JBPM Reference Guide
for JBoss Developers
Edition 5.3.1
Abstract
Chapter 1. Introduction
Note
Note
1.1. Overview
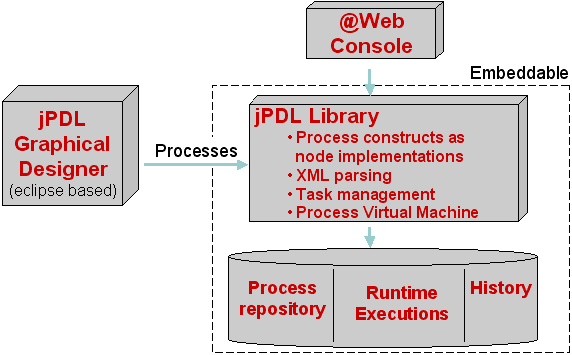
Figure 1.1. Overview of the jPDL components
1.2. The jPDL Suite
- config
- database
- deploy
- designer
- examples
- lib
- src
- The jBPM Web Console
- This is packaged as a web archive. Both process participants and jBPM administrators can use this console.
- The jBPM Tables
- These are contained in the default Hypersonic database. (It already contains a process.)
- An Example Process
- One example process is already deployed to the jBPM database.
- Identity Component
- The identity component libraries are part of the Console Web Application. It owns those tables found in the database which have the
JBPM_ID_prefix.
1.3. The jPDL Graphical Process Designer
1.4. The jBPM Console Web Application
1.5. The jBPM Core Library
Enterprise Java Bean or a web service.
Enterprise Java Bean. Do this if there is a need to create a clustered deployment or provide scalability for extremely high throughput. (The stateless session Enterprise Java Bean adheres to the J2EE 1.3 specifications, mearning that it can be deployed on any application server.)
jbpm-jpdl.jar file are dependent upon third-party libraries such as Hibernate and Dom4J.
1.6. The Identity Component
Note
1.7. The JBoss jBPM Job Executor
TimerService might be used for this purpose; the Job Executor is best used in a "standard" environment.)
jbpm-jpdl library. It can only be deployed in one of the following two scenarios:
- if the
JbpmThreadsServlethas been configured to start the Job Executor. - if a separate Java Virtual Machine has been started so that the Job Executor thread can be run from within it
1.8. Conclusion
Chapter 2. Tutorial
src/java.examples sub-directory).
Note
2.1. "Hello World" Example
Hello World process definition has three of these nodes. (It is best to learn how the pieces fit together by studying this simple process without using the Designer Tool.) The following diagram presents a graphical representation of the Hello World process:
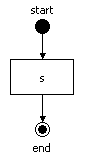
Figure 2.1. The Hello World Process Graph
public void testHelloWorldProcess() {
  // This method shows a process definition and one execution
  // of the process definition.  The process definition has
  // 3 nodes: an unnamed start-state, a state 's' and an
  // end-state named 'end'.
  // The next line parses a piece of xml text into a
  // ProcessDefinition.  A ProcessDefinition is the formal
  // description of a process represented as a java object.
  ProcessDefinition processDefinition = ProcessDefinition.parseXmlString(
      "<process-definition>" +
      "  <start-state>" +
      "    <transition to='s' />" +
      "  </start-state>" +
      "  <state name='s'>" +
      "    <transition to='end' />" +
      "  </state>" +
      "  <end-state name='end' />" +
      "</process-definition>"
  );

    // The next line creates one execution of the process definition.
    // After construction, the process execution has one main path
    // of execution (=the root token) that is positioned in the
    // start-state.
    ProcessInstance processInstance =
      new ProcessInstance(processDefinition);

    // After construction, the process execution has one main path
    // of execution (=the root token).
    Token token = processInstance.getRootToken();

    // Also after construction, the main path of execution is positioned
    // in the start-state of the process definition.
    assertSame(processDefinition.getStartState(), token.getNode());

    // Let's start the process execution, leaving the start-state
    // over its default transition.
    token.signal();
    // The signal method will block until the process execution
    // enters a wait state.

    // The process execution will have entered the first wait state
    // in state 's'. So the main path of execution is now
    // positioned in state 's'
    assertSame(processDefinition.getNode("s"), token.getNode());

    // Let's send another signal.  This will resume execution by
    // leaving the state 's' over its default transition.
    token.signal();
    // Now the signal method returned because the process instance
    // has arrived in the end-state.

    assertSame(processDefinition.getNode("end"), token.getNode());
}
2.2. Database Example
wait state. The next example demonstrates this ability, storing a process instance in the jBPM database.
methods for different pieces of user code. For instance, a piece of user code in a web application starts a process and "persists" the execution in the database. Later, a message-driven bean loads that process instance and resumes the execution of it.
methods are created for different pieces of user code. For instance, a piece of code in a web application starts a process and "persists" the execution in the database. Later, a message-driven bean loads the process instance and resumes executing it.
Note
public class HelloWorldDbTest extends TestCase {

  static JbpmConfiguration jbpmConfiguration = null;

  static {
    // An example configuration file such as this can be found in
    // 'src/config.files'.  Typically the configuration information
    // is in the resource file 'jbpm.cfg.xml', but here we pass in
    // the configuration information as an XML string.

    // First we create a JbpmConfiguration statically.  One
    // JbpmConfiguration can be used for all threads in the system,
    // that is why we can safely make it static.

    jbpmConfiguration = JbpmConfiguration.parseXmlString(
      "<jbpm-configuration>" +

      // A jbpm-context mechanism separates the jbpm core
      // engine from the services that jbpm uses from
      // the environment.

      "<jbpm-context>"+
      "<service name='persistence' "+
      " factory='org.jbpm.persistence.db.DbPersistenceServiceFactory' />" +
      "</jbpm-context>"+

      // Also all the resource files that are used by jbpm are
      // referenced from the jbpm.cfg.xml

      "<string name='resource.hibernate.cfg.xml' " +
      "  value='hibernate.cfg.xml' />" +
      "<string name='resource.business.calendar' " +
      "  value='org/jbpm/calendar/jbpm.business.calendar.properties' />" +
      "<string name='resource.default.modules' " +
      "  value='org/jbpm/graph/def/jbpm.default.modules.properties' />" +
      "<string name='resource.converter' " +
      "  value='org/jbpm/db/hibernate/jbpm.converter.properties' />" +
      "<string name='resource.action.types' " +
      "  value='org/jbpm/graph/action/action.types.xml' />" +
      "<string name='resource.node.types' " +
      "  value='org/jbpm/graph/node/node.types.xml' />" +
      "<string name='resource.varmapping' " +
      "  value='org/jbpm/context/exe/jbpm.varmapping.xml' />" +
      "</jbpm-configuration>"
    );
  }

  public void setUp() {
    jbpmConfiguration.createSchema();
  }

  public void tearDown() {
    jbpmConfiguration.dropSchema();
  }

  public void testSimplePersistence() {
    // Between the 3 method calls below, all data is passed via the
    // database.  Here, in this unit test, these 3 methods are executed
    // right after each other because we want to test a complete process
    // scenario.  But in reality, these methods represent different
    // requests to a server.

    // Since we start with a clean, empty in-memory database, we have to
    // deploy the process first.  In reality, this is done once by the
    // process developer.
    deployProcessDefinition();

    // Suppose we want to start a process instance (=process execution)
    // when a user submits a form in a web application...
    processInstanceIsCreatedWhenUserSubmitsWebappForm();

    // Then, later, upon the arrival of an asynchronous message the
    // execution must continue.
    theProcessInstanceContinuesWhenAnAsyncMessageIsReceived();
  }

  public void deployProcessDefinition() {
    // This test shows a process definition and one execution
    // of the process definition.  The process definition has
    // 3 nodes: an unnamed start-state, a state 's' and an
    // end-state named 'end'.
    ProcessDefinition processDefinition =
        ProcessDefinition.parseXmlString(
      "<process-definition name='hello world'>" +
      "  <start-state name='start'>" +
      "    <transition to='s' />" +
      "  </start-state>" +
      "  <state name='s'>" +
      "    <transition to='end' />" +
      "  </state>" +
      "  <end-state name='end' />" +
      "</process-definition>"
    );

    //Lookup the pojo persistence context-builder that is configured above
    JbpmContext jbpmContext = jbpmConfiguration.createJbpmContext();
    try {
      // Deploy the process definition in the database
      jbpmContext.deployProcessDefinition(processDefinition);

    } finally {
      // Tear down the pojo persistence context.
      // This includes flush the SQL for inserting the process definition
      // to the database.
      jbpmContext.close();
    }
  }

  public void processInstanceIsCreatedWhenUserSubmitsWebappForm() {
    // The code in this method could be inside a struts-action
    // or a JSF managed bean.

    //Lookup the pojo persistence context-builder that is configured above
    JbpmContext jbpmContext = jbpmConfiguration.createJbpmContext();
    try {

      GraphSession graphSession = jbpmContext.getGraphSession();

      ProcessDefinition processDefinition =
          graphSession.findLatestProcessDefinition("hello world");

      //With the processDefinition that we retrieved from the database, we
      //can create an execution of the process definition just like in the
      //hello world example (which was without persistence).
      ProcessInstance processInstance =
          new ProcessInstance(processDefinition);

      Token token = processInstance.getRootToken();
      assertEquals("start", token.getNode().getName());
      // Let's start the process execution
      token.signal();
      // Now the process is in the state 's'.
      assertEquals("s", token.getNode().getName());

      // Now the processInstance is saved in the database.  So the
      // current state of the execution of the process is stored in the
      // database.
      jbpmContext.save(processInstance);
      // The method below will get the process instance back out
      // of the database and resume execution by providing another
      // external signal.

    } finally {
      // Tear down the pojo persistence context.
      jbpmContext.close();
    }
  }

  public void theProcessInstanceContinuesWhenAnAsyncMessageIsReceived() {
  //The code in this method could be the content of a message driven bean.

    // Lookup the pojo persistence context-builder that is configured above
    JbpmContext jbpmContext = jbpmConfiguration.createJbpmContext();
    try {

      GraphSession graphSession = jbpmContext.getGraphSession();
      // First, we need to get the process instance back out of the
      // database.  There are several options to know what process
      // instance we are dealing  with here.  The easiest in this simple
      // test case is just to look for the full list of process instances.
      // That should give us only one result.  So let's look up the
      // process definition.

      ProcessDefinition processDefinition =
          graphSession.findLatestProcessDefinition("hello world");

      //Now search for all process instances of this process definition.
      List processInstances =
          graphSession.findProcessInstances(processDefinition.getId());

      // Because we know that in the context of this unit test, there is
      // only one execution.  In real life, the processInstanceId can be
      // extracted from the content of the message that arrived or from
      // the user making a choice.
      ProcessInstance processInstance =
          (ProcessInstance) processInstances.get(0);

      // Now we can continue the execution.  Note that the processInstance
      // delegates signals to the main path of execution (=the root token).
      processInstance.signal();

      // After this signal, we know the process execution should have
      // arrived in the end-state.
      assertTrue(processInstance.hasEnded());

      // Now we can update the state of the execution in the database
      jbpmContext.save(processInstance);

    } finally {
      // Tear down the pojo persistence context.
      jbpmContext.close();
    }
  }
}
2.3. Contextual Example: Process Variables
java.util.Map classes, in that they map variable names to values, the latter being Java objects. (The process variables are "persisted" as part of the process instance.)
Note
Note
// This example also starts from the hello world process.
// This time even without modification.
ProcessDefinition processDefinition = ProcessDefinition.parseXmlString(
  "<process-definition>" +
  "  <start-state>" +
  "    <transition to='s' />" +
  "  </start-state>" +
  "  <state name='s'>" +
  "    <transition to='end' />" +
  "  </state>" +
  "  <end-state name='end' />" +
  "</process-definition>"
);

ProcessInstance processInstance =
  new ProcessInstance(processDefinition);

// Fetch the context instance from the process instance
// for working with the process variables.
ContextInstance contextInstance =
  processInstance.getContextInstance();

// Before the process has left the start-state,
// we are going to set some process variables in the
// context of the process instance.
contextInstance.setVariable("amount", new Integer(500));
contextInstance.setVariable("reason", "i met my deadline");

// From now on, these variables are associated with the
// process instance.  The process variables are now accessible
// by user code via the API shown here, but also in the actions
// and node implementations.  The process variables are also
// stored into the database as a part of the process instance.

processInstance.signal();

// The variables are accessible via the contextInstance.

assertEquals(new Integer(500),
             contextInstance.getVariable("amount"));
assertEquals("i met my deadline",
             contextInstance.getVariable("reason"));
2.4. Task Assignment Example
AssignmentHandler and use it to include the calculation of actors for tasks.
public void testTaskAssignment() {
  // The process shown below is based on the hello world process.
  // The state node is replaced by a task-node.  The task-node
  // is a node in JPDL that represents a wait state and generates
  // task(s) to be completed before the process can continue to
  // execute.
  ProcessDefinition processDefinition = ProcessDefinition.parseXmlString(
    "<process-definition name='the baby process'>" +
    "  <start-state>" +
    "    <transition name='baby cries' to='t' />" +
    "  </start-state>" +
    "  <task-node name='t'>" +
    "    <task name='change nappy'>" +
    "      <assignment" +
    "       class='org.jbpm.tutorial.taskmgmt.NappyAssignmentHandler' />" +
    "    </task>" +
    "    <transition to='end' />" +
    "  </task-node>" +
    "  <end-state name='end' />" +
    "</process-definition>"
  );

  // Create an execution of the process definition.
  ProcessInstance processInstance =
      new ProcessInstance(processDefinition);
  Token token = processInstance.getRootToken();

  // Let's start the process execution, leaving the start-state
  // over its default transition.
  token.signal();
  // The signal method will block until the process execution
  // enters a wait state.   In this case, that is the task-node.
  assertSame(processDefinition.getNode("t"), token.getNode());

  // When execution arrived in the task-node, a task 'change nappy'
  // was created and the NappyAssignmentHandler was called to determine
  // to whom the task should be assigned.  The NappyAssignmentHandler
  // returned 'papa'.

  // In a real environment, the tasks would be fetched from the
  // database with the methods in the org.jbpm.db.TaskMgmtSession.
  // Since we don't want to include the persistence complexity in
  // this example, we just take the first task-instance of this
  // process instance (we know there is only one in this test
  // scenario).
  TaskInstance taskInstance = (TaskInstance)
      processInstance
        .getTaskMgmtInstance()
        .getTaskInstances()
        .iterator().next();

  // Now, we check if the taskInstance was actually assigned to 'papa'.
  assertEquals("papa", taskInstance.getActorId() );

  // Now we suppose that 'papa' has done his duties and mark the task
  // as done.
  taskInstance.end();
  // Since this was the last (only) task to do, the completion of this
  // task triggered the continuation of the process instance execution.

  assertSame(processDefinition.getNode("end"), token.getNode());
}
2.5. Example of a Custom Action
MyActionHandler. It is not particularly impressive of itself: it merely sets the Boolean variable isExecuted to true. Note that this variable is static so one can access it from within the action handler (and from the action itself) to verify its value.
Note
// MyActionHandler represents a class that could execute
// some user code during the execution of a jBPM process.
public class MyActionHandler implements ActionHandler {

  // Before each test (in the setUp), the isExecuted member
  // will be set to false.
  public static boolean isExecuted = false;

  // The action will set the isExecuted to true so the
  // unit test will be able to show when the action
  // is being executed.
  public void execute(ExecutionContext executionContext) {
    isExecuted = true;
  }
}
Important
MyActionHandler.isExecuted to false.
  // Each test will start with setting the static isExecuted
  // member of MyActionHandler to false.
  public void setUp() {
    MyActionHandler.isExecuted = false;
}public void testTransitionAction() {
// The next process is a variant of the hello world process.
// We have added an action on the transition from state 's'
// to the end-state. The purpose of this test is to show
// how easy it is to integrate Java code in a jBPM process.
ProcessDefinition processDefinition = ProcessDefinition.parseXmlString(
"<process-definition>" +
" <start-state>" +
" <transition to='s' />" +
" </start-state>" +
" <state name='s'>" +
" <transition to='end'>" +
" <action class='org.jbpm.tutorial.action.MyActionHandler' />" +
" </transition>" +
" </state>" +
" <end-state name='end' />" +
"</process-definition>"
);
// Let's start a new execution for the process definition.
ProcessInstance processInstance =
new ProcessInstance(processDefinition);
// The next signal will cause the execution to leave the start
// state and enter the state 's'
processInstance.signal();
// Here we show that MyActionHandler was not yet executed.
assertFalse(MyActionHandler.isExecuted);
// ... and that the main path of execution is positioned in
// the state 's'
assertSame(processDefinition.getNode("s"),
processInstance.getRootToken().getNode());
// The next signal will trigger the execution of the root
// token. The token will take the transition with the
// action and the action will be executed during the
// call to the signal method.
processInstance.signal();
// Here we can see that MyActionHandler was executed during
// the call to the signal method.
assertTrue(MyActionHandler.isExecuted);
}enter-node and leave-node events. Note that a node has more than one event type. This is in contrast to a transition, which has only one event. Hence, when placing actions on a node, always put them in an event element.
ProcessDefinition processDefinition = ProcessDefinition.parseXmlString(
  "<process-definition>" +
  "  <start-state>" +
  "    <transition to='s' />" +
  "  </start-state>" +
  "  <state name='s'>" +
  "    <event type='node-enter'>" +
  "      <action class='org.jbpm.tutorial.action.MyActionHandler' />" +
  "    </event>" +
  "    <event type='node-leave'>" +
  "      <action class='org.jbpm.tutorial.action.MyActionHandler' />" +
  "    </event>" +
  "    <transition to='end'/>" +
  "  </state>" +
  "  <end-state name='end' />" +
  "</process-definition>"
);

ProcessInstance processInstance =
  new ProcessInstance(processDefinition);

assertFalse(MyActionHandler.isExecuted);
// The next signal will cause the execution to leave the start
// state and enter the state 's'.  So the state 's' is entered
// and hence the action is executed.
processInstance.signal();
assertTrue(MyActionHandler.isExecuted);

// Let's reset the MyActionHandler.isExecuted
MyActionHandler.isExecuted = false;

// The next signal will trigger execution to leave the
// state 's'.  So the action will be executed again.
processInstance.signal();
// Voila.
assertTrue(MyActionHandler.isExecuted);
Chapter 3. Configuration
jbpm.cfg.xml configuration file into the root of the classpath. If the file is not available for use as a resource, the default minimal configuration will be used instead. This minimal configuration is included in the jBPM library (org/jbpm/default.jbpm.cfg.xml.) If a jBPM configuration file is provided, the values it contains will be used as the defaults. Hence, one only needs to specify the values that are to be different from those in the default configuration file.
org.jbpm.JbpmConfiguration. Obtain it by making use of the singleton instance method (JbpmConfiguration.getInstance().)
Note
JbpmConfiguration.parseXxxx methods to load a configuration from another source.
static JbpmConfinguration jbpmConfiguration = JbpmConfinguration.parseResource("my.jbpm.cfg.xml");
JbpmConfiguration is "thread safe" and, hence, can be kept in a static member.
JbpmConfiguration as a factory for JbpmContext objects. A JbpmContext will usually represent one transaction. They make services available inside context blocks which looks like this:
JbpmContext jbpmContext = jbpmConfiguration.createJbpmContext();
try {
  // This is what we call a context block.
  // Here you can perform workflow operations

} finally {
  jbpmContext.close();
}JbpmContext makes both a set of services and the configuration settings available to the Business Process Manager. The services are configured by the values in the jbpm.cfg.xml file. They make it possible for the jBPM to run in any Java environment, using whatever services are available within said environment.
JbpmContext:
<jbpm-configuration>

<jbpm-context>
    <service name='persistence'
      factory='org.jbpm.persistence.db.DbPersistenceServiceFactory' />
    <service name='message'
      factory='org.jbpm.msg.db.DbMessageServiceFactory' />
    <service name='scheduler'
      factory='org.jbpm.scheduler.db.DbSchedulerServiceFactory' />
    <service name='logging'
      factory='org.jbpm.logging.db.DbLoggingServiceFactory' />
    <service name='authentication'
      factory=
'org.jbpm.security.authentication.DefaultAuthenticationServiceFactory' />
</jbpm-context>

<!-- configuration resource files pointing to default
     configuration files in jbpm-{version}.jar -->
<string name='resource.hibernate.cfg.xml' value='hibernate.cfg.xml' />

  <!-- <string name='resource.hibernate.properties'
       value='hibernate.properties' /> -->
  <string name='resource.business.calendar'
    value='org/jbpm/calendar/jbpm.business.calendar.properties' />
  <string name='resource.default.modules'
    value='org/jbpm/graph/def/jbpm.default.modules.properties' />
  <string name='resource.converter'
    value='org/jbpm/db/hibernate/jbpm.converter.properties' />
  <string name='resource.action.types'
    value='org/jbpm/graph/action/action.types.xml' />
  <string name='resource.node.types'
    value='org/jbpm/graph/node/node.types.xml' />
  <string name='resource.parsers'
    value='org/jbpm/jpdl/par/jbpm.parsers.xml' />
  <string name='resource.varmapping'
    value='org/jbpm/context/exe/jbpm.varmapping.xml' />
  <string name='resource.mail.templates'
    value='jbpm.mail.templates.xml' />

  <int name='jbpm.byte.block.size' value="1024" singleton="true" />
  <bean name='jbpm.task.instance.factory'
    class='org.jbpm.taskmgmt.impl.DefaultTaskInstanceFactoryImpl'
    singleton='true' />

  <bean name='jbpm.variable.resolver'
    class='org.jbpm.jpdl.el.impl.JbpmVariableResolver'
    singleton='true' />

    <string name='jbpm.mail.smtp.host' value='localhost' />

    <bean name='jbpm.mail.address.resolver'
        class='org.jbpm.identity.mail.IdentityAddressResolver'
        singleton='true' />
    <string name='jbpm.mail.from.address' value='jbpm@noreply' />

    <bean name='jbpm.job.executor'
        class='org.jbpm.job.executor.JobExecutor'>
      <field name='jbpmConfiguration'><ref bean='jbpmConfiguration' />
      </field>
      <field name='name'><string value='JbpmJobExecutor' /></field>
      <field name='nbrOfThreads'><int value='1' /></field>
      <field name='idleInterval'><int value='60000' /></field>
      <field name='retryInterval'><int value='4000' /></field>
      <!-- 1 hour -->
      <field name='maxIdleInterval'><int value='3600000' /></field>
      <field name='historyMaxSize'><int value='20' /></field>
      <!-- 10 minutes -->
      <field name='maxLockTime'><int value='600000' /></field>
      <!-- 1 minute -->
      <field name='lockMonitorInterval'><int value='60000' /></field>
       <!-- 5 seconds -->
      <field name='lockBufferTime'><int value='5000' /></field>
    </bean>
</jbpm-configuration>
- a set of service implementations which configure the
JbpmContext. (The possible configuration options are detailed in the chapters that cover specific service implementations.) - all of the mappings linking references to configuration resources. If one wishes to customize one of the configuration files, update these mappings. To do so, always back up the default configuration file (
jbpm-3.x.jar) to another location on the classpath first. Then, update the reference in this file, pointing it to the customized version that the jBPM is to use. - miscellaneous configurations for use by the jBPM. (These are described in the chapters that cover the specific topics in question.)
JbpmContext contains convenience methods for most of the common process operations. They are demonstrated in this code sample:
public void deployProcessDefinition(ProcessDefinition processDefinition)
public List getTaskList()
public List getTaskList(String actorId)
public List getGroupTaskList(List actorIds)
public TaskInstance loadTaskInstance(long taskInstanceId)
public TaskInstance loadTaskInstanceForUpdate(long taskInstanceId)
public Token loadToken(long tokenId)
public Token loadTokenForUpdate(long tokenId)
public ProcessInstance loadProcessInstance(long processInstanceId)
public ProcessInstance loadProcessInstanceForUpdate(long processInstanceId)
public ProcessInstance newProcessInstance(String processDefinitionName)
public void save(ProcessInstance processInstance)
public void save(Token token)
public void save(TaskInstance taskInstance)
public void setRollbackOnly()
Note
XxxForUpdate methods are designed to register the loaded object for "auto-save."
jbpm-contexts. To do so, make sure that each of them is given a unique name attribute. (Retrieve named contexts by using JbpmConfiguration.createContext(String name);.)
JbpmContext.getServices().getService(String name).
Note
factories as elements instead of attributes. This is necessary when injecting some configuration information into factory objects.
object factory.
3.1. Customizing Factories
Warning
StateObjectStateException exceptions and generates a stack trace. In order to remove the latter, set org.hibernate.event.def.AbstractFlushingEventListener to FATAL. (Alternatively, if using log4j, set the following line in the configuration: for that: log4j.logger.org.hibernate.event.def.AbstractFlushingEventListener=FATAL
<service name='persistence'
    factory='org.jbpm.persistence.db.DbPersistenceServiceFactory' />
Important
<service name="persistence">
    <factory>
        <bean class="org.jbpm.persistence.db.DbPersistenceServiceFactory">
            <field name="dataSourceJndiName">
                <string value="java:/myDataSource"/>
            </field>
            <field name="isCurrentSessionEnabled"><true /></field>
            <field name="isTransactionEnabled"><false /></field>
        </bean>
    </factory>
</service>
3.2. Configuration Properties
- jbpm.byte.block.size
- File attachments and binary variables are stored in the database in the form of a list of fixed-sized, binary objects. (The aim of this is to improve portability amongst different databases. It also allows one to embed the jBPM more easily.) This parameter controls the size of those fixed-length chunks.
- jbpm.task.instance.factory
- To customize the way in which task instances are created, specify a fully-qualified classname against this property. (This is often necessary when one intends to customize, and add new properties to, the
TaskInstancebean.) Ensure that the specified classname implements theorg.jbpm.taskmgmt.TaskInstanceFactoryinterface. (Refer to Section 8.10, “ Customizing Task Instances ” for more information.) - jbpm.variable.resolver
- Use this to customize the way in which jBPM looks for the first term in "JSF"-like expressions.
- jbpm.class.loader
- Use this property to load jBPM classes.
- jbpm.sub.process.async
- Use this property to allow for asynchronous signaling of sub-processes.
- jbpm.job.retries
- This configuration determines when a failed job is retired. If you examine the configuration file, you can set the entry so that it makes a specified number of attempts to process such a job before retiring it.
- jbpm.mail.from.address
- This property displays where a job has come from. The default is jbpm@noreply.
3.3. Other Configuration Files
hibernate.cfg.xml- This contains references to, and configuration details for, the Hibernate mapping resource files.To change the
hibernate.cfg.xmlfile used by jBPM, set the following property in thejbpm.cfg.xmlfile:<string name="resource.hibernate.cfg.xml" value="new.hibernate.cfg.xml"/>The file jbpm.cfg.xml file is located in ${soa.home}/jboss-as/server/${server.config}/jbpm.esb org/jbpm/db/hibernate.queries.hbm.xml- This file contains those Hibernate queries to be used in the jBPM sessions (
org.jbpm.db.*Session.) org/jbpm/graph/node/node.types.xml- This file is used to map XML node elements to
Nodeimplementation classes. org/jbpm/graph/action/action.types.xml- This file is used to map XML action elements to
Actionimplementation classes. org/jbpm/calendar/jbpm.business.calendar.properties- This contains the definitions of "business hours" and "free time."
org/jbpm/context/exe/jbpm.varmapping.xml- This specifies the way in which the process variables values (Java objects) are converted to variable instances for storage in the jBPM database.
org/jbpm/db/hibernate/jbpm.converter.properties- This specifies the
id-to-classnamemappings. The ids are stored in the database. Theorg.jbpm.db.hibernate.ConverterEnumTypeclass is used to map the identifiers to thesingletonobjects. org/jbpm/graph/def/jbpm.default.modules.properties- This specifies which modules are to be added to a new
ProcessDefinitionby default. org/jbpm/jpdl/par/jbpm.parsers.xml- This specifies the phases of process archive parsing.
3.4. Logging Optimistic Concurrency Exceptions
org.hibernate.StateObjectStateException exceptions. If and when this happens, Hibernate will log the exceptions with a simple message,
optimistic locking
            failed
.
StateObjectStateException with a stack trace. To remove these stack traces, set the org.hibernate.event.def.AbstractFlushingEventListener class to FATAL. Do so in log4j by using the following configuration:
log4j.logger.org.hibernate.event.def.AbstractFlushingEventListener=FATAL
3.5. Object Factory
<beans>
    <bean name="task" class="org.jbpm.taskmgmt.exe.TaskInstance"/>
    <string name="greeting">hello world</string>
    <int name="answer">42</int>
    <boolean name="javaisold">true</boolean>
    <float name="percentage">10.2</float>
    <double name="salary">100000000.32</double>
    <char name="java">j</char>
    <null name="dusttodust" />
</beans>
ObjectFactory of = ObjectFactory.parseXmlFromAbove();
assertEquals(TaskInstance.class, of.getNewObject("task").getClass());
assertEquals("hello world", of.getNewObject("greeting"));
assertEquals(new Integer(42), of.getNewObject("answer"));
assertEquals(Boolean.TRUE, of.getNewObject("javaisold"));
assertEquals(new Float(10.2), of.getNewObject("percentage"));
assertEquals(new Double(100000000.32), of.getNewObject("salary"));
assertEquals(new Character('j'), of.getNewObject("java"));
assertNull(of.getNewObject("dusttodust"));]]><beans>
<list name="numbers">
<string>one</string>
<string>two</string>
<string>three</string>
</list>
</beans><beans>
<map name="numbers">
<entry>
<key><int>1</int></key>
<value><string>one</string></value>
</entry>
<entry>
<key><int>2</int></key>
<value><string>two</string></value>
</entry>
<entry>
<key><int>3</int></key>
<value><string>three</string></value>
</entry>
</map>
</beans>setter methods to configure beans:
<beans>
    <bean name="task" class="org.jbpm.taskmgmt.exe.TaskInstance" >
        <field name="name"><string>do dishes</string></field>
        <property name="actorId"><string>theotherguy</string></property>
    </bean>
</beans><beans>
<bean name="a" class="org.jbpm.A" />
<ref name="b" bean="a" />
</beans><beans>
<bean name="task" class="org.jbpm.taskmgmt.exe.TaskInstance" >
<constructor>
<parameter class="java.lang.String">
<string>do dishes</string>
</parameter>
<parameter class="java.lang.String">
<string>theotherguy</string>
</parameter>
</constructor>
</bean>
</beans>factory method:
<beans>
    <bean name="taskFactory"
        class="org.jbpm.UnexistingTaskInstanceFactory"
        singleton="true"/>

    <bean name="task" class="org.jbpm.taskmgmt.exe.TaskInstance" >
        <constructor factory="taskFactory" method="createTask" >
            <parameter class="java.lang.String">
                <string>do dishes</string>
            </parameter>
            <parameter class="java.lang.String">
                <string>theotherguy</string>
            </parameter>
        </constructor>
    </bean>
</beans>static factory method on a class:
<beans>
    <bean name="task" class="org.jbpm.taskmgmt.exe.TaskInstance" >
        <constructor
            factory-class="org.jbpm.UnexistingTaskInstanceFactory"
            method="createTask" >
            <parameter class="java.lang.String">
                <string>do dishes</string>
            </parameter>
            <parameter class="java.lang.String">
                <string>theotherguy</string>
            </parameter>
        </constructor>
    </bean>
</beans>singleton="true" to mark each named object as a singleton. Doing so will ensure that a given object factory always returns the same object for each request.
Note
Singletons cannot be shared between different object factories.
singleton feature causes differentiation between the methods named getObject and getNewObject. Normally, one should use getNewObject as this clears the object factory's object cache before the new object graph is constructed.
object factory's cache. This allows references to one object to be shared. Bear in mind that the singleton object cache is different from the plain object cache. The singleton cache is never cleared, whilst the plain one is cleared every time a getNewObject method is started.
Chapter 4. Persistence
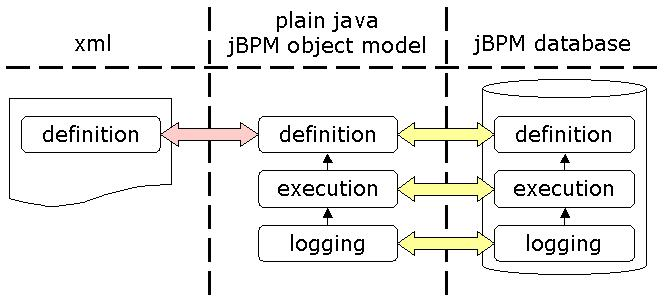
Figure 4.1. The Transformations and Different Forms
Note
Note
4.1. The Persistence Application Programming Interface
4.1.1. Relationship with the Configuration Framework
convenience persistence methods on the JbpmContext, allowing the jBPM context block to call persistence API operations.
JbpmContext jbpmContext = jbpmConfiguration.createJbpmContext();
try {
  // Invoke persistence operations here
} finally {
  jbpmContext.close();
}
4.1.2. Convenience Methods on JbpmContext
- process. deployment
- new process execution commencement
- process execution continuation
deployprocess ant task. However, to do it directly from Java, use this code:
JbpmContext jbpmContext = jbpmConfiguration.createJbpmContext();
try {
  ProcessDefinition processDefinition = ...;
  jbpmContext.deployProcessDefinition(processDefinition);
} finally {
  jbpmContext.close();
}JbpmContext jbpmContext = jbpmConfiguration.createJbpmContext();
try {
String processName = ...;
ProcessInstance processInstance =
jbpmContext.newProcessInstance(processName);
} finally {
jbpmContext.close();
}taskInstance from the database and invoke some methods on the POJO (Plain Old Java Object) jBPM objects. Afterwards, save the updates made to the processInstance into the database.
JbpmContext jbpmContext = jbpmConfiguration.createJbpmContext();
try {
	long processInstanceId = ...;
	ProcessInstance processInstance =
		jbpmContext.loadProcessInstance(processInstanceId);
		processInstance.signal();
		jbpmContext.save(processInstance);
} finally {
	jbpmContext.close();
}jbpmContext.save method if the ForUpdate methods are used in the JbpmContext class. This is because the save process will run automatically when the jbpmContext class is closed. For example, one may wish to inform the jBPM that a taskInstance has completed. This can cause an execution to continue, so the processInstance related to the taskInstance must be saved. The most convenient way to do this is by using the loadTaskInstanceForUpdate method:
JbpmContext jbpmContext = jbpmConfiguration.createJbpmContext();
try {
	long taskInstanceId = ...;
	TaskInstance taskInstance =
		jbpmContext.loadTaskInstanceForUpdate(taskInstanceId);
	taskInstance.end();
	}
finally {
		jbpmContext.close();
}
Important
JbpmConfiguration maintains a set of ServiceFactories. They are configured via the jbpm.cfg.xml file and instantiated as they are needed.
DbPersistenceServiceFactory is only instantiated the first time that it is needed. After that, ServiceFactorys are maintained in the JbpmConfiguration.
DbPersistenceServiceFactory manages a Hibernate ServiceFactory but this is only instantiated the first time that it is requested.
isTransactionEnabledsessionFactoryJndiNamedataSourceJndiNameisCurrentSessionEnabled
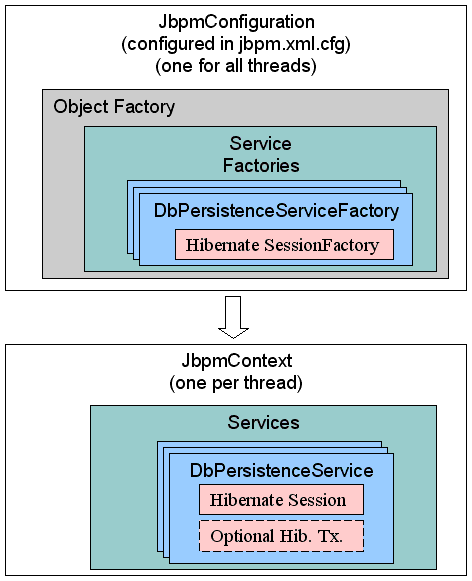
Figure 4.2. The Persistence-Related Classes
jbpmConfiguration.createJbpmContext() class is invoked, only the JbpmContext is created. No further persistence-related initializations occur at this time. The JbpmContext manages a DbPersistenceService class, which is instantiated when it is first requested. The DbPersistenceService class manages the Hibernate session, which is also only instantiated the first time it is required. (In other words, a Hibernate session will only be opened when the first operation that requires persistence is invoked.)
4.2. Configuring the Persistence Service
4.2.1. The DbPersistenceServiceFactory
DbPersistenceServiceFactory class has three more configuration properties: isTransactionEnabled, sessionFactoryJndiName, and dataSourceJndiName. To specify any of these properties in the jbpm.cfg.xml file, specify the Service Factory as a bean within the factory element. This sample code demonstrates how to do so:
<jbpm-context>
  <service name="persistence">
    <factory>
      <bean class="org.jbpm.persistence.db.DbPersistenceServiceFactory">
        <field name="isTransactionEnabled"><false /></field>
        <field name="sessionFactoryJndiName">
          <string value="java:/myHibSessFactJndiName" />
        </field>
        <field name="dataSourceJndiName">
          <string value="java:/myDataSourceJndiName" />
        </field>
      </bean>
    </factory>
  </service>
...
</jbpm-context>
Important
isTransactionEnabled- By default, jBPM will begin a Hibernate transaction when the session is retrieved for the first time and, if the
jbpmContextis closed, the Hibernate transaction will be ended. The transaction is then committed or rolled back depending on whether or notjbpmContext.setRollbackOnlywas called. (The isRollbackOnly property is maintained in theTxService.) To disable transactions and prohibit jBPM from managing them with Hibernate, set the isTransactionEnabled property value tofalse. (This property only controls the behaviour of thejbpmContext; theDbPersistenceService.beginTransaction()can still be called directly directly with the application programming interface, which ignores the isTransactionEnabled setting.) To learn more about transactions, please study Section 4.2.2, “ Hibernate Transactions ”. sessionFactoryJndiName- By default, this is
null, which means that the session factory will not be fetched from JNDI. If it is set and a session factory is needed in order to create a Hibernate session, it will be fetched from JNDI. dataSourceJndiName- By default, this is
null, resulting in creation of JDBC connections being delegated to Hibernate. By specifying a data-source, one makes the Business Process Manager fetch a JDBC connection from the data-source and provide it to Hibernate whilst opening a new session.
4.2.1.1. The Hibernate Session Factory
DbPersistenceServiceFactory uses the hibernate.cfg.xml file in the root of the classpath to create the Hibernate session factory. Note that the Hibernate configuration file resource is mapped in jbpm.hibernate.cfg.xml. Customise it by reconfiguring jbpm.cfg.xml.
<jbpm-configuration>
    <!-- configuration resource files pointing to default
         configuration files in jbpm-{version}.jar -->
    <string name='resource.hibernate.cfg.xml'
        value='hibernate.cfg.xml' />
    <!-- <string name='resource.hibernate.properties'
        value='hibernate.properties' /> -->
</jbpm-configuration>
Important
hibernate.cfg.xml. Instead of updating the hibernate.cfg.xml to point to the database, use hibernate.properties to handle jBPM upgrades. The hibernate.cfg.xml file can then be copied without the need to reapply the changes.
4.2.1.2. Configuring a C3PO Connection Pool
4.2.1.3. Configuring an ehCache Provider
hibernate.cfg.xml file that ships with jBPM includes the following line:
<property name="hibernate.cache.provider_class">
    org.hibernate.cache.HashtableCacheProvider
</property>Warning
HashtableCacheProvider in a production environment.
ehcache instead of the HashtableCacheProvider, simply remove the relevant line from the classpath and substitute ehcache.jar instead. Note that one might have to search for the right ehcache library version that is compatible with one's environment.
4.2.2. Hibernate Transactions
jbpmContext. The transaction will be committed right before the Hibernate session is closed. That will happen inside the jbpmContext.close().
jbpmContext.setRollbackOnly() to mark a transaction for rollback. In doing so, the transaction will be rolled back imediately before the session is closed inside the jbpmContext.close() method.
false, as explained in more detail in Section 4.2.1, “The DbPersistenceServiceFactory”.
4.2.3. JTA Transactions
<jbpm-context>
  <service name="persistence">
    <factory>
      <bean class="org.jbpm.persistence.db.DbPersistenceServiceFactory">
        <field name="isTransactionEnabled"><false /></field>
        <field name="isCurrentSessionEnabled"><true /></field>
        <field name="sessionFactoryJndiName">
          <string value="java:/myHibSessFactJndiName" />
        </field>
      </bean>
    </factory>
  </service>
</jbpm-context>XA datasource.
<hibernate-configuration>
    <session-factory>

        <!-- hibernate dialect -->
        <property name="hibernate.dialect">
            org.hibernate.dialect.HSQLDialect
        </property>

        <!-- DataSource properties (begin) -->
        <property name="hibernate.connection.datasource">
            java:/JbpmDS
        </property>

        <!-- JTA transaction properties (begin) -->
        <property name="hibernate.transaction.factory_class">
            org.hibernate.transaction.JTATransactionFactory
        </property>

        <property name="hibernate.transaction.manager_lookup_class">
            org.hibernate.transaction.JBossTransactionManagerLookup
        </property>

        <property name="jta.UserTransaction">
            java:comp/UserTransaction
        </property>

    </session-factory>
</hibernate-configuration>
Note
XA datasource.
4.2.4. Customizing Queries
hibernate.cfg.xml configuration file:
<hibernate-configuration>
    <!-- hql queries and type defs -->
    <mapping resource="org/jbpm/db/hibernate.queries.hbm.xml" />
</hibernate-configuration>org/jbpm/db/hibernate.queries.hbm.xml in the hibernate.cfg.xml to point to the customized version.
4.2.5. Database Compatibility
4.2.5.1. Isolation Level of the JDBC Connection
READ_COMMITTED.
Warning
READ_UNCOMMITTED, (isolation level zero, the only isolation level supported by Hypersonic), race conditions might occur in the job executor .These might also appear when synchronization of multiple tokens is occurring.
4.2.5.2. Changing the Database
- put the JDBC driver library archive in the classpath.
- update the Hibernate configuration used by jBPM.
- create a schema in the new database.
4.2.5.3. The Database Schema
jbpm.db sub-project contains drivers, instructions and scripts to help the user to start using the database of his or her choice. Refer to the readme.html (found in the root of the jbpm.db project) for more information.
Note
create-drop and the schema will be created automatically the first time the database is used in an application. When the application closes down, the schema will be dropped.
4.2.5.3.1. Programmatic database schema operations
org.jbpm.JbpmConfiguration methods createSchema and dropSchema. Be aware that there is no constraint on invoking these methods other than the privileges of the configured database user.
Note
org.jbpm.db.JbpmSchema:
4.2.5.4. Combining Hibernate Classes
hibernate.cfg.xml file. It is easiest to use the default jBPM hibernate.cfg.xml as a starting point and add references to one's own Hibernate mapping files to customize it.
4.2.5.5. Customizing the jBPM Hibernate Mapping Files
- copy the jBPM Hibernate mapping files from the sources (
src/jbpm-jpdl-sources.jar). - place the copy somewhere on the classpath, (ensuring that it is not the same location as they were in previously.
- update the references to the customized mapping files in
hibernate.cfg.xml
4.2.5.6. Second Level Cache
<cache usage="nonstrict-read-write"/>
nonstrict-read-write. During run-time execution, the process definitions remain static, allowing maximum caching to be achieved. In theory, setting the caching strategy read-only would be even better for run-time execution but, that setting would not permit the deployment of new process definitions.
Chapter 5. Java EE Application Server Facilities
5.1. Enterprise Beans
CommandServiceBean is a stateless session bean that runs Business Process Manager commands by calling its execute method within a separate jBPM context. The available environment entries and customizable resources are summarized in the following table:
| Name | Type | Description |
|---|---|---|
JbpmCfgResource | Environment Entry | This the classpath resource from which the jBPM configuration is read. Optional, defaults to jbpm.cfg.xml. |
ejb/TimerEntityBean | EJB Reference | This is a link to the local entity bean that implements the scheduler service. Required for processes that contain timers. |
jdbc/JbpmDataSource | Resource Manager Reference | This is the logical name of the data source that provides JDBC connections to the jBPM persistence service. Must match the hibernate.connection.datasource property in the Hibernate configuration file. |
jms/JbpmConnectionFactory | Resource Manager Reference | This is the logical name of the factory that provides JMS connections to the jBPM message service. Required for processes that contain asynchronous continuations. |
jms/JobQueue | Message Destination Reference | The jBPM message service sends job messages to this queue. To ensure this is the same queue from which the job listener bean receives messages, the message-destination-link points to a common logical destination, JobQueue. |
jms/CommandQueue | Message Destination Reference | The command listener bean receives messages from this queue. To ensure this is the same queue to which command messages can be sent, the message-destination-link element points to a common logical destination, CommandQueue. |
CommandListenerBean is a message-driven bean that listens to the CommandQueue for command messages. It delegates command execution to the CommandServiceBean.
org.jbpm.Command interface. (The message properties, if any, are ignored.) If the message is not of the expected format, it is forwarded to the DeadLetterQueue and will not be processed any further. The message will also be rejected if the destination reference is absent.
replyTo destination, the command execution result will be wrapped in an object message and sent there.
command connection factory environment reference points to the resource manager being used to supply Java Message Service connections.
JobListenerBean is a message-driven bean that listens to the JbpmJobQueue for job messages, in order to support asynchronous continuations.
Note
long. This property must contain references to a pending Job in the database. The message body, if it exists, is ignored.
CommandListenerBean. It inherits the latter's environmental entries and those resource references that can be customized.
| Name | Type | Description |
|---|---|---|
ejb/LocalCommandServiceBean | EJB Reference | This is a link to the local session bean that executes commands on a separate jBPM context. |
jms/JbpmConnectionFactory | Resource Manager Reference | This is the logical name of the factory that provides Java Message Service connections for producing result messages. Required for command messages that indicate a reply destination. |
jms/DeadLetterQueue | Message Destination Reference | Messages which do not contain a command are sent to the queue referenced here. It is optional. If it is absent, such messages are rejected, which may cause the container to redeliver. |
| - | ||
| Message Destination Reference | Messages which do not contain a command are sent to the queue referenced here. If it is absent, such messages are rejected, which may cause the container to redeliver. |
TimerEntityBean is used by the Enterprise Java Bean timer service for scheduling. When the bean expires, timer execution is delegated to the command service bean.
TimerEntityBean requires access to the Business Process Manager's data source. The Enterprise Java Bean deployment descriptor does not define how an entity bean is to map to a database. (This is left to the container provider.) In the JBoss Application Server, the jbosscmp-jdbc.xml descriptor defines the data source's JNDI name and relational mapping data (such as the table and column names).
Note
java:JbpmDS), as opposed to a resource manager reference (java:comp/env/jdbc/JbpmDataSource).
Note
TimerServiceBean to interact with the Enterprise Java Bean timer service. The session approach had to be abandoned because it caused an unavoidable bottleneck for the cancelation methods. Because session beans have no identity, the timer service was forced to iterate through all the timers to find the ones it had to cancel.
TimerEntityBean, so migration is easy.
| Name | Type | Description |
|---|---|---|
ejb/LocalCommandServiceBean | EJB Reference | This is a link to the local session bean that executes timers on a separate jBPM context. |
5.2. jBPM Enterprise Configuration
jbpm.cfg.xml:
<jbpm-context>
  <service name="persistence"
    factory="org.jbpm.persistence.jta.JtaDbPersistenceServiceFactory" />
  <service name="message"
    factory="org.jbpm.msg.jms.JmsMessageServiceFactory" />
  <service name="scheduler"
    factory="org.jbpm.scheduler.ejbtimer.EntitySchedulerServiceFactory" />
</jbpm-context>JtaDbPersistenceServiceFactory allows the Business Process Manager to participate in JTA transactions. If an existing transaction is underway, the JTA persistence service "clings" to it; otherwise it starts a new transaction. The Business Process Manager's enterprise beans are configured to delegate transaction management to the container. However, a new one will be started automatically if one creates a JbpmContext in an environment in which no transaction is active (such as a web application.) The JTA persistence service factory contains the configurable fields described below.
- isCurrentSessionEnabled
- When this is set to
true, the Business Process Manager will use the "current" Hibernate session associated with the ongoing JTA transaction. This is the default setting. (See http://www.hibernate.org/hib_docs/v3/reference/en/html/architecture.html#architecture-current-session for more information.)Use the same session as by jBPM in other parts of the application by taking advantage of the contextual session mechanism. Do so through a call toSessionFactory.getCurrentSession(). Alternatively, supply a Hibernate session to jBPM by setting isCurrentSessionEnabled tofalseand injecting the session via theJbpmContext.setSession(session)method. This also ensures that jBPM uses the same Hibernate session as other parts of the application.Note
The Hibernate session can be injected into a stateless session bean (via a persistence context, for example). - isTransactionEnabled
- When this is set to
true, jBPM will begin a transaction through Hibernate'stransaction API, using theJbpmConfiguration.createJbpmContext()method to commit it. (The Hibernate session is closed whenJbpmContext.close()is called.)Warning
This is not the desired behavior when the Business Process Manager is deployed as an EAR and hence isTransactionEnabled is set tofalseby default. (See http://www.hibernate.org/hib_docs/v3/reference/en/html/transactions.html#transactions-demarcation for more details.)
JmsMessageServiceFactory delivers asynchronous continuation messages to the JobListenerBean by leveraging the reliable communication infrastructure exposed through the Java Message Service interfaces. The JmsMessageServiceFactory exposes the following configurable fields:
- connectionFactoryJndiName
- This is the name of the JMS connection factory in the JNDI initial context. It defaults to
java:comp/env/jms/JbpmConnectionFactory. - destinationJndiName
- This is the name of the JMS destination to which job messages will be sent. It must match the destination from which
JobListenerBeanreceives messages. It defaults tojava:comp/env/jms/JobQueue. - isCommitEnabled
- This specifies whether the Business Process Manager should commit the Java Message Service session upon
JbpmContext.close(). Messages produced by the JMS message service are never meant to be received before the current transaction commits; hence the sessions created by the service are always transacted. The default value isfalse, which is appropriate when theconnection factoryin use is XA-capable, as the messages produced by the Java Message Service session will be controlled by the overall JTA transaction. This field should be set totrueif the JMS connection factory is not XA-capable so that the Business Process Manager explicitly commits the JMS session's local transaction.
EntitySchedulerServiceFactory is used to schedule business process timers. It does so by building upon on the transactional notification service for timed events provided by the Enterprise Java Bean container. The EJB scheduler service factory has the configurable field described below.
- timerEntityHomeJndiName
- This is the name of the
TimerEntityBean's local home interface in the JNDI initial context. The default value isjava:comp/env/ejb/TimerEntityBean.
5.3. Hibernate Enterprise Configuration
hibernate.cfg.xml file includes the following configuration items. Modify them to support other databases or application servers.
<!-- sql dialect -->
<property name="hibernate.dialect">
    org.hibernate.dialect.HSQLDialect
</property>

<property name="hibernate.cache.provider_class">
  org.hibernate.cache.HashtableCacheProvider
</property>

<!-- DataSource properties (begin) -->
<property name="hibernate.connection.datasource">
    java:comp/env/jdbc/JbpmDataSource
</property>
<!-- DataSource properties (end) -->

<!-- JTA transaction properties (begin) -->
<property name="hibernate.transaction.factory_class">
  org.hibernate.transaction.JTATransactionFactory
</property>
<property name="hibernate.transaction.manager_lookup_class">
  org.hibernate.transaction.JBossTransactionManagerLookup
</property>
<!-- JTA transaction properties (end) -->

<!-- CMT transaction properties (begin) ===
<property name="hibernate.transaction.factory_class">
  org.hibernate.transaction.CMTTransactionFactory
</property>
<property name="hibernate.transaction.manager_lookup_class">
  org.hibernate.transaction.JBossTransactionManagerLookup
</property>
==== CMT transaction properties (end) -->hibernate.dialect setting with that which is appropriate for your database management system. (For more information, read http://www.hibernate.org/hib_docs/v3/reference/en/html/session-configuration.html#configuration-optional-dialects.)
HashtableCacheProvider can be replaced with other supported cache providers. (Refer to http://www.hibernate.org/hib_docs/v3/reference/en/html/performance.html#performance-cache for more information.)
JTATransactionFactory. If an existing transaction is underway, the JTA transaction factory uses it; otherwise it creates a new transaction. The jBPM enterprise beans are configured to delegate transaction management to the container. However, if the jBPM APIs are being used in a context in which no transaction is active (such as a web application), one will be started automatically.
CMTTransactionFactory. This setting ensures that Hibernate will always look for an existing transaction and will report a problem if none is found.
5.4. Client Components
<session>

  <ejb-name>MyClientBean</ejb-name>
  <home>org.example.RemoteClientHome</home>
  <remote>org.example.RemoteClient</remote>
  <local-home>org.example.LocalClientHome</local-home>
  <local>org.example.LocalClient</local>
  <ejb-class>org.example.ClientBean</ejb-class>
  <session-type>Stateless</session-type>
  <transaction-type>Container</transaction-type>

  <ejb-local-ref>
    <ejb-ref-name>ejb/TimerEntityBean</ejb-ref-name>
    <ejb-ref-type>Entity</ejb-ref-type>
    <local-home>org.jbpm.ejb.LocalTimerEntityHome</local-home>
    <local>org.jbpm.ejb.LocalTimerEntity</local>
  </ejb-local-ref>

  <resource-ref>
    <res-ref-name>jdbc/JbpmDataSource</res-ref-name>
    <res-type>javax.sql.DataSource</res-type>
    <res-auth>Container</res-auth>
  </resource-ref>

  <resource-ref>
    <res-ref-name>jms/JbpmConnectionFactory</res-ref-name>
    <res-type>javax.jms.ConnnectionFactory</res-type>
    <res-auth>Container</res-auth>
  </resource-ref>

  <message-destination-ref>
    <message-destination-ref-name>
        jms/JobQueue
    </message-destination-ref-name>
    <message-destination-type>javax.jms.Queue</message-destination-type>
    <message-destination-usage>Produces</message-destination-usage>
  </message-destination-ref>

</session><session>
<ejb-name>MyClientBean</ejb-name>
<jndi-name>ejb/MyClientBean</jndi-name>
<local-jndi-name>java:ejb/MyClientBean</local-jndi-name>
<ejb-local-ref>
<ejb-ref-name>ejb/TimerEntityBean</ejb-ref-name>
<local-jndi-name>java:ejb/TimerEntityBean</local-jndi-name>
</ejb-local-ref>
<resource-ref>
<res-ref-name>jdbc/JbpmDataSource</res-ref-name>
<jndi-name>java:JbpmDS</jndi-name>
</resource-ref>
<resource-ref>
<res-ref-name>jms/JbpmConnectionFactory</res-ref-name>
<jndi-name>java:JmsXA</jndi-name>
</resource-ref>
<message-destination-ref>
<message-destination-ref-name>
jms/JobQueue
</message-destination-ref-name>
<jndi-name>queue/JbpmJobQueue</jndi-name>
</message-destination-ref>
</session><web-app>
<servlet>
<servlet-name>MyClientServlet</servlet-name>
<servlet-class>org.example.ClientServlet</servlet-class>
</servlet>
<servlet-mapping>
<servlet-name>MyClientServlet</servlet-name>
<url-pattern>/client/servlet</url-pattern>
</servlet-mapping>
<ejb-local-ref>
<ejb-ref-name>ejb/TimerEntityBean</ejb-ref-name>
<ejb-ref-type>Entity</ejb-ref-type>
<local-home>org.jbpm.ejb.LocalTimerEntityHome</local-home>
<local>org.jbpm.ejb.LocalTimerEntity</local>
<ejb-link>TimerEntityBean</ejb-link>
</ejb-local-ref>
<resource-ref>
<res-ref-name>jdbc/JbpmDataSource</res-ref-name>
<res-type>javax.sql.DataSource</res-type>
<res-auth>Container</res-auth>
</resource-ref>
<resource-ref>
<res-ref-name>jms/JbpmConnectionFactory</res-ref-name>
<res-type>javax.jms.ConnectionFactory</res-type>
<res-auth>Container</res-auth>
</resource-ref>
<message-destination-ref>
<message-destination-ref-name>
jms/JobQueue
</message-destination-ref-name>
<message-destination-type>javax.jms.Queue</message-destination-type>
<message-destination-usage>Produces</message-destination-usage>
<message-destination-link>JobQueue</message-destination-link>
</message-destination-ref>
</web-app><jboss-web>
<ejb-local-ref>
<ejb-ref-name>ejb/TimerEntityBean</ejb-ref-name>
<local-jndi-name>java:ejb/TimerEntityBean</local-jndi-name>
</ejb-local-ref>
<resource-ref>
<res-ref-name>jdbc/JbpmDataSource</res-ref-name>
<jndi-name>java:JbpmDS</jndi-name>
</resource-ref>
<resource-ref>
<res-ref-name>jms/JbpmConnectionFactory</res-ref-name>
<jndi-name>java:JmsXA</jndi-name>
</resource-ref>
<message-destination-ref>
<message-destination-ref-name>
jms/JobQueue
</message-destination-ref-name>
<jndi-name>queue/JbpmJobQueue</jndi-name>
</message-destination-ref>
</jboss-web>5.5. Conclusion
Chapter 6. Process Modeling
6.1. Some Helpful Definitions
entering a node, leaving a node and taking a transition.
6.2. Process Graph
processdefinition.xml. Each node must have a type (examples being state, decision, fork and join.) Each node has a set of leaving transitions. Names can be given to the transitions that leave a node in order to make them distinct from each other. For example, the following diagram shows a process graph for an auction process.
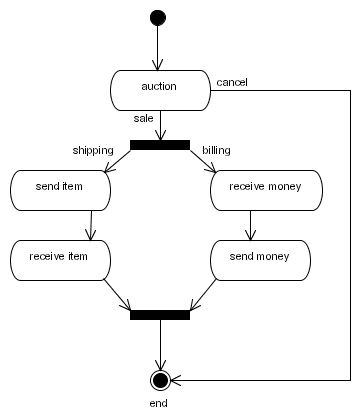
Figure 6.1. The auction process graph
<process-definition>

  <start-state>
    <transition to="auction" />
  </start-state>

  <state name="auction">
    <transition name="auction ends" to="salefork" />
    <transition name="cancel" to="end" />
  </state>

  <fork name="salefork">
    <transition name="shipping" to="send item" />
    <transition name="billing" to="receive money" />
  </fork>

  <state name="send item">
    <transition to="receive item" />
  </state>

  <state name="receive item">
    <transition to="salejoin" />
  </state>

  <state name="receive money">
    <transition to="send money" />
  </state>

  <state name="send money">
    <transition to="salejoin" />
  </state>

  <join name="salejoin">
    <transition to="end" />
  </join>

  <end-state name="end" />

</process-definition>
6.3. Nodes
6.3.1. Node Responsibilities
- it can not propagate the execution. (The node behaves as a
wait state.) - it can propagate the execution over one of the node's
leaving transitions. (This means that the token that originally arrived in the node is passed over one of theleaving transitionswith the API callexecutionContext.leaveNode(String).) The node will now act automatically in the sense that it will execute some custom programming logic and then continue the process execution automatically without waiting. - a node can "decide" to create new tokens, each of which will represent a new path of execution. Each of these new tokens can be launched over the node's
leaving transitions. A good example of this kind of behavior is thefork node. - it can end the path of execution. This means that the token has concluded.
- it can modify the whole run-time structure of the process instance. The run-time structure is a process instance that contains a tree of tokens, each of which represents a path of execution. A node can create and end tokens, put each token in a node of the graph and launch tokens over transitions.
6.3.2. Node Type: Task Node
wait state. When the users complete their tasks, the execution will be triggered, making it resume.
6.3.3. Node Type: State
wait state. It differs from a task node in that no task instances will be created for any task list. This can be useful if the process is waiting for an external system. After that, the process will go into a wait state. When the external system send a response message, a token.signal() is normally invoked, triggering the resumption of the process execution.
6.3.4. Node Type: Decision
- the decision is made by the process, and is therefore specified in the process definition,
- an external entity decides.
decision node. Specify the decision criteria in one of two ways, the simplest being to add condition elements to the transitions. (Conditions are EL expressions or beanshell scripts that return a Boolean value.)
leaving transitions which have conditions have been specified. It will evaluate those transitions first in the order specified in the XML. The first transition for which the condition resolves to true will be taken. If the conditions for all transitions resolve to false, the default transition, (the first in the XML), will taken instead. If no default transition is found, a JbpmException is thrown.
leaving transitions.
DecisionHandler interface that can be specified on the decision node. In this scenario, the decision is calculated by a Java class and the selected leaving transition is returned by the decide method, which belongs to the DecisionHandler implementation.
state or wait state node. The leaving transition can then be provided in the external trigger that resumes execution after the wait state is finished (these might, for example, be Token.signal(String transitionName) or TaskInstance.end(String transitionName).)
6.3.5. Node Type: Fork
6.3.6. Node Type: Join
leaving transition. When there are still sibling tokens active, the join will behave as a wait state.
6.3.7. Node Type: Node
actionhandler can do anything but be aware that it is also responsible for passing on the execution. (See Section 6.3.1, “ Node Responsibilities ” for more information.)
6.4. Transitions
Map getLeavingTransitionsMap() method will return less elements than List getLeavingTransitions().)
6.5. Actions
Important
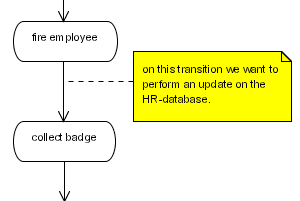
Figure 6.2. A database update action
public class RemoveEmployeeUpdate implements ActionHandler {
  public void execute(ExecutionContext ctx) throws Exception {
    // get the fired employee from the process variables.
    String firedEmployee =
      (String) ctx.getContextInstance().getVariable("fired employee");

    // by taking the same database connection as used for the jbpm
    // updates, we reuse the jbpm transaction for our database update.
    Connection connection =
    ctx.getProcessInstance().getJbpmSession().getSession().getConnection();
    Statement statement = connection.createStatement();
    statement.execute("DELETE FROM EMPLOYEE WHERE ...");
    statement.execute();
    statement.close();
  }
}
<process-definition name="yearly evaluation">
<state name="fire employee">
<transition to="collect badge">
<action class="com.nomercy.hr.RemoveEmployeeUpdate" />
</transition>
</state>
<state name="collect badge">
</process-definition>6.5.1. Action References
6.5.2. Events
node-enter and node-leave events. (Events are the "hooks" for actions. Each event has a list of actions. When the jBPM engine fires an event, the list of actions is executed.)
6.5.3. Passing On Events
6.5.4. Scripts
- executionContext
- token
- node
- task
- taskInstance
<process-definition>
  <event type="node-enter">
    <script>
      System.out.println("this script is entering node "+node);
    </script>
  </event>
  ...
</process-definition><process-definition>
<event type="process-end">
<script>
<expression>
a = b + c;
</expression>
<variable name='XXX' access='write' mapped-name='a' />
<variable name='YYY' access='read' mapped-name='b' />
<variable name='ZZZ' access='read' mapped-name='c' />
</script>
</event>
...
</process-definition>YYY and ZZZ will be made available to the script as script-variables b and c respectively. After the script is finished, the value of script-variable a is stored into the process variable XXX.
read, the process variable will be loaded as a script variable before the script is evaluated. If the access attribute contains write, the script variable will be stored as a process variable after evaluation. The mapped-name attribute can make the process variable available under another name in the script. Use this when the process variable names contain spaces or other invalid characters.
6.5.5. Custom Events
GraphElement.fireEvent(String eventType, ExecutionContext executionContext); method. Choose the names of the event types freely.
6.6. Super-States
6.6.1. Super-State Transitions
6.6.2. Super-State Events
superstate-enter and superstate-leave. They will be fired irrespective of which transitions the node has entered or left. As long as a token takes transitions within the super-state, these events will not be fired.
Note
6.6.3. Hierarchical Names
/) separated name. The slash separates the node names. Use .. to refer to an upper level. The next example shows how to refer to a node in a super-state:
<process-definition>
  <state name="preparation">
    <transition to="phase one/invite murphy"/>
  </state>
  <super-state name="phase one">
    <state name="invite murphy"/>
  </super-state>
</process-definition><process-definition>
<super-state name="phase one">
<state name="preparation">
<transition to="../phase two/invite murphy"/>
</state>
</super-state>
<super-state name="phase two">
<state name="invite murphy"/>
</super-state>
</process-definition>6.7. Exception Handling
exception-handlers can be specified on process-definitions, nodes and transitions. Each of these exception handlers has a list of actions. When an exception occurs in a delegation class, the process element's parent hierarchy is searched for an appropriate exception-handler, the actions for which are executed.
Important
token.signal() method. For those exceptions that are caught, the graph execution continues as if nothing had occurred.
Note
Token.setNode(Node node) to put the token in an arbitrary node within the graph of an exception-handling action.
6.8. Process Composition
process-state. This is a state that is associated with another process definition. When graph execution arrives in the process-state, a new instance of the sub-process is created. This sub-process is then associated with the path of execution that arrived in the process state. The super-process' path of execution will wait until the sub-process has ended and then leave the process state and continue graph execution in the super-process.
<process-definition name="hire">
  <start-state>
    <transition to="initial interview" />
  </start-state>
  <process-state name="initial interview">
    <sub-process name="interview" />
    <variable name="a" access="read,write" mapped-name="aa" />
    <variable name="b" access="read" mapped-name="bb" />
    <transition to="..." />
  </process-state>
  ...
</process-definition>
hire process contains a process-state that spawns an interview process. When execution arrives in the first interview, a new execution (that is, process instance) of the interview process is created. If a version is not explicitly specified, the latest version of the sub-process is used. To make the Business Process Manager instantiate a specific version, specify the optional version attribute. To postpone binding the specified or latest version until the sub-process is actually created, set the optional binding attribute to late.
hire process variable a is copied into interview process variable aa. In the same way, hire variable b is copied into interview variable bb. When the interview process finishes, only variable aa is copied back into the a variable.
6.9. Custom Node Behavior
ActionHandler that can execute any business logic, but also has the responsibility to pass on the graph execution. Here is an example that reads a value from an ERP system, adds an amount (from the process variables) and stores the result back in the ERP system. Based on the size of the amount, use either the small amounts or the large amounts transition to exit.
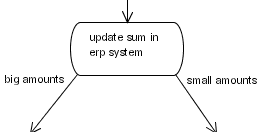
Figure 6.3. Process Snippet for Updating ERP Example
public class AmountUpdate implements ActionHandler {
  public void execute(ExecutionContext ctx) throws Exception {
    // business logic
    Float erpAmount = ...get amount from erp-system...;
    Float processAmount = (Float) ctx.getContextInstance().getVariable("amount");
    float result = erpAmount.floatValue() + processAmount.floatValue();
    ...update erp-system with the result...;

    // graph execution propagation
    if (result > 5000) {
      ctx.leaveNode(ctx, "big amounts");
    } else {
      ctx.leaveNode(ctx, "small amounts");
    }
  }
}
Note
6.10. Graph Execution
Note
wait state.
wait state.
wait state, the tokens can be made to persist in the database.
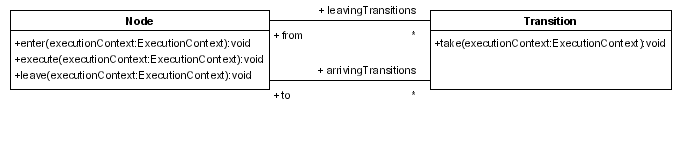
Figure 6.4. The graph execution-related methods
leaving transition from the token's current node. The first transition is the default. In a signal to a token, it takes its current node and calls the Node.leave(ExecutionContext,Transition) method. (It is best to think of the ExecutionContext as a token because the main object in it is a token.) The Node.leave(ExecutionContext,Transition) method will fire the node-leave event and call the Transition.take(ExecutionContext). That method will then run the transition event and call the Node.enter(ExecutionContext) on the transition's destination node. That method will then fire the node-enter event and call the Node.execute(ExecutionContext).
execute method. Each node is responsible for passing on the graph execution by calling the Node.leave(ExecutionContext,Transition) again. In summary:
Token.signal(Transition)Node.leave(ExecutionContext,Transition)Transition.take(ExecutionContext)Node.enter(ExecutionContext)Node.execute(ExecutionContext)
Note
6.11. Transaction Demarcation
token.signal() or taskInstance.end() will only return when the process has entered a new wait state.
Note
async="true" attribute in every node. Asynchronous nodes will not be executed in the thread of the client. Instead, a message is sent over the asynchronous messaging system and the thread is returned to the client (in other words, token.signal() or taskInstance.end() will be returned.)
org.jbpm.command.ExecuteNodeCommand message will be sent from the asynchronous messaging system to the jBPM Command Executor. This reads the commands from the queue and executes them. In the case of the org.jbpm.command.ExecuteNodeCommand, the process will be continued when the node is executed. (Each command is executed in a separate transaction.)
Important
jBPM Command Executor is running so that asynchronous processes can continue. Do so by configuring the web application's CommandExecutionServlet.
Note
wait state. (Use async="true" to demarcate a transaction in the process.)
<start-state>
  <transition to="one" />
</start-state>
<node async="true" name="one">
  <action class="com...MyAutomaticAction" />
  <transition to="two" />
</node>
<node async="true" name="two">
  <action class="com...MyAutomaticAction" />
  <transition to="three" />
</node>
<node async="true" name="three">
  <action class="com...MyAutomaticAction" />
  <transition to="end" />
</node>
<end-state name="end" />
...
//start a transaction
JbpmContext jbpmContext = jbpmConfiguration.createContext();
try {
  ProcessInstance processInstance =
    jbpmContext.newProcessInstance("my async process");
  processInstance.signal();
  jbpmContext.save(processInstance);
} finally {
  jbpmContext.close();
}root token will point to node one and an ExecuteNodeCommand message is sent to the command executor.
node one. The action can decide to pass the execution on or enter a wait state. If it chooses to pass it on, the transaction will be ended when the execution arrives at node two.
Chapter 7. The Context
Note
7.1. Accessing Process Variables
org.jbpm.context.exe.ContextInstance serves as the central interface for process variables. Obtain the ContextInstance from a process instance in this manner:
ProcessInstance processInstance = ...;
ContextInstance contextInstance =
	(ContextInstance) processInstance.getInstance(ContextInstance.class);
void ContextInstance.setVariable(String variableName, Object value);
void ContextInstance.setVariable(
	String variableName, Object value, Token token);

Object ContextInstance.getVariable(String variableName);
Object ContextInstance.getVariable(String variableName, Token token);
java.lang.String. By default, the Business Process Manager supports the following value types. (It also supports any other class that can be persisted with Hibernate.)
java.lang.String | java.lang.Boolean |
java.lang.Character | java.lang.Float |
java.lang.Double | java.lang.Long |
java.lang.Byte | java.lang.Integer |
java.util.Date | byte[] |
java.io.Serializable |
Note
Warning
7.2. Lives of Variables
java.util.Map. Note that variables can also be deleted.
ContextInstance.deleteVariable(String variableName);
ContextInstance.deleteVariable(String variableName, Token token);
7.3. Variable Persistence
7.4. Variable Scopes
root token will be used by default.
root token. (Hence, each variable has, by default, a process scope.) To make a variable token "local", create it explicitly, as per this example:
ContextInstance.createVariable(String name, Object value, Token token);
7.4.1. Variable Overloading
7.4.2. Variable Overriding
contact in the process instance scope with this variable in the nested paths of execution shipping and billing.
7.4.3. Task Instance Variable Scope
7.5. Transient Variables
Note
ProcessInstance Java object.
Note
processdefinition.xml file.
Object ContextInstance.getTransientVariable(String name);
void ContextInstance.setTransientVariable(String name, Object value);
Chapter 8. Task Management
8.1. Tasks
task-nodes and in the process-definition. The most common way is to define one or more tasks in a task-node. In that case the task-node represents a task to be undertaken by the user and the process execution should wait until the actor completes the task. When the actor completes the task, process execution continues. When more tasks are specified in a task-node, the default behaviour is to wait until all the tasks have ended.
process-definition. Tasks specified in this way can be found by searching for their names. One can also reference them from within task-nodes or use them from within actions. In fact, every task (or task-node) that is given a name can be found in the process-definition.
priority. This will be used as the initial priority for each task instance created for this task. (This initial priority can be changed by the task instance afterwards.)
8.2. Task Instances
actorId (java.lang.String). Every task instance is stored in one table (JBPM_TASKINSTANCE.) Query this table for every task instances for a given actorId, in order to obtain the task list for that particular user.
8.2.1. Task Instance Life-Cycle
Note
- Task instances are normally created when the process execution enters a
task-node(via theTaskMgmtInstance.createTaskInstance(...)method.) - A user interface component then queries the database for the task lists. It does so by using the
TaskMgmtSession.findTaskInstancesByActorId(...)method. - Then, after collecting input from the user, the UI component calls
TaskInstance.assign(String),TaskInstance.start()orTaskInstance.end(...).
createstartend
TaskInstance.
JBPM_TASKINSTANCE table.
8.2.2. Task Instances and Graph Executions
task-node before the task instance is completed. By default, task instances are configured to be signalling and non-blocking.
task-node, the process developer can specify the way in which completion of the task instances affects continuation of the process. Give any of these values to the task-node's signal-property:
- last
- This is the default. It proceeds execution when the last task instance has been completed. When no tasks are created on entrance of this node, execution is continued.
- last-wait
- This proceeds execution when the last task instance has been completed. When no tasks are created on entrance of this node, execution waits in the task node until tasks are created.
- first
- This proceeds execution when the first task instance has been completed. When no tasks are created upon the entry of this node, execution is continued.
- first-wait
- This proceeds execution when the first task instance has been completed. When no tasks are created on entrance of this node, execution waits in the task node until tasks are created.
- unsynchronized
- In this case, execution always continues, regardless of whether tasks are created or still unfinished.
- never
- In this case, execution never continues, regardless whether tasks are created or still unfinished.
ActionHandler to the task-node's node-enter event and set create-tasks="false". Here is an example:
public class CreateTasks implements ActionHandler {
  public void execute(ExecutionContext executionContext) throws Exception {
    Token token = executionContext.getToken();
    TaskMgmtInstance tmi = executionContext.getTaskMgmtInstance();

    TaskNode taskNode = (TaskNode) executionContext.getNode();
    Task changeNappy = taskNode.getTask("change nappy");

    // now, 2 task instances are created for the same task.
    tmi.createTaskInstance(changeNappy, token);
    tmi.createTaskInstance(changeNappy, token);
  }
}task-node. They could also be specified in the process-definition and fetched from the TaskMgmtDefinition. (TaskMgmtDefinition extends the process definition by adding task management information.)
TaskInstance.end() method is used to mark task instances as completed. One can optionally specify a transition in the end method. In case the completion of this task instance triggers continuation of the execution, the task-node is left over the specified transition.
8.3. Assignment
task-node contains zero or more tasks. Tasks are static descriptions of part of the process definition. At run-time, executing tasks result in the creation of task instances. A task instance corresponds to one entry in a person's task list.
8.3.1. Assignment Interfaces
AssignmentHandler interface:
public interface AssignmentHandler extends Serializable {
  void assign( Assignable assignable, ExecutionContext executionContext );
}AssignmentHandler implementation calls the assignable methods (setActorId or setPooledActors) to assign a task. The assignable item is either a TaskInstance or a SwimlaneInstance (that is, a process role).
public interface Assignable {
  public void setActorId(String actorId);
  public void setPooledActors(String[] pooledActors);
}TaskInstances and SwimlaneInstances can be assigned to a specific user or to a pool of actors. To assign a TaskInstance to a user, call Assignable.setActorId(String actorId). To assign a TaskInstance to a pool of candidate actors, call Assignable.setPooledActors(String[] actorIds).
AssignmentHandlers, configure each one via the processdefinition.xml file. (See Section 14.2, “Delegation” for more information on how to add configuration to assignment handlers.)
8.3.2. The Assignment Data Model
TaskInstance has an actorId and a set of pooled actors.
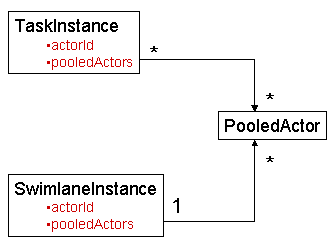
Figure 8.1. The assignment model class diagram
actorId is the responsible for the task, while the set of pooled actors represents a collection of candidates one of whom will become responsible if they take the task. Both actorId and pooledActors are optional and can also be combined.
8.3.3. The Personal Task List
TaskInstance. Put a TaskInstance in someone's task list in one of these ways:
- specify an expression in the task element's
actor-idattribute - use the
TaskInstance.setActorId(String)method from anywhere in the code - use the
assignable.setActorId(String)in anAssignmentHandler
TaskMgmtSession.findTaskInstances(String actorId).
8.3.4. The Group Task List
taskInstance in someone's group task list, add the user's actorId or one of the user's groupIds to the pooledActorIds. To specify the pooled actors, use one of the following methods:
- specify an expression in the attribute
pooled-actor-idsof the task element in the process - use
TaskInstance.setPooledActorIds(String[])from anywhere in your code - use
assignable.setPooledActorIds(String[])in an AssignmentHandler
TaskMgmtSession.findPooledTaskInstances(String actorId) or TaskMgmtSession.findPooledTaskInstances(List actorIds) to search for task instances that are not in a personal task list (actorId==null) and for which there is a match amongst the pooled actorId.
Note
pooledActorIds will only show up in the actor's personal task list. Retain the pooledActorIds in order to put a task instance back into the group by simply setting the taskInstance's actorId property to null.
8.4. Task Instance Variables
8.5. Task Controllers
Note
- create copies of task instance variables so that intermediate updates to them do not affect the process variables until the process is finished. At this time, the copies are submitted back into the process variables.
- the task instance variables do not have a one-to-one relationship with the process variables. For instance, if the process has variables named
sales in Januarysales in Februaryandsales in March, then the task instance form might need to show the average sales for those three months.

Figure 8.2. The task controllers
variable elementswhich express how the process variables are copied in the task variables.
<task name="clean ceiling">
  <controller>
    <variable name="a" access="read" mapped-name="x" />
    <variable name="b" access="read,write,required" mapped-name="y" />
    <variable name="c" access="read,write" />
  </controller>
</task>
read,write.
task-node can have many tasks whilst a start-state has one task.
TaskControllerHandler implementation. Here is the interface for it:.
public interface TaskControllerHandler extends Serializable {
  void initializeTaskVariables(TaskInstance taskInstance, ContextInstance contextInstance, Token token);
  void submitTaskVariables(TaskInstance taskInstance, ContextInstance contextInstance, Token token);
}<task name="clean ceiling">
<controller class="com.yourcom.CleanCeilingTaskControllerHandler">
-- here goes your task controller handler configuration --
</controller>
</task>
8.6. Swimlanes
assignment. Study Section 8.3, “ Assignment ” to learn more.
AssignmentHandler is called. The Assignable item that is passed to the AssignmentHandler is SwimlaneInstance. Every assignment undertaken on the task instances in a given swimlane will propagate to the swimlane instance. This is the default behaviour because the person that takes a task will have a knowledge of that particular process. Hence, ever subsequent task instances in that swimlane is automatically assigned to that user.
8.7. Swimlane in Start Task
Authentication.getAuthenticatedActorId() method. The actor is stored in the start task's swimlane.
<process-definition>
  <swimlane name='initiator' />
  <start-state>
    <task swimlane='initiator' />
    <transition to='...' />
  </start-state>
  ...
</process-definition>8.8. Task Events
task-create, which is fired when a task instance is created.task-assign, which is fired when a task instance is being assigned. Note that in actions that are executed on this event, one can access the previous actor with theexecutionContext.getTaskInstance().getPreviousActorId();method.task-start, which is fired when theTaskInstance.start()method is called. Use this optional feature to indicate that the user is actually starting work on the task instance.task-end, which is fired whenTaskInstance.end(...)is called. This marks the completion of the task. If the task is related to a process execution, this call might trigger the resumption of the process execution.
Note
8.9. Task Timers
8.10. Customizing Task Instances
- create a sub-class of
TaskInstance - create a
org.jbpm.taskmgmt.TaskInstanceFactoryimplementation - configure the implementation by setting the jbpm.task.instance.factory configuration property to the fully qualified class name in the
jbpm.cfg.xmlfile. - if using a sub-class of
TaskInstance, create a Hibernate mapping file for the sub-class (usingextends="org.jbpm.taskmgmt.exe.TaskInstance" - add that mapping file to the list in
hibernate.cfg.xml.
8.11. The Identity Component
java.lang.Strings for maximum flexibility. So any knowledge about the organizational model and the structure of that data is outside the scope of the jBPM's core engine.
8.11.1. The identity model
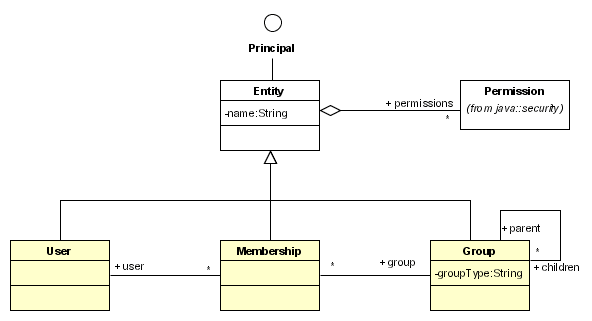
Figure 8.3. The identity model class diagram
User represents a user or a service. A Group is any kind of group of users. Groups can be nested to model the relation between a team, a business unit and the whole company. Groups have a type to differentiate between the hierarchical groups and e.g. hair color groups. Memberships represent the many-to-many relation between users and groups. A membership can be used to represent a position in a company. The name of the membership can be used to indicate the role that the user fulfills in the group.
8.11.2. Assignment expressions
<process-definition>
  <task-node name='a'>
    <task name='laundry'>
      <assignment expression='previous --> group(hierarchy) --> member(boss)' />
    </task>
    <transition to='b' />
  </task-node>

      <para>Syntax of the assignment expression is like this:</para>
      first-term --> next-term --> next-term --> ... --> next-term

where

first-term ::= previous |
               swimlane(swimlane-name) |
               variable(variable-name) |
               user(user-name) |
               group(group-name)

and

next-term ::= group(group-type) |
              member(role-name)
</programlisting>
8.11.2.1. First terms
User or Group in the identity model. Subsequent terms calculate the next term from the intermediate user or group.
previous means the task is assigned to the current authenticated actor. This means the actor that performed the previous step in the process.
swimlane(swimlane-name) means the user or group is taken from the specified swimlane instance.
variable(variable-name) means the user or group is taken from the specified variable instance. The variable instance can contain a java.lang.String, in which case that user or group is fetched from the identity component. Or the variable instance contains a User or Group object.
user(user-name) means the given user is taken from the identity component.
group(group-name) means the given group is taken from the identity component.
8.11.2.2. Next terms
group(group-type) gets the group for a user. Meaning that previous terms must have resulted in a User. It searches for the the group with the given group-type in all the memberships for the user.
member(role-name) gets the user that performs a given role for a group. The previous terms must have resulted in a Group. This term searches for the user with a membership to the group for which the name of the membership matches the given role-name.
8.11.3. Removing the identity component
hibernate.cfg.xml.
<mapping resource="org/jbpm/identity/User.hbm.xml"/>
<mapping resource="org/jbpm/identity/Group.hbm.xml"/>
<mapping resource="org/jbpm/identity/Membership.hbm.xml"/>
ExpressionAssignmentHandler is dependent on the identity component so you will not be able to use it as is. In case you want to reuse the ExpressionAssignmentHandler and bind it to your user data store, you can extend from the ExpressionAssignmentHandler and override the method getExpressionSession.
protected ExpressionSession getExpressionSession(AssignmentContext assignmentContext);
Chapter 9. Scheduler
9.1. Timers
<state name='catch crooks'>
  <timer name='reminder'
         duedate='3 business hours'
         repeat='10 business minutes'
         transition='time-out-transition' >
    <action class='the-remainder-action-class-name' />
  </timer>
  <transition name='time-out-transition' to='...' />
</state>- an event of type
timeris fired - if an action is specified, it executes
- a signal is to resume execution over any specified transition
timer element, the name of the node is used by default.
action or script.)
action-elements are create-timer and cancel-timer. In actual fact, the timer element shown above is just short-hand notation for a create-timer action on node-enter and a cancel-timer action on node-leave.
9.2. Scheduler Deployment
timer runner checks this store and execute each timers at the due moment.

Figure 9.1. Scheduler Components Overview
Chapter 10. Asynchronous Continuations
10.1. The Concept
async="true". async="true" is supported only when it is triggered in an event but can be specified on all node types and all action types.
10.2. Example

Figure 10.1. Example One: Process without Asynchronous Continuation
GraphSession.saveProcessInstance on a JDBC connection. Secondly, in case the automated action accesses and updates some transactional resources, such updates should be combined or made part of the same transaction.
async="true".
async="true" to node 'b' is that the process execution will be split into two parts. The first of these will execute the process up to the point at which node 'b' is to be executed. The second part will execute node 'b.' That execution will stop in wait state 'c'.
Token.signal method) to leave node 'a' in the first transaction, jBPM will automatically trigger and perform the second transaction.
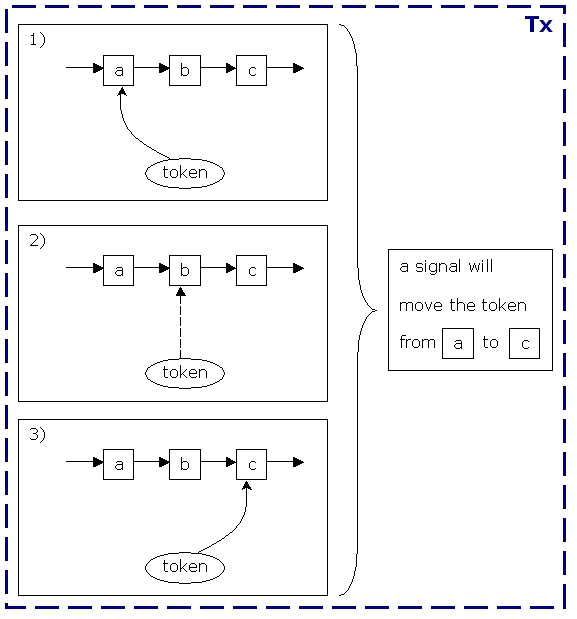
Figure 10.2. A Process with Asynchronous Continuations
async="true" are executed outside of the thread that executes the process. If persistence is configured (it is by default), the actions will be executed in a separate transaction.
10.3. The Job Executor
ExecuteNodeJob and ExecuteActionJob.
Job (Plain Old Java Object) will be dispatched to the MessageService. The message service is associated with the JbpmContext and it just collects all the messages that have to be sent.
JbpmContext.close(). That method cascades the close() invocation to all of the associated services. The actual services can be configured in jbpm.cfg.xml. One of the services, JmsMessageService, is configured by default and will notify the job executor that new job messages are available.
MessageServiceFactory and MessageService to send messages. This is to make the asynchronous messaging service configurable (also in jbpm.cfg.xml). In Java EE environments, the DbMessageService can be replaced with the JmsMessageService to leverage the application server's capabilities.
- The dispatcher thread must acquire a job
- An executor thread must execute the job
REPEATABLE_READ for Hibernate's optimistic locking to work correctly. REPEATABLE_READ guarantees that this query will only update one row in exactly one of the competing transactions.
update JBPM_JOB job
set job.version = 2
    job.lockOwner = '192.168.1.3:2'
where
job.version = 1READ_COMMITTED is not enough because it allows for Non-Repeatable reads to occur. So REPEATABLE_READ is required if you configure more than one job executor thread.
- jbpmConfiguration
- The bean from which configuration is retrieved.
- name
- The name of this executor.
Important
This name should be unique for each node, when more than one jBPM instance is started on a single machine. - nbrOfThreads
- The number of executor threads that are started.
- idleInterval
- The interval that the dispatcher thread will wait before checking the job queue, if there are no jobs pending.
Note
The dispatcher thread is automatically notifed when jobs are added to the queue. - retryInterval
- The interval that a job will wait between retries, if it fails during execution. The default value for this is 3 times.
Note
The maximum number of retries is configured by jbpm.job.retries. - maxIdleInterval
- The maximum period for idleInterval.
- historyMaxSize
- This property is deprecated and has no effect.
- maxLockTime
- The maximum time that a job can be locked before the lock-monitor thread will unlock it.
- lockMonitorInterval
- The period for which the lock-monitor thread will sleep between checking for locked jobs.
- lockBufferTime
- This property is deprecated, and has no affect.
10.4. jBPM's built-in asynchronous messaging
JBPM_JOB table.
org.jbpm.msg.command.CommandExecutor) will read the messages from the database table and execute them. The typical transaction of the POJO command executor looks like this:
- Read next command message
- Execute command message
- Delete command message
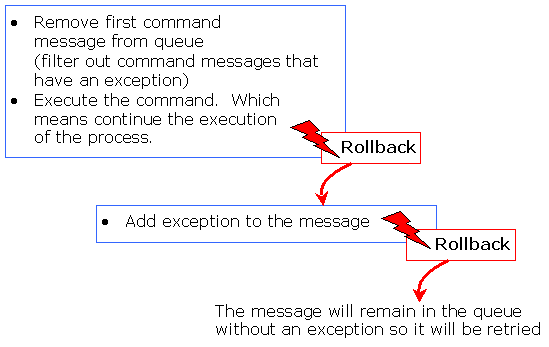
Figure 10.3. POJO command executor transactions
Important
Chapter 11. Business Calendar
11.1. Due Date
duedate ::= [<basedate> +/-] <duration>
11.1.1. Duration
duration ::= <quantity> [business] <unit>
<quantity> must be a piece of text that is parsable with Double.parseDouble(quantity). <unit> will be one of: second, seconds, minute, minutes, hour, hours, day, days, week, weeks, month, months, year or years. Adding the optional business flag will mean that only business hours will be taken into account for this duration. (Without it, the duration will be interpreted as an absolute time period.)
11.1.2. Base Date
basedate ::= <EL>.
<EL> can be any Java Expression Language expression that resolves to a Java Date or Calendar object.
Warning
JbpmException error.
11.1.3. Due Date Examples
<timer name="daysBeforeHoliday" duedate="5 business days">...</timer>
<timer name="pensionDate" duedate="#{dateOfBirth} + 65 years" >...</timer>
<timer name="pensionReminder" duedate="#{dateOfPension} - 1 year" >...</timer>
<timer name="fireWorks" duedate="#{chineseNewYear} repeat="1 year" >...</timer>
<reminder name="hitBoss" duedate="#{payRaiseDay} + 3 days" repeat="1 week" />
11.2. Calendar Configuration
org/jbpm/calendar/jbpm.business.calendar.properties file. (To customize this configuration file, place a modified copy in the root of the classpath.)
jbpm.business.calendar.properties:
hour.format=HH:mm #weekday ::= [<daypart> [& <daypart>]*] #daypart ::= <start-hour>-<to-hour> #start-hour and to-hour must be in the hour.format #dayparts have to be ordered weekday.monday= 9:00-12:00 & 12:30-17:00 weekday.tuesday= 9:00-12:00 & 12:30-17:00 weekday.wednesday= 9:00-12:00 & 12:30-17:00 weekday.thursday= 9:00-12:00 & 12:30-17:00 weekday.friday= 9:00-12:00 & 12:30-17:00 weekday.saturday= weekday.sunday= day.format=dd/MM/yyyy # holiday syntax: <holiday> # holiday period syntax: <start-day>-<end-day> # below are the belgian official holidays holiday.1= 01/01/2005 # nieuwjaar holiday.2= 27/3/2005 # pasen holiday.3= 28/3/2005 # paasmaandag holiday.4= 1/5/2005 # feest van de arbeid holiday.5= 5/5/2005 # hemelvaart holiday.6= 15/5/2005 # pinksteren holiday.7= 16/5/2005 # pinkstermaandag holiday.8= 21/7/2005 # my birthday holiday.9= 15/8/2005 # moederkesdag holiday.10= 1/11/2005 # allerheiligen holiday.11= 11/11/2005 # wapenstilstand holiday.12= 25/12/2005 # kerstmis business.day.expressed.in.hours= 8 business.week.expressed.in.hours= 40 business.month.expressed.in.business.days= 21 business.year.expressed.in.business.days= 220
11.3. Examples
<timer name="daysBeforeHoliday" duedate="5 business days">...</timer>

<timer name="pensionDate" duedate="#{dateOfBirth} + 65 years" >...</timer>

<timer name="pensionReminder" duedate="#{dateOfPension} - 1 year" >...</timer>

<timer name="fireWorks" duedate="#{chineseNewYear} repeat="1 year" >...</timer>

<reminder name="hitBoss" duedate="#{payRaiseDay} + 3 days" repeat="1 week" />
hour.format=HH:mm #weekday ::= [<daypart> [& <daypart>]*] #daypart ::= <start-hour>-<to-hour> #start-hour and to-hour must be in the hour.format #dayparts have to be ordered weekday.monday= 9:00-12:00 & 12:30-17:00 weekday.tuesday= 9:00-12:00 & 12:30-17:00 weekday.wednesday= 9:00-12:00 & 12:30-17:00 weekday.thursday= 9:00-12:00 & 12:30-17:00 weekday.friday= 9:00-12:00 & 12:30-17:00 weekday.saturday= weekday.sunday= day.format=dd/MM/yyyy # holiday syntax: <holiday> # holiday period syntax: <start-day>-<end-day> # below are the belgian official holidays holiday.1= 01/01/2005 # nieuwjaar holiday.2= 27/3/2005 # pasen holiday.3= 28/3/2005 # paasmaandag holiday.4= 1/5/2005 # feest van de arbeid holiday.5= 5/5/2005 # hemelvaart holiday.6= 15/5/2005 # pinksteren holiday.7= 16/5/2005 # pinkstermaandag holiday.8= 21/7/2005 # my birthday holiday.9= 15/8/2005 # moederkesdag holiday.10= 1/11/2005 # allerheiligen holiday.11= 11/11/2005 # wapenstilstand holiday.12= 25/12/2005 # kerstmis business.day.expressed.in.hours= 8 business.week.expressed.in.hours= 40 business.month.expressed.in.business.days= 21 business.year.expressed.in.business.days= 220
Chapter 12. E-Mail Support
12.1. Mail in JPDL
12.1.1. Mail Action
Note
<mail actors="#{president}" subject="readmylips" text="nomoretaxes" />
<mail actors="#{president}" >
    <subject>readmylips</subject>
    <text>nomoretaxes</text>
</mail><mail
to='#{initiator}'
subject='websale'
text='your websale of #{quantity} #{item} was approved' />Note
<mail
    to='admin@mycompany.com'
    subject='urgent'
    text='the mailserver is down :-)' />
Note
<mail template='sillystatement' actors="#{president}" />Note
12.1.2. Mail Node
mail action. (See Section 12.1.1, “ Mail Action ” to find out more.)
<mail-node  name="send email"
            to="#{president}"
            subject="readmylips"
            text="nomoretaxes">
    <transition to="the next node" />
</mail-node>
Important
12.1.3. "Task Assigned" E-Mail
notify="yes" attribute to a task in the following manner:
<task-node name='a'>
    <task name='laundry' swimlane="grandma" notify='yes' />
    <transition to='b' />
</task-node>yes, true or on to make the Business Process Manager send an e- mail to the actor being assigned to the task. (Note that this e- mail is based on a template and contains a link to the web application's task page.)
12.1.4. "Task Reminder" E-Mail
<task-node name='a'>
    <task name='laundry' swimlane="grandma" notify='yes'>
        <reminder duedate="2 business days" repeat="2 business hours"/>
    </task>
    <transition to='b' />
</task-node>
12.2. Expressions in Mail
to, recipients, subject and text can contain JSF-like expressions. (For more information about expressions, see Section 14.3, “ Expressions ”.)
jbpm.cfg.xml file.
president:
<mail   actors="#{president}"
        subject="readmylips"
text="nomoretaxes" />president for that particular process execution.
12.3. Specifying E-Mail Recipients
12.3.1. Multiple Recipients
12.3.2. Sending E-Mail to a BCC Address
<mail to='#{initiator}'
      bcc='bcc@mycompany.com'
      subject='websale'
text='your websale of #{quantity} #{item} was approved' />jbpm.cfg.xml. This example demonstrates how to do so:
<jbpm-configuration>
    ...
    <string name="jbpm.mail.bcc.address" value="bcc@mycompany.com" />
</jbpm-configuration>
12.3.3. Address Resolving
actorIds. These are strings that serves to identify process participants. An address resolver translates actorIds into e-mail addresses.
public interface AddressResolver extends Serializable {
	Object resolveAddress(String actorId);
}actorId.)
jbpm.cfg.xml file with name jbpm.mail.address.resolver, as per this example:
<jbpm-configuration>
    <bean name='jbpm.mail.address.resolver'
        class='org.jbpm.identity.mail.IdentityAddressResolver'
        singleton='true' />
</jbpm-configuration>identity component includes an address resolver. This address resolver will look for the given actorId's user. If the user exists, their e-mail address will be returned. If not, null will be returned.
Note
12.4. E-Mail Templates
processdefinition.xml file to specify e-mails, one can use a template. In this case, each of the fields can still be overwritten by processdefinition.xml. Specify a templates like this:
<mail-templates>
    <variable name="BaseTaskListURL"
        value="http://localhost:8080/jbpm/task?id=" />

    <mail-template name='task-assign'>
        <actors>#{taskInstance.actorId}</actors>
        <subject>Task '#{taskInstance.name}'</subject>
        <text><![CDATA[Hi,
Task '#{taskInstance.name}' has been assigned to you.
Go for it: #{BaseTaskListURL}#{taskInstance.id}
Thanks.
---powered by JBoss jBPM---]]></text>
    </mail-template>

    <mail-template name='task-reminder'>
        <actors>#{taskInstance.actorId}</actors>
        <subject>Task '#{taskInstance.name}' !</subject>
        <text><![CDATA[Hey,
Don't forget about #{BaseTaskListURL}#{taskInstance.id}
Get going !
---powered by JBoss jBPM---]]></text>
    </mail-template>

</mail-templates>jbpm.cfg.xml like this:
<jbpm-configuration>
  <string name="resource.mail.templates" value="jbpm.mail.templates.xml" />
</jbpm-configuration>
12.5. Mail Server Configuration
jbpm.cfg.xml file, as per this example code:
<jbpm-configuration>
    <string name="jbpm.mail.smtp.host" value="localhost" />
</jbpm-configuration><jbpm-configuration> <string name='resource.mail.properties' value='jbpm.mail.properties' /> </jbpm-configuration>
12.6. Email Authentication
12.6.1. Email authentication configuration
| Property | Type | Description |
|---|---|---|
| jbpm.mail.user |
string
|
The email address of the user
|
| jbpm.mail.password |
string
|
The password for that email address
|
| jbpm.mail.smtp.starttls |
boolean
|
Whether or not to use the STARTTLS protocol with the SMTP server
|
| jbpm.mail.smtp.auth |
boolean
|
Whether or not to use the SMTP authentication protocol
|
| jbpm.mail.debug |
boolean
|
Whether or not to set the javax.mail.Session instance to debug mode
|
12.6.2. Email authentication logic
- The mail.smtp.submitter property is set with the value of the jbpm.mail.user property
- The jbpm engine will try to login into the smtp server when sending email.
- Everything that is done when at least the jbpm.mail.user is set, is also done in this case
- The mail.smtp.auth property is set to true, regardless of the value of the jbpm.mail.smtp.auth property
12.7. "From" Address Configuration
From address field jbpm@noreply. Configure it via the jbpm.xfg.xml file with key jbpm.mail.from.address like this:
<jbpm-configuration>
    <string name='jbpm.mail.from.address' value='jbpm@yourcompany.com' />
</jbpm-configuration>
12.8. Customizing E-Mail Support
org.jbpm.mail.Mail. This class is an ActionHandler implementation. Whenever an e-mail is specified in the process XML, a delegation to the mail class will result. It is possible to inherit from the mail class and customize certain behavior for specific needs. To configure a class to be used for mail delegations, specify a jbpm.mail.class.name configuration string in the jbpm.cfg.xml like this:
<jbpm-configuration>
  <string name='jbpm.mail.class.name'
  value='com.your.specific.CustomMail' />
</jbpm-configuration>
Chapter 13. Logging
Note
13.1. Log Creation
org.jbpm.logging.log.ProcessLog.) Process log entries are added to the LoggingInstance, which is an optional extension of the ProcessInstance.
org.jbpm.logging.log.ProcessLog since one can use that to navigate down the inheritance tree.
LoggingInstance collects all log entries. When the ProcessInstance is saved, they are flushed from here to the database. (The ProcessInstance's logs field is not mapped to Hibernate. This is so as to avoid those logs that are retrieved from the database in each transaction.)
ProcessInstance is made in the context of a path of execution and hence, the ProcessLog refers to that token, which also serves as an index sequence generator it. (This is important for log retrieval as it means that logs produced in subsequent transactions shall have sequential sequence numbers.)
public class LoggingInstance extends ModuleInstance {
  ...
  public void addLog(ProcessLog processLog) {...}
  ...
}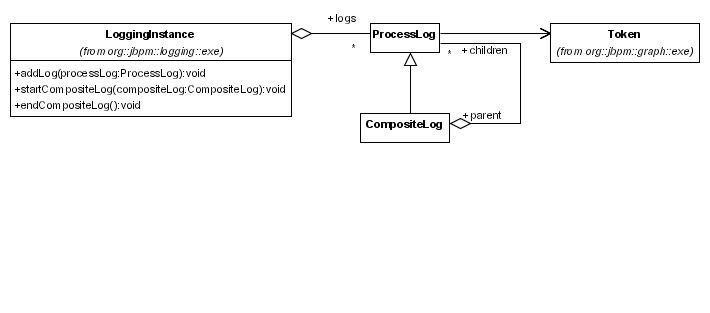
Figure 13.1. The jBPM logging information class diagram
public class LoggingInstance extends ModuleInstance {
  ...
  public void startCompositeLog(CompositeLog compositeLog) {...}
  public void endCompositeLog() {...}
  ...
}CompositeLogs should always be called in a try-finally-block to make sure that the hierarchical structure is consistent. For example:
startCompositeLog(new MyCompositeLog());
try {
  ...
} finally {
  endCompositeLog();
}
13.2. Log Configurations
jbpm.cfg.xml configuration file:
<service name='logging'
factory='org.jbpm.logging.db.DbLoggingServiceFactory' />LoggingService (this is a subclass of DbLoggingService). Having done so, create a custom ServiceFactory for logging and specify it in the factory attribute.
13.3. Log Retrieval
LoggingSession.
ProcessLogs with every token in the process instance. The list will contain the ProcessLogs in the same order as that in which they were created.
public class LoggingSession {
  ...
  public Map findLogsByProcessInstance(long processInstanceId) {...}
  ...
}ProcessLogs in the same order as that in which they were created.
public class LoggingSession {
  public List findLogsByToken(long tokenId) {...}
  ...
}Chapter 14. jBPM Process Definition Language
14.1. Process Archive
processdefinition.xml This file defines the business process in the jPDL notation and provides information about automated actions and human tasks. The process archive also contains other files related to the process, such as action handler classes and user interface task forms.
14.1.1. Deploying a Process Archive
process archive in any of these ways:
- via the Process Designer Tool
- with an
anttask - programatically
GPD Deployer Servlet. This servlet is capable of receiving process archives and deploying them to the configured database.
ant task, define and call the task as follows.
<target name="deploy-process">
  <taskdef name="deployproc" classname="org.jbpm.ant.DeployProcessTask">
    <classpath location="jbpm-jpdl.jar" />
  </taskdef>
  <deployproc process="build/myprocess.par" />
</target>DeployProcessTask attributes.
| Attribute | Description | Required? |
|---|---|---|
| process |
Path to process archive.
|
Yes, unless a nested resource collection element is used.
|
| jbpmcfg |
jBPM configuration resource to load during deployment.
|
No; defaults to
jbpm.cfg.xml
|
| failonerror |
If false, log a warning message, but do not stop the build, when the process definition fails to deploy.
| No; defaults to true |
parseXXX methods of the org.jbpm.graph.def.ProcessDefinition class.
14.1.2. Process Versioning
- by making sure these classes are visible to the jBPM class-loader.To do so, put the delegation classes in a
.jarfile "next to"jbpm-jpdl.jarso that all of the process definitions will see that class file. The Java classes can also be included in the process archive. When you include your delegation classes in the process archive (and they are not visible to the jbpm classloader), the jBPM will also version these classes inside the process definition.Note
Learn more about process classloading by reading Section 14.2, “Delegation”
-1.)
14.1.3. Changing Deployed Process Definitions
Warning
- There is no restriction on updating a process definition loaded through the
org.jbpm.db.GraphSessionmethodsloadProcessDefinition,findProcessDefinitionor reached through association traversal. Nonetheless, it is very easy to mess up the process with a few calls such assetStartState(null)! - Because processs definitions are not supposed to change, the shipped Hibernate configuration specifies the
nonstrict-read-writecaching strategy for definition classes and collections. This strategy can make uncommitted updates visible to other transactions.
14.1.4. Migrating Process Instances
Note
ChangeProcessInstanceVersionCommand as shown below.
new ChangeProcessInstanceVersionCommand()
  .processName("commute")
  .nodeNameMappingAdd("drive to destination", "ride bike to destination")
  .execute(jbpmContext);
14.2. Delegation
14.2.1. jBPM Class Loader
jbpm-jpdl.jar. In the case of web applications, place the custom JAR file in WEB-INF/lib alongside jbpm-jpdl.jar.
14.2.2. Process Class Loader
classes directory of the process archive. Note that this is only useful when you want to version the classes that have been added to the process definition. If versioning is not required, make the classes available to the jBPM class loader instead.
classes directory. To load resources that reside outside this directory, start the path with a double forward slash (//). For example, to load data.xml, located in the process archive root, call class.getResource("//data.xml").
14.2.3. Configuring Delegations
ActionHandler interface can be called on an event in the process. Delegations are specified in the processdefinition.xml file. You can supply any of these three pieces of data when specifying a delegation:
- the class name (required): this is the delegation class' fully-qualified name.
- configuration type (optional): this specifies the way in which to instantiate and configure the delegation object. By default, the constructor is used and the configuration information is ignored.
- configuration (optional): this is the configuration of the delegation object, which must be in the format required by the configuration type.
14.2.3.1. config-type field
- string is trimmed but not converted.
- primitive types such as int, long, float, double, ...
- the basic wrapper classes for the primitive types.
- lists, sets and collections. In these cases, each element of the xml-content is considered an element of the collection and is parsed recursively, applying the conversions. If the element types differ from
java.lang.Stringindicate this by specifying a type attribute with the fully-qualified type name. For example, this code injects anArrayListof strings into numbers field:<numbers> <element>one</element> <element>two</element> <element>three</element> </numbers>
You can convert the text in the elements to any object that has a string constructor. To use a type other than a string, specify the element-type in the field (numbers in this case).Here is another example of a map:<numbers> <entry><key>one</key><value>1</value></entry> <entry><key>two</key><value>2</value></entry> <entry><key>three</key><value>3</value></entry> </numbers>
- In this case, each of the field elements is expected to have one key and one value sub-element. Parse both of these by using the conversion rules recursively. As with collections, it will be assumed that a conversion to
java.lang.Stringis intended if you do not specify a type attribute. org.dom4j.Element- for any other type, the string constructor is used.
public class MyAction implements ActionHandler {
  // access specifiers can be private, default, protected or public
  private String city;
  Integer rounds;
  ...
}... <action class="org.test.MyAction"> <city>Atlanta</city> <rounds>5</rounds> </action> ...
14.2.3.2. config-type bean
14.2.3.3. config-type constructor
14.2.3.4. config-type configuration-property
void configure(String); method.
14.3. Expressions
expression="#{myVar.handler[assignments].assign}"
Note
#{...} notation and includes support for method-binding.
- taskInstance (
org.jbpm.taskmgmt.exe.TaskInstance) - processInstance (
org.jbpm.graph.exe.ProcessInstance) - processDefinition (
org.jbpm.graph.def.ProcessDefinition) - token (
org.jbpm.graph.exe.Token) - taskMgmtInstance (
org.jbpm.taskmgmt.exe.TaskMgmtInstance) - contextInstance (
org.jbpm.context.exe.ContextInstance)
14.4. jPDL XML Schema
processdefinition.xml file.
14.4.1. Validation
- The schema is referenced in the XML document:
<process-definition xmlns="urn:jbpm.org:jpdl-3.2">
  ...
</process-definition>
- The Xerces parser is on the class-path.
Note
${jbpm.home}/src/java.jbpm/org/jbpm/jpdl/xml/jpdl-3.2.xsd or at http://jbpm.org/jpdl-3.2.xsd.
14.4.2. process-definition
| Name | Type | Multiplicity | Description |
|---|---|---|---|
| name | attribute | optional | This is the name of the process |
| swimlane | element | [0..*] | These are the swim-lanes used in the process. The swim-lanes represent process roles and are used for task assignments. |
| start-state | element | [0..1] | This is the process' start state. Note that a process without a start-state is valid, but cannot be executed. |
| {end-state|state|node|task-node|process-state|super-state|fork|join|decision} | element | [0..*] | These are the process definition's nodes. Note that a process without nodes is valid, but cannot be executed. |
| event | element | [0..*] | These serve as a container for actions |
| {action|script|create-timer|cancel-timer} | element | [0..*] | These are globally-defined actions that can be referenced from events and transitions. Note that these actions must specify a name in order to be referenced. |
| task | element | [0..*] | These are globally-defined tasks that can be used in e.g. actions. |
| exception-handler | element | [0..*] | This is a list of those exception handlers that applies to all errors thrown by delegation classes in this process definition. |
14.4.3. node
| Name | Type | Multiplicity | Description |
|---|---|---|---|
| {action|script|create-timer|cancel-timer} | element | 1 | This is a custom action that represents the behaviour for this node |
| common node elements | Section 14.4.4, “common node elements” |
14.4.4. common node elements
| Name | Type | Multiplicity | Description |
|---|---|---|---|
| name | attribute | required | This is the name of the node |
| async | attribute | { true | false }, false is the default | If set to true, this node will be executed asynchronously. See also Chapter 10, Asynchronous Continuations |
| transition | element | [0..*] | These are the leaving transitions. Each transition leaving a node *must* have a distinct name. A maximum of one of the leaving transitions is allowed to have no name. The first transition that is specified is called the default transition. The default transition is taken when the node is left without specifying a transition. |
| event | element | [0..*] | There are two supported event types: {node-enter|node-leave} |
| exception-handler | element | [0..*] | This is a list of exception handlers that applies to every bug thrown by a delegation class from within this process node. |
| timer | element | [0..*] | This specifies a timer that monitors the duration of an execution in this node. |
14.4.5. start-state
| Name | Type | Multiplicity | Description |
|---|---|---|---|
| name | attribute | optional | This is the name of the node |
| task | element | [0..1] | This is the task used to start a new instance for this process or to capture the process initiator. See Section 8.7, “ Swimlane in Start Task ” |
| event | element | [0..*] | This is the supported event type: {node-leave} |
| transition | element | [0..*] | These are the leaving transitions. Each transition leaving a node must have a distinct name. |
| exception-handler | element | [0..*] | This is a list of exception handlers that applies to every bug thrown by a delegation class from within this process node. |
14.4.6. end-state
| Name | Type | Multiplicity | Description |
|---|---|---|---|
| name | attribute | required | This is the name of the end-state |
| end-complete-process | attribute | optional | If the end-complete-process is set to false, only the token concluding this end-state is finished. If this token was the last child to end, the parent token is ended recursively. Set this property to true, to ensure that the full process instance is ended. |
| event | element | [0..*] | The supported event type is {node-enter} |
| exception-handler | element | [0..*] | This is a list of exception handlers that applies to every bug thrown by a delegation class from within this process node. |
14.4.7. state
| Name | Type | Multiplicity | Description |
|---|---|---|---|
| common node elements | See Section 14.4.4, “common node elements” |
14.4.8. task-node
| Name | Type | Multiplicity | Description |
|---|---|---|---|
| signal | attribute | optional | This can be {unsynchronized|never|first|first-wait|last|last-wait}, the default being last. It specifies the way in which task completion affects process execution continuation. |
| create-tasks | attribute | optional | This can be {yes|no|true|false}, with the default being true. Set it to false when a run-time calculation has to determine which of the tasks have to be created. In that case, add an action on node-enter, create the tasks in the action and set create-tasks to false. |
| end-tasks | attribute | optional | This can be {yes|no|true|false}, with the default being false. If remove-tasks is set to true on node-leave, every open task is ended. |
| task | element | [0..*] | These are the tasks that are created when execution arrives in this task node. |
| common node elements | See Section 14.4.4, “common node elements” |
14.4.9. process-state
| Name | Type | Multiplicity | Description |
|---|---|---|---|
| sub-process | element | 1 | This is the sub-process that is associated with this node. |
| variable | element | [0..*] | This specifies how data should be copied from the super-process to the sub-process at the commencement, and from the sub-process to the super-process upon completion of the sub-process. |
| common node elements | See Section 14.4.4, “common node elements” |
14.4.10. super-state
| Name | Type | Multiplicity | Description |
|---|---|---|---|
| {end-state|state|node|task-node|process-state|super-state|fork|join|decision} | element | [0..*] | These are the super-state's nodes. Super-states can be nested. |
| common node elements | See Section 14.4.4, “common node elements” |
14.4.11. fork
| Name | Type | Multiplicity | Description |
|---|---|---|---|
| common node elements | See Section 14.4.4, “common node elements” |
14.4.12. join
| Name | Type | Multiplicity | Description |
|---|---|---|---|
| common node elements | See Section 14.4.4, “common node elements” |
14.4.13. decision
| Name | Type | Multiplicity | Description |
|---|---|---|---|
| handler | element | either a 'handler' element or conditions on the transitions should be specified | the name of a org.jbpm.jpdl.Def.DecisionHandler implementation |
| transition conditions | attribute or element text on the transitions leaving a decision |
Every transition may have a guard condition. The decision node examines the leaving transitions having a condition, and selects the first transition whose condition is true.
In case no condition is met, the default transition is taken. The default transition is the first unconditional transition if there is one, or else the first conditional transition. Transitions are considered in document order.
If only conditional ("guarded") transitions are available, and none of the conditions on the transitions evaluate to true, an exception will be thrown.
| |
| common node elements | See Section 14.4.4, “common node elements” |
14.4.14. event
| Name | Type | Multiplicity | Description |
|---|---|---|---|
| type | attribute | required | This is the event type that is expressed relative to the element on which the event is placed |
| {action|script|create-timer|cancel-timer} | element | [0..*] | This is the list of actions that should be executed on this event |
14.4.15. transition
| Name | Type | Multiplicity | Description |
|---|---|---|---|
| name | attribute | optional | This is the name of the transition. Note that each transition leaving a node *must* have a distinct name. |
| to | attribute | required | This is the destination node's hierarchical name. For more information about hierarchical names, see Section 6.6.3, “ Hierarchical Names ” |
| condition | attribute or element text | optional | This is a guard condition expression. Use these condition attributes (or child elements) in decision nodes, or to calculate the available transitions on a token at run-time. Conditions are only allowed on transitions leaving decision nodes. |
| {action|script|create-timer|cancel-timer} | element | [0..*] | These are the actions that will execute when this transition occurs. Note that a transition's actions do not need to be put in an event (because there is only one). |
| exception-handler | element | [0..*] | This is a list of exception handlers that applies to every bug thrown by a delegation class from within this process node. |
14.4.16. action
| Name | Type | Multiplicity | Description |
|---|---|---|---|
| name | attribute | optional | This is the name of the action. When actions are given names, they can be looked up from the process definition. This can be useful for runtime actions and declaring actions only once. |
| class | attibute | either, a ref-name or an expression | This is the fully-qualified class name of the class that implements the org.jbpm.graph.def.ActionHandler interface. |
| ref-name | attibute | either this or class | This is the name of the referenced action. The content of this action is not processed further if a referenced action is specified. |
| expression | attribute | either this, a class or a ref-name | This is a jPDL expression that resolves to a method. See also Section 14.3, “ Expressions ” |
| accept-propagated-events | attribute | optional | The options are {yes|no|true|false}. The default is yes|true. If set to false, the action will only be executed on events that were fired on this action's element. For more information, read Section 6.5.3, “ Passing On Events ” |
| config-type | attribute | optional | The options are {field|bean|constructor|configuration-property}. This specifies how the action-object should be constructed and how the content of this element should be used as configuration information for that action-object. |
| async | attribute | {true|false} | 'async="true" is only supported in action when it is triggered in an event. The default value is false, which means that the action is executed in the thread of the execution. If set to true, a message will be sent to the command executor and that component will execute the action asynchronously in a separate transaction. |
| {content} | optional | The action's content can be used as the configuration information for custom action implementations. This allows to create reusable delegation classes. |
14.4.17. script
| Name | Type | Multiplicity | Description |
|---|---|---|---|
| name | attribute | optional | This is the name of the script-action. When actions are given names, they can be looked up from the process definition. This can be useful for runtime actions and declaring actions only once. |
| accept-propagated-events | attribute | optional [0..*] | {yes|no|true|false}. Default is yes|true. If set to false, the action will only be executed on events that were fired on this action's element. for more information, see Section 6.5.3, “ Passing On Events ” |
| expression | element | [0..1] | the beanshell script. If you don't specify variable elements, you can write the expression as the content of the script element (omitting the expression element tag). |
| variable | element | [0..*] | in variable for the script. If no in variables are specified, all the variables of the current token will be loaded into the script evaluation. Use the in variables if you want to limit the number of variables loaded into the script evaluation. |
14.4.18. expression
| Name | Type | Multiplicity | Description |
|---|---|---|---|
| {content} | a bean shell script. |
14.4.19. variable
| Name | Type | Multiplicity | Description |
|---|---|---|---|
| name | attribute | required | the process variable name |
| access | attribute | optional | default is read,write. It is a comma separated list of access specifiers. The only access specifiers used so far are read, write and required. "required" is only relevant when you are submitting a task variable to a process variable. |
| mapped-name | attribute | optional | this defaults to the variable name. it specifies a name to which the variable name is mapped. the meaning of the mapped-name is dependent on the context in which this element is used. For a script, this will be the script-variable-name. For a task controller, this will be the label of the task form parameter. For a process-state, this will be the variable name used in the sub-process. |
14.4.20. handler
| Name | Type | Multiplicity | Description |
|---|---|---|---|
| expression | attribute | either this or a class | A jPDL expression. The returned result is transformed to a string with the toString() method. The resulting string should match one of the leaving transitions. See also Section 14.3, “ Expressions ”. |
| class | attribute | either this or ref-name | the fully qualified class name of the class that implements the org.jbpm.graph.node.DecisionHandler interface. |
| config-type | attribute | optional | {field|bean|constructor|configuration-property}. Specifies how the action-object should be constructed and how the content of this element should be used as configuration information for that action-object. |
| {content} | optional | the content of the handler can be used as configuration information for your custom handler implementations. This allows the creation of reusable delegation classes. |
14.4.21. timer
| Name | Type | Multiplicity | Description |
|---|---|---|---|
| name | attribute | optional | the name of the timer. If no name is specified, the name of the enclosing node is taken. Note that every timer should have a unique name. |
| duedate | attribute | required | the duration (optionally expressed in business hours) that specifies the time period between the creation of the timer and the execution of the timer. See Section 11.1.1, “ Duration ” for the syntax. |
| repeat | attribute | optional | {duration | 'yes' | 'true'}after a timer has been executed on the duedate, 'repeat' optionally specifies duration between repeating timer executions until the node is left. If yes or true is specified, the same duration as for the due date is taken for the repeat. See Section 11.1.1, “ Duration ” for the syntax. |
| transition | attribute | optional | a transition-name to be taken when the timer executes, after firing the timer event and executing the action (if any). |
| cancel-event | attribute | optional | this attribute is only to be used in timers of tasks. it specifies the event on which the timer should be cancelled. by default, this is the task-end event, but it can be set to e.g. task-assign or task-start. The cancel-event types can be combined by specifying them in a comma separated list in the attribute. |
| {action|script|create-timer|cancel-timer} | element | [0..1] | an action that should be executed when this timer fires |
14.4.22. create-timer
| Name | Type | Multiplicity | Description |
|---|---|---|---|
| name | attribute | optional | the name of the timer. The name can be used for cancelling the timer with a cancel-timer action. |
| duedate | attribute | required | the duration (optionally expressed in business hours) that specifies the the time period between the creation of the timer and the execution of the timer. See Section 11.1.1, “ Duration ” for the syntax. |
| repeat | attribute | optional | {duration | 'yes' | 'true'}after a timer has been executed on the duedate, 'repeat' optionally specifies duration between repeating timer executions until the node is left. If yes of true is specified, the same duration as for the due date is taken for the repeat. See Section 11.1.1, “ Duration ” for the syntax. |
| transition | attribute | optional | a transition-name to be taken when the timer executes, after firing the the timer event and executing the action (if any). |
14.4.23. cancel-timer
| Name | Type | Multiplicity | Description |
|---|---|---|---|
| name | attribute | optional | the name of the timer to be cancelled. |
14.4.24. task
| Name | Type | Multiplicity | Description |
|---|---|---|---|
| name | attribute | optional | the name of the task. Named tasks can be referenced and looked up via the TaskMgmtDefinition |
| blocking | attribute | optional | {yes|no|true|false}, default is false. If blocking is set to true, the node cannot be left when the task is not finished. If set to false (default) a signal on the token is allowed to continue execution and leave the node. The default is set to false, because blocking is normally forced by the user interface. |
| signalling | attribute | optional | {yes|no|true|false}, default is true. If signalling is set to false, this task will never have the capability of trigering the continuation of the token. |
| duedate | attribute | optional | is a duration expressed in absolute or business hours as explained in Chapter 11, Business Calendar |
| swimlane | attribute | optional | reference to a swimlane. If a swimlane is specified on a task, the assignment is ignored. |
| priority | attribute | optional | one of {highest, high, normal, low, lowest}. alternatively, any integer number can be specified for the priority. FYI: (highest=1, lowest=5) |
| assignment | element | optional | describes a delegation that will assign the task to an actor when the task is created. |
| event | element | [0..*] | supported event types: {task-create|task-start|task-assign|task-end}. Especially for the task-assign we have added a non-persisted property previousActorId to the TaskInstance |
| exception-handler | element | [0..*] | a list of exception handlers that applies to all exceptions thrown by delegation classes thrown in this process node. |
| timer | element | [0..*] | specifies a timer that monitors the duration of an execution in this task. special for task timers, the cancel-event can be specified. by default the cancel-event is task-end, but it can be customized to e.g. task-assign or task-start. |
| controller | element | [0..1] | specifies how the process variables are transformed into task form parameters. the task form paramaters are used by the user interface to render a task form to the user. |
14.4.25. Swimlane
| Name | Type | Multiplicity | Description |
|---|---|---|---|
| name | attribute | required | the name of the swimlane. Swimlanes can be referenced and looked up via the TaskMgmtDefinition |
| assignment | element | [1..1] | specifies a the assignment of this swimlane. the assignment will be performed when the first task instance is created in this swimlane. |
14.4.26. Assignment
| Name | Type | Multiplicity | Description |
|---|---|---|---|
| expression | attribute | optional | For historical reasons, this attribute expression does not refer to the jPDL expression, but instead, it is an assignment expression for the jBPM identity component. For more information on how to write jBPM identity component expressions, see Section 8.11.2, “Assignment expressions”. Note that this implementation has a dependency on the jbpm identity component. |
| actor-id | attribute | optional | An actorId. Can be used in conjunction with pooled-actors. The actor-id is resolved as an expression. So you can refer to a fixed actorId like this actor-id="bobthebuilder". Or you can refer to a property or method that returns a String like this: actor-id="myVar.actorId", which will invoke the getActorId method on the task instance variable "myVar". |
| pooled-actors | attribute | optional | A comma separated list of actorIds. Can be used in conjunction with actor-id. A fixed set of pooled actors can be specified like this: pooled-actors="chicagobulls, pointersisters". The pooled-actors will be resolved as an expression. So you can also refer to a property or method that has to return, a String[], a Collection or a comma separated list of pooled actors. |
| class | attribute | optional | the fully qualified classname of an implementation of org.jbpm.taskmgmt.def.AssignmentHandler |
| config-type | attribute | optional | {field|bean|constructor|configuration-property}. Specifies how the assignment-handler-object should be constructed and how the content of this element should be used as configuration information for that assignment-handler-object. |
| {content} | optional | the content of the assignment-element can be used as configuration information for your AssignmentHandler implementations. This allows the creation of reusable delegation classes. |
14.4.27. Controller
| Name | Type | Multiplicity | Description |
|---|---|---|---|
| class | attribute | optional | the fully qualified classname of an implementation of org.jbpm.taskmgmt.def.TaskControllerHandler |
| config-type | attribute | optional | {field|bean|constructor|configuration-property}. This specifies how the assignment-handler-object should be constructed and how the content of this element should be used as configuration information for that assignment-handler-object. |
| {content} | This is either the content of the controller is the configuration of the specified task controller handler (if the class attribute is specified. if no task controller handler is specified, the content must be a list of variable elements. | ||
| variable | element | [0..*] | When no task controller handler is specified by the class attribute, the content of the controller element must be a list of variables. |
14.4.28. sub-process
| Name | Type | Multiplicity | Description |
|---|---|---|---|
| name | attribute | required | Name of the sub-process to call. Can be an EL expression which must evaluate to String. |
| version | attribute | optional | Version of the sub-process to call. If version is not specified, the process-state takes the latest version of the given process. |
| binding | attribute | optional | Defines the moment when the sub-process is resolved. The options are: {early|late}. The default is to resolve early, that is, at deployment time. If binding is defined as late, the process-state resolves the latest version of the given process at each execution. Late binding is senseless in combination with a fixed version; therefore, the version attribute is ignored if binding="late". |
14.4.29. condition
| Name | Type | Multiplicity | Description |
|---|---|---|---|
The option is {content}. For backwards compatibility, the condition can also be entered with the expression attribute, but that attribute has been deprecated since Version 3.2 | required | The contents of the condition element is a jPDL expression that should evaluate to a Boolean. A decision takes the first transition (as ordered in the processdefinition.xml file) for which the expression resolves to true. If none of the conditions resolve to true, the default leaving transition (the first one) will be taken. Conditions are only allowed on transitions leaving decision nodes. |
14.4.30. exception-handler
| Name | Type | Multiplicity | Description |
|---|---|---|---|
| exception-class | attribute | optional | This specifies the Java "throwable" class' fully-qualified name which should match this exception handler. If this attribute is not specified, it matches all exceptions (java.lang.Throwable). |
| action | element | [1..*] | This is a list of actions to be executed when an error is being handled by this exception handler. |
Chapter 15. Test Driven Development for Workflow
15.1. Introducing Test Driven Development for Workflow
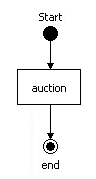
Figure 15.1. The auction test process
public class AuctionTest extends TestCase {

  // parse the process definition
  static ProcessDefinition auctionProcess =
      ProcessDefinition.parseParResource("org/jbpm/tdd/auction.par");

  // get the nodes for easy asserting
  static StartState start = auctionProcess.getStartState();
  static State auction = (State) auctionProcess.getNode("auction");
  static EndState end = (EndState) auctionProcess.getNode("end");

  // the process instance
  ProcessInstance processInstance;

  // the main path of execution
  Token token;

  public void setUp() {
    // create a new process instance for the given process definition
    processInstance = new ProcessInstance(auctionProcess);

    // the main path of execution is the root token
    token = processInstance.getRootToken();
  }

  public void testMainScenario() {
    // after process instance creation, the main path of
    // execution is positioned in the start state.
    assertSame(start, token.getNode());

    token.signal();

    // after the signal, the main path of execution has
    // moved to the auction state
    assertSame(auction, token.getNode());

    token.signal();

    // after the signal, the main path of execution has
    // moved to the end state and the process has ended
    assertSame(end, token.getNode());
    assertTrue(processInstance.hasEnded());
  }
}
15.2. XML Sources
ProcessDefinition. The easiest way to obtain a ProcessDefinition object is by parsing XML. With code completion switched on, type ProcessDefinition.parse. The various parsing methods will be displayed. There are three ways in which to write XML that can be parsed to a ProcessDefinition object:
15.2.1. Parsing a Process Archive
processdefinition.xml. The jBPM Process Designer plug-in reads and writes process archives.
static ProcessDefinition auctionProcess =
    ProcessDefinition.parseParResource("org/jbpm/tdd/auction.par");
15.2.2. Parsing an XML File
processdefinition.xml file by hand, use the JpdlXmlReader. Use an ant script to package the resulting ZIP file.
static ProcessDefinition auctionProcess =
    ProcessDefinition.parseXmlResource("org/jbpm/tdd/auction.xml");
15.2.3. Parsing an XML String
static ProcessDefinition auctionProcess =
    ProcessDefinition.parseXmlString(
  "<process-definition>" +
  "  <start-state name='start'>" +
  "    <transition to='auction'/>" +
  "  </start-state>" +
  "  <state name='auction'>" +
  "    <transition to='end'/>" +
  "  </state>" +
  "  <end-state name='end'/>" +
  "</process-definition>");
Appendix A. GNU Lesser General Public License 2.1
                  GNU LESSER GENERAL PUBLIC LICENSE
                       Version 2.1, February 1999

 Copyright (C) 1991, 1999 Free Software Foundation, Inc.
 51 Franklin Street, Fifth Floor, Boston, MA  02110-1301  USA
 Everyone is permitted to copy and distribute verbatim copies
 of this license document, but changing it is not allowed.

[This is the first released version of the Lesser GPL.  It also counts
 as the successor of the GNU Library Public License, version 2, hence
 the version number 2.1.]

                            Preamble

  The licenses for most software are designed to take away your
freedom to share and change it.  By contrast, the GNU General Public
Licenses are intended to guarantee your freedom to share and change
free software--to make sure the software is free for all its users.

  This license, the Lesser General Public License, applies to some
specially designated software packages--typically libraries--of the
Free Software Foundation and other authors who decide to use it.  You
can use it too, but we suggest you first think carefully about whether
this license or the ordinary General Public License is the better
strategy to use in any particular case, based on the explanations below.

  When we speak of free software, we are referring to freedom of use,
not price.  Our General Public Licenses are designed to make sure that
you have the freedom to distribute copies of free software (and charge
for this service if you wish); that you receive source code or can get
it if you want it; that you can change the software and use pieces of
it in new free programs; and that you are informed that you can do
these things.

  To protect your rights, we need to make restrictions that forbid
distributors to deny you these rights or to ask you to surrender these
rights.  These restrictions translate to certain responsibilities for
you if you distribute copies of the library or if you modify it.

  For example, if you distribute copies of the library, whether gratis
or for a fee, you must give the recipients all the rights that we gave
you.  You must make sure that they, too, receive or can get the source
code.  If you link other code with the library, you must provide
complete object files to the recipients, so that they can relink them
with the library after making changes to the library and recompiling
it.  And you must show them these terms so they know their rights.

  We protect your rights with a two-step method: (1) we copyright the
library, and (2) we offer you this license, which gives you legal
permission to copy, distribute and/or modify the library.

  To protect each distributor, we want to make it very clear that
there is no warranty for the free library.  Also, if the library is
modified by someone else and passed on, the recipients should know
that what they have is not the original version, so that the original
author's reputation will not be affected by problems that might be
introduced by others.

  Finally, software patents pose a constant threat to the existence of
any free program.  We wish to make sure that a company cannot
effectively restrict the users of a free program by obtaining a
restrictive license from a patent holder.  Therefore, we insist that
any patent license obtained for a version of the library must be
consistent with the full freedom of use specified in this license.

  Most GNU software, including some libraries, is covered by the
ordinary GNU General Public License.  This license, the GNU Lesser
General Public License, applies to certain designated libraries, and
is quite different from the ordinary General Public License.  We use
this license for certain libraries in order to permit linking those
libraries into non-free programs.

  When a program is linked with a library, whether statically or using
a shared library, the combination of the two is legally speaking a
combined work, a derivative of the original library.  The ordinary
General Public License therefore permits such linking only if the
entire combination fits its criteria of freedom.  The Lesser General
Public License permits more lax criteria for linking other code with
the library.

  We call this license the "Lesser" General Public License because it
does Less to protect the user's freedom than the ordinary General
Public License.  It also provides other free software developers Less
of an advantage over competing non-free programs.  These disadvantages
are the reason we use the ordinary General Public License for many
libraries.  However, the Lesser license provides advantages in certain
special circumstances.

  For example, on rare occasions, there may be a special need to
encourage the widest possible use of a certain library, so that it becomes
a de-facto standard.  To achieve this, non-free programs must be
allowed to use the library.  A more frequent case is that a free
library does the same job as widely used non-free libraries.  In this
case, there is little to gain by limiting the free library to free
software only, so we use the Lesser General Public License.

  In other cases, permission to use a particular library in non-free
programs enables a greater number of people to use a large body of
free software.  For example, permission to use the GNU C Library in
non-free programs enables many more people to use the whole GNU
operating system, as well as its variant, the GNU/Linux operating
system.

  Although the Lesser General Public License is Less protective of the
users' freedom, it does ensure that the user of a program that is
linked with the Library has the freedom and the wherewithal to run
that program using a modified version of the Library.

  The precise terms and conditions for copying, distribution and
modification follow.  Pay close attention to the difference between a
"work based on the library" and a "work that uses the library".  The
former contains code derived from the library, whereas the latter must
be combined with the library in order to run.

                  GNU LESSER GENERAL PUBLIC LICENSE
   TERMS AND CONDITIONS FOR COPYING, DISTRIBUTION AND MODIFICATION

  0. This License Agreement applies to any software library or other
program which contains a notice placed by the copyright holder or
other authorized party saying it may be distributed under the terms of
this Lesser General Public License (also called "this License").
Each licensee is addressed as "you".

  A "library" means a collection of software functions and/or data
prepared so as to be conveniently linked with application programs
(which use some of those functions and data) to form executables.

  The "Library", below, refers to any such software library or work
which has been distributed under these terms.  A "work based on the
Library" means either the Library or any derivative work under
copyright law: that is to say, a work containing the Library or a
portion of it, either verbatim or with modifications and/or translated
straightforwardly into another language.  (Hereinafter, translation is
included without limitation in the term "modification".)

  "Source code" for a work means the preferred form of the work for
making modifications to it.  For a library, complete source code means
all the source code for all modules it contains, plus any associated
interface definition files, plus the scripts used to control compilation
and installation of the library.

  Activities other than copying, distribution and modification are not
covered by this License; they are outside its scope.  The act of
running a program using the Library is not restricted, and output from
such a program is covered only if its contents constitute a work based
on the Library (independent of the use of the Library in a tool for
writing it).  Whether that is true depends on what the Library does
and what the program that uses the Library does.

  1. You may copy and distribute verbatim copies of the Library's
complete source code as you receive it, in any medium, provided that
you conspicuously and appropriately publish on each copy an
appropriate copyright notice and disclaimer of warranty; keep intact
all the notices that refer to this License and to the absence of any
warranty; and distribute a copy of this License along with the
Library.

  You may charge a fee for the physical act of transferring a copy,
and you may at your option offer warranty protection in exchange for a
fee.

  2. You may modify your copy or copies of the Library or any portion
of it, thus forming a work based on the Library, and copy and
distribute such modifications or work under the terms of Section 1
above, provided that you also meet all of these conditions:

    a) The modified work must itself be a software library.

    b) You must cause the files modified to carry prominent notices
    stating that you changed the files and the date of any change.

    c) You must cause the whole of the work to be licensed at no
    charge to all third parties under the terms of this License.

    d) If a facility in the modified Library refers to a function or a
    table of data to be supplied by an application program that uses
    the facility, other than as an argument passed when the facility
    is invoked, then you must make a good faith effort to ensure that,
    in the event an application does not supply such function or
    table, the facility still operates, and performs whatever part of
    its purpose remains meaningful.

    (For example, a function in a library to compute square roots has
    a purpose that is entirely well-defined independent of the
    application.  Therefore, Subsection 2d requires that any
    application-supplied function or table used by this function must
    be optional: if the application does not supply it, the square
    root function must still compute square roots.)

These requirements apply to the modified work as a whole.  If
identifiable sections of that work are not derived from the Library,
and can be reasonably considered independent and separate works in
themselves, then this License, and its terms, do not apply to those
sections when you distribute them as separate works.  But when you
distribute the same sections as part of a whole which is a work based
on the Library, the distribution of the whole must be on the terms of
this License, whose permissions for other licensees extend to the
entire whole, and thus to each and every part regardless of who wrote
it.

Thus, it is not the intent of this section to claim rights or contest
your rights to work written entirely by you; rather, the intent is to
exercise the right to control the distribution of derivative or
collective works based on the Library.

In addition, mere aggregation of another work not based on the Library
with the Library (or with a work based on the Library) on a volume of
a storage or distribution medium does not bring the other work under
the scope of this License.

  3. You may opt to apply the terms of the ordinary GNU General Public
License instead of this License to a given copy of the Library.  To do
this, you must alter all the notices that refer to this License, so
that they refer to the ordinary GNU General Public License, version 2,
instead of to this License.  (If a newer version than version 2 of the
ordinary GNU General Public License has appeared, then you can specify
that version instead if you wish.)  Do not make any other change in
these notices.

  Once this change is made in a given copy, it is irreversible for
that copy, so the ordinary GNU General Public License applies to all
subsequent copies and derivative works made from that copy.

  This option is useful when you wish to copy part of the code of
the Library into a program that is not a library.

  4. You may copy and distribute the Library (or a portion or
derivative of it, under Section 2) in object code or executable form
under the terms of Sections 1 and 2 above provided that you accompany
it with the complete corresponding machine-readable source code, which
must be distributed under the terms of Sections 1 and 2 above on a
medium customarily used for software interchange.

  If distribution of object code is made by offering access to copy
from a designated place, then offering equivalent access to copy the
source code from the same place satisfies the requirement to
distribute the source code, even though third parties are not
compelled to copy the source along with the object code.

  5. A program that contains no derivative of any portion of the
Library, but is designed to work with the Library by being compiled or
linked with it, is called a "work that uses the Library".  Such a
work, in isolation, is not a derivative work of the Library, and
therefore falls outside the scope of this License.

  However, linking a "work that uses the Library" with the Library
creates an executable that is a derivative of the Library (because it
contains portions of the Library), rather than a "work that uses the
library".  The executable is therefore covered by this License.
Section 6 states terms for distribution of such executables.

  When a "work that uses the Library" uses material from a header file
that is part of the Library, the object code for the work may be a
derivative work of the Library even though the source code is not.
Whether this is true is especially significant if the work can be
linked without the Library, or if the work is itself a library.  The
threshold for this to be true is not precisely defined by law.

  If such an object file uses only numerical parameters, data
structure layouts and accessors, and small macros and small inline
functions (ten lines or less in length), then the use of the object
file is unrestricted, regardless of whether it is legally a derivative
work.  (Executables containing this object code plus portions of the
Library will still fall under Section 6.)

  Otherwise, if the work is a derivative of the Library, you may
distribute the object code for the work under the terms of Section 6.
Any executables containing that work also fall under Section 6,
whether or not they are linked directly with the Library itself.

  6. As an exception to the Sections above, you may also combine or
link a "work that uses the Library" with the Library to produce a
work containing portions of the Library, and distribute that work
under terms of your choice, provided that the terms permit
modification of the work for the customer's own use and reverse
engineering for debugging such modifications.

  You must give prominent notice with each copy of the work that the
Library is used in it and that the Library and its use are covered by
this License.  You must supply a copy of this License.  If the work
during execution displays copyright notices, you must include the
copyright notice for the Library among them, as well as a reference
directing the user to the copy of this License.  Also, you must do one
of these things:

    a) Accompany the work with the complete corresponding
    machine-readable source code for the Library including whatever
    changes were used in the work (which must be distributed under
    Sections 1 and 2 above); and, if the work is an executable linked
    with the Library, with the complete machine-readable "work that
    uses the Library", as object code and/or source code, so that the
    user can modify the Library and then relink to produce a modified
    executable containing the modified Library.  (It is understood
    that the user who changes the contents of definitions files in the
    Library will not necessarily be able to recompile the application
    to use the modified definitions.)

    b) Use a suitable shared library mechanism for linking with the
    Library.  A suitable mechanism is one that (1) uses at run time a
    copy of the library already present on the user's computer system,
    rather than copying library functions into the executable, and (2)
    will operate properly with a modified version of the library, if
    the user installs one, as long as the modified version is
    interface-compatible with the version that the work was made with.

    c) Accompany the work with a written offer, valid for at
    least three years, to give the same user the materials
    specified in Subsection 6a, above, for a charge no more
    than the cost of performing this distribution.

    d) If distribution of the work is made by offering access to copy
    from a designated place, offer equivalent access to copy the above
    specified materials from the same place.

    e) Verify that the user has already received a copy of these
    materials or that you have already sent this user a copy.

  For an executable, the required form of the "work that uses the
Library" must include any data and utility programs needed for
reproducing the executable from it.  However, as a special exception,
the materials to be distributed need not include anything that is
normally distributed (in either source or binary form) with the major
components (compiler, kernel, and so on) of the operating system on
which the executable runs, unless that component itself accompanies
the executable.

  It may happen that this requirement contradicts the license
restrictions of other proprietary libraries that do not normally
accompany the operating system.  Such a contradiction means you cannot
use both them and the Library together in an executable that you
distribute.

  7. You may place library facilities that are a work based on the
Library side-by-side in a single library together with other library
facilities not covered by this License, and distribute such a combined
library, provided that the separate distribution of the work based on
the Library and of the other library facilities is otherwise
permitted, and provided that you do these two things:

    a) Accompany the combined library with a copy of the same work
    based on the Library, uncombined with any other library
    facilities.  This must be distributed under the terms of the
    Sections above.

    b) Give prominent notice with the combined library of the fact
    that part of it is a work based on the Library, and explaining
    where to find the accompanying uncombined form of the same work.

  8. You may not copy, modify, sublicense, link with, or distribute
the Library except as expressly provided under this License.  Any
attempt otherwise to copy, modify, sublicense, link with, or
distribute the Library is void, and will automatically terminate your
rights under this License.  However, parties who have received copies,
or rights, from you under this License will not have their licenses
terminated so long as such parties remain in full compliance.

  9. You are not required to accept this License, since you have not
signed it.  However, nothing else grants you permission to modify or
distribute the Library or its derivative works.  These actions are
prohibited by law if you do not accept this License.  Therefore, by
modifying or distributing the Library (or any work based on the
Library), you indicate your acceptance of this License to do so, and
all its terms and conditions for copying, distributing or modifying
the Library or works based on it.

  10. Each time you redistribute the Library (or any work based on the
Library), the recipient automatically receives a license from the
original licensor to copy, distribute, link with or modify the Library
subject to these terms and conditions.  You may not impose any further
restrictions on the recipients' exercise of the rights granted herein.
You are not responsible for enforcing compliance by third parties with
this License.

  11. If, as a consequence of a court judgment or allegation of patent
infringement or for any other reason (not limited to patent issues),
conditions are imposed on you (whether by court order, agreement or
otherwise) that contradict the conditions of this License, they do not
excuse you from the conditions of this License.  If you cannot
distribute so as to satisfy simultaneously your obligations under this
License and any other pertinent obligations, then as a consequence you
may not distribute the Library at all.  For example, if a patent
license would not permit royalty-free redistribution of the Library by
all those who receive copies directly or indirectly through you, then
the only way you could satisfy both it and this License would be to
refrain entirely from distribution of the Library.

If any portion of this section is held invalid or unenforceable under any
particular circumstance, the balance of the section is intended to apply,
and the section as a whole is intended to apply in other circumstances.

It is not the purpose of this section to induce you to infringe any
patents or other property right claims or to contest validity of any
such claims; this section has the sole purpose of protecting the
integrity of the free software distribution system which is
implemented by public license practices.  Many people have made
generous contributions to the wide range of software distributed
through that system in reliance on consistent application of that
system; it is up to the author/donor to decide if he or she is willing
to distribute software through any other system and a licensee cannot
impose that choice.

This section is intended to make thoroughly clear what is believed to
be a consequence of the rest of this License.

  12. If the distribution and/or use of the Library is restricted in
certain countries either by patents or by copyrighted interfaces, the
original copyright holder who places the Library under this License may add
an explicit geographical distribution limitation excluding those countries,
so that distribution is permitted only in or among countries not thus
excluded.  In such case, this License incorporates the limitation as if
written in the body of this License.

  13. The Free Software Foundation may publish revised and/or new
versions of the Lesser General Public License from time to time.
Such new versions will be similar in spirit to the present version,
but may differ in detail to address new problems or concerns.

Each version is given a distinguishing version number.  If the Library
specifies a version number of this License which applies to it and
"any later version", you have the option of following the terms and
conditions either of that version or of any later version published by
the Free Software Foundation.  If the Library does not specify a
license version number, you may choose any version ever published by
the Free Software Foundation.

  14. If you wish to incorporate parts of the Library into other free
programs whose distribution conditions are incompatible with these,
write to the author to ask for permission.  For software which is
copyrighted by the Free Software Foundation, write to the Free
Software Foundation; we sometimes make exceptions for this.  Our
decision will be guided by the two goals of preserving the free status
of all derivatives of our free software and of promoting the sharing
and reuse of software generally.

                            NO WARRANTY

  15. BECAUSE THE LIBRARY IS LICENSED FREE OF CHARGE, THERE IS NO
WARRANTY FOR THE LIBRARY, TO THE EXTENT PERMITTED BY APPLICABLE LAW.
EXCEPT WHEN OTHERWISE STATED IN WRITING THE COPYRIGHT HOLDERS AND/OR
OTHER PARTIES PROVIDE THE LIBRARY "AS IS" WITHOUT WARRANTY OF ANY
KIND, EITHER EXPRESSED OR IMPLIED, INCLUDING, BUT NOT LIMITED TO, THE
IMPLIED WARRANTIES OF MERCHANTABILITY AND FITNESS FOR A PARTICULAR
PURPOSE.  THE ENTIRE RISK AS TO THE QUALITY AND PERFORMANCE OF THE
LIBRARY IS WITH YOU.  SHOULD THE LIBRARY PROVE DEFECTIVE, YOU ASSUME
THE COST OF ALL NECESSARY SERVICING, REPAIR OR CORRECTION.

  16. IN NO EVENT UNLESS REQUIRED BY APPLICABLE LAW OR AGREED TO IN
WRITING WILL ANY COPYRIGHT HOLDER, OR ANY OTHER PARTY WHO MAY MODIFY
AND/OR REDISTRIBUTE THE LIBRARY AS PERMITTED ABOVE, BE LIABLE TO YOU
FOR DAMAGES, INCLUDING ANY GENERAL, SPECIAL, INCIDENTAL OR
CONSEQUENTIAL DAMAGES ARISING OUT OF THE USE OR INABILITY TO USE THE
LIBRARY (INCLUDING BUT NOT LIMITED TO LOSS OF DATA OR DATA BEING
RENDERED INACCURATE OR LOSSES SUSTAINED BY YOU OR THIRD PARTIES OR A
FAILURE OF THE LIBRARY TO OPERATE WITH ANY OTHER SOFTWARE), EVEN IF
SUCH HOLDER OR OTHER PARTY HAS BEEN ADVISED OF THE POSSIBILITY OF SUCH
DAMAGES.

                     END OF TERMS AND CONDITIONS

           How to Apply These Terms to Your New Libraries

  If you develop a new library, and you want it to be of the greatest
possible use to the public, we recommend making it free software that
everyone can redistribute and change.  You can do so by permitting
redistribution under these terms (or, alternatively, under the terms of the
ordinary General Public License).

  To apply these terms, attach the following notices to the library.  It is
safest to attach them to the start of each source file to most effectively
convey the exclusion of warranty; and each file should have at least the
"copyright" line and a pointer to where the full notice is found.

    <one line to give the library's name and a brief idea of what it does.>
    Copyright (C) <year>  <name of author>

    This library is free software; you can redistribute it and/or
    modify it under the terms of the GNU Lesser General Public
    License as published by the Free Software Foundation; either
    version 2.1 of the License, or (at your option) any later version.

    This library is distributed in the hope that it will be useful,
    but WITHOUT ANY WARRANTY; without even the implied warranty of
    MERCHANTABILITY or FITNESS FOR A PARTICULAR PURPOSE.  See the GNU
    Lesser General Public License for more details.

    You should have received a copy of the GNU Lesser General Public
    License along with this library; if not, write to the Free Software
    Foundation, Inc., 51 Franklin Street, Fifth Floor, Boston, MA  02110-1301  USA

Also add information on how to contact you by electronic and paper mail.

You should also get your employer (if you work as a programmer) or your
school, if any, to sign a "copyright disclaimer" for the library, if
necessary.  Here is a sample; alter the names:

  Yoyodyne, Inc., hereby disclaims all copyright interest in the
  library `Frob' (a library for tweaking knobs) written by James Random Hacker.

  <signature of Ty Coon>, 1 April 1990
  Ty Coon, President of Vice

That's all there is to it!
Appendix B. Revision History
| Revision History | |||
|---|---|---|---|
| Revision 5.3.1-0.402 | Fri Oct 25 2013 | ||
| |||
| Revision 5.3.1-0 | Thu Jan 10 2013 | ||
| |||
| Revision 5.3.0-0 | Thu Mar 29 2012 | ||
| |||
| Revision 5.2.0-0 | Wed Jun 29 2011 | ||
| |||
| Revision 5.1.0-0 | Fri Feb 18 2011 | ||
| |||
| Revision 5.0.2-0 | Wed May 26 2010 | ||
| |||
| Revision 5.0.1-0 | Tue Apr 20 2010 | ||
| |||
| Revision 5.0.0-0 | Sat Jan 30 2010 | ||
| |||