Red Hat Enterprise Linux
Using the para-virtualized drivers Microsoft Windows® Guide
Edition 1.1
Copyright © 2008, 2009 Red Hat, Incorporated.
Abstract
Chapter 1. Overview
Note
Important
virtio drivers, are covered by the Red Hat Enterprise Linux Virtualization Guide.
Chapter 2. Requirements and restrictions
- one or more of the para-virtualized Windows drivers packages. The package installation process is described in Section 3.2, “Installing the para-virtualized drivers”. You only require the packages for the guest architectures you run.
xenpv-win-32bit– The driver package for 32 bit Windows versions.xenpv-win-32bit-debug– The debugging driver package for 32 bit Windows versions.xenpv-win-64bit– The driver package for 64 bit Windows versions.xenpv-win-64bit-debug– The debugging driver for 64 bit Windows versions.
- a system running Red Hat Enterprise Linux 5.2, or later, for the host.
- at least 10MB of free space on each Windows guest.
- administrator level access to the Windows virtual machine.
- root or
sudoaccess to the Red Hat Enterprise Linux host.
This section covers the supported Windows virtualized guest operating systems.
- Windows Server 2003 Service Pack 2 – 32 bit
- Windows Server 2003 Service Pack 2 – 64 bit
- Windows Server 2003 R2 Service Pack 2 – 32 bit
- Windows Server 2003 R2 Service Pack 2 – 64 bit
- Windows XP – Service Pack 2 – 32 bit
- Windows XP – Service Pack 3 – 32 bit
- Windows XP Professional x64 – Service Pack 1 – 64 bit
- Windows XP Professional x64 – Service Pack 2 – 64 bit
- Windows Vista – 32 bit
- Windows Vista – 64 bit
- Windows Vista Service Pack 1 – 32 bit
- Windows Vista Service Pack 1 – 64 bit
Important
Some additional technical restrictions apply to the para-virtualized drivers.
%SYSTEMDRIVE% environment variable in Windows, is the device which contains boot information and system files for the Windows operating system. This device, usually labeled C: drive, contains the Windows directory and cannot use the para-virtualized drivers. The drivers can use a separate partition, logical volume or other physical block device to store applications and non-Windows data. This limitation is due to the limitations of the qemu package.
C: drivewhich contains Windows system files and uses the default, fully virtualized device drivers.D: drivewhich contains applications and utilizes the para-virtualized drivers.
Chapter 3. Installing and configuring the para-virtualized drivers
Important
Windows directory cannot use the para-virtualized drivers.
3.1. Creating the guest
3.2. Installing the para-virtualized drivers
virsh or virt-manager.
- hosting the files on a network accessible to the guest, or
- by creating a virtualized CD-ROM device on the guest of the installation disk .iso file.
yum. The package names in the list below are to assist you with choosing the right package for your guest.
Para-virtualized drivers package names
xenpv-win-32bit- The driver package for the 32 bit versions of Windows.
xenpv-win-32bit-debug- The package for debugging the drivers for the 32 bit versions of Windows.
xenpv-win-64bit- The driver package for the 64 bit versions of Windows.
xenpv-win-64bit-debug- The package for debugging the drivers for the 64 bit versions of Windows.
xenpv-win-64bit-debug) are used for debugging the para-virtualized driver inside of the windows guests. These drivers provide users with more verbose reporting and additional tools for debugging and data logging.
.iso file containing the drivers, use yum on a host with the Virtualization channel in RHN enabled.
# yum install xenpv-win-32bitFor the 64 bit package execute the follow command:
# yum install xenpv-win-64bitThis extracts the packaged files to the
/usr/share/xenpv-win directory. The Bash output below shows the contents of a /usr/share/xenpv-win directory with both 32 bit and 64 bit drivers and the debugging packages installed. Note the symbolic links (denoted by the -> symbol) linking to the newest version of the para-virtualized drivers.
$ ls -al /usr/share/xenpv-win
total 13472
drwxr-xr-x   2 root root    4096 Jul 14 17:29 .
drwxr-xr-x 214 root root    4096 Jul 14 17:29 ..
-rw-r--r--   1 root root 3325952 Jul 11 14:58 xenpv-win-32bit-0.97.1.iso
-rw-r--r--   1 root root 3422208 Jul 11 14:58 xenpv-win-32bit-debug-0.97.1.iso
lrwxrwxrwx   1 root root      32 Jul 14 17:29 xenpv-win-32bit-debug.iso -> xenpv-win-32bit-debug-0.97.1.iso
lrwxrwxrwx   1 root root      26 Jul 14 17:29 xenpv-win-32bit.iso -> xenpv-win-32bit-0.97.1.iso
-rw-r--r--   1 root root 3454976 Jul 11 14:58 xenpv-win-64bit-0.97.1.iso
-rw-r--r--   1 root root 3522560 Jul 11 14:58 xenpv-win-64bit-debug-0.97.1.iso
lrwxrwxrwx   1 root root      32 Jul 14 17:29 xenpv-win-64bit-debug.iso -> xenpv-win-64bit-debug-0.97.1.iso
lrwxrwxrwx   1 root root      26 Jul 14 17:29 xenpv-win-64bit.iso -> xenpv-win-64bit-0.97.1.iso
The .iso files in the
/usr/share/xenpv-win directory are mounted as virtual CD-ROM devices for the Windows guests in order to install the drivers.
virt-manager (graphical) or virsh (command line).
Follow Procedure 3.1, “Using virt-manager to mount a CD-ROM image for a Windows guest” to add a CD-ROM image with virt-manager.
Procedure 3.1. Using virt-manager to mount a CD-ROM image for a Windows guest
- Open
virt-manager, select your virtualized guest from the list of virtual machines and press the button. - Click the button in the Details panel.
- This opens a wizard for adding the new device. Select Storage device from the drop down menu, then click .

- Choose the Simple File option and set the file location of the para-virtualized drivers .iso file. The location of the .iso files is
/usr/share/xenpv-winif you usedyumto install the para-virtualized driver packages.If the drivers are stored physical CD, use the Normal Disk Partition option.Set the Device type to IDE cdrom and click to proceed.
- The disk has been assigned and is available for the guest once the guest is started. Click to close the wizard or back if you made a mistake.

To mount .iso images with virsh guests must be either active (on) or inactive (off) state. For inactive guests refer to Appendix A, Using virsh to mount a CD-ROM image on an inactive domain. For mounting the CD-ROM image on an active guest with virsh, follow Procedure 3.2, “Mounting the driver installation CD-ROM image with virsh on an active guest”.
Procedure 3.2. Mounting the driver installation CD-ROM image with virsh on an active guest
- Determine the required parameters, including:
- An active domain. In the example the domain is called
w2k3_32. - An unallocated block device label. The example in the next step uses
hdc, ifhdcis already allocated choose the next unallocated letter for examplehdd. You can verify which drive labels are in use by reading the configuration file generated with thevirsh dumpxml w2k3_32 w2k3_32guest.xml. This command generates a configuration file calledw2k3_32guest.xmlin the current directory. - The correct driver for your windows guest. In the example the
xenpv-win-32bit.isofrom thexenpv-win-32bitpackage.
- Use the
virshcommand with the parameters modified for your guest.# virsh attach-disk
w2k3_32/usr/share/xenpv-win/xenpv-win-32bit.isohdc--driver file --type cdrom --mode readonly
Warning
| Executable file name | Description |
|---|---|
xenpv-win-32bit.exe | The para-virtualized driver package for 32 bit Microsoft Windows installations. This covers most installations. |
xenpv-win-32bit-debug.exe | The para-virtualized driver debugging package for 32 bit Microsoft Windows installations. |
xenpv-win-64bit.exe | The para-virtualized driver package for 64 bit Microsoft Windows installations. This covers Windows XP Professional® x64 (Service Pack 1 and Service Pack 2), Windows Vista® 64 bit (release and Service Pack 1), Windows Server® 2003 (64 bit) Service Pack 2 and Windows Server® 2003 R2 (64 bit) Service Pack 2. |
xenpv-win-64bit-debug.exe | The para-virtualized driver debugging package for Microsoft Windows 64 bit installations. |
Important
Procedure 3.3. Installing the para-virtualized drivers on the Windows® guest
- The installer may start automatically if you added the virtualized CD-ROM to an active guest. If this occurs skip this step and continue from step 2.Start the installer by double clicking the CD drive (
Ein the example below).If Autorun is disabled, start the installer by double clicking the.exefile on the CD.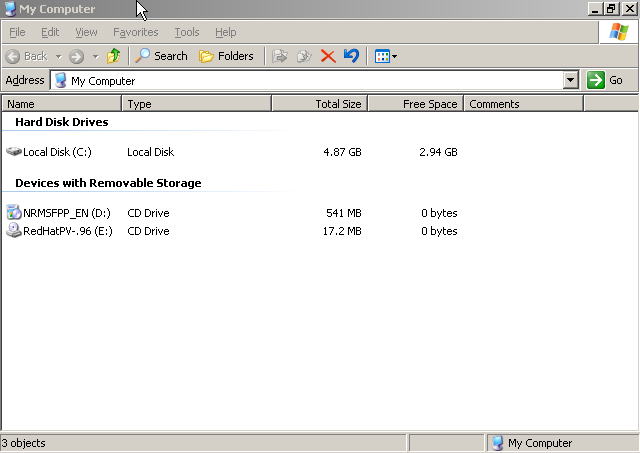
- Once the file is open, the Welcome screen appears. Select to proceed.

- You are now prompted to select the type of install you want.The
Completeoption installs the network driver, disk driver and source code.TheCustomoption opens another dialog box from which you can choose individual components to install.Once you have made your selection, click to continue.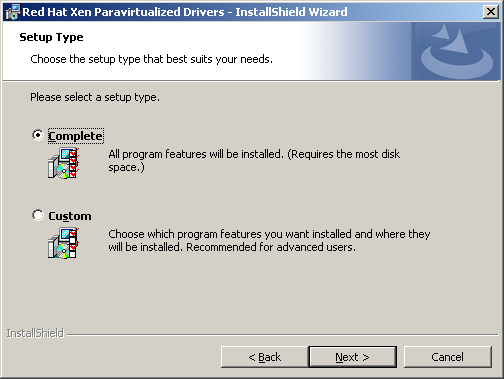
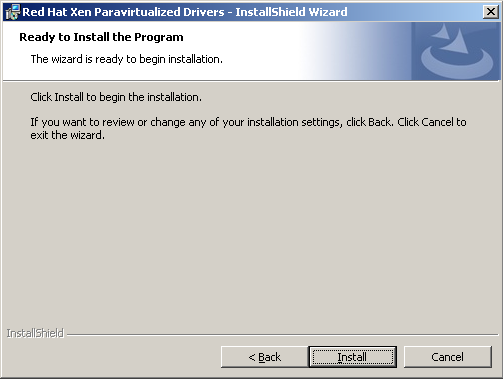
- Select to complete the installation.
- The unsigned driver warning (Network and Disk driver has not been digitally signed) dialog box pops up. Select to install drivers. This dialog box will appear four times, twice for each driver,
rhelscsiand thenrhelnet.
Note
Future releases of Red Hat Para-virtualized Driver for Microsoft Windows will be digitally signed by Windows Hardware Quality Labs (WHQL). Once certified the warning will not appear. - Select Show the README file to view the release notes for the drivers.Click to complete the installation.

- Reboot the guest.
3.3. Post-installation host configuration
This section covers the procedure for adding and modifying disk entries to enable the para-virtualized drivers. Each guest requires modification in order to utilize the drivers.
Warning
/etc/xen directory with the libvirt based tools, virsh and virt-manager. Manually editing configuration files in the /etc/xen directory is not recommended and could render your guests inoperable.
virsh dumpxml to export the configuration of the virtual machine.
# virsh dumpxml virt-machine-name > guest.xml
guest.xml file locate the section containing the disk configuration should resemble this example. This example uses a hard disk partition called /dev/hda6.
<disk type='file' device='disk'>
  <driver name='file'/>
  <source file='/var/lib/xen/images/disk1.img'/>
  <target dev='hda'/>
</disk>
<disk type='file' device='disk'>
  <driver name='file'/>
  <source file='/dev/hda6'/>
  <target dev='hdb'/>
</disk>
file” to “tap:aio” and change the target device from “hdb” to “xvdb”.
<disk type='file' device='disk'>
  <driver name='file'/>
  <source file='/var/lib/xen/images/disk1.img'/>
  <target dev='hda'/>
</disk>
<disk type='file' device='disk'>
  <driver name='tap' type='aio'/>
  <source file='/dev/hda6'/>
  <target dev='xvdb'/>
</disk>
guest.xml.
# virsh define guest.xml
virt-manager or virsh. To restart a guest named virt-machine-name:
# virsh reboot virt-machine-name
Chapter 4. Administration tasks
4.1. Hot plugging para-virtualized disks
virsh command modifying <domain>, <disk image file> and <device node>:
# virsh attach-disk --driver tap --subdriver aio <domain> <disk image file> <device node>Using
virsh to attach a new, hot plugged disk, labeled /var/lib/xen/images/wxp32-2.img, with the alias /dev/xvdb to the guest named wxp32:
# virsh attach-disk --driver tap --subdriver aio wxp32 /var/lib/xen/images/wxp32-2.img /dev/xvdbTo detach a disk dynamically, use
virsh with the detach-disk option:
virsh detach-disk <domain> <device node>This example detaches a disk,
/dev/xvdb, from a guest named wxp32:
# virsh detach-disk wxp32 /dev/xvdb
4.2. Adding para-virtualized network devices
Procedure 4.1. Configuring additional para-virtualized network devices
- Follow the standard driver installation procedure from Chapter 3, Installing and configuring the para-virtualized drivers.
- Once the installation is complete and the para-virtualized drivers are activated, open Device Manager on your guest. Notice that there are two network devices: one labeled "rhelnet" and one labeled "Realtek". The Realtek device is the fully virtualized network device created by Xen. The Realtek device for the primary network interface should be marked disabled by the installation, if not disable it now.
- Shut down the guest before attaching additional network interface controllers.
- Add network interface controllers as required.
- Boot the guest and log in.
- Complete all "Install new hardware wizard" windows which appear after you have logged in.
- Open Device Manager. Two new network interface devices appear. Every new physical device has a "rhelnet" device and a "Realtek" device in Device Manager. Right click on every new Realtek device and select .
- Your guest now uses the para-virtualized drivers for all network interface devices.
Chapter 5. Upgrading the para-virtualized drivers
xenpv-win-32bit- The driver package for the 32 bit versions of Windows.
xenpv-win-32bit-debug- The package for debugging the drivers for the 32 bit versions of Windows.
xenpv-win-64bit- The driver package for the 64 bit versions of Windows.
xenpv-win-64bit-debug- The package for debugging the drivers for the 64 bit versions of Windows.
Warning
yum command to install the packaged .iso files to the /usr/share/xenpv-win directory. Modify xenpv-win-32bit with the package name you require from the list.
# yum update xenpv-win-32bit
yum completes, create a virtualized CD-ROM device containing the updated .iso file for the guest.
virsh” to attach a CD-ROM image with virsh.
Procedure 5.1. Attach the CD-ROM image with virsh
- Use the
virshcommand with the parameters modified for your guest. Refer to Mounting the image with virsh for more information on this step.# virsh attach-disk
w2k3_32/usr/share/xenpv-win/xenpv-win-32bit.isohdc--driver file --type cdrom --mode readonly - Open on the guest and open the CD drive (
Ein the example below). Double click the executable file for your architecture on the CD-ROM drive. The installer may automatically start when the CD-ROM is detected. This starts the installer process which is described in Section 3.2, “Installing the para-virtualized drivers”
virt-managerYou can re-use existing virtualized CD-ROM devices to upgrading the drivers. To re-use a CD-ROM device with virt-manager:
Procedure 5.2. Re-using a CD-ROM device with virt-manager
- Select a CD-ROM device from the list that you no longer need and click the button.
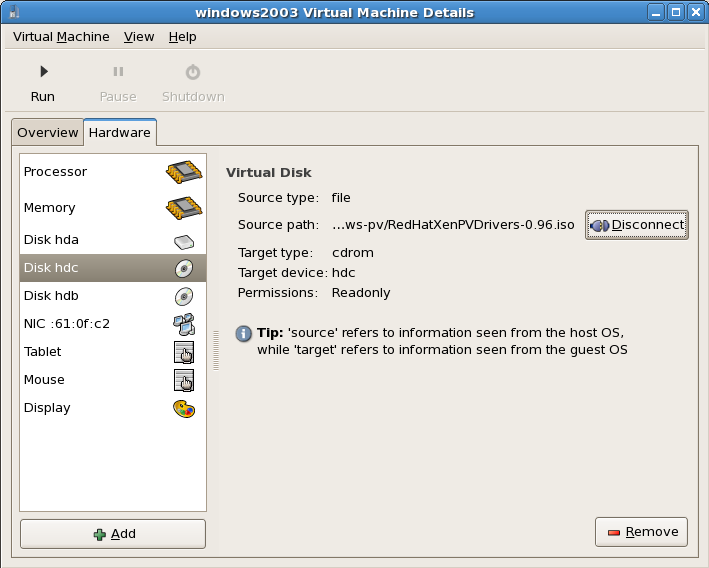
- Click to choose another disk path.

- In the pop up window, choose the location of the para-virtualized drivers .iso image and select to allow the guest access on the next boot.

Chapter 6. Uninstalling the para-virtualized drivers
Procedure 6.1. Removing the para-virtualized drivers
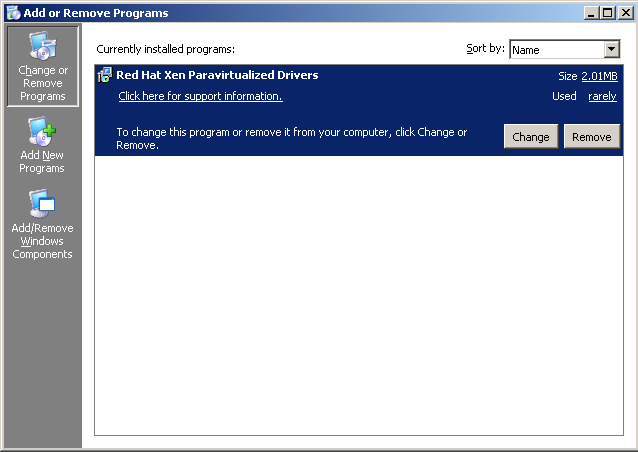
- Open the in the menu.
- Select the Red Hat Xen Para-virtualized Drivers program from the list and click the button.
- Once the uninstall process finishes you are prompted to reboot the guest. Click to the prompt. Shut down the guest instead, do not reboot or restart the guest.

- After shutting down the guest, use
virsh dumpxmlto create an XML configuration file for the guest. Change guest-name and guest.xml to match the name of your guest and the file for saving the configuration.# virsh dumpxml guestname > guest.xml
For every disk entry (refer to Example 6.1, “Para-virtualized disk entry”) in the guest.xml file modify the para-virtualized disk entry to use the generic virtualized drivers(refer to Example 6.2, “Generic disk entry”).Example 6.1. Para-virtualized disk entry
<disk type='file' device='disk'>
  <driver name='tap' type='aio'/>
  <source file='/var/lib/xen/images/disk2.img'/>
  <target dev='xvdb'/>
</disk>
Example 6.2. Generic disk entry
<disk type='file' device='disk'>
  <driver name='file'/>
  <source file='/var/lib/xen/images/disk2.img'/>
  <target dev='hdb'/>
</disk>
Warning
Xen is limited to 4 fully virtualized IDE devices. You cannot presently convert more than 3 para-virtualized disks to fully virtualized disks due to this limitation. - Restart the guest.
- The installer automatically enables the para-virtualized disk driver during the install. The uninstall wizard removed the driver but the device node remains in Windows Device Manager after rebooting. The device node appears as a device named "
PCI Device".This device causes a "Add New Hardware Wizard" to appear. You can safely close the wizard with the button.To permanently disable the para-virtualized disk driver after uninstalling the driver package you must use the provided scripts in theC:\Program Files\RedHat\XenPVdirectory. The para-virtualized drivers files are in the directory chosen during the installation process.Double click thedisableRedHatSCSIDriver.bat- this script disables the para-virtualized disk driverenableRedHatSCSIDriver.bat- this script enables the para-virtualized disk driver
disableRedHatSCSIDriver.batfile or executedisableRedHatSCSIDriver.batfrom an MS-DOS prompt.Note
To run executable batch files in Windows Vista you must right click the file and select from the menu that appears. Double clicking on the file runs the batch script without the appropriate privileges to run successfully.After running the disable script the "PCI Device" in the Device Manager displays a red X icon, indicating that it is disabled.
Note
enableRedHatSCSIDriver.bat script must be executed before the installation program. Ensure that the red X is gone from the device node before attempting to re-install the drivers using the installer package.
virt-manger to uninstall devices
virt-manager can be used instead of virsh to remove devices.
Appendix A. Using virsh to mount a CD-ROM image on an inactive domain
Procedure A.1. Mounting CD-ROM images with virsh on inactive domains
- Create an XML configuration file for your guest, replacing guestname with your guest domains name and windowsguest.xml:
# virsh dumpxml guestname windowsguest.xml
- Add the following entry under the devices tag in the XML configuration file (
windowsguest.xmlin this example). You must change thesource file=parameter to the location of the drivers .iso file and adjust thedev=parameter if you already have ahdbentry.<disk type='file' device='cdrom'> <driver name='file'/> <source file='/usr/share/xenpv-win-32bit/xenpv-win-32bit.iso'/> <target dev='hdb'/> <readonly/> </disk>
- Recreate the guest with the updated configuration file
# virsh define windowsguest.xml
- The guest now has a CD-ROM device containing the para-virtualized drivers once rebooted.
- Once the Windows guest has booted, open and you should see the Red Hat Para-virtualized drivers disk. Click on the disk to continue the installation.
Appendix B. Revision History
| Revision History | ||||
|---|---|---|---|---|
| Revision 1.1-8.400 | 2013-10-31 | |||
| ||||
| Revision 1.1-8 | 2012-07-18 | |||
| ||||
| Revision 1.1-0 | Thu Apr 16 2009 | |||
| ||||
| Revision 1.1-0 | Fri Jan 23 2009 | |||
| ||||
| Revision 1.0-0 | Thu May 01 2008 | |||
| ||||