Dieser Inhalt ist in der von Ihnen ausgewählten Sprache nicht verfügbar.
Installation Guide
Installing Red Hat Enterprise Virtualization
Abstract
Part I. Introduction to Red Hat Enterprise Virtualization
Chapter 1. Introduction to Red Hat Enterprise Virtualization
- The installation and configuration of a Red Hat Enterprise Virtualization Manager.
- The installation and configuration of the hypervisor hosts: RHEL-based hypervisors, Red Hat Enterprise Virtualization Hypervisor (RHEV-H), and Red Hat Virtualization Host (RHVH).
- Attach existing FCP storage to your Red Hat Enterprise Virtualization environment. More storage options can be found in the Administration Guide.
| Component Name | Description |
|---|---|
| Red Hat Enterprise Virtualization Manager | A server that manages and provides access to the resources in the environment. |
| Hosts | Hosts are servers that provide the processing capabilities and memory resources used to run virtual machines. |
| Storage | Storage is used to store the data associated with virtual machines. |
Important
Chapter 2. System Requirements
2.1. Red Hat Enterprise Virtualization Manager Requirements
2.1.1. Hardware Requirements
| Resource | Minimum | Recommended |
|---|---|---|
| CPU | A dual core CPU. | A quad core CPU or multiple dual core CPUs. |
| Memory | 4 GB of available system RAM if Data Warehouse is not installed and if memory is not being consumed by existing processes. | 16 GB of system RAM. |
| Hard Disk | 25 GB of locally accessible, writable, disk space. | 50 GB of locally accessible, writable, disk space. |
| Network Interface | 1 Network Interface Card (NIC) with bandwidth of at least 1 Gbps. | 1 Network Interface Card (NIC) with bandwidth of at least 1 Gbps. |
2.1.2. Browser Requirements
- Tier 1: Browser and operating system combinations that are fully tested and fully supported. Red Hat Engineering is committed to fixing issues with browsers on this tier.
- Tier 2: Browser and operating system combinations that are partially tested, and are likely to work. Limited support is provided for this tier. Red Hat Engineering will attempt to fix issues with browsers on this tier.
- Tier 3: Browser and operating system combinations that are not tested, but may work. Minimal support is provided for this tier. Red Hat Engineering will attempt to fix only minor issues with browsers on this tier.
| Support Tier | Operating System Family | Browser | Portal Access |
|---|---|---|---|
| Tier 1 | Red Hat Enterprise Linux | Mozilla Firefox Extended Support Release (ESR) version | Administration Portal and User Portal |
| Tier 2 | Windows | Internet Explorer 10 or later | Administration Portal and User Portal |
| Any | Most recent version of Google Chrome or Mozilla Firefox | Administration Portal and User Portal | |
| Tier 3 | Any | Earlier versions of Google Chrome or Mozilla Firefox | Administration Portal and User Portal |
| Any | Other browsers | Administration Portal and User Portal |
2.1.3. Client Requirements
- Tier 1: Operating systems on which remote-viewer has been fully tested and is supported.
- Tier 2: Operating systems on which remote-viewer is partially tested and is likely to work. Limited support is provided for this tier. Red Hat Engineering will attempt to fix issues with remote-viewer on this tier.
| Support Tier | Operating System | SPICE Support |
|---|---|---|
| Tier 1 | Red Hat Enterprise Linux 6 | Fully supported on Red Hat Enterprise Linux 6.8 and above |
| Tier 1 | Red Hat Enterprise Linux 7 | Fully supported on Red Hat Enterprise Linux 7.2 and above |
| Microsoft Windows 7 | Fully supported on Microsoft Windows 7 | |
| Tier 2 | Microsoft Windows 8 | Supported when spice-vdagent is running on these guest operating systems |
| Microsoft Windows 10 | Supported when spice-vdagent is running on these guest operating systems |
2.1.4. Operating System Requirements
2.1.5. DNS Requirements
Note
/etc/hosts file is not sufficient because it does not provide reverse DNS lookup.
2.2. Hypervisor Requirements
2.2.1. CPU Requirements
| AMD | Intel | IBM |
|---|---|---|
| AMD Opteron G1 | Intel Conroe | IBM POWER8 |
| AMD Opteron G2 | Intel Penryn | |
| AMD Opteron G3 | Intel Nehalem | |
| AMD Opteron G4 | Intel Westmere | |
| AMD Opteron G5 | Intel Sandybridge | |
| Intel Haswell |
Procedure 2.1. Checking if a Processor Supports the Required Flags
- At the host's boot screen, press any key and select the Boot or Boot with serial console entry from the list.
- Press Tab to edit the kernel parameters for the selected option.
- Ensure there is a Space after the last kernel parameter listed, and append the
rescueparameter. - Press Enter to boot into rescue mode.
- At the prompt which appears, determine that your processor has the required extensions and that they are enabled by running this command:
grep -E 'svm|vmx' /proc/cpuinfo | grep nx
# grep -E 'svm|vmx' /proc/cpuinfo | grep nxCopy to Clipboard Copied! Toggle word wrap Toggle overflow If any output is shown, then the processor is hardware virtualization capable. If no output is shown, then it is still possible that your processor supports hardware virtualization. In some circumstances manufacturers disable the virtualization extensions in the BIOS. If you believe this to be the case, consult the system's BIOS and the motherboard manual provided by the manufacturer.
2.2.2. Memory Requirements
| Minimum | Maximum |
|---|---|
| 2 GB of RAM | 2 TB of RAM |
2.2.3. Storage Requirements
| Version | Root and RootBackup Partitions | Configuration Partition | Logging Partition | Data Partition | Swap Partition | Minimum Total |
|---|---|---|---|---|---|---|
| Red Hat Enterprise Virtualization Hypervisor 6 | 512 MB | 8 MB | 2048 MB | 512 MB | 8 MB | 3.5 GB |
| Red Hat Enterprise Virtualization Hypervisor 7 | 8600 MB | 8 MB | 2048 MB | 10240 MB | 8 MB | 20.4 GB |
| Red Hat Virtualization Host | 6 GB | NA | 8 GB | 15 GB | 1 GB | 32 GB |
Important
Important
fakeraid devices. Where a fakeraid device is present it must be reconfigured such that it no longer runs in RAID mode.
- Access the RAID controller's BIOS and remove all logical drives from it.
- Change controller mode to be non-RAID. This may be referred to as compatibility or JBOD mode.
2.2.4. PCI Device Requirements
2.2.5. Hardware Considerations For Device Assignment
- CPU must support IOMMU (for example, VT-d or AMD-Vi). IBM POWER8 supports IOMMU by default.
- Firmware must support IOMMU.
- CPU root ports used must support ACS or ACS-equivalent capability.
- PCIe device must support ACS or ACS-equivalent capability.
- It is recommended that all PCIe switches and bridges between the PCIe device and the root port should support ACS. For example, if a switch does not support ACS, all devices behind that switch share the same IOMMU group, and can only be assigned to the same virtual machine.
- For GPU support, Red Hat Enterprise Linux 7 supports PCI device assignment of NVIDIA K-Series Quadro (model 2000 series or higher), GRID, and Tesla as non-VGA graphics devices. Currently up to two GPUs may be attached to a virtual machine in addition to one of the standard, emulated VGA interfaces. The emulated VGA is used for pre-boot and installation and the NVIDIA GPU takes over when the NVIDIA graphics drivers are loaded. Note that the NVIDIA Quadro 2000 is not supported, nor is the Quadro K420 card.
lspci -v command can be used to print information for PCI devices already installed on a system.
2.3. Firewalls
2.3.1. Red Hat Enterprise Virtualization Manager Firewall Requirements
engine-setup script can configure the firewall automatically, but this overwrites any pre-existing firewall configuration.
engine-setup command saves a list of the iptables rules required in the /usr/share/ovirt-engine/conf/iptables.example file.
80 and 443) listed here.
| Port(s) | Protocol | Source | Destination | Purpose |
|---|---|---|---|---|
| - | ICMP |
Red Hat Enterprise Virtualization Hypervisor(s)
Red Hat Enterprise Linux host(s)
|
Red Hat Enterprise Virtualization Manager
| When registering to the Red Hat Enterprise Virtualization Manager, virtualization hosts send an ICMP ping request to the Manager to confirm that it is online. |
| 22 | TCP |
System(s) used for maintenance of the Manager including backend configuration, and software upgrades.
|
Red Hat Enterprise Virtualization Manager
|
Secure Shell (SSH) access.
Optional.
|
| 2222 | TCP |
Clients accessing virtual machine serial consoles.
|
Red Hat Enterprise Virtualization Manager
|
Secure Shell (SSH) access to enable connection to virtual machine serial consoles.
|
| 80, 443 | TCP |
Administration Portal clients
User Portal clients
Red Hat Enterprise Virtualization Hypervisor(s)
Red Hat Enterprise Linux host(s)
REST API clients
|
Red Hat Enterprise Virtualization Manager
|
Provides HTTP and HTTPS access to the Manager.
|
| 6100 | TCP |
Administration Portal clients
User Portal clients
|
Red Hat Enterprise Virtualization Manager
|
Provides websocket proxy access for web-based console clients (
noVNC and spice-html5) when the websocket proxy is running on the Manager. If the websocket proxy is running on a different host, however, this port is not used.
|
| 7410 | UDP |
Red Hat Enterprise Virtualization Hypervisor(s)
Red Hat Enterprise Linux host(s)
|
Red Hat Enterprise Virtualization Manager
| Must be open for the Manager to receive Kdump notifications. |
Important
NFSv4
- TCP port
2049for NFS.
NFSv3
- TCP and UDP port
2049for NFS. - TCP and UDP port
111(rpcbind/sunrpc). - TCP and UDP port specified with
MOUNTD_PORT="port" - TCP and UDP port specified with
STATD_PORT="port" - TCP port specified with
LOCKD_TCPPORT="port" - UDP port specified with
LOCKD_UDPPORT="port"
MOUNTD_PORT, STATD_PORT, LOCKD_TCPPORT, and LOCKD_UDPPORT ports are configured in the /etc/sysconfig/nfs file.
2.3.2. Hypervisor Firewall Requirements
| Port(s) | Protocol | Source | Destination | Purpose |
|---|---|---|---|---|
| 22 | TCP |
Red Hat Enterprise Virtualization Manager
|
Red Hat Enterprise Virtualization Hypervisor(s)
Red Hat Virtualization Host(s)
Red Hat Enterprise Linux host(s)
|
Secure Shell (SSH) access.
Optional.
|
| 2223 | TCP |
Red Hat Enterprise Virtualization Manager
|
Red Hat Enterprise Virtualization Hypervisor(s)
Red Hat Virtualization Host(s)
Red Hat Enterprise Linux host(s)
|
Secure Shell (SSH) access to enable connection to virtual machine serial consoles.
|
| 161 | UDP |
Red Hat Enterprise Virtualization Hypervisor(s)
Red Hat Virtualization Host(s)
Red Hat Enterprise Linux host(s)
|
Red Hat Enterprise Virtualization Manager
|
Simple network management protocol (SNMP). Only required if you want Simple Network Management Protocol traps sent from the hypervisor to one or more external SNMP managers.
Optional.
|
| 5900 - 6923 | TCP |
Administration Portal clients
User Portal clients
|
Red Hat Enterprise Virtualization Hypervisor(s)
Red Hat Virtualization Host(s)
Red Hat Enterprise Linux host(s)
|
Remote guest console access via VNC and SPICE. These ports must be open to facilitate client access to virtual machines.
|
| 5989 | TCP, UDP |
Common Information Model Object Manager (CIMOM)
|
Red Hat Enterprise Virtualization Hypervisor(s)
Red Hat Virtualization Host(s)
Red Hat Enterprise Linux host(s)
|
Used by Common Information Model Object Managers (CIMOM) to monitor virtual machines running on the hypervisor. Only required if you want to use a CIMOM to monitor the virtual machines in your virtualization environment.
Optional.
|
| 16514 | TCP |
Red Hat Enterprise Virtualization Hypervisor(s)
Red Hat Virtualization Host(s)
Red Hat Enterprise Linux host(s)
|
Red Hat Enterprise Virtualization Hypervisor(s)
Red Hat Virtualization Host(s)
Red Hat Enterprise Linux host(s)
|
Virtual machine migration using
libvirt.
|
| 49152 - 49216 | TCP |
Red Hat Enterprise Virtualization Hypervisor(s)
Red Hat Virtualization Host(s)
Red Hat Enterprise Linux host(s)
|
Red Hat Enterprise Virtualization Hypervisor(s)
Red Hat Virtualization Host(s)
Red Hat Enterprise Linux host(s)
|
Virtual machine migration and fencing using VDSM. These ports must be open facilitate both automated and manually initiated migration of virtual machines.
|
| 54321 | TCP |
Red Hat Enterprise Virtualization Manager
Red Hat Enterprise Virtualization Hypervisor(s)
Red Hat Virtualization Host(s)
Red Hat Enterprise Linux host(s)
|
Red Hat Enterprise Virtualization Hypervisor(s)
Red Hat Virtualization Host(s)
Red Hat Enterprise Linux host(s)
|
VDSM communications with the Manager and other virtualization hosts.
|
2.3.3. Directory Server Firewall Requirements
| Port(s) | Protocol | Source | Destination | Purpose |
|---|---|---|---|---|
| 88, 464 | TCP, UDP |
Red Hat Enterprise Virtualization Manager
|
Directory server
| Kerberos authentication. |
| 389, 636 | TCP |
Red Hat Enterprise Virtualization Manager
|
Directory server
| Lightweight Directory Access Protocol (LDAP) and LDAP over SSL. |
2.3.4. Database Server Firewall Requirements
| Port(s) | Protocol | Source | Destination | Purpose |
|---|---|---|---|---|
| 5432 | TCP, UDP |
Red Hat Enterprise Virtualization Manager
|
PostgreSQL database server
| Default port for PostgreSQL database connections. |
Part II. Installing the Red Hat Enterprise Virtualization Manager
Chapter 3. Red Hat Enterprise Virtualization Manager
3.1. Subscribing to the Required Entitlements
- Register your system with the Content Delivery Network, entering your Customer Portal user name and password when prompted:
subscription-manager register
# subscription-manager registerCopy to Clipboard Copied! Toggle word wrap Toggle overflow - Find the
Red Hat Enterprise Linux ServerandRed Hat Enterprise Virtualizationsubscription pools and note down the pool IDs.subscription-manager list --available
# subscription-manager list --availableCopy to Clipboard Copied! Toggle word wrap Toggle overflow - Use the pool IDs located in the previous step to attach the entitlements to the system:
subscription-manager attach --pool=pool_id
# subscription-manager attach --pool=pool_idCopy to Clipboard Copied! Toggle word wrap Toggle overflow Note
To find out what subscriptions are currently attached, run:subscription-manager list --consumed
# subscription-manager list --consumedCopy to Clipboard Copied! Toggle word wrap Toggle overflow To list all enabled repositories, run:yum repolist
# yum repolistCopy to Clipboard Copied! Toggle word wrap Toggle overflow - Disable all existing repositories:
subscription-manager repos --disable=*
# subscription-manager repos --disable=*Copy to Clipboard Copied! Toggle word wrap Toggle overflow - Enable the required repositories.
Important
Red Hat Enterprise Virtualization 3.x has reached End Of Life (EOL). Users with Extended Lifecycle Support (ELS) must use the repositories in https://access.redhat.com/solutions/3194482 to keep the environment up and running.
3.2. Installing the Red Hat Enterprise Virtualization Manager Packages
Procedure 3.1. Installing the Red Hat Enterprise Virtualization Manager Packages
- To ensure all packages are up to date, run the following command on the machine where you are installing the Red Hat Enterprise Virtualization Manager:
yum update
# yum updateCopy to Clipboard Copied! Toggle word wrap Toggle overflow - Run the following command to install the rhevm package and dependencies.
yum install rhevm
# yum install rhevmCopy to Clipboard Copied! Toggle word wrap Toggle overflow
3.3. Configuring the Red Hat Enterprise Virtualization Manager
engine-setup command. This command asks you a series of questions and, after you provide the required values for all questions, applies that configuration and starts the ovirt-engine service.
engine-setup creates and configures the Manager database locally on the Manager machine. Alternatively, you can configure the Manager to use a remote database or a manually-configured local database; however, you must set up that database before running engine-setup. To set up a remote database see Appendix D, Preparing a Remote PostgreSQL Database for Use with the Red Hat Enterprise Virtualization Manager. To set up a manually-configured local database, see Appendix E, Preparing a Local Manually-Configured PostgreSQL Database for Use with the Red Hat Enterprise Virtualization Manager.
engine-setup will configure a websocket proxy on the Manager. However, for security and performance reasons, the user can choose to configure it on a separate host. See Appendix F, Installing a Websocket Proxy on a Separate Machine for instructions.
Note
engine-setup command guides you through several distinct configuration stages, each comprising several steps that require user input. Suggested configuration defaults are provided in square brackets; if the suggested value is acceptable for a given step, press Enter to accept that value.
Procedure 3.2. Configuring the Red Hat Enterprise Virtualization Manager
- Run the
engine-setupcommand to begin configuration of the Red Hat Enterprise Virtualization Manager:engine-setup
# engine-setupCopy to Clipboard Copied! Toggle word wrap Toggle overflow - Press Enter to configure the Manager:
Configure Engine on this host (Yes, No) [Yes]:
Configure Engine on this host (Yes, No) [Yes]:Copy to Clipboard Copied! Toggle word wrap Toggle overflow - Optionally allow access to a virtual machines's serial console from the command line.
Configure VM Console Proxy on this host (Yes, No) [Yes]:
Configure VM Console Proxy on this host (Yes, No) [Yes]:Copy to Clipboard Copied! Toggle word wrap Toggle overflow Additional configuration is required on the client machine to use this feature. See Opening a Serial Console to a Virtual Machine in the Virtual Machine Management Guide. - Optionally allow
engine-setupto configure a websocket proxy server for allowing users to connect to virtual machines via the noVNC or HTML 5 consoles:Configure WebSocket Proxy on this machine? (Yes, No) [Yes]:
Configure WebSocket Proxy on this machine? (Yes, No) [Yes]:Copy to Clipboard Copied! Toggle word wrap Toggle overflow To configure the websocket proxy on a separate machine, selectNoand refer to Appendix F, Installing a Websocket Proxy on a Separate Machine for configuration instructions. - Press Enter to accept the automatically detected hostname, or enter an alternative hostname and press Enter. Note that the automatically detected hostname may be incorrect if you are using virtual hosts:
Host fully qualified DNS name of this server [autodetected host name]:
Host fully qualified DNS name of this server [autodetected host name]:Copy to Clipboard Copied! Toggle word wrap Toggle overflow - The
engine-setupcommand checks your firewall configuration and offers to modify that configuration to open the ports used by the Manager for external communication such as TCP ports 80 and 443. If you do not allowengine-setupto modify your firewall configuration, then you must manually open the ports used by the Manager.Setup can automatically configure the firewall on this system. Note: automatic configuration of the firewall may overwrite current settings. Do you want Setup to configure the firewall? (Yes, No) [Yes]:
Setup can automatically configure the firewall on this system. Note: automatic configuration of the firewall may overwrite current settings. Do you want Setup to configure the firewall? (Yes, No) [Yes]:Copy to Clipboard Copied! Toggle word wrap Toggle overflow If you choose to automatically configure the firewall, and no firewall managers are active, you are prompted to select your chosen firewall manager from a list of supported options. Type the name of the firewall manager and press Enter. This applies even in cases where only one option is listed. - Choose to use either a local or remote PostgreSQL database as the Manager database:
Where is the Engine database located? (Local, Remote) [Local]:
Where is the Engine database located? (Local, Remote) [Local]:Copy to Clipboard Copied! Toggle word wrap Toggle overflow - If you select
Local, theengine-setupcommand can configure your database automatically (including adding a user and a database), or it can connect to a preconfigured local database:Setup can configure the local postgresql server automatically for the engine to run. This may conflict with existing applications. Would you like Setup to automatically configure postgresql and create Engine database, or prefer to perform that manually? (Automatic, Manual) [Automatic]:
Setup can configure the local postgresql server automatically for the engine to run. This may conflict with existing applications. Would you like Setup to automatically configure postgresql and create Engine database, or prefer to perform that manually? (Automatic, Manual) [Automatic]:Copy to Clipboard Copied! Toggle word wrap Toggle overflow - If you select
Automaticby pressing Enter, no further action is required here. - If you select
Manual, input the following values for the manually-configured local database:Engine database secured connection (Yes, No) [No]: Engine database name [engine]: Engine database user [engine]: Engine database password:
Engine database secured connection (Yes, No) [No]: Engine database name [engine]: Engine database user [engine]: Engine database password:Copy to Clipboard Copied! Toggle word wrap Toggle overflow
- If you select
Remote, input the following values for the preconfigured remote database host:Copy to Clipboard Copied! Toggle word wrap Toggle overflow
- Select Gluster, Virt, or Both:
Application mode (Both, Virt, Gluster) [Both]:
Application mode (Both, Virt, Gluster) [Both]:Copy to Clipboard Copied! Toggle word wrap Toggle overflow Both offers the greatest flexibility. In most cases, selectBoth. Virt application mode allows you to run virtual machines in the environment; Gluster application mode only allows you to manage GlusterFS from the Administration Portal. - Set a password for the automatically created administrative user of the Red Hat Enterprise Virtualization Manager:
Engine admin password: Confirm engine admin password:
Engine admin password: Confirm engine admin password:Copy to Clipboard Copied! Toggle word wrap Toggle overflow - Set the default value for the
wipe_after_deleteflag, which wipes the blocks of a virtual disk when the disk is deleted.Default SAN wipe after delete (Yes, No) [No]:
Default SAN wipe after delete (Yes, No) [No]:Copy to Clipboard Copied! Toggle word wrap Toggle overflow - The Manager uses certificates to communicate securely with its hosts. This certificate can also optionally be used to secure HTTPS communications with the Manager. Provide the organization name for the certificate:
Organization name for certificate [autodetected domain-based name]:
Organization name for certificate [autodetected domain-based name]:Copy to Clipboard Copied! Toggle word wrap Toggle overflow - By default, external SSL (HTTPS) communication with the Manager is secured with the self-signed certificate created earlier in the configuration to securely communicate with hosts. Alternatively, choose another certificate for external HTTPS connections; this does not affect how the Manager communicates with hosts:
Setup can configure apache to use SSL using a certificate issued from the internal CA. Do you wish Setup to configure that, or prefer to perform that manually? (Automatic, Manual) [Automatic]:
Setup can configure apache to use SSL using a certificate issued from the internal CA. Do you wish Setup to configure that, or prefer to perform that manually? (Automatic, Manual) [Automatic]:Copy to Clipboard Copied! Toggle word wrap Toggle overflow - Optionally allow
engine-setupto make the landing page of the Manager the default page presented by the Apache web server:Setup can configure the default page of the web server to present the application home page. This may conflict with existing applications. Do you wish to set the application as the default web page of the server? (Yes, No) [Yes]:
Setup can configure the default page of the web server to present the application home page. This may conflict with existing applications. Do you wish to set the application as the default web page of the server? (Yes, No) [Yes]:Copy to Clipboard Copied! Toggle word wrap Toggle overflow - Optionally create an NFS share on the Manager to use as an ISO storage domain. The local ISO domain provides a selection of images that can be used in the initial setup of virtual machines:
Configure an NFS share on this server to be used as an ISO Domain? (Yes, No) [Yes]:
Configure an NFS share on this server to be used as an ISO Domain? (Yes, No) [Yes]:Copy to Clipboard Copied! Toggle word wrap Toggle overflow - Specify the path for the ISO domain:
Local ISO domain path [/var/lib/exports/iso]:
Local ISO domain path [/var/lib/exports/iso]:Copy to Clipboard Copied! Toggle word wrap Toggle overflow - Specify the networks or hosts that require access to the ISO domain:
Local ISO domain ACL: 10.1.2.0/255.255.255.0(rw) host01.example.com(rw) host02.example.com(rw)
Local ISO domain ACL: 10.1.2.0/255.255.255.0(rw) host01.example.com(rw) host02.example.com(rw)Copy to Clipboard Copied! Toggle word wrap Toggle overflow The example above allows access to a single /24 network and two specific hosts. See theexports(5)man page for further formatting options. - Specify a display name for the ISO domain:
Local ISO domain name [ISO_DOMAIN]:
Local ISO domain name [ISO_DOMAIN]:Copy to Clipboard Copied! Toggle word wrap Toggle overflow
- Optionally, use the
engine-setupcommand to allow a proxy server to broker transactions from the Red Hat Access plug-in:Would you like transactions from the Red Hat Access Plugin sent from the RHEV Manager to be brokered through a proxy server? (Yes, No) [No]:
Would you like transactions from the Red Hat Access Plugin sent from the RHEV Manager to be brokered through a proxy server? (Yes, No) [No]:Copy to Clipboard Copied! Toggle word wrap Toggle overflow - Review the installation settings, and press Enter to accept the values and proceed with the installation:
Please confirm installation settings (OK, Cancel) [OK]:
Please confirm installation settings (OK, Cancel) [OK]:Copy to Clipboard Copied! Toggle word wrap Toggle overflow - If you intend to link your Red Hat Enterprise Virtualization environment with a directory server, configure the date and time to synchronize with the system clock used by the directory server to avoid unexpected account expiry issues. See Network Time Protocol Setup in the Red Hat Enterprise Linux Deployment Guide for more information.
engine-setup command displays details about how to access your environment. If you chose to manually configure the firewall, engine-setup provides a custom list of ports that need to be opened, based on the options selected during setup. The engine-setup command also saves your answers to a file that can be used to reconfigure the Manager using the same values, and outputs the location of the log file for the Red Hat Enterprise Virtualization Manager configuration process.
admin@internal user. Then, proceed with setting up hypervisor hosts, and attaching storage.
3.4. Connecting to the Administration Portal
- In a web browser, navigate to
https://your-manager-fqdn/ovirt-engine, replacing your-manager-fqdn with the fully qualified domain name that you provided during installation.Important
The first time that you connect to the Administration Portal, you are prompted to trust the certificate being used to secure communications between your browser and the web server. You must accept this certificate. - Click .
- Enter your User Name and Password. If you are logging in for the first time, use the user name
adminin conjunction with the password that you specified during installation. - Select the domain against which to authenticate from the Domain list. If you are logging in using the internal
adminuser name, select theinternaldomain. - You can view the Administration Portal in multiple languages. The default selection will be chosen based on the locale settings of your web browser. If you would like to view the Administration Portal in a language other than the default, select your preferred language from the list.
- Click Login.
Chapter 4. Red Hat Enterprise Virtualization Manager Related Tasks
4.1. Removing the Red Hat Enterprise Virtualization Manager
engine-cleanup command to remove specific components or all components of the Red Hat Enterprise Virtualization Manager.
Note
/var/lib/ovirt-engine/backups/, and include the date and engine- and engine-pki- in their file names respectively.
Procedure 4.1. Removing the Red Hat Enterprise Virtualization Manager
- Run the following command on the machine on which the Red Hat Enterprise Virtualization Manager is installed:
engine-cleanup
# engine-cleanupCopy to Clipboard Copied! Toggle word wrap Toggle overflow - You are prompted whether to remove all Red Hat Enterprise Virtualization Manager components:
- Type
Yesand press Enter to remove all components:Do you want to remove all components? (Yes, No) [Yes]:
Do you want to remove all components? (Yes, No) [Yes]:Copy to Clipboard Copied! Toggle word wrap Toggle overflow - Type
Noand press Enter to select the components to remove. You can select whether to retain or remove each component individually:Do you want to remove Engine database content? All data will be lost (Yes, No) [No]: Do you want to remove PKI keys? (Yes, No) [No]: Do you want to remove PKI configuration? (Yes, No) [No]: Do you want to remove Apache SSL configuration? (Yes, No) [No]:
Do you want to remove Engine database content? All data will be lost (Yes, No) [No]: Do you want to remove PKI keys? (Yes, No) [No]: Do you want to remove PKI configuration? (Yes, No) [No]: Do you want to remove Apache SSL configuration? (Yes, No) [No]:Copy to Clipboard Copied! Toggle word wrap Toggle overflow
- You are given another opportunity to change your mind and cancel the removal of the Red Hat Enterprise Virtualization Manager. If you choose to proceed, the
ovirt-engineservice is stopped, and your environment's configuration is removed in accordance with the options you selected.During execution engine service will be stopped (OK, Cancel) [OK]: ovirt-engine is about to be removed, data will be lost (OK, Cancel) [Cancel]:OK
During execution engine service will be stopped (OK, Cancel) [OK]: ovirt-engine is about to be removed, data will be lost (OK, Cancel) [Cancel]:OKCopy to Clipboard Copied! Toggle word wrap Toggle overflow - Remove the Red Hat Enterprise Virtualization packages:
yum remove rhevm* vdsm-bootstrap
# yum remove rhevm* vdsm-bootstrapCopy to Clipboard Copied! Toggle word wrap Toggle overflow
4.2. Configuring a Local Repository for Offline Red Hat Enterprise Virtualization Manager Installation
- Install Red Hat Enterprise Linux 6 Server on a system that has access to the Content Delivery Network. This system downloads all the required packages, and distributes them to your offline system(s).
Important
Ensure that the system used in this procedure has a large amount of free disk space available. This procedure downloads a large number of packages, and requires up to 50 GB of free disk space. - Register your system with the Content Delivery Network, entering your Customer Portal user name and password when prompted:
subscription-manager register
# subscription-manager registerCopy to Clipboard Copied! Toggle word wrap Toggle overflow - Subscribe the system to all required entitlements:
- Find the
Red Hat Enterprise Linux ServerandRed Hat Enterprise Virtualizationsubscription pools and note down the pool IDs.subscription-manager list --available
# subscription-manager list --availableCopy to Clipboard Copied! Toggle word wrap Toggle overflow - Use the pool IDs located in the previous step to attach the entitlements to the system:
subscription-manager attach --pool=pool_id
# subscription-manager attach --pool=pool_idCopy to Clipboard Copied! Toggle word wrap Toggle overflow - Disable all existing repositories:
subscription-manager repos --disable=*
# subscription-manager repos --disable=*Copy to Clipboard Copied! Toggle word wrap Toggle overflow - Enable the required repositories:
subscription-manager repos --enable=rhel-6-server-rpms subscription-manager repos --enable=rhel-6-server-supplementary-rpms subscription-manager repos --enable=rhel-6-server-rhevm-3.6-rpms subscription-manager repos --enable=jb-eap-6-for-rhel-6-server-rpms
# subscription-manager repos --enable=rhel-6-server-rpms # subscription-manager repos --enable=rhel-6-server-supplementary-rpms # subscription-manager repos --enable=rhel-6-server-rhevm-3.6-rpms # subscription-manager repos --enable=jb-eap-6-for-rhel-6-server-rpmsCopy to Clipboard Copied! Toggle word wrap Toggle overflow - Ensure that all packages currently installed are up to date:
yum update
# yum updateCopy to Clipboard Copied! Toggle word wrap Toggle overflow
- Servers that are not connected to the Internet can access software repositories on other systems using File Transfer Protocol (FTP). To create the FTP repository, install and configure vsftpd:
- Install the vsftpd package:
yum install vsftpd
# yum install vsftpdCopy to Clipboard Copied! Toggle word wrap Toggle overflow - Start the
vsftpdservice, and ensure the service starts on boot:service vsftpd start chkconfig vsftpd on
# service vsftpd start # chkconfig vsftpd onCopy to Clipboard Copied! Toggle word wrap Toggle overflow - Create a sub-directory inside the
/var/ftp/pub/directory. This is where the downloaded packages will be made available:mkdir /var/ftp/pub/rhevrepo
# mkdir /var/ftp/pub/rhevrepoCopy to Clipboard Copied! Toggle word wrap Toggle overflow
- Download packages from all configured software repositories to the
rhevrepodirectory. This includes repositories for all Content Delivery Network subscription pools the system is subscribed to, and any locally configured repositories:reposync -l -p /var/ftp/pub/rhevrepo
# reposync -l -p /var/ftp/pub/rhevrepoCopy to Clipboard Copied! Toggle word wrap Toggle overflow This command downloads a large number of packages, and takes a long time to complete. The-loption enables yum plug-in support. - Install the createrepo package:
yum install createrepo
# yum install createrepoCopy to Clipboard Copied! Toggle word wrap Toggle overflow - Create repository metadata for each of the sub-directories where packages were downloaded under
/var/ftp/pub/rhevrepo:for DIR in `find /var/ftp/pub/rhevrepo -maxdepth 1 -mindepth 1 -type d`; do createrepo $DIR; done;
# for DIR in `find /var/ftp/pub/rhevrepo -maxdepth 1 -mindepth 1 -type d`; do createrepo $DIR; done;Copy to Clipboard Copied! Toggle word wrap Toggle overflow - Create a repository file, and copy it to the
/etc/yum.repos.d/directory on the offline machine on which you will install the Manager.The configuration file can be created manually or with a script. Run the script below on the system hosting the repository, replacing ADDRESS in thebaseurlwith the IP address or fully qualified domain name of the system hosting the repository:Copy to Clipboard Copied! Toggle word wrap Toggle overflow - Install the Manager packages on the offline system. See Section 3.2, “Installing the Red Hat Enterprise Virtualization Manager Packages” for instructions. Packages are installed from the local repository, instead of from the Content Delivery Network.
- Configure the Manager. See Section 3.3, “Configuring the Red Hat Enterprise Virtualization Manager” for initial configuration instructions.
- Continue with host, storage, and virtual machine configuration.
Chapter 5. Data Warehouse and Reports
5.1. Overview of Configuring Data Warehouse and Reports
ovirt_engine_history database, to which the Manager is configured to log information for reporting purposes. Red Hat Enterprise Virtualization Manager Reports functionality is also available as an optional component. Reports provides a customized implementation of JasperServer and JasperReports, an open source reporting tool capable of being embedded in Java-based applications. It produces reports that can be built and accessed via a web user interface, and then rendered to screen, printed, or exported to a variety of formats including PDF, Excel, CSV, Word, RTF, Flash, ODT and ODS. The Data Warehouse and Reports components are optional, and must be installed and configured in addition to the Manager setup.
ovirt_engine_history database will use, use the RHEV Manager History Database Size Calculator tool. The estimate is based on the number of entities and the length of time you have chosen to retain the history records.
5.2. Data Warehouse and Reports Configuration Notes
The following behavior is expected in engine-setup:
engine-setup, and answer No to configuring Data Warehouse and Reports:
Configure Data Warehouse on this host (Yes, No) [Yes]: No Configure Reports on this host (Yes, No) [Yes]: No
Configure Data Warehouse on this host (Yes, No) [Yes]: No
Configure Reports on this host (Yes, No) [Yes]: Noengine-setup again; setup no longer presents the option to configure those services.
To force engine-setup to present both options again, run engine-setup --reconfigure-optional-components.
Note
--offline option .
5.3. Data Warehouse and Reports Installation Options
- Install and configure both Data Warehouse and Reports on the machine on which the Manager is installed.
This configuration hosts the Data Warehouse and Reports services on your Manager machine. This requires only a single registered machine, and is the simplest to configure; however, it also requires that the services share CPU and memory, and increases the demand on the host machine. Users who require access to the Data Warehouse service or the Reports service will require access to the Manager machine itself.
- Install and configure both Data Warehouse and Reports on one separate machine.
This configuration hosts Data Warehouse and Reports on a single, separate machine. This requires two registered machines; however, it reduces the load on the Manager machine, and avoids potential CPU and memory-sharing conflicts on that machine. Administrators can also allow user access to the Data Warehouse-Reports machine, without the need to grant access to the Manager machine. Note that the Data Warehouse and Reports services will still compete for resources on their single host.
- Install and configure Data Warehouse on a separate machine, then install and configure Reports on a separate machine.
This configuration separates each service onto its own dedicated host. This requires three registered machines; however, it reduces the load on each individual machine, and allows each service to avoid potential conflicts caused by sharing CPU and memory with other processes. Administrators can also allow user access to one particular machine, without the need to grant access to either of the two other machines.
- Install and configure Data Warehouse on the Manager machine, then install and configure Reports on a separate machine.
This configuration hosts Data Warehouse on the Manager machine, and Reports on a separate host. This requires two registered machines; however, it reduces the load on the Manager machine, and avoids some memory-sharing conflicts. Administrators can allow user access to the Reports machine, without the need to grant access to the Manager machine.
- Install and configure Data Warehouse on a separate machine, then install and configure Reports on the Manager machine.
This configuration hosts Data Warehouse on a separate machine, and Reports on the Manager machine. This requires two registered machines; however, it reduces the load on the Manager machine, and avoids some memory-sharing conflicts. Administrators can allow user access to the Data Warehouse machine, without the need to grant access to the Manager machine.
Note
/usr/share/jasperreports-server-pro/docs/
5.3.1. Installing and Configuring Data Warehouse and Reports on the Red Hat Enterprise Virtualization Manager
Install and configure Data Warehouse and Red Hat Enterprise Virtualization Manager Reports on the same machine as the Red Hat Enterprise Virtualization Manager.
Ensure that you have completed the following prerequisites:
- You must have installed and configured the Manager on this machine.
- If you choose to use a remote Data Warehouse database or Reports database, you must set up each database before installing the Data Warehouse and Reports services. You must have the following information about each database host:
- The fully qualified domain name of the host
- The port through which the database can be reached (5432 by default)
- The database name
- The database user
- The database password
- If you are using the self-hosted engine, you must move it to maintenance mode:
hosted-engine --set-maintenance --mode=global
# hosted-engine --set-maintenance --mode=globalCopy to Clipboard Copied! Toggle word wrap Toggle overflow
Procedure 5.1. Installing and Configuring Data Warehouse and Reports on the Red Hat Enterprise Virtualization Manager
- Install the rhevm-dwh package and the rhevm-reports package on the system where the Red Hat Enterprise Virtualization Manager is installed:
yum install rhevm-dwh rhevm-reports
# yum install rhevm-dwh rhevm-reportsCopy to Clipboard Copied! Toggle word wrap Toggle overflow - Run the
engine-setupcommand to begin configuration of Data Warehouse and Reports on the machine:engine-setup
# engine-setupCopy to Clipboard Copied! Toggle word wrap Toggle overflow - Follow the prompts to configure Data Warehouse and Reports:
Configure Data Warehouse on this host (Yes, No) [Yes]: Configure Reports on this host (Yes, No) [Yes]:
Configure Data Warehouse on this host (Yes, No) [Yes]: Configure Reports on this host (Yes, No) [Yes]:Copy to Clipboard Copied! Toggle word wrap Toggle overflow - Press Enter to automatically configure the firewall, or type
Noand press Enter to maintain existing settings:Setup can automatically configure the firewall on this system. Note: automatic configuration of the firewall may overwrite current settings. Do you want Setup to configure the firewall? (Yes, No) [Yes]:
Setup can automatically configure the firewall on this system.
Note: automatic configuration of the firewall may overwrite current settings.
Do you want Setup to configure the firewall? (Yes, No) [Yes]:
Copy to Clipboard Copied! Toggle word wrap Toggle overflow If you choose to automatically configure the firewall, and no firewall managers are active, you are prompted to select your chosen firewall manager from a list of supported options. Type the name of the firewall manager and press Enter. This applies even in cases where only one option is listed. - Answer the following questions about the Data Warehouse database and the Reports database:
Copy to Clipboard Copied! Toggle word wrap Toggle overflow Press Enter to choose the highlighted defaults, or type your alternative preference and then press Enter. If you selectRemote, you are prompted to provide details about each remote database host. - Set a password for the Reports administrative users (
adminandsuperuser). Note that the reports system maintains its own set of credentials that are separate to those used for the Manager:Reports power users password:
Reports power users password:Copy to Clipboard Copied! Toggle word wrap Toggle overflow You are prompted to enter the password a second time to confirm it. - For the configuration to take effect, the
ovirt-engineservice must be restarted. Theengine-setupcommand prompts you:During execution engine service will be stopped (OK, Cancel) [OK]:
During execution engine service will be stopped (OK, Cancel) [OK]:Copy to Clipboard Copied! Toggle word wrap Toggle overflow Press Enter to proceed. Theovirt-engineservice restarts automatically later in the command. - Confirm your installation settings:
Please confirm installation settings (OK, Cancel) [OK]:
Please confirm installation settings (OK, Cancel) [OK]:Copy to Clipboard Copied! Toggle word wrap Toggle overflow
Access the Reports Portal at http://demo.redhat.com/ovirt-engine-reports, replacing demo.redhat.com with the fully qualified domain name of the Manager. If during the Manager installation you selected a non-default HTTP port then append :port to the URL, replacing :port with the port that you chose.
admin and the password you set during reports installation. Note that the first time you log in to Red Hat Enterprise Virtualization Manager Reports, a number of web pages are generated and, as a result, your initial attempt to log in may take some time to complete.
5.3.2. Installing and Configuring Data Warehouse and Reports Together on a Separate Machine
Install and configure Data Warehouse and Red Hat Enterprise Virtualization Manager Reports together on a separate host from that on which the Red Hat Enterprise Virtualization Manager is installed. Hosting the Data Warehouse service and the Reports service on a separate machine helps to reduce the load on the Manager machine. Note that hosting Data Warehouse and Reports on the same machine means that these processes will share CPU and memory.
Ensure that you have completed the following prerequisites:
- You must have installed and configured the Manager on a separate machine.
- To set up the Data Warehouse and Reports machine, you must have the following:
- A virtual or physical machine with Red Hat Enterprise Linux 6.6 or later versions of Red Hat Enterprise Linux 6 installed.
- A subscription to the
Red Hat Enterprise Linux ServerandRed Hat Enterprise Virtualizationsubscription pools. - The password from the Manager's
/etc/ovirt-engine/engine.conf.d/10-setup-database.conffile. - Allowed access from the Data Warehouse-Reports machine to the Manager database machine's TCP port 5432.
- If you choose to use a remote Data Warehouse database or Reports database, you must set up each database before installing the Data Warehouse and Reports services. You must have the following information about each database host:
- The fully qualified domain name of the host
- The port through which the database can be reached (5432 by default)
- The database name
- The database user
- The database password
Procedure 5.2. Installing and Configuring Data Warehouse and Reports Together on a Separate Machine
- Register your system with the Content Delivery Network, entering your Customer Portal user name and password when prompted:
subscription-manager register
# subscription-manager registerCopy to Clipboard Copied! Toggle word wrap Toggle overflow - Find the
Red Hat Enterprise Linux ServerandRed Hat Enterprise Virtualizationsubscription pools and note down the pool IDs.subscription-manager list --available
# subscription-manager list --availableCopy to Clipboard Copied! Toggle word wrap Toggle overflow - Use the pool IDs located in the previous step to attach the entitlements to the system:
subscription-manager attach --pool=pool_id
# subscription-manager attach --pool=pool_idCopy to Clipboard Copied! Toggle word wrap Toggle overflow - Disable all existing repositories:
subscription-manager repos --disable=*
# subscription-manager repos --disable=*Copy to Clipboard Copied! Toggle word wrap Toggle overflow - Enable the required repositories:
subscription-manager repos --enable=rhel-6-server-rpms subscription-manager repos --enable=rhel-6-server-supplementary-rpms subscription-manager repos --enable=rhel-6-server-rhevm-3.6-rpms subscription-manager repos --enable=jb-eap-6-for-rhel-6-server-rpms
# subscription-manager repos --enable=rhel-6-server-rpms # subscription-manager repos --enable=rhel-6-server-supplementary-rpms # subscription-manager repos --enable=rhel-6-server-rhevm-3.6-rpms # subscription-manager repos --enable=jb-eap-6-for-rhel-6-server-rpmsCopy to Clipboard Copied! Toggle word wrap Toggle overflow - Ensure that all packages currently installed are up to date:
yum update
# yum updateCopy to Clipboard Copied! Toggle word wrap Toggle overflow - Install the rhevm-dwh-setup and rhevm-reports-setup packages:
yum install rhevm-dwh-setup rhevm-reports-setup
# yum install rhevm-dwh-setup rhevm-reports-setupCopy to Clipboard Copied! Toggle word wrap Toggle overflow - Run the
engine-setupcommand to begin configuration of Data Warehouse and Reports on the machine:engine-setup
# engine-setupCopy to Clipboard Copied! Toggle word wrap Toggle overflow - Follow the prompts to configure Data Warehouse and Reports:
Configure Data Warehouse on this host (Yes, No) [Yes]: Configure Reports on this host (Yes, No) [Yes]:
Configure Data Warehouse on this host (Yes, No) [Yes]: Configure Reports on this host (Yes, No) [Yes]:Copy to Clipboard Copied! Toggle word wrap Toggle overflow - Press Enter to automatically configure the firewall, or type
Noand press Enter to maintain existing settings:Setup can automatically configure the firewall on this system. Note: automatic configuration of the firewall may overwrite current settings. Do you want Setup to configure the firewall? (Yes, No) [Yes]:
Setup can automatically configure the firewall on this system. Note: automatic configuration of the firewall may overwrite current settings. Do you want Setup to configure the firewall? (Yes, No) [Yes]:Copy to Clipboard Copied! Toggle word wrap Toggle overflow If you choose to automatically configure the firewall, and no firewall managers are active, you are prompted to select your chosen firewall manager from a list of supported options. Type the name of the firewall manager and press Enter. This applies even in cases where only one option is listed. - Press Enter to accept the automatically detected hostname, or enter an alternative hostname and press Enter:
Host fully qualified DNS name of this server [autodetected hostname]:
Host fully qualified DNS name of this server [autodetected hostname]:Copy to Clipboard Copied! Toggle word wrap Toggle overflow - Enter the fully qualified domain name of the Manager machine, and then press Enter:
Host fully qualified DNS name of the engine server []:
Host fully qualified DNS name of the engine server []:Copy to Clipboard Copied! Toggle word wrap Toggle overflow - Answer the following questions about the Data Warehouse database and the Reports database:
Copy to Clipboard Copied! Toggle word wrap Toggle overflow Press Enter to choose the highlighted defaults, or type your alternative preference and then press Enter. If you selectRemote, you are prompted to provide details about each remote database host. - Enter the fully qualified domain name and password for the Manager database machine. Press Enter to accept the default values in each other field:
Copy to Clipboard Copied! Toggle word wrap Toggle overflow - Press Enter to allow setup to sign the Reports certificate and Apache certificate on the Manager via SSH:
Setup will need to do some actions on the remote engine server. Either automatically, using ssh as root to access it, or you will be prompted to manually perform each such action. Please choose one of the following: 1 - Access remote engine server using ssh as root 2 - Perform each action manually, use files to copy content around (1, 2) [1]:
Setup will need to do some actions on the remote engine server. Either automatically, using ssh as root to access it, or you will be prompted to manually perform each such action. Please choose one of the following: 1 - Access remote engine server using ssh as root 2 - Perform each action manually, use files to copy content around (1, 2) [1]:Copy to Clipboard Copied! Toggle word wrap Toggle overflow - Press Enter to accept the default SSH port, or enter an alternative port number and then press Enter:
ssh port on remote engine server [22]:
ssh port on remote engine server [22]:Copy to Clipboard Copied! Toggle word wrap Toggle overflow - Enter the root password for the Manager machine:
root password on remote engine server manager-fqdn.com:
root password on remote engine server manager-fqdn.com:Copy to Clipboard Copied! Toggle word wrap Toggle overflow - Press Enter to allow automatic configuration of SSL on Apache:
Setup can configure apache to use SSL using a certificate issued from the internal CA.
Do you wish Setup to configure that, or prefer to perform that manually? (Automatic, Manual) [Automatic]:
Setup can configure apache to use SSL using a certificate issued from the internal CA.
Do you wish Setup to configure that, or prefer to perform that manually? (Automatic, Manual) [Automatic]:
Copy to Clipboard Copied! Toggle word wrap Toggle overflow - Set a password for the Reports administrative users (
adminandsuperuser). Note that the reports system maintains its own set of credentials that are separate to those used for the Manager:Reports power users password:
Reports power users password:Copy to Clipboard Copied! Toggle word wrap Toggle overflow You are prompted to enter the password a second time to confirm it. - Confirm your installation settings:
Please confirm installation settings (OK, Cancel) [OK]:
Please confirm installation settings (OK, Cancel) [OK]:Copy to Clipboard Copied! Toggle word wrap Toggle overflow
Access the Reports Portal at http://demo.redhat.com/ovirt-engine-reports, replacing demo.redhat.com with the fully qualified domain name of the Manager. If during the Manager installation you selected a non-default HTTP port then append :port to the URL, replacing :port with the port that you chose.
admin and the password you set during reports installation. Note that the first time you log in to Red Hat Enterprise Virtualization Manager Reports, a number of web pages are generated and, as a result, your initial attempt to log in may take some time to complete.
5.3.3. Installing and Configuring Data Warehouse and Reports on Separate Machines
Install and configure Data Warehouse on a separate host from that on which the Red Hat Enterprise Virtualization Manager is installed, then install and configure Red Hat Enterprise Virtualization Manager Reports on a third machine. Hosting the Data Warehouse and Reports services on separate machines helps to reduce the load on the Manager machine. Separating Data Warehouse and Reports onto individual machines further reduces the demand each service places on its host machine, and avoids any conflicts caused by sharing CPU and memory with other processes.
- Install and configure Data Warehouse on a separate machine.
- Install and configure Reports on a separate machine.
Ensure that you have completed the following prerequisites:
- You must have installed and configured the Manager on a separate machine.
- To set up the Data Warehouse machine, you must have the following:
- A virtual or physical machine with Red Hat Enterprise Linux 6.6 or later versions of Red Hat Enterprise Linux 6 installed.
- A subscription to the
Red Hat Enterprise Linux ServerandRed Hat Enterprise Virtualizationsubscription pools. - The password from the Manager's
/etc/ovirt-engine/engine.conf.d/10-setup-database.conffile. - Allowed access from the Data Warehouse machine to the Manager database machine's TCP port 5432.
- To set up the Reports machine, you must have the following:
- A virtual or physical machine with Red Hat Enterprise Linux 6.6 or later versions of Red Hat Enterprise Linux 6 installed.
- A subscription to the
Red Hat Enterprise Linux ServerandRed Hat Enterprise Virtualizationsubscription pools. - The password from the Data Warehouse machine's
/etc/ovirt-engine-dwh/ovirt-engine-dwhd.conf.d/10-setup-database.conffile. - Allowed access from the Reports machine to the Manager database machine's TCP port 5432.
- If you choose to use a remote Data Warehouse database or Reports database, you must set up each database before installing the Data Warehouse and Reports services. You must have the following information about each database host:
- The fully qualified domain name of the host
- The port through which the database can be reached (5432 by default)
- The database name
- The database user
- The database password
Procedure 5.3. Step 1: Installing and Configuring Data Warehouse on a Separate Machine
- Register your system with the Content Delivery Network, entering your Customer Portal user name and password when prompted:
subscription-manager register
# subscription-manager registerCopy to Clipboard Copied! Toggle word wrap Toggle overflow - Find the
Red Hat Enterprise Linux ServerandRed Hat Enterprise Virtualizationsubscription pools and note down the pool IDs.subscription-manager list --available
# subscription-manager list --availableCopy to Clipboard Copied! Toggle word wrap Toggle overflow - Use the pool IDs located in the previous step to attach the entitlements to the system:
subscription-manager attach --pool=pool_id
# subscription-manager attach --pool=pool_idCopy to Clipboard Copied! Toggle word wrap Toggle overflow - Disable all existing repositories:
subscription-manager repos --disable=*
# subscription-manager repos --disable=*Copy to Clipboard Copied! Toggle word wrap Toggle overflow - Enable the required repositories:
subscription-manager repos --enable=rhel-6-server-rpms
subscription-manager repos --enable=rhel-6-server-supplementary-rpms
subscription-manager repos --enable=rhel-6-server-rhevm-3.6-rpms
subscription-manager repos --enable=jb-eap-6-for-rhel-6-server-rpms
# subscription-manager repos --enable=rhel-6-server-rpms
# subscription-manager repos --enable=rhel-6-server-supplementary-rpms
# subscription-manager repos --enable=rhel-6-server-rhevm-3.6-rpms
# subscription-manager repos --enable=jb-eap-6-for-rhel-6-server-rpms
Copy to Clipboard Copied! Toggle word wrap Toggle overflow - Ensure that all packages currently installed are up to date:
yum update
# yum updateCopy to Clipboard Copied! Toggle word wrap Toggle overflow - Install the rhevm-dwh-setup package:
yum install rhevm-dwh-setup
# yum install rhevm-dwh-setupCopy to Clipboard Copied! Toggle word wrap Toggle overflow - Run the
engine-setupcommand to begin configuration of Data Warehouse on the machine:engine-setup
# engine-setupCopy to Clipboard Copied! Toggle word wrap Toggle overflow - Press Enter to configure Data Warehouse:
Configure Data Warehouse on this host (Yes, No) [Yes]:
Configure Data Warehouse on this host (Yes, No) [Yes]:Copy to Clipboard Copied! Toggle word wrap Toggle overflow - Press Enter to automatically configure the firewall, or type
Noand press Enter to maintain existing settings:Setup can automatically configure the firewall on this system. Note: automatic configuration of the firewall may overwrite current settings. Do you want Setup to configure the firewall? (Yes, No) [Yes]:
Setup can automatically configure the firewall on this system. Note: automatic configuration of the firewall may overwrite current settings. Do you want Setup to configure the firewall? (Yes, No) [Yes]:Copy to Clipboard Copied! Toggle word wrap Toggle overflow If you choose to automatically configure the firewall, and no firewall managers are active, you are prompted to select your chosen firewall manager from a list of supported options. Type the name of the firewall manager and press Enter. This applies even in cases where only one option is listed. - Press Enter to accept the automatically detected hostname, or enter an alternative hostname and press Enter:
Host fully qualified DNS name of this server [autodetected host name]:
Host fully qualified DNS name of this server [autodetected host name]:Copy to Clipboard Copied! Toggle word wrap Toggle overflow - Answer the following questions about the Data Warehouse database:
Where is the DWH database located? (Local, Remote) [Local]: Setup can configure the local postgresql server automatically for the DWH to run. This may conflict with existing applications. Would you like Setup to automatically configure postgresql and create DWH database, or prefer to perform that manually? (Automatic, Manual) [Automatic]:
Where is the DWH database located? (Local, Remote) [Local]: Setup can configure the local postgresql server automatically for the DWH to run. This may conflict with existing applications. Would you like Setup to automatically configure postgresql and create DWH database, or prefer to perform that manually? (Automatic, Manual) [Automatic]:Copy to Clipboard Copied! Toggle word wrap Toggle overflow Press Enter to choose the highlighted defaults, or type your alternative preference and then press Enter. If you selectRemote, you are prompted to provide details about the remote database host. - Enter the fully qualified domain name and password for the Manager database machine. Press Enter to accept the default values in each other field:
Copy to Clipboard Copied! Toggle word wrap Toggle overflow - Confirm your installation settings:
Please confirm installation settings (OK, Cancel) [OK]:
Please confirm installation settings (OK, Cancel) [OK]:Copy to Clipboard Copied! Toggle word wrap Toggle overflow
Procedure 5.4. Step 2: Installing and Configuring Reports on a Separate Machine
- Register your system with the Content Delivery Network, entering your Customer Portal user name and password when prompted:
subscription-manager register
# subscription-manager registerCopy to Clipboard Copied! Toggle word wrap Toggle overflow - Find subscription pools containing the repositories required to install Reports:
subscription-manager list --available | grep -A8 "Red Hat Enterprise Linux Server" subscription-manager list --available | grep -A8 "Red Hat Enterprise Virtualization"
# subscription-manager list --available | grep -A8 "Red Hat Enterprise Linux Server" # subscription-manager list --available | grep -A8 "Red Hat Enterprise Virtualization"Copy to Clipboard Copied! Toggle word wrap Toggle overflow - Use the pool identifiers located in the previous step to attach the
Red Hat Enterprise Linux ServerandRed Hat Enterprise Virtualizationentitlements to the system:subscription-manager attach --pool=pool_id
# subscription-manager attach --pool=pool_idCopy to Clipboard Copied! Toggle word wrap Toggle overflow - Disable all existing repositories:
subscription-manager repos --disable=*
# subscription-manager repos --disable=*Copy to Clipboard Copied! Toggle word wrap Toggle overflow - Enable the required repositories:
subscription-manager repos --enable=rhel-6-server-rpms subscription-manager repos --enable=rhel-6-server-supplementary-rpms subscription-manager repos --enable=rhel-6-server-rhevm-3.6-rpms subscription-manager repos --enable=jb-eap-6-for-rhel-6-server-rpms
# subscription-manager repos --enable=rhel-6-server-rpms # subscription-manager repos --enable=rhel-6-server-supplementary-rpms # subscription-manager repos --enable=rhel-6-server-rhevm-3.6-rpms # subscription-manager repos --enable=jb-eap-6-for-rhel-6-server-rpmsCopy to Clipboard Copied! Toggle word wrap Toggle overflow - Ensure that all packages currently installed are up to date:
yum update
# yum updateCopy to Clipboard Copied! Toggle word wrap Toggle overflow - Install the rhevm-reports-setup package:
yum install rhevm-reports-setup
# yum install rhevm-reports-setupCopy to Clipboard Copied! Toggle word wrap Toggle overflow - Run the
engine-setupcommand to begin configuration of Reports on the machine:engine-setup
# engine-setupCopy to Clipboard Copied! Toggle word wrap Toggle overflow - Press Enter to configure Reports:
Configure Reports on this host (Yes, No) [Yes]:
Configure Reports on this host (Yes, No) [Yes]:Copy to Clipboard Copied! Toggle word wrap Toggle overflow - Press Enter to automatically configure the firewall, or type
Noand press Enter to maintain existing settings:Setup can automatically configure the firewall on this system. Note: automatic configuration of the firewall may overwrite current settings. Do you want Setup to configure the firewall? (Yes, No) [Yes]:
Setup can automatically configure the firewall on this system.
Note: automatic configuration of the firewall may overwrite current settings.
Do you want Setup to configure the firewall? (Yes, No) [Yes]:
Copy to Clipboard Copied! Toggle word wrap Toggle overflow If you choose to automatically configure the firewall, and no firewall managers are active, you are prompted to select your chosen firewall manager from a list of supported options. Type the name of the firewall manager and press Enter. This applies even in cases where only one option is listed. - Press Enter to accept the automatically detected hostname, or enter an alternative hostname and press Enter:
Host fully qualified DNS name of this server [autodetected host name]:
Host fully qualified DNS name of this server [autodetected host name]:Copy to Clipboard Copied! Toggle word wrap Toggle overflow - Enter the fully qualified domain name of the Manager machine, and then press Enter:
Host fully qualified DNS name of the engine server []:
Host fully qualified DNS name of the engine server []:Copy to Clipboard Copied! Toggle word wrap Toggle overflow - Answer the following questions about the Reports database:
Where is the Reports database located? (Local, Remote) [Local]: Setup can configure the local postgresql server automatically for the Reports to run. This may conflict with existing applications. Would you like Setup to automatically configure postgresql and create Reports database, or prefer to perform that manually? (Automatic, Manual) [Automatic]:
Where is the Reports database located? (Local, Remote) [Local]: Setup can configure the local postgresql server automatically for the Reports to run. This may conflict with existing applications. Would you like Setup to automatically configure postgresql and create Reports database, or prefer to perform that manually? (Automatic, Manual) [Automatic]:Copy to Clipboard Copied! Toggle word wrap Toggle overflow Press Enter to choose the highlighted defaults, or type your alternative preference and then press Enter. If you selectRemote, you are prompted to provide details about the remote database host. - Enter the fully qualified domain name and password for your Data Warehouse database host. Press Enter to accept the default values in each other field:
Copy to Clipboard Copied! Toggle word wrap Toggle overflow - Press Enter to allow setup to sign the Reports certificate and Apache certificate on the Manager via SSH:
Setup will need to do some actions on the remote engine server. Either automatically, using ssh as root to access it, or you will be prompted to manually perform each such action. Please choose one of the following: 1 - Access remote engine server using ssh as root 2 - Perform each action manually, use files to copy content around (1, 2) [1]:
Setup will need to do some actions on the remote engine server. Either automatically, using ssh as root to access it, or you will be prompted to manually perform each such action. Please choose one of the following: 1 - Access remote engine server using ssh as root 2 - Perform each action manually, use files to copy content around (1, 2) [1]:Copy to Clipboard Copied! Toggle word wrap Toggle overflow - Press Enter to accept the default SSH port, or enter an alternative port number and then press Enter:
ssh port on remote engine server [22]:
ssh port on remote engine server [22]:Copy to Clipboard Copied! Toggle word wrap Toggle overflow - Enter the root password for the Manager machine:
root password on remote engine server manager-fqdn.com:
root password on remote engine server manager-fqdn.com:Copy to Clipboard Copied! Toggle word wrap Toggle overflow - Press Enter to allow automatic configuration of SSL on Apache:
Setup can configure apache to use SSL using a certificate issued from the internal CA. Do you wish Setup to configure that, or prefer to perform that manually? (Automatic, Manual) [Automatic]:
Setup can configure apache to use SSL using a certificate issued from the internal CA. Do you wish Setup to configure that, or prefer to perform that manually? (Automatic, Manual) [Automatic]:Copy to Clipboard Copied! Toggle word wrap Toggle overflow - Set a password for the Reports administrative users (
adminandsuperuser). Note that the reports system maintains its own set of credentials that are separate to those used for the Manager:Reports power users password:
Reports power users password:Copy to Clipboard Copied! Toggle word wrap Toggle overflow You are prompted to enter the password a second time to confirm it. - Confirm your installation settings:
Please confirm installation settings (OK, Cancel) [OK]:
Please confirm installation settings (OK, Cancel) [OK]:Copy to Clipboard Copied! Toggle word wrap Toggle overflow
Access the Reports Portal at http://demo.redhat.com/ovirt-engine-reports, replacing demo.redhat.com with the fully qualified domain name of the Manager. If during the Manager installation you selected a non-default HTTP port then append :port to the URL, replacing :port with the port that you chose.
admin and the password you set during reports installation. Note that the first time you log in to Red Hat Enterprise Virtualization Manager Reports, a number of web pages are generated and, as a result, your initial attempt to log in may take some time to complete.
5.3.4. Installing and Configuring Data Warehouse on the Red Hat Enterprise Virtualization Manager and Reports on a Separate Machine
Install and configure Data Warehouse on the same system as the Red Hat Enterprise Virtualization Manager, then install and configure Red Hat Enterprise Virtualization Manager Reports on a separate machine. Hosting the Reports service on a separate machine helps to reduce the load on the Manager machine.
- Install and configure Data Warehouse on the Manager machine.
- Install and configure Reports on a separate machine.
Ensure that you have completed the following prerequisites:
- You must have installed and configured the Manager on one machine. This is the machine on which you are installing Data Warehouse.
- To set up the Reports machine, you must have the following:
- A virtual or physical machine with Red Hat Enterprise Linux 6.6 or later versions of Red Hat Enterprise Linux 6 installed.
- A subscription to the
Red Hat Enterprise Linux ServerandRed Hat Enterprise Virtualizationentitlement pools. - The password from the Data Warehouse machine's
/etc/ovirt-engine-dwh/ovirt-engine-dwhd.conf.d/10-setup-database.conffile. - Allowed access from the Reports machine to the Manager database machine's TCP port 5432.
- If you choose to use a remote Data Warehouse database or Reports database, you must set up each database before installing the Data Warehouse and Reports services. You must have the following information about each database host:
- The fully qualified domain name of the host
- The port through which the database can be reached (5432 by default)
- The database name
- The database user
- The database password
- If you are using the self-hosted engine, you must move it to maintenance mode:
hosted-engine --set-maintenance --mode=global
# hosted-engine --set-maintenance --mode=globalCopy to Clipboard Copied! Toggle word wrap Toggle overflow
Procedure 5.5. Step 1: Installing and Configuring Data Warehouse on the Manager Machine
- Install the rhevm-dwh package:
yum install rhevm-dwh
# yum install rhevm-dwhCopy to Clipboard Copied! Toggle word wrap Toggle overflow - Run the
engine-setupcommand to begin configuration of Data Warehouse on the machine:engine-setup
# engine-setupCopy to Clipboard Copied! Toggle word wrap Toggle overflow - Press Enter to configure Data Warehouse:
Configure Data Warehouse on this host (Yes, No) [Yes]:
Configure Data Warehouse on this host (Yes, No) [Yes]:Copy to Clipboard Copied! Toggle word wrap Toggle overflow - Press Enter to automatically configure the firewall, or type
Noand press Enter to maintain existing settings:Setup can automatically configure the firewall on this system. Note: automatic configuration of the firewall may overwrite current settings. Do you want Setup to configure the firewall? (Yes, No) [Yes]:
Setup can automatically configure the firewall on this system. Note: automatic configuration of the firewall may overwrite current settings. Do you want Setup to configure the firewall? (Yes, No) [Yes]:Copy to Clipboard Copied! Toggle word wrap Toggle overflow If you choose to automatically configure the firewall, and no firewall managers are active, you are prompted to select your chosen firewall manager from a list of supported options. Type the name of the firewall manager and press Enter. This applies even in cases where only one option is listed. - Answer the following questions about the Data Warehouse database:
Where is the DWH database located? (Local, Remote) [Local]: Setup can configure the local postgresql server automatically for the DWH to run. This may conflict with existing applications. Would you like Setup to automatically configure postgresql and create DWH database, or prefer to perform that manually? (Automatic, Manual) [Automatic]:
Where is the DWH database located? (Local, Remote) [Local]: Setup can configure the local postgresql server automatically for the DWH to run. This may conflict with existing applications. Would you like Setup to automatically configure postgresql and create DWH database, or prefer to perform that manually? (Automatic, Manual) [Automatic]:Copy to Clipboard Copied! Toggle word wrap Toggle overflow Press Enter to choose the highlighted defaults, or type your alternative preference and then press Enter. If you selectRemote, you are prompted to provide details about the remote database host. - For the configuration to take effect, the
ovirt-engineservice must be restarted. Theengine-setupcommand prompts you:During execution engine service will be stopped (OK, Cancel) [OK]:
During execution engine service will be stopped (OK, Cancel) [OK]:Copy to Clipboard Copied! Toggle word wrap Toggle overflow Press Enter to proceed. Theovirt-engineservice restarts automatically later in the command. - Confirm your installation settings:
Please confirm installation settings (OK, Cancel) [OK]:
Please confirm installation settings (OK, Cancel) [OK]:Copy to Clipboard Copied! Toggle word wrap Toggle overflow
Procedure 5.6. Step 2: Installing and Configuring Reports on a Separate Machine
- Register your system with the Content Delivery Network, entering your Customer Portal user name and password when prompted:
subscription-manager register
# subscription-manager registerCopy to Clipboard Copied! Toggle word wrap Toggle overflow - Find the
Red Hat Enterprise Linux ServerandRed Hat Enterprise Virtualizationsubscription pools and note down the pool IDs.subscription-manager list --available
# subscription-manager list --availableCopy to Clipboard Copied! Toggle word wrap Toggle overflow - Use the pool IDs located in the previous step to attach the entitlements to the system:
subscription-manager attach --pool=pool_id
# subscription-manager attach --pool=pool_idCopy to Clipboard Copied! Toggle word wrap Toggle overflow - Disable all existing repositories:
subscription-manager repos --disable=*
# subscription-manager repos --disable=*Copy to Clipboard Copied! Toggle word wrap Toggle overflow - Enable the required channels:
subscription-manager repos --enable=rhel-6-server-rpms
subscription-manager repos --enable=rhel-6-server-supplementary-rpms
subscription-manager repos --enable=rhel-6-server-rhevm-3.6-rpms
subscription-manager repos --enable=jb-eap-6-for-rhel-6-server-rpms
# subscription-manager repos --enable=rhel-6-server-rpms
# subscription-manager repos --enable=rhel-6-server-supplementary-rpms
# subscription-manager repos --enable=rhel-6-server-rhevm-3.6-rpms
# subscription-manager repos --enable=jb-eap-6-for-rhel-6-server-rpms
Copy to Clipboard Copied! Toggle word wrap Toggle overflow - Ensure that all packages currently installed are up to date:
yum update
# yum updateCopy to Clipboard Copied! Toggle word wrap Toggle overflow - Install the rhevm-reports-setup package:
yum install rhevm-reports-setup
# yum install rhevm-reports-setupCopy to Clipboard Copied! Toggle word wrap Toggle overflow - Run the
engine-setupcommand to begin configuration of Reports on the machine:engine-setup
# engine-setupCopy to Clipboard Copied! Toggle word wrap Toggle overflow - Press Enter to configure Reports:
Configure Reports on this host (Yes, No) [Yes]:
Configure Reports on this host (Yes, No) [Yes]:Copy to Clipboard Copied! Toggle word wrap Toggle overflow - Press Enter to automatically configure the firewall, or type
Noand press Enter to maintain existing settings:Setup can automatically configure the firewall on this system. Note: automatic configuration of the firewall may overwrite current settings. Do you want Setup to configure the firewall? (Yes, No) [Yes]:
Setup can automatically configure the firewall on this system. Note: automatic configuration of the firewall may overwrite current settings. Do you want Setup to configure the firewall? (Yes, No) [Yes]:Copy to Clipboard Copied! Toggle word wrap Toggle overflow If you choose to automatically configure the firewall, and no firewall managers are active, you are prompted to select your chosen firewall manager from a list of supported options. Type the name of the firewall manager and press Enter. This applies even in cases where only one option is listed. - Press Enter to accept the automatically detected hostname, or enter an alternative hostname and press Enter:
Host fully qualified DNS name of this server [autodetected host name]:
Host fully qualified DNS name of this server [autodetected host name]:Copy to Clipboard Copied! Toggle word wrap Toggle overflow - Enter the fully qualified domain name of the Manager machine, and then press Enter:
Host fully qualified DNS name of the engine server []:
Host fully qualified DNS name of the engine server []:Copy to Clipboard Copied! Toggle word wrap Toggle overflow - Answer the following questions about the Reports database:
Where is the Reports database located? (Local, Remote) [Local]: Setup can configure the local postgresql server automatically for the Reports to run. This may conflict with existing applications. Would you like Setup to automatically configure postgresql and create Reports database, or prefer to perform that manually? (Automatic, Manual) [Automatic]:
Where is the Reports database located? (Local, Remote) [Local]: Setup can configure the local postgresql server automatically for the Reports to run. This may conflict with existing applications. Would you like Setup to automatically configure postgresql and create Reports database, or prefer to perform that manually? (Automatic, Manual) [Automatic]:Copy to Clipboard Copied! Toggle word wrap Toggle overflow Press Enter to choose the highlighted defaults, or type your alternative preference and then press Enter. If you selectRemote, you are prompted to provide details about the remote database host. - Enter the fully qualified domain name and password for your Data Warehouse database host. Press Enter to accept the default values in each other field:
Copy to Clipboard Copied! Toggle word wrap Toggle overflow - Press Enter to allow setup to sign the Reports certificate and Apache certificate on the Manager via SSH:
Setup will need to do some actions on the remote engine server. Either automatically, using ssh as root to access it, or you will be prompted to manually perform each such action. Please choose one of the following: 1 - Access remote engine server using ssh as root 2 - Perform each action manually, use files to copy content around (1, 2) [1]:
Setup will need to do some actions on the remote engine server. Either automatically, using ssh as root to access it, or you will be prompted to manually perform each such action. Please choose one of the following: 1 - Access remote engine server using ssh as root 2 - Perform each action manually, use files to copy content around (1, 2) [1]:Copy to Clipboard Copied! Toggle word wrap Toggle overflow - Press Enter to accept the default SSH port, or enter an alternative port number and then press Enter:
ssh port on remote engine server [22]:
ssh port on remote engine server [22]:Copy to Clipboard Copied! Toggle word wrap Toggle overflow - Enter the root password for the Manager machine:
root password on remote engine server manager-fqdn.com:
root password on remote engine server manager-fqdn.com:Copy to Clipboard Copied! Toggle word wrap Toggle overflow - Press Enter to allow automatic configuration of SSL on Apache:
Setup can configure apache to use SSL using a certificate issued from the internal CA. Do you wish Setup to configure that, or prefer to perform that manually? (Automatic, Manual) [Automatic]:
Setup can configure apache to use SSL using a certificate issued from the internal CA. Do you wish Setup to configure that, or prefer to perform that manually? (Automatic, Manual) [Automatic]:Copy to Clipboard Copied! Toggle word wrap Toggle overflow - Set a password for the Reports administrative users (
adminandsuperuser). Note that the reports system maintains its own set of credentials that are separate to those used for the Manager:Reports power users password:
Reports power users password:Copy to Clipboard Copied! Toggle word wrap Toggle overflow You are prompted to enter the password a second time to confirm it. - Confirm your installation settings:
Please confirm installation settings (OK, Cancel) [OK]:
Please confirm installation settings (OK, Cancel) [OK]:Copy to Clipboard Copied! Toggle word wrap Toggle overflow
Access the Reports Portal at http://demo.redhat.com/ovirt-engine-reports, replacing demo.redhat.com with the fully qualified domain name of the Manager. If during the Manager installation you selected a non-default HTTP port then append :port to the URL, replacing :port with the port that you chose.
admin and the password you set during reports installation. Note that the first time you log in to Red Hat Enterprise Virtualization Manager Reports, a number of web pages are generated and, as a result, your initial attempt to log in may take some time to complete.
5.3.5. Installing and Configuring Data Warehouse on a Separate Machine and Reports on the Red Hat Enterprise Virtualization Manager
Install and configure Data Warehouse on a separate host from that on which the Red Hat Enterprise Virtualization Manager is installed, then install and configure Red Hat Enterprise Virtualization Manager Reports on the Manager machine. Hosting the Data Warehouse service on a separate machine helps to reduce the load on the Manager machine. Note that hosting the Manager and Reports on the same machine means that these processes will share CPU and memory.
- Install and configure Data Warehouse on a separate machine.
- Install and configure Reports on the Manager machine.
Ensure that you have completed the following prerequisites:
- You must have installed and configured the Manager on a separate machine.
- To set up the Data Warehouse machine, you must have the following:
- A virtual or physical machine with Red Hat Enterprise Linux 6.6 or later versions of Red Hat Enterprise Linux 6 installed.
- A subscription to the
Red Hat Enterprise Linux ServerandRed Hat Enterprise Virtualizationentitlement pools. - The password from the Manager's
/etc/ovirt-engine/engine.conf.d/10-setup-database.conffile. - Allowed access from the Data Warehouse machine to the Manager database machine's TCP port 5432.
- To set up the Reports machine, you must have the following:
- The password from the Data Warehouse machine's
/etc/ovirt-engine-dwh/ovirt-engine-dwhd.conf.d/10-setup-database.conffile.
- If you choose to use a remote Data Warehouse database or Reports database, you must set up each database before installing the Data Warehouse and Reports services. You must have the following information about each database host:
- The fully qualified domain name of the host
- The port through which the database can be reached (5432 by default)
- The database name
- The database user
- The database password
- If you are using the self-hosted engine, you must move it to maintenance mode:
hosted-engine --set-maintenance --mode=global
# hosted-engine --set-maintenance --mode=globalCopy to Clipboard Copied! Toggle word wrap Toggle overflow
Procedure 5.7. Step 1: Installing and Configuring Data Warehouse on a Separate Machine
- Register your system with the Content Delivery Network, entering your Customer Portal user name and password when prompted:
subscription-manager register
# subscription-manager registerCopy to Clipboard Copied! Toggle word wrap Toggle overflow - Find the
Red Hat Enterprise Linux ServerandRed Hat Enterprise Virtualizationsubscription pools and note down the pool IDs.subscription-manager list --available
# subscription-manager list --availableCopy to Clipboard Copied! Toggle word wrap Toggle overflow - Use the pool IDs located in the previous step to attach the entitlements to the system:
subscription-manager attach --pool=pool_id
# subscription-manager attach --pool=pool_idCopy to Clipboard Copied! Toggle word wrap Toggle overflow - Disable all existing repositories:
subscription-manager repos --disable=*
# subscription-manager repos --disable=*Copy to Clipboard Copied! Toggle word wrap Toggle overflow - Enable the required channels:
subscription-manager repos --enable=rhel-6-server-rpms subscription-manager repos --enable=rhel-6-server-supplementary-rpms subscription-manager repos --enable=rhel-6-server-rhevm-3.6-rpms subscription-manager repos --enable=jb-eap-6-for-rhel-6-server-rpms
# subscription-manager repos --enable=rhel-6-server-rpms # subscription-manager repos --enable=rhel-6-server-supplementary-rpms # subscription-manager repos --enable=rhel-6-server-rhevm-3.6-rpms # subscription-manager repos --enable=jb-eap-6-for-rhel-6-server-rpmsCopy to Clipboard Copied! Toggle word wrap Toggle overflow - Ensure that all packages currently installed are up to date:
yum update
# yum updateCopy to Clipboard Copied! Toggle word wrap Toggle overflow - Install the rhevm-dwh-setup package:
yum install rhevm-dwh-setup
# yum install rhevm-dwh-setupCopy to Clipboard Copied! Toggle word wrap Toggle overflow - Run the
engine-setupcommand to begin configuration of Data Warehouse on the machine:engine-setup
# engine-setupCopy to Clipboard Copied! Toggle word wrap Toggle overflow - Press Enter to configure Data Warehouse:
Configure Data Warehouse on this host (Yes, No) [Yes]:
Configure Data Warehouse on this host (Yes, No) [Yes]:Copy to Clipboard Copied! Toggle word wrap Toggle overflow - Press Enter to automatically configure the firewall, or type
Noand press Enter to maintain existing settings:Setup can automatically configure the firewall on this system. Note: automatic configuration of the firewall may overwrite current settings. Do you want Setup to configure the firewall? (Yes, No) [Yes]:
Setup can automatically configure the firewall on this system.
Note: automatic configuration of the firewall may overwrite current settings.
Do you want Setup to configure the firewall? (Yes, No) [Yes]:
Copy to Clipboard Copied! Toggle word wrap Toggle overflow If you choose to automatically configure the firewall, and no firewall managers are active, you are prompted to select your chosen firewall manager from a list of supported options. Type the name of the firewall manager and press Enter. This applies even in cases where only one option is listed. - Press Enter to accept the automatically detected hostname, or enter an alternative hostname and press Enter:
Host fully qualified DNS name of this server [autodetected host name]:
Host fully qualified DNS name of this server [autodetected host name]:Copy to Clipboard Copied! Toggle word wrap Toggle overflow - Answer the following questions about the Data Warehouse database:
Where is the DWH database located? (Local, Remote) [Local]: Setup can configure the local postgresql server automatically for the DWH to run. This may conflict with existing applications. Would you like Setup to automatically configure postgresql and create DWH database, or prefer to perform that manually? (Automatic, Manual) [Automatic]:
Where is the DWH database located? (Local, Remote) [Local]: Setup can configure the local postgresql server automatically for the DWH to run. This may conflict with existing applications. Would you like Setup to automatically configure postgresql and create DWH database, or prefer to perform that manually? (Automatic, Manual) [Automatic]:Copy to Clipboard Copied! Toggle word wrap Toggle overflow Press Enter to choose the highlighted defaults, or type your alternative preference and then press Enter. If you selectRemote, you are prompted to provide details about the remote database host. - Enter the fully qualified domain name and password for the Manager database machine. Press Enter to accept the default values in each other field:
Copy to Clipboard Copied! Toggle word wrap Toggle overflow - Confirm your installation settings:
Please confirm installation settings (OK, Cancel) [OK]:
Please confirm installation settings (OK, Cancel) [OK]:Copy to Clipboard Copied! Toggle word wrap Toggle overflow
Procedure 5.8. Step 2: Installing and Configuring Reports on the Manager Machine
- Install the rhevm-reports package:
yum install rhevm-reports
# yum install rhevm-reportsCopy to Clipboard Copied! Toggle word wrap Toggle overflow - Run the
engine-setupcommand to begin configuration of Reports on the machine:engine-setup
# engine-setupCopy to Clipboard Copied! Toggle word wrap Toggle overflow - Press Enter to configure Reports:
Configure Reports on this host (Yes, No) [Yes]:
Configure Reports on this host (Yes, No) [Yes]:Copy to Clipboard Copied! Toggle word wrap Toggle overflow - Press Enter to automatically configure the firewall, or type
Noand press Enter to maintain existing settings:Setup can automatically configure the firewall on this system. Note: automatic configuration of the firewall may overwrite current settings. Do you want Setup to configure the firewall? (Yes, No) [Yes]:
Setup can automatically configure the firewall on this system. Note: automatic configuration of the firewall may overwrite current settings. Do you want Setup to configure the firewall? (Yes, No) [Yes]:Copy to Clipboard Copied! Toggle word wrap Toggle overflow If you choose to automatically configure the firewall, and no firewall managers are active, you are prompted to select your chosen firewall manager from a list of supported options. Type the name of the firewall manager and press Enter. This applies even in cases where only one option is listed. - Answer the following questions about the Reports database:
Where is the Reports database located? (Local, Remote) [Local]: Setup can configure the local postgresql server automatically for the Reports to run. This may conflict with existing applications. Would you like Setup to automatically configure postgresql and create Reports database, or prefer to perform that manually? (Automatic, Manual) [Automatic]:
Where is the Reports database located? (Local, Remote) [Local]: Setup can configure the local postgresql server automatically for the Reports to run. This may conflict with existing applications. Would you like Setup to automatically configure postgresql and create Reports database, or prefer to perform that manually? (Automatic, Manual) [Automatic]:Copy to Clipboard Copied! Toggle word wrap Toggle overflow Press Enter to choose the highlighted defaults, or type your alternative preference and then press Enter. If you selectRemote, you are prompted to provide details about the remote database host. - Enter the fully qualified domain name and password for your Data Warehouse database host. Press Enter to accept the default values in each other field:
Copy to Clipboard Copied! Toggle word wrap Toggle overflow - Set a password for the Reports administrative users (
adminandsuperuser). Note that the reports system maintains its own set of credentials that are separate to those used for the Manager:Reports power users password:
Reports power users password:Copy to Clipboard Copied! Toggle word wrap Toggle overflow You are prompted to enter the password a second time to confirm it. - For the configuration to take effect, the
ovirt-engineservice must be restarted. Theengine-setupcommand prompts you:During execution engine service will be stopped (OK, Cancel) [OK]:
During execution engine service will be stopped (OK, Cancel) [OK]:Copy to Clipboard Copied! Toggle word wrap Toggle overflow Press Enter to proceed. Theovirt-engineservice restarts automatically later in the command. - Confirm your installation settings:
Please confirm installation settings (OK, Cancel) [OK]:
Please confirm installation settings (OK, Cancel) [OK]:Copy to Clipboard Copied! Toggle word wrap Toggle overflow
Access the Reports Portal at http://demo.redhat.com/ovirt-engine-reports, replacing demo.redhat.com with the fully qualified domain name of the Manager. If during the Manager installation you selected a non-default HTTP port then append :port to the URL, replacing :port with the port that you chose.
admin and the password you set during reports installation. Note that the first time you log in to Red Hat Enterprise Virtualization Manager Reports, a number of web pages are generated and, as a result, your initial attempt to log in may take some time to complete.
5.4. Migrating Data Warehouse and Reports to Separate Machines
ovirt_engine_history database, or optionally migrate the ovirt_engine_history database to a new database machine before migrating the Data Warehouse service. If the ovirt_engine_history database is hosted on the Manager, migrating the database in addition to the Data Warehouse service further reduces the competition for resources on the Manager machine. You can migrate the database to the same machine onto which you will migrate the Data Warehouse service, or to a machine that is separate from both the Manager machine and the new Data Warehouse service machine.
5.4.1. Migrating the Data Warehouse Database to a Separate Machine
ovirt_engine_history database before you migrate the Data Warehouse service. This procedure uses pg_dump to create a database backup, and psql to restore the backup on the new database machine. The pg_dump command provides flexible options for backing up and restoring databases; for more information on options that may be suitable for your system, see the pg_dump manual page.
Important
engine-setup and entering the details of the new Data Warehouse database when prompted. If you do not do this, the Reports service is still connected to the old database, and does not receive any new data.
Procedure 5.9. Migrating the Data Warehouse Database to a Separate Machine
- On the existing database machine, dump the
ovirt_engine_historydatabase into a SQL script file:pg_dump ovirt_engine_history > ovirt_engine_history.sql
# pg_dump ovirt_engine_history > ovirt_engine_history.sqlCopy to Clipboard Copied! Toggle word wrap Toggle overflow - Copy the script file from the existing database machine to the new database machine.
- Restore the
ovirt_engine_historydatabase on the new database machine:psql -d ovirt_engine_history -f ovirt_engine_history.sql
# psql -d ovirt_engine_history -f ovirt_engine_history.sqlCopy to Clipboard Copied! Toggle word wrap Toggle overflow The command above assumes that the database on the new machine is also namedovirt_engine_history.
5.4.2. Migrating the Data Warehouse Service to a Separate Machine
ovirt_engine_history database) prior to migrating the Data Warehouse service, see Section 5.4.1, “Migrating the Data Warehouse Database to a Separate Machine”.
- Set up the new Data Warehouse machine.
- Stop the Data Warehouse service on the Manager machine.
- Configure the new Data Warehouse machine.
- Remove the Data Warehouse package from the Manager machine.
Ensure that you have completed the following prerequisites:
- You must have installed and configured the Manager and Data Warehouse on the same machine.
- To set up the new Data Warehouse machine, you must have the following:
- A virtual or physical machine with Red Hat Enterprise Linux 6.6 or later versions of Red Hat Enterprise Linux 6 installed.
- A subscription to the
Red Hat Enterprise Linux ServerandRed Hat Enterprise Virtualizationentitlement pools. - The password from the Manager's
/etc/ovirt-engine/engine.conf.d/10-setup-database.conffile. - Allowed access from the Data Warehouse machine to the Manager database machine's TCP port 5432.
- The
ovirt_engine_historydatabase credentials from the Manager's/etc/ovirt-engine-dwh/ovirt-engine-dwhd.conf.d/10-setup-database.conffile. If you migrated theovirt_engine_historydatabase using Section 5.4.1, “Migrating the Data Warehouse Database to a Separate Machine”, retrieve the credentials you defined during the database setup on that machine.
Procedure 5.10. Step 1: Setting up the New Data Warehouse Machine
- Register your system with the Content Delivery Network, entering your Customer Portal user name and password when prompted:
subscription-manager register
# subscription-manager registerCopy to Clipboard Copied! Toggle word wrap Toggle overflow - Find the
Red Hat Enterprise Linux ServerandRed Hat Enterprise Virtualizationsubscription pools and note down the pool IDs.subscription-manager list --available
# subscription-manager list --availableCopy to Clipboard Copied! Toggle word wrap Toggle overflow - Use the pool IDs located in the previous step to attach the entitlements to the system:
subscription-manager attach --pool=pool_id
# subscription-manager attach --pool=pool_idCopy to Clipboard Copied! Toggle word wrap Toggle overflow - Disable all existing repositories:
subscription-manager repos --disable=*
# subscription-manager repos --disable=*Copy to Clipboard Copied! Toggle word wrap Toggle overflow - Enable the required channels:
subscription-manager repos --enable=rhel-6-server-rpms subscription-manager repos --enable=rhel-6-server-supplementary-rpms subscription-manager repos --enable=rhel-6-server-rhevm-3.6-rpms subscription-manager repos --enable=jb-eap-6-for-rhel-6-server-rpms
# subscription-manager repos --enable=rhel-6-server-rpms # subscription-manager repos --enable=rhel-6-server-supplementary-rpms # subscription-manager repos --enable=rhel-6-server-rhevm-3.6-rpms # subscription-manager repos --enable=jb-eap-6-for-rhel-6-server-rpmsCopy to Clipboard Copied! Toggle word wrap Toggle overflow - Ensure that all packages currently installed are up to date:
yum update
# yum updateCopy to Clipboard Copied! Toggle word wrap Toggle overflow - Install the rhevm-dwh-setup package:
yum install rhevm-dwh-setup
# yum install rhevm-dwh-setupCopy to Clipboard Copied! Toggle word wrap Toggle overflow
Procedure 5.11. Step 2: Stopping the Data Warehouse Service on the Manager Machine
- Stop the Data Warehouse service:
service ovirt-engine-dwhd stop
# service ovirt-engine-dwhd stopCopy to Clipboard Copied! Toggle word wrap Toggle overflow - If the
ovirt_engine_historydatabase, the Manager database, or both are hosted on the Manager machine and were configured by a previous version (Red Hat Enterprise Virtualization 3.4 or prior) that was then upgraded, you must allow the new Data Warehouse machine to access them. Edit the/var/lib/pgsql/data/postgresql.conffile and modify thelisten_addressesline so that it matches the following:listen_addresses = '*'
listen_addresses = '*'Copy to Clipboard Copied! Toggle word wrap Toggle overflow If the line does not exist or has been commented out, add it manually.If one or both databases are hosted on a remote machine, you must manually grant access by editing thepostgres.conffile on each machine, and adding thelisten_addressesline, as above. If both databases are hosted on the Manager machine and were configured during a clean setup of Red Hat Enterprise Virtualization Manager 3.5, access is granted by default. - Restart the postgresql service:
service postgresql restart
# service postgresql restartCopy to Clipboard Copied! Toggle word wrap Toggle overflow
Procedure 5.12. Step 3: Configuring the New Data Warehouse Machine
- Run the
engine-setupcommand to begin configuration of Data Warehouse on the machine:engine-setup
# engine-setupCopy to Clipboard Copied! Toggle word wrap Toggle overflow - Press Enter to configure Data Warehouse:
Configure Data Warehouse on this host (Yes, No) [Yes]:
Configure Data Warehouse on this host (Yes, No) [Yes]:Copy to Clipboard Copied! Toggle word wrap Toggle overflow - Press Enter to automatically configure the firewall, or type
Noand press Enter to maintain existing settings:Setup can automatically configure the firewall on this system. Note: automatic configuration of the firewall may overwrite current settings. Do you want Setup to configure the firewall? (Yes, No) [Yes]:
Setup can automatically configure the firewall on this system. Note: automatic configuration of the firewall may overwrite current settings. Do you want Setup to configure the firewall? (Yes, No) [Yes]:Copy to Clipboard Copied! Toggle word wrap Toggle overflow If you choose to automatically configure the firewall, and no firewall managers are active, you are prompted to select your chosen firewall manager from a list of supported options. Type the name of the firewall manager and press Enter. This applies even in cases where only one option is listed. - Press Enter to accept the automatically detected hostname, or enter an alternative hostname and press Enter:
Host fully qualified DNS name of this server [autodetected host name]:
Host fully qualified DNS name of this server [autodetected host name]:Copy to Clipboard Copied! Toggle word wrap Toggle overflow - Answer the following question about the location of the
ovirt_engine_historydatabase:Where is the DWH database located? (Local, Remote) [Local]: Remote
Where is the DWH database located? (Local, Remote) [Local]: RemoteCopy to Clipboard Copied! Toggle word wrap Toggle overflow Type the alternative option as shown above and then press Enter. - Enter the fully qualified domain name and password for your
ovirt_engine_historydatabase host. Press Enter to accept the default values in each other field:Copy to Clipboard Copied! Toggle word wrap Toggle overflow - Enter the fully qualified domain name and password for the Manager database machine. Press Enter to accept the default values in each other field:
Copy to Clipboard Copied! Toggle word wrap Toggle overflow - Press Enter to create a backup of the existing Data Warehouse database:
Would you like to backup the existing database before upgrading it? (Yes, No) [Yes]:
Would you like to backup the existing database before upgrading it? (Yes, No) [Yes]:Copy to Clipboard Copied! Toggle word wrap Toggle overflow The time and space required for the database backup depends on the size of the database. It may take several hours to complete. If you choose not to back up the database here, andengine-setupfails for any reason, you will not be able to restore the database or any of the data within it. The location of the backup file appears at the end of the setup script. - Confirm that you want to permanently disconnect the existing Data Warehouse service from the Manager:
Do you want to permanently disconnect this DWH from the engine? (Yes, No) [No]:
Do you want to permanently disconnect this DWH from the engine? (Yes, No) [No]:Copy to Clipboard Copied! Toggle word wrap Toggle overflow - Confirm your installation settings:
Please confirm installation settings (OK, Cancel) [OK]:
Please confirm installation settings (OK, Cancel) [OK]:Copy to Clipboard Copied! Toggle word wrap Toggle overflow
Procedure 5.13. Step 4: Removing the Data Warehouse Package from the Manager Machine
- Remove the Data Warehouse package:
yum remove rhevm-dwh
# yum remove rhevm-dwhCopy to Clipboard Copied! Toggle word wrap Toggle overflow This step prevents the Data Warehouse service from attempting to automatically restart after an hour. - Remove the Data Warehouse files:
rm -rf /etc/ovirt-engine-dwh /var/lib/ovirt-engine-dwh
# rm -rf /etc/ovirt-engine-dwh /var/lib/ovirt-engine-dwhCopy to Clipboard Copied! Toggle word wrap Toggle overflow
5.4.3. Migrating the Reports Service to a Separate Machine
ovirt_engine_reports database) cannot be migrated; you must create a new ovirt_engine_reports database when you configure Reports on the new machine. Saved ad hoc reports can be migrated from the Manager machine to the new Reports machine. Migrate the Reports service only after the Manager and Data Warehouse have been configured.
- Configure the new Reports machine.
- Migrate any saved reports to the new Reports machine.
- Remove the Reports service from the Manager machine.
Ensure that you have completed the following prerequisites:
- You must have installed and configured the Manager and Reports on the same machine.
- You must have installed and configured Data Warehouse, either on the Manager machine or on a separate machine.
- To set up the new Reports machine, you must have the following:
- A virtual or physical machine with Red Hat Enterprise Linux 6.6 or later versions of Red Hat Enterprise Linux 6 installed
- A subscription to the
Red Hat Enterprise Linux ServerandRed Hat Enterprise Virtualizationentitlement pools - The password from the Data Warehouse machine's
/etc/ovirt-engine-dwh/ovirt-engine-dwhd.conf.d/10-setup-database.conffile - Allowed access from the Reports machine to the Manager database machine's TCP port 5432
Procedure 5.14. Step 1: Configuring the New Reports Machine
- Register your system with the Content Delivery Network, entering your Customer Portal user name and password when prompted:
subscription-manager register
# subscription-manager registerCopy to Clipboard Copied! Toggle word wrap Toggle overflow - Find the
Red Hat Enterprise Linux ServerandRed Hat Enterprise Virtualizationsubscription pools and note down the pool IDs.subscription-manager list --available
# subscription-manager list --availableCopy to Clipboard Copied! Toggle word wrap Toggle overflow - Use the pool IDs located in the previous step to attach the entitlements to the system:
subscription-manager attach --pool=pool_id
# subscription-manager attach --pool=pool_idCopy to Clipboard Copied! Toggle word wrap Toggle overflow - Disable all existing repositories:
subscription-manager repos --disable=*
# subscription-manager repos --disable=*Copy to Clipboard Copied! Toggle word wrap Toggle overflow - Enable the required channels:
subscription-manager repos --enable=rhel-6-server-rpms subscription-manager repos --enable=rhel-6-server-supplementary-rpms subscription-manager repos --enable=rhel-6-server-rhevm-3.6-rpms subscription-manager repos --enable=jb-eap-6-for-rhel-6-server-rpms
# subscription-manager repos --enable=rhel-6-server-rpms # subscription-manager repos --enable=rhel-6-server-supplementary-rpms # subscription-manager repos --enable=rhel-6-server-rhevm-3.6-rpms # subscription-manager repos --enable=jb-eap-6-for-rhel-6-server-rpmsCopy to Clipboard Copied! Toggle word wrap Toggle overflow - Ensure that all packages currently installed are up to date:
yum update
# yum updateCopy to Clipboard Copied! Toggle word wrap Toggle overflow - Install the rhevm-reports-setup package:
yum install rhevm-reports-setup
# yum install rhevm-reports-setupCopy to Clipboard Copied! Toggle word wrap Toggle overflow - Run the
engine-setupcommand to begin configuration of Reports on the machine:engine-setup
# engine-setupCopy to Clipboard Copied! Toggle word wrap Toggle overflow - Press Enter to configure Reports:
Configure Reports on this host (Yes, No) [Yes]:
Configure Reports on this host (Yes, No) [Yes]:Copy to Clipboard Copied! Toggle word wrap Toggle overflow - Press Enter to automatically configure the firewall, or type
Noand press Enter to maintain existing settings:Setup can automatically configure the firewall on this system. Note: automatic configuration of the firewall may overwrite current settings. Do you want Setup to configure the firewall? (Yes, No) [Yes]:
Setup can automatically configure the firewall on this system. Note: automatic configuration of the firewall may overwrite current settings. Do you want Setup to configure the firewall? (Yes, No) [Yes]:Copy to Clipboard Copied! Toggle word wrap Toggle overflow If you choose to automatically configure the firewall, and no firewall managers are active, you are prompted to select your chosen firewall manager from a list of supported options. Type the name of the firewall manager and press Enter. This applies even in cases where only one option is listed. - Press Enter to accept the automatically detected hostname, or enter an alternative hostname and press Enter:
Host fully qualified DNS name of this server [autodetected host name]:
Host fully qualified DNS name of this server [autodetected host name]:Copy to Clipboard Copied! Toggle word wrap Toggle overflow - Enter the fully qualified domain name of the Manager machine, and then press Enter:
Host fully qualified DNS name of the engine server []:
Host fully qualified DNS name of the engine server []:Copy to Clipboard Copied! Toggle word wrap Toggle overflow - Answer the following questions about the
ovirt_engine_reportsdatabase. Press Enter to allow setup to create and configure a local database:Where is the Reports database located? (Local, Remote) [Local]: Setup can configure the local postgresql server automatically for the Reports to run. This may conflict with existing applications. Would you like Setup to automatically configure postgresql and create Reports database, or prefer to perform that manually? (Automatic, Manual) [Automatic]:
Where is the Reports database located? (Local, Remote) [Local]: Setup can configure the local postgresql server automatically for the Reports to run. This may conflict with existing applications. Would you like Setup to automatically configure postgresql and create Reports database, or prefer to perform that manually? (Automatic, Manual) [Automatic]:Copy to Clipboard Copied! Toggle word wrap Toggle overflow - Enter the fully qualified domain name and password for your
ovirt_engine_historydatabase host. Press Enter to accept the default values in each other field:Copy to Clipboard Copied! Toggle word wrap Toggle overflow - Press Enter to allow setup to sign the Reports certificate and Apache certificate on the Manager via SSH:
Setup will need to do some actions on the remote engine server. Either automatically, using ssh as root to access it, or you will be prompted to manually perform each such action.
Please choose one of the following:
1 - Access remote engine server using ssh as root
2 - Perform each action manually, use files to copy content around
(1, 2) [1]:
Copy to Clipboard Copied! Toggle word wrap Toggle overflow - Press Enter to accept the default SSH port, or enter an alternative port number and then press Enter:
ssh port on remote engine server [22]:
ssh port on remote engine server [22]:Copy to Clipboard Copied! Toggle word wrap Toggle overflow - Enter the root password for the Manager machine:
root password on remote engine server manager-fqdn.com:
root password on remote engine server manager-fqdn.com:Copy to Clipboard Copied! Toggle word wrap Toggle overflow - Press Enter to allow automatic configuration of SSL on Apache:
Setup can configure apache to use SSL using a certificate issued from the internal CA.
Do you wish Setup to configure that, or prefer to perform that manually? (Automatic, Manual) [Automatic]:
Setup can configure apache to use SSL using a certificate issued from the internal CA.
Do you wish Setup to configure that, or prefer to perform that manually? (Automatic, Manual) [Automatic]:
Copy to Clipboard Copied! Toggle word wrap Toggle overflow - Set a password for the Reports administrative users (
adminandsuperuser). Note that the reports system maintains its own set of credentials that are separate to those used for the Manager:Reports power users password:
Reports power users password:Copy to Clipboard Copied! Toggle word wrap Toggle overflow You are prompted to enter the password a second time to confirm it. - Confirm your installation settings:
Please confirm installation settings (OK, Cancel) [OK]:
Please confirm installation settings (OK, Cancel) [OK]:Copy to Clipboard Copied! Toggle word wrap Toggle overflow
Procedure 5.15. Step 2: Migrating Saved Reports to the New Reports Machine
- On the Manager machine, run the
ovirt-engine-reports-toolcommand:ovirt-engine-reports-tool
# ovirt-engine-reports-toolCopy to Clipboard Copied! Toggle word wrap Toggle overflow - Enter the number that corresponds to the export option, and press Enter:
(2) Export Jasperreports saved reports to a zip file (1, 2, 3) []: 2
(2) Export Jasperreports saved reports to a zip file (1, 2, 3) []: 2Copy to Clipboard Copied! Toggle word wrap Toggle overflow - Enter the absolute path for the zip file to export saved reports to, and press Enter:
Filename to export saved reports to: /tmp/saved-reports.zip
Filename to export saved reports to: /tmp/saved-reports.zipCopy to Clipboard Copied! Toggle word wrap Toggle overflow - Copy the zip file to the new Reports machine:
scp /tmp/saved-reports.zip reports-machine-fqdn:/tmp/
# scp /tmp/saved-reports.zip reports-machine-fqdn:/tmp/Copy to Clipboard Copied! Toggle word wrap Toggle overflow - On the new Reports machine, run the
ovirt-engine-reports-toolcommand:ovirt-engine-reports-tool
# ovirt-engine-reports-toolCopy to Clipboard Copied! Toggle word wrap Toggle overflow - Enter the number that corresponds to the import option, and press Enter:
(3) Import a saved reports zip file to Jasperreports (1, 2, 3) []: 3
(3) Import a saved reports zip file to Jasperreports (1, 2, 3) []: 3Copy to Clipboard Copied! Toggle word wrap Toggle overflow - Enter the absolute path of the zip file from which to import, and press Enter:
Filename to import saved reports from: /tmp/saved-reports.zip
Filename to import saved reports from: /tmp/saved-reports.zipCopy to Clipboard Copied! Toggle word wrap Toggle overflow
Procedure 5.16. Step 3: Removing the Reports Service from the Manager Machine
- Stop the Reports service:
service ovirt-engine-reportsd stop
# service ovirt-engine-reportsd stopCopy to Clipboard Copied! Toggle word wrap Toggle overflow - Remove the Reports package:
yum remove rhevm-reports
# yum remove rhevm-reportsCopy to Clipboard Copied! Toggle word wrap Toggle overflow - Remove the Reports files:
rm -rf /etc/ovirt-engine-reports /var/lib/ovirt-engine-reports
# rm -rf /etc/ovirt-engine-reports /var/lib/ovirt-engine-reportsCopy to Clipboard Copied! Toggle word wrap Toggle overflow - Remove the Reports database and user. The default name for both is
ovirt_engine_reports:su - postgres psql
# su - postgres $ psql postgres=# drop database ovirt_engine_reports; postgres=# drop user ovirt_engine_reports;Copy to Clipboard Copied! Toggle word wrap Toggle overflow
Note
engine-setup. This means that the Administration Portal includes dashboards from and direct links to only the most recent Reports installation.
Part III. Installing Hypervisor Hosts
Chapter 6. Introduction to Hypervisor Hosts
Important
| Host Type | Other Names | Description |
|---|---|---|
|
Red Hat Enterprise Virtualization Hypervisor
|
RHEV-H, thin host
|
This is a minimal operating system based on Red Hat Enterprise Linux 7. It is distributed as an ISO file and is a closed system. Filesystem access and root access are limited. Yum is disabled.
This download is available on the Customer Portal and is named
RHEV-H Image.
|
|
Red Hat Virtualization Host
|
RHVH, thin host, Next Generation RHVH
|
Like RHEV-H, this is a minimal operating system based on Red Hat Enterprise Linux 7. It is distributed as an ISO file from the Customer Portal and contains only the packages required for the machine to act as a host. This is the latest thin host available for Red Hat Enterprise Virtualization. Yum is enabled.
This download is available on the Customer Portal and is named
Next Generation RHV-H Image.
|
|
Red Hat Enterprise Linux Host
|
RHEL-based hypervisor, thick host
|
Red Hat Enterprise Linux hosts subscribed to the appropriate channels can be used as hypervisor hosts. It provides you the full access to the operating system.
|
Important
Chapter 7. Red Hat Enterprise Virtualization Hypervisor
7.1. Installing the Red Hat Enterprise Virtualization Hypervisor
Important
- Obtain the Red Hat Enterprise Virtualization Hypervisor ISO file (
RHEV-H Image) either by installing the package or downloading it from the Customer Portal. - Write the Red Hat Enterprise Virtualization Hypervisor ISO File to a USB Storage Device, CD, or DVD.
- Install the Red Hat Enterprise Virtualization Hypervisor Minimal Operating System.
Procedure 7.1. Installing the Red Hat Enterprise Virtualization Hypervisor Disk Image
- Obtain the latest Red Hat Enterprise Virtualization Hypervisor image by installing the package. By default, the Red Hat Enterprise Virtualization Hypervisor disk image is located in the
/usr/share/rhev-hypervisor/directory. Alternatively, download the disk image (RHEV-H Image) from the Customer Portal.- Enable the required repositories:
- For Red Hat Enterprise Linux 6:
subscription-manager repos --enable=rhel-6-server-rhevh-rpms
# subscription-manager repos --enable=rhel-6-server-rhevh-rpmsCopy to Clipboard Copied! Toggle word wrap Toggle overflow - For Red Hat Enterprise Linux 7:
subscription-manager repos --enable=rhel-7-server-rhevh-rpms
# subscription-manager repos --enable=rhel-7-server-rhevh-rpmsCopy to Clipboard Copied! Toggle word wrap Toggle overflow
- Install the RHEV-H package:
- For Red Hat Enterprise Linux 6:
yum install rhev-hypervisor6
# yum install rhev-hypervisor6Copy to Clipboard Copied! Toggle word wrap Toggle overflow - For Red Hat Enterprise Linux 7:
yum install rhev-hypervisor7
# yum install rhev-hypervisor7Copy to Clipboard Copied! Toggle word wrap Toggle overflow
- Write the disk image to a storage device.
- Install the livecd-tools package and write the disk image to a USB storage device.
yum install livecd-tools
# yum install livecd-toolsCopy to Clipboard Copied! Toggle word wrap Toggle overflow livecd-iso-to-disk --format --reset-mbr /usr/share/rhev-hypervisor/rhev-hypervisor.iso /dev/[sdb]
# livecd-iso-to-disk --format --reset-mbr /usr/share/rhev-hypervisor/rhev-hypervisor.iso /dev/[sdb]Copy to Clipboard Copied! Toggle word wrap Toggle overflow - Install the wodim package, insert a blank CD-ROM or DVD, and write the disk image to disc.
yum install wodim
# yum install wodimCopy to Clipboard Copied! Toggle word wrap Toggle overflow wodim dev=[device] [image]
wodim dev=[device] [image]Copy to Clipboard Copied! Toggle word wrap Toggle overflow Note
To find out the name of your writer device, run the following command:less /proc/sys/dev/cdrom/info
# less /proc/sys/dev/cdrom/infoCopy to Clipboard Copied! Toggle word wrap Toggle overflow Example 7.1. Use of the wodim Utility
This example uses the first CD-RW (/dev/sr0) device available and the default Hypervisor image location.wodim dev=/dev/sr0 /usr/share/rhev-hypervisor/rhev-hypervisor.iso
# wodim dev=/dev/sr0 /usr/share/rhev-hypervisor/rhev-hypervisor.isoCopy to Clipboard Copied! Toggle word wrap Toggle overflow
- Start the machine on which to install the Hypervisor minimal operating system using the prepared installation media.
- From the boot menu, select , and press Enter.
Important
If reinstalling Red Hat Enterprise Virtualization Hypervisor over an existing instance on a multipathed iSCSI machine, remove therd_NO_MULTIPATHkernel argument by pressing the Tab button after selecting the option to reinstall the Hypervisor. This will help avoid potential installation errors. - Select a keyboard layout, and press Enter.
- Select the device on which to install the boot loader for the Red Hat Enterprise Virtualization Hypervisor.
- Select the device on which to install the Red Hat Enterprise Virtualization Hypervisor.
- Select the Fill disk with Data partition check box. Clearing this text box displays a field showing the remaining space on the drive and allows you to specify the amount of space to be allocated to data storage.
- From the Confirm disk selection screen, press Enter to confirm the boot device and storage device selection, or select Back and press Enter to revise your selection.
- Set a password for the
adminuser, confirm the password, and press Enter to commence installation.
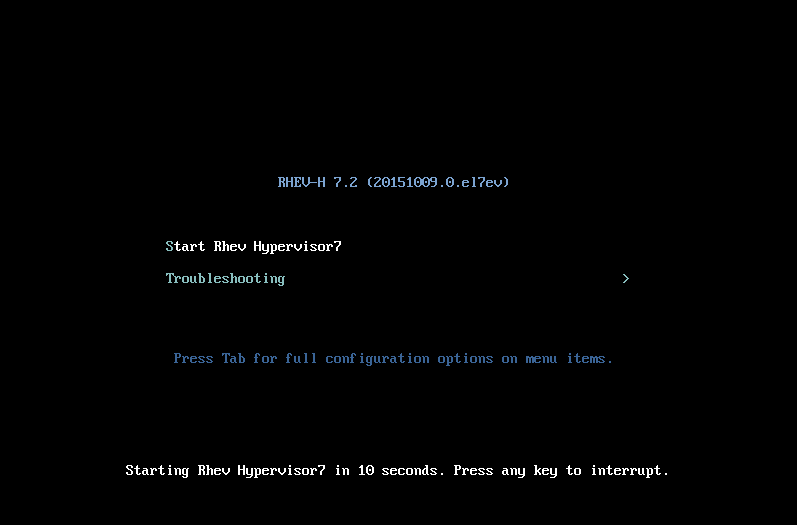
Note
admin user and configure the networking options. You can then add the Hypervisor to a standard Red Hat Enterprise Virtualization environment or use the Hosted Engine screen to configure a self-hosted engine environment. See Appendix G, Configuring a Hypervisor Host for PCI Passthrough for more information on how to enable the hypervisor hardware and software for device passthrough.
Warning
7.2. Modifying the Red Hat Enterprise Virtualization Hypervisor ISO
7.2.1. Introduction to Modifying the Red Hat Enterprise Virtualization Hypervisor ISO
Important
Warning
7.2.2. Installing the edit-node Tool
Procedure 7.2. Installing the edit-node Tool
- Log in to the system on which to modify the Red Hat Enterprise Virtualization Hypervisor ISO file.
- Enable the required repository:
- For Red Hat Enterprise Linux 6:
subscription-manager repos --enable=rhel-6-server-rhevh-rpms
# subscription-manager repos --enable=rhel-6-server-rhevh-rpmsCopy to Clipboard Copied! Toggle word wrap Toggle overflow - For Red Hat Enterprise Linux 7:
subscription-manager repos --enable=rhel-7-server-rhevh-rpms
# subscription-manager repos --enable=rhel-7-server-rhevh-rpmsCopy to Clipboard Copied! Toggle word wrap Toggle overflow
- Install the ovirt-node-tools package:
yum install ovirt-node-tools
# yum install ovirt-node-toolsCopy to Clipboard Copied! Toggle word wrap Toggle overflow
7.2.3. Syntax of the edit-node Tool
Options for the edit-node Tool
--name=image_name- Specifies the name of the modified image.
--output=directory- Specifies the directory to which the edited ISO is saved.
--kickstart=kickstart_file- Specifies the path or URL to and name of a kickstart configuration file.
--script=script- Specifies the path to and name of a script to run in the image.
--shell- Opens an interactive shell with which to edit the image.
--passwd=user,encrypted_password- Defines a password for the specified user. This option accepts MD5-encrypted password values. The
--passwordparameter can be specified multiple times to modify multiple users. If no user is specified, the default user isadmin. --sshkey=user,public_key_file- Specifies the public key for the specified user. This option can be specified multiple times to specify keys for multiple users. If no user is specified, the default user is
admin. --uidmod=user,uid- Specifies the user ID for the specified user. This option can be specified multiple times to specify IDs for multiple users.
--gidmod=group,gid- Specifies the group ID for the specified group. This option can be specified multiple times to specify IDs for multiple groups.
--tmpdir=temporary_directory- Specifies the temporary directory on the local file system to use. By default, this value is set to
/var/tmp --releasefile=release_file- Specifies the path to and name of a release file to use for branding.
--builder=builder- Specifies the builder of a remix.
--install-plugin=plugin- Specifies a list of plug-ins to install in the image. You can specify multiple plug-ins by separating the plug-in names using a comma.
--install=package- Specifies a list of packages to install in the image. You can specify multiple packages by separating the package names using a comma.
--install-kmod=package_name- Installs the specified driver update package from a yum repository or specified
.rpmfile. Specified.rpmfiles are valid only if in whitelisted locations (kmod-specific areas). --repo=repository- Specifies the yum repository to be used in conjunction with the
--install-*options. The value specified can be a local directory, a yum repository file (.repo), or a driver disk.isofile. --nogpgcheck- Skips GPG key verification during the
yum installstage. This option allows you to install unsigned packages.
Manifest Options for the edit-node Tool
--list-plugins- Prints a list of plug-ins added to the image.
--print-version- Prints current version information from
/etc/system-release. --print-manifests- Prints a list of manifest files in the ISO file.
--print-manifest=manifest- Prints the specified manifest file.
--get-manifests=manifest- Creates a
.tarfile of manifest files in the ISO file. --print-file-manifest- Prints the contents of
rootfson the ISO file. --print-rpm-manifest- Prints a list of installed packages in
rootfson the ISO file.
Debugging Options for the edit-node Tool
--debug- Prints debugging information when the edit-node command is run.
--verbose- Prints verbose information regarding the progress of the edit-node command.
--logfile=logfile- Specifies the path to and name of a file in which to print debugging information.
7.2.4. Adding and Updating Packages
Note
http://localhost/myrepo/ or ftp://localhost/myrepo/.
Important
7.2.4.1. Creating a Local Repository
createrepo tool provided by the base Red Hat Enterprise Linux Workstation and Red Hat Enterprise Linux Server repositories.
Procedure 7.3. Creating a Local Repository
- Install the createrepo package and dependencies on the system on which to modify the Red Hat Enterprise Virtualization Hypervisor ISO file:
yum install createrepo
# yum install createrepoCopy to Clipboard Copied! Toggle word wrap Toggle overflow - Create a directory to serve as the repository.
mkdir exampleLocalrepo
# mkdir exampleLocalrepoCopy to Clipboard Copied! Toggle word wrap Toggle overflow - Copy all required packages and their dependencies into the newly created directory.
- Set up the metadata files for that directory to act as a repository:
createrepo exampleLocalrepo
# createrepo exampleLocalrepoCopy to Clipboard Copied! Toggle word wrap Toggle overflow
7.2.4.2. Example: Adding Packages to the Red Hat Enterprise Virtualization Hypervisor ISO File
Example 7.2. Adding a Single Package to the Red Hat Enterprise Virtualization Hypervisor ISO File
edit-node --nogpgcheck --install package1 --repo exampleLocalrepo /usr/share/rhev-hypervisor/rhevh-latest-7.iso
# edit-node --nogpgcheck --install package1 --repo exampleLocalrepo /usr/share/rhev-hypervisor/rhevh-latest-7.isoExample 7.3. Adding Multiple Packages to the Red Hat Enterprise Virtualization Hypervisor ISO File
edit-node --nogpgcheck --install "package1,package2" --repo exampleLocalrepo /usr/share/rhev-hypervisor/rhevh-latest-7.iso
# edit-node --nogpgcheck --install "package1,package2" --repo exampleLocalrepo /usr/share/rhev-hypervisor/rhevh-latest-7.iso7.2.4.3. Example: Updating Packages in the Red Hat Enterprise Virtualization Hypervisor ISO File
Example 7.4. Updating a Single Package in the Red Hat Enterprise Virtualization Hypervisor ISO File
edit-node --nogpgcheck --install vdsm --repo /etc/yum.repos.d/rhevh.repo /usr/share/rhev-hypervisor/rhevh-latest-7.iso
# edit-node --nogpgcheck --install vdsm --repo /etc/yum.repos.d/rhevh.repo /usr/share/rhev-hypervisor/rhevh-latest-7.isoExample 7.5. Updating Multiple Packages in the Red Hat Enterprise Virtualization Hypervisor ISO File
edit-node --nogpgcheck --install "vdsm,libvirt" --repo /etc/yum.repos.d/rhevh.repo /usr/share/rhev-hypervisor/rhevh-latest-7.iso
# edit-node --nogpgcheck --install "vdsm,libvirt" --repo /etc/yum.repos.d/rhevh.repo /usr/share/rhev-hypervisor/rhevh-latest-7.iso7.2.5. Modifying the Default ID of Users and Groups
7.2.5.1. Example: Modifying the Default ID of a User
user1 to 60:
Example 7.6. Modifying the Default ID of a Single User
edit-node --uidmod=user1,60
# edit-node --uidmod=user1,60--uidmod option multiple times in the same command. The following example changes the default ID of the user user1 to 60 and the default ID of the user user2 to 70.
Example 7.7. Modifying the Default ID of Multiple Users
edit-node --uidmod=user1,60 --uidmod=user2,70
# edit-node --uidmod=user1,60 --uidmod=user2,707.2.5.2. Example: Modifying the Default ID of a Group
group1 to 60:
Example 7.8. Modifying the Default ID of a Single Group
edit-node --gidmod=group1,60
# edit-node --gidmod=group1,60--gidmod option multiple times in the same command. The following example changes the default ID of the group group1 to 60 and the default ID of the group group2 to 70.
Example 7.9. Modifying the Default ID of Multiple Groups
edit-node --gidmod=group1,60 --gidmod=group2,70
# edit-node --gidmod=group1,60 --gidmod=group2,707.3. Additional Ways to Prepare the Installation Media
7.3.1. Preparing USB Installation Media Using dd
dd if=[image] of=[device]
# dd if=[image] of=[device]/usr/share/rhev-hypervisor/rhev-hypervisor.iso on the machine on which the rhev-hypervisor7 package is installed. The dd command does not make assumptions as to the format of the device because it performs a low-level copy of the raw data in the selected image.
7.3.2. Preparing USB Installation Media Using dd on Linux Systems
Procedure 7.4. Preparing USB Installation Media using dd on Linux Systems
- Run the following command to ensure you have the latest version of the Red Hat Enterprise Virtualization Hypervisor disk image:
- For Red Hat Enterprise Linux 6:
yum update rhev-hypervisor6
# yum update rhev-hypervisor6Copy to Clipboard Copied! Toggle word wrap Toggle overflow - For Red Hat Enterprise Linux 7:
yum update rhev-hypervisor7
# yum update rhev-hypervisor7Copy to Clipboard Copied! Toggle word wrap Toggle overflow
- Use the dd utility to write the disk image to a USB storage device.
Example 7.10. Use of dd
This example uses a USB storage device named/dev/sdc.dd if=/usr/share/rhev-hypervisor/rhev-hypervisor.iso of=/dev/sdc
# dd if=/usr/share/rhev-hypervisor/rhev-hypervisor.iso of=/dev/sdc 243712+0 records in 243712+0 records out 124780544 bytes (125 MB) copied, 56.3009 s, 2.2 MB/sCopy to Clipboard Copied! Toggle word wrap Toggle overflow Warning
The dd utility will overwrite all data on the device specified by theofparameter. Ensure you have specified the correct device and that the device contains no valuable data before using the dd utility.
7.3.3. Preparing USB Installation Media Using dd on Windows Systems
Procedure 7.5. Preparing USB Installation Media using dd on Windows Systems
- Open http://www.redhat.com/services/custom/cygwin/ in a web browser and click
32-bit Cygwinto download the 32-bit version of Red Hat Cygwin, or64-bit Cygwinto download the 64-bit version of Red Hat Cygwin. - Run the downloaded executable as a user with administrator privileges to open the Red Hat Cygwin installation program.
- Follow the prompts to install Red Hat Cygwin. The Coreutils package in the Base package group provides the dd utility. This package is automatically selected for installation.
- Copy the
rhev-hypervisor.isofile downloaded from the Content Delivery Network toC:\rhev-hypervisor.iso. - Run the Red Hat Cygwin application from the desktop as a user with administrative privileges.
Important
On the Windows 7 and Windows Server 2008, you must right-click the Red Hat Cygwin icon and select the Run as Administrator option to ensure the application runs with the correct permissions. - In the terminal, run the following command to view the drives and partitions currently visible to the system:
cat /proc/partitions
$ cat /proc/partitionsCopy to Clipboard Copied! Toggle word wrap Toggle overflow Example 7.11. View of Disk Partitions Attached to System
Copy to Clipboard Copied! Toggle word wrap Toggle overflow - Attach the USB storage device to which the Red Hat Enterprise Virtualization Hypervisor disk image will be written to the system. Run the
cat /proc/partitionscommand again and compare the output to that of the previous output. A new entry will appear that designates the USB storage device.Example 7.12. View of Disk Partitions Attached to System
Copy to Clipboard Copied! Toggle word wrap Toggle overflow - Use the dd utility to write the
rhev-hypervisor.isofile to the USB storage device. The following example uses a USB storage device named/dev/sdb. Replace sdb with the correct device name for the USB storage device to be used.Example 7.13. Use of dd Utility Under Red Hat Cygwin
Administrator@test / $ dd if=/cygdrive/c/rhev-hypervisor.iso of=/dev/sdb& pid=$!
Administrator@test / $ dd if=/cygdrive/c/rhev-hypervisor.iso of=/dev/sdb& pid=$!Copy to Clipboard Copied! Toggle word wrap Toggle overflow Warning
The dd utility will overwrite all data on the device specified by theofparameter. Ensure you have specified the correct device and that the device contains no valuable data before using the dd utility.Note
Writing disk images to USB storage devices with the version of the dd utility included with Red Hat Cygwin can take significantly longer than the equivalent on other platforms. You can run the following command to view the progress of the operation:kill -USR1 $pid
$ kill -USR1 $pidCopy to Clipboard Copied! Toggle word wrap Toggle overflow
7.3.4. Preparing Optical Hypervisor Installation Media
Procedure 7.6. Preparing Optical Hypervisor Installation Media
- Install the wodim package and dependencies:
yum install wodim
# yum install wodimCopy to Clipboard Copied! Toggle word wrap Toggle overflow - Insert a blank CD-ROM or DVD into your CD or DVD writer.
- Write the disk image to the disc:
wodim dev=[device] [image]
wodim dev=[device] [image]Copy to Clipboard Copied! Toggle word wrap Toggle overflow Note
To find out the name of your writer device, run the following command:less /proc/sys/dev/cdrom/info
# less /proc/sys/dev/cdrom/infoCopy to Clipboard Copied! Toggle word wrap Toggle overflow Example 7.14. Use of the wodim Utility
This example uses the first CD-RW (/dev/sr0) device available and an example unified installer disk image location.wodim dev=/dev/sr0 /usr/share/rhev-hypervisor/rhev-hypervisor.iso
# wodim dev=/dev/sr0 /usr/share/rhev-hypervisor/rhev-hypervisor.isoCopy to Clipboard Copied! Toggle word wrap Toggle overflow
Important
7.4. Automated Installation of the Hypervisor (Advanced)
7.4.1. How the Kernel Arguments Work
- The ovirt-early service sets storage, network and management parameters in the
/etc/default/ovirtfile. These parameters are determined from the kernel arguments passed to the Hypervisor during the boot sequence. - The
/etc/init.d/ovirt-firstbootscript determines the type of installation to perform based on the parameters set on the kernel command line or the TUI installation.
7.4.2. Required Parameters
- One of the following parameters, depending on the type of installation or reinstallation that you wish to perform:
install, to begin an installation (even if it detects an existing installation).reinstall, to remove a current installation and begin a completely clean reinstall.upgrade, to upgrade an existing installation.
- The
storage_initparameter, to initialize a local storage device. - The
BOOTIFparameter, to specify the network interface which the Hypervisor uses to connect to the Manager. When using PXE boot,BOOTIFmay be automatically supplied bypxelinux.
adminpw- Allows you to log in with administrative privileges to configure Red Hat Enterprise Virtualization Hypervisor.
management_server- Specifies the Red Hat Enterprise Virtualization Manager to be used.
rhevm_admin_password- Specifies the password to be used during the process of adding a host in Red Hat Enterprise Virtualization Manager.
7.4.3. Storage Parameters
storage_init- The
storage_initparameter is required for an automated installation; it initializes a local storage device.Hypervisors use one storage device for local installation. There are several methods for defining which disk to initialize and install on.- For USB storage devices, use the
usbparameter to select the disk type. For example:storage_init=usb
storage_init=usbCopy to Clipboard Copied! Toggle word wrap Toggle overflow - For SCSI hard drives, use the
scsiparameter to select the disk type. For example:storage_init=scsi
storage_init=scsiCopy to Clipboard Copied! Toggle word wrap Toggle overflow - For hard drives on the ATA bus, including SATA hard drives that may also appear on the SCSI bus, use the
ataparameter to select the disk type. For example:storage_init=ata
storage_init=ataCopy to Clipboard Copied! Toggle word wrap Toggle overflow - Alternatively, the storage device can be specified by using the Linux device name as the
storage_initparameter. Using device names in the format/dev/disk/by-idis not supported.storage_initmust use the format/dev/mapper/diskor/dev/disk. In this example the/dev/sdadevice is specified:storage_init=/dev/sda
storage_init=/dev/sdaCopy to Clipboard Copied! Toggle word wrap Toggle overflow
When specifying astorage_initvalue ofusb,scsi, oratayou can also append a serial number to explicitly set which device to use. Determine the serial numbers for all disks attached to the system by running the command in the example below:Example 7.15. Finding
udevSerial Numbersfor d in /dev/sd?; do echo $d `udevadm info -q env -n $d | egrep 'ID_BUS=|ID_SERIAL='`; done /dev/sda ID_SERIAL=ST9500325AS_6VE867X1$ for d in /dev/sd?; do echo $d `udevadm info -q env -n $d | egrep 'ID_BUS=|ID_SERIAL='`; done /dev/sda ID_SERIAL=ST9500325AS_6VE867X1Copy to Clipboard Copied! Toggle word wrap Toggle overflow When providing both a storage type and the serial number, ensure that the two values are separated by a colon (:). For example:storage_init=ata:3600508b100104a3953545233304c0003
storage_init=ata:3600508b100104a3953545233304c0003Copy to Clipboard Copied! Toggle word wrap Toggle overflow Important
If reinstalling Red Hat Enterprise Virtualization Hypervisor over an existing instance on a multipathed iSCSI machine, specify the storage type and serial number to avoid installation errors.Note
Consistency of devices names following a system restart is not guaranteed. Device names are liable to change. storage_vol- The
storage_volparameter is used to partition the storage device set by thestorage_initparameter. Afterstorage_vol=, you can specify the size in megabytes of the following partitions: Boot, Swap, Root, Config, Logging, and Data.The Boot partition is always 50 MB and cannot be reconfigured. The Root partition for Red Hat Enterprise Virtualization Hypervisor 7 is always 8600 MB and cannot be reconfigured. The remaining partitions are described in more detail below:Partitions defined by the
storage_volparameterSwap- The swap partition is used for swapping pages of memory that are not frequently accessed to the hard drive. This frees pages of memory in RAM that are in turn used for pages which are accessed more frequently, increasing performance. The default size of the swap partition is calculated based on the amount of RAM installed in the system and over-commit ratio (default is 0.5). Hypervisors must have a swap partition and the swap partition cannot be disabled by setting its size to 0. The minimum size for the swap partition is 8 MB.To determine the size of the swap partition, see https://access.redhat.com/knowledge/solutions/15244.Use the formula from the Red Hat Knowledgebase solution above and add storage for the over-commit ratio (RAM multiplied by the over-commit ratio).
Recommended swap + (RAM * over-commit) = swap partition size
Recommended swap + (RAM * over-commit) = swap partition sizeCopy to Clipboard Copied! Toggle word wrap Toggle overflow Leaving the value empty allows the system to sets the recommended value for the swap partition. Config- The config partition stores configuration files for the Hypervisor. The default and minimum size for the configuration partition is 8 MB.
Logging- The logging partition stores all logs for the Hypervisor. The logging partition requires a minimum of 2048 MB storage. However, it is recommended to allocate more storage to the logging partition if resources permit.
Data- The data partition must be large enough to hold core files for KVM. Core files depend on the RAM size for the guests. The data partition must also be large enough to store kernel dump files, also known as kdumps. A kdump file is usually the same size as the host's system RAM. The data partition also stores the Hypervisor ISO file for Hypervisor upgrades.The data partition requires a minimum of 512 MB storage. The recommended size is at least 1.5 times as large as the RAM on the host system plus an additional 512 MB. It can be configured to take up all remaining space by giving it a size value of
-1, or disabled by giving it a size value of0.
Partitions can be specified in any order. The syntax for specifying each partition issize,type. Each partition specified is separated by a colon (:). To specify a 256MB Swap partition, and a 4096MB Logging partition, the whole parameter isstorage_vol=256,Swap:4096,Logging.Note
The old method of specifying partition sizes is still valid. In the old method, the partition sizes must be given in a particular order, as shown here:storage_vol=BOOT:SWAP:ROOT:CONFIG:LOGGING:DATA
storage_vol=BOOT:SWAP:ROOT:CONFIG:LOGGING:DATACopy to Clipboard Copied! Toggle word wrap Toggle overflow However, since the Boot and Root partitions cannot be reconfigured, sizes for these partitions can be omitted, like so:storage_vol=:SWAP::CONFIG:LOGGING:DATA
storage_vol=:SWAP::CONFIG:LOGGING:DATACopy to Clipboard Copied! Toggle word wrap Toggle overflow If you fail to specify a size, the partition will be created at its default size. To specify a 256MB Swap partition, and a 4096MB Logging partition, the correct syntax is:storage_vol=:256:::4096:
storage_vol=:256:::4096:Copy to Clipboard Copied! Toggle word wrap Toggle overflow The following is the standard format of thestorage_volparameter:storage_vol=256,EFI:256,Root:4096,Swap
storage_vol=256,EFI:256,Root:4096,SwapCopy to Clipboard Copied! Toggle word wrap Toggle overflow iscsi_name- The
iscsi_nameparameter is used to set the iSCSI Initiator Name. The iSCSI Initiator name is expected to take the form of an iSCSI Qualified Name (IQN). This format is defined by RFC 3720, which is available at http://tools.ietf.org/html/rfc3720.The IQN is made up of the following elements, separated by the.character:- The literal string
iqn - The date that the naming authority took control of the domain in yyyy-mm format
- The reversed domain name - demo.redhat.com becomes com.redhat.demo
- Optionally, a storage target name as specified by the naming authority - preceded by a colon
Example 7.16.
iscsi_nameThe following illustrates the IQN for an iSCSI initiator attached to the demo.redhat.com domain where the domain was established in July 2011.iscsi_name=iqn.2011-07.com.redhat.demo
iscsi_name=iqn.2011-07.com.redhat.demoCopy to Clipboard Copied! Toggle word wrap Toggle overflow
7.4.4. Networking Parameters
- Setting the IP address or DHCP.
- Setting the hostname if the hostname is not resolved with DHCP.
- The interface the Red Hat Enterprise Virtualization Manager network is attached to.
Networking Parameters
BOOTIF- The
BOOTIFparameter is required for an automated installation.TheBOOTIFparameter specifies the network interface which the Hypervisor uses to connect to the Red Hat Enterprise Virtualization Manager.Important
When using PXE to boot Hypervisors for installation using theIPAPPEND 2directive causesBOOTIF=<MAC>to be automatically appended to the kernel arguments. If theIPAPPEND 2directive is used it is not necessary to use theBOOTIFparameter.TheBOOTIFparameter takes arguments in one of three forms:link- Indicates to use the first interface (as enumerated by the kernel) with an active link. This is useful for systems with multiple network interface controllers but only one plugged in.
eth#- Indicates to use the NIC as determined by the kernel driver initialization order (where
#is the number of the NIC). To determine the number boot the Hypervisor and select Shell from the Hypervisor Configuration Menu. Useifconfig | grep eth*to list the network interfaces attached to the system. There is no guarantee that on the next reboot the network interface controller will have the sameeth#mapping.BOOTIF=eth0
BOOTIF=eth0Copy to Clipboard Copied! Toggle word wrap Toggle overflow <MAC>- Indicates to use the MAC address explicitly defined inside the brackets.
ip- The
ipparameter sets the IP address for the network interface controller defined by theBOOTIFparameter. Theipparameter accepts either an IP address (in the form 0.0.0.0) ordhcp.ip=192.168.1.1
ip=192.168.1.1Copy to Clipboard Copied! Toggle word wrap Toggle overflow ip=dhcp
ip=dhcpCopy to Clipboard Copied! Toggle word wrap Toggle overflow ipv6- The
ipv6parameter is an alias for theipparameter. It accepts eitherdhcporauto. netmask- The
netmaskparameter sets the subnet mask for the IP address defined with theipparameter.netmask=255.255.255.0
netmask=255.255.255.0Copy to Clipboard Copied! Toggle word wrap Toggle overflow gateway- The
gatewayparameter sets the Internet gateway.gateway=192.168.1.246
gateway=192.168.1.246Copy to Clipboard Copied! Toggle word wrap Toggle overflow dns- The
dnsparameter sets the address of up to two DNS servers. Each DNS server address must be separated by a comma.dns=192.168.1.243,192.168.1.244
dns=192.168.1.243,192.168.1.244Copy to Clipboard Copied! Toggle word wrap Toggle overflow hostname- The
hostnameparameter sets the hostname. The hostname must be a fully-qualified and resolvable domain name.hostname=rhev1.example.com
hostname=rhev1.example.comCopy to Clipboard Copied! Toggle word wrap Toggle overflow ntp- The
ntpparameter sets the address of one or more Network Time Protocol servers. Each NTP server address must be separated by a comma.ntp=192.168.2.253,192.168.2.254
ntp=192.168.2.253,192.168.2.254Copy to Clipboard Copied! Toggle word wrap Toggle overflow vlan- The
vlanparameter sets the VLAN identifier for the network connected to the Red Hat Enterprise Virtualization Manager. This parameter should be set where VLANs are in use.vlan=vlan-id:
vlan=vlan-id:Copy to Clipboard Copied! Toggle word wrap Toggle overflow For example:vlan=36:
vlan=36:Copy to Clipboard Copied! Toggle word wrap Toggle overflow bond- The
bondparameter configures a bond. Each interface name must be separated by a comma.BOOTIF=bond01 bond=bond01:nic1,nic2
BOOTIF=bond01 bond=bond01:nic1,nic2Copy to Clipboard Copied! Toggle word wrap Toggle overflow
7.4.5. Red Hat Network (RHN) Parameters
rhn_activationkey or both the rhn_username and rhn_password parameters must be provided. Where registration is to occur against a satellite server, the rhn_url parameter must be provided.
rhn_type- Sets the RHN entitlement method for this machine.
samsets the entitlement method to Certificate-based RHN, which integrates the Customer Portal, content delivery network, and subscription service (subscription management).classicsets the entitlement method to RHN Classic, which uses the traditional channel entitlement model (channel access) to provides a global view of content access but does not provide insight into system-level subscription uses. The default value issam. rhn_username- The
rhn_usernameparameter sets the username used to connect to RHN.rhn_username=testuser
rhn_username=testuserCopy to Clipboard Copied! Toggle word wrap Toggle overflow rhn_password- The
rhn_passwordparameter sets the password used to connect to RHN.rhn_password=testpassword
rhn_password=testpasswordCopy to Clipboard Copied! Toggle word wrap Toggle overflow rhn_activationkey- The
rhn_activationkeyparameter sets the activation key used to connect to RHN. Activation keys are used to register systems, entitle them to an RHN service level, and subscribe them to specific channels and system groups, all in one action. If bothrhn_activationkeyandrhn_usernameare provided, therhn_activationkeyvalue will be used.rhn_activationkey=7202f3b7d218cf59b764f9f6e9fa281b
rhn_activationkey=7202f3b7d218cf59b764f9f6e9fa281bCopy to Clipboard Copied! Toggle word wrap Toggle overflow rhn_org- This parameter is used only with SAM. Registers the system to SAM in the same way as
--org org_name --activationkey key_valuewhen combined with therhn_activationkeyparameter on the kernel command line.rhn_org=org_name
rhn_org=org_nameCopy to Clipboard Copied! Toggle word wrap Toggle overflow rhn_url- The
rhn_urlparameter sets the URL of the satellite server used to register the host.rhn_url=https://satellite.example.com
rhn_url=https://satellite.example.comCopy to Clipboard Copied! Toggle word wrap Toggle overflow rhn_ca_cert- The
rhn_ca_certparameter sets the URL of the CA certificate used to connect to the satellite server. If it is not provided, the default value isrhn_url/pub/RHN-ORG-TRUSTED-SSL-CERT.rhn_ca_cert=https://satellite.example.com/pub/RHN-ORG-TRUSTED-SSL-CERT
rhn_ca_cert=https://satellite.example.com/pub/RHN-ORG-TRUSTED-SSL-CERTCopy to Clipboard Copied! Toggle word wrap Toggle overflow rhn_profile- The
rhn_profileparameter sets the name of the profile to be registered with RHN for this host. The default value is the system hostname.rhn_profile=testhost
rhn_profile=testhostCopy to Clipboard Copied! Toggle word wrap Toggle overflow
7.4.6. Authentication Parameters
adminpw- The
adminpwparameter is used to set the password for theadminuser. The value provided must already be hashed. All hashing schemes supported by the shadow password mechanism are supported. The recommended way to hash a password for use with this parameter is to run the following command:openssl passwd -1
# openssl passwd -1Copy to Clipboard Copied! Toggle word wrap Toggle overflow Theopensslcommand will prompt for the password to use. A hashed representation of the password will be returned which can be used as theadminpwvalue. rootpw- The
rootpwparameter is used to set a temporaryrootpassword. A password change is forced the first timerootlogs on to the system. The value provided must already be hashed. All hashing schemes supported by the shadow password mechanism are supported. The recommended way to hash a password for use with this parameter is to run the following command:openssl passwd -1
# openssl passwd -1Copy to Clipboard Copied! Toggle word wrap Toggle overflow Theopensslcommand will prompt for the password to use. A hashed representation of the password will be returned which can be used as therootpwvalue.Important
Therootpassword is not set by default and is not supported unless enabled at the request of Red Hat support. rhevm_admin_password- The
rhevm_admin_passwordparameter sets arootpassword and enables SSH password authentication. The value provided must already be hashed. All hashing schemes supported by the shadow password mechanism are supported. The recommended way to hash a password for use with this parameter is to run the following command:openssl passwd -1
# openssl passwd -1Copy to Clipboard Copied! Toggle word wrap Toggle overflow Theopensslcommand will prompt for the password to use. A hashed representation of the password will be returned which can be used as therhevm_admin_passwordvalue.Important
Setting this parameter has the side-effect of enabling SSH password authentication, which is unsupported unless enabled at the request of Red Hat support. We recommend disabling SSH password authentication after initial configuration is complete. ssh_pwauth- The
ssh_pwauthparameter is used to select whether or not password authentication is enabled for SSH connections. Possible values are0(disabled) and1(enabled). The default value is0.ssh_pwauth=1
ssh_pwauth=1Copy to Clipboard Copied! Toggle word wrap Toggle overflow Important
SSH password authentication is disabled by default and is not supported unless enabled at the request of Red Hat support.
7.4.7. Other Parameters
firstboot- The
firstbootparameter indicates that the system should be treated as if there is no existing installation.Thereinstallparameter is a direct alias of thefirstbootparameter, and can be used interchangeably withfirstboot.Warning
Using thefirstbootparameter erases existing data if a disk on the system has a Volume Group namedHostVG. Combining thefirstbootparameter with thestorage_initparameter also erases data on any disks specified withstorage_init. install- The
installparameter indicates that the system should be treated as if there is no existing installation. Theinstallparameter is intended to be used when booting from CD-ROM, DVD, USB, or PXE media. cim_enabled- Enables the use of Common Information Model (CIM) management infrastructure.
cim_passwd- Configures a password for your Common Information Model (CIM) management infrastructure.
disable_aes_ni- Disables the AES-NI encryption instruction set. Possible values are
yorn. kdump_nfs- This parameter configures an NFS server for kdump. The syntax for this parameter is
kdump_nfs=hostname:nfs_share_path, for example,kdump_nfs=nfshost.redhat.com:/path/to/nfs/share. local_boot- The
local_bootparameter is an alias for theupgradeparameter. local_boot_trigger- Sets a target URL to check and disables PXE when installation completes successfully, so that the system boots from disk on subsequent boots.
netconsole- The
netconsoleparameter sets the address of a server to which kernel messages should be logged. Thenetconsoleparameter takes an IP address or fully qualified domain name and, optionally, a port (the default port is 6666).netconsole=rhev.example.com:6666
netconsole=rhev.example.com:6666Copy to Clipboard Copied! Toggle word wrap Toggle overflow nfsv4_domain- The
nfsv4_domainparameter specifies a domain to use for NFSv4. nocheck- The
nocheckparameter will skip the MD5 check of the installation ISO, which might be time consuming if the media is remote or slow. management_server- The
management_serverparameter sets the address of the Red Hat Enterprise Virtualization Manager. Themanagement_serverparameter takes an IP address or fully qualified domain name and, optionally, a port (the default port is 443).management_server=rhev.example.com:443
management_server=rhev.example.com:443Copy to Clipboard Copied! Toggle word wrap Toggle overflow mem_overcommit- The
mem_overcommitparameter specifies the multiplier to use for adding extra swap to support memory over-commit. The default over-commit value is 0.5.mem_overcommit=0.7
mem_overcommit=0.7Copy to Clipboard Copied! Toggle word wrap Toggle overflow qemu_pxe- The
qemu_pxeparameter is used to select which network boot loader is used in virtual machines. Possible values aregpxeandetherboot. .qemu_pxe=gpxe
qemu_pxe=gpxeCopy to Clipboard Copied! Toggle word wrap Toggle overflow reinstall- The
reinstallparameter indicates that the system should be treated as if there is no existing installation.Thefirstbootparameter is a direct alias of thereinstallparameter, and can be used interchangeably withreinstall.Warning
Using thereinstallparameter erases existing data if a disk on the system has a Volume Group namedHostVG. Combining thereinstallparameter with thestorage_initparameter also erases data on any disks specified withstorage_init. snmp_password- Enables and configures a password for the Simple Network Management Protocol.
syslog- Configures an rsyslog server at the address specified. You can also specify a port. The syntax is
syslog=hostname[:port]. upgrade- The
upgradeparameter will upgrade the existing hypervisor image to the version provided by the boot media. The hypervisor will be automatically upgraded and rebooted once complete. If a hypervisor image is not yet installed, the image will be installed to the device selected with thestorage_initparameter. When performing an upgrade, the previous boot entry is saved as BACKUP ingrub.conf. If the reboot following the upgrade procedure fails, the BACKUP boot entry will be automatically selected as the new default. uninstall- The
uninstallparameter removes an existing Red Hat Enterprise Virtualization installation. The host volume group will be removed and the system rebooted.
7.4.8. An Automated Hypervisor Installation Example
Important
rhevm.example.com, and the netconsole server is located on the same machine.
:linux storage_init=/dev/sda storage_vol=::::: local_boot BOOTIF=eth0 management_server=rhevm.example.com netconsole=rhevm.example.com
:linux storage_init=/dev/sda storage_vol=::::: local_boot BOOTIF=eth0 management_server=rhevm.example.com netconsole=rhevm.example.comNote
7.5. Configuring the Red Hat Enterprise Virtualization Hypervisor
7.5.1. Configuring Networking on the Hypervisor
Procedure 7.7. Configuring the Host Name, DNS, and NTP
- In the text user interface, select the Network screen, press the right arrow key and enter a new host name in the Hostname field.
- Select the DNS Server 1 field and enter the IP address of the primary DNS server. Optionally set a secondary DNS server.
- Select the NTP Server 1 field and enter the IP address or host name of the primary NTP server. Optionally set a secondary NTP server.
- Select and press Enter to save the changes. You must save before you proceed to edit the network interfaces.
Procedure 7.8. Configuring Network Interfaces
- Select a network interface from the list beneath Available System NICs and press Enter to configure that network interface.
Note
To identify the physical network interface card associated with the selected network interface, select and press Enter. - Choose to configure IPv4 or IPv6.
- Configure a dynamic or static IP address for IPv4:
- Select DHCP under IPv4 Settings and press the space bar to configure a dynamic IP address.
- Select Static under IPv4 Settings, press the space bar, and input the IP Address, Netmask, and Gateway that the Hypervisor will use to configure a static IP address.
Example 7.17. Static IPv4 Networking Configuration
IPv4 Settings ( ) Disabled ( ) DHCP (*) Static IP Address: 192.168.122.100_ Netmask: 255.255.255.0___ Gateway 192.168.1.1_____
IPv4 Settings ( ) Disabled ( ) DHCP (*) Static IP Address: 192.168.122.100_ Netmask: 255.255.255.0___ Gateway 192.168.1.1_____Copy to Clipboard Copied! Toggle word wrap Toggle overflow
- Configure a stateless, dynamic, or static IP for IPv6:
- Select Auto under IPv6 Settings and press the space bar to configure stateless auto configuration.
- Select DHCP under IPv6 Settings and press the space bar to configure a dynamic IP address.
- Select Static under IPv6 Settings, press the space bar, and input the IP Address, Prefix Length, and Gateway that the Hypervisor will use to configure a static IP address.
Example 7.18. Static IPv6 Networking Configuration
IPv6 Settings ( ) Disabled ( ) Auto ( ) DHCP (*) Static IP Address: 2001:db8:1::ab9:C0A8:103_ Prefix Length: 64______ Gateway 2001:db8:1::ab9:1________
IPv6 Settings ( ) Disabled ( ) Auto ( ) DHCP (*) Static IP Address: 2001:db8:1::ab9:C0A8:103_ Prefix Length: 64______ Gateway 2001:db8:1::ab9:1________Copy to Clipboard Copied! Toggle word wrap Toggle overflow
- Enter a VLAN identifier in the VLAN ID field to configure a VLAN for the device.
- Select the button and press Enter to save the network configuration.
7.5.2. Configuring Remote Storage
Procedure 7.9. Configuring Remote Storage
- Enter an initiator name in the iSCSI Initiator Name field or the path to the NFS share in the NFSv4 Domain (example.redhat.com) field.
Example 7.19. iSCSI Initiator Name
iSCSI Initiator Name: iqn.1994-05.com.redhat:5189835eeb40_____
iSCSI Initiator Name: iqn.1994-05.com.redhat:5189835eeb40_____Copy to Clipboard Copied! Toggle word wrap Toggle overflow Example 7.20. NFS Path
NFSv4 Domain (example.redhat.com): example.redhat.com_____________________
NFSv4 Domain (example.redhat.com): example.redhat.com_____________________Copy to Clipboard Copied! Toggle word wrap Toggle overflow - Select and press Enter.
7.5.3. Connecting the Hypervisor to the Red Hat Enterprise Virtualization Manager
Important
root password on the Hypervisor and enables SSH password authentication. Once the Hypervisor has successfully been added to the Manager, disabling SSH password authentication is recommended.
Important
Procedure 7.10. Configuring a Hypervisor Management Server
- Configure the Hypervisor Management Server using the address of the Manager.
- Enter the IP address or fully qualified domain name of the Manager in the Management Server field.
- Enter the management server port in the Management Server Port field. The default value is
443. If a different port was selected during Red Hat Enterprise Virtualization Manager installation, specify it here, replacing the default value. - Leave the Password and Confirm Password fields blank. These fields are not required if the address of the management server is known.
- Select and press Enter.
After a few minutes, the Hypervisor is displayed under the Hosts tab in the Administration Portal. You must approve it to use the Hypervisor in your Red Hat Enterprise Virtualization environment. See Section 7.6, “Approving a Registered Hypervisor” for more information. - Configure the Hypervisor Management Server using a password.
- Enter a password in the Password field. Although the Hypervisor will accept a weak password, it is recommended that you use a strong password. Strong passwords contain a mix of uppercase, lowercase, numeric and punctuation characters. They are six or more characters long and do not contain dictionary words.
- Re-enter the password in the Confirm Password field.
- Leave the Management Server and Management Server Port fields blank. As long as a password is set, allowing the Hypervisor to be added to the Manager later, these fields are not required.
- Select and press Enter.
After the password is set, manually add the Hypervisor from the Administration Portal. See Section 9.4, “Manually Adding a Hypervisor from the Administration Portal” for more information.
7.5.4. Registering the Hypervisor
Procedure 7.11. Registering the Hypervisor
- Enter your Customer Portal user name in the Login field.
- Enter your Customer Portal password in the Password field.
- Enter a profile name to be used for the system in the Profile Name (optional) field. This is the name under which the system will appear when viewed in the Customer Portal.
- Select the method by which to register the Hypervisor:
Red Hat Subscription Manager
- Select the RHSM option and press the space bar.
- You do not need to enter values in the URL and CA URL fields.
- Optionally enter an organization name in the Organization field.
Example 7.21. Red Hat Subscription Manager Configuration
(X) RHSM ( ) Satellite ( ) SAM URL: _________________________________________________ CA URL: _________________________________________________ Organization: Organization_Name________________________________
(X) RHSM ( ) Satellite ( ) SAM URL: _________________________________________________ CA URL: _________________________________________________ Organization: Organization_Name________________________________Copy to Clipboard Copied! Toggle word wrap Toggle overflow Red Hat Satellite 5
- Select the Satellite option and press the space bar.
- Enter the URL of the Satellite server in the URL field.
- Enter the URL of the certificate authority for the Satellite server in the CA URL field.
- Optionally enter an organization name in the Organization field.
- Optionally enter a life cycle environment name in the Environment field.
Example 7.22. Satellite 5 Configuration
( ) RHSM (X) Satellite ( ) SAM URL: https://sat.example.com____________________________ CA URL: http://sat.example.com/pub/RHN-ORG-TRUSTED-SSL-CERT Organization: Organization_Name__________________________________ Environment: Library____________________________________________
( ) RHSM (X) Satellite ( ) SAM URL: https://sat.example.com____________________________ CA URL: http://sat.example.com/pub/RHN-ORG-TRUSTED-SSL-CERT Organization: Organization_Name__________________________________ Environment: Library____________________________________________Copy to Clipboard Copied! Toggle word wrap Toggle overflow Red Hat Satellite 6.0 or 6.1
- On the Satellite server, extract the certificate:
cd /tmp rpm2cpio /var/www/html/pub/katello-ca-consumer-latest.noarch.rpm | cpio -idmv cat etc/rhsm/ca/candlepin-local.pem etc/rhsm/ca/katello-server-ca.pem >> /var/www/html/pub/katello-server-ca.crt restorecon -Rv /var/www/html/pub/katello-server-ca.crt chmod 644 /var/www/html/pub/katello-server-ca.crt
# cd /tmp # rpm2cpio /var/www/html/pub/katello-ca-consumer-latest.noarch.rpm | cpio -idmv # cat etc/rhsm/ca/candlepin-local.pem etc/rhsm/ca/katello-server-ca.pem >> /var/www/html/pub/katello-server-ca.crt # restorecon -Rv /var/www/html/pub/katello-server-ca.crt # chmod 644 /var/www/html/pub/katello-server-ca.crtCopy to Clipboard Copied! Toggle word wrap Toggle overflow - On the Hypervisor, select the Satellite option and press the space bar.
- Enter the URL of the Satellite server in the URL field.
- Enter the URL of the certificate authority for the Satellite server in the CA URL field.
- Enter an organization name in the Organization field.
- Enter a life cycle environment name in the Environment field.
Example 7.23. Satellite 6 Configuration
( ) RHSM (X) Satellite ( ) SAM URL: https://sat.example.com____________________________ CA URL: http://sat.example.com/pub/katello-server-ca.crt___ Organization: Organization_Name__________________________________ Environment: Library____________________________________________
( ) RHSM (X) Satellite ( ) SAM URL: https://sat.example.com____________________________ CA URL: http://sat.example.com/pub/katello-server-ca.crt___ Organization: Organization_Name__________________________________ Environment: Library____________________________________________Copy to Clipboard Copied! Toggle word wrap Toggle overflow Red Hat Satellite 6.2
- Select the Satellite option and press the space bar.
- Enter the URL of the Satellite server in the URL field.
- Enter the URL of the certificate authority for the Satellite server in the CA URL field.
- Enter an organization name in the Organization field.
- Enter a life cycle environment name in the Environment field.
Example 7.24. Satellite 6 Configuration
( ) RHSM (X) Satellite ( ) SAM URL: https://sat.example.com____________________________ CA URL: http://sat.example.com/pub/katello-server-ca.crt___ Organization: Organization_Name__________________________________ Environment: Library____________________________________________
( ) RHSM (X) Satellite ( ) SAM URL: https://sat.example.com____________________________ CA URL: http://sat.example.com/pub/katello-server-ca.crt___ Organization: Organization_Name__________________________________ Environment: Library____________________________________________Copy to Clipboard Copied! Toggle word wrap Toggle overflow Subscription Asset Manager
- Select the SAM option and press the space bar.
- Enter the URL of the Subscription Asset Manager server in the URL field.
- Enter the URL of the certificate authority for the Subscription Asset Manager server in the CA URL field.
- Optionally enter an organization name in the Organization field.
Example 7.25. Subscription Asset Manager Configuration
( ) RHSM ( ) Satellite (X) SAM URL: https://sam.example.com____________________________ CA URL: http://sam.example.com/sam/candlepin-local.pem_____ Organization: Your_Organization__________________________________
( ) RHSM ( ) Satellite (X) SAM URL: https://sam.example.com____________________________ CA URL: http://sam.example.com/sam/candlepin-local.pem_____ Organization: Your_Organization__________________________________Copy to Clipboard Copied! Toggle word wrap Toggle overflow
- If you are using a proxy server, you must also specify the details of that server:
- Select and press Enter.
- Enter the IP address or fully qualified domain name of the proxy server in the Server field.
- Enter the port by which to attempt a connection to the proxy server in the Port field.
- Enter the user name by which to attempt a connection to the proxy server in the Username field.
- Enter the password by which to authenticate the user name specified above in the Password field.
- Select and press Enter to save the configuration and return to the RHSM Registration screen.
- Select and press Enter.
7.5.5. Changing the Admin User Password and Other Security-Related Tasks
admin user.
Procedure 7.12. Configuring Security-Related Tasks
- To enable SSH authentication, select the Enable SSH password authentication option and press the space bar. SSH authentication can also be enabled in the RHEV-M screen. Leave the option disabled if the function is not required.
- AES-NI encryption is enabled by default.
- If you need to disable it, select the Disable AES-NI option and press the space bar.
- If AES-NI encryption is enabled, you can optionally set the number of bytes by which to pad blocks in AES-NI encryption
- Enter a new password for the
adminuser in the Password field and Confirm Password to change the password used to log into the Hypervisor console. - Select and press Enter.
7.5.6. Changing the Keyboard Layout on the Hypervisor
Procedure 7.13. Configuring the Hypervisor Keyboard Layout
- Select a keyboard layout from the list provided.
Copy to Clipboard Copied! Toggle word wrap Toggle overflow - Select and press Enter to save the selection.
7.5.7. Enabling the SNMP Agent on the Hypervisor
Procedure 7.14. Enabling the SNMP Agent on the Hypervisor
- Select the Enable SNMP option and press the space bar to enable SNMP.
- Enter a password in the Password and Confirm Password fields.
- Select <Save> and press Enter.
7.5.8. Enabling CIM Monitoring Connections on the Hypervisor
Procedure 7.15. Enabling CIM Monitoring Connections on the Hypervisor
- Select the Enable CIM option and press the space bar to enable CIM.
Enable CIM [ ]
Enable CIM [ ]Copy to Clipboard Copied! Toggle word wrap Toggle overflow - Enter a password in the Password field and Confirm Password field.
- Select and press Enter.
7.5.9. Configuring Logging
/var/log/ovirt.log/var/log/ovirt-node.log/var/log/audit/audit.log/var/log/messages- dmesg
Procedure 7.16. Configuring Logging using the Logging Screen
- In the Logrotate Max Log Size field, enter the maximum size in kilobytes that log files can reach before they are rotated by logrotate. The default value is
1024. - Select an Interval to configure logrotate to run Daily, Weekly, or Monthly. The default value is Daily.
- Optionally configure rsyslog to transmit log files to a remote
syslogdaemon:- Enter the remote rsyslog server address in the Server Address field.
- Enter the remote rsyslog server port in the Server Port field. The default port is
514.
- Optionally configure netconsole to transmit kernel messages to a remote destination:
- Enter the Server Address.
- Enter the Server Port. The default port is
6666.
- Select and press Enter.
7.5.10. Configuring Kernel Dumps
| Kdump Options | Description |
|---|---|
|
Disable
|
Disables kernel dumping.
|
|
Local
|
Stores kernel dumps on the local system.
|
|
SSH
|
Exports kernel dumps via SSH to the specified remote location.
|
|
NFS
|
Exports kernel dumps to the specified NFS share.
|
Procedure 7.17. Configuring Kernel Dumps
- Select an option for storing kernel dumps:
Disable
To disable kernel dumps, select , and press the space bar.Local
Select the Local option and press the space bar to store kernel dumps on the local system. This is the default option.SSH
- Select the SSH option and press the space bar to export kernel dumps via SSH.
- Enter the location in which kernel dumps will be stored in the SSH Location (root@example.com) field.
- Enter an SSH Key URL (optional).
NFS
- Select the NFS option and press the space bar to export kernel dumps to an NFS share.
- Enter the location in which kernel dumps will be stored in the NFS Location (example.com:/var/crash) field.
- Select and press Enter.
7.5.11. The Diagnostics Screen
- : Shows the current multipath topology from all available information.
- : Lists the partition tables.
- : Lists partition layout on all block devices.
- : Lists information on all block devices.
7.5.12. The Performance Screen
virtual-host profile is used by default. For Red Hat Enterprise Linux 7 profiles, see Tuned-adm in the Red Hat Enterprise Linux 7 Power Management Guide for more information.
| Tuned Profile | Description |
|---|---|
| |
The system is disabled from using any tuned profile.
|
| |
Based on the enterprise-storage profile, virtual-host decreases the swappiness of virtual memory and enables more aggressive writeback of dirty pages.
|
| |
A profile optimized for virtual machines.
|
| |
A server profile for typical throughput performance tuning.
|
| |
A strong power-saving profile directed at machines with classic hard disks.
|
| |
A power-saving profile directed at server systems.
|
| |
A server profile for typical latency performance tuning.
|
| |
A high-impact power-saving profile directed at laptops running on battery.
|
| |
A medium-impact power-saving profile directed at laptops running on AC.
|
| |
A server profile to improve throughput performance for enterprise-sized server configurations.
|
| |
A power-saving profile directed at desktop systems.
|
| |
The default power-saving profile. This is the most basic power-saving profile. It only enables the disk and CPU plug-ins.
|
7.5.13. The Plugins Screen
- : Allows you to view RPM differences.
- : Allows you to view SRPM differences.
- : Allows you to view file differences.
7.5.14. The Hosted Engine Screen
7.6. Approving a Registered Hypervisor
Procedure 7.18. Approving a Registered Hypervisor
- From the Administration Portal, click the Hosts tab, and then click the host to be approved. The host is currently listed with the status of Pending Approval.
- Click Approve to open the Edit and Approve Hosts window. You can use the window to specify a name for the Hypervisor, fetch its SSH fingerprint before approving it, and configure power management. For information on power management configuration, see Host Power Management Settings Explained in the Administration Guide.
- Click . If you have not configured power management, you are prompted to confirm whether to proceed without doing so; click .
Chapter 8. Red Hat Virtualization Hosts
8.1. Installing Red Hat Virtualization Host
Important
- Download
Next Generation RHV-H Imagefrom the Customer Portal. - Write the RHVH ISO image to a USB, CD, or DVD.
- Install the RHVH minimal operating system.
Procedure 8.1. Installing Red Hat Virtualization Host
- Download the RHVH ISO image from the Customer Portal:
- Log in to the Customer Portal at https://access.redhat.com.
- Click Downloads in the menu bar.
- Click Red Hat Virtualization, scroll up, and click to access the product download page.
- Select 3.6 from the Version drop-down list.
- Download
Next Generation RHV-H Image. - Create a bootable media device. See Making Media in the Red Hat Enterprise Linux Installation Guide for more information.
- Start the machine on which to install RHVH using the prepared installation media.
- From the boot menu, select the option, and press Enter.
Note
You can also press the Tab key to edit the kernel parameters. Kernel parameters must be separated by a space, and you can boot the system using the specified kernel parameters by pressing the Enter key. Press the Esc key to clear any changes to the kernel parameters and return to the boot menu. - Select a language, and click .
- Select a time zone from the Date & Time screen and click .
- Select a keyboard layout from the Keyboard screen and click .
- Select the device on which to install RHVH from the Installation Destination screen. Optionally, enable encryption. Click .
Important
Red Hat strongly recommends using the Automatically configure partitioning option. However, if you do select I will configure partitioning, see Section 8.2.1, “Custom Partitioning” for details.Note
For information on preserving local storage domains when reinstalling RHVH, see https://access.redhat.com/solutions/2804081. - Select a network from the Network & Host Name screen and click to configure the connection details. Enter a host name in the Host name field, and click .
- Optionally configure Language Support, Security Policy, and Kdump. See Installing Using Anaconda in the Red Hat Enterprise Linux 7 Installation Guide for more information on each of the sections in the Installation Summary screen.
- Click .
- Set a root password and, optionally, create an additional user while RHVH installs.
Warning
Red Hat strongly recommends not creating untrusted users on RHVH, as this can lead to exploitation of local security vulnerabilities. - Click to enable RHVH to configure the system.
- Click to complete the installation.
Note
When RHVH restarts,imgbase-motd.serviceperforms a health check on the host and displays the result when you log in on the command line. The messageimgbase status: OKorimgbase status: DEGRADEDindicates the health status. Runimgbase checkto get more information. The service is enabled by default. - Once the installation is complete, subscribe to the required entitlements. See Section 9.3, “Subscribing to the Required Entitlements”, and enable only the
Red Hat Virtualization Host 7repository to allow later updates to the Red Hat Virtualization Host:subscription-manager repos --enable=rhel-7-server-rhvh-4-rpms
# subscription-manager repos --enable=rhel-7-server-rhvh-4-rpmsCopy to Clipboard Copied! Toggle word wrap Toggle overflow
8.2. Advanced Installation
8.2.1. Custom Partitioning
I will configure partitioning option during the installation, and note that the following restrictions apply:
- You must select the LVM Thin Provisioning option in the Manual Partitioning window.
- The following directories are required and must be on thin provisioned logical volumes:
- root (
/)
/home
/tmp
/var
/var/log
/var/log/audit
For information about the required storage sizes for each partition, refer to the table below. - The
/bootdirectory should be defined as a standard partition. - The
/vardirectory must be on a separate volume or disk. - Only XFS or Ext4 file systems are supported.
| / | /home | /tmp | /boot | /var | /var/log | /var/log/audit | swap | Minimum Total |
|---|---|---|---|---|---|---|---|---|
| 6 GB | 1 GB | 1 GB | 1 GB | 15 GB | 8 GB | 2 GB | 1 GB | 32 GB |
8.2.2. Automating Red Hat Virtualization Host Deployment
Procedure 8.2. Automating Deployment using PXE and Kickstart
- Download the RHVH ISO image from the Customer Portal:
- Log in to the Customer Portal at https://access.redhat.com.
- Click Downloads in the menu bar.
- Click Red Hat Virtualization, scroll up, and click to access the product download page.
- Choose the appropriate hypervisor image and click .
- Make the RHVH ISO image available over the network using the instructions in Installation Source on a Network.
- Configure the PXE server using the instructions in Preparing for a Network Installation.The following requirements apply in order to boot RHVH from the PXE server:
- Ensure that you copy the RHVH boot images to the
tftp/root directory.cp URL/to/RHVH-ISO/images/pxeboot/{vmlinuz,initrd.img} /var/lib/tftpboot/pxelinux/# cp URL/to/RHVH-ISO/images/pxeboot/{vmlinuz,initrd.img} /var/lib/tftpboot/pxelinux/Copy to Clipboard Copied! Toggle word wrap Toggle overflow - The boot loader configuration file must include a RHVH label that specifies the RHVH boot images.
KERNEL URL/to/vmlinuz APPEND initrd=URL/to/initrd.img inst.stage2=URL/to/RHVH-ISO
KERNEL URL/to/vmlinuz APPEND initrd=URL/to/initrd.img inst.stage2=URL/to/RHVH-ISOCopy to Clipboard Copied! Toggle word wrap Toggle overflow
- Create a Kickstart file and make it available over the network using the instructions in Kickstart Installations.The following constraints apply to RHVH Kickstart files:
- The
%packagessection is not required for RHVH. Instead, use theliveimgoption and specify thesquashfs.imgfile from the RHVH ISO image.liveimg --url=URL/to/squashfs.img
liveimg --url=URL/to/squashfs.imgCopy to Clipboard Copied! Toggle word wrap Toggle overflow - The
autopartcommand is highly recommended. Thin provisioning must be used.autopart --type=thinp
autopart --type=thinpCopy to Clipboard Copied! Toggle word wrap Toggle overflow If your installation requires manual partitioning instead, see Section 8.2.1, “Custom Partitioning” for a list of limitations that apply to partitions.The following example demonstrates how to configure manual partitioning.Copy to Clipboard Copied! Toggle word wrap Toggle overflow - A
%postsection that calls thenodectl initcommand is required.%post nodectl init %end
%post nodectl init %endCopy to Clipboard Copied! Toggle word wrap Toggle overflow
To fully automate the installation process, you can add this Kickstart file to the boot loader configuration file on the PXE server. Specify the Kickstart location by addinginst.ks=to theAPPENDline:APPEND initrd=URL/to/initrd.img inst.stage2=URL/to/RHVH-ISO inst.ks=URL/to/RHVH-ks.cfg
APPEND initrd=URL/to/initrd.img inst.stage2=URL/to/RHVH-ISO inst.ks=URL/to/RHVH-ks.cfgCopy to Clipboard Copied! Toggle word wrap Toggle overflow Example 8.1. Red Hat Virtualization Host Kickstart File
The following is an example of a Kickstart file used to deploy Red Hat Virtualization Host. You can include additional commands and options as required.Copy to Clipboard Copied! Toggle word wrap Toggle overflow - Install RHVH using the instructions in Booting the Installation on AMD64 and Intel 64 Systems from the Network Using PXE.
Chapter 9. Red Hat Enterprise Linux Hosts
9.1. Red Hat Enterprise Linux Hosts
Red Hat Enterprise Linux Server and the Red Hat Enterprise Virtualization entitlements enabled. For detailed installation instructions, see Red Hat Enterprise Linux 7 Installation Guide.
Important
getenforce. While it is highly recommended to have SELinux in enforcing mode, it is not required for Red Hat Enterprise Virtualization to host virtual machines. Disabling SELinux eliminates a core security feature of Red Hat Enterprise Linux. Problems also occur when migrating virtual machines between hypervisors that have different SELinux modes. For more information, see Red Hat Enterprise Linux 7 Virtualization Security Guide.
Important
Important
9.2. Host Compatibility Matrix
Note
| Supported RHEL or RHEV-H Version | 3.0 | 3.1 | 3.2 | 3.3 | 3.4 | 3.5 | 3.6 |
|---|---|---|---|---|---|---|---|
| 6.2 | ✓ | ||||||
| 6.3 | ✓ | ✓ | |||||
| 6.4 | ✓ | ✓ | ✓ | ||||
| 6.5 | ✓ | ✓ | ✓ | ✓ | ✓ | ||
| 6.6 | ✓ | ||||||
| 6.7 | ✓ | ||||||
| 6.8 | ✓ | ||||||
| 7.0 | ✓ | ✓ | |||||
| 7.1 | ✓ | ✓ | |||||
| 7.2 | ✓ | ✓ | |||||
| 7.3 | ✓ |
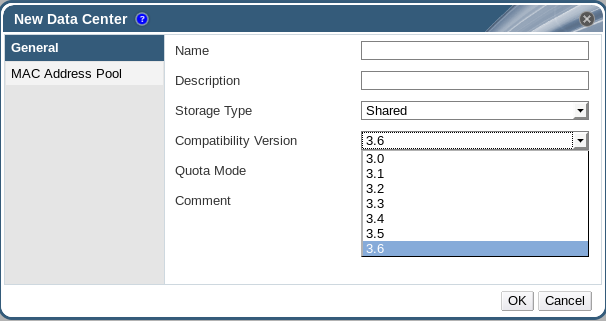
9.3. Subscribing to the Required Entitlements
Red Hat Enterprise Linux Server and Red Hat Enterprise Virtualization entitlements to the host.
Procedure 9.1. Subscribing to Required Entitlements using Subscription Manager
- Register your system with the Content Delivery Network, entering your Customer Portal Username and Password when prompted:
subscription-manager register
# subscription-manager registerCopy to Clipboard Copied! Toggle word wrap Toggle overflow - Find the
Red Hat Enterprise Linux ServerandRed Hat Enterprise Virtualizationsubscription pools and note down the pool IDs.subscription-manager list --available
# subscription-manager list --availableCopy to Clipboard Copied! Toggle word wrap Toggle overflow - Use the pool IDs located in the previous step to attach the entitlements to the system:
subscription-manager attach --pool=poolid
# subscription-manager attach --pool=poolidCopy to Clipboard Copied! Toggle word wrap Toggle overflow Note
To find out what subscriptions are currently attached, run:subscription-manager list --consumed
# subscription-manager list --consumedCopy to Clipboard Copied! Toggle word wrap Toggle overflow To list all enabled repositories, run:yum repolist
# yum repolistCopy to Clipboard Copied! Toggle word wrap Toggle overflow - Ensure all hosts remain on Red Hat Entrprise Linux 7.3:
subscription-manager release --set=7.3
subscription-manager release --set=7.3Copy to Clipboard Copied! Toggle word wrap Toggle overflow - Disable all existing repositories:
subscription-manager repos --disable=*
# subscription-manager repos --disable=*Copy to Clipboard Copied! Toggle word wrap Toggle overflow - Enable the required repositories.
Important
Red Hat Enterprise Virtualization 3.x has reached End Of Life (EOL). Users with Extended Lifecycle Support (ELS) must use the repositories in https://access.redhat.com/solutions/3194482 to keep the environment up and running.If you are installing Red Hat Enterprise Linux 7 hosts, little endian on IBM POWER8 hardware, enable the following repositories instead:subscription-manager repos --enable=rhel-7-server-rhev-mgmt-agent-for-power-le-rpms subscription-manager repos --enable=rhel-7-for-power-le-rpms
# subscription-manager repos --enable=rhel-7-server-rhev-mgmt-agent-for-power-le-rpms # subscription-manager repos --enable=rhel-7-for-power-le-rpmsCopy to Clipboard Copied! Toggle word wrap Toggle overflow Important
Red Hat Enterprise Linux 7 hosts, little endian on IBM POWER8 is not part of the Extended Lifecycle Support (ELS) offering. - Ensure that all packages currently installed are up to date:
yum update
# yum updateCopy to Clipboard Copied! Toggle word wrap Toggle overflow
9.4. Manually Adding a Hypervisor from the Administration Portal
Procedure 9.2. Adding a Host to the Red Hat Enterprise Virtualization Manager
- From the Administration Portal, click the Hosts resource tab.
- Click to open the New Host window.
- Use the drop-down menu to select the Data Center and Host Cluster for the new host.
Important
Red Hat recommends to keep Red Hat Enterprise Linux 6 and Red Hat Enterprise Linux 7 hosts in different clusters. - Enter the Name and the Address of the new host. The standard SSH port, port 22, is auto-filled in the SSH Port field.
- Select an authentication method to use for the Manager to access the host.
- Enter the root user's password to use password authentication.
- Alternatively, copy the key displayed in the SSH PublicKey field to
/root/.ssh/authorized_keyson the host to use public key authentication.
- Click the button to expand the advanced host settings.
- Optionally disable automatic firewall configuration.
- Optionally add a host SSH fingerprint to increase security. You can add it manually, or fetch it automatically.
- You can configure power management, where the host has a supported power management card. For information on power management configuration, see Host Power Management Settings Explained in the Administration Guide.
- Click .
Installing, and you can view the progress of the installation in the details pane. After a brief delay the host status changes to Up.
Part IV. Attaching Storage
Chapter 10. Storage
10.1. Introduction to Storage
- Data Domain: A data domain holds the virtual hard disks and OVF files of all the virtual machines and templates in a data center, and cannot be shared across data centers. Data domains of multiple types (iSCSI, NFS, FC, POSIX, and Gluster) can be added to the same data center, provided they are all shared, rather than local, domains.
Important
You must have one hypervisor host with the status ofUpand have attached a data domain to a data center before you can attach an ISO domain and an export domain. - ISO Domain: ISO domains store ISO files (or logical CDs) used to install and boot operating systems and applications for the virtual machines, and can be shared across different data centers. An ISO domain removes the data center's need for physical media. ISO domains can only be NFS-based. Only one ISO domain can be added to a data center.
- Export Domain: Export domains are temporary storage repositories that are used to copy and move images between data centers and Red Hat Enterprise Virtualization environments. Export domains can be used to backup virtual machines. An export domain can be moved between data centers, however, it can only be active in one data center at a time. Export domains can only be NFS-based. Only one export domain can be added to a data center.
10.2. Adding FCP Storage
Procedure 10.1. Adding FCP Storage
- Click the resource tab to list all storage domains.
- Click to open the New Domain window.
- Enter the Name of the storage domain.
Figure 10.1. Adding FCP Storage
- Use the Data Center drop-down menu to select an FCP data center.If you do not yet have an appropriate FCP data center, select
(none). - Use the drop-down menus to select the Domain Function and the Storage Type. The storage domain types that are not compatible with the chosen data center are not available.
- Select an active host in the Use Host field. If this is not the first data domain in a data center, you must select the data center's SPM host.
Important
All communication to the storage domain is through the selected host and not directly from the Red Hat Enterprise Virtualization Manager. At least one active host must exist in the system and be attached to the chosen data center. All hosts must have access to the storage device before the storage domain can be configured. - The New Domain window automatically displays known targets with unused LUNs when Data / Fibre Channel is selected as the storage type. Select the LUN ID check box to select all of the available LUNs.
- Optionally, you can configure the advanced parameters.
- Click Advanced Parameters.
- Enter a percentage value into the Warning Low Space Indicator field. If the free space available on the storage domain is below this percentage, warning messages are displayed to the user and logged.
- Enter a GB value into the Critical Space Action Blocker field. If the free space available on the storage domain is below this value, error messages are displayed to the user and logged, and any new action that consumes space, even temporarily, will be blocked.
- Select the Wipe After Delete check box to enable the wipe after delete option. This option can be edited after the domain is created, but doing so will not change the wipe after delete property of disks that already exist.
- Click to create the storage domain and close the window.

Locked status while it is being prepared for use. When ready, it is automatically attached to the data center.
Appendix A. Changing the Permissions for the Local ISO Domain
Procedure A.1. Changing the Permissions for the Local ISO Domain
- Log in to the Manager machine.
- Edit the
/etc/exportsfile, and add the hosts, or the subnets to which they belong, to the access control list:/var/lib/exports/iso 10.1.2.0/255.255.255.0(rw) host01.example.com(rw) host02.example.com(rw)
/var/lib/exports/iso 10.1.2.0/255.255.255.0(rw) host01.example.com(rw) host02.example.com(rw)Copy to Clipboard Copied! Toggle word wrap Toggle overflow The example above allows read and write access to a single /24 network and two specific hosts./var/lib/exports/isois the default file path for the ISO domain. See theexports(5)man page for further formatting options. - Apply the changes:
exportfs -ra
# exportfs -raCopy to Clipboard Copied! Toggle word wrap Toggle overflow
/etc/exports file after running engine-setup, running engine-cleanup later will not undo the changes.
Appendix B. Attaching the Local ISO Domain to a Data Center
Procedure B.1. Attaching the Local ISO Domain to a Data Center
- In the Administration Portal, click the Data Centers resource tab and select the appropriate data center.
- Select the Storage tab in the details pane to list the storage domains already attached to the data center.
- Click to open the Attach ISO Library window.
- Click the radio button for the local ISO domain.
- Click .
Appendix C. Enabling Gluster Processes on Red Hat Gluster Storage Nodes
- In the Navigation Pane, select the Clusters tab.
- Select .
- Select the "Enable Gluster Service" radio button. Provide the address, SSH fingerprint, and password as necessary. The address and password fields can be filled in only when the Import existing Gluster configuration check box is selected.
Figure C.1. Selecting the "Enable Gluster Service" Radio Button
- Click .
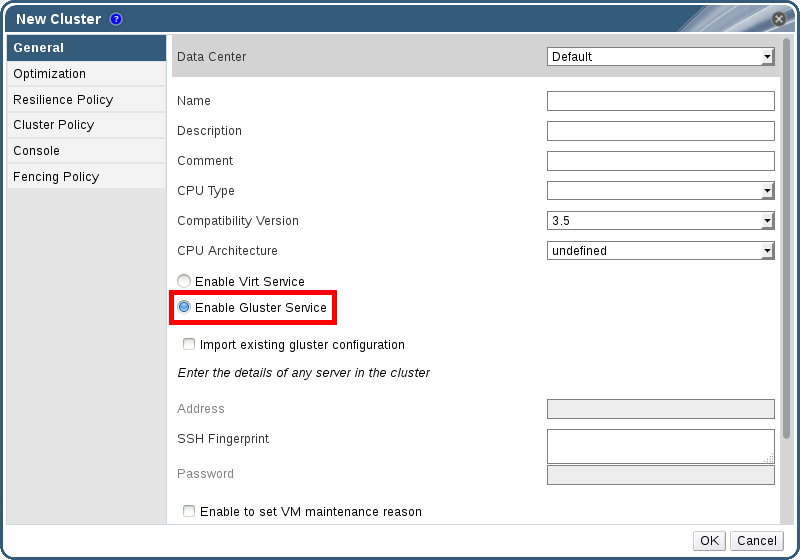
Appendix D. Preparing a Remote PostgreSQL Database for Use with the Red Hat Enterprise Virtualization Manager
engine-setup, creates and configures the Manager database locally on the Manager machine. For automatic database configuration, see Section 3.3, “Configuring the Red Hat Enterprise Virtualization Manager”. To set up the Manager database with custom values on the Manager machine, see Appendix E, Preparing a Local Manually-Configured PostgreSQL Database for Use with the Red Hat Enterprise Virtualization Manager.
engine-setup.
Note
engine-setup and engine-backup --mode=restore commands only support system error messages in the en_US.UTF8 locale, even if the system locale is different.
postgresql.conf file must be set to en_US.UTF8.
Important
Procedure D.1. Preparing a Remote PostgreSQL Database for use with the Red Hat Enterprise Virtualization Manager
- Install the PostgreSQL server package:
yum install postgresql-server
# yum install postgresql-serverCopy to Clipboard Copied! Toggle word wrap Toggle overflow - Initialize the PostgreSQL database, start the
postgresqlservice, and ensure that this service starts on boot:su -l postgres -c "/usr/bin/initdb --locale=en_US.UTF8 --auth='ident' --pgdata=/var/lib/pgsql/data/" service postgresql start chkconfig postgresql on
# su -l postgres -c "/usr/bin/initdb --locale=en_US.UTF8 --auth='ident' --pgdata=/var/lib/pgsql/data/" # service postgresql start # chkconfig postgresql onCopy to Clipboard Copied! Toggle word wrap Toggle overflow - Connect to the psql command line interface as the
postgresuser:su - postgres psql
# su - postgres $ psqlCopy to Clipboard Copied! Toggle word wrap Toggle overflow - Create a user for the Manager to use when it writes to and reads from the database. The default user name on the Manager is
engine:postgres=# create role user_name with login encrypted password 'password';
postgres=# create role user_name with login encrypted password 'password';Copy to Clipboard Copied! Toggle word wrap Toggle overflow - Create a database in which to store data about the Red Hat Enterprise Virtualization environment. The default database name on the Manager is
engine:postgres=# create database database_name owner user_name template template0 encoding 'UTF8' lc_collate 'en_US.UTF-8' lc_ctype 'en_US.UTF-8';
postgres=# create database database_name owner user_name template template0 encoding 'UTF8' lc_collate 'en_US.UTF-8' lc_ctype 'en_US.UTF-8';Copy to Clipboard Copied! Toggle word wrap Toggle overflow - Connect to the new database and add the
plpgsqllanguage:postgres=# \c database_name database_name=# CREATE LANGUAGE plpgsql;
postgres=# \c database_name database_name=# CREATE LANGUAGE plpgsql;Copy to Clipboard Copied! Toggle word wrap Toggle overflow - Ensure the database can be accessed remotely by enabling md5 client authentication. Edit the
/var/lib/pgsql/data/pg_hba.conffile, and add the following line immediately underneath the line starting withlocalat the bottom of the file, replacing X.X.X.X with the IP address of the Manager:host database_name user_name X.X.X.X/32 md5
host database_name user_name X.X.X.X/32 md5Copy to Clipboard Copied! Toggle word wrap Toggle overflow - Allow TCP/IP connections to the database. Edit the
/var/lib/pgsql/data/postgresql.conffile and add the following line:listen_addresses='*'
listen_addresses='*'Copy to Clipboard Copied! Toggle word wrap Toggle overflow This example configures thepostgresqlservice to listen for connections on all interfaces. You can specify an interface by giving its IP address. - Open the default port used for PostgreSQL database connections, and save the updated firewall rules:
iptables -I INPUT 5 -p tcp --dport 5432 -j ACCEPT service iptables save
# iptables -I INPUT 5 -p tcp --dport 5432 -j ACCEPT # service iptables saveCopy to Clipboard Copied! Toggle word wrap Toggle overflow - Restart the
postgresqlservice:service postgresql restart
# service postgresql restartCopy to Clipboard Copied! Toggle word wrap Toggle overflow
Appendix E. Preparing a Local Manually-Configured PostgreSQL Database for Use with the Red Hat Enterprise Virtualization Manager
engine-setup, creates and configures the Manager database locally on the Manager machine. For automatic database configuration, see Section 3.3, “Configuring the Red Hat Enterprise Virtualization Manager”. To configure the Manager database on a machine that is separate from the machine where the Manager is installed, see Appendix D, Preparing a Remote PostgreSQL Database for Use with the Red Hat Enterprise Virtualization Manager.
engine-setup. To set up the database, you must first install the rhevm package on the Manager machine; the postgresql-server package is installed as a dependency.
Note
engine-setup and engine-backup --mode=restore commands only support system error messages in the en_US.UTF8 locale, even if the system locale is different.
postgresql.conf file must be set to en_US.UTF8.
Important
Procedure E.1. Preparing a Local Manually-Configured PostgreSQL Database for use with the Red Hat Enterprise Virtualization Manager
- Initialize the PostgreSQL database, start the
postgresqlservice, and ensure that this service starts on boot:su -l postgres -c "/usr/bin/initdb --locale=en_US.UTF8 --auth='ident' --pgdata=/var/lib/pgsql/data/" service postgresql start chkconfig postgresql on
# su -l postgres -c "/usr/bin/initdb --locale=en_US.UTF8 --auth='ident' --pgdata=/var/lib/pgsql/data/" # service postgresql start # chkconfig postgresql onCopy to Clipboard Copied! Toggle word wrap Toggle overflow - Connect to the psql command line interface as the
postgresuser:su - postgres psql
# su - postgres $ psqlCopy to Clipboard Copied! Toggle word wrap Toggle overflow - Create a user for the Manager to use when it writes to and reads from the database. The default user name on the Manager is
engine:postgres=# create role user_name with login encrypted password 'password';
postgres=# create role user_name with login encrypted password 'password';Copy to Clipboard Copied! Toggle word wrap Toggle overflow - Create a database in which to store data about the Red Hat Enterprise Virtualization environment. The default database name on the Manager is
engine:postgres=# create database database_name owner user_name template template0 encoding 'UTF8' lc_collate 'en_US.UTF-8' lc_ctype 'en_US.UTF-8';
postgres=# create database database_name owner user_name template template0 encoding 'UTF8' lc_collate 'en_US.UTF-8' lc_ctype 'en_US.UTF-8';Copy to Clipboard Copied! Toggle word wrap Toggle overflow - Connect to the new database and add the
plpgsqllanguage:postgres=# \c database_name database_name=# CREATE LANGUAGE plpgsql;
postgres=# \c database_name database_name=# CREATE LANGUAGE plpgsql;Copy to Clipboard Copied! Toggle word wrap Toggle overflow - Ensure the database can be accessed remotely by enabling md5 client authentication. Edit the
/var/lib/pgsql/data/pg_hba.conffile, and add the following line immediately underneath the line starting withlocalat the bottom of the file:host [database name] [user name] 0.0.0.0/0 md5 host [database name] [user name] ::0/0 md5
host [database name] [user name] 0.0.0.0/0 md5 host [database name] [user name] ::0/0 md5Copy to Clipboard Copied! Toggle word wrap Toggle overflow - Restart the
postgresqlservice:service postgresql restart
# service postgresql restartCopy to Clipboard Copied! Toggle word wrap Toggle overflow
Appendix F. Installing a Websocket Proxy on a Separate Machine
Note
Procedure F.1. Installing and Configuring a Websocket Proxy on a Separate Machine
- Install the websocket proxy:
yum install rhevm-websocket-proxy
# yum install rhevm-websocket-proxyCopy to Clipboard Copied! Toggle word wrap Toggle overflow - Run the
engine-setupcommand to configure the websocket proxy.engine-setup
# engine-setupCopy to Clipboard Copied! Toggle word wrap Toggle overflow Note
If the rhevm package has also been installed, chooseNowhen asked to configure the engine on this host. - Press Enter to allow
engine-setupto configure a websocket proxy server on the machine.Configure WebSocket Proxy on this machine? (Yes, No) [Yes]:
Configure WebSocket Proxy on this machine? (Yes, No) [Yes]:Copy to Clipboard Copied! Toggle word wrap Toggle overflow - Press Enter to accept the automatically detected hostname, or enter an alternative hostname and press Enter. Note that the automatically detected hostname may be incorrect if you are using virtual hosts:
Host fully qualified DNS name of this server [host.example.com]:
Host fully qualified DNS name of this server [host.example.com]:Copy to Clipboard Copied! Toggle word wrap Toggle overflow - Press Enter to allow
engine-setupto configure the firewall and open the ports required for external communication. If you do not allowengine-setupto modify your firewall configuration, then you must manually open the required ports.Setup can automatically configure the firewall on this system. Note: automatic configuration of the firewall may overwrite current settings. Do you want Setup to configure the firewall? (Yes, No) [Yes]:
Setup can automatically configure the firewall on this system. Note: automatic configuration of the firewall may overwrite current settings. Do you want Setup to configure the firewall? (Yes, No) [Yes]:Copy to Clipboard Copied! Toggle word wrap Toggle overflow - Enter the fully qualified DNS name of the Manager machine and press Enter.
Host fully qualified DNS name of the engine server []: engine_host.example.com
Host fully qualified DNS name of the engine server []: engine_host.example.comCopy to Clipboard Copied! Toggle word wrap Toggle overflow - Press Enter to allow
engine-setupto perform actions on the Manager machine, or press 2 to manually perform the actions.Setup will need to do some actions on the remote engine server. Either automatically, using ssh as root to access it, or you will be prompted to manually perform each such action. Please choose one of the following: 1 - Access remote engine server using ssh as root 2 - Perform each action manually, use files to copy content around (1, 2) [1]:
Setup will need to do some actions on the remote engine server. Either automatically, using ssh as root to access it, or you will be prompted to manually perform each such action. Please choose one of the following: 1 - Access remote engine server using ssh as root 2 - Perform each action manually, use files to copy content around (1, 2) [1]:Copy to Clipboard Copied! Toggle word wrap Toggle overflow - Press Enter to accept the default SSH port number, or enter the port number of the Manager machine.
ssh port on remote engine server [22]:
ssh port on remote engine server [22]:Copy to Clipboard Copied! Toggle word wrap Toggle overflow - Enter the root password to log in to the Manager machine and press Enter.
root password on remote engine server engine_host.example.com:
root password on remote engine server engine_host.example.com:Copy to Clipboard Copied! Toggle word wrap Toggle overflow
- Select whether to review iptables rules if they differ from the current settings.
Generated iptables rules are different from current ones.
Do you want to review them? (Yes, No) [No]:
Generated iptables rules are different from current ones.
Do you want to review them? (Yes, No) [No]:
Copy to Clipboard Copied! Toggle word wrap Toggle overflow - Press Enter to confirm the configuration settings.
Copy to Clipboard Copied! Toggle word wrap Toggle overflow Instructions are provided to configure the Manager machine to use the configured websocket proxy.Copy to Clipboard Copied! Toggle word wrap Toggle overflow - Log in to the Manager machine and execute the provided instructions.
engine-config -s WebSocketProxy=host.example.com:6100
service ovirt-engine restart
# engine-config -s WebSocketProxy=host.example.com:6100
# service ovirt-engine restart
Copy to Clipboard Copied! Toggle word wrap Toggle overflow
Appendix G. Configuring a Hypervisor Host for PCI Passthrough
Prerequisites:
- Ensure that the host hardware meets the requirements for PCI device passthrough and assignment. See Section 2.2.4, “PCI Device Requirements” for more information.
- Ensure that either Red Hat Enterprise Linux 7 or RHEV-H 7 is installed.
Procedure G.1. Configuring a Hypervisor Host for PCI Passthrough
- Enable the virtualization extension (for example, VT-d or AMD-Vi) in the BIOS. See Enabling Intel VT-x and AMD-V virtualization hardware extensions in BIOS in the Red Hat Enterprise Linux Virtualization and Administration Guide for more information.
- Enable IOMMU by editing the grub configuration file.
Note
If you are using IBM POWER8 hardware, skip this step as IOMMU is enabled by default.- For Intel:
- For Red Hat Enterprise Linux hosts, boot the machine, and append
intel_iommu=onto the end of theGRUB_CMDLINE_LINUXline in thegrubconfiguration file.vi /etc/default/grub
# vi /etc/default/grub
...
GRUB_CMDLINE_LINUX="nofb splash=quiet console=tty0 ... intel_iommu=on
...
Copy to Clipboard Copied! Toggle word wrap Toggle overflow - For RHEV-H, boot the machine, and press F2 to enter rescue mode.
- Remount the boot image with read and write permissions:
mount -o rw,remount LABEL=Root /dev/.initramfs/live
# mount -o rw,remount LABEL=Root /dev/.initramfs/liveCopy to Clipboard Copied! Toggle word wrap Toggle overflow - Edit
/dev/.initramfs/live/grub/grub.confand appendintel_iommu=onto the end of thekernel /vmlinuzline. - Remount the boot image with read-only permission:
mount -o ro,remount LABEL=Root /dev/.initramfs/live
# mount -o ro,remount LABEL=Root /dev/.initramfs/liveCopy to Clipboard Copied! Toggle word wrap Toggle overflow
- For AMD:
- For Red Hat Enterprise Linux hosts, boot the machine, and append
amd_iommu=onto the end of theGRUB_CMDLINE_LINUXline in thegrubconfiguration file.vi /etc/default/grub
# vi /etc/default/grub
...
GRUB_CMDLINE_LINUX="nofb splash=quiet console=tty0 ... amd_iommu=on
...
Copy to Clipboard Copied! Toggle word wrap Toggle overflow - For RHEV-H, boot the machine, and press F2 to enter rescue mode.
- Remount the boot image with read and write permissions:
mount -o rw,remount LABEL=Root /dev/.initramfs/live
# mount -o rw,remount LABEL=Root /dev/.initramfs/liveCopy to Clipboard Copied! Toggle word wrap Toggle overflow - Edit
/dev/.initramfs/live/grub/grub.confand appendamd_iommu=onto the end of thekernel /vmlinuzline. - Remount the boot image with read-only permission:
mount -o ro,remount LABEL=Root /dev/.initramfs/live
# mount -o ro,remount LABEL=Root /dev/.initramfs/liveCopy to Clipboard Copied! Toggle word wrap Toggle overflow
Note
Ifintel_iommu=onoramd_iommu=onworks, you can try replacing them withintel_iommu=ptoramd_iommu=pt. Theptoption only enables IOMMU for devices used in passthrough and will provide better host performance. However, the option may not be supported on all hardware. Revert to previous option if theptoption doesn't work for your host.If the passthrough fails because the hardware does not support interrupt remapping, you can consider enabling theallow_unsafe_interruptsoption if the virtual machines are trusted. Theallow_unsafe_interruptsis not enabled by default because enabling it potentially exposes the host to MSI attacks from virtual machines. To enable the option:For RHEV-H, also runvi /etc/modprobe.d
# vi /etc/modprobe.d
options vfio_iommu_type1 allow_unsafe_interrupts=1
Copy to Clipboard Copied! Toggle word wrap Toggle overflow persist /etc/modprobe.dso the file change persists over system reboots. - Refresh the
grub.cfgfile and reboot the host for these changes to take effect:grub2-mkconfig -o /boot/grub2/grub.cfg
# grub2-mkconfig -o /boot/grub2/grub.cfgCopy to Clipboard Copied! Toggle word wrap Toggle overflow reboot
# rebootCopy to Clipboard Copied! Toggle word wrap Toggle overflow - Run
cat /proc/cmdlineto verify the changes. Your system is now capable of PCI device passthrough and assignment.
Appendix H. Revision History
| Revision History | |||||||||||||||||||
|---|---|---|---|---|---|---|---|---|---|---|---|---|---|---|---|---|---|---|---|
| Revision 3.6-33 | Mon 15 Jan 2018 | ||||||||||||||||||
| |||||||||||||||||||
| Revision 3.6-32 | Fri 20 Oct 2017 | ||||||||||||||||||
| |||||||||||||||||||
| Revision 3.6-31 | Wed 23 Aug 2017 | ||||||||||||||||||
| |||||||||||||||||||
| Revision 3.6-30 | Wed 26 Jul 2017 | ||||||||||||||||||
| |||||||||||||||||||
| Revision 3.6-29 | Wed 21 Jun 2017 | ||||||||||||||||||
| |||||||||||||||||||
| Revision 3.6-28 | Wed 22 Mar 2017 | ||||||||||||||||||
| |||||||||||||||||||
| Revision 3.6-27 | Fri 17 Feb 2017 | ||||||||||||||||||
| |||||||||||||||||||
| Revision 3.6-24 | Thu 19 Jan 2017 | ||||||||||||||||||
| |||||||||||||||||||
| Revision 3.6-21 | Fri 2 Dec 2016 | ||||||||||||||||||
| |||||||||||||||||||
| Revision 3.6-20 | Thu 27 Oct 2016 | ||||||||||||||||||
| |||||||||||||||||||
| Revision 3.6-19 | Fri 07 Oct 2016 | ||||||||||||||||||
| |||||||||||||||||||
| Revision 3.6-18 | Mon 22 Aug 2016 | ||||||||||||||||||
| |||||||||||||||||||
| Revision 3.6-17 | Wed 27 Jul 2016 | ||||||||||||||||||
| |||||||||||||||||||
| Revision 3.6-16 | Wed 29 Jun 2016 | ||||||||||||||||||
| |||||||||||||||||||
| Revision 3.6-15 | Wed 25 May 2016 | ||||||||||||||||||
| |||||||||||||||||||
| Revision 3.6-14 | Mon 18 Apr 2016 | ||||||||||||||||||
| |||||||||||||||||||
| Revision 3.6-13 | Mon 14 Mar 2016 | ||||||||||||||||||
| |||||||||||||||||||
| Revision 3.6-12 | Wed 09 Mar 2016 | ||||||||||||||||||
| |||||||||||||||||||
| Revision 3.6-11 | Mon 22 Feb 2016 | ||||||||||||||||||
| |||||||||||||||||||
| Revision 3.6-10 | Fri 19 Feb 2016 | ||||||||||||||||||
| |||||||||||||||||||
| Revision 3.6-9 | Wed 10 Feb 2016 | ||||||||||||||||||
| |||||||||||||||||||
| Revision 3.6-8 | Mon 8 Feb 2016 | ||||||||||||||||||
| |||||||||||||||||||
| Revision 3.6-7 | Wed 23 Dec 2015 | ||||||||||||||||||
| |||||||||||||||||||
| Revision 3.6-6 | Wed 16 Dec 2015 | ||||||||||||||||||
| |||||||||||||||||||
| Revision 3.6-5 | Wed 2 Dec 2015 | ||||||||||||||||||
| |||||||||||||||||||
| Revision 3.6-4 | Wed 18 Nov 2015 | ||||||||||||||||||
| |||||||||||||||||||
| Revision 3.6-3 | Wed 18 Nov 2015 | ||||||||||||||||||
| |||||||||||||||||||
| Revision 3.6-2 | Wed 18 Nov 2015 | ||||||||||||||||||
| |||||||||||||||||||
| Revision 3.6-1 | Fri 10 Jul 2015 | ||||||||||||||||||
| |||||||||||||||||||