Dieser Inhalt ist in der von Ihnen ausgewählten Sprache nicht verfügbar.
End-user Guide
Using Red Hat CodeReady Workspaces 2.8
Abstract
Making open source more inclusive
Red Hat is committed to replacing problematic language in our code, documentation, and web properties. We are beginning with these four terms: master, slave, blacklist, and whitelist. Because of the enormity of this endeavor, these changes will be implemented gradually over several upcoming releases. For more details, see our CTO Chris Wright’s message.
Chapter 1. Navigating CodeReady Workspaces
This chapter describes available methods to navigate Red Hat CodeReady Workspaces.
1.2. Importing certificates to browsers
This section describes how to import a root certificate authority into a web browser to use CodeReady Workspaces with self-signed TLS certificates.
When a TLS certificate is not trusted, the error message "Your CodeReady Workspaces server may be using a self-signed certificate. To resolve the issue, import the server CA certificate in the browser." blocks the login process. To prevent this, add the public part of the self-signed CA certificate into the browser after installing CodeReady Workspaces.
1.2.1. Adding certificates to Google Chrome on Linux or Windows
Procedure
- Navigate to URL where CodeReady Workspaces is deployed.
Save the certificate:
- Click the warning or open lock icon on the left of the address bar.
- Click Certificates and navigate to the Details tab.
Select the top-level certificate which is the Root certificate authority and export it:
- On Linux, click the button.
- On Windows, click the button.
- Go to Google Chrome Settings, then to the Authorities tab
- In the left panel, select Advanced and continue to Privacy and security.
- At the center of the screen, click Manage certificates and navigate to Authorities tab.
- Click the button and open the saved certificate file.
- Select Trust this certificate for identifying websites and click the button.
- After adding the CodeReady Workspaces certificate to the browser, the address bar displays the closed lock icon next to the URL, indicating a secure connection.
1.2.2. Adding certificates to Google Chrome and Safari on macOS
Procedure
- Navigate to URL where CodeReady Workspaces is deployed.
Save the certificate:
- Click the lock icon on the left of the address bar.
- Click Certificates.
- Select the certificate to use and drag its displayed large icon to the desktop.
- Open the Keychain Access application.
- Select the System keychain and drag the saved certificate file to it.
- Double-click the imported CA, then go to Trust and select When using this certificate: Always Trust.
- Restart the browser for the added certificated to take effect.
1.2.3. Adding certificates to Firefox
Procedure
- Navigate to URL where CodeReady Workspaces is deployed.
Save the certificate:
- Click the lock icon on the left of the address bar.
- Click the button next to the Connection not secure warning.
- Click the button.
- Click the button on the Security tab.
-
Select the second certificate tab. The certificate Common Name should start with
ingress-operator - Click the PEM (cert) link and save the certificate.
-
Navigate to about:preferences, search for
certificates, and click View Certificates. - Go to the Authorities tab, click the button, and open the saved certificate file.
- Check Trust this CA to identify websites and click .
- Restart Firefox for the added certificated to take effect.
- After adding the CodeReady Workspaces certificate to the browser, the address bar displays the closed lock icon next to the URL, indicating a secure connection.
1.3. Accessing CodeReady Workspaces from OpenShift Developer Perspective
The OpenShift Container Platform web console provides two perspectives; the Administrator perspective and the Developer perspective.
The Developer perspective provides workflows specific to developer use cases, such as the ability to:
- Create and deploy applications on OpenShift Container Platform by importing existing codebases, images, and dockerfiles.
- Visually interact with applications, components, and services associated with them within a project and monitor their deployment and build status.
- Group components within an application and connect the components within and across applications.
- Integrate serverless capabilities (Technology Preview).
- Create workspaces to edit your application code using CodeReady Workspaces.
1.3.1. OpenShift Developer Perspective integration with CodeReady Workspaces
This section provides information about OpenShift Developer Perspective support for CodeReady Workspaces.
When the CodeReady Workspaces Operator is deployed into OpenShift Container Platform 4.2 and later, it creates a ConsoleLink Custom Resource (CR). This adds an interactive link to the Red Hat Applications menu for accessing the CodeReady Workspaces installation using the OpenShift Developer Perspective console.
To access the Red Hat Applications menu, click the three-by-three matrix icon on the main screen of the OpenShift web console. The CodeReady Workspaces Console Link, displayed in the drop-down menu, creates a new workspace or redirects the user to an existing one.
OpenShift Container Platform console links are not created when CodeReady Workspaces is used with HTTP resources
When installing CodeReady Workspaces with the From Git option, the OpenShift Developer Perspective console link is only created if CodeReady Workspaces is deployed with HTTPS. The console link will not be created if an HTTP resource is used.
1.3.2. Editing the code of applications running in OpenShift Container Platform using CodeReady Workspaces
This section describes how to start editing the source code of applications running on OpenShift using CodeReady Workspaces.
Prerequisites
- CodeReady Workspaces is deployed on the same OpenShift 4 cluster.
Procedure
- Open the Topology view to list all projects.
-
In the Select an Application search field, type
workspaceto list all workspaces. Click the workspace to edit.
The deployments are displayed as graphical circles surrounded by circular buttons. One of these buttons is Edit Source Code.

- To edit the code of an application using CodeReady Workspaces, click the Edit Source Code button. This redirects to a workspace with the cloned source code of the application component.
1.3.3. Accessing CodeReady Workspaces from Red Hat Applications menu
This section describes how to access CodeReady Workspaces workspaces from the Red Hat Applications menu on OpenShift Container Platform.
Prerequisites
- The CodeReady Workspaces Operator is available in OpenShift 4.
Procedure
Open the Red Hat Applications menu by using the three-by-three matrix icon in the upper right corner of the main screen.
The drop-down menu displays the available applications.
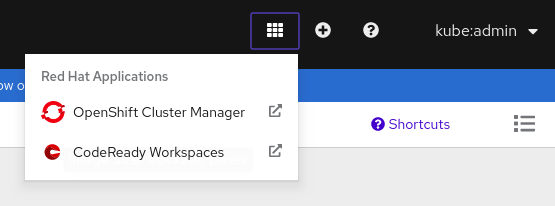
- Click the CodeReady Workspaces link to open the CodeReady Workspaces Dashboard.
Chapter 2. Che-Theia IDE basics
This section describes basics workflows and commands for Che-Theia: the native integrated development environment for Red Hat CodeReady Workspaces.
2.1. Defining custom commands for Che-Theia
The Che-Theia IDE allows users to define custom commands in a devfile that are then available when working in a workspace.
This is useful, for example, for:
- Simplifying building, running, and debugging projects.
- Allowing lead developers to customize workspaces based on team requirements.
- Reducing time needed to onboard new team members.
See also Section 3.6, “Configuring a workspace using a devfile”.
2.1.1. Che-Theia task types
The following is an example of the commands section of a devfile.
commands:

  - name: Package Native App
    actions:
      - type: exec
        component: centos-quarkus-maven
        command: "mvn package -Dnative -Dmaven.test.skip"
        workdir: ${CHE_PROJECTS_ROOT}/quarkus-quickstarts/getting-started

  - name: Start Native App
    actions:
      - type: exec
        component: ubi-minimal
        command: ./getting-started-1.0-SNAPSHOT-runner
        workdir: ${CHE_PROJECTS_ROOT}/quarkus-quickstarts/getting-started/target

  - name: Attach remote debugger
    actions:
    - type: vscode-launch
      referenceContent: |
        {
          "version": "0.2.0",
          "configurations": [
            {
              "type": "java",
              "request": "attach",
              "name": "Attach to Remote Quarkus App",
              "hostName": "localhost",
              "port": 5005
            }
          ]
}- CodeReady Workspaces commands
Package Native AppandStart Native AppThe CodeReady Workspaces commands are to be used to define tasks that will be executed in the workspace container.
-
The
exectype implies that the CodeReady Workspaces runner is used for command execution. The user can specify the component in whose container the command is executed. -
The
commandfield contains the command line for execution. -
The
workdiris the working directory in which the command is executed. -
The
componentfield refers to the container where the command will be executed. The field contains the componentaliaswhere the container is defined.
-
The
- VS Code
launchconfigurations Attach remote debuggerVS Code
launchconfigurations are commonly used to define debugging configuration. To trigger these configurations, press or choose Start Debugging from the Debug menu. The configurations provide information to the debugger, such as the port to connect to for debugging or the type of the application to debug (Node.js, Java, and others.).-
The type is
vscode-launch. -
It contains the
launchconfigurations in the VS Code format. -
For more information about VS Code
launchconfigurations, see the Debugging section on the Visual Studio documentation page.
-
The type is
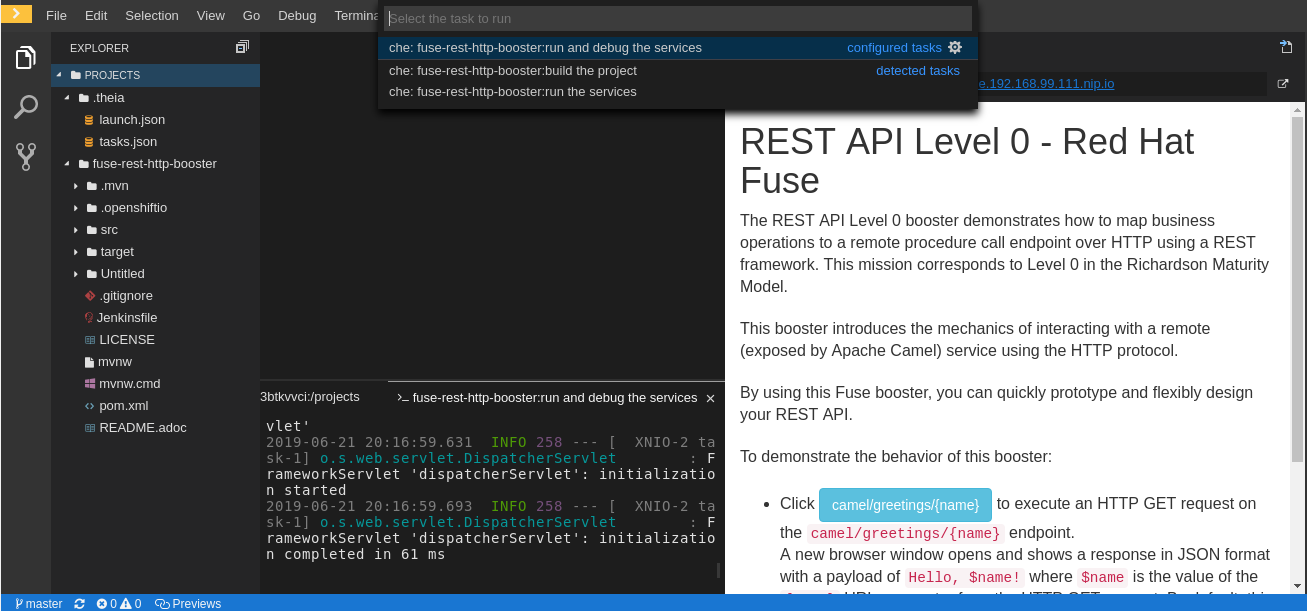
Tasks of type che, also known as exec commands, can be executed from the Terminal→Run Task menu or by selecting them in the My Workspace panel. Other tasks are only available from Terminal→Run Task. Configurations to start with are available in the Che-Theia debugger.
2.1.2. Running and debugging
Che-Theia supports the Debug Adapter Protocol. This protocol defines a generic way for how a development tool can communicate with a debugger. It means Che-Theia works with all implementations.
Prerequisites
- A running instance of CodeReady Workspaces. To install an instance of CodeReady Workspaces, see Installing CodeReady Workspaces.
Procedure
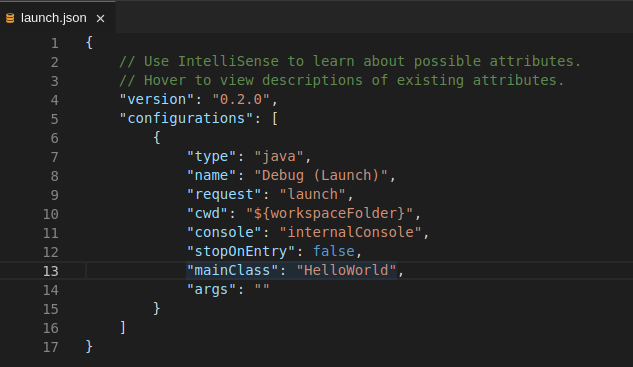
To debug an application:
Click Debug → Add Configuration for debugging or adding of a
launchconfiguration to the project.
From the pop-up menu, select the appropriate configuration for the application that you are about to debug.
Update the configuration by modifying or adding attributes.
Breakpoints can be toggled by selecting the editor margin.

After opening the breakpoint menu, use the Edit Breakpoint command to add conditions.

The IDE then displays the
Expresioninput field.
To start debugging, click View→Debug.
In the Debug view, select the configuration and press F5 to debug the application. Or, start the application without debugging by pressing .

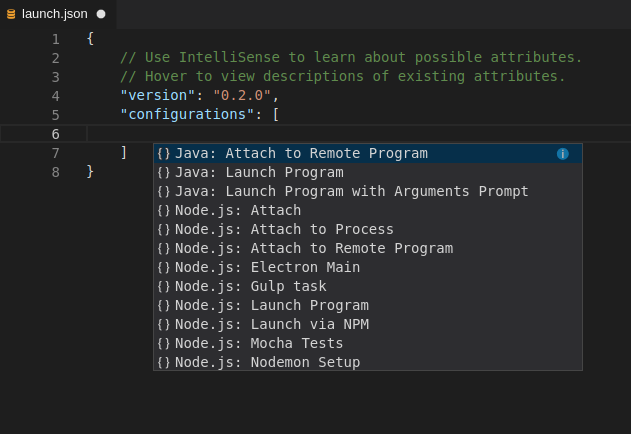
2.1.3. Editing a task and launch configuration
Procedure
To customize the configuration file:
-
Edit the
tasks.jsonorlaunch.jsonconfiguration files. Add new definitions to the configuration file or modify the existing ones.
NoteThe changes are stored in the configuration file.
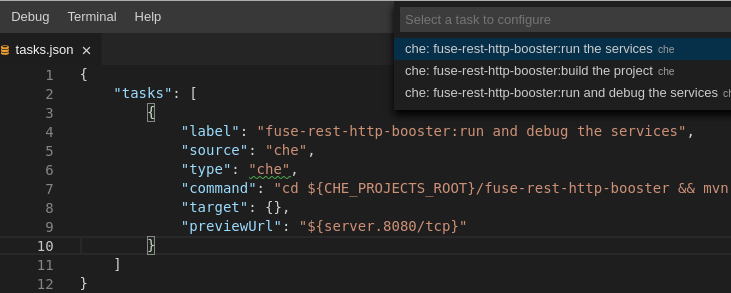
-
To customize the task configuration provided by plug-ins, select the Terminal → Configure Tasks menu option, and choose the task to configure. The configuration is then copied to the
tasks.jsonfile and is available for editing.
2.2. Version Control
Red Hat CodeReady Workspaces natively supports the VS Code SCM model. By default, Red Hat CodeReady Workspaces includes the native VS Code Git extension as a Source Code Management (SCM) provider.
2.2.1. Managing Git configuration: identity
The first thing to do before starting to use Git is to set a user name and email address. This is important because every Git commit uses this information.
Procedure
To configure Git identity using the CodeReady Workspaces user interface:
Open File > Settings > Open Preferences or press Ctrl+,.
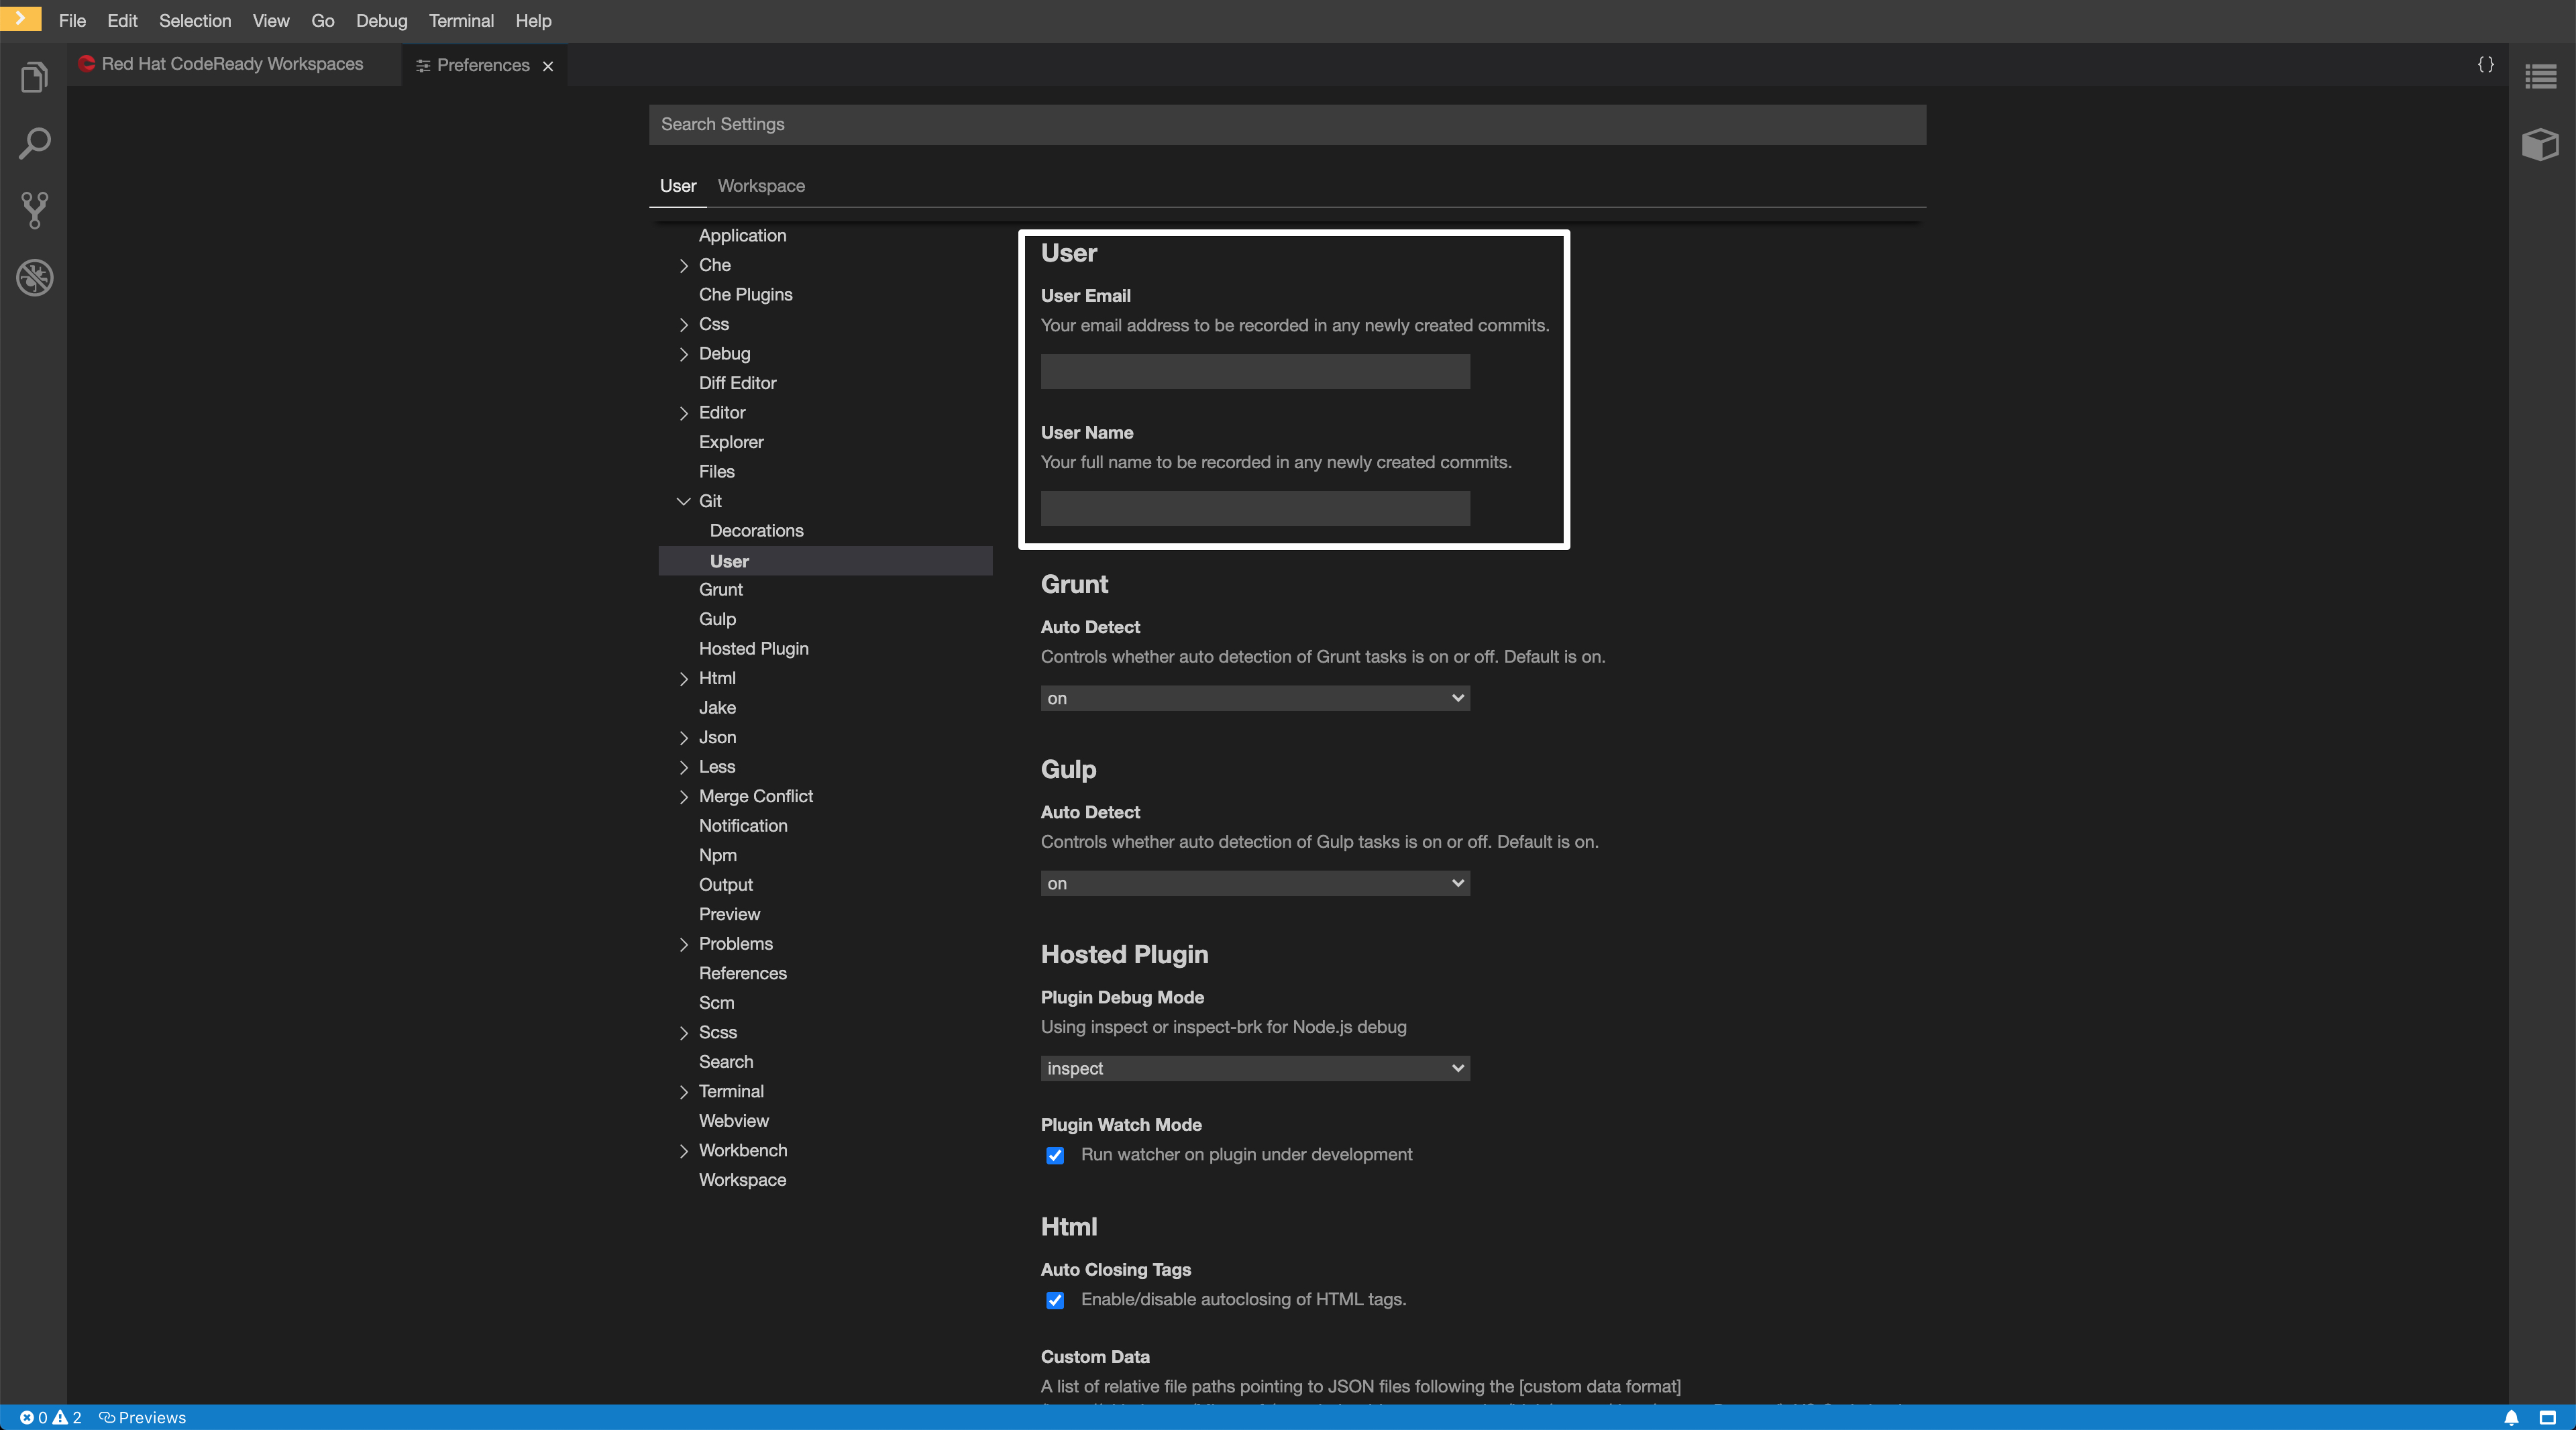
- In the opened window, navigate to the Git → User sub-section and enter the User mail and User name values.
To configure Git identity using the command line, open the terminal of the Che-Theia container.
Navigate to the My Workspace view, and open Plugins > theia-ide… > New terminal:
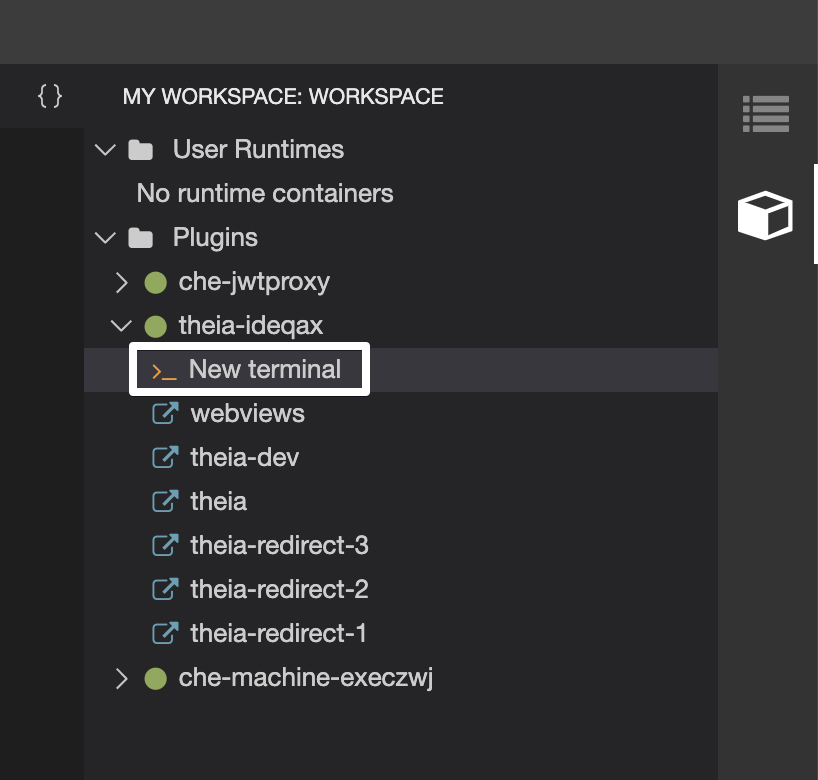
Execute the following commands:
$ git config --global user.name "John Doe"
$ git config --global user.email johndoe@example.com
Che-Theia permanently stores this information in the current container and restores it for other containers on future workspace starts.
2.2.2. Accessing a Git repository using HTTPS
Procedure
To clone a repository using HTTPS:
- Use the clone command provided by the Visual Studio Code Git extension.
Alternatively, use the native Git commands in the terminal to clone a project.
-
Navigate to destination folder using the
cdcommand. Use
git cloneto clone a repository:$ git clone <link>Red Hat CodeReady Workspaces supports Git self-signed TLS certificates. See Deploying CodeReady Workspaces with support for Git repositories with self-signed certificates to learn more.
2.2.3. Accessing a Git repository using a generated SSH key pair
2.2.3.1. Generating an SSH key using the CodeReady Workspaces command palette
The following section describes a generation of an SSH key using the CodeReady Workspaces command palette and its further use in Git provider communication. This SSH key restricts permissions for the specific Git provider, therefore, the user has to create a unique SSH key for each Git provider in use.
Prerequisites
- A running instance of CodeReady Workspaces. To install an instance of Red Hat CodeReady Workspaces, see Installing CodeReady Workspaces.
- An existing workspace defined on this instance of CodeReady Workspaces Section 3.5, “Configuring a CodeReady Workspaces 2.8 workspace”.
- Personal GitHub account or other Git provider account created.
Procedure
A common SSH key pair that works with all the Git providers is present by default. To start using it, add the public key to the Git provider.
Generate an SSH key pair that only works with a particular Git provider:
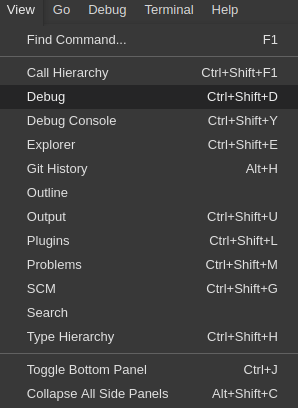
In the CodeReady Workspaces IDE, press F1 to open the Command Palette, or navigate to View → Find Command in the top menu.
The command palette can be also activated by pressing Ctrl+Shift+p (or Cmd+Shift+p on macOS).
-
Search for SSH: generate key pair for particular host by entering
generateinto the search box and pressing Enter once filled. Provide the hostname for the SSH key pair such as, for example,
github.com.The SSH key pair is generated.
Click the button in the lower-right corner and copy the public key from the editor and add it to the Git provider.
It is possible to use another command from the command palette: Clone git repository by providing an SSH secured URL.
2.2.3.2. Adding the associated public key to a repository or account on GitHub
To add the associated public key to a repository or account on GitHub:
- Navigate to github.com.
- Click the drop-down arrow next to the user icon in the upper right corner of the window.
- Click Settings → SSH and GPG keys and then click the button.
- In the Title field, type a title for the key, and in the Key field, paste the public key copied from CodeReady Workspaces.
- Click the button.
2.2.3.3. Adding the associated public key to a Git repository or account on GitLab
To add the associated public key to a Git repository or account on GitLab:
- Navigate to gitlab.com.
- Click the user icon in the upper right corner of the window.
- Click Settings → SSH Keys.
- In the Title field, type a title for the key and in the Key field, paste the public key copied from CodeReady Workspaces.
- Click the button.
2.2.4. Managing pull requests using the GitHub PR plug-in
To manage GitHub pull requests, the VS Code GitHub Pull Request plug-in is available in the list of plug-ins of the workspace.
2.2.4.1. Using the GitHub Pull Requests plug-in
Prerequisites
- GitHub OAuth is configured. See Configuring GitHub OAuth.
Procedure
Sign in to GitHub, using the Accounts menu or the Sign in button in the plugin’s view:
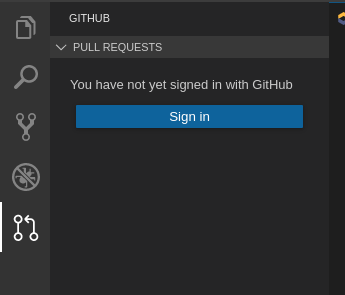
To sign out from GitHub use the Accounts menu in the left bottom side, or GitHub Pull Requests: Sign out of GitHub command.
Additional resources
2.3. Che-Theia Troubleshooting
This section describes some of the most frequent issues with the Che-Theia IDE.
- Che-Theia shows a notification with the following message:
Plugin runtime crashed unexpectedly, all plugins are not working, please reload the page. Probably there is not enough memory for the plugins. This means that one of the Che-Theia plug-ins that are running in the Che-Theia IDE container requires more memory than the container has. To fix this problem, increase the amount of memory for the Che-Theia IDE container:
- Navigate to the CodeReady Workspaces Dashboard.
- Select the workspace in which the problem happened.
- Switch to the Devfile tab.
-
In the
componentssection of the devfile, find a component of thecheEditortype. -
Add a new property,
memoryLimit: 1024M(or increase the value if it already exists). - Save changes and restart the workspace.
2.4. Differences in how Che-Theia Webview works on a single-host mode comparing to a multi-host mode
Depending on which Che deployment strategy is used, single-host or multi-host, there’re differences in how Che-Theia Webview API works.
2.4.1. What’s a Webview
Webview Plug-in API allows creating a view within Che-Theia to show an arbitrary HTML content. Internally, it’s implemented with an iframe and service worker.
2.4.2. Webview in a multi-host mode
When Red Hat CodeReady Workspaces is deployed in a multi-host mode, Webview content is served on a separate origin. That means it’s isolated from the main Che-Theia context. So, a contributed view has no access:
- to the top-level DOM
- to the Che-Theia state, like local storage, cookies, and so on.
2.4.3. Webview in single-host mode
When Red Hat CodeReady Workspaces is deployed in a single-host mode, Webview content is loaded through the same origin as the main Che-Theia context. It means that nothing prevents external content from accessing the main Che-Theia in a browser. So, pay extra attention to what content may be loaded by different Plugins that contribute the Webviews.
Chapter 3. Developer workspaces
Red Hat CodeReady Workspaces provides developer workspaces with everything needed to a code, build, test, run, and debug applications. To allow that, the developer workspaces provide four main components:
- The source code of a project.
- A web-based integrated development environment (IDE).
- Tool dependencies, needed by developers to work on a project.
- Application runtime: a replica of the environment where the application runs in production.
Pods manage each component of a CodeReady Workspaces workspace. Therefore, everything running in a CodeReady Workspaces workspace is running inside containers. This makes a CodeReady Workspaces workspace highly portable.
The embedded browser-based IDE is the point of access for everything running in a CodeReady Workspaces workspace. This makes a CodeReady Workspaces workspace easy to share.
By default, it is possible to run only one workspace at a time. To increase the number of concurrent workspaces a user can run, update the CheCluster:
$ oc patch checluster codeready-workspaces -n openshift-workspaces --type=merge \
-p '{ "spec": { "server": { "customCheProperties": { "CHE_LIMITS_USER_WORKSPACES_RUN_COUNT": "-1" } } } }'
For additional information, see: Users workspace limits.
| Features | Traditional IDE workspaces | Red Hat CodeReady Workspaces workspaces |
|---|---|---|
| Configuration and installation required | Yes. | No. |
| Embedded tools | Partial. IDE plug-ins need configuration. Dependencies need installation and configuration. Example: JDK, Maven, Node. | Yes. Plug-ins provide their dependencies. |
| Application runtime provided | No. Developers have to manage that separately. | Yes. Application runtime is replicated in the workspace. |
| Shareable | No. Or not easily | Yes. Developer workspaces are shareable with a URL. |
| Capable of being versioned | No | Yes. Devfiles exist with project source code. |
| Accessible from anywhere | No. Installation is needed. | Yes. Only requires a browser. |
To start a CodeReady Workspaces workspace, following options are available:
Use the Dashboard to discover CodeReady Workspaces 2.8:
Use a devfile as the preferred way to start a CodeReady Workspaces 2.8 workspace:
Use the browser-based IDE as the preferred way to interact with a CodeReady Workspaces 2.8 workspace. For an alternative way to interact with a CodeReady Workspaces 2.8 workspace, see: Section 3.9, “Remotely accessing workspaces”.
3.1. Creating a workspace from code sample
This section explains how to create a workspace from code sample or devfile template.
- Creating a workspace from sample using the Get Started view.
- Creating a custom workspace using templates on Custom Workspace view.
For more information about devfiles, see Section 3.6, “Configuring a workspace using a devfile”.
3.1.1. Creating a workspace from Get Started view of user dashboard
This section describes how to create a workspace from the user dashboard with a code sample.
Prerequisites
- A running instance of Red Hat CodeReady Workspaces. To install an instance of Red Hat CodeReady Workspaces, see Installing CodeReady Workspaces.
Procedure
- Navigate to the CodeReady Workspaces Dashboard. See Section 1.1, “Navigating CodeReady Workspaces using the Dashboard”.
- In the left navigation panel, go to Get Started.
- Click the tab.
In the gallery, there is list of samples that may be used to build and run projects.
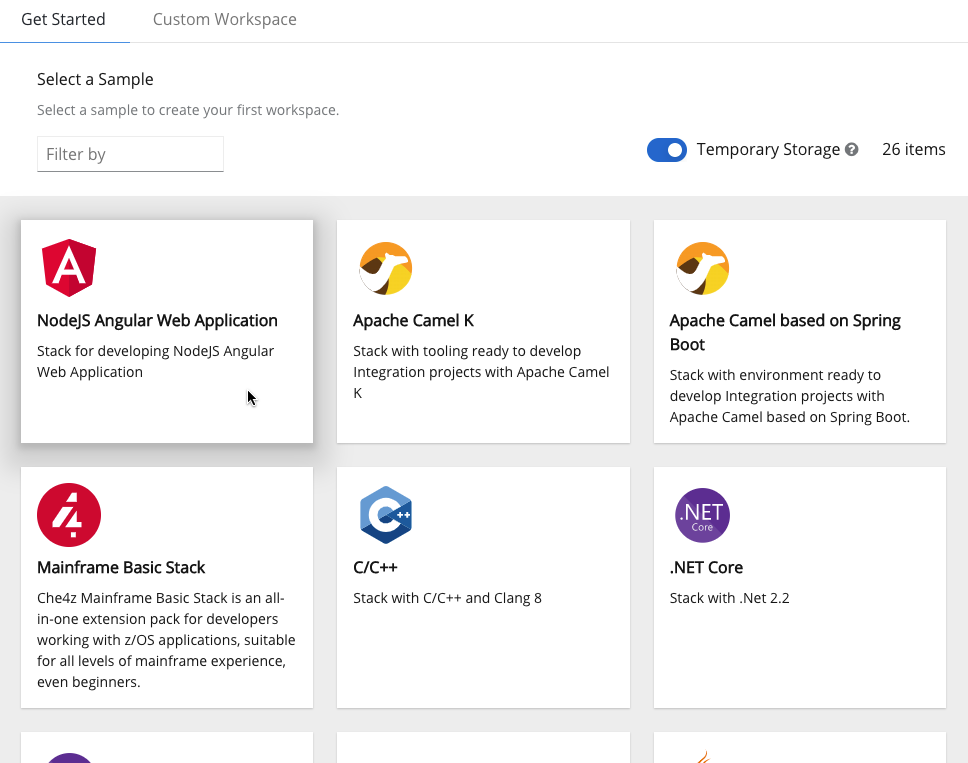
Start the workspace: click the chosen stack card.
Workspace name can be auto-generated based on the underlying devfile of the stack. Generated names always consist of the devfile metadata.generateName property as the prefix and four random characters.
3.1.2. Creating a custom workspace from a template
This section describes how to create a custom workspace from a template.
Prerequisites
- A running instance of Red Hat CodeReady Workspaces. To install an instance of Red Hat CodeReady Workspaces, see Installing CodeReady Workspaces.
Procedure
- Navigate to the CodeReady Workspaces Dashboard. See Section 1.1, “Navigating CodeReady Workspaces using the Dashboard”.
- In the left navigation panel, go to Get Started.
- Click the tab.
Define a Name for the workspace.
New workspace nameWorkspace name can be auto-generated based on the underlying devfile of the stack. Generated names always consist of the devfile
metadata.generateNameproperty as the prefix and four random characters.In the Devfile section, select the devfile template that will be used to build and run projects.

- Start the workspace: click the button at the bottom of the form:
3.2. Creating a workspace from remote devfile
For quick and easy CodeReady Workspaces workspace creation, use a factory link.
3.2.1. Creating a workspace from the default branch of a Git repository
This section describes how to start a CodeReady Workspaces workspace using a factory URL. The factory URL is a link pointing CodeReady Workspaces to a Git source repository containing a devfile.
Prerequisites
- A running instance of Red Hat CodeReady Workspaces. See Installing CodeReady Workspaces.
-
The Git repository <GIT_REPOSITORY_URL> is available over HTTPS and contains a
devfile.yamlor.devfile.yamlin the root folder. See Section 3.6, “Configuring a workspace using a devfile”.
Procedure
Run the workspace by opening the factory URL. Two formats are available:
\https://codeready-<openshift_deployment_name>.<domain_name>/#<GIT_REPOSITORY_URL>- This is the short format.
\https://codeready-<openshift_deployment_name>.<domain_name>/f?url=<GIT_REPOSITORY_URL>This long format supports additional configuration parameters.
Example 3.1. Create a workspace on Eclipse Che hosted by Red Hat from the default branch of the
https://github.com/eclipse/cherepository using the short factory URL format.Example 3.2. Create a workspace on Eclipse Che hosted by Red Hat from the default branch of the
https://github.com/eclipse/cherepository using the long factory URL format.
3.2.2. Creating a workspace from a feature branch of a Git repository
A CodeReady Workspaces workspace can be created by pointing to devfile that is stored in a Git source repository on a feature branch of the user’s choice. The CodeReady Workspaces instance then uses the discovered devfile to build a workspace.
Prerequisites
- A running instance of Red Hat CodeReady Workspaces. To install an instance of Red Hat CodeReady Workspaces, see Installing CodeReady Workspaces.
-
The
devfile.yamlor.devfile.yamlfile is located in the root folder of a Git repository, on a specific branch of the user’s choice that is accessible over HTTPS. See Section 3.6, “Configuring a workspace using a devfile” for detailed information about creating and using devfiles.
Procedure
Execute the workspace by opening the following URL: \https://codeready-<openshift_deployment_name>.<domain_name>/#<GitHubBranch>
Example
Use following URL format to open an experimental quarkus-quickstarts branch hosted on workspaces.openshift.com.
https://workspaces.openshift.com/f?url=https://github.com/maxandersen/quarkus-quickstarts/tree/che3.2.3. Creating a workspace from a publicly accessible standalone devfile using HTTP
A workspace can be created using a devfile, the URL of which is pointing to the raw content of the devfile. The CodeReady Workspaces instance then uses the discovered devfile to build a workspace.
Prerequisites
- A running instance of Red Hat CodeReady Workspaces. To install an instance of Red Hat CodeReady Workspaces, see Installing CodeReady Workspaces.
-
The publicly-accessible standalone
devfile.yamlfile. See Section 3.6, “Configuring a workspace using a devfile” for detailed information about creating and using devfiles.
Procedure
-
Execute the workspace by opening the following URL:
\https://codeready-<openshift_deployment_name>.<domain_name>/#https://<yourhosturl>/devfile.yaml
3.2.4. Overriding devfile values using factory parameters
Values in the following sections of a remote devfile can be overridden using specially constructed additional factory parameters:
-
apiVersion -
metadata -
projects -
attributes
Prerequisites
- A running instance of Red Hat CodeReady Workspaces. To install an instance of Red Hat CodeReady Workspaces, see Installing CodeReady Workspaces.
-
A publicly accessible standalone
devfile.yamlfile. See Section 3.6, “Configuring a workspace using a devfile” for detailed information about creating and using devfiles.
Procedure
-
Open the workspace by navigating to the following URL:
\https://codeready-<openshift_deployment_name>.<domain_name>/f?url=https://<hostURL>/devfile.yaml&override.<parameter.path>=<value>
Example of overriding the generateName property
Consider the following initial devfile:
---
apiVersion: 1.0.0
metadata:
  generateName: golang-
projects:
...
To add or override generateName value, use the following factory URL:
https://workspaces.openshift.com/f?url=<repository-url>&override.metadata.generateName=myprefixThe resulting workspace has the following devfile model:
---
apiVersion: 1.0.0
metadata:
  generateName: myprefix
projects:
...
Example of overriding project source branch property
Consider the following initial devfile:
---
apiVersion: 1.0.0
metadata:
  generateName: java-mysql-
projects:
  - name: web-java-spring-petclinic
    source:
      type: git
      location: "https://github.com/spring-projects/spring-petclinic.git"
...
To add or override source branch value, use the following factory URL:
https://workspaces.openshift.com/f?url=<repository-url>&override.projects.web-java-spring-petclinic.source.branch=1.0.xThe resulting workspace has the following devfile model:
apiVersion: 1.0.0
metadata:
  generateName: java-mysql-
projects:
  - name: web-java-spring-petclinic
    source:
      type: git
      location: "https://github.com/spring-projects/spring-petclinic.git"
      branch: 1.0.x
...
Example of overriding or creating an attribute value
Consider the following initial devfile:
---
apiVersion: 1.0.0
metadata:
  generateName: golang-
attributes:
   persistVolumes: false
projects:
...
To add or override persistVolumes attribute value, use the following factory URL:
https://workspaces.openshift.com/f?url=<repository-url>&override.attributes.persistVolumes=trueThe resulting workspace has the following devfile model:
---
apiVersion: 1.0.0
metadata:
  generateName: golang-
attributes:
   persistVolumes: true
projects:
...
When overriding attributes, everything that follows the attributes keyword is interpreted as an attribute name, so a user can use dot-separated names:
https://workspaces.openshift.com/f?url=<repository-url>&override.attributes.dot.name.format.attribute=trueThe resulting workspace has the following devfile model:
---
apiVersion: 1.0.0
metadata:
  generateName: golang-
attributes:
   dot.name.format.attribute: true
projects:
...
3.2.5. Allowing users to define workspace deployment labels and annotations
This section describes how to customize workspace deployment labels and annotation using factory parameters.
Prerequisites
- A running instance of Red Hat CodeReady Workspaces. To install an instance of Red Hat CodeReady Workspaces, see Installing CodeReady Workspaces.
-
A publicly accessible standalone
devfile.yamlfile. See Section 3.6, “Configuring a workspace using a devfile” for detailed information about creating and using devfiles.
Procedure
-
Open the workspace by navigating to the following URL:
\https://codeready-<openshift_deployment_name>.<domain_name>/f?url=https://<hostURL>/devfile.yaml&workspaceDeploymentLabels=<url_encoded_comma_separated_key_values>&workspaceDeploymentAnnotations=<url_encoded_comma_separated_key_values override>
Example of overriding the deployment labels
Consider the following labels to add:
ike.target=preference-v1
ike.session=test
To add or override labels, use the following factory URL:
https://workspaces.openshift.com/f?url=<repository-url>&workspaceDeploymentLabels=ike.target%3Dpreference-v1%2Cike.session%3DtestThe resulting workspace has the following deployment labels:
---
apiVersion: apps/v1
kind: Deployment
metadata:
  annotations:
    deployment.kubernetes.io/revision: "1"
  creationTimestamp: "2020-10-27T14:03:26Z"
  generation: 1
  labels:
    che.component.name: che-docs-dev
    che.original_name: che-docs-dev
    che.workspace_id: workspacegln2g1shejjufpkd
    ike.session: test
    ike.target: preference-v1
  name: workspacegln2g1shejjufpkd.che-docs-dev
  namespace: opentlc-mgr-che
  resourceVersion: "107516"
spec:
...
Example of overriding the deployment annotations
Consider the following annotations to add:
ike.A1=preference-v1
ike.A=test
To add or override annotations, use the following factory URL:
https://workspaces.openshift.com/f?url=<repository-url>&workspaceDeploymentAnnotations=ike.A1%3Dpreference-v1%2Cike.A%3DtestThe resulting workspace has the following deployment annotations:
---
apiVersion: apps/v1
kind: Deployment
metadata:
  annotations:
    deployment.kubernetes.io/revision: "1"
    ike.A: test
    ike.A1: preference-v1
  creationTimestamp: "2020-10-28T09:58:52Z"
  generation: 1
  labels:
    che.component.name: che-docs-dev
    che.original_name: che-docs-dev
    che.workspace_id: workspacexrtf710v64rl5ouz
  name: workspacexrtf710v64rl5ouz.che-docs-dev
  namespace: opentlc-mgr-che
  resourceVersion: "213191"
...
Additional resources
3.3. Creating a workspace using crwctl and a local devfile
A CodeReady Workspaces workspace can be created by pointing the crwctl tool to a locally stored devfile. The CodeReady Workspaces instance then uses the discovered devfile to build a workspace.
Prerequisites
- A running instance of Red Hat CodeReady Workspaces. To install an instance of Red Hat CodeReady Workspaces, see Installing CodeReady Workspaces.
- The CodeReady Workspaces CLI management tool. See Using the crwctl management tool.
- The devfile is available on the local filesystem in the current working directory. See Section 3.6, “Configuring a workspace using a devfile” for detailed information about creating and using devfiles.
- You are logged in to Red Hat CodeReady Workspaces. See How to login into CodeReady Workspaces using crwctl
Procedure
-
Run a workspace from a devfile using the
workspace:createparameter with thecrwctltool as follows:
$ crwctl workspace:create --name=<WORKSPACE_NAME> \
--devfile=devfile.yaml --start \
-n openshift-workspaces- 1
- The workspace name to create.
If --devfile flag is omitted, the crwctl looks for devfile.yaml or devfile.yml files in the current directory to create a workspace from.
3.4. Creating a workspace by importing the source code of a project
This section describes how to create a new workspace for editing an existing codebase.
Prerequisites
- A running instance of CodeReady Workspaces. To install an instance of CodeReady Workspaces, see Installing CodeReady Workspaces.
- An existing workspace with plug-ins related to your development environment defined on this instance of Red Hat CodeReady Workspaces Section 3.5, “Configuring a CodeReady Workspaces 2.8 workspace”.
A user can progress with two methods that have to be applied before starting a workspace:
To create a new workspace for editing an existing codebase, use one of the following methods after the workspace has been started:
3.4.1. Select a sample from the Dashboard, then change the devfile to include your project
- In the left navigation panel, go to Get Started.
- In a case it’s not selected already, click the Custom Workspace tab.
In the Devfile section, select the devfile template that will be used to build and run projects.
In the Devfile editor, update
projectssection: Example: add a project
To add a project into the workspace, add or edit the following section:
projects:
  - name: che
    source:
      type: git
      location: 'https://github.com/eclipse/che.git'
See the Devfile reference.
- To open the workspace, click the button.
3.4.2. Importing from the Dashboard into an existing workspace
- From the Dashboard, select Workspaces.
- Select your workspace by selecting its name. This will link you to the workspace’s Overview tab.
- Open Devfile tab where you can enter your own YAML configuration.
- Add the project.
To add a project into the workspace, add or edit the following section:
projects:
  - name: che
    source:
      type: git
      location: 'https://github.com/eclipse/che.git'
See the Devfile reference.
3.4.2.1. Editing the commands after importing a project
After you have a project in your workspace, you can add commands to it. Adding commands to your projects allows you to run, debug, or start your application in a browser.
To add commands to the project:
- Open the workspace configuration in the Dashboard, then select the Devfile tab.
- Modify the commands field.
- Open the workspace.
To run a command, select Terminal > Run Task from the main menu.
To configure commands, select Terminal > Configure Tasks from the main menu.
3.4.3. Importing to a running workspace using the Git: Clone command
To import to a running workspace using the Git: Clone command:
Start a workspace, then use the Git: Clone command from the command palette or the Welcome screen to import a project to a running workspace.
Open the command palette by using
F1,CTRL-SHIFT-P, or the link displayed on the Welcome screen.
Enter the path to the project that is about to be cloned.

3.4.4. Importing to a running workspace with git clone in a terminal
In addition to the approaches above, you can also start a workspace, open a Terminal, and type git clone to pull code.
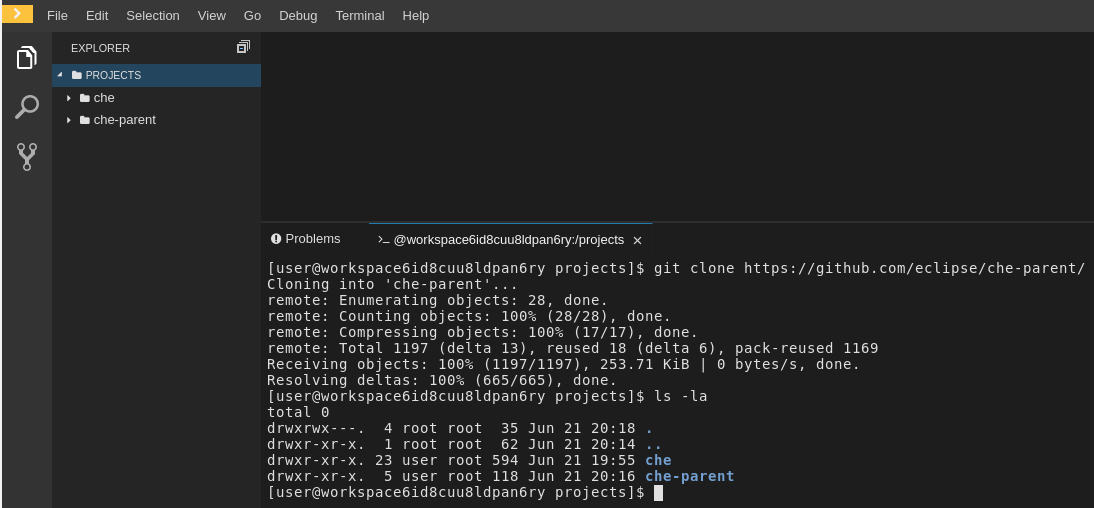
Importing or deleting workspace projects in the terminal does not update the workspace configuration, and the IDE does not reflect the changes in the Devfile tab in the dashboard.
Similarly, when you add a project using the Dashboard, then delete it with rm -fr myproject, it may still appear in the Devfile tab.
3.5. Configuring a CodeReady Workspaces 2.8 workspace
3.5.1. Changing the configuration of an existing workspace
This section describes how to change the configuration of an existing workspace from the user Dashboard.
Prerequisites
- A running instance of CodeReady Workspaces. To install an instance of CodeReady Workspaces, see Installing CodeReady Workspaces.
- An existing workspace defined on this instance of CodeReady Workspaces.
Procedure
- Navigate to the CodeReady Workspaces Dashboard. See Section 1.1, “Navigating CodeReady Workspaces using the Dashboard”.
- In the left navigation panel, go to Workspaces.
- Click the name of a workspace to navigate to the configuration overview page.
Click the Overview tab and execute following actions:
- Change the Workspace name.
- Select Storage Type.
- Review OpenShift project.
- From the Devfile tab, edit YAML configuration of the workspace. See Section 3.6, “Configuring a workspace using a devfile”.
3.5.2. Adding projects to your workspace
Prerequisites
- A running instance of CodeReady Workspaces. To install an instance of CodeReady Workspaces, see Installing CodeReady Workspaces.
- An existing workspace defined on this instance of CodeReady Workspaces.
Procedure
To add a project to your workspace:
- Navigate to the Workspaces page and click the workspace, which is about to be updated.
- Open the Devfile tab.
In the Devfile editor, add a
projectssection with desired project.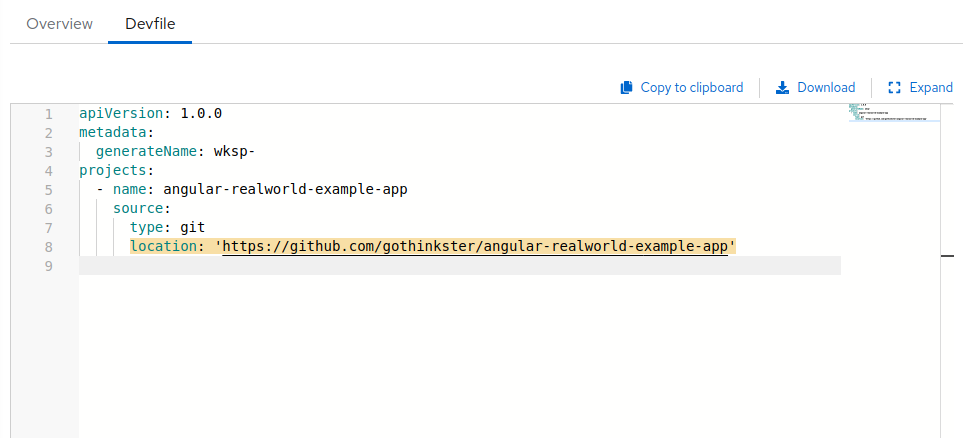
Once the project is added, click the button to save this workspace configuration.
For demonstration example, see below:
Example - Adding a
.gitproject into a workspace using a devfileIn the following instance, the project
crwacts as the example of a user’s project. A user specifies this project using thenameattribute of a devfile. Thelocationattribute defines the source repository represented by an URL to a Git repository or ZIP archive.To add a project into the workspace, add or edit the following section:
projects:
  - name: <crw>
    source:
      type: git
      location: 'https://github.com/<github-organization>/<crw>.git'
For additional information, see the Section 3.6.5, “Devfile reference” section.
3.5.3. Configuring the workspace tools
3.5.3.1. Adding plug-ins
Prerequisites
- A running instance of CodeReady Workspaces. To install an instance of CodeReady Workspaces, see Installing CodeReady Workspaces.
- An existing workspace defined on this instance of CodeReady Workspaces.
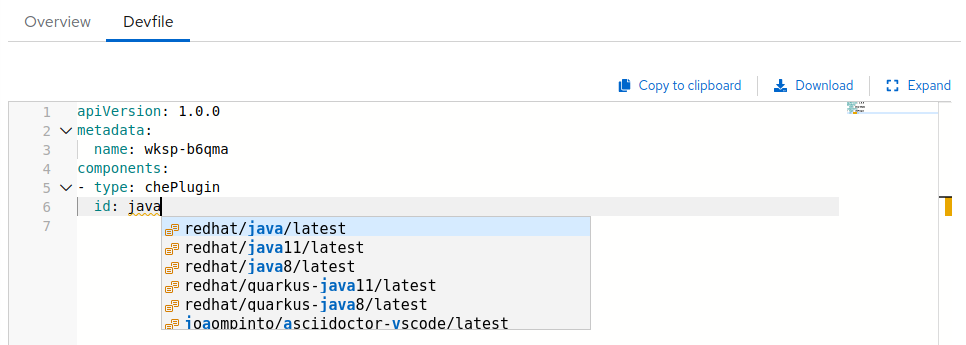
Procedure
To add plug-ins to your workspace:
- Click the Devfile tab.
Add the desired
chePlugincomponent and click the button.NoteTo see a list of available plugins, activate the completion feature by pressing Ctrl+Space.
3.5.3.2. Defining the workspace editor
Prerequisites
- A running instance of CodeReady Workspaces. To install an instance of CodeReady Workspaces, see Installing CodeReady Workspaces.
- An existing workspace defined on this instance of CodeReady Workspaces.
Procedure
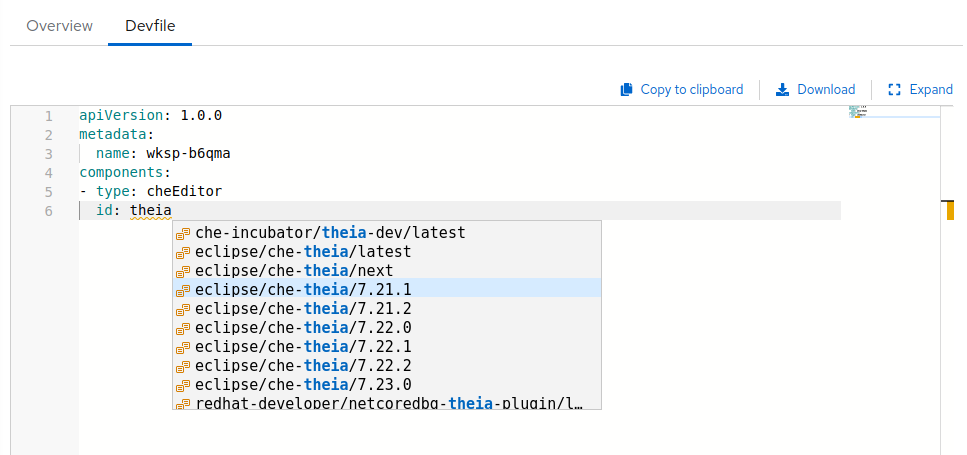
To define the editor to use with the workspace:
- Click the Devfile tab.
Add the desired
cheEditorcomponent and click the button.NoteTo see a list of available plugins, activate the completion feature by pressing Ctrl+Space. The recommended editor for CodeReady Workspaces 2.8 is Che-Theia.
Additional resources
3.6. Configuring a workspace using a devfile
To quickly and easily configure a CodeReady Workspaces workspace, use a devfile. For an introduction to devfiles and instructions for their use, see the instructions in this section.
3.6.1. What is a devfile
A devfile is a file that describes and define a development environment:
- The source code.
- The development components, such as browser IDE tools and application runtimes.
- A list of pre-defined commands.
- Projects to clone.
A devfiles is a YAML file that CodeReady Workspaces consumes and transforms into a cloud workspace composed of multiple containers. It is possible to store a devfile remotely or locally, in any number of ways, such as:
- In a git repository, in the root folder, or on a feature branch.
- On a publicly accessible web server, accessible through HTTP.
-
Locally as a file, and deployed using
crwctl. - In a collection of devfiles, known as a devfile registry.
When creating a workspace, CodeReady Workspaces uses that definition to initiate everything and run all the containers for the required tools and application runtimes. CodeReady Workspaces also mounts file-system volumes to make source code available to the workspace.
Devfiles can be versioned with the project source code. When there is a need for a workspace to fix an old maintenance branch, the project devfile provides a definition of the workspace with the tools and the exact dependencies to start working on the old branch. Use it to instantiate workspaces on demand.
CodeReady Workspaces maintains the devfile up-to-date with the tools used in the workspace:
- Elements of the project, such as the path, git location, or branch.
- Commands to perform daily tasks such as build, run, test, and debug.
- The runtime environment with its container images needed for the application to run.
- Che-Theia plug-ins with tools, IDE features, and helpers that a developer would use in the workspace, for example, Git, Java support, SonarLint, and Pull Request.
3.6.2. A minimal devfile
The following is the minimum content required in a devfile:
apiVersion: 1.0.0
metadata:
  name: crw-in-crw-out
For a complete devfile example, see Red Hat CodeReady Workspaces in CodeReady Workspaces devfile.yaml.
A choice of use of the parameter generateName or name is optional, but only one of these parameters has to be chosen by a user and defined. When both attributes are specified, generateName is ignored. See Section 3.6.3, “Generating workspace names”.
metadata:
  generatedName:
or
metadata:
  name:
3.6.3. Generating workspace names
To specify a prefix for automatically generated workspace names, set the generateName parameter in the devfile:
apiVersion: 1.0.0
metadata:
  generateName: crw-
The workspace name will be in the <generateName>YYYYY format (for example, che-2y7kp). Y is random [a-z0-9] character.
The following naming rules apply when creating workspaces:
-
When
nameis defined, it is used as the workspace name:<name> -
When only
generateNameis defined, it is used as the base of the generated name:<generateName>YYYYY
For workspaces created using a factory, defining name or generateName has the same effect. The defined value is used as the name prefix: <name>YYYYY or <generateName>YYYYY. When both generateName and name are defined, generateName takes precedence.
3.6.4. Writing a devfile for a project
This section describes how to create a minimal devfile for your project and how to include more than one projects in a devfile.
3.6.4.1. Preparing a minimal devfile
A minimal devfile sufficient to run a workspace consists of the following parts:
- Specification version
- Name
Example of a minimal devfile with no project
apiVersion: 1.0.0
metadata:
  name: minimal-workspace
Without any further configuration, a workspace with the default editor is launched along with its default plug-ins, which are configured on the CodeReady Workspaces Server. Che-Theia is configured as the default editor along with the CodeReady Workspaces Machine Exec plug-in. When launching a workspace within a Git repository using a factory, the project from the given repository and branch is be created by default. The project name then matches the repository name.
Add the following parts for a more functional workspace:
- List of components: Development components and user runtimes
- List of projects: Source code repositories
- List of commands: Actions to manage the workspace components, such as running the development tools, starting the runtime environments, and others
Example of a minimal devfile with a project
apiVersion: 1.0.0
metadata:
  name: petclinic-dev-environment
projects:
  - name: petclinic
    source:
      type: git
      location: 'https://github.com/spring-projects/spring-petclinic.git'
components:
  - type: chePlugin
    id: redhat/java/latest
3.6.4.2. Specifying multiple projects in a devfile
A single devfile can define multiple projects, which are cloned to the desired destination. These projects are created inside a user’s workspace after the workspace is started.
For each project, specify the following:
- The type of the source repository - this can be .git or .zip. For additional information, see the Devfile reference section.
- The location of the source repository - an URL to a Git repository or zip archive.
- Optionally, the directory to which the project is cloned. If none is specified, the default directory is used, which is a directory that matches the project name or project Git repository.
Example of a devfile with two projects
In the following example, the projects frontend and backend act as examples of a user’s projects. Each project is located in a separate repository.
-
The
backendproject has a specific requirement to be cloned into thesrc/github.com/<github-organization>/<backend>/directory under the source root, implicitly defined by the CodeReady Workspaces runtime. -
The
frontendproject will be cloned into the<frontend/>directory under the source root.
apiVersion: 1.0.0
metadata:
  name: example-devfile
projects:
- name: <frontend>
  source:
    type: git
    location: https://github.com/<github-organization>/<frontend>.git
- name: <backend>
  clonePath: src/github.com/<github-organization>/<backend>
  source:
    type: git
    location: https://github.com/<github-organization>/<backend>.git
Additional resources
For a detailed explanation of all devfile component assignments and possible values, see:
These sample devfiles are a good source of inspiration:
3.6.5. Devfile reference
This section contains devfile reference and instructions on how to use the various elements that devfiles consist of.
3.6.5.1. Adding schema version to a devfile
Procedure
-
Define the
schemaVersionattribute in the devfile:
Example 3.3. Adding schema version to a devfile
schemaVersion: 1.0.03.6.5.2. Adding a name to a devfile
Adding a name to a devfile is mandatory. Both name and generateName are optional attributes, but at least one of them must be defined.
Procedure
To specify a static name for the workspace, define the
nameattribute.Adding a static name to a devfile
schemaVersion: 1.0.0
metadata:
  name: devfile-sample
To specify a prefix for automatically generated workspace names, define the
generateNameattribute and don’t define thenameattribute. The workspace name will be in the<generateName>YYYYYformat, for example,devfile-sample-2y7kp, whereYis a random[a-z0-9]character.Adding a generated name to a devfile
schemaVersion: 1.0.0
metadata:
  generateName: devfile-sample-
For workspaces created using a factory, defining name or generateName has the same effect. The defined value is used as the name prefix: <name>YYYYY or <generateName>YYYYY. When both generateName and name are defined, generateName takes precedence.
3.6.5.3. Adding projects to a devfile
A devfile is designed to contain one or more projects. A workspace is created to develop those projects. Projects are added in the projects section of devfiles.
Each project in a single devfile must have:
- Unique name
- Source specified
Project source consists of two mandatory values: type and location.
type- The kind of project-source provider.
location- The URL of project source.
CodeReady Workspaces supports the following project types:
git- Projects with sources in Git. The location points to a clone link.
github-
Same as
gitbut for projects hosted on GitHub only. Usegitfor projects that do not use GitHub-specific features. zip- Projects with sources in a ZIP archive. Location points to a ZIP file.
3.6.5.3.1. Project-source type: git
source:
    type: git
    location: https://github.com/eclipse/che.git
    startPoint: master
    tag: 7.2.0
    commitId: 36fe587
    branch: 7.20.x
sparseCheckoutDir: core - 1
startPoint: The general value fortag,commitId, andbranch. ThestartPoint,tag,commitId, andbranchparameters are mutually exclusive. When more than one is supplied, the following order is used:startPoint,tag,commitId,branch.- 2
sparseCheckoutDir: The template for the sparse checkout Git feature. This is useful when only a part of a project, typically a single directory, is needed.
Example 3.4. sparseCheckoutDir parameter settings
-
Set to
/my-module/to create only the rootmy-moduledirectory (and its content). Omit the leading slash (
my-module/) to create allmy-moduledirectories that exist in the project. Including, for example,/addons/my-module/.The trailing slash indicates that only directories with the given name (including their content) are created.
-
Use wildcards to specify more than one directory name. For example, setting
module-*checks out all directories of the given project that start withmodule-.
For more information, see Sparse checkout in Git documentation.
3.6.5.3.2. Project-source type: zip
source:
    type: zip
    location: http://host.net/path/project-src.zip
3.6.5.3.3. Project clone-path parameter: clonePath
The clonePath parameter specifies the path into which the project is to be cloned. The path must be relative to the /projects/ directory, and it cannot leave the /projects/ directory. The default value is the project name.
Example devfile with projects
apiVersion: 1.0.0
metadata:
  name: my-project-dev
projects:
  - name: my-project-resourse
    clonePath: resources/my-project
    source:
      type: zip
      location: http://host.net/path/project-res.zip
  - name: my-project
    source:
      type: git
      location: https://github.com/my-org/project.git
      branch: develop
3.6.5.4. Adding components to a devfile
Each component in a single devfile must have a unique name.
3.6.5.4.1. Component type: cheEditor
Describes the editor used in the workspace by defining its id. A devfile can only contain one component of the cheEditor type.
components:
  - alias: theia-editor
    type: cheEditor
    id: eclipse/che-theia/next
When cheEditor is missing, a default editor is provided along with its default plug-ins. The default plug-ins are also provided for an explicitly defined editor with the same id as the default one (even if it is a different version). Che-Theia is configured as default editor along with the CodeReady Workspaces Machine Exec plug-in.
To specify that a workspace requires no editor, use the editorFree:true attribute in the devfile attributes.
3.6.5.4.2. Component type: chePlugin
Describes plug-ins in a workspace by defining their id. It is allowed to have several chePlugin components.
  components:
   - alias: exec-plugin
     type: chePlugin
     id: eclipse/che-machine-exec-plugin/0.0.1
Both types above use an ID, which is slash-separated publisher, name and version of plug-in from the CodeReady Workspaces Plug-in registry.
List of available Eclipse Che plug-ins and more information about registry can be found in the Eclipse Che plug-in registry GitHub repository.
3.6.5.4.3. Specifying an alternative component registry
To specify an alternative registry for the cheEditor and chePlugin component types, use the registryUrl parameter:
  components:
   - alias: exec-plugin
     type: chePlugin
     registryUrl: https://my-customregistry.com
     id: eclipse/che-machine-exec-plugin/0.0.1
3.6.5.4.4. Specifying a component by linking to its descriptor
Rather than using the editor or plug-in id to specify cheEditor or chePlugin, provide a direct link to the component descriptor, typically named as meta.yaml, using the reference field:
  components:
   - alias: exec-plugin
     type: chePlugin
     reference: https://raw.githubusercontent.com.../plugin/1.0.1/meta.yaml
It is impossible to mix the id and reference fields in a single component definition; they are mutually exclusive.
3.6.5.4.5. Tuning chePlugin component configuration
A chePlugin component may need to be precisely tuned, and in such case, component preferences can be used. The example shows how to configure JVM using plug-in preferences.
  id: redhat/java/0.38.0
  type: chePlugin
  preferences:
     java.jdt.ls.vmargs: '-noverify -Xmx1G -XX:+UseG1GC -XX:+UseStringDeduplication'
Preferences may also be specified as an array:
  id: redhat/java/0.38.0
  type: chePlugin
  preferences:
     go.lintFlags: ["--enable-all", "--new"]
3.6.5.4.6. Component type: kubernetes
A complex component type that allows to apply configuration from a list of OpenShift components.
The content can be provided through the reference attribute, which points to the file with the component content.
  components:
    - alias: mysql
      type: kubernetes
      reference: petclinic.yaml
      selector:
        app.kubernetes.io/name: mysql
        app.kubernetes.io/component: database
        app.kubernetes.io/part-of: petclinic
Alternatively, to post a devfile with such components to REST API, the contents of the OpenShift List object can be embedded into the devfile using the referenceContent field:
  components:
    - alias: mysql
      type: kubernetes
      reference: petclinic.yaml
      referenceContent: |
           kind: List
           items:
            -
             apiVersion: v1
             kind: Pod
             metadata:
              name: ws
             spec:
              containers:
              ... etc
3.6.5.4.7. Overriding container entrypoints
As with the understood by OpenShift).
There can be more containers in the list (contained in Pods or Pod templates of deployments). To select which containers to apply the entrypoint changes to.
The entrypoints can be defined as follows:
  components:
    - alias: appDeployment
      type: kubernetes
      reference: app-deployment.yaml
      entrypoints:
      - parentName: mysqlServer
        command: ['sleep']
        args: ['infinity']
      - parentSelector:
          app: prometheus
        args: ['-f', '/opt/app/prometheus-config.yaml']
The entrypoints list contains constraints for picking the containers along with the command and args parameters to apply to them. In the example above, the constraint is parentName: mysqlServer, which will cause the command to be applied to all containers defined in any parent object called mysqlServer. The parent object is assumed to be a top level object in the list defined in the referenced file, which is app-deployment.yaml in the example above.
Other types of constraints (and their combinations) are possible:
containerName- the name of the container
parentName- the name of the parent object that (indirectly) contains the containers to override
parentSelector- the set of labels the parent object needs to have
A combination of these constraints can be used to precisely locate the containers inside the referenced OpenShift List.
3.6.5.4.8. Overriding container environment variables
To provision or override entrypoints in a OpenShift component, configure it in the following way:
  components:
    - alias: appDeployment
      type: kubernetes
      reference: app-deployment.yaml
      env:
        - name: ENV_VAR
          value: value
This is useful for temporary content or without access to editing the referenced content. The specified environment variables are provisioned into each init container and containers inside all Pods and Deployments.
3.6.5.4.9. Specifying mount-source option
To specify a project sources directory mount into container(s), use the mountSources parameter:
   components:
      - alias: appDeployment
        type: kubernetes
        reference: app-deployment.yaml
        mountSources: true
If enabled, project sources mounts will be applied to every container of the given component. This parameter is also applicable for chePlugin type components.
3.6.5.4.10. Component type: dockerimage
A component type that allows to define a container image-based configuration of a container in a workspace. The dockerimage type of component brings in custom tools into the workspace. The component is identified by its image.
 components:
   - alias: maven
     type: dockerimage
     image: quay.io/eclipse/che-java11-maven:nightly
     volumes:
       - name: mavenrepo
         containerPath: /root/.m2
     env:
       - name: ENV_VAR
         value: value
     endpoints:
       - name: maven-server
         port: 3101
         attributes:
           protocol: http
           secure: 'true'
           public: 'true'
           discoverable: 'false'
     memoryLimit: 1536M
     memoryRequest: 256M
     command: ['tail']
     args: ['-f', '/dev/null']
Example of a minimal dockerimage component
apiVersion: 1.0.0
metadata:
    name: MyDevfile
components:
    - type: dockerimage
      image: golang
      memoryLimit: 512Mi
      command: ['sleep', 'infinity']
It specifies the type of the component, dockerimage and the image attribute names the image to be used for the component using the usual Docker naming conventions, that is, the above type attribute is equal to docker.io/library/golang:latest.
A dockerimage component has many features that enable augmenting the image with additional resources and information needed for meaningful integration of the tool provided by the image with Red Hat CodeReady Workspaces.
3.6.5.4.11. Mounting project sources
For the dockerimage component to have access to the project sources, you must set the mountSources attribute to true.
apiVersion: 1.0.0
metadata:
    name: MyDevfile
components:
    - type: dockerimage
      image: golang
      memoryLimit: 512Mi
      command: ['sleep', 'infinity']
The sources is mounted on a location stored in the CHE_PROJECTS_ROOT environment variable that is made available in the running container of the image. This location defaults to /projects.
3.6.5.4.12. Container Entrypoint
The command attribute of the dockerimage along with other arguments, is used to modify the entrypoint command of the container created from the image. In Red Hat CodeReady Workspaces the container is needed to run indefinitely so that you can connect to it and execute arbitrary commands in it at any time. Because the availability of the sleep command and the support for the infinity argument for it is different and depends on the base image used in the particular images, CodeReady Workspaces cannot insert this behavior automatically on its own. However, you can take advantage of this feature to, for example, start necessary servers with modified configurations, and so on.
3.6.5.4.13. Persistent Storage
Components of any type can specify the custom volumes to be mounted on specific locations within the image. Note that the volume names are shared across all components and therefore this mechanism can also be used to share file systems between components.
Example specifying volumes for dockerimage type:
apiVersion: 1.0.0
metadata:
  name: MyDevfile
components:
  - type: dockerimage
    image: golang
    memoryLimit: 512Mi
    mountSources: true
    command: ['sleep', 'infinity']
    volumes:
      - name: cache
        containerPath: /.cache
Example specifying volumes for cheEditor/chePlugin type:
apiVersion: 1.0.0
metadata:
  name: MyDevfile
components:
  - type: cheEditor
    alias: theia-editor
    id: eclipse/che-theia/next
    env:
    - name: HOME
      value: $(CHE_PROJECTS_ROOT)
    volumes:
    - name: cache
      containerPath: /.cache
Example specifying volumes for kubernetes/openshift type:
apiVersion: 1.0.0
metadata:
  name: MyDevfile
components:
  - type: openshift
    alias: mongo
    reference: mongo-db.yaml
    volumes:
    - name: mongo-persistent-storage
      containerPath: /data/db
3.6.5.4.14. Specifying container memory limit for components
To specify a container(s) memory limit for dockerimage, chePlugin or cheEditor, use the memoryLimit parameter:
  components:
   - alias: exec-plugin
     type: chePlugin
     id: eclipse/che-machine-exec-plugin/0.0.1
     memoryLimit: 1Gi
   - alias: maven
     type: dockerimage
     image: quay.io/eclipse/che-java11-maven:nightly
     memoryLimit: 512M
This limit will be applied to every container of the given component.
For the cheEditor and chePlugin component types, RAM limits can be described in the plug-in descriptor file, typically named meta.yaml.
If none of them are specified, system-wide defaults will be applied (see description of CHE_WORKSPACE_SIDECAR_DEFAULT__MEMORY__LIMIT__MB system property).
3.6.5.4.15. Specifying container memory request for components
To specify a container(s) memory request for dockerimage, chePlugin or cheEditor, use the memoryRequest parameter:
  components:
   - alias: exec-plugin
     type: chePlugin
     id: eclipse/che-machine-exec-plugin/0.0.1
     memoryLimit: 1Gi
     memoryRequest: 512M
   - alias: maven
     type: dockerimage
     image: quay.io/eclipse/che-java11-maven:nightly
     memoryLimit: 512M
     memoryRequest: 256M
This limit will be applied to every container of the given component.
For the cheEditor and chePlugin component types, RAM requests can be described in the plug-in descriptor file, typically named meta.yaml.
If none of them are specified, system-wide defaults are applied (see description of CHE_WORKSPACE_SIDECAR_DEFAULT__MEMORY__REQUEST__MB system property).
3.6.5.4.16. Specifying container CPU limit for components
To specify a container(s) CPU limit for chePlugin, cheEditor or dockerimage use the cpuLimit parameter:
  components:
   - alias: exec-plugin
     type: chePlugin
     id: eclipse/che-machine-exec-plugin/0.0.1
     cpuLimit: 1.5
   - alias: maven
     type: dockerimage
     image: quay.io/eclipse/che-java11-maven:nightly
     cpuLimit: 750m
This limit will be applied to every container of the given component.
For the cheEditor and chePlugin component types, CPU limits can be described in the plug-in descriptor file, typically named meta.yaml.
If none of them are specified, system-wide defaults are applied (see description of CHE_WORKSPACE_SIDECAR_DEFAULT__CPU__LIMIT__CORES system property).
3.6.5.4.17. Specifying container CPU request for components
To specify a container(s) CPU request for chePlugin, cheEditor or dockerimage use the cpuRequest parameter:
  components:
   - alias: exec-plugin
     type: chePlugin
     id: eclipse/che-machine-exec-plugin/0.0.1
     cpuLimit: 1.5
     cpuRequest: 0.225
   - alias: maven
     type: dockerimage
     image: quay.io/eclipse/che-java11-maven:nightly
     cpuLimit: 750m
     cpuRequest: 450m
This limit will be applied to every container of the given component.
For the cheEditor and chePlugin component types, CPU requests can be described in the plug-in descriptor file, typically named meta.yaml.
If none of them are specified, system-wide defaults are applied (see description of CHE_WORKSPACE_SIDECAR_DEFAULT__CPU__REQUEST__CORES system property).
3.6.5.4.18. Environment variables
Red Hat CodeReady Workspaces allows you to configure Docker containers by modifying the environment variables available in component’s configuration. Environment variables are supported by the following component types: dockerimage, chePlugin, cheEditor, kubernetes, openshift. In case component has multiple containers, environment variables will be provisioned to each container.
apiVersion: 1.0.0
metadata:
  name: MyDevfile
components:
  - type: dockerimage
    image: golang
    memoryLimit: 512Mi
    mountSources: true
    command: ['sleep', 'infinity']
    env:
      - name: GOPATH
        value: $(CHE_PROJECTS_ROOT)/go
  - type: cheEditor
    alias: theia-editor
    id: eclipse/che-theia/next
    memoryLimit: 2Gi
    env:
    - name: HOME
value: $(CHE_PROJECTS_ROOT)- The variable expansion works between the environment variables, and it uses the Kubernetes convention for the variable references.
- The predefined variables are available for use in custom definitions.
The following environment variables are pre-set by the CodeReady Workspaces server:
-
CHE_PROJECTS_ROOT: The location of the projects directory (note that if the component does not mount the sources, the projects will not be accessible). -
CHE_WORKSPACE_LOGS_ROOT__DIR: The location of the logs common to all the components. If the component chooses to put logs into this directory, the log files are accessible from all other components. -
CHE_API_INTERNAL: The URL to the CodeReady Workspaces server API endpoint used for communication with the CodeReady Workspaces server. -
CHE_WORKSPACE_ID: The ID of the current workspace. -
CHE_WORKSPACE_NAME: The name of the current workspace. -
CHE_WORKSPACE_NAMESPACE: The CodeReady Workspaces project of the current workspace. This environment variable is the name of the user or organization that the workspace belongs to. Note that this is different from the OpenShift project to which the workspace is deployed. -
CHE_MACHINE_TOKEN: The token used to authenticate the request against the CodeReady Workspaces server.
-
CHE_MACHINE_AUTH_SIGNATURE__PUBLIC__KEY: The public key used to secure the communication with the CodeReady Workspaces server. -
CHE_MACHINE_AUTH_SIGNATURE__ALGORITHM: The encryption algorithm used in the secured communication with the CodeReady Workspaces server.
A devfiles may only need the CHE_PROJECTS_ROOT environment variable to locate the cloned projects in the component’s container. More advanced devfiles might use the CHE_WORKSPACE_LOGS_ROOT__DIR environment variable to read the logs (for example as part of a devfile command). The environment variables used to securely access the CodeReady Workspaces server are out of scope for devfiles and are present only for advanced use cases, which are handled by the CodeReady Workspaces plug-ins.
3.6.5.4.19. Endpoints
Components of any type can specify the endpoints that the Docker image exposes. These endpoints can be made accessible to the users if the CodeReady Workspaces cluster is running using a Kubernetes ingress or an OpenShift route and to the other components within the workspace. You can create an endpoint for your application or database, if your application or database server is listening on a port and you need to be able to directly interact with it yourself or you allow other components to interact with it.
Endpoints have several properties as shown in the following example:
apiVersion: 1.0.0
metadata:
  name: MyDevfile
projects:
  - name: my-go-project
    clonePath: go/src/github.com/acme/my-go-project
    source:
      type: git
      location: https://github.com/acme/my-go-project.git
components:
  - type: dockerimage
    image: golang
    memoryLimit: 512Mi
    mountSources: true
    command: ['sleep', 'infinity']
    env:
      - name: GOPATH
        value: $(CHE_PROJECTS_ROOT)/go
      - name: GOCACHE
        value: /tmp/go-cache
    endpoints:
     - name: web
       port: 8080
       attributes:
         discoverable: false
         public: true
         protocol: http
  - type: dockerimage
    image: postgres
    memoryLimit: 512Mi
    env:
      - name: POSTGRES_USER
        value: user
      - name: POSTGRES_PASSWORD
        value: password
      - name: POSTGRES_DB
        value: database
    endpoints:
      - name: postgres
        port: 5432
        attributes:
          discoverable: true
          public: false
Here, there are two Docker images, each defining a single endpoint. Endpoint is an accessible port that can be made accessible inside the workspace or also publicly (example, from the UI). Each endpoint has a name and port, which is the port on which certain server running inside the container is listening. The following are a few attributes that you can set on the endpoint:
-
discoverable: If an endpoint is discoverable, it means that it can be accessed using its name as the host name within the workspace containers (in the OpenShift terminology, a service is created for it with the provided name). 55 -
public: The endpoint will be accessible outside of the workspace, too (such endpoint can be accessed from the CodeReady Workspaces user interface). Such endpoints are publicized always on port80or443(depending on whethertlsis enabled in CodeReady Workspaces). -
protocol: For public endpoints the protocol is a hint to the UI on how to construct the URL for the endpoint access. Typical values arehttp,https,ws,wss. secure: A boolean value (defaulting tofalse) specifying whether the endpoint is put behind a JWT proxy requiring a JWT workspace token to grant access. The JWT proxy is deployed in the same Pod as the server and assumes the server listens solely on the local loop-back interface, such as127.0.0.1.WarningListening on any other interface than the local loop-back poses a security risk because such server is accessible without the JWT authentication within the cluster network on the corresponding IP addresses.
-
path: The path portion of the URL to the endpoint. This defaults to/, meaning that the endpoint is assumed to be accessible at the web root of the server defined by the component. -
unsecuredPaths: A comma-separated list of endpoint paths that are to stay unsecured even if thesecureattribute is set totrue. cookiesAuthEnabled: When set totrue(the default isfalse), the JWT workspace token is automatically fetched and included in a workspace-specific cookie to allow requests to pass through the JWT proxy.WarningThis setting potentially allows a CSRF attack when used in conjunction with a server using POST requests.
When starting a new server within a component, CodeReady Workspaces automatically detects this, and the UI offers to expose this port as a public port automatically. This behavior is useful for debugging a web application. It is impossible to do this for servers, such as a database server, which automatically starts at the container start. For such components, specify the endpoints explicitly.
Example specifying endpoints for kubernetes/openshift and chePlugin/cheEditor types:
apiVersion: 1.0.0
metadata:
  name: MyDevfile
components:
  - type: cheEditor
    alias: theia-editor
    id: eclipse/che-theia/next
    endpoints:
    - name: 'theia-extra-endpoint'
      port: 8880
      attributes:
        discoverable: true
        public: true

  - type: chePlugin
    id: redhat/php/latest
    memoryLimit: 1Gi
    endpoints:
    - name: 'php-endpoint'
      port: 7777

  - type: chePlugin
    alias: theia-editor
    id: eclipse/che-theia/next
    endpoints:
    - name: 'theia-extra-endpoint'
      port: 8880
      attributes:
        discoverable: true
        public: true

  - type: openshift
    alias: webapp
    reference: webapp.yaml
    endpoints:
    - name: 'web'
      port: 8080
      attributes:
        discoverable: false
        public: true
        protocol: http

  - type: openshift
    alias: mongo
    reference: mongo-db.yaml
    endpoints:
    - name: 'mongo-db'
      port: 27017
      attributes:
        discoverable: true
        public: false
3.6.5.4.20. OpenShift resources
To describe complex deployments, include references to OpenShift resource lists in the devfile. The OpenShift resource lists become a part of the workspace.
- CodeReady Workspaces merges all resources from the OpenShift resource lists into a single deployment.
- Be careful when designing such lists to avoid name conflicts and other problems.
| Platform | Supported resources |
|---|---|
| OpenShift |
|
apiVersion: 1.0.0
metadata:
  name: MyDevfile
projects:
  - name: my-go-project
    clonePath: go/src/github.com/acme/my-go-project
    source:
      type: git
      location: https://github.com/acme/my-go-project.git
components:
  -  type: kubernetes
     reference: ../relative/path/postgres.yaml
The preceding component references a file that is relative to the location of the devfile itself. Meaning, this devfile is only loadable by a CodeReady Workspaces factory to which you supply the location of the devfile and therefore it is able to figure out the location of the referenced OpenShift resource list.
The following is an example of the postgres.yaml file.
apiVersion: v1
kind: List
items:
-
    apiVersion: v1
    kind: Deployment
    metadata:
        name: postgres
        labels:
            app: postgres
    spec:
        template:
        metadata:
            name: postgres
            app:
                name: postgres
        spec:
            containers:
            - image: postgres
              name: postgres
              ports:
              - name: postgres
                containerPort: 5432
                volumeMounts:
                - name: pg-storage
                  mountPath: /var/lib/postgresql/data
            volumes:
            - name: pg-storage
              persistentVolumeClaim:
                  claimName: pg-storage
-
    apiVersion: v1
    kind: Service
    metadata:
        name: postgres
        labels:
            app: postgres
            name: postgres
    spec:
        ports:
            - port: 5432
              targetPort: 5432
        selector:
            app: postgres
-
    apiVersion: v1
    kind: PersistentVolumeClaim
    metadata:
        name: pg-storage
      labels:
        app: postgres
    spec:
        accessModes:
         - ReadWriteOnce
        resources:
            requests:
                storage: 1Gi
For a basic example of a devfile with an associated OpenShift list, see web-nodejs-with-db-sample on redhat-developer GitHub.
If you use generic or large resource lists from which you will only need a subset of resources, you can select particular resources from the list using a selector (which, as the usual OpenShift selectors, works on the labels of the resources in the list).
apiVersion: 1.0.0
metadata:
  name: MyDevfile
projects:
  - name: my-go-project
    clonePath: go/src/github.com/acme/my-go-project
    source:
      type: git
      location: https://github.com/acme/my-go-project.git
components:
  - type: kubernetes
    reference: ../relative/path/postgres.yaml
    selector:
      app: postgres
Additionally, it is also possible to modify the entrypoints (command and arguments) of the containers present in the resource list.
3.6.5.5. Adding commands to a devfile
A devfile allows to specify commands to be available for execution in a workspace. Every command can contain a subset of actions, which are related to a specific component in whose container it will be executed.
 commands:
   - name: build
     actions:
       - type: exec
         component: mysql
         command: mvn clean
         workdir: /projects/spring-petclinic
You can use commands to automate the workspace. You can define commands for building and testing your code, or cleaning the database.
The following are two kinds of commands:
- CodeReady Workspaces specific commands: You have full control over what component executes the command.
-
Editor specific commands: You can use the editor-specific command definitions (example:
tasks.jsonandlaunch.jsonin Che-Theia, which is equivalent to how these files work in VS Code).
3.6.5.5.1. CodeReady Workspaces-specific commands
Each CodeReady Workspaces-specific command features:
-
An
actionsattribute that specifies a command to execute. -
A
componentattribute that specifies the container in which to execute the command.
The commands are run using the default shell in the container.
apiVersion: 1.0.0
metadata:
  name: MyDevfile
projects:
  - name: my-go-project
    clonePath: go/src/github.com/acme/my-go-project
    source:
      type: git
      location: https://github.com/acme/my-go-project.git
components:
  - type: dockerimage
    image: golang
    alias: go-cli
    memoryLimit: 512Mi
    mountSources: true
    command: ['sleep', 'infinity']
    env:
      - name: GOPATH
        value: $(CHE_PROJECTS_ROOT)/go
      - name: GOCACHE
        value: /tmp/go-cache
commands:
  - name: compile and run
    actions:
     - type: exec
       component: go-cli
       command: “go get -d && go run main.go”
workdir: “${CHE_PROJECTS_ROOT}/src/github.com/acme/my-go-project”-
If a component to be used in a command must have an alias. This alias is used to reference the component in the command definition. Example:
alias: go-cliin the component definition andcomponent: go-cliin the command definition. This ensures that Red Hat CodeReady Workspaces can find the correct container to run the command in. - A command can have only one action.
3.6.5.5.2. Editor-specific commands
If the editor in the workspace supports it, the devfile can specify additional configuration in the editor-specific format. This is dependent on the integration code present in the workspace editor itself and so is not a generic mechanism. However, the default Che-Theia editor within Red Hat CodeReady Workspaces is equipped to understand the tasks.json and launch.json files provided in the devfile.
apiVersion: 1.0.0
metadata:
  name: MyDevfile
projects:
  - name: my-go-project
    clonePath: go/src/github.com/acme/my-go-project
    source:
      type: git
      location: https://github.com/acme/my-go-project.git
commands:
  - name: tasks
    actions:
      - type: vscode-task
        referenceContent: >
            {
                "version": "2.0.0",
                "tasks": [
                    {
                        "label": "create test file",
                        "type": "shell",
                        "command": "touch ${workspaceFolder}/test.file"
                    }
                ]
            }
This example shows association of a tasks.json file with a devfile. Notice the vscode-task type that instructs the Che-Theia editor to interpret this command as a tasks definition and referenceContent attribute that contains the contents of the file itself. You can also save this file separately from the devfile and use reference attribute to specify a relative or absolute URL to it.
In addition to the vscode-task commands, the Che-Theia editor understands vscode-launch type using which you can specify the start configurations.
3.6.5.5.3. Command preview URL
It is possible to specify a preview URL for commands that expose web UI. This URL is offered for opening when the command is executed.
commands:
    - name: tasks
      previewUrl:
        port: 8080
path: /myweb
      actions:
      - type: exec
        component: go-cli
        command: "go run webserver.go"
        workdir: ${CHE_PROJECTS_ROOT}/webserver
The example above opens http://__<server-domain>__/myweb, where <server-domain> is the URL to the dynamically created OpenShift Route.
3.6.5.5.3.1. Setting the default way of opening preview URLs
By default, a notification that asks the user about the URL opening preference is displayed.
To specify the preferred way of previewing a service URL:
-
Open CodeReady Workspaces preferences in File → Settings → Open Preferences and find
che.task.preview.notificationsin the CodeReady Workspaces section. Choose from the list of possible values:
-
on— enables a notification for asking the user about the URL opening preferences -
alwaysPreview— the preview URL opens automatically in the Preview panel as soon as a task is running -
alwaysGoTo— the preview URL opens automatically in a separate browser tab as soon as a task is running -
off— disables opening the preview URL (automatically and with a notification)
-
3.6.5.6. Adding attributes to a devfile
Devfile attributes can be used to configure various features.
3.6.5.6.1. Attribute: editorFree
When an editor is not specified in a devfile, a default is provided. When no editor is needed, use the editorFree attribute. The default value of false means that the devfile requests the provisioning of the default editor.
Example of a devfile without an editor
apiVersion: 1.0.0
metadata:
  name: petclinic-dev-environment
components:
  - alias: myApp
    type: kubernetes
    reference: my-app.yaml
attributes:
  editorFree: true
3.6.5.6.2. Attribute: persistVolumes (ephemeral mode)
By default, volumes and PVCs specified in a devfile are bound to a host folder to persist data even after a container restart. To disable data persistence to make the workspace faster, such as when the volume back end is slow, modify the persistVolumes attribute in the devfile. The default value is true. Set to false to use emptyDir for configured volumes and PVC.
Example of a devfile with ephemeral mode enabled
apiVersion: 1.0.0
metadata:
  name: petclinic-dev-environment
projects:
  - name: petclinic
    source:
      type: git
      location: 'https://github.com/che-samples/web-java-spring-petclinic.git'
attributes:
  persistVolumes: false
3.6.5.6.3. Attribute: asyncPersist (asynchronous storage)
When persistVolumes is set to false (see above), the additional attribute asyncPersist can be set to true to enable asynchronous storage. See Configuring storage types for more details.
Example of a devfile with asynchronous storage enabled
apiVersion: 1.0.0
metadata:
  name: petclinic-dev-environment
projects:
  - name: petclinic
    source:
      type: git
      location: 'https://github.com/che-samples/web-java-spring-petclinic.git'
attributes:
  persistVolumes: false
  asyncPersist: true
3.6.5.6.4. Attribute: mergePlugins
This property can be set to manually control how plugins are included in the workspace. When the property mergePlugins is set to true, Che will attempt to avoid running multiple instances of the same container by combining plugins. The default value when this property is not included in a devfile is governed by the Che configuration property che.workspace.plugin_broker.default_merge_plugins; adding the mergePlugins: false attribute to a devfile will disable plugin merging for that workspace.
Example of a devfile with plugin merging disabled
apiVersion: 1.0.0
metadata:
  name: petclinic-dev-environment
projects:
  - name: petclinic
    source:
      type: git
      location: 'https://github.com/che-samples/web-java-spring-petclinic.git'
attributes:
  mergePlugins: false
3.6.6. Objects supported in Red Hat CodeReady Workspaces 2.8
The following table lists the objects that are partially supported in Red Hat CodeReady Workspaces 2.8:
| Object | API | Kubernetes Infra | OpenShift Infra | Notes |
|---|---|---|---|---|
| Pod | Kubernetes | Yes | Yes | - |
| Deployment | Kubernetes | Yes | Yes | - |
| ConfigMap | Kubernetes | Yes | Yes | - |
| PVC | Kubernetes | Yes | Yes | - |
| Secret | Kubernetes | Yes | Yes | - |
| Service | Kubernetes | Yes | Yes | - |
| Ingress | Kubernetes | Yes | No |
Minishift allows you to create Ingress and it works when the host is specified (OpenShift creates a route for it). But, the |
| Route | OpenShift | No | Yes | The OpenShift recipe must be made compatible with the Kubernetes Infrastructure: OpenShift routes replaced on Ingresses. |
| Template | OpenShift | Yes | Yes | The Kubernetes API does not support templates. A workspace with a template in the recipe starts successfully and the default parameters are resolved. |
Additional resources
3.7. Running an existing workspace from the user dashboard
This section describes how to run an existing workspace from the user dashboard.
3.7.1. Running an existing workspace from the user dashboard with the Run button
This section describes how to run an existing workspace from the user dashboard using the Run button.
Prerequisites
- A running instance of CodeReady Workspaces. To install an instance of CodeReady Workspaces, see Installing CodeReady Workspaces.
- An existing workspace defined on this instance of CodeReady Workspaces.
Procedure
- Navigate to the CodeReady Workspaces Dashboard. See Section 1.1, “Navigating CodeReady Workspaces using the Dashboard”.
- In the left navigation panel, navigate to Workspaces.
- Click on the name of a non-running workspace to navigate to the overview page.
Click on the button in the top right corner of the page.
The workspace is started, and a browser does not navigates to the workspace.
3.7.2. Running an existing workspace from the user dashboard using the Open button
This section describes how to run an existing workspace from the user dashboard using the Open button.
Prerequisites
- A running instance of CodeReady Workspaces. To install an instance of CodeReady Workspaces, see Installing CodeReady Workspaces.
- An existing workspace defined on this instance of CodeReady Workspaces.
Procedure
- Navigate to the CodeReady Workspaces Dashboard. See Section 1.1, “Navigating CodeReady Workspaces using the Dashboard”.
- In the left navigation panel, navigate to Workspaces.
- Click on the name of a non-running workspace to navigate to the overview page.
Click on the button in the top right corner of the page.
The workspace is started, and a browser navigates to the workspace.
3.7.3. Running an existing workspace from the user dashboard using the Recent Workspaces
This section describes how to run an existing workspace from the user dashboard using the Recent Workspaces.
Prerequisites
- A running instance of CodeReady Workspaces. To install an instance of CodeReady Workspaces, see Installing CodeReady Workspaces.
- An existing workspace defined on this instance of CodeReady Workspaces.
Procedure
- Navigate to the CodeReady Workspaces Dashboard. See Section 1.1, “Navigating CodeReady Workspaces using the Dashboard”.
- In the left navigation panel, in the Recent Workspaces section, right-click the name of a non-running workspace and click Run in the contextual menu to start it.
3.8. Importing OpenShift applications into a workspace
To deploy a new instance of an application in a CodeReady Workspaces workspace, use one of the following scenarios:
- Modifying an existing workspace: Using the Dashboard user interface
-
From a running application: Generating a devfile with
crwctl
3.8.1. Including a OpenShift application in a workspace devfile definition
This procedure describes how to define a CodeReady Workspaces workspace devfile to include a OpenShift application.
For demonstration purposes, the section uses a sample OpenShift application having the following two Pods:
- A Node.js application specified by this nodejs-app.yaml
- A MongoDB Pod specified by this mongo-db.yaml
To run the application on a OpenShift cluster:
$ node=https://raw.githubusercontent.com/redhat-developer/devfile/master/samples/web-nodejs-with-db-sample/nodejs-app.yaml && \
mongo=https://raw.githubusercontent.com/redhat-developer/devfile/master/samples/web-nodejs-with-db-sample/mongo-db.yaml && \
oc  apply -f ${mongo} && \
oc  apply -f ${node}
The devfile format is used to define a CodeReady Workspaces workspace, and its format is described in the Section 3.6, “Configuring a workspace using a devfile” section.
Prerequisites
- You are logged in to the cluster with a running instance of Red Hat CodeReady Workspaces. To install an instance of Red Hat CodeReady Workspaces, see Installing CodeReady Workspaces.
-
The
crwctlmanagement tool is available. See the Using the crwctl management tool section.
Procedure
Create the simplest devfile:
apiVersion: 1.0.0
metadata:
 name: minimal-workspace
1 - 1
- Only the name
minimal-workspaceis specified. After the CodeReady Workspaces server processes this devfile, the devfile is converted to a minimal CodeReady Workspaces workspace that only has the default editor (Che-Theia) and the default editor plug-ins, including, for example, the terminal.
To add OpenShift applications to a workspace, modify the devfile and add the
Kubernetescomponent type.For example, to embed the NodeJS-Mongo application in the
minimal-workspace:apiVersion: 1.0.0 metadata: name: minimal-workspace components: - type: openshift reference: https://raw.githubusercontent.com/.../mongo-db.yaml - alias: nodejs-app type: openshift reference: https://raw.githubusercontent.com/.../nodejs-app.yaml entrypoints: - command: ['sleep']1 args: ['infinity']- 1
- The
sleep infinitycommand is added as the entrypoint of the Node.js application. The command prevents the application from starting at the workspace start phase. This configuration allows the user to start the application when needed for testing or debugging purposes.
Add the commands in the devfile to make it easier for a developer to test the application:
apiVersion: 1.0.0
metadata:
  name: nodejs-with-db
projects:
  - name: nodejs-mongo-app
    source:
      type: git
      location: 'https://github.com/ijason/NodeJS-Sample-App.git'
      commitId: 187d468 # refers to the last commitId the project compiles (with express3)
components:
  - type: openshift
    reference: https://raw.githubusercontent.com/redhat-developer/devfile/master/samples/web-nodejs-with-db-sample/mongo-db.yaml
  - alias: nodejs-app
    type: openshift
    reference: https://raw.githubusercontent.com/redhat-developer/devfile/master/samples/web-nodejs-with-db-sample/nodejs-app.yaml
commands:
  - name: run
1 actions: - type: exec component: nodejs-app command: cd ${CHE_PROJECTS_ROOT}/nodejs-mongo-app/EmployeeDB/ && npm install && sed -i -- ''s/localhost/mongo/g'' app.js && node app.js- 1
- The
runcommand added to the devfile is available as a task in Che-Theia from the command palette. When executed, the command starts the Node.js application.
Use the devfile to create and start a workspace:
$ crwctl workspace:start --devfile <devfile-path>
3.8.2. Adding a OpenShift application to an existing workspace using the dashboard
This procedure demonstrates how to modify an existing workspace and import the OpenShift application using the newly created devfile.
Prerequisites
- A running instance of CodeReady Workspaces. To install an instance of CodeReady Workspaces, see Installing CodeReady Workspaces.
- An existing workspace defined on this instance of CodeReady Workspaces.
Procedure
- After the creation of a workspace, use the Workspace menu and then click on the desired workspace.
- Modify the workspace devfile, use the Devfile tab.
- Add a OpenShift component.
- For the changes to take effect, save the devfile and restart the CodeReady Workspaces workspace.
3.8.3. Generating a devfile from an existing OpenShift application
This procedure demonstrates how to generate a devfile from an existing OpenShift application using the crwctl tool.
Prerequisites
- A running instance of CodeReady Workspaces. To install an instance of CodeReady Workspaces, see Installing CodeReady Workspaces.
-
The
crwctlmanagement tool is available. See Using the crwctl management tool. - You are logged in to CodeReady Workspaces. See How to login into CodeReady Workspaces using crwctl
Procedure
To generate a devfile, use:
$ crwctl devfile:generateIt is also possible to generate a devfile from, for example, the
NodeJS-MongoDBapplication that includes theNodeJScomponent, using thecrwctl devfile:generatecommand:Example:
$ crwctl devfile:generate --selector="app=nodejs"
apiVersion: 1.0.0
metadata:
  name: crwctl-generated
components:
  - type: kubernetes
    alias: app=nodejs
    referenceContent: |
      kind: List
      apiVersion: v1
      metadata:
        name: app=nodejs
      items:
        - apiVersion: apps/v1
          kind: Deployment
          metadata:
            labels:
              app: nodejs
            name: web
(...)
The Node.js application YAML definition is available in the devfile, inline, using the
referenceContentattribute.To include support for a language, use the
--languageparameter:$ crwctl devfile:generate --selector="app=nodejs" --language="typescript" apiVersion: 1.0.0 metadata: name: crwctl-generated components: - type: kubernetes alias: app=nodejs referenceContent: | kind: List apiVersion: v1 (...) - type: chePlugin alias: typescript-ls id: che-incubator/typescript/latest
Use the generated devfile to start a CodeReady Workspaces workspace with
crwctl.$ crwctl workspace:start --devfile=devfile.yaml
3.9. Remotely accessing workspaces
This section describes how to remotely access CodeReady Workspaces workspaces outside of the browser.
CodeReady Workspaces workspaces exist as containers and are, by default, modified from a browser window. In addition to this, there are the following methods of interacting with a CodeReady Workspaces workspace:
-
Opening a command line in the workspace container using the OpenShift command-line tool,
oc. -
Uploading and downloading files using the
octool.
3.9.1. Remotely accessing workspaces using oc
To access CodeReady Workspaces workspaces remotely using OpenShift command-line tool (oc), follow the instructions in this section.
Prerequisites
The
oc, version 1.5.0 or higher, is available. For information about installed version, use:$ oc version Client Version: version.Info{Major:"1", Minor:"15", GitVersion:"v1.15.0" ...
Procedure
In the example below:
-
workspace7b2wemdf3hx7s3ln.maven-74885cf4d5-kf2q4is the name of the Pod. crwis the project.To find the name of the OpenShift project and the Pod that runs the CodeReady Workspaces workspace:
$ oc  get pod -l che.workspace_id --all-namespaces
NAMESPACE   NAME                                               READY   STATUS    RESTARTS   AGE
crw         workspace7b2wemdf3hx7s3ln.maven-74885cf4d5-kf2q4   4/4     Running   0          6m4s
To find the name of the container:
$ NAMESPACE=crw
$ POD=workspace7b2wemdf3hx7s3ln.maven-74885cf4d5-kf2q4
$ oc  get pod ${POD} -o custom-columns=CONTAINERS:.spec.containers[*].name
CONTAINERS
maven,che-machine-execpau,theia-ide6dj,vscode-javaw92
When you have the project, Pod name, and the name of the container, use the `oc ` command to open a remote shell:
$ NAMESPACE=crw
$ POD=workspace7b2wemdf3hx7s3ln.maven-74885cf4d5-kf2q4
$ CONTAINER=maven
$ oc exec -ti -n ${NAMESPACE} ${POD} -c ${CONTAINER} bash
user@workspace7b2wemdf3hx7s3ln $
From the container, execute the
buildandruncommands (as if from the CodeReady Workspaces workspace terminal):user@workspace7b2wemdf3hx7s3ln $ mvn clean install [INFO] Scanning for projects... (...)
Additional resources
-
For more about
oc, see the Getting started with the CLI.
3.9.2. Downloading and uploading a file to a workspace using the command-line interface
This procedure describes how to use the oc tool to download or upload files remotely from or to an CodeReady Workspaces workspace.
Prerequisites
- A running instance of CodeReady Workspaces. To install an instance of CodeReady Workspaces, see Installing CodeReady Workspaces.
- Remote access to the CodeReady Workspaces workspace you intend to modify. See Remotely accessing workspaces.
The
oc, version 1.5.0 or higher, is available. For information about installed version, use:$ oc version Client Version: version.Info{Major:"1", Minor:"15", GitVersion:"v1.15.0" ...
Procedure
The following procedure uses crw as an example of a user project.
To download a local file named
downloadme.txtfrom a workspace container to the current home directory of the user, use the following in the CodeReady Workspaces remote shell.$ REMOTE_FILE_PATH=/projects/downloadme.txt $ NAMESPACE=crw $ POD=workspace7b2wemdf3hx7s3ln.maven-74885cf4d5-kf2q4 $ CONTAINER=maven $ oc cp ${NAMESPACE}/${POD}:${REMOTE_FILE_PATH} ~/downloadme.txt -c ${CONTAINER}-
To upload a local file named
uploadme.txtto a workspace container in the/projectsdirectory:
$ LOCAL_FILE_PATH=./uploadme.txt
$ NAMESPACE=crw
$ POD=workspace7b2wemdf3hx7s3ln.maven-74885cf4d5-kf2q4
$ CONTAINER=maven
$ oc cp ${LOCAL_FILE_PATH} ${NAMESPACE}/${POD}:/projects -c ${CONTAINER}
Using the preceding steps, the user can also download and upload directories.
Additional resources
-
For more about
oc, see the Getting started with the CLI.
3.10. Mounting a secret as a file or an environment variable into a workspace container
Secrets are OpenShift objects that store sensitive data such as user names, passwords, authentication tokens, and configurations in an encrypted form.
Users can mount a secret that contains sensitive data in a workspace container. This reapplies the stored data from the secret automatically for every newly created workspace. As a result, the user does not have to provide these credentials and configuration settings manually.
The following section describes how to automatically mount a OpenShift secret in a workspace container and create permanent mount points for components such as:
-
Maven configuration, the
settings.xmlfile - SSH key pairs
- AWS authorization tokens
- Git credentials store file
A OpenShift secret can be mounted into a workspace container as:
- A file - This creates automatically mounted Maven settings that will be applied to every new workspace with Maven capabilities.
An environment variable - This uses SSH key pairs and AWS authorization tokens for automatic authentication.
NoteSSH key pairs can also be mounted as a file, but this format is primarily aimed at the settings of the Maven configuration.
The mounting process uses the standard OpenShift mounting mechanism, but it requires additional annotations and labeling for a proper bound of a secret with the required CodeReady Workspaces workspace container.
3.10.1. Mounting a secret as a file into a workspace container
On OpenShift 3.11, secrets mounted as file overrides volume mounts defined in the devfile.
This section describes how to mount a secret from the user’s project as a file in single-workspace or multiple-workspace containers of CodeReady Workspaces.
Prerequisites
- A running instance of CodeReady Workspaces. To install an instance of CodeReady Workspaces, see Installing CodeReady Workspaces.
Procedure
Create a new OpenShift secret in the OpenShift project where a CodeReady Workspaces workspace will be created.
-
The labels of the secret that is about to be created must match the set of labels configured in
che.workspace.provision.secret.labelsproperty of CodeReady Workspaces. The default labels are: -
app.kubernetes.io/part-of: che.eclipse.org app.kubernetes.io/component: workspace-secret:NoteNote that the following example describes variations in the usage of the
target-containerannotation in versions 2.1 and 2.2 of Red Hat CodeReady Workspaces.Example:
apiVersion: v1
kind: Secret
metadata:
  name: mvn-settings-secret
  labels:
    app.kubernetes.io/part-of: che.eclipse.org
    app.kubernetes.io/component: workspace-secret
...
Annotations must indicate the given secret is mounted as a file, provide the mount path, and, optionally, specify the name of the container in which the secret is mounted. If there is no target-container annotation, the secret will be mounted into all user containers of the CodeReady Workspaces workspace, but this is applicable only for the CodeReady Workspaces version 2.1.
apiVersion: v1
kind: Secret
metadata:
  name: mvn-settings-secret
  annotations:
    che.eclipse.org/target-container: maven
    che.eclipse.org/mount-path: {prod-home}/.m2/
    che.eclipse.org/mount-as: file
  labels:
...
Since the CodeReady Workspaces version 2.2, the
target-containerannotation is deprecated andautomount-workspace-secretannotation with Boolean values is introduced. Its purpose is to define the default secret mounting behavior, with the ability to be overridden in a devfile. Thetruevalue enables the automatic mounting into all workspace containers. In contrast, thefalsevalue disables the mounting process until it is explicitly requested in a devfile component using theautomountWorkspaceSecrets:trueproperty.apiVersion: v1 kind: Secret metadata: name: mvn-settings-secret annotations: che.eclipse.org/automount-workspace-secret: "true" che.eclipse.org/mount-path: {prod-home}/.m2/ che.eclipse.org/mount-as: file labels: ...Data of the OpenShift secret may contain several items, whose names must match the desired file name mounted into the container.
apiVersion: v1
kind: Secret
metadata:
  name: mvn-settings-secret
  labels:
    app.kubernetes.io/part-of: che.eclipse.org
    app.kubernetes.io/component: workspace-secret
  annotations:
    che.eclipse.org/automount-workspace-secret: "true"
    che.eclipse.org/mount-path: {prod-home}/.m2/
    che.eclipse.org/mount-as: file
data:
  settings.xml: <base64 encoded data content here>
This results in a file named
settings.xmlbeing mounted at the/home/jboss/.m2/path of all workspace containers.The secret-s mount path can be overridden for specific components of the workspace using devfile. To change mount path, an additional volume should be declared in a component of the devfile, with name matching overridden secret name, and desired mount path.
apiVersion: 1.0.0
metadata:
  ...
components:
 - type: dockerimage
   alias: maven
   image: maven:3.11
   volumes:
     - name: <secret-name>
       containerPath: /my/new/path
   ...
Note that for this kind of overrides, components must declare an alias to be able to distinguish containers which belong to them and apply override path exclusively for those containers.
-
The labels of the secret that is about to be created must match the set of labels configured in
3.10.2. Mounting a secret as an environment variable into a workspace container
The following section describes how to mount a OpenShift secret from the user’s project as an environment variable, or variables, into single-workspace or multiple-workspace containers of CodeReady Workspaces.
Prerequisites
- A running instance of CodeReady Workspaces. To install an instance of CodeReady Workspaces, see Installing CodeReady Workspaces.
Procedure
In the Kubernetes project where a CodeReady Workspaces workspace will be created, generate a new OpenShift secret .
-
The labels of the secret that is about to be generated must match the set of labels configured in
che.workspace.provision.secret.labelsproperty of CodeReady Workspaces. By default, it is a set of two labels: -
app.kubernetes.io/part-of: che.eclipse.org app.kubernetes.io/component: workspace-secret:NoteNote that the following example describes variations in the usage of the
target-containerannotation in versions 2.1 and 2.2 of Red Hat CodeReady Workspaces.Example:
apiVersion: v1
kind: Secret
metadata:
  name: mvn-settings-secret
  labels:
    app.kubernetes.io/part-of: che.eclipse.org
    app.kubernetes.io/component: workspace-secret
...
Annotations must indicate that the given secret is mounted as an environment variable, provides variable names, and optionally, specifies the container name where this mount will be applied. If there is no target-container annotation defined, the secret will be mounted into all user containers of the CodeReady Workspaces workspace, but this is applicable only for the CodeReady Workspaces version 2.1.
apiVersion: v1
kind: Secret
metadata:
  name: mvn-settings-secret
  annotations:
    che.eclipse.org/target-container: maven
    che.eclipse.org/env-name: FOO_ENV
    che.eclipse.org/mount-as: env
  labels:
   ...
data:
  mykey: myvalue
This results in the environment variable named
FOO_ENVand the valuemyvaluebeing provisioned into the container namedmaven.Since the CodeReady Workspaces version 2.2, the
target-containerannotation is deprecated andautomount-workspace-secretannotation with Boolean values is introduced. Its purpose is to define the default secret mounting behavior, with the ability to be overridden in a devfile. Thetruevalue enables the automatic mounting into all workspace containers. In contrast, thefalsevalue disables the mounting process until it is explicitly requested in a devfile component using theautomountWorkspaceSecrets:trueproperty.apiVersion: v1 kind: Secret metadata: name: mvn-settings-secret annotations: che.eclipse.org/automount-workspace-secret: "true" che.eclipse.org/env-name: FOO_ENV che.eclipse.org/mount-as: env labels: ... data: mykey: myvalueThis results in the environment variable named
FOO_ENVand the valuemyvaluebeing provisioned into all workspace containers.If the secret provides more than one data item, the environment variable name must be provided for each of the data keys as follows:
apiVersion: v1
kind: Secret
metadata:
  name: mvn-settings-secret
  annotations:
    che.eclipse.org/automount-workspace-secret: "true"
    che.eclipse.org/mount-as: env
    che.eclipse.org/mykey_env-name: FOO_ENV
    che.eclipse.org/otherkey_env-name: OTHER_ENV
  labels:
   ...
data:
  mykey: myvalue
  otherkey: othervalue
This results in two environment variables with names
FOO_ENV,OTHER_ENV, and valuesmyvalueandothervalue, being provisioned into all workpsace containers.NoteThe maximum length of annotation names in a OpenShift secret is 63 characters, where 9 characters are reserved for a prefix that ends with
/. This acts as a restriction for the maximum length of the key that can be used for the secret.
-
The labels of the secret that is about to be generated must match the set of labels configured in
3.10.3. Mounting a git credentials store into a workspace container
This section describes how to mount git credentials store as secret from the user’s project into the file in single-workspace or multiple-workspace containers of CodeReady Workspaces.
Prerequisites
- A running instance of CodeReady Workspaces. To install an instance of CodeReady Workspaces, see Installing CodeReady Workspaces.
Procedure
- Prepare git credential file in the Storage format.
- Encode content of the file to the base64 format.
Create a new OpenShift secret in the OpenShift project where a CodeReady Workspaces workspace will be created.
-
The labels of the secret that is about to be created must match the set of labels configured in
che.workspace.provision.secret.labelsproperty of CodeReady Workspaces. The default labels are: -
app.kubernetes.io/part-of: che.eclipse.org -
app.kubernetes.io/component: workspace-secret:
-
The labels of the secret that is about to be created must match the set of labels configured in
3.10.4. The use of annotations in the process of mounting a secret into a workspace container
Kubernetes annotations and labels are tools used by libraries, tools, and other clients, to attach arbitrary non-identifying metadata to OpenShift native objects.
Labels select objects and connect them to a collection that satisfies certain conditions, where annotations are used for non-identifying information that is not used by OpenShift objects internally.
This section describes OpenShift annotation values used in the process of OpenShift secret mounting in a CodeReady Workspaces workspace.
Annotations must contain items that help identify the proper mounting configuration. These items are:
-
che.eclipse.org/target-container: Valid till the version 2.1. The name of the mounting container. If the name is not defined, the secret mounts into all user’s containers of the CodeReady Workspaces workspace. -
che.eclipse.org/automount-workspace-secret: Introduced in the version 2.2.. The main mount selector. When set totrue, the secret mounts into all user’s containers of the CodeReady Workspaces workspace. When set tofalse, the secret does not mount into containers by default. The value of this attribute can be overridden in devfile components, using theautomountWorkspaceSecretsboolean property that gives more flexibility to workspace owners. This property requires analiasto be defined for the component that uses it. -
che.eclipse.org/env-name: The name of the environment variable that is used to mount a secret. -
che.eclipse.org/mount-as: This item describes if a secret will be mounted as an environmental variable or a file. Options:envorfile. -
che.eclipse.org/<mykeyName>-env-name: FOO_ENV: The name of the environment variable used when data contains multiple items.mykeyNameis used as an example.
3.11. Authenticating users on private repositories of SCM servers
The following section describes how to configure user authentications for SCM servers.
3.11.1. Authenticating on Bitbucket servers
Red Hat CodeReady Workspaces users may use public or private repositories on Bitbucket SCM (Source Code Management) system as a source of their projects.
The use of private repositories requires additional configuration described below.
Bitbucket authentication is based on using personal access tokens. Each Bitbucket user is able to request several personal access tokens with different names, permissions, expiration times, and so on. Those tokens can be used to sign Bitbucket REST API calls and perform Git repository operations.
To allow Bitbucket authentication on CodeReady Workspaces side, personal tokens must be stored in the user’s namespace in the form of a secret. The secret must look as follows:
apiVersion: v1
kind: Secret
metadata:
  name: bitbucket-personal-access-token-secret
  labels:
    app.kubernetes.io/part-of: che.eclipse.org
    app.kubernetes.io/component: scm-personal-access-token
  annotations:
    che.eclipse.org/expired-after: '-1'
    che.eclipse.org/che-userid: '355d1ce5-990e-401e-9a8c-094bca10b5b3'
    che.eclipse.org/scm-userid: '2'
    che.eclipse.org/scm-username: 'user-foo'
    che.eclipse.org/scm-url: 'https://bitbucket.apps.cluster-example.com'
data:
  token: TlRnNE1UazRORFl5TWpNeU9sMTI1aDFFT2dRbXBlTUYvbmhiLzNQUC9hT08=
The main parts of the secret are:
| Label |
| Indicates it is a SCM personal token secret. |
| Annotation |
| Red Hat CodeReady Workspaces id of the user token belongs to |
| Annotation |
| Bitbucket user id to which token belongs |
| Annotation |
| Bitbucket user name to which token belongs |
| Annotation |
| Bitbucket server URL to which this token belong |
| Annotation |
| Personal access token expiration time |
| Data entry |
| Base-64 encoded value of the personal access token |
Encoding a string into the base64 format using the base64 tool on Linux machines leads to adding the newline character to the end of the source string and causing a value to be unusable as the authentication header value after decoding. Avoid this by using base64 -w0, which removes newly added lines, or strip newlines explicitly using`tr -d \\n`.
To obtain a user ID from a secret using a call to a REST API URL:
For Bitbucket:
https://<bitbucket-hostname>/rest/api/1.0/users/<username>For CodeReady Workspaces
\https://codeready-<openshift_deployment_name>.<domain_name>/api/user- With the token credentials obtained from a secret, another secret is automatically created, allowing authorization to Git operations. This secret is mounted into a workspace container as a Git credentials file, and any additional configurations are not required to work with private Git repositories.
- When a remote Git repository uses a self-signed certificate, add an additional server configuration. See Deploying CodeReady Workspaces with support for Git repositories with self-signed certificates.
3.11.2. Authenticating on GitLab servers
Configuring authentication on the GitLab system is similar to Bitbucket.
GitLab authentication is based on using personal access tokens. Each GitLab user is able to request several personal access tokens with different names, permissions, expiration times, and so on. Those tokens can be used to sign GitLab REST API calls and perform Git repository operations.
See the GitLab documentation for more details about personal access tokens.
To allow GitLab authentication on CodeReady Workspaces side, personal tokens must be stored in the user’s namespace in the form of a secret. The secret must look as follows:
pass:[<!-- vale Vale.Spelling = NO -->]

pass:[<!-- vale Vale.Terms = NO -->]

pass:[<!-- vale IBM.Usage = NO -->]

pass:[<!-- vale IBM.PassiveVoice = NO -->]

pass:[<!-- vale IBM.Slash = NO -->]

apiVersion: v1
kind: Secret
metadata:
  name: gitlab-personal-access-token-secret
  labels:
    app.kubernetes.io/part-of: che.eclipse.org
    app.kubernetes.io/component: scm-personal-access-token
  annotations:
    che.eclipse.org/expired-after: '-1'
    che.eclipse.org/che-userid: '355d1ce5-990e-401e-9a8c-094bca10b5b3'
    che.eclipse.org/scm-userid: '2'
    che.eclipse.org/scm-username: 'user-foo'
    che.eclipse.org/scm-url: 'https://gitlab.apps.cluster-example.com'
data:
  token: Yzh5cEt6cURxUWVCa3FKazhtaHg=

pass:[<!-- vale Vale.Spelling = YES -->]

pass:[<!-- vale Vale.Terms = YES -->]

pass:[<!-- vale IBM.Usage = YES -->]

pass:[<!-- vale IBM.PassiveVoice = YES -->]

pass:[<!-- vale IBM.Slash = YES -->]
The main parts of the secret are:
| Label |
| Indicates it is a SCM personal token secret. |
| Annotation |
| Red Hat CodeReady Workspaces id of the user token belongs to |
| Annotation |
| GitLab user id to which token belongs |
| Annotation |
| GitlLab user name to which token belongs |
| Annotation |
| GitLab server URL to which this token belong |
| Annotation |
| Personal access token expiration time |
| Data entry |
| Base-64 encoded value of the personal access token |
Encoding a string into the base64 format using the base64 tool on Linux machines leads to adding the newline character to the end of the source string and causing a value to be unusable as the authentication header value after decoding. Avoid this by using base64 -w0, which removes newly added lines, or strip newlines explicitly using`tr -d \\n`.
To obtain a user ID from a secret, take a look into user profile page on GitLab web UI or make a call to a REST API URL:
For GitLab:
https://<gitlab-hostname>/api/v4/users?username=<username>For CodeReady Workspaces
\https://codeready-<openshift_deployment_name>.<domain_name>/api/user- With the token credentials obtained from a secret, another secret is automatically created, allowing authorization to Git operations. This secret is mounted into a workspace container as a Git credentials file, and any additional configurations are not required to work with private Git repositories.
- When a remote Git repository uses a self-signed certificate, add an additional server configuration. See: Deploying CodeReady Workspaces with support for Git repositories with self-signed certificates.
Chapter 4. Customizing developer environments
Red Hat CodeReady Workspaces is an extensible and customizable developer-workspaces platform.
You can extend Red Hat CodeReady Workspaces in three different ways:
- Alternative IDEs provide specialized tools for Red Hat CodeReady Workspaces. For example, a Jupyter notebook for data analysis. Alternate IDEs can be based on Eclipse Theia or any other IDE (web or desktop based). The default IDE in Red Hat CodeReady Workspaces is Che-Theia.
- Che-Theia plug-ins add capabilities to the Che-Theia IDE. They rely on plug-in APIs that are compatible with Visual Studio Code. The plug-ins are isolated from the IDE itself. They can be packaged as files or as containers to provide their own dependencies.
- Stacks are pre-configured CodeReady Workspaces workspaces with a dedicated set of tools, which cover different developer personas. For example, it is possible to pre-configure a workbench for a tester with only the tools needed for their purposes.
Figure 4.1. CodeReady Workspaces extensibility
A user can extend CodeReady Workspaces by using self-hosted mode, which CodeReady Workspaces provides by default.
4.1. What is a Che-Theia plug-in
A Che-Theia plug-in is an extension of the development environment isolated from the IDE. Plug-ins can be packaged as files or containers to provide their own dependencies.
Extending Che-Theia using plug-ins can enable the following capabilities:
- Language support: Extend the supported languages by relying on the Language Server Protocol.
- Debuggers: Extend debugging capabilities with the Debug Adapter Protocol.
- Development Tools: Integrate your favorite linters, and as testing and performance tools.
- Menus, panels, and commands: Add your own items to the IDE components.
- Themes: Build custom themes, extend the UI, or customize icon themes.
- Snippets, code formatting, and syntax highlighting: Enhance comfort of use with supported programming languages.
- Keybindings: Add new keyboard mapping and popular keybindings to make the environment feel natural.
4.1.1. Features and benefits of Che-Theia plug-ins
| Features | Description | Benefits |
|---|---|---|
| Fast Loading | Plug-ins are loaded at runtime and are already compiled. IDE is loading the plug-in code. | Avoid any compilation time. Avoid post-installation steps. |
| Secure Loading | Plug-ins are loaded separately from the IDE. The IDE stays always in a usable state. | Plug-ins do not break the whole IDE if it has bugs. Handle network issue. |
| Tools Dependencies | Dependencies for the plug-in are packaged with the plug-in in its own container. | No-installation for tools. Dependencies running into container. |
| Code Isolation | Guarantee that plug-ins cannot block the main functions of the IDE like opening a file or typing | Plug-ins are running into separate threads. Avoid dependencies mismatch. |
| VS Code Extension Compatibility | Extend the capabilities of the IDE with existing VS Code Extensions. | Target multiple platform. Allow easy discovery of Visual Studio Code Extension with required installation. |
4.1.2. Che-Theia plug-in concept in detail
Red Hat CodeReady Workspaces provides a default web IDE for workspaces: Che-Theia. It is based on Eclipse Theia. It is a slightly different version than the plain Eclipse Theia one because there are functionalities that have been added based on the nature of the Red Hat CodeReady Workspaces workspaces. This version of Eclipse Theia for CodeReady Workspaces is called Che-Theia.
You can extend the IDE provided with Red Hat CodeReady Workspaces by building a Che-Theia plug-in. Che-Theia plug-ins are compatible with any other Eclipse Theia-based IDE.
4.1.2.1. Client-side and server-side Che-Theia plug-ins
The Che-Theia editor plug-ins let you add languages, debuggers, and tools to your installation to support your development workflow. Plug-ins run when the editor completes loading. If a Che-Theia plug-in fails, the main Che-Theia editor continues to work.
Che-Theia plug-ins run either on the client side or on the server side. This is a scheme of the client and server-side plug-in concept:
Figure 4.2. Client and server-side Che-Theia plug-ins
The same Che-Theia plug-in API is exposed to plug-ins running on the client side (Web Worker) or the server side (Node.js).
4.1.2.2. Che-Theia plug-in APIs
For the purpose of providing tool isolation and easy extensibility in Red Hat CodeReady Workspaces, the Che-Theia IDE has a set of plug-in APIs. The APIs are compatible with Visual Studio Code extension APIs. In most cases, Che-Theia can run VS Code extensions as its own plug-ins.
When developing a plug-in that depends on or interacts with components of CodeReady Workspaces workspaces (containers, preferences, factories), use the CodeReady Workspaces APIs embedded in Che-Theia.
4.1.2.3. Che-Theia plug-in capabilities
Che-Theia plug-ins have the following capabilities:
| Plug-in | Description | Repository |
|---|---|---|
| CodeReady Workspaces Extended Tasks | Handles the CodeReady Workspaces commands and provides the ability to start those into a specific container of the workspace. | |
| CodeReady Workspaces Extended Terminal | Allows to provide terminal for any of the containers of the workspace. | |
| CodeReady Workspaces Factory | Handles the Red Hat CodeReady Workspaces Factories | |
| CodeReady Workspaces Container | Provides a container view that shows all the containers that are running in the workspace and allows to interact with them. | |
| Dashboard | Integrates the IDE with the Dashboard and facilitate the navigation. | |
| CodeReady Workspaces APIs | Extends the IDE APIs to allow interacting with CodeReady Workspaces-specific components (workspaces, preferences). |
4.1.2.4. VS Code extensions and Eclipse Theia plug-ins
A Che-Theia plug-in can be based on a VS Code extension or an Eclipse Theia plug-in.
- A Visual Studio Code extension
- To repackage a VS Code extension as a Che-Theia plug-in with its own set of dependencies, package the dependencies into a container. This ensures that Red Hat CodeReady Workspaces users do not need to install the dependencies when using the extension. See Section 4.2, “Adding a VS Code extension to a workspace”.
- An Eclipse Theia plug-in
- You can build a Che-Theia plug-in by implementing an Eclipse Theia plug-in and packaging it to Red Hat CodeReady Workspaces.
Additional resources
4.1.3. Che-Theia plug-in metadata
Che-Theia plug-in metadata is information about individual plug-ins for the plug-in registry.
The Che-Theia plug-in metadata, for each specific plug-in, is defined in a meta.yaml file.
Here is an overview of all fields that can be available in plugin meta YAML files. This document represents the Plugin meta YAML structure version 3.
The che-plugin-registry repository contains:
|
| Version 2 and higher where version is 1 supported for backwards compatibility |
|
|
Available: Category must be set to one of the followings: |
|
| Short description of plugin’s purpose |
|
| Name shown in user dashboard |
|
| Optional; section for deprecating plugins in favor of others * autoMigrate - boolean
* migrateTo - new org/plugin-id/version, for example |
|
| Not required to be present in YAML, as if not present, it will be generated during Plugin Registry dockerimage build |
|
| Not required to be present in YAML, as if not present, it will be generated during Plugin Registry dockerimage build |
|
| URL of an SVG or PNG icon |
|
| Name (no spaces allowed), must match [-a-z0-9] |
|
| Name of the publisher, must match [-a-z0-9] |
|
| URL for plugin repository, for example, GitHub |
|
| Plugin title (long) |
|
|
|
|
| Version information, for example: 7.5.1, [-.a-z0-9] |
|
| Specifications (see below) |
|
| Optional; plugin endpoint. See Section 3.6.5.4.19, “Endpoints” |
|
| Optional; sidecar containers for the plug-in. Che Plugin and VS Code extension supports only one container |
|
| Optional; sidecar init containers for the plug-in |
|
| Optional; environment variables for the workspace |
|
| Optional; Attribute that is required for VS Code and Che-Theia plug-ins in a form list of URLs to plug-in artefacts, such as .vsix or .theia files |
|
| Sidecar container name |
|
| Absolute or relative container image URL |
|
|
OpenShift memory limit string, for example |
|
|
OpenShift memory request string, for example |
|
|
OpenShift CPU limit string, for example |
|
|
OpenShift CPU request string, for example |
|
| List of environment variables to set in the sidecar |
|
| String array definition of the root process command in the container |
|
| String array arguments for the root process command in the container |
|
| Volumes required by the plug-in |
|
| Ports exposed by the plug-in (on the container) |
|
| Development commands available to the plug-in container |
|
|
Boolean flag to bound volume with source code |
|
| Optional; init containers for sidecar plugin |
|
|
Container lifecycle hooks. See |
|
| Environment variable name |
|
| Environment variable value |
|
| Path to the volume in the container |
|
| Volume name |
|
| If true, the volume is ephemeral, otherwise the volume is persisted |
|
| Exposed port |
|
| Command name |
|
| Command working directory |
|
| String array that defines the development command |
|
| Name (no spaces allowed), must match [-a-z0-9] |
|
|
|
|
| Target port |
|
| Endpoint attributes |
|
|
Protocol, example: |
|
|
|
|
|
|
|
|
|
|
|
|
|
|
|
|
|
The
*
* |
|
|
The
*
* |
Example meta.yaml for a Che-Theia plug-in: the CodeReady Workspaces machine-exec Service
  apiVersion: v2
  publisher: eclipse
  name: che-machine-exec-plugin
  version: 7.9.2
  type: Che Plugin
  displayName: CodeReady Workspaces machine-exec Service
  title: Che machine-exec Service Plugin
  description: CodeReady Workspaces Plug-in with che-machine-exec service to provide creation terminal
    or tasks for Eclipse CHE workspace containers.
  icon: https://www.eclipse.org/che/images/logo-eclipseche.svg
  repository: https://github.com/eclipse/che-machine-exec/
  firstPublicationDate: "2020-03-18"
  category: Other
  spec:
    endpoints:
     -  name: "che-machine-exec"
        public: true
        targetPort: 4444
        attributes:
          protocol: ws
          type: terminal
          discoverable: false
          secure: true
          cookiesAuthEnabled: true
    containers:
     - name: che-machine-exec
       image: "quay.io/eclipse/che-machine-exec:7.9.2"
       ports:
         - exposedPort: 4444
       command: ['/go/bin/che-machine-exec', '--static', '/cloud-shell', '--url', '127.0.0.1:4444']
Example meta.yaml for a VisualStudio Code extension: the AsciiDoc support extension
apiVersion: v2
category: Language
description: This extension provides a live preview, syntax highlighting and snippets for the AsciiDoc format using Asciidoctor flavor
displayName: AsciiDoc support
firstPublicationDate: "2019-12-02"
icon: https://www.eclipse.org/che/images/logo-eclipseche.svg
name: vscode-asciidoctor
publisher: joaompinto
repository: https://github.com/asciidoctor/asciidoctor-vscode
title: AsciiDoctor Plug-in
type: VS Code extension
version: 2.7.7
spec:
  extensions:
  - https://github.com/asciidoctor/asciidoctor-vscode/releases/download/v2.7.7/asciidoctor-vscode-2.7.7.vsix
4.1.4. Che-Theia plug-in lifecycle
Every time a user starts a Che workspace, a Che-Theia plug-in life cycle process starts. The steps of this process are as follows:
- CodeReady Workspaces server checks for plug-ins to start from the workspace definition.
- CodeReady Workspaces server retrieves plug-in metadata, recognizes each plug-in type, and stores them in memory.
- CodeReady Workspaces server selects a broker according to the plug-in type.
- The broker processes the installation and deployment of the plug-in. The installation process of the plug-in differs for each specific broker.
Plug-ins exist in various types. A broker ensures the success of a plug-in deployment by meeting all installation requirements.
Figure 4.3. Che-Theia plug-in lifecycle
Before a CodeReady Workspaces workspace is launched, CodeReady Workspaces server starts the workspace containers:
-
The Che-Theia plug-in broker extracts the information about sidecar containers that a particular plug-in needs from the
.theiafile. - The broker sends the appropriate container information to CodeReady Workspaces server.
- The broker copies the Che-Theia plug-in to a volume to have it available for the Che-Theia editor container.
- CodeReady Workspaces server then starts all the containers of the workspace.
- Che-Theia starts in its container and checks the correct folder to load the plug-ins.
A user experience with Che-Theia plug-in lifecycle
When a user opens a browser tab with Che-Theia, Che-Theia starts a new plug-in session with:
- Web Worker for frontend
- Node.js for backend
-
Che-Theia notifies all Che-Theia plug-ins with the start of the new session by calling the
start()function for each triggered plug-in. - A Che-Theia plug-in session runs and interacts with the Che-Theia backend and frontend.
-
When the user closes the Che-Theia browser tab, or the session ended on a timeout limit, Che-Theia notifies all plug-ins with the
stop()function for each triggered plug-in.
4.1.5. Embedded and remote Che-Theia plug-ins
Developer workspaces in Red Hat CodeReady Workspaces provide all dependencies needed to work on a project. The application includes the dependencies needed by all the tools and plug-ins used.
Based on the required dependencies, Che-Theia plug-in can run as:
- Embedded, also know as local
- Remote
4.1.5.1. Embedded (local) plug-ins
The Embedded plug-ins are plug-ins without specific dependencies that are injected into the Che-Theia IDE. These plug-ins use the Node.js runtime, which runs in the IDE container.
Examples:
- Code linting
- New set of commands
- New UI components
To include a Che-Theia plug-in or VS Code extension, define a URL to the plug-in .theia archive binary in the meta.yaml file. See Section 4.2, “Adding a VS Code extension to a workspace”
When starting a workspace, CodeReady Workspaces downloads and unpacks the plug-in binaries and includes them in the Che-Theia editor container. The Che-Theia editor initializes the plug-ins when it starts.
4.1.5.2. Remote plug-ins
The plug-in relies on dependencies or it has a back end. It runs in its own sidecar container, and all dependencies are packaged in the container.
A remote Che-Theia plug-in consist of two parts:
-
Che-Theia plug-in or VS Code extension binaries. The definition in the
meta.yamlfile is the same as for embedded plug-ins. -
Container image definition, for example,
eclipse/che-theia-dev:nightly. From this image, CodeReady Workspaces creates a separate container inside a workspace.
Examples:
- Java Language Server
- Python Language Server
When starting a workspace, CodeReady Workspaces creates a container from the plug-in image, downloads and unpacks the plug-in binaries, and includes them in the created container. The Che-Theia editor connects to the remote plug-ins when it starts.
4.1.5.3. Comparison matrix
- Embedded plug-ins are those Che-Theia plug-ins or VS Code extensions that do not require extra dependencies inside its container.
- Remote plug-ins are containers that contain a plug-in with all required dependencies.
| Configure RAM per plug-in | Environment dependencies | Create separated container | |
|---|---|---|---|
| Remote | TRUE | Plug-in uses dependencies defined in the remote container. | TRUE |
| Embedded | FALSE (users can configure RAM for the whole editor container, but not per plug-in) | Plug-in uses dependencies from the editor container; if container does not include these dependencies, the plug-in fails or does not function as expected. | FALSE |
Depending on your use case and the capabilities provided by your plug-in, select one of the described running modes.
4.1.6. Remote plug-in endpoint
Red Hat CodeReady Workspaces has a remote plug-in endpoint service to start VS Code Extensions and Che-Theia plug-ins in separate containers. Red Hat CodeReady Workspaces injects the remote plug-in endpoint binaries into each remote plug-in container. This service starts remote extensions and plug-ins defined in the plug-in meta.yaml file and connects them to the Che-Theia editor container.
The remote plug-in endpoint creates a plug-in API proxy between the remote plug-in container and the Che-Theia editor container. The remote plug-in endpoint is also an interceptor for some plug-in API parts, which it launches inside a remote sidecar container rather than an editor container. Examples: terminal API, debug API.
The remote plug-in endpoint executable command is stored in the environment variable of the remote plug-in container: PLUGIN_REMOTE_ENDPOINT_EXECUTABLE.
Red Hat CodeReady Workspaces provides two ways to start the remote plug-in endpoint with a sidecar image:
-
Defining a
launchremote plug-in endpoint using a Dockerfile. To use this method, patch an original image and rebuild it. -
Defining a
launchremote plug-in endpoint in the plug-inmeta.yamlfile. Use this method to avoid patching an original image.
4.1.6.1. Defining a launch remote plug-in endpoint using Dockerfile
To start a remote plug-in endpoint, set the PLUGIN_REMOTE_ENDPOINT_EXECUTABLE environment variable in the Dockerfile.
Procedure
Start a remote plug-in endpoint using the
CMDcommand in the Dockerfile:Dockerfile example
FROM fedora:30

RUN dnf update -y && dnf install -y nodejs htop && node -v

RUN mkdir /home/jboss

ENV HOME=/home/jboss

RUN mkdir /projects \
    && chmod -R g+rwX /projects \
    && chmod -R g+rwX "${HOME}"

CMD ${PLUGIN_REMOTE_ENDPOINT_EXECUTABLE}
Start a remote plug-in endpoint using the
ENTRYPOINTcommand in the Dockerfile:Dockerfile example
FROM fedora:30

RUN dnf update -y && dnf install -y nodejs htop && node -v

RUN mkdir /home/jboss

ENV HOME=/home/jboss

RUN mkdir /projects \
    && chmod -R g+rwX /projects \
    && chmod -R g+rwX "${HOME}"

ENTRYPOINT ${PLUGIN_REMOTE_ENDPOINT_EXECUTABLE}
4.1.6.1.1. Using a wrapper script
Some images use a wrapper script to configure permissions inside the container. The Dockertfile ENTRYPOINT command defines this script, which executes the main process defined in the CMD command of the Dockerfile.
CodeReady Workspaces uses images with a wrapper script to provide permission configurations to different infrastructures protected by advanced security. OpenShift Container Platform is an example of such an infrastructure.
Example of a wrapper script:
#!/bin/sh

set -e

export USER_ID=$(id -u)
export GROUP_ID=$(id -g)

if ! whoami >/dev/null 2>&1; then
    echo "${USER_NAME:-user}:x:${USER_ID}:0:${USER_NAME:-user} user:${HOME}:/bin/sh" >> /etc/passwd
fi

# Grant access to projects volume in case of non root user with sudo rights
if [ "${USER_ID}" -ne 0 ] && command -v sudo >/dev/null 2>&1 && sudo -n true > /dev/null 2>&1; then
    sudo chown "${USER_ID}:${GROUP_ID}" /projects
fi

exec "$@"
Example of a Dockerfile with a wrapper script:
Dockerfile example
FROM alpine:3.10.2

ENV HOME=/home/theia

RUN mkdir /projects ${HOME} && \
    # Change permissions to let any arbitrary user
    for f in "${HOME}" "/etc/passwd" "/projects"; do \
      echo "Changing permissions on ${f}" && chgrp -R 0 ${f} && \
      chmod -R g+rwX ${f}; \
    done

ADD entrypoint.sh /entrypoint.sh

ENTRYPOINT [ "/entrypoint.sh" ]
CMD ${PLUGIN_REMOTE_ENDPOINT_EXECUTABLE}
Explanation:
-
The container launches the
/entrypoint.shscript defined in theENTRYPOINTcommand of the Dockerfile. -
The script configures the permissions and executes the command using
exec $@. -
CMDis the argument forENTRYPOINT, and theexec $@command calls${PLUGIN_REMOTE_ENDPOINT_EXECUTABLE}. - The remote plug-in endpoint then starts in the container after permission configuration.
-
The container launches the
4.1.6.2. Defining a launch remote plug-in endpoint in a meta.yaml file
Use this method to re-use images for starting a remote plug-in endpoint without any modifications.
Procedure
Modify the plug-in meta.yaml file properties command and args:
-
command- CodeReady Workspaces uses thecommandproperties to override theDockerfile#ENTRYPOINTvalue. -
args- CodeReady Workspaces uses uses theargsproperties to override theDockerfile#CMDvalue. Example of a YAML file with the
commandandargsproperties modified:apiVersion: v2 category: Language description: "Typescript language features" displayName: Typescript firstPublicationDate: "2019-10-28" icon: "https://www.eclipse.org/che/images/logo-eclipseche.svg" name: typescript publisher: che-incubator repository: "https://github.com/Microsoft/vscode" title: "Typescript language features" type: "VS Code extension" version: remote-bin-with-override-entrypoint spec: containers: - image: "example/fedora-for-ts-remote-plugin-without-endpoint:latest" memoryLimit: 512Mi name: vscode-typescript command: - sh - -c args: - ${PLUGIN_REMOTE_ENDPOINT_EXECUTABLE} extensions: - "https://github.com/che-incubator/ms-code.typescript/releases/download/v1.35.1/che-typescript-language-1.35.1.vsix"Modify
argsinstead ofcommandto use an image with a wrapper script pattern and to keep a call of theentrypoint.shscript:apiVersion: v2 category: Language description: "Typescript language features" displayName: Typescript firstPublicationDate: "2019-10-28" icon: "https://www.eclipse.org/che/images/logo-eclipseche.svg" name: typescript publisher: che-incubator repository: "https://github.com/Microsoft/vscode" title: "Typescript language features" type: "VS Code extension" version: remote-bin-with-override-entrypoint spec: containers: - image: "example/fedora-for-ts-remote-plugin-without-endpoint:latest" memoryLimit: 512Mi name: vscode-typescript args: - sh - -c - ${PLUGIN_REMOTE_ENDPOINT_EXECUTABLE} extensions: - "https://github.com/che-incubator/ms-code.typescript/releases/download/v1.35.1/che-typescript-language-1.35.1.vsix"Red Hat CodeReady Workspaces calls the
entrypoint.shwrapper script defined in theENTRYPOINTcommand of the Dockerfile. The script executes[ ‘sh’, ‘-c”, ‘ ${PLUGIN_REMOTE_ENDPOINT_EXECUTABLE}’ ]using theexec “$@”command.
By modifying the command and args properties of the meta.yaml file, a user can:
- Execute a service at a container start
- Start a remote plug-in endpoint
To make these actions run at the same time:
- Start the service.
- Detach the process.
- Start the remote plug-in endpoint.
4.2. Adding a VS Code extension to a workspace
This section describes how to add a VS Code extension to a workspace using the workspace configuration.
Prerequisites
- The VS Code extension is available in the CodeReady Workspaces plug-in registry, or metadata for the VS Code extension are available. See Section 4.3, “Publishing metadata for a VS Code extension”.
4.2.1. Adding a VS Code extension using the workspace configuration
Prerequisites
- A running instance of CodeReady Workspaces. To install an instance of CodeReady Workspaces, see Installing CodeReady Workspaces.
- An existing workspace defined on this instance of CodeReady Workspaces.
- The VS Code extension is available in the CodeReady Workspaces plug-in registry, or metadata for the VS Code extension are available. See Section 4.3, “Publishing metadata for a VS Code extension”.
Procedure
To add a VS Code extension using the workspace configuration:
Click the Workspaces tab on the Dashboard and select the plug-in destination workspace.
The Workspace <workspace-name> window is opened showing the details of the workspace.
- Click the devfile tab.
Locate the components section, and add a new entry with the following structure:
 - type: chePlugin
   id:
1 - 1
- ID format: <publisher>/<plug-inName>/<plug-inVersion>
CodeReady Workspaces automatically adds the other fields to the new component.
Alternatively, you can link to a
meta.yamlfile hosted on GitHub, using the dedicated reference field.- type: chePlugin reference:1 - 1
https://raw.githubusercontent.com/<username>/<registryRepository>/v3/plugins/<publisher>/<plug-inName>/<plug-inVersion>/meta.yaml
- Restart the workspace for the changes to take effect.
4.2.2. Adding a VS Code extension using recommendations
Prerequisites
- A running instance of CodeReady Workspaces. To install an instance of CodeReady Workspaces, see Installing CodeReady Workspaces.
- Featured VS Code extensions are available in the CodeReady Workspaces plug-in registry.
Procedure
Open a workspace without any existing devfile using the CodeReady Workspaces dashboard:
The recommendations plug-in will scan files, discover languages and install VS Code extensions matching these languages. Disable this feature by setting extensions.ignoreRecommendations to true in the devfile attributes.
The recommendations plug-in can suggest VS Code extensions to install when opening files. It suggests extensions based on the workspace content, allowing the user to work with the given files. Enable this feature by setting extensions.openFileRecommendations to true in the devfile attributes.
4.3. Publishing metadata for a VS Code extension
To use a VS Code extension in a CodeReady Workspaces workspace, CodeReady Workspaces need to consume metadata describing the extension. The CodeReady Workspaces plugin registry is a static website publishing metadata for common VS Code extensions.
How to publish metadata for an additional extension, not available in the CodeReady Workspaces plugin registry using the extension configuration. meta.yaml file.
Prerequisite
- If the VS Code extension requires it, the required associated container image is available.
Procedure
-
Create a
meta.yamlfile. Edit the
meta.yamlfile and provide the necessary information. The file must have the following structure:apiVersion: v21 publisher: myorg2 name: my-vscode-ext3 version: 1.7.24 type: value5 displayName:6 title:7 description:8 icon: https://www.eclipse.org/che/images/logo-eclipseche.svg9 repository:10 category:11 spec: containers:12 - image:13 memoryLimit:14 memoryRequest:15 cpuLimit:16 cpuRequest:17 extensions:18 - https://github.com/redhat-developer/vscode-yaml/releases/download/0.4.0/redhat.vscode-yaml-0.4.0.vsix - https://github.com/SonarSource/sonarlint-vscode/releases/download/1.16.0/sonarlint-vscode-1.16.0.vsix- 1
- Version of the file structure.
- 2
- Name of the plug-in publisher. Must be the same as the publisher in the path.
- 3
- Name of the plug-in. Must be the same as in path.
- 4
- Version of the plug-in. Must be the same as in path.
- 5
- Type of the plug-in. Possible values:
Che Plugin,Che Editor,Theia plugin,VS Code extension. - 6
- A short name of the plug-in.
- 7
- Title of the plug-in.
- 8
- A brief explanation of the plug-in and what it does.
- 9
- The link to the plug-in logo.
- 10
- Optional. The link to the source-code repository of the plug-in.
- 11
- Defines the category that this plug-in belongs to. Should be one of the following:
Editor,Debugger,Formatter,Language,Linter,Snippet,Theme, orOther. - 12
- If this section is omitted, the VS Code extension is added into the Che-Theia IDE container.
- 13
- The Docker image from which the sidecar container will be started. Example:
theia-endpoint-image. - 14
- The maximum RAM which is available for the sidecar container. Example: "512Mi". This value might be overridden by the user in the component configuration.
- 15
- The RAM which is given for the sidecar container by default. Example: "256Mi". This value might be overridden by the user in the component configuration.
- 16
- The maximum CPU amount in cores or millicores (suffixed with "m") which is available for the sidecar container. Examples: "500m", "2". This value might be overridden by the user in the component configuration.
- 17
- The CPU amount in cores or millicores (suffixed with "m") which is given for the sidecar container by default. Example: "125m". This value might be overridden by the user in the component configuration.
- 18
- A list of VS Code extensions run in this sidecar container.
-
Publish the
meta.yamlfile as an HTTP resource by creating a gist on GitHub or GitLab with a file content published there.
4.4. Testing a Visual Studio Code extension in CodeReady Workspaces
Visual Studio Code (VS Code) extensions work in a workspace. VS Code extensions can run in the Che-Theia editor container, or in their own isolated and preconfigured containers with their prerequisites.
This section describes how to test a VS Code extension in CodeReady Workspaces with workspaces and how to review the compatibility of VS Code extensions to check whether a specific API is available.
The extension-hosting sidecar container and the use of the extension in a devfile are optional.
4.4.1. Testing a VS Code extension using GitHub gist
Each workspace can have its own set of plug-ins. The list of plug-ins and the list of projects to clone are defined in the devfile.yaml file.
For example, to enable an AsciiDoc plug-in from the Red Hat CodeReady Workspaces dashboard, add the following snippet to the devfile:
components:
- id: joaopinto/vscode-asciidoctor/latest
type: chePluginTo add a plug-in that is not in the default plug-in registry, build a custom plug-in registry. See Customizing the registries, or, alternatively, use GitHub and the gist service.
Prerequisites
- A running instance of CodeReady Workspaces. To install an instance of CodeReady Workspaces, see Installing CodeReady Workspaces.
- A GitHub account.
Procedure
-
Go to the gist webpage and create a
README.mdfile with the following description:Try Bracket Pair Colorizer extension in Red Hat CodeReady Workspacesand content:Example VS Code extension. (Bracket Pair Colorizer is a popular VS Code extension.) - Click the button.
Clone the gist repository by using the URL from the navigation bar of the browser:
$ git clone https://gist.github.com/<your-github-username>/<gist-id>Example of the output of the
git clonecommandgit clone https://gist.github.com/benoitf/85c60c8c439177ac50141d527729b9d91 Cloning into '85c60c8c439177ac50141d527729b9d9'... remote: Enumerating objects: 3, done. remote: Counting objects: 100% (3/3), done. remote: Total 3 (delta 0), reused 0 (delta 0), pack-reused 0 Unpacking objects: 100% (3/3), done.- 1
- Each gist has a unique ID.
Change the directory:
$ cd <gist-directory-name>1 - 1
- Directory name matching the gist ID.
- Download the plug-in from the VS Code marketplace or from its GitHub page, and store the plug-in file in the cloned directory.
Create a
plugin.yamlfile in the cloned directory to add the definition of this plug-in.Example of the
plugin.yamlfile referencing the.vsixbinary file extensionapiVersion: v2 publisher: CoenraadS name: bracket-pair-colorizer version: 1.0.61 type: VS Code extension displayName: Bracket Pair Colorizer title: Bracket Pair Colorizer description: Bracket Pair Colorizer icon: https://raw.githubusercontent.com/redhat-developer/codeready-workspaces/master/dependencies/che-plugin-registry/resources/images/default.svg?sanitize=true repository: https://github.com/CoenraadS/BracketPair category: Language firstPublicationDate: '2020-07-30' spec:1 extensions: - "{{REPOSITORY}}/CoenraadS.bracket-pair-colorizer-1.0.61.vsix"2 latestUpdateDate: "2020-07-30"Define a memory limit and volumes:
spec: containers: - image: "quay.io/eclipse/che-sidecar-java:8-0cfbacb" name: vscode-java memoryLimit: "1500Mi" volumes: - mountPath: "/home/theia/.m2" name: m2Create a
devfile.yamlthat references theplugin.yamlfile:apiVersion: 1.0.0 metadata: generateName: java-maven- projects: - name: console-java-simple source: type: git location: "https://github.com/che-samples/console-java-simple.git" branch: java1.11 components: - type: chePlugin id: redhat/java11/latest - type: chePlugin1 reference: "{{REPOSITORY}}/plugin.yaml" - type: dockerimage alias: maven image: quay.io/eclipse/che-java11-maven:nightly memoryLimit: 512Mi mountSources: true volumes: - name: m2 containerPath: /home/user/.m2 commands: - name: maven build actions: - type: exec component: maven command: "mvn clean install" workdir: ${CHE_PROJECTS_ROOT}/console-java-simple - name: maven build and run actions: - type: exec component: maven command: "mvn clean install && java -jar ./target/*.jar" workdir: ${CHE_PROJECTS_ROOT}/console-java-simple- 1
- Any other devfile definition is also accepted. The important information in this devfile are the lines defining this external component. It means that an external reference defines the plug-in and not an ID, which pointing to a definition in the default plug-in registry.
Verify there are 4 files in the current Git directory:
$ ls -la
.git
CoenraadS.bracket-pair-colorizer-1.0.61.vsix
README.md
devfile.yaml
plugin.yaml
Before committing the files, add a pre-commit hook to update the
{{REPOSITORY}}variable to the public external raw gist link:Create a
.git/hooks/pre-commitfile with this content:#!/bin/sh # get modified files FILES=$(git diff --cached --name-only --diff-filter=ACMR "*.yaml" | sed 's| |\\ |g') # exit fast if no files found [ -z "$FILES" ] && exit 0 # grab remote origin origin=$(git config --get remote.origin.url) url="${origin}/raw" # iterate on files and add the good prefix pattern for FILE in ${FILES}; do sed -e "s#{{REPOSITORY}}#${url}#g" "${FILE}" > "${FILE}.back" mv "${FILE}.back" "${FILE}" done # Add back to staging echo "$FILES" | xargs git add exit 0The hook replaces the
{{REPOSITORY}}macro and adds the external raw link to the gist.Make the script executable:
$ chmod u+x .git/hooks/pre-commit
Commit and push the files:
# Add files
$ git add *

# Commit
$ git commit -m "Initial Commit for the test of our extension"
[master 98dd370] Initial Commit for the test of our extension
 3 files changed, 61 insertions(+)
 create mode 100644 CoenraadS.bracket-pair-colorizer-1.0.61.vsix
 create mode 100644 devfile.yaml
 create mode 100644 plugin.yaml

# and push the files to the main branch
$ git push origin
Visit the gist website and verify that all links have the correct public URL and do not contain any
{{REPOSITORY}}variables. To reach the devfile:$ echo "$(git config --get remote.origin.url)/raw/devfile.yaml"or:
$ echo "https://<che-server>/#$(git config --get remote.origin.url)/raw/devfile.yaml"
4.4.2. Verifying the VS Code extension API compatibility level
Che-Theia does not fully support the VS Code extensions API. The vscode-theia-comparator is used to analyze the compatibility between the Che-Theia plug-in API and the VS Code extension API. This tool runs nightly, and the results are published on the vscode-theia-comparator GitHub page.
Prerequisites
- Personal GitHub access token. See Creating a personal access token for the command line. A GitHub access token is required to increase the GitHub download limit for your IP address.
Procedure
To run the vscode-theia comparator manually:
-
Clone the vscode-theia-comparator repository, and build it using the
yarncommand. -
Set the
GITHUB_TOKENenvironment variable to your token. -
Execute the
yarn run generatecommand to generate a report. -
Open the
out/status.htmlfile to view the report.
4.5. Using alternative IDEs in CodeReady Workspaces
Extending Red Hat CodeReady Workspaces developer workspaces using different IDEs (integrated development environments) enables:
- Re-purposing the environment for different use cases.
- Providing a dedicated custom IDE for specific tools.
- Providing different perspectives for individual users or groups of users.
Red Hat CodeReady Workspaces provides a default web IDE to be used with the developer workspaces. This IDE is completely decoupled. You can bring your own custom IDE for Red Hat CodeReady Workspaces:
- Built from Eclipse Theia, which is a framework to build web IDEs. Example: Sirius on the web.
- Completely different web IDEs, such as Jupyter, Eclipse Dirigible, or others. Example: Jupyter in Red Hat CodeReady Workspaces workspaces.
Bringing custom IDE built from Eclipse Theia
- Creating your own custom IDE based on Eclipse Theia.
- Adding CodeReady Workspaces-specific tools to your custom IDE.
- Packaging your custom IDE into the available editors for CodeReady Workspaces.
Bringing your completely different web IDE into CodeReady Workspaces
- Packaging your custom IDE into the available editors for CodeReady Workspaces.
4.6. Support for JetBrains IDEs
This section contains information about supported JetBrains IDEs that can be used in Red Hat CodeReady Workspaces workspaces.
Red Hat CodeReady Workspaces supports running a workspace with the following list of JetBrains IDEs:
- IntelliJ Idea Community Edition
- IntelliJ Idea Ultimate Edition
- WebStorm
List of JetBrains IDEs that are planned to be supported:
- GoLand
- PhpStorm
- PyCharm Professional Edition
- PyCharm Community Edition
The version of supported JetBrains products should is 2018.1 or higher.
The following sections describe how to create an image with a specific IDE and workspace based on the built image:
4.6.1. Using IntelliJ Idea Community Edition
Procedure
- Clone the che-editor-intellij-community repository, which is needed to build IntelliJ Idea Community Edition located under the che-incubator organization.
Build IntelliJ Idea Community Edition by calling the following command inside the repository folder:
$ podman build -t idea-ic --build-arg PRODUCT_NAME=ideaIC .This command builds an image with a
2020.2.3version by default.Tag and push the built image to a user repository:
$ podman tag idea-ic:latest <username>/idea-ic:latest
$ podman push <username>/idea-ic:latest
Use this image as the CodeReady Workspaces editor. To achieve this, create two YAML configuration files:
workspace.yaml– workspace configuration. Do not forget to provide a correct URL to themeta.yamlfile:metadata: name: che-ideaic components: - type: cheEditor reference: '<URL to the meta.yaml>' alias: ideaic-editor apiVersion: 1.0.0meta.yaml– CodeReady Workspaces editor configuration. Do not forget to replace<username>with the user name of the repository to which the image is pushed:apiVersion: v2 publisher: <username> name: ideaic-NOVNC version: 2020.2.3 type: Che Editor displayName: IntelliJ IDEA Community Edition title: IntelliJ IDEA Community Edition (in browser using noVNC) as editor for Red Hat CodeReady Workspaces description: IntelliJ IDEA Community Edition running on the Web with noVNC icon: https://resources.jetbrains.com/storage/products/intellij-idea/img/meta/intellij-idea_logo_300x300.png category: Editor repository: https://github.com/che-incubator/che-editor-intellij-community firstPublicationDate: "2020-10-27" spec: endpoints: - name: "intellij" public: true targetPort: 8080 attributes: protocol: http type: ide path: /vnc.html?resize=remote&autoconnect=true&reconnect=true containers: - name: ideaic-novnc image: "<username>/idea-ic:latest" mountSources: true volumes: - mountPath: "/JetBrains/ideaIC" name: ideaic-configuration ports: - exposedPort: 8080 memoryLimit: "2048M"
4.6.2. Using IntelliJ Idea Ultimate Edition
Procedure
- Clone the che-editor-intellij-community repository, which is needed to build IntelliJ Idea Community Edition located under the che-incubator organization.
Build IntelliJ Idea Ultimate Edition by calling the following command inside the repository folder:
$ podman build -t idea-iu --build-arg PRODUCT_NAME=ideaIU .This command builds an image with a
2020.2.3version by default.Tag and push the built image to a user repository:
$ podman tag idea-iu:latest <username>/idea-iu:latest $ podman push <username>/idea-iu:latest- Provision the activation code for offline use to be able to use WebStorm with a registered license. See section Section 4.6.4, “Provisioning JetBrains activation code for offline use”.
Create a workspace with the following
workspace.yamlandmeta.yamlfiles:workspace.yaml– workspace configuration. Do not forget to provide a correct URL to themeta.yamlfile:metadata: name: che-ideaiu components: - type: cheEditor reference: '<URL to the meta.yaml>' alias: ideaiu-editor automountWorkspaceSecrets: true apiVersion: 1.0.0NoteIn the current workspace definition, there is a new property:
automountWorkspaceSecrets: true. This property instructs Red Hat CodeReady Workspaces to provision secrets into a specific component. In this case, it provisions it into the CodeReady Workspaces editor based on IntelliJ Idea Ultimate Edition. This parameter is mandatory to successfully register the IDE with an activation code for offline use.meta.yaml– CodeReady Workspaces editor configuration. Do not forget to replace<username>with the user name of the repository to which the image is pushed:apiVersion: v2 publisher: <username> name: ideaIU-NOVNC version: 2020.2.3 type: Che Editor displayName: IntelliJ IDEA Ultimate Edition title: IntelliJ IDEA Ultimate Edition (in browser using noVNC) as editor for Red Hat CodeReady Workspaces description: IntelliJ IDEA Ultimate Edition running on the Web with noVNC icon: https://resources.jetbrains.com/storage/products/intellij-idea/img/meta/intellij-idea_logo_300x300.png category: Editor repository: https://github.com/che-incubator/che-editor-intellij-community firstPublicationDate: "2020-10-27" spec: endpoints: - name: "intellij" public: true targetPort: 8080 attributes: protocol: http type: ide path: /vnc.html?resize=remote&autoconnect=true&reconnect=true containers: - name: ideaiu-novnc image: "<username>/idea-iu:latest" mountSources: true volumes: - mountPath: "/JetBrains/ideaIU" name: ideaiu-configuration ports: - exposedPort: 8080 memoryLimit: "2048M"
4.6.3. Using WebStorm
Procedure
- Clone the che-editor-intellij-community repository, which is needed to build IntelliJ Idea Community Edition located under the che-incubator organization.
Build the image:
$ podman build -t webstorm --build-arg PRODUCT_NAME=WebStorm .This command builds an image with a
2020.2.3version by default.Tag and push the built image to a user repository:
$ podman tag webstorm:latest <username>/webstorm:latest $ podman push <username>/webstorm:latest- Provision the activation code for offline use to be able to use WebStorm with a registered license. See section Section 4.6.4, “Provisioning JetBrains activation code for offline use”.
Create a workspace with the following
workspace.yamlandmeta.yamlfiles:workspace.yaml– workspace configuration. Do not forget to provide a correct URL to themeta.yamlfile:metadata: name: che-webstorm components: - type: cheEditor reference: '<URL to meta.yaml>' alias: webstorm-editor automountWorkspaceSecrets: true apiVersion: 1.0.0NoteIn the current workspace definition, there is a new property:
automountWorkspaceSecrets: true. This property instructs Red Hat CodeReady Workspaces to provision secrets into a specific component. In this case, it provisions it into the CodeReady Workspaces editor based on IntelliJ Idea Ultimate Edition. This parameter is mandatory to successfully register the IDE with an activation code for offline use.meta.yaml– CodeReady Workspaces editor configuration. Do not forget to replace<username>with the user name of the repository to which the image is pushed:apiVersion: v2 publisher: <username> name: webstorm-NOVNC version: 2020.2.3 type: Che Editor displayName: WebStorm title: WebStorm (in browser using noVNC) as editor for Red Hat CodeReady Workspaces description: WebStorm running on the Web with noVNC icon: https://resources.jetbrains.com/storage/products/webstorm/img/meta/webstorm_logo_300x300.png category: Editor repository: https://github.com/che-incubator/che-editor-intellij-community firstPublicationDate: "2020-10-27" spec: endpoints: - name: "intellij" public: true targetPort: 8080 attributes: protocol: http type: ide path: /vnc.html?resize=remote&autoconnect=true&reconnect=true containers: - name: webstorm-novnc image: "<username>/webstorm:latest" mountSources: true volumes: - mountPath: "/JetBrains/WebStorm" name: webstorm-configuration ports: - exposedPort: 8080 memoryLimit: "2048M"
4.6.4. Provisioning JetBrains activation code for offline use
An activation code for offline use is a file with a license code that can be retrieved from the license management section of your JetBrains account for the license that is assigned to you. When you purchase a personal subscription or are assigned a commercial subscription by your organization, you receive an email prompting you to create a JetBrains account that becomes connected with the license.
When using an activation code to activate a product, you need to generate a new activation code and apply it to your product each time the subscription is renewed.
Prerequisites
- JetBrains account
- Personal or organization subscription
Procedure
Retrieve the activation code from the JetBrains account:
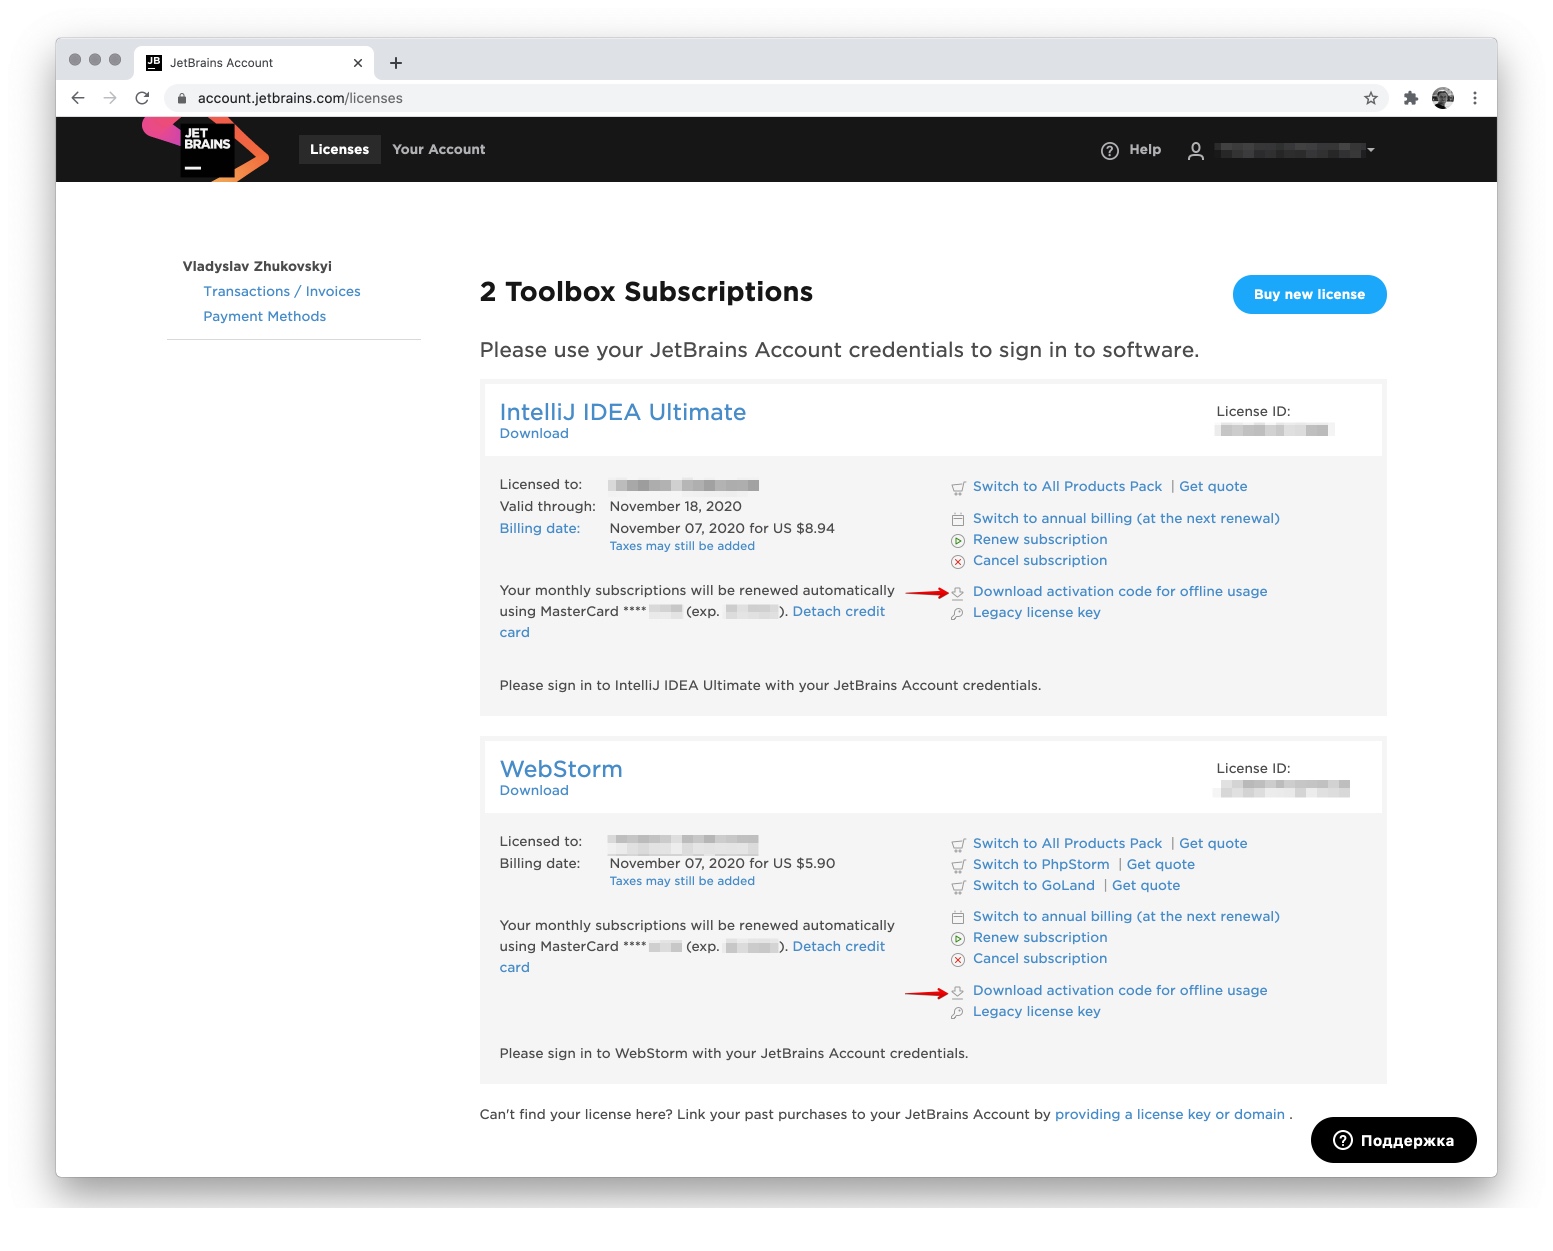
JetBrains provides a zip archive with two types of the activation code. Use the
<License ID> - for 2018.1 or later.txtfile:
- Provision the activation code for offline use with Che. This procedure is performed through the OpenShift Secrets.
Create a OpenShift Secret to instruct CodeReady Workspaces to mount the activation code into a container based on JetBrains specific product:
apiVersion: v1
kind: Secret
metadata:
  name: <secret name>
1 labels: app.kubernetes.io/component: workspace-secret app.kubernetes.io/part-of: che.eclipse.org annotations: che.eclipse.org/automount-workspace-secret: 'false' che.eclipse.org/mount-path: /tmp/ che.eclipse.org/mount-as: file data: <product name (ideaIU or WebStorm)>.key: <base64-encoded data content>2 - 1
<secret name>– The section that specifies the secret name. It may have a different name, for example,ideaiu-offline-activation-code. Provide the secret name in lowercase.- 2
- Product name and activation code:
-
<product name (ideaIU or WebStorm)>– Replace with the JetBrains product name. See section Section 4.6.4.1, “JetBrains product-name mapping”. -
<base64-encoded data content>– The activation code content encoded in base64.
-
Use the automount-workspace-secret option set to false to disable the mounting process until it is explicitly requested in a devfile component using the automountWorkspaceSecrets:true property. See the workspace.yaml example file above. This is the default behavior to avoid mounting the activation code into every container except specific ones that have to work with it.
As a result, in the Che Editor, the file with the activation code for offline use is mounted to the /tmp/ideaIU.key or /tmp/WebStorm.key path (or similar - based on the type of the build).
IntelliJ Idea Community Edition does not require this procedure. This has to be done for JetBrains products that need to be registered.
4.6.4.1. JetBrains product-name mapping
This section provides mapping used internally between JetBrains products and the product name during image build.
| JetBrains Product | PRODUCT_NAME |
|---|---|
| IntelliJ Idea Community Edition |
|
| IntelliJ Idea Ultimate Edition |
|
| WebStorm |
|
4.7. Theia-based IDEs
This section describes how to provide a custom IDE, based on Eclipse Theia framework.
To use a Theia-based IDE in Red Hat CodeReady Workspaces as an editor, you need to prepare two main components:
- a Docker image containing your IDE
-
the Che editor descriptor file -
meta.yaml
Procedure
Describe the IDE with an editor descriptor -
meta.yamlfile:version: 1.0.0 editors: - id: eclipse/che-theia/next title: Eclipse Theia development version. displayName: theia-ide description: Eclipse Theia, get the latest release each day. icon: https://raw.githubusercontent.com/theia-ide/theia/master/logo/theia-logo-no-text-black.svg?sanitize=true repository: https://github.com/eclipse/che-theia firstPublicationDate: "2021-01-01" endpoints: - name: "theia" public: true targetPort: 3100 attributes: protocol: http type: ide secure: true cookiesAuthEnabled: true discoverable: false containers: - name: theia-ide image: "<your-ide-image>" mountSources: true ports: - exposedPort: 3100 memoryLimit: "512M"targetPortandexposedPortmust be the same as the Theia-based IDE running inside the container. Replace<your-ide-image>with the name of the IDE image. Themeta.yamlfile should be publicly accessible through an HTTP(S) link.Add your editor to a Devfile:
apiVersion: 1.0.0
metadata:
  name: che-theia-based-ide
components:
  - type: cheEditor
    reference: '<meta.yaml URL>'
<meta.yaml URL>should point to the publicly hostedmeta.yamlfile described in the previous step.
4.8. Adding tools to CodeReady Workspaces after creating a workspace
When installed in a workspace, CodeReady Workspaces plug-ins bring new capabilities to CodeReady Workspaces. Plug-ins consist of a Che-Theia plug-in, metadata, and a hosting container. These plug-ins may provide the following capabilities:
- Integrating with other systems, including OpenShift.
- Automating some developer tasks, such as formatting, refactoring, and running automated tests.
- Communicating with multiple databases directly from the IDE.
- Enhanced code navigation, auto-completion, and error highlighting.
This chapter provides basic information about installing, enabling, and using CodeReady Workspaces plug-ins in workspaces.
4.8.1. Additional tools in the CodeReady Workspaces workspace
CodeReady Workspaces plug-ins are extensions to the Che-Theia IDE that come bundled with container images. These images contain the native prerequisites of their respective extensions. For example, the OpenShift command-line tool is bundled with a command to install it, which ensures the proper functionality of the OpenShift Connector plug-in, all available in the dedicated image.
Plug-ins can also include metadata to define a description, categorization tags, and an icon. CodeReady Workspaces provides a registry of plug-ins available for installation into the user’s workspace.
The Che-Theia IDE is generally compatible with the VS Code extensions API and VS Code extensions are automatically compatible with Che-Theia. These extensions are possible to package as CodeReady Workspaces plug-ins by combining them with their dependencies. By default, CodeReady Workspaces includes a plug-in registry containing common plug-ins.
Adding a plug-in
Using the Dashboard:
Add a plug-in directly into a devfile using the Devfile tab.
The devfile can also further the plug-in configuration, such as defining memory or CPU consumption.
Using the Che-Theia IDE:
- By pressing Ctrl+Shift+J or by navigating to View → Plugins.
Additional resources
4.8.2. Adding a language support plug-in to a CodeReady Workspaces workspace
This procedure describes adding a tool to an existing workspace by enabling a dedicated plug-in from the Dashboard.
To add tools that are available as plug-ins into a CodeReady Workspaces workspace, use one of the following methods:
This procedure uses the Language Support for Java plug-in as an example.
Prerequisites
- A running instance of CodeReady Workspaces. To install an instance of CodeReady Workspaces, see Installing CodeReady Workspaces.
An existing workspace defined in this instance of Red Hat CodeReady Workspaces; see:
The workspace must be in a stopped state. To stop a workspace:
- Navigate to the CodeReady Workspaces Dashboard. See Section 1.1, “Navigating CodeReady Workspaces using the Dashboard”.
- In the Dashboard, click the Workspaces menu to open the workspaces list and locate the workspace.
- On the same row with the displayed workspace, on the right side of the screen, click the square button to stop the workspace.
- Wait a few seconds for the workspace to stop (the workspace’s icon on the list will turn grey), then configure the workspace by selecting it.
Procedure
To add the plug-in from the Plug-in registry to an existing CodeReady Workspaces workspace, use one of the following methods:
Installing the plug-in by adding content to the devfile.
- Navigate to the Devfile tab. The devfile YAML is displayed.
Locate the
componentssection of the devfile and add the following lines to add the Java language plugin with Java 8 to the workspace:- id: redhat/java8/latest type: chePluginAn example of the final result:
components: - id: redhat/php/latest memoryLimit: 1Gi type: chePlugin - id: redhat/php-debugger/latest memoryLimit: 256Mi type: chePlugin - mountSources: true endpoints: - name: 8080/tcp port: 8080 memoryLimit: 512Mi type: dockerimage volumes: - name: composer containerPath: {prod-home}/.composer - name: symfony containerPath: {prod-home}/.symfony alias: php image: 'quay.io/eclipse/che-php-7:nightly' - id: redhat/java8/latest type: chePlugin- On the bottom right side of the screen, save the changes using the button. After changes are saved, the workspace can be restarted and will include the new plug-in.
Additional resources
4.9. Using private container registries
This section describes the necessary steps to use container images from private container registries.
Prerequisites
- A running instance of CodeReady Workspaces. See Installing CodeReady Workspaces.
Procedure
- Navigate to the CodeReady Workspaces Dashboard. See Section 1.1, “Navigating CodeReady Workspaces using the Dashboard”.
Navigate to User Preferences.
- Click on your username in the top right corner.
- Click the tab.
Click the button in tab and execute following actions:
- Enter the container registry domain name in the Registry field.
- Optionally, enter the username of your account at this registry in the Username field.
- Enter the password in the Password field to authenticate in the container registry.
- Click the button.
Verification
- See that there is a new entry in the tab.
- Create a workspace that uses a container image from the specified container registry. See Section 3.6, “Configuring a workspace using a devfile”.
Additional resources
Chapter 5. Using artifact repositories in a restricted environment
This section describes how to manually configure various technology stacks to work with artifacts from in-house repositories using self-signed certificates.
5.1. Using Maven artifact repositories
Maven downloads artifacts that are defined in two locations:
-
Artifact repositories defined in a
pom.xmlfile of the project. Configuring repositories inpom.xmlis not specific to Red Hat CodeReady Workspaces. For more information, see the Maven documentation about the POM. -
Artifact repositories defined in a
settings.xmlfile. By default,settings.xmlis located at`~/.m2/settings.xml.
5.1.1. Defining repositories in settings.xml
To specify your own artifact repositories at example.server.org, use the settings.xml file. To do that, ensure, that settings.xml is present in all the containers that use Maven tools, in particular the Maven container and the Java plug-in container.
By default, settings.xml is located at the <home dir>/.m2 directory which is already on persistent volume in Maven and Java plug-in containers and you don’t need to re-create the file each time you restart the workspace if it isn’t in ephemeral mode.
In case you have another container that uses Maven tools and you are about to share <home dir>/.m2 folder with this container, you have to specify the custom volume for this specific component in the devfile:
apiVersion: 1.0.0
metadata:
  name: MyDevfile
components:
  - type: chePlugin
    alias: maven-tool
    id: plugin/id
    volumes:
    - name: m2
      containerPath: <home dir>/.m2
Procedure
Configure your
settings.xmlfile to use artifact repositories atexample.server.org:<settings> <profiles> <profile> <id>my-nexus</id> <pluginRepositories> <pluginRepository> <id>my-nexus-snapshots</id> <releases> <enabled>false</enabled> </releases> <snapshots> <enabled>true</enabled> </snapshots> <url>http://example.server.org/repository/maven-snapshots/</url> </pluginRepository> <pluginRepository> <id>my-nexus-releases</id> <releases> <enabled>true</enabled> </releases> <snapshots> <enabled>false</enabled> </snapshots> <url>http://example.server.org/repository/maven-releases/</url> </pluginRepository> </pluginRepositories> <repositories> <repository> <id>my-nexus-snapshots</id> <releases> <enabled>false</enabled> </releases> <snapshots> <enabled>true</enabled> </snapshots> <url>http://example.server.org/repository/maven-snapshots/</url> </repository> <repository> <id>my-nexus-releases</id> <releases> <enabled>true</enabled> </releases> <snapshots> <enabled>false</enabled> </snapshots> <url>http://example.server.org/repository/maven-releases/</url> </repository> </repositories> </profile> </profiles> <activeProfiles> <activeProfile>my-nexus</activeProfile> </activeProfiles> </settings>
5.1.2. Defining Maven settings.xml file across workspaces
To use your own settings.xml file across all your workspaces, create a Secret object (with a name of your choice) in the same project as the workspace. Put the contents of the required settings.xml in the data section of the Secret (possibly along with other files that should reside in the same directory). Labelling and annotating this Secret according to Section 3.10.1, “Mounting a secret as a file into a workspace container” ensures that the contents of the Secret is mounted into the workspace Pod. Note that you need to restart any previously running workspaces for them to use this Secret.
Prerequisites
This is required to set your private credentials to a Maven repository. See the Maven documentation Settings.xml#Servers for additional information.
To mount this settings.xml:
<settings xmlns="http://maven.apache.org/SETTINGS/1.0.0"
          xmlns:xsi="http://www.w3.org/2001/XMLSchema-instance"
          xsi:schemaLocation="http://maven.apache.org/SETTINGS/1.0.0
                              https://maven.apache.org/xsd/settings-1.0.0.xsd">
  <servers>
    <server>
      <id>repository-id</id>
      <username>username</username>
      <password>password123</password>
    </server>
  </servers>
</settings>
Procedure
Convert
settings.xmlto base64:$ cat settings.xml | base64Copy the output to a new file,
secret.yaml, which also defines needed annotations and labels:apiVersion: v1 kind: Secret metadata: name: maven-settings-secret labels: app.kubernetes.io/part-of: che.eclipse.org app.kubernetes.io/component: workspace-secret annotations: che.eclipse.org/automount-workspace-secret: "true" che.eclipse.org/mount-path: /home/jboss/.m2 che.eclipse.org/mount-as: file type: Opaque data: settings.xml: PHNldHRpbmdzIHhtbG5zPSJodHRwOi8vbWF2ZW4uYXBhY2hlLm9yZy9TRVRUSU5HUy8xLjAuMCIKICAgICAgICAgIHhtbG5zOnhzaT0iaHR0cDovL3d3dy53My5vcmcvMjAwMS9YTUxTY2hlbWEtaW5zdGFuY2UiCiAgICAgICAgICB4c2k6c2NoZW1hTG9jYXRpb249Imh0dHA6Ly9tYXZlbi5hcGFjaGUub3JnL1NFVFRJTkdTLzEuMC4wCiAgICAgICAgICAgICAgICAgICAgICAgICAgICAgIGh0dHBzOi8vbWF2ZW4uYXBhY2hlLm9yZy94c2Qvc2V0dGluZ3MtMS4wLjAueHNkIj4KICA8c2VydmVycz4KICAgIDxzZXJ2ZXI+CiAgICAgIDxpZD5yZXBvc2l0b3J5LWlkPC9pZD4KICAgICAgPHVzZXJuYW1lPnVzZXJuYW1lPC91c2VybmFtZT4KICAgICAgPHBhc3N3b3JkPnBhc3N3b3JkMTIzPC9wYXNzd29yZD4KICAgIDwvc2VydmVyPgogIDwvc2VydmVycz4KPC9zZXR0aW5ncz4KCreate this secret in the cluster:
$ oc apply -f secret.yaml-
Start a new workspace. The
mavencontainer contains a file/home/jboss/.m2/settings.xmlwith your original content.
5.1.2.1. OpenShift 3.11 and OpenShift <1.13
On OpenShift 3.11 , it’s impossible to have multiple VolumeMounts at same path so having devfile with volume /home/jboss/.m2 and secret at /home/jboss/.m2/settings.xml would resolve into the conflict. On these clusters use /home/jboss/.m2/repository as a volume for maven repository in the devfile:
apiVersion: 1.0.0
metadata:
  ...
components:
 - type: dockerimage
   alias: maven
   image: maven:3.11
   volumes:
     - name: m2
       containerPath: /home/jboss/.m2/repository
   ...
5.1.3. Using self-signed certificates in Maven projects
Internal artifact repositories often do not have a certificate signed by an authority that is trusted by default in Java. They are mainly signed by an internal company authority or are self-signed. Configure your tools to accept these certificates by adding them to the Java truststore.
Procedure
Obtain a server certificate file from the repository server. It is customary for administrators to provide certificates of internal artifact servers as OpenShift secrets (see Importing untrusted TLS certificates to CodeReady Workspaces). The relevant server certificates will be mounted in
/public-certsin every container in the workspace.Copy the original Java truststore file:
$ mkdir /projects/maven
$ cp $JAVA_HOME/lib/security/cacerts /projects/maven/truststore.jks
$ chmod +w /projects/maven/truststore.jks
Import the certificate into the Java truststore file
$ keytool -import -noprompt -file /public-certs/nexus.cer -alias nexus -keystore /projects/maven/truststore.jks -storepass changeit
Certificate was added to keystore
Add the truststore file.
In the Maven container:
Add the
javax.net.sslsystem property to theMAVEN_OPTSenvironment variable:- mountSources: true alias: maven type: dockerimage ... env: -name: MAVEN_OPTS value: >- -Duser.home=/projects/maven -Djavax.net.ssl.trustStore=/projects/maven/truststore.jks -Djavax.net.ssl.trustStorePassword=changeit- Restart the workspace.
In the Java plug-in container:
In the devfile, add the
javax.net.sslsystem property for the Java language server:components: - id: redhat/java11/latest type: chePlugin preferences: java.jdt.ls.vmargs: >- -noverify -Xmx1G -XX:+UseG1GC -XX:+UseStringDeduplication -Duser.home=/projects/maven -Djavax.net.ssl.trustStore=/projects/maven/truststore.jks -Djavax.net.ssl.trustStorePassword=changeit [...]
5.2. Using Gradle artifact repositories
5.2.1. Downloading different versions of Gradle
The recommended way to download any version of Gradle is by using the Gradle Wrapper script. If your project does not have a gradle/wrapper directory, run $ gradle wrapper to configure the Wrapper.
Prerequisites
- The Gradle Wrapper is present in your project.
Procedure
To download a Gradle version from a non-standard location, change your Wrapper settings in /projects/<your_project>/gradle/wrapper/gradle-wrapper.properties:
Change the
distributionUrlproperty to point to a URL of the Gradle distributionZIPfile:properties distributionUrl=http://<url_to_gradle>/gradle-6.1-bin.zip
Alternatively, you may place a Gradle distribution zip file locally in /project/gradle in your workspace.
Change the
distributionUrlproperty to point to a local address of the Gradle distribution zip file:properties distributionUrl=file\:/projects/gradle/gradle-6.1-bin.zip
5.2.2. Configuring global Gradle repositories
Use an initialization script to configure global repositories for the workspace. Gradle performs extra configuration before projects are evaluated, and this configuration is used in each Gradle project from the workspace.
Procedure
To set global repositories for Gradle that could be used in each Gradle project in the workspace, create an init.gradle script in the ~/.gradle/ directory:
allprojects {
  repositories {
    mavenLocal ()
    maven {
      url "http://repo.mycompany.com/maven"
      credentials {
        username "admin"
        password "my_password"
      }
    }
  }
}
This file configures Gradle to use a local Maven repository with the given credentials.
The ~/.gradle directory does not persist in the current Java plug-in versions, so you must create the init.gradle script at each workspace start in the Java plug-in sidecar container.
5.2.3. Using self-signed certificates in Gradle projects
Internal artifact repositories often do not have a certificate signed by an authority that is trusted by default in Java. They are mainly signed by an internal company authority or are self-signed. Configure your tools to accept these certificates by adding them to the Java truststore.
Procedure
Obtain a server certificate file from the repository server. It is customary for administrators to provide certificates of internal artifact servers as OpenShift secrets (see Importing untrusted TLS certificates to CodeReady Workspaces). The relevant server certificates will be mounted in
/public-certsin every container in the workspace.Copy the original Java truststore file:
$ mkdir /projects/maven
$ cp $JAVA_HOME/lib/security/cacerts /projects/maven/truststore.jks
$ chmod +w /projects/maven/truststore.jks
Import the certificate into the Java truststore file
$ keytool -import -noprompt -file /public-certs/nexus.cer -alias nexus -keystore /projects/maven/truststore.jks -storepass changeit Certificate was added to keystore-
Upload the truststore file to
/projects/gradle/truststore.jksto make it available for all containers.
Add the truststore file in the Gradle container.
Add the
javax.net.sslsystem property to theJAVA_OPTSenvironment variable:- mountSources: true alias: maven type: dockerimage ... env: -name: JAVA_OPTS value: >- -Duser.home=/projects/gradle -Djavax.net.ssl.trustStore=/projects/maven/truststore.jks -Djavax.net.ssl.trustStorePassword=changeit
Additional resources
5.3. Using Python artifact repositories
5.3.1. Configuring Python to use a non-standard registry
To specify a non-standard repository for use by the Python pip tool, set the PIP_INDEX_URL environment variable.
Procedure
In your devfile, configure the
PIP_INDEX_URLenvironment variable for the language support and for the development container components:- id: ms-python/python/latest memoryLimit: 512Mi type: chePlugin env: - name: 'PIP_INDEX_URL' value: 'https://<username>:<password>@pypi.company.com/simple' - mountSources: true memoryLimit: 512Mi type: dockerimage alias: python image: 'registry.redhat.io/codeready-workspaces/plugin-java8-rhel8:2.5' env: - name: 'PIP_INDEX_URL' value: 'https://<username>:<password>@pypi.company.com/simple'
5.3.2. Using self-signed certificates in Python projects
Internal artifact repositories often do not have a self-signed TLS certificate signed by an authority that is trusted by default. They are mainly signed by an internal company authority or are self-signed. Configure your tools to accept these certificates.
Python uses certificates from a file defined in the PIP_CERT environment variable.
Procedure
Obtain the certificate used by the pip server in the Privacy-Enhanced Mail (PEM) format. It is customary for administrators to provide certificates of internal artifact servers as OpenShift secrets (see Importing untrusted TLS certificates to CodeReady Workspaces). The relevant server certificates will be mounted in
/public-certsin every container in the workspace.Notepip accepts certificates in the Privacy-Enhanced Mail (PEM) format only. Convert the certificate to the PEM format using OpenSSL if necessary.
Configure the devfile:
 - id: ms-python/python/latest
    memoryLimit: 512Mi
    type: chePlugin
    env:
      - name: 'PIP_INDEX_URL'
        value: 'https://<username>:<password>@pypi.company.com/simple'
      - value: '/projects/tls/rootCA.pem'
        name: 'PIP_CERT'
  - mountSources: true
    memoryLimit: 512Mi
    type: dockerimage
    alias: python
    image: 'registry.redhat.io/codeready-workspaces/plugin-java8-rhel8:2.5'
    env:
      - name: 'PIP_INDEX_URL'
        value: 'https://<username>:<password>@pypi.company.com/simple'
      - value: '/projects/tls/rootCA.pem'
        name: 'PIP_CERT'
5.4. Using Go artifact repositories
To configure Go in a restricted environment, use the GOPROXY environment variable and the Athens module data store and proxy.
5.4.1. Configuring Go to use a non-standard-registry
Athens is a Go module data store and proxy with many configuration options. It can be configured to act only as a module data store and not as a proxy. An administrator can upload their Go modules to the Athens data store and have them available across their Go projects. If a project tries to access a Go module that is not in the Athens data store, the Go build fails.
To work with Athens, configure the
GOPROXYenvironment variable in the devfile of your CLI container:components: - mountSources: true type: dockerimage alias: go-cli image: 'quay.io/eclipse/che-golang-1.12:7.7.0' ... - value: /tmp/.cache name: GOCACHE - value: 'http://your.athens.host' name: GOPROXY
5.4.2. Using self-signed certificates in Go projects
Internal artifact repositories often do not have a self-signed TLS certificate signed by an authority that is trusted by default. They are typically signed by an internal company authority or are self-signed. Configure your tools to accept these certificates.
Go uses certificates from a file defined in the SSL_CERT_FILE environment variable.
Procedure
-
Obtain the certificate used by the Athens server in the Privacy-Enhanced Mail (PEM) format. It is customary for administrators to provide certificates of internal artifact servers as OpenShift secrets (see Importing untrusted TLS certificates to CodeReady Workspaces). The relevant server certificates will be mounted in
/public-certsin every container in the workspace. Add the appropriate environment variables to your devfile:
components:
- mountSources: true
  type: dockerimage
  alias: go-cli
  image: 'registry.redhat.io/codeready-workspaces/stacks-golang-rhel8:2.5'
  ...
  - value: /tmp/.cache
    name: GOCACHE
  - value: 'http://your.athens.host'
    name: GOPROXY
  - value: '/projects/tls/rootCA.crt'
    name: SSL_CERT_FILE
Additional resources
5.5. Using NuGet artifact repositories
To configure NuGet in a restricted environment, modify the nuget.config file and use the SSL_CERT_FILE environment variable in the devfile to add self-signed certificates.
5.5.1. Configuring NuGet to use a non-standard artifact repository
NuGet searches for configuration files anywhere between the solution directory and the driver root directory. If you put the nuget.config file in the /projects directory, the nuget.config file defines NuGet behavior for all projects in /projects.
Procedure
Create and place the
nuget.configfile in the/projectsdirectory.Example
nuget.configwith a Nexus repository hosted atnexus.example.org:<?xml version="1.0" encoding="UTF-8"?> <configuration> <packageSources> <add key="nexus2" value="https://nexus.example.org/repository/nuget-hosted/"/> </packageSources> <packageSourceCredentials> <nexus2> <add key="Username" value="user" /> <add key="Password" value="..." /> </nexus2> </packageSourceCredentials> </configuration>
5.5.2. Using self-signed certificates in NuGet projects
Internal artifact repositories often do not have a self-signed TLS certificate signed by an authority that is trusted by default. They are mainly signed by an internal company authority or are self-signed. Configure your tools to accept these certificates.
Procedure
-
Obtain the certificate used by the .NET server in the Privacy-Enhanced Mail (PEM) format. It is customary for administrators to provide certificates of internal artifact servers as OpenShift secrets (see Importing untrusted TLS certificates to CodeReady Workspaces). The relevant server certificates will be mounted in
/public-certsin every container in the workspace. Specify the location of the certificate file in the
SSL_CERT_FILEenvironment variable in your devfile for the OmniSharp plug-in and for the .NET container.Example of the devfile:
components:
  - id: redhat-developer/che-omnisharp-plugin/latest
    memoryLimit: 1024Mi
    type: chePlugin
    alias: omnisharp
    env:
     - value: /public-certs/nuget.cer
       name: SSL_CERT_FILE
 - mountSources: true
   endpoints:
     - name: 5000/tcp
       port: 5000
   memoryLimit: 512Mi
   type: dockerimage
   volumes:
     - name: dotnet
       containerPath: /home/jboss
   alias: dotnet
   image: 'quay.io/eclipse/che-dotnet-2.2:7.7.1'
   env:
     - value: /projects/tls/rootCA.crt
       name: SSL_CERT_FILE
5.6. Using npm artifact repositories
The npm (Node Package Manager) package manager for the JavaScript programming language is configured using the npm config command, by writing values to the .npmrc files. However, configuration values can also be set using the environment variables beginning with NPM_CONFIG_.
The Javascript/Typescript plug-in used in Red Hat CodeReady Workspaces does not download any artifacts. It is enough to configure npm in the dev-machine component.
Use the following environment variables for configuration:
-
The URL for the artifact repository:
NPM_CONFIG_REGISTRY -
For using a certificate from a file:
NODE_EXTRA_CA_CERTS
Obtain a server certificate file from the repository server. It is customary for administrators to provide certificates of internal artifact servers as OpenShift secrets (see Importing untrusted TLS certificates to CodeReady Workspaces). The relevant server certificates will be mounted in /public-certs in every container in the workspace.
An example configuration for the use of an internal repository with a self-signed certificate:
  - mountSources: true
    endpoints:
      - name: nodejs
        port: 3000
    memoryLimit: '512Mi'
    type: 'dockerimage'
    alias: 'nodejs'
    image: 'quay.io/eclipse/che-nodejs10-ubi:nightly'
    env:
      -name: NODE_EXTRA_CA_CERTS
       value: '/public-certs/nexus.cer
     - name: NPM_CONFIG_REGISTRY
       value: 'https://snexus-airgap.apps.acme.com/repository/npm-proxy/'
Chapter 6. Troubleshooting CodeReady Workspaces
This section provides troubleshooting procedures for the most frequent issues a user can come in conflict with.
Additional resources
6.1. Viewing CodeReady Workspaces workspaces logs
This section describes how to view CodeReady Workspaces workspaces logs.
6.1.1. Viewing logs from language servers and debug adapters
6.1.1.1. Checking important logs
This section describes how to check important logs.
Procedure
- In the OpenShift web console, click Applications → Pods to see a list of all the active workspaces.
- Click on the name of the running Pod where the workspace is running. The Pod screen contains the list of all containers with additional information.
Choose a container and click the container name.
NoteThe most important logs are the
theia-idecontainer and the plug-ins container logs.- On the container screen, navigate to the Logs section.
6.1.1.2. Detecting memory problems
This section describes how to detect memory problems related to a plug-in running out of memory. The following are the two most common problems related to a plug-in running out of memory:
- The plug-in container runs out of memory
-
This can happen during plug-in initialization when the container does not have enough RAM to execute the entrypoint of the image. The user can detect this in the logs of the plug-in container. In this case, the logs contain
OOMKilled, which implies that the processes in the container requested more memory than is available in the container. - A process inside the container runs out of memory without the container noticing this
For example, the Java language server (Eclipse JDT Language Server, started by the
vscode-javaextension) throws an OutOfMemoryException. This can happen any time after the container is initialized, for example, when a plug-in starts a language server or when a process runs out of memory because of the size of the project it has to handle.To detect this problem, check the logs of the primary process running in the container. For example, to check the log file of Eclipse JDT Language Server for details, see the relevant plug-in-specific sections.
6.1.1.3. Logging the client-server traffic for debug adapters
This section describes how to log the exchange between Che-Theia and a debug adapter into the Output view.
Prerequisites
- A debug session must be started for the Debug adapters option to appear in the list.
Procedure
- Click File → Settings and then open Preferences.
- Expand the Debug section in the Preferences view.
Set the trace preference value to
true(default isfalse).All the communication events are logged.
- To watch these events, click View → Output and select Debug adapters from the drop-down list at the upper right corner of the Output view.
6.1.1.4. Viewing logs for Python
This section describes how to view logs for the Python language server.
Procedure
Navigate to the Output view and select Python in the drop-down list.

6.1.1.5. Viewing logs for Go
This section describes how to view logs for the Go language server.
6.1.1.5.1. Finding the Go path
This section describes how to find where the GOPATH variable points to.
Procedure
Execute the
Go: Current GOPATHcommand.

6.1.1.5.2. Viewing the Debug Console log for Go
This section describes how to view the log output from the Go debugger.
Procedure
Set the
showLogattribute totruein the debug configuration.{ "version": "0.2.0", "configurations": [ { "type": "go", "showLog": true .... } ] }To enable debugging output for a component, add the package to the comma-separated list value of the
logOutputattribute:{ "version": "0.2.0", "configurations": [ { "type": "go", "showLog": true, "logOutput": "debugger,rpc,gdbwire,lldbout,debuglineerr" .... } ] }The debug console prints the additional information in the debug console.
6.1.1.5.3. Viewing the Go logs output in the Output panel
This section describes how to view the Go logs output in the Output panel.
Procedure
- Navigate to the Output view.
Select Go in the drop-down list.

6.1.1.6. Viewing logs for the NodeDebug NodeDebug2 adapter
No specific diagnostics exist other than the general ones.
6.1.1.7. Viewing logs for Typescript
6.1.1.7.1. Enabling the label switched protocol (LSP) tracing
Procedure
-
To enable the tracing of messages sent to the Typescript (TS) server, in the Preferences view, set the
typescript.tsserver.traceattribute toverbose. Use this to diagnose the TS server issues. -
To enable logging of the TS server to a file, set the
typescript.tsserver.logattribute toverbose. Use this log to diagnose the TS server issues. The log contains the file paths.
6.1.1.7.2. Viewing the Typescript language server log
This section describes how to view the Typescript language server log.
Procedure
To get the path to the log file, see the Typescript Output console:

To open log file, use the Open TS Server log command.

6.1.1.7.3. Viewing the Typescript logs output in the Output panel
This section describes how to view the Typescript logs output in the Output panel.
Procedure
- Navigate to the Output view
Select TypeScript in the drop-down list.

6.1.1.8. Viewing logs for Java
Other than the general diagnostics, there are Language Support for Java (Eclipse JDT Language Server) plug-in actions that the user can perform.
6.1.1.8.1. Verifying the state of the Eclipse JDT Language Server
Procedure
Check if the container that is running the Eclipse JDT Language Server plug-in is running the Eclipse JDT Language Server main process.
-
Open a terminal in the container that is running the Eclipse JDT Language Server plug-in (an example name for the container:
vscode-javaxxx). Inside the terminal, run the
ps aux | grep jdtcommand to check if the Eclipse JDT Language Server process is running in the container. If the process is running, the output is:usr/lib/jvm/default-jvm/bin/java --add-modules=ALL-SYSTEM --add-opens java.base/java.utilThis message also shows the VSCode Java extension used. If it is not running, the language server has not been started inside the container.
- Check all logs described in Checking important logs
6.1.1.8.2. Verifying the Eclipse JDT Language Server features
Procedure
If the Eclipse JDT Language Server process is running, check if the language server features are working:
- Open a Java file and use the hover or autocomplete functionality. In case of an erroneous file, the user sees Java in the Outline view or in the Problems view.
6.1.1.8.3. Viewing the Java language server log
Procedure
The Eclipse JDT Language Server has its own workspace where it logs errors, information about executed commands, and events.
- To open this log file, open a terminal in the container that is running the Eclipse JDT Language Server plug-in. You can also view the log file by running the Java: Open Java Language Server log file command.
-
Run
cat <PATH_TO_LOG_FILE>wherePATH_TO_LOG_FILEis/home/theia/.theia/workspace-storage/<workspace_name>/redhat.java/jdt_ws/.metadata/.log.
6.1.1.8.4. Logging the Java language server protocol (LSP) messages
Procedure
To log the LSP messages to the VS Code Output view, enable tracing by setting the java.trace.server attribute to verbose.
Additional resources
For troubleshooting instructions, see the VS Code Java Github repository.
6.1.1.9. Viewing logs for Intelephense
6.1.1.9.1. Logging the Intelephense client-server communication
Procedure
To configure the PHP Intelephense language support to log the client-server communication in the Output view:
- Click File → Settings.
- Open the Preferences view.
-
Expand the Intelephense section and set the
trace.server.verbosepreference value toverboseto see all the communication events (the default value isoff).
6.1.1.9.2. Viewing Intelephense events in the Output panel
This procedure describes how to view Intelephense events in the Output panel.
Procedure
- Click View → Output
- Select Intelephense in the drop-down list for the Output view.
6.1.1.10. Viewing logs for PHP-Debug
This procedure describes how to configure the PHP Debug plug-in to log the PHP Debug plug-in diagnostic messages into the Debug Console view. Configure this before the start of the debug session.
Procedure
-
In the
launch.jsonfile, add the"log": trueattribute to thephpconfiguration. - Start the debug session.
- The diagnostic messages are printed into the Debug Console view along with the application output.
6.1.1.11. Viewing logs for XML
Other than the general diagnostics, there are XML plug-in specific actions that the user can perform.
6.1.1.11.1. Verifying the state of the XML language server
Procedure
-
Open a terminal in the container named
vscode-xml-<xxx>. Run
ps aux | grep javato verify that the XML language server has started. If the process is running, the output is:java ***/org.eclipse.ls4xml-uber.jar`If is not, see the Checking important logs chapter.
6.1.1.11.2. Checking XML language server feature flags
Procedure
Check if the features are enabled. The XML plug-in provides multiple settings that can enable and disable features:
-
xml.format.enabled: Enable the formatter -
xml.validation.enabled: Enable the validation -
xml.documentSymbols.enabled: Enable the document symbols
-
-
To diagnose whether the XML language server is working, create a simple XML element, such as
<hello></hello>, and confirm that it appears in the Outline panel on the right. -
If the document symbols do not show, ensure that the
xml.documentSymbols.enabledattribute is set totrue. If it istrue, and there are no symbols, the language server may not be hooked to the editor. If there are document symbols, then the language server is connected to the editor. -
Ensure that the features that the user needs, are set to
truein the settings (they are set totrueby default). If any of the features are not working, or not working as expected, file an issue against the Language Server.
6.1.1.11.3. Enabling XML Language Server Protocol (LSP) tracing
Procedure
To log LSP messages to the VS Code Output view, enable tracing by setting the xml.trace.server attribute to verbose.
6.1.1.11.4. Viewing the XML language server log
Procedure
The log from the language server can be found in the plug-in sidecar at /home/theia/.theia/workspace-storage/<workspace_name>/redhat.vscode-xml/lsp4xml.log.
6.1.1.12. Viewing logs for YAML
This section describes the YAML plug-in specific actions that the user can perform, in addition to the general diagnostics ones.
6.1.1.12.1. Verifying the state of the YAML language server
This section describes how to verify the state of the YAML language server.
Procedure
Check if the container running the YAML plug-in is running the YAML language server.
-
In the editor, open a terminal in the container that is running the YAML plug-in (an example name of the container:
vscode-yaml-<xxx>). -
In the terminal, run the
ps aux | grep nodecommand. This command searches all the node processes running in the current container. Verify that a command
node **/server.jsis running.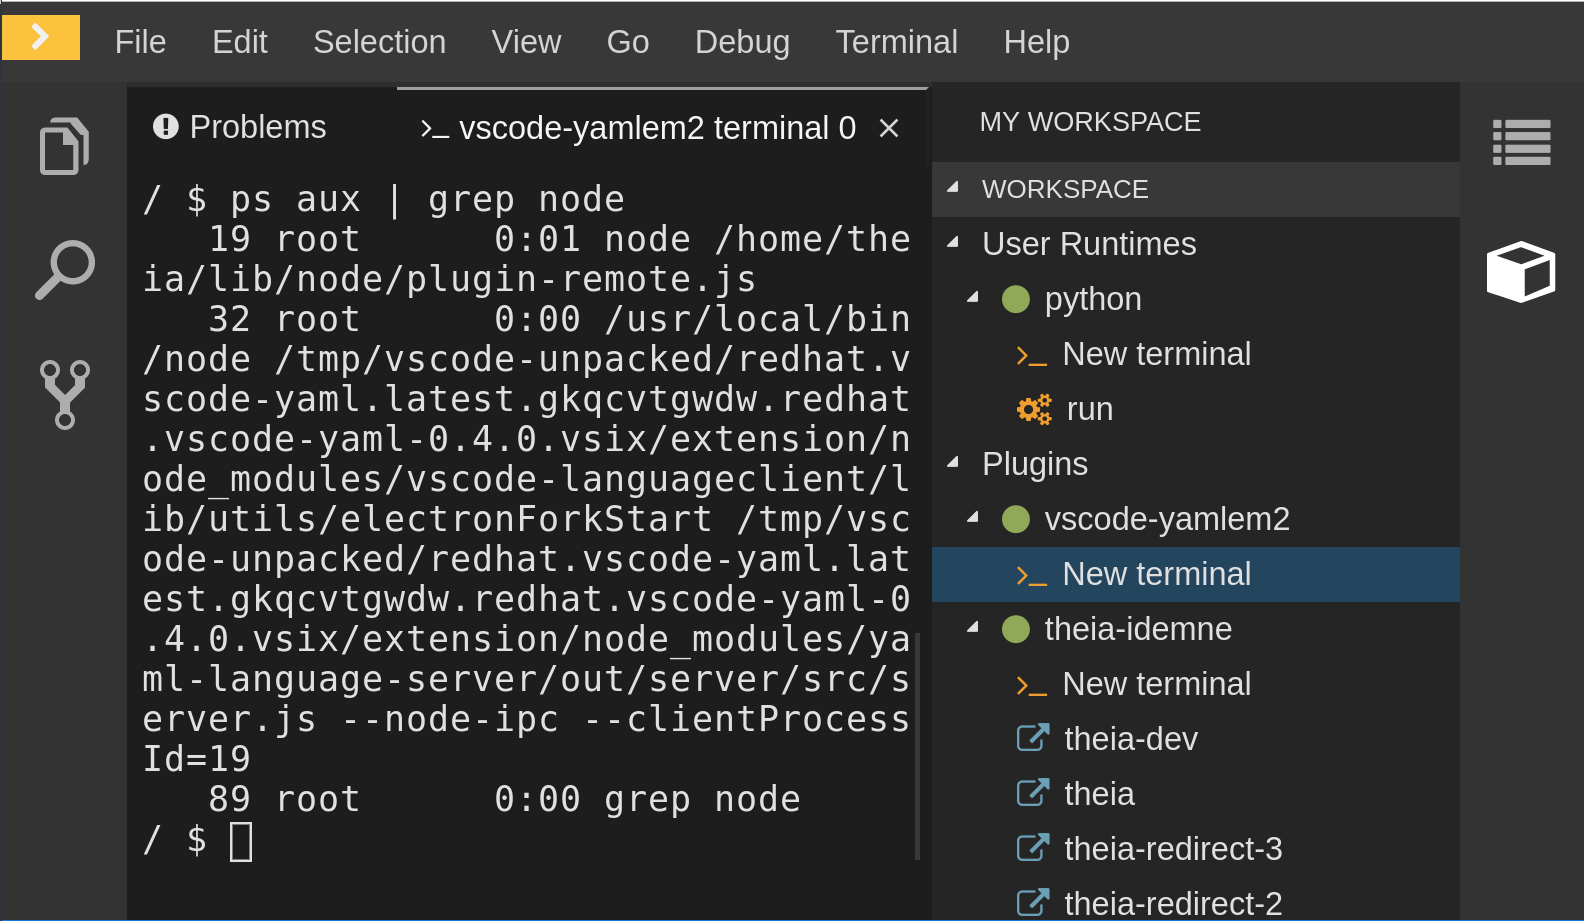
The node **/server.js running in the container indicates that the language server is running. If it is not running, the language server has not started inside the container. In this case, see Checking important logs.
6.1.1.12.2. Checking the YAML language server feature flags
Procedure
To check the feature flags:
Check if the features are enabled. The YAML plug-in provides multiple settings that can enable and disable features, such as:
-
yaml.format.enable: Enables the formatter -
yaml.validate: Enables validation -
yaml.hover: Enables the hover function -
yaml.completion: Enables the completion function
-
-
To check if the plug-in is working, type the simplest YAML, such as
hello: world, and then open the Outline panel on the right side of the editor. - Verify if there are any document symbols. If yes, the language server is connected to the editor.
-
If any feature is not working, make sure that the settings listed above are set to
true(they are set totrueby default). If a feature is not working, file an issue against the Language Server.
6.1.1.12.3. Enabling YAML Language Server Protocol (LSP) tracing
Procedure
To log LSP messages to the VS Code Output view, enable tracing by setting the yaml.trace.server attribute to verbose.
6.1.1.13. Viewing logs for Dotnet with OmniSharp-Theia plug-in
6.1.1.13.1. OmniSharp-Theia plug-in
CodeReady Workspaces uses the OmniSharp-Theia plug-in as a remote plug-in. It is located at github.com/redhat-developer/omnisharp-theia-plugin. In case of an issue, report it, or contribute your fix in the repository.
This plug-in registers omnisharp-roslyn as a language server and provides project dependencies and language syntax for C# applications.
The language server runs on .NET SDK 2.2.105.
6.1.1.13.2. Verifying the state of the OmniSharp-Theia plug-in language server
Procedure
To check if the container running the OmniSharp-Theia plug-in is running OmniSharp, execute the ps aux | grep OmniSharp.exe command. If the process is running, the following is an example output:
/tmp/theia-unpacked/redhat-developer.che-omnisharp-plugin.0.0.1.zcpaqpczwb.omnisharp_theia_plugin.theia/server/bin/mono
/tmp/theia-unpacked/redhat-developer.che-omnisharp-plugin.0.0.1.zcpaqpczwb.omnisharp_theia_plugin.theia/server/omnisharp/OmniSharp.exe
If the output is different, the language server has not started inside the container. Check the logs described in Checking important logs.
6.1.1.13.3. Checking OmniSharp Che-Theia plug-in language server features
Procedure
-
If the OmniSharp.exe process is running, check if the language server features are working by opening a
.csfile and trying the hover or completion features, or opening the Problems or Outline view.
6.1.1.13.4. Viewing OmniSharp-Theia plug-in logs in the Output panel
Procedure
If OmniSharp.exe is running, it logs all information in the Output panel. To view the logs, open the Output view and select C# from the drop-down list.
6.1.1.14. Viewing logs for Dotnet with NetcoredebugOutput plug-in
6.1.1.14.1. NetcoredebugOutput plug-in
The NetcoredebugOutput plug-in provides the netcoredbg tool. This tool implements the VS Code Debug Adapter protocol and allows users to debug .NET applications under the .NET Core runtime.
The container where the NetcoredebugOutput plug-in is running contains Dotnet SDK v.2.2.105.
6.1.1.14.2. Verifying the state of the NetcoredebugOutput plug-in
Procedure
Search for a
netcoredbgdebug configuration in thelaunch.jsonfile.Example 6.1. Sample debug configuration
{ "type": "netcoredbg", "request": "launch", "program": "${workspaceFolder}/bin/Debug/<target-framework>/<project-name.dll>", "args": [], "name": ".NET Core Launch (console)", "stopAtEntry": false, "console": "internalConsole" }-
Test the autocompletion feature within the braces of the
configurationsection of thelaunch.jsonfile. If you can findnetcoredbg, the Che-Theia plug-in is correctly initialized. If not, see Checking important logs.
6.1.1.14.3. Viewing NetcoredebugOutput plug-in logs in the Output panel
This section describes how to view NetcoredebugOutput plug-in logs in the Output panel.
Procedure
Open the Debug console.

6.1.1.15. Viewing logs for Camel
6.1.1.15.1. Verifying the state of the Camel language server
Procedure
The user can inspect the log output of the sidecar container using the Camel language tools that are stored in the vscode-apache-camel<xxx> Camel container.
To verify the state of the language server:
-
Open a terminal inside the
vscode-apache-camel<xxx>container. Run the
ps aux | grep javacommand. The following is an example language server process:java -jar /tmp/vscode-unpacked/camel-tooling.vscode-apache-camel.latest.euqhbmepxd.camel-tooling.vscode-apache-camel-0.0.14.vsix/extension/jars/language-server.jar- If you cannot find it, see Checking important logs.
6.1.1.15.2. Viewing Camel logs in the Output panel
The Camel language server is a SpringBoot application that writes its log to the $\{java.io.tmpdir}/log-camel-lsp.out file. Typically, $\{java.io.tmpdir} points to the /tmp directory, so the filename is /tmp/log-camel-lsp.out.
Procedure
The Camel language server logs are printed in the Output channel named Language Support for Apache Camel.
The output channel is created only at the first created log entry on the client side. It may be absent when everything is going well.
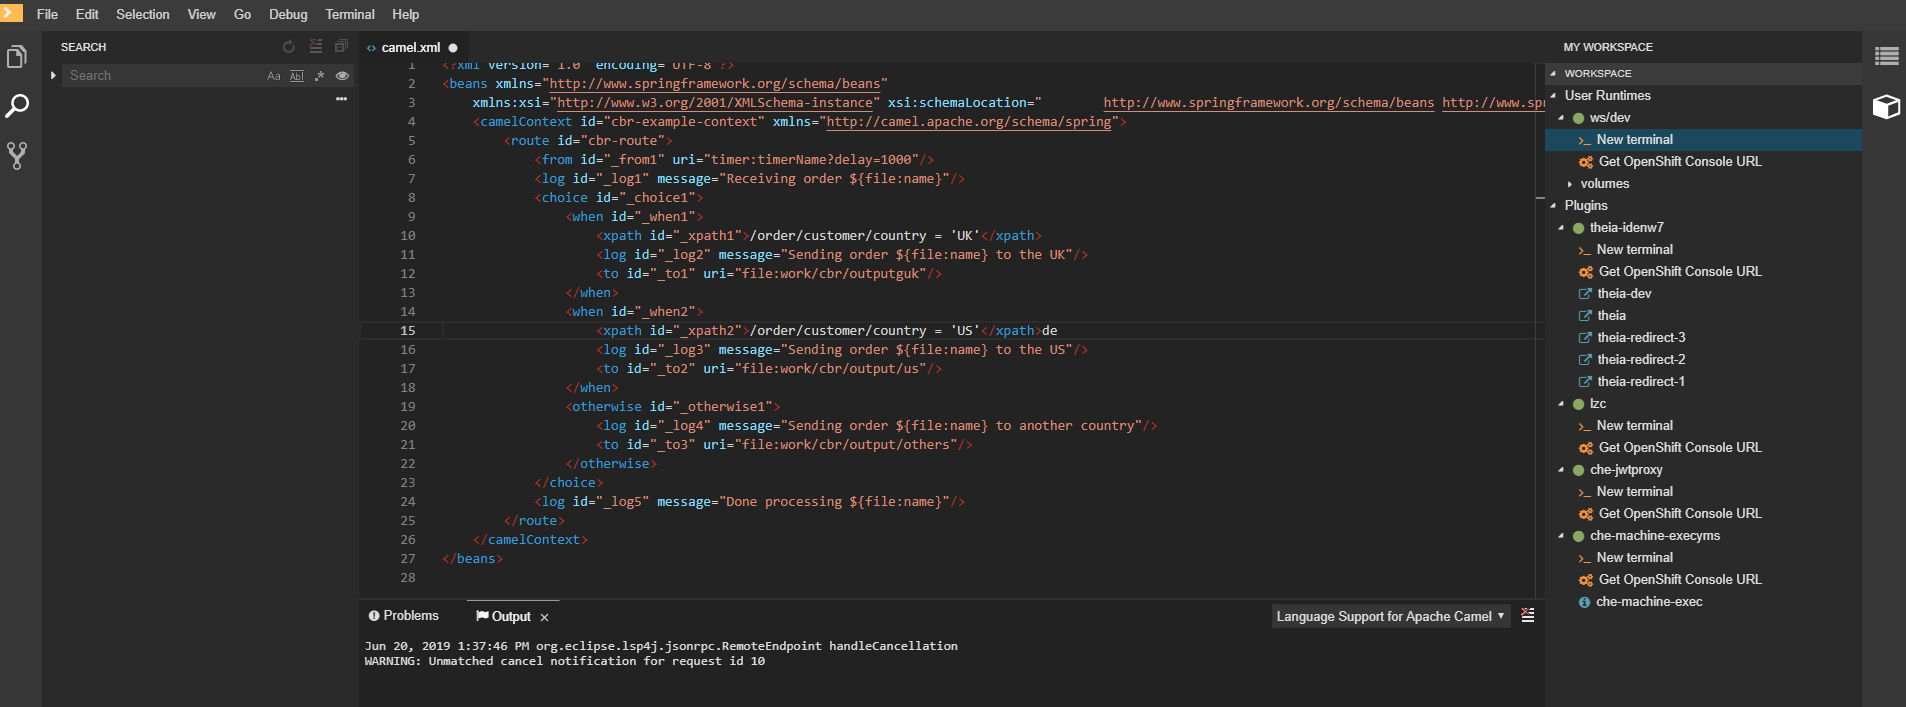
6.1.2. Viewing Che-Theia IDE logs
This section describes how to view Che-Theia IDE logs.
6.1.2.1. Viewing Che-Theia editor logs using the OpenShift CLI
Observing Che-Theia editor logs helps to get a better understanding and insight over the plug-ins loaded by the editor. This section describes how to access the Che-Theia editor logs using the OpenShift CLI (command-line interface).
Prerequisites
- CodeReady Workspaces is deployed in an OpenShift cluster.
- A workspace is created.
- User is located in a CodeReady Workspaces installation project.
Procedure
Obtain the list of the available Pods:
$ oc get podsExample
$ oc get pods
NAME                                              READY  STATUS   RESTARTS  AGE
codeready-9-xz6g8                                 1/1    Running  1         15h
workspace0zqb2ew3py4srthh.go-cli-549cdcf69-9n4w2  4/4    Running  0         1h
Obtain the list of the available containers in the particular Pod:
$ oc get pods <name-of-pod> --output jsonpath='\{.spec.containers[*].name}'Example:
$ oc get pods workspace0zqb2ew3py4srthh.go-cli-549cdcf69-9n4w2 -o
jsonpath='\{.spec.containers[*].name}'
> go-cli che-machine-exechr7 theia-idexzb vscode-gox3r
Get logs from the
theia/idecontainer:$ oc logs --follow <name-of-pod> --container <name-of-container>Example:
$ oc logs --follow workspace0zqb2ew3py4srthh.go-cli-549cdcf69-9n4w2 -container
theia-idexzb
>root INFO unzipping the plug-in 'task_plugin.theia' to directory: /tmp/theia-unpacked/task_plugin.theia
root INFO unzipping the plug-in 'theia_yeoman_plugin.theia' to directory: /tmp/theia-unpacked/theia_yeoman_plugin.theia
root WARN A handler with prefix term  is already registered.
root INFO [nsfw-watcher: 75] Started watching: /home/theia/.theia
root WARN e.onStart is slow, took: 367.4600000013015 ms
root INFO [nsfw-watcher: 75] Started watching: /projects
root INFO [nsfw-watcher: 75] Started watching: /projects/.theia/tasks.json
root INFO [4f9590c5-e1c5-40d1-b9f8-ec31ec3bdac5] Sync of 9 plugins took: 62.26000000242493 ms
root INFO [nsfw-watcher: 75] Started watching: /projects
root INFO [hosted-plugin: 88] PLUGIN_HOST(88) starting instance
6.2. Investigating failures at a workspace start using the Verbose mode
Verbose mode allows users to reach an enlarged log output, investigating failures at a workspace start.
In addition to usual log entries, the verbose mode also lists the container logs of each workspace.
6.2.1. Restarting a CodeReady Workspaces workspace in verbose mode after start failure
This section describes how to restart a CodeReady Workspaces workspace in the Verbose mode after a failure during the workspace start. Dashboard proposes the restart of a workspace in the Verbose mode once the workspace fails at its start.
Prerequisites
- A running instance of CodeReady Workspaces. To install an instance of CodeReady Workspaces, see Installing CodeReady Workspaces.
- An existing workspace that fails to start.
Procedure
- Using Dashboard, try to start a workspace.
- When it fails to start, click on the displayed Restart in Verbose Mode link.
- Check the Logs tab to find a reason for the workspace failure.
6.2.2. Starting a CodeReady Workspaces workspace in verbose mode
This section describes how to start the Red Hat CodeReady Workspaces workspace in verbose mode.
Prerequisites
- A running instance of Red Hat CodeReady Workspaces. To install an instance of Red Hat CodeReady Workspaces, see Installing CodeReady Workspaces.
- An existing workspace defined on this instance of CodeReady Workspaces.
Procedure
- Open the Workspaces tab.
- On the left side of a row dedicated to the workspace, access the drop-down menu displayed as three horizontal dots and select the Open in Verbose Mode option. Alternatively, this option is also available in the workspace details, under the Actions drop-down menu.
- Check the Logs tab to find a reason for the workspace failure.
6.3. Troubleshooting slow workspaces
Sometimes, workspaces can take a long time to start. Tuning can reduce this start time. Depending on the options, administrators or users can do the tuning.
This section includes several tuning options for starting workspaces faster or improving workspace runtime performance.
6.3.1. Improving workspace start time
- Caching images with Image Puller
Role: Administrator
When starting a workspace, OpenShift pulls the images from the registry. A workspace can include many containers meaning that OpenShift pulls Pod’s images (one per container). Depending on the size of the image and the bandwidth, it can take a long time.
Image Puller is a tool that can cache images on each of OpenShift nodes. As such, pre-pulling images can improve start times. See Caching images for faster workspace start.
- Choosing better storage type
Role: Administrator and user
Every workspace has a shared volume attached. This volume stores the project files, so that when restarting a workspace, changes are still available. Depending on the storage, attach time can take up to a few minutes, and I/O can be slow.
To avoid this problem, use ephemeral or asynchronous storage. See Configuring storage types.
- Installing offline
Role: Administrator
Components of CodeReady Workspaces are OCI images. Setup Red Hat CodeReady Workspaces in offline mode (air-gap scenario) to allow for reducing any extra download at runtime as everything needs to be present from the beginning. See https://access.redhat.com/documentation/en-us/red_hat_codeready_workspaces/2.8/html-single/installation_guide/index#installing-codeready-workspaces-in-a-restricted-environment_crw.
- Optimizing workspace plug-ins
Role: User
When selecting various plug-ins, each plug-in can bring its own sidecar container, which is an OCI image. OpenShift pulls the images of these sidecar containers.
Reduce the number of plug-ins, or disable them to see if start time is faster. See also Caching images for faster workspace start.
- Reducing the number of public endpoints
Role: Administrator
For each endpoint, OpenShift is creating OpenShift Route objects. Depending on the underlying configuration, this creation can be slow.
To avoid this problem, reduce the exposure. For example, to automatically detect a new port listening inside containers and redirect traffic for the processes using a local IP address (
127.0.0.1), the Che-Theia IDE plug-in has three optional routes.By reducing the number of endpoints and checking endpoints of all plug-ins, workspace start can be faster.
- CDN configuration
The IDE editor uses a CDN (Content Delivery Network) to serve content. Check that the content uses a CDN to the client (or a local route for offline setup).
To check that, open Developer Tools in the browser and check for
vendorsin the Network tab.vendors.<random-id>.jsoreditor.main.*should come from CDN URLs.
6.3.2. Improving workspace runtime performance
- Providing enough CPU resources
Plug-ins consume CPU resources. For example, when a plug-in provides IntelliSense features, adding more CPU resources may lead to better performance.
Ensure the CPU settings in the devfile definition,
devfile.yaml, are correct:apiVersion: 1.0.0 components: - type: chePlugin id: id/of/plug-in cpuLimit: 1360Mi1 cpuRequest: 100m2 - Providing enough memory
Plug-ins consume CPU and memory resources. For example, when a plug-in provides IntelliSense features, collecting data can consume all the memory allocated to the container.
Providing more memory to the plug-in can increase performance. Ensure about the correctness of memory settings:
-
in the plug-in definition -
meta.yamlfile in the devfile definition -
devfile.yamlfileapiVersion: v2 spec: containers: - image: "quay.io/my-image" name: "vscode-plugin" memoryLimit: "512Mi"1 extensions: - https://link.to/vsix- 1
- Specifies the memory limit for the plug-in.
In the devfile definition (
devfile.yaml):apiVersion: 1.0.0 components: - type: chePlugin id: id/of/plug-in memoryLimit: 1048M1 memoryRequest: 256M- 1
- Specifies the memory limit for this plug-in.
-
in the plug-in definition -
- Choosing better storage type
- Use ephemeral or asynchronous storage for faster I/O. See Configuring storage types.
6.4. Troubleshooting network problems
This section describes how to prevent or resolve issues related to network policies. CodeReady Workspaces requires the availability of the WebSocket Secure (WSS) connections. Secure WebSocket connections improve confidentiality and also reliability because they reduce the risk of interference by bad proxies.
Prerequisites
- The WebSocket Secure (WSS) connections on port 443 must be available on the network. Firewall and proxy may need additional configuration.
Use a supported web browser:
- Chrome
- Firefox
Procedure
- Verify the browser supports the WebSocket protocol. See: Searching a websocket test.
- Verify firewalls settings: WebSocket Secure (WSS) connections on port 443 must be available.
- Verify proxy servers settings: The proxy transmits and intercepts WebSocket Secure (WSS) connections on port 443.
Chapter 7. OpenShift Connector overview
OpenShift Connector, also referred to as Visual Studio Code OpenShift Connector for Red Hat OpenShift, is a plug-in for CodeReady Workspaces that provides a method for interacting with Red Hat OpenShift 3 or 4 clusters.
OpenShift Connector makes it possible to create, build, and debug applications in the CodeReady Workspaces IDE and then deploy the applications directly to a running OpenShift cluster.
OpenShift Connector is a GUI for the OpenShift Do (odo) utility, which aggregates OpenShift CLI (oc) commands into compact units. As such, OpenShift Connector helps new developers who do not have OpenShift background with creating applications and running them on the cloud. Instead of using several oc commands, the user creates a new component or service by selecting a preconfigured template, such as a Project, an Application, or a Service, and then deploys it as an OpenShift Component to their cluster.
This section provides information about installing, enabling, and basic use of the OpenShift Connector plug-in.
- Section 7.1, “Features of OpenShift Connector”
- Section 7.2, “Installing OpenShift Connector in CodeReady Workspaces”
- Section 7.3, “Authenticating with OpenShift Connector from CodeReady Workspaces when the OpenShift OAuth service does not authenticate the CodeReady Workspaces instance”
- Section 7.4, “Creating Components with OpenShift Connector in CodeReady Workspaces”
- Section 7.5, “Connecting source code from GitHub to an OpenShift Component using OpenShift Connector”
7.1. Features of OpenShift Connector
The OpenShift Connector plug-in enables the user create, deploy, and push OpenShift Components to an OpenShift Cluster in a GUI.
When used in CodeReady Workspaces, the OpenShift Connector GUI provides the following benefits to its users:
Cluster management
Logging in to clusters using:
- Authentication tokens
- Username and password
- Auto-login feature when CodeReady Workspaces is authenticated with the OpenShift OAuth service
-
Switching contexts between different
.kube/configentries directly from the extension view. - Viewing and managing OpenShift resources as build and deployment. configurations from the Explorer view.
Development
- Connecting to a local or hosted OpenShift cluster directly from CodeReady Workspaces.
- Quickly updating the cluster with your changes.
- Creating Components, Services, and Routes on the connected cluster.
- Adding storage directly to a component from the extension itself.
Deployment
- Deploying to OpenShift clusters with a single click directly from CodeReady Workspaces.
- Navigating to the multiple Routes, created to access the deployed application.
- Deploying multiple interlinked Components and Services directly on the cluster.
- Pushing and watching component changes from the CodeReady Workspaces IDE.
- Streaming logs directly on the integrated terminal view of CodeReady Workspaces.
Monitoring
- Working with OpenShift resources directly from the CodeReady Workspaces IDE.
- Starting and resuming build and deployment configurations.
- Viewing and following logs for deployments, pods, and containers.
7.2. Installing OpenShift Connector in CodeReady Workspaces
OpenShift Connector is a plug-in designed to create basic OpenShift Components, using CodeReady Workspaces as the editor, and to deploy the Component to an OpenShift cluster. To visually verify that the plug-in is available in your instance, see whether the OpenShift icon is displayed in the CodeReady Workspaces left menu.
To install and enable OpenShift Connector in a CodeReady Workspaces instance, use instructions in this section.
Prerequisites
- A running instance of Red Hat CodeReady Workspaces. To install an instance of Red Hat CodeReady Workspaces, see Installing CodeReady Workspaces.
Procedure
Install OpenShift Connector in CodeReady Workspaces by adding it as an extension in the CodeReady Workspaces Plugins panel.
- Open the CodeReady Workspaces Plugins panel by pressing Ctrl+Shift+J or by navigating to View → Plugins.
- Search for vscode-openshift-connector, and click the button.
- Restart the workspace for the changes to take effect.
- The dedicated OpenShift Application Explorer icon is added to the left panel.
7.3. Authenticating with OpenShift Connector from CodeReady Workspaces when the OpenShift OAuth service does not authenticate the CodeReady Workspaces instance
This section describes how to authenticate with an OpenShift cluster when the OpenShift OAuth service does not authenticate the CodeReady Workspaces instance. It enables the user to develop and push Components from CodeReady Workspaces to the OpenShift instance that contains CodeReady Workspaces.
When the OpenShift OAuth service authenticates the CodeReady Workspaces instance, the OpenShift Connector plug-in automatically establishes the authentication with the OpenShift instance containing CodeReady Workspaces.
OpenShift Connector offers the following methods for logging in to the OpenShift Cluster from the CodeReady Workspaces instance:
- Using the notification asking to log in to the OpenShift instance containing CodeReady Workspaces.
- Using the button.
- Using the Command Palette.
OpenShift Connector plug-in requires manual connecting to the target cluster.
The OpenShift Connector plug-in logs in to the cluster as inClusterUser. If this user does not have manage project permission, this error message appears when creating a project using OpenShift Application Explorer:
Failed to create Project with error 'Error: Command failed: "/tmp/vscode-unpacked/redhat.vscode-openshift -connector.latest.qvkozqtkba.openshift-connector-0.1.4-523.vsix/extension/out/tools/linux/odo" project create test-project ✗ projectrequests.project.openshift.io is forbidden
To work around this issue:
- Log out from the local cluster.
- Log in to OpenShift cluster using the OpenShift user’s credentials.
Prerequisites
- A running instance of CodeReady Workspaces. See Installing CodeReady Workspaces.
- A CodeReady Workspaces workspace is available. See Chapter 3, Developer workspaces.
- The OpenShift Connector plug-in is available. See Section 7.2, “Installing OpenShift Connector in CodeReady Workspaces”.
- The OpenShift OAuth provider is available only for the auto-login to the OpenShift instance containing CodeReady Workspaces. See Configuring OpenShift OAuth.
Procedure
- In the left panel, click the OpenShift Application Explorer icon.
In the OpenShift Connector panel, log in using the OpenShift Application Explorer. Use one of the following methods:
- Click the button in the top left corner of the pane.
Press F1 to open the Command Palette, or navigate to View > Find Command in the top menu.
Search for OpenShift: Log in to cluster and press Enter.
- If a You are already logged in a cluster. message appears, click Yes.
Select the method to log in to the cluster: Credentials or Token, and follow the login instructions.
NoteTo authenticate with a token, the required token information is in the upper right corner of the main OpenShift Container Platform screen, under <User name> > Copy Login Command.
7.4. Creating Components with OpenShift Connector in CodeReady Workspaces
In the context of OpenShift, Components and Services are basic structures that need to be stored in Application, which is a part of the OpenShift project that organizes deployables into virtual folders for better readability.
This chapter describes how to create OpenShift Components in the CodeReady Workspaces using the OpenShift Connector plug-in and push them to an OpenShift cluster.
Prerequisites
- A running instance of CodeReady Workspaces. To install an instance of CodeReady Workspaces, see Installing CodeReady Workspaces.
- The user is logged in to an OpenShift cluster using the OpenShift Connector plug-in.
Procedure
- In the OpenShift Connector panel, right-click the row with the red OpenShift icon and select New Project.
- Enter a name for your project.
- Right-click the created project and select New Component.
When prompted, enter the name for a new OpenShift Application in which the component can be stored.
The following options of source for your component are displayed:
Git Repository
This prompts you to specify a Git repository URL and select the intended revision of the runtime.
Binary File
This prompts you to select a file from the file explorer.
Workspace Directory
This prompts you to select a folder from the file explorer.
- Enter the name for the component.
- Select the component type.
- Select the component type version.
- The component is created. Right-click the component, select New URL, and enter a name of your choice.
The component is ready to be pushed to the OpenShift cluster. To do so, right-click the component and select Push.
The component is deployed to the cluster. Use a right-click for selecting additional actions, such as debugging and opening in a browser, which requires the exposure of the port
8080.
7.5. Connecting source code from GitHub to an OpenShift Component using OpenShift Connector
When the user has a Git-stored source code that is wanted for further development, it is more efficient to deploy it directly from the Git repository into the OpenShift Connector Component.
This chapter describes how to obtain the content from the Git repository and connect it with a CodeReady Workspaces-developed OpenShift Component.
Prerequisites
- Have a running CodeReady Workspaces workspace.
- Be logged in to the OpenShift cluster using the OpenShift Connector.
Procedure
To make changes to your GitHub component, clone the repository into CodeReady Workspaces to obtain this source code:
- In the CodeReady Workspaces main screen, open the Command Palette by pressing F1.
-
Type the
Git Clonecommand in the Command Palette and press Enter. - Provide the GitHub URL and select the destination for the deployment.
- Add source-code files to your Project using the button.
For additional information about cloning Git repository, see: Section 2.2.2, “Accessing a Git repository using HTTPS”.
Chapter 8. Telemetry overview
Telemetry is the explicit and ethical collection of operation data. By default, telemetry is not available in Red Hat CodeReady Workspaces, but there is an abstract API that allows enabling telemetry using the plug-in mechanism. This approach is used in the Hosted Che service where telemetry is enabled for every workspace.
This documentation includes a guide describing how to make your own telemetry client for Red Hat CodeReady Workspaces, followed by an overview of the Red Hat CodeReady Workspaces Woopra Telemetry Plugin.
8.1. Use cases
Red Hat CodeReady Workspaces telemetry API allows tracking:
- Duration of a workspace utilization
- User-driven actions such as file editing, committing, and pushing to remote repositories.
- The list of plug-ins enabled in a workspace
- Programming languages and devfiles used in workspaces. See Section 3.6.1, “What is a devfile”
8.2. How it works
When a CodeReady Workspaces workspace starts, the che-theia container starts the telemetry plug-in, which is responsible for sending telemetry events to a back-end. If the $CHE_WORKSPACE_TELEMETRY_BACKEND_PORT environment variable was set in the workspace Pod, the telemetry plug-in will send events to a back-end listening at that port.
If the CodeReady Workspaces workspace has a telemetry back-end container running, and it is listening on $CHE_WORKSPACE_TELEMETRY_BACKEND_PORT, it takes the events sent from the telemetry plug-in, turns them into the back-end-specific representation of events, and sends them to the configured analytics back-end (for example, Segment or Woopra).
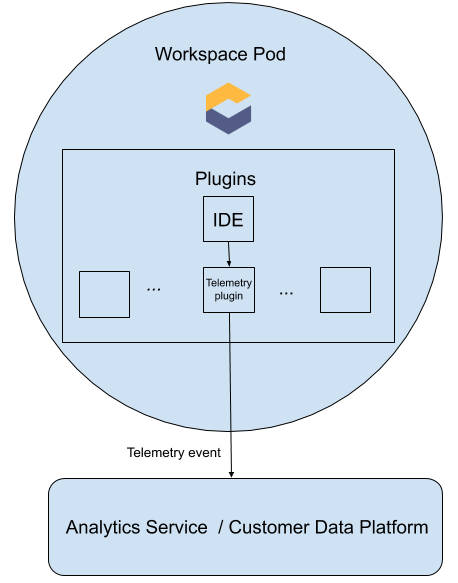
8.3. Creating A Telemetry Plug-in
This section shows how to create an AnalyticsManager class that extends AbstractAnalyticsManager and implements the following methods:
-
isEnabled()- determines whether or not the telemetry back-end is functioning correctly. This could mean always returningtrue, or have more complex checks, for example, returningfalsewhen a connection property is missing. -
destroy()- cleanup method that is run before shutting down the telemetry back-end. This method sends theWORKSPACE_STOPPEDevent. -
onActivity()- notifies that some activity is still happening for a given user. This is mainly used to sendWORKSPACE_INACTIVEevents. -
onEvent()- submits telemetry events to the telemetry server, such asWORKSPACE_USEDorWORKSPACE_STARTED. -
increaseDuration()- increases the duration of a current event rather than sending multiple events in a small frame of time.
The following sections cover:
- Creation of a telemetry server to echo events to standard output.
- Extending the CodeReady Workspaces telemetry client and implementing a user’s custom back-end.
-
Creating a
meta.yamlfile representing a CodeReady Workspaces workspace plug-in for a user’s custom back-end. -
Specifying of a location of a custom plug-in to CodeReady Workspaces by setting the
CHE_WORKSPACE_DEVFILE_DEFAULT__EDITOR_PLUGINSenvironment variable.
8.3.1. Getting Started
This document describes the steps required to extend the CodeReady Workspaces telemetry system to connect to a custom back-end:
- Creating a server process that receives events
- Extending CodeReady Workspaces libraries to create a back-end that send events to the server
- Packaging the telemetry back-end in a container and deploying it to an image registry
- Adding a plug-in for your back-end and instructing CodeReady Workspaces to load the plug-in in your workspaces
Optional: creating a server that receives events
This example shows how to create a server that receives events from CodeReady Workspaces and writes them to standard output.
For production use cases, consider integrating with a third-party telemetry system (for example, Segment, Woopra) rather than creating your own telemetry server. In this case, use your provider’s APIs to send events from your custom back-end to their system.
The following Go code starts a server on port 8080 and writes events to standard output:
main.go
package main

import (
	"io/ioutil"
	"net/http"

	"go.uber.org/zap"
)

var logger *zap.SugaredLogger

func event(w http.ResponseWriter, req *http.Request) {
	switch req.Method {
	case "GET":
		logger.Info("GET /event")
	case "POST":
		logger.Info("POST /event")
	}
	body, err := req.GetBody()
	if err != nil {
		logger.With("err", err).Info("error getting body")
		return
	}
	responseBody, err := ioutil.ReadAll(body)
	if err != nil {
		logger.With("error", err).Info("error reading response body")
		return
	}
	logger.With("body", string(responseBody)).Info("got event")
}

func activity(w http.ResponseWriter, req *http.Request) {
	switch req.Method {
	case "GET":
		logger.Info("GET /activity, doing nothing")
	case "POST":
		logger.Info("POST /activity")
		body, err := req.GetBody()
		if err != nil {
			logger.With("error", err).Info("error getting body")
			return
		}
		responseBody, err := ioutil.ReadAll(body)
		if err != nil {
			logger.With("error", err).Info("error reading response body")
			return
		}
		logger.With("body", string(responseBody)).Info("got activity")
	}
}

func main() {

	log, _ := zap.NewProduction()
	logger = log.Sugar()

	http.HandleFunc("/event", event)
	http.HandleFunc("/activity", activity)
	logger.Info("Added Handlers")

	logger.Info("Starting to serve")
	http.ListenAndServe(":8080", nil)
}
Create a container image based on this code and expose it as a deployment in OpenShift in the openshift-workspaces project. The code for the example telemetry server is available at che-workspace-telemetry-example. To deploy the telemetry server, clone the repository and build the container:
$ git clone https://github.com/che-incubator/che-workspace-telemetry-example
$ cd che-workspace-telemetry-example
$ docker build -t registry/organization/che-workspace-telemetry-example:latest
$ docker push registry/organization/che-workspace-telemetry-example:latest
In manifest.yaml, replace the image and host fields to match the image you pushed, and the public hostname of your OpenShift cluster. Then run:
$ oc apply -f manifest.yaml -n {prod-namespace}8.3.2. Creating a new Maven project
For fast feedback when developing, it is recommended to do development inside a CodeReady Workspaces workspace. This way, you can run the application in a cluster and connect to the workspaces front-end telemetry plug-in to send events to your custom back-end.
Create a new Maven Quarkus project scaffolding:
$ mvn io.quarkus:quarkus-maven-plugin:1.2.1.Final:create \
  -DprojectGroupId=mygroup -DprojectArtifactId=telemetryback-end \
  -DprojectVersion=my-version -DclassName="org.my.group.MyResource"
Add a dependency to
org.eclipse.che.incubator.workspace-telemetry.back-end-basein yourpom.xml:pom.xml
<dependency> <groupId>org.eclipse.che.incubator.workspace-telemetry</groupId> <artifactId>backend-base</artifactId> <version>0.0.11</version> </dependency> <dependency> <groupId>org.apache.httpcomponents</groupId> <artifactId>httpclient</artifactId> <version>4.5.12</version> </dependency>- Add the Apache HTTP components library to send HTTP requests.
-
Consult the GitHub packages for the latest version and Maven coordinates of
back-end-base. GitHub packages require a personal access token withread:packagespermissions to download the CodeReady Workspaces telemetry libraries. Create a personal access token and copy the token value. Create a
settings.xmlfile in the repository root and add the coordinates and token to theche-incubatorpackages:settings.xml
<settings xmlns="http://maven.apache.org/SETTINGS/1.0.0"
  xmlns:xsi="http://www.w3.org/2001/XMLSchema-instance"
  xsi:schemaLocation="http://maven.apache.org/SETTINGS/1.0.0
http://maven.apache.org/xsd/settings-1.0.0.xsd">
   <servers>
      <server>
         <id>che-incubator</id>
         <username>${env.GITHUB_USERNAME}</username>
         <password>${env.GITHUB_TOKEN}</password>
      </server>
   </servers>

   <profiles>
      <profile>
         <id>github</id>
         <activation>
            <activeByDefault>true</activeByDefault>
         </activation>
         <repositories>
            <repository>
               <id>central</id>
               <url>https://repo1.maven.org/maven2</url>
                <releases><enabled>true</enabled></releases>
                <snapshots><enabled>false</enabled></snapshots>
                </repository>
                <repository>
                <id>che-incubator</id>
                <name>GitHub navikt Apache Maven Packages</name>
                <url>https://maven.pkg.github.com/che-incubator/che-workspace-telemetry-client</url>
                </repository>
            </repositories>
        </profile>
    </profiles>
    </settings>
This file is used when packaging the application in a container. When running locally, add the information to your personal
settings.xmlfile.
8.3.3. Running the application
Run and test the application is in a CodeReady Workspaces workspace:
$ mvn quarkus:dev -Dquarkus.http.port=${CHE_WORKSPACE_TELEMETRY_BACKEND_PORT}
If CodeReady Workspaces is secured using a self-signed certificate, add the certificate to a trust store and mount it into the workspace. Also add the Java system property, -Djavax.net.ssl.trustStore=/path/to/trustStore, to the mvn command. For example, assuming the trust store is located in $JAVA_HOME/jre/lib/security/cacerts:
$ keytool -import -alias self-signed-certificate \
  -file <path/to/self-signed-certificate> -keystore $JAVA_HOME/jre/lib/security/cacerts
Followed by:
$ mvn quarkus:dev -Dquarkus.http.port=${CHE_WORKSPACE_TELEMETRY_BACKEND_PORT} \
  -Djavax.net.ssl.trustStore=$JAVA_HOME/jre/lib/security/cacerts
8.3.4. Creating a concrete implementation of AnalyticsManager and adding specialized logic
Create two new files in your project:
-
AnalyticsManager.java- contains the logic specific to our telemetry system. -
MainConfiguration.java- is the main entrypoint that creates an instance ofAnalyticsManagerand starts listening for events.
AnalyticsManager.java
package org.my.group;

import java.util.Map;

import org.eclipse.che.api.core.rest.HttpJsonRequestFactory;
import org.eclipse.che.incubator.workspace.telemetry.base.AbstractAnalyticsManager;
import org.eclipse.che.incubator.workspace.telemetry.base.AnalyticsEvent;

public class AnalyticsManager extends AbstractAnalyticsManager {

    public AnalyticsManager(String apiEndpoint, String workspaceId, String machineToken,
            HttpJsonRequestFactory requestFactory) {
        super(apiEndpoint, workspaceId, machineToken, requestFactory);
    }

    @Override
    public boolean isEnabled() {
        // TODO Auto-generated method stub
        return true;
    }

    @Override
    public void destroy() {
        // TODO Auto-generated method stub
    }

    @Override
    public void onEvent(AnalyticsEvent event, String ownerId, String ip, String userAgent, String resolution,
            Map<String, Object> properties) {
        // TODO Auto-generated method stub
    }

    @Override
    public void increaseDuration(AnalyticsEvent event, Map<String, Object> properties) {
        // TODO Auto-generated method stub
    }

    @Override
    public void onActivity() {
        // TODO Auto-generated method stub
    }
}
MainConfiguration.java
package org.my.group;

import javax.enterprise.context.Dependent;
import javax.enterprise.inject.Produces;

import org.eclipse.che.incubator.workspace.telemetry.base.AbstractAnalyticsManager;
import org.eclipse.che.incubator.workspace.telemetry.base.BaseConfiguration;

@Dependent
public class MainConfiguration extends BaseConfiguration {
    @Produces
    public AbstractAnalyticsManager analyticsManager() {
      return new AnalyticsManager(apiEndpoint, workspaceId, machineToken, requestFactory());

    }
}
8.3.5. Implementing isEnabled()
For the purposes of the example, this method just returns true whenever it is called. Whenever the server is running, it is enabled and operational.
AnalyticsManager.java
@Override
public boolean isEnabled() {
    return true;
}
It is possible to put more a complex login in isEnabled(). For example, the service should not be considered operational in certain cases. The hosted CodeReady Workspaces woopra back-end checks that a configuration property exists before determining if the back-end is enabled.
8.3.6. Implementing onEvent()
onEvent() sends the event passed to the back-end to the telemetry system. For the example application, it sends an HTTP POST payload to our server. The example telemetry server application is deployed to OpenShift at the following URL: http://little-telemetry-back-end-che.apps-crc.testing.
AnalyticsManager.java
@Override
public void onEvent(AnalyticsEvent event, String ownerId, String ip, String userAgent, String resolution, Map<String, Object> properties) {
    HttpClient httpClient = HttpClients.createDefault();
    HttpPost httpPost = new HttpPost("http://little-telemetry-backend-che.apps-crc.testing/event");
    HashMap<String, Object> eventPayload = new HashMap<String, Object>(properties);
    eventPayload.put("event", event);
    StringEntity requestEntity = new StringEntity(new JsonObject(eventPayload).toString(),
            ContentType.APPLICATION_JSON);
    httpPost.setEntity(requestEntity);
    try {
        HttpResponse response = httpClient.execute(httpPost);
    } catch (IOException e) {
        e.printStackTrace();
    }
}
This sends an HTTP request to the telemetry server and automatically debounces identical events in a small time period, where the default value is 1500 milliseconds. It is possible to modify this period by setting subclasses.
8.3.7. Implementing increaseDuration()
Many telemetry systems recognize event duration. The AbstractAnalyticsManager merges similar events that happen in the same frame of time into one event, so that a user does not get several identical events sent to the server in a small time frame. This implementation of increaseDuration() is a no-op. This method uses the APIs of a user’s telemetry provider to alter the event or event properties to reflect an event’s increased duration.
AnalyticsManager.java
@Override
public void increaseDuration(AnalyticsEvent event, Map<String, Object> properties) {}
8.3.8. Implementing onActivity()
Set an inactive timeout limit, and use onActivity() to send a WORKSPACE_INACTIVE event if the last event time is longer than the inactivity timeout.
AnalyticsManager.java
public class AnalyticsManager extends AbstractAnalyticsManager {

    ...

    private long inactiveTimeLimt = 60000 * 3;

    ...


    @Override
    public void onActivity() {
        if (System.currentTimeMillis() - lastEventTime >= inactiveTimeLimt) {
            onEvent(WORKSPACE_INACTIVE, lastOwnerId, lastIp, lastUserAgent, lastResolution, commonProperties);
        }
    }
8.3.9. Implementing destroy()
When destroy() is called, send a WORKSPACE_STOPPED event and shutdown any resources, such as connection pools.
AnalyticsManager.java
@Override
public void destroy() {
    onEvent(WORKSPACE_STOPPED, lastOwnerId, lastIp, lastUserAgent, lastResolution, commonProperties);
}
Running mvn quarkus:dev as described in Section 8.3.3, “Running the application” displays the WORKSPACE_STOPPED event, sent to the server when the Quarkus application is terminated.
8.3.10. Packaging the Quarkus application
See the quarkus documentation for the best instructions to package the application in a container. Build and push the container to a container registry of your choice.
8.3.11. Creating a meta.yaml for your plug-in.
Create a meta.yaml definition representing a CodeReady Workspaces plug-in that runs your custom back-end in a workspace Pod. For more information about meta.yaml, see Section 4.1, “What is a Che-Theia plug-in”.
meta.yaml
apiVersion: v2
publisher: demo-publisher
name: little-telemetry-backend
version: 0.0.1
type: Che Plugin
displayName: Little Telemetry Backend
description: A Demo telemetry backend
title: Little Telemetry Backend
category: Other
spec:
  workspaceEnv:
    - name: CHE_WORKSPACE_TELEMETRY_BACKEND_PORT
      value: '4167'
  containers:
  - name: YOUR BACKEND NAME
    image: YOUR IMAGE NAME
    env:
      - name: CHE_API
        value: $(CHE_API_INTERNAL)
In most cases, a user would deploy this file to a corporate web server. For this guide, we create an Apache web server on OpenShift and host the plug-in there.
Create a configMap referencing the new meta.yaml file.
$ oc create configmap --from-file=meta.yaml -n openshift-workspaces telemetry-plugin-meta
Create a deployment, a service, and a route to expose the web server. The deployment references this configMap and places it in the /var/www/html directory.
manifests.yaml
kind: Deployment
apiVersion: apps/v1
metadata:
  name: apache
  namespace: <openshift-workspaces>
spec:
  replicas: 1
  selector:
    matchLabels:
      app: apache
  template:
    metadata:
      labels:
        app: apache
    spec:
      volumes:
        - name: plugin-meta-yaml
          configMap:
            name: telemetry-plugin-meta
            defaultMode: 420
      containers:
        - name: apache
          image: 'registry.redhat.io/rhscl/httpd-24-rhel7:latest'
          ports:
            - containerPort: 8080
              protocol: TCP
          resources: {}
          volumeMounts:
            - name: plugin-meta-yaml
              mountPath: /var/www/html
  strategy:
    type: RollingUpdate
    rollingUpdate:
      maxUnavailable: 25%
      maxSurge: 25%
  revisionHistoryLimit: 10
  progressDeadlineSeconds: 600
---
kind: Service
apiVersion: v1
metadata:
  name: apache
  namespace: <openshift-workspaces>
spec:
  ports:
    - protocol: TCP
      port: 8080
      targetPort: 8080
  selector:
    app: apache
  type: ClusterIP
---
kind: Route
apiVersion: route.openshift.io/v1
metadata:
  name: apache
  namespace: <openshift-workspaces>
spec:
  host: apache-che.apps-crc.testing
  to:
    kind: Service
    name: apache
    weight: 100
  port:
    targetPort: 8080
  wildcardPolicy: None
$ oc apply -f manifests.yaml
Wait a few minutes for the image to pull and the deployment to start, and then confirm that meta.yaml is available in the web server:
$ curl apache-che.apps-crc.testing/meta.yaml
This command should return the meta.yaml file.
8.3.12. Updating CodeReady Workspaces to reference your telemetry plug-in
Update the CheCluster Custom Resource, and add the CHE_WORKSPACE_DEVFILE_DEFAULT__EDITOR_PLUGINS environment variable to spec.server.customCheProperties. The value of the environment variable must be the URL of the location of the meta.yaml file on your web server. This can be accomplished by running oc edit checluster -n openshift-workspaces and typing in the change at the terminal, or by editing the CR in the OpenShift console (Installed Operators → Red Hat CodeReady Workspaces → Red Hat CodeReady Workspaces Cluster → codeready-workspaces → YAML).
Example 8.1. Example of a YAML file
apiVersion: org.eclipse.che/v1
kind: CheCluster
metadata:
  creationTimestamp: '2020-05-14T13:21:51Z'
  finalizers:
    - oauthclients.finalizers.che.eclipse.org
  generation: 18
  name: codeready-workspaces
  namespace: <openshift-workspaces>
  resourceVersion: '5108404'
  selfLink: /apis/org.eclipse.che/v1/namespaces/che/checlusters/eclipse-che
  uid: bae08db2-104d-4e44-a001-c9affc07528d
spec:
  auth:
    identityProviderURL: 'https://keycloak-che.apps-crc.testing'
    identityProviderRealm: che
    updateAdminPassword: false
    oAuthSecret: ZMmNPRbgOJJQ
    oAuthClientName: eclipse-che-openshift-identity-provider-yrlcxs
    identityProviderClientId: che-public
    identityProviderPostgresSecret: che-identity-postgres-secret
    externalIdentityProvider: false
    identityProviderSecret: che-identity-secret
    openShiftoAuth: true
  database:
    chePostgresDb: dbche
    chePostgresHostName: postgres
    chePostgresPort: '5432'
    chePostgresSecret: che-postgres-secret
    externalDb: false
  k8s: {}
  metrics:
    enable: false
  server:
    cheLogLevel: INFO
    customCheProperties:
      CHE_WORKSPACE_DEVFILE_DEFAULT__EDITOR_PLUGINS: 'http://apache-che.apps-crc.testing/meta.yaml'
    externalDevfileRegistry: false
    cheHost: che-che.apps-crc.testing
    selfSignedCert: true
    cheDebug: 'false'
    tlsSupport: true
    allowUserDefinedWorkspaceNamespaces: false
    externalPluginRegistry: false
    gitSelfSignedCert: false
    cheFlavor: che
  storage:
    preCreateSubPaths: true
    pvcClaimSize: 1Gi
    pvcStrategy: per-workspace
status:
  devfileRegistryURL: 'https://devfile-registry-che.apps-crc.testing'
  keycloakProvisioned: true
  cheClusterRunning: Available
  cheURL: 'https://che-che.apps-crc.testing'
  openShiftoAuthProvisioned: true
  dbProvisioned: true
  cheVersion: 7.13.1
  keycloakURL: 'https://keycloak-che.apps-crc.testing'
  pluginRegistryURL: 'https://plugin-registry-che.apps-crc.testing/v3'
Wait for the CodeReady Workspaces server to restart, and create a new workspace. See a new message stating that the plug-in is being installed into the workspace.

Perform any operations in the started workspace and observe their events in the example telemetry server logs.
= The Woopra Telemetry Plugin
The Woopra Telemetry Plugin is a plugin built to send telemetry from a Red Hat CodeReady Workspaces installation to Segment and Woopra. This plugin is used by Eclipse Che hosted by Red Hat, but any Red Hat CodeReady Workspaces deployment can take advantage of this plugin. There are no dependencies other than a valid Woopra domain and Segment Write key. The link:https://raw.githubusercontent.com/che-incubator/che-workspace-telemetry-woopra-plugin/master/meta.yaml [plugin’s meta.yaml] file has 5 environment variables that can be passed to the plugin:
-
WOOPRA_DOMAIN- The Woopra domain to send events to. -
SEGMENT_WRITE_KEY- The write key to send events to Segment and Woopra. -
WOOPRA_DOMAIN_ENDPOINT- If you prefer not to pass in the Woopra domain directly, the plugin will get it from a supplied HTTP endpoint that returns the Woopra Domain. -
SEGMENT_WRITE_KEY_ENDPOINT- If you prefer not to pass in the Segment write key directly, the plugin will get it from a supplied HTTP endpoint that returns the Segment write key.
To enable the Woopra plugin on the Red Hat CodeReady Workspaces installation, deploy the meta.yaml file to an HTTP server with the environment variables set correctly. Then, edit the CheCluster Custom Resource, and set the spec.server.customCheProperties.CHE_WORKSPACE_DEVFILE_DEFAULT__EDITOR_PLUGINS field:
spec:
  server:
    customCheProperties:
      CHE_WORKSPACE_DEVFILE_DEFAULT__EDITOR_PLUGINS: 'eclipse/che-machine-exec-plugin/7.20.0,https://your-web-server/meta.yaml'
= Java Lombok
This section shows how to enable Lombok support in your Java projects. By default, the lombok.jar file is available in all Java plug-ins provided by CodeReady Workspaces.
To enable Lombok in a CodeReady Workspaces workspace, see the instructions below.
Prerequisites
A workspace or a devfile with:
-
One of the Java-based plug-ins enabled (
redhat/java,redhat/java11,redhat/java8,redhat/quarkus-java8orredhat/quarkus-java11) - A valid Lombok project to import
-
One of the Java-based plug-ins enabled (
Procedure
- Open the workspace devfile.
Edit the existing Java plug-in section, adding the preference:
  - id: redhat/java/latest
    preferences:
      java.jdt.ls.vmargs: '-javaagent:/lombok.jar'
Verification
- Start or restart the workspace.
- Open a file containing Lombok annotations.
Verify that the Class outline contains the Lombok generated methods.
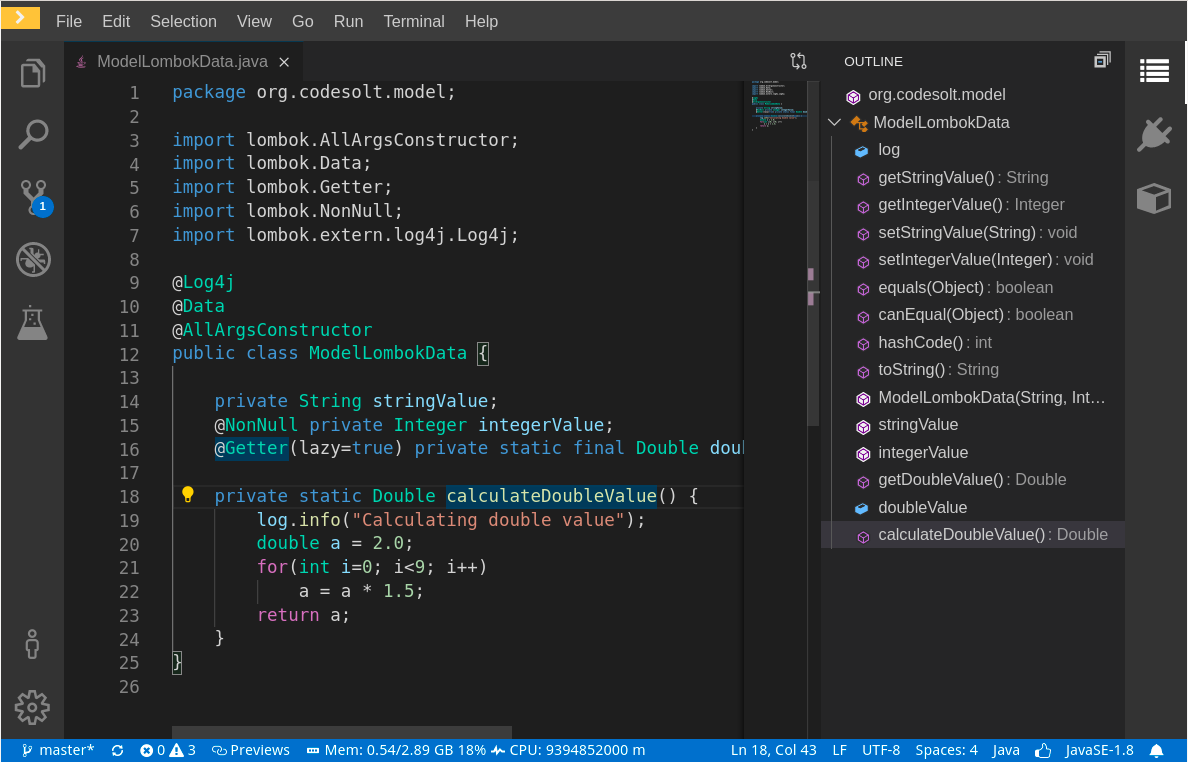
Additional resources
- For more details, see the Project Lombok website.