Dieser Inhalt ist in der von Ihnen ausgewählten Sprache nicht verfügbar.
Performance Tuning Guide
Red Hat Directory Server 11
Tuning the performance of Directory Server
Abstract
This guide provides tips for improving server and database performance.
Making Open Source More Inclusive
Red Hat is committed to replacing problematic language in our code, documentation, and web properties. We are beginning with these four terms: master, slave, blacklist, and whitelist. Because of the enormity of this endeavor, these changes will be implemented gradually over several upcoming releases. For more details, see “our CTO Chris Wright's message”.
Chapter 1. Introduction to Directory Server Performance Tuning
Link kopierenLink in die Zwischenablage kopiert!
This article provides some procedures and options that administrators can use to optimize the performance of their Red Hat Directory Server deployments. Performance tuning a Directory Server instance is unique to each server because of differences for every server in its machine environment, directory size and data type, load and network use, even the types of operations that users and clients perform.
The purpose of this guide is to highlight the features that Red Hat Directory Server provides for tracking and assessing server and database performance. There are also some procedures given to help tune server performance. For more in-depth planning information, however, check out the Red Hat Directory Server Deployment Guide, and for for command-line and UI-based administrative instructions, see the Red Hat Directory Server Administration Guide.
1.1. Setting Goals for Directory Server Performance
Link kopierenLink in die Zwischenablage kopiert!
Performance tuning is simply a way to identify potential (or real) bottlenecks in the normal operating environment of the server and then taking steps to mitigate those bottlenecks.
The general plan for performance tuning is:
- Assess the environment. Look at everything around the Directory Server: its usage, the load, the network connection and reliability, most common operations, the physical machine its on, along with any services competing for its resources.
- Measure the current Directory Server performance and establish baselines.
- Identify the server areas which can be improved.
- Make any changes to the Directory Server settings and, potentially, to the host machine.
- Measure the Directory Server performance again to see how the changes affected the performance.
Directory Server provides some sort of monitoring in three areas:
- The server process (counters and logs)
- The databases (counters)
- Any database links (counters)
In the Directory Server, most performance measurements are going to be how well the Directory Server retrieves and delivers information to clients. With that in mind, these are the server areas that can be tuned for the best Directory Server performance (and these are the areas covered in this article):
- Search operations
- Indexing performance (which affects both search and write operations)
- Database transactions
- Database and entry cache settings
- Database links
Other changes can be made to the host machine's settings or hardware which can also affect Directory Server performance:
- Available memory (based on directory size)
- Other servers running on the same machine (which could compete for resources)
- Distributing user databases across other Directory Server instances on other machines
- Balancing server loads due to network performance
These changes relate much more to planning an effective Directory Server deployment than changes that can be made to an instance. Reviewing the Deployment Guide can provide more detail about how to plan an optimal enterprise deployment.
Chapter 2. Tracking Server and Database Performance
Link kopierenLink in die Zwischenablage kopiert!
Red Hat Directory Server has two methods of recording and tracking performance data: performance counters and logs. Counters are used to determine how well the Directory Server performing, particularly in database performance; logs are used to diagnose any problem areas with server and LDAP operations and configuration.
Performance counters focus on the operations and information of the Directory Server for the server, all configured databases, and database links (chaining databases).
There are three types of logs: access (for client connections), errors (for errors, warnings, and details of events), and audit (changes to Directory Server configuration). The access and error logs run by default (and the errors log is required for the server to run). Audit logging, because of the overhead, must be enabled manually.
Note
The access log is buffered. This allows full access logging even with highly loaded servers, but there is a time lag between when the event occurs in the server and when the event is written to the log.
2.1. Monitoring Server Activity
Link kopierenLink in die Zwischenablage kopiert!
The Directory Server's current activities can be monitored from either the Web Console or the command line. It is also possible to monitor the activity of the caches for all of the database.
Note
Some of the counters for Directory Server database attributes monitored by server use 64-bit integers, even on 32-bit systems (total connections, operations initiated, operations completed, entries sent, and bytes sent). On high-volume systems, this keeps the counters from rolling too quickly and skewing monitoring data.
2.1.1. Monitoring the Directory Server Using the Command Line
Link kopierenLink in die Zwischenablage kopiert!
To monitor the server using the command line:
dsconf -D "cn=Directory Manager" ldap://server.example.com monitor server
# dsconf -D "cn=Directory Manager" ldap://server.example.com monitor server
The following table describes the attributes the command returns:
| Attribute | Description | ||||||
|---|---|---|---|---|---|---|---|
| version | Identifies the directory's current version number. | ||||||
| threads | The current number of active threads used for handling requests. Additional threads may be created by internal server tasks, such as replication or chaining. | ||||||
| connection | Provides the following summary information for each open connection (only available if you bind to the directory as Directory Manager):
| ||||||
| currentconnections | Identifies the number of connections currently in service by the directory. | ||||||
| totalconnections | Identifies the number of connections handled by the directory since it started. | ||||||
| currentconnectionsatmaxthreads | Displays all connections that are currently in a max thread state. | ||||||
| maxthreadsperconnhits | Displays how many times a connection hit max thread. | ||||||
| dtablesize | Shows the number of file descriptors available to the directory. Each connection requires one file descriptor: one for every open index, one for log file management, and one for ns-slapd itself. Essentially, this value shows how many additional concurrent connections can be serviced by the directory. For more information on file descriptors, see the operating system documentation. | ||||||
| readwaiters | Identifies the number of threads waiting to read data from a client. | ||||||
| opsinitiated | Identifies the number of operations the server has initiated since it started. | ||||||
| opscompleted | Identifies the number of operations the server has completed since it started. | ||||||
| entriessent | Identifies the number of entries sent to clients since the server started. | ||||||
| bytessent | Identifies the number of bytes sent to clients since the server started. | ||||||
| currenttime | Identifies the time when this snapshot of the server was taken. The time is displayed in Greenwich Mean Time (GMT) in UTC format. | ||||||
| starttime | Identifies the time when the server started. The time is displayed in Greenwich Mean Time (GMT) in UTC format. | ||||||
| nbackends | Identifies the number of back ends (databases) the server services. |
2.1.2. Monitoring the Server Using the Web Console
Link kopierenLink in die Zwischenablage kopiert!
To monitor the server using the web console:
- Open the Directory Server user interface in the web console. For details, see Logging Into Directory Server Using the Web Console section in the Red Hat Directory Server Administration Guide.
- Select the instance.
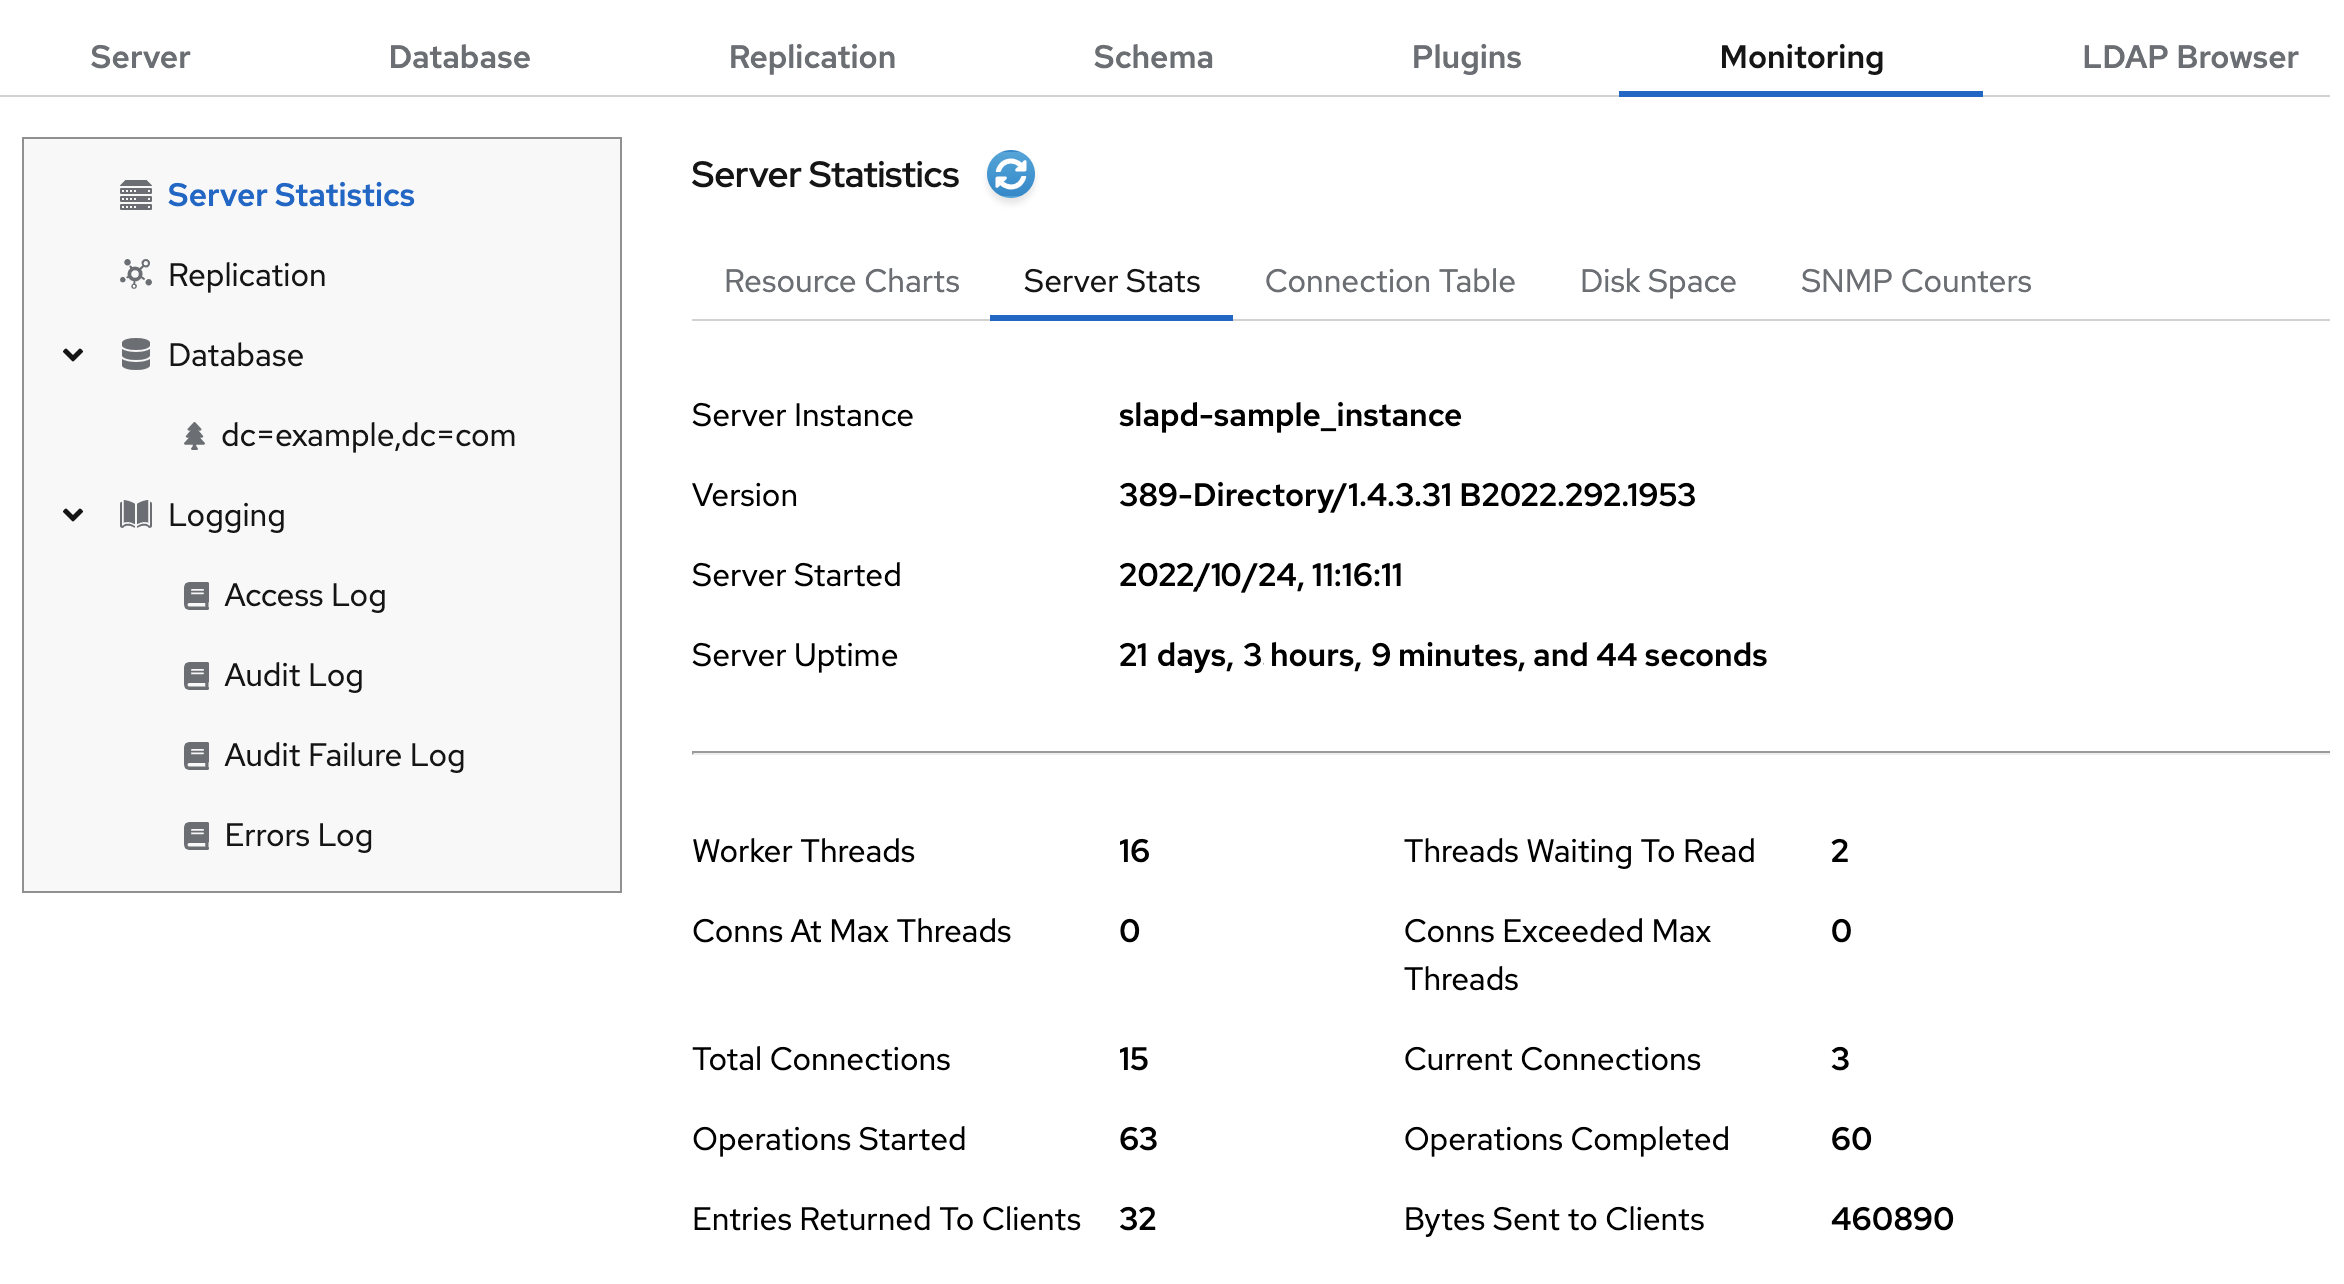
- On the tab, select Server Statistics.The following table describes the fields visible in this menu:
Expand Table 2.2. General Information (Server) Field Description Server Instance Displays the name of the Directory Server instance. Version Identifies the current server version. Server Started The date and time the server was started. Server Uptime The time the instance is running. Worker Threads The current number of active threads used for handling requests. Additional threads may be created by internal server tasks, such as replication or chaining. Threads Waiting To Read The total number of threads waiting to read from the client. Threads may not be immediately read if the server starts to receive a request from the client, and then the transmission of that request is halted for some reason. Generally, threads waiting to read are an indication of a slow network or client. Conns At Max Threads Displays all connections that are currently in a max threadstate.Conns Hit Max Threads Displays how many times a connection hit max thread.Total Connections The total number of connections established to this Directory Server instance. Current Connections The total number of open connections. Each connection can account for multiple operations, and therefore multiple threads. Operations Started The number of operations initiated by this connection. Operations Completed The number of operations completed by the server for this connection. Entries Returned to Clients The number of entries sent to clients since the server started. Bytes Sent to Clients The number of bytes sent to clients since the server started.
2.2. Monitoring Database Activity
Link kopierenLink in die Zwischenablage kopiert!
Note
Some of the counters for Directory Server database attributes monitored by server use 64-bit integers, even on 32-bit systems (entry cache hits, entry cache tries, the current cache size, and the maximum cache size). On high-volume systems, this keeps the counters from rolling too quickly and skewing monitoring data.
2.2.1. Monitoring Database Activity Using the Command Line
Link kopierenLink in die Zwischenablage kopiert!
To monitor the current activity of a database:
dsconf -D "cn=Directory Manager" ldap://server.example.com monitor backend
# dsconf -D "cn=Directory Manager" ldap://server.example.com monitor backend
The following table describes the attributes the command returns:
| Attribute | Description |
|---|---|
| readonly | Indicates whether the database is in read-only mode (1) or in read-write mode (0). |
| entrycachehits | The total number of successful entry cache lookups. The value is the total number of times the server could retrieve an entry from the entry cache without reloading it from the database. |
| entrycachetries | The total number of entry cache lookups since you started the instance. The value is the total number, since the instance has been started, {DS} tried to retrieve entry from the entry cache. |
| entrycachehitratio |
The number of entry cache tries to successful entry cache lookups. This number is based on the total lookups and hits since you last started the instance. The closer the entry cache hit ratio is to 100%, the better.
Whenever an operation attempts to find an entry that is not present in the entry cache, the server needs to access the database to obtain the entry. Thus, as this ratio drops towards zero, the number of disk accesses increases, and directory search performance decreases. To improve this ratio, increase the size of the entry cache of the database.
To improve this ratio, increase the size of the entry cache by increasing the value of the
nsslapd-cachememsize attribute in the cn=database_name, cn=ldbm database,cn=plugins,cn=config entry.
|
| currententrycachesize |
The total size, in bytes, of directory entries currently present in the entry cache.
To increase the size of the entries which can be present in the cache, increase the value of the
nsslapd-cachememsize attribute in the cn=database_name, cn=ldbm database,cn=plugins,cn=config entry.
|
| maxentrycachesize |
The maximum size, in bytes, of directory entries that {DS} can maintain in the entry cache.
To increase the size of the entries which can be present in the cache, increase the value of the
nsslapd-cachememsize attribute in the cn=database_name, cn=ldbm database,cn=plugins,cn=config entry.
|
| currententrycachecount | The current number of entries stored in the entry cache of a given backend. |
| maxentrycachecount |
The maximum number of entries stored in the entry cache of a database.
To tune this value, increase the value of the
nsslapd-cachesize attribute in the cn=database_name,cn=ldbm database,cn=plugins,cn=config
|
| dncachehits | The number of times the server could process a request by obtaining a normalized distinguished name (DN) from the DN cache rather than normalizing it again. |
| dncachetries | The total number of DN cache accesses since you started the instance. |
| dncachehitratio | The ratio of cache tries to successful DN cache hits. The closer this value is to 100%, the better. |
| currentdncachesize |
The total size, in bytes, of DN currently present in the DN cache.
To increase the size of the entries which can be present in the DN cache, increase the value of the
nsslapd-dncachememsize attribute in the cn=database_name, cn=ldbm database,cn=plugins,cn=config entry.
|
| maxdncachesize |
The maximum size, in bytes, of DNs that {DS} can maintain in the DN cache.
To increase the size of the entries which can be present in the cache, increase the value of the
nsslapd-dncachememsize attribute in the cn=database_name, cn=ldbm database,cn=plugins,cn=config entry.
|
| currentdncachecount | The number of DNs currently present in the DN cache. |
| maxdncachecount | The maximum number of DNs allowed in the DN cache. |
2.2.2. Monitoring Database Activity Using the Web Console
Link kopierenLink in die Zwischenablage kopiert!
To monitor the database activity using the Web Console:
- Open the Directory Server user interface in the web console. For details, see Logging Into Directory Server Using the Web Console section in the Red Hat Directory Server Administration Guide.
- Select the instance.
- On the tab, select the database entry to display.
- Select Entry Cache to display the performance values of the entry cache:The following table describes the fields visible on this tab:
Expand Table 2.4. Fields on the Entry Cache Tab Field Name Description Entry Cache Hit Ratio Ratio that indicates the number of entry cache tries to successful entry cache lookups. This number is based on the total lookups and hits since the directory was last started. The closer this value is to 100%, the better. Whenever an operation attempts to find an entry that is not present in the entry cache, the directory has to perform a disk access to obtain the entry. Thus, as this ratio drops towards zero, the number of disk accesses increases, and directory search performance drops.To improve this ratio, increase the size of the entry cache by increasing the value of thensslapd-cachememsizeattribute in thecn=database_name,cn=ldbm database,cn=plugins,cn=configentry for the database.Entry Cache Tries The total number of entry cache lookups since the directory was last started. That is, the total number of entries requested since server startup. Entry Cache Hits The total number of successful entry cache lookups. That is, the total number of times the server could process a search request by obtaining data from the cache rather than by going to disk. Entry Cache Max Size The size of the entry cache in bytes maintained by the directory.This value is managed by thensslapd-cachememsizeattribute in thecn=database_name,cn=ldbm database,cn=plugins,cn=configentry for the database.Entry Cache Current Size The number of directory entries currently present in the entry cache. Entry Cache Max Entries DEPRECATED.The maximum number of directory entries that can be maintained in the entry cache.Do not attempt to manage the cache size by setting a maximum number of allowed entries. This can make it difficult for the host to allocate RAM effectively. Manage the cache size by setting the amount of RAM available to the cache, using thensslapd-cachememsizeattribute.Entry Cache Count The number of directory entries currently present in the entry cache. - Select DN Cache for performance values on the DN cache.


2.3. Monitoring Database Link Activity
Link kopierenLink in die Zwischenablage kopiert!
The activity for database links (chained databases) can also be displayed, however, only using the command line:
dsconf -D "cn=Directory Manager" ldap://server.example.com monitor chaining
# dsconf -D "cn=Directory Manager" ldap://server.example.com monitor chaining
The following table describes the attributes the command returns:
| Attribute Name | Description |
|---|---|
| nsAddCount | The number of add operations received. |
| nsDeleteCount | The number of delete operations received. |
| nsModifyCount | The number of modify operations received. |
| nsRenameCount | The number of rename operations received. |
| nsSearchBaseCount | The number of base-level searches received. |
| nsSearchOneLevelCount | The number of one-level searches received. |
| nsSearchSubtreeCount | The number of subtree searches received. |
| nsAbandonCount | The number of abandon operations received. |
| nsBindCount | The number of bind request received. |
| nsUnbindCount | The number of unbinds received. |
| nsCompareCount | The number of compare operations received. |
| nsOperationConnectionCount | The number of open connections for normal operations. |
| nsBindConnectionCount | The number of open connections for bind operations. |
2.4. Monitoring the Local Disk for Graceful Shutdown
Link kopierenLink in die Zwischenablage kopiert!
When the disk space available on a system becomes too small, the Directory Server process terminates. As a consequence, there is a risk of corrupting the database or loosing data.
To prevent this problem, you can configure Directory Server to monitor the free disk space. The monitoring thread checks the free space on the file systems that contain the configuration, transaction log, and database directories.
Depending on the remaining free disk space, Directory Server behaves different:
- If the free disk space reaches the defined threshold, Directory Server:
- Disables verbose logging
- Disables access access logging
- Deletes archived log files
Note
Directory Server always continues writing error logs, even if the threshold is reached. - If the free disk space is lower than the half of the configured threshold, Directory Server shuts down within a defined grace period.
- If the available disk space is ever lower than 4 KB, Directory Server shuts down immediately.
If disk space is freed up, then Directory Server aborts the shutdown process and re-enables all of the previously disabled log settings.
2.4.1. Configuring Local Disk Monitoring Using the Command Line
Link kopierenLink in die Zwischenablage kopiert!
To configure local disk monitoring using the command line:
- Enable the disk monitoring feature, set a threshold value, and a grace period:
dsconf -D "cn=Directory Manager" ldap://server.example.com config replace nsslapd-disk-monitoring=on nsslapd-disk-monitoring-threshold=3000000000 nsslapd-disk-monitoring-grace-period=60
# dsconf -D "cn=Directory Manager" ldap://server.example.com config replace nsslapd-disk-monitoring=on nsslapd-disk-monitoring-threshold=3000000000 nsslapd-disk-monitoring-grace-period=60Copy to Clipboard Copied! Toggle word wrap Toggle overflow This command sets the threshold of free disk space to 3 GB and the grace period to 60 seconds. - Optionally, configure that Directory Server neither disables access logging nor deletes archived logs, by enabling the
nsslapd-disk-monitoring-logging-criticalparameter:dsconf -D "cn=Directory Manager" ldap://server.example.com config replace nsslapd-disk-monitoring-logging-critical=on
# dsconf -D "cn=Directory Manager" ldap://server.example.com config replace nsslapd-disk-monitoring-logging-critical=onCopy to Clipboard Copied! Toggle word wrap Toggle overflow - Restart the Directory Server instance:
dsctl instance_name restart
# dsctl instance_name restartCopy to Clipboard Copied! Toggle word wrap Toggle overflow
2.4.2. Configuring Local Disk Monitoring Using the Web Console
Link kopierenLink in die Zwischenablage kopiert!
To configure local disk monitoring using the Web Console:
- Open the Directory Server user interface in the web console. For details, see Logging Into Directory Server Using the Web Console section in the Red Hat Directory Server Administration Guide.
- Select the instance.
- Open the menu, and select Server Configuration.
- Enable Enable Disk Space Monitoring, and set the threshold in bytes and the grace period in minutes.This example sets the monitoring threshold to 3 GB (3,221,225,472 bytes) and the time before Directory Server shuts down the instance after reaching the threshold to
60minutes. - Optionally, configure that Directory Server neither disables access logging nor deletes archived logs by selecting Preserve Logs.
- Click .
- Click the button, and select Restart Instance.

Chapter 3. Tuning the Number of Locks
Link kopierenLink in die Zwischenablage kopiert!
Lock mechanisms in Directory Server control how many copies of Directory Server processes can run at the same time. For example, during an import job, Directory Server sets a lock in the
/run/lock/dirsrv/slapd-instance_name/imports/ directory to prevent the ns-slapd (Directory Server) process, another import, or export operations from running.
If the server runs out of available locks, the following error is logged in the
/var/log/dirsrv/slapd-instance_name/errors file:
libdb: Lock table is out of available locks
libdb: Lock table is out of available locks
If error messages indicate that the lock table is out of available locks, double the number of locks. If the problem persists, double the value again.
3.1. Manually Monitoring the Number of Locks
Link kopierenLink in die Zwischenablage kopiert!
To monitor the number of locks using the command line, enter:
ldapsearch -D "cn=Directory Manager" -W -p 389 -h server.example.com -x
     -s sub -b "cn=database,cn=monitor,cn=ldbm database,cn=plugins,cn=config"
     nsslapd-db-current-locks nsslapd-db-max-locks
# ldapsearch -D "cn=Directory Manager" -W -p 389 -h server.example.com -x
     -s sub -b "cn=database,cn=monitor,cn=ldbm database,cn=plugins,cn=config"
     nsslapd-db-current-locks nsslapd-db-max-locks
For details about the monitoring attributes, see the descriptions in the Directory Server Configuration, Command, and File Reference.
3.2. Avoiding Data Corruption by Monitoring Free Database Locks
Link kopierenLink in die Zwischenablage kopiert!
Running out of database locks can lead to data corruption. To avoid this, Directory Server, by default, monitors the remaining number of free database locks every 500 milliseconds and, if the number of active database locks is equal or higher than the 90%, Directory Server aborts all searches.
You can change the interval and threshold:
- For example, to set the interval to
600milliseconds and the threshold to85percent, enter:dsconf -D "cn=Directory Manager" ldap://server.example.com backend config set --locks-monitoring-enabled on --locks-monitoring-pause 600 --locks-monitoring-threshold 85
# dsconf -D "cn=Directory Manager" ldap://server.example.com backend config set --locks-monitoring-enabled on --locks-monitoring-pause 600 --locks-monitoring-threshold 85Copy to Clipboard Copied! Toggle word wrap Toggle overflow The--locks-monitoring-enabled onoption ensure that the feature is enabled.Note
If you set a too high interval, the server can run out of locks before the next monitoring check happens. Setting a too short interval can slow down the server. - Restart the instance:
dsctl instance_name restart
# dsctl instance_name restartCopy to Clipboard Copied! Toggle word wrap Toggle overflow
3.3. Setting the Number of Locks Using the Command Line
Link kopierenLink in die Zwischenablage kopiert!
To set the number of locks using the command line:
- Use the
dsconf backend config setcommand to update the number of locks. For example, to set the value to20000:dsconf -D "cn=Directory Manager" ldap://server.example.com backend config set --locks=20000
# dsconf -D "cn=Directory Manager" ldap://server.example.com backend config set --locks=20000Copy to Clipboard Copied! Toggle word wrap Toggle overflow - Restart the Directory Server instance:
dsctl instance_name restart
# dsctl instance_name restartCopy to Clipboard Copied! Toggle word wrap Toggle overflow
3.4. Setting the Number of Locks Using the Web Console
Link kopierenLink in die Zwischenablage kopiert!
To set the number of locks using the Web Console:
- Open the Directory Server user interface in the web console. For details, see Logging Into Directory Server Using the Web Console section in the Red Hat Directory Server Administration Guide.
- Select the instance.
- Open the menu, and select Global Database Configuration.
- Click Show Advanced Settings.
- Update the value in the Database Locks field.
- Click .
- Click the button, and select Restart Instance.
Chapter 4. Improving Search Performance (and Balancing Read Performance)
Link kopierenLink in die Zwischenablage kopiert!
The most effective way to improve search operations against the directory is to configure thorough indexes for entries, combined with reasonable limits on search results.
4.1. Using Indexes
Link kopierenLink in die Zwischenablage kopiert!
An index (as it implies) is a tag that shows that a certain entry contains a certain attribute, without having to contain any other detail about the entry (which saves space and makes returning search results faster). Each index is organized around a Directory Server attribute and a certain way of matching that attribute:
- Presence index (pres) simply shows what entries contain an attribute.
- Equality index (eq) shows which attribute values match a specific search string.
- Approximate index (approx) is used for efficient sounds-like searches, which shows entries which have a value that phonetically matches a string.
- Substring index (sub) matches any substring of an attribute value to the given search string. (This index if very expensive for the server to maintain.)
- International index uses a matching rule to match strings in a directory which contains values in languages other than English.
Note
Indexing is described in much more detail in the Managing Indexes chapter in the Red Hat Directory Server Administration Guide.
However, just creating indexes is not directly going to increase server performance. Maintaining indexes puts a burden on the Directory Server for every modify, add, and delete operation by having to verify every attribute in the change against every index maintained by the server:
- The Directory Server receives an add or modify operation.
- The Directory Server examines the indexing attributes to determine whether an index is maintained for the attribute values.
- If the created attribute values are indexed, then the Directory Server generates the new index entries.
- Once the server completes the indexing, the actual attribute values are created according to the client request.
For example, the Directory Server adds the entry:
The Directory Server is maintaining the following indexes:
- Equality, approximate, and substring indexes for
cn(common name) andsn(surname) attributes. - Equality and substring indexes for the telephone number attribute.
- Substring indexes for the description attribute.
When adding that entry to the directory, the Directory Server must perform these steps:
- Create the
cnequality index entry forJohnandJohn Doe. - Create the appropriate
cnapproximate index entries forJohnandJohn Doe. - Create the appropriate
cnsubstring index entries forJohnandJohn Doe. - Create the
snequality index entry forDoe. - Create the appropriate
snapproximate index entry forDoe. - Create the appropriate
snsubstring index entries forDoe. - Create the telephone number equality index entry for
408 555 8834. - Create the appropriate telephone number substring index entries for
408 555 8834. - Create the appropriate description substring index entries for
Manufacturing lead for the Z238 line of widgets. A large number of substring entries are generated for this string.
Before creating new indexes, make sure to balance the overhead of maintaining the indexes against the potential improvements in search performance. Especially important, match the types of indexes that you maintain to the type of information stored in the directory and the type of information users routinely search for.
- Approximate indexes are not efficient for attributes commonly containing numbers, such as telephone numbers.
- Substring indexes do not work for binary attributes.
- Equality indexes should be avoided if the value is big (such as attributes intended to contain photographs or passwords containing encrypted data).
- Maintaining indexes for attributes not commonly used in a search increases overhead without improving global searching performance.
- Attributes that are not indexed can still be specified in search requests, although the search performance may be degraded significantly, depending on the type of search.
- The more indexes you maintain, the more disk space you require.
Note
Creating indexes is much more effective for directories which have a high search operation load and low modify operation load.
4.2. Tuning Directory Server Resource Settings
Link kopierenLink in die Zwischenablage kopiert!
You can configure several parameters to manage and improve the amount of resources Directory Server uses.
4.2.1. Updating Directory Server Resource Settings Using the Command Line
Link kopierenLink in die Zwischenablage kopiert!
To update the server resource settings using the command line:
- Update the performance settings:
dsconf -D "cn=Directory Manager" ldap://server.example.com config replace parameter_name=setting
dsconf -D "cn=Directory Manager" ldap://server.example.com config replace parameter_name=settingCopy to Clipboard Copied! Toggle word wrap Toggle overflow You can set the following parameters:nsslapd-threadnumber: Sets the number of worker threads.nsslapd-maxdescriptors: Sets the maximum number of file descriptors.nsslapd-timelimit: Sets the search time limit.nsslapd-sizelimit: Sets the search size limit.nsslapd-pagedsizelimit: Sets the paged search size limit.nsslapd-idletimeout: Sets the idle connection timeout.nsslapd-ioblocktimeout: Sets the input/output (I/O) block timeout.nsslapd-ndn-cache-enabled: Enables or disables the normalized DN cache.nsslapd-ndn-cache-max-size: Sets the normalized DN cache size, ifnsslapd-ndn-cache-enabledis enabled.nsslapd-outbound-ldap-io-timeout: Sets the outbound I/O timeout.nsslapd-maxbersize: Sets the maximum Basic Encoding Rules (BER) size.nsslapd-maxsasliosize: Sets the maximum Simple Authentication and Security Layer (SASL) I/O size.nsslapd-listen-backlog-size: Sets the maximum number of sockets available to receive incoming connections.nsslapd-max-filter-nest-level: Sets the maximum nested filter level.nsslapd-ignore-virtual-attrs: Enables or disables virtual attribute lookups.nsslapd-connection-nocanon: Enables or disables revers DNS lookups.nsslapd-enable-turbo-mode: Enables or disables the turbo mode feature.
For further details about these parameters, see their descriptions in the Red Hat Directory Server Configuration, Command, and File Reference. - Restart the Directory Server instance:
dsctl instance_name restart
# dsctl instance_name restartCopy to Clipboard Copied! Toggle word wrap Toggle overflow
4.2.2. Updating Directory Server Resource Settings Using the Web Console
Link kopierenLink in die Zwischenablage kopiert!
To update the server resource settings using the Web Console:
- Open the Directory Server user interface in the web console. For details, see Logging Into Directory Server Using the Web Console section in the Red Hat Directory Server Administration Guide.
- Select the instance.
- Open the menu, and select Tuning & Limits.
- Update the settings. Optionally, click Show Advanced Settings to display all settings.To display a tooltip and the corresponding attribute name in the
cn=configentry for a parameter, hover the mouse cursor over the setting. For further details, see the parameter description in the Red Hat Directory Server Configuration, Command, and File Reference.. - Click .
- Click the button, and select Restart Instance.

4.3. Setting Index Scan Limits
Link kopierenLink in die Zwischenablage kopiert!
In large directories, the search results list can get huge. A directory with a million
inetorgperson entries would have a million entries that were returned with a filter like (objectclass=inetorgperson), and an index for the sn attribute would have at least a million entries in it.
Loading a long ID list from the database significantly reduces search performance. The configuration parameter,
nsslapd-idlistscanlimit, sets a limit on the number of IDs that are read before a key is considered to match the entire primary index (meaning the search is treated as an unindexed search with a different set of resource limits).
For large indexes, it is actually more efficient to treat any search which matches the index as an unindexed search. The search operation only has to look in one place to process results (the entire directory) rather than searching through an index that is nearly the size of a directory, plus the directory itself.
The default value of the
nsslapd-idlistscanlimit attribute is 4000, which is gives good performance for a common range of database sizes and access patterns. It's usually not necessary to change this value. If the database index is slightly larger than the 4000 entries, but still significantly smaller than the overall directory, then raising the scan limit improves searches which would otherwise hit the default limit of 4000.
On the other hand, lowering the limit can significantly speed up searches that would otherwise hit the 4000 entry limit, but where it is not necessary to scan every entry.
4.3.1. Setting an Index Scan Limit Using the Command Line
Link kopierenLink in die Zwischenablage kopiert!
To set an index scan limit using the command line:
- For example, to set the number of entry IDs that Directory Server searches during a search operation to
8000:dsconf -D "cn=Directory Manager" ldap://server.example.com backend config set --idlistscanlimit=8000
# dsconf -D "cn=Directory Manager" ldap://server.example.com backend config set --idlistscanlimit=8000Copy to Clipboard Copied! Toggle word wrap Toggle overflow - Restart the Directory Server instance:
dsctl instance_name restart
# dsctl instance_name restartCopy to Clipboard Copied! Toggle word wrap Toggle overflow
4.3.2. Setting an Index Scan Limit Using the Web Console
Link kopierenLink in die Zwischenablage kopiert!
To set an index scan limit using the Web Console:
- Open the Directory Server user interface in the web console. For details, see Logging Into Directory Server Using the Web Console section in the Red Hat Directory Server Administration Guide.
- Select the instance.
- On the tab, select Global Database Configuration.
- Update the value in the ID List Scan Limit field.
- Click .
- Click the button, and select Restart Instance.
4.4. Fine Grained ID List Size
Link kopierenLink in die Zwischenablage kopiert!
In large databases, some queries can consume a large amount of CPU and RAM resources. To improve the performance, you can set a default ID scan limit that applies to all indexes in the database using the
nsslapd-idlistscanlimit attribute. However in some cases it is useful to define a limit for certain indexes, or use no ID list. You can set individual settings for ID list scan limits for different types of search filters using the nsIndexIDListScanLimit attribute.
To set a limit, for example for the
objectClass attribute, add the nsIndexIDListScanLimit parameter to the DN cn=objectclass,cn=index,cn=userRoot,cn=ldbm database,cn=plugins,cn=config.
The
nsIndexIDListScanLimit attribute is multi valued and takes the following list of parameters as a value:
nsIndexIDListScanLimit: limit=NNN [type=eq[,sub,...]] [flags=AND[,XXX,...]] [values=val[,val,...]]
nsIndexIDListScanLimit: limit=NNN [type=eq[,sub,...]] [flags=AND[,XXX,...]] [values=val[,val,...]]limit: The maximum size of the ID list. Valid values are:-1: Unlimited.0: Do not use the index.1 to the maximum 32-bit integer (2147483647): Maximum number of IDs.
type: Optional. The type of the index.eq,sub,pres, and so on. The value must be one of the actualnsIndexTypespecified for the index definition. For example, you cannot usetype=eqif you do not havensIndexType=eqdefined.flags: Optional. Flags that alter the behavior of applying the scan limit. Valid values are:AND: Apply the scan limit only to searches in which the attribute appears in anANDclause.OR: Apply the scan limit only to searches in which the attribute appears in anORclause.
values: Optional. Comma separated list of values which must match the search filter in order for the limit to be applied. Since the matches are done one at a time, the values will match if any of the values matches.The values must be used with only one type at a time.The values must correspond to the index type, and must correspond to the syntax of the attribute to which the index is applied. For example, if you specified the integer based attributeuidNumberand it is indexed foreq, you cannot usetype=eq values=abc.If the value contains spaces, commas, NULL, or other values which require to be escaped, the LDAP filter escape syntax should be used: backslash (\) followed by the 2 hex digit code for the character. In the following example, the commas in the DN value are escaped with\2C.nsIndexIDListScanLimit: limit=0 type=eq values=uid=user\2Cou=People\2Cdc=example\2Cdc=com
nsIndexIDListScanLimit: limit=0 type=eq values=uid=user\2Cou=People\2Cdc=example\2Cdc=comCopy to Clipboard Copied! Toggle word wrap Toggle overflow
Example 4.1. Setting nsIndexIDListScanLimit
In a large database with 10 million entries that contain the object class
inetOrgPerson, a search for (&(objectClass=inetOrgPerson)(uid=user)) creates first an ID list containing all 10 million IDs matching objectClass=inetOrgPerson. When the database applies the second part of the filter, it searches the result list for objects matching uid=user. In this cases it is useful to define a limit for certain indexes, or use no ID list at all.
To set that no ID list is created for
objectClass=inetOrgPerson in AND clauses, add the following nsIndexIDListScanLimit:
No ID list is created for
objectClass=inetOrgPerson when used in an AND clause. In all other situations the value of nsslapd-idlistscanlimit is applied.
4.5. Tuning the Database Cache for Searches
Link kopierenLink in die Zwischenablage kopiert!
The database attributes that affect search performance mainly define the amount of memory available to the server. The maximum values that can be set for the database's cache size attributes depends on the amount of real memory on the machine. Roughly, the amount of available memory on the machine should always be greater than sum total of the default database cache size and sum of each entry cache size.
Use caution when changing these cache sizing attributes. The ability to improve server performance with these attributes depends on the size of the database, the amount of physical memory available on the machine, and whether directory searches are random (that is, if the directory clients are searching for random and widely scattered directory data).
If the database does not fit into memory and if searches are random, attempting to increase the values set on these attributes does not help directory performance. In fact, changing these attributes may harm overall performance.
The attributes of each database used to store directory data can be resized.
To improve the cache hit ratio on search operations, increase the amount of data that the Directory Server maintains in the database cache, as described in Section 6.5, “Setting the Database Cache Size”, by editing the values for the
nsslapd-dbcachesize parameter.
4.6. Managing Special Entries
Link kopierenLink in die Zwischenablage kopiert!
Directory Server stores the
cn=config entry in the /etc/dirsrv/slapd-instance_name/dse.ldif configuration file and not in the same highly scalable database as regular entries. For this reason, do not store regular user or groups in cn=config.
Chapter 5. Tuning Transaction Logging
Link kopierenLink in die Zwischenablage kopiert!
Every Directory Server contains a transaction log which writes operations for all the databases it manages. Whenever a directory database operation such as a modify is performed, the server creates a single database transaction for all of the database operations invoked as a result of that LDAP operation. This includes both updating the entry data in the entry index file and updating all of the attribute indexes. If all of the operations succeed, the server commits the transaction, writes the operations to the transaction log, and verifies that the entire transaction is written to disk. If any of these operations fail, the server rolls back the transaction, and all of the operations are discarded. This all-or-nothing approach in the server guarantees that an update operation is atomic. Either the entire operation succeeds permanently and irrevocably, or it fails.
Periodically, the Directory Server (through internal housekeeping threads) flushes the contents of the transaction logs to the actual database index files and checks if the transaction logs require trimming.
If the server experiences a failure, such as a power outage, and shuts down abnormally, the information about recent directory changes is still saved by the transaction log. When the server restarts, the directory automatically detects the error condition and uses the database transaction log to recover the database.
Although database transaction logging and database recovery are automatic processes that require no intervention, it can be advisable to tune some of the database transaction logging attributes to optimize performance.
Warning
The transaction logging attributes are provided only for system modifications and diagnostics. These settings should be changed only with the guidance of Red Hat Technical Support. Setting these attributes and other configuration attributes inconsistently may cause the directory to be unstable.
5.1. Moving the Database Directory to a Separate Disk or Partition
Link kopierenLink in die Zwischenablage kopiert!
To achieve higher performance, store the directory server databases and transaction log on a fast drive, such as a nonvolatile memory express (NVMe) drive or an SSD.
For example, if you already run a Directory Server instance and want to mount the
/dev/nvme0n1p1 partition to the /var/lib/dirsrv/slapd-instance_name/db/ directory:
- Stop the instance:
systemctl stop dirsrv@instance_name
# systemctl stop dirsrv@instance_nameCopy to Clipboard Copied! Toggle word wrap Toggle overflow - Mount the
/dev/nvme0n1p1partition to a temporary directory. For example:mount /dev/nvme0n1p1 /mnt/
# mount /dev/nvme0n1p1 /mnt/Copy to Clipboard Copied! Toggle word wrap Toggle overflow - Copy the content of the
/var/lib/dirsrv/slapd-instance_name/db/directory to the temporary mount point:mv /var/lib/dirsrv/slapd-instance_name/db/* /mnt/
# mv /var/lib/dirsrv/slapd-instance_name/db/* /mnt/Copy to Clipboard Copied! Toggle word wrap Toggle overflow - Unmount the temporary directory:
umount /mnt/
# umount /mnt/Copy to Clipboard Copied! Toggle word wrap Toggle overflow - If
/var/lib/dirsrv/slapd-instance_name/db/is also a separate mount point, unmount the directory:umount /var/lib/dirsrv/slapd-instance_name/db/
# umount /var/lib/dirsrv/slapd-instance_name/db/Copy to Clipboard Copied! Toggle word wrap Toggle overflow - Update the
/etc/fstabfile to mount the/dev/nvme0n1p1partition automatically to/var/lib/dirsrv/slapd-instance_name/db/when the system boots. For details, see the corresponding section in the Red Hat System Administrator's Guide. - Mount the file system. If you added the entry to
/etc/fstab:mount /var/lib/dirsrv/slapd-instance_name/db/
# mount /var/lib/dirsrv/slapd-instance_name/db/Copy to Clipboard Copied! Toggle word wrap Toggle overflow - If SELinux is running in
enforcingmode, restore the SELinux context:restorecon -Rv /var/lib/dirsrv/slapd-instance_name/db/
# restorecon -Rv /var/lib/dirsrv/slapd-instance_name/db/Copy to Clipboard Copied! Toggle word wrap Toggle overflow - Start the instance:
systemctl start dirsrv@instance_name
# systemctl start dirsrv@instance_nameCopy to Clipboard Copied! Toggle word wrap Toggle overflow
5.2. Changing the Database Checkpoint Interval
Link kopierenLink in die Zwischenablage kopiert!
At regular intervals, the Directory Server writes operations logged in the transaction log to the database index files and logs a checkpoint entry in the database transaction log. By indicating which changes have already been written to the database indexes, checkpoint entries indicate where to begin recovery from the transaction log, thus speeding up the recovery process.
By default, the Directory Server is set up to send a checkpoint entry to the database transaction log every 60 seconds. Increasing the checkpoint interval may increase the performance of directory write operations. However, increasing the checkpoint interval may also increase the amount of time required to recover directory databases after a disorderly shutdown and require more disk space due to large database transaction log files. Therefore, only modify this attribute if you are familiar with database optimization and can fully assess the effect of the change.
5.2.1. Changing the Database Checkpoint Interval Using the Command Line
Link kopierenLink in die Zwischenablage kopiert!
To change the database checkpoint interval using the command line, enter:
dsconf -D "cn=Directory Manager" ldap://server.example.com backend config set --checkpoint-interval=120
# dsconf -D "cn=Directory Manager" ldap://server.example.com backend config set --checkpoint-interval=120
This example changes the interval to 120 seconds.
5.2.2. Changing the Database Checkpoint Interval Using the Web Console
Link kopierenLink in die Zwischenablage kopiert!
To change the database checkpoint interval using the Web Console:
- Open the Directory Server user interface in the web console. For details, see Logging Into Directory Server Using the Web Console section in the Red Hat Directory Server Administration Guide.
- Select the instance.
- On the tab, select Global Database Configuration.
- Click Show Advanced Settings.
- Update the value in the Database Checkpoint Interval field.
- Click .
5.3. Disabling Durable Transactions
Link kopierenLink in die Zwischenablage kopiert!
Durable transaction logging means that each LDAP update operation, comprised of a sequence of database operations in a transaction, is physically written to disk. Even though each LDAP operation can be comprised of multiple database operations, each LDAP operation is treated as a single database transaction. Each LDAP operation is both atomic and durable.
Warning
Turning off durable transactions can improve Directory Server write performance at the risk of data loss.
When durable transaction logging is disabled, every directory database operation is written to the database transaction log file but may not be physically written to disk immediately. If a directory change was written to the logical database transaction log file but not physically written to disk at the time of a system crash, the change cannot be recovered. When durable transactions are disabled, the recovered database is consistent but does not reflect the results of any LDAP write operations that completed just before the system crash.
By default, durable database transaction logging is enabled. To disable durable transaction logging:
- Stop the Directory Server instance:
dsctl instance_name stop
# dsctl instance_name stopCopy to Clipboard Copied! Toggle word wrap Toggle overflow - Edit the
/etc/dirsrv/slapd-instance_name/dse.ldiffile, and set thensslapd-db-durable-transactionparameter in thecn=config,cn=ldbm database,cn=plugins,cn=configentry tooff:dn: cn=config,cn=ldbm database,cn=plugins,cn=config ... nsslapd-db-durable-transaction: off ...
dn: cn=config,cn=ldbm database,cn=plugins,cn=config ... nsslapd-db-durable-transaction: off ...Copy to Clipboard Copied! Toggle word wrap Toggle overflow - Start the Directory Server instance:
dsctl instance_name start
# dsctl instance_name startCopy to Clipboard Copied! Toggle word wrap Toggle overflow
5.4. Specifying Transaction Batching
Link kopierenLink in die Zwischenablage kopiert!
To improve the update performance when a full transaction durability is not required, use the following command:
dsconf -D "cn=Directory Manager" ldap://server.example.com backend config set --txn-batch-val=value
# dsconf -D "cn=Directory Manager" ldap://server.example.com backend config set --txn-batch-val=value
The
--txn-batch-val specifies how many transactions be batched before Directory Server commits them to the transaction log. Setting this value to a value greater than 0 causes the server to delay committing transactions until the number of queued transactions is equal to this value.
Chapter 6. Managing the Database Cache Settings
Link kopierenLink in die Zwischenablage kopiert!
Directory Server uses the following caches:
- The Entry cache, which contains individual directory entries.
- The DN cache is used to associate DNs and RDNs with entries.
- The Database cache, which contains the database index files
*.dband*.db4files.
For the highest performance improvements, all cache sizes must be able to store all of their records. If you do not use the recommended auto-sizing feature and have not enough RAM available, assign free memory to the caches in the previously shown order.
6.1. The Database and Entry Cache Auto-Sizing Feature
Link kopierenLink in die Zwischenablage kopiert!
By default, Directory Server automatically determine the optimized size for the database and entry cache. Auto-sizing optimizes the size of both caches based on the hardware resources of the server when the instance starts.
Important
Red Hat recommends to use the auto-tuning settings. Do not set the entry cache size manually.
6.1.1. Manually Re-enabling the Database and Entry Cache Auto-sizing
Link kopierenLink in die Zwischenablage kopiert!
If you upgraded the instance from a version prior to 10.1.1, or previously manually set an entry cache size, you can enable the auto-tuning for the entry cache.
The following parameters in the
cn=config,cn=ldbm database,cn=plugins,cn=config entry control the auto-sizing:
nsslapd-cache-autosize- This settings controls if auto-sizing is enabled for the database and entry cache. Auto-sizing is enabled:
- For both the database and entry cache, if the
nsslapd-cache-autosizeparameter is set to a value greater than0. - For the database cache, if the
nsslapd-cache-autosizeandnsslapd-dbcachesizeparameters are set to0. - For the entry cache, if the
nsslapd-cache-autosizeandnsslapd-cachememsizeparameters are set to0.
nsslapd-cache-autosize-split- The value sets the percentage of RAM that is used for the database cache. The remaining percentage is used for the entry cache.Using more than 1.5 GB RAM for the database cache does not improve the performance. Therefore, Directory Server limits the database cache 1.5 GB.
To enable the database and entry cache auto-sizing:
- Stop the Directory Server instance:
systemctl stop dirsrv@instance_name
# systemctl stop dirsrv@instance_nameCopy to Clipboard Copied! Toggle word wrap Toggle overflow - Backup the
/etc/dirsrv/slapd-instance_name/dse.ldiffile:cp /etc/dirsrv/slapd-instance_name/dse.ldif \ /etc/dirsrv/slapd-instance_name/dse.ldif.bak.$(date "+%F_%H-%M-%S")# cp /etc/dirsrv/slapd-instance_name/dse.ldif \ /etc/dirsrv/slapd-instance_name/dse.ldif.bak.$(date "+%F_%H-%M-%S")Copy to Clipboard Copied! Toggle word wrap Toggle overflow - Edit the
/etc/dirsrv/slapd-instance_name/dse.ldiffile:- Set the percentage of free system RAM to use for the database and entry cache. For example, to set 10%:
nsslapd-cache-autosize: 10
nsslapd-cache-autosize: 10Copy to Clipboard Copied! Toggle word wrap Toggle overflow Note
If you set thensslapd-cache-autosizeparameter to0, you must additionally set:- the
nsslapd-dbcachesizein thecn=config,cn=ldbm database,cn=plugins,cn=configentry to0to enable the auto-sized database cache. - the
nsslapd-cachememsizein thecn=database_name,cn=ldbm database,cn=plugins,cn=configentry to0to enable the auto-sized entry cache for a database.
- Optionally, set the percentage used from the free system RAM for the database cache. For example, to set 40%:
nsslapd-cache-autosize-split: 40
nsslapd-cache-autosize-split: 40Copy to Clipboard Copied! Toggle word wrap Toggle overflow Directory Server uses the remaining 60% of free memory for the entry cache. - Save the changes.
- Start the Directory Server instance:
systemctl start dirsrv@instance_name
# systemctl start dirsrv@instance_nameCopy to Clipboard Copied! Toggle word wrap Toggle overflow
Example 6.1. The nsslapd-cache-autosize and nsslapd-cache-autosize-split Parameter
The following settings are the default values for the parameters:
nsslapd-cache-autosize: 25
nsslapd-cache-autosize-split: 25
nsslapd-dbcachesize: 1536MB
nsslapd-cache-autosize: 25
nsslapd-cache-autosize-split: 25
nsslapd-dbcachesize: 1536MB
Using these settings, 25% of the system's free RAM is used (
nsslapd-cache-autosize). From this memory, 25% are used for the database cache (nsslapd-cache-autosize-split) and the remaining 75% for the entry cache.
Depending on the free RAM, this results in the following cache sizes:
|
GB of Free RAM
|
Database Cache Size
|
Entry Cache Size
|
|---|---|---|
|
1 GB
|
64 MB
|
192 MB
|
|
2 GB
|
128 MB
|
384 MB
|
|
4 GB
|
256 MB
|
768 MB
|
|
8 GB
|
512 MB
|
1,536 MB
|
|
16 GB
|
1,024 MB
|
3,072 MB
|
|
32 GB
|
1,536 MB
|
6,656 MB
|
|
64 GB
|
1,536 MB
|
14,848 MB
|
|
128 GB
|
1,536 MB
|
31,232 MB
|
6.2. Determining the Required Cache Sizes
Link kopierenLink in die Zwischenablage kopiert!
The
dsconf monitor dbmon command enables you to monitor cache statistics at runtime.
To display the statistics, enter:
Optionally, pass the
-b back_end or -x option to the command to display the statistics for a specific back end or the index.
If your caches are sufficiently sized, the number in
DN Cache Count matches the values in the Cache Count backend entries. Additionally, if all of the entries and DNs fit within their respective caches, the Entry Cache Count count value matches the DN Cache Count value.
The output of the example shows:
- Only 2.2% free database cache is left:
Database Cache:
 ...
 - Free Space:          397.31 KB
 - Free Percentage:     2.2%
Database Cache:
 ...
 - Free Space:          397.31 KB
 - Free Percentage:     2.2%
Copy to Clipboard Copied! Toggle word wrap Toggle overflow However, to operate efficiently, at least 15% free database cache is required. To determine the optimal size of the database cache, calculate the sizes of all*.dband*.db4files in the/var/lib/dirsrv/slapd-instance_name/db/directory including subdirectories and the changelog database, and add 12% for overhead.To set the database cache, see Section 6.5, “Setting the Database Cache Size”. - The DN cache of the
userrootdatabase is well-chosen:Copy to Clipboard Copied! Toggle word wrap Toggle overflow The DN cache of the database contains 100000 records, 69,8% of the cache is free, and each DN in memory requires 130 bytes on average.To set the DN cache, see Section 6.4, “Setting the Size of the DN Cache”. - The statistics on the entry cache of the
userrootdatabase indicates that the entry cache value should be increased for better performance:Copy to Clipboard Copied! Toggle word wrap Toggle overflow The entry cache contains in this database 50000 records and only 2 Kilobytes of free space are left. To enable Directory Server to cache all 100000 DNs, the cache must be increased to minimum of 890 MB (100000 DNs * 8,9 KB average entry size). However, Red Hat recommends to round the minimum required size to the next highest GB and double the result. In this example, the entry cache should be set to 2 Gigabytes.To set the entry cache, see Section 6.3, “Manually Setting the Entry Cache Size”.
6.3. Manually Setting the Entry Cache Size
Link kopierenLink in die Zwischenablage kopiert!
The entry cache is used to store directory entries that are used during search and read operations. Setting the entry cache to a size that enables Directory Server to store all records has the highest performance impact on search operations.
If entry caching is not configured, Directory Server reads the entry from the
id2entry.db database file and converts the DNs from the on-disk format to the in-memory format. Entries that are stored in the cache enable the server to skip the disk I/O and conversion steps.
Note
Instead of manually setting the entry cache size Red Hat recommends the auto-sizing feature for optimized settings based on the hardware resources. For details, see Section 6.1.1, “Manually Re-enabling the Database and Entry Cache Auto-sizing”.
6.3.1. Manually Setting the Entry Cache Size Using the Command Line
Link kopierenLink in die Zwischenablage kopiert!
To manually set the entry cache size using the command line:
- Disable automatic cache tuning:
dsconf -D "cn=Directory Manager" ldap://server.example.com backend config set --cache-autosize=0
# dsconf -D "cn=Directory Manager" ldap://server.example.com backend config set --cache-autosize=0Copy to Clipboard Copied! Toggle word wrap Toggle overflow - Display the suffixes and their corresponding back end:
dsconf -D "cn=Directory Manager" ldap://server.example.com suffix list
dc=example,dc=com (userroot)
# dsconf -D "cn=Directory Manager" ldap://server.example.com suffix list
dc=example,dc=com (userroot)
Copy to Clipboard Copied! Toggle word wrap Toggle overflow This command displays the name of the back end database next to each suffix. You require the suffix's database name in the next step. - Set the entry cache size for the database:
dsconf -D "cn=Directory Manager" ldap://server.example.com backend suffix set --cache-memsize=2147483648 userRoot
# dsconf -D "cn=Directory Manager" ldap://server.example.com backend suffix set --cache-memsize=2147483648 userRootCopy to Clipboard Copied! Toggle word wrap Toggle overflow This command sets the entry cache to 2 gigabytes. - Restart the Directory Service instance:
dsctl instance_name restart
# dsctl instance_name restartCopy to Clipboard Copied! Toggle word wrap Toggle overflow
6.3.2. Manually Setting the Entry Cache Size Using the Web Console
Link kopierenLink in die Zwischenablage kopiert!
To manually set the entry cache size using the Web Console:
- Open the Directory Server user interface in the web console. For details, see Logging Into Directory Server Using the Web Console section in the Red Hat Directory Server Administration Guide.
- Select the instance.
- On the tab, select Global Database Configuration.
- Disable Automatic Cache Tuning.
- Click .
- Click the button, and select Restart Instance.
- Set the size of the database cache in the Entry Cache Size (bytes) field.
- Click .
- Click the button, and select Restart Instance.
6.4. Setting the Size of the DN Cache
Link kopierenLink in die Zwischenablage kopiert!
The
entryrdn index is used to associate DNs and RDNs with entries. It enables the server to efficiently perform subtree rename, entry move, and moddn operations. The DN cache is used to cache the in-memory representation of the entryrdn index to avoid expensive file I/O and transformation operations. For best performance, especially with but not limited to entry rename and move operations, set the DN cache to a size that enables Directory Server to cache all DNs in the database.
If a DN is not stored in the cache, Directory Server reads the DN from the
entryrdn.db index database file and converts the DNs from the on-disk format to the in-memory format. DNs that are stored in the cache enable the server to skip the disk I/O and conversion steps.
6.4.1. Setting the Size of the DN Cache Using the Command Line
Link kopierenLink in die Zwischenablage kopiert!
To set the DN cache size of a database using the command line:
- Display the suffixes and their corresponding back end:
dsconf -D "cn=Directory Manager" ldap://server.example.com suffix list
dc=example,dc=com (userroot)
# dsconf -D "cn=Directory Manager" ldap://server.example.com suffix list
dc=example,dc=com (userroot)
Copy to Clipboard Copied! Toggle word wrap Toggle overflow This command displays the name of the back end database next to each suffix. You require the suffix's database name in the next step. - To disable database and entry cache auto-sizing, enter:
dsconf -D "cn=Directory Manager" ldap://server.example.com backend config set --cache-autosize=0
# dsconf -D "cn=Directory Manager" ldap://server.example.com backend config set --cache-autosize=0Copy to Clipboard Copied! Toggle word wrap Toggle overflow - To set the DN cache size, enter:
dsconf -D "cn=Directory Manager" ldap://server.example.com backend suffix set --dncache-memsize=20971520 userRoot
# dsconf -D "cn=Directory Manager" ldap://server.example.com backend suffix set --dncache-memsize=20971520 userRootCopy to Clipboard Copied! Toggle word wrap Toggle overflow This command sets the DN cache for theuserRootdatabase to 20 megabytes. - Restart the Directory Service instance:
dsctl instance_name restart
# dsctl instance_name restartCopy to Clipboard Copied! Toggle word wrap Toggle overflow
6.4.2. Setting the Size of the DN Cache Using the Web Console
Link kopierenLink in die Zwischenablage kopiert!
To set DN cache size of a database using the Web Console:
- Open the Directory Server user interface in the web console. For details, see Logging Into Directory Server Using the Web Console section in the Red Hat Directory Server Administration Guide.
- Select the instance.
- On the tab, select the suffix for which you want to set the DN cache size.
- Enter the size in bytes into the DN Cache Size (bytes) field.
- Click .
- Click the button, and select Restart Instance.
6.5. Setting the Database Cache Size
Link kopierenLink in die Zwischenablage kopiert!
The database cache contains the Berkeley database index files for the database, meaning all of the
*.db and other files used for attribute indexing by the database. This value is passed to the Berkeley DB API function set_cachesize().
This cache size has less of an impact on Directory Server performance than the entry cache size, but if there is available RAM after the entry cache size is set, increase the amount of memory allocated to the database cache.
The operating system also has a file system cache which may compete with the database cache for RAM usage. Refer to the operating system documentation to find information on file system cache settings and monitoring the file system cache.
Note
Instead of manually setting the entry cache size Red Hat recommends the auto-sizing feature for optimized settings based on the hardware resources. For details, see Section 6.1.1, “Manually Re-enabling the Database and Entry Cache Auto-sizing”.
6.5.1. Manually Setting the Database Cache Size Using the Command Line
Link kopierenLink in die Zwischenablage kopiert!
To manually set the database cache size using the command line:
- Disable automatic cache tuning:
dsconf -D "cn=Directory Manager" ldap://server.example.com backend config set --cache-autosize=0
# dsconf -D "cn=Directory Manager" ldap://server.example.com backend config set --cache-autosize=0Copy to Clipboard Copied! Toggle word wrap Toggle overflow Manually set the database cache size:dsconf -D "cn=Directory Manager" ldap://server.example.com backend config set --dbcachesize=268435456
# dsconf -D "cn=Directory Manager" ldap://server.example.com backend config set --dbcachesize=268435456Copy to Clipboard Copied! Toggle word wrap Toggle overflow This command sets the database cache to 256 megabytes. - Restart the Directory Service instance:
dsctl instance_name restart
# dsctl instance_name restartCopy to Clipboard Copied! Toggle word wrap Toggle overflow
6.5.2. Manually Setting the Database Cache Size Using the Web Console
Link kopierenLink in die Zwischenablage kopiert!
To manually set the database cache size using the Web Console:
- Open the Directory Server user interface in the web console. For details, see Logging Into Directory Server Using the Web Console section in the Red Hat Directory Server Administration Guide.
- Select the instance.
- On the tab, select Global Database Configuration.
- Disable Automatic Cache Tuning.
- Click .
- Set the Database Cache Size (bytes) field to the database cache size.
- Click .
- Click the button, and select Restart Instance.
6.5.3. Storing the Database Cache on a RAM Disk
Link kopierenLink in die Zwischenablage kopiert!
If your system running the Directory Server instance has enough free RAM, you can optionally store the database cache on a RAM disk for further performance improvements:
- Create a directory for the database cache and metadata on the RAM disk:
mkdir -p /dev/shm/slapd-instance_name/
# mkdir -p /dev/shm/slapd-instance_name/Copy to Clipboard Copied! Toggle word wrap Toggle overflow - Set the following permissions on the directory:
chown dirsrv:dirsrv /dev/shm/slapd-instance_name/
chmod 770 /dev/shm/slapd-instance_name/
# chown dirsrv:dirsrv /dev/shm/slapd-instance_name/
# chmod 770 /dev/shm/slapd-instance_name/
Copy to Clipboard Copied! Toggle word wrap Toggle overflow - Stop the Directory Server instance:
systemctl stop dirsrv@instance_name
# systemctl stop dirsrv@instance_nameCopy to Clipboard Copied! Toggle word wrap Toggle overflow - Edit the
/etc/dirsrv/slapd-instance_name/dse.ldiffile and set the new path in thensslapd-db-home-directoryattribute in thecn=bdb,cn=config,cn=ldbm database,cn=plugins,cn=configentry:dn: cn=bdb,cn=config,cn=ldbm database,cn=plugins,cn=config ... nsslapd-db-home-directory: /dev/shm/slapd-instance_name/
dn: cn=bdb,cn=config,cn=ldbm database,cn=plugins,cn=config ... nsslapd-db-home-directory: /dev/shm/slapd-instance_name/Copy to Clipboard Copied! Toggle word wrap Toggle overflow If thensslapd-db-home-directoryattribute does not exist, add it with the new value to thecn=bdb,cn=config,cn=ldbm database,cn=plugins,cn=configentry. - Start the Directory Server instance:
systemctl start dirsrv@instance_name
# systemctl start dirsrv@instance_nameCopy to Clipboard Copied! Toggle word wrap Toggle overflow
Note
When the database cache is stored on a RAM disk, Directory Server needs to recreate it after each reboot. As a consequence, the service start and initial operations are slower until the cache is recreated.
Chapter 7. Setting the Number of Directory Server Threads
Link kopierenLink in die Zwischenablage kopiert!
The number of threads Directory Server uses to handle simultaneous connections affects the performance of the server. For example, if all threads are busy handling time-consuming tasks (such as
add operations), new incoming connections are queued until a free thread can process the request.
If the server provides a low number of CPU threads, configuring a higher number of threads can increase the performance. However, on a server with many CPU threads, setting a too high value does not further increase the performance.
By default, Directory Server automatically calculates the number of threads automatically. This number is based on the hardware resources of the server when the instance starts.
Note
Red Hat recommends to use the auto-tuning settings. Do not set the number of threads manually.
7.1. Automatic Thread Tuning
Link kopierenLink in die Zwischenablage kopiert!
If you enable automatic thread tuning, Directory Server will use the following optimized number of threads:
|
Number of CPU Threads
|
Number of Directory Server Threads
|
|---|---|
|
1-16
|
16
|
|
17-512
|
The Directory Server thread number matches the CPU thread number in the system. For example, if your system has 24 CPU threads, Directory Server uses 24 threads. The maximum number of Directory Server threads is 512.
|
|
512 and more
|
512. Directory Server applies the recommended maximum number of threads.
|
7.1.1. Enabling Automatic Thread Tuning Using the Command Line
Link kopierenLink in die Zwischenablage kopiert!
Directory Server can automatically set the number of threads based on the available hardware threads. To enable this feature:
- Enable automatic setting of the number of threads:
dsconf -D "cn=Directory Manager" ldap://server.example.com config replace nsslapd-threadnumber="-1"
# dsconf -D "cn=Directory Manager" ldap://server.example.com config replace nsslapd-threadnumber="-1"Copy to Clipboard Copied! Toggle word wrap Toggle overflow - Restart the Directory Server instance:
dsctl instance_name restart
# dsctl instance_name restartCopy to Clipboard Copied! Toggle word wrap Toggle overflow
Important
If you enabled the automatic setting of the number of threads, the
nsslapd-threadnumber parameter shows the calculated number of threads while Directory Server is running.
7.1.2. Enabling Automatic Thread Tuning Using the Web Console
Link kopierenLink in die Zwischenablage kopiert!
Directory Server can automatically set the number of threads based on the available hardware threads. To enable this feature:
- Open the Directory Server user interface in the web console. For details, see Logging Into Directory Server Using the Web Console section in the Red Hat Directory Server Administration Guide.
- Select the instance.
- Open the menu, and select Tuning & Limits.
- Set the Number Of Worker Threads field to
-1. - Click .
- Click the button, and select Restart Instance.
Important
If you enabled the automatic setting, the Number Of Worker Threads field shows the calculated number of threads while Directory Server is running.
7.2. Manually Setting the Number of Thread
Link kopierenLink in die Zwischenablage kopiert!
In certain situations, it can be necessary to manually set a fixed number of Directory Server threads instead of using the automatic thread tuning.
Note
If the number of hardware threads changes, for example, because you increased the CPU cores of the virtual machine that runs the Directory Server instance, you must manually update the number of threads. For details about using the optimized and automatic setting, see Section 7.1, “Automatic Thread Tuning”.
7.2.1. Manually Setting the Number of Threads Using the Command Line
Link kopierenLink in die Zwischenablage kopiert!
To manually set the number of threads using the command line:
- Set the number of threads:
dsconf -D "cn=Directory Manager" ldap://server.example.com config replace nsslapd-threadnumber="64"
# dsconf -D "cn=Directory Manager" ldap://server.example.com config replace nsslapd-threadnumber="64"Copy to Clipboard Copied! Toggle word wrap Toggle overflow This command sets the number of threads to64. - Restart the Directory Server instance:
dsctl instance_name restart
# dsctl instance_name restartCopy to Clipboard Copied! Toggle word wrap Toggle overflow
7.2.2. Manually Setting the Number of Threads Using the Web Console
Link kopierenLink in die Zwischenablage kopiert!
To manually set the number of threads using the Web Console:
- Open the Directory Server user interface in the web console. For details, see Logging Into Directory Server Using the Web Console section in the Red Hat Directory Server Administration Guide.
- Select the instance.
- Open the menu, and select Tuning & Limits.
- Set the Number Of Worker Threads field to the number of threads.
- Click .
- Click the button, and select Restart Instance.
Chapter 8. Tuning the Replication Performance
Link kopierenLink in die Zwischenablage kopiert!
8.1. Improving the Multi-supplier Replication Efficiency
Link kopierenLink in die Zwischenablage kopiert!
The replication latency in a multi-supplier replication environment, especially if the servers are connected using a wide area network (WAN), can be high in case of multiple suppliers are receiving updates at the same time. This happens when one suppliers exclusively accesses a replica without releasing it for a long time. In such situations, other suppliers cannot send updates to this consumer, which increases the replication latency.
To release a replica after a fixed amount of time, set the
nsds5ReplicaReleaseTimeout parameter on replication suppliers and hubs.
Note
The
60 seconds default value is ideal for most environments. A value set too high or too low can have a negative impact on the replication performance. If the value is set too low, replication servers are constantly reacquiring one another, and servers are not able to send many updates. In a high-traffic replication environment, a longer timeout can improve situations where one supplier exclusively accesses a replica. However, in most cases, a value higher than 120 seconds slows down replication.
8.1.1. Setting the Replication Release Timeout Using the Command Line
Link kopierenLink in die Zwischenablage kopiert!
To set the replication release timeout using the command line:
- Set the timeout value:
dsconf -D "cn=Directory Manager" ldap://supplier.example.com replication set --suffix="dc=example,dc=com" --repl-release-timeout=70
# dsconf -D "cn=Directory Manager" ldap://supplier.example.com replication set --suffix="dc=example,dc=com" --repl-release-timeout=70Copy to Clipboard Copied! Toggle word wrap Toggle overflow This command sets the replication release timeout value for thedc=example,dc=comsuffix to70seconds. - Restart the Directory Server instance:
dsctl instance_name restart
# dsctl instance_name restartCopy to Clipboard Copied! Toggle word wrap Toggle overflow
8.1.2. Setting the Replication Release Timeout Using the Web Console
Link kopierenLink in die Zwischenablage kopiert!
To set the replication release timeout using the Web Console:
- Open the Directory Server user interface in the web console. For details, see Logging Into Directory Server Using the Web Console section in the Red Hat Directory Server Administration Guide.
- Select the instance.
- Open the menu, and select Configuration.
- Click Show Advanced Settings.
- Set the timeout value in the Replication Release Timeout field.
- Click .
- Click the button, and select Restart Instance.
Chapter 9. Tuning Database Link Performance
Link kopierenLink in die Zwischenablage kopiert!
Database link performance can be improved through changes to the Directory Server's connection and thread management.
9.1. Managing Connections to the Remote Server
Link kopierenLink in die Zwischenablage kopiert!
Each database link maintains a pool of connections to a remote server. This section describes how to optimize them.
9.1.1. Managing Connections to the Remote Server Using the Command Line
Link kopierenLink in die Zwischenablage kopiert!
This section describes how you update the settings for a specific database, as well as the default settings.
9.1.1.1. Updating the Database Link Connection Management Settings for a Specific Database
Link kopierenLink in die Zwischenablage kopiert!
To update the database link connection management settings for a specific database:
- Use the following command to update a setting for a database link:
dsconf -D "cn=Directory Manager" ldap://server.example.com chaining link-set parameter=value link_name
# dsconf -D "cn=Directory Manager" ldap://server.example.com chaining link-set parameter=value link_nameCopy to Clipboard Copied! Toggle word wrap Toggle overflow For a list of parameters you can set, enter:dsconf -D "cn=Directory Manager" ldap://server.example.com chaining link-set --help
# dsconf -D "cn=Directory Manager" ldap://server.example.com chaining link-set --helpCopy to Clipboard Copied! Toggle word wrap Toggle overflow - Restart the Directory Server instance:
dsctl instance_name restart
# dsctl instance_name restartCopy to Clipboard Copied! Toggle word wrap Toggle overflow
9.1.1.2. Updating the Default Database Link Connection Management Settings
Link kopierenLink in die Zwischenablage kopiert!
To update the default database link connection management settings, use the following command:
dsconf -D "cn=Directory Manager" ldap://server.example.com chaining config-set-def parameter=value
# dsconf -D "cn=Directory Manager" ldap://server.example.com chaining config-set-def parameter=value
For a list of parameters you can set, enter:
dsconf -D "cn=Directory Manager" ldap://server.example.com chaining config-set-def --help
# dsconf -D "cn=Directory Manager" ldap://server.example.com chaining config-set-def --help9.1.2. Managing Connections to the Remote Server Using the Web Console
Link kopierenLink in die Zwischenablage kopiert!
This section describes how you update the settings for a specific database, as well as the default settings.
9.1.2.1. Updating the Database Link Connection Management Settings for a Specific Database
Link kopierenLink in die Zwischenablage kopiert!
To update the database link connection management settings for a specific database:
- Open the Directory Server user interface in the web console. For details, see Logging Into Directory Server Using the Web Console section in the Red Hat Directory Server Administration Guide.
- Select the instance.
- On the tab, select the database link configuration you want to update.
- Click Show Advanced Settings.
- Update the fields in the advanced settings area:To display a tooltip and the corresponding attribute name in the
cn=configentry for a parameter, hover the mouse cursor over the setting. For further details, see the parameter's description in the Red Hat Directory Server Configuration, Command, and File Reference.. - Click .
- Click the button, and select Restart Instance.
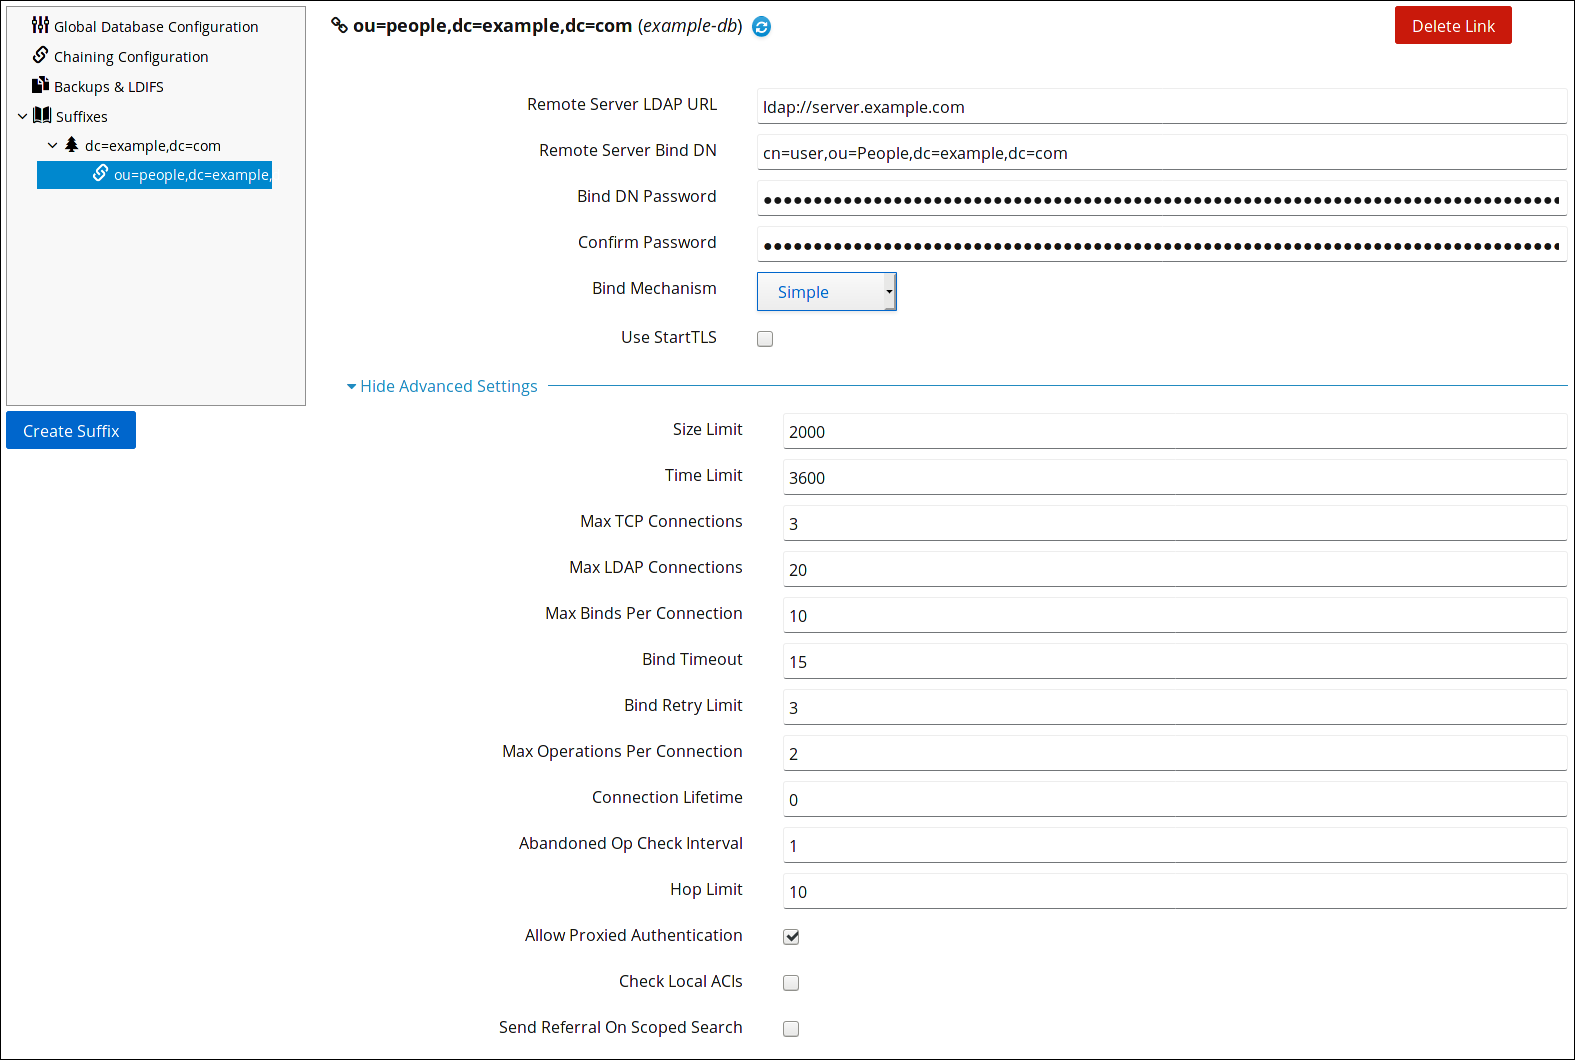
9.1.2.2. Updating the Default Database Link Connection Management Settings
Link kopierenLink in die Zwischenablage kopiert!
To update the default database link connection management settings:
- Open the Directory Server user interface in the web console. For details, see Logging Into Directory Server Using the Web Console section in the Red Hat Directory Server Administration Guide.
- Select the instance.
- On the tab, select Chaining Configuration.
- Update the fields in the Default Database Link Creation Settings area:To display a tooltip and the corresponding attribute name in the
cn=configentry for a parameter, hover the mouse cursor over the setting. For further details, see the parameter's description in the Red Hat Directory Server Configuration, Command, and File Reference.. - Click .
- Click the button, and select Restart Instance.

9.2. Detecting Errors During Normal Processing
Link kopierenLink in die Zwischenablage kopiert!
Protect server performance by detecting errors during the normal chaining operation between the database link and the remote server. The database link has two attributes —
nsMaxResponseDelay and nsMaxTestResponseDelay — which work together to determine if the remote server is no longer responding.
The first attribute,
nsMaxResponseDelay, sets a maximum duration for an LDAP operation to complete. If the operation takes more than the amount of time specified in this attribute, the database link's server suspects that the remote server is no longer online.
Once the
nsMaxResponseDelay period has been met, the database link pings the remote server. During the ping, the database link issues another LDAP request, a simple search request for an object that does not exist in the remote server. The duration of the ping is set using the nsMaxTestResponseDelay.
If the remote server does not respond before the
nsMaxTestResponseDelay period has passed, then an error is returned, and the connection is flagged as down. All connections between the database link and remote server will be blocked for 30 seconds, protecting the server from a performance degradation. After 30 seconds, operation requests made by the database link to the remote server continue as normal.
Both attributes are stored in the
cn=config,cn=chaining database,cn=plugins,cn=config entry. The following table describes the attributes in more detail:
| Attribute Name | Description |
|---|---|
| nsMaxResponseDelay | Maximum amount of time it can take a remote server to respond to an LDAP operation request made by a database link before an error is suspected. This period is given in seconds. The default delay period is 60 seconds. Once this delay period has been met, the database link tests the connection with the remote server. |
| nsMaxTestResponseDelay | Duration of the test issued by the database link to check whether the remote server is responding. If a response from the remote server is not returned before this period has passed, the database link assumes the remote server is down, and the connection is not used for subsequent operations. This period is given in seconds. The default test response delay period is 15 seconds. |
Chapter 10. Improving Import Performance
Link kopierenLink in die Zwischenablage kopiert!
Very large entry sizes or a large number of entries can negatively impact server performance during import operations. This section describes how to tune both Directory Server settings and operating system settings to improve the import performance.
10.1. Tuning Directory Server for Large Database Imports and Imports with Large Attributes
Link kopierenLink in die Zwischenablage kopiert!
Update the entry cache in the following scenarios:
- You want to import a very large database.
- You want to import a database with large attributes, such as binary attributes that store certificate chains or images.
For details, about setting the size of the entry cache, see Section 6.1, “The Database and Entry Cache Auto-Sizing Feature” and Section 6.3, “Manually Setting the Entry Cache Size”.
10.2. Tuning Directory Server For Importing a Large Number of Entries
Link kopierenLink in die Zwischenablage kopiert!
When you import a large number of entries, operating system settings on the maximum number of user processes can limit the performance of Directory Server.
- To temporarily increase the maximum number of processes, enter:
ulimit -u 32000
# ulimit -u 32000Copy to Clipboard Copied! Toggle word wrap Toggle overflow When a user logs off, the changes are back to the default settings. - To permanently increase the maximum number of processes, see “How to set ulimit values”.
Appendix A. Revision History
Link kopierenLink in die Zwischenablage kopiert!
Note that revision numbers relate to the edition of this manual, not to version numbers of Red Hat Directory Server.
| Revision History | |||
|---|---|---|---|
| Revision 11.5-1 | Tue May 10 2022 | ||
| |||
| Revision 11.4-1 | Tue Nov 09 2021 | ||
| |||
| Revision 11.3-1 | Tue May 11 2021 | ||
| |||
| Revision 11.2-1 | Tue Nov 03 2020 | ||
| |||
| Revision 11.1-1 | Tue Apr 28 2020 | ||
| |||
| Revision History | |||
|---|---|---|---|
| Revision 11.0-1 | Tue Nov 05 2019 | ||
| |||
Legal Notice
Link kopierenLink in die Zwischenablage kopiert!
Copyright © 2021 Red Hat, Inc.
This document is licensed by Red Hat under the Creative Commons Attribution-ShareAlike 3.0 Unported License. If you distribute this document, or a modified version of it, you must provide attribution to Red Hat, Inc. and provide a link to the original. If the document is modified, all Red Hat trademarks must be removed.
Red Hat, as the licensor of this document, waives the right to enforce, and agrees not to assert, Section 4d of CC-BY-SA to the fullest extent permitted by applicable law.
Red Hat, Red Hat Enterprise Linux, the Shadowman logo, the Red Hat logo, JBoss, OpenShift, Fedora, the Infinity logo, and RHCE are trademarks of Red Hat, Inc., registered in the United States and other countries.
Linux® is the registered trademark of Linus Torvalds in the United States and other countries.
Java® is a registered trademark of Oracle and/or its affiliates.
XFS® is a trademark of Silicon Graphics International Corp. or its subsidiaries in the United States and/or other countries.
MySQL® is a registered trademark of MySQL AB in the United States, the European Union and other countries.
Node.js® is an official trademark of Joyent. Red Hat is not formally related to or endorsed by the official Joyent Node.js open source or commercial project.
The OpenStack® Word Mark and OpenStack logo are either registered trademarks/service marks or trademarks/service marks of the OpenStack Foundation, in the United States and other countries and are used with the OpenStack Foundation's permission. We are not affiliated with, endorsed or sponsored by the OpenStack Foundation, or the OpenStack community.
All other trademarks are the property of their respective owners.