Dieser Inhalt ist in der von Ihnen ausgewählten Sprache nicht verfügbar.
Desktop Migration and Administration Guide
GNOME 3 desktop migration planning, deployment, configuration, and administration in RHEL 7
Abstract
Chapter 1. Introducing the GNOME 3 Desktop
1.1. What Is GNOME 3?
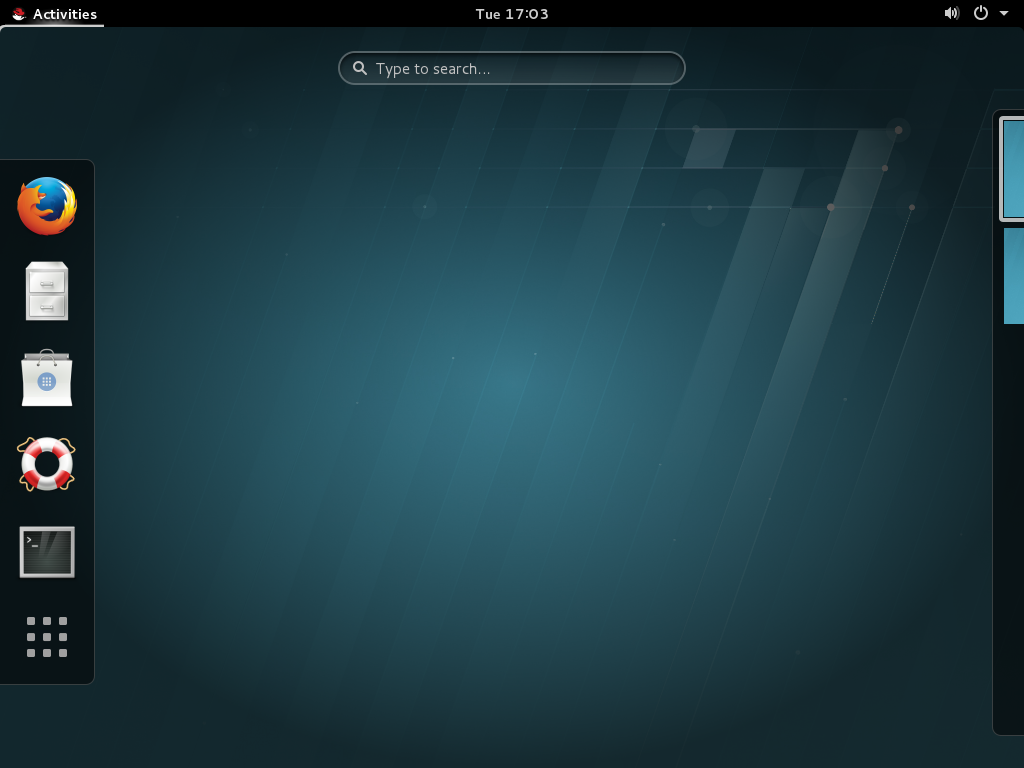
Figure 1.1. The GNOME 3 Desktop (GNOME Classic)
Important
- GNOME Shell
- GNOME Shell is a modern and intuitive graphical user interface. It provides quality user experience, including visual effects and hardware acceleration support.
- GNOME Classic
- GNOME Classic combines old and new; it keeps the familiar look and feel of GNOME 2, but adds the powerful new features and 3-D capabilities of GNOME Shell. GNOME Classic is the default GNOME session and GNOME Shell mode in Red Hat Enterprise Linux 7.
- GSettings
- GSettings is a configuration storage system, replacing
GConffound in older GNOME versions. For more information about the transition fromGConfto GSettings, see Chapter 3, GSettings and dconf. To learn more about configuring your desktop with GSettings, read Chapter 9, Configuring Desktop with GSettings and dconf. - GVFS
GVFSprovides complete virtual file system infrastructure and handles storage in the GNOME Desktop in general. ThroughGVFS, GNOME 3 integrates well with online document-storage services, calendars, and contact lists, so all your data can be accessed from the same place. Read more aboutGVFSin Chapter 15, Virtual File Systems and Disk Management.- GTK+
GTK+, a multi-platform toolkit for creating graphical user interfaces, provides a highly-usable feature-rich API. Thanks toGTK+, GNOME 3 is able to change the look of an application or provide smooth appearance of graphics. In addition,GTK+contains a number of features such as object-oriented programming support (GObject), wide support of international character sets and text layouts (Pango), or a set of accessibility interfaces (ATK).
1.2. What Is GNOME Shell?
- The top bar.
- The horizontal bar at the top of the screen provides access to some of the basic functions of GNOME Shell, such as the
Activities Overview, clock and calendar, system status icons, and the system menu at the top-left corner of the screen. - The system menu.
- The
system menuis in the top right corner. You can update some of your settings, find information about your Wi-Fi connection, switch user, log out, and turn off your computer from this menu. - The Activities Overview.
- The
Activities Overviewfeatures windows and applications views that let the user run applications and windows and switch between them.Thesearch entryat the top allows for searching various items available on the desktop, including applications, documents, files, and configuration tools.The vertical bar on the left side is calleddash, and it contains a list of favorite and running applications.Theworkspace listis displayed on the right side, and allows the user to switch between multiple workspaces, or move applications and windows from one workspace to another. - The message tray.
- The
message trayis a horizontal bar near the bottom of the screen, and shows when the user presses Super+M. It provides access to pending notifications. - Components specific to GNOME Classic.
- GNOME Classic is the default GNOME Shell mode in Red Hat Enterprise Linux 7. It changes some of the aspects of GNOME Shell behavior as well as the GNOME Shell appearance. That includes the bottom bar with the window list, and the and menus on the top bar. For detailed information on GNOME Classic, see Section 1.3, “What Is GNOME Classic?”.
1.2.1. Hardware Acceleration and Software Rendering
Clutter, an OpenGL-based graphics library.
llvmpipe driver.
llvmpipe driver, you can run the glxinfo command:
glxinfo | grep renderer
$ glxinfo | grep renderer
OpenGL renderer string: Gallium 0.4 on llvmpipe (LVVM 3.3, 128 bits)1.3. What Is GNOME Classic?
- The and menus.
- The menu is displayed at the top left of the screen. It gives the user access to applications organized into categories. The user can also open the
Activities Overviewfrom that menu.The menu is displayed next to the menu on the top bar. It gives the user quick access to important folders, for example or . - The taskbar.
- The taskbar is displayed at the bottom of the screen, and features:
- a window list,
- a notification icon displayed next to the window list,
- a short identifier for the current workspace and total number of available workspaces displayed next to the notification icon.
- Four available workspaces.
- In GNOME Classic, the number of workspaces available to the user is by default set to 4.
- Minimize and maximize buttons.
- Window titlebars in GNOME Classic feature the minimize and maximize buttons that let the user quickly minimize the windows to the window list, or maximize them to take up all of the space on the desktop.
- A traditional Super+Tab window switcher.
- In GNOME Classic, windows in the Super+Tab window switcher are not grouped by application.
- The system menu.
- The
system menuis in the top right corner. You can update some of your settings, find information about your Wi-Fi connection, switch user, log out, and turn off your computer from this menu.
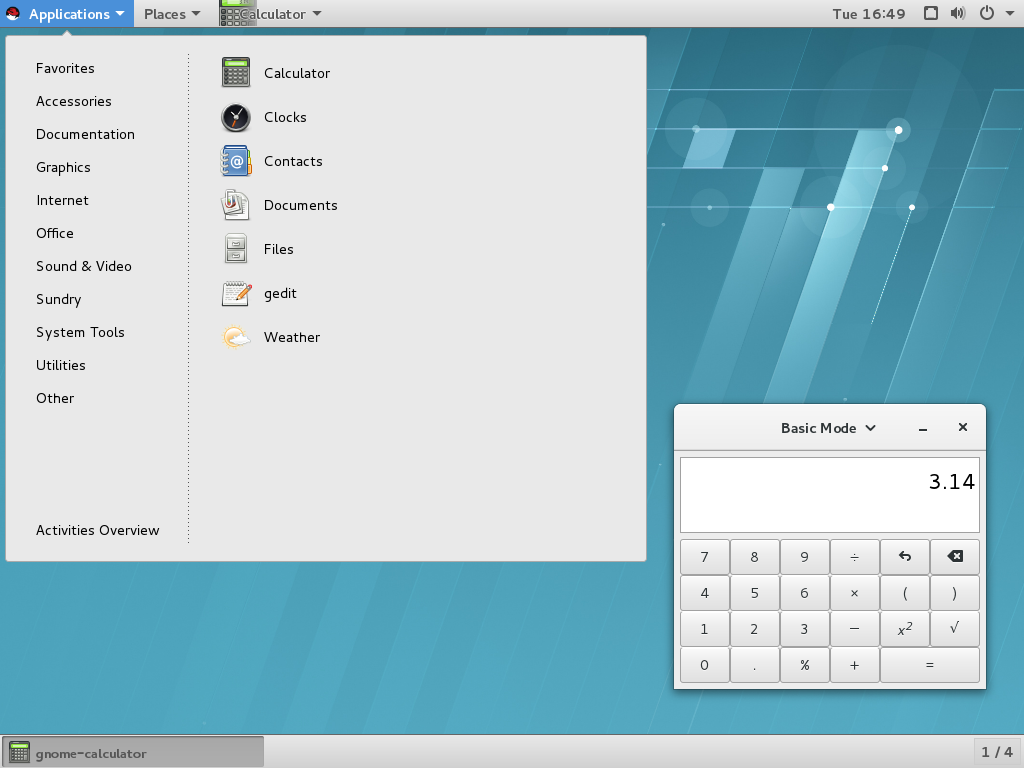
Figure 1.2. GNOME Classic with the Calculator application and the Accessories submenu of the Applications menu
1.3.1. The GNOME Classic Extensions
- AlternateTab (
alternate-tab@gnome-shell-extensions.gcampax.github.com), - Applications Menu (
apps-menu@gnome-shell-extensions.gcampax.github.com), - Launch new instance (
launch-new-instance@gnome-shell-extensions.gcampax.github.com), - Places Status Indicator (
places-menu@gnome-shell-extensions.gcampax.github.com), - Window List (
window-list@gnome-shell-extensions.gcampax.github.com).
1.3.2. Switching from GNOME Classic to GNOME and Back
gnome-shell --mode=user -r &
$ gnome-shell --mode=user -r &gnome-shell --mode=classic -r &
$ gnome-shell --mode=classic -r &1.3.3. Disabling GNOME Classic as the Default Session
/var/lib/AccountsService/users/username file. See Section 14.3.2, “Configuring a User Default Session” for details on how to do that.
Getting More Information
Activities Overview, type help, and then press Enter.
1.4. Note on Accessibility

Activities overview and typing help. From the GNOME Help menu, select Universal access.
Note
Part I. Migration Planning
- Red Hat Enterprise Linux 7 System Administrator's Guide, for components such as the
GRUB 2boot loader, package management,systemd, or printer configuration. - Red Hat Enterprise Linux 7 Migration Planning Guide for an overview of major changes in behavior and compatibility between Red Hat Enterprise Linux 6 and Red Hat Enterprise Linux 7. The Migration Planning Guide also introduces the tools provided by Red Hat to assist with upgrades to Red Hat Enterprise Linux 7.
- Red Hat Enterprise Linux 7 Installation Guide for detailed information about installing Red Hat Enterprise Linux 7 and using the Anaconda installer.
Chapter 2. logind
logind (or more specifically systemd-logind) is a system service that manages user logins. This service is responsible for the following:
- keeping track of users and sessions, their processes and their idle states,
- creating control groups for user processes,
- providing PolicyKit-based access for users to operations such as system shutdown or sleep,
- implementing a shutdown/sleep inhibition logic for applications,
- handling of power/sleep hardware keys,
- multi-seat management, session switch management, and device access management for users,
- automatic spawning of text logins (gettys) on virtual terminal (console) activation and user runtime directory management.
logind service is deeply integrated with systemd, the new initialization system in Red Hat Enterprise Linux 7, and replaces the upstart initialization system from Red Hat Enterprise Linux 6. With this change comes a number of new features and functions. The following is a summary of those most significant:
- ConsoleKit
- The
ConsoleKitframework is deprecated in Red Hat Enterprise Linux 7. Equivalent functionality is now provided bysystemd. BothConsoleKitandlogindare services for tracking the currently running user sessions.Note
ConsoleKithad the ability to run arbitrary shell scripts any time the active session on the system changed (using virtual terminal switching). This functionality is no longer provided. - the /var/log/ConsoleKit/history file
- Previously,
ConsoleKitwas sending log files to/var/log/ConsoleKit/history, which the presentloginddoes not support. The file has been replaced by the traditionalwtmpandutmpfiles which now keep track of all logins and logouts on the system./var/log/ConsoleKit/historyprovided similar information as thewtmpfile, though in a different format. Given the overlap in functionality,logindonly adopted thewtmpfile's role. - seat.d scripts
- Since
ConsoleKitis no longer in use,seat.dscripts no longer complement theConsoleKitframework, and have been replaced bysystemd-logind. - the ck-list-sessions command
ConsoleKitprovided theck-list-sessionscommand, which returned extended information about recent users, not only regular users but also GUI access withGDM. The comparable result can now be reached by running theloginctlcommand:loginctl list-sessions
$ loginctl list-sessionsCopy to Clipboard Copied! Toggle word wrap Toggle overflow - multi-seat support
logindalong withGDMprovide the multi-seat feature with which the user can attach another monitor, mouse, or keyboard to their machine. Doing so, an additional login screen appears and the user can log in as if they were using another machine.To list seats that are available on the system, run the following command:loginctl list-seats
$ loginctl list-seatsCopy to Clipboard Copied! Toggle word wrap Toggle overflow To show the status of a specific seat on the system, run the following command:loginctl seat-status seat
$ loginctl seat-status seatCopy to Clipboard Copied! Toggle word wrap Toggle overflow where seat is the name of the seat, for exampleseat0.To assign specific hardware to a particular seat, run the following command:loginctl attach seat device
# loginctl attach seat deviceCopy to Clipboard Copied! Toggle word wrap Toggle overflow where seat is the name of the seat, for exampleseat1, and device is the device name specified with the/sysdevice path, for example/sys/devices/pci0000:00/0000:00:02.0/drm/card0.To change the assignment, assign the hardware to a different seat, or use theloginctl flush-devicescommand.
Getting More Information
systemd-logind.service(8) – The man page for logind provides more information on the logind usage and features. It also covers the APIs systemd-logind provides (logind D-Bus API documentation).
logind.conf(5) – The man page for logind.conf discusses the login manager configuration file.
loginctl(1) – The man page for the systemd login manager includes more information on the multi-seat feature.
Chapter 3. GSettings and dconf
GConf (for storing user preferences) to the combination of the GSettings high-level configuration system and the dconf back end.
- GConf
- As mentioned above, the
GConfconfiguration system has been replaced by two systems:- the
GSettingsAPI, and - the
dconfback end which serves as a low-level configuration system and program that collects system hardware and software configuration details in a single compact binary format.
Both thegsettingscommand-line tool and thedconfutility are used to view and change user settings. Thegsettingsutility does so directly in the terminal, while thedconfutility uses thedconf-editorGUI for editing a configuration database. See Chapter 9, Configuring Desktop with GSettings and dconf for more information ondconf-editorand thegsettingsutility. - gconftool
- The
gconftool-2tool has been replaced bygsettingsanddconf. Likewise,gconf-editorhas been replaced bydconf-editor. - Overriding
- The concept of keyfiles has been introduced in Red Hat Enterprise Linux 7: the dconf utility allows the system administrator to override the default settings by directly installing defaults overrides. For example, setting the default background for all users is now executed by using a dconf override placed in a keyfile in the keyfile directory, such as
/etc/dconf/db/local.d/). To learn more about default values and overriding, see Section 9.5, “Configuring Custom Default Values”. - Locking the Settings
- The
dconfsystem now allows individual settings or entire settings subpaths to be locked down to prevent user customization. For more information on how to lock settings, see Section 9.5.1, “Locking Down Specific Settings”. - NFS and dconf
- Using the
dconfutility on home directories shared overNFSrequires additional configuration. See Section 9.7, “Storing User Settings Over NFS” for information on this topic.
Getting More Information
dconf to configure user settings.
Chapter 4. PolicyKit
PolicyKit utility is a framework that provides an authorization API used by privileged programs (also called mechanisms) offering services to unprivileged programs (also called subjects). The following are details on the changes PolicyKit, or its system name polkit, has undergone.
4.1. Policy Configuration
*.pkla and *.conf, which used key/value pairs to define additional local authorizations.
polkit rules for local customization are stored in the /etc/polkit-1/rules.d/ directory, the third party packages are stored in /usr/share/polkit-1/rules.d/.
.conf and .pkla configuration files have been preserved and exist side by side with .rules files. polkit has been upgraded for Red Hat Enterprise Linux 7 with the compatibility issue in mind.
polkitd now reads .rules files in lexicographic order from the /etc/polkit-1/rules.d and /usr/share/polkit-1/rules.d directories. If two files are named identically, files in /etc are processed before files in /usr. In addition, existing rules are applied by the /etc/polkit-1/rules.d/49-polkit-pkla-compat.rules file. They can therefore be overridden by .rules files in either /usr or /etc with a name that comes before 49-polkit-pkla-compat in lexicographic order. The simplest way to ensure that your old rules are not overridden is to begin the name of all other .rules files with a number higher than 49.
/etc/polkit-1/rules.d/10-enable-mount.rules file:
Example 4.1. Allow Mounting a File system on a System device
For more information, see:
polkit(8) – The man page for the description of the JavaScript rules and the precedence rules.pkla-admin-identities(8) andpkla-check-authorization(8) – The man pages for documentation of the.confand.pklafile formats, respectively.
4.2. Default Policy
/etc/polkit-1/rules.d/50-default.rules.
Note
sudo users are allowed to run programs with the security privileges of another user, Administrator is a member of the wheel group providing additional special system privileges that empower a user to execute restricted commands.
4.3. Checking Permissions from Scripts
pkcheck utility, which checks whether a process is authorized for action, now supports a new format for parameters specified by the --process option. This makes running pkcheck safer by avoiding a race condition. The new format looks as follows: pkcheck --process pid,start-time,uid
$ pkcheck --process pid,start-time,uid Important
pid or pid,start-time formats for the --process option. All scripts that invoke pkcheck need to use the new format pid,start-time,uid to avoid a race condition.
pkcheck(1) man page.
4.4. Extending polkit Configuration
.rules file that calls an external program.
PolkitBackendActionLookup implementation (the interface used to provide data to authentication dialogs) has also been removed from polkit in Red Hat Enterprise Linux 7.
polkit, see the polkit(8) man page.
Chapter 5. GDM
GDM is the GNOME Display Manager, which provides a graphical login environment. After the transition from GNOME 2 to GNOME 3, configuring GDM is only possible through systemd as it no longer supports other init systems.
- the gdm package
- The gdm package has replaced xorg-x11-xdm, which provided a legacy display login manager for the X Window System. As mentioned before, the gdm package provides the graphical login screen, shown shortly after boot up, log out, and when user-switching.
- GDM and logind
GDMnow useslogindfor defining and tracking users. For more information, see Chapter 2, logind. System administrators can also set up automatic login manually in the GDM custom configuration file:/etc/gdm/custom.conf.- custom.conf
- GDM configuration is now found in
/etc/gdm/custom.conf. However for backwards compatibility, if/etc/gdm/gdm.confis found it will be used instead ofcustom.conf. When upgrading, Red Hat recommends removing your oldgdm.conffile and migrating any custom configuration tocustom.conf.
Getting More Information
GDM, see Section 14.1, “What Is GDM?”.
Chapter 6. GNOME Shell Extensions
6.1. Replacement for the Clock Applet
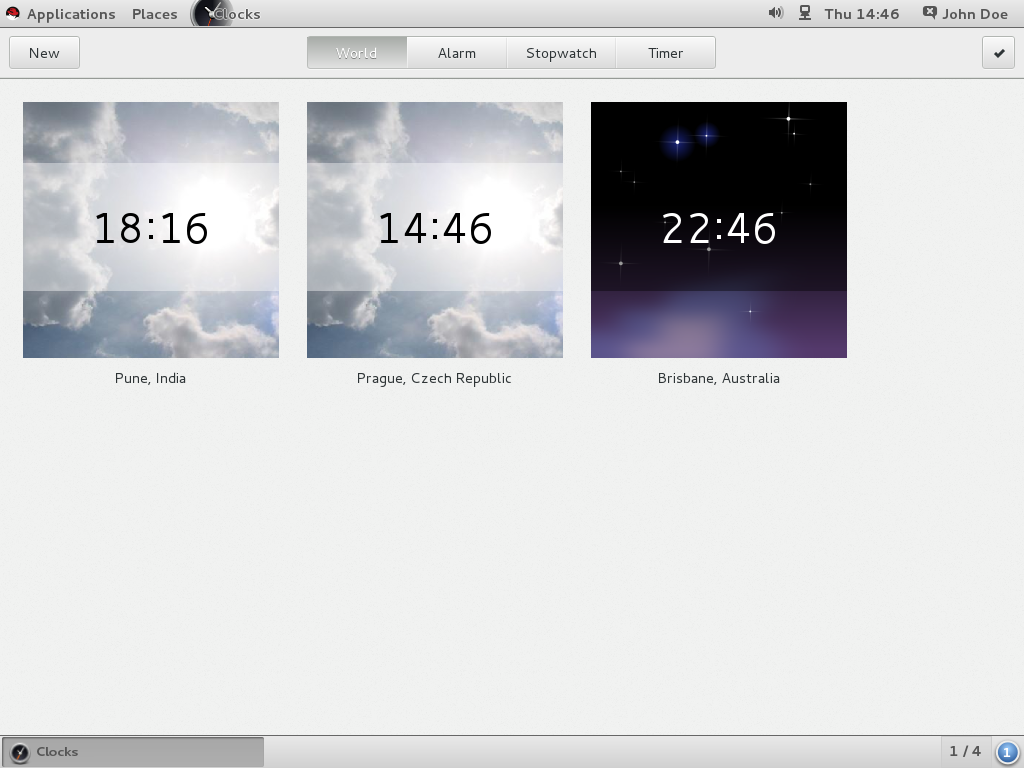
Figure 6.1. Open Clocks
Getting More Information
Chapter 7. gnome-session
gnome-session program has also been updated in Red Hat Enterprise Linux 7. It starts the GNOME Desktop as it used to; nonetheless, some of its components have changed.
- gnome-session-properties
- The gnome-session-properties application is still part of the gnome-session package. However, its functionality has been limited to managing startup programs for individual users, and saving currently running applications when logging out. The latter functionality has been kept from Red Hat Enterprise Linux 6.
- named session
- The button is able to save a session in a specific time and to name it. The saved sessions are restored on login. When you click in gnome-session-properties, the list of saved applications is shown on login as well.With this update, it is also possible to create multiple layouts and rename them, or to be able to select multiple user sessions for one user account.
Getting More Information
Chapter 8. Internationalization
8.1. Input Methods
8.1.1. Configuring and Switching Input Methods
Activities Overview, type help, and then press Enter.
ibus-setup tool and switch them with a shortcut.
8.1.2. Predictive Input Method for IBus
ibus-typing-booster is a predictive input method for the IBus platform. It predicts complete words based on partial input, allowing for faster and more accurate text input. Users can select the required word from a list of suggestions. ibus-typing-booster can also use Hunspell dictionaries to make suggestions for a language.
8.1.3. IBus in the GNOME Desktop Replaces im-chooser
im-chooser is deprecated except for using non-IBus input methods.
8.2. Changed File Locations
- The
.xinputrcfile has been moved from the user's home directory to the~/.config/imsettings/directory. - The
.imsettings.logfile has been moved from the user's home directory and can now be found in~/.cache/imsettings/log. - The
~/.fonts.conffile has been deprecated. Users are encouraged to move the file to the~/.config/fontconfig/directory. - The
~/.fonts.conf.ddirectory has been deprecated. Users are encouraged to move the directory to the~/.config/fontconfig/directory. - All disabled
fontconfigconfiguration files in the/etc/fonts/conf.avail/directory have been moved to the/usr/share/fontconfig/conf.avail/directory. If you have any local symbolic links pointing to the old location, remember to update them.
Part II. Configuration and Administration
Chapter 9. Configuring Desktop with GSettings and dconf
9.1. Terminology Explained: GSettings, gsettings, and dconf
- dconf
dconfis a key-based configuration system which manages user settings. It is the back end forGSettingsused in Red Hat Enterprise Linux 7.dconfmanages a range of different settings, includingGDM, application, and proxy settings.- dconf
- The
dconfcommand-line utility is used for reading and writing individual values or entire directories from and to adconfdatabase. - GSettings
- GSettings is a high-level API for application settings, front end for
dconf. - gsettings
- The
gsettingscommand-line tool is used to view and change user settings.
9.2. User and System Settings
dconf allows system administrators and users several levels of control over configuration.
- Administrators can define default settings that apply to all users.
- Users can override the defaults with their own settings.
- Optionally, administrators can also lock settings to prevent users from overriding them. For more information, see Section 9.5.1, “Locking Down Specific Settings”.
9.3. Browsing GSettings Values for Desktop Applications
GSettings values:
- The dconf-editor GUI tool.
- The
gsettingscommand-line utility.
Note
yum install dconf-editor
# yum install dconf-editorgsettings utility let you browse and change options for system and application preferences. You can even use them to change preferences that do not exist in the graphical user interface.
gsettings can be used to display and set dconf values. It also includes Bash completion for commands and settings. gsettings can be used to automate configuration in shell scripts.
gsettings utility are intended to browse and modify the current user's GSettings database. This means that you should always run these tools as a normal user.

Figure 9.1. dconf-editor showing org.gnome.destop.background GSettings Keys
Getting More Information
dconf-editor(1) man page.
gsettings(1) man page.
9.4. What Are dconf Profiles?
dconf system collects. dconf profiles allow you to compare identical systems to troubleshoot hardware or software problems.
dconf system stores its profiles in text files. The $DCONF_PROFILE environment variable can specify a relative path to the file from the /etc/dconf/profile/ directory, or an absolute path, such as in a user's home directory.
dconf profile will override the default settings unless there is a problem with the value that you have set.
9.4.1. Selecting a dconf Profile
dconf consults the $DCONF_PROFILE environment variable whether the variable is set. If set, dconf attempts to open the named profile and aborts if this step fails.
dconf attempts to open the profile named user. Provided this step still fails, dconf falls back to an internal hard-wired configuration.
dconf database. The first line indicates the database used to write changes whereas the remaining lines show read-only databases. The following is a sample profile stored in /etc/dconf/profile/user:
user-db:user
system-db:local
system-db:site
user-db:user
system-db:local
system-db:site~/.config/dconf, and local and site are system databases, located in /etc/dconf/db/.
Important
dconf profile for a session is determined at login, so users will have to log out and log in to apply a new dconf user profile to their session.
9.5. Configuring Custom Default Values
dconf profile. These defaults can be overridden by the user.
user profile must exist and the value for the key must be added to a dconf database.
Example 9.1. Set the Default Background
- If it does not already exist, create the
userprofile in/etc/dconf/profile/user:user-db:user system-db:local
user-db:user system-db:localCopy to Clipboard Copied! Toggle word wrap Toggle overflow where local is the name of adconfdatabase. - Create a keyfile for the local database in
/etc/dconf/db/local.d/01-background, which contains the following default settings:Copy to Clipboard Copied! Toggle word wrap Toggle overflow In the default setting of the keyfile, the following GSettings keys are used:Expand Table 9.1. org.gnome.desktop.background schemas GSettings Keys Key Name Possible Values Description picture-options "none", "wallpaper", "centered", "scaled", "stretched", "zoom", "spanned" Determines how the image set by wallpaper_filename is rendered. picture-uri filename with the path URI to use for the background image. Note that the backend only supports local (file://) URIs. primary-color default: 000000 Left or Top color when drawing gradients, or the solid color. secondary-color default: FFFFFF Right or Bottom color when drawing gradients, not used for solid color. - Edit the keyfile according to your preferences. For more information, see Section 9.3, “Browsing GSettings Values for Desktop Applications”.
- Update the system databases:
dconf update
# dconf updateCopy to Clipboard Copied! Toggle word wrap Toggle overflow
Important
user profile is created or changed, the user will need to log out and log in again before the changes will be applied.
user profile, you can use the dconf command-line utility to read and write individual values or entire directories from and to a dconf database. For more information, see the dconf(1) man page.
9.5.1. Locking Down Specific Settings
dconf is a useful tool for preventing users from changing specific settings.
GSettings key, you will need to create a locks subdirectory in the keyfile directory (for instance, /etc/dconf/db/local.d/locks/). The files inside this directory contain a list of keys to lock, and you may add any number of files to this directory.
Important
Example 9.2. Locking Down the Default Wallpaper
- Set a default wallpaper by following steps in Section 10.5.1, “Customizing the Default Desktop Background”.
- Create a new directory named
/etc/dconf/db/local.d/locks/. - Create a new file in
/etc/dconf/db/local.d/locks/00-default-wallpaperwith the following contents, listing one key per line:Prevent users from changing values for the following keys:
# Prevent users from changing values for the following keys: /org/gnome/desktop/background/picture-uri /org/gnome/desktop/background/picture-options /org/gnome/desktop/background/primary-color /org/gnome/desktop/background/secondary-colorCopy to Clipboard Copied! Toggle word wrap Toggle overflow - Update the system databases:
dconf update
# dconf updateCopy to Clipboard Copied! Toggle word wrap Toggle overflow
9.6. GSettings Keys Properties
dconf database only once. If you set the same key to different values in different places in the dconf database, only one of them will take effect. In other words, you will override one key setting with another.
dconf system database, each key can only have one value. Values for some keys are of an array type. For this value type, the value can be specified as a list of multiple elements separated by a comma. An example of an array value is shown below:
key=['option1', 'option2']
key=['option1', 'option2']Example 9.3. The org.gnome.desktop.input-sources.xkb-options GSettings Key
org.gnome.desktop.input-sources.xkb-options GSettings key works as follows. It can only be set once, so if you want two elements in the value you need to specify them in the same configuration file. Since this value is an array type, it can have several elements:
[org/gnome/desktop/input-sources] # Enable Ctrl-Alt-Backspace for all users # Set the Right Alt key as the Compose key and enable it xkb-options=['terminate:ctrl_alt_bksp', 'compose:ralt']
[org/gnome/desktop/input-sources]
# Enable Ctrl-Alt-Backspace for all users
# Set the Right Alt key as the Compose key and enable it
xkb-options=['terminate:ctrl_alt_bksp', 'compose:ralt']
9.7. Storing User Settings Over NFS
dconf to work correctly when using Network File System (NFS) home directories, the dconf keyfile back end must be used.
dconf keyfile back end. Otherwise notifications on configuration changes made on remote machines will not work properly.
Procedure 9.1. Setting the dconf Keyfile Back End
- Verify that the glib2-fam package is installed on the system.
- The system must be subscribed to the
Optionalchannel. To learn how to subscribe the system to theOptionalchannel, read this resource: How to access Optional and Supplementary channels, and -devel packages using Red Hat Subscription Management (RHSM)? - Install the glib2-fam package by running the following command:
yum install glib2-fam
# yum install glib2-famCopy to Clipboard Copied! Toggle word wrap Toggle overflow
- Create or edit the
/etc/dconf/profile/userfile on every client. - At the very beginning of this file, add the following line:
service-db:keyfile/user
service-db:keyfile/userCopy to Clipboard Copied! Toggle word wrap Toggle overflow
dconf keyfile back end will only take effect the next time that the user logs in. It polls the keyfile to determine whether updates have been made, so settings may not be updated immediately.
Chapter 10. Default Appearance
GRUB, Plymouth), the login screen, fonts, keyboard layouts, the screen shield, and desktop backgrounds.
10.1. Branding Anaconda
10.2. Boot Loader Screen
GRUB 2. You can change several parts of GRUB 2's appearance. The following sections show you how to change the distribution name, menu colors, and and the background image.
10.2.1. Distribution Name
GRUB 2 displays a title containing the distribution name. You can change the title by customizing the GRUB_DISTRIBUTOR variable in the /etc/default/grub file.
Procedure 10.1. Setting the Distribution Name
- As root, open the
/etc/default/grubfile. - Use the
GRUB_DISTRIBUTORvariable to specify your own distribution name. The following is the excerpt of the/etc/default/grubfile. Update the second line with theGRUB_DISTRIBUTORvariable:Copy to Clipboard Copied! Toggle word wrap Toggle overflow - Run the following command as root to ensure the changes take effect:
grub2-mkconfig -o /boot/grub2/grub.cfg
grub2-mkconfig -o /boot/grub2/grub.cfgCopy to Clipboard Copied! Toggle word wrap Toggle overflow Note
You need to update the/etc/default/grubdirectory after every change you make in there.
GRUB 2 screen by modifying the /etc/grub.d/40_custom plain text file or by adding another file in the /etc/grub.d/ directory. You can choose from the following directives:
- set color_normal=foreground/background
- set color_highlight=foreground/background
- set menu_color_normal=foreground/background
- set menu_color_highlight=foreground/background
grub(8) man page for more information on the semantics and accepted values for these variables.
10.2.2. GRUB 2 Background
GRUB background configured in the default setup. Nevertheless, it is possible to add an image to the boot loader screen.
GRUB 2, it is necessary to have a GRUB 2 Unicode font installed for the gfxterm graphical terminal. No font is provided by default, so the prerequisite is to convert an existing TTF or OTF file to the PF2 format used by GRUB 2:
grub2-mkfont command, convert an existing TTF or OTF file to the PF2 format. Name the output file unicode.pf2 to work correctly with the default configuration as written by grub2-mkconfig.
Example 10.1. Converting a TTF File to PF2 Format
LiberationSerif-Bold.ttf to the .pf2 format. The new .pf2 format file is called unicode2 so as not to be confused with the existing unicode.pf2 in the /grub2/fonts/ directory.
grub2-mkfont --output=/boot/grub2/fonts/unicode2.pf2 --size=24 /usr/share/fonts/liberation/LiberationSerif-Bold.ttf
grub2-mkfont --output=/boot/grub2/fonts/unicode2.pf2 --size=24 /usr/share/fonts/liberation/LiberationSerif-Bold.ttfGRUB 2. The image file can reside outside of the boot/ directory.
Procedure 10.2. Adding an Image to the Boot Loader Screen
- Open the
/etc/default/grubfile as root. - Edit the following configuration variables in the file:
GRUB_TERMINAL=gfxterm GRUB_BACKGROUND=path_to_the_image.png
GRUB_TERMINAL=gfxterm GRUB_BACKGROUND=path_to_the_image.pngCopy to Clipboard Copied! Toggle word wrap Toggle overflow Supported formats are PNG, JPG, JPEG, and TGA. - Create a new configuration file with a background image:
grub2-mkconfig -o /boot/grub2/grub.cfg
grub2-mkconfig -o /boot/grub2/grub.cfgCopy to Clipboard Copied! Toggle word wrap Toggle overflow - Reboot your system.
10.3. Plymouth
Plymouth is a graphical boot system and logger for Red Hat Enterprise Linux 7, which makes use of the kernel-based mode setting (KMS) and Direct Rendering Manager (DRM). Plymouth also handles user interaction during boot.
10.3.1. Branding the Theme
Plymouth is composed of a theme data file and a compiled splash plugin module. The data file has a .plymouth extension, and is installed in the /usr/share/plymouth/themes/ directory.
[Plymouth Theme] section, in the key-value format. Valid keys for this group are Name, Description, and ModuleName. While the first two keys are self-explanatory, the third specifies the name of a Plymouth splash plugin module. Different plugins provide different animations at boot time and the underlying implementation of the various themes:
Example 10.2. A .plymouth File Specimen
[Plymouth Theme] Name=Charge Description=A theme that features the shadowy hull of my logo charge up and finally burst into full form. ModuleName=two-step
[Plymouth Theme]
Name=Charge
Description=A theme that features the shadowy hull of my logo charge up and finally burst into full form.
ModuleName=two-step
Procedure 10.3. Changing the Plymouth Theme
- Search for the existing
Plymouththemes and choose the most preferable one. Run the following command:yum search plymouth-theme
# yum search plymouth-themeCopy to Clipboard Copied! Toggle word wrap Toggle overflow Or run theplymouth-set-default-theme --listcommand to view the installed themes.You can also install all the themes when installing all the plymouth packages. However, you will install a number of unnecessary packages as well.yum install plymouth\*
# yum install plymouth\*Copy to Clipboard Copied! Toggle word wrap Toggle overflow - Set the new theme as default with the
plymouth-set-default-theme theme_namecommand.Example 10.3. Set "spinfinity" as the Default Theme
You have chosen the spinfinity theme, so you run:plymouth-set-default-theme spinfinity
# plymouth-set-default-theme spinfinityCopy to Clipboard Copied! Toggle word wrap Toggle overflow - Rebuild the
initrddaemon after editing otherwise your theme will not show in the boot screen. Do so by running:dracut -f
# dracut -fCopy to Clipboard Copied! Toggle word wrap Toggle overflow
10.3.2. Creating a New Plymouth Theme
Procedure 10.4. Creating Your Own Theme from an Existing Theme
- Copy an entire content of a
plymouth/directory. As a template directory, use, for example, the default theme for Red Hat Enterprise Linux 7,/usr/share/plymouth/themes/charge/charge.plymouth, which uses a two-step splash plugin (two-step is a popular boot load feature of a two phased boot process that starts with a progressing animation synced to boot time and finishes with a short, fast one-shot animation):Copy to Clipboard Copied! Toggle word wrap Toggle overflow - Save the
charge.plymouthfile with a new name in the/usr/share/plymouth/themes/newtheme/directory, in the following format:newtheme.plymouth
newtheme.plymouthCopy to Clipboard Copied! Toggle word wrap Toggle overflow - Update the settings in your
/usr/share/plymouth/themes/newtheme/newtheme.plymouthfile according to your preferences, changing color, alignment, or transition. - Set your newtheme as default by running the following command:
plymouth-set-default-theme newtheme
# plymouth-set-default-theme newthemeCopy to Clipboard Copied! Toggle word wrap Toggle overflow - Rebuild the
initrddaemon after changing the theme by running the command below:dracut -f
# dracut -fCopy to Clipboard Copied! Toggle word wrap Toggle overflow
10.3.2.1. Using Branded Logo
Important
Procedure 10.5. Add Your Logo to the Theme
- Create an image file named
logo.pngwith your logo. - Edit the
/usr/share/plymouth/themes/newtheme.plymouthfile by updating the ImageDir key to point to the directory with thelogo.pngimage file you created in step 1:ImageDir=/usr/share/plymouth/themes/newtheme
ImageDir=/usr/share/plymouth/themes/newthemeCopy to Clipboard Copied! Toggle word wrap Toggle overflow
Plymouth, see the plymouth(8) man page.
10.4. Customizing the Login Screen
10.4.1. Adding a Greeter Logo
org.gnome.login-screen.logo GSettings key. Since GDM uses its own dconf profile, you can add a greeter logo by changing the settings in that profile.
dconf, see Chapter 9, Configuring Desktop with GSettings and dconf.
- All the major formats are supported: ANI, BPM, GIF, ICNS, ICO, JPEG, JPEG 2000, PCX, PNM, PBM, PGM, PPM, GTIFF, RAS, TGA, TIFF, XBM, WBMP, XPM, and SVG.
- The size of the picture scales proportionally to the height of 48 pixels. So, if you set the logo to 1920x1080, for example, it changes into an 85x48 thumbnail of the original picture.
Procedure 10.6. Adding a logo to the login screen
- Create or edit the
gdmprofile in/etc/dconf/profile/gdmwhich contains the following lines:user-db:user system-db:gdm file-db:/usr/share/gdm/greeter-dconf-defaults
user-db:user system-db:gdm file-db:/usr/share/gdm/greeter-dconf-defaultsCopy to Clipboard Copied! Toggle word wrap Toggle overflow gdmis the name of adconfdatabase. - Create a
gdmdatabase for machine-wide settings in/etc/dconf/db/gdm.d/01-logo:[org/gnome/login-screen] logo='/usr/share/pixmaps/logo/greeter-logo.png'
[org/gnome/login-screen] logo='/usr/share/pixmaps/logo/greeter-logo.png'Copy to Clipboard Copied! Toggle word wrap Toggle overflow Replace /usr/share/pixmaps/logo/greeter-logo.png with the path to the image file you want to use as the greeter logo. - Update the system databases:
dconf update
# dconf updateCopy to Clipboard Copied! Toggle word wrap Toggle overflow
Note
dconf update command as root to update the system databases. In case the logo does not update, try restarting GDM. For more information, see Section 14.1.1, “Restarting GDM”.
10.4.2. Displaying a Text Banner
org.gnome.login-screen.banner-message-enable- enables showing the banner message.
org.gnome.login-screen.banner-message-text- shows the text banner message in the login window.
GDM uses its own dconf profile, you can configure the text banner by changing the settings in that profile.
Procedure 10.7. Displaying a Text Banner on the Login Screen
- Create or edit the
gdmprofile in/etc/dconf/profile/gdmwhich contains the following lines:user-db:user system-db:gdm file-db:/usr/share/gdm/greeter-dconf-defaults
user-db:user system-db:gdm file-db:/usr/share/gdm/greeter-dconf-defaultsCopy to Clipboard Copied! Toggle word wrap Toggle overflow gdmis the name of adconfdatabase. - Create a
gdmdatabase for machine-wide settings in/etc/dconf/db/gdm.d/01-banner-message:[org/gnome/login-screen] banner-message-enable=true banner-message-text='Type the banner message here'
[org/gnome/login-screen] banner-message-enable=true banner-message-text='Type the banner message here'Copy to Clipboard Copied! Toggle word wrap Toggle overflow Note
There is no character limit for the banner message. GNOME Shell autodetects longer stretches of text and enters two column mode. However, the banner message text cannot be read from an external file. - Update the system databases:
dconf update
# dconf updateCopy to Clipboard Copied! Toggle word wrap Toggle overflow
10.4.2.1. What if the Banner Message Does Not Update?
dconf update command.
GDM. For more information, see Section 14.1.1, “Restarting GDM”.
10.4.3. Displaying Multiple Keyboard Layouts
Procedure 10.8. Changing the System Keyboard Layout Settings
- Find the codes of the required language layouts in the
/usr/share/X11/xkb/rules/base.lstfile under the section named! layout. - Use the
localectltool to change the system keyboard layout settings as follows:localectl set-x11-keymap layout
$ localectl set-x11-keymap layoutCopy to Clipboard Copied! Toggle word wrap Toggle overflow You can specify multiple layouts as a comma-separated list. For example, to setesas the default layout, andusas the secondary layout, run the following command:localectl set-x11-keymap es,us
$ localectl set-x11-keymap es,usCopy to Clipboard Copied! Toggle word wrap Toggle overflow - Log out to find that the defined layouts are available at the top bar on the login screen.
localectl tool to specify the machine-wide default keyboard model, variant, and options. See the localectl(1) man page for more information.
10.4.4. Disabling the Login Screen User List
org.gnome.login-screen.disable-user-list GSettings key.
Procedure 10.9. Setting the org.gnome.login-screen.disable-user-list Key
- Create or edit the
gdmprofile in/etc/dconf/profile/gdmwhich contains the following lines:user-db:user system-db:gdm file-db:/usr/share/gdm/greeter-dconf-defaults
user-db:user system-db:gdm file-db:/usr/share/gdm/greeter-dconf-defaultsCopy to Clipboard Copied! Toggle word wrap Toggle overflow gdmis the name of adconfdatabase. - Create a
gdmdatabase for machine-wide settings in/etc/dconf/db/gdm.d/00-login-screen:[org/gnome/login-screen] # Do not show the user list disable-user-list=true
[org/gnome/login-screen] # Do not show the user list disable-user-list=trueCopy to Clipboard Copied! Toggle word wrap Toggle overflow - Update the system databases by updating the
dconfutility:dconf update
# dconf updateCopy to Clipboard Copied! Toggle word wrap Toggle overflow
10.5. Customizing Desktop Backgrounds
dconf utility, you can configure the default background, add extra backgrounds, or add multiple backgrounds.
10.5.1. Customizing the Default Desktop Background
org.gnome.desktop.background schema.
Procedure 10.10. Setting the Default Background
- Create a
localdatabase for machine-wide settings in/etc/dconf/db/local.d/00-background:Copy to Clipboard Copied! Toggle word wrap Toggle overflow - Override the user's setting to prevent the user from changing it in
/etc/dconf/db/local.d/locks/background:List the keys used to configure the desktop background
# List the keys used to configure the desktop background /org/gnome/desktop/background/picture-uri /org/gnome/desktop/background/picture-options /org/gnome/desktop/background/primary-color /org/gnome/desktop/background/secondary-colorCopy to Clipboard Copied! Toggle word wrap Toggle overflow For more information, see Section 9.5.1, “Locking Down Specific Settings”. - Update the system databases:
dconf update
# dconf updateCopy to Clipboard Copied! Toggle word wrap Toggle overflow - Users must log out and back in again before the system-wide settings take effect.
10.5.2. Adding Extra Backgrounds
- Create a filename.xml file (there are no requirements for file names) specifying your extra background's appearance using the org.gnome.desktop.background schemas. Here is a list of the most frequently used schemas:
Expand Table 10.1. org.gnome.desktop.background schemas GSettings Keys Key Name Possible Values Description picture-options "none", "wallpaper", "centered", "scaled", "stretched", "zoom", "spanned" Determines how the image set by wallpaper_filename is rendered. color-shading-type "horizontal", "vertical", and "solid" How to shade the background color. primary-color default: #023c88 Left or Top color when drawing gradients, or the solid color. secondary-color default: #5789ca Right or Bottom color when drawing gradients, not used for solid color. The full range of options is to be found in thedconf-editorGUI orgsettingscommand-line utility. For more information, see Section 9.3, “Browsing GSettings Values for Desktop Applications”. - Store the filename.xml file in the
/usr/share/gnome-background-properties/directory.
Example 10.4. Extra Backgrounds File
<wallpaper> elements to add more backgrounds.
<wallpaper> elements, adding two different backgrounds:
Example 10.5. Extra Backgrounds File with Two Wallpaper Elements
10.5.3. Setting the Screen Shield
org.gnome.desktop.screensaver.picture-uri GSettings key. Since GDM uses its own dconf profile, you can set the default background by changing the settings in that profile.
dconf, see Chapter 9, Configuring Desktop with GSettings and dconf.
Procedure 10.11. Adding a Logo to the Screen Shield
- Create a
gdmdatabase for machine-wide settings in/etc/dconf/db/gdm.d/01-screensaver:[org/gnome/desktop/screensaver] picture-uri='file:///opt/corp/background.jpg'
[org/gnome/desktop/screensaver] picture-uri='file:///opt/corp/background.jpg'Copy to Clipboard Copied! Toggle word wrap Toggle overflow Replace /opt/corp/background.jpg with the path to the image file you want to use as the Screen Shield.Supported formats are PNG, JPG, JPEG, and TGA. The image will be scaled if necessary to fit the screen. - Update the system databases:
dconf update
# dconf updateCopy to Clipboard Copied! Toggle word wrap Toggle overflow - You must log out before the system-wide settings take effect.
10.5.3.1. What If the Screen Shield Does Not Update?
dconf update command as root to update the system databases.
GDM. For more information, see Section 14.1.1, “Restarting GDM”.
10.6. Configuring Fonts
fontconfig utility for font management and customization. fontconfig simplifies font management and provides display features, such as anti-aliasing. This section describes the following font management tasks:
- adding new fonts (both for one user and for all users)
- specifying fonts to use in place of missing fonts
- configuring font aliases
- defining font preferences per language
- customizing font properties
fontconfig searches directories that are by default listed in the /etc/fonts/fonts.conf configuration file.
fontconfig, you can use the fc-list command:
fc-list : file
$ fc-list : filefc-list, see the fc-list(1) man page.
fontconfig and its configuration, see the fonts-conf(5) man page.
10.6.1. Adding Extra Fonts for All Users
fontconfig for font handling.
Procedure 10.12. Installing an Extra Font
- As the
rootuser, create the/usr/local/share/fonts/directory and copy the font into it.Create a subdirectory for each font-family you are installing as some fonts have multiple files for bold, italic, and so on. - Make sure that the font cache is updated by running the following command:
fc-cache /usr/local/share/fonts/
# fc-cache /usr/local/share/fonts/Copy to Clipboard Copied! Toggle word wrap Toggle overflow
Important
fontconfig will detect the new fonts and make them available. Unlike user sessions, some applications might need to be restarted before they will allow you to use the new fonts, though.
10.6.2. Adding Extra Fonts for All Users Using Alternative Directories
/usr/local/share/fonts/ if that directory is listed in the /etc/fonts/fonts.conf file.
/etc/fonts/fonts.conf file, you need to create your own machine-wide configuration file in /etc/fonts/local.conf.
Important
/etc/fonts/fonts.conf file because it will be replaced when the fontconfig library is updated.
Procedure 10.13. Installing an Extra Font
- As the
rootuser, create your own machine-wide/etc/fonts/local.confconfiguration file including the directory with fonts.Copy to Clipboard Copied! Toggle word wrap Toggle overflow - Ensure the permissions for your directory are set to
755.chmod -R 755 /PATH/TO/YOUR/DIRECTORY_NAME
# chmod -R 755 /PATH/TO/YOUR/DIRECTORY_NAMECopy to Clipboard Copied! Toggle word wrap Toggle overflow - Specify the directory name when updating the font cache with the
fc-cachecommand.fc-cache DIRECTORY_NAME
# fc-cache DIRECTORY_NAMECopy to Clipboard Copied! Toggle word wrap Toggle overflow
10.6.3. Adding Extra Fonts for Individual Users
fontconfig for font handling.
Procedure 10.14. Installing an Extra Font
- Copy the font to the
~/.local/share/fonts/directory to install it. - Make sure that the font cache is updated by running the following command:
fc-cache ~/.local/share/fonts
$ fc-cache ~/.local/share/fontsCopy to Clipboard Copied! Toggle word wrap Toggle overflow
Important
fontconfig will detect the new fonts and make them available. You may need to restart running applications to see the changes. User sessions do not need to be restarted.
10.6.4. Substituting Fonts
fontconfig reads the /etc/fonts/fonts.conf configuration file to determine the most similar available font to substitute for the requested font. Individual characters can also be substituted if they are not present in the requested font.
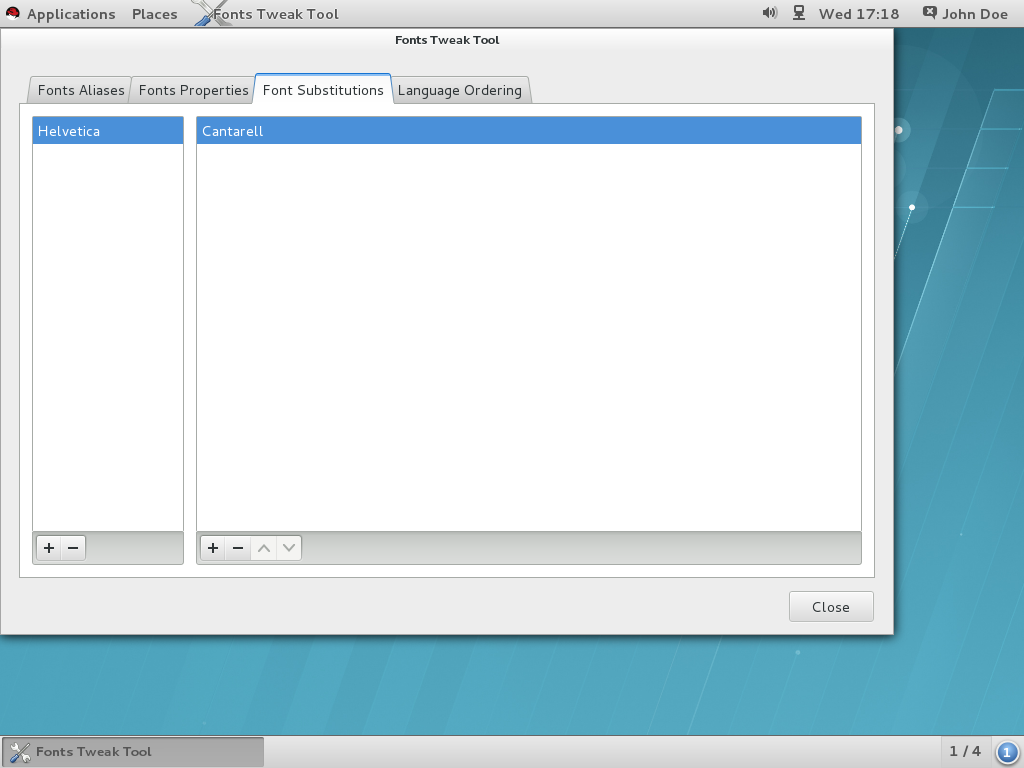
Figure 10.1. Substituting Fonts with Fonts Tweak Tool
yum install fonts-tweak-tool
# yum install fonts-tweak-toolProcedure 10.15. Substituting a Font
- Start the Fonts Tweak Tool by pressing the Super key to enter the
Activities Overview, typeFonts Tweak Tool, and then press Enter. - Click the Font Substitutions tab.
- Click the button at the bottom left of the left pane, select or type the name of the font you want to substitute, and then click .
- Click the button at the bottom left of the right pane, select the name of the font you want to use to substitute for the first font, and then click .
- Click .
10.6.5. Configuring Font Aliases
- Sans Serif,
- Serif,
- Monospace,
- Cursive, and
- Fantasy.
yum install fonts-tweak-tool
# yum install fonts-tweak-tool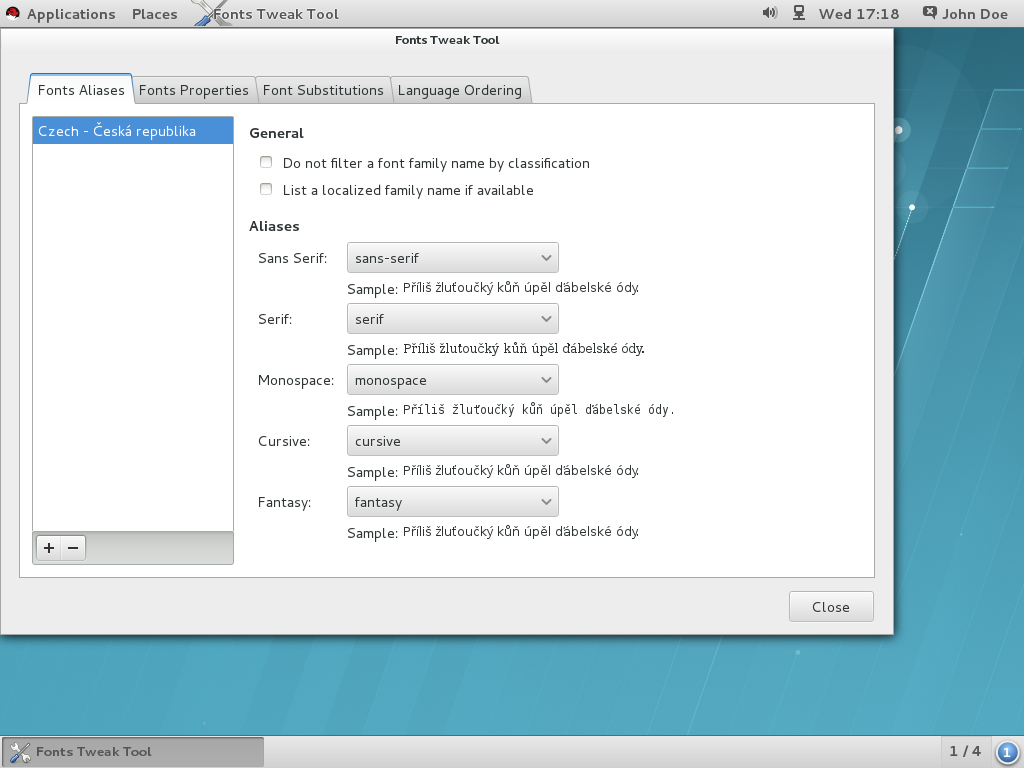
Figure 10.2. Configuring a Font Alias with Fonts Tweak Tool
Procedure 10.16. Configuring a Font Alias
- Start the Fonts Tweak Tool by pressing the Super key to enter the
Activities Overview, typeFonts Tweak Tool, and then press Enter. - Click the Font Aliases tab.
- Click the button at the bottom left of the left pane, select or type the name of the locale you want to configure the font aliases for, and then click .To configure default font aliases regardless of the used locale, select Default from the list of locales.
- At the right pane, locate the font alias you want to override the system defaults for, and select the custom font from the drop-down list.
- Click .
10.6.6. Multiple Language Ordering
yum install fonts-tweak-tool
# yum install fonts-tweak-toolProcedure 10.17. Configuring Multiple Languages
- Start the Fonts Tweak Tool by pressing the Super key to enter the
Activities Overview, typeFonts Tweak Tool, and then press Enter. - Click the Language Ordering tab.
- Click the button at the bottom left of the window, select or type the name of the language you want to configure as primary, and then click .
- To add another language, click the button at the bottom left of the window, select the name of the language you want to configure as secondary, and then click .Repeat this step to add more languages.
- Click .
Important
Xft applications) may not display all characters for the user's languages properly. This is due to the lack of support for fallback fonts in those applications, or in the rendering libraries the applications are using.
10.6.7. Configuring Font Properties
yum install fonts-tweak-tool
# yum install fonts-tweak-toolProcedure 10.18. Changing the Font Properties
- Start the Fonts Tweak Tool by pressing the Super key to enter the
Activities Overview, typeFonts Tweak Tool, and then press Enter. - Click the Fonts Properties tab.
- Click the button at the bottom left of the window, select or type the name of the font you want to change the properties for, and then click .Repeat this step to add more fonts.
- Change the font properties as needed.
- Click .
- Use the embedded bitmap font if available.
- This is useful for users who prefer bitmap fonts over outline fonts. To use the embedded bitmap font, add a suitable font and click Use embedded bitmap font if any.
- Use the JIS X 2013:2004 glyphs.
- To use Japanese glyphs from the JIS X 2013:2004 standard, rather than from JIS X 2013:2000 or older, add a font that supports JIS X 2013:2004, and then click on in the Features list.
Chapter 11. GNOME Shell Extensions
dconf when configuring GNOME Shell Extensions, setting the following two GSettings keys:
org.gnome.shell.enabled-extensionsorg.gnome.shell.development-tools
dconf and GSettings, see Chapter 9, Configuring Desktop with GSettings and dconf.
11.1. What Are GNOME Shell Extensions?
~/.local/share/gnome-shell/extensions/uuid, or machine-wide in /usr/share/gnome-shell/extensions/uuid.
- Your uuid must not contain Unicode characters.
- Your uuid must not contain the gnome.org ending as it must not appear to be affiliated with the GNOME Project.
- Your uuid must contain only alphanumerical characters, the period (.), the at symbol (@), and the underscore (_).
Important
Procedure 11.1. View installed extensions
- Press Alt+F2.
- Type in
lgand press Enter to open Looking Glass. - On the top bar of Looking Glass, click to open the list of installed extensions.

Figure 11.1. Viewing Installed extensions with Looking Glass
11.2. Enabling Machine-wide Extensions
/usr/share/gnome-shell/extensions directory.
org.gnome.shell.enabled-extensions key in order to set the default enabled extensions. However, there is currently no way to enable additional extensions for users who have already logged in. This does not apply for existing users who have installed and enabled their own GNOME extensions.
Procedure 11.2. Enabling machine-wide extensions
- Create a
localdatabase file for machine-wide settings in/etc/dconf/db/local.d/00-extensions:[org/gnome/shell] # List all extensions that you want to have enabled for all users enabled-extensions=['myextension1@myname.example.com', 'myextension2@myname.example.com']
[org/gnome/shell] # List all extensions that you want to have enabled for all users enabled-extensions=['myextension1@myname.example.com', 'myextension2@myname.example.com']Copy to Clipboard Copied! Toggle word wrap Toggle overflow Theenabled-extensionskey specifies the enabled extensions using the extensions' uuid (myextension1@myname.example.com and myextension2@myname.example.com). - Update the system databases:
dconf update
# dconf updateCopy to Clipboard Copied! Toggle word wrap Toggle overflow - Users must log out and back in again before the system-wide settings take effect.
11.3. Locking Down Enabled Extensions
org.gnome.shell.enabled-extensions and org.gnome.shell.development-tools keys.
org.gnome.shell.development-tools key ensures that the user cannot use GNOME Shell's integrated debugger and inspector tool (Looking Glass) to disable any mandatory extensions.
Procedure 11.3. Locking down enabled extensions
- Create a
localdatabase file for machine-wide settings in/etc/dconf/db/local.d/00-extensions:Copy to Clipboard Copied! Toggle word wrap Toggle overflow Theenabled-extensionskey specifies the enabled extensions using the extensions' uuid (myextension1@myname.example.com and myextension2@myname.example.com).Thedevelopment-toolskey is set to false to disable access to Looking Glass. - Override the user's setting and prevent the user from changing it in
/etc/dconf/db/local.d/locks/extensions:Lock the list of mandatory extensions and access to Looking Glass
# Lock the list of mandatory extensions and access to Looking Glass /org/gnome/shell/enabled-extensions /org/gnome/shell/development-toolsCopy to Clipboard Copied! Toggle word wrap Toggle overflow - Update the system databases:
dconf update
# dconf updateCopy to Clipboard Copied! Toggle word wrap Toggle overflow - Users must log out and back in again before the system-wide settings take effect.
org.gnome.shell.enabled-extensions and org.gnome.shell.development-tools keys, any extensions installed in ~/.local/share/gnome-shell/extensions or /usr/share/gnome-shell/extensions that are not listed in the org.gnome.shell.enabled-extensions key will not be loaded by GNOME Shell, thus preventing the user from using them.
11.4. Setting Up Mandatory Extensions
/usr/share/gnome-shell/extensions directory and then lock down the org.gnome.shell.enabled-extensions and org.gnome.shell.development-tools keys.
org.gnome.shell.development-tools key ensures that the user cannot use GNOME Shell's integrated debugger and inspector tool (Looking Glass) to disable any mandatory extensions.
Procedure 11.4. Setting up mandatory extensions
- Create a
localdatabase file for machine-wide settings in/etc/dconf/db/local.d/00-extensions-mandatory:Copy to Clipboard Copied! Toggle word wrap Toggle overflow Theenabled-extensionskey specifies the enabled extensions using the extensions' uuid (myextension1@myname.example.com and myextension2@myname.example.com).Thedevelopment-toolskey is set to false to disable access to Looking Glass. - Override the user's setting and prevent the user from changing it in
/etc/dconf/db/local.d/locks/extensions-mandatory:Lock the list of mandatory extensions and access to Looking Glass
# Lock the list of mandatory extensions and access to Looking Glass /org/gnome/shell/enabled-extensions /org/gnome/shell/development-toolsCopy to Clipboard Copied! Toggle word wrap Toggle overflow - Update the system databases:
dconf update
# dconf updateCopy to Clipboard Copied! Toggle word wrap Toggle overflow - Users must log out and back in again before the system-wide settings take effect.
Chapter 12. Integrating Applications
- Add or modify a menu item for the application, or customize the menu structure by creating or modifying submenus. See Section 12.1, “Customizing Menus” for more information on menu customization.
- Customize the default favorite applications visible on the GNOME Shell dash in the
Activities Overview. See Section 12.2, “Customizing Default Favorite Applications” for more information on how to do that. - Add or modify a MIME type for the application, and associate the application with a specific MIME type. See Section 12.3, “Configuring File Associations” for more information on configuring MIME types.
12.2. Customizing Default Favorite Applications
Activities Overview. You can use dconf to set the favorite applications for an individual user, or to set the same favorite applications for all users.
12.2.1. Setting Different Favorite Applications for Individual Users
~/.config/dconf/user. The following sample uses dconf to set gedit, Terminal, and Nautilus as the default favorites for a user. The example code allows users to modify the list later, if they wish to do so.
Example 12.3. Contents of /etc/dconf/profile:
This line allows the user to change the default favorites later
# This line allows the user to change the default favorites later
user-db:userExample 12.4. Contents of ~/.config/dconf/user:
Set gedit, terminal and nautilus as default favorites
# Set gedit, terminal and nautilus as default favorites
[org/gnome/shell]
favorite-apps = ['gedit.desktop', 'gnome-terminal.desktop', 'nautilus.desktop']Note
12.2.2. Setting the Same Favorite Applications for All Users
dconf keyfiles. The following sample edits the dconf profile and then create a keyfile to set the default favorite applications for all employees in the first floor of an organization.
Example 12.5. Contents of /etc/dconf/profile:
user-db:user # This line defines a system database called first_floor system-db:first_floor
user-db:user
# This line defines a system database called first_floor
system-db:first_floorNote
user database file will take precedence over the settings in the first_floor database file, but locks introduced in the first_floor database file will take priority over those present in user. For more information about locks, see Section 9.5.1, “Locking Down Specific Settings”.
Example 12.6. Contents of /etc/dconf/db/first_floor.d/00_floor1_settings:
This sample sets gedit, terminal and nautilus as default favorites for all users in the first floor
# This sample sets gedit, terminal and nautilus as default favorites
# for all users in the first floor
[org/gnome/shell]
favorite-apps = ['gedit.desktop', 'gnome-terminal.desktop', 'nautilus.desktop']dconf update command.
12.3. Configuring File Associations
12.3.1. What Are MIME Types?
- Determine which application should open a specific file format by default.
- Register other applications that can also open a specific file format.
- Provide a string describing the type of a file, for example, in a file properties dialog of the Files application.
- Provide an icon representing a specific file format, for example, in a file properties dialog of the Files application.
media-type/subtype-identifier
media-type/subtype-identifierExample 12.7. MIME Types Format
image/jpeg is an example of a MIME type where image is the media type, and jpeg is the subtype identifier.
- The machine-wide and user-specific location to store all MIME type specification files.
- How to register a MIME type so that the desktop environment knows which applications can be used to open a specific file format.
- How the user can change which applications should open what file formats.
12.3.1.1. What Is the MIME Database?
/usr/share/mime/packages/ directory where the MIME type related files specifying information on known MIME types are stored. One example of such a file is /usr/share/mime/packages/freedesktop.org.xml, specifying information about the standard MIME types available on the system by default. That file is provided by the shared-mime-info package.
Getting More Information
12.3.2. Adding a Custom MIME Type for All Users
/usr/share/mime/packages/ directory and a .desktop file in the /usr/share/applications/ directory.
Procedure 12.3. Adding a Custom application/x-newtype MIME Type for All Users
- Create the
/usr/share/mime/packages/application-x-newtype.xmlfile:Copy to Clipboard Copied! Toggle word wrap Toggle overflow The sampleapplication-x-newtype.xmlfile above defines a new MIME typeapplication/x-newtypeand assigns file names with the.xyzextension to that MIME type. - Create a new
.desktopfile named, for example,myapplication1.desktop, and place it in the/usr/share/applications/directory:[Desktop Entry] Type=Application MimeType=application/x-newtype Name=My Application 1 Exec=myapplication1 field_code
[Desktop Entry] Type=Application MimeType=application/x-newtype Name=My Application 1 Exec=myapplication1 field_codeCopy to Clipboard Copied! Toggle word wrap Toggle overflow The samplemyapplication1.desktopfile above associates theapplication/x-newtypeMIME type with an application named My Application 1, which is run by the commandmyapplication1.Based on howmyapplication1gets started, choose one respective field code from Desktop Entry Specification. For example, for an application capable of opening multiple files, use:Exec=myapplication1 %F
Exec=myapplication1 %FCopy to Clipboard Copied! Toggle word wrap Toggle overflow - As root, update the MIME database for your changes to take effect:
update-mime-database /usr/share/mime
# update-mime-database /usr/share/mimeCopy to Clipboard Copied! Toggle word wrap Toggle overflow - As root, update the application database:
update-desktop-database /usr/share/applications
# update-desktop-database /usr/share/applicationsCopy to Clipboard Copied! Toggle word wrap Toggle overflow - To verify that you have successfully associated
*.xyzfiles with theapplication/x-newtypeMIME type, first create an empty file, for exampletest.xyz:touch test.xyz
$ touch test.xyzCopy to Clipboard Copied! Toggle word wrap Toggle overflow Then run thegvfs-infocommand:gvfs-info test.xyz | grep "standard::content-type"
$ gvfs-info test.xyz | grep "standard::content-type" standard::content-type: application/x-newtypeCopy to Clipboard Copied! Toggle word wrap Toggle overflow - To verify that
myapplication1.desktophas been correctly set as the default registered application for theapplication/x-newtypeMIME type, run thegvfs-mime --querycommand:Copy to Clipboard Copied! Toggle word wrap Toggle overflow
12.3.3. Adding a Custom MIME Type for Individual Users
~/.local/share/mime/packages/ directory and a .desktop file in the ~/.local/share/applications/ directory.
Procedure 12.4. Adding a Custom application/x-newtype MIME Type for Individual Users
- Create the
~/.local/share/mime/packages/application-x-newtype.xmlfile:Copy to Clipboard Copied! Toggle word wrap Toggle overflow The sampleapplication-x-newtype.xmlfile above defines a new MIME typeapplication/x-newtypeand assigns file names with the.xyzextension to that MIME type. - Create a new
.desktopfile named, for example,myapplication1.desktop, and place it in the~/.local/share/applications/directory:[Desktop Entry] Type=Application MimeType=application/x-newtype Name=My Application 1 Exec=myapplication1 field_code
[Desktop Entry] Type=Application MimeType=application/x-newtype Name=My Application 1 Exec=myapplication1 field_codeCopy to Clipboard Copied! Toggle word wrap Toggle overflow The samplemyapplication1.desktopfile above associates theapplication/x-newtypeMIME type with an application named My Application 1, which is run by the commandmyapplication1.Based on howmyapplication1gets started, choose one respective field code from Desktop Entry Specification. For example, for an application capable of opening multiple files, use:Exec=myapplication1 %F
Exec=myapplication1 %FCopy to Clipboard Copied! Toggle word wrap Toggle overflow - Update the MIME database for your changes to take effect:
update-mime-database ~/.local/share/mime
$ update-mime-database ~/.local/share/mimeCopy to Clipboard Copied! Toggle word wrap Toggle overflow - Update the application database:
update-desktop-database ~/.local/share/applications
$ update-desktop-database ~/.local/share/applicationsCopy to Clipboard Copied! Toggle word wrap Toggle overflow - To verify that you have successfully associated
*.xyzfiles with theapplication/x-newtypeMIME type, first create an empty file, for exampletest.xyz:touch test.xyz
$ touch test.xyzCopy to Clipboard Copied! Toggle word wrap Toggle overflow Then run thegvfs-infocommand:gvfs-info test.xyz | grep "standard::content-type"
$ gvfs-info test.xyz | grep "standard::content-type" standard::content-type: application/x-newtypeCopy to Clipboard Copied! Toggle word wrap Toggle overflow - To verify that
myapplication1.desktophas been correctly set as the default registered application for theapplication/x-newtypeMIME type, run thegvfs-mime --querycommand:Copy to Clipboard Copied! Toggle word wrap Toggle overflow
12.3.4. Overriding the Default Registered Application for All Users
/usr/share/applications/mimeapps.list and /usr/share/applications/[desktop environment name]-mimeapps.list file are the package-installed defaults, which specify which application is registered to open specific MIME types by default.
/etc/xdg/mimeapps.list or /etc/xdg/[desktop environment name]-mimeapps.list file with a list of MIME types for which they want to override the default registered application.
/usr/share/applications//etc/xdg/
mimeapps.list[desktop environment name]-mimeapps.list
Note
defaults.list file instead of the mimeapps.list file.
Procedure 12.5. Overriding the Default Registered Application for All Users
- Consult the
/usr/share/applications/mimeapps.listfile to determine the MIME types for which you want to change the default registered application. For example, the following sample of themimeapps.listfile specifies the default registered application for thetext/htmlandapplication/xhtml+xmlMIME types:[Default Applications] text/html=firefox.desktop application/xhtml+xml=firefox.desktop
[Default Applications] text/html=firefox.desktop application/xhtml+xml=firefox.desktopCopy to Clipboard Copied! Toggle word wrap Toggle overflow The default application (Firefox) is defined by specifying its corresponding.desktopfile (firefox.desktop). The default location for other applications'.desktopfiles is/usr/share/applications/. - Create the
/etc/xdg/mimeapps.listfile. In the file, specify the MIME types and their corresponding default registered applications:[Default Applications] text/html=myapplication1.desktop application/xhtml+xml=myapplication2.desktop
[Default Applications] text/html=myapplication1.desktop application/xhtml+xml=myapplication2.desktopCopy to Clipboard Copied! Toggle word wrap Toggle overflow This sets the default registered application for thetext/htmlMIME type tomyapplication1.desktop, and the default registered application for theapplication/xhtml+xmlMIME type tomyapplication2.desktop.For these settings to function properly, ensure that both themyapplication1.desktopandmyapplication2.desktopfiles are placed in the/usr/share/applications/directory. - You can use the
gvfs-mime querycommand to verify that the default registered application has been set correctly:Copy to Clipboard Copied! Toggle word wrap Toggle overflow
12.3.5. Overriding the Default Registered Application for Individual Users
/usr/share/applications/mimeapps.list and /usr/share/applications/[desktop environment name]-mimeapps.list file are the package-installed defaults, which specify which application is registered to open specific MIME types by default.
~/.local/share/applications/mimeapps.list or ~/.local/share/applications/[desktop environment id]-mimeapps.list file with a list of MIME types for which you want to override the default registered application.
/usr/share/applications//etc/xdg/~/.local/share/application/
mimeapps.list[desktop environment name]-mimeapps.list
Note
defaults.list file instead of the mimeapps.list file.
Procedure 12.6. Overriding the Default Registered Application for Individual Users
- Consult the
/usr/share/applications/mimeapps.listfile to determine the MIME types for which you want to change the default registered application. For example, the following sample of themimeapps.listfile specifies the default registered application for thetext/htmlandapplication/xhtml+xmlMIME types:[Default Applications] text/html=firefox.desktop application/xhtml+xml=firefox.desktop
[Default Applications] text/html=firefox.desktop application/xhtml+xml=firefox.desktopCopy to Clipboard Copied! Toggle word wrap Toggle overflow The default application (Firefox) is defined by specifying its corresponding.desktopfile (firefox.desktop). The system default location for other applications'.desktopfiles is/usr/share/applications/. Individual users'.desktopfiles can be stored in~/.local/share/applications/. - Create the
~/.local/share/applications/mimeapps.listfile. In the file, specify the MIME types and their corresponding default registered applications:[Default Applications] text/html=myapplication1.desktop application/xhtml+xml=myapplication2.desktop
[Default Applications] text/html=myapplication1.desktop application/xhtml+xml=myapplication2.desktopCopy to Clipboard Copied! Toggle word wrap Toggle overflow This sets the default registered application for thetext/htmlMIME type tomyapplication1.desktop, and the default registered application for theapplication/xhtml+xmlMIME type tomyapplication2.desktop.For these settings to function properly, ensure that both themyapplication1.desktopandmyapplication2.desktopfiles are placed in the/usr/share/applications/directory. - You can use the
gvfs-mime --querycommand to verify that the default registered application has been set correctly:Copy to Clipboard Copied! Toggle word wrap Toggle overflow
Chapter 13. Customizing GNOME Desktop Features
dconf utility. The users will experience the difference when they log out and log in again.
13.1. Allowing and Disallowing Online Accounts
- enable all online accounts;
- selectively enable a few online accounts;
- disable all online accounts.
Procedure 13.1. Configuring Online Accounts
- If you do not have the gnome-online-accounts package on your system, install it by running the following command as root:
yum install gnome-online-accounts
# yum install gnome-online-accountsCopy to Clipboard Copied! Toggle word wrap Toggle overflow - Create a keyfile for the local database in
/etc/dconf/db/local.d/goa, which contains the following configuration:- For selectively enabling a few providers only:
[org/gnome/online-accounts] whitelisted-providers= ['google', 'facebook']
[org/gnome/online-accounts] whitelisted-providers= ['google', 'facebook']Copy to Clipboard Copied! Toggle word wrap Toggle overflow - For disabling all providers:
[org/gnome/online-accounts] whitelisted-providers= ['']
[org/gnome/online-accounts] whitelisted-providers= ['']Copy to Clipboard Copied! Toggle word wrap Toggle overflow - For allowing all available providers:
[org/gnome/online-accounts] whitelisted-providers= ['all']
[org/gnome/online-accounts] whitelisted-providers= ['all']Copy to Clipboard Copied! Toggle word wrap Toggle overflow
- Lock down the settings to prevent users from overriding them.
- If it does not exist, create a new directory named
/etc/dconf/db/local.d/locks/. - Create a new file in
/etc/dconf/db/local.d/locks/goawith the following contents:Prevent users from changing values for the following key:
# Prevent users from changing values for the following key: /org/gnome/online-accountsCopy to Clipboard Copied! Toggle word wrap Toggle overflow
- Update the system databases for the changes to take effect:
dconf update
# dconf updateCopy to Clipboard Copied! Toggle word wrap Toggle overflow - Users must log out and back in again before the system-wide settings take effect.
13.2. Enabling the Ctrl+Alt+Backspace Shortcut
- a program caused the X server to stop working.
- you need to switch from your logged-in session quickly.
- you have launched a program that failed.
- you cannot operate in the current session for various reason.
- your screen freezes.
org.gnome.desktop.input-sources.xkb-options GSettings key. (For more information on GSettings keys, see Section 9.6, “GSettings Keys Properties”.)
Procedure 13.2. Enabling the Ctrl-Alt-Backspace Shortcut
- Create a
localdatabase for machine-wide settings in/etc/dconf/db/local.d/00-input-sources:[org/gnome/desktop/input-sources] # Enable Ctrl-Alt-Backspace for all users xkb-options=['terminate:ctrl_alt_bksp']
[org/gnome/desktop/input-sources] # Enable Ctrl-Alt-Backspace for all users xkb-options=['terminate:ctrl_alt_bksp']Copy to Clipboard Copied! Toggle word wrap Toggle overflow - Override the user's setting and prevent the user from changing it in
/etc/dconf/db/local.d/locks/input-sources:Lock the list of enabled XKB options
# Lock the list of enabled XKB options /org/gnome/desktop/input-sources/xkb-optionsCopy to Clipboard Copied! Toggle word wrap Toggle overflow - Update the system databases for the changes to take effect:
dconf update
# dconf updateCopy to Clipboard Copied! Toggle word wrap Toggle overflow - Users must log out and back in again before the system-wide settings take effect.
13.3. Enabling the Compose Key
Compose key is a feature that enables you to type special symbols or characters not found on your keyboard. In GNOME Desktop, you can define one of the existing keys on your keyboard as the Compose key. The Compose key is used in combination with other keys, known as Compose key sequences, to enter special characters you type frequently.
Example 13.1. Using Compose Key
Compose key, then type AE (in capitals), you will get "Æ". If you type the letters in lower case, you get "æ".
Compose key and configure a certain key on your keyboard as the Compose key, set the org.gnome.desktop.input-sources.xkb-options GSettings key. That way, the setting will be enabled by default for all users on your system. (For more information on GSettings keys, see Section 9.6, “GSettings Keys Properties”.)
Procedure 13.3. Setting the Right Alt Key as the Compose Key
- Create a
localdatabase for machine-wide settings in/etc/dconf/db/local.d/00-input-sources:[org/gnome/desktop/input-sources] # Set the Right Alt key as the Compose key and enable it xkb-options=['compose:ralt']
[org/gnome/desktop/input-sources] # Set the Right Alt key as the Compose key and enable it xkb-options=['compose:ralt']Copy to Clipboard Copied! Toggle word wrap Toggle overflow If you want to set a different key than Right Alt, replace ralt with the name of that key as specified in the xkeyboard-config(7) man page, section Compose key position. - Override the user's setting and prevent the user from changing it in
/etc/dconf/db/local.d/locks/input-sources:Lock the list of enabled XKB options
# Lock the list of enabled XKB options /org/gnome/desktop/input-sources/xkb-optionsCopy to Clipboard Copied! Toggle word wrap Toggle overflow - Update the system databases for the changes to take effect:
dconf update
# dconf updateCopy to Clipboard Copied! Toggle word wrap Toggle overflow - Users must log out and back in again before the system-wide settings take effect.
Compose key. Just press and release the Compose key and then type the key combination to get the specific symbol.
Note
13.4. Disabling Command-Line Access
- Set the
org.gnome.desktop.lockdown.disable-command-lineGSettings key, which prevents the user from accessing the terminal or specifying a command line to be executed (the Alt+F2 command prompt). - Disable switching to virtual terminals (VTs) with the Ctrl+Alt+function key shortcuts by modifying the X server configuration.
- Remove Terminal and any other application that provides access to the terminal from the menu and
Activities Overviewin GNOME Shell. This is done by removing menu items for those applications. For detailed information on how to remove a menu item, see Section 12.1.2, “Removing a Menu Item for All Users”.
13.4.1. Setting the org.gnome.desktop.lockdown.disable-command-line Key
- Create a
localdatabase for machine-wide settings in/etc/dconf/db/local.d/00-lockdown:[org/gnome/desktop/lockdown] # Disable command-line access disable-command-line=true
[org/gnome/desktop/lockdown] # Disable command-line access disable-command-line=trueCopy to Clipboard Copied! Toggle word wrap Toggle overflow - Override the user's setting and prevent the user from changing it in
/etc/dconf/db/local.d/locks/lockdown:Lock the disabled command-line access
# Lock the disabled command-line access /org/gnome/desktop/lockdownCopy to Clipboard Copied! Toggle word wrap Toggle overflow - Update the system databases:
dconf update
# dconf updateCopy to Clipboard Copied! Toggle word wrap Toggle overflow - Users must log out and back in again before the system-wide settings take effect.
13.4.2. Disabling Virtual Terminal Switching
DontVTSwitch option to the Serverflags section in an X configuration file in the /etc/X11/xorg.conf.d/ directory.
Procedure 13.4. Disabling Access to Virtual Terminals
- Create or edit an X configuration file in the
/etc/X11/xorg.conf.d/directory:Note
By convention, these host-specific configuration file names start with two digits and a hyphen and always have the .conf extension. Thus, the following file name can be/etc/X11/xorg.conf.d/10-xorg.conf.Section "Serverflags" Option "DontVTSwitch" "yes" EndSection
Section "Serverflags" Option "DontVTSwitch" "yes" EndSectionCopy to Clipboard Copied! Toggle word wrap Toggle overflow - Restart the X server for your changes to take effect.
13.5. Locking Down Printing
Important
org.gnome.desktop.lockdown.disable-printing key. Follow the procedure.
Procedure 13.5. Locking Down the org.gnome.desktop.lockdown.disable-printing Key
- Create the user profile if it already does not exist (
/etc/dconf/profile/user):user-db:user system-db:local
user-db:user
system-db:local
Copy to Clipboard Copied! Toggle word wrap Toggle overflow - Create a
localdatabase for machine-wide settings inetc/dconf/db/local.d/00-lockdown:[org/gnome/desktop/lockdown] # Prevent applications from printing disable-printing=true
[org/gnome/desktop/lockdown] # Prevent applications from printing disable-printing=trueCopy to Clipboard Copied! Toggle word wrap Toggle overflow - Override the user's setting and prevent the user from changing it in
/etc/dconf/db/local.d/locks/lockdown:List the keys used to configure lockdown
# List the keys used to configure lockdown /org/gnome/desktop/lockdown/disable-printingCopy to Clipboard Copied! Toggle word wrap Toggle overflow - Update the system databases by running
dconf update
# dconf updateCopy to Clipboard Copied! Toggle word wrap Toggle overflow
13.6. Locking File Saving on Disk
Important
org.gnome.desktop.lockdown.disable-save-to-disk key. Follow the procedure:
Procedure 13.6. Locking Down the org.gnome.desktop.lockdown.disable-save-to-disk Key
- Create the
userprofile in/etc/dconf/profile/userunless it already exists:user-db:user system-db:local
user-db:user system-db:localCopy to Clipboard Copied! Toggle word wrap Toggle overflow - Create a
localdatabase for machine-wide settings in the/etc/dconf/db/local.d/00-lockdownfile.[org/gnome/desktop/lockdown] # Prevent the user from saving files on disk disable-save-to-disk=true
[org/gnome/desktop/lockdown] # Prevent the user from saving files on disk disable-save-to-disk=trueCopy to Clipboard Copied! Toggle word wrap Toggle overflow - Override the user's setting and prevent the user from changing it in
/etc/dconf/db/local.d/locks/lockdown:Lock this key to disable saving files on disk
# Lock this key to disable saving files on disk /org/gnome/desktop/lockdown/disable-save-to-diskCopy to Clipboard Copied! Toggle word wrap Toggle overflow - Update the system databases by running
dconf update
# dconf updateCopy to Clipboard Copied! Toggle word wrap Toggle overflow
13.7. Locking Repartitioning
polkit enables you to set permissions for individual operations. For udisks2, the utility for disk management services, the configuration is located at /usr/share/polkit-1/actions/org.freedesktop.udisks2.policy. This file contains a set of actions and default values, which can be overridden by system administrator.
Important
polkit configuration stored in /etc overrides the configuration shipped by packages in /usr/share/.
Procedure 13.7. To Prevent Users from Changing Disks Settings
- Create a file with the same content as in
/usr/share/polkit-1/actions/org.freedesktop.udisks2.policy.cp /usr/share/polkit-1/actions/org.freedesktop.udisks2.policy /etc/share/polkit-1/actions/org.freedesktop.udisks2.policy
cp /usr/share/polkit-1/actions/org.freedesktop.udisks2.policy /etc/share/polkit-1/actions/org.freedesktop.udisks2.policyCopy to Clipboard Copied! Toggle word wrap Toggle overflow Do not change the/usr/share/polkit-1/actions/org.freedesktop.udisks2.policyfile, your changes will be overwritten by the next package update. - Delete the action you do not need and add the following lines to the
/etc/polkit-1/actions/org.freedesktop.udisks2.policyfile:Copy to Clipboard Copied! Toggle word wrap Toggle overflow Replacenobyauth_adminif you want to ensure only the root user is able to carry out the action. - Save the changes.
Authentication is required to modify the disks settings
Authentication is required to modify the disks settings13.8. Locking Down User Logout and User Switching
- Create the
/etc/dconf/profile/userprofile which contains the following lines:user-db:user system-db:local
user-db:user
system-db:local
Copy to Clipboard Copied! Toggle word wrap Toggle overflow localis the name of adconfdatabase. - Create the directory
/etc/dconf/db/local.d/if it does not already exist. - Create the key file
/etc/dconf/db/local.d/00-logoutto provide information for thelocaldatabase:[org/gnome/desktop/lockdown] # Prevent the user from user switching disable-log-out=true
[org/gnome/desktop/lockdown] # Prevent the user from user switching disable-log-out=trueCopy to Clipboard Copied! Toggle word wrap Toggle overflow - Override the user's setting and prevent the user from changing it in
/etc/dconf/db/local.d/locks/lockdown:Lock this key to disable user logout
# Lock this key to disable user logout /org/gnome/desktop/lockdown/disable-log-outCopy to Clipboard Copied! Toggle word wrap Toggle overflow - Update the system databases:
dconf update
# dconf updateCopy to Clipboard Copied! Toggle word wrap Toggle overflow - Users must log out and back in again before the system-wide settings take effect.
Important
Procedure 13.8. Prevent the User form Switching to a Different User Account
- Create the
/etc/dconf/profile/userprofile which contains the following lines:user-db:user system-db:local
user-db:user system-db:localCopy to Clipboard Copied! Toggle word wrap Toggle overflow localis the name of adconfdatabase. - Create the directory
/etc/dconf/db/local.d/if it does not already exist. - Create the key file
/etc/dconf/db/local.d/00-user-switchingto provide information for thelocaldatabase:[org/gnome/desktop/lockdown] # Prevent the user from user switching disable-user-switching=true
[org/gnome/desktop/lockdown] # Prevent the user from user switching disable-user-switching=trueCopy to Clipboard Copied! Toggle word wrap Toggle overflow - Override the user's setting and prevent the user from changing it in
/etc/dconf/db/local.d/locks/lockdown:Lock this key to disable user switching
# Lock this key to disable user switching
/org/gnome/desktop/lockdown/disable-user-switching
Copy to Clipboard Copied! Toggle word wrap Toggle overflow - Update the system databases:
dconf update
# dconf updateCopy to Clipboard Copied! Toggle word wrap Toggle overflow - Users must log out and back in again before the system-wide settings take effect.
13.9. Single-application Mode
Procedure 13.9. Set Up Single-application Mode
- Create the following files with the following content:
/usr/bin/redhat-kioskCopy to Clipboard Copied! Toggle word wrap Toggle overflow Important
The/usr/bin/redhat-kioskfile must be executable.Replace thegedit ~/.local/bin/redhat-kioskcode by the commands that you want to execute in the kiosk session. This example launches a full-screen application designed for the kiosk deployment named http://mine-kios-web-app:Copy to Clipboard Copied! Toggle word wrap Toggle overflow /usr/share/applications/com.redhat.Kiosk.Script.desktop[Desktop Entry] Name=Kiosk Type=Application Exec=redhat-kiosk
[Desktop Entry] Name=Kiosk Type=Application Exec=redhat-kioskCopy to Clipboard Copied! Toggle word wrap Toggle overflow /usr/share/applications/com.redhat.Kiosk.WindowManager.desktopCopy to Clipboard Copied! Toggle word wrap Toggle overflow /usr/share/gnome-session/sessions/redhat-kiosk.session[GNOME Session] Name=Kiosk RequiredComponents=com.redhat.Kiosk.WindowManager;com.redhat.Kiosk.Script;
[GNOME Session] Name=Kiosk RequiredComponents=com.redhat.Kiosk.WindowManager;com.redhat.Kiosk.Script;Copy to Clipboard Copied! Toggle word wrap Toggle overflow /usr/share/xsessions/com.redhat.Kiosk.desktopCopy to Clipboard Copied! Toggle word wrap Toggle overflow
- Restart the
GDMservice:systemctl restart gdm.service
systemctl restart gdm.serviceCopy to Clipboard Copied! Toggle word wrap Toggle overflow - Create a separate user for the kiosk session and select
Kioskas the session type for the user of the kiosk session.Figure 13.1. Selecting the kiosk session
Kiosk session, the user launches a full screen application designed for the kiosk deployment.
13.10. Preventing the Computer from Suspending when Closing the Lid
Warning
Procedure 13.10. Configuring the lid switch
- Open the
/etc/systemd/logind.conffile for editing. - Find the
HandleLidSwitch=suspendline in the file. If it is quoted out with the#character at the start, unquote it.If the line is not present in the file, add it. - Replace the default
suspendparameter withlockfor the screen to lock;ignorefor nothing to happen;powerofffor the computer to switch off.
For example:[Login] HandleLidSwitch=lock
[Login] HandleLidSwitch=lockCopy to Clipboard Copied! Toggle word wrap Toggle overflow - Save your changes and close the editor.
- Run the following command so that your changes preserve the next restart of the system:
systemctl restart systemd-logind.service
# systemctl restart systemd-logind.serviceCopy to Clipboard Copied! Toggle word wrap Toggle overflow Warning
Keep in mind that restarting the service forcibly interrupts any currently running GNOME session of any desktop user who is logged in. This can result in users losing unsaved data.
/etc/systemd/logind.conf file, see the logind.conf(5) man page.
13.11. Changing Behavior when Pressing the Power Button in Graphical Target Mode
Procedure 13.11. Using dconf to configure the system to shutdown after pressing the button
- Create a
localdatabase for system-wide settings in the/etc/dconf/db/local.d/01-powerfile:[org/gnome/settings-daemon/plugins/power] power-button-action='interactive'
[org/gnome/settings-daemon/plugins/power] power-button-action='interactive'Copy to Clipboard Copied! Toggle word wrap Toggle overflow - Override the user's setting and prevent the user from changing it in the
/etc/dconf/db/local.d/locks/01-powerfile:/org/gnome/settings-daemon/plugins/power/power-button-action
/org/gnome/settings-daemon/plugins/power/power-button-actionCopy to Clipboard Copied! Toggle word wrap Toggle overflow - Update the system databases:
dconf update
# dconf updateCopy to Clipboard Copied! Toggle word wrap Toggle overflow - Log out and back in again before the system-wide settings take effect.
Options for particular buttons
nothing- does nothing
suspend- suspends the system
hibernate- hibernates the system
interactive- shows a pop-up query asking the user what to doWith interactive mode, the system powers off automatically after 60 seconds when hitting the power button.However, you can choose a different behavior from the pop-up query as shown in the figure below.
Figure 13.2. Pop-up query for interactive mode
Chapter 14. Session Management
14.1. What Is GDM?
GNOME Display Manager (GDM) is a graphical login program running in the background that runs and manages the X servers for both local and remote logins.
GDM is a replacement for XDM, the X Display Manager. However, GDM is not derived from XDM and does not contain any original XDM code. In addition, there is no support for a graphical configuration tool in GDM, so editing the /etc/gdm/custom.conf configuration file is necessary to change the GDM settings.
14.1.1. Restarting GDM
GDM for your changes to take effect.
Warning
GDM service, run the following command:
systemctl restart gdm.service
# systemctl restart gdm.service14.1.2. Displaying results of GDM configuration
GDM configuration, run the following command:
DCONF_PROFILE=gdm gsettings list-recursively org.gnome.login-screen
$ DCONF_PROFILE=gdm gsettings list-recursively org.gnome.login-screen 14.2. Authentication
14.2.1. Using Enterprise Credentials to Log into GNOME
@ sign, and then your domain name. For example, if your domain name is example.com and the user name is User, type:
User@example.com
User@example.com14.2.1.1. Choosing to Use Enterprise Credentials During Welcome Screens
Procedure 14.1. Configuring Enterprise Credentials
- At the Login welcome screen, choose .
- Type the name of your domain in the Domain field if it is not already prefilled.
- Type your domain account user and password in the relevant fields.
- Click .
14.2.1.2. Changing to Use Enterprise Credentials to Log into GNOME
Procedure 14.2. Configuring Enterprise Credentials
- Click your name on the top bar and select Settings from the menu.
- From the list of items, select Users.
- Click the Unlock button and type the computer administrator's password.
- Click the button in the lower left of the window.
- Select the Enterprise Login pane.
- Enter the domain, user, and password for your Enterprise account, and click Add.
14.2.1.3. Troubleshooting and Advanced Setup
realm command and its various subcommands can be used to troubleshoot the enterprise login feature. For example, to see whether the machine has been configured for enterprise logins, run the following command:
realm list
$ realm listrealm join command, or running realm join in an automated fashion from a script.
Getting More Information
realmd to connect to an Active Directory domain.
14.2.2. Enabling Smart Card Authentication
- Configuration of GDM to allow prompting for smart cards
- Configuration of the operating system to allow using smart cards to login
1.Configuration of GDM to allow prompting for smart cards
Procedure 14.3. Enabling smart card authentication using dconf editor GUI
- Uncheck the box for the org.gnome.login-screen enable-password-authentication dcof key.
- Check the box for the org.gnome.login-screen enable-smartcard-authentication dcof key.
Procedure 14.4. Enabling smart card authentication using dconf-tool
- Create a keyfile in the
/etc/dconf/db/gdm.ddirectory. - Add the following content to this keyfile:
[org/gnome/login-screen]
enable-password-authentication='false'
enable-smartcard-authentication='true'
[org/gnome/login-screen]
enable-password-authentication='false'
enable-smartcard-authentication='true'
Copy to Clipboard Copied! Toggle word wrap Toggle overflow - Update the system dconf databases:
dconf update
# dconf updateCopy to Clipboard Copied! Toggle word wrap Toggle overflow
2.Configuration of the operating system to allow using smart cards to login
system-config-authentication tool to configure the system to allow users to use smart cards, making their use available to GDM as a valid authentication method for the graphical environment. The tool is provided by the authconfig-gtk package.
system-config-authentication tool, see the Red Hat Enterprise Linux 7 System-Level Authentication Guide.
14.2.3. Enabling Fingerprint Authentication
system-config-authentication tool to enable fingerprint authentication. The tool is provided by the authconfig-gtk package.
system-config-authentication tool, see the Red Hat Enterprise Linux 7 System-Level Authentication Guide.
14.3. User Sessions
14.3.1. What Are Typical Processes in User Sessions?
- dbus-daemon
- The dbus-daemon provides a message bus daemon which programs can use to exchange messages with one another. dbus-daemon is implemented with the D-Bus library which provides one-to-one communication between any two applications.For extended information, see the
dbus-daemon(1) man page. - gnome-keyring-daemon
- Credentials such as user name and password for various programs and websites are stored securely using the
gnome-keyring-daemon. This information is written into an encrypted file called the keyring file and saved in the user's home directory.For extended information, see thegnome-keyring-daemon(1) man page. - gnome-session
- The gnome-session program is responsible for running the GNOME Desktop environment with help of a display manager, such as GDM. The default session for the user is set at the time of system installation by the system administrator. gnome-session typically loads the last session that ran successfully on the system.For extended information, see the
gnome-session(1) man page. - gnome-settings-daemon
- The
gnome-settings-daemonhandles settings for a GNOME session and for all programs that are run within the session.For extended information, see thegnome-settings-daemon(1) man page. - gnome-shell
gnome-shellprovides the core user interface functionality for GNOME, such as launching programs, browsing directories, viewing files and so on.For extended information, see thegnome-shell(1) man page.- pulseaudio
- PulseAudio is a sound server for Red Hat Enterprise Linux that lets programs output audio using the Pulseaudio daemon.For extended information, see the
pulseaudio(1) man page.
dconf-serviceibusat-spi2-dbus-launcherat-spi2-registrydgnome-shell-calendar-servergoa-daemongsd-printer- various Evolution factory processes
- various
GVFSprocesses
14.3.2. Configuring a User Default Session
/var/lib/AccountsService/users/ directory.
Note
.dmrc file in the user home directory was used to create default sessions. This .dmrc file is no longer used.
Procedure 14.5. Specifying a Default Session for a User
- Make sure that you have the gnome-session-xsession package installed by running the following command:
yum install gnome-session-xsession
# yum install gnome-session-xsessionCopy to Clipboard Copied! Toggle word wrap Toggle overflow - Navigate to the
/usr/share/xsessionsdirectory where you can find.desktopfiles for each of the available sessions. Consult the contents of the.desktopfiles to determine the session you want to use. - To specify a default session for a user, update the user's
account servicein the/var/lib/AccountsService/users/username file:[User] Language= XSession=gnome
[User] Language= XSession=gnomeCopy to Clipboard Copied! Toggle word wrap Toggle overflow In this sample, GNOME has been set as the default session, using the/usr/share/xsessions/gnome.desktopfile. Note that the system default in Red Hat Enterprise Linux 7 is GNOME Classic (the/usr/share/xsessions/gnome-classic.desktopfile).
14.3.3. Creating a Custom Session
- Create a
.desktopfile in/etc/X11/sessions/new-session.desktop. Make sure that the file specifies the following entries:Copy to Clipboard Copied! Toggle word wrap Toggle overflow TheExecentry specifies the command, possibly with arguments, to execute. You can run the custom session with thegnome-session --session=new-sessioncommand.For more information on the parameters that you can use withgnome-session, see thegnome-session(1) man page. - Create a custom session file in
/usr/share/gnome-session/sessions/new-session.sessionwhere you can specify the name and required components for the session:[GNOME Session] Name=Custom Session RequiredComponents=gnome-shell-classic;gnome-settings-daemon;
[GNOME Session] Name=Custom Session RequiredComponents=gnome-shell-classic;gnome-settings-daemon;Copy to Clipboard Copied! Toggle word wrap Toggle overflow Note that any item that you specify inRequiredComponentsneeds to have its corresponding.desktopfile in/usr/share/applications/.
GDM login screen.
14.3.4. Viewing User Session Logs
systemd journal. Because Red Hat Enterprise Linux 7 is a systemd-based system, the user session log data is stored directly in the systemd journal in a binary format.
Note
~/.xsession-errors file, which is no longer used.
Procedure 14.6. Viewing User Session Logs
- Determine your user ID (
uid) by running the following command:id --user
$ id --user
1000
Copy to Clipboard Copied! Toggle word wrap Toggle overflow - View the journal logs for the user ID determined above:
journalctl _UID=1000
$ journalctl _UID=1000Copy to Clipboard Copied! Toggle word wrap Toggle overflow
Getting More Information
journalctl(1) man page provides more information on the systemd journal usage.
systemd journal on Red Hat Enterprise Linux 7, see the Red Hat Enterprise Linux 7 System-Level Authentication Guide.
14.3.5. Adding an Autostart Application for All Users
.desktop file for that application in the /etc/xdg/autostart/ directory.
Procedure 14.7. Adding an Autostart (Startup) Application for All Users
- Create a
.desktopfile in the/etc/xdg/autostart/directory:Copy to Clipboard Copied! Toggle word wrap Toggle overflow - Replace Files with the name of the application.
- Replace nautilus -n with the command you wish to use to run the application.
- You can use the
AutostartConditionkey to check for a value of a GSettings key.The session manager runs the application automatically if the key's value is true. If the key's value changes in the running session, the session manager starts or stops the application, depending on what the previous value for the key was.
14.3.6. Configuring Automatic Login
GDM custom configuration file, as follows.
Example 14.1. Configuring Automatic Login for a user john
/etc/gdm/custom.conf file and make sure that the [daemon] section in the file specifies the following:
[daemon]
AutomaticLoginEnable=True
AutomaticLogin=john
[daemon]
AutomaticLoginEnable=True
AutomaticLogin=john14.3.7. Configuring Automatic Logout
Warning
Procedure 14.8. Setting Automatic Logout for a Mains Powered Machine
- Create a
localdatabase for machine-wide settings in/etc/dconf/db/local.d/00-autologout:[org/gnome/settings-daemon/plugins/power] # Set the timeout to 900 seconds when on mains power sleep-inactive-ac-timeout=900 # Set action after timeout to be logout when on mains power sleep-inactive-ac-type='logout'
[org/gnome/settings-daemon/plugins/power] # Set the timeout to 900 seconds when on mains power sleep-inactive-ac-timeout=900 # Set action after timeout to be logout when on mains power sleep-inactive-ac-type='logout'Copy to Clipboard Copied! Toggle word wrap Toggle overflow - Override the user's setting and prevent the user from changing it in
/etc/dconf/db/local.d/locks/autologout:Lock automatic logout settings
# Lock automatic logout settings
/org/gnome/settings-daemon/plugins/power/sleep-inactive-ac-timeout
/org/gnome/settings-daemon/plugins/power/sleep-inactive-ac-type
Copy to Clipboard Copied! Toggle word wrap Toggle overflow - Update the system databases:
dconf update
# dconf updateCopy to Clipboard Copied! Toggle word wrap Toggle overflow - Users must log out and back in again before the system-wide settings take effect.
org.gnome.settings-daemon.plugins.power.sleep-inactive-ac-timeoutThe number of seconds that the computer needs to be inactive before it goes to sleep if it is running from AC power.org.gnome.settings-daemon.plugins.power.sleep-inactive-ac-typeWhat should happen when the timeout has passed if the computer is running from AC power.org.gnome.settings-daemon.plugins.power.sleep-inactive-battery-timeoutThe number of seconds that the computer needs to be inactive before it goes to sleep if it is running from power.org.gnome.settings-daemon.plugins.power.sleep-inactive-battery-typeWhat should happen when the timeout has passed if the computer is running from battery power.
gsettings range command on a key for a list of values which you can use. For example:
14.3.8. Setting Screen Brightness and Idle Time
Example 14.2. Setting the Drop in the Brightness Level
local database for machine-wide settings in /etc/dconf/db/local.d/00-power, as in the following example:
[org/gnome/settings-daemon/plugins/power]
idle-dim=true
[org/gnome/settings-daemon/plugins/power]
idle-dim=trueExample 14.3. Setting Brightness Level
local database for machine-wide settings in /etc/dconf/db/local.d/00-power, as in the following example, and replace 30 with the integer value you want to use:
[org/gnome/settings-daemon/plugins/power]
idle-brightness=30
[org/gnome/settings-daemon/plugins/power]
idle-brightness=30Example 14.4. Setting Idle Time
local database for machine-wide settings in /etc/dconf/db/local.d/00-session, as in the following example, and replace 900 with the integer value you want to use:
[org/gnome/desktop/session]
idle-delay=uint32 900
[org/gnome/desktop/session]
idle-delay=uint32 900uint32 along with the integer value as shown.
dconf update command as root.
Note
14.3.9. Locking the Screen When the User Is Idle
Procedure 14.9. Enabling the Screensaver and Locking the Screen
- Create a
localdatabase for system-wide settings in/etc/dconf/db/local.d/00-screensaver:Copy to Clipboard Copied! Toggle word wrap Toggle overflow You must include theuint32along with the integer key values as shown. - Override the user's setting and prevent the user from changing it in the
/etc/dconf/db/local.d/locks/screensaverfile:Lock desktop screensaver settings
# Lock desktop screensaver settings
/org/gnome/desktop/session/idle-delay
/org/gnome/desktop/screensaver/lock-enabled
/org/gnome/desktop/screensaver/lock-delay
Copy to Clipboard Copied! Toggle word wrap Toggle overflow - Update the system databases:
dconf update
# dconf updateCopy to Clipboard Copied! Toggle word wrap Toggle overflow - Users must log out and back in again before the system-wide settings take effect.
14.3.10. Screencast Recording
webm format.
Procedure 14.10. Making a Screencast
- To start the recording, press Ctrl+Alt+Shift+R.When the recorder is capturing the screen activity, it displays a red circle in the bottom-right corner of the screen.
- To stop the recording, press Ctrl+Alt+Shift+R. The red circle in the bottom-right corner of the screen disappears.
- Navigate to the
~/Videosfolder where you can find the recorded video with a file name that starts withScreencastand includes the date and time of the recording.
Chapter 15. Virtual File Systems and Disk Management
15.1. GVFS
GVFS (GNOME Virtual File System) is an extension of the virtual file system interface provided by the libraries the GNOME Desktop is built on. GVFS provides complete virtual file system infrastructure and handles storage in the GNOME Desktop.
GVFS uses addresses for full identification based on the URI (Uniform Resource Identifier) standard, syntactically similar to URL addresses used in web browsers. These addresses in form of schema://user@server/path are the key information determining the kind of service.
15.2. Back Ends for GVFS
GVFS, which provide access to a specific type of resource. The following is a list of available GVFS back ends and their specifications:
| Back end | Description |
|---|---|
| afc | Similar to MTP (Media Transfer Protocol), exposes files on your Apple iDevice (connected through USB). |
| afp | Apple Filing Protocol (AFP) client to access file services of Mac operation system X and original Mac operation system. |
| archive | Handles various archiving files (ZIP, TAR) in read-only way. |
| burn | A virtual back end used by burning applications as a temporary storage for new CD/DVD/BD medium contents. |
| cdda | Exposes Audio CD through separate Waveform Audio File Format (WAV) files. |
| computer | Virtual back end consolidating active mounts and physical volumes. Acts similarly to a signpost. Previously used by Nautilus for its Computer view. |
| dav, davs | WebDAV client, including secure variant. Authentication is possible only during mount, does not support later re-authentication on per-folder basis. |
| dns-sd | DNS Service Discovery – Avahi client, used during network browsing, forms persistent URIs to discovered services. |
| ftp | A fully featured FTP (File Transfer Protocol) client, without FTPS support for the time being. Supports passive transfers by default. |
| gphoto2 | A Picture Transfer Protocol (PTP) client to access your camera attached by USB or FireWire. |
| http | Handles all HTTP requests; useful for easy downloading files from web in client applications. |
| locatest | Simple testing back end proxying file:/// URI.; with error injection support. |
| mtp | Media Transfer Protocol back end for accessing media player and smart phones memory. |
| network | For browsing the network, showing nearby Avahi and Samba servers. |
| obexftp | A Bluetooth client. |
| recent | A back end used in GtkFileChooser to list recent files used by GNOME applications. |
| sftp | A fully-featured SFTP (SSH File Transfer Protocol) client. |
| smb | Access Samba and Windows shares. |
| trash | A trash back end which allows to restore deleted files. |
Note
yum package manager.
GVFS, which carries all necessary information needed for unique identification, such as type of service (back end ID), absolute path and user name if needed. You can see this information in the Nautilus address bar and GTK+ open or save file dialogs.
Example 15.1. URI String Pointing to the Root Directory
ftp://ftp.myserver.net/
ftp://ftp.myserver.net/
Example 15.2. URI String Pointing to a Text File
ssh://joe@ftp.myserver.net/home/joe/todo.txt
ssh://joe@ftp.myserver.net/home/joe/todo.txt
15.3. Mounting, Unmounting and Ejecting
Procedure 15.1. Manual Mounting
- Open a file in Nautilus (that is, the Files application).
- In the location bar at the top of your screen, enter a well-formed URI string. If the location bar does not display, press Ctrl+L.Alternatively, Nautilus provides dialog, which you find by going into → .
- When asked for login credentials, type your name and password into the relevant entry boxes.
- Once the mounting process is finished, your are allowed to work with files.
Procedure 15.2. Unmounting
- Click the eject icon on the chosen mount.
- Wait until the mount disappears or notification about safe removal is displayed.
Important
Important
GVFS mounts, (and physical volumes as well, are restricted to their owner only, no other user is permitted to exploit your privacy.
15.4. Managing Bookmarks
Procedure 15.3. To bookmark a Location:
- Select the folder or file you want to bookmark.
- Press Ctrl+D.
GVFS subsystem looks for existing mounts and spawns a new one if not already present. This way you are able to authenticate even within the open or save dialog.
GtkFileChooser) lists bookmarks in the left panel of the dialog. Also Nautilus and its clones present bookmarks in a sidebar or, more universally, in the Files menu.
Note
GVFS volumes and mounts are listed in the GtkFileChooser sidebar. Sometimes a bookmark and a GVFS volume combine into a single item to prevent duplication and confusion. Bookmarks then can have eject icon just like GVFS mounts.
~/.config/gtk-3.0/bookmarks file. In the example below, the bookmarked locations are ~/Music, ~/Pictures, ~/Videos, ~/Downloads, and ~/bin, so the content of the ~/.config/gtk-3.0/bookmarks file looks as follows:
Example 15.3. The ~/.config/gtk-3.0/bookmarks File
file:///home/username/Music
file:///home/username/Pictures
file:///home/username/Videos
file:///home/username/Downloads
file:///home/username/bin
file:///home/username/Music
file:///home/username/Pictures
file:///home/username/Videos
file:///home/username/Downloads
file:///home/username/binProcedure 15.4. To edit Bookmarks:
- Open the Files menu on the top bar.
- Click Bookmark to open the bookmark editor.
15.5. Configuring a Default Server List
~/.config/nautilus/servers file in the XBEL format. It is possible to add the list of file-sharing servers to that file to make file shares easily accessible to your users.
Note
ftp://ftp.gnome.org/ in the ~/.config/nautilus/servers file.
Example 15.4. The ~/.config/nautilus/servers File
15.6. Exposing GNOME Virtual File Systems to All Other Applications
GVFS also provides a FUSE daemon which exposes active GVFS mounts. This means that any application can access active GVFS mounts using the standard POSIX APIs as though they were regular filesystems.
GVFS provides a FUSE (Filesystem in Userspace) daemon, which exposes active mounts through its mount for standard POSIX (Portable Operating System Interface) access. This daemon transparently translates incoming requests to imitate a local file system for applications.
Important
GVFS back ends.
FUSE daemon starts automatically with the GVFS master daemon and places its mount either in the /run/user/UID/gvfs or ~/.gvfs files as a fallback. Manual browsing shows that there individual directories for each GVFS mount. When you are opening documents from GVFS locations with non-native applications, a transformed path is passed as an argument. Note that native GIO applications automatically translate this path back to a native URI.
15.7. Password Management of GVFS Mounts
GVFS mount asks for credentials on its activation unless the resource allows anonymous authentication or does not require any at all. Presented in a standard GTK+ dialog, the user is able to choose whether the password should be saved or not.
Procedure 15.5. Example: Authenticated Mount Process
- Open Files and activate the address bar by pressing Ctrl+L.
- Enter a well-formed URI string of a service that needs authentication (for example,
sftp://localhost/). - The credentials dialog is displayed, asking for a user name, password and password store options.
- Fill in the credentials and confirm.
GNOME Keyring is a central place for secrets storage. It is encrypted and automatically unlocked on desktop session start using the password provided on login by default. If it is protected by a different password, the password is set at the first use.
GNOME Keyring itself, the Seahorse application is provided. It allows individual records to be removed or passwords changed. For more information on Seahorse, consult the help manual for Seahorse embedded directly in the desktop.
15.8. GVFS Tools and xdg-utils in GNOME
GVFS ships with several commands that may come useful for scripting or testing. A set of POSIX commands counterparts is offered:
gvfs-catgvfs-lessgvfs-mkdirgvfs-mountgvfs-renamegvfs-set-attributegvfs-copygvfs-lsgvfs-movegvfs-rmgvfs-trashgvfs-infogvfs-savegvfs-tree
GVFS specifics:
gvfs-monitor-dirgvfs-monitor-filegvfs-mimegvfs-open
FUSE daemon to be running. Their purpose is not to be drop-in replacements for POSIX commands, in fact, a very little range of switches is supported. In their basic form, an URI string (instead of a local path) is taken as an argument.
xdg-tools (a freedesktop.org interoperability project). For example, the commonly used xdg-open actually calls gvfs-open when a running GNOME session is detected, reading file type associations from the correct location.
- To lists all files in
/tmpon a local file system, execute:gvfs-ls file:///tmp
$ gvfs-ls file:///tmpCopy to Clipboard Copied! Toggle word wrap Toggle overflow - The command below lists contents of a text file from a remote machine:
gvfs-cat ssh://joe@ftp.myserver.net/home/joe/todo.txt
$ gvfs-cat ssh://joe@ftp.myserver.net/home/joe/todo.txtCopy to Clipboard Copied! Toggle word wrap Toggle overflow - To copy the referenced text file to a local
/tmpdirectory, run:gvfs-copy ssh://joe@ftp.myserver.net/home/joe/todo.txt /tmp/
$ gvfs-copy ssh://joe@ftp.myserver.net/home/joe/todo.txt /tmp/Copy to Clipboard Copied! Toggle word wrap Toggle overflow
Note
bash completion is provided as a part of the package.
15.9. Using GVFS Metadata
GVFS has its metadata storage implemented as a set of simple key/value pairs information bound to a particular file. Thus, there is a tool for a user or application to save small data designed for runtime information such as icon position, last-played location, position in a document, emblems, notes, and so on.
GVFS stores all metadata privately so it is available only on the machine. However, GVFS mounts and removable media are tracked as well.
Note
/run/media/ instead of the /media directory.
- the
gvfs-infocommand; - the
gvfs-set-attributecommand; - or any other native GIO way of working with attributes.
gvfs-info calls and data persistence after a move or rename (note the gvfs-info command output):
Example 15.5. Setting Custom Metadata Attribute
15.10. Troubleshooting
15.10.1. Active VFS Mounts Are Invisible
gvfs-fuse, provided as a fallback for non-GIO clients.
gvfs-fuse process is running. Since gvfs-fuse runs automatically and it is not recommended to start it by yourself, try logging out and logging in as a first option.
- Find the
UID(system user ID) for the/run/user/UID/gvfs/path by running theidcommand (thegvfsd-fusedaemon requires a path it is supposed to expose its services at).Or, when the/run/user/UID/gvfs/path is unavailable,gvfsd-fuseuses a.gvfspath in your home directory. - Start the
gvfsd-fusedaemon by running the/usr/libexec/gvfsd-fuse -f /run/user/UID/gvfscommand. - Now, the VFS mount is available and you can manually browse for the path in your application.
15.10.2. Connected USB Disk Is Invisible
- You cannot see the device in the Disks application.
- You have run the
udisksctl dumpcommand, which lists the current state of theudisksdaemon and shows information about all objects, but your flash drive is not among them. - You have run the
dmesgcommand. Towards the end of the log, there are messages related to USB device detection and a list of detected partitions, but your flash drive is not among them.
- Open Disks by pressing the Super key to enter the
Activities Overview, typingDisks, and then pressing Enter. - In the actions menu, click .
- Click Show in user interface.
- Confirm by clicking .
15.10.3. Nautilus Shows Unknown or Unwanted Partitions
/etc/fstab file as the devices are not shown in the user interface by default. The /etc/fstab file typically lists disk partitions that are intended to be used in the operating system, and indicates how they are mounted. Certain mount options may allow or prevent displaying the volume in the user interface.
- Open Disks by pressing the Super key to enter the
Activities Overview, typingDisks, and then pressing Enter. - In the actions menu, click .
- Uncheck Show in user interface and confirm by clicking .
15.10.5. What to Do If the Disk Is Busy?
Where and How to View System Processes?
- Run the
lsofcommand to get the list of open files alongside with processes. Iflsofis not available, run theps axcommand that also provides the list of running processes. - Alternatively, you can use the System Monitor application to display the running processes in a GUI.
- Make sure that you have
iotopinstalled by running the following command:yum install iotop
# yum install iotopCopy to Clipboard Copied! Toggle word wrap Toggle overflow Then runiotopas root to view the system processes.
- On the command line, execute the
killcommand. - In the System Monitor, right-click the line with the program process name, and click the or drop-down menu item.
Chapter 16. Hardware Configuration
16.1. Tablets
16.1.1. Adding Support for a New Tablet
libwacom is a tablet information client library storing data about Wacom models. This library is used by both the gnome-settings-daemon component and the Wacom Tablet settings panel in GNOME.
libwacom, a new tablet definition file must be created. Tablet definition files are included in the libwacom-data package. If this package is installed, the tablet definition files are then locally available in the /usr/share/libwacom/ directory.
libwacom database and udev rules file.
Important
libwacom is that it works normally in a GNOME session, but the device is not correctly mapped to the screen.
Procedure 16.1. How to add tablet descriptions
- Use the
libwacom-list-local-devicestool to list all local devices recognized bylibwacom.If your device is not listed, but it is available as an event device in the kernel (see/proc/bus/input/devices) and in the X session (see xinput list), the device is missing fromlibwacom's database. - Create a new tablet definition file. Use data/wacom.example below and edit the respective lines.
Note
The new .tablet file may already be available, so check the upstream repository first at https://sourceforge.net/p/linuxwacom/libwacom/ci/master/tree/. If you find your tablet model on the list, it is sufficient to copy the file to the local machine.Copy to Clipboard Copied! Toggle word wrap Toggle overflow - Add and install the new file with the .tablet suffix:
cp the-new-file.tablet /usr/share/libwacom/
cp the-new-file.tablet /usr/share/libwacom/Copy to Clipboard Copied! Toggle word wrap Toggle overflow Once installed, the tablet is part oflibwacom's database. The tablet is then available throughlibwacom-list-local-devices. - Create a new file
/etc/udev/rules/99-libwacom-override.ruleswith the following content so that your settings are not overwritten:Copy to Clipboard Copied! Toggle word wrap Toggle overflow - Reboot your system.
16.1.2. Where Is the Wacom Tablet Configuration Stored?
/org/gnome/settings-daemon/peripherals/wacom/machine-id-device-id key, where machine-id is a D-Bus machine ID, and device-id is a tablet device ID. The configuration schema for the tablet is org.gnome.settings-daemon.peripherals.wacom.
/org/gnome/settings-daemon/peripherals/wacom/device-id/tool-id key, where tool-id is the identifier for the stylus used for professional ranges. For the consumer ranges with no support for tool-id, a generic identifier is used instead. The configuration schema for the stylus is org.gnome.settings-daemon.peripherals.wacom.stylus, and for the eraser org.gnome.settings-daemon.peripherals.wacom.eraser.
gsd-list-wacom tool, which is provided by the gnome-settings-daemon-devel package.
Optional channel, and run the following command:
yum install gnome-settings-daemon-devel
# yum install gnome-settings-daemon-develOptional channel, read the following resource:
/usr/libexec/gsd-list-wacom
$ /usr/libexec/gsd-list-wacom16.1.3. When Sharing Home Directories Between Machines, the Wacom Settings Only Apply to One Machine
/org/gnome/settings-daemon/peripherals/wacom/machine-id-device-id GSettings key, which stores your tablet settings.
Appendix A. KDE Plasma Workspaces
Appendix B. Accessing Red Hat Documentation
B.1. Product Documentation
- The Red Hat Enterprise Linux 7 System Administrator's Guide, available from https://access.redhat.com/documentation/en-US/Red_Hat_Enterprise_Linux/7/html-single/System_Administrators_Guide/index.html, contains detailed information about various system components, for instance the
GRUB 2boot loader, package management,systemd, or printer configuration. - The Red Hat Enterprise Linux 7 Installation Guide, available from https://access.redhat.com/documentation/en-US/Red_Hat_Enterprise_Linux/7/html/Installation_Guide/index.html, contains detailed information about installing Red Hat Enterprise Linux 7 and using the Anaconda installer.
- The Red Hat Enterprise Linux 7 Migration Planning Guide, available from https://access.redhat.com/documentation/en-US/Red_Hat_Enterprise_Linux/7/html-single/Migration_Planning_Guide/index.html, contains an overview of major changes in behavior and compatibility between Red Hat Enterprise Linux 6 and Red Hat Enterprise Linux 7. The Migration Planning Guide also introduces the tools provided by Red Hat to assist with upgrades to Red Hat Enterprise Linux 7.
- The Red Hat Enterprise Linux 7 Networking Guide, available from https://access.redhat.com/documentation/en-US/Red_Hat_Enterprise_Linux/7/html-single/Networking_Guide/index.html, contains information about configuration and administration of networking for Red Hat Enterprise Linux 7.
- The Red Hat Enterprise Linux 7 Virtualization Deployment and Administration Guide, available from https://access.redhat.com/documentation/en-US/Red_Hat_Enterprise_Linux/7/html/Virtualization_Deployment_and_Administration_Guide/, contains information about installing, configuring, and managing Red Hat Enterprise Linux virtualization.
B.2. Red Hat Access GUI
Appendix C. Acknowledgements
Appendix D. Revision History
| Revision History | |||
|---|---|---|---|
| Revision 0.1-95 | Mon Aug 05 2018 | ||
| |||
| Revision 0.1-87 | Wed Jul 26 2017 | ||
| |||
| Revision 0.1-86 | Mon Oct 17 2016 | ||
| |||
| Revision 0.1-85 | Mon Oct 17 2016 | ||
| |||
| Revision 0.1-84 | Wed 17 Aug 2016 | ||
| |||
| Revision 0.1-83 | Fri 01 Apr 2016 | ||
| |||
| Revision 0.1-82 | Wed 11 Nov 2015 | ||
| |||
| Revision 0.1-80 | Wed 24 Jun 2015 | ||
| |||
| Revision 0.1-78 | Tue 07 Apr 2015 | ||
| |||
| Revision 0.1-76 | Tue 17 Feb 2015 | ||
| |||
| Revision 0.1-74 | Thu 04 Dec 2014 | ||
| |||
| Revision 0.1-69 | Mon 02 Jun 2014 | ||
| |||
| Revision 0.1-35 | Wed 11 Dec 2013 | ||
| |||