Dieser Inhalt ist in der von Ihnen ausgewählten Sprache nicht verfügbar.
Configuring SAP HANA Scale-Up Multitarget System Replication for disaster recovery
Abstract
Providing feedback on Red Hat documentation
We appreciate your feedback on our documentation. Let us know how we can improve it.
Submitting feedback through Jira (account required)
- Make sure you are logged in to the Jira website.
- Click on this link to provide feedback.
- Enter a descriptive title in the Summary field.
- Enter your suggestion for improvement in the Description field. Include links to the relevant parts of the documentation.
- Click Create at the bottom of the dialogue.
Chapter 1. Overview
Due to the growing demands on availability, one copy of data is not enough.
To ensure business continuity, a reliable and highly available architecture must replicate data across more than just one system. Using multitarget system replication, the primary system can replicate data changes to more than one secondary system. For more information, see SAP HANA Multitarget System Replication.
This document describes how to configure a replication site for disaster recovery using SAP HANA Multitarget System Replication on a 2-node cluster, installed as described in Automating SAP HANA Scale-Up System Replication using the RHEL HA Add-On.
A sample configuration looks like this:
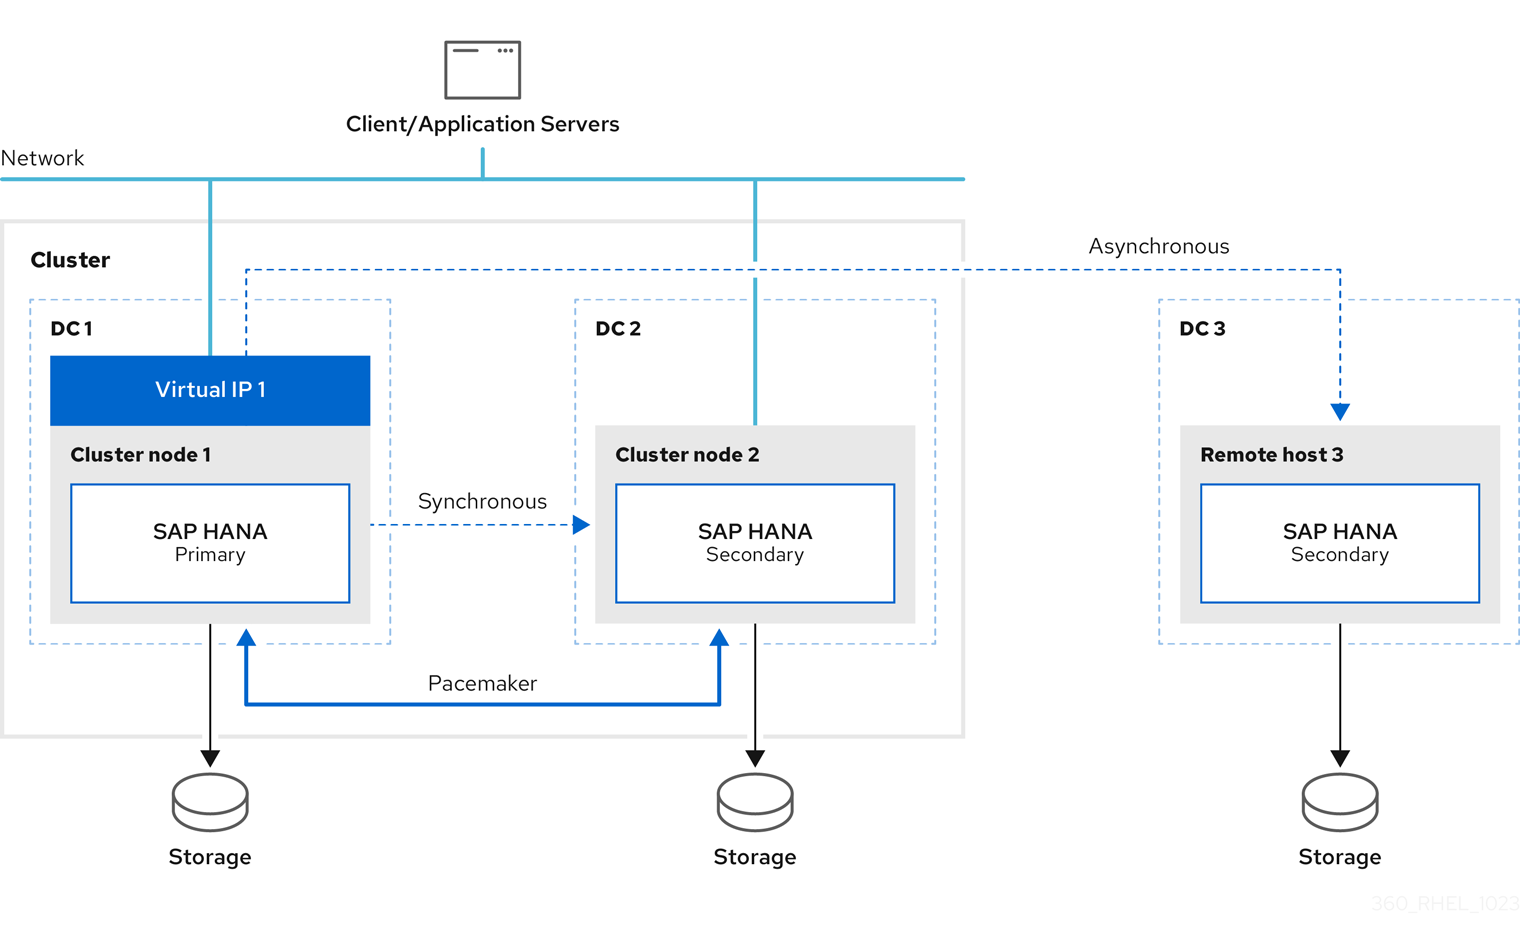
The initial setup is as follows:
- Replicate Primary site 1 (DC1) to Secondary site 2 (DC2)
- Replicate Primary site 1 (DC1) to Secondary site 3 (DC3)
If the primary fails, the primary switches to secondary site 2 (DC2) and the former primary site 1 (DC1) will become the secondary site.
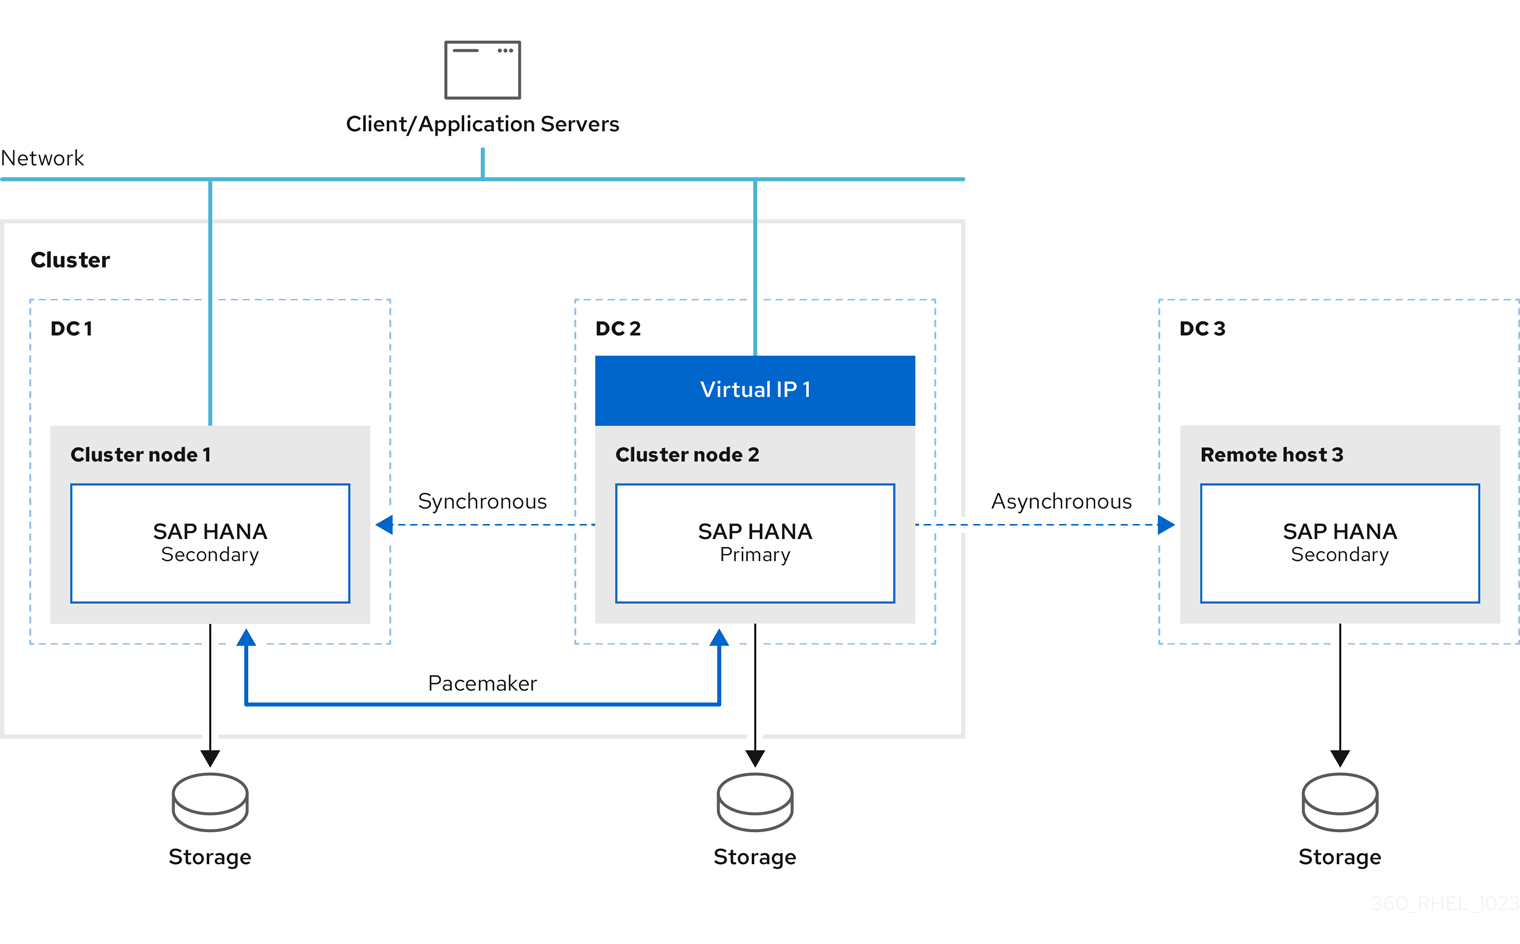
When failover occurs, this solution ensures that the configured primary site is switched at the third DR site as well. The configuration after failover is as follows:
- Primary running on DC2
- Secondary running on DC1 (synced from DC2)
- Secondary running on DC3 (synced from DC2)
The SAP HANA instance on remotehost3 will be automatically re-registered to the new primary as long as this instance is up and running during the failover.
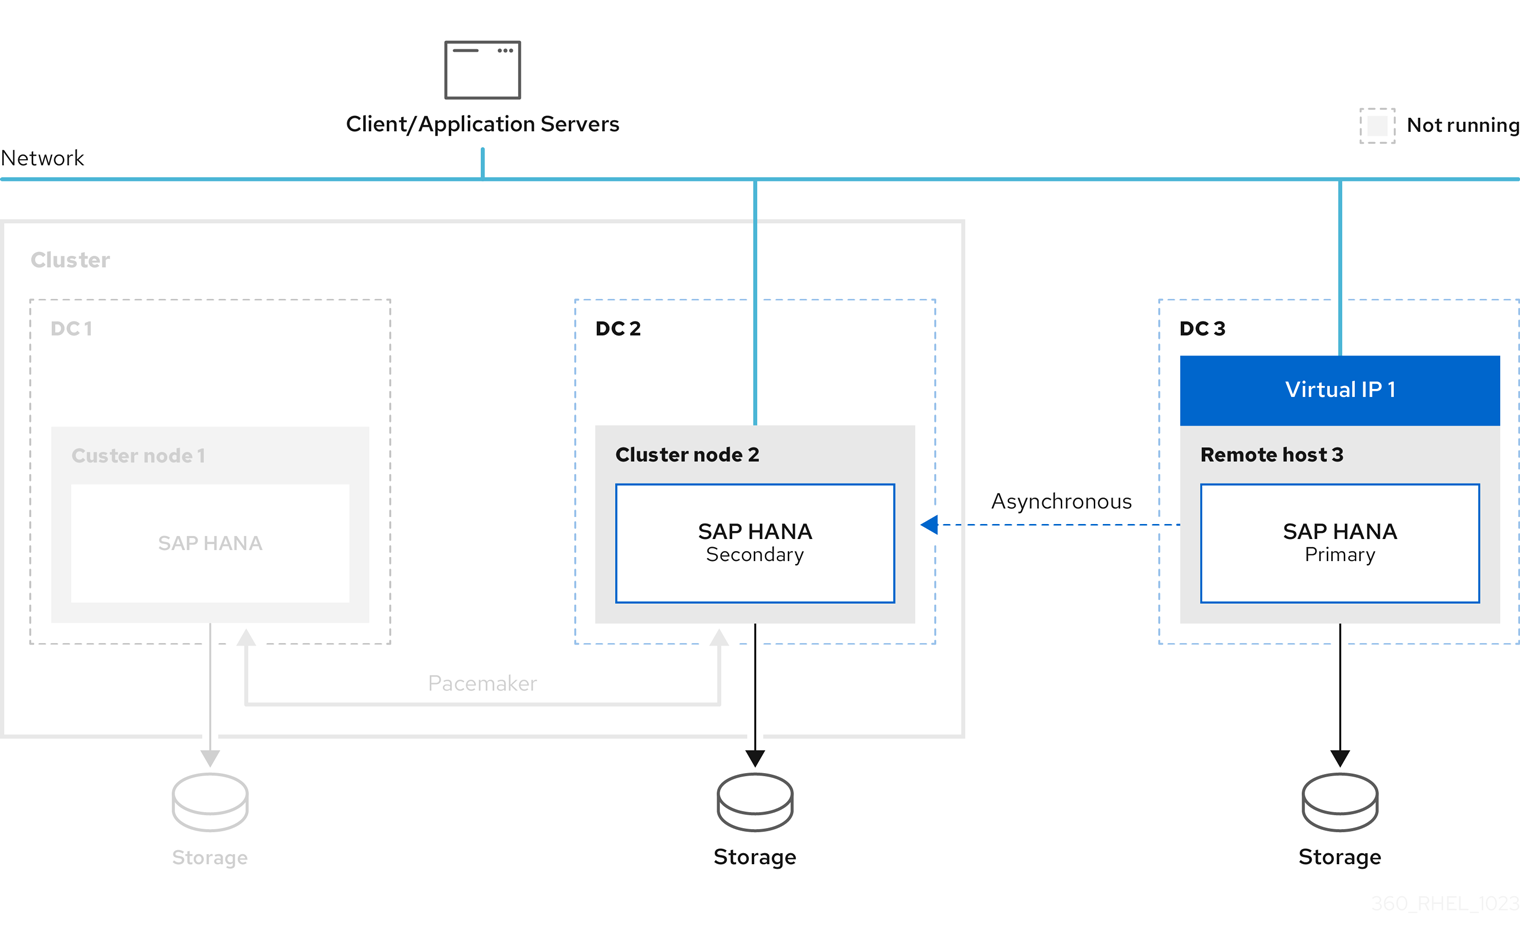
This document also describes the example of switching the primary database to the third site.
Please note that further network configuration is required for the connection of the clients to the database. This is not within the scope of this document.
For further information, please check the following:
Chapter 2. Parameters
These parameters of an existing two-node cluster are used to setup the third site:
| Parameter | Example | Description |
|---|---|---|
| SID | RH2 | System ID of the HANA Database |
| First SITE | DC1 | Name of the first datacenter /site |
| Second SITE | DC2 | Name of the second datacenter / site |
| Third SITE | DC3 | Name of the third datacenter / site |
| InstanceNr | 02 | HANA Instance Number |
| <sid>adm uid | 1000 | User-ID of sidadm user |
| sapsys gid | 980 | Group ID of sapsys |
It is required that all three HANA instances use the same values for the following:
- SID
- InstanceNr
- <sid>adm uid
- sapsys gid
Chapter 3. Prerequisite
For the solution to work, the following requirements must be met.
All nodes must have the same:
- number of CPUs and RAM
- software configuration
- RHEL release
- firewall settings
- SAP HANA release (SAP HANA 2.0 SPS04 or later)
The pacemaker packages are only installed on the cluster nodes and must use the same version of resource-agents-sap-hana (0.162.1 or later).
To be able to support SAP HANA Multitarget System Replication, refer to Add SAP HANA Multitarget System Replication autoregister support. Also, set the following:
-
use
register_secondaries_on_takeover=true -
use
log_mode=normal
The initial setup is based on the installation guide, Automating SAP HANA Scale-Up System Replication using the RHEL HA Add-On.
The system replication configuration of all SAP HANA instances is based on SAP requirements. For more information, refer to the guidelines from SAP based on the SAP HANA Administration Guide .
Chapter 4. Installation
This chapter describes the installation of the additional SAP HANA instance.
4.1. Check the 2-node Base Installation with a failover test
Verify that the installation is done based on Automating SAP HANA Scale-Up System Replication using the RHEL HA Add-On.
To be able to use SAP HANA Multitarget System Replication, the version of resource-agents-sap-hana must be 0.162.1 or later. This can be checked, as shown below:
# rpm -q resource-agents-sap-hana
resource-agents-sap-hana-0.162.1-0.el8_6.1.noarch
You can run a failover test to ensure that the environment is working. You can move the SAPHana resource, which is also described in Failover the SAPHana Resource using Move.
4.2. Install SAP HANA on third site
On the third site, you also need to install SAP HANA using the same version and parameters as for the SAP HANA instances on the two-node Pacemaker cluster, as shown below:
| Parameter | Value |
|---|---|
| SID | RH2 |
| InstanceNumber | 02 |
| <sid>adm user ID | rh2adm 999 |
| sapsys group ID | sapsys 999 |
The SAP HANA installation is done using hdblcm. For more details, see SAP HANA Installation using hdbclm. Optionally, the installation can also be done using Ansible.
In the examples in this chapter, we are using:
- hosts: clusternode1 on site DC1, clusternode2 on site DC2, and remotehost3 on site DC3
- SID RH2
- adminuser rh2adm
4.3. Setup SAP HANA System Replication on the third node
In the existing installation, there is already SAP HANA system replication configured between the primary and secondary SAP HANA instances in a two-node cluster. SAP HANA System Replication is enabled on the up-and-running primary SAP HANA database instance.
This chapter describes how to register the third SAP HANA instance as an additional secondary HANA System Replication site on node remotehost3 at site DC3. This step is similar to the registration of the original secondary HANA instance (DC2) on node clusternode2. More details are described in the following chapters. If you need further information, you can also check General Prerequisites for Configuring SAP HANA System Replication.
4.3.1. Check the primary database
You must check that the other databases are running and the system replication is working properly. Please refer to:
You can discover the primary HANA instance with:
clusternode1:rh2adm> hdbnsutil -sr_state | egrep -e "primary masters|^mode"
mode: primary
4.3.2. Copy database keys
Before you are able to register a new secondary HANA instance, the database keys of the primary HANA instance need to be copied to the new additional HANA replication site. In our example, the hostname of the third site is remotehost3.
For example, on the primary node clusternode1, run:
clusternode1:rh2adm> scp -rp
/usr/sap/${SAPSYSTEMNAME}/SYS/global/security/rsecssfs/data/SSFS_${SAPSYSTEMNAME}.DAT  remotehost3:/usr/sap/${SAPSYSTEMNAME}/SYS/global/security/rsecssfs/data/SSFS_${SAPSYSTEMNAME}.DAT
clusternode1:rh2adm> scp -rp
/usr/sap/${SAPSYSTEMNAME}/SYS/global/security/rsecssfs/key/SSFS_${SAPSYSTEMNAME}.KEY remotehost3:/usr/sap/${SAPSYSTEMNAME}/SYS/global/security/rsecssfs/key/SSFS_${SAPSYSTEMNAME}.KEY
4.3.3. Register the third site as secondary
You need to know the name of the node that is running the primary database.
To monitor the registration, you can run the following command in a separate terminal on the primary node:
clusternode1:rh2adm> watch python
/usr/sap/${SAPSYSTEMNAME}/HDB${TINSTANCE}/python_support/systemReplicationStatus.py
This will show you the progress and any errors if they occur.
To register the HANA instance on the third site (DC3) as an additional secondary SAP HANA instance, run the following command on the third site host remotehost3:
remotehost3:rh2adm> hdbnsutil -sr_register --name=DC3
--remoteHost=clusternode1 --remoteInstance=${TINSTANCE}
--replicationMode=async --operationMode=logreplay --online
In this example, DC3 is the name of the third site, clusternode1 is the name of the primary node.
If the database instance is already running, you don’t have to stop it, you can use the option --online, which will register the instance while it is online. The necessary restart (stop and start) of the instance will then be initiated by hdbnsutil itself.
The option --online works in any case, both when the HANA instance is online and offline (this option is available with SAP HANA 2.0 SPS04 and later).
If the HANA instance is offline, you have to start it after the third node is registered. You can find additional information in SAP HANA System Replication.
4.3.4. Add SAP HANA Multitarget System Replication autoregister support
We are using a SAP HANA System Replication option called register_secondaries_on_takeover = true. This will automatically re-register with the new primary site in case of a failover between the previous primary site and the other secondary site. This option must be added to the global.ini file on all potential primary sites.
All HANA instances should have this entry in their global.ini:
[system_replication]
register_secondaries_on_takeover = true
The following two chapters describe the global.ini configuration in detail.
Despite the parameter, if the third database is down when the failover is initiated, the third instance needs to be re-registered manually.
4.3.5. Configure global.ini on the pacemaker nodes
The option register_secondaries_on_takeover = true needs to be added to the [system_replication] section in global.ini of the SAP HANA nodes of site 1 and site 2, which are managed by the pacemaker cluster. Please edit the file global.ini always on the respective node, and do not copy the file from another node.
The global.ini file should only be edited if the HANA instance of a site has stopped processing.
Edit the global.ini as the rh2adm user:
clusternode1:rh2adm> vim
/usr/sap/${SAPSYSTEMNAME}/SYS/global/hdb/custom/config/global.ini
Example:
# global.ini last modified 2023-07-14 16:31:14.120444 by hdbnsutil -sr_register --remoteHost=hana07 --remoteInstance=02 --replicationMode=syncmem --operationMode=logreplay --name=DC2
[multidb]
mode = multidb
database_isolation = low
singletenant = yes

[ha_dr_provider_SAPHanaSR]
provider = SAPHanaSR
path = /hana/shared/myHooks
execution_order = 1

[persistence]
basepath_datavolumes = /hana/data/RH2
basepath_logvolumes = /hana/log/RH2
log_mode = normal
enable_auto_log_backup = true

[system_replication]
register_secondaries_on_takeover = true
timetravel_logreplay_mode = auto
operation_mode = logreplay
mode = primary
actual_mode = syncmem
site_id = 1
site_name = DC2

[system_replication_site_masters]
2 = clusternode1:30201

[trace]
ha_dr_saphanasr = info
This option is active as soon as the SAP HANA database instance is started.
4.3.6. Configure global.ini on remotehost3
Edit the global.ini as a <sid>adm user:
% vim /usr/sap/${SAPSYSTEMNAME}/SYS/global/hdb/custom/config/global.ini
On remotehost3, the ha_dr_provider_SAPHanaSR section is not used.
Example of global.ini on remotehost3:
# global.ini last modified 2023-06-22 17:22:54.154508 by hdbnameserver
[multidb]
mode = multidb
database_isolation = low
singletenant = yes

[persistence]
basepath_datavolumes = /hana/data/RH2
basepath_logvolumes = /hana/log/RH2
log_mode = normal
enable_auto_log_backup = true

[system_replication]
operation_mode = logreplay
register_secondaries_on_takeover = true
reconnect_time_interval = 5
timetravel_logreplay_mode = auto
site_id = 3
mode = syncmem
actual_mode = syncmem
site_name = DC3

[system_replication_site_masters]
2 = clusternode1:30201
4.3.7. Verify installation
After the installation, you have to check if all HANA instances are up and running and that HANA System Replication is working between them. The easiest way is to check the systemReplicationStatus, as described in more detail in Check the System Replication status. Please also refer to the Check Database for further information.
For HANA System Replication to work correctly, please ensure that the “log_mode” parameter is set to “normal”. Please refer to Checking the log_mode of the SAP HANA database for more information.
To verify that the setup is working as expected, please run the Test cases as described in the following chapter.
Chapter 5. Test cases
After finishing the installation, it is recommended to run some basic tests to check the installation and verify how SAP HANA Multitarget System Replication is working and how it recovers from a failure. It is always a good practice to run these test cases before starting production. If possible, you can also prepare a test environment to verify the changes before applying them in production.
All cases will describe:
- Subject of the test
- Test preconditions
- Test steps
- Monitoring the test
- Starting the test
- Expected result(s)
- Ways to return to an initial state
To automatically register a former primary HANA replication site as a new secondary HANA replication site on the HANA instances that are managed by the cluster, you can use the option AUTOMATED_REGISTER=true in the SAPHana resource. For more details, refer to AUTOMATED_REGISTER.
The names of the HA cluster nodes and the HANA replication sites (in brackets) used in the examples are:
- clusternode1 (DC1)
- clusternode2 (DC2)
- remotehost3 (DC3)
The following parameters are used for configuring the HANA instances and the cluster:
- SID=RH2
- INSTANCENUMBER=02
- CLUSTERNAME=cluster1
You can use clusternode1-2, remotehost3 also as alias in the /etc/hosts in your test environment.
The tests are described in more detail, including examples and additional checks of preconditions. At the end, there are examples of how to clean up the environment to be prepared for further testing.
In some cases, if the distance between clusternode1-2 and remotehost3 is too long, you should use –replcationMode=async instead of –replicationMode=syncmem. Please also ask your SAP HANA administrator before choosing the right option.
5.1. Prepare the tests
Before we run a test, the complete environment needs to be in a correct and healthy state. We have to check the cluster and the database via:
-
pcs status --full -
python systemReplicationStatus.py -
df -h
An example for pcs status --full can be found in Check cluster status with pcs status. If there are warnings or previous failures in the "Migration Summary", you should clean up the cluster before you start your test.
[root@clusternode1]# pcs resource clear SAPHana_RH2_02-cloneCluster Cleanup describes some more ways to do it. It is important that the cluster and all the resources be started.
Besides the cluster, the database should also be up and running and in sync. The easiest way to verify the proper status of the database is to check the system replication status. See also Replication Status. This should be checked on the primary database.
To discover the primary node, you can check Discover Primary Database or use:
-
pcs status | grep -E "Promoted|Master" -
hdbnsutil -sr_stateConfiguration
Check if there is enough space on the file systems by running:
# df -hPlease also follow the guidelines for a system check before you continue. If the environment is clean, it is ready to run the tests. During the test, monitoring is helpful to observe progress.
5.2. Monitor the environment
In this section, we are focusing on monitoring the environment during the tests. This section will only cover the necessary monitors to see the changes. It is recommended to run the monitors from a dedicated terminal. To be able to detect changes during the test, it is recommended to start monitoring before starting the test.
In the Useful Commands section, more examples are shown.
5.2.1. Discover the primary node
You need to discover the primary node to monitor a failover or run certain commands that only provide information about the replication status when executed on the primary node.
To discover the primary node, you can run the following commands as the <sid>adm user:
clusternode1:rh2adm> watch -n 5 'hdbnsutil -sr_stateConfiguration | egrep -e "primary masters|^mode"'Output example, when clusternode2 is the primary database:
mode: syncmem
primary masters: clusternode2
A second way to identify the primary node is to run the following command as root on a cluster node:
# watch -n 5 'pcs status --full'Output on the node that runs the primary database is:
mode: primary5.2.2. Check the Replication status
The replication status shows the relationship between primary and secondary database nodes and the current status of the replication.
To discover the replication status, you can run as the <sid>adm user:
clusternode1:rh2adm> hdbnsutil -sr_stateConfigurationIf you want to permanently monitor changes in the system replication status, please run the following command:
clusternode1:rh2adm> watch -n 5 'python
/usr/sap/${SAPSYSTEMNAME}/HDB${TINSTANCE}/exe/python_support/systemReplicationStatus.py ; echo Status $?'
This example repeatedly captures the replication status and also determines the current return code.
As long as the return code (status) is 15, the replication status is fine. The other return codes are:
- 10: NoHSR
- 11: Error
- 12: Unknown
- 13: Initializing
- 14: Syncing
- 15: Active
If you register a new secondary, you can run it in a separate window on the primary node, and you will see the progress of the replication. If you want to monitor a failover, you can run it in parallel on the old primary as well as on the new primary database server. For more information, please read Check SAP HANA System Replication Status.
5.2.3. Check /var/log/messages entries
Pacemaker is writing a lot of information into the /var/log/messages file. During a failover, a huge number of messages are written into this message file. To be able to follow only the important messages depending on the SAP HANA resource agent, it is useful to filter the detailed activities of the pacemaker SAP resources. It is enough to check the message file on a single cluster node.
For example, you can use this alias:
# alias tmsl='tail -1000f /var/log/messages | egrep -s "Setting master-rsc_SAPHana_${SAPSYSTEMNAME}_HDB${TINSTANCE}|sr_register|WAITING4LPA|PROMOTED|DEMOTED|UNDEFINED|master_walk|SWAIT|WaitforStopped|FAILED|LPT"'Run this alias in a separate window to monitor the progress of the test. Please also check the example Monitor failover and sync state.
5.2.4. Cluster status
There are several ways to check the cluster status.
Check if the cluster is running:
-
pcs cluster status
-
Check the cluster and all resources:
-
pcs status
-
Check the cluster, all resources and all node attributes:
-
pcs status --full
-
Check the resources only:
-
pcs resource
-
The pcs status --full command will give you all the necessary information. To monitor changes, you can run this command together with watch.
# pcs status --full
If you want to see changes, you can run, in a separate window, the command watch:
# watch pcs status --fullAn output example and further options can be found in Check cluster status.
5.2.5. Discover leftovers
To ensure that your environment is ready to run the next test, leftovers from previous tests need to be fixed or removed.
stonithis used to fence a node in the cluster:-
Detect:
[root@clusternode1]# pcs stonith history -
Fix:
[root@clusternode1]# pcs stonith cleanup
-
Detect:
Multiple primary databases:
Detect:
clusternode1:rh2adm> hdbnsutil -sr_stateConfiguration | grep -i primaryAll nodes with the same primary need to be identified.
-
Fix: clusternode1:rh2adm> re-register the wrong primary with option
--force_full_replica
Location Constraints caused by move:
Detect:
[root@clusternode1]# pcs constraint locationCheck the warning section.
-
Fix:
[root@clusternode1]# pcs resource clear <clone-resource-which was moved>
Secondary replication relationship:
-
Detect: on the primary database run
clusternode1:rh2adm> python ${DIR_EXECUTABLES}/python_support/systemReplicationStatus.py - Fix: unregister and re-register the secondary databases.
-
Detect: on the primary database run
Check siteReplicationMode (same output on all SAP HANA nodes
-
clusternode1:rh2adm> hdbnsutil -sr_state --sapcontrol=1 |grep site.*Mode
-
Pcs property:
-
Detect:
[root@clusternode1]# pcs property config -
Fix:
[root@clusternode1]# pcs property set <key=value> -
Clear
maintenance_mode -
[root@clusternode1]# pcs property set maintenance-mode=false
-
Detect:
log_mode:Detect:
clusternode1:rh2adm> python systemReplicationStatus.pyWill respond in the replication status that
log_modenormally is required.log_modecan be detected as described in Usinghdbsqlto checkInifilecontents.-
Fix: change the
log_modeto normal and restart the primary database.
CIB entries:
Detect: SFAIL entries in the cluster information base.
Please refer to Check cluster consistency, to find and remove CIB entries.
Cleanup/clear:
Detect:
[root@clusternode1]# pcs status --fullSometimes it shows errors or warnings. You can cleanup/clear resources and if everything is fine, nothing happens. Before running the next test, you can cleanup your environment.
Examples to fix:
[root@clusternode1]# pcs resource clear <name-of-the-clone-resource>[root@clusternode1]# pcs resource cleanup <name-of-the-clone-resource>
This is also useful if you want to check if there is an issue in an existing environment. For more information, please refer to Useful commands.
5.3. Test 1:Failover of the primary node with an active third site
| Subject of the test | Automatic re-registration of the third site. Sync state changes to SOK after clearing. |
| Test preconditions |
|
| Test steps |
Move the SAPHana resource using the |
| Monitoring the test |
On the third site run as
On the secondary node run as root: |
| Starting the test | Execute the cluster command:
|
| Expected result | In the monitor command on site 3 the primary master changes from clusternode1 to clusternode2.
After clearing the resource the sync state will change from |
| Ways to return to an initial state | Run the test twice. |
(*)
remotehost3:rh2adm>
watch hdbnsutil -sr_state
[root@clusternode1]# tail -1000f /var/log/messages |egrep -e ‘SOK|SWAIT|SFAIL’
Detailed description
Check the initial state of your cluster as root on clusternode1 or clusternode2:
[root@clusternode1]# pcs status --full
Cluster name: cluster1
Cluster Summary:
  * Stack: corosync
  * Current DC: clusternode1 (1) (version 2.1.2-4.el8_6.6-ada5c3b36e2) - partition with quorum
  * Last updated: Mon Sep  4 06:34:46 2023
  * Last change:  Mon Sep  4 06:33:04 2023 by root via crm_attribute on clusternode1
  * 2 nodes configured
  * 6 resource instances configured

Node List:
  * Online: [ clusternode1 (1) clusternode2 (2) ]

Full List of Resources:
  * auto_rhevm_fence1	(stonith:fence_rhevm):	 Started clusternode1
  * Clone Set: SAPHanaTopology_RH2_02-clone [SAPHanaTopology_RH2_02]:
    * SAPHanaTopology_RH2_02	(ocf::heartbeat:SAPHanaTopology):	 Started clusternode2
    * SAPHanaTopology_RH2_02	(ocf::heartbeat:SAPHanaTopology):	 Started clusternode1
  * Clone Set: SAPHana_RH2_02-clone [SAPHana_RH2_02] (promotable):
    * SAPHana_RH2_02	(ocf::heartbeat:SAPHana):	 Slave clusternode2
    * SAPHana_RH2_02	(ocf::heartbeat:SAPHana):	 Master clusternode1
  * vip_RH2_02_MASTER	(ocf::heartbeat:IPaddr2):	 Started clusternode1

Node Attributes:
  * Node: clusternode1 (1):
    * hana_rh2_clone_state            	: PROMOTED
    * hana_rh2_op_mode                	: logreplay
    * hana_rh2_remoteHost             	: clusternode2
    * hana_rh2_roles                  	: 4:P:master1:master:worker:master
    * hana_rh2_site                   	: DC1
    * hana_rh2_sra                    	: -
    * hana_rh2_srah                   	: -
    * hana_rh2_srmode                 	: syncmem
    * hana_rh2_sync_state             	: PRIM
    * hana_rh2_version                	: 2.00.062.00
    * hana_rh2_vhost                  	: clusternode1
    * lpa_rh2_lpt                     	: 1693809184
    * master-SAPHana_RH2_02           	: 150
  * Node: clusternode2 (2):
    * hana_rh2_clone_state            	: DEMOTED
    * hana_rh2_op_mode                	: logreplay
    * hana_rh2_remoteHost             	: clusternode1
    * hana_rh2_roles                  	: 4:S:master1:master:worker:master
    * hana_rh2_site                   	: DC2
    * hana_rh2_sra                    	: -
    * hana_rh2_srah                   	: -
    * hana_rh2_srmode                 	: syncmem
    * hana_rh2_sync_state             	: SOK
    * hana_rh2_version                	: 2.00.062.00
    * hana_rh2_vhost                  	: clusternode2
    * lpa_rh2_lpt                     	: 30
    * master-SAPHana_RH2_02           	: 100

Migration Summary:

Tickets:

PCSD Status:
  clusternode1: Online
  clusternode2: Online

Daemon Status:
  corosync: active/disabled
  pacemaker: active/disabled
  pcsd: active/enabled
This output shows you that HANA is promoted on clusternode1 which is the primary SAP HANA server, and that the name of the clone resource is SAPHana_RH2_02-clone, which is promotable.
You can run this in a separate window during the test to see the changes.
[root@clusternode1]# watch pcs status --fullAnother way to identify the name of the SAP HANA clone resource is:
[root@clusternode2]# pcs resource
  * Clone Set: SAPHanaTopology_RH2_02-clone [SAPHanaTopology_RH2_02]:
    * Started: [ clusternode1 clusternode2 ]
  * Clone Set: SAPHana_RH2_02-clone [SAPHana_RH2_02] (promotable):
    * Promoted: [ clusternode2 ]
    * Unpromoted: [ clusternode1 ]
To see the change of the primary server start monitoring on remotehost3 on a separate terminal window before you start the test.
remotehost3:rh2adm> watch 'hdbnsutil -sr_state | grep "primary masters"The output will look like:
Every 2.0s: hdbnsutil -sr_state | grep "primary masters"                                                                                 remotehost3: Mon Sep  4 08:47:21 2023

primary masters: clusternode1
During the test the expected output will change to clusternode2.
Start the test by moving the clone resource discovered above to clusternode2:
[root@clusternode1]# pcs resource move SAPhana_RH2_02-clone clusternode2The output of the monitor on remotehost3 will change to:
Every 2.0s: hdbnsutil -sr_state | grep "primary masters"                                                                                 remotehost3: Mon Sep  4 08:50:31 2023

primary masters: clusternode2
Pacemaker creates a location constraint for moving the clone resource. This needs to be manually removed. You can see the constraint using:
[root@clusternode1]# pcs constraint locationThis constraint needs to be removed by executing the following steps.
Clear the clone resource to remove the location constraint:
[root@clusternode1]# pcs resource clear SAPhana_RH2_02-clone
Removing constraint: cli-prefer-SAPHana_RH2_02-clone
Cleanup the resource:
[root@clusternode1]# pcs resource cleanup SAPHana_RH2_02-clone
Cleaned up SAPHana_RH2_02:0 on clusternode2
Cleaned up SAPHana_RH2_02:1 on clusternode1
Waiting for 1 reply from the controller
... got reply (done)
Result of the test
- The “primary masters” monitor on remotehost3 should show an immediate switch to the new primary node.
-
If you check the cluster status, the former secondary will be promoted, the former primary gets re-registered, and the
Clone_Statechanges fromPromotedtoUndefinedtoWAITINGFORLPAtoDEMOTED. -
The secondary will change the
sync_statetoSFAILwhen theSAPHanamonitor is started for the first time after the failover. Because of existing location constraints, the resource needs to be cleared, and after a short time, thesync_stateof the secondary will change toSOKagain. - Secondary gets promoted.
To restore the initial state you can simply run the next test. After finishing the tests please run a Cluster Cleanup.
5.4. Test 2:Failover of the primary node with passive third site
| Subject of the test | No registration of the third site. Failover works even if the third site is down. |
| Test preconditions |
|
| Test steps |
Move the SAPHana resource using the |
| Starting the test | Execute the cluster command:
|
| Monitoring the test |
On the third site run as
On the cluster nodes run as root: |
| Expected result | No change on DC3. Replication stays on old relationship. |
| Ways to return to an initial state | Re-register DC3 on new primary and start SAP HANA. |
Detailed description
Check the initial state of your cluster as root on clusternode1 or clusternode2:
[root@clusternode1]# pcs status --full
Cluster name: cluster1
Cluster Summary:
  * Stack: corosync
  * Current DC: clusternode1 (1) (version 2.1.2-4.el8_6.6-ada5c3b36e2) - partition with quorum
  * Last updated: Mon Sep  4 06:34:46 2023
  * Last change:  Mon Sep  4 06:33:04 2023 by root via crm_attribute on clusternode1
  * 2 nodes configured
  * 6 resource instances configured

Node List:
  * Online: [ clusternode1 (1) clusternode2 (2) ]

Full List of Resources:
  * auto_rhevm_fence1	(stonith:fence_rhevm):	 Started clusternode1
  * Clone Set: SAPHanaTopology_RH2_02-clone [SAPHanaTopology_RH2_02]:
    * SAPHanaTopology_RH2_02	(ocf::heartbeat:SAPHanaTopology):	 Started clusternode2
    * SAPHanaTopology_RH2_02	(ocf::heartbeat:SAPHanaTopology):	 Started clusternode1
  * Clone Set: SAPHana_RH2_02-clone [SAPHana_RH2_02] (promotable):
    * SAPHana_RH2_02	(ocf::heartbeat:SAPHana):	 Slave clusternode2
    * SAPHana_RH2_02	(ocf::heartbeat:SAPHana):	 Master clusternode1
  * vip_RH2_02_MASTER	(ocf::heartbeat:IPaddr2):	 Started clusternode1

Node Attributes:
  * Node: clusternode1 (1):
    * hana_rh2_clone_state            	: PROMOTED
    * hana_rh2_op_mode                	: logreplay
    * hana_rh2_remoteHost             	: clusternode2
    * hana_rh2_roles                  	: 4:P:master1:master:worker:master
    * hana_rh2_site                   	: DC1
    * hana_rh2_sra                    	: -
    * hana_rh2_srah                   	: -
    * hana_rh2_srmode                 	: syncmem
    * hana_rh2_sync_state             	: PRIM
    * hana_rh2_version                	: 2.00.062.00
    * hana_rh2_vhost                  	: clusternode1
    * lpa_rh2_lpt                     	: 1693809184
    * master-SAPHana_RH2_02           	: 150
  * Node: clusternode2 (2):
    * hana_rh2_clone_state            	: DEMOTED
    * hana_rh2_op_mode                	: logreplay
    * hana_rh2_remoteHost             	: clusternode1
    * hana_rh2_roles                  	: 4:S:master1:master:worker:master
    * hana_rh2_site                   	: DC2
    * hana_rh2_sra                    	: -
    * hana_rh2_srah                   	: -
    * hana_rh2_srmode                 	: syncmem
    * hana_rh2_sync_state             	: SOK
    * hana_rh2_version                	: 2.00.062.00
    * hana_rh2_vhost                  	: clusternode2
    * lpa_rh2_lpt                     	: 30
    * master-SAPHana_RH2_02           	: 100

Migration Summary:

Tickets:

PCSD Status:
  clusternode1: Online
  clusternode2: Online

Daemon Status:
  corosync: active/disabled
  pacemaker: active/disabled
  pcsd: active/enabled
This output of this example shows you that HANA is promoted on clusternode1, which is the primary SAP HANA server, and that the name of the clone resource is
SAPHana_RH2_02-clone, which is promotable. If you run test 3 before HANA, it might be promoted on clusternode2.Stop the database on remotehost3:
remotehost3:rh2adm> HDB stop
hdbdaemon will wait maximal 300 seconds for NewDB services finishing.
Stopping instance using: /usr/sap/RH2/SYS/exe/hdb/sapcontrol -prot NI_HTTP -nr 02 -function Stop 400

12.07.2023 11:33:14
Stop
OK
Waiting for stopped instance using: /usr/sap/RH2/SYS/exe/hdb/sapcontrol -prot NI_HTTP -nr 02 -function WaitforStopped 600 2


12.07.2023 11:33:30
WaitforStopped
OK
hdbdaemon is stopped.
Check the primary database on remotehost3:
remotehost3:rh2adm> hdbnsutil -sr_stateConfiguration| grep -i "primary masters"

primary masters: clusternode2
Check the current primary in the cluster on a cluster node:
[root@clusternode1]# pcs resource | grep Masters
    * Masters: [ clusternode2 ]
Check the
sr_stateto see the SAP HANA System Replication relationships:clusternode2remotehost3:rh2adm> hdbnsutil -sr_state System Replication State ~~~~~~~~~~~~~~~~~~~~~~~~ online: true mode: primary operation mode: primary site id: 2 site name: DC1 is source system: true is secondary/consumer system: false has secondaries/consumers attached: true is a takeover active: false is primary suspended: false Host Mappings: ~~~~~~~~~~~~~~ clusternode1 -> [DC3] remotehost3 clusternode1 -> [DC1] clusternode1 clusternode1 -> [DC2] clusternode2 Site Mappings: ~~~~~~~~~~~~~~ DC1 (primary/primary) |---DC3 (syncmem/logreplay) |---DC2 (syncmem/logreplay) Tier of DC1: 1 Tier of DC3: 2 Tier of DC2: 2 Replication mode of DC1: primary Replication mode of DC3: syncmem Replication mode of DC2: syncmem Operation mode of DC1: primary Operation mode of DC3: logreplay Operation mode of DC2: logreplay Mapping: DC1 -> DC3 Mapping: DC1 -> DC2 done.The SAP HANA System Replication relations still have one primary (DC1), which is replicated to DC2 and DC3.
The replication relationship on remotehost3, which is down, can be displayed using:
remothost3:rh2adm> hdbnsutil -sr_stateConfiguration

System Replication State
~~~~~~~~~~~~~~~~~~~~~~~~

mode: syncmem
site id: 3
site name: DC3
active primary site: 1

primary masters: clusternode1
done.
The database on remotehost3 which is offline checks the entries in the
global.inifile.Starting the test: Initiate a failover in the cluster, moving the
SAPHana-clone-resourceexample:[root@clusternode1]# pcs resource move SAPHana_RH2_02-clone clusternode2NoteIf SAPHana is promoted on clusternode2, you have to move the clone resource to clusternode1. The example expects that SAPHana is promoted on clusternode1.
There will be no output. Similar to the former test, a location constraint will be created, which can be displayed with:
[root@clusternode1]# pcs constraint location
Location Constraints:
  Resource: SAPHana_RH2_02-clone
    Enabled on:
      Node: clusternode1 (score:INFINITY) (role:Started)
Even if the cluster looks fine again, this constraint avoids another failover unless the constraint is removed. One way is to clear the resource.
Clear the resource:
[root@clusternode1]# pcs constraint location
Location Constraints:
  Resource: SAPHana_RH2_02-clone
    Enabled on:
      Node: clusternode1 (score:INFINITY) (role:Started)
[root@clusternode1]# pcs resource clear SAPHana_RH2_02-clone
Removing constraint: cli-prefer-SAPHana_RH2_02-clone
Cleanup the resource:
[root@clusternode1]# pcs resource cleanup SAPHana_RH2_02-clone
Cleaned up SAPHana_RH2_02:0 on clusternode2
Cleaned up SAPHana_RH2_02:1 on clusternode1
Waiting for 1 reply from the controller
... got reply (done)
Check the current status.
There are three ways to display the replication status, which needs to be in sync. Starting with the primary on remotehost3:
remotehost3clusternode2:rh2adm>  hdbnsutil -sr_stateConfiguration| grep -i primary
active primary site: 1
primary masters: clusternode1
The output shows site 1 or clusternode1, which was the primary before starting the test to move the primary to clusternode2.
Next check the system replication status on the new primary.
First detect the new primary:
[root@clusternode1]# pcs resource | grep  Master
    * Masters: [ clusternode2 ]
Here we have an inconsistency, which requires us to re-register remotehost3. You might think that if we run the test again, we might switch the primary back to the original clusternode1. In this case, we have a third way to identify if system replication is working. On the primary node run:
clusternode2:rh2adm> cdpy
clusternode2:rh2adm> python ${DIR_EXECUTABLES}/python_support/systemReplicationStatus.py
|Database |Host   |Port  |Service Name |Volume ID |Site ID |Site Name |Secondary |Secondary |Secondary |Secondary |Secondary     |Replication |Replication |Replication    |Secondary    |
|         |       |      |             |          |        |          |Host      |Port      |Site ID   |Site Name |Active Status |Mode        |Status      |Status Details |Fully Synced |
|-------- |------ |----- |------------ |--------- |------- |--------- |--------- |--------- |--------- |--------- |------------- |----------- |----------- |-------------- |------------ |
|SYSTEMDB |clusternode2 |30201 |nameserver   |        1 |      2 |DC2       |clusternode1    |    30201 |        1 |DC1       |YES           |SYNCMEM     |ACTIVE      |               |        True |
|RH2      |clusternode2 |30207 |xsengine     |        2 |      2 |DC2       |clusternode1    |    30207 |        1 |DC1       |YES           |SYNCMEM     |ACTIVE      |               |        True |
|RH2      |clusternode2 |30203 |indexserver  |        3 |      2 |DC2       |clusternode1    |    30203 |        1 |DC1       |YES           |SYNCMEM     |ACTIVE      |               |        True |

status system replication site "1": ACTIVE
overall system replication status: ACTIVE

Local System Replication State
~~~~~~~~~~~~~~~~~~~~~~~~~~~~~~

mode: PRIMARY
site id: 2
site name: DC2
If you don’t see remotehost3 in this output, you have to re-register remotehost3. Before registering, please run the following on the primary node to watch the progress of the registration:
clusternode2:rh2adm> watch python
${DIR_EXECUTABLES}/python_support/systemReplicationStatus.py
Now you can re-register remotehost3 using this command:
remotehost3:rh2adm> hdbnsutil -sr_register --remoteHost=clusternode2 --remoteInstance=${TINSTANCE} --replicationMode=async --name=DC3 --remoteName=DC2 --operation
Mode=logreplay --online
adding site ...
collecting information ...
updating local ini files ...
done.
Even if the database on remotehost3 is not started yet, you are able to see the third site in the system replication status output. The registration can be finished by starting the database on remotehost3:
remotehost3:rh2adm> HDB start


StartService
Impromptu CCC initialization by 'rscpCInit'.
  See SAP note 1266393.
OK
OK
Starting instance using: /usr/sap/RH2/SYS/exe/hdb/sapcontrol -prot NI_HTTP -nr 02 -function StartWait 2700 2


04.09.2023 11:36:47
Start
OK
The monitor started above will immediately show the synchronization of remotehost3.
-
To switch back, run the test again. One optional test is to switch the primary to the node, which is configured on the
global.inion remotehost3 and then starting the database. The database might come up, but it will never be shown in the output of the system replication status unless it is re-registered. - The missing entry will be immediately created, and the system replication will start as soon as the SAP HANA database is started.
You can check this by executing:
sidadm@clusternode1% hdbnsutil -sr_state sidadm@clusternode1% python systemReplicationStatus.py ; echo $?- You can find more information in Check SAP HANA System Replication status.
5.5. Test 3:Failover of the primary node to the third site
| Subject of the test | Failover the primary to the third site.. Third site becomes primary. Secondary will be re-registered to third site. |
| Test preconditions |
|
| Test steps |
Put the cluster into
Takeover the HANA database form the third node using: |
| Starting the test |
Execute the SAP HANA command on remotehost3:rh2adm>: |
| Monitoring the test |
On the third site run as |
| Expected result |
|
| Ways to return to an initial state |
Detailed description
Check if the databases are running using Check database and check the replication status:
clusternode2:rh2adm> hdbnsutil -sr_state | egrep -e "^mode:|primary masters"The output is, for example:
mode: syncmem
primary masters: clusternode1
In this case, the primary database is clusternode1. If you run this command on clusternode1, you will get:
mode: primaryOn this primary node, you can also display the system replication status. It should look like this:
clusternode1:rh2adm> cdpy
clusternode1:rh2adm> python systemReplicationStatus.py
|Database |Host   |Port  |Service Name |Volume ID |Site ID |Site Name |Secondary |Secondary |Secondary |Secondary |Secondary     |Replication |Replication |Replication    |Secondary    |
|         |       |      |             |          |        |          |Host      |Port      |Site ID   |Site Name |Active Status |Mode        |Status      |Status Details |Fully Synced |
|-------- |------ |----- |------------ |--------- |------- |--------- |--------- |--------- |--------- |--------- |------------- |----------- |----------- |-------------- |------------ |
|SYSTEMDB |clusternode1 |30201 |nameserver   |        1 |      1 |DC1       |remotehost3    |    30201 |        3 |DC3       |YES           |SYNCMEM     |ACTIVE      |               |        True |
|RH2      |clusternode1 |30207 |xsengine     |        2 |      1 |DC1       |remotehost3    |    30207 |        3 |DC3       |YES           |SYNCMEM     |ACTIVE      |               |        True |
|RH2      |clusternode1 |30203 |indexserver  |        3 |      1 |DC1       |remotehost3    |    30203 |        3 |DC3       |YES           |SYNCMEM     |ACTIVE      |               |        True |
|SYSTEMDB |clusternode1 |30201 |nameserver   |        1 |      1 |DC1       |clusternode2    |    30201 |        2 |DC2       |YES           |SYNCMEM     |ACTIVE      |               |        True |
|RH2      |clusternode1 |30207 |xsengine     |        2 |      1 |DC1       |clusternode2    |    30207 |        2 |DC2       |YES           |SYNCMEM     |ACTIVE      |               |        True |
|RH2      |clusternode1 |30203 |indexserver  |        3 |      1 |DC1       |clusternode2    |    30203 |        2 |DC2       |YES           |SYNCMEM     |ACTIVE      |               |        True |

status system replication site "3": ACTIVE
status system replication site "2": ACTIVE
overall system replication status: ACTIVE

Local System Replication State
~~~~~~~~~~~~~~~~~~~~~~~~~~~~~~

mode: PRIMARY
site id: 1
site name: DC1
Now we have a proper environment, and we can start monitoring the system replication status on all 3 nodes in separate windows. The 3 monitors should be started before the test is started. The output will change when the test is executed. So keep them running as long as the test is not completed.
On the old primary node, clusternode1 ran in a separate window during the test:
clusternode1:rh2adm> watch -n 5 'python /usr/sap/${SAPSYSTEMNAME}/HDB${TINSTANCE}/exe/python_support/systemReplicationStatus.py ; echo Status $?'The output on clusternode1 will be:
Every 5.0s: python /usr/sap/${SAPSYSTEMNAME}/HDB${TINSTANCE}/exe/python_support/systemReplicati...  clusternode1: Tue XXX XX HH:MM:SS 2023

|Database |Host   |Port  |Service Name |Volume ID |Site ID |Site Name |Secondary |Secondary |Secondary |Secondary |Secondary     |
Replication |Replication |Replication    |Secondary    |
|         |	  |	 |             |          |        |          |Host	 |Port      |Site ID   |Site Name |Active Status |
Mode        |Status	 |Status Details |Fully Synced |
|-------- |------ |----- |------------ |--------- |------- |--------- |--------- |--------- |--------- |--------- |------------- |
----------- |----------- |-------------- |------------ |
|SYSTEMDB |clusternode1 |30201 |nameserver   |        1 |	 1 |DC1       |remotehost3    |    30201 |        3 |DC3	  |YES		 |
ASYNC       |ACTIVE	 |               |        True |
|RH2	  |clusternode1 |30207 |xsengine     |        2 |	 1 |DC1       |remotehost3    |    30207 |        3 |DC3	  |YES		 |
ASYNC       |ACTIVE	 |               |        True |
|RH2	  |clusternode1 |30203 |indexserver  |        3 |	 1 |DC1       |remotehost3    |    30203 |        3 |DC3	  |YES		 |
ASYNC       |ACTIVE	 |               |        True |
|SYSTEMDB |clusternode1 |30201 |nameserver   |        1 |	 1 |DC1       |clusternode2    |    30201 |        2 |DC2	  |YES		 |
SYNCMEM     |ACTIVE	 |               |        True |
|RH2	  |clusternode1 |30207 |xsengine     |        2 |	 1 |DC1       |clusternode2    |    30207 |        2 |DC2	  |YES		 |
SYNCMEM     |ACTIVE	 |               |        True |
|RH2	  |clusternode1 |30203 |indexserver  |        3 |	 1 |DC1       |clusternode2    |    30203 |        2 |DC2	  |YES		 |
SYNCMEM     |ACTIVE	 |               |        True |

status system replication site "3": ACTIVE
status system replication site "2": ACTIVE
overall system replication status: ACTIVE

Local System Replication State
~~~~~~~~~~~~~~~~~~~~~~~~~~~~~~

mode: PRIMARY
site id: 1
site name: DC1
Status 15
On remotehost3, run the same command:
remotehost3:rh2adm> watch -n 5 'python /usr/sap/${SAPSYSTEMNAME}/HDB${TINSTANCE}/exe/python_support/systemReplicationStatus.py ; echo Status $?'The response will be:
this system is either not running or is not primary system replication siteThis will change after the test initiates the failover. The output looks similar to the example of the primary node before the test was started.
On the second node, start:
clusternode2:rh2adm> watch -n 10 'hdbnsutil -sr_state | grep masters'This will show the current master clusternode1 and will switch immediately after the failover is initiated.
-
To ensure that everything is configured correctly, please also check the
global.ini. Check
global.inion DC1, DC2, and DC3:On all three nodes, the
global.inishould contain:[persistent] log_mode=normal [system_replication] register_secondaries_on_takeover=trueYou can edit the
global.iniwith:clusternode1:rh2adm>vim /usr/sap/${SAPSYSTEMNAME}/SYS/global/hdb/custom/config/global.ini[Optional] Put the cluster into
maintenance-mode:[root@clusternode1]# pcs property set maintenance-mode=trueDuring the tests, you will find out that the failover will work with and without setting the
maintenance-mode. So you can run the first test without it. While recovering, it should be done; I just want to show you that it works with and without. This is an option if the primary is not accessible.Start the test: Failover to DC3. On remotehost3, please run:
remotehost3:rh2adm> hdbnsutil -sr_takeover
done.
The test has started, and now please check the output of the previously started monitors. On the clusternode1, the system replication status will lose its relationship to remotehost3 and clusternode2 (DC2):
Every 5.0s: python /usr/sap/RH2/HDB02/exe/python_support/systemReplicationStatus.py ; echo Status $?                               clusternode1: Mon Sep  4 11:52:16 2023

|Database |Host   |Port  |Service Name |Volume ID |Site ID |Site Name |Secondary |Secondary |Secondary |Secondary |Secondary     |Replication |Replication |Replic
ation                  |Secondary    |
|         |       |      |             |          |        |          |Host      |Port      |Site ID   |Site Name |Active Status |Mode        |Status      |Status
 Details               |Fully Synced |
|-------- |------ |----- |------------ |--------- |------- |--------- |--------- |--------- |--------- |--------- |------------- |----------- |----------- |------
---------------------- |------------ |
|SYSTEMDB |clusternode1 |30201 |nameserver   |        1 |      1 |DC1       |clusternode2    |    30201 |        2 |DC2       |YES           |SYNCMEM     |ERROR       |Commun
ication channel closed |       False |
|RH2      |clusternode1 |30207 |xsengine     |        2 |      1 |DC1       |clusternode2    |    30207 |        2 |DC2       |YES           |SYNCMEM     |ERROR       |Commun
ication channel closed |       False |
|RH2      |clusternode1 |30203 |indexserver  |        3 |      1 |DC1       |clusternode2    |    30203 |        2 |DC2       |YES           |SYNCMEM     |ERROR       |Commun
ication channel closed |       False |

status system replication site "2": ERROR
overall system replication status: ERROR

Local System Replication State
~~~~~~~~~~~~~~~~~~~~~~~~~~~~~~

mode: PRIMARY
site id: 1
site name: DC1
Status 11
The cluster still doesn’t notice this behavior. If you check the return code of the system replication status, Returncode 11 means error, which tells you something is wrong. If you have access, it is a good idea to enter
maintenance-modenow.The remotehost3 becomes the new primary, and clusternode2 (DC2) gets automatically registered as the new primary on the remotehost3.
Example output of the system replication state of remotehost3:
Every 5.0s: python /usr/sap/RH2/HDB02/exe/python_support/systemReplicationStatus.py ; echo Status $?                               remotehost3: Mon Sep  4 13:55:29 2023

|Database |Host   |Port  |Service Name |Volume ID |Site ID |Site Name |Secondary |Secondary |Secondary |Secondary |Secondary     |Replication |Replication |Replic
ation    |Secondary    |
|         |       |      |             |          |        |          |Host      |Port      |Site ID   |Site Name |Active Status |Mode        |Status      |Status
 Details |Fully Synced |
|-------- |------ |----- |------------ |--------- |------- |--------- |--------- |--------- |--------- |--------- |------------- |----------- |----------- |------
-------- |------------ |
|SYSTEMDB |remotehost3 |30201 |nameserver   |        1 |      3 |DC3       |clusternode2    |    30201 |        2 |DC2       |YES           |SYNCMEM     |ACTIVE      |
         |        True |
|RH2      |remotehost3 |30207 |xsengine     |        2 |      3 |DC3       |clusternode2    |    30207 |        2 |DC2       |YES           |SYNCMEM     |ACTIVE      |
         |        True |
|RH2      |remotehost3 |30203 |indexserver  |        3 |      3 |DC3       |clusternode2    |    30203 |        2 |DC2       |YES           |SYNCMEM     |ACTIVE      |
         |        True |

status system replication site "2": ACTIVE
overall system replication status: ACTIVE

Local System Replication State
~~~~~~~~~~~~~~~~~~~~~~~~~~~~~~

mode: PRIMARY
site id: 3
site name: DC3
Status 15
The returncode 15 also says everything is okay, but clusternode1 is missing. This must be re-registered manually. The former primary clusternode1 is not listed, so the replication relationship is lost.
Set
maintenance-mode.If not already done before, set
maintenance-modeon the cluster on one node of the cluster with the command:[root@clusternode1]# pcs property set maintenance-mode=trueYou can check if the
maintenance-modeis active by running this command:[root@clusternode1]# pcs resource * Clone Set: SAPHanaTopology_RH2_02-clone [SAPHanaTopology_RH2_02] (unmanaged): * SAPHanaTopology_RH2_02 (ocf::heartbeat:SAPHanaTopology): Started clusternode2node2 (unmanaged) * SAPHanaTopology_RH2_02 (ocf::heartbeat:SAPHanaTopology): Started clusternode1node1 (unmanaged) * Clone Set: SAPHana_RH2_02-clone [SAPHana_RH2_02] (promotable, unmanaged): * SAPHana_RH2_02 (ocf::heartbeat:SAPHana): Slave clusternode2node2 (unmanaged) * SAPHana_RH2_02 (ocf::heartbeat:SAPHana): Master clusternode1node1 (unmanaged) * vip_RH2_02_MASTER (ocf::heartbeat:IPaddr2): Started clusternode1node1 (unmanaged)The resources are displaying unmanaged, this indicates that the cluster is in
maintenance-mode=true. The virtual IP address is still started on clusternode1. If you want to use this IP on another node, please disablevip_RH2_02_MASTERbefore you set maintanence-mode=true.[root@clusternode1]# pcs resource disable vip_RH2_02_MASTERRe-register clusternode1.
When we check the
sr_stateon clusternode1, you will see a relationship only to DC2:clusternode1:rh2adm> hdbnsutil -sr_state System Replication State ~~~~~~~~~~~~~~~~~~~~~~~~ online: true mode: primary operation mode: primary site id: 1 site name: DC1 is source system: true is secondary/consumer system: false has secondaries/consumers attached: true is a takeover active: false is primary suspended: false Host Mappings: ~~~~~~~~~~~~~~ clusternode1 -> [DC2] clusternode2 clusternode1 -> [DC1] clusternode1 Site Mappings: ~~~~~~~~~~~~~~ DC1 (primary/primary) |---DC2 (syncmem/logreplay) Tier of DC1: 1 Tier of DC2: 2 Replication mode of DC1: primary Replication mode of DC2: syncmem Operation mode of DC1: primary Operation mode of DC2: logreplay Mapping: DC1 -> DC2 done.But when we check DC2, the primary database server is DC3. So the information from DC1 is not correct.
clusternode2:rh2adm> hdbnsutil -sr_stateIf we check the system replication status on DC1, the returncode is 12, which is unknown. So DC1 needs to be re-registered.
You can use this command to register the former primary clusternode1 as a new secondary of remotehost3.
clusternode1:rh2adm> hdbnsutil -sr_register --remoteHost=remotehost3 --remoteInstance=${TINSTANCE} --replicationMode=asyncsyncmem --name=DC1 --remoteName=DC3 --operationMode=logreplay --onlineAfter the registration is done, you will see on remotehost3 all three sites replicated, and the status (return code) will change to 15.
If this fails, you have to manually remove the replication relationships on DC1 and DC3. Please follow the instructions described in Register Secondary.
For example, list the existing relationships with:
clusternode1:rh2adm> hdbnsutil -sr_stateTo remove the existing relationships you can use:
clusternode1:rh2adm> hdbnsutil -sr_unregister --name=DC2`This may not usually be necessary. We assume that test 4 will be performed after test 3. So the recovery step is to run test 4.
5.6. Test 4:Failback of the primary node to the first site
| Subject of the test | Primary switch back to a cluster node. Failback and enable the cluster again. Re-register the third site as secondary. |
| Test preconditions |
|
| Test steps | Check the expected primary of the cluster. Failover from the DC3 node to the DC1 node. Check if the former secondary has switched to the new primary. Re-register remotehost3 as a new secondary.
Set cluster |
| Monitoring the test | On the new primary start:
On the secondary start:
|
| Starting the test |
Check the expected primary of the cluster: VIP and promoted SAP HANA resources should run on the same node which is the potential new primary.
On this potential primary run as Re-register the former primary as new secondary:
Cluster continues to work after setting the |
| Expected result | New primary is starting SAP HANA. The replication status will show all 3 sites replicated. Second cluster site gets automatically re-registered to the new primary. DR site becomes an additional replica of the database. |
| Ways to return to an initial state | Run test 3. |
Detailed description
Check if the cluster is put into
maintenance-mode:[root@clusternode1]# pcs property config maintenance-mode Cluster Properties: maintenance-mode: trueIf the
maintenance-modeis not true you can set it with:[root@clusternode1]# pcs property set maintenance-mode=trueCheck the system replication status and discover the primary database on all nodes.
First of all, discover the primary database using:
clusternode1:rh2adm> hdbnsutil -sr_state | egrep -e "^mode:|primary masters"The output should be as follows:
On clusternode1:
clusternode1:rh2adm> hdbnsutil -sr_state | egrep -e "^mode:|primary masters" mode: syncmem primary masters: remotehost3On clusternode2:
clusternode2:rh2adm> hdbnsutil -sr_state | egrep -e "^mode:|primary masters" mode: syncmem primary masters: remotehost3On remotehost3:
remotehost3:rh2adm> hdbnsutil -sr_state | egrep -e "^mode:|primary masters" mode: primaryOn all three nodes, the primary database is remotehost3.
On this primary database, you have to ensure that the system replication status is active for all three nodes and the return code is 15:
remotehost3:rh2adm> python /usr/sap/${SAPSYSTEMNAME}/HDB${TINSTANCE}/exe/python_support/systemReplicationStatus.py |Database |Host |Port |Service Name |Volume ID |Site ID |Site Name |Secondary |Secondary |Secondary |Secondary |Secondary |Replication |Replication |Replication |Secondary | | | | | | | | |Host |Port |Site ID |Site Name |Active Status |Mode |Status |Status Details |Fully Synced | |-------- |------ |----- |------------ |--------- |------- |--------- |--------- |--------- |--------- |--------- |------------- |----------- |----------- |-------------- |------------ | |SYSTEMDB |remotehost3 |30201 |nameserver | 1 | 3 |DC3 |clusternode2 | 30201 | 2 |DC2 |YES |SYNCMEM |ACTIVE | | True | |RH2 |remotehost3 |30207 |xsengine | 2 | 3 |DC3 |clusternode2 | 30207 | 2 |DC2 |YES |SYNCMEM |ACTIVE | | True | |RH2 |remotehost3 |30203 |indexserver | 3 | 3 |DC3 |clusternode2 | 30203 | 2 |DC2 |YES |SYNCMEM |ACTIVE | | True | |SYSTEMDB |remotehost3 |30201 |nameserver | 1 | 3 |DC3 |clusternode1 | 30201 | 1 |DC1 |YES |SYNCMEM |ACTIVE | | True | |RH2 |remotehost3 |30207 |xsengine | 2 | 3 |DC3 |clusternode1 | 30207 | 1 |DC1 |YES |SYNCMEM |ACTIVE | | True | |RH2 |remotehost3 |30203 |indexserver | 3 | 3 |DC3 |clusternode1 | 30203 | 1 |DC1 |YES |SYNCMEM |ACTIVE | | True | status system replication site "2": ACTIVE status system replication site "1": ACTIVE overall system replication status: ACTIVE Local System Replication State ~~~~~~~~~~~~~~~~~~~~~~~~~~~~~~ mode: PRIMARY site id: 3 site name: DC3 [rh2adm@remotehost3: python_support]# echo $? 15Check if all three
sr_statesare consistent.Please run on all three nodes,
hdbnsutil -sr_state --sapcontrol=1 |grep site.*Mode:clusternode1:rh2adm>hdbnsutil -sr_state --sapcontrol=1 |grep site.*Mode clusternode2:rh2adm> hsbnsutil -sr_state --sapcontrol=1 | grep site.*Mode remotehost3:rh2adm>hsbnsutil -sr_state --sapcontrol=1 | grep site.*ModeThe output should be the same on all nodes:
siteReplicationMode/DC1=primary siteReplicationMode/DC3=async siteReplicationMode/DC2=syncmem siteOperationMode/DC1=primary siteOperationMode/DC3=logreplay siteOperationMode/DC2=logreplayStart monitoring in separate windows.
On clusternode1, start:
clusternode1:rh2adm> watch "python /usr/sap/${SAPSYSTEMNAME}/HDB${TINSTANCE}/exe/python_support/systemReplicationStatus.py; echo \$?"On remotehost3, start:
remotehost3:rh2adm>watch "python /usr/sap/${SAPSYSTEMNAME}/HDB${TINSTANCE}/exe/python_support/systemReplicationStatus.py; echo \$?"On clusternode2, start:
clusternode2:rh2adm> watch "hdbnsutil -sr_state --sapcontrol=1 |grep siteReplicationMode"Start the test.
To failover to clusternode1, start on clusternode1:
clusternode1:rh2adm> hdbnsutil -sr_takeover done.Check the output of the monitors.
The monitor on clusternode1 will change to:
Every 2.0s: python systemReplicationStatus.py; echo $? clusternode1: Mon Sep 4 23:34:30 2023 |Database |Host |Port |Service Name |Volume ID |Site ID |Site Name |Secondary |Secondary |Secondary |Secondary |Secondary |Replication |Replication |Replication |Secondary | | | | | | | | |Host |Port |Site ID |Site Name |Active Status |Mode |Status |Status Details |Fully Synced | |-------- |------ |----- |------------ |--------- |------- |--------- |--------- |--------- |--------- |--------- |------------- |----------- |----------- |-------------- |------------ | |SYSTEMDB |clusternode1 |30201 |nameserver | 1 | 1 |DC1 |clusternode2 | 30201 | 2 |DC2 |YES |SYNCMEM |ACTIVE | | True | |RH2 |clusternode1 |30207 |xsengine | 2 | 1 |DC1 |clusternode2 | 30207 | 2 |DC2 |YES |SYNCMEM |ACTIVE | | True | |RH2 |clusternode1 |30203 |indexserver | 3 | 1 |DC1 |clusternode2 | 30203 | 2 |DC2 |YES |SYNCMEM |ACTIVE | | True | status system replication site "2": ACTIVE overall system replication status: ACTIVE Local System Replication State ~~~~~~~~~~~~~~~~~~~~~~~~~~~~~~ mode: PRIMARY site id: 1 site name: DC1 15Important is also the return code 15.
The monitor on clusternode2 will change to:
Every 2.0s: hdbnsutil -sr_state --sapcontrol=1 |grep site.*Mode clusternode2: Mon Sep 4 23:35:18 2023 siteReplicationMode/DC1=primary siteReplicationMode/DC2=syncmem siteOperationMode/DC1=primary siteOperationMode/DC2=logreplayDC3 is gone and needs to be re-registered.
On remotehost3, the
systemReplicationStatusreports an error, and the returncode changes to 11.Check if cluster nodes get re-registered:
clusternode1:rh2adm> hdbnsutil -sr_state System Replication State ~~~~~~~~~~~~~~~~~~~~~~~~ online: true mode: primary operation mode: primary site id: 1 site name: DC1 is source system: true is secondary/consumer system: false has secondaries/consumers attached: true is a takeover active: false is primary suspended: false Host Mappings: ~~~~~~~~~~~~~~ clusternode1 -> [DC2] clusternode2 clusternode1 -> [DC1] clusternode1 Site Mappings: ~~~~~~~~~~~~~~ DC1 (primary/primary) |---DC2 (syncmem/logreplay) Tier of DC1: 1 Tier of DC2: 2 Replication mode of DC1: primary Replication mode of DC2: syncmem Operation mode of DC1: primary Operation mode of DC2: logreplay Mapping: DC1 -> DC2 done.The Site Mapping shows that clusternode2 (DC2) was re-registered.
Check or enable the vip resource:
[root@clusternode1]# pcs resource * Clone Set: SAPHanaTopology_RH2_02-clone [SAPHanaTopology_RH2_02] (unmanaged): * SAPHanaTopology_RH2_02 (ocf::heartbeat:SAPHanaTopology): Started clusternode2 (unmanaged) * SAPHanaTopology_RH2_02 (ocf::heartbeat:SAPHanaTopology): Started clusternode1 (unmanaged) * Clone Set: SAPHana_RH2_02-clone [SAPHana_RH2_02] (promotable, unmanaged): * SAPHana_RH2_02 (ocf::heartbeat:SAPHana): Master clusternode2 (unmanaged) * SAPHana_RH2_02 (ocf::heartbeat:SAPHana): Slave clusternode1 (unmanaged) * vip_RH2_02_MASTER (ocf::heartbeat:IPaddr2): Stopped (disabled, unmanaged)The vip resource
vip_RH2_02_MASTERis stopped.To start it again run:
[root@clusternode1]# pcs resource enable vip_RH2_02_MASTER Warning: 'vip_RH2_02_MASTER' is unmanagedThe warning is right because the cluster will not start any resources unless
maintenance-mode=false.Stop cluster
maintenance-mode.Before we stop the
maintenance-mode, we should start two monitors in separate windows to see the changes.On clusternode2, run:
[root@clusternode2]# watch pcs status --fullOn clusternode1, run:
clusternode1:rh2adm> watch "python /usr/sap/${SAPSYSTEMNAME}/HDB${TINSTANCE}/exe/python_support/systemReplicationStatus.py; echo $?"Now you can unset the
maintenance-modeon clusternode1 by running:[root@clusternode1]# pcs property set maintenance-mode=falseThe monitor on clusternode1 should show you that everything is running now as expected:
Every 2.0s: pcs status --full clusternode1: Tue Sep 5 00:01:17 2023 Cluster name: cluster1 Cluster Summary: * Stack: corosync * Current DC: clusternode1 (1) (version 2.1.2-4.el8_6.6-ada5c3b36e2) - partition with quorum * Last updated: Tue Sep 5 00:01:17 2023 * Last change: Tue Sep 5 00:00:30 2023 by root via crm_attribute on clusternode1 * 2 nodes configured * 6 resource instances configured Node List: * Online: [ clusternode1 (1) clusternode2 (2) ] Full List of Resources: * auto_rhevm_fence1 (stonith:fence_rhevm): Started clusternode1 * Clone Set: SAPHanaTopology_RH2_02-clone [SAPHanaTopology_RH2_02]: * SAPHanaTopology_RH2_02 (ocf::heartbeat:SAPHanaTopology): Started clusternode2 * SAPHanaTopology_RH2_02 (ocf::heartbeat:SAPHanaTopology): Started clusternode1 * Clone Set: SAPHana_RH2_02-clone [SAPHana_RH2_02] (promotable): * SAPHana_RH2_02 (ocf::heartbeat:SAPHana): Slave clusternode2 * SAPHana_RH2_02 (ocf::heartbeat:SAPHana): Master clusternode1 * vip_RH2_02_MASTER (ocf::heartbeat:IPaddr2): Started clusternode1 Node Attributes: * Node: clusternode1 (1): * hana_rh2_clone_state : PROMOTED * hana_rh2_op_mode : logreplay * hana_rh2_remoteHost : clusternode2 * hana_rh2_roles : 4:P:master1:master:worker:master * hana_rh2_site : DC1 * hana_rh2_sra : - * hana_rh2_srah : - * hana_rh2_srmode : syncmem * hana_rh2_sync_state : PRIM * hana_rh2_version : 2.00.062.00 * hana_rh2_vhost : clusternode1 * lpa_rh2_lpt : 1693872030 * master-SAPHana_RH2_02 : 150 * Node: clusternode2 (2): * hana_rh2_clone_state : DEMOTED * hana_rh2_op_mode : logreplay * hana_rh2_remoteHost : clusternode1 * hana_rh2_roles : 4:S:master1:master:worker:master * hana_rh2_site : DC2 * hana_rh2_sra : - * hana_rh2_srah : - * hana_rh2_srmode : syncmem * hana_rh2_sync_state : SOK * hana_rh2_version : 2.00.062.00 * hana_rh2_vhost : clusternode2 * lpa_rh2_lpt : 30 * master-SAPHana_RH2_02 : 100 Migration Summary: Tickets: PCSD Status: clusternode1: Online clusternode2: Online Daemon Status: corosync: active/disabled pacemaker: active/disabled pcsd: active/enabledAfter manual interaction, it is always good advice to cleanup the cluster, as described in Cluster Cleanup.
Re-register remotehost3 to the new primary on clusternode1.
Remotehost3 needs to be re-registered. To monitor the progress, please start on clusternode1:
con_cluster_cleanupclusternode1:rh2adm> watch -n 5 'python /usr/sap/${SAPSYSTEMNAME}/HDB${TINSTANCE}/exe/python_support/systemReplicationStatus.py ; echo Status $?'On remotehost3, please start:
remotehost3:rh2adm> watch 'hdbnsutil -sr_state --sapcontrol=1 |grep siteReplicationMode'Now you can re-register remotehost3 with this command:
remotehost3:rh2adm> hdbnsutil -sr_register --remoteHost=clusternode1 --remoteInstance=${TINSTANCE} --replicationMode=async --name=DC3 --remoteName=DC1 --operationMode=logreplay --onlineThe monitor on clusternode1 will change to:
Every 5.0s: python /usr/sap/${SAPSYSTEMNAME}/HDB${TINSTANCE}/exe/python_support/systemReplicationStatus.py ; echo Status $? clusternode1: Tue Sep 5 00:14:40 2023 |Database |Host |Port |Service Name |Volume ID |Site ID |Site Name |Secondary |Secondary |Secondary |Secondary |Secondary |Replication |Replication |Replication |Secondary | | | | | | | | |Host |Port |Site ID |Site Name |Active Status |Mode |Status |Status Details |Fully Synced | |-------- |------ |----- |------------ |--------- |------- |--------- |--------- |--------- |--------- |--------- |------------- |----------- |----------- |-------------- |------------ | |SYSTEMDB |clusternode1 |30201 |nameserver | 1 | 1 |DC1 |remotehost3 | 30201 | 3 |DC3 |YES |ASYNC |ACTIVE | | True | |RH2 |clusternode1 |30207 |xsengine | 2 | 1 |DC1 |remotehost3 | 30207 | 3 |DC3 |YES |ASYNC |ACTIVE | | True | |RH2 |clusternode1 |30203 |indexserver | 3 | 1 |DC1 |remotehost3 | 30203 | 3 |DC3 |YES |ASYNC |ACTIVE | | True | |SYSTEMDB |clusternode1 |30201 |nameserver | 1 | 1 |DC1 |clusternode2 | 30201 | 2 |DC2 |YES |SYNCMEM |ACTIVE | | True | |RH2 |clusternode1 |30207 |xsengine | 2 | 1 |DC1 |clusternode2 | 30207 | 2 |DC2 |YES |SYNCMEM |ACTIVE | | True | |RH2 |clusternode1 |30203 |indexserver | 3 | 1 |DC1 |clusternode2 | 30203 | 2 |DC2 |YES |SYNCMEM |ACTIVE | | True | status system replication site "3": ACTIVE status system replication site "2": ACTIVE overall system replication status: ACTIVE Local System Replication State ~~~~~~~~~~~~~~~~~~~~~~~~~~~~~~ mode: PRIMARY site id: 1 site name: DC1 Status 15And the monitor of remotehost3 will change to:
Every 2.0s: hdbnsutil -sr_state --sapcontrol=1 |grep site.*Mode remotehost3: Tue Sep 5 02:15:28 2023 siteReplicationMode/DC1=primary siteReplicationMode/DC3=syncmem siteReplicationMode/DC2=syncmem siteOperationMode/DC1=primary siteOperationMode/DC3=logreplay siteOperationMode/DC2=logreplayNow we have again 3 entries, and remotehost3 (DC3) is again a secondary site replicated from clusternode1 (DC1).
Check if all nodes are part of the system replication status on clusternode1.
Please run on all three nodes,
hdbnsutil -sr_state --sapcontrol=1 |grep site.*Mode:clusternode1:rh2adm> hdbnsutil -sr_state --sapcontrol=1 |grep site.*ModesiteReplicationMode clusternode2:rh2adm> hsbnsutil -sr_state --sapcontrol=1 | grep site.*Mode remotehost3:rh2adm> hsbnsutil -sr_state --sapcontrol=1 | grep site.*ModeOn all nodes, we should get the same output:
siteReplicationMode/DC1=primary siteReplicationMode/DC3=syncmem siteReplicationMode/DC2=syncmem siteOperationMode/DC1=primary siteOperationMode/DC3=logreplay siteOperationMode/DC2=logreplayCheck pcs status --full and SOK.
Run:
[root@clusternode1]# pcs status --full| grep sync_stateThe output should be either PRIM or SOK:
* hana_rh2_sync_state : PRIM * hana_rh2_sync_state : SOKFinally, the cluster status should look like this, including the
sync_statePRIM and SOK:[root@clusternode1]# pcs status --full Cluster name: cluster1 Cluster Summary: * Stack: corosync * Current DC: clusternode1 (1) (version 2.1.2-4.el8_6.6-ada5c3b36e2) - partition with quorum * Last updated: Tue Sep 5 00:18:52 2023 * Last change: Tue Sep 5 00:16:54 2023 by root via crm_attribute on clusternode1 * 2 nodes configured * 6 resource instances configured Node List: * Online: [ clusternode1 (1) clusternode2 (2) ] Full List of Resources: * auto_rhevm_fence1 (stonith:fence_rhevm): Started clusternode1 * Clone Set: SAPHanaTopology_RH2_02-clone [SAPHanaTopology_RH2_02]: * SAPHanaTopology_RH2_02 (ocf::heartbeat:SAPHanaTopology): Started clusternode2 * SAPHanaTopology_RH2_02 (ocf::heartbeat:SAPHanaTopology): Started clusternode1 * Clone Set: SAPHana_RH2_02-clone [SAPHana_RH2_02] (promotable): * SAPHana_RH2_02 (ocf::heartbeat:SAPHana): Slave clusternode2 * SAPHana_RH2_02 (ocf::heartbeat:SAPHana): Master clusternode1 * vip_RH2_02_MASTER (ocf::heartbeat:IPaddr2): Started clusternode1 Node Attributes: * Node: clusternode1 (1): * hana_rh2_clone_state : PROMOTED * hana_rh2_op_mode : logreplay * hana_rh2_remoteHost : clusternode2 * hana_rh2_roles : 4:P:master1:master:worker:master * hana_rh2_site : DC1 * hana_rh2_sra : - * hana_rh2_srah : - * hana_rh2_srmode : syncmem * hana_rh2_sync_state : PRIM * hana_rh2_version : 2.00.062.00 * hana_rh2_vhost : clusternode1 * lpa_rh2_lpt : 1693873014 * master-SAPHana_RH2_02 : 150 * Node: clusternode2 (2): * hana_rh2_clone_state : DEMOTED * hana_rh2_op_mode : logreplay * hana_rh2_remoteHost : clusternode1 * hana_rh2_roles : 4:S:master1:master:worker:master * hana_rh2_site : DC2 * hana_rh2_sra : - * hana_rh2_srah : - * hana_rh2_srmode : syncmem * hana_rh2_sync_state : SOK * hana_rh2_version : 2.00.062.00 * hana_rh2_vhost : clusternode2 * lpa_rh2_lpt : 30 * master-SAPHana_RH2_02 : 100 Migration Summary: Tickets: PCSD Status: clusternode1: Online clusternode2: Online Daemon Status: corosync: active/disabled pacemaker: active/disabled pcsd: active/enabled- Refer to Check cluster status and Check database to verify that all works fine again.
Chapter 6. Maintenance procedures
6.1. Updating the OS and HA cluster components
Please refer to Recommended Practices for Applying Software Updates to a RHEL High Availability or Resilient Storage Cluster, for more information.
6.2. Updating the SAP HANA instances
If the SAP HANA System Replication setup is managed using the HA cluster configuration described in this document, some additional steps are needed in addition to the actual process of updating the SAP HANA instances before and after the update. Execute the following steps:
Put the SAPHana resource in unmanaged mode.
[root]# pcs resource unmanage SAPHana_RH2_02-clone- Update the SAP HANA instances using the procedure provided by SAP.
When the update of the SAP HANA instances has been completed and it has been verified that SAP HANA System Replication is working again, the status of the SAPHana resource needs to be refreshed to make sure the cluster is aware of the current state of the SAP HANA System Replication setup.
[root]# pcs resource refresh SAPHana_RH2_02-cloneWhen the HA cluster has correctly picked up the current status of the SAP HANA System Replication setup, put the SAPHana resource back into managed mode so that the HA cluster will be able to react to any issues in the SAP HANA System Replication setup again.
[root]# pcs resource manage SAPHana_RH2_02-clone
6.3. Manually moving SAPHana resource to another node (SAP HANA System Replication takeover by HA cluster)
A manual takeover of SAP HANA System Replication can be triggered by moving the promotable clone resource:
[root]# pcs resource move SAPHana_RH2_02-clone
pcs-0.10.8-1.el8 or later is required for this command to work correctly. Please refer to The pcs resource move command fails for a promotable clone unless "--master" is specified, for more information.
With each pcs resource move command invocation, the HA cluster creates a location constraint to cause the resource to move. Please refer to Is there a way to manage constraints when running pcs resource move?, for more information. This constraint must be removed after it has been verified that the SAP HANA System Replication takeover has been completed in order to allow the HA cluster to manage the former primary SAP HANA instance again.
To remove the constraint created by pcs resource move, use the following command:
[root]# pcs resource clear SAPHana_RH2_02-clone
What happens to the former SAP HANA primary instance after the takeover has been completed and the constraint has been removed depends on the setting of the AUTOMATED_REGISTER parameter of the SAPHana resource:
-
If
Automated_REGISTER=true, then the former SAP HANA primary instance will be registered as the new secondary and SAP HANA System Replication will become active again. -
If
AUTOMATED_REGISTER=false, then it is up to the operator to decide what should happen with the former SAP HANA primary instance after the takeover.
Chapter 7. Useful commands
Below are 3 sections of useful commands. In most cases, it should help to verify successful operation or configuration. Examples are listed together with the response. In some cases, the output has been adjusted for formatting reasons.
-
All commands listed in this document when executed by the
<sid>admuser start with>. -
All commands run by the
root userstart with a#. -
To execute the commands, omit the prefix
>or#.
7.1. SAP HANA commands
The SAP HANA commands are executed by the <sid>adm user. Example:
[root@clusternode1]# su - rh2adm
clusternode1:rh2adm> cdpy
clusternode1:rh2adm> pwd
/usr/sap/RH2/HDB02/exe/python_support
clusternode1:rh2adm> python systemReplicationStatus.py -h
systemReplicationStatus.py [-h|--help] [-a|--all] [-l|--localhost] [-m|--multiTaget] [-s|--site=<site name>] [-t|--printLandscapeTree] [--omitSecondaryActiveStatus] [--sapcontrol=1]
clusternode1:rh2adm> python landscapeHostConfiguration.py -h
landscapeHostConfiguration.py [-h|--help] [--localhost] [--sapcontrol=1]
clusternode1:rh2adm> hdbnsutil # run hdbnsutil without parameters to get help7.1.1. SAP HANA installation using hdbclm
The installation of the third site is similar to the installation of the second site. The installation can be done with hdblcm as user root. To ensure that nothing is installed before, run hdbuninst to check if SAP HANA is not already installed on this node.
Example output of HANA uninstallation:
[root@remotehost3]# cd /software/DATA_UNITS/HDB_SERVER_LINUX_X86_64
root@DC3/software/DATA_UNITS/HDB_SERVER_LINUX_X86_64# ./hdbuninst
Option 0 will remove an already existing HANA Installation
No SAP HANA Installation found is the expected answerExample output of HANA installation on DC3:
----[root@remotehost3]# cd /software/DATA_UNITS/HDB_SERVER_LINUX_X86_64
# ./hdbuninst
Option 0 will remove an already existing HANA Installation
No SAP HANA Installation found is the expected answer
----
Example output of HANA installation:
[source,text]
----
[root@remotehost3]# ./hdblcm
1 install
2 server
/hana/shared is default directory
Enter Local Hostname [remotehost3]: use the default name
additional hosts only during Scale-Out Installation y default is n
ENTER SAP HANA System ID: RH2
Enter Instance Number [02]:
Enter Local Host Worker Group [default]:
Select System Usage / Enter Index [4]:
Choose encryption
Enter Location of Data Volumes [/hana/data/RH2]:
Enter Location of Log Volumes [/hana/log/RH2]:
Restrict maximum memory allocation? [n]:
Enter Certificate Host Name
Enter System Administrator (rh2adm) Password: <Y0urPasswd>
Confirm System Administrator (rh2adm) Password: <Y0urPasswd>
Enter System Administrator Home Directory [/usr/sap/RH2/home]:
Enter System Administrator Login Shell [/bin/sh]:
Enter System Administrator User ID [1000]:
Enter System Database User (SYSTEM) Password: <Y0urPasswd>
Confirm System Database User (SYSTEM) Password: <Y0urPasswd>
Restart system after machine reboot? [n]:
----Before the installation starts, a summary is listed:
SAP HANA Database System Installation
Installation Parameters
Remote Execution: ssh
Database Isolation: low
Install Execution Mode: standard
Installation Path: /hana/shared
Local Host Name: dc3host
SAP HANA System ID: RH2
Instance Number: 02
Local Host Worker Group: default
System Usage: custom
Location of Data Volumes: /hana/data/RH2
Location of Log Volumes: /hana/log/RH2
SAP HANA Database secure store: ssfs
Certificate Host Names: remotehost3 -> remotehost3 System Administrator Home Directory: /usr/sap/RH2/home
System Administrator Login Shell: /bin/sh
System Administrator User ID: 1000
ID of User Group (sapsys): 1010
Software Components
SAP HANA Database
Install version 2.00.052.00.1599235305
Location: /software/DATA_UNITS/HDB_SERVER_LINUX_X86_64/server
SAP HANA Local Secure Store
Do not install
SAP HANA AFL (incl.PAL,BFL,OFL)
Do not install
SAP HANA EML AFL
Do not install
SAP HANA EPM-MDS
Do not install
SAP HANA Database Client
Do not install
SAP HANA Studio
Do not install
SAP HANA Smart Data Access
Do not install
SAP HANA XS Advanced Runtime
Do not install
Log File Locations
Log directory: /var/tmp/hdb_RH2_hdblcm_install_2021-06-09_18.48.13
Trace location: /var/tmp/hdblcm_2021-06-09_18.48.13_31307.trc
Do you want to continue? (y/n):Enter y to start the installation.
7.1.2. Using hdbsql to check Inifile contents
clusternode1:rh2adm> hdbsql -i ${TINSTANCE} -u system -p Y0urP8ssw0rd
Welcome to the SAP HANA Database interactive terminal.
Type: \h for help with commands
\q to quit
hdbsql RH2=> select * from M_INIFILE_CONTENTS where section='system_replication'
FILE_NAME,LAYER_NAME,TENANT_NAME,HOST,SECTION,KEY,VALUE
"global.ini","DEFAULT","","","system_replication","actual_mode","primary"
"global.ini","DEFAULT","","","system_replication","mode","primary"
"global.ini","DEFAULT","","","system_replication","operation_mode","logreplay"
"global.ini","DEFAULT","","","system_replication","register_secondaries_on_takeover
","true"
"global.ini","DEFAULT","","","system_replication","site_id","1"
"global.ini","DEFAULT","","","system_replication","site_name","DC2"
"global.ini","DEFAULT","","","system_replication","timetravel_logreplay_mode","auto
"
"global.ini","DEFAULT","","","system_replication","alternative_sources",""
"global.ini","DEFAULT","","","system_replication","datashipping_logsize_threshold",
"5368709120"
"global.ini","DEFAULT","","","system_replication","datashipping_min_time_interval",
"600"
"global.ini","DEFAULT","","","system_replication","datashipping_parallel_channels",
"4"
"global.ini","DEFAULT","","","system_replication","datashipping_parallel_processing
","true"
"global.ini","DEFAULT","","","system_replication","datashipping_snapshot_max_retent
ion_time","300"
"global.ini","DEFAULT","","","system_replication","enable_data_compression","false"
"global.ini","DEFAULT","","","system_replication","enable_full_sync","false"
"global.ini","DEFAULT","","","system_replication","enable_log_compression","false"
"global.ini","DEFAULT","","","system_replication","enable_log_retention","auto"
"global.ini","DEFAULT","","","system_replication","full_replica_on_failed_delta_syn
c_check","false"
"global.ini","DEFAULT","","","system_replication","hint_based_routing_site_name",""
"global.ini","DEFAULT","","","system_replication","keep_old_style_alert","false"
"global.ini","DEFAULT","","","system_replication","logshipping_async_buffer_size","
67108864"
"global.ini","DEFAULT","","","system_replication","logshipping_async_wait_on_buffer
_full","true"
"global.ini","DEFAULT","","","system_replication","logshipping_max_retention_size",
"1048576"
"global.ini","DEFAULT","","","system_replication","logshipping_replay_logbuffer_cac
he_size","1073741824"
"global.ini","DEFAULT","","","system_replication","logshipping_replay_push_persiste
nt_segment_count","5"
"global.ini","DEFAULT","","","system_replication","logshipping_snapshot_logsize_thr
eshold","3221225472"
"global.ini","DEFAULT","","","system_replication","logshipping_snapshot_min_time_in
terval","900"
"global.ini","DEFAULT","","","system_replication","logshipping_timeout","30"
"global.ini","DEFAULT","","","system_replication","preload_column_tables","true"
"global.ini","DEFAULT","","","system_replication","propagate_log_retention","off"
"global.ini","DEFAULT","","","system_replication","reconnect_time_interval","30"
"global.ini","DEFAULT","","","system_replication","retries_before_register_to_alter
native_source","20"
"global.ini","DEFAULT","","","system_replication","takeover_esserver_without_log_ba
ckup","false"
"global.ini","DEFAULT","","","system_replication","takeover_wait_until_esserver_res
tart","true"
"global.ini","DEFAULT","","","system_replication","timetravel_call_takeover_hooks",
"off"
"global.ini","DEFAULT","","","system_replication","timetravel_log_retention_policy"
,"none"
"global.ini","DEFAULT","","","system_replication","timetravel_max_retention_time","
0"
"global.ini","DEFAULT","","","system_replication","timetravel_snapshot_creation_int
erval","1440"
"indexserver.ini","DEFAULT","","","system_replication","logshipping_async_buffer_si
ze","268435456"
"indexserver.ini","DEFAULT","","","system_replication","logshipping_replay_logbuffe
r_cache_size","4294967296"
"indexserver.ini","DEFAULT","","","system_replication","logshipping_replay_push_per
sistent_segment_count","20"
41 rows selected (overall time 1971.958 msec; server time 31.359 msec)7.1.3. Check database
Check if the database is running and discover the current primary node.
List database instances
clusternode1:rh2adm> sapcontrol -nr ${TINSTANCE} -function
GetSystemInstanceList
23.06.2023 12:08:17
GetSystemInstanceList
OK
hostname, instanceNr, httpPort, httpsPort, startPriority, features, dispstatus
node1, 2, 50213, 50214, 0.3, HDB|HDB_WORKER, GREENIf the output is green the instance is running.
List database processes
clusternode1:rh2adm> sapcontrol -nr ${TINSTANCE} -function GetProcessList
GetProcessList
OK
name, description, dispstatus, textstatus, starttime, elapsedtime, pid
hdbdaemon, HDB Daemon, GREEN, Running, 2023 09 04 14:34:01, 18:41:33, 3788067
hdbcompileserver, HDB Compileserver, GREEN, Running, 2023 09 04 22:35:40, 10:39:54, 445299
hdbindexserver, HDB Indexserver-RH2, GREEN, Running, 2023 09 04 22:35:40, 10:39:54, 445391
hdbnameserver, HDB Nameserver, GREEN, Running, 2023 09 04 22:35:34, 10:40:00, 445178
hdbpreprocessor, HDB Preprocessor, GREEN, Running, 2023 09 04 22:35:40, 10:39:54, 445306
hdbwebdispatcher, HDB Web Dispatcher, GREEN, Running, 2023 09 04 22:35:53, 10:39:41, 445955
hdbxsengine, HDB XSEngine-RH2, GREEN, Running, 2023 09 04 22:35:40, 10:39:54, 445394
Usually, all database processes have the status GREEN.
List SAP HANA processes
clusternode1:rh2adm> HDB info
USER PID PPID %CPU VSZ RSS COMMAND
rh2adm 1560 1559 0.0 6420 3136 watch -n 5 sapcontrol -nr 02 -functi
rh2adm 1316 1315 0.0 8884 5676 -sh
rh2adm 2549 1316 0.0 7516 4072 \_ /bin/sh /usr/sap/RH2/HDB02/HDB i
rh2adm 2579 2549 0.0 10144 3576 \_ ps fx -U rh2adm -o user:8,pi
rh2adm 2388 1 0.0 679536 55520 hdbrsutil --start --port 30203 --vo
rh2adm 1921 1 0.0 679196 55312 hdbrsutil --start --port 30201 --vo
rh2adm 1469 1 0.0 8852 3260 sapstart pf=/usr/sap/RH2/SYS/profile
rh2adm 1476 1469 0.7 438316 86288 \_ /usr/sap/RH2/HDB02/remotehost3/trace/
rh2adm 1501 1476 11.7 9690172 1574796 \_ hdbnameserver
rh2adm 1845 1476 0.8 410696 122988 \_ hdbcompileserver
rh2adm 1848 1476 1.0 659464 154072 \_ hdbpreprocessor
rh2adm 1899 1476 14.7 9848276 1765208 \_ hdbindexserver -port 30203
rh2adm 1902 1476 8.4 5023288 1052768 \_ hdbxsengine -port 30207
rh2adm 2265 1476 5.2 2340284 405016 \_ hdbwebdispatcher
rh2adm 1117 1 1.1 543532 30676 /usr/sap/RH2/HDB02/exe/sapstartsrv p
rh2adm 1029 1 0.0 20324 11572 /usr/lib/systemd/systemd --user
rh2adm 1030 1029 0.0 23256 3536 \_ (sd-pam)Display SAP HANA landscape configuration
clusternode1:rh2adm>
/usr/sap/${SAPSYSTEMNAME}/HDB${TINSTANCE}/exe/Python/bin/python
/usr/sap/${SAPSYSTEMNAME}/HDB${TINSTANCE}/exe/python_support/landscapeHostConfiguration.py;echo $?
| Host | Host | Host | Failover | Remove | Storage | Storage | Failover | Failover | NameServer | NameServer | IndexServer | IndexServer | Host | Host | Worker | Worker |
| | Active | Status | Status | Status | Config | Actual | Config | Actual | Config | Actual | Config | Actual | Config | Actual | Config | Actual |
| | | | | | Partition | Partition | Group | Group | Role | Role | Role | Role | Roles | Roles | Groups | Groups |
| ------ | ------ | ------ | -------- | ------ | --------- | --------- | -------- | -------- | ---------- | ---------- | ----------- | ----------- | ------ | ------ | ------- | ------- |
| clusternode1 | yes | ok | | | 1 | 1 | default | default | master 1 | master | worker | master | worker | worker | default | default |
overall host status: ok
4Returncodes:
- 0: Fatal
- 1: Error
- 2: Warning
- 3: Info
- 4: OK
Discover primary database
clusternode1:rh2adm> hdbnsutil -sr_state | egrep -e "primary masters|^mode"Example of check on a secondary:
clusternode1:rh2adm> hdbnsutil -sr_state | egrep -e "primary masters|^mode"
mode: syncmem
primary masters: clusternode1Example of check on the current primary:
clusternode1:rh2adm> hdbnsutil -sr_state | egrep -e "primary masters|^mode"
mode: primary
clusternode1:rh2adm>hdbnsutil -sr_state --sapcontrol=1 |grep site.*Mode
siteReplicationMode/DC1=primary
siteReplicationMode/DC3=async
siteReplicationMode/DC2=syncmem
siteOperationMode/DC1=primary
siteOperationMode/DC3=logreplay
siteOperationMode/DC2=logreplayDisplay the database version
Example using SQL query:
hdbsql RH2=> select * from m_database
SYSTEM_ID,DATABASE_NAME,HOST,START_TIME,VERSION,USAGE
"RH2","RH2","node1","2023-06-22 15:33:05.235000000","2.00.059.02.1647435895","CUSTOM"
1 row selected (overall time 29.107 msec; server time 927 usec)
Example using systemOverview.py:
clusternode1:rh2adm> python ./systemOverview.py
| Section    | Name            | Status  | Value                                               |
| ---------- | --------------- | ------- | --------------------------------------------------- |
| System     | Instance ID     |         | RH2                                                 |
| System     | Instance Number |         | 02                                                  |
| System     | Distributed     |         | No                                                  |
| System     | Version         |         | 2.00.059.02.1647435895 (fa/hana2sp05)               |
| System     | Platform        |         | Red Hat Enterprise Linux 9.2 Beta (Plow) 9.2 (Plow) |
| Services   | All Started     | OK      | Yes                                                 |
| Services   | Min Start Time  |         | 2023-07-14 16:31:19.000                             |
| Services   | Max Start Time  |         | 2023-07-26 11:23:17.324                             |
| Memory     | Memory          | OK      | Physical 31.09 GB, Swap 10.00 GB, Used 26.38        |
| CPU        | CPU             | OK      | Available 4, Used 1.04                              |
| Disk       | Data            | OK      | Size 89.0 GB, Used 59.3 GB, Free 33 %               |
| Disk       | Log             | OK      | Size 89.0 GB, Used 59.3 GB, Free 33 %               |
| Disk       | Trace           | OK      | Size 89.0 GB, Used 59.3 GB, Free 33 %               |
| Statistics | Alerts          | WARNING | cannot check statistics w/o SQL connection          |
7.1.4. Start and stop SAP HANA
Option 1: HDB command
clusternode1:rh2adm> HDB help
Usage: /usr/sap/RH2/HDB02/HDB { start|stop|reconf|restart|version|info|proc|admin|kill|kill-<sig>|term }
  kill or kill-9 should never be used in a productive environment!
Start the Database
clusternode1:rh2adm> HDB startStop the database
clusternode1:rh2adm> HDB stop
Option 2 (recommended): Use sapcontrol
clusternode1:rh2adm> sapcontrol -nr ${TINSTANCE} -function StartSystem HDB

03.07.2023 14:08:30
StartSystem
OK
clusternode1:rh2adm> sapcontrol -nr ${TINSTANCE} -function StopSystem HDB
03.07.2023 14:09:33
StopSystem
OKUse the GetProcessList to monitor the starting and stopping of HANA services:
clusternode1:rh2adm> sapcontrol -nr ${TINSTANCE} -function GetProcessList7.1.5. Check SAP HANA System Replication status
There are many ways to check the SAP HANA System Replication status:
- `clusternode1:rh2adm> python systemReplicationStatus.py ` on the primary node
-
clusternode1:rh2adm> echo $? #(Return code of systemReplicationStatus) -
clusternode1:rh2adm> hdbnsutil -sr_state -
clusternode1:rh2adm> hdbnsutil -sr_stateConfiguration
Example of systemReplicationStatus.py output running as a monitor:
clusternode1:rh2adm> watch -n 5 "python
/usr/sap/${SAPSYSTEMNAME}/HDB{TINSTACE}/exe/python_support/systemReplicationStatus.py;echo \$?"
 concurrent-fencing: true
Every 5.0s: python systemReplicationStatus.py;echo $?                                                                                                                              hana08: Fri Jul 28 17:01:05 2023

|Database |Host   |Port  |Service Name |Volume ID |Site ID |Site Name |Secondary |Secondary |Secondary |Secondary |Secondary     |Replication |Replication |Replication    |
|         |	  |	 |             |          |        |          |Host	 |Port      |Site ID   |Site Name |Active Status |Mode        |Status	   |Status Details |
|-------- |------ |----- |------------ |--------- |------- |--------- |--------- |--------- |--------- |--------- |------------- |----------- |----------- |-------------- |
|SYSTEMDB |hana08 |30201 |nameserver   |        1 |	 1 |DC2       |hana09    |    30201 |        3 |DC3	  |YES           |SYNCMEM     |ACTIVE	   |               |
|RH2	  |hana08 |30207 |xsengine     |        2 |	 1 |DC2       |hana09    |    30207 |        3 |DC3	  |YES           |SYNCMEM     |ACTIVE	   |               |
|RH2	  |hana08 |30203 |indexserver  |        3 |	 1 |DC2       |hana09    |    30203 |        3 |DC3	  |YES           |SYNCMEM     |ACTIVE	   |               |
|SYSTEMDB |hana08 |30201 |nameserver   |        1 |	 1 |DC2       |remotehost3    |    30201 |        2 |DC1	  |YES           |SYNCMEM     |ACTIVE	   |               |
|RH2	  |hana08 |30207 |xsengine     |        2 |	 1 |DC2       |remotehost3    |    30207 |        2 |DC1	  |YES           |SYNCMEM     |ACTIVE	   |               |
|RH2	  |hana08 |30203 |indexserver  |        3 |	 1 |DC2       |remotehost3    |    30203 |        2 |DC1	  |YES           |SYNCMEM     |ACTIVE	   |               |

status system replication site "3": ACTIVE
status system replication site "2": ACTIVE
overall system replication status: ACTIVE

Local System Replication State
~~~~~~~~~~~~~~~~~~~~~~~~~~~~~~

mode: PRIMARY
site id: 1
site name: DC2
15
The expected results for the return codes are:
- 10: NoHSR
- 11: Error
- 12: Unknown
- 13: Initializing
- 14: Syncing
- 15: Active
In most cases the System Replication check will return with return code 15. Another display option is to use -t (printLandscapeTree).
Example for the output on the current primary:
clusternode1:rh2adm> python systemReplicationStatus.py -t
HANA System Replication landscape:
  DC1  ( primary )
     | --- DC3  ( syncmem )
     | --- DC2  ( syncmem )
Example of hdbnsutil -sr_state:
[root@clusternode1]# su - rh2adm
clusternode1:rh2adm> watch -n 10 hdbnsutil -sr_state
Every 10.0s: hdbnsutil -sr_state                                                                           clusternode1: Thu Jun 22 08:42:00 2023


System Replication State
~~~~~~~~~~~~~~~~~~~~~~~~

online: true

mode: syncmem
operation mode: logreplay
site id: 2
site name: DC1

is source system: false
is secondary/consumer system: true
has secondaries/consumers attached: false
is a takeover active: false
is primary suspended: false
is timetravel enabled: false
replay mode: auto
active primary site: 1

primary masters: clusternode2

Host Mappings:
~~~~~~~~~~~~~~

clusternode1 -> [DC3] remotehost3
clusternode1 -> [DC1] clusternode1
clusternode1 -> [DC2] clusternode2


Site Mappings:
~~~~~~~~~~~~~~
DC2 (primary/primary)
    |---DC3 (syncmem/logreplay)
    |---DC1 (syncmem/logreplay)

Tier of DC2: 1
Tier of DC3: 2
Tier of DC1: 2

Replication mode of DC2: primary
[2] 0:ssh*
Example of sr_stateConfiguation on the primary:
clusternode1:rh2adm> hdbnsutil -sr_stateConfiguration

System Replication State
~~~~~~~~~~~~~~~~~~~~~~~~

mode: primary
site id: 2
site name: DC1
done.
Example of sr_stateConfiguration on the secondary:
clusternode1:rh2adm> hdbnsutil -sr_stateConfiguration

System Replication State
~~~~~~~~~~~~~~~~~~~~~~~~

mode: syncmem
site id: 1
site name: DC2
active primary site: 2

primary masters: clusternode1
done.
You can also check in the secondary database which node is the current primary. During the failover it happens to have two primary databases and this information is needed to decide which potential primary database is wrong and needs to be re-registered as secondary.
For additional information, refer to Example: Checking the Status on the Primary and Secondary Systems.
7.1.6. Register secondary node
Preconditions to register a secondary database for a SAP HANA System Replication environment:
- Create SAP HANA backup
- Enable SAP HANA System Replication on the primary node
- Copy database keys
- Register Secondary Node
Registration example:
clusternode1:rh2adm> hdbnsutil -sr_register --remoteHost=clusternode2 --remoteInstance=${TINSTANCE} --replicationMode=syncmem --name=DC1 --online
--operationMode not set; using default from global.ini/[system_replication]/operation_mode: logreplay
adding site ...
collecting information ...
updating local ini files ...
done.
With the registration the global.ini file will be automatically updated
… from:
# global.ini last modified 2023-06-15 09:55:05.665341 by /usr/sap/RH2/HDB02/exe/hdbnsutil -initTopology --workergroup=default --set_user_system_pw
[multidb]
mode = multidb
database_isolation = low
singletenant = yes

[persistence]
basepath_datavolumes = /hana/data/RH2
basepath_logvolumes = /hana/log/RH2
… to:
# global.ini last modified 2023-06-15 11:25:44.516946 by hdbnsutil -sr_register --remoteHost=node2 --remoteInstance=02 --replicationMode=syncmem --name=DC1 --online
[multidb]
mode = multidb
database_isolation = low
singletenant = yes

[persistence]
basepath_datavolumes = /hana/data/RH2
basepath_logvolumes = /hana/log/RH2

[system_replication]
timetravel_logreplay_mode = auto
site_id = 3
mode = syncmem
actual_mode = syncmem
site_name = DC1
operation_mode = logreplay

[system_replication_site_masters]
1 = clusternode2:30201
7.1.7. sapcontrol GetProcessList
Check the processes of an active SAP HANA database
clusternode1:rh2adm> sapcontrol -nr ${TINSTANCE} -function GetProcessList                                          clusternode1: Wed Jun  7 08:23:03 2023

07.06.2023 08:23:03
GetProcessList
OK
name, description, dispstatus, textstatus, starttime, elapsedtime, pid
hdbdaemon, HDB Daemon, GREEN, Running, 2023 06 02 16:59:42, 111:23:21, 4245
hdbcompileserver, HDB Compileserver, GREEN, Running, 2023 06 02 17:01:35, 111:21:28, 7888
hdbindexserver, HDB Indexserver-RH2, GREEN, Running, 2023 06 02 17:01:36, 111:21:27, 7941
hdbnameserver, HDB Nameserver, GREEN, Running, 2023 06 02 17:01:29, 111:21:34, 7594
hdbpreprocessor, HDB Preprocessor, GREEN, Running, 2023 06 02 17:01:35, 111:21:28, 7891
hdbwebdispatcher, HDB Web Dispatcher, GREEN, Running, 2023 06 02 17:01:42, 111:21:21, 8339
hdbxsengine, HDB XSEngine-RH2, GREEN, Running, 2023 06 02 17:01:36, 111:21:27, 7944
7.1.8. sapcontrol GetInstanceList
This will list the status of instances of a SAP HANA database. It will also show the ports. There are three different status names:
- GREEN (running)
- GRAY (stopped)
- YELLOW ( status is currently changing)
Example of an active instance:
clusternode1:rh2adm> sapcontrol -nr ${TINSTANCE} -function GetSystemInstanceList                                   clusternode1: Wed Jun  7 08:24:13 2023


07.06.2023 08:24:13
GetSystemInstanceList
OK
hostname, instanceNr, httpPort, httpsPort, startPriority, features, dispstatus
remotehost3, 2, 50213, 50214, 0.3, HDB|HDB_WORKER, GREEN
Example of a stopped instance:
clusternode1:rh2adm> sapcontrol -nr ${TINSTANCE} -function GetSystemInstanceList

22.06.2023 09:14:55
GetSystemInstanceList
OK
hostname, instanceNr, httpPort, httpsPort, startPriority, features, dispstatus
remotehost3, 2, 50213, 50214, 0.3, HDB|HDB_WORKER, GRAY
7.1.9. hdbcons examples
You can also use the HDB Console to display information about the database:
-
hdbcons -e hdbindexserver 'replication info' -
hdbcons -e hdbindexserver helpfor more options
Example of ‘replication info’:
clusternode1:rh2adm> hdbcons -e hdbindexserver 'replication info'
hdbcons -p `pgrep hdbindex` 'replication info'
SAP HANA DB Management Client Console (type '\?' to get help for client commands)
Try to open connection to server process with PID 451925
SAP HANA DB Management Server Console (type 'help' to get help for server commands)
Executable: hdbindexserver (PID: 451925)
[OK]
--
## Start command at: 2023-06-22 09:05:25.211
listing default statistics for volume 3
System Replication Primary Information
======================================
System Replication Primary Configuration
 [system_replication] logshipping_timeout                         = 30
 [system_replication] enable_full_sync                            = false
 [system_replication] preload_column_tables                       = true
 [system_replication] ensure_backup_history                       = true
 [system_replication_communication] enable_ssl                    = off
 [system_replication] keep_old_style_alert                        = false
 [system_replication] enable_log_retention                        = auto
 [system_replication] logshipping_max_retention_size              = 1048576
 [system_replication] logshipping_async_buffer_size               = 268435456
 - lastLogPos                  : 0x4ab2700
 - lastLogPosTimestamp         : 22.06.2023-07.05.25 (1687417525193952)
 - lastConfirmedLogPos         : 0x4ab2700
 - lastConfirmedLogPosTimestamp: 22.06.2023-07.05.25 (1687417525193952)
 - lastSavepointVersion        : 1286
 - lastSavepointLogPos         : 0x4ab0602
 - lastSavepointTimestamp      : 22.06.2023-07.02.42 (1687417362853007)
 2 session registered.
Session index 0
 - SiteID              : 3
 - RemoteHost          : 192.168.5.137
Log Connection
 - ptr               : 0x00007ff04c0a1000
 - channel           : {<NetworkChannelSSLFilter>={<NetworkChannelBase>={this=140671686293528, fd=70, refCnt=2, idx=5, local=192.168.5.134/40203_tcp, remote=192.168.5.137/40406_tcp, state=Connected, pending=[r---]}}}
 - SSLActive           : false
 - mode              : syncmem
Data Connection
 - ptr               : 0x00007ff08b730000
 - channel           : {<NetworkChannelSSLFilter>={<NetworkChannelBase>={this=140671436247064, fd=68, refCnt=2, idx=6, local=192.168.5.134/40203_tcp, remote=192.168.5.137/40408_tcp, state=Connected, pending=[r---]}}}
 - SSLActive           : false
Primary Statistics
 - Creation Timestamp              : 20.06.2023-13.55.07 (1687269307772532)
 - Last Reset Timestamp            : 20.06.2023-13.55.07 (1687269307772532)
 - Statistic Reset Count           : 0
 - ReplicationMode                 : syncmem
 - OperationMode                   : logreplay
 - ReplicationStatus               : ReplicationStatus_Active
 - ReplicationStatusDetails        :
 - ReplicationFullSync             : DISABLED
 - shippedLogPos                   : 0x4ab2700
 - shippedLogPosTimestamp          : 22.06.2023-07.05.25 (1687417525193952)
 - sentLogPos                      : 0x4ab2700
 - sentLogPosTimestamp             : 22.06.2023-07.05.25 (1687417525193952)
 - sentMaxLogWriteEndPosition      : 0x4ab2700
 - sentMaxLogWriteEndPositionReqCnt: 0x1f6b8
 - shippedLogBuffersCount          : 142439
 - shippedLogBuffersSize           : 805855232 bytes
 - shippedLogBuffersSizeUsed       : 449305792 bytes (55.76clusternode1:rh2adm>)
 - shippedLogBuffersSizeNet        : 449013696 bytes (55.72clusternode1:rh2adm>)
 - shippedLogBufferDuration        : 83898615 microseconds
 - shippedLogBufferDurationMin     : 152 microseconds
 - shippedLogBufferDurationMax     : 18879 microseconds
 - shippedLogBufferDurationSend    : 7301067 microseconds
 - shippedLogBufferDurationComp    : 0 microseconds
 - shippedLogBufferThroughput      : 9709099.18 bytes/s
 - shippedLogBufferPendingDuration : 80583785 microseconds
 - shippedLogBufferRealThrougput   : 10073190.40 bytes/s
 - replayLogPos                    : 0x4ab2700
 - replayLogPosTimestamp           : 22.06.2023-07.05.25 (1687417525193952)
 - replayBacklog                   : 0 microseconds
 - replayBacklogSize               : 0 bytes
 - replayBacklogMax                : 822130896 microseconds
 - replayBacklogSizeMax            : 49455104 bytes
 - shippedSavepointVersion         : 0
 - shippedSavepointLogPos          : 0x0
 - shippedSavepointTimestamp       : not set
 - shippedFullBackupCount          : 0
 - shippedFullBackupSize           : 0 bytes
 - shippedFullBackupSizeNet        : 0 bytes (-nanclusternode1:rh2adm>)
 - shippedFullBackupDuration       : 0 microseconds
 - shippedFullBackupDurationComp   : 0 microseconds
 - shippedFullBackupThroughput     : 0.00 bytes/s
 - shippedFullBackupStreamCount     : 0
 - shippedFullBackupResumeCount     : 0
 - shippedLastFullBackupSize       : 0 bytes
 - shippedLastFullBackupSizeNet    : 0 bytes (-nanclusternode1:rh2adm>)
 - shippedLastFullBackupStart      : not set
 - shippedLastFullBackupEnd        : not set
 - shippedLastFullBackupDuration   : 0 microseconds
 - shippedLastFullBackupStreamCount : 0
 - shippedLastFullBackupResumeCount : 0
 - shippedDeltaBackupCount         : 0
 - shippedDeltaBackupSize          : 0 bytes
 - shippedDeltaBackupSizeNet       : 0 bytes (-nanclusternode1:rh2adm>)
 - shippedDeltaBackupDuration      : 0 microseconds
 - shippedDeltaBackupDurationComp  : 0 microseconds
 - shippedDeltaBackupThroughput    : 0.00 bytes/s
 - shippedDeltaBackupStreamCount   : 0
 - shippedDeltaBackupResumeCount   : 0
 - shippedLastDeltaBackupSize      : 0 bytes
 - shippedLastDeltaBackupSizeNet   : 0 bytes (-nanclusternode1:rh2adm>)
 - shippedLastDeltaBackupStart     : not set
 - shippedLastDeltaBackupEnd       : not set
 - shippedLastDeltaBackupDuration  : 0 microseconds
 - shippedLastDeltaBackupStreamCount : 0
 - shippedLastDeltaBackupResumeCount : 0
 - currentTransferType             : None
 - currentTransferSize             : 0 bytes
 - currentTransferPosition         : 0 bytes (0clusternode1:rh2adm>)
 - currentTransferStartTime        : not set
 - currentTransferThroughput       : 0.00 MB/s
 - currentTransferStreamCount      : 0
 - currentTransferResumeCount      : 0
 - currentTransferResumeStartTime  : not set
 - Secondary sync'ed via Log Count : 1
 - syncLogCount                    : 3
 - syncLogSize                     : 62840832 bytes
 - backupHistoryComplete           : 1
 - backupLogPosition               : 0x4a99980
 - backupLogPositionUpdTimestamp   : 22.06.2023-06.56.27 (0x5feb26227e7af)
 - shippedMissingLogCount          : 0
 - shippedMissingLogSize           : 0 bytes
 - backlogSize                     : 0 bytes
 - backlogTime                     : 0 microseconds
 - backlogSizeMax                  : 0 bytes
 - backlogTimeMax                  : 0 microseconds
 - Secondary Log Connect time      : 20.06.2023-13.55.31 (1687269331361049)
 - Secondary Data Connect time     : 20.06.2023-13.55.33 (1687269333768341)
 - Secondary Log Close time        : not set
 - Secondary Data Close time       : 20.06.2023-13.55.31 (1687269331290050)
 - Secondary Log Reconnect Count   : 0
 - Secondary Log Failover Count    : 0
 - Secondary Data Reconnect Count  : 1
 - Secondary Data Failover Count   : 0
----------------------------------------------------------------
Session index 1
 - SiteID              : 2
 - RemoteHost          : 192.168.5.133
Log Connection
 - ptr               : 0x00007ff0963e4000
 - channel           : {<NetworkChannelSSLFilter>={<NetworkChannelBase>={this=140671506282520, fd=74, refCnt=2, idx=0, local=192.168.5.134/40203_tcp, remote=192.168.5.133/40404_tcp, state=Connected, pending=[r---]}}}
 - SSLActive           : false
 - mode              : syncmem
Data Connection
 - ptr               : 0x00007ff072c04000
 - channel           : {<NetworkChannelSSLFilter>={<NetworkChannelBase>={this=140671463146520, fd=75, refCnt=2, idx=1, local=192.168.5.134/40203_tcp, remote=192.168.5.133/40406_tcp, state=Connected, pending=[r---]}}}
 - SSLActive           : false
Primary Statistics
 - Creation Timestamp              : 20.06.2023-13.55.49 (1687269349892111)
 - Last Reset Timestamp            : 20.06.2023-13.55.49 (1687269349892111)
 - Statistic Reset Count           : 0
 - ReplicationMode                 : syncmem
 - OperationMode                   : logreplay
 - ReplicationStatus               : ReplicationStatus_Active
 - ReplicationStatusDetails        :
 - ReplicationFullSync             : DISABLED
 - shippedLogPos                   : 0x4ab2700
 - shippedLogPosTimestamp          : 22.06.2023-07.05.25 (1687417525193952)
 - sentLogPos                      : 0x4ab2700
 - sentLogPosTimestamp             : 22.06.2023-07.05.25 (1687417525193952)
 - sentMaxLogWriteEndPosition      : 0x4ab2700
 - sentMaxLogWriteEndPositionReqCnt: 0x1f377
 - shippedLogBuffersCount          : 142326
 - shippedLogBuffersSize           : 793939968 bytes
 - shippedLogBuffersSizeUsed       : 437675200 bytes (55.13clusternode1:rh2adm>)
 - shippedLogBuffersSizeNet        : 437565760 bytes (55.11clusternode1:rh2adm>)
 - shippedLogBufferDuration        : 76954026 microseconds
 - shippedLogBufferDurationMin     : 115 microseconds
 - shippedLogBufferDurationMax     : 19285 microseconds
 - shippedLogBufferDurationSend    : 2951495 microseconds
 - shippedLogBufferDurationComp    : 0 microseconds
 - shippedLogBufferThroughput      : 10446578.53 bytes/s
 - shippedLogBufferPendingDuration : 73848247 microseconds
 - shippedLogBufferRealThrougput   : 10875889.97 bytes/s
 - replayLogPos                    : 0x4ab2700
 - replayLogPosTimestamp           : 22.06.2023-07.05.25 (1687417525193952)
 - replayBacklog                   : 0 microseconds
 - replayBacklogSize               : 0 bytes
 - replayBacklogMax                : 113119944 microseconds
 - replayBacklogSizeMax            : 30171136 bytes
 - shippedSavepointVersion         : 0
 - shippedSavepointLogPos          : 0x0
 - shippedSavepointTimestamp       : not set
 - shippedFullBackupCount          : 0
 - shippedFullBackupSize           : 0 bytes
 - shippedFullBackupSizeNet        : 0 bytes (-nanclusternode1:rh2adm>)
 - shippedFullBackupDuration       : 0 microseconds
 - shippedFullBackupDurationComp   : 0 microseconds
 - shippedFullBackupThroughput     : 0.00 bytes/s
 - shippedFullBackupStreamCount     : 0
 - shippedFullBackupResumeCount     : 0
 - shippedLastFullBackupSize       : 0 bytes
 - shippedLastFullBackupSizeNet    : 0 bytes (-nanclusternode1:rh2adm>)
 - shippedLastFullBackupStart      : not set
 - shippedLastFullBackupEnd        : not set
 - shippedLastFullBackupDuration   : 0 microseconds
 - shippedLastFullBackupStreamCount : 0
 - shippedLastFullBackupResumeCount : 0
 - shippedDeltaBackupCount         : 0
 - shippedDeltaBackupSize          : 0 bytes
 - shippedDeltaBackupSizeNet       : 0 bytes (-nanclusternode1:rh2adm>)
 - shippedDeltaBackupDuration      : 0 microseconds
 - shippedDeltaBackupDurationComp  : 0 microseconds
 - shippedDeltaBackupThroughput    : 0.00 bytes/s
 - shippedDeltaBackupStreamCount   : 0
 - shippedDeltaBackupResumeCount   : 0
 - shippedLastDeltaBackupSize      : 0 bytes
 - shippedLastDeltaBackupSizeNet   : 0 bytes (-nanclusternode1:rh2adm>)
 - shippedLastDeltaBackupStart     : not set
 - shippedLastDeltaBackupEnd       : not set
 - shippedLastDeltaBackupDuration  : 0 microseconds
 - shippedLastDeltaBackupStreamCount : 0
 - shippedLastDeltaBackupResumeCount : 0
 - currentTransferType             : None
 - currentTransferSize             : 0 bytes
 - currentTransferPosition         : 0 bytes (0clusternode1:rh2adm>)
 - currentTransferStartTime        : not set
 - currentTransferThroughput       : 0.00 MB/s
 - currentTransferStreamCount      : 0
 - currentTransferResumeCount      : 0
 - currentTransferResumeStartTime  : not set
 - Secondary sync'ed via Log Count : 1
 - syncLogCount                    : 3
 - syncLogSize                     : 61341696 bytes
 - backupHistoryComplete           : 1
 - backupLogPosition               : 0x4a99980
 - backupLogPositionUpdTimestamp   : 22.06.2023-06.56.27 (0x5feb26227e670)
 - shippedMissingLogCount          : 0
 - shippedMissingLogSize           : 0 bytes
 - backlogSize                     : 0 bytes
 - backlogTime                     : 0 microseconds
 - backlogSizeMax                  : 0 bytes
 - backlogTimeMax                  : 0 microseconds
 - Secondary Log Connect time      : 20.06.2023-13.56.21 (1687269381053599)
 - Secondary Data Connect time     : 20.06.2023-13.56.27 (1687269387399610)
 - Secondary Log Close time        : not set
 - Secondary Data Close time       : 20.06.2023-13.56.21 (1687269381017244)
 - Secondary Log Reconnect Count   : 0
 - Secondary Log Failover Count    : 0
 - Secondary Data Reconnect Count  : 1
 - Secondary Data Failover Count   : 0
----------------------------------------------------------------
[OK]
## Finish command at: 2023-06-22 09:05:25.212 command took: 572.000 usec
--
[EXIT]
--
[BYE]
Example of help:
clusternode1:rh2adm> hdbcons  -e hdbindexserver help
SAP HANA DB Management Client Console (type '\?' to get help for client commands)
Try to open connection to server process with PID 451925
SAP HANA DB Management Server Console (type 'help' to get help for server commands)
Executable: hdbindexserver (PID: 451925)
[OK]
--
## Start command at: 2023-06-22 09:07:16.784
Synopsis:
help [<command name>]: Print command help
   - <command name> - Command name for which to display help
Available commands:
ae_tableload - Handle loading of column store tables and columns
all - Print help and other info for all hdbcons commands
authentication - Authentication management.
binarysemaphore - BinarySemaphore management
bye - Exit console client
cd - ContainerDirectory management
cfgreg - Basis Configurator
checktopic - CheckTopic management
cnd - ContainerNameDirectory management
conditionalvariable - ConditionalVariable management
connection - Connection management
context - Execution context management (i.e., threads)
converter - Converter management
cpuresctrl - Manage cpu resources such as last-level cache allocation
crash - Crash management
crypto - Cryptography management (SSL/SAML/X509/Encryption).
csaccessor - Display diagnostics related to the CSAccessor library
ddlcontextstore - Get DdlContextStore information
deadlockdetector - Deadlock detector.
debug - Debug management
distribute - Handling distributed systems
dvol - DataVolume management
ELF - ELF symbol resolution management
encryption - Persistence encryption management
eslog - Manipulate logger on extended storage
event - Event management
exit - Exit console client
flightrecorder - Flight Recorder
hananet - HANA-Net command interface
help - Display help for a command or command list
hkt - HANA Kernal Tracer (HKT) management
indexmanager - Get IndexManager information, especially for IndexHandles
itab - Internaltable diagnostics
jexec - Information and actions for Job Executor/Scheduler
licensing - Licensing management.
log - Show information about logger and manipulate logger
machine - Information about the machine topology
mm - Memory management
monitor - Monitor view command
mproxy - Malloc proxy management
msl - Mid size LOB management
mutex - Mutex management
numa - Provides NUMA statistics for all columns of a given table, broken down by column constituents like dictionary, data vector and index.
nvmprovider - NVM Provider
output - Command for managing output from the hdbcons
page - Page management
pageaccess - PageAccess management
profiler - Profiler
quit - Exit console client
readwritelock - ReadWriteLock management
replication - Monitor data and log replication
resman - ResourceManager management
rowstore - Row Store
runtimedump - Generate a runtime dump.
savepoint - Savepoint management
semaphore - Semaphore management
servicethreads - Thread information M_SERVICE_THREADS
snapshot - Snapshot management
stat - Statistics management
statisticsservercontroller - StatisticsServer internals
statreg - Statistics registry command
syncprimi - Syncprimitive management (Mutex, CondVariable, Semaphore, BinarySemaphore,
ReadWriteLock)
table - Table Management
tablepreload - Manage and monitor table preload
trace - Trace management
tracetopic - TraceTopic management
transaction - Transaction management
ut - UnifiedTable Management
version - Version management
vf - VirtualFile management
x2 - get X2 info
[OK]
## Finish command at: 2023-06-22 09:07:16.785 command took: 209.000 usec
--
[EXIT]
--
[BYE]
7.1.10. Create SAP HANA backup
If you want to use SAP HANA System Replication, a backup must first be created on the primary system.
Example of how to perform this is as user <sid>adm:
clusternode1:rh2adm> hdbsql -i ${TINSTANCE} -u system -d SYSTEMDB "BACKUP DATA USING FILE ('/hana/backup/')"
clusternode1:rh2adm> hdbsql -i ${TINSTANCE} -u system -d ${SAPSYSTEMNAME} "BACKUP DATA USING FILE ('/hana/backup/')"
7.1.11. Enable SAP HANA System Replication on the primary database
SAP HANA System Replication has to be enabled on the primary node. This requires a backup to be done first.
clusternode1:rh2adm> hdbnsutil -sr_enable --name=DC1
nameserver is active, proceeding ...
successfully enabled system as system replication source site
done.
7.1.12. Copy database keys to the secondary nodes
The database keys need to be copied from the primary to the secondary database before it can be registered as a secondary.
For example:
clusternode1:rh2adm> scp -rp /usr/sap/${SAPSYSTEMNAME}/SYS/global/security/rsecssfs/data/SSFS_${SAPSYSTEMNAME}.DAT  remotehost3:/usr/sap/${SAPSYSTEMNAME}/SYS/global/security/rsecssfs/data/SSFS_${SAPSYSTEMNAME}.DAT
clusternode1:rh2adm> scp -rp /usr/sap/${SAPSYSTEMNAME}/SYS/global/security/rsecssfs/key/SSFS_${SAPSYSTEMNAME}.KEY remotehost3:/usr/sap/${SAPSYSTEMNAME}/SYS/global/security/rsecssfs/key/SSFS_${SAPSYSTEMNAME}.KEY
7.1.13. Register a secondary node for SAP HANA System Replication
Please ensure that the database keys have been copied to the secondary nodes first. Then run the registration command:
clusternode1:rh2adm> hdbnsutil -sr_register --remoteHost=remotehost3 --remoteInstance=${TINSTANCE} --replicationMode=syncmem --name=DC1 --remoteName=DC3 --operationMode=logreplay --onlineParameter description:
-
remoteHost: hostname of the active node running the source (primary) database -
remoteInstance: the instance number of the database replicationMode: one of the following options-
sync: hard disk synchronization -
async: asynchronous replication -
syncmem: memory synchronization
-
-
name: this is an alias for this replication site -
remoteName: alias name of the source database operationMode: one of the following options-
delta_datashipping: data is periodically transmitted. Takeovers take a little bit longer. -
logreplay: logs are redone immediately on the remote site. Takeover is faster. -
logreplay_readaccess: additional logreplay read-only access to the second site is possible.
-
7.1.14. Check the log_mode of the SAP HANA database
There are two options for setting the log_mode:
-
log_mode=overwrite -
log_mode=normal: This is the default value and is also required when the database instance is running as primary. Using SAP HANA Multitarget System Replication, you have to uselog_mode=normal. The best way to check thelog_modeis by usinghdbsql:
Example including a wrong overwrite entry:
clusternode1:rh2adm> hdbsql -i ${TINSTANCE} -d ${SAPSYSTEMNAME} -u system
Password:

Welcome to the SAP HANA Database interactive terminal.

Type:  \h for help with commands
       \q to quit

hdbsql RH2=> select * from m_inifile_contents where key='log_mode'
FILE_NAME,LAYER_NAME,TENANT_NAME,HOST,SECTION,KEY,VALUE
"global.ini","DEFAULT","","","persistence","log_mode","normal"
"global.ini","HOST","","node2","persistence","log_mode","overwrite"
2 rows selected (overall time 46.931 msec; server time 30.845 msec)

hdbsql RH2=>exit
In this case, we have two global.ini files:
DEFAULT-
/usr/sap/${SAPSYSTEMNAME}/SYS/global/hdb/custom/config/global.ini
-
HOST-
/hana/shared/${SAPSYSTEMNAME}/HDB${TINSTANCE}/${HOSTNAME}/global.iniTheHOSTvalues overwrite theDEFAULTvalues. You can also check both files before the database is started and then usehdbsqlagain to verify the right settings. You can change thelog_modeby editing theglobal.inifile.
-
Example:
clusternode1:rh2adm> vim /hana/shared/${SAPSYSTEMNAME}/HDB${TINSTANCE}/${HOSTNAME}/global.ini
# global.ini last modified 2023-04-06 16:15:03.521715 by hdbnameserver
[persistence]
log_mode = overwrite
# global.ini last modified 2023-04-06 16:15:03.521715 by hdbnameserver
[persistence]
log_mode = normal
After having checked or updated the global.ini file(s), verify the log_mode values:
clusternode1:rh2adm> hdbsql -d ${SAPSYSTEMNAME} -i ${TINSTANCE} -u SYSTEM;
hdbsql RH2=> select * from m_inifile_contents where section='persistence' and key='log_mode'
FILE_NAME,LAYER_NAME,TENANT_NAME,HOST,SECTION,KEY,VALUE
"global.ini","DEFAULT","","","persistence","log_mode","normal"
"global.ini","HOST","","node2","persistence","log_mode","normal"
2 rows selected (overall time 60.982 msec; server time 20.420 msec)
The section also shows that this parameter needs to be set in the [persistence] section. When you change the log mode from overwrite to normal, it is recommended that you create a full data backup to ensure that the database can be recovered.
7.1.15. Discover primary database
There are several ways to identify the primary node, for instance:
-
pcs status | grep Promoted -
hdbnsutil -sr_stateConfiguration -
systemReplicationStatus.py
Option 1 - The following example of the systemReplicationStatus.py script and filter will return the primary database location on all nodes:
clusternode1:rh2adm>
/usr/sap/${SAPSYSTEMNAME}/HDB${TINSTANCE}/exe/Python/bin/python
/usr/sap/${SAPSYSTEMNAME}/HDB${TINSTANCE}/exe/python_support/systemReplicationStatus.py --sapcontrol=1 | egrep -e
"3${TINSTANCE}01/HOST|PRIMARY_MASTERS"| head -1 | awk -F"=" '{ print $2 }'
Output:
clusternode2
Option 2 - The following example displays the systemReplicationStatus in a similar way for all nodes:
rh2adm>hdbnsutil -sr_state --sapcontrol=1 | grep site.*ModeOutput:
siteReplicationMode/DC1=primary
siteReplicationMode/DC3=async
siteReplicationMode/DC2=syncmem
siteOperationMode/DC1=primary
siteOperationMode/DC3=logreplay
siteOperationMode/DC2=logreplay
7.1.16. Takeover primary
Please refer to Check the Replication status section for check on the primary and the secondary nodes. Also:
-
Put cluster into
maintenance-mode - Initiate the takeover on the secondary node
Example for enabling maintenance-mode for the cluster:
[root@clusternode1]# pcs property set maintenance-mode=true
On the secondary that is to become the new primary, run as <sidadm> user:
clusternode1:rh2adm> hdbnsutil -sr_takeoverThis secondary becomes the primary, other active secondary databases get re-registered to the new primary and the old primary needs to be manually re-registered as secondary.
7.1.17. Re-register former primary as secondary
Please ensure that the cluster is stopped or put in maintenance-mode. Example:
clusternode2:rh2adm> hdbnsutil -sr_register --remoteHost=remotehost3 --remoteInstance=${TINSTANCE} --replicationMode=syncmem --name=DC2 --online --remoteName=DC3 --operationMode=logreplay --force_full_replica --onlineIn our examples, we are using full replication. Your SAP HANA system administrator should know when full replication is required.
7.1.18. Recover from failover
Please refer to Check the SAP HANA System Replication status and Discover the primary node. It is important that the information is consistent. If a node is not part of the systemReplicationStatus.py output and has a different system replication state, please check with your database administrator if this node needs to be re-registered.
One way of solving this is to re-register this site as a new secondary.
Sometimes a secondary instance will still not come up. Then unregister this site before you re-register it again. Example of unregistering the secondary DC1:
clusternode1:rh2adm> hdbnsutil -sr_unregister --name=DC1Example of re-registering DC1:
clusternode1:rh2adm> hdbnsutil -sr_register --name=DC1 --remoteHost=node2 --remoteInstance=02 --replicationMode=sync --operationMode=logreplay --onlineThe database needs to be started and checked if it is running. Finally check the replication status.
7.2. Pacemaker commands
7.2.1. Start and stop the cluster
To start the cluster on all nodes execute the following command:
# pcs cluster start -allAfter a reboot, the cluster will be started automatically only if the service is enabled. The command will help to know if the cluster has started and if the daemons are enabled to be autostarted.
# pcs cluster statusThe cluster auto-start can be enabled with:
# pcs cluster enable --allOther options are:
- Stop the cluster.
- Put a node into standby.
-
Put the cluster into
maintenance-mode.
For more details, please check the pcs cluster help:
# pcs cluster stop --all
# pcs cluster help
7.2.2. Put the cluster into maintenance-mode
If you want to make changes and you want to avoid interference bythe pacemaker cluster, you can "freeze" the cluster by putting it into maintenance-mode:
# pcs property set maintenance-mode=true
An easy way to verify maintenance-mode is to check if the resources are unmanaged:
# pcs resource
  * Clone Set: SAPHanaTopology_RH2_02-clone [SAPHanaTopology_RH2_02] (unmanaged):
    * SAPHanaTopology_RH2_02    (ocf:heartbeat:SAPHanaTopology):         Started clusternode1 (unmanaged)
    * SAPHanaTopology_RH2_02    (ocf:heartbeat:SAPHanaTopology):         Started clusternode2 (unmanaged)
  * Clone Set: SAPHana_RH2_02-clone [SAPHana_RH2_02] (promotable, unmanaged):
    * SAPHana_RH2_02    (ocf:heartbeat:SAPHana):         Unpromoted clusternode1 (unmanaged)
    * SAPHana_RH2_02    (ocf:heartbeat:SAPHana):         Promoted clusternode2 (unmanaged)
  * vip_RH2_02_MASTER   (ocf:heartbeat:IPaddr2):         Started clusternode2 (unmanaged)
Refresh cluster resources to detect the resource state while the cluster is in maintenance-mode and does not update resource status changes:
# pcs resource refresh
This will indicate if anything is not yet correct and will cause remediation action by the cluster, as soon as it is taken out of maintenance-mode.
Remove the maintenance-mode by running:
# pcs property set maintenance-mode=falseNow the cluster will continue to work. If something is configured wrong, it will react now.
7.2.3. Check cluster status
Following are several ways to check the cluster status:
Check if the cluster is running:
# pcs cluster statusCheck the cluster and all resources:
# pcs statusCheck the cluster, all resources and all node attributes:
# pcs status --fullCheck the resources only:
# pcs resource status --fullCheck
Stonithhistory:# pcs stonith historyCheck location constraints:
# pcs constraint location
Fencing must be configured and tested. In order to obtain a solution that is as automated as possible, the cluster must be constantly activated, which will then enable the cluster to automatically start after a reboot. In a production environment, disabling the restart allows manual intervention, for instance after a crash. Please also check the daemon status.
Example:
# pcs status --full
Cluster name: cluster1
Status of pacemakerd: 'Pacemaker is running' (last updated 2023-06-22 17:56:01 +02:00)
Cluster Summary:
  * Stack: corosync
  * Current DC: clusternode2 (2) (version 2.1.5-7.el9-a3f44794f94) - partition with quorum
  * Last updated: Thu Jun 22 17:56:01 2023
  * Last change:  Thu Jun 22 17:53:34 2023 by root via crm_attribute on clusternode1
  * 2 nodes configured
  * 6 resource instances configured
Node List:
  * Node clusternode1 (1): online, feature set 3.16.2
  * Node clusternode2 (2): online, feature set 3.16.2
Full List of Resources:
  * h7fence	(stonith:fence_rhevm):	 Started clusternode2
  * Clone Set: SAPHanaTopology_RH2_02-clone [SAPHanaTopology_RH2_02]:
    * SAPHanaTopology_RH2_02	(ocf:heartbeat:SAPHanaTopology):	 Started clusternode1
    * SAPHanaTopology_RH2_02	(ocf:heartbeat:SAPHanaTopology):	 Started clusternode2
  * Clone Set: SAPHana_RH2_02-clone [SAPHana_RH2_02] (promotable):
    * SAPHana_RH2_02	(ocf:heartbeat:SAPHana):	 Promoted clusternode1
    * SAPHana_RH2_02	(ocf:heartbeat:SAPHana):	 Unpromoted clusternode2
  * vip_RH2_02_MASTER	(ocf:heartbeat:IPaddr2):	 Started clusternode1
Node Attributes:
  * Node: clusternode1 (1):
    * hana_rh2_clone_state            	: PROMOTED
    * hana_rh2_op_mode                	: logreplay
    * hana_rh2_remoteHost             	: clusternode2
    * hana_rh2_roles                  	: 4:P:master1:master:worker:master
    * hana_rh2_site                   	: DC1
    * hana_rh2_sra                    	: -
    * hana_rh2_srah                   	: -
    * hana_rh2_srmode                 	: syncmem
    * hana_rh2_sync_state             	: PRIM
    * hana_rh2_version                	: 2.00.059.02
    * hana_rh2_vhost                  	: clusternode1
    * lpa_rh2_lpt                     	: 1687449214
    * master-SAPHana_RH2_02           	: 150
  * Node: clusternode2 (2):
    * hana_rh2_clone_state            	: DEMOTED
    * hana_rh2_op_mode                	: logreplay
    * hana_rh2_remoteHost             	: clusternode1
    * hana_rh2_roles                  	: 4:S:master1:master:worker:master
    * hana_rh2_site                   	: DC2
    * hana_rh2_sra                    	: -
    * hana_rh2_srah                   	: -
    * hana_rh2_srmode                 	: syncmem
    * hana_rh2_sync_state             	: SOK
    * hana_rh2_version                	: 2.00.059.02
    * hana_rh2_vhost                  	: clusternode2
    * lpa_rh2_lpt                     	: 30
    * master-SAPHana_RH2_02           	: 100
Migration Summary:
Tickets:
PCSD Status:
  clusternode1: Online
  clusternode2: Online
Daemon Status:
  corosync: active/enabled
  pacemaker: active/enabled
  pcsd: active/enabled
7.2.4. Check resource states
Use pcs resource to check the status of all resources. This prints the list and the current status of the resources.
Example:
# pcs resource
  * Clone Set: SAPHanaTopology_RH2_02-clone [SAPHanaTopology_RH2_02]:
    * Started: [ clusternode1 clusternode2 ]
  * Clone Set: SAPHana_RH2_02-clone [SAPHana_RH2_02] (promotable):
    * Promoted: [ clusternode1 ]
    * Unpromoted: [ clusternode2 ]
  * vip_RH2_02_MASTER	(ocf:heartbeat:IPaddr2):	 Started clusternode1
7.2.5. Check resource config
The following displays the current resource configuration:
# pcs resource config
Resource: vip_RH2_02_MASTER (class=ocf provider=heartbeat type=IPaddr2)
  Attributes: vip_RH2_02_MASTER-instance_attributes
    ip=192.168.5.136
  Operations:
    monitor: vip_RH2_02_MASTER-monitor-interval-10s
      interval=10s
      timeout=20s
    start: vip_RH2_02_MASTER-start-interval-0s
      interval=0s
      timeout=20s
    stop: vip_RH2_02_MASTER-stop-interval-0s
      interval=0s
      timeout=20s
Clone: SAPHanaTopology_RH2_02-clone
  Meta Attributes: SAPHanaTopology_RH2_02-clone-meta_attributes
    clone-max=2
    clone-node-max=1
    interleave=true
  Resource: SAPHanaTopology_RH2_02 (class=ocf provider=heartbeat type=SAPHanaTopology)
    Attributes: SAPHanaTopology_RH2_02-instance_attributes
      InstanceNumber=02
      SID=RH2
    Operations:
      methods: SAPHanaTopology_RH2_02-methods-interval-0s
        interval=0s
        timeout=5
      monitor: SAPHanaTopology_RH2_02-monitor-interval-10
        interval=10
        timeout=600
      reload: SAPHanaTopology_RH2_02-reload-interval-0s
        interval=0s
        timeout=5
      start: SAPHanaTopology_RH2_02-start-interval-0s
        interval=0s
        timeout=600
      stop: SAPHanaTopology_RH2_02-stop-interval-0s
        interval=0s
        timeout=600
Clone: SAPHana_RH2_02-clone
  Meta Attributes: SAPHana_RH2_02-clone-meta_attributes
    clone-max=2
    clone-node-max=1
    interleave=true
    notify=true
    promotable=true
  Resource: SAPHana_RH2_02 (class=ocf provider=heartbeat type=SAPHana)
    Attributes: SAPHana_RH2_02-instance_attributes
      AUTOMATED_REGISTER=true
      DUPLICATE_PRIMARY_TIMEOUT=300
      HANA_CALL_TIMEOUT=10
      InstanceNumber=02
      PREFER_SITE_TAKEOVER=true
      SID=RH2
    Operations:
      demote: SAPHana_RH2_02-demote-interval-0s
        interval=0s
        timeout=3600
      methods: SAPHana_RH2_02-methods-interval-0s
        interval=0s
        timeout=5
      monitor: SAPHana_RH2_02-monitor-interval-251
        interval=251
        timeout=700
        role=Unpromoted
      monitor: SAPHana_RH2_02-monitor-interval-249
        interval=249
        timeout=700
        role=Promoted
      promote: SAPHana_RH2_02-promote-interval-0s
        interval=0s
        timeout=3600
      reload: SAPHana_RH2_02-reload-interval-0s
        interval=0s
        timeout=5
      start: SAPHana_RH2_02-start-interval-0s
        interval=0s
        timeout=3200
      stop: SAPHana_RH2_02-stop-interval-0s
        interval=0s
        timeout=3100
This lists all the parameters which are used to configure the installed and configured resource agent.
7.2.6. SAPHana resource option AUTOMATED_REGISTER=true
If this option is used in the SAPHana resource, pacemaker will automatically re-register the secondary database.
It is recommended to use this option for the first tests. When using AUTOMATED_REGISTER=false the administrator needs to re-register the secondary node manually.
7.2.7. Resource handling
There are several options for managing resources. For more information, please check out the help available:
# pcs resource helpList the used resource agents:
# pcs resource config | grep "type=" | awk -F"type=" '{ print $2 }' | sed -e "s/)//g"Example output:
IPaddr2
SAPHanaTopology
SAPHana
Display specific resource agent description and configuration parameters:
# pcs resource describe <resource agent>Example (without output):
# pcs resource describe IPaddr2
Example of resource agent IPaddr2 (with output):
Assumed agent name 'ocf:heartbeat:IPaddr2' (deduced from 'IPaddr2')
ocf:heartbeat:IPaddr2 - Manages virtual IPv4 and IPv6 addresses (Linux specific version)

This Linux-specific resource manages IP alias IP addresses. It can add an IP alias, or remove one. In
addition, it can implement Cluster Alias IP functionality if invoked as a clone resource.  If used as a
clone, "shared address with a trivial, stateless (autonomous) load-balancing/mutual exclusion on
ingress" mode gets applied (as opposed to "assume resource uniqueness" mode otherwise). For that, Linux
firewall (kernel and userspace) is assumed, and since recent distributions are ambivalent in plain
"iptables" command to particular back-end resolution, "iptables-legacy" (when present) gets prioritized
so as to avoid incompatibilities (note that respective ipt_CLUSTERIP firewall extension in use here is,
at the same time, marked deprecated, yet said "legacy" layer can make it workable, literally, to this
day) with "netfilter" one (as in "iptables-nft"). In that case, you should explicitly set clone-node-max
>= 2, and/or clone-max < number of nodes. In case of node failure, clone instances need to be re-
allocated on surviving nodes. This would not be possible if there is already an instance on those nodes,
and clone-node-max=1 (which is the default).  When the specified IP address gets assigned to a
respective interface, the resource agent sends unsolicited ARP (Address Resolution Protocol, IPv4) or NA
(Neighbor Advertisement, IPv6) packets to inform neighboring machines about the change. This
functionality is controlled for both IPv4 and IPv6 by shared 'arp_*' parameters.

Resource options:
  ip (required) (unique): The IPv4 (dotted quad notation) or IPv6 address (colon hexadecimal notation)
      example IPv4 "192.168.1.1". example IPv6 "2001:db8:DC28:0:0:FC57:D4C8:1FFF".
  nic: The base network interface on which the IP address will be brought online.  If left empty, the
      script will try and determine this from the routing table.  Do NOT specify an alias interface in
      the form eth0:1 or anything here; rather, specify the base interface only. If you want a label,
      see the iflabel parameter.  Prerequisite:  There must be at least one static IP address, which is
      not managed by the cluster, assigned to the network interface. If you can not assign any static IP
      address on the interface, modify this kernel parameter:  sysctl -w
      net.ipv4.conf.all.promote_secondaries=1 # (or per device)
  cidr_netmask: The netmask for the interface in CIDR format (e.g., 24 and not 255.255.255.0)  If
      unspecified, the script will also try to determine this from the routing table.
  broadcast: Broadcast address associated with the IP. It is possible to use the special symbols '+' and
      '-' instead of the broadcast address. In this case, the broadcast address is derived by
      setting/resetting the host bits of the interface prefix.
  iflabel: You can specify an additional label for your IP address here. This label is appended to your
      interface name.  The kernel allows alphanumeric labels up to a maximum length of 15 characters
      including the interface name and colon (e.g. eth0:foobar1234)  A label can be specified in nic
      parameter but it is deprecated. If a label is specified in nic name, this parameter has no effect.
  lvs_support: Enable support for LVS Direct Routing configurations. In case a IP address is stopped,
      only move it to the loopback device to allow the local node to continue to service requests, but
      no longer advertise it on the network.  Notes for IPv6: It is not necessary to enable this option
      on IPv6. Instead, enable 'lvs_ipv6_addrlabel' option for LVS-DR usage on IPv6.
  lvs_ipv6_addrlabel: Enable adding IPv6 address label so IPv6 traffic originating from the address's
      interface does not use this address as the source. This is necessary for LVS-DR health checks to
      realservers to work. Without it, the most recently added IPv6 address (probably the address added
      by IPaddr2) will be used as the source address for IPv6 traffic from that interface and since that
      address exists on loopback on the realservers, the realserver response to pings/connections will
      never leave its loopback. See RFC3484 for the detail of the source address selection.  See also
      'lvs_ipv6_addrlabel_value' parameter.
  lvs_ipv6_addrlabel_value: Specify IPv6 address label value used when 'lvs_ipv6_addrlabel' is enabled.
      The value should be an unused label in the policy table which is shown by 'ip addrlabel list'
      command. You would rarely need to change this parameter.
  mac: Set the interface MAC address explicitly. Currently only used in case of the Cluster IP Alias.
      Leave empty to chose automatically.
  clusterip_hash: Specify the hashing algorithm used for the Cluster IP functionality.
  unique_clone_address: If true, add the clone ID to the supplied value of IP to create a unique address
      to manage
  arp_interval: Specify the interval between unsolicited ARP (IPv4) or NA (IPv6) packets in
      milliseconds.  This parameter is deprecated and used for the backward compatibility only. It is
      effective only for the send_arp binary which is built with libnet, and send_ua for IPv6. It has no
      effect for other arp_sender.
  arp_count: Number of unsolicited ARP (IPv4) or NA (IPv6) packets to send at resource initialization.
  arp_count_refresh: For IPv4, number of unsolicited ARP packets to send during resource monitoring.
      Doing so helps mitigate issues of stuck ARP caches resulting from split-brain situations.
  arp_bg: Whether or not to send the ARP (IPv4) or NA (IPv6) packets in the background. The default is
      true for IPv4 and false for IPv6.
  arp_sender: For IPv4, the program to send ARP packets with on start. Available options are:  -
      send_arp: default  - ipoibarping: default for infiniband interfaces if ipoibarping is available  -
      iputils_arping: use arping in iputils package  - libnet_arping: use another variant of arping
      based on libnet
  send_arp_opts: For IPv4, extra options to pass to the arp_sender program. Available options are vary
      depending on which arp_sender is used.  A typical use case is specifying '-A' for iputils_arping
      to use ARP REPLY instead of ARP REQUEST as Gratuitous ARPs.
  flush_routes: Flush the routing table on stop. This is for applications which use the cluster IP
      address and which run on the same physical host that the IP address lives on. The Linux kernel may
      force that application to take a shortcut to the local loopback interface, instead of the
      interface the address is really bound to. Under those circumstances, an application may, somewhat
      unexpectedly, continue to use connections for some time even after the IP address is deconfigured.
      Set this parameter in order to immediately disable said shortcut when the IP address goes away.
  run_arping: For IPv4, whether or not to run arping for collision detection check.
  nodad: For IPv6, do not perform Duplicate Address Detection when adding the address.
  noprefixroute: Use noprefixroute flag (see 'man ip-address').
  preferred_lft: For IPv6, set the preferred lifetime of the IP address. This can be used to ensure that
      the created IP address will not be used as a source address for routing. Expects a value as
      specified in section 5.5.4 of RFC 4862.
  network_namespace: Specifies the network namespace to operate within. The namespace must already
      exist, and the interface to be used must be within the namespace.

Default operations:
  start:
    interval=0s
    timeout=20s
  stop:
    interval=0s
    timeout=20s
  monitor:
    interval=10s
    timeout=20s
If the cluster is stopped, all the resources will be stopped as well; if the cluster is put into maintenance-mode, all resources remain in their current status but will not be monitored or managed.
7.2.8. Cluster property handling for maintenance-mode
List all defined properties:
[root@clusternode1] pcs property
Cluster Properties:
 cluster-infrastructure: corosync
 cluster-name: cluster1
 concurrent-fencing: true
 dc-version: 2.1.5-7.el9-a3f44794f94
 hana_rh2_site_srHook_DC1: PRIM
 hana_rh2_site_srHook_DC2: SFAIL
 have-watchdog: false
 last-lrm-refresh: 1688548036
 maintenance-mode: true
 priority-fencing-delay: 10s
 stonith-enabled: true
 stonith-timeout: 900
To reconfigure the database, the cluster must be instructed to ignore any changes until the configuration is complete. You can put the cluster into maintenance-mode using:
# pcs property set maintenance-mode=true
Check the maintenance-mode:
# pcs resource
  * Clone Set: SAPHanaTopology_RH2_02-clone [SAPHanaTopology_RH2_02] (unmanaged):
    * SAPHanaTopology_RH2_02	(ocf:heartbeat:SAPHanaTopology):	 Started clusternode1 (unmanaged)
    * SAPHanaTopology_RH2_02	(ocf:heartbeat:SAPHanaTopology):	 Started clusternode2 (unmanaged)
  * Clone Set: SAPHana_RH2_02-clone [SAPHana_RH2_02] (promotable, unmanaged):
    * SAPHana_RH2_02	(ocf:heartbeat:SAPHana):	 Promoted clusternode1 (unmanaged)
    * SAPHana_RH2_02	(ocf:heartbeat:SAPHana):	 Unpromoted clusternode2 (unmanaged)
  * vip_RH2_02_MASTER	(ocf:heartbeat:IPaddr2):	 Started clusternode1 (unmanaged)
Verify that all resources are "unmanaged":
[root@clusternode1]# pcs status
Cluster name: cluster1
Status of pacemakerd: 'Pacemaker is running' (last updated 2023-06-27 16:02:15 +02:00)
Cluster Summary:
  * Stack: corosync
  * Current DC: clusternode2 (version 2.1.5-7.el9-a3f44794f94) - partition with quorum
  * Last updated: Tue Jun 27 16:02:16 2023
  * Last change:  Tue Jun 27 16:02:14 2023 by root via cibadmin on clusternode1
  * 2 nodes configured
  * 6 resource instances configured

              *** Resource management is DISABLED ***
  The cluster will not attempt to start, stop or recover services

Node List:
  * Online: [ clusternode1 clusternode2 ]

Full List of Resources:
  * h7fence	(stonith:fence_rhevm):	 Started clusternode2 (unmanaged)
  * Clone Set: SAPHanaTopology_RH2_02-clone [SAPHanaTopology_RH2_02] (unmanaged):
    * SAPHanaTopology_RH2_02	(ocf:heartbeat:SAPHanaTopology):	 Started clusternode1 (unmanaged)
    * SAPHanaTopology_RH2_02	(ocf:heartbeat:SAPHanaTopology):	 Started clusternode2 (unmanaged)
  * Clone Set: SAPHana_RH2_02-clone [SAPHana_RH2_02] (promotable, unmanaged):
    * SAPHana_RH2_02	(ocf:heartbeat:SAPHana):	 Promoted clusternode1 (unmanaged)
    * SAPHana_RH2_02	(ocf:heartbeat:SAPHana):	 Unpromoted clusternode2 (unmanaged)
  * vip_RH2_02_MASTER	(ocf:heartbeat:IPaddr2):	 Started clusternode1 (unmanaged)

Daemon Status:
  corosync: active/enabled
  pacemaker: active/enabled
  pcsd: active/enabled
The resources will switch back to managed if you unset the maintenance-mode:
# pcs property set maintenance-mode=false7.2.9. Failover the SAPHana resource using Move
A simple example of how to failover the SAP HANA database is to use the pcs resource move command. You need to use the clone resource name and move the resource as shown below:
# pcs resource move <SAPHana-clone-resource>
In this example, the clone resource is SAPHana_RH2_02-clone:
[root@clusternode1]# pcs resource
  * Clone Set: SAPHanaTopology_RH2_02-clone [SAPHanaTopology_RH2_02]:
    * Started: [ clusternode1 clusternode2 ]
  * Clone Set: SAPHana_RH2_02-clone [SAPHana_RH2_02] (promotable):
    * Promoted: [ clusternode1 ]
    * Unpromoted: [ clusternode2 ]
  * vip_RH2_02_MASTER	(ocf:heartbeat:IPaddr2):	 Started clusternode1
Move the resource:
# pcs resource move SAPHana_RH2_02-clone
Location constraint to move resource 'SAPHana_RH2_02-clone' has been created
Waiting for the cluster to apply configuration changes...
Location constraint created to move resource 'SAPHana_RH2_02-clone' has been removed
Waiting for the cluster to apply configuration changes...
resource 'SAPHana_RH2_02-clone' is promoted on node 'clusternode2'; unpromoted on node 'clusternode1'
Check if there are remaining constraints:
# pcs constraint locationYou can remove those location constraints created during the failover by clearing the resource. Example:
[root@clusternode1]# pcs resource clear SAPHana_RH2_02-cloneCheck if there are any remaining warnings or entries in the "Migration Summary":
# pcs status --full
Check the stonith history:
# pcs stonith historyIf desired, clear the stonith history:
# pcs stonith history cleanupIf you are using a pacemaker version earlier than 2.1.5, please refer to Is there a way to manage constraints when running pcs resource move? and check the remaining constraints.
7.2.10. Monitor failover and sync state
All pacemaker activities are logged in the /var/log/messages file on the cluster nodes. Since there are many other messages, it is sometimes difficult to read the messages related to the SAP resource agent. You can configure a command alias that filters out only the messages related to SAP resource agent.
Example alias tmsl:
# alias tmsl='tail -1000f /var/log/messages | egrep -s "Setting master-rsc_SAPHana_${SAPSYSTEMNAME}_HDB${TINSTANCE}|sr_register|WAITING4LPA|PROMOTED|DEMOTED|UNDEFINED|master_walk|SWAIT|WaitforStopped|FAILED|LPT"'
Example output of tsml:
[root@clusternode1]# tmsl
Jun 22 13:59:54 clusternode1 SAPHana(SAPHana_RH2_02)[907482]: INFO: DEC: Finally get_SRHOOK()=SOK
Jun 22 13:59:55 clusternode1 SAPHana(SAPHana_RH2_02)[907482]: INFO: DEC: secondary with sync status SOK ==> possible takeover node
Jun 22 13:59:55 clusternode1 SAPHana(SAPHana_RH2_02)[907482]: INFO: DEC: hana_rh2_site_srHook_DC1=SWAIT
Jun 22 13:59:55 clusternode1 SAPHana(SAPHana_RH2_02)[907482]: INFO: DEC: hana_rh2_site_srHook_DC1 is empty or SWAIT. Take polling attribute: hana_rh2_sync_state=SOK
Jun 22 13:59:55 clusternode1 SAPHana(SAPHana_RH2_02)[907482]: INFO: DEC: Finally get_SRHOOK()=SOK
Jun 22 13:59:55 clusternode1 SAPHana(SAPHana_RH2_02)[907482]: INFO: DEC: saphana_monitor_secondary: scoring_crm_master(4:S:master1:master:worker:master,SOK)
Jun 22 13:59:55 clusternode1 SAPHana(SAPHana_RH2_02)[907482]: INFO: DEC: scoring_crm_master: sync(SOK) is matching syncPattern (SOK)
Jun 22 14:04:06 clusternode1 SAPHana(SAPHana_RH2_02)[914625]: INFO: DEC: hana_rh2_site_srHook_DC1=SWAIT
Jun 22 14:04:06 clusternode1 SAPHana(SAPHana_RH2_02)[914625]: INFO: DEC: hana_rh2_site_srHook_DC1 is empty or SWAIT. Take polling attribute: hana_rh2_sync_state=SOK
Jun 22 14:04:06 clusternode1 SAPHana(SAPHana_RH2_02)[914625]: INFO: DEC: Finally get_SRHOOK()=SOK
Jun 22 14:04:09 clusternode1 SAPHana(SAPHana_RH2_02)[914625]: INFO: DEC: hana_rh2_site_srHook_DC1=SWAIT
Jun 22 14:04:09 clusternode1 SAPHana(SAPHana_RH2_02)[914625]: INFO: DEC: hana_rh2_site_srHook_DC1 is empty or SWAIT. Take polling attribute: hana_rh2_sync_state=SOK
Jun 22 14:04:09 clusternode1 SAPHana(SAPHana_RH2_02)[914625]: INFO: DEC: Finally get_SRHOOK()=SOK
Jun 22 14:04:09 clusternode1 SAPHana(SAPHana_RH2_02)[914625]: INFO: DEC: secondary with sync status SOK ==> possible takeover node
Jun 22 14:04:09 clusternode1 SAPHana(SAPHana_RH2_02)[914625]: INFO: DEC: hana_rh2_site_srHook_DC1=SWAIT
Jun 22 14:04:09 clusternode1 SAPHana(SAPHana_RH2_02)[914625]: INFO: DEC: hana_rh2_site_srHook_DC1 is empty or SWAIT. Take polling attribute: hana_rh2_sync_state=SOK
Jun 22 14:04:09 clusternode1 SAPHana(SAPHana_RH2_02)[914625]: INFO: DEC: Finally get_SRHOOK()=SOK
Jun 22 14:04:09 clusternode1 SAPHana(SAPHana_RH2_02)[914625]: INFO: DEC: saphana_monitor_secondary: scoring_crm_master(4:S:master1:master:worker:master,SOK)
Jun 22 14:04:09 clusternode1 SAPHana(SAPHana_RH2_02)[914625]: INFO: DEC: scoring_crm_master: sync(SOK) is matching syncPattern (SOK)
Jun 22 14:08:21 clusternode1 SAPHana(SAPHana_RH2_02)[922136]: INFO: DEC: hana_rh2_site_srHook_DC1=SWAIT
Jun 22 14:08:21 clusternode1 SAPHana(SAPHana_RH2_02)[922136]: INFO: DEC: hana_rh2_site_srHook_DC1 is empty or SWAIT. Take polling attribute: hana_rh2_sync_state=SOK
Jun 22 14:08:21 clusternode1 SAPHana(SAPHana_RH2_02)[922136]: INFO: DEC: Finally get_SRHOOK()=SOK
Jun 22 14:08:23 clusternode1 SAPHana(SAPHana_RH2_02)[922136]: INFO: DEC: hana_rh2_site_srHook_DC1=SWAIT
Jun 22 14:08:23 clusternode1 SAPHana(SAPHana_RH2_02)[922136]: INFO: DEC: hana_rh2_site_srHook_DC1 is empty or SWAIT. Take polling attribute: hana_rh2_sync_state=SOK
Jun 22 14:08:23 clusternode1 SAPHana(SAPHana_RH2_02)[922136]: INFO: DEC: Finally get_SRHOOK()=SOK
Jun 22 14:08:24 clusternode1 SAPHana(SAPHana_RH2_02)[922136]: INFO: DEC: secondary with sync status SOK ==> possible takeover node
Jun 22 14:08:24 clusternode1 SAPHana(SAPHana_RH2_02)[922136]: INFO: DEC: hana_rh2_site_srHook_DC1=SWAIT
Jun 22 14:08:24 clusternode1 SAPHana(SAPHana_RH2_02)[922136]: INFO: DEC: hana_rh2_site_srHook_DC1 is empty or SWAIT. Take polling attribute: hana_rh2_sync_state=SOK
Jun 22 14:08:24 clusternode1 SAPHana(SAPHana_RH2_02)[922136]: INFO: DEC: Finally get_SRHOOK()=SOK
Jun 22 14:08:24 clusternode1 SAPHana(SAPHana_RH2_02)[922136]: INFO: DEC: saphana_monitor_secondary: scoring_crm_master(4:S:master1:master:worker:master,SOK)
Jun 22 14:08:24 clusternode1 SAPHana(SAPHana_RH2_02)[922136]: INFO: DEC: scoring_crm_master: sync(SOK) is matching syncPattern (SOK)
Jun 22 14:12:35 clusternode1 SAPHana(SAPHana_RH2_02)[929408]: INFO: DEC: hana_rh2_site_srHook_DC1=SWAIT
Jun 22 14:12:35 clusternode1 SAPHana(SAPHana_RH2_02)[929408]: INFO: DEC: hana_rh2_site_srHook_DC1 is empty or SWAIT. Take polling attribute: hana_rh2_sync_state=SOK
Jun 22 14:12:36 clusternode1 SAPHana(SAPHana_RH2_02)[929408]: INFO: DEC: Finally get_SRHOOK()=SOK
Jun 22 14:12:38 clusternode1 SAPHana(SAPHana_RH2_02)[929408]: INFO: DEC: hana_rh2_site_srHook_DC1=SWAIT
Jun 22 14:12:38 clusternode1 SAPHana(SAPHana_RH2_02)[929408]: INFO: DEC: hana_rh2_site_srHook_DC1 is empty or SWAIT. Take polling attribute: hana_rh2_sync_state=SOK
Jun 22 14:12:38 clusternode1 SAPHana(SAPHana_RH2_02)[929408]: INFO: DEC: Finally get_SRHOOK()=SOK
Jun 22 14:12:38 clusternode1 SAPHana(SAPHana_RH2_02)[929408]: INFO: DEC: secondary with sync status SOK ==> possible takeover node
Jun 22 14:12:39 clusternode1 SAPHana(SAPHana_RH2_02)[929408]: INFO: DEC: hana_rh2_site_srHook_DC1=SWAIT
Jun 22 14:12:39 clusternode1 SAPHana(SAPHana_RH2_02)[929408]: INFO: DEC: hana_rh2_site_srHook_DC1 is empty or SWAIT. Take polling attribute: hana_rh2_sync_state=SOK
Jun 22 14:12:39 clusternode1 SAPHana(SAPHana_RH2_02)[929408]: INFO: DEC: Finally get_SRHOOK()=SOK
Jun 22 14:12:39 clusternode1 SAPHana(SAPHana_RH2_02)[929408]: INFO: DEC: saphana_monitor_secondary: scoring_crm_master(4:S:master1:master:worker:master,SOK)
Jun 22 14:12:39 clusternode1 SAPHana(SAPHana_RH2_02)[929408]: INFO: DEC: scoring_crm_master: sync(SOK) is matching syncPattern (SOK)
Jun 22 14:14:01 clusternode1 pacemaker-attrd[10150]: notice: Setting hana_rh2_clone_state[clusternode2]: PROMOTED -> DEMOTED
Jun 22 14:14:02 clusternode1 pacemaker-attrd[10150]: notice: Setting hana_rh2_clone_state[clusternode2]: DEMOTED -> UNDEFINED
Jun 22 14:14:19 clusternode1 pacemaker-attrd[10150]: notice: Setting hana_rh2_clone_state[clusternode1]: DEMOTED -> PROMOTED
Jun 22 14:14:21 clusternode1 SAPHana(SAPHana_RH2_02)[932762]: INFO: DEC: hana_rh2_site_srHook_DC1=SWAIT
Jun 22 14:14:21 clusternode1 SAPHana(SAPHana_RH2_02)[932762]: INFO: DEC: hana_rh2_site_srHook_DC1 is empty or SWAIT. Take polling attribute: hana_rh2_sync_state=SOK
Jun 22 14:14:21 clusternode1 SAPHana(SAPHana_RH2_02)[932762]: INFO: DEC: Finally get_SRHOOK()=SOK
Jun 22 14:15:14 clusternode1 SAPHana(SAPHana_RH2_02)[932762]: INFO: DEC: hana_rh2_site_srHook_DC1=SWAIT
Jun 22 14:15:22 clusternode1 pacemaker-attrd[10150]: notice: Setting hana_rh2_sync_state[clusternode1]: SOK -> PRIM
Jun 22 14:15:23 clusternode1 pacemaker-attrd[10150]: notice: Setting hana_rh2_sync_state[clusternode2]: PRIM -> SOK
Jun 22 14:15:23 clusternode1 SAPHana(SAPHana_RH2_02)[934810]: INFO: ACT site=DC1, setting SOK for secondary (1)
Jun 22 14:15:25 clusternode1 pacemaker-attrd[10150]: notice: Setting hana_rh2_clone_state[clusternode2]: UNDEFINED -> DEMOTED
Jun 22 14:15:32 clusternode1 pacemaker-attrd[10150]: notice: Setting hana_rh2_sync_state[clusternode2]: SOK -> SFAIL
Jun 22 14:19:36 clusternode1 pacemaker-attrd[10150]: notice: Setting hana_rh2_sync_state[clusternode2]: SFAIL -> SOK
Jun 22 14:19:36 clusternode1 SAPHana(SAPHana_RH2_02)[942693]: INFO: ACT site=DC1, setting SOK for secondary (1)
Jun 22 14:23:49 clusternode1 SAPHana(SAPHana_RH2_02)[950623]: INFO: ACT site=DC1, setting SOK for secondary (1)
Jun 22 14:28:02 clusternode1 SAPHana(SAPHana_RH2_02)[958633]: INFO: ACT site=DC1, setting SOK for secondary (1)
Jun 22 14:32:15 clusternode1 SAPHana(SAPHana_RH2_02)[966683]: INFO: ACT site=DC1, setting SOK for secondary (1)
Jun 22 14:36:27 clusternode1 SAPHana(SAPHana_RH2_02)[974736]: INFO: ACT site=DC1, setting SOK for secondary (1)
Jun 22 14:40:40 clusternode1 SAPHana(SAPHana_RH2_02)[982934]: INFO: ACT site=DC1, setting SOK for secondary (1)
The filter makes it easier to understand what status changes are happening. If details are missing, you can open the whole message file to read all the information.
After a failover, you can clear the resource. Please also check that there are no remaining location constraints.
7.2.11. Check cluster consistency
During the installation the resources are sometimes started before the configuration is finally completed. This can lead to entries in the Cluster Information Base (CIB), which can result in incorrect behavior. This can easily be checked and also manually corrected after the configuration has been completed.
If you start the SAPHana resources the missing entries will be recreated. Wrong entries cannot be addressed by pcs commands and need to be removed manually.
Check CIB entries:
# cibadmin --queryDC3 and SFAIL are entries that should not be present in the Cluster Information Base, when the cluster members are DC1 and DC2, and when the sync state between the nodes is reported as SOK.
Example to check for corresponding entries:
# cibadmin --query |grep '"DC3"'
# cibadmin --query |grep '"SFAIL"'
The command can be executed on any node in the cluster as user root. Usually the output of the command is empty. If there is still an error in the configuration the output could look like this:
<nvpair id="SAPHanaSR-hana_rh1_glob_sec" name="hana_rh1_glob_sec" value="DC3"/>These entries can be removed with the following command:
# cibadmin --delete --xml-text '<...>'To remove the entries in the example above you have to enter the following. Please note that the output contains double quotes, so the text must be embedded in single quotes:
# cibadmin --delete --xml-text ' <nvpair id="SAPHanaSR-hana_rh1_glob_sec" name="hana_rh1_glob_sec" value="DC3"/>'Verify the absence of the removed CIB entries. The returned output should be empty.
# cibadmin --query |grep 'DC3"'7.2.12. Cluster cleanup
During the failover tests there might be left behind constraints and other remains from previous tests. The cluster needs to be cleared from these before starting the next test.
Check the cluster status for failure events:
# pcs status --fullIf you see cluster warnings or entries in the "Migration Summary", you should clear and cleanup the resources:
# pcs resource clear SAPHana_RH2_02-clone
# pcs resource cleanup SAPHana_RH2_02-clone
Output:
Cleaned up SAPHana_RH2_02:0 on clusternode1
Cleaned up SAPHana_RH2_02:1 on clusternode2
Check if there are unwanted location constraints, for example from a previous failover:
# pcs constraint locationCheck the existing constraints in more detail:
# pcs constraint --fullExample of a location constraint after a resource move:
Node: hana08 (score:-INFINITY) (role:Started) (id:cli-ban-SAPHana_RH2_02-clone-on-hana08)Clear this location constraint:
# pcs resource clear SAPHana_RH2_02-cloneVerify the constraint is gone from the constraints list. If it persists, explicitly delete it using its constraint id:
# pcs constraint delete cli-ban-SAPHana_RH2_02-clone-on-hana08
If you run several tests with fencing you might also clear the stonith history:
# pcs stonith history cleanupAll pcs commands are executed as user root. Please also check Discover leftovers.
7.2.13. Other cluster commands
Various cluster command examples
# pcs status --full
# crm_mon -1Arf # Provides an overview
# pcs resource # Lists all resources and shows if they are running
# pcs constraint --full # Lists all constraint ids which should be removed
# pcs cluster start --all # This will start the cluster on all nodes
# pcs cluster stop --all # This will stop the cluster on all nodes
# pcs node attribute # Lists node attributes
7.3. RHEL and general commands
7.3.1. Discover current status
You have to follow several steps to know what the current status of the environment is. Please refer to Monitor the environment. Also, we recommend to do the following:
-
Check
/var/log/messages, use Aliases for monitoring for easier log reviews. - Sometimes a cluster must be cleaned up from previous activity to continue proper operation. Discover leftovers and clear them if necessary.
7.3.2. yum info
# yum info resource-agents-sap-hana
Last metadata expiration check: 2:47:28 ago on Tue 06 Jun 2023 03:13:57 AM CEST.
Installed Packages
Name         : resource-agents-sap-hana
Epoch        : 1
Version      : 0.162.1
Release      : 2.el9_2
Architecture : noarch
Size         : 174 k
Source       : resource-agents-sap-hana-0.162.1-2.el9_2.src.rpm
Repository   : @System
Summary      : SAP HANA cluster resource agents
URL          : https://github.com/SUSE/SAPHanaSR
License      : GPLv2+
Description  : The SAP HANA resource agents interface with Pacemaker to allow
             : SAP instances to be managed in a cluster environment.
7.3.3. RPM display version
# rpm -q resource-agents-sap-hana
resource-agents-sap-hana-0.162.1-2.el9_2.noarch
7.3.4. Aliases for monitoring
You can add this to your shell profile. In the example the root aliases depend on the <sid>adm aliases, which must therefore also already be defined.
root ( add to
~/.bashrc):# export ListInstances=$(/usr/sap/hostctrl/exe/saphostctrl -function ListInstances| head -1 ) export sid=$(echo "$ListInstances" |cut -d " " -f 5| tr [A-Z] [a-z]) export SID=$(echo $sid | tr [a-z] [A-Z]) export Instance=$(echo "$ListInstances" |cut -d " " -f 7 ) alias crmm='watch -n 1 crm_mon -1Arf' alias crmv='watch -n 1 /usr/local/bin/crmmv' alias cglo='su - ${sid}adm -c cglo' alias cdh='cd /usr/lib/ocf/resource.d/heartbeat' alias gtr='su - ${sid}adm -c gtr' alias hdb='su - ${sid}adm -c hdb' alias hdbi='su - ${sid}adm -c hdbi' alias hgrep='history | grep $1' alias hri='su - ${sid}adm -c hri' alias hris='su - ${sid}adm -c hris' alias killnode="echo 'b' > /proc/sysrq-trigger" alias lhc='su - ${sid}adm -c lhc' alias pit='ssh pitunnel' alias python='/usr/sap/${SID}/HDB${Instance}/exe/Python/bin/python' alias srstate='su - ${sid}adm -c srstate' alias shr='watch -n 5 "SAPHanaSR-monitor --sid=${SID}"' alias sgsi='su - ${sid}adm -c sgsi' alias srm='su - ${sid}adm -c srm' alias srs='su - ${sid}adm -c srs' alias sapstart='su - ${sid}adm -c sapstart' alias sapstop='su - ${sid}adm -c sapstop' alias tma='tmux attach -t `tmux ls | grep -v atta| head -1 |cut -d " " -f 1`' alias tm='tail -100f /var/log/messages |grep -v systemd' alias tms='tail -1000f /var/log/messages | egrep -s "Setting master-rsc_SAPHana_${SID}_HDB${Instance}|sr_register|WAITING4 LPA|EXCLUDE as possible takeover node|SAPHanaSR|failed|${HOSTNAME}|PROMOTED|DEMOTED|UNDEFINED|master_walk|SWAIT|WaitforStop ped|FAILED"' alias tmss='tail -1000f /var/log/messages | grep -v systemd| egrep -s "secondary with sync status|Setting master-rsc_SAPHa na_${SID}_HDB${Instance}|sr_register|WAITING4LPA|EXCLUDE as possible takeover node|SAPHanaSR|failed|${HOSTNAME}|PROMOTED|DE MOTED|UNDEFINED|master_walk|SWAIT|WaitforStopped|FAILED"' alias tmm='tail -1000f /var/log/messages | egrep -s "Setting master-rsc_SAPHana_${SID}_HDB${Instance}|sr_register|WAITING4 LPA|PROMOTED|DEMOTED|UNDEFINED|master_walk|SWAIT|WaitforStopped|FAILED|LPT|SOK|SFAIL|SAPHanaSR-mon"| grep -v systemd' alias tmsl='tail -1000f /var/log/messages | egrep -s "Setting master-rsc_SAPHana_${SID}_HDB${Instance}|sr_register|WAITING 4LPA|PROMOTED|DEMOTED|UNDEFINED|master_walk|SWAIT|WaitforStopped|FAILED|LPT|SOK|SFAIL|SAPHanaSR-mon"' alias vih='vim /usr/lib/ocf/resource.d/heartbeat/SAPHanaStart' alias vglo='su - ${sid}adm -c vglo'<sid>adm( add to~/.customer.sh):alias tm='tail -100f /var/log/messages |grep -v systemd' alias tms='tail -1000f /var/log/messages | egrep -s "Setting master-rsc_SAPHana_${SAPSYSTEMNAME}_HDB${TINSTANCE}|sr_register|WAITING4LPA|EXCLUDE as possible takeover node|SAPHanaSR|failed|${HOSTNAME}|PROMOTED|DEMOTED|UNDEFINED|master_walk|SWAIT|WaitforStopped|FAILED"' alias tmsl='tail -1000f /var/log/messages | egrep -s "Setting master-rsc_SAPHana_${SAPSYSTEMNAME}_HDB${TINSTANCE}|sr_register|WAITING4LPA|PROMOTED|DEMOTED|UNDEFINED|master_walk|SWAIT|WaitforStopped|FAILED|LPT"' alias sapstart='sapcontrol -nr ${TINSTANCE} -function StartSystem HDB;hdbi' alias sapstop='sapcontrol -nr ${TINSTANCE} -function StopSystem HDB;hdbi' alias sgsi='watch sapcontrol -nr ${TINSTANCE} -function GetSystemInstanceList' alias spl='watch sapcontrol -nr ${TINSTANCE} -function GetProcessList' alias splh='watch "sapcontrol -nr ${TINSTANCE} -function GetProcessList| grep hdbdaemon"' alias srm='watch "hdbnsutil -sr_state --sapcontrol=1 |grep site.*Mode"' alias srs="watch -n 5 'python /usr/sap/${SAPSYSTEMNAME}/HDB${TINSTANCE}/exe/python_support/systemReplicationStatus.py ; echo Status \$?'" alias srstate='watch -n 10 hdbnsutil -sr_state' alias hdb='watch -n 5 "sapcontrol -nr ${TINSTANCE} -function GetProcessList| egrep -s hdbdaemon\|hdbnameserver\|hdbindexserver "' alias hdbi='watch -n 5 "sapcontrol -nr ${TINSTANCE} -function GetProcessList| egrep -s hdbdaemon\|hdbnameserver\|hdbindexserver;sapcontrol -nr ${TINSTANCE} -function GetSystemInstanceList "' alias hgrep='history | grep $1' alias vglo="vim /usr/sap/${SAPSYSTEMNAME}/SYS/global/hdb/custom/config/global.ini" alias vgloh="vim /hana/shared/${SAPSYSTEMNAME}/HDB${TINSTANCE}/${HOSTNAME}/global.ini" alias hri='hdbcons -e hdbindexserver "replication info"' alias hris='hdbcons -e hdbindexserver "replication info" | egrep -e "SiteID|ReplicationStatus_"' alias gtr='watch -n 10 /usr/sap/${SAPSYSTEMNAME}/HDB${TINSTANCE}/exe/Python/bin/python /usr/sap/${SAPSYSTEMNAME}/HDB${TINSTANCE}/exe/python_support/getTakeoverRecommendation.py --sapcontrol=1' alias lhc='/usr/sap/${SAPSYSTEMNAME}/HDB${TINSTANCE}/exe/Python/bin/python /usr/sap/${SAPSYSTEMNAME}/HDB${TINSTANCE}/exe/python_support/landscapeHostConfiguration.py;echo $?'
Chapter 8. References
8.1. Red Hat
8.2. SAP
- SAP HANA Administration Guide for SAP HANA Platform
- Disaster Recovery Scenarios for Multitarget System Replication
- SAP HANA System Replication Configuration Parameter
- Example: Checking the Status on the Primary and Secondary Systems
- General Prerequisites for Configuring SAP HANA System Replication
- Change Log Modes
- Failed to re-register former primary site as new secondary site due to missing log
- Checking the Status with landscapeHostConfiguration.py
- How to Setup SAP HANA Multi-Target System Replication
- SAP HANA Multitarget System Replication