Dieser Inhalt ist in der von Ihnen ausgewählten Sprache nicht verfügbar.
Release Notes and Known Issues
Highlighted features in 11.1
Abstract
Chapter 1. Introduction to Red Hat JBoss Developer Studio
1.1. About Red Hat JBoss Developer Studio
JBoss Developer Studio is a set of Eclipse-based development tools. It contains plug-ins that integrate with Eclipse to extend the existing functionality of the integrated development environment (IDE).
JBoss Developer Studio is designed to increase your productivity when developing applications. You can focus on building, testing, and deploying your applications because JBoss application development tools are integrated in one IDE. JBoss Developer Studio can also assist your application development with its unique features in the following ways:
- Develop new applications using the wizards and project examples of Red Hat Central
- Add powerful functionality to applications with minimal effort using Forge Tools
- Build web interfaces with ease using the visual editing and drag-and-drop utilities of Visual Web Tools and Mobile Web Tools
- Experience browsers automatically refreshing in response to modified application resources with LiveReload Tools
- Incorporate Hibernate, CDI, JAX-RS, JSF, Seam, and other popular APIs into applications with simplicity using the tool-driven interface
- Preview and test mobile web applications on a variety of simulated mobile devices using BrowserSim
- Create, build, and test Cordova-based hybrid mobile applications for iOS and Android platforms using Hybrid Mobile Tools and CordovaSim
- Deploy applications to JBoss runtime servers and the cloud using JBoss Server Tools and OpenShift Tools
JBoss Developer Studio is built around Eclipse and packaged with all the necessary dependencies and third-party plug-ins for simplified installing. For developers already running Eclipse, JBoss Developer Studio can also be installed through Eclipse Marketplace. Installing JBoss Developer Studio in an existing Eclipse installation is referred to as BYOE (Bring Your Own Eclipse).
1.2. Use Cases of JBoss Developer Studio
JBoss Developer Studio assists Java EE developers by integrating JBoss technology and APIs in a single development environment. Here are a few ways that JBoss Developer Studio helps make development easier:
1.2.1. Web Applications
Red Hat Central provides wizards that generate skeletons and sample projects, enabling you to focus on developing the functionality of your applications. The wizards create web applications based on different APIs and technologies, showing the usage and advantages of each. JBoss Developer Studio also offers project file templates in a range of popular programming languages, including HTML, XHTML, and JSF.
Palettes in JBoss Developer Studio give access to the core elements of the JSF, RichFaces and Seam APIs, for use in developing the user interfaces of your applications. Elements of these APIs can be dragged and dropped directly into your project so that you can create richer user interfaces quickly. Visual Web Tools offers graphical and source viewing of files and defaults to dedicated editors for different file types. JBoss Developer Studio supports the Java EE specification and provides tools for JAX-RS, Hibernate, and CDI APIs so you can develop the server-side components of your applications effortlessly.
LiveReload Tools automatically refreshes browsers of local or deployed applications as you modify project resources to avoid needing to manually refresh. You can experience automatic refreshing when viewing applications in browsers on external and mobile devices, with application web addresses easy to navigate to with QR codes.
1.2.2. Web Applications Optimized for Mobile Devices
Mobile Web Tools provides support for HTML5 and jQuery Mobile to enable you to create web applications optimized across desktop and mobile clients. The HTML5 Project wizard in Red Hat Central generates a sample application using HTML5 and jQuery Mobile technologies and, together with HTML5 and jQuery Mobile project file templates, helps you to get up and running with these APIs and technologies quickly. HTML5 and jQuery Mobile widgets can be dragged from the jQuery Mobile palette into your project files and, in conjunction with the widget wizards, enable you to effortlessly develop customized user interfaces for your mobile web applications.
BrowserSim allows you to view your web applications on a variety of simulated mobile devices so that you can ensure they will be correctly formatted. LiveReload also extends to BrowserSim allowing you to experience automatic browser refreshing as you develop your mobile web applications. The integration of Firebug Lite and Weinre capabilities with BrowserSim assists you to inspect the page source of web pages with familiar tools.
1.2.3. Hybrid Mobile Applications
Hybrid Mobile Tools provides support for developing and building Cordova-based hybrid mobile applications for iOS and Android platforms. The Hybrid Mobile application wizard assists you to quickly generate new projects, while the Cordova Configuration Editor and Cordova Plug-in Discovery wizard help you to efficiently modify the capabilities of your projects. Hybrid Mobile Tools provides actions that simplify your workflow, for example calling your system installed Android and iOS SDKs from within the IDE to emulate or run your hybrid mobile applications. With wizards to export workspace projects to Cordova-enabled native projects or ready-to-sign applications, you can quickly be ready to share your hybrid mobile projects and applications.
CordovaSim enables you to view and test your hybrid mobile applications on Android and iOS simulated mobile devices so that you can ensure they look and work as expected. You can interact with your mobile applications through BrowserSim and use the device input panel to provide sample data to your applications for device functions like cameras and accelerometers. An advantage of CordovaSim is that it does not require native SDKs to be installed on your system, unlike native SDK emulators. Additionally, by teaming the device control panel with BrowserSim, you get all of the great functionality of BrowserSim, such as skins and LiveReload, while simulating your hybrid mobile applications.
1.2.4. Applications for Cloud Deployment
OpenShift Tools deploys your applications directly to the cloud on the Red Hat OpenShift platform. You can create and manage your OpenShift account and manage the deployment of applications to OpenShift within the IDE. In addition to using the OpenShift Application wizard to create and deploy new OpenShift applications, OpenShift Tools can import applications already deployed on OpenShift so that you can further develop them and manage their deployment from the comfort of the IDE.
Chapter 2. About this Release
Red Hat JBoss Developer Studio 11.1 is an update of Red Hat JBoss Developer Studio 11.0 and it has the following features:
- It includes Eclipse Oxygen.
- It requires a minimum of Java 8 to run.
- It introduces new features, which are outlined in the New Features section.
- It contains new features for the existing tools.
- It resolves issues identified in earlier versions of JBoss Developer Studio.
For more information about operating systems, chip architectures and Java developer kits supported by this release, see Supported Configurations and Components page on the Red Hat Customer Portal.
Chapter 3. Eclipse Automated Reporting Interface (AERI)
To contribute to JBoss Tools, we recommend you to enable the Eclipse Automated Reporting Interface (AERI) in JBoss Tools. To read about configuring error reporting in JBoss Tools, see: http://tools.jboss.org/usage/#error-reporting.
Chapter 4. New Features and Enhancements
4.1. OpenShift 3
4.1.1. CDK 3.2 Server Adapter
A new server adapter has been added to support the next generation of CDK 3.2. While the server adapter itself has limited functionality, it is able to start and stop the CDK virtual machine via its minishift binary. Click Ctrl+3 (Cmd+3 on OSX) and type CDK to show a command to setup and/or launch the CDK server adapter. You should see the old CDK 2 server adapter and the new CDK 3 one (labeled Red Hat Container Development Kit 3.2+).
Figure 4.1. New CDK 3.2 Server Adapter

Set the credentials for your Red Hat account, the location of the CDK minishift binary file, the type of virtualization hypervisor and an optional CDK profile name.
Figure 4.2. Set the Credentials for CDK 3.2

After completion, a new CDK Server adapter will then be created and visible in the Servers view.
Figure 4.3. A New CDK Server Adapter Added

After the server is started, Docker and OpenShift connections should appear in their respective views, allowing the user to quickly create a new Openshift application and begin developing their AwesomeApp in a highly-replicatable environment.
Figure 4.4. New OpenShift Connection in the OpenShift Explorer View

Figure 4.5. New Docker Connection in the Docker Explorer View

4.1.2. New Command to Tune Resource Limits
A new command has been added to tune resource limits (CPU, memory) on an OpenShift deployment. It is available for a Service, a DeploymentConfig, a ReplicationController, or a Pod.
To activate it, in the OpenShift Explorer view, select the OpenShift resource, right-click and select Edit resource limits. The following dialog will appear:
Figure 4.6. Editing Resource Limits

After you change the resource limits for this deployment, it will be updated and new pods will be spawned (not for ReplicationController).
Figure 4.7. New Pods Created

4.1.3. Discover Docker Registry URL for OpenShift Connections
When an OpenShift connection is created, the Docker registry URL is empty. When the CDK is started through the CDK server adapter, an OpenShift connection is created or updated if a matching OpenShift connection is found. If you have several OpenShift connections the remaining ones will be left with the empty URL.
You can find the matching Docker registry URL when editing the OpenShift connection through the Discover button.
Figure 4.8. Finding Matching Docker Registry URLs

Click the Discover button and the Docker registry URL will be auto filled if a matching started CDK server adapter is found.
Figure 4.9. Auto Filled Docker Registry URL

4.1.4. OpenShift.io Login
It is possible to login from JBoss Tools to OpenShift.io. A single account will be maintained per workspace. Once you initially logged onto OpenShift.io, all needed account information (tokens,…) will be stored securely.
There are two ways to login onto OpenShift.io:
- Through the UI
- Via a third party service that will invoke the proper extension point
4.1.4.1. UI Based Login to OpenShift.io
Click the new icon Toolbar to login.
If this is the first time you are logging in to OpenShift.io or if your OpenShift.io account tokens are not valid anymore, you will see a browser launched with the following content:
Figure 4.10. UI Based Login to OpenShift.io

Enter your RHDP login and the browser will then auto-close and an extract of the OpenShift.io token will be displayed (for security reasons).
Figure 4.11. Extract of OpenShift.io Token

This dialog will be also shown if an OpenShift.io account was configured in the workspace and the account information is valid.
4.1.4.2. Via Extension Point
The OpenShift.io integration can be invoked by a third party service through the org.jboss.tools.openshift.io.code.tokenProvider extension point. This extension point will perform the same actions as the UI but will return an access token for OpenShift.io to the third party service. A detailed explanation of how to use this extension point is described on the Wiki page.
You can display the account information using the Eclipse Jboss Tools > OpenShift.io preference node. If you workspace does not contain an OpenShift.io account yet, you should see the following.
Figure 4.12. OpenShift.io Account Not Configured

If you have a configured OpenShift.io account, you should see the following.
Figure 4.13. OpenShift.io Account Configured

4.2. Server Tools
4.2.1. EAP 7.1 Server Adapter
A server adapter has been added to work with EAP 7.1 and Wildfly 11. It is based on WildFly 11. This new server adapter includes support for incremental management deployment like its upstream WildFly 11 counterpart.
4.3. Fuse Tooling
4.3.1. Global Beans: Improved Support for Bean References
It is now possible to set Bean references from the User Interface when creating a new Bean.
Figure 4.14. Setting Bean References

Editing Bean references is also available in the Properties view when editing an existing Bean.
Figure 4.15. Setting Bean References in the Properties View

Additional validation has been added to help users avoid mixing Beans defined with class names and Beans defined referencing other beans.
4.3.2. Apache Karaf 4.x Server Adapter
You can now download and install Apache Karaf 4.0 and 4.1 server adapters from within your development environment.
Figure 4.16. New Apache Karaf Server Adapters

4.3.3. Switch Apache Camel Version
You can now change the Apache Camel version used in your project. For this, invoke the context menu of the project in the Project Explorer view and navigate to the Configure menu. Here, the Change Camel Version menu entry will guide you through this process.
Figure 4.17. Switch Apache Camel Version

4.3.4. Improved Validation
The validation in the editor has been improved to find containers that lack mandatory child elements (for instance a Choice without a child element).
Figure 4.18. Improved Validation

4.4. Java Development Tools (JDT)
4.4.1. Support for Java™ 9
Java™ 9 is here, and JDT fully supports it:
- The Eclipse compiler for Java (ECJ) implements all the new Java 9 language enhancements.
Updated significant features to support Java Modules, such as compiler, search and many editor features.
ImportantIt is not mandatory to run Eclipse with Java Runtime 9 to get the Java 9 support. However, a Java runtime 9 is required to be on a project’s build path to compile a modular project against the system modules.
When a Java Runtime 9 is added to a project’s build path, the system modules are listed under the System library in the Package Explorer view.
Figure 4.19. System Modules Listed under the System Library

An existing non-modular Java project can be quickly converted to a module by creating a
module-info.javafor that project. This feature can be availed once the project has been moved to compliance 9.Figure 4.20. A Non-modular Java Project Converted to Module

With Java 9 support, a library or a container can now be added to the module path as opposed to the classpath.
Figure 4.21. A Library or a Container can be Added to the Module Path

Once a module has been added to a project’s module path, its encapsulation properties can further be modified by clicking the Is Modular option and editing the Module properties. The following example shows how module module.one can be made to export its packages in the context of the current Java project.
Figure 4.22. Modifying the Encapsulation Properties

Java search now includes a new search scope - Module.
Figure 4.23. Module Search

4.4.2. Support for JUnit 5
JUnit 5 support is now available in Eclipse.
Create a new JUnit Jupiter test via New JUnit Test Case wizard.
Figure 4.24. New JUnit Test Case Wizard

Add JUnit 5 library to the build path.
New JUnit Test Case wizard offers to add it while creating a new JUnit Jupiter test.
Figure 4.25. Adding JUnit 5 Library

Quick Fix (Ctrl+1) proposal on @Test, @TestFactory, @ParameterizedTest, and @RepeatedTest annotations.
Figure 4.26. Quick Fix Annotations

Add JUnit library in Java Build Path dialog.
Figure 4.27. Java Build Path dialog

Create a JUnit Jupiter test method with the new test_jupiter template.
Figure 4.28. Creating a JUnit Jupiter Test Method

Create a @TestFactory method with the new test_factory template.
Figure 4.29. Creating a TestFactory

JUnit Jupiter’s Assertions, Assumptions, DynamicContainer, and DynamicTest classes are now added to Eclipse Favorites by default.
Figure 4.30. Classes Defined in Eclipse Favorites

This allows you to quickly import the static methods from these classes in your code via Content Assist (Ctrl + Space) and Quick Fix (Ctrl + 1).
View all the failures from grouped assertions in the same Result Comparison dialog opened from the JUnit view.
Figure 4.31. View Failures in the Result Comparison Dialog Box

View the number of disabled tests and tests with assumption failures on hover in JUnit view.
Figure 4.32. Viewing the Disabled Tests

Use Go to File action or double-click to navigate to the test from the JUnit view even when the test is displayed with a custom name.
Figure 4.33. Go to File Option

(Re-)Run a single @Nested test class by using the Run action in the JUnit view or the Outline view. Optionally, you can right-click a nested test class name in the editor and use the Run As action.
Figure 4.34. Run Option

The Test Method Selection dialog in JUnit launch configuration now shows the method parameter types.
Figure 4.35. Method Parameter Types

You can provide tags to be included in or excluded from a test run in the Configure Tags dialog of JUnit launch configuration.
Figure 4.36. Provide Tags in the Configure Tags Dialog Box
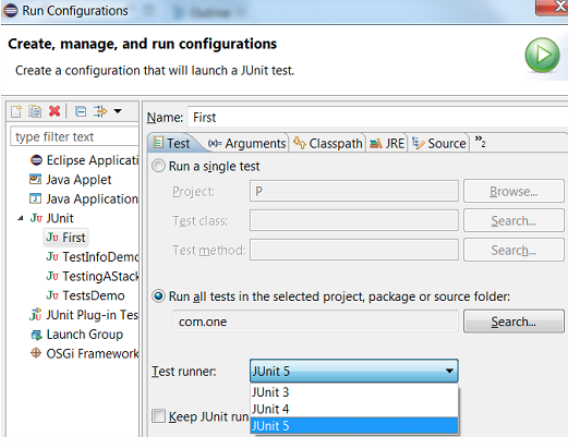
 Important
If you are using an Eclipse workspace where you were running your JUnit 5 tests via @RunWith(JUnitPlatform.class) in Eclipse without JUnit 5 support then you will have JUnit 4 as the test runner in their launch configurations. Before executing these tests in Eclipse with JUnit 5 support, you should either change their test runner to JUnit 5 or delete them so that the new launch configurations are created with JUnit 5 test runner while running the tests.
Figure 4.37. Run Configurations
We do not support running tests in a setup where an old Eclipse build (not having JUnit 5 support) is using a new Eclipse build (having JUnit 5 support) as target. Also, developers who have the JDT JUnit runtime bundles (org.eclipse.jdt.junit.runtime, org.eclipse.jdt.junit4.runtime) checked out and pull the latest changes will run into the above issue. You are expected to use a new Eclipse build for the development.
Chapter 5. Resolved Issues
To view information about resolved issues in this release of JBoss Developer Studio, see the Resolved Issues.
Chapter 6. Known Issues
To view information about known issues in this release of JBoss Developer Studio, see the Known Issues.
The following known issues are highlighted:
- JBIDE-20983: cannot use oracle service name in datasource creation
- JBIDE-19633: Not able to create 'non-bare' repository in JBDS 8.1.
- JBIDE-17176: Unable to browse and select PortletBridge runtime libraries in JPP 6
- JBIDE-12957: Xhtml files appear garbled when it’s reopened in the JBDS editor
- JBDS-3645: Installation of JBoss Developer Studio to a network drive fails
- JBDS-3470: Toolbars + Icons unusable on UHD screens
- JBDS-3069: Ungraceful shutdown results in multiple errors on startup
- JBIDE-24754: Redhat Central screen does not show due to JS error
- JBDS-4442: Central page does not work on Fedora 26 if package webkitgtk3 is not installed
- JBIDE-25146: Eclipse annotation processing not enabled by default can result in errors
- JBDS-4617: NoClassDefFoundError: org/apache/http/client/cache/HttpCacheStorage
Chapter 7. Apply this Release
JBoss Developer Studio 11.1 is available from a number of sources:
- To install JBoss Developer Studio 11.1, use the universal installer available from the Red Hat Customer Portal.
- To install JBoss Developer Studio BYOE 11.1 in Eclipse Oxygen, use Eclipse Marketplace, the JBoss Developer Studio update site or the update .zip file available from the Red Hat Customer Portal.
In all cases, for more information, see the Red Hat JBoss Developer Studio Installation Guide at the JBoss Developer Studio Documentation page.