Getting Started Guide
For Use with Red Hat JBoss Enterprise Application Platform 6
Abstract
Chapter 1. Introduction
1.1. About Red Hat JBoss Enterprise Application Platform 6
1.2. About the Red Hat Customer Portal
- Manage and maintain Red Hat entitlements and support contracts.
- Download officially-supported software.
- Access product documentation and the Red Hat Knowledgebase.
- Contact Global Support Services.
- File bugs against Red Hat products.
1.3. About the Red Hat JBoss Developer Program
1.4. About the Full Red Hat JBoss Commercial Program
1.5. How to Find More Information
Chapter 2. Prerequisites
2.1. JBoss EAP 6 Installation Prerequisites
JBoss EAP is available under the Red Hat JBoss Developer Program or the Full Red Hat JBoss Commercial Program. For more information about the Red Hat JBoss Developer Program, see Section 1.3, “About the Red Hat JBoss Developer Program”. For more information about the Full Red Hat JBoss Commercial Program, see Section 1.4, “About the Full Red Hat JBoss Commercial Program”. The following steps describe the prerequisites for both programs.
Common Prerequisites
- Review the supported configurations and ensure your system is supported: https://access.redhat.com/articles/111663.
- If you set up an account on the Red Hat Customer Portal and are participating in the Full Red Hat JBoss Commercial Program, ensure that your system is up to date with Red Hat issued updates and errata.
ZIP/Installer Prerequisites
- You must grant administration privileges for the installation directory.
- Ensure that the chosen Java development kit has been extracted (or installed). See the Java development kit documentation for information on how to do this.
- On Microsoft Windows Server, ensure that the JAVA_HOME and PATH environment variables have been set, otherwise shortcuts will not work.
- On Hewlett-Packard HP-UX, ensure that an
unziputility has been installed.
Chapter 3. Download and Install the Product
3.1. JBoss EAP Installation Overview
- You can install JBoss EAP using the graphical installation program.
- You can install JBoss EAP using a ZIP file.
3.2. Download and Install JBoss EAP Using the Graphical Installation Program
3.2.1. Download the JBoss EAP 6 Installation Program
JBoss EAP is available under the Red Hat JBoss Developer Program or the Full Red Hat JBoss Commercial Program. Follow the procedure below that matches your program choice.
Procedure 3.1. Download the JBoss EAP Installation Program from the Customer Portal under the Full Red Hat JBoss Commercial Program
- Open a browser and log into the Customer Portal at https://access.redhat.com.
- Click .
- Click Red Hat JBoss Enterprise Application Platform in the Product Downloads list.
- Select the correct JBoss EAP version from the Version drop-down menu.
- Find Red Hat JBoss Enterprise Application Platform 6.x.x Installer in the list and click the option.
- You are prompted to save the JAR file to a directory of your choice. Choose a directory and save the file.
Procedure 3.2. Download the JBoss EAP Installation Program from jboss.org under the Red Hat JBoss Developer Program
- Open a browser and access the following URL: http://www.jboss.org/products/eap.
- To download the installation program for current GA shipping version of the product, click the button on the right side of the page.
- Follow these steps to choose an alternate version, which may include the latest Alpha or Beta releases, as well as previous versions of the product.
- Click the Download JBoss EAP link on the left side of the page.
- Click the Installer link under the Download column for the correct product version.
- You are prompted to save the JAR file to a directory of your choice. Choose a directory and save the file.
The JBoss EAP 6 installation program JAR file has been downloaded successfully to the target machine.
3.2.2. Run the JBoss EAP Installation Program
Procedure 3.3. Run the JBoss EAP Installation Program
- Open a terminal and navigate to the directory containing the downloaded installation program JAR.
- Type the following command:
java -jar jboss-eap-6.x.x-installer.jar
java -jar jboss-eap-6.x.x-installer.jarCopy to Clipboard Copied! Toggle word wrap Toggle overflow Note
In the Hewlett-Packard HP-UX or Solaris environment, you can specify the required architecture by using the -d32/-d64 switch. Launch the installer by executing either of these commands:orjava -jar -d64 jboss-eap-6.x.x-installer.jar
java -jar -d64 jboss-eap-6.x.x-installer.jarCopy to Clipboard Copied! Toggle word wrap Toggle overflow java -jar -d32 jboss-eap-6.x.x-installer.jar
java -jar -d32 jboss-eap-6.x.x-installer.jarCopy to Clipboard Copied! Toggle word wrap Toggle overflow - Follow the instructions in the table below.
|
Screen name
|
When it Appears
|
Description
|
|---|---|---|
|
Always
|
Choose the desired language for the installation program and click .
| |
|
Always
|
The EULA for RED HAT JBOSS MIDDLEWARE.
Select "I accept the terms of this license agreement", and click .
| |
|
Always
|
Select the installation path for JBoss EAP and click . You are prompted to create the new directory, or, if it exists, to replace the named directory.
| |
|
Always
|
Select the packs to install. Required packs are disabled for deselection.
| |
|
Always
|
Create an administrative user and assign a password. Then click .
| |
|
Always
|
Install the quickstart examples. Choose and select the installation path. Then click .
| |
|
If you choose to install the quickstart examples
|
Keep the default selections to automatically configure the default Maven settings and use the publicly hosted Maven repository. Then click .
| |
|
Always
|
Keep the default port bindings, then click .
| |
|
Always
|
Select the preferred startup option on completion of the installation process. Then click .
| |
|
Always
|
Choose to skip configuration of logging levels. Then click .
| |
|
Always
|
Choose and click to continue.
| |
|
Always
|
Review your selections and click .
| |
|
Always
|
When installation progress completes, click .
| |
|
Always
|
When processing finishes, click .
| |
|
Always
|
Accept the default and click .
| |
|
Always
|
Click .
Installation is now complete.
|
Procedure 3.4. Text-based Install Process
- Open a terminal and navigate to the directory containing the downloaded installation program JAR.
- Launch the Text-based installer by executing the following command:
java -jar jboss-eap-6.x.x-installer.jar -console
java -jar jboss-eap-6.x.x-installer.jar -consoleCopy to Clipboard Copied! Toggle word wrap Toggle overflow - Follow the steps to install JBoss EAP 6.
The installation is complete and JBoss EAP 6 is installed on your target machine.
3.3. Download and Install JBoss EAP Using the ZIP
3.3.1. Download JBoss EAP 6 (ZIP Installation)
JBoss EAP is available under the Red Hat JBoss Developer Program or the Full Red Hat JBoss Commercial Program. Follow the procedure below that matches your program choice.
Procedure 3.5. Download the ZIP file from the Customer Portal under the Full Red Hat JBoss Commercial Program
- Open a browser and log into the Red Hat Customer Portal at https://access.redhat.com.
- Click .
- Click Red Hat JBoss Enterprise Application Platform in the Product Downloads list.
- Select the correct JBoss EAP version from the Version drop-down menu.
- Find Red Hat JBoss Enterprise Application Platform 6.x.x in the list and click the option.
- You are prompted to save the ZIP file to a directory of your choice. Choose a directory and save the file.
Procedure 3.6. Download the ZIP file from jboss.org under the Red Hat JBoss Developer Program
- Open a web browser and access this URL: http://www.jboss.org/products/eap/
- Click the Download JBoss EAP link on the left side of the page.
- Click the ZIP link under the Download column for the correct product version.
- You are prompted to save the ZIP file to a directory of your choice. Choose a directory and save the file.
The JBoss EAP 6 ZIP file has been downloaded successfully to the target machine.
3.3.2. Install JBoss EAP 6 (ZIP Installation)
This topic covers the steps to install JBoss EAP 6 using the downloaded ZIP file.
Procedure 3.7. ZIP File Installation
Move the ZIP archive to the desired location.
Move the ZIP file to the server and directory where you plan to install JBoss EAP 6. The user who will start and stop the server must have read and write access to this directory.Use an appropriate application to extract the ZIP archive to the desired location.
In a Red Hat Enterprise Linux environment, use theunziputility to extract the contents of the ZIP archive.In a Microsoft Windows environment, right-click the file and select Extract All.In a Hewlett-Packard HP-UX environment, use theunziputility to extract the contents of the ZIP archive.
JBoss EAP 6 has been installed successfully. The directory created by extracting the ZIP archive is the top-level directory for the server. This is referred to as EAP_HOME.
3.4. Download the Quickstart Code Examples
3.4.1. Download the Quickstarts
JBoss EAP 6 comes with a comprehensive set of quickstart code examples designed to help users begin writing applications using the Java EE 6 technologies.
Procedure 3.8. Download the Quickstarts under the Full Red Hat JBoss Commercial Program
- Open a browser and log into the Red Hat Customer Portal at https://access.redhat.com.
- Click .
- Click Red Hat JBoss Enterprise Application Platform in the Product Downloads list.
- Select the correct JBoss EAP version from the Version drop-down menu.
- Find Red Hat JBoss Enterprise Application Platform 6.x.x Quickstarts in the list and click the option.
- You are prompted to save the Zip file to a directory of your choice. Choose a directory and save the file.
- Unzip the archive in a directory of your choosing.
Procedure 3.9. Download the Quickstarts under the Red Hat JBoss Developer Program
- Open a web browser and access this URL: http://www.jboss.org/products/eap/
- Click the link on the left side of the page to display product download information.
- Under Download JBoss EAP, click the link to download a Zip archive containing the examples.
- You are prompted to save the ZIP file to a directory of your choice. Choose a directory and save the file.
- Unzip the archive in a directory of your choosing.
Chapter 4. Post-install Instructions
4.1. Set Up the Development Environment
4.1.1. Red Hat JBoss Developer Studio Installation Overview
4.1.2. Download Red Hat JBoss Developer Studio
- Click the button. You are prompted to save the ZIP file to a directory of your choice.
4.1.3. Install Red Hat JBoss Developer Studio
- Open a terminal and navigate to the directory containing the downloaded
.jarfile. - Run the following command to launch the GUI installation program:
java -jar jboss-devstudio-build_version-installer-eap.jar
java -jar jboss-devstudio-build_version-installer-eap.jarCopy to Clipboard Copied! Toggle word wrap Toggle overflow Note
Alternatively, you may be able to double-click the.jarfile to launch the installation program. - Click to start the installation process.
- Select I accept the terms of this license agreement and click .
- Adjust the installation path and click .
Note
If the installation path folder does not exist, a prompt will appear. Click to create the folder. - Choose a JVM, or leave the default JVM selected, and click .
- Red Hat JBoss Developer Studio includes Red Hat JBoss Enterprise Application Platform. If it was previously installed, choose . Otherwise, choose to install and configure it for use with Red Hat JBoss Developer Studio.
- Review the installation details, and click .
- Click when the installation process is complete.
- Configure the desktop shortcuts for Red Hat JBoss Developer Studio, and click .
- Click .
4.1.4. Start Red Hat JBoss Developer Studio
Procedure 4.1. Command to start Red Hat JBoss Developer Studio
- Open a terminal and navigate to the Red Hat JBoss Developer Studio installation directory.
- Run the following command to start Red Hat JBoss Developer Studio:For Linux:
./jbdevstudio
[localhost]$ ./jbdevstudioCopy to Clipboard Copied! Toggle word wrap Toggle overflow For Microsoft Windows:jbdevstudio.bat
C:\JBDS_INSTALL_DIRECTORY > jbdevstudio.batCopy to Clipboard Copied! Toggle word wrap Toggle overflow
4.1.5. Add the JBoss EAP Server Using Define New Server
Procedure 4.2. Add the server
- Open the Servers tab. If there is no Servers tab, add it to the panel as follows:
- Click → → .
- Select Servers from the Server folder and click .
- Click on No servers are available. Click this link to create a new server... or, if you prefer, right-click within the blank Server panel and select → .
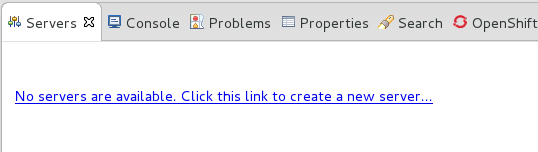
Figure 4.1. Add a new server - No servers available
- Expand JBoss Enterprise Middleware and choose . Enter a server name, for example, "JBoss Enterprise Application Platform 6.4", then click to create the JBoss runtime and define the server. The next time you define a new server, this dialog displays a Server runtime environment selection with the new runtime definition.
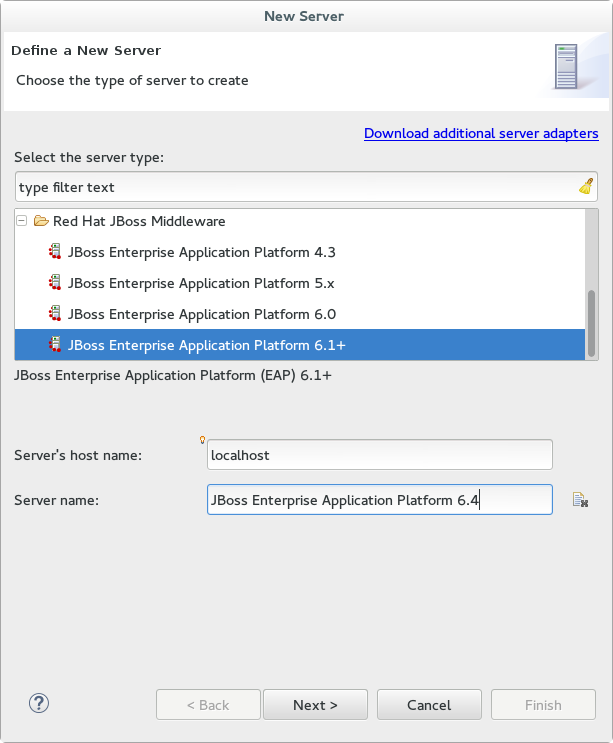
Figure 4.2. Define a New Server
- Create a Server Adapter to manage starting and stopping the server. Keep the defaults and click .
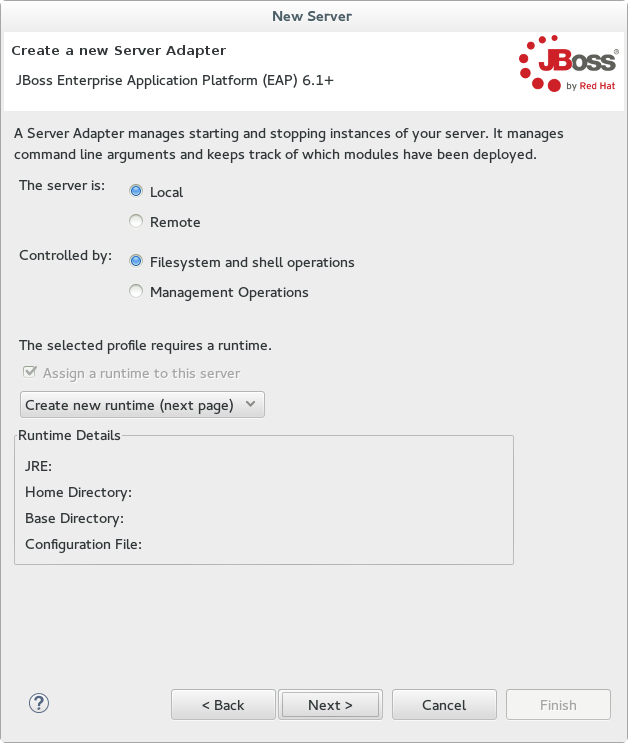
Figure 4.3. Create a New Server Adapter
- Enter a name, for example "JBoss EAP 6.4 Runtime". Under Home Directory, click and navigate to your JBoss EAP install location. Then click .
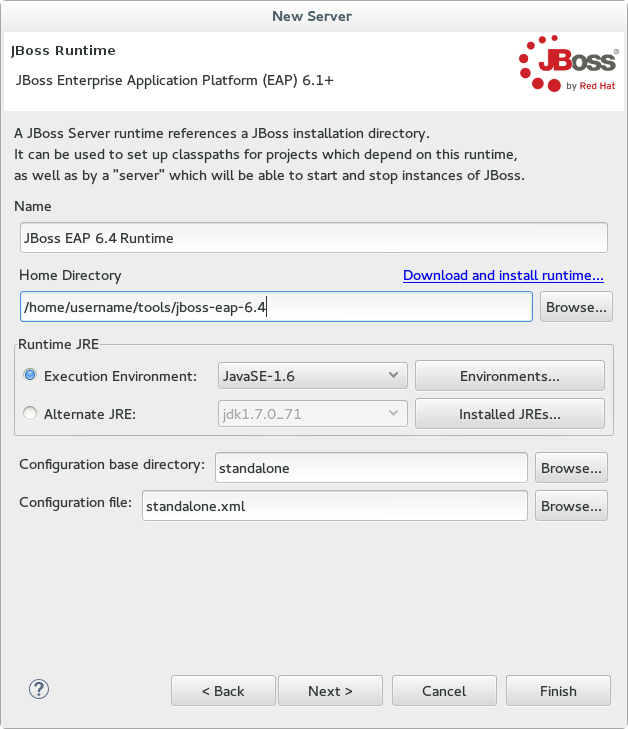
Figure 4.4. Add New Server Runtime Environment
Note
Some quickstarts require that you run the server with a different profile or additional arguments. To deploy a quickstart that requires thefullprofile, you must define a new server and add a Server Runtime Environment that specifiesstandalone-full.xmlfor the Configuration file. Be sure to give the new server a descriptive name. - Configure existing projects for the new server. Because you do not have any projects at this point, click .
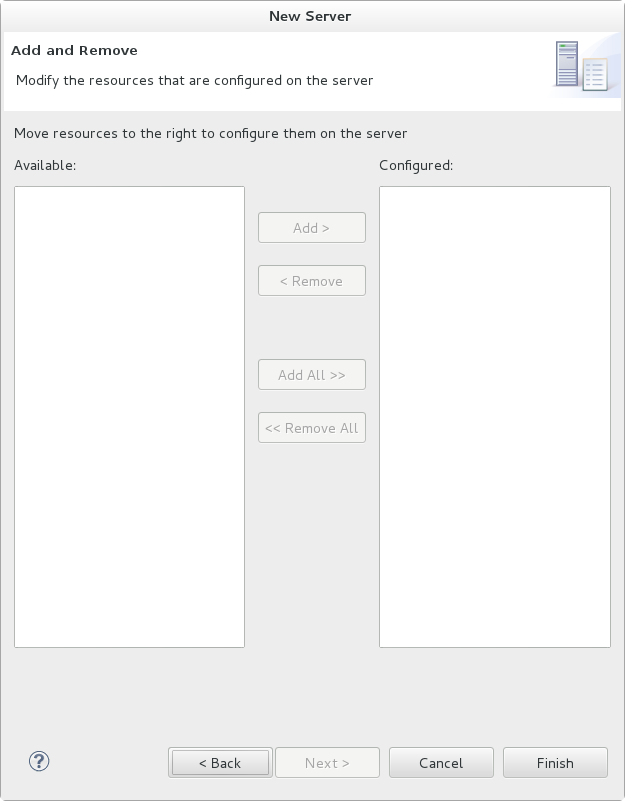
Figure 4.5. Modify resources for the new JBoss server
The JBoss EAP Runtime Server is listed in the Servers tab.
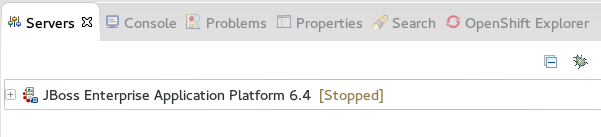
Figure 4.6. Server appears in the server list
4.2. Configure Maven
4.2.1. About Maven
4.2.2. Configure the Maven Settings
4.2.3. Configure Maven for Red Hat JBoss Developer Studio
4.2.3.1. Configure Maven for Use with Red Hat JBoss Developer Studio
Procedure 4.3. Configure Maven in Red Hat JBoss Developer Studio
- Click →, expand JBoss Tools and select JBoss Maven Integration.
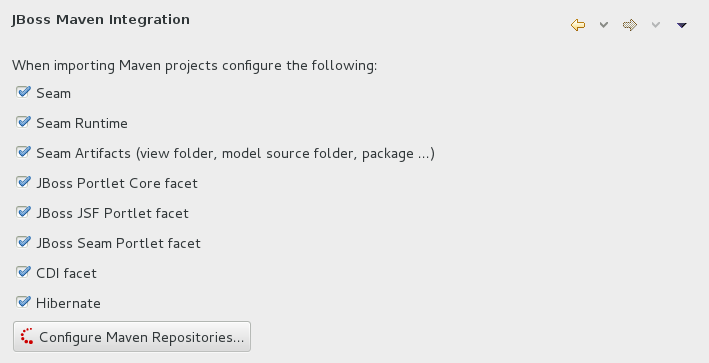
Figure 4.7. JBoss Maven Integration Pane in the Preferences Window
- Click .
- Click to configure the JBoss GA Tech Preview Maven repository. Complete the
Add Maven Repositorydialog as follows:- Set the Profile ID, Repository ID, and Repository Name values to
jboss-ga-repository. - Set the Repository URL value to
http://maven.repository.redhat.com/techpreview/all. - Click the checkbox to enable the Maven repository.
- Click
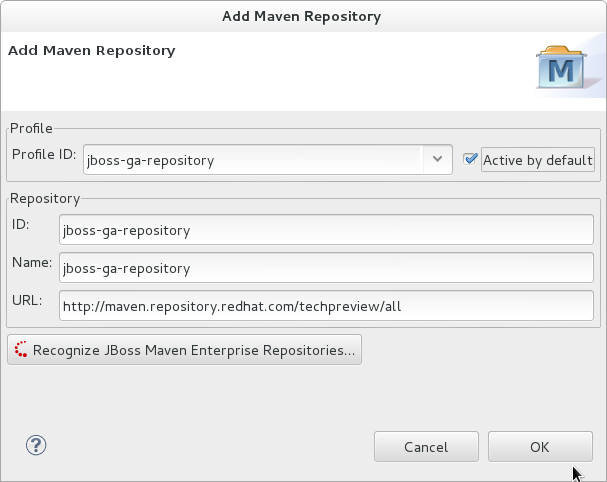
Figure 4.8. Add Maven Repository - JBoss Tech Preview
- Click to configure the JBoss Early Access Maven repository. Complete the
Add Maven Repositorydialog as follows:- Set the Profile ID, Repository ID, and Repository Name values to
jboss-earlyaccess-repository. - Set the Repository URL value to
http://maven.repository.redhat.com/earlyaccess/all/. - Click the checkbox to enable the Maven repository.
- Click
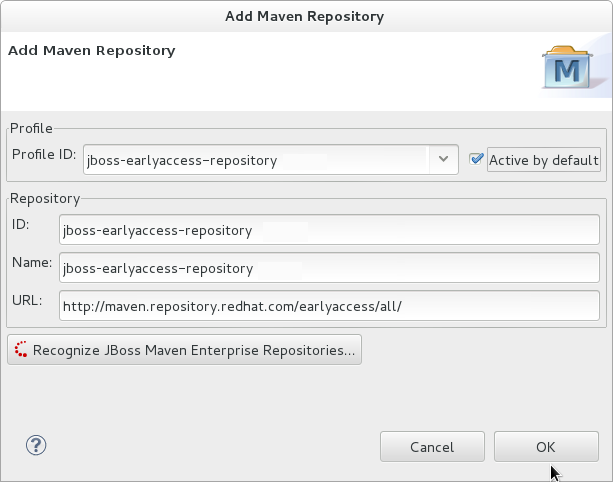
Figure 4.9. Add Maven Repository - JBoss Early Access
- Review the repositories and click .

Figure 4.10. Review Maven Repositories
- You are prompted with the message "Are you sure you want to update the file 'MAVEN_HOME/settings.xml'?". Click to update the settings. Click to close the dialog.The JBoss EAP Maven repository is now configured for use with Red Hat JBoss Developer Studio.
4.2.4. Configure Maven for Command Line
4.2.4.1. Download and Install Maven
- Go to Apache Maven Project - Download Maven and download the latest distribution for your operating system.
- See the Maven documentation for information on how to download and install Apache Maven for your operating system.
4.2.4.2. Configure the Maven Settings for Use with Command Line
- You can copy the preconfigured
settings.xmlfile that ships with the quickstarts. - You can manually edit the Maven
settings.xmlfile.
You must install Maven before you configure the settings. For more information, see: Section 4.2.4.1, “Download and Install Maven”
Procedure 4.4. Configure Maven Using the Settings Shipped with the Quickstart Examples
settings.xml file that is configured to use the online JBoss EAP Maven repository. If you have downloaded the quickstarts, this is the easiest way to configure the settings.
- This procedure overwrites the existing Maven settings file, so you must back up the existing Maven
settings.xmlfile.- Locate the Maven install directory for your operating system. It is usually installed in
USER_HOME/.m2/directory.- For Linux or Mac, this is:
~/.m2/ - For Windows, this is:
\Documents and Settings\USER_NAME\.m2\or\Users\USER_NAME\.m2\
- If you have an existing
USER_HOME/.m2/settings.xmlfile, rename it or make a backup copy so you can restore it later.
- If have not yet downloaded the quickstarts, follow the instructions here: Section 3.4.1, “Download the Quickstarts”.
- Copy the
QUICKSTART_HOME/settings.xmlfile to theUSER_HOME/.m2/directory. - If you modify the
settings.xmlfile while Red Hat JBoss Developer Studio is running, follow the procedure at the end of this topic entitled Refresh the Red Hat JBoss Developer Studio User Settings.
Procedure 4.5. Manually Edit and Configure the Maven Settings To Use the Online JBoss EAP Maven Repository
- Locate the Maven install directory for your operating system. It is usually installed in
USER_HOME/.m2/directory.- For Linux or Mac, this is
~/.m2/ - For Windows, this is
\Documents and Settings\USER_NAME\.m2\or\Users\USER_NAME\.m2\
- If you do not find a
settings.xmlfile, copy thesettings.xmlfile from theUSER_HOME/.m2/conf/directory into theUSER_HOME/.m2/directory. - Copy the following XML into the
<profiles>element of the file.Copy to Clipboard Copied! Toggle word wrap Toggle overflow Copy the following XML into the<activeProfiles>element of thesettings.xmlfile.<activeProfile>jboss-ga-repository</activeProfile> <activeProfile>jboss-earlyaccess-repository</activeProfile>
<activeProfile>jboss-ga-repository</activeProfile> <activeProfile>jboss-earlyaccess-repository</activeProfile>Copy to Clipboard Copied! Toggle word wrap Toggle overflow - If you modify the
settings.xmlfile while Red Hat JBoss Developer Studio is running, follow the procedure at the end of this topic entitled Refresh the Red Hat JBoss Developer Studio User Settings.
Procedure 4.6. Refresh the Red Hat JBoss Developer Studio User Settings
settings.xml file while Red Hat JBoss Developer Studio is running, you must refresh the user settings.
- From the menu, choose → .
- In the Preferences Window, expand Maven and choose User Settings.
- Click the button to refresh the Maven user settings in Red Hat JBoss Developer Studio.

Figure 4.11. Update Maven User Settings
Important
- Missing artifact ARTIFACT_NAME
- [ERROR] Failed to execute goal on project PROJECT_NAME; Could not resolve dependencies for PROJECT_NAME
~/.m2/repository/ subdirectory on Linux, or the %SystemDrive%\Users\USERNAME\.m2\repository\ subdirectory on Windows.
Chapter 5. Try It Out
5.1. Run the Quickstarts
5.1.1. Run the Quickstarts in Red Hat JBoss Developer Studio
Procedure 5.1. Import the quickstarts into Red Hat JBoss Developer Studio
Important
- If you have not yet done so, Section 4.2.4.2, “Configure the Maven Settings for Use with Command Line”.
- Start Red Hat JBoss Developer Studio.
- From the menu, select → .
- In the selection list, choose → , then click .
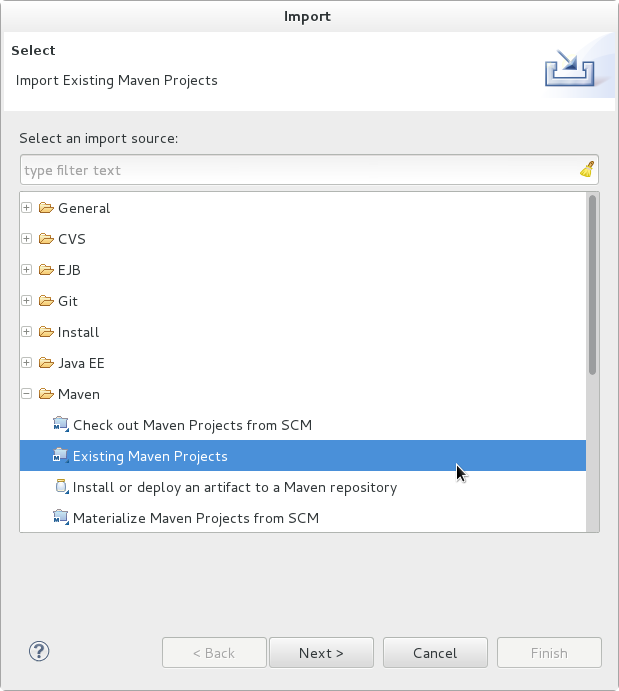
Figure 5.1. Import Existing Maven Projects
- Browse to the directory of the quickstart you plan to test, for example the
helloworldquickstart, and click . The Projects list box is populated with thepom.xmlfile of the selected quickstart project.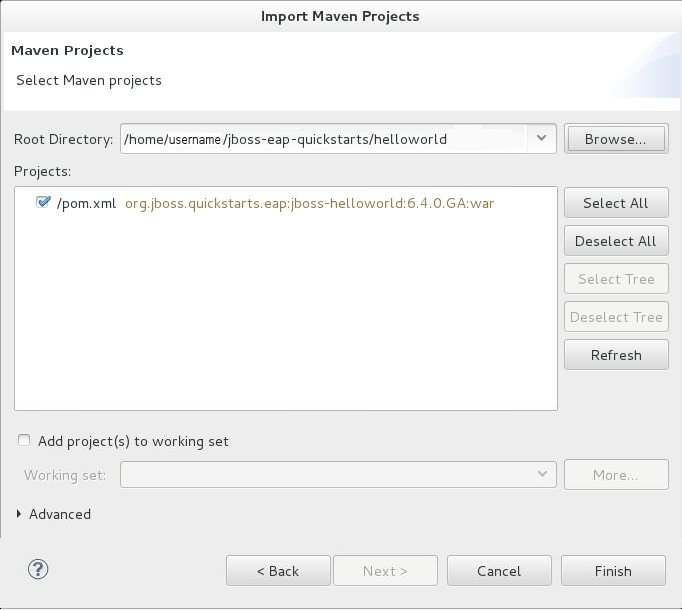
Figure 5.2. Select Maven Projects
- Click .
Procedure 5.2. Build and Deploy the helloworld quickstart
helloworld quickstart is one of the simplest quickstarts and is a good way to verify that the JBoss server is configured and running correctly.
- If you do not see a Servers tab or have not yet defined a server, follow the instructions here: Section 4.1.5, “Add the JBoss EAP Server Using Define New Server”. If you plan to deploy a quickstart that requires the
fullprofile or additional startup arguments, be sure to create the server runtime environment as noted in the quickstart instructions. - Right-click on the
jboss-helloworldproject in the Project Explorer tab and select . You are provided with a list of choices. Select .
Figure 5.3. Run As - Run on Server
- Select JBoss EAP 6.1+ Runtime Server from the server list and click .
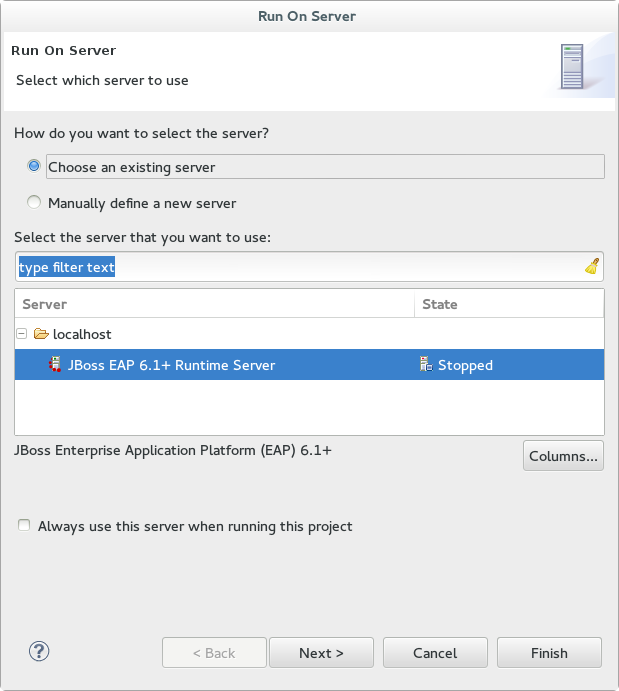
Figure 5.4. Run on Server
- The next screen displays the resources that are configured on the server. The
jboss-helloworldquickstart is configured for you. Click to deploy the quickstart.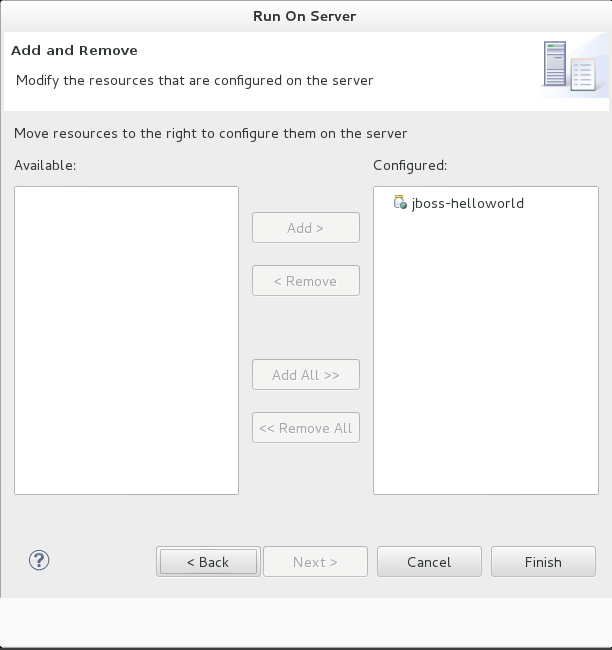
Figure 5.5. Modify Resources Configured on the Server
- Review the results.
- In the
Servertab, the JBoss EAP 6.x Runtime Server status changes to[Started, Republish]. - The server Console tab shows messages detailing the JBoss EAP 6.x server start and the helloworld quickstart deployment.
- A helloworld tab appears displaying the URL http://localhost:8080/jboss-helloworld/HelloWorld and the text "Hello World!".
- The following messages in the Console confirm deployment of the
jboss-helloworld.warfile:The registered web context is appended toJBAS018210: Register web context: /jboss-helloworld JBAS018559: Deployed "jboss-helloworld.war" (runtime-name : "jboss-helloworld.war")
JBAS018210: Register web context: /jboss-helloworld JBAS018559: Deployed "jboss-helloworld.war" (runtime-name : "jboss-helloworld.war")Copy to Clipboard Copied! Toggle word wrap Toggle overflow http://localhost:8080to provide the URL used to access the deployed application.
- To verify the
helloworldquickstart deployed successfully to the JBoss server, open a web browser and access the application at this URL: http://localhost:8080/jboss-helloworld
Procedure 5.3. Run the bean-validation quickstart Arquillian tests
bean-validation quickstart is an example of a quickstart that provides Arquillian tests.
- Follow the procedure above to import the
bean-validationquickstart into Red Hat JBoss Developer Studio. - In the Servers tab, right-click on the server and choose to start the JBoss EAP server. If you do not see a Servers tab or have not yet defined a server, follow the instructions here: Section 4.1.5, “Add the JBoss EAP Server Using Define New Server”.
- Right-click on the
jboss-bean-validationproject in the Project Explorer tab and select . You are provided with a list of choices. Select . - In the Goals input field of the Edit Configuration dialog, type:
clean test -Parq-jbossas-remoteThen click .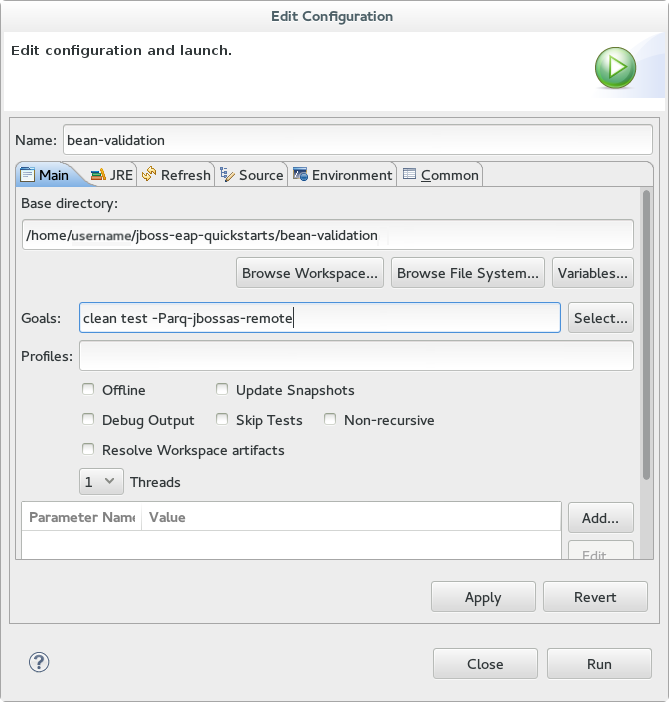
Figure 5.6. Edit Configuration
- Review the results.The server Console tab shows messages detailing the JBoss EAP server start and the output of the
bean-validationquickstart Arquillian tests.Copy to Clipboard Copied! Toggle word wrap Toggle overflow
5.1.2. Run the Quickstarts Using a Command Line
Procedure 5.4. Build and Deploy the Quickstarts Using a Command Line
- If you have not yet done so, Section 4.2.4.2, “Configure the Maven Settings for Use with Command Line” .
- Review the
README.htmlfile in the root directory of the quickstarts.This file contains general information about system requirements, how to configure Maven, how to add users, and how to run the Quickstarts. Be sure to read through it before you get started.It also contains a table listing the available quickstarts. The table lists each quickstart name and the technologies it demonstrates. It gives a brief description of each quickstart and the level of experience required to set it up. For more detailed information about a quickstart, click on the quickstart name.Some quickstarts are designed to enhance or extend other quickstarts. These are noted in thePrerequisitescolumn. If a quickstart lists prerequisites, you must install them first before working with the quickstart.Some quickstarts require the installation and configuration of optional components. Do not install these components unless the quickstart requires them. - Run the
helloworldquickstart.Thehelloworldquickstart is one of the simplest quickstarts and is a good way to verify that the JBoss server is configured and running correctly. Open theREADME.htmlfile in the root of thehelloworldquickstart. It contains detailed instructions on how to build and deploy the quickstart and access the running application - Run the other quickstarts.Follow the instructions in the
README.htmlfile located in the root folder of each quickstart to run the example.
Appendix A. Installation Program Screen Shots
A.1. Language Selection
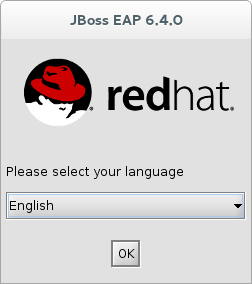
Figure A.1. JBoss EAP Installation Program Language Selection
A.2. End User License Agreement
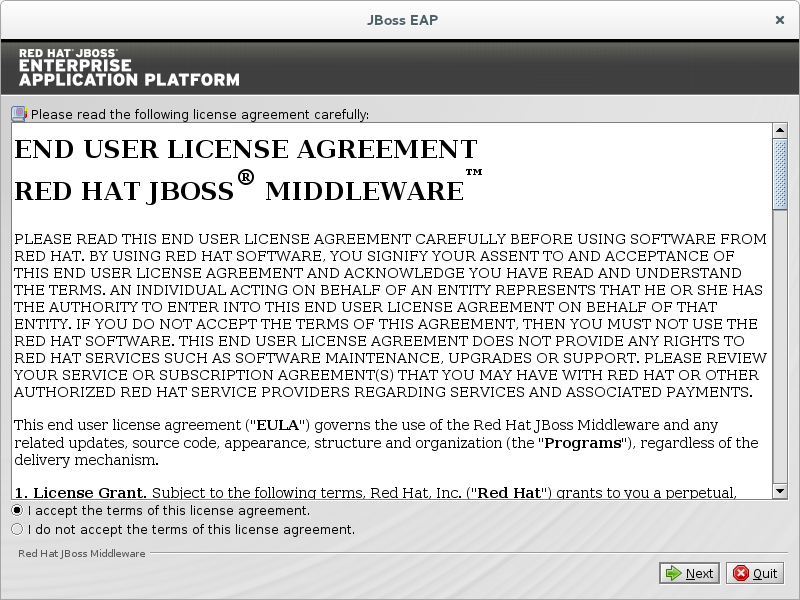
Figure A.2. JBoss EAP Installation Program End User License Agreement
A.3. Installation Path
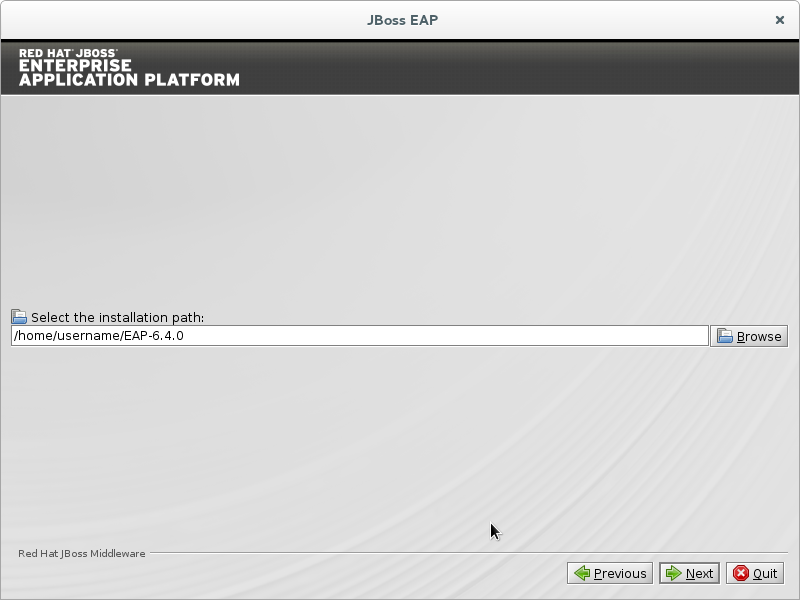
Figure A.3. JBoss EAP Installation Program Installation Path
A.4. Select the Packs to Install
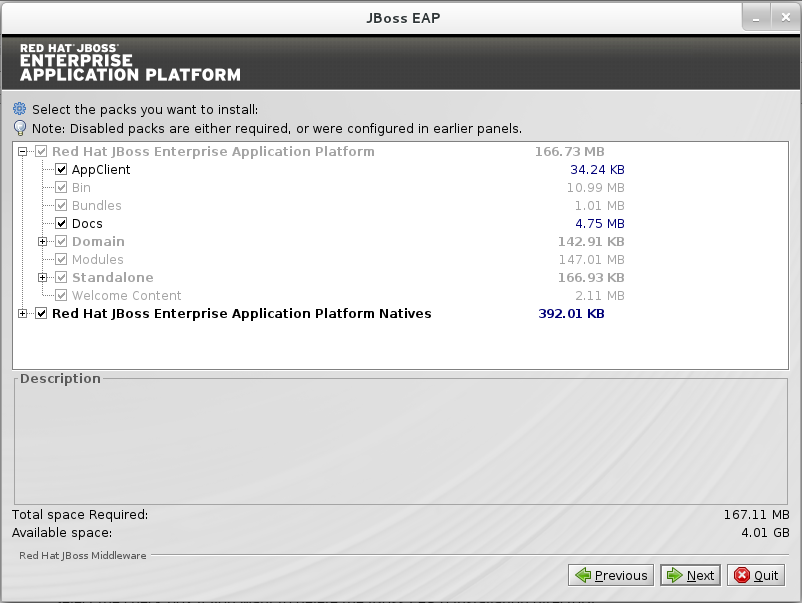
Figure A.4. JBoss EAP Installation Program Select Packs to Install
A.5. Administrative User Creation
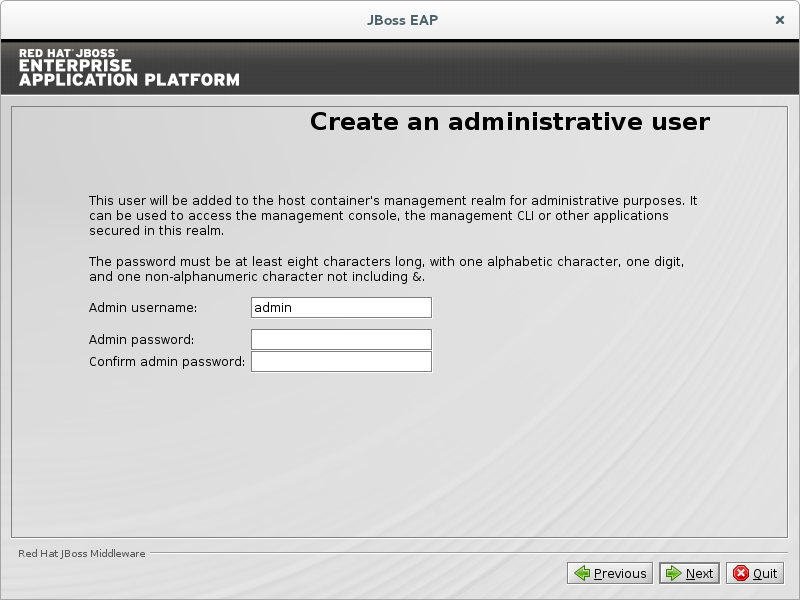
Figure A.5. JBoss EAP Installation Program Administrative User Creation
A.6. Quickstart Installation
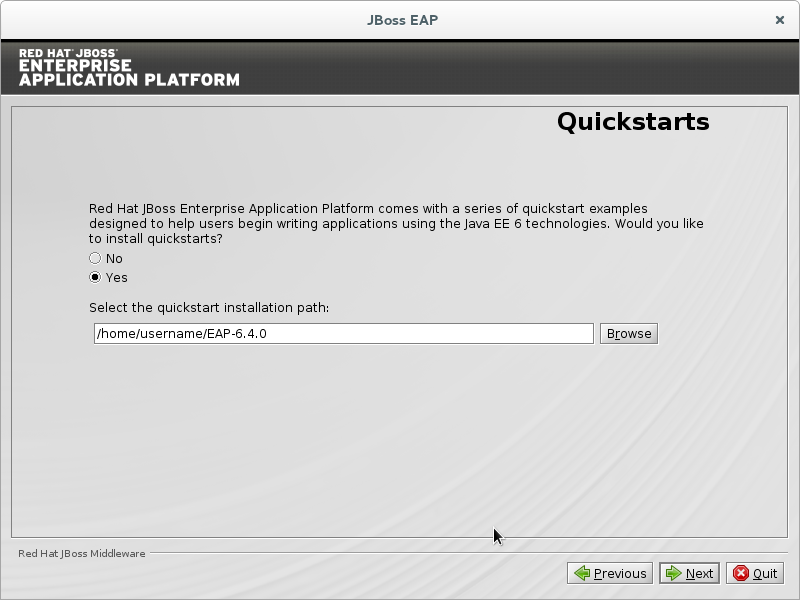
Figure A.6. JBoss EAP Installation Program Quickstart Setup
A.7. Maven Repository Setup
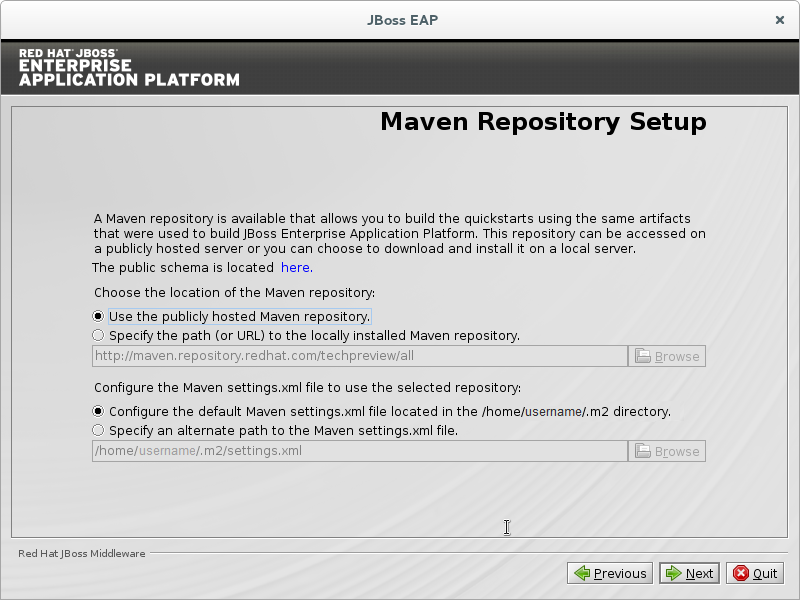
Figure A.7. JBoss EAP Installation Program Maven Repository Setup
A.8. Socket Binding Setup
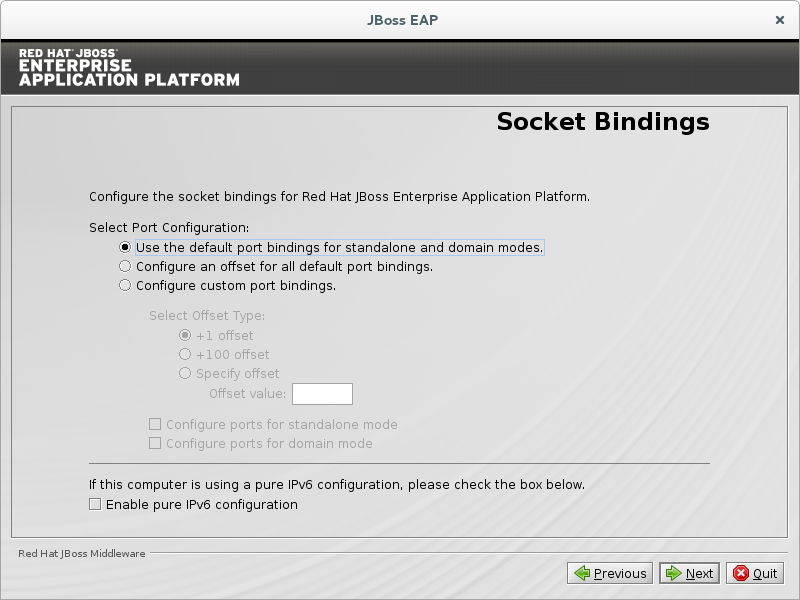
Figure A.8. JBoss EAP Installation Program Default Socket Bindings
A.9. Server Launch
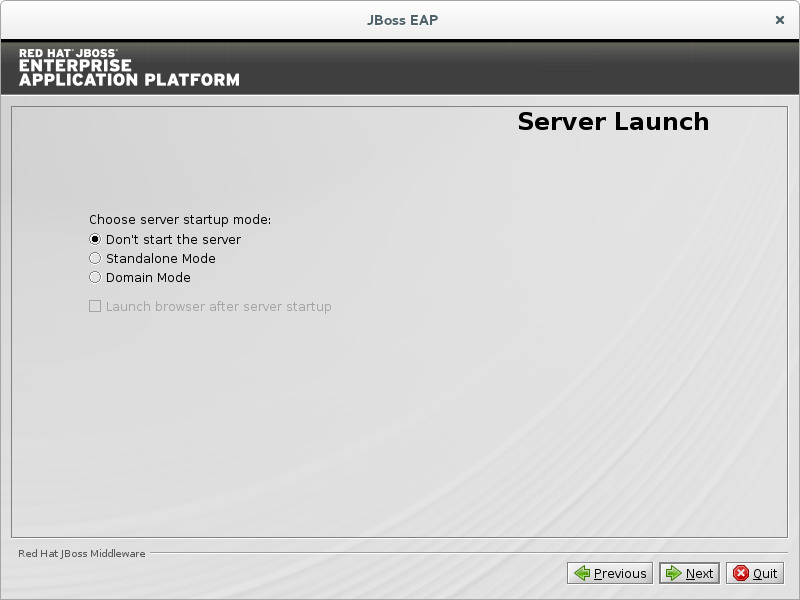
Figure A.9. JBoss EAP Installation Program Server Launch
A.10. Configure Logging Levels
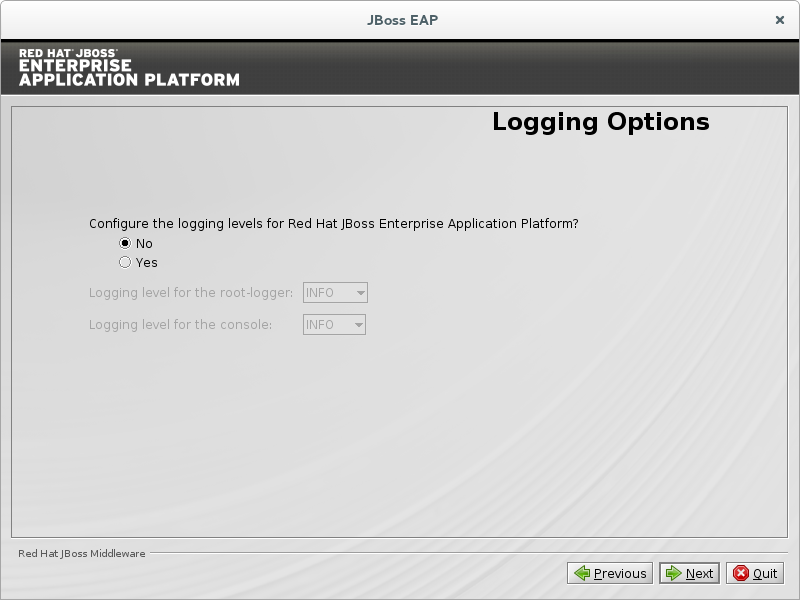
Figure A.10. JBoss EAP Installation Program Skip Logging Level Configuration
A.11. Configure Runtime Environment
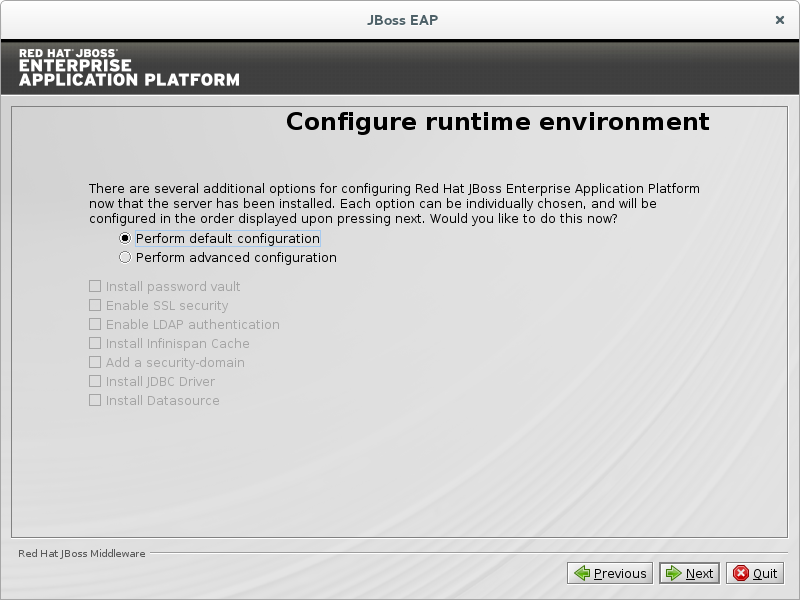
Figure A.11. JBoss EAP Installation Program Configure Runtime Environment - Default
A.12. Review Installation Components
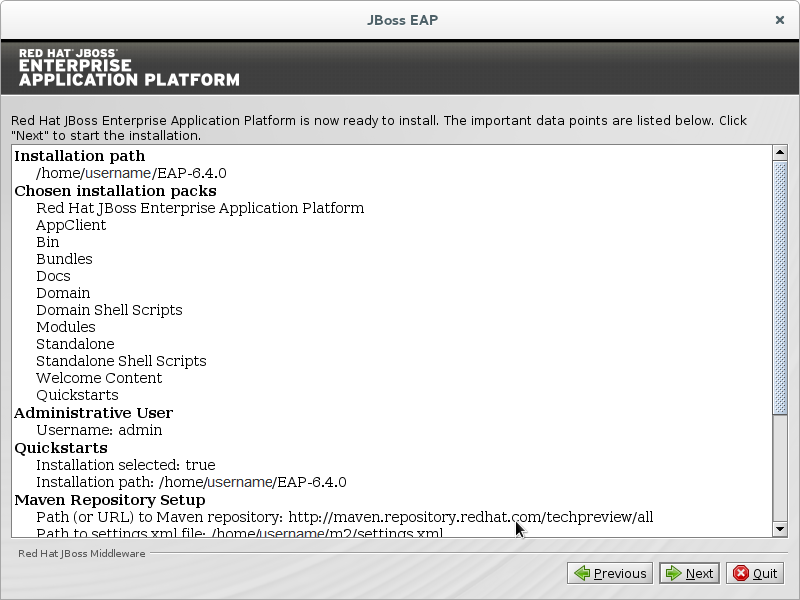
Figure A.12. JBoss EAP Installation Program Review Selected Components
A.13. Installation Progress
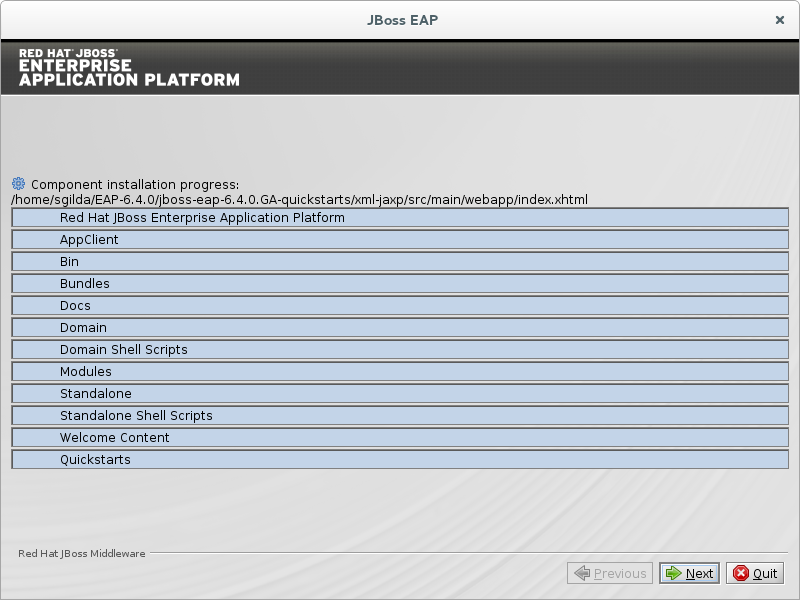
Figure A.13. JBoss EAP Installation Program Component Installation Progress
A.14. Installation Processing Finished

Figure A.14. JBoss EAP Installation Program Processing Finished
A.15. Create Shortcuts
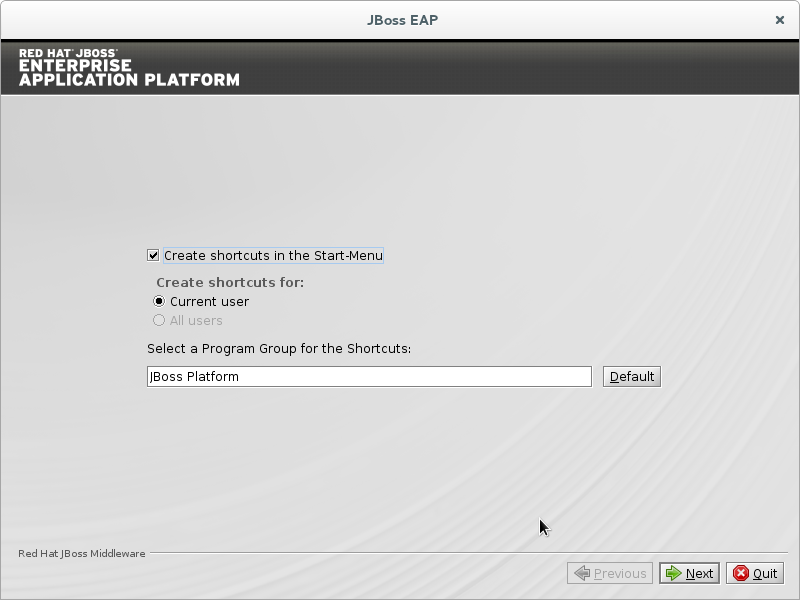
Figure A.15. JBoss EAP Installer Create Shortcuts
A.16. Generate Install Script

Figure A.16. JBoss EAP Installation Program Generate Install Script
Appendix B. Revision History
| Revision History | |||
|---|---|---|---|
| Revision 6.4.0-38 | Thursday November 16 2017 | ||
| |||