User Guide
Managing Applications in the Cloud with OpenShift Enterprise
Abstract
- Create and manage domains and SSL certificates
- Create, build, and deploy applications
- Manage applications and cartridges
- Monitor and manage application storage and resources
Chapter 1. Introduction to OpenShift Enterprise
1.1. Basic Architecture
| System Component | Description |
|---|---|
| Broker | Responsible for managing user logins, DNS, and application state. It manages the nodes and coordinates provisioning and application management. User interaction with the broker is performed using the management console, CLI, or a REST-based API. |
| Nodes | Hold the gears that run the applications, and enable resource sharing so that multiple gears can run on a single physical or virtual machine. This machine is referred to as a node host. |
| Message Bus | Link between the broker and the nodes. |
| Gears | Resource-constrained containers for application code where cartridges run. Gears determine the amount of RAM and disk space available to a cartridge. |
| Cartridges | Cartridges provide the functionality to run applications. Numerous cartridges are currently available to support languages such as Perl, PHP, and Ruby, as well as many database cartridges, such as PostgreSQL and MySQL. |
1.2. User Interfaces
1.2.1. Management Console
broker.example.com.
- Setting up, administering and managing accounts
- Launching new applications
- Managing and monitoring applications

Figure 1.1. Management Console
| Page | Description | |
|---|---|---|

| View and manage applications and cartridges. If there are no applications, you can create new applications from this page. | |

| View and manage SSH keys, domains, and account authorizations. | |

| Access to KBase articles, community forums, tutorials, and other community resources. A wide variety of resources are available for diagnosing and resolving issues with your account or your applications. | |

|
View and manage account information. This page shows account details and account usage.
|
1.2.2. Client Tools
- Coding
- Debugging
- Advanced application management
Note
rhc package found in the OpenShift Enterprise 2.0 Client Tools channel is based on the Red Hat Enterprise Linux 6 RPM version of the client tools, and not the Ruby gem version, which is updated more frequently. Therefore, some updated features may be temporarily only available for the Ruby gem version. See Client Tools Installation Guide to install the latest Ruby gem version of the client tools and get all available features.
1.3. What's New in OpenShift Enterprise 2.0
Chapter 2. Getting Started
2.1. OpenShift User Account
2.2. Client Tools
2.3. Basic Administration
2.3.1. Viewing Account Information
$ rhc accountExample 2.1. Viewing Account Information
$ rhc account
Login User@example.com
-----------------------------------------------------
  ID:                 52424geb2587c836b106001b
  Gears Used:         10
  Gears Allowed:      16
  Domains Allowed:    3
  Allowed Gear Sizes: small
  SSL Certificates:   yes
2.3.2. Ending Current Session
$ rhc logoutChapter 3. Authentication
3.1. Authorization Tokens
3.1.1. Introduction to Authorization Tokens
| Scope | Description | Validity |
|---|---|---|
| session | Access to all API functions against an account. | 1 day |
| read | Read-only access to account resources, but cannot view authorization tokens. | 1 month |
| userinfo | Access to login name, unique id, and user capabilities. | 1 month |
rhc setup command is initially run to configure the client tools, the setup wizard prompts you to create an authorization token. If you answer YES, the wizard creates a session token in the ~/.openshift directory. With this token, all client tool commands can be run without entering your login credentials each time. When the token expires you are automatically prompted to reenter login information to renew the existing token. See the OpenShift Enterprise Client Tools Installation Guide for more information on installing and configuring the client tools.
rhc setup command to create one.
rhc logout command to delete the token.
3.1.2. Creating Authorization Tokens
$ rhc authorization add --scopes Scope --note Name--scopes option, and a name for the token with the --note option.
Example 3.1. Creating an Authorization Token
rhc authorization add --scopes session --note My_Token
Adding authorization ... done

My_token
--------
  Token:      787a57211d42f251204136b05d490038830d9b7057f54f816c2a9fcd0c8333b8
  Scopes:     session
  Created:    4:40 PM
  Expires In: about 1 day
--token token_string global option to run rhc commands as the user associated with the authorization token that was provided.
3.1.3. Viewing Authorization Tokens
$ rhc authorization listExample 3.2. Viewing Authorization Tokens
$ rhc authorization list
My_token
--------
  Token:      787a57211d42f251204136b05d490038830d9b7057f54f816c2a9fcd0c8333b8
  Scopes:     session
  Created:    4:40 PM
  Expires In: about 23 hours

RHC/1.8.0 (from laptop.example.com on x86_64-linux)
---------------------------------------------------
  Token:      28f6e375dc7ea57b0dcabb3850d08ee9bc023f7df5dbfa4958afe7ad71d33e37
  Scopes:     session
  Created:    12:58 PM
  Expires In: about 19 hours
3.1.4. Deleting Authorization Tokens
Delete one or more tokens with the following command, separating multiple tokens with commas:
$ rhc authorization delete token_1, token_2Delete all tokens associated with your account with the following command:
$ rhc authorization delete-all3.2. SSH Keys
3.2.1. Introduction to SSH Keys
.ssh folder of your home directory. The SSH key pair consists of the public key, id_rsa.pub, and the private key, id_rsa. As part of the initial configuration, you have the option of automatically uploading the public key, id_rsa.pub, to the OpenShift Enterprise server. See the Client Tools Installation Guide for more information on how to configure the client tools.
| ssh-rsa |
| ssh-dss |
| ecdsa-sha2-nistp256-cert-v01@openssh.com |
| ecdsa-sha2-nistp384-cert-v01@openssh.com |
| ecdsa-sha2-nistp521-cert-v01@openssh.com |
| ssh-rsa-cert-v01@openssh.com |
| ssh-dss-cert-v01@openssh.com |
| ssh-rsa-cert-v00@openssh.com |
| ssh-dss-cert-v00@openssh.com |
| ecdsa-sha2-nistp256 |
| ecdsa-sha2-nistp384 |
| ecdsa-sha2-nistp521 |
| krb5-principal |
3.2.2. Generating Keys Manually
- Run the following command to generate a pair of keys, replacing KeyType with the type of key to generate:
$ ssh-keygen -t KeyType - Press Enter when prompted to save the key file in the default location:
...
Generating public/private rsa key pair.
Enter file in which to save the key (/home/username/.ssh/id_rsa): /home/username/.ssh/id_rsa
Note
Red Hat recommends to save all SSH keys in the default location. If anid_rsafile already exists, rename the new SSH key file to avoid overwriting the existing one. - Enter a passphrase or leave blank when prompted, then press Enter:
Enter passphrase (empty for no passphrase):
Enter same passphrase again:
Your identification has been saved in /home/username/.ssh/id_rsa
Your public key has been saved in /home/username/.ssh/id_rsa.pub.
...
3.2.3. Adding a Key
$ rhc sshkey add KeyName KeyPath3.2.3.1. Adding a Specific SSH Key Type
$ rhc sshkey add KeyName --type KeyType --content KeyContentAdd a Kerberos principal SSH key with the following command:
$ rhc sshkey add KeyName --type krb5-principal --content Principal3.2.4. Viewing All Public Keys
$ rhc sshkey listExample 3.3. Viewing All Public Keys
$ rhc sshkey list
libra (type: ssh-rsa)
---------------------
  Fingerprint: 43:f5:29:ad:9f:b8:b3:a6:e7:88:c9:7f:4c:a9:0c:ad

winKey (type: ssh-rsa)
----------------------
  Fingerprint: 0c:16:81:e3:51:eb:12:90:f6:03:80:g2:a2:10:78:14

default (type: ssh-rsa)
-----------------------
  Fingerprint: 43:f8:93:re:9f:a3:a8:f4:f3:34:g8:3d:1g:d8:3c:as
  Available:   true

You have 3 SSH keys associated with your account.
3.2.5. Viewing a Specific Public Key
$ rhc sshkey show KeyName3.2.6. Deleting a Key
$ rhc sshkey remove KeyName3.2.7. Resolving Authentication Issues
- Use the interactive setup wizard (recommended)
- Manually generate and add SSH keys
3.2.7.1. Resolving Issues with Interactive Setup Wizard
rhc setup command and follow the onscreen instructions.
3.3. Mutual SSL
Procedure 3.1. To Configure the Client Tools for Mutual SSL Authentication:
- Mutual SSL authentication requires the current version of the OpenShift client tools. Ensure your client tools are up to date using the method you used to install them. See the OpenShift Enterprise Client Tools Installation Guide for details.
- If you are only connecting to one OpenShift Enterprise server, you can add the following to the
~/.openshift/express.conffile on the workstation where the client tools are installed:ssl_ca_file=path/to/SSLCA/certificate/file ssl_client_cert_file=path/to/SSL/certificate/file ssl_client_key_file=path/to/certificate/keyfile insecure=false use_authorization_tokens=true libra_server=broker.example.comAlternatively, you can perform the same configuration from the command line using therhc setupcommand:# rhc setup --ssl-client-cert-file path/to/SSL/certificate/file --ssl-client-key-file path/to/certificate/keyfile --ssl-ca-file path/to/SSLCA/certificate/fileIf you are using your client tools to manage accounts for multiple OpenShift servers, you can use therhc servercommand instead:# rhc server add broker.example.com --nickname Server_Nickname --ssl-client-cert-file path/to/SSL/certificate/file --ssl-client-key-file path/to/certificate/keyfile --ssl-ca-file path/to/SSLCA/certificate/fileSee Chapter 4, Multiple OpenShift Servers for general information on managing and switching between accounts for multiple OpenShift servers.
Chapter 4. Multiple OpenShift Servers
~/.openshift/express.conf file would be overwritten each time the client tools were configured for use with a new server. Starting with OpenShift Enterprise 2.1.5, you can configure the client tools shipped with OpenShift Enterprise for use with multiple servers.
4.1. Server Management
4.1.1. Adding a Server
$ rhc server add server.name.example.com$ rhc server add server.name.example.com --nickname Server_Nicknameopenshift.redhat.com, the nickname defaults to online.
$ rhc server add server.name.example.com --nickname Server_Nickname --rhlogin user@company.com4.1.2. Switching Between Servers
$ rhc server use server.name.example.com$ rhc server use Server_Nickname4.1.3. Configuring Server Settings
rhc setup command for the first time, the ~/.openshift/express.conf file is created, containing the settings for your initial server configuration. When you add another server, or run the rhc setup command again with the --server option, the ~/.openshift/servers.yml file is created, containing the settings for each server. You can edit this file to make any changes to the server configuration, and this takes precedence over the initial ~/.openshift/express.conf file.
Example 4.1. Contents of the ~/.openshift/servers.yml File
-server:
	hostname: dev.openshift.company.com
	nickname: development
	login: user@company.com
	use_authorization_tokens: true
	insecure: true

-server
	hostname: openshift.redhat.com
	nickname: online
	login: user@personal.com
	use_authorization_tokens: true
insecure: false$ rhc server configure server.name.example.com Server_Setting$ rhc server configure Server_Nickname Server_Setting~/.openshift/servers.yml file, such as the server nickname, the user name associated with the server, or any authorization tokens associated with the account.
Example 4.2. Changing the Nickname of a Server
$ rhc server configure dev.openshift.company.com --nickname devExample 4.3. Changing the Default User
$ rhc server configure dev --rhlogin username@example.com4.1.4. Listing Servers
$ rhc server listrhc servers command.
4.1.5. Viewing a Server
$ rhc server show server.name.example.com$ rhc server show Server_Nickname4.1.6. Removing a Server
$ rhc server remove server.name.example.com$ rhc server remove Server_NicknameNote
Chapter 5. Domains
5.1. Introduction to Domains
5.2. Domain Management
5.2.1. Creating a Domain
$ rhc domain create Domain_Nameautomobile.
Example 5.1. Creating a Domain
$ rhc domain create automobile

Creating domain 'automobile'

You may now create an application using the 'rhc app create' command
Note
Domains Allowed setting determines the number of domains you can create. Use the rhc account command to view account settings. Contact your system administrator to request any changes to your account, or see the OpenShift Enterprise Administration Guide at https://access.redhat.com/site/documentation for more information.
5.2.2. Listing Available Domains
$ rhc domain listExample 5.2. Listing Available Domains
$ rhc domain list
Domain automobile
---------------
  Created:            Oct 01  7:28 PM
  Allowed Gear Sizes: small, medium

Domain automobile2
-----------------
  Created:            Oct 01  7:46 PM
Allowed Gear Sizes: small, mediumrhc domains command to list all available domains.
5.2.3. Viewing a Domain
$ rhc domain showExample 5.3. Viewing a Domain
$ rhc domain show
Domain automobile
---------------
  Created:            Oct 01  7:28 PM
  Allowed Gear Sizes: small, medium

  racer @ http://racer-automobile.example.com/ (uuid: 926056f8845b4e388b37f6735c89d0eb)
  -----------------------------------------------------------------------------
    Domain:  automobile
    Created: Oct 01  7:28 PM
    Gears:   2 (defaults to small)
    Git URL: ssh://926056f8845b4e388b37f6735c89d0eb@racer-automobile.example.com/~/git/racer.git/
    SSH:     926056f8845b4e388b37f6735c89d0eb@racer-automobile.example.com

    php-5.4 (PHP 5.4)
    -----------------
      Scaling: x2 (minimum: 2, maximum: 2) on small gears

You have 1 application in your domain.-n option:
$ rhc domain show -n Domain_Name5.2.4. Renaming a Domain
- Ensure the domain does not contain any applications with the following command:
$ rhc appsDelete any applications that exist in that domain with the following command:$ rhc app delete App_NameWarning
Deleting an application deletes all remote data associated with that application, which cannot be recovered. - Rename a domain with the following command, specifying the current domain name and the new domain name:
$ rhc domain rename Old_Domain_Name New_Domain_NameExample 5.4. Renaming a Domain
$ rhc domain rename olddomain newdomain
Renaming domain 'olddomain' to 'newdomain'... done
Applications in this domain will use the new name in their URL.
5.2.5. Deleting a Domain
Procedure 5.1. To Delete a Domain:
- Ensure the domain does not contain any applications with the following command:
$ rhc domain show Domain_NameDelete any applications that exist in that domain with the following command:$ rhc app delete App_NameWarning
Deleting an application deletes all remote data associated with that application, which cannot be recovered. - Delete the domain with the following command:
$ rhc domain delete Domain_Name
Note
See Also:
5.2.6. Configuring Domain Gear Size
| Option | Description |
|---|---|
| --no-allowed-gear-sizes | Does not allow any gear sizes in this domain. |
| --allowed-gear-sizes [SIZES] | Gear sizes to be allowed in this domain. To specify multiple sizes, use a comma-delimited list. To see available sizes, run the rhc account command. |
| -n, --namespace [NAME] | Name of a domain. |
$ rhc domain-configure domain --allowed-gear-sizes gearsizesExample 5.5. Configuring the Gear Size of a Domain
$ rhc domain-configure mydomain --allowed-gear-sizes small.highcpuChapter 6. Teams
6.1. Introduction to Teams
You can have explicit roles within a domain, and belong to a team which has a role within the domain. The following team roles are available: view, edit, and admin. If you have a specific role, and you are on a team that has a different role, the effective role is the higher of the two roles. Therefore, the following guidelines apply:
- If you have the
viewrole in a domain, and you are not on a team, you can view the domain. - If you are on a team that has the
viewrole in a domain, you can view applications within that domain. - If you have the
editrole within a domain, and you are on a team that has theviewrole, you can edit applications within the domain. - If you have the
viewrole in a domain, and you are on a team that has theeditrole, you can edit applications within the domain. - If you do not have an explicit role in a domain, and you are on a team that has the
editrole, you are not listed in the domain membership, except within the team.
6.2. Team Management
6.2.1. Creating a Team
$ rhc team create Team_NameNote
6.2.2. Adding Members to a Team
$ rhc member add user@myemail.com -t Team_NameNote
6.2.3. Listing Your Teams
$ rhc teams--mine command:
$ rhc teams --mine6.2.4. Viewing Team Information
$ rhc team show Team_Name$ rhc team show --team-id Team_ID6.2.5. Leaving a Team
$ rhc team leave Team_Name$ rhc team leave --team-id Team_IDNote
6.2.6. Deleting a Team
$ rhc team delete Team_Name$ rhc team delete --team-id Team_IDNote
Chapter 7. Domain Membership
7.1. Introduction to Domain Membership
| Role | Description |
|---|---|
| View | Member has read-only access to view information about the domain and its applications and cannot make any changes. |
| Edit | Member can create, update, and delete all applications in the domain, and has Git and SSH access. |
| Administer | Member has access to all features, but cannot change allowed gear sizes or edit the domain name. |
edit role, but it can be changed.
7.2. Managing Domain Membership
7.2.1. Adding a Member
$ rhc member add user@myemail.com -n Domain_Nameedit. Use the --role option when adding a member to specify a different role:
$ rhc member add user@myemail.com -n Domain_Name --role Member_Role
When adding a team to a domain, use the --type option with team specified:
$ rhc member add Team_Name -n Domain_Name --type team--global option:
$ rhc member add Global_Team_Name -n Domain_Name --type team --global$ rhc member add Team_ID -n Domain_Name --type team --idsNote
--role option.
7.2.2. Changing Member Role
view, edit, or admin:
$ rhc member update user@myadmin.com -n Domain_Name --role Member_Role
Change an existing team's role by using the --type option and specifying team:
$ rhc member update Team_Name -n Domain_Name --role Member_Role --type team$ rhc member update Team_ID -n Domain_Name --role Member_Role --type team --ids7.2.3. Listing Members of a Domain
$ rhc member list Domain_NameExample 7.1. Listing Domain Members
$ rhc member list automobile
Login                 Login  			Role		Type
--------------------- -----------------		------------	----
member@example.com	member@example.com	admin (owner)	user
myteam						edit		team
member2@example.com	member2@example.com	view		user
member3@example.co	member3@example.com	edit		user
member4@example.com member4@example.com admin user--all option to display all members, including team-members:
$ rhc member list Domain_Name --allExample 7.2. Listing Domain Members
$ rhc member list automobile --all
Login                 	Login  			 Role			Type
--------------------- 	-----------------	 ------------		----
member@example.com	 member@example.com	  admin (owner)		user
myteam						  edit			team
member2@example.com	 member2@example.com	  view			user
member3@example.co	 member3@example.com	  edit			user
member4@example.com	 member4@example.com	  admin			user
team_member1@example.com team_member1@example.com edit (via myteam)	user
team_member2@example.com team_member2@example.com edit (via myteam) 	user
team_member3@example.com team_member3@example.com edit (via myteam) 	user
7.2.4. Listing Members of an Application
-a option:
$ rhc member list -a App_NameExample 7.3. Listing Application Members
$ rhc member list -a myapp
 Login                   Role
----------------------- -------------
user1@myemail.com      admin (owner)
user2@myemail.com      view
7.2.5. Removing a Member
-n option and the user name to be removed:
$ rhc member remove -n Domain_Name user@myemail.com--all option:
$ rhc member remove -n Domain_Name --all
Remove a team from a domain by specifying the team name and adding the --type option:
$ rhc member remove Team_Name -n Domain_Name --type teamChapter 8. Regions and Zones
8.1. Introduction to Regions and Zones
8.2. Region and Zone Management
8.2.1. Listing Available Regions
$ rhc region listrhc regions command.
See Also:
Chapter 9. Cartridges
9.1. Introduction to Cartridges
9.1.1. Web Framework Cartridges
| Cartridge | Scalable | Version |
|---|---|---|
| Do-It-Yourself (DIY) | No | - |
| JBoss A-MQ | No | 6.1 [a] |
| JBoss EAP | Yes | 6.2 |
| JBoss Fuse | No | 6.1 [a] |
| JBoss Fuse Builder | Yes | 6.1 [a] |
| Jenkins Server | No | 1.5 |
| Node.js | Yes | 0.10 |
| Perl | Yes | 5.10 |
| PHP | Yes | 5.3, 5.4 [b] [c] |
| Python | Yes | 2.6, 2.7, 3.3 [d] |
| Ruby | Yes | 1.8, 1.9, 2.0 [e] |
| Tomcat (JBoss EWS) | Yes | 6, 7 [f] |
[a]
JBoss A-MQ 6.1, JBoss Fuse 6.1, and JBoss Fuse Builder 6.1 are available starting in OpenShift Enterprise 2.1.7
[b]
PHP 5.4 is available starting in OpenShift Enterprise 2.1.
[c]
PHP 5.3 has APC opcode cache enabled by default. PHP 5.4 has Zend OPCache enabled by default, with APC enabled only for user cache.
[d]
Python 3.3 is available starting in OpenShift Enterprise 2.1.1.
[e]
Ruby 2.0 is available starting in OpenShift Enterprise 2.2.
[f]
EWS 3 is only certified to run with Java 1.7.
| ||
9.1.2. Add-on Cartridges
| Function | Description |
|---|---|
| Database | Provide the application with one of several database back ends. Examples include MySQL and PostgreSQL. |
| Monitoring and Management | Provide a range of options for managing and monitoring the application. Examples include the Cron task scheduler, and the Jenkins Client. |
The following table describes all available database cartridges.
| Cartridge | Scalable | Version | Description |
|---|---|---|---|
| MySQL | No | 5.1, 5.5 [a] | Multi-user, multi-threaded SQL database server. |
| MongoDB | No | 2.4 [b] | High-performance, open source NoSQL database. |
| PostgreSQL | No | 8.4, 9.2 | Advanced object-relational database management system |
[a]
MySQL 5.5 is available starting in OpenShift Enterprise 2.1.
[b]
MongoDB 2.4 is available starting in OpenShift Enterprise 2.1.1.
| |||
Important
The following table describes all available management cartridges, and shows whether they are scalable or not.
| Cartridge | Scalable | Version | Description |
|---|---|---|---|
| HAProxy | Yes | 1.4 | High performance TCP/HTTP load balancer. |
| Cron | Yes | 1.4 | A daemon that runs specified programs at scheduled times. |
| Jenkins Client | No | 1.5 | A client for managing Jenkins-enabled applications. |
9.1.3. Downloadable Cartridges
See Also:
Chapter 10. Applications
10.1. Introduction to Applications
~/.ssh/known_hosts directory.
| Component | Description |
|---|---|
| Domain | The domain provides a unique group identifier for all the applications of a specific user. The domain is not directly related to DNS; instead, it is appended to the application name to form a final application URL of the form http://App_Name-domain.example.com |
| Application Name | The name of the application is selected by a user. The final URL to access the application is of the form http://App_Name-domain.example.com |
| Alias | DNS names can be provided for the application by registering an alias with OpenShift Enterprise and pointing the DNS entry to the OpenShift Enterprise servers. |
| Git repository | A Git repository is used to modify application code locally. After the code is applied, the git push command is required to deploy the revised code. |
/var/tmp and /tmp directories for each user application. The /var/tmp directory is a symbolic link to /tmp. Each /tmp directory is completely isolated from the /tmp directories of all other applications. Files that are untouched for any period of ten days are automatically deleted from these directories.
10.1.1. Application Life Cycle
| Process | Description |
|---|---|
| Code | Develop the application code with the desired language and tools. Continuously push the application code to the applications remote Git source code repository. |
| Build | OpenShift Enterprise supports various build mechanisms, whether it is a simple script, a personal Jenkins continuous integration server, or an external build system. |
| Deploy | Every application is composed of cartridges that simplify server maintenance and configuration. OpenShift Enterprise supports various technologies to provision the required services automatically. |
| Manage | OpenShift Enterprise allows real-time monitoring, debugging, and tuning of applications. Applications are scaled automatically depending on web traffic. |
10.1.2. Scalable Applications
Each application created on OpenShift Enterprise must have one web framework cartridge defined upon creation. For example, a PHP cartridge. When an application is defined as scalable, a second cartridge, the HAProxy cartridge, is added to the application. The HAProxy cartridge listens to all incoming web-page requests to an application and passes them to the web cartridge, following the defined guidelines for load monitoring.
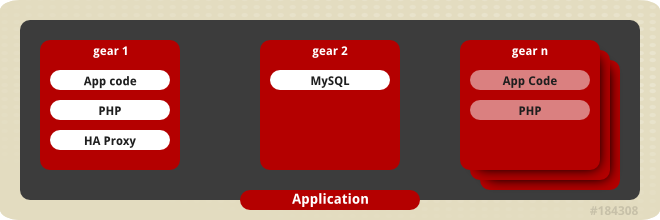
Figure 10.1. Cartridges on Gears in a Scaling Application
10.1.3. Highly-Available Applications
At this time of writing, the only way to enable high availability in applications is through the REST API. See Section 11.7, “Making Applications Highly Available” for the curl command to make your applications highly available, or the relevant section in the OpenShift Enterprise REST API Guide for more information:
Chapter 11. Application Management
11.1. General Information
--timeout option on the command line is used to override the default values when there are constant timeout issues. OpenShift Enterprise uses two timeout parameters: a connection timeout, which determines how long the client tries to connect to the server before timing out; and a read timeout, which determines how long the client waits for a response from the server. The default connection timeout value is 20 seconds. The default read timeout value is 120 seconds.
--timeout option affects both timeout parameters, but it can only be used to increase the default values. The timeout value cannot be set to be less than the default. For example, if --timeout 50 is used, it sets the connection timeout value to 50 seconds, but does not affect the read timeout value. Similarly, if --timeout 150 is used, it sets both the connection and read timeout values to 150 seconds.
11.2. Creating an Application
Prerequisites:
rhc app create command and using the command options to supply the required information, such as the type of web framework to be used with the new application. Note that if multiple versions are available for the specified web framework cartridge, you are prompted to specify the version number to use for the new application.
| Option | Description |
|---|---|
| -n, --namespace [NAME] | Domain where you wish to create the application. |
| -g, --gear-size [SIZE] | Gear size determines how much memory and CPU a cartridge consumes. |
| -s, --scaling | Creates a scalable application. |
| --from-code [URL] | URL to a Git repository that becomes the initial contents of the application. |
| -a, --app [NAME] | Name for the application to be created. |
| --enable-jenkins [NAME] | Enables Jenkins continuous integration, and creates a Jenkins application if one does not already exist. The default name is 'jenkins' if a name is not specified. |
| --region [NAME] | Specifies the region in which the application will be created. |
Create a non-scalable application in the default domain with the following command:
$ rhc app create App_Name Cart_NameExample 11.1. Creating a Non-Scalable Application
$ rhc app create racer php-5.4
Application Options
-------------------
Domain:     mydomain
Cartridges: php-5.4
Gear Size:  default
Scaling:    no

Creating application 'racer' ... done


Waiting for your DNS name to be available ... done

Cloning into 'racer'...
The authenticity of host 'racer-mydomain.rhcloud.com (50.19.129.28)' can't be established.
RSA key fingerprint is cf:ee:77:cb:0e:fc:02:d7:72:7e:ae:80:c0:90:88:a7.
Are you sure you want to continue connecting (yes/no)? yes
Warning: Permanently added 'racer-mydomain.rhcloud.com,50.19.129.28' (RSA) to the list of known hosts.

Your application 'racer' is now available.

  URL:        http://racer-mydomain.rhcloud.com/
  SSH to:     52ae91b8dbd93c8c43000001@racer-mydomain.rhcloud.com
  Git remote: ssh://52ae91b8dbd93c8c43000001@racer-mydomain.rhcloud.com/~/git/racer.git/
  Cloned to:  /home/blank/racer

Run 'rhc show-app racer' for more details about your app.
Create a scalable application by adding the -s parameter to the command:
$ rhc app create App_Name Cart_Name -sExample 11.2. Creating a Scalable Application
$ rhc app create racer php-5.4 -sNote
Replace the web framework type with the URL of the manifest for the hosted cartridge to create an application from a downloadable cartridge:
$ rhc app create App_Name https://www.example.com/manifest.yml
As described in Section 5.2.1, “Creating a Domain”, each domain supports multiple applications. Therefore, if there are multiple domains associated with an account, you must specify in which domain to create the new application with the -n option:
$ rhc app create App_Name Cart_Name -n Domain_Name- http://app1-domain.example.com
- http://app2-domain.example.com
Create an application and enable Jenkins continuous integration:
$ rhc app create App_Name Cart_Name --enable-jenkins Jenkins_App_NameExample 11.3. Creating an Application With Jenkins Continuous Integration
$ rhc app create mynewapp php-5.4 --enable-jenkins myjenkinsapp
Application Options
-------------------
Domain:     mydomain
Cartridges: php-5.4
Gear Size:  default
Scaling:    no

Creating application 'mynewapp' ... done


Setting up a Jenkins application ... done

  Jenkins created successfully.  Please make note of these credentials:

   User: admin
   Password: wEXesNXyEe1M

Note:  You can change your password at: https://myjenkinsapp-mydomain.rhcloud.com/me/configure

Setting up Jenkins build ... done

  Associated with job 'mynewapp-build' in Jenkins server.

Waiting for your DNS name to be available ... done

Cloning into 'mynewapp'...
The authenticity of host 'mynewapp-mydomain.rhcloud.com (54.234.56.174)' can't be established.
RSA key fingerprint is cf:ee:77:cb:0e:fc:02:d7:72:7e:ae:80:c0:90:88:a7.
Are you sure you want to continue connecting (yes/no)? yes
Warning: Permanently added 'mynewapp-mydomain.rhcloud.com,54.234.56.174' (RSA) to the list of known hosts.

Your application 'mynewapp' is now available.

  URL:        http://mynewapp-mydomain.rhcloud.com/
  SSH to:     52b10d7d2587c8415000012c@mynewapp-mydomain.rhcloud.com
  Git remote: ssh://52b10d7d2587c8415000012c@mynewapp-mydomain.rhcloud.com/~/git/mynewapp.git/
  Cloned to:  /home/blank/mynewapp

Run 'rhc show-app mynewapp' for more details about your app.
Important
OpenShift Enterprise supports grouping nodes into regions and zones. With the release of OpenShift Enterprise 2.2, you can create an application and assign it to a specific region using the --region option:
$ rhc app create App_Name Cart_Name --gear-size Gear_Size --region Region_NameExample 11.4. Creating a Scalable Application into a Specific Region
$ rhc app create racer php-5.4 --gear-size medium --region eu-west-1a --scalingTo create an application using code from a Git repository, specify the URL:
$ rhc app create --from-code URLFor build or other testing purposes, create an application of no specific type with the DIY cartridge:
$ rhc app create App_Name diygit push and a .openshift/action_hooks/.
Note
git push command the application is automatically deployed and visible to customers.
11.3. Cloning an Existing Application
$ rhc app create New_Name --from-app App_Name
Use domain/ to clone an application from another domain you have access to:
$ rhc app create New_Name --from-app domain/App_NameOpenShift Enterprise supports hosting applications in multiple regions and zones. With the release of OpenShift Enterprise 2.2, you can clone an application to a region other than us-east-1 using the --region option:
$ rhc app create New_App --from-app Existing_App --region Region_Name| Option | Description |
|---|---|
| --gear-size Gear_Size | Use this option to change the gear size of the new application. For example, if the original application uses the small gear size, use this option with medium for the new application to use medium gears. |
| --[no-]scaling | Use this option to configure the new application to be either scaling or non-scaling. For example, if the original application has scaling enabled, use the --no-scaling option to disable scaling for the new application and vice-versa. |
| --env En_var | A cloned application will have the same environment variables as the original application. To add new environment variables to the new application, use this option with any desired environment variables. Additionally, you can override any environment variables that were set in the original application with this option and the environment variables to replace them. |
| --no-git | Use this to disable Git for the new application. |
| --region Region_Name | Specifies the region to which the application will be cloned. |
11.4. Cloning the Remote Application Repository
$ rhc git-clone App_NameExample 11.5. Cloning the Remote Application Repository
$ rhc git-clone racer
Cloning into 'racer'...
Your application Git repository has been cloned to '/home/apps/racer'
11.5. Viewing Applications for a User
$ rhc appsExample 11.6. Viewing Applications for User
$ rhc apps
racer @ http://racer-automobile.example.com/ (uuid: 926056f8845b4e388b37f6735c89d0eb)
-------------------------------------------------------------------------------------
  Domain:  		automobile
  Created: 		Dec 19 10:20 PM
  Gears:   		1 (defaults to small)
  Git URL: 		ssh://926056f8845b4e388b37f6735c89d0eb@racer-automobile.example.com/~/git/racer.git/
  SSH:     		926056f8845b4e388b37f6735c89d0eb@racer-automobile.example.com
  Deployment: 		auto (on git push)

  php-5.4 (PHP 5.4)
  -----------------
    Gears: 1 small
--mine option to only list the applications that are within domains that you have created:
$ rhc apps --mine11.6. Scaling an Application Manually
- If a certain load is anticipated on an application and it must be scaled accordingly.
- There are a fixed set of resources for an application.
- The cost must be controlled manually.
Procedure 11.1. To Scale an Application Manually:
- View the cartridges associated with a scalable application with the following command:
$ rhc app show App_NameLocate the scaling cartridges as required. The example shows that the php-5.4 cartridge is scaling.Example 11.7. Showing a Cartridge's Information
$ rhc app show hybrid hybrid @ http://hybrid-automobile.example.com/ (uuid: fjoe04cabdc4efa8f2513a21e2ed27d) ----------------------------------------------------------------------------- Domain: automobile Created: 11:48 AM Gears: 1 (defaults to small) Git URL: ssh://fjoe04cabdc4efa8f2513a21e2ed27d@hybrid-automobile.example.com/~/git/hybrid.git/ SSH: fjoe04cabdc4efa8f2513a21e2ed27d@hybrid-automobile.example.com Deployment: auto (on git push) php-5.4 (PHP 5.4) ----------------- Scaling: x1 (minimum: 1, maximum: available) on small gears haproxy-1.4 (OpenShift Web Balancer) ------------------------------------ Gears: Located with php-5.4 - Set the minimum and maximum amount of gears the cartridge can use for scaling with the following command, specifying the application name and minimum and maximum number of gears:
$ rhc cartridge scale Cart_Name -a App_Name --min Min_Gears --max Max_GearsExample 11.8. Setting the Maximum and Minimum Amount of Gears for a Cartridge
$ rhc cartridge scale php -a hybrid --min 1 --max 10
Setting scale range for php ... done

php-5.4 (PHP 5.4)
-----------------
  Scaling: x1 (minimum: 1, maximum: 10) on small gears
1 to stop a cartridge from scaling.
11.7. Making Applications Highly Available
# rhc app enable-ha App_Name$ curl -X POST https://Hostname/broker/rest/domains/Domain_Name/applications/App_Name/events --user Username:Password --data-urlencode event=make-haenable-ha does not add a second HAProxy cartridge to the application. To resolve this, a scale-up event needs to happen for the second HAProxy cartridge to be added:
# rhc app-scale-up test2# rhc cartridge-scale cartridge -a test2 --min min_value11.8. Application Management Commands
rhc app command and the available options. The following example shows the command syntax.
$ rhc app action App_Name [Options]| Action | Details |
|---|---|
| start | Start an application. |
| stop | Stop an application. |
| force-stop | Stop all application processes. |
| restart | Restart an application. |
| reload | Reload an application. |
| show | Show information about an application. |
| tidy | Clean out the application's log files and tmp directories, and tidy up the Git repository on the server. |
| create | Create an application and add it to a domain. |
| delete | Remove an application. |
| configure | Configure an application's properties. |
| deploy | Deploy a Git reference or binary file of an application. |
| Option | Description |
|---|---|
| -n, --namespace [NAME] | Name of a domain. |
| -a, --app [NAME] | Name of an application. |
| -l, --rhlogin [LOGIN] | OpenShift Enterprise user account. |
| -p, --password [PASSWORD] | OpenShift Enterprise account password. |
Example 11.9. Starting an Application
$ rhc app start myapp -n mydomain
RESULT:
myapp started
11.9. Managing Applications in a Secure Shell Environment
11.9.1. Introduction to Secure Shell Environment
Important
| Option | Description |
|---|---|
| -n, --namespace [NAME] | Domain where you wish to create the application. |
| --ssh [PATH] | Path to SSH executable or additional options. |
| --gears | Execute the command on all application gears; requires a command. |
| --limit [INTEGAR] | Limit the number of simultaneous SSH connections that can be opened with the --gears option; default is 5. |
| --command [COMMAND] | Command to run in the application's secure shell environment. |
| -a, --app [NAME] | Name for the application to be created. |
| -l, --rhlogin [LOGIN] | OpenShift Enterprise user account. |
| -p, --password [PASSWORD] | OpenShift Enterprise account password. |
11.9.2. Accessing an Application
$ rhc ssh App_Name [Options]Example 11.10. Accessing an Application in Secure Shell Environment
$ rhc ssh racer
Connecting to 517623ecdbd93cdffa000001@racer-automobile.example.com ...

    *********************************************************************

    You are accessing a service that is for use only by authorized users.
    If you do not have authorization, discontinue use at once.
    Any use of the services is subject to the applicable terms of the
    agreement which can be found at:
    https://www.openshift.com/legal

    *********************************************************************

    Welcome to OpenShift shell

    This shell will assist you in managing OpenShift applications.

    !!! IMPORTANT !!! IMPORTANT !!! IMPORTANT !!!
    Shell access is quite powerful and it is possible for you to
    accidentally damage your application.  Proceed with care!
    If worse comes to worst, destroy your application with 'rhc app delete'
    and recreate it
    !!! IMPORTANT !!! IMPORTANT !!! IMPORTANT !!!

    Type "help" for more info.

[racer-automobile.example.com 517623ecdbd93cdffa000001]\>help command to see the available shell commands. General Linux commands are available for routine operations in the shell environment.
--ssh option.
11.9.3. Accessing a Specific Gear
Procedure 11.2. To Access a Specific Gear:
- Determine the gear's ID and SSH URL with the following command:
$ rhc app show App_Name --gearsExample 11.11. Viewing Application Gears
$ rhc app show automobile --gears
ID                       State   Cartridges          Size  SSH URL
------------------------ ------- ------------------- ----- ----------------------------------------------------------------------------
51774b712587c83ddb00009d started php-5.4 haproxy-1.4 small 51774b712587c83ddb00009d@hybrid-automobile.example.com
519b0fd02587c84b860002d8 started php-5.4 haproxy-1.4 small 519b0fd02587c84b860002d8@519b0fd02587c84b860002d8-automobile.example.com
519b1018dbd93c85180001fc started php-5.4 haproxy-1.4 small 519b1018dbd93c85180001fc@519b1018dbd93c85180001fc-automobile.example.com
519b06ebdbd93cd439000027 started postgresql-9.2      small 519b06ebdbd93cd439000027@519b06ebdbd93cd439000027-automobile.example.com
In the example output the ID of the first scaling gear is519b0fd02587c84b860002d8and its SSH URL is519b0fd02587c84b860002d8@519b0fd02587c84b860002d8-automobile.example.com. - Open a secure shell environment to the desired gear with the gear's SSH URL:
$ ssh 519b0fd02587c84b860002d8@519b0fd02587c84b860002d8-automobile.example.com
11.9.4. Accessing a Database Cartridge
Important
Procedure 11.3. To Manage a Database in a Shell Environment:
- Access the desired application in a shell environment with the following command:
$ rhc ssh App_Name - From the application's shell environment prompt, run the appropriate command for the database to access the interactive database shell:
- Run the
mysqlcommand to access the MySQL shell. - Run the
psqlcommand to access the PostgreSQL shell. - Run the
mongocommand to access the MongoDB shell.
Example 11.12. Accessing a MySQL Shell
[racer-automobile.example.com 515e21acdbd93c051d000022]\> mysql
Welcome to the MySQL monitor.  Commands end with ; or \g.
Your MySQL connection id is 1
Server version: 5.1.71 Source distribution

Copyright (c) 2000, 2013, Oracle and/or its affiliates. All rights reserved.

Oracle is a registered trademark of Oracle Corporation and/or its
affiliates. Other names may be trademarks of their respective
owners.

Type 'help;' or '\h' for help. Type '\c' to clear the current input statement.

mysql>
Note
persistence.xml like:
<connection-url>jdbc:mysql://xxx.x.xxx.xxx:xxxx/databaseName?useUnicode=yes&characterEncoding=UTF-8</connection-url>
11.10. Custom Domains and SSL Certificates
Click on an application name in the My Applications tab in the Management Console to view custom domain name and SSL certificate management options for the selected application.
11.10.1. Managing Custom Domain Names
Add a custom domain name to an application with the following command, specifying the application name and custom domain name:
$ rhc alias add App_Name Custom_Domain_NameExample 11.13. Adding a Custom Domain Name
 $ rhc alias add racer fast.cars.com
RESULT:
Alias 'fast.cars.com' has been added.View domain name aliases and SSL certificate status with the following command, specifying the application name:
$ rhc alias list App_NameExample 11.14. Viewing Custom Domain Names
 $ rhc alias list racer

Alias         Has Certificate? Certificate Added
------------- ---------------- -----------------
fast.cars.com yes              2013-08-05
quick.cars.com noRemove a domain name alias from an application with the following command, specifying the application name and the custom domain name to be removed:
$ rhc alias remove App_Name Custom_Domain_Name11.10.2. Managing Custom SSL Certificates
Add a custom SSL certificate to an alias with the following command.
$ rhc alias update-cert App_Name Domain_Name --certificate Cert_File --private-key Key_File --passphrase option.
View domain name aliases and SSL Certificate status with the following command, specifying the application name:
$ rhc alias list App_NameExample 11.15. Checking SSL Certificate Status
$ rhc alias list racer

Alias         Has Certificate? Certificate Added
------------- ---------------- -----------------
fast.cars.com yes              2013-08-05
quick.cars.com no               -
Remove a custom SSL certificate from an alias with the following command, specifying the application name and alias name:
$ rhc alias delete-cert App_Name Alias11.11. Enabling the JBoss Metrics Plug-in
standalone.xml file within the <extensions> element:
<extension module="com.openshift.metrics"/><profile> element to look similar to the following:
Example 11.16. JBoss Metrics Plug-in XML
<subsystem xmlns="urn:redhat:openshift:metrics:1.0">
  <max-line-length>1024</max-line-length>
  <metrics-group cron="*/5 * * * * ?">
    <source type="jboss" path="core-service=platform-mbean/type=memory-pool/name=CMS_Old_Gen">
      <metric source-key="usage.used" publish-key="oldgen.used" />
      <metric source-key="usage.max" publish-key="oldgen.max" />
      <metric source-key="usage.committed" publish-key="oldgen.committed" />
    </source>
    <source path="java.lang:type=Memory" type="mbean">
      <metric source-key="HeapMemoryUsage.used" publish-key="jmx.heap.used"/>
    </source>
  </metrics-group>
</subsystem>
core-service=platform-mbean/type=memory-pool/name=CMS_Old_Gen, or a valid MBean, such as java.lang:type=Memory can be a source. Each source has a type (jboss or mbean) and a path, which is the name of the resource. A source contains one or more data points that can be read and published. You can specify a source-key (the location in the source of the data point) and a publish-key (the label of the information when written to stdout). Metrics are printed to stdout similar to the following:
Example 11.17. Logged Metrics Data
Jun 10 16:25:39 vm openshift-platform[29398]: type=metric appName=php6 gear=53961099e659c55b08000102 app=53961099e659c55b08000102 ns=demo quota.blocks.used=988 quota.blocks.limit=1048576 quota.files.used=229 quota.files.limit=80000metrics-group entries in order to group together the data points you wish to emit at any interval. For example, to emit memory data every 10 seconds but database connection pool data every 30 seconds, you would need two different metrics groups, because their schedules are different.
enabled="false" to any <metrics-group>, <source>, or <metric> attribute to disable it from being logged:
<metrics-group enabled="false">11.12. The Watchman Tool
- Watchman searches cgroup event flow through syslog to determine when a gear is destroyed. If the pattern does not match a clean gear removal, the gear will be restarted.
- Watchman monitors the application server logs for messages hinting at out of memory, then restarts the gear if needed.
- Watchman compares the user-defined status of a gear, then the actual status of the gear, and fixes any dependencies.
- Watchman searches processes to ensure they belong to the correct cgroup. It kills abandoned processes associated with a stopped gear, or restarts a gear that has zero running processes.
- Watchman monitors the usage rate of CPU cycles and restricts a gear's CPU consumption if the rate of change is too aggressive.
11.13. Scheduling Cron Jobs
Procedure 11.4. To Enable Cron Support for an Application:
- Add the cron scheduler cartridge to an application:
$ rhc cartridge add cron -a App_Name - Add the cron jobs to the application's
.openshift/cron/{minutely,hourly,weekly,daily,monthly}/directories.Example 11.18. Sample Cron File
$ mkdir -p .openshift/cron/minutely
$ echo 'date >> $OPENSHIFT_REPO_DIR/php/date.txt' > .openshift/cron/minutely/date.sh
The example cron job appends a new line of date information to the$OPENSHIFT_REPO_DIR/php/date.txtfile every minute. - Commit the changes and push them to the remote repository:
$ git add .openshift/cron/
$ git commit -m "configuring cron jobs"
$ git push
Example 11.19. Verifying Cron Job Script Works Correctly
$ curl http://holy-roller.example.com/date.txt
Thu Feb  2 01:02:01 EST 2012
Thu Feb  2 01:03:01 EST 2012
Thu Feb 2 01:04:01 EST 2012/cron subdirectories are executed at the respective frequencies. For example, scripts in each subdirectory are executed in alphabetical order; scripts in the /cron/hourly directory are executed on the first minute of every hour.
Disable all cron job scripts with the following command:
$ rhc cartridge stop cron -a App_NameEnable all cron job scripts with the following command:
$ rhc cartridge start cron -a App_NameNote
11.14. Binding Applications to Ports
Important
| Application Name | Port Number | Description |
|---|---|---|
| Kerberos | 4444 | Kerberos is used for user authentication identifying with a node. |
| Git | 9418 | Git is used for version control. |
| MySQLd | 3306, 63132-63164 | My Structured Query Language (MySQL) acts as a server providing access to databases. |
| Mongod | 27017 | MongoDB acts as a server providing access to databases. |
| PostgreSQL | 5432 | PostgreSQL acts as a server providing access to databases. |
| MS SQL | 1433-1434 | MS SQL acts as a server providing access to databases. |
| Oracle | 1521, 2483, 2484 | Oracle acts as a server providing access to databases. |
| HTTP/HTTPS | 8008, 8009, 8443 | Hypertext Transfer Protocol Secure (HTTPS) is used for secure communication over a server. |
| HTTP cache | 8080, 8118, 8123, 10001-10010 | HTTP cache is used for the temporary storage of documents. |
| memcache | 11211 | memcache is a memory caching system. |
| jacORB | 3528, 3529 | JacORB is a Java request broker. |
| JBoss Debug | 8787 | A debug program for JBoss applications. |
| JBoss Management | 4712, 4447, 7600, 9123, 9990, 9999, 18001 | A management program for JBoss applications. |
| AMQP | 5671-5672 | Advanced Message Queuing Protocol (AMQP) is used to transfer messages between applications. |
| PulseAudio | 4713 | PulseAudio is a server that manages the use of audio devices. |
| Flash | 1935 | Flash is a multimedia platform. |
| Munin | 4949 | Munin is a network monitoring application. |
| Virt Migration | 49152-49216 | Virt migration is the copying of one machine's data and moving it to another. |
| OCSP | 9080 | Online Certificate Service Protocol (OCSP) is a protocol used for obtaining the status of a certificate. |
OPENSHIFT_Cart_Name_PORT (8080) for HTTP connectivity, which reroutes externally through port 80.
11.14.1. Configuring WebSocket Ports
ws://), requests are directed to port 8000, while WebSocket Secure connections (wss://) use port 8443, as shown in the following example:
- http://example.example.com:8000
- https://example.example.com:8443
11.14.2. Configuring Email Ports
- SMTP/submission: 25, 465, 587
- IMAP: 143, 220, 993
- POP: 109, 110, 995
Important
11.15. Port Forwarding
11.15.1. Introduction to Port Forwarding
11.15.2. Application Port Forwarding
$ rhc port-forward App_NameExample 11.20. Configuring Port Forwarding for an Application
$ rhc port-forward myapp
Checking available ports ... done
Forwarding ports ...
Address already in use - bind(2) while forwarding port 8080. Trying local port 8081
Address already in use - bind(2) while forwarding port 8080. Trying local port 8081
Address already in use - bind(2) while forwarding port 8081. Trying local port 8082

To connect to a service running on OpenShift, use the Local address

Service Local                OpenShift
------- --------------- ---- -------------------------------------------------------
haproxy 127.0.0.1:8080   =>  127.9.159.130:8080
haproxy 127.0.0.1:8081   =>  127.9.159.131:8080
httpd   127.0.0.1:8082   =>  127.9.159.129:8080
mysql   127.0.0.1:50226  =>  52347a1d2587c86695111697-mydomain.rhcloud.com:50226

Press CTRL-C to terminate port forwardingrhc port-forward command forwards all open ports on a running application to your local workstation. If an application contains multiple cartridges, the command output shows which remote services are being bound to local ports.
$ ssh -L local_port:host:remote_port gear_ID@app-domain.example.comExample 11.21. Forwarding Specific Ports
$ ssh -L 8080:localhost:8080 70277280b8534c8a9fc76d2734393dfa@racer-auto.example.com11.15.3. Gear Port Forwarding
$ rhc port-forward App_Name -g gear_IDExample 11.22. Port Forwarding a Specific Gear
$ rhc port-forward racer -g 522d59745973caccab0000c1
Checking available ports ... done
Forwarding ports ...

To connect to a service running on OpenShift, use the Local address

Service Local               OpenShift
------- -------------- ---- -------------------
httpd   127.0.0.1:8080  =>  127.12.166.129:8080

Press CTRL-C to terminate port forwarding11.15.4. Port Forwarding on Mac OS X
- localhost
- 127.0.0.1
Example 11.23. Error Messages When Port Forwarding on Mac OS X
$ rhc port-forward myapp
Checking available ports...
Error trying to forward ports. You can try to forward manually by running:
ssh -N 70277280b8534c8a9fc76d2734393dfa@myapp-domain.example.com
$ sudo ifconfig lo0 alias application_IP_addressExample 11.24. Manually Configured IP Address
$ sudo ifconfig lo0 alias 127.10.51.129Note
ifconfig command on Mac OS X.
Example 11.25. Configuring Aliases for Multiple IP Addresses
$ sudo ifconfig lo0 alias 127.11.25.1
$ sudo ifconfig lo0 alias 127.11.25.2rhc port-forward command.
Important
11.16. Deleting an Application
Warning
yes when prompted:
$ rhc app delete App_NameWarning
Delete the local application data with the following command:
$ rm -rf ~/path/to/app_directory/Chapter 12. Cartridge Management
12.1. Viewing Available Cartridges
$ rhc cartridge list12.2. Adding a Cartridge to an Application
| Option | Description |
|---|---|
| -a, --app [NAME] | Name of an application. |
| -n, --namespace [NAME] | Name of a domain. |
| -e, --env [VARIABLE=VALUE] | Environment variable(s) to be set on this cartridge. It can also be a path to a file that contains the environment variables. |
| -g, --gear-size [SIZE] | Gear size determines how much memory and CPU a cartridge consumes. |
| -c, --cartridge [CART_TYPE] | Type of cartridge to add to an application. |
$ rhc cartridge add Cart_Name -a App_Name
When adding a cartridge to an application, specify the cartridge gear size with the -g, or --gear-size option along with the gear size. Note that this option is not available with non-scalable applications, because the web cartridge and any add-on cartridges are placed on the same gear.
$ rhc cartridge add Cart_Name -a App_Name -g gear_size12.3. Viewing Cartridges for an Application
$ rhc app show App_NameExample 12.1. List of Cartridges for an Application
$ rhc app show mynewapp
mynewapp @ http://mynewapp-mydomain.rhcloud.com/
  (uuid: 5213190e2587c8817a000121)
----------------------------------------------------
  Domain:     mydomain
  Created:    Aug 20, 2013  3:21 AM
  Gears:      2 (defaults to medium)
  Git URL:    ssh://5213190e2587c8817a000121@mynewapp-mydomain.rhcloud.com/~/git/mynewapp.git/
  SSH:        5213190e2587c8817a000121@mynewapp-mydomain.rhcloud.com
  Deployment: auto (on git push)

  php-5.4 (PHP 5.4)
  -----------------
    Scaling: x1 (minimum: 1, maximum: available) on medium gears

  haproxy-1.4 (Web Load Balancer)
  -------------------------------
    Gears: Located with php-5.4

  mysql-5.5 (MySQL 5.5)
  ---------------------
    Gears:          1 medium
    Connection URL: mysql://$OPENSHIFT_MYSQL_DB_HOST:$OPENSHIFT_MYSQL_DB_PORT/
    Database Name:  mynewapp
    Password:       password
    Username:       username
12.4. Cartridge Management Commands
rhc cartridge command, with the following syntax:
$ rhc cartridge Action Cart_Type -a App_Name| Action | Details |
|---|---|
| list | List supported cartridges. |
| add | Add a cartridge. |
| remove | Remove a cartridge. |
| stop | Stop a cartridge. |
| start | Start a cartridge. |
| restart | Restart a cartridge. |
| status | Return the current status of a cartridge. |
| reload | Reload the configuration of a cartridge. |
| show | Show information about a cartridge. |
| storage | View and manipulate storage on a cartridge. |
| scale | Set the scaling range of a cartridge. |
| Option | Description |
|---|---|
| -n, --namespace [NAME] | Name of a domain. |
| -a, --app [NAME] | Name of an application. |
| -c, --cartridge [CART_TYPE] | Name of cartridge. |
| -l, --rhlogin [LOGIN] | OpenShift Enterprise user account. |
| -p, --password [PASSWORD] | OpenShift Enterprise account password. |
Example 12.2. Stopping a Cartridge
$ rhc cartridge stop php -a mynewapp
Using php-5.4 (PHP 5.4) for 'php'
Stopping php-5.4 ... done
Chapter 13. Build and Deployment
13.1. Introduction to Deployment
| Deployment Step | Description |
|---|---|
| Pre-build | This occurs when the git push command is run, but before the push is fully committed. |
| Build | This builds an application, downloads required dependencies, executes the .openshift/action_hooks/build script and prepares everything for deployment. |
| Deploy | This performs any required tasks necessary to prepare the application for starting, including running the .openshift/action_hooks/deploy script. This step occurs immediately before the application is issued a start command. |
| Post-deploy | This step enables interaction with the running application, including running the .openshift/action_hooks/post_deploy script. This step occurs immediately after the application is restarted. |
13.2. Preparing an Application for Deployment
App_Name/php/ directory. The following instructions describe how to prepare an application for deployment.
Procedure 13.1. To Prepare an Application for Deployment:
- Add each new file and directory to the Git index:
$ git add path/to/newfile - Commit an application to the local repository:
$ git commit -m "commit message"
13.3. Deployment Mechanisms
13.3.1. Automatic Deployment
$ git commit
$ git pushgit push command sends the application data to the remote repository and automatically deploys the application. The application automatically stops, builds, and restarts when the code changes are pushed to the remote server.
13.3.1.1. Configuring Automatic Deployment
$ rhc configure-app -a App_Name --auto-deploy13.3.2. Manual Deployment
13.3.2.1. Configuring Manual Deployment
$ rhc configure-app -a App_Name --no-auto-deploygit push command is run, the application data is only pushed to the remote repository; the application is not deployed.
13.3.2.2. Preserving Deployments
$ rhc configure-app -a App_Name --keep-deployments No_of_Deps 13.3.2.3. Deploying from a Git Branch
$ rhc configure-app -a App_Name deployment-branch Git_Branch13.3.2.4. Deploying from a Snapshot
Procedure 13.2. To Deploy From a Snapshot:
- Save an application snapshot to build a deployable .tar.gz artifact:
$ rhc save-snapshot App_Name --deployment - Configure the application for binary artifact deployments:Note that this command changes the application's deployment process and disables the
$ rhc configure-app App_Name --deployment-type binarygit pushcommand. - Deploy the application using the binary artifact that was created:Alternatively, use the following command to deploy from a URL:
$ rhc deploy ./app.tar.gz -a App_Name$ rhc deploy http://foo.com/path/to/file.tar.gz -a App_Name
13.3.2.5. Viewing Previous Deployments
$ rhc deployments App_Name13.3.2.6. Activating a Previous Deployment
$ rhc activate-deployment -a App_Name Dep_ID13.4. Action Hooks
13.4.1. Introduction to Action Hooks
App_Name/.openshift/action_hooks directory.
13.4.2. Cartridge Action Hooks
App_Name/.openshift/action_hooks directory with the same name as the desired event.
| Action | Description | Event-specific examples |
|---|---|---|
| Start | Start the software the cartridge controls. | pre_start_Cart_Name, post_start_Cart_Name |
| Stop | Stop the software the cartridge controls. | pre_stop_Cart_Name, post_stop_Cart_Name |
| Reload | The cartridge and the package software will re-read the configuration information. | pre_reload_Cart_Name, post_reload_Cart_Name |
| Restart | Current cartridge process is stopped and started again. | pre_restart_Cart_Name, post_restart_Cart_Name |
| Tidy | All unused resources are released. | pre_tidy_Cart_Name, post_tidy_Cart_Name |
App_Name/.openshift/action_hooks/pre_start_jbossas, edit it and add the desired information.
13.4.3. Build and Deployment Action Hooks
- pre-build
- build
- deploy
- post-deploy
App_Name/.openshift/action_hooks directory to use the build and deployment action hooks. For example, to use an action hook during the application build phase, create the file App_Name/.openshift/action_hooks/build, edit it and add the following to the file's contents:
Example 13.1. Adding an Action Hook to the Build Process
echo Downloading my.zip...
curl -o $OPENSHIFT_DATA_DIR/my.zip
http://myserver/my.zipgit push process.
13.4.4. Scaling Action Hooks
haproxy_ctld daemon. The haproxy_ctld.rb script, which changes the thresholds and algorithms used to control scale up and down behavior, can be customized for use as an action hook in scalable applications.
Procedure 13.3. To Customize Automatic Scaling for an Application:
- Use SSH to connect to a scalable application and consult the generic
~/haproxy/usr/bin/haproxy_ctld.rbscript for detailed usage information. - Copy the file to the Git repository of the application in the
App_Name/.openshift/action_hooks/directory. - Ensure the file is executable:
# chmod +x App_Name/.openshift/action_hooks/haproxy_ctld.rb - Edit the file to the desired specifications.
- Deploy the changes. To ensure that the changes take effect immediately, the HAProxy cartridge restarts automatically during deployment if the
haproxy_ctld.rbaction hook is detected.
Example 13.2. Scaling Up Based on Memory Usage
~/haproxy/usr/bin/haproxy_ctld.rb script by specifying the following parameters.
...
# Scale up when any gear is using 400M or more memory.
mem_scale_up = 419430400

# Scale down when any gear is using 300M or less memory
mem_scale_down = 314572800

# min_gears - Once this number of gears is met, don't try to scale down any lower
min_gears = 2

gear_list['web'].each do |uuid, array|
 mem_usage = `ssh -i ~/.openshift_ssh/id_rsa #{uuid}@#{array['dns']} 'oo-cgroup-read memory.memsw.usage_in_bytes'`.to_i
 if mem_usage >= mem_scale_up
   @log.error("memory usage (#{mem_usage}) on #{array['dns']} is above threshold(#{mem_scale_up}), adding new gear")
   self.add_gear
 end
end
13.4.5. Metrics Action Hooks
metrics in the App_Name/.openshift/action_hooks directory to use the metrics action hook.
A metrics message must include the following fields and be written to standard out (STDOUT):
type=metric <metric name>=<metric value>Example 13.3. Metrics Message Example
type=metric thread.count=513.5. Environment Variables
13.5.1. Introduction to Environment Variables
- Add an
exportstatement to theApp_Name/.openshift/action_hooks/buildfile, then rungit push. The variables are listed in the Git output and start withremote: declare -x. - Access the application with SSH and run the
envcommand at the shell prompt.
13.5.2. Informational Environment Variables
| Environment Variable Name | Purpose |
|---|---|
OPENSHIFT_APP_DNS | The fully-qualified domain namespace of the application. |
OPENSHIFT_APP_NAME | The name of the application. |
OPENSHIFT_APP_UUID | The UUID of the application (32 hexadecimal characters). |
OPENSHIFT_Cart_Name_IP | The IP address the application listens on. |
OPENSHIFT_Cart_Name_PORT | The port the application receives requests from. |
OPENSHIFT_SECRET_TOKEN | A 128-character string unique to an application that can be used for authentication, and can be overridden with the rhc env set command. |
13.5.3. Directory Environment Variables
| Environment Variable Name | Purpose |
|---|---|
OPENSHIFT_HOMEDIR | The home directory of the application. |
OPENSHIFT_DATA_DIR | A persistent data directory. |
OPENSHIFT_REPO_DIR | Repository containing the currently deployed version of the application. |
OPENSHIFT_TMP_DIR | A temporary directory you can use; SELinux protects data in this directory from other users. |
OPENSHIFT_LOG_DIR | Where all cartridge logs are stored. |
Note
OPENSHIFT_DATA_DIR. Therefore, Red Hat recommends that you store persistent files in the OPENSHIFT_DATA_DIR directory.
13.5.4. Logging Environment Variables
OPENSHIFT_LOG_DIR directory of an application, log files are rolled if their file size exceeds a configurable threshold. A configurable number of rolled files are retained before the oldest file is removed prior to the next roll.
| Environment Variable Name | Purpose |
|---|---|
LOGSHIFTER_OUTPUT_TYPE | If permitted by your system administrator, overrides the default logging behavior. Set file to have logs written to the OPENSHIFT_LOG_DIR directory of the application, or set syslog to enable Syslog logging, if available. Starting in OpenShift Enterprise 2.1.7, set multi to enable both file and syslog at the same time. |
LOGSHIFTER_Cart_Name_MAX_FILESIZE | A case-insensitive string representing the maximum log file size that triggers a roll event. The default value is 10M. If a zero size is specified regardless of the unit, log rolling is effectively disabled. |
LOGSHIFTER_Cart_Name_MAX_FILES | An integer representing the maximum number of log files to retain. The default is 10. |
Cart_Name is a replaceable term used to represent the cartridge short-name. The LOGSHIFTER_Cart_Name_MAX_FILESIZE variable accepts strings in kilobytes, megabytes, gigabytes, and terabytes. For example, for an application with a PHP cartridge, any of the following values would be valid:
- LOGSHIFTER_PHP_MAX_FILESIZE=500K
- LOGSHIFTER_PHP_MAX_FILESIZE=10M
- LOGSHIFTER_PHP_MAX_FILESIZE=2G
- LOGSHIFTER_PHP_MAX_FILESIZE=1T
13.5.5. Database Environment Variables
| Environment Variable Name | Purpose |
|---|---|
OPENSHIFT_Cart_Name_DB_HOST | The host name or IP address used to connect to the database. |
OPENSHIFT_Cart_Name_DB_PORT | The port the database server is listening on. |
OPENSHIFT_Cart_Name_DB_USERNAME | The database administrative user name. |
OPENSHIFT_Cart_Name_DB_PASSWORD | The database administrative user's password. |
OPENSHIFT_Cart_Name_DB_SOCKET | An AF socket for connecting to the database (for non-scaled apps only). |
OPENSHIFT_Cart_Name_DB_URL | Database connection URL. |
13.5.6. Library Environment Variables
| Environment Variable Name | Purpose |
|---|---|
OPENSHIFT_Cart_Name_LD_LIBRARY_PATH_ELEMENT | Configures the location of each cartridge's library file. |
Note
LD_LIBRARY_PATH. However, cartridges may be competing for a place in the set directory. Configure the destination of each cartridge's files with OPENSHIFT_Cart_Name_LD_LIBRARY_PATH_ELEMENT to merge each cartridge's library into the global directory. Note that the order that the files are entered into the global directory is add-on cartridges first, then web framework cartridges. Red Hat
recommends not changing the location of the LD_LIBRARY_PATH environment variable.
13.5.7. Jenkins Environment Variables
| Environment Variable Name | Purpose |
|---|---|
JENKINS_USERNAME | System builder account on the Jenkins server. |
JENKINS_PASSWORD | Password for the system builder account on the Jenkins server. |
JENKINS_URL | DNS name for the associated Jenkins server where builds occur. |
13.5.8. Gear Environment Variables
| Environment Variable Name | Purpose |
|---|---|
OPENSHIFT_GEAR_DNS | The fully-qualified domain name of the gear. |
OPENSHIFT_GEAR_NAME | The name of the gear. |
OPENSHIFT_GEAR_UUID | The UUID of the gear. |
13.5.9. JBoss Environment Variables
| Environment Variable Name | Purpose |
|---|---|
JAVA_OPTS | Controlled by the cartridge and used to specify additional arguments to the JVM where JBoss application will run. |
JAVA_OPTS_EXT | Appended to the JAVA_OPTS environment variable before the JVM is invoked, and used to provide additional options to the JVM without rewriting the JAVA_OPTS environment variable. This allows developers to better support their application users. |
DISABLE_OPENSHIFT_MANAGED_SERVER_CONFIG | Set to true and the standalone.xml file from the repository is ignored, as is the copy that was retained. |
/App_Name/.openshift/config/standalone.xml file that is part of jbossas-7. The following example code shows the environment variables for a MySQL datasource connection URL in the form jdbc:mysql://SERVER_NAME:PORT/DATABASE_NAME:
<connection-url>jdbc:mysql://${env.OPENSHIFT_MYSQL_DB_HOST}:${env.OPENSHIFT_MYSQL_DB_PORT}/${env.OPENSHIFT_APP_NAME}</connection-url>
Procedure 13.4. To Set Environment Variables on the Server:
- Open the
App_Name/.openshift/config/standalone.xmlfile. - Specify the required values for any of your environment variables, then save and close the file.
- Commit and push the changes to the server:
$ git commit -a -m "COMMIT MESSAGE"
$ git push
Important
rhc snapshot commands.
Note
standalone.xml file, it only edits the local gear's standalone.xml file and not the repository one provided by your OpenShift cartridge template: App_Name/.openshift/config/standalone.xml. Manual changes will be lost upon an application restart, and the last version of the repository standalone.xml file will be used even if you remove the repository standalone.xml file.
standalone.xml file, set the DISABLE_OPENSHIFT_MANAGED_SERVER_CONFIG environment variable to true by running:
# rhc env set DISABLE_OPENSHIFT_MANAGED_SERVER_CONFIG=true -a App_Name13.5.10. Ruby Environment Variables
| Environment Variable Name | Purpose |
|---|---|
OPENSHIFT_RUBY_LOG_DIR | Where cartridge-specific logs are stored. |
BUNDLE_WITHOUT | Prevents Bundler from installing certain groups specified in the Gemfile. |
13.5.11. Python Environment Variables
| Environment Variable name | Purpose |
|---|---|
OPENSHIFT_PYTHON_WSGI_APPLICATION | Sets a custom path for the WSGI entry point. |
OPENSHIFT_PYTHON_REQUIREMENTS_PATH | Sets a custom path for the pip requirements file. When git push is run, any dependencies listed in the requirements.txt file will be installed by the Python cartridge. |
13.5.12. Custom Environment Variables
Set one of more environment variables for an application with the following command:
$ rhc env set Variable=Value Variable2=Value2 -a App_NameView the custom environment variables set for an application with the following command:
$ rhc env list -a App_NameDisplay the value of one or more custom environment variables with the following command:
$ rhc env show Variable Variable2 -a App_NameRemove a custom environment variable with the following command:
$ rhc env unset Variable -a App_Name13.6. Hot Deployment
13.6.1. Introduction to Hot Deployment
git push command is run to upload code modifications, OpenShift Enterprise stops, builds, deploys, and restarts an application. This entire process takes time to complete and is unnecessary for many types of code changes. With hot deployment the changes to application code are applied without restarting the application cartridge, resulting in increased deployment speed and minimized application downtime.
hot_deploy marker file. If the marker is present, supported application cartridges automatically hot deploy when the git push command is executed.
| Type of Application | Hot Deploy |
|---|---|
| JBoss Application Server | Yes |
| JBoss Enterprise Application Platform | Yes |
| Tomcat 6 (JBoss Enterprise Web Server 1.0) | Yes |
| Tomcat 7 (JBoss Enterprise Web Server 2.0) | Yes |
| PHP | Yes |
| Perl | Yes |
| Ruby | Yes |
| Python | Yes |
| Node.js | Yes |
| Zend Server | Yes |
| Jenkins | No |
| HAProxy | No |
| DIY | No |
13.6.2. Hot Deployment Build Details
When JBoss AS, JBoss EAP, Tomcat 6, and Tomcat 7 applications are hot deployed, the Maven build is executed (either with Jenkins or without), but the server does not restart. Following the build, the JBoss HDScanner notices any modifications and redeploys them. If previously deployed artifacts are removed as part of the update, they are undeployed automatically.
When PHP, Perl, Python, and Node.js applications are hot deployed, the application code is built (dependencies are processed and user build action_hooks are run) and deployed to the application server. The server does not restart. This is true regardless of whether an application has Jenkins enabled or not. For applications that have Jenkins enabled, the build is performed on a Jenkins slave instance and then synced to the gear(s) where the application server is running.
When a Ruby application is hot deployed, the Passenger restart.txt file is touched, and the application server serves the new code without requiring a full server restart. See the Passenger Documentation for more information.
13.6.3. Enabling and Disabling Hot Deployment
Enable hot deployment by creating the hot_deploy marker file in the application's root directory with the following command:
C:\app_directory> copy NUL > .openshift\markers\hot_deployhot_deploy marker file from the application's root directory:
C:\app_directory> del .openshift\markers\hot_deploy
hot_deploy marker file in the application's root directory:
[user@user app_directory]$ touch .openshift/markers/hot_deployhot_deploy marker file from the application's root directory:
[user@user app_directory]$ rm .openshift/markers/hot_deploy13.7. Jenkins Continuous Integration
13.7.1. Introduction to Jenkins
git push command initiates a build process inside Jenkins. For custom applications, or applications that have no upstream repositories, the build process is initiated directly from the Jenkins web interface rather than with the git push command.
- Archived build information
- No application downtime during the build process
- Failed builds are not deployed; instead, a previous working version is left in place
- Additional memory and storage resources are available
- A large community of Jenkins plug-ins
13.7.2. Configuring Jenkins
13.7.2.1. Configuring Jenkins with New Applications
--jenkins-enable option:
$ rhc app create App_Name App_Type --enable-jenkins Jenkins_App_Name-s to create a scalable application.
See Also:
13.7.2.2. Configuring Jenkins with Existing Applications
Procedure 13.5. To Configure Jenkins with an Existing Application:
- Create the Jenkins application:
$ rhc app create App_Name jenkins-1Example 13.4. Creating Jenkins Applications
$ rhc app create myjenkins jenkins-1 Application Options ------------------- Domain: mydomain Cartridges: jenkins-1 Gear Size: default Scaling: no Creating application 'myjenkins' ... done Jenkins created successfully. Please make note of these credentials: User: admin Password: Zek_Mdtr86uq Note: You can change your password at: https://myjenkins-mydomain.rhcloud.com/me/configure ........ Run 'rhc show-app myjenkins' for more details about your app. - Add the Jenkins client cartridge to the specified application:
$ rhc cartridge add jenkins-client-1 -a App_NameExample 13.5. Adding Jenkins Client to Application
$ rhc cartridge add jenkins-client-1 -a myapp
Adding jenkins-client-1 to application 'myapp' ... done

jenkins-client-1 (Jenkins Client)
---------------------------------
  Gears:   Located with php-5.4
  Job URL: https://myjenkins-mydomain.rhcloud.com/job/myapp-build/

Associated with job 'myapp-build' in Jenkins server.
13.7.3. Building Applications with Jenkins
- The
git pushcommand is executed, and Jenkins is notified that a new push is ready. - A dedicated Jenkins slave (a builder) is created. The
rhc appscommand shows slave information. The application name is the same as that of the originating application, but with a.bldrsuffix.Important
The first 28 characters of the application name must be unique to avoid build issues that are caused when builders are shared across applications. - Jenkins runs the build.
- Content from the originating application is downloaded to the builder application using
git(for source code) andrsync(for existing libraries). ci_build.shis called from the Jenkins shell. This sets up the builder application for the Jenkins environment and performs some built-in bundling steps (PHP pear processing, Python virtual environment, etc)..openshift/action_hooks/buildis executed on the Jenkins builder.- Any additional desired steps are executed from the Jenkins shell (Maven build, Gem install, test cases, etc).
- Jenkins stops the currently running application, and runs
rsyncto synchronize all new content over to the originating application. .openshift/action_hooks/deployis executed on the originating application.- Jenkins starts the originating application, and
.openshift/action_hooks/post_deployis executed on this application. - Jenkins archives all build artifacts for later reference.
- After 15 minutes of idle time, the "build app" will be destroyed and will no longer appear in the output of the
rhc appscommand. The build artifacts, however, will still exist in Jenkins and can be viewed there.
$ rhc tail jenkins$ rhc tail App_Name13.7.3.1. Building Custom Applications
git push command.
 icon of the application from the Jenkins web interface, located on the right side, to build it.
Chapter 14. Gear Storage and Disk Space Management
14.1. Introduction to Gear Storage and Disk Space
Note
14.2. Viewing Gear Storage
$ rhc cartridge storage --show -a App_NameExample 14.1. Viewing Gear Storage
$ rhc cartridge storage --show -a myapp
RESULT:

MySQL Database 5.5
------------------
  Base Gear Storage:       1GB
  Additional Gear Storage: 3GB

OpenShift Web Balancer
----------------------
  Base Gear Storage:       1GB
  Additional Gear Storage: None

PHP 5.4
-------
  Base Gear Storage:       1GB
  Additional Gear Storage: None
-c option to specify the cartridge:
$ rhc cartridge storage --show -a App_Name -c Cart_NameExample 14.2. Viewing Gear Storage for a Specific Cartridge
$ rhc cartridge storage --show -a myapp -c php-5
RESULT:
PHP 5.4
-------
  Base Gear Storage:       1GB
  Additional Gear Storage: None
14.3. Adding Gear Storage
$ rhc cartridge storage Cart_Name -a App_Name --add Storage_Amount(GB)Example 14.3. Adding Gear Storage
$ rhc cartridge storage php-5.4 -a myapp --add 3gb
Set storage on cartridge ... set to 3GB

Storage Info
------------
  Base Gear Storage:       1GB
  Additional Gear Storage: 3GB
14.4. Setting Gear Storage
--set option.
$ rhc cartridge storage php-5 -a App_Name --set Storage_Amount(GB)Example 14.4. Setting Gear Storage
$ rhc cartridge storage php-5 -a racer --set 5gb
Set storage on cartridge ... set to 5GB

Storage Info
------------
  Base Gear Storage:       1GB
  Additional Gear Storage: 5GB
--add option because the exact amount of gear storage is specified, rather than adding more storage to the existing amount.
14.5. Removing Gear Storage
$ rhc cartridge storage Cart_Name -a App_Name --remove Storage_Amount(GB)Example 14.5. Removing Gear Storage
$ rhc cartridge storage php-5 -a myapp --remove 3gb
Set storage on cartridge ... 2GB

Storage Info
------------
  Base Gear Storage:       1GB
  Additional Gear Storage: 2GB
14.6. Tidying an Application
- Run the
git gccommand on the application's Git repository on the server. - Clear the application's
/tmpand log file directories that are specified by the application'sOPENSHIFT_LOG_DIRandOPENSHIFT_TMP_DIRenvironment variables. - Clear unused application libraries and remove any library files previously installed by a
git pushcommand.
Important
rm -rf command to clear the contents of these directories. Before performing this step, save the log files by creating a snapshot of the system with the rhc snapshot save command.
$ rhc app tidy App_NameChapter 15. Application Backup and Restoration with Snapshots
15.1. Introduction to Snapshots
tar.gz files, which contain the application and all local files, including log files.
Important
A binary deployment file is a snapshot of an application used for deployment without using Git. Each snapshot has the same top-level structure:
build-dependencies/
dependencies/
repo/repo directory are the files that make up the application source code. The contents of the build-dependencies and dependencies directories are cartridge-specific, and are determined by the contents of the managed_files.yml file.
managed_files.yml file dictates the construction of the snapshot:
- If an entry under dependency_dirs starts with ~/, then a new folder will be created in the
dependenciesdirectory. - If an entry under dependency_dirs does not start with ~/, then a directory will be created in the
dependencies/Cartridge_Namedirectory. - If an entry under dependency_dirs has the format
key: Value, thenValuewill be the directory name for the previous rules.
Example 15.1. A Sample Node.js managed_files.yml File
managed_files.yml file on a Node.js cartridge:
dependency_dirs:
- ~/.npm
- node_modules
- ~/.node_modules: node_modules
.npm file will be in the dependencies directory, and the node_modules file will be in the cartridge dependencies directory dependencies/nodejs directory:
.npm
nodejs/node_modulesbuild_dependencies in the managed_files.yml file, though the build_dependencies file is mainly used in JBoss cartridges.
managed_files.yml file for deployment. See Section 13.1, “Introduction to Deployment” for information on deployment, and Section 13.3.2.4, “Deploying from a Snapshot” for information on deploying from a binary snapshot file.
15.2. Creating an Application Snapshot
$ rhc snapshot save App_NameExample 15.2. Creating an Application Snapshot
$ rhc snapshot save myapp
Pulling down a snapshot to myapp.tar.gz...
Creating and sending tar.gz

RESULT:
Success$App_Name.tar.gz and is created in your current directory. Choose a different filename or file path by using the --filepath option to override the defaults.
15.3. Restoring from an Application Snapshot
git push was run.
Warning
rhc snapshot restore command overwrites the remote Git repository. Therefore, any changes made since taking the snapshot are lost. Importing snapshot data into a local environment can delete local content, for example a user table in a database. If you are unsure of the effect a snapshot import could have on local data, use SSH to access an application and create the backup directly.
$ rhc snapshot restore App_NameExample 15.3. Restoring from an Application Snapshot
$ rhc snapshot restore myapp
Restoring from snapshot myapp.tar.gz...
Removing old git repo: ~/git/myapp.git/
Removing old data dir: ~/app-root/data/*
Restoring ~/git/App_Name.git and ~/app-root/data
Activation status: success

RESULT:
Success
$ rhc snapshot restore App_Name --filepath Renamed_App15.4. Migrating an Application to Another Gear
Procedure 15.1. To Migrate an Application to Another Gear:
- Create a snapshot of an existing application:
$ rhc snapshot save App_Name - Verify that the
App_Name.tar.gzfile has been created in the working directory. After confirming the application snapshot is saved, delete the existing application:$ rhc app delete App_Name - Create a new application using the same cartridges, but with the correct gear size:
$ rhc app create App_Name Cart_Name -g gear_size - Finally, restore the previously saved application snapshot to the newly created application. Be sure to specify the correct path to the saved application snapshot:
$ rhc snapshot restore App_Name -f App_Name.tar.gz
Appendix A. Revision History
| Revision History | |||||||
|---|---|---|---|---|---|---|---|
| Revision 2.2-6 | Thu Jun 15 2017 | ||||||
| |||||||
| Revision 2.2-5 | Thu Sep 08 2016 | ||||||
| |||||||
| Revision 2.2-4 | Thu Aug 20 2015 | ||||||
| |||||||
| Revision 2.2-3 | Tue Jun 09 2015 | ||||||
| |||||||
| Revision 2.2-2 | Wed Dec 03 2014 | ||||||
| |||||||
| Revision 2.2-0 | Tue Nov 4 2014 | ||||||
| |||||||
| Revision 2.1-7 | Thu Oct 23 2014 | ||||||
| |||||||
| Revision 2.1-6 | Thu Oct 2 2014 | ||||||
| |||||||
| Revision 2.1-5 | Tue Aug 26 2014 | ||||||
| |||||||
| Revision 2.1-3 | Mon Aug 11 2014 | ||||||
| |||||||
| Revision 2.1-2 | Thu Jun 26 2014 | ||||||
| |||||||
| Revision 2.1-1 | Thu Jun 5 2014 | ||||||
| |||||||
| Revision 2.1-0 | Fri May 16 2014 | ||||||
| Revision 2.0-1 | Thu Feb 27 2014 | ||||||
| |||||||
| Revision 2.0-0 | Mon Dec 9 2013 | ||||||
| |||||||