Installation Guide
Installing Red Hat Enterprise Linux 6.9 for all architectures
Abstract
Chapter 1. Obtaining Red Hat Enterprise Linux
| Architecture | Installation DVD | Boot CD or boot DVD | Boot USB flash drive |
|---|---|---|---|
Where variant is the variant of Red Hat Enterprise Linux (for example, server or workstation) and version is the latest version number (for example, 6.5). | |||
| BIOS-based 32-bit x86 | x86 DVD ISO image file | rhel-variant-version-i386-boot.iso | rhel-variant-version-i386-boot.iso |
| UEFI-based 32-bit x86 | Not available | ||
| BIOS-based AMD64 and Intel 64 | x86_64 DVD ISO image file (to install 64-bit operating system) or x86 DVD ISO image file (to install 32-bit operating system) | rhel-variant-version-x86_64boot.iso orrhel-variant-version-i386-boot.iso | rhel-variant-version-x86_64boot.iso or rhel-variant-version-i386-boot.iso |
| UEFI-based AMD64 and Intel 64 | x86_64 DVD ISO image file | rhel-variant-version-x86_64-boot.iso | efidisk.img (from x86_64 DVD ISO image file) |
| POWER (64-bit only) | ppc DVD ISO image file | rhel-server-version-ppc64-boot.iso | Not available |
| System z | s390 DVD ISO image file | Not available | Not available |
Procedure 1.1. Downloading Red Hat Enterprise Linux ISO Images
- Visit the Customer Portal at https://access.redhat.com/home. If you are not logged in, click LOG IN on the right side of the page. Enter your account credentials when prompted.
- Click DOWNLOADS at the top of the page.
- Click Red Hat Enterprise Linux.
- Ensure that you select the appropriate Product Variant, Version and Architecture for your installation target. By default,
Red Hat Enterprise Linux Serverandx86_64are selected. If you are not sure which variant best suits your needs, see http://www.redhat.com/en/technologies/linux-platforms/enterprise-linux. - A list of available downloads is displayed; most notably, a minimal Boot ISO image and a full installation Binary DVD ISO image. The Boot ISO is a minimal boot image which only contains the installer and requires a source to install packages from (such as an HTTP or FTP server). The Binary DVD download contains both the installer and necessary packages, and therefore requires less setup.Additional images may be available, such as preconfigured virtual machine images, which are beyond the scope of this document.
- Choose the image file that you want to use. There are several ways to download an ISO image from Red Hat Customer Portal:
- Click its name to begin downloading it to your computer using your web browser.
- Right-click the name and then click or a similar menu item, the exact wording of which depends on the browser that you are using. This action copies the URL of the file to your clipboard, which allows you to use an alternative application to download the file to your computer. This approach is especially useful if your Internet connection is unstable: in that case, you browser may fail to download the whole file, and an attempt to resume the interrupted download process fails because the download link contains an authentication key which is only valid for a short time. Specialized applications such as curl can, however, be used to resume interrupted download attempts from the Customer Portal, which means that you need not download the whole file again and thus you save your time and bandwidth consumption.
Procedure 1.2. Using curl to Download Installation Media
- Make sure the curl package is installed by running the following command as root:
yum install curl
# yum install curlCopy to Clipboard Copied! Toggle word wrap Toggle overflow If your Linux distribution does not use yum, or if you do not use Linux at all, download the most appropriate software package from the curl website. - Open a terminal window, enter a suitable directory, and type the following command:
curl -o filename.iso 'copied_link_location'
$ curl -o filename.iso 'copied_link_location'curl -o filename.iso 'copied_link_location'curl -o filename.iso 'copied_link_location'curl -o filename.iso 'copied_link_location'curl -o filename.iso 'copied_link_location'Copy to Clipboard Copied! Toggle word wrap Toggle overflow Replace filename.iso with the ISO image name as displayed in the Customer Portal, such asrhel-server-6.9-x86_64-dvd.iso. This is important because the download link in the Customer Portal contains extra characters which curl would otherwise use in the downloaded file name, too. Then, keep the single quotation mark in front of the next parameter, and replace copied_link_location with the link that you have copied from the Customer Portal.Note that in Linux, you can paste the content of the clipboard into the terminal window by middle-clicking anywhere in the window, or by pressing Shift+Insert. Finally, use another single quotation mark after the last parameter, and press Enter to run the command and start transferring the ISO image. The single quotation marks prevent the command line interpreter from misinterpreting any special characters that might be included in the download link.Example 1.1. Downloading an ISO image with curl
The following is an example of a curl command line:curl -o rhel-server-6.9-x86_64-dvd.iso 'https://access.cdn.redhat.com//content/origin/files/sha256/85/85a...46c/rhel-server-6.9-x86_64-dvd.iso?_auth_=141...7bf'
$ curl -o rhel-server-6.9-x86_64-dvd.iso 'https://access.cdn.redhat.com//content/origin/files/sha256/85/85a...46c/rhel-server-6.9-x86_64-dvd.iso?_auth_=141...7bf'Copy to Clipboard Copied! Toggle word wrap Toggle overflow Note that the actual download link is much longer because it contains complicated identifiers. - If your Internet connection does drop before the transfer is complete, refresh the download page in the Customer Portal; log in again if necessary. Copy the new download link, use the same basic
curlcommand line parameters as earlier but be sure to use the new download link, and add-C -to instruct curl to automatically determine where it should continue based on the size of the already downloaded file.Example 1.2. Resuming an interrupted download attempt
The following is an example of a curl command line that you use if you have only partially downloaded the ISO image of your choice:curl -o rhel-server-6.9-x86_64-dvd.iso 'https://access.cdn.redhat.com//content/origin/files/sha256/85/85a...46c/rhel-server-6.9-x86_64-dvd.iso?_auth_=141...963' -C -
$ curl -o rhel-server-6.9-x86_64-dvd.iso 'https://access.cdn.redhat.com//content/origin/files/sha256/85/85a...46c/rhel-server-6.9-x86_64-dvd.iso?_auth_=141...963' -C -Copy to Clipboard Copied! Toggle word wrap Toggle overflow
- Optionally, you can use a checksum utility such as sha256sum to verify the integrity of the image file after the download finishes. All downloads on the Download Red Hat Enterprise Linux page are provided with their checksums for reference:
sha256sum rhel-server-6.9-x86_64-dvd.iso
$ sha256sum rhel-server-6.9-x86_64-dvd.iso 85a...46c rhel-server-6.9-x86_64-dvd.isoCopy to Clipboard Copied! Toggle word wrap Toggle overflow Similar tools are available for Microsoft Windows and Mac OS X. You can also use the installation program to verify the media when starting the installation; see Section 28.6.1, “Verifying Boot Media” for details.
- burn it to a physical DVD (refer to Section 2.1, “Making an Installation DVD”).
- use it to prepare minimal boot media (refer to Section 2.2, “Making Minimal Boot Media”).
- place it on a server to prepare for installations over a network (refer to Section 4.1, “Preparing for a Network Installation” for x86 architectures, Section 12.1, “Preparing for a Network Installation” for Power Systems servers or Section 19.1, “Preparing for a Network Installation” for IBM System z).
- place it on a hard drive to prepare for installation to use the hard drive as an installation source (refer to Section 4.2, “Preparing for a Hard Drive Installation” for x86 architectures, Section 12.2, “Preparing for a Hard Drive Installation” for Power Systems servers or Section 19.2, “Preparing for a Hard Drive Installation” for IBM System z).
- place it on a pre-boot execution environment (PXE) server to prepare for installations using PXE boot (refer to Chapter 30, Setting Up an Installation Server).
Chapter 2. Making Media
- an installation DVD
- a minimal boot CD or DVD that can boot the installer
- a USB flash drive to boot the installer
2.1. Making an Installation DVD
2.2. Making Minimal Boot Media
- to boot the system to install Red Hat Enterprise Linux over a network
- to boot the system to install Red Hat Enterprise Linux from a hard drive
- to use a kickstart file during installation (refer to Section 32.9.1, “Creating Kickstart Boot Media”
- to commence a network or hard-drive installation or to use an anaconda update or a kickstart file with a DVD installation.
- Download the ISO image file named
rhel-variant-version-architecture-boot.isothat is available at the same location as the images of the Red Hat Enterprise Linux 6.9 installation DVD — refer to Chapter 1, Obtaining Red Hat Enterprise Linux. - Burn the
.isofile to a blank CD or DVD using the same procedure detailed in Section 2.1, “Making an Installation DVD” for the installation disc.
.iso file to a USB device with the dd command. As the .iso file is only around 200 MB in size, you do not need an especially large USB flash drive.
2.2.1. Minimal USB Boot Media for BIOS-based Systems
Warning
- Plug in your USB flash drive.
- Find the flash drive's device name. If the media has a volume name, use it to look up the device name in
/dev/disk/by-label, or use thefindfscommand:findfs LABEL=MyLabel
findfs LABEL=MyLabelfindfs LABEL=MyLabelCopy to Clipboard Copied! Toggle word wrap Toggle overflow If the media does not have a volume name or you do not know it, you can also use thedmesgcommand shortly after connecting the media to your computer. After running the command, the device name (such assdborsdc) should appear in several lines towards the end of the output. - Become root:
su -
su -Copy to Clipboard Copied! Toggle word wrap Toggle overflow - Use the
ddcommand to transfer the boot ISO image to the USB device:dd if=path/image_name.iso of=/dev/device
# dd if=path/image_name.iso of=/dev/device# dd if=path/image_name.iso of=/dev/device# dd if=path/image_name.iso of=/dev/device# dd if=path/image_name.iso of=/dev/deviceCopy to Clipboard Copied! Toggle word wrap Toggle overflow where path/image_name.iso is the boot ISO image file that you downloaded anddeviceis the device name for the USB flash drive. Ensure you specify the device name (such assdc), not the partition name (such assdc1). For example:dd if=~/Downloads/RHEL6.9-Server-x86_64-boot.iso of=/dev/sdc
# dd if=~/Downloads/RHEL6.9-Server-x86_64-boot.iso of=/dev/sdcCopy to Clipboard Copied! Toggle word wrap Toggle overflow
2.2.2. Minimal USB Boot Media for UEFI-based Systems
Warning
efidisk.img file in the images/ directory on the Red Hat Enterprise Linux 6.9 installation DVD:
- Download an ISO image file of the Red Hat Enterprise Linux 6.9 installation DVD as described in Chapter 1, Obtaining Red Hat Enterprise Linux.
- Become root:
su -
su -Copy to Clipboard Copied! Toggle word wrap Toggle overflow - Create a mount point for the ISO image file:
mkdir /mnt/dvdiso
# mkdir /mnt/dvdisoCopy to Clipboard Copied! Toggle word wrap Toggle overflow - Mount the image file:
mount DVD.iso /mnt/dvdiso -o loop
# mount DVD.iso /mnt/dvdiso -o loop# mount DVD.iso /mnt/dvdiso -o loop# mount DVD.iso /mnt/dvdiso -o loopCopy to Clipboard Copied! Toggle word wrap Toggle overflow Where DVD.iso is the name of the ISO image file, for exampleRHEL6.9-Server-x86_64-DVD.iso. - Transfer
efidisk.imgfrom the ISO image file to your USB flash drive:dd if=/mnt/dvdiso/images/efidisk.img of=/dev/device_name
# dd if=/mnt/dvdiso/images/efidisk.img of=/dev/device_name# dd if=/mnt/dvdiso/images/efidisk.img of=/dev/device_nameCopy to Clipboard Copied! Toggle word wrap Toggle overflow For example:dd if=/mnt/dvdiso/images/efidisk.img of=/dev/sdc
# dd if=/mnt/dvdiso/images/efidisk.img of=/dev/sdcCopy to Clipboard Copied! Toggle word wrap Toggle overflow Note
Use theddcommand to write the image file directly to the device. Usingcpto copy the file or transferring the file using a file manager will make the device unbootable. - Unmount the ISO image file:
umount /mnt/dvdiso
# umount /mnt/dvdisoCopy to Clipboard Copied! Toggle word wrap Toggle overflow
2.3. Creating a USGCB-compliant Installation Image
/root/ directory on the installed system.
Note
/usr/share/scap-security-guide/kickstart/ssg-rhel6-usgcb-server-with-gui-ks.cfg.
- Package repository location - the
urlcommand. To use a package repository on an HTTP or FTP server, replace the default IP address with an address of a server containing a package repository. Replace this command with one ofnfs,cdrom, orharddriveto install from a NFS server, optical drive, or local hard drive, respectively. - System language, keyboard layout, and time zone - the
lang,keyboardandtimezonecommands. - Root password - the
rootpwcommand. By default, the root password configured in this Kickstart is "server". Make sure to generate a new checksum and change it. - Boot loader password - the
bootloader --password=command. The default password is "password". Make sure to generate a new checksum and change it. - Network configuration - the
networkcommand. Automatic configuration using DHCP is enabled by default - adjust the settings if necessary. - Package selection - modify the
%packagessection of the file to install packages and groups you need.Important
Packages git, aide and openscap-utils must always be installed. They are required for the Kickstart file and post installation OpenSCAP system evaluation to work. - Disk partitioning layout - the
part,volgroupandlogvolcommands.The USGCB standard defines concrete requirements for a compliant system's disk layout, which means that the logical volumes defined in the default Kickstart file -/home,/tmp,/var,/var/log, and/var/log/audit- must always be created as separate partitions or logical volumes. Additionally, Red Hat Enterprise Linux requires you to create a/bootphysical partition and volumes for/andswap. These are all defined in the default Kickstart; you can add additional separate logical volumes or partitions, and you can change the sizes of the default ones.Note
By default, the/var/log/auditvolume only takes up 512 MB of space. Due to the high number of calls being audited, it is highly recommended to increase its size to at least 1024 MB.
Part I. x86, AMD64, and Intel 64 — Installation and Booting
Chapter 3. Planning for Installation on the x86 Architecture
3.1. Upgrade or Install?
- Clean Install
- A clean install is performed by backing up all data from the system, formatting disk partitions, performing an installation of Red Hat Enterprise Linux 7 from installation media, and then restoring any user data.
Note
This is the recommended method for upgrading between major versions of Red Hat Enterprise Linux. - In-Place Upgrade
- An in-place upgrade is a way of upgrading your system without removing the older version first. The procedure requires installing the migration utilities available for your system and running them as any other software. In Red Hat Enterprise Linux, the Preupgrade Assistant assesses your current system and identifies potential problems you might encounter during and/or after the upgrade. It also performs minor fixes and modifications to the system. The Red Hat Upgrade Tool utility downloads the packages and performs the actual upgrade. An in-place upgrade requires a lot of troubleshooting and planning and should only be done if there is no other choice. For more information on the Preupgrade Assistant, see Chapter 37, Upgrading Your Current System.
Warning
Never perform an in-place upgrade on a production system without first testing it on a cloned backup copy of the system.
3.2. Is Your Hardware Compatible?
https://hardware.redhat.com/
https://hardware.redhat.com/3.3. Hardware Requirements
- Hard drives connected by a standard internal interface, such as SCSI, SATA, or SAS
- BIOS/firmware RAID devices
- Xen block devices on Intel processors in Xen virtual machines.
- VirtIO block devices on Intel processors in KVM virtual machines.
3.4. RAID and Other Disk Devices
Important
/etc/fstab, /etc/crypttab or other configuration files which refer to devices by their device node names will not work in Red Hat Enterprise Linux 6. Before migrating these files, you must therefore edit them to replace device node paths with device UUIDs instead. You can find the UUIDs of devices with the blkid command.
3.4.1. Hardware RAID
3.4.2. Software RAID
3.4.3. FireWire and USB Disks
Note
3.5. Notes on UEFI Support
3.5.1. Feature Support
- The system must support UEFI Specification 2.0 or later. Earlier revisions are not supported.
- The Secure Boot technology is not supported, and will prevent Red Hat Enterprise Linux from being installed. Systems using UEFI Specification 2.2 or later must have Secure Boot disabled in order to install and run Red Hat Enterprise Linux 6.9.
3.5.2. Disk Drives with MBR on UEFI Systems
msdos) label, the disk must be relabeled. This means you can not reuse existing partitions on a MBR-partitioned disk, and all data on the disk will be lost. Make sure to back up all data on the drive before installing Red Hat Enterprise Linux.
- Attach the drive to an existing Linux system and use an utility such as
partedorfdiskto create a GPT label on the drive. For example, to create a GPT label on disk/dev/sdcusingparted, use the following command:parted /dev/sdc mklabel gpt
# parted /dev/sdc mklabel gptCopy to Clipboard Copied! Toggle word wrap Toggle overflow Warning
Make sure you specify the correct drive. Relabeling a disk will destroy all data on it, andpartedwill not ask you for a confirmation. - Perform an automated Kickstart installation, and use the
clearpartandzerombrcommands. If your system uses UEFI firmware, using these commands on the boot drive will relabel it with a GPT. - During a manual installation in the graphical user interface, when you get to the partitioning screen. Select an option other than custom partitioning (for example Use All Space). Make sure to check the Review and modify partitioning layout check box, and click Next.On the following screen, modify the automatically created layout so it suits your needs. After you finish and click Next, Anaconda will use your layout and relabel the drive automatically.
3.6. Do You Have Enough Disk Space?
/ and swap) must be dedicated to Red Hat Enterprise Linux.
- have enough unpartitioned[1] disk space for the installation of Red Hat Enterprise Linux, or
- have one or more partitions that may be deleted, thereby freeing up enough disk space to install Red Hat Enterprise Linux.
3.7. Selecting an Installation Method
- DVD
- If you have a DVD drive and the Red Hat Enterprise Linux DVD you can use this method. Refer to Section 8.3.1, “Installing from a DVD”, for DVD installation instructions.If you booted the installation from a piece of media other than the installation DVD, you can specify the DVD as the installation source with the
linux askmethodorlinux repo=cdrom:device:/deviceboot option, or by selecting on the menu (refer to Section 8.3, “Installation Method”). - Hard Drive
- If you have copied the Red Hat Enterprise Linux ISO images to a local hard drive, you can use this method. You need a boot CD-ROM (use the
linux askmethodorlinux repo=hd:device:/pathboot option), or by selecting on the menu (refer to Section 8.3, “Installation Method”). Refer to Section 8.3.2, “Installing from a Hard Drive”, for hard drive installation instructions. - NFS
- If you are installing from an NFS server using ISO images or a mirror image of Red Hat Enterprise Linux, you can use this method. You need a boot CD-ROM (use the
linux askmethodorlinux repo=nfs:server :options:/pathboot option, or the option on the menu described in Section 8.3, “Installation Method”). Refer to Section 8.3.4, “Installing via NFS” for network installation instructions. Note that NFS installations may also be performed in GUI mode. - URL
- If you are installing directly from an HTTP or HTTPS (Web) server or an FTP server, use this method. You need a boot CD-ROM (use the
linux askmethod,linux repo=ftp://user:password@host/path, orlinux repo=http://host/pathboot option, orlinux repo=https://host/pathboot option,or the option on the menu described in Section 8.3, “Installation Method”). Refer to Section 8.3.5, “Installing via FTP, HTTP, or HTTPS”, for FTP, HTTP, and HTTPS installation instructions.
askmethod, the next stage loads automatically from the DVD. Proceed to Section 8.2, “Language Selection”.
Note
3.8. Choose a Boot Method
Chapter 4. Preparing for Installation
4.1. Preparing for a Network Installation
Note
Note
boot: prompt:
linux mediacheck
linux mediacheckNote
/var/www/inst/rhel6.9 on the network server can be accessed as http://network.server.com/inst/rhel6.9.
/location/of/disk/space. The directory that will be made publicly available via FTP, NFS, HTTP, or HTTPS will be specified as /publicly_available_directory. For example, /location/of/disk/space may be a directory you create called /var/isos. /publicly_available_directory might be /var/www/html/rhel6.9, for an HTTP install.
dd if=/dev/dvd of=/path_to_image/name_of_image.iso
dd if=/dev/dvd of=/path_to_image/name_of_image.isodd if=/dev/dvd of=/path_to_image/name_of_image.isodd if=/dev/dvd of=/path_to_image/name_of_image.isodd if=/dev/dvd of=/path_to_image/name_of_image.isodd if=/dev/dvd of=/path_to_image/name_of_image.isodd if=/dev/dvd of=/path_to_image/name_of_image.isodd if=/dev/dvd of=/path_to_image/name_of_image.iso4.1.1. Preparing for FTP, HTTP, and HTTPS Installation
Warning
TLSv1 protocol, and disable SSLv2 and SSLv3. This is due to the POODLE SSL vulnerability (CVE-2014-3566). See https://access.redhat.com/solutions/1232413 for details about securing Apache, and https://access.redhat.com/solutions/1234773 for information about securing tftp.
4.1.2. Preparing for an NFS Installation
install.img file, and optionally the product.img file available on the network server via NFS.
- Transfer the ISO image to the NFS exported directory. On a Linux system, run:
mv /path_to_image/name_of_image.iso /publicly_available_directory/
mv /path_to_image/name_of_image.iso /publicly_available_directory/mv /path_to_image/name_of_image.iso /publicly_available_directory/mv /path_to_image/name_of_image.iso /publicly_available_directory/mv /path_to_image/name_of_image.iso /publicly_available_directory/mv /path_to_image/name_of_image.iso /publicly_available_directory/mv /path_to_image/name_of_image.iso /publicly_available_directory/mv /path_to_image/name_of_image.iso /publicly_available_directory/Copy to Clipboard Copied! Toggle word wrap Toggle overflow where path_to_image is the path to the ISO image file, name_of_image is the name of the ISO image file, and publicly_available_directory is a directory that is available over NFS or that you intend to make available over NFS. - Use a SHA256 checksum program to verify that the ISO image that you copied is intact. Many SHA256 checksum programs are available for various operating systems. On a Linux system, run:
sha256sum name_of_image.iso
$ sha256sum name_of_image.iso$ sha256sum name_of_image.iso$ sha256sum name_of_image.isoCopy to Clipboard Copied! Toggle word wrap Toggle overflow where name_of_image is the name of the ISO image file. The SHA256 checksum program displays a string of 64 characters called a hash. Compare this hash to the hash displayed for this particular image on the Downloads page in the Red Hat Customer Portal (refer to Chapter 1, Obtaining Red Hat Enterprise Linux). The two hashes should be identical. - Copy the
images/directory from inside the ISO image to the same directory in which you stored the ISO image file itself. Enter the following commands:mount -t iso9660 /path_to_image/name_of_image.iso /mount_point -o loop,ro cp -pr /mount_point/images /publicly_available_directory/ umount /mount_point
mount -t iso9660 /path_to_image/name_of_image.iso /mount_point -o loop,romount -t iso9660 /path_to_image/name_of_image.iso /mount_point -o loop,romount -t iso9660 /path_to_image/name_of_image.iso /mount_point -o loop,romount -t iso9660 /path_to_image/name_of_image.iso /mount_point -o loop,romount -t iso9660 /path_to_image/name_of_image.iso /mount_point -o loop,romount -t iso9660 /path_to_image/name_of_image.iso /mount_point -o loop,romount -t iso9660 /path_to_image/name_of_image.iso /mount_point -o loop,ro cp -pr /mount_point/images /publicly_available_directory/cp -pr /mount_point/images /publicly_available_directory/cp -pr /mount_point/images /publicly_available_directory/cp -pr /mount_point/images /publicly_available_directory/cp -pr /mount_point/images /publicly_available_directory/ umount /mount_pointumount /mount_pointCopy to Clipboard Copied! Toggle word wrap Toggle overflow wherepath_to_imageis the path to the ISO image file,name_of_imageis the name of the ISO image file, andmount_pointis a mount point on which to mount the image while you copy files from the image. For example:mount -t iso9660 /var/isos/RHEL6.iso /mnt/tmp -o loop,ro cp -pr /mnt/tmp/images /var/isos/ umount /mnt/tmp
mount -t iso9660 /var/isos/RHEL6.iso /mnt/tmp -o loop,ro cp -pr /mnt/tmp/images /var/isos/ umount /mnt/tmpCopy to Clipboard Copied! Toggle word wrap Toggle overflow The ISO image file and animages/directory are now present, side-by-side, in the same directory. - Verify that the
images/directory contains at least theinstall.imgfile, without which installation cannot proceed. Optionally, theimages/directory should contain theproduct.imgfile, without which only the packages for a Minimal installation will be available during the package group selection stage (refer to Section 9.17, “Package Group Selection”).Important
install.imgandproduct.imgmust be the only files in theimages/directory. - Ensure that an entry for the publicly available directory exists in the
/etc/exportsfile on the network server so that the directory is available via NFS.To export a directory read-only to a specific system, use:/publicly_available_directory client.ip.address (ro)
/publicly_available_directory client.ip.address (ro)/publicly_available_directory client.ip.address (ro)/publicly_available_directory client.ip.address (ro)/publicly_available_directory client.ip.address (ro)Copy to Clipboard Copied! Toggle word wrap Toggle overflow To export a directory read-only to all systems, use:/publicly_available_directory * (ro)
/publicly_available_directory * (ro)/publicly_available_directory * (ro)Copy to Clipboard Copied! Toggle word wrap Toggle overflow - On the network server, start the NFS daemon (on a Red Hat Enterprise Linux system, use
/sbin/service nfs start). If NFS is already running, reload the configuration file (on a Red Hat Enterprise Linux system use/sbin/service nfs reload). - Be sure to test the NFS share following the directions in the Red Hat Enterprise Linux Deployment Guide. Refer to your NFS documentation for details on starting and stopping the NFS server.
Note
boot: prompt:
linux mediacheck
linux mediacheck4.2. Preparing for a Hard Drive Installation
Note
Important
- an ISO image of the installation DVD. An ISO image is a file that contains an exact copy of the content of a DVD.
- an
install.imgfile extracted from the ISO image. - optionally, a
product.imgfile extracted from the ISO image.
- Obtain an ISO image of the Red Hat Enterprise Linux installation DVD (refer to Chapter 1, Obtaining Red Hat Enterprise Linux). Alternatively, if you have the DVD on physical media, you can create an image of it with the following command on a Linux system:
dd if=/dev/dvd of=/path_to_image/name_of_image.iso
dd if=/dev/dvd of=/path_to_image/name_of_image.isodd if=/dev/dvd of=/path_to_image/name_of_image.isodd if=/dev/dvd of=/path_to_image/name_of_image.isodd if=/dev/dvd of=/path_to_image/name_of_image.isodd if=/dev/dvd of=/path_to_image/name_of_image.isodd if=/dev/dvd of=/path_to_image/name_of_image.isodd if=/dev/dvd of=/path_to_image/name_of_image.isoCopy to Clipboard Copied! Toggle word wrap Toggle overflow where dvd is your DVD drive device, name_of_image is the name you give to the resulting ISO image file, and path_to_image is the path to the location on your system where the resulting ISO image will be stored. - Transfer the ISO image to the hard drive.The ISO image must be located on a hard drive that is either internal to the computer on which you will install Red Hat Enterprise Linux, or on a hard drive that is attached to that computer by USB.
- Use a SHA256 checksum program to verify that the ISO image that you copied is intact. Many SHA256 checksum programs are available for various operating systems. On a Linux system, run:
sha256sum name_of_image.iso
$ sha256sum name_of_image.iso$ sha256sum name_of_image.iso$ sha256sum name_of_image.isoCopy to Clipboard Copied! Toggle word wrap Toggle overflow where name_of_image is the name of the ISO image file. The SHA256 checksum program displays a string of 64 characters called a hash. Compare this hash to the hash displayed for this particular image on the Downloads page in the Red Hat Customer Portal (refer to Chapter 1, Obtaining Red Hat Enterprise Linux). The two hashes should be identical. - Copy the
images/directory from inside the ISO image to the same directory in which you stored the ISO image file itself. Enter the following commands:mount -t iso9660 /path_to_image/name_of_image.iso /mount_point -o loop,ro cp -pr /mount_point/images /publicly_available_directory/ umount /mount_point
mount -t iso9660 /path_to_image/name_of_image.iso /mount_point -o loop,romount -t iso9660 /path_to_image/name_of_image.iso /mount_point -o loop,romount -t iso9660 /path_to_image/name_of_image.iso /mount_point -o loop,romount -t iso9660 /path_to_image/name_of_image.iso /mount_point -o loop,romount -t iso9660 /path_to_image/name_of_image.iso /mount_point -o loop,romount -t iso9660 /path_to_image/name_of_image.iso /mount_point -o loop,romount -t iso9660 /path_to_image/name_of_image.iso /mount_point -o loop,ro cp -pr /mount_point/images /publicly_available_directory/cp -pr /mount_point/images /publicly_available_directory/cp -pr /mount_point/images /publicly_available_directory/cp -pr /mount_point/images /publicly_available_directory/cp -pr /mount_point/images /publicly_available_directory/ umount /mount_pointumount /mount_pointCopy to Clipboard Copied! Toggle word wrap Toggle overflow wherepath_to_imageis the path to the ISO image file,name_of_imageis the name of the ISO image file, andmount_pointis a mount point on which to mount the image while you copy files from the image. For example:mount -t iso9660 /var/isos/RHEL6.iso /mnt/tmp -o loop,ro cp -pr /mnt/tmp/images /var/isos/ umount /mnt/tmp
mount -t iso9660 /var/isos/RHEL6.iso /mnt/tmp -o loop,ro cp -pr /mnt/tmp/images /var/isos/ umount /mnt/tmpCopy to Clipboard Copied! Toggle word wrap Toggle overflow The ISO image file and animages/directory are now present, side-by-side, in the same directory. - Verify that the
images/directory contains at least theinstall.imgfile, without which installation cannot proceed. Optionally, theimages/directory should contain theproduct.imgfile, without which only the packages for a Minimal installation will be available during the package group selection stage (refer to Section 9.17, “Package Group Selection”).Important
install.imgandproduct.imgmust be the only files in theimages/directory.
Note
boot: prompt:
linux mediacheck
linux mediacheckChapter 5. System Specifications List
- If you plan to use a customized partition layout, record:
- The model numbers, sizes, types, and interfaces of the hard drives attached to the system. For example, Seagate ST3320613AS 320 GB on SATA0, Western Digital WD7500AAKS 750 GB on SATA1. This will allow you to identify specific hard drives during the partitioning process.
- If you are installing Red Hat Enterprise Linux as an additional operating system on an existing system, record:
- The mount points of the existing partitions on the system. For example,
/bootonsda1,/onsda2, and/homeonsdb1. This will allow you to identify specific partitions during the partitioning process.
- If you plan to install from an image on a local hard drive:
- The hard drive and directory that holds the image.
- If you plan to install from a network location, or install on an iSCSI target:
- The make and model numbers of the network adapters on your system. For example, Netgear GA311. This will allow you to identify adapters when manually configuring the network.
- IP, DHCP, and BOOTP addresses
- Netmask
- Gateway IP address
- One or more name server IP addresses (DNS)
If any of these networking requirements or terms are unfamiliar to you, contact your network administrator for assistance. - If you plan to install from a network location:
- The location of the image on an FTP server, HTTP (web) server, HTTPS (web) server, or NFS server – see Section 8.3.5, “Installing via FTP, HTTP, or HTTPS” and Section 8.3.4, “Installing via NFS” for examples.
- If you plan to install on an iSCSI target:
- The location of the iSCSI target. Depending on your network, you might also need a CHAP username and password, and perhaps a reverse CHAP username and password – see Section 9.6.1.1, “ Advanced Storage Options ”.
- If you are installing using Intel iSCSI Remote Boot:
- All attached iSCSI storage devices must be disabled, otherwise the installation will succeed but the installed system will not boot.
- If your computer is part of a domain:
- You should verify that the domain name will be supplied by the DHCP server. If not, you will need to input the domain name manually during installation.
Chapter 6. Updating Drivers During Installation on Intel and AMD Systems
- place the ISO image file of the driver disc in a location accessible to the installer:
- on a local hard drive
- a USB flash drive
- create a driver disc by extracting the image file onto:
- a CD
- a DVD
Refer to the instructions for making installation discs in Section 2.1, “Making an Installation DVD” for more information on burning ISO image files to CD or DVD.
6.1. Limitations of Driver Updates During Installation
- Devices already in use
- You cannot use a driver update to replace drivers that the installation program has already loaded. Instead, you must complete the installation with the drivers that the installation program loaded and update to the new drivers after installation, or, if you need the new drivers for the installation process, consider performing an initial RAM disk driver update — refer to Section 6.2.3, “Preparing an Initial RAM Disk Update”.
- Devices with an equivalent device available
- Because all devices of the same type are initialized together, you cannot update drivers for a device if the installation program has loaded drivers for a similar device. For example, consider a system that has two different network adapters, one of which has a driver update available. The installation program will initialize both adapters at the same time, and therefore, you will not be able to use this driver update. Again, complete the installation with the drivers loaded by the installation program and update to the new drivers after installation, or use an initial RAM disk driver update.
6.2. Preparing for a Driver Update During Installation
- Methods that use the image file itself
- local hard drive
- USB flash drive
- Methods that use a driver update disk produced from an image file
- CD
- DVD
6.2.1. Preparing to Use a Driver Update Image File
6.2.1.1. Preparing to use an image file on local storage
.iso. In the following example, the file is named dd.iso:
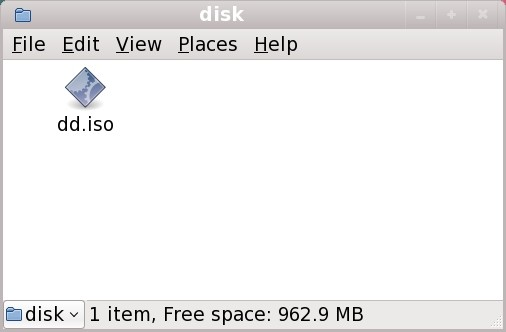
Figure 6.1. Content of a USB flash drive holding a driver update image file
OEMDRV.
dlabel=on boot option, which is enabled by default. Refer to Section 6.3.1, “Let the Installer Find a Driver Update Disk Automatically”.
6.2.2. Preparing a Driver Disc
6.2.2.1. Creating a driver update disc on CD or DVD
Important
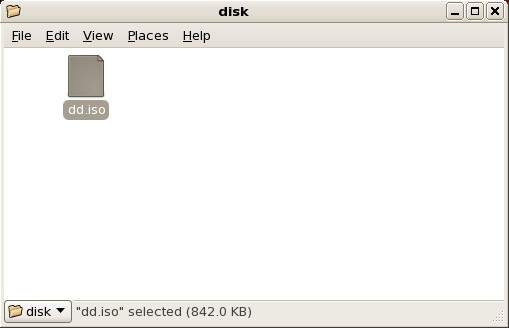
- Use the desktop file manager to locate the ISO image file of the driver disc, supplied to you by Red Hat or your hardware vendor.
Figure 6.2. A typical .iso file displayed in a file manager window
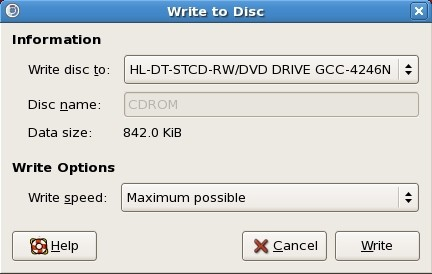
- Right-click on this file and choose . You will see a window similar to the following:
Figure 6.3. CD/DVD Creator's Write to Disc dialog
- Click the button. If a blank disc is not already in the drive, CD/DVD Creator will prompt you to insert one.
rhdd3 and a directory named rpms:
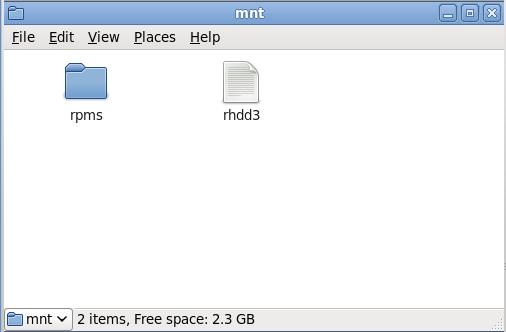
Figure 6.4. Contents of a typical driver update disc on CD or DVD
.iso, then you have not created the disc correctly and should try again. Ensure that you choose an option similar to burn from image if you use a Linux desktop other than GNOME or if you use a different operating system.
6.2.3. Preparing an Initial RAM Disk Update
Important
- Place the driver update image file on your installation server. Usually, you would do this by downloading it to the server from a location on the Internet specified by Red Hat or your hardware vendor. Names of driver update image files end in
.iso. - Copy the driver update image file into the
/tmp/initrd_updatedirectory. - Rename the driver update image file to
dd.img. - At the command line, change into the
/tmp/initrd_updatedirectory, type the following command, and press Enter:find . | cpio --quiet -o -H newc | gzip -9 >/tmp/initrd_update.img
find . | cpio --quiet -o -H newc | gzip -9 >/tmp/initrd_update.imgCopy to Clipboard Copied! Toggle word wrap Toggle overflow - Copy the file
/tmp/initrd_update.imginto the directory the holds the target that you want to use for installation. This directory is placed under the/var/lib/tftpboot/pxelinux/directory. For example,/var/lib/tftpboot/pxelinux/rhel6/might hold the PXE target for Red Hat Enterprise Linux 6. - Edit the
/var/lib/tftpboot/pxelinux/pxelinux.cfg/defaultfile to include an entry that includes the initial RAM disk update that you just created, in the following format:label target-dd kernel target/vmlinuz append initrd=target/initrd.img,target/dd.img
label target-dd kernel target/vmlinuz append initrd=target/initrd.img,target/dd.imgCopy to Clipboard Copied! Toggle word wrap Toggle overflow Where target is the target that you want to use for installation.
Example 6.1. Preparing an initial RAM disk update from a driver update image file
driver_update.iso is a driver update image file that you downloaded from the Internet to a directory on your PXE server. The target that you want to PXE boot from is located in /var/lib/tftpboot/pxelinux/rhel6/
cp driver_update.iso /tmp/initrd_update/dd.img cd /tmp/initrd_update find . | cpio --quiet -c -o -H newc | gzip -9 >/tmp/initrd_update.img cp /tmp/initrd_update.img /var/lib/tftpboot/pxelinux/rhel6/dd.img
$ cp driver_update.iso /tmp/initrd_update/dd.img
$ cd /tmp/initrd_update
$ find . | cpio --quiet -c -o -H newc | gzip -9 >/tmp/initrd_update.img
$ cp /tmp/initrd_update.img /var/lib/tftpboot/pxelinux/rhel6/dd.img/var/lib/tftpboot/pxelinux/pxelinux.cfg/default file and include the following entry:
label rhel6-dd kernel rhel6/vmlinuz append initrd=rhe6/initrd.img,rhel6/dd.img
label rhel6-dd
kernel rhel6/vmlinuz
append initrd=rhe6/initrd.img,rhel6/dd.img6.3. Performing a Driver Update During Installation
- let the installer automatically find a driver update disk.
- let the installer prompt you for a driver update.
- use a boot option to specify a driver update disk.
6.3.1. Let the Installer Find a Driver Update Disk Automatically
OEMDRV before starting the installation process. The installer will automatically examine the device and load any driver updates that it detects and will not prompt you during the process. Refer to Section 6.2.1.1, “Preparing to use an image file on local storage” to prepare a storage device for the installer to find.
6.3.2. Let the Installer Prompt You for a Driver Update
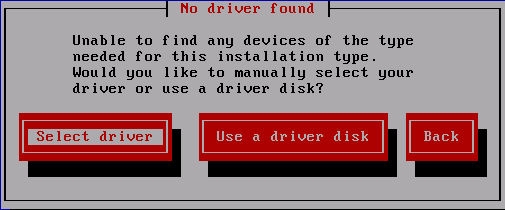
- Begin the installation normally for whatever method you have chosen. If the installer cannot load drivers for a piece of hardware that is essential for the installation process (for example, if it cannot detect any network or storage controllers), it prompts you to insert a driver update disk:
Figure 6.5. The no driver found dialog
- Select Use a driver disk and refer to Section 6.4, “Specifying the Location of a Driver Update Image File or a Driver Update Disk”.
6.3.3. Use a Boot Option to Specify a Driver Update Disk
Important
- Type
linux ddat the boot prompt at the start of the installation process and press Enter. The installer prompts you to confirm that you have a driver disk:Figure 6.6. The driver disk prompt
- Insert the driver update disk that you created on CD, DVD, or USB flash drive and select . The installer examines the storage devices that it can detect. If there is only one possible location that could hold a driver disk (for example, the installer detects the presence of a DVD drive, but no other storage devices) it will automatically load any driver updates that it finds at this location.If the installer finds more than one location that could hold a driver update, it prompts you to specify the location of the update. See Section 6.4, “Specifying the Location of a Driver Update Image File or a Driver Update Disk”.

6.3.4. Select a PXE Target that Includes a Driver Update
- Select
network bootin your computer's BIOS or boot menu. The procedure to specify this option varies widely among different computers. Consult your hardware documentation or the hardware vendor for specifics relevant to your computer. - In the preboot execution environment (PXE), choose the boot target that you prepared on your PXE server. For example, if you labeled this environment
rhel6-ddin the/var/lib/tftpboot/pxelinux/pxelinux.cfg/defaultfile on your PXE server, typerhel6-ddat the prompt and press Enter.
6.4. Specifying the Location of a Driver Update Image File or a Driver Update Disk
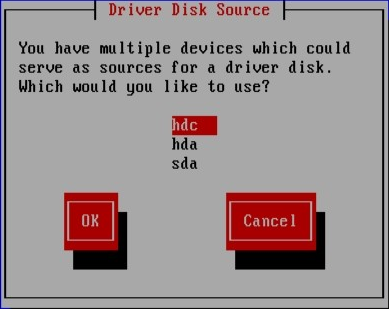
Figure 6.7. Selecting a driver disk source

Figure 6.8. Selecting a driver disk partition
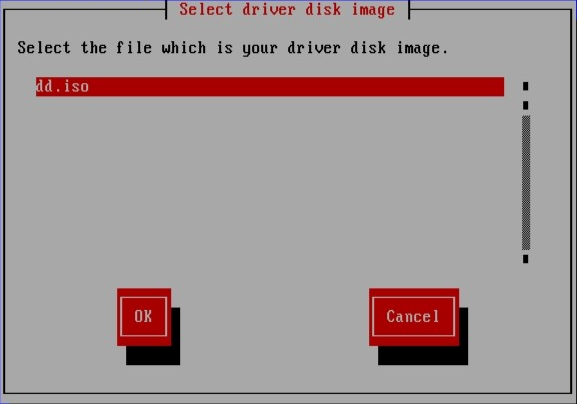
Figure 6.9. Selecting an ISO image
Chapter 7. Booting the Installer
7.1. Starting the Installation Program
Important
Note
7.1.1. Booting the Installation Program on x86, AMD64, and Intel 64 Systems
- Red Hat Enterprise Linux DVD — Your machine supports a bootable DVD drive and you have the Red Hat Enterprise Linux installation DVD.
- Boot CD-ROM — Your machine supports a bootable CD-ROM drive and you want to perform network or hard drive installation.
- USB flash drive — Your machine supports booting from a USB device.
- PXE boot via network — Your machine supports booting from the network. This is an advanced installation path. Refer to Chapter 30, Setting Up an Installation Server for additional information on this method.
Important
- Disconnect any external FireWire or USB disks that you do not need for installation. Refer to Section 3.4.3, “FireWire and USB Disks” for more information.
- Power on your computer system.
- Insert the media in your computer.
- Power off your computer with the boot media still inside.
- Power on your computer system.
Press F10 to select boot device, although the specific wording and the key that you must press varies widely from computer to computer. Consult the documentation for your computer or motherboard, or seek support from the hardware manufacturer or vendor.
boot: prompt, at which you can enter additional boot options as described in Section 7.1.3, “Additional Boot Options”.
Important
7.1.2. The Boot Menu
boot: prompt at which you can specify custom boot options, press the Esc key and refer to Section 7.1.3, “Additional Boot Options”.
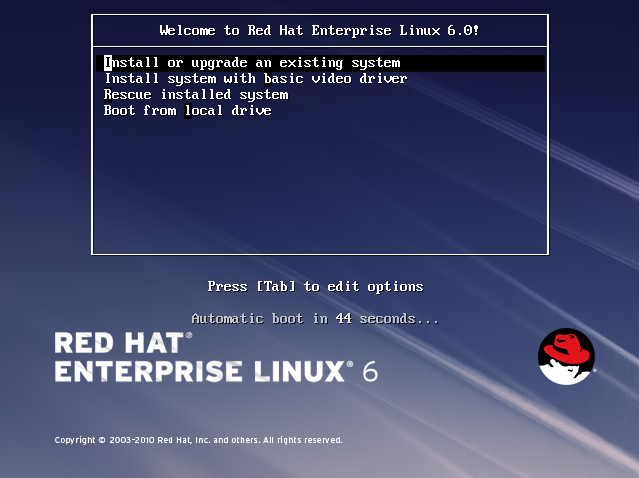
Figure 7.1. The boot screen
- Install or upgrade an existing system
- This option is the default. Choose this option to install Red Hat Enterprise Linux onto your computer system using the graphical installation program.
- Install system with basic video driver
- This option allows you to install Red Hat Enterprise Linux in graphical mode even if the installation program is unable to load the correct driver for your video card. If your screen appears distorted or goes blank when using the Install or upgrade an existing system option, restart your computer and try this option instead.
- Rescue installed system
- Choose this option to repair a problem with your installed Red Hat Enterprise Linux system that prevents you from booting normally. Although Red Hat Enterprise Linux is an exceptionally stable computing platform, it is still possible for occasional problems to occur that prevent booting. The rescue environment contains utility programs that allow you fix a wide variety of these problems.
- Boot from local drive
- This option boots the system from the first installed disk. If you booted this disc accidentally, use this option to boot from the hard disk immediately without starting the installer.
Note
7.1.3. Additional Boot Options
boot: prompt appears, at which you can use the boot loader options described below.
Note
linux text
linux textCopy to Clipboard Copied! Toggle word wrap Toggle overflow linux repo=cdrom:device
linux repo=cdrom:deviceCopy to Clipboard Copied! Toggle word wrap Toggle overflow linux repo=ftp://username:password@URL
linux repo=ftp://username:password@URLCopy to Clipboard Copied! Toggle word wrap Toggle overflow linux repo=http://URL
linux repo=http://URLCopy to Clipboard Copied! Toggle word wrap Toggle overflow linux repo=hd:device
linux repo=hd:deviceCopy to Clipboard Copied! Toggle word wrap Toggle overflow linux repo=nfs:options:server:/path
linux repo=nfs:options:server:/pathCopy to Clipboard Copied! Toggle word wrap Toggle overflow linux repo=nfsiso:options:server:/path
linux repo=nfsiso:options:server:/pathCopy to Clipboard Copied! Toggle word wrap Toggle overflow In these examples,cdromrefers to a CD or DVD drive,ftprefers to a location accessible by FTP,httprefers to a location accessible by HTTP,hdrefers to an ISO image file accessible on a hard drive partition,nfsrefers to an expanded tree of installation files accessible by NFS, andnfsisorefers to an ISO image file accessible by NFS.- ISO images have an SHA256 checksum embedded in them. To test the checksum integrity of an ISO image, at the installation boot prompt, type:
linux mediacheck
linux mediacheckCopy to Clipboard Copied! Toggle word wrap Toggle overflow The installation program prompts you to insert a DVD or select an ISO image to test, and select to perform the checksum operation. This checksum operation can be performed on any Red Hat Enterprise Linux DVD. It is strongly recommended to perform this operation on any Red Hat Enterprise Linux DVD that was created from downloaded ISO images. This command works with the DVD, hard drive ISO, and NFS ISO installation methods. linux console=<device>
linux console=<device>Copy to Clipboard Copied! Toggle word wrap Toggle overflow For text mode installations, use:linux text console=<device>
linux text console=<device>Copy to Clipboard Copied! Toggle word wrap Toggle overflow In the above command, <device> should be the device you are using (such as ttyS0 or ttyS1). For example,linux text console=ttyS0.Text mode installations using a serial terminal work best when the terminal supports UTF-8. Under UNIX and Linux, Kermit supports UTF-8. For Windows, Kermit '95 works well. Non-UTF-8 capable terminals works as long as only English is used during the installation process. An enhanced serial display can be used by passing theutf8command as a boot-time option to the installation program. For example:linux console=ttyS0 utf8
linux console=ttyS0 utf8Copy to Clipboard Copied! Toggle word wrap Toggle overflow
7.1.3.1. Kernel Options
linux updates
linux updateslinux text updates
linux text updatesrhupdates/ on the server.
7.2. Installing from a Different Source
| Boot method | Installation source |
|---|---|
| Installation DVD | DVD, network, or hard disk |
| Installation USB flash drive | Installation DVD, network, or hard disk |
| Minimal boot CD or USB, rescue CD | Network or hard disk |
7.3. Booting from the Network Using PXE
Network Boot or Boot Services. Once you properly configure PXE booting, the computer can boot the Red Hat Enterprise Linux installation system without any other media.
- Ensure that the network cable is attached. The link indicator light on the network socket should be lit, even if the computer is not switched on.
- Switch on the computer.
- A menu screen appears. Press the number key that corresponds to the desired option.
Note
pxelinux.cfg/* config files:
IPAPPEND 2 APPEND ksdevice=bootif
IPAPPEND 2
APPEND ksdevice=bootifksdevice=link
ksdevice=linkChapter 8. Configuring Language and Installation Source
8.1. The Text Mode Installation Program User Interface
Important
xdriver=vesa option – refer to Chapter 28, Boot Options
Note
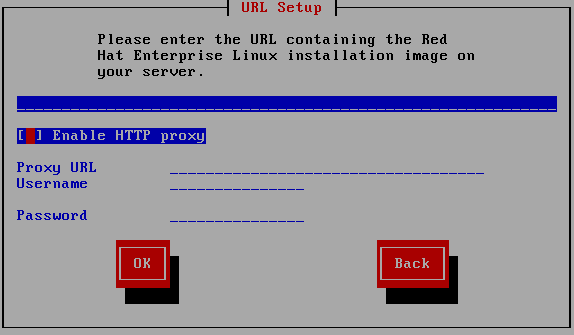
Figure 8.1. Installation Program Widgets as seen in URL Setup
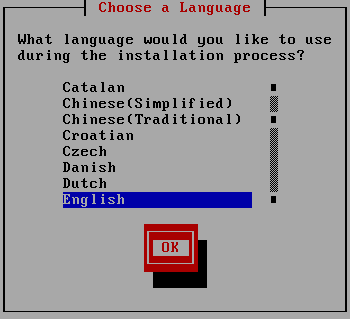
Figure 8.2. Installation Program Widgets as seen in Choose a Language
- Window — Windows (usually referred to as dialogs in this manual) appear on your screen throughout the installation process. At times, one window may overlay another; in these cases, you can only interact with the window on top. When you are finished in that window, it disappears, allowing you to continue working in the window underneath.
- Checkbox — Checkboxes allow you to select or deselect a feature. The box displays either an asterisk (selected) or a space (unselected). When the cursor is within a checkbox, press Space to select or deselect a feature.
- Text Input — Text input lines are regions where you can enter information required by the installation program. When the cursor rests on a text input line, you may enter and/or edit information on that line.
- Text Widget — Text widgets are regions of the screen for the display of text. At times, text widgets may also contain other widgets, such as checkboxes. If a text widget contains more information than can be displayed in the space reserved for it, a scroll bar appears; if you position the cursor within the text widget, you can then use the Up and Down arrow keys to scroll through all the information available. Your current position is shown on the scroll bar by a # character, which moves up and down the scroll bar as you scroll.
- Scroll Bar — Scroll bars appear on the side or bottom of a window to control which part of a list or document is currently in the window's frame. The scroll bar makes it easy to move to any part of a file.
- Button Widget — Button widgets are the primary method of interacting with the installation program. You progress through the windows of the installation program by navigating these buttons, using the Tab and Enter keys. Buttons can be selected when they are highlighted.
- Cursor — Although not a widget, the cursor is used to select (and interact with) a particular widget. As the cursor is moved from widget to widget, it may cause the widget to change color, or the cursor itself may only appear positioned in or next to the widget. In Figure 8.1, “Installation Program Widgets as seen in URL Setup”, the cursor is positioned on the checkbox. Figure 8.2, “Installation Program Widgets as seen in Choose a Language”, shows the cursor on the button.
8.1.1. Using the Keyboard to Navigate
Warning
8.2. Language Selection
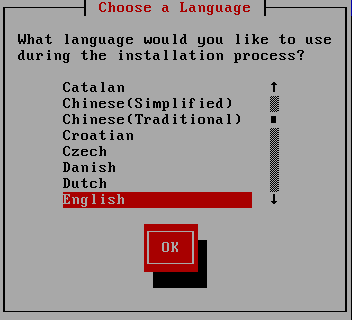
Figure 8.3. Language Selection
8.3. Installation Method
askmethod boot option, use the arrow keys on your keyboard to select an installation method (refer to Figure 8.4, “Installation Method”). With your selected method highlighted, press the Tab key to move to the button and press the Enter key to confirm your choice.
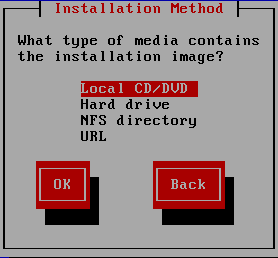
Figure 8.4. Installation Method
8.3.1. Installing from a DVD
Note
8.3.2. Installing from a Hard Drive
repo=hd boot option, you already specified a partition.
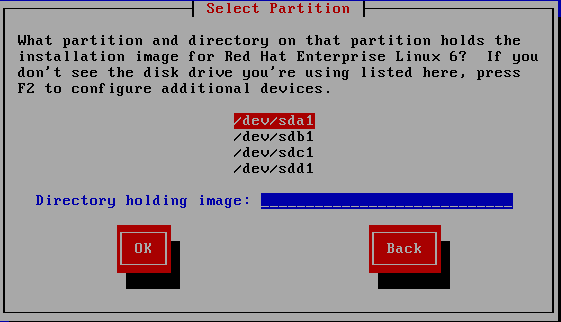
Figure 8.5. Selecting Partition Dialog for Hard Drive Installation
/dev/sd. Each individual drive has its own letter, for example /dev/sda. Each partition on a drive is numbered, for example /dev/sda1.
| Partition type | Volume | Original path to files | Directory to use |
|---|---|---|---|
| VFAT | D:\ | D:\Downloads\RHEL6.9 | /Downloads/RHEL6.9 |
| ext2, ext3, ext4 | /home | /home/user1/RHEL6.9 | /user1/RHEL6.9 |
/. If the ISO images are located in a subdirectory of a mounted partition, enter the name of the directory holding the ISO images within that partition. For example, if the partition on which the ISO images is normally mounted as /home/, and the images are in /home/new/, you would enter /new/.
Important
8.3.3. Performing a Network Installation
askmethod or repo= options, you can install Red Hat Enterprise Linux from a network server using FTP, HTTP, HTTPS, or NFS protocols. Anaconda uses the same network connection to consult additional software repositories later in the installation process.
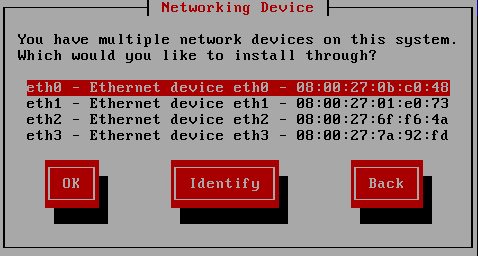
Figure 8.6. Networking Device
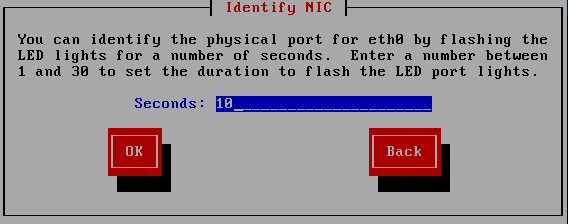
Figure 8.7. Identify NIC
IPv4 options
- Dynamic IP configuration (DHCP)
- Anaconda uses DHCP running on the network to supply the network configuration automatically.
- Manual configuration
- Anaconda prompts you to enter the network configuration manually, including the IP address for this system, the netmask, the gateway address, and the DNS address.
IPv6 options
- Automatic
- Anaconda uses router advertisement (RA) and DHCP for automatic configuration, based on the network environment. (Equivalent to the
Automaticoption in NetworkManager) - Automatic, DHCP only
- Anaconda does not use RA, but requests information from DHCPv6 directly to create a stateful configuration. (Equivalent to the
Automatic, DHCP onlyoption in NetworkManager) - Manual configuration
- Anaconda prompts you to enter the network configuration manually, including the IP address for this system, the netmask, the gateway address, and the DNS address.
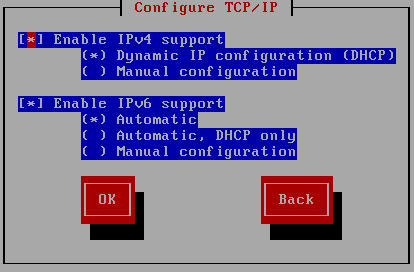
Figure 8.8. Configure TCP/IP
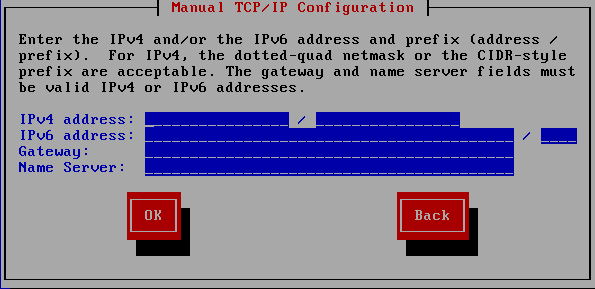
Figure 8.9. Manual TCP/IP Configuration
- If you are installing via NFS, proceed to Section 8.3.4, “Installing via NFS”.
- If you are installing via Web or FTP, proceed to Section 8.3.5, “Installing via FTP, HTTP, or HTTPS”.
8.3.4. Installing via NFS
repo=nfs boot option, you already specified a server and path.
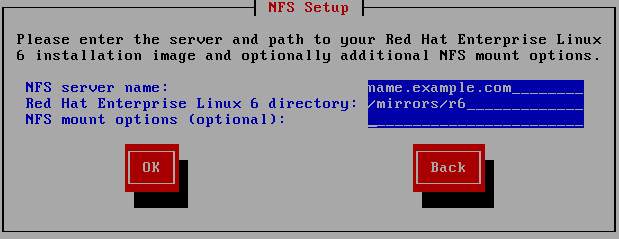
Figure 8.10. NFS Setup Dialog
- Enter the domain name or IP address of your NFS server in the NFS server name field. For example, if you are installing from a host named
eastcoastin the domainexample.com, entereastcoast.example.com. - Enter the name of the exported directory in the Red Hat Enterprise Linux 6.9 directory field:
- If the NFS server is exporting a mirror of the Red Hat Enterprise Linux installation tree, enter the directory which contains the root of the installation tree. If everything was specified properly, a message appears indicating that the installation program for Red Hat Enterprise Linux is running.
- If the NFS server is exporting the ISO image of the Red Hat Enterprise Linux DVD, enter the directory which contains the ISO image.
If you followed the setup described in Section 4.1.2, “Preparing for an NFS Installation”, the exported directory is the one that you specified aspublicly_available_directory. - Specify any NFS mount options that you require in the NFS mount options field. Refer to the man pages for mount and nfs for a comprehensive list of options. If you do not require any mount options, leave the field empty.
- Proceed with Chapter 9, Installing Using Anaconda.
8.3.5. Installing via FTP, HTTP, or HTTPS
Important
http:// or https:// or ftp:// as the protocol.
repo=ftp or repo=http boot options, you already specified a server and path.
/images directory for your architecture. For example:
/mirrors/redhat/rhel-6.9/Server/i386/
https:// as the protocol.
{ftp|http|https}://<user>:<password>@<hostname>[:<port>]/<directory>/
http://install:rhel6.9pw@name.example.com/mirrors/redhat/rhel-6.9/Server/i386/
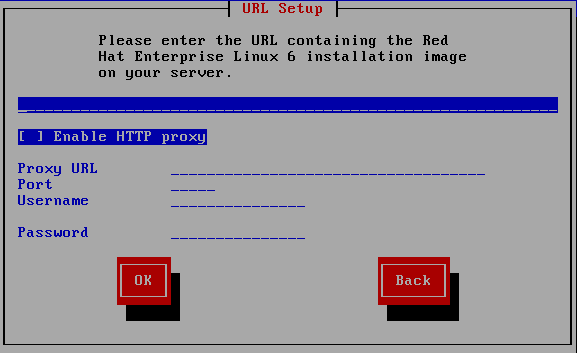
Figure 8.11. URL Setup Dialog
8.4. Verifying Media
Chapter 9. Installing Using Anaconda
9.1. The Text Mode Installation Program User Interface
Important
- The installation system fails to identify the display hardware on your computer
- You choose the text mode installation from the boot menu
- configuring advanced storage methods such as LVM, RAID, FCoE, zFCP, and iSCSI.
- customizing the partition layout
- customizing the bootloader layout
- selecting packages during installation
- configuring the installed system with firstboot
linux ip option can be used to configure network settings. Refer to Section 28.1, “Configuring the Installation System at the Boot Menu” for instructions.
9.2. The Graphical Installation Program User Interface
Note
boot: prompt:
linux text
linux text9.2.1. Screenshots During Installation
/root/anaconda-screenshots.
autostep --autoscreenshot option to generate a screenshot of each step of the installation automatically. Refer to Section 32.3, “Creating the Kickstart File” for details of configuring a Kickstart file.
9.2.2. A Note About Virtual Consoles
| console | keystrokes | contents |
|---|---|---|
| 1 | ctrl+alt+f1 | graphical display |
| 2 | ctrl+alt+f2 | shell prompt |
| 3 | ctrl+alt+f3 | install log (messages from installation program) |
| 4 | ctrl+alt+f4 | system-related messages |
| 5 | ctrl+alt+f5 | other messages |
9.3. Welcome to Red Hat Enterprise Linux

Figure 9.1. The Welcome screen
9.4. Language Selection
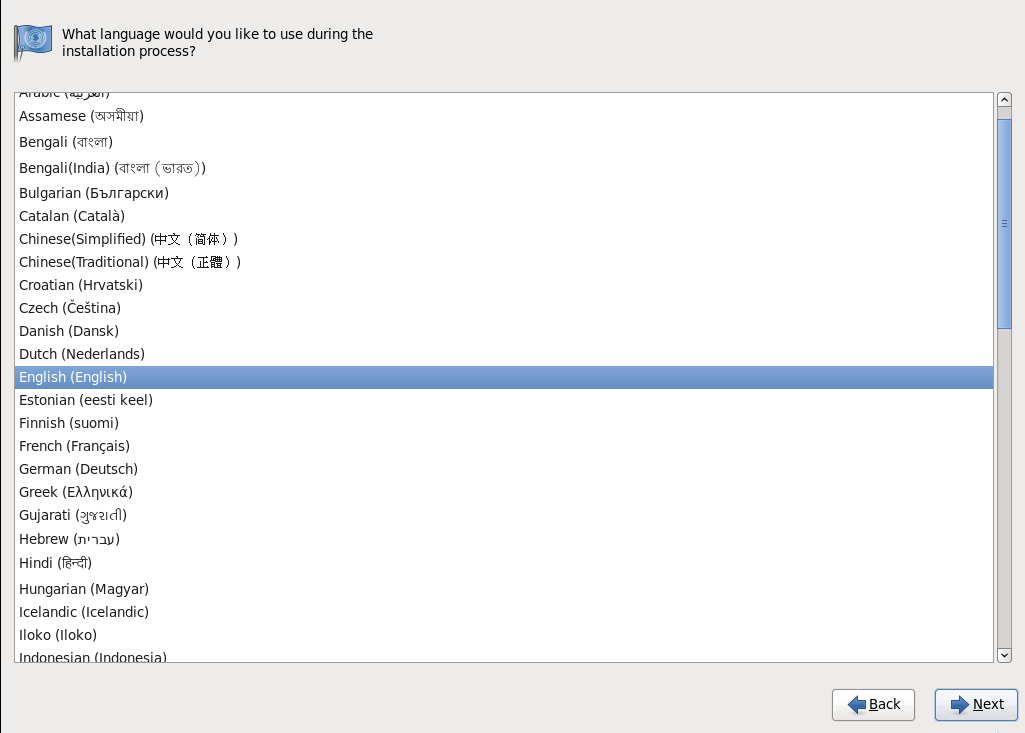
Figure 9.2. Language Configuration
9.5. Keyboard Configuration
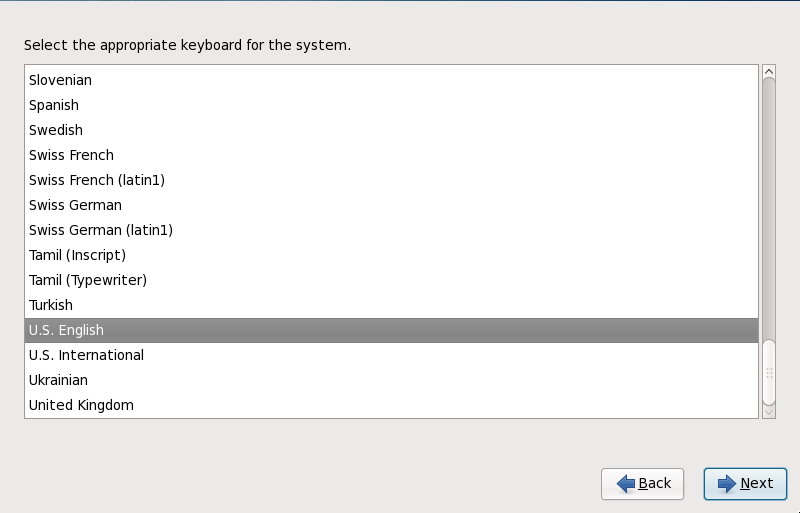
Figure 9.3. Keyboard Configuration
latin1 option, which uses dead keys to access certain characters, such as those with diacritical marks. When you press a dead key, nothing will appear on your screen until you press another key to "complete" the character. For example, to type é on a latin1 keyboard layout, you would press (and release) the ' key, and then press the E key. By contrast, you access this character on some other keyboards by pressing and holding down a key (such as Alt-Gr) while you press the E key. Other keyboards might have a dedicated key for this character.
Note
system-config-keyboard command in a shell prompt to launch the Keyboard Configuration Tool. If you are not root, it prompts you for the root password to continue.
9.6. Storage Devices
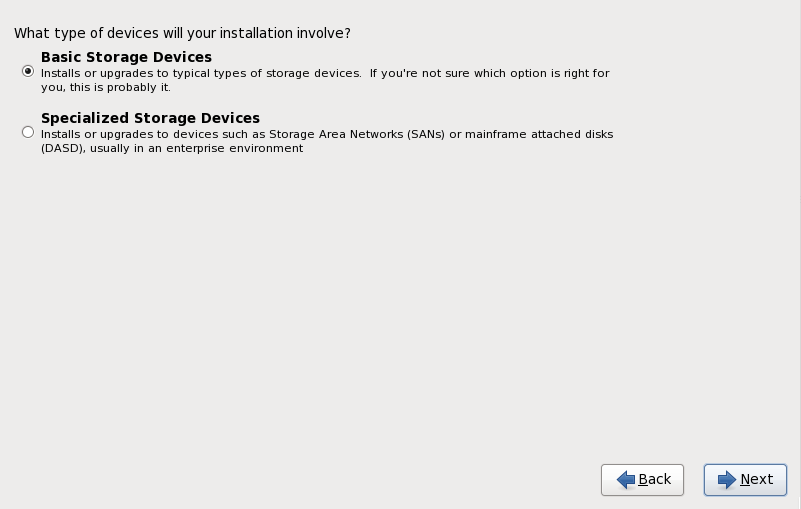
Figure 9.4. Storage devices
- Basic Storage Devices
- Select to install Red Hat Enterprise Linux on the following storage devices:
- hard drives or solid-state drives connected directly to the local system.
- Specialized Storage Devices
- Select to install Red Hat Enterprise Linux on the following storage devices:
- Storage area networks (SANs)
- Direct access storage devices (DASDs)
- Firmware RAID devices
- Multipath devices
Use the option to configure Internet Small Computer System Interface (iSCSI) and FCoE (Fiber Channel over Ethernet) connections.
Note
mdeventd daemon is not performed during installation.
9.6.1. The Storage Devices Selection Screen
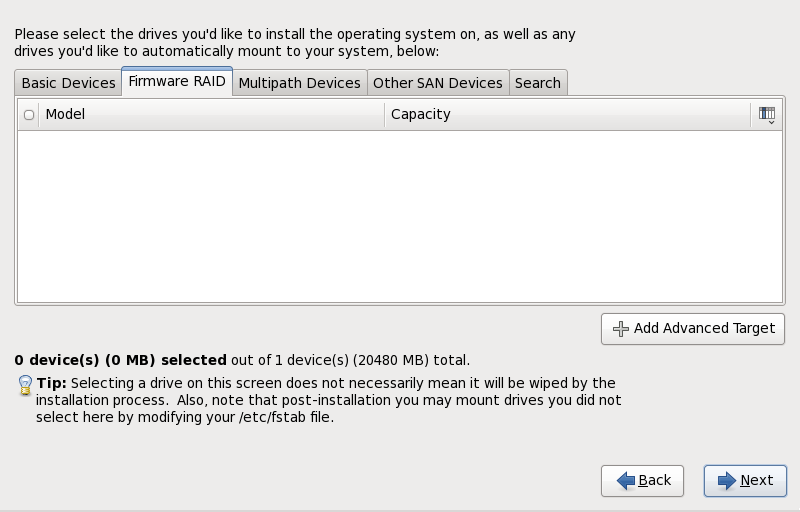
Figure 9.5. Select storage devices — Basic devices
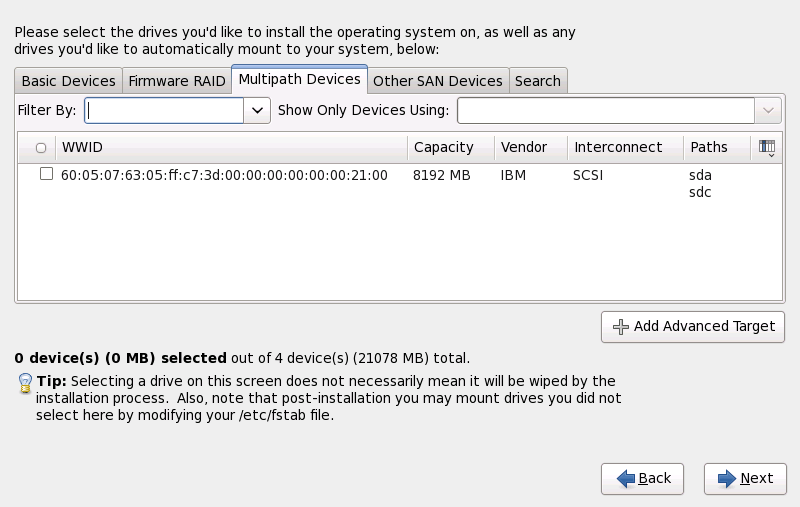
Figure 9.6. Select storage devices — Multipath Devices
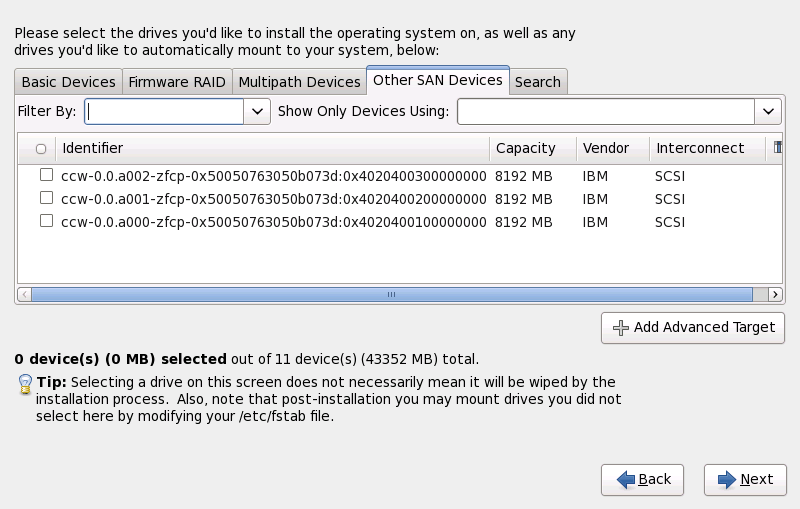
Figure 9.7. Select storage devices — Other SAN Devices
- Basic Devices
- Basic storage devices directly connected to the local system, such as hard disk drives and solid-state drives.
- Firmware RAID
- Storage devices attached to a firmware RAID controller.
- Multipath Devices
- Storage devices accessible through more than one path, such as through multiple SCSI controllers or Fiber Channel ports on the same system.
Important
The installer only detects multipath storage devices with serial numbers that are 16 or 32 characters in length. - Other SAN Devices
- Any other devices available on a storage area network (SAN).

Figure 9.8. The Storage Devices Search Tab

Figure 9.9. Selecting Columns
/etc/fstab file.
Important
9.6.1.1. Advanced Storage Options
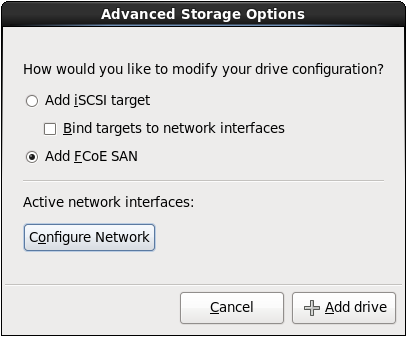
Figure 9.10. Advanced Storage Options
9.6.1.1.1. Select and configure a network interface
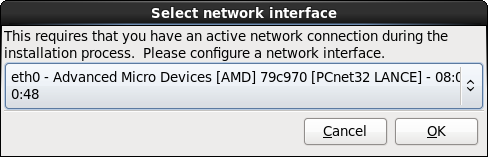
Figure 9.11. Select network interface
- Select an interface from the drop-down menu.
- Click .
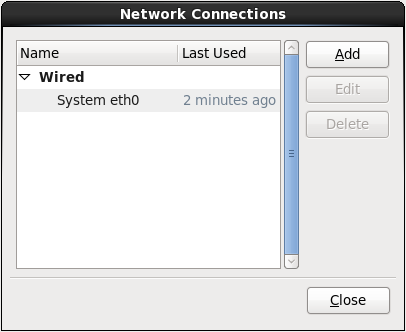
Figure 9.12. Network Connections
9.6.1.1.2. Configure iSCSI parameters
Procedure 9.1. iSCSI discovery
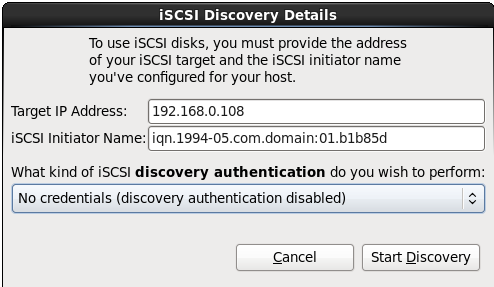
Figure 9.13. The iSCSI Discovery Details dialog
- Enter the IP address of the iSCSI target in the Target IP Address field.
- Provide a name in the iSCSI Initiator Name field for the iSCSI initiator in iSCSI qualified name (IQN) format.A valid IQN contains:
- the string
iqn.(note the period) - a date code that specifies the year and month in which your organization's Internet domain or subdomain name was registered, represented as four digits for the year, a dash, and two digits for the month, followed by a period. For example, represent September 2010 as
2010-09. - your organization's Internet domain or subdomain name, presented in reverse order with the top-level domain first. For example, represent the subdomain
storage.example.comascom.example.storage - a colon followed by a string that uniquely identifies this particular iSCSI initiator within your domain or subdomain. For example,
:diskarrays-sn-a8675309.
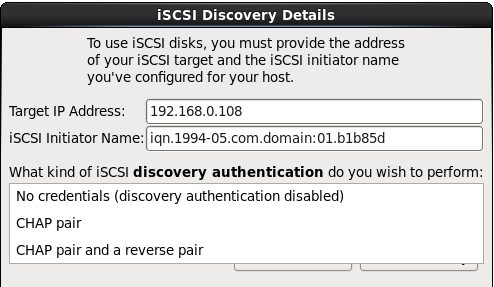
A complete IQN therefore resembles:iqn.2010-09.storage.example.com:diskarrays-sn-a8675309, and anaconda pre-populates the iSCSI Initiator Name field with a name in this format to help you with the structure.For more information on IQNs, refer to 3.2.6. iSCSI Names in RFC 3720 - Internet Small Computer Systems Interface (iSCSI) available from http://tools.ietf.org/html/rfc3720#section-3.2.6 and 1. iSCSI Names and Addresses in RFC 3721 - Internet Small Computer Systems Interface (iSCSI) Naming and Discovery available from http://tools.ietf.org/html/rfc3721#section-1. - Use the drop-down menu to specify the type of authentication to use for iSCSI discovery:
Figure 9.14. iSCSI discovery authentication
- If you selected as the authentication type, provide the username and password for the iSCSI target in the CHAP Username and CHAP Password fields.
Figure 9.15. CHAP pair
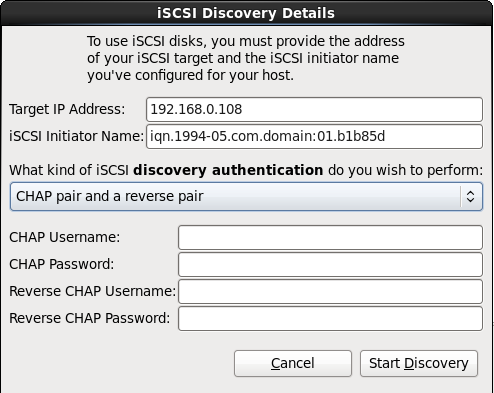
- If you selected as the authentication type, provide the username and password for the iSCSI target in the CHAP Username and CHAP Password field and the username and password for the iSCSI initiator in the Reverse CHAP Username and Reverse CHAP Password fields.
Figure 9.16. CHAP pair and a reverse pair
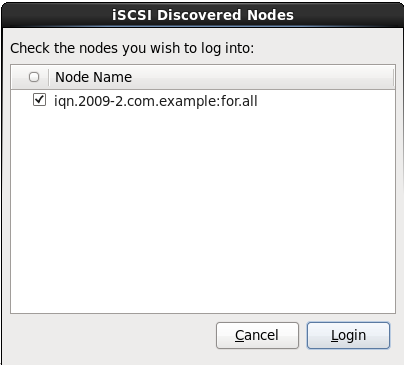
- Click . Anaconda attempts to discover an iSCSI target based on the information that you provided. If discovery succeeds, the iSCSI Discovered Nodes dialog presents you with a list of all the iSCSI nodes discovered on the target.
- Each node is presented with a checkbox beside it. Click the checkboxes to select the nodes to use for installation.
Figure 9.17. The iSCSI Discovered Nodes dialog
- Click to initiate an iSCSI session.

Procedure 9.2. Starting an iSCSI session
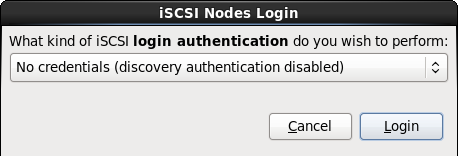
Figure 9.18. The iSCSI Nodes Login dialog
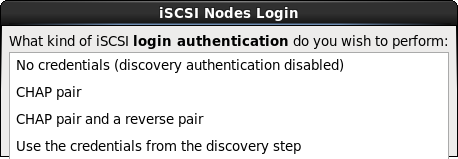
- Use the drop-down menu to specify the type of authentication to use for the iSCSI session:
Figure 9.19. iSCSI session authentication
If your environment uses the same type of authentication and same username and password for iSCSI discovery and for the iSCSI session, select to reuse these credentials. - If you selected as the authentication type, provide the username and password for the iSCSI target in the CHAP Username and CHAP Password fields.
Figure 9.20. CHAP pair
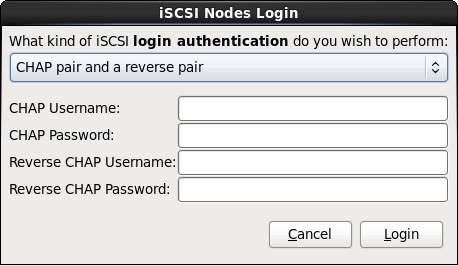
- If you selected as the authentication type, provide the username and password for the iSCSI target in the CHAP Username and CHAP Password fields and the username and password for the iSCSI initiator in the Reverse CHAP Username and Reverse CHAP Password fields.
Figure 9.21. CHAP pair and a reverse pair
- Click . Anaconda attempts to log into the nodes on the iSCSI target based on the information that you provided. The iSCSI Login Results dialog presents you with the results.
Figure 9.22. The iSCSI Login Results dialog
- Click to continue.


9.6.1.1.3. Configure FCoE Parameters
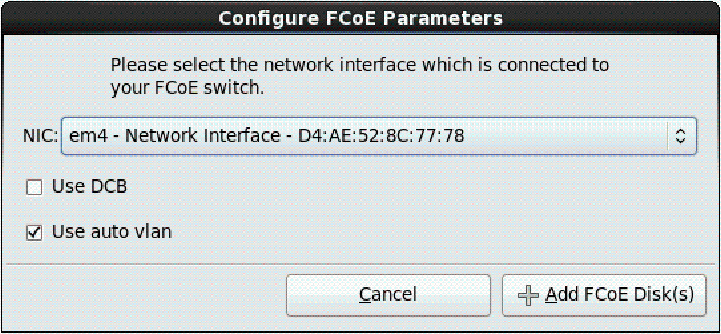
Figure 9.23. Configure FCoE Parameters
9.7. Setting the Hostname
Note
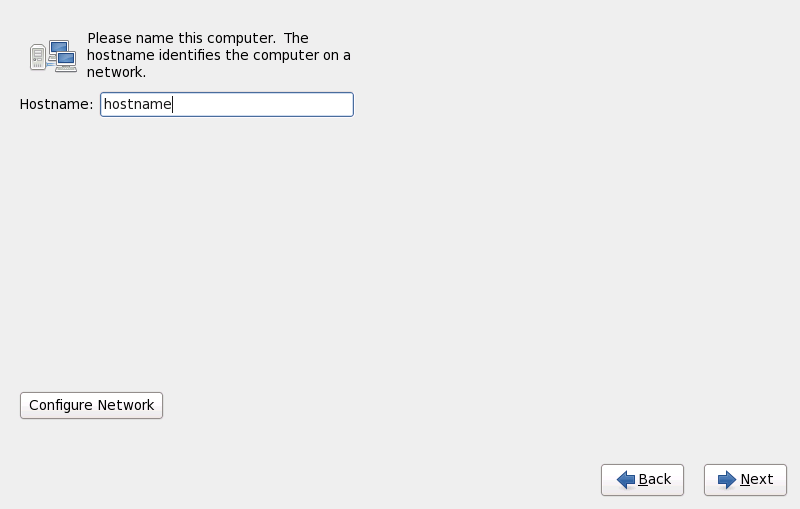
Figure 9.24. Setting the hostname
Note
9.7.1. Editing Network Connections
Important
Note
system-config-network command in a shell prompt to launch the Network Administration Tool. If you are not root, it prompts you for the root password to continue.
Figure 9.25. Network Connections
9.7.1.1. Options common to all types of connection
9.7.1.2. The Wired tab
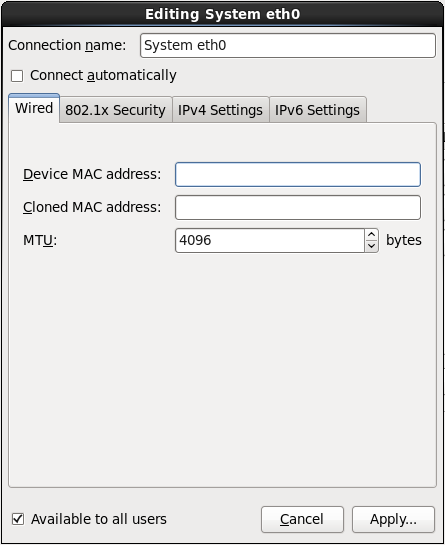
Figure 9.26. The Wired tab
9.7.1.3. The 802.1x Security tab
- Authentication
- Choose one of the following methods of authentication:
- TLS for Transport Layer Security
- Tunneled TLS for Tunneled Transport Layer Security, otherwise known as TTLS, or EAP-TTLS
- Protected EAP (PEAP) for Protected Extensible Authentication Protocol
- Identity
- Provide the identity of this server.
- User certificate
- Browse to a personal X.509 certificate file encoded with Distinguished Encoding Rules (DER) or Privacy Enhanced Mail (PEM).
- CA certificate
- Browse to a X.509 certificate authority certificate file encoded with Distinguished Encoding Rules (DER) or Privacy Enhanced Mail (PEM).
- Private key
- Browse to a private key file encoded with Distinguished Encoding Rules (DER), Privacy Enhanced Mail (PEM), or the Personal Information Exchange Syntax Standard (PKCS#12).
- Private key password
- The password for the private key specified in the Private key field. Select Show password to make the password visible as you type it.
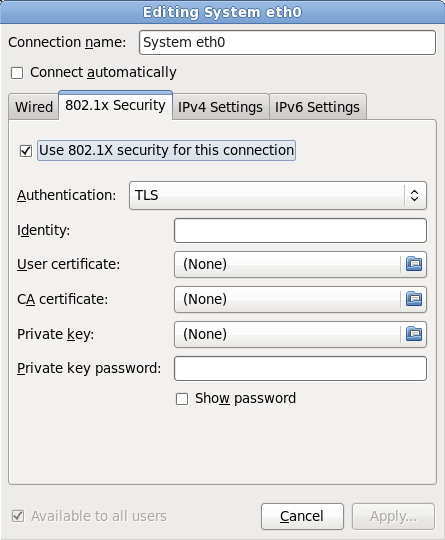
Figure 9.27. The 802.1x Security tab
9.7.1.4. The IPv4 Settings tab
- Automatic (DHCP)
- IPv4 parameters are configured by the DHCP service on the network.
- Automatic (DHCP) addresses only
- The IPv4 address, netmask, and gateway address are configured by the DHCP service on the network, but DNS servers and search domains must be configured manually.
- Manual
- IPv4 parameters are configured manually for a static configuration.
- Link-Local Only
- A link-local address in the 169.254/16 range is assigned to the interface.
- Shared to other computers
- The system is configured to provide network access to other computers. The interface is assigned an address in the 10.42.x.1/24 range, a DHCP server and DNS server are started, and the interface is connected to the default network connection on the system with network address translation (NAT).
- Disabled
- IPv4 is disabled for this connection.
Figure 9.28. The IPv4 Settings tab
9.7.1.4.1. Editing IPv4 routes
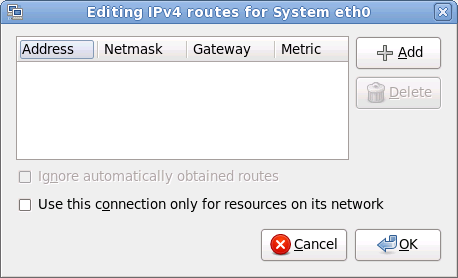
Figure 9.29. The Editing IPv4 Routes dialog
9.7.1.5. The IPv6 Settings tab
- Ignore
- IPv6 is ignored for this connection.
- Automatic
- NetworkManager uses router advertisement (RA) to create an automatic, stateless configuration.
- Automatic, addresses only
- NetworkManager uses RA to create an automatic, stateless configuration, but DNS servers and search domains are ignored and must be configured manually.
- Automatic, DHCP only
- NetworkManager does not use RA, but requests information from DHCPv6 directly to create a stateful configuration.
- Manual
- IPv6 parameters are configured manually for a static configuration.
- Link-Local Only
- A link-local address with the fe80::/10 prefix is assigned to the interface.

Figure 9.30. The IPv6 Settings tab
9.7.1.5.1. Editing IPv6 routes
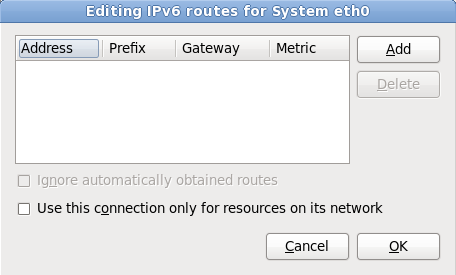
Figure 9.31. The Editing IPv6 Routes dialog
9.7.1.6. Restart a network device
ONBOOT=yes is set. Refer to the Red Hat Enterprise Linux 6.9 Deployment Guide available from https://access.redhat.com/documentation/en-US/Red_Hat_Enterprise_Linux/6/html/Deployment_Guide/index.html for more information about interface configuration files.
- Press Ctrl+Alt+F2 to switch to virtual terminal
tty2. - Move the interface configuration file to a temporary location:
mv /etc/sysconfig/network-scripts/ifcfg-device_name /tmp
mv /etc/sysconfig/network-scripts/ifcfg-device_name /tmpCopy to Clipboard Copied! Toggle word wrap Toggle overflow where device_name is the device that you just reconfigured. For example,ifcfg-eth0is the ifcfg file foreth0.The device is now disconnected in anaconda. - Open the interface configuration file in the vi editor:
vi /tmp/ifcfg-device_name
vi /tmp/ifcfg-device_nameCopy to Clipboard Copied! Toggle word wrap Toggle overflow - Verify that the interface configuration file contains the line
ONBOOT=yes. If the file does not already contain the line, add it now and save the file. - Exit the vi editor.
- Move the interface configuration file back to the
/etc/sysconfig/network-scripts/directory:mv /tmp/ifcfg-device_name /etc/sysconfig/network-scripts/
mv /tmp/ifcfg-device_name /etc/sysconfig/network-scripts/Copy to Clipboard Copied! Toggle word wrap Toggle overflow The device is now reconnected in anaconda. - Press Ctrl+Alt+F6 to return to anaconda.
9.8. Time Zone Configuration
- Using your mouse, click on the interactive map to select a specific city (represented by a yellow dot). A red X appears indicating your selection.
- You can also scroll through the list at the bottom of the screen to select your time zone. Using your mouse, click on a location to highlight your selection.
Warning
Note
system-config-date command in a shell prompt to launch the Time and Date Properties Tool. If you are not root, it prompts you for the root password to continue.
9.9. Set the Root Password
Note
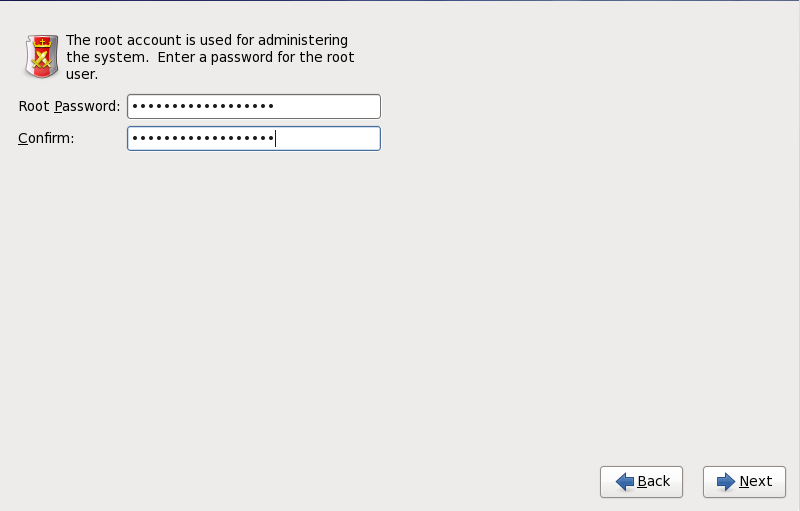
Figure 9.32. Root Password
su command to change to root only when you need to perform tasks that require superuser authorization. These basic rules minimize the chances of a typo or an incorrect command doing damage to your system.
Note
su - at the shell prompt in a terminal window and then press Enter. Then, enter the root password and press Enter.
Warning
passwd command as root. If you forget the root password, see Resolving Problems in System Recovery Modes in the Red Hat Enterprise Linux 6 Deployment Guide for instructions on how to set a new one.
9.10. Assign Storage Devices
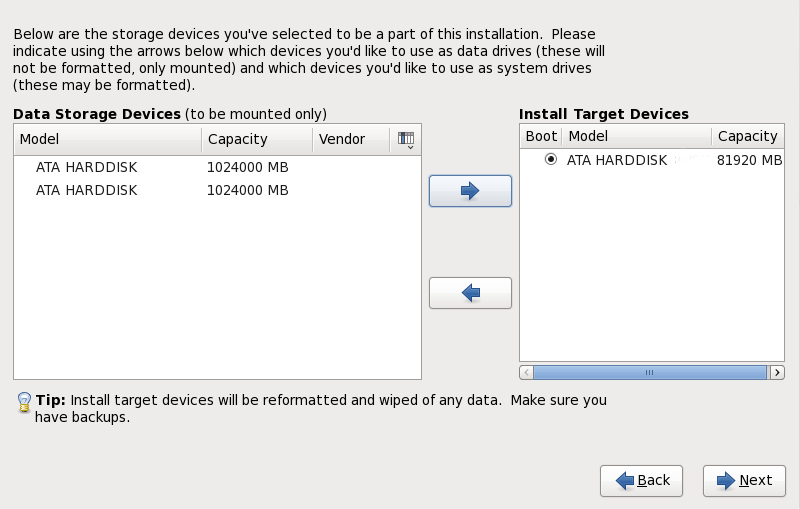
Figure 9.33. Assign storage devices
Important
9.11. Initializing the Hard Disk
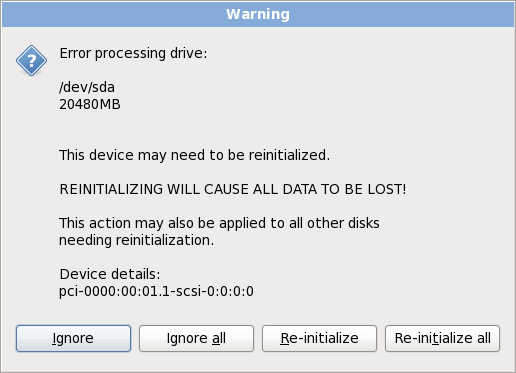
Figure 9.34. Warning screen – initializing hard drive
zerombr (refer to Chapter 32, Kickstart Installations). This command is required when performing an unattended installation on a system with previously initialized disks.
Warning
9.12. Upgrading an Existing System
Important
9.12.1. The Upgrade Dialog
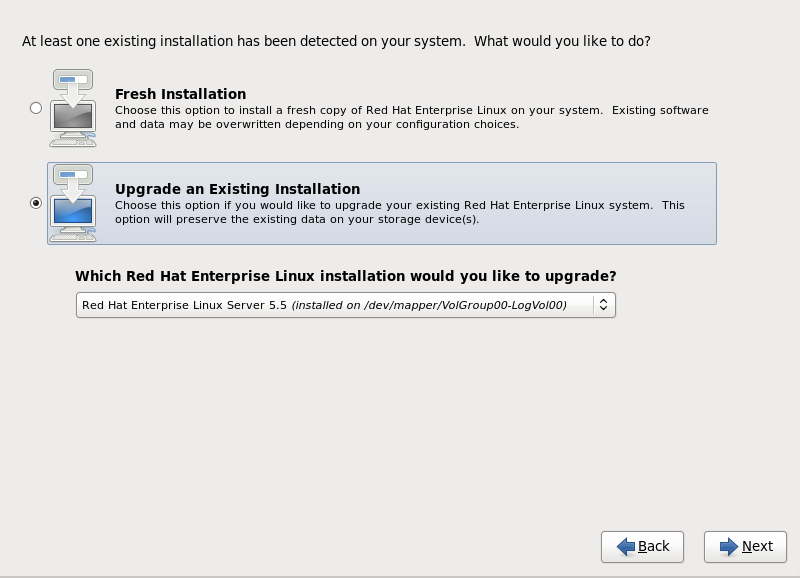
Figure 9.35. The Upgrade Dialog
Note
9.12.2. Upgrading Using the Installer
Note
/home partition and perform a fresh installation. For more information on partitions and how to set them up, refer to Section 9.13, “Disk Partitioning Setup”.
rpm -qa --qf '%{NAME} %{VERSION}-%{RELEASE} %{ARCH}\n' > ~/old-pkglist.txt
rpm -qa --qf '%{NAME} %{VERSION}-%{RELEASE} %{ARCH}\n' > ~/old-pkglist.txtsu -c 'tar czf /tmp/etc-`date +%F`.tar.gz /etc' su -c 'mv /tmp/etc-*.tar.gz /home'
su -c 'tar czf /tmp/etc-`date +%F`.tar.gz /etc'
su -c 'mv /tmp/etc-*.tar.gz /home'/home directory as well as content from services such as an Apache, FTP, or SQL server, or a source code management system. Although upgrades are not destructive, if you perform one improperly there is a small possibility of data loss.
Warning
/home directory. If your /home directory is not a separate partition, you should not follow these examples verbatim! Store your backups on another device such as CD or DVD discs or an external hard disk.
9.12.3. Updating the Boot Loader Configuration
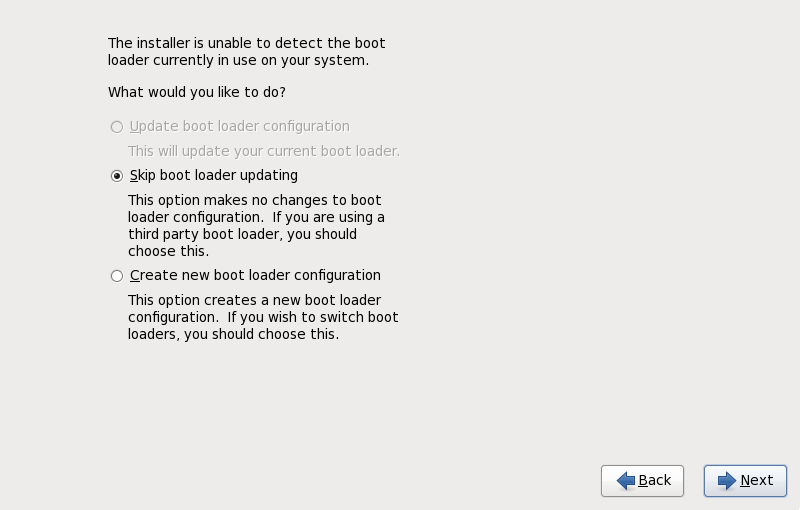
Figure 9.36. The Upgrade Boot Loader Dialog
9.13. Disk Partitioning Setup
Warning
Important
Important
/boot/ partition must be created on a partition outside of the RAID array, such as on a separate hard drive. An internal hard drive is necessary to use for partition creation with problematic RAID cards.
/boot/ partition is also necessary for software RAID setups.
/boot/ partition.
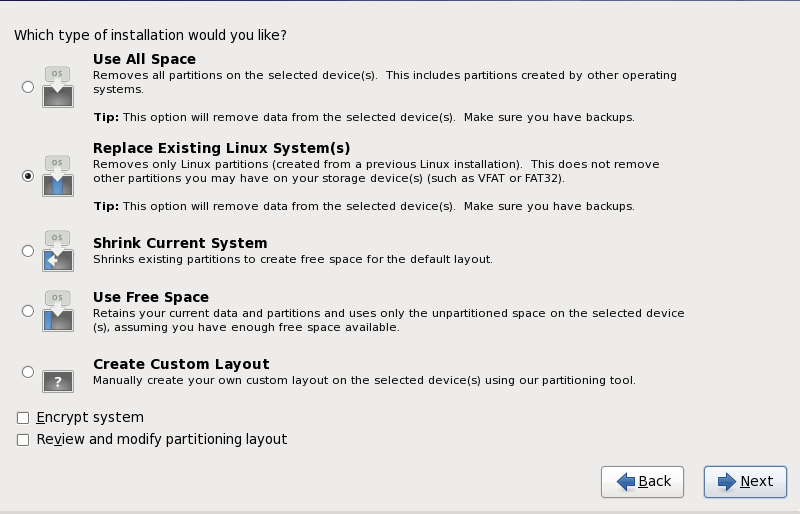
Figure 9.37. Disk Partitioning Setup
- Use All Space
- Select this option to remove all partitions on your hard drives (this includes partitions created by other operating systems such as Windows VFAT or NTFS partitions).
Warning
If you select this option, all data on the selected hard drives is removed by the installation program. Do not select this option if you have information that you want to keep on the hard drives where you are installing Red Hat Enterprise Linux.In particular, do not select this option when you configure a system to chain load the Red Hat Enterprise Linux boot loader from another boot loader. - Replace Existing Linux System(s)
- Select this option to remove only partitions created by a previous Linux installation. This does not remove other partitions you may have on your hard drives (such as VFAT or FAT32 partitions).
- Shrink Current System
- Select this option to resize your current data and partitions manually and install a default Red Hat Enterprise Linux layout in the space that is freed.
Warning
If you shrink partitions on which other operating systems are installed, you might not be able to use those operating systems. Although this partitioning option does not destroy data, operating systems typically require some free space in their partitions. Before you resize a partition that holds an operating system that you might want to use again, find out how much space you need to leave free. - Use Free Space
- Select this option to retain your current data and partitions and install Red Hat Enterprise Linux in the unused space available on the storage drives. Ensure that there is sufficient space available on the storage drives before you select this option — refer to Section 3.6, “Do You Have Enough Disk Space?”.
Warning
If your 64-bit x86 system uses UEFI instead of BIOS, you will need to manually create a /boot partition. This partition must have an ext3 file system. If you choose to partition automatically, your system will not boot. - Create Custom Layout
- Select this option to partition storage devices manually and create customized layouts. Refer to Section 9.15, “ Creating a Custom Layout or Modifying the Default Layout ”
/boot partition. Refer to Appendix C, Disk Encryption for information on encryption.
Important
Important
9.14. Choosing a Disk Encryption Passphrase
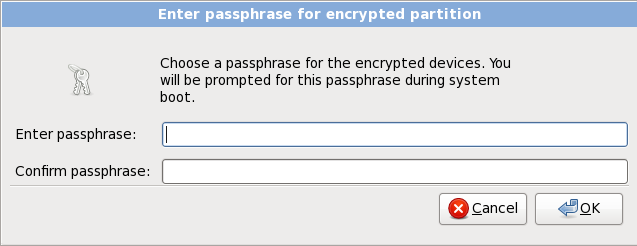
Figure 9.38. Enter passphrase for encrypted partition
Warning
9.15. Creating a Custom Layout or Modifying the Default Layout
Warning
Important
/boot/efi.
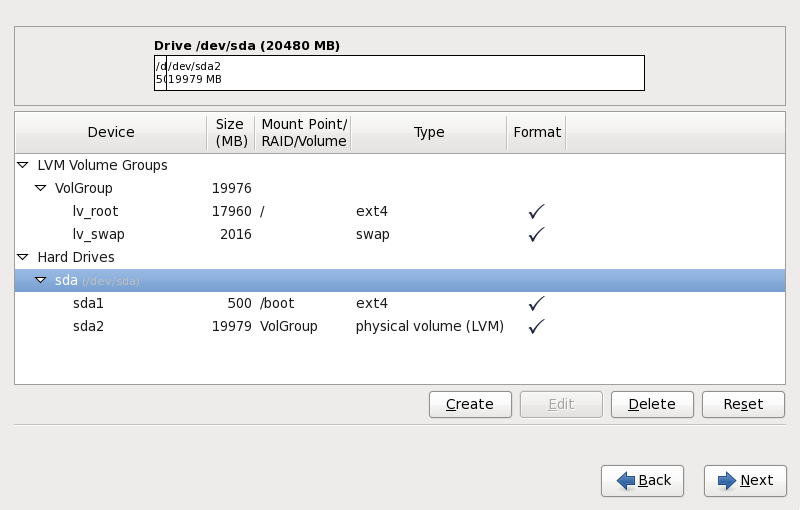
Figure 9.39. Partitioning on x86, AMD64, and Intel 64 Systems
/dev/sda or LogVol00), its size (in MB), and its model as detected by the installation program.
- Device
- the name of the device, logical volume, or partition
- Size (MB)
- the size of the device, logical volume, or partition (in MB)
- Mount Point/RAID/Volume
- the mount point (location within a file system) on which a partition is to be mounted, or the name of the RAID or logical volume group of which it is a part
- Type
- the type of partition. If the partition is a standard partition, this field displays the type of file system on the partition (for example, ext4). Otherwise, it indicates that the partition is a
physical volume (LVM), or part of asoftware RAID - Format
- A check mark in this column indicates that the partition will be formatted during installation.
- Create
- create a new partition, logical volume, or software RAID
- Edit
- change an existing partition, logical volume, or software RAID. Note that you can only shrink partitions with the button, not enlarge partitions.
- Delete
- remove a partition, logical volume, or software RAID
- Reset
- undo all changes made in this screen
9.15.1. Create Storage
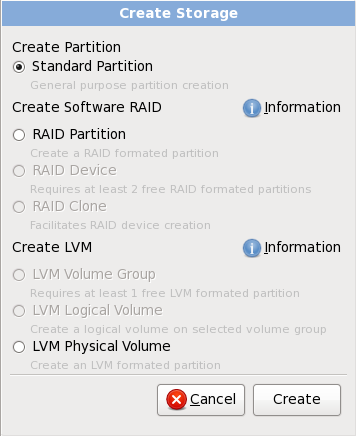
Figure 9.40. Creating Storage
Create Partition
- Standard Partition — create a standard disk partition (as described in Appendix A, An Introduction to Disk Partitions) in unallocated space.
Create Software RAID
- RAID Partition — create a partition in unallocated space to form part of a software RAID device. To form a software RAID device, two or more RAID partitions must be available on the system.
- RAID Device — combine two or more RAID partitions into a software RAID device. When you choose this option, you can specify the type of RAID device to create (the RAID level). This option is only available when two or more RAID partitions are available on the system.
Create LVM Logical Volume
- LVM Physical Volume — create a physical volume in unallocated space.
- LVM Volume Group — create a volume group from one or more physical volumes. This option is only available when at least one physical volume is available on the system.
- LVM Logical Volume — create a logical volume on a volume group. This option is only available when at least one volume group is available on the system.
9.15.2. Adding Partitions
Note
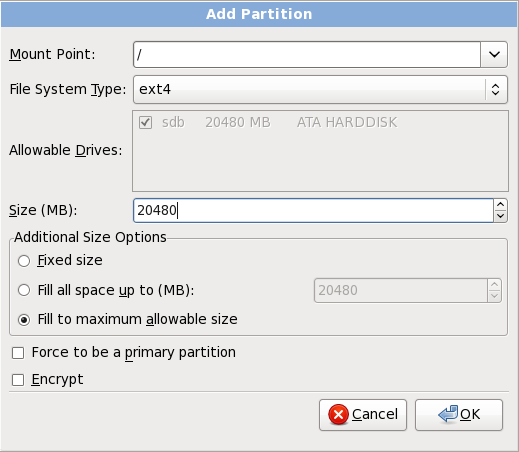
Figure 9.41. Creating a New Partition
- Mount Point: Enter the partition's mount point. For example, if this partition should be the root partition, enter
/; enter/bootfor the/bootpartition, and so on. You can also use the pull-down menu to choose the correct mount point for your partition. For a swap partition the mount point should not be set — setting the filesystem type toswapis sufficient. - File System Type: Using the pull-down menu, select the appropriate file system type for this partition. For more information on file system types, refer to Section 9.15.2.1, “File System Types”.
- Allowable Drives: This field contains a list of the hard disks installed on your system. If a hard disk's box is highlighted, then a desired partition can be created on that hard disk. If the box is not checked, then the partition will never be created on that hard disk. By using different checkbox settings, you can have anaconda place partitions where you need them, or let anaconda decide where partitions should go.
- Size (MB): Enter the size (in megabytes) of the partition. Note, this field starts with 200 MB; unless changed, only a 200 MB partition will be created.
- Additional Size Options: Choose whether to keep this partition at a fixed size, to allow it to "grow" (fill up the available hard drive space) to a certain point, or to allow it to grow to fill any remaining hard drive space available.If you choose Fill all space up to (MB), you must give size constraints in the field to the right of this option. This allows you to keep a certain amount of space free on your hard drive for future use.
- Force to be a primary partition: Select whether the partition you are creating should be one of the first four partitions on the hard drive. If unselected, the partition is created as a logical partition. Refer to Section A.1.3, “Partitions Within Partitions — An Overview of Extended Partitions”, for more information.
- Encrypt: Choose whether to encrypt the partition so that the data stored on it cannot be accessed without a passphrase, even if the storage device is connected to another system. Refer to Appendix C, Disk Encryption for information on encryption of storage devices. If you select this option, the installer prompts you to provide a passphrase before it writes the partition to the disk.
- : Select once you are satisfied with the settings and wish to create the partition.
- : Select if you do not want to create the partition.
9.15.2.1. File System Types
Partition types
- standard partition — A standard partition can contain a file system or swap space, or it can provide a container for software RAID or an LVM physical volume.
- swap — Swap partitions are used to support virtual memory. In other words, data is written to a swap partition when there is not enough RAM to store the data your system is processing. Refer to the Red Hat Enterprise Linux Deployment Guide for additional information.
- software RAID — Creating two or more software RAID partitions allows you to create a RAID device. For more information regarding RAID, refer to the chapter RAID (Redundant Array of Independent Disks) in the Red Hat Enterprise Linux Deployment Guide.
- physical volume (LVM) — Creating one or more physical volume (LVM) partitions allows you to create an LVM logical volume. LVM can improve performance when using physical disks. For more information regarding LVM, refer to the Red Hat Enterprise Linux Deployment Guide.
File systems
- ext4 — The ext4 file system is based on the ext3 file system and features a number of improvements. These include support for larger file systems and larger files, faster and more efficient allocation of disk space, no limit on the number of subdirectories within a directory, faster file system checking, and more robust journaling. A maximum file system size of 16TB is supported for ext4. The ext4 file system is selected by default and is highly recommended.
Note
Theuser_xattrandaclmount options are automatically set on ext4 systems by the installation system. These options enable extended attributes and access control lists, respectively. More information about mount options can be found in the Red Hat Enterprise Linux Storage Administration Guide. - ext3 — The ext3 file system is based on the ext2 file system and has one main advantage — journaling. Using a journaling file system reduces time spent recovering a file system after a crash as there is no need to
fsck[3] the file system. A maximum file system size of 16TB is supported for ext3. - ext2 — An ext2 file system supports standard Unix file types (regular files, directories, symbolic links, etc). It provides the ability to assign long file names, up to 255 characters.
- xfs — XFS is a highly scalable, high-performance file system that supports filesystems up to 16 exabytes (approximately 16 million terabytes), files up to 8 exabytes (approximately 8 million terabytes) and directory structures containing tens of millions of entries. XFS supports metadata journaling, which facilitates quicker crash recovery. The XFS file system can also be defragmented and resized while mounted and active.
Note
The maximum size of an XFS partition the installer can create is 100 TB. - vfat — The VFAT file system is a Linux file system that is compatible with Microsoft Windows long filenames on the FAT file system.
- Btrfs — Btrfs is under development as a file system capable of addressing and managing more files, larger files, and larger volumes than the ext2, ext3, and ext4 file systems. Btrfs is designed to make the file system tolerant of errors, and to facilitate the detection and repair of errors when they occur. It uses checksums to ensure the validity of data and metadata, and maintains snapshots of the file system that can be used for backup or repair.Because Btrfs is still experimental and under development, the installation program does not offer it by default. If you want to create a Btrfs partition on a drive, you must commence the installation process with the boot option
btrfs. Refer to Chapter 28, Boot Options for instructions.Warning
Red Hat Enterprise Linux 6.9 includes Btrfs as a technology preview to allow you to experiment with this file system. You should not choose Btrfs for partitions that will contain valuable data or that are essential for the operation of important systems.
9.15.3. Create Software RAID
- RAID Partition
- Choose this option to configure a partition for software RAID. This option is the only choice available if your disk contains no software RAID partitions. This is the same dialog that appears when you add a standard partition — refer to Section 9.15.2, “Adding Partitions” for a description of the available options. Note, however, that File System Type must be set to
software RAIDFigure 9.42. Create a software RAID partition

- RAID Device
- Choose this option to construct a RAID device from two or more existing software RAID partitions. This option is available if two or more software RAID partitions have been configured.
Figure 9.43. Create a RAID device
Select the file system type as for a standard partition.Anaconda automatically suggests a name for the RAID device, but you can manually select names frommd0tomd15.Click the checkboxes beside individual storage devices to include or remove them from this RAID.The RAID Level corresponds to a particular type of RAID. Choose from the following options:- RAID 0 — distributes data across multiple storage devices. Level 0 RAIDs offer increased performance over standard partitions, and can be used to pool the storage of multiple devices into one large virtual device. Note that Level 0 RAIDS offer no redundancy and that the failure of one device in the array destroys the entire array. RAID 0 requires at least two RAID partitions.
- RAID 1 — mirrors the data on one storage device onto one or more other storage devices. Additional devices in the array provide increasing levels of redundancy. RAID 1 requires at least two RAID partitions.
- RAID 4 — distributes data across multiple storage devices, but uses one device in the array to store parity information that safeguards the array in case any device within the array fails. Because all parity information is stored on the one device, access to this device creates a bottleneck in the performance of the array. RAID 4 requires at least three RAID partitions.
- RAID 5 — distributes data and parity information across multiple storage devices. Level 5 RAIDs therefore offer the performance advantages of distributing data across multiple devices, but do not share the performance bottleneck of level 4 RAIDs because the parity information is also distributed through the array. RAID 5 requires at least three RAID partitions.
- RAID 6 — level 6 RAIDs are similar to level 5 RAIDs, but instead of storing only one set of parity data, they store two sets. RAID 6 requires at least four RAID partitions.
- RAID 10 — level 10 RAIDs are nested RAIDs or hybrid RAIDs. Level 10 RAIDs are constructed by distributing data over mirrored sets of storage devices. For example, a level 10 RAID constructed from four RAID partitions consists of two pairs of partitions in which one partition mirrors the other. Data is then distributed across both pairs of storage devices, as in a level 0 RAID. RAID 10 requires at least four RAID partitions.
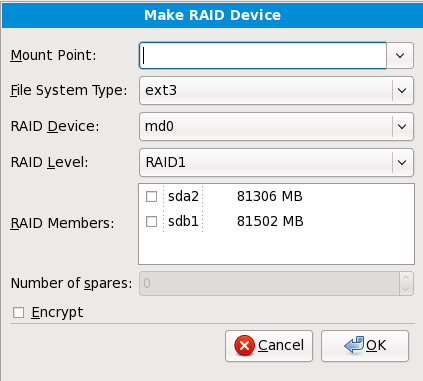
9.15.4. Create LVM Logical Volume
Important
lvm command. To return to the text-mode installation, press Alt+F1.
- LVM Physical Volume
- Choose this option to configure a partition or device as an LVM physical volume. This option is the only choice available if your storage does not already contain LVM Volume Groups. This is the same dialog that appears when you add a standard partition — refer to Section 9.15.2, “Adding Partitions” for a description of the available options. Note, however, that File System Type must be set to
physical volume (LVM)Figure 9.44. Create an LVM Physical Volume

- Make LVM Volume Group
- Choose this option to create LVM volume groups from the available LVM physical volumes, or to add existing logical volumes to a volume group.
Figure 9.45. Make LVM Volume Group
To assign one or more physical volumes to a volume group, first name the volume group. Then select the physical volumes to be used in the volume group. Finally, configure logical volumes on any volume groups using the Add, Edit and Delete options.You may not remove a physical volume from a volume group if doing so would leave insufficient space for that group's logical volumes. Take for example a volume group made up of two 5 GB LVM physical volume partitions, which contains an 8 GB logical volume. The installer would not allow you to remove either of the component physical volumes, since that would leave only 5 GB in the group for an 8 GB logical volume. If you reduce the total size of any logical volumes appropriately, you may then remove a physical volume from the volume group. In the example, reducing the size of the logical volume to 4 GB would allow you to remove one of the 5 GB physical volumes. - Make Logical Volume
- Choose this option to create an LVM logical volume. Select a mount point, file system type, and size (in MB) just as if it were a standard disk partition. You can also choose a name for the logical volume and specify the volume group to which it will belong.
Figure 9.46. Make Logical Volume

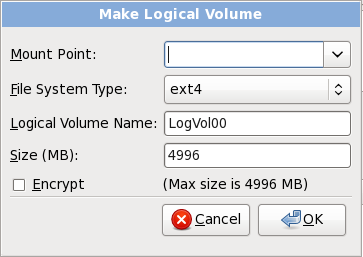
9.15.5. Recommended Partitioning Scheme
9.15.5.1. x86, AMD64, and Intel 64 systems
- A
swappartition - A
/bootpartition - A
/partition - A
homepartition - A
/boot/efipartition (EFI System Partition) - only on systems with UEFI firmware
- A
swappartition (at least 256 MB) — Swap partitions support virtual memory: data is written to a swap partition when there is not enough RAM to store the data your system is processing.In years past, the recommended amount of swap space increased linearly with the amount of RAM in the system. Modern systems often include hundreds of gigabytes of RAM, however. As a consequence, recommended swap space is considered a function of system memory workload, not system memory.The following table provides the recommended size of a swap partition depending on the amount of RAM in your system and whether you want sufficient memory for your system to hibernate. The recommended swap partition size is established automatically during installation. To allow for hibernation, however, you will need to edit the swap space in the custom partitioning stage.Important
Recommendations in the table below are especially important on systems with low memory (1 GB and less). Failure to allocate sufficient swap space on these systems may cause issues such as instability or even render the installed system unbootable.Expand Table 9.2. Recommended System Swap Space Amount of RAM in the system Recommended swap space Recommended swap space if allowing for hibernation ⩽ 2GB 2 times the amount of RAM 3 times the amount of RAM > 2GB – 8GB Equal to the amount of RAM 2 times the amount of RAM > 8GB – 64GB At least 4 GB 1.5 times the amount of RAM > 64GB At least 4 GB Hibernation not recommended At the border between each range listed above (for example, a system with 2GB, 8GB, or 64GB of system RAM), discretion can be exercised with regard to chosen swap space and hibernation support. If your system resources allow for it, increasing the swap space may lead to better performance.Note that distributing swap space over multiple storage devices — particularly on systems with fast drives, controllers and interfaces — also improves swap space performance.Note
Swap space size recommendations issued for Red Hat Enterprise Linux 6.0, 6.1, and 6.2 differed from the current recommendations, which were first issued with the release of Red Hat Enterprise Linux 6.3 in June 2012 and did not account for hibernation space. Automatic installations of these earlier versions of Red Hat Enterprise Linux 6 still generate a swap space in line with these superseded recommendations. However, manually selecting a swap space size in line with the newer recommendations issued for Red Hat Enterprise Linux 6.3 is advisable for optimal performance. - A
/boot/partition (250 MB)The partition mounted on
/boot/contains the operating system kernel (which allows your system to boot Red Hat Enterprise Linux), along with files used during the bootstrap process. For most users, a 250 MB boot partition is sufficient.Important
The/bootand/(root) partition in Red Hat Enterprise Linux 6.9 can only use the ext2, ext3, and ext4 (recommended) file systems. You cannot use any other file system for this partition, such as Btrfs, XFS, or VFAT. Other partitions, such as/home, can use any supported file system, including Btrfs and XFS (if available). See the following article on the Red Hat Customer Portal for additional information: https://access.redhat.com/solutions/667273.Warning
Note that normally the/bootpartition is created automatically by the installer. However, if the/(root) partition is larger than 2 TB and (U)EFI is used for booting, you need to create a separate/bootpartition that is smaller than 2 TB to boot the machine successfully.Note
If your hard drive is more than 1024 cylinders (and your system was manufactured more than two years ago), you may need to create a/boot/partition if you want the/(root) partition to use all of the remaining space on your hard drive.Note
If you have a RAID card, be aware that some BIOS types do not support booting from the RAID card. In cases such as these, the/boot/partition must be created on a partition outside of the RAID array, such as on a separate hard drive. - A
rootpartition (3.0 GB - 5.0 GB) — this is where "/" (the root directory) is located. In this setup, all files (except those stored in/boot) are on the root partition.A 3.0 GB partition allows you to install a minimal installation, while a 5.0 GB root partition lets you perform a full installation, choosing all package groups.Important
The/bootand/(root) partition in Red Hat Enterprise Linux 6.9 can only use the ext2, ext3, and ext4 (recommended) file systems. You cannot use any other file system for this partition, such as Btrfs, XFS, or VFAT. Other partitions, such as/home, can use any supported file system, including Btrfs and XFS (if available). See the following article on the Red Hat Customer Portal for additional information: https://access.redhat.com/solutions/667273.Important
The/(or root) partition is the top of the directory structure. The/rootdirectory (sometimes pronounced "slash-root") is the home directory of the user account for system administration. - A
homepartition (at least 100 MB)To store user data separately from system data, create a dedicated partition within a volume group for the
/homedirectory. This will enable you to upgrade or reinstall Red Hat Enterprise Linux without erasing user data files.
/ partition, upgrades become easier. Refer to the description of the Edit option in Section 9.15, “ Creating a Custom Layout or Modifying the Default Layout ” for more information.
/foo must be at least 500 MB, and you do not make a separate /foo partition, then the / (root) partition must be at least 500 MB.
| Directory | Minimum size |
|---|---|
/ | 250 MB |
/usr | 250 MB |
/tmp | 50 MB |
/var | 384 MB |
/home | 100 MB |
/boot | 250 MB |
Note
9.15.5.1.1. Advice on Partitions
- Consider encrypting any partitions that might contain sensitive data. Encryption prevents unauthorized people from accessing the data on the partitions, even if they have access to the physical storage device. In most cases, you should at least encrypt the
/homepartition. - Each kernel installed on your system requires approximately 30 MB on the
/bootpartition. Unless you plan to install a great many kernels, the default partition size of 250 MB for/bootshould suffice.Important
The/bootand/(root) partition in Red Hat Enterprise Linux 6.9 can only use the ext2, ext3, and ext4 (recommended) file systems. You cannot use any other file system for this partition, such as Btrfs, XFS, or VFAT. Other partitions, such as/home, can use any supported file system, including Btrfs and XFS (if available). See the following article on the Red Hat Customer Portal for additional information: https://access.redhat.com/solutions/667273. - The
/vardirectory holds content for a number of applications, including the Apache web server. It also is used to store downloaded update packages on a temporary basis. Ensure that the partition containing the/vardirectory has enough space to download pending updates and hold your other content.Warning
The PackageKit update software downloads updated packages to/var/cache/yum/by default. If you partition the system manually, and create a separate/var/partition, be sure to create the partition large enough (3.0 GB or more) to download package updates. - The
/usrdirectory holds the majority of software content on a Red Hat Enterprise Linux system. For an installation of the default set of software, allocate at least 4 GB of space. If you are a software developer or plan to use your Red Hat Enterprise Linux system to learn software development skills, you may want to at least double this allocation. - Consider leaving a portion of the space in an LVM volume group unallocated. This unallocated space gives you flexibility if your space requirements change but you do not wish to remove data from other partitions to reallocate storage.
- a If you separate subdirectories into partitions, you can retain content in those subdirectories if you decide to install a new version of Red Hat Enterprise Linux over your current system. For instance, if you intend to run a MySQL databasge in
/var/lib/mysql, make a separate partition for that directory in case you need to reinstall later. - UEFI systems should contain a 50-150MB
/boot/efipartition with an EFI System Partition filesystem.
Note
Example 9.1. Example partition setup
| Partition | Size and type |
|---|---|
/boot | 250 MB ext3 partition |
swap | 2 GB swap |
| LVM physical volume | Remaining space, as one LVM volume group |
| Partition | Size and type |
|---|---|
/ | 13 GB ext4 |
/var | 4 GB ext4 |
/home | 50 GB ext4 |
9.16. Write Changes to Disk
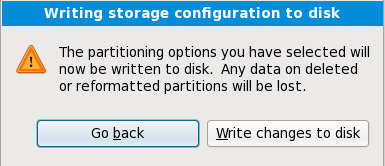
Figure 9.47. Writing storage configuration to disk
Warning
9.17. Package Group Selection
Important
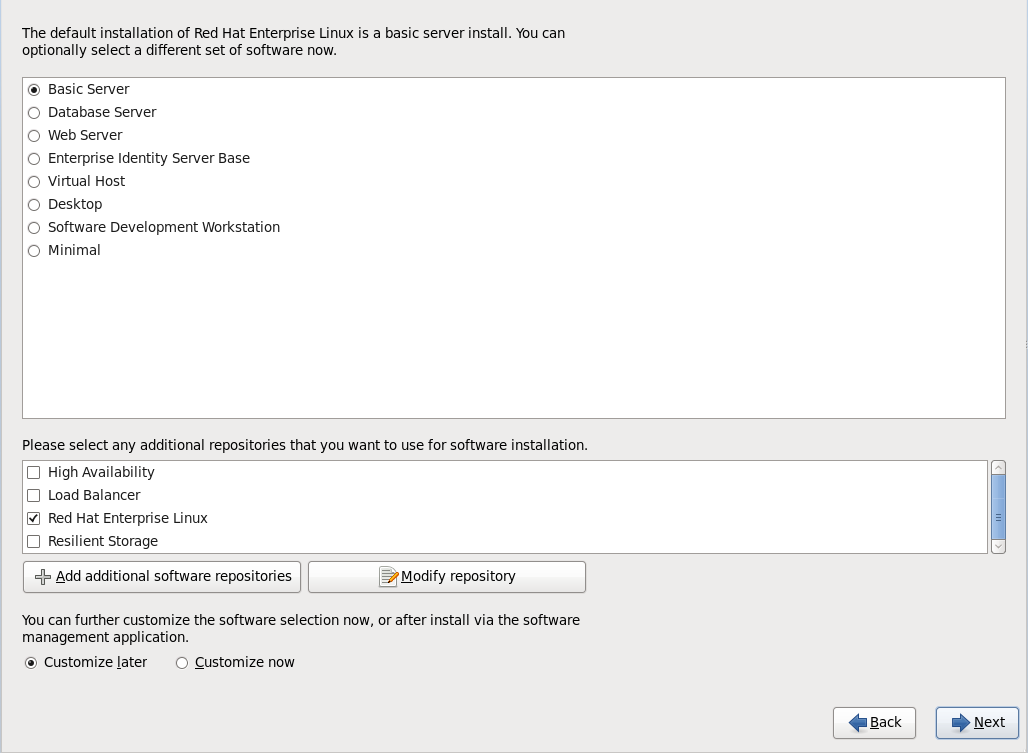
Figure 9.48. Package Group Selection
- Basic Server
- This option provides a basic installation of Red Hat Enterprise Linux for use on a server.
- Database Server
- This option provides the MySQL and PostgreSQL databases.
- Web server
- This option provides the Apache web server.
- Enterprise Identity Server Base
- This option provides OpenLDAP and Enterprise Identity Management (IPA) to create an identity and authentication server.
- Virtual Host
- This option provides the KVM and Virtual Machine Manager tools to create a host for virtual machines.
- Desktop
- This option provides the OpenOffice.org productivity suite, graphical tools such as the GIMP, and multimedia applications.
- Software Development Workstation
- This option provides the necessary tools to compile software on your Red Hat Enterprise Linux system.
- Minimal
- This option provides only the packages essential to run Red Hat Enterprise Linux. A minimal installation provides the basis for a single-purpose server or desktop appliance and maximizes performance and security on such an installation.
Warning
Minimal installation currently does not configure the firewall (iptables/ip6tables) by default because the authconfig and system-config-firewall-base packages are missing from the selection. To work around this issue, you can use a Kickstart file to add these packages to your selection. See the Red Hat Customer Portal for details about the workaround, and Chapter 32, Kickstart Installations for information about Kickstart files.If you do not use the workaround, the installation will complete successfully, but no firewall will be configured, presenting a security risk.
9.17.1. Installing from Additional Repositories
- The High Availability repository includes packages for high-availability clustering (also known as failover clustering) using the Red Hat High-availability Service Management component.
- The Load Balancer repository includes packages for load-balancing clustering using Linux Virtual Server (LVS).
- The Red Hat Enterprise Linux repository is automatically selected for you. It contains the complete collection of software that was released as Red Hat Enterprise Linux 6.9, with the various pieces of software in their versions that were current at the time of release.
- The Resilient Storage repository includes packages for storage clustering using the Red Hat global file system (GFS).
Figure 9.49. Adding a software repository
Figure 9.50. Select network interface
- Select an interface from the drop-down menu.
- Click .
Figure 9.51. Network Connections
repodata.
Warning
9.17.2. Customizing the Software Selection
Note
Figure 9.52. Package Group Details
Figure 9.53. Package Selection List Context Menu
9.17.2.1. Core Network Services
- centralized logging through syslog
- email through SMTP (Simple Mail Transfer Protocol)
- network file sharing through NFS (Network File System)
- remote access through SSH (Secure SHell)
- resource advertising through mDNS (multicast DNS)
- network file transfer through HTTP (HyperText Transfer Protocol)
- printing through CUPS (Common UNIX Printing System)
- remote desktop access through VNC (Virtual Network Computing)
9.18. x86, AMD64, and Intel 64 Boot Loader Configuration
Important
Note
Figure 9.54. Boot Loader Configuration
Warning
Warning
- Select to include an additional operating system in GRUB.Select the disk partition which contains the bootable operating system from the drop-down list and give the entry a label. GRUB displays this label in its boot menu.
- To change an entry in the GRUB boot menu, select the entry and then select .
- To remove an entry from the GRUB boot menu, select the entry and then select .
Note
Note
/boot/grub/grub.conf file. If you cannot boot, you may be able to use the "rescue" mode on the first Red Hat Enterprise Linux installation disc to reset the GRUB password.
grub-md5-crypt utility. For information on using this utility, use the command man grub-md5-crypt in a terminal window to read the manual pages.
Important
9.18.1. Advanced Boot Loader Configuration
- The Master Boot Record (MBR) — This is the recommended place to install a boot loader on systems with BIOS firmware, unless the MBR already starts another operating system loader, such as System Commander. The MBR is a special area on your hard drive that is automatically loaded by your computer's BIOS, and is the earliest point at which the boot loader can take control of the boot process. If you install it in the MBR, when your machine boots, GRUB presents a boot prompt. You can then boot Red Hat Enterprise Linux or any other operating system that you have configured the boot loader to boot.
- The EFI System Partition — Systems with UEFI firmware require a special partition for installing the boot loader. This should be a physical (non-LVM) partition of the
efitype at least 50 MB in size; the recommended size is 200 MB. The drive containing this partition must be labeled with a GUID Partition Table (GPT) instead of a Master Boot Record. If you are installing Red Hat Enterprise Linux on a drive with a MBR, the drive must be relabeled; all data on the drive will be lost in the process. - The first sector of your boot partition — This is recommended if you are already using another boot loader on your system. In this case, your other boot loader takes control first. You can then configure that boot loader to start GRUB, which then boots Red Hat Enterprise Linux.
Note
If you install GRUB as a secondary boot loader, you must reconfigure your primary boot loader whenever you install and boot from a new kernel. The kernel of an operating system such as Microsoft Windows does not boot in the same fashion. Most users therefore use GRUB as the primary boot loader on dual-boot systems.

Figure 9.55. Boot Loader Installation
Note
/boot/ partition was created.
Note
/boot Linux partition on the first 1024 cylinders of your hard drive to boot Linux. The other Linux partitions can be after cylinder 1024.
parted, 1024 cylinders equals 528MB. For more information, refer to:
http://www.pcguide.com/ref/hdd/bios/sizeMB504-c.html
http://www.pcguide.com/ref/hdd/bios/sizeMB504-c.html9.18.2. Rescue Mode
- Boot an x86, AMD64, or Intel 64 system from any installation medium, such as CD, DVD, USB, or PXE, and type
linux rescueat the installation boot prompt. Refer to Chapter 36, Basic System Recovery for a more complete description of rescue mode.
9.18.3. Alternative Boot Loaders
Important
9.19. Installing Packages
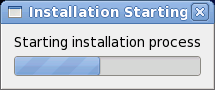
Figure 9.56. Starting installation

Figure 9.57. Packages completed
/root/install.log once you reboot your system.
9.20. Installation Complete
login: prompt or a GUI login screen (if you installed the X Window System and chose to start X automatically) appears.
fsck application is used to check the file system for metadata consistency and optionally repair one or more Linux file systems.
Chapter 10. Troubleshooting Installation on an Intel or AMD System
/tmp directory. These files include:
/tmp/anaconda.log- general anaconda messages
/tmp/program.log- all external programs run by anaconda
/tmp/storage.log- extensive storage module information
/tmp/yum.log- yum package installation messages
/tmp/syslog- hardware-related system messages
/tmp/anaconda-tb-identifier, where identifier is a random string.
scp on the installation image (not the other way round).
10.1. You Are Unable to Boot Red Hat Enterprise Linux
10.1.1. Are You Unable to Boot With Your RAID Card?
GRUB: ) and a flashing cursor may be all that appears. If this is the case, you must repartition your system.
/boot partition outside of the RAID array, such as on a separate hard drive. An internal hard drive is necessary to use for partition creation with problematic RAID cards.
/boot/ partition.
10.1.2. Is Your System Displaying Signal 11 Errors?
boot: or yaboot: prompt:
linux mediacheck
linux mediacheckhttp://www.bitwizard.nl/sig11/
http://www.bitwizard.nl/sig11/10.1.3. Diagnosing Early Boot Problems
kernel (or linux in some cases), append the following:
- On a system with BIOS firmware, append
earlyprintk=vga,keep. Boot console messages should then be displayed on the system display. - On a system with UEFI firmware, append
earlyprintk=efi,keep. Boot console messages should then be displayed in the EFI frame buffer.
quiet option (if not present already) to suppress all other messages and only display messages from the boot console.
Note
/boot/config-version file - the CONFIG_EARLY_PRINTK= and CONFIG_EARLY_PRINTK_EFI= options must be set to the y value. They are enabled by default, but if you disabled them, you may need to mount the /boot partition in rescue mode and edit the configuration file to re-enable them.
10.2. Trouble Beginning the Installation
10.2.1. Problems with Booting into the Graphical Installation
xdriver=vesa boot option at the boot prompt. Alternatively, you can force the installer to use a specific screen resolution with the resolution= boot option. This option may be most helpful for laptop users. Another solution to try is the driver= option to specify the driver that should be loaded for your video card. If this works, you should report it as a bug, because the installer failed to detect your video card automatically. Refer to Chapter 28, Boot Options for more information on boot options.
Note
nofb boot option. This command may be necessary for accessibility with some screen reading hardware.
10.3. Trouble During the Installation
10.3.1. The "No devices found to install Red Hat Enterprise Linux" Error Message
No devices found to install Red Hat Enterprise Linux, there is probably a SCSI controller that is not being recognized by the installation program.
10.3.2. Saving Traceback Messages
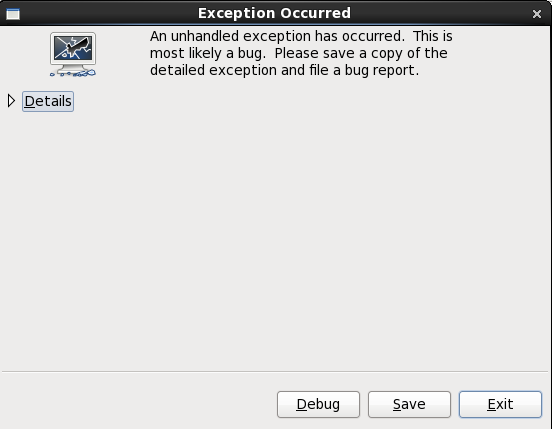
Figure 10.1. The Crash Reporting Dialog Box
- Details
- shows you the details of the error:
Figure 10.2. Details of the Crash
- Save
- saves details of the error locally or remotely:
- Exit
- exits the installation process.
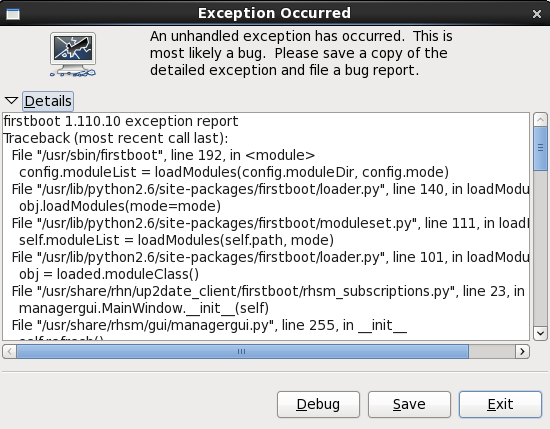
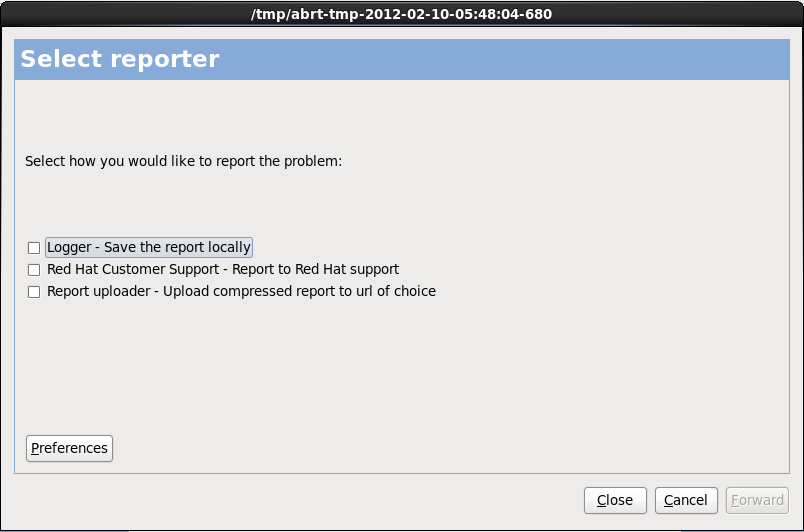
Figure 10.3. Select reporter
- Logger
- saves details of the error as a log file to the local hard drive at a specified location.
- Red Hat Customer Support
- submits the crash report to Customer Support for assistance.
- Report uploader
- uploads a compressed version of the crash report to Bugzilla or a URL of your choice.
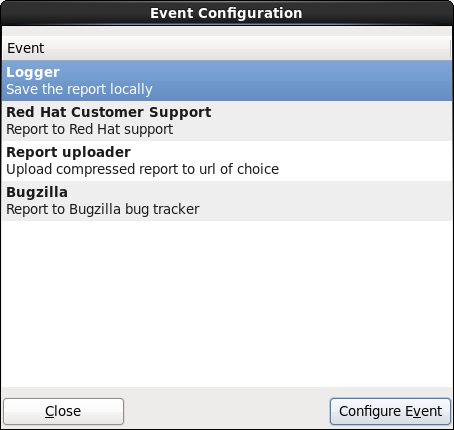
Figure 10.4. Configure reporter preferences
- Logger
- Specify a path and a filename for the log file. Check Append if you are adding to an existing log file.
Figure 10.5. Specify local path for log file
- Red Hat Customer Support
- Enter your Red Hat Network username and password so your report reaches Customer Support and is linked with your account. The URL is prefilled and Verify SSL is checked by default.
Figure 10.6. Enter Red Hat Network authentication details
- Report uploader
- Specify a URL for uploading a compressed version of the crash report.
Figure 10.7. Enter URL for uploading crash report
- Bugzilla
- Enter your Bugzilla username and password to lodge a bug with Red Hat's bug-tracking system using the crash report. The URL is prefilled and is checked by default.
Figure 10.8. Enter Bugzilla authentication details
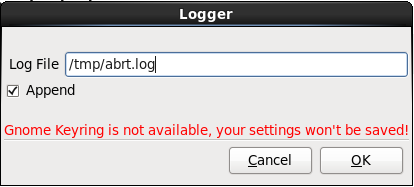
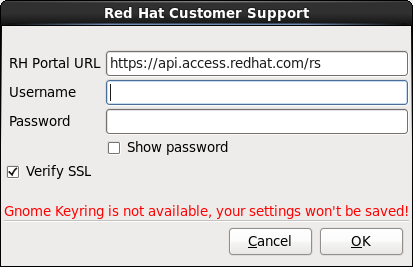
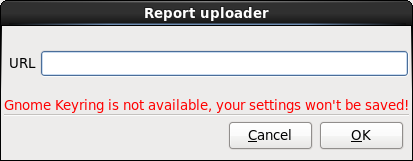
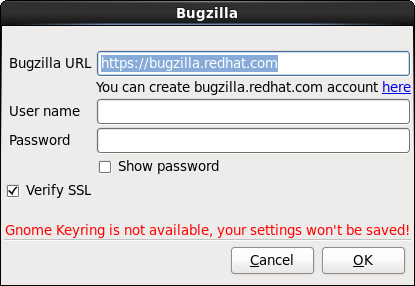
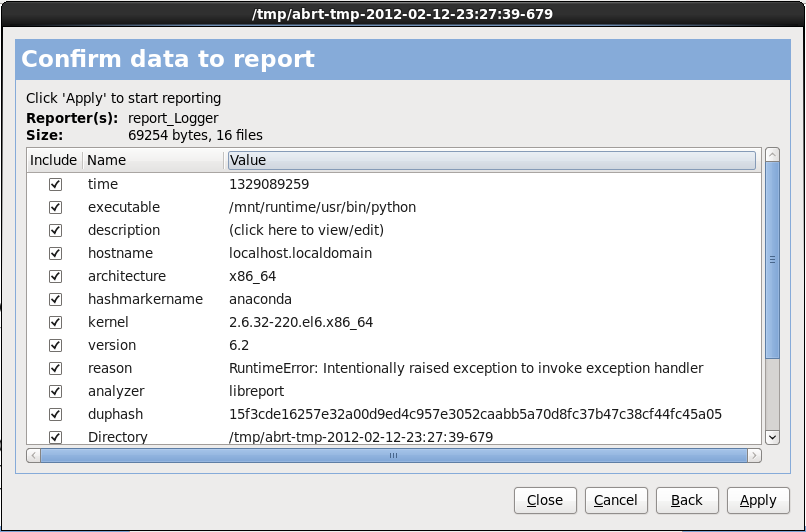
Figure 10.9. Confirm report data
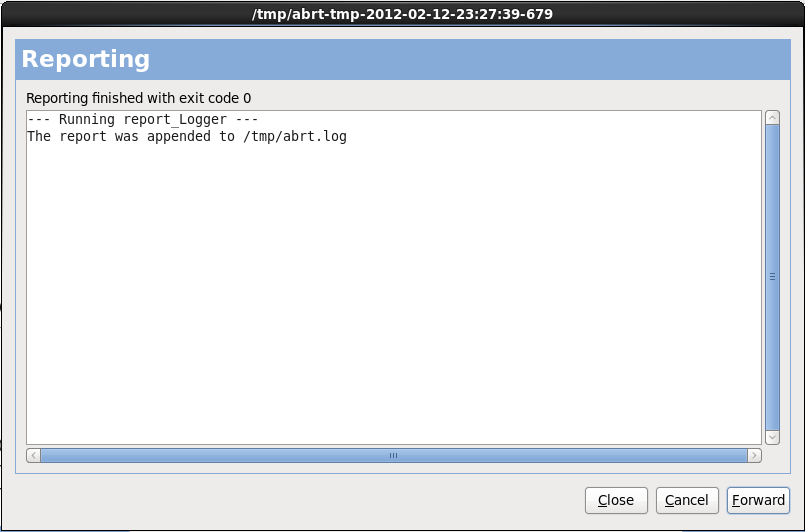
Figure 10.10. Report in progress
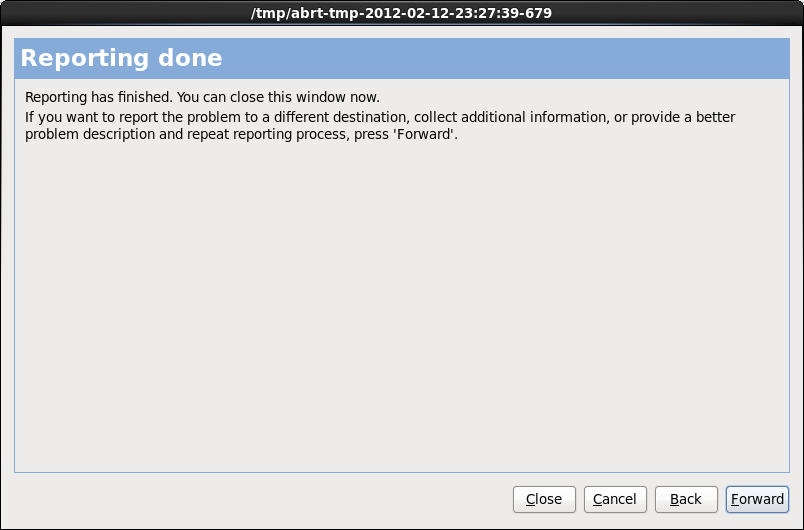
Figure 10.11. Reporting done
10.3.3. Trouble with Partition Tables
The partition table on device hda was unreadable. To create new partitions it must be initialized, causing the loss of ALL DATA on this drive.
10.3.4. Using Remaining Space
swap and a / (root) partition created, and you have selected the root partition to use the remaining space, but it does not fill the hard drive.
/boot partition if you want the / (root) partition to use all of the remaining space on your hard drive.
10.3.5. The "drive must have a GPT disk label" Error Message
sda must have a GPT disk label
sda must have a GPT disk labelsda) has a Master Boot Record (MBR) label, but UEFI systems require a GUID Partition Table (GPT) label. Therefore you can not reuse an existing partitioning layout on a MBR-labeled drive; the disk must be relabeled, which means you will have to create a new partition layout and lose all existing data.
10.3.6. Other Partitioning Problems
- A
/(root) partition - A <swap> partition of type swap
Note
10.4. Problems After Installation
10.4.1. Trouble With the Graphical GRUB Screen on an x86-based System?
/boot/grub/grub.conf file.
grub.conf file, comment out the line which begins with splashimage by inserting the # character at the beginning of the line.
b to boot the system.
grub.conf file is reread and any changes you have made take effect.
grub.conf file.
10.4.2. Booting into a Graphical Environment
startx.
/etc/inittab, by changing just one number in the runlevel section. When you are finished, reboot the computer. The next time you log in, you are presented with a graphical login prompt.
su command.
gedit /etc/inittab
gedit /etc/inittab/etc/inittab opens. Within the first screen, a section of the file which looks like the following appears:
id:3:initdefault: from a 3 to a 5.
Warning
3 to 5.
id:5:initdefault:
id:5:initdefault:10.4.3. Problems with the X Window System (GUI)
10.4.4. Problems with the X Server Crashing and Non-Root Users
df -h
df -hdf command should help you diagnose which partition is full. For additional information about df and an explanation of the options available (such as the -h option used in this example), refer to the df man page by typing man df at a shell prompt.
/home/ and /tmp/ partitions can sometimes fill up quickly with user files. You can make some room on that partition by removing old files. After you free up some disk space, try running X as the user that was unsuccessful before.
10.4.5. Problems When You Try to Log In
linux single.
e for edit when the GRUB boot screen has loaded. You are presented with a list of items in the configuration file for the boot label you have selected.
kernel and type e to edit this boot entry.
kernel line, add:
single
singleb to boot the system.
# prompt, you must type passwd root, which allows you to enter a new password for root. At this point you can type shutdown -r now to reboot the system with the new root password.
su - and enter your root password when prompted. Then, type passwd <username>. This allows you to enter a new password for the specified user account.
https://hardware.redhat.com/
https://hardware.redhat.com/10.4.6. Is Your RAM Not Being Recognized?
cat /proc/meminfo command.
/boot/grub/grub.conf:
mem=xxM
mem=xxM/boot/grub/grub.conf, the above example would look similar to the following:
grub.conf are reflected on your system.
e for edit. You are presented with a list of items in the configuration file for the boot label you have selected.
kernel and type e to edit this boot entry.
kernel line, add
mem=xxM
mem=xxMb to boot the system.
10.4.7. Your Printer Does Not Work
system-config-printer command at a shell prompt to launch the Printer Configuration Tool. If you are not root, it prompts you for the root password to continue.
10.4.8. Apache HTTP Server or Sendmail Stops Responding During Startup
/etc/hosts file:
127.0.0.1 localhost.localdomain localhost
127.0.0.1 localhost.localdomain localhostPart II. IBM Power Systems — Installation and Booting
Important
ppc and ppc64 respectively). Red Hat Enterprise Linux 6 supports only 64-bit Power Systems servers (ppc64).
Chapter 11. Planning for Installation on Power Systems Servers
11.1. Upgrade or Install?
11.2. Hardware Requirements
11.3. Installation Tools
- Install and configure Linux on a non-virtualized Power Systems server.
- Install and configure Linux on servers with previously-configured logical partitions (LPARs, also known as virtualized servers).
- Install IBM service and productivity tools on a new or previously installed Linux system. The IBM service and productivity tools include dynamic logical partition (DLPAR) utilities.
- Upgrade system firmware level on Power Systems servers.
- Perform diagnostics or maintenance operations on previously installed systems.
- Migrate a LAMP server (software stack) and application data from a System x to a System p system. A LAMP server is a bundle of open source software. LAMP is an acronym for Linux, Apache HTTP Server, MySQL relational database, and PHP (Perl or Python) scripting language.
11.4. Preparation for IBM Power Systems servers
Important
c00000, otherwise you might see errors such as:
DEFAULT CATCH!, exception-handler=fff00300
DEFAULT CATCH!, exception-handler=fff0030011.5. RAID and Other Disk Devices
Important
/etc/fstab, /etc/crypttab or other configuration files which refer to devices by their device node names will not work in Red Hat Enterprise Linux 6. Before migrating these files, you must therefore edit them to replace device node paths with device UUIDs instead. You can find the UUIDs of devices with the blkid command.
11.5.1. Hardware RAID
11.5.2. Software RAID
11.5.3. FireWire and USB Disks
Note
11.6. Do You Have Enough Disk Space?
- have enough unpartitioned[6] disk space for the installation of Red Hat Enterprise Linux, or
- have one or more partitions that may be deleted, thereby freeing up enough disk space to install Red Hat Enterprise Linux.
11.7. Choose a Boot Method
Chapter 12. Preparing for Installation
12.1. Preparing for a Network Installation
Important
Note
Note
yaboot: prompt:
linux mediacheck
linux mediacheckNote
/var/www/inst/rhel6.9 on the network server can be accessed as http://network.server.com/inst/rhel6.9.
/location/of/disk/space. The directory that will be made publicly available via FTP, NFS, HTTP, or HTTPS will be specified as /publicly_available_directory. For example, /location/of/disk/space may be a directory you create called /var/isos. /publicly_available_directory might be /var/www/html/rhel6.9, for an HTTP install.
dd if=/dev/dvd of=/path_to_image/name_of_image.iso
dd if=/dev/dvd of=/path_to_image/name_of_image.isodd if=/dev/dvd of=/path_to_image/name_of_image.isodd if=/dev/dvd of=/path_to_image/name_of_image.isodd if=/dev/dvd of=/path_to_image/name_of_image.isodd if=/dev/dvd of=/path_to_image/name_of_image.isodd if=/dev/dvd of=/path_to_image/name_of_image.isodd if=/dev/dvd of=/path_to_image/name_of_image.iso12.1.1. Preparing for FTP, HTTP, and HTTPS Installation
Warning
TLSv1 protocol, and disable SSLv2 and SSLv3. This is due to the POODLE SSL vulnerability (CVE-2014-3566). See https://access.redhat.com/solutions/1232413 for details about securing Apache, and https://access.redhat.com/solutions/1234773 for information about securing tftp.
12.1.2. Preparing for an NFS Installation
install.img file, and optionally the product.img file available on the network server via NFS.
- Transfer the ISO image to the NFS exported directory. On a Linux system, run:
mv /path_to_image/name_of_image.iso /publicly_available_directory/
mv /path_to_image/name_of_image.iso /publicly_available_directory/mv /path_to_image/name_of_image.iso /publicly_available_directory/mv /path_to_image/name_of_image.iso /publicly_available_directory/mv /path_to_image/name_of_image.iso /publicly_available_directory/mv /path_to_image/name_of_image.iso /publicly_available_directory/mv /path_to_image/name_of_image.iso /publicly_available_directory/mv /path_to_image/name_of_image.iso /publicly_available_directory/Copy to Clipboard Copied! Toggle word wrap Toggle overflow where path_to_image is the path to the ISO image file, name_of_image is the name of the ISO image file, and publicly_available_directory is a directory that is available over NFS or that you intend to make available over NFS. - Use a SHA256 checksum program to verify that the ISO image that you copied is intact. Many SHA256 checksum programs are available for various operating systems. On a Linux system, run:
sha256sum name_of_image.iso
$ sha256sum name_of_image.iso$ sha256sum name_of_image.iso$ sha256sum name_of_image.isoCopy to Clipboard Copied! Toggle word wrap Toggle overflow where name_of_image is the name of the ISO image file. The SHA256 checksum program displays a string of 64 characters called a hash. Compare this hash to the hash displayed for this particular image on the Downloads page in the Red Hat Customer Portal (refer to Chapter 1, Obtaining Red Hat Enterprise Linux). The two hashes should be identical. - Copy the
images/directory from inside the ISO image to the same directory in which you stored the ISO image file itself. Enter the following commands:mount -t iso9660 /path_to_image/name_of_image.iso /mount_point -o loop,ro cp -pr /mount_point/images /publicly_available_directory/ umount /mount_point
mount -t iso9660 /path_to_image/name_of_image.iso /mount_point -o loop,romount -t iso9660 /path_to_image/name_of_image.iso /mount_point -o loop,romount -t iso9660 /path_to_image/name_of_image.iso /mount_point -o loop,romount -t iso9660 /path_to_image/name_of_image.iso /mount_point -o loop,romount -t iso9660 /path_to_image/name_of_image.iso /mount_point -o loop,romount -t iso9660 /path_to_image/name_of_image.iso /mount_point -o loop,romount -t iso9660 /path_to_image/name_of_image.iso /mount_point -o loop,ro cp -pr /mount_point/images /publicly_available_directory/cp -pr /mount_point/images /publicly_available_directory/cp -pr /mount_point/images /publicly_available_directory/cp -pr /mount_point/images /publicly_available_directory/cp -pr /mount_point/images /publicly_available_directory/ umount /mount_pointumount /mount_pointCopy to Clipboard Copied! Toggle word wrap Toggle overflow wherepath_to_imageis the path to the ISO image file,name_of_imageis the name of the ISO image file, andmount_pointis a mount point on which to mount the image while you copy files from the image. For example:mount -t iso9660 /var/isos/RHEL6.iso /mnt/tmp -o loop,ro cp -pr /mnt/tmp/images /var/isos/ umount /mnt/tmp
mount -t iso9660 /var/isos/RHEL6.iso /mnt/tmp -o loop,ro cp -pr /mnt/tmp/images /var/isos/ umount /mnt/tmpCopy to Clipboard Copied! Toggle word wrap Toggle overflow The ISO image file and animages/directory are now present, side-by-side, in the same directory. - Verify that the
images/directory contains at least theinstall.imgfile, without which installation cannot proceed. Optionally, theimages/directory should contain theproduct.imgfile, without which only the packages for a Minimal installation will be available during the package group selection stage (refer to Section 16.19, “Package Group Selection”).Important
install.imgandproduct.imgmust be the only files in theimages/directory. - Ensure that an entry for the publicly available directory exists in the
/etc/exportsfile on the network server so that the directory is available via NFS.To export a directory read-only to a specific system, use:/publicly_available_directory client.ip.address (ro)
/publicly_available_directory client.ip.address (ro)/publicly_available_directory client.ip.address (ro)/publicly_available_directory client.ip.address (ro)/publicly_available_directory client.ip.address (ro)Copy to Clipboard Copied! Toggle word wrap Toggle overflow To export a directory read-only to all systems, use:/publicly_available_directory * (ro)
/publicly_available_directory * (ro)/publicly_available_directory * (ro)Copy to Clipboard Copied! Toggle word wrap Toggle overflow - On the network server, start the NFS daemon (on a Red Hat Enterprise Linux system, use
/sbin/service nfs start). If NFS is already running, reload the configuration file (on a Red Hat Enterprise Linux system use/sbin/service nfs reload). - Be sure to test the NFS share following the directions in the Red Hat Enterprise Linux Deployment Guide. Refer to your NFS documentation for details on starting and stopping the NFS server.
Note
boot: prompt:
linux mediacheck
linux mediacheck12.2. Preparing for a Hard Drive Installation
Note
Important
- an ISO image of the installation DVD. An ISO image is a file that contains an exact copy of the content of a DVD.
- an
install.imgfile extracted from the ISO image. - optionally, a
product.imgfile extracted from the ISO image.
- Obtain an ISO image of the Red Hat Enterprise Linux installation DVD (refer to Chapter 1, Obtaining Red Hat Enterprise Linux). Alternatively, if you have the DVD on physical media, you can create an image of it with the following command on a Linux system:
dd if=/dev/dvd of=/path_to_image/name_of_image.iso
dd if=/dev/dvd of=/path_to_image/name_of_image.isodd if=/dev/dvd of=/path_to_image/name_of_image.isodd if=/dev/dvd of=/path_to_image/name_of_image.isodd if=/dev/dvd of=/path_to_image/name_of_image.isodd if=/dev/dvd of=/path_to_image/name_of_image.isodd if=/dev/dvd of=/path_to_image/name_of_image.isodd if=/dev/dvd of=/path_to_image/name_of_image.isoCopy to Clipboard Copied! Toggle word wrap Toggle overflow where dvd is your DVD drive device, name_of_image is the name you give to the resulting ISO image file, and path_to_image is the path to the location on your system where the resulting ISO image will be stored. - Transfer the ISO image to the hard drive.The ISO image must be located on a hard drive that is either internal to the computer on which you will install Red Hat Enterprise Linux, or on a hard drive that is attached to that computer by USB.
- Use a SHA256 checksum program to verify that the ISO image that you copied is intact. Many SHA256 checksum programs are available for various operating systems. On a Linux system, run:
sha256sum name_of_image.iso
$ sha256sum name_of_image.iso$ sha256sum name_of_image.iso$ sha256sum name_of_image.isoCopy to Clipboard Copied! Toggle word wrap Toggle overflow where name_of_image is the name of the ISO image file. The SHA256 checksum program displays a string of 64 characters called a hash. Compare this hash to the hash displayed for this particular image on the Downloads page in the Red Hat Customer Portal (refer to Chapter 1, Obtaining Red Hat Enterprise Linux). The two hashes should be identical. - Copy the
images/directory from inside the ISO image to the same directory in which you stored the ISO image file itself. Enter the following commands:mount -t iso9660 /path_to_image/name_of_image.iso /mount_point -o loop,ro cp -pr /mount_point/images /publicly_available_directory/ umount /mount_point
mount -t iso9660 /path_to_image/name_of_image.iso /mount_point -o loop,romount -t iso9660 /path_to_image/name_of_image.iso /mount_point -o loop,romount -t iso9660 /path_to_image/name_of_image.iso /mount_point -o loop,romount -t iso9660 /path_to_image/name_of_image.iso /mount_point -o loop,romount -t iso9660 /path_to_image/name_of_image.iso /mount_point -o loop,romount -t iso9660 /path_to_image/name_of_image.iso /mount_point -o loop,romount -t iso9660 /path_to_image/name_of_image.iso /mount_point -o loop,ro cp -pr /mount_point/images /publicly_available_directory/cp -pr /mount_point/images /publicly_available_directory/cp -pr /mount_point/images /publicly_available_directory/cp -pr /mount_point/images /publicly_available_directory/cp -pr /mount_point/images /publicly_available_directory/ umount /mount_pointumount /mount_pointCopy to Clipboard Copied! Toggle word wrap Toggle overflow wherepath_to_imageis the path to the ISO image file,name_of_imageis the name of the ISO image file, andmount_pointis a mount point on which to mount the image while you copy files from the image. For example:mount -t iso9660 /var/isos/RHEL6.iso /mnt/tmp -o loop,ro cp -pr /mnt/tmp/images /var/isos/ umount /mnt/tmp
mount -t iso9660 /var/isos/RHEL6.iso /mnt/tmp -o loop,ro cp -pr /mnt/tmp/images /var/isos/ umount /mnt/tmpCopy to Clipboard Copied! Toggle word wrap Toggle overflow The ISO image file and animages/directory are now present, side-by-side, in the same directory. - Verify that the
images/directory contains at least theinstall.imgfile, without which installation cannot proceed. Optionally, theimages/directory should contain theproduct.imgfile, without which only the packages for a Minimal installation will be available during the package group selection stage (refer to Section 9.17, “Package Group Selection”).Important
install.imgandproduct.imgmust be the only files in theimages/directory.
Note
boot: prompt:
linux mediacheck
linux mediacheckChapter 13. Updating Drivers During Installation on IBM Power Systems Servers
- place the ISO image file of the driver disc in a location accessible to the installer:
- on a local hard drive
- a USB flash drive
- create a driver disc by extracting the image file onto:
- a CD
- a DVD
Refer to the instructions for making installation discs in Section 2.1, “Making an Installation DVD” for more information on burning ISO image files to CD or DVD.
13.1. Limitations of Driver Updates During Installation
- Devices already in use
- You cannot use a driver update to replace drivers that the installation program has already loaded. Instead, you must complete the installation with the drivers that the installation program loaded and update to the new drivers after installation, or, if you need the new drivers for the installation process, consider performing an initial RAM disk driver update — refer to Section 13.2.3, “Preparing an Initial RAM Disk Update”.
- Devices with an equivalent device available
- Because all devices of the same type are initialized together, you cannot update drivers for a device if the installation program has loaded drivers for a similar device. For example, consider a system that has two different network adapters, one of which has a driver update available. The installation program will initialize both adapters at the same time, and therefore, you will not be able to use this driver update. Again, complete the installation with the drivers loaded by the installation program and update to the new drivers after installation, or use an initial RAM disk driver update.
13.2. Preparing for a Driver Update During Installation
- Methods that use the image file itself
- local hard drive
- USB flash drive
- Methods that use a driver update disk produced from an image file
- CD
- DVD
13.2.1. Preparing to Use a Driver Update Image File
13.2.1.1. Preparing to use an image file on local storage
.iso. In the following example, the file is named dd.iso:
Figure 13.1. Content of a USB flash drive holding a driver update image file
OEMDRV.
dlabel=on boot option, which is enabled by default. Refer to Section 6.3.1, “Let the Installer Find a Driver Update Disk Automatically”.
13.2.2. Preparing a Driver Disc
13.2.2.1. Creating a driver update disc on CD or DVD
Important
- Use the desktop file manager to locate the ISO image file of the driver disc, supplied to you by Red Hat or your hardware vendor.
Figure 13.2. A typical .iso file displayed in a file manager window
- Right-click on this file and choose . You will see a window similar to the following:
Figure 13.3. CD/DVD Creator's Write to Disc dialog
- Click the button. If a blank disc is not already in the drive, CD/DVD Creator will prompt you to insert one.
rhdd3 and a directory named rpms:
Figure 13.4. Contents of a typical driver update disc on CD or DVD
.iso, then you have not created the disc correctly and should try again. Ensure that you choose an option similar to burn from image if you use a Linux desktop other than GNOME or if you use a different operating system.
13.2.3. Preparing an Initial RAM Disk Update
Important
- Place the driver update image file on your installation server. Usually, you would do this by downloading it to the server from a location on the Internet specified by Red Hat or your hardware vendor. Names of driver update image files end in
.iso. - Copy the driver update image file into the
/tmp/initrd_updatedirectory. - Rename the driver update image file to
dd.img. - At the command line, change into the
/tmp/initrd_updatedirectory, type the following command, and press Enter:find . | cpio --quiet -o -H newc | gzip -9 >/tmp/initrd_update.img
find . | cpio --quiet -o -H newc | gzip -9 >/tmp/initrd_update.imgCopy to Clipboard Copied! Toggle word wrap Toggle overflow - Copy the file
/tmp/initrd_update.imginto the directory the holds the target that you want to use for installation. This directory is placed under the/var/lib/tftpboot/yaboot/directory. For example,/var/lib/tftpboot/yaboot/rhel6/might hold the yaboot installation target for Red Hat Enterprise Linux 6. - Edit the
/var/lib/tftpboot/yaboot/yaboot.conffile to include an entry that includes the initial RAM disk update that you just created, in the following format:image=target/vmlinuz label=target-dd initrd=target/initrd.img,target/dd.img
image=target/vmlinuz label=target-dd initrd=target/initrd.img,target/dd.imgCopy to Clipboard Copied! Toggle word wrap Toggle overflow Where target is the target that you want to use for installation.
Example 13.1. Preparing an initial RAM disk update from a driver update image file
driver_update.iso is a driver update image file that you downloaded from the Internet to a directory on your installation server. The target on your installation server that you want to boot from is located in /var/lib/tftpboot/yaboot/rhel6/
cp driver_update.iso /tmp/initrd_update/dd.img cd /tmp/initrd_update find . | cpio --quiet -c -o -H newc | gzip -9 >/tmp/initrd_update.img cp /tmp/initrd_update.img /tftpboot/yaboot/rhel6/dd.img
$ cp driver_update.iso /tmp/initrd_update/dd.img
$ cd /tmp/initrd_update
$ find . | cpio --quiet -c -o -H newc | gzip -9 >/tmp/initrd_update.img
$ cp /tmp/initrd_update.img /tftpboot/yaboot/rhel6/dd.img/var/lib/tftpboot/yaboot/yaboot.conf file and include the following entry:
image=rhel6/vmlinuz label=rhel6-dd initrd=rhel6/initrd.img,rhel6/dd.img
image=rhel6/vmlinuz
label=rhel6-dd
initrd=rhel6/initrd.img,rhel6/dd.img13.3. Performing a Driver Update During Installation
- let the installer automatically find a driver update disk.
- let the installer prompt you for a driver update.
- use a boot option to specify a driver update disk.
13.3.1. Let the Installer Find a Driver Update Disk Automatically
OEMDRV before starting the installation process. The installer will automatically examine the device and load any driver updates that it detects and will not prompt you during the process. Refer to Section 13.2.1.1, “Preparing to use an image file on local storage” to prepare a storage device for the installer to find.
13.3.2. Let the Installer Prompt You for a Driver Update
- Begin the installation normally for whatever method you have chosen. If the installer cannot load drivers for a piece of hardware that is essential for the installation process (for example, if it cannot detect any network or storage controllers), it prompts you to insert a driver update disk:
Figure 13.5. The no driver found dialog
- Select Use a driver disk and refer to Section 13.4, “Specifying the Location of a Driver Update Image File or a Driver Update Disk”.
13.3.3. Use a Boot Option to Specify a Driver Update Disk
Important
- Type
linux ddat the boot prompt at the start of the installation process and press Enter. The installer prompts you to confirm that you have a driver disk:Figure 13.6. The driver disk prompt
- Insert the driver update disk that you created on CD, DVD, or USB flash drive and select . The installer examines the storage devices that it can detect. If there is only one possible location that could hold a driver disk (for example, the installer detects the presence of a DVD drive, but no other storage devices) it will automatically load any driver updates that it finds at this location.If the installer finds more than one location that could hold a driver update, it prompts you to specify the location of the update. See Section 13.4, “Specifying the Location of a Driver Update Image File or a Driver Update Disk”.
13.3.4. Select an Installation Server Target That Includes a Driver Update
- Configure the computer to boot from the network interface by selecting
Select Boot Optionsin the SMS menu, thenSelect Boot/Install Device. Finally, select your network device from the list of available devices. - In the yaboot installation server environment, choose the boot target that you prepared on your installation server. For example, if you labeled this environment
rhel6-ddin the/var/lib/tftpboot/yaboot/yaboot.conffile on your installation server, typerhel6-ddat the prompt and press Enter.
13.4. Specifying the Location of a Driver Update Image File or a Driver Update Disk
Figure 13.7. Selecting a driver disk source
Figure 13.8. Selecting a driver disk partition
Figure 13.9. Selecting an ISO image
Chapter 14. Booting the Installer
Important
vnc boot option (refer to Section 28.2.1, “Enabling Remote Access with VNC”).
Important
Cannot load initrd.img: Claim failed for initrd memory at 02000000 rc=ffffffff
Cannot load initrd.img: Claim failed for initrd memory at 02000000 rc=ffffffffreal-base to c00000. You can obtain the value of real-base from the OpenFirmware prompt with the printenv command and set the value with the setenv command.

Figure 14.1. SMS console
boot: prompt. To begin a graphical installation, pass the vnc boot option now. Otherwise. press Enter or wait for the timeout to expire for the installation to begin.
vmlinuz and ramdisk to boot your system over a network. You cannot use the ppc64.img to boot over a network; the file is too large for TFTP.
14.2. Installing from a Different Source
| Boot method | Installation source |
|---|---|
| Installation DVD | DVD, network, or hard disk |
| Installation USB flash drive | Installation DVD, network, or hard disk |
| Minimal boot CD or USB, rescue CD | Network or hard disk |
14.3. Booting from the Network Using a yaboot Installation Server
Select Boot Options in the SMS menu, then Select Boot/Install Device. Finally, select your network device from the list of available devices.
- Ensure that the network cable is attached. The link indicator light on the network socket should be lit, even if the computer is not switched on.
- Switch on the computer.
- A menu screen appears. Press the number key that corresponds to the desired option.
Chapter 15. Configuring Language and Installation Source
15.1. The Text Mode Installation Program User Interface
Important
xdriver=vesa option – refer to Chapter 28, Boot Options
Figure 15.1. Installation Program Widgets as seen in URL Setup
Figure 15.2. Installation Program Widgets as seen in Choose a Language
- Window — Windows (usually referred to as dialogs in this manual) appear on your screen throughout the installation process. At times, one window may overlay another; in these cases, you can only interact with the window on top. When you are finished in that window, it disappears, allowing you to continue working in the window underneath.
- Checkbox — Checkboxes allow you to select or deselect a feature. The box displays either an asterisk (selected) or a space (unselected). When the cursor is within a checkbox, press Space to select or deselect a feature.
- Text Input — Text input lines are regions where you can enter information required by the installation program. When the cursor rests on a text input line, you may enter and/or edit information on that line.
- Text Widget — Text widgets are regions of the screen for the display of text. At times, text widgets may also contain other widgets, such as checkboxes. If a text widget contains more information than can be displayed in the space reserved for it, a scroll bar appears; if you position the cursor within the text widget, you can then use the Up and Down arrow keys to scroll through all the information available. Your current position is shown on the scroll bar by a # character, which moves up and down the scroll bar as you scroll.
- Scroll Bar — Scroll bars appear on the side or bottom of a window to control which part of a list or document is currently in the window's frame. The scroll bar makes it easy to move to any part of a file.
- Button Widget — Button widgets are the primary method of interacting with the installation program. You progress through the windows of the installation program by navigating these buttons, using the Tab and Enter keys. Buttons can be selected when they are highlighted.
- Cursor — Although not a widget, the cursor is used to select (and interact with) a particular widget. As the cursor is moved from widget to widget, it may cause the widget to change color, or the cursor itself may only appear positioned in or next to the widget. In Figure 15.1, “Installation Program Widgets as seen in URL Setup”, the cursor is positioned on the checkbox. Figure 8.2, “Installation Program Widgets as seen in Choose a Language”, shows the cursor on the button.
15.1.1. Using the Keyboard to Navigate
Warning
15.2. Language Selection
Figure 15.3. Language Selection
15.3. Installation Method
Figure 15.4. Installation Method
15.3.1. Beginning Installation
15.3.1.1. Installing from a DVD
15.3.2. Installing from a Hard Drive
repo=hd boot option, you already specified a partition.
Figure 15.5. Selecting Partition Dialog for Hard Drive Installation
/dev/sd. Each individual drive has its own letter, for example /dev/sda. Each partition on a drive is numbered, for example /dev/sda1.
| Partition type | Volume | Original path to files | Directory to use |
|---|---|---|---|
| VFAT | D:\ | D:\Downloads\RHEL6.9 | /Downloads/RHEL6.9 |
| ext2, ext3, ext4 | /home | /home/user1/RHEL6.9 | /user1/RHEL6.9 |
/. If the ISO images are located in a subdirectory of a mounted partition, enter the name of the directory holding the ISO images within that partition. For example, if the partition on which the ISO images is normally mounted as /home/, and the images are in /home/new/, you would enter /new/.
Important
15.3.3. Performing a Network Installation
askmethod or repo= options, you can install Red Hat Enterprise Linux from a network server using FTP, HTTP, HTTPS, or NFS protocols. Anaconda uses the same network connection to consult additional software repositories later in the installation process.
Figure 15.6. Networking Device
Figure 15.7. Identify NIC
IPv4 options
- Dynamic IP configuration (DHCP)
- Anaconda uses DHCP running on the network to supply the network configuration automatically.
- Manual configuration
- Anaconda prompts you to enter the network configuration manually, including the IP address for this system, the netmask, the gateway address, and the DNS address.
IPv6 options
- Automatic
- Anaconda uses router advertisement (RA) and DHCP for automatic configuration, based on the network environment. (Equivalent to the
Automaticoption in NetworkManager) - Automatic, DHCP only
- Anaconda does not use RA, but requests information from DHCPv6 directly to create a stateful configuration. (Equivalent to the
Automatic, DHCP onlyoption in NetworkManager) - Manual configuration
- Anaconda prompts you to enter the network configuration manually, including the IP address for this system, the netmask, the gateway address, and the DNS address.
Figure 15.8. Configure TCP/IP
Figure 15.9. Manual TCP/IP Configuration
- If you are installing via NFS, proceed to Section 15.3.4, “Installing via NFS”.
- If you are installing via Web or FTP, proceed to Section 15.3.5, “Installing via FTP, HTTP, or HTTPS”.
15.3.4. Installing via NFS
repo=nfs boot option, you already specified a server and path.
Figure 15.10. NFS Setup Dialog
- Enter the domain name or IP address of your NFS server in the NFS server name field. For example, if you are installing from a host named
eastcoastin the domainexample.com, entereastcoast.example.com. - Enter the name of the exported directory in the Red Hat Enterprise Linux 6.9 directory field:
- If the NFS server is exporting a mirror of the Red Hat Enterprise Linux installation tree, enter the directory which contains the root of the installation tree. If everything was specified properly, a message appears indicating that the installation program for Red Hat Enterprise Linux is running.
- If the NFS server is exporting the ISO image of the Red Hat Enterprise Linux DVD, enter the directory which contains the ISO image.
If you followed the setup described in Section 12.1.2, “Preparing for an NFS Installation”, the exported directory is the one that you specified aspublicly_available_directory. - Specify any NFS mount options that you require in the NFS mount options field. Refer to the man pages for mount and nfs for a comprehensive list of options. If you do not require any mount options, leave the field empty.
- Proceed with Chapter 16, Installing Using Anaconda.
15.3.5. Installing via FTP, HTTP, or HTTPS
Important
http:// or https:// or ftp:// as the protocol.
repo=ftp or repo=http boot options, you already specified a server and path.
/images directory for your architecture. For example:
/mirrors/redhat/rhel-6.9/Server/ppc64/
https:// as the protocol.
{ftp|http|https}://<user>:<password>@<hostname>[:<port>]/<directory>/
http://install:rhel6.9pw@name.example.com/mirrors/redhat/rhel-6.9/Server/ppc64/
Figure 15.11. URL Setup Dialog
15.4. Verifying Media
Chapter 16. Installing Using Anaconda
16.1. The Text Mode Installation Program User Interface
- configuring advanced storage methods such as LVM, RAID, FCoE, zFCP, and iSCSI.
- customizing the partition layout
- customizing the bootloader layout
- selecting packages during installation
- configuring the installed system with firstboot
16.2. The Graphical Installation Program User Interface
Note
yaboot: prompt:
linux text
linux text16.3. A Note About Linux Virtual Consoles
| console | keystrokes | contents |
|---|---|---|
| 1 | ctrl+alt+f1 | installation dialog |
| 2 | ctrl+alt+f2 | shell prompt |
| 3 | ctrl+alt+f3 | install log (messages from installation program) |
| 4 | ctrl+alt+f4 | system-related messages |
| 5 | ctrl+alt+f5 | other messages |
| 6 | ctrl+alt+f6 | x graphical display |
16.4. Using the HMC vterm
16.5. Welcome to Red Hat Enterprise Linux
Figure 16.1. The Welcome screen
16.6. Language Selection
Figure 16.2. Language Configuration
16.7. Keyboard Configuration
Figure 16.3. Keyboard Configuration
Note
system-config-keyboard command in a shell prompt to launch the Keyboard Configuration Tool. If you are not root, it prompts you for the root password to continue.
16.8. Storage Devices
Figure 16.4. Storage devices
- Basic Storage Devices
- Select to install Red Hat Enterprise Linux on the following storage devices:
- hard drives or solid-state drives connected directly to the local system.
- Specialized Storage Devices
- Select to install Red Hat Enterprise Linux on the following storage devices:
- Storage area networks (SANs)
- Direct access storage devices (DASDs)
- Firmware RAID devices
- Multipath devices
Use the option to configure Internet Small Computer System Interface (iSCSI) and FCoE (Fiber Channel over Ethernet) connections.
Note
mdeventd daemon is not performed during installation.
16.8.1. The Storage Devices Selection Screen
Figure 16.5. Select storage devices — Basic devices
Figure 16.6. Select storage devices — Multipath Devices
Figure 16.7. Select storage devices — Other SAN Devices
- Basic Devices
- Basic storage devices directly connected to the local system, such as hard disk drives and solid-state drives.
- Firmware RAID
- Storage devices attached to a firmware RAID controller.
- Multipath Devices
- Storage devices accessible through more than one path, such as through multiple SCSI controllers or Fiber Channel ports on the same system.
Important
The installer only detects multipath storage devices with serial numbers that are 16 or 32 characters in length. - Other SAN Devices
- Any other devices available on a storage area network (SAN).
Figure 16.8. The Storage Devices Search Tab
Figure 16.9. Selecting Columns
/etc/fstab file.
Important
16.8.1.1. Advanced Storage Options
Figure 16.10. Advanced Storage Options
16.8.1.1.1. Select and configure a network interface
Figure 16.11. Select network interface
- Select an interface from the drop-down menu.
- Click .
Figure 16.12. Network Connections
16.8.1.1.2. Configure iSCSI parameters
Procedure 16.1. iSCSI discovery
Figure 16.13. The iSCSI Discovery Details dialog
- Enter the IP address of the iSCSI target in the Target IP Address field.
- Provide a name in the iSCSI Initiator Name field for the iSCSI initiator in iSCSI qualified name (IQN) format.A valid IQN contains:
- the string
iqn.(note the period) - a date code that specifies the year and month in which your organization's Internet domain or subdomain name was registered, represented as four digits for the year, a dash, and two digits for the month, followed by a period. For example, represent September 2010 as
2010-09. - your organization's Internet domain or subdomain name, presented in reverse order with the top-level domain first. For example, represent the subdomain
storage.example.comascom.example.storage - a colon followed by a string that uniquely identifies this particular iSCSI initiator within your domain or subdomain. For example,
:diskarrays-sn-a8675309.
A complete IQN therefore resembles:iqn.2010-09.storage.example.com:diskarrays-sn-a8675309, and anaconda pre-populates the iSCSI Initiator Name field with a name in this format to help you with the structure.For more information on IQNs, refer to 3.2.6. iSCSI Names in RFC 3720 - Internet Small Computer Systems Interface (iSCSI) available from http://tools.ietf.org/html/rfc3720#section-3.2.6 and 1. iSCSI Names and Addresses in RFC 3721 - Internet Small Computer Systems Interface (iSCSI) Naming and Discovery available from http://tools.ietf.org/html/rfc3721#section-1. - Use the drop-down menu to specify the type of authentication to use for iSCSI discovery:
Figure 16.14. iSCSI discovery authentication
- If you selected as the authentication type, provide the username and password for the iSCSI target in the CHAP Username and CHAP Password fields.
Figure 16.15. CHAP pair
- If you selected as the authentication type, provide the username and password for the iSCSI target in the CHAP Username and CHAP Password field and the username and password for the iSCSI initiator in the Reverse CHAP Username and Reverse CHAP Password fields.
Figure 16.16. CHAP pair and a reverse pair
- Click . Anaconda attempts to discover an iSCSI target based on the information that you provided. If discovery succeeds, the iSCSI Discovered Nodes dialog presents you with a list of all the iSCSI nodes discovered on the target.
- Each node is presented with a checkbox beside it. Click the checkboxes to select the nodes to use for installation.
Figure 16.17. The iSCSI Discovered Nodes dialog
- Click to initiate an iSCSI session.
Procedure 16.2. Starting an iSCSI session
Figure 16.18. The iSCSI Nodes Login dialog
- Use the drop-down menu to specify the type of authentication to use for the iSCSI session:
Figure 16.19. iSCSI session authentication
If your environment uses the same type of authentication and same username and password for iSCSI discovery and for the iSCSI session, select to reuse these credentials. - If you selected as the authentication type, provide the username and password for the iSCSI target in the CHAP Username and CHAP Password fields.
Figure 16.20. CHAP pair
- If you selected as the authentication type, provide the username and password for the iSCSI target in the CHAP Username and CHAP Password fields and the username and password for the iSCSI initiator in the Reverse CHAP Username and Reverse CHAP Password fields.
Figure 16.21. CHAP pair and a reverse pair
- Click . Anaconda attempts to log into the nodes on the iSCSI target based on the information that you provided. The iSCSI Login Results dialog presents you with the results.
Figure 16.22. The iSCSI Login Results dialog
- Click to continue.
16.8.1.1.3. Configure FCoE Parameters
Figure 16.23. Configure FCoE Parameters
16.9. Setting the Hostname
Note
Figure 16.24. Setting the hostname
Note
16.9.1. Editing Network Connections
Important
Note
system-config-network command in a shell prompt to launch the Network Administration Tool. If you are not root, it prompts you for the root password to continue.
Figure 16.25. Network Connections
16.9.1.1. Options common to all types of connection
16.9.1.2. The Wired tab
Figure 16.26. The Wired tab
16.9.1.3. The 802.1x Security tab
- Authentication
- Choose one of the following methods of authentication:
- TLS for Transport Layer Security
- Tunneled TLS for Tunneled Transport Layer Security, otherwise known as TTLS, or EAP-TTLS
- Protected EAP (PEAP) for Protected Extensible Authentication Protocol
- Identity
- Provide the identity of this server.
- User certificate
- Browse to a personal X.509 certificate file encoded with Distinguished Encoding Rules (DER) or Privacy Enhanced Mail (PEM).
- CA certificate
- Browse to a X.509 certificate authority certificate file encoded with Distinguished Encoding Rules (DER) or Privacy Enhanced Mail (PEM).
- Private key
- Browse to a private key file encoded with Distinguished Encoding Rules (DER), Privacy Enhanced Mail (PEM), or the Personal Information Exchange Syntax Standard (PKCS#12).
- Private key password
- The password for the private key specified in the Private key field. Select Show password to make the password visible as you type it.
Figure 16.27. The 802.1x Security tab
16.9.1.4. The IPv4 Settings tab
- Automatic (DHCP)
- IPv4 parameters are configured by the DHCP service on the network.
- Automatic (DHCP) addresses only
- The IPv4 address, netmask, and gateway address are configured by the DHCP service on the network, but DNS servers and search domains must be configured manually.
- Manual
- IPv4 parameters are configured manually for a static configuration.
- Link-Local Only
- A link-local address in the 169.254/16 range is assigned to the interface.
- Shared to other computers
- The system is configured to provide network access to other computers. The interface is assigned an address in the 10.42.x.1/24 range, a DHCP server and DNS server are started, and the interface is connected to the default network connection on the system with network address translation (NAT).
- Disabled
- IPv4 is disabled for this connection.
Figure 16.28. The IPv4 Settings tab
16.9.1.4.1. Editing IPv4 routes
Figure 16.29. The Editing IPv4 Routes dialog
16.9.1.5. The IPv6 Settings tab
- Ignore
- IPv6 is ignored for this connection.
- Automatic
- NetworkManager uses router advertisement (RA) to create an automatic, stateless configuration.
- Automatic, addresses only
- NetworkManager uses RA to create an automatic, stateless configuration, but DNS servers and search domains are ignored and must be configured manually.
- Automatic, DHCP only
- NetworkManager does not use RA, but requests information from DHCPv6 directly to create a stateful configuration.
- Manual
- IPv6 parameters are configured manually for a static configuration.
- Link-Local Only
- A link-local address with the fe80::/10 prefix is assigned to the interface.
Figure 16.30. The IPv6 Settings tab
16.9.1.5.1. Editing IPv6 routes
Figure 16.31. The Editing IPv6 Routes dialog
16.9.1.6. Restart a network device
ONBOOT=yes is set. Refer to the Red Hat Enterprise Linux 6.9 Deployment Guide available from https://access.redhat.com/documentation/en-US/Red_Hat_Enterprise_Linux/6/html/Deployment_Guide/index.html for more information about interface configuration files.
- Press Ctrl+Alt+F2 to switch to virtual terminal
tty2. - Move the interface configuration file to a temporary location:
mv /etc/sysconfig/network-scripts/ifcfg-device_name /tmp
mv /etc/sysconfig/network-scripts/ifcfg-device_name /tmpCopy to Clipboard Copied! Toggle word wrap Toggle overflow where device_name is the device that you just reconfigured. For example,ifcfg-eth0is the ifcfg file foreth0.The device is now disconnected in anaconda. - Open the interface configuration file in the vi editor:
vi /tmp/ifcfg-device_name
vi /tmp/ifcfg-device_nameCopy to Clipboard Copied! Toggle word wrap Toggle overflow - Verify that the interface configuration file contains the line
ONBOOT=yes. If the file does not already contain the line, add it now and save the file. - Exit the vi editor.
- Move the interface configuration file back to the
/etc/sysconfig/network-scripts/directory:mv /tmp/ifcfg-device_name /etc/sysconfig/network-scripts/
mv /tmp/ifcfg-device_name /etc/sysconfig/network-scripts/Copy to Clipboard Copied! Toggle word wrap Toggle overflow The device is now reconnected in anaconda. - Press Ctrl+Alt+F6 to return to anaconda.
16.10. Time Zone Configuration
- Using your mouse, click on the interactive map to select a specific city (represented by a yellow dot). A red X appears indicating your selection.
- You can also scroll through the list at the bottom of the screen to select your time zone. Using your mouse, click on a location to highlight your selection.
Note
system-config-date command in a shell prompt to launch the Time and Date Properties Tool. If you are not root, it prompts you for the root password to continue.
16.11. Set the Root Password
Note
Figure 16.32. Root Password
su command to change to root only when you need to perform tasks that require superuser authorization. These basic rules minimize the chances of a typo or an incorrect command doing damage to your system.
Note
su - at the shell prompt in a terminal window and then press Enter. Then, enter the root password and press Enter.
Warning
passwd command as root. If you forget the root password, see Resolving Problems in System Recovery Modes in the Red Hat Enterprise Linux 6 Deployment Guide for instructions on how to set a new one.
16.12. Assign Storage Devices
Figure 16.33. Assign storage devices
Important
16.13. Initializing the Hard Disk
Figure 16.34. Warning screen – initializing hard drive
zerombr (refer to Chapter 32, Kickstart Installations). This command is required when performing an unattended installation on a system with previously initialized disks.
Warning
16.14. Upgrading an Existing System
Important
16.14.1. The Upgrade Dialog
Figure 16.35. The Upgrade Dialog
Note
16.14.2. Upgrading Using the Installer
Note
/home partition and perform a fresh installation. For more information on partitions and how to set them up, refer to Section 9.13, “Disk Partitioning Setup”.
rpm -qa --qf '%{NAME} %{VERSION}-%{RELEASE} %{ARCH}\n' > ~/old-pkglist.txt
rpm -qa --qf '%{NAME} %{VERSION}-%{RELEASE} %{ARCH}\n' > ~/old-pkglist.txtsu -c 'tar czf /tmp/etc-`date +%F`.tar.gz /etc' su -c 'mv /tmp/etc-*.tar.gz /home'
su -c 'tar czf /tmp/etc-`date +%F`.tar.gz /etc'
su -c 'mv /tmp/etc-*.tar.gz /home'/home directory as well as content from services such as an Apache, FTP, or SQL server, or a source code management system. Although upgrades are not destructive, if you perform one improperly there is a small possibility of data loss.
Warning
/home directory. If your /home directory is not a separate partition, you should not follow these examples verbatim! Store your backups on another device such as CD or DVD discs or an external hard disk.
16.15. Disk Partitioning Setup
Warning
Important
Important
/boot/ partition must be created on a partition outside of the RAID array, such as on a separate hard drive. An internal hard drive is necessary to use for partition creation with problematic RAID cards.
/boot/ partition is also necessary for software RAID setups.
/boot/ partition.
Figure 16.36. Disk Partitioning Setup
- Use All Space
- Select this option to remove all partitions on your hard drives (this includes partitions created by other operating systems such as Windows VFAT or NTFS partitions).
Warning
If you select this option, all data on the selected hard drives is removed by the installation program. Do not select this option if you have information that you want to keep on the hard drives where you are installing Red Hat Enterprise Linux.In particular, do not select this option when you configure a system to chain load the Red Hat Enterprise Linux boot loader from another boot loader. - Replace Existing Linux System(s)
- Select this option to remove only partitions created by a previous Linux installation. This does not remove other partitions you may have on your hard drives (such as VFAT or FAT32 partitions).
- Shrink Current System
- Select this option to resize your current data and partitions manually and install a default Red Hat Enterprise Linux layout in the space that is freed.
Warning
If you shrink partitions on which other operating systems are installed, you might not be able to use those operating systems. Although this partitioning option does not destroy data, operating systems typically require some free space in their partitions. Before you resize a partition that holds an operating system that you might want to use again, find out how much space you need to leave free. - Use Free Space
- Select this option to retain your current data and partitions and install Red Hat Enterprise Linux in the unused space available on the storage drives. Ensure that there is sufficient space available on the storage drives before you select this option — refer to Section 11.6, “Do You Have Enough Disk Space?”.
- Create Custom Layout
- Select this option to partition storage devices manually and create customized layouts. Refer to Section 16.17, “ Creating a Custom Layout or Modifying the Default Layout ”
/boot partition. Refer to Appendix C, Disk Encryption for information on encryption.
Important
Important
16.16. Choosing a Disk Encryption Passphrase
Figure 16.37. Enter passphrase for encrypted partition
Warning
16.17. Creating a Custom Layout or Modifying the Default Layout
/) partition, a /boot/ partition, PReP boot partition, and usually a swap partition appropriate to the amount of RAM you have on the system.
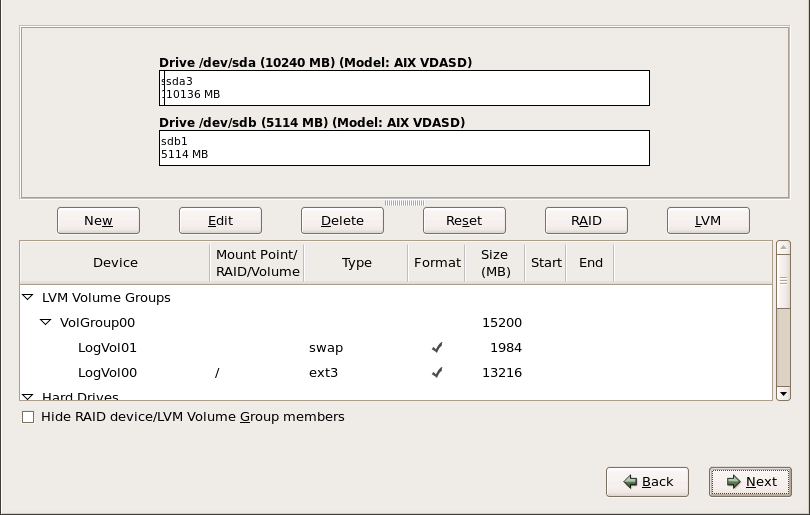
Figure 16.38. Partitioning on IBM System p
/dev/sda or LogVol00), its size (in MB), and its model as detected by the installation program.
- Device
- the name of the device, logical volume, or partition
- Size (MB)
- the size of the device, logical volume, or partition (in MB)
- Mount Point/RAID/Volume
- the mount point (location within a file system) on which a partition is to be mounted, or the name of the RAID or logical volume group of which it is a part
- Type
- the type of partition. If the partition is a standard partition, this field displays the type of file system on the partition (for example, ext4). Otherwise, it indicates that the partition is a
physical volume (LVM), or part of asoftware RAID - Format
- A check mark in this column indicates that the partition will be formatted during installation.
- Create
- create a new partition, logical volume, or software RAID
- Edit
- change an existing partition, logical volume, or software RAID. Note that you can only shrink partitions with the button, not enlarge partitions.
- Delete
- remove a partition, logical volume, or software RAID
- Reset
- undo all changes made in this screen
16.17.1. Create Storage
Figure 16.39. Creating Storage
Create Partition
- Standard Partition — create a standard disk partition (as described in Appendix A, An Introduction to Disk Partitions) in unallocated space.
Create Software RAID
- RAID Partition — create a partition in unallocated space to form part of a software RAID device. To form a software RAID device, two or more RAID partitions must be available on the system.
- RAID Device — combine two or more RAID partitions into a software RAID device. When you choose this option, you can specify the type of RAID device to create (the RAID level). This option is only available when two or more RAID partitions are available on the system.
Create LVM Logical Volume
- LVM Physical Volume — create a physical volume in unallocated space.
- LVM Volume Group — create a volume group from one or more physical volumes. This option is only available when at least one physical volume is available on the system.
- LVM Logical Volume — create a logical volume on a volume group. This option is only available when at least one volume group is available on the system.
16.17.2. Adding Partitions
Note
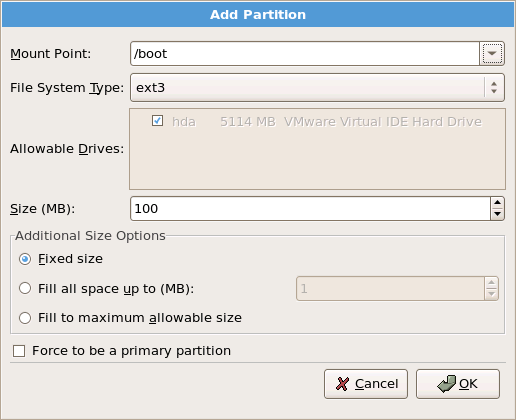
Figure 16.40. Creating a New Partition
- Mount Point: Enter the partition's mount point. For example, if this partition should be the root partition, enter
/; enter/bootfor the/bootpartition, and so on. You can also use the pull-down menu to choose the correct mount point for your partition. For a swap partition the mount point should not be set — setting the filesystem type toswapis sufficient. - File System Type: Using the pull-down menu, select the appropriate file system type for this partition. For more information on file system types, refer to Section 16.17.2.1, “File System Types”.
- Allowable Drives: This field contains a list of the hard disks installed on your system. If a hard disk's box is highlighted, then a desired partition can be created on that hard disk. If the box is not checked, then the partition will never be created on that hard disk. By using different checkbox settings, you can have anaconda place partitions where you need them, or let anaconda decide where partitions should go.
- Size (MB): Enter the size (in megabytes) of the partition. Note, this field starts with 200 MB; unless changed, only a 200 MB partition will be created.
- Additional Size Options: Choose whether to keep this partition at a fixed size, to allow it to "grow" (fill up the available hard drive space) to a certain point, or to allow it to grow to fill any remaining hard drive space available.If you choose Fill all space up to (MB), you must give size constraints in the field to the right of this option. This allows you to keep a certain amount of space free on your hard drive for future use.
- Force to be a primary partition: Select whether the partition you are creating should be one of the first four partitions on the hard drive. If unselected, the partition is created as a logical partition. Refer to Section A.1.3, “Partitions Within Partitions — An Overview of Extended Partitions”, for more information.
- Encrypt: Choose whether to encrypt the partition so that the data stored on it cannot be accessed without a passphrase, even if the storage device is connected to another system. Refer to Appendix C, Disk Encryption for information on encryption of storage devices. If you select this option, the installer prompts you to provide a passphrase before it writes the partition to the disk.
- : Select once you are satisfied with the settings and wish to create the partition.
- : Select if you do not want to create the partition.
16.17.2.1. File System Types
Partition types
- standard partition — A standard partition can contain a file system or swap space, or it can provide a container for software RAID or an LVM physical volume.
- swap — Swap partitions are used to support virtual memory. In other words, data is written to a swap partition when there is not enough RAM to store the data your system is processing. Refer to the Red Hat Enterprise Linux Deployment Guide for additional information.
- software RAID — Creating two or more software RAID partitions allows you to create a RAID device. For more information regarding RAID, refer to the chapter RAID (Redundant Array of Independent Disks) in the Red Hat Enterprise Linux Deployment Guide.
- physical volume (LVM) — Creating one or more physical volume (LVM) partitions allows you to create an LVM logical volume. LVM can improve performance when using physical disks. For more information regarding LVM, refer to the Red Hat Enterprise Linux Deployment Guide.
File systems
- ext4 — The ext4 file system is based on the ext3 file system and features a number of improvements. These include support for larger file systems and larger files, faster and more efficient allocation of disk space, no limit on the number of subdirectories within a directory, faster file system checking, and more robust journaling. A maximum file system size of 16TB is supported for ext4. The ext4 file system is selected by default and is highly recommended.
Note
Theuser_xattrandaclmount options are automatically set on ext4 systems by the installation system. These options enable extended attributes and access control lists, respectively. More information about mount options can be found in the Red Hat Enterprise Linux Storage Administration Guide. - ext3 — The ext3 file system is based on the ext2 file system and has one main advantage — journaling. Using a journaling file system reduces time spent recovering a file system after a crash as there is no need to
fsck[8] the file system. A maximum file system size of 16TB is supported for ext3. - ext2 — An ext2 file system supports standard Unix file types (regular files, directories, symbolic links, etc). It provides the ability to assign long file names, up to 255 characters.
- xfs — XFS is a highly scalable, high-performance file system that supports filesystems up to 16 exabytes (approximately 16 million terabytes), files up to 8 exabytes (approximately 8 million terabytes) and directory structures containing tens of millions of entries. XFS supports metadata journaling, which facilitates quicker crash recovery. The XFS file system can also be defragmented and resized while mounted and active.
Note
The maximum size of an XFS partition the installer can create is 100 TB. - vfat — The VFAT file system is a Linux file system that is compatible with Microsoft Windows long filenames on the FAT file system.
- Btrfs — Btrfs is under development as a file system capable of addressing and managing more files, larger files, and larger volumes than the ext2, ext3, and ext4 file systems. Btrfs is designed to make the file system tolerant of errors, and to facilitate the detection and repair of errors when they occur. It uses checksums to ensure the validity of data and metadata, and maintains snapshots of the file system that can be used for backup or repair.Because Btrfs is still experimental and under development, the installation program does not offer it by default. If you want to create a Btrfs partition on a drive, you must commence the installation process with the boot option
btrfs. Refer to Chapter 28, Boot Options for instructions.Warning
Red Hat Enterprise Linux 6.9 includes Btrfs as a technology preview to allow you to experiment with this file system. You should not choose Btrfs for partitions that will contain valuable data or that are essential for the operation of important systems.
16.17.3. Create Software RAID
- RAID Partition
- Choose this option to configure a partition for software RAID. This option is the only choice available if your disk contains no software RAID partitions. This is the same dialog that appears when you add a standard partition — refer to Section 16.17.2, “Adding Partitions” for a description of the available options. Note, however, that File System Type must be set to
software RAIDFigure 16.41. Create a software RAID partition
- RAID Device
- Choose this option to construct a RAID device from two or more existing software RAID partitions. This option is available if two or more software RAID partitions have been configured.
Figure 16.42. Create a RAID device
Select the file system type as for a standard partition.Anaconda automatically suggests a name for the RAID device, but you can manually select names frommd0tomd15.Click the checkboxes beside individual storage devices to include or remove them from this RAID.The RAID Level corresponds to a particular type of RAID. Choose from the following options:- RAID 0 — distributes data across multiple storage devices. Level 0 RAIDs offer increased performance over standard partitions, and can be used to pool the storage of multiple devices into one large virtual device. Note that Level 0 RAIDS offer no redundancy and that the failure of one device in the array destroys the entire array. RAID 0 requires at least two RAID partitions.
- RAID 1 — mirrors the data on one storage device onto one or more other storage devices. Additional devices in the array provide increasing levels of redundancy. RAID 1 requires at least two RAID partitions.
- RAID 4 — distributes data across multiple storage devices, but uses one device in the array to store parity information that safeguards the array in case any device within the array fails. Because all parity information is stored on the one device, access to this device creates a bottleneck in the performance of the array. RAID 4 requires at least three RAID partitions.
- RAID 5 — distributes data and parity information across multiple storage devices. Level 5 RAIDs therefore offer the performance advantages of distributing data across multiple devices, but do not share the performance bottleneck of level 4 RAIDs because the parity information is also distributed through the array. RAID 5 requires at least three RAID partitions.
- RAID 6 — level 6 RAIDs are similar to level 5 RAIDs, but instead of storing only one set of parity data, they store two sets. RAID 6 requires at least four RAID partitions.
- RAID 10 — level 10 RAIDs are nested RAIDs or hybrid RAIDs. Level 10 RAIDs are constructed by distributing data over mirrored sets of storage devices. For example, a level 10 RAID constructed from four RAID partitions consists of two pairs of partitions in which one partition mirrors the other. Data is then distributed across both pairs of storage devices, as in a level 0 RAID. RAID 10 requires at least four RAID partitions.
16.17.4. Create LVM Logical Volume
Important
lvm command. To return to the text-mode installation, press Alt+F1.
- LVM Physical Volume
- Choose this option to configure a partition or device as an LVM physical volume. This option is the only choice available if your storage does not already contain LVM Volume Groups. This is the same dialog that appears when you add a standard partition — refer to Section 16.17.2, “Adding Partitions” for a description of the available options. Note, however, that File System Type must be set to
physical volume (LVM)Figure 16.43. Create an LVM Physical Volume
- Make LVM Volume Group
- Choose this option to create LVM volume groups from the available LVM physical volumes, or to add existing logical volumes to a volume group.
Figure 16.44. Make LVM Volume Group
To assign one or more physical volumes to a volume group, first name the volume group. Then select the physical volumes to be used in the volume group. Finally, configure logical volumes on any volume groups using the Add, Edit and Delete options.You may not remove a physical volume from a volume group if doing so would leave insufficient space for that group's logical volumes. Take for example a volume group made up of two 5 GB LVM physical volume partitions, which contains an 8 GB logical volume. The installer would not allow you to remove either of the component physical volumes, since that would leave only 5 GB in the group for an 8 GB logical volume. If you reduce the total size of any logical volumes appropriately, you may then remove a physical volume from the volume group. In the example, reducing the size of the logical volume to 4 GB would allow you to remove one of the 5 GB physical volumes. - Make Logical Volume
- Choose this option to create an LVM logical volume. Select a mount point, file system type, and size (in MB) just as if it were a standard disk partition. You can also choose a name for the logical volume and specify the volume group to which it will belong.
Figure 16.45. Make Logical Volume
16.17.5. Recommended Partitioning Scheme
- A
swappartition (at least 256 MB) — Swap partitions support virtual memory: data is written to a swap partition when there is not enough RAM to store the data your system is processing.In years past, the recommended amount of swap space increased linearly with the amount of RAM in the system. Modern systems often include hundreds of gigabytes of RAM, however. As a consequence, recommended swap space is considered a function of system memory workload, not system memory.The following table provides the recommended size of a swap partition depending on the amount of RAM in your system and whether you want sufficient memory for your system to hibernate. The recommended swap partition size is established automatically during installation. To allow for hibernation, however, you will need to edit the swap space in the custom partitioning stage.Important
Recommendations in the table below are especially important on systems with low memory (1 GB and less). Failure to allocate sufficient swap space on these systems may cause issues such as instability or even render the installed system unbootable.Expand Table 16.2. Recommended System Swap Space Amount of RAM in the system Recommended swap space Recommended swap space if allowing for hibernation ⩽ 2GB 2 times the amount of RAM 3 times the amount of RAM > 2GB – 8GB Equal to the amount of RAM 2 times the amount of RAM > 8GB – 64GB At least 4 GB 1.5 times the amount of RAM > 64GB At least 4 GB Hibernation not recommended At the border between each range listed above (for example, a system with 2GB, 8GB, or 64GB of system RAM), discretion can be exercised with regard to chosen swap space and hibernation support. If your system resources allow for it, increasing the swap space may lead to better performance.Note that distributing swap space over multiple storage devices — particularly on systems with fast drives, controllers and interfaces — also improves swap space performance.Note
Swap space size recommendations issued for Red Hat Enterprise Linux 6.0, 6.1, and 6.2 differed from the current recommendations, which were first issued with the release of Red Hat Enterprise Linux 6.3 in June 2012 and did not account for hibernation space. Automatic installations of these earlier versions of Red Hat Enterprise Linux 6 still generate a swap space in line with these superseded recommendations. However, manually selecting a swap space size in line with the newer recommendations issued for Red Hat Enterprise Linux 6.3 is advisable for optimal performance. - A PReP boot partition on the first partition of the hard drive — the PReP boot partition contains the Yaboot boot loader (which allows other Power Systems servers to boot Red Hat Enterprise Linux). Unless you plan to boot from a network source, you must have a PReP boot partition to boot Red Hat Enterprise Linux.For IBM System p users: The PReP boot partition should be between 4-8 MB, not to exceed 10 MB.
- A
/boot/partition (250 MB) — the partition mounted on/boot/contains the operating system kernel (which allows your system to boot Red Hat Enterprise Linux), along with files used during the bootstrap process. Due to the limitations of most PC firmware, creating a small partition to hold these is a good idea. For most users, a 250 MB boot partition is sufficient.Warning
If you have a RAID card, be aware that Red Hat Enterprise Linux 6.9 does not support setting up hardware RAID on an IPR card. You can boot the standalone diagnostics CD prior to installation to create a RAID array and then install to that RAID array.Important
The/bootand/(root) partition in Red Hat Enterprise Linux 6.9 can only use the ext2, ext3, and ext4 (recommended) file systems. You cannot use any other file system for this partition, such as Btrfs, XFS, or VFAT. Other partitions, such as/home, can use any supported file system, including Btrfs and XFS (if available). See the following article on the Red Hat Customer Portal for additional information: https://access.redhat.com/solutions/667273. - A
rootpartition (3.0 GB - 5.0 GB) — this is where "/" (the root directory) is located. In this setup, all files (except those stored in/boot) are on the root partition.A 3.0 GB partition allows you to install a minimal installation, while a 5.0 GB root partition lets you perform a full installation, choosing all package groups.Important
The/bootand/(root) partition in Red Hat Enterprise Linux 6.9 can only use the ext2, ext3, and ext4 (recommended) file systems. You cannot use any other file system for this partition, such as Btrfs, XFS, or VFAT. Other partitions, such as/home, can use any supported file system, including Btrfs and XFS (if available). See the following article on the Red Hat Customer Portal for additional information: https://access.redhat.com/solutions/667273.Important
The/(or root) partition is the top of the directory structure. The/rootdirectory (sometimes pronounced "slash-root") is the home directory of the user account for system administration.
Warning
/var/cache/yum/ by default. If you partition the system manually, and create a separate /var/ partition, be sure to create the partition large enough (3.0 GB or more) to download package updates.
16.18. Write Changes to Disk
Figure 16.46. Writing storage configuration to disk
Warning
16.19. Package Group Selection
Important
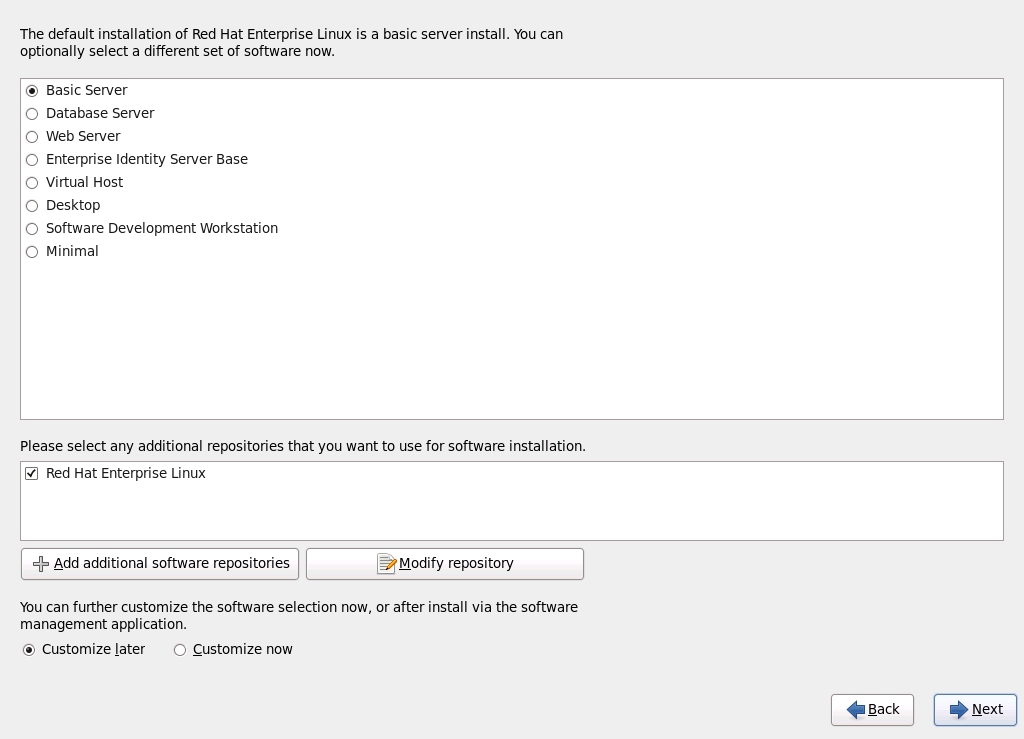
Figure 16.47. Package Group Selection
- Basic Server
- This option provides a basic installation of Red Hat Enterprise Linux for use on a server.
- Database Server
- This option provides the MySQL and PostgreSQL databases.
- Web server
- This option provides the Apache web server.
- Enterprise Identity Server Base
- This option provides OpenLDAP and Enterprise Identity Management (IPA) to create an identity and authentication server.
- Virtual Host
- This option provides the KVM and Virtual Machine Manager tools to create a host for virtual machines.
- Desktop
- This option provides the OpenOffice.org productivity suite, graphical tools such as the GIMP, and multimedia applications.
- Software Development Workstation
- This option provides the necessary tools to compile software on your Red Hat Enterprise Linux system.
- Minimal
- This option provides only the packages essential to run Red Hat Enterprise Linux. A minimal installation provides the basis for a single-purpose server or desktop appliance and maximizes performance and security on such an installation.
Warning
Minimal installation currently does not configure the firewall (iptables/ip6tables) by default because the authconfig and system-config-firewall-base packages are missing from the selection. To work around this issue, you can use a Kickstart file to add these packages to your selection. See the Red Hat Customer Portal for details about the workaround, and Chapter 32, Kickstart Installations for information about Kickstart files.If you do not use the workaround, the installation will complete successfully, but no firewall will be configured, presenting a security risk.
16.19.1. Installing from Additional Repositories
Figure 16.48. Adding a software repository
Figure 16.49. Select network interface
- Select an interface from the drop-down menu.
- Click .
Figure 16.50. Network Connections
repodata.
Warning
16.19.2. Customizing the Software Selection
Note
Note
Figure 16.51. Package Group Details
Figure 16.52. Package Selection List Context Menu
16.19.2.1. Core Network Services
- centralized logging through syslog
- email through SMTP (Simple Mail Transfer Protocol)
- network file sharing through NFS (Network File System)
- remote access through SSH (Secure SHell)
- resource advertising through mDNS (multicast DNS)
- network file transfer through HTTP (HyperText Transfer Protocol)
- printing through CUPS (Common UNIX Printing System)
- remote desktop access through VNC (Virtual Network Computing)
16.20. Installing Packages
Figure 16.53. Starting installation
Figure 16.54. Packages completed
16.21. Installation Complete
login: prompt or a GUI login screen (if you installed the X Window System and chose to start X automatically) appears.
fsck application is used to check the file system for metadata consistency and optionally repair one or more Linux file systems.
Chapter 17. Troubleshooting Installation on an IBM Power Systems server
/tmp directory. These files include:
/tmp/anaconda.log- general anaconda messages
/tmp/program.log- all external programs run by anaconda
/tmp/storage.log- extensive storage module information
/tmp/yum.log- yum package installation messages
/tmp/syslog- hardware-related system messages
/tmp/anaconda-tb-identifier, where identifier is a random string.
http://www14.software.ibm.com/webapp/set2/sas/f/lopdiags/info/LinuxAlerts.html
http://www14.software.ibm.com/webapp/set2/sas/f/lopdiags/info/LinuxAlerts.htmlscp on the installation image (not the other way round).
17.1. You Are Unable to Boot Red Hat Enterprise Linux
17.1.1. Is Your System Displaying Signal 11 Errors?
boot: or yaboot: prompt:
linux mediacheck
linux mediacheckhttp://www.bitwizard.nl/sig11/
http://www.bitwizard.nl/sig11/17.2. Trouble Beginning the Installation
17.2.1. Problems with Booting into the Graphical Installation
resolution= boot option. Refer to Chapter 28, Boot Options for more information.
Note
nofb boot option. This command may be necessary for accessibility with some screen reading hardware.
17.3. Trouble During the Installation
17.3.1. The "No devices found to install Red Hat Enterprise Linux" Error Message
No devices found to install Red Hat Enterprise Linux, there is probably a SCSI controller that is not being recognized by the installation program.
17.3.2. Saving Traceback Messages
Figure 17.1. The Crash Reporting Dialog Box
- Details
- shows you the details of the error:
Figure 17.2. Details of the Crash
- Save
- saves details of the error locally or remotely:
- Exit
- exits the installation process.
Figure 17.3. Select reporter
- Logger
- saves details of the error as a log file to the local hard drive at a specified location.
- Red Hat Customer Support
- submits the crash report to Customer Support for assistance.
- Report uploader
- uploads a compressed version of the crash report to Bugzilla or a URL of your choice.
Figure 17.4. Configure reporter preferences
- Logger
- Specify a path and a filename for the log file. Check Append if you are adding to an existing log file.
Figure 17.5. Specify local path for log file
- Red Hat Customer Support
- Enter your Red Hat Network username and password so your report reaches Customer Support and is linked with your account. The URL is prefilled and Verify SSL is checked by default.
Figure 17.6. Enter Red Hat Network authentication details
- Report uploader
- Specify a URL for uploading a compressed version of the crash report.
Figure 17.7. Enter URL for uploading crash report
- Bugzilla
- Enter your Bugzilla username and password to lodge a bug with Red Hat's bug-tracking system using the crash report. The URL is prefilled and is checked by default.
Figure 17.8. Enter Bugzilla authentication details
Figure 17.9. Confirm report data
Figure 17.10. Report in progress
Figure 17.11. Reporting done
Important
17.3.3. Trouble with Partition Tables
The partition table on device hda was unreadable. To create new partitions it must be initialized, causing the loss of ALL DATA on this drive.
17.3.4. Other Partitioning Problems for IBM Power Systems Users
- A
/(root) partition - A <swap> partition of type swap
- A PReP Boot partition.
- A /boot/ partition.
Note
17.4. Problems After Installation
17.4.1. Unable to IPL from *NWSSTG
17.4.2. Booting into a Graphical Environment
startx.
/etc/inittab, by changing just one number in the runlevel section. When you are finished, reboot the computer. The next time you log in, you are presented with a graphical login prompt.
su command.
gedit /etc/inittab
gedit /etc/inittab/etc/inittab opens. Within the first screen, a section of the file which looks like the following appears:
id:3:initdefault: from a 3 to a 5.
Warning
3 to 5.
id:5:initdefault:
id:5:initdefault:17.4.3. Problems with the X Window System (GUI)
17.4.4. Problems with the X Server Crashing and Non-Root Users
df -h
df -hdf command should help you diagnose which partition is full. For additional information about df and an explanation of the options available (such as the -h option used in this example), refer to the df man page by typing man df at a shell prompt.
/home/ and /tmp/ partitions can sometimes fill up quickly with user files. You can make some room on that partition by removing old files. After you free up some disk space, try running X as the user that was unsuccessful before.
17.4.5. Problems When You Try to Log In
linux single.
# prompt, you must type passwd root, which allows you to enter a new password for root. At this point you can type shutdown -r now to reboot the system with the new root password.
su - and enter your root password when prompted. Then, type passwd <username>. This allows you to enter a new password for the specified user account.
https://hardware.redhat.com/
https://hardware.redhat.com/17.4.6. Your Printer Does Not Work
system-config-printer command at a shell prompt to launch the Printer Configuration Tool. If you are not root, it prompts you for the root password to continue.
17.4.7. Apache HTTP Server or Sendmail Stops Responding During Startup
/etc/hosts file:
127.0.0.1 localhost.localdomain localhost
127.0.0.1 localhost.localdomain localhostPart III. IBM System z Architecture - Installation and Booting
Chapter 18. Planning for Installation on System z
18.1. Pre-Installation
- Decide whether you want to run the operating system on an LPAR or as a z/VM guest operating system.
- Decide if you need swap space and if so how much. Although it is possible (and recommended) to assign enough memory to z/VM guest virtual machine and let z/VM do the necessary swapping, there are cases where the amount of required RAM is hard to predict. Such instances should be examined on a case-by-case basis. Refer to Section 23.15.5, “Recommended Partitioning Scheme”.
- Decide on a network configuration. Red Hat Enterprise Linux 6.9 for IBM System z supports the following network devices:
- Real and virtual Open Systems Adapter (OSA)
- Real and virtual HiperSockets
- LAN channel station (LCS) for real OSA
- Disk space. Calculate how much disk space you need and allocate sufficient disk space on DASDs[9] or SCSI[10] disks. You require at least 2 GB for a server installation, and 5 GB if you want to install all packages. You also require disk space for any application data. After the installation, more DASD or SCSI disk partitions may be added or deleted as necessary.The disk space used by the newly installed Red Hat Enterprise Linux system (the Linux instance) must be separate from the disk space used by other operating systems you may have installed on your system.For more information about disks and partition configuration, refer to Section 23.15.5, “Recommended Partitioning Scheme”.
- RAM. Acquire 1 GB (recommended) for the Linux instance. With some tuning, an instance might run with as little as 512 MB RAM.
18.2. Overview of the System z Installation Procedure
Booting (IPL) the installer
Connect with the mainframe, then perform an initial program load (IPL), or boot, from the medium containing the installation program.Installation Phase 1
Set up an initial network device. This network device is then used to connect to the installation system via SSH or VNC. This gets you a full-screen mode terminal or graphical display to continue installation as on other architectures.Installation Phase 2
Specify which language to use, and how and where the installation program and the software packages to be installed from the repository on the Red Hat installation medium can be found.Installation Phase 3
Use anaconda (the main part of the Red Hat installation program) to perform the rest of the installation.
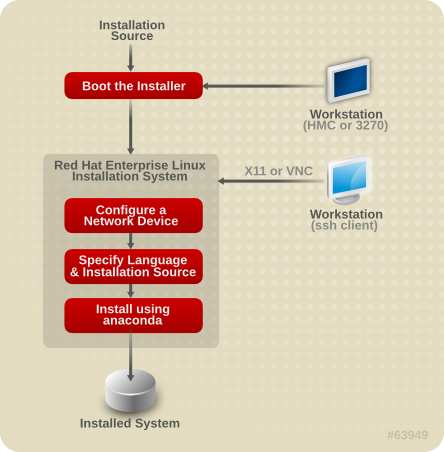
Figure 18.1. The Installation Process
18.2.1. Booting (IPL) the Installer
kernel.img) and initial ramdisk (initrd.img) with at least the parameters in generic.prm. The Linux installation system is also called the installer in this book.
- z/VM reader — refer to Section 20.1.1, “Using the z/VM Reader” for details.
- SE or HMC through a remote FTP server — refer to Section 20.2.1, “Using an FTP Server” for details.
- SE or HMC DVD — refer to Section 20.2.2, “Using the HMC or SE DVD Drive” for details
- DASD — refer to Section 20.1.2, “Using a Prepared DASD” for z/VM or Section 20.2.3, “Using a Prepared DASD” for LPAR
- SCSI device that is attached through an FCP channel — refer to Section 20.1.3, “Using a Prepared FCP-attached SCSI Disk” for z/VM or Section 20.2.4, “Using a Prepared FCP-attached SCSI Disk” for LPAR
- FCP-attached SCSI DVD — refer to Section 20.1.4, “ Using an FCP-attached SCSI DVD Drive” for z/VM or Section 20.2.5, “Using an FCP-attached SCSI DVD Drive” for LPAR
18.2.2. Installation Phase 1
18.2.3. Installation Phase 2
- Over the network using one of the FTP, HTTP, HTTPS, or NFS protocols. A separate network server (FTP, HTTP, HTTPS, or NFS), which holds all the required installation sources, must be set up in advance. For details on how to set up a network server, refer to Section 19.1, “Preparing for a Network Installation”.
- Hard disk (DASD or a SCSI device attached through an FCP channel). You need to set up a disk that holds the required installation sources in advance. For details, Refer to Section 19.2, “Preparing for a Hard Drive Installation”.
- Through an FCP-attached SCSI DVD. This is handled automatically if booted from FCP-attached SCSI DVD.
18.2.4. Installation Phase 3
- Graphical mode
This can be used through a VNC client (recommended) or through an X11 server. You can use your mouse and keyboard to navigate through the screens, click buttons, and enter text in fields.
- Text-based mode
This interface does not offer all interface elements of the GUI and does not support all settings. Use this for interactive installations if you cannot use a VNC client or X11 server.
- cmdline mode
This is intended for automated installations on System z. (Refer to Section 26.6, “Parameters for Kickstart Installations”)
display= variable in the parameter file (refer to Section 26.4, “VNC and X11 Parameters” for details). In Red Hat Enterprise Linux 6.9 the text-based installation has been reduced to minimize user interaction. Features like installation on FCP-attached SCSI devices, changing partition layout, or package selection are only available with the graphical user interface installation. Use the graphical installation whenever possible. (Refer to Chapter 23, Installation Phase 3: Installing Using Anaconda.)
18.3. Graphical User Interface with X11 or VNC
| Parameter | SSH login | User interface |
|---|---|---|
| none | SSH without X11 forwarding | VNC or text |
vnc | SSH with or without X11 forwarding | VNC |
| none | SSH with X11 forwarding | X11 |
display=IP/hostname:display | SSH without X11 forwarding | X11 |
18.3.1. Installation using X11 forwarding
ssh -X install@linuxvm.example.com
ssh -X install@linuxvm.example.comssh -X install@linuxvm.example.com-X option (the capital letter X) enables X11 forwarding.
18.3.2. Installation using X11
display=workstationname:0.0 in the parameter file, where workstationname is the hostname of the client workstation connecting to the Linux image. Alternatively, you can set the display environment variable and run loader manually after having logged in with SSH as user root. By default you log in as user install. This starts the loader automatically and does not allow overriding the display environment variable.
xauth command. To manage X11 authorization cookies with xauth, you must log in to the Linux installation system using SSH as user root. For details on xauth and how to manage authorization cookies, refer to the xauth manpage.
xhost +linuxvm
xhost +linuxvmxhost +linuxvmdisplay= variable settings in the parameter file. If performing an installation under z/VM, rerun the installation to load the new parameter file on the reader.
18.3.3. Installation using VNC
vnc variable and optionally the vncpassword variable in your parameter file (refer to Section 26.4, “VNC and X11 Parameters” for details).
18.3.4. Installation using a VNC listener
vncconnect option in your parameter file, in addition to the options vnc and optionally vncpassword. The network and firewalls must allow an IP connection from your temporary Linux installation to your workstation.
-listen option to run vncviewer as a listener. In a terminal window, enter the command:
vncviewer -listen
vncviewer -listen18.3.5. Automating the Installation with Kickstart
ks= option. The kickstart file typically resides on the network. The parameter file often also contains the options cmdline and RUNKS=1 to execute the loader without having to log in over the network with SSH (Refer to Section 26.6, “Parameters for Kickstart Installations”).
18.3.5.1. Every Installation Produces a Kickstart File
/root/anaconda-ks.cfg. You may use this file to repeat the installation with identical settings, or modify copies to specify settings for other systems.
dasda can have partitions dasda1, dasda2, and dasda3.
Chapter 19. Preparing for Installation
19.1. Preparing for a Network Installation
Note
Note
/var/www/inst/rhel6.9 on the network server can be accessed as http://network.server.com/inst/rhel6.9.
/location/of/disk/space. The directory that will be made publicly available via FTP, NFS, HTTP, or HTTPS will be specified as /publicly_available_directory. For example, /location/of/disk/space may be a directory you create called /var/isos. /publicly_available_directory might be /var/www/html/rhel6.9, for an HTTP install.
dd if=/dev/dvd of=/path_to_image/name_of_image.iso
dd if=/dev/dvd of=/path_to_image/name_of_image.isodd if=/dev/dvd of=/path_to_image/name_of_image.isodd if=/dev/dvd of=/path_to_image/name_of_image.isodd if=/dev/dvd of=/path_to_image/name_of_image.isodd if=/dev/dvd of=/path_to_image/name_of_image.isodd if=/dev/dvd of=/path_to_image/name_of_image.isodd if=/dev/dvd of=/path_to_image/name_of_image.iso19.1.1. Preparing for FTP, HTTP, and HTTPS Installation
Warning
TLSv1 protocol, and disable SSLv2 and SSLv3. This is due to the POODLE SSL vulnerability (CVE-2014-3566). See https://access.redhat.com/solutions/1232413 for details about securing Apache, and https://access.redhat.com/solutions/1234773 for information about securing tftp.
19.1.2. Preparing for an NFS Installation
install.img file, and optionally the product.img file available on the network server via NFS.
- Transfer the ISO image to the NFS exported directory. On a Linux system, run:
mv /path_to_image/name_of_image.iso /publicly_available_directory/
mv /path_to_image/name_of_image.iso /publicly_available_directory/mv /path_to_image/name_of_image.iso /publicly_available_directory/mv /path_to_image/name_of_image.iso /publicly_available_directory/mv /path_to_image/name_of_image.iso /publicly_available_directory/mv /path_to_image/name_of_image.iso /publicly_available_directory/mv /path_to_image/name_of_image.iso /publicly_available_directory/mv /path_to_image/name_of_image.iso /publicly_available_directory/Copy to Clipboard Copied! Toggle word wrap Toggle overflow where path_to_image is the path to the ISO image file, name_of_image is the name of the ISO image file, and publicly_available_directory is a directory that is available over NFS or that you intend to make available over NFS. - Use a SHA256 checksum program to verify that the ISO image that you copied is intact. Many SHA256 checksum programs are available for various operating systems. On a Linux system, run:
sha256sum name_of_image.iso
$ sha256sum name_of_image.iso$ sha256sum name_of_image.iso$ sha256sum name_of_image.isoCopy to Clipboard Copied! Toggle word wrap Toggle overflow where name_of_image is the name of the ISO image file. The SHA256 checksum program displays a string of 64 characters called a hash. Compare this hash to the hash displayed for this particular image on the Downloads page in the Red Hat Customer Portal (refer to Chapter 1, Obtaining Red Hat Enterprise Linux). The two hashes should be identical. - Copy the
images/directory from inside the ISO image to the same directory in which you stored the ISO image file itself. Enter the following commands:mount -t iso9660 /path_to_image/name_of_image.iso /mount_point -o loop,ro cp -pr /mount_point/images /publicly_available_directory/ umount /mount_point
mount -t iso9660 /path_to_image/name_of_image.iso /mount_point -o loop,romount -t iso9660 /path_to_image/name_of_image.iso /mount_point -o loop,romount -t iso9660 /path_to_image/name_of_image.iso /mount_point -o loop,romount -t iso9660 /path_to_image/name_of_image.iso /mount_point -o loop,romount -t iso9660 /path_to_image/name_of_image.iso /mount_point -o loop,romount -t iso9660 /path_to_image/name_of_image.iso /mount_point -o loop,romount -t iso9660 /path_to_image/name_of_image.iso /mount_point -o loop,ro cp -pr /mount_point/images /publicly_available_directory/cp -pr /mount_point/images /publicly_available_directory/cp -pr /mount_point/images /publicly_available_directory/cp -pr /mount_point/images /publicly_available_directory/cp -pr /mount_point/images /publicly_available_directory/ umount /mount_pointumount /mount_pointCopy to Clipboard Copied! Toggle word wrap Toggle overflow wherepath_to_imageis the path to the ISO image file,name_of_imageis the name of the ISO image file, andmount_pointis a mount point on which to mount the image while you copy files from the image. For example:mount -t iso9660 /var/isos/RHEL6.iso /mnt/tmp -o loop,ro cp -pr /mnt/tmp/images /var/isos/ umount /mnt/tmp
mount -t iso9660 /var/isos/RHEL6.iso /mnt/tmp -o loop,ro cp -pr /mnt/tmp/images /var/isos/ umount /mnt/tmpCopy to Clipboard Copied! Toggle word wrap Toggle overflow The ISO image file and animages/directory are now present, side-by-side, in the same directory. - Verify that the
images/directory contains at least theinstall.imgfile, without which installation cannot proceed. Optionally, theimages/directory should contain theproduct.imgfile, without which only the packages for a Minimal installation will be available during the package group selection stage (refer to Section 23.17, “Package Group Selection”). - Ensure that an entry for the publicly available directory exists in the
/etc/exportsfile on the network server so that the directory is available via NFS.To export a directory read-only to a specific system, use:/publicly_available_directory client.ip.address (ro)
/publicly_available_directory client.ip.address (ro)/publicly_available_directory client.ip.address (ro)/publicly_available_directory client.ip.address (ro)/publicly_available_directory client.ip.address (ro)Copy to Clipboard Copied! Toggle word wrap Toggle overflow To export a directory read-only to all systems, use:/publicly_available_directory * (ro)
/publicly_available_directory * (ro)/publicly_available_directory * (ro)Copy to Clipboard Copied! Toggle word wrap Toggle overflow - On the network server, start the NFS daemon (on a Red Hat Enterprise Linux system, use
/sbin/service nfs start). If NFS is already running, reload the configuration file (on a Red Hat Enterprise Linux system use/sbin/service nfs reload). - Be sure to test the NFS share following the directions in the Red Hat Enterprise Linux Deployment Guide. Refer to your NFS documentation for details on starting and stopping the NFS server.
Note
boot: prompt:
linux mediacheck
linux mediacheck19.2. Preparing for a Hard Drive Installation
19.2.1. Accessing Installation Phase 3 and the Package Repository on a Hard Drive
Note
install.img file extracted from the ISO image. With these files present on a hard drive, you can choose as the installation source when you boot the installation program.
- an ISO image of the installation DVD. An ISO image is a file that contains an exact copy of the content of a DVD.
- an
install.imgfile extracted from the ISO image. - optionally, a
product.imgfile extracted from the ISO image.
- Obtain an ISO image of the Red Hat Enterprise Linux installation DVD (refer to Chapter 1, Obtaining Red Hat Enterprise Linux). Alternatively, if you have the DVD on physical media, you can create an image of it with the following command on a Linux system:
dd if=/dev/dvd of=/path_to_image/name_of_image.iso
dd if=/dev/dvd of=/path_to_image/name_of_image.isodd if=/dev/dvd of=/path_to_image/name_of_image.isodd if=/dev/dvd of=/path_to_image/name_of_image.isodd if=/dev/dvd of=/path_to_image/name_of_image.isodd if=/dev/dvd of=/path_to_image/name_of_image.isodd if=/dev/dvd of=/path_to_image/name_of_image.isodd if=/dev/dvd of=/path_to_image/name_of_image.isoCopy to Clipboard Copied! Toggle word wrap Toggle overflow where dvd is your DVD drive device, name_of_image is the name you give to the resulting ISO image file, and path_to_image is the path to the location on your system where the resulting ISO image will be stored. - Transfer the ISO images to the DASD or SCSI device.The ISO files must be located on a hard drive that is activated in installation phase 1 (refer to Chapter 21, Installation Phase 1: Configuring a Network Device) or in installation phase 2 (refer to Chapter 22, Installation Phase 2: Configuring Language and Installation Source). This is automatically possible with DASDs.For an FCP LUN, you must either boot (IPL) from the same FCP LUN or use the rescue shell provided by the installation phase 1 menus to manually activate the FCP LUN holding the ISOs as described in Section 25.2.1, “Dynamically Activating an FCP LUN”.
- Use a SHA256 checksum program to verify that the ISO image that you copied is intact. Many SHA256 checksum programs are available for various operating systems. On a Linux system, run:
sha256sum name_of_image.iso
$ sha256sum name_of_image.iso$ sha256sum name_of_image.iso$ sha256sum name_of_image.isoCopy to Clipboard Copied! Toggle word wrap Toggle overflow where name_of_image is the name of the ISO image file. The SHA256 checksum program displays a string of 64 characters called a hash. Compare this hash to the hash displayed for this particular image on the Downloads page in the Red Hat Customer Portal (refer to Chapter 1, Obtaining Red Hat Enterprise Linux). The two hashes should be identical. - Copy the
images/directory from inside the ISO image to the same directory in which you stored the ISO image file itself. Enter the following commands:mount -t iso9660 /path_to_image/name_of_image.iso /mount_point -o loop,ro cp -pr /mount_point/images /publicly_available_directory/ umount /mount_point
mount -t iso9660 /path_to_image/name_of_image.iso /mount_point -o loop,romount -t iso9660 /path_to_image/name_of_image.iso /mount_point -o loop,romount -t iso9660 /path_to_image/name_of_image.iso /mount_point -o loop,romount -t iso9660 /path_to_image/name_of_image.iso /mount_point -o loop,romount -t iso9660 /path_to_image/name_of_image.iso /mount_point -o loop,romount -t iso9660 /path_to_image/name_of_image.iso /mount_point -o loop,romount -t iso9660 /path_to_image/name_of_image.iso /mount_point -o loop,ro cp -pr /mount_point/images /publicly_available_directory/cp -pr /mount_point/images /publicly_available_directory/cp -pr /mount_point/images /publicly_available_directory/cp -pr /mount_point/images /publicly_available_directory/cp -pr /mount_point/images /publicly_available_directory/ umount /mount_pointumount /mount_pointCopy to Clipboard Copied! Toggle word wrap Toggle overflow wherepath_to_imageis the path to the ISO image file,name_of_imageis the name of the ISO image file, andmount_pointis a mount point on which to mount the image while you copy files from the image. For example:mount -t iso9660 /var/isos/RHEL6.iso /mnt/tmp -o loop,ro cp -pr /mnt/tmp/images /var/isos/ umount /mnt/tmp
mount -t iso9660 /var/isos/RHEL6.iso /mnt/tmp -o loop,ro cp -pr /mnt/tmp/images /var/isos/ umount /mnt/tmpCopy to Clipboard Copied! Toggle word wrap Toggle overflow The ISO image file and animages/directory are now present, side-by-side, in the same directory. - Verify that the
images/directory contains at least theinstall.imgfile, without which installation cannot proceed. Optionally, theimages/directory should contain theproduct.imgfile, without which only the packages for a Minimal installation will be available during the package group selection stage (refer to Section 23.17, “Package Group Selection”).Important
install.imgandproduct.imgmust be the only files in theimages/directory. - Make the DASD or SCSI LUN accessible to the new z/VM guest virtual machine or LPAR, and then proceed with installation. (Refer to Chapter 20, Booting (IPL) the Installer) or alternatively with Section 19.2.1.1, “Preparing for Booting the Installer from a Hard Drive”.
Note
mediacheck parameter to your parameter file (refer to Section 26.7, “Miscellaneous Parameters”).
19.2.1.1. Preparing for Booting the Installer from a Hard Drive
/mnt, and you do not need to preserve an existing boot record.
zipl -V -t /mnt/ -i /mnt/images/kernel.img -r /mnt/images/initrd.img -p /mnt/images/generic.prm
zipl -V -t /mnt/ -i /mnt/images/kernel.img -r /mnt/images/initrd.img -p /mnt/images/generic.prmWarning
zipl.conf).
Chapter 20. Booting (IPL) the Installer
20.1. Installing Under z/VM
- the z/VM virtual reader
- a DASD or an FCP-attached SCSI device prepared with the zipl boot loader
- an FCP-attached SCSI DVD drive
Note
logon user here
logon user herelogon user herelogon user here#cp ipl cms
#cp ipl cmsquery disk
query disk- Query the available main memory, which is called storage in System z terminology. Your guest should have at least 512 megabytes of main memory.
cp query virtual storage
cp query virtual storageCopy to Clipboard Copied! Toggle word wrap Toggle overflow - Query available network devices of type:
osa- OSA (CHPID type OSD, real or virtual (VSWITCH or GuestLAN type QDIO), both in QDIO mode)
hsi- HiperSockets (CHPID type IQD, real or virtual (GuestLAN type Hipers))
lcs- LCS (CHPID type OSE)
For example, to query all of the network device types mentioned above:cp query virtual osa
cp query virtual osaCopy to Clipboard Copied! Toggle word wrap Toggle overflow - Query available DASDs. Only those that are flagged RW for read-write mode can be used as installation targets:
cp query virtual dasd
cp query virtual dasdCopy to Clipboard Copied! Toggle word wrap Toggle overflow - Query available FCP channels:
cp query virtual fcp
cp query virtual fcpCopy to Clipboard Copied! Toggle word wrap Toggle overflow
20.1.1. Using the z/VM Reader
- If necessary, add the device containing the z/VM TCP/IP tools to your CMS disk list. For example:
cp link tcpmaint 592 592 acc 592 fm
cp link tcpmaint 592 592 acc 592 fmCopy to Clipboard Copied! Toggle word wrap Toggle overflow Replace fm with any FILEMODE letter. - Execute the command:
ftp host
ftp hostftp hostCopy to Clipboard Copied! Toggle word wrap Toggle overflow Where host is the hostname or IP address of the FTP server that hosts the boot images (kernel.imgandinitrd.img). - Log in and execute the following commands. Use the
(reploption if you are overwriting existingkernel.img,initrd.img,generic.prm, orredhat.execfiles:Copy to Clipboard Copied! Toggle word wrap Toggle overflow - Optionally check whether the files were transferred correctly by using the CMS command
filelistto show the received files and their format. It is important thatkernel.imgandinitrd.imghave a fixed record length format denoted byFin the Format column and a record length of 80 in theLreclcolumn. For example:Copy to Clipboard Copied! Toggle word wrap Toggle overflow Press PF3 to quitfilelistand return to the CMS prompt. - Finally execute the REXX script
redhat.execto boot (IPL) the installer:redhat
redhatCopy to Clipboard Copied! Toggle word wrap Toggle overflow
20.1.2. Using a Prepared DASD
cp ipl DASD device number loadparm boot_entry_number
cp ipl DASD device number loadparm boot_entry_numbercp ipl DASD device number loadparm boot_entry_numbercp ipl DASD device number loadparm boot_entry_numbercp ipl DASD device number loadparm boot_entry_numbercp ipl eb1c loadparm 0
cp ipl eb1c loadparm 020.1.3. Using a Prepared FCP-attached SCSI Disk
- Configure the SCSI boot loader of z/VM to access the prepared SCSI disk in the FCP storage area network. Select the prepared zipl boot menu entry referring to the Red Hat Enterprise Linux installer. Use a command of the following form:
cp set loaddev portname WWPN lun LUN bootprog boot_entry_number
cp set loaddev portname WWPN lun LUN bootprog boot_entry_numbercp set loaddev portname WWPN lun LUN bootprog boot_entry_numbercp set loaddev portname WWPN lun LUN bootprog boot_entry_numbercp set loaddev portname WWPN lun LUN bootprog boot_entry_numbercp set loaddev portname WWPN lun LUN bootprog boot_entry_numbercp set loaddev portname WWPN lun LUN bootprog boot_entry_numberCopy to Clipboard Copied! Toggle word wrap Toggle overflow Replace WWPN with the WWPN of the storage system and LUN with the LUN of the disk. The 16-digit hexadecimal numbers must be split into two pairs of eight digits each. For example:cp set loaddev portname 50050763 050b073d lun 40204011 00000000 bootprog 0
cp set loaddev portname 50050763 050b073d lun 40204011 00000000 bootprog 0Copy to Clipboard Copied! Toggle word wrap Toggle overflow - Optionally, confirm your settings with the command:
query loaddev
query loaddevCopy to Clipboard Copied! Toggle word wrap Toggle overflow - IPL the FCP device connected with the storage system containing the disk with the command:
cp ipl FCP_device
cp ipl FCP_device cp ipl FCP_device cp ipl FCP_deviceCopy to Clipboard Copied! Toggle word wrap Toggle overflow For example:cp ipl fc00
cp ipl fc00Copy to Clipboard Copied! Toggle word wrap Toggle overflow
20.1.4. Using an FCP-attached SCSI DVD Drive
- Insert your Red Hat Enterprise Linux for System z DVD into the DVD drive.
- Configure the SCSI boot loader of z/VM to access the DVD drive in the FCP storage area network and specify
1for the boot entry on the Red Hat Enterprise Linux for System z DVD. Use a command of the following form:cp set loaddev portname WWPN lun FCP_LUN bootprog 1
cp set loaddev portname WWPN lun FCP_LUN bootprog 1cp set loaddev portname WWPN lun FCP_LUN bootprog 1cp set loaddev portname WWPN lun FCP_LUN bootprog 1cp set loaddev portname WWPN lun FCP_LUN bootprog 1cp set loaddev portname WWPN lun FCP_LUN bootprog 1Copy to Clipboard Copied! Toggle word wrap Toggle overflow Replace WWPN with the WWPN of the FCP-to-SCSI bridge and FCP_LUN with the LUN of the DVD drive. The 16-digit hexadecimal numbers must be split into two pairs of eight characters each. For example:cp set loaddev portname 20010060 eb1c0103 lun 00010000 00000000 bootprog 1
cp set loaddev portname 20010060 eb1c0103 lun 00010000 00000000 bootprog 1Copy to Clipboard Copied! Toggle word wrap Toggle overflow - Optionally, confirm your settings with the command:
cp query loaddev
cp query loaddevCopy to Clipboard Copied! Toggle word wrap Toggle overflow - IPL on the FCP device connected with the FCP-to-SCSI bridge.
cp ipl FCP_device
cp ipl FCP_devicecp ipl FCP_deviceCopy to Clipboard Copied! Toggle word wrap Toggle overflow For example:cp ipl fc00
cp ipl fc00Copy to Clipboard Copied! Toggle word wrap Toggle overflow
20.2. Installing in an LPAR
- an FTP server
- the DVD drive of the HMC or SE
- a DASD or an FCP-attached SCSI drive prepared with the zipl boot loader
- an FCP-attached SCSI DVD drive
- Log in on the IBM System z Hardware Management Console (HMC) or the Support Element (SE) as a user with sufficient privileges to install a new operating system to an LPAR. The
SYSPROGuser is recommended. - Select Images, then select the LPAR to which you wish to install. Use the arrows in the frame on the right side to navigate to the menu.
- Double-click Operating System Messages to show the text console on which Linux boot messages will appear and potentially user input will be required. Refer to the chapter on booting Linux in Linux on System z Device Drivers, Features, and Commands on Red Hat Enterprise Linux 6 and the Hardware Management Console Operations Guide, order number [SC28-6857], for details.
20.2.1. Using an FTP Server
- Double-click Load from CD-ROM, DVD, or Server.
- In the dialog box that follows, select FTP Source, and enter the following information: Host Computer: Hostname or IP address of the FTP server you wish to install from (for example, ftp.redhat.com) User ID: Your user name on the FTP server (or anonymous) Password: Your password (use your email address if you are logging in as anonymous) Account (optional): Leave this field empty File location (optional): Directory on the FTP server holding Red Hat Enterprise Linux for System z (for example, /rhel/s390x/)
- Click Continue.
- In the dialog that follows, keep the default selection of
generic.insand click Continue.
20.2.2. Using the HMC or SE DVD Drive
- Double-click Load from CD-ROM, DVD, or Server.
- In the dialog box that follows, select Local CD-ROM / DVD then click Continue.
- In the dialog that follows, keep the default selection of
generic.insthen click Continue.
20.2.3. Using a Prepared DASD
- Double-click Load.
- In the dialog box that follows, select
Normalas the Load type. - As Load address fill in the device number of the DASD.
- As Load parameter fill in the number corresponding the zipl boot menu entry that you prepared for booting the Red Hat Enterprise Linux installer.
- Click the button.
20.2.4. Using a Prepared FCP-attached SCSI Disk
- Double-click Load.
- In the dialog box that follows, select
SCSIas the Load type. - As Load address fill in the device number of the FCP channel connected with the SCSI disk.
- As World wide port name fill in the WWPN of the storage system containing the disk as a 16-digit hexadecimal number.
- As Logical unit number fill in the LUN of the disk as a 16-digit hexadecimal number.
- As Boot program selector fill in the number corresponding the zipl boot menu entry that you prepared for booting the Red Hat Enterprise Linux installer.
- Leave the Boot record logical block address as
0and the Operating system specific load parameters empty. - Click the button.
20.2.5. Using an FCP-attached SCSI DVD Drive
- Insert your Red Hat Enterprise Linux for System z DVD into the DVD drive.
- Double-click Load.
- In the dialog box that follows, select
SCSIas the Load type. - As Load address fill in the device number of the FCP channel connected with the FCP-to-SCSI bridge.
- As World wide port name fill in the WWPN of the FCP-to-SCSI bridge as a 16-digit hexadecimal number.
- As Logical unit number fill in the LUN of the DVD drive as a 16-digit hexadecimal number.
- As Boot program selector fill in the number
1to select the boot entry on the Red Hat Enterprise Linux for System z DVD. - Leave the Boot record logical block address as
0and the Operating system specific load parameters empty. - Click the button.
Chapter 21. Installation Phase 1: Configuring a Network Device
generic.prm), you will be asked questions about your network. It is a good idea to have your data ready in the form of a datasheet or similar. If you want to automate this step, supply the information for each option in your parameter file or CMS configuration file.
Starting the zSeries initrd to configure networking. Version is 1.2 Starting udev...
Starting the zSeries initrd to configure networking. Version is 1.2
Starting udev...cio_ignore kernel parameter used. If no devices are found because of cio_ignore, as in the example below, you can clear the list of ignored devices. Note that this might take some time and result in a long list when there are many devices, such as on an LPAR.
Important
none. This satisfies the requirement for a defined DASD parameter, while resulting in a SCSI-only environment.
Incorrect ... (<OPTION-NAME>): 0) redo this parameter, 1) continue, 2) restart dialog, 3) halt, 4) shell
Incorrect ... (<OPTION-NAME>):
0) redo this parameter, 1) continue, 2) restart dialog, 3) halt, 4) shellNetwork type 0) default is previous "qeth", 1) new value, ?) help
Network type
0) default is previous "qeth", 1) new value, ?) helpInitial configuration completed:
Initial configuration completed. c) continue, p) parm file/configuration, n) network state, r) restart, s) shell
Initial configuration completed.
c) continue, p) parm file/configuration, n) network state, r) restart, s) shellRUNKS=1 with kickstart and cmdline mode, linuxrc automatically starts the loader.
21.1. A Note on Terminals
root to get a root shell without automatically starting the installer. For problem determination, you might connect with many ssh sessions.
Chapter 22. Installation Phase 2: Configuring Language and Installation Source
generic.prm) the loader program to select language and installation source starts in text mode. In your new ssh session, the following message is displayed:
Welcome to the anaconda install environment 1.2 for zSeries
Welcome to the anaconda install environment 1.2 for zSeries22.1. Non-interactive Line-Mode Installation
cmdline option was specified as boot option in your parameter file (Section 26.6, “Parameters for Kickstart Installations”) or in your kickstart file (refer to Section 32.3, “Creating the Kickstart File”, the loader starts up with line-mode oriented text output. In this mode, all necessary information must be provided in the kickstart file. The installer does not allow user interaction and stops if there is unspecified installation information.
22.2. The Text Mode Installation Program User Interface
Figure 22.1. Installation Program Widgets as seen in URL Setup
Figure 22.2. Installation Program Widgets as seen in Choose a Language
- Window — Windows (usually referred to as dialogs in this manual) appear on your screen throughout the installation process. At times, one window may overlay another; in these cases, you can only interact with the window on top. When you are finished in that window, it disappears, allowing you to continue working in the window underneath.
- Checkbox — Checkboxes allow you to select or deselect a feature. The box displays either an asterisk (selected) or a space (unselected). When the cursor is within a checkbox, press Space to select or deselect a feature.
- Text Input — Text input lines are regions where you can enter information required by the installation program. When the cursor rests on a text input line, you may enter and/or edit information on that line.
- Text Widget — Text widgets are regions of the screen for the display of text. At times, text widgets may also contain other widgets, such as checkboxes. If a text widget contains more information than can be displayed in the space reserved for it, a scroll bar appears; if you position the cursor within the text widget, you can then use the Up and Down arrow keys to scroll through all the information available. Your current position is shown on the scroll bar by a # character, which moves up and down the scroll bar as you scroll.
- Scroll Bar — Scroll bars appear on the side or bottom of a window to control which part of a list or document is currently in the window's frame. The scroll bar makes it easy to move to any part of a file.
- Button Widget — Button widgets are the primary method of interacting with the installation program. You progress through the windows of the installation program by navigating these buttons, using the Tab and Enter keys. Buttons can be selected when they are highlighted.
- Cursor — Although not a widget, the cursor is used to select (and interact with) a particular widget. As the cursor is moved from widget to widget, it may cause the widget to change color, or the cursor itself may only appear positioned in or next to the widget. In Figure 22.1, “Installation Program Widgets as seen in URL Setup”, the cursor is positioned on the checkbox. Figure 8.2, “Installation Program Widgets as seen in Choose a Language”, shows the cursor on the button.
22.2.1. Using the Keyboard to Navigate
Warning
22.3. Language Selection
lang= (refer to Section 26.5, “Loader Parameters”) or with the kickstart command lang (refer to Section 28.4, “Automating the Installation with Kickstart”).
Figure 22.3. Language Selection
22.4. Installation Method
Figure 22.4. Installation Method
22.4.1. Installing from a DVD
Note
22.4.2. Installing from a Hard Drive
repo=hd boot option, you already specified a partition.
Figure 22.5. Selecting Partition Dialog for Hard Drive Installation
/dev/dasd. Each individual drive has its own letter, for example /dev/dasda or /dev/sda. Each partition on a drive is numbered, for example /dev/dasda1 or /dev/sda1.
| File system | Mount point | Original path to files | Directory to use |
|---|---|---|---|
| ext2, ext3, ext4 | /home | /home/user1/RHEL6.9 | /user1/RHEL6.9 |
/. If the ISO images are located in a subdirectory of a mounted partition, enter the name of the directory holding the ISO images within that partition. For example, if the partition on which the ISO images is normally mounted as /home/, and the images are in /home/new/, you would enter /new/.
Important
22.4.3. Performing a Network Installation
- If you are installing via NFS, proceed to Section 22.4.4, “Installing via NFS”.
- If you are installing via Web or FTP, proceed to Section 22.4.5, “Installing via FTP, HTTP, or HTTPS”.
22.4.4. Installing via NFS
repo=nfs boot option, you already specified a server and path.
Figure 22.6. NFS Setup Dialog
- Enter the domain name or IP address of your NFS server in the NFS server name field. For example, if you are installing from a host named
eastcoastin the domainexample.com, entereastcoast.example.com. - Enter the name of the exported directory in the Red Hat Enterprise Linux 6.9 directory field:
- If the NFS server is exporting a mirror of the Red Hat Enterprise Linux installation tree, enter the directory which contains the root of the installation tree. If everything was specified properly, a message appears indicating that the installation program for Red Hat Enterprise Linux is running.
- If the NFS server is exporting the ISO image of the Red Hat Enterprise Linux DVD, enter the directory which contains the ISO image.
If you followed the setup described in Section 19.1.2, “Preparing for an NFS Installation”, the exported directory is the one that you specified aspublicly_available_directory. - Specify any NFS mount options that you require in the NFS mount options field. Refer to the man pages for mount and nfs for a comprehensive list of options. If you do not require any mount options, leave the field empty.
22.4.5. Installing via FTP, HTTP, or HTTPS
Important
http:// or https:// or ftp:// as the protocol.
repo=ftp or repo=http boot options, you already specified a server and path.
/images directory for your architecture. For example:
/mirrors/redhat/rhel-6.9/Server/s390x/
https:// as the protocol.
{ftp|http|https}://<user>:<password>@<hostname>[:<port>]/<directory>/
http://install:rhel6.9pw@name.example.com/mirrors/redhat/rhel-6.9/Server/s390x/
Figure 22.7. URL Setup Dialog
22.5. Verifying Media
22.6. Retrieving Phase 3 of the Installation Program

Figure 22.8. Retrieving phase 3 of the installation program
Chapter 23. Installation Phase 3: Installing Using Anaconda
23.1. The Non-interactive Line-Mode Text Installation Program Output
cmdline option was specified as boot option in your parameter file (Refer to Section 26.6, “Parameters for Kickstart Installations”) or in your kickstart file (refer to Chapter 32, Kickstart Installations), anaconda starts with line-mode oriented text output. In this mode, all necessary information must be provided in the kickstart file. The installer will not allow user interaction and stops if there is unspecified installation information.
23.2. The Text Mode Installation Program User Interface
- Interactively activating FCP LUNs
- configuring advanced storage methods such as LVM, RAID, FCoE, zFCP, and iSCSI.
- customizing the partition layout
- customizing the bootloader layout
- selecting packages during installation
- configuring the installed system with firstboot
23.3. The Graphical Installation Program User Interface
23.4. Configure the Install Terminal
display= variable and do not use X11 forwarding, anaconda gives you the choice of starting VNC or text mode.
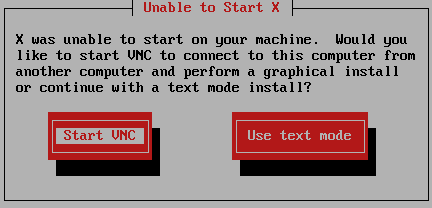
Figure 23.1. Choosing VNC or text mode
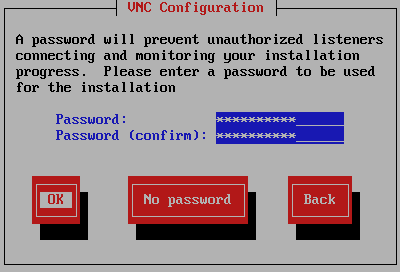
Figure 23.2. The VNC server starts
23.5. Welcome to Red Hat Enterprise Linux
Figure 23.3. The Welcome screen
23.6. Storage Devices
Figure 23.4. Storage devices
- Basic Storage Devices
- This option does not apply to System z.
- Specialized Storage Devices
- Select to install Red Hat Enterprise Linux on the following storage devices:
- Direct access storage devices (DASDs)
- Multipath devices such as FCP-attachable SCSI LUN with multiple paths
- Storage area networks (SANs) such as FCP-attachable SCSI LUNs with a single path
Use the option to configure Internet Small Computer System Interface (iSCSI) connections. You cannot use the FCoE (Fiber Channel over Ethernet) option on System z; this option is grayed out.
Note
mdeventd daemon is not performed during installation.
23.6.1. The Storage Devices Selection Screen
- Basic Devices
- Basic storage devices directly connected to the local system, such as hard disk drives and solid-state drives. On System z, this contains activated DASDs.
- Firmware RAID
- Storage devices attached to a firmware RAID controller. This does not apply to System z.
- Multipath Devices
- Storage devices accessible through more than one path, such as through multiple SCSI controllers or Fiber Channel ports on the same system.
Important
The installer only detects multipath storage devices with serial numbers that are 16 or 32 characters in length. - Other SAN Devices
- Any other devices available on a storage area network (SAN) such as FCP LUNs attached over one single path.
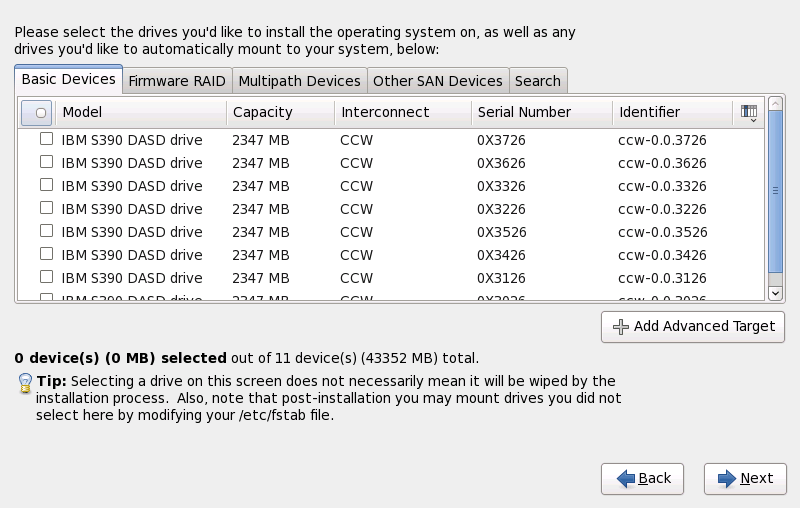
Figure 23.5. Select storage devices — Basic Devices
Figure 23.6. Select storage devices — Multipath Devices
Figure 23.7. Select storage devices — Other SAN Devices
Figure 23.8. The Storage Devices Search Tab
Figure 23.9. Selecting Columns
/etc/fstab file.
23.6.1.1. DASD low-level formatting
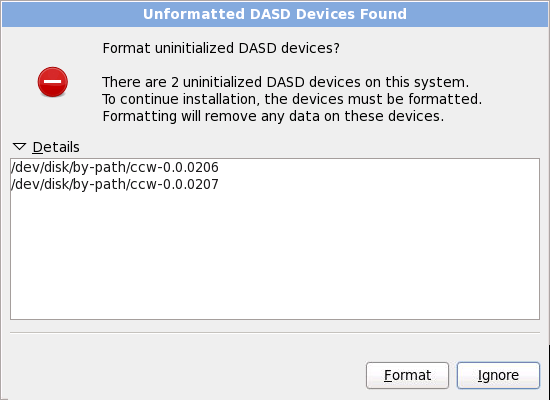
Figure 23.10. Unformatted DASD Devices Found
zerombr. Refer to Chapter 32, Kickstart Installations for more details.
23.6.1.2. Advanced Storage Options
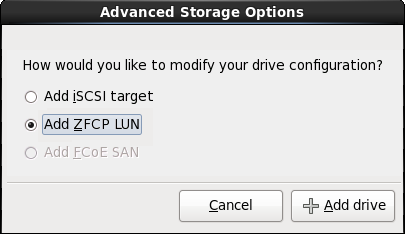
Figure 23.11. Advanced Storage Options
23.6.1.2.1. Configure iSCSI parameters
Procedure 23.1. iSCSI discovery
Figure 23.12. The iSCSI Discovery Details dialog
- Enter the IP address of the iSCSI target in the Target IP Address field.
- Provide a name in the iSCSI Initiator Name field for the iSCSI initiator in iSCSI qualified name (IQN) format.A valid IQN contains:
- the string
iqn.(note the period) - a date code that specifies the year and month in which your organization's Internet domain or subdomain name was registered, represented as four digits for the year, a dash, and two digits for the month, followed by a period. For example, represent September 2010 as
2010-09. - your organization's Internet domain or subdomain name, presented in reverse order with the top-level domain first. For example, represent the subdomain
storage.example.comascom.example.storage - a colon followed by a string that uniquely identifies this particular iSCSI initiator within your domain or subdomain. For example,
:diskarrays-sn-a8675309.
A complete IQN therefore resembles:iqn.2010-09.storage.example.com:diskarrays-sn-a8675309, and anaconda pre-populates the iSCSI Initiator Name field with a name in this format to help you with the structure.For more information on IQNs, refer to 3.2.6. iSCSI Names in RFC 3720 - Internet Small Computer Systems Interface (iSCSI) available from http://tools.ietf.org/html/rfc3720#section-3.2.6 and 1. iSCSI Names and Addresses in RFC 3721 - Internet Small Computer Systems Interface (iSCSI) Naming and Discovery available from http://tools.ietf.org/html/rfc3721#section-1. - Use the drop-down menu to specify the type of authentication to use for iSCSI discovery:
Figure 23.13. iSCSI discovery authentication
- If you selected as the authentication type, provide the username and password for the iSCSI target in the CHAP Username and CHAP Password fields.
Figure 23.14. CHAP pair
- If you selected as the authentication type, provide the username and password for the iSCSI target in the CHAP Username and CHAP Password field and the username and password for the iSCSI initiator in the Reverse CHAP Username and Reverse CHAP Password fields.
Figure 23.15. CHAP pair and a reverse pair
- Click . Anaconda attempts to discover an iSCSI target based on the information that you provided. If discovery succeeds, the iSCSI Discovered Nodes dialog presents you with a list of all the iSCSI nodes discovered on the target.
- Each node is presented with a checkbox beside it. Click the checkboxes to select the nodes to use for installation.
Figure 23.16. The iSCSI Discovered Nodes dialog
- Click to initiate an iSCSI session.
Procedure 23.2. Starting an iSCSI session
Figure 23.17. The iSCSI Nodes Login dialog
- Use the drop-down menu to specify the type of authentication to use for the iSCSI session:
Figure 23.18. iSCSI session authentication
If your environment uses the same type of authentication and same username and password for iSCSI discovery and for the iSCSI session, select to reuse these credentials. - If you selected as the authentication type, provide the username and password for the iSCSI target in the CHAP Username and CHAP Password fields.
Figure 23.19. CHAP pair
- If you selected as the authentication type, provide the username and password for the iSCSI target in the CHAP Username and CHAP Password fields and the username and password for the iSCSI initiator in the Reverse CHAP Username and Reverse CHAP Password fields.
Figure 23.20. CHAP pair and a reverse pair
- Click . Anaconda attempts to log into the nodes on the iSCSI target based on the information that you provided. The iSCSI Login Results dialog presents you with the results.
Figure 23.21. The iSCSI Login Results dialog
- Click to continue.
23.6.1.2.2. FCP Devices
Notes
- Interactive creation of an FCP device is only possible in graphical mode. It is not possible to interactively configure an FCP device in a text-only install.
- Each value entered should be verified as correct, as any mistakes made may cause the system not to operate properly. Use only lower-case letters in hex values.
- For more information on these values, refer to the hardware documentation check with the system administrator who set up the network for this system.
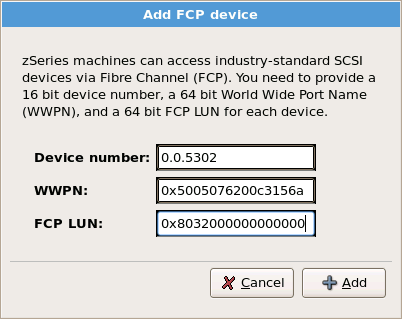
Figure 23.22. Add FCP Device
Important
none as the parameter interactively during phase 1 of an interactive installation, or add DASD=none in the parameter or CMS configuration file. This satisfies the requirement for a defined DASD parameter, while resulting in a SCSI-only environment.
23.7. Setting the Hostname
Note
Figure 23.23. Setting the hostname
23.7.1. Editing Network Connections
Note
system-config-network command in a shell prompt to launch the Network Administration Tool. If you are not root, it prompts you for the root password to continue.
Figure 23.24. Network Connections
eth0 (OSA, LCS), or hsi0 (HiperSockets). Note that on System z you cannot add a new connection here. To modify an existing connection, select a row in the list and click the button. A dialog box appears with a set of tabs appropriate to wired connections, as described below.
23.7.1.1. Options common to all types of connection
23.7.1.2. The Wired tab
Figure 23.25. The Wired tab
23.7.1.3. The 802.1x Security tab
- Authentication
- Choose one of the following methods of authentication:
- TLS for Transport Layer Security
- Tunneled TLS for Tunneled Transport Layer Security, otherwise known as TTLS, or EAP-TTLS
- Protected EAP (PEAP) for Protected Extensible Authentication Protocol
- Identity
- Provide the identity of this server.
- User certificate
- Browse to a personal X.509 certificate file encoded with Distinguished Encoding Rules (DER) or Privacy Enhanced Mail (PEM).
- CA certificate
- Browse to a X.509 certificate authority certificate file encoded with Distinguished Encoding Rules (DER) or Privacy Enhanced Mail (PEM).
- Private key
- Browse to a private key file encoded with Distinguished Encoding Rules (DER), Privacy Enhanced Mail (PEM), or the Personal Information Exchange Syntax Standard (PKCS#12).
- Private key password
- The password for the private key specified in the Private key field. Select Show password to make the password visible as you type it.
Figure 23.26. The 802.1x Security tab
23.7.1.4. The IPv4 Settings tab
IPADDR, NETMASK, GATEWAY, DNS, SEARCHDNS (Refer to Section 26.3, “Installation Network Parameters”).
- Automatic (DHCP)
- IPv4 parameters are configured by the DHCP service on the network.
- Automatic (DHCP) addresses only
- The IPv4 address, netmask, and gateway address are configured by the DHCP service on the network, but DNS servers and search domains must be configured manually.
- Manual
- IPv4 parameters are configured manually for a static configuration.
- Link-Local Only
- A link-local address in the 169.254/16 range is assigned to the interface.
- Shared to other computers
- The system is configured to provide network access to other computers. The interface is assigned an address in the 10.42.x.1/24 range, a DHCP server and DNS server are started, and the interface is connected to the default network connection on the system with network address translation (NAT).
- Disabled
- IPv4 is disabled for this connection.
Figure 23.27. The IPv4 Settings tab
23.7.1.4.1. Editing IPv4 routes
Figure 23.28. The Editing IPv4 Routes dialog
23.7.1.5. The IPv6 Settings tab
- Ignore
- IPv6 is ignored for this connection.
- Automatic
- NetworkManager uses router advertisement (RA) to create an automatic, stateless configuration.
- Automatic, addresses only
- NetworkManager uses RA to create an automatic, stateless configuration, but DNS servers and search domains are ignored and must be configured manually.
- Automatic, DHCP only
- NetworkManager does not use RA, but requests information from DHCPv6 directly to create a stateful configuration.
- Manual
- IPv6 parameters are configured manually for a static configuration.
- Link-Local Only
- A link-local address with the fe80::/10 prefix is assigned to the interface.
Figure 23.29. The IPv6 Settings tab
23.7.1.5.1. Editing IPv6 routes
Figure 23.30. The Editing IPv6 Routes dialog
23.7.1.6. Restart a network device
ONBOOT=yes is set. Refer to the Red Hat Enterprise Linux 6.9 Deployment Guide available from https://access.redhat.com/documentation/en-US/Red_Hat_Enterprise_Linux/6/html/Deployment_Guide/index.html for more information about interface configuration files.
- Press Ctrl+Alt+F2 to switch to virtual terminal
tty2. - Move the interface configuration file to a temporary location:
mv /etc/sysconfig/network-scripts/ifcfg-device_name /tmp
mv /etc/sysconfig/network-scripts/ifcfg-device_name /tmpCopy to Clipboard Copied! Toggle word wrap Toggle overflow where device_name is the device that you just reconfigured. For example,ifcfg-eth0is the ifcfg file foreth0.The device is now disconnected in anaconda. - Open the interface configuration file in the vi editor:
vi /tmp/ifcfg-device_name
vi /tmp/ifcfg-device_nameCopy to Clipboard Copied! Toggle word wrap Toggle overflow - Verify that the interface configuration file contains the line
ONBOOT=yes. If the file does not already contain the line, add it now and save the file. - Exit the vi editor.
- Move the interface configuration file back to the
/etc/sysconfig/network-scripts/directory:mv /tmp/ifcfg-device_name /etc/sysconfig/network-scripts/
mv /tmp/ifcfg-device_name /etc/sysconfig/network-scripts/Copy to Clipboard Copied! Toggle word wrap Toggle overflow The device is now reconnected in anaconda. - Press Ctrl+Alt+F6 to return to anaconda.
23.8. Time Zone Configuration
- Using your mouse, click on the interactive map to select a specific city (represented by a yellow dot). A red X appears indicating your selection.
- You can also scroll through the list at the bottom of the screen to select your time zone. Using your mouse, click on a location to highlight your selection.
Note
system-config-date command in a shell prompt to launch the Time and Date Properties Tool. If you are not root, it prompts you for the root password to continue.
23.9. Set the Root Password
Note
Figure 23.31. Root Password
su command to change to root only when you need to perform tasks that require superuser authorization. These basic rules minimize the chances of a typo or an incorrect command doing damage to your system.
Note
su - at the shell prompt in a terminal window and then press Enter. Then, enter the root password and press Enter.
Warning
passwd command as root. If you forget the root password, see Resolving Problems in System Recovery Modes in the Red Hat Enterprise Linux 6 Deployment Guide for instructions on how to set a new one.
23.10. Assign Storage Devices
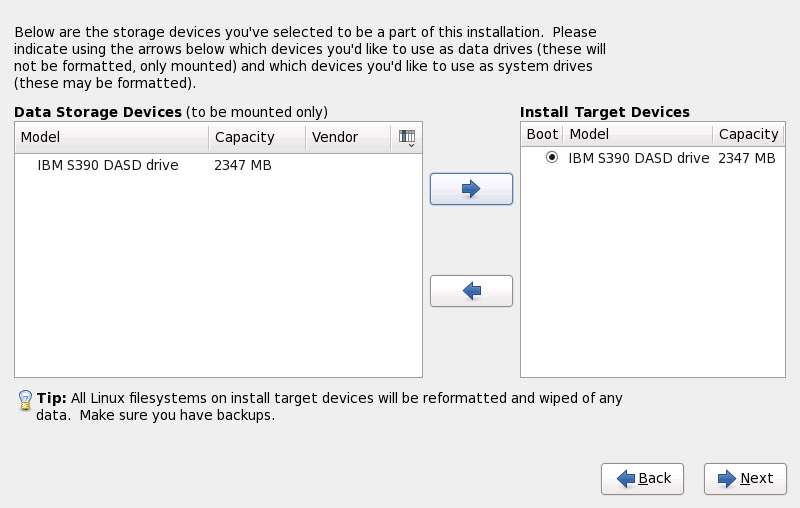
Figure 23.32. Assign storage devices
/boot directory, which is determined later on during partitioning.
23.11. Initializing the Hard Disk
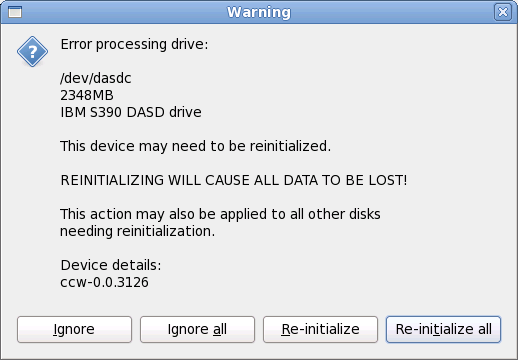
Figure 23.33. Warning screen – initializing DASD
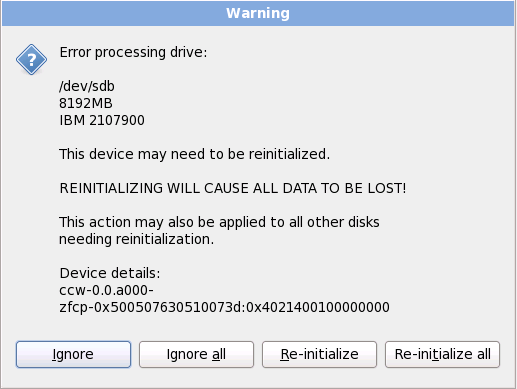
Figure 23.34. Warning screen – initializing FCP LUN
zerombr (refer to Chapter 32, Kickstart Installations). This command is required when performing an unattended installation on a system with previously initialized disks.
Warning
23.12. Upgrading an Existing System
Important
Note
23.12.1. Upgrading Using the Installer
Note
/home partition and perform a fresh installation. For more information on partitions and how to set them up, refer to Section 9.13, “Disk Partitioning Setup”.
rpm -qa --qf '%{NAME} %{VERSION}-%{RELEASE} %{ARCH}\n' > ~/old-pkglist.txt
rpm -qa --qf '%{NAME} %{VERSION}-%{RELEASE} %{ARCH}\n' > ~/old-pkglist.txtsu -c 'tar czf /tmp/etc-`date +%F`.tar.gz /etc' su -c 'mv /tmp/etc-*.tar.gz /home'
su -c 'tar czf /tmp/etc-`date +%F`.tar.gz /etc'
su -c 'mv /tmp/etc-*.tar.gz /home'/home directory as well as content from services such as an Apache, FTP, or SQL server, or a source code management system. Although upgrades are not destructive, if you perform one improperly there is a small possibility of data loss.
Warning
/home directory. If your /home directory is not a separate partition, you should not follow these examples verbatim! Store your backups on another device such as CD or DVD discs or an external hard disk.
23.13. Disk Partitioning Setup
Warning
Important
/home partition that persistently contains user information).
Figure 23.35. Disk Partitioning Setup
Important
- Use All Space
- Select this option to remove all partitions on your storage drives (this includes partitions created by other operating systems such as z/VM or z/OS).
Warning
If you select this option, all data on the selected DASD and SCSI storage devices is removed by the installation program. - Replace Existing Linux System(s)
- Select this option to remove only Linux partitions (partitions created from a previous Linux installation). This does not remove other partitions you may have on your storage devices (such as z/VM or z/OS partitions).
- Shrink Current System
- Select this option to resize your current data and partitions manually and install a default Red Hat Enterprise Linux layout in the space that is freed.
Warning
If you shrink partitions on which other operating systems are installed, you might not be able to use those operating systems. Although this partitioning option does not destroy data, operating systems typically require some free space in their partitions. Before you resize a partition that holds an operating system that you might want to use again, find out how much space you need to leave free. - Use Free Space
- Select this option to retain your current data and partitions and install Red Hat Enterprise Linux in the unused space available on the storage drives. Ensure that there is sufficient space available on the storage drives before you select this option — refer to Section 18.1, “Pre-Installation”.
- Create Custom Layout
- Select this option to partition storage devices manually and create customized layouts. Refer to Section 23.15, “ Creating a Custom Layout or Modifying the Default Layout ”
/boot partition. Refer to Appendix C, Disk Encryption for information on encryption.
Important
23.14. Choosing a Disk Encryption Passphrase
Figure 23.36. Enter passphrase for encrypted partition
Warning
23.15. Creating a Custom Layout or Modifying the Default Layout
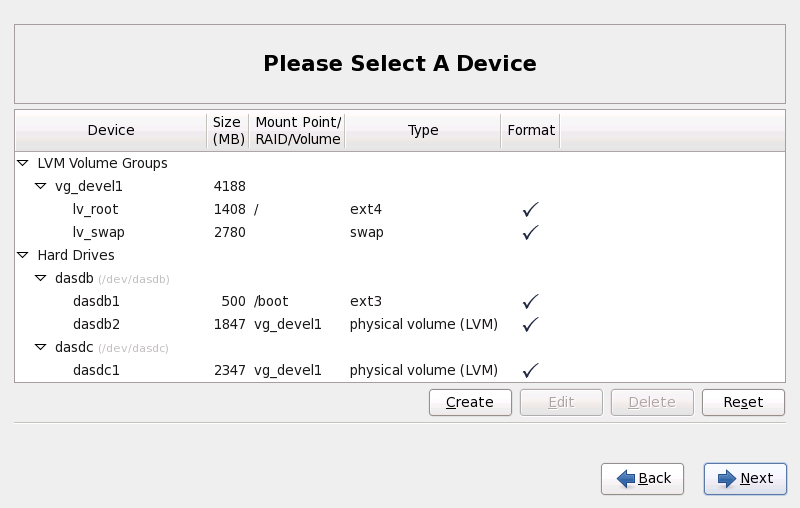
Figure 23.37. Partitioning on System z
dasdb; dasda was assigned to the CMSDASD and this name is no longer available at this point in the installation process.
- Device
- the name of the device, logical volume, or partition
- Size (MB)
- the size of the device, logical volume, or partition (in MB)
- Mount Point/RAID/Volume
- the mount point (location within a file system) on which a partition is to be mounted, or the name of the RAID or logical volume group of which it is a part
- Type
- the type of partition. If the partition is a standard partition, this field displays the type of file system on the partition (for example, ext4). Otherwise, it indicates that the partition is a
physical volume (LVM), or part of asoftware RAID - Format
- A check mark in this column indicates that the partition will be formatted during installation.
- Create
- create a new partition, logical volume, or software RAID
- Edit
- change an existing partition, logical volume, or software RAID. Note that you can only shrink partitions with the button, not enlarge partitions.
- Delete
- remove a partition, logical volume, or software RAID
- Reset
- undo all changes made in this screen
/boot. The kernel files and bootloader sector will be associated with this device. The first DASD or SCSI LUN will be used, and the device number will be used when re-IPLing the post-installed system.
Note
23.15.1. Create Storage
Figure 23.38. Creating Storage
Create Partition
- Standard Partition — create a standard disk partition (as described in Appendix A, An Introduction to Disk Partitions) in unallocated space.
Create Software RAID
- RAID Partition — create a partition in unallocated space to form part of a software RAID device. To form a software RAID device, two or more RAID partitions must be available on the system.
- RAID Device — combine two or more RAID partitions into a software RAID device. When you choose this option, you can specify the type of RAID device to create (the RAID level). This option is only available when two or more RAID partitions are available on the system.
Create LVM Logical Volume
- LVM Physical Volume — create a physical volume in unallocated space.
- LVM Volume Group — create a volume group from one or more physical volumes. This option is only available when at least one physical volume is available on the system.
- LVM Logical Volume — create a logical volume on a volume group. This option is only available when at least one volume group is available on the system.
23.15.2. Adding Partitions
Note
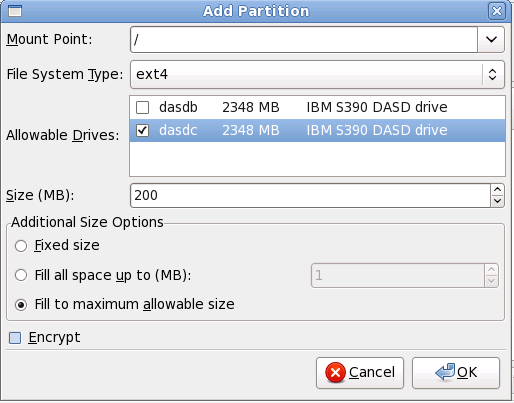
Figure 23.39. Creating a New Partition
- Mount Point: Enter the partition's mount point. For example, if this partition should be the root partition, enter
/; enter/bootfor the/bootpartition, and so on. You can also use the pull-down menu to choose the correct mount point for your partition. For a swap partition the mount point should not be set — setting the filesystem type toswapis sufficient. - File System Type: Using the pull-down menu, select the appropriate file system type for this partition. For more information on file system types, refer to Section 23.15.2.1, “File System Types”.
- Allowable Drives: This field contains a list of the hard disks installed on your system. If a hard disk's box is highlighted, then a desired partition can be created on that hard disk. If the box is not checked, then the partition will never be created on that hard disk. By using different checkbox settings, you can have anaconda place partitions where you need them, or let anaconda decide where partitions should go.
- Size (MB): Enter the size (in megabytes) of the partition. Note, this field starts with 200 MB; unless changed, only a 200 MB partition will be created.
- Additional Size Options: Choose whether to keep this partition at a fixed size, to allow it to "grow" (fill up the available hard drive space) to a certain point, or to allow it to grow to fill any remaining hard drive space available.If you choose Fill all space up to (MB), you must give size constraints in the field to the right of this option. This allows you to keep a certain amount of space free on your hard drive for future use.
- Force to be a primary partition: Select whether the partition you are creating should be one of the first four partitions on the hard drive. If unselected, the partition is created as a logical partition. Refer to Section A.1.3, “Partitions Within Partitions — An Overview of Extended Partitions”, for more information.
- Encrypt: Choose whether to encrypt the partition so that the data stored on it cannot be accessed without a passphrase, even if the storage device is connected to another system. Refer to Appendix C, Disk Encryption for information on encryption of storage devices. If you select this option, the installer prompts you to provide a passphrase before it writes the partition to the disk.
- : Select once you are satisfied with the settings and wish to create the partition.
- : Select if you do not want to create the partition.
23.15.2.1. File System Types
Partition types
- standard partition — A standard partition can contain a file system or swap space, or it can provide a container for software RAID or an LVM physical volume.
- swap — Swap partitions are used to support virtual memory. In other words, data is written to a swap partition when there is not enough RAM to store the data your system is processing. Refer to the Red Hat Enterprise Linux Deployment Guide for additional information.
- software RAID — Creating two or more software RAID partitions allows you to create a RAID device. For more information regarding RAID, refer to the chapter RAID (Redundant Array of Independent Disks) in the Red Hat Enterprise Linux Deployment Guide.
- physical volume (LVM) — Creating one or more physical volume (LVM) partitions allows you to create an LVM logical volume. LVM can improve performance when using physical disks. For more information regarding LVM, refer to the Red Hat Enterprise Linux Deployment Guide.
File systems
- ext4 — The ext4 file system is based on the ext3 file system and features a number of improvements. These include support for larger file systems and larger files, faster and more efficient allocation of disk space, no limit on the number of subdirectories within a directory, faster file system checking, and more robust journaling. A maximum file system size of 16TB is supported for ext4. The ext4 file system is selected by default and is highly recommended.
Note
The mount optionsuser_xattrandaclare automatically set on ext4 systems by the installation system. These options enable extended attributes and access control lists, respectively. More information about mount options can be found in the Red Hat Enterprise Linux Storage Administration Guide. - ext3 — The ext3 file system is based on the ext2 file system and has one main advantage — journaling. Using a journaling file system reduces time spent recovering a file system after a crash as there is no need to
fsck[12] the file system. A maximum file system size of 16TB is supported for ext3. - ext2 — An ext2 file system supports standard Unix file types (regular files, directories, symbolic links, etc). It provides the ability to assign long file names, up to 255 characters.
- xfs — XFS is a highly scalable, high-performance file system that supports filesystems up to 16 exabytes (approximately 16 million terabytes), files up to 8 exabytes (approximately 8 million terabytes) and directory structures containing tens of millions of entries. XFS supports metadata journaling, which facilitates quicker crash recovery. The XFS file system can also be defragmented and resized while mounted and active.
Important
Red Hat Enterprise Linux 6.9 does not support XFS on System z. - vfat — The VFAT file system is a Linux file system that is compatible with Microsoft Windows long filenames on the FAT file system.
- Btrfs — Btrfs is under development as a file system capable of addressing and managing more files, larger files, and larger volumes than the ext2, ext3, and ext4 file systems. Btrfs is designed to make the file system tolerant of errors, and to facilitate the detection and repair of errors when they occur. It uses checksums to ensure the validity of data and metadata, and maintains snapshots of the file system that can be used for backup or repair.Because Btrfs is still experimental and under development, the installation program does not offer it by default. If you want to create a Btrfs partition on a drive, you must commence the installation process with the boot option
btrfs. Refer to Chapter 28, Boot Options for instructions.Warning
Red Hat Enterprise Linux 6.9 includes Btrfs as a technology preview to allow you to experiment with this file system. You should not choose Btrfs for partitions that will contain valuable data or that are essential for the operation of important systems.
23.15.3. Create Software RAID
Note
- RAID Partition
- Choose this option to configure a partition for software RAID. This option is the only choice available if your disk contains no software RAID partitions. This is the same dialog that appears when you add a standard partition — refer to Section 23.15.2, “Adding Partitions” for a description of the available options. Note, however, that File System Type must be set to
software RAIDFigure 23.40. Create a software RAID partition
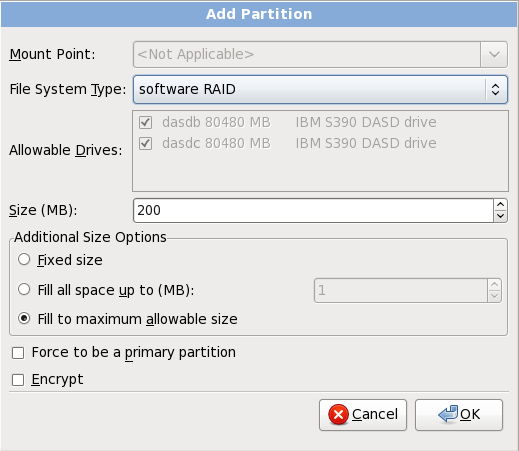
- RAID Device
- Choose this option to construct a RAID device from two or more existing software RAID partitions. This option is available if two or more software RAID partitions have been configured.
Figure 23.41. Create a RAID device
Select the file system type as for a standard partition.Anaconda automatically suggests a name for the RAID device, but you can manually select names frommd0tomd15.Click the checkboxes beside individual storage devices to include or remove them from this RAID.The RAID Level corresponds to a particular type of RAID. Choose from the following options:- RAID 0 — distributes data across multiple storage devices. Level 0 RAIDs offer increased performance over standard partitions, and can be used to pool the storage of multiple devices into one large virtual device. Note that Level 0 RAIDS offer no redundancy and that the failure of one device in the array destroys the entire array. RAID 0 requires at least two RAID partitions.
- RAID 1 — mirrors the data on one storage device onto one or more other storage devices. Additional devices in the array provide increasing levels of redundancy. RAID 1 requires at least two RAID partitions.
- RAID 4 — distributes data across multiple storage devices, but uses one device in the array to store parity information that safeguards the array in case any device within the array fails. Because all parity information is stored on the one device, access to this device creates a bottleneck in the performance of the array. RAID 4 requires at least three RAID partitions.
- RAID 5 — distributes data and parity information across multiple storage devices. Level 5 RAIDs therefore offer the performance advantages of distributing data across multiple devices, but do not share the performance bottleneck of level 4 RAIDs because the parity information is also distributed through the array. RAID 5 requires at least three RAID partitions.
- RAID 6 — level 6 RAIDs are similar to level 5 RAIDs, but instead of storing only one set of parity data, they store two sets. RAID 6 requires at least four RAID partitions.
- RAID 10 — level 10 RAIDs are nested RAIDs or hybrid RAIDs. Level 10 RAIDs are constructed by distributing data over mirrored sets of storage devices. For example, a level 10 RAID constructed from four RAID partitions consists of two pairs of partitions in which one partition mirrors the other. Data is then distributed across both pairs of storage devices, as in a level 0 RAID. RAID 10 requires at least four RAID partitions.
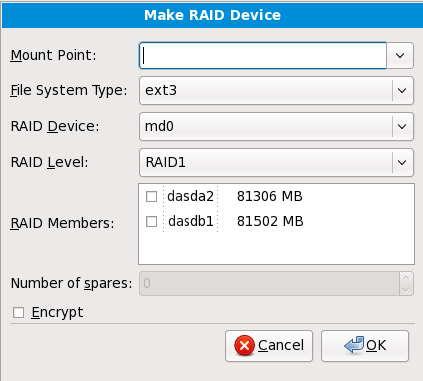
23.15.4. Create LVM Logical Volume
Important
lvm command.
- LVM Physical Volume
- Choose this option to configure a partition or device as an LVM physical volume. This option is the only choice available if your storage does not already contain LVM Volume Groups. This is the same dialog that appears when you add a standard partition — refer to Section 23.15.2, “Adding Partitions” for a description of the available options. Note, however, that File System Type must be set to
physical volume (LVM)Figure 23.42. Create an LVM Physical Volume
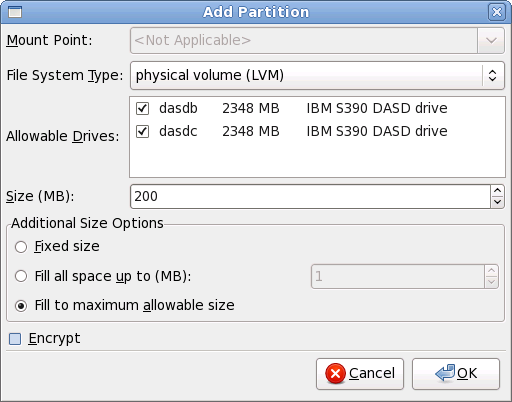
- Make LVM Volume Group
- Choose this option to create LVM volume groups from the available LVM physical volumes, or to add existing logical volumes to a volume group.
Figure 23.43. Make LVM Volume Group
To assign one or more physical volumes to a volume group, first name the volume group. Then select the physical volumes to be used in the volume group. Finally, configure logical volumes on any volume groups using the Add, Edit and Delete options.You may not remove a physical volume from a volume group if doing so would leave insufficient space for that group's logical volumes. Take for example a volume group made up of two 5 GB LVM physical volume partitions, which contains an 8 GB logical volume. The installer would not allow you to remove either of the component physical volumes, since that would leave only 5 GB in the group for an 8 GB logical volume. If you reduce the total size of any logical volumes appropriately, you may then remove a physical volume from the volume group. In the example, reducing the size of the logical volume to 4 GB would allow you to remove one of the 5 GB physical volumes. - Make Logical Volume
- Choose this option to create an LVM logical volume. Select a mount point, file system type, and size (in MB) just as if it were a standard disk partition. You can also choose a name for the logical volume and specify the volume group to which it will belong.
Figure 23.44. Make Logical Volume
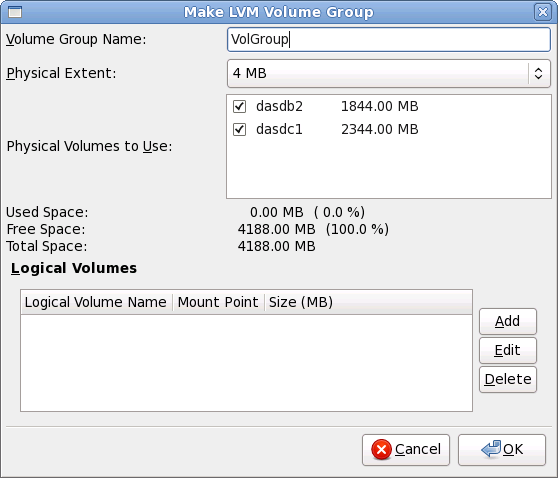
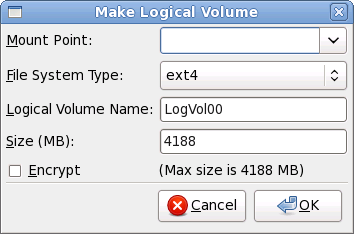
23.15.5. Recommended Partitioning Scheme
- 'Chapter 7. Linux Swapping' in the IBM Redbooks publication Linux on IBM System z: Performance Measurement and Tuning [IBM Form Number SG24-6926-01], [ISBN 0738485586], available from http://www.redbooks.ibm.com/abstracts/sg246926.html
- Linux Performance when running under VM, available from http://www.vm.ibm.com/perf/tips/linuxper.html
23.16. Write Changes to Disk
Figure 23.45. Writing storage configuration to disk
Warning
23.17. Package Group Selection
Important
Figure 23.46. Package Group Selection
- Basic Server
- This option provides a basic installation of Red Hat Enterprise Linux for use on a server.
- Database Server
- This option provides the MySQL and PostgreSQL databases.
- Web server
- This option provides the Apache web server.
- Enterprise Identity Server Base
- This option provides OpenLDAP and Enterprise Identity Management (IPA) to create an identity and authentication server.
- Virtual Host
- This option provides the KVM and Virtual Machine Manager tools to create a host for virtual machines.
- Desktop
- This option provides the OpenOffice.org productivity suite, graphical tools such as the GIMP, and multimedia applications.
- Software Development Workstation
- This option provides the necessary tools to compile software on your Red Hat Enterprise Linux system.
- Minimal
- This option provides only the packages essential to run Red Hat Enterprise Linux. A minimal installation provides the basis for a single-purpose server or desktop appliance and maximizes performance and security on such an installation.
Warning
Minimal installation currently does not configure the firewall (iptables/ip6tables) by default because the authconfig and system-config-firewall-base packages are missing from the selection. To work around this issue, you can use a Kickstart file to add these packages to your selection. See the Red Hat Customer Portal for details about the workaround, and Chapter 32, Kickstart Installations for information about Kickstart files.If you do not use the workaround, the installation will complete successfully, but no firewall will be configured, presenting a security risk.
23.17.1. Installing from Additional Repositories
Figure 23.47. Adding a software repository
Figure 23.48. Select network interface
- Select an interface from the drop-down menu.
- Click .
Figure 23.49. Network Connections
repodata.
Warning
23.17.2. Customizing the Software Selection
Note
Note
Figure 23.50. Package Group Details
Figure 23.51. Package Selection List Context Menu
23.17.2.1. Core Network Services
- centralized logging through syslog
- email through SMTP (Simple Mail Transfer Protocol)
- network file sharing through NFS (Network File System)
- remote access through SSH (Secure SHell)
- resource advertising through mDNS (multicast DNS)
- network file transfer through HTTP (HyperText Transfer Protocol)
- printing through CUPS (Common UNIX Printing System)
- remote desktop access through VNC (Virtual Network Computing)
23.18. Installing Packages
Figure 23.52. Starting installation
Figure 23.53. Packages completed
23.19. Installation Complete
/boot partition for Red Hat Enterprise Linux has been installed.
23.19.1. IPL Under z/VM
#cp i 200
#cp i 200/boot partition is typically located.
/boot on an FCP LUN, you must provide the WWPN and LUN for the FCP-attached device from which to IPL.
- Provide FCP routing information to an FCP-attached device, for example, where
0x50050763050B073Dis the WWPN, and0x4020400100000000is the FCP LUN:#cp set loaddev portname50050763 050B073D lun 40204001 00000000
#cp set loaddev portname50050763 050B073D lun 40204001 00000000Copy to Clipboard Copied! Toggle word wrap Toggle overflow - IPL the FCP adapter, for example
FC00:#cp ipl FC00
#cp ipl FC00Copy to Clipboard Copied! Toggle word wrap Toggle overflow
Note
#cp disconnect instead of #cp logoff. When your virtual machine is re-connected using the usual logon procedure, it might be placed in CP console function mode (CP READ). If so, to resume execution on your virtual machine, enter the BEGIN command.
23.19.2. IPL on an LPAR
/boot partition is located.
23.19.3. Continuing After Reboot (re-IPL)
/etc/securetty.
fsck application is used to check the file system for metadata consistency and optionally repair one or more Linux file systems.
Chapter 24. Troubleshooting Installation on IBM System z
/tmp directory. These files include:
/tmp/anaconda.log- general anaconda messages
/tmp/program.log- all external programs run by anaconda
/tmp/storage.log- extensive storage module information
/tmp/yum.log- yum package installation messages
/tmp/syslog- hardware-related system messages
/tmp/anaconda-tb-identifier, where identifier is a random string.
scp on the installation image (not the other way round).
24.1. You Are Unable to Boot Red Hat Enterprise Linux
24.1.1. Is Your System Displaying Signal 11 Errors?
24.2. Trouble During the Installation
24.2.1. The "No devices found to install Red Hat Enterprise Linux" Error Message
No devices found to install Red Hat Enterprise Linux, then there may be an issue with your DASD devices. If you encounter this error, add the DASD=<disks> parameter to your parameter file or CMS configuration file (where disks is the DASD range reserved for installation) and start the install again.
dasdfmt command within a Linux root shell, instead of formatting the DASDs using CMS. Anaconda automatically detects any DASD devices that are not yet formatted and asks you whether to format the devices.
24.2.2. Saving Traceback Messages
Figure 24.1. The Crash Reporting Dialog Box
- Details
- shows you the details of the error:
Figure 24.2. Details of the Crash
- Save
- saves details of the error locally or remotely:
- Exit
- exits the installation process.
Figure 24.3. Select reporter
- Logger
- saves details of the error as a log file to the local hard drive at a specified location.
- Red Hat Customer Support
- submits the crash report to Customer Support for assistance.
- Report uploader
- uploads a compressed version of the crash report to Bugzilla or a URL of your choice.
Figure 24.4. Configure reporter preferences
- Logger
- Specify a path and a filename for the log file. Check Append if you are adding to an existing log file.
Figure 24.5. Specify local path for log file
- Red Hat Customer Support
- Enter your Red Hat Network username and password so your report reaches Customer Support and is linked with your account. The URL is prefilled and Verify SSL is checked by default.
Figure 24.6. Enter Red Hat Network authentication details
- Report uploader
- Specify a URL for uploading a compressed version of the crash report.
Figure 24.7. Enter URL for uploading crash report
- Bugzilla
- Enter your Bugzilla username and password to lodge a bug with Red Hat's bug-tracking system using the crash report. The URL is prefilled and is checked by default.
Figure 24.8. Enter Bugzilla authentication details
Figure 24.9. Confirm report data
Figure 24.10. Report in progress
Figure 24.11. Reporting done
24.2.3. Other Partitioning Problems
- A
/(root) partition - A <swap> partition of type swap
Note
24.3. Problems After Installation
24.3.1. Remote Graphical Desktops and XDMCP
/etc/gdm/custom.conf file on the Red Hat Enterprise Linux system with a text editor such as vi or nano. In the [xdcmp] section, add the line Enable=true, save the file, and exit the text editor.
/sbin/init 4
/sbin/init 4login: prompt, enter your username and password.
/sbin/init 5
/sbin/init 5X. For example:
X :1 -query s390vm.example.com
X :1 -query s390vm.example.com:1 of the X11 server system (usually accessible by using the Ctrl-Alt-F8 key combination).
Xnest allows users to open a remote desktop nested within their local X11 session. For example, run Xnest using the following command, replacing s390vm.example.com with the hostname of the remote X11 server:
Xnest :1 -query s390vm.example.com
Xnest :1 -query s390vm.example.com24.3.2. Problems When You Try to Log In
single to the zipl boot menu or by any other means to append kernel command line options at IPL.
# prompt, you must type passwd root, which allows you to enter a new password for root. At this point you can type shutdown -r now to reboot the system with the new root password.
su - and enter your root password when prompted. Then, type passwd <username>. This allows you to enter a new password for the specified user account.
https://hardware.redhat.com/
https://hardware.redhat.com/24.3.3. Your Printer Does Not Work
system-config-printer command at a shell prompt to launch the Printer Configuration Tool. If you are not root, it prompts you for the root password to continue.
24.3.4. Apache HTTP Server or Sendmail Stops Responding During Startup
/etc/hosts file:
127.0.0.1 localhost.localdomain localhost
127.0.0.1 localhost.localdomain localhostChapter 25. Configuring an Installed Linux on System z Instance
25.1. Adding DASDs
Note
CP ATTACH EB1C TO *
CP ATTACH EB1C TO *CP LINK RHEL6X 4B2E 4B2E MR DASD 4B2E LINKED R/W
CP LINK RHEL6X 4B2E 4B2E MR
DASD 4B2E LINKED R/W
25.1.1. Dynamically Setting DASDs Online
Procedure 25.1. Adding DASD Disks on IBM System z Using the VMCP Driver
- Enable the
VMCPdriver:modprobe vmcp
# modprobe vmcpCopy to Clipboard Copied! Toggle word wrap Toggle overflow - Use the
cio_ignorecommand to remove the DASD from the list of ignored devices and make it visible to Linux:cio_ignore -r DeviceNumber
# cio_ignore -r DeviceNumbercio_ignore -r DeviceNumberCopy to Clipboard Copied! Toggle word wrap Toggle overflow Replace DeviceNumber with the device number of the DASD. For example:cio_ignore -r 0102
# cio_ignore -r 0102Copy to Clipboard Copied! Toggle word wrap Toggle overflow - Link the disk to the virtual machine:
vmcp 'link * DeviceNumber DeviceNumber rw'
# vmcp 'link * DeviceNumber DeviceNumber rw'vmcp 'link * DeviceNumber DeviceNumber rw'vmcp 'link * DeviceNumber DeviceNumber rw'vmcp 'link * DeviceNumber DeviceNumber rw'vmcp 'link * DeviceNumber DeviceNumber rw'Copy to Clipboard Copied! Toggle word wrap Toggle overflow Replace DeviceNumber with the device number of the DASD. - Set the device online. Use a command of the following form:
# chccwdev -e DeviceNumber
# # chccwdev -e DeviceNumber# chccwdev -e DeviceNumberCopy to Clipboard Copied! Toggle word wrap Toggle overflow Replace DeviceNumber with the device number of the DASD. - Verify that the disk is ready using the
lsdasdcommand:Copy to Clipboard Copied! Toggle word wrap Toggle overflow In the above example, device 0102 (shown as0.0.0102in theBus-IDcolumn) is being accessed as/dev/dasdf.
25.1.2. Persistently setting DASDs online
/) file system. Those DASDs required for the root file system need to be activated early during the boot process by the initramfs to be able to mount the root file system. The DASDs which are not part of the root file system can be activated later, simplifying the configuration process.
cio_ignore) is handled transparently for persistent device configurations. You do not need to free devices from the ignore list manually.
25.1.2.1. DASDs Which Are Part of the Root File System
initramfs so that your changes will take effect after the next reboot. The following procedure explains the steps you need to take.
Procedure 25.2. Permanently Attaching DASDs as Root Devices
- Edit the
/etc/dasd.confconfiguration file using a plain text editor such as Vim, and append a line to this file with your DASD's configuration. You can use parts of the file that describe previously configured devices for reference. A valid configuration line will look similar to the following:0.0.0102 use_diag=0 readonly=0 erplog=0 failfast=0
0.0.0102 use_diag=0 readonly=0 erplog=0 failfast=0Copy to Clipboard Copied! Toggle word wrap Toggle overflow - Edit the
/etc/zipl.confconfiguration file. An examplezipl.conffile will look similar to the following:Copy to Clipboard Copied! Toggle word wrap Toggle overflow Note the multiplerd_DASD=options on theparameters=line. You must add the new DASD to this line, using the same syntax - therd_DASD=keyword, followed by the device ID and a comma-separated list of options. See thedasd=parameter description in the DASD device driver chapter in Linux on System z Device Drivers, Features, and Commands on Red Hat Enterprise Linux 6 for details. - The next step is to rebuild the
initrd:mkinitrd -f /boot/initramfs-2.6.32-71.el6.s390x.img `uname -r`
# mkinitrd -f /boot/initramfs-2.6.32-71.el6.s390x.img `uname -r`Copy to Clipboard Copied! Toggle word wrap Toggle overflow - Then, rebuild the boot loader configuration using the
ziplcommand. You can use the-Voption for more detailed output:Copy to Clipboard Copied! Toggle word wrap Toggle overflow
pvcreate, vgextend and lvextend commands to create a physical volume for LVM, expand the existing volume group and expand the root logical volume, respectively. See Section 25.1.5, “Expanding Existing LVM Volumes to New Storage Devices” for details.
25.1.3. DASDs Which Are Not Part of the Root File System
/etc/dasd.conf. It contains one DASD per line. Each line begins with the device bus ID of a DASD. Optionally, each line can continue with options separated by space or tab characters. Options consist of key-value-pairs, where the key and value are separated by an equals sign.
sysfs attribute a DASD may have. The value will be written to the key's sysfs attribute. Entries in /etc/dasd.conf are activated and configured by udev when a DASD is added to the system. At boot time, all DASDs visible to the system get added and trigger udev.
/etc/dasd.conf:
0.0.0207 0.0.0200 use_diag=1 readonly=1
0.0.0207
0.0.0200 use_diag=1 readonly=1
/etc/dasd.conf only become effective after a reboot of the system or after the dynamic addition of a new DASD by changing the system's I/O configuration (that is, the DASD is attached under z/VM). Alternatively, you can trigger the activation of a new entry in /etc/dasd.conf for a DASD which was previously not active, by executing the following commands:
Procedure 25.3. Permanently Attaching DASDs as Non-root Devices
- Trigger the activation by writing to the
ueventattribute of the device:echo add > /sys/bus/ccw/devices/device.bus,ID/uevent
echo add > /sys/bus/ccw/devices/device.bus,ID/ueventecho add > /sys/bus/ccw/devices/device.bus,ID/ueventecho add > /sys/bus/ccw/devices/device.bus,ID/ueventCopy to Clipboard Copied! Toggle word wrap Toggle overflow For example:echo add > /sys/bus/ccw/devices/0.0.021a/uevent
echo add > /sys/bus/ccw/devices/0.0.021a/ueventCopy to Clipboard Copied! Toggle word wrap Toggle overflow
25.1.4. Preparing a New DASD with Low-level Formatting
Warning
Procedure 25.4. Formatting a DASD
- Wipe all existing data on the DASD using the
dasdfmtcommand. Replace DeviceNumber with the device number of the DASD. When prompted for confirmation (as shown in the example below), typeyesto proceed.Copy to Clipboard Copied! Toggle word wrap Toggle overflow When the progress bar reaches the end and the format is complete,dasdfmtprints the following output:Rereading the partition table... Exiting...
Rereading the partition table... Exiting...Copy to Clipboard Copied! Toggle word wrap Toggle overflow See thedasdfmt(8)man page for information about the syntax of thedasdfmtcommand. - Use the
fdasdcommand to write a new Linux-compatible partition table to the DASD. Replace DeviceNumber with the device number of the DASD.Copy to Clipboard Copied! Toggle word wrap Toggle overflow This example uses the-aoption to create a single partition spanning the entire disk. Other layouts are possible; up to three partitions can be created on a single DASD. For information about the syntax of thefdasdcommand and available options, see thefdasd(8)man page. - Create a new partition with
fdisk. Replace DeviceName with the device name of the DASD.fdisk /dev/DeviceName
# fdisk /dev/DeviceNamefdisk /dev/DeviceNameCopy to Clipboard Copied! Toggle word wrap Toggle overflow After you executefdisk, a series of prompts will appear in your terminal. These prompts can be used to manipulate the disk partition table, creating new partitions or editing existing one. For information about usingfdisk, see thefdisk(8)man page.
/dev/disk/by-path/ccw-0.0.4b2e-part1. Never use the full DASD device (dev/dasdb) for anything but the commands dasdfmt and fdasd. If you want to use the entire DASD, create one partition spanning the entire drive as in the fdasd example above.
Note
/etc/fstab, use the persistent device symbolic links under /dev/disk/by-path/.
25.1.5. Expanding Existing LVM Volumes to New Storage Devices
Procedure 25.5. Expanding Existing Logical Volume to Use a New DASD
- Create a new physical volume for LVM on the DASD using the
pvcreatecommand:pvcreate /dev/DeviceName
# pvcreate /dev/DeviceNamepvcreate /dev/DeviceNameCopy to Clipboard Copied! Toggle word wrap Toggle overflow Important
The device name must be specified as a partition - for example,/dev/dasdf1. Do not specify the entire block device. - List existing physical volumes using the
pvscommand to verify that the physical volume has been created:Copy to Clipboard Copied! Toggle word wrap Toggle overflow As you can see in the above example,/dev/dasdf1now contains an empty physical volume which is not assigned to any volume group. - Use the
vgextendcommand to expand an existing volume group containing the volume you want to use the new DASD for:vgextend VolumeGroup PhysicalVolume
# vgextend VolumeGroup PhysicalVolumevgextend VolumeGroup PhysicalVolumevgextend VolumeGroup PhysicalVolumevgextend VolumeGroup PhysicalVolumeCopy to Clipboard Copied! Toggle word wrap Toggle overflow Replace VolumeGroup with the name of the volume group you are expanding, and PhysicalVolume with the name of the physical volume (for example,/dev/dasdf1). - Use the
lvextendcommand to expand a logical volume you want to use the new DASD for:lvextend -L +Size /dev/mapper/VolumeGroup-LogicalVolume
# lvextend -L +Size /dev/mapper/VolumeGroup-LogicalVolumelvextend -L +Size /dev/mapper/VolumeGroup-LogicalVolumelvextend -L +Size /dev/mapper/VolumeGroup-LogicalVolumelvextend -L +Size /dev/mapper/VolumeGroup-LogicalVolumelvextend -L +Size /dev/mapper/VolumeGroup-LogicalVolumelvextend -L +Size /dev/mapper/VolumeGroup-LogicalVolumeCopy to Clipboard Copied! Toggle word wrap Toggle overflow For example:lvextend -L +2G /dev/mapper/vg_local-lv_root
# lvextend -L +2G /dev/mapper/vg_local-lv_root Extending logical volume lv_root to 2,58 GiB Logical volume lv_root successfully resizedCopy to Clipboard Copied! Toggle word wrap Toggle overflow
pvs, vgs, and lvs commands as root to view existing LVM physical volumes, volume groups and logical volumes at any point during the procedure.
25.2. Adding FCP-Attached Logical Units (LUNs)
Note
CP ATTACH FC00 TO * CP ATTACH FCD0 TO *
CP ATTACH FC00 TO *
CP ATTACH FCD0 TO *25.2.1. Dynamically Activating an FCP LUN
- Use the
cio_ignorecommand to remove the FCP adapter from the list of ignored devices and make it visible to Linux:cio_ignore -r DeviceNumber
# cio_ignore -r DeviceNumber# cio_ignore -r DeviceNumberCopy to Clipboard Copied! Toggle word wrap Toggle overflow Replace DeviceNumber with the device number of the FCP adapter. For example: - To bring the FCP adapter device online, use the following command:
chccwdev -e fc00
# chccwdev -e fc00Copy to Clipboard Copied! Toggle word wrap Toggle overflow - Verify that the required WWPN was found by the automatic port scanning of the zfcp device driver:
Copy to Clipboard Copied! Toggle word wrap Toggle overflow - Activate the FCP LUN by adding it to the port (WWPN) through which you would like to access the LUN:
echo 0x4020400100000000 > /sys/bus/ccw/drivers/zfcp/0.0.fc00/0x50050763050b073d/unit_add
# echo 0x4020400100000000 > /sys/bus/ccw/drivers/zfcp/0.0.fc00/0x50050763050b073d/unit_addCopy to Clipboard Copied! Toggle word wrap Toggle overflow - Find out the assigned SCSI device name:
lszfcp -DV
# lszfcp -DV /sys/devices/css0/0.0.0015/0.0.fc00/0x50050763050b073d/0x4020400100000000 /sys/bus/ccw/drivers/zfcp/0.0.fc00/host0/rport-0:0-21/target0:0:21/0:0:21:1089355792Copy to Clipboard Copied! Toggle word wrap Toggle overflow
25.2.2. Persistently Activating FCP LUNs
initramfs to be able to mount the root file system. cio_ignore is handled transparently for persistent device configurations and you do not need to free devices from the ignore list manually.
25.2.2.1. FCP LUNs That Are Part of the Root File System
/etc/zipl.conf followed by a run of the zipl boot loader tool. There is no more need to recreate the initramfs.
rd_ZFCP=. The value is a comma-separated list containing the device bus ID, the WWPN as 16 digit hexadecimal number prefixed with 0x, and the FCP LUN prefixed with 0x and padded with zeroes to the right to have 16 hexadecimal digits.
zipl.conf is for a system that uses physical volumes on partitions of two FCP LUNs for an LVM volume group vg_devel1 that contains a logical volume lv_root for the root file system. For simplicity, the example shows a configuration without multipathing.
rd_ZFCP=0.0.fc00,0x5105074308c212e9,0x401040a300000000 to the parameters line of your boot kernel in zipl.conf, for example:
/etc/zipl.conf for the next IPL:
25.2.2.2. FCP LUNs That Are Not Part of the Root File System
/etc/zfcp.conf. It contains one FCP LUN per line. Each line contains the device bus ID of the FCP adapter, the WWPN as 16 digit hexadecimal number prefixed with 0x, and the FCP LUN prefixed with 0x and padded with zeroes to the right to have 16 hexadecimal digits, separated by a space or tab. Entries in /etc/zfcp.conf are activated and configured by udev when an FCP adapter is added to the system. At boot time, all FCP adapters visible to the system are added and trigger udev.
/etc/zfcp.conf only become effective after a reboot of the system or after the dynamic addition of a new FCP channel by changing the system's I/O configuration (for example, a channel is attached under z/VM). Alternatively, you can trigger the activation of a new entry in /etc/zfcp.conf for an FCP adapter which was previously not active, by executing the following commands:
- Use the
cio_ignorecommand to remove the FCP adapter from the list of ignored devices and make it visible to Linux:cio_ignore -r DeviceNumber
# cio_ignore -r DeviceNumber# cio_ignore -r DeviceNumberCopy to Clipboard Copied! Toggle word wrap Toggle overflow Replace DeviceNumber with the device number of the FCP adapter. For example:cio_ignore -r fcfc
# cio_ignore -r fcfcCopy to Clipboard Copied! Toggle word wrap Toggle overflow - To trigger the uevent that activates the change, issue:
echo add > /sys/bus/ccw/devices/Device.Bus.ID/uevent
echo add > /sys/bus/ccw/devices/Device.Bus.ID/ueventecho add > /sys/bus/ccw/devices/Device.Bus.ID/ueventecho add > /sys/bus/ccw/devices/Device.Bus.ID/ueventCopy to Clipboard Copied! Toggle word wrap Toggle overflow For example:echo add > /sys/bus/ccw/devices/0.0.fcfc/uevent
echo add > /sys/bus/ccw/devices/0.0.fcfc/ueventCopy to Clipboard Copied! Toggle word wrap Toggle overflow
25.3. Adding a Network Device
- Dynamically
- Load the device driver
- Remove the network devices from the list of ignored devices.
- Create the group device.
- Configure the device.
- Set the device online.
- Persistently
- Create a configuration script.
- Activate the interface.
25.3.1. Adding a qeth Device
- hsin for HiperSockets devices
- ethn for Ethernet features
0 for the first device of that type, 1 for the second, and so on.
25.3.1.1. Dynamically Adding a qeth Device
- Determine whether the qeth device driver modules are loaded. The following example shows loaded qeth modules:
Copy to Clipboard Copied! Toggle word wrap Toggle overflow If the output of thelsmodcommand shows that the qeth modules are not loaded, run themodprobecommand to load them:modprobe qeth
# modprobe qethCopy to Clipboard Copied! Toggle word wrap Toggle overflow - Use the
cio_ignorecommand to remove the network channels from the list of ignored devices and make them visible to Linux:cio_ignore -r read_device_bus_id,write_device_bus_id,data_device_bus_id
# cio_ignore -r read_device_bus_id,write_device_bus_id,data_device_bus_id# cio_ignore -r read_device_bus_id,write_device_bus_id,data_device_bus_id# cio_ignore -r read_device_bus_id,write_device_bus_id,data_device_bus_id# cio_ignore -r read_device_bus_id,write_device_bus_id,data_device_bus_id# cio_ignore -r read_device_bus_id,write_device_bus_id,data_device_bus_id# cio_ignore -r read_device_bus_id,write_device_bus_id,data_device_bus_idCopy to Clipboard Copied! Toggle word wrap Toggle overflow Replace read_device_bus_id,write_device_bus_id,data_device_bus_id with the three device bus IDs representing a network device. For example, if the read_device_bus_id is0.0.f500, the write_device_bus_id is0.0.f501, and the data_device_bus_id is0.0.f502:cio_ignore -r 0.0.f500,0.0.f501,0.0.f502
# cio_ignore -r 0.0.f500,0.0.f501,0.0.f502Copy to Clipboard Copied! Toggle word wrap Toggle overflow - Use the znetconf command to sense and list candidate configurations for network devices:
Copy to Clipboard Copied! Toggle word wrap Toggle overflow - Select the configuration you want to work with and use znetconf to apply the configuration and to bring the configured group device online as network device.
znetconf -a f500
# znetconf -a f500 Scanning for network devices... Successfully configured device 0.0.f500 (eth1)Copy to Clipboard Copied! Toggle word wrap Toggle overflow - Optionally, you can also pass arguments that are configured on the group device before it is set online:
znetconf -a f500 -o portname=myname
# znetconf -a f500 -o portname=myname Scanning for network devices... Successfully configured device 0.0.f500 (eth1)Copy to Clipboard Copied! Toggle word wrap Toggle overflow Now you can continue to configure the networketh1interface.
- Create a qeth group device:
echo read_device_bus_id,write_device_bus_id,data_device_bus_id > /sys/bus/ccwgroup/drivers/qeth/group
# echo read_device_bus_id,write_device_bus_id,data_device_bus_id > /sys/bus/ccwgroup/drivers/qeth/group# echo read_device_bus_id,write_device_bus_id,data_device_bus_id > /sys/bus/ccwgroup/drivers/qeth/group# echo read_device_bus_id,write_device_bus_id,data_device_bus_id > /sys/bus/ccwgroup/drivers/qeth/group# echo read_device_bus_id,write_device_bus_id,data_device_bus_id > /sys/bus/ccwgroup/drivers/qeth/group# echo read_device_bus_id,write_device_bus_id,data_device_bus_id > /sys/bus/ccwgroup/drivers/qeth/group# echo read_device_bus_id,write_device_bus_id,data_device_bus_id > /sys/bus/ccwgroup/drivers/qeth/group# echo read_device_bus_id,write_device_bus_id,data_device_bus_id > /sys/bus/ccwgroup/drivers/qeth/groupCopy to Clipboard Copied! Toggle word wrap Toggle overflow For example:echo 0.0.f500,0.0.f501,0.0.f502 > /sys/bus/ccwgroup/drivers/qeth/group
# echo 0.0.f500,0.0.f501,0.0.f502 > /sys/bus/ccwgroup/drivers/qeth/groupCopy to Clipboard Copied! Toggle word wrap Toggle overflow - Next, verify that the qeth group device was created properly by looking for the read channel:
ls /sys/bus/ccwgroup/drivers/qeth/0.0.f500
# ls /sys/bus/ccwgroup/drivers/qeth/0.0.f500Copy to Clipboard Copied! Toggle word wrap Toggle overflow You may optionally set additional parameters and features, depending on the way you are setting up your system and the features you require, such as:portnolayer2portname
For information on additional parameters, refer to the chapter on the qeth device driver in Linux on System z Device Drivers, Features, and Commands on Red Hat Enterprise Linux 6. - Bring the device online by writing 1 to the online sysfs attribute:
echo 1 > /sys/bus/ccwgroup/drivers/qeth/0.0.f500/online
# echo 1 > /sys/bus/ccwgroup/drivers/qeth/0.0.f500/onlineCopy to Clipboard Copied! Toggle word wrap Toggle overflow - Then verify the state of the device:
cat /sys/bus/ccwgroup/drivers/qeth/0.0.f500/online 1
# cat /sys/bus/ccwgroup/drivers/qeth/0.0.f500/online 1Copy to Clipboard Copied! Toggle word wrap Toggle overflow A return value of1indicates that the device is online, while a return value0indicates that the device is offline. - Find the interface name that was assigned to the device:
cat /sys/bus/ccwgroup/drivers/qeth/0.0.f500/if_name eth1
# cat /sys/bus/ccwgroup/drivers/qeth/0.0.f500/if_name eth1Copy to Clipboard Copied! Toggle word wrap Toggle overflow Now you can continue to configure the networketh1interface.The following command from the s390utils package shows the most important settings of your qeth device:Copy to Clipboard Copied! Toggle word wrap Toggle overflow
25.3.1.2. Dynamically Removing a qeth Device
- Use the
znetconfcommand to show you all configured network devices:Copy to Clipboard Copied! Toggle word wrap Toggle overflow - Select the network device to be removed and trigger
znetconfto set the device offline and ungroup the ccw group device.znetconf -r f500
# znetconf -r f500 Remove network device 0.0.f500 (0.0.f500,0.0.f501,0.0.f502)? Warning: this may affect network connectivity! Do you want to continue (y/n)?y Successfully removed device 0.0.f500 (eth1)Copy to Clipboard Copied! Toggle word wrap Toggle overflow - Verify the success of the removal:
znetconf -c Device IDs Type Card Type CHPID Drv. Name State -------------------------------------------------------------------------------- 0.0.8036,0.0.8037,0.0.8038 1731/05 HiperSockets FB qeth hsi1 online 0.0.f5f0,0.0.f5f1,0.0.f5f2 1731/01 OSD_1000 76 qeth eth0 online
znetconf -c Device IDs Type Card Type CHPID Drv. Name State -------------------------------------------------------------------------------- 0.0.8036,0.0.8037,0.0.8038 1731/05 HiperSockets FB qeth hsi1 online 0.0.f5f0,0.0.f5f1,0.0.f5f2 1731/01 OSD_1000 76 qeth eth0 onlineCopy to Clipboard Copied! Toggle word wrap Toggle overflow
25.3.1.3. Persistently Adding a qeth Device
/etc/sysconfig/network-scripts/.
ifcfg-device, where device is the value found in the if_name file in the qeth group device that was created earlier. In this example it is eth1. cio_ignore is handled transparently for persistent device configurations and you do not need to free devices from the ignore list manually.
cd /etc/sysconfig/network-scripts cp ifcfg-eth0 ifcfg-eth1
# cd /etc/sysconfig/network-scripts
# cp ifcfg-eth0 ifcfg-eth1ifcfg-eth0 as a template:
/etc/sysconfig/network-scripts/ifcfg-eth0
- Modify the
DEVICEstatement to reflect the contents of theif_namefile from your ccwgroup. - Modify the
IPADDRstatement to reflect the IP address of your new interface. - Modify the
NETMASKstatement as needed. - If the new interface is to be activated at boot time, then make sure
ONBOOTis set toyes. - Make sure the
SUBCHANNELSstatement matches the hardware addresses for your qeth device. - Modify the
PORTNAMEstatement or leave it out if it is not necessary in your environment. - You may add any valid sysfs attribute and its value to the
OPTIONSparameter. The Red Hat Enterprise Linux installer currently uses this to configure the layer mode (layer2) and the relative port number (portno) of qeth devices.The qeth device driver default for OSA devices is now layer 2 mode. To continue using old ifcfg definitions that rely on the previous default of layer 3 mode, addlayer2=0to theOPTIONS parameter.
/etc/sysconfig/network-scripts/ifcfg-eth1
ifcfg file only become effective after rebooting the system or after the dynamic addition of new network device channels by changing the system's I/O configuration (for example, attaching under z/VM). Alternatively, you can trigger the activation of a ifcfg file for network channels which were previously not active yet, by executing the following commands:
- Use the
cio_ignorecommand to remove the network channels from the list of ignored devices and make them visible to Linux:cio_ignore -r read_device_bus_id,write_device_bus_id,data_device_bus_id
# cio_ignore -r read_device_bus_id,write_device_bus_id,data_device_bus_id# cio_ignore -r read_device_bus_id,write_device_bus_id,data_device_bus_id# cio_ignore -r read_device_bus_id,write_device_bus_id,data_device_bus_id# cio_ignore -r read_device_bus_id,write_device_bus_id,data_device_bus_id# cio_ignore -r read_device_bus_id,write_device_bus_id,data_device_bus_id# cio_ignore -r read_device_bus_id,write_device_bus_id,data_device_bus_idCopy to Clipboard Copied! Toggle word wrap Toggle overflow Replace read_device_bus_id,write_device_bus_id,data_device_bus_id with the three device bus IDs representing a network device. For example, if the read_device_bus_id is0.0.0600, the write_device_bus_id is0.0.0601, and the data_device_bus_id is0.0.0602:cio_ignore -r 0.0.0600,0.0.0601,0.0.0602
# cio_ignore -r 0.0.0600,0.0.0601,0.0.0602Copy to Clipboard Copied! Toggle word wrap Toggle overflow - To trigger the uevent that activates the change, issue:
echo add > /sys/bus/ccw/devices/read-channel/uevent
echo add > /sys/bus/ccw/devices/read-channel/ueventecho add > /sys/bus/ccw/devices/read-channel/ueventecho add > /sys/bus/ccw/devices/read-channel/ueventCopy to Clipboard Copied! Toggle word wrap Toggle overflow For example:echo add > /sys/bus/ccw/devices/0.0.0600/uevent
echo add > /sys/bus/ccw/devices/0.0.0600/ueventCopy to Clipboard Copied! Toggle word wrap Toggle overflow - Check the status of the network device:
lsqeth
# lsqethCopy to Clipboard Copied! Toggle word wrap Toggle overflow - Now start the new interface:
ifup eth1
# ifup eth1Copy to Clipboard Copied! Toggle word wrap Toggle overflow - Check the status of the interface:
Copy to Clipboard Copied! Toggle word wrap Toggle overflow - Check the routing for the new interface:
Copy to Clipboard Copied! Toggle word wrap Toggle overflow - Verify your changes by using the ping command to ping the gateway or another host on the subnet of the new device:
ping -c 1 192.168.70.8
# ping -c 1 192.168.70.8 PING 192.168.70.8 (192.168.70.8) 56(84) bytes of data. 64 bytes from 192.168.70.8: icmp_seq=0 ttl=63 time=8.07 msCopy to Clipboard Copied! Toggle word wrap Toggle overflow - If the default route information has changed, you must also update
/etc/sysconfig/networkaccordingly.
25.3.2. Adding an LCS Device
- ethn for OSA-Express Fast Ethernet and Gigabit Ethernet
0 for the first device of that type, 1 for the second, and so on.
25.3.2.1. Dynamically Adding an LCS Device
- Load the device driver:
modprobe lcs
# modprobe lcsCopy to Clipboard Copied! Toggle word wrap Toggle overflow - Use the
cio_ignorecommand to remove the network channels from the list of ignored devices and make them visible to Linux:cio_ignore -r read_device_bus_id,write_device_bus_id
# cio_ignore -r read_device_bus_id,write_device_bus_id# cio_ignore -r read_device_bus_id,write_device_bus_id# cio_ignore -r read_device_bus_id,write_device_bus_id# cio_ignore -r read_device_bus_id,write_device_bus_idCopy to Clipboard Copied! Toggle word wrap Toggle overflow Replace read_device_bus_id and write_device_bus_id with the two device bus IDs representing a network device. For example:cio_ignore -r 0.0.09a0,0.0.09a1
# cio_ignore -r 0.0.09a0,0.0.09a1Copy to Clipboard Copied! Toggle word wrap Toggle overflow - Create the group device:
echo read_device_bus_id,write_device_bus_id > /sys/bus/ccwgroup/drivers/lcs/group
# echo read_device_bus_id,write_device_bus_id > /sys/bus/ccwgroup/drivers/lcs/group# echo read_device_bus_id,write_device_bus_id > /sys/bus/ccwgroup/drivers/lcs/group# echo read_device_bus_id,write_device_bus_id > /sys/bus/ccwgroup/drivers/lcs/group# echo read_device_bus_id,write_device_bus_id > /sys/bus/ccwgroup/drivers/lcs/group# echo read_device_bus_id,write_device_bus_id > /sys/bus/ccwgroup/drivers/lcs/groupCopy to Clipboard Copied! Toggle word wrap Toggle overflow - Configure the device. OSA cards can provide up to 16 ports for a single CHPID. By default, the LCS group device uses port
0. To use a different port, issue a command similar to the following:echo portno > /sys/bus/ccwgroup/drivers/lcs/device_bus_id/portno
# echo portno > /sys/bus/ccwgroup/drivers/lcs/device_bus_id/portno# echo portno > /sys/bus/ccwgroup/drivers/lcs/device_bus_id/portno# echo portno > /sys/bus/ccwgroup/drivers/lcs/device_bus_id/portnoCopy to Clipboard Copied! Toggle word wrap Toggle overflow Replace portno with the port number you want to use. For more information about configuration of the LCS driver, refer to the chapter on LCS in Linux on System z Device Drivers, Features, and Commands on Red Hat Enterprise Linux 6. - Set the device online:
echo 1 > /sys/bus/ccwgroup/drivers/lcs/read_device_bus_id/online
# echo 1 > /sys/bus/ccwgroup/drivers/lcs/read_device_bus_id/onlineCopy to Clipboard Copied! Toggle word wrap Toggle overflow - To find out what network device name has been assigned, enter the command:
ls -l /sys/bus/ccwgroup/drivers/lcs/read_device_bus_ID/net/
# ls -l /sys/bus/ccwgroup/drivers/lcs/read_device_bus_ID/net/ drwxr-xr-x 4 root root 0 2010-04-22 16:54 eth1Copy to Clipboard Copied! Toggle word wrap Toggle overflow
25.3.2.2. Persistently Adding an LCS Device
cio_ignore is handled transparently for persistent device configurations and you do not need to free devices from the ignore list manually.
- Create a configuration script as file in
/etc/sysconfig/network-scripts/with a name likeifcfg-ethnwhere n is an integer starting with0. The file should look similar to the following:Copy to Clipboard Copied! Toggle word wrap Toggle overflow - Modify the value of
PORTNAMEto reflect the LCS port number (portno) you would like to use. You can add any valid lcs sysfs attribute and its value to the optionalOPTIONSparameter. Refer to Section 25.3.1.3, “Persistently Adding a qeth Device” for the syntax. - Set the
DEVICEparameter as follows:DEVICE=ethn
DEVICE=ethnCopy to Clipboard Copied! Toggle word wrap Toggle overflow - Issue an
ifupcommand to activate the device:ifup ethn
# ifup ethn# ifup ethnCopy to Clipboard Copied! Toggle word wrap Toggle overflow
ifcfg file only become effective after rebooting the system. You can trigger the activation of a ifcfg file for network channels by executing the following commands:
- Use the
cio_ignorecommand to remove the LCS device adapter from the list of ignored devices and make it visible to Linux:cio_ignore -r read_device_bus_id,write_device_bus_id
# cio_ignore -r read_device_bus_id,write_device_bus_id# cio_ignore -r read_device_bus_id,write_device_bus_id# cio_ignore -r read_device_bus_id,write_device_bus_id# cio_ignore -r read_device_bus_id,write_device_bus_idCopy to Clipboard Copied! Toggle word wrap Toggle overflow Replace read_device_bus_id and write_device_bus_id with the device bus IDs of the LCS device. For example:cio_ignore -r 0.0.09a0,0.0.09a1
# cio_ignore -r 0.0.09a0,0.0.09a1Copy to Clipboard Copied! Toggle word wrap Toggle overflow - To trigger the uevent that activates the change, issue:
echo add > /sys/bus/ccw/devices/read-channel/uevent
echo add > /sys/bus/ccw/devices/read-channel/ueventecho add > /sys/bus/ccw/devices/read-channel/ueventecho add > /sys/bus/ccw/devices/read-channel/ueventCopy to Clipboard Copied! Toggle word wrap Toggle overflow For example:echo add > /sys/bus/ccw/devices/0.0.09a0/uevent
echo add > /sys/bus/ccw/devices/0.0.09a0/ueventCopy to Clipboard Copied! Toggle word wrap Toggle overflow
25.3.3. Mapping Subchannels and Network Device Names
DEVICE= option in the ifcfg file does not determine the mapping of subchannels to network device names. Instead, the udev rules file /etc/udev/rules.d/70-persistent-net.rules determines which network device channel gets which network device name.
NAME= variable for each device.
/etc/udev/rules.d/70-persistent-net.rules:
25.3.4. Configuring a System z Network Device for Network Root File System
zipl.conf on a DASD or FCP-attached SCSI LUN prepared with the zipl boot loader. There is no need to recreate the initramfs.
rd_ZNET=.
NETTYPE (qeth, lcs, ctc), two (lcs, ctc) or three (qeth) device bus IDs, and optional additional parameters consisting of key-value pairs corresponding to network device sysfs attributes. This parameter configures and activates the System z network hardware. The configuration of IP addresses and other network specifics works the same as for other platforms. Refer to the dracut documentation for more details.
root=10.16.105.196:/nfs/nfs_root cio_ignore=all,!0.0.0009 rd_ZNET=qeth,0.0.0a00,0.0.0a01,0.0.0a02,layer2=1,portno=0,portname=OSAPORT ip=10.16.105.197:10.16.105.196:10.16.111.254:255.255.248.0:nfs‑server.subdomain.domain:eth0:none rd_NO_LUKS rd_NO_LVM rd_NO_MD rd_NO_DM LANG=en_US.UTF-8 SYSFONT=latarcyrheb-sun16 KEYTABLE=us
root=10.16.105.196:/nfs/nfs_root cio_ignore=all,!0.0.0009 rd_ZNET=qeth,0.0.0a00,0.0.0a01,0.0.0a02,layer2=1,portno=0,portname=OSAPORT ip=10.16.105.197:10.16.105.196:10.16.111.254:255.255.248.0:nfs‑server.subdomain.domain:eth0:none rd_NO_LUKS rd_NO_LVM rd_NO_MD rd_NO_DM LANG=en_US.UTF-8 SYSFONT=latarcyrheb-sun16 KEYTABLE=usChapter 26. Parameter and Configuration Files
- automate the user input for linuxrc or the loader (refer to Chapter 21, Installation Phase 1: Configuring a Network Device and Chapter 22, Installation Phase 2: Configuring Language and Installation Source).
- install unattended with kickstart.
- choose non-default installation settings that are not accessible through the installer"s interactive user interface, such as rescue mode.
root=/dev/ram0 or ro, and parameters for the installation process, such as vncpassword=test or vnc.
26.1. Required Parameters
generic.prm in directory images/ of the installation DVD:
root=file_system- where file_system represents the device on which the root file system can be found. For installation purposes, it must be set to
/dev/ram0, which is the ramdisk containing the Red Hat Enterprise Linux installation program. ro- mounts the root file system, which is a ramdisk, read-only.
ip=off- disables automatic network configuration.
ramdisk_size=size- modifies the memory size reserved for the ramdisk to ensure that the Red Hat Enterprise Linux installation program fits within it. For example:
ramdisk_size=40000.
cio_ignore=all,!0.0.0009. This setting speeds up boot and device detection on systems with many devices. The installer transparently handles the activation of ignored devices.
Important
cio_ignore support not being implemented throughout the entire stack, adapt the cio_ignore= parameter value to your system or remove the parameter entirely from your parameter file used for booting (IPL) the installer.
26.2. The z/VM Configuration File
variable=value .
CMSDASD and CMSCONFFILE parameters to the parameter file. These parameters point the installation program to the configuration file:
CMSDASD=cmsdasd_address- Where cmsdasd_address is the device number of a CMS-formatted disk that contains the configuration file. This is usually the CMS user"s
Adisk.For example:CMSDASD=191 CMSCONFFILE=configuration_file- Where configuration_file is the name of the configuration file. This value must be specified in lower case. It is specified in a Linux file name format:
CMS_file_name.CMS_file_type.The CMS fileREDHAT CONFis specified asredhat.conf. The CMS file name and the file type can each be from one to eight characters that follow the CMS conventions.For example:CMSCONFFILE=redhat.conf
26.3. Installation Network Parameters
NETTYPE="type"- Where type must be one of the following:
qeth,lcs, orctc. The default isqeth.Chooselcsfor:- OSA-2 Ethernet/Token Ring
- OSA-Express Fast Ethernet in non-QDIO mode
- OSA-Express High Speed Token Ring in non-QDIO mode
- Gigabit Ethernet in non-QDIO mode
Chooseqethfor:- OSA-Express Fast Ethernet
- Gigabit Ethernet (including 1000Base-T)
- High Speed Token Ring
- HiperSockets
- ATM (running Ethernet LAN emulation)
SUBCHANNELS="device_bus_IDs"- Where bus_IDs is a comma-separated list of two or three device bus IDs.Provides required device bus IDs for the various network interfaces:
qeth: SUBCHANNELS="read_device_bus_id,write_device_bus_id,data_device_bus_id" lcs or ctc: SUBCHANNELS="read_device_bus_id,write_device_bus_id"
qeth: SUBCHANNELS="read_device_bus_id,write_device_bus_id,data_device_bus_id" lcs or ctc: SUBCHANNELS="read_device_bus_id,write_device_bus_id"Copy to Clipboard Copied! Toggle word wrap Toggle overflow For example (a sample qeth SUBCHANNEL statement):SUBCHANNELS="0.0.f5f0,0.0.f5f1,0.0.f5f2"
SUBCHANNELS="0.0.f5f0,0.0.f5f1,0.0.f5f2"Copy to Clipboard Copied! Toggle word wrap Toggle overflow PORTNAME="osa_portname",PORTNAME="lcs_portnumber"- This variable supports OSA devices operating in qdio mode or in non-qdio mode.When using qdio mode (
NETTYPE="qeth"), osa_portname is the portname specified on the OSA device when operating in qeth mode.When using non-qdio mode (NETTYPE="lcs"), lcs_portnumber is used to pass the relative port number as a decimal integer in the range of 0 through 15. PORTNO="portnumber"- You can add either
PORTNO="0"(to use port 0) orPORTNO="1"(to use port 1 of OSA features with two ports per CHPID) to the CMS configuration file to avoid being prompted for the mode. LAYER2="value"- Where value can be
0or1.UseLAYER2="0"to operate an OSA or HiperSockets device in layer 3 mode (NETTYPE="qeth"). UseLAYER2="1"for layer 2 mode. For virtual network devices under z/VM this setting must match the definition of the GuestLAN or VSWITCH to which the device is coupled.To use network services that operate on layer 2 (the Data Link Layer or its MAC sublayer) such as DHCP, layer 2 mode is a good choice.The qeth device driver default for OSA devices is now layer 2 mode. To continue using the previous default of layer 3 mode, setLAYER2="0"explicitly. VSWITCH="value"- Where value can be
0or1.SpecifyVSWITCH="1"when connecting to a z/VM VSWITCH or GuestLAN, orVSWITCH="0"(or nothing at all) when using directly attached real OSA or directly attached real HiperSockets. MACADDR="MAC_address"- If you specify
LAYER2="1"andVSWITCH="0", you can optionally use this parameter to specify a MAC address. Linux requires six colon-separated octets as pairs lower case hex digits - for example,MACADDR=62:a3:18:e7:bc:5f. Note that this is different from the notation used by z/VM.If you specifyLAYER2="1"andVSWITCH="1", you must not specify theMACADDR, because z/VM assigns a unique MAC address to virtual network devices in layer 2 mode. CTCPROT="value"- Where value can be
0,1, or3.Specifies the CTC protocol forNETTYPE="ctc". The default is0. HOSTNAME="string"- Where string is the hostname of the newly-installed Linux instance.
IPADDR="IP"- Where IP is the IP address of the new Linux instance.
NETMASK="netmask"- Where netmask is the netmask.The netmask supports the syntax of a prefix integer (from 1 to 32) as specified in IPv4 classless interdomain routing (CIDR). For example, you can specify
24instead of255.255.255.0, or20instead of255.255.240.0. GATEWAY="gw"- Where gw is the gateway IP address for this network device.
MTU="mtu"- Where mtu is the Maximum Transmission Unit (MTU) for this network device.
DNS="server1:server2:additional_server_terms:serverN"- Where "server1:server2:additional_server_terms:serverN" is a list of DNS servers, separated by colons. For example:
DNS="10.1.2.3:10.3.2.1"
DNS="10.1.2.3:10.3.2.1"Copy to Clipboard Copied! Toggle word wrap Toggle overflow SEARCHDNS="domain1:domain2:additional_dns_terms:domainN"- Where "domain1:domain2:additional_dns_terms:domainN" is a list of the search domains, separated by colons. For example:
SEARCHDNS="subdomain.domain:domain"
SEARCHDNS="subdomain.domain:domain"Copy to Clipboard Copied! Toggle word wrap Toggle overflow You only need to specifySEARCHDNS=if you specify theDNS=parameter. DASD=- Defines the DASD or range of DASDs to configure for the installation. For a detailed description of the syntax, refer to the
dasd_moddevice driver module option described in the chapter on the DASD device driver in Linux on System z Device Drivers, Features, and Commands on Red Hat Enterprise Linux 6.Linuxrc supports a comma-separated list of device bus IDs or of ranges of device bus IDs with the optional attributesro,diag,erplog, andfailfast. Optionally, you can abbreviate device bus IDs to device numbers with leading zeros stripped. Any optional attributes should be separated by colons and enclosed in parentheses. Optional attributes follow a device bus ID or a range of device bus IDs.The only supported global option isautodetect. This does not support the specification of non-existent DASDs to reserve kernel device names for later addition of DASDs. Use persistent DASD device names (for example/dev/disk/by-path/...) to enable transparent addition of disks later. Other global options such asprobeonly,nopav, ornofcxare not supported by linuxrc.Only specify those DASDs that you really need to install your system. All unformatted DASDs specified here must be formatted after a confirmation later on in the installer (refer to Section 23.6.1.1, “DASD low-level formatting”). Add any data DASDs that are not needed for the root file system or the/bootpartition after installation as described in Section 25.1.3, “DASDs Which Are Not Part of the Root File System”.For FCP-only environments, specifyDASD="none".For example:DASD="eb1c,0.0.a000-0.0.a003,eb10-eb14(diag),0.0.ab1c(ro:diag)"
DASD="eb1c,0.0.a000-0.0.a003,eb10-eb14(diag),0.0.ab1c(ro:diag)"Copy to Clipboard Copied! Toggle word wrap Toggle overflow FCP_n="device_bus_ID WWPN FCP_LUN"- Where:
- n is typically an integer value (for example
FCP_1orFCP_2) but could be any string with alphabetic or numeric characters or underscores. - device_bus_ID specifies the device bus ID of the FCP device representing the host bus adapter (HBA) (for example
0.0.fc00for device fc00). - WWPN is the world wide port name used for routing (often in conjunction with multipathing) and is as a 16-digit hex value (for example
0x50050763050b073d). - FCP_LUN refers to the storage logical unit identifier and is specified as a 16-digit hexadecimal value padded with zeroes to the right (for example
0x4020400100000000).
These variables can be used on systems with FCP devices to activate FCP LUNs such as SCSI disks. Additional FCP LUNs can be activated during the installation interactively or by means of a kickstart file. There is no interactive question for FCP in linuxrc. An example value may look similar to the following:FCP_1="0.0.fc00 0x50050763050b073d 0x4020400100000000"
FCP_1="0.0.fc00 0x50050763050b073d 0x4020400100000000"Copy to Clipboard Copied! Toggle word wrap Toggle overflow Important
Each of the values used in the FCP parameters (for exampleFCP_1orFCP_2) are site-specific and are normally supplied by the FCP storage administrator.
26.4. VNC and X11 Parameters
display=IP/hostname:display- Sets the hostname or IP address and the X11 display where the installer should connect to and display its graphical user interface.
vnc- Specify
vncto use the VNC graphical user interface later in the installation process. vncpassword=- This parameter sets the password used to connect to the VNC server. The password parameter is optional. If not used, the VNC server does not use a password and anybody can connect to the VNC server.
vncconnect=IP/hostname[:port]- When used in addition to
vncandvncpassword=, this optional parameter specifies the hostname or IP address (and optionally, a TCP port) where a VNC client is running in listening mode. The installer connects to and displays its graphical user interface on this VNC client.
26.5. Loader Parameters
lang=language- Sets the language of the installer user interface, for example,
enfor English ordefor German. This automates the response to Choose a Language (refer to Section 22.3, “Language Selection”). repo=installation_source- Sets the installation source to access stage 2 as well as the repository with the packages to be installed. This automates the response to Installation Method (refer to Section 22.4, “Installation Method”).
26.6. Parameters for Kickstart Installations
ks=URL- References a kickstart file, which usually resides on the network for Linux installations on System z. Replace URL with the full path including the file name of the kickstart file. This parameter activates automatic installation with kickstart. Refer to Section 28.4, “Automating the Installation with Kickstart” and Section 32.11, “Starting a Kickstart Installation” for more details.]
RUNKS=value- Where value is defined as 1 if you want to run the loader automatically on the Linux console without having to log in over the network with SSH. To use
RUNKS=1, the console must either support full-screen or thecmdlineoption below should be used. The latter applies for the 3270 terminal under z/VM or the operating system messages console for LPAR. We recommendRUNKS=1for fully automatic installations with kickstart. WhenRUNKS=1is set, linuxrc automatically continues in case of parameter errors and does not interrupt unattended installations by prompting for user interaction.Leave out the parameter or specifyRUNKS=0otherwise. cmdline- When
cmdlineis specified, output on line-mode terminals (such as 3270 under z/VM or operating system messages for LPAR) becomes readable, as the installer disables escape terminal sequences that are only applicable to UNIX-like consoles. This requires installation with a kickstart file that answers all questions, since the installer does not support interactive user input in cmdline mode.
RUNKS or cmdline options. Refer to Chapter 32, Kickstart Installations for details.
26.7. Miscellaneous Parameters
askmethod- Do not use an automatically detected DVD as installation source but ask for the installation method to manually specify the installation source. This parameter is useful if you booted from an FCP-attached DVD but want to continue with another installation source, for example on the network or on a local hard disk.
mediacheck- Turns on testing of an ISO-based installation source; for example, when booted from an FCP-attached DVD or using
repo=with an ISO on local hard disk or mounted with NFS. nompath- Disables support for multipathing devices.
proxy=[protocol://][username[:password]@]host[:port]- Specify a proxy to use with installation over HTTP, HTTPS, or FTP.
rescue- Boot into a rescue system running from a ramdisk that can be used to fix and restore an installed system.
stage2=URL- Specifies a path to an
install.imgfile instead of to an installation source. Otherwise, follows the same syntax asrepo=. Ifstage2is specified, it typically takes precedence over other methods of findinginstall.img. However, if anaconda findsinstall.imgon local media, thestage2URL will be ignored.Ifstage2is not specified andinstall.imgcannot be found locally, anaconda looks to the location given byrepo=ormethod=.If onlystage2=is given withoutrepo=ormethod=, anaconda uses whatever repos the installed system would have enabled by default for installation. syslog=IP/hostname[:port]- Makes the installer send log messages to a remote syslog server.
26.8. Sample Parameter File and CMS Configuration File
generic.prm file.
generic.prm file:
root="/dev/ram0" ro ip="off" ramdisk_size="40000" cio_ignore="all,!0.0.0009" CMSDASD="191" CMSCONFFILE="redhat.conf" vnc
root="/dev/ram0" ro ip="off" ramdisk_size="40000" cio_ignore="all,!0.0.0009"
CMSDASD="191" CMSCONFFILE="redhat.conf"
vncredhat.conf file configuring a QETH network device (pointed to by CMSCONFFILE in generic.prm):
Chapter 27. IBM System z References
27.1. IBM System z Publications
Linux on System z — Device Drivers, Features, and Commands as available with Red Hat Enterprise Linux 6. 2010. SC34-2597.
Linux on System z — Using the Dump Tools on Red Hat Enterprise Linux 6. 2010. SC34-2607.
Linux on System z — How to use FC-attached SCSI devices with Linux on System z9 and zSeries. 2008. SC33-8413.
How to use Execute-in-Place Technology with Linux on z/VM. 2008. SC34-2594.
Linux on System z — How to Set up a Terminal Server Environment on z/VM. 2009. SC34-2596.
Linux on System z — libica 2.0 Programmer’s Reference. 2009. SC34-2602.
Linux on System z — How to Improve Performance with PAV. 2008. SC33-8414.
z/VM — Getting Started with Linux on System z. 2009. SC24-6194.
27.2. IBM Redbooks Publications for System z
Introductory publications
Introduction to the New Mainframe: z/VM Basics. 2007. SG24-7316.
z/VM and Linux on IBM System z The Virtualization Cookbook for Red Hat Enterprise Linux 5.2. 2008. SG24-7492.
Practical Migration to Linux on System z. 2009. SG24-7727.
Performance and high availability
Linux on IBM System z: Performance Measurement and Tuning. 2011. SG24-6926.
Achieving High Availability on Linux for System z with Linux-HA Release 2. 2009. SG24-7711.
Security
Security for Linux on System z. 2013. SG24-7728.
Using Cryptographic Adapters for Web Servers with Linux on IBM System z9 and zSeries. 2006. REDP-4131.
Networking
IBM System z Connectivity Handbook. 2013. SG24-5444.
OSA Express Implementation Guide. 2009. SG24-5948.
HiperSockets Implementation Guide. 2007. SG24-6816.
Fibre Channel Protocol for Linux and z/VM on IBM System z. 2007. SG24-7266.
27.3. Online Resources
For z/VM publications, refer to http://www.vm.ibm.com/library/ .
For System z I/O connectivity information, refer to http://www.ibm.com/systems/z/hardware/connectivity/index.html .
For System z cryptographic coprocessor information, refer to http://www.ibm.com/security/cryptocards/ .
Sharing and maintaining RHEL 5.3 Linux under z/VM. http://www.linuxvm.org/Present/misc/ro-root-RH5.pdf .
Part IV. Advanced Installation Options
- boot options.
- installing without media.
- installing through VNC.
- using kickstart to automate the installation process.
Chapter 28. Boot Options
linux option at the boot: prompt.
boot: prompt on a system that displays a graphical boot screen, press the Esc key while the graphical boot screen is displayed.
linux option1 option2 option3
linux option1 option2 option3Note
28.1. Configuring the Installation System at the Boot Menu
- language
- display resolution
- interface type
- Installation method
- network settings
28.1.1. Specifying the Language
lang option. Use the keymap option to configure the correct keyboard layout.
el_GR and gr identify the Greek language and the Greek keyboard layout:
linux lang=el_GR keymap=gr
linux lang=el_GR keymap=gr28.1.2. Configuring the Interface
resolution=setting as a boot option. For example, to set the display resolution to 1024×768, enter:
linux resolution=1024x768
linux resolution=1024x768linux text
linux textdisplay=ip:0 to allow remote display forwarding. In this command, ip should be replaced with the IP address of the system on which you want the display to appear.
xhost +remotehostname, where remotehostname is the name of the host from which you are running the original display. Using the command xhost +remotehostname limits access to the remote display terminal and does not allow access from anyone or any system not specifically authorized for remote access.
28.1.3. Updating anaconda
linux updates
linux updatesrhupdates/ on the server.
Important
rhupdates directory should only contain anaconda updates. The installation may fail if you add other files (such as errata RPMs) or if you place too much content in the directory.
linux updates=
linux updates=28.1.4. Specifying the Installation Method
askmethod option to display additional menus that enable you to specify the installation method and network settings. You may also configure the installation method and network settings at the boot: prompt itself.
boot: prompt, use the repo option. Refer to Table 28.1, “Installation methods” for the supported installation methods.
| Installation method | Option format |
|---|---|
| DVD drive | repo=cdrom:device |
| Hard Drive | repo=hd:device/path |
| HTTP Server | repo=http://host/path |
| HTTPS Server | repo=https://host/path |
| FTP Server | repo=ftp://username:password@host/path |
| NFS Server | repo=nfs:server:/path |
| ISO images on an NFS Server | repo=nfsiso:server:/path |
28.1.5. Specifying the Network Settings
boot: prompt as follows:
ip- The system's IP address.
netmask- The system's netmask.
gateway- The IP address of the network gateway.
dns- The IP address of the DNS server.
ksdevice- The network device to use with these settings.
ifname- The name you wish to assign to the network device, followed by the device's MAC address.
vlanid- The virtual LAN ID number (802.1q tag) for the specified network device.
nicdelay- The delay after which the network will be considered active. If you use this option, the system will wait after bringing up network interfaces until either the gateway is successfully pinged, or until the amount of seconds specified in this parameter passes. This is useful for some NICs which may report that a link is available before it actually is, causing any operations which require network access (such as Kickstart file downloads) to fail. Maximum value of this parameter is 30 as defined by NetworkManager; specifying a value higher than 30 will cause the option to be ignored.
192.168.1.10 for interface eth0. The interface is named primary, and the system will wait for 5 seconds or until it can successfully ping the gateway before continuing:
linux ip=192.168.1.10 netmask=255.255.255.0 gateway=192.168.1.1 dns=192.168.1.3 ksdevice=eth0 ifname=primary:01:23:45:67:89:ab nicdelay=5
linux ip=192.168.1.10 netmask=255.255.255.0 gateway=192.168.1.1 dns=192.168.1.3 ksdevice=eth0 ifname=primary:01:23:45:67:89:ab nicdelay=5boot: prompt, these settings are used for the installation process and the Networking Devices and Configure TCP/IP dialogs do not appear.
28.1.5.1. Configuring a Bonded Interface
bond option. Name the bonded interface, specify which network connections will be bonded, and list any additional options in the following format:
linux bond=<bondname>:<bondslaves>:[:<options>]
linux bond=<bondname>:<bondslaves>:[:<options>]linux bond=bond0:eth0,eth1:mode=active-backup,primary=eth1
linux bond=bond0:eth0,eth1:mode=active-backup,primary=eth128.2. Enabling Remote Access to the Installation System
Note
28.2.1. Enabling Remote Access with VNC
linux vnc vncpassword=qwerty
linux vnc vncpassword=qwertyvnc option enables the VNC service. The vncpassword option sets a password for remote access. The example shown above sets the password as qwerty.
Note
Starting VNC... The VNC server is now running. Please connect to computer.mydomain.com:1 to begin the install... Starting graphical installation... Press <enter> for a shell
Starting VNC...
The VNC server is now running.
Please connect to computer.mydomain.com:1 to begin the install...
Starting graphical installation...
Press <enter> for a shellcomputer.mydomain.com:1.
28.2.2. Connecting the Installation System to a VNC Listener
-listen option to run vncviewer as a listener. In a terminal window, enter the command:
vncviewer -listen
vncviewer -listenNote
5500 in the Port(s) field, and specify tcp as the Protocol.
boot: prompt. In addition to vnc and vncpassword options, use the vncconnect option to specify the name or IP address of the system that has the listening client. To specify the TCP port for the listener, add a colon and the port number to the name of the system.
desktop.mydomain.com on the port 5500, enter the following at the boot: prompt:
linux vnc vncpassword=qwerty vncconnect=desktop.mydomain.com:5500
linux vnc vncpassword=qwerty vncconnect=desktop.mydomain.com:550028.2.3. Enabling Remote Access with ssh
sshd=1 option at the boot: prompt:
linux sshd=1
linux sshd=1ssh utility. The ssh command requires the name or IP address of the installation system, and a password if you specified one (for example, in a kickstart file).
28.2.4. Enabling Remote Access with Telnet
linux text telnet
linux text telnettelnet utility. The telnet command requires the name or IP address of the installation system:
telnet computer.mydomain.com
telnet computer.mydomain.comWarning
telnet option to install systems on networks with restricted access.
28.3. Logging to a Remote System During the Installation
syslog option. Specify the IP address of the logging system, and the UDP port number of the log service on that system. By default, syslog services that accept remote messages listen on UDP port 514.
192.168.1.20, enter the following at the boot: prompt:
linux syslog=192.168.1.20:514
linux syslog=192.168.1.20:51428.3.1. Configuring a Log Server
rsyslog to provide a syslog service. The default configuration of rsyslog rejects messages from remote systems.
Warning
rsyslog configuration detailed below does not make use of any of the security measures available in rsyslog Crackers may slow or crash systems that permit access to the logging service, by sending large quantities of false log messages. In addition, hostile users may intercept or falsify messages sent to the logging service over the network.
/etc/rsyslog.conf. You must use root privileges to edit the file /etc/rsyslog.conf. Uncomment the following lines by removing the hash preceding them:
$ModLoad imudp.so $UDPServerRun 514
$ModLoad imudp.so
$UDPServerRun 514rsyslog service to apply the change:
su -c '/sbin/service rsyslog restart'
su -c '/sbin/service rsyslog restart'root password when prompted.
Note
514 in the Port(s) field, and specify udp as the Protocol.
28.4. Automating the Installation with Kickstart
Note
/root/anaconda-ks.cfg. You may use this file to repeat the installation with identical settings, or modify copies to specify settings for other systems.
Important
user option in the Kickstart file before installing additional systems from it (refer to Section 32.4, “Kickstart Options” for details) or log into the installed system with a virtual console as root and add users with the adduser command.
system-config-kickstart to install this utility. To load the Red Hat Enterprise Linux Kickstart editor, choose → → .
ks option to specify the name and location of the file:
linux ks=location/kickstart-file.cfg
linux ks=location/kickstart-file.cfg| Kickstart source | Option format |
|---|---|
| DVD drive | ks=cdrom:/directory/ks.cfg |
| Hard Drive | ks=hd:/device/directory/ks.cfg |
| Other Device | ks=file:/device/directory/ks.cfg |
| HTTP Server | ks=http://server.mydomain.com/directory/ks.cfg |
| HTTPS Server | ks=https://server.mydomain.com/directory/ks.cfg |
| FTP Server | ks=ftp://server.mydomain.com/directory/ks.cfg |
| NFS Server | ks=nfs:server.mydomain.com:/directory/ks.cfg |
Important
/dev/sdb to identify a hard drive or a USB drive containing a Kickstart file. However, there is no guarantee that the device identifier will remain the same on multiple systems. Therefore, the recommended method for specifying a hard drive or a USB drive in Kickstart installations is by UUID. For example:
ks=hd:UUID=ede47e6c-8b5f-49ad-9509-774fa7119281:ks.cfg
ks=hd:UUID=ede47e6c-8b5f-49ad-9509-774fa7119281:ks.cfgblkid command as root:
blkid /dev/sdb1
# blkid /dev/sdb1
/dev/sdb1: UUID="2c3a072a-3d0c-4f3a-a4a1-ab5f24f59266" TYPE="ext4"
ks= option. If you add the option kssendmac, the request also sends HTTP headers to the Web application. Your application can use these headers to identify the computer. This line sends a request with headers to the application http://server.mydomain.com/kickstart.cgi:
linux ks=http://server.mydomain.com/kickstart.cgi kssendmac
linux ks=http://server.mydomain.com/kickstart.cgi kssendmac28.5. Enhancing Hardware Support
28.5.1. Overriding Automatic Hardware Detection
Note
| Compatibility | Option |
|---|---|
| Disable all hardware detection | noprobe |
| Disable graphics, keyboard, and mouse detection | headless |
| Disable passing keyboard and mouse information to stage 2 of the installation program | nopass |
| Use basic VESA driver for video | xdriver=vesa |
| Disable shell access on virtual console 2 during installation | noshell |
| Disable advanced configuration and power interface (ACPI) | acpi=off |
| Disable machine check exception (MCE) CPU self-diagnosis. | nomce |
| Disable non-uniform memory access on the AMD64 architecture | numa-off |
| Force kernel to detect a specific amount of memory, where xxx is a value in megabytes | mem=xxxm |
| Enable DMA only for IDE and SATA drives | libata.dma=1 |
| Disable BIOS-assisted RAID | nodmraid |
| Disable Firewire device detection | nofirewire |
| Disable parallel port detection | noparport |
| Disable PC Card (PCMCIA) device detection | nopcmcia |
| Disable all probing of network hardware | nonet |
Note
isa option causes the system to display an additional text screen at the beginning of the installation process. Use this screen to configure the ISA devices on your computer.
Important
28.6. Using the Maintenance Boot Modes
28.6.1. Verifying Boot Media
- select OK at the prompt to test the media before installation when booting from the Red Hat Enterprise Linux DVD
- boot Red Hat Enterprise Linux with the option
mediacheckoption.
28.6.2. Booting Your Computer with the Rescue Mode
/mnt/sysimage/.
28.6.3. Upgrading Your Computer
upgrade, has been superceded by a stage in the installation process where the installation program prompts you to upgrade or reinstall earlier versions of Red Hat Enterprise Linux that it detects on your system.
/etc/redhat-release file have changed. The boot option upgradeany relaxes the test that the installation program performs and allows you to upgrade a Red Hat Enterprise Linux installation that the installation program has not correctly identified.
Chapter 29. Installing Without Media
Important
29.1. Retrieving Boot Files
vmlinuz and initrd.img files from a Red Hat Enterprise Linux DVD (or DVD image) to the /boot/ directory, renaming them to vmlinuz-install and initrd.img-install. You must have root privileges to write files into the /boot/ directory.
29.2. Editing the GRUB Configuration
/boot/grub/grub.conf. To configure GRUB to boot from the new files, add a boot stanza to /boot/grub/grub.conf that refers to them.
title Installation
root (hd0,0)
kernel /vmlinuz-install
initrd /initrd.img-install
title Installation
root (hd0,0)
kernel /vmlinuz-install
initrd /initrd.img-installkernel line of the boot stanza. These options set preliminary options in Anaconda which the user normally sets interactively. For a list of available installer boot options, refer to Chapter 28, Boot Options.
ip=repo=lang=keymap=ksdevice=(if installation requires an interface other than eth0)vncandvncpassword=for a remote installation
default option in /boot/grub/grub.conf to point to the new first stanza you added:
default 0
default 029.3. Booting to Installation
Chapter 30. Setting Up an Installation Server
- Configure the network (NFS, FTP, HTTP, HTTPS) server to export the installation tree.
- Configure the files on the
tftpserver necessary for network booting. - Configure which hosts are allowed to boot from the network configuration.
- Start the
tftpservice. - Configure DHCP.
- Boot the client, and start the installation.
30.1. Setting Up the Network Server
30.2. Network Boot Configuration
tftp server so they can be found when the client requests them. The tftp server is usually the same server as the network server exporting the installation tree.
Note
30.2.1. Configuring PXE Boot for BIOS
- If tftp-server is not yet installed, run
yum install tftp-server. - In the tftp-server config file at
/etc/xinetd.d/tftp, change thedisabledparameter fromyestono. - Configure your DHCP server to use the boot images packaged with SYSLINUX. (If you do not have a DHCP server installed, refer to the DHCP Servers chapter in the Red Hat Enterprise Linux Deployment Guide.)A sample configuration in
/etc/dhcp/dhcpd.confmight look like:Copy to Clipboard Copied! Toggle word wrap Toggle overflow - You now need the
pxelinux.0file from the syslinux-nolinux package in the ISO image file. To access it, run the following commands as root:mount -t iso9660 /path_to_image/name_of_image.iso /mount_point -o loop,ro cp -pr /mount_point/Packages/syslinux-nolinux-version-architecture.rpm /publicly_available_directory umount /mount_point
mount -t iso9660 /path_to_image/name_of_image.iso /mount_point -o loop,romount -t iso9660 /path_to_image/name_of_image.iso /mount_point -o loop,romount -t iso9660 /path_to_image/name_of_image.iso /mount_point -o loop,romount -t iso9660 /path_to_image/name_of_image.iso /mount_point -o loop,romount -t iso9660 /path_to_image/name_of_image.iso /mount_point -o loop,ro cp -pr /mount_point/Packages/syslinux-nolinux-version-architecture.rpm /publicly_available_directorycp -pr /mount_point/Packages/syslinux-nolinux-version-architecture.rpm /publicly_available_directorycp -pr /mount_point/Packages/syslinux-nolinux-version-architecture.rpm /publicly_available_directorycp -pr /mount_point/Packages/syslinux-nolinux-version-architecture.rpm /publicly_available_directorycp -pr /mount_point/Packages/syslinux-nolinux-version-architecture.rpm /publicly_available_directorycp -pr /mount_point/Packages/syslinux-nolinux-version-architecture.rpm /publicly_available_directory umount /mount_pointumount /mount_pointCopy to Clipboard Copied! Toggle word wrap Toggle overflow Extract the package:rpm2cpio syslinux-nolinux-version-architecture.rpm | cpio -dimv
rpm2cpio syslinux-nolinux-version-architecture.rpm | cpio -dimvrpm2cpio syslinux-nolinux-version-architecture.rpm | cpio -dimvrpm2cpio syslinux-nolinux-version-architecture.rpm | cpio -dimvCopy to Clipboard Copied! Toggle word wrap Toggle overflow - Create a
pxelinuxdirectory withintftpbootand copypxelinux.0into it:mkdir /var/lib/tftpboot/pxelinux cp publicly_available_directory/usr/share/syslinux/pxelinux.0 /var/lib/tftpboot/pxelinux
mkdir /var/lib/tftpboot/pxelinux cp publicly_available_directory/usr/share/syslinux/pxelinux.0 /var/lib/tftpboot/pxelinuxcp publicly_available_directory/usr/share/syslinux/pxelinux.0 /var/lib/tftpboot/pxelinuxcp publicly_available_directory/usr/share/syslinux/pxelinux.0 /var/lib/tftpboot/pxelinuxCopy to Clipboard Copied! Toggle word wrap Toggle overflow - Create a
pxelinux.cfgdirectory withinpxelinux:mkdir /var/lib/tftpboot/pxelinux/pxelinux.cfg
mkdir /var/lib/tftpboot/pxelinux/pxelinux.cfgCopy to Clipboard Copied! Toggle word wrap Toggle overflow - Add a config file to this directory. The file should either be named
defaultor named after the IP address, converted into hexadecimal format without delimiters. For example, if your machine's IP address is 10.0.0.1, the filename would be0A000001.A sample config file at/var/lib/tftpboot/pxelinux/pxelinux.cfg/defaultmight look like:Copy to Clipboard Copied! Toggle word wrap Toggle overflow For instructions on how to specify the installation source, refer to Section 7.1.3, “Additional Boot Options” - Copy the splash image into your
tftproot directory:cp /boot/grub/splash.xpm.gz /var/lib/tftpboot/pxelinux/splash.xpm.gz
cp /boot/grub/splash.xpm.gz /var/lib/tftpboot/pxelinux/splash.xpm.gzCopy to Clipboard Copied! Toggle word wrap Toggle overflow - Copy the boot images into your
tftproot directory:cp /path/to/x86_64/os/images/pxeboot/{vmlinuz,initrd.img} /var/lib/tftpboot/pxelinux/rhel6/cp /path/to/x86_64/os/images/pxeboot/{vmlinuz,initrd.img} /var/lib/tftpboot/pxelinux/rhel6/cp /path/to/x86_64/os/images/pxeboot/{vmlinuz,initrd.img} /var/lib/tftpboot/pxelinux/rhel6/cp /path/to/x86_64/os/images/pxeboot/{vmlinuz,initrd.img} /var/lib/tftpboot/pxelinux/rhel6/Copy to Clipboard Copied! Toggle word wrap Toggle overflow - Boot the client system, and select the network device as your boot device when prompted.
30.2.2. Configuring PXE Boot for EFI
- If tftp-server is not yet installed, run
yum install tftp-server. - In the tftp-server config file at
/etc/xinetd.d/tftp, change thedisableparameter fromyestono. - Create a directory within
tftpbootfor the EFI boot images, and then copy them from your boot directory. In these examples we will name the subdirectorypxelinux, but any other name could be used.mkdir /var/lib/tftpboot/pxelinux cp /boot/efi/EFI/redhat/grub.efi /var/lib/tftpboot/pxelinux/bootx64.efi
mkdir /var/lib/tftpboot/pxelinux cp /boot/efi/EFI/redhat/grub.efi /var/lib/tftpboot/pxelinux/bootx64.efiCopy to Clipboard Copied! Toggle word wrap Toggle overflow - Configure your DHCP server to use the EFI boot images packaged with GRUB. (If you do not have a DHCP server installed, refer to the DHCP Servers chapter in the Red Hat Enterprise Linux Deployment Guide.)A sample configuration in
/etc/dhcp/dhcpd.confmight look like:Copy to Clipboard Copied! Toggle word wrap Toggle overflow - Add a config file to
/var/lib/tftpboot/pxelinux. The file should either be namedefidefaultor named after the IP address, converted into hexadecimal format without delimiters. For example, if your machine's IP address is 10.0.0.1, the filename would be0A000001.A sample config file at/var/lib/tftpboot/pxelinux/efidefaultmight look like:Copy to Clipboard Copied! Toggle word wrap Toggle overflow For instructions on how to specify the installation source, refer to Section 7.1.3, “Additional Boot Options” - Copy the splash image into your
tftproot directory:cp /boot/grub/splash.xpm.gz /var/lib/tftpboot/pxelinux/splash.xpm.gz
cp /boot/grub/splash.xpm.gz /var/lib/tftpboot/pxelinux/splash.xpm.gzCopy to Clipboard Copied! Toggle word wrap Toggle overflow - Copy the boot images into your
tftproot directory:cp /path/to/x86_64/os/images/pxeboot/{vmlinuz,initrd.img} /var/lib/tftpboot/pxelinux/rhel6/cp /path/to/x86_64/os/images/pxeboot/{vmlinuz,initrd.img} /var/lib/tftpboot/pxelinux/rhel6/cp /path/to/x86_64/os/images/pxeboot/{vmlinuz,initrd.img} /var/lib/tftpboot/pxelinux/rhel6/cp /path/to/x86_64/os/images/pxeboot/{vmlinuz,initrd.img} /var/lib/tftpboot/pxelinux/rhel6/Copy to Clipboard Copied! Toggle word wrap Toggle overflow - Boot the client system, and select the network device as your boot device when prompted.
30.2.3. Configuring for Power Systems Servers
- If tftp-server is not yet installed, run
yum install tftp-server. - In the tftp-server config file at
/etc/xinetd.d/tftp, change thedisabledparameter fromyestono. - Configure your DHCP server to use the boot images packaged with yaboot. (If you do not have a DHCP server installed, refer to the DHCP Servers chapter in the Red Hat Enterprise Linux Deployment Guide.)A sample configuration in
/etc/dhcp/dhcpd.confmight look like:Copy to Clipboard Copied! Toggle word wrap Toggle overflow - You now need the
yabootbinary file from theyabootpackage in the ISO image file. To access it, run the following commands as root:mkdir /publicly_available_directory/yaboot-unpack mount -t iso9660 /path_to_image/name_of_image.iso /mount_point -o loop,ro cp -pr /mount_point/Packages/yaboot-version.ppc.rpm /publicly_available_directory/yaboot-unpack
mkdir /publicly_available_directory/yaboot-unpack mount -t iso9660 /path_to_image/name_of_image.iso /mount_point -o loop,romount -t iso9660 /path_to_image/name_of_image.iso /mount_point -o loop,romount -t iso9660 /path_to_image/name_of_image.iso /mount_point -o loop,romount -t iso9660 /path_to_image/name_of_image.iso /mount_point -o loop,romount -t iso9660 /path_to_image/name_of_image.iso /mount_point -o loop,ro cp -pr /mount_point/Packages/yaboot-version.ppc.rpm /publicly_available_directory/yaboot-unpackcp -pr /mount_point/Packages/yaboot-version.ppc.rpm /publicly_available_directory/yaboot-unpackcp -pr /mount_point/Packages/yaboot-version.ppc.rpm /publicly_available_directory/yaboot-unpackcp -pr /mount_point/Packages/yaboot-version.ppc.rpm /publicly_available_directory/yaboot-unpackcp -pr /mount_point/Packages/yaboot-version.ppc.rpm /publicly_available_directory/yaboot-unpackcp -pr /mount_point/Packages/yaboot-version.ppc.rpm /publicly_available_directory/yaboot-unpackcp -pr /mount_point/Packages/yaboot-version.ppc.rpm /publicly_available_directory/yaboot-unpackCopy to Clipboard Copied! Toggle word wrap Toggle overflow Extract the package:cd /publicly_available_directory/yaboot-unpack rpm2cpio yaboot-version.ppc.rpm | cpio -dimv
cd /publicly_available_directory/yaboot-unpackcd /publicly_available_directory/yaboot-unpackcd /publicly_available_directory/yaboot-unpack rpm2cpio yaboot-version.ppc.rpm | cpio -dimvrpm2cpio yaboot-version.ppc.rpm | cpio -dimvrpm2cpio yaboot-version.ppc.rpm | cpio -dimvCopy to Clipboard Copied! Toggle word wrap Toggle overflow - Create a
yabootdirectory withintftpbootand copy theyabootbinary file into it:mkdir /var/lib/tftpboot/yaboot cp publicly_available_directory/yaboot-unpack/usr/lib/yaboot/yaboot /var/lib/tftpboot/yaboot
mkdir /var/lib/tftpboot/yaboot cp publicly_available_directory/yaboot-unpack/usr/lib/yaboot/yaboot /var/lib/tftpboot/yabootcp publicly_available_directory/yaboot-unpack/usr/lib/yaboot/yaboot /var/lib/tftpboot/yabootcp publicly_available_directory/yaboot-unpack/usr/lib/yaboot/yaboot /var/lib/tftpboot/yabootCopy to Clipboard Copied! Toggle word wrap Toggle overflow - Add a config file named
yaboot.confto this directory. A sample config file might look like:Copy to Clipboard Copied! Toggle word wrap Toggle overflow For instructions on how to specify the installation source, refer to Section 7.1.3, “Additional Boot Options” - Copy the boot images from the extracted ISO into your
tftproot directory:cp /mount_point/images/ppc/ppc64/vmlinuz /var/lib/tftpboot/yaboot/rhel6/vmlinuz-RHEL6 cp /mount_point/images/ppc/ppc64/initrd.img /var/lib/tftpboot/yaboot/rhel6/initrd-RHEL6.img
cp /mount_point/images/ppc/ppc64/vmlinuz /var/lib/tftpboot/yaboot/rhel6/vmlinuz-RHEL6 cp /mount_point/images/ppc/ppc64/initrd.img /var/lib/tftpboot/yaboot/rhel6/initrd-RHEL6.imgCopy to Clipboard Copied! Toggle word wrap Toggle overflow - Clean up by removing the
yaboot-unpackdirectory and unmounting the ISO:rm -rf /publicly_available_directory/yaboot-unpack umount /mount_point
rm -rf /publicly_available_directory/yaboot-unpackrm -rf /publicly_available_directory/yaboot-unpackrm -rf /publicly_available_directory/yaboot-unpack umount /mount_pointumount /mount_pointCopy to Clipboard Copied! Toggle word wrap Toggle overflow - Boot the client system, and select the network device as your boot device when prompted.
30.3. Starting the tftp Server
tftp-server package is installed with the command rpm -q tftp-server.
tftp is an xinetd-based service; start it with the following commands:
/sbin/chkconfig --level 345 xinetd on /sbin/chkconfig --level 345 tftp on
/sbin/chkconfig --level 345 xinetd on
/sbin/chkconfig --level 345 tftp ontftp and xinetd services to start at boot time in runlevels 3, 4, and 5.
30.4. Adding a Custom Boot Message
/var/lib/tftpboot/linux-install/msgs/boot.msg to use a custom boot message.
30.5. Performing the Installation
Chapter 31. Installing Through VNC
- Less screen real estate for creating user interfaces similar to those found in the graphical mode.
- Difficult internationalization support.
- Desire to maintain a single interactive installation code path.
31.1. VNC Viewer
- Your workstation
- Laptop on a datacenter crash cart
yum install tigervnc
# yum install tigervnc31.2. VNC Modes in Anaconda
31.2.1. Direct Mode
- Specify
vncas a boot argument. - Specify the
vnccommand in the kickstart file used for installation.
Running anaconda VERSION, the PRODUCT system installer - please wait...
Running anaconda VERSION, the PRODUCT system installer - please wait...
- Requires visual access to the system console to see the IP address and port to connect the VNC viewer to.
- Requires interactive access to the system console to complete the first stage of the installer.
31.2.2. Connect Mode
vncconnect boot parameter:
boot: linux vncconnect=HOST
boot: linux vncconnect=HOST31.3. Installation Using VNC
31.3.1. Installation Example
- Connect the laptop or other workstation to the target system using a crossover cable. If you are using regular patch cables, make sure you connect the two systems using a small hub or switch. Most recent Ethernet interfaces will automatically detect if they need to be crossover or not, so it may be possible to connect the two systems directly using a regular patch cable.
- Configure the VNC viewer system to use a RFC 1918 address with no gateway. This private network connection will only be used for the purpose of installation. Configure the VNC viewer system to be 192.168.100.1/24. If that address is in use, just pick something else in the RFC 1918 address space that is available to you.
- Start the installation on the target system.
- Booting the installation DVD.If booting the installation DVD, make sure
vncis passed as a boot parameter. To add thevncparameter, you will need a console attached to the target system that allows you to interact with the boot process. Enter the following at the prompt:boot: linux vnc
boot: linux vncCopy to Clipboard Copied! Toggle word wrap Toggle overflow - Boot over the network.If the target system is configured with a static IP address, add the
vnccommand to the kickstart file. If the target system is using DHCP, addvncconnect=HOSTto the boot arguments for the target system. HOST is the IP address or DNS host name of the VNC viewer system. Enter the following at the prompt:boot: linux vncconnect=HOST
boot: linux vncconnect=HOSTCopy to Clipboard Copied! Toggle word wrap Toggle overflow
- When prompted for the network configuration on the target system, assign it an available RFC 1918 address in the same network you used for the VNC viewer system. For example, 192.168.100.2/24.
Note
This IP address is only used during installation. You will have an opportunity to configure the final network settings, if any, later in the installer. - Once the installer indicates it is starting anaconda, you will be instructed to connect to the system using the VNC viewer. Connect to the viewer and follow the graphical installation mode instructions found in the product documentation.
31.3.2. Kickstart Considerations
vnc command to the kickstart file for the system. You will be able to connect to the target system using your VNC viewer and monitor the installation progress. The address to use is the one the system is configured with via the kickstart file.
vncconnect method may work better for you. Rather than adding the vnc boot parameter to the kickstart file, add the vncconnect=HOST parameter to the list of boot arguments for the target system. For HOST, put the IP address or DNS host name of the VNC viewer system. See the next section for more details on using the vncconnect mode.
31.3.3. Firewall Considerations
vnc boot parameter, you may also want to pass the vncpassword parameter in these scenarios. While the password is sent in plain text over the network, it does provide an extra step before a viewer can connect to a system. Once the viewer connects to the target system over VNC, no other connections are permitted. These limitations are usually sufficient for installation purposes.
Important
vncpassword option. It should not be a password you use on any systems, especially a real root password.
vncconnect parameter. In this mode of operation, you start the viewer on your system first telling it to listen for an incoming connection. Pass vncconnect=HOST at the boot prompt and the installer will attempt to connect to the specified HOST (either a hostname or IP address).
31.4. References
- TigerVNC: http://tigervnc.sourceforge.net/
- RFC 1918 - Address Allocation for Private Networks: http://www.ietf.org/rfc/rfc1918.txt
Chapter 32. Kickstart Installations
32.1. What are Kickstart Installations?
/tmp directory to assist with debugging installation failures.
Note
/tmp/netinfo in previous versions of Red Hat Enterprise Linux must now source the ifcfg files in /etc/sysconfig/network-scripts.
32.2. How Do You Perform a Kickstart Installation?
- Create a kickstart file.
- Create a boot media with the kickstart file or make the kickstart file available on the network.
- Make the installation tree available.
- Start the kickstart installation.
32.3. Creating the Kickstart File
/root/anaconda-ks.cfg. You should be able to edit it with any text editor or word processor that can save files as ASCII text.
- Sections must be specified in order. Items within the sections do not have to be in a specific order unless otherwise specified. The section order is:
- Command section — Refer to Section 32.4, “Kickstart Options” for a list of kickstart options. You must include the required options.
- The
%packagessection — Refer to Section 32.5, “Package Selection” for details. - The
%preand%postsections — These two sections can be in any order and are not required. Refer to Section 32.6, “Pre-installation Script” and Section 32.7, “Post-installation Script” for details.
Note
Each section should end with%endto avoid logged warnings. - Items that are not required can be omitted.
- Omitting any required item results in the installation program prompting the user for an answer to the related item, just as the user would be prompted during a typical installation. Once the answer is given, the installation continues unattended (unless it finds another missing item).
- Lines starting with a pound (also known as hash) sign (#) are treated as comments and are ignored.
- For kickstart upgrades, the following items are required:
- Language
- Installation method
- Device specification (if device is needed to perform the installation)
- Keyboard setup
- The
upgradekeyword - Boot loader configuration
If any other items are specified for an upgrade, those items are ignored (note that this includes package selection).
32.4. Kickstart Options
Note
[ ]) are optional arguments for the command.
Important
sda), you can instead use any item from /dev/disk. For example, instead of:
part / --fstype=ext4 --onpart=sda1
part / --fstype=ext4 --onpart=sda1
part / --fstype=ext4 --onpart=/dev/disk/by-path/pci-0000:00:05.0-scsi-0:0:0:0-part1 part / --fstype=ext4 --onpart=/dev/disk/by-id/ata-ST3160815AS_6RA0C882-part1
part / --fstype=ext4 --onpart=/dev/disk/by-path/pci-0000:00:05.0-scsi-0:0:0:0-part1
part / --fstype=ext4 --onpart=/dev/disk/by-id/ata-ST3160815AS_6RA0C882-part1
sda. This is especially useful in large storage environments.
-
authorauthconfig(required) - Sets up the authentication options for the system. It is similar to the
authconfigcommand, which can be run after the installation - see theauthconfig(8)man page for more information.Passwords are shadowed by default.Warning
Theauthconfigcommand requires the authconfig package, which is not included when using the minimal package group. Addauthconfigto the%packagessection as described in Section 32.5, “Package Selection”, if you are using the minimal package group and want to use this command in your Kickstart file.Warning
When using OpenLDAP with theSSLprotocol for security, make sure that theSSLv2andSSLv3protols are disabled in the server configuration. This is due to the POODLE SSL vulnerability (CVE-2014-3566). See https://access.redhat.com/solutions/1234843 for details.--enablenis— Turns on NIS support. By default,--enablenisuses whatever domain it finds on the network. A domain should almost always be set by hand with the--nisdomain=option.--nisdomain=— NIS domain name to use for NIS services.--nisserver=— Server to use for NIS services (broadcasts by default).--useshadowor--enableshadow— Use shadow passwords. This option is enabled by default.--enableldap— Turns on LDAP support in/etc/nsswitch.conf, allowing your system to retrieve information about users (for example, their UIDs, home directories, and shells) from an LDAP directory. To use this option, you must install thenss-pam-ldapdpackage. You must also specify a server and a base DN (distinguished name) with--ldapserver=and--ldapbasedn=.--enableldapauth— Use LDAP as an authentication method. This enables thepam_ldapmodule for authentication and changing passwords, using an LDAP directory. To use this option, you must have thenss-pam-ldapdpackage installed. You must also specify a server and a base DN with--ldapserver=and--ldapbasedn=. If your environment does not use TLS (Transport Layer Security), use the--disableldaptlsswitch to ensure that the resulting configuration file works.--ldapserver=— If you specified either--enableldapor--enableldapauth, use this option to specify the name of the LDAP server to use. This option is set in the/etc/ldap.conffile.--ldapbasedn=— If you specified either--enableldapor--enableldapauth, use this option to specify the DN in your LDAP directory tree under which user information is stored. This option is set in the/etc/ldap.conffile.--enableldaptls— Use TLS (Transport Layer Security) lookups. This option allows LDAP to send encrypted usernames and passwords to an LDAP server before authentication.--disableldaptls— Do not use TLS (Transport Layer Security) lookups in an environment that uses LDAP for authentication.--enablekrb5— Use Kerberos 5 for authenticating users. Kerberos itself does not know about home directories, UIDs, or shells. If you enable Kerberos, you must make users' accounts known to this workstation by enabling LDAP, NIS, or Hesiod or by using the/usr/sbin/useraddcommand. If you use this option, you must have thepam_krb5package installed.--krb5realm=— The Kerberos 5 realm to which your workstation belongs.--krb5kdc=— The KDC (or KDCs) that serve requests for the realm. If you have multiple KDCs in your realm, separate their names with commas (,).--krb5adminserver=— The KDC in your realm that is also running kadmind. This server handles password changing and other administrative requests. This server must be run on the master KDC if you have more than one KDC.--enablehesiod— Enable Hesiod support for looking up user home directories, UIDs, and shells. More information on setting up and using Hesiod on your network is in/usr/share/doc/glibc-2.x.x/README.hesiod, which is included in theglibcpackage. Hesiod is an extension of DNS that uses DNS records to store information about users, groups, and various other items.--hesiodlhsand--hesiodrhs— TheHesiodLHS (left-hand side) and RHS (right-hand side) values, set in/etc/hesiod.conf. TheHesiodlibrary uses these values to search DNS for a name, similar to the way that LDAP uses a base DN.To look up user information for the usernamejim, the Hesiod library looks upjim.passwd<LHS><RHS>, which should resolve to a TXT record that contains a string identical to an entry for that user in thepasswdfile:jim:*:501:501:Jungle Jim:/home/jim:/bin/bash. To look up groups, the Hesiod library looks upjim.group<LHS><RHS>instead.To look up users and groups by number, make501.uida CNAME forjim.passwd, and501.gida CNAME forjim.group. Note that the library does not place a period (.) in front of the LHS and RHS values when performing a search. Therefore, if the LHS and RHS values need to have a period placed in front of them, you must include the period in the values you set for--hesiodlhsand--hesiodrhs.--enablesmbauth— Enables authentication of users against an SMB server (typically a Samba or Windows server). SMB authentication support does not know about home directories, UIDs, or shells. If you enable SMB, you must make users' accounts known to the workstation by enabling LDAP, NIS, or Hesiod or by using the/usr/sbin/useraddcommand.--smbservers=— The name of the servers to use for SMB authentication. To specify more than one server, separate the names with commas (,).--smbworkgroup=— The name of the workgroup for the SMB servers.--enablecache— Enables thenscdservice. Thenscdservice caches information about users, groups, and various other types of information. Caching is especially helpful if you choose to distribute information about users and groups over your network using NIS, LDAP, or Hesiod.--passalgo=— specifysha256to set up the SHA-256 hashing algorithm orsha512to set up the SHA-512 hashing algorithm.
-
autopart(optional) - Automatically creates partitions — a root (
/) partition (1 GB or bigger), a swap partition, and an appropriate boot partition for the architecture.Note
Note that theautopartoption cannot be used together with thepart/partition,raid,logvol, orvolgroupoptions in the same kickstart file.--encrypted— Should all devices with support be encrypted by default? This is equivalent to checking the Encrypt checkbox on the initial partitioning screen.--cipher=— Specifies which type of encryption will be used if the anaconda default aes-xts-plain64 is not satisfactory. You must use this option together with the--encryptedoption; by itself it has no effect. Available types of encryption are listed in the Red Hat Enterprise Linux Security Guide, but Red Hat strongly recommends using either aes-xts-plain64 or aes-cbc-essiv:sha256.--passphrase=— Provide a default system-wide passphrase for all encrypted devices.--escrowcert=URL_of_X.509_certificate— Store data encryption keys of all encrypted volumes as files in/root, encrypted using the X.509 certificate from the URL specified with URL_of_X.509_certificate. The keys are stored as a separate file for each encrypted volume. This option is only meaningful if--encryptedis specified.--backuppassphrase=— Add a randomly-generated passphrase to each encrypted volume. Store these passphrases in separate files in/root, encrypted using the X.509 certificate specified with--escrowcert. This option is only meaningful if--escrowcertis specified.
-
autostep(optional) - Similar to
interactiveexcept it goes to the next screen for you. It is used mostly for debugging and should not be used when deploying a system because it may disrupt package installation.--autoscreenshot— Take a screenshot at every step during installation and copy the images over to/root/anaconda-screenshotsafter installation is complete. This is most useful for documentation.
-
bootloader(required) - Specifies how the boot loader should be installed. This option is required for both installations and upgrades.
Important
If you select text mode for a kickstart installation, make sure that you specify choices for the partitioning, bootloader, and package selection options. These steps are automated in text mode, and anaconda cannot prompt you for missing information. If you do not provide choices for these options, anaconda will stop the installation process.Important
It is highly recommended to set up a boot loader password on every machine. An unprotected boot loader can allow a potential attacker to modify the system's boot options and gain access to the system. See the chapter titled Workstation Security in the Red Hat Enterprise Linux Security Guide for more information on boot loader passwords and password security in general.--append=— Specifies kernel parameters. To specify multiple parameters, separate them with spaces. For example:bootloader --location=mbr --append="hdd=ide-scsi ide=nodma"
bootloader --location=mbr --append="hdd=ide-scsi ide=nodma"Copy to Clipboard Copied! Toggle word wrap Toggle overflow --driveorder— Specify which drive is first in the BIOS boot order. For example:bootloader --driveorder=sda,hda
bootloader --driveorder=sda,hdaCopy to Clipboard Copied! Toggle word wrap Toggle overflow --disabled— This option is a stronger version of--location=none. While--location=nonesimply disables bootloader installation,--disableddisables bootloader installation and also disables installation of the bootloader package, thus saving space.--location=— Specifies where the boot record is written. Valid values are the following:mbr(the default),partition(installs the boot loader on the first sector of the partition containing the kernel — necessary for UEFI), ornone(do not install the boot loader).Important
64-bit AMD and Intel systems with UEFI firmware require the boot loader to be installed in an EFI system partition on a disk labeled with a GUID Partition Table (GPT). Using a disk with a Master Boot Record (MBR) label requires that the disk be relabeled using theclearpartandzerombrcommands. Relabeling a disk will render all data on that disk inaccessible and it will require creating a new partition layout.--password=— If using GRUB, sets the GRUB boot loader password to the one specified with this option. This should be used to restrict access to the GRUB shell, where arbitrary kernel options can be passed.--iscrypted— If using GRUB, should be included if the password is already encrypted. The encryption method is detected automatically based on the password.To create an encrypted password, use the following command:python -c 'import crypt; print(crypt.crypt("My Password"))'python -c 'import crypt; print(crypt.crypt("My Password"))'Copy to Clipboard Copied! Toggle word wrap Toggle overflow This will create a sha512 crypt of your password.--upgrade— Upgrade the existing boot loader configuration, preserving the old entries. This option is only available for upgrades.
-
clearpart(optional) - Removes partitions from the system, prior to creation of new partitions. By default, no partitions are removed.
Note
If theclearpartcommand is used, then the--onpartcommand cannot be used on a logical partition.--all— Erases all partitions from the system.Warning
This option will erase all disks which can be reached by the installer, including any attached network storage. Use this option with caution.You can preventclearpartfrom wiping storage you want to preserve by using the--drives=option and specifying only the drives you want to clear, by attaching network storage later (for example, in the%postsection of the Kickstart file), or by blacklisting the kernel modules used to access network storage.Important
Theclearpartcannot clear an existing BIOS RAID setup. For this, the commandwipefs -amust be added to your%prescript. Note that this will wipe all metadata from the RAID.--drives=— Specifies which drives to clear partitions from. For example, the following clears all the partitions on the first two drives on the primary IDE controller:clearpart --drives=hda,hdb --all
clearpart --drives=hda,hdb --allCopy to Clipboard Copied! Toggle word wrap Toggle overflow To clear a multipath device, use the formatdisk/by-id/scsi-WWID, where WWID is the world-wide identifier for the device. For example, to clear a disk with WWID58095BEC5510947BE8C0360F604351918, use:clearpart --drives=disk/by-id/scsi-58095BEC5510947BE8C0360F604351918
clearpart --drives=disk/by-id/scsi-58095BEC5510947BE8C0360F604351918Copy to Clipboard Copied! Toggle word wrap Toggle overflow This format is preferable for all multipath devices, but if errors arise, multipath devices that do not use logical volume management (LVM) can also be cleared using the formatdisk/by-id/dm-uuid-mpath-WWID, where WWID is the world-wide identifier for the device. For example, to clear a disk with WWID2416CD96995134CA5D787F00A5AA11017, use:clearpart --drives=disk/by-id/dm-uuid-mpath-2416CD96995134CA5D787F00A5AA11017
clearpart --drives=disk/by-id/dm-uuid-mpath-2416CD96995134CA5D787F00A5AA11017Copy to Clipboard Copied! Toggle word wrap Toggle overflow Warning
Never specify multipath devices by device names likempatha. Device names likempathaare not specific to a particular disk. The disk named/dev/mpathaduring installation might not be the one that you expect it to be. Therefore, theclearpartcommand could target the wrong disk.--initlabel— Initializes a disk (or disks) by creating a default disk label for all disks in their respective architecture that have been designated for formatting (for example, msdos for x86). Because--initlabelcan see all disks, it is important to ensure only those drives that are to be formatted are connected.clearpart --initlabel --drives=names_of_disks
clearpart --initlabel --drives=names_of_disksCopy to Clipboard Copied! Toggle word wrap Toggle overflow For example:clearpart --initlabel --drives=dasda,dasdb,dasdc
clearpart --initlabel --drives=dasda,dasdb,dasdcCopy to Clipboard Copied! Toggle word wrap Toggle overflow --linux— Erases all Linux partitions.--none(default) — Do not remove any partitions.--cdl— Reformat all detected LDL (Linux Disk Layout) disks to CDL (Compatible Disk Layout). Only available on IBM System z.
Note
Using theclearpart --allcommand in a Kickstart file to remove all existing partitions during the installation will cause Anaconda to pause and prompt you for a confirmation. If you need to perform the installation automatically with no interaction, add thezerombrcommand to your Kickstart file. -
cmdline(optional) - Perform the installation in a completely non-interactive command line mode. Any prompts for interaction halts the install. This mode is useful on IBM System z systems with the 3270 terminal under z/VM and operating system messages applet on LPAR. The recommended use is in conjunction with
RUNKS=1andks=. Refer to Section 26.6, “Parameters for Kickstart Installations”. -
device(optional) - On most PCI systems, the installation program autoprobes for Ethernet and SCSI cards properly. On older systems and some PCI systems, however, kickstart needs a hint to find the proper devices. The
devicecommand, which tells the installation program to install extra modules, is in this format:device <moduleName> --opts=<options>
device <moduleName> --opts=<options>Copy to Clipboard Copied! Toggle word wrap Toggle overflow - <moduleName> — Replace with the name of the kernel module which should be installed.
--opts=— Options to pass to the kernel module. For example:--opts="aic152x=0x340 io=11"
--opts="aic152x=0x340 io=11"Copy to Clipboard Copied! Toggle word wrap Toggle overflow
-
driverdisk(optional) - Driver disks can be used during kickstart installations. You must copy the driver disks's contents to the root directory of a partition on the system's hard drive. Then you must use the
driverdiskcommand to tell the installation program where to look for the driver disk.driverdisk <partition> --source=<url> --biospart=<biospart> [--type=<fstype>]
driverdisk <partition> --source=<url> --biospart=<biospart> [--type=<fstype>]Copy to Clipboard Copied! Toggle word wrap Toggle overflow Alternatively, a network location can be specified for the driver disk:driverdisk --source=ftp://path/to/dd.img driverdisk --source=http://path/to/dd.img driverdisk --source=nfs:host:/path/to/img
driverdisk --source=ftp://path/to/dd.img driverdisk --source=http://path/to/dd.img driverdisk --source=nfs:host:/path/to/imgCopy to Clipboard Copied! Toggle word wrap Toggle overflow - <partition> — Partition containing the driver disk.
- <url> — URL for the driver disk. NFS locations can be given in the form
nfs:host:/path/to/img. - <biospart> — BIOS partition containing the driver disk (for example,
82p2). --type=— File system type (for example, vfat or ext2).
-
fcoe(optional) - Specify which FCoE devices should be activated automatically in addition to those discovered by Enhanced Disk Drive Services (EDD).
--nic=(mandatory) — The name of the device to be activated.--dcb=— Establish Data Center Bridging (DCB) settings.--autovlan— Discover VLANs automatically.
-
firewall(optional) - This option corresponds to the Firewall Configuration screen in the installer.
firewall --enabled|--disabled [--trust=] <device> <incoming> [--port=]
firewall --enabled|--disabled [--trust=] <device> <incoming> [--port=]Copy to Clipboard Copied! Toggle word wrap Toggle overflow Warning
Thefirewallcommand requires the system-config-firewall-base package, which is not included when using the minimal package group. Addsystem-config-firewall-baseto the%packagessection as described in Section 32.5, “Package Selection”, if you are using the minimal package group and you want to use this command in your Kickstart file.--enabledor--enable— Reject incoming connections that are not in response to outbound requests, such as DNS replies or DHCP requests. If access to services running on this machine is needed, you can choose to allow specific services through the firewall.--disabledor--disable— Do not configure any iptables rules.--trust=— Listing a device here, such as eth0, allows all traffic coming to and from that device to go through the firewall. To list more than one device, use--trust eth0 --trust eth1. Do NOT use a comma-separated format such as--trust eth0, eth1.- <incoming> — Replace with one or more of the following to allow the specified services through the firewall.
--ssh--telnet--smtp--http--ftp
--port=— You can specify that ports be allowed through the firewall using the port:protocol format. For example, to allow IMAP access through your firewall, specifyimap:tcp. Numeric ports can also be specified explicitly; for example, to allow UDP packets on port 1234 through, specify1234:udp. To specify multiple ports, separate them by commas.
-
firstboot(optional) - Determine whether the firstboot starts the first time the system is booted. If enabled, the firstboot package must be installed. If not specified, this option is disabled by default.
--enableor--enabled— The Setup Agent is started the first time the system boots.--disableor--disabled— The Setup Agent is not started the first time the system boots.--reconfig— Enable the Setup Agent to start at boot time in reconfiguration mode. This mode enables the language, mouse, keyboard, root password, security level, and time zone configuration options in addition to the default ones.
-
graphical(optional) - Perform the kickstart installation in graphical mode. This is the default.
-
group(optional) - Creates a new user group on the system. If a group with the given name or GID already exists, this command will fail. In addition, the
usercommand can be used to create a new group for the newly created user.group --name=name [--gid=gid]
group --name=name [--gid=gid]group --name=name [--gid=gid]group --name=name [--gid=gid]group --name=name [--gid=gid]group --name=name [--gid=gid]Copy to Clipboard Copied! Toggle word wrap Toggle overflow --name=- Provides the name of the group.--gid=- The group's GID. If not provided, defaults to the next available non-system GID.
-
halt(optional) - Halt the system after the installation has successfully completed. This is similar to a manual installation, where anaconda displays a message and waits for the user to press a key before rebooting. During a kickstart installation, if no completion method is specified, this option is used as the default.The
haltoption is equivalent to theshutdown -hcommand.For other completion methods, refer to thepoweroff,reboot, andshutdownkickstart options. -
ignoredisk(optional) - Causes the installer to ignore the specified disks. This is useful if you use autopartition and want to be sure that some disks are ignored. For example, without
ignoredisk, attempting to deploy on a SAN-cluster the kickstart would fail, as the installer detects passive paths to the SAN that return no partition table.The syntax is:ignoredisk --drives=drive1,drive2,...
ignoredisk --drives=drive1,drive2,...Copy to Clipboard Copied! Toggle word wrap Toggle overflow where driveN is one ofsda,sdb,...,hda,... etc.To ignore a multipath device that does not use logical volume management (LVM), use the formatdisk/by-id/dm-uuid-mpath-WWID, where WWID is the world-wide identifier for the device. For example, to ignore a disk with WWID2416CD96995134CA5D787F00A5AA11017, use:ignoredisk --drives=disk/by-id/dm-uuid-mpath-2416CD96995134CA5D787F00A5AA11017
ignoredisk --drives=disk/by-id/dm-uuid-mpath-2416CD96995134CA5D787F00A5AA11017Copy to Clipboard Copied! Toggle word wrap Toggle overflow Multipath devices that use LVM are not assembled until after anaconda has parsed the kickstart file. Therefore, you cannot specify these devices in the formatdm-uuid-mpath. Instead, to ignore a multipath device that uses LVM, use the formatdisk/by-id/scsi-WWID, where WWID is the world-wide identifier for the device. For example, to ignore a disk with WWID58095BEC5510947BE8C0360F604351918, use:ignoredisk --drives=disk/by-id/scsi-58095BEC5510947BE8C0360F604351918
ignoredisk --drives=disk/by-id/scsi-58095BEC5510947BE8C0360F604351918Copy to Clipboard Copied! Toggle word wrap Toggle overflow Warning
Never specify multipath devices by device names likempatha. Device names likempathaare not specific to a particular disk. The disk named/dev/mpathaduring installation might not be the one that you expect it to be. Therefore, theclearpartcommand could target the wrong disk.--only-use— specifies a list of disks for the installer to use. All other disks are ignored. For example, to use disksdaduring installation and ignore all other disks:ignoredisk --only-use=sda
ignoredisk --only-use=sdaCopy to Clipboard Copied! Toggle word wrap Toggle overflow To include a multipath device that does not use LVM:ignoredisk --only-use=disk/by-id/dm-uuid-mpath-2416CD96995134CA5D787F00A5AA11017
ignoredisk --only-use=disk/by-id/dm-uuid-mpath-2416CD96995134CA5D787F00A5AA11017Copy to Clipboard Copied! Toggle word wrap Toggle overflow To include a multipath device that uses LVM:ignoredisk --only-use=disk/by-id/scsi-58095BEC5510947BE8C0360F604351918
ignoredisk --only-use=disk/by-id/scsi-58095BEC5510947BE8C0360F604351918Copy to Clipboard Copied! Toggle word wrap Toggle overflow
-
install(optional) - Tells the system to install a fresh system rather than upgrade an existing system. This is the default mode. For installation, you must specify the type of installation from
cdrom,harddrive,nfs, orurl(for FTP, HTTP, or HTTPS installations). Theinstallcommand and the installation method command must be on separate lines.cdrom— Install from the first optical drive on the system.harddrive— Install from a Red Hat installation tree on a local drive, which must be either vfat or ext2.--biospart=BIOS partition to install from (such as 82).--partition=Partition to install from (such as sdb2).--dir=Directory containing thevariantdirectory of the installation tree.
For example:harddrive --partition=hdb2 --dir=/tmp/install-tree
harddrive --partition=hdb2 --dir=/tmp/install-treeCopy to Clipboard Copied! Toggle word wrap Toggle overflow nfs— Install from the NFS server specified.--server=Server from which to install (hostname or IP).--dir=Directory containing thevariantdirectory of the installation tree.--opts=Mount options to use for mounting the NFS export. (optional)
For example:nfs --server=nfsserver.example.com --dir=/tmp/install-tree
nfs --server=nfsserver.example.com --dir=/tmp/install-treeCopy to Clipboard Copied! Toggle word wrap Toggle overflow url— Install from an installation tree on a remote server using the FTP, HTTP, or HTTPS protocol. You can only specify one URL.For example:url --url http://<server>/<dir>
url --url http://<server>/<dir>Copy to Clipboard Copied! Toggle word wrap Toggle overflow or:url --url ftp://<username>:<password>@<server>/<dir>
url --url ftp://<username>:<password>@<server>/<dir>Copy to Clipboard Copied! Toggle word wrap Toggle overflow
-
interactive(optional) - Perform an interactive installation, but use the information in the kickstart file to provide defaults. During the installation, anaconda still prompts you at every stage. Either accept the values from the kickstart file by clicking or change the values and click to continue. Refer also to the
autostepcommand. -
iscsi(optional) iscsi --ipaddr=<ipaddr> [options]
iscsi --ipaddr=<ipaddr> [options]Copy to Clipboard Copied! Toggle word wrap Toggle overflow Specifies additional iSCSI storage to be attached during installation. If you use theiscsiparameter, you must also assign a name to the iSCSI node, using theiscsinameparameter earlier in the kickstart file.We recommend that wherever possible you configure iSCSI storage in the system BIOS or firmware (iBFT for Intel systems) rather than use theiscsiparameter. Anaconda automatically detects and uses disks configured in BIOS or firmware and no special configuration is necessary in the kickstart file.If you must use theiscsiparameter, ensure that networking is activated at the beginning of the installation, and that theiscsiparameter appears in the kickstart file before you refer to iSCSI disks with parameters such asclearpartorignoredisk.--port=(mandatory) — the port number (typically,--port=3260)--user=— the username required to authenticate with the target--password=— the password that corresponds with the username specified for the target--reverse-user=— the username required to authenticate with the initiator from a target that uses reverse CHAP authentication--reverse-password=— the password that corresponds with the username specified for the initiator
-
iscsiname(optional) - Assigns a name to an iSCSI node specified by the iscsi parameter. If you use the
iscsiparameter in your kickstart file, you must specifyiscsinameearlier in the kickstart file. -
keyboard(required) - Sets the default keyboard type for the system. The available keyboard types are:
be-latin1— Belgianbg_bds-utf8— Bulgarianbg_pho-utf8— Bulgarian (Phonetic)br-abnt2— Brazilian (ABNT2)cf— French Canadiancroat— Croatiancz-us-qwertz— Czechcz-lat2— Czech (qwerty)de— Germande-latin1— German (latin1)de-latin1-nodeadkeys— German (latin1 without dead keys)dvorak— Dvorakdk— Danishdk-latin1— Danish (latin1)es— Spanishet— Estonianfi— Finnishfi-latin1— Finnish (latin1)fr— Frenchfr-latin9— French (latin9)fr-latin1— French (latin1)fr-pc— French (pc)fr_CH— Swiss Frenchfr_CH-latin1— Swiss French (latin1)gr— Greekhu— Hungarianhu101— Hungarian (101 key)is-latin1— Icelandicit— Italianit-ibm— Italian (IBM)it2— Italian (it2)jp106— Japaneseko— Koreanla-latin1— Latin Americanmk-utf— Macedoniannl— Dutchno— Norwegianpl2— Polishpt-latin1— Portuguesero— Romanianru— Russiansr-cy— Serbiansr-latin— Serbian (latin)sv-latin1— Swedishsg— Swiss Germansg-latin1— Swiss German (latin1)sk-qwerty— Slovak (qwerty)slovene— Sloveniantrq— Turkishuk— United Kingdomua-utf— Ukrainianus-acentos— U.S. Internationalus— U.S. English
The file/usr/lib/python2.6/site-packages/system_config_keyboard/keyboard_models.pyon 32-bit systems or/usr/lib64/python2.6/site-packages/system_config_keyboard/keyboard_models.pyon 64-bit systems also contains this list and is part of the system-config-keyboard package. -
lang(required) - Sets the language to use during installation and the default language to use on the installed system. For example, to set the language to English, the kickstart file should contain the following line:
lang en_US
lang en_USCopy to Clipboard Copied! Toggle word wrap Toggle overflow The file/usr/share/system-config-language/locale-listprovides a list of the valid language codes in the first column of each line and is part of thesystem-config-languagepackage.Certain languages (for example, Chinese, Japanese, Korean, and Indic languages) are not supported during text-mode installation. If you specify one of these languages with thelangcommand, the installation process continues in English, but the installed system uses your selection as its default language. -
langsupport(deprecated) - The langsupport keyword is deprecated and its use will cause an error message to be printed to the screen and installation to halt. Instead of using the langsupport keyword, you should now list the support package groups for all languages you want supported in the
%packagessection of your kickstart file. For instance, adding support for French means you should add the following to%packages:@french-support
@french-supportCopy to Clipboard Copied! Toggle word wrap Toggle overflow -
logging(optional) - This command controls the error logging of anaconda during installation. It has no effect on the installed system.
logging [--host=<host>] [--port=<port>] [--level=debug|info|error|critical]
logging [--host=<host>] [--port=<port>] [--level=debug|info|error|critical]Copy to Clipboard Copied! Toggle word wrap Toggle overflow --host=— Send logging information to the given remote host, which must be running a syslogd process configured to accept remote logging.--port=— If the remote syslogd process uses a port other than the default, it may be specified with this option.--level=— One of debug, info, warning, error, or critical.Specify the minimum level of messages that appear on tty3. All messages will still be sent to the log file regardless of this level, however.
-
logvol(optional) - Create a logical volume for Logical Volume Management (LVM) with the syntax:
logvol <mntpoint> --vgname=<name> --size=<size> --name=<name> [options]
logvol <mntpoint> --vgname=<name> --size=<size> --name=<name> [options]Copy to Clipboard Copied! Toggle word wrap Toggle overflow Important
Do not use the dash ("-") character in logical volume or volume group names when installing Red Hat Enterprise Linux using Kickstart. If you do, the installation will finish normally, but the character will be removed from all newly created volume and volume group names. For example, if you create a volume group namedvolgrp-01, its name will be changed tovolgrp01.This limitation only applies to new installations. If you are upgrading or reinstalling an existing installation and use the--noformatoption described below, dashes used in volume and volume group names will be preserved.- The <mntpoint> is where the partition is mounted and must be of one of the following forms:
/<path>For example,/,/usr,/homeswapThe partition is used as swap space.To determine the size of the swap partition automatically, use the--recommendedoption:swap --recommended
swap --recommendedCopy to Clipboard Copied! Toggle word wrap Toggle overflow The size assigned will be effective but not precisely calibrated for your system.To determine the size of the swap partition automatically but also allow extra space for your system to hibernate, use the--hibernationoption:swap --hibernation
swap --hibernationCopy to Clipboard Copied! Toggle word wrap Toggle overflow The size assigned will be equivalent to the swap space assigned by--recommendedplus the amount of RAM on your system.For the swap sizes assigned by these commands, refer to Section 9.15.5, “Recommended Partitioning Scheme” for x86, AMD64, and Intel 64 Architecture and Section 16.17.5, “Recommended Partitioning Scheme” for IBM Power Systems servers.Important
Swap space recommendations were updated in Red Hat Enterprise Linux 6.3. Previously, systems with large amounts of RAM were assigned huge swap spaces. This delayed the Out-of-Memory Killer (oom_kill) in addressing critical memory shortages, even if a process was malfunctioning.Consequently, if you are using an earlier version of Red Hat Enterprise Linux 6,swap --recommendedwill generate larger swap spaces than those described in the Recommended Partitioning Scheme, even on systems with large amounts of RAM. This may negate the need to allow extra space for hibernation.However, these updated swap space values are nonetheless recommended for earlier versions of Red Hat Enterprise Linux 6 and can be set manually using theswap --size=option.
The options are as follows:--noformat— Use an existing logical volume and do not format it.--useexisting— Use an existing logical volume and reformat it.--fstype=— Sets the file system type for the logical volume. Valid values arexfs,ext2,ext3,ext4,swap,vfat,hfs, andefi.--fsoptions=— Specifies a free form string of options to be used when mounting the filesystem. This string will be copied into the/etc/fstabfile of the installed system and should be enclosed in quotes.--fsprofile— Specifies a usage type to be passed to the program that makes a filesystem on this partition. A usage type defines a variety of tuning parameters to be used when making a filesystem. For this option to work, the filesystem must support the concept of usage types and there must be a configuration file that lists valid types. For ext2, ext3, and ext4, this configuration file is/etc/mke2fs.conf.--grow=— Tells the logical volume to grow to fill available space (if any), or up to the maximum size setting.--maxsize=— The maximum size in megabytes when the logical volume is set to grow. Specify an integer value here such as500(do not include the unit).--recommended=— Determine the size of the logical volume automatically.--percent=— Specify the amount by which to grow the logical volume, as a percentage of the free space in the volume group after any statically-sized logical volumes are taken into account. This option must be used in conjunction with the--sizeand--growoptions forlogvol.--encrypted— Specifies that this logical volume should be encrypted, using the passphrase provided in the--passphraseoption. If you do not specify a passphrase, anaconda uses the default, system-wide passphrase set with theautopart --passphrasecommand, or stops the installation and prompts you to provide a passphrase if no default is set.--cipher=— Specifies which type of encryption will be used if the anaconda default aes-xts-plain64 is not satisfactory. You must use this option together with the--encryptedoption; by itself it has no effect. Available types of encryption are listed in the Red Hat Enterprise Linux Security Guide, but Red Hat strongly recommends using either aes-xts-plain64 or aes-cbc-essiv:sha256.--passphrase=— Specifies the passphrase to use when encrypting this logical volume. You must use this option together with the--encryptedoption; by itself it has no effect.--escrowcert=URL_of_X.509_certificate— Store data encryption keys of all encrypted volumes as files in/root, encrypted using the X.509 certificate from the URL specified with URL_of_X.509_certificate. The keys are stored as a separate file for each encrypted volume. This option is only meaningful if--encryptedis specified.--backuppassphrase=— Add a randomly-generated passphrase to each encrypted volume. Store these passphrases in separate files in/root, encrypted using the X.509 certificate specified with--escrowcert. This option is only meaningful if--escrowcertis specified.
Create the partition first, create the logical volume group, and then create the logical volume. For example:part pv.01 --size 3000 volgroup myvg pv.01 logvol / --vgname=myvg --size=2000 --name=rootvol
part pv.01 --size 3000 volgroup myvg pv.01 logvol / --vgname=myvg --size=2000 --name=rootvolCopy to Clipboard Copied! Toggle word wrap Toggle overflow Create the partition first, create the logical volume group, and then create the logical volume to occupy 90% of the remaining space in the volume group. For example:part pv.01 --size 1 --grow volgroup myvg pv.01 logvol / --vgname=myvg --size=1 --name=rootvol --grow --percent=90
part pv.01 --size 1 --grow volgroup myvg pv.01 logvol / --vgname=myvg --size=1 --name=rootvol --grow --percent=90Copy to Clipboard Copied! Toggle word wrap Toggle overflow -
mediacheck(optional) - If given, this will force anaconda to run mediacheck on the installation media. This command requires that installs be attended, so it is disabled by default.
-
monitor(optional) - If the monitor command is not given, anaconda will use X to automatically detect your monitor settings. Please try this before manually configuring your monitor.
monitor --monitor=<monitorname>|--hsync|vsync=<frequency> [--noprobe]
monitor --monitor=<monitorname>|--hsync|vsync=<frequency> [--noprobe]Copy to Clipboard Copied! Toggle word wrap Toggle overflow --hsync=— Specifies the horizontal sync frequency of the monitor.--monitor=— Use specified monitor; monitor name should be from the list of monitors in /usr/share/hwdata/MonitorsDB from the hwdata package. The list of monitors can also be found on the X Configuration screen of the Kickstart Configurator. This is ignored if --hsync or --vsync is provided. If no monitor information is provided, the installation program tries to probe for it automatically.--noprobe=— Do not try to probe the monitor.--vsync=— Specifies the vertical sync frequency of the monitor.
-
mouse(deprecated) - The mouse keyword is deprecated.
-
network(optional) - Configures network information for the target system and activates network devices in the installer environment. The device specified in the first
networkcommand is activated automatically if network access is required during installation, for example, during a network installation or installation over VNC. From Red Hat Enterprise Linux 6.1 onwards, you can also explicitly require device to activate in the installer environment with the--activateoption.Important
If you need to manually specify network settings during an otherwise-automated kickstart installation, do not usenetwork. Instead, boot the system with theasknetworkoption (refer to Section 32.11, “Starting a Kickstart Installation”), which will prompt anaconda to ask you for network settings rather than use the default settings. anaconda will ask this before fetching the kickstart file.Once the network connection is established, you can only reconfigure network settings with those specified in your kickstart file.Note
You will only be prompted for information about your network:- before fetching the kickstart file if you are using the
asknetworkboot option - when the network is first accessed once the kickstart file has been fetched, if the network was not used to fetch it and you have provided no kickstart network commands
--activate— activate this device in the installer environment.If you use the--activateoption on a device that has already been activated (for example, an interface you configured with boot options so that the system could retrieve the kickstart file) the device is reactivated to use the details specified in the kickstart file.Use the--nodefrouteoption to prevent the device from using the default route.Theactivateoption is new in Red Hat Enterprise Linux 6.1.--bootproto=— One ofdhcp,bootp,ibft, orstatic.Theibftoption is new in Red Hat Enterprise Linux 6.1.Thebootprotooption defaults todhcp.bootpanddhcpare treated the same.The DHCP method uses a DHCP server system to obtain its networking configuration. As you might guess, the BOOTP method is similar, requiring a BOOTP server to supply the networking configuration. To direct a system to use DHCP:network --bootproto=dhcp
network --bootproto=dhcpCopy to Clipboard Copied! Toggle word wrap Toggle overflow To direct a machine to use BOOTP to obtain its networking configuration, use the following line in the kickstart file:network --bootproto=bootp
network --bootproto=bootpCopy to Clipboard Copied! Toggle word wrap Toggle overflow To direct a machine to use the configuration specified in iBFT, use:network --bootproto=ibft
network --bootproto=ibftCopy to Clipboard Copied! Toggle word wrap Toggle overflow The static method requires that you specify the IP address, netmask, gateway, and nameserver in the kickstart file. As the name implies, this information is static and is used during and after the installation.All static networking configuration information must be specified on one line; you cannot wrap lines using a backslash as you can on a command line. A line that specifies static networking in a kickstart file is therefore more complex than lines that specify DHCP, BOOTP, or iBFT. Note that the examples on this page have line breaks in them for presentation reasons; they would not work in an actual kickstart file.network --bootproto=static --ip=10.0.2.15 --netmask=255.255.255.0 --gateway=10.0.2.254 --nameserver=10.0.2.1
network --bootproto=static --ip=10.0.2.15 --netmask=255.255.255.0 --gateway=10.0.2.254 --nameserver=10.0.2.1Copy to Clipboard Copied! Toggle word wrap Toggle overflow You can also configure multiple nameservers here. To do so, specify them as a comma-delimited list in the command line.network --bootproto=static --ip=10.0.2.15 --netmask=255.255.255.0 --gateway=10.0.2.254 --nameserver 192.168.2.1,192.168.3.1
network --bootproto=static --ip=10.0.2.15 --netmask=255.255.255.0 --gateway=10.0.2.254 --nameserver 192.168.2.1,192.168.3.1Copy to Clipboard Copied! Toggle word wrap Toggle overflow --device=— specifies the device to be configured (and eventually activated) with thenetworkcommand. For the firstnetworkcommand,--device=defaults (in order of preference) to one of:- the device specified by the
ksdeviceboot option - the device activated automatically to fetch the kickstart file
- the device selected in the Networking Devices dialog
The behavior of any subsequentnetworkcommand is unspecified if its--deviceoption is missing. Take care to specify a--deviceoption for any network command beyond the first.You can specify a device in one of five ways:- the device name of the interface, for example,
eth0 - the MAC address of the interface, for example,
00:12:34:56:78:9a - the keyword
link, which specifies the first interface with its link in theupstate - the keyword
bootif, which uses the MAC address that pxelinux set in theBOOTIFvariable. SetIPAPPEND 2in yourpxelinux.cfgfile to have pxelinux set theBOOTIFvariable. - the keyword
ibft, which uses the MAC address of the interface specified by iBFT
network --bootproto=dhcp --device=eth0
network --bootproto=dhcp --device=eth0Copy to Clipboard Copied! Toggle word wrap Toggle overflow --ip=— IP address of the device.--ipv6=— IPv6 address of the device. Useautofor automatic configuration, ordhcpfor DHCPv6 only configuration (no router advertisements).--gateway=— Default gateway as a single IPv4 address.--ipv6gateway=— Default gateway as a single IPv6 address.--nameserver=— Primary nameserver, as an IP address. Multiple nameservers must each be separated by a comma.--nodefroute— Prevents the interface being set as the default route. Use this option when you activate additional devices with the--activate=option, for example, a NIC on a separate subnet for an iSCSI target.Thenodefrouteoption is new in Red Hat Enterprise Linux 6.1.--nodns— Do not configure any DNS server.--netmask=— Network mask of the device.--hostname=— Hostname for the installed system.--ethtool=— Specifies additional low-level settings for the network device which will be passed to the ethtool program.--onboot=— Whether or not to enable the device at boot time.--dhcpclass=— The DHCP class.--mtu=— The MTU of the device.--noipv4— Disable configuration of IPv4 on this device.--noipv6— Disable configuration of IPv6 on this device.Note
The--noipv6kickstart option does not currently disable IPv6 configuration of individual devices, due to a bug. However, disabling ipv6 system-wide is possible by using the--noipv6option on every network device and using thenoipv6boot parameter. See Section 32.11, “Starting a Kickstart Installation” for more information about thenoipv6boot option, and the Knowledgebase article at https://access.redhat.com/solutions/1565723 for more information on disabling IPv6 system-wide.--vlanid=— Specifies virtual LAN ID number (802.1q tag).--bondslaves=— Specifies which network interfaces will be bonded as a comma-separated list.--bondopts=— a list of optional parameters for a bonded interface, which is specified using the--bondslaves=and--device=options. Options in this list must be separated by commas (",") or semicolons (";"). If an option itself contains a comma, use a semicolon to separate the options. For example:network --bondopts=mode=active-backup,balance-rr;primary=eth1
network --bondopts=mode=active-backup,balance-rr;primary=eth1Copy to Clipboard Copied! Toggle word wrap Toggle overflow Available optional parameters are listed in the Working with Kernel Modules chapter of the Red Hat Enterprise Linux Deployment Guide.Important
The--bondopts=mode=parameter only supports full mode names such asbalance-rrorbroadcast, not their numerical representations such as0or3.
-
partorpartition(required for installs, ignored for upgrades) - Creates a partition on the system.If more than one Red Hat Enterprise Linux installation exists on the system on different partitions, the installation program prompts the user and asks which installation to upgrade.
Warning
All partitions created are formatted as part of the installation process unless--noformatand--onpartare used.Important
If you select text mode for a kickstart installation, make sure that you specify choices for the partitioning, bootloader, and package selection options. These steps are automated in text mode, and anaconda cannot prompt you for missing information. If you do not provide choices for these options, anaconda will stop the installation process.For a detailed example ofpartin action, refer to Section 32.4.1, “Advanced Partitioning Example”.part|partition <mntpoint> --name=<name> --device=<device> --rule=<rule> [options]
part|partition <mntpoint> --name=<name> --device=<device> --rule=<rule> [options]Copy to Clipboard Copied! Toggle word wrap Toggle overflow - <mntpoint> — Where the partition is mounted. The value must be of one of the following forms:
/<path>For example,/,/usr,/homeswapThe partition is used as swap space.To determine the size of the swap partition automatically, use the--recommendedoption:swap --recommended
swap --recommendedCopy to Clipboard Copied! Toggle word wrap Toggle overflow The size assigned will be effective but not precisely calibrated for your system.To determine the size of the swap partition automatically but also allow extra space for your system to hibernate, use the--hibernationoption:swap --hibernation
swap --hibernationCopy to Clipboard Copied! Toggle word wrap Toggle overflow The size assigned will be equivalent to the swap space assigned by--recommendedplus the amount of RAM on your system.For the swap sizes assigned by these commands, refer to Section 9.15.5, “Recommended Partitioning Scheme” for x86, AMD64, and Intel 64 Architecture and Section 16.17.5, “Recommended Partitioning Scheme” for IBM Power Systems servers.Important
Swap space recommendations were updated in Red Hat Enterprise Linux 6.3. Previously, systems with large amounts of RAM were assigned huge swap spaces. This delayed the Out-of-Memory Killer (oom_kill) in addressing critical memory shortages, even if a process was malfunctioning.Consequently, if you are using an earlier version of Red Hat Enterprise Linux 6,swap --recommendedwill generate larger swap spaces than those described in the Recommended Partitioning Scheme, even on systems with large amounts of RAM. This may negate the need to allow extra space for hibernation.However, these updated swap space values are nonetheless recommended for earlier versions of Red Hat Enterprise Linux 6 and can be set manually using theswap --size=option.raid.<id>The partition is used for software RAID (refer toraid).pv.<id>The partition is used for LVM (refer tologvol).
--size=— The minimum partition size in megabytes. Specify an integer value here such as500(do not include the unit).Important
If the--sizevalue is too small, the installation will fail. Set the--sizevalue as the minimum amount of space you require. For size recommendations, refer to Section 9.15.5, “Recommended Partitioning Scheme”.--grow— Tells the partition to grow to fill available space (if any), or up to the maximum size setting.Note
If you use--grow=without setting--maxsize=on a swap partition, Anaconda will limit the maximum size of the swap partition. For systems that have less than 2GB of physical memory, the imposed limit is twice the amount of physical memory. For systems with more than 2GB, the imposed limit is the size of physical memory plus 2GB.--maxsize=— The maximum partition size in megabytes when the partition is set to grow. Specify an integer value here such as500(do not include the unit).--noformat— Specifies that the partition should not be formatted, for use with the--onpartcommand.--onpart=or--usepart=— Specifies the device on which to place the partition. For example:partition /home --onpart=hda1
partition /home --onpart=hda1Copy to Clipboard Copied! Toggle word wrap Toggle overflow puts/homeon/dev/hda1.These options can also add a partition to a logical volume. For example:partition pv.1 --onpart=hda2
partition pv.1 --onpart=hda2Copy to Clipboard Copied! Toggle word wrap Toggle overflow The device must already exist on the system; the--onpartoption will not create it.--ondisk=or--ondrive=— Forces the partition to be created on a particular disk. For example,--ondisk=sdbputs the partition on the second SCSI disk on the system.To specify a multipath device that does not use logical volume management (LVM), use the formatdisk/by-id/dm-uuid-mpath-WWID, where WWID is the world-wide identifier for the device. For example, to specify a disk with WWID2416CD96995134CA5D787F00A5AA11017, use:part / --fstype=ext3 --grow --asprimary --size=100 --ondisk=disk/by-id/dm-uuid-mpath-2416CD96995134CA5D787F00A5AA11017
part / --fstype=ext3 --grow --asprimary --size=100 --ondisk=disk/by-id/dm-uuid-mpath-2416CD96995134CA5D787F00A5AA11017Copy to Clipboard Copied! Toggle word wrap Toggle overflow Multipath devices that use LVM are not assembled until after anaconda has parsed the kickstart file. Therefore, you cannot specify these devices in the formatdm-uuid-mpath. Instead, to specify a multipath device that uses LVM, use the formatdisk/by-id/scsi-WWID, where WWID is the world-wide identifier for the device. For example, to specify a disk with WWID58095BEC5510947BE8C0360F604351918, use:part / --fstype=ext3 --grow --asprimary --size=100 --ondisk=disk/by-id/scsi-58095BEC5510947BE8C0360F604351918
part / --fstype=ext3 --grow --asprimary --size=100 --ondisk=disk/by-id/scsi-58095BEC5510947BE8C0360F604351918Copy to Clipboard Copied! Toggle word wrap Toggle overflow Warning
Never specify multipath devices by device names likempatha. Device names likempathaare not specific to a particular disk. The disk named/dev/mpathaduring installation might not be the one that you expect it to be. Therefore, theclearpartcommand could target the wrong disk.--asprimary— Forces automatic allocation of the partition as a primary partition, or the partitioning fails.--type=(replaced byfstype) — This option is no longer available. Usefstype.--fsoptions— Specifies a free form string of options to be used when mounting the filesystem. This string will be copied into the/etc/fstabfile of the installed system and should be enclosed in quotes.--fsprofile— Specifies a usage type to be passed to the program that makes a filesystem on this partition. A usage type defines a variety of tuning parameters to be used when making a filesystem. For this option to work, the filesystem must support the concept of usage types and there must be a configuration file that lists valid types. For ext2, ext3, and ext4, this configuration file is/etc/mke2fs.conf.--fstype=— Sets the file system type for the partition. Valid values arexfs,ext2,ext3,ext4,swap,vfat,hfs, andefi.--recommended— Determine the size of the partition automatically.--onbiosdisk— Forces the partition to be created on a particular disk as discovered by the BIOS.--encrypted— Specifies that this partition should be encrypted, using the passphrase provided in the--passphraseoption. If you do not specify a passphrase, anaconda uses the default, system-wide passphrase set with theautopart --passphrasecommand, or stops the installation and prompts you to provide a passphrase if no default is set.--cipher=— Specifies which type of encryption will be used if the anaconda default aes-xts-plain64 is not satisfactory. You must use this option together with the--encryptedoption; by itself it has no effect. Available types of encryption are listed in the Red Hat Enterprise Linux Security Guide, but Red Hat strongly recommends using either aes-xts-plain64 or aes-cbc-essiv:sha256.--passphrase=— Specifies the passphrase to use when encrypting this partition. You must use this option together with the--encryptedoption; by itself it has no effect.--escrowcert=URL_of_X.509_certificate— Store data encryption keys of all encrypted partitions as files in/root, encrypted using the X.509 certificate from the URL specified with URL_of_X.509_certificate. The keys are stored as a separate file for each encrypted partition. This option is only meaningful if--encryptedis specified.--backuppassphrase=— Add a randomly-generated passphrase to each encrypted partition. Store these passphrases in separate files in/root, encrypted using the X.509 certificate specified with--escrowcert. This option is only meaningful if--escrowcertis specified.--label=— assign a label to an individual partition.
Note
If partitioning fails for any reason, diagnostic messages appear on virtual console 3. -
poweroff(optional) - Shut down and power off the system after the installation has successfully completed. Normally during a manual installation, anaconda displays a message and waits for the user to press a key before rebooting. During a kickstart installation, if no completion method is specified, the
haltoption is used as default.Thepoweroffoption is equivalent to theshutdown -pcommand.Note
Thepoweroffoption is highly dependent on the system hardware in use. Specifically, certain hardware components such as the BIOS, APM (advanced power management), and ACPI (advanced configuration and power interface) must be able to interact with the system kernel. Contact your manufacturer for more information on you system's APM/ACPI abilities.For other completion methods, refer to thehalt,reboot, andshutdownkickstart options. raid(optional)- Assembles a software RAID device. This command is of the form:
raid <mntpoint> --level=<level> --device=<mddevice> <partitions*>
raid <mntpoint> --level=<level> --device=<mddevice> <partitions*>Copy to Clipboard Copied! Toggle word wrap Toggle overflow - <mntpoint> — Location where the RAID file system is mounted. If it is
/, the RAID level must be 1 unless a boot partition (/boot) is present. If a boot partition is present, the/bootpartition must be level 1 and the root (/) partition can be any of the available types. The <partitions*> (which denotes that multiple partitions can be listed) lists the RAID identifiers to add to the RAID array.Important
If a RAID device has been prepared and has not been reformatted during installation, ensure that the RAID metadata version is0.90if you intend to put the/bootandPRePpartitions on the RAID device.The default Red Hat Enterprise Linux 6 mdadm metadata version is not supported for the boot device. --level=— RAID level to use (0, 1, or 5).--device=— Name of the RAID device to use (such as md0 or md1). RAID devices range from md0 to md15, and each may only be used once.--spares=— Specifies the number of spare drives allocated for the RAID array. Spare drives are used to rebuild the array in case of drive failure.--fsprofile— Specifies a usage type to be passed to the program that makes a filesystem on this partition. A usage type defines a variety of tuning parameters to be used when making a filesystem. For this option to work, the filesystem must support the concept of usage types and there must be a configuration file that lists valid types. For ext2, ext3, and ext4, this configuration file is/etc/mke2fs.conf.--fstype=— Sets the file system type for the RAID array. Valid values arexfs,ext2,ext3,ext4,swap,vfat, andhfs.--fsoptions=— Specifies a free form string of options to be used when mounting the filesystem. This string will be copied into the /etc/fstab file of the installed system and should be enclosed in quotes.--noformat— Use an existing RAID device and do not format the RAID array.--useexisting— Use an existing RAID device and reformat it.--encrypted— Specifies that this RAID device should be encrypted, using the passphrase provided in the--passphraseoption. If you do not specify a passphrase, anaconda uses the default, system-wide passphrase set with theautopart --passphrasecommand, or stops the installation and prompts you to provide a passphrase if no default is set.--cipher=— Specifies which type of encryption will be used if the anaconda default aes-xts-plain64 is not satisfactory. You must use this option together with the--encryptedoption; by itself it has no effect. Available types of encryption are listed in the Red Hat Enterprise Linux Security Guide, but Red Hat strongly recommends using either aes-xts-plain64 or aes-cbc-essiv:sha256.--passphrase=— Specifies the passphrase to use when encrypting this RAID device. You must use this option together with the--encryptedoption; by itself it has no effect.--escrowcert=URL_of_X.509_certificate— Store the data encryption key for this device in a file in/root, encrypted using the X.509 certificate from the URL specified with URL_of_X.509_certificate. This option is only meaningful if--encryptedis specified.--backuppassphrase=— Add a randomly-generated passphrase to this device. Store the passphrase in a file in/root, encrypted using the X.509 certificate specified with--escrowcert. This option is only meaningful if--escrowcertis specified.
The following example shows how to create a RAID level 1 partition for/, and a RAID level 5 for/usr, assuming there are three SCSI disks on the system. It also creates three swap partitions, one on each drive.part raid.01 --size=60 --ondisk=sda part raid.02 --size=60 --ondisk=sdb part raid.03 --size=60 --ondisk=sdc
part raid.01 --size=60 --ondisk=sda part raid.02 --size=60 --ondisk=sdb part raid.03 --size=60 --ondisk=sdcCopy to Clipboard Copied! Toggle word wrap Toggle overflow part swap --size=128 --ondisk=sda part swap --size=128 --ondisk=sdb part swap --size=128 --ondisk=sdc
part swap --size=128 --ondisk=sda part swap --size=128 --ondisk=sdb part swap --size=128 --ondisk=sdcCopy to Clipboard Copied! Toggle word wrap Toggle overflow part raid.11 --size=1 --grow --ondisk=sda part raid.12 --size=1 --grow --ondisk=sdb part raid.13 --size=1 --grow --ondisk=sdc
part raid.11 --size=1 --grow --ondisk=sda part raid.12 --size=1 --grow --ondisk=sdb part raid.13 --size=1 --grow --ondisk=sdcCopy to Clipboard Copied! Toggle word wrap Toggle overflow raid / --level=1 --device=md0 raid.01 raid.02 raid.03 raid /usr --level=5 --device=md1 raid.11 raid.12 raid.13
raid / --level=1 --device=md0 raid.01 raid.02 raid.03 raid /usr --level=5 --device=md1 raid.11 raid.12 raid.13Copy to Clipboard Copied! Toggle word wrap Toggle overflow For a detailed example ofraidin action, refer to Section 32.4.1, “Advanced Partitioning Example”. -
reboot(optional) - Reboot after the installation is successfully completed (no arguments). Normally, kickstart displays a message and waits for the user to press a key before rebooting.The
rebootoption is equivalent to theshutdown -rcommand.Specifyrebootto automate installation fully when installing in cmdline mode on System z.For other completion methods, refer to thehalt,poweroff, andshutdownkickstart options.Thehaltoption is the default completion method if no other methods are explicitly specified in the kickstart file.Note
Use of therebootoption may result in an endless installation loop, depending on the installation media and method. -
repo(optional) - Configures additional yum repositories that may be used as sources for package installation. Multiple repo lines may be specified.
repo --name=<repoid> [--baseurl=<url>| --mirrorlist=<url>]
repo --name=<repoid> [--baseurl=<url>| --mirrorlist=<url>]Copy to Clipboard Copied! Toggle word wrap Toggle overflow --name=— The repo id. This option is required.--baseurl=— The URL for the repository. The variables that may be used in yum repo config files are not supported here. You may use one of either this option or --mirrorlist, not both.--mirrorlist=— The URL pointing at a list of mirrors for the repository. The variables that may be used in yum repo config files are not supported here. You may use one of either this option or --baseurl, not both.
Important
Repositories used for installation must be stable. The installation may fail if a repository is modified before the installation concludes. -
rootpw(required) - Sets the system's root password to the <password> argument.
rootpw [--iscrypted] <password>
rootpw [--iscrypted] <password>Copy to Clipboard Copied! Toggle word wrap Toggle overflow --iscrypted— If this is present, the password argument is assumed to already be encrypted. To create an encrypted password, use the following command:python -c 'import crypt; print(crypt.crypt("My Password"))'python -c 'import crypt; print(crypt.crypt("My Password"))'Copy to Clipboard Copied! Toggle word wrap Toggle overflow This will create a sha512 crypt of your password.
-
selinux(optional) - Sets the state of SELinux on the installed system. SELinux defaults to enforcing in anaconda.
selinux [--disabled|--enforcing|--permissive]
selinux [--disabled|--enforcing|--permissive]Copy to Clipboard Copied! Toggle word wrap Toggle overflow --enforcing— Enables SELinux with the default targeted policy being enforced.Note
If theselinuxoption is not present in the kickstart file, SELinux is enabled and set to--enforcingby default.--permissive— Outputs warnings based on the SELinux policy, but does not actually enforce the policy.--disabled— Disables SELinux completely on the system.
For more information regarding SELinux for Red Hat Enterprise Linux, refer to the Red Hat Enterprise Linux 6.9 Deployment Guide. -
services(optional) - Modifies the default set of services that will run under the default runlevel. The list of disabled services is processed before the list of enabled services. Therefore, if a service appears on both lists, it is enabled.
--disabled— Disable the services given in the comma separated list.--enabled— Enable the services given in the comma separated list.
Important
Do not include spaces in the list of services. If you do, kickstart will enable or disable only the services up to the first space. For example:services --disabled auditd, cups,smartd, nfslockwill disable only the auditd service. To disable all four services, this entry should include no spaces between services:services --disabled auditd,cups,smartd,nfslock -
shutdown(optional) - Shut down the system after the installation has successfully completed. During a kickstart installation, if no completion method is specified, the
haltoption is used as default.Theshutdownoption is equivalent to theshutdowncommand.For other completion methods, refer to thehalt,poweroff, andrebootkickstart options. -
skipx(optional) - If present, X is not configured on the installed system.
Important
If you install a display manager among your package selection options, this package will create an X configuration, and the installed system will default to run level 5. The effect of theskipxoption will be overridden. -
sshpw(optional) - During installation, you can interact with anaconda and monitor its progress over an SSH connection. Use the
sshpwcommand to create temporary accounts through which to log on. Each instance of the command creates a separate account that exists only in the installation environment. These accounts are not transferred to the installed system.sshpw --username=<name> <password> [--iscrypted|--plaintext] [--lock]
sshpw --username=<name> <password> [--iscrypted|--plaintext] [--lock]Copy to Clipboard Copied! Toggle word wrap Toggle overflow --username— Provides the name of the user. This option is required.--iscrypted— Specifies that the password is already encrypted.--plaintext— Specifies that the password is in plain text and not encrypted.--lock— If this is present, the new user account is locked by default. That is, the user will not be able to login from the console.
Important
By default, the ssh server is not started during installation. To makesshavailable during installation, boot the system with the kernel boot optionsshd=1. Refer to Section 28.2.3, “Enabling Remote Access with ssh” for details of how to specify this kernel option at boot time.Note
If you want to disable rootsshaccess to your hardware during installation, run:sshpw --username=root --lock
sshpw --username=root --lockCopy to Clipboard Copied! Toggle word wrap Toggle overflow -
text(optional) - Perform the kickstart installation in text mode. Kickstart installations are performed in graphical mode by default.
Important
If you select text mode for a kickstart installation, make sure that you specify choices for the partitioning, bootloader, and package selection options. These steps are automated in text mode, and anaconda cannot prompt you for missing information. If you do not provide choices for these options, anaconda will stop the installation process. -
timezone(required) - Sets the system time zone to <timezone> which may be any of the time zones listed in the
/usr/share/zoneinfodirectory.timezone [--utc] <timezone>
timezone [--utc] <timezone>Copy to Clipboard Copied! Toggle word wrap Toggle overflow --utc— If present, the system assumes the hardware clock is set to UTC (Greenwich Mean) time.
-
unsupported_hardware(optional) - Tells the installer to suppress the Unsupported Hardware Detected alert. If this command is not included and unsupported hardware is detected, the installation will stall at this alert.
-
upgrade(optional) - Tells the system to upgrade an existing system rather than install a fresh system. You must specify one of
cdrom,harddrive,nfs, orurl(for FTP, HTTP, and HTTPS) as the location of the installation tree. Refer toinstallfor details. -
user(optional) - Creates a new user on the system.
user --name=<username> [--groups=<list>] [--homedir=<homedir>] [--password=<password>] [--iscrypted] [--shell=<shell>] [--uid=<uid>]
user --name=<username> [--groups=<list>] [--homedir=<homedir>] [--password=<password>] [--iscrypted] [--shell=<shell>] [--uid=<uid>]Copy to Clipboard Copied! Toggle word wrap Toggle overflow --name=— Provides the name of the user. This option is required.--groups=— In addition to the default group, a comma separated list of group names the user should belong to. The groups must exist before the user account is created.--homedir=— The home directory for the user. If not provided, this defaults to /home/<username>.--password=— The new user's password. If not provided, the account will be locked by default.--iscrypted=— Is the password provided by --password already encrypted or not?--shell=— The user's login shell. If not provided, this defaults to the system default.--uid=— The user's UID. If not provided, this defaults to the next available non-system UID.
-
vnc(optional) - Allows the graphical installation to be viewed remotely via VNC. This method is usually preferred over text mode, as there are some size and language limitations in text installs. With no options, this command will start a VNC server on the machine with no password and will print out the command that needs to be run to connect a remote machine.
vnc [--host=<hostname>] [--port=<port>] [--password=<password>]
vnc [--host=<hostname>] [--port=<port>] [--password=<password>]Copy to Clipboard Copied! Toggle word wrap Toggle overflow --host=— Instead of starting a VNC server on the install machine, connect to the VNC viewer process listening on the given hostname.--port=— Provide a port that the remote VNC viewer process is listening on. If not provided, anaconda will use the VNC default.--password=— Set a password which must be provided to connect to the VNC session. This is optional, but recommended.
-
volgroup(optional) - Use to create a Logical Volume Management (LVM) group with the syntax:
volgroup <name> <partition> [options]
volgroup <name> <partition> [options]Copy to Clipboard Copied! Toggle word wrap Toggle overflow Important
Do not use the dash ("-") character in logical volume or volume group names when installing Red Hat Enterprise Linux using Kickstart. If you do, the installation will finish normally, but the character will be removed from all newly created volume and volume group names. For example, if you create a volume group namedvolgrp-01, its name will be changed tovolgrp01.This limitation only applies to new installations. If you are upgrading or reinstalling an existing installation and use the--noformatoption described below, dashes used in volume and volume group names will be preserved.Create the partition first, create the logical volume group, and then create the logical volume. For example:part pv.01 --size 3000 volgroup myvg pv.01 logvol / --vgname=myvg --size=2000 --name=rootvol
part pv.01 --size 3000 volgroup myvg pv.01 logvol / --vgname=myvg --size=2000 --name=rootvolCopy to Clipboard Copied! Toggle word wrap Toggle overflow For a detailed example ofvolgroupin action, refer to Section 32.4.1, “Advanced Partitioning Example”.The options are as follows:--noformat— Use an existing volume group and do not format it.--useexisting- Use an existing volume group and reformat it. If you use this option, do not specify a partition. For example:volgroup rhel00 --useexisting --noformat
volgroup rhel00 --useexisting --noformatCopy to Clipboard Copied! Toggle word wrap Toggle overflow --pesize=— Set the size of the physical extents. The default size for Kickstart installations is 4 MiB.--reserved-space=— Specify an amount of space to leave unused in a volume group, in megabytes. Only usable when creating a new volume group.--reserved-percent=— Specify a percentage of total volume group space to leave unused. Only usable when creating a new volume group.
Note
The--reserved-space=and--reserved-percent=options allow you to leave a part of the total volume group space unused by any volumes. This allows you to reserve space for LVM snapshots, even if thelogvol --growcommand is used during partitioning. -
winbind(optional) - Configures the system to connect to a Windows Active Directory or a Windows domain controller. User information from the specified directory or domain controller can then be accessed and server authentication options can be configured.
--enablewinbind— Enable winbind for user account configuration.--disablewinbind— Disable winbind for user account configuration.--enablewinbindauth— Enable windbindauth for authentication.--disablewinbindauth— Disable windbindauth for authentication.--enablewinbindoffline— Configures winbind to allow offline login.--disablewinbindoffline— Configures winbind to prevent offline login.--enablewinbindusedefaultdomain— Configures winbind to assume that users with no domain in their usernames are domain users.--disablewinbindusedefaultdomain— Configures winbind to assume that users with no domain in their usernames are not domain users.
-
xconfig(optional) - Configures the X Window System. If you install the X Window System with a kickstart file that does not include the
xconfigcommand, you must provide the X configuration manually during installation.Do not use this command in a kickstart file that does not install the X Window System.--driver— Specify the X driver to use for the video hardware.--videoram=— Specifies the amount of video RAM the video card has.--defaultdesktop=— Specify either GNOME or KDE to set the default desktop (assumes that GNOME Desktop Environment and/or KDE Desktop Environment has been installed through%packages).--startxonboot— Use a graphical login on the installed system.
-
zerombr(optional) - If
zerombris specified any invalid partition tables found on disks are initialized. This destroys all of the contents of disks with invalid partition tables. This command is required when performing an unattended installation on a system with previously initialized disks.Specific to System z: Ifzerombris specified, any DASD visible to the installer which is not already low-level formatted gets automatically low-level formatted with dasdfmt. The command also prevents user choice during interactive installations. Ifzerombris not specified and there is at least one unformatted DASD visible to the installer, a non-interactive kickstart installation will exit unsuccessfully. Ifzerombris not specified and there is at least one unformatted DASD visible to the installer, an interactive installation exits if the user does not agree to format all visible and unformatted DASDs. To circumvent this, only activate those DASDs that you will use during installation. You can always add more DASDs after installation is complete.Note
That this command was previously specified aszerombr yes. This form is now deprecated; you should now simply specifyzerombrin your kickstart file instead. -
zfcp(optional) - Define a Fiber channel device (IBM System z).
zfcp [--devnum=<devnum>] [--wwpn=<wwpn>] [--fcplun=<fcplun>] -
%include(optional) - Use the
%include /path/to/filecommand to include the contents of another file in the kickstart file as though the contents were at the location of the%includecommand in the kickstart file.
32.4.1. Advanced Partitioning Example
clearpart, raid, part, volgroup, and logvol kickstart options in action:
32.5. Package Selection
Warning
* in the %packages section. Red Hat does not support this type of installation.
@Everything, but this option is not included in Red Hat Enterprise Linux 6.
%packages command to begin a kickstart file section that lists the packages you would like to install (this is for installations only, as package selection during upgrades is not supported).
variant/repodata/comps-*.xml file on the Red Hat Enterprise Linux 6.9 Installation DVD for a list of groups. Each group has an id, user visibility value, name, description, and package list. If the group is selected for installation, the packages marked mandatory in the package list are always installed, the packages marked default are installed if they are not specifically excluded elsewhere, and the packages marked optional must be specifically included elsewhere even when the group is selected.
@ symbol, a space, and then the full group name or group id as given in the comps.xml file. For example:
%packages @X Window System @Desktop @Sound and Video
%packages
@X Window System
@Desktop
@Sound and VideoCore and Base groups are always selected by default, so it is not necessary to specify them in the %packages section.
Warning
@Core group, the firewall (iptables/ip6tables) will not be configured on the installed system. This presents a security risk. To work around this issue, add the authconfig and system-config-firewall-base packages to your package selection as described below. The firewall will be configured properly if these packages are present.
%packages section which will also configure the firewall will look similar to the following:
%packages @Core authconfig system-config-firewall-base
%packages
@Core
authconfig
system-config-firewall-base
sqlite curl aspell docbook*
sqlite
curl
aspell
docbook*docbook* entry includes the packages docbook-dtds, docbook-simple, docbook-slides and others that match the pattern represented with the wildcard.
-@ Graphical Internet -autofs -ipa*fonts
-@ Graphical Internet
-autofs
-ipa*fontsImportant
glibc.i686
glibc.i686* will introduce package and file conflicts onto the installed system. Packages known to cause such problems are assigned to the @Conflicts (variant) group, where variant is Client, ComputeNode, Server or Workstation. If you specify * in a kickstart file, be sure to exclude @Conflicts (variant) or the installation will fail:
* -@Conflicts (Server)
*
-@Conflicts (Server)* in a kickstart file, even if you exclude @Conflicts (variant).
%end command.
%packages option:
--nobase- Do not install the
@Basegroup. Use this option to perform a minimal installation, for example, for a single-purpose server or desktop appliance. -
--nocore - Disables installation of the
@Corepackage group which is otherwise always installed by default. Disabling the@Corepackage group with--nocoreshould be only used for creating lightweight containers; installing a desktop or server system with--nocorewill result in an unusable system.Note
- Using
-@Coreto exclude packages in the@Corepackage group does not work. The only way to exclude the@Corepackage group is with the--nocoreoption. - The
@Corepackage group is defined as a minimal set of packages needed for installing a working system. It is not related in any way to core packages as defined in the Package Manifest and Scope of Coverage Details.
--ignoredeps- The --ignoredeps option has been deprecated. Dependencies are resolved automatically every time now.
--ignoremissing- Ignore the missing packages and groups instead of halting the installation to ask if the installation should be aborted or continued. For example:
%packages --ignoremissing
%packages --ignoremissingCopy to Clipboard Copied! Toggle word wrap Toggle overflow
32.6. Pre-installation Script
ks.cfg has been parsed. This section must be placed towards the end of the kickstart file, after the kickstart commands described in Section 32.4, “Kickstart Options”, and must start with the %pre command and end with the %end command. If your kickstart file also includes a %post section, the order of the %pre and %post sections does not matter. See Section 32.8, “Kickstart Examples” for example configuration files.
Note
%pre section; however, name service has not been configured at this point, so only IP addresses work.
arping, awk, basename, bash, bunzip2, bzcat, cat, chattr, chgrp, chmod, chown, chroot, chvt, clear, cp, cpio, cut, date, dd, df, dirname, dmesg, du, e2fsck, e2label, echo, egrep, eject, env, expr, false, fdisk, fgrep, find, fsck, fsck.ext2, fsck.ext3, ftp, grep, gunzip, gzip, hdparm, head, hostname, hwclock, ifconfig, insmod, ip, ipcalc, kill, killall, less, ln, load_policy, login, losetup, ls, lsattr, lsmod, lvm, md5sum, mkdir, mke2fs, mkfs.ext2, mkfs.ext3, mknod, mkswap, mktemp, modprobe, more, mount, mt, mv, nslookup, openvt, pidof, ping, ps, pwd, readlink, rm, rmdir, rmmod, route, rpm, sed, sh, sha1sum, sleep, sort, swapoff, swapon, sync, tail, tar, tee, telnet, top, touch, true, tune2fs, umount, uniq, vconfig, vi, wc, wget, wipefs, xargs, zcat.
Note
--interpreter /usr/bin/python- Allows you to specify a different scripting language, such as Python. Replace /usr/bin/python with the scripting language of your choice.
32.7. Post-installation Script
%post command and end with the %end command. If your kickstart file also includes a %pre section, the order of the %pre and %post sections does not matter. See Section 32.8, “Kickstart Examples” for example configuration files.
Note
%post section. If you configured the network for DHCP, the /etc/resolv.conf file has not been completed when the installation executes the %post section. You can access the network, but you can not resolve IP addresses. Thus, if you are using DHCP, you must specify IP addresses in the %post section.
Note
--nochroot- Allows you to specify commands that you would like to run outside of the chroot environment.The following example copies the file
/etc/resolv.confto the file system that was just installed.%post --nochroot cp /etc/resolv.conf /mnt/sysimage/etc/resolv.conf
%post --nochroot cp /etc/resolv.conf /mnt/sysimage/etc/resolv.confCopy to Clipboard Copied! Toggle word wrap Toggle overflow --interpreter /usr/bin/python- Allows you to specify a different scripting language, such as Python. Replace /usr/bin/python with the scripting language of your choice.
--log /path/to/logfile- Logs the output of the post-install script. Note that the path of the log file must take into account whether or not you use the
--nochrootoption. For example, without--nochroot:%post --log=/root/ks-post.log
%post --log=/root/ks-post.logCopy to Clipboard Copied! Toggle word wrap Toggle overflow with--nochroot:%post --nochroot --log=/mnt/sysimage/root/ks-post.log
%post --nochroot --log=/mnt/sysimage/root/ks-post.logCopy to Clipboard Copied! Toggle word wrap Toggle overflow
32.8. Kickstart Examples
32.8.1. Set host name interactively during installation
%pre script asks to enter a host name for the installed system. The %post script configures the network according to the user's input.
32.8.2. Registering and Then Mounting an NFS Share
%post --log=/root/ks-post.log /usr/sbin/subscription-manager register --username=admin@example.com --password=secret --serverurl=sam-server.example.com --org="Admin Group" --environment="Dev" %end
%post --log=/root/ks-post.log
/usr/sbin/subscription-manager register --username=admin@example.com --password=secret --serverurl=sam-server.example.com --org="Admin Group" --environment="Dev"
%endrunme from an NFS share:
mkdir /mnt/temp mount -o nolock 10.10.0.2:/usr/new-machines /mnt/temp openvt -s -w -- /mnt/temp/runme umount /mnt/temp
mkdir /mnt/temp
mount -o nolock 10.10.0.2:/usr/new-machines /mnt/temp
openvt -s -w -- /mnt/temp/runme
umount /mnt/temp-o nolock is required when mounting an NFS mount.
32.8.3. Registering a System in RHN Classic
rhnreg_ks command is a utility for registering a system with the Red Hat Network. It is designed to be used in a non-interactive environment (a Kickstart style install, for example). All the information can be specified on the command line or standard input (stdin). This command should be used when you have created an activation key and you want to register a system using a key.
rhnreg_ks to automatically register your system, see the Knowledgebase article at https://access.redhat.com/solutions/876433.
32.8.4. Running subscription-manager as a Post-Install Script
%post --log=/root/ks-post.log /usr/sbin/subscription-manager register --username=admin@example.com --password=secret --serverurl=sam-server.example.com --org="Admin Group" --environment="Dev" --servicelevel=standard --release="6.6" %end
%post --log=/root/ks-post.log
/usr/sbin/subscription-manager register --username=admin@example.com --password=secret --serverurl=sam-server.example.com --org="Admin Group" --environment="Dev" --servicelevel=standard --release="6.6"
%end32.8.5. Changing partition layout
%pre script generates a different set of partitioning commands depending on whether the system has two drives or not.
%pre script then instructs Kickstart to execute the commands that were generated by the script above:
%include /tmp/part-include
%include /tmp/part-include32.9. Making the Kickstart File Available
- On removable media, such as a floppy disk, optical disk, or USB flash drive
- On a hard drive
- On a network
32.9.1. Creating Kickstart Boot Media
x86 and x86_64). Additionally, this procedure requires the genisoimage and isomd5sum packages; these packages are available on Red Hat Enterprise Linux, but if you use a different system, you may need to adjust the commands used.
Note
ks.cfg. Separate boot media will be required.
Procedure 32.1. Including a Kickstart File on Boot Media
- Mount the ISO image you have downloaded:
mount /path/to/image.iso /mnt/iso
# mount /path/to/image.iso /mnt/isomount /path/to/image.iso /mnt/isomount /path/to/image.iso /mnt/isoCopy to Clipboard Copied! Toggle word wrap Toggle overflow - Extract the ISO image into a working directory somewhere in your system:
cp -pRf /mnt/iso /tmp/workdir
# cp -pRf /mnt/iso /tmp/workdircp -pRf /mnt/iso /tmp/workdirCopy to Clipboard Copied! Toggle word wrap Toggle overflow - Unmount the mounted image:
umount /mnt/iso
# umount /mnt/isoCopy to Clipboard Copied! Toggle word wrap Toggle overflow - The contents of the image is now placed in the
iso/directory in your working directory. Add your Kickstart file (ks.cfg) into theiso/directory:cp /path/to/ks.cfg /tmp/workdir/iso
# cp /path/to/ks.cfg /tmp/workdir/isocp /path/to/ks.cfg /tmp/workdir/isocp /path/to/ks.cfg /tmp/workdir/isocp /path/to/ks.cfg /tmp/workdir/isoCopy to Clipboard Copied! Toggle word wrap Toggle overflow - Open the
isolinux/isolinux.cfgconfiguration file inside theiso/directory. This file determines all the menu options which appear in the boot menu. A single menu entry is defined as the following:Copy to Clipboard Copied! Toggle word wrap Toggle overflow Add theks=boot option to the line beginning withappend. The exact syntax depends on how you plan to boot the ISO image; for example, if you plan on booting from a CD or DVD, useks=cdrom:/ks.cfg. A list of possible sources and the syntax used to configure them is available in Section 28.4, “Automating the Installation with Kickstart”. - Use
genisoimagein theiso/directory to create a new bootable ISO image with your changes included:genisoimage -U -r -v -T -J -joliet-long -V "RHEL-6.9" -volset "RHEL-6.9" -A "RHEL-6.9" -b isolinux/isolinux.bin -c isolinux/boot.cat -no-emul-boot -boot-load-size 4 -boot-info-table -eltorito-alt-boot -e images/efiboot.img -no-emul-boot -o ../NEWISO.iso .
# genisoimage -U -r -v -T -J -joliet-long -V "RHEL-6.9" -volset "RHEL-6.9" -A "RHEL-6.9" -b isolinux/isolinux.bin -c isolinux/boot.cat -no-emul-boot -boot-load-size 4 -boot-info-table -eltorito-alt-boot -e images/efiboot.img -no-emul-boot -o ../NEWISO.iso .Copy to Clipboard Copied! Toggle word wrap Toggle overflow This comand will create a file namedNEWISO.isoin your working directory (one directory above theiso/directory).Important
If you use a disk label to refer to any device in yourisolinux.cfg(e.g.ks=hd:LABEL=RHEL-6.9/ks.cfg, make sure that the label matches the label of the new ISO you are creating. Also note that in boot loader configuration, spaces in labels must be replaced with\x20. - Implant a md5 checksum into the new ISO image:
implantisomd5 ../NEWISO.iso
# implantisomd5 ../NEWISO.isoCopy to Clipboard Copied! Toggle word wrap Toggle overflow
ks.cfg and must be located in the flash memory's top-level directory. The kickstart file should be on a separate flash memory drive to the boot media.
ks= boot option to specify which device contains the USB drive. See Section 28.4, “Automating the Installation with Kickstart” for details about the ks= boot option.
rhel-variant-version-architecture-boot.iso image file that you can download from the Software & Download Center of the Red Hat customer portal.
Note
32.9.2. Making the Kickstart File Available on the Network
ks kernel boot option in the append line of a target in your pxelinux.cfg/default file to specify the location of a kickstart file on your network. The syntax of the ks option in a pxelinux.cfg/default file is identical to its syntax when used at the boot prompt. Refer to Section 32.11, “Starting a Kickstart Installation” for a description of the syntax and refer to Example 32.1, “Using the ks option in the pxelinux.cfg/default file” for an example of an append line.
dhcpd.conf file on the DHCP server is configured to point to /var/lib/tftpboot/pxelinux.0 on the BOOTP server (whether on the same physical machine or not), systems configured to boot over the network can load the kickstart file and commence installation.
Example 32.1. Using the ks option in the pxelinux.cfg/default file
foo.ks is a kickstart file available on an NFS share at 192.168.0.200:/export/kickstart/, part of your pxelinux.cfg/default file might include:
label 1 kernel RHEL6/vmlinuz append initrd=RHEL6/initrd.img ramdisk_size=10000 ks=nfs:192.168.0.200:/export/kickstart/foo.ks
label 1
kernel RHEL6/vmlinuz
append initrd=RHEL6/initrd.img ramdisk_size=10000 ks=nfs:192.168.0.200:/export/kickstart/foo.ks32.10. Making the Installation Tree Available
32.11. Starting a Kickstart Installation
Important
user option in the Kickstart file before installing additional systems from it (refer to Section 32.4, “Kickstart Options” for details) or log into the installed system with a virtual console as root and add users with the adduser command.
ks command line argument is passed to the kernel.
- With Driver Disk
- If you need to use a driver disk with kickstart, specify the
ddoption as well. For example, if installation requires a kickstart file on a local hard drive and also requires a driver disk, boot the system with:linux ks=hd:partition:/path/ks.cfg dd
linux ks=hd:partition:/path/ks.cfg ddCopy to Clipboard Copied! Toggle word wrap Toggle overflow - Boot CD-ROM
- If the kickstart file is on a boot CD-ROM as described in Section 32.9.1, “Creating Kickstart Boot Media”, insert the CD-ROM into the system, boot the system, and enter the following command at the
boot:prompt (whereks.cfgis the name of the kickstart file):linux ks=cdrom:/ks.cfg
linux ks=cdrom:/ks.cfgCopy to Clipboard Copied! Toggle word wrap Toggle overflow
askmethod- Prompt the user to select an installation source, even if a Red Hat Enterprise Linux installation DVD is detected on the system.
asknetwork- Prompt for network configuration in the first stage of installation regardless of installation method.
autostep- Make kickstart non-interactive. Used for debugging and to generate screenshots. This option should not be used when deploying a system because it may disrupt package installation.
debug- Start up pdb immediately.
dd- Use a driver disk.
dhcpclass=<class>- Sends a custom DHCP vendor class identifier. ISC's dhcpcd can inspect this value using "option vendor-class-identifier".
dns=<dns>- Comma separated list of nameservers to use for a network installation.
driverdisk- Same as 'dd'.
expert- Turns on special features:
- allows partitioning of removable media
- prompts for a driver disk
gateway=<gw>- Gateway to use for a network installation.
graphical- Force graphical install. Required to have ftp/http use GUI.
isa- Prompt user for ISA devices configuration.
ip=<ip>- IP to use for a network installation, use 'dhcp' for DHCP.
ipv6=auto,ipv6=dhcp- IPv6 configuration for the device. Use
autofor automatic configuration (SLAAC, SLAAC with DHCPv6), ordhcpfor DHCPv6 only configuration (no router advertisements). keymap=<keymap>- Keyboard layout to use. Valid layouts include:
be-latin1— Belgianbg_bds-utf8— Bulgarianbg_pho-utf8— Bulgarian (Phonetic)br-abnt2— Brazilian (ABNT2)cf— French Canadiancroat— Croatiancz-us-qwertz— Czechcz-lat2— Czech (qwerty)de— Germande-latin1— German (latin1)de-latin1-nodeadkeys— German (latin1 without dead keys)dvorak— Dvorakdk— Danishdk-latin1— Danish (latin1)es— Spanishet— Estonianfi— Finnishfi-latin1— Finnish (latin1)fr— Frenchfr-latin9— French (latin9)fr-latin1— French (latin1)fr-pc— French (pc)fr_CH— Swiss Frenchfr_CH-latin1— Swiss French (latin1)gr— Greekhu— Hungarianhu101— Hungarian (101 key)is-latin1— Icelandicit— Italianit-ibm— Italian (IBM)it2— Italian (it2)jp106— Japaneseko— Koreanla-latin1— Latin Americanmk-utf— Macedoniannl— Dutchno— Norwegianpl2— Polishpt-latin1— Portuguesero— Romanianru— Russiansr-cy— Serbiansr-latin— Serbian (latin)sv-latin1— Swedishsg— Swiss Germansg-latin1— Swiss German (latin1)sk-qwerty— Slovak (qwerty)slovene— Sloveniantrq— Turkishuk— United Kingdomua-utf— Ukrainianus-acentos— U.S. Internationalus— U.S. English
The file/usr/lib/python2.6/site-packages/system_config_keyboard/keyboard_models.pyon 32-bit systems or/usr/lib64/python2.6/site-packages/system_config_keyboard/keyboard_models.pyon 64-bit systems also contains this list and is part of the system-config-keyboard package. ks=nfs:<server>:/<path>- The installation program looks for the kickstart file on the NFS server <server>, as file <path>. The installation program uses DHCP to configure the Ethernet card. For example, if your NFS server is server.example.com and the kickstart file is in the NFS share
/mydir/ks.cfg, the correct boot command would beks=nfs:server.example.com:/mydir/ks.cfg. ks={http|https}://<server>/<path>- The installation program looks for the kickstart file on the HTTP or HTTPS server <server>, as file <path>. The installation program uses DHCP to configure the Ethernet card. For example, if your HTTP server is server.example.com and the kickstart file is in the HTTP directory
/mydir/ks.cfg, the correct boot command would beks=http://server.example.com/mydir/ks.cfg. ks=hd:<device>:/<file>- The installation program mounts the file system on <device> (which must be vfat or ext2), and looks for the kickstart configuration file as <file> in that file system (for example,
ks=hd:sda3:/mydir/ks.cfg). ks=bd:<biosdev>:/<path>- The installation program mounts the file system on the specified partition on the specified BIOS device <biosdev>, and looks for the kickstart configuration file specified in <path> (for example,
ks=bd:80p3:/mydir/ks.cfg). Note this does not work for BIOS RAID sets. ks=file:/<file>- The installation program tries to read the file <file> from the file system; no mounts are done. This is normally used if the kickstart file is already on the
initrdimage. ks=cdrom:/<path>- The installation program looks for the kickstart file on CD-ROM, as file <path>.
ks- If
ksis used alone, the installation program configures the Ethernet card to use DHCP. The kickstart file is read from NFS server specified by DHCP option server-name. The name of the kickstart file is one of the following:- If DHCP is specified and the boot file begins with a
/, the boot file provided by DHCP is looked for on the NFS server. - If DHCP is specified and the boot file begins with something other than a
/, the boot file provided by DHCP is looked for in the/kickstartdirectory on the NFS server. - If DHCP did not specify a boot file, then the installation program tries to read the file
/kickstart/1.2.3.4-kickstart, where 1.2.3.4 is the numeric IP address of the machine being installed.
ksdevice=<device>- The installation program uses this network device to connect to the network. You can specify the device in one of five ways:
- the device name of the interface, for example,
eth0 - the MAC address of the interface, for example,
00:12:34:56:78:9a - the keyword
link, which specifies the first interface with its link in theupstate - the keyword
bootif, which uses the MAC address that pxelinux set in theBOOTIFvariable. SetIPAPPEND 2in yourpxelinux.cfgfile to have pxelinux set theBOOTIFvariable. - the keyword
ibft, which uses the MAC address of the interface specified by iBFT
For example, consider a system connected to an NFS server through the eth1 device. To perform a kickstart installation on this system using a kickstart file from the NFS server, you would use the commandks=nfs:<server>:/<path> ksdevice=eth1at theboot:prompt. kssendmac- Adds HTTP headers to ks=http:// request that can be helpful for provisioning systems. Includes MAC address of all nics in CGI environment variables of the form: "X-RHN-Provisioning-MAC-0: eth0 01:23:45:67:89:ab".
lang=<lang>- Language to use for the installation. This should be a language which is valid to be used with the 'lang' kickstart command.
loglevel=<level>- Set the minimum level required for messages to be logged. Values for <level> are debug, info, warning, error, and critical. The default value is info.
mediacheck- Activates loader code to give user option of testing integrity of install source (if an ISO-based method).
netmask=<nm>- Netmask to use for a network installation.
nofallback- If GUI fails, exit.
nofb- Do not load the VGA16 framebuffer required for doing text-mode installation in some languages.
nofirewire- Do not load support for firewire devices.
noipv4- Disable IPv4 networking on the device specified by the
ksdevice=boot option. noipv6- Disable IPv6 networking on all network devices on the installed system, and during installation.
Important
During installations from a PXE server, IPv6 networking might become active before anaconda processes the Kickstart file. If so, this option will have no effect during installation.Note
To disable IPv6 on the installed system, the--noipv6kickstart option must be used on each network device, in addition to thenoipv6boot option. See the Knowledgebase article at https://access.redhat.com/solutions/1565723 for more information about disabling IPv6 system-wide. nomount- Don't automatically mount any installed Linux partitions in rescue mode.
nonet- Do not auto-probe network devices.
noparport- Do not attempt to load support for parallel ports.
nopass- Do not pass information about the keyboard and mouse from anaconda stage 1 (the loader) to stage 2 (the installer).
nopcmcia- Ignore PCMCIA controllers in the system.
noprobe- Do not automatically probe for hardware; prompt the user to allow anaconda to probe for particular categories of hardware.
noshell- Do not put a shell on tty2 during install.
repo=cdrom- Do a DVD based installation.
repo=ftp://<path>- Use <path> for an FTP installation.
repo=hd:<dev>:<path>- Use <path> on <dev> for a hard drive installation.
repo=http://<path>- Use <path> for an HTTP installation.
repo=https://<path>- Use <path> for an HTTPS installation.
repo=nfs:<path>- Use <path> for an NFS installation.
rescue- Run rescue environment.
resolution=<mode>- Run installer in mode specified, '1024x768' for example.
serial- Turns on serial console support.
skipddc- Do not probe the Data Display Channel (DDC) of the monitor. This option provides a workaround if the DDC probe causes the system to stop responding.
syslog=<host>[:<port>]- Once installation is up and running, send log messages to the syslog process on <host>, and optionally, on port <port>. Requires the remote syslog process to accept connections (the -r option).
text- Force text mode install.
Important
If you select text mode for a kickstart installation, make sure that you specify choices for the partitioning, bootloader, and package selection options. These steps are automated in the text mode, and anaconda cannot prompt you for missing information. If you do not provide choices for these options, anaconda will stop the installation process. updates- Prompt for storage device containing updates (bug fixes).
updates=ftp://<path>- Image containing updates over FTP.
updates=http://<path>- Image containing updates over HTTP.
updates=https://<path>- Image containing updates over HTTPS.
upgradeany- Offer to upgrade any Linux installation detected on the system, regardless of the contents or the existence of the
/etc/redhat-releasefile. vnc- Enable vnc-based installation. You will need to connect to the machine using a vnc client application.
vncconnect=<host>[:<port>]- Connect to the vnc client named <host>, and optionally use port <port>.Requires 'vnc' option to be specified as well.
vncpassword=<password>- Enable a password for the vnc connection. This will prevent someone from inadvertently connecting to the vnc-based installation.Requires 'vnc' option to be specified as well.
Chapter 33. Kickstart Configurator
su - yum install system-config-kickstart or use your graphical package manager to install the software.
system-config-kickstart, or click → → on the GNOME desktop or + → → on the KDE desktop.
33.1. Basic Configuration
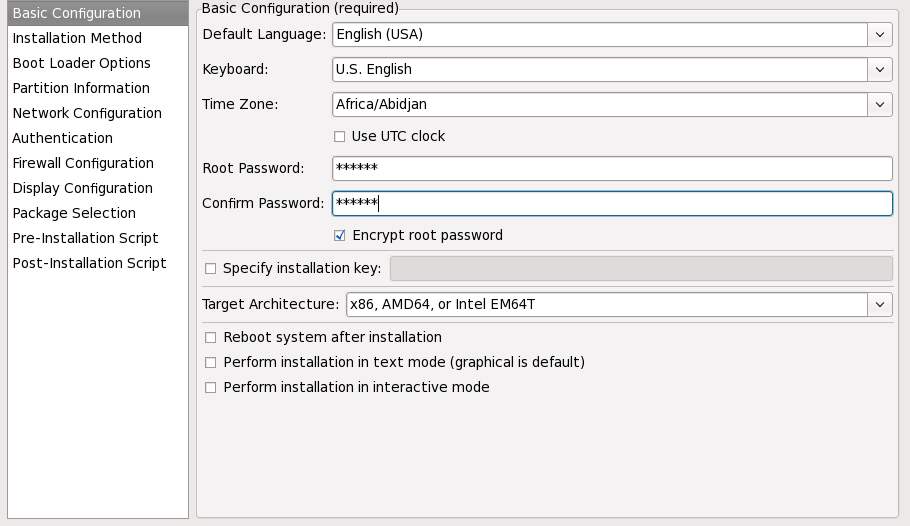
Figure 33.1. Basic Configuration
33.2. Installation Method
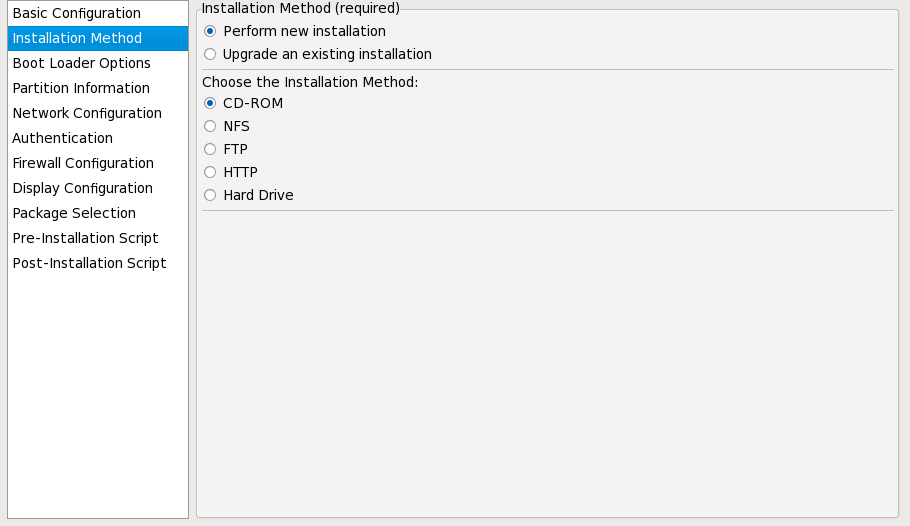
Figure 33.2. Installation Method
- DVD — Choose this option to install or upgrade from the Red Hat Enterprise Linux DVD.
- NFS — Choose this option to install or upgrade from an NFS shared directory. In the text field for the NFS server, enter a fully-qualified domain name or IP address. For the NFS directory, enter the name of the NFS directory that contains the
variantdirectory of the installation tree. For example, if the NFS server contains the directory/mirrors/redhat/i386/Server/, enter/mirrors/redhat/i386/for the NFS directory. - FTP — Choose this option to install or upgrade from an FTP server. In the FTP server text field, enter a fully-qualified domain name or IP address. For the FTP directory, enter the name of the FTP directory that contains the
variantdirectory. For example, if the FTP server contains the directory/mirrors/redhat/i386/Server/, enter/mirrors/redhat/i386/Server/for the FTP directory. If the FTP server requires a username and password, specify them as well. - HTTP — Choose this option to install or upgrade from an HTTP server. In the text field for the HTTP server, enter the fully-qualified domain name or IP address. For the HTTP directory, enter the name of the HTTP directory that contains the
variantdirectory. For example, if the HTTP server contains the directory/mirrors/redhat/i386/Server/, enter/mirrors/redhat/i386/Server/for the HTTP directory. - Hard Drive — Choose this option to install or upgrade from a hard drive. Hard drive installations require the use of ISO images. Be sure to verify that the ISO images are intact before you start the installation. To verify them, use an
md5sumprogram as well as thelinux mediacheckboot option as discussed in Section 28.6.1, “Verifying Boot Media”. Enter the hard drive partition that contains the ISO images (for example,/dev/hda1) in the Hard Drive Partition text box. Enter the directory that contains the ISO images in the Hard Drive Directory text box.
33.3. Boot Loader Options

Figure 33.3. Boot Loader Options
/boot partition). Install the boot loader on the MBR if you plan to use it as your boot loader.
cdrecord by configuring hdd=ide-scsi as a kernel parameter (where hdd is the CD-ROM device).
Important
33.4. Partition Information
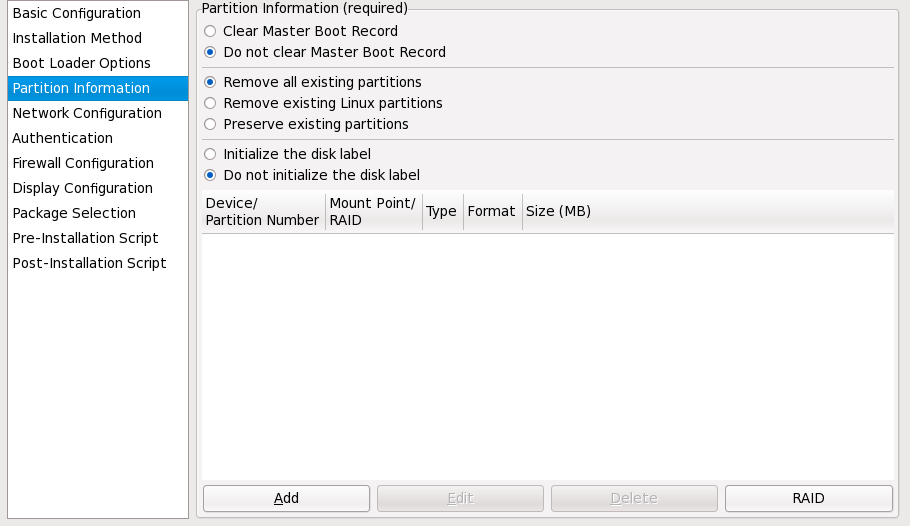
Figure 33.4. Partition Information
msdos for x86), select Initialize the disk label if you are installing on a brand new hard drive.
Note
anaconda and kickstart support Logical Volume Management (LVM), at present there is no mechanism for configuring this using the Kickstart Configurator.
33.4.1. Creating Partitions
- In the Additional Size Options section, choose to make the partition a fixed size, up to a chosen size, or fill the remaining space on the hard drive. If you selected swap as the file system type, you can select to have the installation program create the swap partition with the recommended size instead of specifying a size.
- Force the partition to be created as a primary partition.
- Create the partition on a specific hard drive. For example, to make the partition on the first IDE hard disk (
/dev/hda), specifyhdaas the drive. Do not include/devin the drive name. - Use an existing partition. For example, to make the partition on the first partition on the first IDE hard disk (
/dev/hda1), specifyhda1as the partition. Do not include/devin the partition name. - Format the partition as the chosen file system type.
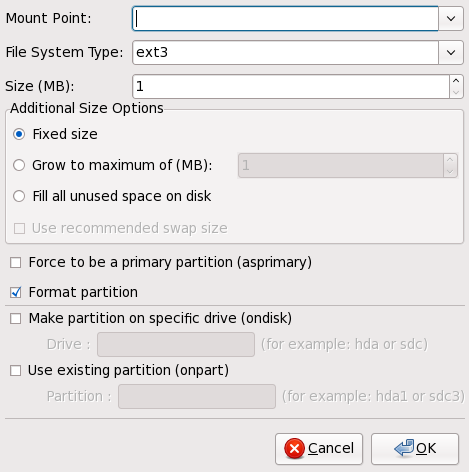
Figure 33.5. Creating Partitions
33.4.1.1. Creating Software RAID Partitions
- Click the button.
- Select Create a software RAID partition.
- Configure the partitions as previously described, except select Software RAID as the file system type. Also, you must specify a hard drive on which to make the partition or specify an existing partition to use.

Figure 33.6. Creating a Software RAID Partition
- Click the button.
- Select Create a RAID device.
- Select a mount point, file system type, RAID device name, RAID level, RAID members, number of spares for the software RAID device, and whether to format the RAID device.
Figure 33.7. Creating a Software RAID Device
- Click to add the device to the list.
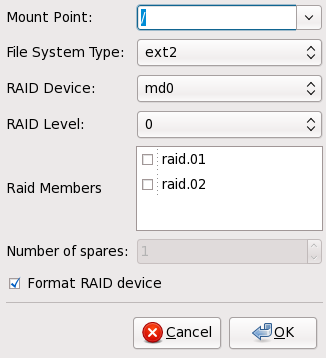
33.5. Network Configuration
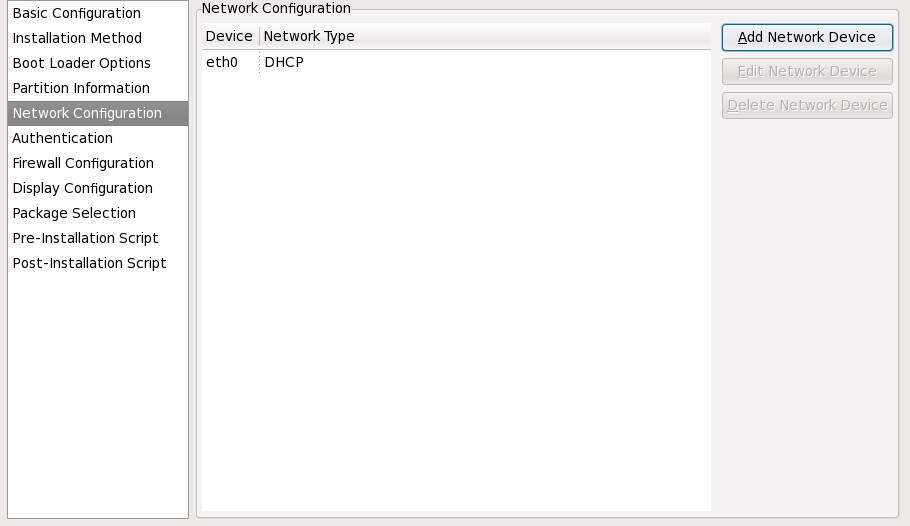
Figure 33.8. Network Configuration
system-config-network). Refer to the Red Hat Enterprise Linux Deployment Guide for details.
33.6. Authentication
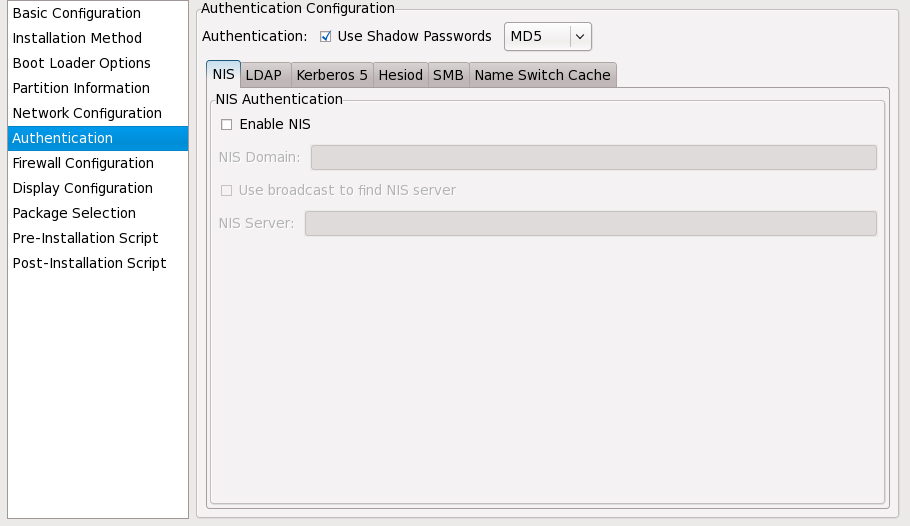
Figure 33.9. Authentication
- NIS
- LDAP
- Kerberos 5
- Hesiod
- SMB
- Name Switch Cache
33.7. Firewall Configuration
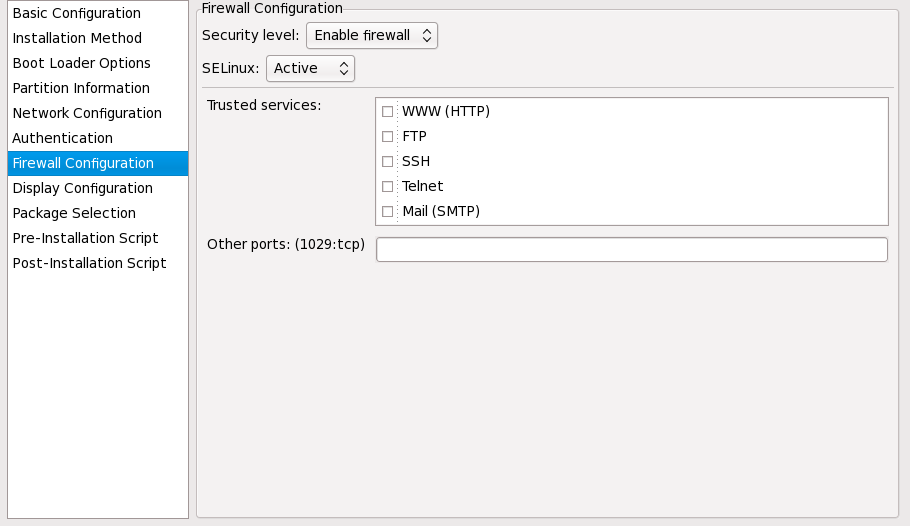
Figure 33.10. Firewall Configuration
port:protocol. For example, to allow IMAP access through the firewall, specify imap:tcp. Numeric ports can also be specified explicitly; to allow UDP packets on port 1234 through the firewall, enter 1234:udp. To specify multiple ports, separate them with commas.
33.7.1. SELinux Configuration
enforcing, permissive or disabled mode. Finer grained configuration is not possible at this time.
33.8. Display Configuration
skipx option is written to the kickstart file.
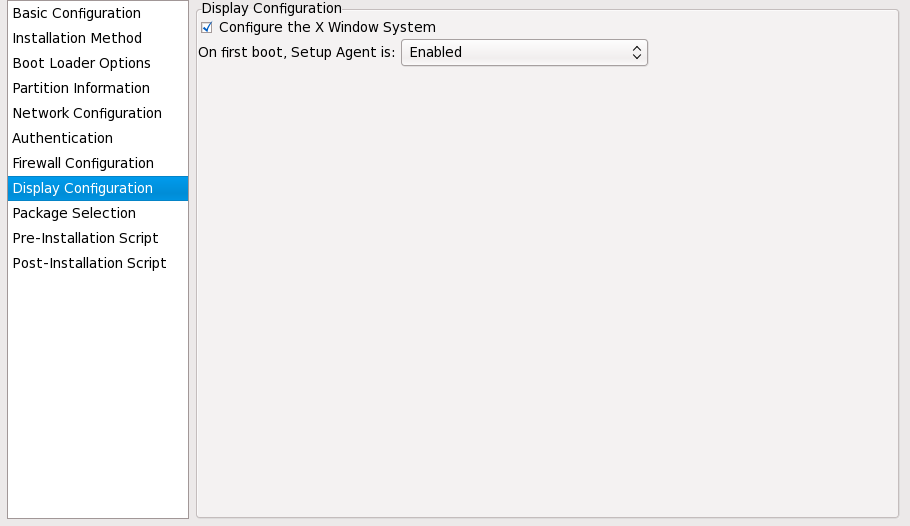
Figure 33.11. X Configuration
33.9. Package Selection
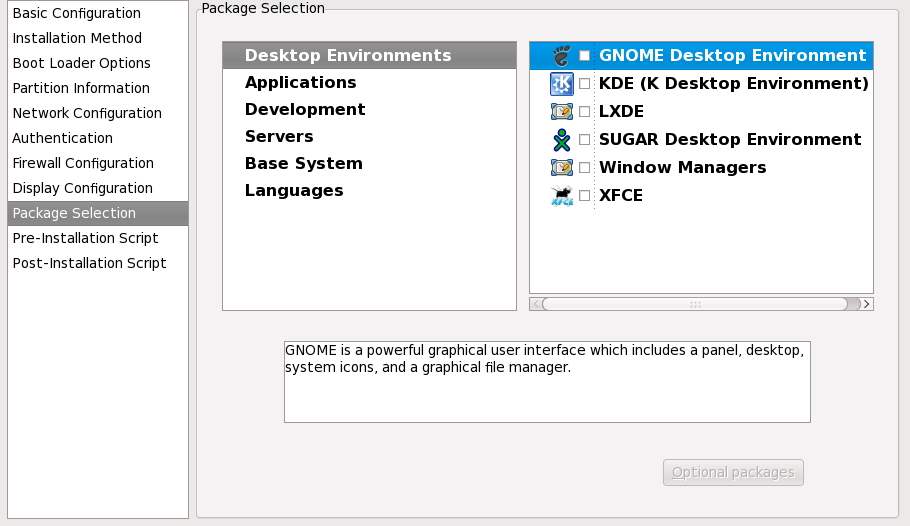
Figure 33.12. Package Selection
%packages section of the kickstart file after you save it. Refer to Section 32.5, “Package Selection” for details.
33.10. Pre-Installation Script
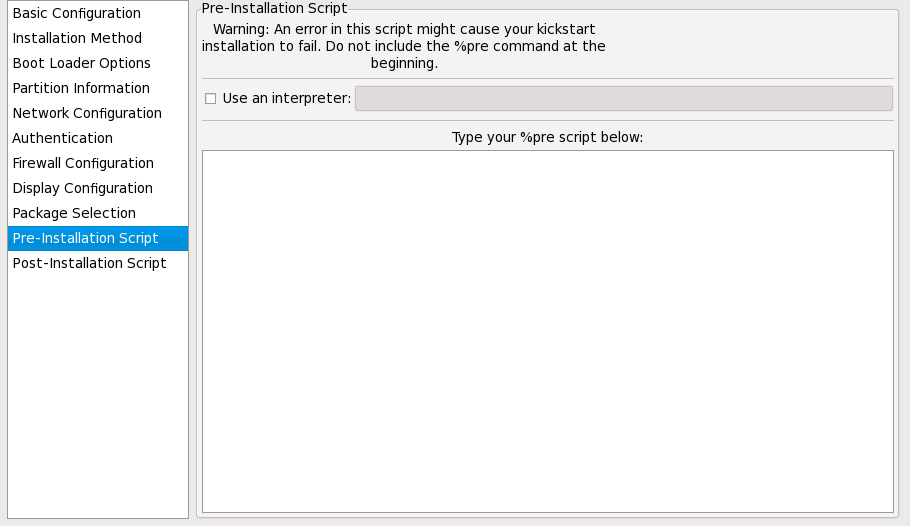
Figure 33.13. Pre-Installation Script
Important
/usr/bin/python2.6 can be specified for a Python script. This option corresponds to using %pre --interpreter /usr/bin/python2.6 in your kickstart file.
Important
%pre command. It is added for you.
Note
33.11. Post-Installation Script
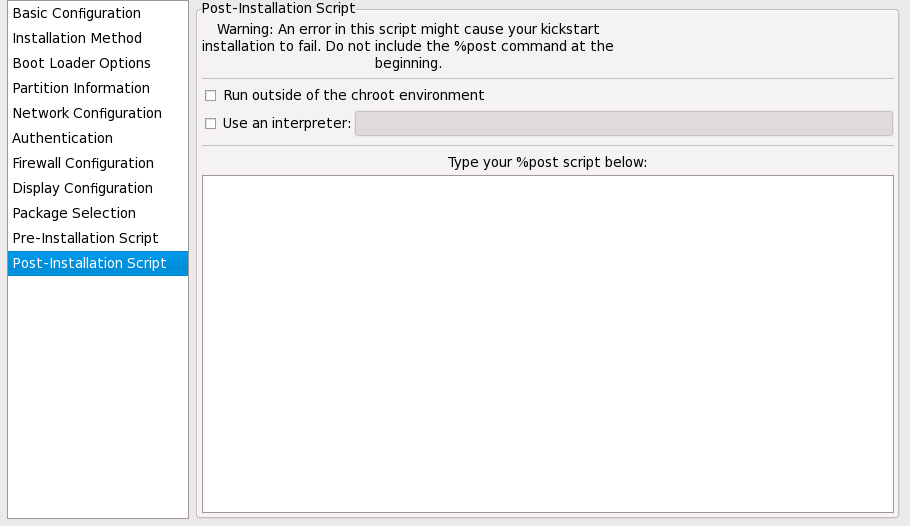
Figure 33.14. Post-Installation Script
Important
Important
%post command. It is added for you.
%post section:
echo "Welcome!" > /etc/motd
echo "Welcome!" > /etc/motdNote
33.11.1. Chroot Environment
--nochroot option in the %post section.
/mnt/sysimage/.
echo "Welcome!" > /mnt/sysimage/etc/motd
echo "Welcome!" > /mnt/sysimage/etc/motd33.11.2. Use an Interpreter
/usr/bin/python2.2 can be specified for a Python script. This option corresponds to using %post --interpreter /usr/bin/python2.2 in your kickstart file.
33.12. Saving the File
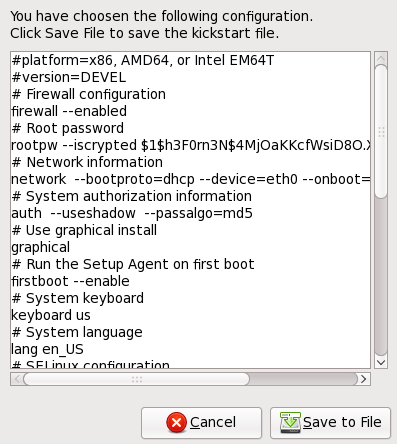
Figure 33.15. Preview
Part V. After Installation
- using a Red Hat Enterprise Linux installation disc to rescue a damaged system.
- upgrading to a new version of Red Hat Enterprise Linux.
- removing Red Hat Enterprise Linux from your computer.
Chapter 34. Firstboot
Important
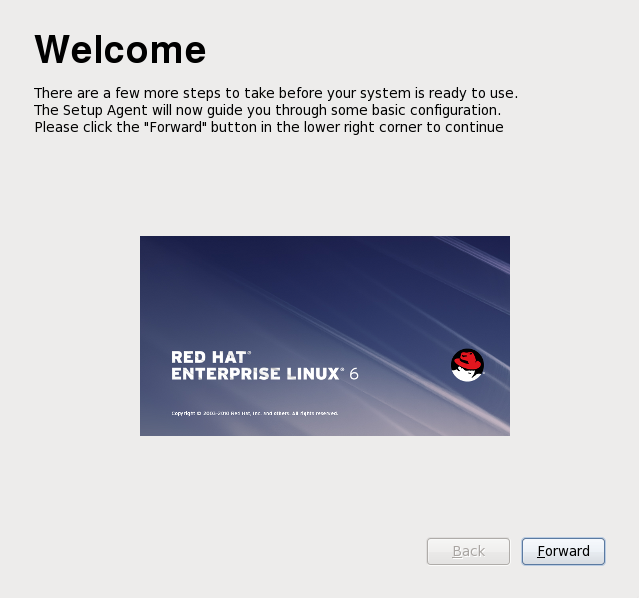
Figure 34.1. Firstboot welcome screen
34.1. License Information
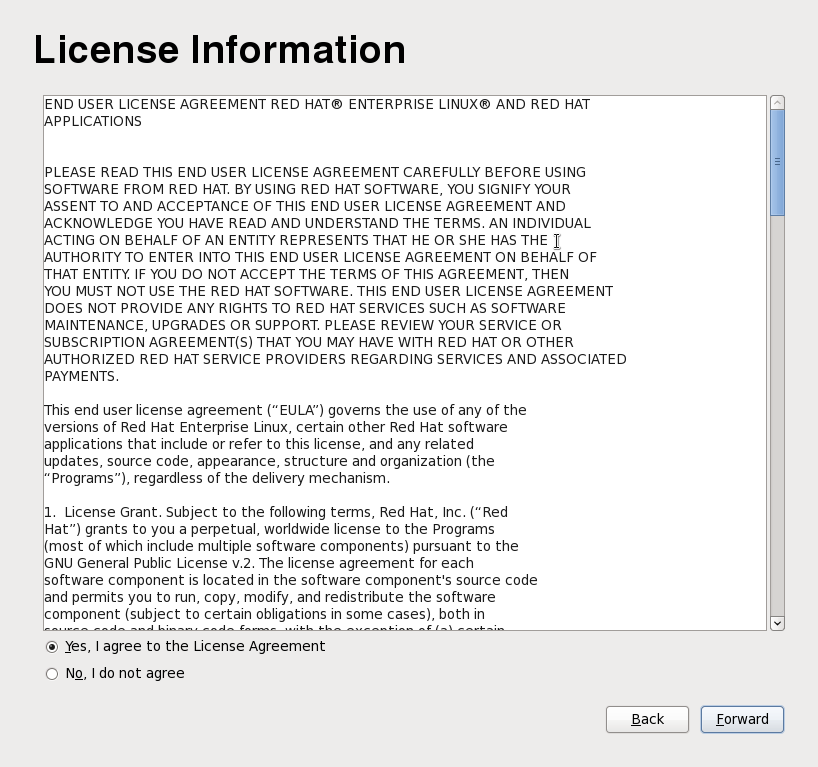
Figure 34.2. Firstboot license screen
34.2. Configuring the Subscription Service
34.2.1. Set Up Software Updates
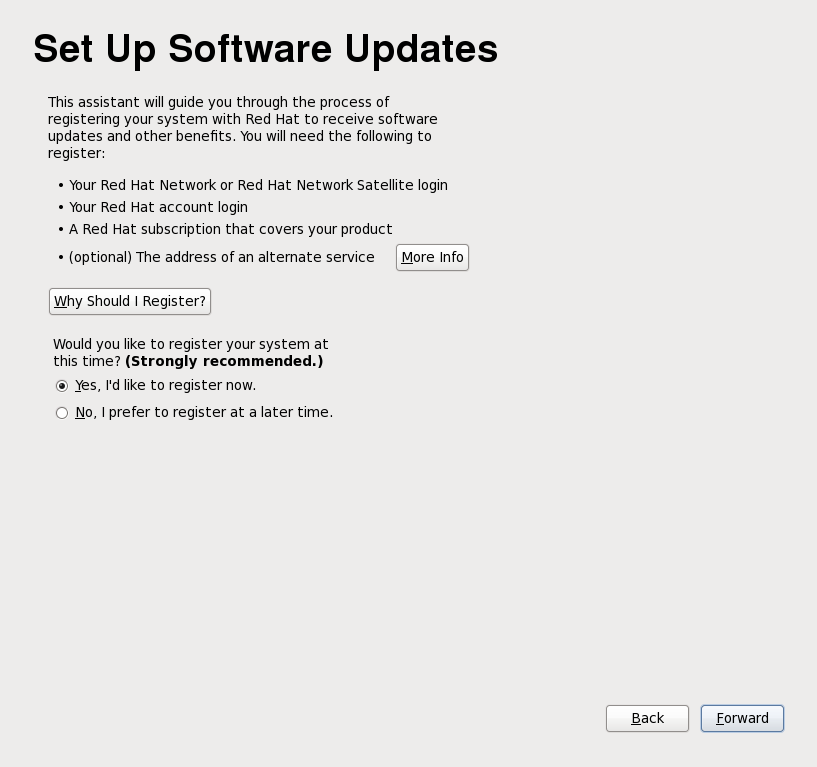
Figure 34.3. Set Up Software Updates
Note
34.2.2. Choose Service
- Red Hat Subscription Management
- Any subscription service which uses the proper X.509 certificates to identify the system, installed products, and attached subscriptions is part of Red Hat Subscription Management. This includes Customer Portal Subscription Management (hosted services), Subscription Asset Manager (on-premise subscription service and proxied content delivery), and CloudForms System Engine (on-premise subscription and content delivery services).This option is the default. Red Hat Subscription Management is strongly recommended for organizations that do not run a local Satellite server.
- Red Hat Network (RHN) Classic
- Select the Red Hat Network (RHN) Classic option to use the legacy systems-management features of Red Hat Network. While RHN Classic can be used with Red Hat Enterprise Linux 6.x systems, it is intended primarily for existing, legacy systems. It is recommended that new installations use Red Hat Subscription Management.
- An RHN Satellite or RHN Proxy
- Use this option in environments with access to a local mirror of the Red Hat Network content.
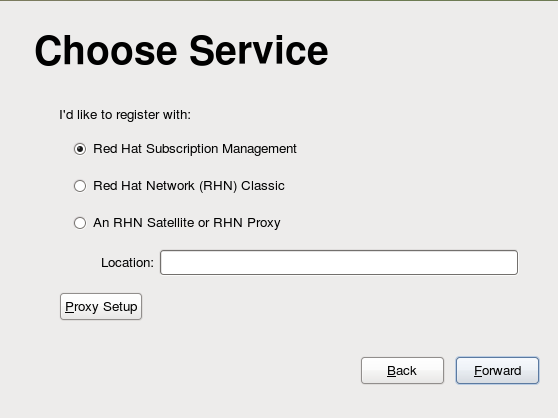
Figure 34.4. Choose Service
34.2.3. Subscription Management Registration
- Customer Portal Subscription Management, hosted services from Red Hat (the default)
- Subscription Asset Manager, an on-premise subscription server which proxies content delivery back to the Customer Portal's services
- CloudForms System Engine, an on-premise service which handles both subscription services and content delivery
- To identify which subscription server to use for registration, enter the hostname of the service. The default service is Customer Portal Subscription Management, with the hostname subscription.rhn.redhat.com. To use a different subscription service, such as Subscription Asset Manager, enter the hostname of the local server.
Figure 34.5. Subscription Service Selection
- Click .
- Enter the user credentials for the given subscription service to log in.
Figure 34.6. Subscription Management Registration
Important
The user credentials to use depend on the subscription service. When registering with the Customer Portal, use the Red Hat Network credentials for the administrator or company account.However, for Subscription Asset Manager or CloudForms System engine, the user account to use is created within the on-premise service and probably is not the same as the Customer Portal user account.If you have lost your login or password for the Customer Portal, recover them from https://www.redhat.com/wapps/sso/lostPassword.html. For lost login or password information for Subscription Asset Manager or CloudForms System Engine, contact your local administrator. - Set the system name for the host. This is anything which uniquely and clearly identifies the system within the subscription service inventory. This is usually the hostname or fully-qualified domain name of the machine, but it can be any string.
- Optional. Set whether subscriptions should be set manually after registration. By default, this checkbox is unchecked so that the best-matched subscriptions are automatically applied to the system. Selecting this checkbox means that subscriptions must be added to the system manually after firstboot registration is complete. (Even if subscriptions are auto-attached, additional subscriptions can be added to the system later using the local Subscription Manager tools.)
- When registration begins, firstboot scans for organizations and environments (sub-domains within the organization) to which to register the system.
Figure 34.7. Organization Scan
IT environments that use Customer Portal Subscription Management have only a single organization, so no further configuration is necessary. IT infrastructures that use a local subscription service like Subscription Asset Manager might have multiple organizations configured, and those organizations may have multiple environments configured within them.If multiple organizations are detected, Subscription Manager prompts to select the one to join.Figure 34.8. Organization Selection
- If you decided to let Subscription Manager automatically attach subscriptions to the system (the default), then the system scans for the subscriptions to attach as part of the registration process.
Figure 34.9. Auto-Selecting Subscriptions
When registration is complete, the Subscription Manager reports the applied service level for the system based on the information in the selected subscription and the specific subscription that has been attached to the new system. This subscription selection must be confirmed to complete the registration process.Figure 34.10. Confirm Subscription
If you selected to apply subscriptions later, then that part of the registration process is skipped, and the Subscription Manager screen in firstboot simply instructs you to attach subscriptions later.Figure 34.11. Note to Select Subscriptions Later
- Click to move to the next configuration area for firstboot, user setup.
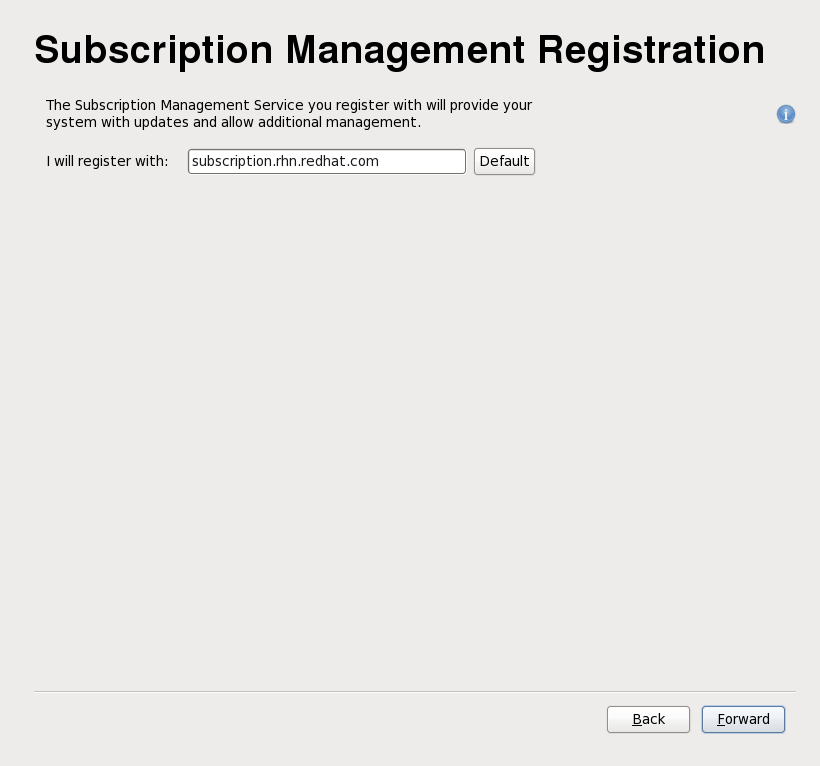


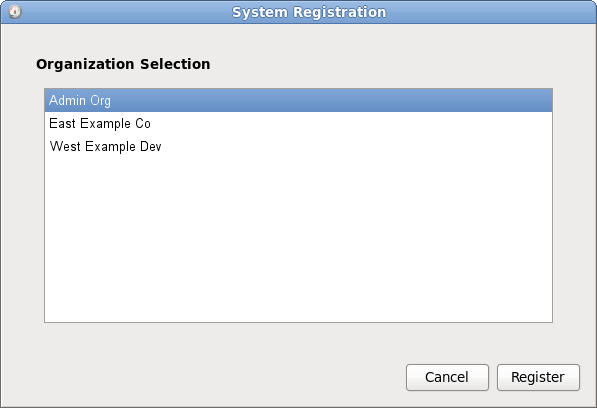
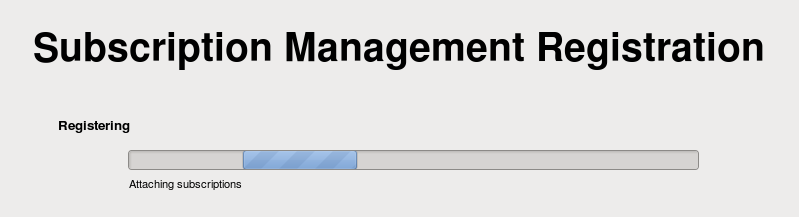
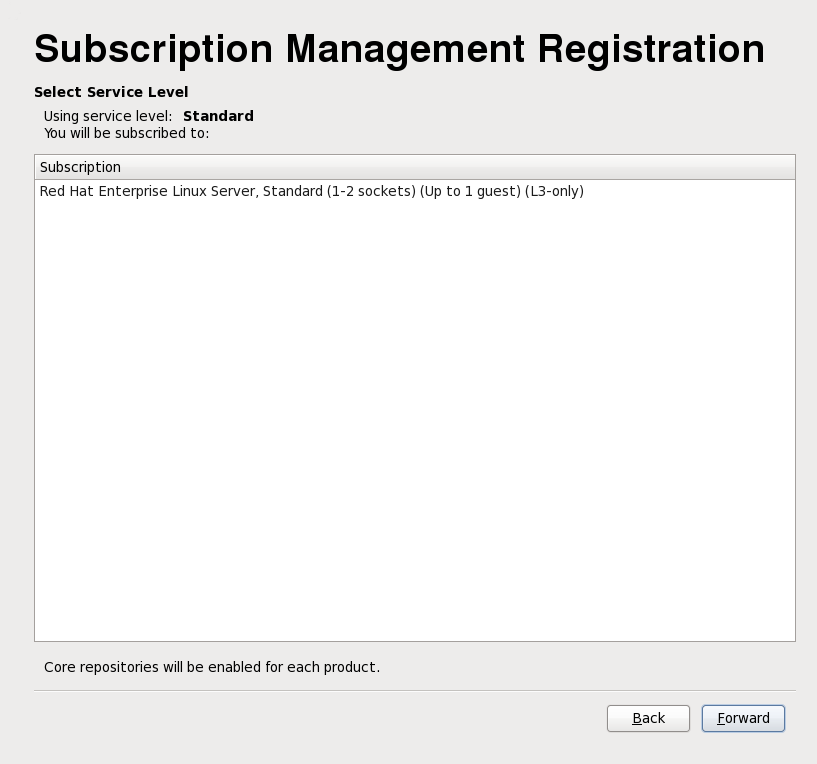
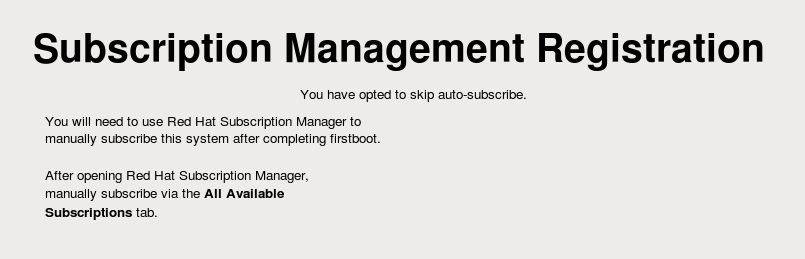
34.3. Create User
root account.
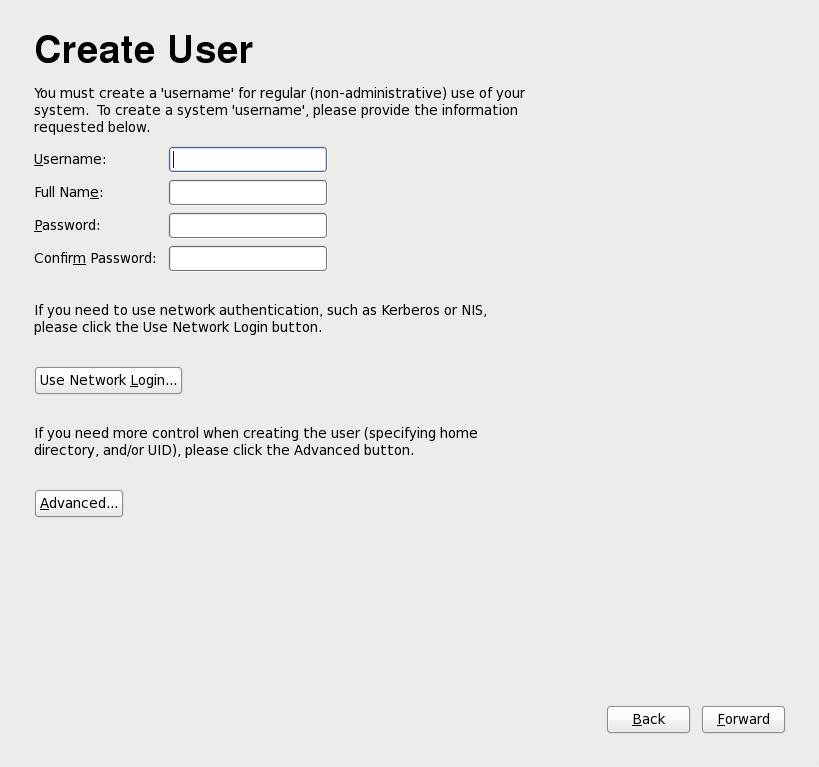
Figure 34.12. Firstboot create user screen
Important
Note
34.3.1. Authentication Configuration
- (for use when the user database on the network is not accessible)
- (Lightweight Directory Access Protocol)
- (Network Information Service)
- (for use with Microsoft Active Directory)
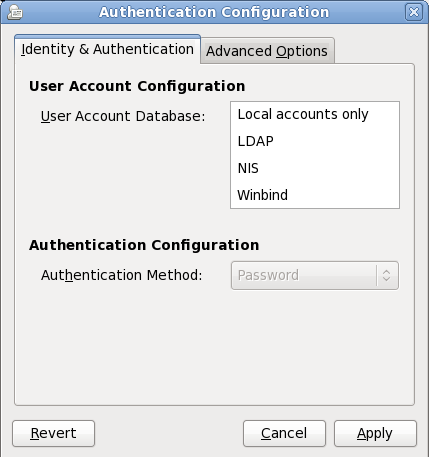
Figure 34.13. Firstboot Authentication Configuration screen
LDAP, you must specify the base distinguished name for LDAP searches, and the address of the LDAP server. You must also select an Authentication Method relevant to the type of user database that you chose, for example, a Kerberos password, LDAP password, or NIS password.
/etc/security/access.conf.
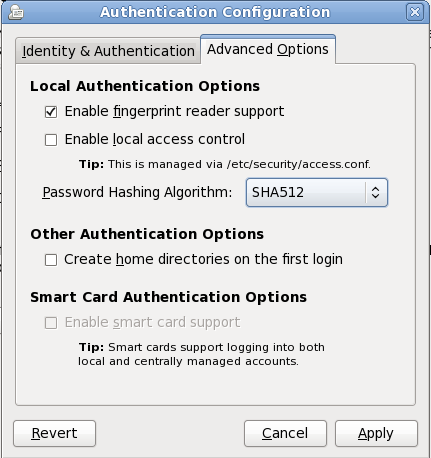
Figure 34.14. Firstboot authentication Advanced Options screen
34.4. Date and Time
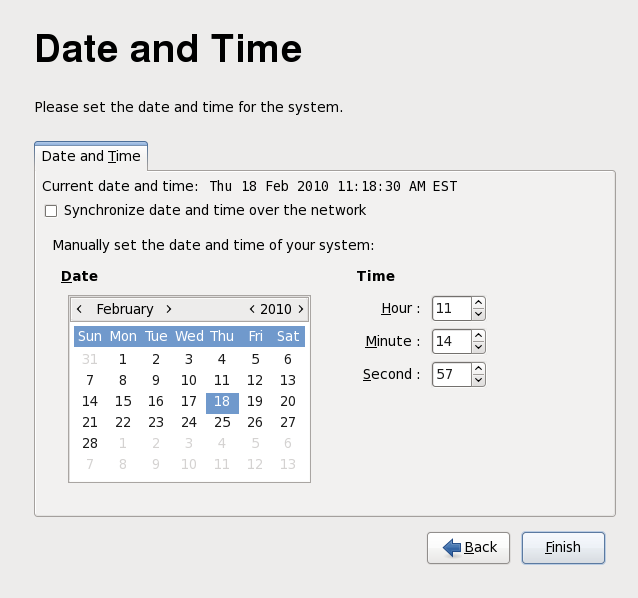
Figure 34.15. Firstboot date and time screen
34.5. Kdump
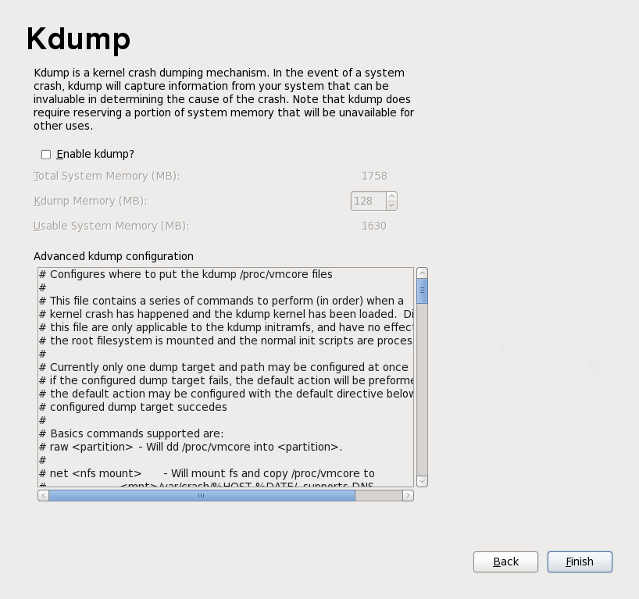
Figure 34.16. Kdump screen
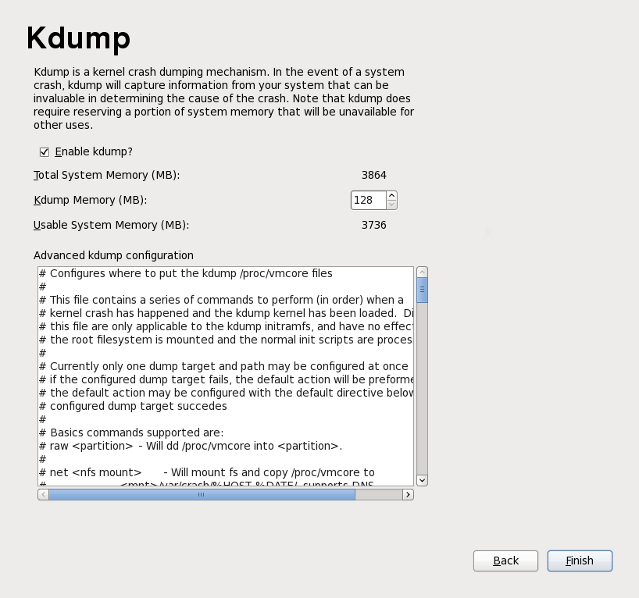
Figure 34.17. Kdump enabled
Chapter 35. Your Next Steps
35.1. Updating Your System
35.1.1. Driver Update rpm Packages
kmod- (notice the final -) and click .
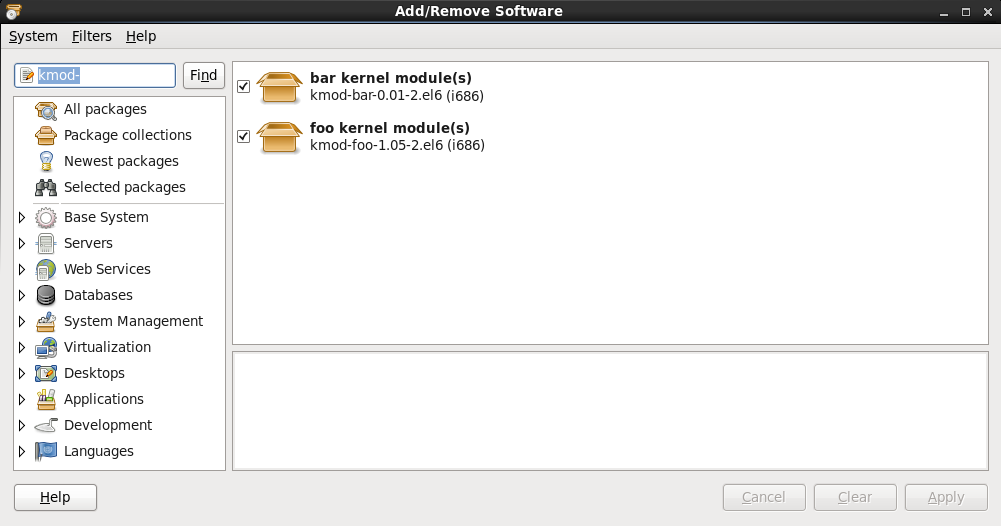
Figure 35.1. Listing Installed Driver Update RPM Packages
rpm -qa | egrep ^kmod-
$ rpm -qa | egrep ^kmod-
- on the end of kmod. This will list all installed packages that begin with kmod-, which should include all driver updates that are currently installed on your system. Additional drivers provided by third-party update software are not listed in this output. Contact the third-party vendor for details.
- Download the driver update rpm package from the location specified by Red Hat or your hardware vendor. The package file name will begin with
kmod(short for kernel module) and have a form similar to this example:kmod-foo-1.05-2.el6.9.i686In the example, the driver update rpm package supplies a driver update named foo with version number 1.05-2 for Red Hat Enterprise Linux 6.9, on i686 systems.Driver update rpm packages are signed packages, and like all other software packages, they are automatically validated at install time. To perform this step manually, type the following at a command line:rpm --checksig -v filename.rpm
$ rpm --checksig -v filename.rpmCopy to Clipboard Copied! Toggle word wrap Toggle overflow where filename.rpm is the driver update rpm package file name. This verifies the package against using the standard Red Hat GPG package signing key that is already installed on any Red Hat Enterprise Linux 6.9 system. If you need this key for verification purposes on another system, you can can obtain it from: https://access.redhat.com/security/team/key/ - Locate and double-click the file that you downloaded. The system might prompt you for the root password, after which it will present the following Installing Packages box:
Figure 35.2. The installing packages box
Click to complete the package installation.Alternatively, you can install a driver update manually on the command line:rpm -ivh kmod-foo-1.05-2.el6.9.i686
$ rpm -ivh kmod-foo-1.05-2.el6.9.i686Copy to Clipboard Copied! Toggle word wrap Toggle overflow - Whether you used a graphical install, or a command line install, reboot your system to ensure your system is using the new driver.
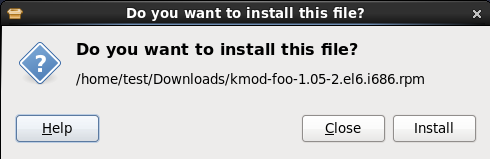
35.2. Finishing an Upgrade
Important
release. Check the old package list for the repositories that were installed:
awk '{print $1}' ~/old-pkglist.txt | grep 'release$'
awk '{print $1}' ~/old-pkglist.txt | grep 'release$'yum and other software management tools on your Red Hat Enterprise Linux system.
awk '{print $1}' ~/old-pkglist.txt | sort | uniq > ~/old-pkgnames.txt
rpm -qa --qf '%{NAME}\n' | sort | uniq > ~/new-pkgnames.txt
diff -u ~/old-pkgnames.txt ~/new-pkgnames.txt | grep '^-' | sed 's/^-//' > /tmp/pkgs-to-install.txt
awk '{print $1}' ~/old-pkglist.txt | sort | uniq > ~/old-pkgnames.txt
rpm -qa --qf '%{NAME}\n' | sort | uniq > ~/new-pkgnames.txt
diff -u ~/old-pkgnames.txt ~/new-pkgnames.txt | grep '^-' | sed 's/^-//' > /tmp/pkgs-to-install.txt/tmp/pkgs-to-install.txt with the yum command to restore most or all of your old software:
su -c 'yum install `cat /tmp/pkgs-to-install.txt`'
su -c 'yum install `cat /tmp/pkgs-to-install.txt`'Important
35.3. Switching to a Graphical Login
Important
Important
- If you are not already root, switch users to the
rootaccount:su -
su -Copy to Clipboard Copied! Toggle word wrap Toggle overflow Provide the administrator password when prompted. - If you have not already done so, install the X Window System and a graphical desktop environment. For example, to install the GNOME desktop environment, use this command:
yum groupinstall "X Window System" Desktop
yum groupinstall "X Window System" DesktopCopy to Clipboard Copied! Toggle word wrap Toggle overflow To install the KDE desktop environment, use:yum groupinstall "X Window System" "KDE Desktop"
yum groupinstall "X Window System" "KDE Desktop"Copy to Clipboard Copied! Toggle word wrap Toggle overflow This step may take some time as your Red Hat Enterprise Linux system downloads and installs additional software. You may be asked to provide the installation media depending on your original installation source. - Run the following command to edit the
/etc/inittabfile:vi /etc/inittab
vi /etc/inittabCopy to Clipboard Copied! Toggle word wrap Toggle overflow - Press the I key to enter
insertmode. - Find the line that includes the text
initdefault. Change the numeral3to5. - Type
:wqand press the Enter key to save the file and exit the vi text editor.
reboot command. Your system will restart and present a graphical login.
35.3.1. Enabling Access to Software Repositories from the Command Line
35.3.1.1. Enabling Access to Software Repositories Through the Internet
- If you are not already root, switch users to the
rootaccount:su -
su -Copy to Clipboard Copied! Toggle word wrap Toggle overflow - Ensure that the system is plugged into your network. Note that your network might be as small as two devices — a computer and an external modem/router.
- Run
system-config-network. The network configuration tool starts and displays the Select Action screen. - Select and press Enter. The network configuration tool displays the Select A Device screen with a list of network interfaces present on your system. The first interface is named
eth0by default. - Select a network interface to configure and press Enter. The network configuration tool takes you to the Network Configuration screen.
- You can manually configure a static IP, gateway, and DNS servers on this screen or leave these fields blank to accept the default values. When you have chosen a configuration, select , and press Enter. The network configuration tool takes you back to the Select A Device screen.
- Select and press Enter. The network configuration tool takes you back to the Select Action screen.
- Select and press Enter. The network configuration tool saves your settings and exits.
- Run
ifup interface, where interface is the network interface that you configured with the network configuration tool. For example, runifup eth0to starteth0.
35.3.1.2. Using a Red Hat Enterprise Linux Installation DVD as a Software Repository
- If you are using a physical DVD, insert the disc into your computer.
- If you are not already root, switch users to the
rootaccount:su -
su -Copy to Clipboard Copied! Toggle word wrap Toggle overflow - Create a mount point for the repository:
mkdir -p /path/to/repo
mkdir -p /path/to/repomkdir -p /path/to/repoCopy to Clipboard Copied! Toggle word wrap Toggle overflow where /path/to/repo is a location for the repository, for example,/mnt/repo - Mount the DVD on the mount point that you just created. If you are using a physical disc, you need to know the device name of your DVD drive. You can find the names of any CD or DVD drives on your system with the command
cat /proc/sys/dev/cdrom/info. The first CD or DVD drive on the system is typically namedsr0. When you know the device name, mount the DVD:mount -r -t iso9660 /dev/device_name /path/to/repo
mount -r -t iso9660 /dev/device_name /path/to/repomount -r -t iso9660 /dev/device_name /path/to/repomount -r -t iso9660 /dev/device_name /path/to/repomount -r -t iso9660 /dev/device_name /path/to/repoCopy to Clipboard Copied! Toggle word wrap Toggle overflow For example:mount -r -t iso9660 /dev/sr0 /mnt/repoIf you are using an ISO image file of a disc, mount the image file like this:mount -r -t iso9660 -o loop /path/to/image/file.iso /path/to/repo
mount -r -t iso9660 -o loop /path/to/image/file.iso /path/to/repomount -r -t iso9660 -o loop /path/to/image/file.iso /path/to/repomount -r -t iso9660 -o loop /path/to/image/file.iso /path/to/repomount -r -t iso9660 -o loop /path/to/image/file.iso /path/to/repoCopy to Clipboard Copied! Toggle word wrap Toggle overflow For example:mount -r -o loop /home/root/Downloads/RHEL6.9-Server-i386-DVD.iso /mnt/repoNote that you can only mount an image file if the storage device that holds the image file is itself mounted. For example, if the image file is stored on a hard drive that is not mounted automatically when the system boots, you must mount the hard drive before you mount an image file stored on that hard drive. Consider a hard drive named/dev/sdbthat is not automatically mounted at boot time and which has an image file stored in a directory namedDownloadson its first partition:mkdir /mnt/temp mount /dev/sdb1 /mnt/temp mkdir /mnt/repo mount -r -t iso9660 -o loop mount -r -o loop /mnt/temp/Downloads/RHEL6.9-Server-i386-DVD.iso /mnt/repo
mkdir /mnt/temp mount /dev/sdb1 /mnt/temp mkdir /mnt/repo mount -r -t iso9660 -o loop mount -r -o loop /mnt/temp/Downloads/RHEL6.9-Server-i386-DVD.iso /mnt/repoCopy to Clipboard Copied! Toggle word wrap Toggle overflow If you are not sure whether a storage device is mounted, run themountcommand to obtain a list of current mounts. If you are not sure of the device name or partition number of a storage device, runfdisk -land try to identify it in the output. - Create a new repo file in the
/etc/yum.repos.d/directory. The name of the file is not important, as long as it ends in.repo. For example,dvd.repois an obvious choice.- Choose a name for the repo file and open it as a new file with the vi text editor. For example:
vi /etc/yum.repos.d/dvd.repo
vi /etc/yum.repos.d/dvd.repoCopy to Clipboard Copied! Toggle word wrap Toggle overflow - Press the I key to enter
insertmode. - Supply the details of the repository. For example:
[dvd] baseurl=file:///mnt/repo/Server enabled=1 gpgcheck=1 gpgkey=file:///etc/pki/rpm-gpg/RPM-GPG-KEY-redhat-release
[dvd] baseurl=file:///mnt/repo/Server enabled=1 gpgcheck=1 gpgkey=file:///etc/pki/rpm-gpg/RPM-GPG-KEY-redhat-releaseCopy to Clipboard Copied! Toggle word wrap Toggle overflow The name of the repository is specified in square brackets — in this example,[dvd]. The name is not important, but you should choose something that is meaningful and recognizable.The line that specifies thebaseurlshould contain the path to the mount point that you created previously, suffixed with/Serverfor a Red Hat Enterprise Linux server installation DVD, or with/Clientfor a Red Hat Enterprise Linux client installation DVD. - Press the Esc key to exit
insertmode. - Type
:wqand press the Enter key to save the file and exit the vi text editor. - After installing or upgrading software from the DVD, delete the repo file that you created.
35.4. Installing Packages With yum
yum install package_name
yum install package_namei686, type:
yum install foobar.i686
~]# yum install foobar.i68635.5. Automating the Initial Configuration of Cloud Instances Using cloud-init
- set the default locale
- configure the host name
- configure network interfaces
- generate private SSH keys
- add SSH keys to the user's
.ssh/authorized_keysdirectory - set up ephemeral mount points
- Red Hat Enterprise Linux Atomic Host 7 Installation and Configuration Guide
- Red Hat OpenStack Platform 8 Instances and Images Guide
- Red Hat Enterprise Virtualization Virtual Machine Management Guide
- Red Hat CloudForms Provisioning Virtual Machines and Hosts Guide
Chapter 36. Basic System Recovery
36.1. Rescue Mode
36.1.1. Common Problems
- You are unable to boot normally into Red Hat Enterprise Linux (runlevel 3 or 5).
- You are having hardware or software problems, and you want to get a few important files off of your system's hard drive.
- You forgot the root password.
36.1.1.1. Unable to Boot into Red Hat Enterprise Linux
/ partition changes, the boot loader might not be able to find it to mount the partition. To fix this problem, boot in rescue mode and modify the /boot/grub/grub.conf file.
36.1.1.2. Hardware/Software Problems
36.1.1.3. Root Password
passwd command to reset the root password.
36.1.2. Booting into Rescue Mode
- By booting the system from a boot CD-ROM or DVD.
- By booting the system from other installation boot media, such as USB flash devices.
- By booting the system from the Red Hat Enterprise Linux installation DVD.
rescue as a kernel parameter. For example, for an x86 system, type the following command at the installation boot prompt:
linux rescue
linux rescuedd:
linux rescue dd
linux rescue ddrdblacklist option. For example, to boot into rescue mode without the foobar driver, run:
linux rescue rdblacklist=foobar
linux rescue rdblacklist=foobarThe rescue environment will now attempt to find your Linux installation and mount it under the directory /mnt/sysimage. You can then make any changes required to your system. If you want to proceed with this step choose 'Continue'. You can also choose to mount your file systems read-only instead of read-write by choosing 'Read-only'. If for some reason this process fails you can choose 'Skip' and this step will be skipped and you will go directly to a command shell.
/mnt/sysimage/. If it fails to mount a partition, it notifies you. If you select , it attempts to mount your file system under the directory /mnt/sysimage/, but in read-only mode. If you select , your file system is not mounted. Choose if you think your file system is corrupted.
sh-3.00b#
sh-3.00b#chroot /mnt/sysimage
chroot /mnt/sysimagerpm that require your root partition to be mounted as /. To exit the chroot environment, type exit to return to the prompt.
/foo, and typing the following command:
mount -t ext4 /dev/mapper/VolGroup00-LogVol02 /foo
mount -t ext4 /dev/mapper/VolGroup00-LogVol02 /foomount -t ext4 /dev/mapper/VolGroup00-LogVol02 /foo/foo is a directory that you have created and /dev/mapper/VolGroup00-LogVol02 is the LVM2 logical volume you want to mount. If the partition is of type ext2 or ext3 replace ext4 with ext2 or ext3 respectively.
fdisk -l
fdisk -lpvdisplay, vgdisplay or lvdisplay commands, respectively.
ssh,scp, andpingif the network is starteddumpandrestorefor users with tape drivespartedandfdiskfor managing partitionsrpmfor installing or upgrading softwarevifor editing text files
36.1.2.1. Reinstalling the Boot Loader
- Boot the system from an installation boot medium.
- Type
linux rescueat the installation boot prompt to enter the rescue environment. - Type
chroot /mnt/sysimageto mount the root partition. - Type
/sbin/grub-install bootpartto reinstall the GRUB boot loader, where bootpart is the boot partition (typically, /dev/sda). - Review the
/boot/grub/grub.conffile, as additional entries may be needed for GRUB to control additional operating systems. - Reboot the system.
36.1.3. Booting into Single-User Mode
- At the GRUB splash screen at boot time, press any key to enter the GRUB interactive menu.
- Select Red Hat Enterprise Linux with the version of the kernel that you wish to boot and type
ato append the line. - Go to the end of the line and type
singleas a separate word (press the Spacebar and then typesingle). Press Enter to exit edit mode.
36.1.4. Booting into Emergency Mode
init files are not loaded. If init is corrupted or not working, you can still mount file systems to recover data that could be lost during a re-installation.
single with the keyword emergency.
36.2. Rescue Mode on Power Systems servers
exit 0. This causes a reboot from the C side. To reboot from the A or B side or from *NWSSTG, you should vary off the system instead of exiting the shell.
36.2.1. Special Considerations for Accessing the SCSI Utilities from Rescue Mode
- Boot from the CD-ROM with the
linux rescue askmethodcommand. This allows you to manually select NFS as the source of your rescue media instead of defaulting to the CD-ROM drive. - Copy the first installation disc onto a file system of another Linux system.
- Make this copy of the installation disc available through NFS or FTP.
- Vary off or power down the system you need to rescue. Set its IPL parameters as instructed for booting the Installation discs in rescue mode, except that the IPL source should point to the copy of
boot.imgon your IFS (from step 1, above). - Make sure the installation disc is not in your DVD drive.
- IPL the Linux system.
- Follow the prompts as described in Section 36.2, “Rescue Mode on Power Systems servers”. An additional prompt for the installation source appears. Select NFS or FTP (as appropriate) and complete the following network configuration screen.
- When the Linux system has booted into rescue mode, the CD-ROM drive is available for use and you can mount the driver media to access the SCSI utilities.
36.3. Using Rescue Mode to Fix or Work Around Driver Problems
36.3.1. Using RPM to Add, Remove, or Replace a Driver
- Boot the system into rescue mode with the
linux rescuecommand at the boot prompt, or thelinux rescue ddcommand if you need to load a third-party driver from a driver disc. Follow the instructions in Section 36.1.2, “Booting into Rescue Mode” and do not choose to mount the installed system as read only. - Change the root directory to
/mnt/sysimage/:chroot /mnt/sysimage/
chroot /mnt/sysimage/Copy to Clipboard Copied! Toggle word wrap Toggle overflow - Use the
rpm -ecommand to remove the driver package. For example, to remove the kmod-foobar driver package, run:rpm -e kmod-foobar
rpm -e kmod-foobarCopy to Clipboard Copied! Toggle word wrap Toggle overflow - Exit the chroot environment:
exit
exitCopy to Clipboard Copied! Toggle word wrap Toggle overflow
- Boot the system into rescue mode with the
linux rescuecommand at the boot prompt, or thelinux rescue ddcommand if you need to load a third-party driver from a driver disc. Follow the instructions in Section 36.1.2, “Booting into Rescue Mode” and do not choose to mount the installed system as read only. - Make the RPM package that contains the driver available. For example, mount a CD or USB flash drive and copy the RPM package to a location of your choice under
/mnt/sysimage/, for example:/mnt/sysimage/root/drivers/. - Change the root directory to
/mnt/sysimage/:chroot /mnt/sysimage/
chroot /mnt/sysimage/Copy to Clipboard Copied! Toggle word wrap Toggle overflow - Use the
rpm -ivhcommand to install the driver package. For example, to install the kmod-foobar driver package from/root/drivers/, run:rpm -ivh /root/drivers/kmod-foobar-1.2.04.17.el6.i686
rpm -ivh /root/drivers/kmod-foobar-1.2.04.17.el6.i686Copy to Clipboard Copied! Toggle word wrap Toggle overflow Note that/root/drivers/in this chroot environment is/mnt/sysimage/root/drivers/in the original rescue environment.
36.3.2. Blacklisting a Driver
rdblacklist kernel option blacklists a driver at boot time. To continue to blacklist the driver on subsequent boots, add the rdblacklist option to the line in /boot/grub/grub.conf that describes your kernel. To blacklist the driver when the root device is mounted, add a blacklist entry in a file under /etc/modprobe.d/.
- Boot the system into rescue mode with the command
linux rescue rdblacklist=name_of_driver, where name_of_driver is the driver that you need to blacklist. Follow the instructions in Section 36.1.2, “Booting into Rescue Mode” and do not choose to mount the installed system as read only. - Open the
/mnt/sysimage/boot/grub/grub.conffile with the vi text editor:vi /mnt/sysimage/boot/grub/grub.conf
vi /mnt/sysimage/boot/grub/grub.confCopy to Clipboard Copied! Toggle word wrap Toggle overflow - Identify the default kernel used to boot the system. Each kernel is specified in the
grub.conffile with a group of lines that beginstitle. The default kernel is specified by thedefaultparameter near the start of the file. A value of0refers to the kernel described in the first group of lines, a value of1refers to the kernel described in the second group, and higher values refer to subsequent kernels in turn. - Edit the
kernelline of the group to include the optionrdblacklist=name_of_driver, where name_of_driver is the driver that you need to blacklist. For example, to blacklist the driver named foobar:kernel /vmlinuz-2.6.32-71.18-2.el6.i686 ro root=/dev/sda1 rhgb quiet rdblacklist=foobar
kernel /vmlinuz-2.6.32-71.18-2.el6.i686 ro root=/dev/sda1 rhgb quiet rdblacklist=foobarCopy to Clipboard Copied! Toggle word wrap Toggle overflow - Save the file and exit vi.
- Create a new file under
/etc/modprobe.d/that contains the commandblacklist name_of_driver. Give the file a descriptive name that will help you find it in future, and use the filename extension.conf. For example, to continue to blacklist the driver foobar when the root device is mounted, run:echo "blacklist foobar" >> /mnt/sysimage/etc/modprobe.d/blacklist-foobar.conf
echo "blacklist foobar" >> /mnt/sysimage/etc/modprobe.d/blacklist-foobar.confCopy to Clipboard Copied! Toggle word wrap Toggle overflow - Reboot the system. You no longer need to supply
rdblacklistmanually as a kernel option until you next update the default kernel. If you update the default kernel before the problem with the driver has been fixed, you must editgrub.confagain to ensure that the faulty driver is not loaded at boot time.
Chapter 37. Upgrading Your Current System
- The Preupgrade Assistant, which is a diagnostics utility that assesses your current system and identifies potential problems you might encounter during and/or after the upgrade.
- The Red Hat Upgrade Tool utility, which is used to upgrade a system from Red Hat Enterprise Linux to version 7.
Chapter 38. Unregistering from Red Hat Subscription Management Services
38.1. Systems Registered with Red Hat Subscription Management
unregister command.
subscription-manager unregister --username=name
[root@server ~]# subscription-manager unregister --username=nameNote
38.2. Systems Registered with RHN Classic
rm -rf /etc/sysconfig/rhn/systemid
[root@server ~]# rm -rf /etc/sysconfig/rhn/systemidNote
rhn-migrate-classic-to-rhsm script to migrate the system and all its attached subscriptions to the specified Red Hat Subscription Management server.
38.3. Systems Registered with Satellite
Chapter 39. Removing Red Hat Enterprise Linux From x86-based Systems
Warning
Important
39.1. Red Hat Enterprise Linux is the Only Operating System on the Computer
- Back up any data that you want to keep.
- Shut down the computer.
- Boot your computer with the installation disc for the replacement operating system.
- Follow the prompts presented during the installation process. Windows, OS X, and most Linux installation discs allow you to manually partition your hard drive during the installation process, or will offer you the option to remove all partitions and start with a fresh partition scheme. At this point, remove any existing partitions that the installation software detects or allow the installer to remove the partitions automatically. "System restore" media for computers pre-installed with Microsoft Windows might create a default partition layout automatically without input from you.
Warning
If your computer has system restore software stored on a partition on a hard drive, take care when removing partitions while installing an operating system from other media. Under these circumstances, you could destroy the partition holding the system restore software.
39.2. Your Computer Dual-boots Red Hat Enterprise Linux and Another Operating System
39.2.1. Your Computer Dual-boots Red Hat Enterprise Linux and a Microsoft Windows Operating System
39.2.1.1. Windows 2000, Windows Server 2000, Windows XP, and Windows Server 2003
Warning
- Remove the Red Hat Enterprise Linux partitions
- Boot your computer into your Microsoft Windows environment.
- Click Start>Run..., type
diskmgmt.mscand press Enter. The Disk Management tool opens.The tool displays a graphical representation of your disk, with bars representing each partition. The first partition is usually labeledNTFSand corresponds to yourC:drive. At least two Red Hat Enterprise Linux partitions will be visible. Windows will not display a file system type for these partitions, but may allocate drive letters to some of them. - Right-click on one of the Red Hat Enterprise Linux partitions, then click Delete Partition and click Yes to confirm the deletion. Repeat this process for the other Red Hat Enterprise Linux partitions on your system. As you delete partitions, Windows labels the space on the hard drive previously occupied by those partitions as
unallocated.
- Enable Windows to use the space on your hard drive vacated by Red Hat Enterprise Linux (optional)
Note
This step is not required to remove Red Hat Enterprise Linux from your computer. However, if you skip this step, you will leave part of your hard drive's storage capacity unusable by Windows. Depending on your configuration, this might be a significant portion of the storage capacity of the drive.Decide whether to extend an existing Windows partition to use the extra space, or create a new Windows partition in that space. If you create new a Windows partition, Windows will allocate a new drive letter to it and will interact with it as if it is a separate hard drive.Extending an Existing Windows Partition
Note
The diskpart tool used in this step is installed as part of the Windows XP and Windows 2003 operating systems. If you are performing this step on a computer running Windows 2000 or Windows Server 2000, you can download a version of diskpart for your operating system from the Microsoft website.- Click Start>Run..., type
diskpartand press Enter. A command window appears. - Type
list volumeand press Enter. Diskpart displays a list of the partitions on your system with a volume number, its drive letter, volume label, filesystem type, and size. Identify the Windows partition that you would like to use to occupy the space vacated on your hard drive by Red Hat Enterprise Linux and take note of its volume number (for example, your WindowsC:drive might be "Volume 0"). - Type
select volume N(where N is the volume number for the Windows partition that you want to extend) and press Enter. Now typeextendand press Enter. Diskpart now extends your chosen partition to fill the remaining space on your hard drive. It will notify you when the operation is complete.
Adding a New Windows Partition
- In the
Disk Managementwindow, right-click on disk space that Windows labels asunallocatedand selectNew Partitionfrom the menu. The New Partition Wizard starts. - Follow the prompts presented by the New Partition Wizard. If you accept the default options, the tool will create a new partition that fills all available space on the hard drive, assigns it the next available drive letter, and formats it with the NTFS file system.
- Restore the Windows bootloader
- Insert the Windows installation disk and restart your computer. As your computer starts, the following message will appear on the screen for a few seconds:
Press any key to boot from CD
Press any key to boot from CDCopy to Clipboard Copied! Toggle word wrap Toggle overflow Press any key while the message is still showing and the Windows installation software will load. - When the
Welcome to Setupscreen appears, you can start the Windows Recovery Console. The procedure is slightly different on different versions of Windows:- On Windows 2000 and Windows Server 2000, press the R key, then the C key.
- On Windows XP and Windows Server 2003, press the R key.
- The Windows Recovery Console scans your hard drives for Windows installations, and assigns a number to each one. It displays a list of Windows installations and prompts you to select one. Type the number corresponding to the Windows installation that you want to restore.
- The Windows Recovery Console prompts you for the Administrator password for your Windows installation. Type the Administrator password and press the Enter key. If there is no administrator password for this system, press only the Enter key.
- At the prompt, type the command
fixmbrand press the Enter. The fixmbr tool now restores the Master Boot Record for the system. - When the prompt reappears, type
exitand press the Enter key. - Your computer will restart and boot your Windows operating system.
39.2.1.2. Windows Vista and Windows Server 2008
Warning
- Remove the Red Hat Enterprise Linux partitions
- Boot your computer into your Microsoft Windows environment.
- Click Start then type
diskmgmt.mscinto the Start Search box and press Enter. The Disk Management tool opens.The tool displays a graphical representation of your disk, with bars representing each partition. The first partition is usually labeledNTFSand corresponds to yourC:drive. At least two Red Hat Enterprise Linux partitions will be visible. Windows will not display a file system type for these partitions, but may allocate drive letters to some of them. - Right-click on one of the Red Hat Enterprise Linux partitions, then click Delete Partition and click Yes to confirm the deletion. Repeat this process for the other Red Hat Enterprise Linux partitions on your system. As you delete partitions, Windows labels the space on the hard drive previously occupied by those partitions as
unallocated.
- Enable Windows to use the space on your hard drive vacated by Red Hat Enterprise Linux (optional)
Note
This step is not required to remove Red Hat Enterprise Linux from your computer. However, if you skip this step, you will leave part of your hard drive's storage capacity unusable by Windows. Depending on your configuration, this might be a significant portion of the storage capacity of the drive.Decide whether to extend an existing Windows partition to use the extra space, or create a new Windows partition in that space. If you create new a Windows partition, Windows will allocate a new drive letter to it and will interact with it as if it is a separate hard drive.Extending an Existing Windows Partition
- In the Disk Management window, right-click on the Windows partition that you want to extend and select Extend Volume from the menu. The Extend Volume Wizard opens.
- Follow the prompts presented by the Extend Volume Wizard. If you accept the defaults that it offers you, the tool will extend the selected volume to fill all available space on the hard drive.
Adding a New Windows Partition
- In the
Disk Managementwindow, right-click on disk space that Windows labels asunallocatedand selectNew Simple Volumefrom the menu. The New Simple Volume Wizard starts. - Follow the prompts presented by the New Simple Volume Wizard. If you accept the default options, the tool will create a new partition that fills all available space on the hard drive, assigns it the next available drive letter, and formats it with the NTFS file system.
- Restore the Windows bootloader
- Insert the Windows installation disk and restart your computer. As your computer starts, the following message will appear on the screen for a few seconds:
Press any key to boot from CD or DVD
Press any key to boot from CD or DVDCopy to Clipboard Copied! Toggle word wrap Toggle overflow Press any key while the message is still showing and the Windows installation software will load. - In the Install Windows dialog, select a language, time and currency format, and keyboard type. Click Next
- Click Repair your computer.
- The Windows Recovery Environment (WRE) shows you the Windows installations that it can detect on your system. Select the installation that you want to restore, then click Next.
- Click Command prompt. A command window will open.
- Type
bootrec /fixmbrand press Enter. - When the prompt reappears, close the command window, then click Restart.
- Your computer will restart and boot your Windows operating system.
39.2.2. Your computer dual-boots Red Hat Enterprise Linux and a different Linux distribution
Remove Red Hat Enterprise Linux partitions
- Boot your Red Hat Enterprise Linux installation.
- As root or with sudo, run mount. Note the partitions that are mounted. In particular, note the partition that is mounted as the root of the filesystem. The output of
mounton a system where the root of the filesystem is on a standard partition such as/dev/sda2might resemble:Copy to Clipboard Copied! Toggle word wrap Toggle overflow The output ofmounton a system where the root of the filesystem is on a logical volume might resemble:Copy to Clipboard Copied! Toggle word wrap Toggle overflow - Ensure that any data on this system that you still require is backed up to another system or storage location.
- Shut down the system and boot the Linux distribution that you want to keep on the system.
- As root or with sudo, run mount. If any of the partitions that you previously noted as used for Red Hat Enterprise Linux are mounted, review the contents of these partitions. If you no longer require the contents of these partitions, unmount them with the
umountcommand. - Remove any unwanted and unnecessary partitions, for example, with fdisk for standard partitions, or lvremove and vgremove to remove logical volumes and volume groups.
Remove Red Hat Enterprise Linux entries from your bootloader
Important
These instructions assume that your system uses the GRUB bootloader. If you use a different bootloader (such as LILO) consult the documentation for that software to identify and remove Red Hat Enterprise Linux entries from its list of boot targets and to ensure that your default operating system is correctly specified.- At the command line, type
su -and press Enter. When the system prompts you for the root password, type the password and press Enter. - Type
gedit /boot/grub/grub.confand press Enter. This opens thegrub.conffile in the gedit text editor. - A typical Red Hat Enterprise Linux entry in the
grub.conffile consists of four lines:Depending on the configuration of your system, there may be multiple Red Hat Enterprise Linux entries inExample 39.1. Example Red Hat Enterprise Linux entry in
grub.conftitle Red Hat Enterprise Linux (2.6.32.130.el6.i686)root (hd0,1)kernel /vmlinuz-2.6.32.130.el6.i686 ro root=UUID=04a07c13-e6bf-6d5a-b207-002689545705 rhgb quietinitrd /initrd-2.6.32.130.el6.i686.imggrub.conf, each corresponding to a different version of the Linux kernel. Delete each of the Red Hat Enterprise Linux entries from the file. Grub.confcontains a line that specifies the default operating system to boot, in the formatdefault=Nwhere N is a number equal to or greater than 0. If N is set to 0, GRUB will boot the first operating system in the list. If N is set to 1, it will boot the second operating system, and so forth.Identify the entry for the operating system that you want GRUB to boot by default and note its place in the order within the list.Make sure that thedefault=line contains the number one below the number of your chosen default operating system in the list.Save the updatedgrub.conffile and close gedit
Make space available to your operating system
Note
This step is not required to remove Red Hat Enterprise Linux from your computer. However, if you skip this step, you will leave part of your hard drive's storage capacity unusable by your other Linux operating system. Depending on your configuration, this might be a significant portion of the storage capacity of the drive.Note
To carry out this step, you require live media for a Linux distribution, for example, the Fedora Live CD or the Knoppix DVD.The method to make the space freed by removing the Red Hat Enterprise Linux partitions available to your other Linux operating system differs, depending on whether your chosen operating system is installed on disk partitions configured to use Logical Volume Management (LVM) or not.If you do not use LVM
- Boot your computer from Linux live media, and install parted if it is not already present.
- As root or with sudo, run parted disk, where disk is the device name of the disk that contains a partition that you want to resize, for example,
/dev/sda. - At the
(parted)prompt, enterprint. The parted tool displays information about the partitions on your system, including their partition numbers, their sizes, and their positions on the disk. - At the
(parted)prompt, enterresize number start end, where number is the partition number, start is the location on the disk at which the partition begins, and end is the location on the disk at which you want the partition to end. Use the start position that you previously obtained with theprintcommand, and refer to the parted documentation for different ways to specify the end parameter. - When parted finishes resizing the partition, enter
quitat the(parted)prompt. - Run
e2fsck partition, where partition is the partition that you just resized. For example, if you just resized/dev/sda3, entere2fsck /dev/sda3.Linux now checks the file system of the newly-resized partition. - When the file system check finishes, type
resize2fs partitionat a command line and press Enter, where partition is the partition that you just resized. For example, if you just resized/dev/sda3, typeresize2fs /dev/sda3.Linux now resizes your file system to fill the newly-resized partition. - Restart your computer. The extra space is now available to your Linux installation.
If you use LVM
- Boot your computer from Linux live media and install fdisk and lvm2 if they are not already present.
Create a new partition in the free space on the disk
- As root or with sudo, run fdisk disk, where disk is the device name of the disk where you want to create new space, for example,
/dev/sda. - At the prompt
Command (m for help):, enternto create a new partition. Refer to the fdisk documentation for options.
Change the partition type identifier
- At the prompt
Command (m for help):, entertto change a partition type. - At the prompt
Partition number (1-4):, type the number of the partition that you just created. For example, if you just created partition/dev/sda3, type the number3and press Enter. This identifies the partition whose type fdisk will change. - At the prompt
Hex code (type L to list codes):, enter8eto create a Linux LVM partition. - At the prompt
Command (m for help):, enterwto write the changes to disk and exit fdisk.
Expand the volume group
- At the command prompt, type
lvmand press Enter to start the lvm2 tool. - At the
lvm>prompt, typepvcreate partitionand press Enter, where partition is the partition that you recently created. For example,pvcreate /dev/sda3. This creates/dev/sda3as a physical volume in LVM. - At the
lvm>prompt, typevgextend VolumeGroup partitionand press Enter, where VolumeGroup is the LVM volume group on which Linux is installed and partition is the partition that you recently created. For example, if Linux is installed on/dev/VolumeGroup00, you would typevgextend /dev/VolumeGroup00 /dev/sda3to extend that volume group to include the physical volume at/dev/sda3. - At the
lvm>prompt, typelvextend -l +100%FREE LogVoland press Enter, where LogVol is the logical volume that contains your Linux filesystem. For example, to extendLogVol00to fill the newly-available space in its volume group,VolGroup00, typelvextend -l +100%FREE /dev/VolGroup00/LogVol00. - At the
lvm>prompt, typeexitand press Enter to exit lvm2
- Type
e2fsck LogVolat the command line and press Enter, where LogVol is the logical volume that you just resized. For example, if you just resized/dev/VolumeGroup00/LogVol00, you would typee2fsck /dev/VolumeGroup00/LogVol00.Linux now checks the file system of the newly-resized logical volume. - When the file system check finishes, type
resize2fs LogVolat a command line and press Enter, where LogVol is the partition that you just resized. For example, if you just resized/dev/VolumeGroup00/LogVol00, you would typeresize2fs /dev/VolumeGroup00/LogVol00.Linux now resizes your file system to fill the newly-resized logical volume. - Restart your computer. The extra space is now available to your Linux installation.
39.3. Replacing Red Hat Enterprise Linux with MS-DOS or Legacy Versions of Microsoft Windows
fdisk utility to create a new MBR with the undocumented flag /mbr. This ONLY rewrites the MBR to boot the primary DOS partition. The command should look like the following:
fdisk /mbr
fdisk /mbrfdisk, you will experience the Partitions exist but they do not exist problem. The best way to remove non-DOS partitions is with a tool that understands partitions other than DOS.
linux rescue. This starts the rescue mode program.
list-harddrives. This command lists all hard drives on your system that are recognizable by the installation program, as well as their sizes in megabytes.
Warning
parted. Start parted, where /dev/hda is the device on which to remove the partition:
parted /dev/hda
parted /dev/hdaprint command, view the current partition table to determine the minor number of the partition to remove:
printprint command also displays the partition's type (such as linux-swap, ext2, ext3, ext4 and so on). Knowing the type of the partition helps you in determining whether to remove the partition.
rm. For example, to remove the partition with minor number 3:
rm 3
rm 3Important
print command to confirm that it is removed from the partition table.
quit to quit parted.
parted, type exit at the boot prompt to exit rescue mode and reboot your system, instead of continuing with the installation. The system should reboot automatically. If it does not, you can reboot your computer using Control+Alt+Delete .
Chapter 40. Removing Red Hat Enterprise Linux from IBM System z
- Overwrite the disks with a new installation.
- Start a new installation and use the partitioning dialog (refer to Section 23.13, “Disk Partitioning Setup”) to format the partitions where Linux was installed. After the Write changes to disk dialog described in Section 23.16, “Write Changes to Disk”, exit the installer.
- Make the DASD or SCSI disk where Linux was installed visible from another system, then delete the data. However, this might require special privileges. Ask your system administrator for advice. You can use Linux commands such as
dasdfmt(DASD only),parted,mke2fsordd. For more details about the commands, refer to the respective man pages.
40.1. Running a Different Operating System on your z/VM Guest or LPAR
Part VI. Technical Appendices
Appendix A. An Introduction to Disk Partitions
Note
A.1. Hard Disk Basic Concepts

Figure A.1. An Unused Disk Drive
A.1.1. It is Not What You Write, it is How You Write It

Figure A.2. Disk Drive with a File System
- A small percentage of the drive's available space is used to store file system-related data and can be considered as overhead.
- A file system splits the remaining space into small, consistently-sized segments. For Linux, these segments are known as blocks. [15]

Figure A.3. Disk Drive with a Different File System

Figure A.4. Disk Drive with Data Written to It
A.1.2. Partitions: Turning One Drive Into Many
- Logical separation of the operating system data from the user data
- Ability to use different file systems
- Ability to run multiple operating systems on one machine
Note

Figure A.5. Disk Drive with Partition Table
- The points on the disk where the partition starts and ends
- Whether the partition is "active"
- The partition's type
Figure A.6. Disk Drive With Single Partition
| Partition Type | Value | Partition Type | Value |
|---|---|---|---|
| Empty | 00 | Novell Netware 386 | 65 |
| DOS 12-bit FAT | 01 | PIC/IX | 75 |
| XENIX root | 02 | Old MINIX | 80 |
| XENIX usr | 03 | Linux/MINUX | 81 |
| DOS 16-bit <=32M | 04 | Linux swap | 82 |
| Extended | 05 | Linux native | 83 |
| DOS 16-bit >=32 | 06 | Linux extended | 85 |
| OS/2 HPFS | 07 | Amoeba | 93 |
| AIX | 08 | Amoeba BBT | 94 |
| AIX bootable | 09 | BSD/386 | a5 |
| OS/2 Boot Manager | 0a | OpenBSD | a6 |
| Win95 FAT32 | 0b | NEXTSTEP | a7 |
| Win95 FAT32 (LBA) | 0c | BSDI fs | b7 |
| Win95 FAT16 (LBA) | 0e | BSDI swap | b8 |
| Win95 Extended (LBA) | 0f | Syrinx | c7 |
| Venix 80286 | 40 | CP/M | db |
| Novell | 51 | DOS access | e1 |
| PReP Boot | 41 | DOS R/O | e3 |
| GNU HURD | 63 | DOS secondary | f2 |
| Novell Netware 286 | 64 | BBT | ff |
A.1.3. Partitions Within Partitions — An Overview of Extended Partitions
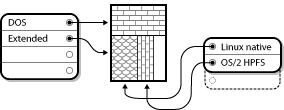
Figure A.7. Disk Drive With Extended Partition
A.1.4. GUID Partition Table (GPT)
- To preserve backward compatibility with MBR disks, the first sector (LBA 0) of GPT is reserved for MBR data and it is called “protective MBR”.
- The primary GPT header begins on the second logical block (LBA 1) of the device. The header contains the disk GUID, the location of the primary partition table, the location of the secondary GPT header, and CRC32 checksums of itself and the primary partition table. It also specifies the number of partition entries of the table.
- The primary GPT table includes, by default, 128 partition entries, each with an entry size 128 bytes, its partition type GUID and unique partition GUID.
- The secondary GPT table is identical to the primary GPT table. It is used mainly as a backup table for recovery in case the primary partition table is corrupted.
- The secondary GPT header is located on the last logical sector of the disk and it can be used to recover GPT information in case the primary header is corrupted. It contains the disk GUID, the location of the secondary partition table and the primary GPT header, CRC32 checksums of itself and the secondary partition table, and the number of possible partition entries.
Important
A.1.5. Making Room For Red Hat Enterprise Linux
- Unpartitioned free space is available
- An unused partition is available
- Free space in an actively used partition is available
Note
A.1.5.1. Using Unpartitioned Free Space
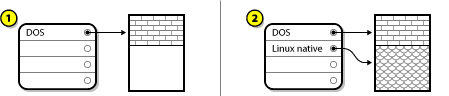
Figure A.8. Disk Drive with Unpartitioned Free Space
A.1.5.2. Using Space from an Unused Partition
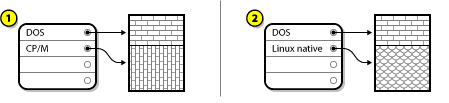
Figure A.9. Disk Drive With an Unused Partition
A.1.5.3. Using Free Space from an Active Partition
- Destructive Repartitioning
- Basically, you delete the single large partition and create several smaller ones. As you might imagine, any data you had in the original partition is destroyed. This means that making a complete backup is necessary. For your own sake, make two backups, use verification (if available in your backup software), and try to read data from your backup before you delete the partition.
Warning
If there was an operating system of some type installed on that partition, it needs to be reinstalled as well. Be aware that some computers sold with pre-installed operating systems may not include the CD-ROM media to reinstall the original operating system. The best time to notice if this applies to your system is before you destroy your original partition and its operating system installation.After creating a smaller partition for your existing operating system, you can reinstall any software, restore your data, and start your Red Hat Enterprise Linux installation. Figure A.10, “Disk Drive Being Destructively Repartitioned” shows this being done.Figure A.10. Disk Drive Being Destructively Repartitioned
In Figure A.10, “Disk Drive Being Destructively Repartitioned”, 1 represents before and 2 represents after.Warning
As Figure A.10, “Disk Drive Being Destructively Repartitioned”, shows, any data present in the original partition is lost without proper backup! - Non-Destructive Repartitioning
- Here, you run a program that does the seemingly impossible: it makes a big partition smaller without losing any of the files stored in that partition. Many people have found this method to be reliable and trouble-free. What software should you use to perform this feat? There are several disk management software products on the market. Do some research to find the one that is best for your situation.While the process of non-destructive repartitioning is rather straightforward, there are a number of steps involved:
- Compress and backup existing data
- Resize the existing partition
- Create new partition(s)

A.1.5.3.1. Compress existing data
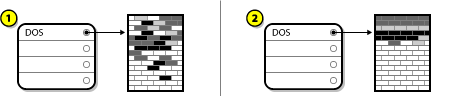
Figure A.11. Disk Drive Being Compressed
A.1.5.3.2. Resize the existing partition
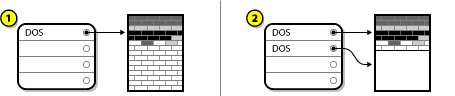
Figure A.12. Disk Drive with Partition Resized
A.1.5.3.3. Create new partition(s)
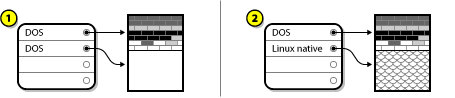
Figure A.13. Disk Drive with Final Partition Configuration
Note
parted utility. This is a freely available program that can resize partitions.
parted, it is important that you be familiar with disk storage and that you perform a backup of your computer data. You should make two copies of all the important data on your computer. These copies should be to removable media (such as tape, CD-ROM, or diskettes), and you should make sure they are readable before proceeding.
parted, be aware that after parted runs you are left with two partitions: the one you resized, and the one parted created out of the newly freed space. If your goal is to use that space to install Red Hat Enterprise Linux, you should delete the newly created partition, either by using the partitioning utility under your current operating system or while setting up partitions during installation.
A.1.6. Partition Naming Scheme
- Each partition's type is checked to determine if it can be read by DOS/Windows.
- If the partition's type is compatible, it is assigned a "drive letter." The drive letters start with a "C" and move on to the following letters, depending on the number of partitions to be labeled.
- The drive letter can then be used to refer to that partition as well as the file system contained on that partition.
/dev/xxyN.
/dev/- This is the name of the directory in which all device files reside. Since partitions reside on hard disks, and hard disks are devices, the files representing all possible partitions reside in
/dev/. xx- The first two letters of the partition name indicate the type of device on which the partition resides, usually either
hd(for IDE disks) orsd(for SCSI disks). y- This letter indicates which device the partition is on. For example,
/dev/hda(the first IDE hard disk) or/dev/sdb(the second SCSI disk). N- The final number denotes the partition. The first four (primary or extended) partitions are numbered
1through4. Logical partitions start at5. So, for example,/dev/hda3is the third primary or extended partition on the first IDE hard disk, and/dev/sdb6is the second logical partition on the second SCSI hard disk.
Note
A.1.7. Disk Partitions and Other Operating Systems
A.1.8. Disk Partitions and Mount Points
/dev/hda5 is mounted on /usr/, that would mean that all files and directories under /usr/ physically reside on /dev/hda5. So the file /usr/share/doc/FAQ/txt/Linux-FAQ would be stored on /dev/hda5, while the file /etc/gdm/custom.conf would not.
/usr/ would be mount points for other partitions. For instance, a partition (say, /dev/hda7) could be mounted on /usr/local/, meaning that /usr/local/man/whatis would then reside on /dev/hda7 rather than /dev/hda5.
A.1.9. How Many Partitions?
swap, /boot/, and / (root).
Appendix B. iSCSI Disks
B.1. iSCSI Disks in anaconda
- When anaconda starts, it checks if the BIOS or add-on boot ROMs of the system support iSCSI Boot Firmware Table (iBFT), a BIOS extension for systems which can boot from iSCSI. If the BIOS supports iBFT, anaconda will read the iSCSI target information for the configured boot disk from the BIOS and log in to this target, making it available as an installation target.
- If you select the Specialized Storage Devices option during installation, the storage device selection screen presents you with an Add Advanced Target button. If you click this button, you can add iSCSI target information like the discovery IP address. Anaconda probes the given IP address and logs in to any targets that it finds. See Section 9.6.1.1, “ Advanced Storage Options ” for the details that you can specify for iSCSI targets.
/ so that the system will automatically log in to them when it starts. If / is placed on an iSCSI target, initrd will log into this target and anaconda does not include this target in start up scripts to avoid multiple attempts to log into the same target.
/ is placed on an iSCSI target, anaconda sets NetworkManager to ignore any network interfaces that were active during the installation process. These interfaces will also be configured by initrd when the system starts. If NetworkManager were to reconfigure these interfaces, the system would lose its connection to /.
B.2. iSCSI Disks During Start Up
- The init script in the initrd will log in to iSCSI targets used for
/(if any). This is done using the iscsistart utility (which can do this without requiring iscsid to run). - When the root filesystem has been mounted and the various service initscripts get run, the iscsid initscript will get called. This script will then start iscsid if any iSCSI targets are used for
/, or if any targets in the iSCSI database are marked to be logged in to automatically. - After the classic network service script has been run (or would have been run if enabled) the iscsi initscript will run. If the network is accessible, this will log in to any targets in the iSCSI database which are marked to be logged in to automatically. If the network is not accessible, this script will exit quietly.
- When using NetworkManager to access the network (instead of the classic network service script), NetworkManager will call the iscsi initscript. See:
/etc/NetworkManager/dispatcher.d/04-iscsiImportant
Because NetworkManager is installed in/usr, you cannot use it to configure network access if/usris on network-attached storage such as an iSCSI target.
Appendix C. Disk Encryption
C.1. What is Block Device Encryption?
C.2. Encrypting Block Devices Using dm-crypt/LUKS6tit
dm-crypt module. This arrangement provides a low-level mapping that handles encryption and decryption of the device's data. User-level operations, such as creating and accessing encrypted devices, are accomplished through the use of the cryptsetup utility.
C.2.1. Overview of LUKS
- What LUKS does:
- LUKS encrypts entire block devices
- LUKS is thereby well-suited for protecting the contents of mobile devices such as:
- Removable storage media
- Laptop disk drives
- The underlying contents of the encrypted block device are arbitrary.
- This makes it useful for encrypting
swapdevices. - This can also be useful with certain databases that use specially formatted block devices for data storage.
- LUKS uses the existing device mapper kernel subsystem.
- This is the same subsystem used by LVM, so it is well tested.
- LUKS provides passphrase strengthening.
- This protects against dictionary attacks.
- LUKS devices contain multiple key slots.
- This allows users to add backup keys/passphrases.
- What LUKS does not do:
- LUKS is not well-suited for applications requiring many (more than eight) users to have distinct access keys to the same device.
- LUKS is not well-suited for applications requiring file-level encryption.
C.2.2. How Will I Access the Encrypted Devices After Installation? (System Startup)
Note
C.2.3. Choosing a Good Passphrase
C.3. Creating Encrypted Block Devices in Anaconda
Note
Note
kickstart to set a separate passphrase for each new encrypted block device.
C.3.1. What Kinds of Block Devices Can Be Encrypted?
C.3.2. Saving Passphrases
--escrowcert parameter to any of the autopart, logvol, part or raid commands. During installation, the encryption keys for the specified devices are saved in files in /root, encrypted with the certificate.
C.3.3. Creating and Saving Backup Passphrases
--escrowcert parameter as described in Section C.3.2, “Saving Passphrases”, followed by the --backuppassphrase parameter for each of the kickstart commands that relate to the devices for which you want to create backup passphrases.
C.4. Creating Encrypted Block Devices on the Installed System After Installation
C.4.1. Create the Block Devices
parted, pvcreate, lvcreate and mdadm.
C.4.2. Optional: Fill the Device with Random Data
/dev/sda3) with random data before encrypting it greatly increases the strength of the encryption. The downside is that it can take a very long time.
Warning
- The best way, which provides high quality random data but takes a long time (several minutes per gigabyte on most systems):
dd if=/dev/urandom of=<device>
dd if=/dev/urandom of=<device>Copy to Clipboard Copied! Toggle word wrap Toggle overflow - Fastest way, which provides lower quality random data:
badblocks -c 10240 -s -w -t random -v <device>
badblocks -c 10240 -s -w -t random -v <device>Copy to Clipboard Copied! Toggle word wrap Toggle overflow
C.4.3. Format the Device as a dm-crypt/LUKS Encrypted Device
Warning
cryptsetup luksFormat <device>
cryptsetup luksFormat <device>Note
cryptsetup(8) man page.
cryptsetup isLuks <device> && echo Success
cryptsetup isLuks <device> && echo Successcryptsetup luksDump <device>
cryptsetup luksDump <device>C.4.4. Create a Mapping to Allow Access to the Device's Decrypted Contents
device-mapper.
/dev/sda3), is guaranteed to remain constant as long as the LUKS header remains intact. To find a LUKS device's UUID, run the following command:
cryptsetup luksUUID <device>
cryptsetup luksUUID <device>luks-<uuid>, where <uuid> is replaced with the device's LUKS UUID (eg: luks-50ec957a-5b5a-47ee-85e6-f8085bbc97a8). This naming convention might seem unwieldy but is it not necessary to type it often.
cryptsetup luksOpen <device> <name>
cryptsetup luksOpen <device> <name>/dev/mapper/<name>, which represents the decrypted device. This block device can be read from and written to like any other unencrypted block device.
dmsetup info <name>
dmsetup info <name>Note
dmsetup(8) man page.
C.4.5. Create File Systems on the Mapped Device or Continue to Build Complex Storage Structures Using the Mapped Device
/dev/mapper/<name>) as any other block device. To create an ext2 filesystem on the mapped device, use the following command:
mke2fs /dev/mapper/<name>
mke2fs /dev/mapper/<name>/mnt/test, use the following command:
Important
/mnt/test must exist before executing this command.
mount /dev/mapper/<name> /mnt/test
mount /dev/mapper/<name> /mnt/testC.4.6. Add the Mapping Information to /etc/crypttab
/etc/crypttab file. If the file doesn't exist, create it and change the owner and group to root (root:root) and change the mode to 0744. Add a line to the file with the following format:
<name> <device> none
<name> <device> nonecryptsetup luksUUID <device>. This ensures the correct device will be identified and used even if the device node (eg: /dev/sda5) changes.
Note
/etc/crypttab file, read the crypttab(5) man page.
C.4.7. Add an Entry to /etc/fstab
/dev/mapper/<name> in the /etc/fstab file.
/etc/fstab by UUID or by a filesystem label. The main purpose of this is to provide a constant identifier in the event that the device name (eg: /dev/sda4) changes. LUKS device names in the form of /dev/mapper/luks-<luks_uuid> are based only on the device's LUKS UUID, and are therefore guaranteed to remain constant. This fact makes them suitable for use in /etc/fstab.
Note
/etc/fstab file, read the fstab(5) man page.
C.5. Common Post-Installation Tasks
C.5.1. Set a Randomly Generated Key as an Additional Way to Access an Encrypted Block Device
C.5.1.1. Generate a Key
$HOME/keyfile.
dd if=/dev/urandom of=$HOME/keyfile bs=32 count=1 chmod 600 $HOME/keyfile
dd if=/dev/urandom of=$HOME/keyfile bs=32 count=1
chmod 600 $HOME/keyfile
C.5.1.2. Add the Key to an Available Keyslot on the Encrypted Device
cryptsetup luksAddKey <device> ~/keyfile
cryptsetup luksAddKey <device> ~/keyfileC.5.2. Add a New Passphrase to an Existing Device
cryptsetup luksAddKey <device>
cryptsetup luksAddKey <device>C.5.3. Remove a Passphrase or Key from a Device
cryptsetup luksRemoveKey <device>
cryptsetup luksRemoveKey <device>Appendix D. Understanding LVM
ext4, and a mount point.
Note
/boot partition.
/boot on LVM logical volumes with linear mapping.
Note
/ and swap partitions within LVM volumes, with a separate /boot partition.
Appendix E. The GRUB Boot Loader
E.1. Boot Loaders and System Architecture
| Architecture | Boot Loaders |
|---|---|
| AMD AMD64 | GRUB |
| IBM Power Systems | yaboot |
| IBM System z | z/IPL |
| x86 | GRUB |
Important
/boot and / (root) partition in Red Hat Enterprise Linux 6.9 can only use the ext2, ext3, and ext4 (recommended) file systems. You cannot use any other file system for this partition, such as Btrfs, XFS, or VFAT. Other partitions, such as /home, can use any supported file system, including Btrfs and XFS (if available). See the following article on the Red Hat Customer Portal for additional information: https://access.redhat.com/solutions/667273.
E.2. GRUB
E.2.1. GRUB and the Boot Process on BIOS-based x86 Systems
- The Stage 1 or primary boot loader is read into memory by the BIOS from the MBR [16]. The primary boot loader exists on less than 512 bytes of disk space within the MBR and is capable of loading either the Stage 1.5 or Stage 2 boot loader.BIOS cannot read partition tables or file systems. It initializes the hardware, reads the MBR, then depends entirely on the stage 1 bootloader to continue the boot process.
- The Stage 1.5 boot loader is read into memory by the Stage 1 boot loader, if necessary. Some hardware requires an intermediate step to get to the Stage 2 boot loader. This is sometimes true when the
/boot/partition is above the 1024 cylinder head of the hard drive or when using LBA mode. The Stage 1.5 boot loader is found either on the/boot/partition or on a small part of the MBR and the/boot/partition. - The Stage 2 or secondary boot loader is read into memory. The secondary boot loader displays the GRUB menu and command environment. This interface allows the user to select which kernel or operating system to boot, pass arguments to the kernel, or look at system parameters.
- The secondary boot loader reads the operating system or kernel as well as the contents of
/boot/sysroot/into memory. Once GRUB determines which operating system or kernel to start, it loads it into memory and transfers control of the machine to that operating system.
Warning
E.2.2. GRUB and the Boot Process on UEFI-based x86 Systems
- The UEFI-based platform reads the partition table on the system storage and mounts the EFI System Partition (ESP), a VFAT partition labeled with a particular globally unique identifier (GUID). The ESP contains EFI applications such as bootloaders and utility software, stored in directories specific to software vendors. Viewed from within the Red Hat Enterprise Linux 6.9 file system, the ESP is
/boot/efi/, and EFI software provided by Red Hat is stored in/boot/efi/EFI/redhat/. - The
/boot/efi/EFI/redhat/directory contains grub.efi, a version of GRUB compiled for the EFI firmware architecture as an EFI application. In the simplest case, the EFI boot manager selectsgrub.efias the default bootloader and reads it into memory.If the ESP contains other EFI applications, the EFI boot manager might prompt you to select an application to run, rather than load grub.efi automatically. - GRUB determines which operating system or kernel to start, loads it into memory, and transfers control of the machine to that operating system.
E.2.3. Features of GRUB
- GRUB provides a true command-based, pre-OS environment on x86 machines. This feature affords the user maximum flexibility in loading operating systems with specified options or gathering information about the system. For years, many non-x86 architectures have employed pre-OS environments that allow system booting from a command line.
- GRUB supports Logical Block Addressing (LBA) mode. LBA places the addressing conversion used to find files in the hard drive's firmware, and is used on many IDE and all SCSI hard devices. Before LBA, boot loaders could encounter the 1024-cylinder BIOS limitation, where the BIOS could not find a file after the 1024 cylinder head of the disk. LBA support allows GRUB to boot operating systems from partitions beyond the 1024-cylinder limit, so long as the system BIOS supports LBA mode. Most modern BIOS revisions support LBA mode.
- GRUB can read ext2 partitions. This functionality allows GRUB to access its configuration file,
/boot/grub/grub.conf, every time the system boots, eliminating the need for the user to write a new version of the first stage boot loader to the MBR when configuration changes are made. The only time a user needs to reinstall GRUB on the MBR is if the physical location of the/boot/partition is moved on the disk.
E.3. Installing GRUB
/boot/grub/grub.conf. You can use the grub-install script (part of the grub package) to install GRUB. For example:
grub-install disk
# grub-install diskgrub-install disk/dev/sda.
/boot/efi/EFI/redhat/grub.conf. An image of GRUB's first-stage boot loader is available on the EFI System Partitition in the directory EFI/redhat/ with the filename grubx64.efi, and you can use the efibootmgr command to install this image into your system's EFI System Partition. For example:
efibootmgr -c -d disk -p partition_number -l /EFI/redhat/grubx64.efi -L "grub_uefi"
# efibootmgr -c -d disk -p partition_number -l /EFI/redhat/grubx64.efi -L "grub_uefi"efibootmgr -c -d disk -p partition_number -l /EFI/redhat/grubx64.efi -L "grub_uefi"efibootmgr -c -d disk -p partition_number -l /EFI/redhat/grubx64.efi -L "grub_uefi"efibootmgr -c -d disk -p partition_number -l /EFI/redhat/grubx64.efi -L "grub_uefi"efibootmgr -c -d disk -p partition_number -l /EFI/redhat/grubx64.efi -L "grub_uefi"/dev/sda) and partition_number with the partition number of your EFI System Partition (the default value is 1, meaning the first partition on the disk).
Important
grub-install command manually every time after the package is updated.
grub-install(8) man page. For information about the EFI System Partition, see Section 9.18.1, “Advanced Boot Loader Configuration”. For information about the efibootmgr tool, see the efibootmgr(8) man page.
E.4. Troubleshooting GRUB
grub-install command manually every time after the package is updated. See Section E.3, “Installing GRUB” for details about the command.
Important
/boot directory must reside on a single, specific disk partition. The /boot directory cannot be striped across multiple disks, as in a level 0 RAID. To use a level 0 RAID on your system, place /boot on a separate partition outside the RAID.
/boot directory must reside on a single, specific disk partition, GRUB cannot boot the system if the disk holding that partition fails or is removed from the system. This is true even if the disk is mirrored in a level 1 RAID. The following Red Hat Knowledgebase article describes how to make the system bootable from another disk in the mirrored set: https://access.redhat.com/site/articles/7094
grub-install command to reinstall the boot loader, or by editing the /boot/grub/grub.conf or /boot/efi/EFI/redhat/grub.conf with a plain text editor. For information about the configuration file structure, see Section E.8, “GRUB Menu Configuration File”.
Note
grub.conf and menu.lst. The grub.conf configuration file is loaded first; therefore you should make your changes there. The second file, menu.lst, will only be loaded if grub.conf is not found.
E.5. GRUB Terminology
E.5.1. Device Names
(<type-of-device><bios-device-number>,<partition-number>)
hd for a hard disk or fd for a 3.5 diskette. A lesser used device type is also available called nd for a network disk. Instructions on configuring GRUB to boot over the network are available online at http://www.gnu.org/software/grub/manual/.
0 and a secondary IDE hard drive is numbered 1. This syntax is roughly equivalent to that used for devices by the kernel. For example, the a in hda for the kernel is analogous to the 0 in hd0 for GRUB, the b in hdb is analogous to the 1 in hd1, and so on.
0. However, BSD partitions are specified using letters, with a corresponding to 0, b corresponding to 1, and so on.
Note
0, not 1. Failing to make this distinction is one of the most common mistakes made by new users.
(hd0) and the second as (hd1). Likewise, GRUB refers to the first partition on the first drive as (hd0,0) and the third partition on the second hard drive as (hd1,2).
- It does not matter if system hard drives are IDE or SCSI, all hard drives begin with the letters
hd. The lettersfdare used to specify 3.5 diskettes. - To specify an entire device without respect to partitions, leave off the comma and the partition number. This is important when telling GRUB to configure the MBR for a particular disk. For example,
(hd0)specifies the MBR on the first device and(hd3)specifies the MBR on the fourth device. - If a system has multiple drive devices, it is very important to know how the drive boot order is set in the BIOS. This is a simple task if a system has only IDE or SCSI drives, but if there is a mix of devices, it becomes critical that the type of drive with the boot partition be accessed first.
E.5.2. File Names and Blocklists
(<device-type><device-number>,<partition-number>)</path/to/file>
hd, fd, or nd. Replace <device-number> with the integer for the device. Replace </path/to/file> with an absolute path relative to the top-level of the device.
0+50,100+25,200+1
0+50,100+25,200+1(hd0,0)+1
(hd0,0)+1chainloader command with a similar blocklist designation at the GRUB command line after setting the correct device and partition as root:
chainloader +1
chainloader +1E.5.3. The Root File System and GRUB
(hd0,0)/grub/splash.xpm.gz is located within the /grub/ directory at the top-level (or root) of the (hd0,0) partition (which is actually the /boot/ partition for the system).
kernel command is executed with the location of the kernel file as an option. Once the Linux kernel boots, it sets up the root file system that Linux users are familiar with. The original GRUB root file system and its mounts are forgotten; they only existed to boot the kernel file.
E.6. GRUB Interfaces
Note
- Menu Interface
- This is the default interface shown when GRUB is configured by the installation program. A menu of operating systems or preconfigured kernels are displayed as a list, ordered by name. Use the arrow keys to select an operating system or kernel version and press the Enter key to boot it. If you do nothing on this screen, then after the time out period expires GRUB will load the default option.Press the e key to enter the entry editor interface or the c key to load a command line interface.Refer to Section E.8, “GRUB Menu Configuration File” for more information on configuring this interface.
- Menu Entry Editor Interface
- To access the menu entry editor, press the e key from the boot loader menu. The GRUB commands for that entry are displayed here, and users may alter these command lines before booting the operating system by adding a command line (o inserts a new line after the current line and O inserts a new line before it), editing one (e), or deleting one (d).After all changes are made, the b key executes the commands and boots the operating system. The Esc key discards any changes and reloads the standard menu interface. The c key loads the command line interface.
Note
For information about changing runlevels using the GRUB menu entry editor, refer to Section E.9, “Changing Runlevels at Boot Time”. - Command Line Interface
- The command line interface is the most basic GRUB interface, but it is also the one that grants the most control. The command line makes it possible to type any relevant GRUB commands followed by the Enter key to execute them. This interface features some advanced shell-like features, including Tab key completion based on context, and Ctrl key combinations when typing commands, such as Ctrl+a to move to the beginning of a line and Ctrl+e to move to the end of a line. In addition, the arrow, Home, End, and Delete keys work as they do in the
bashshell.Refer to Section E.7, “GRUB Commands” for a list of common commands.
E.6.1. Interfaces Load Order
E.7. GRUB Commands
boot— Boots the operating system or chain loader that was last loaded.chainloader </path/to/file>— Loads the specified file as a chain loader. If the file is located on the first sector of the specified partition, use the blocklist notation,+1, instead of the file name.The following is an examplechainloadercommand:chainloader +1
chainloader +1Copy to Clipboard Copied! Toggle word wrap Toggle overflow displaymem— Displays the current use of memory, based on information from the BIOS. This is useful to determine how much RAM a system has prior to booting it.initrd </path/to/initrd>— Enables users to specify an initial RAM disk to use when booting. Aninitrdis necessary when the kernel needs certain modules in order to boot properly, such as when the root partition is formatted with the ext3 or ext4 file system.The following is an exampleinitrdcommand:initrd /initrd-2.6.8-1.523.img
initrd /initrd-2.6.8-1.523.imgCopy to Clipboard Copied! Toggle word wrap Toggle overflow install <stage-1> <install-disk> <stage-2>— Installs GRUB to the system MBR.pconfig-file<stage-1>— Signifies a device, partition, and file where the first boot loader image can be found, such as(hd0,0)/grub/stage1.<install-disk>— Specifies the disk where the stage 1 boot loader should be installed, such as(hd0).<stage-2>— Passes the stage 2 boot loader location to the stage 1 boot loader, such as(hd0,0)/grub/stage2.p<config-file>— This option tells theinstallcommand to look for the menu configuration file specified by<config-file>, such as(hd0,0)/grub/grub.conf.
Warning
Theinstallcommand overwrites any information already located on the MBR.kernel </path/to/kernel> <option-1> <option-N>... — Specifies the kernel file to load when booting the operating system. Replace </path/to/kernel> with an absolute path from the partition specified by the root command. Replace <option-1> with options for the Linux kernel, such asroot=/dev/VolGroup00/LogVol00to specify the device on which the root partition for the system is located. Multiple options can be passed to the kernel in a space separated list.The following is an examplekernelcommand:kernel /vmlinuz-2.6.8-1.523 ro root=/dev/VolGroup00/LogVol00
kernel /vmlinuz-2.6.8-1.523 ro root=/dev/VolGroup00/LogVol00Copy to Clipboard Copied! Toggle word wrap Toggle overflow The option in the previous example specifies that the root file system for Linux is located on thehda5partition.root (<device-type><device-number>,<partition>)— Configures the root partition for GRUB, such as(hd0,0), and mounts the partition.The following is an examplerootcommand:root (hd0,0)
root (hd0,0)Copy to Clipboard Copied! Toggle word wrap Toggle overflow rootnoverify (<device-type><device-number>,<partition>)— Configures the root partition for GRUB, just like therootcommand, but does not mount the partition.
help --all for a full list of commands. For a description of all GRUB commands, refer to the documentation available online at http://www.gnu.org/software/grub/manual/.
E.8. GRUB Menu Configuration File
/boot/grub/grub.conf on BIOS systems and /boot/efi/EFI/redhat/grub.conf on UEFI systems), which is used to create the list of operating systems to boot in GRUB's menu interface, essentially allows the user to select a pre-set group of commands to execute. The commands given in Section E.7, “GRUB Commands” can be used, as well as some special commands that are only available in the configuration file.
E.8.1. Configuration File Structure
Note
title line in the GRUB configuration file. For the Windows section to be set as the default in the previous example, change the default=0 to default=1.
E.8.2. Configuration File Directives
chainloader </path/to/file>— Loads the specified file as a chain loader. Replace </path/to/file> with the absolute path to the chain loader. If the file is located on the first sector of the specified partition, use the blocklist notation,+1.color <normal-color> <selected-color>— Allows specific colors to be used in the menu, where two colors are configured as the foreground and background. Use simple color names such asred/black. For example:color red/black green/blue
color red/black green/blueCopy to Clipboard Copied! Toggle word wrap Toggle overflow default=<integer>— Replace <integer> with the default entry title number to be loaded if the menu interface times out.fallback=<integer>— Replace <integer> with the entry title number to try if the first attempt fails.hiddenmenu— Prevents the GRUB menu interface from being displayed, loading thedefaultentry when thetimeoutperiod expires. The user can see the standard GRUB menu by pressing the Esc key.initrd </path/to/initrd>— Enables users to specify an initial RAM disk to use when booting. Replace </path/to/initrd> with the absolute path to the initial RAM disk.kernel </path/to/kernel> <option-1> <option-N>— Specifies the kernel file to load when booting the operating system. Replace </path/to/kernel> with an absolute path from the partition specified by the root directive. Multiple options can be passed to the kernel when it is loaded.These options include:rhgb(Red Hat graphical boot) — displays an animation during the boot process, rather than lines of text.quiet— suppresses all but the most important messages in the part of the boot sequence before the Red Hat graphical boot animation begins.
password=<password>— Prevents a user who does not know the password from editing the entries for this menu option.Optionally, it is possible to specify an alternate menu configuration file after thepassword=<password>directive. In this case, GRUB restarts the second stage boot loader and uses the specified alternate configuration file to build the menu. If an alternate menu configuration file is left out of the command, a user who knows the password is allowed to edit the current configuration file.Important
It is highly recommended to set up a boot loader password on every machine. An unprotected boot loader can allow a potential attacker to modify the system's boot options and gain access to the system. See the chapter titled Workstation Security in the Red Hat Enterprise Linux Security Guide for more information on boot loader passwords and password security in general.map— Swaps the numbers assigned to two hard drives. For example:map (hd0) (hd3) map (hd3) (hd0)
map (hd0) (hd3) map (hd3) (hd0)Copy to Clipboard Copied! Toggle word wrap Toggle overflow assigns the number0to the fourth hard drive, and the number3to the first hard drive. This option is especially useful if you configure your system with an option to boot a Windows operating system, because the Windows boot loader must find the Windows installation on the first hard drive.For example, if your Windows installation is on the fourth hard drive, the following entry ingrub.confwill allow the Windows boot loader to load Windows correctly:title Windows map (hd0) (hd3) map (hd3) (hd0) rootnoverify (hd3,0) chainloader +1
title Windows map (hd0) (hd3) map (hd3) (hd0) rootnoverify (hd3,0) chainloader +1Copy to Clipboard Copied! Toggle word wrap Toggle overflow root (<device-type><device-number>,<partition>)— Configures the root partition for GRUB, such as(hd0,0), and mounts the partition. To specify the boot drive selected by the EFI boot manager, the syntax is <device-type>,<partition>, such as(bd,1).rootnoverify (<device-type><device-number>,<partition>)— Configures the root partition for GRUB, just like therootcommand, but does not mount the partition.timeout=<integer>— Specifies the interval, in seconds, that GRUB waits before loading the entry designated in thedefaultcommand.splashimage=<path-to-image>— Specifies the location of the splash screen image to be used when GRUB boots.title group-title— Specifies a title to be used with a particular group of commands used to load a kernel or operating system.device grub-device-name uefi-device-name— Assigns a GRUB device name to refer to a specific UEFI device. The argument grub-device-name should be replaced with a GRUB device name, for example(hd0). The argument uefi-device-name should be replaced with a UEFI device name in the form of eitherHD(number, start, size, signature), orCD(index, start, size), where number is the partition number, starting at 1, index is the index of the CD's El Torito boot entry, start and size are the start position and size of the partition respectively, in sectors, in hexadecimal format, and signature is the partition's unique GUID.
#).
E.9. Changing Runlevels at Boot Time
- When the GRUB menu bypass screen appears at boot time, press any key to enter the GRUB menu (within the first three seconds).
- Press the a key to append to the
kernelcommand. - Add
<space><runlevel>at the end of the boot options line to boot to the desired runlevel. For example, the following entry would initiate a boot process into runlevel 3:grub append> ro root=/dev/VolGroup00/LogVol00 rhgb quiet 3
grub append> ro root=/dev/VolGroup00/LogVol00 rhgb quiet 3Copy to Clipboard Copied! Toggle word wrap Toggle overflow
E.10. Additional Resources
E.10.1. Installed Documentation
/usr/share/doc/grub-<version-number>/— This directory contains good information about using and configuring GRUB, where <version-number> corresponds to the version of the GRUB package installed.info grub— The GRUB info page contains a tutorial, a user reference manual, a programmer reference manual, and a FAQ document about GRUB and its usage.
E.10.2. Useful Websites
- http://www.gnu.org/software/grub/ — The home page of the GNU GRUB project. This site contains information concerning the state of GRUB development and an FAQ.
- https://access.redhat.com/site/solutions/6863 — Details booting operating systems other than Linux.
Appendix F. Boot Process, Init, and Shutdown
F.1. The Boot Process
- The system loads and runs a boot loader. The specifics of this process depend on the system architecture. For example:
- BIOS-based x86 systems run a first-stage boot loader from the MBR of the primary hard disk that, in turn, loads an additional boot loader, GRUB.
- UEFI-based x86 systems mount an EFI System Partition that contains a version of the GRUB boot loader. The EFI boot manager loads and runs GRUB as an EFI application.
- Power Systems servers mount a PPC PReP partition that contains the Yaboot boot loader. The System Management Services (SMS) boot manager loads and runs yaboot.
- IBM System z runs the z/IPL boot loader from a DASD or FCP-connected device that you specify when you IPL the partition that contains Red Hat Enterprise Linux.
- The boot loader loads the kernel into memory, which in turn loads any necessary modules and mounts the root partition read-only.
- The kernel transfers control of the boot process to the
/sbin/initprogram. - The
/sbin/initprogram loads all services and user-space tools, and mounts all partitions listed in/etc/fstab. - The user is presented with a login screen for the freshly booted Linux system.
F.2. A Detailed Look at the Boot Process
F.2.1. The Firmware Interface
F.2.1.1. BIOS-based x86 Systems
F.2.1.2. UEFI-based x86 Systems
F.2.2. The Boot Loader
F.2.2.1. The GRUB boot loader for x86 systems
/boot/grub/grub.conf (for BIOS) or /boot/efi/EFI/redhat/grub.conf (for UEFI) — at boot time. Refer to Section E.8, “GRUB Menu Configuration File” for information on how to edit this file.
Important
/boot/ directory. The kernel binary is named using the following format — /boot/vmlinuz-<kernel-version> file (where <kernel-version> corresponds to the kernel version specified in the boot loader's settings).
initramfs is used by the kernel to load drivers and modules necessary to boot the system. This is particularly important if SCSI hard drives are present or if the systems use the ext3 or ext4 file system.
initramfs image(s) are loaded into memory, the boot loader hands control of the boot process to the kernel.
F.2.2.2. Boot Loaders for Other Architectures
init command, the same sequence of events occurs on every architecture. So the main difference between each architecture's boot process is in the application used to find and load the kernel.
F.2.3. The Kernel
initramfs image(s) in a predetermined location in memory, decompresses it directly to /sysroot/, and loads all necessary drivers. Next, it initializes virtual devices related to the file system, such as LVM or software RAID, before completing the initramfs processes and freeing up all the memory the disk image once occupied.
/sbin/init program.
F.2.4. The /sbin/init Program
/sbin/init program (also called init) coordinates the rest of the boot process and configures the environment for the user.
init command starts, it becomes the parent or grandparent of all of the processes that start up automatically on the system. First, it runs the /etc/rc.d/rc.sysinit script, which sets the environment path, starts swap, checks the file systems, and executes all other steps required for system initialization. For example, most systems use a clock, so rc.sysinit reads the /etc/sysconfig/clock configuration file to initialize the hardware clock. Another example is if there are special serial port processes which must be initialized, rc.sysinit executes the /etc/rc.serial file.
init command then processes the jobs in the /etc/event.d directory, which describe how the system should be set up in each SysV init runlevel. Runlevels are a state, or mode, defined by the services listed in the SysV /etc/rc.d/rc<x>.d/ directory, where <x> is the number of the runlevel. For more information on SysV init runlevels, refer to Section F.4, “SysV Init Runlevels”.
init command sets the source function library, /etc/rc.d/init.d/functions, for the system, which configures how to start, kill, and determine the PID of a program.
init program starts all of the background processes by looking in the appropriate rc directory for the runlevel specified as the default in /etc/inittab. The rc directories are numbered to correspond to the runlevel they represent. For instance, /etc/rc.d/rc5.d/ is the directory for runlevel 5.
init program looks in the /etc/rc.d/rc5.d/ directory to determine which processes to start and stop.
/etc/rc.d/rc5.d/ directory:
/etc/rc.d/rc5.d/ directory. Rather, all of the files in /etc/rc.d/rc5.d/ are symbolic links pointing to scripts located in the /etc/rc.d/init.d/ directory. Symbolic links are used in each of the rc directories so that the runlevels can be reconfigured by creating, modifying, and deleting the symbolic links without affecting the actual scripts they reference.
K or an S. The K links are processes that are killed on that runlevel, while those beginning with an S are started.
init command first stops all of the K symbolic links in the directory by issuing the /etc/rc.d/init.d/<command> stop command, where <command> is the process to be killed. It then starts all of the S symbolic links by issuing /etc/rc.d/init.d/<command> start.
Note
/etc/rc.d/init.d/httpd stop stops the Apache HTTP Server.
Note
init program executes is the /etc/rc.d/rc.local file. This file is useful for system customization. Refer to Section F.3, “Running Additional Programs at Boot Time” for more information about using the rc.local file.
init command has progressed through the appropriate rc directory for the runlevel, Upstart forks an /sbin/mingetty process for each virtual console (login prompt) allocated to the runlevel by the job definition in the /etc/event.d directory. Runlevels 2 through 5 have all six virtual consoles, while runlevel 1 (single user mode) has one, and runlevels 0 and 6 have none. The /sbin/mingetty process opens communication pathways to tty devices[18], sets their modes, prints the login prompt, accepts the user's username and password, and initiates the login process.
/etc/X11/prefdm. The prefdm script executes the preferred X display manager[19] — gdm, kdm, or xdm, depending on the contents of the /etc/sysconfig/desktop file.
F.2.5. Job Definitions
/etc/inittab script to start system processes defined for each runlevel. The default configuration now uses an event-driven init daemon provided by the upstart package. Whenever particular events occur, the init daemon processes jobs stored in the /etc/event.d directory. The init daemon recognizes the start of the system as such an event.
/etc/events.d/tty2 job is a service to maintain a virtual terminal on tty2 from the time that the system starts until the system shuts down, or another event (such as a change in runlevel) stops the job. The job is constructed so that init will restart the virtual terminal if it stops unexpectedly during that time:
F.3. Running Additional Programs at Boot Time
/etc/rc.d/rc.local script is executed by the init command at boot time or when changing runlevels. Adding commands to the bottom of this script is an easy way to perform necessary tasks like starting special services or initialize devices without writing complex initialization scripts in the /etc/rc.d/init.d/ directory and creating symbolic links.
/etc/rc.serial script is used if serial ports must be setup at boot time. This script runs setserial commands to configure the system's serial ports. Refer to the setserial man page for more information.
F.4. SysV Init Runlevels
init launches or halts when initializing a runlevel. SysV init was chosen because it is easier to use and more flexible than the traditional BSD-style init process.
/etc/rc.d/ directory. Within this directory, are the rc, rc.local, rc.sysinit, and, optionally, the rc.serial scripts as well as the following directories:
init.d/ rc0.d/ rc1.d/ rc2.d/ rc3.d/ rc4.d/ rc5.d/ rc6.d/
init.d/ rc0.d/ rc1.d/ rc2.d/ rc3.d/ rc4.d/ rc5.d/ rc6.d/init.d/ directory contains the scripts used by the /sbin/init command when controlling services. Each of the numbered directories represent the six runlevels configured by default under Red Hat Enterprise Linux.
F.4.1. Runlevels
init. For instance, runlevel 1 (single user mode) halts any network services, while runlevel 3 starts these services. By assigning specific services to be halted or started on a given runlevel, init can quickly change the mode of the machine without the user manually stopping and starting services.
0— Halt1— Single-user text mode2— Not used (user-definable)3— Full multi-user text mode4— Not used (user-definable)5— Full multi-user graphical mode (with an X-based login screen)6— Reboot
/etc/inittab. To find out the default runlevel for a system, look for the line similar to the following near the bottom of /etc/inittab:
id:5:initdefault:
id:5:initdefault:/etc/inittab as root.
Warning
/etc/inittab. Simple typos can cause the system to become unbootable. If this happens, either use a boot CD or DVD, enter single-user mode, or enter rescue mode to boot the computer and repair the file.
F.4.2. Runlevel Utilities
/etc/rc.d/.
/sbin/chkconfig— The/sbin/chkconfigutility is a simple command line tool for maintaining the/etc/rc.d/init.d/directory hierarchy.- /usr/sbin/ntsysv — The ncurses-based /sbin/ntsysv utility provides an interactive text-based interface, which some find easier to use than
chkconfig. - Services Configuration Tool — The graphical Services Configuration Tool (
system-config-services) program is a flexible utility for configuring runlevels.
F.5. Shutting Down
/sbin/shutdown command. The shutdown man page has a complete list of options, but the two most common uses are:
/sbin/shutdown -h now
/sbin/shutdown -h now/sbin/shutdown -r now
/sbin/shutdown -r now-h option halts the machine, and the -r option reboots.
reboot and halt commands to shut down the system while in runlevels 1 through 5. For more information about PAM console users, refer to the Red Hat Enterprise Linux Deployment Guide.
Appendix G. Alternatives to busybox commands
PATH environment variable is set in the installation environment.
| Busybox command | %pre | %post | New command or alternative |
|---|---|---|---|
addgroup | no | yes | /usr/sbin/groupadd |
adduser | no | yes | /usr/sbin/useradd |
adjtimex | no | no | none |
ar | no | yes | /usr/bin/ar |
arping | yes | yes | /sbin/arping or /usr/sbin/arping |
ash | yes | yes | /bin/bash |
awk | yes | yes | /sbin/awk, /sbin/gawk, or /usr/bin/gawk [a] |
basename | yes | yes | /bin/bash [b], /usr/bin/basename |
bbconfig | no | no | none — this command is a specific to Busybox |
bunzip2 | yes | yes | /usr/bin/bunzip2, /usr/bin/bzip2 -d |
busybox | no | no | none |
bzcat | yes | yes | /usr/bin/bzcat, /usr/bin/bzip2 -dc |
cal | no | yes | /usr/bin/cal |
cat | yes | yes | /usr/bin/cat |
catv | no | no | cat -vET or cat -A |
chattr | yes | yes | /usr/bin/chattr |
chgrp | yes | yes | /usr/bin/chgrp |
chmod | yes | yes | /usr/bin/chmod |
chown | yes | yes | /usr/bin/chown |
chroot | yes | yes | /usr/sbin/chroot |
chvt | yes | yes | /usr/bin/chvt |
cksum | no | yes | /usr/bin/cksum |
clear | yes | yes | /usr/bin/clear |
cmp | no | yes | /usr/bin/cmp |
comm | no | yes | /usr/bin/comm |
cp | yes | yes | /usr/bin/cp |
cpio | yes | yes | /usr/bin/cpio |
crond | no | no | none — no daemons available to scriptlets |
crontab | no | yes | /usr/bin/crontab |
cut | yes | yes | /usr/bin/cut |
date | yes | yes | /usr/bin/date |
dc | no | yes | /usr/bin/dc |
dd | yes | yes | /usr/bin/dd |
deallocvt | no | yes | /usr/bin/deallocvt |
delgroup | no | yes | /usr/sbin/groupdel |
deluser | no | yes | /usr/sbin/userdel |
devfsd | no | no | none — Red Hat Enterprise Linux does not use devfs |
df | yes | yes | /usr/bin/df |
diff | no | yes | /usr/bin/diff |
dirname | yes | yes | /bin/bash [c], /usr/bin/dirname |
dmesg | yes | yes | /usr/bin/dmesg |
dnsd | no | no | none — no daemons available to scriptlets |
dos2unix | no | no | sed 's/.$//' |
dpkg | no | no | none — no support for Debian packages |
dpkg-deb | no | no | none — no support for Debian packages |
du | yes | yes | /usr/bin/du |
dumpkmap | no | no | none |
dumpleases | no | no | none |
e2fsck | yes | yes | /usr/sbin/e2fsck |
e2label | yes | yes | /usr/sbin/e2label |
echo | yes | yes | /usr/bin/echo |
ed | no | no | /sbin/sed, /usr/bin/sed |
egrep | yes | yes | /sbin/egrep, /usr/bin/egrep |
eject | yes | yes | /usr/bin/eject |
env | yes | yes | /usr/bin/env |
ether-wake | no | no | none |
expr | yes | yes | /usr/bin/expr |
fakeidentd | no | no | none — no daemons available to scriptlets |
false | yes | yes | /usr/bin/false |
fbset | no | yes | /usr/sbin/fbset |
fdflush | no | no | none |
fdformat | no | yes | /usr/bin/fdformat |
fdisk | yes | yes | /usr/sbin/fdisk |
fgrep | yes | yes | /sbin/fgrep, /usr/bin/fgrep |
find | yes | yes | /usr/bin/find |
findfs | no | no | none |
fold | no | yes | /usr/bin/fold |
free | no | yes | /usr/bin/free |
freeramdisk | no | no | none |
fsck | yes | yes | /usr/sbin/fsck |
fsck.ext2 | yes | yes | /usr/sbin/fsck.ext2, /usr/sbin/e2fsck |
fsck.ext3 | yes | yes | /usr/sbin/fsck.ext3, /usr/sbin/e2fsck |
fsck.minix | no | no | none — no support for the Minix file system |
ftpget | yes | yes | /usr/bin/ftp or Python ftplib module |
ftpput | yes | yes | /usr/bin/ftp or Python ftplib module |
fuser | no | yes | /sbin/fuser |
getopt | no | yes | /usr/bin/getopt |
getty | no | no | none |
grep | yes | yes | /sbin/grep, /usr/bin/grep |
gunzip | yes | yes | /usr/bin/gunzip, /usr/bin/gzip -d |
gzip | yes | yes | /usr/bin/gzip |
hdparm | yes | yes | /usr/sbin/hdparm |
head | yes | yes | /usr/bin/head |
hexdump | no | yes | /usr/bin/hexdump |
hostid | no | yes | /usr/bin/hostid or Python |
hostname | yes | yes | /sbin/hostname, /usr/bin/hostname |
httpd | no | no | none — no daemons available to scriptlets |
hush | no | no | none |
hwclock | yes | yes | /usr/sbin/hwclock |
id | no | yes | /usr/bin/id or Python |
ifconfig | yes | yes | /sbin/ifconfig, /usr/sbin/ifconfig |
ifdown | no | no | ifconfig device down |
ifup | no | no | ifconfig device up |
inetd | no | no | none — no daemons available to scriptlets |
insmod | yes | yes | /sbin/insmod, /usr/sbin/insmod |
install | no | yes | /usr/bin/install or mkdir/cp/chmod/chown/chgrp |
ip | yes | yes | /sbin/ip, /usr/sbin/ip |
ipaddr | no | no | ifconfig or ip |
ipcalc | yes | yes | /sbin/ipcalc, /usr/bin/ipcalc |
ipcrm | no | yes | /usr/bin/ipcrm |
ipcs | no | yes | /usr/bin/ipcs |
iplink | no | no | ip |
iproute | no | no | ip |
iptunnel | no | yes | /sbin/iptunnel |
kill | yes | yes | /sbin/kill, /usr/bin/kill |
killall | yes | yes | /usr/bin/killall |
lash | no | no | none |
last | no | yes | /usr/bin/last |
length | no | no | Python or bash |
less | yes | yes | /usr/bin/less |
linux32 | no | no | none |
linux64 | no | no | none |
ln | yes | yes | /sbin/ln, /usr/bin/ln |
load_policy | yes | yes | /sbin/load_policy, /usr/sbin/load_policy |
loadfont | no | no | none |
loadkmap | no | no | none |
login | yes | yes | /usr/bin/login |
logname | no | yes | /usr/bin/logname |
losetup | yes | yes | /usr/bin/losetup |
ls | yes | yes | /usr/bin/ls |
lsattr | yes | yes | /usr/bin/lsattr |
lsmod | yes | yes | /usr/bin/lsmod |
lzmacat | no | yes | /usr/bin/lzmadec |
makedevs | no | no | /usr/bin/mknod |
md5sum | yes | yes | /usr/bin/md5sum |
mdev | no | no | none |
mesg | no | yes | /usr/bin/mesg |
mkdir | yes | yes | /sbin/mkdir, /usr/bin/mkdir |
mke2fs | yes | yes | /usr/sbin/mke2fs |
mkfifo | no | yes | /usr/bin/mkfifo |
mkfs.ext2 | yes | yes | /usr/sbin/mkfs.ext2 |
mkfs.ext3 | yes | yes | /usr/sbin/mkfs.ext3 |
mkfs.minix | no | no | none — no support for Minix filesystem |
mknod | yes | yes | /usr/bin/mknod |
mkswap | yes | yes | /usr/sbin/mkswap |
mktemp | yes | yes | /usr/bin/mktemp |
modprobe | yes | yes | /sbin/modprobe, /usr/sbin/modprobe |
more | yes | yes | /usr/bin/more |
mount | yes | yes | /sbin/mount, /usr/bin/mount |
mountpoint | no | no | Look at the output of the mount command |
msh | no | no | none |
mt | yes | yes | /usr/bin/mt |
mv | yes | yes | /usr/bin/mv |
nameif | no | no | none |
nc | no | yes | /usr/bin/nc |
netstat | no | yes | /bin/netstat |
nice | no | yes | /bin/nice |
nohup | no | yes | /usr/bin/nohup |
nslookup | yes | yes | /usr/bin/nslookup |
od | no | yes | /usr/bin/od |
openvt | yes | yes | /usr/bin/openvt |
passwd | no | yes | /usr/bin/passwd |
patch | no | yes | /usr/bin/patch |
pidof | yes | yes | /usr/sbin/pidof |
ping | yes | yes | /usr/bin/ping |
ping6 | no | yes | /bin/ping6 |
pipe_progress | no | no | none |
pivot_root | no | yes | /sbin/pivot_root |
printenv | no | yes | /usr/bin/printenv |
printf | no | yes | /usr/bin/printf |
ps | yes | yes | /usr/bin/ps |
pwd | yes | yes | /usr/bin/pwd |
rdate | no | yes | /usr/bin/rdate |
readlink | yes | yes | /sbin/readlink, /usr/bin/readlink |
readprofile | no | yes | /usr/sbin/readprofile |
realpath | no | no | Python os.path.realpath() |
renice | no | yes | /usr/bin/renice |
reset | no | yes | /usr/bin/reset |
rm | yes | yes | /sbin/rm, /usr/bin/rm |
rmdir | yes | yes | /sbin/rmdir, /usr/bin/rmdir |
rmmod | yes | yes | /sbin/rmmod, /usr/bin/rmmod |
route | yes | yes | /sbin/route, /usr/sbin/route |
rpm | yes | yes | /usr/bin/rpm |
rpm2cpio | no | yes | /usr/bin/rpm2cpio |
run-parts | no | no | none |
runlevel | no | no | none |
rx | no | no | none |
sed | yes | yes | /sbin/sed, /usr/bin/sed |
seq | no | yes | /usr/bin/seq |
setarch | no | yes | /usr/bin/setarch |
setconsole | no | no | none |
setkeycodes | no | yes | /usr/bin/setkeycodes |
setlogcons | no | no | none |
setsid | no | yes | /usr/bin/setsid |
sh | yes | yes | /sbin/sh, /usr/bin/sh |
sha1sum | yes | yes | /usr/bin/sha1sum |
sleep | yes | yes | /sbin/sleep, /usr/bin/sleep |
sort | yes | yes | /usr/bin/sort |
start-stop-daemon | no | no | none |
stat | no | yes | /usr/bin/stat or Python os.stat() |
strings | no | yes | /usr/bin/strings |
stty | no | yes | /bin/stty |
su | no | yes | /bin/su |
sulogin | no | yes | /sbin/sulogin |
sum | no | yes | /usr/bin/sum |
swapoff | yes | yes | /usr/sbin/swapoff |
swapon | yes | yes | /usr/sbin/swapon |
switch_root | no | yes | /sbin/switch_root |
sync | yes | yes | /usr/bin/sync |
sysctl | no | yes | /sbin/sysctl |
tail | yes | yes | /usr/bin/tail |
tar | yes | yes | /usr/bin/tar |
tee | yes | yes | /usr/bin/tee |
telnet | yes | yes | /usr/bin/telnet |
telnetd | no | no | none — no daemons available to scriptlets |
test | no | yes | /usr/bin/test or [ in bash |
tftp | no | yes | /usr/bin/tftp |
time | no | yes | /usr/bin/time or Python |
top | yes | yes | /usr/bin/top |
touch | yes | yes | /sbin/touch, /usr/bin/touch |
tr | no | yes | /usr/bin/tr or Python |
traceroute | no | yes | /bin/traceroute |
true | yes | yes | /usr/bin/true |
tty | no | yes | /usr/bin/tty |
tune2fs | yes | yes | /usr/sbin/tune2fs |
udhcpc | no | no | /sbin/dhclient |
udhcpd | no | no | none — no daemons available to scriptlets |
umount | yes | yes | /sbin/umount, /usr/bin/umount |
uname | no | yes | /bin/uname or Python os.uname() |
uncompress | no | no | none |
uniq | yes | yes | /usr/bin/uniq |
unix2dos | no | no | sed 's/$//' |
unlzma | no | yes | /usr/bin/unlzma |
unzip | no | yes | /usr/bin/unzip |
uptime | no | yes | /usr/bin/uptime or Python reading /proc/uptime |
usleep | no | yes | /bin/usleep or Python |
uudecode | no | yes | /usr/bin/uudecode or Python |
uuencode | no | yes | /usr/bin/uuencode or Python |
vconfig | yes | yes | /usr/sbin/vconfig |
vi | yes | yes | /usr/bin/vi |
vlock | no | no | none |
watch | no | yes | /usr/bin/watch |
watchdog | no | no | none |
wc | yes | yes | /usr/bin/wc |
wget | yes | yes | /sbin/wget, /usr/bin/wget |
which | no | yes | /usr/bin/which |
who | no | yes | /usr/bin/who |
whoami | no | yes | /usr/bin/whoami |
xargs | yes | yes | /usr/bin/xargs |
yes | no | yes | /usr/bin/yes |
zcat | yes | yes | /usr/bin/zcat |
zcip | no | no | NetworkManager should take care of this |
[a]
Red Hat Enterprise Linux 6 ships with GNU awk rather than the busybox awk in the installation environment.
[b]
GNU bash can provide basename functionality using string manipulation. If var="/usr/bin/command", then echo ${var##*/} gives command.
[c]
GNU bash can provide dirname functionality using string manipulation. If var="/usr/bin/command", then echo ${var%/*} gives /usr/bin.
| |||
Appendix H. Other Technical Documentation
anaconda and Red Hat Enterprise Linux systems use a common set of software components. For detailed information on key technologies, refer to the Web sites listed below:
- Boot Loader
- Red Hat Enterprise Linux uses the
GRUBboot loader. Refer to http://www.gnu.org/software/grub/ for more information. - Disk Partitioning
- Red Hat Enterprise Linux uses
partedto partition disks. Refer to http://www.gnu.org/software/parted/ for more information. - Storage Management
- Logical Volume Management (LVM) provides administrators with a range of facilities to manage storage. By default, the Red Hat Enterprise Linux installation process formats drives as LVM volumes. Refer to http://www.tldp.org/HOWTO/LVM-HOWTO/ for more information.
- Audio Support
- The Linux kernel used by Red Hat Enterprise Linux incorporates PulseAudio audio server. For more information about PulseAudio, refer to the project documentation: http://www.freedesktop.org/wiki/Software/PulseAudio/Documentation/User/.
- Graphics System
- Both the installation system and Red Hat Enterprise Linux use the
Xorgsuite to provide graphical capabilities. Components ofXorgmanage the display, keyboard and mouse for the desktop environments that users interact with. Refer to http://www.x.org/ for more information. - Remote Displays
- Red Hat Enterprise Linux and
anacondainclude VNC (Virtual Network Computing) software to enable remote access to graphical displays. For more information about VNC, refer to the documentation on the RealVNC Web site: http://www.realvnc.com/support/documentation.html. - Command-line Interface
- By default, Red Hat Enterprise Linux uses the GNU
bashshell to provide a command-line interface. The GNU Core Utilities complete the command-line environment. Refer to http://www.gnu.org/software/bash/bash.html for more information onbash. To learn more about the GNU Core Utilities, refer to http://www.gnu.org/software/coreutils/. - Remote System Access
- Red Hat Enterprise Linux incorporates the OpenSSH suite to provide remote access to the system. The SSH service enables a number of functions, which include access to the command-line from other systems, remote command execution, and network file transfers. During the installation process
anacondamay use thescpfeature of OpenSSH to transfer crash reports to remote systems. Refer to the OpenSSH Web site for more information: http://www.openssh.com/. - Access Control
- SELinux provides Mandatory Access Control (MAC) capabilities that supplement the standard Linux security features. Refer to the SELinux Project Pages for more information: http://www.nsa.gov/research/selinux/index.shtml.
- Firewall
- The Linux kernel used by Red Hat Enterprise Linux incorporates the
netfilterframework to provide firewall features. The Netfilter project website provides documentation for bothnetfilter, and theiptablesadministration facilities: http://netfilter.org/documentation/index.html. - Software Installation
- Red Hat Enterprise Linux uses
yumto manage the RPM packages that make up the system. Refer to http://yum.baseurl.org/ for more information. - Virtualization
- Virtualization provides the capability to simultaneously run multiple operating systems on the same computer. Red Hat Enterprise Linux also includes tools to install and manage the secondary systems on a Red Hat Enterprise Linux host. You may select virtualization support during the installation process, or at any time thereafter. Refer to the Red Hat Enterprise Linux Virtualization documentation available from https://access.redhat.com/documentation/en/red-hat-enterprise-linux/ for more information.
Appendix I. Revision History
| Revision History | |||
|---|---|---|---|
| Revision 1.0-138 | Tue Mar 14 2017 | ||
| |||
| Revision 1.0-137 | Tue Mar 14 2017 | ||
| |||
| Revision 1.0-131 | Tue Mar 11 2016 | ||
| |||
| Revision 1.0-127 | Fri 10 Jul 2015 | ||
| |||
| Revision 1.0-112 | Wed Oct 08 2014 | ||
| |||
| Revision 1.0-102 | Thu Nov 07 2013 | ||
| |||
| Revision 1.0-96 | Tue Feb 19 2013 | ||
| |||
| Revision 1.0-95 | Sun Feb 17 2013 | ||
| |||
| Revision 1.0-41 | Thu May 19 2011 | ||
| |||
| Revision 1.0-0 | Wed Aug 25 2010 | ||
| |||
Index
Symbols
- /boot/ partition
- recommended partitioning, Recommended Partitioning Scheme, Recommended Partitioning Scheme
- /root/install.log
- install log file location, Installing Packages
- /var/ partition
- recommended partitioning, Recommended Partitioning Scheme, Recommended Partitioning Scheme
A
- adding partitions, Adding Partitions, Adding Partitions, Adding Partitions
- file system type, File System Types, File System Types, File System Types
- anacdump.txt, Troubleshooting Installation on an Intel or AMD System, Troubleshooting Installation on an IBM Power Systems server, Troubleshooting Installation on IBM System z
- Anaconda, Other Technical Documentation
- anaconda.log, Troubleshooting Installation on an Intel or AMD System, Troubleshooting Installation on an IBM Power Systems server, Troubleshooting Installation on IBM System z
- array (see RAID)
- automatic partitioning, Disk Partitioning Setup, Disk Partitioning Setup, Disk Partitioning Setup
B
- Basic Input/Output System (see BIOS)
- BIOS
- definition of, BIOS-based x86 Systems
- (see also boot process)
- BIOS (Basic Input/Output System), Booting the Installer
- boot loader, Updating the Boot Loader Configuration, x86, AMD64, and Intel 64 Boot Loader Configuration
- (see also GRUB)
- configuration, x86, AMD64, and Intel 64 Boot Loader Configuration
- GRUB, x86, AMD64, and Intel 64 Boot Loader Configuration
- installing on boot partition, Advanced Boot Loader Configuration
- MBR, Advanced Boot Loader Configuration
- password, x86, AMD64, and Intel 64 Boot Loader Configuration
- upgrading, Updating the Boot Loader Configuration
- boot loader password, x86, AMD64, and Intel 64 Boot Loader Configuration
- boot loaders, GRUB
- (see also GRUB)
- definition of, The GRUB Boot Loader
- types of
- boot options, Additional Boot Options
- from network, Additional Boot Options
- mediacheck, Additional Boot Options
- serial mode, Additional Boot Options
- UTF-8, Additional Boot Options
- text mode, Additional Boot Options
- boot process, Boot Process, Init, and Shutdown, A Detailed Look at the Boot Process
- (see also boot loaders)
- chain loading, GRUB and the Boot Process on BIOS-based x86 Systems, GRUB and the Boot Process on UEFI-based x86 Systems
- direct loading, GRUB and the Boot Process on BIOS-based x86 Systems, GRUB and the Boot Process on UEFI-based x86 Systems
- for x86, A Detailed Look at the Boot Process
- stages of, The Boot Process, A Detailed Look at the Boot Process
- /sbin/init command, The /sbin/init Program
- boot loader, The GRUB boot loader for x86 systems
- EFI shell, UEFI-based x86 Systems
- kernel, The Kernel
- booting
- emergency mode, Booting into Emergency Mode
- installation program
- x86, AMD64 and Intel 64, Booting the Installation Program on x86, AMD64, and Intel 64 Systems
- rescue mode, Booting into Rescue Mode
- single-user mode, Booting into Single-User Mode
- booting the installation program
- IBM System p , Booting the Installer
C
- canceling the installation, Installing from a DVD, Installing from a DVD
- CD/DVD media
- booting, Booting the Installation Program on x86, AMD64, and Intel 64 Systems, Booting the Installer
- making, Making Media
- (see also ISO images)
- Chain loading, The Storage Devices Selection Screen , Assign Storage Devices , Disk Partitioning Setup, Advanced Boot Loader Configuration, The Storage Devices Selection Screen , Assign Storage Devices , Disk Partitioning Setup
- chkconfig , Runlevel Utilities
- (see also services)
- clock, Time Zone Configuration, Time Zone Configuration, Time Zone Configuration
- CMS configuration files, Parameter and Configuration Files
- sample CMS configuration file, Sample Parameter File and CMS Configuration File
- configuration
- clock, Time Zone Configuration, Time Zone Configuration, Time Zone Configuration
- GRUB, x86, AMD64, and Intel 64 Boot Loader Configuration
- hardware, System Specifications List
- time, Time Zone Configuration, Time Zone Configuration, Time Zone Configuration
- time zone, Time Zone Configuration, Time Zone Configuration, Time Zone Configuration
- configuration files
- CMS configuration files, Parameter and Configuration Files
- the z/VM configuration file, The z/VM Configuration File
- consoles, virtual, A Note About Virtual Consoles, A Note About Linux Virtual Consoles
- content service, Choose Service
D
- DASD installation, Installing from a Hard Drive
- DHCP (Dynamic Host Configuration Protocol), Setting the Hostname, Setting the Hostname, Setting the Hostname
- Disk Partitioner
- adding partitions, Adding Partitions, Adding Partitions, Adding Partitions
- disk partitioning, Disk Partitioning Setup, Disk Partitioning Setup, Disk Partitioning Setup
- disk space, Do You Have Enough Disk Space?, Do You Have Enough Disk Space?
- driver diskette, Starting the Installation Program
- drivers
- adding
- removing
- replacing
- DVD
- DVD media
- downloading, Obtaining Red Hat Enterprise Linux
- (see also ISO images)
E
- EFI shell, UEFI-based x86 Systems
- (see also boot process)
- emergency mode, Booting into Emergency Mode
- Encryption
- Backup passphrases
- Creating backup passphrases, Creating and Saving Backup Passphrases
- Saving backup passphrases, Creating and Saving Backup Passphrases
- Passphrases
- Saving passphrases, Saving Passphrases
- ext2 (see file systems)
- ext3 (see file systems)
- ext4 (see file systems)
- extended partitions, Partitions Within Partitions — An Overview of Extended Partitions
- Extensible Firmware Interface shell (see EFI shell)
F
- FCoE
- installation, Advanced Storage Options , Advanced Storage Options , Advanced Storage Options
- fcoe
- via Kickstart, Kickstart Options
- FCP devices, FCP Devices
- file system
- formats, overview of, It is Not What You Write, it is How You Write It
- file system types, File System Types, File System Types, File System Types
- file systems
- ext2, Installing from a Hard Drive, Installing from a Hard Drive, Installing from a Hard Drive
- ext3, Installing from a Hard Drive, Installing from a Hard Drive, Installing from a Hard Drive
- ext4, Installing from a Hard Drive, Installing from a Hard Drive, Installing from a Hard Drive
- vfat, Installing from a Hard Drive, Installing from a Hard Drive, Installing from a Hard Drive
- firewall
- documentation, Other Technical Documentation
- Firstboot, Firstboot
- content service, Choose Service
- RHN setup, Subscription Management Registration
- subscriptions, Configuring the Subscription Service
- users, Create User
- via Kickstart, Kickstart Options
- FTP
G
- GRUB, x86, AMD64, and Intel 64 Boot Loader Configuration, Boot Loaders and System Architecture, The GRUB boot loader for x86 systems
- (see also boot loaders)
- additional resources, Additional Resources
- installed documentation, Installed Documentation
- useful websites, Useful Websites
- alternatives to, Alternative Boot Loaders
- boot process, GRUB and the Boot Process on BIOS-based x86 Systems, GRUB and the Boot Process on UEFI-based x86 Systems
- Changing Runlevels at Boot Time, Changing Runlevels at Boot Time
- changing runlevels with, GRUB Interfaces
- commands, GRUB Commands
- configuration, x86, AMD64, and Intel 64 Boot Loader Configuration
- configuration file
- /boot/grub/grub.conf , Configuration File Structure
- structure, Configuration File Structure
- definition of, GRUB
- documentation, Other Technical Documentation
- features, Features of GRUB
- interfaces, GRUB Interfaces
- command line, GRUB Interfaces
- menu, GRUB Interfaces
- menu entry editor, GRUB Interfaces
- order of, Interfaces Load Order
- menu configuration file, GRUB Menu Configuration File
- directives, Configuration File Directives
- role in boot process, The GRUB boot loader for x86 systems
- terminology, GRUB Terminology
- devices, Device Names
- files, File Names and Blocklists
- root file system, The Root File System and GRUB
- troubleshooting, Troubleshooting GRUB
- grub.conf , Configuration File Structure
- (see also GRUB)
H
- halt, Shutting Down
- (see also shutdown)
- Hard disk
- hard disk
- basic concepts, Hard Disk Basic Concepts
- extended partitions, Partitions Within Partitions — An Overview of Extended Partitions
- file system formats, It is Not What You Write, it is How You Write It
- partition introduction, Partitions: Turning One Drive Into Many
- partition types, Partitions: Turning One Drive Into Many
- partitioning of, An Introduction to Disk Partitions
- hard drive installation, Installing from a Hard Drive, Installing from a Hard Drive, Installing from a Hard Drive
- hardware
- compatibility, Is Your Hardware Compatible?
- configuration, System Specifications List
- support, Hardware Requirements, Hardware Requirements
- hardware preparation, IBM Power Systems servers, Preparation for IBM Power Systems servers
- HMC vterm, Using the HMC vterm
- hostname, Setting the Hostname, Setting the Hostname, Setting the Hostname
- HTTP
I
- init command, The /sbin/init Program
- (see also boot process)
- configuration files
- /etc/inittab , SysV Init Runlevels
- role in boot process, The /sbin/init Program
- (see also boot process)
- runlevels
- directories for, SysV Init Runlevels
- runlevels accessed by, Runlevels
- SysV init
- definition of, SysV Init Runlevels
- install log file
- /root/install.log , Installing Packages
- installation
- aborting, Installing from a DVD, Installing from a DVD
- disk space, Do You Have Enough Disk Space?, Do You Have Enough Disk Space?
- DVD, Installing from a DVD, Installing from a DVD
- from network, Additional Boot Options
- FTP, Preparing for a Network Installation, Installing via FTP, HTTP, or HTTPS, Preparing for a Network Installation, Installing via FTP, HTTP, or HTTPS, Preparing for a Network Installation, Installing via FTP, HTTP, or HTTPS
- GUI, Installing Using Anaconda, Installing Using Anaconda, Installation Phase 3: Installing Using Anaconda
- hard drive, Preparing for a Hard Drive Installation, Installing from a Hard Drive, Preparing for a Hard Drive Installation, Installing from a Hard Drive, Preparing for a Hard Drive Installation, Installing from a Hard Drive
- HTTP, Preparing for a Network Installation, Installing via FTP, HTTP, or HTTPS, Preparing for a Network Installation, Installing via FTP, HTTP, or HTTPS, Preparing for a Network Installation, Installing via FTP, HTTP, or HTTPS
- keyboard navigation, Using the Keyboard to Navigate, Using the Keyboard to Navigate, Using the Keyboard to Navigate
- kickstart (see kickstart installations)
- mediacheck, Additional Boot Options
- method
- DVD, Selecting an Installation Method
- hard drive, Selecting an Installation Method
- NFS image, Selecting an Installation Method
- selecting, Selecting an Installation Method
- URL, Selecting an Installation Method
- network, Preparing for a Network Installation, Preparing for a Network Installation, Preparing for a Network Installation
- NFS, Preparing for a Network Installation, Installing via NFS, Preparing for a Network Installation, Installing via NFS, Preparing for a Network Installation, Installing via NFS
- server information, Installing via NFS, Installing via NFS, Installing via NFS
- partitioning, Creating a Custom Layout or Modifying the Default Layout , Creating a Custom Layout or Modifying the Default Layout , Creating a Custom Layout or Modifying the Default Layout
- program
- graphical user interface, The Graphical Installation Program User Interface, The Graphical Installation Program User Interface, The Graphical Installation Program User Interface
- starting, Starting the Installation Program
- text mode user interface, The Text Mode Installation Program User Interface, The Text Mode Installation Program User Interface, The Text Mode Installation Program User Interface
- virtual consoles, A Note About Virtual Consoles, A Note About Linux Virtual Consoles
- serial mode, Additional Boot Options
- UTF-8, Additional Boot Options
- starting, Installing from a DVD, Installing from a DVD
- text mode, Additional Boot Options
- installation method
- selecting, Installation Method, Installation Method, Installation Method
- installation program
- x86, AMD64 and Intel 64
- installing packages, Package Group Selection, Package Group Selection, Package Group Selection
- IPL NWSSTG, Unable to IPL from *NWSSTG
- IPv4, Setting the Hostname, Setting the Hostname, Setting the Hostname
- iscsi
- installation, Advanced Storage Options , Advanced Storage Options , Advanced Storage Options
- ISO images
- downloading, Obtaining Red Hat Enterprise Linux
K
- kdump, Kdump
- kernel
- role in boot process, The Kernel
- kernel options, Kernel Options
- keyboard
- configuration, Keyboard Configuration, Keyboard Configuration
- navigating the installation program using, Using the Keyboard to Navigate, Using the Keyboard to Navigate, Using the Keyboard to Navigate
- keymap
- selecting language, Language Selection, Language Selection
- selecting type of keyboard, Keyboard Configuration, Keyboard Configuration
- Kickstart, Automating the Installation with Kickstart, Automating the Installation with Kickstart
- kickstart
- how the file is found, Starting a Kickstart Installation
- parameters for System z parameter files, Parameters for Kickstart Installations
- subscriptions, Running subscription-manager as a Post-Install Script
- Kickstart Configurator , Kickstart Configurator
- %post script, Post-Installation Script
- %pre script, Pre-Installation Script
- authentication options, Authentication
- basic options, Basic Configuration
- boot loader, Boot Loader Options
- boot loader options, Boot Loader Options
- Display configuration, Display Configuration
- firewall configuration, Firewall Configuration
- installation method selection, Installation Method
- interactive, Basic Configuration
- keyboard, Basic Configuration
- language, Basic Configuration
- network configuration, Network Configuration
- package selection, Package Selection
- partitioning, Partition Information
- software RAID, Creating Software RAID Partitions
- preview, Kickstart Configurator
- reboot, Basic Configuration
- root password, Basic Configuration
- encrypt, Basic Configuration
- saving, Saving the File
- SELinux configuration, SELinux Configuration
- text mode installation, Basic Configuration
- time zone, Basic Configuration
- kickstart file
- %include, Kickstart Options
- %post, Post-installation Script
- %pre, Pre-installation Script
- auth, Kickstart Options
- authconfig, Kickstart Options
- autopart, Kickstart Options
- autostep, Kickstart Options
- bootloader, Kickstart Options
- CD-ROM-based, Creating Kickstart Boot Media
- clearpart, Kickstart Options
- cmdline, Kickstart Options
- creating, Kickstart Options
- device, Kickstart Options
- diskette-based, Creating Kickstart Boot Media
- driverdisk, Kickstart Options
- fcoe, Kickstart Options
- firewall, Kickstart Options
- firstboot, Kickstart Options
- flash-based, Creating Kickstart Boot Media
- format of, Creating the Kickstart File
- graphical, Kickstart Options
- halt, Kickstart Options
- ignoredisk, Kickstart Options
- include contents of another file, Kickstart Options
- install, Kickstart Options
- installation methods, Kickstart Options
- interactive, Kickstart Options
- iscsi, Kickstart Options
- iscsiname, Kickstart Options
- keyboard, Kickstart Options
- lang, Kickstart Options
- langsupport, Kickstart Options
- logging, Kickstart Options
- logvol, Kickstart Options
- mediacheck, Kickstart Options
- mouse, Kickstart Options
- network, Kickstart Options
- network-based, Making the Kickstart File Available on the Network, Making the Installation Tree Available
- options, Kickstart Options
- partitioning examples, Advanced Partitioning Example
- package selection specification, Package Selection
- part, Kickstart Options
- partition, Kickstart Options
- post-installation configuration, Post-installation Script
- poweroff, Kickstart Options
- pre-installation configuration, Pre-installation Script
- raid , Kickstart Options
- reboot, Kickstart Options
- rootpw, Kickstart Options
- selinux, Kickstart Options
- services , Kickstart Options
- shutdown, Kickstart Options
- skipx, Kickstart Options
- sshpw, Kickstart Options
- text, Kickstart Options
- timezone, Kickstart Options
- unsupported_hardware, Kickstart Options
- upgrade, Kickstart Options
- user, Kickstart Options
- vnc, Kickstart Options
- volgroup, Kickstart Options
- what it looks like, Creating the Kickstart File
- winbind, Kickstart Options
- xconfig, Kickstart Options
- zerombr, Kickstart Options
- zfcp, Kickstart Options
- Kickstart file
- group, Kickstart Options
- kickstart installations, Kickstart Installations
- CD-ROM-based, Creating Kickstart Boot Media
- diskette-based, Creating Kickstart Boot Media
- file format, Creating the Kickstart File
- file locations, Making the Kickstart File Available
- flash-based, Creating Kickstart Boot Media
- installation tree, Making the Installation Tree Available
- LVM, Kickstart Options
- network-based, Making the Kickstart File Available on the Network, Making the Installation Tree Available
- starting, Starting a Kickstart Installation
- from a boot CD-ROM, Starting a Kickstart Installation
L
- language
- configuration, Language Selection, Language Selection
- selecting, Language Selection, Language Selection, Language Selection
- log files, Troubleshooting Installation on an Intel or AMD System, Troubleshooting Installation on an IBM Power Systems server, Troubleshooting Installation on IBM System z
- kickstart installations, What are Kickstart Installations?
- LVM
- documentation, Other Technical Documentation
- logical volume, Understanding LVM
- physical volume, Understanding LVM
- understanding, Understanding LVM
- volume group, Understanding LVM
- with kickstart, Kickstart Options
M
- master boot record, x86, AMD64, and Intel 64 Boot Loader Configuration
- Master Boot Record, Unable to Boot into Red Hat Enterprise Linux (see MBR)
- reinstalling, Reinstalling the Boot Loader
- MBR
- definition of, A Detailed Look at the Boot Process, BIOS-based x86 Systems
- (see also boot loaders)
- (see also boot process)
- installing boot loader on, Advanced Boot Loader Configuration
- modem, Setting the Hostname, Setting the Hostname, Setting the Hostname
- mount points
- partitions and, Disk Partitions and Mount Points
- Multipath devices
- Mixing with non-multipath devices, Disk Partitioning Setup, Disk Partitioning Setup, Disk Partitioning Setup
N
- network
- Network bonding, Configuring a Bonded Interface
- Network boot installations
- boot message, custom, Adding a Custom Boot Message
- configuration, Network Boot Configuration
- overview, Setting Up an Installation Server
- performing, Performing the Installation
- setting up the network server, Setting Up the Network Server
- network installation
- NFS
- NFS (Network File System)
- NTP (Network Time Protocol), Time Zone Configuration, Time Zone Configuration, Date and Time
- ntsysv , Runlevel Utilities
- (see also services)
O
- OpenSSH, Other Technical Documentation
- (see also SSH)
- OS/400, Boot Loaders and System Architecture
- (see also boot loaders)
P
- package groups, Customizing the Software Selection , Customizing the Software Selection , Customizing the Software Selection
- packages
- groups, Package Group Selection, Package Group Selection, Package Group Selection
- installing, Package Group Selection, Package Group Selection, Package Group Selection
- installing with yum, Installing Packages With yum
- selecting, Package Group Selection, Package Group Selection, Package Group Selection
- parameter files, Parameter and Configuration Files
- installation network parameters, Installation Network Parameters
- kickstart parameters, Parameters for Kickstart Installations
- loader parameters, Loader Parameters
- required parameters, Required Parameters
- sample parameter file, Sample Parameter File and CMS Configuration File
- VNC parameters, VNC and X11 Parameters
- X11 parameters, VNC and X11 Parameters
- parm files (see parameter files)
- parted partitioning utility, Create new partition(s)
- partition
- partitioning, Creating a Custom Layout or Modifying the Default Layout , Creating a Custom Layout or Modifying the Default Layout , Creating a Custom Layout or Modifying the Default Layout
- automatic, Disk Partitioning Setup, Disk Partitioning Setup, Disk Partitioning Setup
- basic concepts, An Introduction to Disk Partitions
- creating new, Adding Partitions, Adding Partitions, Adding Partitions
- file system type, File System Types, File System Types, File System Types
- destructive, Using Free Space from an Active Partition
- extended partitions, Partitions Within Partitions — An Overview of Extended Partitions
- how many partitions, Partitions: Turning One Drive Into Many, How Many Partitions?
- introduction to, Partitions: Turning One Drive Into Many
- making room for partitions, Making Room For Red Hat Enterprise Linux
- mount points and, Disk Partitions and Mount Points
- naming partitions, Partition Naming Scheme
- non-destructive, Using Free Space from an Active Partition
- numbering partitions, Partition Naming Scheme
- other operating systems, Disk Partitions and Other Operating Systems
- primary partitions, Partitions: Turning One Drive Into Many
- recommended, Recommended Partitioning Scheme, Recommended Partitioning Scheme
- types of partitions, Partitions: Turning One Drive Into Many
- using free space, Using Unpartitioned Free Space
- using in-use partition, Using Free Space from an Active Partition
- using unused partition, Using Space from an Unused Partition
- Partitioning , Creating a Custom Layout or Modifying the Default Layout , Creating a Custom Layout or Modifying the Default Layout , Creating a Custom Layout or Modifying the Default Layout
- adding partitions
- file system type, File System Types, File System Types, File System Types
- Passphrases
- Block device encryption passphrases
- Creating backup block device encryption passphrases, Creating and Saving Backup Passphrases
- Saving backup block device encryption passphrases, Creating and Saving Backup Passphrases
- Saving block device encryption passphrases, Saving Passphrases
- password
- boot loader, x86, AMD64, and Intel 64 Boot Loader Configuration
- setting root, Set the Root Password, Set the Root Password, Set the Root Password
- Planning for Installation
- System z, Pre-Installation
- Power Systems rescue mode, Rescue Mode on Power Systems servers
- accessing SCSI utilities, Special Considerations for Accessing the SCSI Utilities from Rescue Mode
- program.log, Troubleshooting Installation on an Intel or AMD System, Troubleshooting Installation on an IBM Power Systems server, Troubleshooting Installation on IBM System z
- programs
- running at boot time, Running Additional Programs at Boot Time
- PulseAudio, Other Technical Documentation
- PXE (Pre-boot eXecution Environment), Booting from the Network Using PXE
R
- RAID
- hardware, RAID and Other Disk Devices , RAID and Other Disk Devices
- kickstart installations, Kickstart Options
- Kickstart Configurator, Creating Software RAID Partitions
- software, RAID and Other Disk Devices , RAID and Other Disk Devices
- system unbootable after disk failure, Troubleshooting GRUB
- trouble booting from drive attached to RAID card, Are You Unable to Boot With Your RAID Card?
- rc.local
- modifying, Running Additional Programs at Boot Time
- rc.serial , Running Additional Programs at Boot Time
- (see also setserial command)
- Red Hat Subscription Management, Subscription Management Registration
- registration
- with Firstboot, Set Up Software Updates
- with kickstart, Running subscription-manager as a Post-Install Script
- removing
- Red Hat Enterprise Linux
- from IBM System z, Removing Red Hat Enterprise Linux from IBM System z
- from x86-based systems, Removing Red Hat Enterprise Linux From x86-based Systems
- rescue discs, Booting Your Computer with the Rescue Mode
- rescue mode, Rescue Mode, Booting Your Computer with the Rescue Mode
- definition of, Booting into Rescue Mode
- utilities available, Booting into Rescue Mode
- rescue mode, Power Systems, Rescue Mode on Power Systems servers
- accessing SCSI utilities, Special Considerations for Accessing the SCSI Utilities from Rescue Mode
- RHN setup
- selecting the subscription service, Subscription Management Registration
- root / partition
- recommended partitioning, Recommended Partitioning Scheme, Recommended Partitioning Scheme
- root password, Set the Root Password, Set the Root Password, Set the Root Password
- runlevel 1, Booting into Single-User Mode
- runlevels (see init command)
- changing with GRUB, GRUB Interfaces
- configuration of, Runlevel Utilities
- (see also services)
S
- SCAP Security Guide, Creating a USGCB-compliant Installation Image
- scp, Other Technical Documentation
- (see also SSH)
- screenshots
- during installation, Screenshots During Installation
- selecting
- SELinux
- documentation, Other Technical Documentation
- serial console, Configuring the Interface
- serial ports (see setserial command)
- services
- configuring with chkconfig , Runlevel Utilities
- configuring with ntsysv , Runlevel Utilities
- configuring with Services Configuration Tool , Runlevel Utilities
- Services Configuration Tool , Runlevel Utilities
- (see also services)
- setserial command
- configuring, Running Additional Programs at Boot Time
- shutdown, Shutting Down
- (see also halt)
- single-user mode, Booting into Single-User Mode
- ssh
- starting ssh at boot time, Enabling Remote Access with ssh
- SSH (Secure SHell)
- documentation, Other Technical Documentation
- starting
- steps
- booting with CD-ROM or DVD, Choose a Boot Method
- disk space, Do You Have Enough Disk Space?, Do You Have Enough Disk Space?
- hardware compatibility, Is Your Hardware Compatible?
- IBM Power Systems servers hardware preparation, Preparation for IBM Power Systems servers
- installing from DVD, Choose a Boot Method
- supported hardware, Hardware Requirements, Hardware Requirements
- storage devices
- basic storage devices, Storage Devices, Storage Devices, Storage Devices
- specialized storage devices, Storage Devices, Storage Devices, Storage Devices
- storage.log, Troubleshooting Installation on an Intel or AMD System, Troubleshooting Installation on an IBM Power Systems server, Troubleshooting Installation on IBM System z
- subscription
- with kickstart, Running subscription-manager as a Post-Install Script
- subscription service, Unregistering from Red Hat Subscription Management Services
- subscriptions
- with firstboot, Configuring the Subscription Service
- swap partition
- recommended partitioning, Recommended Partitioning Scheme, Recommended Partitioning Scheme
- syslog, Troubleshooting Installation on an Intel or AMD System, Troubleshooting Installation on an IBM Power Systems server, Troubleshooting Installation on IBM System z, Logging to a Remote System During the Installation
- system recovery, Basic System Recovery
- adding drivers, Using Rescue Mode to Fix or Work Around Driver Problems
- common problems, Common Problems
- forgetting the root password, Root Password
- hardware/software problems, Hardware/Software Problems
- reinstalling the boot loader, Reinstalling the Boot Loader
- unable to boot into Red Hat Enterprise Linux, Unable to Boot into Red Hat Enterprise Linux
- removing drivers, Using Rescue Mode to Fix or Work Around Driver Problems
- replacing drivers, Using Rescue Mode to Fix or Work Around Driver Problems
- system-config-kickstart (see Kickstart Configurator )
- SysV init (see init command)
T
- TCP/IP configuration, Performing a Network Installation, Performing a Network Installation, Performing a Network Installation
- Telnet, Enabling Remote Access with Telnet
- text interface, Configuring the Interface
- tftp , Starting the tftp Server
- time zone
- configuration, Time Zone Configuration, Time Zone Configuration, Time Zone Configuration
- traceback messages
- saving traceback messages without removable media, Saving Traceback Messages, Saving Traceback Messages, Saving Traceback Messages
- troubleshooting, Troubleshooting Installation on an Intel or AMD System, Troubleshooting Installation on an IBM Power Systems server, Troubleshooting Installation on IBM System z
- after the installation, Problems After Installation, Problems After Installation, Problems After Installation
- Apache HTTP Server stops responding during startup, Apache HTTP Server or Sendmail Stops Responding During Startup, Apache HTTP Server or Sendmail Stops Responding During Startup, Apache HTTP Server or Sendmail Stops Responding During Startup
- booting into a graphical environment, Booting into a Graphical Environment, Booting into a Graphical Environment
- booting into GNOME or KDE, Booting into a Graphical Environment, Booting into a Graphical Environment
- booting into the X Window System, Booting into a Graphical Environment, Booting into a Graphical Environment
- graphical GRUB screen, Trouble With the Graphical GRUB Screen on an x86-based System?
- graphical login, Remote Graphical Desktops and XDMCP
- logging in, Problems When You Try to Log In, Problems When You Try to Log In, Problems When You Try to Log In
- printers, Your Printer Does Not Work, Your Printer Does Not Work, Your Printer Does Not Work
- RAM not recognized, Is Your RAM Not Being Recognized?
- Sendmail stops responding during startup, Apache HTTP Server or Sendmail Stops Responding During Startup, Apache HTTP Server or Sendmail Stops Responding During Startup, Apache HTTP Server or Sendmail Stops Responding During Startup
- X (X Window System), Problems with the X Window System (GUI), Problems with the X Window System (GUI)
- X server crashes, Problems with the X Server Crashing and Non-Root Users, Problems with the X Server Crashing and Non-Root Users
- beginning the installation, Trouble Beginning the Installation, Trouble Beginning the Installation
- frame buffer, disabling, Problems with Booting into the Graphical Installation, Problems with Booting into the Graphical Installation
- GUI installation method unavailable, Problems with Booting into the Graphical Installation, Problems with Booting into the Graphical Installation
- booting, You Are Unable to Boot Red Hat Enterprise Linux, You Are Unable to Boot Red Hat Enterprise Linux, You Are Unable to Boot Red Hat Enterprise Linux
- during the installation, Trouble During the Installation, Trouble During the Installation, Trouble During the Installation
- completing partitions, Other Partitioning Problems, Other Partitioning Problems for IBM Power Systems Users , Other Partitioning Problems
- drive must have gpt disk label, The "drive must have a GPT disk label" Error Message
- No devices found to install Red Hat Enterprise Linux error message, The "No devices found to install Red Hat Enterprise Linux" Error Message, The "No devices found to install Red Hat Enterprise Linux" Error Message, The "No devices found to install Red Hat Enterprise Linux" Error Message
- partition tables, Trouble with Partition Tables, Trouble with Partition Tables
- saving traceback messages without removable media, Saving Traceback Messages, Saving Traceback Messages, Saving Traceback Messages
- using remaining hard drive space, Using Remaining Space
- DVD failure
- DVD verification, Additional Boot Options
U
- UEFI (Unified Extensible Firmware Interface), Booting the Installer
- uninstalling
- from IBM System z, Removing Red Hat Enterprise Linux from IBM System z
- from x86-based systems, Removing Red Hat Enterprise Linux From x86-based Systems
- unregister, Unregistering from Red Hat Subscription Management Services
- upgrade
- to Red Hat Enterprise Linux 7, Upgrading Your Current System
- using Preupgrade Assistant, Upgrading Your Current System
- using Red Hat Upgrade, Upgrading Your Current System
- USB flash media
- downloading, Obtaining Red Hat Enterprise Linux
- making, Making Media
- USB media
- user interface, graphical
- user interface, text mode
- users
- creating, Create User
- USGCB compliance
- installation image, Creating a USGCB-compliant Installation Image
V
- vfat (see file systems)
- virtual consoles, A Note About Virtual Consoles, A Note About Linux Virtual Consoles
- Virtualization
- documentation, Other Technical Documentation
- VNC (Virtual Network Computing), Enabling Remote Access to the Installation System
- documentation, Other Technical Documentation
- enabling, Enabling Remote Access with VNC
- installing client, Enabling Remote Access to the Installation System
- listening mode, Connecting the Installation System to a VNC Listener
Y
- yaboot, Boot Loaders and System Architecture
- (see also boot loaders)
- yaboot installation server, Booting from the Network Using a yaboot Installation Server
- yum
- documentation, Other Technical Documentation
- installing with yum, Installing Packages With yum
- yum.log, Troubleshooting Installation on an Intel or AMD System, Troubleshooting Installation on an IBM Power Systems server, Troubleshooting Installation on IBM System z
Z
- z/IPL, Boot Loaders and System Architecture
- (see also boot loaders)