Getting Started Guide
Basic setup and configuration with Red Hat Satellite
Abstract
Chapter 1. Channel Management
- Red Hat Channels - are official Red Hat repositories containing Red Hat released packages.
- Custom Channels - are channels created by a Satellite administrator based on an organization or group's needs. These are managed by the organization and may contain third-party packages and repositories.
1.1. Managing Red Hat Network Channels
1.1.1. Differentiating Base Channels and Child Channels
1.1.2. Subscribing a System to the Red Hat Satellite
- Registration through activation keys - Because of the simplicity and speed of activation keys, this is the preferred method for registering systems as clients of either Red Hat Satellite Proxy Server or Red Hat Satellite Server. Systems registered using an activation key are subscribed to all channels associated with that activation key. For more information about activation keys, consult the Red Hat Satellite Client Configuration Guide and the Red Hat Satellite Reference Guide.
- Install registration - After initial registeration through either the Red Hat Update Agent or the Red Hat Network Registration Client, it is automatically assigned to the base channel that corresponds to the version of Red Hat Enterprise Linux on the system. Once a system is registered, its default base channel can be changed to a private base channel on a per-system basis using Red Hat Satellite. For more information about using these applications, see the respective chapter of the Red Hat Satellite Reference Guide for your entitlement level (Management or Provisioning).
- Website subscription - Various specific child channels are available for subscription, depending on the system's base channel. The system may be subscribed to the child channel through the Satellite web interface. If the organization has created custom base channels, the systems may also be reassigned to these custom channels through the website. For more information about subscribing to channels online, see the Satellite web interface chapter of the Red Hat Satellite Reference Guide.
- Using the
spacewalk-channelcommand-line tool (CLI) - thespacewalk-channelallows you to subscribe systems to specific channels via the command line without logging on to the Red Hat Network website.For example, to subscribe to two channels:spacewalk-channel --add -c rhn-tools-rhel-x86_64-server-6 -c \ rhel-x86_64-server-6 --user username --password password# spacewalk-channel --add -c rhn-tools-rhel-x86_64-server-6 -c \ rhel-x86_64-server-6 --user username --password passwordCopy to Clipboard Copied! Toggle word wrap Toggle overflow To unsubscribe from the channels:spacewalk-channel --remove -c rhn-tools-rhel-x86_64-server-6 -c \ rhel-x86_64-server-6 --user username --password password# spacewalk-channel --remove -c rhn-tools-rhel-x86_64-server-6 -c \ rhel-x86_64-server-6 --user username --password passwordCopy to Clipboard Copied! Toggle word wrap Toggle overflow To list subscribed channels:spacewalk-channel --list
# spacewalk-channel --listCopy to Clipboard Copied! Toggle word wrap Toggle overflow
1.1.3. Deleting a Red Hat Base Channel from Red Hat Satellite
- The specific architecture is not supported by the organization and should not be available.
- The subscription for the specific architecture has expired and updates are unavailable.
- The product channel has reached end of life.
- The Red Hat Satellite server needs disk space.
The spacewalk-backend-tools, version 0.5.28.49 or newer, is required to run the commands below.
- Log in as root on the Red Hat Satellite server.
- List all subscribed channels the Satellite is subscribed to:
spacewalk-remove-channel --list
# spacewalk-remove-channel --listCopy to Clipboard Copied! Toggle word wrap Toggle overflow Take note of the channel to be removed. This is called thechannel_labeland will be used in the next step. - Remove the channel from the Satellite:
/usr/bin/spacewalk-remove-channel -c channel_label --unsubscribe
# /usr/bin/spacewalk-remove-channel -c channel_label --unsubscribeCopy to Clipboard Copied! Toggle word wrap Toggle overflow Where:--unsubscribewill automatically unsubscribe all systems subscribed to the channel being removed.
Note
1.1.4. Managing Repositories
1.1.4.1. Adding Repositories
- Log in as a Channel Administrator or Organizational Administrator.
- Click on → → .
- On the top right-hand corner of the page, click .
- Fill in the following:
- - An identifying name for the repository
- - A valid URL where the repository resides
- - The SSL Certificate Authority required for accessing repositories over HTTPS
- - The SSL Certificate required for accessing repositories over HTTPS
- - The SSL Key required for accessing repositories over HTTPS
Note
Create new SSL certificates and manage existing ones by navigating to → → . - - Defines a package filter to apply to the repository. Use plus (+) to include packages, or minus (-) to exclude packages. The following example filters out the
kernelpackage and any packages beginning withzshexcept forzsh-html:-zsh*,kernel +zsh-html
-zsh*,kernel +zsh-htmlCopy to Clipboard Copied! Toggle word wrap Toggle overflow
- Click .
1.1.4.2. Adding Repositories to a Channel
- Click → .
- Choose the specific channel you wish the repository to be a part of.
- Click on the subtab and select the repositories you wish to add to the channel.
- Select the repositories to be added to the channel.
- Click .
1.1.4.3. Scheduling Repository Synchronization
- Click → .
- Choose the channel the repository is a member of.
- Click on the subtab → .
- Choose when you wish to schedule the synchronization. Click to schedule a sync immediately or select a schedule with the options:
- - disables any schedule currently in place.
- - schedules a daily synchronization with source repositories at a specified time.
- - schedules a weekly synchronization with source repositories at a specified day and time.
- - schedules a monthly synchronization on a specified day of the month and time.
- - Defines a custom schedule for synchronization.
- Click to save your changes and schedule the synchronization.
Note
1.1.4.4. Deleting Repositories
- Log in as a Channel Administrator or Organizational Administrator.
- Click on → → .
- Choose the repository you wish to delete.
- On the top right-hand corner of the page, click .
1.2. Creating and Managing Custom Channels
- Paid Service Channels - These channels are available if the organization has purchased access to them either directly or in conjunction with a particular Red Hat solution. Red Hat Enterprise Linux is an example of a paid service channel.
- Custom Channels - These channels are created by the organizational administrator to manage custom packages. These channels, also known as private channels, by default, appear only to the organization who creates them; they can never be accessed by anyone else. However, private channels can be shared across organizations by setting up Organizational Trusts and sharing the channel.
Note
1.2.1. Tools, Repositories, and Practices
- Red Hat Network Package Manager - Use this to push custom packages into custom channels on your Red Hat Satellite Proxy Server.
- Red Hat Network Push - Use this to push custom packages into custom channels on your Red Hat Satellite Server.
- Red Hat Satellite Synchronization Tool - Use this to import and synchronize standard packages from Red Hat Network Classic to the Red Hat Satellite server at your location. This is done via the Internet or CD/DVD ISO images.
Note
1.2.2. Creating a Software Channel
- Log in to the Red Hat Satellite website as a Channel Administrator.
- On the top navigation bar, click the Channels tab and then click the button on the left navigation bar.
- On the Software Channel Management page, click at the top-right corner. Red Hat Satellite Server administrators are presented with the option to . See Section 1.2.8, “Cloning Software Channels” for instructions.
- On the New Channel page, define the details of the channel following the instructions on the page. For most channel management actions, the Channel Label is used to identify the channel, so select a meaningful label. View the details of existing channels for ideas.The GPG key URL must be the location of the key on the server, as defined during the client configuration process. See the Red Hat Satellite Client Configuration Guide. The GPG key ID is the unique identifier, such as "DB42A60E", while the GPG key fingerprint is similar to "CA20 8686 2BD6 9DFC 65F6 ECC4 2191 80CD DB42 A60E". Notice that the key ID is the same as the last pair of quartets in the key fingerprint.
- When finished, click at the bottom of the page.
1.2.3. Assigning Packages to Software Channels
- Click on the Channels tab in the top navigation bar and then Manage Software Channels on the left navigation bar.
- In the Software Channel Management page, click the name of the channel to receive packages.
- In the Basic Channel Details page, click the Packages tab and then the Add subtab. To associate packages with the channel being edited, select the option containing the packages from the dropdown menu and click .
Note
Packages already associated with the channel being edited are not displayed. Packages not assigned to a specific channel are found in the menu item. Selecting presents all available packages. - Select the checkboxes of the packages to be assigned to the edited channel and click at the bottom-right corner of the page. A confirmation page appears with the packages listed.
- Click to associate the packages with the channel. The List/Remove subtab of the Managed Software Channel Details page then appears with the new packages listed.
1.2.4. Managing Channel Management Privileges
- Log in to the Red Hat Satellite website as an Organization Administrator.
- On the top navigation bar, click the Users tab and then click the name of the user who is performing channel management functions.
- On the User Details page, scroll down to the Roles section and select the checkbox labeled Channel Administrator. Then click at the bottom of the page. Note that Organization Administrators are automatically granted channel administration privileges.
- Have the user log in to the Red Hat Satellite website, click the Channels tab on the top navigation bar, and ensure the button appears on the corresponding left navigation bar.
1.2.5. Changing Custom Channel Permissions
- Restricting channel content to specific organizations and systems for qualifying purposes like testing different software configurations before production
- Controlled distribution of licensed or third-party packages
1.2.5.1. Modifying Custom Channel User Permissions
It is assumed that there is an existing channel that needs permission changes.
- Log in to the Satellite server as a channel or organization administrator.
- Click → .
- Click the channel whose permissions need to be modified.
- Scroll down to the → and
- Click to save the changes.
- Click the subtab and select the users that should be able to subscribe to the channel.
- Click .
1.2.5.2. Modifying Custom Organization Permissions
It is assumed that there is an existing channel that needs permission changes.
- Log in to the Satellite server as a channel or organization administrator.
- Click → .
- Click the channel whose permissions need to be modified.
- Scroll down to the → . Choose either of the following:
- This channel is private and cannot be accessed by any other organization.
- This channel is protected and may only be accessed by specific trusted organizations.
- This channel is public and may be accessed by any of the trusted organizations trusted by this organization.
- Click Update Channel.
- (Optional) If you chose protected channel, the Satellite server will ask to confirm the channel sharing modification that was made. Since systems maybe subscribed to the channel that will be removed because of the change in channel permissions. Choose either to:
- Click on to unsubscribe any systems previously subscribed from trusted organizations.
- Click on to keep the systems from trusted organizations subscribed.
- Click if you wish to review the systems and trusted organizations before taking action.
1.2.6. Manage Software Channels
Warning
1.2.7. Basic Channel Details
- Details - Provides basic information about the channel, such as its parent channel, name, summary, and description. Some of this information is modifiable. In addition, a Per-User Subscription Restrictions combobox can be seen by Organization Administrators and Channel Administrators. This signifies the default behavior of every channel allowing any user to subscribe systems to it. Unchecking this box and clicking causes the appearance of a Subscribers tab, which is used to grant certain users subscription permissions to the channel.
- Organizations - Provides a list of organizations in which the channel has granted access to view and consume content in the channel. These organizations are listed because of the organizational trust your Organization has with them. Access to this channel by organizations can be modified here. Select the checkbox and click on to remove an organization's access. Note that Organization Administrators and Channel Administrators automatically have subscription access to all channels.
- Managers - Lists users who have management permissions to the custom channel. This tab appears for Organization Administrators and Channel Administrators. Select the checkboxes of the users to be allowed full administration of this channel and click . This status does not enable the user to create new channels. Note that Organization Administrators and Channel Administrators automatically have management access to all channels.
- Errata - Provides the errata associated with each of your custom channels. Just as Red Hat Network produces and delivers errata updates to Red Hat Enterprise Linux software, you deliver errata updates to your custom channels as part of updating your servers with the latest code. This tab contains subtabs that allow you to view, add, remove, and clone erratum: List/Remove, Add and Clone. Note that cloning errata can be done only via Red Hat Satellite Server.
- List/Remove - Displays all of the errata currently associated with the custom channel and provides a means to cancel that association. To remove errata from the channel, select their checkboxes and click on the bottom right-hand corner of the page. A confirmation page appears listing the errata to be removed. Click to complete the action.
- Add - Enables the addition of errata to the channel. All of the errata potentially applicable to the channel are listed. To add errata to the channel, select the appropriate checkboxes and click . See Chapter 5, Errata Management for a discussion of errata management.
- Clone - Allows Satellite customers to replicate errata and associated packages for a cloned channel. This subtab immediately appears populated for channels that were cloned with either the original state or select errata option. The Clone tab also gains errata whenever one is issued for the target (that is, originating) channel. This makes it useful for channels cloned with the current state option, as well. See Section 1.2.8, “Cloning Software Channels” for a discussion of cloning options.To include errata from the target channel in the cloned channel, select either or from each advisory's dropdown menu. The option exists only if the erratum has been previously cloned. Use it to associate the erratum across channels and avoid duplicate entries. Use the option to create a new entry, such as when modifying it from the previous clone.By default, cloned errata inherit the label of the original Red Hat advisory with the "RH?" prefix replaced with "CL". For example, RHSA-2003:324 becomes CLA-2003:324. Subsequent clones of the same advisory have their second letters sequenced to denote their order, such as "CM" and "CN". These labels can be altered through the Errata Management page. See Chapter 5, Errata Management for instructions.In addition to the option, previously cloned errata contain values within the Owned Errata column. The erratum label is linked to its details page. The pub and mod flags within parentheses identify whether the cloned erratum has been published or modified from the original advisory. A plus sign + before the flag indicates affirmative, the cloned errata has been published. A minus sign - before the flag denotes negative. For example, (-mod) may mean a package has been deleted. To find out more about publishing and editing custom errata, See Chapter 5, Errata Management.To exclude errata from the cloned channel, select from the dropdown menus. When satisfied with the changes, click . Review the impending changes on the confirmation page and click .
- Sync - Displays the errata packages that were not included in the initial channel cloning but have since been updated. This page is where cloned channels can be synchronized with current errata by marking the desired checkbox and clicking .
- Packages - Provides the packages associated with each of the custom channels. This tab contains the following subtabs that allow organizations to view, add, and remove packages: List/Remove, Add, and Compare.
- List/Remove - Displays all of the packages currently associated with the custom channel and provides a means to cancel that association. To remove packages from the channel, select their checkboxes and click on the bottom right-hand corner of the page. A confirmation page appears with the packages to be removed listed. Click to complete the action.
Important
The list displayed on this page differs from the standard package list available in the Software Channel Details page. It displays all versions of a package remaining in the database rather than just the latest. It is possible to revert to a previous version of a package simply by removing the latest version. - Add - Enables the addition of packages to the channel. To see available packages, select an option from the View dropdown menu and click . To add packages to the channel, select the appropriate checkboxes and click . See Section 1.2.3, “Assigning Packages to Software Channels” for more information about this process.
- Compare - Enables the comparison of package lists between different channels. To see the differences, select another channel from the Compare to: dropdown menu and click . A list appears showing all packages not contained by both channels and indicating the existing channel location of each.
- Repositories - Select to assign
yumrepositories to the channel and synchronize repository content.- Add / Remove — Lists configured repositories. Repositories can be added and removed by selecting the checkbox next to the repository name and clicking .
- Sync — Lists configured repositories. The synchronization schedule can be set using the dropdown boxes, or an immediate synchronization can be performed by clicking .
1.2.8. Cloning Software Channels
- Click the Channels tab on the top navigation bar then the Manage Software Channels on the left navigation bar. This takes you to the Software Channel Management page.
- Click clone channel at the top-right corner to begin cloning.Three cloning options are presented: current state of the channel, original state of the channel, or select errata. These options are described fully on the webpage itself but are summarized as:
- Current state of the channel - All of the errata and all of the latest packages now in the target channel.
- Original state of the channel - All of the original packages from the target channel but none of the errata or associated update packages.
- Select Errata - All of the original packages from the target channel with the ability to exclude certain errata and associated update packages.
- Select the option desired using the radio buttons within the Clone field, identify the target channel using the Clone From dropdown menu, and click .
- On the New Software Channel page, complete the fields as described in Section 1.2.2, “Creating a Software Channel”. The default values will suffice.
- Click . If either the original or current option is selected, the Details tab of Managed Software Channel Details page will appear. Alter the settings for the new channel. See Section 1.2.7, “Basic Channel Details” for instructions.If the select errata option to clone the channel is selected, it will redirect to the Clone subtab of Managed Software Channel Details page instead. Errata and associated packages for cloning may have to be individually selected for cloning and inclusion in the new channel. See Section 1.2.7, “Basic Channel Details” for specific instructions.
Note
spacewalk-clone-by-date.
1.2.9. Creating Custom Channels From Specific Update Levels
- A controlled environment with systems that require only minor release updates instead of the latest updates
- A test environment with a specific package set
- Systems with applications that require specific versions to function
To implement the solution below, the Satellite Server must be subscribed to the Red Hat Network Tools channel and the spacewalk-remote-utils must be installed on the Satellite Server. The package is included in the Red Hat Network Tools channel.
- Log in as root to the Satellite server.
- Create the custom channel from a specific update level on Red Hat Satellite:
Copy to Clipboard Copied! Toggle word wrap Toggle overflow Where:- -lUSER, --user=USER - The username to connect to the server.
- -sSERVER, --server=SERVER - The hostname or IP address of the Satellite or Spacewalk server to connect to. Defaults to localhost.
- -vVERSION, --version=VERSION - The version of the channel to create (e.g. 6, 5, 4).
- -rRELEASE, --release=RELEASE - The release of the channel to create (e.g. AS, ES, WS, Server, Client, Desktop).
- -uUPDATE_LEVEL, --update=UPDATE_LEVEL - The update level of a channel to create (e.g. GOLD, U1, U2, U3, U4, U5, U6, U7, U8, U9), where GOLD stands for the initial release.
- -aARCH, --arch=ARCH - The arch of the channel to create (e.g. i386, ia64, ppc, s390, s390x, x86_64).
- -dDEST_CHANNEL, --destChannel=DEST_CHANNEL - The label of the destination channel. This will be created if not present.
- -DDATAFILE, --data=DATAFILE - Path to a list of rpms to move to the destination channel, only used if version, release, update, and arch are not specified.(Optional)
Note
1.2.10. Removing Software Packages
Warning
- Go to the Package Management page and select an option containing the packages from the dropdown menu and click .
- Select the appropriate checkboxes and click . A confirmation page appears with the packages listed. Click Delete Package(s) to delete the packages entirely.
Note
1.2.11. Deleting Software Channels
Note
Important
- Packages from the channel will remain on the server even if the channel is removed. There is an option to delete them after.
- Any errata related to the channel may be orphaned after the channel deletion.
- The Satellite server will not delete a parent channel if a child channel exists. Delete all child channels before deleting the parent.
- Kickstart distributions must be dissociated from the channel or deleted before deleting the channel.
- If the established channel on the Proxy is connected to a Satellite, delete the channel on the Red Hat Satellite Proxy Server.
1.2.12. Uploading and Maintaining Custom Packages
Warning
1.2.12.1. Uploading Packages to Red Hat Satellite Proxy Server
spacewalk-proxy-package-manager RPM package and its dependencies. This package is available to registered Red Hat Satellite Proxy Server systems and is installed by running yum install spacewalk-proxy-package-manager.
Note
*.rpm) are stored on the Red Hat Satellite Proxy Server. For this reason, custom packages cannot be downloaded through the Red Hat Satellite website, although they are listed. They must be retrieved by the client system using yum install.
1.2.12.1.1. Configuring and Using the Red Hat Network Package Manager
scp:
scp foo.rpm root@rhnproxy.example.com:/tmp
# scp foo.rpm root@rhnproxy.example.com:/tmp
Note
rhn_package_manager -c label_of_private_channel pkg-list
# rhn_package_manager -c label_of_private_channel pkg-list-c or --channel), the uploaded package headers are linked to all the channels identified. If a channel is not specified, the packages are deposited in the No Channels section of the Package Management page. See Section 1.2.3, “Assigning Packages to Software Channels” for instructions on reassigning packages.
-d option to specify the local directory that contains the packages to be added to the channel. Red Hat Network Package Manager can also read the list of packages from standard input (using --stdin).
/etc/rhn/default/rhn_proxy_package_manager.conf. The choices can be overridden in the default configuration file with settings in the main configuration file /etc/rhn/rhn.conf or via command line options passed to Red Hat Network Package Manager.
.rhn_package_manager in the home directory of the user currently logged in and finally from /etc/rhn/rhn_package_manager.conf. Make sure all of these files have the appropriate permissions to prevent others from reading them.
rhn_package_manager -s -c name_of_private_channel
# rhn_package_manager -s -c name_of_private_channel-s option lists all the missing packages, which are packages uploaded to the Red Hat Satellite Server but not present in the local directory. You must be an Organization Administrator to use this option. The application prompts you for your Red Hat Satellite username and password.
--copyonly option copies the file listed in the argument into the specified channel without uploading to the Satellite. This is useful when a channel on a Red Hat Satellite Proxy Server is missing a package and you don't want to reimport all of the packages in the channel.
rhn_package_manager -c channel-name --copyonly /path/to/missing/file
# rhn_package_manager -c channel-name --copyonly /path/to/missing/filerhn_package_manager -l -c name_of_private_channel
# rhn_package_manager -l -c name_of_private_channel-l option lists the package name, version number, release number, architecture, and channel name for each package in the specified channel(s). See Section 1.2.12.1.1, “Configuring and Using the Red Hat Network Package Manager” for additional options.
rhn_package_manager):
| Option | Description |
|---|---|
-v, --verbose | Increase verbosity of standard output messages. |
-d, --dir DIRECTORY_NAME | Process packages from this directory. |
-c, --channel CHANNEL_NAME | Specify the channel to receive packages. Multiple channels may be specified using multiple instances of -c (e.g.: -c channel_one -c channel_two) |
-n, --count NUMBER | Process this number of headers per call - the default is 32. |
-l, --list | List the packages in the specified channel(s). |
-s, --sync | Check if local directory is in sync with the server. |
-p, --printconf | Print the current configuration and exit. |
--newest | Push only the packages that are newer than those on the server. Note that source packages are special in that their versions are never compared to each other. Their newness is dependent on their associated binary packages. Using this option with Red Hat Network Package Manager and just a source package does upload the package, but the source package does not appear in the Red Hat Satellite Web interface until the associated binary package has been uploaded. Contrast this with --source. Using --source --newest together does update the stand-alone source package with newer packages and does not require an associated binary package to be uploaded first. |
--source | Upload the indicated source packages. Doing this treats them as plain, stand-alone packages and not as special source packages associated with another, pre-existing binary package. For example, use this when application sources need to be distributed to developers and testers outside of regular source control management. |
--stdin | Read the package names from standard input. |
--nosig | Don't fail if packages are unsigned. |
--no-ssl | Turn off SSL (not recommended). |
--stdin | Read the package names from standard input. |
--username USERNAME | Specify the Red Hat Satellite username. If the username is not provided, you will be prompted for the username of a valid Channel Administrator. |
--password PASSWORD | Specify the Red Hat Satellite password. If the password is not provided, you will be prompted for the password of a valid Channel Administrator. |
--dontcopy | In the post-upload step, do not copy the packages to their final location in the package tree. |
--copyonly | Only copy the packages, do not re-import them. |
--test | Only print a list of the packages to be pushed. |
-?, --help | Display the help screen with a list of options. |
--usage | Briefly describe the available options. |
--copyonly | Only copy packages |
Note
rhn_package_manager manual page: man rhn_package_manager.
1.2.12.2. Uploading Packages to Red Hat Satellite Server
rhnpush package and its dependencies. This package is available to registered Red Hat Satellite Server systems and is installed by running yum install rhnpush.
Note
1.2.12.2.1. Configuring the Red Hat Network Push Application
/etc/sysconfig/rhn/rhnpushrc. This file contains values for all the options contained in Section 1.2.12.2.1, “Configuring the Red Hat Network Push Application”.
rhnpush command is issued. Settings in the current directory (./.rhnpushrc) take precedent over those in the user's home directory (~/.rhnpushrc), which are used before those in the central configuration file (/etc/sysconfig/rhn/rhnpushrc).
- The software channel to be populated
- The home directory configuration file to include the username to be invoked
- The central configuration file to identify the server to receive the packages
rhnpush command:
| Option | Description |
|---|---|
-v --verbose | Increase verbosity, option can be used multiple times, that is, -vv, -vvv, and so forth. |
-d, --dir DIRECTORY | Process packages from this directory. |
-c, --channel=CHANNEL_LABEL | Specify the channel to receive packages. Note that this is required and is not the same as the channel's name. Multiple channels may be specified using multiple instances of -c (e.g. -c CHANNEL_ONE -c CHANNEL_TWO). |
-n, --count N_HEADERS_PER_CALL | Process this number of headers per call. Must be an integer. The default number is 25. |
-l, --list | List only the specified channels. |
-r, --reldirRELATIVE_DIRECTORY | Associate this relative directory with each file. |
-o, --orgidORGANIZATION_ID | Include the organization's ID number. Must be an integer. |
-u , --username USERNAME | Include the Red Hat Satellite username of the user that has administrative access to the specified channel. If not provided, rhnpush prompts for the username of a valid Channel Administrator. The username and password are cached in ~/.rhnpushcache for a limited time, five minutes being the default. Use --new-cache to force a new username and password. |
-p , --password PASSWORD | Include the Red Hat Satellite password of user that has administrative access to the specified channel. If not provided, rhnpush prompts for the password of a valid Channel Administrator. The username and password are cached in ~/.rhnpushcache for a limited time, five minutes being the default. Use --new-cache to force a new username and password. |
-s, --stdin | Read package list from standard input, for example from a piped ls command. |
-X, --exclude GLOB | Exclude packages that match this glob expression. |
--force | Force upload of a package, even if a package of that name and version currently exists in the channel. Without this option, uploading a pre-existing package returns an error. |
--nosig | Don't fail if packages are unsigned. |
--new-cache | Forces Red Hat Network Push to drop the username and password cache, then accept or ask for new ones. This is useful if mistakes are entered the first time. |
--newest | Push only the packages that are newer than those on the server. Note that source packages are special in that their versions are never compared to each other. Their newness is dependent on their associated binary packages. Using this option with Red Hat Network Push and just a source package does upload the package, but the source package does not appear in the Red Hat Satellite Web interface until the associated binary package has been uploaded. Contrast this with --source. Using --source --newest together does update the stand-alone source package with newer packages and does not require an associated binary package to be uploaded first. |
--header | Upload only the headers. |
--source | Upload the indicated source packages. Doing this treats them as plain, stand-alone packages and not as special source packages associated with another, pre-existing binary package. For example, use this when you want to distribute application source to developers and testers outside of regular source control management. |
--server SERVER | Specify the server to which packages are uploaded. Currently, a value of http://localhost/APP is necessary. This parameter is required. |
--test | This only prints a list of the packages to be pushed, it doesn't actually push them. |
-h, --help | Briefly describe the options. |
-?, --usage | View the usage summary. |
Note
rhnpush manual page: man rhnpush.
1.2.12.2.2. Using the Red Hat Network Push application
Note
rhnpush -c label_of_private_channel pkg-list
# rhnpush -c label_of_private_channel pkg-listrhnpush -c label_of_private_channel --server=localhost pkg-list
# rhnpush -c label_of_private_channel --server=localhost pkg-list-c or --channel), the uploaded package headers are linked to all the channels identified. If there is no channel specified, the packages are deposited in the No Channels section of the Package Management page. See Section 1.2.3, “Assigning Packages to Software Channels” for instructions on reassigning packages.
--server option specifies the server to which the packages are installed, and is required. Red Hat Network Push can be installed on external systems, but running Red Hat Network Push locally on the Red Hat Satellite Server is recommended.
pkg-list reference represents the list of packages to be uploaded. Alternatively, use the -d option to specify the local directory that contains the packages to be added to the channel. Red Hat Network Push can also read the list of packages from standard input (using --stdin).
1.3. Managing Configuration Channels
1.3.1. Preparing Systems for Config Management
config-enable file installed. These tools may already be installed on the system, especially if the system was kickstarted with configuration management functionality. If not, they can be found within the Red Hat Network Tools child channel. The following packages should be downloaded and installed:
rhncfg- The base libraries and functions needed by allrhncfg-*packages.rhncfg-actions- The code required to run configuration actions scheduled via the Red Hat Network website.rhncfg-client- A command line interface to the client features of the Red Hat Network Configuration Management system.rhncfg-management- A command line interface used to manage Red Hat Network configuration.
1.3.2. Creating a New Configuration Channel
- Log in as a Channel Administrator or an Organization Administrator.
- Click the tab.
- On the right-hand frame marked as Configuration Actions, click .
- Fill in the following fields:
- Name
- Label. This field must contain only alphanumeric characters, "-", "_", and "."
- Description. You must enter a description. This field can contain any brief information that allows you to distinguish this channel from others.
- Click .
1.3.3. Adding Configuration Files to the Configuration Channel
- Log in as a Channel Administrator or an Organization Administrator.
- Click the tab.
- On the submenu on the left, click on .
- Select the configuration channel the configuration files will be added to.
- Click on the subtab .
- Fill in the required fields:
- File to Upload - the maximum allowed file size for configuration files is 128kb.
- Filename/Path - the path in the target system the configuration file should be deployed to.
- Ownership - the user and group that owns the file. If the user and group added in the fields do not exist on the systems where the file is being deployed to, the deployment will fail.
- File Permissions Mode - permissions on the file based on who can modify it. For example, '644' for text files and '755' for directories and executables will allow global access or execution (but not modification).
- SELinux context - enter SELinux context like: user_u:role_r:type_t:s0-s15:c0.c1024.
- Macro Delimiters - a listing of available macros are in the next section, Section 1.3.4, “Including Macros in Configuration Files”
1.3.4. Including Macros in Configuration Files
- rhn.system.sid
- rhn.system.profile_name
- rhn.system.description
- rhn.system.hostname
- rhn.system.ip_address
- rhn.system.custom_info(key_name)
- rhn.system.net_interface.ip_address(eth_device)
- rhn.system.net_interface.netmask(eth_device)
- rhn.system.net_interface.broadcast(eth_device)
- rhn.system.net_interface.hardware_address(eth_device)
- rhn.system.net_interface.driver_module(eth_device)
server.conf, with the IP address and hostname macros included, like so:
hostname={| rhn.system.hostname |}
ip_address={| rhn.system.net_interface.ip_address(eth0) |}
hostname={| rhn.system.hostname |}
ip_address={| rhn.system.net_interface.ip_address(eth0) |}
rhncfg-client), the variables will be replaced with the hostname and IP address of the system, as recorded in the Satellite's System Profile. In the above configuration file, for example, the deployed version resembles the following:
hostname=test.example.domain.com
ip_address=177.18.54.7
hostname=test.example.domain.com
ip_address=177.18.54.7
asset={@ rhn.system.custom_info(asset) @}
asset={@ rhn.system.custom_info(asset) @}
asset=Example#456
asset=Example#456
asset={@ rhn.system.custom_info(asset) = 'Asset #' @}
asset={@ rhn.system.custom_info(asset) = 'Asset #' @}
rhncfg-manager) will not translate or alter the files, as that tool is system agnostic. rhncfg-manager does not depend on system settings.
Note
1.3.5. Subscribing Systems to the Configuration Channel
- Systems must be subscribed to the configuration channel.
- Configuration Management must be enabled on the systems. See Section 1.3.6, “Enabling Configuration Management on Systems” for the procedure.
- Click . On the left-hand submenu, click .
- Select the configuration channel where the systems should be added.
- On the channel page, click on the → subtab.
- Select systems to be added to the configuration channel and click .
1.3.6. Enabling Configuration Management on Systems
- Target systems need a provisioning entitlement. See the Systems chapter for the procedure on how to add a provisioning entitlement to a system.
- A subscription to the Red Hat Satellite Tools channel. See the Systems chapter for the procedure on how to change a child channel.
- Log in as Channel Administrator or Satellite Administrator.
- Click on
- On the right-hand frame marked as Configuration Actions, click .
- Select systems to enable.
- Schedule the package installation of the
rhcfg-*packages. Select a time for these configuration packages to be installed. - Click .
- Open a terminal console on the individual systems or remotely login as root. The following actions need to be performed:
- Run this command to complete the pending
rhncfg-*package installation:rhn_check
# rhn_checkCopy to Clipboard Copied! Toggle word wrap Toggle overflow - Run the following command to enable Red Hat Network actions:
rhn-actions-control --enable-all
# rhn-actions-control --enable-allCopy to Clipboard Copied! Toggle word wrap Toggle overflow
Chapter 2. Organizations
2.1. Creating an Organization
- To create a new organization, click → → .
- Type the organization name into the appropriate text box. The name should be between 3 and 128 characters.
- Create an administrator for the organization, by providing the following information:
- Enter a Desired Login for the organization administrator, which should be between 5 and 64 characters long. Consider creating a descriptive login name for the Organization Administrator account that matches administrative login names with the organization.
- Create a Desired Password and Confirm the password.
- Type in the Email address for the organization administrator.
- Enter the First Name and Last Name of the organization administrator.
- Click the button to complete the process.
organization 1 Organization Administrator account for themselves. This will give them the ability to log in to the organization if required.
Important
2.2. Managing Organization Entitlements
- System Entitlement - Management entitlement is a base requirement for all organizations to function correctly. The number of management entitlements allocated to an organization is equivalent to the maximum number of systems that can register to that organization on the Red Hat Satellite, regardless of the number of software entitlements available. For example, if there are 100 Red Hat Enterprise Linux Client entitlements available in total, but only 50 management system entitlements are available to the organization, only 50 systems are able to register to that organization. Provisioning is also recommended especially for systems managed in organizations.
- Software Channel Entitlements - for systems that use Red Hat channels, Red Hat Enterprise Linux Server would be required. The Red Hat Network Tools channel would also be recommended. The Red Hat Network Tools channel contains various client software required for extended Red Hat Satellite functionality, such as clients necessary for configuration management and kickstart support as well as the
rhn-virtualizationpackage, which is necessary for the entitlements of Xen and KVM virtual guests to be counted correctly.
2.2.1. Changing an Organization's System Entitlement
- Click the menu, and select .
- Choose an organization from the list and select the tab. The page defaults to .
- Change the Proposed Totals of system entitlements based on how many entitlements should be allocated to the organization. The maximum and minimum totals are indicated just below the fields.
- Click to update all changes.
2.2.2. Changing an Organization's Software Channel Entitlement
- Click the menu, and select .
- Choose an organization from the list and select the tab.
- Within the interface, click the Software Channel Entitlements tab to see all entitlements for all organizations, and their usage. Change the Regular Proposed Total according to the planned channel entitlements that should be allocated to the organization. The minimum and maximum totals are indicated below the field.Channel entitlements can be either Regular or Flex. Any system can use a regular entitlement. Flex entitlements can only be used by systems that have been detected as being guests of a supported virtualization type.
- Click on to update all changes.
Note
2.3. Managing Multiple Organizations
2.3.1. Modeling your Satellite for Multi-Organization Use
2.3.1.1. Centrally-Managed Satellite for A Multi-Department Organization

Figure 2.1. Centralized Satellite Management for Multi-Department Organization
2.3.1.2. Decentralized Management of Multiple Third Party Organizations
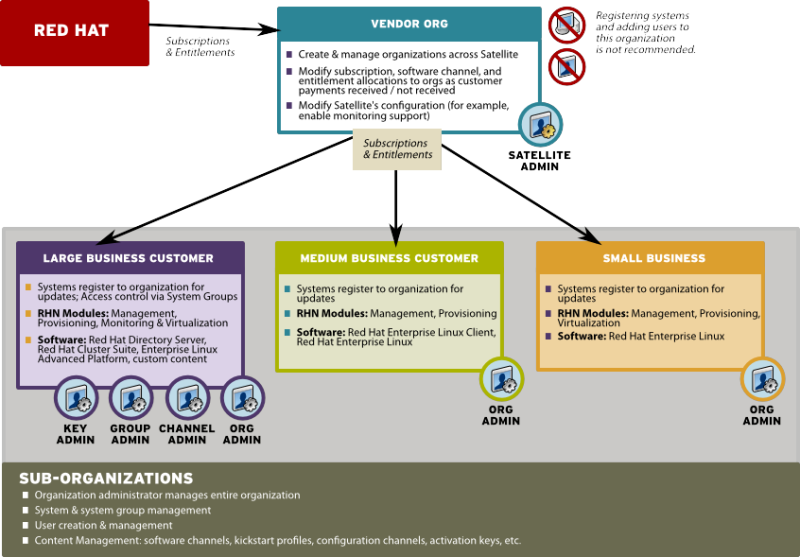
Figure 2.2. Decentralized Satellite Management for Multi-Department Organization
2.3.1.3. Recommendations for Multi-Organization Use
- Use the Satellite as a single organization Satellite
- Are in the process of migrating from a single organization Satellite to a multiple organization Satellite
- The administrative organization is treated as a special case with respect to entitlements. You can only add or remove entitlements to this organization implicitly by removing them or adding them from the other organizations on the Satellite.
- The administrative organization is a staging area for subscriptions and entitlements. When you associate the Satellite with a new certificate, any new entitlements will be granted to this organization by default. In order to make those new entitlements available to other organizations on the Satellite, you will need to explicitly allocate those entitlements to the other organizations from the administrative organization.
- The Satellite server may only contain as many systems as there are entitlements in the Satellite certificate. Evaluate each organization's entitlement usage on the Satellite and decide how many entitlements are required for each organization to function properly. Each organization administrator should be aware of the entitlement constraint and manage the system profiles as required. Should there be any issues, the Satellite administrator can step in to mediate entitlement concerns.
Note
When logged in under a Satellite administrator, you cannot decrement the allocated entitlements to an organization below the number of entitlements that organization has actively associated with system profiles.
2.3.2. Configuring Systems in an Organization
- Registering Using Login and Password - If you provide a login and password created for a specified organization, the system will be registered to that organization. For example, if
user-123is a member of the Central IT organization on the Satellite, the following command on any system would register that system to the Central IT organization on your Satellite:rhnreg_ks --username=user-123 --password=foobaz
# rhnreg_ks --username=user-123 --password=foobazCopy to Clipboard Copied! Toggle word wrap Toggle overflow Note
The--orgid(for Red Hat Enterprise Linux 5) parameter inrhnreg_ksare not related to Satellite registration or Red Hat Satellite's multiple organizations support. - Registering Using An Activation Key - You can also register a system to an organization using an activation key from the organization. Activation keys will register systems to the organization in which the activation key was created. Activation keys are a good registration method to use if you want to allow users to register systems into an organization without providing them login access to that organization. If you want to move systems between organizations, you may also automate the move with scripts using the activation keys.
Note
Activation keys have a new format since Red Hat Satellite 5.1.0, so the first few characters of the activation key are used to indicate which organization (by ID number) owns the activation.
2.3.3. Managing Organizational Trusts
Note
2.3.3.1. Establishing an Organizational Trust
2.3.3.2. Sharing Content Channels between Organizations in a Trust
Note
- Log in to the Satellite with the username of the Organization Administrator.
- Click on the → .
- Click the custom channel that you want to share with the other organizations.
- From the Channel Access Control section of the Details page, there are three choices for sharing in Organizational Sharing.
- Private - Make the channel private so that it cannot be accessed by any organizations except the channel's owner.
- Protected - Allow the channel to be accessed by specific trusted organizations of your choice.
Note
Choosing Protected sharing displays a separate page that prompts you to confirm that you are granting channel access to the organizations by clicking . - Public - Allow all organizations within the trust to access the custom channel.
Click the radio button next to your selection and click .
Note
2.3.3.3. Migrating Systems from One Trusted Organization to Another
migrate-system-profile.
Note
2.3.3.3.1. Using the Satellite Interface to Migrate Systems
Procedure 2.1. To Migrate a System Between Organizations:
- Click the tab and then click the name of the system that you want to migrate.
- Click → and select the name of the organization that you want to migrate the system to.
- Click .
2.3.3.3.2. Using migrate-system-profile
migrate-system-profile usage is based on the command-line, and uses systemIDs and orgIDs as arguments to specify what is being moved and its destination organization.
migrate-system-profile command, you must have the spacewalk-utils package installed. You do not need to be logged into the Satellite server to use migrate-system-profile; however, if you do not you will need specify the hostname or IP address of the server as a command-line switch.
Note
migrate-system-profile command, the system does not carry any of the previous entitlements or channel subscriptions from the source organization. However, the system's history is preserved, and can be accessed by the new Organization Administrator in order to simplify the rest of the migration process, which includes subscribing to a base channels and granting entitlements.
Note
spacewalk-report tool.
migrate-system-profile --satellite {SATELLITE HOSTNAME OR IP} --systemId={SYSTEM ID} --to-org-id={DESTINATION ORGANIZATION ID}
# migrate-system-profile --satellite {SATELLITE HOSTNAME OR IP} --systemId={SYSTEM ID} --to-org-id={DESTINATION ORGANIZATION ID}Example 2.1. Migration from one department to another
- Finance department organization ID is
2 - The workstation has a system ID of
10001020 - The Red Hat Satellite hostname is
satserver.example.com
migrate-system-profile --satellite=satserver.example.com --systemId=10001020 --to-org-id=2
# migrate-system-profile --satellite=satserver.example.com --systemId=10001020 --to-org-id=2
--username= and --password= at the command-line).
--csv option of migrate-system-profile to automate the process using a simple comma-separated list of systems to migrate.
systemId,to-org-id
systemId,to-org-id1000010000,3 1000010020,1 1000010010,4
1000010000,3
1000010020,1
1000010010,4
migrate-system-profile see the manual page by typing man migrate-system-profile or for a basic help screen type migrate-system-profile -h.
Chapter 3. System Provisioning
3.1. Provisioning Through Red Hat Satellite
http://satellite.example.com/ks/dist/ks-rhel-x86_64-server-6-6.4, followed by the name of the package you wish to download, such as: http://satellite.example.com/ks/dist/ks-rhel-x86_64-server-6-6.4/GPL.
Definitions
- Kickstarting
- The process of installing a Red Hat Enterprise Linux system in an automated manner requiring little or no user intervention. Technically, kickstart refers to a mechanism in the Anaconda installation program that allows concise description of the contents and configuration of a machine to be written into the installer, which it then acts on. Such a concise system definition is referred to as a Kickstart profile.
- Kickstart profile
- The kickstart file is a text file that specifies all of the options needed to kickstart a machine, including partitioning information, network configuration, and packages to install. In Red Hat Satellite, a Kickstart Profile is a superset of a traditional Anaconda kickstart definition, as Satellite's implementation builds on Cobbler's enhancements to kickstarting. A Kickstart Profile presumes the existence of a Kickstart Tree.
- Kickstart Tree
- The software and support files needed in order to kickstart a machine. This is also often called an "install tree". This is usually the directory structure and files pulled from the installation media that ships with a particular release. In Cobbler terminology, a Kickstart Tree is part of a distribution.
- PXE (Preboot eXecution Environment)
- A low-level protocol that makes it possible to kickstart bare metal machines (usually physical, or real, machines) on power-up with no pre-configuration of the target machine itself. PXE relies on a DHCP server to inform clients about bootstrap servers. PXE must be supported in the firmware of the target machine in order to be used. It is possible to use the virtualization and reinstall facilities of Satellite without PXE, though PXE is very useful for booting new physical machines, or reinstalling machines that are not registered to Satellite.
Provisioning Scenarios
- New installations
- Provisioning a system that has not previously had an operating system installed (also known as bare metal installations).
- Virtual installations
- Satellite supports KVM, Xen fully-virtualized guests, and Xen para-virtualized guests.
- Re-provisioning
- Both physical and guest systems can be re-provisioned, provided that they have been registered to the same Satellite instance. See Section 3.5, “Reprovisioning”.
3.1.1. Kickstart Explained
- After being placed on the network and turned on, the machine's PXE logic broadcasts its MAC address and a request to be discovered.
- If a static IP address is not being used, the DHCP server recognizes the discovery request and extends an offer of network information needed for the new machine to boot. This includes an IP address, the default gateway to be used, the netmask of the network, the IP address of the TFTP or HTTP server holding the bootloader program, and the full path and file name of that program relative to the server's root.
- The machine applies the networking information and initiates a session with the server to request the bootloader program.
- The bootloader, once loaded, searches for its configuration file on the server from which it was itself loaded. This file dictates which kernel and kernel options, such as the initial RAM disk (initrd) image, should be executed on the booting machine. Assuming the bootloader program is SYSLINUX, this file is located in the
pxelinux.cfgdirectory on the server and named the hexadecimal equivalent of the new machine's IP address. For example, a bootloader configuration file for Red Hat Enterprise Linux 6 should contain:Copy to Clipboard Copied! Toggle word wrap Toggle overflow - The machine accepts and uncompresses the init image and kernel, boots the kernel, and initiates a kickstart installation with the options supplied in the bootloader configuration file, including the server containing the kickstart configuration file.
- This kickstart configuration file in turn directs the machine to the location of the installation files.
- The new machine is built based upon the parameters established within the kickstart configuration file.
3.1.2. Prerequisites
- A DHCP server. This is not required for kickstarting, but a DHCP server will ease the need to configure network settings in the kickstart file. You may also boot from the network. If you do not have a DHCP server and are using a static IP addresses, you should select static IP while developing your kickstart profile.
- An FTP server. It can be used in place of hosting the kickstart distribution trees via HTTP.
- Configure DHCP to assign required networking parameters and the bootloader program location.
- Specify the kernel to be used and the appropriate kernel options within the bootloader configuration file.
3.1.2.1. Required Packages
rhn-tools Red Hat Network (RHN) channel:
koanspacewalk-koan
rhn-tools channel in order to have access to these packages from your custom channel.
kernel and initrd files to be in specific locations within the kickstart tree. However, these locations are different for different architectures. The table below explains the different locations:
| Architecture | kernel | Initial RAM Disk image |
|---|---|---|
| IBM System z | TREE_PATH/images/kernel.img | TREE_PATH/images/initrd.img |
| PowerPC | TREE_PATH/ppc/ppc64/vmlinuz | TREE_PATH/ppc/ppc64/initrd.img |
| All other architectures | TREE_PATH/images/pxeboot/vmlinuz | TREE_PATH/images/pxeboot/initrd.img |
3.1.2.2. Kickstart Trees
Procedure 3.1. Installing Kickstart Trees Automatically
satellite-sync.
- Choose which distribution to base the kickstarts on and locate that distribution's base channel, as well as its corresponding Red Hat Network Tools channel.For example, to use Red Hat Enterprise Linux 6 with x86 architecture, the
rhel-x86_64-server-6channel and its corresponding Red Hat Network Tools channelrhn-tools-rhel-x86_64-server-6are required. - If it is a connected Satellite, synchronize the Satellite server with the Red Hat servers directly using the
satellite-synccommand. If the Satellite server is disconnected, it is necessary to obtain disconnected channel dumps from the Red Hat servers and synchronize with those. - Synchronizing the channel will automatically create a corresponding kickstart tree for that distribution.
Procedure 3.2. Installing Kickstart Trees Manually
- Copy the installation ISO to the Satellite server and mount it to
/mnt/iso. - Copy the contents of the ISO to a custom location. It is recommended to create a directory within
/var/satellitefor all custom distributions. For example, copying a Red Hat Enterprise Linux 6 beta distribution's contents to/var/satellite/custom-distro/rhel-x86_64-server-6-beta/. - Use the Red Hat Satellite web interface to create a custom software channel. Use → → to create a parent channel with an appropriate name and label. For the example used above, use the label rhel-6-beta.
- Push the software packages from the tree location to the newly created software channel using the
rhnpushcommand:rhnpush --server=http://localhost/APP -c 'rhel-6-beta' \ -d /var/satellite/custom-distro/rhel-x86_64-server-6-beta/Server/
# rhnpush --server=http://localhost/APP -c 'rhel-6-beta' \ -d /var/satellite/custom-distro/rhel-x86_64-server-6-beta/Server/Copy to Clipboard Copied! Toggle word wrap Toggle overflow The sub-directory within the tree could be different depending on the distribution. - Once the software packages have been pushed, they can be deleted from within the tree path using the
rmcommand. The packages are still stored on the Satellite server within the channel, and are no longer required in the tree.rm /var/satellite/custom-distro/rhel-x86_64-server-6-beta/Server/*.rpm
# rm /var/satellite/custom-distro/rhel-x86_64-server-6-beta/Server/*.rpmCopy to Clipboard Copied! Toggle word wrap Toggle overflow You can choose to leave the software packages within the kickstart tree. This will allow them to be installed with theyumcommand at any time later on. - Use the Red Hat Satellite web interface to create the distribution. Use → → → to create the distribution, using an appropriate label and the full tree path (such as
/var/satellite/custom-distro/rhel-x86_64-server-6-beta/. Select the base channel that was created earlier, and the correct Installer Generation (such as Red Hat Enterprise Linux 6). To complete the creation, select Create Kickstart Distribution. - To maintain the same software across multiple environments and systems, the Red Hat Network Tools child channel from an existing Red Hat Enterprise Linux base channel can be cloned as a child channel of the newly created base channel. Cloning a child channel can be done by:
- On the Satellite web interface, click on → →
- Choose the Child Channel you wish to clone from the drop down box Clone From: and choose the clone state.
- Click Create Channel.
- Fill in the necessary information and choose the parent channel that the cloned child channel needs to be under.
- Click Create Channel.
3.1.2.3. Kickstart Profiles
Procedure 3.3. Creating a Kickstart Profile with a Wizard
- Select → →
- Provide an appropriate Label, and select the desired Base Channel and Kickstartable Tree
- Select the desired Virtualization Type. See Section 3.1.2.3, “Kickstart Profiles” for more information about virtualization types. Click next to continue.
- Select the download location for the kickstart profile. For custom distributions, enter the location of its tree as a URL (both HTTP and FTP are supported), otherwise, use the default option. Click next to continue.
- Enter the root password and click finish to complete the profile creation.
- The complete kickstart profile will be created. View the profile by clicking Kickstart File.
Procedure 3.4. Creating a Kickstart Profile with the Raw Method
- Select → →
- Provide an appropriate label, and select the desired distribution
- Select the desired Virtualization Type. See Section 3.1.2.3, “Kickstart Profiles” for more information about virtualization types.
- If there is an existing kickstart profile, upload the file. Otherwise, write the kickstart profile in the File Contents text box.Here is a sample raw kickstart that can be used as a starting point:
Copy to Clipboard Copied! Toggle word wrap Toggle overflow - The Red Hat Satellite server does not handle the specified distribution as the
urlin the kickstart, so remember to include theurl --urloption in the profile, similar to the following:url --url http://$http_server/ks/dist/org/1/my_distro
url --url http://$http_server/ks/dist/org/1/my_distroCopy to Clipboard Copied! Toggle word wrap Toggle overflow Replacemy_distrowith the distribution label and1with your org id. - Raw kickstart profiles use
$http_serverinstead of the Satellite's host name. This will be filled in automatically when the kickstart template is rendered. - The
redhat_registersnippet is used to handle registration.
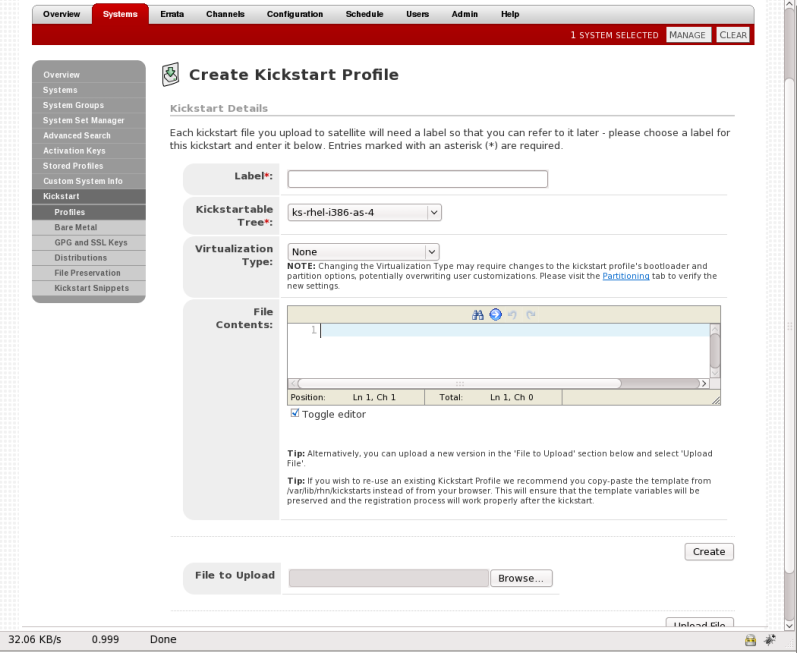
Figure 3.1. Raw Kickstart
All kickstart profiles have a virtualization type associated with them. This table outlines the different options:
| Type | Description | Uses |
|---|---|---|
| none | No virtualization | Use this type for normal provisioning, bare metal installations, and virtualized installation that are not Xen or KVM (such as VMware, or Virtage) |
| KVM Virtualized Guest | KVM guests | Use this type for provisioning KVM guests |
| Xen Fully-Virtualized Guest | Xen guests | Use this type for provisioning Xen guests
Note
This option requires hardware support on the host, but does not require a modified operating system on the guest.
|
| Xen Para-Virtualized Guest | Xen Guests | Use this type for provisioning a virtual guest with Xen para-virtualization. Para-virtualization is the fastest virtualization mode. It requires a PAE flag on the system CPU, and a modified operating system. Only Red Hat Enterprise Linux 5 supports guests under para-virtualization. |
| Xen Virtualization Host | Xen hosts | Use this type for provisioning a virtual host with Xen para-virtualization. Xen para-virtualized guests and hosts are supported, if the hardware is compatible. Supported on Red Hat Enterprise Linux 5 only. |
kernel-xen package in the %packages section.
qemu package in the %packages section.
Note
3.1.2.4. Templating
for loops and if statements in the kickstart files. This is achieved using the cheetah tool.
- Reusing a particular section of a kickstart, such as a disk partitioning section, between multiple kickstarts.
- Performing some
%postactions consistently across multiple kickstarts. - Defining a snippet across multiple server roles such as DNS server, proxy server, and web server. For example, a web server might have the following snippet defined:
httpd
mod_ssl
mod_python
httpd
mod_ssl
mod_python
Copy to Clipboard Copied! Toggle word wrap Toggle overflow To create a web server profile, include the web server snippet in the%packagesection of the kickstart file. For a profile to be both a web server and a proxy server, include both snippets in the package section. To add another package to the web server snippet,mod_perlfor example, update the snippet, and all profiles that are using that snippet are dynamically updated.
Templating allows the defining of a variable to be used throughout a kickstart file. Variables are subject to a form of inheritance that allows them to be set at one level and overridden at levels below them. So, if a variable is defined at the system level, it will override the same variable defined at the profile or kickstart tree levels. Likewise, if a variable is defined at the profile level, it will override the same variable defined at the kickstart tree level.
Note
Snippets reuse pieces of code between multiple kickstart templates. They can span many lines, and include variables. They can be included in a kickstart profile by using the text $SNIPPET('snippet_name'). A snippet can be made for a package list, for a %post script, or for any text that would normally be included in a kickstart file.
/var/lib/cobbler/snippets/. Once Kickstart profiles are created, review the contents of /var/lib/rhn/kickstarts/ to see how snippets are incorportated into the profiles.
redhat_register snippet is a default snippet that is used to register machines to a Red Hat Satellite server as part of a kickstart. It uses a variable called redhat_management_key to register the machine. To use the snippet, set the redhat_management_key variable at either the system, profile, or distribution level and then add $SNIPPET('redhat_register') to a %post section of the kickstart. Any wizard-style kickstarts that are generated by the Red Hat Satellite server will already include this snippet in the %post section.
/var/lib/rhn/kickstarts/snippets/ directory. Red Hat Satellite stores snippets for different organizations in different directories, so custom snippets will be stored with a filename similar to the following, where 1 is the organization ID:
$SNIPPET('spacewalk/1/snippet_name')
$SNIPPET('spacewalk/1/snippet_name')
Note
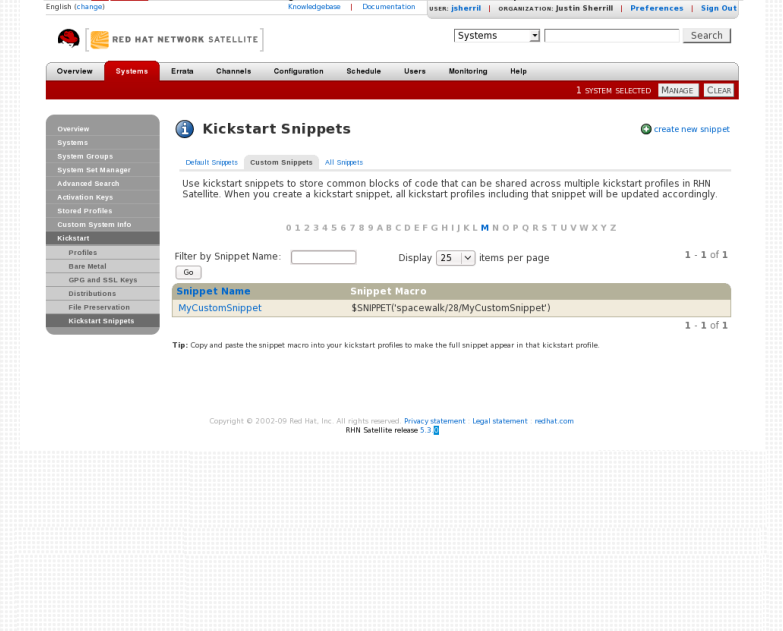
Figure 3.2. Kickstart Snippets
The $ and # characters are used during templating for specifying variables and control flow. If these characters are needed for any other purpose in a script, they will need to be escaped so that they are not recognized as a variable. This can be achieved in several ways:
- Placing a backslash character (
\) before every instance of$or#that needs to be ignored during templating. - Wrap the entire script in
#raw ... #end rawAll%preand%postscripts created using the wizard-style kickstarts are wrapped with#raw...#end rawby default. This can be toggled using the Template checkbox available when editing a%postor%prescript. - Include
#errorCatcher Echoin the first line of the snippet.
Example 3.1. Escaping Special Characters in templates
%post section:
%post
echo $foo > /tmp/foo.txt
%post
echo $foo > /tmp/foo.txt
$ being escaped, the templating engine will try to find a variable named $foo and would fail because foo does not exist as a variable.
$ is by using a backslash character (\):
%post
echo \$foo > /tmp/foo.txt
%post
echo \$foo > /tmp/foo.txt
\$foo to be rendered as $foo.
#raw ... #end raw, as follows
%post
#raw
echo $foo > /tmp/foo.txt
#end raw
%post
#raw
echo $foo > /tmp/foo.txt
#end raw
#errorCatcher Echo in the first line of the kickstart template. This instructs the templating engine to ignore any variables that do not exist and print out the text as is. This option is already included in the wizard-style kickstarts, and can be included in any raw kickstarts created manually.
3.1.2.5. Kickstarting from Bare Metal
- Standard operating system installation media
- PXE boot
- Yaboot for PowerPC
Procedure 3.5. Booting from Installation Media
- Insert installation media into the machine. The media must match the kickstart intended to use. For example, if the kickstart is configured to use the
ks-rhel-x86_64-server-6-6.4kickstart tree, use the Red Hat Enterprise Linux 6.4 64-bit installation media. - At the boot prompt, activate the kickstart by giving this command:
linux ks=http://satellite.example.com/path/to/kickstart
linux ks=http://satellite.example.com/path/to/kickstartCopy to Clipboard Copied! Toggle word wrap Toggle overflow - Once the system boots up, download the kickstart file, and install automatically.
Procedure 3.6. PXE Booting
Important
If a DHCP server is deployed on another system on the network, administrative access to the DHCP server is required in order to edit the DHCP configuration file.PrerequisitesThe latest cobbler-loaders package needs to be installed. This is to ensure that the
pxelinux.0boot image is installed and available on the Satellite before PXE booting. To install the latest version:yum install cobbler-loaders
# yum install cobbler-loadersCopy to Clipboard Copied! Toggle word wrap Toggle overflow If the machines reside on multiple networks, ensure that all of the machines can connect to the DHCP server. This can be achieved by multi-homing the DHCP server (using either a real or trunked VLAN) and configuring any routers or switches to pass the DHCP protocol across network boundaries.Configure the DHCP server so that it points to the PXE server by setting thenext-serveraddress for the systems to be managed by Red Hat Satellite.To use hostnames when performing the installation, configure the DHCP server to point to the domain and IP addresses, by including the following lines:option domain-name DOMAIN_NAME; option domain-name-servers IP_ADDRESS1, IP_ADDRESS2;
option domain-name DOMAIN_NAME; option domain-name-servers IP_ADDRESS1, IP_ADDRESS2;Copy to Clipboard Copied! Toggle word wrap Toggle overflow - On the DHCP server, switch to the root user and open the
/etc/dhcpd.conffile. Append a new class with options for performing PXE boot installation:Copy to Clipboard Copied! Toggle word wrap Toggle overflow This class will perform the following actions:- Enable network booting with the
bootpprotocol - Create a class called
PXE. If a system is configured to have PXE first in its boot priority, it will identify itself asPXEClient. - The DHCP server directs the system to the Cobbler server at the IP address 192.168.2.1
- The DHCP server refers to the boot image file at
/var/lib/tftpboot/pxelinux.0
Restart your DHCP server:service dhcpd restart
# service dhcpd restartCopy to Clipboard Copied! Toggle word wrap Toggle overflow - Configure Xinetd. Xinetd is a daemon that manages a suite of services including TFTP, the FTP server used for transferring the boot image to a PXE client.Enable Xinetd using the
chkconfigcommand:chkconfig xinetd on
# chkconfig xinetd onCopy to Clipboard Copied! Toggle word wrap Toggle overflow Alternatively, switch to the root user and open the/etc/xinetd.d/tftpfile. Locate thedisable = yesline and change it to readdisable = no. - Start the Xinetd service so that TFTP can start serving the
pxelinux.0boot image:chkconfig --level 345 xinetd on /sbin/service xinetd start
# chkconfig --level 345 xinetd on # /sbin/service xinetd startCopy to Clipboard Copied! Toggle word wrap Toggle overflow Thechkconfigcommand turns on thexinetdservice for all user runlevels, while the/sbin/servicecommand turns onxinetdimmediately.
Procedure 3.7. Yaboot Booting
- Configure the boot order for your PowerPC clients. This involves accessing the Open Firmware interface and running the following commands at the prompt.List the aliases of all devices on your system using the
devaliascommand:Copy to Clipboard Copied! Toggle word wrap Toggle overflow Display the current boot order by checking theboot-deviceenvironment variable:0 > printenv boot-device -------------- Partition: common -------- Signature: 0x70 --------------- boot-device /pci@800000020000002/pci@2,3/ide@1/disk@0 /pci@800000020000002/pci@2,4/pci1069,b166@1/scsi@1/sd@5,0 ok
0 > printenv boot-device -------------- Partition: common -------- Signature: 0x70 --------------- boot-device /pci@800000020000002/pci@2,3/ide@1/disk@0 /pci@800000020000002/pci@2,4/pci1069,b166@1/scsi@1/sd@5,0 okCopy to Clipboard Copied! Toggle word wrap Toggle overflow Add thenetworkdevice to the top of the boot order by setting theboot-deviceenvironment variable with thenetworkdevice first and then the existing boot devices:0 > setenv boot-device network /pci@800000020000002/pci@2,3/ide@1/disk@0 /pci@800000020000002/pci@2,4/pci1069,b166@1/scsi@1/sd@5,0
0 > setenv boot-device network /pci@800000020000002/pci@2,3/ide@1/disk@0 /pci@800000020000002/pci@2,4/pci1069,b166@1/scsi@1/sd@5,0Copy to Clipboard Copied! Toggle word wrap Toggle overflow The system is now configured to boot from thenetworkdevice first. Ifnetworkfails, the system will boot from the remaining devices in the boot order. - Set the system configuration properties on the Satellite server. For example, the following command creates a new system called
myppc01using a specific MAC address on the network:cobbler system add --name myppc01 --hostname myppc01.example.com --profile rhel6webserver--kopts "console=hvc0 serial" --interface 0 --mac 40:95:40:42:F4:46
# cobbler system add --name myppc01 --hostname myppc01.example.com --profile rhel6webserver--kopts "console=hvc0 serial" --interface 0 --mac 40:95:40:42:F4:46Copy to Clipboard Copied! Toggle word wrap Toggle overflow This also creates a set of directories for the Yaboot bootloader and configuration based upon the MAC address specified. For example, the command previously used would create the following directories:/var/lib/tftpboot/ppc/40-95-40-42-F4-46 /var/lib/tftpboot/etc/40-95-40-42-F4-46
/var/lib/tftpboot/ppc/40-95-40-42-F4-46 /var/lib/tftpboot/etc/40-95-40-42-F4-46Copy to Clipboard Copied! Toggle word wrap Toggle overflow The first directory (/var/lib/tftpboot/ppc/40-95-40-42-F4-46) contains theramdiskandvmlinuzfiles used for for Yaboot. The second directory (/var/lib/tftpboot/etc/40-95-40-42-F4-46) contains the configuration file (yaboot.conf) with the Yaboot settings.See Section 3.1.4.6, “Adding a System to Cobbler” for more information about using Cobbler to provision systems. - On the DHCP server, switch to the root user and open the
/etc/dhcpd.conffile. Append a new entry with options for performing Yaboot installation. For example:Copy to Clipboard Copied! Toggle word wrap Toggle overflow This class will perform the following actions:- Enable network booting with the
bootpprotocol - Create a class called
Yaboot. If a system is configured to have Yaboot first in its boot priority, it will identify itself asAAPLBSDPC. - The DHCP server directs the system to the Cobbler server at the IP address 192.168.2.1
- The DHCP server refers to the Yaboot image file at created previously with
cobbler
Restart your DHCP server:service dhcpd restart
# service dhcpd restartCopy to Clipboard Copied! Toggle word wrap Toggle overflow - Configure Xinetd. Xinetd is a daemon that manages a suite of services including TFTP, the FTP server used for transferring the boot image to a PowerPC client.Enable Xinetd using the
chkconfigcommand:chkconfig xinetd on
# chkconfig xinetd onCopy to Clipboard Copied! Toggle word wrap Toggle overflow Alternatively, switch to the root user and open the/etc/xinetd.d/tftpfile. Locate thedisable = yesline and change it to readdisable = no. - Start the Xinetd service so that TFTP can start serving the Yaboot boot image:
chkconfig --level 345 xinetd on
/sbin/service xinetd start
# chkconfig --level 345 xinetd on
# /sbin/service xinetd start
Copy to Clipboard Copied! Toggle word wrap Toggle overflow Thechkconfigcommand turns on thexinetdservice for all user runlevels, while the/sbin/servicecommand turns onxinetdimmediately.
3.1.3. Using Activation Keys
rhnreg_ks.
Note
Procedure 3.8. Managing Activation Keys
- Select → from the top and left navigation bars.
- Click the create new key link at the top-right corner.
Warning
In addition to the fields listed below, Red Hat Satellite customers may also populate the Key field itself. This user-defined string of characters can then be supplied withrhnreg_ksto register client systems with the Satellite. Do not insert commas in the key. All other characters are accepted. Commas are problematic since they are the separator used when including two or more activation keys at once. See Section 3.1.3, “Using Activation Keys” for details. - Provide the following information:
- Description - User-defined description to identify the generated activation key.
- Usage - The maximum number of registered systems that can be registered to the activation key at any one time. Leave blank for unlimited use. Deleting a system profile reduces the usage count by one and registering a system profile with the key increases the usage count by one.
- Base Channels - The primary channel for the key. Selecting nothing will enable you to select from all child channels, although systems can be subscribed to only those that are applicable.
- Add-on Entitlements - The supplemental entitlements for the key, which includes Monitoring, Provisioning, Virtualization, and Virtualization Platform. All systems will be given these entitlements with the key.
- Universal default - Whether or not this key should be considered the primary activation key for your organization. Any client registering to Satellite without an activation key specified will use the Universal Default activation key. Ideally, the Universal Default activation key would include a standard or minimum set of channels and entitlements for basic system registration. For more information on Universal Default activation keys, see https://access.redhat.com/solutions/1140083.
Click .
Procedure 3.9. Using Multiple Activation Keys at Once
- base software channels - registration fails
- entitlements - registration fails
- enable config flag - configuration management is set
- Create multiple individual activation keys. See Section 3.1.3, “Using Activation Keys” for instructions.
- On the command line, include all the activation keys, separated by a comma, as an option in
rhnreg_ks:rhnreg_ks --activationkey=activationkey1,activationkey2,activationkey3
# rhnreg_ks --activationkey=activationkey1,activationkey2,activationkey3Copy to Clipboard Copied! Toggle word wrap Toggle overflow This may also be added into the kickstart profile within the Post tab of the Kickstart Details page. See Section 3.1.2.3, “Kickstart Profiles” for instructions.
Warning
3.1.4. Using Cobbler
Warning
- Kickstart template creation and management using the Cheetah template engine and Kickstart Snippets
- Virtual machine guest installation automation with the
koanclient-side tool - Installation environment analysis using the
cobbler checkcommand - Building installation ISOs with PXE-like menus using the
cobbler buildisocommand for Satellite systems with x86_64 architecture.
3.1.4.1. Cobbler Requirements
- To use Cobbler for system installation with PXE, install and configure the
tftp-serverpackage. - To use Cobbler to PXE boot systems for installation, your Satellite server requires either the ability to act as a DHCP server for Cobbler PXE booting or access to your network DHCP server. Edit
/etc/dhcp.confto changenext-serverto the hostname or IP address of your Cobbler server. - The latest
cobbler-loaderspackage needs to be installed. This is to ensure that thepxelinux.0boot image is installed and available on the Satellite before PXE booting. To install the latest version:yum install cobbler-loaders
# yum install cobbler-loadersCopy to Clipboard Copied! Toggle word wrap Toggle overflow
3.1.4.1.1. Configuring Cobbler with DHCP
Procedure 3.10. Configuring an Existing DHCP Server
- Log in as root on the DHCP server.
- Edit the
/etc/dhcpd.conffile and append a new class with options for performing PXE boot installation. For example:Copy to Clipboard Copied! Toggle word wrap Toggle overflow Following each action step-by-step in the above example:- The administrator enables network booting with the
bootpprotocol. - The administrator then creates a class called
PXE. A system that is configured to have PXE first in its boot priority will identify itself as aPXEClient. - The DHCP server directs the system to the Cobbler server at 192.168.2.1.
- Finally, the DHCP server retrieves the
pxelinux.0bootloader file.
3.1.4.1.2. Configuring Xinetd and TFTP for Cobbler
- Log in as root.
- Edit the
/etc/xinetd.d/tftpand change the option:disable = yes
disable = yesCopy to Clipboard Copied! Toggle word wrap Toggle overflow todisable = no
disable = noCopy to Clipboard Copied! Toggle word wrap Toggle overflow - Start the xinetd service:
chkconfig --level 345 xinetd on
/sbin/service xinetd start
# chkconfig --level 345 xinetd on
# /sbin/service xinetd start
Copy to Clipboard Copied! Toggle word wrap Toggle overflow
3.1.4.1.3. Configuring SELinux and IPTables for Cobbler Support
Procedure 3.11. Enabling Cobbler Support in SELinux
- Log in as root.
- Set the SELinux Boolean to allow HTTPD web service components:
setsebool -P httpd_can_network_connect true
# setsebool -P httpd_can_network_connect trueCopy to Clipboard Copied! Toggle word wrap Toggle overflow The-Pswitch is essential, as it enables HTTPD connection persistently across all system reboots.
Procedure 3.12. IPTables Configuration
- Log in as root.
- Add the following rules to the existing IPTables firewall rule sets to open the Cobbler-related ports:
- For TFTP:
/sbin/iptables -A INPUT -m state --state NEW -m tcp -p tcp --dport 69 -j ACCEPT
/sbin/iptables -A INPUT -m state --state NEW -m udp -p udp --dport 69 -j ACCEPT
# /sbin/iptables -A INPUT -m state --state NEW -m tcp -p tcp --dport 69 -j ACCEPT
# /sbin/iptables -A INPUT -m state --state NEW -m udp -p udp --dport 69 -j ACCEPT
Copy to Clipboard Copied! Toggle word wrap Toggle overflow - For HTTPD:
/sbin/iptables -A INPUT -m state --state NEW -m tcp -p tcp --dport 80 -j ACCEPT
/sbin/iptables -A INPUT -m state --state NEW -m tcp -p tcp --dport 443 -j ACCEPT
# /sbin/iptables -A INPUT -m state --state NEW -m tcp -p tcp --dport 80 -j ACCEPT
# /sbin/iptables -A INPUT -m state --state NEW -m tcp -p tcp --dport 443 -j ACCEPT
Copy to Clipboard Copied! Toggle word wrap Toggle overflow - For Cobbler and Koan XMLRPC:
/sbin/iptables -A INPUT -m state --state NEW -m tcp -p tcp --dport 25151 -j ACCEPT
# /sbin/iptables -A INPUT -m state --state NEW -m tcp -p tcp --dport 25151 -j ACCEPTCopy to Clipboard Copied! Toggle word wrap Toggle overflow
- Save the firewall configuration:
/sbin/iptables-save > /etc/sysconfig/iptables
# /sbin/iptables-save > /etc/sysconfig/iptablesCopy to Clipboard Copied! Toggle word wrap Toggle overflow
3.1.4.2. Configuring Cobbler with /etc/cobbler/settings
/etc/cobbler/settings file. The file contains several configurable settings, and offers detailed explanations for each setting regarding how it affects the functionality of Cobbler and whether it is recommended for users to change the setting for their environment.
/etc/cobbler/settings file, which documents each setting in detail.
3.1.4.3. Syncing and Starting the Cobbler Service
- Before starting the cobbler service, run a check on the cobbler service to make sure that all the prerequisites are configured according to the organization's needs:
cobbler check
# cobbler checkCopy to Clipboard Copied! Toggle word wrap Toggle overflow - Start the Satellite server with the following command:
/usr/sbin/rhn-satellite start
# /usr/sbin/rhn-satellite startCopy to Clipboard Copied! Toggle word wrap Toggle overflow Warning
Do not start or stop thecobblerdservice independent of the Satellite service, as doing so may cause errors and other issues.Always use/usr/sbin/rhn-satelliteto start or stop Red Hat Satellite.
3.1.4.4. Adding a Distribution to Cobbler
cobbler to create a distribution with the following syntax:
cobbler distro add --name=string --kernel=path --initrd=path
# cobbler distro add --name=string --kernel=path --initrd=path--name=string switch is a label used to differentiate one distro choice from another (for example, rhel5server)
--kernel=path switch specifies the path to the kernel image file
--initrd=path switch specifies the path to the initial ramdisk (initrd) image file.
3.1.4.5. Adding a Profile to Cobbler
cobbler to create profiles with the following syntax:
cobbler profile add --name=string --distro=string [--kickstart=url] [--virt-file-size=gigabytes] [--virt-ram=megabytes]
# cobbler profile add --name=string --distro=string [--kickstart=url] [--virt-file-size=gigabytes] [--virt-ram=megabytes]
--name=string is the unique label for the profile, such as rhel5webserver or rhel4workstation .
--distro=string switch specifies the distribution that will be used for this particular profile. Distributions were added in Section 3.1.4.4, “Adding a Distribution to Cobbler”.
--kickstart=url option specifies the location of the kickstart file (if available).
--virt-file-size=gigabytes option allows you to set the size of the virtual guest file image. The default is 5 gigabytes if left unspecified.
--virt-ram=megabytes option specifies how many megabytes of physical RAM that a virtual guest system can consume. The default is 512 megabytes if left unspecified.
3.1.4.6. Adding a System to Cobbler
Note
koan and PXE menus alone, it is not required to create system records. However, system records are useful when:
- System-specific kickstart templating is required
- A specific system always receives specific set of content
- There is a specific role intended for a specific client
cobbler system add --name=string --profile=string --mac-address=AA:BB:CC:DD:EE:FF
# cobbler system add --name=string --profile=string --mac-address=AA:BB:CC:DD:EE:FF
--name=string is the unique label for the system, such as engineeringserver or frontofficeworkstation.
--profile=string specifies one of the profile names added in Section 3.1.4.5, “Adding a Profile to Cobbler”.
--mac-address=AA:BB:CC:DD:EE:FF option allows systems with the specified MAC address to automatically be provisioned to the profile associated with the system record if they are being kickstarted.
man cobbler at a shell prompt.
Important
default has a special function. It sets all undefined systems to use a specific profile through PXE. Without a default system, PXE falls to local boot for unconfigured systems. Include only default as the name and the profile, such as:
cobbler system add --name=default --profile=rhel5webserver
# cobbler system add --name=default --profile=rhel5webserver
3.1.4.7. Using Cobbler Templates
- Robust features that allow administrators to create and manage large amounts of profiles or systems without duplication of effort or manually creating kickstarts for every unique situation
- While templates can become complex and involve loops, conditionals and other enhanced features and syntax, they can also be used simply to make kickstart files without such complexity
3.1.4.7.1. Using Templates
/etc/sysconfig/network-scripts/. However, where templates differ from standard kickstart files are in their use of variables.
network --device=eth0 --bootproto=static --ip=192.168.100.24 --netmask=255.255.255.0 --gateway=192.168.100.1 --nameserver=192.168.100.2
network --device=eth0 --bootproto=static --ip=192.168.100.24 --netmask=255.255.255.0 --gateway=192.168.100.1 --nameserver=192.168.100.2
network --device=$net_dev --bootproto=static --ip=$ip_addr --netmask=255.255.255.0 --gateway=$my_gateway --nameserver=$my_nameserver
network --device=$net_dev --bootproto=static --ip=$ip_addr --netmask=255.255.255.0 --gateway=$my_gateway --nameserver=$my_nameserver
3.1.4.7.2. Kickstart Snippets
$SNIPPET() function that will be parsed by Cobbler and substitute that function call with the contents of the snippet.
my_partition), and place the file in /var/lib/cobbler/snippets/ so that Cobbler can access it.
$SNIPPET() function in your kickstart templates. For example:
$SNIPPET('my_partition')
$SNIPPET('my_partition')
my_partition file.
3.1.4.8. Using Koan
3.1.4.8.1. Using Koan to Provision Virtual Systems
koan to initiate the installation of a virtual guest on a system.
cobbler add profile --name=virtualfileserver --distro=rhel-i386-server-5 --virt-file-size=20 --virt-ram=1000
# cobbler add profile --name=virtualfileserver --distro=rhel-i386-server-5 --virt-file-size=20 --virt-ram=1000
koan:
koan --server=hostname --list=profiles
# koan --server=hostname --list=profiles
cobbler profile add.
koan --virt --server=cobbler-server.example.com --profile=virtualfileserver --virtname=marketingfileserver
# koan --virt --server=cobbler-server.example.com --profile=virtualfileserver --virtname=marketingfileserver
virtualfileserver profile. The virtname option specifies a label for the virtual guest, which by default is labeled with the system's MAC address.
3.1.4.8.2. Using Koan to Re-install Running Systems
koan can help you by destructively replacing a running system with a new installation from the available Cobbler profiles.
koan --replace-self --server=hostname --profile=name
# koan --replace-self --server=hostname --profile=name
--profile=name on the Cobbler server specified in --server=hostname.
3.1.4.9. Building ISOs with Cobbler
cobbler buildiso command provides functionality to create a boot ISO image containing a set of distributions and kernels, and a menu similar to PXE network installations.
--iso option.
cobbler buildiso --iso=/path/to/boot.iso
# cobbler buildiso --iso=/path/to/boot.iso--profiles and --systems options.
cobbler buildiso --systems="system1,system2,system3" \
    --profiles="profile1,profile2,profile3"
# cobbler buildiso --systems="system1,system2,system3" \
    --profiles="profile1,profile2,profile3"
Note
Note
cobbler buildiso --standalone option is not supported with Red Hat provided kickstart trees. The standalone option is used for provisioning machines that have no network connectivity to the cobbler server, but all of the additional functionality Satellite provisioning provides requires a network connection to the Satellite. If you need to install Red Hat Enterprise Linux on a machine with no network connectivity, install Red Hat Enterprise Linux by downloading the ISO image.
3.2. Provisioning Through Red Hat Satellite Proxy
- When provisioning a virtual guest or doing a reprovisioning of a system, select the desired proxy from the Select Satellite Proxy drop down box.
- For a bare metal installation, replace the Red Hat Satellite's fully qualified domain name (FQDN) with that of the proxy's FQDN. For example, if the URL to the kickstart file is:
http://satellite.example.com/ks/cfg/org/1/label/myprofile
http://satellite.example.com/ks/cfg/org/1/label/myprofileCopy to Clipboard Copied! Toggle word wrap Toggle overflow - Kickstart through to the Red Hat Satellite Proxy:
http://proxy.example.com/ks/cfg/org/1/label/myprofile
http://proxy.example.com/ks/cfg/org/1/label/myprofileCopy to Clipboard Copied! Toggle word wrap Toggle overflow
3.3. Provisioning Virtualized Guests
- KVM Virtualized Guest
- Xen Fully-Virtualized Guest
- Xen Para-Virtualized Guest
Procedure 3.13. Provisioning a Virtualized Guest
- Check that the host system has a Virtualization or Virtualization Platform system entitlement.
- On the Systems page, select the appropriate virtual host, then select → . Select the appropriate kickstart profile and enter a guest name.
- To configure additional parameters such as guest memory and CPU usage, click the button. The following options can be configured:
- Network: static or DHCP
- Kernel options
- Package profile synchronization: when the kickstart finishes the system will synchronize its package profile to that of another system or a stored profile
- Memory allocation: RAM (Defaults to 512MB)
- Virtual disk size
- Virtual CPUs (Defaults to 1)
- Virtual bridge: The networking bridge used for the install. Defaults to
xenbr0for Xen provisioning, andvirbr0for KVM.Note
Thevirbr0networking bridge will not allow outside networking. If outside networking is required, configure the host to create an actual bridge instead. However,xenbr0is an actual bridge, and it is recommended for use if possible. - Virtual storage path: Path to either a file, LVM Logical Volume, directory, or block device with which to store the guest's disk information, such as
/dev/sdb,/dev/LogVol00/mydisk,VolGroup00, or/var/lib/xen/images/myDisk.
- Click .
3.4. Kickstarting through Cloned or Custom Channels
- Kickstart a system from a Red Hat Enterprise Linux channel with
@Basementioned under%packages. Under the same kickstart, specify an activation key to subscribe to the cloned or custom channels. Also mention the packages to install from the cloned or custom channel under packages section of the activation key. Kickstarting a system through this method initially installs from Red Hat Enterprise Linux Base channel with minimal packages and then registers the system to the cloned channel on the Satellite 5 server using the activation key. After registration, update the system through the kickstart. - Alternatively, if you aim to kickstart the system directly from your cloned or custom channel, create a distribution tree for the channel. An example procedure is outlined below.
Procedure 3.14. Creating a Distribution Tree for a Cloned Channel
- Copy your cloned channel. For example, for Red Hat Enterprise Linux 6.6:
cd /var/satellite/rhn/kickstart/
mkdir custom-distro-rhel-6.6
cd custom-distro-rhel-6.6
cp -rpv ../ks-rhel-x86_64-server-6-6.6/* .
# cd /var/satellite/rhn/kickstart/
# mkdir custom-distro-rhel-6.6
# cd custom-distro-rhel-6.6
# cp -rpv ../ks-rhel-x86_64-server-6-6.6/* .
Copy to Clipboard Copied! Toggle word wrap Toggle overflow - Set the permissions for all files in the tree to be 644 with
apache:apacheas the ownership.find . -type f -print0 | xargs -0 chmod 644 find . -type f -print0 | xargs -0 chown apache:apache
# find . -type f -print0 | xargs -0 chmod 644
# find . -type f -print0 | xargs -0 chown apache:apache
Copy to Clipboard Copied! Toggle word wrap Toggle overflow Set the permissions for all directories in the tree to be 755 withapache:rootas the ownership.find . -type d -print0 | xargs -0 chmod 755 find . -type d -print0 | xargs -0 chown apache:root
# find . -type d -print0 | xargs -0 chmod 755
# find . -type d -print0 | xargs -0 chown apache:root
Copy to Clipboard Copied! Toggle word wrap Toggle overflow - Login to the Satellite 5 server web UI and navigate to → → →
- Set the following values:
- Distribution Label: custom-distro-rhel-6.6
- Tree Path: /var/satellite/rhn/kickstart/custom-distro-rhel-6.6/
- Installer Generation: 6
When complete, click Create Kickstart Distribution.
Note
3.5. Reprovisioning
Example 3.2. Configuring Kernel Options and Post Kernel Options
vnc vncpassword=PASSWORD in the Kernel Options line.
noapic kernel option, add noapic to the Post Kernel Options line.
Procedure 3.15. File Preservation
Note
- Go to → → → and create a list of files to preserve.
- Go to → → and associate the file preservation list with a kickstart by selecting the desired profile.
- Go to → and select the file preservation list.
3.6. Provisioning Rollbacks with Snapshots
Note
- The reason the snapshot was taken
- The time it was taken
- The number of tags applied to each snapshot
Procedure 3.16. Performing a Snapshot Rollback
- Click on .
- Click on the system that requires a roll back.
- Choose the → tab.
- Click the of the snapshot taken and review the potential changes on the provided subtabs, starting with .
- Check each subtab for the specific changes that will be made to the system during the rollback:
- group memberships
- channel subscriptions
- installed packages
- configuration channel subscriptions
- configuration files
- snapshot tags
- When satisfied with the reversion, return to the subtab and click the button. To see the list again, click Return to snapshot list.
3.6.1. Using Snapshot Tags
Procedure 3.17. Creating Snapshot Tags
- Click .
- Enter a descriptive term in the field.
- Click .
Chapter 4. System Management
4.1. Registering Systems to Satellite
4.1.1. Using Red Hat Network Bootstrap to Register a System
/usr/bin/rhn-bootstrap, serves that purpose and comes installed by default on both Red Hat Satellite Server and Red Hat Satellite Proxy Server.
- Redirect client applications to the Red Hat Satellite Proxy or Satellite
- Import custom GPG keys
- Install SSL certificates
- Register the system to Red Hat Network and particular system groups and channels with the help of activation keys
- Perform miscellaneous post-configuration activities, including updating packages, performing reboots, and altering Red Hat Network configuration
Warning
bootstrap.sh is automatically placed in the /var/www/html/pub/bootstrap/ directory of the Red Hat Network Server. From there it can be downloaded and run on all client systems. Note that some preparation and post-generation editing is required, as identified in the following sections. See Section 4.1.1.4, “Configuring Red Hat Network Bootstrap Options” for an example script.
4.1.1.1. Preparing for Red Hat Network Bootstrap Installation
rhn-bootstrap) depends on other components of the Red Hat Network infrastructure to properly configure client systems, those components must be prepared before script generation. The following list identifies initial measures:
- Generate activation keys to be called by the script(s). Activation keys can be used to register Red Hat Enterprise Linux systems, entitle them to an Red Hat Network service level, and subscribe them to specific channels and system groups, all in one action. Note that the organizational account must have Management entitlements available to use an activation key, while inclusion of multiple activation keys at once requires Provisioning entitlements. Generate activation keys through the Activation Keys page within the Systems category of the Red Hat Satellite website (either the central Red Hat Network Servers for Proxy or the fully qualified domain name of the Satellite).
- Red Hat recommends RPMs be signed by a custom GNU Privacy Guard (GPG) key. Make the key available so that it can be referred to from the script. Generate the key as described in the Red Hat Satellite Reference Guide and place the key in the
/var/www/html/pub/directory of the Red Hat Satellite Server. See the Importing Custom GPG Keys section in the Red Hat Satellite Reference Guide. - To deploy the CA SSL public certificate through the script, have the certificate or the package (RPM) containing that certificate available on that Red Hat Network Server and include it during script generation with the
--ssl-certoption. See the SSL Infrastructure section of the Client Configuration Guide for details. - Have the values ready to develop one or many bootstrap scripts, depending on the variety of systems to be reconfigured. Since Red Hat Network Bootstrap provides a full set of reconfiguration options, use it to generate different bootstrap scripts to accommodate each type of system. For instance,
bootstrap-web-servers.shmight be used to reconfigure the Web servers, whilebootstrap-app-servers.shcan handle the application servers. See Section 4.1.1.4, “Configuring Red Hat Network Bootstrap Options” for the complete list.
4.1.1.2. Generating Bootstrap Scripts
rhn-bootstrap command followed by the desired options and values. If no options are included, a bootstrap.sh file is created in the bootstrap/ subdirectory that contains the essential values derived from the server, including hostname, the SSL certificate, it if exists, SSL and GPG settings, and a call for the client-config-overrides.txt file.
- Use the
--activation-keysoption to include keys, taking into account the entitlement requirements identified in Section 4.1.1.1, “Preparing for Red Hat Network Bootstrap Installation”. - Use the
--gpg-keyoption to identify the key path and filename during script generation. Otherwise, use the--no-gpgoption to turn off this verification on client systems. Red Hat recommends retaining this security measure. - Include the
--allow-config-actionsflag to enable remote configuration management on all client systems touched by the script. This feature is useful in reconfiguring multiple systems simultaneously. - Include the
--allow-remote-commandsflag to enable remote script use on all client systems. Like configuration management, this feature aids in reconfiguring multiple systems.
rhn-bootstrap --activation-keys KEY1,KEY2 \
    --gpg-key /var/www/html/pub/MY_CORPORATE_PUBLIC_KEY \
    --allow-config-actions \
    --allow-remote-commands
# rhn-bootstrap --activation-keys KEY1,KEY2 \
    --gpg-key /var/www/html/pub/MY_CORPORATE_PUBLIC_KEY \
    --allow-config-actions \
    --allow-remote-commands
4.1.1.3. Using the Red Hat Network Bootstrap Script
/var/www/html/pub/bootstrap/ directory and run the following command, altering the hostname and name of the script as needed to suit the system type:
cat bootstrap-EDITED-NAME.sh | ssh root@CLIENT_MACHINE1 /bin/bash
# cat bootstrap-EDITED-NAME.sh | ssh root@CLIENT_MACHINE1 /bin/bashwget or curl to retrieve and run the script from every client system. Log into each client machine and issue the following command, altering script and hostname accordingly:
wget -qO - \
    https://your-satellite.example.com/pub/bootstrap/bootstrap-EDITED-NAME.sh \
    | /bin/bash
# wget -qO - \
    https://your-satellite.example.com/pub/bootstrap/bootstrap-EDITED-NAME.sh \
    | /bin/bash
curl:
curl -Sks \
    https://your-satellite.example.com/pub/bootstrap/bootstrap-EDITED-NAME.sh \
    | /bin/bash
# curl -Sks \
    https://your-satellite.example.com/pub/bootstrap/bootstrap-EDITED-NAME.sh \
    | /bin/bash
4.1.1.4. Configuring Red Hat Network Bootstrap Options
rhn-bootstrap --help or reviewing its man page.
| Option | Description |
|---|---|
-h, --help | Display the help screen with a list of options specific to generating the bootstrap script. |
--activation-keys=ACTIVATION_KEYS | Activation key(s) with multiple entries separated by a comma and no space. |
--overrides=OVERRIDES | Configuration overrides filename. The default is client-config-overrides.txt. |
--script=SCRIPT | The bootstrap script filename. The default is bootstrap.sh. |
--hostname=HOSTNAME | The fully qualified domain name (FQDN) of the server to which client systems will connect. |
--ssl-cert=SSL_CERT | The path to the organization's public SSL certificate, either a package or a raw certificate. It will be copied to the --pub-tree option. A value of "" will force a search of --pub-tree. |
--gpg-key=GPG_KEY | The path to the organization's public GPG key, if used. It will be copied to the location specified by the --pub-tree option. |
--http-proxy=HTTP_PROXY | The HTTP proxy setting for the client systems in the form hostname:port. A value of "" disables this setting. |
--http-proxy-username=HTTP_PROXY_USERNAME | If using an authenticating HTTP proxy, specify a username. A value of "" disables this setting. |
--http-proxy-password=HTTP_PROXY_PASSWORD | If using an authenticating HTTP proxy, specify a password. |
--allow-config-actions | Boolean; including this option sets the system to allow all configuration actions via Red Hat Network. This requires installing certain rhncfg-* packages, possibly through an activation key. |
--allow-remote-commands | Boolean; including this option sets the system to allow arbitrary remote commands via Red Hat Network. This requires installing certain rhncfg-* packages, possibly through an activation key. |
--no-ssl | Not recommended - Boolean; including this option turns SSL off on the client system. |
--no-gpg | Not recommended - Boolean; including this option turns GPG checking off on the client system. |
--pub-tree=PUB_TREE | Change not recommended - The public directory tree where the CA SSL certificate and package will land; the bootstrap directory and scripts. The default is /var/www/html/pub/. |
--force | Not recommended - Boolean; including this option forces bootstrap script generation despite warnings. |
-v, --verbose | Display verbose messaging. Accumulative; -vvv causes extremely verbose messaging. |
4.1.1.5. Manually Scripting the Red Hat Network Bootstrap Configuration
/pub/ directory of the server, running wget -O- on it, and piping the output to a shell session, the entire bootstrap process can be run with a single command from each client:
wget -O - http://proxy-or-sat.example.com.com/pub/bootstrap_script | bash
# wget -O - http://proxy-or-sat.example.com.com/pub/bootstrap_script | bash
Warning
4.1.1.6. Implementing Kickstart
rhnreg_ks utility that comes with the rhn-setup RPMs. This section discusses the proper use of rhnreg_ks to register systems.
rhnreg_ks utility uses activation keys to register, entitle, and subscribe systems to specified channels in one swift motion. To find out more about activation keys, see the Red Hat Update Agent and Red Hat Network Website sections of the Red Hat Network Management Reference Guide.
4.1.1.7. Sample Bootstrap Script
/var/www/html/pub/bootstrap/bootstrap.sh script generated by the Red Hat Satellite Server installation program provides the ability to reconfigure client systems to access the Red Hat Satellite Server easily. It is available to both Red Hat Satellite Server and Red Hat Satellite Proxy Server customers through the RHN Bootstrap tool. After modifying the script for a particular use, it can be run on each client machine.
4.2. Managing Systems with Satellite
4.2.1. Managing Individual Systems
4.2.1.1. Controlling the System's Power Management
Important
cobbler integration with IPMI. Prior to using power management features, Satellite requires installation of the IPMI fencing agent on the server. Install the fencing agent using the following command:
yum install fence-agents
# yum install fence-agents
/etc/rhn/rhn.conf file and add the following property to the end of the file:
java.power_management.types = ipmilan
java.power_management.types = ipmilan
rhn-satellite restart
# rhn-satellite restart
- Navigate to → .
- Choose a system to manage.
- Check your System's provisioning entitlement is enabled by navigating to → . Check Provisioning under Add-On Entitlements and click Update Properties.
- Navigate to → .
- Choose IPMI for the fencing agent Type.
- Enter the Network address for your IPMI power management board. Satellite communicates with the power management board using the fencing agent.
- Enter the Username and Password for the power management board.
- Click Save.
4.2.1.2. Viewing the System's Hardware Profile
- Click → .
- Click on the system name.
- Click on .
4.2.1.3. Scheduling a System Reboot from the Satellite
- Click → .
- Click on the system name.
- On the right-hand side of the page under , click .
4.2.1.4. Changing a System's Base Channel Subscriptions
- Click → .
- Click on the system name.
- On the left-hand side of the page, under , click on .
- Scroll down to the section on the bottom of the page and choose the base channel you wish to apply.
- Click .
Note
4.2.1.5. Changing a System's Child Channel Subscriptions
- Click → .
- Click on the system name.
- On the left-hand side of the page, under , click on .
- Choose the child channels that the system requires by ticking the checkboxes. You may choose as many as needed. Note that some channels may consume additional software entitlements if chosen.
- Click .
4.2.1.6. Adding Provisioning/Monitoring Entitlements to a System
- Provisioning- This entitlement is required by a system that needs the ability to use kickstart, package rollback and configuration file management.
- Monitoring- This entitlement allows Satellite with Monitoring-entitled clients to notify administrators of system performance issues before they become critical.
- Click → .
- Click on the system name.
- Click on → .
- Select the required entitlements in the Add-On Entitlements section.
- Click .
4.2.1.7. Remotely Installing New Packages
- Click → .
- Click on the system name.
- Click on → → .
- Select the packages to install on the system.
- Click .
- Choose to schedule the installation on a specific time or as soon as possible.
- Click .
Note
4.2.1.8. Remotely Upgrading Packages
- Click → .
- Click on the system name.
- Click on → →
- Select packages to be upgraded.
- Choose to schedule the installation on a specific time or as soon as possible.
- Click .
Note
4.2.1.9. Locking the System against Changes
- Click → .
- Click on the system name.
- Click in the field in the System Info section.
Note
4.2.1.10. Configuring System Currency Weights/Multipliers
/usr/share/rhn/config-defaults/rhn_java.conf: :
/etc/rhn/rhn.conf file. The higher the score, the higher the importance is given to the system in the report.
- Log in as root on the Satellite server.
- Edit the
/etc/rhn/rhn.confwith your chosen text editor:vim /etc/rhn/rhn.conf
# vim /etc/rhn/rhn.confCopy to Clipboard Copied! Toggle word wrap Toggle overflow - Add the custom values you wish to change in the
/etc/rhn/rhn.conffile:Copy to Clipboard Copied! Toggle word wrap Toggle overflow - Save the
/etc/rhn/rhn.conffile. - Restart the Satellite service:
rhn-satellite restart
# rhn-satellite restartCopy to Clipboard Copied! Toggle word wrap Toggle overflow
Note
system.getSystemCurrencyMultipliers- this API call provides information about the current weight/multiplier configuration.system.getSystemCurrencyScores- this API call returns a list of systems, their scores and the counts of applicable errata of each type.
4.2.2. Managing System Groups
4.2.2.1. Adding a System to a System Group
- Click → .
- Click on the system name.
- Click → .
- Select the group or groups that the system should be added to.
- Click .
4.2.2.2. Adding Multiple Systems to the System Group
- Click → .
- Click on the desired system group.
- Click the subtab.
Note
Target Systems are eligible systems that are on the Satellite and can be added to the group. - Click .
4.2.2.3. Adding Group Administrators to the Group
- Click → .
- Click on the desired system group.
- Click the subtab.
- Click on the usernames that need to be group administrators.
- Click .
Note
4.2.2.4. Removing Systems from the System Group
- Click → .
- Click on the desired system group.
- Click on .
- Select all the systems to be removed from the System Group.
- Click .
4.2.2.5. Applying Errata to Affected Systems in a Group
- Click → .
- Click on the desired system group.
- Click on the subtab.
- Select the Advisory that you would like to apply to the affected systems.
- Click to view a list of systems that are affected by the erratum.
- Select the systems you wish to apply the erratum to or choose .
- Click .
4.2.3. Managing Systems with System Set Manager
- Scheduling errata updates, as well as upgrading, installing and removing packages
- Managing systems' channel membership, the deployment of configuration channels and configuration channel subscriptions
- Provisioning systems, running remote commands and tagging systems for snapshot rollbacks
- Migrating systems to another organization and setting custom values for selected systems in the Satellite
4.2.3.1. Adding Systems to SSM
- Click → .
- Click on the system name.
- On the top right-hand corner of the page, click .
4.2.3.2. Scheduling Errata Updates in SSM
- Click → .
- Click Schedule Errata Updates on the main page or click the subtab.
- Select the Advisory that you would like to apply to the affected systems. Choose as many as is applicable for the set of systems.
- Click .
4.2.3.3. Managing Channel Memberships
- Click → → .
- As discussed, base channels need to be selected prior to subscribing to child channels. If only child channel subscriptions are to be changed, go the next step. If the base channel needs to be changed, follow these steps to subscribe to a base channel:
- Click the subtab.
- Choose the base channel you wish to subscribe to from the .
- Click .
- Click the subtab to go back to the Child Channel page.
- Select to subscribe the selected systems to the channel. Select to unsubscribe the selected systems to the channel and select if no changes should be made for the channel subscriptions.
- Click to save the changes made.
- A summary of changes will appear to confirm the changes made in the previous screen. Review these changes and select when the changes are correct.
4.2.3.4. Enabling Configuration Management with SSM
- Requirements
- The following requirements are necessary to enable configuration management in a system:
- A provisioning entitlement. See the Systems chapter for the procedure on how to add a provisioning entitlement to a system.
- A subscription to the Red Hat Satellite Tools channel. See the Systems chapter for the procedure on how to change a child channel.
- An organization administrator.
- System subscribed to SSM. In order for SSM to perform this action, the systems need to be subscribed to SSM.
- Click → → .
- Click the subtab.
- Schedule the package installation of the
rhcfg-*packages. Select a time for these configuration packages to be installed. - Click .
- Open a terminal console on the individual systems or remotely login as root. The following actions need to be performed:
- Run this command to complete the pending
rhncfg-*package installation:rhn_check
# rhn_checkCopy to Clipboard Copied! Toggle word wrap Toggle overflow - Run the following command to enable Red Hat Network actions:
rhn-actions-control --enable-all
# rhn-actions-control --enable-allCopy to Clipboard Copied! Toggle word wrap Toggle overflow
4.2.3.5. Subscribing to Configuration Channels with SSM
- Requirements
- In order for SSM to subscribe systems to channels, the following requirements need to be fulfilled:
- The system must be added to SSM. See the Adding Systems to SSM procedure in this section.
- Configuration management should be enabled. See the Enabling Configuration Management with SSM. procedure in this chapter.
- Configuration management requires that the system has a provisioning entitlement. See the Systems chapter for the procedure on how to add a provisioning entitlement to a system.
- Click → → or → → .
- Select the channels the systems should be subscribed to.
- Click .
- Choose a channel on the list and use the up and down arrows to change the priority. This assigns a rank to the channel. Ranking the channels will allow higher ranked channels to override any configuration changes from files with the same path in the lower channels.
- Select the configuration channel's priority by using the radio buttons on the side. This will rank the priority of the configuration channels listed here against the current configuration channels on the system.
- Click .
- Confirm the systems against the configuration channels they will be subscribed to. Once all the information is confirmed correct, click .
4.2.3.6. Deploying Configuration Channels through SSM
- Click → → or → → .
- Select the filenames of the files to be deployed.
- Schedule the deployment of the configuration file by choosing to deploy it as soon as possible or choose a specific date and time.
- Click to confirm the configuration deployment.
4.2.3.7. Tagging Systems for Provisioning
- Click → → .
- Fill in the Tag name field.
- Click .
4.2.3.8. Running Remote Commands using SSM
- Click → → .
- Fill in the following fields:
- Run as user
- Run as group
- Timeout (in seconds)
- Script
- Set a scheduled date and time for the shell script to run on the target systems.
- Click .
4.2.4. Managing Action Chains
httpd package on a system, upload a set of configuration file in /etc/httpd/conf.d/, and finally run a script to start the httpd service. Satellite can schedule and execute these actions in order using the action chaining features.
- Install a package
- Update a package
- Remove a package
- Verify a package
- Apply errata
- Run a remote command
- Deploy a configuration file
- Reboot a system

Figure 4.1. Add to Action Chain
4.3. Managing Virtualized Client Systems
- Red Hat Enterprise Linux Server (v. 5 for 32-bit x86) - rhel-i386-server-5 (and all child channels)
- Red Hat Network Tools for RHEL Server (v. 5 for 32-bit x86) - rhn-tools-rhel-i386-server-5
- Red Hat Enterprise Linux Server Virtualization (v. 5 for 32-bit x86) - rhel-i386-server-vt-5 (and all child channels)
- Red Hat Enterprise Linux Server (v. 6 for 64-bit x86_64) - rhel-x86_64-server-6 (and all child channels)
- Red Hat Network Tools for RHEL Server (v. 6 for 64-bit x86_64) - rhn-tools-rhel-x86_64-server-6
4.3.1. Setting Up the Host System for Your Virtual Systems
4.3.1.1. Creating a Kickstart Profile for the Guest Systems
- Log in to the Satellite's web interface. Navigate to the Kickstart Overview screen by clicking the Manage Kickstarts link in the Tasks widget in Your Red Hat Network, or by clicking on the Systems tab, followed by the Kickstart subtab in the left navigation bar.
- On the Kickstart Overview page, click the Create a New Kickstart Profile link in the Kickstart Actions widget in the upper right corner.
- Enter a label for your profile that will enable you to distinguish it from your other profiles. For the remaining instructions, we'll assume the label is host-system-for-virtual-guests.
- For the Base Channel field, select Red Hat Enterprise Linux (v.5 or 6 for $ARCH) (where $ARCH is the architecture of your host system).
Note
You may install 32-bit Red Hat Enterprise Linux 5 or 6 on a 64-bit host system. If you choose to do this, however, please be aware that your guest systems must also run the 32-bit version of Red Hat Enterprise Linux. - In the Kickstartable Tree field, select
ks-rhel-$ARCH-server-5 (or 6)where $ARCH is the architecture of your host system. - Select the Virtualization Type.
Note
If you are changing the Virtualization Type of an existing kickstart profile, it may also modify the bootloader and partition options, potentially overwriting any user customizations. Be sure to review the Partitioning tab to verify these settings when changing the Virtualization Type. - Click the button in the lower right of the screen to continue on to the next step.
Note
If any of the fields are missing the options indicated above, you may not have successfully synced software channel content to your Satellite from Red Hat's servers.
- Select the location of the distribution files for the installation of your host system. There will already be a Default Download Location filled out and selected for you on this screen. Click the button on this screen to continue to Step 3.
Note
If the default download location is missing, you may not have successfully synced software channel content to your Satellite from Red Hat's server. - Choose a root password to set on the host system you will be provisioning, and click to finish creation of the profile.
- You will be shown the newly-created kickstart profile. You may browse through the various tabs of the profile and modify the settings as you see fit, but this is not necessary as the default settings work well for the majority of cases.In order to be able to remotely start and stop the guest using the Satellite web interface, you will need to include the package
acpid.
4.3.1.2. Kickstarting Your Host System
4.3.1.2.1. Your Host System Does Not have Red Hat Enterprise Linux Installed
- You will find an ISO to create a boot CD for your host by using
sshto log into your Satellite. It is at the following location on your satellite:/var/satellite/rhn/kickstart/ks-rhel-i386-server-5.3/images/boot.iso
/var/satellite/rhn/kickstart/ks-rhel-i386-server-5.3/images/boot.isoCopy to Clipboard Copied! Toggle word wrap Toggle overflow Note
It is possible to use a flash-memory USB key to boot your system in order to kickstart it. See the Red Hat Enterprise Linux Installation Guide for tips on how to do this. Note that your host system's hardware must support boot via these devices. - Insert the boot CD in the drive and reboot the system, making sure the CD-ROM drive is set as the primary boot device in the system's BIOS.
- After reboot, you will find yourself at a boot prompt. Type the following command at this prompt to start your kickstart:
linux \
ks=http://your-satellite.example.com/ks/label/the profile label you created earlier
linux \
ks=http://your-satellite.example.com/ks/label/the profile label you created earlier
Copy to Clipboard Copied! Toggle word wrap Toggle overflow Note
For some systems, you may need to addksdevice=eth0to the command above or disable one of two or more NICs in the system's BIOS to avoid confusion during the kickstart process. - The kickstart for your host system will begin. It will take around fifteen minutes to complete. Upon successful completion of this kickstart, you will have provisioned a host system for your virtual guest and registered it to your Satellite.
4.3.1.2.2. Your Host System Has Red Hat Enterprise Linux 6 or 7 Installed
Note
Note
- Register your host system to your Red Hat Satellite. Use
sshto connect to your host system then issue the following command as root:rhnreg_ks --serverUrl=http://your-satellite.example.com/XMLRPC \ --username=username --password=password# rhnreg_ks --serverUrl=http://your-satellite.example.com/XMLRPC \ --username=username --password=passwordCopy to Clipboard Copied! Toggle word wrap Toggle overflow Note
If your host system is already registered to a different Red Hat Network server, add the--forceoption to the command above. - Open up the host system's profile in the Satellite web interface. Log into the web interface of your Satellite at https://your-satellite.example.com/. Click on the Systems tab in the top navigational bar. You will see the host system you just registered - click on its profile name to access its system profile page.
- Make sure your system has access to the software channels it needs to access the software required for hosting virtual guests. From your host system's profile page, click on the Alter Channel Subscriptions link on the profile page under the Subscribed Channels header. Check the RHEL Virtualization and Red Hat Network Tools for RHEL Server checkboxes and click the button underneath the list of channels.
- Check if the necessary software installed for hosting virtual guests is on the system. On the host system, issue the following command as root:For Red Hat Enterprise Linux 6:
rpm -q qemu-kvm rhn-virtualization-host python-virtinst
# rpm -q qemu-kvm rhn-virtualization-host python-virtinstCopy to Clipboard Copied! Toggle word wrap Toggle overflow For Red Hat Enterprise Linux 7:rpm -q qemu-kvm rhn-virtualization-host virt-install
# rpm -q qemu-kvm rhn-virtualization-host virt-installCopy to Clipboard Copied! Toggle word wrap Toggle overflow Ifrpmindicates these packages are not installed, you must install them by running the following command as root on the system:For Red Hat Enterprise Linux 6:yum install qemu-kvm rhn-virtualization-host python-virtinst
# yum install qemu-kvm rhn-virtualization-host python-virtinstCopy to Clipboard Copied! Toggle word wrap Toggle overflow For Red Hat Enterprise Linux 7:yum install qemu-kvm rhn-virtualization-host virt-install
# yum install qemu-kvm rhn-virtualization-host virt-installCopy to Clipboard Copied! Toggle word wrap Toggle overflow - Restart the machine to pick up the changes, or use the appropriate
modprobecommand for your processor:modprobe kvm_intel
# modprobe kvm_intelCopy to Clipboard Copied! Toggle word wrap Toggle overflow or:modprobe kvm_amd
# modprobe kvm_amdCopy to Clipboard Copied! Toggle word wrap Toggle overflow - Install and run the
osadpackage in order for your host system to be responsive to commands sent from the Satellite, such as start, pause, resume, and shutdown. To install:yum install -y osad
# yum install -y osadCopy to Clipboard Copied! Toggle word wrap Toggle overflow After installation, start theosadprocess:/sbin/service osad restart
# /sbin/service osad restartCopy to Clipboard Copied! Toggle word wrap Toggle overflow - Your host system will now be ready for Red Hat Network virtual guest provisioning.
4.3.1.3. Your Host System Has Red Hat Enterprise Linux 5 Installed
- Register your host system to your Satellite. Use
sshto connect to your host system. Register your host system to your satellite issuing the following command as root:rhnreg_ks --serverUrl=http://your-satellite.example.com/XMLRPC \ --username=username --password=password# rhnreg_ks --serverUrl=http://your-satellite.example.com/XMLRPC \ --username=username --password=passwordCopy to Clipboard Copied! Toggle word wrap Toggle overflow Note
If your host system is already registered to a different Red Hat Network server, add the--forceoption to the command above. - Open up the host system's profile in the Satellite web interface. Log into the web interface of your Satellite at https://your-satellite.example.com/. Click on the Systems tab in the top navigational bar. You will see the host system you just registered - click on its profile name to access its system profile page.
- Make sure your system has access to the software channels it needs to access the software required for hosting virtual guests. From your host system's profile page, click on the Alter Channel Subscriptions link on the profile page under the Subscribed Channels header. Check the RHEL Virtualization and Red Hat Network Tools for RHEL Server checkboxes and click the button underneath the list of channels.
- Check to see if you have the necessary software installed for hosting virtual guest on the system. On the host system, issue the following command as root:
rpm -q xen kernel-xen rhn-virtualization-host
# rpm -q xen kernel-xen rhn-virtualization-hostCopy to Clipboard Copied! Toggle word wrap Toggle overflow For KVM, issue the following command as root:rpm -q kvm kmod-kvm rhn-virtualization-host python-virtinst
# rpm -q kvm kmod-kvm rhn-virtualization-host python-virtinstCopy to Clipboard Copied! Toggle word wrap Toggle overflow Ifrpmindicates these packages are not installed, you must install them by running the following command as root on the system:yum install xen kernel-xen rhn-virtualization-host
# yum install xen kernel-xen rhn-virtualization-hostCopy to Clipboard Copied! Toggle word wrap Toggle overflow For KVM users, install by running the following command as root:yum install kvm kmod-kvm rhn-virtualization-host python-virtinst
# yum install kvm kmod-kvm rhn-virtualization-host python-virtinstCopy to Clipboard Copied! Toggle word wrap Toggle overflow For Xen, you will then need to edit the/etc/grub.confconfiguration file to boot the new xen kernel by default. To do this, select the lines ingrub.confthat pertain to the xen kernel from the beginning of thetitleline to the end of theinitrdline, copy the lines, delete them, and paste them into the file as the first kernel entry ingrub.conf. Also ensure that the value of the default variable at the top ofgrub.confis set to a value of '0'.Note
If you ever update the kernel on the host system, the standard kernel is the default choice upon reboot. To ensure that the Xen kernel is chosen by default, change the following value in the/etc/sysconfig/kernelfile:DEFAULTKERNEL=kernel
DEFAULTKERNEL=kernelCopy to Clipboard Copied! Toggle word wrap Toggle overflow Change the value tokernel-xen:DEFAULTKERNEL=kernel-xen
DEFAULTKERNEL=kernel-xenCopy to Clipboard Copied! Toggle word wrap Toggle overflow - Restart the machine to pick up the changes, or use the appropriate
modprobecommand for your processor:modprobe kvm_intel
# modprobe kvm_intelCopy to Clipboard Copied! Toggle word wrap Toggle overflow or:modprobe kvm_amd
# modprobe kvm_amdCopy to Clipboard Copied! Toggle word wrap Toggle overflow - Reboot the system ensuring that it boots into the xen kernel. Use the command
uname -rto see if the running kernel is a xen kernel. If you do not see the Xen string in the name of the kernel you have not booted into the correct kernel.Note
If the system already has Xen andkernel-xeninstalled you do not need to reboot after installingrhn-virtualization-host. - Install and run the
osadpackage in order for your host system to be responsive to commands sent from the Satellite, such as start, pause, resume, and shutdown. To install:yum install -y osad
# yum install -y osadCopy to Clipboard Copied! Toggle word wrap Toggle overflow After installation start theosadprocess:/sbin/service osad restart
# /sbin/service osad restartCopy to Clipboard Copied! Toggle word wrap Toggle overflow - Your host system will now be ready for Red Hat Network virtual guest provisioning.
4.3.2. Setting Up Your Virtual Systems
4.3.2.1. Create a Kickstart Profile for the Guest Systems
- Log on to the Satellite's web interface. Navigate to the Kickstart Overview screen by clicking on the Manage Kickstarts link in the Tasks widget in Overview, or by clicking on Systems in the top navigation bar and then Kickstart from the left navigation bar.
- On the Kickstart Overview page, click the Create a new Kickstart Profile link in the Kickstart Actions widget in the upper right corner.
- The next page displayed is Step 1 of the kickstart profile creation process:
- Enter a label for the profile that will allow you to distinguish it from the other profiles. A good choice would be guest-system.
- For the Base Channel field, select Red Hat Enterprise Linux $PRODUCT (v.5 or 6 for $ARCH) where $ARCH is the architecture of your host system's operating system and $PRODUCT is either Server or Client.
Note
Red Hat Enterprise Linux Client 5 or Red Hat Enterprise Linux Client 6 may not be available for selection if you did not synchronize the Client software channels to your Satellite.Note
The channel labels for Red Hat Enterprise Linux 5 or Red Hat Enterprise Linux 6 and Red Hat Enterprise Linux 5 Desktop or Red Hat Enterprise Linux 6 Desktop refer to 'server' and 'client' respectively. - For the Kickstartable Tree field, select ks-rhel-$ARCH-$PRODUCT-5.3 where $ARCH is the architecture of your host system and $PRODUCT is either 'server' or 'client', depending on which product with which you would like to provision your guest.
- Select the Virtualization Type.
Note
If you are changing the Virtualization Type of an existing kickstart profile, it may also modify the bootloader and partition options, potentially overwriting any user customizations. Be sure to review the Partitioning tab to verify these settings when changing the Virtualization Type. - Click the button in the lower right of the screen to continue on to the next step.
- For Step 2 of the kickstart profile creation process, select the location of the distribution files for the installation of your guest system. There will already be a Default Download Location filled out and selected for you on this screen. Click the button on this screen to continue to Step 3.
Note
Red Hat Enterprise Linux Client 5 or Red Hat Enterprise Linux Client 6 may not be available for selection if you did not synchronize the Client software channels to your Satellite. - For Step 3 of the kickstart profile creation process, choose a root password for the guest system you are provisioning, and click to finish creation of the profile.
4.3.2.2. Provisioning Your Guest Systems
- Log into the Satellite's web interface. Browse to your host system's profile by clicking on the Systems tab in the top navigation bar, and click on the system's name.
- To schedule a kickstart for a guest system, go to the → tab in the host system's profile. For the Guest Name field choose guest1. For the Memory Allocation, Virtual CPUs, and Storage fields, the default values should be fine. Feel free to change these as desired, taking note of the advice provided for each field in the interface. For the Kickstart Profile field, select the previously created guest system profile.
- Click on the button in the lower-right corner of the screen. You will be taken to the Kickstart Status page where you can follow along with the guest's kickstart progress. The status screen will indicate when the kickstart is successfully completed. To view your new guest, click on the Virtualization tab of the host system's profile on the Satellite. To view a list of virtual systems, navigate to → → .
Note
If you do not see the Initiate a kickstart guest message on the Kickstart Status page shortly after scheduling the kickstart of the guest, you may be missingosadon your host.Host systems require theosadpackage in order to be responsive to commands sent from the Satellite, such as start, pause, resume, and shutdown. Ifosadis not installed and running, the host system will not receive these commands from the web interface for 2.5 hours, or the next time that the Red Hat Network daemon runs.You can check whether or notosadis installing and running by checking the OSA Status field in the host system's profile on the Satellite. If the OSA Status field does not exist or the field indicates that the system has not contacted Satellite in several minutes you will need to install osad before you can successfully provision a guest on the host system. Runyum install -y osadas root.Note
You may receive the following message from theKickstart Statuspage during the guest's kickstart:Copy to Clipboard Copied! Toggle word wrap Toggle overflow This message should not cause alarm unless more than twenty minutes have passed. To check if the kickstart is continuing look at the installation log to make sure there are no errors, reload the Kickstart Status page, and check that the Last File Request field continues to be updated. - If you would like to register additional guests to your host, repeat the steps above. It is important to remember that you can only provision one guest at a time. If you attempt to schedule a guest kickstart while another is currently taking place, the current guest kickstart process will be canceled and the new guest kickstart process will begin.
- View your newly-created virtual guest's system in the Satellite's web interface by clicking on the Virtualization tab in the host system's profile. Then, click on the profile name of your virtual system to view its Satellite system profile.
4.3.2.3. Managing Your Virtual Guest Entitlements
4.3.3. Working With Your Virtual Systems
Note
4.3.3.1. Logging into Virtual Systems Directly via SSH
- You will need to locate the virtual system's IP address. Locate it by navigating to the → tab and clicking on the virtual system's profile name.
- On the virtual system's profile page, you'll find the IP address in the left-hand column in the IP Address field.
- Connect to the IP address by using
sshas root with the password you set for the virtual system in the kickstart profile.
4.3.3.2. Gaining Console Access Via the Host
- Connect to the host system and determine the ID number of the guest you would like to work with. Connect to the host system via
sshand run the following command:xm list
# xm listCopy to Clipboard Copied! Toggle word wrap Toggle overflow This will provide you with a list all of the guests created on your Satellite, including their ID number. The guest we created earlier,guest1, will be in this list with an ID number. For example, if this guest has been assigned an ID of 2, then: - Run the following command to access the console of this virtual system:
xm console 2
# xm console 2Copy to Clipboard Copied! Toggle word wrap Toggle overflow You will immediately be able to view a login prompt onguest1. - Log in to
guest1as root using the same password you set in the kickstart profile you used to provision the system.(There may be some messages on the screen. In this case, hit the Enter key on your keyboard to receive a fresh login prompt.) - To exit the guest console and return to the host system's command prompt, you may hit the Ctrl and ] keys on your keyboard simultaneously.
4.3.3.3. Installing Software Via the Satellite Web Interface
- Browse to the virtual system's profile in your Satellite's web interface by logging in and navigating to → → and clicking on the name of your virtual system's profile.
- In the virtual system's profile, click on the + tab.
- Click on Install New Packages in the Packages tab menu.
- Select the packages you wish to install and click the Install Selected Packages button in the lower right-hand corner of the screen.
- Review the package install details and click on the button in the lower right-hand corner of the screen.
- The package install will take place the next time the guest system checks in with the Satellite. To force the install to take place immediately, you may run the
rhn_checkcommand on the guest system.
4.3.3.4. Installing Software Via Yum From the Virtual System
yum command can be used to install and update software. For example, to install the text editor vim, issue the following command as root:
yum install -y vim-enhanced
# yum install -y vim-enhanced
4.3.3.5. Restarting Guests when Host Reboots
rhn-virtualization-host service can restart guests automatically in the event of a host system reboot.
- Locate the guest's config file on the host in
/etc/sysconfig/rhn/virt/. It will be named by UUID, but the correct file can be found by using thegrepcommand to search for the guest name within the UUID files. - When you have found the UUID file corresponding to your guest system, create a symbolic link from the UUID file to the
/etc/sysconfig/rhn/virt/auto/directory.ln -s /etc/sysconfig/rhn/virt/GUEST_UUID.xml /etc/sysconfig/rhn/virt/auto/
# ln -s /etc/sysconfig/rhn/virt/GUEST_UUID.xml /etc/sysconfig/rhn/virt/auto/Copy to Clipboard Copied! Toggle word wrap Toggle overflow
4.3.3.6. Deleting Virtual Systems
- Shut down the virtual system that you wish to delete. You may do this by browsing to the host system's profile in the Satellite web interface, clicking on the virtualization tab, and selecting the virtual systems that you would like to delete. Finish shutting down by clicking the button at the bottom of the screen.
- Delete the virtual system from Satellite. This is accomplished by selecting the virtual system's checkbox and clicking the button at the bottom of the screen.
Note
Allow for at least two minutes between shutting down a virtual system and deleting it. Otherwise, the virtual system may not shut down properly and you will delete it while it is running. If you delete a virtual system from Satellite while it is running, it will reappear on the Satellite the next time it checks in. If this happens, simply shutdown the system, wait two minutes, and delete it again. - Delete the disk image for the virtual system you would like to delete. You will find the disk image for guest1, for example, at the following location on the host system:
/var/lib/xen/disk-images/guest1.disk
/var/lib/xen/disk-images/guest1.diskCopy to Clipboard Copied! Toggle word wrap Toggle overflow Delete it with the following command:rm /var/lib/xen/disk-images/guest1.disk
# rm /var/lib/xen/disk-images/guest1.diskCopy to Clipboard Copied! Toggle word wrap Toggle overflow If guest1 was on a KVM host system the disk image could be found at:/var/lib/libvirt/images/guest1.img
/var/lib/libvirt/images/guest1.imgCopy to Clipboard Copied! Toggle word wrap Toggle overflow - Finally, you must delete the Red Hat Network configuration files from the host system. To locate the Red Hat Network configuration file for guest1, run the following command:
grep guest1 /etc/sysconfig/rhn/virt/*.xml
# grep guest1 /etc/sysconfig/rhn/virt/*.xmlCopy to Clipboard Copied! Toggle word wrap Toggle overflow Then delete the file indicated. For example:rm /etc/sysconfig/rhn/virt/14e5cfbf72342515236ad74b260c2f6b.xml
# rm /etc/sysconfig/rhn/virt/14e5cfbf72342515236ad74b260c2f6b.xmlCopy to Clipboard Copied! Toggle word wrap Toggle overflow - You have successfully deleted a guest system from your host system and from Satellite.
Chapter 5. Errata Management
Warning
- Published Errata - displays the errata alerts the organization has created and disseminated. To edit an existing published errata, follow the steps described in Section 5.1, “Creating and Editing Errata”. To distribute the errata, click on the top-right corner of the Errata Details page. The errata alert is sent to the administrators of all affected systems.
- Unpublished Errata - displays the errata alerts your organization has created but not yet distributed. To edit an existing unpublished errata, follow the steps described in Section 5.1, “Creating and Editing Errata”. To publish the errata, click on the top-right corner of the Errata Details page. Confirm the channels associated with the errata and click the button, now in the lower-right corner. The errata alert is shifted to the Published page awaiting distribution.
5.1. Creating and Editing Errata
- On the top navigation bar, click on then select on the left navigation bar. From the Errata Management page, click on .
- Enter a label for the erratum in the Advisory field, ideally following a naming convention adopted by your organization. Note that this label cannot begin with the letters "RH" (capitalized or not) to prevent confusion between custom errata and those issued by Red Hat .
- Then, complete all remaining required fields and click the Create Errata button. View standard Red Hat Errata Alerts for examples of properly completed fields.
Note
5.2. Assigning Packages to Errata
- After selecting an erratum to edit, click on the Packages tab then the Add subtab.
- To associate packages with the erratum being edited, select the channel from the dropdown menu that contains the packages and click . Packages already associated with the erratum being edited are not displayed. Selecting presents all available packages.
- After clicking , the package list for the selected option appears. Note that the page header still lists the errata being edited.
- In the list, select the checkboxes of the packages to be assigned to the edited errata, and click at the bottom-right corner of the page.
- A confirmation page appears with the packages listed. Click to associate the packages with the errata. The List/Remove subtab of the Managed Errata Details page appears with the new packages listed.
5.3. Publishing Errata
- On the top navigation bar, click on → on the left navigation bar.
- Click on . A confirmation page appears that will ask you to select which channels you wish to make the errata available in. Choose the relevant channels.
- Click . The errata published will now appear in the Published page of Manage Errata.
5.4. Cloning Errata
Appendix A. Boot Devices
boot.iso is a required prerequisite for creating boot devices. Make sure that this is available somewhere on the system and take note of its location.
Important
syslinux and syslinux-extlinux packages to use the following procedures.
yum install syslinux syslinux-extlinux
# yum install syslinux syslinux-extlinux
syslinux package installs files in /usr/share/syslinux/ for Red Hat Enterprise Linux 6. If using Red Hat Enterprise Linux 5, substitute this directory with /usr/lib/syslinux/.
syslinux-extlinux package installs tools for USB boot media creation.
Procedure A.1. CD and DVD Boot Media
Note
\" is used below to represent a continuation of one line at the shell prompt.
- Create a working directory for the boot image:
mkdir -p temp cd/isolinux
# mkdir -p temp cd/isolinuxCopy to Clipboard Copied! Toggle word wrap Toggle overflow - Mount the boot image to the
tempdirectory:mount -o loop boot.iso temp
# mount -o loop boot.iso tempCopy to Clipboard Copied! Toggle word wrap Toggle overflow - Copy the required files for a Boot Media device to the previously created directory:
cp -aP temp/isolinux/* cd/isolinux/
# cp -aP temp/isolinux/* cd/isolinux/Copy to Clipboard Copied! Toggle word wrap Toggle overflow - Unmount the
tempdirectory and change the permissions on thecddirectory to be readable and writable to the user:umount temp chmod -R u+rw cd
# umount temp
# chmod -R u+rw cd
Copy to Clipboard Copied! Toggle word wrap Toggle overflow - Change to the
./cddirectory:cd ./cd
# cd ./cdCopy to Clipboard Copied! Toggle word wrap Toggle overflow - Copy the
/usr/share/syslinux/menu.c32file to the./cddirectory:cp -p /usr/share/syslinux/menu.c32 isolinux
# cp -p /usr/share/syslinux/menu.c32 isolinuxCopy to Clipboard Copied! Toggle word wrap Toggle overflow - Customize any boot parameters and targets in
isolinux.cfgas needed for CD booting. - Use the
mkisofsto create an ISO to burn to a CD or DVD.mkisofs -o ./custom-boot.iso -b isolinux/isolinux.bin -c isolinux/boot.cat -no-emul-boot \ -boot-load-size 4 -boot-info-table -J -l -r -T -v -V "Custom Red Hat Enterprise Linux Boot" . -boot-load-size 4 -boot-info-table -J -l -r -T -v -V "Custom Red Hat Enterprise Linux Boot" .# mkisofs -o ./custom-boot.iso -b isolinux/isolinux.bin -c isolinux/boot.cat -no-emul-boot \ -boot-load-size 4 -boot-info-table -J -l -r -T -v -V "Custom Red Hat Enterprise Linux Boot" .Copy to Clipboard Copied! Toggle word wrap Toggle overflow - Burn the directory to a CD or DVD to complete the procedure.
Procedure A.2. PXE Boot
- Create a working directory for the boot image:
mkdir -p temp pxe/pxelinux.cfg
# mkdir -p temp pxe/pxelinux.cfgCopy to Clipboard Copied! Toggle word wrap Toggle overflow - Mount the boot image to the
tempdirectory:mount -o loop boot.iso temp
# mount -o loop boot.iso tempCopy to Clipboard Copied! Toggle word wrap Toggle overflow - Copy the required files for a PXE Boot device to the previously created directory:
cp -aP temp/isolinux/* pxe/
# cp -aP temp/isolinux/* pxe/Copy to Clipboard Copied! Toggle word wrap Toggle overflow - Unmount the
tempdirectory and change the permissions on thecddirectory to be readable and writable to the user:umount temp chmod -R u+rw pxe
# umount temp
# chmod -R u+rw pxe
Copy to Clipboard Copied! Toggle word wrap Toggle overflow - Change to the
/pxedirectory:cd ./pxe
# cd ./pxeCopy to Clipboard Copied! Toggle word wrap Toggle overflow - Copy the
/usr/share/syslinux/menu.c32file to the/pxedirectory:cp -p /usr/share/syslinux/menu.c32 .
# cp -p /usr/share/syslinux/menu.c32 .Copy to Clipboard Copied! Toggle word wrap Toggle overflow - Move the
isolinux.cfgfile topxelinux.cfg/default:mv isolinux.cfg pxelinux.cfg/default
# mv isolinux.cfg pxelinux.cfg/defaultCopy to Clipboard Copied! Toggle word wrap Toggle overflow - Remove the temporary files:
rm -f isolinux.bin TRANS.TBL
# rm -f isolinux.bin TRANS.TBLCopy to Clipboard Copied! Toggle word wrap Toggle overflow - Copy the
/usr/share/syslinux/pxelinux.0file to the/pxedirectory:cp -p /usr/share/syslinux/pxelinux.0 .
# cp -p /usr/share/syslinux/pxelinux.0 .Copy to Clipboard Copied! Toggle word wrap Toggle overflow - Open the
pxelinux.cfg/defaultfile in your preferred text editor, and customize any boot parameters and targets as needed for PXE booting.
Procedure A.3. USB Boot Media
Warning
/dev/loop0 for mounting, make sure you use the correct device for your system. You can check which is the correct device using the losetup -f command.
- Create a working directory for the boot image:
mkdir -p temp usb/extlinux
# mkdir -p temp usb/extlinuxCopy to Clipboard Copied! Toggle word wrap Toggle overflow - Mount the boot image to the
tempdirectory:mount -o loop boot.iso temp
# mount -o loop boot.iso tempCopy to Clipboard Copied! Toggle word wrap Toggle overflow - Copy the required files for a USB Media Boot device to the previously created directory:
cp -aP temp/isolinux/* usb/extlinux/
# cp -aP temp/isolinux/* usb/extlinux/Copy to Clipboard Copied! Toggle word wrap Toggle overflow - Unmount the
tempdirectory and change the permissions on thecddirectory to be readable and writable to the user:umount temp chmod -R u+rw usb
# umount temp
# chmod -R u+rw usb
Copy to Clipboard Copied! Toggle word wrap Toggle overflow - Copy the
/usr/share/syslinux/menu.c32file to the./usb/extlinux/directory:cp -p /usr/share/syslinux/menu.c32 ./usb/extlinux/
# cp -p /usr/share/syslinux/menu.c32 ./usb/extlinux/Copy to Clipboard Copied! Toggle word wrap Toggle overflow - Move the
usb/extlinux/isolinux.cfgfile tousb/extlinux/extlinux.conf:mv usb/extlinux/isolinux.cfg usb/extlinux/extlinux.conf
# mv usb/extlinux/isolinux.cfg usb/extlinux/extlinux.confCopy to Clipboard Copied! Toggle word wrap Toggle overflow - Remove the temporary files:
rm -f usb/extlinux/isolinux.bin usb/extlinux/TRANS.TBL
# rm -f usb/extlinux/isolinux.bin usb/extlinux/TRANS.TBLCopy to Clipboard Copied! Toggle word wrap Toggle overflow - Convert the
custom-boot.imgfile and copy it:dd if=/dev/zero of=./custom-boot.img bs=1024 count=300000
# dd if=/dev/zero of=./custom-boot.img bs=1024 count=300000Copy to Clipboard Copied! Toggle word wrap Toggle overflow - Discover the correct mounting location for the loopback device:
losetup -f
# losetup -f
/dev/loop0
Copy to Clipboard Copied! Toggle word wrap Toggle overflow Set up the loopback device with the boot image:losetup /dev/loop0 ./custom-boot.img
# losetup /dev/loop0 ./custom-boot.imgCopy to Clipboard Copied! Toggle word wrap Toggle overflow - Open the
fdiskutility:fdisk /dev/loop0
# fdisk /dev/loop0Copy to Clipboard Copied! Toggle word wrap Toggle overflow Create one primary bootable partition on the device. This can be done by using the following key press combination: n p 1 Enter Enter a 1 p w - Copy the master boot record (MBR) to the loopback device:
dd if=/usr/share/syslinux/mbr.bin of=/dev/loop0
# dd if=/usr/share/syslinux/mbr.bin of=/dev/loop0Copy to Clipboard Copied! Toggle word wrap Toggle overflow - Add partition maps to the loopback device:
kpartx -av /dev/loop0
# kpartx -av /dev/loop0Copy to Clipboard Copied! Toggle word wrap Toggle overflow - Create the file system:
mkfs.ext2 -m 0 -L "Custom Red Hat Enterprise Linux Boot" /dev/mapper/loop0p1
# mkfs.ext2 -m 0 -L "Custom Red Hat Enterprise Linux Boot" /dev/mapper/loop0p1Copy to Clipboard Copied! Toggle word wrap Toggle overflow - Mount the device:
mount /dev/mapper/loop0p1 temp
# mount /dev/mapper/loop0p1 tempCopy to Clipboard Copied! Toggle word wrap Toggle overflow - Delete temporary files:
rm -rf temp/lost+found
# rm -rf temp/lost+foundCopy to Clipboard Copied! Toggle word wrap Toggle overflow - Copy the
usb/extlinux/directory to a temporary location:cp -a usb/extlinux/* temp/
# cp -a usb/extlinux/* temp/Copy to Clipboard Copied! Toggle word wrap Toggle overflow - Install the bootloader in the temporary location:
extlinux -i temp
# extlinux -i tempCopy to Clipboard Copied! Toggle word wrap Toggle overflow - Unmount the temporary location:
umount temp
# umount tempCopy to Clipboard Copied! Toggle word wrap Toggle overflow - Delete the partition maps on the loopback device:
kpartx -dv /dev/loop0
# kpartx -dv /dev/loop0Copy to Clipboard Copied! Toggle word wrap Toggle overflow - Delete the loopback device:
losetup -d /dev/loop0
# losetup -d /dev/loop0Copy to Clipboard Copied! Toggle word wrap Toggle overflow Synchronize the file system changes:sync
# syncCopy to Clipboard Copied! Toggle word wrap Toggle overflow - Open the
extlinux.conffile in your preferred text editor, and customize any boot parameters and targets as needed for USB booting. - Transfer the image to a USB device to complete the procedure. Insert the device, and run the
dmesgcommand to check the mounting location. In this example, it is/dev/sdb.Unmount the USB device:umount /dev/sdb
# umount /dev/sdbCopy to Clipboard Copied! Toggle word wrap Toggle overflow Copy the image to the USB device:dd if=./custom-boot.img of=/dev/sdb
# dd if=./custom-boot.img of=/dev/sdbCopy to Clipboard Copied! Toggle word wrap Toggle overflow
Appendix B. Custom Package Management
B.1. Building Packages for Red Hat Network
B.1.1. RPM Benefits
- Easy Upgrades
- Using RPM, you upgrade individual components of a system without completely reinstalling. When Red Hat releases a new version of Red Hat Enterprise Linux, users do not have to reinstall in order to upgrade. RPM allows intelligent, fully-automated, in-place upgrades of the system. Configuration files in packages are preserved across upgrades so users do not lose customizations. There are no special upgrade files needed to update a package because the same RPM file is used to install and upgrade the package.
- Package Querying
- RPM provides querying options that allows a search through the entire RPM database for all packages or just for certain files. RPM can also find out what package the file belongs to and where the package came from. The files contained in the package are in a compressed archive, with a custom binary header containing useful information about the package and its contents. RPM queries the headers quickly and easily.
- System Verification
- Another feature is the ability to verify packages. If there are concerns that a file related to a package was deleted, verify the package to check the status of the files it provides. The verification notifies you of any anomalies. If errors do exist, the files are reinstalled easily. Modified configuration files are preserved during reinstallation.
- Pristine Sources
- A crucial design goal of RPM is to allow the use of pristine software sources, as distributed by the original authors of the software. With RPM, the pristine sources can be packaged, along with any patches that were used, plus complete build instructions. This is an important advantage for several reasons. For instance, if a new version of a program is released, it is unnecessary to start from scratch to make it compile. Looking at the match may allow you to see what you might need to do. All the compiled-in defaults and changes made to get the software to build properly are easily visible using this technique.Keeping sources pristine may seem important only to developers, but it results in higher quality software for end users as well.
B.1.2. Red Hat Network RPM Guidelines
- Learn RPM. It is crucial to have a fundamental understanding of the important features of RPM to build packages properly. For more information about RPM, start with the following resources:
- When building an RPM for a child channel, build the package on a fresh install of Red Hat Enterprise Linux of the same version as the child's base channel. Be sure to apply all updates from Red Hat Network first.
- The RPM package must install without using the
--forceor--nodepsoptions. If an RPM cannot be installed cleanly on a build system, Red Hat Network cannot install it automatically on a system. - The RPM package filename must be in the NVR (name, version, release) format and must contain the architecture for the package. The proper format is
name-version-release.arch.rpm. For example, a valid RPM package filename ispkgname-0.84-1.i386.rpm, where name is pkgname, version is 0.84, release is 1, and arch is i386. - The RPM package should be signed by the maintainer of the package. Unsigned packages may be distributed through Red Hat Network, but the yum updater must be forced to accept them. Signing packages is highly recommended and is covered in Section B.2, “Digital Signatures for Red Hat Network Packages”.
- If the package is changed in any way, including changing the signature or recompiling, the version or release must be increased incrementally. In other words, the NVRA (including architecture) for each RPM distributed through Red Hat Network must correspond to a unique build to avoid ambiguities.
- No RPM package may obsolete itself.
- If a package is split into separate packages, be extremely careful with the dependencies. Do not split an existing package unless there is a compelling reason to do so.
- No package may rely upon interactive pre-install, post-install, pre-uninstall, or post-uninstall scripts. If the package requires direct user intervention during installation, it cannot work with Red Hat Network.
- Any pre-install, post-install, pre-uninstall, and post-uninstall scripts should never write anything to stderr or stdout. Redirect the messages to
/dev/nullif they are not necessary. Otherwise, write them to a file. - When creating the spec file, use the group definitions from
/usr/share/doc/rpm-<version>/GROUPS. If there is not an exact match, select the next best match. - Use the RPM dependency feature to make sure the program runs after it is installed.
Important
B.2. Digital Signatures for Red Hat Network Packages
B.2.1. Generating a GnuPG Keypair
- Type the following command as the root user on the shell prompt:
gpg --gen-key
gpg --gen-keyCopy to Clipboard Copied! Toggle word wrap Toggle overflow GPG Keypairs should not be created by non-root users. The root user can lock memory pages which means the information is never written to disk, unlike non-root users. - After executing the command to generate a keypair, an introductory screen containing key options similar to the following will appear:
Copy to Clipboard Copied! Toggle word wrap Toggle overflow - Choose the option
1and then press Enter. - Choose the key size, which is how long the key should be. The longer the key, the more resistant against attacks the messages are. Creating a key of at least 2048 bits in size is recommended.
- The next option will ask to specify how long the key needs to be valid. When choosing an expiration date, remember that anyone using the public key must also be informed of the expiration and supplied with a new public key. It is recommended to not select an expiration date. If an expiration date is not specified, you are asked to confirm your decision:
Key does not expire at all Is this correct (y/n)?
Key does not expire at all Is this correct (y/n)?Copy to Clipboard Copied! Toggle word wrap Toggle overflow - Press y to confirm your decision.
- Provide a User-ID containing your name, your email address, and an optional comment. Each of these is requested individually. When finished, you are presented with a summary of the information you entered.
- Accept your choices and enter a passphrase.
Note
Like your account passwords, a good passphrase is essential for optimal security in GnuPG. Mix your passphrase with uppercase and lowercase letters, use numbers, and/or include punctuation marks. - Once you enter and verify your passphrase, the keys are generated. A message similar to the following appears:
Copy to Clipboard Copied! Toggle word wrap Toggle overflow When the activity on the screen ceases, your new keys are placed in the directory.gnupgin root's home directory. This is the default location of keys generated by the root user.
gpg --list-keys
gpg --list-keysgpg --export -a 'Your Name' > public_key.txt
gpg --export -a 'Your Name' > public_key.txt
public_key.txt.
yum. Techniques for deploying this key across an organization are covered in the Red Hat Network Client Configuration Guide.
B.2.2. Signing packages
~/.rpmmacros file to include the following:
%_signature gpg
%_gpg_name B7085C8A
%_signature gpg
%_gpg_name B7085C8A_gpg_name key ID value of B7085C8A with the key ID from your GPG keyring that you use to sign packages. This value tells RPM which signature to use.
rpm --resign package-name-1.0-1.noarch.rpm
rpm --resign package-name-1.0-1.noarch.rpmrpm --checksig -v package-name-1.0-1.noarch.rpm
rpm --checksig -v package-name-1.0-1.noarch.rpmNote
rpm --checksig -v command, import the gpg key. See Section B.2.3, “Importing Custom GPG Keys” in the next section for more information.
B.2.3. Importing Custom GPG Keys
cp /some/path/YOUR-RPM-GPG-KEY /var/www/html/pub/
cp /some/path/YOUR-RPM-GPG-KEY /var/www/html/pub/wget -O- -q http://your_proxy_or_sat.your_domain.com/pub/YOUR-RPM-GPG-KEY
wget -O- -q http://your_proxy_or_sat.your_domain.com/pub/YOUR-RPM-GPG-KEY-O- option sends results to standard output while the -q option sets Wget to run in quiet mode. Remember to replace the YOUR-RPM-GPG-KEY variable with the filename of your key.
rpm --import /path/to/YOUR-RPM-GPG-KEY
rpm --import /path/to/YOUR-RPM-GPG-KEYNote
Appendix C. Revision History
| Revision History | |||
|---|---|---|---|
| Revision 1.1-0 | Wed Feb 1 2017 | ||
| |||