Installation Guide
Configuring, registering, and updating Red Hat Satellite Server
Abstract
Chapter 1. Introduction
1.1. Red Hat Satellite 5
The popular functionality of Satellite 5 includes the ability to provision a large number of systems using kickstart files and activation keys to install and configure systems to a predictable state. This provisioning process associates systems to designated organizations, software and configuration channels, as well as placing systems in predefined system groups. The Satellite 5 provisioning functionality enables administrators to provision thousands of systems in a consistent manner.
Satellite 5 is recognized as a solid platform for managing software and configuration files for a large number of systems. It is also well known for the simplicity and consistency of the provisioning process. The Satellite 5 systems management platform is also well known for delivering the correct versions and updated versions of content to the correct systems in a very structured manner. Administrators can manage the Satellite and systems management processes through the Satellite webUI and also through the Satellite API interfaces.
1.2. System Overview
- Red Hat Satellite Core
- The core system and entry point for Red Hat Update Agent running on client systems. Red Hat Satellite also includes an Apache HTTP Server, which serves XML-RPC requests.
- Red Hat Satellite Web Interface
- A user interface for advanced system, system group, user, and channel management. The organization configures access to the Red Hat Satellite web interface from the local area network and, optionally, the Internet too. Red Hat Satellite provides an interface similar to the Red Hat Customer Portal website and allows full control over client systems, system groups, and users.
- Database
- Red Hat Satellite uses one of the following database types:
- Embedded Database - The database comes bundled with Red Hat Satellite and is installed on the same machine as the Satellite during the installation process. The included database is PostgreSQL.
- Managed Database - The database comes bundled with Red Hat Satellite and is installed on a separate machine during the installation process. The included database is PostgreSQL.
- External Database - An organization's existing database or, preferably, a database contained on a separate machine. Red Hat Satellite supports PostgreSQL, Oracle Database 12c (Standard or Enterprise Edition), Oracle Database 11g (Standard or Enterprise Edition), or Oracle Database 10g Release 2 (Standard or Enterprise Edition) for this database installation type.
- RPM Repository
- Package repository for Red Hat RPM packages and custom RPM packages identified by the organization.
- Management Tools
- The Red Hat Satellite Management Tools synchronize the database and package repository with the Red Hat Content Delivery Network. Red Hat Satellite also includes management tools for:
- Database and file system synchronization
- Custom RPM and repository imports
- Channel maintenance (Web-based)
- Errata management (Web-based)
- User management (Web-based)
- Client system and system grouping (Web-based)
- Red Hat Update Agent
- The Red Hat Update Agent operates on client systems to retrieve updates from the organization's internal Red Hat Satellite. System administrators also schedule these actions through the Red Hat Satellite Web Interface.When a client requests updates, the organization's internal Red Hat Satellite queries its database, authenticates the client system, identifies updated packages, and sends the requested RPMs back to the client system. The client also installs these packages if set in preferences. The client system can send an updated package profile to the database on the Red Hat Satellite.
Important
Red Hat strongly recommends that clients connected to Red Hat Satellite be running the latest update of Red Hat Enterprise Linux to ensure proper connectivity. - Red Hat Satellite Proxy Server
- Use Red Hat Satellite in conjunction with Red Hat Satellite Proxy Server to create a distributed, self-contained Satellite environment for the organization. For example, an organization can maintain one Red Hat Satellite in a secure location while systems in proximity connect to it through local network access. Other remote offices would maintain Satellite Proxy Server installations that connect to the Satellite server. The different locations inside the organization require a networked connection, but this can be a private network; an Internet connection is not required for any of the systems. See the Red Hat Satellite Proxy Installation Guide for more information on installing and configuring Satellite Proxies.
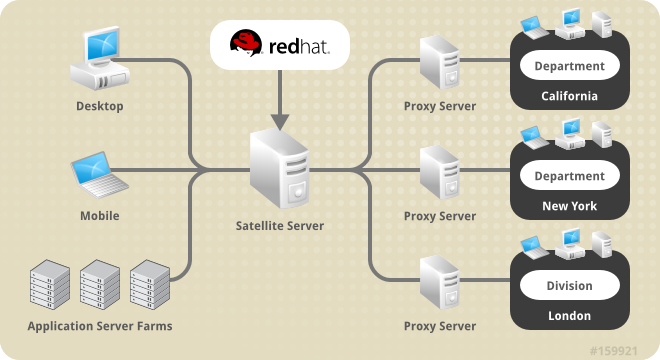
Figure 1.1. Using Red Hat Satellite and Red Hat Satellite Proxy Server Together
1.3. Terms to Understand
- Channel
- A Channel is a list of software packages. There are two types of channels: base channels and child channels. A base channel consists of a list of packages based on a specific architecture and Red Hat release. A child channel is a channel associated with a base channel that contains extra packages.
- Organization Administrator
- An Organization Administrator is a user role with the highest level of control over an organization's Red Hat Network account. Members of this role can add other users, systems, and system groups to the organization as well as remove them. An organization must have at least one Organization Administrator.
- Channel Administrator
- A Channel Administrator is a user role with full access to channel management capabilities. Users with this role are capable of creating channels, assigning packages to channels, cloning channels, and deleting channels. This role can be assigned by an Organization Administrator through the Users tab of the Red Hat Customer Portal website.
- Certificate Authority
- A Certificate Authority distributes digital signatures to users as part of public key infrastructure for encrypted authentication and communication.
- Traceback
- A Traceback is a detailed error message for troubleshooting the Red Hat Satellite. Red Hat Satellite generates Tracebacks automatically when a critical error occurs and mails the individual(s) designated in the Red Hat Satellite configuration file.
1.4. Summary of Steps
Obtaining Red Hat Satellite
- After an evaluation, contact your Red Hat sales representative to purchase Red Hat Satellite.
- Receive login information for the Red Hat Customer Portal from your sales representative.
- Log into the Red Hat Customer Portal website (access.redhat.com) and download the distribution ISOs for Red Hat Enterprise Linux and Red Hat Satellite. These can be found on the Product Downloads page under → and → .
- (Optional) While still logged into the Customer Portal, download the Channel Content ISOs to be served by your Red Hat Satellite. These are also available through the Product Downloads page under → → . These Channel Content ISOs differ from the distribution ISOs previously mentioned in that they contain metadata necessary for parsing and serving packages by Red Hat Satellite.
Preparing for Red Hat Satellite Installation
- Check the software, hardware, and standard database requirements. See Chapter 2, Requirements for these requirements.
- Create and download a manifest to activate the Satellite server.
Installing Red Hat Satellite
- If installing Red Hat Satellite with an Embedded Database, use the following installation scenario: Section 3.1, “Scenario 1: Installing Satellite with Embedded Database”.
- If installing Red Hat Satellite with an Managed Database, use the following installation scenario: Section 3.2, “Scenario 2: Installing Satellite with Managed Database”.
- If installing Red Hat Satellite with an External Database, use the following installation scenario: Section 3.3, “Scenario 3: Installing Satellite with External Database”.
Initial Use
- Open Red Hat Satellite's web interface in a web browser and create the first user account. This is the Administrator account (also referred to as the Organization Administrator).
- Finalize Red Hat Satellite with any post-installation steps.
- Use the Red Hat Satellite CDN Synchronization Tool to import the channels and associated packages into the Red Hat Satellite.
Chapter 2. Requirements
2.1. Software Requirements
- Base Operating System
- Red Hat Satellite 5 requires a Red Hat Enterprise Linux 6 operating system with the latest packages from the
@Basepackage group and no other package-set modifications, third-party configurations, or software not directly necessary for the operation of the server. This restriction includes hardening or other non-Red Hat security software. If such software is required in your infrastructure, first install and verify a complete working Red Hat Satellite first, then create a backup of the system before adding any non-Red Hat software.Red Hat Satellite 5 also supports installation on Red Hat Enterprise Linux to supported virtualized environments, including:- KVM
- Xen
- VMware
Performance on virtualized environments will not always equal the same performance of physical hardware. Make sure to consider your virtual environment's performance and implement any recommended tuning guidelines.Important
Each purchased Satellite product includes one supported instance of Red Hat Enterprise Linux Server. Install Satellite on a fresh installation of Enterprise Linux where Satellite is the only application and service provided by the OS. Using the Red Hat Enterprise Linux OS included with Satellite to run other daemons, applications, or services within your environment is not supported. - Red Hat Satellite Installation Media
- Red Hat provides the installation media as a disc or ISO. It contains an Red Hat Satellite Installation Script, which installs all packages required for Red Hat Satellite.
Important
The Red Hat Satellite Installation Script installs packages beyond the@Basepackage group. The installation script attempts to download and install these packages but prompts you to install the listed packages manually if they are unavailable. In this situation, either:- Install these package from your Red Hat Enterprise Linux installation media, or
- Subscribe the base operating system to the Red Hat Enterprise Linux channel to resolve package dependencies during installation.
The installation ISO lists the packages necessary for installation in therhelrpmsfile located in theupdatesdirectory. - Channel content
- All software packages and data exported for all entitled Red Hat channels. This content is loaded directly on the Red Hat Satellite after installation using the Red Hat Satellite Synchronization Tool.
- Perl interpreter
- The installer is a Perl script, and so requires a Perl interpreter. To test if a Perl interpreter is already installed, run the command
perl --version. If the output includes the textcommand not found, install a Perl interpreter.# yum install perl
2.2. Hardware Requirements
- Red Hat Satellite with Embedded Database - 1 machine
- Red Hat Satellite with Managed/External Database - 2 machines
2.2.1. x86_64 Hardware Requirements
CPU
- Required: Intel dual-core processor, 2.4GHz, 512K cache or equivalent
- Recommended: Intel quad-core processor, 2.4GHz dual processor, 512K cache or equivalent
Memory
- Required: 4 GB of memory
- Recommended: 8 GB of memory
Storage
- 5 GB storage for base installation
- A minimum of 40 GB storage per software channel (including
Baseand child channels), in/var/satellite/, configurable at install - A minimum of 10 GB storage for cache files stored within
/var/cache/rhn. See Section 2.4.5, “Caching” for more information. - Strongly Recommended: A SCSI drive connected to a level 5 RAID
Database
- See Section 2.3.1, “Database Sizing” for standard database requirements.
- Embedded Database: A minimum of 12 GB storage for the database repository in the
/var/opt/rh/rh-postgresql95/lib/pgsql/datapartition on the Satellite host. This partition must be local storage only.Important
Due to an updated version of the PostgreSQL Embedded Database, the database location has changed to/var/opt/rh/rh-postgresql95/lib/pgsql/datain Red Hat Satellite 5.8. Make sure to allocate enough hard disk space to this location. - Managed Database: A minimum of 12 GB storage for the database repository in the
/var/opt/rh/rh-postgresql95/lib/pgsql/datapartition on the Managed Database host. This partition must be local storage only. The instructions for installing this database are a part of the Managed Database installation scenario (See Section 3.2.2, “Mounting the Installation Media”). - External Database: See Section 3.3.1, “External Database Requirements”.
Backup
- A separate partition (or better, a separate set of physical disks) for storing backups, which can be any directory specifiable at backup time
- An external SAN for more reliable backups
2.2.2. s/390x Hardware Requirements
CPU
- Required: 1 IFL, either in LPAR configuration or shared through z/VM
- Recommended: 2 or more IFLs on z9 or earlier, 1 or more IFL on z10
Memory
- Required: 4 GB of memory
- Recommended: 8 GB of memory
Storage
- Required:
- 1 GB swap on ECKD DASD
- 1xMod3 ECKD DASD or ≥ 2 GB FCP SCSI LUN for base installation
- A minimum of 40 GB storage per software channel (including
Baseand child channels), in/var/satellite/, configurable at install - A minimum of 10 GB storage for cache files stored within
/var/cache/rhn. See Section 2.4.5, “Caching” for more information.
- Recommended:
- 512 MB swap on VDISK + 1 GB swap on ECKD DASD
- 1xMod9 ECKD DASD or ≥ 2 GB multipathed FCP SCSI LUN for base installation
- A minimum of 40 GB storage per software channel (including
Baseand child channels), in/var/satellite/, configurable at install - A minimum of 10 GB storage for cache files stored within
/var/cache/rhn. See Section 2.4.5, “Caching” for more information.
Database
- See Section 2.3.1, “Database Sizing” for standard database requirements.
- Embedded Database: A minimum of 12 GB storage for the database repository in the
/var/opt/rh/rh-postgresql95/lib/pgsql/datapartition. This partition must be local storage only.Important
Due to an updated version of the PostgreSQL Embedded Database, the database location has changed to/var/opt/rh/rh-postgresql95/lib/pgsql/datain Red Hat Satellite 5.8. Make sure to allocate enough hard disk space to this location. - Managed Database: A minimum of 12 GB storage for the database repository in the
/var/opt/rh/rh-postgresql95/lib/pgsql/datapartition on the Managed Database host. This partition must be local storage only. The instructions for installing this database are a part of the Managed Database installation scenario (See Section 3.2.2, “Mounting the Installation Media”). - External Database: See Section 3.3.1, “External Database Requirements”.
Other
- z/VM 5.3 or later for kickstart and provisioning of guests.
- VSWITCH or HiperSocket LAN for high speed connections to guests
2.3. General Database Requirements
2.3.1. Database Sizing
- 250 KiB per client system
- 500 KiB per channel, plus 230 KiB per package in the channel (so a channel with 5000 packages would require 1.1 Gib)
- The number of public Red Hat packages imported (typical: 5000)
- The number of private packages to be managed (typical: 500)
- The number of systems to be managed (typical: 1000)
- The number of packages installed on the average system (typical: 500)
/var/opt/rh/rh-postgresql95/lib/pgsql/data contains an amount of free space equal to the tablespace size. This free space is used for the db-control restore command. For example, ensure 12 GB of free space exists for a 12 GB tablespace.
Important
/var/opt/rh/rh-postgresql95/lib/pgsql/data in Red Hat Satellite 5.8. Make sure to allocate enough hard disk space to this location.
2.3.2. Database Partitioning
Procedure 2.1. Creating and Mounting a Database Partition
- Log in to the database server as
root. For Embedded Databases, this is the same server as the Red Hat Satellite. - Create the
postgresuser.# useradd -d /var/lib/pgsql -M -r -s /bin/bash -U postgres - Add the mount point in
/etc/fstab. For example:UUID="xxxxxxxx-xxxx-xxxx" /var/opt/rh/rh-postgresql95/lib/pgsql/data ext4 defaults 0 0Important
Red Hat does not support storing the database on a network filesystem. - Mount the partition to
/var/opt/rh/rh-postgresql95/lib/pgsql/dataand change ownership topostgres:postgres:# mkdir -p /var/opt/rh/rh-postgresql95/lib/pgsql/data # mount /var/opt/rh/rh-postgresql95/lib/pgsql/data # chown postgres:postgres /var/opt/rh/rh-postgresql95/lib/pgsql/data # chmod 700 /var/opt/rh/rh-postgresql95/lib/pgsql/data # restorecon -Rv /var/opt/rh/rh-postgresql95/lib/pgsql/data
/var/opt/rh/rh-postgresql95/lib/pgsql/data.
Important
/var/opt/rh/rh-postgresql95/lib/pgsql/data in Red Hat Satellite 5.8. Make sure to allocate enough hard disk space to this location.
2.4. Additional Requirements
2.4.1. Firewall
| Port | Protocol | Direction | Reason |
|---|---|---|---|
| 67 | TCP/UDP | Inbound | Open this port to configure the Red Hat Satellite as a DHCP server for systems requesting IP addresses. |
| 69 | TCP/UDP | Inbound | Open this port to configure Red Hat Satellite as a PXE server and allow installation and re-installation of PXE-boot enabled systems. |
| 80 | TCP | Inbound | Web UI and client requests come in via HTTP. |
| 443 | TCP | Inbound | Web UI and client requests come in via HTTPS. |
| 443 | TCP | Outbound | Red Hat Satellite uses this port to reach Red Hat Subscription Manager (unless running in a disconnected mode for Satellite). |
| 4545 | TCP | Inbound and Outbound | Red Hat Satellite Monitoring makes connections to rhnmd running on client systems, if Monitoring is enabled and probes are configured for registered systems. |
| 5222 | TCP | Inbound | This port pushes actions to client systems. |
| 5269 | TCP | Inbound and Outbound | This port pushes actions to Red Hat Proxy Server. |
| 5432 | TCP | Inbound and Outbound | This is a requirement for communication with a PostgreSQL database server if using an External Database or Managed Database. |
subscription.rhsm.redhat.comcdn.redhat.comcert-api.access.redhat.com(if using Red Hat Insights)api.access.redhat.com(if using Red Hat Insights)
2.4.2. File Permissions
umask command sets file permissions mask for new files. This helps secure the file permissions for new files created on a system. Users with a restrictive umask value might experience problems with installation and operation of Red Hat Satellite. Use the recommended umask value of 022.
2.4.3. SELinux Policy
targeted policy in enforcing or permissive mode on Red Hat Enterprise Linux 5 and 6.
2.4.4. Bandwidth
| |
Single Package (10Mb)
|
Minor Release (750Mb)
|
Major Release (6Gb)
|
|---|---|---|---|
|
256Kbps
|
5 Mins 27 Secs
|
6 Hrs 49 Mins 36 Secs
|
2 Days 7 Hrs 55 Mins
|
|
512Kbps
|
2 Mins 43.84 Secs
|
3 Hrs 24 Mins 48 Secs
|
1 Day 3 Hrs 57 Mins
|
|
T1 (1.5Mbps)
|
54.33 Secs
|
1 Hr 7 Mins 54.78 Secs
|
9 Hrs 16 Mins 20.57 Secs
|
|
10Mbps
|
8.39 Secs
|
10 Mins 29.15 Secs
|
1 Hr 25 Mins 53.96 Secs
|
|
100Mbps
|
0.84 Secs
|
1 Min 2.91 Secs
|
8 Mins 35.4 Secs
|
|
1000Mbps
|
0.08 Secs
|
6.29 Secs
|
51.54 Secs
|
2.4.5. Caching
/var/satellite/, Red Hat Satellite requires space to generate cache files. These cache files are constantly regenerated as they become needed, even if the cache files are deleted. These cache files are stored within /var/cache/rhn, and the storage needs of this directory depend on the following factors:
- How many channels you synchronize or import from Red Hat or Channel dumps.
- How many custom packages and channels you have.
- Whether or not you are using Red Hat Satellite Synchronization.
/var/cache/rhn/ on a Red Hat Satellite server. For very large environments with numerous channels, packages, and using Inter Satellite Sync, usage can grow to as much as 100 GB of space for cache files in /var/cache/rhn.
2.4.6. Synchronized System Times
2.4.7. Setting System Language and Locale
/etc/sysconfig/i18n file. The LANG setting in the file must be in the following format:
LANG="[language_TERRITORY].UTF-8"
language and TERRITORY are entered as two-letter codes. For example if your language is English and your locale is the United States, you set your LANG setting to en_US.UTF-8.
2.4.8. Fully Qualified Domain Name (FQDN)
Important
jabberd) to fail.
2.4.9. Functioning Domain Name Service (DNS)
2.4.10. Red Hat Network Account
Warning
- Red Hat Enterprise Linux - Optional Packages
- Red Hat Enterprise Linux - Supplementary Packages
- Red Hat Developer Suite
- Red Hat Application Server
- Red Hat Extras
- JBoss product channels
2.4.11. Backups of Login Information
access.redhat.com, the primary administrator account on the Red Hat Satellite itself, SSL certificate generation, and database connection (which also requires an SID, or net service name). Red Hat strongly recommends you copy this information to removable storage media, print out on paper, and store in a fireproof safe.
2.4.12. Channel Content ISOs
2.4.13. Service Access
chkconfig.
- jabberd
- postgresql (for Embedded Database Installation)
- tomcat6 (for installation on Red Hat Enterprise Linux 6)
- httpd
- osa-dispatcher
- Monitoring
- MonitoringScout
- rhn-search
- cobblerd
- taskomatic
Chapter 3. Installation Scenarios
3.1. Scenario 1: Installing Satellite with Embedded Database
3.1.1. Downloading the Installation Media
Procedure 3.1. Download the Installation Media
- Log on to the Customer Portal.
- Click Downloads.
- Click Red Hat Satellite.
- Select 5.8 for RHEL 6 from the Versions drop-down list.
- Select x86_64 or s390x from the Architecture list.
- Download the Red Hat Satellite 5.8 Binary DVD.
- Depending on your preferred installation source, either copy the DVD ISO image to the Satellite host, or burn it to DVD media.
- If you will be mounting the ISO image and running the installation program from there, copy the ISO image to the Satellite host.
# scp satellite.iso root@hostname:/rootNote
If you will be installing a Managed DB instance, also copy the ISO image to that host. - If you will be mounting a DVD and running the installation program from there, burn the DVD ISO image to DVD media.
3.1.2. Mounting the Installation Media
Procedure 3.2. Mounting from a disc
- Log into the machine as
root. - Insert the Red Hat Satellite Server CD or DVD containing the installation files.
- Red Hat Enterprise Linux might automount the disc. If so, it mounts the disc to the
/media/cdrom/directory. If Red Hat Enterprise Linux does not automount the disc, manually mount it to the/media/cdrom/directory with the following command:# mkdir /media/cdrom # mount /dev/cdrom /media/cdrom
Procedure 3.3. Mounting from an ISO image
- Log into the host as
root. - Mount the ISO image to a location on your filesystem:
# mkdir /media/cdrom
# mount -o loop iso_filename /media/cdrom
/media/cdrom/. Use this location to access the Red Hat Satellite installation program.
3.1.3. Generating a Manifest
Note
Procedure 3.4. Generate New Satellite 5.8 Manifest
- Log on to the Customer Portal and navigate to Subscriptions in the upper-left corner.
- Navigate to Subscription Allocations.
- Click New subscription allocation.
- Enter a name in the Name field, select Satellite 5.8 from the Type drop-down list, and click Create.
- Navigate to the Subscription tab and click .
- For each product to be attached to the manifest, specify the desired quantity in the Entitlements field, and click Submit. It may take several minutes for the subscriptions to be attached.
- Click and save the manifest file locally.
- Log out of the Customer Portal.
- Access the terminal on the host to which the manifest file was downloaded.If the Satellite server is available via the network, copy the manifest file to the Satellite host. In this example, the file is copied to the
/rootdirectory.# scp manifest_file.zip root@satellite.example.com:/rootIf the Satellite server is disconnected, copy the manifest file to portable media, and on the Satellite server, copy the manifest file from the portable media.
3.1.4. Installing Behind a HTTP Proxy: Pre-Configuration (Optional)
Note
- This section only applies to networks behind a HTTP proxy.
- Satellite does not support NTLM as a HTTP access authentication method. Only Basic access authentication, and Digest access authentication methods are supported.
/etc/rhsm/rhsm.conf, and edit the following lines, adding details of the HTTP proxy, and credentials.
proxy_hostname = proxy_hostname
proxy_port = proxy_port
proxy_user = proxy_user
proxy_password = proxy_password
3.1.5. Registering Host with Red Hat Content Delivery Network
# subscription-manager register
The system has been registered with ID: 541084ff2-44cab-4eb1-9fa1-7683431bcf9a
3.1.6. Activating the Satellite Repositories
Procedure 3.5. Activate the Satellite Repositories
- List all available subscriptions, and identify the Red Hat Satellite 5 subscription.The list of available subscriptions may be long, but if you pipe the output into a pager utility, such as
lessormore, you can read the output one screenful at a time.# subscription-manager list --all --available | lessNote thePool IDas this is required to attach the subscription. - Attach the subscription to the host.
# subscription-manager attach --pool=pool_idThe output should be similar to the following:Successfully attached a subscription for: Red Hat Satellite - Disable all repositories.
# subscription-manager repos --disable "*" - Enable the Red Hat Enterprise Linux 6 repository. The Red Hat Satellite 5.8 repository will be enabled automatically by the installation program.For AMD64 and Intel 64
# subscription-manager repos --enable=rhel-6-server-rpmsFor IBM System z# subscription-manager repos --enable=rhel-6-for-system-z-rpms
3.1.7. Running the Installation Program
root user.
Warning
Procedure 3.6. Running Installation Program
- Run the installation program from the
/media/cdrom/directory:# ./install.plThe installation program first verifies the requirements in Chapter 2, Requirements are met before proceeding.* Starting the Red Hat Satellite installer. * Performing pre-install checks. * Pre-install checks complete. Beginning installation. - The script performs host registration with Red Hat Subscription Manager (if not already done), installs and updates all required packages, and populates the database on the Managed Database Host.If the installation program prompts with the question, "Do you want the installer to resolve dependencies [y/N]?", reply
y(Yes).* RHSM Registration. ** Registration: System is already registered with RHSM. Not re-registering. * RHSM Subscriptions. ** Subscriptions: Subscription providing 'Red Hat Satellite' already attached. ** Subscriptions: Subscription providing 'Red Hat Enterprise Linux Server' already attached. ** Subscriptions: Disabling all RHSM repositories (rhel-6-server-rpms). ** Subscriptions: All repositories disabled. ** Subscriptions: Enabling RHEL repository. ** Subscriptions: RHEL repository enabled. * Checking for uninstalled prerequisites. ** Checking if yum is available ... There are some packages from Red Hat Enterprise Linux that are not part of the @base group that Satellite will require to be installed on this system. The installer will try resolve the dependencies automatically. However, you may want to install these prerequisites manually. Do you want the installer to resolve dependencies [y/N]? y * Installing Satellite packages. Warning: yum did not install the following packages: libXt * Now running spacewalk-setup. * Setting up SELinux.. ** Database: Setting up database connection for PostgreSQL backend. Database "rhnschema" does not exist ** Database: Installing the database: ** Database: This is a long process that is logged in: ** Database: /var/log/rhn/install_db.log *** Progress: # ** Database: Installation complete. ** Database: Populating database. *** Progress: ###########################
3.1.8. Configuring the Satellite
/root/.gnupg/ directory, if required.
* Configuring tomcat.
* Setting up users and groups.
** GPG: Initializing GPG and importing key.
You must enter an email address.
Admin Email Address? admin@example.com
* Performing initial configuration.
* Activating Red Hat Satellite.
Where is your satellite manifest file? /path/manifest_file.zip
** Loading Red Hat Satellite Manifest.
** Verifying manifest locally.
** Activating Red Hat Satellite.
y to the Apache SSL configuration question, then answer the CA certificate questions.
- CA cert
- Enter a password for the certificate.
- Organization
- Enter the name of your organization.
- Organization Unit
- Enter the name of your department within your organization.
- Email Address
- Enter an email address to be associated with this certificate, such as the admin email entered in the steps above.
- City
- Enter your city.
- State
- Enter your state.
- Country
- Enter your country. The country code must be exactly two letters, or the certificate generation fails. Type
?to see a list of country codes.
* Configuring apache SSL virtual host.
Should setup configure apache's default ssl server for you (saves original ssl.conf) [Y]?
** /etc/httpd/conf.d/ssl.conf has been backed up to ssl.conf-swsave
* Configuring jabberd.
* Creating SSL certificates.
CA certificate password?
Re-enter CA certificate password?
Organization? Red Hat
Organization Unit [satellite.example.com]? Sales
Email Address [admin@example.com]? admin@example.com
City? Raleigh
State? NC
Country code (Examples: "US", "JP", "IN", or type "?" to see a list)? US
** SSL: Generating CA certificate.
** SSL: Deploying CA certificate.
** SSL: Generating server certificate.
** SSL: Storing SSL certificates.
* Deploying configuration files.
* Update configuration in database.
y.
* Setting up Cobbler..
cobblerd does not appear to be running/accessible
Cobbler requires tftp and xinetd services be turned on for PXE provisioning functionality. Enable these services [Y]?
* Restarting services.
Installation complete.
Visit https://satellite.example.com to create the Red Hat Satellite administrator account.
/tftpboot directory.
setsebool -P cobbler_anon_write onNote
3.2. Scenario 2: Installing Satellite with Managed Database
- One host for the Satellite Server
- One host for the Managed Database
3.2.1. Downloading the Installation Media
Procedure 3.7. Download the Installation Media
- Log on to the Customer Portal.
- Click Downloads.
- Click Red Hat Satellite.
- Select 5.8 for RHEL 6 from the Versions drop-down list.
- Select x86_64 or s390x from the Architecture list.
- Download the Red Hat Satellite 5.8 Binary DVD.
- Depending on your preferred installation source, either copy the DVD ISO image to the Satellite host, or burn it to DVD media.
- If you will be mounting the ISO image and running the installation program from there, copy the ISO image to both the Satellite host and the Managed DB host.
# scp satellite.iso root@satellite_hostname:/root # scp satellite.iso root@manageddb_hostname:/root - If you will be mounting a DVD and running the installation program from there, burn the DVD ISO image to DVD media.
3.2.2. Mounting the Installation Media
Procedure 3.8. Mounting from a disc
- Log into the machine as
root. - Insert the Red Hat Satellite Server CD or DVD containing the installation files.
- Red Hat Enterprise Linux might automount the disc. If so, it mounts the disc to the
/media/cdrom/directory. If Red Hat Enterprise Linux does not automount the disc, manually mount it to the/media/cdrom/directory with the following command:# mkdir /media/cdrom # mount /dev/cdrom /media/cdrom
Procedure 3.9. Mounting from an ISO image
- Log into the host as
root. - Mount the ISO image to a location on your filesystem:
# mkdir /media/cdrom # mount -o loop iso_filename /media/cdrom
/media/cdrom/. Use this location to access the Red Hat Satellite installation program.
3.2.3. Generating a Manifest
Note
Procedure 3.10. Generate New Satellite 5.8 Manifest
- Log on to the Customer Portal and navigate to Subscriptions in the upper-left corner.
- Navigate to Subscription Allocations.
- Click New subscription allocation.
- Enter a name in the Name field, select Satellite 5.8 from the Type drop-down list, and click Create.
- Navigate to the Subscription tab and click .
- For each product to be attached to the manifest, specify the desired quantity in the Entitlements field, and click Submit. It may take several minutes for the subscriptions to be attached.
- Click and save the manifest file locally.
- Log out of the Customer Portal.
- Access the shell prompt on the host to which the manifest file was downloaded.Copy the manifest file to the Satellite host. In this example, the file is copied to the
/rootdirectory.# scp manifest_file.zip root@satellite.example.com:/root
3.2.4. Installing Behind a HTTP Proxy: Pre-Configuration (Optional)
Note
- This section only applies to networks behind a HTTP proxy.
- Satellite does not support NTLM as a HTTP access authentication method. Only Basic access authentication, and Digest access authentication methods are supported.
/etc/rhsm/rhsm.conf, and edit the following lines, adding details of the HTTP proxy, and credentials.
proxy_hostname = proxy_hostname
proxy_port = proxy_port
proxy_user = proxy_user
proxy_password = proxy_password3.2.5. Registering Host with Red Hat Content Delivery Network
Note
# subscription-manager register
The system has been registered with ID: 541084ff2-44cab-4eb1-9fa1-7683431bcf9a
3.2.6. Activating the Satellite Repositories
Note
Procedure 3.11. Activate the Satellite Repositories
- List all available subscriptions, and identify the Red Hat Satellite 5 subscription.The list of available subscriptions may be long, but if you pipe the output into a pager utility, such as
lessormore, you can read the output one screenful at a time.# subscription-manager list --all --available | lessNote thePool IDas this is required to attach the subscription. - Attach the subscription to the host.
# subscription-manager attach --pool=pool_idThe output should be similar to the following:Successfully attached a subscription for: Red Hat Satellite - Disable all repositories.
# subscription-manager repos --disable "*" - Enable the Red Hat Enterprise Linux 6 repository. The Red Hat Satellite 5.8 repository will be enabled automatically by the installation program.For AMD64 and Intel 64
# subscription-manager repos --enable=rhel-6-server-rpmsFor IBM System z# subscription-manager repos --enable=rhel-6-for-system-z-rpms
3.2.7. Installing the Managed Database
Note
Procedure 3.12. Installing the Managed Database
- Log into the host to be used for the Managed Database as the
rootuser. - Navigate to the directory containing the Satellite installation program.
# cd /media/cdrom - Run the installation program with the
--managed-dboption.# ./install.pl --managed-db - The installation program asks for the following information.
- Database name
- Database user
- Database password
- A comma-separated list of local addresses to listen. Leave blank for all addresses.
- A comma-separated list of remote addresses in address/netmask format. The Managed Database allows connections from these addresses.
Database name: mydb Database user: mydbuser Database password: mydbpassword Local addresses to listen on (comma-separated, RETURN for all): 127.0.0.1 Remote addresses to allow connection from (address/netmask format, comma-separated): 192.168.1.10/32 Initializing database: [ OK ] Starting postgresql service: [ OK ]
3.2.8. Installing Satellite
root user.
Warning
Procedure 3.13. Running Installation Script
- Run the installer script from the
/media/cdrom/directory:# ./install.pl --external-postgresqlThe installation program first verifies the requirements in Chapter 2, Requirements are met before proceeding.* Starting the Red Hat Satellite installer. * Performing pre-install checks. * Pre-install checks complete. Beginning installation. - The script performs host registration with Red Hat Subscription Manager (if not already done), installs and updates all required packages, and populates the database on the Managed Database host.
* RHSM Registration. ** Registration: System is already registered with RHSM. Not re-registering. * RHSM Subscriptions. ** Subscriptions: Subscription providing 'Red Hat Satellite' already attached. ** Subscriptions: Subscription providing 'Red Hat Enterprise Linux Server' already attached. ** Subscriptions: Disabling all RHSM repositories (rhel-6-server-rpms). ** Subscriptions: All repositories disabled. ** Subscriptions: Enabling RHEL repository. ** Subscriptions: RHEL repository enabled. * Checking for uninstalled prerequisites. ** Checking if yum is available ... There are some packages from Red Hat Enterprise Linux that are not part of the @base group that Satellite will require to be installed on this system. The installer will try resolve the dependencies automatically. However, you may want to install these prerequisites manually. Do you want the installer to resolve dependencies [y/N]? y * Installing Satellite packages. Warning: yum did not install the following packages: libXt * Now running spacewalk-setup. * Setting up SELinux.. ** Database: Setting up database connection for PostgreSQL backend. Hostname (leave empty for local)? satellite-db.example.com Port [5432]? Database? mydb Username? mydbuser Password? ************ ** Database: Populating database. *** Progress: ####################################
3.2.9. Configuring the Satellite
/root/.gnupg/ directory, if required.
* Configuring tomcat.
* Setting up users and groups.
** GPG: Initializing GPG and importing key.
You must enter an email address.
Admin Email Address? admin@example.com
* Performing initial configuration.
* Activating Red Hat Satellite.
Where is your satellite manifest file? /path/manifest_file.zip
** Loading Red Hat Satellite Manifest.
** Verifying manifest locally.
** Activating Red Hat Satellite.
y to the Apache SSL configuration question, then answer the CA certificate questions.
- CA cert
- Enter a password for the certificate.
- Organization
- Enter the name of your organization.
- Organization Unit
- Enter the name of your department within your organization.
- Email Address
- Enter an email address to be associated with this certificate, such as the admin email entered in the steps above.
- City
- Enter your city.
- State
- Enter your state.
- Country
- Enter your country. The country code must be exactly two letters, or the certificate generation fails. Type
?to see a list of country codes.
* Configuring apache SSL virtual host.
Should setup configure apache's default ssl server for you (saves original ssl.conf) [Y]?
** /etc/httpd/conf.d/ssl.conf has been backed up to ssl.conf-swsave
* Configuring jabberd.
* Creating SSL certificates.
CA certificate password?
Re-enter CA certificate password?
Organization? Red Hat
Organization Unit [satellite.example.com]? Sales
Email Address [admin@example.com]? admin@example.com
City? Raleigh
State? NC
Country code (Examples: "US", "JP", "IN", or type "?" to see a list)? US
** SSL: Generating CA certificate.
** SSL: Deploying CA certificate.
** SSL: Generating server certificate.
** SSL: Storing SSL certificates.
* Deploying configuration files.
* Update configuration in database.
y.
* Setting up Cobbler..
cobblerd does not appear to be running/accessible
Cobbler requires tftp and xinetd services be turned on for PXE provisioning functionality. Enable these services [Y]?
* Restarting services.
Installation complete.
Visit https://satellite.example.com to create the satellite administrator account.
/tftpboot directory.
setsebool -P cobbler_anon_write on3.3. Scenario 3: Installing Satellite with External Database
- One Red Hat Enterprise Linux 6 host for the Satellite Server
- One host containing your External Database. This database must adhere to the requirements outlined in Section 3.3.1, “External Database Requirements”.
3.3.1. External Database Requirements
- PostgreSQL 9.5
- Oracle Database 12c Standard and Enterprise Edition
- Oracle Database 11g Standard and Enterprise Edition
- Oracle Database 10g Release 2 Standard and Enterprise Edition
Note
Important
3.3.1.1. PostgreSQL Database Requirements
- rh-postgresql95
- rh-postgresql95-postgresql
- rh-postgresql95-postgresql-contrib
- rh-postgresql95-postgresql-libs
- rh-postgresql95-postgresql-server
- rh-postgresql95-postgresql-pltcl
Note
# subscription-manager repos --enable=rhel-server-rhscl-6-rpms
# yum install rh-postgresql95 rh-postgresql95-postgresql rh-postgresql95-postgresql-contrib rh-postgresql95-postgresql-libs rh-postgresql95-postgresql-server rh-postgresql95-postgresql-pltcl
# service rh-postgresql95-postgresql initdb
# service rh-postgresql95-postgresql start
# chkconfig rh-postgresql95-postgresql on
postgres user and run PostgreSQL through the Software Collections tool:
# su postgres
bash-4.1$ scl enable rh-postgresql95 'psql'
plpgsql and pltclu languages:
postgres=# CREATE USER mydbuser WITH PASSWORD 'mydbpassword';
postgres=# ALTER USER mydbuser WITH SUPERUSER;
postgres=# CREATE DATABASE mydb OWNER mydbuser;
postgres=# \connect mydb
mydb=# CREATE EXTENSION plpgsql;
mydb=# CREATE EXTENSION pltclu;
mydb=# \q
Important
root user and edit the /var/opt/rh/rh-postgresql95/lib/pgsql/data/pg_hba.conf file:
bash-4.1$ exit
# vi /var/opt/rh/rh-postgresql95/lib/pgsql/data/pg_hba.conf
host mydb mydbuser 192.168.1.0/24 md5
mydb database using the mydbuser from any system on the 192.168.1.0/24 network. The accepted authentication must also use an MD5-encrypted password.
/var/opt/rh/rh-postgresql95/lib/pgsql/data/postgresql.conf.
listen_addresses = '*'
bytea_output = 'escape'
listen_addresses parameter opens communication to the database from other systems. The bytea_output parameter sets the correct encoding for bytea datatypes. Without this parameter, Satellite's Taskomatic service fails.
# service rh-postgresql95-postgresql restart
3.3.1.2. Oracle Database Requirements
- ALTER SESSION
- CREATE SEQUENCE
- CREATE SYNONYM
- CREATE TABLE
- CREATE VIEW
- CREATE PROCEDURE
- CREATE TRIGGER
- CREATE TYPE
- CREATE SESSION
- CREATE OPERATOR
- SELECT ON V_$PARAMETER
Warning
- Security Identifier (SID)
- Listener Port
- Username
- UTF-8 character set
Important
- Uniform Extent Size
- Auto Segment Space Management
Important
3.3.2. Downloading the Installation Media
Procedure 3.14. Download the Installation Media
- Log on to the Customer Portal.
- Click Downloads.
- Click Red Hat Satellite.
- Select 5.8 for RHEL 6 from the Versions drop-down list.
- Select x86_64 or s390x from the Architecture list.
- Download the Red Hat Satellite 5.8 Binary DVD.
- Depending on your preferred installation source, either copy the DVD ISO image to the Satellite host, or burn it to DVD media.
- If you will be mounting the ISO image and running the installation program from there, copy the ISO image to the Satellite host.
# scp satellite.iso root@hostname:/rootNote
If you will be installing a Managed DB instance, also copy the ISO image to that host. - If you will be mounting a DVD and running the installation program from there, burn the DVD ISO image to DVD media.
3.3.3. Mounting the Installation Media
Procedure 3.15. Mounting from a disc
- Log into the machine as
root. - Insert the Red Hat Satellite Server CD or DVD containing the installation files.
- Red Hat Enterprise Linux might automount the disc. If so, it mounts the disc to the
/media/cdrom/directory. If Red Hat Enterprise Linux does not automount the disc, manually mount it to the/media/cdrom/directory with the following command:# mkdir /media/cdrom # mount /dev/cdrom /media/cdrom
Procedure 3.16. Mounting from an ISO image
- Log into the host as
root. - Mount the ISO image to a location on your filesystem:
# mkdir /media/cdrom # mount -o loop iso_filename /media/cdrom
/media/cdrom/. Use this location to access the Red Hat Satellite installation program.
3.3.4. Generating a Manifest
Note
Procedure 3.17. Generate New Satellite 5.8 Manifest
- Log on to the Customer Portal and navigate to Subscriptions in the upper-left corner.
- Navigate to Subscription Allocations.
- Click New subscription allocation.
- Enter a name in the Name field, select Satellite 5.8 from the Type drop-down list, and click Create.
- Navigate to the Subscription tab and click .
- For each product to be attached to the manifest, specify the desired quantity in the Entitlements field, and click Submit. It may take several minutes for the subscriptions to be attached.
- Click and save the manifest file locally.
- Log out of the Customer Portal.
- Access the shell prompt on the host to which the manifest file was downloaded.Copy the manifest file to the Satellite host. In this example, the file is copied to the
/rootdirectory.# scp manifest_file.zip root@satellite.example.com:/root
3.3.5. Installing Behind a HTTP Proxy: Pre-Configuration (Optional)
Note
- This section only applies to networks behind a HTTP proxy.
- Satellite does not support NTLM as a HTTP access authentication method. Only Basic access authentication, and Digest access authentication methods are supported.
/etc/rhsm/rhsm.conf, and edit the following lines, adding details of the HTTP proxy, and credentials.
proxy_hostname = proxy_hostname
proxy_port = proxy_port
proxy_user = proxy_user
proxy_password = proxy_password3.3.6. Registering Host with Red Hat Content Delivery Network
# subscription-manager register
The system has been registered with ID: 541084ff2-44cab-4eb1-9fa1-7683431bcf9a
3.3.7. Activating the Satellite Repositories
Procedure 3.18. Activate the Satellite Repositories
- List all available subscriptions, and identify the Red Hat Satellite 5 subscription.The list of available subscriptions may be long, but if you pipe the output into a pager utility, such as
lessormore, you can read the output one screenful at a time.# subscription-manager list --all --available | lessNote thePool IDas this is required to attach the subscription. - Attach the subscription to the host.
# subscription-manager attach --pool=pool_idThe output should be similar to the following:Successfully attached a subscription for: Red Hat Satellite - Disable all repositories.
# subscription-manager repos --disable "*" - Enable the Red Hat Enterprise Linux 6 repository. The Red Hat Satellite 5.8 repository will be enabled automatically by the installation program.For AMD64 and Intel 64
# subscription-manager repos --enable=rhel-6-server-rpmsFor IBM System z# subscription-manager repos --enable=rhel-6-for-system-z-rpms
3.3.8. Running the Installation Program
root user.
Warning
Procedure 3.19. Running Installation Program
- Run the installation program from the
/media/cdrom/directory. To install to an external PostgreSQL database:# ./install.pl --external-postgresqlOr to install to an external Oracle database:# ./install.pl --external-oracleThe installation program first verifies the requirements in Chapter 2, Requirements are met before proceeding.* Starting the Red Hat Satellite installer. * Performing pre-install checks. * Pre-install checks complete. Beginning installation. - The script performs host registration with Red Hat Subscription Manager (if not already done), installs and updates all required packages, and populates the database on the Managed Database Host.
* RHSM Registration.
** Registration: System is already registered with RHSM.  Not re-registering.
* RHSM Subscriptions.
** Subscriptions: Subscription providing 'Red Hat Satellite' already attached.
** Subscriptions: Subscription providing 'Red Hat Enterprise Linux Server' already attached.
** Subscriptions: Disabling all RHSM repositories (rhel-6-server-rpms).
** Subscriptions: All repositories disabled.
** Subscriptions: Enabling RHEL repository.
** Subscriptions: RHEL repository enabled.
* Checking for uninstalled prerequisites.
** Checking if yum is available ...
There are some packages from Red Hat Enterprise Linux that are not part
of the @base group that Satellite will require to be installed on this
system. The installer will try resolve the dependencies automatically.
However, you may want to install these prerequisites manually.
Do you want the installer to resolve dependencies [y/N]? y
* Installing Satellite packages.
Warning: yum did not install the following packages:
	libXt
* Now running spacewalk-setup.
* Setting up SELinux..
** Database: Setting up database connection for PostgreSQL backend.
Database "rhnschema" does not exist
** Database: Installing the database:
** Database: This is a long process that is logged in:
** Database:   /var/log/rhn/install_db.log
*** Progress: #
** Database: Installation complete.
** Database: Populating database.
*** Progress: ###########################
3.3.9. Configuring the Satellite
/root/.gnupg/ directory, if required.
* Configuring tomcat.
* Setting up users and groups.
** GPG: Initializing GPG and importing key.
You must enter an email address.
Admin Email Address? admin@example.com
* Performing initial configuration.
* Activating Red Hat Satellite.
Where is your satellite manifest file? /path/manifest_file.zip
** Loading Red Hat Satellite Manifest.
** Verifying manifest locally.
** Activating Red Hat Satellite.
y to the Apache SSL configuration question, then answer the CA certificate questions.
- CA cert
- Enter a password for the certificate.
- Organization
- Enter the name of your organization.
- Organization Unit
- Enter the name of your department within your organization.
- Email Address
- Enter an email address to be associated with this certificate, such as the admin email entered in the steps above.
- City
- Enter your city.
- State
- Enter your state.
- Country
- Enter your country. The country code must be exactly two letters, or the certificate generation fails. Type
?to see a list of country codes.
* Configuring apache SSL virtual host.
Should setup configure apache's default ssl server for you (saves original ssl.conf) [Y]?
** /etc/httpd/conf.d/ssl.conf has been backed up to ssl.conf-swsave
* Configuring jabberd.
* Creating SSL certificates.
CA certificate password?
Re-enter CA certificate password?
Organization? Red Hat
Organization Unit [satellite.example.com]? Sales
Email Address [admin@example.com]? admin@example.com
City? Raleigh
State? NC
Country code (Examples: "US", "JP", "IN", or type "?" to see a list)? US
** SSL: Generating CA certificate.
** SSL: Deploying CA certificate.
** SSL: Generating server certificate.
** SSL: Storing SSL certificates.
* Deploying configuration files.
* Update configuration in database.
y.
* Setting up Cobbler..
cobblerd does not appear to be running/accessible
Cobbler requires tftp and xinetd services be turned on for PXE provisioning functionality. Enable these services [Y]?
* Restarting services.
Installation complete.
Visit https://satellite.example.com to create the satellite administrator account.
`/tftpboot directory.
setsebool -P cobbler_anon_write onNote
Chapter 4. Configuration
4.1. Create Administrator Account
4.2. Configure Red Hat Satellite
4.2.1. General Configuration
4.2.2. Certificate
4.2.3. Bootstrap
/var/www/html/pub/bootstrap/ directory of Red Hat Satellite, significantly reduces the effort involved in reconfiguring all systems, which by default obtain packages from the central Red Hat Network Servers. The required fields are pre-populated with values derived from previous installation steps. Ensure this information is accurate.
4.2.4. Organizations
4.2.5. Restart
4.2.6. Cobbler Rebuild
4.3. Configuring the PostgreSQL Database to use SSL
To enable SSL communication between the Satellite Server and PosgreSQL database server, you require the following. Consult your preferred Certificate Authority's documentation for instructions on how to create these files.
- An SSL certificate for the Satellite Server, signed by a Certificate Authority. In the following procedures, the example filename is
server.crt. - The private key with which you signed the certificate. In the following procedures, the example filename is
server.key. - The Certificate Authority's certificate with which the certificate was signed. In the following procedures, the example filename is
root-ca.cert.
[root@satellite ~]# spacewalk-service stop
Procedure 4.1. Configuring SSL on the database server
- Login to the database server as
root. - Copy your signed certificate and private key to the required locations on the database server:
[root@database~]# cp server.{key,crt} /var/opt/rh/rh-postgresql95/lib/pgsql/data/. [root@database~]# chown postgres:postgres /var/opt/rh/rh-postgresql95/lib/pgsql/data/server.{key,crt} [root@database~]# chmod 0400 /var/opt/rh/rh-postgresql95/lib/pgsql/data/server.key - Edit the
postgresql.conffile and add the following option:ssl=on - Edit the
pg_hba.conffile. This file is a permissions file for restricting access to the database. Look for a line similar to the following:host mydb mydbuser 192.168.122.0/24 md5This line should contain your database name, database user, and IP address or range that allows connections. Change thehostoption tohostssl:hostssl mydb mydbuser 192.168.122.0/24 md5This changes the incoming communication protocol to use SSL and refuse any unencrypted PostgreSQL connections. - Restart the
rh-postgresql95-postgresqlservice so the changes take effect:[root@database~]# service rh-postgresql95-postgresql restart
Procedure 4.2. Configuring SSL on the Satellite Server
- Login to the Satellite Server as
root. - Copy your
root-ca.certcertificate:[root@satellite ~]# cp root-ca.cert /etc/rhn/postgresql-db-root-ca.cert - Edit the
/etc/rhn/rhn.conffile and add the following option:db_ssl_enabled = 1 - Add the certificate to Satellite's Java web server keystore:
[root@satellite ~]# openssl x509 -in /etc/rhn/postgresql-db-root-ca.cert -out server.der -outform der [root@satellite ~]# keytool -keystore /etc/rhn/javatruststore.jks -alias postgresql -import -file server.der [root@satellite ~]# rm server.derImportant
The/etc/rhn/javatruststore.jksrequires a password for any modifications to the keystore. Change this password if necessary using the following command:[root@satellite ~]# keytool -storepasswd -keystore /etc/rhn/javatruststore.jks - Restore the SELinux context of the new certificate files:
[root@satellite ~]# restorecon -R -F -v /etc/rhn/ - Start the Satellite services:
[root@satellite ~]# spacewalk-service start
Chapter 5. Authentication
5.1. Implementing PAM Authentication
Note
pam-devel package.
# yum install pam-develselinux-policy-targeted package.
# yum update selinux-policy-targetedProcedure 5.1. Configuring Red Hat Satellite to use PAM
- Set the
allow_httpd_mod_auth_pamSELinux boolean to on:# setsebool -P allow_httpd_mod_auth_pam 1 - Open the
/etc/rhn/rhn.conffile in your preferred text editor, and add the following line:pam_auth_service = rhn-satelliteCreate a PAM service file in the/etc/pam.d/directory:# touch /etc/pam.d/rhn-satellite - Edit the file and add one of the following, depending on your authentication method:
Example 5.1. SSSD Authentication
#%PAM-1.0 auth required pam_env.so auth sufficient pam_sss.so auth required pam_deny.so account sufficient pam_sss.so account required pam_deny.soExample 5.2. Kerberos Authentication
#%PAM-1.0 auth required pam_env.so auth sufficient pam_krb5.so no_user_check auth required pam_deny.so account required pam_krb5.so no_user_checkExample 5.3. LDAP Authentication
#%PAM-1.0 auth required pam_env.so auth sufficient pam_ldap.so no_user_check auth required pam_deny.so account required pam_ldap.so no_user_checkFor more detail about configuring PAM, see the Pluggable Authentication Modules (PAM) in the Red Hat Enterprise Linux Deployment Guide.Note
For Kerberos-authenticating users, change the password by usingkpasswd. Do not change the password on Red Hat Satellite web application as this method only changes the local password on the Satellite server. Local passwords are not in use if PAM is enabled for that user. - Restart the service to pick up the changes:
# rhn-satellite restart - To enable a user to authenticate against PAM, select the checkbox labeled Pluggable Authentication Modules (PAM). It is positioned below the password and password confirmation fields on the Create User page.
5.2. Using Identity Management for Authentication
- Kerberos authentication in the WebUI
- Users do not need to be pre-created in Satellite database
- The PAM authentication can be enabled for all users
- User roles can be derived from user group membership in the external identity provider
- System Groups administrators can be derived from user group membership in the external identity provider per Organization
Note
rhn_register, rhnreg_ks, spacecmd, rhncfg-manager and the Satellite 5 API can not use IPA authentication.
5.2.1. Requirements
- A configured Satellite Server. The following instructions will use the hostname
satellite.example.comto denote the Satellite server. - A configured IPA/IdM Server on Red Hat Enterprise Linux 6 or 7. The following instructions will use the hostname
ipa.example.comto denote the IPA server. - Installation of additional packages on the Satellite server. Use the following command to install these packages from the standard Red Hat Enterprise Linux 6 and 7 repositories:
[root@satellite ~]# yum install ipa-client ipa-admintools sssd sssd-dbus mod_auth_kerb mod_authnz_pam mod_lookup_identity mod_intercept_form_submit -y - The latest version of the
selinux-policypackage to ensure the latest SELinux Booleans are added. You can update this package with the following command:[root@satellite ~]# yum update selinux-policy -y
5.2.2. Enrolling the Satellite Server
ipa-client-install command. This will step through the required configuration options to enrol the Satellite server.
[root@satellite ~]# ipa-client-install
Provide the domain name of your IPA server (ex: example.com): example.com
Provide your IPA server name (ex: ipa.example.com): ipa.example.com
Hostname: satellite.example.com
Realm: EXAMPLE.COM
DNS Domain: example.com
IPA Server: ipa.example.com
BaseDN: dc=example,dc=com
Continue to configure the system with these values? [no]: yes
User authorized to enroll computers: admin
Synchronizing time with KDC...
Password for admin@EXAMPLE.COM: *********
ipa service-add command:
[root@satellite ~]# kinit admin
[root@satellite ~]# ipa service-add HTTP/satellite.example.com
--------------------------------------------------
Added service "HTTP/satellite.example.com@EXAMPLE.COM"
--------------------------------------------------
Principal: HTTP/satellite.example.com@EXAMPLE.COM
Managed by: satellite.example.com
5.2.3. Using the IPA Authentication Setup Tool
spacewalk-setup-ipa-authentication, which configures your Satellite server to use IPA Authentication. The tool performs the following steps:
- Configures Kerberos authentication on the Satellite server
- Configures SSSD services on the Satellite server
- Configures Satellite webservers to communicate with SSSD and observe PAM authentication
[root@satellite ~]# spacewalk-setup-ipa-authentication
5.2.4. Finalizing Authentication Configuration
5.2.5. Configuring IPA to Use Multiple Organizations (Optional)
ou) in the IPA server.
5.2.6. Configuring IPA to Use Groups (Optional)
- External Group Name - Enter the name of the group from the IPA server.
- Administrative Roles and Roles - Select roles to assign to the group. For example, assign the Channel Administrator.
Chapter 6. Entitlements
6.1. Activating Satellite
- Satellite was not activated on installation, and now you need to activate it.
- You need details of the active manifest, including the quantity of subscriptions, their expiry date, and the products included.
- You have changed subscriptions and need these changes applied to Satellite.
- Product entitlements have been changed by Red Hat, and these changes need to be reflected in Satellite. For example, SKU, products, and associated repositories are sometimes changed by Red Hat. These changes are reflected automatically in the Red Hat Customer Portal, but Satellite must be refreshed manually.
rhn-satellite-activate. For details on rhn-satellite-activate, append --help, or view the man page by entering the command man rhn-satellite-activate.
Procedure 6.1. Activating Red Hat Satellite via the Satellite web UI
Create the manifest on the Red Hat Customer Portal, then download the manifest file to your computer. For details, see Section 3.1.3, “Generating a Manifest”.
- Login to the Satellite 5 server web UI, click on Admin, then Red Hat Satellite Configuration and click Manifest.
- Click , select the manifest file, then click .When the update completes, the message Manifest uploaded. Red Hat Satellite has been re-activated. indicates it has been successful.
Procedure 6.2. Activating Red Hat Satellite via the Command Line
Create the manifest on the Red Hat Customer Portal, download the manifest file to your computer, then copy it to the Satellite server. For details, see Section 3.1.3, “Generating a Manifest”.
- Activate Red Hat Satellite.
- Run the following command if Satellite is in connected mode.
# rhn-satellite-activate --manifest=manifest_file.zip - Run the following command if Satellite is in disconnected mode.
# rhn-satellite-activate --disconnected --manifest=manifest_file.zip
Note
--ignore-version-mismatch option to the rhn-satellite-activate command. See Chapter 10, Upgrades and /etc/sysconfig/rhn/satellite-upgrade/README for more information.
6.2. Viewing Details of a Manifest
# rct cat-manifest manifest_file.zip# rhn-satellite-activate --manifest-info
Name: testhost.example.com
UUID: eb83a78a-caa7-4d38-8d5a-68a335a1a8a2
Owner ID: 5894300
Satellite version: 5.8
Created: 2017-06-20T03:35:57.483+0000
API URL: https://subscription.rhn.redhat.com/subscription/consumers/
# rct cat-manifest /etc/sysconfig/rhn/rhsm-manifest.zip| head -n 32, to display only the first 32 lines. With this information available, you could search it for specific content, for example with a text editor, or the grep tool.
6.3. Refreshing the Current Subscriptions
If Satellite server is in connected mode, you can refresh the subscriptions with one command. The parameter --manifest-refresh instructs rhn-satellite-activate to download the manifest, then reactivate it.
# rhn-satellite-activate --manifest-refresh
If the Satellite server is in disconnected mode, you must first create the manifest on the Red Hat Customer Portal, download the manifest file to your computer, then copy it to the Satellite server. For details, see Section 3.1.3, “Generating a Manifest”.
# rhn-satellite-activate --disconnected --manifest=manifest_file.zip13:35:56 Downloading manifest...
13:37:14 Populating channel families...
13:37:14 Updating certificates...
13:37:14 Updating manifest repositories...
6.4. Refreshing Product Entitlements
Request regeneration of entitlement certificates on the Red Hat Customer Portal.
# rhn-satellite-activate --manifest-reconcile-request
# rhn-satellite-activate --manifest-refresh
Recreate the manifest on the Red Hat Customer Portal, download the manifest file to your computer, then copy it to the Satellite server. For details, see Section 3.1.3, “Generating a Manifest”.
# rhn-satellite-activate --disconnected --manifest=manifest_file.zip6.5. Subscription Expiration
Chapter 7. Virtualization Agent (virt-who)
7.1. Setting up the Virtualization Agent
- Red Hat Enterprise Linux 6 or above.
- Access to both the Red Hat Satellite and the hypervisor on port 443, TCP. In addition, you must create a user in your virtualization environment so that the Virtualization Agent can read information about hypervisors and guests. This can be a user with read-only permission.
- The system must be registered to either Red Hat Subscription Manager, or the Red Hat Satellite and subscribed to the Satellite Tools channel.
- Login as root on the Red Hat Satellite.
- Install the virt-who package:
# yum install virt-who - Edit the following entries in the
/etc/sysconfig/virt-whofile:# Start virt-who on background, perform doublefork and monitor for virtual guest # events (if possible). It is NOT recommended to turn off this option for # starting virt-who as service. VIRTWHO_BACKGROUND=1 # Enable debugging output. # optional VIRTWHO_DEBUG=1 # virt-who subscription manager backend, enable ony one option from following 2: # Report to Subscription Asset Manager (SAM) VIRTWHO_SAM=0 # Report to Satellite VIRTWHO_SATELLITE=1Edit the virtualization options for your virtualization environment type. For example, for Red Hat Enterprise Virtualization:# Register guests using RHEV-M VIRTWHO_RHEVM=1 # Options for RHEV-M mode VIRTWHO_RHEVM_ENV=not-used VIRTWHO_RHEVM_SERVER=server_hostname_or_IP VIRTWHO_RHEVM_USERNAME=server_login VIRTWHO_RHEVM_PASSWORD=server_passwordFor VMware ESX:# Register ESX machines using vCenter VIRTWHO_ESX=1 # Option for ESX mode VIRTWHO_ESX_ENV=not-used VIRTWHO_ESX_OWNER=organization_id VIRTWHO_ESX_SERVER=server_hostname_or_IP VIRTWHO_ESX_USERNAME=server_login VIRTWHO_ESX_PASSWORD=server_passwordNote
The user for accessing the virtualization environment only requires read-only permissions. For security, create a new user in your virtualization environment with read-only permissions and nothing else.Finally, edit the Satellite options and enter your server details:# Option for Satellite backend VIRTWHO_SATELLITE_SERVER=satellite_hostname VIRTWHO_SATELLITE_USERNAME=username VIRTWHO_SATELLITE_PASSWORD=password - Start the virt-who service:
service virt-who startStarting the virt-who service will gather the host/guest UUID information and send the information to the Satellite. It will also scan the/var/lib/virt-who/hypervisor-systemid-[UUID]file to check if the hypervisor has already been registered to the Red Hat Satellite. If it does, the existing hypervisor system information on the Red Hat Satellite is updated. If it does not exist on the Satellite, the new hypervisor wil be registered.
Note
/var/lib/virt-who/hypervisor-systemid-UUID, and the hypervisor needs to be manually removed via the satellite web UI.
/etc/virt-who.d/ instead of adding details for a single configuration in the /etc/sysconfig/virt-who file. For example:
[test-esx-1]
type=esx
server=10.1.1.1
username=admin
password=password
[test-esx-2]
type=esx
server=10.1.2.1
username=admin
password=password
7.1.1. VMware Configuration Scenario
virtwho-readonly-user account in Active Directory and provide access to vCenter:
- Run the Active Directory Users and Computers program on your Windows machine with a user that has rights to add users into your domain. Create a user named
virtwho-readonly-user. - Log in to vSphere Web Client using an account with administrator privileges.
- Navigate to → → → .
Figure 7.1. Navigate to Single Sign-On Configuration
- Navigate to the tab, press the plus icon, and select the Active Directory identity source. This adds Active Directory identity source, including the
virtwho-readonly-useruser.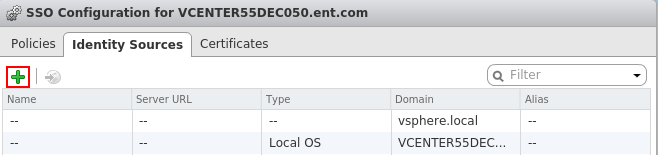
Figure 7.2. Add the Identity Source
- Navigate to → and select the vCenter to grant access to
virtwho-readonly-user.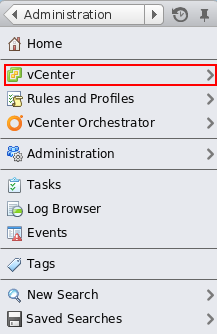
Figure 7.3. Navigate to vCenter
- Navigate to → and press the plus icon to open the Add Permission dialog.
Figure 7.4. Click the plus icon
- Select the
virtwho-readonly-user. - Select the Read-only role.
- Click OK to save the permissions.
- Log out and test the
virtwho-readonly-userin vCenter. Make sure the inventory shows the resources thatvirtwho-readonly-usercan access.
- Log in to the Satellite server and install virt-who:
# yum install virt-who - Edit the
/etc/sysconfig/virt-whofile and use the following options:# virt-who options VIRTWHO_BACKGROUND=1 VIRTWHO_DEBUG=1 # Enable virt-who with VMware VIRTWHO_ESX=1 # Options for ESX mode VIRTWHO_ESX_ENV=not-used VIRTWHO_ESX_OWNER=[organization_id] VIRTWHO_ESX_SERVER=vcenter.example.com VIRTWHO_ESX_USERNAME=DOMAIN\\virtwho-readonly-user VIRTWHO_ESX_PASSWORD=******* # Report to Satellite VIRTWHO_SAM=0 VIRTWHO_SATELLITE=1Replace [organization_id] with the ID of your target organization on your Satellite server. - Start and enable the virt-who service:
# service virt-who start # chkconfig virt-who on
7.2. Setting up Guests
- Download the SSL cert from the Satellite to the guest system:
# rpm -Uvh https://satellite_hostname.example.com/pub/rhn-org-trusted-ssl-cert-1.0-1.noarch.rpm - Edit the following entries in the
/etc/sysconfig/rhn/up2date:serverURL=https://satellite.hostname.example.com/XMLRPC sslCACert=/usr/share/rhn/RHN-ORG-TRUSTED-SSL-CERT - Register the guest to the Satellite by running the command:
# rhnreg_ks --username sat_username --password sat_password
7.3. Verifying the Setup
- Log in to the Satellite.
- Click on to go to the Systems Overview page.
- Click on a system name.
- Check the following information on the System Details page:
- Checked-In Time - this field should update every time virt-who is run.
- System ID - this should match the system ID of the guest client in the hypervisor.
- Guests - this column is located in the subtab. All guest machines from the hypervisor should be listed in this section:
- Systems that are not registered to the Satellite will appear as "virtual machine from [VMTYPE] hypervisor [UUID]" For example, "VM from esx hypervisor 92ffdfd8-14a2-11e3-ad37-a213e27ebfdc"
- Systems that are registered to the Satellite will reflect the name given at registration and will link to the Satellite's records of the registered system
Chapter 8. Content and Synchronization
- A successful Red Hat Satellite installation.
- The Red Hat Satellite requires access to one of the following content sources:
- The Red Hat Content Delivery Network (CDN) via the Internet.
- Red Hat Network Channel Content ISOs.
- Red Hat Satellite Exporter data.
cdn-sync) tool is used. If content is being synchronized from Red Hat Network Channel Content ISOs, or from one Satellite instance to another Satellite instance, the Satellite Synchronization (satellite-sync) tool is used. The sections in this chapter explain the use of each tool and its use with each content source type.
cdn-sync tool has many of the same parameters as the satellite-sync tool.
8.1. Red Hat Satellite CDN Synchronization Tool
cdn-sync) enables a Satellite server to synchronize its repositories, and associated metadata, with the Red Hat Content Delivery Network (CDN).
Important
cdn-sync tool imports a large amount of data, especially on newly installed Red Hat Satellite servers. If your database has performance issues after a significant amount of data changes, consider gathering statistics on the database.
cdn-sync command, and the synchronization of all packages in all available repositories begins. The total amount of data to be downloaded can be very large, so Red Hat recommends you first evaluate the amount of data to be downloaded, and determine a suitable strategy to minimize its impact on network load. For example, you could identify those channels with the most content, and schedule their synchronization accordingly.
satellite-sync -l command would list the number of packages per channel by default. The Red Hat CDN is repository based, and does not allow the number of packages per repository to be shown in real time. To provide this information, you must use the --count-packages parameter. The first time this parameter is used, it may take a long time time to process the data, depending on your manifest and the number of accessible repositories and channels. However the first run creates a cache, so subsequent runs are faster. For example, the first run might take an hour, and subsequent runs from 5 to 10 minutes.
cdn-sync tool logs its activity in the file /var/log/rhn/cdnsync.log. It also logs the synchronization of each channel in /var/log/rhn/cdnsync/channel_name.
8.1.1. Calculating Data Download Size
# cdn-sync --list-channels --count-packages
cdn-sync --list-channels --count-packages command.
12:18:48 . rhel-x86_64-server-7 14232 packages (18.4G)
12:18:48 . rhel-x86_64-server-7-htb 5200 packages (4.1G)
12:18:48 . rhel-x86_64-server-7.1.eus 8056 packages (10.5G)
12:18:48 . rhel-x86_64-server-7.2.eus 11697 packages (15.3G)
8.1.2. Synchronize Select Channels
cdn-sync command's --channel parameter. Note that the --channel parameter accepts only one channel. To synchronize multiple channels, either repeat the cdn-sync command, or repeat the --channel parameter.
cdn-sync command to synchronize the four example channels in Section 8.1.1, “Calculating Data Download Size”.
# cdn-sync --channel rhel-x86_64-server-7 \
--channel rhel-x86_64-server-7-htb \
--channel rhel-x86_64-server-7.1.eus \
--channel rhel-x86_64-server-7.2.eus
8.2. Synchronization with Local Media
8.2.1. Preparing for Import from Local Media
Procedure 8.1. Obtain the Channel Content ISOs
- Log into the web interface.
- Click Channels in the top navigation bar.
- Click on the Red Hat Satellite channel. Ensure you select the Satellite channel that corresponds to your version of Satellite.
- Click the Downloads tab and use the instructions on the page to obtain the Channel Content ISOs, available by version of Red Hat Enterprise Linux.
- If the desired Channel Content ISOs do not appear, ensure your Red Hat Entitlement Certificate has been uploaded to Red Hat Network and correctly identifies the target channels.
Procedure 8.2. Mount and copy Channel Content ISOs
- Log into the machine as root.
- Create a directory in
/mnt/to store the file(s) with the command:# mkdir /mnt/import/ - Mount the ISO file using the following command:
# mount [iso_filename] /mnt/import -o loop - Create a target directory for the files:
# mkdir /var/rhn-sat-import/ - This sample command assumes the administrator wants to copy the contents of the ISO (mounted in
/mnt/import/) into/var/rhn-sat-import/:# cp -ruv /mnt/import/* /var/rhn-sat-import/ - Then unmount
/mnt/importin preparation for the next ISO:# umount /mnt/import - Repeat these steps for the channel content ISO file of every channel that you need to import separately. Do not use combined full or incremental sources of channel content ISOs.
8.2.2. Import from Local Media
/var/rhn-sat-import .
- List the channels available for import.
# satellite-sync --list-channels --mount-point=/var/rhn-sat-import - Initiate the import of a specific channel using a channel label presented in the previous list.
# satellite-sync --channel=[channel-label] --mount-point=/var/rhn-sat-importNote
Importing package data can take up to two hours per channel. Register systems to channels as soon as they appear in the Red Hat Satellite web interface. No packages are necessary for registration, although updates cannot be retrieved from the Satellite until the channel is completely populated. - Repeat this step for each channel or include them all within a single command by passing each channel label preceded with an additional
-cflag, like so:# satellite-sync -c [channel-label-1] -c [channel-label-2] --mount-point /var/rhn-sat-import
# cd /var/rhn-sat-import/; ls -alR | grep rpm
/var/rhn-sat-import/ repository.
# rm -rf /var/rhn-sat-import
8.3. Synchronization via Export
rhn-satellite-exporter) tool exports content listing in an XML format, which a user imports into another Red Hat Satellite. Export the content into a chosen directory with the -d option, transport the directory to another Red Hat Satellite, and use the Satellite Synchronization Tool to import the contents. This synchronizes the two Red Hat Satellites so they contain identical content.
- Channel Families
- Architectures
- Channel metadata
- Blacklists
- RPMs
- RPM metadata
- Errata
- Kickstarts
- A successful Red Hat Satellite installation.
- Sufficient disk space in the directory specified in the
-doption. This directory will contain the exported contents.
8.3.1. Performing an Export
root:
# rhn-satellite-exporter -d /var/rhn-sat-export --no-errata --channel [channel_name]rsync or scp -r.
rhn-satellite-exporter command. See the rhn-satellite-exporter manpage for all available options and their meaning.
rhn-satellite-exporter to export data depends on the number and size of the exported channels. The --no-packages, --no-kickstarts, --no-errata, and --no-rpms options reduce the amount of time required for rhn-satellite-exporter to run, but also prevents export of potentially useful information. For that reason, only use these options when certain the content is not required and can be excluded. Additionally, use the matching options for cdn-sync when importing the data. For example, if you use --no-kickstarts with rhn-satellite-exporter, specify the same --no-kickstarts option when importing the data.
8.3.2. Moving Exported Data
Procedure 8.3. Moving Exporter Content
- Log into the machine as
root. - Create a target directory for the files, such as:
# mkdir /var/rhn-sat-import/ - Make the export data available on the local machine in the directory created in the previous step. Either copy the data directly, or mount the data from another machine using NFS. Copy the data into the new directory with the following command:
# scp -r root@storage.example.com:/var/rhn-sat-export/* /var/rhn-sat-import
8.3.3. Performing an Import
/var/rhn-sat-import.
- List the channels available for import with the command:
# satellite-sync --list-channels --mount-point /var/rhn-sat-import - Initiate the import of a specific channel using a channel label presented in the previous list. Run the following command :
# satellite-sync --channel=[channel-label] --mount-point=/var/rhn-sat-importNote
Importing package data can take up to two hours per channel. Register systems to channels as soon as they appear in the Red Hat Satellite web interface. No packages are necessary for registration, although updates cannot be retrieved from the Satellite until the channel is completely populated.Repeat this step for each channel or include them all within a single command by passing each channel label preceded by an additional--channelflag:# satellite-sync --channel=channel-label-1 -c channel-label-2 --mount-point=/var/rhn-sat-import - The population of channels executes until completion. Verify all of the packages are moved out of the repository with the following command:
# cd /var/rhn-sat-import/; ls -alR | grep rpmIf all RPMs are installed and moved to their permanent locations, the count appears as zero. If so, remove the temporary/var/rhn-sat-import/repository.# rm -rf /var/rhn-sat-import
Chapter 9. Synchronization between Multiple Satellites
Note
ISS Requirements
- Two or more Red Hat Satellite servers
- At least one Red Hat Satellite populated with at least one channel
- Satellite Administrator privileges on all Satellite systems intended for ISS
9.1. Inter-Satellite Synchronization
spacewalk-sync-setup. Both methods are effective, and it would be left to the user's choice on which one to use.
9.1.1. Manual Configuration
Procedure 9.1. Configuring the Master Satellite Server
satellite-sync operations use this information to assign custom channel ownership to the Slave Organization which is mapped to a specific Master Organization. It can also map the trust relationships between the exposed Master Organization to matching Slave Organizations, creating the equivalent relationships on the Slave.
- On the Web Interface:
- Log in as the Satellite Administrator.
- Click → → .
- On the top right-hand corner, click .
- Fill in the following information:
- Slave Fully Qualified Domain Name (FQDN)
- Allow Slave to Sync? - Choosing this field will allow the Slave Satellite to access this Master Satellite. Otherwise, contact with this Slave will be denied.
- Sync all orgs to Slave? - Checking this field will synchronize all organizations to the Slave Satellite.
Note
Choosing the Sync All Orgs to Slave? option on the Master Setup page will override any specifically selected organizations in the Local Organization table below. - Click .
- (Optional) Click on any local organization to be exported to the Slave Satellite.
- Click .
Note
In Satellite 5.5 and previous versions, the Master Satellite used theiss_slavesparameter in the/etc/rhn/rhn.conffile to identify which slaves could contact the Master Satellite. Satellite 5.6 and later uses the information in the Master Setup page to determine this information.
- On the Command Line:
- Enable the inter-satellite synchronization (ISS) feature in the
/etc/rhn/rhn.conffile:disable_iss=0 - Save the configuration file, and restart the
httpdservice:service httpd restart
Procedure 9.2. Configuring Slave Servers
- In order to securely transfer content to the slave servers, the
ORG-SSLcertificate from the master server is needed. The certificate can be downloaded over HTTP from the/pub/directory of any satellite. The file is calledRHN-ORG-TRUSTED-SSL-CERT, but can be renamed and placed anywhere in the local filesystem of the slave, such as the/usr/share/rhn/directory. - Log in to the Slave Satellite as the Satellite Administrator.
- Click → → .
- On the top right-hand corner, click .
- Fill in the following information:
- Master Fully-Qualified Domain Name
- Default Master?
- Filename of this Master's CA Certificate - Use the full path of the CA Certificate downloaded in the initial step of this procedure.
- Click .
Procedure 9.3. Performing an Inter-Satellite Synchronization
- Begin the synchronization by running the
satellite-synccommand:satellite-sync -c your-channelNote
Command line options that are manually provided with thesatellite-synccommand will override any custom settings in the/etc/rhn/rhn.conffile.
Procedure 9.4. Mapping the Master Satellite's Exported Organizations to the Slave Satellite's Organizations
After following the procedures preceding this one, the Master Satellite should show up in the Slave Satellite's Slave Setup under → → . If it does not, please re-check the steps above.
- Log in as the Satellite Administrator.
- Click on → → .
- Select a Master Satellite by clicking on it's name.
- Use the drop-down box to map the exported master organization name to a matching local organization in the Slave Satellite.
- Click .
- On the command line, issue the
satellite-syncon each of the custom channels to obtain the correct trust structure and channel permissions:satellite-sync -c your-channel
9.1.2. Automated Configuration
spacewalk-sync-setup allows users to specify a Master and Slave Satellite instance and uses configuration files to set up the information described in both the Master and Slave setup. It can create a set of default configuration files if requested. Essentially, it automates the previously setup and mapped configuration for Master-Slave relationships.
In order for automated configuration to succeed:
- The spacewalk-utils package needs to be installed on the system that will issue the command
spacewalk-sync-setup. - Existing organizations with custom permissions on the Master Satellite must be present.
- Existing organizations within the Slave Satellite must be present.
Procedure 9.5. Configuring the Master Satellite Server
- Enable the inter-satellite synchronization (ISS) feature in the
/etc/rhn/rhn.conffile:disable_iss=0 - Save the configuration file, and restart the
httpdservice:service httpd restart
Procedure 9.6. Configuring Slave Servers
- In order to securely transfer content to the slave servers, the
ORG-SSLcertificate from the master server is needed. The certificate can be downloaded over HTTP from the/pub/directory of any satellite. The file is calledRHN-ORG-TRUSTED-SSL-CERT, but can be renamed and placed anywhere in the local filesystem of the slave, such as the/usr/share/rhn/directory. - Log in to the Slave Satellite as the Satellite Administrator.
- Click → → .
- On the top right-hand corner, click .
- Fill in the following information:
- Master Fully-Qualified Domain Name
- Default Master?
- Filename of this Master's CA Certificate - Use the full path of the CA Certificate downloaded in the initial step of this procedure.
- Click .
Procedure 9.7. Mapping Master Satellite Organizations to Slave Satellite Organizations with spacewalk-sync-setup
- Log in to a system. It does not matter if it is a Master Satellite, a Slave Satellite or a different system altogether, as long as the system can access the public XMLRPC API of the Master and Slave Satellites.
- Issue the
spacewalk-sync-setupon a command line interface:spacewalk-sync-setup --ms=[Master_FQDN] \ --ml=[Master_Sat_Admin_login] \ --mp=[Master_Sat_Admin_password] \ --ss=[Slave FQDN] --sl=[Slave_Sat_Admin_login] \ --sp=[Slave_Sat_Admin_password> \ --create-templates --applyWhere:- --ms=MASTER, --master-server=MASTER is the FQDN of the Master to connect to
- --ml=MASTER_LOGIN, --master-login=MASTER_LOGIN is the Satellite Administrator login for the Master Satellite
- --mp=MASTER_PASSWORD, --master-password=MASTER_PASSWORD is the password for the Satellite Administrator login on the Master Satellite
- --ss=SLAVE, --slave-server=SLAVE is the FQDN of the Slave Satellite to connect to.
- --sl=SLAVE_LOGIN, --slave-login=SLAVE_LOGIN is the Satellite Administrator login for the Slave Satellite
- --sp=SLAVE_PASSWORD, --slave-password=SLAVE_PASSWORD is the password for the Satellite Administrator login on the Slave Satellite
- --ct, --create-templates is the option that creates both a master and a slave setup file for the master/slave pair we've pointed at
- --apply tells the Satellite instances to make the changes specified by the setup files to the specified Satellite instances
Note
For more setup options:spacewalk-sync-setup --helpThe output from this command will be as follows:INFO: Connecting to [admin@master-fqdn] INFO: Connecting to [admin@slave-fqdn] INFO: Generating master-setup file $HOME/.spacewalk-sync-setup/master.txt INFO: Generating slave-setup file $HOME/.spacewalk-sync-setup/slave.txt INFO: Applying master-setup $HOME/.spacewalk-sync-setup/master.txt INFO: Applying slave-setup $HOME/.spacewalk-sync-setup/slave.txt - On the command line, issue the
satellite-synccommand on each of the custom channels to obtain the correct trust structure and channel permissions:satellite-sync -c your-channel
9.2. Organizational Synchronization
- If the source content belongs to the
NULLorganization (that is, it is Red Hat content) it will default to theNULLorganization even if a destination organization is specified. This ensures that specified content is always in the privilegedNULLorganization. - If an organization is specified at the command line, content will be imported from that organization.
- If no organization is specified, it will default to organization 1.
orgid) are used to synchronize satellites:
Example 9.1. Import Content from Master to Slave Satellite
satellite-sync --parent-sat=master.satellite.example.com -c channel-name --orgid=2
Example 9.2. Import Content from an Exported Dump of an Organization
$ satellite-sync -m /dump -c channel-name --orgid=2
Example 9.3. Import Content from Red Hat Network Hosted
$ satellite-sync -c channel-name9.3. Inter-Satellite Synchronization Use Cases
Example 9.4. Staging Satellite

Figure 9.1. Staging Satellite

Figure 9.2. Syncing from Red Hat Network Hosted and a Satellite Staging Server
- Run the
satellite-synccommand to synchronize data with rhn_parent (usually Red Hat Network Hosted):satellite-sync -c your-channel - Run the following command to synchronize data from the staging server:
satellite-sync --iss-parent=staging-satellite.example.com -c custom-channel
Example 9.5. Synchronized Slaves
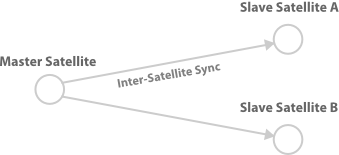
Figure 9.3. Slave Satellites are maintained exactly as the master
Example 9.6. Slave Custom Content
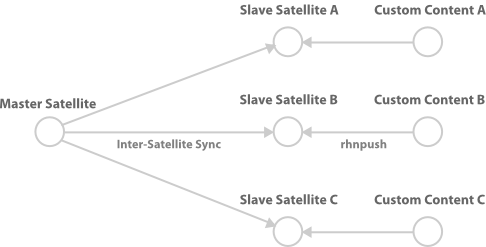
Figure 9.4. Slave Satellites that retain their own custom content
Example 9.7. Bi-directional synchronization
satellite-sync is run will pull the content from the other Satellite server and the synchronized data will depend on the options run with satellite-sync. Without any options, the synchronization will attempt to update everything that was previously synchronized.

Figure 9.5. Bi-directional synchronization
Chapter 10. Upgrades
- Complete the upgrade requirements.
- Perform the upgrade.
- Optionally, complete the post-installation tasks.
10.1. Upgrade Requirements
10.1.1. Content Synchronization Changes
cdn-sync) tool is used. If content is being synchronized from Red Hat Network Channel Content ISOs, or from one Satellite instance to another Satellite instance, the Satellite Synchronization (satellite-sync) tool is used. The sections in this chapter explain the use of each tool and its use with each content source type. The new tool was introduced with Red Hat Satellite 5.8 because of the retirement of the Red Hat Network.
cron, review and amend those scheduled jobs as necessary. To ease the transition, the cdn-sync and satellite-sync tools have many of the same parameters, but they are not equivalent. For further details of each tool, see Chapter 8, Content and Synchronization.
10.1.2. Backup the Satellite 5 Instance
10.1.3. PostgreSQL Upgrade
10.1.4. Confirming Database Disk Space
Procedure 10.1. Confirm Database Disk Space
- Calculate the disk space occupied by the embedded database.
- For Satellite 5.6The embedded database is stored in directory
/var/lib/pgsql. After the upgrade, the embedded database will be stored in directory/var/opt/rh/rh-postgresql95/lib/pgsql.# du --summarize -h /var/lib/pgsqlExample output of theducommand.81M /var/lib/pgsql - For Satellite 5.7The embedded database is stored in directory
/opt/rh/postgresql92/root/var/lib/pgsql. After the upgrade, the embedded database will be stored in directory/var/opt/rh/rh-postgresql95/lib/pgsql.# du --summarize -h /opt/rh/postgresql92/root/var/lib/pgsqlExample output of theducommand.81M /opt/rh/postgresql92/root/var/lib/pgsql
- Confirm the available disk space in the embedded database's location for Satellite 5.8.
# df -h /varExample output of thedfcommand.Filesystem Size Used Avail Use% Mounted on /dev/mapper/vg_testhost01-lv_root 50G 3.4G 44G 8% / - Compare the disk space occupied by the embedded database and the available disk space. If the available disk space is less than the total disk space occupied by the embedded database, do not proceed until this has been corrected.
10.1.5. Downloading a Satellite 5.8 Manifest
Procedure 10.2. Download a Satellite 5.8 Manifest
- Log on to the Customer Portal and click Subscriptions.
- Click Satellite Organizations.
- Click Satellite.
- Click the name of the Satellite instance to be upgraded.
- Select Satellite 5.8 from the Version: drop-down list, and click .
- Click and save the manifest file.
- Copy the manifest file to the Satellite 5 host which is being upgraded.
# scp manifest_file.zip root@satellite.example.com:/root
10.1.6. Downloading Satellite 5.8 ISO
Procedure 10.3. Download the Installation Media
- Log on to the Customer Portal.
- Click Downloads.
- Click Red Hat Satellite.
- Select 5.8 for RHEL 6 from the Versions drop-down list.
- Select x86_64 or s390x from the Architecture list.
- Download the Red Hat Satellite 5.8 Binary DVD.
- Depending on your upgrade requirements, either burn the DVD ISO image to DVD media, or copy it to the host on which Red Hat Satellite will be installed.Run the following command on the host containing the DVD ISO image to copy it to the Satellite host. In this example, the ISO image is copied to the directory
/root.# scp satellite.iso root@satellite.example.com:/rootIf you will be upgrading Red Hat Satellite from a DVD, burn the download ISO image to a writeable DVD.
10.1.7. Migrating Registration to Red Hat Subscription Manager
10.2. Upgrading to Satellite 5.8
- Mount the Satellite 5.8 installation media.
- Install the Satellite 5.8 upgrade package.
- Complete the upgrade instructions.
10.2.1. Mounting the Installation Media
Procedure 10.4. Mounting from a disc
- Log into the machine as
root. - Insert the Red Hat Satellite Server CD or DVD containing the installation files.
- Red Hat Enterprise Linux might automount the disc. If so, it mounts the disc to the
/media/cdrom/directory. If Red Hat Enterprise Linux does not automount the disc, manually mount it to the/media/cdrom/directory with the following command:# mkdir /media/cdrom # mount /dev/cdrom /media/cdrom
Procedure 10.5. Mounting from an ISO image
- Log into the machine as
root. - Download the ISO image from the Red Hat Network website.
- Mount the ISO image to a location on your filesystem:
# mkdir /media/cdrom
# mount -o loop iso_filename /media/cdrom
10.2.2. Performing the Satellite 5.8 Upgrade
rhn-upgrade package on your Red Hat Satellite 5 server. This installs scripts and a comprehensive set of upgrade instructions.
rhn-upgrade package directly from the Red Hat CDN.
# yum install rhn-upgrade
rhn-upgrade RPM package was not available, download it manually from the Red Hat CDN, then install it.
Procedure 10.6. Download and Install Red Hat Satellite 5 Upgrade Package
Note
- Log on to the Customer Portal and click Downloads.
- From the Product list, click Red Hat Satellite.
- Select the Product Variant, Version and Architecture which match the current, installed instance of Satellite. For example,
Red Hat Satellite,5.6 for RHEL 6, andx86_64. - Click Packages and enter
upgradein the Search field. - Click Download Latest beside the rhn-upgrade package, and download it.
- Copy the
rhn-upgrade.rpmpackage to the Satellite server.If you have network access to the Satellite server from this computer, use thescptool. In this example, the package is copied to the/rootdirectory.# scp rhn-upgrade.rpm root@satellite.example.com:/rootIf you do not have network access to the Satellite server from this computer, copy the package to local media, transport the media to the Satellite server, and copy it from there. - On the Satellite server, navigate to the directory containing the
rhn-upgrade.rpmpackage, and install it.# yum localinstall rhn-upgrade.rpm
/etc/sysconfig/rhn/satellite-upgrade/README, and follow the instructions it contains. It refers to other files which contain detailed instructions for specific scenarios.
10.3. Post-installation Tasks
10.3.1. Configuring for FIPS 140-2 Compliance
- User passwords, previously encrypted with MD5 method, will be encrypted with SHA-256 algorithm
- Client certificates (
/etc/sysconfig/rhn/systemid), which the registered systems use to authenticate with the parent server, are changed from MD5 to SHA-256 encryption
Procedure 10.7. Updating User Passwords
- Export a list of users with MD5-encrypted passwords:
# spacewalk-report users-md5 > users-md5.csv - Change the password of each user using the following for loop:
# for i in $(cat users-md5.csv | awk -F, 'NR>1 { print $4 }'); do
      echo "Changing password for user $i";
      satpasswd $i;
      echo;
done
Alternatively, instruct all users in the fileusers-md5.csvto log into Satellite's Web UI. Satellite will automatically change their passwords in the database to use SHA-256.
Procedure 10.8. Updating Client Certificates
- Export a list of client systems using certificates using MD5-encryption:
# spacewalk-report system-md5-certificates > system-md5-certificates.csv - Use the
spacewalk-fips-toolto schedule an update of systems in an organization. You need to repeat this process for each organization in your Satellite environment. First use the following commands for organization with ID 1:# ORG_ID=1 # for system in $(awk -F, "NR>1 { if (\$3 == $ORG_ID) print \$1 }" system-md5-certificates.csv); do systems="$systems $system"; done # spacewalk-fips-tool -i -u admin -d "2014-12-01 14:00:00" -o /tmp/scheduled-installations.csv $systemsThis schedules the installation of packages requires for the certificate update on December 1, 2014 at 2pm.Next, Either runrhn_check -von each client or wait untilosadpicks up the event.Finally, use thespacewalk-fips-toolagain to schedule an update of certificates:# ORG_ID=1 # for system in $(awk -F, "NR>1 { if (\$3 == $ORG_ID) print \$1 }" system-md5-certificates.csv); do systems="$systems $system"; done # spacewalk-fips-tool -c -u admin -d "2014-12-01 14:00:00" -o /tmp/scheduled-installations.csv $systems - Repeat this process for each organization ID.
10.3.2. Removing Redundant Java Versions
# yum remove java-1.6.0-ibm java-1.7.1-ibm
Chapter 11. Migrating from RHN to RHSM
Warning
- Upgrade the Satellite 5 database schema (if required).
- Remove the Satellite 5 registration from Red Hat Network.
- Migrate the Satellite 5 subscription to Red Hat Subscription Management.
Note
- Remove the Satellite 5 registration from Red Hat Network.
- Migrate the Satellite 5 subscription to Red Hat Subscription Management.
Procedure 11.1. Upgrading the Satellite 5 Database Schema
- On the Satellite 5 server, list packages for which updates are applicable.
# yum check-updateIf there is an update pending for thesatellite-schemapackage, complete the procedure detailed in How do I upgrade the database schema of a Red Hat Satellite server?.
Procedure 11.2. Removing the Satellite 5 Host's Subscription from Red Hat Network
- Open a web browser, log into the Red Hat Customer Portal, click Subscriptions, click Satellite in the list of Subscription Management Applications, then click on the Satellite tab.
- Find the desired Satellite instance in the list, and click on the host name.

Figure 11.1. Details of the Satellite 5 Subscription
- Click the check box beside the Red Hat Satellite subscription to be migrated, click , then click to confirm.
Warning
Remove only the Red Hat Satellite subscription. All other subscriptions must remain.The successful removal of the Red Hat Satellite subscription is confirmed by the message: The subscription(s) you selected have been removed. - In the Version drop-down list, select the version of Satellite 5 which you are currently running.
- Click and save the certificate file locally.The Satellite 5 entitlement certificate, contained in the file downloaded, is required in Procedure 11.3, “ Migrating the Satellite 5 Host's Registration ”.
Procedure 11.3. Migrating the Satellite 5 Host's Registration
- Red Hat Network username and password.
- On the Satellite 5 server, ensure that all packages are current.
# yum update - Confirm the version of the
spacewalk-backendpackage is at version2.0.3-42or higher.Note
If this is the Managed DB host, skip this step.# rpm -q spacewalk-backend spacewalk-backend-2.0.3-42.el6sat.noarchWarning
If version 2.0.3-42 (or higher) ofspacewalk-backendpackage is not available, or cannot be installed, do NOT proceed with the migration. Contact Red Hat Support for assistance. - Install the packages
subscription-managerandsubscription-manager-migration.Thesubscription-manager-migrationpackage contains the Satellite 5 subscription script.# yum install subscription-manager # yum install subscription-manager-migration - Record the Red Hat Network username which was used to register the Red Hat Enterprise Linux instance. This username and its password is required in the next step.
# grep -A1 name\>username /etc/sysconfig/rhn/systemidIn this example, the username isadmin@example.com.<name>username</name> <value><string>admin@example.com</string></value> - Run the Satellite 5 Red Hat Network to Red Hat Subscription Manager migration script.
# rhn-migrate-classic-to-rhsm Legacy username: Red Hat Network username Legacy password: Red Hat Network passwordTheLegacy usernameandLegacy passwordare the same credentials which were used to register the server to Red Hat Network. The username was obtained in the prior step.Example output fromrhn-migrate-classic-to-rhsm.Retrieving existing legacy subscription information... +-----------------------------------------------------+ System is currently subscribed to these legacy channels: +-----------------------------------------------------+ rhel-x86_64-server-6 redhat-rhn-satellite-5.6-server-x86_64-6 +-----------------------------------------------------+ Installing product certificates for these legacy channels: +-----------------------------------------------------+ rhel-x86_64-server-6 redhat-rhn-satellite-5.6-server-x86_64-6 Product certificates installed successfully to /etc/pki/product. Preparing to unregister system from legacy server... System successfully unregistered from legacy server. Attempting to register system to destination server... Registering to: subscription.rhsm.redhat.com:443/subscription The system has been registered with ID: 284e025c-4a60-4084-b49c-4cb26fd7cf93 Installed Product Current Status: Product Name: Red Hat Enterprise Linux Server Status: Subscribed Product Name: Red Hat Satellite Status: Subscribed System 'satellite.example.com' successfully registered.The messageSystem 'satellite.example.com' successfully registered.confirms that the Satellite 5 system's migration to Red Hat Subscription Manager has been successful. In this example, the Satellite 5 server has been given a Red Hat Subscription Management UUID of284e025c-4a60-4084-b49c-4cb26fd7cf93. - Disable all repositories.
# subscription-manager repos --disable '*' - Enable only those repositories required by Satellite 5.For Red Hat Enterprise Linux 6
# subscription-manager repos --enable rhel-6-server-rpms # subscription-manager repos --enable=rhel-6-server-satellite-5.8-rpms - Reactivate the Satellite 5 instance.
Note
If this is the Managed DB host, skip this step.Therhn-satellite-activatecommand requires the certificate downloaded in Procedure 11.2, “ Removing the Satellite 5 Host's Subscription from Red Hat Network ”. In this example, the certificate was saved in fileSatellite-5.cert.# rhn-satellite-activate -vvv --rhn-cert=Satellite-5.cert RHN_PARENT: satellite.rhn.redhat.comWhen the Satellite Server is reactivated, you may see the following error message. This is expected, and can be safely ignored, because thesystemidfile is the Red Hat Network system ID. The system ID file is deleted when the host's registration is migrated to Red Hat Subscription Manager.ERROR: Server not registered? No systemid: /etc/sysconfig/rhn/systemid - Optionally, if Satellite is installed on Red Hat Enterprise Linux 6, remove those packages which were previously used to communicate with Red Hat Network.
Warning
Do not remove these packages if Satellite is installed on Red Hat Enterprise Linux 5. Removing these packages from Red Hat Enterprise Linux 5 will result in the failure of Satellite.# yum remove yum-rhn-plugin rhn-check rhn-setup rhnsd
Chapter 12. Maintenance
12.1. Managing Red Hat Satellite with rhn-satellite
rhn-satellite) to stop, start, or retrieve status information from these various services. This tool accepts all of the standard service commands:
/usr/sbin/rhn-satellite start
/usr/sbin/rhn-satellite stop
/usr/sbin/rhn-satellite restart
/usr/sbin/rhn-satellite reload
/usr/sbin/rhn-satellite enable
/usr/sbin/rhn-satellite disable
/usr/sbin/rhn-satellite status
rhn-satellite to control Red Hat Satellite's operation and retrieve status messages from all services at once.
12.2. Performing Critical Updates to the Server
yum update on the Red Hat Satellite or use the website at https://access.redhat.com to apply the updates.
Important
httpd service upon installation. Conducting a full update of the Red Hat Satellite Server (such as with the command yum update) might cause Apache to fail. To avoid this, make sure to restart the httpd service after upgrading it.
Procedure 12.1. Performing Critical Updates to the Server
- Stop the satellite services. Keep the database running during the upgrade with
# rhn-satellite stop --exclude postgresql - Take a backup of the satellite's database in a working state. Run the following command and replace the [FILENAME] option with the full path to the backup file that you want to create. This location needs to be writable by the PostgreSQL user:
# db-control online-backup FILENAME - Apply the updates:
# yum updateApply all Satellite updates. Updating the schema without updating the rest of the Satellite components can cause issues with the Satellite database. - Update the database schema using spacewalk-schema-upgrade command.
# spacewalk-schema-upgradeThis process will update your database schema to latest version. Thespacewalk-schema-upgradecommand will inform you with the results of the upgrade and exact locations of schema upgrade log files. To double-check if the schema update passed, run the following commands:# rpm -q satellite-schema # rhn-schema-versionIf the outputed versions match, continue with the process. Otherwise restore the database withdb-control restore /path/to/backup. - Restart Red Hat Satellite:
# rhn-satellite start --exclude postgresql - Clear the search index:
# service rhn-search cleanindexIt is recommended to clean the search index. The above command triggers the creation of a new one, which in most cases completes within thirty minutes to an hour. You might experience issues with the search features of Satellite 5 if you do not clean the index.
Warning
12.3. Changing the Red Hat Satellite Hostname
spacewalk-utils package contains the spacewalk-hostname-rename script.
spacewalk-hostname-rename script, you must first ensure that you know your SSL CA passphrase by performing the following command:
# openssl rsa -in path/RHN-ORG-PRIVATE-SSL-KEY
spacewalk-hostname-rename requires one mandatory argument, which is the IP address of the Red Hat Satellite server, regardless of whether the IP address will change along with the hostname or not.
spacewalk-hostname-rename is as follows:
spacewalk-hostname-rename <ip address> [ --ssl-country=<country> --ssl-state=<state>\
--ssl-org=<organization/company> --ssl-orgunit=<department> --ssl-email=<email address> --ssl-ca-password=<password>]
spacewalk-hostname-rename generates a new certificate.
spacewalk-hostname-rename, see the following Red Hat Knowledgebase entry:
12.4. Conducting Red Hat Satellite-Specific Tasks
12.4.1. Deleting Users
- Click Users in the top navigation bar of the Red Hat Network website.
- Click the name of the user to be removed.
- Click the delete user link at the top-right corner of the page.
- A confirmation page appears explaining that this removal is permanent. To continue, click at the bottom-right corner of the page.
Note
12.4.2. Configuring Red Hat Satellite Search
/usr/share/rhn/config-defaults/rhn_search.conf file. The following list defines the search configuration and their default values in parentheses.
- search.index_work_dir
- Specifies where Lucene indexes are kept (
/usr/share/rhn/search/indexes). - search.rpc_handlers
- Semi-colon separated list of classes to act as handlers for XMLRPC calls.
(filename>index:com.redhat.satellite.search.rpc.handlers.IndexHandler, db:com.redhat.satellite.search.rpc.handlers.DatabaseHandler, admin:com.redhat.satellite.search.rpc.handlers.AdminHandler) - search.max_hits_returned
- Maximum number of results which will be returned for the query (
500). - search.connection.driver_class
- JDBC driver class to conduct database searches (
oracle.jdbc.driver.OracleDriver). - search.score_threshold
- Minimum score a result needs to be returned back as query result (
.10). - search.system_score_threshold
- Minimum score a system search result needs to be returned back as a query result (
.01). - search.errata_score_threshold
- Minimum score an errata search result needs to be returned back as a query result (
.20). - search.errata.advisory_score_threshold
- Minimum score an errata advisory result needs to be returned back as a query result (
.30). - search.min_ngram
- Minimum length of n-gram characters. Note that any change to this value requires
clean-indexto be run, and doc-indexes need to be modified and rebuilt (1). - search.max_ngram
- Maximum length of n-gram characters. Note that any change to this value requires
clean-indexto be run, and doc-indexes need to be modified and rebuilt (5). - search.doc.limit_results
- Type
trueto limit the number of results both on search.score_threshold and restrict max hits to be below search.max_hits_returned; typefalsemeans to return all documentation search matches (false). - search.schedule.interval
- Input the time in milliseconds to control the interval with which the SearchServer polls the database for changes; the default is 5 minutes (
300000). - search.log.explain.results
- Used during development and debugging. If set to true, this will log additional information showing what influences the score of each result (
false).
12.5. Automating Synchronization
root:
crontab -e
Note
EDITOR variable, like so: export EDITOR=gedit. Choosing a graphical editor will require an enabled graphical interface.
0 1 * * * perl -le 'sleep rand 9000' && cdn-sync --email >/dev/null \
2>/dev/null
stdout and stderr from cron to prevent duplicating the more easily read messages from cdn-sync. Use other options from Section 8.1, “Red Hat Satellite CDN Synchronization Tool” if necessary.
12.6. Enabling Push to Clients
osa-dispatcher) provides support for this feature.
jabberd to the osad instances running on the clients.
Important
osa-dispatcher package, which is contained in the Red Hat Satellite software channel for on the Customer Portal. Once installed, start the service on the Satellite as root using the following command:
service osa-dispatcher start
osad package on all client systems to receive pushed actions. Find this package within the Red Hat Network Tools child channel on the Red Hat Satellite.
Warning
osad package on the Red Hat Satellite server. This package conflicts with the osa-dispatcher package installed on the server.
root using the command:
service osad start
osa-dispatcher and osad accept stop, restart, and status commands, as well.
12.7. Maintaining the Database
# su postgres -
bash-4.1$ psql -d rhnschema -c 'VACUUM;'
bash-4.1$ exit
postgres user to access the Satellite 5 database (rhnschema) and perform a VACUUM on the database tables. This reclaims storage that dead tuples occupy. Deleted or obsolete tuples are not usually physically removed from their table and remain present until performing a VACUUM.
12.8. Migrating the Database
12.8.1. Migrating from an Embedded Database to a Managed Database
- The Red Hat Satellite installation ISO
- A complete installation of Red Hat Satellite server with an Embedded Database (
satellite.example.com) - A new system to host the Managed Database with Red Hat Enterprise Linux 6 installed (
manageddb.example.com)
Procedure 12.2. Migrating to a Managed Database
- Shut down the Red Hat Satellite instance:
[root@satellite ~]# rhn-satellite stop - Remove the
rhn-upgradepackage if it exists on your server:[root@satellite ~]# yum remove rhn-upgrade - Use
db-controlto create a database backup[root@satellite ~]# mkdir ~/dbbackup [root@satellite ~]# db-control backup ~/dbbackup - Copy the database backup from the Satellite server to the Managed Database server.
[root@satellite ~]# scp -r ~/dbbackup root@manageddb.example.com:~/. - Install the Managed Database using the Red Hat Satellite installation ISO.
- After you have installed the Managed External Database, shut it down and back up the database configuration and access control files.
[root@manageddb ~]# db-control stop
[root@manageddb ~]# cp /var/opt/rh/rh-postgresql95/lib/pgsql/data/postgresql.conf ~/dbbackup
[root@manageddb ~]# cp /var/opt/rh/rh-postgresql95/lib/pgsql/data/pg_hba.conf ~/dbbackup
You need to backup these files because the migration process will erase them. - Use
db-controlto restore the database backup to the Managed Database server.[root@manageddb ~]# db-control restore ~/dbbackup - Restore the database configuration and access control files from backup to the Managed Database.
[root@manageddb ~]# cp ~/dbbackup/postgresql.conf /var/opt/rh/rh-postgresql95/lib/pgsql/data/postgresql.conf [root@manageddb ~]# cp ~/dbbackup/pg_hba.conf /var/opt/rh/rh-postgresql95/lib/pgsql/data/pg_hba.conf - On the Satellite server, edit the
/etc/rhn/rhn.conffile and changedb_hostto the domain name of the Managed Database and set thedb_portto 5432. For example:db_host = manageddb.example.com db_port = 5432 - Remove
rh-postgresql95-postgresqlfrom the/etc/rhn/service-listfile on the Satellite server.[root@satellite ~]# sed -i 's/rh-postgresql95-postgresql //g' /etc/rhn/service-list - On the Managed Database, edit the
/etc/rhn/rhn.conffile and changedb_name,db_user,db_passwordto reflect the same values in/etc/rhn/rhn.confon the Satellite server. For example:db_name = mydb db_user = mydbuser db_password = mydbpassword - Start the Managed Database instance using
db-control.[root@manageddb ~]# db-control start - Remove the PostgreSQL and
spacewalk-dobbypackages from the Satellite server.[root@satellite ~]# yum remove rh-postgresql95 rh-postgresql95-postgresql rh-postgresql95-postgresql-contrib rh-postgresql95-postgresql-libs rh-postgresql95-postgresql-server rh-postgresql95-postgresql-pltcl spacewalk-dobby - Restart Red Hat Satellite.
[root@satellite ~]# rhn-satellite start
12.8.2. Migrating from an Embedded Database to an External PostgreSQL Database
- A complete installation of Red Hat Satellite server with an Embedded Database (
satellite.example.com) - A system hosting a running instance of PostgreSQL (
postgresql.example.com), See Section 3.3.1.1, “PostgreSQL Database Requirements” for configuration details.
Procedure 12.3. Migrating to an External PostgreSQL Database
- Shut down all services on the Red Hat Satellite server, but start the Embedded Database with
db-control:[root@satellite ~]# rhn-satellite stop [root@satellite ~]# db-control start - Remove the
rhn-upgradeif it exists on your server:[root@satellite ~]# yum remove rhn-upgrade - Update your database to the latest schema version:
[root@satellite ~]# yum update satellite-schema
[root@satellite ~]# spacewalk-schema-upgrade
This ensures that your database version matches the latest version on the External PostgreSQL Database. - Create a directory to hold your database snapshot.
[root@satellite ~]# mkdir ~/dbbackup [root@satellite ~]# cd ~/dbbackup - Export the database using
spacewalk-dump-schema:[root@satellite dbbackup]# spacewalk-dump-schema --to=postgresql > migrate-to-postgresql.sql - Stop the Embedded Database:
[root@satellite dbbackup]# db-control stop - Use
spacewalk-setupto populate the External PostgreSQL Database:[root@satellite dbbackup]# spacewalk-setup --db-only --external-postgresqlThe script asks for your database details so Satellite can connect and populate the database. Enter your External PostgreSQL Database details:** Database: Setting up database connection for PostgreSQL backend. Hostname (leave empty for local)? postgresql.example.com Port [5432]? Database? myextdb Username? root Password?The script populates the database. - When the script completes database population, restore the database schema
[root@satellite dbbackup]# spacewalk-sql -i < migrate-to-postgresql.sql - Remove the PostgreSQL and
spacewalk-dobbypackages from the Satellite server.[root@satellite ~]# yum remove rh-postgresql95 rh-postgresql95-postgresql rh-postgresql95-postgresql-contrib rh-postgresql95-postgresql-libs rh-postgresql95-postgresql-server rh-postgresql95-postgresql-pltcl spacewalk-dobby - Start Red Hat Satellite.
[root@satellite ~]# rhn-satellite start
12.8.3. Migrating from an Embedded Database to an External Oracle Database
- A complete installation of Red Hat Satellite server with an Embedded Database (
satellite.example.com) - A system hosting a running instance of Oracle Database (
oracledb.example.com). See Section 3.3.1, “External Database Requirements” for configuration details.
Procedure 12.4. Migrating to an External Oracle Database
- Shut down all services on the Red Hat Satellite server, but start the Embedded Database with
db-control:[root@satellite ~]# rhn-satellite stop [root@satellite ~]# db-control start - Remove the
rhn-upgradepackage if it exists on your server:[root@satellite ~]# yum remove rhn-upgrade - Update your database to the latest schema version:
[root@satellite ~]# yum update satellite-schema
[root@satellite ~]# spacewalk-schema-upgrade
This ensures that your database version matches the latest version on the External Oracle Database. - Create a directory to hold your database snapshot.
[root@satellite ~]# mkdir ~/dbbackup [root@satellite ~]# cd ~/dbbackup - Export the database using
spacewalk-dump-schema:[root@satellite dbbackup]# spacewalk-dump-schema --to=oracle > migrate-to-oracle.sql - Stop the Embedded Database:
[root@satellite dbbackup]# db-control stop - Exchange the PostgreSQL drivers and configuration scripts with the Oracle drivers and configuration scripts on the Satellite server:
[root@satellite dbbackup]# yum remove -y spacewalk-postgresql [root@satellite dbbackup]# yum install -y spacewalk-oracle [root@satellite dbbackup]# yum remove -y spacewalk-java-postgresql spacewalk-backend-sql-postgresql - Use
spacewalk-setupto populate the External Oracle Database:[root@satellite dbbackup]# spacewalk-setup --db-only --external-oracleThe script asks for your database details so Satellite can connect and populate the database. Enter your External Oracle Database details:** Database: Setting up database connection for Oracle backend. Database service name (SID)? oracledb Database hostname [localhost]? oracledb.example.com Database (listener) port [1521]?The script populates the database.Important
Use the default Oracle Database port (1521) for the Red Hat Satellite database. Using an alternative port can cause SELinux errors. - When the script completes database population, restore the database schema
[root@satellite dbbackup]# spacewalk-sql -i < migrate-to-oracle.sqlImportant
You might need to change SELinux context of the migration script before loading it into Oracle Database:[root@satellite dbbackup]# semanage fcontext -a -t oracle_sqlplus_exec_t /root/dbbackup/migrate-to-oracle.sql [root@satellite dbbackup]# restorecon -v /root/dbbackup/migrate-to-oracle.sqlSimilarly, you might need to change SELinux context of dumped tables:[root@satellite dbbackup]# semanage fcontext -a -t oracle_tmp_t "/tmp/dumped-tables(/.*)?" [root@satellite dbbackup]# restorecon -R -v /tmp/dumped-tables/ - Remove the PostgreSQL and
spacewalk-dobbypackages from the Satellite server.[root@satellite ~]# yum remove rh-postgresql95 rh-postgresql95-postgresql rh-postgresql95-postgresql-contrib rh-postgresql95-postgresql-libs rh-postgresql95-postgresql-server rh-postgresql95-postgresql-pltcl spacewalk-dobby - Start Red Hat Satellite.
[root@satellite ~]# rhn-satellite start
12.8.4. Migrating from a Managed Database to an Embedded Database
- The Red Hat Satellite installation ISO
- A complete installation of Red Hat Satellite server (
satellite.example.com) with a Managed Database on a seperate server (manageddb.example.com)
Procedure 12.5. Migrating to an Embedded Database
- Stop the main services on the Satellite server.
[root@satellite ~]# rhn-satellite stop - Shut down the database on the Managed Database server.
[root@manageddb ~]# db-control stop - Remove the
rhn-upgradepackage if it exists on your server:[root@satellite ~]# yum remove rhn-upgrade - Use db-control to create a database backup on the Managed Database Server and copy that backup to the Satellite server.
[root@manageddb ~]# mkdir ~/dbbackup
[root@manageddb ~]# db-control backup ~/dbbackup
[root@manageddb ~]# scp -r ~/dbbackup root@satellite.example.com:~/.
The Managed Database server is now free for other purposes. All further actions take place on the Satellite server. - Mount the Red Hat Satellite installation ISO on the Satellite server and set and export the YUM0 variable with the Red Hat Satellite mount point value.
[root@satellite ~]# mkdir /media/cdrom [root@satellite ~]# mount -o loop Red_Hat_Satellite_58.iso /media/cdrom [root@satellite ~]# export YUM0=/media/cdrom - Enable the
red-hat-satelliterepository. If thered-hat-satelliterepository definition is not present, install thesatellite-repopackage found in$YUM0/Satellite. After thered-hat-satelliterepository is enabled, install the@satellite-databasepackage group and disable thered-hat-satelliterepository.[root@satellite ~]# yum install @satellite-database --enablerepo=red-hat-satellite - Use
db-controlto restore the database backup.[root@satellite ~]# db-control restore ~/dbbackup - Edit the
/etc/rhn/rhn.conffile to remove the db_port and db_hostname values.[root@satellite ~]# sed -i 's/db_host\s*=.*/db_host = /' /etc/rhn/rhn.conf [root@satellite ~]# sed -i 's/db_port\s*=.*/db_port = /' /etc/rhn/rhn.conf - Add the
rh-postgresql95-postgresqlservice to the/etc/rhn/service-listfile to ensure that it is started and stopped in parallel with Red Hat Satellite.[root@satellite ~]# echo "SERVICES=\"rh-postgresql95-postgresql \$SERVICES\"" >> /etc/rhn/service-list - Start the Red Hat Satellite services.
[root@satellite ~]# rhn-satellite start
12.8.5. Migrating from an External PostgreSQL Database to an Embedded Database
- A complete installation of Red Hat Satellite server (
satellite.example.com) using an External PostgreSQL Database (postgresql.example.com).
Procedure 12.6. Migrating to an Embedded Database from an External PostgreSQL Database
- Shut down all services on the Red Hat Satellite server:
[root@satellite ~]# rhn-satellite stop - Make sure your External PostgreSQL Database is still running.
- Remove the
rhn-upgradeif it exists on your server:[root@satellite ~]# yum remove rhn-upgrade - Update the External PostgreSQL Database to the latest schema version:
[root@satellite ~]# yum update satellite-schema
[root@satellite ~]# spacewalk-schema-upgrade
This ensures that your database version matches the latest version for the Embedded Database. - Create a directory to hold your database snapshot.
[root@satellite ~]# mkdir ~/dbbackup [root@satellite ~]# cd ~/dbbackup - Export the database using
spacewalk-dump-schema:[root@satellite dbbackup]# spacewalk-dump-schema --to=postgresql > migrate-to-postgresql.sql - Stop the External Database. It is no longer required.
- Install the PostgreSQL installation and Satellite database tools packages on the Satellite server:
[root@satellite dbbackup]# yum install -y spacewalk-setup-postgresql spacewalk-dobby - Use
spacewalk-setupto populate the Embedded Database:[root@satellite dbbackup]# spacewalk-setup --db-onlyThe script populates the database. Wait until this process completes.** Database: Setting up database connection for PostgreSQL backend. ** Database: Installing the database: ** Database: This is a long process that is logged in: ** Database: /var/log/rhn/install_db.log *** Progress: # ** Database: Installation complete. ** Database: Populating database. *** Progress: #################################### - When the script completes database population, restore the database schema:
[root@satellite dbbackup]# spacewalk-sql -i < migrate-to-postgresql.sql - Start Red Hat Satellite.
[root@satellite ~]# rhn-satellite start
12.8.6. Migrating from an External Oracle Database to an Embedded Database
- A complete installation of Red Hat Satellite server (
satellite.example.com) using an External Oracle Database (oracledb.example.com).
Procedure 12.7. Migrating to an Embedded Database from Oracle Database
- Shut down all services on the Red Hat Satellite server:
[root@satellite ~]# rhn-satellite stop - Make sure your External Oracle Database is still running.
- Remove the
rhn-upgradeif it exists on your server:[root@satellite ~]# yum remove rhn-upgrade - Update the External Oracle Database to the latest schema version:
[root@satellite ~]# yum update satellite-schema
[root@satellite ~]# spacewalk-schema-upgrade
This ensures that your database version matches the latest version for the Embedded Database. - Create a directory to hold your database snapshot.
[root@satellite ~]# mkdir ~/dbbackup [root@satellite ~]# cd ~/dbbackup - Export the database using
spacewalk-dump-schema:[root@satellite dbbackup]# spacewalk-dump-schema --to=postgresql > migrate-to-postgresql.sql - Stop the External Oracle Database. It is no longer required.
- Exchange the Oracle drivers and configuration scripts with the PostgreSQL drivers and configuration scripts on the Satellite server:
[root@satellite dbbackup]# yum remove -y spacewalk-oracle [root@satellite dbbackup]# yum install -y spacewalk-postgresql spacewalk-setup-postgresql spacewalk-dobby [root@satellite dbbackup]# yum remove -y spacewalk-java-oracle spacewalk-backend-sql-oracle - Use
spacewalk-setupto populate the Embedded Database:[root@satellite dbbackup]# spacewalk-setup --db-onlyThe script populates the database. Wait until this process completes.** Database: Setting up database connection for PostgreSQL backend. ** Database: Installing the database: ** Database: This is a long process that is logged in: ** Database: /var/log/rhn/install_db.log *** Progress: # ** Database: Installation complete. ** Database: Populating database. *** Progress: #################################### - When the script completes database population, restore the database schema
[root@satellite dbbackup]# spacewalk-sql -i < migrate-to-postgresql.sql - Start Red Hat Satellite.
[root@satellite ~]# rhn-satellite start
12.8.7. Migrating from an External Oracle Database to an External PostgreSQL Database
- A complete installation of Red Hat Satellite server (
satellite.example.com) using an External Oracle Database (oracledb.example.com). - A system hosting a running instance of PostgreSQL (
postgresql.example.com), See Section 3.3.1.1, “PostgreSQL Database Requirements” for configuration details.
Procedure 12.8. Migrating to an External Database from Oracle Database
- Shut down all services on the Red Hat Satellite server:
[root@satellite ~]# rhn-satellite stop - Make sure your External Oracle Database is still running.
- Remove the
rhn-upgradeif it exists on your server:[root@satellite ~]# yum remove rhn-upgrade - Update the External Oracle Database to the latest schema version:
[root@satellite ~]# yum update satellite-schema
[root@satellite ~]# spacewalk-schema-upgrade
This ensures that your database version matches the latest version for the External Database. - Create a directory to hold your database snapshot.
[root@satellite ~]# mkdir ~/dbbackup [root@satellite ~]# cd ~/dbbackup - Export the database using
spacewalk-dump-schema:[root@satellite dbbackup]# spacewalk-dump-schema --to=postgresql > migrate-to-postgresql.sql - Stop the External Oracle Database. It is no longer required.
- Exchange the Oracle drivers and configuration scripts with the PostgreSQL drivers and configuration scripts on the Satellite server:
[root@satellite dbbackup]# yum remove -y spacewalk-oracle [root@satellite dbbackup]# yum install -y spacewalk-postgresql [root@satellite dbbackup]# yum remove -y spacewalk-java-oracle spacewalk-backend-sql-oracle - Use
spacewalk-setupto populate the External Database:[root@satellite dbbackup]# spacewalk-setup --db-only --external-postgresqlThe script asks for your database details so Satellite can connect and populate the database. Enter your External PostgreSQL Database details:** Database: Setting up database connection for PostgreSQL backend. Hostname (leave empty for local)? postgresql.example.com Port [5432]? Database? myextdb Username? root Password? - When the script completes database population, restore the database schema
[root@satellite dbbackup]# spacewalk-sql -i < migrate-to-postgresql.sql - Start Red Hat Satellite.
[root@satellite ~]# rhn-satellite start
Appendix A. Example Red Hat Satellite Installation Topologies
- The total number of client systems to be served by the Red Hat Satellite.
- The maximum number of clients expected to connect concurrently to the Red Hat Satellite.
- The number of custom packages and channels to be served by the Red Hat Satellite.
- The number of Red Hat Satellites being used in the customer environment.
- The number of Red Hat Proxy Servers being used in the customer environment.
A.1. Single Red Hat Satellite Topology

Figure A.1. Single Red Hat Satellite Topology
A.2. Multiple Red Hat Satellite Horizontally Tiered Topology
rhn-satellite-exporter and satellite-sync -m commands. Alternatively, the Inter-Satellite Sync 2 feature is designed for this purpose.
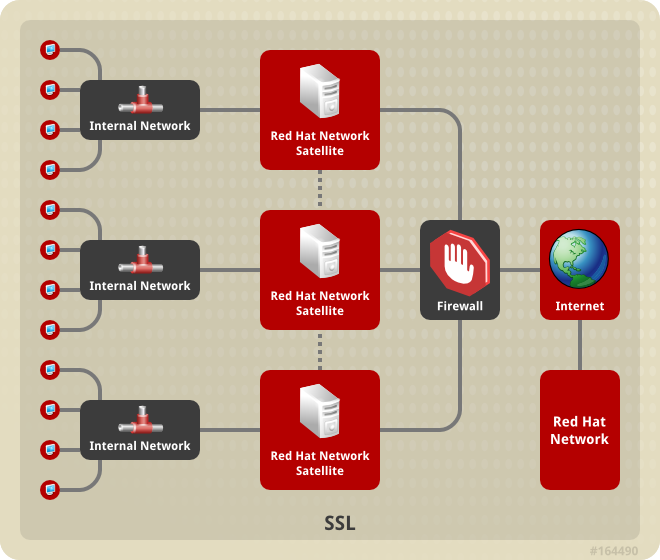
Figure A.2. Multiple Red Hat Satellite Horizontally Tiered Topology
A.3. Red Hat Satellite-to-Proxy Vertically Tiered Topology
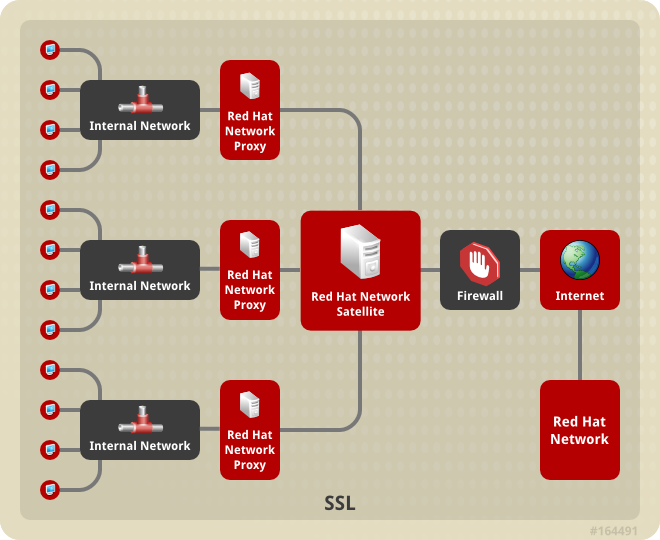
Figure A.3. Red Hat Satellite-to-Proxy Vertically Tiered Topology
Appendix B. Sample Red Hat Satellite Configuration File
/etc/rhn/rhn.conf configuration file for the Red Hat Satellite provides a means for you to establish key settings. Be warned, however, that errors inserted into this file may cause Satellite failures. So make configuration changes with caution.
#/etc/rhn/rhn.conf example for a Red Hat Satellite
#-------------------------------------------------

# Destination of all tracebacks, such as crash information, etc.
traceback_mail = test@pobox.com, test@redhat.com
mount_point = /var/satellite
kickstart_mount_point = /var/satellite
repomd_cache_mount_point = /var/cache
server.satellite.rhn_parent = satellite.rhn.redhat.com

# Use proxy FQDN, or FQDN:port
server.satellite.http_proxy =
server.satellite.http_proxy_username =
server.satellite.http_proxy_password =
server.satellite.ca_chain = /usr/share/rhn/RHNS-CA-CERT

# Use these options if this server is intended to be a slave.
# Name of parent for ISS.
# # If left blank rhn_parent is taken by default.
# # This option can be overriden on satellite-sync command line.
iss_parent      =
iss_ca_chain    = /usr/share/rhn/RHN-ORG-TRUSTED-SSL-CERT

# Use this option if this server is intended to be a master
# Comma separated list of allowed iss slaves, like:
# allowed_iss_slaves=slave1-satellite.redhat.com,slave2-satellite.redhat.com
allowed_iss_slaves=

# Completely disable ISS.
# If set to 1, then no slave will be able to sync from this server
# this option does not affect ability to sync to this server from
# another spacewalk (or hosted).
disable_iss=0

db_backend = postgresql
db_user = rhnuser
db_password = rhnpw
db_name = rhnschema
db_host =
db_port =

server.nls_lang = english.UTF8

hibernate.dialect=org.hibernate.dialect.PostgreSQLDialect
hibernate.connection.driver_class=org.postgresql.Driver
hibernate.connection.driver_proto=jdbc:postgresql


web.satellite = 1
web.satellite_install =

web.session_swap_secret_1 = 9c3da20106d2968d838ee0e8a0431d25
web.session_swap_secret_2 = 9d6dcb05f90586c9aa0cba72328f9abb
web.session_swap_secret_3 = 296ddef52ea5df4bc5ee666a238c0454
web.session_swap_secret_4 = 0863e7427021c045fe4c19dbd3db1900

session_secret_1 = 2ae50e0414ecc9d42e15fece90cce4b5
session_secret_2 = da2abb2f77c328f879d7b4f24a2d68fa
session_secret_3 = 60531c88064d0d00edbfe683a1c962da
session_secret_4 = 1af4c9e335d427761d17bb93d051df87

server.secret_key = d8e7f083a9c40bf76d09c38fb5d0e52b

encrypted_passwords = 1

web.param_cleansers = RHN::Cleansers->cleanse
web.base_acls = RHN::Access

web.restrict_mail_domains =

web.ssl_available = 1

web.is_monitoring_backend = 1
web.is_monitoring_scout = 1

# OSA configuration #

server.jabber_server = sat570.example.com
osa-dispatcher.jabber_server = sat570.example.com

# set up SSL on the dispatcher
osa-dispatcher.osa_ssl_cert = /var/www/html/pub/RHN-ORG-TRUSTED-SSL-CERT

# Enable Solaris support

web.enable_solaris_support = 0

# force removing entitlements from systems when modifying multiorg entitlements
# below the current usage amount.
web.force_unentitlement=0

# system snapshots enabled
enable_snapshots = 1

#cobbler host name
cobbler.host = sat570.example.com
#option generated from rhn-config-satellite.pl
web.subscribe_proxy_channel=1

#option generated from rhn-config-satellite.pl
force_package_upload=1

#option generated from rhn-config-satellite.pl
enable_nvrea=0

#option generated from rhn-config-satellite.pl
web.default_mail_from=RHN Satellite dev-null@localhost

#option generated from rhn-config-satellite.pl
web.l10n_resourcebundles=com.redhat.rhn.frontend.strings.jsp.StringPackage,com.redhat.rhn.frontend.strings.java.StringPackage,com.redhat.rhn.frontend.strings.database.StringPackage,com.redhat.rhn.frontend.strings.nav.StringPackage,com.redhat.rhn.frontend.strings.template.StringPackage,com.redhat.rhn.branding.strings.StringPackage

#option generated from rhn-config-satellite.pl
product_name=RHN Satellite

#option generated from rhn-config-satellite.pl
web.version=5.8.0

#option generated from rhn-config-satellite.pl
disconnected=1
Appendix C. Revision History
| Revision History | |||
|---|---|---|---|
| Revision 1.1-0 | Wed Feb 1 2017 | ||
| |||