SOA Getting Started Guide
This guide is for installation teams.
Edition 5.3.1
Abstract
Preface
Chapter 1. Preface
1.1. Business Integration
1.2. What is a Service-Oriented Architecture?
A Service Oriented Architecture (SOA) is not a single program or technology. Think of it, rather, as a software design paradigm.
Note
1.3. Key Points of a Service-Oriented Architecture
- the messages being exchanged
- the agents that act as service requesters and providers
- the shared transport mechanisms that allow the messages to flow back and forth.
1.4. What is the JBoss Enterprise SOA Platform?
1.5. The Service-Oriented Architecture Paradigm
- Service Provider
- A service provider allows access to services, creates a description of a service and publishes it to the service broker.
- Service Requester
- A service requester is responsible for discovering a service by searching through the service descriptions given by the service broker. A requester is also responsible for binding to services provided by the service provider.
- Service Broker
- A service broker hosts a registry of service descriptions. It is responsible for linking a requester to a service provider.
1.6. Core and Components
1.7. Components of the JBoss Enterprise SOA Platform
- A full Java EE-compliant application server (the JBoss Enterprise Application Platform)
- an enterprise service bus (JBoss ESB)
- a business process management system (jBPM)
- a business rules engine (JBoss Rules)
- support for the optional JBoss Enterprise Data Services (EDS) product.
1.8. JBoss Enterprise SOA Platform Features
- The JBoss Enterprise Service Bus (ESB)
- The ESB sends messages between services and transforms them so that they can be processed by different types of systems.
- Business Process Execution Language (BPEL)
- You can use web services to orchestrate business rules using this language. It is included with SOA for the simple execution of business process instructions.
- Java Universal Description, Discovery and Integration (jUDDI)
- This is the default service registry in SOA. It is where all the information pertaining to services on the ESB are stored.
- Smooks
- This transformation engine can be used in conjunction with SOA to process messages. It can also be used to split messages and send them to the correct destination.
- JBoss Rules
- This is the rules engine that is packaged with SOA. It can infer data from the messages it receives to determine which actions need to be performed.
1.9. Features of the JBoss Enterprise SOA Platform's JBossESB Component
- Multiple transports and protocols
- A listener-action model (so that you can loosely-couple services together)
- Content-based routing (through the JBoss Rules engine, XPath, Regex and Smooks)
- Integration with the JBoss Business Process Manager (jBPM) in order to provide service orchestration functionality
- Integration with JBoss Rules in order to provide business rules development functionality.
- Integration with a BPEL engine.
- Be configured to work with a wide variety of transport mechanisms (such as e-mail and JMS),
- Be used as a general-purpose object repository,
- Allow you to implement pluggable data transformation mechanisms,
- Support logging of interactions.
Important
org.jboss.internal.soa.esb and org.jboss.soa.esb. Use the contents of the org.jboss.internal.soa.esb package sparingly because they are subject to change without notice. By contrast, everything within the org.jboss.soa.esb package is covered by Red Hat's deprecation policy.
1.10. Task Management
1.11. Integration Use Case
1.12. Utilising the JBoss Enterprise SOA Platform in a Business Environment
Chapter 2. Introducing the JBoss Enterprise SOA Platform
2.1. Intended Audience
2.2. Aim of This Book
2.3. Back Up Your Data
Warning
Chapter 3. Prerequisites
3.1. Prerequisites for Installing the JBoss Enterprise SOA Platform
- A supported Java Virtual Machine
- A supported Java Development Kit (for running the quickstarts)
- A supported database server (needed to run the JBoss Server)
- Apache Ant 1.7 or later (needed to run the Database Schema Configuration Tool and deploy the JBoss ESB quick start examples)
- An archiving tool (such as FileRoller, ark or tar). (You need this to extract the contents of compressed files)
- JBoss Developer Studio 5.0. (Obtain it from the Red Hat Customer Portal at https://access.redhat.com/home)
3.2. Java Virtual Machine
3.3. Install Open JDK on Red Hat Enterprise Linux
Procedure 3.1. Install Open JDK on Red Hat Enterprise Linux
Subscribe to the Base Channel
Obtain the OpenJDK from the RHN base channel. (Your installation of Red Hat Enterprise Linux is subscribed to this channel by default.)Install the Package
Use the yum utility to install OpenJDK:yum install java-1.7.0-openjdk-develVerify that OpenJDK is Now Your System Default
To ensure that the correct JDK is set as the system default, login as root and run the alternatives command:/usr/sbin/alternatives --config javaSelect /usr/lib/jvm/jre-1.6.0-openjdk/bin/javaSet javac/usr/sbin/alternatives --config javacSelect /usr/lib/jvm/java-1.6.0-openjdk/bin/java
3.4. Apache Ant
3.5. Install Apache Ant
Procedure 3.2. Installing Apache Ant on Red Hat Enterprise Linux
Download Apache Ant
Open a terminal and input this command:sudo yum install ant-traxInstall Apache Ant
EnterYwhen prompted to do so by the installer.Add the ANT_HOME Environment Variable
vi ~/.bash_profile.- Add the following line:
export ANT_HOME=/FILEPATH/antwhere filepath is the directory in which Apache Ant was installed. Save and exit vi.Example 3.1.
export ANT_HOME=/opt/apache-ant-1.8.2Append the Ant installation's
bindirectory to the Path environmental variable.vi ~/.bash_profile.- Add the following line and then save and exit vi:
export PATH=$PATH:$ANT_HOME/binTest the installation
Go back to your terminal and runant -version. The output should resemble the following:[localhost]$ ant -version Apache Ant(TM) version 1.8.2 compiled on July 6 2011
Procedure 3.3. Installing Apache Ant on Microsoft Windows
Download Apache Ant
Download the latest Apache Ant binary release from http://ant.apache.org/.Extract Apache Ant
Extract the files to a preferred installation location such as:c:\Program Files\Apache\Ant\
Add the ANT_HOME Environment Variable
- Click on the .
- Open the .
- Select → →
- Create a new variable called
ANT_HOME. - Configure the ANT_HOME variable so that it points to the Apache Ant directory.
Append the bin directory of the Ant installation to the Path environmental variable.
- Click on the .
- Open the .
- Select → → →
- Edit the variable and append the text:
;%ANT_HOME%\binTest the installation
Runant -versionin a command line terminal. The version number should appear.
Chapter 4. Download the Product
4.1. Red Hat Customer Portal
4.2. Packages Available for Download
| Package | Description |
|---|---|
| JBoss Enterprise SOA Platform Package | The SOA Platform package is a complete JBoss application deployment environment. This single installation provides a complete environment for deploying SOA applications. It includes Seam, Hibernate, clustering, and transaction services. |
| JBoss Enterprise SOA Platform Standalone Edition Package | The SOA Standalone package provides a light-weight solution for deployments where only the core SOA functionality is needed. It does not support clustering. |
| JBoss Enterprise SOA Platform Source Code Package | The source code package contains the complete source code for the JBoss Enterprise SOA Platform product. |
| SOA Platform JavaDocs | The JavaDocs package contains the complete JavaDocs for the JBoss Enterprise SOA Platform's APIs. |
4.3. Differences Between Versions of the JBoss Enterprise SOA Platform
| SOA Platform Package | SOA Standalone Package | |
|---|---|---|
| JBoss ESB | YES | YES |
| JBoss Rules | YES | YES |
| JBoss JBPM | YES | YES |
| JBoss EAP | YES | YES |
| BPEL Engine | YES | YES |
| EJB3 | YES | NO |
| JBoss RestEasy | YES | NO |
| JBoss Seam | YES | NO |
| Support for JBoss Enterprise Data Services Deployment | YES | NO |
4.4. JavaDocs
4.5. Download Files From the Red Hat Customer Portal
Before you begin this task, you need a Customer Portal account. Browse to https://access.redhat.com and click the Register link in the upper right corner to create an account.
Procedure 4.1. Task:
- Browse to https://access.redhat.com and click the Log in link in the top right corner. Enter your credentials and click Log In.Result:
You are logged into RHN and you are returned to the main web page at https://access.redhat.com.
Navigate to the Downloads page.
Use one of the following options to navigate to the Downloads page.- Click the Downloads link in the top navigation bar.
- Navigate directly to https://access.redhat.com/downloads/.
Select the product and version to download.
Use one of the following ways to choose the correct product and version to download.- Step through the navigation one level at a time.
- Search for your product using the search area at the top right-hand side of the screen.
Download the appropriate file for your operating system and installation method of choice.
Depending on the product you choose, you may have the choice of a Zip archive, RPM, or native installer for a specific operating system and architecture. Click either the file name or the Download link to the right of the file you want to download.
The file is downloaded to your computer.
4.6. Checksum Validation
4.7. Verify the Downloaded File
Procedure 4.2. Verify the Downloaded File
- To verify that a file downloaded from the Red Hat Customer Portal is error-free, whilst still on the portal site, go to that package's Software Details page. Here you will find
MD5andSHA256"checksum" values that you will use to check the integrity of the file. - Open a terminal window and run either either the
md5sumorsha256sumcommand, supplying the filename of the downloadedZIPas an argument. The program will output the checksum value for the file. - Compare the checksum value returned by the command to the corresponding value displayed on the Software Details page for the file.
Note
Microsoft Windows does not come equipped with a checksum tool. Users of that operating system will have to download a third-party product instead.
If the two checksum values are identical then the file has not been altered or corrupted and is, therefore, safe to use.
4.8. Red Hat Documentation Site
Chapter 5. Installation
5.1. Variable Name: SOA_ROOT Directory
jboss-soa-p-5 directory. In the Standalone edition, though, it is the jboss-soa-p-standalone-5 directory.
SOA_ROOT. Substitute either jboss-soa-p-5 or jboss-soa-p-standalone-5 as appropriate whenever you see this name.
5.2. Variable Name: PROFILE
5.3. Install the JBoss Enterprise SOA Platform on Red Hat Enterprise Linux
Prerequisites
- a Java Development Kit (Red Hat recommends OpenJDK)
- a database server
- Apache Ant 1.7 or later
- an archiving tool that can open ZIP files
Warning
Procedure 5.1. Installation
- Extract the installation directory by running
unzip soa-p-VERSION.zip. - Open the user account settings file in your text editor:
vi SOA_ROOT/jboss-as/server/default/conf/props/soa-users.properties.The contents of this file using the following syntax:username=password.#admin=adminConfirm that the security roles for your admin account are enabled by removing a leading hash character, if it is present.Warning
Because this account is not secure and the password can be easily guessed, use admin=admin for test purposes only. Do not useadminas a password on production systems as this may compromise security. - Save the file and exit vi.
- Open the security permissions file in your text editor:
vi SOA_ROOT/jboss-as/server/default/conf/props/soa-roles.properties.#admin=JBossAdmin,HttpInvoker,user,adminConfirm that the security roles for your admin account are enabled by removing a leading hash character, if it is present. - Save the changes to the file and exit vi.
The JBoss Enterprise SOA Platform is now installed and configured for basic use.
5.4. Install the JBoss Enterprise SOA Platform on Microsoft Windows
Prerequisites
- a Java Development Kit
- a database server
- Apache Ant 1.7 or later
- an archiving tool that can open ZIP files
Warning
Procedure 5.2. Installation
- Extract the
soa-p-VERSION.zipusing the ZIP tool of your choice. - Confirm that the security roles for your admin account are enabled by removing a leading hash character, if it is present.
Warning
Because this account is not secure and the password can be easily guessed, use admin=admin for test purposes only. Do not useadminas a password on production systems as this may compromise security. - Save the file and exit Notepad.
- Open
SOA_ROOT\jboss-as\server\default\conf\props\soa-roles.propertiesin Notepad.#admin=JBossAdmin,HttpInvoker,user,adminRemove the hash to enable the security permissions for your admin account. - Save the file and exit Notepad.
The JBoss Enterprise SOA Platform is now installed and configured for basic use.
Chapter 6. Basic Operation Tutorial
6.1. Running the JBoss Enterprise SOA Platform for the First Time
In the following section you will learn how to launch and run the JBoss Enterprise SOA Platform for the first time. The simplest thing you can do is run the demonstration code found in the "Hello World" quick start.
6.2. Start the JBoss Enterprise SOA Platform
The following software must be installed:
- JBoss Enterprise SOA Platform
Procedure 6.1. Start the JBoss Enterprise SOA Platform
Start the SOA server in a server window
Red Hat Enterprise Linux
- Open a terminal and navigate to the
bindirectory by entering the commandcd SOA_ROOT/jboss-as/bin. - Enter
./run.shto start the SOA server. (Because you are not specifying a server profile, "default" will be used.)
Microsoft Windows
- Open a terminal and navigate to the
bindirectory by entering the commandchdir SOA_ROOT\jboss-as\bin. - Enter
run.batto start the SOA server. (Because you are not specifying a server profile, "default" will be used.)
The server starts. Note that this will take approximately two minutes, depending on the speed of your hardware.
Note
less SOA_ROOT/jboss-as/server/PROFILE/log/server.log. As another check, open a web browser and go to http://localhost:8080. Make sure you can login to the admin console with the user name and password you have set.
6.3. Troubleshooting the Boot Process
- "Address already in use" - There is already a server running on port 8080.
- "Java not found" - The Java JRE may not be installed, or if it is, your PATH environment variable is not set to locate the java runtime.
- "Class not found" - The CLASSPATH environment variable is not set properly. You really don't need to set this variable as the server startup script sets it for you.
- If you see any of these errors, examine the server.log messages that come before and after the error message for additional information regarding the root cause of the error.
6.4. Running the "Hello World" Quickstart
6.4.1. Quickstart
SOA_ROOT/jboss-as/samples/quickstarts/ directory. Build and deploy every quickstart by using Apache Ant.
6.4.2. Important Notes About Quickstarts
- Each quickstart needs to be built and deployed using Apache Ant.
- Each quickstart uses the
samples/quickstarts/conf/quickstarts.propertiesfile to store environment-specific configuration options such as the directory where the server was installed. You must create aquickstarts.propertiesfile that matches your server installation. An example properties file (quickstarts.properties-example) is included. - Each quickstart has different requirements. These are documented in their individual
readme.txtfiles. - Not every quickstart can run under every server profile.
- The jBPM quickstarts require a valid jBPM Console user name and password. Supply these by adding them as properties in the
SOA_ROOT/jboss-as/samples/quickstarts/conf/quickstarts.propertiesfile:# jBPM console security credentials jbpm.console.username=admin jbpm.console.password=adminpasswordThe quickstarts that are affected by this requirement arebpm_orchestration1,bpm_orchestration2,bpm_orchestration3andbpm_orchestration4. - You can only execute some of the quickstarts (such as groovy_gateway) if the server is not running in headless mode. (The JBoss Enterprise SOA Platform is configured to launch in headless mode by default.)
Important
Red Hat recommends that you run production servers in headless mode only.
6.4.3. Deploy the "Hello World" Quickstart on Your Test Server
Prerequisites
- Check that the setting in
SOA_ROOT/jboss-as/samples/quickstarts/conf/quickstarts.properties-examplematches the server configuration (defaultin a testing environment).
Procedure 6.2. Deploy the "Hello World" Quickstart
- Check that the server has fully launched.
- Open a second terminal window and navigate to the directory containing the quick start:
cd SOA_ROOT/jboss-as/samples/quickstarts/helloworld(orchdir SOA_ROOT\jboss-as\samples\quickstarts\helloworldin Microsoft Windows). - Run
ant deployto deploy the quickstart. Look for messages such as this to confirm if the deployment was successful:deploy-esb: [copy] Copying 1 file to /jboss/local/53_DEV2/jboss-soa-p-5/jboss-as/server/default/deploy deploy-exploded-esb: quickstart-specific-deploys: [echo] No Quickstart specific deployments being made. display-instructions: [echo] [echo] ****************** [echo] Quickstart deployed to target JBoss ESB/App Server at '/jboss/local/53_DEV2/jboss-soa-p-5/jboss-as/server/default/deploy'. [echo] 1. Check your ESB Server console to make sure the deployment was executed without errors. [echo] 2. Run 'ant runtest' to run the Quickstart. [echo] 3. Check your ESB Server console again. The Quickstart should have produced some output. [echo] ****************** deploy: BUILD SUCCESSFULAlso, check for this in theSOA_ROOT/jboss-as/server/default/log/server.log:10:58:52,998 INFO [NamingHelper] JNDI InitialContext properties:{} 11:00:58,154 INFO [QueueService] Queue[/queue/quickstart_helloworld_Request_esb] started, fullSize=200000, pageSize=2000, downCacheSize=2000 11:00:58,186 INFO [QueueService] Queue[/queue/quickstart_helloworld_Request_gw] started, fullSize=200000, pageSize=2000, downCacheSize=2000 11:00:58,427 INFO [EsbDeployment] Starting ESB Deployment 'Quickstart_helloworld.esb' - Run the quickstart by issuing this command:
ant runtest. When the quickstart is run, messages such as this are written to theSOA_ROOT/jboss-as/server/default/log/server.log:11:03:02,190 INFO [STDOUT] &&&&&&&&&&&&&&&&&&&&&&&&&&&&&&&&&&&&&&&&&&&&&&&& 11:03:02,191 INFO [STDOUT] Body: Hello World 11:03:02,191 INFO [STDOUT] &&&&&&&&&&&&&&&&&&&&&&&&&&&&&&&&&&&&&&&&&&&&&&&& 11:03:02,192 INFO [STDOUT] Message structure: 11:03:02,192 INFO [STDOUT] [Hello World].
The words "Hello World" will appear on the server terminal. This message will also be appended to the SOA_ROOT/jboss-as/server/default/log/server.log file.
6.4.4. ant deploy
ant deploy compiles a quickstart's source code in the build directory, then generates an .ESB file (such as Quickstart_helloworld.esb) in the server profile's deploy directory. (Note that it generates .JAR files for BPEL quickstarts.) The server detects the presence of the new .esb archive and deploys it. In the .ESB archive is a deployment.xml file that ant deploy uses to configure a queue.
ant deploy also uses an XSL template to transform generic JMS queue names into the specific JMS queues needed by the target server's messaging provider. Ant selects the correct messaging provider by examining the server for a messaging provider deployment. Only JBoss Messaging, JBoss MQ, and HornetQ are detected by the build script. Other messaging providers are not supported by the quick start. Ant then puts the deployment.xml file into the build/META-INF directory before including it in the same .ESB archive as the rest of the quickstart.
6.4.5. ant runtest
ant runtest sends an ESB-unaware "Hello World" message (which is a plain String object) to the JMS Queue (queue/quickstart_helloworld_Request_gw). It instructs Java to run the sender class (in the case of the "Hello World" quick start, this is called org.jboss.soa.esb.samples.quickstart.helloworld.test.sendJMSMessage). By doing so, it sends a message directly to the deployed process.
6.4.6. ant sendesb
ant sendesb command sends an ESB message to the SOA Server. It sends the ESB-aware message directly to the ESB listener, meaning that it does not have to utilize a gateway.
6.4.7. Undeploy the "Hello World" Quickstart
Procedure 6.3. Task
- Navigate to the quickstart's directory:
cd SOA_ROOT/jboss-as/samples/quickstarts/helloworld(orchdir SOA_ROOT\jboss-as\samples\quickstarts\helloworldif you are running Microsoft Windows). - Run the
ant undeploycommand. You should see messages such as this displayed:undeploy: [delete] Deleting: /jboss/local/53_DEV2/jboss-soa-p-5/jboss-as/server/default/deploy/Quickstart_helloworld.esb BUILD SUCCESSFULAnd messages such as this written to the server.log:11:10:08,205 INFO [EsbDeployment] Stopping 'Quickstart_helloworld.esb' 11:10:08,577 INFO [EsbDeployment] Destroying 'Quickstart_helloworld.esb'
6.5. Stop the JBoss Enterprise SOA Platform Server
Procedure 6.4. Stop the JBoss Enterprise SOA Platform Server
Stop the SOA server
Press ctrl-c in the server window (the terminal window where the SOA server was started).
The server will shut down. Note that this process will take a few minutes. Look for this line in the server.log file to confirm that the server has shut down successfully:
12:17:02,786 INFO [ServerImpl] Shutdown complete
6.6. Examining the "Hello World" Quickstart
6.6.1. Overview of How the "Hello World" Quickstart Works
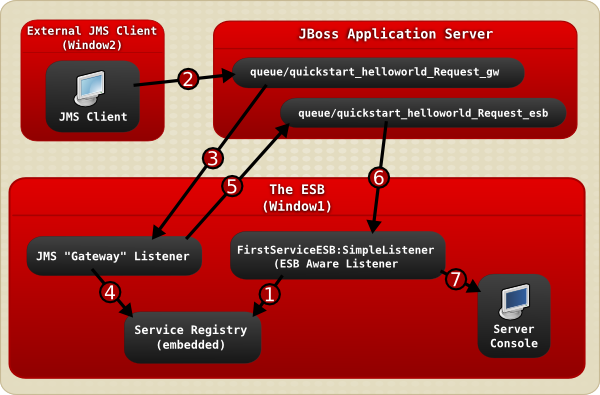
Figure 6.1. Image
- The JBoss Enterprise SOA Platform server is launched in
Window1and then theFirstServiceESB:SimpleListenerservice is added to the Service Registry service when the helloworld quickstart is deployed. - A JMS client sends an ESB-unaware "Hello World" message, (it is a plain
Stringobject), to the JMS Queue (queue/quickstart_helloworld_Request_gw). - The JMS Gateway Listener receives the ESB-unaware message and creates from it an ESB-aware message for use by ESB-aware end-points.
- The
JMS Gateway Listeneruses theservice registryto find theFirstServiceESB:SimpleListenerservice's end-point reference (EPR). In this case, the EPR is thequeue/quickstart_helloworld_Request_esbJMS queue. - The
JMS Gateway Listenertakes the new ESB-aware message and sends it to thequeue/quickstart_helloworld_Request_esbJMS queue. - The
FirstServiceESB:SimpleListenerservice receives the message. - The
FirstServiceESB:SimpleListenerservice extracts the payload from the message and outputs it to the console.
6.6.2. ESB Message
org.jboss.soa.esb.message interface. This standardized format consists of a header, body (payload) and attachments. All ESB-aware clients and services communicate with one another using messages.
6.6.3. Components of an ESB Message
- Header
- The header contains such information as the destination end-point reference, the sender end-point reference, and where the reply goes. This is all general message-level functional information.
- Context
- This is additional information that further explains the message; for example, transaction or security data, the identity of the ultimate receiver or HTTP-cookie information.
- Body
- The actual contents of the message.
- Fault
- Any error information associated with the message.
- Attachment
- Any attachments (additional files) associated with the message.
- Properties
- Any message-specific properties.(For example, the jbossesb.message.id property specifies a unique value for each message).
    <xs:complexType name="Envelope">
	<xs:attribute ref="Header" use="required"/>
	<xs:attribute ref="Context" use="required"/>
	<xs:attribute ref="Body" use="required"/>
	<xs:attribute ref="Attachment" use="optional"/>
	<xs:attribute ref="Properties" use="optional"/>
	<xs:attribute ref="Fault" use="optional"/>
</xs:complexType>
6.6.4. How Message Objects are Sent to the Queue
The JBoss Enterprise SOA Platform product uses a properties object that is populated with parameters to identify the presence of JNDI on the local server. It is then used as the parameter for a call to create a new Naming Context which is used to obtain the ConnectionFactory. The Connection Factory, in turn, creates the QueueConnection, which creates the QueueSession. This QueueSession creates a Sender object for the Queue. The Sender object is used to create an ObjectMessage for the sender and to then send it to the Queue.
6.6.5. Properties Object
6.6.6. Naming Context
6.6.7. ConnectionFactory
org.jboss.jms.client.JBossConnectionFactory) that creates a QueueConnection. The Naming Contect obtains the ConnectionFactory from JNDI.
6.6.8. QueueConnection
6.6.9. QueueSession
6.6.10. SOA_ROOT/jboss-as/samples/quickstarts/helloworld/build.xml
build.xml file contains the instructions used by ant deploy to compile the quickstart's source code in the build directory. You can edit this file to add your own custom instructions.
6.6.11. SOA_ROOT/jboss-as/samples/quickstarts/helloworld/deployment.xml
deployment.xml file is used by ant runtest to create and configure a messaging queue.
ant deploy generates the deployment.xml file in the build/META-INF directory during the compilation process. It then populates it when it determines which of the hard-coded JMS queues should be used. Once populated, the file is packaged as part of the .ESB archive. (Ant uses an XSL template to transform generic JMS queue names into the specific JMS queues required by the target server's messaging provider. It is from this template that the deployment.xml file is created.)
6.6.12. Messaging Queues
6.6.13. Message Listeners
org.jboss.soa.esb.message.Message format. Each gateway listener must have a corresponding ESB listener defined.
6.6.14. ESB-Awareness
6.6.15. Gateway Listener
org.jboss.soa.esb.message.Message format. This conversion happens in a variety of different ways, depending on the gateway type. Once the conversion has occurred, the gateway listener routes the data to its correct destination.
6.6.16. Senders
send method is called by its QueueSession's ObjectMessage when ant runtest is executed. When this happens, the client sends a message to the queue.
6.6.17. Learn More About a Quickstart
Procedure 6.5. Task
- Study the quickstart's
readme.txtfile. - Run the
ant helpcommand in the quickstart's directory.
6.7. The "Hello World" Quickstart's Source Code
6.7.1. SOA_ROOT/jboss-as/samples/quickstarts/helloworld/src
src directory contains the uncompiled programming instructions. The classes are in files nested in subdirectories. ant deploy compiles this source code.
6.7.2. SOA_ROOT/jboss-as/samples/quickstarts/helloworld/lib
lib directory contains the classes needed by ant deploy, (in addition to the source code), to compile the quick start.
6.7.3. SOA_ROOT/jboss-as/server/SERVER_PROFILE/deploy
ant deploy moves the compiled version of a quick start (in the form of an .ESB archive file) from the build directory to the /jboss-as/server/default/deploy/ directory. The JBoss Enterprise SOA Server is polling this directory and, when it detects the presence of a new .ESB file, it deploys it.
Chapter 7. Removal
7.1. Remove the JBoss Enterprise SOA Platform from Your System
Procedure 7.1. Remove the JBoss Enterprise SOA Platform from Your System
Remove the JBoss Enterprise SOA Platform from a Red Hat Enterprise Linux System
Having made sure the server is shut down, navigate to the level above the SOA_ROOT directory and issue this command:rm -Rf SOA_ROOT.Remove the JBoss Enterprise SOA Platform from a Microsoft Windows System
Having made sure the server is shut down, open Windows Explorer, go to the directory in which the SOA_ROOT is located, select the SOA_ROOT and delete it.- Delete the database.
Appendix A. Some Definitions
A.1. Enterprise Service Bus
A.2. JBoss Rules
A.3. soa-users.properties
soa-users.properties file is where the user accounts and passwords for accessing the SOA Web consoles are stored. Administrators control access to the system by editing this file. Note that the passwords are saved in clear text so for production systems, password encryption should be used instead.
A.4. soa-roles.properties
soa-roles.properties file is where user access privileges are defined. This file uses the following syntax: username=role1,role2,role3. You can assign any number of roles. Note that a user must be assigned the JBossAdmin, HttpInvoker, user, and admin roles in order to be able to log into the server consoles.
A.5. run.sh
run.sh is the shell script the user runs to launch the JBoss Enterprise SOA Platform. The Microsoft Windows equivalent is run.bat. The script contains the commands needed to start the server with the profile and port binding which the user has specified in the shell. The script is found in the SOA_ROOT/jboss-as/bin directory.
A.6. Server Profiles
SOA_ROOT/jboss-as/server/ directory. The user specifies which profile to run when launching the software by using the -c switch. If none is specified, the "Default" profile is used.
Appendix B. Revision History
| Revision History | |||
|---|---|---|---|
| Revision 5.3.1-31.400 | 2013-10-31 | ||
| |||
| Revision 5.3.1-31 | Tue Feb 05 2013 | ||
| |||