Installing and using the Migration Toolkit for Virtualization
Migrating from VMware vSphere or Red Hat Virtualization to Red Hat OpenShift Virtualization
Abstract
Making open source more inclusive
Red Hat is committed to replacing problematic language in our code, documentation, and web properties. We are beginning with these four terms: master, slave, blacklist, and whitelist. Because of the enormity of this endeavor, these changes will be implemented gradually over several upcoming releases. For more details, see our CTO Chris Wright’s message.
Chapter 1. About the Migration Toolkit for Virtualization
You can use the Migration Toolkit for Virtualization (MTV) to migrate virtual machines from the following source providers to OpenShift Virtualization destination providers:
- VMware vSphere
- Red Hat Virtualization (RHV)
- OpenStack
- Open Virtual Appliances (OVAs) that were created by VMware vSphere
- Remote OpenShift Virtualization clusters
Additional resources
1.1. About cold and warm migration
MTV supports cold migration from:
- VMware vSphere
- Red Hat Virtualization (RHV)
- OpenStack
- Remote OpenShift Virtualization clusters
MTV supports warm migration from VMware vSphere and from RHV.
1.1.1. Cold migration
Cold migration is the default migration type. The source virtual machines are shut down while the data is copied.
1.1.2. Warm migration
Most of the data is copied during the precopy stage while the source virtual machines (VMs) are running.
Then the VMs are shut down and the remaining data is copied during the cutover stage.
Precopy stage
The VMs are not shut down during the precopy stage.
The VM disks are copied incrementally using changed block tracking (CBT) snapshots. The snapshots are created at one-hour intervals by default. You can change the snapshot interval by updating the forklift-controller deployment.
You must enable CBT for each source VM and each VM disk.
A VM can support up to 28 CBT snapshots. If the source VM has too many CBT snapshots and the Migration Controller service is not able to create a new snapshot, warm migration might fail. The Migration Controller service deletes each snapshot when the snapshot is no longer required.
The precopy stage runs until the cutover stage is started manually or is scheduled to start.
Cutover stage
The VMs are shut down during the cutover stage and the remaining data is migrated. Data stored in RAM is not migrated.
You can start the cutover stage manually by using the MTV console or you can schedule a cutover time in the Migration manifest.
Chapter 2. Prerequisites
Review the following prerequisites to ensure that your environment is prepared for migration.
2.1. Software requirements
You must install compatible versions of Red Hat OpenShift and OpenShift Virtualization.
2.2. Storage support and default modes
MTV uses the following default volume and access modes for supported storage.
| Provisioner | Volume mode | Access mode |
|---|---|---|
| kubernetes.io/aws-ebs | Block | ReadWriteOnce |
| kubernetes.io/azure-disk | Block | ReadWriteOnce |
| kubernetes.io/azure-file | Filesystem | ReadWriteMany |
| kubernetes.io/cinder | Block | ReadWriteOnce |
| kubernetes.io/gce-pd | Block | ReadWriteOnce |
| kubernetes.io/hostpath-provisioner | Filesystem | ReadWriteOnce |
| manila.csi.openstack.org | Filesystem | ReadWriteMany |
| openshift-storage.cephfs.csi.ceph.com | Filesystem | ReadWriteMany |
| openshift-storage.rbd.csi.ceph.com | Block | ReadWriteOnce |
| kubernetes.io/rbd | Block | ReadWriteOnce |
| kubernetes.io/vsphere-volume | Block | ReadWriteOnce |
If the OpenShift Virtualization storage does not support dynamic provisioning, you must apply the following settings:
Filesystemvolume modeFilesystemvolume mode is slower thanBlockvolume mode.ReadWriteOnceaccess modeReadWriteOnceaccess mode does not support live virtual machine migration.
See Enabling a statically-provisioned storage class for details on editing the storage profile.
If your migration uses block storage and persistent volumes created with an EXT4 file system, increase the file system overhead in CDI to be more than 10%. The default overhead that is assumed by CDI does not completely include the reserved place for the root partition. If you do not increase the file system overhead in CDI by this amount, your migration might fail.
When migrating from OpenStack or running a cold-migration from RHV to the OCP cluster that MTV is deployed on, the migration allocates persistent volumes without CDI. In these cases, you might need to adjust the file system overhead.
If the configured file system overhead, which has a default value of 10%, is too low, the disk transfer will fail due to lack of space. In such a case, you would want to increase the file system overhead.
In some cases, however, you might want to decrease the file system overhead to reduce storage consumption.
You can change the file system overhead by changing the value of the controller_filesystem_overhead in the spec portion of the forklift-controller CR, as described in Configuring the MTV Operator.
2.3. Network prerequisites
The following prerequisites apply to all migrations:
- IP addresses, VLANs, and other network configuration settings must not be changed before or during migration. The MAC addresses of the virtual machines are preserved during migration.
- The network connections between the source environment, the OpenShift Virtualization cluster, and the replication repository must be reliable and uninterrupted.
- If you are mapping more than one source and destination network, you must create a network attachment definition for each additional destination network.
2.3.1. Ports
The firewalls must enable traffic over the following ports:
| Port | Protocol | Source | Destination | Purpose |
|---|---|---|---|---|
| 443 | TCP | OpenShift nodes | VMware vCenter | VMware provider inventory Disk transfer authentication |
| 443 | TCP | OpenShift nodes | VMware ESXi hosts | Disk transfer authentication |
| 902 | TCP | OpenShift nodes | VMware ESXi hosts | Disk transfer data copy |
| Port | Protocol | Source | Destination | Purpose |
|---|---|---|---|---|
| 443 | TCP | OpenShift nodes | RHV Engine | RHV provider inventory Disk transfer authentication |
| 443 | TCP | OpenShift nodes | RHV hosts | Disk transfer authentication |
| 54322 | TCP | OpenShift nodes | RHV hosts | Disk transfer data copy |
2.4. Source virtual machine prerequisites
The following prerequisites apply to all migrations:
- ISO/CDROM disks must be unmounted.
- Each NIC must contain one IPv4 and/or one IPv6 address.
- The VM operating system must be certified and supported for use as a guest operating system with OpenShift Virtualization.
-
VM names must contain only lowercase letters (
a-z), numbers (0-9), or hyphens (-), up to a maximum of 253 characters. The first and last characters must be alphanumeric. The name must not contain uppercase letters, spaces, periods (.), or special characters. VM names must not duplicate the name of a VM in the OpenShift Virtualization environment.
NoteMigration Toolkit for Virtualization automatically assigns a new name to a VM that does not comply with the rules.
Migration Toolkit for Virtualization makes the following changes when it automatically generates a new VM name:
- Excluded characters are removed.
- Uppercase letters are switched to lowercase letters.
-
Any underscore (
_) is changed to a dash (-).
This feature allows a migration to proceed smoothly even if someone entered a VM name that does not follow the rules.
2.5. Red Hat Virtualization prerequisites
The following prerequisites apply to Red Hat Virtualization migrations:
-
To create a source provider, you must have at least the
UserRoleandReadOnlyAdminroles assigned to you. These are the minimum required permissions, however, any other administrator or superuser permissions will also work.
You must keep the UserRole and ReadOnlyAdmin roles until the virtual machines of the source provider have been migrated. Otherwise, the migration will fail.
To migrate virtual machines:
You must have one of the following:
- RHV admin permissions. These permissions allow you to migrate any virtual machine in the system.
-
DiskCreatorandUserVmManagerpermissions on every virtual machine you want to migrate.
- You must use a compatible version of Red Hat Virtualization.
You must have the Manager CA certificate, unless it was replaced by a third-party certificate, in which case, specify the Manager Apache CA certificate.
You can obtain the Manager CA certificate by navigating to https://<engine_host>/ovirt-engine/services/pki-resource?resource=ca-certificate&format=X509-PEM-CA in a browser.
- If you are migrating a virtual machine with a direct LUN disk, ensure that the nodes in the OpenShift Virtualization destination cluster that the VM is expected to run on can access the backend storage.
- Unlike disk images that are copied from a source provider to a target provider, LUNs are detached, but not removed, from virtual machines in the source provider and then attached to the virtual machines (VMs) that are created in the target provider.
- LUNs are not removed from the source provider during the migration in case fallback to the source provider is required. However, before re-attaching the LUNs to VMs in the source provider, ensure that the LUNs are not used by VMs on the target environment at the same time, which might lead to data corruption.
2.6. OpenStack prerequisites
The following prerequisites apply to OpenStack migrations:
- You must use a compatible version of OpenStack.
2.6.1. Additional authentication methods for migrations with OpenStack source providers
MTV versions 2.6 and later support the following authentication methods for migrations with OpenStack source providers in addition to the standard username and password credential set:
- Token authentication
- Application credential authentication
You can use these methods to migrate virtual machines with OpenStack source providers using the CLI the same way you migrate other virtual machines, except for how you prepare the Secret manifest.
2.6.1.1. Using token authentication with an OpenStack source provider
You can use token authentication, instead of username and password authentication, when you create an OpenStack source provider.
MTV supports both of the following types of token authentication:
- Token with user ID
- Token with user name
For each type of token authentication, you need to use data from OpenStack to create a Secret manifest.
Prerequisites
Have an OpenStack account.
Procedure
- In the dashboard of the OpenStack web console, click Project > API Access.
Expand Download OpenStack RC file and click OpenStack RC file.
The file that is downloaded, referred to here as
<openstack_rc_file>, includes the following fields used for token authentication:OS_AUTH_URL OS_PROJECT_ID OS_PROJECT_NAME OS_DOMAIN_NAME OS_USERNAME
To get the data needed for token authentication, run the following command:
$ openstack token issue
The output, referred to here as
<openstack_token_output>, includes thetoken,userID, andprojectIDthat you need for authentication using a token with user ID.Create a
Secretmanifest similar to the following:For authentication using a token with user ID:
cat << EOF | oc apply -f -
apiVersion: v1
kind: Secret
metadata:
  name: openstack-secret-tokenid
  namespace: openshift-mtv
  labels:
    createdForProviderType: openstack
type: Opaque
stringData:
  authType: token
  token: <token_from_openstack_token_output>
  projectID: <projectID_from_openstack_token_output>
  userID: <userID_from_openstack_token_output>
  url: <OS_AUTH_URL_from_openstack_rc_file>
EOF
For authentication using a token with user name:
cat << EOF | oc apply -f -
apiVersion: v1
kind: Secret
metadata:
  name: openstack-secret-tokenname
  namespace: openshift-mtv
  labels:
    createdForProviderType: openstack
type: Opaque
stringData:
  authType: token
  token: <token_from_openstack_token_output>
  domainName: <OS_DOMAIN_NAME_from_openstack_rc_file>
  projectName: <OS_PROJECT_NAME_from_openstack_rc_file>
  username: <OS_USERNAME_from_openstack_rc_file>
  url: <OS_AUTH_URL_from_openstack_rc_file>
EOF
-
Continue migrating your virtual machine according to the procedure in Migrating virtual machines, starting with step 2, "Create a
Providermanifest for the source provider."
2.6.1.2. Using application credential authentication with an OpenStack source provider
You can use application credential authentication, instead of username and password authentication, when you create an OpenStack source provider.
MTV supports both of the following types of application credential authentication:
- Application credential ID
- Application credential name
For each type of application credential authentication, you need to use data from OpenStack to create a Secret manifest.
Prerequisites
You have an OpenStack account.
Procedure
- In the dashboard of the OpenStack web console, click Project > API Access.
Expand Download OpenStack RC file and click OpenStack RC file.
The file that is downloaded, referred to here as
<openstack_rc_file>, includes the following fields used for application credential authentication:OS_AUTH_URL OS_PROJECT_ID OS_PROJECT_NAME OS_DOMAIN_NAME OS_USERNAME
To get the data needed for application credential authentication, run the following command:
$ openstack application credential create --role member --role reader --secret redhat forklift
The output, referred to here as
<openstack_credential_output>, includes:-
The
idandsecretthat you need for authentication using an application credential ID -
The
nameandsecretthat you need for authentication using an application credential name
-
The
Create a
Secretmanifest similar to the following:For authentication using the application credential ID:
cat << EOF | oc apply -f -
apiVersion: v1
kind: Secret
metadata:
  name: openstack-secret-appid
  namespace: openshift-mtv
  labels:
    createdForProviderType: openstack
type: Opaque
stringData:
  authType: applicationcredential
  applicationCredentialID: <id_from_openstack_credential_output>
  applicationCredentialSecret: <secret_from_openstack_credential_output>
  url: <OS_AUTH_URL_from_openstack_rc_file>
EOF
For authentication using the application credential name:
cat << EOF | oc apply -f -
apiVersion: v1
kind: Secret
metadata:
  name: openstack-secret-appname
  namespace: openshift-mtv
  labels:
    createdForProviderType: openstack
type: Opaque
stringData:
  authType: applicationcredential
  applicationCredentialName: <name_from_openstack_credential_output>
  applicationCredentialSecret: <secret_from_openstack_credential_output>
  domainName: <OS_DOMAIN_NAME_from_openstack_rc_file>
  username: <OS_USERNAME_from_openstack_rc_file>
  url: <OS_AUTH_URL_from_openstack_rc_file>
EOF
-
Continue migrating your virtual machine according to the procedure in Migrating virtual machines, starting with step 2, "Create a
Providermanifest for the source provider."
2.7. VMware prerequisites
It is strongly recommended to create a VDDK image to accelerate migrations. For more information, see Creating a VDDK image.
The following prerequisites apply to VMware migrations:
- You must use a compatible version of VMware vSphere.
- You must be logged in as a user with at least the minimal set of VMware privileges.
- To access the virtual machine using a pre-migration hook, VMware Tools must be installed on the source virtual machine.
-
The VM operating system must be certified and supported for use as a guest operating system with OpenShift Virtualization and for conversion to KVM with
virt-v2v. - If you are running a warm migration, you must enable changed block tracking (CBT) on the VMs and on the VM disks.
- If you are migrating more than 10 VMs from an ESXi host in the same migration plan, you must increase the NFC service memory of the host.
- It is strongly recommended to disable hibernation because Migration Toolkit for Virtualization (MTV) does not support migrating hibernated VMs.
In the event of a power outage, data might be lost for a VM with disabled hibernation. However, if hibernation is not disabled, migration will fail
Neither MTV nor OpenShift Virtualization support conversion of Btrfs for migrating VMs from VMWare.
VMware privileges
The following minimal set of VMware privileges is required to migrate virtual machines to OpenShift Virtualization with the Migration Toolkit for Virtualization (MTV).
| Privilege | Description |
|---|---|
|
| |
|
| Allows powering off a powered-on virtual machine. This operation powers down the guest operating system. |
|
| Allows powering on a powered-off virtual machine and resuming a suspended virtual machine. |
|
| Allows managing a virtual machine by the VMware VIX API. |
|
Note
All | |
|
| Allows opening a disk on a virtual machine for random read and write access. Used mostly for remote disk mounting. |
|
| Allows operations on files associated with a virtual machine, including VMX, disks, logs, and NVRAM. |
|
| Allows opening a disk on a virtual machine for random read access. Used mostly for remote disk mounting. |
|
| Allows read operations on files associated with a virtual machine, including VMX, disks, logs, and NVRAM. |
|
| Allows write operations on files associated with a virtual machine, including VMX, disks, logs, and NVRAM. |
|
| Allows cloning of a template. |
|
| Allows cloning of an existing virtual machine and allocation of resources. |
|
| Allows creation of a new template from a virtual machine. |
|
| Allows customization of a virtual machine’s guest operating system without moving the virtual machine. |
|
| Allows deployment of a virtual machine from a template. |
|
| Allows marking an existing powered-off virtual machine as a template. |
|
| Allows marking an existing template as a virtual machine. |
|
| Allows creation, modification, or deletion of customization specifications. |
|
| Allows promote operations on a virtual machine’s disks. |
|
| Allows reading a customization specification. |
|
| |
|
| Allows creation of a snapshot from the virtual machine’s current state. |
|
| Allows removal of a snapshot from the snapshot history. |
|
| |
|
| Allows exploring the contents of a datastore. |
|
| Allows performing low-level file operations - read, write, delete, and rename - in a datastore. |
|
| |
|
| Allows verification of the validity of a session. |
|
| |
|
| Allows decryption of an encrypted virtual machine. |
|
| Allows access to encrypted resources. |
2.7.1. Creating a VDDK image
The Migration Toolkit for Virtualization (MTV) can use the VMware Virtual Disk Development Kit (VDDK) SDK to accelerate transferring virtual disks from VMware vSphere.
Creating a VDDK image, although optional, is highly recommended.
To make use of this feature, you download the VMware Virtual Disk Development Kit (VDDK), build a VDDK image, and push the VDDK image to your image registry.
The VDDK package contains symbolic links, therefore, the procedure of creating a VDDK image must be performed on a file system that preserves symbolic links (symlinks).
Storing the VDDK image in a public registry might violate the VMware license terms.
Prerequisites
- Red Hat OpenShift image registry.
-
podmaninstalled. - You are working on a file system that preserves symbolic links (symlinks).
- If you are using an external registry, OpenShift Virtualization must be able to access it.
Procedure
Create and navigate to a temporary directory:
$ mkdir /tmp/<dir_name> && cd /tmp/<dir_name>
- In a browser, navigate to the VMware VDDK version 8 download page.
- Select version 8.0.1 and click Download.
In order to migrate to OpenShift Virtualization 4.12, download VDDK version 7.0.3.2 from the VMware VDDK version 7 download page.
- Save the VDDK archive file in the temporary directory.
Extract the VDDK archive:
$ tar -xzf VMware-vix-disklib-<version>.x86_64.tar.gz
Create a
Dockerfile:$ cat > Dockerfile <<EOF FROM registry.access.redhat.com/ubi8/ubi-minimal USER 1001 COPY vmware-vix-disklib-distrib /vmware-vix-disklib-distrib RUN mkdir -p /opt ENTRYPOINT ["cp", "-r", "/vmware-vix-disklib-distrib", "/opt"] EOF
Build the VDDK image:
$ podman build . -t <registry_route_or_server_path>/vddk:<tag>
Push the VDDK image to the registry:
$ podman push <registry_route_or_server_path>/vddk:<tag>
- Ensure that the image is accessible to your OpenShift Virtualization environment.
2.7.2. Increasing the NFC service memory of an ESXi host
If you are migrating more than 10 VMs from an ESXi host in the same migration plan, you must increase the NFC service memory of the host. Otherwise, the migration will fail because the NFC service memory is limited to 10 parallel connections.
Procedure
- Log in to the ESXi host as root.
Change the value of
maxMemoryto1000000000in/etc/vmware/hostd/config.xml:... <nfcsvc> <path>libnfcsvc.so</path> <enabled>true</enabled> <maxMemory>1000000000</maxMemory> <maxStreamMemory>10485760</maxStreamMemory> </nfcsvc> ...Restart
hostd:# /etc/init.d/hostd restart
You do not need to reboot the host.
2.8. Open Virtual Appliance (OVA) prerequisites
The following prerequisites apply to Open Virtual Appliance (OVA) file migrations:
- All OVA files are created by VMware vSphere.
Migration of OVA files that were not created by VMware vSphere but are compatible with vSphere might succeed. However, migration of such files is not supported by MTV. MTV supports only OVA files created by VMware vSphere.
The OVA files are in one or more folders under an NFS shared directory in one of the following structures:
In one or more compressed Open Virtualization Format (OVF) packages that hold all the VM information.
The filename of each compressed package must have the
.ovaextension. Several compressed packages can be stored in the same folder.When this structure is used, MTV scans the root folder and the first-level subfolders for compressed packages.
For example, if the NFS share is,
/nfs, then:
The folder/nfsis scanned.
The folder/nfs/subfolder1is scanned.
But,/nfs/subfolder1/subfolder2is not scanned.In extracted OVF packages.
When this structure is used, MTV scans the root folder, first-level subfolders, and second-level subfolders for extracted OVF packages. However, there can be only one
.ovffile in a folder. Otherwise, the migration will fail.For example, if the NFS share is,
/nfs, then:
The OVF file/nfs/vm.ovfis scanned.
The OVF file/nfs/subfolder1/vm.ovfis scanned.
The OVF file/nfs/subfolder1/subfolder2/vm.ovfis scanned.
But, the OVF file/nfs/subfolder1/subfolder2/subfolder3/vm.ovfis not scanned.
2.9. Software compatibility guidelines
You must install compatible software versions.
| Migration Toolkit for Virtualization | Red Hat OpenShift | OpenShift Virtualization | VMware vSphere | Red Hat Virtualization | OpenStack |
|---|---|---|---|---|---|
| 2.6.7 | 4.14 or later | 4.14 or later | 6.5 or later | 4.4 SP1 or later | 16.1 or later |
MTV 2.6 was tested only with Red Hat Virtualization (RHV) 4.4 SP1. Migration from Red Hat Virtualization (RHV) 4.3 has not been tested with MTV 2.6. While not supported, basic migrations from RHV 4.3 are expected to work.
As RHV 4.3 lacks the improvements that were introduced in RHV 4.4 for MTV, and new features were not tested with RHV 4.3, migrations from RHV 4.3 may not function at the same level as migrations from RHV 4.4, with some functionality may be missing.
Therefore, it is recommended to upgrade RHV to the supported version above before the migration to OpenShift Virtualization.
However, migrations from RHV 4.3.11 were tested with MTV 2.3, and may work in practice in many environments using MTV 2.6. In this case, we advise upgrading Red Hat Virtualization Manager (RHVM) to the previously mentioned supported version before the migration to OpenShift Virtualization.
2.9.1. OpenShift Operator Life Cycles
For more information about the software maintenance Life Cycle classifications for Operators shipped by Red Hat for use with OpenShift Container Platform, see OpenShift Operator Life Cycles.
Chapter 3. Installing and configuring the MTV Operator
You can install the MTV Operator by using the Red Hat OpenShift web console or the command line interface (CLI).
In Migration Toolkit for Virtualization (MTV) version 2.4 and later, the MTV Operator includes the MTV plugin for the Red Hat OpenShift web console.
After you install the MTV Operator by using either the Red Hat OpenShift web console or the CLI, you can configure the Operator.
3.1. Installing the MTV Operator by using the Red Hat OpenShift web console
You can install the MTV Operator by using the Red Hat OpenShift web console.
Prerequisites
- Red Hat OpenShift 4.14 or later installed.
- OpenShift Virtualization Operator installed on an OpenShift migration target cluster.
-
You must be logged in as a user with
cluster-adminpermissions.
Procedure
- In the Red Hat OpenShift web console, click Operators → OperatorHub.
- Use the Filter by keyword field to search for mtv-operator.
- Click Migration Toolkit for Virtualization Operator and then click Install.
- Click Create ForkliftController when the button becomes active.
Click Create.
Your ForkliftController appears in the list that is displayed.
- Click Workloads → Pods to verify that the MTV pods are running.
Click Operators → Installed Operators to verify that Migration Toolkit for Virtualization Operator appears in the openshift-mtv project with the status Succeeded.
When the plugin is ready you will be prompted to reload the page. The Migration menu item is automatically added to the navigation bar, displayed on the left of the Red Hat OpenShift web console.
3.2. Installing the MTV Operator from the command line interface
You can install the MTV Operator from the command line interface (CLI).
Prerequisites
- Red Hat OpenShift 4.14 or later installed.
- OpenShift Virtualization Operator installed on an OpenShift migration target cluster.
-
You must be logged in as a user with
cluster-adminpermissions.
Procedure
Create the openshift-mtv project:
$ cat << EOF | oc apply -f -
apiVersion: project.openshift.io/v1
kind: Project
metadata:
  name: openshift-mtv
EOF
Create an
OperatorGroupCR calledmigration:$ cat << EOF | oc apply -f - apiVersion: operators.coreos.com/v1 kind: OperatorGroup metadata: name: migration namespace: openshift-mtv spec: targetNamespaces: - openshift-mtv EOFCreate a
SubscriptionCR for the Operator:$ cat << EOF | oc apply -f - apiVersion: operators.coreos.com/v1alpha1 kind: Subscription metadata: name: mtv-operator namespace: openshift-mtv spec: channel: release-v2.6 installPlanApproval: Automatic name: mtv-operator source: redhat-operators sourceNamespace: openshift-marketplace startingCSV: "mtv-operator.v2.6.7" EOF
Create a
ForkliftControllerCR:$ cat << EOF | oc apply -f - apiVersion: forklift.konveyor.io/v1beta1 kind: ForkliftController metadata: name: forklift-controller namespace: openshift-mtv spec: olm_managed: true EOF
Verify that the MTV pods are running:
$ oc get pods -n openshift-mtv
Example output
NAME                                                    READY   STATUS    RESTARTS   AGE
forklift-api-bb45b8db4-cpzlg                            1/1     Running   0          6m34s
forklift-controller-7649db6845-zd25p                    2/2     Running   0          6m38s
forklift-must-gather-api-78fb4bcdf6-h2r4m               1/1     Running   0          6m28s
forklift-operator-59c87cfbdc-pmkfc                      1/1     Running   0          28m
forklift-ui-plugin-5c5564f6d6-zpd85                     1/1     Running   0          6m24s
forklift-validation-7d84c74c6f-fj9xg                    1/1     Running   0          6m30s
forklift-volume-populator-controller-85d5cb64b6-mrlmc   1/1     Running   0          6m36s
3.3. Configuring the MTV Operator
You can configure all of the following settings of the MTV Operator by modifying the ForkliftController CR, or in the Settings section of the Overview page, unless otherwise indicated.
- Maximum number of virtual machines (VMs) per plan that can be migrated simultaneously.
-
How long
must gatherreports are retained before being automatically deleted. - CPU limit allocated to the main controller container.
- Memory limit allocated to the main controller container.
- Interval at which a new snapshot is requested before initiating a warm migration.
- Frequency with which the system checks the status of snapshot creation or removal during a warm migration.
-
Percentage of space in persistent volumes allocated as file system overhead when the
storageclassisfilesystem(ForkliftControllerCR only). -
Fixed amount of additional space allocated in persistent block volumes. This setting is applicable for any
storageclassthat is block-based (ForkliftControllerCR only). -
Configuration map of operating systems to preferences for vSphere source providers (
ForkliftControllerCR only). -
Configuration map of operating systems to preferences for Red Hat Virtualization (RHV) source providers (
ForkliftControllerCR only).
The procedure for configuring these settings using the user interface is presented in Configuring MTV settings. The procedure for configuring these settings by modifying the ForkliftController CR is presented following.
Procedure
-
Change a parameter’s value in the
specportion of theForkliftControllerCR by adding the label and value as follows:
spec:
label: value 1- 1
- Labels you can configure using the CLI are shown in the table that follows, along with a description of each label and its default value.
| Label | Description | Default value |
|---|---|---|
|
| The maximum number of VMs per plan that can be migrated simultaneously. |
|
|
|
The duration in hours for retaining |
|
|
| The CPU limit allocated to the main controller container. |
|
|
| The memory limit allocated to the main controller container. |
|
|
| The interval in minutes at which a new snapshot is requested before initiating a warm migration. |
|
|
| The frequency in seconds with which the system checks the status of snapshot creation or removal during a warm migration. |
|
|
|
Percentage of space in persistent volumes allocated as file system overhead when the
|
|
|
|
Fixed amount of additional space allocated in persistent block volumes. This setting is applicable for any
|
|
|
| Configuration map for vSphere source providers. This configuration map maps the operating system of the incoming VM to a OpenShift Virtualization preference name. This configuration map needs to be in the namespace where the MTV Operator is deployed. To see the list of preferences in your OpenShift Virtualization environment, open the OpenShift web console and click Virtualization → Preferences.
You can add values to the configuration map when this label has the default value,
|
|
|
| Configuration map for RHV source providers. This configuration map maps the operating system of the incoming VM to a OpenShift Virtualization preference name. This configuration map needs to be in the namespace where the MTV Operator is deployed. To see the list of preferences in your OpenShift Virtualization environment, open the OpenShift web console and click Virtualization → Preferences.
You can add values to the configuration map when this label has the default value,
|
|
Chapter 4. Migrating virtual machines by using the Red Hat OpenShift web console
You can migrate virtual machines (VMs) by using the Red Hat OpenShift web console to:
You must ensure that all prerequisites are met.
VMware only: You must have the minimal set of VMware privileges.
VMware only: Creating a VMware Virtual Disk Development Kit (VDDK) image will increase migration speed.
4.1. The MTV user interface
The Migration Toolkit for Virtualization (MTV) user interface is integrated into the OpenShift web console.
In the left-hand panel, you can choose a page related to a component of the migration progress, for example, Providers for Migration, or, if you are an administrator, you can choose Overview, which contains information about migrations and lets you configure MTV settings.
Figure 4.1. MTV extension interface
In pages related to components, you can click on the Projects list, which is in the upper-left portion of the page, and see which projects (namespaces) you are allowed to work with.
- If you are an administrator, you can see all projects.
- If you are a non-administrator, you can see only the projects that you have permissions to work with.
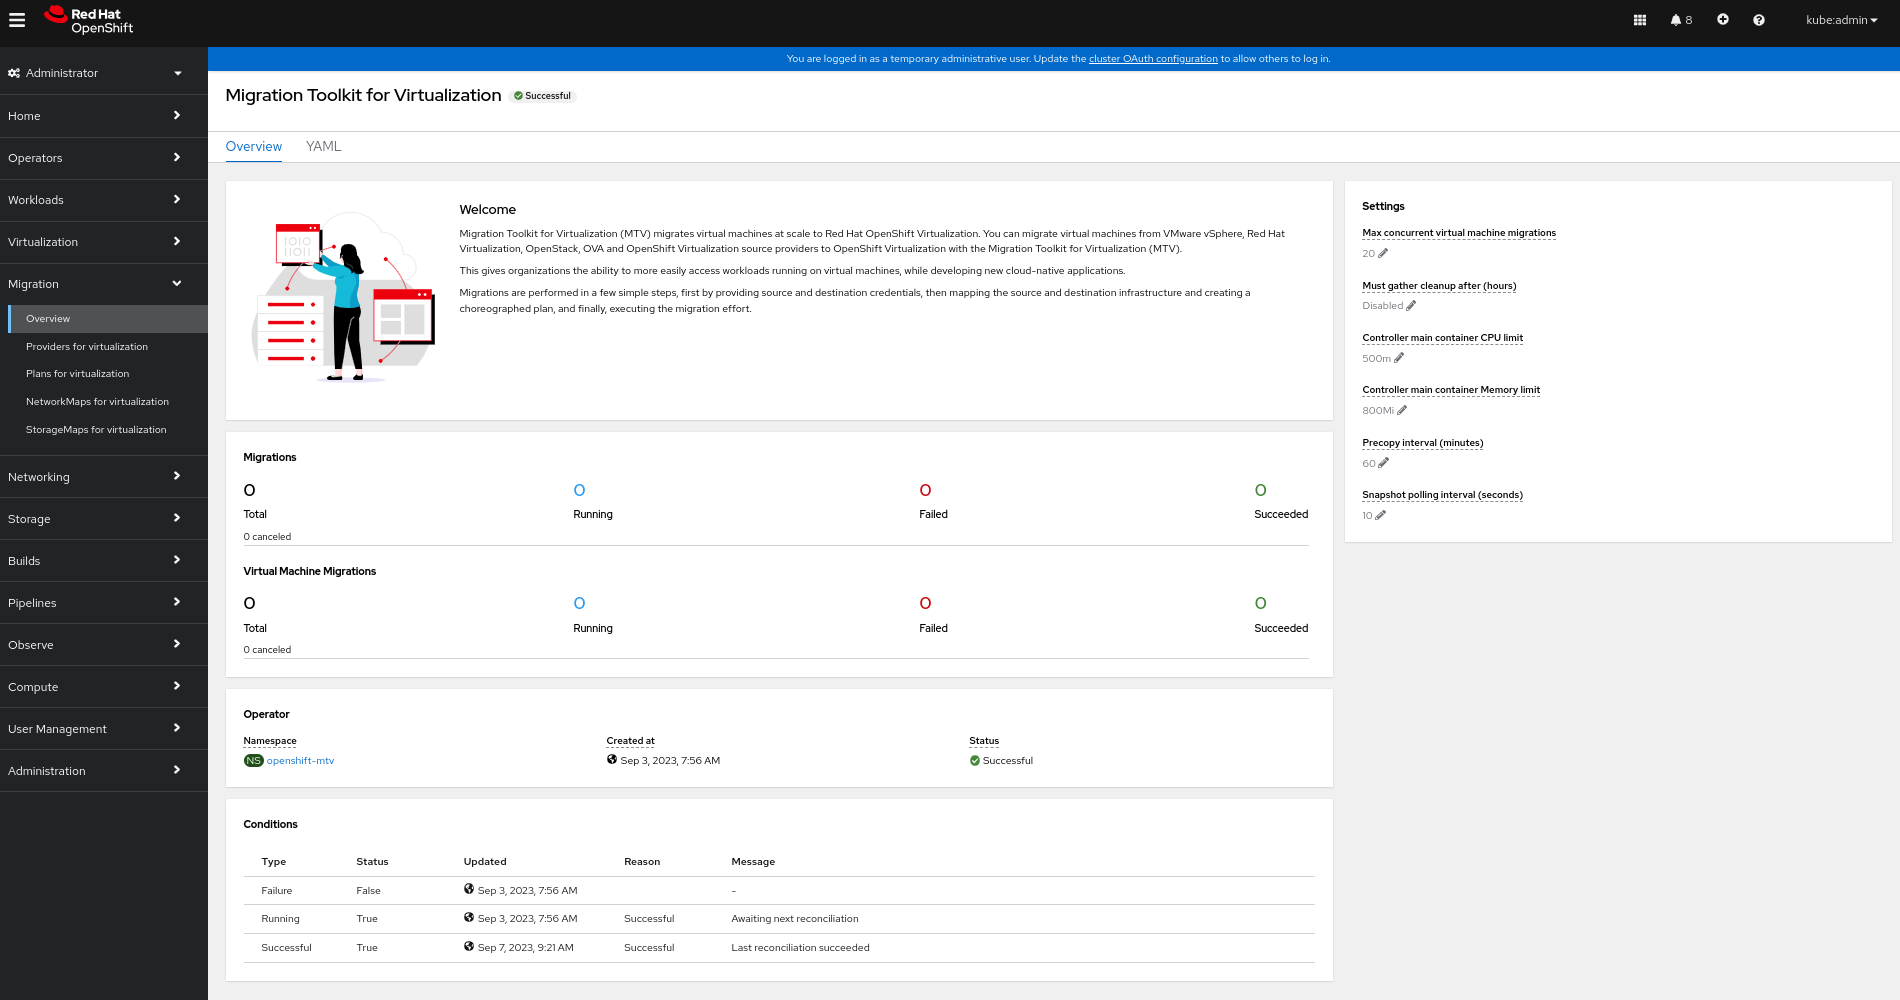
4.2. The MTV Overview page
The Migration Toolkit for Virtualization (MTV) Overview page displays system-wide information about migrations and a list of Settings you can change.
If you have Administrator privileges, you can access the Overview page by clicking Migration → Overview in the Red Hat OpenShift web console.
The Overview page has 3 tabs:
- Overview
- YAML
- Metrics
4.2.1. Overview tab
The Overview tab lets you see:
- Operator: The namespace on which the MTV Operator is deployed and the status of the Operator
- Pods: The name, status, and creation time of each pod that was deployed by the MTV Operator
Conditions: Status of the MTV Operator:
-
Failure: Last failure.
Falseindicates no failure since deployment. - Running: Whether the Operator is currently running and waiting for the next reconciliation.
- Successful: Last successful reconciliation.
-
Failure: Last failure.
4.2.2. YAML tab
The custom resource ForkliftController that defines the operation of the MTV Operator. You can modify the custom resource from this tab.
4.2.3. Metrics tab
The Metrics tab lets you see:
Migrations: The number of migrations performed using MTV:
- Total
- Running
- Failed
- Succeeded
- Canceled
Virtual Machine Migrations: The number of VMs migrated using MTV:
- Total
- Running
- Failed
- Succeeded
- Canceled
Since a single migration might involve many virtual machines, the number of migrations performed using MTV might vary significantly from the number of virtual machines that have been migrated using MTV.
- Chart showing the number of running, failed, and succeeded migrations performed using MTV for each of the last 7 days
- Chart showing the number of running, failed, and succeeded virtual machine migrations performed using MTV for each of the last 7 days
4.3. Configuring MTV settings
If you have Administrator privileges, you can access the Overview page and change the following settings in it:
| Setting | Description | Default value |
|---|---|---|
| Max concurrent virtual machine migrations | The maximum number of VMs per plan that can be migrated simultaneously | 20 |
| Must gather cleanup after (hours) |
The duration for retaining | Disabled |
| Controller main container CPU limit | The CPU limit allocated to the main controller container | 500 m |
| Controller main container Memory limit | The memory limit allocated to the main controller container | 800 Mi |
| Precopy internal (minutes) | The interval at which a new snapshot is requested before initiating a warm migration | 60 |
| Snapshot polling interval (seconds) | The frequency with which the system checks the status of snapshot creation or removal during a warm migration | 10 |
Procedure
- In the Red Hat OpenShift web console, click Migration → Overview. The Settings list is on the right-hand side of the page.
- In the Settings list, click the Edit icon of the setting you want to change.
- Choose a setting from the list.
- Click Save.
4.4. Adding providers
You can add source providers and destination providers for a virtual machine migration by using the Red Hat OpenShift web console.
4.4.1. Adding source providers
You can use MTV to migrate VMs from the following source providers:
- VMware vSphere
- Red Hat Virtualization
- OpenStack
- Open Virtual Appliances (OVAs) that were created by VMware vSphere
- OpenShift Virtualization
You can add a source provider by using the Red Hat OpenShift web console.
4.4.1.1. Adding a VMware vSphere source provider
You can migrate VMware vSphere VMs from VMware vCenter or from a VMWare ESX/ESXi server. In MTV versions 2.6 and later, you can migrate directly from an ESX/ESXi server, without going through vCenter, by specifying the SDK endpoint to that of an ESX/ESXi server.
EMS enforcement is disabled for migrations with VMware vSphere source providers in order to enable migrations from versions of vSphere that are supported by Migration Toolkit for Virtualization but do not comply with the 2023 FIPS requirements. Therefore, users should consider whether migrations from vSphere source providers risk their compliance with FIPS. Supported versions of vSphere are specified in Software compatibility guidelines.
Prerequisites
- It is strongly recommended to create a VMware Virtual Disk Development Kit (VDDK) image in a secure registry that is accessible to all clusters. A VDDK image accelerates migration. For more information, see Creating a VDDK image.
Procedure
- In the Red Hat OpenShift web console, click Migration → Providers for virtualization.
- Click Create Provider.
- Click vSphere.
- Specify the following fields:
Provider Details
- Provider resource name: Name of the source provider.
- Endpoint type: Select the vSphere provider endpoint type. Options: vCenter or ESXi. You can migrate virtual machines from vCenter, an ESX/ESXi server that is not managed by vCenter, or from an ESX/ESXi server that is managed by vCenter but does not go through vCenter.
-
URL: URL of the SDK endpoint of the vCenter on which the source VM is mounted. Ensure that the URL includes the
sdkpath, usually/sdk. For example,https://vCenter-host-example.com/sdk. If a certificate for FQDN is specified, the value of this field needs to match the FQDN in the certificate. -
VDDK init image:
VDDKInitImagepath. It is strongly recommended to create a VDDK init image to accelerate migrations. For more information, see Creating a VDDK image.
Provider details
-
Username: vCenter user or ESXi user. For example,
user@vsphere.local. Password: vCenter user password or ESXi user password.
Choose one of the following options for validating CA certificates:
- Use a custom CA certificate: Migrate after validating a custom CA certificate.
- Use the system CA certificate: Migrate after validating the system CA certificate.
Skip certificate validation : Migrate without validating a CA certificate.
- To use a custom CA certificate, leave the Skip certificate validation switch toggled to left, and either drag the CA certificate to the text box or browse for it and click Select.
- To use the system CA certificate, leave the Skip certificate validation switch toggled to the left, and leave the CA certificate text box empty.
- To skip certificate validation, toggle the Skip certificate validation switch to the right.
Optional: Ask MTV to fetch a custom CA certificate from the provider’s API endpoint URL.
- Click Fetch certificate from URL. The Verify certificate window opens.
If the details are correct, select the I trust the authenticity of this certificate checkbox, and then, click Confirm. If not, click Cancel, and then, enter the correct certificate information manually.
Once confirmed, the CA certificate will be used to validate subsequent communication with the API endpoint.
Click Create provider to add and save the provider.
The provider appears in the list of providers.
NoteIt might take a few minutes for the provider to have the status
Ready.
4.4.1.1.1. Selecting a migration network for a VMware source provider
You can select a migration network in the Red Hat OpenShift web console for a source provider to reduce risk to the source environment and to improve performance.
Using the default network for migration can result in poor performance because the network might not have sufficient bandwidth. This situation can have a negative effect on the source platform because the disk transfer operation might saturate the network.
You can also control the network from which disks are transferred from a host by using the Network File Copy (NFC) service in vSphere.
Prerequisites
- The migration network must have sufficient throughput, minimum speed of 10 Gbps, for disk transfer.
The migration network must be accessible to the OpenShift Virtualization nodes through the default gateway.
NoteThe source virtual disks are copied by a pod that is connected to the pod network of the target namespace.
- The migration network should have jumbo frames enabled.
Procedure
- In the Red Hat OpenShift web console, click Migration → Providers for virtualization.
- Click the host number in the Hosts column beside a provider to view a list of hosts.
- Select one or more hosts and click Select migration network.
Specify the following fields:
- Network: Network name
-
ESXi host admin username: For example,
root - ESXi host admin password: Password
- Click Save.
Verify that the status of each host is Ready.
If a host status is not Ready, the host might be unreachable on the migration network or the credentials might be incorrect. You can modify the host configuration and save the changes.
4.4.1.2. Adding a Red Hat Virtualization source provider
You can add a Red Hat Virtualization source provider by using the Red Hat OpenShift web console.
Prerequisites
- Manager CA certificate, unless it was replaced by a third-party certificate, in which case, specify the Manager Apache CA certificate
Procedure
- In the Red Hat OpenShift web console, click Migration → Providers for virtualization.
- Click Create Provider.
- Click Red Hat Virtualization
Specify the following fields:
- Provider resource name: Name of the source provider.
-
URL: URL of the API endpoint of the Red Hat Virtualization Manager (RHVM) on which the source VM is mounted. Ensure that the URL includes the path leading to the RHVM API server, usually
/ovirt-engine/api. For example,https://rhv-host-example.com/ovirt-engine/api. - Username: Username.
- Password: Password.
Choose one of the following options for validating CA certificates:
- Use a custom CA certificate: Migrate after validating a custom CA certificate.
- Use the system CA certificate: Migrate after validating the system CA certificate.
Skip certificate validation : Migrate without validating a CA certificate.
- To use a custom CA certificate, leave the Skip certificate validation switch toggled to left, and either drag the CA certificate to the text box or browse for it and click Select.
- To use the system CA certificate, leave the Skip certificate validation switch toggled to the left, and leave the CA certificate text box empty.
- To skip certificate validation, toggle the Skip certificate validation switch to the right.
Optional: Ask MTV to fetch a custom CA certificate from the provider’s API endpoint URL.
- Click Fetch certificate from URL. The Verify certificate window opens.
If the details are correct, select the I trust the authenticity of this certificate checkbox, and then, click Confirm. If not, click Cancel, and then, enter the correct certificate information manually.
Once confirmed, the CA certificate will be used to validate subsequent communication with the API endpoint.
Click Create provider to add and save the provider.
The provider appears in the list of providers.
4.4.1.3. Adding an OpenStack source provider
You can add an OpenStack source provider by using the Red Hat OpenShift web console.
When you migrate an image-based VM from an OpenStack provider, a snapshot is created for the image that is attached to the source VM and the data from the snapshot is copied over to the target VM. This means that the target VM will have the same state as that of the source VM at the time the snapshot was created.
Procedure
- In the Red Hat OpenShift web console, click Migration → Providers for virtualization.
- Click Create Provider.
- Click OpenStack.
Specify the following fields:
- Provider resource name: Name of the source provider.
-
URL: URL of the OpenStack Identity (Keystone) endpoint. For example,
http://controller:5000/v3. Authentication type: Choose one of the following methods of authentication and supply the information related to your choice. For example, if you choose Application credential ID as the authentication type, the Application credential ID and the Application credential secret fields become active, and you need to supply the ID and the secret.
Application credential ID
- Application credential ID: OpenStack application credential ID
-
Application credential secret: OpenStack https://github.com/kubev2v/forklift-documentation/pull/402pplication credential
Secret
Application credential name
- Application credential name: OpenStack application credential name
-
Application credential secret: : OpenStack application credential
Secret - Username: OpenStack username
- Domain: OpenStack domain name
Token with user ID
- Token: OpenStack token
- User ID: OpenStack user ID
- Project ID: OpenStack project ID
Token with user Name
- Token: OpenStack token
- Username: OpenStack username
- Project: OpenStack project
- Domain name: OpenStack domain name
Password
- Username: OpenStack username
- Password: OpenStack password
- Project: OpenStack project
- Domain: OpenStack domain name
Choose one of the following options for validating CA certificates:
- Use a custom CA certificate: Migrate after validating a custom CA certificate.
- Use the system CA certificate: Migrate after validating the system CA certificate.
Skip certificate validation : Migrate without validating a CA certificate.
- To use a custom CA certificate, leave the Skip certificate validation switch toggled to left, and either drag the CA certificate to the text box or browse for it and click Select.
- To use the system CA certificate, leave the Skip certificate validation switch toggled to the left, and leave the CA certificate text box empty.
- To skip certificate validation, toggle the Skip certificate validation switch to the right.
Optional: Ask MTV to fetch a custom CA certificate from the provider’s API endpoint URL.
- Click Fetch certificate from URL. The Verify certificate window opens.
If the details are correct, select the I trust the authenticity of this certificate checkbox, and then, click Confirm. If not, click Cancel, and then, enter the correct certificate information manually.
Once confirmed, the CA certificate will be used to validate subsequent communication with the API endpoint.
Click Create provider to add and save the provider.
The provider appears in the list of providers.
4.4.1.4. Adding an Open Virtual Appliance (OVA) source provider
You can add Open Virtual Appliance (OVA) files that were created by VMware vSphere as a source provider by using the Red Hat OpenShift web console.
Procedure
- In the Red Hat OpenShift web console, click Migration → Providers for virtualization.
- Click Create Provider.
- Click Open Virtual Appliance (OVA).
Specify the following fields:
- Provider resource name: Name of the source provider
- URL: URL of the NFS file share that serves the OVA
Click Create provider to add and save the provider.
The provider appears in the list of providers.
NoteAn error message might appear that states that an error has occurred. You can ignore this message.
4.4.1.5. Adding a Red Hat OpenShift Virtualization source provider
You can use a Red Hat OpenShift Virtualization provider as both a source provider and destination provider.
Specifically, the host cluster that is automatically added as a OpenShift Virtualization provider can be used as both a source provider and a destination provider.
You can migrate VMs from the cluster that MTV is deployed on to another cluster, or from a remote cluster to the cluster that MTV is deployed on.
The Red Hat OpenShift cluster version of the source provider must be 4.13 or later.
Procedure
- In the Red Hat OpenShift web console, click Migration → Providers for virtualization.
- Click Create Provider.
- Click OpenShift Virtualization.
Specify the following fields:
- Provider resource name: Name of the source provider
- URL: URL of the endpoint of the API server
Service account bearer token: Token for a service account with
cluster-adminprivilegesIf both URL and Service account bearer token are left blank, the local OpenShift cluster is used.
Choose one of the following options for validating CA certificates:
- Use a custom CA certificate: Migrate after validating a custom CA certificate.
- Use the system CA certificate: Migrate after validating the system CA certificate.
Skip certificate validation : Migrate without validating a CA certificate.
- To use a custom CA certificate, leave the Skip certificate validation switch toggled to left, and either drag the CA certificate to the text box or browse for it and click Select.
- To use the system CA certificate, leave the Skip certificate validation switch toggled to the left, and leave the CA certificate text box empty.
- To skip certificate validation, toggle the Skip certificate validation switch to the right.
Optional: Ask MTV to fetch a custom CA certificate from the provider’s API endpoint URL.
- Click Fetch certificate from URL. The Verify certificate window opens.
If the details are correct, select the I trust the authenticity of this certificate checkbox, and then, click Confirm. If not, click Cancel, and then, enter the correct certificate information manually.
Once confirmed, the CA certificate will be used to validate subsequent communication with the API endpoint.
Click Create provider to add and save the provider.
The provider appears in the list of providers.
4.4.2. Adding destination providers
You can add a OpenShift Virtualization destination provider by using the Red Hat OpenShift web console.
4.4.2.1. Adding an OpenShift Virtualization destination provider
You can use a Red Hat OpenShift Virtualization provider as both a source provider and destination provider.
Specifically, the host cluster that is automatically added as a OpenShift Virtualization provider can be used as both a source provider and a destination provider.
You can also add another OpenShift Virtualization destination provider to the Red Hat OpenShift web console in addition to the default OpenShift Virtualization destination provider, which is the cluster where you installed MTV.
You can migrate VMs from the cluster that MTV is deployed on to another cluster, or from a remote cluster to the cluster that MTV is deployed on.
Prerequisites
-
You must have an OpenShift Virtualization service account token with
cluster-adminprivileges.
Procedure
- In the Red Hat OpenShift web console, click Migration → Providers for virtualization.
- Click Create Provider.
- Click OpenShift Virtualization.
Specify the following fields:
- Provider resource name: Name of the source provider
- URL: URL of the endpoint of the API server
Service account bearer token: Token for a service account with
cluster-adminprivilegesIf both URL and Service account bearer token are left blank, the local OpenShift cluster is used.
Choose one of the following options for validating CA certificates:
- Use a custom CA certificate: Migrate after validating a custom CA certificate.
- Use the system CA certificate: Migrate after validating the system CA certificate.
Skip certificate validation : Migrate without validating a CA certificate.
- To use a custom CA certificate, leave the Skip certificate validation switch toggled to left, and either drag the CA certificate to the text box or browse for it and click Select.
- To use the system CA certificate, leave the Skip certificate validation switch toggled to the left, and leave the CA certificate text box empty.
- To skip certificate validation, toggle the Skip certificate validation switch to the right.
Optional: Ask MTV to fetch a custom CA certificate from the provider’s API endpoint URL.
- Click Fetch certificate from URL. The Verify certificate window opens.
If the details are correct, select the I trust the authenticity of this certificate checkbox, and then, click Confirm. If not, click Cancel, and then, enter the correct certificate information manually.
Once confirmed, the CA certificate will be used to validate subsequent communication with the API endpoint.
Click Create provider to add and save the provider.
The provider appears in the list of providers.
4.4.2.2. Selecting a migration network for an OpenShift Virtualization provider
You can select a default migration network for an OpenShift Virtualization provider in the Red Hat OpenShift web console to improve performance. The default migration network is used to transfer disks to the namespaces in which it is configured.
If you do not select a migration network, the default migration network is the pod network, which might not be optimal for disk transfer.
You can override the default migration network of the provider by selecting a different network when you create a migration plan.
Procedure
- In the Red Hat OpenShift web console, click Migration → Providers for virtualization.
-
On the right side of the provider, select Select migration network from the Options menu
 .
.
- Select a network from the list of available networks and click Select.
4.5. Creating migration plans
You can create a migration plan by using the Red Hat OpenShift web console to specify a source provider, the virtual machines (VMs) you want to migrate, and other plan details.
For your convenience, there are two procedures to create migration plans, starting with either a source provider or with specific VMs:
- To start with a source provider, see Creating a migration plan starting with a source provider.
- To start with specific VMs, see Creating a migration plan starting with specific VMs.
Virtual machines with guest initiated storage connections, such as Internet Small Computer Systems Interface (iSCSI) connections or Network File System (NFS) mounts, are not handled by MTV and could require additional planning before or reconfiguration after the migration.
This is to ensure that no issues arise due to the addition or newly migrated VM accessing this storage.
4.5.1. Creating a migration plan starting with a source provider
You can create a migration plan based on a source provider, starting on the Plans for virtualization page. Note the specific options for migrations from VMware or RHV providers.
Procedure
In the Red Hat OpenShift web console, click Plans for virtualization and then click Create Plan.
The Create migration plan wizard opens to the Select source provider interface.
Select the source provider of the VMs you want to migrate.
The Select virtual machines interface opens.
Select the VMs you want to migrate and click Next.
The Create migration plan pane opens. It displays the source provider’s name and suggestions for a target provider and namespace, a network map, and a storage map.
- Enter the Plan name.
- Make any needed changes to the editable items.
- Click Add mapping to edit a suggested network mapping or a storage mapping, or to add one or more additional mappings.
Click Create migration plan.
MTV validates the migration plan and the Plan details page opens, indicating whether the plan is ready for use or contains an error. The details of the plan are listed, and you can edit the items you filled in on the previous page. If you make any changes, MTV validates the plan again.
VMware source providers only (All optional):
Preserving static IPs of VMs: By default, virtual network interface controllers (vNICs) change during the migration process. This results in vNICs that are set with a static IP in vSphere losing their IP. To avoid this by preserving static IPs of VMs, click the Edit icon next to Preserve static IPs and toggle the Whether to preserve the static IPs switch in the window that opens. Then click Save.
MTV then issues a warning message about any VMs with a Windows operating system for which vNIC properties are missing. To retrieve any missing vNIC properties, run those VMs in vSphere in order for the vNIC properties to be reported to MTV.
- Entering a list of decryption passphrases for disks encrypted using Linux Unified Key Setup (LUKS): To enter a list of decryption passphrases for LUKS-encrypted devices, in the Settings section, click the Edit icon next to Disk decryption passphrases, enter the passphrases, and then click Save. You do not need to enter the passphrases in a specific order - for each LUKS-encrypted device, MTV tries each passphrase until one unlocks the device.
Specifying a root device: Applies to multi-boot VM migrations only. By default, MTV uses the first bootable device detected as the root device.
To specify a different root device, in the Settings section, click the Edit icon next to Root device and choose a device from the list of commonly-used options, or enter a device in the text box.
MTV uses the following format for disk location:
/dev/sd<disk_identifier><disk_partition>. For example, if the second disk is the root device and the operating system is on the disk’s second partition, the format would be:/dev/sdb2. After you enter the boot device, click Save.If the conversion fails because the boot device provided is incorrect, it is possible to get the correct information by looking at the conversion pod logs.
RHV source providers only (Optional):
Preserving the CPU model of VMs that are migrated from RHV: Generally, the CPU model (type) for RHV VMs is set at the cluster level, but it can be set at the VM level, which is called a custom CPU model. By default, MTV sets the CPU model on the destination cluster as follows: MTV preserves custom CPU settings for VMs that have them, but, for VMs without custom CPU settings, MTV does not set the CPU model. Instead, the CPU model is later set by OpenShift Virtualization.
To preserve the cluster-level CPU model of your RHV VMs, in the Settings section, click the Edit icon next to Preserve CPU model. Toggle the Whether to preserve the CPU model switch, and then click Save.
If the plan is valid,
- You can run the plan now by clicking Start migration.
- You can run the plan later by selecting it on the Plans for virtualization page and following the procedure in Running a migration plan.
4.5.2. Creating a migration plan starting with specific VMs
You can create a migration plan based on specific VMs, starting on the Providers for virtualization page. Note the specific options for migrations from VMware or RHV providers.
Procedure
- In the Red Hat OpenShift web console, click Providers for virtualization.
In the row of the appropriate source provider, click VMs.
The Virtual Machines tab opens.
Select the VMs you want to migrate and click Create migration plan.
The Create migration plan pane opens. It displays the source provider’s name and suggestions for a target provider and namespace, a network map, and a storage map.
- Enter the Plan name.
- Make any needed changes to the editable items.
- Click Add mapping to edit a suggested network mapping or a storage mapping, or to add one or more additional mappings.
Click Create migration plan.
MTV validates the migration plan and the Plan details page opens, indicating whether the plan is ready for use or contains an error. The details of the plan are listed, and you can edit the items you filled in on the previous page. If you make any changes, MTV validates the plan again.
VMware source providers only (All optional):
Preserving static IPs of VMs: By default, virtual network interface controllers (vNICs) change during the migration process. This results in vNICs that are set with a static IP in vSphere losing their IP. To avoid this by preserving static IPs of VMs, click the Edit icon next to Preserve static IPs and toggle the Whether to preserve the static IPs switch in the window that opens. Then click Save.
MTV then issues a warning message about any VMs with a Windows operating system for which vNIC properties are missing. To retrieve any missing vNIC properties, run those VMs in vSphere in order for the vNIC properties to be reported to MTV.
- Entering a list of decryption passphrases for disks encrypted using Linux Unified Key Setup (LUKS): To enter a list of decryption passphrases for LUKS-encrypted devices, in the Settings section, click the Edit icon next to Disk decryption passphrases, enter the passphrases, and then click Save. You do not need to enter the passphrases in a specific order - for each LUKS-encrypted device, MTV tries each passphrase until one unlocks the device.
Specifying a root device: Applies to multi-boot VM migrations only. By default, MTV uses the first bootable device detected as the root device.
To specify a different root device, in the Settings section, click the Edit icon next to Root device and choose a device from the list of commonly-used options, or enter a device in the text box.
MTV uses the following format for disk location:
/dev/sd<disk_identifier><disk_partition>. For example, if the second disk is the root device and the operating system is on the disk’s second partition, the format would be:/dev/sdb2. After you enter the boot device, click Save.If the conversion fails because the boot device provided is incorrect, it is possible to get the correct information by looking at the conversion pod logs.
RHV source providers only (Optional):
Preserving the CPU model of VMs that are migrated from RHV: Generally, the CPU model (type) for RHV VMs is set at the cluster level, but it can be set at the VM level, which is called a custom CPU model. By default, MTV sets the CPU model on the destination cluster as follows: MTV preserves custom CPU settings for VMs that have them, but, for VMs without custom CPU settings, MTV does not set the CPU model. Instead, the CPU model is later set by OpenShift Virtualization.
To preserve the cluster-level CPU model of your RHV VMs, in the Settings section, click the Edit icon next to Preserve CPU model. Toggle the Whether to preserve the CPU model switch, and then click Save.
If the plan is valid,
- You can run the plan now by clicking Start migration.
- You can run the plan later by selecting it on the Plans for virtualization page and following the procedure in Running a migration plan.
4.6. Running a migration plan
You can run a migration plan and view its progress in the Red Hat OpenShift web console.
Prerequisites
- Valid migration plan.
Procedure
In the Red Hat OpenShift web console, click Migration → Plans for virtualization.
The Plans list displays the source and target providers, the number of virtual machines (VMs) being migrated, the status, and the description of each plan.
- Click Start beside a migration plan to start the migration.
Click Start in the confirmation window that opens.
The Migration details by VM screen opens, displaying the migration’s progress
Warm migration only:
- The precopy stage starts.
- Click Cutover to complete the migration.
If the migration fails:
- Click Get logs to retrieve the migration logs.
- Click Get logs in the confirmation window that opens.
- Wait until Get logs changes to Download logs and then click the button to download the logs.
Click a migration’s Status, whether it failed or succeeded or is still ongoing, to view the details of the migration.
The Migration details by VM screen opens, displaying the start and end times of the migration, the amount of data copied, and a progress pipeline for each VM being migrated.
- Expand an individual VM to view its steps and the elapsed time and state of each step.
4.7. Migration plan options
On the Plans for virtualization page of the Red Hat OpenShift web console, you can click the Options menu
![]() beside a migration plan to access the following options:
beside a migration plan to access the following options:
- Get logs: Retrieves the logs of a migration. When you click Get logs, a confirmation window opens. After you click Get logs in the window, wait until Get logs changes to Download logs and then click the button to download the logs.
- Edit: Edit the details of a migration plan. You cannot edit a migration plan while it is running or after it has completed successfully.
Duplicate: Create a new migration plan with the same virtual machines (VMs), parameters, mappings, and hooks as an existing plan. You can use this feature for the following tasks:
- Migrate VMs to a different namespace.
- Edit an archived migration plan.
- Edit a migration plan with a different status, for example, failed, canceled, running, critical, or ready.
Archive: Delete the logs, history, and metadata of a migration plan. The plan cannot be edited or restarted. It can only be viewed.
NoteThe Archive option is irreversible. However, you can duplicate an archived plan.
Delete: Permanently remove a migration plan. You cannot delete a running migration plan.
NoteThe Delete option is irreversible.
Deleting a migration plan does not remove temporary resources such as
importerpods,conversionpods, config maps, secrets, failed VMs, and data volumes. (BZ#2018974) You must archive a migration plan before deleting it in order to clean up the temporary resources.- View details: Display the details of a migration plan.
- Restart: Restart a failed or canceled migration plan.
- Cancel scheduled cutover: Cancel a scheduled cutover migration for a warm migration plan.
4.8. Canceling a migration
You can cancel the migration of some or all virtual machines (VMs) while a migration plan is in progress by using the Red Hat OpenShift web console.
Procedure
- In the Red Hat OpenShift web console, click Plans for virtualization.
- Click the name of a running migration plan to view the migration details.
- Select one or more VMs and click Cancel.
Click Yes, cancel to confirm the cancellation.
In the Migration details by VM list, the status of the canceled VMs is Canceled. The unmigrated and the migrated virtual machines are not affected.
You can restart a canceled migration by clicking Restart beside the migration plan on the Migration plans page.
Chapter 5. Migrating virtual machines from the command line
You can migrate virtual machines to OpenShift Virtualization from the command line.
You must ensure that all prerequisites are met.
5.1. Permissions needed by non-administrators to work with migration plan components
If you are an administrator, you can work with all components of migration plans (for example, providers, network mappings, and migration plans).
By default, non-administrators have limited ability to work with migration plans and their components. As an administrator, you can modify their roles to allow them full access to all components, or you can give them limited permissions.
For example, administrators can assign non-administrators one or more of the following cluster roles for migration plans:
| Role | Description |
|---|---|
|
| Can view migration plans but not to create, delete or modify them |
|
|
Can create, delete or modify (all parts of |
|
|
All |
Note that pre-defined cluster roles include a resource (for example, plans), an API group (for example, forklift.konveyor.io-v1beta1) and an action (for example, view, edit).
As a more comprehensive example, you can grant non-administrators the following set of permissions per namespace:
- Create and modify storage maps, network maps, and migration plans for the namespaces they have access to
- Attach providers created by administrators to storage maps, network maps, and migration plans
- Not be able to create providers or to change system settings
| Actions | API group | Resource |
|---|---|---|
|
|
|
|
|
|
|
|
|
|
|
|
|
|
|
|
|
|
|
|
|
|
|
|
|
|
|
|
|
| Empty string |
|
Non-administrators need to have the create permissions that are part of edit roles for network maps and for storage maps to create migration plans, even when using a template for a network map or a storage map.
5.2. Retrieving a VMware vSphere moRef
When you migrate VMs with a VMware vSphere source provider using Migration Toolkit for Virtualization (MTV) from the CLI, you need to know the managed object reference (moRef) of certain entities in vSphere, such as datastores, networks, and VMs.
You can retrieve the moRef of one or more vSphere entities from the Inventory service. You can then use each moRef as a reference for retrieving the moRef of another entity.
Procedure
Retrieve the routes for the project:
oc get route -n openshift-mtv
Retrieve the
Inventoryservice route:$ oc get route <inventory_service> -n openshift-mtv
Retrieve the access token:
$ TOKEN=$(oc whoami -t)
Retrieve the moRef of a VMware vSphere provider:
$ curl -H "Authorization: Bearer $TOKEN" https://<inventory_service_route>/providers/vsphere -k
Retrieve the datastores of a VMware vSphere source provider:
$ curl -H "Authorization: Bearer $TOKEN" https://<inventory_service_route>/providers/vsphere/<provider id>/datastores/ -k
Example output
[
  {
    "id": "datastore-11",
    "parent": {
      "kind": "Folder",
      "id": "group-s5"
    },
    "path": "/Datacenter/datastore/v2v_general_porpuse_ISCSI_DC",
    "revision": 46,
    "name": "v2v_general_porpuse_ISCSI_DC",
    "selfLink": "providers/vsphere/01278af6-e1e4-4799-b01b-d5ccc8dd0201/datastores/datastore-11"
  },
  {
    "id": "datastore-730",
    "parent": {
      "kind": "Folder",
      "id": "group-s5"
    },
    "path": "/Datacenter/datastore/f01-h27-640-SSD_2",
    "revision": 46,
    "name": "f01-h27-640-SSD_2",
    "selfLink": "providers/vsphere/01278af6-e1e4-4799-b01b-d5ccc8dd0201/datastores/datastore-730"
  },
 ...
In this example, the moRef of the datastore v2v_general_porpuse_ISCSI_DC is datastore-11 and the moRef of the datastore f01-h27-640-SSD_2 is datastore-730.
5.3. Migrating virtual machines
You migrate virtual machines (VMs) from the command line (CLI) by creating MTV custom resources (CRs). The CRs and the migration procedure vary by source provider.
You must specify a name for cluster-scoped CRs.
You must specify both a name and a namespace for namespace-scoped CRs.
To migrate to or from an OpenShift cluster that is different from the one the migration plan is defined on, you must have an OpenShift Virtualization service account token with cluster-admin privileges.
5.3.1. Migrating from a VMware vSphere source provider
You can migrate from a VMware vSphere source provider by using the CLI.
Procedure
Create a
Secretmanifest for the source provider credentials:$ cat << EOF | oc apply -f - apiVersion: v1 kind: Secret metadata: name: <secret> namespace: <namespace> ownerReferences: 1 - apiVersion: forklift.konveyor.io/v1beta1 kind: Provider name: <provider_name> uid: <provider_uid> labels: createdForProviderType: vsphere createdForResourceType: providers type: Opaque stringData: user: <user> 2 password: <password> 3 insecureSkipVerify: <"true"/"false"> 4 cacert: | 5 <ca_certificate> url: <api_end_point> 6 EOF
- 1
- The
ownerReferencessection is optional. - 2
- Specify the vCenter user or the ESX/ESXi user.
- 3
- Specify the password of the vCenter user or the ESX/ESXi user.
- 4
- Specify
"true"to skip certificate verification, specify"false"to verify the certificate. Defaults to"false"if not specified. Skipping certificate verification proceeds with an insecure migration and then the certificate is not required. Insecure migration means that the transferred data is sent over an insecure connection and potentially sensitive data could be exposed. - 5
- When this field is not set and skip certificate verification is disabled, MTV attempts to use the system CA.
- 6
- Specify the API endpoint URL of the vCenter or the ESX/ESXi, for example,
https://<vCenter_host>/sdk.
Create a
Providermanifest for the source provider:$ cat << EOF | oc apply -f - apiVersion: forklift.konveyor.io/v1beta1 kind: Provider metadata: name: <source_provider> namespace: <namespace> spec: type: vsphere url: <api_end_point> 1 settings: vddkInitImage: <VDDK_image> 2 sdkEndpoint: vcenter 3 secret: name: <secret> 4 namespace: <namespace> EOF
- 1
- Specify the URL of the API endpoint, for example,
https://<vCenter_host>/sdk. - 2
- Optional, but it is strongly recommended to create a VDDK image to accelerate migrations. Follow OpenShift documentation to specify the VDDK image you created.
- 3
- Options:
vcenteroresxi. - 4
- Specify the name of the provider
SecretCR.
Create a
Hostmanifest:$ cat << EOF | oc apply -f - apiVersion: forklift.konveyor.io/v1beta1 kind: Host metadata: name: <vmware_host> namespace: <namespace> spec: provider: namespace: <namespace> name: <source_provider> 1 id: <source_host_mor> 2 ipAddress: <source_network_ip> 3 EOF- 1
- Specify the name of the VMware vSphere
ProviderCR. - 2
- Specify the Managed Object Reference (moRef) of the VMware vSphere host. To retrieve the moRef, see Retrieving a VMware vSphere moRef.
- 3
- Specify the IP address of the VMware vSphere migration network.
Create a
NetworkMapmanifest to map the source and destination networks:$ cat << EOF | oc apply -f - apiVersion: forklift.konveyor.io/v1beta1 kind: NetworkMap metadata: name: <network_map> namespace: <namespace> spec: map: - destination: name: <network_name> type: pod 1 source: 2 id: <source_network_id> name: <source_network_name> - destination: name: <network_attachment_definition> 3 namespace: <network_attachment_definition_namespace> 4 type: multus source: id: <source_network_id> name: <source_network_name> provider: source: name: <source_provider> namespace: <namespace> destination: name: <destination_provider> namespace: <namespace> EOF- 1
- Allowed values are
podandmultus. - 2
- You can use either the
idor thenameparameter to specify the source network. Forid, specify the VMware vSphere network Managed Object Reference (moRef). To retrieve the moRef, see Retrieving a VMware vSphere moRef. - 3
- Specify a network attachment definition for each additional OpenShift Virtualization network.
- 4
- Required only when
typeismultus. Specify the namespace of the OpenShift Virtualization network attachment definition.
Create a
StorageMapmanifest to map source and destination storage:$ cat << EOF | oc apply -f - apiVersion: forklift.konveyor.io/v1beta1 kind: StorageMap metadata: name: <storage_map> namespace: <namespace> spec: map: - destination: storageClass: <storage_class> accessMode: <access_mode> 1 source: id: <source_datastore> 2 provider: source: name: <source_provider> namespace: <namespace> destination: name: <destination_provider> namespace: <namespace> EOF- 1
- Allowed values are
ReadWriteOnceandReadWriteMany. - 2
- Specify the VMware vSphere datastore moRef. For example,
f2737930-b567-451a-9ceb-2887f6207009. To retrieve the moRef, see Retrieving a VMware vSphere moRef.
Optional: Create a
Hookmanifest to run custom code on a VM during the phase specified in thePlanCR:$ cat << EOF | oc apply -f - apiVersion: forklift.konveyor.io/v1beta1 kind: Hook metadata: name: <hook> namespace: <namespace> spec: image: quay.io/konveyor/hook-runner playbook: | LS0tCi0gbmFtZTogTWFpbgogIGhvc3RzOiBsb2NhbGhvc3QKICB0YXNrczoKICAtIG5hbWU6IExv YWQgUGxhbgogICAgaW5jbHVkZV92YXJzOgogICAgICBmaWxlOiAiL3RtcC9ob29rL3BsYW4ueW1s IgogICAgICBuYW1lOiBwbGFuCiAgLSBuYW1lOiBMb2FkIFdvcmtsb2FkCiAgICBpbmNsdWRlX3Zh cnM6CiAgICAgIGZpbGU6ICIvdG1wL2hvb2svd29ya2xvYWQueW1sIgogICAgICBuYW1lOiB3b3Jr bG9hZAoK EOFwhere:
playbookrefers to an optional Base64-encoded Ansible Playbook. If you specify a playbook, theimagemust behook-runner.NoteYou can use the default
hook-runnerimage or specify a custom image. If you specify a custom image, you do not have to specify a playbook.
Create a
Planmanifest for the migration:$ cat << EOF | oc apply -f - apiVersion: forklift.konveyor.io/v1beta1 kind: Plan metadata: name: <plan> 1 namespace: <namespace> spec: warm: false 2 provider: source: name: <source_provider> namespace: <namespace> destination: name: <destination_provider> namespace: <namespace> map: 3 network: 4 name: <network_map> 5 namespace: <namespace> storage: 6 name: <storage_map> 7 namespace: <namespace> targetNamespace: <target_namespace> vms: 8 - id: <source_vm> 9 - name: <source_vm> hooks: 10 - hook: namespace: <namespace> name: <hook> 11 step: <step> 12 EOF
- 1
- Specify the name of the
PlanCR. - 2
- Specify whether the migration is warm -
true- or cold -false. If you specify a warm migration without specifying a value for thecutoverparameter in theMigrationmanifest, only the precopy stage will run. - 3
- Specify only one network map and one storage map per plan.
- 4
- Specify a network mapping even if the VMs to be migrated are not assigned to a network. The mapping can be empty in this case.
- 5
- Specify the name of the
NetworkMapCR. - 6
- Specify a storage mapping even if the VMs to be migrated are not assigned with disk images. The mapping can be empty in this case.
- 7
- Specify the name of the
StorageMapCR. - 8
- You can use either the
idor thenameparameter to specify the source VMs.
- 9
- Specify the VMware vSphere VM moRef. To retrieve the moRef, see Retrieving a VMware vSphere moRef.
- 10
- Optional: You can specify up to two hooks for a VM. Each hook must run during a separate migration step.
- 11
- Specify the name of the
HookCR. - 12
- Allowed values are
PreHook, before the migration plan starts, orPostHook, after the migration is complete.
Create a
Migrationmanifest to run thePlanCR:$ cat << EOF | oc apply -f - apiVersion: forklift.konveyor.io/v1beta1 kind: Migration metadata: name: <name_of_migration_cr> namespace: <namespace> spec: plan: name: <name_of_plan_cr> namespace: <namespace> cutover: <optional_cutover_time> EOFNoteIf you specify a cutover time, use the ISO 8601 format with the UTC time offset, for example,
2024-04-04T01:23:45.678+09:00.
5.3.2. Migrating from a Red Hat Virtualization source provider
You can migrate from a Red Hat Virtualization (RHV) source provider by using the CLI.
Prerequisites
If you are migrating a virtual machine with a direct LUN disk, ensure that the nodes in the OpenShift Virtualization destination cluster that the VM is expected to run on can access the backend storage.
- Unlike disk images that are copied from a source provider to a target provider, LUNs are detached, but not removed, from virtual machines in the source provider and then attached to the virtual machines (VMs) that are created in the target provider.
- LUNs are not removed from the source provider during the migration in case fallback to the source provider is required. However, before re-attaching the LUNs to VMs in the source provider, ensure that the LUNs are not used by VMs on the target environment at the same time, which might lead to data corruption.
Procedure
Create a
Secretmanifest for the source provider credentials:$ cat << EOF | oc apply -f - apiVersion: v1 kind: Secret metadata: name: <secret> namespace: <namespace> ownerReferences: 1 - apiVersion: forklift.konveyor.io/v1beta1 kind: Provider name: <provider_name> uid: <provider_uid> labels: createdForProviderType: ovirt createdForResourceType: providers type: Opaque stringData: user: <user> 2 password: <password> 3 insecureSkipVerify: <"true"/"false"> 4 cacert: | 5 <ca_certificate> url: <api_end_point> 6 EOF
- 1
- The
ownerReferencessection is optional. - 2
- Specify the RHV Manager user.
- 3
- Specify the user password.
- 4
- Specify
"true"to skip certificate verification, specify"false"to verify the certificate. Defaults to"false"if not specified. Skipping certificate verification proceeds with an insecure migration and then the certificate is not required. Insecure migration means that the transferred data is sent over an insecure connection and potentially sensitive data could be exposed. - 5
- Enter the Manager CA certificate, unless it was replaced by a third-party certificate, in which case, enter the Manager Apache CA certificate. You can retrieve the Manager CA certificate at https://<engine_host>/ovirt-engine/services/pki-resource?resource=ca-certificate&format=X509-PEM-CA.
- 6
- Specify the API endpoint URL, for example,
https://<engine_host>/ovirt-engine/api.
Create a
Providermanifest for the source provider:$ cat << EOF | oc apply -f - apiVersion: forklift.konveyor.io/v1beta1 kind: Provider metadata: name: <source_provider> namespace: <namespace> spec: type: ovirt url: <api_end_point> 1 secret: name: <secret> 2 namespace: <namespace> EOF
Create a
NetworkMapmanifest to map the source and destination networks:$ cat << EOF | oc apply -f - apiVersion: forklift.konveyor.io/v1beta1 kind: NetworkMap metadata: name: <network_map> namespace: <namespace> spec: map: - destination: name: <network_name> type: pod 1 source: 2 id: <source_network_id> name: <source_network_name> - destination: name: <network_attachment_definition> 3 namespace: <network_attachment_definition_namespace> 4 type: multus source: id: <source_network_id> name: <source_network_name> provider: source: name: <source_provider> namespace: <namespace> destination: name: <destination_provider> namespace: <namespace> EOF- 1
- Allowed values are
podandmultus. - 2
- You can use either the
idor thenameparameter to specify the source network. Forid, specify the RHV network Universal Unique ID (UUID). - 3
- Specify a network attachment definition for each additional OpenShift Virtualization network.
- 4
- Required only when
typeismultus. Specify the namespace of the OpenShift Virtualization network attachment definition.
Create a
StorageMapmanifest to map source and destination storage:$ cat << EOF | oc apply -f - apiVersion: forklift.konveyor.io/v1beta1 kind: StorageMap metadata: name: <storage_map> namespace: <namespace> spec: map: - destination: storageClass: <storage_class> accessMode: <access_mode> 1 source: id: <source_storage_domain> 2 provider: source: name: <source_provider> namespace: <namespace> destination: name: <destination_provider> namespace: <namespace> EOFOptional: Create a
Hookmanifest to run custom code on a VM during the phase specified in thePlanCR:$ cat << EOF | oc apply -f - apiVersion: forklift.konveyor.io/v1beta1 kind: Hook metadata: name: <hook> namespace: <namespace> spec: image: quay.io/konveyor/hook-runner playbook: | LS0tCi0gbmFtZTogTWFpbgogIGhvc3RzOiBsb2NhbGhvc3QKICB0YXNrczoKICAtIG5hbWU6IExv YWQgUGxhbgogICAgaW5jbHVkZV92YXJzOgogICAgICBmaWxlOiAiL3RtcC9ob29rL3BsYW4ueW1s IgogICAgICBuYW1lOiBwbGFuCiAgLSBuYW1lOiBMb2FkIFdvcmtsb2FkCiAgICBpbmNsdWRlX3Zh cnM6CiAgICAgIGZpbGU6ICIvdG1wL2hvb2svd29ya2xvYWQueW1sIgogICAgICBuYW1lOiB3b3Jr bG9hZAoK EOFwhere:
playbookrefers to an optional Base64-encoded Ansible Playbook. If you specify a playbook, theimagemust behook-runner.NoteYou can use the default
hook-runnerimage or specify a custom image. If you specify a custom image, you do not have to specify a playbook.
Create a
Planmanifest for the migration:$ cat << EOF | oc apply -f - apiVersion: forklift.konveyor.io/v1beta1 kind: Plan metadata: name: <plan> 1 namespace: <namespace> preserveClusterCpuModel: true 2 spec: warm: false 3 provider: source: name: <source_provider> namespace: <namespace> destination: name: <destination_provider> namespace: <namespace> map: 4 network: 5 name: <network_map> 6 namespace: <namespace> storage: 7 name: <storage_map> 8 namespace: <namespace> targetNamespace: <target_namespace> vms: 9 - id: <source_vm> 10 - name: <source_vm> hooks: 11 - hook: namespace: <namespace> name: <hook> 12 step: <step> 13 EOF
- 1
- Specify the name of the
PlanCR. - 2
- See note below.
- 3
- Specify whether the migration is warm or cold. If you specify a warm migration without specifying a value for the
cutoverparameter in theMigrationmanifest, only the precopy stage will run. - 4
- Specify only one network map and one storage map per plan.
- 5
- Specify a network mapping even if the VMs to be migrated are not assigned to a network. The mapping can be empty in this case.
- 6
- Specify the name of the
NetworkMapCR. - 7
- Specify a storage mapping even if the VMs to be migrated are not assigned with disk images. The mapping can be empty in this case.
- 8
- Specify the name of the
StorageMapCR. - 9
- You can use either the
idor thenameparameter to specify the source VMs. - 10
- Specify the RHV VM UUID.
- 11
- Optional: You can specify up to two hooks for a VM. Each hook must run during a separate migration step.
- 12
- Specify the name of the
HookCR. - 13
- Allowed values are
PreHook, before the migration plan starts, orPostHook, after the migration is complete.
Note-
If the migrated machines is set with a custom CPU model, it will be set with that CPU model in the destination cluster, regardless of the setting of
preserveClusterCpuModel. If the migrated machine is not set with a custom CPU model:
-
If
preserveClusterCpuModelis set to 'true`, MTV checks the CPU model of the VM when it runs in RHV, based on the cluster’s configuration, and then sets the migrated VM with that CPU model. -
If
preserveClusterCpuModelis set to 'false`, MTV does not set a CPU type and the VM is set with the default CPU model of the destination cluster.
-
If
Create a
Migrationmanifest to run thePlanCR:$ cat << EOF | oc apply -f - apiVersion: forklift.konveyor.io/v1beta1 kind: Migration metadata: name: <name_of_migration_cr> namespace: <namespace> spec: plan: name: <name_of_plan_cr> namespace: <namespace> cutover: <optional_cutover_time> EOFNoteIf you specify a cutover time, use the ISO 8601 format with the UTC time offset, for example,
2024-04-04T01:23:45.678+09:00.
5.3.3. Migrating from an OpenStack source provider
You can migrate from an OpenStack source provider by using the CLI.
Procedure
Create a
Secretmanifest for the source provider credentials:$ cat << EOF | oc apply -f - apiVersion: v1 kind: Secret metadata: name: <secret> namespace: <namespace> ownerReferences: 1 - apiVersion: forklift.konveyor.io/v1beta1 kind: Provider name: <provider_name> uid: <provider_uid> labels: createdForProviderType: openstack createdForResourceType: providers type: Opaque stringData: user: <user> 2 password: <password> 3 insecureSkipVerify: <"true"/"false"> 4 domainName: <domain_name> projectName: <project_name> regionName: <region_name> cacert: | 5 <ca_certificate> url: <api_end_point> 6 EOF
- 1
- The
ownerReferencessection is optional. - 2
- Specify the OpenStack user.
- 3
- Specify the user OpenStack password.
- 4
- Specify
"true"to skip certificate verification, specify"false"to verify the certificate. Defaults to"false"if not specified. Skipping certificate verification proceeds with an insecure migration and then the certificate is not required. Insecure migration means that the transferred data is sent over an insecure connection and potentially sensitive data could be exposed. - 5
- When this field is not set and skip certificate verification is disabled, MTV attempts to use the system CA.
- 6
- Specify the API endpoint URL, for example,
https://<identity_service>/v3.
Create a
Providermanifest for the source provider:$ cat << EOF | oc apply -f - apiVersion: forklift.konveyor.io/v1beta1 kind: Provider metadata: name: <source_provider> namespace: <namespace> spec: type: openstack url: <api_end_point> 1 secret: name: <secret> 2 namespace: <namespace> EOF
Create a
NetworkMapmanifest to map the source and destination networks:$ cat << EOF | oc apply -f - apiVersion: forklift.konveyor.io/v1beta1 kind: NetworkMap metadata: name: <network_map> namespace: <namespace> spec: map: - destination: name: <network_name> type: pod 1 source:2 id: <source_network_id> name: <source_network_name> - destination: name: <network_attachment_definition> 3 namespace: <network_attachment_definition_namespace> 4 type: multus source: id: <source_network_id> name: <source_network_name> provider: source: name: <source_provider> namespace: <namespace> destination: name: <destination_provider> namespace: <namespace> EOF- 1
- Allowed values are
podandmultus. - 2
- You can use either the
idor thenameparameter to specify the source network. Forid, specify the OpenStack network UUID. - 3
- Specify a network attachment definition for each additional OpenShift Virtualization network.
- 4
- Required only when
typeismultus. Specify the namespace of the OpenShift Virtualization network attachment definition.
Create a
StorageMapmanifest to map source and destination storage:$ cat << EOF | oc apply -f - apiVersion: forklift.konveyor.io/v1beta1 kind: StorageMap metadata: name: <storage_map> namespace: <namespace> spec: map: - destination: storageClass: <storage_class> accessMode: <access_mode> 1 source: id: <source_volume_type> 2 provider: source: name: <source_provider> namespace: <namespace> destination: name: <destination_provider> namespace: <namespace> EOFOptional: Create a
Hookmanifest to run custom code on a VM during the phase specified in thePlanCR:$ cat << EOF | oc apply -f - apiVersion: forklift.konveyor.io/v1beta1 kind: Hook metadata: name: <hook> namespace: <namespace> spec: image: quay.io/konveyor/hook-runner playbook: | LS0tCi0gbmFtZTogTWFpbgogIGhvc3RzOiBsb2NhbGhvc3QKICB0YXNrczoKICAtIG5hbWU6IExv YWQgUGxhbgogICAgaW5jbHVkZV92YXJzOgogICAgICBmaWxlOiAiL3RtcC9ob29rL3BsYW4ueW1s IgogICAgICBuYW1lOiBwbGFuCiAgLSBuYW1lOiBMb2FkIFdvcmtsb2FkCiAgICBpbmNsdWRlX3Zh cnM6CiAgICAgIGZpbGU6ICIvdG1wL2hvb2svd29ya2xvYWQueW1sIgogICAgICBuYW1lOiB3b3Jr bG9hZAoK EOFwhere:
playbookrefers to an optional Base64-encoded Ansible Playbook. If you specify a playbook, theimagemust behook-runner.NoteYou can use the default
hook-runnerimage or specify a custom image. If you specify a custom image, you do not have to specify a playbook.
Create a
Planmanifest for the migration:$ cat << EOF | oc apply -f - apiVersion: forklift.konveyor.io/v1beta1 kind: Plan metadata: name: <plan> 1 namespace: <namespace> spec: provider: source: name: <source_provider> namespace: <namespace> destination: name: <destination_provider> namespace: <namespace> map: 2 network: 3 name: <network_map> 4 namespace: <namespace> storage: 5 name: <storage_map> 6 namespace: <namespace> targetNamespace: <target_namespace> vms: 7 - id: <source_vm> 8 - name: <source_vm> hooks: 9 - hook: namespace: <namespace> name: <hook> 10 step: <step> 11 EOF
- 1
- Specify the name of the
PlanCR. - 2
- Specify only one network map and one storage map per plan.
- 3
- Specify a network mapping, even if the VMs to be migrated are not assigned to a network. The mapping can be empty in this case.
- 4
- Specify the name of the
NetworkMapCR. - 5
- Specify a storage mapping, even if the VMs to be migrated are not assigned with disk images. The mapping can be empty in this case.
- 6
- Specify the name of the
StorageMapCR. - 7
- You can use either the
idor thenameparameter to specify the source VMs. - 8
- Specify the OpenStack VM UUID.
- 9
- Optional: You can specify up to two hooks for a VM. Each hook must run during a separate migration step.
- 10
- Specify the name of the
HookCR. - 11
- Allowed values are
PreHook, before the migration plan starts, orPostHook, after the migration is complete.
Create a
Migrationmanifest to run thePlanCR:$ cat << EOF | oc apply -f - apiVersion: forklift.konveyor.io/v1beta1 kind: Migration metadata: name: <name_of_migration_cr> namespace: <namespace> spec: plan: name: <name_of_plan_cr> namespace: <namespace> cutover: <optional_cutover_time> EOFNoteIf you specify a cutover time, use the ISO 8601 format with the UTC time offset, for example,
2024-04-04T01:23:45.678+09:00.
5.3.4. Migrating from an Open Virtual Appliance (OVA) source provider
You can migrate from Open Virtual Appliance (OVA) files that were created by VMware vSphere as a source provider by using the CLI.
Procedure
Create a
Secretmanifest for the source provider credentials:$ cat << EOF | oc apply -f - apiVersion: v1 kind: Secret metadata: name: <secret> namespace: <namespace> ownerReferences: 1 - apiVersion: forklift.konveyor.io/v1beta1 kind: Provider name: <provider_name> uid: <provider_uid> labels: createdForProviderType: ova createdForResourceType: providers type: Opaque stringData: url: <nfs_server:/nfs_path> 2 EOF
Create a
Providermanifest for the source provider:$ cat << EOF | oc apply -f - apiVersion: forklift.konveyor.io/v1beta1 kind: Provider metadata: name: <source_provider> namespace: <namespace> spec: type: ova url: <nfs_server:/nfs_path> 1 secret: name: <secret> 2 namespace: <namespace> EOF
Create a
NetworkMapmanifest to map the source and destination networks:$ cat << EOF | oc apply -f - apiVersion: forklift.konveyor.io/v1beta1 kind: NetworkMap metadata: name: <network_map> namespace: <namespace> spec: map: - destination: name: <network_name> type: pod 1 source: id: <source_network_id> 2 - destination: name: <network_attachment_definition> 3 namespace: <network_attachment_definition_namespace> 4 type: multus source: id: <source_network_id> provider: source: name: <source_provider> namespace: <namespace> destination: name: <destination_provider> namespace: <namespace> EOF- 1
- Allowed values are
podandmultus. - 2
- Specify the OVA network Universal Unique ID (UUID).
- 3
- Specify a network attachment definition for each additional OpenShift Virtualization network.
- 4
- Required only when
typeismultus. Specify the namespace of the OpenShift Virtualization network attachment definition.
Create a
StorageMapmanifest to map source and destination storage:$ cat << EOF | oc apply -f - apiVersion: forklift.konveyor.io/v1beta1 kind: StorageMap metadata: name: <storage_map> namespace: <namespace> spec: map: - destination: storageClass: <storage_class> accessMode: <access_mode> 1 source: name: Dummy storage for source provider <provider_name> 2 provider: source: name: <source_provider> namespace: <namespace> destination: name: <destination_provider> namespace: <namespace> EOF- 1
- Allowed values are
ReadWriteOnceandReadWriteMany. - 2
- For OVA, the
StorageMapcan map only a single storage, which all the disks from the OVA are associated with, to a storage class at the destination. For this reason, the storage is referred to in the UI as "Dummy storage for source provider <provider_name>". In the YAML, write the phrase as it appears above, without the quotation marks and replacing <provider_name> with the actual name of the provider.
Optional: Create a
Hookmanifest to run custom code on a VM during the phase specified in thePlanCR:$ cat << EOF | oc apply -f - apiVersion: forklift.konveyor.io/v1beta1 kind: Hook metadata: name: <hook> namespace: <namespace> spec: image: quay.io/konveyor/hook-runner playbook: | LS0tCi0gbmFtZTogTWFpbgogIGhvc3RzOiBsb2NhbGhvc3QKICB0YXNrczoKICAtIG5hbWU6IExv YWQgUGxhbgogICAgaW5jbHVkZV92YXJzOgogICAgICBmaWxlOiAiL3RtcC9ob29rL3BsYW4ueW1s IgogICAgICBuYW1lOiBwbGFuCiAgLSBuYW1lOiBMb2FkIFdvcmtsb2FkCiAgICBpbmNsdWRlX3Zh cnM6CiAgICAgIGZpbGU6ICIvdG1wL2hvb2svd29ya2xvYWQueW1sIgogICAgICBuYW1lOiB3b3Jr bG9hZAoK EOFwhere:
playbookrefers to an optional Base64-encoded Ansible Playbook. If you specify a playbook, theimagemust behook-runner.NoteYou can use the default
hook-runnerimage or specify a custom image. If you specify a custom image, you do not have to specify a playbook.
Create a
Planmanifest for the migration:$ cat << EOF | oc apply -f - apiVersion: forklift.konveyor.io/v1beta1 kind: Plan metadata: name: <plan> 1 namespace: <namespace> spec: provider: source: name: <source_provider> namespace: <namespace> destination: name: <destination_provider> namespace: <namespace> map: 2 network: 3 name: <network_map> 4 namespace: <namespace> storage: 5 name: <storage_map> 6 namespace: <namespace> targetNamespace: <target_namespace> vms: 7 - id: <source_vm> 8 - name: <source_vm> hooks: 9 - hook: namespace: <namespace> name: <hook> 10 step: <step> 11 EOF
- 1
- Specify the name of the
PlanCR. - 2
- Specify only one network map and one storage map per plan.
- 3
- Specify a network mapping, even if the VMs to be migrated are not assigned to a network. The mapping can be empty in this case.
- 4
- Specify the name of the
NetworkMapCR. - 5
- Specify a storage mapping even if the VMs to be migrated are not assigned with disk images. The mapping can be empty in this case.
- 6
- Specify the name of the
StorageMapCR. - 7
- You can use either the
idor thenameparameter to specify the source VMs. - 8
- Specify the OVA VM UUID.
- 9
- Optional: You can specify up to two hooks for a VM. Each hook must run during a separate migration step.
- 10
- Specify the name of the
HookCR. - 11
- Allowed values are
PreHook, before the migration plan starts, orPostHook, after the migration is complete.
Create a
Migrationmanifest to run thePlanCR:$ cat << EOF | oc apply -f - apiVersion: forklift.konveyor.io/v1beta1 kind: Migration metadata: name: <name_of_migration_cr> namespace: <namespace> spec: plan: name: <name_of_plan_cr> namespace: <namespace> cutover: <optional_cutover_time> EOFNoteIf you specify a cutover time, use the ISO 8601 format with the UTC time offset, for example,
2024-04-04T01:23:45.678+09:00.
5.3.5. Migrating from a Red Hat OpenShift Virtualization source provider
You can use a Red Hat OpenShift Virtualization provider as either a source provider or as a destination provider.
Procedure
Create a
Secretmanifest for the source provider credentials:$ cat << EOF | oc apply -f - apiVersion: v1 kind: Secret metadata: name: <secret> namespace: <namespace> ownerReferences: 1 - apiVersion: forklift.konveyor.io/v1beta1 kind: Provider name: <provider_name> uid: <provider_uid> labels: createdForProviderType: openshift createdForResourceType: providers type: Opaque stringData: token: <token> 2 password: <password> 3 insecureSkipVerify: <"true"/"false"> 4 cacert: | 5 <ca_certificate> url: <api_end_point> 6 EOF
- 1
- The
ownerReferencessection is optional. - 2
- Specify a token for a service account with
cluster-adminprivileges. If bothtokenandurlare left blank, the local OpenShift cluster is used. - 3
- Specify the user password.
- 4
- Specify
"true"to skip certificate verification, specify"false"to verify the certificate. Defaults to"false"if not specified. Skipping certificate verification proceeds with an insecure migration and then the certificate is not required. Insecure migration means that the transferred data is sent over an insecure connection and potentially sensitive data could be exposed. - 5
- When this field is not set and skip certificate verification is disabled, MTV attempts to use the system CA.
- 6
- Specify the URL of the endpoint of the API server.
Create a
Providermanifest for the source provider:$ cat << EOF | oc apply -f - apiVersion: forklift.konveyor.io/v1beta1 kind: Provider metadata: name: <source_provider> namespace: <namespace> spec: type: openshift url: <api_end_point> 1 secret: name: <secret> 2 namespace: <namespace> EOF
Create a
NetworkMapmanifest to map the source and destination networks:$ cat << EOF | oc apply -f - apiVersion: forklift.konveyor.io/v1beta1 kind: NetworkMap metadata: name: <network_map> namespace: <namespace> spec: map: - destination: name: <network_name> type: pod 1 source: name: <network_name> type: pod - destination: name: <network_attachment_definition> 2 namespace: <network_attachment_definition_namespace> 3 type: multus source: name: <network_attachment_definition> namespace: <network_attachment_definition_namespace> type: multus provider: source: name: <source_provider> namespace: <namespace> destination: name: <destination_provider> namespace: <namespace> EOF- 1
- Allowed values are
podandmultus. - 2
- Specify a network attachment definition for each additional OpenShift Virtualization network. Specify the
namespaceeither by using thenamespace propertyor with a name built as follows:<network_namespace>/<network_name>. - 3
- Required only when
typeismultus. Specify the namespace of the OpenShift Virtualization network attachment definition.
Create a
StorageMapmanifest to map source and destination storage:$ cat << EOF | oc apply -f - apiVersion: forklift.konveyor.io/v1beta1 kind: StorageMap metadata: name: <storage_map> namespace: <namespace> spec: map: - destination: storageClass: <storage_class> accessMode: <access_mode> 1 source: name: <storage_class> provider: source: name: <source_provider> namespace: <namespace> destination: name: <destination_provider> namespace: <namespace> EOF- 1
- Allowed values are
ReadWriteOnceandReadWriteMany.
Optional: Create a
Hookmanifest to run custom code on a VM during the phase specified in thePlanCR:$ cat << EOF | oc apply -f - apiVersion: forklift.konveyor.io/v1beta1 kind: Hook metadata: name: <hook> namespace: <namespace> spec: image: quay.io/konveyor/hook-runner playbook: | LS0tCi0gbmFtZTogTWFpbgogIGhvc3RzOiBsb2NhbGhvc3QKICB0YXNrczoKICAtIG5hbWU6IExv YWQgUGxhbgogICAgaW5jbHVkZV92YXJzOgogICAgICBmaWxlOiAiL3RtcC9ob29rL3BsYW4ueW1s IgogICAgICBuYW1lOiBwbGFuCiAgLSBuYW1lOiBMb2FkIFdvcmtsb2FkCiAgICBpbmNsdWRlX3Zh cnM6CiAgICAgIGZpbGU6ICIvdG1wL2hvb2svd29ya2xvYWQueW1sIgogICAgICBuYW1lOiB3b3Jr bG9hZAoK EOFwhere:
playbookrefers to an optional Base64-encoded Ansible Playbook. If you specify a playbook, theimagemust behook-runner.NoteYou can use the default
hook-runnerimage or specify a custom image. If you specify a custom image, you do not have to specify a playbook.
Create a
Planmanifest for the migration:$ cat << EOF | oc apply -f - apiVersion: forklift.konveyor.io/v1beta1 kind: Plan metadata: name: <plan> 1 namespace: <namespace> spec: provider: source: name: <source_provider> namespace: <namespace> destination: name: <destination_provider> namespace: <namespace> map: 2 network: 3 name: <network_map> 4 namespace: <namespace> storage: 5 name: <storage_map> 6 namespace: <namespace> targetNamespace: <target_namespace> vms: - name: <source_vm> namespace: <namespace> hooks: 7 - hook: namespace: <namespace> name: <hook> 8 step: <step> 9 EOF
- 1
- Specify the name of the
PlanCR. - 2
- Specify only one network map and one storage map per plan.
- 3
- Specify a network mapping, even if the VMs to be migrated are not assigned to a network. The mapping can be empty in this case.
- 4
- Specify the name of the
NetworkMapCR. - 5
- Specify a storage mapping, even if the VMs to be migrated are not assigned with disk images. The mapping can be empty in this case.
- 6
- Specify the name of the
StorageMapCR. - 7
- Optional: You can specify up to two hooks for a VM. Each hook must run during a separate migration step.
- 8
- Specify the name of the
HookCR. - 9
- Allowed values are
PreHook, before the migration plan starts, orPostHook, after the migration is complete.
Create a
Migrationmanifest to run thePlanCR:$ cat << EOF | oc apply -f - apiVersion: forklift.konveyor.io/v1beta1 kind: Migration metadata: name: <name_of_migration_cr> namespace: <namespace> spec: plan: name: <name_of_plan_cr> namespace: <namespace> cutover: <optional_cutover_time> EOFNoteIf you specify a cutover time, use the ISO 8601 format with the UTC time offset, for example,
2024-04-04T01:23:45.678+09:00.
5.4. Canceling a migration
You can cancel an entire migration or individual virtual machines (VMs) while a migration is in progress from the command line interface (CLI).
Canceling an entire migration
Delete the
MigrationCR:$ oc delete migration <migration> -n <namespace> 1- 1
- Specify the name of the
MigrationCR.
Canceling the migration of individual VMs
Add the individual VMs to the
spec.cancelblock of theMigrationmanifest:$ cat << EOF | oc apply -f - apiVersion: forklift.konveyor.io/v1beta1 kind: Migration metadata: name: <migration> namespace: <namespace> ... spec: cancel: - id: vm-102 1 - id: vm-203 - name: rhel8-vm EOF- 1
- You can specify a VM by using the
idkey or thenamekey.
The value of the
idkey is the managed object reference, for a VMware VM, or the VM UUID, for a RHV VM.Retrieve the
MigrationCR to monitor the progress of the remaining VMs:$ oc get migration/<migration> -n <namespace> -o yaml
Chapter 6. Advanced migration options
6.1. Changing precopy intervals for warm migration
You can change the snapshot interval by patching the ForkliftController custom resource (CR).
Procedure
Patch the
ForkliftControllerCR:$ oc patch forkliftcontroller/<forklift-controller> -n openshift-mtv -p '{"spec": {"controller_precopy_interval": <60>}}' --type=merge 1- 1
- Specify the precopy interval in minutes. The default value is
60.
You do not need to restart the
forklift-controllerpod.
6.2. Creating custom rules for the Validation service
The Validation service uses Open Policy Agent (OPA) policy rules to check the suitability of each virtual machine (VM) for migration. The Validation service generates a list of concerns for each VM, which are stored in the Provider Inventory service as VM attributes. The web console displays the concerns for each VM in the provider inventory.
You can create custom rules to extend the default ruleset of the Validation service. For example, you can create a rule that checks whether a VM has multiple disks.
6.2.1. About Rego files
Validation rules are written in Rego, the Open Policy Agent (OPA) native query language. The rules are stored as .rego files in the /usr/share/opa/policies/io/konveyor/forklift/<provider> directory of the Validation pod.
Each validation rule is defined in a separate .rego file and tests for a specific condition. If the condition evaluates as true, the rule adds a {“category”, “label”, “assessment”} hash to the concerns. The concerns content is added to the concerns key in the inventory record of the VM. The web console displays the content of the concerns key for each VM in the provider inventory.
The following .rego file example checks for distributed resource scheduling enabled in the cluster of a VMware VM:
drs_enabled.rego example
package io.konveyor.forklift.vmware 1

has_drs_enabled {
    input.host.cluster.drsEnabled 2
}

concerns[flag] {
    has_drs_enabled
    flag := {
        "category": "Information",
        "label": "VM running in a DRS-enabled cluster",
        "assessment": "Distributed resource scheduling is not currently supported by OpenShift Virtualization. The VM can be migrated but it will not have this feature in the target environment."
    }
}
6.2.2. Checking the default validation rules
Before you create a custom rule, you must check the default rules of the Validation service to ensure that you do not create a rule that redefines an existing default value.
Example: If a default rule contains the line default valid_input = false and you create a custom rule that contains the line default valid_input = true, the Validation service will not start.
Procedure
Connect to the terminal of the
Validationpod:$ oc rsh <validation_pod>
Go to the OPA policies directory for your provider:
$ cd /usr/share/opa/policies/io/konveyor/forklift/<provider> 1- 1
- Specify
vmwareorovirt.
Search for the default policies:
$ grep -R "default" *
6.2.3. Creating a validation rule
You create a validation rule by applying a config map custom resource (CR) containing the rule to the Validation service.
-
If you create a rule with the same name as an existing rule, the
Validationservice performs anORoperation with the rules. -
If you create a rule that contradicts a default rule, the
Validationservice will not start.
Validation rule example
Validation rules are based on virtual machine (VM) attributes collected by the Provider Inventory service.
For example, the VMware API uses this path to check whether a VMware VM has NUMA node affinity configured: MOR:VirtualMachine.config.extraConfig["numa.nodeAffinity"].
The Provider Inventory service simplifies this configuration and returns a testable attribute with a list value:
"numaNodeAffinity": [
    "0",
    "1"
],
You create a Rego query, based on this attribute, and add it to the forklift-validation-config config map:
`count(input.numaNodeAffinity) != 0`
Procedure
Create a config map CR according to the following example:
$ cat << EOF | oc apply -f - apiVersion: v1 kind: ConfigMap metadata: name: <forklift-validation-config> namespace: openshift-mtv data: vmware_multiple_disks.rego: |- package <provider_package> 1 has_multiple_disks { 2 count(input.disks) > 1 } concerns[flag] { has_multiple_disks 3 flag := { "category": "<Information>", 4 "label": "Multiple disks detected", "assessment": "Multiple disks detected on this VM." } } EOF- 1
- Specify the provider package name. Allowed values are
io.konveyor.forklift.vmwarefor VMware andio.konveyor.forklift.ovirtfor Red Hat Virtualization. - 2
- Specify the
concernsname and Rego query. - 3
- Specify the
concernsname andflagparameter values. - 4
- Allowed values are
Critical,Warning, andInformation.
Stop the
Validationpod by scaling theforklift-controllerdeployment to0:$ oc scale -n openshift-mtv --replicas=0 deployment/forklift-controller
Start the
Validationpod by scaling theforklift-controllerdeployment to1:$ oc scale -n openshift-mtv --replicas=1 deployment/forklift-controller
Check the
Validationpod log to verify that the pod started:$ oc logs -f <validation_pod>
If the custom rule conflicts with a default rule, the
Validationpod will not start.Remove the source provider:
$ oc delete provider <provider> -n openshift-mtv
Add the source provider to apply the new rule:
$ cat << EOF | oc apply -f -
apiVersion: forklift.konveyor.io/v1beta1
kind: Provider
metadata:
  name: <provider>
  namespace: openshift-mtv
spec:
  type: <provider_type> 1
  url: <api_end_point> 2
  secret:
    name: <secret> 3
    namespace: openshift-mtv
EOF
You must update the rules version after creating a custom rule so that the Inventory service detects the changes and validates the VMs.
6.2.4. Updating the inventory rules version
You must update the inventory rules version each time you update the rules so that the Provider Inventory service detects the changes and triggers the Validation service.
The rules version is recorded in a rules_version.rego file for each provider.
Procedure
Retrieve the current rules version:
$ GET https://forklift-validation/v1/data/io/konveyor/forklift/<provider>/rules_version 1Example output
{
   "result": {
       "rules_version": 5
   }
}
Connect to the terminal of the
Validationpod:$ oc rsh <validation_pod>
-
Update the rules version in the
/usr/share/opa/policies/io/konveyor/forklift/<provider>/rules_version.regofile. -
Log out of the
Validationpod terminal. Verify the updated rules version:
$ GET https://forklift-validation/v1/data/io/konveyor/forklift/<provider>/rules_version 1Example output
{
   "result": {
       "rules_version": 6
   }
}
6.3. Retrieving the Inventory service JSON
You retrieve the Inventory service JSON by sending an Inventory service query to a virtual machine (VM). The output contains an "input" key, which contains the inventory attributes that are queried by the Validation service rules.
You can create a validation rule based on any attribute in the "input" key, for example, input.snapshot.kind.
Procedure
Retrieve the routes for the project:
oc get route -n openshift-mtv
Retrieve the
Inventoryservice route:$ oc get route <inventory_service> -n openshift-mtv
Retrieve the access token:
$ TOKEN=$(oc whoami -t)
Trigger an HTTP GET request (for example, using Curl):
$ curl -H "Authorization: Bearer $TOKEN" https://<inventory_service_route>/providers -k
Retrieve the
UUIDof a provider:$ curl -H "Authorization: Bearer $TOKEN" https://<inventory_service_route>/providers/<provider> -k 1Retrieve the VMs of a provider:
$ curl -H "Authorization: Bearer $TOKEN" https://<inventory_service_route>/providers/<provider>/<UUID>/vms -k
Retrieve the details of a VM:
$ curl -H "Authorization: Bearer $TOKEN" https://<inventory_service_route>/providers/<provider>/<UUID>/workloads/<vm> -k
Example output
{ "input": { "selfLink": "providers/vsphere/c872d364-d62b-46f0-bd42-16799f40324e/workloads/vm-431", "id": "vm-431", "parent": { "kind": "Folder", "id": "group-v22" }, "revision": 1, "name": "iscsi-target", "revisionValidated": 1, "isTemplate": false, "networks": [ { "kind": "Network", "id": "network-31" }, { "kind": "Network", "id": "network-33" } ], "disks": [ { "key": 2000, "file": "[iSCSI_Datastore] iscsi-target/iscsi-target-000001.vmdk", "datastore": { "kind": "Datastore", "id": "datastore-63" }, "capacity": 17179869184, "shared": false, "rdm": false }, { "key": 2001, "file": "[iSCSI_Datastore] iscsi-target/iscsi-target_1-000001.vmdk", "datastore": { "kind": "Datastore", "id": "datastore-63" }, "capacity": 10737418240, "shared": false, "rdm": false } ], "concerns": [], "policyVersion": 5, "uuid": "42256329-8c3a-2a82-54fd-01d845a8bf49", "firmware": "bios", "powerState": "poweredOn", "connectionState": "connected", "snapshot": { "kind": "VirtualMachineSnapshot", "id": "snapshot-3034" }, "changeTrackingEnabled": false, "cpuAffinity": [ 0, 2 ], "cpuHotAddEnabled": true, "cpuHotRemoveEnabled": false, "memoryHotAddEnabled": false, "faultToleranceEnabled": false, "cpuCount": 2, "coresPerSocket": 1, "memoryMB": 2048, "guestName": "Red Hat Enterprise Linux 7 (64-bit)", "balloonedMemory": 0, "ipAddress": "10.19.2.96", "storageUsed": 30436770129, "numaNodeAffinity": [ "0", "1" ], "devices": [ { "kind": "RealUSBController" } ], "host": { "id": "host-29", "parent": { "kind": "Cluster", "id": "domain-c26" }, "revision": 1, "name": "IP address or host name of the vCenter host or RHV Engine host", "selfLink": "providers/vsphere/c872d364-d62b-46f0-bd42-16799f40324e/hosts/host-29", "status": "green", "inMaintenance": false, "managementServerIp": "10.19.2.96", "thumbprint": <thumbprint>, "timezone": "UTC", "cpuSockets": 2, "cpuCores": 16, "productName": "VMware ESXi", "productVersion": "6.5.0", "networking": { "pNICs": [ { "key": "key-vim.host.PhysicalNic-vmnic0", "linkSpeed": 10000 }, { "key": "key-vim.host.PhysicalNic-vmnic1", "linkSpeed": 10000 }, { "key": "key-vim.host.PhysicalNic-vmnic2", "linkSpeed": 10000 }, { "key": "key-vim.host.PhysicalNic-vmnic3", "linkSpeed": 10000 } ], "vNICs": [ { "key": "key-vim.host.VirtualNic-vmk2", "portGroup": "VM_Migration", "dPortGroup": "", "ipAddress": "192.168.79.13", "subnetMask": "255.255.255.0", "mtu": 9000 }, { "key": "key-vim.host.VirtualNic-vmk0", "portGroup": "Management Network", "dPortGroup": "", "ipAddress": "10.19.2.13", "subnetMask": "255.255.255.128", "mtu": 1500 }, { "key": "key-vim.host.VirtualNic-vmk1", "portGroup": "Storage Network", "dPortGroup": "", "ipAddress": "172.31.2.13", "subnetMask": "255.255.0.0", "mtu": 1500 }, { "key": "key-vim.host.VirtualNic-vmk3", "portGroup": "", "dPortGroup": "dvportgroup-48", "ipAddress": "192.168.61.13", "subnetMask": "255.255.255.0", "mtu": 1500 }, { "key": "key-vim.host.VirtualNic-vmk4", "portGroup": "VM_DHCP_Network", "dPortGroup": "", "ipAddress": "10.19.2.231", "subnetMask": "255.255.255.128", "mtu": 1500 } ], "portGroups": [ { "key": "key-vim.host.PortGroup-VM Network", "name": "VM Network", "vSwitch": "key-vim.host.VirtualSwitch-vSwitch0" }, { "key": "key-vim.host.PortGroup-Management Network", "name": "Management Network", "vSwitch": "key-vim.host.VirtualSwitch-vSwitch0" }, { "key": "key-vim.host.PortGroup-VM_10G_Network", "name": "VM_10G_Network", "vSwitch": "key-vim.host.VirtualSwitch-vSwitch1" }, { "key": "key-vim.host.PortGroup-VM_Storage", "name": "VM_Storage", "vSwitch": "key-vim.host.VirtualSwitch-vSwitch1" }, { "key": "key-vim.host.PortGroup-VM_DHCP_Network", "name": "VM_DHCP_Network", "vSwitch": "key-vim.host.VirtualSwitch-vSwitch1" }, { "key": "key-vim.host.PortGroup-Storage Network", "name": "Storage Network", "vSwitch": "key-vim.host.VirtualSwitch-vSwitch1" }, { "key": "key-vim.host.PortGroup-VM_Isolated_67", "name": "VM_Isolated_67", "vSwitch": "key-vim.host.VirtualSwitch-vSwitch2" }, { "key": "key-vim.host.PortGroup-VM_Migration", "name": "VM_Migration", "vSwitch": "key-vim.host.VirtualSwitch-vSwitch2" } ], "switches": [ { "key": "key-vim.host.VirtualSwitch-vSwitch0", "name": "vSwitch0", "portGroups": [ "key-vim.host.PortGroup-VM Network", "key-vim.host.PortGroup-Management Network" ], "pNICs": [ "key-vim.host.PhysicalNic-vmnic4" ] }, { "key": "key-vim.host.VirtualSwitch-vSwitch1", "name": "vSwitch1", "portGroups": [ "key-vim.host.PortGroup-VM_10G_Network", "key-vim.host.PortGroup-VM_Storage", "key-vim.host.PortGroup-VM_DHCP_Network", "key-vim.host.PortGroup-Storage Network" ], "pNICs": [ "key-vim.host.PhysicalNic-vmnic2", "key-vim.host.PhysicalNic-vmnic0" ] }, { "key": "key-vim.host.VirtualSwitch-vSwitch2", "name": "vSwitch2", "portGroups": [ "key-vim.host.PortGroup-VM_Isolated_67", "key-vim.host.PortGroup-VM_Migration" ], "pNICs": [ "key-vim.host.PhysicalNic-vmnic3", "key-vim.host.PhysicalNic-vmnic1" ] } ] }, "networks": [ { "kind": "Network", "id": "network-31" }, { "kind": "Network", "id": "network-34" }, { "kind": "Network", "id": "network-57" }, { "kind": "Network", "id": "network-33" }, { "kind": "Network", "id": "dvportgroup-47" } ], "datastores": [ { "kind": "Datastore", "id": "datastore-35" }, { "kind": "Datastore", "id": "datastore-63" } ], "vms": null, "networkAdapters": [], "cluster": { "id": "domain-c26", "parent": { "kind": "Folder", "id": "group-h23" }, "revision": 1, "name": "mycluster", "selfLink": "providers/vsphere/c872d364-d62b-46f0-bd42-16799f40324e/clusters/domain-c26", "folder": "group-h23", "networks": [ { "kind": "Network", "id": "network-31" }, { "kind": "Network", "id": "network-34" }, { "kind": "Network", "id": "network-57" }, { "kind": "Network", "id": "network-33" }, { "kind": "Network", "id": "dvportgroup-47" } ], "datastores": [ { "kind": "Datastore", "id": "datastore-35" }, { "kind": "Datastore", "id": "datastore-63" } ], "hosts": [ { "kind": "Host", "id": "host-44" }, { "kind": "Host", "id": "host-29" } ], "dasEnabled": false, "dasVms": [], "drsEnabled": true, "drsBehavior": "fullyAutomated", "drsVms": [], "datacenter": null } } } }
6.4. Adding hooks to a migration plan
You can add hooks a migration plan from the command line by using the Migration Toolkit for Virtualization API.
6.4.1. API-based hooks for MTV migration plans
You can add hooks to a migration plan from the command line by using the Migration Toolkit for Virtualization API.
Default hook image
The default hook image for an MTV hook is registry.redhat.io/rhmtc/openshift-migration-hook-runner-rhel8:v1.8.2-2. The image is based on the Ansible Runner image with the addition of python-openshift to provide Ansible Kubernetes resources and a recent oc binary.
Hook execution
An Ansible playbook that is provided as part of a migration hook is mounted into the hook container as a ConfigMap. The hook container is run as a job on the desired cluster, using the default ServiceAccount in the konveyor-forklift namespace.
PreHooks and PostHooks
You specify hooks per VM and you can run each as a PreHook or a PostHook. In this context, a PreHook is a hook that is run before a migration and a PostHook is a hook that is run after a migration.
When you add a hook, you must specify the namespace where the hook CR is located, the name of the hook, and specify whether the hook is a PreHook or PostHook.
In order for a PreHook to run on a VM, the VM must be started and available via SSH.
Example PreHook:
kind: Plan
apiVersion: forklift.konveyor.io/v1beta1
metadata:
  name: test
  namespace: konveyor-forklift
spec:
  vms:
    - id: vm-2861
      hooks:
        - hook:
            namespace: konveyor-forklift
            name: playbook
          step: PreHook
6.4.2. Adding Hook CRs to a VM migration by using the MTV API
You can add a PreHook or a PostHook Hook CR when you migrate a virtual machine from the command line by using the Migration Toolkit for Virtualization API. A PreHook runs before a migration, a PostHook, after.
You can retrieve additional information stored in a secret or in a configMap by using a k8s module.
For example, you can create a hook CR to install cloud-init on a VM and write a file before migration.
Procedure
If needed, create a secret with an SSH private key for the VM. You can either use an existing key or generate a key pair, install the public key on the VM, and base64 encode the private key in the secret.
apiVersion: v1
data:
  key: VGhpcyB3YXMgZ2VuZXJhdGVkIHdpdGggc3NoLWtleWdlbiBwdXJlbHkgZm9yIHRoaXMgZXhhbXBsZS4KSXQgaXMgbm90IHVzZWQgYW55d2hlcmUuCi0tLS0tQkVHSU4gT1BFTlNTSCBQUklWQVRFIEtFWS0tLS0tCmIzQmxibk56YUMxclpYa3RkakVBQUFBQUJHNXZibVVBQUFBRWJtOXVaUUFBQUFBQUFBQUJBQUFCbHdBQUFBZHpjMmd0Y24KTmhBQUFBQXdFQUFRQUFBWUVBMzVTTFRReDBFVjdPTWJQR0FqcEsxK2JhQURTTVFuK1NBU2pyTGZLNWM5NGpHdzhDbnA4LwovRHErZHFBR1pxQkg2ZnAxYmVJM1BZZzVWVDk0RVdWQ2RrTjgwY3dEcEo0Z1R0NHFUQ1gzZUYvY2x5VXQyUC9zaTNjcnQ0CjBQdi9wVnZXU1U2TlhHaDJIZC93V0MwcGh5Z0RQOVc5SHRQSUF0OFpnZmV2ZnUwZHpraVl6OHNVaElWU2ZsRGpaNUFqcUcKUjV2TVVUaGlrczEvZVlCeTdiMkFFSEdzYU8xN3NFbWNiYUlHUHZuUFVwWmQrdjkyYU1JdWZoYjhLZkFSbzZ3Ty9ISW1VbQovdDdHWFBJUmxBMUhSV0p1U05odTQzZS9DY3ZYd3Z6RnZrdE9kYXlEQzBMTklHMkpVaURlNWd0UUQ1WHZXc1p3MHQvbEs1CklacjFrZXZRNUJsYWNISmViV1ZNYUQvdllpdFdhSFo4OEF1Y0czaGh2bjkrOGNSTGhNVExiVlFSMWh2UVpBL1JtQXN3eE0KT3VJSmRaUmtxTThLZlF4Z28zQThRNGJhQW1VbnpvM3Zwa0FWdC9uaGtIOTRaRE5rV2U2RlRhdThONStyYTJCZkdjZVA4VApvbjFEeTBLRlpaUlpCREVVRVc0eHdTYUVOYXQ3c2RDNnhpL1d5OURaQUFBRm1NRFBXeDdBejFzZUFBQUFCM056YUMxeWMyCkVBQUFHQkFOK1VpMDBNZEJGZXpqR3p4Z0k2U3RmbTJnQTBqRUova2dFbzZ5M3l1WFBlSXhzUEFwNmZQL3c2dm5hZ0JtYWcKUituNmRXM2lOejJJT1ZVL2VCRmxRblpEZk5ITUE2U2VJRTdlS2t3bDkzaGYzSmNsTGRqLzdJdDNLN2VORDcvNlZiMWtsTwpqVnhvZGgzZjhGZ3RLWWNvQXovVnZSN1R5QUxmR1lIM3IzN3RIYzVJbU0vTEZJU0ZVbjVRNDJlUUk2aGtlYnpGRTRZcExOCmYzbUFjdTI5Z0JCeHJHanRlN0JKbkcyaUJqNzV6MUtXWGZyL2RtakNMbjRXL0Nud0VhT3NEdnh5SmxKdjdleGx6eUVaUU4KUjBWaWJrallidU4zdnduTDE4TDh4YjVMVG5Xc2d3dEN6U0J0aVZJZzN1WUxVQStWNzFyR2NOTGY1U3VTR2E5WkhyME9RWgpXbkJ5WG0xbFRHZy83MklyVm1oMmZQQUxuQnQ0WWI1L2Z2SEVTNFRFeTIxVUVkWWIwR1FQMFpnTE1NVERyaUNYV1VaS2pQCkNuME1ZS053UEVPRzJnSmxKODZONzZaQUZiZjU0WkIvZUdRelpGbnVoVTJydkRlZnEydGdYeG5Iai9FNko5UTh0Q2hXV1UKV1FReEZCRnVNY0VtaERXcmU3SFF1c1l2MXN2UTJRQUFBQU1CQUFFQUFBR0JBSlZtZklNNjdDQmpXcU9KdnFua2EvakRrUwo4TDdpSE5mekg1TnRZWVdPWmRMTlk2L0lRa1pDeFcwTWtSKzlUK0M3QUZKZzBNV2Q5ck5PeUxJZDkxNjZoOVJsNG0xdFJjCnViZ1o2dWZCZ3hGVDlXS21mSEdCNm4zelh5b2pQOEFJTnR6ODVpaUVHVXFFRWtVRVdMd0RGSmdvcFllQ3l1VmZ2ZE92MUgKRm1WWmEwNVo0b3NQNkNENXVmc2djQ1RYQTR6VnZ5ZHVCYkxqdHN5RjdYZjNUdjZUQ1QxU0swZHErQk1OOXRvb0RZaXpwagpzbDh6NzlybXp3eUFyWFlVcnFUUkpsNmpwRkNrWHJLcy9LeG96MHhhbXlMY2RORk9hWE51LzlnTkpjRERsV2hPcFRqNHk4CkpkNXBuV1Jueis1RHJLRFdhY0loUW1CMUxVd2ZLWmQwbVFxaUpzMUMxcXZVUmlKOGExaThKUTI4bHFuWTFRRk9wbk13emcKWEpla2FndThpT1ExRFJlQkhaM0NkcVJUYnY3bVJZSGxramx0dXJmZGc4M3hvM0ErZ1JSR001eUVOcW5xSkplQjhJQVB5UwptMFp0dGdqbHNqNTJ2K1B1NmExMHoxZndKK1VML2N6dTRKeEpOYlp6WTFIMnpLODJBaVI1T3JYNmx2aUEvSWFSRVcwUUFBCkFNQndVeUJpcUc5bEZCUnltL2UvU1VORVMzdHpicUZNdTdIcy84WTV5SnAxKzR6OXUxNGtJR2ttV0Y5eE5HT3hrY3V0cWwKeHVUcndMbjFUaFNQTHQrTjUwTGhVdzR4ZjBhNUxqemdPbklPU0FRbm5HY1Nxa0dTRDlMR21obGE2WmpydFBHY29lQ3JHdAo5M1Vvcmx5YkxNRzFFRFAxWmpKS1RaZzl6OUMwdDlTTGd3ei9DbFhydW9UNXNQVUdKWnUrbHlIZXpSTDRtcHl6OEZMcnlOCkdNci9leVM5bWdISjNVVkZEYjNIZ3BaK1E1SUdBRU5rZVZEcHIwMGhCZXZndGd6YWtBQUFEQkFQVXQ1RitoMnBVby94V1YKenRkcVQvMzA4dFB5MXVMMU1lWFoydEJPQmRwSDJyd0JzdWt0aTIySGtWZUZXQjJFdUlFUXppMzY3MGc1UGdxR1p4Vng4dQpobEE0Rkg4ZXN1NTNQckZqVW9EeFJhb3d3WXBFcFh5Y2pnNUE1MStwR1VQcWljWjB0YjliaWlhc3BWWXZhWW5sdGlnVG5iClN0UExMY29nemNiL0dGcVYyaXlzc3lwTlMwKzBNRTUxcEtxWGNaS2swbi8vVHpZWWs4TW8vZzRsQ3pmUEZQUlZrVVM5blIKWU1pQzRlcEk0TERmbVdnM0xLQ2N1Zk85all3aWgwYlFBQUFNRUE2WEtldDhEMHNvc0puZVh5WFZGd0dyVyszNlhBVGRQTwpMWDdjaStjYzFoOGV1eHdYQWx3aTJJNFhxSmJBVjBsVEhuVGEycXN3Uy9RQlpJUUJWSkZlVjVyS1daZTc4R2F3d1pWTFZNCldETmNwdFFyRTFaM2pGNS9TdUVzdlVxSDE0Tkc5RUFXWG1iUkNzelE0Vlk3NzQrSi9sTFkvMnlDT1diNzlLYTJ5OGxvYUoKVXczWWVtSld3blp2R3hKNldsL3BmQ2xYN3lEVXlXUktLdGl0cWNjbmpCWVkyRE1tZURwdURDYy9ZdDZDc3dLRmRkMkJ1UwpGZGt5cDlZY3VMaDlLZEFBQUFIR3BoYzI5dVFFRlVMVGd3TWxVdWJXOXVkR3hsYjI0dWFXNTBjbUVCQWdNRUJRWT0KLS0tLS1FTkQgT1BFTlNTSCBQUklWQVRFIEtFWS0tLS0tCgo=
kind: Secret
metadata:
  name: ssh-credentials
  namespace: konveyor-forklift
type: Opaque
Encode your playbook by conncatenating a file and piping it for base64, for example:
$ cat playbook.yml | base64 -w0
NoteYou can also use a here document to encode a playbook:
$ cat << EOF | base64 -w0
- hosts: localhost
  tasks:
  - debug:
      msg: test
EOF
Create a Hook CR:
apiVersion: forklift.konveyor.io/v1beta1 kind: Hook metadata: name: playbook namespace: konveyor-forklift spec: image: registry.redhat.io/rhmtc/openshift-migration-hook-runner-rhel8:v1.8.2-2 playbook: LSBuYW1lOiBNYWluCiAgaG9zdHM6IGxvY2FsaG9zdAogIHRhc2tzOgogIC0gbmFtZTogTG9hZCBQbGFuCiAgICBpbmNsdWRlX3ZhcnM6CiAgICAgIGZpbGU6IHBsYW4ueW1sCiAgICAgIG5hbWU6IHBsYW4KCiAgLSBuYW1lOiBMb2FkIFdvcmtsb2FkCiAgICBpbmNsdWRlX3ZhcnM6CiAgICAgIGZpbGU6IHdvcmtsb2FkLnltbAogICAgICBuYW1lOiB3b3JrbG9hZAoKICAtIG5hbWU6IAogICAgZ2V0ZW50OgogICAgICBkYXRhYmFzZTogcGFzc3dkCiAgICAgIGtleTogInt7IGFuc2libGVfdXNlcl9pZCB9fSIKICAgICAgc3BsaXQ6ICc6JwoKICAtIG5hbWU6IEVuc3VyZSBTU0ggZGlyZWN0b3J5IGV4aXN0cwogICAgZmlsZToKICAgICAgcGF0aDogfi8uc3NoCiAgICAgIHN0YXRlOiBkaXJlY3RvcnkKICAgICAgbW9kZTogMDc1MAogICAgZW52aXJvbm1lbnQ6CiAgICAgIEhPTUU6ICJ7eyBhbnNpYmxlX2ZhY3RzLmdldGVudF9wYXNzd2RbYW5zaWJsZV91c2VyX2lkXVs0XSB9fSIKCiAgLSBrOHNfaW5mbzoKICAgICAgYXBpX3ZlcnNpb246IHYxCiAgICAgIGtpbmQ6IFNlY3JldAogICAgICBuYW1lOiBzc2gtY3JlZGVudGlhbHMKICAgICAgbmFtZXNwYWNlOiBrb252ZXlvci1mb3JrbGlmdAogICAgcmVnaXN0ZXI6IHNzaF9jcmVkZW50aWFscwoKICAtIG5hbWU6IENyZWF0ZSBTU0gga2V5CiAgICBjb3B5OgogICAgICBkZXN0OiB+Ly5zc2gvaWRfcnNhCiAgICAgIGNvbnRlbnQ6ICJ7eyBzc2hfY3JlZGVudGlhbHMucmVzb3VyY2VzWzBdLmRhdGEua2V5IHwgYjY0ZGVjb2RlIH19IgogICAgICBtb2RlOiAwNjAwCgogIC0gYWRkX2hvc3Q6CiAgICAgIG5hbWU6ICJ7eyB3b3JrbG9hZC52bS5pcGFkZHJlc3MgfX0iCiAgICAgIGFuc2libGVfdXNlcjogcm9vdAogICAgICBncm91cHM6IHZtcwoKLSBob3N0czogdm1zCiAgdGFza3M6CiAgLSBuYW1lOiBJbnN0YWxsIGNsb3VkLWluaXQKICAgIGRuZjoKICAgICAgbmFtZToKICAgICAgLSBjbG91ZC1pbml0CiAgICAgIHN0YXRlOiBsYXRlc3QKCiAgLSBuYW1lOiBDcmVhdGUgVGVzdCBGaWxlCiAgICBjb3B5OgogICAgICBkZXN0OiAvdGVzdC50eHQKICAgICAgY29udGVudDogIkhlbGxvIFdvcmxkIgogICAgICBtb2RlOiAwNjQ0Cg== serviceAccount: forklift-controller 1- 1
- Specify a
serviceAccountto run the hook with in order to control access to resources on the cluster.
NoteTo decode an attached playbook retrieve the resource with custom output and pipe it to base64. For example:
 oc get -n konveyor-forklift hook playbook -o \
   go-template='{{ .spec.playbook }}' | base64 -d
The playbook encoded here runs the following:
- name: Main
  hosts: localhost
  tasks:
  - name: Load Plan
    include_vars:
      file: plan.yml
      name: plan

  - name: Load Workload
    include_vars:
      file: workload.yml
      name: workload

  - name:
    getent:
      database: passwd
      key: "{{ ansible_user_id }}"
      split: ':'

  - name: Ensure SSH directory exists
    file:
      path: ~/.ssh
      state: directory
      mode: 0750
    environment:
      HOME: "{{ ansible_facts.getent_passwd[ansible_user_id][4] }}"

  - k8s_info:
      api_version: v1
      kind: Secret
      name: ssh-credentials
      namespace: konveyor-forklift
    register: ssh_credentials

  - name: Create SSH key
    copy:
      dest: ~/.ssh/id_rsa
      content: "{{ ssh_credentials.resources[0].data.key | b64decode }}"
      mode: 0600

  - add_host:
      name: "{{ workload.vm.ipaddress }}"
      ansible_user: root
      groups: vms

- hosts: vms
  tasks:
  - name: Install cloud-init
    dnf:
      name:
      - cloud-init
      state: latest

  - name: Create Test File
    copy:
      dest: /test.txt
      content: "Hello World"
      mode: 0644
Create a Plan CR using the hook:
kind: Plan apiVersion: forklift.konveyor.io/v1beta1 metadata: name: test namespace: konveyor-forklift spec: map: network: namespace: "konveyor-forklift" name: "network" storage: namespace: "konveyor-forklift" name: "storage" provider: source: namespace: "konveyor-forklift" name: "boston" destination: namespace: "konveyor-forklift" name: host targetNamespace: "konveyor-forklift" vms: - id: vm-2861 hooks: - hook: namespace: konveyor-forklift name: playbook step: PreHook 1- 1
- Options are
PreHook, to run the hook before the migration, andPostHook, to run the hook after the migration.
In order for a PreHook to run on a VM, the VM must be started and available via SSH.
Chapter 7. Upgrading the Migration Toolkit for Virtualization
You can upgrade the MTV Operator by using the Red Hat OpenShift web console to install the new version.
Procedure
- In the Red Hat OpenShift web console, click Operators → Installed Operators → Migration Toolkit for Virtualization Operator → Subscription.
Change the update channel to the correct release.
See Changing update channel in the Red Hat OpenShift documentation.
Confirm that Upgrade status changes from Up to date to Upgrade available. If it does not, restart the
CatalogSourcepod:-
Note the catalog source, for example,
redhat-operators. From the command line, retrieve the catalog source pod:
$ oc get pod -n openshift-marketplace | grep <catalog_source>
Delete the pod:
$ oc delete pod -n openshift-marketplace <catalog_source_pod>
Upgrade status changes from Up to date to Upgrade available.
If you set Update approval on the Subscriptions tab to Automatic, the upgrade starts automatically.
-
Note the catalog source, for example,
If you set Update approval on the Subscriptions tab to Manual, approve the upgrade.
See Manually approving a pending upgrade in the Red Hat OpenShift documentation.
-
If you are upgrading from MTV 2.2 and have defined VMware source providers, edit the VMware provider by adding a VDDK
initimage. Otherwise, the update will change the state of any VMware providers toCritical. For more information, see Adding a VMSphere source provider. -
If you mapped to NFS on the Red Hat OpenShift destination provider in MTV 2.2, edit the
AccessModesandVolumeModeparameters in the NFS storage profile. Otherwise, the upgrade will invalidate the NFS mapping. For more information, see Customizing the storage profile.
Chapter 8. Uninstalling the Migration Toolkit for Virtualization
You can uninstall the Migration Toolkit for Virtualization (MTV) by using the Red Hat OpenShift web console or the command line interface (CLI).
8.1. Uninstalling MTV by using the Red Hat OpenShift web console
You can uninstall Migration Toolkit for Virtualization (MTV) by using the Red Hat OpenShift web console to delete the openshift-mtv project and custom resource definitions (CRDs).
Prerequisites
-
You must be logged in as a user with
cluster-adminprivileges.
Procedure
- Click Home → Projects.
- Locate the openshift-mtv project.
-
On the right side of the project, select Delete Project from the Options menu
.
- In the Delete Project pane, enter the project name and click Delete.
- Click Administration → CustomResourceDefinitions.
-
Enter
forkliftin the Search field to locate the CRDs in theforklift.konveyor.iogroup. -
On the right side of each CRD, select Delete CustomResourceDefinition from the Options menu
.
8.2. Uninstalling MTV from the command line interface
You can uninstall Migration Toolkit for Virtualization (MTV) from the command line interface (CLI) by deleting the openshift-mtv project and the forklift.konveyor.io custom resource definitions (CRDs).
Prerequisites
-
You must be logged in as a user with
cluster-adminprivileges.
Procedure
Delete the project:
$ oc delete project openshift-mtv
Delete the CRDs:
$ oc get crd -o name | grep 'forklift' | xargs oc delete
Delete the OAuthClient:
$ oc delete oauthclient/forklift-ui
Chapter 9. Troubleshooting
This section provides information for troubleshooting common migration issues.
9.1. Error messages
This section describes error messages and how to resolve them.
warm import retry limit reached
The warm import retry limit reached error message is displayed during a warm migration if a VMware virtual machine (VM) has reached the maximum number (28) of changed block tracking (CBT) snapshots during the precopy stage.
To resolve this problem, delete some of the CBT snapshots from the VM and restart the migration plan.
Unable to resize disk image to required size
The Unable to resize disk image to required size error message is displayed when migration fails because a virtual machine on the target provider uses persistent volumes with an EXT4 file system on block storage. The problem occurs because the default overhead that is assumed by CDI does not completely include the reserved place for the root partition.
To resolve this problem, increase the file system overhead in CDI to more than 10%.
9.2. Using the must-gather tool
You can collect logs and information about MTV custom resources (CRs) by using the must-gather tool. You must attach a must-gather data file to all customer cases.
You can gather data for a specific namespace, migration plan, or virtual machine (VM) by using the filtering options.
If you specify a non-existent resource in the filtered must-gather command, no archive file is created.
Prerequisites
-
You must be logged in to the OpenShift Virtualization cluster as a user with the
cluster-adminrole. -
You must have the Red Hat OpenShift CLI (
oc) installed.
Collecting logs and CR information
-
Navigate to the directory where you want to store the
must-gatherdata. Run the
oc adm must-gathercommand:$ oc adm must-gather --image=registry.redhat.io/migration-toolkit-virtualization/mtv-must-gather-rhel8:2.6.7
The data is saved as
/must-gather/must-gather.tar.gz. You can upload this file to a support case on the Red Hat Customer Portal.Optional: Run the
oc adm must-gathercommand with the following options to gather filtered data:Namespace:
$ oc adm must-gather --image=registry.redhat.io/migration-toolkit-virtualization/mtv-must-gather-rhel8:2.6.7 \
  -- NS=<namespace> /usr/bin/targeted
Migration plan:
$ oc adm must-gather --image=registry.redhat.io/migration-toolkit-virtualization/mtv-must-gather-rhel8:2.6.7 \
  -- PLAN=<migration_plan> /usr/bin/targeted
Virtual machine:
$ oc adm must-gather --image=registry.redhat.io/migration-toolkit-virtualization/mtv-must-gather-rhel8:2.6.7 \ -- VM=<vm_id> NS=<namespace> /usr/bin/targeted 1- 1
- Specify the VM ID as it appears in the
PlanCR.
9.3. Architecture
This section describes MTV custom resources, services, and workflows.
9.3.1. MTV custom resources and services
The Migration Toolkit for Virtualization (MTV) is provided as an Red Hat OpenShift Operator. It creates and manages the following custom resources (CRs) and services.
MTV custom resources
-
ProviderCR stores attributes that enable MTV to connect to and interact with the source and target providers. -
NetworkMappingCR maps the networks of the source and target providers. -
StorageMappingCR maps the storage of the source and target providers. -
PlanCR contains a list of VMs with the same migration parameters and associated network and storage mappings. MigrationCR runs a migration plan.Only one
MigrationCR per migration plan can run at a given time. You can create multipleMigrationCRs for a singlePlanCR.
MTV services
The
Inventoryservice performs the following actions:- Connects to the source and target providers.
- Maintains a local inventory for mappings and plans.
- Stores VM configurations.
-
Runs the
Validationservice if a VM configuration change is detected.
-
The
Validationservice checks the suitability of a VM for migration by applying rules. The
Migration Controllerservice orchestrates migrations.When you create a migration plan, the
Migration Controllerservice validates the plan and adds a status label. If the plan fails validation, the plan status isNot readyand the plan cannot be used to perform a migration. If the plan passes validation, the plan status isReadyand it can be used to perform a migration. After a successful migration, theMigration Controllerservice changes the plan status toCompleted.-
The
Populator Controllerservice orchestrates disk transfers using Volume Populators. -
The
Kubevirt ControllerandContainerized Data Import (CDI) Controllerservices handle most technical operations.
9.3.2. High-level migration workflow
The high-level workflow shows the migration process from the point of view of the user:
- You create a source provider, a target provider, a network mapping, and a storage mapping.
You create a
Plancustom resource (CR) that includes the following resources:- Source provider
- Target provider, if MTV is not installed on the target cluster
- Network mapping
- Storage mapping
- One or more virtual machines (VMs)
You run a migration plan by creating a
MigrationCR that references thePlanCR.If you cannot migrate all the VMs for any reason, you can create multiple
MigrationCRs for the samePlanCR until all VMs are migrated.-
For each VM in the
PlanCR, theMigration Controllerservice records the VM migration progress in theMigrationCR. Once the data transfer for each VM in the
PlanCR completes, theMigration Controllerservice creates aVirtualMachineCR.When all VMs have been migrated, the
Migration Controllerservice updates the status of thePlanCR toCompleted. The power state of each source VM is maintained after migration.
9.3.3. Detailed migration workflow
You can use the detailed migration workflow to troubleshoot a failed migration.
The workflow describes the following steps:
Warm Migration or migration to a remote OpenShift cluster:
When you create the
Migrationcustom resource (CR) to run a migration plan, theMigration Controllerservice creates aDataVolumeCR for each source VM disk.For each VM disk:
-
The
Containerized Data Importer (CDI) Controllerservice creates a persistent volume claim (PVC) based on the parameters specified in theDataVolumeCR. -
If the
StorageClasshas a dynamic provisioner, the persistent volume (PV) is dynamically provisioned by theStorageClassprovisioner. -
The
CDI Controllerservice creates animporterpod. The
importerpod streams the VM disk to the PV.After the VM disks are transferred:
The
Migration Controllerservice creates aconversionpod with the PVCs attached to it when importing from VMWare.The
conversionpod runsvirt-v2v, which installs and configures device drivers on the PVCs of the target VM.-
The
Migration Controllerservice creates aVirtualMachineCR for each source virtual machine (VM), connected to the PVCs. If the VM ran on the source environment, the
Migration Controllerpowers on the VM, theKubeVirt Controllerservice creates avirt-launcherpod and aVirtualMachineInstanceCR.The
virt-launcherpod runsQEMU-KVMwith the PVCs attached as VM disks.
Cold migration from RHV or OpenStack to the local OpenShift cluster:
When you create a
Migrationcustom resource (CR) to run a migration plan, theMigration Controllerservice creates for each source VM disk aPersistentVolumeClaimCR, and anOvirtVolumePopulatorwhen the source is RHV, or anOpenstackVolumePopulatorCR when the source is OpenStack.For each VM disk:
-
The
Populator Controllerservice creates a temporarily persistent volume claim (PVC). If the
StorageClasshas a dynamic provisioner, the persistent volume (PV) is dynamically provisioned by theStorageClassprovisioner.-
The
Migration Controllerservice creates a dummy pod to bind all PVCs. The name of the pod containspvcinit.
-
The
-
The
Populator Controllerservice creates apopulatorpod. The
populatorpod transfers the disk data to the PV.After the VM disks are transferred:
- The temporary PVC is deleted, and the initial PVC points to the PV with the data.
-
The
Migration Controllerservice creates aVirtualMachineCR for each source virtual machine (VM), connected to the PVCs. If the VM ran on the source environment, the
Migration Controllerpowers on the VM, theKubeVirt Controllerservice creates avirt-launcherpod and aVirtualMachineInstanceCR.The
virt-launcherpod runsQEMU-KVMwith the PVCs attached as VM disks.
Cold migration from VMWare to the local OpenShift cluster:
When you create a
Migrationcustom resource (CR) to run a migration plan, theMigration Controllerservice creates aDataVolumeCR for each source VM disk.For each VM disk:
-
The
Containerized Data Importer (CDI) Controllerservice creates a blank persistent volume claim (PVC) based on the parameters specified in theDataVolumeCR. -
If the
StorageClasshas a dynamic provisioner, the persistent volume (PV) is dynamically provisioned by theStorageClassprovisioner.
For all VM disks:
-
The
Migration Controllerservice creates a dummy pod to bind all PVCs. The name of the pod containspvcinit. -
The
Migration Controllerservice creates aconversionpod for all PVCs. The
conversionpod runsvirt-v2v, which converts the VM to the KVM hypervisor and transfers the disks' data to their corresponding PVs.After the VM disks are transferred:
-
The
Migration Controllerservice creates aVirtualMachineCR for each source virtual machine (VM), connected to the PVCs. If the VM ran on the source environment, the
Migration Controllerpowers on the VM, theKubeVirt Controllerservice creates avirt-launcherpod and aVirtualMachineInstanceCR.The
virt-launcherpod runsQEMU-KVMwith the PVCs attached as VM disks.
9.4. Logs and custom resources
You can download logs and custom resource (CR) information for troubleshooting. For more information, see the detailed migration workflow.
9.4.1. Collected logs and custom resource information
You can download logs and custom resource (CR) yaml files for the following targets by using the Red Hat OpenShift web console or the command line interface (CLI):
- Migration plan: Web console or CLI.
- Virtual machine: Web console or CLI.
- Namespace: CLI only.
The must-gather tool collects the following logs and CR files in an archive file:
CRs:
-
DataVolumeCR: Represents a disk mounted on a migrated VM. -
VirtualMachineCR: Represents a migrated VM. -
PlanCR: Defines the VMs and storage and network mapping. -
JobCR: Optional: Represents a pre-migration hook, a post-migration hook, or both.
-
Logs:
-
importerpod: Disk-to-data-volume conversion log. Theimporterpod naming convention isimporter-<migration_plan>-<vm_id><5_char_id>, for example,importer-mig-plan-ed90dfc6-9a17-4a8btnfh, whereed90dfc6-9a17-4a8is a truncated RHV VM ID andbtnfhis the generated 5-character ID. -
conversionpod: VM conversion log. Theconversionpod runsvirt-v2v, which installs and configures device drivers on the PVCs of the VM. Theconversionpod naming convention is<migration_plan>-<vm_id><5_char_id>. -
virt-launcherpod: VM launcher log. When a migrated VM is powered on, thevirt-launcherpod runsQEMU-KVMwith the PVCs attached as VM disks. -
forklift-controllerpod: The log is filtered for the migration plan, virtual machine, or namespace specified by themust-gathercommand. -
forklift-must-gather-apipod: The log is filtered for the migration plan, virtual machine, or namespace specified by themust-gathercommand. hook-jobpod: The log is filtered for hook jobs. Thehook-jobnaming convention is<migration_plan>-<vm_id><5_char_id>, for example,plan2j-vm-3696-posthook-4mx85orplan2j-vm-3696-prehook-mwqnl.NoteEmpty or excluded log files are not included in the
must-gatherarchive file.
-
Example must-gather archive structure for a VMware migration plan
must-gather
└── namespaces
    ├── target-vm-ns
    │   ├── crs
    │   │   ├── datavolume
    │   │   │   ├── mig-plan-vm-7595-tkhdz.yaml
    │   │   │   ├── mig-plan-vm-7595-5qvqp.yaml
    │   │   │   └── mig-plan-vm-8325-xccfw.yaml
    │   │   └── virtualmachine
    │   │       ├── test-test-rhel8-2disks2nics.yaml
    │   │       └── test-x2019.yaml
    │   └── logs
    │       ├── importer-mig-plan-vm-7595-tkhdz
    │       │   └── current.log
    │       ├── importer-mig-plan-vm-7595-5qvqp
    │       │   └── current.log
    │       ├── importer-mig-plan-vm-8325-xccfw
    │       │   └── current.log
    │       ├── mig-plan-vm-7595-4glzd
    │       │   └── current.log
    │       └── mig-plan-vm-8325-4zw49
    │           └── current.log
    └── openshift-mtv
        ├── crs
        │   └── plan
        │       └── mig-plan-cold.yaml
        └── logs
            ├── forklift-controller-67656d574-w74md
            │   └── current.log
            └── forklift-must-gather-api-89fc7f4b6-hlwb6
                └── current.log
9.4.2. Downloading logs and custom resource information from the web console
You can download logs and information about custom resources (CRs) for a completed, failed, or canceled migration plan or for migrated virtual machines (VMs) by using the Red Hat OpenShift web console.
Procedure
- In the Red Hat OpenShift web console, click Migration → Plans for virtualization.
- Click Get logs beside a migration plan name.
In the Get logs window, click Get logs.
The logs are collected. A
Log collection completemessage is displayed.- Click Download logs to download the archive file.
- To download logs for a migrated VM, click a migration plan name and then click Get logs beside the VM.
9.4.3. Accessing logs and custom resource information from the command line interface
You can access logs and information about custom resources (CRs) from the command line interface by using the must-gather tool. You must attach a must-gather data file to all customer cases.
You can gather data for a specific namespace, a completed, failed, or canceled migration plan, or a migrated virtual machine (VM) by using the filtering options.
If you specify a non-existent resource in the filtered must-gather command, no archive file is created.
Prerequisites
-
You must be logged in to the OpenShift Virtualization cluster as a user with the
cluster-adminrole. -
You must have the Red Hat OpenShift CLI (
oc) installed.
Procedure
-
Navigate to the directory where you want to store the
must-gatherdata. Run the
oc adm must-gathercommand:$ oc adm must-gather --image=registry.redhat.io/migration-toolkit-virtualization/mtv-must-gather-rhel8:2.6.7
The data is saved as
/must-gather/must-gather.tar.gz. You can upload this file to a support case on the Red Hat Customer Portal.Optional: Run the
oc adm must-gathercommand with the following options to gather filtered data:Namespace:
$ oc adm must-gather --image=registry.redhat.io/migration-toolkit-virtualization/mtv-must-gather-rhel8:2.6.7 \
  -- NS=<namespace> /usr/bin/targeted
Migration plan:
$ oc adm must-gather --image=registry.redhat.io/migration-toolkit-virtualization/mtv-must-gather-rhel8:2.6.7 \
  -- PLAN=<migration_plan> /usr/bin/targeted
Virtual machine:
$ oc adm must-gather --image=registry.redhat.io/migration-toolkit-virtualization/mtv-must-gather-rhel8:2.6.7 \ -- VM=<vm_name> NS=<namespace> /usr/bin/targeted 1- 1
- You must specify the VM name, not the VM ID, as it appears in the
PlanCR.