Developer Guide
OpenShift Enterprise 3.2 Developer Reference
Abstract
- Monitor and browse projects with the web console
- Configure and utilize the CLI
- Generate configurations using templates
- Manage builds and webhooks
- Define and trigger deployments
- Integrate external services (databases, SaaS endpoints)
Chapter 1. Overview
This guide helps developers set up and configure a workstation to develop and deploy applications in an OpenShift Enterprise cloud environment with a command-line interface (CLI). This guide provides detailed instructions and examples to help developers:
- Monitor and browse projects with the web console.
- Configure and utilize the CLI.
- Generate configurations using templates.
- Manage builds and webhooks.
- Define and trigger deployments.
- Integrate external services (databases, SaaS endpoints).
Chapter 2. Application Life Cycle Examples
2.1. Overview
As a PaaS, OpenShift Enterprise is designed for building and deploying applications. Depending on how much you want to involve OpenShift Enterprise in the development process, you can choose to develop on OpenShift Enterprise and use it to continuously develop an application, or you can deploy a fully developed application onto an OpenShift Enterprise instance.
2.2. Developing on OpenShift Enterprise

You can develop your application on OpenShift Enterprise directly. Use the following process if you plan to use OpenShift Enterprise as a method to build and deploy your application:
- Initial Planning
- What does your application do?
- What programming language will it be developed in?
- Access to OpenShift Enterprise
- OpenShift Enterprise should be installed by this point, either by yourself or an administrator within your organization.
- Develop
- Using your editor/IDE of choice, create a basic skeleton of an application. It should be developed enough to tell OpenShift Enterprise what kind of application it is.
- Push the code to your Git repository.
- Generate
-
Create a basic application using the
new-appcommand. OpenShift Enterprise generates build and deployment configurations.
-
Create a basic application using the
- Manage
- Start developing your application code.
- Ensure your application builds successfully.
- Continue to locally develop and polish your code.
- Push your code to a Git repository.
- Is any extra configuration needed? Explore the Developer Guide for more options.
- Verify
-
You can verify your application in a number of ways. You can push your changes to your application’s Git repository, and use OpenShift Enterprise to rebuild and redeploy your application. Alternatively, you can hot deploy using
rsyncto synchronize your code changes into a running pod.
-
You can verify your application in a number of ways. You can push your changes to your application’s Git repository, and use OpenShift Enterprise to rebuild and redeploy your application. Alternatively, you can hot deploy using
2.3. Developing Then Deploying on OpenShift Enterprise

Another possible application life cycle is to develop locally, then use OpenShift Enterprise to deploy your fully developed application. Use the following process if you plan to have application code already, then want to build and deploy onto an OpenShift Enterprise installation when completed:
- Initial Planning
- What does your application do?
- What programming language will it be developed in?
- Develop
- Develop your application code using your editor/IDE of choice.
- Build and test your application code locally.
- Push your code to a Git repository.
- Access to OpenShift Enterprise
- OpenShift Enterprise should be installed by this point, either by yourself or an administrator within your organization.
- Generate
-
Create a basic application using the
new-appcommand. OpenShift Enterprise generates build and deployment configurations.
-
Create a basic application using the
- Verify
- Ensure that the application that you have built and deployed in the above Generate step is successfully running on OpenShift Enterprise.
- Manage
- Continue to develop your application code until you are happy with the results.
- Rebuild your application in OpenShift Enterprise to accept any newly pushed code.
- Is any extra configuration needed? Explore the Developer Guide for more options.
Chapter 3. Authentication
3.1. Web Console Authentication
When accessing the web console from a browser at <master_public_addr>:8443, you are automatically redirected to a login page.
Review the browser versions and operating systems that can be used to access the web console.
You can provide your login credentials on this page to obtain a token to make API calls. After logging in, you can navigate your projects using the web console.
3.2. CLI Authentication
You can authenticate from the command line using the CLI command oc login. You can get started with the CLI by running this command without any options:
$ oc login
The command’s interactive flow helps you establish a session to an OpenShift Enterprise server with the provided credentials. If any information required to successfully log in to an OpenShift Enterprise server is not provided, the command prompts for user input as required. The configuration is automatically saved and is then used for every subsequent command.
All configuration options for the oc login command, listed in the oc login --help command output, are optional. The following example shows usage with some common options:
$ oc login [-u=<username>] \
  [-p=<password>] \
  [-s=<server>] \
  [-n=<project>] \
  [--certificate-authority=</path/to/file.crt>|--insecure-skip-tls-verify]
The following table describes these common options:
| Option | Syntax | Description |
|---|---|---|
|
|
$ oc login -s=<server> | Specifies the host name of the OpenShift Enterprise server. If a server is provided through this flag, the command does not ask for it interactively. This flag can also be used if you already have a CLI configuration file and want to log in and switch to another server. |
|
|
$ oc login -u=<username> -p=<password> | Allows you to specify the credentials to log in to the OpenShift Enterprise server. If user name or password are provided through these flags, the command does not ask for it interactively. These flags can also be used if you already have a configuration file with a session token established and want to log in and switch to another user name. |
|
|
$ oc login -u=<username> -p=<password> -n=<project> |
A global CLI option which, when used with |
|
|
$ oc login --certificate-authority=<path/to/file.crt> | Correctly and securely authenticates with an OpenShift Enterprise server that uses HTTPS. The path to a certificate authority file must be provided. |
|
|
$ oc login --insecure-skip-tls-verify |
Allows interaction with an HTTPS server bypassing the server certificate checks; however, note that it is not secure. If you try to |
CLI configuration files allow you to easily manage multiple CLI profiles.
If you have access to administrator credentials but are no longer logged in as the default system user system:admin, you can log back in as this user at any time as long as the credentials are still present in your CLI configuration file. The following command logs in and switches to the default project:
$ oc login -u system:admin -n default
Chapter 4. Projects
4.1. Overview
A project allows a community of users to organize and manage their content in isolation from other communities.
4.2. Creating a Project
If allowed by your cluster administrator, you can create a new project using the CLI or the web console.
To create a new project using the CLI:
$ oc new-project <project_name> \
    --description="<description>" --display-name="<display_name>"
For example:
$ oc new-project hello-openshift \
    --description="This is an example project to demonstrate OpenShift v3" \
--display-name="Hello OpenShift"The number of projects you are allowed to create may be limited by the system administrator. Once your limit is reached, you may need to delete an existing project in order to create a new one.
4.3. Viewing Projects
When viewing projects, you are restricted to seeing only the projects you have access to view based on the authorization policy.
To view a list of projects:
$ oc get projects
You can change from the current project to a different project for CLI operations. The specified project is then used in all subsequent operations that manipulate project-scoped content:
$ oc project <project_name>
You can also use the web console to view and change between projects. After authenticating and logging in, you are presented with a list of projects that you have access to:
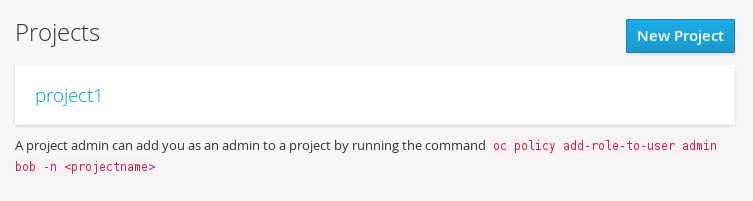
If you use the CLI to create a new project, you can then refresh the page in the browser to see the new project.
Selecting a project brings you to the project overview for that project.
4.4. Checking Project Status
The oc status command provides a high-level overview of the current project, with its components and their relationships. This command takes no argument:
$ oc status
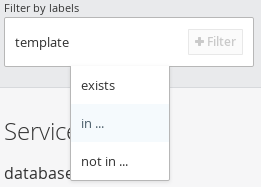
4.5. Filtering by Labels
You can filter the contents of a project page in the web console by using the labels of a resource. You can pick from a suggested label name and values, or type in your own. Multiple filters can be added. When multiple filters are applied, resources must match all of the filters to remain visible.
To filter by labels:
Select a label type:

Select one of the following:
exists
Verify that the label name exists, but ignore its value.
in
Verify that the label name exists and is equal to one of the selected values.
not in
Verify that the label name does not exist, or is not equal to any of the selected values.
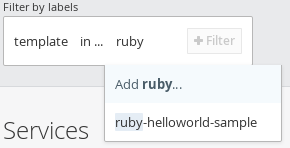
If you selected in or not in, select a set of values then select Filter:
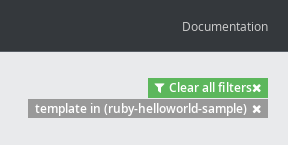
After adding filters, you can stop filtering by selecting Clear all filters or by clicking individual filters to remove them:
4.6. Deleting a Project
When you delete a project, the server updates the project status to Terminating from Active. The server then clears all content from a project that is Terminating before finally removing the project. While a project is in Terminating status, a user cannot add new content to the project. Projects can be deleted from the CLI or the web console.
To delete a project using the CLI:
$ oc delete project <project_name>
Chapter 5. Creating New Applications
5.1. Overview
You can create a new OpenShift Enterprise application from source code, images, or templates by using either the OpenShift CLI or web console.
5.2. Creating an Application Using the CLI
5.2.1. Creating an Application From Source Code
The new-app command allows you to create applications using source code in a local or remote Git repository.
To create an application using a Git repository in a local directory:
$ oc new-app /path/to/source/code
If using a local Git repository, the repository must have an origin remote that points to a URL accessible by the OpenShift Enterprise cluster.
You can use a subdirectory of your source code repository by specifying a --context-dir flag. To create an application using a remote Git repository and a context subdirectory:
$ oc new-app https://github.com/openshift/sti-ruby.git \
    --context-dir=2.0/test/puma-test-app
Also, when specifying a remote URL, you can specify a Git branch to use by appending #<branch_name> to the end of the URL:
$ oc new-app https://github.com/openshift/ruby-hello-world.git#beta4
Using new-app results in a build configuration, which creates a new application image from your source code. It also constructs a deployment configuration to deploy the new image, and a service to provide load-balanced access to the deployment running your image.
OpenShift Enterprise automatically detects whether the Docker or Sourcebuild strategy is being used, and in the case of Source builds, detects an appropriate language builder image.
Build Strategy Detection
If a Dockerfile is in the repository when creating a new application, OpenShift Enterprise generates a Docker build strategy. Otherwise, it generates a Source strategy.
You can specify a strategy by setting the --strategy flag to either source or docker.
$ oc new-app /home/user/code/myapp --strategy=docker
Language Detection
If creating a Source build, new-app attempts to determine the language builder to use by the presence of certain files in the root of the repository:
| Language | Files |
|---|---|
|
| Rakefile, Gemfile, config.ru |
|
| pom.xml |
|
| app.json, package.json |
|
| index.php, composer.json |
|
| requirements.txt, setup.py |
|
| index.pl, cpanfile |
After a language is detected, new-app searches the OpenShift Enterprise server for image stream tags that have a supports annotation matching the detected language, or an image stream that matches the name of the detected language. If a match is not found, new-app searches the Docker Hub registry for an image that matches the detected language based on name.
You can override the image the builder uses for a particular source repository by specifying the image (either an image stream or container specification) and the repository, with a ~ as a separator.
For example, to use the myproject/my-ruby image stream with the source in a remote repository:
$ oc new-app myproject/my-ruby~https://github.com/openshift/ruby-hello-world.git
To use the openshift/ruby-20-centos7:latest container image stream with the source in a local repository:
$ oc new-app openshift/ruby-20-centos7:latest~/home/user/code/my-ruby-app
5.2.2. Creating an Application From an Image
You can deploy an application from an existing image. Images can come from image streams in the OpenShift Enterprise server, images in a specific registry or Docker Hub registry, or images in the local Docker server.
The new-app command attempts to determine the type of image specified in the arguments passed to it. However, you can explicitly tell new-app whether the image is a Docker image (using the --docker-image argument) or an image stream (using the -i|--image argument).
If you specify an image from your local Docker repository, you must ensure that the same image is available to the OpenShift Enterprise cluster nodes.
For example, to create an application from the DockerHub MySQL image:
$ oc new-app mysql
To create an application using an image in a private registry, specify the full Docker image specification:
$ oc new-app myregistry:5000/example/myimage
If the registry containing the image is not secured with SSL, cluster administrators must ensure that the Docker daemon on the OpenShift Enterprise node hosts is run with the --insecure-registry flag pointing to that registry. You must also tell new-app that the image comes from an insecure registry with the --insecure-registry=true flag.
You can create an application from an existing image stream and tag (optional) for the image stream:
$ oc new-app my-stream:v1
5.2.3. Creating an Application From a Template
You can create an application from a previously stored template or from a template file, by specifying the name of the template as an argument. For example, you can store a sample application template and use it to create an application.
To create an application from a stored template:
$ oc create -f examples/sample-app/application-template-stibuild.json
$ oc new-app ruby-helloworld-sample
To directly use a template in your local file system, without first storing it in OpenShift Enterprise, use the -f|--file argument:
$ oc new-app -f examples/sample-app/application-template-stibuild.json
Template Parameters
When creating an application based on a template, use the -p|--param argument to set parameter values defined by the template:
$ oc new-app ruby-helloworld-sample \
    -p ADMIN_USERNAME=admin,ADMIN_PASSWORD=mypassword
5.2.4. Further Modifying Application Creation
The new-app command generates OpenShift Enterprise objects that will build, deploy, and run the application being created. Normally, these objects are created in the current project using names derived from the input source repositories or the input images. However, new-app allows you to modify this behavior.
The set of objects created by new-app depends on the artifacts passed as input: source repositories, images, or templates.
| Object | Description |
|---|---|
|
|
A |
|
|
For |
|
|
A |
|
|
The |
| Other | Other objects can be generated when instantiating templates. |
5.2.4.1. Specifying Environment Variables
When generating applications from a source or an image, you can use the -e|--env argument to pass environment variables to the application container at run time:
$ oc new-app openshift/postgresql-92-centos7 \
    -e POSTGRESQL_USER=user \
    -e POSTGRESQL_DATABASE=db \
    -e POSTGRESQL_PASSWORD=password
5.2.4.2. Specifying Labels
When generating applications from source, images, or templates, you can use the -l|--label argument to add labels to the created objects. Labels make it easy to collectively select, configure, and delete objects associated with the application.
$ oc new-app https://github.com/openshift/ruby-hello-world -l name=hello-world
5.2.4.3. Viewing the Output Without Creation
To see a dry-run of what new-app will create, you can use the -o|--output argument with a yaml or json value. You can then use the output to preview the objects that will be created, or redirect it to a file that you can edit. Once you are satisfied, you can use oc create to create the OpenShift Enterprise objects.
To output new-app artifacts to a file, edit them, then create them:
$ oc new-app https://github.com/openshift/ruby-hello-world \
    -o yaml > myapp.yaml
$ vi myapp.yaml
$ oc create -f myapp.yaml
5.2.4.4. Creating Objects With Different Names
Objects created by new-app are normally named after the source repository, or the image used to generate them. You can set the name of the objects produced by adding a --name flag to the command:
$ oc new-app https://github.com/openshift/ruby-hello-world --name=myapp
5.2.4.5. Creating Objects in a Different Project
Normally, new-app creates objects in the current project. However, you can create objects in a different project that you have access to using the -n|--namespace argument:
$ oc new-app https://github.com/openshift/ruby-hello-world -n myproject
5.2.4.6. Creating Multiple Objects
The new-app command allows creating multiple applications specifying multiple parameters to new-app. Labels specified in the command line apply to all objects created by the single command. Environment variables apply to all components created from source or images.
To create an application from a source repository and a Docker Hub image:
$ oc new-app https://github.com/openshift/ruby-hello-world mysql
If a source code repository and a builder image are specified as separate arguments, new-app uses the builder image as the builder for the source code repository. If this is not the intent, simply specify a specific builder image for the source using the ~ separator.
5.2.4.7. Grouping Images and Source in a Single Pod
The new-app command allows deploying multiple images together in a single pod. In order to specify which images to group together, use the + separator. The --group command line argument can also be used to specify the images that should be grouped together. To group the image built from a source repository with other images, specify its builder image in the group:
$ oc new-app ruby+mysql
To deploy an image built from source and an external image together:
$ oc new-app \
    ruby~https://github.com/openshift/ruby-hello-world \
    mysql \
    --group=ruby+mysql
5.2.4.8. Useful Edits
Following are some specific examples of useful edits to make in the myapp.yaml file.
These examples presume myapp.yaml was created as a result of the oc new-app … -o yaml command.
Example 5.1. Deploy to Selected Nodes
apiVersion: v1
items:
- apiVersion: v1
  kind: Project  1
  metadata:
    name: myapp
    annotations:
      openshift.io/node-selector: region=west  2
- apiVersion: v1
  kind: ImageStream
  ...
kind: List
metadata: {}
- 1
- In myapp.yaml, the section that defines the myapp project has both
kind: Projectandmetadata.name: myapp. If this section is missing, you should add it at the second level, as a new item of the listitems, peer to thekind: ImageStreamdefinitions. - 2
- Add this node selector annotation to the myapp project to cause its pods to be deployed only on nodes that have the label
region=west.
5.3. Creating an Application Using the Web Console
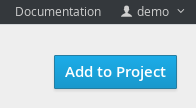
While in the desired project, click Add to Project:
Select either a builder image from the list of images in your project, or from the global library:
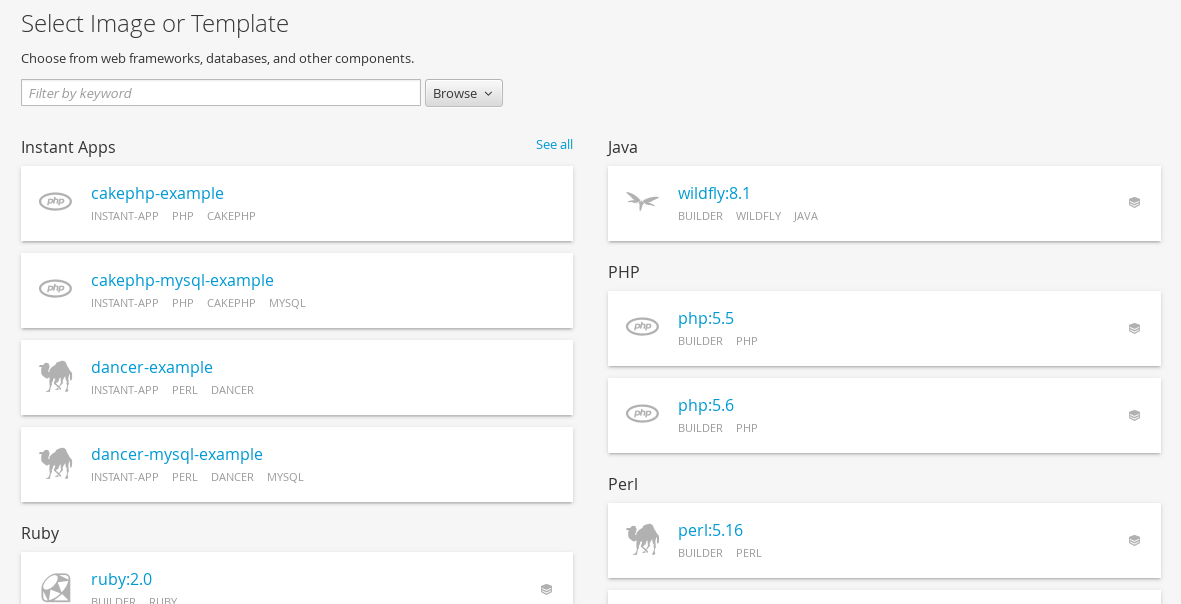 Note
NoteOnly image stream tags that have the builder tag listed in their annotations appear in this list, as demonstrated here:
kind: "ImageStream" apiVersion: "v1" metadata: name: "ruby" creationTimestamp: null spec: dockerImageRepository: "registry.access.redhat.com/openshift3/ruby-20-rhel7" tags: - name: "2.0" annotations: description: "Build and run Ruby 2.0 applications" iconClass: "icon-ruby" tags: "builder,ruby" 1 supports: "ruby:2.0,ruby" version: "2.0"- 1
- Including builder here ensures this
ImageStreamTagappears in the web console as a builder.
Modify the settings in the new application screen to configure the objects to support your application:
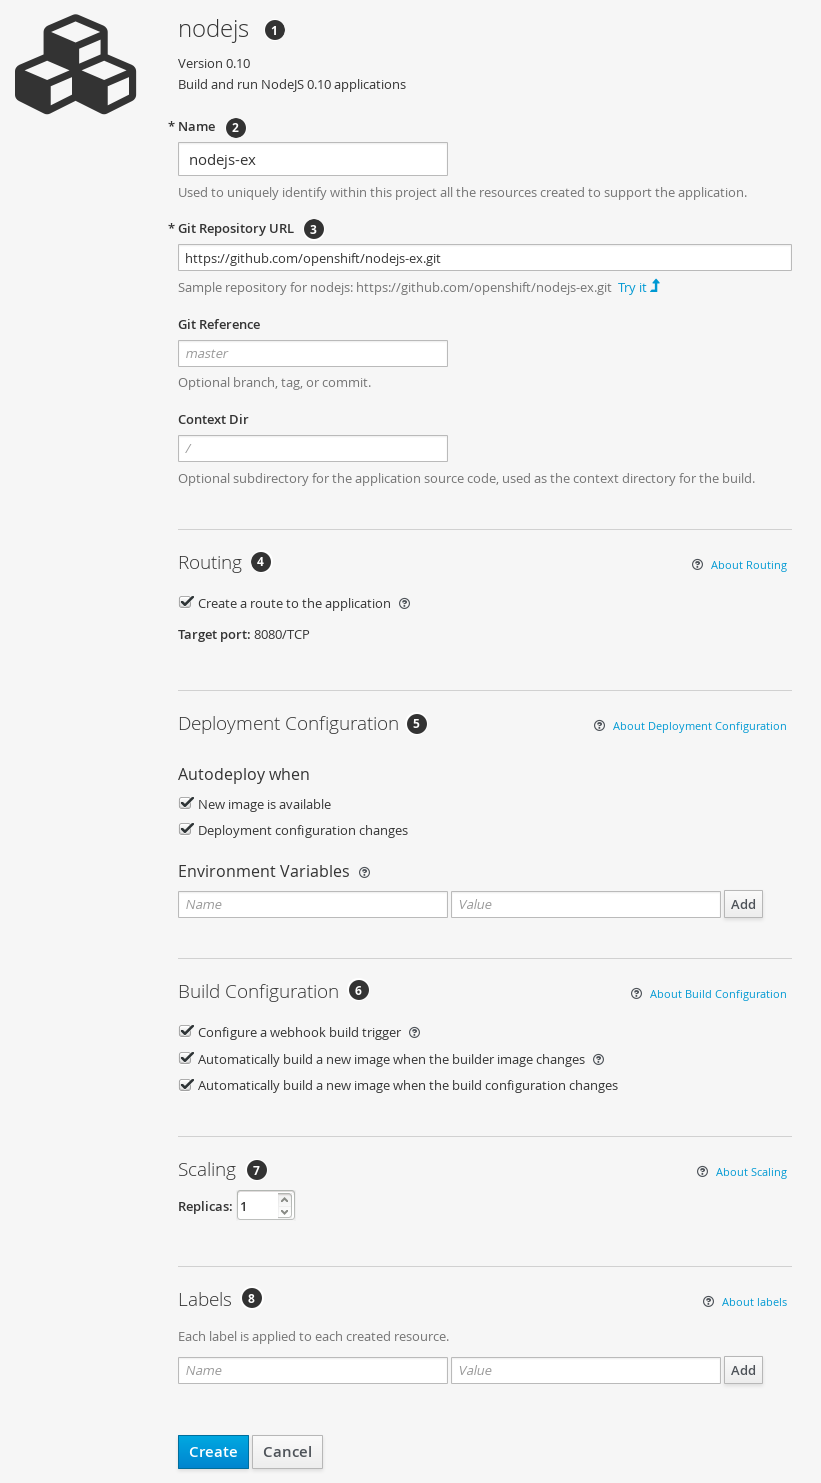
- The builder image name and description.
- The application name used for the generated OpenShift Enterprise objects.
- The Git repository URL, reference, and context directory for your source code.
- Routing configuration section for making this application publicly accessible.
- Deployment configuration section for customizing deployment triggers and image environment variables.
- Build configuration section for customizing build triggers.
- Replica scaling section for configuring the number of running instances of the application.
- The labels to assign to all items generated for the application. You can add and edit labels for all objects here.
NoteTo see all of the configuration options, click the "Show advanced build and deployment options" link.
Chapter 6. Migrating Applications
6.1. Overview
This topic covers the migration procedure of OpenShift version 2 (v2) applications to OpenShift version 3 (v3).
This topic uses some terminology that is specific to OpenShift v2. Comparing OpenShift Enterprise 2 and OpenShift Enterprise 3 provides insight on the differences between the two versions and the language used.
To migrate OpenShift v2 applications to OpenShift Enterprise v3, all cartridges in the v2 application must be recorded as each v2 cartridge is equivalent with a corresponding image or template in OpenShift Enterprise v3 and they must be migrated individually. For each cartridge, all dependencies or required packages also must be recorded, as they must be included in the v3 images.
The general migration procedure is:
Back up the v2 application.
- Web cartridge: The source code can be backed up to a Git repository such as by pushing to a repository on GitHub.
-
Database cartridge: The database can be backed up using a dump command (
mongodump,mysqldump,pg_dump) to back up the database. Web and database cartridges:
rhcclient tool provides snapshot ability to back up multiple cartridges:$ rhc snapshot save <app_name>
The snapshot is a tar file that can be unzipped, and its content is application source code and the database dump.
- If the application has a database cartridge, create a v3 database application, sync the database dump to the pod of the new v3 database application, then restore the v2 database in the v3 database application with database restore commands.
- For a web framework application, edit the application source code to make it v3 compatible. Then, add any dependencies or packages required in appropriate files in the Git repository. Convert v2 environment variables to corresponding v3 environment variables.
- Create a v3 application from source (your Git repository) or from a quickstart with your Git URL. Also, add the database service parameters to the new application to link the database application to the web application.
- In v2, there is an integrated Git environment and your applications automatically rebuild and restart whenever a change is pushed to your v2 Git repository. In v3, in order to have a build automatically triggered by source code changes pushed to your public Git repository, you must set up a webhook after the initial build in v3 is completed.
6.2. Migrating Database Applications
6.2.1. Overview
This topic reviews how to migrate MySQL, PostgreSQL, and MongoDB database applications from OpenShift version 2 (v2) to OpenShift version 3 (v3).
6.2.2. Supported Databases
| v2 | v3 |
|---|---|
| MongoDB: 2.4 | MongoDB: 2.4, 2.6 |
| MySQL: 5.5 | MySQL: 5.5, 5.6 |
| PostgreSQL: 9.2 | PostgreSQL: 9.2, 9.4 |
6.2.3. MySQL
Export all databases to a dump file and copy it to a local machine (into the current directory):
$ rhc ssh <v2_application_name>
$ mysqldump --skip-lock-tables -h $OPENSHIFT_MYSQL_DB_HOST -P ${OPENSHIFT_MYSQL_DB_PORT:-3306} -u ${OPENSHIFT_MYSQL_DB_USERNAME:-'admin'} \
 --password="$OPENSHIFT_MYSQL_DB_PASSWORD" --all-databases > ~/app-root/data/all.sql
$ exit
Download dbdump to your local machine:
$ mkdir mysqldumpdir
$ rhc scp -a <v2_application_name> download mysqldumpdir app-root/data/all.sql
Create a v3 mysql-persistent pod from template:
$ oc new-app mysql-persistent -p \
   MYSQL_USER=<your_V2_mysql_username> -p \
   MYSQL_PASSWORD=<your_v2_mysql_password> -p MYSQL_DATABASE=<your_v2_database_name>
Check to see if the pod is ready to use:
$ oc get pods
When the pod is up and running, copy database archive files to your v3 MySQL pod:
$ oc rsync /local/mysqldumpdir <mysql_pod_name>:/var/lib/mysql/data
Restore the database in the v3 running pod:
$ oc rsh <mysql_pod>
$ cd /var/lib/mysql/data/mysqldumpdir
In v3, to restore databases you need to access MySQL as root user.
In v2, the
$OPENSHIFT_MYSQL_DB_USERNAMEhad full privileges on all databases. In v3, you must grant privileges to$MYSQL_USERfor each database.$ mysql -u root $ source all.sql
Grant all privileges on <dbname> to
<your_v2_username>@localhost, then flush privileges.Remove the dump directory from the pod:
$ cd ../; rm -rf /var/lib/mysql/data/mysqldumpdir
Supported MySQL Environment Variables
| v2 | v3 |
|---|---|
|
|
|
|
|
|
|
|
|
|
|
|
|
| |
|
| |
|
| |
|
| |
|
| |
|
| |
|
|
|
|
|
|
|
|
|
|
|
|
|
|
|
|
|
|
|
|
|
|
|
|
|
| |
|
| |
|
| |
|
| |
|
| |
|
|
6.2.4. PostgreSQL
Back up the v2 PostgreSQL database from the gear:
$ rhc ssh -a <v2-application_name>
$ mkdir ~/app-root/data/tmp
$ pg_dump <database_name> | gzip > ~/app-root/data/tmp/<database_name>.gz
Extract the backup file back to your local machine:
$ rhc scp -a <v2_application_name> download <local_dest> app-root/data/tmp/<db-name>.gz
$ gzip -d <database-name>.gz
NoteSave the backup file to a separate folder for step 4.
Create the PostgreSQL service using the v2 application database name, user name and password to create the new service:
$ oc new-app postgresql-persistent -p POSTGRESQL_DATABASE=dbname -p
POSTGRESQL_PASSWORD=password -p POSTGRESQL_USER=username
Check to see if the pod is ready to use:
$ oc get pods
When the pod is up and running, sync the backup directory to pod:
$ oc rsync /local/path/to/dir <postgresql_pod_name>:/var/lib/pgsql/data
Remotely access the pod:
$ oc rsh <pod_name>
Restore the database:
psql dbname < /var/lib/pgsql/data/<database_backup_file>
Remove all backup files that are no longer needed:
$ rm /var/lib/pgsql/data/<database-backup-file>
Supported PostgreSQL Environment Variables
| v2 | v3 |
|---|---|
|
|
|
|
|
|
|
|
|
|
|
|
|
| |
|
| |
|
| |
|
| |
|
| |
|
| |
|
| |
|
| |
|
| |
|
| |
|
| |
|
| |
|
| |
|
|
6.2.5. MongoDB
- For OpenShift v3: MongoDB shell version 3.2.6
- For OpenShift v2: MongoDB shell version 2.4.9
Remotely access the v2 application via the
sshcommand:$ rhc ssh <v2_application_name>
Run mongodump, specifying a single database with
-d <database_name> -c <collections>. Without those options, dump all databases. Each database is dumped in its own directory:$ mongodump -h $OPENSHIFT_MONGODB_DB_HOST -o app-root/repo/mydbdump -u 'admin' -p $OPENSHIFT_MONGODB_DB_PASSWORD $ cd app-root/repo/mydbdump/<database_name>; tar -cvzf dbname.tar.gz $ exit
Download dbdump to a local machine in the mongodump directory:
$ mkdir mongodump
$ rhc scp -a <v2 appname> download mongodump \
  app-root/repo/mydbdump/<dbname>/dbname.tar.gz
Start a MongoDB pod in v3. Because the latest image (3.2.6) does not include mongo-tools, to use
mongorestoreormongoimportcommands you need to edit the default mongodb-persistent template to specify the image tag that contains themongo-tools, “mongodb:2.4”. For that reason, the followingoc exportcommand and edit are necessary:$ oc export template mongodb-persistent -n openshift -o json > mongodb-24persistent.json
Edit L80 of mongodb-24persistent.json; replace
mongodb:latestwithmongodb:2.4.$ oc new-app --template=mongodb-persistent -n <project-name-that-template-was-created-in> \ MONGODB_USER=user_from_v2_app -p \ MONGODB_PASSWORD=password_from_v2_db -p \ MONGODB_DATABASE=v2_dbname -p \ MONGODB_ADMIN_PASSWORD=password_from_v2_db $ oc get pods
When the mongodb pod is up and running, copy the database archive files to the v3 MongoDB pod:
$ oc rsync local/path/to/mongodump <mongodb_pod_name>:/var/lib/mongodb/data
$ oc rsh <mongodb_pod>
In the MongoDB pod, complete the following for each database you want to restore:
$ cd /var/lib/mongodb/data/mongodump
$ tar -xzvf dbname.tar.gz
$ mongorestore -u $MONGODB_USER -p $MONGODB_PASSWORD -d dbname -v /var/lib/mongodb/data/mongodump
Check if the database is restored:
$ mongo admin -u $MONGODB_USER -p $MONGODB_ADMIN_PASSWORD
$ use dbname
$ show collections
$ exit
Remove the mongodump directory from the pod:
$ rm -rf /var/lib/mongodb/data/mongodump
Supported MongoDB Environment Variables
| v2 | v3 |
|---|---|
|
|
|
|
|
|
|
|
|
|
|
|
|
| |
|
| |
|
| |
|
| |
|
| |
|
| |
|
| |
|
| |
|
|
6.3. Migrating Web Framework Applications
6.3.1. Overview
This topic reviews how to migrate Python, Ruby, PHP, Perl, Node.js, JBoss EAP, JBoss WS (Tomcat), and Wildfly 10 (JBoss AS) web framework applications from OpenShift version 2 (v2) to OpenShift version 3 (v3).
6.3.2. Python
Set up a new GitHub repository and add it as a remote branch to the current, local v2 Git repository:
$ git remote add <remote-name> https://github.com/<github-id>/<repo-name>.git
Push the local v2 source code to the new repository:
$ git push -u <remote-name> master
Ensure that all important files such as setup.py, wsgi.py, requirements.txt, and etc are pushed to new repository.
- Ensure all required packages for your application are included in requirements.txt.
- S2I-python does not support mod_wsgi anymore. However, gunicorn is supported and it is an alternative for mod_wsgi. So, add gunicorn package to requirements.txt.
Use the
occommand to launch a new Python application from the builder image and source code:$ oc new-app --strategy=source python:3.3~https://github.com/<github-id>/<repo-name> --name=<app-name> -e <ENV_VAR_NAME>=<env_var_value>
Supported Python Versions
| v2 | v3 |
|---|---|
| Python: 2.6, 2.7, 3.3 | Python: 2.7, 3.3, 3.4 |
| Django | Django-psql-example (quickstart) |
6.3.3. Ruby
Set up a new GitHub repository and add it as a remote branch to the current, local v2 Git repository:
$ git remote add <remote-name> https://github.com/<github-id>/<repo-name>.git
Push the local v2 source code to the new repository:
$ git push -u <remote-name> master
If you do not have a Gemfile and are running a simple rack application, copy this Gemfile into the root of your source:
https://github.com/openshift/ruby-ex/blob/master/Gemfile
NoteThe latest version of the rack gem that supports Ruby 2.0 is 1.6.4, so the Gemfile needs to be modified to
gem 'rack', “1.6.4”.For Ruby 2.2 or later, use the rack gem 2.0 or later.
Use the
occommand to launch a new Ruby application from the builder image and source code:$ oc new-app --strategy=source ruby:2.0~https://github.com/<github-id>/<repo-name>.git
Supported Ruby Versions
| v2 | v3 |
|---|---|
| Ruby: 1.8, 1.9, 2.0 | Ruby: 2.0, 2.2 |
| Ruby on Rails: 3, 4 | Rails-postgresql-example (quickstart) |
| Sinatra |
6.3.4. PHP
Set up a new GitHub repository and add it as a remote branch to the current, local v2 Git repository:
$ git remote add <remote-name> https://github.com/<github-id>/<repo-name>
Push the local v2 source code to the new repository:
$ git push -u <remote-name> master
Use the
occommand to launch a new PHP application from the builder image and source code:$ oc new-app https://github.com/<github-id>/<repo-name>.git --name=<app-name> -e <ENV_VAR_NAME>=<env_var_value>
Supported PHP Versions
| v2 | v3 |
|---|---|
| PHP: 5.3, 5.4 | PHP:5.5, 5.6 |
| PHP 5.4 with Zend Server 6.1 | |
| CodeIgniter 2 | |
| HHVM | |
| Laravel 5.0 | |
| cakephp-mysql-example (quickstart) |
6.3.5. Perl
Set up a new GitHub repository and add it as a remote branch to the current, local v2 Git repository:
$ git remote add <remote-name> https://github.com/<github-id>/<repo-name>
Push the local v2 source code to the new repository:
$ git push -u <remote-name> master
Edit the local Git repository and push changes upstream to make it v3 compatible:
In v2, CPAN modules reside in .openshift/cpan.txt. In v3, the s2i builder looks for a file named cpanfile in the root directory of the source.
$ cd <local-git-repository>
$ mv .openshift/cpan.txt cpanfile
Edit cpanfile, as it has a slightly different format:
format of cpanfile format of cpan.txt requires ‘cpan::mod’;
cpan::mod
requires ‘Dancer’;
Dancer
requires ‘YAML’;
YAML
Remove .openshift directory
NoteIn v3, action_hooks and cron tasks are not supported in the same way. See Action Hooks for more information.
-
Use the
occommand to launch a new Perl application from the builder image and source code:
$ oc new-app https://github.com/<github-id>/<repo-name>.git
Supported Perl Versions
| v2 | v3 |
|---|---|
| Perl: 5.10 | Perl: 5.16, 5.20 |
| Dancer-mysql-example (quickstart) |
6.3.6. Node.js
Set up a new GitHub repository and add it as a remote branch to the current, local Git repository:
$ git remote add <remote-name> https://github.com/<github-id>/<repo-name>
Push the local v2 source code to the new repository:
$ git push -u <remote-name> master
Edit the local Git repository and push changes upstream to make it v3 compatible:
Remove the .openshift directory.
NoteIn v3, action_hooks and cron tasks are not supported in the same way. See Action Hooks for more information.
Edit server.js.
- L116 server.js: 'self.app = express();'
- L25 server.js: self.ipaddress = '0.0.0.0';
L26 server.js: self.port = 8080;
NoteLines(L) are from the base V2 cartridge server.js.
Use the
occommand to launch a new Node.js application from the builder image and source code:$ oc new-app https://github.com/<github-id>/<repo-name>.git --name=<app-name> -e <ENV_VAR_NAME>=<env_var_value>
Supported Node.js Versions
| v2 | v3 |
|---|---|
| Node.js 0.10 | Nodejs: 0.10 |
| Nodejs-mongodb-example (quickstart) |
6.3.7. JBoss EAP
Set up a new GitHub repository and add it as a remote branch to the current, local Git repository:
$ git remote add <remote-name> https://github.com/<github-id>/<repo-name>
Push the local v2 source code to the new repository:
$ git push -u <remote-name> master
- If the repository includes pre-built .war files, they need to reside in the deployments directory off the root directory of the repository.
Create the new application using the JBoss EAP 6 builder image (jboss-eap64-openshift) and the source code repository from GitHub:
$ oc new-app --strategy=source jboss-eap64-openshift~https://github.com/<github-id>/<repo-name>.git
6.3.8. JBoss WS (Tomcat)
Set up a new GitHub repository and add it as a remote branch to the current, local Git repository:
$ git remote add <remote-name> https://github.com/<github-id>/<repo-name>
Push the local v2 source code to the new repository:
$ git push -u <remote-name> master
- If the repository includes pre-built .war files, they need to reside in the deployments directory off the root directory of the repository.
Create the new application using the JBoss Web Server 3 (Tomcat 7) builder image (jboss-webserver30-tomcat7) and the source code repository from GitHub:
$ oc new-app --strategy=source
jboss-webserver30-tomcat7-openshift~https://github.com/<github-id>/<repo-name>.git
--name=<app-name> -e <ENV_VAR_NAME>=<env_var_value>
6.3.9. JBoss AS (Wildfly 10)
Set up a new GitHub repository and add it as a remote branch to the current, local Git repository:
$ git remote add <remote-name> https://github.com/<github-id>/<repo-name>
Push the local v2 source code to the new repository:
$ git push -u <remote-name> master
Edit the local Git repository and push the changes upstream to make it v3 compatible:
Remove .openshift directory.
NoteIn v3, action_hooks and cron tasks are not supported in the same way. See Action Hooks for more information.
- Add the deployments directory to the root of the source repository. Move the .war files to ‘deployments’ directory.
Use the the
occommand to launch a new Wildfly application from the builder image and source code:$ oc new-app https://github.com/<github-id>/<repo-name>.git --image-stream=”openshift/wildfly:10.0" --name=<app-name> -e <ENV_VAR_NAME>=<env_var_value>
NoteThe argument
--nameis optional to specify the name of your application. The argument-eis optional to add environment variables that are needed for build and deployment processes, such asOPENSHIFT_PYTHON_DIR.
6.3.10. Supported JBoss/XPaas Versions
| v2 | v3 |
|---|---|
| JBoss App Server 7 | |
| Tomcat 6 (JBoss EWS 1.0) | jboss-webserver30-tomcat7-openshift: 1.1 |
| Tomcat 7 (JBoss EWS 2.0) | |
| Vert.x 2.1 | |
| WildFly App Server 10 | |
| WildFly App Server 8.2.1.Final | |
| WildFly App Server 9 | |
| CapeDwarf | |
| JBoss Data Virtualization 6 | |
| JBoss Enterprise App Platform 6 | jboss-eap64-openshift: 1.2, 1.3 |
| JBoss Unified Push Server 1.0.0.Beta1, Beta2 | |
| JBoss BPM Suite | |
| JBoss BRMS | |
| jboss-eap70-openshift: 1.3-Beta | |
| eap64-https-s2i | |
| eap64-mongodb-persistent-s2i | |
| eap64-mysql-persistent-s2i | |
| eap64-psql-persistent-s2i |
6.4. QuickStart Examples
6.4.1. Overview
Although there is no clear-cut migration path for v2 quickstart to v3 quickstart, the following quickstarts are currently available in v3. If you have an application with a database, rather than using oc new-app to create your application, then oc new-app again to start a separate database service and linking the two with common environment variables, you can use one of the following to instantiate the linked application and database at once, from your GitHub repository containing your source code. You can list all available templates with oc get templates -n openshift:
CakePHP MySQL https://github.com/openshift/cakephp-ex
- template: cakephp-mysql-example
Node.js MongoDB https://github.com/openshift/nodejs-ex
- template: nodejs-mongodb-example
Django PosgreSQL https://github.com/openshift/django-ex
- template: django-psql-example
Dancer MySQL https://github.com/openshift/dancer-ex
- template: dancer-mysql-example
Rails PostgreSQL https://github.com/openshift/rails-ex
- template: rails-postgresql-example
6.4.2. Workflow
Run a git clone of one of the above template URLs locally. Add and commit your application source code and push a GitHub repository, then start a v3 quickstart application from one of the templates listed above:
- Create a GitHub repository for your application.
Clone a quickstart template and add your GitHub repository as a remote:
$ git clone <one-of-the-template-URLs-listed-above>
$ cd <your local git repository>
$ git remote add upstream <https://github.com/<git-id>/<quickstart-repo>.git>
$ git push -u upstream master
Commit and push your source code to GitHub:
$ cd <your local repository>
$ git commit -am “added code for my app”
$ git push origin master
Create a new application in v3:
$ oc new-app --template=<template> \ -p SOURCE_REPOSITORY_URL=<https://github.com/<git-id>/<quickstart_repo>.git> \ -p DATABASE_USER=<your_db_user> \ -p DATABASE_NAME=<your_db_name> \ -p DATABASE_PASSWORD=<your_db_password> \ -p DATABASE_ADMIN_PASSWORD=<your_db_admin_password> 1- 1
- Only applicable for MongoDB.
You should now have 2 pods running, a web framework pod, and a database pod. The web framework pod environment should match the database pod environment. You can list the environment variables with
oc set env pod/<pod_name> --list:-
DATABASE_NAMEis now<DB_SERVICE>_DATABASE -
DATABASE_USERis now<DB_SERVICE>_USER -
DATABASE_PASSWORDis now<DB_SERVICE>_PASSWORD DATABASE_ADMIN_PASSWORDis nowMONGODB_ADMIN_PASSWORD(only applicable for MongoDB)If no
SOURCE_REPOSITORY_URLis specified, the template will use the template URL (https://github.com/openshift/<quickstart>-ex) listed above as the source repository, and a hello-welcome application will be started.
-
If you are migrating a database, export databases to a dump file and restore the database in the new v3 database pod. Refer to the steps outlined in Database Applications, skipping the
oc new-appstep as the database pod is already up and running.
6.5. Continuous Integration and Deployment (CI/CD)
6.5.1. Overview
This topic reviews the differences in continuous integration and deployment (CI/CD) applications between OpenShift version 2 (v2) and OpenShift version 3 (v3) and how to migrate these applications into the v3 environment.
6.5.2. Jenkins
The Jenkins applications in OpenShift version 2 (v2) and OpenShift version 3 (v3) are configured differently due to fundamental differences in architecture. For example, in v2, the application uses an integrated Git repository that is hosted in the gear to store the source code. In v3, the source code is located in a public or private Git repository that is hosted outside of the pod.
Furthermore, in OpenShift v3, Jenkins jobs can not only be triggered by source code changes, but also by changes in ImageStream, which are changes on the images that are used to build the application along with its source code. As a result, it is highly recommended that you migrate the Jenkins application manually by creating a new Jenkins application in v3, and then re-creating jobs with the configurations that are suitable to OpenShift v3 environment.
Consult these resources for more information on how to create a Jenkins application, configure jobs, and use Jenkins plug-ins properly:
6.6. Webhooks and Action Hooks
6.6.1. Overview
This topic reviews the differences in webhooks and action hooks between OpenShift version 2 (v2) and OpenShift version 3 (v3) and how to migrate these applications into the v3 environment.
6.6.2. Webhooks
After creating a
BuildConfig`from a GitHub repository, run:$ oc describe bc/<name-of-your-BuildConfig>
This will output a webhook GitHub URL that looks like:
<https://api.dev-preview-int.openshift.com:443/oapi/v1/namespaces/nsname/buildconfigs/bcname/webhooks/secret/github>.
- Cut and paste this URL into GitHub, from the GitHub web console.
- In your GitHub repository, select Add Webhook from Settings → Webhooks & Services.
- Paste the URL output (similar to above) into the Payload URL field.
You should see a message from GitHub stating that your webhook was successfully configured.
Now, whenever you push a change to your GitHub repository, a new build will automatically start, and upon a successful build a new deployment will start.
If you delete or recreate your application, you will have to update the Payload URL field in GitHub with the new BuildConfig webhook url.
6.6.3. Action Hooks
In OpenShift version 2 (v2), there are build, deploy, post_deploy, and pre_build scripts or action_hooks that are located in the .openshift/action_hooks directory. While there is no one-to-one mapping of function for these in v3, the S2I tool in v3 does have the option of adding customizable scripts, either in a designated URL or in the .s2i/bin directory of your source repository.
OpenShift version 3 (v3) also offers a post-build hook for running basic testing of an image after it is built and before it is pushed to the registry. Deployment hooks are configured in the deployment configuration.
In v2, action_hooks are commonly used to set up environment variables. In v2, any environment variables should be passed with:
$ oc new-app <source-url> -e ENV_VAR=env_var
or:
$ oc new-app <template-name> -p ENV_VAR=env_var
Also, environment variables can be added or changed using:
$ oc set env dc/<name-of-dc>
ENV_VAR1=env_var1 ENV_VAR2=env_var2’
6.7. S2I Tool
6.7.1. Overview
The Source-to-Image (S2I) tool injects application source code into a container image and the final product is a new and ready-to-run container image that incorporates the builder image and built source code. The S2I tool can be installed on your local machine without OpenShift Enterprise from the repository.
The S2I tool is a very powerful tool to test and verify your application and images locally before using them on OpenShift Enterprise.
6.7.2. Creating a Container Image
- Identify the builder image that is needed for the application. Red Hat offers multiple builder images for different languages including Python, Ruby, Perl, PHP, and Node.js. Other images are available from the community space.
S2I can build images from source code in a local file system or from a Git repository. To build a new container image from the builder image and the source code:
$ s2i build <source-location> <builder-image-name> <output-image-name>
Note<source-location>can either be a Git repository URL or a directory to source code in a local file system.Test the built image with the Docker daemon:
$ docker run -d --name <new-name> -p <port-number>:<port-number> <output-image-name>
$ curl localhost:<port-number>
- Push the new image to the OpenShift registry.
Create a new application from the image in the OpenShift registry using the
occommand:$ oc new-app <image-name>
6.8. Support Guide
6.8.1. Overview
This topic reviews supported languages, frameworks, databases, and markers for OpenShift version 2 (v2) and OpenShift version 3 (v3).
6.8.2. Supported Databases
See the Supported Databases section of the Database Applications topic.
6.8.3. Supported Languages
6.8.4. Supported Frameworks
| v2 | v3 |
|---|---|
| Jenkins Server | jenkins-persistent |
| Drupal 7 | |
| Ghost 0.7.5 | |
| WordPress 4 | |
| Ceylon | |
| Go | |
| MEAN |
6.8.5. Supported Markers
| v2 | v3 |
|---|---|
| pip_install | If your repository contains requirements.txt, then pip is invoked by default. Otherwise, pip is not used. |
| v2 | v3 |
|---|---|
| disable_asset_compilation |
This can be done by setting |
| v2 | v3 |
|---|---|
| enable_cpan_tests |
This can be done by setting |
| v2 | v3 |
|---|---|
| use_composer | composer is always used if the source repository includes a composer.json in the root directory. |
| v2 | v3 |
|---|---|
| NODEJS_VERSION | N/A |
| use_npm |
npm is always used to start the application, unless |
| v2 | v3 |
|---|---|
| enable_debugging |
This option is controlled via the |
| skip_maven_build | If pom.xml is present, maven will be run. |
| java7 | N/A |
| java8 | JavaEE is using JDK8. |
| v2 | v3 |
|---|---|
| enable_debugging | N/A |
| v2 | v3 |
|---|---|
| force_clean_build | There is a similar concept in v3, as noCache field in buildconfig forces the container build to rerun each layer. In the S2I build, the incremental flag is false by default, which indicates a clean build. |
| hot_deploy | |
| enable_public_server_status | N/A |
| disable_auto_scaling | Autoscaling is off by default and it can be turn on via pod auto-scaling. |
6.8.6. Supported Environment Variables
Chapter 7. Application Tutorials
7.1. Overview
This topic group includes information on how to get your application up and running in OpenShift Enterprise and covers different languages and their frameworks.
7.2. Quickstart Templates
7.2.1. Overview
A quickstart is a basic example of an application running on OpenShift Enterprise. Quickstarts come in a variety of languages and frameworks, and are defined in a template, which is constructed from a set of services, build configurations, and deployment configurations. This template references the necessary images and source repositories to build and deploy the application.
To explore a quickstart, create an application from a template. Your administrator may have already installed these templates in your OpenShift Enterprise cluster, in which case you can simply select it from the web console. See the template documentation for more information on how to upload, create from, and modify a template.
Quickstarts refer to a source repository that contains the application source code. To customize the quickstart, fork the repository and, when creating an application from the template, substitute the default source repository name with your forked repository. This results in builds that are performed using your source code instead of the provided example source. You can then update the code in your source repository and launch a new build to see the changes reflected in the deployed application.
7.2.2. Web Framework Quickstart Templates
These quickstarts provide a basic application of the indicated framework and language:
CakePHP: a PHP web framework (includes a MySQL database)
Dancer: a Perl web framework (includes a MySQL database)
Django: a Python web framework (includes a PostgreSQL database)
NodeJS: a NodeJS web application (includes a MongoDB database)
Rails: a Ruby web framework (includes a PostgreSQL database)
7.3. Ruby on Rails
7.3.1. Overview
Ruby on Rails is a popular web framework written in Ruby. This guide covers using Rails 4 on OpenShift Enterprise.
We strongly advise going through the whole tutorial to have an overview of all the steps necessary to run your application on the OpenShift Enterprise. If you experience a problem try reading through the entire tutorial and then going back to your issue. It can also be useful to review your previous steps to ensure that all the steps were executed correctly.
For this guide you will need:
- Basic Ruby/Rails knowledge
- Locally installed version of Ruby 2.0.0+, Rubygems, Bundler
- Basic Git knowledge
- Running instance of OpenShift Enterprise v3
7.3.2. Local Workstation Setup
First make sure that an instance of OpenShift Enterprise is running and is available. For more info on how to get OpenShift Enterprise up and running check the installation methods. Also make sure that your oc CLI client is installed and the command is accessible from your command shell, so you can use it to log in using your email address and password.
7.3.2.1. Setting Up the Database
Rails applications are almost always used with a database. For the local development we chose the PostgreSQL database. To install it type:
$ sudo yum install -y postgresql postgresql-server postgresql-devel
Next you need to initialize the database with:
$ sudo postgresql-setup initdb
This command will create the /var/lib/pgsql/data directory, in which the data will be stored.
Start the database by typing:
$ sudo systemctl start postgresql.service
When the database is running, create your rails user:
$ sudo -u postgres createuser -s rails
Note that the user we created has no password.
7.3.3. Writing Your Application
If you are starting your Rails application from scratch, you need to install the Rails gem first.
$ gem install rails
Successfully installed rails-4.2.0
1 gem installed
After you install the Rails gem create a new application, with PostgreSQL as your database:
$ rails new rails-app --database=postgresql
Then change into your new application directory.
$ cd rails-app
If you already have an application, make sure the pg (postgresql) gem is present in your Gemfile. If not edit your Gemfile by adding the gem:
gem 'pg'
To generate a new Gemfile.lock with all your dependencies run:
$ bundle install
In addition to using the postgresql database with the pg gem, you’ll also need to ensure the config/database.yml is using the postgresql adapter.
Make sure you updated default section in the config/database.yml file, so it looks like this:
default: &default
  adapter: postgresql
  encoding: unicode
  pool: 5
  host: localhost
  username: rails
  password:
Create your application’s development and test databases by using this rake command:
$ rake db:create
This will create development and test database in your PostgreSQL server.
7.3.3.1. Creating a Welcome Page
Since Rails 4 no longer serves a static public/index.html page in production, we need to create a new root page.
In order to have a custom welcome page we need to do following steps:
- Create a controller with an index action
-
Create a view page for the
welcomecontrollerindexaction - Create a route that will serve applications root page with the created controller and view
Rails offers a generator that will do all this necessary steps for you.
$ rails generate controller welcome index
All the necessary files have been created, now we just need to edit line 2 in config/routes.rb file to look like:
root 'welcome#index'
Run the rails server to verify the page is available.
$ rails server
You should see your page by visiting http://localhost:3000 in your browser. If you don’t see the page, check the logs that are output to your server to debug.
7.3.3.2. Configuring the Application for OpenShift Enterprise
In order to have your application communicating with the PostgreSQL database service that will be running in OpenShift Enterprise, you will need to edit the default section in your config/database.yml to use environment variables, which you will define later, upon the database service creation.
The default section in your edited config/database.yml together with pre-defined variables should look like:
<% user = ENV.key?("POSTGRESQL_ADMIN_PASSWORD") ? "root" : ENV["POSTGRESQL_USER"] %>
<% password = ENV.key?("POSTGRESQL_ADMIN_PASSWORD") ? ENV["POSTGRESQL_ADMIN_PASSWORD"] : ENV["POSTGRESQL_PASSWORD"] %>
<% db_service = ENV.fetch("DATABASE_SERVICE_NAME","").upcase %>

default: &default
  adapter: postgresql
  encoding: unicode
  # For details on connection pooling, see rails configuration guide
  # http://guides.rubyonrails.org/configuring.html#database-pooling
  pool: <%= ENV["POSTGRESQL_MAX_CONNECTIONS"] || 5 %>
  username: <%= user %>
  password: <%= password %>
  host: <%= ENV["#{db_service}_SERVICE_HOST"] %>
  port: <%= ENV["#{db_service}_SERVICE_PORT"] %>
  database: <%= ENV["POSTGRESQL_DATABASE"] %>
For an example of how the final file should look, see Ruby on Rails example application config/database.yml.
7.3.3.3. Storing Your Application in Git
OpenShift Enterprise requires git, if you don’t have it installed you will need to install it.
Building an application in OpenShift Enterprise usually requires that the source code be stored in a git repository, so you will need to install git if you do not already have it.
Make sure you are in your Rails application directory by running the ls -1 command. The output of the command should look like:
$ ls -1
app
bin
config
config.ru
db
Gemfile
Gemfile.lock
lib
log
public
Rakefile
README.rdoc
test
tmp
vendor
Now run these commands in your Rails app directory to initialize and commit your code to git:
$ git init
$ git add .
$ git commit -m "initial commit"
Once your application is committed you need to push it to a remote repository. For this you would need a GitHub account, in which you create a new repository.
Set the remote that points to your git repository:
$ git remote add origin git@github.com:<namespace/repository-name>.git
After that, push your application to your remote git repository.
$ git push
7.3.4. Deploying Your Application to OpenShift Enterprise
To deploy your Ruby on Rails application, create a new Project for the application:
$ oc new-project rails-app --description="My Rails application" --display-name="Rails Application"
After creating the the rails-app project, you will be automatically switched to the new project namespace.
Deploying your application in OpenShift Enterprise involves three steps:
- Creating a database service from OpenShift Enterprise’s PostgreSQL image
- Creating a frontend service from OpenShift Enterprise’s Ruby 2.0 builder image and your Ruby on Rails source code, which we wire with the database service
- Creating a route for your application.
7.3.4.1. Creating the Database Service
Your Rails application expects a running database service. For this service use PostgeSQL database image.
To create the database service you will use the oc new-app command. To this command you will need to pass some necessary environment variables which will be used inside the database container. These environment variables are required to set the username, password, and name of the database. You can change the values of these environment variables to anything you would like. The variables we are going to be setting are as follows:
- POSTGRESQL_DATABASE
- POSTGRESQL_USER
- POSTGRESQL_PASSWORD
Setting these variables ensures:
- A database exists with the specified name
- A user exists with the specified name
- The user can access the specified database with the specified password
For example:
$ oc new-app postgresql -e POSTGRESQL_DATABASE=db_name -e POSTGRESQL_USER=username -e POSTGRESQL_PASSWORD=password
To also set the password for the database administrator, append to the previous command with:
-e POSTGRESQL_ADMIN_PASSWORD=admin_pw
To watch the progress of this command:
$ oc get pods --watch
7.3.4.2. Creating the Frontend Service
To bring your application to OpenShift Enterprise, you need to specify a repository in which your application lives, using once again the oc new-app command, in which you will need to specify database related environment variables we setup in the Creating the Database Service:
$ oc new-app path/to/source/code --name=rails-app -e POSTGRESQL_USER=username -e POSTGRESQL_PASSWORD=password -e POSTGRESQL_DATABASE=db_name -e DATABASE_SERVICE_NAME=postgresql
With this command, OpenShift Enterprise fetches the source code, sets up the Builder image, builds your application image, and deploys the newly created image together with the specified environment variables. The application is named rails-app.
You can verify the environment variables have been added by viewing the JSON document of the rails-app DeploymentConfig:
$ oc get dc rails-app -o json
You should see the following section:
env": [
    {
        "name": "POSTGRESQL_USER",
        "value": "username"
    },
    {
        "name": "POSTGRESQL_PASSWORD",
        "value": "password"
    },
    {
        "name": "POSTGRESQL_DATABASE",
        "value": "db_name"
    },
    {
    "name": "DATABASE_SERVICE_NAME",
    "value": "postgresql"
    }
],
To check the build process, use the build-logs command:
$ oc logs -f build rails-app-1
Once the build is complete, you can look at the running pods in OpenShift Enterprise:
$ oc get pods
You should see a line starting with myapp-(#number)-(some hash) and that is your application running in OpenShift Enterprise.
Before your application will be functional, you need to initialize the database by running the database migration script. There are two ways you can do this:
- Manually from the running frontend container:
First you need to exec into frontend container with rsh command:
$ oc rsh <FRONTEND_POD_ID>
Run the migration from inside the container:
$ RAILS_ENV=production bundle exec rake db:migrate
If you are running your Rails application in a development or test environment you don’t have to specify the RAILS_ENV environment variable.
- By adding pre-deployment lifecycle hooks in your template. For example check the hooks example in our Rails example application.
7.3.4.3. Creating a Route for Your Application
To expose a service by giving it an externally-reachable hostname like www.example.com use OpenShift Enterprise route. In your case you need to expose the frontend service by typing:
$ oc expose service rails-app --hostname=www.example.com
It’s the user’s responsibility to ensure the hostname they specify resolves into the IP address of the router. For more information, check the OpenShift Enterprise documentation on:
Chapter 8. Opening a Remote Shell to Containers
8.1. Overview
The oc rsh command allows you to locally access and manage tools that are on the system. The secure shell (SSH) is the underlying technology and industry standard that provides a secure connection to the application. Access to applications with the shell environment is protected and restricted with Security-Enhanced Linux (SELinux) policies.
8.2. Start a Secure Shell Session
Open a remote shell session to a container:
$ oc rsh <pod>
While in the remote shell, you can issue commands as if you are inside the container and perform local operations like monitoring, debugging, and using CLI commands specific to what is running in the container.
For example, in a MySQL container, you can count the number of records in the database by invoking the mysql command, then using the the prompt to type in the SELECT command. You can also use use commands like ps(1) and ls(1) for validation.
BuildConfigs and DeployConfigs map out how you want things to look and pods (with containers inside) are created and dismantled as needed. Your changes are not persistent. If you make changes directly within the container and that container is destroyed and rebuilt, your changes will no longer exist.
oc exec can be used to execute a command remotely. However, the oc rsh command provides an easier way to keep a remote shell open persistently.
8.3. Secure Shell Session Help
For help with usage, options, and to see examples:
$ oc rsh -h
Chapter 9. Templates
9.1. Overview
A template describes a set of objects that can be parameterized and processed to produce a list of objects for creation by OpenShift Enterprise. A template can be processed to create anything you have permission to create within a project, for example services, build configurations, and deployment configurations. A template may also define a set of labels to apply to every object defined in the template.
You can create a list of objects from a template using the CLI or, if a template has been uploaded to your project or the global template library, using the web console.
9.2. Uploading a Template
If you have a JSON or YAML file that defines a template, for example as seen in this example, you can upload the template to projects using the CLI. This saves the template to the project for repeated use by any user with appropriate access to that project. Instructions on writing your own templates are provided later in this topic.
To upload a template to your current project’s template library, pass the JSON or YAML file with the following command:
$ oc create -f <filename>
You can upload a template to a different project using the -n option with the name of the project:
$ oc create -f <filename> -n <project>
The template is now available for selection using the web console or the CLI.
9.3. Creating from Templates Using the Web Console
To create the objects from an uploaded template using the web console:
While in the desired project, click Add to Project:
Select a template from the list of templates in your project, or provided by the global template library:
Modify template parameters in the template creation screen:
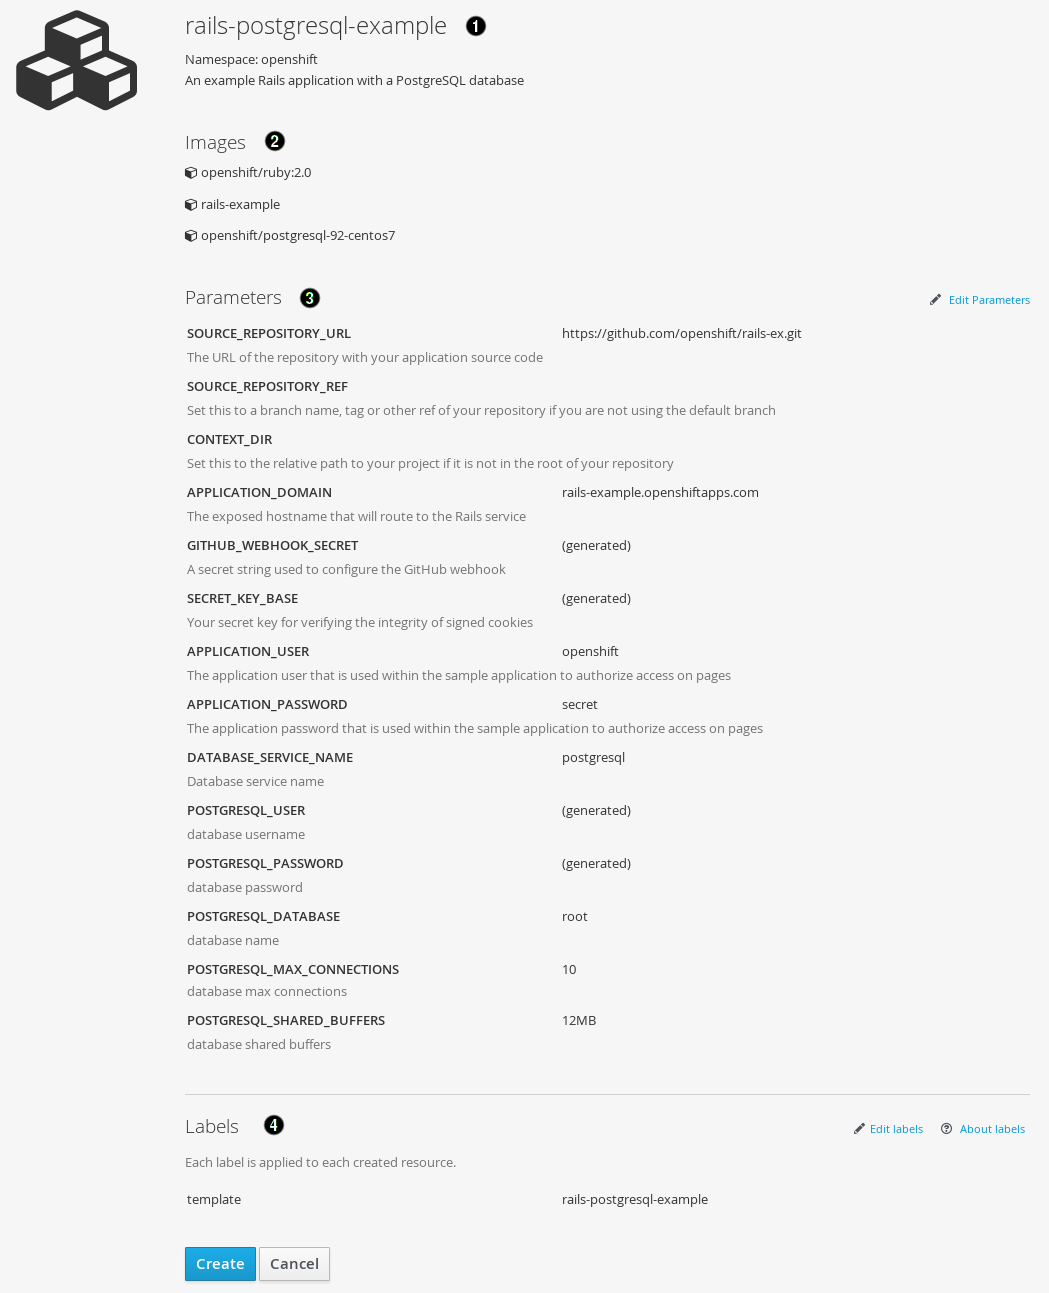
- Template name and description.
- Container images included in the template.
- Parameters defined by the template. You can edit values for parameters defined in the template here.
- Labels to assign to all items included in the template. You can add and edit labels for objects.
9.4. Creating from Templates Using the CLI
You can use the CLI to process templates and use the configuration that is generated to create objects.
9.4.1. Labels
Labels are used to manage and organize generated objects, such as pods. The labels specified in the template are applied to every object that is generated from the template.
There is also the ability to add labels in the template from the command line.
$ oc process -f <filename> -l name=otherLabel
9.4.2. Parameters
The list of parameters that you can override are listed in the parameters section of the template. You can list them with the CLI by using the following command and specifying the file to be used:
$ oc process --parameters -f <filename>
Alternatively, if the template is already uploaded:
$ oc process --parameters -n <project> <template_name>
For example, the following shows the output when listing the parameters for one of the Quickstart templates in the default openshift project:
$ oc process --parameters -n openshift rails-postgresql-example
NAME                         DESCRIPTION                                                                                              GENERATOR           VALUE
SOURCE_REPOSITORY_URL        The URL of the repository with your application source code                                                                  https://github.com/openshift/rails-ex.git
SOURCE_REPOSITORY_REF        Set this to a branch name, tag or other ref of your repository if you are not using the default branch
CONTEXT_DIR                  Set this to the relative path to your project if it is not in the root of your repository
APPLICATION_DOMAIN           The exposed hostname that will route to the Rails service                                                                    rails-postgresql-example.openshiftapps.com
GITHUB_WEBHOOK_SECRET        A secret string used to configure the GitHub webhook                                                     expression          [a-zA-Z0-9]{40}
SECRET_KEY_BASE              Your secret key for verifying the integrity of signed cookies                                            expression          [a-z0-9]{127}
APPLICATION_USER             The application user that is used within the sample application to authorize access on pages                                 openshift
APPLICATION_PASSWORD         The application password that is used within the sample application to authorize access on pages                             secret
DATABASE_SERVICE_NAME        Database service name                                                                                                        postgresql
POSTGRESQL_USER              database username                                                                                        expression          user[A-Z0-9]{3}
POSTGRESQL_PASSWORD          database password                                                                                        expression          [a-zA-Z0-9]{8}
POSTGRESQL_DATABASE          database name                                                                                                                root
POSTGRESQL_MAX_CONNECTIONS   database max connections                                                                                                     10
POSTGRESQL_SHARED_BUFFERS    database shared buffers                                                                                                      12MB
The output identifies several parameters that are generated with a regular expression-like generator when the template is processed.
9.4.3. Generating a List of Objects
Using the CLI, you can process a file defining a template to return the list of objects to standard output:
$ oc process -f <filename>
Alternatively, if the template has already been uploaded to the current project:
$ oc process <template_name>
The process command also takes a list of templates you can process to a list of objects. In that case, every template will be processed and the resulting list of objects will contain objects from all templates passed to a process command:
$ cat <first_template> <second_template> | oc process -f -
You can create objects from a template by processing the template and piping the output to oc create:
$ oc process -f <filename> | oc create -f -
Alternatively, if the template has already been uploaded to the current project:
$ oc process <template> | oc create -f -
You can override any parameter values defined in the file by adding the -v option followed by a comma-separated list of <name>=<value> pairs. A parameter reference may appear in any text field inside the template items.
For example, in the following the POSTGRESQL_USER and POSTGRESQL_DATABASE parameters of a template are overridden to output a configuration with customized environment variables:
Example 9.1. Creating a List of Objects from a Template
$ oc process -f my-rails-postgresql \
    -v POSTGRESQL_USER=bob,POSTGRESQL_DATABASE=mydatabase
The JSON file can either be redirected to a file or applied directly without uploading the template by piping the processed output to the oc create command:
$ oc process -f my-rails-postgresql \
    -v POSTGRESQL_USER=bob,POSTGRESQL_DATABASE=mydatabase \
    | oc create -f -
9.5. Modifying an Uploaded Template
You can edit a template that has already been uploaded to your project by using the following command:
$ oc edit template <template>
9.6. Using the Instant App and Quickstart Templates
OpenShift Enterprise provides a number of default Instant App and Quickstart templates to make it easy to quickly get started creating a new application for different languages. Templates are provided for Rails (Ruby), Django (Python), Node.js, CakePHP (PHP), and Dancer (Perl). Your cluster administrator should have created these templates in the default, global openshift project so you have access to them. You can list the available default Instant App and Quickstart templates with:
$ oc get templates -n openshift
If they are not available, direct your cluster administrator to the Loading the Default Image Streams and Templates topic.
By default, the templates build using a public source repository on GitHub that contains the necessary application code. In order to be able to modify the source and build your own version of the application, you must:
-
Fork the repository referenced by the template’s default
SOURCE_REPOSITORY_URLparameter. -
Override the value of the
SOURCE_REPOSITORY_URLparameter when creating from the template, specifying your fork instead of the default value.
By doing this, the build configuration created by the template will now point to your fork of the application code, and you can modify the code and rebuild the application at will. A walkthrough of this process using the web console is provided in Getting Started for Developers: Web Console.
Some of the Instant App and Quickstart templates define a database deployment configuration. The configuration they define uses ephemeral storage for the database content. These templates should be used for demonstration purposes only as all database data will be lost if the database pod restarts for any reason.
9.7. Writing Templates
You can define new templates to make it easy to recreate all the objects of your application. The template will define the objects it creates along with some metadata to guide the creation of those objects.
9.7.1. Description
The template description covers information that informs users what your template does and helps them find it when searching in the web console. In addition to general descriptive information, it includes a set of tags. Useful tags include the name of the language your template is related to (e.g., java, php, ruby, etc.). In addition, adding the special tag instant-app causes your template to be displayed in the list of Instant Apps on the template selection page of the web console.
kind: "Template"
apiVersion: "v1"
metadata:
  name: "cakephp-mysql-example" 1
  annotations:
    description: "An example CakePHP application with a MySQL database" 2
    tags: "instant-app,php,cakephp,mysql" 3
    iconClass: "icon-php" 4
9.7.2. Labels
Templates can include a set of labels. These labels will be added to each object created when the template is instantiated. Defining a label in this way makes it easy for users to find and manage all the objects created from a particular template.
kind: "Template"
apiVersion: "v1"
...
labels:
template: "cakephp-mysql-example" 1- 1
- A label that will be applied to all objects created from this template.
9.7.3. Parameters
Parameters allow a value to be supplied by the user or generated when the template is instantiated. This is useful for generating random passwords or allowing the user to supply a host name or other user-specific value that is required to customize the template. Parameters can be referenced by placing values in the form "${PARAMETER_NAME}" in place of any string field in the template.
kind: Template
apiVersion: v1
objects:
  - kind: BuildConfig
    apiVersion: v1
    metadata:
      name: cakephp-mysql-example
      annotations:
        description: Defines how to build the application
    spec:
      source:
        type: Git
        git:
          uri: "${SOURCE_REPOSITORY_URL}" 1
          ref: "${SOURCE_REPOSITORY_REF}"
        contextDir: "${CONTEXT_DIR}"
parameters:
  - name: SOURCE_REPOSITORY_URL 2
    description: The URL of the repository with your application source code 3
    value: https://github.com/openshift/cakephp-ex.git 4
    required: true 5
  - name: GITHUB_WEBHOOK_SECRET
    description: A secret string used to configure the GitHub webhook
    generate: expression 6
from: "[a-zA-Z0-9]{40}" 7- 1
- This value will be replaced with the value of the
SOURCE_REPOSITORY_URLparameter when the template is instantiated. - 2
- The name of the parameter. This value is displayed to users and used to reference the parameter within the template.
- 3
- A description of the parameter.
- 4
- A default value for the parameter which will be used if the user does not override the value when instantiating the template.
- 5
- Indicates this parameter is required, meaning the user cannot override it with an empty value. If the parameter does not provide a default or generated value, the user must supply a value.
- 6
- A parameter which has its value generated via a regular expression-like syntax.
- 7
- The input to the generator. In this case, the generator will produce a 40 character alphanumeric value including upper and lowercase characters.
9.7.4. Object List
The main portion of the template is the list of objects which will be created when the template is instantiated. This can be any valid API object, such as a BuildConfig, DeploymentConfig, Service, etc. The object will be created exactly as defined here, with any parameter values substituted in prior to creation. The definition of these objects can reference parameters defined earlier.
kind: "Template"
apiVersion: "v1"
objects:
  - kind: "Service" 1
    apiVersion: "v1"
    metadata:
      name: "cakephp-mysql-example"
      annotations:
        description: "Exposes and load balances the application pods"
    spec:
      ports:
        - name: "web"
          port: 8080
          targetPort: 8080
      selector:
name: "cakephp-mysql-example"- 1
- The definition of a
Servicewhich will be created by this template.
If an object definition’s metadata includes a namespace field, the field will be stripped out of the definition during template instantiation. This is necessary because all objects created during instantiation are placed into the target namespace, so it would be invalid for the object to declare a different namespace.
9.7.5. Creating a Template from Existing Objects
Rather than writing an entire template from scratch, you can also export existing objects from your project in template form, and then modify the template from there by adding parameters and other customizations. To export objects in a project in template form, run:
$ oc export all --as-template=<template_name> > <template_filename>
You can also substitute a particular resource type or multiple resources instead of all. Run oc export -h for more examples.
The object types included in oc export all are:
- BuildConfig
- Build
- DeploymentConfig
- ImageStream
- Pod
- ReplicationController
- Route
- Service
Chapter 10. Service Accounts
10.1. Overview
When a person uses the OpenShift Enterprise CLI or web console, their API token authenticates them to the OpenShift API. However, when a regular user’s credentials are not available, it is common for components to make API calls independently. For example:
- Replication controllers make API calls to create or delete pods.
- Applications inside containers could make API calls for discovery purposes.
- External applications could make API calls for monitoring or integration purposes.
Service accounts provide a flexible way to control API access without sharing a regular user’s credentials.
10.2. User Names and Groups
Every service account has an associated user name that can be granted roles, just like a regular user. The user name is derived from its project and name:
system:serviceaccount:<project>:<name>
For example, to add the view role to the robot service account in the top-secret project:
$ oc policy add-role-to-user view system:serviceaccount:top-secret:robot
Every service account is also a member of two groups:
- system:serviceaccounts
- Includes all service accounts in the system.
- system:serviceaccounts:<project>
- Includes all service accounts in the specified project.
For example, to allow all service accounts in all projects to view resources in the top-secret project:
$ oc policy add-role-to-group view system:serviceaccounts -n top-secret
To allow all service accounts in the managers project to edit resources in the top-secret project:
$ oc policy add-role-to-group edit system:serviceaccounts:managers -n top-secret
10.3. Default Service Accounts and Roles
Three service accounts are automatically created in every project:
| Service Account | Usage |
|---|---|
| builder | Used by build pods. It is given the system:image-builder role, which allows pushing images to any image stream in the project using the internal Docker registry. |
| deployer | Used by deployment pods and is given the system:deployer role, which allows viewing and modifying replication controllers and pods in the project. |
| default | Used to run all other pods unless they specify a different service account. |
All service accounts in a project are given the system:image-puller role, which allows pulling images from any image stream in the project using the internal Docker registry.
10.4. Managing Service Accounts
Service accounts are API objects that exist within each project. They can be created or deleted like any other API object.
$ oc create serviceaccount robot
serviceaccounts/robot
10.5. Managing Service Account Credentials
As soon as a service account is created, two secrets are automatically added to it:
- an API token
- credentials for the internal Docker registry
These can be seen by describing the service account:
$ oc describe serviceaccount robot
Name:               robot
Labels:             <none>
Image pull secrets:	robot-dockercfg-624cx

Mountable secrets: 	robot-token-uzkbh
                   	robot-dockercfg-624cx

Tokens:            	robot-token-8bhpp
                   	robot-token-uzkbh
The system ensures that service accounts always have an API token and internal Docker registry credentials.
The generated API token and Docker registry credentials do not expire, but they can be revoked by deleting the secret. When the secret is deleted, a new one is automatically generated to take its place.
10.6. Managing Allowed Secrets
In addition to providing API credentials, a pod’s service account determines which secrets the pod is allowed to use.
Pods use secrets in two ways:
- image pull secrets, providing credentials used to pull images for the pod’s containers
- mountable secrets, injecting the contents of secrets into containers as files
To allow a secret to be used as an image pull secret by a service account’s pods, run:
$ oc secrets add --for=pull \
    serviceaccount/<serviceaccount-name> \
    secret/<secret-name>
To allow a secret to be mounted by a service account’s pods, run:
$ oc secrets add --for=mount \
    serviceaccount/<serviceaccount-name> \
    secret/<secret-name>
This example creates and adds secrets to a service account:
$ oc secrets new secret-plans plan1.txt plan2.txt
secret/secret-plans

$ oc secrets new-dockercfg my-pull-secret \
    --docker-username=mastermind \
    --docker-password=12345 \
    --docker-email=mastermind@example.com
secret/my-pull-secret

$ oc secrets add serviceaccount/robot secret/secret-plans --for=mount

$ oc secrets add serviceaccount/robot secret/my-pull-secret --for=pull

$ oc describe serviceaccount robot
Name:               robot
Labels:             <none>
Image pull secrets:	robot-dockercfg-624cx
                   	my-pull-secret

Mountable secrets: 	robot-token-uzkbh
                   	robot-dockercfg-624cx
                   	secret-plans

Tokens:            	robot-token-8bhpp
                   	robot-token-uzkbh
10.7. Using a Service Account’s Credentials Inside a Container
When a pod is created, it specifies a service account (or uses the default service account), and is allowed to use that service account’s API credentials and referenced secrets.
A file containing an API token for a pod’s service account is automatically mounted at /var/run/secrets/kubernetes.io/serviceaccount/token.
That token can be used to make API calls as the pod’s service account. This example calls the users/~ API to get information about the user identified by the token:
$ TOKEN="$(cat /var/run/secrets/kubernetes.io/serviceaccount/token)"

$ curl --cacert /var/run/secrets/kubernetes.io/serviceaccount/ca.crt \
    "https://openshift.default.svc.cluster.local/oapi/v1/users/~" \
    -H "Authorization: Bearer $TOKEN"

kind: "User"
apiVersion: "v1"
metadata:
  name: "system:serviceaccount:top-secret:robot"
  selflink: "/oapi/v1/users/system:serviceaccount:top-secret:robot"
  creationTimestamp: null
identities: null
groups:
  - "system:serviceaccounts"
  - "system:serviceaccounts:top-secret"
10.8. Using a Service Account’s Credentials Externally
The same token can be distributed to external applications that need to authenticate to the API.
Use the following syntax to to view a service account’s API token:
$ oc describe secret <secret-name>
For example:
$ oc describe secret robot-token-uzkbh -n top-secret
Name:		robot-token-uzkbh
Labels:		<none>
Annotations:	kubernetes.io/service-account.name=robot,kubernetes.io/service-account.uid=49f19e2e-16c6-11e5-afdc-3c970e4b7ffe

Type:	kubernetes.io/service-account-token

Data

token:	eyJhbGciOiJSUzI1NiIsInR5cCI6IkpXVCJ9...

$ oc login --token=eyJhbGciOiJSUzI1NiIsInR5cCI6IkpXVCJ9...
Logged into "https://server:8443" as "system:serviceaccount:top-secret:robot" using the token provided.

You don't have any projects. You can try to create a new project, by running

    $ oc new-project <projectname>

$ oc whoami
system:serviceaccount:top-secret:robot
Chapter 11. Builds
11.1. Overview
A build is the process of transforming input parameters into a resulting object. Most often, the process is used to transform source code into a runnable image.
Build configurations are characterized by a strategy and one or more sources. The strategy determines the aforementioned process, while the sources provide its input.
There are three build strategies:
- Source-To-Image (S2I) (description, options)
- Docker (description, options)
- Custom (description, options)
And there are four types of build source:
It is up to each build strategy to consider or ignore a certain type of source, as well as to determine how it is to be used.
Binary and Git are mutually exclusive source types. Dockerfile and Image can be used by themselves, with each other, or together with either Git or Binary. Also, the Binary build source type is unique from the other options in how it is specified to the system.
11.2. Defining a BuildConfig
A build configuration describes a single build definition and a set of triggers for when a new build should be created.
A build configuration is defined by a BuildConfig, which is a REST object that can be used in a POST to the API server to create a new instance. The following example BuildConfig results in a new build every time a container image tag or the source code changes:
Example 11.1. BuildConfig Object Definition
kind: "BuildConfig"
apiVersion: "v1"
metadata:
  name: "ruby-sample-build" 1
spec:
  triggers: 2
    - type: "GitHub"
      github:
        secret: "secret101"
    - type: "Generic"
      generic:
        secret: "secret101"
    - type: "ImageChange"
  source: 3
    type: "Git"
    git:
      uri: "https://github.com/openshift/ruby-hello-world"
    dockerfile: "FROM openshift/ruby-22-centos7\nUSER example"
  strategy: 4
    type: "Source"
    sourceStrategy:
      from:
        kind: "ImageStreamTag"
        name: "ruby-20-centos7:latest"
  output: 5
    to:
      kind: "ImageStreamTag"
      name: "origin-ruby-sample:latest"
  postCommit: 6
      script: "bundle exec rake test"
- 1
- This specification will create a new
BuildConfignamed ruby-sample-build. - 2
- You can specify a list of triggers, which cause a new build to be created.
- 3
- The
sourcesection defines the source of the build. Thetypedetermines the primary source of input, and can be eitherGit, to point to a code repository location;Dockerfile, to build from an inline Dockerfile; orBinary, to accept binary payloads. Using multiple sources at once is possible. Refer to the documentation for each source type for details. - 4
- The
strategysection describes the build strategy used to execute the build. You can specifySource,DockerandCustomstrategies here. This above example uses theruby-20-centos7container image that Source-To-Image will use for the application build. - 5
- After the container image is successfully built, it will be pushed into the repository described in the
outputsection. - 6
- The
postCommitsection defines an optional build hook.
11.3. Source-to-Image Strategy Options
The following options are specific to the S2I build strategy.
11.3.1. Force Pull
By default, if the builder image specified in the build configuration is available locally on the node, that image will be used. However, to override the local image and refresh it from the registry to which the image stream points, create a BuildConfig with the forcePull flag set to true:
strategy:
  type: "Source"
  sourceStrategy:
    from:
      kind: "ImageStreamTag"
      name: "builder-image:latest" 1
forcePull: true 2- 1
- The builder image being used, where the local version on the node may not be up to date with the version in the registry to which the image stream points.
- 2
- This flag causes the local builder image to be ignored and a fresh version to be pulled from the registry to which the image stream points. Setting
forcePullto false results in the default behavior of honoring the image stored locally.
11.3.2. Incremental Builds
S2I can perform incremental builds, which means it reuses artifacts from previously-built images. To create an incremental build, create a BuildConfig with the following modification to the strategy definition:
strategy:
  type: "Source"
  sourceStrategy:
    from:
      kind: "ImageStreamTag"
      name: "incremental-image:latest" 1
incremental: true 2- 1
- Specify an image that supports incremental builds. Consult the documentation of the builder image to determine if it supports this behavior.
- 2
- This flag controls whether an incremental build is attempted. If the builder image does not support incremental builds, the build will still succeed, but you will get a log message stating the incremental build was not successful because of a missing save-artifacts script.
See the S2I Requirements topic for information on how to create a builder image supporting incremental builds.
11.3.3. Overriding Builder Image Scripts
You can override the assemble, run, and save-artifactsS2I scripts provided by the builder image in one of two ways. Either:
- Provide an assemble, run, and/or save-artifacts script in the .s2i/bin directory of your application source repository, or
- Provide a URL of a directory containing the scripts as part of the strategy definition. For example:
strategy:
  type: "Source"
  sourceStrategy:
    from:
      kind: "ImageStreamTag"
      name: "builder-image:latest"
scripts: "http://somehost.com/scripts_directory" 1- 1
- This path will have run, assemble, and save-artifacts appended to it. If any or all scripts are found they will be used in place of the same named script(s) provided in the image.
Files located at the scripts URL take precedence over files located in .s2i/bin of the source repository. See the S2I Requirements topic and the S2I documentation for information on how S2I scripts are used.
11.3.4. Environment Variables
There are two ways to make environment variables available to the source build process and resulting image: environment files and BuildConfig environment values.
11.3.4.1. Environment Files
Source build enables you to set environment values (one per line) inside your application, by specifying them in a .s2i/environment file in the source repository. The environment variables specified in this file are present during the build process and in the final container image. The complete list of supported environment variables is available in the documentation for each image.
If you provide a .s2i/environment file in your source repository, S2I reads this file during the build. This allows customization of the build behavior as the assemble script may use these variables.
For example, if you want to disable assets compilation for your Rails application, you can add DISABLE_ASSET_COMPILATION=true in the .s2i/environment file to cause assets compilation to be skipped during the build.
In addition to builds, the specified environment variables are also available in the running application itself. For example, you can add RAILS_ENV=development to the .s2i/environment file to cause the Rails application to start in development mode instead of production.
11.3.4.2. BuildConfig Environment
You can add environment variables to the sourceStrategy definition of the BuildConfig. The environment variables defined there are visible during the assemble script execution and will be defined in the output image, making them also available to the run script and application code.
For example disabling assets compilation for your Rails application:
sourceStrategy:
...
  env:
    - name: "DISABLE_ASSET_COMPILATION"
      value: "true"
11.4. Docker Strategy Options
The following options are specific to the Docker build strategy.
11.4.1. FROM Image
The FROM instruction of the Dockerfile will be replaced by the from of the BuildConfig:
strategy:
  type: Docker
  dockerStrategy:
    from:
      kind: "ImageStreamTag"
      name: "debian:latest"
11.4.2. Dockerfile Path
By default, Docker builds use a Dockerfile (named Dockerfile) located at the root of the context specified in the BuildConfig.spec.source.contextDir field.
The dockerfilePath field allows the build to use a different path to locate your Dockerfile, relative to the BuildConfig.spec.source.contextDir field. It can be simply a different file name other than the default Dockerfile (for example, MyDockerfile), or a path to a Dockerfile in a subdirectory (for example, dockerfiles/app1/Dockerfile):
strategy:
  type: Docker
  dockerStrategy:
    dockerfilePath: dockerfiles/app1/Dockerfile
11.4.3. No Cache
Docker builds normally reuse cached layers found on the host performing the build. Setting the noCache option to true forces the build to ignore cached layers and rerun all steps of the Dockerfile:
strategy:
  type: "Docker"
  dockerStrategy:
    noCache: true
11.4.4. Force Pull
By default, if the builder image specified in the build configuration is available locally on the node, that image will be used. However, to override the local image and refresh it from the registry to which the image stream points, create a BuildConfig with the forcePull flag set to true:
strategy:
  type: "Docker"
  dockerStrategy:
forcePull: true 1- 1
- This flag causes the local builder image to be ignored, and a fresh version to be pulled from the registry to which the image stream points. Setting
forcePullto false results in the default behavior of honoring the image stored locally.
11.4.5. Environment Variables
To make environment variables available to the Docker build process and resulting image, you can add environment variables to the dockerStrategy definition of the BuildConfig.
The environment variables defined there are inserted as a single ENV Dockerfile instruction right after the FROM instruction, so that it can be referenced later on within the Dockerfile.
The variables are defined during build and stay in the output image, therefore they will be present in any container that runs that image as well.
For example, defining a custom HTTP proxy to be used during build and runtime:
dockerStrategy:
...
  env:
    - name: "HTTP_PROXY"
      value: "http://myproxy.net:5187/"
Cluster administrators can also configure global build settings using Ansible.
11.5. Custom Strategy Options
The following options are specific to the Custom build strategy.
11.5.1. FROM Image
Use the customStrategy.from section to indicate the image to use for the custom build:
strategy:
  type: "Custom"
  customStrategy:
    from:
      kind: "DockerImage"
      name: "openshift/sti-image-builder"
11.5.2. Exposing the Docker Socket
In order to allow the running of Docker commands and the building of container images from inside the container, the build container must be bound to an accessible socket. To do so, set the exposeDockerSocket option to true:
strategy:
  type: "Custom"
  customStrategy:
    exposeDockerSocket: true
11.5.3. Secrets
In addition to secrets for source and images that can be added to all build types, custom strategies allow adding an arbitrary list of secrets to the builder pod.
Each secret can be mounted at a specific location:
strategy:
  type: "Custom"
  customStrategy:
    secrets:
      - secretSource: 1
          name: "secret1"
        mountPath: "/tmp/secret1" 2
      - secretSource:
          name: "secret2"
mountPath: "/tmp/secret2"11.5.4. Force Pull
By default, when setting up the build pod, the build controller checks if the image specified in the build configuration is available locally on the node. If so, that image will be used. However, to override the local image and refresh it from the registry to which the image stream points, create a BuildConfig with the forcePull flag set to true:
strategy:
  type: "Custom"
  customStrategy:
forcePull: true 1- 1
- This flag causes the local builder image to be ignored, and a fresh version to be pulled from the registry to which the image stream points. Setting
forcePullto false results in the default behavior of honoring the image stored locally.
11.5.5. Environment Variables
To make environment variables available to the Custom build process, you can add environment variables to the customStrategy definition of the BuildConfig.
The environment variables defined there are passed to the pod that runs the custom build.
For example, defining a custom HTTP proxy to be used during build:
customStrategy:
...
  env:
    - name: "HTTP_PROXY"
      value: "http://myproxy.net:5187/"
Cluster administrators can also configure global build settings using Ansible.
11.6. Build Inputs
There are several ways to provide content for builds to operate on. In order of precedence:
- Inline Dockerfile definitions
- Content extracted from existing images
- Git repositories
- Binary inputs
These can be combined into a single build. As the inline Dockerfile takes precedence, it can overwrite any other file named Dockerfile provided by another input. Binary input and Git repository are mutually exclusive inputs.
When the build is run, a working directory is constructed and all input content is placed in the working directory (e.g. the input git repository is cloned into the working directory, files specified from input images are copied into the working directory using the target path). Next the build process will cd into the contextDir if one is defined. Then the inline Dockerfile (if any) is written to the current directory. Last, the content from the current directory will be provided to the build process for reference by the Dockerfile, assemble script, or custom builder logic. This means any input content that resides outside the contextDir will be ignored by the build.
Here is an example of a source definition that includes multiple input types and an explanation of how they are combined. For more details on how each input type is defined, see the specific sections for each input type.
source:
  git:
    uri: https://github.com/openshift/ruby-hello-world.git 1
  images:
  - from:
      kind: ImageStreamTag
      name: myinputimage:latest
      namespace: mynamespace
    paths:
    - destinationDir: app/dir/injected/dir 2
      sourcePath: /usr/lib/somefile.jar
  contextDir: "app/dir" 3
dockerfile: "FROM centos:7\nRUN yum install -y httpd" 4- 1
- The repository to be cloned into the working directory for the build
- 2
/usr/lib/somefile.jarfrommyinputimagewill be stored in<workingdir>/app/dir/injected/dir- 3
- The working dir for the build will become
<original_workingdir>/app/dir - 4
- A
Dockerfilewith this content will be created in<original_workingdir>/app/dir, overwriting any existing file with that name
11.7. Git Repository Source Options
When the BuildConfig.spec.source.type is Git, a Git repository is required, and an inline Dockerfile is optional.
The source code is fetched from the location specified and, if the BuildConfig.spec.source.dockerfile field is specified, the inline Dockerfile replaces the one in the contextDir of the Git repository.
The source definition is part of the spec section in the BuildConfig:
source:
  type: "Git"
  git: 1
    uri: "https://github.com/openshift/ruby-hello-world"
    ref: "master"
  contextDir: "app/dir" 2
  dockerfile: "FROM openshift/ruby-22-centos7\nUSER example" 3
- 1
- The
gitfield contains the URI to the remote Git repository of the source code. Optionally, specify thereffield to check out a specific Git reference. A validrefcan be a SHA1 tag or a branch name. - 2
- The
contextDirfield allows you to override the default location inside the source code repository where the build looks for the application source code. If your application exists inside a sub-directory, you can override the default location (the root folder) using this field. - 3
- If the optional
dockerfilefield is provided, it should be a string containing a Dockerfile that overwrites any Dockerfile that may exist in the source repository.
When using the Git repository as a source without specifying the ref field, OpenShift Enterprise performs a shallow clone (--depth=1 clone). That means only the HEAD (usually the master branch) is downloaded. This results in repositories downloading faster, including the commit history.
A shallow clone is also used when the ref field is specified and set to an existing remote branch name. However, if you specify the ref field to a specific commit, the system will fallback to a regular Git clone operation and checkout the commit, because using the --depth=1 option only works with named branch refs.
To perform a full Git clone of the master for the specified repository, set the ref to master.
11.7.1. Using a Proxy for Git Cloning
If your Git repository can only be accessed using a proxy, you can define the proxy to use in the source section of the BuildConfig. You can configure both a HTTP and HTTPS proxy to use. Both fields are optional.
Your source URI must use the HTTP or HTTPS protocol for this to work.
source:
  type: Git
  git:
    uri: "https://github.com/openshift/ruby-hello-world"
    httpProxy: http://proxy.example.com
    httpsProxy: https://proxy.example.com
Cluster administrators can also configure a global proxy for Git cloning using Ansible.
11.7.2. Using Private Repositories for Builds
Supply valid credentials to build an application from a private repository.
Currently two types of authentication are supported: basic username-password and SSH key based authentication.
11.7.2.1. Basic Authentication
Basic authentication requires either a combination of username and password, or a token to authenticate against the SCM server. A CA certificate file, or a .gitconfig file can be attached.
A secret is used to store your keys.
Create the
secretfirst before using the username and password to access the private repository:$ oc secrets new-basicauth basicsecret --username=USERNAME --password=PASSWORD
To create a Basic Authentication Secret with a token:
$ oc secrets new-basicauth basicsecret --password=TOKEN
To create a Basic Authentication Secret with a CA certificate file:
$ oc secrets new-basicauth basicsecret --username=USERNAME --password=PASSWORD --ca-cert=FILENAME
To create a Basic Authentication Secret with a
.gitconfigfile:$ oc secrets new-basicauth basicsecret --username=USERNAME --password=PASSWORD --gitconfig=FILENAME
Add the
secretto the builder service account. Each build is run withserviceaccount/builderrole, so you need to give it access your secret with following command:$ oc secrets add serviceaccount/builder secrets/basicsecret
Add a
sourceSecretfield to thesourcesection inside theBuildConfigand set it to the name of thesecretthat you created. In this casebasicsecret:apiVersion: "v1" kind: "BuildConfig" metadata: name: "sample-build" spec: output: to: kind: "ImageStreamTag" name: "sample-image:latest" source: git: uri: "https://github.com/user/app.git" 1 sourceSecret: name: "basicsecret" type: "Git" strategy: sourceStrategy: from: kind: "ImageStreamTag" name: "python-33-centos7:latest" type: "Source"- 1
- The URL of private repository, accessed by basic authentication, is usually in the
httporhttpsform.
11.7.2.2. SSH Key Based Authentication
SSH Key Based Authentication requires a private SSH key. A .gitconfig file can also be attached.
The repository keys are usually located in the $HOME/.ssh/ directory, and are named id_dsa.pub, id_ecdsa.pub, id_ed25519.pub, or id_rsa.pub by default. Generate SSH key credentials with the following command:
$ ssh-keygen -t rsa -C "your_email@example.com"
Creating a passphrase for the SSH key prevents OpenShift Enterprise from building. When prompted for a passphrase, leave it blank.
Two files are created: the public key and a corresponding private key (one of id_dsa, id_ecdsa, id_ed25519, or id_rsa). With both of these in place, consult your source control management (SCM) system’s manual on how to upload the public key. The private key will be used to access your private repository.
A secret is used to store your keys.
Create the
secretfirst before using the SSH key to access the private repository:$ oc secrets new-sshauth sshsecret --ssh-privatekey=$HOME/.ssh/id_rsa
To create a SSH Based Authentication Secret with a
.gitconfigfile:$ oc secrets new-sshauth sshsecret --ssh-privatekey=$HOME/.ssh/id_rsa --gitconfig=FILENAME
Add the
secretto the builder service account. Each build is run withserviceaccount/builderrole, so you need to give it access your secret with following command:$ oc secrets add serviceaccount/builder secrets/sshsecret
Add a
sourceSecretfield into thesourcesection inside theBuildConfigand set it to the name of thesecretthat you created. In this casesshsecret:apiVersion: "v1" kind: "BuildConfig" metadata: name: "sample-build" spec: output: to: kind: "ImageStreamTag" name: "sample-image:latest" source: git: uri: "git@repository.com:user/app.git" 1 sourceSecret: name: "sshsecret" type: "Git" strategy: sourceStrategy: from: kind: "ImageStreamTag" name: "python-33-centos7:latest" type: "Source"- 1
- The URL of private repository, accessed by a private SSH key, is usually in the form
git@example.com:<username>/<repository>.git.
11.7.2.3. Other
If the cloning of your application is dependent on a CA certificate, .gitconfig file, or both, then you can create a secret that contains them, add it to the builder service account, and then your BuildConfig.
Create desired type of
secret:To create a secret from a
.gitconfig:$ oc secrets new mysecret .gitconfig=path/to/.gitconfig
To create a secret from a
CA certificate:$ oc secrets new mysecret ca.crt=path/to/certificate
To create a secret from a
CA certificateand.gitconfig:$ oc secrets new mysecret ca.crt=path/to/certificate .gitconfig=path/to/.gitconfig
NoteSSL verification can be turned off, if
sslVerify=falseis set for thehttpsection in your.gitconfigfile:[http] sslVerify=false
Add the
secretto the builder service account. Each build is run with theserviceaccount/builderrole, so you need to give it access your secret with following command:$ oc secrets add serviceaccount/builder secrets/mysecret
Add the
secretto theBuildConfig:source: git: uri: "https://github.com/openshift/nodejs-ex.git" sourceSecret: name: "mysecret"
Defining Secrets in the BuildConfig provides more information on this topic.
11.8. Dockerfile Source
When the BuildConfig.spec.source.type is Dockerfile, an inline Dockerfile is used as the build input, and no additional sources can be provided.
This source type is valid when the build strategy type is Docker or Custom.
The source definition is part of the spec section in the BuildConfig:
source:
  type: "Dockerfile"
dockerfile: "FROM centos:7\nRUN yum install -y httpd" 1- 1
- The
dockerfilefield contains an inline Dockerfile that will be built.
11.9. Binary Source
Streaming content in binary format from a local file system to the builder is called a binary type build. The corresponding value of BuildConfig.spec.source.type is Binary for such builds.
This source type is unique in that it is leveraged solely based on your use of the oc start-build.
Binary type builds require content to be streamed from the local file system, so automatically triggering a binary type build (e.g. via an image change trigger) is not possible, because the binary files cannot be provided. Similarly, you cannot launch binary type builds from the web console.
To utilize binary builds, invoke oc start-build with one of these options:
-
--from-file: The contents of the file you specify are sent as a binary stream to the builder. The builder then stores the data in a file with the same name at the top of the build context. -
--from-dirand--from-repo: The contents are archived and sent as a binary stream to the builder. The builder then extracts the contents of the archive within the build context directory.
In each of the above cases:
-
If your
BuildConfigalready has aBinarysource type defined, it will effectively be ignored and replaced by what the client sends. -
If your
BuildConfighas aGitsource type defined, it is dynamically disabled, sinceBinaryandGitare mutually exclusive, and the data in the binary stream provided to the builder takes precedence.
When using oc new-build --binary=true, the command ensures that the restrictions associated with binary builds are enforced. The resulting BuildConfig will have a source type of Binary, meaning that the only valid way to run a build for this BuildConfig is to use oc start-build with one of the --from options to provide the requisite binary data.
The dockerfile and contextDir source options have special meaning with binary builds.
dockerfile can be used with any binary build source. If dockerfile is used and the binary stream is an archive, its contents serve as a replacement Dockerfile to any Dockerfile in the archive. If dockerfile is used with the --from-file argument, and the file argument is named dockerfile, the value from dockerfile replaces the value from the binary stream.
In the case of the binary stream encapsulating extracted archive content, the value of the contextDir field is interpreted as a subdirectory within the archive, and, if valid, the builder changes into that subdirectory before executing the build.
11.10. Image Source
Additional files can be provided to the build process via images. Input images are referenced in the same way the From and To image targets are defined. This means both container images and image stream tags can be referenced. In conjunction with the image, you must provide one or more path pairs to indicate the path of the files/directories to copy out of the image and the destination to place them in the build context.
The source path can be any absolute path within the image specified. The destination must be a relative directory path. At build time, the image will be loaded and the indicated files and directories will be copied into the context directory of the build process. This is the same directory into which the source repository content (if any) is cloned. If the source path ends in /. then the content of the directory will be copied, but the directory itself will not be created at the destination.
Image inputs are specified in the source definition of the BuildConfig:
source:
  git:
    uri: https://github.com/openshift/ruby-hello-world.git
  images: 1
  - from: 2
      kind: ImageStreamTag
      name: myinputimage:latest
      namespace: mynamespace
    paths: 3
    - destinationDir: injected/dir 4
      sourcePath: /usr/lib/somefile.jar 5
  - from:
      kind: ImageStreamTag
      name: myotherinputimage:latest
      namespace: myothernamespace
    pullSecret: mysecret 6
    paths:
    - destinationDir: injected/dir
sourcePath: /usr/lib/somefile.jar- 1
- An array of one or more input images and files.
- 2
- A reference to the image containing the files to be copied.
- 3
- An array of source/destination paths.
- 4
- The directory relative to the build root where the build process can access the file.
- 5
- The location of the file to be copied out of the referenced image.
- 6
- An optional secret provided if credentials are needed to access the input image.
This feature is not supported for builds using the Custom Strategy.
11.11. Using Secrets During a Build
In some scenarios, build operations require credentials to access dependent resources, but it is undesirable for those credentials to be available in the final application image produced by the build.
For example, when building a NodeJS application, you can set up your private mirror for NodeJS modules. In order to download modules from that private mirror, you have to supply a custom .npmrc file for the build that contains a URL, user name, and password. For security reasons, you do not want to expose your credentials in the application image.
This example describes NodeJS, but you can use the same approach for adding SSL certificates into the /etc/ssl/certs directory, API keys or tokens, license files, etc.
11.11.1. Defining Secrets in the BuildConfig
Create the
Secret:$ oc secrets new secret-npmrc .npmrc=~/.npmrc
This creates a new secret named secret-npmrc, which contains the base64 encoded content of the ~/.npmrc file.
Add the secret to the
sourcesection in the existing build configuration:source: git: uri: https://github.com/openshift/nodejs-ex.git secrets: - secret: name: secret-npmrc type: GitTo include the secrets in a new build configuration, run the following command:
$ oc new-build openshift/nodejs-010-centos7~https://github.com/openshift/nodejs-ex.git --build-secret secret-npmrc
During the build, the .npmrc file is copied into the directory where the source code is located. In case of the OpenShift Enterprise S2I builder images, this is the image working directory, which is set using the
WORKDIRinstruction in the Dockerfile. If you want to specify another directory, add adestinationDirto the secret definition:source: git: uri: https://github.com/openshift/nodejs-ex.git secrets: - secret: name: secret-npmrc destinationDir: /etc type: GitYou can also specify the destination directory when creating a new build configuration:
$ oc new-build openshift/nodejs-010-centos7~https://github.com/openshift/nodejs-ex.git --build-secret “secret-npmrc:/etc”
In both cases, the .npmrc file is added to the /etc directory of the build environment. Note that for a Docker strategy the destination directory must be a relative path.
11.11.2. Source-to-Image Strategy
When using a Source strategy, all defined source secrets are copied to their respective destinationDir. If you left destinationDir empty, then the secrets are placed in the working directory of the builder image. The same rule is used when a destinationDir is a relative path; the secrets are placed in the paths that are relative to the image’s working directory. The destinationDir must exist or an error will occur. No directory paths are created during the copy process.
Currently, any files with these secrets are world-writable (have 0666 permissions) and will be truncated to size zero after executing the assemble script. This means that the secret files will exist in the resulting image, but they will be empty for security reasons.
11.11.3. Docker Strategy
When using a Docker strategy, you can add all defined source secrets into your container image using the ADD and COPY instructions in your Dockerfile. If you do not specify the destinationDir for a secret, then the files will be copied into the same directory in which the Dockerfile is located. If you specify a relative path as destinationDir, then the secrets will be copied into that directory, relative to your Dockerfile location. This makes the secret files available to the Docker build operation as part of the context directory used during the build.
Users should always remove their secrets from the final application image so that the secrets are not present in the container running from that image. However, the secrets will still exist in the image itself in the layer where they were added. This removal should be part of the Dockerfile itself.
11.11.4. Custom Strategy
When using a Custom strategy, then all the defined source secrets are available inside the builder container in the /var/run/secrets/openshift.io/build directory. The custom build image is responsible for using these secrets appropriately. The Custom strategy also allows secrets to be defined as described in Secrets. There is no technical difference between existing strategy secrets and the source secrets. However, your builder image might distinguish between them and use them differently, based on your build use case. The source secrets are always mounted into the /var/run/secrets/openshift.io/build directory or your builder can parse the $BUILD environment variable, which includes the full build object.
11.12. Starting a Build
Manually start a new build from an existing build configuration in your current project using the following command:
$ oc start-build <buildconfig_name>
Re-run a build using the --from-build flag:
$ oc start-build --from-build=<build_name>
Specify the --follow flag to stream the build’s logs in stdout:
$ oc start-build <buildconfig_name> --follow
Specify the --env flag to set any desired environment variable for the build:
$ oc start-build <buildconfig_name> --env=<key>=<value>
Rather than relying on a Git source pull or a Dockerfile for a build, you can can also start a build by directly pushing your source, which could be the contents of a Git or SVN working directory, a set of prebuilt binary artifacts you want to deploy, or a single file. This can be done by specifying one of the following options for the start-build command:
| Option | Description |
|---|---|
|
| Specifies a directory that will be archived and used as a binary input for the build. |
|
| Specifies a single file that will be the only file in the build source. The file is placed in the root of an empty directory with the same file name as the original file provided. |
|
|
Specifies a path to a local repository to use as the binary input for a build. Add the |
When passing any of these options directly to the build, the contents are streamed to the build and override the current build source settings.
Builds triggered from binary input will not preserve the source on the server, so rebuilds triggered by base image changes will use the source specified in the build configuration.
For example, the following command sends the contents of a local Git repository as an archive from the tag v2 and starts a build:
$ oc start-build hello-world --from-repo=../hello-world --commit=v2
11.13. Canceling a Build
Manually cancel a build using the web console, or with the following CLI command:
$ oc cancel-build <build_name>
11.14. Deleting a BuildConfig
Delete a BuildConfig using the following command:
$ oc delete bc <BuildConfigName>
This will also delete all builds that were instantiated from this BuildConfig. Specify the --cascade=false flag if you do not want to delete the builds:
$ oc delete --cascade=false bc <BuildConfigName>
11.15. Viewing Build Details
You can view build details using the web console or the following CLI command:
$ oc describe build <build_name>
The output of the describe command includes details such as the build source, strategy, and output destination. If the build uses the Docker or Source strategy, it will also include information about the source revision used for the build: commit ID, author, committer, and message.
11.16. Accessing Build Logs
You can access build logs using the web console or the CLI.
To stream the logs using the build directly:
$ oc logs -f build/<build_name>
To stream the logs of the latest build for a build configuration:
$ oc logs -f bc/<buildconfig_name>
To return the logs of a given version build for a build configuration:
$ oc logs --version=<number> bc/<buildconfig_name>
Log Verbosity
To enable more verbose output, pass the BUILD_LOGLEVEL environment variable as part of the sourceStrategy or dockerStrategy in a BuildConfig:
sourceStrategy:
...
  env:
    - name: "BUILD_LOGLEVEL"
value: "2" 1- 1
- Adjust this value to the desired log level.
A platform administrator can set verbosity for the entire OpenShift Enterprise instance by passing the --loglevel option to the openshift start command. If both --loglevel and BUILD_LOGLEVEL are specified, BUILD_LOGLEVEL takes precedence.
Available log levels for Source builds are as follows:
| Level 0 | Produces output from containers running the assemble script and all encountered errors. This is the default. |
| Level 1 | Produces basic information about the executed process. |
| Level 2 | Produces very detailed information about the executed process. |
| Level 3 | Produces very detailed information about the executed process, and a listing of the archive contents. |
| Level 4 | Currently produces the same information as level 3. |
| Level 5 | Produces everything mentioned on previous levels and additionally provides docker push messages. |
11.17. Setting Maximum Duration
When defining a BuildConfig, you can define its maximum duration by setting the completionDeadlineSeconds field. It is specified in seconds and is not set by default. When not set, there is no maximum duration enforced.
The maximum duration is counted from the time when a build pod gets scheduled in the system, and defines how long it can be active, including the time needed to pull the builder image. After reaching the specified timeout, the build is terminated by OpenShift Enterprise.
The following example shows the part of a BuildConfig specifying completionDeadlineSeconds field for 30 minutes:
spec:
  completionDeadlineSeconds: 1800
11.18. Build Triggers
When defining a BuildConfig, you can define triggers to control the circumstances in which the BuildConfig should be run. The following build triggers are available:
11.18.1. Webhook Triggers
Webhook triggers allow you to trigger a new build by sending a request to the OpenShift Enterprise API endpoint. You can define these triggers using GitHub webhooks or Generic webhooks.
GitHub Webhooks
GitHub webhooks handle the call made by GitHub when a repository is updated. When defining the trigger, you must specify a secret, which will be part of the URL you supply to GitHub when configuring the webhook. The secret ensures the uniqueness of the URL, preventing others from triggering the build. The following example is a trigger definition YAML within the BuildConfig:
type: "GitHub"
github:
  secret: "secret101"
The secret field in webhook trigger configuration is not the same as secret field you encounter when configuring webhook in GitHub UI. The former is to make the webhook URL unique and hard to predict, the latter is an optional string field used to create HMAC hex digest of the body, which is sent as an X-Hub-Signatureheader.
The payload URL is returned as the GitHub Webhook URL by the describe command (see below), and is structured as follows:
http://<openshift_api_host:port>/oapi/v1/namespaces/<namespace>/buildconfigs/<name>/webhooks/<secret>/github
To configure a GitHub Webhook:
Describe the build configuration to get the webhook URL:
$ oc describe bc <name>
- Copy the webhook URL.
- Follow the GitHub setup instructions to paste the webhook URL into your GitHub repository settings.
Gogs supports the same webhook payload format as GitHub. Therefore, if you are using a Gogs server, you can define a GitHub webhook trigger on your BuildConfig and trigger it via your Gogs server also.
Generic Webhooks
Generic webhooks can be invoked from any system capable of making a web request. As with a GitHub webhook, you must specify a secret which will be part of the URL, the caller must use to trigger the build. The secret ensures the uniqueness of the URL, preventing others from triggering the build. The following is an example trigger definition YAML within the BuildConfig:
type: "Generic"
generic:
  secret: "secret101"
To set up the caller, supply the calling system with the URL of the generic webhook endpoint for your build:
http://<openshift_api_host:port>/oapi/v1/namespaces/<namespace>/buildconfigs/<name>/webhooks/<secret>/generic
The endpoint can accept an optional payload with the following format:
type: "git"
git:
  uri: "<url to git repository>"
  ref: "<optional git reference>"
  commit: "<commit hash identifying a specific git commit>"
  author:
    name: "<author name>"
    email: "<author e-mail>"
  committer:
    name: "<committer name>"
    email: "<committer e-mail>"
  message: "<commit message>"
Displaying a BuildConfig’s Webhook URLs
Use the following command to display the webhook URLs associated with a build configuration:
$ oc describe bc <name>
If the above command does not display any webhook URLs, then no webhook trigger is defined for that build configuration.
11.18.2. Image Change Triggers
Image change triggers allow your build to be automatically invoked when a new version of an upstream image is available. For example, if a build is based on top of a RHEL image, then you can trigger that build to run any time the RHEL image changes. As a result, the application image is always running on the latest RHEL base image.
Configuring an image change trigger requires the following actions:
Define an
ImageStreamthat points to the upstream image you want to trigger on:kind: "ImageStream" apiVersion: "v1" metadata: name: "ruby-20-centos7"
This defines the image stream that is tied to a container image repository located at
<system-registry>/<namespace>/ruby-20-centos7. The<system-registry>is defined as a service with the namedocker-registryrunning in OpenShift Enterprise.If an image stream is the base image for the build, set the from field in the build strategy to point to the image stream:
strategy:
  type: "Source"
  sourceStrategy:
    from:
      kind: "ImageStreamTag"
      name: "ruby-20-centos7:latest"
In this case, the
sourceStrategydefinition is consuming thelatesttag of the image stream namedruby-20-centos7located within this namespace.Define a build with one or more triggers that point to image streams:
type: "imageChange" 1
imageChange: {}
type: "imagechange" 2
imageChange:
  from:
    kind: "ImageStreamTag"
    name: "custom-image:latest"
- 1
- An image change trigger that monitors the
ImageStreamandTagas defined by the build strategy’sfromfield. TheimageChangeobject here must be empty. - 2
- An image change trigger that monitors an arbitrary image stream. The
imageChangepart in this case must include afromfield that references theImageStreamTagto monitor.
When using an image change trigger for the strategy image stream, the generated build is supplied with an immutable Docker tag that points to the latest image corresponding to that tag. This new image reference will be used by the strategy when it executes for the build. For other image change triggers that do not reference the strategy image stream, a new build will be started, but the build strategy will not be updated with a unique image reference.
In the example above that has an image change trigger for the strategy, the resulting build will be:
strategy:
  type: "Source"
  sourceStrategy:
    from:
      kind: "DockerImage"
      name: "172.30.17.3:5001/mynamespace/ruby-20-centos7:immutableid"
This ensures that the triggered build uses the new image that was just pushed to the repository, and the build can be re-run any time with the same inputs.
In addition to setting the image field for all Strategy types, for custom builds, the OPENSHIFT_CUSTOM_BUILD_BASE_IMAGE environment variable is checked. If it does not exist, then it is created with the immutable image reference. If it does exist then it is updated with the immutable image reference.
If a build is triggered due to a webhook trigger or manual request, the build that is created uses the immutableid resolved from the ImageStream referenced by the Strategy. This ensures that builds are performed using consistent image tags for ease of reproduction.
Image streams that point to container images in v1 Docker registries only trigger a build once when the image stream tag becomes available and not on subsequent image updates. This is due to the lack of uniquely identifiable images in v1 Docker registries.
11.18.3. Configuration Change Triggers
A configuration change trigger allows a build to be automatically invoked as soon as a new BuildConfig is created. The following is an example trigger definition YAML within the BuildConfig:
type: "ConfigChange"
Configuration change triggers currently only work when creating a new BuildConfig. In a future release, configuration change triggers will also be able to launch a build whenever a BuildConfig is updated.
11.19. Build Hooks
Build hooks allow behavior to be injected into the build process.
Use the postCommit field to execute commands inside a temporary container that is running the build output image. The hook is executed immediately after the last layer of the image has been committed and before the image is pushed to a registry.
The current working directory is set to the image’s WORKDIR, which is the default working directory of the container image. For most images, this is where the source code is located.
The hook fails if the script or command returns a non-zero exit code or if starting the temporary container fails. When the hook fails it marks the build as failed and the image is not pushed to a registry. The reason for failing can be inspected by looking at the build logs.
Build hooks can be used to run unit tests to verify the image before the build is marked complete and the image is made available in a registry. If all tests pass and the test runner returns with exit code 0, the build is marked successful. In case of any test failure, the build is marked as failed. In all cases, the build log will contain the output of the test runner, which can be used to identify failed tests.
The postCommit hook is not only limited to running tests, but can be used for other commands as well. Since it runs in a temporary container, changes made by the hook do not persist, meaning that the hook execution cannot affect the final image. This behavior allows for, among other uses, the installation and usage of test dependencies that are automatically discarded and will be not present in the final image.
There are different ways to configure the post build hook. All forms in the following examples are equivalent and execute bundle exec rake test --verbose:
Shell script:
postCommit:
  script: "bundle exec rake test --verbose"
The
scriptvalue is a shell script to be run with/bin/sh -ic. Use this when a shell script is appropriate to execute the build hook. For example, for running unit tests as above. To control the image entry point, or if the image does not have/bin/sh, usecommandand/orargs.NoteThe additional
-iflag was introduced to improve the experience working with CentOS and RHEL images, and may be removed in a future release.Command as the image entry point:
postCommit:
  command: ["/bin/bash", "-c", "bundle exec rake test --verbose"]
In this form,
commandis the command to run, which overrides the image entry point in the exec form, as documented in the Dockerfile reference. This is needed if the image does not have/bin/sh, or if you do not want to use a shell. In all other cases, usingscriptmight be more convenient.Pass arguments to the default entry point:
postCommit:
  args: ["bundle", "exec", "rake", "test", "--verbose"]
In this form,
argsis a list of arguments that are provided to the default entry point of the image. The image entry point must be able to handle arguments.Shell script with arguments:
postCommit:
  script: "bundle exec rake test $1"
  args: ["--verbose"]
Use this form if you need to pass arguments that would otherwise be hard to quote properly in the shell script. In the
script,$0will be "/bin/sh" and$1,$2, etc, are the positional arguments fromargs.Command with arguments:
postCommit:
  command: ["bundle", "exec", "rake", "test"]
  args: ["--verbose"]
This form is equivalent to appending the arguments to
command.
Providing both script and command simultaneously creates an invalid build hook.
11.19.1. Using the Command Line
The oc set build-hook command can be used to set the build hook for a build configuration.
To set a command as the post-commit build hook:
$ oc set build-hook bc/mybc --post-commit --command -- bundle exec rake test --verbose
To set a script as the post-commit build hook:
$ oc set build-hook bc/mybc --post-commit --script="bundle exec rake test --verbose"
11.20. Using Docker Credentials for Pushing and Pulling Images
Supply the .dockercfg file with valid Docker Registry credentials in order to push the output image into a private Docker Registry or pull the builder image from the private Docker Registry that requires authentication. For the OpenShift Enterprise Docker Registry, you don’t have to do this because secrets are generated automatically for you by OpenShift Enterprise.
The .dockercfg JSON file is found in your home directory by default and has the following format:
auths:
  https://index.docker.io/v1/: 1
    auth: "YWRfbGzhcGU6R2labnRib21ifTE=" 2
    email: "user@example.com" 3
You can define multiple Docker registry entries in this file. Alternatively, you can also add authentication entries to this file by running the docker login command. The file will be created if it does not exist. Kubernetes provides secret objects, which are used to store your configuration and passwords.
Create the
secretfrom your local .dockercfg file:$ oc secrets new dockerhub ~/.dockercfg
This generates a JSON specification of the
secretnamed dockerhub and creates the object.Once the
secretis created, add it to the builder service account. Each build is run withserviceaccount/builderrole, so you need to give it access your secret with following command:$ oc secrets add serviceaccount/builder secrets/dockerhub
Add a
pushSecretfield into theoutputsection of theBuildConfigand set it to the name of thesecretthat you created, which in the above example is dockerhub:spec: output: to: kind: "DockerImage" name: "private.registry.com/org/private-image:latest" pushSecret: name: "dockerhub"Pull the builder container image from a private Docker registry by specifying the
pullSecretfield, which is part of the build strategy definition:strategy: sourceStrategy: from: kind: "DockerImage" name: "docker.io/user/private_repository" pullSecret: name: "dockerhub" type: "Source"
This example uses pullSecret in a Source build, but it is also applicable in Docker and Custom builds.
11.21. Build Run Policy
The build run policy describes the order in which the builds created from the build configuration should run. This can be done by changing the value of the runPolicy field in the spec section of the Build specification.
It is also possible to change the runPolicy value for existing build configurations.
-
Changing
ParalleltoSerialorSerialLatestOnlyand triggering a new build from this configuration will cause the new build to wait until all parallel builds complete as the serial build can only run alone. -
Changing
SerialtoSerialLatestOnlyand triggering a new build will cause cancellation of all existing builds in queue, except the currently running build and the most recently created build. The newest build will execute next.
11.21.1. Serial Run Policy
Setting the runPolicy field to Serial will cause all new builds created from the Build configuration to be run sequentially. That means there will be only one build running at a time and every new build will wait until the previous build completes. Using this policy will result in consistent and predictable build output. This is the default runPolicy.
Triggering three builds from the sample-build configuration, using the Serial policy will result in:
NAME             TYPE      FROM          STATUS    STARTED          DURATION
sample-build-1   Source    Git@e79d887   Running   13 seconds ago   13s
sample-build-2   Source    Git           New
sample-build-3   Source    Git           New
When the sample-build-1 build completes, the sample-build-2 build will run:
NAME             TYPE      FROM          STATUS    STARTED          DURATION
sample-build-1   Source    Git@e79d887   Completed 43 seconds ago   34s
sample-build-2   Source    Git@1aa381b   Running   2 seconds ago    2s
sample-build-3   Source    Git           New
11.21.2. SerialLatestOnly Run Policy
Setting the runPolicy field to SerialLatestOnly will cause all new builds created from the Build configuration to be run sequentially, same as using the Serial run policy. The difference is that when a currently running build completes, the next build that will run is the latest build created. In other words, you do not wait for the queued builds to run, as they are skipped. Skipped builds are marked as Cancelled. This policy can be used for fast, iterative development.
Triggering three builds from the sample-build configuration, using the SerialLatestOnly policy will result in:
NAME             TYPE      FROM          STATUS    STARTED          DURATION
sample-build-1   Source    Git@e79d887   Running   13 seconds ago   13s
sample-build-2   Source    Git           Cancelled
sample-build-3   Source    Git           New
The sample-build-2 build will be canceled (skipped) and the next build run after sample-build-1 completes will be the sample-build-3 build:
NAME             TYPE      FROM          STATUS    STARTED          DURATION
sample-build-1   Source    Git@e79d887   Completed 43 seconds ago   34s
sample-build-2   Source    Git           Cancelled
sample-build-3   Source    Git@1aa381b   Running   2 seconds ago    2s
11.21.3. Parallel Run Policy
Setting the runPolicy field to Parallel causes all new builds created from the Build configuration to be run in parallel. This can produce unpredictable results, as the first created build can complete last, which will replace the pushed container image produced by the last build which completed earlier.
Use the parallel run policy in cases where you do not care about the order in which the builds will complete.
Triggering three builds from the sample-build configuration, using the Parallel policy will result in three simultaneous builds:
NAME             TYPE      FROM          STATUS    STARTED          DURATION
sample-build-1   Source    Git@e79d887   Running   13 seconds ago   13s
sample-build-2   Source    Git@a76d881   Running   15 seconds ago   3s
sample-build-3   Source    Git@689d111   Running   17 seconds ago   3s
The completion order is not guaranteed:
NAME             TYPE      FROM          STATUS    STARTED          DURATION
sample-build-1   Source    Git@e79d887   Running   13 seconds ago   13s
sample-build-2   Source    Git@a76d881   Running   15 seconds ago   3s
sample-build-3   Source    Git@689d111   Completed 17 seconds ago   5s
11.22. Build Output
Docker and Source builds result in the creation of a new container image. The image is then pushed to the registry specified in the output section of the Build specification.
If the output kind is ImageStreamTag, then the image will be pushed to the integrated OpenShift Enterprise registry and tagged in the specified image stream. If the output is of type DockerImage, then the name of the output reference will be used as a Docker push specification. The specification may contain a registry or will default to DockerHub if no registry is specified. If the output section of the build specification is empty, then the image will not be pushed at the end of the build.
Example 11.2. Output to an ImageStreamTag
output:
  to:
    kind: "ImageStreamTag"
    name: "sample-image:latest"
Example 11.3. Output to a Docker Push Specification
output:
  to:
    kind: "DockerImage"
    name: "my-registry.mycompany.com:5000/myimages/myimage:tag"
11.22.1. Output Image Environment Variables
Docker and Source builds set the following environment variables on output images:
| Variable | Description |
|---|---|
|
| Name of the build |
|
| Namespace of the build |
|
| The source URL of the build |
|
| The Git reference used in the build |
|
| Source commit used in the build |
11.22.2. Output Image Labels
Docker and Source builds set the following labels on output images:
| Label | Description |
|---|---|
| io.openshift.build.commit.author | Author of the source commit used in the build |
| io.openshift.build.commit.date | Date of the source commit used in the build |
| io.openshift.build.commit.id | Hash of the source commit used in the build |
| io.openshift.build.commit.message | Message of the source commit used in the build |
| io.openshift.build.commit.ref | Branch or reference specified in the source |
| io.openshift.build.source-location | Source URL for the build |
11.23. Using External Artifacts During a Build
It is not recommended to store binary files in a source repository. Therefore, you may find it necessary to define a build which pulls additional files (such as Java .jar dependencies) during the build process. How this is done depends on the build strategy you are using.
For a Source build strategy, you must put appropriate shell commands into the assemble script:
Example 11.4. .s2i/bin/assemble File
#!/bin/sh
APP_VERSION=1.0
wget http://repository.example.com/app/app-$APP_VERSION.jar -O app.jar
Example 11.5. .s2i/bin/run File
#!/bin/sh
exec java -jar app.jar
For more information on how to control which assemble and run script is used by a Source build, see Overriding Builder Image Scripts.
For a Docker build strategy, you must modify the Dockerfile and invoke shell commands with the RUN instruction:
Example 11.6. Excerpt of Dockerfile
FROM jboss/base-jdk:8

ENV APP_VERSION 1.0
RUN wget http://repository.example.com/app/app-$APP_VERSION.jar -O app.jar

EXPOSE 8080
CMD [ "java", "-jar", "app.jar" ]
In practice, you may want to use an environment variable for the file location so that the specific file to be downloaded can be customized using an environment variable defined on the BuildConfig, rather than updating the assemble script or Dockerfile.
You can choose between different methods of defining environment variables:
-
Using the .s2i/environment file (only for a
Sourcebuild strategy) -
Setting in
BuildConfig -
Providing explicitly using
oc start-build --env(only for builds that are triggered manually)
11.24. Build Resources
By default, builds are completed by pods using unbound resources, such as memory and CPU. These resources can be limited by specifying resource limits in a project’s default container limits.
You can also limit resource use by specifying resource limits as part of the build configuration. In the following example, each of the resources, cpu, and memory parameters are optional:
apiVersion: "v1"
kind: "BuildConfig"
metadata:
  name: "sample-build"
spec:
  resources:
    limits:
      cpu: "100m" 1
memory: "256Mi" 2However, if a quota has been defined for your project, one of the following two items is required:
A
resourcessection set with an explicitrequests:resources: requests: 1 cpu: "100m" memory: "256Mi"- 1
- The
requestsobject contains the list of resources that correspond to the list of resources in the quota.
-
A limit range defined in your project, where the defaults from the
LimitRangeobject apply to pods created during the build process.
Otherwise, build pod creation will fail, citing a failure to satisfy quota.
11.25. Troubleshooting
| Issue | Resolution |
|---|---|
| A build fails with: requested access to the resource is denied | You have exceeded one of the image quotas set on your project. Check your current quota and verify the limits applied and storage in use: $ oc describe quota |
Chapter 12. Managing Images
12.1. Overview
An image stream comprises any number of container images identified by tags. It presents a single virtual view of related images, similar to a Docker image repository.
By watching an image stream, builds and deployments can receive notifications when new images are added or modified and react by performing a build or deployment, respectively.
There are many ways you can interact with images and set up image streams, depending on where the images' registries are located, any authentication requirements around those registries, and how you want your builds and deployments to behave. The following sections cover a range of these topics.
12.2. Tagging Images
Before working with OpenShift Enterprise image streams and their tags, it will help to first understand image tags in the context of Docker generally.
Container images can have names added to them that make it more intuitive to determine what they contain, called a tag. Using a tag to specify the version of what is contained in the image is a common use case. If you have an image named ruby, you could have a tag named 2.0 for 2.0 version of Ruby, and another named latest to indicate literally the latest built image in that repository overall.
When interacting directly with images using the docker CLI, the docker tag command can add tags, which essentially adds an alias to an image that can consist of several parts. Those parts can include:
<registry_server>/<user_name>/<image_name>:<tag>
The <user_name> part in the above could also refer to a project or namespace if the image is being stored in an OpenShift Enterprise environment with an internal registry.
OpenShift Enterprise provides the oc tag command, which is similar to the docker tag command, but operates on image streams instead of directly on images.
See Red Hat Enterprise Linux 7’s Getting Started with Containers documentation for more about tagging images directly using the docker CLI.
12.2.1. Adding Tags to Image Streams
Keeping in mind that an image stream in OpenShift Enterprise comprises zero or more container images identified by tags, you can add tags to an image stream using the oc tag command:
$ oc tag <source> <destination>
For example, to configure the ruby image’s latest tag to always refer to the current image for the tag 2.0:
$ oc tag ruby:latest ruby:2.0
There are different types of tags available. The default behavior uses a permanent tag, which points to a specific image in time; even when the source changes, it will not reflect in the destination tag.
A tracking tag means the destination tag’s metadata will be imported during the import. To ensure the destination tag is updated whenever the source tag changes, use the --alias=true flag:
$ oc tag --alias=true <source> <destination>
You can also add the --scheduled=true flag to have the destination tag be refreshed (i.e., re-imported) periodically. The period is configured globally at the system level. See Importing Tag and Image Metadata for more details.
Avoid tagging OpenShift Enterprise-managed images (i.e., those built using an OpenShift Enterprise instance and pushed to its internal registry). There is a known issue that prevents the registry client from pulling from such a tag.
12.2.2. Removing Tags from Image Streams
You can stop tracking a tag by removing the tag. For example, to stop tracking an existing latest tag:
$ oc tag -d ruby:latest
However, while the above command removes the tag from the image stream definition, it does not remove it from the image stream status. The image stream definition is user-defined, whereas the image stream status reflects the information the system has from the specification.
To remove a tag completely from an image stream:
$ oc delete istag/ruby:latest
12.2.3. Referencing Images in Image Streams
Images can be referenced in image streams using the following reference types:
An
ImageStreamTagis used to reference or retrieve an image for a given image stream and tag. It uses the following convention for its name:<image_stream_name>:<tag>
An
ImageStreamImageis used to reference or retrieve an image for a given image stream and image name. It uses the following convention for its name:<image_stream_name>@<id>
The
<id>is an immutable identifier for a specific image, also called a digest.A
DockerImageis used to reference or retrieve an image for a given external registry. It uses standard Docker pull specification for its name, e.g.:openshift/ruby-20-centos7:2.0
NoteWhen no tag is specified, it is assumed the latest tag will be used.
You can also reference a third-party registry:
registry.access.redhat.com/rhel7:latest
Or an image with a digest:
centos/ruby-22-centos7@sha256:3a335d7d8a452970c5b4054ad7118ff134b3a6b50a2bb6d0c07c746e8986b28e
When viewing example image stream definitions, such as the example CentOS image streams, you may notice they contain definitions of ImageStreamTag and references to DockerImage, but nothing related to ImageStreamImage.
This is because the ImageStreamImage objects are automatically created in OpenShift Enterprise whenever you import or tag an image into the image stream. You should never have to explicitly define an ImageStreamImage object in any image stream definition that you use to create image streams.
You can view an image’s object definition by retrieving an ImageStreamImage definition using the image stream name and ID:
$ oc export isimage <image_stream_name>@<id>
You can find valid <id> values for a given image stream by running:
$ oc describe is <image_stream_name>
For example, from the ruby image stream asking for the ImageStreamImage with the name and ID of ruby@3a335d7:
Example 12.1. Definition of an Image Object Retrieved via ImageStreamImage
$ oc export isimage ruby@3a335d7

apiVersion: v1
image:
  dockerImageLayers:
  - name: sha256:a3ed95caeb02ffe68cdd9fd84406680ae93d633cb16422d00e8a7c22955b46d4
    size: 0
  - name: sha256:ee1dd2cb6df21971f4af6de0f1d7782b81fb63156801cfde2bb47b4247c23c29
    size: 196634330
  - name: sha256:a3ed95caeb02ffe68cdd9fd84406680ae93d633cb16422d00e8a7c22955b46d4
    size: 0
  - name: sha256:a3ed95caeb02ffe68cdd9fd84406680ae93d633cb16422d00e8a7c22955b46d4
    size: 0
  - name: sha256:ca062656bff07f18bff46be00f40cfbb069687ec124ac0aa038fd676cfaea092
    size: 177723024
  - name: sha256:63d529c59c92843c395befd065de516ee9ed4995549f8218eac6ff088bfa6b6e
    size: 55679776
  dockerImageMetadata:
    Architecture: amd64
    Author: SoftwareCollections.org <sclorg@redhat.com>
    Config:
      Cmd:
      - /bin/sh
      - -c
      - $STI_SCRIPTS_PATH/usage
      Entrypoint:
      - container-entrypoint
      Env:
      - PATH=/opt/app-root/src/bin:/opt/app-root/bin:/usr/local/sbin:/usr/local/bin:/usr/sbin:/usr/bin:/sbin:/bin
      - STI_SCRIPTS_URL=image:///usr/libexec/s2i
      - STI_SCRIPTS_PATH=/usr/libexec/s2i
      - HOME=/opt/app-root/src
      - BASH_ENV=/opt/app-root/etc/scl_enable
      - ENV=/opt/app-root/etc/scl_enable
      - PROMPT_COMMAND=. /opt/app-root/etc/scl_enable
      - RUBY_VERSION=2.2
      ExposedPorts:
        8080/tcp: {}
      Image: d9c3abc5456a9461954ff0de8ae25e0e016aad35700594714d42b687564b1f51
      Labels:
        build-date: 2015-12-23
        io.k8s.description: Platform for building and running Ruby 2.2 applications
        io.k8s.display-name: Ruby 2.2
        io.openshift.builder-base-version: 8d95148
        io.openshift.builder-version: 8847438ba06307f86ac877465eadc835201241df
        io.openshift.expose-services: 8080:http
        io.openshift.s2i.scripts-url: image:///usr/libexec/s2i
        io.openshift.tags: builder,ruby,ruby22
        io.s2i.scripts-url: image:///usr/libexec/s2i
        license: GPLv2
        name: CentOS Base Image
        vendor: CentOS
      User: "1001"
      WorkingDir: /opt/app-root/src
    ContainerConfig: {}
    Created: 2016-01-26T21:07:27Z
    DockerVersion: 1.8.2-el7
    Id: 57b08d979c86f4500dc8cad639c9518744c8dd39447c055a3517dc9c18d6fccd
    Parent: d9c3abc5456a9461954ff0de8ae25e0e016aad35700594714d42b687564b1f51
    Size: 430037130
    apiVersion: "1.0"
    kind: DockerImage
  dockerImageMetadataVersion: "1.0"
  dockerImageReference: centos/ruby-22-centos7@sha256:3a335d7d8a452970c5b4054ad7118ff134b3a6b50a2bb6d0c07c746e8986b28e
  metadata:
    creationTimestamp: 2016-01-29T13:17:45Z
    name: sha256:3a335d7d8a452970c5b4054ad7118ff134b3a6b50a2bb6d0c07c746e8986b28e
    resourceVersion: "352"
    uid: af2e7a0c-c68a-11e5-8a99-525400f25e34
kind: ImageStreamImage
metadata:
  creationTimestamp: null
  name: ruby@3a335d7
  namespace: openshift
  selflink: /oapi/v1/namespaces/openshift/imagestreamimages/ruby@3a335d7
12.3. Image Pull Policy
Each container in a pod has a container image. Once you have created an image and pushed it to a registry, you can then refer to it in the pod.
When OpenShift Enterprise creates containers, it uses the container’s imagePullPolicy to determine if the image should be pulled prior to starting the container. There are three possible values for imagePullPolicy:
-
Always- always pull the image. -
IfNotPresent- only pull the image if it does not already exist on the node. -
Never- never pull the image.
If a container’s imagePullPolicy parameter is not specified, OpenShift Enterprise sets it based on the image’s tag:
-
If the tag is latest, OpenShift Enterprise defaults
imagePullPolicytoAlways. -
Otherwise, OpenShift Enterprise defaults
imagePullPolicytoIfNotPresent.
12.4. Accessing the Internal Registry
You can access OpenShift Enterprise’s internal registry directly to push or pull images. For example, this could be helpful if you wanted to create an image stream by manually pushing an image, or just to docker pull an image directly.
The internal registry authenticates using the same tokens as the OpenShift Enterprise API. To perform a docker login against the internal registry, you can choose any user name and email, but the password must be a valid OpenShift Enterprise token.
To log into the internal registry:
Log in to OpenShift Enterprise:
$ oc login
Get your access token:
$ oc whoami -t
Log in to the internal registry using the token. You must have docker installed on your system:
$ docker login -u <user_name> -e <email_address> \ -p <token_value> <registry_server>:<port>NoteContact your cluster administrator if you do not know the registry IP or host name and port to use.
In order to pull an image, the authenticated user must have get rights on the requested imagestreams/layers. In order to push an image, the authenticated user must have update rights on the requested imagestreams/layers.
By default, all service accounts in a project have rights to pull any image in the same project, and the builder service account has rights to push any image in the same project.
12.5. Using Image Pull Secrets
Docker registries can be secured to prevent unauthorized parties from accessing certain images. If you are using OpenShift Enterprise’s internal registry and are pulling from image streams located in the same project, then your pod’s service account should already have the correct permissions and no additional action should be required.
However, for other scenarios, such as referencing images across OpenShift Enterprise projects or from secured registries, then additional configuration steps are required. The following sections detail these scenarios and their required steps.
12.5.1. Allowing Pods to Reference Images Across Projects
When using the internal registry, to allow pods in project-a to reference images in project-b, a service account in project-a must be bound to the system:image-puller role in project-b:
$ oc policy add-role-to-user \
    system:image-puller system:serviceaccount:project-a:default \
    --namespace=project-b
After adding that role, the pods in project-a that reference the default service account will be able to pull images from project-b.
To allow access for any service account in project-a, use the group:
$ oc policy add-role-to-group \
    system:image-puller system:serviceaccounts:project-a \
    --namespace=project-b
12.5.2. Allowing Pods to Reference Images from Other Secured Registries
The .dockercfg file (or $HOME/.docker/config.json for newer Docker clients) is a Docker credentials file that stores your information if you have previously logged into a secured or insecure registry.
To pull a secured container image that is not from OpenShift Enterprise’s internal registry, you must create a pull secret from your Docker credentials and add it to your service account.
If you already have a .dockercfg file for the secured registry, you can create a secret from that file by running:
$ oc secrets new <pull_secret_name> .dockercfg=<path/to/.dockercfg>
Or if you have a $HOME/.docker/config.json file:
$ oc secrets new <pull_secret_name> .dockerconfigjson=<path/to/.docker/config.json>
If you do not already have a Docker credentials file for the secured registry, you can create a secret by running:
$ oc secrets new-dockercfg <pull_secret_name> \
    --docker-server=<registry_server> --docker-username=<user_name> \
    --docker-password=<password> --docker-email=<email>
To use a secret for pulling images for pods, you must add the secret to your service account. The name of the service account in this example should match the name of the service account the pod will use; default is the default service account:
$ oc secrets add serviceaccount/default secrets/<pull_secret_name> --for=pull
To use a secret for pushing and pulling build images, the secret must be mountable inside of a pod. You can do this by running:
$ oc secrets add serviceaccount/builder secrets/<pull_secret_name>
12.6. Importing Tag and Image Metadata
An image stream can be configured to import tag and image metadata from an image repository in an external Docker image registry. You can do this using a few different methods.
You can manually import tag and image information with the
oc import-imagecommand using the--fromoption:$ oc import-image <image_stream_name>[:<tag>] --from=<docker_image_repo> --confirm
For example:
$ oc import-image my-ruby --from=docker.io/openshift/ruby-20-centos7 --confirm
The import completed successfully.

Name:			my-ruby
Created:		Less than a second ago
Labels:			<none>
Annotations:		openshift.io/image.dockerRepositoryCheck=2016-05-06T20:59:30Z
Docker Pull Spec:	172.30.94.234:5000/demo-project/my-ruby

Tag	Spec					Created			PullSpec							Image
latest	docker.io/openshift/ruby-20-centos7	Less than a second ago	docker.io/openshift/ruby-20-centos7@sha256:772c5bf9b2d1e8...	<same>
You can also add the
--allflag to import all tags for the image instead of just latest.Like most objects in OpenShift Enterprise, you can also write and save a JSON or YAML definition to a file then create the object using the CLI. Set the
spec.dockerImageRepositoryfield to the Docker pull spec for the image:apiVersion: "v1" kind: "ImageStream" metadata: name: "my-ruby" spec: dockerImageRepository: "docker.io/openshift/ruby-20-centos7"
Then create the object:
$ oc create -f <file>
When you create an image stream that references an image in an external Docker registry, OpenShift Enterprise communicates with the external registry within a short amount of time to get up to date information about the image.
After the tag and image metadata is synchronized, the image stream object would look similar to the following:
apiVersion: v1
kind: ImageStream
metadata:
  name: my-ruby
  namespace: demo-project
  selflink: /oapi/v1/namespaces/demo-project/imagestreams/my-ruby
  uid: 5b9bd745-13d2-11e6-9a86-0ada84b8265d
  resourceVersion: '4699413'
  generation: 2
  creationTimestamp: '2016-05-06T21:34:48Z'
  annotations:
    openshift.io/image.dockerRepositoryCheck: '2016-05-06T21:34:48Z'
spec:
  dockerImageRepository: docker.io/openshift/ruby-20-centos7
  tags:
    -
      name: latest
      annotations: null
      from:
        kind: DockerImage
        name: 'docker.io/openshift/ruby-20-centos7:latest'
      generation: 2
      importPolicy: {  }
status:
  dockerImageRepository: '172.30.94.234:5000/demo-project/my-ruby'
  tags:
    -
      tag: latest
      items:
        -
          created: '2016-05-06T21:34:48Z'
          dockerImageReference: 'docker.io/openshift/ruby-20-centos7@sha256:772c5bf9b2d1e8e80742ed75aab05820419dc4532fa6d7ad8a1efddda5493dc3'
          image: 'sha256:772c5bf9b2d1e8e80742ed75aab05820419dc4532fa6d7ad8a1efddda5493dc3'
          generation: 2
You can set a tag to query external registries at a scheduled interval to synchronize tag and image metadata by setting the --scheduled=true flag with the oc tag command as mentioned in Adding Tags to Image Streams.
Alternatively, you can set importPolicy.scheduled to true in the tag’s definition:
apiVersion: v1
kind: ImageStream
metadata:
  name: ruby
spec:
  tags:
  - from:
      kind: DockerImage
      name: openshift/ruby-20-centos7
    name: latest
    importPolicy:
      scheduled: true
12.6.1. Importing Images from Insecure Registries
An image stream can be configured to import tag and image metadata from insecure image registries, such as those signed with a self-signed certificate or using plain HTTP instead of HTTPS.
To configure this, add the openshift.io/image.insecureRepository annotation and set it to true. This setting bypasses certificate validation when connecting to the registry:
kind: ImageStream
apiVersion: v1
metadata:
  name: ruby
  annotations:
    openshift.io/image.insecureRepository: "true" 1
  spec:
dockerImageRepository: my.repo.com:5000/myimage- 1
- Set the
openshift.io/image.insecureRepositoryannotation to true
The above definition only affects importing tag and image metadata. For this image to be used in the cluster (e.g., to be able to do a docker pull), each node must have Docker configured with the --insecure-registry flag. See Host Preparation for information.
Additionally, you can specify a single tag using an insecure repository. To do so, set importPolicy.insecure in the tag’s definition to true:
kind: ImageStream
apiVersion: v1
metadata:
  name: ruby
  tags:
  - from:
      kind: DockerImage
      name: my.repo.com:5000/myimage
    name: mytag
    importPolicy:
insecure: true 1- 1
- Set tag mytag to use insecure connection to that registry.
12.6.2. Importing Images from Private Registries
An image stream can be configured to import tag and image metadata from private image registries, requiring authentication.
To configure this, you need to create a secret which is used to store your credentials.
Create the secret first, before importing the image from the private repository:
$ oc secrets new-dockercfg <secret_name> \
    --docker-server=<docker_registry_server> \
    --docker-username=<docker_user> \
    --docker-password=<docker_password> \
    --docker-email=<docker_email>
For more options, see:
$ oc secrets new-dockercfg --help
After the secret is configured, proceed with creating the new image stream or using the oc import-image command. During the import process, OpenShift Enterprise will pick up the secrets and provide them to the remote party.
When importing from an insecure registry, the registry URL defined in the secret must include the :80 port suffix or the secret will not be used when attempting to import from the registry.
12.6.3. Importing Images Across Projects
An image stream can be configured to import tag and image metadata from the internal registry, but from a different project. The recommended method for this is to use the oc tag command as shown in Adding Tags to Image Streams:
$ oc tag <source_project>/<image_stream>:<tag> <new_image_stream>:<new_tag>
Another method is to import the image from the other project manually using the pull spec:
The following method is strongly discouraged and should be used only if the former using oc tag is insufficient.
First, add the necessary policy to access the other project:
$ oc policy add-role-to-group \
    system:image-puller \
    system:serviceaccounts:<destination_project> \
    -n <source_project>
This allows
<destination_project>to pull images from<source_project>.With the policy in place, you can import the image manually:
$ oc import-image <new_image_stream> --confirm \
    --from=<docker_registry>/<source_project>/<image_stream>
12.6.4. Creating an Image Stream by Manually Pushing an Image
An image stream can also be automatically created by manually pushing an image to the internal registry. This is only possible when using an OpenShift Enterprise internal registry.
Before performing this procedure, the following must be satisfied:
- The destination project you push to must already exist.
-
The user must be authorized to
{get, update} "imagestream/layers"in that project. The system:image-pusher role can be added to a user to provide these permissions. If you are a project administrator, then you would also have these permissions.
To create an image stream by manually pushing an image:
- First, log in to the internal registry.
Then, tag your image using the appropriate internal registry location. For example, if you had already pulled the docker.io/centos:centos7 image locally:
$ docker tag docker.io/centos:centos7 172.30.48.125:5000/test/my-image
Finally, push the image to your internal registry. For example:
$ docker push 172.30.48.125:5000/test/my-image
The push refers to a repository [172.30.48.125:5000/test/my-image] (len: 1)
c8a648134623: Pushed
2bf4902415e3: Pushed
latest: digest: sha256:be8bc4068b2f60cf274fc216e4caba6aa845fff5fa29139e6e7497bb57e48d67 size: 6273
Verify that the image stream was created:
$ oc get is
NAME       DOCKER REPO                        TAGS      UPDATED
my-image   172.30.48.125:5000/test/my-image   latest    3 seconds ago
Chapter 13. Quotas and Limit Ranges
13.1. Overview
Using quotas and limit ranges, cluster administrators can set constraints to limit the number of objects or amount of compute resources that are used in your project. This helps cluster administrators better manage and allocate resources across all projects, and ensure that no projects are using more than is appropriate for the cluster size.
As a developer, you can also set requests and limits on compute resources at the pod and container level.
The following sections help you understand how to check on your quota and limit range settings, what sorts of things they can constrain, and how you can request or limit compute resources in your own pods and containers.
13.2. Quotas
A resource quota, defined by a ResourceQuota object, provides constraints that limit aggregate resource consumption per project. It can limit the quantity of objects that can be created in a project by type, as well as the total amount of compute resources that may be consumed by resources in that project.
Quotas are set by cluster administrators and are scoped to a given project.
13.2.1. Viewing Quotas
You can view usage statistics related to any hard limits defined in a project’s quota by navigating in the web console to the project’s Settings tab.
You can also use the CLI to view quota details:
First, get the list of quotas defined in the project. For example, for a project called demoproject:
$ oc get quota -n demoproject
NAME                AGE
besteffort          11m
compute-resources   2m
object-counts       29m
Then, describe the quota you are interested in, for example the object-counts quota:
$ oc describe quota object-counts -n demoproject
Name:			object-counts
Namespace:		demoproject
Resource		Used	Hard
--------		----	----
configmaps		3	10
persistentvolumeclaims	0	4
replicationcontrollers	3	20
secrets			9	10
services		2	10
Full quota definitions can be viewed by running oc export on the object. The following show some sample quota definitions:
Example 13.1. object-counts.yaml
apiVersion: v1
kind: ResourceQuota
metadata:
  name: object-counts
spec:
  hard:
    configmaps: "10" 1
    persistentvolumeclaims: "4" 2
    replicationcontrollers: "20" 3
    secrets: "10" 4
services: "10" 5- 1
- The total number of
ConfigMapobjects that can exist in the project. - 2
- The total number of persistent volume claims (PVCs) that can exist in the project.
- 3
- The total number of replication controllers that can exist in the project.
- 4
- The total number of secrets that can exist in the project.
- 5
- The total number of services that can exist in the project.
Example 13.2. compute-resources.yaml
apiVersion: v1
kind: ResourceQuota
metadata:
  name: compute-resources
spec:
  hard:
    pods: "4" 1
    requests.cpu: "1" 2
    requests.memory: 1Gi 3
    limits.cpu: "2" 4
limits.memory: 2Gi 5- 1
- The total number of pods in a non-terminal state that can exist in the project.
- 2
- Across all pods in a non-terminal state, the sum of CPU requests cannot exceed 1 core.
- 3
- Across all pods in a non-terminal state, the sum of memory requests cannot exceed 1Gi.
- 4
- Across all pods in a non-terminal state, the sum of CPU limits cannot exceed 2 cores.
- 5
- Across all pods in a non-terminal state, the sum of memory limits cannot exceed 2Gi.
Example 13.3. besteffort.yaml
apiVersion: v1
kind: ResourceQuota
metadata:
  name: besteffort
spec:
  hard:
    pods: "1" 1
  scopes:
- BestEffort 2Example 13.4. compute-resources-long-running.yaml
apiVersion: v1
kind: ResourceQuota
metadata:
  name: compute-resources-long-running
spec:
  hard:
    pods: "4" 1
    limits.cpu: "4" 2
    limits.memory: "2Gi" 3
  scopes:
- NotTerminating 4- 1
- The total number of pods in a non-terminal state.
- 2
- Across all pods in a non-terminal state, the sum of CPU limits cannot exceed this value.
- 3
- Across all pods in a non-terminal state, the sum of memory limits cannot exceed this value.
- 4
- Restricts the quota to only matching pods where
spec.activeDeadlineSeconds is nil. For example, this quota would not charge for build or deployer pods.
Example 13.5. compute-resources-time-bound.yaml
apiVersion: v1
kind: ResourceQuota
metadata:
  name: compute-resources-time-bound
spec:
  hard:
    pods: "2" 1
    limits.cpu: "1" 2
    limits.memory: "1Gi" 3
  scopes:
- Terminating 4- 1
- The total number of pods in a non-terminal state.
- 2
- Across all pods in a non-terminal state, the sum of CPU limits cannot exceed this value.
- 3
- Across all pods in a non-terminal state, the sum of memory limits cannot exceed this value.
- 4
- Restricts the quota to only matching pods where
spec.activeDeadlineSeconds >=0. For example, this quota would charge for build or deployer pods, but not long running pods like a web server or database.
13.2.2. Resources Managed by Quota
The following describes the set of compute resources and object types that may be managed by a quota.
A pod is in a terminal state if status.phase in (Failed, Succeeded) is true.
| Resource Name | Description |
|---|---|
|
|
The sum of CPU requests across all pods in a non-terminal state cannot exceed this value. |
|
|
The sum of memory requests across all pods in a non-terminal state cannot exceed this value. |
|
|
The sum of CPU requests across all pods in a non-terminal state cannot exceed this value. |
|
|
The sum of memory requests across all pods in a non-terminal state cannot exceed this value. |
|
|
The sum of storage requests across all persistent volume claims cannot exceed this value. |
|
| The sum of CPU limits across all pods in a non-terminal state cannot exceed this value. |
|
| The sum of memory limits across all pods in a non-terminal state cannot exceed this value. |
|
| The sum of storage limits across all persistent volume claims cannot exceed this value. |
| Resource Name | Description |
|---|---|
|
| The total number of pods in a non-terminal state that can exist in the project. |
|
| The total number of replication controllers that can exist in the project. |
|
| The total number of resource quotas that can exist in the project. |
|
| The total number of services that can exist in the project. |
|
| The total number of secrets that can exist in the project. |
|
|
The total number of |
|
| The total number of persistent volume claims that can exist in the project. |
13.2.3. Quota Scopes
Each quota can have an associated set of scopes. A quota will only measure usage for a resource if it matches the intersection of enumerated scopes.
Adding a scope to a quota restricts the set of resources to which that quota can apply. Specifying a resource outside of the allowed set results in a validation error.
| Scope | Description |
|---|---|
| Terminating |
Match pods where |
| NotTerminating |
Match pods where |
| BestEffort |
Match pods that have best effort quality of service for either |
| NotBestEffort |
Match pods that do not have best effort quality of service for |
A BestEffort scope restricts a quota to limiting the following resources:
-
pods
A Terminating, NotTerminating, or NotBestEffort scope restricts a quota to tracking the following resources:
-
pods -
memory -
requests.memory -
limits.memory -
cpu -
requests.cpu -
limits.cpu
13.2.4. Quota Enforcement
After a resource quota for a project is first created, the project restricts the ability to create any new resources that may violate a quota constraint until it has calculated updated usage statistics.
After a quota is created and usage statistics are updated, the project accepts the creation of new content. When you create or modify resources, your quota usage is incremented immediately upon the request to create or modify the resource.
When you delete a resource, your quota use is decremented during the next full recalculation of quota statistics for the project. If project modifications exceed a quota usage limit, the server denies the action. An appropriate error message is returned explaining the quota constraint violated, and what your currently observed usage stats are in the system.
13.2.5. Requests vs Limits
When allocating compute resources, each container may specify a request and a limit value each for CPU and memory. Quotas can restrict any of these values.
If the quota has a value specified for requests.cpu or requests.memory, then it requires that every incoming container make an explicit request for those resources. If the quota has a value specified for limits.cpu or limits.memory, then it requires that every incoming container specify an explicit limit for those resources.
See Compute Resources for more on setting requests and limits in pods and containers.
13.3. Limit Ranges
A limit range, defined by a LimitRange object, enumerates compute resource constraints in a project at the pod and container level, and specifies the amount of resources that a pod or container can consume.
All resource create and modification requests are evaluated against each LimitRange object in the project. If the resource violates any of the enumerated constraints, then the resource is rejected. If the resource does not set an explicit value, and if the constraint supports a default value, then the default value is applied to the resource.
Limit ranges are set by cluster administrators and are scoped to a given project.
13.3.1. Viewing Limit Ranges
You can view any limit ranges defined in a project by navigating in the web console to the project’s Settings tab.
You can also use the CLI to view limit range details:
First, get the list of limit ranges defined in the project. For example, for a project called demoproject:
$ oc get limits -n demoproject
NAME              AGE
resource-limits   6d
Then, describe the limit range you are interested in, for example the resource-limits limit range:
<<<<<<< HEAD
$ oc describe limits resource-limits
Name:		resource-limits
Namespace:	demoproject
Type		Resource	Min	Max	Default Request	Default Limit	Max Limit/Request Ratio
----		--------	---	---	---------------	-------------	-----------------------
Pod		cpu		30m	2	-		-		-
Pod		memory		150Mi	1Gi	-		-		-
Container	memory		150Mi	1Gi	307Mi		512Mi		-
Container	cpu		30m	2	60m		1		-
=======
$ oc describe limits resource-limits -n demoproject
Name:                           resource-limits
Namespace:                      demoproject
Type                            Resource                Min     Max     Default Request Default Limit   Max Limit/Request Ratio
----                            --------                ---     ---     --------------- -------------   -----------------------
Pod                             cpu                     200m    2       -               -               -
Pod                             memory                  6Mi     1Gi     -               -               -
Container                       cpu                     100m    2       200m            300m            10
Container                       memory                  4Mi     1Gi     100Mi           200Mi           -
openshift.io/Image              storage                 -       1Gi     -               -               -
openshift.io/ImageStream        openshift.io/image      -       12      -               -               -
openshift.io/ImageStream        openshift.io/image-tags -       10      -               -               -
>>>>>>> 7fb6456... Fix `oc describe limits` example
Full limit range definitions can be viewed by running oc export on the object. The following shows an example limit range definition:
Example 13.6. Limit Range Object Definition
apiVersion: "v1"
kind: "LimitRange"
metadata:
  name: "resource-limits" 1
spec:
  limits:
    -
      type: "Pod"
      max:
        cpu: "2" 2
        memory: "1Gi" 3
      min:
        cpu: "200m" 4
        memory: "6Mi" 5
    -
      type: "Container"
      max:
        cpu: "2" 6
        memory: "1Gi" 7
      min:
        cpu: "100m" 8
        memory: "4Mi" 9
      default:
        cpu: "300m" 10
        memory: "200Mi" 11
      defaultRequest:
        cpu: "200m" 12
        memory: "100Mi" 13
      maxLimitRequestRatio:
        cpu: "10" 14
- 1
- The name of the limit range object.
- 2
- The maximum amount of CPU that a pod can request on a node across all containers.
- 3
- The maximum amount of memory that a pod can request on a node across all containers.
- 4
- The minimum amount of CPU that a pod can request on a node across all containers.
- 5
- The minimum amount of memory that a pod can request on a node across all containers.
- 6
- The maximum amount of CPU that a single container in a pod can request.
- 7
- The maximum amount of memory that a single container in a pod can request.
- 8
- The minimum amount of CPU that a single container in a pod can request.
- 9
- The minimum amount of memory that a single container in a pod can request.
- 10
- The default amount of CPU that a container will be limited to use if not specified.
- 11
- The default amount of memory that a container will be limited to use if not specified.
- 12
- The default amount of CPU that a container will request to use if not specified.
- 13
- The default amount of memory that a container will request to use if not specified.
- 14
- The maximum amount of CPU burst that a container can make as a ratio of its limit over request.
13.3.2. Container Limits
Supported Resources:
- CPU
- Memory
Supported Constraints:
Per container, the following must hold true if specified:
| Constraint | Behavior |
|---|---|
|
|
If the configuration defines a |
|
|
If the configuration defines a |
|
|
If a configuration defines a
For example, if a container has |
Supported Defaults:
Default[resource]-
Defaults
container.resources.limit[resource]to specified value if none. Default Requests[resource]-
Defaults
container.resources.requests[resource]to specified value if none.
13.3.3. Pod Limits
Supported Resources:
- CPU
- Memory
Supported Constraints:
Across all containers in a pod, the following must hold true:
| Constraint | Enforced Behavior |
|---|---|
|
|
|
|
|
|
|
|
|
13.4. Compute Resources
Each container running on a node consumes compute resources, which are measurable quantities that can be requested, allocated, and consumed.
When authoring a pod configuration file, you can optionally specify how much CPU and memory (RAM) each container needs in order to better schedule pods in the cluster and ensure satisfactory performance.
CPU is measured in units called millicores. Each node in a cluster inspects the operating system to determine the amount of CPU cores on the node, then multiplies that value by 1000 to express its total capacity. For example, if a node has 2 cores, the node’s CPU capacity would be represented as 2000m. If you wanted to use 1/10 of a single core, it would be represented as 100m.
Memory is measured in bytes. In addition, it may be used with SI suffices (E, P, T, G, M, K) or their power-of-two-equivalents (Ei, Pi, Ti, Gi, Mi, Ki).
apiVersion: v1
kind: Pod
spec:
  containers:
  - image: openshift/hello-openshift
    name: hello-openshift
    resources:
      requests:
        cpu: 100m 1
        memory: 200Mi 2
      limits:
        cpu: 200m 3
memory: 400Mi 413.4.1. CPU Requests
Each container in a pod can specify the amount of CPU it requests on a node. The scheduler uses CPU requests to find a node with an appropriate fit for a container.
The CPU request represents a minimum amount of CPU that your container may consume, but if there is no contention for CPU, it can use all available CPU on the node. If there is CPU contention on the node, CPU requests provide a relative weight across all containers on the system for how much CPU time the container may use.
On the node, CPU requests map to Kernel CFS shares to enforce this behavior.
13.4.2. Viewing Compute Resources
To view compute resources for a pod:
$ oc describe pod ruby-hello-world-tfjxt
Name:       ruby-hello-world-tfjxt
Namespace:      default
Image(s):     ruby-hello-world
Node:       /
Labels:       run=ruby-hello-world
Status:       Pending
Reason:
Message:
IP:
Replication Controllers:  ruby-hello-world (1/1 replicas created)
Containers:
  ruby-hello-world:
    Container ID:
    Image ID:
    Image:    ruby-hello-world
    QoS Tier:
      cpu:  Burstable
      memory: Burstable
    Limits:
      cpu:  200m
      memory: 400Mi
    Requests:
      cpu:    100m
      memory:   200Mi
    State:    Waiting
    Ready:    False
    Restart Count:  0
    Environment Variables:
13.4.3. CPU Limits
Each container in a pod can specify the amount of CPU it is limited to use on a node. CPU limits control the maximum amount of CPU that your container may use independent of contention on the node. If a container attempts to exceed the specified limit, the system will throttle the container. This allows the container to have a consistent level of service independent of the number of pods scheduled to the node.
13.4.4. Memory Requests
By default, a container is able to consume as much memory on the node as possible. In order to improve placement of pods in the cluster, specify the amount of memory required for a container to run. The scheduler will then take available node memory capacity into account prior to binding your pod to a node. A container is still able to consume as much memory on the node as possible even when specifying a request.
13.4.5. Memory Limits
If you specify a memory limit, you can constrain the amount of memory the container can use. For example, if you specify a limit of 200Mi, a container will be limited to using that amount of memory on the node. If the container exceeds the specified memory limit, it will be terminated and potentially restarted dependent upon the container restart policy.
13.4.6. Quality of Service Tiers
A compute resource is classified with a quality of service (QoS) based on the specified request and limit value.
| Quality of Service | Description |
|---|---|
| BestEffort | Provided when a request and limit are not specified. |
| Burstable | Provided when a request is specified that is less than an optionally specified limit. |
| Guaranteed | Provided when a limit is specified that is equal to an optionally specified request. |
A container may have a different quality of service for each compute resource. For example, a container can have Burstable CPU and Guaranteed memory qualities of service.
The quality of service has different impacts on different resources, depending on whether the resource is compressible or not. CPU is a compressible resource, whereas memory is an incompressible resource.
- With CPU Resources:
- A BestEffort CPU container is able to consume as much CPU as is available on a node but runs with the lowest priority.
- A Burstable CPU container is guaranteed to get the minimum amount of CPU requested, but it may or may not get additional CPU time. Excess CPU resources are distributed based on the amount requested across all containers on the node.
- A Guaranteed CPU container is guaranteed to get the amount requested and no more, even if there are additional CPU cycles available. This provides a consistent level of performance independent of other activity on the node.
- With Memory Resources:
- A BestEffort memory container is able to consume as much memory as is available on the node, but there are no guarantees that the scheduler will place that container on a node with enough memory to meet its needs. In addition, a BestEffort container has the greatest chance of being killed if there is an out of memory event on the node.
- A Burstable memory container is scheduled on the node to get the amount of memory requested, but it may consume more. If there is an out of memory event on the node, Burstable containers are killed after BestEffort containers when attempting to recover memory.
- A Guaranteed memory container gets the amount of memory requested, but no more. In the event of an out of memory event, it will only be killed if there are no more BestEffort or Burstable containers on the system.
13.4.7. Specifying Compute Resources via CLI
To specify compute resources via the CLI:
$ oc run ruby-hello-world --image=ruby-hello-world --limits=cpu=200m,memory=400Mi --requests=cpu=100m,memory=200Mi
13.5. Project Resource Limits
Resource limits can be set per-project by cluster administrators. Developers do not have the ability to create, edit, or delete these limits, but can view them for projects they have access to.
Chapter 14. Deployments
14.1. Overview
A deployment in OpenShift Enterprise is a replication controller based on a user defined template called a deployment configuration. Deployments are created manually or in response to triggered events.
The deployment system provides:
- A deployment configuration, which is a template for deployments.
- Triggers that drive automated deployments in response to events.
- User-customizable strategies to transition from the previous deployment to the new deployment.
- Rollbacks to a previous deployment.
- Manual replication scaling.
The deployment configuration contains a version number that is incremented each time a new deployment is created from that configuration. In addition, the cause of the last deployment is added to the configuration.
14.2. Creating a Deployment Configuration
A deployment configuration consists of the following key parts:
Deployment configurations are deploymentConfig OpenShift Enterprise API resources which can be managed with the oc command like any other resource. The following is an example of a deploymentConfig resource:
kind: "DeploymentConfig"
apiVersion: "v1"
metadata:
  name: "frontend"
spec:
  template: 1
    metadata:
      labels:
        name: "frontend"
    spec:
      containers:
        - name: "helloworld"
          image: "openshift/origin-ruby-sample"
          ports:
            - containerPort: 8080
              protocol: "TCP"
  replicas: 5 2
  selector:
    name: "frontend"
  triggers:
    - type: "ConfigChange" 3
    - type: "ImageChange" 4
      imageChangeParams:
        automatic: true
        containerNames:
          - "helloworld"
        from:
          kind: "ImageStreamTag"
          name: "origin-ruby-sample:latest"
  strategy: 5
    type: "Rolling"
- 1
- The replication controller template named
frontenddescribes a simple Ruby application. - 2
- There will be 5 replicas of
frontendby default. - 3
- A configuration change trigger causes a new deployment to be created any time the replication controller template changes.
- 4
- An image change trigger trigger causes a new deployment to be created each time a new version of the
origin-ruby-sample:latestimage repository is available. - 5
- The Rolling strategy is the default and may be omitted.
14.3. Starting a Deployment
You can start a new deployment manually using the web console, or from the CLI:
$ oc deploy <deployment_config> --latest
If there’s already a deployment in progress, the command will display a message and a new deployment will not be started.
14.4. Viewing a Deployment
To get basic information about recent deployments:
$ oc deploy <deployment_config>
This will show details about the latest and recent deployments, including any currently running deployment.
For more detailed information about a deployment configuration and the latest deployment:
$ oc describe dc <deployment_config>
The web console shows deployments in the Browse tab.
14.5. Canceling a Deployment
To cancel a running or stuck deployment:
$ oc deploy <deployment_config> --cancel
The cancellation is a best-effort operation, and may take some time to complete. It’s possible the deployment will partially or totally complete before the cancellation is effective.
14.6. Retrying a Deployment
To retry the last failed deployment:
$ oc deploy <deployment_config> --retry
If the last deployment didn’t fail, the command will display a message and the deployment will not be retried.
Retrying a deployment restarts the deployment and does not create a new deployment version. The restarted deployment will have the same configuration it had when it failed.
14.7. Rolling Back a Deployment
Rollbacks revert an application back to a previous deployment and can be performed using the REST API, the CLI, or the web console.
To rollback to the last successful deployment:
$ oc rollback <deployment_config>
The deployment configuration’s template will be reverted to match the deployment specified in the rollback command, and a new deployment will be started.
Image change triggers on the deployment configuration are disabled as part of the rollback to prevent unwanted deployments soon after the rollback is complete. To re-enable the image change triggers:
$ oc deploy <deployment_config> --enable-triggers
To roll back to a specific version:
$ oc rollback <deployment_config> --to-version=1
To see what the rollback would look like without performing the rollback:
$ oc rollback <deployment_config> --dry-run
14.8. Executing Commands Inside a Container
You can add a command to a container, which modifies the container’s startup behavior by overruling the image’s ENTRYPOINT. This is different from a lifecycle hook, which instead can be run once per deployment at a specified time.
Add the command parameters to the spec field of the deployment configuration. You can also add an args field, which modifies the command (or the ENTRYPOINT if command does not exist).
...
spec:
  containers:
    -
    name: <container_name>
    image: 'image'
    command:
      - '<command>'
    args:
      - '<argument_1>'
      - '<argument_2>'
      - '<argument_3>'
...
For example, to execute the java command with the '-jar' and '/opt/app-root/springboots2idemo.jar' arguments:
...
spec:
  containers:
    -
    name: example-spring-boot
    image: 'image'
    command:
      - java
    args:
      - '-jar'
      - /opt/app-root/springboots2idemo.jar
...
14.9. Viewing Deployment Logs
To view the logs of the latest deployment for a given deployment configuration:
$ oc logs dc/<deployment_config> [--follow]
Logs can be retrieved either while the deployment is running or if it has failed. If the deployment was successful, there will be no logs to view.
You can also view logs from older deployments:
$ oc logs --version=1 dc/<deployment_config>
This command returns the logs from the first deployment of the provided deployment configuration, if and only if that deployment exists (i.e., it has failed and has not been manually deleted or pruned).
14.10. Triggers
A deployment configuration can contain triggers, which drive the creation of new deployments in response to events, only inside OpenShift Enterprise at the moment.
If no triggers are defined on a deployment configuration, deployments must be started manually.
14.10.1. Configuration Change Trigger
The ConfigChange trigger results in a new deployment whenever new changes are detected in the pod template of the deployment configuration.
If only a ConfigChange trigger is defined on a deployment configuration, the first deployment is automatically created soon after the deployment configuration itself is created.
Example 14.1. A ConfigChange Trigger
triggers:
  - type: "ConfigChange"
14.10.2. Image Change Trigger
The ImageChange trigger results in a new deployment whenever the value of an image stream tag changes, either by a build or because it was imported.
Example 14.2. An ImageChange Trigger
triggers:
  - type: "ImageChange"
    imageChangeParams:
      automatic: true 1
      from:
        kind: "ImageStreamTag"
        name: "origin-ruby-sample:latest"
      containerNames:
- "helloworld"- 1
- If the
imageChangeParams.automaticfield is set tofalse, the trigger is disabled.
With the above example, when the latest tag value of the origin-ruby-sample image stream changes and the new image value differs from the current image specified in the deployment configuration’s helloworld container, a new deployment is created using the new image for the helloworld container.
If an ImageChange trigger is defined on a deployment configuration (with a ConfigChange trigger or with automatic=true) and the ImageStreamTag pointed by the ImageChange trigger does not exist yet, then the first deployment automatically starts as soon as an image is imported or pushed by a build to the ImageStreamTag.
14.11. Strategies
A deployment strategy determines the deployment process, and is defined by the deployment configuration. Each application has different requirements for availability (and other considerations) during deployments. OpenShift Enterprise provides strategies to support a variety of deployment scenarios.
A deployment strategy uses readiness checks to determine if a new pod is ready for use. If a readiness check fails, the deployment is stopped.
The Rolling strategy is the default strategy used if no strategy is specified on a deployment configuration.
14.11.1. Rolling Strategy
The rolling strategy performs a rolling update and supports lifecycle hooks for injecting code into the deployment process.
The rolling deployment strategy waits for pods to pass their readiness check before scaling down old components, and does not allow pods that do not pass their readiness check within a configurable timeout.
The following is an example of the Rolling strategy:
strategy:
  type: Rolling
  rollingParams:
    timeoutSeconds: 120 1
    maxSurge: "20%" 2
    maxUnavailable: "10%" 3
    pre: {} 4
post: {}The Rolling strategy will:
-
Execute any
prelifecycle hook. - Scale up the new deployment based on the surge configuration.
- Scale down the old deployment based on the max unavailable configuration.
- Repeat this scaling until the new deployment has reached the desired replica count and the old deployment has been scaled to zero.
-
Execute any
postlifecycle hook.
When scaling down, the Rolling strategy waits for pods to become ready so it can decide whether further scaling would affect availability. If scaled up pods never become ready, the deployment will eventually time out and result in a deployment failure.
When executing the post lifecycle hook, all failures will be ignored regardless of the failure policy specified on the hook.
The maxUnavailable parameter is the maximum number of pods that can be unavailable during the update. The maxSurge parameter is the maximum number of pods that can be scheduled above the original number of pods. Both parameters can be set to either a percentage (e.g., 10%) or an absolute value (e.g., 2). The default value for both is 25%.
These parameters allow the deployment to be tuned for availability and speed. For example:
-
maxUnavailable=0andmaxSurge=20%ensures full capacity is maintained during the update and rapid scale up. -
maxUnavailable=10%andmaxSurge=0performs an update using no extra capacity (an in-place update). -
maxUnavailable=10%andmaxSurge=10%scales up and down quickly with some potential for capacity loss.
14.11.2. Recreate Strategy
The Recreate strategy has basic rollout behavior and supports lifecycle hooks for injecting code into the deployment process.
The following is an example of the Recreate strategy:
strategy:
  type: Recreate
  recreateParams: 1
    pre: {} 2
    mid: {}
    post: {}
The Recreate strategy will:
- Execute any "pre" lifecycle hook.
- Scale down the previous deployment to zero.
- Execute any "mid" lifecycle hook.
- Scale up the new deployment.
- Execute any "post" lifecycle hook.
During scale up, if the replica count of the deployment is greater than one, the first replica of the deployment will be validated for readiness before fully scaling up the deployment. If the validation of the first replica fails, the deployment will be considered a failure.
14.11.3. Custom Strategy
The Custom strategy allows you to provide your own deployment behavior.
The following is an example of the Custom strategy:
strategy:
  type: Custom
  customParams:
    image: organization/strategy
    command: [ "command", "arg1" ]
    environment:
      - name: ENV_1
        value: VALUE_1
In the above example, the organization/strategy container image provides the deployment behavior. The optional command array overrides any CMD directive specified in the image’s Dockerfile. The optional environment variables provided are added to the execution environment of the strategy process.
Additionally, OpenShift Enterprise provides the following environment variables to the strategy process:
| Environment Variable | Description |
|---|---|
|
| The name of the new deployment (a replication controller). |
|
| The namespace of the new deployment. |
The replica count of the new deployment will initially be zero. The responsibility of the strategy is to make the new deployment active using the logic that best serves the needs of the user.
14.12. Lifecycle Hooks
The Recreate and Rolling strategies support lifecycle hooks, which allow behavior to be injected into the deployment process at predefined points within the strategy:
The following is an example of a "pre" lifecycle hook:
pre:
  failurePolicy: Abort
execNewPod: {} 1- 1
execNewPodis a pod-based lifecycle hook.
Every hook has a failurePolicy, which defines the action the strategy should take when a hook failure is encountered:
|
| The deployment should be considered a failure if the hook fails. |
|
| The hook execution should be retried until it succeeds. |
|
| Any hook failure should be ignored and the deployment should proceed. |
Some hook points for a strategy might support only a subset of failure policy values. For example, the Recreate and Rolling strategies do not currently support the Abort policy for a "post" deployment lifecycle hook. Consult the documentation for a given strategy for details on any restrictions regarding lifecycle hooks.
Hooks have a type-specific field that describes how to execute the hook. Currently pod-based hooks are the only supported hook type, specified by the execNewPod field.
14.12.1. Pod-based Lifecycle Hook
Pod-based lifecycle hooks execute hook code in a new pod derived from the template in a deployment configuration.
The following simplified example deployment configuration uses the Rolling strategy. Triggers and some other minor details are omitted for brevity:
kind: DeploymentConfig
apiVersion: v1
metadata:
  name: frontend
spec:
  template:
    metadata:
      labels:
        name: frontend
    spec:
      containers:
        - name: helloworld
          image: openshift/origin-ruby-sample
  replicas: 5
  selector:
    name: frontend
  strategy:
    type: Rolling
    rollingParams:
      pre:
        failurePolicy: Abort
        execNewPod:
          containerName: helloworld 1
          command: [ "/usr/bin/command", "arg1", "arg2" ] 2
          env: 3
            - name: CUSTOM_VAR1
              value: custom_value1
          volumes:
- data 4- 1
- The
helloworldname refers tospec.template.spec.containers[0].name. - 2
- This
commandoverrides anyENTRYPOINTdefined by theopenshift/origin-ruby-sampleimage. - 3
envis an optional set of environment variables for the hook container.- 4
volumesis an optional set of volume references for the hook container.
In this example, the "pre" hook will be executed in a new pod using the openshift/origin-ruby-sample image from the helloworld container. The hook pod will have the following properties:
-
The hook command will be
/usr/bin/command arg1 arg2. -
The hook container will have the
CUSTOM_VAR1=custom_value1environment variable. -
The hook failure policy is
Abort, meaning the deployment will fail if the hook fails. -
The hook pod will inherit the
datavolume from the deployment configuration pod.
14.13. Deployment Resources
A deployment is completed by a pod that consumes resources (memory and CPU) on a node. By default, pods consume unbounded node resources. However, if a project specifies default container limits, then pods consume resources up to those limits.
You can also limit resource use by specifying resource limits as part of the deployment strategy. Deployment resources can be used with the Recreate, Rolling, or Custom deployment strategies.
In the following example, each of resources, cpu, and memory is optional:
type: "Recreate"
resources:
  limits:
    cpu: "100m" 1
memory: "256Mi" 2However, if a quota has been defined for your project, one of the following two items is required:
A
resourcessection set with an explicitrequests:type: "Recreate" resources: requests: 1 cpu: "100m" memory: "256Mi"- 1
- The
requestsobject contains the list of resources that correspond to the list of resources in the quota.
-
A limit range defined in your project, where the defaults from the
LimitRangeobject apply to pods created during the deployment process.
Otherwise, deploy pod creation will fail, citing a failure to satisfy quota.
14.14. Manual Scaling
In addition to rollbacks, you can exercise fine-grained control over the number of replicas from the web console, or by using the oc scale command. For example, the following command sets the replicas in the deployment configuration frontend to 3.
$ oc scale dc frontend --replicas=3
The number of replicas eventually propagates to the desired and current state of the deployment configured by the deployment configuration frontend.
14.15. Assigning Pods to Specific Nodes
You can use node selectors in conjunction with labeled nodes to control pod placement.
OpenShift Enterprise administrators can assign labels during an advanced installation, or added to a node after installation.
Cluster administrators can set the default node selector for your project in order to restrict pod placement to specific nodes. As an OpenShift developer, you can set a node selector on a pod configuration to restrict nodes even further.
To add a node selector when creating a pod, edit the pod configuration, and add the nodeSelector value. This can be added to a single pod configuration, or in a pod template:
apiVersion: v1
kind: Pod
spec:
  nodeSelector:
    disktype: ssd
...
Pods created when the node selector is in place are assigned to nodes with the specified labels.
The labels specified here are used in conjunction with the labels added by a cluster administrator. For example, if a project has the type=user-node and region=east labels added to a project by the cluster administrator, and you add the above disktype: ssd label to a pod, the pod will only ever be scheduled on nodes that have all three labels.
Labels can only be set to one value, so setting a node selector of region=west in a pod configuration that has region=east as the administrator-set default, results in a pod that will never be scheduled.
14.16. Running a Pod with a Different Service Account
You can run a pod with a service account other than the default:
Edit the deployment configuration:
$ oc edit dc/<deployment_config>
Add the
serviceAccountandserviceAccountNameparameters to thespecfield, and specify the service account you want to use:spec: securityContext: {} serviceAccount: <service_account> serviceAccountName: <service_account>
Chapter 15. Routes
15.1. Overview
An OpenShift Enterprise route exposes a service at a host name, like www.example.com, so that external clients can reach it by name.
DNS resolution for a host name is handled separately from routing; your administrator may have configured a cloud domain that will always correctly resolve to the OpenShift Enterprise router, or if using an unrelated host name you may need to modify its DNS records independently to resolve to the router.
15.2. Creating Routes
You can create unsecured and secured routes routes using the web console or the CLI.
Using the web console, you can navigate to the Browse → Routes page, then click Create Route to define and create a route in your project:
Figure 15.1. Creating a Route Using the Web Console
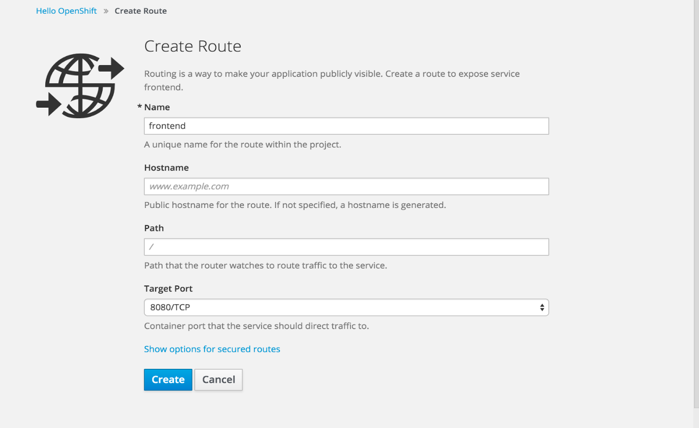
Using the CLI, the following example creates an unsecured route:
$ oc expose svc/frontend --hostname=www.example.com
The new route inherits the name from the service unless you specify one using the --name option.
Example 15.1. YAML Definition of the Unsecured Route Created Above
apiVersion: v1
kind: Route
metadata:
  name: frontend
spec:
  host: www.example.com
  to:
    kind: Service
    name: frontend
Unsecured routes are the default configuration, and are therefore the simplest to set up. However, secured routes offer security for connections to remain private. To create a secured HTTPS route encrypted with a key and certificate (PEM-format files which you must generate and sign separately), you can use the create route command and optionally provide certificates and a key.
TLS is the replacement of SSL for HTTPS and other encrypted protocols.
$ oc create route edge --service=frontend \
    --cert=${MASTER_CONFIG_DIR}/ca.crt \
    --key=${MASTER_CONFIG_DIR}/ca.key \
    --ca-cert=${MASTER_CONFIG_DIR}/ca.crt \
    --hostname=www.example.com
Example 15.2. YAML Definition of the Secured Route Created Above
apiVersion: v1
kind: Route
metadata:
  name: frontend
spec:
  host: www.example.com
  to:
    kind: Service
    name: frontend
  tls:
    termination: edge
    key: |-
      -----BEGIN PRIVATE KEY-----
      [...]
      -----END PRIVATE KEY-----
    certificate: |-
      -----BEGIN CERTIFICATE-----
      [...]
      -----END CERTIFICATE-----
    caCertificate: |-
      -----BEGIN CERTIFICATE-----
      [...]
      -----END CERTIFICATE-----
Currently, password protected key files are not supported. HAProxy prompts for a password upon starting and does not have a way to automate this process. To remove a passphrase from a keyfile, you can run:
# openssl rsa -in <passwordProtectedKey.key> -out <new.key>
You can create a secured route without specifying a key and certificate, in which case the router’s default certificate will be used for TLS termination.
TLS termination in OpenShift Enterprise relies on SNI for serving custom certificates. Any non-SNI traffic received on port 443 is handled with TLS termination and a default certificate, which may not match the requested host name, resulting in validation errors.
Further information on all types of TLS termination as well as path-based routing are available in the Architecture section.
Chapter 16. Integrating External Services
16.1. Overview
Many OpenShift Enterprise applications use external resources, such as external databases, or an external SaaS endpoint. These external resources can be modeled as native OpenShift Enterprise services, so that applications can work with them as they would any other internal service.
16.2. External MySQL Database
One of the most common types of external services is an external database. To support an external database, an application needs:
- An endpoint to communicate with.
A set of credentials and coordinates, including:
- A user name
- A passphrase
- A database name
The solution for integrating with an external database includes:
-
A
Serviceobject to represent the SaaS provider as an OpenShift Enterprise service. -
One or more
Endpointsfor the service. - Environment variables in the appropriate pods containing the credentials.
The following steps outline a scenario for integrating with an external MySQL database:
Create an OpenShift Enterprise service to represent your external database. This is similar to creating an internal service; the difference is in the service’s
Selectorfield.Internal OpenShift Enterprise services use the
Selectorfield to associate pods with services using labels. TheEndpointsControllersystem component synchronizes the endpoints for services that specify selectors with the pods that match the selector. The service proxy and OpenShift Enterprise router load-balance requests to the service amongst the service’s endpoints.Services that represent an external resource do not require associated pods. Instead, leave the
Selectorfield unset. This represents the external service, making theEndpointsControllerignore the service and allows you to specify endpoints manually:kind: "Service" apiVersion: "v1" metadata: name: "external-mysql-service" spec: ports: - name: "mysql" protocol: "TCP" port: 3306 targetPort: 3306 nodePort: 0 selector: {} 1- 1
- The
selectorfield to leave blank.
Next, create the required endpoints for the service. This gives the service proxy and router the location to send traffic directed to the service:
kind: "Endpoints" apiVersion: "v1" metadata: name: "external-mysql-service" 1 subsets: 2 - addresses: - ip: "10.0.0.0" 3 ports: - port: 3306 4 name: "mysql"- 1
- The name of the
Serviceinstance, as defined in the previous step. - 2
- Traffic to the service will be load-balanced between the supplied
Endpointsif more than one is supplied. - 3
- Endpoints IPs cannot be loopback (127.0.0.0/8), link-local (169.254.0.0/16), or link-local multicast (224.0.0.0/24).
- 4
- The
portandnamedefinition must match theportandnamevalue in the service defined in the previous step.
Now that the service and endpoints are defined, give the appropriate pods access to the credentials to use the service by setting environment variables in the appropriate containers:
  kind: "DeploymentConfig"
  apiVersion: "v1"
  metadata:
    name: "my-app-deployment"
  spec: 1
    strategy:
      type: "Rolling"
      rollingParams:
        updatePeriodSeconds: 1
        intervalSeconds: 1
        timeoutSeconds: 120
    replicas: 2
    selector:
      name: "frontend"
    template:
      metadata:
        labels:
          name: "frontend"
      spec:
        containers:
          -
            name: "helloworld"
            image: "origin-ruby-sample"
            ports:
              -
                containerPort: 3306
                protocol: "TCP"
            env:
              -
                name: "MYSQL_USER"
                value: "${MYSQL_USER}" 2
              -
                name: "MYSQL_PASSWORD"
                value: "${MYSQL_PASSWORD}" 3
              -
                name: "MYSQL_DATABASE"
                value: "${MYSQL_DATABASE}" 4
External Database Environment Variables
Using an external service in your application is similar to using an internal service. Your application will be assigned environment variables for the service and the additional environment variables with the credentials described in the previous step. For example, a MySQL container receives the following environment variables:
-
EXTERNAL_MYSQL_SERVICE_SERVICE_HOST=<ip_address> -
EXTERNAL_MYSQL_SERVICE_SERVICE_PORT=<port_number> -
MYSQL_USERNAME=<mysql_username> -
MYSQL_PASSWORD=<mysql_password> -
MYSQL_DATABASE_NAME=<mysql_database>
The application is responsible for reading the coordinates and credentials for the service from the environment and establishing a connection with the database via the service.
16.3. External SaaS Provider
A common type of external service is an external SaaS endpoint. To support an external SaaS provider, an application needs:
- An endpoint to communicate with
A set of credentials, such as:
- An API key
- A user name
- A passphrase
The following steps outline a scenario for integrating with an external SaaS provider:
Create an OpenShift Enterprise service to represent the external service. This is similar to creating an internal service; however the difference is in the service’s
Selectorfield.Internal OpenShift Enterprise services use the
Selectorfield to associate pods with services using labels. A system component calledEndpointsControllersynchronizes the endpoints for services that specify selectors with the pods that match the selector. The service proxy and OpenShift Enterprise router load-balance requests to the service amongst the service’s endpoints.Services that represents an external resource do not require that pods be associated with it. Instead, leave the
Selectorfield unset. This makes theEndpointsControllerignore the service and allows you to specify endpoints manually:kind: "Service" apiVersion: "v1" metadata: name: "example-external-service" spec: ports: - name: "mysql" protocol: "TCP" port: 3306 targetPort: 3306 nodePort: 0 selector: {} 1- 1
- The
selectorfield to leave blank.
Next, create endpoints for the service containing the information about where to send traffic directed to the service proxy and the router:
kind: "Endpoints"
apiVersion: "v1"
metadata:
  name: "example-external-service" 1
subsets: 2
- addresses:
  - ip: "10.10.1.1"
  ports:
  - name: "mysql"
    port: 3306
- 1
- The name of the
Serviceinstance. - Traffic to the service is load-balanced between the
subsetssupplied here.Now that the service and endpoints are defined, give pods the credentials to use the service by setting environment variables in the appropriate containers:
---
  kind: "DeploymentConfig"
  apiVersion: "v1"
  metadata:
    name: "my-app-deployment"
  spec:  1
    strategy:
      type: "Rolling"
      rollingParams:
        updatePeriodSeconds: 1
        intervalSeconds: 1
        timeoutSeconds: 120
    replicas: 1
    selector:
      name: "frontend"
    template:
      metadata:
        labels:
          name: "frontend"
      spec:
        containers:
          -
            name: "helloworld"
            image: "openshift/openshift/origin-ruby-sample"
            ports:
              -
                containerPort: 3306
                protocol: "TCP"
            env:
              -
                name: "SAAS_API_KEY" 2
                value: "<SaaS service API key>"
              -
                name: "SAAS_USERNAME" 3
                value: "<SaaS service user>"
              -
                name: "SAAS_PASSPHRASE" 4
                value: "<SaaS service passphrase>"
External SaaS Provider Environment Variables
Similarly, when using an internal service, your application is assigned environment variables for the service and the additional environment variables with the credentials described in the above steps. In the above example, the container receives the following environment variables:
-
EXAMPLE_EXTERNAL_SERVICE_SERVICE_HOST=<ip_address> -
EXAMPLE_EXTERNAL_SERVICE_SERVICE_PORT=<port_number> -
SAAS_API_KEY=<saas_api_key> -
SAAS_USERNAME=<saas_username> -
SAAS_PASSPHRASE=<saas_passphrase>
The application reads the coordinates and credentials for the service from the environment and establishes a connection with the service.
Chapter 17. Secrets
17.1. Overview
The Secret object type provides a mechanism to hold sensitive information such as passwords, OpenShift Enterprise client config files, dockercfg files, private source repository credentials, etc. Secrets decouple sensitive content from the pods that use it and can be mounted into containers using a volume plug-in or used by the system to perform actions on behalf of a pod. This topic discusses important properties of secrets and provides an overview on how developers can use them.
Example 17.1. YAML Secret Object Definition
apiVersion: v1
kind: Secret
metadata:
  name: test-secret
  namespace: my-namespace
data: 1
  username: "dmFsdWUtMQ0K"
password: "dmFsdWUtMg0KDQo="- 1
- The allowable format for the keys in the
datafield must meet the guidelines in the DNS_SUBDOMAIN value in the Kubernetes identifiers glossary.
17.2. Properties of Secrets
Key properties include:
- Secret data can be referenced independently from its definition.
- Secret data never comes to rest on the node. Volumes are backed by temporary file-storage facilities (tmpfs).
- Secret data can be shared within a namespace.
17.2.1. Secrets and the Pod Lifecycle
A secret must be created before the pods that depend on it.
Containers read the secret from the files. If a secret is expected to be stored in an environment variable, then you must modify the image to populate the environment variable from the file before running the main program.
Once a pod is created, its secret volumes do not change, even if the secret resource is modified. To change the secret used, the original pod must be deleted, and a new pod (perhaps with an identical PodSpec) must be created. An exception to this is when a node is rebooted and the secret data must be re-read from the API server. Updating a secret follows the same workflow as deploying a new container image. The kubectl rollingupdate command can be used.
The resourceVersion value in a secret is not specified when it is referenced. Therefore, if a secret is updated at the same time as pods are starting, then the version of the secret will be used for the pod will not be defined.
Currently, it is not possible to check the resource version of a secret object that was used when a pod was created. It is planned that pods will report this information, so that a controller could restart ones using a old resourceVersion. In the interim, do not update the data of existing secrets, but create new ones with distinct names.
17.3. Creating and Using Secrets
When creating secrets:
- Create a secret object with secret data
-
Create a pod with a volume of type
secretand a container to mount the volume - Update the pod’s service account to allow the reference to the secret.
17.3.1. Creating Secrets
To create a secret object, use the following command, where the JSON file is a predefined secret:
$ oc create -f secret.json
17.3.2. Secrets in Volumes and Environment Variables
See examples of YAML files with secret data.
After you create a secret, you can:
Create the pod to reference your secret:
$ oc create -f <your_yaml_file>.yaml
Get the logs:
$ oc logs secret-example-pod
Delete the pod:
$ oc delete pod secret-example-pod
17.3.3. Image Pull Secrets
See Using Image Pull Secrets for more information.
17.3.4. Source Clone Secrets
See Using Private Repositories for Builds for more information.
17.4. Restrictions
To use a secret, a pod needs to reference the secret. A secret can be used with a pod in two ways: either as files in a volume mounted on one or more of its containers, or used by kubelet when pulling images for the pod.
Volume type secrets write data into the container as a file using the volume mechanism. imagePullSecrets use service accounts for the automatic injection of the secret into all pods in a namespaces.
When a template contains a secret definition, the only way for the template to use the provided secret is to ensure that the secret volume sources are validated and that the specified object reference actually points to an object of type Secret. Therefore, a secret needs to be created before any pods that depend on it. The most effective way to ensure this is to have it get injected automatically through the use of a service account.
Secret API objects reside in a namespace. They can only be referenced by pods in that same namespace.
Individual secrets are limited to 1MB in size. This is to discourage the creation of large secrets that would exhaust apiserver and kubelet memory. However, creation of a number of smaller secrets could also exhaust memory.
17.4.1. Secret Data Keys
Secret keys must be in a DNS subdomain.
17.5. Examples
Example 17.2. YAML Secret That Will Create Four Files
apiVersion: v1
kind: Secret
metadata:
  name: test-secret
data:
  username: dmFsdWUtMQ0K     1
  password: dmFsdWUtMQ0KDQo= 2
stringData:
  hostname: myapp.mydomain.com 3
  secret.properties: |-     4
    property1=valueA
    property2=valueB
Example 17.3. YAML of a Pod Populating Files in a Volume with Secret Data
apiVersion: v1
kind: Pod
metadata:
  name: secret-example-pod
spec:
  containers:
    - name: secret-test-container
      image: busybox
      command: [ "/bin/sh", "-c", "cat /etc/secret-volume/*" ]
      volumeMounts:
          # name must match the volume name below
          - name: secret-volume
            mountPath: /etc/secret-volume
            readOnly: true
  volumes:
    - name: secret-volume
      secret:
        secretName: test-secret
  restartPolicy: Never
Example 17.4. YAML of a Pod Populating Environment Variables with Secret Data
apiVersion: v1
kind: Pod
metadata:
  name: secret-example-pod
spec:
  containers:
    - name: secret-test-container
      image: busybox
      command: [ "/bin/sh", "-c", "export" ]
      env:
        - name: TEST_SECRET_USERNAME_ENV_VAR
          valueFrom:
            secretKeyRef:
              name: test-secret
              key: username
  restartPolicy: Never
17.6. Troubleshooting
| Issue | Resolution |
|---|---|
|
A service certificate generation fails with (service’s secret/ssl-key references serviceUID 62ad25ca-d703-11e6-9d6f-0e9c0057b608, which does not match 77b6dd80-d716-11e6-9d6f-0e9c0057b60 |
The service that generated the ceritiface no longer exists (has different $ oc delete secret <secret_name> $ oc annotate service <service_name> service.alpha.openshift.io/serving-cert-generation-error- $ oc annotate service <service_name> service.alpha.openshift.io/serving-cert-generation-error-num- Note
The command removing annotation has a |
Chapter 18. ConfigMaps
18.1. Overview
Many applications require configuration using some combination of configuration files, command line arguments, and environment variables. These configuration artifacts should be decoupled from image content in order to keep containerized applications portable.
The ConfigMap object provides mechanisms to inject containers with configuration data while keeping containers agnostic of OpenShift Enterprise. A ConfigMap can be used to store fine-grained information like individual properties or coarse-grained information like entire configuration files or JSON blobs.
The ConfigMap API object holds key-value pairs of configuration data that can be consumed in pods or used to store configuration data for system components such as controllers. ConfigMap is similar to secrets, but designed to more conveniently support working with strings that do not contain sensitive information.
For example:
Example 18.1. ConfigMap Object Definition
kind: ConfigMap
apiVersion: v1
metadata:
  creationTimestamp: 2016-02-18T19:14:38Z
  name: example-config
  namespace: default
data: 1
  example.property.1: hello
  example.property.2: world
  example.property.file: |-
    property.1=value-1
    property.2=value-2
property.3=value-3- 1
- Contains the configuration data.
Configuration data can be consumed in pods in a variety of ways. A ConfigMap can be used to:
- Populate the value of environment variables.
- Set command-line arguments in a container.
- Populate configuration files in a volume.
Both users and system components may store configuration data in a ConfigMap.
18.2. Creating ConfigMaps
You can use the following command to create a ConfigMap easily from directories, specific files, or literal values:
$ oc create configmap <configmap_name> [options]
The following sections cover the different ways you can create a ConfigMap.
18.2.1. Creating from Directories
Consider a directory with some files that already contain the data with which you want to populate a ConfigMap:
$ ls example-files
game.properties
ui.properties

$ cat example-files/game.properties
enemies=aliens
lives=3
enemies.cheat=true
enemies.cheat.level=noGoodRotten
secret.code.passphrase=UUDDLRLRBABAS
secret.code.allowed=true
secret.code.lives=30

$ cat example-files/ui.properties
color.good=purple
color.bad=yellow
allow.textmode=true
how.nice.to.look=fairlyNice
You can use the following command to create a ConfigMap holding the content of each file in this directory:
$ oc create configmap game-config \
    --from-file=example-files/
When the --from-file option points to a directory, each file directly in that directory is used to populate a key in the ConfigMap, where the name of the key is the file name, and the value of the key is the content of the file.
For example, the above command creates the following ConfigMap:
$ oc describe configmaps game-config
Name:           game-config
Namespace:      default
Labels:         <none>
Annotations:    <none>

Data

game.properties:        121 bytes
ui.properties:          83 bytes
You can see the two keys in the map are created from the file names in the directory specified in the command. Because the content of those keys may be large, the output of oc describe only shows the names of the keys and their sizes.
If you want to see the values of the keys, you can oc get the object with the -o option:
$ oc get configmaps game-config -o yaml

apiVersion: v1
data:
  game.properties: |-
    enemies=aliens
    lives=3
    enemies.cheat=true
    enemies.cheat.level=noGoodRotten
    secret.code.passphrase=UUDDLRLRBABAS
    secret.code.allowed=true
    secret.code.lives=30
  ui.properties: |
    color.good=purple
    color.bad=yellow
    allow.textmode=true
    how.nice.to.look=fairlyNice
kind: ConfigMap
metadata:
  creationTimestamp: 2016-02-18T18:34:05Z
  name: game-config
  namespace: default
  resourceVersion: "407"-
  selflink: /api/v1/namespaces/default/configmaps/game-config
  uid: 30944725-d66e-11e5-8cd0-68f728db1985
18.2.2. Creating from Files
You can also pass the --from-file option with a specific file, and pass it multiple times to the CLI. The following yields equivalent results to the Creating from Directories example:
Create the
ConfigMapspecifying a specific file:$ oc create configmap game-config-2 \ --from-file=example-files/game.properties \ --from-file=example-files/ui.propertiesVerify the results:
$ oc get configmaps game-config-2 -o yaml

apiVersion: v1
data:
  game.properties: |-
    enemies=aliens
    lives=3
    enemies.cheat=true
    enemies.cheat.level=noGoodRotten
    secret.code.passphrase=UUDDLRLRBABAS
    secret.code.allowed=true
    secret.code.lives=30
  ui.properties: |
    color.good=purple
    color.bad=yellow
    allow.textmode=true
    how.nice.to.look=fairlyNice
kind: ConfigMap
metadata:
  creationTimestamp: 2016-02-18T18:52:05Z
  name: game-config-2
  namespace: default
  resourceVersion: "516"
  selflink: /api/v1/namespaces/default/configmaps/game-config-2
  uid: b4952dc3-d670-11e5-8cd0-68f728db1985
You can also set the key to use for an individual file with the --from-file option by passing an expression of key=value. For example:
Create the
ConfigMapspecifying a key-value pair:$ oc create configmap game-config-3 \ --from-file=game-special-key=example-files/game.propertiesVerify the results:
$ oc get configmaps game-config-3 -o yaml

apiVersion: v1
data:
  game-special-key: |-
    enemies=aliens
    lives=3
    enemies.cheat=true
    enemies.cheat.level=noGoodRotten
    secret.code.passphrase=UUDDLRLRBABAS
    secret.code.allowed=true
    secret.code.lives=30
kind: ConfigMap
metadata:
  creationTimestamp: 2016-02-18T18:54:22Z
  name: game-config-3
  namespace: default
  resourceVersion: "530"
  selflink: /api/v1/namespaces/default/configmaps/game-config-3
  uid: 05f8da22-d671-11e5-8cd0-68f728db1985
18.2.3. Creating from Literal Values
You can also supply literal values for a ConfigMap. The --from-literal option takes a key=value syntax that allows literal values to be supplied directly on the command line:
Create the
ConfigMapspecifying a literal value:$ oc create configmap special-config \ --from-literal=special.how=very \ --from-literal=special.type=charmVerify the results:
$ oc get configmaps special-config -o yaml

apiVersion: v1
data:
  special.how: very
  special.type: charm
kind: ConfigMap
metadata:
  creationTimestamp: 2016-02-18T19:14:38Z
  name: special-config
  namespace: default
  resourceVersion: "651"
  selflink: /api/v1/namespaces/default/configmaps/special-config
  uid: dadce046-d673-11e5-8cd0-68f728db1985
18.3. Use Cases: Consuming ConfigMaps in Pods
The following sections describe some uses cases when consuming ConfigMap objects in pods.
18.3.1. Consuming in Environment Variables
A ConfigMap can be used to populate the value of command line arguments. For example, consider the following ConfigMap:
apiVersion: v1
kind: ConfigMap
metadata:
  name: special-config
  namespace: default
data:
  special.how: very
  special.type: charm
You can consume the keys of this ConfigMap in a pod using configMapKeyRef sections:
apiVersion: v1
kind: Pod
metadata:
  name: dapi-test-pod
spec:
  containers:
    - name: test-container
      image: gcr.io/google_containers/busybox
      command: [ "/bin/sh", "-c", "env" ]
      env:
        - name: SPECIAL_LEVEL_KEY
          valueFrom:
            configMapKeyRef:
              name: special-config
              key: special.how
        - name: SPECIAL_TYPE_KEY
          valueFrom:
            configMapKeyRef:
              name: special-config
              key: special.type
  restartPolicy: Never
When this pod is run, its output will include the following lines:
SPECIAL_LEVEL_KEY=very
SPECIAL_TYPE_KEY=charm
18.3.2. Setting Command-line Arguments
A ConfigMap can also be used to set the value of the command or arguments in a container. This is accomplished using the Kubernetes substitution syntax $(VAR_NAME). Consider the following ConfigMap:
apiVersion: v1
kind: ConfigMap
metadata:
  name: special-config
  namespace: default
data:
  special.how: very
  special.type: charm
To inject values into the command line, you must consume the keys you want to use as environment variables, as in the Consuming in Environment Variables use case. Then you can refer to them in a container’s command using the $(VAR_NAME) syntax.
apiVersion: v1
kind: Pod
metadata:
  name: dapi-test-pod
spec:
  containers:
    - name: test-container
      image: gcr.io/google_containers/busybox
      command: [ "/bin/sh", "-c", "echo $(SPECIAL_LEVEL_KEY) $(SPECIAL_TYPE_KEY)" ]
      env:
        - name: SPECIAL_LEVEL_KEY
          valueFrom:
            configMapKeyRef:
              name: special-config
              key: special.how
        - name: SPECIAL_TYPE_KEY
          valueFrom:
            configMapKeyRef:
              name: special-config
              key: special.type
  restartPolicy: Never
When this pod is run, the output from the test-container container will be:
very charm
18.3.3. Consuming in Volumes
A ConfigMap can also be consumed in volumes. Returning again to the following example ConfigMap:
apiVersion: v1
kind: ConfigMap
metadata:
  name: special-config
  namespace: default
data:
  special.how: very
  special.type: charm
You have a couple different options for consuming this ConfigMap in a volume. The most basic way is to populate the volume with files where the key is the file name and the content of the file is the value of the key:
apiVersion: v1
kind: Pod
metadata:
  name: dapi-test-pod
spec:
  containers:
    - name: test-container
      image: gcr.io/google_containers/busybox
      command: [ "/bin/sh", "cat", "/etc/config/special.how" ]
      volumeMounts:
      - name: config-volume
        mountPath: /etc/config
  volumes:
    - name: config-volume
      configMap:
        name: special-config
  restartPolicy: Never
When this pod is run, the output will be:
very
You can also control the paths within the volume where ConfigMap keys are projected:
apiVersion: v1
kind: Pod
metadata:
  name: dapi-test-pod
spec:
  containers:
    - name: test-container
      image: gcr.io/google_containers/busybox
      command: [ "/bin/sh", "cat", "/etc/config/path/to/special-key" ]
      volumeMounts:
      - name: config-volume
        mountPath: /etc/config
  volumes:
    - name: config-volume
      configMap:
        name: special-config
        items:
        - key: special.how
          path: path/to/special-key
  restartPolicy: Never
When this pod is run, the output will be:
very
18.4. Example: Configuring Redis
For a real-world example, you can configure Redis using a ConfigMap. To inject Redis with the recommended configuration for using Redis as a cache, the Redis configuration file should contain the following:
maxmemory 2mb
maxmemory-policy allkeys-lru
If your configuration file is located at example-files/redis/redis-config, create a ConfigMap with it:
Create the
ConfigMapspecifying the configuration file:$ oc create configmap example-redis-config \ --from-file=example-files/redis/redis-configVerify the results:
$ oc get configmap example-redis-config -o yaml

apiVersion: v1
data:
  redis-config: |
    maxmemory 2mb
    maxmemory-policy allkeys-lru
kind: ConfigMap
metadata:
  creationTimestamp: 2016-04-06T05:53:07Z
  name: example-redis-config
  namespace: default
  resourceVersion: "2985"
  selflink: /api/v1/namespaces/default/configmaps/example-redis-config
  uid: d65739c1-fbbb-11e5-8a72-68f728db1985
Now, create a pod that uses this ConfigMap:
Create a pod definition like the following and save it to a file, for example redis-pod.yaml:
apiVersion: v1
kind: Pod
metadata:
  name: redis
spec:
  containers:
  - name: redis
    image: kubernetes/redis:v1
    env:
    - name: MASTER
      value: "true"
    ports:
    - containerPort: 6379
    resources:
      limits:
        cpu: "0.1"
    volumeMounts:
    - mountPath: /redis-master-data
      name: data
    - mountPath: /redis-master
      name: config
  volumes:
    - name: data
      emptyDir: {}
    - name: config
      configMap:
        name: example-redis-config
        items:
        - key: redis-config
          path: redis.conf
Create the pod:
$ oc create -f redis-pod.yaml
The newly-created pod has a ConfigMap volume that places the redis-config key of the example-redis-config ConfigMap into a file called redis.conf. This volume is mounted into the /redis-master directory in the Redis container, placing our configuration file at /redis-master/redis.conf, which is where the image looks for the Redis configuration file for the master.
If you oc exec into this pod and run the redis-cli tool, you can check that the configuration was applied correctly:
$ oc exec -it redis redis-cli
127.0.0.1:6379> CONFIG GET maxmemory
1) "maxmemory"
2) "2097152"
127.0.0.1:6379> CONFIG GET maxmemory-policy
1) "maxmemory-policy"
2) "allkeys-lru"
18.5. Restrictions
A ConfigMap must be created before they are consumed in pods. Controllers can be written to tolerate missing configuration data; consult individual components configured via ConfigMap on a case-by-case basis.
ConfigMap objects reside in a project. They can only be referenced by pods in the same project.
The Kubelet only supports use of a ConfigMap for pods it gets from the API server. This includes any pods created using the CLI, or indirectly from a replication controller. It does not include pods created using the OpenShift Enterprise node’s --manifest-url flag, its --config flag, or its REST API (these are not common ways to create pods).
Chapter 19. Using Daemonsets
19.1. Overview
A daemonset can be used to run replicas of a pod on specific or all nodes in an OpenShift Enterprise cluster.
Use daemonsets to create shared storage, run a logging pod on every node in your cluster, or deploy a monitoring agent on every node.
For more information on daemonsets, see the Kubernetes documentation.
Daemonset scheduling is incompatible with project’s default node selector. If you fail to disable it, the daemonset gets restricted by merging with the default node selector. This results in frequent pod recreates on the nodes that got unselected by the merged node selector, which in turn puts unwanted load on the cluster.
Therefore,
Before you start using daemonsets, disable the default project-wide node selector in your namespace, by setting the namespace annotation
openshift.io/node-selectorto an empty string:# oc patch namespace myproject -p \ '{"metadata": {"annotations": {"openshift.io/node-selector": ""}}}'-
If you are creating a new project, overwrite the default node selector using
oc adm new-project --node-selector="".
19.2. Creating Daemonsets
Before creating daemonsets, ensure you have been given the required role by your OpenShift Enterprise administrator.
When creating daemonsets, the nodeSelector field is used to indicate the nodes on which the daemonset should deploy replicas.
Define the daemonset yaml file:
apiVersion: extensions/v1beta1 kind: DaemonSet metadata: name: hello-daemonset spec: selector: matchLabels: name: hello-daemonset 1 template: metadata: labels: name: hello-daemonset 2 spec: nodeSelector: 3 type: infra containers: - image: openshift/hello-openshift imagePullPolicy: Always name: registry ports: - containerPort: 80 protocol: TCP resources: {} terminationMessagePath: /dev/termination-log serviceAccount: default terminationGracePeriodSeconds: 10Create the daemonset object:
oc create -f daemonset.yaml
To verify that the pods were created, and that each node has a pod replica:
Find the daemonset pods:
$ oc get pods
hello-daemonset-cx6md   1/1       Running   0          2m
hello-daemonset-e3md9   1/1       Running   0          2m
View the pods to verify the pod has been placed onto the node:
$ oc describe pod/hello-daemonset-cx6md|grep Node
Node:        openshift-node01.hostname.com/10.14.20.134
$ oc describe pod/hello-daemonset-e3md9|grep Node
Node:        openshift-node02.hostname.com/10.14.20.137
- If you update a DaemonSet’s pod template, the existing pod replicas are not affected.
- If you delete a DaemonSet and then create a new DaemonSet with a different template but the same label selector, it recognizes any existing pod replicas as having matching labels and thus does not update them or create new replicas despite a mismatch in the pod template.
- If you change node labels, the DaemonSet adds pods to nodes that match the new labels and deletes pods from nodes that do not match the new labels.
To update a DaemonSet, force new pod replicas to be created by deleting the old replicas or nodes.
Chapter 20. Pod Autoscaling
20.1. Overview
A horizontal pod autoscaler, defined by a HorizontalPodAutoscaler object, specifies how the system should automatically increase or decrease the scale of a replication controller or deployment configuration, based on metrics collected from the pods that belong to that replication controller or deployment configuration.
Horizontal pod autoscaling is supported starting in OpenShift Enterprise 3.1.1.
20.2. Requirements for Using Horizontal Pod Autoscalers
In order to use horizontal pod autoscalers, your cluster administrator must have properly configured cluster metrics.
20.3. Supported Metrics
The following metrics are supported by horizontal pod autoscalers:
| Metric | Description |
|---|---|
| CPU Utilization | Percentage of the requested CPU |
20.4. Autoscaling
You can create a horizontal pod autoscaler with the oc autoscale command and specify the minimum and maximum number of pods you want to run, as well as the CPU utilization your pods should target.
After a horizontal pod autoscaler is created, it begins attempting to query Heapster for metrics on the pods. It may take one to two minutes before Heapster obtains the initial metrics.
After metrics are available in Heapster, the horizontal pod autoscaler computes the ratio of the current metric utilization with the desired metric utilization, and scales up or down accordingly. The scaling will occur at a regular interval, but it may take one to two minutes before metrics make their way into Heapster.
For replication controllers, this scaling corresponds directly to the replicas of the replication controller. For deployment configurations, scaling corresponds directly to the replica count of the deployment configuration. Note that autoscaling applies only to the latest deployment in the Complete phase.
20.5. Creating a Horizontal Pod Autoscaler
Use the oc autoscale command and specify at least the maximum number of pods you want to run at any given time. You can optionally specify the minimum number of pods and the average CPU utilization your pods should target, otherwise those are given default values from the OpenShift Enterprise server.
For example:
$ oc autoscale dc/frontend --min 1 --max 10 --cpu-percent=80
deploymentconfig "frontend" autoscaled
The above example creates a horizontal pod autoscaler with the following definition:
Example 20.1. Horizontal Pod Autoscaler Object Definition
apiVersion: extensions/v1beta1
kind: HorizontalPodAutoscaler
metadata:
  name: frontend 1
spec:
  scaleRef:
    kind: DeploymentConfig 2
    name: frontend 3
    apiVersion: v1 4
    subresource: scale
  minReplicas: 1 5
  maxReplicas: 10 6
  cpuUtilization:
    targetPercentage: 80 7
- 1
- The name of this horizontal pod autoscaler object
- 2
- The kind of object to scale
- 3
- The name of the object to scale
- 4
- The API version of the object to scale
- 5
- The minimum number of replicas to which to scale down
- 6
- The maximum number of replicas to which to scale up
- 7
- The percentage of the requested CPU that each pod should ideally be using
20.6. Viewing a Horizontal Pod Autoscaler
To view the status of a horizontal pod autoscaler:
$ oc get hpa/frontend
NAME              REFERENCE                                 TARGET    CURRENT   MINPODS        MAXPODS   AGE
frontend          DeploymentConfig/default/frontend/scale   80%       79%       1              10        8d

$ oc describe hpa/frontend
Name:                           frontend
Namespace:                      default
Labels:                         <none>
CreationTimestamp:              Mon, 26 Oct 2015 21:13:47 -0400
Reference:                      DeploymentConfig/default/frontend/scale
Target CPU utilization:         80%
Current CPU utilization:        79%
Min pods:                       1
Max pods:                       10
Chapter 21. Managing Volumes
21.1. Overview
Containers are not persistent by default; on restart, their contents are cleared. Volumes are mounted file systems available to pods and their containers which may be backed by a number of host-local or network attached storage endpoints.
To ensure that the file system on the volume contains no errors and, if errors are present, to repair them when possible, OpenShift Enterprise invokes the fsck utility prior to the mount utility. This occurs when either adding a volume or updating an existing volume.
The simplest volume type is EmptyDir, which is a temporary directory on a single machine. Administrators may also allow you to request a persistent volume that is automatically attached to your pods.
EmptyDir volume storage may be restricted by a quota based on the pod’s FSGroup, if enabled by your cluster administrator.
You can use the CLI command oc volume to add, update, or remove volumes and volume mounts for any object that has a pod template like replication controllers or deployment configurations. You can also list volumes in pods or any object that has a pod template.
21.2. General CLI Usage
The oc volume command uses the following general syntax:
$ oc volume <object_selection> <operation> <mandatory_parameters> <optional_parameters>
This topic uses the form <object_type>/<name> for <object_selection> in later examples. However, you can choose one of the following options:
| Syntax | Description | Example |
|---|---|---|
|
|
Selects |
|
|
|
Selects |
|
|
|
Selects resources of type |
|
|
|
Selects all resources of type |
|
|
| File name, directory, or URL to file to use to edit the resource. |
|
The <operation> can be one of --add, --remove, or --list.
Any <mandatory_parameters> or <optional_parameters> are specific to the selected operation and are discussed in later sections.
21.3. Adding Volumes
To add a volume, a volume mount, or both to pod templates:
$ oc volume <object_type>/<name> --add [options]
| Option | Description | Default |
|---|---|---|
|
| Name of the volume. | Automatically generated, if not specified. |
|
|
Name of the volume source. Supported values: |
|
|
|
Select containers by name. It can also take wildcard |
|
|
| Mount path inside the selected containers. | |
|
|
Host path. Mandatory parameter for | |
|
|
Name of the secret. Mandatory parameter for | |
|
|
Name of the persistent volume claim. Mandatory parameter for | |
|
|
Details of volume source as a JSON string. Recommended if the desired volume source is not supported by | |
|
|
Display the modified objects instead of updating them on the server. Supported values: | |
|
| Output the modified objects with the given version. |
|
Examples
Add a new volume source emptyDir to deployment configuration registry:
$ oc volume dc/registry --add
Add volume v1 with secret $ecret for replication controller r1 and mount inside the containers at /data:
$ oc volume rc/r1 --add --name=v1 --type=secret --secret-name='$ecret' --mount-path=/data
Add existing persistent volume v1 with claim name pvc1 to deployment configuration dc.json on disk, mount the volume on container c1 at /data, and update the deployment configuration on the server:
$ oc volume -f dc.json --add --name=v1 --type=persistentVolumeClaim \ --claim-name=pvc1 --mount-path=/data --containers=c1
Add volume v1 based on Git repository https://github.com/namespace1/project1 with revision 5125c45f9f563 for all replication controllers:
$ oc volume rc --all --add --name=v1 \
--source='{"gitRepo": {
"repository": "https://github.com/namespace1/project1",
"revision": "5125c45f9f563"
}}'21.4. Updating Volumes
Updating existing volumes or volume mounts is the same as adding volumes, but with the --overwrite option:
$ oc volume <object_type>/<name> --add --overwrite [options]
Examples
Replace existing volume v1 for replication controller r1 with existing persistent volume claim pvc1:
$ oc volume rc/r1 --add --overwrite --name=v1 --type=persistentVolumeClaim --claim-name=pvc1
Change deployment configuration d1 mount point to /opt for volume v1:
$ oc volume dc/d1 --add --overwrite --name=v1 --mount-path=/opt
21.5. Removing Volumes
To remove a volume or volume mount from pod templates:
$ oc volume <object_type>/<name> --remove [options]
| Option | Description | Default |
|---|---|---|
|
| Name of the volume. | |
|
|
Select containers by name. It can also take wildcard |
|
|
| Indicate that you want to remove multiple volumes at once. | |
|
|
Display the modified objects instead of updating them on the server. Supported values: | |
|
| Output the modified objects with the given version. |
|
Some examples:
Remove a volume v1 from deployment config d1:
$ oc volume dc/d1 --remove --name=v1
Unmount volume v1 from container c1 for deployment configuration d1 and remove the volume v1 if it is not referenced by any containers on d1:
$ oc volume dc/d1 --remove --name=v1 --containers=c1
Remove all volumes for replication controller r1:
$ oc volume rc/r1 --remove --confirm
21.6. Listing Volumes
To list volumes or volume mounts for pods or pod templates:
$ oc volume <object_type>/<name> --list [options]
List volume supported options:
| Option | Description | Default |
|---|---|---|
|
| Name of the volume. | |
|
|
Select containers by name. It can also take wildcard |
|
Examples
List all volumes for pod p1:
$ oc volume pod/p1 --list
List volume v1 defined on all deployment configurations:
$ oc volume dc --all --name=v1
Chapter 22. Using Persistent Volumes
22.1. Overview
A PersistentVolume object is a storage resource in an OpenShift Enterprise cluster. Storage is provisioned by your cluster administrator by creating PersistentVolume objects from sources such as GCE Persistent Disk, AWS Elastic Block Store (EBS), and NFS mounts.
The Installation and Configuration Guide provides instructions for cluster administrators on provisioning an OpenShift Enterprise cluster with persistent storage using NFS, GlusterFS, Ceph RBD, OpenStack Cinder, AWS EBS, GCE Persistent Disk, iSCSI, and Fibre Channel.
Storage can be made available to you by laying claims to the resource. You can make a request for storage resources using a PersistentVolumeClaim object; the claim is paired with a volume that generally matches your request.
22.2. Requesting Storage
You can request storage by creating PersistentVolumeClaim objects in your projects:
Persistent Volume Claim Object Definition
apiVersion: "v1"
kind: "PersistentVolumeClaim"
metadata:
name: "claim1"
spec:
accessModes:
- "ReadWriteOnce"
resources:
requests:
storage: "1Gi"
volumeName: "pv0001"
22.3. Volume and Claim Binding
A PersistentVolume is a specific resource. A PersistentVolumeClaim is a request for a resource with specific attributes, such as storage size. In between the two is a process that matches a claim to an available volume and binds them together. This allows the claim to be used as a volume in a pod. OpenShift Enterprise finds the volume backing the claim and mounts it into the pod.
You can tell whether a claim or volume is bound by querying using the CLI:
$ oc get pvc NAME LABELS STATUS VOLUME claim1 map[] Bound pv0001 $ oc get pv NAME LABELS CAPACITY ACCESSMODES STATUS CLAIM pv0001 map[] 5368709120 RWO Bound yournamespace / claim1
22.4. Claims as Volumes in Pods
A PersistentVolumeClaim is used by a pod as a volume. OpenShift Enterprise finds the claim with the given name in the same namespace as the pod, then uses the claim to find the corresponding volume to mount.
Pod Definition with a Claim
apiVersion: "v1"
kind: "Pod"
metadata:
name: "mypod"
labels:
name: "frontendhttp"
spec:
containers:
-
name: "myfrontend"
image: openshift/hello-openshift
ports:
-
containerPort: 80
name: "http-server"
volumeMounts:
-
mountPath: "/var/www/html"
name: "pvol"
volumes:
-
name: "pvol"
persistentVolumeClaim:
claimName: "claim1"
22.5. Volume and Claim Pre-binding
If you know exactly what PersistentVolume you want your PersistentVolumeClaim to bind to, you can specify the PV in your PVC using the volumeName field. This method skips the normal matching and binding process. The PVC will only be able to bind to a PV that has the same name specified in volumeName. If such a PV with that name exists and is Available, the PV and PVC will be bound regardless of whether the PV satisfies the PVC’s label selector, access modes, and resource requests.
Example 22.1. Persistent Volume Claim Object Definition with volumeName
apiVersion: "v1"
kind: "PersistentVolumeClaim"
metadata:
name: "claim1"
spec:
accessModes:
- "ReadWriteOnce"
resources:
requests:
storage: "1Gi"
volumeName: "pv0001"
The ability to set claimRefs is a temporary workaround for the described use cases. A long-term solution for limiting who can claim a volume is in development.
The cluster administrator should first consider configuring selector-label volume binding before resorting to setting claimRefs on behalf of users.
You may also want your cluster administrator to "reserve" the volume for only your claim so that nobody else’s claim can bind to it before yours does. In this case, the administrator can specify the PVC in the PV using the claimRef field. The PV will only be able to bind to a PVC that has the same name and namespace specified in claimRef. The PVC’s access modes and resource requests must still be satisfied in order for the PV and PVC to be bound, though the label selector is ignored.
Persistent Volume Object Definition with claimRef
apiVersion: v1
kind: PersistentVolume
metadata:
name: pv0001
spec:
capacity:
storage: 1Gi
accessModes:
- ReadWriteOnce
nfs:
path: /tmp
server: 172.17.0.2
persistentVolumeReclaimPolicy: Recycle
claimRef:
name: claim1
namespace: default
Specifying a volumeName in your PVC does not prevent a different PVC from binding to the specified PV before yours does. Your claim will remain Pending until the PV is Available.
Specifying a claimRef in a PV does not prevent the specified PVC from being bound to a different PV. The PVC is free to choose another PV to bind to according to the normal binding process. Therefore, to avoid these scenarios and ensure your claim gets bound to the volume you want, you must ensure that both volumeName and claimRef are specified.
You can tell that your setting of volumeName and/or claimRef influenced the matching and binding process by inspecting a Bound PV and PVC pair for the pv.kubernetes.io/bound-by-controller annotation. The PVs and PVCs where you set the volumeName and/or claimRef yourself will have no such annotation, but ordinary PVs and PVCs will have it set to "yes".
When a PV has its claimRef set to some PVC name and namespace, and is reclaimed according to a Retain or Recycle recycling policy, its claimRef will remain set to the same PVC name and namespace even if the PVC or the whole namespace no longer exists.
Chapter 23. Executing Remote Commands
23.1. Overview
You can use the CLI to execute remote commands in a container. This allows you to run general Linux commands for routine operations in the container.
For security purposes, the oc exec command does not work when accessing privileged containers. See the CLI operations topic for more information.
23.2. Basic Usage
Support for remote container command execution is built into the CLI:
$ oc exec <pod> [-c <container>] <command> [<arg_1> ... <arg_n>]
For example:
$ oc exec mypod date Thu Apr 9 02:21:53 UTC 2015
23.3. Protocol
Clients initiate the execution of a remote command in a container by issuing a request to the Kubernetes API server:
/proxy/minions/<node_name>/exec/<namespace>/<pod>/<container>?command=<command>
In the above URL:
-
<node_name>is the FQDN of the node. -
<namespace>is the namespace of the target pod. -
<pod>is the name of the target pod. -
<container>is the name of the target container. -
<command>is the desired command to be executed.
For example:
/proxy/minions/node123.openshift.com/exec/myns/mypod/mycontainer?command=date
Additionally, the client can add parameters to the request to indicate if:
- the client should send input to the remote container’s command (stdin).
- the client’s terminal is a TTY.
- the remote container’s command should send output from stdout to the client.
- the remote container’s command should send output from stderr to the client.
After sending an exec request to the API server, the client upgrades the connection to one that supports multiplexed streams; the current implementation uses SPDY.
The client creates one stream each for stdin, stdout, and stderr. To distinguish among the streams, the client sets the streamType header on the stream to one of stdin, stdout, or stderr.
The client closes all streams, the upgraded connection, and the underlying connection when it is finished with the remote command execution request.
Administrators can see the Architecture guide for more information.
Chapter 24. Copying Files to or from a Container
24.1. Overview
You can use the CLI to copy local files to or from a remote directory in a container. This is a useful tool for copying database archives to and from your pods for backup and restore purposes. It can also be used to copy source code changes into a running pod for development debugging, when the running pod supports hot reload of source files.
24.2. Basic Usage
Support for copying local files to or from a container is built into the CLI:
$ oc rsync <source> <destination> [-c <container>]
For example, to copy a local directory to a pod directory:
$ oc rsync /home/user/source devpod1234:/src
Or to copy a pod directory to a local directory:
$ oc rsync devpod1234:/src /home/user/source
24.3. Backing Up and Restoring Databases
Use oc rsync to copy database archives from an existing database container to a new database container’s persistent volume directory.
MySQL is used in the example below. Replace mysql|MYSQL with pgsql|PGSQL or mongodb|MONGODB and refer to the migration guide to find the exact commands for each of our supported database images. The example assumes an existing database container.
Back up the existing database from a running database pod:
$ oc rsh <existing db container> # mkdir /var/lib/mysql/data/db_archive_dir # mysqldump --skip-lock-tables -h ${MYSQL_SERVICE_HOST} -P ${MYSQL_SERVICE_PORT:-3306} \ -u ${MYSQL_USER} --password="$MYSQL_PASSWORD" --all-databases > /var/lib/mysql/data/db_archive_dir/all.sql # exitRemote sync the archive file to your local machine:
$ oc rsync <existing db container with db archive>:/var/lib/mysql/data/db_archive_dir /tmp/.
Start a second MySQL pod into which to load the database archive file created above. The MySQL pod must have a unique
DATABASE_SERVICE_NAME.$ oc new-app mysql-persistent \ -p MYSQL_USER=<archived mysql username> \ -p MYSQL_PASSWORD=<archived mysql password> \ -p MYSQL_DATABASE=<archived database name> \ -p DATABASE_SERVICE_NAME='mysql2' 1 $ oc rsync /tmp/db_archive_dir new_dbpod1234:/var/lib/mysql/data $ oc rsh new_dbpod1234- 1
mysqlis the default. In this example,mysql2is created.
Use the appropriate commands to restore the database in the new database container from the copied database archive directory:
MySQL
$ cd /var/lib/mysql/data/db_archive_dir $ mysql -u root $ source all.sql $ GRANT ALL PRIVILEGES ON <dbname>.* TO '<your username>'@'localhost'; FLUSH PRIVILEGES; $ cd ../; rm -rf /var/lib/mysql/data/db_backup_dir
You now have two MySQL database pods running in your project with the archived database.
24.4. Requirements
The oc rsync command uses the local rsync command if present on the client’s machine. This requires that the remote container also have the rsync command.
If rsync is not found locally or in the remote container, then a tar archive will be created locally and sent to the container where tar will be used to extract the files. If tar is not available in the remote container, then the copy will fail.
The tar copy method does not provide the same functionality as rsync. For example, rsync creates the destination directory if it does not exist and will only send files that are different between the source and the destination.
In Windows, the cwRsync client should be installed and added to the PATH for use with the oc rsync command.
24.5. Specifying the Copy Source
The source argument of the oc rsync command must point to either a local directory or a pod directory. Individual files are not currently supported.
When specifying a pod directory the directory name must be prefixed with the pod name:
<pod name>:<dir>
Just as with UNIX rsync, if the directory name ends in a path separator (/), only the contents of the directory are copied to the destination. Otherwise, the directory itself is copied to the destination with all its contents.
24.6. Specifying the Copy Destination
The destination argument of the oc rsync command must point to a directory. If the directory does not exist, but rsync is used for copy, the directory is created for you.
24.7. Deleting Files at the Destination
The --delete flag may be used to delete any files in the remote directory that are not in the local directory.
Chapter 25. Port Forwarding
25.1. Overview
You can use the CLI to forward one or more local ports to a pod. This allows you to listen on a given or random port locally, and have data forwarded to and from given ports in the pod.
25.2. Basic Usage
Support for port forwarding is built into the CLI:
$ oc port-forward <pod> [<local_port>:]<remote_port> [...[<local_port_n>:]<remote_port_n>]
The CLI listens on each local port specified by the user, forwarding via the protocol described below.
Ports may be specified using the following formats:
|
| The client listens on port 5000 locally and forwards to 5000 in the pod. |
|
| The client listens on port 6000 locally and forwards to 5000 in the pod. |
|
| The client selects a free local port and forwards to 5000 in the pod. |
For example, to listen on ports 5000 and 6000 locally and forward data to and from ports 5000 and 6000 in the pod, run:
$ oc port-forward <pod> 5000 6000
To listen on port 8888 locally and forward to 5000 in the pod, run:
$ oc port-forward <pod> 8888:5000
To listen on a free port locally and forward to 5000 in the pod, run:
$ oc port-forward <pod> :5000
Or, alternatively:
$ oc port-forward <pod> 0:5000
25.3. Protocol
Clients initiate port forwarding to a pod by issuing a request to the Kubernetes API server:
/proxy/minions/<node_name>/portForward/<namespace>/<pod>
In the above URL:
-
<node_name>is the FQDN of the node. -
<namespace>is the namespace of the target pod. -
<pod>is the name of the target pod.
For example:
/proxy/minions/node123.openshift.com/portForward/myns/mypod
After sending a port forward request to the API server, the client upgrades the connection to one that supports multiplexed streams; the current implementation uses SPDY.
The client creates a stream with the port header containing the target port in the pod. All data written to the stream is delivered via the Kubelet to the target pod and port. Similarly, all data sent from the pod for that forwarded connection is delivered back to the same stream in the client.
The client closes all streams, the upgraded connection, and the underlying connection when it is finished with the port forwarding request.
Administrators can see the Architecture guide for more information.
Chapter 27. Application Health
27.1. Overview
In software systems, components can become unhealthy due to transient issues (such as temporary connectivity loss), configuration errors, or problems with external dependencies. OpenShift Enterprise applications have a number of options to detect and handle unhealthy containers.
27.2. Container Health Checks Using Probes
A probe is a Kubernetes action that periodically performs diagnostics on a running container. Currently, two types of probes exist, each serving a different purpose:
| Liveness Probe |
A liveness probe checks if the container in which it is configured is still running. If the liveness probe fails, the kubelet kills the container, which will be subjected to its restart policy. Set a liveness check by configuring the |
| Readiness Probe |
A readiness probe determines if a container is ready to service requests. If the readiness probe fails a container, the endpoints controller ensures the container has its IP address removed from the endpoints of all services. A readiness probe can be used to signal to the endpoints controller that even though a container is running, it should not receive any traffic from a proxy. Set a readiness check by configuring the |
The exact timing of a probe is controlled by two fields, both expressed in units of seconds:
| Field | Description |
|---|---|
|
| How long to wait after the container starts to begin the probe. |
|
|
How long to wait for the probe to finish (default: |
Both probes can be configured in three ways:
HTTP Checks
The kubelet uses a web hook to determine the healthiness of the container. The check is deemed successful if the HTTP response code is between 200 and 399. The following is an example of a readiness check using the HTTP checks method:
Example 27.1. Readiness HTTP check
...
readinessProbe:
httpGet:
path: /healthz
port: 8080
initialDelaySeconds: 15
timeoutSeconds: 1
...A HTTP check is ideal for applications that return HTTP status codes when completely initialized.
Container Execution Checks
The kubelet executes a command inside the container. Exiting the check with status 0 is considered a success. The following is an example of a liveness check using the container execution method:
Example 27.2. Liveness Container Execution Check
...
livenessProbe:
exec:
command:
- cat
- /tmp/health
initialDelaySeconds: 15
timeoutSeconds: 1
...TCP Socket Checks
The kubelet attempts to open a socket to the container. The container is only considered healthy if the check can establish a connection. The following is an example of a liveness check using the TCP socket check method:
Example 27.3. Liveness TCP Socket Check
...
livenessProbe:
tcpSocket:
port: 8080
initialDelaySeconds: 15
timeoutSeconds: 1
...A TCP socket check is ideal for applications that do not start listening until initialization is complete.
For more information on health checks, see the Kubernetes documentation.
Chapter 28. Events
28.1. Overview
Events in OpenShift Enterprise are modeled based on events that happen to API objects in an OpenShift Enterprise cluster. Events allow OpenShift Enterprise to record information about real-world events in a resource-agnostic manner. They also allow developers and administrators to consume information about system components in a unified way.
28.2. Viewing Events with the CLI
You can get a list of events in a given project using the following command:
$ oc get events [-n <project>]
28.3. Viewing Events in the Console
You can see events in your project from the web console from the Browse → Events page. Many other objects, such as pods and deployments, have their own Events tab as well, which shows events related to that object.
28.4. Comprehensive List of Events
This section describes the events of OpenShift Enterprise.
| Name | Description |
|---|---|
|
| Failed pod configuration validation. |
| Name | Description |
|---|---|
|
| Back-off restarting failed the container. |
|
| Container created. |
|
| Pull/Create/Start failed. |
|
| Killing the container. |
|
| Container started. |
| Name | Description |
|---|---|
|
| Container is unhealthy. |
| Name | Description |
|---|---|
|
| Back off Ctr Start, image pull. |
|
| The image’s NeverPull Policy is violated. |
|
| Failed to pull the image. |
|
| Failed to inspect the image. |
|
| Successfully pulled the image or the container image is already present on the machine. |
|
| Pulling the image. |
| Name | Description |
|---|---|
|
| Free disk space failed. |
|
| Invalid disk capacity. |
| Name | Description |
|---|---|
|
| Volume mount failed. |
|
| Host network not supported. |
|
| Host/port conflict. |
|
| Insufficient free CPU. |
|
| Insufficient free memory. |
|
| Kubelet setup failed. |
|
| Undefined shaper. |
|
| Node is not ready. |
|
| Node is not schedulable. |
|
| Node is ready. |
|
| Node is schedulable. |
|
| Node selector mismatch. |
|
| Out of disk. |
|
| Node rebooted. |
|
| Starting kubelet. |
| Name | Description |
|---|---|
|
| Pod sync failed. |
| Name | Description |
|---|---|
|
| There is an OOM (out of memory) situation on the cluster. |
Chapter 29. Downward API
29.1. Overview
It is common for containers to consume information about API objects. The downward API is a mechanism that allows containers to do this without coupling to OpenShift Enterprise. Containers can consume information from the downward API using environment variables or a volume plug-in.
29.2. Selecting Fields
Fields within the pod are selected using the FieldRef API type. FieldRef has two fields:
| Field | Description |
|---|---|
|
| The path of the field to select, relative to the pod. |
|
|
The API version to interpret the |
Currently, these are the valid selectors in the v1 API:
| Selector | Description |
|---|---|
|
| The pod’s name. This is supported in both environment variables and volumes. |
|
| The pod’s namespace.This is supported in both environment variables and volumes. |
|
| The pod’s labels. This is only supported in volumes and not in environment variables. |
|
| The pod’s annotations. This is only supported in volumes and not in environment variables. |
|
| The pod’s IP. This is only supported in environment variables and not volumes. |
The apiVersion field, if not specified, defaults to the API version of the enclosing pod template.
In the future, more information, such as resource limits for pods and information about services, will be available using the downward API.
29.3. Using Environment Variables
One mechanism for consuming the downward API is using a container’s environment variables. The EnvVar type’s valueFrom field (of type EnvVarSource) is used to specify that the variable’s value should come from a FieldRef source instead of the literal value specified by the value field. In the future, additional sources may be supported; currently the source’s fieldRef field is used to select a field from the downward API.
Only constant attributes of the pod can be consumed this way, as environment variables cannot be updated once a process is started in a way that allows the process to be notified that the value of a variable has changed. The fields supported using environment variables are:
- Pod name
- Pod namespace
For example:
Create a
pod.jsonfile:apiVersion: v1 kind: Pod metadata: name: dapi-env-test-pod spec: containers: - name: env-test-container image: gcr.io/google_containers/busybox command: [ "/bin/sh", "-c", "env" ] env: - name: MY_POD_NAME valueFrom: fieldRef: fieldPath: metadata.name - name: MY_POD_NAMESPACE valueFrom: fieldRef: fieldPath: metadata.namespace restartPolicy: NeverCreate the pod from the
pod.jsonfile:$ oc create -f pod.json
Check the container’s logs:
$ oc logs -p dapi-env-test-pod
You should see
MY_POD_NAMEandMY_POD_NAMESPACEin the logs.
29.4. Using the Volume Plug-in
Another mechanism for consuming the downward API is using a volume plug-in. The downward API volume plug-in creates a volume with configured fields projected into files. The metadata field of the VolumeSource API object is used to configure this volume. The plug-in supports the following fields:
- Pod name
- Pod namespace
- Pod annotations
- Pod labels
Example 29.1. Downward API Volume Plug-in Configuration
spec:
volumes:
- name: podinfo
metadata: 1
items: 2
- name: "labels" 3
fieldRef:
fieldPath: metadata.labels 4For example:
Create a
volume-pod.jsonfile:kind: Pod apiVersion: v1 metadata: labels: zone: us-east-coast cluster: downward-api-test-cluster1 rack: rack-123 name: dapi-volume-test-pod annotations: annotation1: 345 annotation2: 456 spec: containers: - name: volume-test-container image: gcr.io/google_containers/busybox command: ["sh", "-c", "cat /etc/labels /etc/annotations"] volumeMounts: - name: podinfo mountPath: /etc readOnly: false volumes: - name: podinfo metadata: items: - name: "labels" fieldRef: fieldPath: metadata.labels - name: "annotations" fieldRef: fieldPath: metadata.annotations restartPolicy: NeverCreate the pod from the
volume-pod.jsonfile:$ oc create -f volume-pod.json
Check the container’s logs and verify the presence of the configured fields:
$ oc logs -p dapi-volume-test-pod cluster=downward-api-test-cluster1 rack=rack-123 zone=us-east-coast annotation1=345 annotation2=456 kubernetes.io/config.source=api
Chapter 30. Managing Environment Variables
30.1. Setting and Unsetting Environment Variables
OpenShift Enterprise provides the oc set env command to set or unset environment variables for objects that have a pod template, such as replication controllers or deployment configurations. It can also list environment variables in pods or any object that has a pod template. This command can also be used on BuildConfig objects.
30.2. List Environment Variables
To list environment variables in pods or pod templates:
$ oc set env <object-selection> --list [<common-options>]
This example lists all environment variables for pod p1:
$ oc set env pod/p1 --list
30.3. Set Environment Variables
To set environment variables in the pod templates:
$ oc set env <object-selection> KEY_1=VAL_1 ... KEY_N=VAL_N [<set-env-options>] [<common-options>]
Set environment options:
| Option | Description |
|---|---|
|
| Set given key value pairs of environment variables. |
|
| Confirm updating existing environment variables. |
In the following example, both commands modify environment variable STORAGE in the deployment config registry. The first adds, with value /data. The second updates, with value /opt.
$ oc set env dc/registry STORAGE=/data $ oc set env dc/registry --overwrite STORAGE=/opt
The following example finds environment variables in the current shell whose names begin with RAILS_ and adds them to the replication controller r1 on the server:
$ env | grep RAILS_ | oc set env rc/r1 -e -
The following example does not modify the replication controller defined in file rc.json. Instead, it writes a YAML object with updated environment STORAGE=/local to new file rc.yaml.
$ oc set env -f rc.json STORAGE=/opt -o yaml > rc.yaml
30.3.1. Automatically Added Environment Variables
| Variable Name |
|---|
|
|
|
|
Example Usage
The service KUBERNETES which exposes TCP port 53 and has been allocated cluster IP address 10.0.0.11 produces the following environment variables:
KUBERNETES_SERVICE_PORT=53 MYSQL_DATABASE=root KUBERNETES_PORT_53_TCP=tcp://10.0.0.11:53 KUBERNETES_SERVICE_HOST=10.0.0.11
Use the oc rsh command to SSH into your container and run oc set env to list all available variables.
30.4. Unset Environment Variables
To unset environment variables in the pod templates:
$ oc set env <object-selection> KEY_1- ... KEY_N- [<common-options>]
The trailing hyphen (-, U+2D) is required.
This example removes environment variables ENV1 and ENV2 from deployment config d1:
$ oc set env dc/d1 ENV1- ENV2-
This removes environment variable ENV from all replication controllers:
$ oc set env rc --all ENV-
This removes environment variable ENV from container c1 for replication controller r1:
$ oc set env rc r1 --containers='c1' ENV-
Chapter 31. Jobs
31.1. Overview
A job, in contrast to a replication controller, runs a pod with any number of replicas to completion. A job tracks the overall progress of a task and updates its status with information about active, succeeded, and failed pods. Deleting a job will clean up any pod replicas it created. Jobs are part of the Kubernetes API, which can be managed with oc commands like other object types.
See the Kubernetes documentation for more information about jobs.
31.2. Creating a Job
A job configuration consists of the following key parts:
- A pod template, which describes the application the pod will create.
-
An optional
parallelismparameter, which specifies how many pod replicas running in parallel should execute a job. If not specified, this defaults to the value in thecompletionsparameter. -
An optional
completionsparameter, specifying how many concurrently running pods should execute a job. If not specified, this value defaults to one.
The following is an example of a job resource:
apiVersion: extensions/v1beta1 kind: Job metadata: name: pi spec: selector: 1 matchLabels: app: pi parallelism: 1 2 completions: 1 3 template: 4 metadata: name: pi labels: app: pi spec: containers: - name: pi image: perl command: ["perl", "-Mbignum=bpi", "-wle", "print bpi(2000)"] restartPolicy: Never
- Label selector of the pod to run. It uses the generalized label selectors.
-
Optional value for how many pod replicas a job should run in parallel; defaults to
completions. - Optional value for how many successful pod completions are needed to mark a job completed; defaults to one.
- Template for the pod the controller creates.
31.3. Scaling a Job
A job can be scaled up or down by using the oc scale command with the --replicas option, which, in the case of jobs, modifies the spec.parallelism parameter. This will result in modifying the number of pod replicas running in parallel, executing a job.
The following command uses the example job above, and sets the parallelism parameter to three:
$ oc scale job pi --replicas=3
Scaling replication controllers also uses the oc scale command with the --replicas option, but instead changes the replicas parameter of a replication controller configuration.
31.4. Setting Maximum Duration
When defining a Job, you can define its maximum duration by setting the activeDeadlineSeconds field. It is specified in seconds and is not set by default. When not set, there is no maximum duration enforced.
The maximum duration is counted from the time when a first pod gets scheduled in the system, and defines how long a job can be active. It tracks overall time of an execution and is irrelevant to the number of completions (number of pod replicas needed to execute a task). After reaching the specified timeout, the job is terminated by OpenShift Enterprise.
The following example shows the part of a Job specifying activeDeadlineSeconds field for 30 minutes:
spec:
activeDeadlineSeconds: 1800Chapter 32. Revision History: Developer Guide
32.1. Mon Apr 03 2017
| Affected Topic | Description of Change |
|---|---|
| Removed "m" as a valid suffix for memory in the Compute Resources section. |
32.2. Tue Mar 14 2017
| Affected Topic | Description of Change |
|---|---|
| Added an example YAML file of a secret that will create four files. |
32.3. Tue Feb 21 2017
| Affected Topic | Description of Change |
|---|---|
| Corrected an example YAML file and added missing steps. |
32.4. Mon Jan 30 2017
| Affected Topic | Description of Change |
|---|---|
| Removed redundant information and CLI reference material; rearranged sections to match user process. | |
| Updated the example Dockerfile path to point to a file, not a directory. |
32.5. Mon Jan 16 2017
| Affected Topic | Description of Change |
|---|---|
|
Added information about the |
32.6. Mon Jan 09 2017
| Affected Topic | Description of Change |
|---|---|
|
Updated the | |
| Added the FROM Image section. |
32.7. Tue Oct 11 2016
| Affected Topic | Description of Change |
|---|---|
|
Added a procedure outlining how |
32.8. Tue Oct 04 2016
| Affected Topic | Description of Change |
|---|---|
| Added information on shallow cloning. |
32.9. Tue Sep 13 2016
| Affected Topic | Description of Change |
|---|---|
| New topic on using daemonsets as a developer. |
32.10. Tue Sep 06 2016
| Affected Topic | Description of Change |
|---|---|
| Added a new Running a Pod with a Different Service Account section. | |
| Fixed the formatting of some commands. | |
| Added a comprehensive list of events. |
32.11. Mon Aug 29 2016
| Affected Topic | Description of Change |
|---|---|
| Added a new set of topics reviewing the migration procedure of OpenShift version 2 (v2) applications to OpenShift version 3 (v3), including: |
32.12. Mon Aug 08 2016
| Affected Topic | Description of Change |
|---|---|
|
Added a |
32.13. Mon Aug 01 2016
| Affected Topic | Description of Change |
|---|---|
| Corrected the endpoints example within the External MySQL Database section. |
32.14. Wed Jul 27 2016
| Affected Topic | Description of Change |
|---|---|
| Added Build Resources section. | |
| Added support details in the Selecting Fields section. | |
| Removed High-level Application Health Checks section. | |
| Added the Useful Edits section with instructions on how to deploy an application to selected nodes. |
32.15. Thu Jul 14 2016
| Affected Topic | Description of Change |
|---|---|
| Fixed build configuration example in the Other section. | |
|
Updated the | |
| Clarified operational conditions around config-change and image-change triggers. | |
| Added the mid lifecycle-hook in the Recreate Strategy section. | |
| Added clarifying details to the Restrictions section. | |
|
Added | |
|
Updated outdated syntax instances of | |
|
Added | |
| Added information about automatically added environment variables. |
32.16. Tue Jun 14 2016
| Affected Topic | Description of Change |
|---|---|
| Added a section on project resource limits. |
32.17. Fri Jun 10 2016
| Affected Topic | Description of Change |
|---|---|
| Added a new topic on opening a remote shell to containers. |
32.18. Mon May 30 2016
| Affected Topic | Description of Change |
|---|---|
|
Fixed | |
|
Added use cases for the | |
|
Updated the examples in the Defining a BuildConfig, Git Repository Source Options, and Using a Proxy for Git Cloning sections to use |
32.19. Thu May 12 2016
OpenShift Enterprise 3.2 initial release.
| Affected Topic | Description of Change |
|---|---|
| Added information about binary builds to the Binary Source section. | |
| Clarified how to avoid copying the base directory when including extra files in the image source. | |
| Added a Troubleshooting Guidance table. | |
| Added a Using Secrets During a Build section. | |
| Added a Build Hooks section. | |
| Added an Image Source section. | |
| Added a Deleting a BuildConfig section. | |
| Added a Setting Maximum Duration section, which includes job deadline information. | |
| Resource Quota | Moved the topic from Developer Guide to Cluster Administration, as it involves cluster administration tasks, and renamed it to Setting Quotas. |
|
New topic for the new | |
| New topic aggregating many related tasks regarding images and image streams. Includes many sections previously found in the Builds and Image Streams and Image Pull Secrets topics, as well as updated and enhanced details throughout. | |
| Added an Important box to Adding Tags to Image Streams advising against tagging internally managed images. | |
| Added a Creating an Image Stream by Manually Pushing an Image section. | |
| Added an Importing Images from Private Registries section. | |
| Consolidated and re-used developer-relevant information about quotas and limit ranges from related Cluster Administrator topics into what was previously the "Compute Resources" topic, and renamed it to Quotas and Limit Ranges. | |
|
Updated to use the | |
| Added images to the Application Life Cycle Examples topic. | |
|
Added a Note indicating that | |
| Added the Application Life Cycle Examples topic to the Developer Guide, which outlines example workflows for building applications. | |
| Added a Note box about project creation limits. | |
|
Updated to include |
Legal Notice
Copyright © 2024 Red Hat, Inc.
OpenShift documentation is licensed under the Apache License 2.0 (https://www.apache.org/licenses/LICENSE-2.0).
Modified versions must remove all Red Hat trademarks.
Portions adapted from https://github.com/kubernetes-incubator/service-catalog/ with modifications by Red Hat.
Red Hat, Red Hat Enterprise Linux, the Red Hat logo, the Shadowman logo, JBoss, OpenShift, Fedora, the Infinity logo, and RHCE are trademarks of Red Hat, Inc., registered in the United States and other countries.
Linux® is the registered trademark of Linus Torvalds in the United States and other countries.
Java® is a registered trademark of Oracle and/or its affiliates.
XFS® is a trademark of Silicon Graphics International Corp. or its subsidiaries in the United States and/or other countries.
MySQL® is a registered trademark of MySQL AB in the United States, the European Union and other countries.
Node.js® is an official trademark of Joyent. Red Hat Software Collections is not formally related to or endorsed by the official Joyent Node.js open source or commercial project.
The OpenStack® Word Mark and OpenStack logo are either registered trademarks/service marks or trademarks/service marks of the OpenStack Foundation, in the United States and other countries and are used with the OpenStack Foundation’s permission. We are not affiliated with, endorsed or sponsored by the OpenStack Foundation, or the OpenStack community.
All other trademarks are the property of their respective owners.