Installation and Configuration
OpenShift Enterprise 3.2 Installation and Configuration
Abstract
Chapter 1. Overview
OpenShift Enterprise Installation and Configuration topics cover the basics of installing and configuring OpenShift Enterprise in your environment. Configuration, management, and logging are also covered. Use these topics for the one-time tasks required quickly set up your OpenShift Enterprise environment and configure it based on your organizational needs.
For day to day cluster administrator tasks, see Cluster Administration.
Chapter 2. Installing
2.1. Overview
The quick installation method allows you to use an interactive CLI utility to install OpenShift Enterprise across a set of hosts. This installer is a self-contained wrapper intended for usage on a Red Hat Enterprise Linux 7 host.
For production environments, a reference configuration implemented using Ansible playbooks is available as the advanced installation method.
Before beginning either installation method, start with the Prerequisites topic.
2.2. Prerequisites
2.2.1. Overview
OpenShift Enterprise infrastructure components can be installed across multiple hosts. The following sections outline the system requirements and instructions for preparing your environment and hosts before installing OpenShift Enterprise.
2.2.2. Planning
For production environments, several factors that can influence installation must be considered prior to deployment:
- What is the number of required hosts required to run the cluster?
- How many pods are required in your cluster?
- Is high availability required? High availability is recommended for fault tolerance.
- Which installation type do you want to use: RPM or containerized?
2.2.3. System Requirements
You must have an active OpenShift Enterprise subscription on your Red Hat account to proceed. If you do not, contact your sales representative for more information.
OpenShift Enterprise 3.2 requires Docker 1.9.1, and supports Docker 1.10 as of OpenShift Enterprise 3.2.1.
The system requirements vary per host type:
| |
|
OpenShift Enterprise only supports servers with x86_64 architecture.
Meeting the /var/ file system sizing requirements in RHEL Atomic Host requires making changes to the default configuration. See Managing Storage in Red Hat Enterprise Linux Atomic Host for instructions on configuring this during or after installation.
2.2.3.1. Host Recommendations
The following apply to production environments. Test or sample environments will function with the minimum requirements.
- Master Hosts
- In a highly available OpenShift Enterprise cluster with external etcd, a master host should have 1 CPU core and 1.5 GB of memory, on top of the defaults in the table above, for each 1000 pods. Therefore, the recommended size of master host in an OpenShift Enterprise cluster of 2000 pods would be 2 CPU cores and 5 GB of RAM, in addition to the minimum requirements for a master host of 2 CPU cores and 8 GB of RAM.
When planning an environment with multiple masters, a minimum of three etcd hosts as well as a load-balancer between the master hosts, is required.
- Node Hosts
- The size of a node host depends on the expected size of its workload. As an OpenShift Enterprise cluster administrator, you will need to calculate the expected workload, then add about 10% for overhead. For production environments, allocate enough resources so that node host failure does not affect your maximum capacity.
Use the above with the following table to plan the maximum loads for nodes and pods:
| Host | Sizing Recommendation |
|---|---|
| Maximum nodes per cluster | 300 |
| Maximum pods per nodes | 110 |
Oversubscribing the physical resources on a node affects resource guarantees the Kubernetes scheduler makes during pod placement. Learn what measures you can take to avoid memory swapping.
2.2.3.2. Configuring Core Usage
By default, OpenShift Enterprise masters and nodes use all available cores in the system they run on. You can choose the number of cores you want OpenShift Enterprise to use by setting the GOMAXPROCS environment variable.
For example, run the following before starting the server to make OpenShift Enterprise only run on one core:
# export GOMAXPROCS=12.2.3.3. Security Warning
OpenShift Enterprise runs containers on your hosts, and in some cases, such as build operations and the registry service, it does so using privileged containers. Furthermore, those containers access your host’s Docker daemon and perform docker build and docker push operations. As such, you should be aware of the inherent security risks associated with performing docker run operations on arbitrary images as they effectively have root access.
For more information, see these articles:
To address these risks, OpenShift Enterprise uses security context constraints that control the actions that pods can perform and what it has the ability to access.
2.2.4. Environment Requirements
The following must be set up in your environment before OpenShift Enterprise can be installed.
2.2.4.1. DNS
A fully functional DNS environment is a requirement for OpenShift Enterprise to work correctly. Adding entries into the /etc/hosts file is not enough, because that file is not copied into containers running on the platform.
To configure the OpenShift Enterprise DNS environment:
Key components of OpenShift Enterprise run themselves inside of containers. By default, these containers receive their /etc/resolv.conf DNS configuration file from their host. OpenShift Enterprise then inserts one DNS value into the pods (above the node’s nameserver values). That value is defined in the /etc/origin/node/node-config.yaml file by the dnsIP parameter, which by default is set to the address of the host node because the host is using dnsmasq. If the dnsIP parameter is omitted from the node-config.yaml file, then the value defaults to the kubernetes service IP, which is the first nameserver in the pod’s /etc/resolv.conf file.
As of OpenShift Enterprise 3.2, dnsmasq is automatically configured on all masters and nodes. The pods use the nodes as their DNS, and the nodes forward the requests. By default, dnsmasq is configured on the nodes to listen on port 53, therefore the nodes cannot run any other type of DNS application.
Previously, in OpenShift Enterprise 3.1, a DNS server could not be installed on a master node, because it ran its own internal DNS server. Now, with master nodes using dnsmasq, SkyDNS is now configured to listen on port 8053 so that dnsmasq can run on the masters. Note that these DNS changes (dnsmasq configured on nodes and the SkyDNS port change) only apply to new installations of OpenShift Enterprise 3.2. Clusters upgraded to OpenShift Enterprise 3.2 from a previous version do not currently have these changes applied during the upgrade process.
NetworkManager is required on the nodes in order to populate dnsmasq with the DNS IP addresses.
If you do not have a properly functioning DNS environment, you could experience failure with:
- Product installation via the reference Ansible-based scripts
- Deployment of the infrastructure containers (registry, routers)
- Access to the OpenShift Enterprise web console, because it is not accessible via IP address alone
Configuring a DNS Environment
To properly configure your DNS environment for OpenShift Enterprise:
Check the contents of /etc/resolv.conf:
$ cat /etc/resolv.conf # Generated by NetworkManager search ose3.example.com nameserver 10.64.33.1 # nameserver updated by /etc/NetworkManager/dispatcher.d/99-origin-dns.shEnsure that the DNS servers listed in /etc/resolv.conf are able to resolve to the addresses of all the masters and nodes in your OpenShift Enterprise environment:
$ dig <node_hostname> @<IP_address> +shortFor example:
$ dig node1.ose3.example.com @10.64.33.1 +short 10.64.33.156 $ dig master.ose3.example.com @10.64.33.1 +short 10.64.33.37If DHCP is:
- Disabled, then configure your network interface to be static, and add DNS nameservers to NetworkManager.
Enabled, then the NetworkManager dispatch script automatically configures DNS based on the DHCP configuration. Optionally, you can add a value to
dnsIPin the node-config.yaml file to prepend the pod’s resolv.conf file. The second nameserver is then defined by the host’s first nameserver. By default, this will be the IP address of the node host.NoteFor most configurations, do not set the
openshift_dns_ipoption during the advanced installation of OpenShift Enterprise (using Ansible), because this option overrides the default IP address set bydnsIP.Instead, allow the installer to configure each node to use dnsmasq and forward requests to SkyDNS or the external DNS provider. If you do set the
openshift_dns_ipoption, then it should be set either with a DNS IP that queries SkyDNS first, or to the SkyDNS service or endpoint IP (the Kubernetes service IP).
2.2.4.1.1. Disabling dnsmasq
If you want to disable dnsmasq (for example, if your /etc/resolv.conf is managed by a configuration tool other than NetworkManager), then set openshift_use_dnsmasq to false in the Ansible playbook.
However, certain containers do not properly move to the next nameserver when the first issues SERVFAIL. Red Hat Enterprise Linux (RHEL)-based containers do not suffer from this, but certain versions of uclibc and musl do.
Configuring Wildcard DNS
Optionally, configure a wildcard for the router to use, so that you do not need to update your DNS configuration when new routes are added.
A wildcard for a DNS zone must ultimately resolve to the IP address of the OpenShift Enterprise router.
For example, create a wildcard DNS entry for cloudapps that has a low time-to-live value (TTL) and points to the public IP address of the host where the router will be deployed:
*.cloudapps.example.com. 300 IN A 192.168.133.2
In almost all cases, when referencing VMs you must use host names, and the host names that you use must match the output of the hostname -f command on each node.
In your /etc/resolv.conf file on each node host, ensure that the DNS server that has the wildcard entry is not listed as a nameserver or that the wildcard domain is not listed in the search list. Otherwise, containers managed by OpenShift Enterprise may fail to resolve host names properly.
Running Diagnostics
To explore your DNS setup and run specific DNS queries, you can use the host and dig commands (part of the bind-utils package). For example, you can query a specific DNS server, or check if recursion is involved.
$ host `hostname`
ose3-master.example.com has address 172.16.25.41
$ dig ose3-node1.example.com +short
172.16.25.452.2.4.2. Network Access
A shared network must exist between the master and node hosts. If you plan to configure multiple masters for high-availability using the advanced installation method, you must also select an IP to be configured as your virtual IP (VIP) during the installation process. The IP that you select must be routable between all of your nodes, and if you configure using a FQDN it should resolve on all nodes.
NetworkManager
NetworkManager, a program for providing detection and configuration for systems to automatically connect to the network, is required.
Required Ports
OpenShift Enterprise infrastructure components communicate with each other using ports, which are communication endpoints that are identifiable for specific processes or services. Ensure the following ports required by OpenShift Enterprise are open between hosts, for example if you have a firewall in your environment. Some ports are optional depending on your configuration and usage.
| 4789 | UDP | Required for SDN communication between pods on separate hosts. |
| 53 or 8053 | TCP/UDP | Required for DNS resolution of cluster services (SkyDNS). Installations prior to 3.2 or environments upgraded to 3.2 use port 53. New installations will use 8053 by default so that dnsmasq may be configured. |
| 4789 | UDP | Required for SDN communication between pods on separate hosts. |
| 443 or 8443 | TCP | Required for node hosts to communicate to the master API, for the node hosts to post back status, to receive tasks, and so on. |
| 4789 | UDP | Required for SDN communication between pods on separate hosts. |
| 10250 | TCP |
The master proxies to node hosts via the Kubelet for |
In the following table, (L) indicates the marked port is also used in loopback mode, enabling the master to communicate with itself.
In a single-master cluster:
- Ports marked with (L) must be open.
- Ports not marked with (L) need not be open.
In a multiple-master cluster, all the listed ports must be open.
| 53 (L) or 8053 (L) | TCP/UDP | Required for DNS resolution of cluster services (SkyDNS). Installations prior to 3.2 or environments upgraded to 3.2 use port 53. New installations will use 8053 by default so that dnsmasq may be configured. |
| 2049 (L) | TCP/UDP | Required when provisioning an NFS host as part of the installer. |
| 2379 | TCP | Used for standalone etcd (clustered) to accept changes in state. |
| 2380 | TCP | etcd requires this port be open between masters for leader election and peering connections when using standalone etcd (clustered). |
| 4001 (L) | TCP | Used for embedded etcd (non-clustered) to accept changes in state. |
| 4789 (L) | UDP | Required for SDN communication between pods on separate hosts. |
| 9000 | TCP |
If you choose the |
| 443 or 8443 | TCP | Required for node hosts to communicate to the master API, for node hosts to post back status, to receive tasks, and so on. |
| 22 | TCP | Required for SSH by the installer or system administrator. |
| 53 or 8053 | TCP/UDP | Required for DNS resolution of cluster services (SkyDNS). Installations prior to 3.2 or environments upgraded to 3.2 use port 53. New installations will use 8053 by default so that dnsmasq may be configured. Only required to be internally open on master hosts. |
| 80 or 443 | TCP | For HTTP/HTTPS use for the router. Required to be externally open on node hosts, especially on nodes running the router. |
| 1936 | TCP | For router statistics use. Required to be open when running the template router to access statistics, and can be open externally or internally to connections depending on if you want the statistics to be expressed publicly. |
| 4001 | TCP | For embedded etcd (non-clustered) use. Only required to be internally open on the master host. 4001 is for server-client connections. |
| 2379 and 2380 | TCP | For standalone etcd use. Only required to be internally open on the master host. 2379 is for server-client connections. 2380 is for server-server connections, and is only required if you have clustered etcd. |
| 4789 | UDP | For VxLAN use (OpenShift Enterprise SDN). Required only internally on node hosts. |
| 8443 | TCP | For use by the OpenShift Enterprise web console, shared with the API server. |
| 10250 | TCP | For use by the Kubelet. Required to be externally open on nodes. |
Notes
- In the above examples, port 4789 is used for User Datagram Protocol (UDP).
- When deployments are using the SDN, the pod network is accessed via a service proxy, unless it is accessing the registry from the same node the registry is deployed on.
-
OpenShift Enterprise internal DNS cannot be received over SDN. Depending on the detected values of
openshift_facts, or if theopenshift_ipandopenshift_public_ipvalues are overridden, it will be the computed value ofopenshift_ip. For non-cloud deployments, this will default to the IP address associated with the default route on the master host. For cloud deployments, it will default to the IP address associated with the first internal interface as defined by the cloud metadata. -
The master host uses port 10250 to reach the nodes and does not go over SDN. It depends on the target host of the deployment and uses the computed values of
openshift_hostnameandopenshift_public_hostname.
| 9200 | TCP |
For Elasticsearch API use. Required to be internally open on any infrastructure nodes so Kibana is able to retrieve logs for display. It can be externally opened for direct access to Elasticsearch by means of a route. The route can be created using |
| 9300 | TCP | For Elasticsearch inter-cluster use. Required to be internally open on any infrastructure node so the members of the Elasticsearch cluster may communicate with each other. |
2.2.4.3. Git Access
You must have either Internet access and a GitHub account, or read and write access to an internal, HTTP-based Git server
2.2.4.4. Persistent Storage
The Kubernetes persistent volume framework allows you to provision an OpenShift Enterprise cluster with persistent storage using networked storage available in your environment. This can be done after completing the initial OpenShift Enterprise installation depending on your application needs, giving users a way to request those resources without having any knowledge of the underlying infrastructure.
The Installation and Configuration Guide provides instructions for cluster administrators on provisioning an OpenShift Enterprise cluster with persistent storage using NFS, GlusterFS, Ceph RBD, OpenStack Cinder, AWS Elastic Block Store (EBS), GCE Persistent Disks, and iSCSI.
2.2.4.5. SELinux
Security-Enhanced Linux (SELinux) must be enabled on all of the servers before installing OpenShift Enterprise or the installer will fail. Also, configure SELINUXTYPE=targeted in the /etc/selinux/config file:
# This file controls the state of SELinux on the system.
# SELINUX= can take one of these three values:
# enforcing - SELinux security policy is enforced.
# permissive - SELinux prints warnings instead of enforcing.
# disabled - No SELinux policy is loaded.
SELINUX=enforcing
# SELINUXTYPE= can take one of these three values:
# targeted - Targeted processes are protected,
# minimum - Modification of targeted policy. Only selected processes are protected.
# mls - Multi Level Security protection.
SELINUXTYPE=targeted2.2.4.6. Cloud Provider Considerations
Set up the Security Group
When installing on AWS or OpenStack, ensure that you set up the appropriate security groups. These are some ports that you should have in your security groups, without which the installation will fail. You may need more depending on the cluster configuration you want to install. For more information and to adjust your security groups accordingly, see Required Ports for more information.
| All OpenShift Enterprise Hosts |
|
| etcd Security Group |
|
| Master Security Group |
|
| Node Security Group |
|
| Infrastructure Nodes (ones that can host the OpenShift Enterprise router) |
|
If configuring ELBs for load balancing the masters and/or routers, you also need to configure Ingress and Egress security groups for the ELBs appropriately.
Override Detected IP Addresses and Host Names
Some deployments require that the user override the detected host names and IP addresses for the hosts. To see the default values, run the openshift_facts playbook:
# ansible-playbook playbooks/byo/openshift_facts.ymlNow, verify the detected common settings. If they are not what you expect them to be, you can override them.
The Advanced Installation topic discusses the available Ansible variables in greater detail.
| Variable | Usage |
|---|---|
|
|
|
|
|
|
|
|
|
|
|
|
|
|
|
If openshift_hostname is set to a value other than the metadata-provided private-dns-name value, the native cloud integration for those providers will no longer work.
In AWS, situations that require overriding the variables include:
| Variable | Usage |
|---|---|
|
|
The user is installing in a VPC that is not configured for both |
|
|
Possibly if they have multiple network interfaces configured and they want to use one other than the default. You must first set |
|
|
|
|
|
|
If setting openshift_hostname to something other than the metadata-provided private-dns-name value, the native cloud integration for those providers will no longer work.
For EC2 hosts in particular, they must be deployed in a VPC that has both DNS host names and DNS resolution enabled, and openshift_hostname should not be overridden.
Post-Installation Configuration for Cloud Providers
Following the installation process, you can configure OpenShift Enterprise for AWS, OpenStack, or GCE.
2.2.5. Host Preparation
Before installing OpenShift Enterprise, you must first prepare each host per the following.
2.2.5.1. Software Prerequisites
Installing an Operating System
A base installation of RHEL 7.1 or later or RHEL Atomic Host 7.2.4 or later is required for master and node hosts. See the following documentation for the respective installation instructions, if required:
Registering the Hosts
Each host must be registered using Red Hat Subscription Manager (RHSM) and have an active OpenShift Enterprise subscription attached to access the required packages.
On each host, register with RHSM:
# subscription-manager register --username=<user_name> --password=<password>List the available subscriptions:
# subscription-manager list --availableIn the output for the previous command, find the pool ID for an OpenShift Enterprise subscription and attach it:
# subscription-manager attach --pool=<pool_id>NoteWhen finding the pool ID, the related subscription name might include either "OpenShift Enterprise" or "OpenShift Container Platform", due to the product name change introduced with version 3.3.
Disable all repositories and enable only the required ones:
# subscription-manager repos --disable="*" # subscription-manager repos \ --enable="rhel-7-server-rpms" \ --enable="rhel-7-server-extras-rpms" \ --enable="rhel-7-server-ose-3.2-rpms"
Managing Packages
For RHEL 7 systems:
Install the following base packages:
# yum install wget git net-tools bind-utils iptables-services bridge-utils bash-completionUpdate the system to the latest packages:
# yum updateInstall the following package, which provides OpenShift Enterprise utilities and pulls in other tools required by the quick and advanced installation methods, such as Ansible and related configuration files:
# yum install atomic-openshift-utilsInstall the following *-excluder packages on each RHEL 7 system, which helps ensure your systems stay on the correct versions of atomic-openshift and docker packages when you are not trying to upgrade, according to the OpenShift Enterprise version:
# yum install atomic-openshift-excluder atomic-openshift-docker-excluderThe *-excluder packages add entries to the
excludedirective in the host’s /etc/yum.conf file when installed. Run the following command on each host to remove the atomic-openshift packages from the list for the duration of the installation.# atomic-openshift-excluder unexclude
For RHEL Atomic Host 7 systems:
Ensure the host is up to date by upgrading to the latest Atomic tree if one is available:
# atomic host upgradeAfter the upgrade is completed and prepared for the next boot, reboot the host:
# systemctl reboot
Installing Docker
At this point, you should install Docker on all master and node hosts. This allows you to configure your Docker storage options before installing OpenShift Enterprise.
For RHEL 7 systems, install Docker 1.10.
NoteOn RHEL Atomic Host 7 systems, Docker should already be installed, configured, and running by default.
The atomic-openshift-docker-excluder package that was installed in Software Prerequisites should ensure that the correct version of Docker is installed in this step:
# yum install dockerAfter the package installation is complete, verify that version 1.10.3 was installed:
# docker versionEdit the /etc/sysconfig/docker file and add
--insecure-registry 172.30.0.0/16to theOPTIONSparameter. For example:OPTIONS='--selinux-enabled --insecure-registry 172.30.0.0/16'If using the Quick Installation method, you can easily script a complete installation from a kickstart or cloud-init setup, change the default configuration file:
# sed -i '/OPTIONS=.*/c\OPTIONS="--selinux-enabled --insecure-registry 172.30.0.0/16"' \ /etc/sysconfig/dockerThe Advanced Installation method automatically changes /etc/sysconfig/docker.
The
--insecure-registryoption instructs the Docker daemon to trust any Docker registry on the indicated subnet, rather than requiring a certificate.Important172.30.0.0/16 is the default value of the
servicesSubnetvariable in the master-config.yaml file. If this has changed, then the--insecure-registryvalue in the above step should be adjusted to match, as it is indicating the subnet for the registry to use. Note that theopenshift_portal_netvariable can be set in the Ansible inventory file and used during the advanced installation method to modify theservicesSubnetvariable.NoteAfter the initial OpenShift Enterprise installation is complete, you can choose to secure the integrated Docker registry, which involves adjusting the
--insecure-registryoption accordingly.
2.2.5.2. Configuring Docker Storage
Docker containers and the images they are created from are stored in Docker’s storage back end. This storage is ephemeral and separate from any persistent storage allocated to meet the needs of your applications.
For RHEL Atomic Host
The default storage back end for Docker on RHEL Atomic Host is a thin pool logical volume, which is supported for production environments. You must ensure that enough space is allocated for this volume per the Docker storage requirements mentioned in System Requirements.
If you do not have enough allocated, see Managing Storage with Docker Formatted Containers for details on using docker-storage-setup and basic instructions on storage management in RHEL Atomic Host.
For RHEL
The default storage back end for Docker on RHEL 7 is a thin pool on loopback devices, which is not supported for production use and only appropriate for proof of concept environments. For production environments, you must create a thin pool logical volume and re-configure Docker to use that volume.
You can use the docker-storage-setup script included with Docker to create a thin pool device and configure Docker’s storage driver. This can be done after installing Docker and should be done before creating images or containers. The script reads configuration options from the /etc/sysconfig/docker-storage-setup file and supports three options for creating the logical volume:
- Option A) Use an additional block device.
- Option B) Use an existing, specified volume group.
- Option C) Use the remaining free space from the volume group where your root file system is located.
Option A is the most robust option, however it requires adding an additional block device to your host before configuring Docker storage. Options B and C both require leaving free space available when provisioning your host.
Create the docker-pool volume using one of the following three options:
Option A) Use an additional block device.
In /etc/sysconfig/docker-storage-setup, set DEVS to the path of the block device you wish to use. Set VG to the volume group name you wish to create; docker-vg is a reasonable choice. For example:
# cat <<EOF > /etc/sysconfig/docker-storage-setup DEVS=/dev/vdc VG=docker-vg EOFThen run docker-storage-setup and review the output to ensure the docker-pool volume was created:
# docker-storage-setup [5/1868] 0 Checking that no-one is using this disk right now ... OK Disk /dev/vdc: 31207 cylinders, 16 heads, 63 sectors/track sfdisk: /dev/vdc: unrecognized partition table type Old situation: sfdisk: No partitions found New situation: Units: sectors of 512 bytes, counting from 0 Device Boot Start End #sectors Id System /dev/vdc1 2048 31457279 31455232 8e Linux LVM /dev/vdc2 0 - 0 0 Empty /dev/vdc3 0 - 0 0 Empty /dev/vdc4 0 - 0 0 Empty Warning: partition 1 does not start at a cylinder boundary Warning: partition 1 does not end at a cylinder boundary Warning: no primary partition is marked bootable (active) This does not matter for LILO, but the DOS MBR will not boot this disk. Successfully wrote the new partition table Re-reading the partition table ... If you created or changed a DOS partition, /dev/foo7, say, then use dd(1) to zero the first 512 bytes: dd if=/dev/zero of=/dev/foo7 bs=512 count=1 (See fdisk(8).) Physical volume "/dev/vdc1" successfully created Volume group "docker-vg" successfully created Rounding up size to full physical extent 16.00 MiB Logical volume "docker-poolmeta" created. Logical volume "docker-pool" created. WARNING: Converting logical volume docker-vg/docker-pool and docker-vg/docker-poolmeta to pool's data and metadata volumes. THIS WILL DESTROY CONTENT OF LOGICAL VOLUME (filesystem etc.) Converted docker-vg/docker-pool to thin pool. Logical volume "docker-pool" changed.Option B) Use an existing, specified volume group.
In /etc/sysconfig/docker-storage-setup, set VG to the desired volume group. For example:
# cat <<EOF > /etc/sysconfig/docker-storage-setup VG=docker-vg EOFThen run docker-storage-setup and review the output to ensure the docker-pool volume was created:
# docker-storage-setup Rounding up size to full physical extent 16.00 MiB Logical volume "docker-poolmeta" created. Logical volume "docker-pool" created. WARNING: Converting logical volume docker-vg/docker-pool and docker-vg/docker-poolmeta to pool's data and metadata volumes. THIS WILL DESTROY CONTENT OF LOGICAL VOLUME (filesystem etc.) Converted docker-vg/docker-pool to thin pool. Logical volume "docker-pool" changed.Option C) Use the remaining free space from the volume group where your root file system is located.
Verify that the volume group where your root file system resides has the desired free space, then run docker-storage-setup and review the output to ensure the docker-pool volume was created:
# docker-storage-setup Rounding up size to full physical extent 32.00 MiB Logical volume "docker-poolmeta" created. Logical volume "docker-pool" created. WARNING: Converting logical volume rhel/docker-pool and rhel/docker-poolmeta to pool's data and metadata volumes. THIS WILL DESTROY CONTENT OF LOGICAL VOLUME (filesystem etc.) Converted rhel/docker-pool to thin pool. Logical volume "docker-pool" changed.
Verify your configuration. You should have a dm.thinpooldev value in the /etc/sysconfig/docker-storage file and a docker-pool logical volume:
# cat /etc/sysconfig/docker-storage DOCKER_STORAGE_OPTIONS=--storage-opt dm.fs=xfs --storage-opt dm.thinpooldev=/dev/mapper/docker--vg-docker--pool # lvs LV VG Attr LSize Pool Origin Data% Meta% Move Log Cpy%Sync Convert docker-pool rhel twi-a-t--- 9.29g 0.00 0.12ImportantBefore using Docker or OpenShift Enterprise, verify that the docker-pool logical volume is large enough to meet your needs. The docker-pool volume should be 60% of the available volume group and will grow to fill the volume group via LVM monitoring.
Check if Docker is running:
# systemctl is-active dockerIf Docker has not yet been started on the host, enable and start the service:
# systemctl enable docker # systemctl start dockerIf Docker is already running, re-initialize Docker:
WarningThis will destroy any Docker containers or images currently on the host.
# systemctl stop docker # rm -rf /var/lib/docker/* # systemctl restart dockerIf there is any content in /var/lib/docker/, it must be deleted. Files will be present if Docker has been used prior to the installation of OpenShift Enterprise.
Reconfiguring Docker Storage
Should you need to reconfigure Docker storage after having created the docker-pool, you should first remove the docker-pool logical volume. If you are using a dedicated volume group, you should also remove the volume group and any associated physical volumes before reconfiguring docker-storage-setup according to the instructions above.
See Logical Volume Manager Administration for more detailed information on LVM management.
Managing Docker Container Logs
Sometimes a container’s log file (the /var/lib/docker/containers/<hash>/<hash>-json.log file on the node where the container is running) can increase to a problematic size. You can manage this by configuring Docker’s json-file logging driver to restrict the size and number of log files.
| Option | Purpose |
|---|---|
|
| Sets the size at which a new log file is created. |
|
| Sets the file on each host to configure the options. |
For example, to set the maximum file size to 1MB and always keep the last three log files, edit the /etc/sysconfig/docker file to configure max-size=1M and max-file=3:
OPTIONS='--insecure-registry=172.30.0.0/16 --selinux-enabled --log-opt max-size=1M --log-opt max-file=3'Next, restart the Docker service:
# systemctl restart dockerViewing Available Container Logs
Container logs are stored in the /var/lib/docker/containers/<hash>/ directory on the node where the container is running. For example:
# ls -lh /var/lib/docker/containers/f088349cceac173305d3e2c2e4790051799efe363842fdab5732f51f5b001fd8/
total 2.6M
-rw-r--r--. 1 root root 5.6K Nov 24 00:12 config.json
-rw-r--r--. 1 root root 649K Nov 24 00:15 f088349cceac173305d3e2c2e4790051799efe363842fdab5732f51f5b001fd8-json.log
-rw-r--r--. 1 root root 977K Nov 24 00:15 f088349cceac173305d3e2c2e4790051799efe363842fdab5732f51f5b001fd8-json.log.1
-rw-r--r--. 1 root root 977K Nov 24 00:15 f088349cceac173305d3e2c2e4790051799efe363842fdab5732f51f5b001fd8-json.log.2
-rw-r--r--. 1 root root 1.3K Nov 24 00:12 hostconfig.json
drwx------. 2 root root 6 Nov 24 00:12 secretsSee Docker’s documentation for additional information on how to Configure Logging Drivers.
2.2.5.3. Ensuring Host Access
The quick and advanced installation methods require a user that has access to all hosts. If you want to run the installer as a non-root user, passwordless sudo rights must be configured on each destination host.
For example, you can generate an SSH key on the host where you will invoke the installation process:
# ssh-keygenDo not use a password.
An easy way to distribute your SSH keys is by using a bash loop:
# for host in master.example.com \
node1.example.com \
node2.example.com; \
do ssh-copy-id -i ~/.ssh/id_rsa.pub $host; \
doneModify the host names in the above command according to your configuration.
2.2.6. Setting Global Proxy Values
The OpenShift Enterprise installer uses the proxy settings in the _/etc/environment _ file.
Ensure the following domain suffixes and IP addresses are in the /etc/environment file in the no_proxy parameter:
- Master and node host names (domain suffix).
- Other internal host names (domain suffix).
- Etcd IP addresses (must be IP addresses and not host names, as etcd access is done by IP address).
- Docker registry IP address.
-
Kubernetes IP address, by default 172.30.0.1. Must be the value set in the
openshift_portal_netparameter in the Ansible inventory file, by default /etc/ansible/hosts. -
Kubernetes internal domain suffix:
cluster.local. -
Kubernetes internal domain suffix:
.svc.
The following example assumes http_proxy and https_proxy values are set:
no_proxy=.internal.example.com,10.0.0.1,10.0.0.2,10.0.0.3,.cluster.local,.svc,localhost,127.0.0.1,172.30.0.1
Because noproxy does not support CIDR, you can use domain suffixes.
2.2.7. What’s Next?
If you are interested in installing OpenShift Enterprise using the containerized method (optional for RHEL but required for RHEL Atomic Host), see RPM vs Containerized to ensure that you understand the differences between these methods.
When you are ready to proceed, you can install OpenShift Enterprise using the quick installation or advanced installation method.
2.3. RPM vs Containerized
2.3.1. Overview
The default method for installing OpenShift Enterprise on Red Hat Enterprise Linux (RHEL) uses RPMs. Alternatively, you can use the containerized method, which deploys containerized OpenShift Enterprise master and node components. When targeting a RHEL Atomic Host system, the containerized method is the only available option, and is automatically selected for you based on the detection of the /run/ostree-booted file.
You can easily deploy environments mixing containerized and RPM based installations. For the advanced installation method, you can set the Ansible variable containerized=true in an inventory file on a cluster-wide or per host basis. For the quick installation method, you can choose between the RPM or containerized method on a per host basis during the interactive installation, or set the values manually in an installation configuration file.
When installing an environment with multiple masters, the load balancer cannot be deployed by the installation process as a container. See Advanced Installation for load balancer requirements using the native HA method.
The following sections detail the differences between the RPM and containerized methods.
2.3.2. Required Images
Containerized installations make use of the following images:
- openshift3/ose
- openshift3/node
- openshift3/openvswitch
- registry.access.redhat.com/rhel7/etcd
By default, all of the above images are pulled from the Red Hat Registry at registry.access.redhat.com.
If you need to use a private registry to pull these images during the installation, you can specify the registry information ahead of time. For the advanced installation method, you can set the following Ansible variables in your inventory file, as required:
cli_docker_additional_registries=<registry_hostname>
cli_docker_insecure_registries=<registry_hostname>
cli_docker_blocked_registries=<registry_hostname>For the quick installation method, you can export the following environment variables on each target host:
# export OO_INSTALL_ADDITIONAL_REGISTRIES=<registry_hostname>
# export OO_INSTALL_INSECURE_REGISTRIES=<registry_hostname>Blocked Docker registries cannot currently be specified using the quick installation method.
The configuration of additional, insecure, and blocked Docker registries occurs at the beginning of the installation process to ensure that these settings are applied before attempting to pull any of the required images.
2.3.3. Starting and Stopping Containers
The installation process creates relevant systemd units which can be used to start, stop, and poll services using normal systemctl commands. For containerized installations, these unit names match those of an RPM installation, with the exception of the etcd service which is named etcd_container.
This change is necessary as currently RHEL Atomic Host ships with the etcd package installed as part of the operating system, so a containerized version is used for the OpenShift Enterprise installation instead. The installation process disables the default etcd service. The etcd package is slated to be removed from RHEL Atomic Host in the future.
2.3.4. File Paths
All OpenShift configuration files are placed in the same locations during containerized installation as RPM based installations and will survive os-tree upgrades.
However, the default image stream and template files are installed at /etc/origin/examples/ for containerized installations rather than the standard /usr/share/openshift/examples/, because that directory is read-only on RHEL Atomic Host.
2.3.5. Storage Requirements
RHEL Atomic Host installations normally have a very small root file system. However, the etcd, master, and node containers persist data in the /var/lib/ directory. Ensure that you have enough space on the root file system before installing OpenShift Enterprise; see the System Requirements section for details.
2.3.6. Open vSwitch SDN Initialization
OpenShift Enterprise SDN initialization requires that the Docker bridge be reconfigured and that Docker is restarted. This complicates the situation when the node is running within a container. When using the Open vSwitch (OVS) SDN, you will see the node start, reconfigure Docker, restart Docker (which restarts all containers), and finally start successfully.
In this case, the node service may fail to start and be restarted a few times because the master services are also restarted along with Docker. The current implementation uses a workaround which relies on setting the Restart=always parameter in the Docker based systemd units.
2.4. Quick Installation
2.4.1. Overview
The quick installation method allows you to use an interactive CLI utility, the atomic-openshift-installer command, to install OpenShift Enterprise across a set of hosts. This installer can deploy OpenShift Enterprise components on targeted hosts by either installing RPMs or running containerized services.
This installation method is provided to make the installation experience easier by interactively gathering the data needed to run on each host. The installer is a self-contained wrapper intended for usage on a Red Hat Enterprise Linux (RHEL) 7 system. While RHEL Atomic Host is supported for running containerized OpenShift Enterprise services, the installer is provided by an RPM not available by default in RHEL Atomic Host, and must therefore be run from a RHEL 7 system. The host initiating the installation does not need to be intended for inclusion in the OpenShift Enterprise cluster, but it can be.
In addition to running interactive installations from scratch, the atomic-openshift-installer command can also be run or re-run using a predefined installation configuration file. This file can be used with the installer to:
- run an unattended installation,
- add nodes to an existing cluster,
- upgrade your cluster, or
- reinstall the OpenShift Enterprise cluster completely.
Alternatively, you can use the advanced installation method for more complex environments.
2.4.2. Before You Begin
The installer allows you to install OpenShift Enterprise master and node components on a defined set of hosts.
By default, any hosts you designate as masters during the installation process are automatically also configured as nodes so that the masters are configured as part of the OpenShift Enterprise SDN. The node component on the masters, however, are marked unschedulable, which blocks pods from being scheduled on it. After the installation, you can mark them schedulable if you want.
Before installing OpenShift Enterprise, you must first satisfy the prerequisites on your hosts, which includes verifying system and environment requirements and properly installing and configuring Docker. You must also be prepared to provide or validate the following information for each of your targeted hosts during the course of the installation:
- User name on the target host that should run the Ansible-based installation (can be root or non-root)
- Host name
- Whether to install components for master, node, or both
- Whether to use the RPM or containerized method
- Internal and external IP addresses
If you are interested in installing OpenShift Enterprise using the containerized method (optional for RHEL but required for RHEL Atomic Host), see RPM vs Containerized to ensure that you understand the differences between these methods, then return to this topic to continue.
After following the instructions in the Prerequisites topic and deciding between the RPM and containerized methods, you can continue to running an interactive or unattended installation.
2.4.3. Running an Interactive Installation
Ensure you have read through Before You Begin.
You can start the interactive installation by running:
$ atomic-openshift-installer installThen follow the on-screen instructions to install a new OpenShift Enterprise cluster.
After it has finished, ensure that you back up the ~/.config/openshift/installer.cfg.ymlinstallation configuration file that is created, as it is required if you later want to re-run the installation, add hosts to the cluster, or upgrade your cluster. Then, verify the installation.
2.4.4. Defining an Installation Configuration File
The installer can use a predefined installation configuration file, which contains information about your installation, individual hosts, and cluster. When running an interactive installation, an installation configuration file based on your answers is created for you in ~/.config/openshift/installer.cfg.yml. The file is created if you are instructed to exit the installation to manually modify the configuration or when the installation completes. You can also create the configuration file manually from scratch to perform an unattended installation.
Example 2.1. Installation Configuration File Specification
version: v1
variant: openshift-enterprise
variant_version: 3.2
ansible_ssh_user: root
ansible_log_path: /tmp/ansible.log
hosts:
- ip: 10.0.0.1
hostname: master-private.example.com
public_ip: 24.222.0.1
public_hostname: master.example.com
master: true
node: true
containerized: true
connect_to: 24.222.0.1
- ip: 10.0.0.2
hostname: node1-private.example.com
public_ip: 24.222.0.2
public_hostname: node1.example.com
node: true
connect_to: 10.0.0.2
- ip: 10.0.0.3
hostname: node2-private.example.com
public_ip: 24.222.0.3
public_hostname: node2.example.com
node: true
connect_to: 10.0.0.3- 1
- The version of this installation configuration file. As of OpenShift Enterprise 3.1, the only valid version here is
v1. - 2
- The OpenShift Enterprise variant to install. For OSE, set this to
openshift-enterprise. - 3
- A valid version your selected variant:
3.2,3.1, or3.0. If not specified, this defaults to the newest version for the specified variant. - 4
- Defines which user Ansible uses to SSH in to remote systems for gathering facts and for the installation. By default, this is the root user, but you can set it to any user that has sudo privileges.
- 5
- Defines where the Ansible logs are stored. By default, this is the /tmp/ansible.log file.
- 6
- Defines a list of the hosts onto which you want to install the OpenShift Enterprise master and node components.
- 7 8
- Required. Allows the installer to connect to the system and gather facts before proceeding with the install.
- 9 10
- Required for unattended installations. If these details are not specified, then this information is pulled from the facts gathered by the installer, and you are asked to confirm the details. If undefined for an unattended installation, the installation fails.
- 11 12
- Determines the type of services that are installed. At least one of these must be set to true for the configuration file to be considered valid.
- 13
- If set to true, containerized OpenShift Enterprise services are run on target master and node hosts instead of installed using RPM packages. If set to false or unset, the default RPM method is used. RHEL Atomic Host requires the containerized method, and is automatically selected for you based on the detection of the /run/ostree-booted file. See RPM vs Containerized for more details.
- 14
- The IP address that Ansible attempts to connect to when installing, upgrading, or uninstalling the systems. If the configuration file was auto-generated, then this is the value you first enter for the host during that interactive install process.
2.4.5. Running an Unattended Installation
Ensure you have read through the Before You Begin.
Unattended installations allow you to define your hosts and cluster configuration in an installation configuration file before running the installer so that you do not have to go through all of the interactive installation questions and answers. It also allows you to resume an interactive installation you may have left unfinished, and quickly get back to where you left off.
To run an unattended installation, first define an installation configuration file at ~/.config/openshift/installer.cfg.yml. Then, run the installer with the -u flag:
$ atomic-openshift-installer -u installBy default in interactive or unattended mode, the installer uses the configuration file located at ~/.config/openshift/installer.cfg.yml if the file exists. If it does not exist, attempting to start an unattended installation fails.
Alternatively, you can specify a different location for the configuration file using the -c option, but doing so will require you to specify the file location every time you run the installation:
$ atomic-openshift-installer -u -c </path/to/file> installAfter the unattended installation finishes, ensure that you back up the ~/.config/openshift/installer.cfg.yml file that was used, as it is required if you later want to re-run the installation, add hosts to the cluster, or upgrade your cluster. Then, verify the installation.
2.4.6. Verifying the Installation
After the installation completes:
Verify that the master is started and nodes are registered and reporting in Ready status. On the master host, run the following as root:
# oc get nodes NAME LABELS STATUS master.example.com kubernetes.io/hostname=master.example.com,region=infra,zone=default Ready,SchedulingDisabled node1.example.com kubernetes.io/hostname=node1.example.com,region=primary,zone=east Ready node2.example.com kubernetes.io/hostname=node2.example.com,region=primary,zone=west ReadyTo verify that the web console is installed correctly, use the master host name and the console port number to access the console with a web browser.
For example, for a master host with a hostname of
master.openshift.comand using the default port of8443, the web console would be found at:https://master.openshift.com:8443/consoleNow that the install has been verified, run the following command on each master and node host to add the atomic-openshift packages back to the list of yum excludes on the host:
# atomic-openshift-excluder exclude
Then, see What’s Next for the next steps on configuring your OpenShift Enterprise cluster.
2.4.7. Uninstalling OpenShift Enterprise
You can uninstall OpenShift Enterprise on all hosts in your cluster using the installer by running:
$ atomic-openshift-installer uninstallSee the advanced installation method for more options.
2.4.8. What’s Next?
Now that you have a working OpenShift Enterprise instance, you can:
- Configure authentication; by default, authentication is set to Deny All.
- Configure the automatically-deployed integrated Docker registry.
- Configure the automatically-deployed router.
2.5. Advanced Installation
2.5.1. Overview
For production environments, a reference configuration implemented using Ansible playbooks is available as the advanced installation method for installing OpenShift Enterprise hosts. Familiarity with Ansible is assumed, however you can use this configuration as a reference to create your own implementation using the configuration management tool of your choosing.
While RHEL Atomic Host is supported for running containerized OpenShift Enterprise services, the advanced installation method utilizes Ansible, which is not available in RHEL Atomic Host, and must therefore be run from a RHEL 7 system. The host initiating the installation does not need to be intended for inclusion in the OpenShift Enterprise cluster, but it can be.
Alternatively, you can use the quick installation method if you prefer an interactive installation experience.
Running Ansible playbooks with the --tags or --check options is not supported by Red Hat.
2.5.2. Before You Begin
Before installing OpenShift Enterprise, you must first see the Prerequisites topic to prepare your hosts, which includes verifying system and environment requirements per component type and properly installing and configuring Docker. It also includes installing Ansible version 2.2.0 or later, as the advanced installation method is based on Ansible playbooks and as such requires directly invoking Ansible.
If you are interested in installing OpenShift Enterprise using the containerized method (optional for RHEL but required for RHEL Atomic Host), see RPM vs Containerized to ensure that you understand the differences between these methods, then return to this topic to continue.
After following the instructions in the Prerequisites topic and deciding between the RPM and containerized methods, you can continue in this topic to Configuring Ansible.
2.5.3. Configuring Ansible
The /etc/ansible/hosts file is Ansible’s inventory file for the playbook to use during the installation. The inventory file describes the configuration for your OpenShift Enterprise cluster. You must replace the default contents of the file with your desired configuration.
The following sections describe commonly-used variables to set in your inventory file during an advanced installation, followed by example inventory files you can use as a starting point for your installation. The examples describe various environment topographies, including using multiple masters for high availability. You can choose an example that matches your requirements, modify it to match your own environment, and use it as your inventory file when running the advanced installation.
2.5.3.1. Configuring Host Variables
To assign environment variables to hosts during the Ansible installation, indicate the desired variables in the /etc/ansible/hosts file after the host entry in the [masters] or [nodes] sections. For example:
[masters]
ec2-52-6-179-239.compute-1.amazonaws.com openshift_public_hostname=ose3-master.public.example.comThe following table describes variables for use with the Ansible installer that can be assigned to individual host entries:
| Variable | Purpose |
|---|---|
|
| This variable overrides the internal cluster host name for the system. Use this when the system’s default IP address does not resolve to the system host name. |
|
| This variable overrides the system’s public host name. Use this for cloud installations, or for hosts on networks using a network address translation (NAT). |
|
| This variable overrides the cluster internal IP address for the system. Use this when using an interface that is not configured with the default route. |
|
| This variable overrides the system’s public IP address. Use this for cloud installations, or for hosts on networks using a network address translation (NAT). |
|
| If set to true, containerized OpenShift Enterprise services are run on target master and node hosts instead of installed using RPM packages. If set to false or unset, the default RPM method is used. RHEL Atomic Host requires the containerized method, and is automatically selected for you based on the detection of the /run/ostree-booted file. See RPM vs Containerized for more details. Containerized installations are supported starting in OSE 3.1.1. |
|
| This variable adds labels to nodes during installation. See Configuring Node Host Labels for more details. |
|
|
This variable is used to configure |
|
| This variable configures additional Docker options within /etc/sysconfig/docker, such as options used in Managing Container Logs. Example usage: "--log-driver json-file --log-opt max-size=1M --log-opt max-file=3". |
2.5.3.2. Configuring Cluster Variables
To assign environment variables during the Ansible install that apply more globally to your OpenShift Enterprise cluster overall, indicate the desired variables in the /etc/ansible/hosts file on separate, single lines within the [OSEv3:vars] section. For example:
[OSEv3:vars]
openshift_master_identity_providers=[{'name': 'htpasswd_auth',
'login': 'true', 'challenge': 'true',
'kind': 'HTPasswdPasswordIdentityProvider',
'filename': '/etc/origin/master/htpasswd'}]
openshift_master_default_subdomain=apps.test.example.comThe following table describes variables for use with the Ansible installer that can be assigned cluster-wide:
| Variable | Purpose |
|---|---|
|
| This variable sets the SSH user for the installer to use and defaults to root. This user should allow SSH-based authentication without requiring a password. If using SSH key-based authentication, then the key should be managed by an SSH agent. |
|
|
If |
|
| If set to true, containerized OpenShift Enterprise services are run on all target master and node hosts in the cluster instead of installed using RPM packages. If set to false or unset, the default RPM method is used. RHEL Atomic Host requires the containerized method, and is automatically selected for you based on the detection of the /run/ostree-booted file. See RPM vs Containerized for more details. Containerized installations are supported starting in OSE 3.1.1. |
|
| This variable overrides the host name for the cluster, which defaults to the host name of the master. |
|
| This variable overrides the public host name for the cluster, which defaults to the host name of the master. If you use an external load balancer, specify the address of the external load balancer. For example: ---- openshift_master_cluster_public_hostname=openshift-ansible.public.example.com ---- |
|
|
Optional. This variable defines the HA method when deploying multiple masters. Supports the |
|
|
This variable enables rolling restarts of HA masters (i.e., masters are taken down one at a time) when running the upgrade playbook directly. It defaults to |
|
| This variable configures which OpenShift Enterprise SDN plug-in to use for the pod network, which defaults to redhat/openshift-ovs-subnet for the standard SDN plug-in. Set the variable to redhat/openshift-ovs-multitenant to use the multitenant plug-in. |
|
| This variable overrides the identity provider, which defaults to Deny All. |
|
| These variables are used to configure custom certificates which are deployed as part of the installation. See Configuring Custom Certificates for more information. |
|
| |
|
| These variables override defaults for session options in the OAuth configuration. See Configuring Session Options for more information. |
|
| |
|
| |
|
| |
|
| This variable configures the subnet in which services will be created within the OpenShift Enterprise SDN. This network block should be private and must not conflict with any existing network blocks in your infrastructure to which pods, nodes, or the master may require access to, or the installation will fail. Defaults to 172.30.0.0/16, and cannot be re-configured after deployment. If changing from the default, avoid 172.16.0.0/16, which the docker0 network bridge uses by default, or modify the docker0 network. |
|
| This variable overrides the default subdomain to use for exposed routes. |
|
| This variable specifies the service proxy mode to use: either iptables for the default, pure-iptables implementation, or userspace for the user space proxy. |
|
| Default node selector for automatically deploying router pods. See Configuring Node Host Labels for details. |
|
| Default node selector for automatically deploying registry pods. See Configuring Node Host Labels for details. |
|
| This variable overrides the node selector that projects will use by default when placing pods. |
|
| This variable overrides the SDN cluster network CIDR block. This is the network from which pod IPs are assigned. This network block should be a private block and must not conflict with existing network blocks in your infrastructure to which pods, nodes, or the master may require access. Defaults to 10.128.0.0/14 and cannot be arbitrarily re-configured after deployment, although certain changes to it can be made in the SDN master configuration. |
|
| This variable specifies the size of the per host subnet allocated for pod IPs by OpenShift Enterprise SDN. Defaults to 9 which means that a subnet of size /23 is allocated to each host; for example, given the default 10.128.0.0/14 cluster network, this will allocate 10.128.0.0/23, 10.128.2.0/23, 10.128.4.0/23, and so on. This cannot be re-configured after deployment. |
|
| OpenShift Enterprise adds the specified additional registry or registries to the Docker configuration. |
|
| OpenShift Enterprise adds the specified additional insecure registry or registries to the Docker configuration. |
|
| OpenShift Enterprise adds the specified blocked registry or registries to the Docker configuration. |
2.5.3.3. Configuring Global Proxy Options
If your hosts require use of a HTTP or HTTPS proxy in order to connect to external hosts, there are many components that must be configured to use the proxy, including masters, Docker, and builds. Node services only connect to the master API requiring no external access and therefore do not need to be configured to use a proxy.
In order to simplify this configuration, the following Ansible variables can be specified at a cluster or host level to apply these settings uniformly across your environment.
See Configuring Global Build Defaults and Overrides for more information on how the proxy environment is defined for builds.
| Variable | Purpose |
|---|---|
|
|
This variable specifies the |
|
|
This variable specifices the |
|
|
This variable is used to set the |
|
|
This boolean variable specifies whether or not the names of all defined OpenShift hosts and |
|
|
This variable defines the |
|
|
This variable defines the |
|
|
This variable defines the |
|
|
This variable defines the HTTP proxy used by |
|
|
This variable defines the HTTPS proxy used by |
2.5.3.4. Configuring Node Host Labels
You can assign labels to node hosts during the Ansible install by configuring the /etc/ansible/hosts file. Labels are useful for determining the placement of pods onto nodes using the scheduler. Other than region=infra (discussed below), the actual label names and values are arbitrary and can be assigned however you see fit per your cluster’s requirements.
To assign labels to a node host during an Ansible install, use the openshift_node_labels variable with the desired labels added to the desired node host entry in the [nodes] section. In the following example, labels are set for a region called primary and a zone called east:
[nodes]
node1.example.com openshift_node_labels="{'region': 'primary', 'zone': 'east'}"
The openshift_router_selector and openshift_registry_selector Ansible settings are set to region=infra by default:
# default selectors for router and registry services
# openshift_router_selector='region=infra'
# openshift_registry_selector='region=infra'The default router and registry will be automatically deployed if nodes exist that match the selector settings above. For example:
[nodes]
node1.example.com openshift_node_labels="{'region':'infra','zone':'default'}"2.5.3.5. Marking Masters as Unschedulable Nodes
Any hosts you designate as masters during the installation process should also be configured as nodes by adding them to the [nodes] section so that the masters are configured as part of the OpenShift Enterprise SDN.
However, in order to ensure that your masters are not burdened with running pods, you can make them unschedulable by adding the openshift_schedulable=false option any node that is also a master. For example:
[nodes]
master.example.com openshift_node_labels="{'region':'infra','zone':'default'}" openshift_schedulable=false2.5.3.6. Configuring Session Options
Session options in the OAuth configuration are configurable in the inventory file. By default, Ansible populates a sessionSecretsFile with generated authentication and encryption secrets so that sessions generated by one master can be decoded by the others. The default location is /etc/origin/master/session-secrets.yaml, and this file will only be re-created if deleted on all masters.
You can set the session name and maximum number of seconds with openshift_master_session_name and openshift_master_session_max_seconds:
openshift_master_session_name=ssn
openshift_master_session_max_seconds=3600
If provided, openshift_master_session_auth_secrets and openshift_master_encryption_secrets must be equal length.
For openshift_master_session_auth_secrets, used to authenticate sessions using HMAC, it is recommended to use secrets with 32 or 64 bytes:
openshift_master_session_auth_secrets=['DONT+USE+THIS+SECRET+b4NV+pmZNSO']
For openshift_master_encryption_secrets, used to encrypt sessions, secrets must be 16, 24, or 32 characters long, to select AES-128, AES-192, or AES-256:
openshift_master_session_encryption_secrets=['DONT+USE+THIS+SECRET+b4NV+pmZNSO']2.5.3.7. Configuring Custom Certificates
Custom serving certificates for the public host names of the OpenShift Enterprise API and web console can be deployed during an advanced installation and are configurable in the inventory file.
Custom certificates should only be configured for the host name associated with the publicMasterURL which can be set using openshift_master_cluster_public_hostname. Using a custom serving certificate for the host name associated with the masterURL (openshift_master_cluster_hostname) will result in TLS errors as infrastructure components will attempt to contact the master API using the internal masterURL host.
Certificate and key file paths can be configured using the openshift_master_named_certificates cluster variable:
openshift_master_named_certificates=[{"certfile": "/path/to/custom1.crt", "keyfile": "/path/to/custom1.key"}]File paths must be local to the system where Ansible will be run. Certificates are copied to master hosts and are deployed within the /etc/origin/master/named_certificates/ directory.
Ansible detects a certificate’s Common Name and Subject Alternative Names. Detected names can be overridden by providing the "names" key when setting openshift_master_named_certificates:
openshift_master_named_certificates=[{"certfile": "/path/to/custom1.crt", "keyfile": "/path/to/custom1.key", "names": ["public-master-host.com"]}]
Certificates configured using openshift_master_named_certificates are cached on masters, meaning that each additional Ansible run with a different set of certificates results in all previously deployed certificates remaining in place on master hosts and within the master configuration file.
If you would like openshift_master_named_certificates to be overwritten with the provided value (or no value), specify the openshift_master_overwrite_named_certificates cluster variable:
openshift_master_overwrite_named_certificates=trueFor a more complete example, consider the following cluster variables in an inventory file:
openshift_master_cluster_method=native
openshift_master_cluster_hostname=lb.openshift.com
openshift_master_cluster_public_hostname=custom.openshift.comTo overwrite the certificates on a subsequent Ansible run, you could set the following:
openshift_master_named_certificates=[{"certfile": "/root/STAR.openshift.com.crt", "keyfile": "/root/STAR.openshift.com.key", "names": ["custom.openshift.com"]}]
openshift_master_overwrite_named_certificates=true2.5.4. Single Master Examples
You can configure an environment with a single master and multiple nodes, and either a single embedded etcd or multiple external etcd hosts.
Moving from a single master cluster to multiple masters after installation is not supported.
Single Master and Multiple Nodes
The following table describes an example environment for a single master (with embedded etcd) and two nodes:
| Host Name | Infrastructure Component to Install |
|---|---|
| master.example.com | Master and node |
| node1.example.com | Node |
| node2.example.com |
You can see these example hosts present in the [masters] and [nodes] sections of the following example inventory file:
Example 2.2. Single Master and Multiple Nodes Inventory File
# Create an OSEv3 group that contains the masters and nodes groups
[OSEv3:children]
masters
nodes
# Set variables common for all OSEv3 hosts
[OSEv3:vars]
# SSH user, this user should allow ssh based auth without requiring a password
ansible_ssh_user=root
# If ansible_ssh_user is not root, ansible_become must be set to true
#ansible_become=true
deployment_type=openshift-enterprise
# uncomment the following to enable htpasswd authentication; defaults to DenyAllPasswordIdentityProvider
#openshift_master_identity_providers=[{'name': 'htpasswd_auth', 'login': 'true', 'challenge': 'true', 'kind': 'HTPasswdPasswordIdentityProvider', 'filename': '/etc/origin/master/htpasswd'}]
# host group for masters
[masters]
master.example.com
# host group for nodes, includes region info
[nodes]
master.example.com openshift_node_labels="{'region': 'infra', 'zone': 'default'}"
node1.example.com openshift_node_labels="{'region': 'primary', 'zone': 'east'}"
node2.example.com openshift_node_labels="{'region': 'primary', 'zone': 'west'}"To use this example, modify the file to match your environment and specifications, and save it as /etc/ansible/hosts.
Single Master, Multiple etcd, and Multiple Nodes
The following table describes an example environment for a single master, three etcd hosts, and two nodes:
| Host Name | Infrastructure Component to Install |
|---|---|
| master.example.com | Master and node |
| etcd1.example.com | etcd |
| etcd2.example.com | |
| etcd3.example.com | |
| node1.example.com | Node |
| node2.example.com |
When specifying multiple etcd hosts, external etcd is installed and configured. Clustering of OpenShift Enterprise’s embedded etcd is not supported.
You can see these example hosts present in the [masters], [nodes], and [etcd] sections of the following example inventory file:
Example 2.3. Single Master, Multiple etcd, and Multiple Nodes Inventory File
# Create an OSEv3 group that contains the masters, nodes, and etcd groups
[OSEv3:children]
masters
nodes
etcd
# Set variables common for all OSEv3 hosts
[OSEv3:vars]
ansible_ssh_user=root
deployment_type=openshift-enterprise
# uncomment the following to enable htpasswd authentication; defaults to DenyAllPasswordIdentityProvider
#openshift_master_identity_providers=[{'name': 'htpasswd_auth', 'login': 'true', 'challenge': 'true', 'kind': 'HTPasswdPasswordIdentityProvider', 'filename': '/etc/origin/master/htpasswd'}]
# host group for masters
[masters]
master.example.com
# host group for etcd
[etcd]
etcd1.example.com
etcd2.example.com
etcd3.example.com
# host group for nodes, includes region info
[nodes]
master.example.com openshift_node_labels="{'region': 'infra', 'zone': 'default'}"
node1.example.com openshift_node_labels="{'region': 'primary', 'zone': 'east'}"
node2.example.com openshift_node_labels="{'region': 'primary', 'zone': 'west'}"To use this example, modify the file to match your environment and specifications, and save it as /etc/ansible/hosts.
2.5.5. Multiple Masters Examples
You can configure an environment with multiple masters, multiple etcd hosts, and multiple nodes. Configuring multiple masters for high availability (HA) ensures that the cluster has no single point of failure.
Moving from a single master cluster to multiple masters after installation is not supported.
When configuring multiple masters, the advanced installation supports the following high availability (HA) method:
|
| Leverages the native HA master capabilities built into OpenShift Enterprise and can be combined with any load balancing solution. If a host is defined in the [lb] section of the inventory file, Ansible installs and configures HAProxy automatically as the load balancing solution. If no host is defined, it is assumed you have pre-configured a load balancing solution of your choice to balance the master API (port 8443) on all master hosts. |
For your pre-configured load balancing solution, you must have:
- A pre-created load balancer VIP configured for SSL passthrough.
A domain name for VIP registered in DNS.
-
The domain name will become the value of both
openshift_master_cluster_public_hostnameandopenshift_master_cluster_hostnamein the OpenShift Enterprise installer.
-
The domain name will become the value of both
See External Load Balancer Integrations for more information.
For more on the high availability master architecture, see Kubernetes Infrastructure.
Note the following when using the native HA method:
- The advanced installation method does not currently support multiple HAProxy load balancers in an active-passive setup. See the Load Balancer Administration documentation for post-installation amendments.
-
In a HAProxy setup, controller manager servers run as standalone processes. They elect their active leader with a lease stored in etcd. The lease expires after 30 seconds by default. If a failure happens on an active controller server, it will take up to this number of seconds to elect another leader. The interval can be configured with the
osm_controller_lease_ttlvariable.
To configure multiple masters, refer to the following section.
Multiple Masters with Multiple etcd, and Using Native HA
The following describes an example environment for three masters, one HAProxy load balancer, three etcd hosts, and two nodes using the native HA method:
| Host Name | Infrastructure Component to Install |
|---|---|
| master1.example.com | Master (clustered using native HA) and node |
| master2.example.com | |
| master3.example.com | |
| lb.example.com | HAProxy to load balance API master endpoints |
| etcd1.example.com | etcd |
| etcd2.example.com | |
| etcd3.example.com | |
| node1.example.com | Node |
| node2.example.com |
When specifying multiple etcd hosts, external etcd is installed and configured. Clustering of OpenShift Enterprise’s embedded etcd is not supported.
You can see these example hosts present in the [masters], [etcd], [lb], and [nodes] sections of the following example inventory file:
Example 2.4. Multiple Masters Using HAProxy Inventory File
# Create an OSEv3 group that contains the master, nodes, etcd, and lb groups.
# The lb group lets Ansible configure HAProxy as the load balancing solution.
# Comment lb out if your load balancer is pre-configured.
[OSEv3:children]
masters
nodes
etcd
lb
# Set variables common for all OSEv3 hosts
[OSEv3:vars]
ansible_ssh_user=root
deployment_type=openshift-enterprise
# Uncomment the following to enable htpasswd authentication; defaults to
# DenyAllPasswordIdentityProvider.
#openshift_master_identity_providers=[{'name': 'htpasswd_auth', 'login': 'true', 'challenge': 'true', 'kind': 'HTPasswdPasswordIdentityProvider', 'filename': '/etc/origin/master/htpasswd'}]
# Native high availbility cluster method with optional load balancer.
# If no lb group is defined installer assumes that a load balancer has
# been preconfigured. For installation the value of
# openshift_master_cluster_hostname must resolve to the load balancer
# or to one or all of the masters defined in the inventory if no load
# balancer is present.
openshift_master_cluster_method=native
openshift_master_cluster_hostname=openshift-cluster.example.com
openshift_master_cluster_public_hostname=openshift-cluster.example.com
# override the default controller lease ttl
#osm_controller_lease_ttl=30
# enable ntp on masters to ensure proper failover
openshift_clock_enabled=true
# host group for masters
[masters]
master1.example.com
master2.example.com
master3.example.com
# host group for etcd
[etcd]
etcd1.example.com
etcd2.example.com
etcd3.example.com
# Specify load balancer host
[lb]
lb.example.com
# host group for nodes, includes region info
[nodes]
master[1:3].example.com openshift_node_labels="{'region': 'infra', 'zone': 'default'}"
node1.example.com openshift_node_labels="{'region': 'primary', 'zone': 'east'}"
node2.example.com openshift_node_labels="{'region': 'primary', 'zone': 'west'}"To use this example, modify the file to match your environment and specifications, and save it as /etc/ansible/hosts.
Multiple Masters with Master and etcd on the Same Host, and Using Native HA
The following describes an example environment for three masters with etcd on each host, one HAProxy load balancer, and two nodes using the native HA method:
| Host Name | Infrastructure Component to Install |
|---|---|
| master1.example.com | Master (clustered using native HA) and node with etcd on each host |
| master2.example.com | |
| master3.example.com | |
| lb.example.com | HAProxy to load balance API master endpoints |
| node1.example.com | Node |
| node2.example.com |
You can see these example hosts present in the [masters], [etcd], [lb], and [nodes] sections of the following example inventory file:
# Create an OSEv3 group that contains the master, nodes, etcd, and lb groups.
# The lb group lets Ansible configure HAProxy as the load balancing solution.
# Comment lb out if your load balancer is pre-configured.
[OSEv3:children]
masters
nodes
etcd
lb
# Set variables common for all OSEv3 hosts
[OSEv3:vars]
ansible_ssh_user=root
deployment_type=openshift-enterprise
# Uncomment the following to enable htpasswd authentication; defaults to
# DenyAllPasswordIdentityProvider.
#openshift_master_identity_providers=[{'name': 'htpasswd_auth', 'login': 'true', 'challenge': 'true', 'kind': 'HTPasswdPasswordIdentityProvider', 'filename': '/etc/origin/master/htpasswd'}]
# Native high availbility cluster method with optional load balancer.
# If no lb group is defined installer assumes that a load balancer has
# been preconfigured. For installation the value of
# openshift_master_cluster_hostname must resolve to the load balancer
# or to one or all of the masters defined in the inventory if no load
# balancer is present.
openshift_master_cluster_method=native
openshift_master_cluster_hostname=openshift-cluster.example.com
openshift_master_cluster_public_hostname=openshift-cluster.example.com
# override the default controller lease ttl
#osm_controller_lease_ttl=30
# host group for masters
[masters]
master1.example.com
master2.example.com
master3.example.com
# host group for etcd
[etcd]
master1.example.com
master2.example.com
master3.example.com
# Specify load balancer host
[lb]
lb.example.com
# host group for nodes, includes region info
[nodes]
master[1:3].example.com openshift_node_labels="{'region': 'infra', 'zone': 'default'}"
node1.example.com openshift_node_labels="{'region': 'primary', 'zone': 'east'}"
node2.example.com openshift_node_labels="{'region': 'primary', 'zone': 'west'}"To use this example, modify the file to match your environment and specifications, and save it as /etc/ansible/hosts.
2.5.6. Running the Advanced Installation
After you have configured Ansible by defining an inventory file in /etc/ansible/hosts, you can run the advanced installation using the following playbook:
# ansible-playbook /usr/share/ansible/openshift-ansible/playbooks/byo/config.ymlIf for any reason the installation fails, before re-running the installer, see Known Issues to check for any specific instructions or workarounds.
The installer caches playbook configuration values for 10 minutes, by default. If you change any system, network, or inventory configuration, and then re-run the installer within that 10 minute period, the new values are not used, and the previous values are used instead. You can delete the contents of the cache, which is defined by the fact_caching_connection value in the /etc/ansible/ansible.cfg file.
Due to a known issue, after running the installation, if NFS volumes are provisioned for any component, the following directories might be created whether their components are being deployed to NFS volumes or not:
- /exports/logging-es
- /exports/logging-es-ops/
- /exports/metrics/
- /exports/prometheus
- /exports/prometheus-alertbuffer/
- /exports/prometheus-alertmanager/
You can delete these directories after installation, as needed.
2.5.7. Verifying the Installation
After the installation completes:
Verify that the master is started and nodes are registered and reporting in Ready status. On the master host, run the following as root:
# oc get nodes NAME LABELS STATUS master.example.com kubernetes.io/hostname=master.example.com,region=infra,zone=default Ready,SchedulingDisabled node1.example.com kubernetes.io/hostname=node1.example.com,region=primary,zone=east Ready node2.example.com kubernetes.io/hostname=node2.example.com,region=primary,zone=west ReadyTo verify that the web console is installed correctly, use the master host name and the console port number to access the console with a web browser.
For example, for a master host with a hostname of
master.openshift.comand using the default port of8443, the web console would be found at:https://master.openshift.com:8443/consoleNow that the install has been verified, run the following command on each master and node host to add the atomic-openshift packages back to the list of yum excludes on the host:
# atomic-openshift-excluder exclude
Multiple etcd Hosts
If you installed multiple etcd hosts:
On a etcd host, verify the etcd cluster health, substituting for the FQDNs of your etcd hosts in the following:
# etcdctl -C \ https://etcd1.example.com:2379,https://etcd2.example.com:2379,https://etcd3.example.com:2379 \ --ca-file=/etc/origin/master/master.etcd-ca.crt \ --cert-file=/etc/origin/master/master.etcd-client.crt \ --key-file=/etc/origin/master/master.etcd-client.key cluster-healthAlso verify the member list is correct:
# etcdctl -C \ https://etcd1.example.com:2379,https://etcd2.example.com:2379,https://etcd3.example.com:2379 \ --ca-file=/etc/origin/master/master.etcd-ca.crt \ --cert-file=/etc/origin/master/master.etcd-client.crt \ --key-file=/etc/origin/master/master.etcd-client.key member list
Multiple Masters Using HAProxy
If you installed multiple masters using HAProxy as a load balancer, browse to the following URL according to your [lb] section definition and check HAProxy’s status:
http://<lb_hostname>:9000You can verify your installation by consulting the HAProxy Configuration documentation.
2.5.8. Uninstalling OpenShift Enterprise
You can uninstall OpenShift Enterprise hosts in your cluster by running the uninstall.yml playbook. This playbook deletes OpenShift Enterprise content installed by Ansible, including:
- Configuration
- Containers
- Default templates and image streams
- Images
- RPM packages
The playbook will delete content for any hosts defined in the inventory file that you specify when running the playbook. If you want to uninstall OpenShift Enterprise across all hosts in your cluster, run the playbook using the inventory file you used when installing OpenShift Enterprise initially or ran most recently:
# ansible-playbook [-i /path/to/file] \
/usr/share/ansible/openshift-ansible/playbooks/adhoc/uninstall.yml2.5.8.1. Uninstalling Nodes
You can also uninstall node components from specific hosts using the uninstall.yml playbook while leaving the remaining hosts and cluster alone:
This method should only be used when attempting to uninstall specific node hosts and not for specific masters or etcd hosts, which would require further configuration changes within the cluster.
- First follow the steps in Deleting Nodes to remove the node object from the cluster, then continue with the remaining steps in this procedure.
Create a different inventory file that only references those hosts. For example, to only delete content from one node:
[OSEv3:children] nodes1 [OSEv3:vars] ansible_ssh_user=root deployment_type=openshift-enterprise [nodes] node3.example.com openshift_node_labels="{'region': 'primary', 'zone': 'west'}"2 Specify that new inventory file using the
-ioption when running the uninstall.yml playbook:# ansible-playbook -i /path/to/new/file \ /usr/share/ansible/openshift-ansible/playbooks/adhoc/uninstall.yml
When the playbook completes, all OpenShift Enterprise content should be removed from any specified hosts.
2.5.9. Known Issues
The following are known issues for specified installation configurations.
Multiple Masters
- On failover, it is possible for the controller manager to overcorrect, which causes the system to run more pods than what was intended. However, this is a transient event and the system does correct itself over time. See https://github.com/kubernetes/kubernetes/issues/10030 for details.
On failure of the Ansible installer, you must start from a clean operating system installation. If you are using virtual machines, start from a fresh image. If you are using bare metal machines, run the following on all hosts:
# yum -y remove openshift openshift-* etcd docker docker-common # rm -rf /etc/origin /var/lib/openshift /etc/etcd \ /var/lib/etcd /etc/sysconfig/atomic-openshift* /etc/sysconfig/docker* \ /root/.kube/config /etc/ansible/facts.d /usr/share/openshift
2.5.10. What’s Next?
Now that you have a working OpenShift Enterprise instance, you can:
- Configure authentication; by default, authentication is set to Deny All.
- Deploy an integrated Docker registry.
- Deploy a router.
2.6. Disconnected Installation
2.6.1. Overview
Frequently, portions of a datacenter may not have access to the Internet, even via proxy servers. Installing OpenShift Enterprise in these environments is considered a disconnected installation.
An OpenShift Enterprise disconnected installation differs from a regular installation in two primary ways:
- The OpenShift Enterprise software channels and repositories are not available via Red Hat’s content distribution network.
- OpenShift Enterprise uses several containerized components. Normally, these images are pulled directly from Red Hat’s Docker registry. In a disconnected environment, this is not possible.
A disconnected installation ensures the OpenShift Enterprise software is made available to the relevant servers, then follows the same installation process as a standard connected installation. This topic additionally details how to manually download the container images and transport them onto the relevant servers.
Once installed, in order to use OpenShift Enterprise, you will need source code in a source control repository (for example, Git). This topic assumes that an internal Git repository is available that can host source code and this repository is accessible from the OpenShift Enterprise nodes. Installing the source control repository is outside the scope of this document.
Also, when building applications in OpenShift Enterprise, your build may have some external dependencies, such as a Maven Repository or Gem files for Ruby applications. For this reason, and because they might require certain tags, many of the Quickstart templates offered by OpenShift Enterprise may not work on a disconnected environment. However, while Red Hat container images try to reach out to external repositories by default, you can configure OpenShift Enterprise to use your own internal repositories. For the purposes of this document, we assume that such internal repositories already exist and are accessible from the OpenShift Enterprise nodes hosts. Installing such repositories is outside the scope of this document.
You can also have a Red Hat Satellite server that provides access to Red Hat content via an intranet or LAN. For environments with Satellite, you can synchronize the OpenShift Enterprise software onto the Satellite for use with the OpenShift Enterprise servers.
Red Hat Satellite 6.1 also introduces the ability to act as a Docker registry, and it can be used to host the OpenShift Enterprise containerized components. Doing so is outside of the scope of this document.
2.6.2. Prerequisites
This document assumes that you understand OpenShift Enterprise’s overall architecture and that you have already planned out what the topology of your environment will look like.
2.6.3. Required Software and Components
In order to pull down the required software repositories and container images, you will need a Red Hat Enterprise Linux (RHEL) 7 server with access to the Internet and at least 100GB of additional free space. All steps in this section should be performed on the Internet-connected server as the root system user.
2.6.3.1. Syncing Repositories
Before you sync with the required repositories, you may need to import the appropriate GPG key:
# rpm --import /etc/pki/rpm-gpg/RPM-GPG-KEY-redhat-releaseIf the key is not imported, the indicated package is deleted after syncing the repository.
To sync the required repositories:
Register the server with the Red Hat Customer Portal. You must use the login and password associated with the account that has access to the OpenShift Enterprise subscriptions:
# subscription-manager registerAttach to a subscription that provides OpenShift Enterprise channels. You can find the list of available subscriptions using:
# subscription-manager list --availableThen, find the pool ID for the subscription that provides OpenShift Enterprise, and attach it:
# subscription-manager attach --pool=<pool_id> # subscription-manager repos --disable="*" # subscription-manager repos \ --enable="rhel-7-server-rpms" \ --enable="rhel-7-server-extras-rpms" \ --enable="rhel-7-server-ose-3.2-rpms"The
yum-utilscommand provides the reposync utility, which lets you mirror yum repositories, andcreaterepocan create a usableyumrepository from a directory:# yum -y install yum-utils createrepo docker gitYou will need up to 110GB of free space in order to sync the software. Depending on how restrictive your organization’s policies are, you could re-connect this server to the disconnected LAN and use it as the repository server. You could use USB-connected storage and transport the software to another server that will act as the repository server. This topic covers these options.
Make a path to where you want to sync the software (either locally or on your USB or other device):
# mkdir -p </path/to/repos>Sync the packages and create the repository for each of them. You will need to modify the command for the appropriate path you created above:
# for repo in \ rhel-7-server-rpms rhel-7-server-extras-rpms \ rhel-7-server-ose-3.2-rpms do reposync --gpgcheck -lm --repoid=${repo} --download_path=/path/to/repos createrepo -v </path/to/repos/>${repo} -o </path/to/repos/>${repo} done
2.6.3.2. Syncing Images
To sync the container images:
Start the Docker daemon:
# systemctl start dockerPull all of the required OpenShift Enterprise containerized components:
# docker pull registry.access.redhat.com/openshift3/ose-haproxy-router:v3.2.1.31 # docker pull registry.access.redhat.com/openshift3/ose-deployer:v3.2.1.31 # docker pull registry.access.redhat.com/openshift3/ose-sti-builder:v3.2.1.31 # docker pull registry.access.redhat.com/openshift3/ose-docker-builder:v3.2.1.31 # docker pull registry.access.redhat.com/openshift3/ose-pod:v3.2.1.31 # docker pull registry.access.redhat.com/openshift3/ose-docker-registry:v3.2.1.31Pull all of the required OpenShift Enterprise containerized components for the additional centralized log aggregation and metrics aggregation components:
# docker pull registry.access.redhat.com/openshift3/logging-deployment:3.2.1 # docker pull registry.access.redhat.com/openshift3/logging-elasticsearch:3.2.1 # docker pull registry.access.redhat.com/openshift3/logging-kibana:3.2.1 # docker pull registry.access.redhat.com/openshift3/logging-fluentd:3.2.1 # docker pull registry.access.redhat.com/openshift3/logging-auth-proxy:3.2.1 # docker pull registry.access.redhat.com/openshift3/metrics-deployer:3.2.1 # docker pull registry.access.redhat.com/openshift3/metrics-hawkular-metrics:3.2.1 # docker pull registry.access.redhat.com/openshift3/metrics-cassandra:3.2.1 # docker pull registry.access.redhat.com/openshift3/metrics-heapster:3.2.1Pull the Red Hat-certified Source-to-Image (S2I) builder images that you intend to use in your OpenShift environment. You can pull the following images:
- jboss-eap70-openshift
- jboss-amq-62
- jboss-datagrid65-openshift
- jboss-decisionserver62-openshift
- jboss-eap64-openshift
- jboss-eap70-openshift
- jboss-webserver30-tomcat7-openshift
- jboss-webserver30-tomcat8-openshift
- mongodb
- mysql
- nodejs
- perl
- php
- postgresql
- python
- redhat-sso70-openshift
ruby
Make sure to indicate the correct tag specifying the desired version number. For example, to pull both the previous and latest version of the Tomcat image:
# docker pull \ registry.access.redhat.com/jboss-webserver-3/webserver30-tomcat7-openshift:latest # docker pull \ registry.access.redhat.com/jboss-webserver-3/webserver30-tomcat7-openshift:1.1
2.6.3.3. Preparing Images for Export
Container images can be exported from a system by first saving them to a tarball and then transporting them:
Make and change into a repository home directory:
# mkdir </path/to/repos/images> # cd </path/to/repos/images>Export the OpenShift Enterprise containerized components:
# docker save -o ose3-images.tar \ registry.access.redhat.com/openshift3/ose-haproxy-router \ registry.access.redhat.com/openshift3/ose-deployer \ registry.access.redhat.com/openshift3/ose-sti-builder \ registry.access.redhat.com/openshift3/ose-docker-builder \ registry.access.redhat.com/openshift3/ose-pod \ registry.access.redhat.com/openshift3/ose-docker-registryIf you synchronized the metrics and log aggregation images, export:
# docker save -o ose3-logging-metrics-images.tar \ registry.access.redhat.com/openshift3/logging-deployment \ registry.access.redhat.com/openshift3/logging-elasticsearch \ registry.access.redhat.com/openshift3/logging-kibana \ registry.access.redhat.com/openshift3/logging-fluentd \ registry.access.redhat.com/openshift3/logging-auth-proxy \ registry.access.redhat.com/openshift3/metrics-deployer \ registry.access.redhat.com/openshift3/metrics-hawkular-metrics \ registry.access.redhat.com/openshift3/metrics-cassandra \ registry.access.redhat.com/openshift3/metrics-heapsterExport the S2I builder images that you synced in the previous section. For example, if you synced only the Tomcat image:
# docker save -o ose3-builder-images.tar \ registry.access.redhat.com/jboss-webserver-3/webserver30-tomcat7-openshift:latest \ registry.access.redhat.com/jboss-webserver-3/webserver30-tomcat7-openshift:1.1
2.6.4. Repository Server
During the installation (and for later updates, should you so choose), you will need a webserver to host the repositories. RHEL 7 can provide the Apache webserver.
Option 1: Re-configuring as a Web server
If you can re-connect the server where you synchronized the software and images to your LAN, then you can simply install Apache on the server:
# yum install httpdSkip to Placing the Software.
Option 2: Building a Repository Server
If you need to build a separate server to act as the repository server, install a new RHEL 7 system with at least 110GB of space. On this repository server during the installation, make sure you select the Basic Web Server option.
2.6.4.1. Placing the Software
If necessary, attach the external storage, and then copy the repository files into Apache’s root folder. Note that the below copy step (
cp -a) should be substituted with move (mv) if you are repurposing the server you used to sync:# cp -a /path/to/repos /var/www/html/ # chmod -R +r /var/www/html/repos # restorecon -vR /var/www/htmlAdd the firewall rules:
# firewall-cmd --permanent --add-service=http # firewall-cmd --reloadEnable and start Apache for the changes to take effect:
# systemctl enable httpd # systemctl start httpd
2.6.5. OpenShift Enterprise Systems
2.6.5.1. Building Your Hosts
At this point you can perform the initial creation of the hosts that will be part of the OpenShift Enterprise environment. It is recommended to use the latest version of RHEL 7 and to perform a minimal installation. You will also want to pay attention to the other OpenShift Enterprise-specific prerequisites.
Once the hosts are initially built, the repositories can be set up.
2.6.5.2. Connecting the Repositories
On all of the relevant systems that will need OpenShift Enterprise software components, create the required repository definitions. Place the following text in the /etc/yum.repos.d/ose.repo file, replacing <server_IP> with the IP or host name of the Apache server hosting the software repositories:
[rhel-7-server-rpms]
name=rhel-7-server-rpms
baseurl=http://<server_IP>/repos/rhel-7-server-rpms
enabled=1
gpgcheck=0
[rhel-7-server-extras-rpms]
name=rhel-7-server-extras-rpms
baseurl=http://<server_IP>/repos/rhel-7-server-extras-rpms
enabled=1
gpgcheck=0
[rhel-7-server-ose-3.2-rpms]
name=rhel-7-server-ose-3.2-rpms
baseurl=http://<server_IP>/repos/rhel-7-server-ose-3.2-rpms
enabled=1
gpgcheck=02.6.5.3. Host Preparation
At this point, the systems are ready to continue to be prepared following the OpenShift Enterprise documentation.
Skip the section titled Registering the Hosts and start with Managing Packages.
2.6.6. Installing OpenShift Enterprise
2.6.6.1. Importing OpenShift Enterprise Containerized Components
To import the relevant components, securely copy the images from the connected host to the individual OpenShift Enterprise hosts:
# scp /var/www/html/repos/images/ose3-images.tar root@<openshift_host_name>:
# ssh root@<openshift_host_name> "docker load -i ose3-images.tar"
If you prefer, you could use wget on each OpenShift Enterprise host to fetch the tar file, and then perform the Docker import command locally. Perform the same steps for the metrics and logging images, if you synchronized them.
On the host that will act as an OpenShift Enterprise master, copy and import the builder images:
# scp /var/www/html/images/ose3-builder-images.tar root@<openshift_master_host_name>:
# ssh root@<openshift_master_host_name> "docker load -i ose3-builder-images.tar"2.6.6.2. Running the OpenShift Enterprise Installer
You can now choose to follow the quick or advanced OpenShift Enterprise installation instructions in the documentation.
2.6.6.3. Creating the Internal Docker Registry
You now need to create the internal Docker registry.
2.6.7. Post-Installation Changes
In one of the previous steps, the S2I images were imported into the Docker daemon running on one of the OpenShift Enterprise master hosts. In a connected installation, these images would be pulled from Red Hat’s registry on demand. Since the Internet is not available to do this, the images must be made available in another Docker registry.
OpenShift Enterprise provides an internal registry for storing the images that are built as a result of the S2I process, but it can also be used to hold the S2I builder images. The following steps assume you did not customize the service IP subnet (172.30.0.0/16) or the Docker registry port (5000).
2.6.7.1. Re-tagging S2I Builder Images
On the master host where you imported the S2I builder images, obtain the service address of your Docker registry that you installed on the master:
# export REGISTRY=$(oc get service docker-registry -t '{{.spec.clusterIP}}{{"\n"}}')Next, tag all of the builder images that you synced and exported before pushing them into the OpenShift Enterprise Docker registry. For example, if you synced and exported only the Tomcat image:
# docker tag \ registry.access.redhat.com/jboss-webserver-3/webserver30-tomcat7-openshift:1.1 \ $REGISTRY:5000/openshift/webserver30-tomcat7-openshift:1.1 # docker tag \ registry.access.redhat.com/jboss-webserver-3/webserver30-tomcat7-openshift:latest \ $REGISTRY:5000/openshift/webserver30-tomcat7-openshift:1.2 # docker tag \ registry.access.redhat.com/jboss-webserver-3/webserver30-tomcat7-openshift:latest \ $REGISTRY:5000/openshift/webserver30-tomcat7-openshift:latest
2.6.7.2. Creating an Administrative User
Pushing the container images into OpenShift Enterprise’s Docker registry requires a user with cluster-admin privileges. Because the default OpenShift Enterprise system administrator does not have a standard authorization token, they cannot be used to log in to the Docker registry.
To create an administrative user:
Create a new user account in the authentication system you are using with OpenShift Enterprise. For example, if you are using local
htpasswd-based authentication:# htpasswd -b /etc/openshift/openshift-passwd <admin_username> <password>The external authentication system now has a user account, but a user must log in to OpenShift Enterprise before an account is created in the internal database. Log in to OpenShift Enterprise for this account to be created. This assumes you are using the self-signed certificates generated by OpenShift Enterprise during the installation:
# oc login --certificate-authority=/etc/origin/master/ca.crt \ -u <admin_username> https://<openshift_master_host>:8443Get the user’s authentication token:
# MYTOKEN=$(oc whoami -t) # echo $MYTOKEN iwo7hc4XilD2KOLL4V1O55ExH2VlPmLD-W2-JOd6Fko
2.6.7.3. Modifying the Security Policies
Using
oc loginswitches to the new user. Switch back to the OpenShift Enterprise system administrator in order to make policy changes:# oc login -u system:adminIn order to push images into the OpenShift Enterprise Docker registry, an account must have the
image-buildersecurity role. Add this to your OpenShift Enterprise administrative user:# oadm policy add-role-to-user system:image-builder <admin_username>Next, add the administrative role to the user in the openshift project. This allows the administrative user to edit the openshift project, and, in this case, push the container images:
# oadm policy add-role-to-user admin <admin_username> -n openshift
2.6.7.4. Editing the Image Stream Definitions
The openshift project is where all of the image streams for builder images are created by the installer. They are loaded by the installer from the /usr/share/openshift/examples directory. Change all of the definitions by deleting the image streams which had been loaded into OpenShift Enterprise’s database, then re-create them:
Delete the existing image streams:
# oc delete is -n openshift --allMake a backup of the files in /usr/share/openshift/examples/ if you desire. Next, edit the file image-streams-rhel7.json in the /usr/share/openshift/examples/image-streams folder. You will find an image stream section for each of the builder images. Edit the
specstanza to point to your internal Docker registry.For example, change:
"spec": { "dockerImageRepository": "registry.access.redhat.com/rhscl/mongodb-26-rhel7",to:
"spec": { "dockerImageRepository": "172.30.69.44:5000/openshift/mongodb-26-rhel7",In the above, the repository name was changed from rhscl to openshift. You will need to ensure the change, regardless of whether the repository is rhscl, openshift3, or another directory. Every definition should have the following format:
<registry_ip>:5000/openshift/<image_name>Repeat this change for every image stream in the file. Ensure you use the correct IP address that you determined earlier. When you are finished, save and exit. Repeat the same process for the JBoss image streams in the /usr/share/openshift/examples/xpaas-streams/jboss-image-streams.json file.
Load the updated image stream definitions:
# oc create -f /usr/share/openshift/examples/image-streams/image-streams-rhel7.json -n openshift # oc create -f /usr/share/openshift/examples/xpaas-streams/jboss-image-streams.json -n openshift
2.6.7.5. Loading the Container Images
At this point the system is ready to load the container images.
Log in to the Docker registry using the token and registry service IP obtained earlier:
# docker login -u adminuser -e mailto:adminuser@abc.com \ -p $MYTOKEN $REGISTRY:5000Push the Docker images:
# docker push $REGISTRY:5000/openshift/webserver30-tomcat7-openshift:1.1 # docker push $REGISTRY:5000/openshift/webserver30-tomcat7-openshift:1.2 # docker push $REGISTRY:5000/openshift/webserver30-tomcat7-openshift:latestVerify that all the image streams now have the tags populated:
# oc get imagestreams -n openshift NAME DOCKER REPO TAGS UPDATED jboss-webserver30-tomcat7-openshift $REGISTRY/jboss-webserver-3/webserver30-jboss-tomcat7-openshift 1.1,1.1-2,1.1-6 + 2 more... 2 weeks ago ...
2.6.8. Installing a Router
At this point, the OpenShift Enterprise environment is almost ready for use. It is likely that you will want to install and configure a router.
2.7. Configure or Deploy a Docker Registry
2.7.1. Overview
OpenShift can build Docker images from your source code, deploy them, and manage their lifecycle. To enable this, OpenShift provides an internal, integrated Docker registry that can be deployed in your OpenShift environment to locally manage images.
2.7.2. Deploying the Registry
Starting in OpenShift Enterprise 3.2, quick installations automatically handle the initial deployment of the Docker registry and the OpenShift Enterprise router. However, you may need to manually create the registry if:
You did an advanced install and did not include the
openshift_registry_selectorvariable.Or,
For some reason it was not automatically deployed during a quick installation.
Or,
- You deleted the registry and need to deploy it again.
To deploy the integrated Docker registry, use the oadm registry command as a user with cluster administrator privileges. For example:
$ oadm registry --config=/etc/origin/master/admin.kubeconfig \
--service-account=registry \
--images='registry.access.redhat.com/openshift3/ose-${component}:${version}' \
--selector='region=infra'
During advanced installation, the openshift_registry_selector and openshift_hosted_router_selector Ansible settings are set to region=infra by default. The default router and registry will only be automatically deployed if a node exists that matches the region=infra label. <1> --config is the path to the CLI configuration file for the cluster administrator. <2> --service-account is the service account used to run the registry’s pod. <3> Required to pull the correct image for OpenShift Enterprise. <4> Optionally, you can specify the node location where you want to install the registry by specifying the corresponding node label.
This creates a service and a deployment configuration, both called docker-registry. Once deployed successfully, a pod is created with a name similar to docker-registry-1-cpty9.
Use --selector to deploy the registry to any node(s) that match a specified node label:
$ oadm registry <registry_name> --replicas=<number> --selector=<label> \
--service-account=registry
For example, if you want to create a registry named registry and have it placed on a node labeled with region=infra:
$ oadm registry registry --replicas=1 --selector='region=infra' \
--service-account=registryTo see a full list of options that you can specify when creating the registry:
$ oadm registry --help2.7.2.1. Registry Compute Resources
By default, the registry is created with no settings for compute resource requests or limits. For production, it is highly recommended that the deployment configuration for the registry be updated to set resource requests and limits for the registry pod. Otherwise, the registry pod will be considered a BestEffort pod.
See Compute Resources for more information on configuring requests and limits.
2.7.2.2. Storage for the Registry
The registry stores Docker images and metadata. If you simply deploy a pod with the registry, it uses an ephemeral volume that is destroyed if the pod exits. Any images anyone has built or pushed into the registry would disappear.
2.7.2.2.1. Production Use
For production use, attach a remote volume or define and use the persistent storage method of your choice.
For example, to use an existing persistent volume claim:
$ oc volume deploymentconfigs/docker-registry --add --name=registry-storage -t pvc \
--claim-name=<pvc_name> --overwriteOr, to attach an existing NFS volume to the registry:
$ oc volume deploymentconfigs/docker-registry \
--add --overwrite --name=registry-storage --mount-path=/registry \
--source='{"nfs": { "server": "<fqdn>", "path": "/path/to/export"}}'See Known Issues if using a scaled registry with a shared NFS volume.
2.7.2.2.1.1. Use Amazon S3 as a Storage Back-end
There is also an option to use Amazon Simple Storage Service storage with the internal Docker registry. It is a secure cloud storage manageable through AWS Management Console. To use it, the registry’s configuration file must be manually edited and mounted to the registry pod. However, before you start with the configuration, look at upstream’s recommended steps.
Take a default YAML configuration file as a base and replace the filesystem entry in the storage section with s3 entry such as below. The resulting storage section may look like this:
storage:
cache:
layerinfo: inmemory
delete:
enabled: true
s3:
accesskey: awsaccesskey
secretkey: awssecretkey
region: us-west-1
regionendpoint: http://myobjects.local
bucket: bucketname
encrypt: true
keyid: mykeyid
secure: true
v4auth: false
chunksize: 5242880
rootdirectory: /s3/object/name/prefixAll of the s3 configuration options are documented in upstream’s driver reference documentation.
Overriding the registry configuration will take you through the additional steps on mounting the configuration file into pod.
When the registry runs on the S3 storage back-end, there are reported issues.
2.7.2.2.2. Non-Production Use
For non-production use, you can use the --mount-host=<path> option to specify a directory for the registry to use for persistent storage. The registry volume is then created as a host-mount at the specified <path>.
The --mount-host option mounts a directory from the node on which the registry container lives. If you scale up the docker-registry deployment configuration, it is possible that your registry pods and containers will run on different nodes, which can result in two or more registry containers, each with its own local storage. This will lead to unpredictable behavior, as subsequent requests to pull the same image repeatedly may not always succeed, depending on which container the request ultimately goes to.
The --mount-host option requires that the registry container run in privileged mode. This is automatically enabled when you specify --mount-host. However, not all pods are allowed to run privileged containers by default. If you still want to use this option, create the registry and specify that it use the registry service account that was created during installation:
$ oadm registry --service-account=registry \
--config=/etc/origin/master/admin.kubeconfig \
--images='registry.access.redhat.com/openshift3/ose-${component}:${version}' \
--mount-host=<path>The Docker registry pod runs as user 1001. This user must be able to write to the host directory. You may need to change directory ownership to user ID 1001 with this command:
$ sudo chown 1001:root <path>2.7.2.3. Maintaining the Registry IP Address
OpenShift Enterprise refers to the integrated registry by its service IP address, so if you decide to delete and recreate the docker-registry service, you can ensure a completely transparent transition by arranging to re-use the old IP address in the new service. If a new IP address cannot be avoided, you can minimize cluster disruption by rebooting only the masters.
- Re-using the Address
- To re-use the IP address, you must save the IP address of the old docker-registry service prior to deleting it, and arrange to replace the newly assigned IP address with the saved one in the new docker-registry service.
Make a note of the
ClusterIPfor the service:$ oc get svc/docker-registry -o yaml | grep clusterIP:Delete the service:
$ oc delete svc/docker-registry dc/docker-registryCreate the registry definition in registry.yaml, replacing
<options>with, for example, those used in step 3 of the instructions in the Non-Production Use section:$ oadm registry <options> -o yaml > registry.yaml-
Edit registry.yaml, find the
Servicethere, and change itsClusterIPto the address noted in step 1. Create the registry using the modified registry.yaml:
$ oc create -f registry.yaml
- Rebooting the Masters
If you are unable to re-use the IP address, any operation that uses a pull specification that includes the old IP address will fail. To minimize cluster disruption, you must reboot the masters:
# systemctl restart atomic-openshift-masterThis ensures that the old registry URL, which includes the old IP address, is cleared from the cache.
NoteWe recommend against rebooting the entire cluster because that incurs unnecessary downtime for pods and does not actually clear the cache.
2.7.3. Viewing Logs
To view the logs for the Docker registry, use the oc logs command with the deployment config:
$ oc logs dc/docker-registry
2015-05-01T19:48:36.300593110Z time="2015-05-01T19:48:36Z" level=info msg="version=v2.0.0+unknown"
2015-05-01T19:48:36.303294724Z time="2015-05-01T19:48:36Z" level=info msg="redis not configured" instance.id=9ed6c43d-23ee-453f-9a4b-031fea646002
2015-05-01T19:48:36.303422845Z time="2015-05-01T19:48:36Z" level=info msg="using inmemory layerinfo cache" instance.id=9ed6c43d-23ee-453f-9a4b-031fea646002
2015-05-01T19:48:36.303433991Z time="2015-05-01T19:48:36Z" level=info msg="Using OpenShift Auth handler"
2015-05-01T19:48:36.303439084Z time="2015-05-01T19:48:36Z" level=info msg="listening on :5000" instance.id=9ed6c43d-23ee-453f-9a4b-031fea6460022.7.4. File Storage
Tag and image metadata is stored in OpenShift Enterprise, but the registry stores layer and signature data in a volume that is mounted into the registry container at /registry. As oc exec does not work on privileged containers, to view a registry’s contents you must manually SSH into the node housing the registry pod’s container, then run docker exec on the container itself:
List the current pods to find the pod name of your Docker registry:
# oc get podsThen, use
oc describeto find the host name for the node running the container:# oc describe pod <pod_name>Log into the desired node:
# ssh node.example.comList the running containers on the node host and identify the container ID for the Docker registry:
# docker ps | grep ose-docker-registryList the registry contents using the
docker execcommand:# docker exec -it 4c01db0b339c find /registry /registry/docker /registry/docker/registry /registry/docker/registry/v2 /registry/docker/registry/v2/blobs1 /registry/docker/registry/v2/blobs/sha256 /registry/docker/registry/v2/blobs/sha256/ed /registry/docker/registry/v2/blobs/sha256/ed/ede17b139a271d6b1331ca3d83c648c24f92cece5f89d95ac6c34ce751111810 /registry/docker/registry/v2/blobs/sha256/ed/ede17b139a271d6b1331ca3d83c648c24f92cece5f89d95ac6c34ce751111810/data2 /registry/docker/registry/v2/blobs/sha256/a3 /registry/docker/registry/v2/blobs/sha256/a3/a3ed95caeb02ffe68cdd9fd84406680ae93d633cb16422d00e8a7c22955b46d4 /registry/docker/registry/v2/blobs/sha256/a3/a3ed95caeb02ffe68cdd9fd84406680ae93d633cb16422d00e8a7c22955b46d4/data /registry/docker/registry/v2/blobs/sha256/f7 /registry/docker/registry/v2/blobs/sha256/f7/f72a00a23f01987b42cb26f259582bb33502bdb0fcf5011e03c60577c4284845 /registry/docker/registry/v2/blobs/sha256/f7/f72a00a23f01987b42cb26f259582bb33502bdb0fcf5011e03c60577c4284845/data /registry/docker/registry/v2/repositories3 /registry/docker/registry/v2/repositories/p1 /registry/docker/registry/v2/repositories/p1/pause4 /registry/docker/registry/v2/repositories/p1/pause/_manifests /registry/docker/registry/v2/repositories/p1/pause/_manifests/revisions /registry/docker/registry/v2/repositories/p1/pause/_manifests/revisions/sha256 /registry/docker/registry/v2/repositories/p1/pause/_manifests/revisions/sha256/e9a2ac6418981897b399d3709f1b4a6d2723cd38a4909215ce2752a5c068b1cf /registry/docker/registry/v2/repositories/p1/pause/_manifests/revisions/sha256/e9a2ac6418981897b399d3709f1b4a6d2723cd38a4909215ce2752a5c068b1cf/signatures5 /registry/docker/registry/v2/repositories/p1/pause/_manifests/revisions/sha256/e9a2ac6418981897b399d3709f1b4a6d2723cd38a4909215ce2752a5c068b1cf/signatures/sha256 /registry/docker/registry/v2/repositories/p1/pause/_manifests/revisions/sha256/e9a2ac6418981897b399d3709f1b4a6d2723cd38a4909215ce2752a5c068b1cf/signatures/sha256/ede17b139a271d6b1331ca3d83c648c24f92cece5f89d95ac6c34ce751111810 /registry/docker/registry/v2/repositories/p1/pause/_manifests/revisions/sha256/e9a2ac6418981897b399d3709f1b4a6d2723cd38a4909215ce2752a5c068b1cf/signatures/sha256/ede17b139a271d6b1331ca3d83c648c24f92cece5f89d95ac6c34ce751111810/link6 /registry/docker/registry/v2/repositories/p1/pause/_uploads7 /registry/docker/registry/v2/repositories/p1/pause/_layers8 /registry/docker/registry/v2/repositories/p1/pause/_layers/sha256 /registry/docker/registry/v2/repositories/p1/pause/_layers/sha256/a3ed95caeb02ffe68cdd9fd84406680ae93d633cb16422d00e8a7c22955b46d4 /registry/docker/registry/v2/repositories/p1/pause/_layers/sha256/a3ed95caeb02ffe68cdd9fd84406680ae93d633cb16422d00e8a7c22955b46d4/link9 /registry/docker/registry/v2/repositories/p1/pause/_layers/sha256/f72a00a23f01987b42cb26f259582bb33502bdb0fcf5011e03c60577c4284845 /registry/docker/registry/v2/repositories/p1/pause/_layers/sha256/f72a00a23f01987b42cb26f259582bb33502bdb0fcf5011e03c60577c4284845/link- 1 1
- This directory stores all layers and signatures as blobs.
- 2 2
- This file contains the blob’s contents.
- 3 3
- This directory stores all the image repositories.
- 4 4
- This directory is for a single image repository p1/pause.
- 5
- This directory contains signatures for a particular image manifest revision.
- 6
- This file contains a reference back to a blob (which contains the signature data).
- 7
- This directory contains any layers that are currently being uploaded and staged for the given repository.
- 8
- This directory contains links to all the layers this repository references.
- 9
- This file contains a reference to a specific layer that has been linked into this repository via an image.
2.7.5. Accessing the Registry Directly
For advanced usage, you can access the registry directly to invoke docker commands. This allows you to push images to or pull them from the integrated registry directly using operations like docker push or docker pull. To do so, you must be logged in to the registry using the docker login command. The operations you can perform depend on your user permissions, as described in the following sections.
2.7.5.1. User Prerequisites
To access the registry directly, the user that you use must satisfy the following, depending on your intended usage:
For any direct access, you must have a regular user, if one does not already exist, for your preferred identity provider. A regular user can generate an access token required for logging in to the registry. System users, such as system:admin, cannot obtain access tokens and, therefore, cannot access the registry directly.
For example, if you are using
HTPASSWDauthentication, you can create one using the following command:# htpasswd /etc/origin/openshift-htpasswd <user_name>The user must have the system:registry role. To add this role:
# oadm policy add-role-to-user system:registry <user_name>Have the admin role for the project associated with the Docker operation. For example, if accessing images in the global openshift project:
$ oadm policy add-role-to-user admin <user_name> -n openshiftFor writing or pushing images, for example when using the
docker pushcommand, the user must have the system:image-builder role. To add this role:$ oadm policy add-role-to-user system:image-builder <user_name>
For more information on user permissions, see Managing Role Bindings.
2.7.5.2. Logging in to the Registry
Ensure your user satisfies the prerequisites for accessing the registry directly.
To log in to the registry directly:
Ensure you are logged in to OpenShift Enterprise as a regular user:
$ oc loginGet your access token:
$ oc whoami -tLog in to the Docker registry:
$ docker login -u <username> -e <any_email_address> \ -p <token_value> <registry_ip>:<port>
2.7.5.3. Pushing and Pulling Images
After logging in to the registry, you can perform docker pull and docker push operations against your registry.
You can pull arbitrary images, but if you have the system:registry role added, you can only push images to the registry in your project.
In the following examples, we use:
| Component | Value |
| <registry_ip> |
|
| <port> |
|
| <project> |
|
| <image> |
|
| <tag> |
omitted (defaults to |
Pull an arbitrary image:
$ docker pull docker.io/busyboxTag the new image with the form
<registry_ip>:<port>/<project>/<image>. The project name must appear in this pull specification for OpenShift Enterprise to correctly place and later access the image in the registry.$ docker tag docker.io/busybox 172.30.124.220:5000/openshift/busyboxNoteYour regular user must have the system:image-builder role for the specified project, which allows the user to write or push an image. Otherwise, the
docker pushin the next step will fail. To test, you can create a new project to push the busybox image.Push the newly-tagged image to your registry:
$ docker push 172.30.124.220:5000/openshift/busybox ... cf2616975b4a: Image successfully pushed Digest: sha256:3662dd821983bc4326bee12caec61367e7fb6f6a3ee547cbaff98f77403cab55
2.7.6. Securing the Registry
Optionally, you can secure the registry so that it serves traffic via TLS:
- Deploy the registry.
Fetch the service IP and port of the registry:
$ oc get svc/docker-registry NAME LABELS SELECTOR IP(S) PORT(S) docker-registry docker-registry=default docker-registry=default 172.30.124.220 5000/TCPYou can use an existing server certificate, or create a key and server certificate valid for specified IPs and host names, signed by a specified CA. To create a server certificate for the registry service IP and the docker-registry.default.svc.cluster.local host name:
$ oadm ca create-server-cert \ --signer-cert=/etc/origin/master/ca.crt \ --signer-key=/etc/origin/master/ca.key \ --signer-serial=/etc/origin/master/ca.serial.txt \ --hostnames='docker-registry.default.svc.cluster.local,172.30.124.220' \ --cert=/etc/secrets/registry.crt \ --key=/etc/secrets/registry.keyCreate the secret for the registry certificates:
$ oc secrets new registry-secret \ /etc/secrets/registry.crt \ /etc/secrets/registry.keyAdd the secret to the registry pod’s service accounts (including the default service account):
$ oc secrets add serviceaccounts/registry secrets/registry-secret $ oc secrets add serviceaccounts/default secrets/registry-secretAdd the secret volume to the registry deployment configuration:
$ oc volume dc/docker-registry --add --type=secret \ --secret-name=registry-secret -m /etc/secretsEnable TLS by adding the following environment variables to the registry deployment configuration:
$ oc env dc/docker-registry \ REGISTRY_HTTP_TLS_CERTIFICATE=/etc/secrets/registry.crt \ REGISTRY_HTTP_TLS_KEY=/etc/secrets/registry.keySee more details on overriding registry options.
Update the scheme used for the registry’s liveness probe from HTTP to HTTPS:
$ oc patch dc/docker-registry -p '{"spec": {"template": {"spec": {"containers":[{ "name":"registry", "livenessProbe": {"httpGet": {"scheme":"HTTPS"}} }]}}}}'If your registry was initially deployed on OpenShift Enterprise 3.2 or later, update the scheme used for the registry’s readiness probe from HTTP to HTTPS:
$ oc patch dc/docker-registry -p '{"spec": {"template": {"spec": {"containers":[{ "name":"registry", "readinessProbe": {"httpGet": {"scheme":"HTTPS"}} }]}}}}'Validate the registry is running in TLS mode. Wait until the latest docker-registry deployment completes and verify the Docker logs for the registry container. You should find an entry for
listening on :5000, tls.$ oc logs dc/docker-registry | grep tls time="2015-05-27T05:05:53Z" level=info msg="listening on :5000, tls" instance.id=deeba528-c478-41f5-b751-dc48e4935fc2Copy the CA certificate to the Docker certificates directory. This must be done on all nodes in the cluster:
$ dcertsdir=/etc/docker/certs.d $ destdir_addr=$dcertsdir/172.30.124.220:5000 $ destdir_name=$dcertsdir/docker-registry.default.svc.cluster.local:5000 $ sudo mkdir -p $destdir_addr $destdir_name $ sudo cp ca.crt $destdir_addr1 $ sudo cp ca.crt $destdir_name- 1
- The ca.crt file is a copy of /etc/origin/master/ca.crt on the master.
Remove the
--insecure-registryoption only for this particular registry in the /etc/sysconfig/docker file. Then, reload the daemon and restart the docker service to reflect this configuration change:$ sudo systemctl daemon-reload $ sudo systemctl restart dockerValidate the
dockerclient connection. Runningdocker pushto the registry ordocker pullfrom the registry should succeed. Make sure you have logged into the registry.$ docker tag|push <registry/image> <internal_registry/project/image>For example:
$ docker pull busybox $ docker tag docker.io/busybox 172.30.124.220:5000/openshift/busybox $ docker push 172.30.124.220:5000/openshift/busybox ... cf2616975b4a: Image successfully pushed Digest: sha256:3662dd821983bc4326bee12caec61367e7fb6f6a3ee547cbaff98f77403cab55
2.7.7. Advanced: Overriding the Registry Configuration
You can override the integrated registry’s default configuration, found by default at /config.yml in a running registry’s container, with your own custom configuration.
Upstream configuration options in this file may also be overridden using environment variables. However, the middleware section may not be overridden using environment variables. Learn how to override specific configuration options.
2.7.7.1. Deploying Updated Configuration
To enable managing the registry configuration file directly, it is recommended that the configuration file be mounted as a secret volume:
- Deploy the registry.
Edit the registry configuration file locally as needed. The initial YAML file deployed on the registry is provided below. Review supported options.
Registry configuration file
version: 0.1 log: level: debug http: addr: :5000 storage: cache: blobdescriptor: inmemory filesystem: rootdirectory: /registry delete: enabled: true auth: openshift: realm: openshift middleware: repository: - name: openshift options: pullthrough: trueCreate a new secret called registry-config from your custom registry configuration file you edited locally:
$ oc secrets new registry-config config.yml=</path/to/custom/registry/config.yml>Add the registry-config secret as a volume to the registry’s deployment configuration to mount the custom configuration file at /etc/docker/registry/:
$ oc volume dc/docker-registry --add --type=secret \ --secret-name=registry-config -m /etc/docker/registry/Update the registry to reference the configuration path from the previous step by adding the following environment variable to the registry’s deployment configuration:
$ oc env dc/docker-registry \ REGISTRY_CONFIGURATION_PATH=/etc/docker/registry/config.yml
This may be performed as an iterative process to achieve the desired configuration. For example, during troubleshooting, the configuration may be temporarily updated to put it in debug mode.
To update an existing configuration:
This procedure will overwrite the currently deployed registry configuration.
- Edit the local registry configuration file, config.yml.
Delete the registry-config secret:
$ oc delete secret registry-configRecreate the secret to reference the updated configuration file:
$ oc secrets new registry-config config.yml=</path/to/custom/registry/config.yml>Redeploy the registry to read the updated configuration:
$ oc deploy docker-registry --latest
Maintain configuration files in a source control repository.
2.7.7.2. Registry Configuration Reference
There are many configuration options available in the upstream docker distribution library. Not all configuration options are supported or enabled. Use this section as a reference.
Upstream configuration options in this file may also be overridden using environment variables. However, the middleware section may not be overridden using environment variables. Learn how to override specific configuration options.
2.7.7.2.1. Log
Upstream options are supported.
log:
level: debug
formatter: text
fields:
service: registry
environment: staging2.7.7.2.2. Hooks
Mail hooks are not supported.
2.7.7.2.3. Storage
The following storage drivers are supported:
- Filesystem
- S3. Learn more about CloudFront configuration.
- OpenStack Swift
- Google Cloud Storage (GCS), starting in OpenShift Enterprise 3.2.1.13.
General registry storage configuration options are supported.
General Storage Configuration Options
storage:
delete:
enabled: true
redirect:
disable: false
cache:
blobdescriptor: inmemory
maintenance:
uploadpurging:
enabled: true
age: 168h
interval: 24h
dryrun: false
readonly:
enabled: false- 1
- This entry is mandatory for image pruning to work properly.
2.7.7.2.4. Auth
Auth options should not be altered. The openshift extension is the only supported option.
auth:
openshift:
realm: openshift2.7.7.2.5. Middleware
The repository middleware extension allows to configure OpenShift Enterprise middleware responsible for interaction with OpenShift Enterprise and image proxying.
The repository middleware extension should not be altered except for the options section to disable pull-through cache.
middleware:
repository:
- name: openshift
options:
pullthrough: true 2.7.7.2.6. CloudFront Middleware
The CloudFront middleware extension can be added to support AWS, CloudFront CDN storage provider. CloudFront middleware speeds up distribution of image content internationally. The blobs are distributed to several edge locations around the world. The client is always directed to the edge with the lowest latency.
The CloudFront middleware extension can be only used with S3 storage. It is utilized only during blob serving. Therefore, only blob downloads can be speeded up, not uploads.
The following is an example of minimal configuration of S3 storage driver with a CloudFront middleware:
version: 0.1
log:
level: debug
http:
addr: :5000
storage:
cache:
blobdescriptor: inmemory
delete:
enabled: true
s3:
accesskey: BJKMSZBRESWJQXRWMAEQ
secretkey: 5ah5I91SNXbeoUXXDasFtadRqOdy62JzlnOW1goS
region: us-east-1
bucket: docker.myregistry.com
auth:
openshift:
realm: openshift
middleware:
registry:
- name: openshift
repository:
- name: openshift
storage:
- name: cloudfront
options:
baseurl: https://jrpbyn0k5k88bi.cloudfront.net/
privatekey: /etc/docker/cloudfront-ABCEDFGHIJKLMNOPQRST.pem
keypairid: ABCEDFGHIJKLMNOPQRST
- name: openshift- 1
- The S3 storage must be configured the same way regardless of CloudFront middleware.
- 2
- The CloudFront storage middleware needs to be listed before OpenShift middleware.
- 3
- The CloudFront base URL. In the AWS management console, this is listed as Domain Name of CloudFront distribution.
- 4
- The location of your AWS private key on the filesystem. This must be not confused with Amazon EC2 key pair. Please refer to AWS documentation on creating CloudFront key pairs for your trusted signers. The file needs to be mounted as a secret secret into the registry pod.
- 5
- The ID of your Cloudfront key pair.
2.7.7.2.7. Overriding Middleware Configuration Options
The middleware section cannot be overridden using environment variables. There are a few exceptions, however. For example:
middleware:
repository:
- name: openshift
options:
acceptschema2: false
enforcequota: false
projectcachettl: 1m
blobrepositorycachettl: 10m - 1
- A configuration option that can be overridden by the boolean environment variable
REGISTRY_MIDDLEWARE_REPOSITORY_OPENSHIFT_ACCEPTSCHEMA2, which allows for the ability to accept manifest schema v2 on manifest put requests. - 2
- A configuration option that can be overridden by the boolean environment variable
REGISTRY_MIDDLEWARE_REPOSITORY_OPENSHIFT_ENFORCEQUOTA, which allows the ability to turn quota enforcement on or off. By default, quota enforcement is off. It overrides OpenShift Enterprise middleware configuration option. Recognized values are true and false. - 3
- A configuration option that can be overridden by the environment variable
REGISTRY_MIDDLEWARE_REPOSITORY_OPENSHIFT_PROJECTCACHETTL, specifying an eviction timeout for project quota objects. It takes a valid time duration string (for example, 2m). If empty, you get the default timeout. If zero (0m), caching is disabled. - 4
- A configuration option that can be overriden by the environment variable
REGISTRY_MIDDLEWARE_REPOSITORY_OPENSHIFT_BLOBREPOSITORYCACHETTL, specifying an eviction timeout for associations between blob and containing repository. The format of the value is the same as inprojectcachettlcase.
2.7.7.2.7.1. Image Pullthrough
If enabled, the registry will attempt to fetch requested blob from a remote registry unless the blob exists locally. The remote candidates are calculated from DockerImage entries stored in status of the image stream, a client pulls from. All the unique remote registry references in such entries will be tried in turn until the blob is found. The blob, served this way, will not be stored in the registry.
This feature is on by default. However, it can be disabled using a configuration option.
2.7.7.2.7.2. Manifest schema v2 support
Each image has a manifest describing its blobs, instructions for running it and additional metadata. The manifest is versioned which have different structure and fields as it evolves over time. The same image can be represented by multiple manifest versions. Each version will have different digest though.
The registry currently supports manifest v2 schema 1 (schema1). The manifest v2 schema 2 (schema2) is not yet supported.
You should be wary of compatibility issues with various Docker clients:
- Docker clients of version 1.9 or older support only schema1. Any manifest this client pulls or pushes will be of this legacy schema.
- Docker clients of version 1.10 support both schema1 and schema2. And by default, they will push the latter to the registry if it supports newer schema. Which means only schema1 will be pushed to the internal Docker registry.
2.7.7.2.8. Reporting
Reporting is unsupported.
2.7.7.2.9. HTTP
Upstream options are supported. Learn how to alter these settings via environment variables. Only the tls section should be altered. For example:
http:
addr: :5000
tls:
certificate: /etc/secrets/registry.crt
key: /etc/secrets/registry.key2.7.7.2.10. Notifications
Upstream options are supported. The REST API Reference provides more comprehensive integration options.
Example:
notifications:
endpoints:
- name: registry
disabled: false
url: https://url:port/path
headers:
Accept:
- text/plain
timeout: 500
threshold: 5
backoff: 10002.7.7.2.11. Redis
Redis is not supported.
2.7.7.2.12. Health
Upstream options are supported. The registry deployment configuration provides an integrated health check at /healthz.
2.7.7.2.13. Proxy
Proxy configuration should not be enabled. This functionality is provided by the OpenShift Enterprise repository middleware extension, pullthrough: true.
2.7.8. Whitelisting Docker Registries
You can specify a whitelist of docker registries, allowing you to curate a set of images and templates that are available for download by OpenShift Enterprise users. This curated set can be placed in one or more docker registries, and then added to the whitelist. When using a whitelist, only the specified registries are accessible within OpenShift Enterprise, and all other registries are denied access by default.
To configure a whitelist:
Edit the /etc/sysconfig/docker file to block all registries:
BLOCK_REGISTRY='--block-registry=all'You may need to uncomment the
BLOCK_REGISTRYline.In the same file, add registries to which you want to allow access:
ADD_REGISTRY='--add-registry=<registry1> --add-registry=<registry2>'Allowing Access to Registries
ADD_REGISTRY='--add-registry=registry.access.redhat.com'This example would restrict access to images available on the Red Hat Customer Portal.
Once the whitelist is configured, if a user tries to pull from a docker registry that is not on the whitelist, they will receive an error message stating that this registry is not allowed.
2.7.9. Exposing the Registry
To expose your internal registry externally, it is recommended that you run a secure registry. To expose the registry you must first have deployed a router.
- Deploy the registry.
- Secure the registry.
- Deploy a router.
Create a passthrough route via the
oc create route passthroughcommand, specifying the registry as the route’s service. By default, the name of the created route is the same as the service name.For example:
$ oc get svc NAME CLUSTER_IP EXTERNAL_IP PORT(S) SELECTOR AGE docker-registry 172.30.69.167 <none> 5000/TCP docker-registry=default 4h kubernetes 172.30.0.1 <none> 443/TCP,53/UDP,53/TCP <none> 4h router 172.30.172.132 <none> 80/TCP router=router 4h $ oc create route passthrough \ --service=docker-registry \1 --hostname=<host> route "docker-registry" created2 $ oc get route/docker-registry -o yaml apiVersion: v1 kind: Route metadata: name: docker-registry spec: host: <host>1 to: kind: Service name: docker-registry2 tls: termination: passthrough3 NotePassthrough is currently the only type of route supported for exposing the secure registry.
Next, you must trust the certificates being used for the registry on your host system. The certificates referenced were created when you secured your registry.
$ sudo mkdir -p /etc/docker/certs.d/<host> $ sudo cp <ca certificate file> /etc/docker/certs.d/<host> $ sudo systemctl restart dockerLog in to the registry using the information from securing the registry. However, this time point to the host name used in the route rather than your service IP. You should now be able to tag and push images using the route host.
$ oc get imagestreams -n test NAME DOCKER REPO TAGS UPDATED $ docker pull busybox $ docker tag busybox <host>/test/busybox $ docker push <host>/test/busybox The push refers to a repository [<host>/test/busybox] (len: 1) 8c2e06607696: Image already exists 6ce2e90b0bc7: Image successfully pushed cf2616975b4a: Image successfully pushed Digest: sha256:6c7e676d76921031532d7d9c0394d0da7c2906f4cb4c049904c4031147d8ca31 $ docker pull <host>/test/busybox latest: Pulling from <host>/test/busybox cf2616975b4a: Already exists 6ce2e90b0bc7: Already exists 8c2e06607696: Already exists Digest: sha256:6c7e676d76921031532d7d9c0394d0da7c2906f4cb4c049904c4031147d8ca31 Status: Image is up to date for <host>/test/busybox:latest $ oc get imagestreams -n test NAME DOCKER REPO TAGS UPDATED busybox 172.30.11.215:5000/test/busybox latest 2 seconds agoNoteYour image streams will have the IP address and port of the registry service, not the route name and port. See
oc get imagestreamsfor details.NoteIn the
<host>/test/busyboxexample above,testrefers to the project name.
2.7.10. Known Issues
The following are the known issues when deploying or using the integrated registry.
2.7.10.1. Image Push Errors with Scaled Registry Using Shared NFS Volume
When using a scaled registry with a shared NFS volume, you may see one of the following errors during the push of an image:
-
digest invalid: provided digest did not match uploaded content -
blob upload unknown -
blob upload invalid
These errors are returned by an internal registry service when Docker attempts to push the image. Its cause originates in the synchronization of file attributes across nodes. Factors such as NFS client side caching, network latency, and layer size can all contribute to potential errors that might occur when pushing an image using the default round-robin load balancing configuration.
You can perform the following steps to minimize the probability of such a failure:
Ensure that the
sessionAffinityof your docker-registry service is set toClientIP:$ oc get svc/docker-registry --template='{{.spec.sessionAffinity}}'This should return
ClientIP, which is the default in recent OpenShift Enterprise versions. If not, change it:$ oc get -o yaml svc/docker-registry | \ sed 's/\(sessionAffinity:\s*\).*/\1ClientIP/' | \ oc replace -f --
Ensure that the NFS export line of your registry volume on your NFS server has the
no_wdelayoptions listed. See Export Settings in the Persistent Storage Using NFS topic for details.
2.7.10.2. Pull of Internally Managed Image Fails with not found Error
This error occurs when the pulled image is pushed to an image stream different from the one it is being pulled from. This is caused by re-tagging a built image into an arbitrary image stream:
$ oc tag srcimagestream:latest anyproject/pullimagestream:latestAnd subsequently pulling from it, using an image reference such as:
internal.registry.url:5000/anyproject/pullimagestream:latestDuring a manual Docker pull, this will produce a similar error:
Error: image anyproject/pullimagestream:latest not foundTo prevent this, avoid the tagging of internally managed images completely, or re-push the built image to the desired namespace manually.
2.7.10.3. Image Push fails with 500 Internal Server Error on S3 storage
There are problems reported happening when the registry runs on S3 storage back-end. Pushing to a Docker registry occasionally fails with the following error:
Received unexpected HTTP status: 500 Internal Server ErrorTo debug this, you need to view the registry logs. In there, look for similar error messages occurring at the time of the failed push:
time="2016-03-30T15:01:21.22287816-04:00" level=error msg="unknown error completing upload: driver.Error{DriverName:\"s3\", Enclosed:(*url.Error)(0xc20901cea0)}" http.request.method=PUT
...
time="2016-03-30T15:01:21.493067808-04:00" level=error msg="response completed with error" err.code=UNKNOWN err.detail="s3: Put https://s3.amazonaws.com/oso-tsi-docker/registry/docker/registry/v2/blobs/sha256/ab/abe5af443833d60cf672e2ac57589410dddec060ed725d3e676f1865af63d2e2/data: EOF" err.message="unknown error" http.request.method=PUT
...
time="2016-04-02T07:01:46.056520049-04:00" level=error msg="error putting into main store: s3: The request signature we calculated does not match the signature you provided. Check your key and signing method." http.request.method=PUT
atestIf you see such errors, contact your Amazon S3 support. There may be a problem in your region or with your particular bucket.
2.7.10.4. Build Fails with error: build error: Failed to push image: EOF
Check your registry log. If you see similar error message to the one below:
time="2016-08-10T07:29:06.882023903Z" level=panic msg="Configuration error: OpenShift registry middleware not activated" 2016-08-10 07:29:06.882174 I | http: panic serving 10.131.0.1:34558: &{0xc820010680 map[] 2016-08-10 07:29:06.882023903 +0000 UTC panic Configuration error: OpenShift registry middleware not activated}It means that your custom configuration file lacks mandatory entries in the middleware section. Add them, re-deploy the registry, and restart your builds.
2.7.10.5. Image Pruning Fails
If you encounter the following error when pruning images:
BLOB sha256:49638d540b2b62f3b01c388e9d8134c55493b1fa659ed84e97cb59b87a6b8e6c error deleting blobAnd your registry log contains the following information:
error deleting blob \"sha256:49638d540b2b62f3b01c388e9d8134c55493b1fa659ed84e97cb59b87a6b8e6c\": operation unsupported
It means that your custom configuration file lacks mandatory entries in the storage section, namely storage:delete:enabled set to true. Add them, re-deploy the registry, and repeat your image pruning operation.
2.7.11. What’s Next?
After you have a registry deployed, you can:
- Configure authentication; by default, authentication is set to Deny All.
- Deploy a router.
2.8. Configure or Deploy the Router
2.8.1. Overview
The OpenShift Enterprise router is the ingress point for all external traffic destined for services in your OpenShift installation. OpenShift provides and supports the following two router plug-ins:
- The HAProxy template router is the default plug-in. It uses the openshift3/ose-haproxy-router image to run an HAProxy instance alongside the template router plug-in inside a container on OpenShift Enterprise. It currently supports HTTP(S) traffic and TLS-enabled traffic via SNI. The router’s container listens on the host network interface, unlike most containers that listen only on private IPs. The router proxies external requests for route names to the IPs of actual pods identified by the service associated with the route.
- The F5 router integrates with an existing F5 BIG-IP® system in your environment to synchronize routes. F5 BIG-IP® version 11.4 or newer is required in order to have the F5 iControl REST API.
The F5 router plug-in is available starting in OpenShift Enterprise 3.0.2.
2.8.2. Router Service Account
Before deploying an OpenShift Enterprise cluster, you must have a service account for the router. Starting in OpenShift Enterprise 3.1, a router service account is automatically created during a quick or advanced installation (previously, this required manual creation). This service account has permissions to a security context constraint (SCC) that allows it to specify host ports.
Use of labels (e.g., to define router shards) requires cluster-reader permission.
$ oadm policy add-cluster-role-to-user \
cluster-reader \
system:serviceaccount:default:router2.8.3. Deploying the Default HAProxy Router
The oadm router command is provided with the administrator CLI to simplify the tasks of setting up routers in a new installation. If you followed the quick installation, then a default router was automatically created for you. The oadm router command creates the service and deployment configuration objects. Just about every form of communication between OpenShift Enterprise components is secured by TLS and uses various certificates and authentication methods. Use the --credentials option to specify what credentials the router should use to contact the master.
Routers directly attach to port 80 and 443 on all interfaces on a host. Restrict routers to hosts where port 80/443 is available and not being consumed by another service, and set this using node selectors and the scheduler configuration. As an example, you can achieve this by dedicating infrastructure nodes to run services such as routers.
It is recommended to use separate distinct openshift-router credentials with your router. The credentials can be provided using the --credentials flag to the oadm router command. Alternatively, the default cluster administrator credentials can be used from the $KUBECONFIG environment variable.
$ oadm router --dry-run --service-account=router \
--credentials='/etc/origin/master/openshift-router.kubeconfig'
Router pods created using oadm router have default resource requests that a node must satisfy for the router pod to be deployed. In an effort to increase the reliability of infrastructure components, the default resource requests are used to increase the QoS tier of the router pods above pods without resource requests. The default values represent the observed minimum resources required for a basic router to be deployed and can be edited in the routers deployment configuration and you may want to increase them based on the load of the router.
- Checking the Default Router
- The default router service account, named router, is automatically created during quick and advanced installations. To verify that this account already exists:
$ oadm router --dry-run \
--credentials='/etc/origin/master/openshift-router.kubeconfig' \
--service-account=router- Viewing the Default Router
- To see what the default router would look like if created:
$ oadm router -o yaml \
--credentials='/etc/origin/master/openshift-router.kubeconfig' \
--service-account=router- Creating a Router
- The quick installation process automatically creates a default router. To create a router if it does not exist:
$ oadm router <router_name> --replicas=<number> \
--credentials='/etc/origin/master/openshift-router.kubeconfig' \
--service-account=router- Deploying the Router to a Labeled Node
- To deploy the router to any node(s) that match a specified node label:
$ oadm router <router_name> --replicas=<number> --selector=<label> \
--credentials='/etc/origin/master/openshift-router.kubeconfig' \
--service-account=router
For example, if you want to create a router named router and have it placed on a node labeled with region=infra:
$ oadm router router --replicas=1 --selector='region=infra' \
--credentials='/etc/origin/master/openshift-router.kubeconfig' \
--service-account=router
During advanced installation, the openshift_hosted_router_selector and openshift_registry_selector Ansible settings are set to region=infra by default. The default router and registry will only be automatically deployed if a node exists that matches the region=infra label.
Multiple instances are created on different hosts according to the scheduler policy.
To deploy the router to any node(s) that match a specified node label:
$ oadm router <router_name> --replicas=<number> --selector=<label> \
--service-account=router
For example, if you want to create a router named router and have it placed on a node labeled with region=infra:
$ oadm router router --replicas=1 --selector='region=infra' \
--service-account=router- Using a Different Router Image
- To use a different router image and view the router configuration that would be used:
$ oadm router <router_name> -o <format> --images=<image> \
--credentials='/etc/origin/master/openshift-router.kubeconfig' \
--service-account=routerFor example:
$ oadm router region-west -o yaml --images=myrepo/somerouter:mytag \
--credentials='/etc/origin/master/openshift-router.kubeconfig' \
--service-account=router2.8.3.1. High Availability
You can set up a highly-available router on your OpenShift Enterprise cluster using IP failover.
2.8.3.2. Customizing the Router Service Ports
You can customize the service ports that a template router binds to by setting the environment variables ROUTER_SERVICE_HTTP_PORT and ROUTER_SERVICE_HTTPS_PORT. This can be done by creating a template router, then editing its deployment configuration.
The following example creates a router deployment with 0 replicas and customizes the router service HTTP and HTTPS ports, then scales it appropriately (to 1 replica).
$ oadm router --replicas=0 --ports='10080:10080,10443:10443'
$ oc set env dc/router ROUTER_SERVICE_HTTP_PORT=10080 \
ROUTER_SERVICE_HTTPS_PORT=10443
$ oc scale dc/router --replicas=1- 1
- Ensures exposed ports are appropriately set for routers that use the container networking mode
--host-network=false.
If you do customize the template router service ports, you will also need to ensure that the nodes where the router pods run have those custom ports opened in the firewall (either via Ansible or iptables, or any other custom method that you use via firewall-cmd).
The following is an example using iptables to open the custom router service ports.
$ iptables -A INPUT -p tcp --dport 10080 -j ACCEPT
$ iptables -A INPUT -p tcp --dport 10443 -j ACCEPT2.8.3.3. Working With Multiple Routers
An administrator can create multiple routers with the same definition to serve the same set of routes. By having different groups of routers with different namespace or route selectors, they can vary the routes that the router serves.
Multiple routers can be grouped to distribute routing load in the cluster and separate tenants to different routers or shards. Each router or shard in the group handles routes based on the selectors in the router. An administrator can create shards over the whole cluster using ROUTE_LABELS. A user can create shards over a namespace (project) by using NAMESPACE_LABELS.
2.8.3.4. Adding a Node Selector to a Deployment Configuration
Making specific routers deploy on specific nodes requires two steps:
Add a label to the desired node:
$ oc label node 10.254.254.28 "router=first"Add a node selector to the router deployment configuration:
$ oc edit dc <deploymentConfigName>Add the
template.spec.nodeSelectorfield with a key and value corresponding to the label:... template: metadata: creationTimestamp: null labels: router: router1 spec: nodeSelector:1 router: "first" ...- 1
- The key and value are
routerandfirst, respectively, corresponding to therouter=firstlabel.
2.8.3.5. Using Router Shards
The access controls are based on the service account that the router is run with.
Using NAMESPACE_LABELS and/or ROUTE_LABELS, a router can filter out the namespaces and/or routes that it should service. This enables you to partition routes amongst multiple router deployments effectively distributing the set of routes.
Example: A router deployment finops-router is run with route selector NAMESPACE_LABELS="name in (finance, ops)" and a router deployment dev-router is run with route selector NAMESPACE_LABELS="name=dev".
If all routes are in the 3 namespaces finance, ops or dev, then this could effectively distribute our routes across two router deployments.
In the above scenario, sharding becomes a special case of partitioning with no overlapping sets. Routes are divided amongst multiple router shards.
The criteria for route selection governs how the routes are distributed. It is possible to have routes that overlap accross multiple router deployments.
Example: In addition to the finops-router and dev-router in the example above, we also have an devops-router which is run with a route selector NAMESPACE_LABELS="name in (dev, ops)".
The routes in namespaces dev or ops now are serviced by two different router deployments. This becomes a case where we have partitioned the routes with an overlapping set.
In addition, this enables us to create more complex routing rules ala divert high priority traffic to the dedicated finops-router but send the lower priority ones to the devops-router.
NAMESPACE_LABELS allows filtering the projects to service and selecting all the routes from those projects. But we may want to partition routes based on other criteria in the routes themselves. The ROUTE_LABELS selector allows you to slice-and-dice the routes themselves.
Example: A router deployment prod-router is run with route selector ROUTE_LABELS="mydeployment=prod" and a router deployment devtest-router is run with route selector ROUTE_LABELS="mydeployment in (dev, test)"
Example assumes you have all the routes you wish to serviced tagged with a label "mydeployment=<tag>".
2.8.3.6. Creating Router Shards
Router sharding lets you select how routes are distributed among a set of routers.
Router sharding is based on labels; you set labels on the routes in the pool, and express the desired subset of those routes for the router to serve with a selection expression via the oc set env command.
First, ensure that service account associated with the router has the cluster reader permission.
The rest of this section describes an extended example. Suppose there are 26 routes, named a — z, in the pool, with various labels:
Possible labels on routes in the pool
sla=high geo=east hw=modest dept=finance
sla=medium geo=west hw=strong dept=dev
sla=low dept=opsThese labels express the concepts: service level agreement, geographical location, hardware requirements, and department. The routes in the pool can have at most one label from each column. Some routes may have other labels, entirely, or none at all.
| Name(s) | SLA | Geo | HW | Dept | Other Labels |
|---|---|---|---|---|---|
|
|
|
|
|
|
|
|
|
|
|
| ||
|
|
|
|
| ||
|
|
|
|
| ||
|
|
|
|
| ||
|
|
|
|
Here is a convenience script mkshard that ilustrates how oadm router, oc set env, and oc scale work together to make a router shard.
#!/bin/bash
# Usage: mkshard ID SELECTION-EXPRESSION
id=$1
sel="$2"
router=router-shard-$id
oadm router $router --replicas=0
dc=dc/router-shard-$id
oc set env $dc ROUTE_LABELS="$sel"
oc scale $dc --replicas=3 Running mkshard several times creates several routers:
| Router | Selection Expression | Routes |
|---|---|---|
|
|
|
|
|
|
|
|
|
|
|
|
2.8.3.7. Modifying Router Shards
Because a router shard is a construct based on labels, you can modify either the labels (via oc label) or the selection expression.
This section extends the example started in the Creating Router Shards section, demonstrating how to change the selection expression.
Here is a convenience script modshard that modifies an existing router to use a new selection expression:
#!/bin/bash
# Usage: modshard ID SELECTION-EXPRESSION...
id=$1
shift
router=router-shard-$id
dc=dc/$router
oc scale $dc --replicas=0
oc set env $dc "$@"
oc scale $dc --replicas=3 - 1
- The modified router has name
router-shard-<id>. - 2
- The deployment configuration where the modifications occur.
- 3
- Scale it down.
- 4
- Set the new selection expression using
oc set env. Unlikemkshardfrom the Creating Router Shards section, the selection expression specified as the non-IDarguments tomodshardmust include the environment variable name as well as its value. - 5
- Scale it back up.
In modshard, the oc scale commands are not necessary if the deployment strategy for router-dhsard-<id> is Rolling.
For example, to expand the department for router-shard-3 to include ops as well as dev:
$ modshard 3 ROUTE_LABELS='dept in (dev, ops)'
The result is that router-shard-3 now selects routes g — s (the combined sets of g — k and l — s).
This example takes into account that there are only three departments in this example scenario, and specifies a department to leave out of the shard, thus achieving the same result as the preceding example:
$ modshard 3 ROUTE_LABELS='dept != finanace'
This example specifies shows three comma-separated qualities, and results in only route b being selected:
$ modshard 3 ROUTE_LABELS='hw=strong,type=dynamic,geo=west'
Similarly to ROUTE_LABELS, which involve a route’s labels, you can select routes based on the labels of the route’s namespace labels, with the NAMESPACE_LABELS environment variable. This example modifies router-shard-3 to serve routes whose namespace has the label frequency=weekly:
$ modshard 3 NAMESPACE_LABELS='frequency=weekly'
The last example combines ROUTE_LABELS and NAMESPACE_LABELS to select routes with label sla=low and whose namespace has the label frequency=weekly:
$ modshard 3 \
NAMESPACE_LABELS='frequency=weekly' \
ROUTE_LABELS='sla=low'2.8.3.8. Using Namespace Router Shards
The routes for a project can be handled by a selected router by using NAMESPACE_LABELS. The router is given a selector for a NAMESPACE_LABELS label and the project that wants to use the router applies the NAMESPACE_LABELS label to its namespace.
First, ensure that service account associated with the router has the cluster reader permission. This permits the router to read the labels that are applied to the namespaces.
Now create and label the router:
$ oadm router ... --service-account=router
$ oc set env dc/router NAMESPACE_LABELS="router=r1"Because the router has a selector for a namespace, the router will handle routes for that namespace. So, for example:
$ oc label namespace default "router=r1"Now create routes in the default namespace, and the route is available in the default router:
$ oc create -f route1.yamlNow create a new project (namespace) and create a route, route2.
$ oc new-project p1
$ oc create -f route2.yamlAnd notice the route is not available in your router. Now label namespace p1 with "router=r1"
$ oc label namespace p1 "router=r1"Which makes the route available to the router.
Note that removing the label from the namespace won’t have immediate effect (as we don’t see the updates in the router), so if you redeploy/start a new router pod, you should see the unlabelled effects.
$ oc scale dc/router --replicas=0 && oc scale dc/router --replicas=12.8.4. Finding the Host Name of the Router
When exposing a service, a user can use the same route from the DNS name that external users use to access the application. The network administrator of the external network must make sure the host name resolves to the name of a router that has admitted the route. The user can set up their DNS with a CNAME that points to this host name. However, the user may not know the host name of the router. When it is not known, the cluster administrator can provide it.
The cluster administrator can use the --router-canonical-hostname option with the router’s canonical host name when creating the router. For example:
# oadm router myrouter --router-canonical-hostname="rtr.example.com"
This creates the ROUTER_CANONCAL_HOSTNAME environment variable in the router’s deployment configuration containing the host name of the router.
For routers that already exist, the cluster administrator can edit the router’s deployment configuration and add the ROUTER_CANONICAL_HOSTNAME environment variable:
spec:
template:
spec:
containers:
- env:
- name: ROUTER_CANONCAL_HOSTNAME
value: rtr.example.com
The ROUTER_CANONICAL_HOSTNAME value is displayed in the route status for all routers that have admitted the route. The route status is refreshed every time the router is reloaded.
When a user creates a route, all of the active routers evaluate the route and, if conditions are met, admit it. When a router that defines the ROUTER_CANONCAL_HOSTNAME environment variable admits the route, the router places the value in the routerCanonicalHostname field in the route status. The user can examine the route status to determine which, if any, routers have admitted the route, select a router from the list, and find the host name of the router to pass along to the network administrator.
status:
ingress:
conditions:
lastTransitionTime: 2016-12-07T15:20:57Z
status: "True"
type: Admitted
host: hello.in.mycloud.com
routerCanonicalHostname: rtr.example.com
routerName: myrouter
wildcardPolicy: None
oc describe inclues the host name when available:
$ oc describe route/hello-route3
...
Requested Host: hello.in.mycloud.com exposed on router myroute (host rtr.example.com) 12 minutes ago
Using the above information, the user can ask the DNS administrator to set up a CNAME from the route’s host, hello.in.mycloud.com, to the router’s canonical hostname, rtr.example.com. This results in any traffic to hello.in.mycloud.com reaching the user’s application.
2.8.4.1. Customizing the Default Routing Subdomain
You can customize the default routing subdomain by modifying the master configuration file. Routes that do not specify a host name would have one generated using this default routing subdomain.
2.8.4.1.1. Modifying the Master Configuration file
You can customize the suffix used as the default routing subdomain for your environment using the master configuration file (the /etc/origin/master/master-config.yaml file by default).
The following example shows how you can set the configured suffix to v3.openshift.test:
routingConfig:
subdomain: v3.openshift.testThis change requires a restart of the master if it is running.
With the OpenShift Enterprise master(s) running the above configuration, the generated host name for the example of a route named no-route-hostname without a host name added to a namespace mynamespace would be:
no-route-hostname-mynamespace.v3.openshift.test2.8.4.2. Forcing Route Host Names to a Custom Routing Subdomain
If an administrator wants to restrict all routes to a specific routing subdomain, they can pass the --force-subdomain option to the oadm router command. This forces the router to override any host names specified in a route and generate one based on the template provided to the --force-subdomain option.
The following example runs a router, which overrides the route host names using a custom subdomain template ${name}-${namespace}.apps.example.com.
$ oadm router --force-subdomain='${name}-${namespace}.apps.example.com'2.8.4.3. Using Wildcard Certificates
A TLS-enabled route that does not include a certificate uses the router’s default certificate instead. In most cases, this certificate should be provided by a trusted certificate authority, but for convenience you can use the OpenShift Enterprise CA to create the certificate. For example:
$ CA=/etc/origin/master
$ oadm ca create-server-cert --signer-cert=$CA/ca.crt \
--signer-key=$CA/ca.key --signer-serial=$CA/ca.serial.txt \
--hostnames='*.cloudapps.example.com' \
--cert=cloudapps.crt --key=cloudapps.keyThe router expects the certificate and key to be in PEM format in a single file:
$ cat cloudapps.crt cloudapps.key $CA/ca.crt > cloudapps.router.pem
From there you can use the --default-cert flag:
$ oadm router --default-cert=cloudapps.router.pem --service-account=router \
--credentials=${ROUTER_KUBECONFIG:-"$KUBECONFIG"}Browsers only consider wildcards valid for subdomains one level deep. So in this example, the certificate would be valid for a.cloudapps.example.com but not for a.b.cloudapps.example.com.
2.8.4.4. Using Secured Routes
Currently, password protected key files are not supported. HAProxy prompts for a password upon starting and does not have a way to automate this process. To remove a passphrase from a keyfile, you can run:
# openssl rsa -in <passwordProtectedKey.key> -out <new.key>Here is an example of how to use a secure edge terminated route with TLS termination occurring on the router before traffic is proxied to the destination. The secure edge terminated route specifies the TLS certificate and key information. The TLS certificate is served by the router front end.
First, start up a router instance:
# oadm router --replicas=1 --service-account=router \
--credentials=${ROUTER_KUBECONFIG:-"$KUBECONFIG"}
Next, create a private key, csr and certificate for our edge secured route. The instructions on how to do that would be specific to your certificate authority and provider. For a simple self-signed certificate for a domain named www.example.test, see the example shown below:
# sudo openssl genrsa -out example-test.key 2048
#
# sudo openssl req -new -key example-test.key -out example-test.csr \
-subj "/C=US/ST=CA/L=Mountain View/O=OS3/OU=Eng/CN=www.example.test"
#
# sudo openssl x509 -req -days 366 -in example-test.csr \
-signkey example-test.key -out example-test.crtGenerate a route using the above certificate and key.
$ oc create route edge --service=my-service \
--hostname=www.example.test \
--key=example-test.key --cert=example-test.crt
route "my-service" createdLook at its definition.
$ oc get route/my-service -o yaml
apiVersion: v1
kind: Route
metadata:
name: my-service
spec:
host: www.example.test
to:
kind: Service
name: my-service
tls:
termination: edge
key: |
-----BEGIN PRIVATE KEY-----
[...]
-----END PRIVATE KEY-----
certificate: |
-----BEGIN CERTIFICATE-----
[...]
-----END CERTIFICATE-----
Make sure your DNS entry for www.example.test points to your router instance(s) and the route to your domain should be available. The example below uses curl along with a local resolver to simulate the DNS lookup:
# routerip="4.1.1.1" # replace with IP address of one of your router instances.
# curl -k --resolve www.example.test:443:$routerip https://www.example.test/2.8.4.5. Using the Container Network Stack
The OpenShift Enterprise router runs inside a container and the default behavior is to use the network stack of the host (i.e., the node where the router container runs). This default behavior benefits performance because network traffic from remote clients does not need to take multiple hops through user space to reach the target service and container.
Additionally, this default behavior enables the router to get the actual source IP address of the remote connection rather than getting the node’s IP address. This is useful for defining ingress rules based on the originating IP, supporting sticky sessions, and monitoring traffic, among other uses.
This host network behavior is controlled by the --host-network router command line option, and the default behaviour is the equivalent of using --host-network=true. If you wish to run the router with the container network stack, use the --host-network=false option when creating the router. For example:
$ oadm router \
--credentials='/etc/origin/master/openshift-router.kubeconfig' \
--service-account=router \
--host-network=falseInternally, this means the router container must publish the 80 and 443 ports in order for the external network to communicate with the router.
Running with the container network stack means that the router sees the source IP address of a connection to be the NATed IP address of the node, rather than the actual remote IP address.
On OpenShift Enterprise clusters using multi-tenant network isolation, routers on a non-default namespace with the --host-network=false option will load all routes in the cluster, but routes across the namespaces will not be reachable due to network isolation. With the --host-network=true option, routes bypass the container network and it can access any pod in the cluster. If isolation is needed in this case, then do not add routes across the namespaces.
2.8.4.6. Exposing Router metrics
Using the --metrics-image and --expose-metrics options, you can configure the OpenShift Enterprise router to run a sidecar container that exposes or publishes router metrics for consumption by external metrics collection and aggregation systems (e.g. Prometheus, statsd).
Depending on your router implementation, the image is appropriately set up and the metrics sidecar container is started when the router is deployed. For example, the HAProxy-based router implementation defaults to using the prom/haproxy-exporter image to run as a sidecar container, which can then be used as a metrics datasource by the Prometheus server.
The --metrics-image option overrides the defaults for HAProxy-based router implementations and, in the case of custom implementations, enables the image to use for a custom metrics exporter or publisher.
Grab the HAProxy Prometheus exporter image from the Docker registry:
$ sudo docker pull prom/haproxy-exporterCreate the OpenShift Enterprise router:
$ oadm router \ --credentials='/etc/origin/master/openshift-router.kubeconfig' \ --service-account=router --expose-metricsOr, optionally, use the
--metrics-imageoption to override the HAProxy defaults:$ oadm router \ --credentials='/etc/origin/master/openshift-router.kubeconfig' \ --service-account=router --expose-metrics \ --metrics-image=prom/haproxy-exporterOnce the haproxy-exporter containers (and your HAProxy router) have started, point Prometheus to the sidecar container on port 9101 on the node where the haproxy-exporter container is running:
$ haproxy_exporter_ip="<enter-ip-address-or-hostname>" $ cat > haproxy-scraper.yml <<CFGEOF --- global: scrape_interval: "60s" scrape_timeout: "10s" # external_labels: # source: openshift-router scrape_configs: - job_name: "haproxy" target_groups: - targets: - "${haproxy_exporter_ip}:9101" CFGEOF $ # And start prometheus as you would normally using the above config file. $ echo " - Example: prometheus -config.file=haproxy-scraper.yml " $ echo " or you can start it as a container on {product-title}!! $ echo " - Once the prometheus server is up, view the {product-title} HAProxy " $ echo " router metrics at: http://<ip>:9090/consoles/haproxy.html "
2.8.4.7. Preventing Connection Failures During Restarts
If you connect to the router while the proxy is reloading, there is a small chance that your connection will end up in the wrong network queue and be dropped. The issue is being addressed. In the meantime, it is possible to work around the problem by installing iptables rules to prevent connections during the reload window. However, doing so means that the router needs to run with elevated privilege so that it can manipulate iptables on the host. It also means that connections that happen during the reload are temporarily ignored and must retransmit their connection start, lengthening the time it takes to connect, but preventing connection failure.
To prevent this, configure the router to use iptables by changing the service account, and setting an environment variable on the router.
Use a Privileged SCC
When creating the router, allow it to use the privileged SCC. This gives the router user the ability to create containers with root privileges on the nodes:
$ oadm policy add-scc-to-user privileged -z routerPatch the Router Deployment Configuration to Create a Privileged Container
You can now create privileged containers. Next, configure the router deployment configuration to use the privilege so that the router can set the iptables rules it needs. This patch changes the router deployment configuration so that the container that is created runs as root:
$ oc patch dc router -p '{"spec":{"template":{"spec":{"containers":[{"name":"router","securityContext":{"privileged":true}}]}}}}'Configure the Router to Use iptables
Set the option on the router deployment configuration:
$ oc set env dc/router -c router DROP_SYN_DURING_RESTART=1If you used a non-default name for the router, you must change dc/router accordingly.
2.8.5. Deploying a Customized HAProxy Router
The HAProxy router is based on a golang template that generates the HAProxy configuration file from a list of routes. If you want a customized template router to meet your needs, you can customize the template file, build a new Docker image, and run a customized router. Alternatively you can use a ConfigMap.
One common case for this might be implementing new features within the application back ends. For example, it might be desirable in a highly-available setup to use stick-tables that synchronizes between peers. The router plug-in provides all the facilities necessary to make this customization.
You can obtain a new haproxy-config.template file from the latest router image by running:
# docker run --rm --interactive=true --tty --entrypoint=cat \
registry.access.redhat.com/openshift3/ose-haproxy-router:v3.0.2.0 haproxy-config.templateSave this content to a file for use as the basis of your customized template.
2.8.5.1. Using a ConfigMap to Replace the Router Configuration Template
You can use ConfigMap to customize the router instance without rebuilding the router image. The haproxy-config.template, reload-haproxy, and other scripts can be modified as well as creating and modifying router environment variables.
- Copy the haproxy-config.template that you want to modify as described above. Modify it as desired.
Create a ConfigMap:
$ oc create configmap customrouter --from-file=haproxy-config.templateThe
customrouterConfigMap now contains a copy of the modified haproxy-config.template file.Modify the router deployment configuration to mount the ConfigMap as a file and point the
TEMPLATE_FILEenvironment variable to it. This can be done viaoc envandoc volumecommands, or alternatively by editing the router deployment configuration.- Using
occommands $ oc env dc/router \ TEMPLATE_FILE=/var/lib/haproxy/conf/custom/haproxy-config.template $ oc volume dc/router --add --overwrite \ --name=config-volume \ --mount-path=/var/lib/haproxy/conf/custom \ --source='{"configMap": { "name": "customrouter"}}'- Editing the Router Deployment Configuration
Use
oc edit dc routerto edit the router deployment configuration with a text editor.... - name: STATS_USERNAME value: admin - name: TEMPLATE_FILE1 value: /var/lib/haproxy/conf/custom/haproxy-config.template image: openshift/origin-haproxy-routerp ... terminationMessagePath: /dev/termination-log volumeMounts:2 - mountPath: /var/lib/haproxy/conf/custom name: config-volume dnsPolicy: ClusterFirst ... terminationGracePeriodSeconds: 30 volumes:3 - configMap: name: customrouter name: config-volume test: false ...Save the changes and exit the editor. This restarts the router.
- Using
2.8.5.2. Using Stick Tables
The following example customization can be used in a highly-available routing setup to use stick-tables that synchronize between peers.
Adding a Peer Section
In order to synchronize stick-tables amongst peers you must a define a peers section in your HAProxy configuration. This section determines how HAProxy will identify and connect to peers. The plug-in provides data to the template under the .PeerEndpoints variable to allow you to easily identify members of the router service. You may add a peer section to the haproxy-config.template file inside the router image by adding:
{{ if (len .PeerEndpoints) gt 0 }}
peers openshift_peers
{{ range $endpointID, $endpoint := .PeerEndpoints }}
peer {{$endpoint.TargetName}} {{$endpoint.IP}}:1937
{{ end }}
{{ end }}Changing the Reload Script
When using stick-tables, you have the option of telling HAProxy what it should consider the name of the local host in the peer section. When creating endpoints, the plug-in attempts to set the TargetName to the value of the endpoint’s TargetRef.Name. If TargetRef is not set, it will set the TargetName to the IP address. The TargetRef.Name corresponds with the Kubernetes host name, therefore you can add the -L option to the reload-haproxy script to identify the local host in the peer section.
peer_name=$HOSTNAME
if [ -n "$old_pid" ]; then
/usr/sbin/haproxy -f $config_file -p $pid_file -L $peer_name -sf $old_pid
else
/usr/sbin/haproxy -f $config_file -p $pid_file -L $peer_name
fi- 1
- Must match an endpoint target name that is used in the peer section.
Modifying Back Ends
Finally, to use the stick-tables within back ends, you can modify the HAProxy configuration to use the stick-tables and peer set. The following is an example of changing the existing back end for TCP connections to use stick-tables:
{{ if eq $cfg.TLSTermination "passthrough" }}
backend be_tcp_{{$cfgIdx}}
balance leastconn
timeout check 5000ms
stick-table type ip size 1m expire 5m{{ if (len $.PeerEndpoints) gt 0 }} peers openshift_peers {{ end }}
stick on src
{{ range $endpointID, $endpoint := $serviceUnit.EndpointTable }}
server {{$endpointID}} {{$endpoint.IP}}:{{$endpoint.Port}} check inter 5000ms
{{ end }}
{{ end }}After this modification, you can rebuild your router.
2.8.5.3. Rebuilding Your Router
After you have made any desired modifications to the template, such as the example stick tables customization, you must rebuild your router for your changes to go in effect:
- Rebuild the Docker image to include your customized template.
- Push the resulting image to your repository.
Create the router specifying your new image, either:
- in the pod’s object definition directly, or
-
by adding the
--images=<repo>/<image>:<tag>flag to theoadm routercommand when creating a highly-available routing service.
2.8.6. Deploying the F5 Router
The F5 router plug-in is available starting in OpenShift Enterprise 3.0.2.
The F5 router plug-in is provided as a Docker image and run as a pod, just like the default HAProxy router. Deploying the F5 router is done similarly as well, using the oadm router command but providing additional flags (or environment variables) to specify the following parameters for the F5 BIG-IP® host:
| Flag | Description |
|---|---|
|
|
Specifies that an F5 router should be launched (the default |
|
| Specifies the F5 BIG-IP® host’s management interface’s host name or IP address. |
|
| Specifies the F5 BIG-IP® user name (typically admin). |
|
| Specifies the F5 BIG-IP® password. |
|
| Specifies the name of the F5 virtual server for HTTP connections. |
|
| Specifies the name of the F5 virtual server for HTTPS connections. |
|
| Specifies the path to the SSH private key file for the F5 BIG-IP® host. Required to upload and delete key and certificate files for routes. |
|
| A Boolean flag that indicates that the F5 router should skip strict certificate verification with the F5 BIG-IP® host. |
As with the HAProxy router, the oadm router command creates the service and deployment configuration objects, and thus the replication controllers and pod(s) in which the F5 router itself runs. The replication controller restarts the F5 router in case of crashes. Because the F5 router is only watching routes and endpoints and configuring F5 BIG-IP® accordingly, running the F5 router in this way along with an appropriately configured F5 BIG-IP® deployment should satisfy high-availability requirements.
The F5 router will also need to be run in privileged mode because route certificates get copied using scp:
$ oadm policy remove-scc-from-user hostnetwork -z router
$ oadm policy add-scc-to-user privileged -z routerTo deploy the F5 router:
- First, establish a tunnel using a ramp node, which allows for the routing of traffic to pods through the OpenShift Enterprise SDN.
Run the
oadm routercommand with the appropriate flags. For example:$ oadm router \ --type=f5-router \ --external-host=10.0.0.2 \ --external-host-username=admin \ --external-host-password=mypassword \ --external-host-http-vserver=ose-vserver \ --external-host-https-vserver=https-ose-vserver \ --external-host-private-key=/path/to/key \ --credentials='/etc/origin/master/openshift-router.kubeconfig' \1 --service-account=router- 1
--credentialsis the path to the CLI configuration file for the openshift-router. It is recommended using an openshift-router specific profile with appropriate permissions.
2.8.7. What’s Next?
If you deployed an HAProxy router, you can learn more about monitoring the router.
If you have not yet done so, you can:
- Configure authentication; by default, authentication is set to Deny All.
- Deploy an integrated Docker registry.
Chapter 3. Upgrading
3.1. Overview
When new versions of OpenShift are released, you can upgrade your existing cluster to apply the latest enhancements and bug fixes. This includes upgrading from previous minor versions, such as release 3.1 to 3.2, and applying asynchronous errata updates within a minor version (3.2.z releases). See the OpenShift Enterprise 3.2 Release Notes to review the latest changes.
Due to the core architectural changes between the major versions, OpenShift Enterprise 2 environments cannot be upgraded to OpenShift Enterprise 3 and require a fresh installation.
Unless noted otherwise, node and masters within a major version are forward and backward compatible, so upgrading your cluster should go smoothly. However, you should not run mismatched versions longer than necessary to upgrade the entire cluster.
If you installed using the quick or advanced installation and the ~/.config/openshift/installer.cfg.yml or inventory file that was used is available, you can perform an automated upgrade. Alternatively, you can upgrade OpenShift manually.
Starting with RHBA-2016:1208, upgrades from OpenShift Enterprise 3.1 to 3.2 are supported for clusters using the containerized installation method. See Known Issues.
3.2. Performing Automated Cluster Upgrades
3.2.1. Overview
Starting with OpenShift 3.0.2, if you installed using the advanced installation and the inventory file that was used is available, you can use the upgrade playbook to automate the OpenShift cluster upgrade process. If you installed using the quick installation method and a ~/.config/openshift/installer.cfg.yml file is available, you can use the installer to perform the automated upgrade.
The automated upgrade performs the following steps for you:
- Applies the latest configuration.
- Upgrades and restart master services.
- Upgrades and restart node services.
- Applies the latest cluster policies.
- Updates the default router if one exists.
- Updates the default registry if one exists.
- Updates default image streams and InstantApp templates.
Ensure that you have met all prerequisites before proceeding with an upgrade. Failure to do so can result in a failed upgrade.
Running Ansible playbooks with the --tags or --check options is not supported by Red Hat.
3.2.2. Preparing for an Automated Upgrade
If you are on OpenShift Enterprise 3.0, you must first upgrade to 3.1 before upgrading to 3.2. Further, if you are currently using the Pacemaker HA method, you must first upgrade to the native HA method before upgrading to 3.2, as the Pacemaker method is no longer supported starting with 3.2. See the OpenShift Enterprise 3.1 upgrade documentation for instructions.
Starting with RHBA-2016:1208, upgrades from OpenShift Enterprise 3.1 to 3.2 are supported for clusters using the containerized installation method. See Known Issues.
To prepare for an automated upgrade:
If you are upgrading from OpenShift Enterprise 3.1 to 3.2, on each master and node host you must manually disable the 3.1 channel and enable the 3.2 channel:
# subscription-manager repos --disable="rhel-7-server-ose-3.1-rpms" \ --enable="rhel-7-server-ose-3.2-rpms"\ --enable="rhel-7-server-rpms" \ --enable="rhel-7-server-extras-rpms" # yum clean allFor any upgrade path, always ensure that you have the latest version of the atomic-openshift-utils package, which should also update the openshift-ansible-* packages:
# yum update atomic-openshift-utilsInstall or update to the following latest available *-excluder packages on each RHEL 7 system, which helps ensure your systems stay on the correct versions of atomic-openshift and docker packages when you are not trying to upgrade, according to the OpenShift Enterprise version:
# yum install atomic-openshift-excluder atomic-openshift-docker-excluderThese packages add entries to the
excludedirective in the host’s /etc/yum.conf file.You must be logged in as a cluster administrative user on the master host for the upgrade to succeed:
$ oc login
There are two methods for running the automated upgrade: using the installer or running the upgrade playbook directly. Choose and follow one method.
3.2.3. Using the Installer to Upgrade
If you installed OpenShift Enterprise using the quick installation method, you should have an installation configuration file located at ~/.config/openshift/installer.cfg.yml. The installer requires this file to start an upgrade.
The installer supports upgrading between minor versions of OpenShift Enterprise (e.g., 3.1 to 3.2) as well as between asynchronous errata updates within a minor version (e.g., 3.2.z).
If you have an older format installation configuration file in ~/.config/openshift/installer.cfg.yml from an existing OpenShift Enterprise 3.0 or 3.1 installation, the installer will attempt to upgrade the file to the new supported format. If you do not have an installation configuration file of any format, you can create one manually.
To start the upgrade, run the installer with the upgrade subcommand:
- Satisfy the steps in Preparing for an Automated Upgrade to ensure you are using the latest upgrade playbooks.
Run the following command on each host to remove the atomic-openshift packages from the list of yum excludes on the host:
# atomic-openshift-excluder unexcludeRun the installer with the
upgradesubcommand:# atomic-openshift-installer upgrade- Follow the on-screen instructions to upgrade to the latest release.
After all master and node upgrades have completed, a recommendation will be printed to reboot all hosts. Before rebooting, run the following command on each master and node host to add the atomic-openshift packages back to the list of yum excludes on the host:
# atomic-openshift-excluder excludeThen reboot all hosts.
After rebooting, if there are no additional features enabled, you can verify the upgrade. Otherwise, the next step depends on what additional features have you previously enabled.
Expand Feature Next Step Aggregated Logging
Cluster Metrics
3.2.4. Running the Upgrade Playbook Directly
You can run the automated upgrade playbook using Ansible directly, similar to the advanced installation method, if you have an inventory file.
The same v3_2 upgrade playbook can be used to upgrade either of the following to the latest 3.2 release:
3.2.4.1. Upgrading to OpenShift Enterprise 3.2
Before running the upgrade, first ensure the deployment_type parameter in your inventory file is set to openshift-enterprise.
If you have multiple masters configured and want to enable rolling, full system restarts of the hosts, you can set the openshift_rolling_restart_mode parameter in your inventory file to system. Otherwise, the default value services performs rolling service restarts on HA masters, but does not reboot the systems. See Configuring Cluster Variables for details.
Then, run the v3_2 upgrade playbook. If your inventory file is located somewhere other than the default /etc/ansible/hosts, add the -i flag to specify the location. If you previously used the atomic-openshift-installer command to run your installation, you can check ~/.config/openshift/.ansible/hosts for the last inventory file that was used, if needed.
# ansible-playbook [-i </path/to/inventory/file>] \
/usr/share/ansible/openshift-ansible/playbooks/byo/openshift-cluster/upgrades/v3_2/upgrade.ymlThe upgrade playbook was previously located in a v3_1_to_v3_2 directory. Ensure you are using the latest playbooks per the Preparing for an Automated Upgrade section.
After all master and node upgrades have completed, a recommendation will be printed to reboot all hosts. Before rebooting, run the following command on each master and node host to add the atomic-openshift packages back to the list of yum excludes on the host:
# atomic-openshift-excluder excludeThen reboot all hosts.
After rebooting, if there are no additional features enabled, you can verify the upgrade. Otherwise, the next step depends on what additional features have you previously enabled.
Expand Feature Next Step Aggregated Logging
Cluster Metrics
3.2.4.2. Upgrading to OpenShift Enterprise 3.2 Asynchronous Releases
To apply asynchronous errata updates to an existing OpenShift Enterprise 3.2 cluster, first upgrade the atomic-openshift-utils package on the Red Hat Enterprise Linux 7 system where you will be running Ansible:
# yum update atomic-openshift-utils
Then, run the same v3_2 upgrade playbook that is used for upgrading to OpenShift Enterprise 3.2 from 3.1. If your inventory file is located somewhere other than the default /etc/ansible/hosts, add the -i flag to specify the location. If you previously used the atomic-openshift-installer command to run your installation, you can check ~/.config/openshift/.ansible/hosts for the last inventory file that was used, if needed.
# ansible-playbook [-i </path/to/inventory/file>] \
/usr/share/ansible/openshift-ansible/playbooks/byo/openshift-cluster/upgrades/v3_2/upgrade.ymlAfter all master and node upgrades have completed, a recommendation will be printed to reboot all hosts. Before rebooting, run the following command on each master and node host to add the atomic-openshift packages back to the list of yum excludes on the host:
# atomic-openshift-excluder excludeThen reboot all hosts.
After rebooting, if there are no additional features enabled, you can verify the upgrade. Otherwise, the next step depends on what additional features have you previously enabled.
Expand Feature Next Step Aggregated Logging
Cluster Metrics
3.2.5. Upgrading the EFK Logging Stack
If you have previously deployed the EFK logging stack and want to upgrade to the latest logging component images, the steps must be performed manually as shown in Manual Upgrades.
3.2.6. Upgrading Cluster Metrics
If you have previously deployed cluster metrics, you must manually update to the latest metric components.
3.2.7. Verifying the Upgrade
To verify the upgrade, first check that all nodes are marked as Ready:
# oc get nodes
NAME LABELS STATUS
master.example.com kubernetes.io/hostname=master.example.com,region=infra,zone=default Ready
node1.example.com kubernetes.io/hostname=node1.example.com,region=primary,zone=east ReadyThen, verify that you are running the expected versions of the docker-registry and router images, if deployed:
# oc get -n default dc/docker-registry -o json | grep \"image\"
"image": "openshift3/ose-docker-registry:v3.2.1.31",
# oc get -n default dc/router -o json | grep \"image\"
"image": "openshift3/ose-haproxy-router:v3.2.1.31",After upgrading, you can use the diagnostics tool on the master to look for common issues:
# oadm diagnostics
...
[Note] Summary of diagnostics execution:
[Note] Completed with no errors or warnings seen.3.3. Performing Manual Cluster Upgrades
3.3.1. Overview
As an alternative to performing an automated upgrade, you can manually upgrade your OpenShift cluster. To manually upgrade without disruption, it is important to upgrade each component as documented in this topic.
Before you begin your upgrade, familiarize yourself now with the entire procedure. Specific releases may require additional steps to be performed at key points before or during the standard upgrade process.
Ensure that you have met all prerequisites before proceeding with an upgrade. Failure to do so can result in a failed upgrade.
3.3.2. Preparing for a Manual Upgrade
If you are on OpenShift Enterprise 3.0, you must first upgrade to 3.1 before upgrading to 3.2. Further, if you are currently using the Pacemaker HA method, you must first upgrade to the native HA method before upgrading to 3.2, as the Pacemaker method is no longer supported starting with 3.2. See the OpenShift Enterprise 3.1 upgrade documentation for instructions.
Starting with RHBA-2016:1208, upgrades from OpenShift Enterprise 3.1 to 3.2 are supported for clusters using the containerized installation method. See Known Issues.
To prepare for a manual upgrade, follow these steps:
If you are upgrading from OpenShift Enterprise 3.1 to 3.2, manually disable the 3.1 channel and enable the 3.2 channel on each host:
# subscription-manager repos --disable="rhel-7-server-ose-3.1-rpms" \ --enable="rhel-7-server-ose-3.2-rpms" \ --enable="rhel-7-server-extras-rpms"On RHEL 7 systems, also clear the yum cache:
# yum clean allInstall or update to the latest available version of the atomic-openshift-utils package on each RHEL 7 system, which provides files that will be used in later sections:
# yum install atomic-openshift-utilsBecause RHEL Atomic Host 7 systems cannot use yum, you must download the atomic-openshift-utils package on a subscribed RHEL 7 system and copy the following file to any RHEL Atomic Host 7 systems to be used later:
/usr/share/ansible/openshift-ansible/playbooks/common/openshift-cluster/upgrades/files/nuke_images.shNoteThis file was previously located at /usr/share/ansible/openshift-ansible/playbooks/byo/openshift-cluster/upgrades/docker/files/nuke_images.sh.
Install or update to the following latest available *-excluder packages on each RHEL 7 system, which helps ensure your systems stay on the correct versions of atomic-openshift and docker packages when you are not trying to upgrade, according to the OpenShift Enterprise version:
# yum install atomic-openshift-excluder atomic-openshift-docker-excluderThese packages add entries to the
excludedirective in the host’s /etc/yum.conf file.Create an etcd backup on each master. The etcd package is required, even if using embedded etcd, for access to the
etcdctlcommand to make the backup. The package is installed by default for RHEL Atomic Host 7 systems. If the master is a RHEL 7 system, ensure the package is installed:# yum install etcdThen, create the backup:
# ETCD_DATA_DIR=/var/lib/origin1 # etcdctl backup \ --data-dir $ETCD_DATA_DIR \ --backup-dir $ETCD_DATA_DIR.bak.<date>2 For any upgrade path, ensure that you are running the latest kernel on each RHEL 7 system:
# yum update kernel
3.3.3. Upgrading Master Components
Upgrade your master hosts first:
Run the following command on each master to remove the atomic-openshift packages from the list of yum excludes on the host:
# atomic-openshift-excluder unexcludeUpgrade the atomic-openshift packages or related images.
For masters using the RPM-based method on a RHEL 7 system, upgrade all installed atomic-openshift packages:
# yum upgrade atomic-openshift\*For masters using the containerized method on a RHEL 7 or RHEL Atomic Host 7 system, set the
IMAGE_VERSIONparameter to the version you are upgrading to in the following files:- /etc/sysconfig/atomic-openshift-master (single master clusters only)
- /etc/sysconfig/atomic-openshift-master-controllers (multi-master clusters only)
- /etc/sysconfig/atomic-openshift-master-api (multi-master clusters only)
- /etc/sysconfig/atomic-openshift-node
/etc/sysconfig/atomic-openshift-openvswitch
For example:
IMAGE_VERSION=v3.2.1.31
Restart the master service(s) on each master and review logs to ensure they restart successfully.
For single master clusters:
# systemctl restart atomic-openshift-master # journalctl -r -u atomic-openshift-masterFor multi-master clusters:
# systemctl restart atomic-openshift-master-controllers # systemctl restart atomic-openshift-master-api # journalctl -r -u atomic-openshift-master-controllers # journalctl -r -u atomic-openshift-master-apiBecause masters also have node components running on them in order to be configured as part of the OpenShift SDN, restart the atomic-openshift-node and openvswitch services:
# systemctl restart atomic-openshift-node # systemctl restart openvswitch # journalctl -r -u openvswitch # journalctl -r -u atomic-openshift-nodeRun the following command on each master to add the atomic-openshift packages back to the list of yum excludes on the host:
# atomic-openshift-excluder exclude
Upgrade any external etcd hosts using the RPM-based method on a RHEL 7 system:
Upgrade the etcd package:
# yum update etcdRestart the etcd service and review the logs to ensure it restarts successfully:
# systemctl restart etcd # journalctl -r -u etcd
If you are performing a cluster upgrade that requires updating Docker to version 1.10, such as OpenShift Enterprise 3.1 to 3.2 or 3.2.0 to 3.2.1, you must also perform the following steps if you are not already on Docker 1.10:
The node component on masters is set by default to unschedulable status during initial installation, so that pods are not deployed to them. However, it is possible to set them schedulable during the initial installation or manually thereafter. If any of your masters are also configured as a schedulable node, skip the following Docker upgrade steps for those masters and instead run all steps described in Upgrading Nodes when you get to that section for those hosts as well.
Run the following script on each master and external etcd host to remove all containers and images, which is required to avoid a long upgrade process for older images after Docker is updated. Containers and images for pods backed by replication controllers will be recreated automatically:
# chmod u+x /usr/share/ansible/openshift-ansible/playbooks/common/openshift-cluster/upgrades/files/nuke_images.sh # /usr/share/ansible/openshift-ansible/playbooks/common/openshift-cluster/upgrades/files/nuke_images.shUpgrade Docker.
For RHEL 7 systems:
# yum update dockerThen, restart the docker service and review the logs to ensure it restarts successfully:
# systemctl restart docker # journalctl -r -u dockerFor RHEL Atomic Host 7 systems, upgrade to the latest Atomic tree if one is available:
NoteIf upgrading to RHEL Atomic Host 7.2.5, this upgrades Docker to version 1.10. See the OpenShift Enterprise 3.2.1.1 release notes for details and known issues.
# atomic host upgradeAfter the upgrade is completed and prepared for the next boot, reboot the host and ensure the docker service starts successfully:
# systemctl reboot # journalctl -r -u docker
3.3.4. Updating Policy Definitions
After a cluster upgrade, the recommended default cluster roles may have been updated. To check if an update is recommended for your environment, you can run:
# oadm policy reconcile-cluster-rolesThis command outputs a list of roles that are out of date and their new proposed values. For example:
# oadm policy reconcile-cluster-roles
apiVersion: v1
items:
- apiVersion: v1
kind: ClusterRole
metadata:
creationTimestamp: null
name: admin
rules:
- attributeRestrictions: null
resources:
- builds/custom
...Your output will vary based on the OpenShift version and any local customizations you have made. Review the proposed policy carefully.
You can either modify this output to re-apply any local policy changes you have made, or you can automatically apply the new policy using the following process:
Reconcile the cluster roles:
# oadm policy reconcile-cluster-roles \ --additive-only=true \ --confirmReconcile the cluster role bindings:
# oadm policy reconcile-cluster-role-bindings \ --exclude-groups=system:authenticated \ --exclude-groups=system:authenticated:oauth \ --exclude-groups=system:unauthenticated \ --exclude-users=system:anonymous \ --additive-only=true \ --confirmReconcile security context constraints:
# oadm policy reconcile-sccs \ --additive-only=true \ --confirm
3.3.5. Upgrading Nodes
After upgrading your masters, you can upgrade your nodes. When restarting the atomic-openshift-node service, there will be a brief disruption of outbound network connectivity from running pods to services while the service proxy is restarted. The length of this disruption should be very short and scales based on the number of services in the entire cluster.
One at at time for each node that is not also a master, you must disable scheduling and evacuate its pods to other nodes, then upgrade packages and restart services.
Run the following command on each node to remove the atomic-openshift packages from the list of yum excludes on the host:
# atomic-openshift-excluder unexcludeAs a user with cluster-admin privileges, disable scheduling for the node:
# oadm manage-node <node> --schedulable=falseEvacuate pods on the node to other nodes:
ImportantThe
--forceoption deletes any pods that are not backed by a replication controller.# oadm manage-node <node> --evacuate --forceUpgrade the node component packages or related images.
For nodes using the RPM-based method on a RHEL 7 system, upgrade all installed atomic-openshift packages:
# yum upgrade atomic-openshift\*For nodes using the containerized method on a RHEL 7 or RHEL Atomic Host 7 system, set the
IMAGE_VERSIONparameter in the /etc/sysconfig/atomic-openshift-node and /etc/sysconfig/openvswitch files to the version you are upgrading to. For example:IMAGE_VERSION=v3.2.1.31
Restart the atomic-openshift-node and openvswitch services and review the logs to ensure they restart successfully:
# systemctl restart atomic-openshift-node # systemctl restart openvswitch # journalctl -r -u atomic-openshift-node # journalctl -r -u openvswitchIf you are performing a cluster upgrade that requires updating Docker to version 1.10, such as OpenShift Enterprise 3.1 to 3.2 or 3.2.0 to 3.2.1, you must also perform the following steps if you are not already on Docker 1.10:
Run the following script to remove all containers and images, which is required to avoid a long upgrade process for older images after Docker is updated. Containers and images for pods backed by replication controllers will be recreated automatically:
# chmod u+x /usr/share/ansible/openshift-ansible/playbooks/common/openshift-cluster/upgrades/files/nuke_images.sh # /usr/share/ansible/openshift-ansible/playbooks/common/openshift-cluster/upgrades/files/nuke_images.shUpgrade Docker.
For RHEL 7 systems:
# yum update dockerThen, restart the docker service and review the logs to ensure it restarts successfully:
# systemctl restart docker # journalctl -r -u dockerAfter Docker is restarted, restart the atomic-openshift-node service again and review the logs to ensure it restarts successfully:
# systemctl restart atomic-openshift-node # journalctl -r -u atomic-openshift-nodeFor RHEL Atomic Host 7 systems, upgrade to the latest Atomic tree if one is available:
NoteIf upgrading to RHEL Atomic Host 7.2.5, this upgrades Docker to version 1.10. See the OpenShift Enterprise 3.2.1.1 release notes for details and known issues.
# atomic host upgradeAfter the upgrade is completed and prepared for the next boot, reboot the host and ensure the docker service starts successfully:
# systemctl reboot # journalctl -r -u docker
Re-enable scheduling for the node:
# oadm manage-node <node> --schedulableRun the following command on the node to add the atomic-openshift packages back to the list of yum excludes on the host:
# atomic-openshift-excluder exclude- Repeat these steps on the next node, and continue repeating these steps until all nodes have been upgraded.
After all nodes have been upgraded, as a user with cluster-admin privileges, verify that all nodes are showing as Ready:
# oc get nodes NAME LABELS STATUS master.example.com kubernetes.io/hostname=master.example.com Ready,SchedulingDisabled node1.example.com kubernetes.io/hostname=node1.example.com Ready node2.example.com kubernetes.io/hostname=node2.example.com Ready
3.3.6. Upgrading the Router
If you have previously deployed a router, the router deployment configuration must be upgraded to apply updates contained in the router image. To upgrade your router without disrupting services, you must have previously deployed a highly-available routing service.
Edit your router’s deployment configuration. For example, if it has the default router name:
# oc edit dc/routerApply the following changes:
...
spec:
template:
spec:
containers:
- env:
...
image: registry.access.redhat.com/openshift3/ose-haproxy-router:v3.2.1.31
imagePullPolicy: IfNotPresent
...- 1
- Adjust the image version to match the version you are upgrading to.
You should see one router pod updated and then the next.
3.3.7. Upgrading the Registry
The registry must also be upgraded for changes to take effect in the registry image. If you have used a PersistentVolumeClaim or a host mount point, you may restart the registry without losing the contents of your registry. Deploying a Docker Registry details how to configure persistent storage for the registry.
Edit your registry’s deployment configuration:
# oc edit dc/docker-registryApply the following changes:
...
spec:
template:
spec:
containers:
- env:
...
image: registry.access.redhat.com/openshift3/ose-docker-registry:v3.2.1.31
imagePullPolicy: IfNotPresent
...- 1
- Adjust the image version to match the version you are upgrading to.
Images that are being pushed or pulled from the internal registry at the time of upgrade will fail and should be restarted automatically. This will not disrupt pods that are already running.
3.3.8. Updating the Default Image Streams and Templates
By default, the quick and advanced installation methods automatically create default image streams, InstantApp templates, and database service templates in the openshift project, which is a default project to which all users have view access. These objects were created during installation from the JSON files located under the /usr/share/ansible/openshift-ansible/roles/openshift_examples/files/examples/ directory.
Because RHEL Atomic Host 7 cannot use yum to update packages, the following steps must take place on a RHEL 7 system.
Update the packages that provide the example JSON files. On a subscribed Red Hat Enterprise Linux 7 system where you can run the CLI as a user with cluster-admin permissions, install or update to the latest version of the atomic-openshift-utils package, which should also update the openshift-ansible- packages:
# yum update atomic-openshift-utilsThe openshift-ansible-roles package provides the latest example JSON files.
After a manual upgrade, get the latest templates from openshift-ansible-roles:
rpm -ql openshift-ansible-roles | grep examples | grep v1.2In this example, /usr/share/ansible/openshift-ansible/roles/openshift_examples/files/examples/v1.2/image-streams/image-streams-rhel7.json is the latest file that you want in the latest openshift-ansible-roles package.
/usr/share/openshift/examples/image-streams/image-streams-rhel7.json is not owned by a package, but is updated by Ansible. If you are upgrading outside of Ansible. you need to get the latest .json files on the system where you are running
oc, which can run anywhere that has access to the master.Install atomic-openshift-utils and its dependencies to install the new content into /usr/share/ansible/openshift-ansible/roles/openshift_examples/files/examples/v1.2/.:
$ oc create -n openshift -f /usr/share/ansible/openshift-ansible/roles/openshift_examples/files/examples/v1.2/image-streams/image-streams-rhel7.json $ oc create -n openshift -f /usr/share/ansible/openshift-ansible/roles/openshift_examples/files/examples/v1.2/image-streams/dotnet_imagestreams.json $ oc replace -n openshift -f /usr/share/ansible/openshift-ansible/roles/openshift_examples/files/examples/v1.2/image-streams/image-streams-rhel7.json $ oc replace -n openshift -f /usr/share/ansible/openshift-ansible/roles/openshift_examples/files/examples/v1.2/image-streams/dotnet_imagestreams.jsonUpdate the templates:
$ oc create -n openshift -f /usr/share/ansible/openshift-ansible/roles/openshift_examples/files/examples/v1.2/quickstart-templates/ $ oc create -n openshift -f /usr/share/ansible/openshift-ansible/roles/openshift_examples/files/examples/v1.2/db-templates/ $ oc create -n openshift -f /usr/share/ansible/openshift-ansible/roles/openshift_examples/files/examples/v1.2/infrastructure-templates/ $ oc create -n openshift -f /usr/share/ansible/openshift-ansible/roles/openshift_examples/files/examples/v1.2/xpaas-templates/ $ oc create -n openshift -f /usr/share/ansible/openshift-ansible/roles/openshift_examples/files/examples/v1.2/xpaas-streams/ $ oc replace -n openshift -f /usr/share/ansible/openshift-ansible/roles/openshift_examples/files/examples/v1.2/quickstart-templates/ $ oc replace -n openshift -f /usr/share/ansible/openshift-ansible/roles/openshift_examples/files/examples/v1.2/db-templates/ $ oc replace -n openshift -f /usr/share/ansible/openshift-ansible/roles/openshift_examples/files/examples/v1.2/infrastructure-templates/ $ oc replace -n openshift -f /usr/share/ansible/openshift-ansible/roles/openshift_examples/files/examples/v1.2/xpaas-templates/ $ oc replace -n openshift -f /usr/share/ansible/openshift-ansible/roles/openshift_examples/files/examples/v1.2/xpaas-streams/Errors are generated for items that already exist. This is expected behavior:
# oc create -n openshift -f /usr/share/ansible/openshift-ansible/roles/openshift_examples/files/examples/v1.2/quickstart-templates/ Error from server: error when creating "/usr/share/ansible/openshift-ansible/roles/openshift_examples/files/examples/v1.2/quickstart-templates/cakephp-mysql.json": templates "cakephp-mysql-example" already exists Error from server: error when creating "/usr/share/ansible/openshift-ansible/roles/openshift_examples/files/examples/v1.2/quickstart-templates/cakephp.json": templates "cakephp-example" already exists Error from server: error when creating "/usr/share/ansible/openshift-ansible/roles/openshift_examples/files/examples/v1.2/quickstart-templates/dancer-mysql.json": templates "dancer-mysql-example" already exists Error from server: error when creating "/usr/share/ansible/openshift-ansible/roles/openshift_examples/files/examples/v1.2/quickstart-templates/dancer.json": templates "dancer-example" already exists Error from server: error when creating "/usr/share/ansible/openshift-ansible/roles/openshift_examples/files/examples/v1.2/quickstart-templates/django-postgresql.json": templates "django-psql-example" already exists
Now, content can be updated. Without running the automated upgrade playbooks, the content is not updated in /usr/share/openshift/.
3.3.9. Importing the Latest Images
After updating the default image streams, you may also want to ensure that the images within those streams are updated. For each image stream in the default openshift project, you can run:
# oc import-image -n openshift <imagestream>For example, get the list of all image streams in the default openshift project:
# oc get is -n openshift
NAME DOCKER REPO TAGS UPDATED
mongodb registry.access.redhat.com/openshift3/mongodb-24-rhel7 2.4,latest,v3.1.1.6 16 hours ago
mysql registry.access.redhat.com/openshift3/mysql-55-rhel7 5.5,latest,v3.1.1.6 16 hours ago
nodejs registry.access.redhat.com/openshift3/nodejs-010-rhel7 0.10,latest,v3.1.1.6 16 hours ago
...Update each image stream one at a time:
# oc import-image -n openshift nodejs
The import completed successfully.
Name: nodejs
Created: 10 seconds ago
Labels: <none>
Annotations: openshift.io/image.dockerRepositoryCheck=2016-07-05T19:20:30Z
Docker Pull Spec: 172.30.204.22:5000/openshift/nodejs
Tag Spec Created PullSpec Image
latest 4 9 seconds ago registry.access.redhat.com/rhscl/nodejs-4-rhel7:latest 570ad8ed927fd5c2c9554ef4d9534cef808dfa05df31ec491c0969c3bd372b05
4 registry.access.redhat.com/rhscl/nodejs-4-rhel7:latest 9 seconds ago <same> 570ad8ed927fd5c2c9554ef4d9534cef808dfa05df31ec491c0969c3bd372b05
0.10 registry.access.redhat.com/openshift3/nodejs-010-rhel7:latest 9 seconds ago <same> a1ef33be788a28ec2bdd48a9a5d174ebcfbe11c8e986d2996b77f5bccaaa4774
In order to update your S2I-based applications, you must manually trigger a new build of those applications after importing the new images using oc start-build <app-name>.
3.3.10. Upgrading the EFK Logging Stack
Use the following to upgrade an already-deployed EFK logging stack.
The following steps apply when upgrading from OpenShift Enterprise 3.1 to 3.2, or are applying an asynchronous update to 3.2. These steps pull the latest 3.2 logging images.
Ensure you are working in the project where the EFK stack was previously deployed. For example, if the project is named logging:
$ oc project loggingScale down your Fluentd instances to 0:
$ oc scale dc/logging-fluentd --replicas=0Wait until they have terminated. This helps prevent loss of data by giving them time to properly flush their current buffer and send any logs they were processing to Elasticsearch.
Scale down your Kibana instances:
$ oc scale dc/logging-kibana --replicas=0If you have an operations deployment, also run:
$ oc scale dc/logging-kibana-ops --replicas=0Once confirming your Fluentd and Kibana pods have been terminated, scale down the Elasticsearch pods:
$ oc scale dc/logging-es-<unique_name> --replicas=0If you have an operations deployment, also run:
$ oc scale dc/logging-es-ops-<unique_name> --replicas=0After confirming your Elasticsearch pods have been terminated, rerun the deployer to generate any missing or changed features.
Follow the first step in Deploying the EFK Stack. After the deployer completes, re-attach the persistent volume claims you were previously using, then deploy a template that is created by the deployer:
$ oc process logging-support-template | oc apply -f -
Deployment of logging components is intended to happen automatically based on tags being imported into the image streams created in the previous step. However, as not all tags are automatically imported, this mechanism has become unreliable as multiple versions are released. Therefore, manual importing may be necessary as follows.
For each image stream
logging-auth-proxy,logging-kibana,logging-elasticsearch, andlogging-fluentd, manually import the tag corresponding to theIMAGE_VERSIONspecified (or defaulted) for the deployer.$ oc import-image <name>:<version> --from <prefix><name>:<tag>For example:
$ oc import-image logging-auth-proxy:3.2.1 \ --from registry.access.redhat.com/openshift3/logging-auth-proxy:3.2.1 $ oc import-image logging-kibana:3.2.1 \ --from registry.access.redhat.com/openshift3/logging-kibana:3.2.1 $ oc import-image logging-elasticsearch:3.2.1 \ --from registry.access.redhat.com/openshift3/logging-elasticsearch:3.2.1 $ oc import-image logging-fluentd:3.2.1 \ --from registry.access.redhat.com/openshift3/logging-fluentd:3.2.1Next, scale Elasticsearch back up incrementally so that the cluster has time to rebuild.
To begin, scale up to 1:
$ oc scale dc/logging-es-<unique_name> --replicas=1Follow the logs of the resulting pod to ensure that it is able to recover its indices correctly and that there are no errors:
$ oc logs -f <pod_name>If that is successful, you can then do the same for the operations cluster, if one was previously used.
- After all Elasticsearch nodes have recovered their indices, continue to scale it back up to the size it was prior to doing maintenance. Check the logs of the Elasticsearch members to verify that they have correctly joined the cluster and recovered.
- Now scale Kibana and Fluentd back up to their previous state. Because Fluentd was shut down and allowed to push its remaining records to Elasticsearch in the previous steps, it can now pick back up from where it left off with no loss of logs, provided any unread log files are still available on the node.
In the latest version, Kibana will display indices differently now in order to prevent users from being able to access the logs of previously created projects that have been deleted.
Due to this change, your old logs will not appear automatically. To migrate your old indices to the new format, rerun the deployer with
-v MODE=migratein addition to your prior flags. This should be run while your Elasticsearch cluster is running, as the script must connect to it to make changes.NoteThis only impacts non-operations logs. Operations logs will appear the same as in previous versions. There should be minimal performance impact to Elasticsearch while running this and it will not perform an install.
3.3.11. Upgrading Cluster Metrics
After upgrading an already-deployed Cluster Metrics install, you must update to a newer version of the metrics components.
- The update process stops all the metrics containers, updates the metrics configuration files, and redeploys the newer components.
- It does not change the metrics route.
- It does not delete the metrics persistent volume claim. Metrics stored to persistent volumes before the update are available after the update completes.
The update deletes all non-persisted metric values and overwrites local changes to the metrics configurations. For example, the number of instances in a replica set is not saved.
To update, follow the same steps as when the metrics components were first deployed, using the correct template, except this time, specify the MODE=refresh option:
$ oc new-app -f metrics-deployer.yaml \
-p HAWKULAR_METRICS_HOSTNAME=hm.example.com,MODE=refresh - 1
- In the original deployment command, there was no
MODE=refresh.
During the update, the metrics components do not run. Because of this, they cannot collect data and a gap normally appears in the graphs.
3.3.12. Additional Manual Steps Per Release
Some OpenShift releases may have additional instructions specific to that release that must be performed to fully apply the updates across the cluster. Read through the following sections carefully depending on your upgrade path, as you may be required to perform certain steps at key points during the standard upgrade process described earlier in this topic.
See the OpenShift Enterprise 3.2 Release Notes to review the latest release notes.
3.3.12.1. OpenShift Enterprise 3.2.0
There are no additional manual steps for the upgrade to OpenShift Enterprise 3.2.0 that are not already mentioned inline during the standard manual upgrade process.
3.3.12.2. OpenShift Enterprise 3.2.1.1
The upgrade to OpenShift Enterprise 3.2.1.1 involves updating to Docker 1.10. The steps to properly upgrade Docker are higlighted and included inline in the Upgrading Master Components and Upgrading Nodes sections. No other additional manual steps are required for this release.
See the Known Issues for OpenShift Enterprise 3.2.1.1 for more details on using OpenShift Enterprise and Docker 1.10.
3.3.12.3. OpenShift Enterprise 3.2.1.4
There are no additional manual steps for the upgrade to OpenShift Enterprise 3.2.1.4 that are not already mentioned inline during the standard manual upgrade process.
3.3.12.4. OpenShift Enterprise 3.2.1.9
There are no additional manual steps for the upgrade to OpenShift Enterprise 3.2.1.9 that are not already mentioned inline during the standard manual upgrade process.
3.3.12.5. OpenShift Enterprise 3.2.1.13
There are no additional manual steps for the upgrade to OpenShift Enterprise 3.2.1.13 that are not already mentioned inline during the standard manual upgrade process.
3.3.12.6. OpenShift Enterprise 3.2.1.15
There are no additional manual steps for the upgrade to OpenShift Enterprise 3.2.1.15 that are not already mentioned inline during the standard manual upgrade process.
3.3.12.7. OpenShift Enterprise 3.2.1.17
There are no additional manual steps for the upgrade to OpenShift Enterprise 3.2.1.17 that are not already mentioned inline during the standard manual upgrade process.
3.3.12.8. OpenShift Enterprise 3.2.1.21
There are no additional manual steps for the upgrade to OpenShift Enterprise 3.2.1.21 that are not already mentioned inline during the standard manual upgrade process.
3.3.12.9. OpenShift Enterprise 3.2.1.23
There are no additional manual steps for the upgrade to OpenShift Enterprise 3.2.1.23 that are not already mentioned inline during the standard manual upgrade process.
3.3.12.10. OpenShift Enterprise 3.2.1.26
There are no additional manual steps for the upgrade to OpenShift Enterprise 3.2.1.26 that are not already mentioned inline during the standard manual upgrade process.
3.3.12.11. OpenShift Enterprise 3.2.1.28
There are no additional manual steps for the upgrade to OpenShift Enterprise 3.2.1.28 that are not already mentioned inline during the standard manual upgrade process.
3.3.12.12. OpenShift Enterprise 3.2.1.30
There are no additional manual steps for the upgrade to OpenShift Enterprise 3.2.1.30 that are not already mentioned inline during the standard manual upgrade process.
3.3.12.13. OpenShift Enterprise 3.2.1.31-2
There are no additional manual steps for the upgrade to OpenShift Enterprise 3.2.1.31-2 that are not already mentioned inline during the standard manual upgrade process.
3.3.12.14. OpenShift Enterprise 3.2.1.31-4
There are no additional manual steps for the upgrade to OpenShift Enterprise 3.2.1.31-4 that are not already mentioned inline during the standard manual upgrade process.
3.3.13. Verifying the Upgrade
To verify the upgrade, first check that all nodes are marked as Ready:
# oc get nodes
NAME LABELS STATUS
master.example.com kubernetes.io/hostname=master.example.com,region=infra,zone=default Ready
node1.example.com kubernetes.io/hostname=node1.example.com,region=primary,zone=east ReadyThen, verify that you are running the expected versions of the docker-registry and router images, if deployed:
# oc get -n default dc/docker-registry -o json | grep \"image\"
"image": "openshift3/ose-docker-registry:v3.2.1.31",
# oc get -n default dc/router -o json | grep \"image\"
"image": "openshift3/ose-haproxy-router:v3.2.1.31",After upgrading, you can use the diagnostics tool on the master to look for common issues:
# oadm diagnostics
...
[Note] Summary of diagnostics execution:
[Note] Completed with no errors or warnings seen.Chapter 4. Downgrading OpenShift
4.1. Overview
Following an OpenShift Enterprise upgrade, it may be desirable in extreme cases to downgrade your cluster to a previous version. The following sections outline the required steps for each system in a cluster to perform such a downgrade for the OpenShift Enterprise 3.2 to 3.1 downgrade path.
These steps are currently only supported for RPM-based installations of OpenShift Enterprise and assumes downtime of the entire cluster.
For the OpenShift Enterprise 3.1 to 3.0 downgrade path, see the OpenShift Enterprise 3.1 documentation, which has modified steps.
4.2. Verifying Backups
The Ansible playbook used during the upgrade process should have created a backup of the master-config.yaml file and the etcd data directory. Ensure these exist on your masters and etcd members:
/etc/origin/master/master-config.yaml.<timestamp>
/var/lib/origin/etcd-backup-<timestamp>Also, back up the node-config.yaml file on each node (including masters, which have the node component on them) with a timestamp:
/etc/origin/node/node-config.yaml.<timestamp>If you use a separate etcd cluster instead of a single embedded etcd instance, the backup is likely created on all etcd members, though only one is required for the recovery process. You can run a separate etcd instance that is co-located with your master nodes.
The RPM downgrade process in a later step should create .rpmsave backups of the following files, but it may be a good idea to keep a separate copy regardless:
/etc/sysconfig/atomic-openshift-master
/etc/etcd/etcd.conf - 1
- Only required if using a separate etcd cluster.
4.3. Shutting Down the Cluster
On all masters, nodes, and etcd members, if you use a separate etcd cluster that runs on different nodes, ensure the relevant services are stopped.
On the master in a single master cluster:
# systemctl stop atomic-openshift-masterOn each master in a multi-master cluster:
# systemctl stop atomic-openshift-master-api
# systemctl stop atomic-openshift-master-controllersOn all master and node hosts:
# systemctl stop atomic-openshift-nodeOn any etcd hosts for a separate etcd cluster:
# systemctl stop etcd4.4. Removing RPMs
On all masters, nodes, and etcd members, if you use a separate etcd cluster that runs on different nodes, remove the following packages:
# yum remove atomic-openshift \
atomic-openshift-clients \
atomic-openshift-node \
atomic-openshift-master \
openvswitch \
atomic-openshift-sdn-ovs \
tuned-profiles-atomic-openshift-nodeIf you use a separate etcd cluster, also remove the etcd package:
# yum remove etcd
If using the embedded etcd, leave the etcd package installed. It is required for running the etcdctl command to issue operations in later steps.
4.5. Downgrading Docker
OpenShift Enterprise 3.2 requires Docker 1.9.1 and also supports Docker 1.10.3, however OpenShift Enterprise 3.1 requires Docker 1.8.2.
Downgrade to Docker 1.8.2 on each host using the following steps:
Remove all local containers and images on the host. Any pods backed by a replication controller will be recreated.
WarningThe following commands are destructive and should be used with caution.
Delete all containers:
# docker rm $(docker ps -a -q)Delete all images:
# docker rmi $(docker images -q)Use
yum swap(instead ofyum downgrade) to install Docker 1.8.2:# yum swap docker-* docker-*1.8.2 # sed -i 's/--storage-opt dm.use_deferred_deletion=true//' /etc/sysconfig/docker-storage # systemctl restart dockerYou should now have Docker 1.8.2 installed and running on the host. Verify with the following:
# docker version Client: Version: 1.8.2-el7 API version: 1.20 Package Version: docker-1.8.2-10.el7.x86_64 [...] # systemctl status docker ● docker.service - Docker Application Container Engine Loaded: loaded (/usr/lib/systemd/system/docker.service; enabled; vendor preset: disabled) Active: active (running) since Mon 2016-06-27 15:44:20 EDT; 33min ago [...]
4.6. Reinstalling RPMs
Disable the OpenShift Enterprise 3.3 repositories, and re-enable the 3.2 repositories:
# subscription-manager repos \
--disable=rhel-7-server-ose-3.3-rpms \
--enable=rhel-7-server-ose-3.2-rpmsOn each master, install the following packages:
# yum install atomic-openshift \
atomic-openshift-clients \
atomic-openshift-node \
atomic-openshift-master \
openvswitch \
atomic-openshift-sdn-ovs \
tuned-profiles-atomic-openshift-nodeOn each node, install the following packages:
# yum install atomic-openshift \
atomic-openshift-node \
openvswitch \
atomic-openshift-sdn-ovs \
tuned-profiles-atomic-openshift-nodeIf you use a separate etcd cluster, install the following package on each etcd member:
# yum install etcd4.7. Restoring etcd
See Backup and Restore.
4.8. Bringing OpenShift Enterprise Services Back Online
See Backup and Restore.
4.9. Verifying the Downgrade
To verify the downgrade, first check that all nodes are marked as Ready:
# oc get nodes
NAME STATUS AGE
master.example.com Ready,SchedulingDisabled 165d
node1.example.com Ready 165d
node2.example.com Ready 165dThen, verify that you are running the expected versions of the docker-registry and router images, if deployed:
# oc get -n default dc/docker-registry -o json | grep \"image\"
"image": "openshift3/ose-docker-registry:v3.1.1.6",
# oc get -n default dc/router -o json | grep \"image\"
"image": "openshift3/ose-haproxy-router:v3.1.1.6",
You can use the diagnostics tool on the master to look for common issues and provide suggestions. In OpenShift Enterprise 3.1, the oc adm diagnostics tool is available as openshift ex diagnostics:
# openshift ex diagnostics
...
[Note] Summary of diagnostics execution:
[Note] Completed with no errors or warnings seen.Chapter 5. Master and Node Configuration
5.1. Overview
The openshift start command is used to launch OpenShift Enterprise servers. The command and its subcommands (master to launch a master server and node to launch a node server) all take a limited set of arguments that are sufficient for launching servers in a development or experimental environment.
However, these arguments are insufficient to describe and control the full set of configuration and security options that are necessary in a production environment. To provide those options, it is necessary to use the dedicated master and node configuration files.
Master configuration files and node configuration files are fully specified with no default values. Therefore, any empty value indicates that you want to start up with an empty value for that parameter. This makes it easy to reason about exactly what your configuration is, but it also makes it difficult to remember all of the options to specify. To make this easier, the configuration files can be created with the --write-config option and then used with the --config option.
5.2. Master Configuration Files
This section reviews parameters mentioned in the master-config.yaml file.
You can create a new master configuration file to see the valid options for your installed version of OpenShift Enterprise.
5.2.1. Admission Control Configuration
| Parameter Name | Description |
|---|---|
|
| Contains admission control plug-in configuration. |
|
|
Key-value pairs that will be passed directly to the Kube API server that match the API servers' command line arguments. These are not migrated, but if you reference a value that does not exist the server will not start. These values may override other settings in |
|
|
Key-value pairs that will be passed directly to the Kube controller manager that match the controller manager’s command line arguments. These are not migrated, but if you reference a value that does not exist the server will not start. These values may override other settings in |
|
|
Used to enable or disable various admission plug-ins. When this type is present as the configuration object under |
|
| Allows specifying a configuration file per admission control plug-in. |
|
| A list of admission control plug-in names that will be installed on the master. Order is significant. If empty, a default list of plug-ins is used. |
|
|
Key-value pairs that will be passed directly to the Kube scheduler that match the scheduler’s command line arguments. These are not migrated, but if you reference a value that does not exist the server will not start. These values may override other settings in |
5.2.2. Asset Configuration
| Parameter Name | Description |
|---|---|
|
| Holds the necessary configuration options for serving assets. |
|
| A list of features that should not be started. You will likely want to set this as null. It is very unlikely that anyone will want to manually disable features and that is not encouraged. |
|
| Files to serve from the asset server file system under a subcontext. |
|
| When set to true, tells the asset server to reload extension scripts and stylesheets for every request rather than only at startup. It lets you develop extensions without having to restart the server for every change. |
|
|
Key- (string) and value- (string) pairs that will be injected into the console under the global variable |
|
| File paths on the asset server files to load as scripts when the web console loads. |
|
| File paths on the asset server files to load as style sheets when the web console loads. |
|
| The public endpoint for logging (optional). |
|
| An optional, absolute URL to redirect web browsers to after logging out of the web console. If not specified, the built-in logout page is shown. |
|
| How the web console can access the OpenShift Enterprise server. |
|
| The public endpoint for metrics (optional). |
|
| URL of the the asset server. |
5.2.3. Authentication and Authorization Configuration
| Parameter Name | Description |
|---|---|
|
| Holds authentication and authorization configuration options. |
|
| Indicates how many authentication results should be cached. If 0, the default cache size is used. |
|
| Indicates how long an authorization result should be cached. It takes a valid time duration string (e.g. "5m"). If empty, you get the default timeout. If zero (e.g. "0m"), caching is disabled. |
5.2.4. Controller Configuration
| Parameter Name | Description |
|---|---|
|
|
List of the controllers that should be started. If set to none, no controllers will start automatically. The default value is * which will start all controllers. When using *, you may exclude controllers by prepending a |
|
|
Enables controller election, instructing the master to attempt to acquire a lease before controllers start and renewing it within a number of seconds defined by this value. Setting this value non-negative forces |
|
| Instructs the master to not automatically start controllers, but instead to wait until a notification to the server is received before launching them. |
5.2.5. etcd Configuration
| Parameter Name | Description |
|---|---|
|
| The advertised host:port for client connections to etcd. |
|
| Contains information about how to connect to etcd. |
|
| Holds the necessary configuration options for connecting with an etcd database. |
|
| Contains information about how API resources are stored in etcd. These values are only relevant when etcd is the backing store for the cluster. |
|
| The path within etcd that the Kubernetes resources will be rooted under. This value, if changed, will mean existing objects in etcd will no longer be located. The default value is kubernetes.io. |
|
| The API version that Kubernetes resources in etcd should be serialized to. This value should not be advanced until all clients in the cluster that read from etcd have code that allows them to read the new version. |
|
| The path within etcd that the OpenShift Enterprise resources will be rooted under. This value, if changed, will mean existing objects in etcd will no longer be located. The default value is openshift.io. |
|
| API version that OS resources in etcd should be serialized to. This value should not be advanced until all clients in the cluster that read from etcd have code that allows them to read the new version. |
|
| The advertised host:port for peer connections to etcd. |
|
| Describes how to start serving the etcd peer. |
|
| Describes how to start serving the etcd master. |
|
| The path to the etcd storage directory. |
5.2.6. Grant Configuration
| Parameter Name | Description |
|---|---|
|
| Describes how to handle grants. |
|
| Auto-approves client authorization grant requests. |
|
| Auto-denies client authorization grant requests. |
|
| Prompts the user to approve new client authorization grant requests. |
|
| Determines the default strategy to use when an OAuth client requests a grant.This method will be used only if the specific OAuth client does not provide a strategy of their own. Valid grant handling methods are:
|
5.2.7. Image Configuration
| Parameter Name | Description |
|---|---|
|
| Allows scheduled background import of images to be disabled. |
|
| The format of the name to be built for the system component. |
|
| Holds options that describe how to build image names for system components. |
|
| Controls limits and behavior for importing images. |
|
| Determines if the latest tag will be pulled from the registry. |
|
| Controls the number of images that are imported when a user does a bulk import of a Docker repository. This number defaults to 5 to prevent users from importing large numbers of images accidentally. Set -1 for no limit. |
|
| The maximum number of scheduled image streams that will be imported in the background per minute. The default value is 60. |
|
| The minimum number of seconds that can elapse between when image streams scheduled for background import are checked against the upstream repository. The default value is 15 minutes. |
5.2.8. Kubernetes Master Configuration
| Parameter Name | Description |
|---|---|
|
| A list of API levels that should be enabled on startup, v1 as examples. |
|
|
A map of groups to the versions (or |
|
| Contains information about how to connect to kubelets. |
|
| Holds the necessary configuration options for the Kubernetes master. |
|
| The number of expected masters that should be running. This value defaults to 1 and may be set to a positive integer, or if set to -1, indicates this is part of a cluster. |
|
|
The public IP address of Kubernetes resources. If empty, the first result from |
|
| File name for the .kubeconfig file that describes how to connect this node to the master. |
|
| The range to use for assigning service public ports on a host. |
|
| The subnet to use for assigning service IPs. |
|
| The list of nodes that are statically known. |
5.2.9. Network Configuration
| Parameter Name | Description |
|---|---|
|
| The CIDR string to specify the global overlay network’s L3 space. |
|
|
Controls what values are acceptable for the service external IP field. If empty, no |
|
| The number of bits to allocate to each host’s subnet. For example, 8 would mean a /24 network on the host. |
|
| Controls the range to assign ingress IPs from for services of type LoadBalancer on bare metal. If empty, ingress IPs will not be assigned. It may contain a single CIDR that will be allocated from. For security reasons, you should ensure that this range does not overlap with the CIDRs reserved for external IPs, nodes, pods, or services. |
|
| Provides network options for the node. |
|
| The name of the network plug-in to use. |
|
| The CIDR string to specify the service networks. |
5.2.10. OAuth Authentication Configuration
| Parameter Name | Description |
|---|---|
|
| Forces the provider selection page to render even when there is only a single provider. |
|
| Used for building valid client redirect URLs for external access. |
|
| A path to a file containing a go template used to render error pages during the authentication or grant flow If unspecified, the default error page is used. |
|
| Ordered list of ways for a user to identify themselves. |
|
| A path to a file containing a go template used to render the login page. If unspecified, the default login page is used. |
|
|
CA for verifying the TLS connection back to the |
|
| Used for building valid client redirect URLs for external access. |
|
| Used for making server-to-server calls to exchange authorization codes for access tokens. |
|
| Holds the necessary configuration options for OAuth authentication. |
|
| Allows for customization of pages like the login page. |
|
| A path to a file containing a go template used to render the provider selection page. If unspecified, the default provider selection page is used. |
|
| Holds information about configuring sessions. |
|
| Allows you to customize pages like the login page. |
|
| Contains options for authorization and access tokens. |
5.2.11. Project Configuration
| Parameter Name | Description |
|---|---|
|
| Holds default project node label selector. |
|
| Holds information about project creation and defaults. |
|
| The string presented to a user if they are unable to request a project via the project request API endpoint. |
|
| The template to use for creating projects in response to projectrequest. It is in the format namespace/template and it is optional. If it is not specified, a default template is used. |
5.2.12. Scheduler Configuration
| Parameter Name | Description |
|---|---|
|
| Points to a file that describes how to set up the scheduler. If empty, you get the default scheduling rules |
5.2.13. Security Allocator Configuration
| Parameter Name | Description |
|---|---|
|
|
Defines the range of MCS categories that will be assigned to namespaces. The format is |
|
| Controls the automatic allocation of UIDs and MCS labels to a project. If nil, allocation is disabled. |
|
| Defines the total set of Unix user IDs (UIDs) that will be allocated to projects automatically, and the size of the block each namespace gets. For example, 1000-1999/10 will allocate ten UIDs per namespace, and will be able to allocate up to 100 blocks before running out of space. The default is to allocate from 1 billion to 2 billion in 10k blocks (which is the expected size of the ranges container images will use once user namespaces are started). |
5.2.14. Service Account Configuration
| Parameter Name | Description |
|---|---|
|
| Controls whether or not to allow a service account to reference any secret in a namespace without explicitly referencing them. |
|
|
A list of service account names that will be auto-created in every namespace. If no names are specified, the |
|
| The CA for verifying the TLS connection back to the master. The service account controller will automatically inject the contents of this file into pods so they can verify connections to the master. |
|
|
A file containing a PEM-encoded private RSA key, used to sign service account tokens. If no private key is specified, the service account |
|
| A list of files, each containing a PEM-encoded public RSA key. If any file contains a private key, the public portion of the key is used. The list of public keys is used to verify presented service account tokens. Each key is tried in order until the list is exhausted or verification succeeds. If no keys are specified, no service account authentication will be available. |
|
| Holds the necessary configuration options for a service account. |
5.2.15. Serving Information Configuration
| Parameter Name | Description |
|---|---|
|
| Allows the DNS server on the master to answer queries recursively. Note that open resolvers can be used for DNS amplification attacks and the master DNS should not be made accessible to public networks. |
|
| The ip:port to serve on. |
|
| Controls limits and behavior for importing images. |
|
| A file containing a PEM-encoded certificate. |
|
| TLS cert information for serving secure traffic. |
|
| The certificate bundle for all the signers that you recognize for incoming client certificates. |
|
| Holds the necessary configuration options for DNS. |
|
| Holds the domain suffix. |
|
| Holds the IP. |
|
|
A file containing a PEM-encoded private key for the certificate specified by |
|
| Provides overrides to the client connection used to connect to the master. |
|
| The number of concurrent requests allowed to the server. If zero, no limit. |
|
| A list of certificates to use to secure requests to specific host names. |
|
| The number of seconds before requests are timed out. The default is 60 minutes. If -1, there is no limit on requests. |
|
| The HTTP serving information for the assets. |
5.2.16. Volume Configuration
| Parameter Name | Description |
|---|---|
|
| A boolean to enable or disable dynamic provisioning. Default is true. |
| FSGroup |
Can be specified to enable a quota on local storage use per unique FSGroup ID. At present this is only implemented for emptyDir volumes, and if the underlying |
|
| Contains options for controlling local volume quota on the node. |
|
| Contains options for configuring volume plug-ins in the master node. |
|
| Contains options for configuring volumes on the node. |
|
| Contains options for configuring volumes on the node. |
|
| The directory that volumes are stored under. |
5.3. Node Configuration Files
The following node-config.yaml file is a sample node configuration file that was generated with the default values as of writing. You can create a new node configuration file to see the valid options for your installed version of OpenShift Enterprise.
Example 5.1. Sample Node Configuration File
allowDisabledDocker: false
apiVersion: v1
authConfig:
authenticationCacheSize: 1000
authenticationCacheTTL: 5m
authorizationCacheSize: 1000
authorizationCacheTTL: 5m
dnsDomain: cluster.local
dnsIP: 10.0.2.15
dockerConfig:
execHandlerName: native
imageConfig:
format: openshift/origin-${component}:${version}
latest: false
iptablesSyncPeriod: 5s
kind: NodeConfig
masterKubeConfig: node.kubeconfig
networkConfig:
mtu: 1450
networkPluginName: ""
nodeIP: ""
nodeName: node1.example.com
podManifestConfig:
path: "/path/to/pod-manifest-file"
fileCheckIntervalSeconds: 30
proxyArguments:
proxy-mode:
- iptables
volumeConfig:
localQuota:
perFSGroup: null
servingInfo:
bindAddress: 0.0.0.0:10250
bindNetwork: tcp4
certFile: server.crt
clientCA: node-client-ca.crt
keyFile: server.key
namedCertificates: null
volumeDirectory: /root/openshift.local.volumes- 1
- Configures an IP address to be prepended to a pod’s /etc/resolv.conf by adding the address here.
- 2
- Allows pods to be placed directly on certain set of nodes, or on all nodes without going through the scheduler. You can then use pods to perform the same administrative tasks and support the same services on each node.
- 3
- Specifies the path for the pod manifest file or directory. If it is a directory, then it is expected to contain one or more manifest files. This is used by the Kubelet to create pods on the node.
- 4
- This is the interval (in seconds) for checking the manifest file for new data. The interval must be a positive value.
- 5
- The service proxy implementation to use.
- 6
- Preliminary support for local emptyDir volume quotas, set this value to a resource quantity representing the desired quota per FSGroup, per node. (i.e. 1Gi, 512Mi, etc) Currently requires that the volumeDirectory be on an XFS filesystem mounted with the 'gquota' option, and the matching security context contraint’s fsGroup type set to 'MustRunAs'.
5.3.1. Pod and Node Configuration
| Parameter Name | Description |
|---|---|
|
| The fully specified configuration starting an OpenShift Enterprise node. |
|
| Node may have multiple IPs, so this specifies the IP to use for pod traffic routing. If not specified, network parse/lookup on the nodeName is performed and the first non-loopback address is used. |
|
| The value used to identify this particular node in the cluster. If possible, this should be your fully qualified hostname. If you are describing a set of static nodes to the master, this value must match one of the values in the list. |
|
| Controls grace period for deleting pods on failed nodes. It takes valid time duration string. If empty, you get the default pod eviction timeout. |
|
| Specifies the client cert/key to use when proxying to pods. |
5.3.2. Docker Configuration
| Parameter Name | Description |
|---|---|
|
| If true, the kubelet will ignore errors from Docker. This means that a node can start on a machine that does not have docker started. |
|
| Holds Docker related configuration options |
|
| The handler to use for executing commands in Docker containers. |
5.3.3. Parallel Image Pulls with Docker 1.9+
If you are using Docker 1.9+, you may want to consider enabling parallel image pulling, as the default is to pull images one at a time.
There is a potential issue with data corruption prior to Docker 1.9. However, starting with 1.9, the corruption issue is resolved and it is safe to switch to parallel pulls.
kubeletArguments:
serialize-image-pulls:
- "false" - 1
- Change to true to disable parallel pulls. (This is the default config)
5.4. Passwords and Other Sensitive Data
For some authentication configurations, an LDAP bindPassword or OAuth clientSecret value is required. Instead of specifying these values directly in the master configuration file, these values may be provided as environment variables, external files, or in encrypted files.
Environment Variable Example
...
bindPassword:
env: BIND_PASSWORD_ENV_VAR_NAMEExternal File Example
...
bindPassword:
file: bindPassword.txtEncrypted External File Example
...
bindPassword:
file: bindPassword.encrypted
keyFile: bindPassword.keyTo create the encrypted file and key file for the above example:
$ oadm ca encrypt --genkey=bindPassword.key --out=bindPassword.encrypted
> Data to encrypt: B1ndPass0rd!Encrypted data is only as secure as the decrypting key. Care should be taken to limit filesystem permissions and access to the key file.
5.5. Creating New Configuration Files
For masters, the openshift start command accepts options that indicate that it should simply write the configuration files that it would have used, then terminate. For nodes, a configuration file can be written using the oadm create-node-config command. Creating new configuration files is useful to get a starting point for defining your configuration.
The following commands write the relevant launch configuration file(s), certificate files, and any other necessary files to the specified --write-config or --node-dir directory.
To create configuration files for an all-in-one server (a master and a node on the same host) in the specified directory:
$ openshift start --write-config=/openshift.local.configTo create a master configuration file and other required files in the specified directory:
$ openshift start master --write-config=/openshift.local.config/masterTo create a node configuration file and other related files in the specified directory:
$ oadm create-node-config --node-dir=/openshift.local.config/node-<node_hostname> --node=<node_hostname> --hostnames=<hostname>,<ip_address>
For the --hostnames option in the above command, use a comma-delimited list of every host name or IP address you want server certificates to be valid for. The above command also assumes that certificate files are located in an openshift.local.config/master/ directory. If they are not, you can include options to specify their location. Run the command with the -h option to see details.
5.6. Launching Servers Using Configuration Files
Once you have modified the master and/or node configuration files to your specifications, you can use them when launching servers by specifying them as an argument. Keep in mind that if you specify a configuration file, none of the other command line options you pass are respected.
To launch an all-in-one server using a master configuration and a node configuration file:
$ openshift start --master-config=/openshift.local.config/master/master-config.yaml --node-config=/openshift.local.config/node-<node_hostname>/node-config.yamlTo launch a master server using a master configuration file:
$ openshift start master --config=/openshift.local.config/master/master-config.yamlTo launch a node server using a node configuration file:
$ openshift start node --config=/openshift.local.config/node-<node_hostname>/node-config.yamlChapter 6. Adding Hosts to an Existing Cluster
6.1. Overview
Depending on how your OpenShift Enterprise cluster was installed, you can add new hosts (either nodes or masters) to your installation by using the install tool for quick installations, or by using the scaleup.yml playbook for advanced installations.
6.2. Adding Hosts Using the Quick Installer Tool
If you used the quick install tool to install your OpenShift Enterprise cluster, you can use the quick install tool to add a new node host to your existing cluster, or to reinstall the cluster entirely.
Currently, you can not use the quick installer tool to add new master hosts. You must use the advanced installation method to do so.
If you used the installer in either interactive or unattended mode, you can re-run the installation as long as you have an installation configuration file at ~/.config/openshift/installer.cfg.yml (or specify a different location with the -c option).
The recommended maximum number of nodes is 300.
To add nodes to your installation:
Re-run the installer with the
installsubcommand in interactive or unattended mode:$ atomic-openshift-installer [-u] [-c </path/to/file>] installThe installer detects your current environment and allows you to either add an additional node or re-perform a clean install:
Gathering information from hosts... Installed environment detected. By default the installer only adds new nodes to an installed environment. Do you want to (1) only add additional nodes or (2) perform a clean install?:Choose (1) and follow the on-screen instructions to complete your desired task.
6.3. Adding Hosts Using the Advanced Install
If you installed using the advanced install, you can add new hosts to your cluster by running the scaleup.yml playbook. This playbook queries the master, generates and distributes new certificates for the new hosts, then runs the configuration playbooks on the new hosts only. Before running the scaleup.yml playbook, complete all prerequisite host preparation steps.
This process is similar to re-running the installer in the quick installation method to add nodes, however you have more configuration options available when using the advanced method and when running the playbooks directly.
You must have an existing inventory file (for example, /etc/ansible/hosts) that is representative of your current cluster configuration in order to run the scaleup.yml playbook. If you previously used the atomic-openshift-installer command to run your installation, you can check ~/.config/openshift/.ansible/hosts for the last inventory file that the installer generated, and use or modify that as needed as your inventory file. You must then specify the file location with -i when calling ansible-playbook later.
The recommended maximum number of nodes is 300.
To add a host to an existing cluster:
Ensure you have the latest playbooks by updating the atomic-openshift-utils package:
# yum update atomic-openshift-utilsEdit your /etc/ansible/hosts file and add new_<host_type> to the [OSEv3:children] section:
For example, to add a new node host, add new_nodes:
[OSEv3:children] masters nodes new_nodesTo add new master hosts, add new_masters.
Create a [new_<host_type>] section much like an existing section, specifying host information for any new hosts you want to add. For example, when adding a new node:
[nodes] master[1:3].example.com openshift_node_labels="{'region': 'infra', 'zone': 'default'}" node1.example.com openshift_node_labels="{'region': 'primary', 'zone': 'east'}" node2.example.com openshift_node_labels="{'region': 'primary', 'zone': 'west'}" [new_nodes] node3.example.com openshift_node_labels="{'region': 'primary', 'zone': 'west'}"See Configuring Host Variables for more options.
When adding new masters, hosts added to the [new_masters] section must also be added to the [new_nodes] section with the
openshift_schedulable=falsevariable. This ensures the new master host is part of the OpenShift SDN and that pods are not scheduled for placement on them. For example:[masters] master[1:2].example.com [new_masters] master3.example.com [nodes] node[1:3].example.com openshift_node_labels="{'region': 'infra'}" master[1:2].example.com openshift_schedulable=false [new_nodes] master3.example.com openshift_schedulable=falseRun the scaleup.yml playbook. If your inventory file is located somewhere other than the default of /etc/ansible/hosts, specify the location with the
-i option.For additional nodes:
# ansible-playbook [-i /path/to/file] \ /usr/share/ansible/openshift-ansible/playbooks/byo/openshift-node/scaleup.ymlFor additional masters:
# ansible-playbook [-i /path/to/file] \ /usr/share/ansible/openshift-ansible/playbooks/byo/openshift-master/scaleup.yml- After the playbook completes successfully, verify the installation.
Finally, move any hosts you had defined in the [new_<host_type>] section into their appropriate section (but leave the [new_<host_type>] section definition itself in place) so that subsequent runs using this inventory file are aware of the nodes but do not handle them as new nodes. For example, when adding new nodes:
[nodes] master[1:3].example.com openshift_node_labels="{'region': 'infra', 'zone': 'default'}" node1.example.com openshift_node_labels="{'region': 'primary', 'zone': 'east'}" node2.example.com openshift_node_labels="{'region': 'primary', 'zone': 'west'}" node3.example.com openshift_node_labels="{'region': 'primary', 'zone': 'west'}" [new_nodes]
Chapter 7. Loading the Default Image Streams and Templates
7.1. Overview
Your OpenShift Enterprise installation includes useful sets of Red Hat-provided image streams and templates to make it easy for developers to create new applications. By default, the quick and advanced installation methods automatically create these sets in the openshift project, which is a default global project to which all users have view access.
7.2. Offerings by Subscription Type
Depending on the active subscriptions on your Red Hat account, the following sets of image streams and templates are provided and supported by Red Hat. Contact your Red Hat sales representative for further subscription details.
7.2.1. OpenShift Enterprise Subscription
The core set of image streams and templates are provided and supported with an active OpenShift Enterprise subscription. This includes the following technologies:
| Type | Technology |
|---|---|
| Languages & Frameworks | |
| Databases | |
| Middleware Services | |
| Other Services |
7.2.2. xPaaS Middleware Add-on Subscriptions
Support for xPaaS middleware images are provided by xPaaS Middleware add-on subscriptions, which are separate subscriptions for each xPaaS product. If the relevant subscription is active on your account, image streams and templates are provided and supported for the following technologies:
| Type | Technology |
|---|---|
| Middleware Services |
7.3. Before You Begin
Before you consider performing the tasks in this topic, confirm if these image streams and templates are already registered in your OpenShift Enterprise cluster by doing one of the following:
- Log into the web console and click Add to Project.
List them for the openshift project using the CLI:
$ oc get is -n openshift $ oc get templates -n openshift
If the default image streams and templates are ever removed or changed, you can follow this topic to create the default objects yourself. Otherwise, the following instructions are not necessary.
7.4. Prerequisites
Before you can create the default image streams and templates:
- The integrated Docker registry service must be deployed in your OpenShift Enterprise installation.
-
You must be able to run the
oc createcommand with cluster-admin privileges, because they operate on the default openshiftproject. - You must have installed the atomic-openshift-utils RPM package. See Software Prerequisites for instructions.
Define shell variables for the directories containing image streams and templates. This significantly shortens the commands in the following sections. To do this:
$ IMAGESTREAMDIR="/usr/share/ansible/openshift-ansible/roles/openshift_examples/files/examples/v1.2/image-streams"; \ XPAASSTREAMDIR="/usr/share/ansible/openshift-ansible/roles/openshift_examples/files/examples/v1.2/xpaas-streams"; \ XPAASTEMPLATES="/usr/share/ansible/openshift-ansible/roles/openshift_examples/files/examples/v1.2/xpaas-templates"; \ DBTEMPLATES="/usr/share/ansible/openshift-ansible/roles/openshift_examples/files/examples/v1.2/db-templates"; \ QSTEMPLATES="/usr/share/ansible/openshift-ansible/roles/openshift_examples/files/examples/v1.2/quickstart-templates"
7.5. Creating Image Streams for OpenShift Enterprise Images
If your node hosts are subscribed using Red Hat Subscription Manager and you want to use the core set of image streams that used Red Hat Enterprise Linux (RHEL) 7 based images:
$ oc create -f $IMAGESTREAMDIR/image-streams-rhel7.json -n openshiftAlternatively, to create the core set of image streams that use the CentOS 7 based images:
$ oc create -f $IMAGESTREAMDIR/image-streams-centos7.json -n openshiftCreating both the CentOS and RHEL sets of image streams is not possible, because they use the same names. To have both sets of image streams available to users, either create one set in a different project, or edit one of the files and modify the image stream names to make them unique.
7.6. Creating Image Streams for xPaaS Middleware Images
The xPaaS Middleware image streams provide images for JBoss EAP, JBoss JWS, JBoss A-MQ, JBoss Fuse Integration Services, Decision Server, and JBoss Data Grid. They can be used to build applications for those platforms using the provided templates.
To create the xPaaS Middleware set of image streams:
$ oc create -f $XPAASSTREAMDIR/jboss-image-streams.json -n openshiftAccess to the images referenced by these image streams requires the relevant xPaaS Middleware subscriptions.
7.7. Creating Database Service Templates
The database service templates make it easy to run a database image which can be utilized by other components. For each database (MongoDB, MySQL, and PostgreSQL), two templates are defined.
One template uses ephemeral storage in the container which means data stored will be lost if the container is restarted, for example if the pod moves. This template should be used for demonstration purposes only.
The other template defines a persistent volume for storage, however it requires your OpenShift Enterprise installation to have persistent volumes configured.
To create the core set of database templates:
$ oc create -f $DBTEMPLATES -n openshiftAfter creating the templates, users are able to easily instantiate the various templates, giving them quick access to a database deployment.
7.8. Creating Instant App and Quickstart Templates
The Instant App and Quickstart templates define a full set of objects for a running application. These include:
- Build configurations to build the application from source located in a GitHub public repository
- Deployment configurations to deploy the application image after it is built.
- Services to provide load balancing for the application pods.
- Routes to provide external access to the application.
Some of the templates also define a database deployment and service so the application can perform database operations.
The templates which define a database use ephemeral storage for the database content. These templates should be used for demonstration purposes only as all database data will be lost if the database pod restarts for any reason.
Using these templates, users are able to easily instantiate full applications using the various language images provided with OpenShift Enterprise. They can also customize the template parameters during instantiation so that it builds source from their own repository rather than the sample repository, so this provides a simple starting point for building new applications.
To create the core Instant App and Quickstart templates:
$ oc create -f $QSTEMPLATES -n openshiftThere is also a set of templates for creating applications using various xPaaS Middleware products (JBoss EAP, JBoss JWS, JBoss A-MQ, JBoss Fuse Integration Services, Decision Server, and JBoss Data Grid), which can be registered by running:
$ oc create -f $XPAASTEMPLATES -n openshiftThe xPaaS Middleware templates require the xPaaS Middleware image streams, which in turn require the relevant xPaaS Middleware subscriptions.
The templates which define a database use ephemeral storage for the database content. These templates should be used for demonstration purposes only as all database data will be lost if the database pod restarts for any reason.
7.9. What’s Next?
With these artifacts created, developers can now log into the web console and follow the flow for creating from a template. Any of the database or application templates can be selected to create a running database service or application in the current project. Note that some of the application templates define their own database services as well.
The example applications are all built out of GitHub repositories which are referenced in the templates by default, as seen in the SOURCE_REPOSITORY_URL parameter value. Those repositories can be forked, and the fork can be provided as the SOURCE_REPOSITORY_URL parameter value when creating from the templates. This allows developers to experiment with creating their own applications.
You can direct your developers to the Using the Instant App and Quickstart Templates section in the Developer Guide for these instructions.
Chapter 8. Configuring Custom Certificates
8.1. Overview
Administrators can configure custom serving certificates for the public host names of the OpenShift Enterprise API and web console. This can be done during an advanced installation or configured after installation.
8.2. Configuring Custom Certificates with Ansible
During advanced installations, custom certificates can be configured using the openshift_master_named_certificates and openshift_master_overwrite_named_certificates parameters, which are configurable in the inventory file. More details are available about configuring custom certificates with Ansible.
Example 8.1. Example Custom Certificate Configuration with Ansible
# Configure custom named certificates
# NOTE: openshift_master_named_certificates is cached on masters and is an
# additive fact, meaning that each run with a different set of certificates
# will add the newly provided certificates to the cached set of certificates.
#
# An optional CA may be specified for each named certificate. CAs will
# be added to the OpenShift CA bundle which allows for the named
# certificate to be served for internal cluster communication.
#
# If you would like openshift_master_named_certificates to be overwritten with
# the provided value, specify openshift_master_overwrite_named_certificates.
openshift_master_overwrite_named_certificates=true
#
# Provide local certificate paths which will be deployed to masters
openshift_master_named_certificates=[{"certfile": "/path/on/host/to/custom1.crt", "keyfile": "/path/on/host/to/custom1.key", "cafile": "/path/on/host/to/custom-ca1.crt"}]
#
# Detected names may be overridden by specifying the "names" key
#openshift_master_named_certificates=[{"certfile": "/path/on/host/to/custom1.crt", "keyfile": "/path/on/host/to/custom1.key", "names": ["public-master-host.com"], "cafile": "/path/on/host/to/custom-ca1.crt"}]8.3. Configuring Custom Certificates
The namedCertificates section may be listed in the servingInfo and assetConfig.servingInfo sections of the master configuration file or in the servingInfo section of the node configuration file. Multiple certificates can be configured this way and each certificate may be associated with multiple host names or wildcards.
A default certificate must be configured in the servingInfo.certFile and servingInfo.keyFile configuration sections in addition to namedCertificates.
The namedCertificates section should only be configured for the host name associated with the masterPublicURL, assetConfig.publicURL, and oauthConfig.assetPublicURL settings. Using a custom serving certificate for the host name associated with the masterURL will result in TLS errors as infrastructure components will attempt to contact the master API using the internal masterURL host.
Example 8.2. Custom Certificates Configuration
servingInfo:
...
namedCertificates:
- certFile: custom.crt
keyFile: custom.key
names:
- "customhost.com"
- "api.customhost.com"
- "console.customhost.com"
- certFile: wildcard.crt
keyFile: wildcard.key
names:
- "*.wildcardhost.com"
...Relative paths are resolved relative to the master configuration file. Restart the server to pick up the configuration changes.
Chapter 9. Redeploying Certificates
9.1. Overview
OpenShift Enterprise uses certificates to provide secure connections for the following components:
- masters (API server and controllers)
- etcd
- nodes
- registry
- router
You can use Ansible playbooks provided with the installer to automate checking expiration dates for cluster certificates. Playbooks are also provided to automate backing up and redeploying these certificates, which can fix common certificate errors.
Possible use cases for redeploying certificates include:
- The installer detected the wrong host names and the issue was identified too late.
- The certificates are expired and you need to update them.
- You have a new CA and would like to create certificates using it instead.
9.2. Checking Certificate Expirations
You can use the installer to warn you about any certificates expiring within a configurable window of days and notify you about any certificates that have already expired. Certificate expiry playbooks use the Ansible role openshift_certificate_expiry.
Certificates examined by the role include:
- Master and node service certificates
- Router and registry service certificates from etcd secrets
- Master, node, router, registry, and kubeconfig files for cluster-admin users
- etcd certificates (including embedded)
9.2.1. Role Variables
The openshift_certificate_expiry role uses the following variables:
| Variable Name | Default Value | Description |
|---|---|---|
|
|
| Base OpenShift Enterprise configuration directory. |
|
|
| Flag certificates that will expire in this many days from now. |
|
|
| Include healthy (non-expired and non-warning) certificates in results. |
| Variable Name | Default Value | Description |
|---|---|---|
|
|
| Generate an HTML report of the expiry check results. |
|
|
| The full path for saving the HTML report. |
|
|
| Save expiry check results as a JSON file. |
|
|
| The full path for saving the JSON report. |
9.2.2. Running Certificate Expiration Playbooks
The OpenShift Enterprise installer provides a set of example certificate expiration playbooks, using different sets of configuration for the openshift_certificate_expiry role.
These playbooks must be used with an inventory file that is representative of the cluster. For best results, run ansible-playbook with the -v option.
Using the easy-mode.yaml example playbook, you can try the role out before tweaking it to your specifications as needed. This playbook:
- Produces JSON and stylized HTML reports in /tmp/.
- Sets the warning window very large, so you will almost always get results back.
- Includes all certificates (healthy or not) in the results.
easy-mode.yaml Playbook
- name: Check cert expirys
hosts: nodes:masters:etcd
become: yes
gather_facts: no
vars:
openshift_certificate_expiry_warning_days: 1500
openshift_certificate_expiry_save_json_results: yes
openshift_certificate_expiry_generate_html_report: yes
openshift_certificate_expiry_show_all: yes
roles:
- role: openshift_certificate_expiryTo run the easy-mode.yaml playbook:
$ ansible-playbook -v -i <inventory_file> \
/usr/share/ansible/openshift-ansible/playbooks/certificate_expiry/easy-mode.yamlOther Example Playbooks
The other example playbooks are also available to run directly out of the /usr/share/ansible/openshift-ansible/playbooks/certificate_expiry/ directory.
| File Name | Usage |
|---|---|
| default.yaml |
Produces the default behavior of the |
| html_and_json_default_paths.yaml | Generates HTML and JSON artifacts in their default paths. |
| longer_warning_period.yaml | Changes the expiration warning window to 1500 days. |
| longer-warning-period-json-results.yaml | Changes the expiration warning window to 1500 days and saves the results as a JSON file. |
To run any of these example playbooks:
$ ansible-playbook -v -i <inventory_file> \
/usr/share/ansible/openshift-ansible/playbooks/certificate_expiry/<playbook>9.2.3. Output Formats
As noted above, there are two ways to format your check report. In JSON format for machine parsing, or as a stylized HTML page for easy skimming.
HTML Report
An example of an HTML report is provided with the installer. You can open the following file in your browser to view it:
/usr/share/ansible/openshift-ansible/roles/openshift_certificate_expiry/examples/cert-expiry-report.html
JSON Report
There are two top-level keys in the saved JSON results: data and summary.
The data key is a hash where the keys are the names of each host examined and the values are the check results for the certificates identified on each respective host.
The summary key is a hash that summarizes the total number of certificates:
- examined on the entire cluster
- that are OK
- expiring within the configured warning window
- already expired
For an example of the full JSON report, see /usr/share/ansible/openshift-ansible/roles/openshift_certificate_expiry/examples/cert-expiry-report.json.
The summary from the JSON data can be easily checked for warnings or expirations using a variety of command-line tools. For example, using grep you can look for the word summary and print out the two lines after the match (-A2):
$ grep -A2 summary /tmp/cert-expiry-report.json
"summary": {
"warning": 16,
"expired": 0
If available, the jq tool can also be used to pick out specific values. The first two examples below show how to select just one value, either warning or expired. The third example shows how to select both values at once:
$ jq '.summary.warning' /tmp/cert-expiry-report.json
16
$ jq '.summary.expired' /tmp/cert-expiry-report.json
0
$ jq '.summary.warning,.summary.expired' /tmp/cert-expiry-report.json
16
09.3. Redeploying Certificates
Use the following playbooks to redeploy master, etcd, node, registry, and router certificates on all relevant hosts. You can redeploy all of them at once using the current CA, redeploy certificates for specific components only, or redeploy a newly generated or custom CA on its own.
Just like the certificate expiry playbooks, these playbooks must be run with an inventory file that is representative of the cluster.
In particular, the inventory must specify or override all host names and IP addresses set via the following variables such that they match the current cluster configuration:
-
openshift_hostname -
openshift_public_hostname -
openshift_ip -
openshift_public_ip -
openshift_master_cluster_hostname -
openshift_master_cluster_public_hostname
9.3.1. Redeploying All Certificates Using the Current OpenShift Enterprise and etcd CA
The redeploy-certificates.yml playbook does not regenerate the OpenShift Enterprise CA certificate. New master, etcd, node, registry, and router certificates are created using the current CA certificate to sign new certificates.
This also includes serial restarts of:
- etcd
- master services
- node services
To redeploy master, etcd, and node certificates using the current OpenShift Enterprise CA, run this playbook, specifying your inventory file:
$ ansible-playbook -i <inventory_file> \
/usr/share/ansible/openshift-ansible/playbooks/byo/openshift-cluster/redeploy-certificates.yml9.3.2. Redeploying a New or Custom OpenShift Enterprise CA
The redeploy-openshift-ca.yml playbook redeploys the OpenShift Enterprise CA certificate by generating a new CA certificate and distributing an updated bundle to all components including client kubeconfig files and the node’s database of trusted CAs (the CA-trust).
This also includes serial restarts of:
- master services
- node services
- docker
Additionally, you can specify a custom CA certificate when redeploying certificates instead of relying on a CA generated by OpenShift Enterprise.
When the master services are restarted, the registry and routers can continue to communicate with the master without being redeployed because the master’s serving certificate is the same, and the CA the registry and routers have are still valid.
To redeploy a newly generated or custom CA:
If you want to use a custom CA, set the following variable in your inventory file:
# Configure custom ca certificate # NOTE: CA certificate will not be replaced with existing clusters. # This option may only be specified when creating a new cluster or # when redeploying cluster certificates with the redeploy-certificates # playbook. openshift_master_ca_certificate={'certfile': '</path/to/ca.crt>', 'keyfile': '</path/to/ca.key>'}If you do not set the above, then the current CA will be regenerated in the next step.
Run the redeploy-openshift-ca.yml playbook, specifying your inventory file:
$ ansible-playbook -i <inventory_file> \ /usr/share/ansible/openshift-ansible/playbooks/byo/openshift-cluster/redeploy-openshift-ca.yml
With the new OpenShift Enterprise CA in place, you can then use the redeploy-certificates.yml playbook at your discretion whenever you want to redeploy certificates signed by the new CA on all components.
9.3.3. Redeploying a New etcd CA
The redeploy-etcd-ca.yml playbook redeploys the etcd CA certificate by generating a new CA certificate and distributing an updated bundle to all etcd peers and master clients.
This also includes serial restarts of:
- etcd
- master services
To redeploy a newly generated etcd CA:
Run the redeploy-etcd-ca.yml playbook, specifying your inventory file:
$ ansible-playbook -i <inventory_file> \ /usr/share/ansible/openshift-ansible/playbooks/byo/openshift-cluster/redeploy-etcd-ca.yml
With the new etcd CA in place, you can then use the redeploy-etcd-certificates.yml playbook at your discretion whenever you want to redeploy certificates signed by the new etcd CA on etcd peers and master clients. Alternatively, you can use the redeploy-certificates.yml playbook to redeploy certificates for OpenShift Enterprise components in addition to etcd peers and master clients.
9.3.4. Redeploying Master Certificates Only
The redeploy-master-certificates.yml playbook only redeploys master certificates. This also includes serial restarts of master services.
To redeploy master certificates, run this playbook, specifying your inventory file:
$ ansible-playbook -i <inventory_file> \
/usr/share/ansible/openshift-ansible/playbooks/byo/openshift-cluster/redeploy-master-certificates.yml9.3.5. Redeploying etcd Certificates Only
The redeploy-etcd-certificates.yml playbook only redeploys etcd certificates including master client certificates.
This also include serial restarts of:
- etcd
- master services.
To redeploy etcd certificates, run this playbook, specifying your inventory file:
$ ansible-playbook -i <inventory_file> \
/usr/share/ansible/openshift-ansible/playbooks/byo/openshift-cluster/redeploy-etcd-certificates.yml9.3.6. Redeploying Node Certificates Only
The redeploy-node-certificates.yml playbook only redeploys node certificates. This also include serial restarts of node services.
To redeploy node certificates, run this playbook, specifying your inventory file:
$ ansible-playbook -i <inventory_file> \
/usr/share/ansible/openshift-ansible/playbooks/byo/openshift-cluster/redeploy-node-certificates.yml9.3.7. Redeploying Registry or Router Certificates Only
The redeploy-registry-certificates.yml and redeploy-router-certificates.yml playbooks replace installer-created certificates for the registry and router. If custom certificates are in use for these components, see Redeploying Custom Registry or Router Certificates to replace them manually.
9.3.7.1. Redeploying Registry Certificates Only
To redeploy registry certificates, run the following playbook, specifying your inventory file:
$ ansible-playbook -i <inventory_file> \
/usr/share/ansible/openshift-ansible/playbooks/byo/openshift-cluster/redeploy-registry-certificates.yml9.3.7.2. Redeploying Router Certificates Only
To redeploy router certificates, run the following playbook, specifying your inventory file:
$ ansible-playbook -i <inventory_file> \
/usr/share/ansible/openshift-ansible/playbooks/byo/openshift-cluster/redeploy-router-certificates.yml9.3.8. Redeploying Custom Registry or Router Certificates
When nodes are evacuated due to a redeployed CA, registry and router pods are restarted. If the registry and router certificates were not also redeployed with the new CA, this can cause outages because they cannot reach the masters using their old certificates.
The playbooks for redeploying certificates cannot redeploy custom registry or router certificates, so to address this issue, you can manually redeploy the registry and router certificates.
9.3.8.1. Redeploying Registry Certificates Manually
To redeploy registry certificates manually, you must add new registry certificates to a secret named registry-certificates, then redeploy the registry:
Switch to the
defaultproject for the remainder of these steps:$ oc project defaultIf your registry was initially created on OpenShift Enterprise 3.1 or earlier, it may still be using environment variables to store certificates (which has been deprecated in favor of using secrets).
Run the following and look for the
OPENSHIFT_CA_DATA,OPENSHIFT_CERT_DATA,OPENSHIFT_KEY_DATAenvironment variables:$ oc env dc/docker-registry --listIf they do not exist, skip this step. If they do, create the following
ClusterRoleBinding:$ cat <<EOF | apiVersion: v1 groupNames: null kind: ClusterRoleBinding metadata: creationTimestamp: null name: registry-registry-role roleRef: kind: ClusterRole name: system:registry subjects: - kind: ServiceAccount name: registry namespace: default userNames: - system:serviceaccount:default:registry EOF oc create -f -Then, run the following to remove the environment variables:
$ oc env dc/docker-registry OPENSHIFT_CA_DATA- OPENSHIFT_CERT_DATA- OPENSHIFT_KEY_DATA- OPENSHIFT_MASTER-
Set the following environment variables locally to make later commands less complex:
$ REGISTRY_IP=`oc get service docker-registry -o jsonpath='{.spec.clusterIP}'` $ REGISTRY_HOSTNAME=`oc get route/docker-registry -o jsonpath='{.spec.host}'`Create new registry certificates:
$ oc adm ca create-server-cert \ --signer-cert=/etc/origin/master/ca.crt \ --signer-key=/etc/origin/master/ca.key \ --hostnames=$REGISTRY_IP,docker-registry.default.svc.cluster.local,$REGISTRY_HOSTNAME \ --cert=/etc/origin/master/registry.crt \ --key=/etc/origin/master/registry.key \ --signer-serial=/etc/origin/master/ca.serial.txtUpdate the
registry-certificatessecret with the new registry certificates:$ oc secret new registry-certificates \ /etc/origin/master/registry.crt \ /etc/origin/master/registry.key \ -o json | oc replace -f -Redeploy the registry:
$ oc deploy dc/docker-registry --latest
9.3.8.2. Redeploying Router Certificates Manually
When routers are initially deployed, an annotation is added to the router’s service that automatically creates a service serving certificate secret.
To redeploy router certificates manually, that service serving certificate can be triggered to be recreated by deleting the secret, adding a new secret, then redeploying the router:
Switch to the
defaultproject for the remainder of these steps:$ oc project defaultIf your router was initially created on OpenShift Enterprise 3.1 or earlier, it may still be using environment variables to store certificates (which has been deprecated in favor of using service serving certificate secret).
Run the following and look for the
OPENSHIFT_CA_DATA,OPENSHIFT_CERT_DATA,OPENSHIFT_KEY_DATAenvironment variables:$ oc env dc/router --listIf they do not exist, skip this step. If they do, create the following
ClusterRoleBinding:$ cat <<EOF | apiVersion: v1 groupNames: null kind: ClusterRoleBinding metadata: creationTimestamp: null name: router-router-role roleRef: kind: ClusterRole name: system:router subjects: - kind: ServiceAccount name: router namespace: default userNames: - system:serviceaccount:default:router EOF oc create -f -Then, run the following to remove the environment variables:
$ oc env dc/router OPENSHIFT_CA_DATA- OPENSHIFT_CERT_DATA- OPENSHIFT_KEY_DATA- OPENSHIFT_MASTER-
To obtain a new certificate, run:
# cd /root # mkdir cert ; cd cert # CA=/etc/origin/master # oadm ca create-server-cert --signer-cert=$CA/ca.crt --signer-key=$CA/ca.key \ --signer-serial=$CA/ca.serial.txt --hostnames=hostnames.for.the.certificate \ --cert=router.crt --key=router.keyThis will generate:
- A new certificate (router.crt in this example).
- Its corresponding private key (router.key in this example).
- A copy of the signing certificate authority (CA) certificate chain ($CA/ca.crt in this example; it can contain more than one certificate if intermediate CAs are involved).
Create a new file by concatenating these three files in that specific order:
# cat router.crt router.key $CA/ca.crt > router.pemTo back up the old certificate:
# oc export secret router-certs > ~/old-router-certs-secret.yaml1 - 1
router-certsis the default name of the secret, as it is the name used by theoadm router --default-certoption.
Delete the
router-certssecret:$ oc delete secret router-certsCreate a new secret.
# oc secrets new router-certs tls.crt=router.pem tls.key=router.key \1 -o json --type='kubernetes.io/tls' --confirm | \ oc replace -f -- 1
- router.pem contains the certificate, its key, and its signing CA.
Redeploy the router:
$ oc deploy dc/router --latest
Chapter 10. Configuring Authentication and User Agent
10.1. Overview
The OpenShift Enterprise master includes a built-in OAuth server. Developers and administrators obtain OAuth access tokens to authenticate themselves to the API.
As an administrator, you can configure OAuth using the master configuration file to specify an identity provider. This can be done during an advanced installation or configured after installation.
If you installed OpenShift Enterprise using the Quick Installation or Advanced Installation method, the Deny All identity provider is used by default, which denies access for all user names and passwords. To allow access, you must choose a different identity provider and configure the master configuration file appropriately (located at /etc/origin/master/master-config.yaml by default).
When running a master without a configuration file, the Allow All identity provider is used by default, which allows any non-empty user name and password to log in. This is useful for testing purposes. To use other identity providers, or to modify any token, grant, or session options, you must run the master from a configuration file.
Roles need to be assigned to administer the setup with an external user.
10.2. Configuring Identity Providers with Ansible
For initial advanced installations, the Deny All identity provider is configured by default, though it can be overridden during installation using the openshift_master_identity_providers parameter, which is configurable in the inventory file. Session options in the OAuth configuration are also configurable in the inventory file.
Example 10.1. Example Identity Provider Configuration with Ansible
# htpasswd auth
openshift_master_identity_providers=[{'name': 'htpasswd_auth', 'login': 'true', 'challenge': 'true', 'kind': 'HTPasswdPasswordIdentityProvider', 'filename': '/etc/origin/master/htpasswd'}]
# Defining htpasswd users
#openshift_master_htpasswd_users={'user1': '<pre-hashed password>', 'user2': '<pre-hashed password>'
# or
#openshift_master_htpasswd_file=<path to local pre-generated htpasswd file>
# Allow all auth
#openshift_master_identity_providers=[{'name': 'allow_all', 'login': 'true', 'challenge': 'true', 'kind': 'AllowAllPasswordIdentityProvider'}]
# LDAP auth
#openshift_master_identity_providers=[{'name': 'my_ldap_provider', 'challenge': 'true', 'login': 'true', 'kind': 'LDAPPasswordIdentityProvider', 'attributes': {'id': ['dn'], 'email': ['mail'], 'name': ['cn'], 'preferredUsername': ['uid']}, 'bindDN': '', 'bindPassword': '', 'ca': '', 'insecure': 'false', 'url': 'ldap://ldap.example.com:389/ou=users,dc=example,dc=com?uid'}]
# Configuring the ldap ca certificate
#openshift_master_ldap_ca=<ca text>
# or
#openshift_master_ldap_ca_file=<path to local ca file to use>
# Available variables for configuring certificates for other identity providers:
#openshift_master_openid_ca
#openshift_master_openid_ca_file
#openshift_master_request_header_ca
#openshift_master_request_header_ca_file10.3. Identity Providers
You can configure the master host for authentication using your desired identity provider by modifying the master configuration file. The following sections detail the identity providers supported by OpenShift Enterprise.
There are four parameters common to all identity providers:
| Parameter | Description |
|---|---|
|
| The provider name is prefixed to provider user names to form an identity name. |
|
|
When true, unauthenticated token requests from non-web clients (like the CLI) are sent a
To prevent cross-site request forgery (CSRF) attacks against browser clients Basic authentication challenges are only sent if a |
|
| When true, unauthenticated token requests from web clients (like the web console) are redirected to a login page backed by this provider. Not supported by all identity providers.
If you want users to be sent to a branded page before being redirected to the identity provider’s login, then set |
|
| Defines how new identities are mapped to users when they login. See Mapping Identities to Users for more information. |
When adding or changing identity providers, you can map identities from the new provider to existing users by setting the mappingMethod parameter to add.
10.3.1. Mapping Identities to Users
Setting the mappingMethod parameter in a master configuration file determines how identities are mapped to users:
...
oauthConfig:
identityProviders:
- name: htpasswd_auth
challenge: true
login: false
mappingMethod: "claim"
...
When set to the default claim value, OAuth will fail if the identity is mapped to a previously-existing user name. The following table outlines the use cases for the available mappingMethod parameter values:
| Parameter | Description |
|---|---|
|
| The default value. Provisions a user with the identity’s preferred user name. Fails if a user with that user name is already mapped to another identity. |
|
| Looks up an existing identity, user identity mapping, and user, but does not automatically provision users or identities. This allows cluster administrators to set up identities and users manually, or using an external process. |
|
| Provisions a user with the identity’s preferred user name. If a user with the preferred user name is already mapped to an existing identity, a unique user name is generated. For example, myuser2. This method should not be used in combination with external processes that require exact matches between OpenShift Enterprise user names and identity provider user names, such as LDAP group sync. |
|
| Provisions a user with the identity’s preferred user name. If a user with that user name already exists, the identity is mapped to the existing user, adding to any existing identity mappings for the user. Required when multiple identity providers are configured that identify the same set of users and map to the same user names. |
10.3.2. Allow All
Set AllowAllPasswordIdentityProvider in the identityProviders stanza to allow any non-empty user name and password to log in. This is the default identity provider when running OpenShift Enterprise without a master configuration file.
Example 10.2. Master Configuration Using AllowAllPasswordIdentityProvider
oauthConfig:
...
identityProviders:
- name: my_allow_provider
challenge: true
login: true
mappingMethod: claim
provider:
apiVersion: v1
kind: AllowAllPasswordIdentityProvider- 1
- This provider name is prefixed to provider user names to form an identity name.
- 2
- When true, unauthenticated token requests from non-web clients (like the CLI) are sent a
WWW-Authenticatechallenge header for this provider. - 3
- When true, unauthenticated token requests from web clients (like the web console) are redirected to a login page backed by this provider.
- 4
- Controls how mappings are established between this provider’s identities and user objects, as described above.
10.3.3. Deny All
Set DenyAllPasswordIdentityProvider in the identityProviders stanza to deny access for all user names and passwords.
Example 10.3. Master Configuration Using DenyAllPasswordIdentityProvider
oauthConfig:
...
identityProviders:
- name: my_deny_provider
challenge: true
login: true
mappingMethod: claim
provider:
apiVersion: v1
kind: DenyAllPasswordIdentityProvider- 1
- This provider name is prefixed to provider user names to form an identity name.
- 2
- When true, unauthenticated token requests from non-web clients (like the CLI) are sent a
WWW-Authenticatechallenge header for this provider. - 3
- When true, unauthenticated token requests from web clients (like the web console) are redirected to a login page backed by this provider.
- 4
- Controls how mappings are established between this provider’s identities and user objects, as described above.
10.3.4. HTPasswd
Set HTPasswdPasswordIdentityProvider in the identityProviders stanza to validate user names and passwords against a flat file generated using htpasswd.
The htpasswd utility is in the httpd-tools package:
# yum install httpd-tools
OpenShift Enterprise supports the Bcrypt, SHA-1, and MD5 cryptographic hash functions, and MD5 is the default for htpasswd. Plaintext, encrypted text, and other hash functions are not currently supported.
The flat file is reread if its modification time changes, without requiring a server restart.
To create the file, run:
$ htpasswd -c </path/to/users.htpasswd> <user_name>To add or update a login to the file, run:
$ htpasswd </path/to/users.htpasswd> <user_name>To remove a login from the file, run:
$ htpasswd -D </path/to/users.htpasswd> <user_name>Example 10.4. Master Configuration Using HTPasswdPasswordIdentityProvider
oauthConfig:
...
identityProviders:
- name: my_htpasswd_provider
challenge: true
login: true
mappingMethod: claim
provider:
apiVersion: v1
kind: HTPasswdPasswordIdentityProvider
file: /path/to/users.htpasswd - 1
- This provider name is prefixed to provider user names to form an identity name.
- 2
- When true, unauthenticated token requests from non-web clients (like the CLI) are sent a
WWW-Authenticatechallenge header for this provider. - 3
- When true, unauthenticated token requests from web clients (like the web console) are redirected to a login page backed by this provider.
- 4
- Controls how mappings are established between this provider’s identities and user objects, as described above.
- 5
- File generated using
htpasswd.
10.3.5. Keystone
Set KeystonePasswordIdentityProvider in the identityProviders stanza to validate user names and passwords against an OpenStack Keystone v3 server. This enables shared authentication with an OpenStack server configured to store users in an internal Keystone database.
Example 10.5. Master Configuration Using KeystonePasswordIdentityProvider
oauthConfig:
...
identityProviders:
- name: my_keystone_provider
challenge: true
login: true
mappingMethod: claim
provider:
apiVersion: v1
kind: KeystonePasswordIdentityProvider
domainName: default
ca: ca.pem
certFile: keystone.pem
keyFile: keystonekey.pem - 1
- This provider name is prefixed to provider user names to form an identity name.
- 2
- When true, unauthenticated token requests from non-web clients (like the CLI) are sent a
WWW-Authenticatechallenge header for this provider. - 3
- When true, unauthenticated token requests from web clients (like the web console) are redirected to a login page backed by this provider.
- 4
- Controls how mappings are established between this provider’s identities and user objects, as described above.
- 5
- Keystone domain name. In Keystone, usernames are domain-specific. Only a single domain is supported.
- 6
- The URL to use to connect to the Keystone server (required).
- 7
- Optional: Certificate bundle to use to validate server certificates for the configured URL.
- 8
- Optional: Client certificate to present when making requests to the configured URL.
- Key for the client certificate. Required if
certFileis specified.
10.3.6. LDAP Authentication
Set LDAPPasswordIdentityProvider in the identityProviders stanza to validate user names and passwords against an LDAPv3 server, using simple bind authentication.
During authentication, the LDAP directory is searched for an entry that matches the provided user name. If a single unique match is found, a simple bind is attempted using the distinguished name (DN) of the entry plus the provided password. Here are the steps taken:
-
Generate a search filter by combining the attribute and filter in the configured
urlwith the user-provided user name. - Search the directory using the generated filter. If the search does not return exactly one entry, deny access.
- Attempt to bind to the LDAP server using the DN of the entry retrieved from the search, and the user-provided password.
- If the bind is unsuccessful, deny access.
- If the bind is successful, build an identity using the configured attributes as the identity, email address, display name, and preferred user name.
The configured url is an RFC 2255 URL, which specifies the LDAP host and search parameters to use. The syntax of the URL is:
ldap://host:port/basedn?attribute?scope?filterFor the above example:
| URL Component | Description |
|---|---|
|
|
For regular LDAP, use the string |
|
|
The name and port of the LDAP server. Defaults to |
|
| The DN of the branch of the directory where all searches should start from. At the very least, this must be the top of your directory tree, but it could also specify a subtree in the directory. |
|
|
The attribute to search for. Although RFC 2255 allows a comma-separated list of attributes, only the first attribute will be used, no matter how many are provided. If no attributes are provided, the default is to use |
|
|
The scope of the search. Can be either either |
|
|
A valid LDAP search filter. If not provided, defaults to |
When doing searches, the attribute, filter, and provided user name are combined to create a search filter that looks like:
(&(<filter>)(<attribute>=<username>))For example, consider a URL of:
ldap://ldap.example.com/o=Acme?cn?sub?(enabled=true)
When a client attempts to connect using a user name of bob, the resulting search filter will be (&(enabled=true)(cn=bob)).
If the LDAP directory requires authentication to search, specify a bindDN and bindPassword to use to perform the entry search.
Example 10.6. Master Configuration Using LDAPPasswordIdentityProvider
oauthConfig:
...
identityProviders:
- name: "my_ldap_provider"
challenge: true
login: true
mappingMethod: claim
provider:
apiVersion: v1
kind: LDAPPasswordIdentityProvider
attributes:
id:
- dn
email:
- mail
name:
- cn
preferredUsername:
- uid
bindDN: ""
bindPassword: ""
ca: my-ldap-ca-bundle.crt
insecure: false
url: "ldap://ldap.example.com/ou=users,dc=acme,dc=com?uid" - 1
- This provider name is prefixed to the returned user ID to form an identity name.
- 2
- When true, unauthenticated token requests from non-web clients (like the CLI) are sent a
WWW-Authenticatechallenge header for this provider. - 3
- When true, unauthenticated token requests from web clients (like the web console) are redirected to a login page backed by this provider.
- 4
- Controls how mappings are established between this provider’s identities and user objects, as described above.
- 5
- List of attributes to use as the identity. First non-empty attribute is used. At least one attribute is required. If none of the listed attribute have a value, authentication fails.
- 6
- List of attributes to use as the email address. First non-empty attribute is used.
- 7
- List of attributes to use as the display name. First non-empty attribute is used.
- 8
- List of attributes to use as the preferred user name when provisioning a user for this identity. First non-empty attribute is used.
- 9
- Optional DN to use to bind during the search phase.
- 10
- Optional password to use to bind during the search phase. This value may also be provided in an environment variable, external file, or encrypted file.
- 11
- Certificate bundle to use to validate server certificates for the configured URL. If empty, system trusted roots are used. Only applies if insecure: false.
- 12
- When true, no TLS connection is made to the server. When false,
ldaps://URLs connect using TLS, andldap://URLs are upgraded to TLS. - 13
- An RFC 2255 URL which specifies the LDAP host and search parameters to use, as described above.
10.3.7. Basic Authentication (Remote)
Set BasicAuthPasswordIdentityProvider in the identityProviders stanza to validate user names and passwords against a remote server using a server-to-server Basic authentication request. User names and passwords are validated against a remote URL that is protected by Basic authentication and returns JSON.
A 401 response indicates failed authentication.
A non-200 status, or the presence of a non-empty "error" key, indicates an error:
{"error":"Error message"}
A 200 status with a sub (subject) key indicates success:
{"sub":"userid"} - 1
- The subject must be unique to the authenticated user and must not be able to be modified.
A successful response may optionally provide additional data, such as:
A display name using the
namekey. For example:{"sub":"userid", "name": "User Name", ...}An email address using the
emailkey. For example:{"sub":"userid", "email":"user@example.com", ...}A preferred user name using the
preferred_usernamekey. This is useful when the unique, unchangeable subject is a database key or UID, and a more human-readable name exists. This is used as a hint when provisioning the OpenShift Enterprise user for the authenticated identity. For example:{"sub":"014fbff9a07c", "preferred_username":"bob", ...}
Example 10.7. Master Configuration Using BasicAuthPasswordIdentityProvider
oauthConfig:
...
identityProviders:
- name: my_remote_basic_auth_provider
challenge: true
login: true
mappingMethod: claim
provider:
apiVersion: v1
kind: BasicAuthPasswordIdentityProvider
url: https://www.example.com/remote-idp
ca: /path/to/ca.file
certFile: /path/to/client.crt
keyFile: /path/to/client.key - 1
- This provider name is prefixed to the returned user ID to form an identity name.
- 2
- When true, unauthenticated token requests from non-web clients (like the CLI) are sent a
WWW-Authenticatechallenge header for this provider. - 3
- When true, unauthenticated token requests from web clients (like the web console) are redirected to a login page backed by this provider.
- 4
- Controls how mappings are established between this provider’s identities and user objects, as described above.
- 5
- URL accepting credentials in Basic authentication headers.
- 6
- Optional: Certificate bundle to use to validate server certificates for the configured URL.
- 7
- Optional: Client certificate to present when making requests to the configured URL.
- 8
- Key for the client certificate. Required if
certFileis specified.
10.3.8. Request Header
Set RequestHeaderIdentityProvider in the identityProviders stanza to identify users from request header values, such as X-Remote-User. It is typically used in combination with an authenticating proxy, which sets the request header value. This is similar to how the remote user plug-in in OpenShift Enterprise 2 allowed administrators to provide Kerberos, LDAP, and many other forms of enterprise authentication.
For users to authenticate using this identity provider, they must access <master>/oauth/authorize via an authenticating proxy. You can either proxy the entire master API server so that all access goes through the proxy, or you can configure the OAuth server to redirect unauthenticated requests to the proxy.
To redirect unauthenticated requests from clients expecting login flows:
-
Set the
loginparameter to true. -
Set the
provider.loginURLparameter to the proxy URL to send those clients to.
To redirect unauthenticated requests from clients expecting WWW-Authenticate challenges:
-
Set the
challengeparameter to true. -
Set the
provider.challengeURLparameter to the proxy URL to send those clients to.
The provider.challengeURL and provider.loginURL parameters can include the following tokens in the query portion of the URL:
${url}is replaced with the current URL, escaped to be safe in a query parameter.For example:
https://www.example.com/sso-login?then=${url}${query}is replaced with the current query string, unescaped.For example:
https://www.example.com/auth-proxy/oauth/authorize?${query}
If you expect unauthenticated requests to reach the OAuth server, a clientCA parameter should be set for this identity provider, so that incoming requests are checked for a valid client certificate before the request’s headers are checked for a user name. Otherwise, any direct request to the OAuth server can impersonate any identity from this provider, merely by setting a request header.
Example 10.8. Master Configuration Using RequestHeaderIdentityProvider
oauthConfig:
...
identityProviders:
- name: my_request_header_provider
challenge: true
login: true
mappingMethod: claim
provider:
apiVersion: v1
kind: RequestHeaderIdentityProvider
challengeURL: "https://www.example.com/challenging-proxy/oauth/authorize?${query}"
loginURL: "https://www.example.com/login-proxy/oauth/authorize?${query}"
clientCA: /path/to/client-ca.file
clientCommonNames:
- my-auth-proxy
headers:
- X-Remote-User
- SSO-User
emailHeaders:
- X-Remote-User-Email
nameHeaders:
- X-Remote-User-Display-Name
preferredUsernameHeaders:
- X-Remote-User-Login- 1
- This provider name is prefixed to the user name in the request header to form an identity name.
- 2
- RequestHeaderIdentityProvider can only respond to clients that request
WWW-Authenticatechallenges by redirecting to a configuredchallengeURL. The configured URL should respond with aWWW-Authenticatechallenge. - 3
- RequestHeaderIdentityProvider can only respond to clients requesting a login flow by redirecting to a configured
loginURL. The configured URL should respond with a login flow. - 4
- Controls how mappings are established between this provider’s identities and user objects, as described above.
- 5
- Optional: URL to redirect unauthenticated /oauth/authorize requests to, for clients which expect interactive logins. ${url} is replaced with the current URL, escaped to be safe in a query parameter. ${query} is replaced with the current query string.
- 6
- Optional: URL to redirect unauthenticated /oauth/authorize requests to, for clients which expect
WWW-Authenticatechallenges. ${url} is replaced with the current URL, escaped to be safe in a query parameter. ${query} is replaced with the current query string. - 7
- Optional: PEM-encoded certificate bundle. If set, a valid client certificate must be presented and validated against the certificate authorities in the specified file before the request headers are checked for user names.
- 8
- Optional: list of common names (
cn). If set, a valid client certificate with a Common Name (cn) in the specified list must be presented before the request headers are checked for user names. If empty, any Common Name is allowed. Can only be used in combination withclientCA. - 9
- Header names to check, in order, for the user identity. The first header containing a value is used as the identity. Required, case-insensitive.
- 10
- Header names to check, in order, for an email address. The first header containing a value is used as the email address. Optional, case-insensitive.
- 11
- Header names to check, in order, for a display name. The first header containing a value is used as the display name. Optional, case-insensitive.
- 12
- Header names to check, in order, for a preferred user name, if different than the immutable identity determined from the headers specified in
headers. The first header containing a value is used as the preferred user name when provisioning. Optional, case-insensitive.
Example 10.9. Apache Authentication Using RequestHeaderIdentityProvider
This example configures an authentication proxy on the same host as the master. Having the proxy and master on the same host is merely a convenience and may not be suitable for your environment. For example, if you were already running a router on the master, port 443 would not be available.
It is also important to note that while this reference configuration uses Apache’s mod_auth_form, it is by no means required and other proxies can easily be used if the following requirements are met:
-
Block the
X-Remote-Userheader from client requests to prevent spoofing. - Enforce client certificate authentication in the RequestHeaderIdentityProvider configuration.
-
Require the
X-Csrf-Tokenheader be set for all authentication request using the challenge flow. - Only the /oauth/authorize endpoint should be proxied, and redirects should not be rewritten to allow the backend server to send the client to the correct location.
Installing the Prerequisites
The mod_auth_form module is shipped as part of the mod_session package that is found in the Optional channel:
# yum install -y httpd mod_ssl mod_session apr-util-openssl
Generate a CA for validating requests that submit the trusted header. This CA should be used as the file name for clientCA in the master’s identity provider configuration.
# oadm ca create-signer-cert \
--cert='/etc/origin/master/proxyca.crt' \
--key='/etc/origin/master/proxyca.key' \
--name='openshift-proxy-signer@1432232228' \
--serial='/etc/origin/master/proxyca.serial.txt'
Generate a client certificate for the proxy. This can be done using any x509 certificate tooling. For convenience, the oadm CLI can be used:
# oadm create-api-client-config \
--certificate-authority='/etc/origin/master/proxyca.crt' \
--client-dir='/etc/origin/master/proxy' \
--signer-cert='/etc/origin/master/proxyca.crt' \
--signer-key='/etc/origin/master/proxyca.key' \
--signer-serial='/etc/origin/master/proxyca.serial.txt' \
--user='system:proxy'
# pushd /etc/origin/master
# cp master.server.crt /etc/pki/tls/certs/localhost.crt
# cp master.server.key /etc/pki/tls/private/localhost.key
# cp ca.crt /etc/pki/CA/certs/ca.crt
# cat proxy/system\:proxy.crt \
proxy/system\:proxy.key > \
/etc/pki/tls/certs/authproxy.pem
# popd- 1
- The user name can be anything, however it is useful to give it a descriptive name as it will appear in logs.
- 2
- When running the authentication proxy on a different host name than the master, it is important to generate a certificate that matches the host name instead of using the default master certificate as shown above. The value for
masterPublicURLin the /etc/origin/master/master-config.yaml file must be included in theX509v3 Subject Alternative Namein the certificate that is specified forSSLCertificateFile. If a new certificate needs to be created, theoadm ca create-server-certcommand can be used.
Configuring Apache
Unlike OpenShift Enterprise 2, this proxy does not need to reside on the same host as the master. It uses a client certificate to connect to the master, which is configured to trust the X-Remote-User header.
Configure Apache per the following:
LoadModule auth_form_module modules/mod_auth_form.so
LoadModule session_module modules/mod_session.so
LoadModule request_module modules/mod_request.so
# Nothing needs to be served over HTTP. This virtual host simply redirects to
# HTTPS.
<VirtualHost *:80>
DocumentRoot /var/www/html
RewriteEngine On
RewriteRule ^(.*)$ https://%{HTTP_HOST}$1 [R,L]
</VirtualHost>
<VirtualHost *:443>
# This needs to match the certificates you generated. See the CN and X509v3
# Subject Alternative Name in the output of:
# openssl x509 -text -in /etc/pki/tls/certs/localhost.crt
ServerName www.example.com
DocumentRoot /var/www/html
SSLEngine on
SSLCertificateFile /etc/pki/tls/certs/localhost.crt
SSLCertificateKeyFile /etc/pki/tls/private/localhost.key
SSLCACertificateFile /etc/pki/CA/certs/ca.crt
SSLProxyEngine on
SSLProxyCACertificateFile /etc/pki/CA/certs/ca.crt
# It's critical to enforce client certificates on the Master. Otherwise
# requests could spoof the X-Remote-User header by accessing the Master's
# /oauth/authorize endpoint directly.
SSLProxyMachineCertificateFile /etc/pki/tls/certs/authproxy.pem
# Send all requests to the console
RewriteEngine On
RewriteRule ^/console(.*)$ https://%{HTTP_HOST}:8443/console$1 [R,L]
# In order to using the challenging-proxy an X-Csrf-Token must be present.
RewriteCond %{REQUEST_URI} ^/challenging-proxy
RewriteCond %{HTTP:X-Csrf-Token} ^$ [NC]
RewriteRule ^.* - [F,L]
<Location /challenging-proxy/oauth/authorize>
# Insert your backend server name/ip here.
ProxyPass https://[MASTER]:8443/oauth/authorize
AuthType basic
</Location>
<Location /login-proxy/oauth/authorize>
# Insert your backend server name/ip here.
ProxyPass https://[MASTER]:8443/oauth/authorize
# mod_auth_form providers are implemented by mod_authn_dbm, mod_authn_file,
# mod_authn_dbd, mod_authnz_ldap and mod_authn_socache.
AuthFormProvider file
AuthType form
AuthName openshift
ErrorDocument 401 /login.html
</Location>
<ProxyMatch /oauth/authorize>
AuthUserFile /etc/origin/master/htpasswd
AuthName openshift
Require valid-user
RequestHeader set X-Remote-User %{REMOTE_USER}s env=REMOTE_USER
# For ldap:
# AuthBasicProvider ldap
# AuthLDAPURL "ldap://ldap.example.com:389/ou=People,dc=my-domain,dc=com?uid?sub?(objectClass=*)"
# It's possible to remove the mod_auth_form usage and replace it with
# something like mod_auth_kerb, mod_auth_gssapi or even mod_auth_mellon.
# The former would be able to support both the login and challenge flows
# from the Master. Mellon would likely only support the login flow.
# For Kerberos
# yum install mod_auth_gssapi
# AuthType GSSAPI
# GssapiCredStore keytab:/etc/httpd.keytab
</ProxyMatch>
</VirtualHost>
RequestHeader unset X-Remote-UserAdditional mod_auth_form Requirements
A sample login page is available from the openshift_extras repository. This file should be placed in the DocumentRoot location (/var/www/html by default).
Creating Users
At this point, you can create the users in the system Apache is using to store accounts information. In this example, file-backed authentication is used:
# yum -y install httpd-tools
# touch /etc/origin/master/htpasswd
# htpasswd /etc/origin/master/htpasswd <user_name>Configuring the Master
The identityProviders stanza in the /etc/origin/master/master-config.yaml file must be updated as well:
identityProviders:
- name: requestheader
challenge: true
login: true
provider:
apiVersion: v1
kind: RequestHeaderIdentityProvider
challengeURL: "https://[MASTER]/challenging-proxy/oauth/authorize?${query}"
loginURL: "https://[MASTER]/login-proxy/oauth/authorize?${query}"
clientCA: /etc/origin/master/proxyca.crt
headers:
- X-Remote-UserRestarting Services
Finally, restart the following services:
# systemctl restart httpd
# systemctl restart atomic-openshift-masterVerifying the Configuration
Test by bypassing the proxy. You should be able to request a token if you supply the correct client certificate and header:
# curl -L -k -H "X-Remote-User: joe" \ --cert /etc/pki/tls/certs/authproxy.pem \ https://[MASTER]:8443/oauth/token/requestIf you do not supply the client certificate, the request should be denied:
# curl -L -k -H "X-Remote-User: joe" \ https://[MASTER]:8443/oauth/token/requestThis should show a redirect to the configured
challengeURL(with additional query parameters):# curl -k -v -H 'X-Csrf-Token: 1' \ '<masterPublicURL>/oauth/authorize?client_id=openshift-challenging-client&response_type=token'This should show a 401 response with a
WWW-Authenticatebasic challenge:# curl -k -v -H 'X-Csrf-Token: 1' \ '<redirected challengeURL from step 3 +query>'This should show a redirect with an access token:
# curl -k -v -u <your_user>:<your_password> \ -H 'X-Csrf-Token: 1' '<redirected_challengeURL_from_step_3 +query>'
10.3.9. GitHub
Set GitHubIdentityProvider in the identityProviders stanza to use GitHub as an identity provider, using the OAuth integration.
Using GitHub as an identity provider requires users to get a token using <master>/oauth/token/request to use with command-line tools.
Using GitHub as an identity provider allows any GitHub user to authenticate to your server. You can limit authentication to members of specific GitHub organizations with the organizations configuration attribute, as shown below.
Example 10.10. Master Configuration Using GitHubIdentityProvider
oauthConfig:
...
identityProviders:
- name: github
challenge: false
login: true
mappingMethod: claim
provider:
apiVersion: v1
kind: GitHubIdentityProvider
clientID: ...
clientSecret: ...
organizations:
- myorganization1
- myorganization2- 1
- This provider name is prefixed to the GitHub numeric user ID to form an identity name. It is also used to build the callback URL.
- 2
- GitHubIdentityProvider cannot be used to send
WWW-Authenticatechallenges. - 3
- When true, unauthenticated token requests from web clients (like the web console) are redirected to GitHub to log in.
- 4
- Controls how mappings are established between this provider’s identities and user objects, as described above.
- 5
- The client ID of a registered GitHub OAuth application. The application must be configured with a callback URL of
<master>/oauth2callback/<identityProviderName>. - 6
- The client secret issued by GitHub. This value may also be provided in an environment variable, external file, or encrypted file.
- 7
- Optional list of organizations. If specified, only GitHub users that are members of at least one of the listed organizations will be allowed to log in. If the GitHub OAuth application configured in clientID is not owned by the organization, an organization owner must grant third-party access in order to use this option. This can be done during the first GitHub login by the organization’s administrator, or from the GitHub organization settings.
10.3.10. GitLab
Set GitLabIdentityProvider in the identityProviders stanza to use GitLab.com or any other GitLab instance as an identity provider, using the OAuth integration. The OAuth provider feature requires GitLab version 7.7.0 or higher.
Using GitLab as an identity provider requires users to get a token using <master>/oauth/token/request to use with command-line tools.
Example 10.11. Master Configuration Using GitLabIdentityProvider
oauthConfig:
...
identityProviders:
- name: gitlab
challenge: false
login: true
mappingMethod: claim
provider:
apiVersion: v1
kind: GitLabIdentityProvider
url: ...
clientID: ...
clientSecret: ...
ca: ... - 1
- This provider name is prefixed to the GitLab numeric user ID to form an identity name. It is also used to build the callback URL.
- 2
- When true, unauthenticated token requests from non-web clients (like the CLI) are sent a
WWW-Authenticatechallenge header for this provider. This uses the Resource Owner Password Credentials grant flow to obtain an access token from GitLab. - 3
- When true, unauthenticated token requests from web clients (like the web console) are redirected to GitLab to log in.
- 4
- Controls how mappings are established between this provider’s identities and user objects, as described above.
- 5
- The host URL of a GitLab OAuth provider. This could either be
https://gitlab.com/or any other self hosted instance of GitLab. - 6
- The client ID of a registered GitLab OAuth application. The application must be configured with a callback URL of
<master>/oauth2callback/<identityProviderName>. - 7
- The client secret issued by GitLab. This value may also be provided in an environment variable, external file, or encrypted file.
- 8
- CA is an optional trusted certificate authority bundle to use when making requests to the GitLab instance. If empty, the default system roots are used.
10.3.11. Google
Set GoogleIdentityProvider in the identityProviders stanza to use Google as an identity provider, using Google’s OpenID Connect integration.
Using Google as an identity provider requires users to get a token using <master>/oauth/token/request to use with command-line tools.
Using Google as an identity provider allows any Google user to authenticate to your server. You can limit authentication to members of a specific hosted domain with the hostedDomain configuration attribute, as shown below.
Example 10.12. Master Configuration Using GoogleIdentityProvider
oauthConfig:
...
identityProviders:
- name: google
challenge: false
login: true
mappingMethod: claim
provider:
apiVersion: v1
kind: GoogleIdentityProvider
clientID: ...
clientSecret: ...
hostedDomain: "" - 1
- This provider name is prefixed to the Google numeric user ID to form an identity name. It is also used to build the redirect URL.
- 2
- GoogleIdentityProvider cannot be used to send
WWW-Authenticatechallenges. - 3
- When true, unauthenticated token requests from web clients (like the web console) are redirected to Google to log in.
- 4
- Controls how mappings are established between this provider’s identities and user objects, as described above.
- 5
- The client ID of a registered Google project. The project must be configured with a redirect URI of
<master>/oauth2callback/<identityProviderName>. - 6
- The client secret issued by Google. This value may also be provided in an environment variable, external file, or encrypted file.
- 7
- Optional hosted domain to restrict sign-in accounts to. If empty, any Google account is allowed to authenticate.
10.3.12. OpenID Connect
Set OpenIDIdentityProvider in the identityProviders stanza to integrate with an OpenID Connect identity provider using an Authorization Code Flow.
ID Token and UserInfo decryptions are not supported.
By default, the openid scope is requested. If required, extra scopes can be specified in the extraScopes field.
Claims are read from the JWT id_token returned from the OpenID identity provider and, if specified, from the JSON returned by the UserInfo URL.
At least one claim must be configured to use as the user’s identity. The standard identity claim is sub.
You can also indicate which claims to use as the user’s preferred user name, display name, and email address. If multiple claims are specified, the first one with a non-empty value is used. The standard claims are:
|
| The user identity. |
|
| The preferred user name when provisioning a user. |
|
| Email address. |
|
| Display name. |
Using an OpenID Connect identity provider requires users to get a token using <master>/oauth/token/request to use with command-line tools.
Example 10.13. Standard Master Configuration Using OpenIDIdentityProvider
oauthConfig:
...
identityProviders:
- name: my_openid_connect
challenge: false
login: true
mappingMethod: claim
provider:
apiVersion: v1
kind: OpenIDIdentityProvider
clientID: ...
clientSecret: ...
claims:
id:
- sub
preferredUsername:
- preferred_username
name:
- name
email:
- email
urls:
authorize: https://myidp.example.com/oauth2/authorize
token: https://myidp.example.com/oauth2/token - 1
- This provider name is prefixed to the value of the identity claim to form an identity name. It is also used to build the redirect URL.
- 2
- When true, unauthenticated token requests from non-web clients (like the CLI) are sent a
WWW-Authenticatechallenge header for this provider. This requires the OpenID provider to support the Resource Owner Password Credentials grant flow. - 3
- When true, unauthenticated token requests from web clients (like the web console) are redirected to the authorize URL to log in.
- 4
- Controls how mappings are established between this provider’s identities and user objects, as described above.
- 5
- The client ID of a client registered with the OpenID provider. The client must be allowed to redirect to
<master>/oauth2callback/<identityProviderName>. - 6
- The client secret. This value may also be provided in an environment variable, external file, or encrypted file.
- 7
- Use the value of the
subclaim in the returnedid_tokenas the user’s identity. - 8
- Authorization Endpoint described in the OpenID spec. Must use
https. - 9
- Token Endpoint described in the OpenID spec. Must use
https.
A custom certificate bundle, extra scopes, extra authorization request parameters, and userInfo URL can also be specified:
Example 10.14. Full Master Configuration Using OpenIDIdentityProvider
oauthConfig:
...
identityProviders:
- name: my_openid_connect
challenge: false
login: true
mappingMethod: claim
provider:
apiVersion: v1
kind: OpenIDIdentityProvider
clientID: ...
clientSecret: ...
ca: my-openid-ca-bundle.crt
extraScopes:
- email
- profile
extraAuthorizeParameters:
include_granted_scopes: "true"
claims:
id:
- custom_id_claim
- sub
preferredUsername:
- preferred_username
- email
name:
- nickname
- given_name
- name
email:
- custom_email_claim
- email
urls:
authorize: https://myidp.example.com/oauth2/authorize
token: https://myidp.example.com/oauth2/token
userInfo: https://myidp.example.com/oauth2/userinfo - 1
- Certificate bundle to use to validate server certificates for the configured URLs. If empty, system trusted roots are used.
- 2
- Optional list of scopes to request, in addition to the openid scope, during the authorization token request.
- 3
- Optional map of extra parameters to add to the authorization token request.
- 4
- List of claims to use as the identity. First non-empty claim is used. At least one claim is required. If none of the listed claims have a value, authentication fails.
- 5
- List of claims to use as the preferred user name when provisioning a user for this identity. First non-empty claim is used.
- 6
- List of claims to use as the display name. First non-empty claim is used.
- 7
- List of claims to use as the email address. First non-empty claim is used.
- 8
- UserInfo Endpoint described in the OpenID spec. Must use
https.
10.4. Token Options
The OAuth server generates two kinds of tokens:
| Access tokens | Longer-lived tokens that grant access to the API. |
| Authorize codes | Short-lived tokens whose only use is to be exchanged for an access token. |
Use the tokenConfig stanza to set token options:
Example 10.15. Master Configuration Token Options
oauthConfig:
...
tokenConfig:
accessTokenMaxAgeSeconds: 86400
authorizeTokenMaxAgeSeconds: 300 10.5. Grant Options
To configure how the OAuth server responds to token requests for a client the user has not previously granted permission, set the method value in the grantConfig stanza. Valid values for method are:
|
| Auto-approve the grant and retry the request. |
|
| Prompt the user to approve or deny the grant. |
|
| Auto-deny the grant and return a failure error to the client. |
Example 10.16. Master Configuration Grant Options
oauthConfig:
...
grantConfig:
method: auto10.6. Session Options
The OAuth server uses a signed and encrypted cookie-based session during login and redirect flows.
Use the sessionConfig stanza to set session options:
Example 10.17. Master Configuration Session Options
oauthConfig:
...
sessionConfig:
sessionMaxAgeSeconds: 300
sessionName: ssn
sessionSecretsFile: "..." - 1
- Controls the maximum age of a session; sessions auto-expire once a token request is complete. If auto-grant is not enabled, sessions must last as long as the user is expected to take to approve or reject a client authorization request.
- 2
- Name of the cookie used to store the session.
- 3
- File name containing serialized
SessionSecretsobject. If empty, a random signing and encryption secret is generated at each server start.
If no sessionSecretsFile is specified, a random signing and encryption secret is generated at each start of the master server. This means that any logins in progress will have their sessions invalidated if the master is restarted. It also means that if multiple masters are configured, they will not be able to decode sessions generated by one of the other masters.
To specify the signing and encryption secret to use, specify a sessionSecretsFile. This allows you separate secret values from the configuration file and keep the configuration file distributable, for example for debugging purposes.
Multiple secrets can be specified in the sessionSecretsFile to enable rotation. New sessions are signed and encrypted using the first secret in the list. Existing sessions are decrypted and authenticated by each secret until one succeeds.
Example 10.18. Session Secret Configuration:
apiVersion: v1
kind: SessionSecrets
secrets:
- authentication: "..."
encryption: "..."
- authentication: "..."
encryption: "..."
...- 1
- List of secrets used to authenticate and encrypt cookie sessions. At least one secret must be specified. Each secret must set an authentication and encryption secret.
- 2
- Signing secret, used to authenticate sessions using HMAC. Recommended to use a secret with 32 or 64 bytes.
- 3
- Encrypting secret, used to encrypt sessions. Must be 16, 24, or 32 characters long, to select AES-128, AES-192, or AES-256.
10.7. Preventing CLI Version Mismatch With User Agent
OpenShift Enterprise implements a user agent that can be used to prevent an application developer’s CLI accessing the OpenShift Enterprise API.
User agents for the OpenShift Enterprise CLI are constructed from a set of values within OpenShift Enterprise:
<command>/<version> (<platform>/<architecture>) <client>/<git_commit>So, for example, when:
-
<command> =
oc -
<version> = The client version. For example,
v3.3.0. This can change depending on if the request is made against the Kubernetes API at/api, or the OpenShift Enterprise API at/oapi -
<platform> =
linux -
<architecture> =
amd64 -
<client> =
openshift, orkubernetesdepending on if the request is made against the Kubernetes API at/api, or the OpenShift Enterprise API at/oapi. -
<git_commit> = The Git commit of the client version (for example,
f034127)
the user agent will be:
oc/v3.3.0 (linux/amd64) openshift/f034127
As an OpenShift Enterprise administrator, you can prevent clients from accessing the API with the userAgentMatching configuration setting of a master configuration. So, if a client is using a particular library or binary, they will be prevented from accessing the API.
The following user agent example denies the Kubernetes 1.2 client binary, OpenShift Origin 1.1.3 binary, and the POST and PUT httpVerbs:
policyConfig:
userAgentMatchingConfig:
defaultRejectionMessage: "Your client is too old. Go to https://example.org to update it."
deniedClients:
- regex: '\w+/v(?:(?:1\.1\.1)|(?:1\.0\.1)) \(.+/.+\) openshift/\w{7}'
- regex: '\w+/v(?:1\.1\.3) \(.+/.+\) openshift/\w{7}'
httpVerbs:
- POST
- PUT
- regex: '\w+/v1\.2\.0 \(.+/.+\) kubernetes/\w{7}'
httpVerbs:
- POST
- PUT
requiredClients: nullAdministrators can also deny clients that do not exactly match the expected clients:
policyConfig:
userAgentMatchingConfig:
defaultRejectionMessage: "Your client is too old. Go to https://example.org to update it."
deniedClients: []
requiredClients:
- regex: '\w+/v1\.1\.3 \(.+/.+\) openshift/\w{7}'
- regex: '\w+/v1\.2\.0 \(.+/.+\) kubernetes/\w{7}'
httpVerbs:
- POST
- PUTWhen the client’s user agent mismatches the configuration, errors occur. To ensure that mutating requests match, enforce a whitelist. Rules are mapped to specific verbs, so you can ban mutating requests while allowing non-mutating requests.
Chapter 11. Syncing Groups With LDAP
11.1. Overview
As an OpenShift Enterprise administrator, you can use groups to manage users, change their permissions, and enhance collaboration. Your organization may have already created user groups and stored them in an LDAP server. OpenShift Enterprise can sync those LDAP records with internal OpenShift Enterprise records, enabling you to manage your groups in one place. OpenShift Enterprise currently supports group sync with LDAP servers using three common schemas for defining group membership: RFC 2307, Active Directory, and augmented Active Directory.
You must have cluster-admin privileges to sync groups.
11.2. Configuring LDAP Sync
Before you can run LDAP sync, you need a sync configuration file. This file contains LDAP client configuration details:
- Configuration for connecting to your LDAP server.
- Sync configuration options that are dependent on the schema used in your LDAP server.
A sync configuration file can also contain an administrator-defined list of name mappings that maps OpenShift Enterprise Group names to groups in your LDAP server.
11.2.1. LDAP Client Configuration
Example 11.1. LDAP Client Configuration
url: ldap://10.0.0.0:389
bindDN: cn=admin,dc=example,dc=com
bindPassword: password
insecure: false
ca: my-ldap-ca-bundle.crt - 1
- The connection protocol, IP address of the LDAP server hosting your database, and the port to connect to, formatted as
scheme://host:port. - 2
- Optional distinguished name (DN) to use as the Bind DN. OpenShift Enterprise uses this if elevated privilege is required to retrieve entries for the sync operation.
- 3
- Optional password to use to bind. OpenShift Enterprise uses this if elevated privilege is necessary to retrieve entries for the sync operation. This value may also be provided in an environment variable, external file, or encrypted file.
- 4
- When
true, no TLS connection is made to the server. Whenfalse, secure LDAP (ldaps://) URLs connect using TLS, and insecure LDAP (ldap://) URLs are upgraded to TLS. - 5
- The certificate bundle to use for validating server certificates for the configured URL. If empty, OpenShift Enterprise uses system-trusted roots. This only applies if
insecureis set tofalse.
11.2.2. LDAP Query Definition
Sync configurations consist of LDAP query definitions for the entries that are required for synchronization. The specific definition of an LDAP query depends on the schema used to store membership information in the LDAP server.
Example 11.2. LDAP Query Definition
baseDN: ou=users,dc=example,dc=com
scope: sub
derefAliases: never
timeout: 0
filter: (objectClass=inetOrgPerson)
pageSize: 0 - 1
- The distinguished name (DN) of the branch of the directory where all searches will start from. It is required that you specify the top of your directory tree, but you can also specify a subtree in the directory.
- 2
- The scope of the search. Valid values are
base,one, orsub. If this is left undefined, then a scope ofsubis assumed. Descriptions of the scope options can be found in the table below. - 3
- The behavior of the search with respect to aliases in the LDAP tree. Valid values are
never,search,base, oralways. If this is left undefined, then the default is toalwaysdereference aliases. Descriptions of the dereferencing behaviors can be found in the table below. - 4
- The time limit allowed for the search by the client, in seconds. A value of 0 imposes no client-side limit.
- 5
- A valid LDAP search filter. If this is left undefined, then the default is
(objectClass=*). - 6
- The optional maximum size of response pages from the server, measured in LDAP entries. If set to 0, no size restrictions will be made on pages of responses. Setting paging sizes is necessary when queries return more entries than the client or server allow by default.
| LDAP Search Scope | Description |
|---|---|
|
| Only consider the object specified by the base DN given for the query. |
|
| Consider all of the objects on the same level in the tree as the base DN for the query. |
|
| Consider the entire subtree rooted at the base DN given for the query. |
| Dereferencing Behavior | Description |
|---|---|
|
| Never dereference any aliases found in the LDAP tree. |
|
| Only dereference aliases found while searching. |
|
| Only dereference aliases while finding the base object. |
|
| Always dereference all aliases found in the LDAP tree. |
11.2.3. User-Defined Name Mapping
A user-defined name mapping explicitly maps the names of OpenShift Enterprise Groups to unique identifiers that find groups on your LDAP server. The mapping uses normal YAML syntax. A user-defined mapping can contain an entry for every group in your LDAP server or only a subset of those groups. If there are groups on the LDAP server that do not have a user-defined name mapping, the default behavior during sync is to use the attribute specified as the Group’s name.
Example 11.3. User-Defined Name Mapping
groupUIDNameMapping:
"cn=group1,ou=groups,dc=example,dc=com": firstgroup
"cn=group2,ou=groups,dc=example,dc=com": secondgroup
"cn=group3,ou=groups,dc=example,dc=com": thirdgroup11.3. Running LDAP Sync
Once you have created a sync configuration file, then sync can begin. OpenShift Enterprise allows administrators to perform a number of different sync types with the same server.
By default, all group synchronization or pruning operations are dry-run, so you must set the --confirm flag on the sync-groups command in order to make changes to OpenShift Enterprise Group records.
To sync all groups from the LDAP server with OpenShift Enterprise:
$ oadm groups sync --sync-config=config.yaml --confirmTo sync all Groups already in OpenShift Enterprise that correspond to groups in the LDAP server specified in the configuration file:
$ oadm groups sync --type=openshift --sync-config=config.yaml --confirmTo sync a subset of LDAP groups with OpenShift Enterprise, you can use whitelist files, blacklist files, or both:
Any combination of blacklist files, whitelist files, or whitelist literals will work; whitelist literals can be included directly in the command itself. This applies to groups found on LDAP servers, as well as Groups already present in OpenShift Enterprise. Your files must contain one unique group identifier per line.
$ oadm groups sync --whitelist=<whitelist_file> \
--sync-config=config.yaml \
--confirm
$ oadm groups sync --blacklist=<blacklist_file> \
--sync-config=config.yaml \
--confirm
$ oadm groups sync <group_unique_identifier> \
--sync-config=config.yaml \
--confirm
$ oadm groups sync <group_unique_identifier> \
--whitelist=<whitelist_file> \
--blacklist=<blacklist_file> \
--sync-config=config.yaml \
--confirm
$ oadm groups sync --type=openshift \
--whitelist=<whitelist_file> \
--sync-config=config.yaml \
--confirm11.4. Running a Group Pruning Job
An administrator can also choose to remove groups from OpenShift Enterprise records if the records on the LDAP server that created them are no longer present. The prune job will accept the same sync configuration file and white- or black-lists as used for the sync job.
For example, if groups had previously been synchronized from LDAP using some config.yaml file, and some of those groups no longer existed on the LDAP server, the following command would determine which Groups in OpenShift Enterprise corresponded to the deleted groups in LDAP and then remove them from OpenShift Enterprise:
$ oadm groups prune --sync-config=config.yaml --confirm11.5. Sync Examples
This section contains examples for the RFC 2307, Active Directory, and augmented Active Directory schemas. All of the following examples synchronize a group named admins that has two members: Jane and Jim. Each example explains:
- How the group and users are added to the LDAP server.
- What the LDAP sync configuration file looks like.
- What the resulting Group record in OpenShift Enterprise will be after synchronization.
These examples assume that all users are direct members of their respective groups. Specifically, no groups have other groups as members. See Nested Membership Sync Example for information on how to sync nested groups.
11.5.1. RFC 2307
In the RFC 2307 schema, both users (Jane and Jim) and groups exist on the LDAP server as first-class entries, and group membership is stored in attributes on the group. The following snippet of ldif defines the users and group for this schema:
Example 11.4. LDAP Entries Using RFC 2307 Schema: rfc2307.ldif
dn: ou=users,dc=example,dc=com
objectClass: organizationalUnit
ou: users
dn: cn=Jane,ou=users,dc=example,dc=com
objectClass: person
objectClass: organizationalPerson
objectClass: inetOrgPerson
cn: Jane
sn: Smith
displayName: Jane Smith
mail: jane.smith@example.com
dn: cn=Jim,ou=users,dc=example,dc=com
objectClass: person
objectClass: organizationalPerson
objectClass: inetOrgPerson
cn: Jim
sn: Adams
displayName: Jim Adams
mail: jim.adams@example.com
dn: ou=groups,dc=example,dc=com
objectClass: organizationalUnit
ou: groups
dn: cn=admins,ou=groups,dc=example,dc=com
objectClass: groupOfNames
cn: admins
owner: cn=admin,dc=example,dc=com
description: System Administrators
member: cn=Jane,ou=users,dc=example,dc=com
member: cn=Jim,ou=users,dc=example,dc=comTo sync this group, you must first create the configuration file. The RFC 2307 schema requires you to provide an LDAP query definition for both user and group entries, as well as the attributes with which to represent them in the internal OpenShift Enterprise records.
For clarity, the Group you create in OpenShift Enterprise should use attributes other than the distinguished name whenever possible for user- or administrator-facing fields. For example, identify the users of a Group by their e-mail, and use the name of the group as the common name. The following configuration file creates these relationships:
If using user-defined name mappings, your configuration file will differ.
Example 11.5. LDAP Sync Configuration Using RFC 2307 Schema: rfc2307_config.yaml
kind: LDAPSyncConfig
apiVersion: v1
url: ldap://LDAP_SERVICE_IP:389
insecure: false
rfc2307:
groupsQuery:
baseDN: "ou=groups,dc=example,dc=com"
scope: sub
derefAliases: never
filter: (objectclass=groupOfNames)
pageSize: 0
groupUIDAttribute: dn
groupNameAttributes: [ cn ]
groupMembershipAttributes: [ member ]
usersQuery:
baseDN: "ou=users,dc=example,dc=com"
scope: sub
derefAliases: never
filter: (objectclass=inetOrgPerson)
pageSize: 0
userUIDAttribute: dn
userNameAttributes: [ mail ]
tolerateMemberNotFoundErrors: false
tolerateMemberOutOfScopeErrors: false- 1
- The IP address and host of the LDAP server where this group’s record is stored.
- 2
- When
true, no TLS connection is made to the server. Whenfalse, secure LDAP (ldaps://) URLs connect using TLS, and insecure LDAP (ldap://) URLs are upgraded to TLS. - 3
- The attribute that uniquely identifies a group on the LDAP server.
- 4
- The attribute to use as the name of the Group.
- 5
- The attribute on the group that stores the membership information.
- 6
- The attribute that uniquely identifies a user on the LDAP server.
- 7
- The attribute to use as the name of the user in the OpenShift Enterprise Group record.
To run sync with the rfc2307_config.yaml file:
$ oadm groups sync --sync-config=rfc2307_config.yaml --confirmOpenShift Enterprise creates the following Group record as a result of the above sync operation:
Example 11.6. OpenShift Enterprise Group Created Using rfc2307_config.yaml
apiVersion: v1
kind: Group
metadata:
annotations:
openshift.io/ldap.sync-time: 2015-10-13T10:08:38-0400
openshift.io/ldap.uid: cn=admins,ou=groups,dc=example,dc=com
openshift.io/ldap.url: LDAP_SERVER_IP:389
creationTimestamp:
name: admins
users:
- jane.smith@example.com
- jim.adams@example.com- 1
- The last time this Group was synchronized with the LDAP server, in ISO 6801 format.
- 2
- The unique identifier for the group on the LDAP server.
- 3
- The IP address and host of the LDAP server where this Group’s record is stored.
- 4
- The name of the Group as specified by the sync file.
- 5
- The users that are members of the Group, named as specified by the sync file.
11.5.1.1. RFC2307 with User-Defined Name Mappings
When syncing groups with user-defined name mappings, the configuration file changes to contain these mappings as shown below.
Example 11.7. LDAP Sync Configuration Using RFC 2307 Schema With User-Defined Name Mappings: rfc2307_config_user_defined.yaml
kind: LDAPSyncConfig
apiVersion: v1
groupUIDNameMapping:
"cn=admins,ou=groups,dc=example,dc=com": Administrators
rfc2307:
groupsQuery:
baseDN: "ou=groups,dc=example,dc=com"
scope: sub
derefAliases: never
filter: (objectclass=groupOfNames)
pageSize: 0
groupUIDAttribute: dn
groupNameAttributes: [ cn ]
groupMembershipAttributes: [ member ]
usersQuery:
baseDN: "ou=users,dc=example,dc=com"
scope: sub
derefAliases: never
filter: (objectclass=inetOrgPerson)
pageSize: 0
userUIDAttribute: dn
userNameAttributes: [ mail ]
tolerateMemberNotFoundErrors: false
tolerateMemberOutOfScopeErrors: falseTo run sync with the rfc2307_config_user_defined.yaml file:
$ oadm groups sync --sync-config=rfc2307_config_user_defined.yaml --confirmOpenShift Enterprise creates the following Group record as a result of the above sync operation:
Example 11.8. OpenShift Enterprise Group Created Using rfc2307_config_user_defined.yaml
apiVersion: v1
kind: Group
metadata:
annotations:
openshift.io/ldap.sync-time: 2015-10-13T10:08:38-0400
openshift.io/ldap.uid: cn=admins,ou=groups,dc=example,dc=com
openshift.io/ldap.url: LDAP_SERVER_IP:389
creationTimestamp:
name: Administrators
users:
- jane.smith@example.com
- jim.adams@example.com- 1
- The name of the Group as specified by the user-defined name mapping.
11.5.2. RFC 2307 with User-Defined Error Tolerances
By default, if the groups being synced contain members whose entries are outside of the scope defined in the member query, the group sync fails with an error:
Error determining LDAP group membership for "<group>": membership lookup for user "<user>" in group "<group>" failed because of "search for entry with dn="<user-dn>" would search outside of the base dn specified (dn="<base-dn>")".
This often indicates a mis-configured baseDN in the usersQuery field. However, in cases where the baseDN intentionally does not contain some of the members of the group, setting tolerateMemberOutOfScopeErrors: true allows the group sync to continue. Out of scope members will be ignored.
Similarly, when the group sync process fails to locate a member for a group, it fails outright with errors:
Error determining LDAP group membership for "<group>": membership lookup for user "<user>" in group "<group>" failed because of "search for entry with base dn="<user-dn>" refers to a non-existent entry".
Error determining LDAP group membership for "<group>": membership lookup for user "<user>" in group "<group>" failed because of "search for entry with base dn="<user-dn>" and filter "<filter>" did not return any results".
This often indicates a mis-configured usersQuery field. However, in cases where the group contains member entries that are known to be missing, setting tolerateMemberNotFoundErrors: true allows the group sync to continue. Problematic members will be ignored.
Enabling error tolerances for the LDAP group sync causes the sync process to ignore problematic member entries. If the LDAP group sync is not configured correctly, this could result in synced OpenShift Enterprise groups missing members.
Example 11.9. LDAP Entries Using RFC 2307 Schema With Problematic Group Membership: rfc2307_problematic_users.ldif
dn: ou=users,dc=example,dc=com
objectClass: organizationalUnit
ou: users
dn: cn=Jane,ou=users,dc=example,dc=com
objectClass: person
objectClass: organizationalPerson
objectClass: inetOrgPerson
cn: Jane
sn: Smith
displayName: Jane Smith
mail: jane.smith@example.com
dn: cn=Jim,ou=users,dc=example,dc=com
objectClass: person
objectClass: organizationalPerson
objectClass: inetOrgPerson
cn: Jim
sn: Adams
displayName: Jim Adams
mail: jim.adams@example.com
dn: ou=groups,dc=example,dc=com
objectClass: organizationalUnit
ou: groups
dn: cn=admins,ou=groups,dc=example,dc=com
objectClass: groupOfNames
cn: admins
owner: cn=admin,dc=example,dc=com
description: System Administrators
member: cn=Jane,ou=users,dc=example,dc=com
member: cn=Jim,ou=users,dc=example,dc=com
member: cn=INVALID,ou=users,dc=example,dc=com
member: cn=Jim,ou=OUTOFSCOPE,dc=example,dc=com In order to tolerate the errors in the above example, the following additions to your sync configuration file must be made:
Example 11.10. LDAP Sync Configuration Using RFC 2307 Schema Tolerating Errors: rfc2307_config_tolerating.yaml
kind: LDAPSyncConfig
apiVersion: v1
url: ldap://LDAP_SERVICE_IP:389
rfc2307:
groupsQuery:
baseDN: "ou=groups,dc=example,dc=com"
scope: sub
derefAliases: never
filter: (objectclass=groupOfNames)
groupUIDAttribute: dn
groupNameAttributes: [ cn ]
groupMembershipAttributes: [ member ]
usersQuery:
baseDN: "ou=users,dc=example,dc=com"
scope: sub
derefAliases: never
filter: (objectclass=inetOrgPerson)
userUIDAttribute: dn
userNameAttributes: [ mail ]
tolerateMemberNotFoundErrors: true
tolerateMemberOutOfScopeErrors: true - 1
- When
true, the sync job tolerates groups for which some members were not found, and members whose LDAP entries are not found are ignored. The default behavior for the sync job is to fail if a member of a group is not found. - 2
- When
true, the sync job tolerates groups for which some members are outside the user scope given in theusersQuerybase DN, and members outside the member query scope are ignored. The default behavior for the sync job is to fail if a member of a group is out of scope.
To run sync with the rfc2307_config_tolerating.yaml file:
$ oadm groups sync --sync-config=rfc2307_config_tolerating.yaml --confirmOpenShift Enterprise creates the following group record as a result of the above sync operation:
Example 11.11. OpenShift Enterprise Group Created Using rfc2307_config.yaml
apiVersion: v1
kind: Group
metadata:
annotations:
openshift.io/ldap.sync-time: 2015-10-13T10:08:38-0400
openshift.io/ldap.uid: cn=admins,ou=groups,dc=example,dc=com
openshift.io/ldap.url: LDAP_SERVER_IP:389
creationTimestamp:
name: admins
users:
- jane.smith@example.com
- jim.adams@example.com- 1
- The users that are members of the group, as specified by the sync file. Members for which lookup encountered tolerated errors are absent.
11.5.3. Active Directory
In the Active Directory schema, both users (Jane and Jim) exist in the LDAP server as first-class entries, and group membership is stored in attributes on the user. The following snippet of ldif defines the users and group for this schema:
Example 11.12. LDAP Entries Using Active Directory Schema: active_directory.ldif
dn: ou=users,dc=example,dc=com
objectClass: organizationalUnit
ou: users
dn: cn=Jane,ou=users,dc=example,dc=com
objectClass: person
objectClass: organizationalPerson
objectClass: inetOrgPerson
objectClass: testPerson
cn: Jane
sn: Smith
displayName: Jane Smith
mail: jane.smith@example.com
memberOf: admins
dn: cn=Jim,ou=users,dc=example,dc=com
objectClass: person
objectClass: organizationalPerson
objectClass: inetOrgPerson
objectClass: testPerson
cn: Jim
sn: Adams
displayName: Jim Adams
mail: jim.adams@example.com
memberOf: admins- 1
- The user’s group memberships are listed as attributes on the user, and the group does not exist as an entry on the server. The
memberOfattribute does not have to be a literal attribute on the user; in some LDAP servers, it is created during search and returned to the client, but not committed to the database.
To sync this group, you must first create the configuration file. The Active Directory schema requires you to provide an LDAP query definition for user entries, as well as the attributes to represent them with in the internal OpenShift Enterprise Group records.
For clarity, the Group you create in OpenShift Enterprise should use attributes other than the distinguished name whenever possible for user- or administrator-facing fields. For example, identify the users of a Group by their e-mail, but define the name of the Group by the name of the group on the LDAP server. The following configuration file creates these relationships:
Example 11.13. LDAP Sync Configuration Using Active Directory Schema: active_directory_config.yaml
kind: LDAPSyncConfig
apiVersion: v1
url: ldap://LDAP_SERVICE_IP:389
activeDirectory:
usersQuery:
baseDN: "ou=users,dc=example,dc=com"
scope: sub
derefAliases: never
filter: (objectclass=inetOrgPerson)
pageSize: 0
userNameAttributes: [ mail ]
groupMembershipAttributes: [ memberOf ] To run sync with the active_directory_config.yaml file:
$ oadm groups sync --sync-config=active_directory_config.yaml --confirmOpenShift Enterprise creates the following Group record as a result of the above sync operation:
Example 11.14. OpenShift Enterprise Group Created Using active_directory_config.yaml
apiVersion: v1
kind: Group
metadata:
annotations:
openshift.io/ldap.sync-time: 2015-10-13T10:08:38-0400
openshift.io/ldap.uid: admins
openshift.io/ldap.url: LDAP_SERVER_IP:389
creationTimestamp:
name: admins
users:
- jane.smith@example.com
- jim.adams@example.com- 1
- The last time this Group was synchronized with the LDAP server, in ISO 6801 format.
- 2
- The unique identifier for the group on the LDAP server.
- 3
- The IP address and host of the LDAP server where this Group’s record is stored.
- 4
- The name of the group as listed in the LDAP server.
- 5
- The users that are members of the Group, named as specified by the sync file.
11.5.4. Augmented Active Directory
In the augmented Active Directory schema, both users (Jane and Jim) and groups exist in the LDAP server as first-class entries, and group membership is stored in attributes on the user. The following snippet of ldif defines the users and group for this schema:
Example 11.15. LDAP Entries Using Augmented Active Directory Schema: augmented_active_directory.ldif
dn: ou=users,dc=example,dc=com
objectClass: organizationalUnit
ou: users
dn: cn=Jane,ou=users,dc=example,dc=com
objectClass: person
objectClass: organizationalPerson
objectClass: inetOrgPerson
objectClass: testPerson
cn: Jane
sn: Smith
displayName: Jane Smith
mail: jane.smith@example.com
memberOf: cn=admins,ou=groups,dc=example,dc=com
dn: cn=Jim,ou=users,dc=example,dc=com
objectClass: person
objectClass: organizationalPerson
objectClass: inetOrgPerson
objectClass: testPerson
cn: Jim
sn: Adams
displayName: Jim Adams
mail: jim.adams@example.com
memberOf: cn=admins,ou=groups,dc=example,dc=com
dn: ou=groups,dc=example,dc=com
objectClass: organizationalUnit
ou: groups
dn: cn=admins,ou=groups,dc=example,dc=com
objectClass: groupOfNames
cn: admins
owner: cn=admin,dc=example,dc=com
description: System Administrators
member: cn=Jane,ou=users,dc=example,dc=com
member: cn=Jim,ou=users,dc=example,dc=comTo sync this group, you must first create the configuration file. The augmented Active Directory schema requires you to provide an LDAP query definition for both user entries and group entries, as well as the attributes with which to represent them in the internal OpenShift Enterprise Group records.
For clarity, the Group you create in OpenShift Enterprise should use attributes other than the distinguished name whenever possible for user- or administrator-facing fields. For example, identify the users of a Group by their e-mail, and use the name of the Group as the common name. The following configuration file creates these relationships.
Example 11.16. LDAP Sync Configuration Using Augmented Active Directory Schema: augmented_active_directory_config.yaml
kind: LDAPSyncConfig
apiVersion: v1
url: ldap://LDAP_SERVICE_IP:389
augmentedActiveDirectory:
groupsQuery:
baseDN: "ou=groups,dc=example,dc=com"
scope: sub
derefAliases: never
filter: (objectclass=groupOfNames)
pageSize: 0
groupUIDAttribute: dn
groupNameAttributes: [ cn ]
usersQuery:
baseDN: "ou=users,dc=example,dc=com"
scope: sub
derefAliases: never
filter: (objectclass=inetOrgPerson)
pageSize: 0
userNameAttributes: [ mail ]
groupMembershipAttributes: [ memberOf ] To run sync with the augmented_active_directory_config.yaml file:
$ oadm groups sync --sync-config=augmented_active_directory_config.yaml --confirmOpenShift Enterprise creates the following Group record as a result of the above sync operation:
Example 11.17. OpenShift Group Created Using augmented_active_directory_config.yaml
apiVersion: v1
kind: Group
metadata:
annotations:
openshift.io/ldap.sync-time: 2015-10-13T10:08:38-0400
openshift.io/ldap.uid: cn=admins,ou=groups,dc=example,dc=com
openshift.io/ldap.url: LDAP_SERVER_IP:389
creationTimestamp:
name: admins
users:
- jane.smith@example.com
- jim.adams@example.com- 1
- The last time this Group was synchronized with the LDAP server, in ISO 6801 format.
- 2
- The unique identifier for the group on the LDAP server.
- 3
- The IP address and host of the LDAP server where this Group’s record is stored.
- 4
- The name of the Group as specified by the sync file.
- 5
- The users that are members of the Group, named as specified by the sync file.
11.6. Nested Membership Sync Example
Groups in OpenShift Enterprise do not nest. The LDAP server must flatten group membership before the data can be consumed. Microsoft’s Active Directory Server supports this feature via the LDAP_MATCHING_RULE_IN_CHAIN rule, which has the OID 1.2.840.113556.1.4.1941. Furthermore, only explicitly whitelisted groups can be synced when using this matching rule.
This section has an example for the augmented Active Directory schema, which synchronizes a group named admins that has one user Jane and one group otheradmins as members. The otheradmins group has one user member: Jim. This example explains:
- How the group and users are added to the LDAP server.
- What the LDAP sync configuration file looks like.
- What the resulting Group record in OpenShift Enterprise will be after synchronization.
In the augmented Active Directory schema, both users (Jane and Jim) and groups exist in the LDAP server as first-class entries, and group membership is stored in attributes on the user or the group. The following snippet of ldif defines the users and groups for this schema:
LDAP Entries Using Augmented Active Directory Schema With Nested Members: augmented_active_directory_nested.ldif
dn: ou=users,dc=example,dc=com
objectClass: organizationalUnit
ou: users
dn: cn=Jane,ou=users,dc=example,dc=com
objectClass: person
objectClass: organizationalPerson
objectClass: inetOrgPerson
objectClass: testPerson
cn: Jane
sn: Smith
displayName: Jane Smith
mail: jane.smith@example.com
memberOf: cn=admins,ou=groups,dc=example,dc=com
dn: cn=Jim,ou=users,dc=example,dc=com
objectClass: person
objectClass: organizationalPerson
objectClass: inetOrgPerson
objectClass: testPerson
cn: Jim
sn: Adams
displayName: Jim Adams
mail: jim.adams@example.com
memberOf: cn=otheradmins,ou=groups,dc=example,dc=com
dn: ou=groups,dc=example,dc=com
objectClass: organizationalUnit
ou: groups
dn: cn=admins,ou=groups,dc=example,dc=com
objectClass: group
cn: admins
owner: cn=admin,dc=example,dc=com
description: System Administrators
member: cn=Jane,ou=users,dc=example,dc=com
member: cn=otheradmins,ou=groups,dc=example,dc=com
dn: cn=otheradmins,ou=groups,dc=example,dc=com
objectClass: group
cn: otheradmins
owner: cn=admin,dc=example,dc=com
description: Other System Administrators
memberOf: cn=admins,ou=groups,dc=example,dc=com
member: cn=Jim,ou=users,dc=example,dc=comTo sync nested groups with Active Directory, you must provide an LDAP query definition for both user entries and group entries, as well as the attributes with which to represent them in the internal OpenShift Enterprise Group records. Furthermore, certain changes are required in this configuration:
-
The
oadm groups synccommand must explicitly whitelist groups. -
The user’s
groupMembershipAttributesmust include"memberOf:1.2.840.113556.1.4.1941:"to comply with theLDAP_MATCHING_RULE_IN_CHAINrule. -
The
groupUIDAttributemust be set todn. The
groupsQuery:-
Must not set
filter. -
Must set a valid
derefAliases. -
Should not set
baseDNas that value is ignored. -
Should not set
scopeas that value is ignored.
-
Must not set
For clarity, the Group you create in OpenShift Enterprise should use attributes other than the distinguished name whenever possible for user- or administrator-facing fields. For example, identify the users of a Group by their e-mail, and use the name of the Group as the common name. The following configuration file creates these relationships:
LDAP Sync Configuration Using Augmented Active Directory Schema With Nested Members: augmented_active_directory_config_nested.yaml
kind: LDAPSyncConfig
apiVersion: v1
url: ldap://LDAP_SERVICE_IP:389
augmentedActiveDirectory:
groupsQuery:
derefAliases: never
pageSize: 0
groupUIDAttribute: dn
groupNameAttributes: [ cn ]
usersQuery:
baseDN: "ou=users,dc=example,dc=com"
scope: sub
derefAliases: never
filter: (objectclass=inetOrgPerson)
pageSize: 0
userNameAttributes: [ mail ]
groupMembershipAttributes: [ "memberOf:1.2.840.113556.1.4.1941:" ] - 1
groupsQueryfilters cannot be specified. ThegroupsQuerybase DN and scope values are ignored.groupsQuerymust set a validderefAliases.- 2
- The attribute that uniquely identifies a group on the LDAP server. It must be set to
dn. - 3
- The attribute to use as the name of the Group.
- 4
- The attribute to use as the name of the user in the OpenShift Enterprise Group record.
mailorsAMAccountNameare preferred choices in most installations. - 5
- The attribute on the user that stores the membership information. Note the use of
LDAP_MATCHING_RULE_IN_CHAIN.
To run sync with the augmented_active_directory_config_nested.yaml file:
$ oadm groups sync \
'cn=admins,ou=groups,dc=example,dc=com' \
--sync-config=augmented_active_directory_config_nested.yaml \
--confirm
You must explicitly whitelist the cn=admins,ou=groups,dc=example,dc=com group.
OpenShift Enterprise creates the following Group record as a result of the above sync operation:
OpenShift Group Created Using augmented_active_directory_config_nested.yaml
apiVersion: v1
kind: Group
metadata:
annotations:
openshift.io/ldap.sync-time: 2015-10-13T10:08:38-0400
openshift.io/ldap.uid: cn=admins,ou=groups,dc=example,dc=com
openshift.io/ldap.url: LDAP_SERVER_IP:389
creationTimestamp:
name: admins
users:
- jane.smith@example.com
- jim.adams@example.com- 1
- The last time this Group was synchronized with the LDAP server, in ISO 6801 format.
- 2
- The unique identifier for the group on the LDAP server.
- 3
- The IP address and host of the LDAP server where this Group’s record is stored.
- 4
- The name of the Group as specified by the sync file.
- 5
- The users that are members of the Group, named as specified by the sync file. Note that members of nested groups are included since the group membership was flattened by the Microsoft Active Directory Server.
11.7. LDAP Sync Configuration Specification
The object specification for the configuration file is below. Note that the different schema objects have different fields. For example, v1.ActiveDirectoryConfig has no groupsQuery field whereas v1.RFC2307Config and v1.AugmentedActiveDirectoryConfig both do.
11.7.1. v1.LDAPSyncConfig
LDAPSyncConfig holds the necessary configuration options to define an LDAP group sync.
| Name | Description | Schema |
|---|---|---|
|
| String value representing the REST resource this object represents. Servers may infer this from the endpoint the client submits requests to. Cannot be updated. In CamelCase. More info: http://releases.k8s.io/HEAD/docs/devel/api-conventions.md#types-kinds | string |
|
| Defines the versioned schema of this representation of an object. Servers should convert recognized schemas to the latest internal value, and may reject unrecognized values. More info: http://releases.k8s.io/HEAD/docs/devel/api-conventions.md#resources | string |
|
|
Host is the scheme, host and port of the LDAP server to connect to: | string |
|
| Optional DN to bind to the LDAP server with. | string |
|
| Optional password to bind with during the search phase. | |
|
|
If | boolean. |
|
| Optional trusted certificate authority bundle to use when making requests to the server. If empty, the default system roots are used. | string |
|
| Optional direct mapping of LDAP group UIDs to OpenShift Enterprise Group names. | object |
|
| Holds the configuration for extracting data from an LDAP server set up in a fashion similar to RFC2307: first-class group and user entries, with group membership determined by a multi-valued attribute on the group entry listing its members. | |
|
| Holds the configuration for extracting data from an LDAP server set up in a fashion similar to that used in Active Directory: first-class user entries, with group membership determined by a multi-valued attribute on members listing groups they are a member of. | |
|
| Holds the configuration for extracting data from an LDAP server set up in a fashion similar to that used in Active Directory as described above, with one addition: first-class group entries exist and are used to hold metadata but not group membership. |
11.7.2. v1.StringSource
StringSource allows specifying a string inline, or externally via environment variable or file. When it contains only a string value, it marshals to a simple JSON string.
| Name | Description | Schema |
|---|---|---|
|
|
Specifies the cleartext value, or an encrypted value if | string |
|
|
Specifies an environment variable containing the cleartext value, or an encrypted value if the | string |
|
|
References a file containing the cleartext value, or an encrypted value if a | string |
|
| References a file containing the key to use to decrypt the value. | string |
11.7.3. v1.LDAPQuery
LDAPQuery holds the options necessary to build an LDAP query.
| Name | Description | Schema |
|---|---|---|
|
| DN of the branch of the directory where all searches should start from. | string |
|
|
The (optional) scope of the search. Can be | string |
|
|
The (optional) behavior of the search with regards to alisases. Can be | string |
|
|
Holds the limit of time in seconds that any request to the server can remain outstanding before the wait for a response is given up. If this is | integer |
|
| A valid LDAP search filter that retrieves all relevant entries from the LDAP server with the base DN. | string |
|
|
Maximum preferred page size, measured in LDAP entries. A page size of | integer |
11.7.4. v1.RFC2307Config
RFC2307Config holds the necessary configuration options to define how an LDAP group sync interacts with an LDAP server using the RFC2307 schema.
| Name | Description | Schema |
|---|---|---|
|
| Holds the template for an LDAP query that returns group entries. | |
|
|
Defines which attribute on an LDAP group entry will be interpreted as its unique identifier. ( | string |
|
| Defines which attributes on an LDAP group entry will be interpreted as its name to use for an OpenShift Enterprise group. | string array |
|
|
Defines which attributes on an LDAP group entry will be interpreted as its members. The values contained in those attributes must be queryable by your | string array |
|
| Holds the template for an LDAP query that returns user entries. | |
|
|
Defines which attribute on an LDAP user entry will be interpreted as its unique identifier. It must correspond to values that will be found from the | string |
|
|
Defines which attributes on an LDAP user entry will be used, in order, as its OpenShift Enterprise user name. The first attribute with a non-empty value is used. This should match your | string array |
|
|
Determines the behavior of the LDAP sync job when missing user entries are encountered. If | boolean |
|
|
Determines the behavior of the LDAP sync job when out-of-scope user entries are encountered. If | boolean |
11.7.5. v1.ActiveDirectoryConfig
ActiveDirectoryConfig holds the necessary configuration options to define how an LDAP group sync interacts with an LDAP server using the Active Directory schema.
| Name | Description | Schema |
|---|---|---|
|
| Holds the template for an LDAP query that returns user entries. | |
|
| Defines which attributes on an LDAP user entry will be interpreted as its OpenShift Enterprise user name. | string array |
|
| Defines which attributes on an LDAP user entry will be interpreted as the groups it is a member of. | string array |
11.7.6. v1.AugmentedActiveDirectoryConfig
AugmentedActiveDirectoryConfig holds the necessary configuration options to define how an LDAP group sync interacts with an LDAP server using the augmented Active Directory schema.
| Name | Description | Schema |
|---|---|---|
|
| Holds the template for an LDAP query that returns user entries. | |
|
| Defines which attributes on an LDAP user entry will be interpreted as its OpenShift Enterprise user name. | string array |
|
| Defines which attributes on an LDAP user entry will be interpreted as the groups it is a member of. | string array |
|
| Holds the template for an LDAP query that returns group entries. | |
|
|
Defines which attribute on an LDAP group entry will be interpreted as its unique identifier. ( | string |
|
| Defines which attributes on an LDAP group entry will be interpreted as its name to use for an OpenShift Enterprise group. | string array |
Chapter 12. Advanced LDAP Configuration
12.1. Overview
OpenShift Enterprise Advanced Lightweight Directory Access Protocol (LDAP) Configuration covers the following topics:
12.2. Setting up SSSD for LDAP Failover
12.2.1. Overview
OpenShift Enterprise provides an authentication provider for use with Lightweight Directory Access Protocol (LDAP) setups, but it can only connect to a single LDAP server. This can be problematic if that LDAP server becomes unavailable. System Security Services Daemon (SSSD) can be used to solve the issue.
Originally designed to manage local and remote authentication to the host operating system, SSSD can now be configured to provide identity, authentication, and authorization services to web services like OpenShift Enterprise. SSSD provides advantages over the built-in LDAP provider, including the ability to connect to any number of failover LDAP servers, as well as the ability to cache authentication attempts in case it can no longer reach any of those servers.
The setup for this configuration is advanced and requires a separate authentication server (also called an authenticating proxy) for OpenShift Enterprise to communicate with. This topic describes how to do this setup on a dedicated physical or virtual machine (VM), but the concepts are also applicable to a setup in a container.
12.2.2. Prerequisites for Authenticating Proxy Setup
Before starting setup, you need to know the following information about your LDAP server.
- Whether the directory server is powered by FreeIPA, Active Directory, or another LDAP solution.
- The Uniform Resource Identifier (URI) for the LDAP server (for example, ldap.example.com).
- The location of the CA certificate for the LDAP server.
- Whether the LDAP server corresponds to RFC 2307 or RFC2307bis for user groups.
Prepare the VMs:
- proxy.example.com: A VM to use as the authenticating proxy. This machine must have at least SSSD 1.12.0 available, which means a fairly recent operating system. This topic uses a Red Hat Enterprise Linux 7.2 server for its examples.
- openshift.example.com: A VM to use to run OpenShift Enterprise.
These VMs can be configured to run on the same system, but for the examples used in this topic they are kept separate.
12.2.3. Phase 1: Certificate Generation
To ensure that communication between the authenticating proxy and OpenShift Enterprise is trustworthy, create a set of Transport Layer Security (TLS) certificates to use during the other phases of this setup. In the OpenShift Enterprise system, start by using the auto-generated certificates created as part of running:
# openshift start \ --public-master=https://openshift.example.com:8443 \ --write-config=/etc/origin/Among other things, this generates a /etc/origin/master/ca.{cert|key}. Use this signing certificate to generate keys to use on the authenticating proxy.
# mkdir -p /etc/origin/proxy/ # oadm ca create-server-cert \ --cert='/etc/origin/proxy/proxy.example.com.crt' \ --key='/etc/origin/proxy/proxy.example.com.key' \ --hostnames=proxy.example.com \ --signer-cert=/etc/origin/master/ca.crt \ --signer-key='/etc/origin/master/ca.key' \ --signer-serial='/etc/origin/master/ca.serial.txt'ImportantEnsure that any host names and interface IP addresses that need to access the proxy are listed. Otherwise, the HTTPS connection will fail.
Create a new CA to sign this client certificate:
# oadm ca create-signer-cert \ --cert='/etc/origin/proxy/proxyca.crt' \ --key='/etc/origin/proxy/proxyca.key' \ --name='openshift-proxy-signer@UNIQUESTRING' \1 --serial='/etc/origin/proxy/proxyca.serial.txt'- 1
- Make
UNIQUESTRINGsomething unique.
Generate the API client certificate that the authenticating proxy will use to prove its identity to OpenShift Enterprise.
# oadm create-api-client-config \ --certificate-authority='/etc/origin/proxy/proxyca.crt' \ --client-dir='/etc/origin/proxy' \ --signer-cert='/etc/origin/proxy/proxyca.crt' \ --signer-key='/etc/origin/proxy/proxyca.key' \ --signer-serial='/etc/origin/proxy/proxyca.serial.txt' \ --user='system:proxy'This prevents malicious users from impersonating the proxy and sending fake identities.
Copy the certificate and key information to the appropriate file for future steps:
# cat /etc/origin/proxy/system\:proxy.crt \ /etc/origin/proxy/system\:proxy.key \ > /etc/origin/proxy/authproxy.pem
12.2.4. Phase 2: Authenticating Proxy Setup
This section guides you through the steps to authenticate the proxy setup.
12.2.4.1. Step 1: Copy Certificates
From openshift.example.com, securely copy the necessary certificates to the proxy machine:
# scp /etc/origin/master/ca.crt \
root@proxy.example.com:/etc/pki/CA/certs/
# scp /etc/origin/proxy/proxy.example.com.crt \
/etc/origin/proxy/authproxy.pem \
root@proxy.example.com:/etc/pki/tls/certs/
# scp /etc/origin/proxy/proxy.example.com.key \
root@proxy.example.com:/etc/pki/tls/private/12.2.4.2. Step 2: SSSD Configuration
- Install a new VM with an operating system that includes 1.12.0 or later so that you can use the mod_identity_lookup module. The examples in this topic use a Red Hat Enterprise Linux 7.2 Server.
Install all of the necessary dependencies:
# yum install -y sssd \ sssd-dbus \ realmd \ httpd \ mod_session \ mod_ssl \ mod_lookup_identity \ mod_authnz_pamThis gives you the needed SSSD and the web server components.
Edit the /etc/httpd/conf.modules.d/55-authnz_pam.conf file and remove the comment from the following:
LoadModule authnz_pam_module modules/mod_authnz_pam.soSet up SSSD to authenticate this VM against the LDAP server. If the LDAP server is a FreeIPA or Active Directory environment, then realmd can be used to join this machine to the domain.
# realm join ldap.example.comFor more advanced case, see the System-Level Authentication Guide
If you want to use SSSD to manage failover situations for LDAP, this can be configured by adding additional entries in /etc/sssd/sssd.conf on the ldap_uri line. Systems enrolled with FreeIPA can automatically handle failover using DNS SRV records.
Restart SSSD to ensure that all of the changes are applied properly:
$ systemctl restart sssd.serviceTest that the user information can be retrieved properly:
$ getent passwd <username> username:*:12345:12345:Example User:/home/username:/usr/bin/bash- Attempt to log into the VM as an LDAP user and confirm that the authentication is properly set up. This can be done via the local console or a remote service such as SSH.
If you do not want LDAP users to be able to log into this machine, it is recommended to modify /etc/pam.d/system-auth and /etc/pam.d/password-auth to remove the lines containing pam_sss.so.
12.2.4.3. Step 3: Apache Configuration
You need to set up Apache to communicate with SSSD. Create a PAM stack file for use with Apache. To do so:
Create the /etc/pam.d/openshift file and add the following contents:
auth required pam_sss.so account required pam_sss.soThis configuration enables PAM (the pluggable authentication module) to use pam_sss.so to determine authentication and access control when an authentication request is issued for the openshift stack.
Configure the Apache httpd.conf. The steps in this section focus on setting up the challenge authentication, which is useful for logging in with
oc loginand similar automated tools.NoteConfiguring Form-Based Authentication explains how to set up a graphical login using SSSD as well, but it requires the rest of this setup as a prerequisite.
Create the new file openshift-proxy.conf in /etc/httpd/conf.d (substituting the correct host names where indicated):
LoadModule request_module modules/mod_request.so LoadModule lookup_identity_module modules/mod_lookup_identity.so # Nothing needs to be served over HTTP. This virtual host simply redirects to # HTTPS. <VirtualHost *:80> DocumentRoot /var/www/html RewriteEngine On RewriteRule ^(.*)$ https://%{HTTP_HOST}$1 [R,L] </VirtualHost> <VirtualHost *:443> # This needs to match the certificates you generated. See the CN and X509v3 # Subject Alternative Name in the output of: # openssl x509 -text -in /etc/pki/tls/certs/proxy.example.com.crt ServerName proxy.example.com DocumentRoot /var/www/html SSLEngine on SSLCertificateFile /etc/pki/tls/certs/proxy.example.com.crt SSLCertificateKeyFile /etc/pki/tls/private/proxy.example.com.key SSLCACertificateFile /etc/pki/CA/certs/ca.crt # Send logs to a specific location to make them easier to find ErrorLog logs/proxy_error_log TransferLog logs/proxy_access_log LogLevel warn SSLProxyEngine on SSLProxyCACertificateFile /etc/pki/CA/certs/ca.crt # It's critical to enforce client certificates on the Master. Otherwise # requests could spoof the X-Remote-User header by accessing the Master's # /oauth/authorize endpoint directly. SSLProxyMachineCertificateFile /etc/pki/tls/certs/authproxy.pem # Send all requests to the console RewriteEngine On RewriteRule ^/console(.*)$ https://%{HTTP_HOST}:8443/console$1 [R,L] # In order to using the challenging-proxy an X-Csrf-Token must be present. RewriteCond %{REQUEST_URI} ^/challenging-proxy RewriteCond %{HTTP:X-Csrf-Token} ^$ [NC] RewriteRule ^.* - [F,L] <Location /challenging-proxy/oauth/authorize> # Insert your backend server name/ip here. ProxyPass https://openshift.example.com:8443/oauth/authorize AuthType Basic AuthBasicProvider PAM AuthPAMService openshift Require valid-user </Location> <ProxyMatch /oauth/authorize> AuthName openshift RequestHeader set X-Remote-User %{REMOTE_USER}s env=REMOTE_USER </ProxyMatch> </VirtualHost> RequestHeader unset X-Remote-UserNoteConfiguring Form-Based Authentication explains how to add the login-proxy block to support form authentication.
Set a boolean to tell SELinux that it is acceptable for Apache to contact the PAM subsystem:
# setsebool -P allow_httpd_mod_auth_pam onStart up Apache:
# systemctl start httpd.service
12.2.5. Phase 3: OpenShift Enterprise Configuration
This section describes how to set up an OpenShift Enterprise server from scratch in an "all in one" configuration. Master and Node Configuration provides more information on alternate configurations.
Modify the default configuration to use the new identity provider just created. To do so:
- Modify the /etc/origin/master/master-config.yaml file.
Scan through it and locate the identityProviders section and replace it with:
identityProviders: - name: any_provider_name challenge: true login: false mappingMethod: claim provider: apiVersion: v1 kind: RequestHeaderIdentityProvider challengeURL: "https://proxy.example.com/challenging-proxy/oauth/authorize?${query}" clientCA: /etc/origin/master/proxy/proxyca.crt headers: - X-Remote-UserNoteConfiguring Form-Based Authentication explains how to add the login URL to support web logins.
Configuring Extended LDAP Attributes explains how to add the email and full-name attributes. Note that the full-name attributes are only stored to the database on the first login.
Start OpenShift Enterprise with the updated configuration:
# openshift start \ --public-master=https://openshift.example.com:8443 \ --master-config=/etc/origin/master/master-config.yaml \ --node-config=/etc/origin/node-node1.example.com/node-config.yamlTest logins:
oc login https://openshift.example.com:8443It should now be possible to log in with only valid LDAP credentials.
12.3. Configuring Form-Based Authentication
12.3.1. Overview
This topic builds upon Setting up SSSD for LDAP Failover and describes how to set up form-based authentication for signing into the OpenShift Enterprise web console.
12.3.2. Prepare a Login Page
The OpenShift Enterprise upstream repositories have a template for forms. Copy that to your authenticating proxy on proxy.example.com:
# curl -o /var/www/html/login.html \
https://raw.githubusercontent.com/openshift/openshift-extras/master/misc/form_auth/login.htmlModify this .html file to change the logo icon and "Welcome" content for your environment.
12.3.3. Install Another Apache Module
To intercept form-based authentication, install an Apache module:
# yum -y install mod_intercept_form_submit12.3.4. Apache Configuration
- Modify /etc/httpd/conf.modules.d/55-intercept_form_submit.conf and uncomment the LoadModule line.
Add a new section to your openshift-proxy.conf file inside the
<VirtualHost *:443>block.<Location /login-proxy/oauth/authorize> # Insert your backend server name/ip here. ProxyPass https://openshift.example.com:8443/oauth/authorize InterceptFormPAMService openshift InterceptFormLogin httpd_username InterceptFormPassword httpd_password RewriteCond %{REQUEST_METHOD} GET RewriteRule ^.*$ /login.html [L] </Location>This tells Apache to listen for POST requests on the /login-proxy/oauth/authorize and to pass the user name and password over to the openshift PAM service.
- Restart the service and move back over to the OpenShift Enterprise configuration.
12.3.5. OpenShift Enterprise Configuration
In the master-config.yaml file, update the identityProviders section:
identityProviders: - name: any_provider_name challenge: true login: true1 mappingMethod: claim provider: apiVersion: v1 kind: RequestHeaderIdentityProvider challengeURL: "https://proxy.example.com/challenging-proxy/oauth/authorize?${query}" loginURL: "https://proxy.example.com/login-proxy/oauth/authorize?${query}"2 clientCA: /etc/origin/master/proxy/proxyca.crt headers: - X-Remote-UserRestart OpenShift Enterprise with the updated configuration.
NoteYou should be able to browse to https://openshift.example.com:8443 and use your LDAP credentials to sign in via the login form.
12.4. Configuring Extended LDAP Attributes
12.4.1. Overview
This topic builds upon Setting up SSSD for LDAP Failover and Configuring Form-Based Authentication and focuses on configuring extended Lightweight Directory Access Protocol (LDAP) attributes.
12.4.2. Prerequisites
- SSSD 1.12.0 or later. This is available on Red Hat Enterprise Linux 7.0 and later.
mod_lookup_identity 0.9.4 or later.
- The required version is not yet available on any version of Red Hat Enterprise Linux. However, compatible packages (RPMs) are available from upstream until they arrive in Red Hat Enterprise Linux.
12.4.3. Configuring SSSD
You need to ask System Security Services Daemon (SSSD) to look up attributes in LDAP that it normally does not care about for simple system-login use-cases. In the case of OpenShift Enterprise, there is only one such attribute: email. So, you need to:
Modify the [domain/DOMAINNAME] section of /etc/sssd/sssd.conf on the authenticating proxy and add this attribute:
[domain/example.com] ... ldap_user_extra_attrs = mailTell SSSD that it is acceptable for this attribute to be retrieved by Apache. Add the following two lines to the [ifp] section of /etc/sssd/sssd.conf:
[ifp] user_attributes = +mail allowed_uids = apache, rootRestart SSSD:
# systemctl restart sssd.service- Test this configuration.
12.4.4. Configuring Apache
Now that SSSD is set up and successfully serving extended attributes, configure the web server to ask for them and to insert them in the correct places.
Enable the module to be loaded by Apache. To do so, modify /etc/httpd/conf.modules.d/55-lookup_identity.conf and uncomment the line:
LoadModule lookup_identity_module modules/mod_lookup_identity.soSet an SELinux boolean so that SElinux allows Apache to connect to SSSD over D-BUS:
# setsebool -P httpd_dbus_sssd onEdit /etc/httpd/conf.d/openshift-proxy.conf and add the following lines inside the <ProxyMatch /oauth/authorize> section:
Restart Apache to pick up the changes:
# systemctl restart httpd.service
12.4.5. Configuring OpenShift Enterprise
Tell OpenShift Enterprise where to find these new attributes during login. To do so:
Edit the /etc/origin/master/master-config.yaml file and add the following lines to the identityProviders section:
identityProviders: - name: sssd challenge: true login: true mappingMethod: claim provider: apiVersion: v1 kind: RequestHeaderIdentityProvider challengeURL: "https://proxy.example.com/challenging-proxy/oauth/authorize?${query}" loginURL: "https://proxy.example.com/login-proxy/oauth/authorize?${query}" clientCA: /home/example/workspace/openshift/configs/openshift.example.com/proxy/proxyca.crt headers: - X-Remote-User emailHeaders:1 - X-Remote-User-Email2 nameHeaders:3 - X-Remote-User-Display-Name4 Launch OpenShift Enterprise with this updated configuration and log in to the web as a new user.
You should see their full name appear in the upper-right of the screen. You can also verify with
oc get identities -o yamlthat both email addresses and full names are available.
12.4.6. Debugging Notes
Currently, OpenShift Enterprise only saves these attributes to the user at the time of the first login and does not update them again after that. So, while you are testing (and only while testing), run oc delete users,identities --all to clear the identities out so you can log in again.
Chapter 13. Configuring the SDN
13.1. Overview
The OpenShift Enterprise SDN enables communication between pods across the OpenShift Enterprise cluster, establishing a pod network. Two SDN plug-ins are currently available (ovs-subnet and ovs-multitenant), which provide different methods for configuring the pod network.
13.2. Configuring the Pod Network with Ansible
For initial advanced installations, the ovs-subnet plug-in is installed and configured by default, though it can be overridden during installation using the os_sdn_network_plugin_name parameter, which is configurable in the Ansible inventory file.
Example 13.1. Example SDN Configuration with Ansible
# Configure the multi-tenant SDN plugin (default is 'redhat/openshift-ovs-subnet')
# os_sdn_network_plugin_name='redhat/openshift-ovs-multitenant'
# Disable the OpenShift SDN plugin
# openshift_use_openshift_sdn=False
# Configure SDN cluster network CIDR block. This network block should
# be a private block and should not conflict with existing network
# blocks in your infrastructure that pods may require access to.
# Can not be changed after deployment.
#osm_cluster_network_cidr=10.1.0.0/16
# default subdomain to use for exposed routes
#openshift_master_default_subdomain=apps.test.example.com
# Configure SDN cluster network and kubernetes service CIDR blocks. These
# network blocks should be private and should not conflict with network blocks
# in your infrastructure that pods may require access to. Can not be changed
# after deployment.
#osm_cluster_network_cidr=10.1.0.0/16
#openshift_portal_net=172.30.0.0/16
# Configure number of bits to allocate to each host’s subnet e.g. 8
# would mean a /24 network on the host.
#osm_host_subnet_length=8
# This variable specifies the service proxy implementation to use:
# either iptables for the pure-iptables version (the default),
# or userspace for the userspace proxy.
#openshift_node_proxy_mode=iptables
For initial quick installations, the ovs-subnet plug-in is installed and configured by default as well, and can be reconfigured post-installation using the networkConfig stanza of the master-config.yaml file.
13.3. Configuring the Pod Network on Masters
Cluster administrators can control pod network settings on masters by modifying parameters in the networkConfig section of the master configuration file (located at /etc/origin/master/master-config.yaml by default):
networkConfig:
clusterNetworkCIDR: 10.128.0.0/14
hostSubnetLength: 9
networkPluginName: "redhat/openshift-ovs-subnet"
serviceNetworkCIDR: 172.30.0.0/16
The serviceNetworkCIDR and hostSubnetLength values cannot be changed after the cluster is first created, and clusterNetworkCIDR can only be changed to be a larger network that still contains the original network. For example, given the default value of 10.128.0.0/14, you could change clusterNetworkCIDR to 10.128.0.0/9 (i.e., the entire upper half of net 10) but not to 10.64.0.0/16, because that does not overlap the original value.
13.4. Configuring the Pod Network on Nodes
Cluster administrators can control pod network settings on nodes by modifying parameters in the networkConfig section of the node configuration file (located at /etc/origin/node/node-config.yaml by default):
13.5. Migrating Between SDN Plug-ins
If you are already using one SDN plug-in and want to switch to another:
When switching from the ovs-subnet to the ovs-multitenant plug-in, all the existing projects in the cluster will be fully isolated (assigned unique VNIDs). Cluster administrators can choose to modify the project networks using the administrator CLI.
13.6. External Access to the Cluster Network
If a host that is external to OpenShift Enterprise requires access to the cluster network, you have two options:
- Configure the host as an OpenShift Enterprise node but mark it unschedulable so that the master does not schedule containers on it.
- Create a tunnel between your host and a host that is on the cluster network.
Both options are presented as part of a practical use-case in the documentation for configuring routing from an edge load-balancer to containers within OpenShift Enterprise SDN.
Chapter 14. Configuring for AWS
14.1. Overview
OpenShift Enterprise can be configured to access an AWS EC2 infrastructure, including using AWS volumes as persistent storage for application data. After AWS is configured properly, some additional configurations will need to be completed on the OpenShift Enterprise hosts.
14.2. Configuring AWS Variables
To set the required AWS variables, create a /etc/aws/aws.conf file with the following contents on all of your OpenShift Enterprise hosts, both masters and nodes:
[Global]
Zone = us-east-1c - 1
- This is the Availability Zone of your AWS Instance and where your EBS Volume resides; this information is obtained from the AWS Managment Console.
14.3. Configuring OpenShift Enterprise Masters for AWS
You can set the AWS configuration on your OpenShift Enterprise master hosts in two ways:
14.3.1. Configuring OpenShift Enterprise for AWS with Ansible
During advanced installations, AWS can be configured using the openshift_cloudprovider_aws_access_key, openshift_cloudprovider_aws_secret_key, and openshift_cloudprovider_kind parameters, which are configurable in the inventory file.
Example 14.1. Example AWS Configuration with Ansible
# Cloud Provider Configuration
#
# Note: You may make use of environment variables rather than store
# sensitive configuration within the ansible inventory.
# For example:
#openshift_cloudprovider_aws_access_key="{{ lookup('env','AWS_ACCESS_KEY_ID') }}"
#openshift_cloudprovider_aws_secret_key="{{ lookup('env','AWS_SECRET_ACCESS_KEY') }}"
#
# AWS
#openshift_cloudprovider_kind=aws
# Note: IAM profiles may be used instead of storing API credentials on disk.
#openshift_cloudprovider_aws_access_key=aws_access_key_id
#openshift_cloudprovider_aws_secret_key=aws_secret_access_keyWhen Ansible configures AWS, the following files are created for you:
- /etc/aws/aws.conf
- /etc/origin/master/master-config.yaml
- /etc/origin/node/node-config.yaml
- /etc/sysconfig/atomic-openshift-master
- /etc/sysconfig/atomic-openshift-node
14.3.2. Manually Configuring OpenShift Enterprise Masters for AWS
Edit or create the master configuration file on all masters (/etc/origin/master/master-config.yaml by default) and update the contents of the apiServerArguments and controllerArguments sections:
kubernetesMasterConfig:
...
apiServerArguments:
cloud-provider:
- "aws"
cloud-config:
- "/etc/aws/aws.conf"
controllerArguments:
cloud-provider:
- "aws"
cloud-config:
- "/etc/aws/aws.conf"When triggering a containerized installation, only the directories of /etc/origin and /var/lib/origin are mounted to the master and node container. Therefore, aws.conf should be in /etc/origin/ instead of /etc/.
14.3.3. Manually Configuring OpenShift Enterprise Nodes for AWS
Edit or create the node configuration file on all nodes (/etc/origin/node/node-config.yaml by default) and update the contents of the kubeletArguments section:
kubeletArguments:
cloud-provider:
- "aws"
cloud-config:
- "/etc/aws/aws.conf"When triggering a containerized installation, only the directories of /etc/origin and /var/lib/origin are mounted to the master and node container. Therefore, aws.conf should be in /etc/origin/ instead of /etc/.
14.4. Setting Key Value Access Pairs
Make sure the following environment variables are set in the /etc/sysconfig/atomic-openshift-master file on masters and the /etc/sysconfig/atomic-openshift-node file on nodes:
AWS_ACCESS_KEY_ID=<key_ID>
AWS_SECRET_ACCESS_KEY=<secret_key>Access keys are obtained when setting up your AWS IAM user.
14.5. Applying Configuration Changes
Start or restart OpenShift Enterprise services on all master and node hosts to apply your configuration changes:
# systemctl restart atomic-openshift-master
# systemctl restart atomic-openshift-node
Switching from not using a cloud provider to using a cloud provider produces an error message. Adding the cloud provider tries to delete the node because the node switches from using the hostname as the externalID (which would have been the case when no cloud provider was being used) to using the AWS instance-id (which is what the AWS cloud provider specifies). To resolve this issue:
- Log in to the CLI as a cluster administrator.
Delete the nodes:
$ oc delete node <node_name>- On each node host, restart the atomic-openshift-node service.
- Add back any labels on each node that you previously had.
Chapter 15. Configuring for OpenStack
15.1. Overview
When deployed on OpenStack, OpenShift Enterprise can be configured to access OpenStack infrastructure, including using OpenStack Cinder volumes as persistent storage for application data.
15.2. Configuring OpenStack Variables
To set the required OpenStack variables, create a /etc/cloud.conf file with the following contents on all of your OpenShift Enterprise hosts, both masters and nodes:
[Global]
auth-url = <OS_AUTH_URL>
username = <OS_USERNAME>
password = <password>
domain-id = <OS_USER_DOMAIN_ID>
tenant-id = <OS_TENANT_ID>
region = <OS_REGION_NAME>
[LoadBalancer]
subnet-id = <UUID of the load balancer subnet>
Consult your OpenStack administrators for values of the OS_ variables, which are commonly used in OpenStack configuration.
15.3. Configuring OpenShift Enterprise Masters for OpenStack
You can set an OpenStack configuration on your OpenShift Enterprise master and node hosts in two different ways:
- Using Ansible and the advanced installation tool
- Manually, by modifying the master-config.yaml and node-config.yaml files.
15.3.1. Configuring OpenShift Enterprise for OpenStack with Ansible
During advanced installations, OpenStack can be configured using the following parameters, which are configurable in the inventory file:
-
openshift_cloudprovider_kind -
openshift_cloudprovider_openstack_auth_url -
openshift_cloudprovider_openstack_username -
openshift_cloudprovider_openstack_password -
openshift_cloudprovider_openstack_domain_id -
openshift_cloudprovider_openstack_domain_name -
openshift_cloudprovider_openstack_tenant_id -
openshift_cloudprovider_openstack_tenant_name -
openshift_cloudprovider_openstack_region -
openshift_cloudprovider_openstack_lb_subnet_id
Example 15.1. Example OpenStack Configuration with Ansible
# Cloud Provider Configuration
#
# Note: You may make use of environment variables rather than store
# sensitive configuration within the ansible inventory.
# For example:
#openshift_cloudprovider_openstack_username="{{ lookup('env','USERNAME') }}"
#openshift_cloudprovider_openstack_password="{{ lookup('env','PASSWORD') }}"
#
# Openstack
#openshift_cloudprovider_kind=openstack
#openshift_cloudprovider_openstack_auth_url=http://openstack.example.com:35357/v2.0/
#openshift_cloudprovider_openstack_username=username
#openshift_cloudprovider_openstack_password=password
#openshift_cloudprovider_openstack_domain_id=domain_id
#openshift_cloudprovider_openstack_domain_name=domain_name
#openshift_cloudprovider_openstack_tenant_id=tenant_id
#openshift_cloudprovider_openstack_tenant_name=tenant_name
#openshift_cloudprovider_openstack_region=region
#openshift_cloudprovider_openstack_lb_subnet_id=subnet_id15.3.2. Manually Configuring OpenShift Enterprise Masters for OpenStack
Edit or create the master configuration file on all masters (/etc/origin/master/master-config.yaml by default) and update the contents of the apiServerArguments and controllerArguments sections:
kubernetesMasterConfig:
...
apiServerArguments:
cloud-provider:
- "openstack"
cloud-config:
- "/etc/cloud.conf"
controllerArguments:
cloud-provider:
- "openstack"
cloud-config:
- "/etc/cloud.conf"When triggering a containerized installation, only the directories of /etc/origin and /var/lib/origin are mounted to the master and node container. Therefore, cloud.conf should be in /etc/origin/ instead of /etc/.
15.3.3. Manually Configuring OpenShift Enterprise Nodes for OpenStack
Edit or create the node configuration file on all nodes (/etc/origin/node/node-config.yaml by default) and update the contents of the kubeletArguments and nodeName sections:
nodeName:
<instance_name>
kubeletArguments:
cloud-provider:
- "openstack"
cloud-config:
- "/etc/cloud.conf"- 1
- Name of the OpenStack instance where the node runs (i.e., name of the virtual machine)
When triggering a containerized installation, only the directories of /etc/origin and /var/lib/origin are mounted to the master and node container. Therefore, cloud.conf should be in /etc/origin/ instead of /etc/.
Chapter 16. Configuring for GCE
16.1. Overview
OpenShift Enterprise can be configured to access an GCE infrastructure, including using GCE volumes as persistent storage for application data. After GCE is configured properly, some additional configurations will need to be completed on the OpenShift Enterprise hosts.
16.2. Configuring Masters
Edit or create the master configuration file on all masters (/etc/origin/master/master-config.yaml by default) and update the contents of the apiServerArguments and controllerArguments sections:
kubernetesMasterConfig:
...
apiServerArguments:
cloud-provider:
- "gce"
controllerArguments:
cloud-provider:
- "gce"When triggering a containerized installation, only the directories of /etc/origin and /var/lib/origin are mounted to the master and node container. Therefore, master-config.yaml should be in /etc/origin/master instead of /etc/.
16.3. Configuring Nodes
Edit or create the node configuration file on all nodes (/etc/origin/node/node-config.yaml by default) and update the contents of the kubeletArguments section:
kubeletArguments:
cloud-provider:
- "gce"When triggering a containerized installation, only the directories of /etc/origin and /var/lib/origin are mounted to the master and node container. Therefore, node-config.yaml should be in /etc/origin/node instead of /etc/.
Then, start or restart the OpenShift Enterprise services on the master and all nodes.
Chapter 17. Configuring Persistent Storage
17.1. Overview
The Kubernetes persistent volume framework allows you to provision an OpenShift Enterprise cluster with persistent storage using networked storage available in your environment. This can be done after completing the initial OpenShift Enterprise installation depending on your application needs, giving users a way to request those resources without having any knowledge of the underlying infrastructure.
These topics show how to configure persistent volumes in OpenShift Enterprise using the following supported volume plug-ins:
17.2. Persistent Storage Using NFS
17.2.1. Overview
OpenShift Enterprise clusters can be provisioned with persistent storage using NFS. Persistent volumes (PVs) and persistent volume claims (PVCs) provide a convenient method for sharing a volume across a project. While the NFS-specific information contained in a PV definition could also be defined directly in a pod definition, doing so does not create the volume as a distinct cluster resource, making the volume more susceptible to conflicts.
This topic covers the specifics of using the NFS persistent storage type. Some familiarity with OpenShift Enterprise and NFS is beneficial. See the Persistent Storage concept topic for details on the OpenShift Enterprise persistent volume (PV) framework in general.
17.2.2. Provisioning
Storage must exist in the underlying infrastructure before it can be mounted as a volume in OpenShift Enterprise. To provision NFS volumes, a list of NFS servers and export paths are all that is required.
You must first create an object definition for the PV:
Example 17.1. PV Object Definition Using NFS
apiVersion: v1
kind: PersistentVolume
metadata:
name: pv0001
spec:
capacity:
storage: 5Gi
accessModes:
- ReadWriteOnce
nfs:
path: /tmp
server: 172.17.0.2
persistentVolumeReclaimPolicy: Recycle - 1
- The name of the volume. This is the PV identity in various
oc <command> podcommands. - 2
- The amount of storage allocated to this volume.
- 3
- Though this appears to be related to controlling access to the volume, it is actually used similarly to labels and used to match a PVC to a PV. Currently, no access rules are enforced based on the
accessModes. - 4
- The volume type being used, in this case the nfs plug-in.
- 5
- The path that is exported by the NFS server.
- 6
- The host name or IP address of the NFS server.
- 7
- The reclaim policy for the PV. This defines what happens to a volume when released from its claim. Valid options are Retain (default) and Recycle. See Reclaiming Resources.
Each NFS volume must be mountable by all schedulable nodes in the cluster.
Save the definition to a file, for example nfs-pv.yaml, and create the PV:
$ oc create -f nfs-pv.yaml
persistentvolume "pv0001" createdVerify that the PV was created:
# oc get pv
NAME LABELS CAPACITY ACCESSMODES STATUS CLAIM REASON AGE
pv0001 <none> 5368709120 RWO Available 31sThe next step can be to create a PVC, which binds to the new PV:
Example 17.2. PVC Object Definition
apiVersion: v1
kind: PersistentVolumeClaim
metadata:
name: nfs-claim1
spec:
accessModes:
- ReadWriteOnce
resources:
requests:
storage: 1Gi Save the definition to a file, for example nfs-claim.yaml, and create the PVC:
# oc create -f nfs-claim.yaml17.2.3. Enforcing Disk Quotas
You can use disk partitions to enforce disk quotas and size constraints. Each partition can be its own export. Each export is one PV. OpenShift Enterprise enforces unique names for PVs, but the uniqueness of the NFS volume’s server and path is up to the administrator.
Enforcing quotas in this way allows the developer to request persistent storage by a specific amount (for example, 10Gi) and be matched with a corresponding volume of equal or greater capacity.
17.2.4. NFS Volume Security
This section covers NFS volume security, including matching permissions and SELinux considerations. The user is expected to understand the basics of POSIX permissions, process UIDs, supplemental groups, and SELinux.
See the full Volume Security topic before implementing NFS volumes.
Developers request NFS storage by referencing, in the volumes section of their pod definition, either a PVC by name or the NFS volume plug-in directly.
The /etc/exports file on the NFS server contains the accessible NFS directories. The target NFS directory has POSIX owner and group IDs. The OpenShift Enterprise NFS plug-in mounts the container’s NFS directory with the same POSIX ownership and permissions found on the exported NFS directory. However, the container is not run with its effective UID equal to the owner of the NFS mount, which is the desired behavior.
As an example, if the target NFS directory appears on the NFS server as:
# ls -lZ /opt/nfs -d
drwxrws---. nfsnobody 5555 unconfined_u:object_r:usr_t:s0 /opt/nfs
# id nfsnobody
uid=65534(nfsnobody) gid=65534(nfsnobody) groups=65534(nfsnobody)Then the container must match SELinux labels, and either run with a UID of 65534 (nfsnobody owner) or with 5555 in its supplemental groups in order to access the directory.
The owner ID of 65534 is used as an example. Even though NFS’s root_squash maps root (0) to nfsnobody (65534), NFS exports can have arbitrary owner IDs. Owner 65534 is not required for NFS exports.
17.2.4.1. Group IDs
The recommended way to handle NFS access (assuming it is not an option to change permissions on the NFS export) is to use supplemental groups. Supplemental groups in OpenShift Enterprise are used for shared storage, of which NFS is an example. In contrast, block storage, such as Ceph RBD or iSCSI, use the fsGroup SCC strategy and the fsGroup value in the pod’s securityContext.
It is generally preferable to use supplemental group IDs to gain access to persistent storage versus using user IDs. Supplemental groups are covered further in the full Volume Security topic.
Because the group ID on the example target NFS directory shown above is 5555, the pod can define that group ID using supplementalGroups under the pod-level securityContext definition. For example:
spec:
containers:
- name:
...
securityContext:
supplementalGroups: [5555]
Assuming there are no custom SCCs that might satisfy the pod’s requirements, the pod likely matches the restricted SCC. This SCC has the supplementalGroups strategy set to RunAsAny, meaning that any supplied group ID is accepted without range checking.
As a result, the above pod passes admissions and is launched. However, if group ID range checking is desired, a custom SCC, as described in pod security and custom SCCs, is the preferred solution. A custom SCC can be created such that minimum and maximum group IDs are defined, group ID range checking is enforced, and a group ID of 5555 is allowed.
17.2.4.2. User IDs
User IDs can be defined in the container image or in the pod definition. The full Volume Security topic covers controlling storage access based on user IDs, and should be read prior to setting up NFS persistent storage.
It is generally preferable to use supplemental group IDs to gain access to persistent storage versus using user IDs.
In the example target NFS directory shown above, the container needs its UID set to 65534 (ignoring group IDs for the moment), so the following can be added to the pod definition:
spec:
containers:
- name:
...
securityContext:
runAsUser: 65534 Assuming the default project and the restricted SCC, the pod’s requested user ID of 65534 is not allowed, and therefore the pod fails. The pod fails for the following reasons:
- It requests 65534 as its user ID.
- All SCCs available to the pod are examined to see which SCC allows a user ID of 65534 (actually, all policies of the SCCs are checked but the focus here is on user ID).
-
Because all available SCCs use MustRunAsRange for their
runAsUserstrategy, UID range checking is required. - 65534 is not included in the SCC or project’s user ID range.
It is generally considered a good practice not to modify the predefined SCCs. The preferred way to fix this situation is to create a custom SCC, as described in the full Volume Security topic. A custom SCC can be created such that minimum and maximum user IDs are defined, UID range checking is still enforced, and the UID of 65534 is allowed.
17.2.4.3. SELinux
See the full Volume Security topic for information on controlling storage access in conjunction with using SELinux.
By default, SELinux does not allow writing from a pod to a remote NFS server. The NFS volume mounts correctly, but is read-only.
To enable writing to NFS volumes with SELinux enforcing on each node, run:
# setsebool -P virt_use_nfs 1
# setsebool -P virt_sandbox_use_nfs 1
The -P option above makes the bool persistent between reboots.
The virt_use_nfs boolean is defined by the docker-selinux package. If an error is seen indicating that this bool is not defined, ensure this package has been installed.
17.2.4.4. Export Settings
In order to enable arbitrary container users to read and write the volume, each exported volume on the NFS server should conform to the following conditions:
Each export must be:
/<example_fs> *(rw,root_squash,no_wdelay)The
no_wdelayoption prevents the server from delaying writes, which greatly improves read-after-write consistency.The firewall must be configured to allow traffic to the mount point. For NFSv4, the default port is 2049 (nfs). For NFSv3, there are three ports to configure: 2049 (nfs), 20048 (mountd), and 111 (portmapper).
NFSv4
# iptables -I INPUT 1 -p tcp --dport 2049 -j ACCEPTNFSv3
# iptables -I INPUT 1 -p tcp --dport 2049 -j ACCEPT # iptables -I INPUT 1 -p tcp --dport 20048 -j ACCEPT # iptables -I INPUT 1 -p tcp --dport 111 -j ACCEPT-
The NFS export and directory must be set up so that it is accessible by the target pods. Either set the export to be owned by the container’s primary UID, or supply the pod group access using
supplementalGroups, as shown in Group IDs above. See the full Volume Security topic for additional pod security information as well.
17.2.5. Reclaiming Resources
NFS implements the OpenShift Enterprise Recyclable plug-in interface. Automatic processes handle reclamation tasks based on policies set on each persistent volume.
By default, PVs are set to Retain. NFS volumes which are set to Recycle are scrubbed (i.e., rm -rf is run on the volume) after being released from their claim (i.e, after the user’s PersistentVolumeClaim bound to the volume is deleted). Once recycled, the NFS volume can be bound to a new claim.
Once claim to a PV is released (that is, the PVC is deleted), the PV object should not be re-used. Instead, a new PV should be created with the same basic volume details as the original.
For example, the administrator creates a PV named nfs1:
apiVersion: v1
kind: PersistentVolume
metadata:
name: nfs1
spec:
capacity:
storage: 1Mi
accessModes:
- ReadWriteMany
nfs:
server: 192.168.1.1
path: "/"
The user creates PVC1, which binds to nfs1. The user then deletes PVC1, releasing claim to nfs1, which causes nfs1 to be Released. If the administrator wishes to make the same NFS share available, they should create a new PV with the same NFS server details, but a different PV name:
apiVersion: v1
kind: PersistentVolume
metadata:
name: nfs2
spec:
capacity:
storage: 1Mi
accessModes:
- ReadWriteMany
nfs:
server: 192.168.1.1
path: "/"
Deleting the original PV and re-creating it with the same name is discouraged. Attempting to manually change the status of a PV from Released to Available causes errors and potential data loss.
A PV with retention policy of Recycle scrubs (rm -rf) the data and marks it as Available for claim. The Recycle retention policy is deprecated starting in OpenShift Enterprise 3.6 and should be avoided. Anyone using recycler should use dynamic provision and volume deletion instead.
17.2.6. Automation
Clusters can be provisioned with persistent storage using NFS in the following ways:
- Enforce storage quotas using disk partitions.
- Enforce security by restricting volumes to the project that has a claim to them.
- Configure reclamation of discarded resources for each PV.
They are many ways that you can use scripts to automate the above tasks. You can use an example Ansible playbook to help you get started.
17.2.7. Additional Configuration and Troubleshooting
Depending on what version of NFS is being used and how it is configured, there may be additional configuration steps needed for proper export and security mapping. The following are some that may apply:
| NFSv4 mount incorrectly shows all files with ownership of nobody:nobody |
|
| Disabling ID mapping on NFSv4 |
|
17.3. Persistent Storage Using GlusterFS
17.3.1. Overview
You can configure your OpenShift Enterprise cluster to use Red Hat Gluster Storage as persistent storage for containerized applications. There are two deployment solutions available when using Red Hat Gluster Storage, using either a containerized or dedicated storage cluster. This topic focuses mainly on the the persistent volume plug-in solution using a dedicated Red Hat Gluster Storage cluster.
17.3.1.1. Containerized Red Hat Gluster Storage
Starting with the Red Hat Gluster Storage 3.1 update 3 release, you can deploy containerized Red Hat Gluster Storage directly on OpenShift Enterprise. Containerized Red Hat Gluster Storage converged with OpenShift Enterprise addresses the use case where containerized applications require both shared file storage and the flexibility of a converged infrastructure with compute and storage instances being scheduled and run from the same set of hardware.
Figure 17.1. Architecture - Red Hat Gluster Storage Container Converged with OpenShift
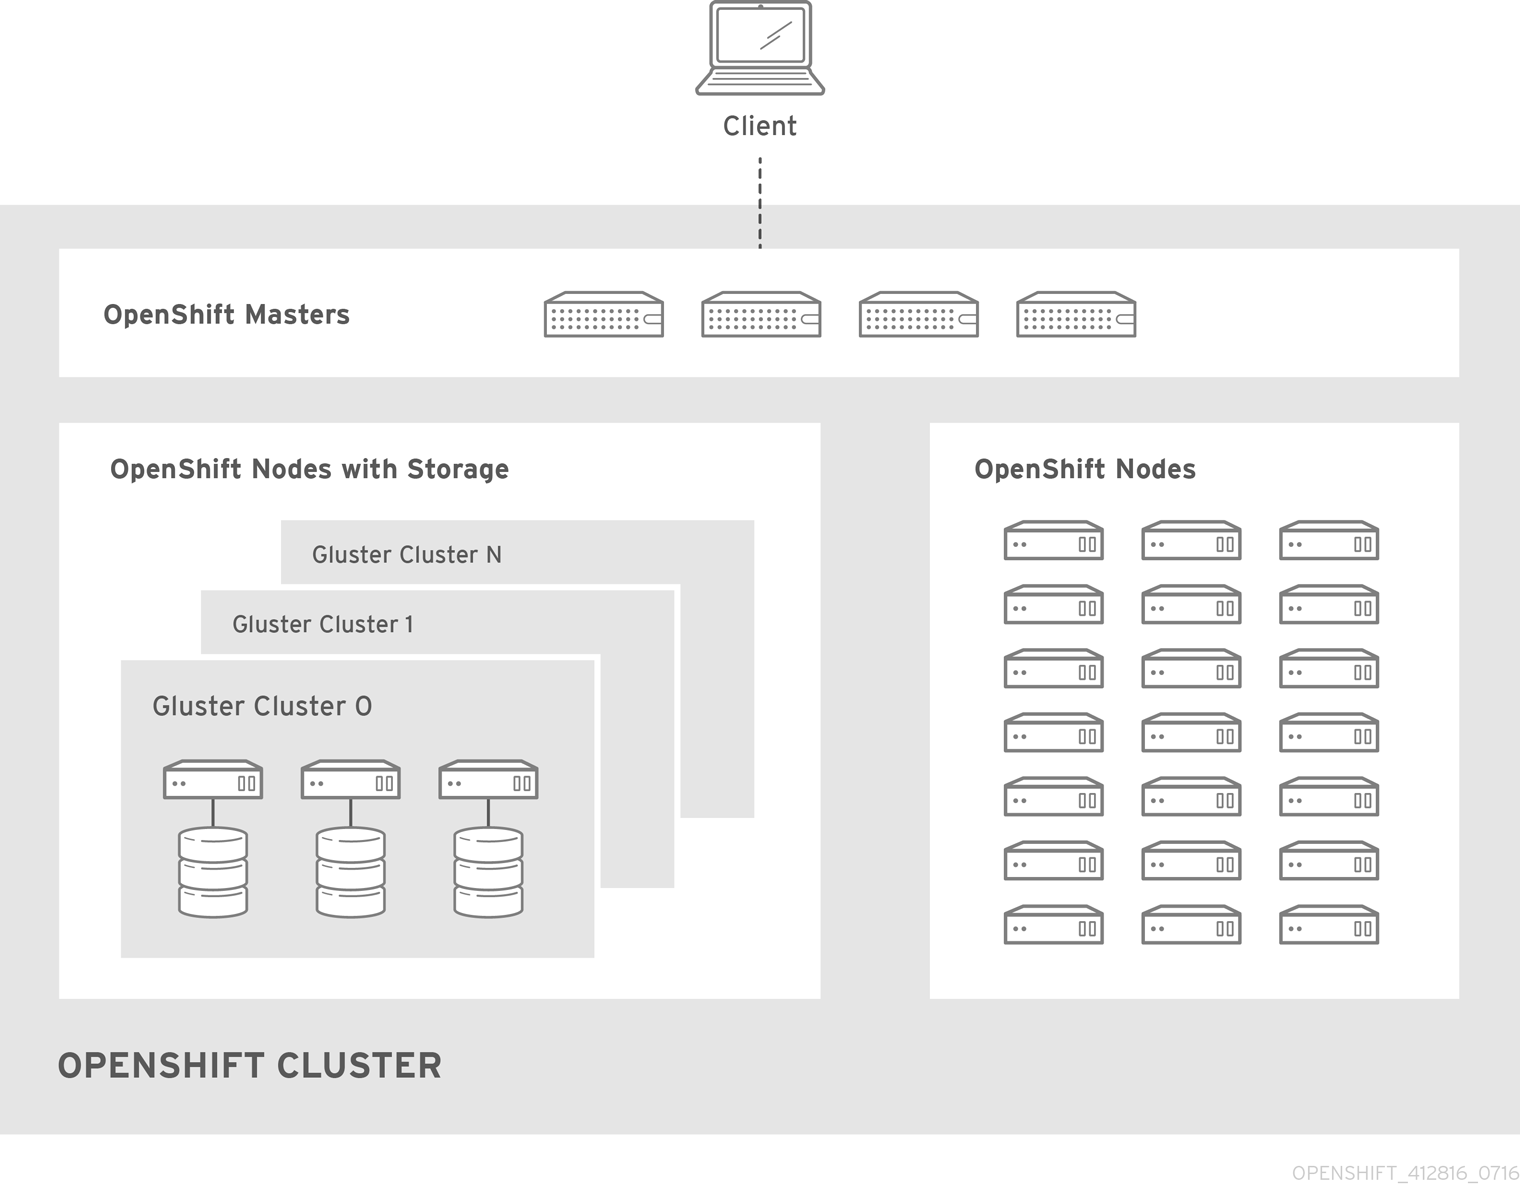
Step-by-step instructions for this containerized solution are provided separately in the following Red Hat Gluster Storage documentation:
17.3.1.2. Dedicated Storage Cluster
If you have a dedicated Red Hat Gluster Storage cluster available in your environment, you can configure OpenShift Enterprise’s Gluster volume plug-in. The dedicated storage cluster delivers persistent Red Hat Gluster Storage file storage for containerized applications over the network. The applications access storage served out from the storage clusters through common storage protocols.
Figure 17.2. Architecture - Dedicated Red Hat Gluster Storage Cluster Using the OpenShift Enterprise Volume Plug-in
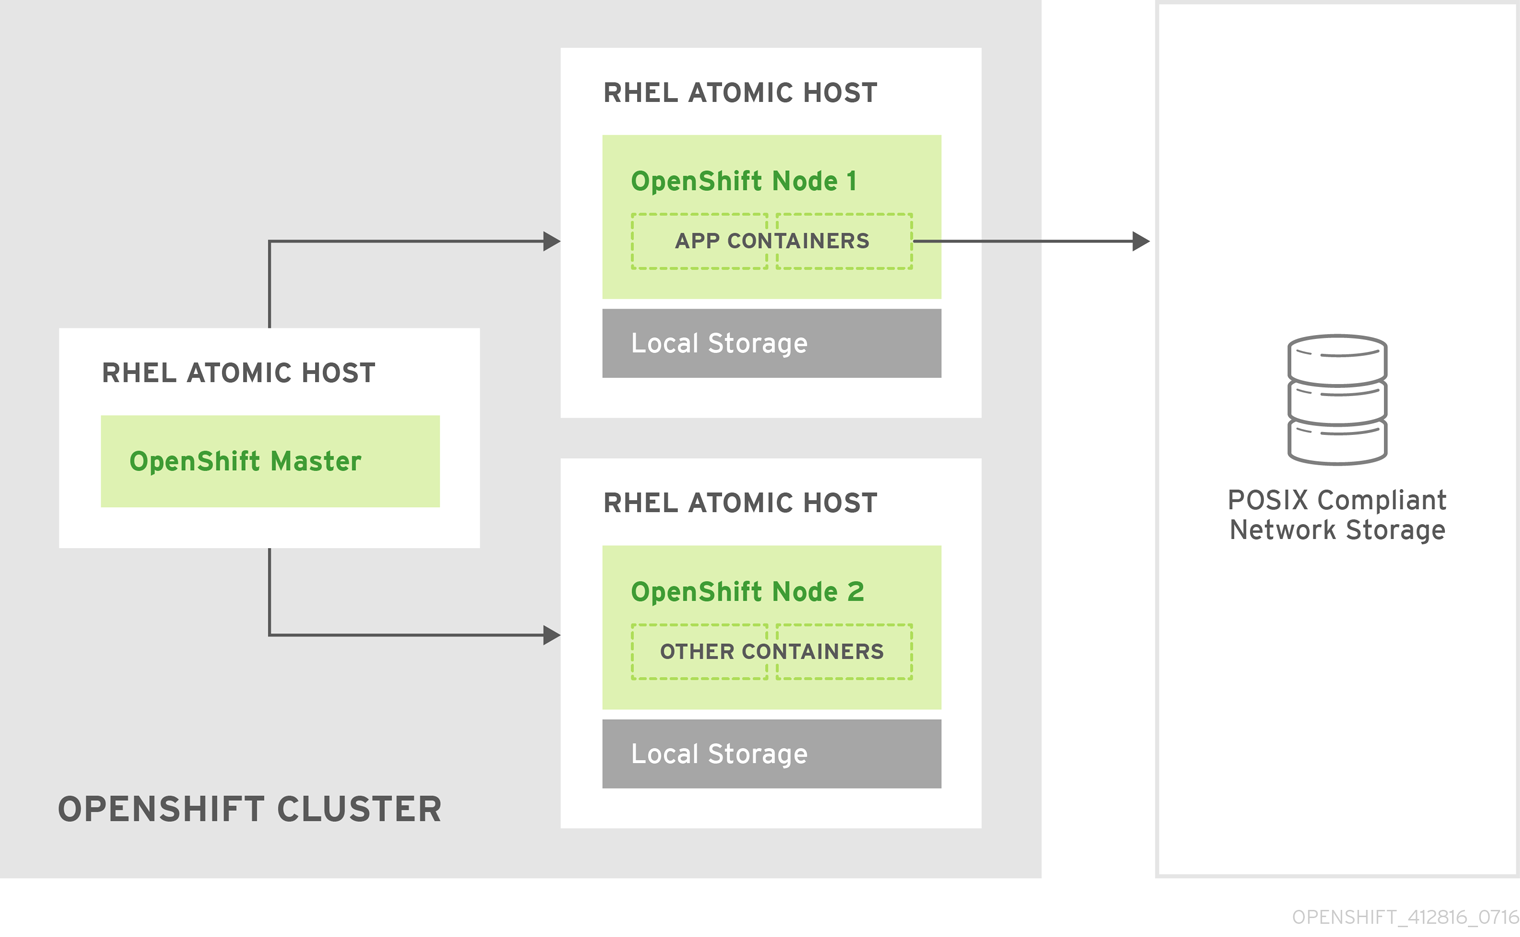
This solution is a conventional deployment where containerized compute applications run on an OpenShift Enterprise cluster. The remaining sections in this topic provide the step-by-step instructions for the dedicated Red Hat Gluster Storage solution.
This topic presumes some familiarity with OpenShift Enterprise and GlusterFS; see the Red Hat Gluster Storage 3 Administration Guide for more on GlusterFS. See the Persistent Storage topic for details on the OpenShift Enterprise PV framework in general.
High-availability of storage in the infrastructure is left to the underlying storage provider.
17.3.2. Support Requirements
The following requirements must be met to create a supported integration of Red Hat Gluster Storage and OpenShift Enterprise.
17.3.2.1. Supported Operating Systems
The following table lists the supported versions of OpenShift Enterprise with Red Hat Gluster Storage Server.
| Red Hat Gluster Storage | OpenShift Enterprise |
|---|---|
| 3.1.3 | 3.1 or later |
17.3.2.2. Environment Requirements
The environment requirements for OpenShift Enterprise and Red Hat Gluster Storage are described in this section.
Red Hat Gluster Storage
- All installations of Red Hat Gluster Storage must have valid subscriptions to Red Hat Network channels and Subscription Management repositories.
- Red Hat Gluster Storage installations must adhere to the requirements laid out in the Red Hat Gluster Storage Installation Guide.
- Red Hat Gluster Storage installations must be completely up to date with the latest patches and upgrades. Refer to the Red Hat Gluster Storage 3.1 Installation Guide to upgrade to the latest version.
- The versions of OpenShift Enterprise and Red Hat Gluster Storage integrated must be compatible, according to the information in Supported Operating Systems.
- A fully-qualified domain name (FQDN) must be set for each hypervisor and Red Hat Gluster Storage server node. Ensure that correct DNS records exist, and that the FQDN is resolvable via both forward and reverse DNS lookup.
Red Hat OpenShift Enterprise
- All installations of OpenShift Enterprise must have valid subscriptions to Red Hat Network channels and Subscription Management repositories.
- OpenShift Enterprise installations must adhere to the requirements laid out in the Installation and Configuration documentation.
- The OpenShift Enterprise cluster must be up and running.
- A user with cluster-admin permissions must be created.
- All OpenShift Enterprise nodes on RHEL systems must have the glusterfs-fuse RPM installed, which should match the version of Red Hat Gluster Storage server running in the containers. For more information on installing glusterfs-fuse, see Native Client in the Red Hat Gluster Storage Administration Guide.
17.3.3. Provisioning
To provision GlusterFS volumes the following are required:
- An existing storage device in your underlying infrastructure.
- A distinct list of servers (IP addresses) in the Gluster cluster, to be defined as endpoints.
- A service, to persist the endpoints (optional).
- An existing Gluster volume to be referenced in the persistent volume object.
glusterfs-fuse installed on each schedulable OpenShift Enterprise node in your cluster:
# yum install glusterfs-fuse
Persistent volumes (PVs) and persistent volume claims (PVCs) can share volumes across a single project. While the GlusterFS-specific information contained in a PV definition could also be defined directly in a pod definition, doing so does not create the volume as a distinct cluster resource, making the volume more susceptible to conflicts.
17.3.3.1. Creating Gluster Endpoints
An endpoints definition defines the GlusterFS cluster as EndPoints and includes the IP addresses of your Gluster servers. The port value can be any numeric value within the accepted range of ports. Optionally, you can create a service that persists the endpoints.
Define the following service:
Example 17.3. Gluster Service Definition
apiVersion: v1 kind: Service metadata: name: glusterfs-cluster1 spec: ports: - port: 1- 1
- This name must be defined in the endpoints definition to match the endpoints to this service
Save the service definition to a file, for example gluster-service.yaml, then create the service:
$ oc create -f gluster-service.yamlVerify that the service was created:
# oc get services NAME CLUSTER_IP EXTERNAL_IP PORT(S) SELECTOR AGE glusterfs-cluster 172.30.205.34 <none> 1/TCP <none> 44sDefine the Gluster endpoints:
Example 17.4. Gluster Endpoints Definition
apiVersion: v1 kind: Endpoints metadata: name: glusterfs-cluster1 subsets: - addresses: - ip: 192.168.122.2212 ports: - port: 1 - addresses: - ip: 192.168.122.2223 ports: - port: 14 Save the endpoints definition to a file, for example gluster-endpoints.yaml, then create the endpoints:
$ oc create -f gluster-endpoints.yaml endpoints "glusterfs-cluster" createdVerify that the endpoints were created:
$ oc get endpoints NAME ENDPOINTS AGE docker-registry 10.1.0.3:5000 4h glusterfs-cluster 192.168.122.221:1,192.168.122.222:1 11s kubernetes 172.16.35.3:8443 4d
17.3.3.2. Creating the Persistent Volume
GlusterFS does not support the 'Recycle' recycling policy.
Next, define the PV in an object definition before creating it in OpenShift Enterprise:
Example 17.5. Persistent Volume Object Definition Using GlusterFS
apiVersion: v1 kind: PersistentVolume metadata: name: gluster-default-volume1 spec: capacity: storage: 2Gi2 accessModes:3 - ReadWriteMany glusterfs:4 endpoints: glusterfs-cluster5 path: myVol16 readOnly: false persistentVolumeReclaimPolicy: Retain7 - 1
- The name of the volume. This is how it is identified via persistent volume claims or from pods.
- 2
- The amount of storage allocated to this volume.
- 3
accessModesare used as labels to match a PV and a PVC. They currently do not define any form of access control.- 4
- The volume type being used, in this case the glusterfs plug-in.
- 5
- The endpoints name that defines the Gluster cluster created in Creating Gluster Endpoints.
- 6
- The Gluster volume that will be accessed, as shown in the
gluster volume statuscommand. - 7
- The Recycle policy is currently not supported with glusterfs
Save the definition to a file, for example gluster-pv.yaml, and create the persistent volume:
# oc create -f gluster-pv.yamlVerify that the persistent volume was created:
# oc get pv NAME LABELS CAPACITY ACCESSMODES STATUS CLAIM REASON AGE gluster-default-volume <none> 2147483648 RWX Available 2s
17.3.3.3. Creating the Persistent Volume Claim
Developers request GlusterFS storage by referencing either a PVC or the Gluster volume plug-in directly in the volumes section of a pod spec. A PVC exists only in the user’s project and can only be referenced by pods within that project. Any attempt to access a PV across a project causes the pod to fail.
Create a PVC that will bind to the new PV:
Example 17.6. PVC Object Definition
Save the definition to a file, for example gluster-claim.yaml, and create the PVC:
# oc create -f gluster-claim.yamlNotePVs and PVCs make sharing a volume across a project simpler. The gluster-specific information contained in the PV definition can also be defined directly in a pod specification.
17.3.4. Gluster Volume Security
This section covers Gluster volume security, including matching permissions and SELinux considerations. Understanding the basics of POSIX permissions, process UIDs, supplemental groups, and SELinux is presumed.
See the full Volume Security topic before implementing Gluster volumes.
As an example, assume that the target Gluster volume, HadoopVol is mounted under /mnt/glusterfs/, with the following POSIX permissions and SELinux labels:
# ls -lZ /mnt/glusterfs/
drwxrwx---. yarn hadoop system_u:object_r:fusefs_t:s0 HadoopVol
# id yarn
uid=592(yarn) gid=590(hadoop) groups=590(hadoop)
In order to access the HadoopVol volume, containers must match the SELinux label, and run with a UID of 592 or 590 in their supplemental groups. The OpenShift Enterprise GlusterFS plug-in mounts the volume in the container with the same POSIX ownership and permissions found on the target gluster mount, namely the owner will be 592 and group ID will be 590. However, the container is not run with its effective UID equal to 592, nor with its GID equal to 590, which is the desired behavior. Instead, a container’s UID and supplemental groups are determined by Security Context Constraints (SCCs) and the project defaults.
17.3.4.1. Group IDs
Configure Gluster volume access by using supplemental groups, assuming it is not an option to change permissions on the Gluster mount. Supplemental groups in OpenShift Enterprise are used for shared storage, such as GlusterFS. In contrast, block storage, such as Ceph RBD or iSCSI, use the fsGroup SCC strategy and the fsGroup value in the pod’s securityContext.
Use supplemental group IDs instead of user IDs to gain access to persistent storage. Supplemental groups are covered further in the full Volume Security topic.
The group ID on the target Gluster mount example above is 590. Therefore, a pod can define that group ID using supplementalGroups under the pod-level securityContext definition. For example:
spec:
containers:
- name:
...
securityContext:
supplementalGroups: [590]
Assuming there are no custom SCCs that satisfy the pod’s requirements, the pod matches the restricted SCC. This SCC has the supplementalGroups strategy set to RunAsAny, meaning that any supplied group IDs are accepted without range checking.
As a result, the above pod will pass admissions and can be launched. However, if group ID range checking is desired, use a custom SCC, as described in pod security and custom SCCs. A custom SCC can be created to define minimum and maximum group IDs, enforce group ID range checking, and allow a group ID of 590.
17.3.4.2. User IDs
User IDs can be defined in the container image or in the pod definition. The full Volume Security topic covers controlling storage access based on user IDs, and should be read prior to setting up NFS persistent storage.
Use supplemental group IDs instead of user IDs to gain access to persistent storage.
In the target Gluster mount example above, the container needs a UID set to 592, so the following can be added to the pod definition:
spec:
containers:
- name:
...
securityContext:
runAsUser: 592 With the default project and the restricted SCC, a pod’s requested user ID of 592 will not be allowed, and the pod will fail. This is because:
- The pod requests 592 as its user ID.
- All SCCs available to the pod are examined to see which SCC will allow a user ID of 592.
-
Because all available SCCs use MustRunAsRange for their
runAsUserstrategy, UID range checking is required. - 592 is not included in the SCC or project’s user ID range.
Do not modify the predefined SCCs. Insead, create a custom SCC so that minimum and maximum user IDs are defined, UID range checking is still enforced, and the UID of 592 will be allowed.
17.3.4.3. SELinux
See the full Volume Security topic for information on controlling storage access in conjunction with using SELinux.
By default, SELinux does not allow writing from a pod to a remote Gluster server.
To enable writing to GlusterFS volumes with SELinux enforcing on each node, run:
$ sudo setsebool -P virt_sandbox_use_fusefs on
The virt_sandbox_use_fusefs boolean is defined by the docker-selinux package. If you get an error saying it is not defined, please ensure that this package is installed.
The -P option makes the bool persistent between reboots.
17.4. Persistent Storage Using OpenStack Cinder
17.4.1. Overview
You can provision your OpenShift Enterprise cluster with persistent storage using OpenStack Cinder. Some familiarity with Kubernetes and OpenStack is assumed.
Before creating persistent volumes using Cinder, OpenShift Enterprise must first be properly configured for OpenStack.
The Kubernetes persistent volume framework allows administrators to provision a cluster with persistent storage and gives users a way to request those resources without having any knowledge of the underlying infrastructure. OpenStack Cinder volumes can be provisioned dynamically. Persistent volumes are not bound to a single project or namespace; they can be shared across the OpenShift Enterprise cluster. Persistent volume claims, however, are specific to a project or namespace and can be requested by users.
For a detailed example, see the guide for WordPress and MySQL using persistent volumes.
High-availability of storage in the infrastructure is left to the underlying storage provider.
17.4.2. Provisioning
Storage must exist in the underlying infrastructure before it can be mounted as a volume in OpenShift Enterprise. After ensuring OpenShift Enterprise is configured for OpenStack, all that is required for Cinder is a Cinder volume ID and the PersistentVolume API.
17.4.2.1. Creating the Persistent Volume
Cinder does not support the 'Recycle' recycling policy.
You must define your persistent volume in an object definition before creating it in OpenShift Enterprise:
Example 17.7. Persistent Volume Object Definition Using Cinder
apiVersion: "v1"
kind: "PersistentVolume"
metadata:
name: "pv0001"
spec:
capacity:
storage: "5Gi"
accessModes:
- "ReadWriteOnce"
cinder:
fsType: "ext3"
volumeID: "f37a03aa-6212-4c62-a805-9ce139fab180" - 1
- The name of the volume. This will be how it is identified via persistent volume claims or from pods.
- 2
- The amount of storage allocated to this volume.
- 3
- This defines the volume type being used, in this case the cinder plug-in.
- 4
- File system type to mount.
- 5
- This is the Cinder volume that will be used.
Changing the value of the fstype parameter after the volume has been formatted and provisioned can result in data loss and pod failure.
Save your definition to a file, for example cinder-pv.yaml, and create the persistent volume:
# oc create -f cinder-pv.yaml
persistentvolume "pv0001" createdVerify that the persistent volume was created:
# oc get pv
NAME LABELS CAPACITY ACCESSMODES STATUS CLAIM REASON AGE
pv0001 <none> 5Gi RWO Available 2sUsers can then request storage using persistent volume claims, which can now utilize your new persistent volume.
Persistent volume claims only exist in the user’s namespace and can only be referenced by a pod within that same namespace. Any attempt to access a persistent volume from a different namespace causes the pod to fail.
17.4.2.2. Volume Format
Before OpenShift Enterprise mounts the volume and passes it to a container, it checks that it contains a file system as specified by the fsType parameter in the persistent volume definition. If the device is not formatted with the file system, all data from the device is erased and the device is automatically formatted with the given file system.
This allows using unformatted Cinder volumes as persistent volumes, because OpenShift Enterprise formats them before the first use.
17.5. Persistent Storage Using Ceph Rados Block Device (RBD)
17.5.1. Overview
OpenShift Enterprise clusters can be provisioned with persistent storage using Ceph RBD.
Persistent volumes (PVs) and persistent volume claims (PVCs) can share volumes across a single project. While the Ceph RBD-specific information contained in a PV definition could also be defined directly in a pod definition, doing so does not create the volume as a distinct cluster resource, making the volume more susceptible to conflicts.
This topic presumes some familiarity with OpenShift Enterprise and Ceph RBD. See the Persistent Storage concept topic for details on the OpenShift Enterprise persistent volume (PV) framework in general.
Project and namespace are used interchangeably throughout this document. See Projects and Users for details on the relationship.
High-availability of storage in the infrastructure is left to the underlying storage provider.
17.5.2. Provisioning
To provision Ceph volumes, the following are required:
- An existing storage device in your underlying infrastructure.
- The Ceph key to be used in an OpenShift Enterprise secret object.
- The Ceph image name.
- The file system type on top of the block storage (e.g., ext4).
ceph-common installed on each schedulable OpenShift Enterprise node in your cluster:
# yum install ceph-common
17.5.2.1. Creating the Ceph Secret
Define the authorization key in a secret configuration, which is then converted to base64 for use by OpenShift Enterprise.
In order to use Ceph storage to back a persistent volume, the secret must be created in the same project as the PVC and pod. The secret cannot simply be in the default project.
Run
ceph auth get-keyon a Ceph MON node to display the key value for theclient.adminuser:apiVersion: v1 kind: Secret metadata: name: ceph-secret data: key: QVFBOFF2SlZheUJQRVJBQWgvS2cwT1laQUhPQno3akZwekxxdGc9PQ==Save the secret definition to a file, for example ceph-secret.yaml, then create the secret:
$ oc create -f ceph-secret.yamlVerify that the secret was created:
# oc get secret ceph-secret NAME TYPE DATA AGE ceph-secret Opaque 1 23d
17.5.2.2. Creating the Persistent Volume
Ceph RBD does not support the 'Recycle' recycling policy.
Developers request Ceph RBD storage by referencing either a PVC, or the Gluster volume plug-in directly in the volumes section of a pod specification. A PVC exists only in the user’s namespace and can be referenced only by pods within that same namespace. Any attempt to access a PV from a different namespace causes the pod to fail.
Define the PV in an object definition before creating it in OpenShift Enterprise:
Example 17.8. Persistent Volume Object Definition Using Ceph RBD
apiVersion: v1 kind: PersistentVolume metadata: name: ceph-pv1 spec: capacity: storage: 2Gi2 accessModes: - ReadWriteOnce3 rbd:4 monitors:5 - 192.168.122.133:6789 pool: rbd image: ceph-image user: admin secretRef: name: ceph-secret6 fsType: ext47 readOnly: false persistentVolumeReclaimPolicy: Retain- 1
- The name of the PV that is referenced in pod definitions or displayed in various
ocvolume commands. - 2
- The amount of storage allocated to this volume.
- 3
accessModesare used as labels to match a PV and a PVC. They currently do not define any form of access control. All block storage is defined to be single user (non-shared storage).- 4
- The volume type being used, in this case the rbd plug-in.
- 5
- An array of Ceph monitor IP addresses and ports.
- 6
- The Ceph secret used to create a secure connection from OpenShift Enterprise to the Ceph server.
- 7
- The file system type mounted on the Ceph RBD block device.
ImportantChanging the value of the
fstypeparameter after the volume has been formatted and provisioned can result in data loss and pod failure.Save your definition to a file, for example ceph-pv.yaml, and create the PV:
# oc create -f ceph-pv.yamlVerify that the persistent volume was created:
# oc get pv NAME LABELS CAPACITY ACCESSMODES STATUS CLAIM REASON AGE ceph-pv <none> 2147483648 RWO Available 2sCreate a PVC that will bind to the new PV:
Example 17.9. PVC Object Definition
kind: PersistentVolumeClaim apiVersion: v1 metadata: name: ceph-claim spec: accessModes:1 - ReadWriteOnce resources: requests: storage: 2Gi2 Save the definition to a file, for example ceph-claim.yaml, and create the PVC:
# oc create -f ceph-claim.yaml
17.5.3. Ceph Volume Security
See the full Volume Security topic before implementing Ceph RBD volumes.
A significant difference between shared volumes (NFS and GlusterFS) and block volumes (Ceph RBD, iSCSI, and most cloud storage), is that the user and group IDs defined in the pod definition or container image are applied to the target physical storage. This is referred to as managing ownership of the block device. For example, if the Ceph RBD mount has its owner set to 123 and its group ID set to 567, and if the pod defines its runAsUser set to 222 and its fsGroup to be 7777, then the Ceph RBD physical mount’s ownership will be changed to 222:7777.
Even if the user and group IDs are not defined in the pod specification, the resulting pod may have defaults defined for these IDs based on its matching SCC, or its project. See the full Volume Security topic which covers storage aspects of SCCs and defaults in greater detail.
A pod defines the group ownership of a Ceph RBD volume using the fsGroup stanza under the pod’s securityContext definition:
17.6. Persistent Storage Using AWS Elastic Block Store
17.6.1. Overview
OpenShift Enterprise supports AWS Elastic Block Store volumes (EBS). You can provision your OpenShift Enterprise cluster with persistent storage using AWS EC2. Some familiarity with Kubernetes and AWS is assumed.
Before creating persistent volumes using AWS, OpenShift Enterprise must first be properly configured for AWS ElasticBlockStore.
The Kubernetes persistent volume framework allows administrators to provision a cluster with persistent storage and gives users a way to request those resources without having any knowledge of the underlying infrastructure. AWS Elastic Block Store volumes can be provisioned dynamically. Persistent volumes are not bound to a single project or namespace; they can be shared across the OpenShift Enterprise cluster. Persistent volume claims, however, are specific to a project or namespace and can be requested by users.
High-availability of storage in the infrastructure is left to the underlying storage provider.
17.6.2. Provisioning
Storage must exist in the underlying infrastructure before it can be mounted as a volume in OpenShift Enterprise. After ensuring OpenShift is configured for AWS Elastic Block Store, all that is required for OpenShift and AWS is an AWS EBS volume ID and the PersistentVolume API.
17.6.2.1. Creating the Persistent Volume
AWS does not support the 'Recycle' recycling policy.
You must define your persistent volume in an object definition before creating it in OpenShift Enterprise:
Example 17.10. Persistent Volume Object Definition Using AWS
apiVersion: "v1"
kind: "PersistentVolume"
metadata:
name: "pv0001"
spec:
capacity:
storage: "5Gi"
accessModes:
- "ReadWriteOnce"
awsElasticBlockStore:
fsType: "ext4"
volumeID: "vol-f37a03aa" - 1
- The name of the volume. This will be how it is identified via persistent volume claims or from pods.
- 2
- The amount of storage allocated to this volume.
- 3
- This defines the volume type being used, in this case the awsElasticBlockStore plug-in.
- 4
- File system type to mount.
- 5
- This is the AWS volume that will be used.
Changing the value of the fstype parameter after the volume has been formatted and provisioned can result in data loss and pod failure.
Save your definition to a file, for example aws-pv.yaml, and create the persistent volume:
# oc create -f aws-pv.yaml
persistentvolume "pv0001" createdVerify that the persistent volume was created:
# oc get pv
NAME LABELS CAPACITY ACCESSMODES STATUS CLAIM REASON AGE
pv0001 <none> 5Gi RWO Available 2sUsers can then request storage using persistent volume claims, which can now utilize your new persistent volume.
Persistent volume claims only exist in the user’s namespace and can only be referenced by a pod within that same namespace. Any attempt to access a persistent volume from a different namespace causes the pod to fail.
17.6.2.2. Volume Format
Before OpenShift Enterprise mounts the volume and passes it to a container, it checks that it contains a file system as specified by the fsType parameter in the persistent volume definition. If the device is not formatted with the file system, all data from the device is erased and the device is automatically formatted with the given file system.
This allows using unformatted AWS volumes as persistent volumes, because OpenShift Enterprise formats them before the first use.
17.7. Persistent Storage Using GCE Persistent Disk
17.7.1. Overview
OpenShift Enterprise supports GCE Persistent Disk volumes (gcePD). You can provision your OpenShift Enterprise cluster with persistent storage using GCE. Some familiarity with Kubernetes and GCE is assumed.
Before creating persistent volumes using GCE, OpenShift Enterprise must first be properly configured for GCE Persistent Disk.
The Kubernetes persistent volume framework allows administrators to provision a cluster with persistent storage and gives users a way to request those resources without having any knowledge of the underlying infrastructure. GCE Persistent Disk volumes can be provisioned dynamically. Persistent volumes are not bound to a single project or namespace; they can be shared across the OpenShift Enterprise cluster. Persistent volume claims, however, are specific to a project or namespace and can be requested by users.
High-availability of storage in the infrastructure is left to the underlying storage provider.
17.7.2. Provisioning
Storage must exist in the underlying infrastructure before it can be mounted as a volume in OpenShift Enterprise. After ensuring OpenShift Enterprise is configured for GCE PersistentDisk, all that is required for Openshift and GCE is an GCE Persistent Disk volume ID and the PersistentVolume API.
17.7.2.1. Creating the Persistent Volume
GCE does not support the 'Recycle' recycling policy.
You must define your persistent volume in an object definition before creating it in OpenShift Enterprise:
Example 17.11. Persistent Volume Object Definition Using GCE
apiVersion: "v1"
kind: "PersistentVolume"
metadata:
name: "pv0001"
spec:
capacity:
storage: "5Gi"
accessModes:
- "ReadWriteOnce"
gcePersistentDisk:
fsType: "ext4"
pdName: "pd-disk-1" - 1
- The name of the volume. This will be how it is identified via persistent volume claims or from pods.
- 2
- The amount of storage allocated to this volume.
- 3
- This defines the volume type being used, in this case the gcePersistentDisk plug-in.
- 4
- File system type to mount.
- 5
- This is the GCE Persistent Disk volume that will be used.
Changing the value of the fstype parameter after the volume has been formatted and provisioned can result in data loss and pod failure.
Save your definition to a file, for example gce-pv.yaml, and create the persistent volume:
# oc create -f gce-pv.yaml
persistentvolume "pv0001" createdVerify that the persistent volume was created:
# oc get pv
NAME LABELS CAPACITY ACCESSMODES STATUS CLAIM REASON AGE
pv0001 <none> 5Gi RWO Available 2sUsers can then request storage using persistent volume claims, which can now utilize your new persistent volume.
Persistent volume claims only exist in the user’s namespace and can only be referenced by a pod within that same namespace. Any attempt to access a persistent volume from a different namespace causes the pod to fail.
17.7.2.2. Volume Format
Before OpenShift Enterprise mounts the volume and passes it to a container, it checks that it contains a file system as specified by the fsType parameter in the persistent volume definition. If the device is not formatted with the file system, all data from the device is erased and the device is automatically formatted with the given file system.
This allows using unformatted GCE volumes as persistent volumes, because OpenShift Enterprise formats them before the first use.
17.8. Persistent Storage Using iSCSI
17.8.1. Overview
You can provision your OpenShift Enterprise cluster with persistent storage using iSCSI. Some familiarity with Kubernetes and iSCSI is assumed.
The Kubernetes persistent volume framework allows administrators to provision a cluster with persistent storage and gives users a way to request those resources without having any knowledge of the underlying infrastructure.
High-availability of storage in the infrastructure is left to the underlying storage provider.
17.8.2. Provisioning
Storage must exist in the underlying infrastructure before it can be mounted as a volume in OpenShift Enterprise. All that is required for iSCSI is iSCSI target portal, valid iSCSI IQN, valid LUN number, and filesystem type, and the PersistentVolume API.
iSCSI does not support the 'Recycle' recycling policy.
Example 17.12. Persistent Volume Object Definition
apiVersion: v1
kind: PersistentVolume
metadata:
name: iscsi-pv
spec:
capacity:
storage: 1Gi
accessModes:
- ReadWriteOnce
iscsi:
targetPortal: 10.16.154.81
iqn: iqn.2014-12.example.server:storage.target00
lun: 0
fsType: 'ext4'
readOnly: false17.8.2.1. Enforcing Disk Quotas
Use LUN partitions to enforce disk quotas and size constraints. Each LUN is one persistent volume. Kubernetes enforces unique names for persistent volumes.
Enforcing quotas in this way allows the end user to request persistent storage by a specific amount (e.g, 10Gi) and be matched with a corresponding volume of equal or greater capacity.
17.8.2.2. iSCSI Volume Security
Users request storage with a PersistentVolumeClaim. This claim only lives in the user’s namespace and can only be referenced by a pod within that same namespace. Any attempt to access a persistent volume across a namespace causes the pod to fail.
Each iSCSI LUN must be accessible by all nodes in the cluster.
17.9. Persistent Storage Using Fibre Channel
17.9.1. Overview
You can provision your OpenShift Enterprise cluster with persistent storage using Fibre Channel. Some familiarity with Kubernetes and Fibre Channel is assumed.
The Kubernetes persistent volume framework allows administrators to provision a cluster with persistent storage and gives users a way to request those resources without having any knowledge of the underlying infrastructure.
High-availability of storage in the infrastructure is left to the underlying storage provider.
17.9.2. Provisioning
Storage must exist in the underlying infrastructure before it can be mounted as a volume in OpenShift Enterprise. All that is required for Fibre Channel persistent storage is the targetWWNs (array of Fibre Channel target’s World Wide Names), a valid LUN number, and filesystem type, and the PersistentVolume API. Note, the number of LUNs must correspond to the number of Persistent Volumes that are created. In the example below, we have LUN as 2, therefore we have created two Persistent Volume definitions.
Fiber Channel does not support the 'Recycle' recycling policy.
Example 17.13. Persistent Volumes Object Definition
apiVersion: v1
kind: PersistentVolume
metadata:
name: pv0001
spec:
capacity:
storage: 1Gi
accessModes:
- ReadWriteOnce
fc:
targetWWNs: ['500a0981891b8dc5', '500a0981991b8dc5']
lun: 2
fsType: ext4apiVersion: v1
kind: PersistentVolume
metadata:
name: pv0002
spec:
capacity:
storage: 1Gi
accessModes:
- ReadOnlyMany
fc:
targetWWNs: ['500a0981891b8dc5', '500a0981991b8dc5']
lun: 2
fsType: ext4
Changing the value of the fstype parameter after the volume has been formatted and provisioned can result in data loss and pod failure.
17.9.2.1. Enforcing Disk Quotas
Use LUN partitions to enforce disk quotas and size constraints. Each LUN is one persistent volume. Kubernetes enforces unique names for persistent volumes.
Enforcing quotas in this way allows the end user to request persistent storage by a specific amount (e.g, 10Gi) and be matched with a corresponding volume of equal or greater capacity.
17.9.2.2. Fibre Channel Volume Security
Users request storage with a PersistentVolumeClaim. This claim only lives in the user’s namespace and can only be referenced by a pod within that same namespace. Any attempt to access a persistent volume across a namespace causes the pod to fail.
Each Fibre Channel LUN must be accessible by all nodes in the cluster.
17.10. Dynamically Provisioning Persistent Volumes
17.10.1. Overview
You can provision your OpenShift Enterprise cluster with storage dynamically when running in a cloud environment. The Kubernetes persistent volume framework allows administrators to provision a cluster with persistent storage and gives users a way to request those resources without having any knowledge of the underlying infrastructure.
Many storage types are available for use as persistent volumes in OpenShift Enterprise. While all of them can be statically provisioned by an administrator, some types of storage can be created dynamically using an API. These types of storage can be provisioned in an OpenShift Enterprise cluster using the new and experimental dynamic storage feature.
Dynamic provisioning of persistent volumes is currently a Technology Preview feature, introduced in OpenShift Enterprise 3.1.1. This feature is experimental and expected to change in the future as it matures and feedback is received from users. New ways to provision the cluster are planned and the means by which one accesses this feature is going to change. Backwards compatibility is not guaranteed.
17.10.2. Enabling Provisioner Plug-ins
OpenShift Enterprise provides the following provisioner plug-ins, which have generic implementations for dynamic provisioning that use the cluster’s configured cloud provider’s API to create new storage resources:
| Storage Type | Provisioner Plug-in Name | Required Cloud Configuration | Notes |
|---|---|---|---|
| OpenStack Cinder |
| ||
| AWS Elastic Block Store (EBS) |
|
For dynamic provisioning when using multiple clusters in different zones, each node must be tagged with | |
| GCE Persistent Disk (gcePD) |
|
In multi-zone configurations, PVs must be created in the same region/zone as the master node. Do this by setting the |
For any chosen provisioner plug-ins, the relevant cloud configuration must also be set up, per Required Cloud Configuration in the above table.
When your OpenShift Enterprise cluster is configured for EBS, GCE, or Cinder, the associated provisioner plug-in is implied and automatically enabled. No additional OpenShift Enterprise configuration by the cluster administration is required for dynamic provisioning.
For example, if your OpenShift Enterprise cluster is configured to run in AWS, the EBS provisioner plug-in is automatically available for creating dynamically provisioned storage requested by a user.
Future provisioner plug-ins will include the many types of storage a single provider offers. AWS, for example, has several types of EBS volumes to offer, each with its own performance characteristics; there is also an NFS-like storage option. More provisioner plug-ins will be implemented for the supported storage types available in OpenShift Enterprise.
17.10.3. Requesting Dynamically Provisioned Storage
Users can request dynamically provisioned storage by including a storage class annotation in their persistent volume claim:
Example 17.14. Persistent Volume Claim Requesting Dynamic Storage
kind: "PersistentVolumeClaim"
apiVersion: "v1"
metadata:
name: "claim1"
annotations:
volume.alpha.kubernetes.io/storage-class: "foo"
spec:
accessModes:
- "ReadWriteOnce"
resources:
requests:
storage: "3Gi"- 1
- The value of the
volume.alpha.kubernetes.io/storage-classannotation is not meaningful at this time. The presence of the annotation, with any arbitrary value, triggers provisioning using the single implied provisioner plug-in per cloud.
17.10.3.1. Volume Owner Information
For dynamically provisioned storage, OpenShift Enterprise defines three key/value pairs, collectively known as the volume owner information, and arranges for the storage to associate this triplet with the provisioned volume. The keys are normally not visible to OpenShift Enterprise users, while the values are taken from user-visible PV and PVC objects.
Keys
kubernetes.io/created-for/pv/nameName of the
PersistentVolume.NoteThere is no key for the PV namespace because that has value
defaultand cannot be changed.kubernetes.io/created-for/pvc/namespace,kubernetes.io/created-for/pvc/name-
Namespace and name, respectively, of the
PersistentVolumeClaim.
Other Terms for Volume Owner Information
Each storage type saves the volume owner information in its own way. When communicating with the storage administrator, use these specific terms to avoid confusion:
| Term for Key/Value Pairs | Storage Type |
|---|---|
| tags | AWS EBS |
| metadata | OpenStack Cinder |
| JSON-in-description | GCE PD |
Using Volume Owner Information
The main benefit of saving the volume owner information is to enable storage administrators to recognize volumes dynamically created by OpenShift Enterprise.
Example scenarios:
OpenShift Enterprise terminates unexpectedly and the dynamically provisioned AWS EBS contains useful data that must be recovered. The OpenShift Enterprise users provide the storage administrators with a list of affected projects and their PVCs:
Expand Project Name PVC Name app-server
a-pv-01
a-pv-02
notifications
n-pv-01
The storage administrators search for the orphaned volumes, matching project names and PVC names to the
kubernetes.io/created-for/pvc/namespaceandkubernetes.io/created-for/pvc/nametags, respectively. They find them and arrange to make them available again for data-recovery efforts.-
The users do not explicitly delete the dynamically provisioned storage volumes when they are finished with a project. The storage administrators find the defunct volumes and delete them. Unlike the preceding scenario, they need match only the project names to
kubernetes.io/created-for/pvc/namespace.
17.10.4. Volume Recycling
Volumes created dynamically by a provisioner have their persistentVolumeReclaimPolicy set to Delete. When a persistent volume claim is deleted, its backing persistent volume is considered released of its claim, and that resource can be reclaimed by the cluster. Dynamic provisioning utilizes the provider’s API to delete the volume from the provider and then removes the persistent volume from the cluster.
17.11. Volume Security
17.11.1. Overview
This topic provides a general guide on pod security as it relates to volume security. For information on pod-level security in general, see Managing Security Context Constraints (SCC) and the Security Context Constraint concept topic. For information on the OpenShift Enterprise persistent volume (PV) framework in general, see the Persistent Storage concept topic.
Accessing persistent storage requires coordination between the cluster and/or storage administrator and the end developer. The cluster administrator creates PVs, which abstract the underlying physical storage. The developer creates pods and, optionally, PVCs, which bind to PVs, based on matching criteria, such as capacity.
Multiple persistent volume claims (PVCs) within the same project can bind to the same PV. However, once a PVC binds to a PV, that PV cannot be bound by a claim outside of the first claim’s project. If the underlying storage needs to be accessed by multiple projects, then each project needs its own PV, which can point to the same physical storage. In this sense, a bound PV is tied to a project. For a detailed PV and PVC example, see the guide for WordPress and MySQL using NFS.
For the cluster administrator, granting pods access to PVs involves:
- knowing the group ID and/or user ID assigned to the actual storage,
- understanding SELinux considerations, and
- ensuring that these IDs are allowed in the range of legal IDs defined for the project and/or the SCC that matches the requirements of the pod.
Group IDs, the user ID, and SELinux values are defined in the SecurityContext section in a pod definition. Group IDs are global to the pod and apply to all containers defined in the pod. User IDs can also be global, or specific to each container. Four sections control access to volumes:
17.11.2. SCCs, Defaults, and Allowed Ranges
SCCs influence whether or not a pod is given a default user ID, fsGroup ID, supplemental group ID, and SELinux label. They also influence whether or not IDs supplied in the pod definition (or in the image) will be validated against a range of allowable IDs. If validation is required and fails, then the pod will also fail.
SCCs define strategies, such as runAsUser, supplementalGroups, and fsGroup. These strategies help decide whether the pod is authorized. Strategy values set to RunAsAny are essentially stating that the pod can do what it wants regarding that strategy. Authorization is skipped for that strategy and no OpenShift Enterprise default is produced based on that strategy. Therefore, IDs and SELinux labels in the resulting container are based on container defaults instead of OpenShift Enterprise policies.
For a quick summary of RunAsAny:
- Any ID defined in the pod definition (or image) is allowed.
- Absence of an ID in the pod definition (and in the image) results in the container assigning an ID, which is root (0) for Docker.
- No SELinux labels are defined, so Docker will assign a unique label.
For these reasons, SCCs with RunAsAny for ID-related strategies should be protected so that ordinary developers do not have access to the SCC. On the other hand, SCC strategies set to MustRunAs or MustRunAsRange trigger ID validation (for ID-related strategies), and cause default values to be supplied by OpenShift Enterprise to the container when those values are not supplied directly in the pod definition or image.
SCCs may define the range of allowed IDs (user or groups). If range checking is required (for example, using MustRunAs) and the allowable range is not defined in the SCC, then the project determines the ID range. Therefore, projects support ranges of allowable ID. However, unlike SCCs, projects do not define strategies, such as runAsUser.
Allowable ranges are helpful not only because they define the boundaries for container IDs, but also because the minimum value in the range becomes the default value for the ID in question. For example, if the SCC ID strategy value is MustRunAs, the minimum value of an ID range is 100, and the ID is absent from the pod definition, then 100 is provided as the default for this ID.
As part of pod admission, the SCCs available to a pod are examined (roughly, in priority order followed by most restrictive) to best match the requests of the pod. Setting a SCC’s strategy type to RunAsAny is less restrictive, whereas a type of MustRunAs is more restrictive. All of these strategies are evaluated. To see which SCC was assigned to a pod, use the oc get pod command:
# oc get pod <pod_name> -o yaml
...
metadata:
annotations:
openshift.io/scc: nfs-scc
name: nfs-pod1
namespace: default
...- 1
- Name of the SCC that the pod used (in this case, a custom SCC).
- 2
- Name of the pod.
- 3
- Name of the project. "Namespace" is interchangeable with "project" in OpenShift Enterprise. See Projects and Users for details.
It may not be immediately obvious which SCC was matched by a pod, so the command above can be very useful in understanding the UID, supplemental groups, and SELinux relabeling in a live container.
Any SCC with a strategy set to RunAsAny allows specific values for that strategy to be defined in the pod definition (and/or image). When this applies to the user ID (runAsUser) it is prudent to restrict access to the SCC to prevent a container from being able to run as root.
Because pods often match the restricted SCC, it is worth knowing the security this entails. The restricted SCC has the following characteristics:
-
User IDs are constrained due to the
runAsUserstrategy being set to MustRunAsRange. This forces user ID validation. -
Because a range of allowable user IDs is not defined in the SCC (see
oc export scc restrictedfor more details), the project’sopenshift.io/sa.scc.uid-rangerange will be used for range checking and for a default ID, if needed. -
A default user ID is produced when a user ID is not specified in the pod definition due to
runAsUserbeing set to MustRunAsRange. -
An SELinux label is required (
seLinuxContextset to MustRunAs), which uses the project’s default MCS label. -
Arbitrary supplemental group IDs are allowed because no range checking is required. This is a result of both the
supplementalGroupsandfsGroupstrategies being set to RunAsAny. - Default supplemental groups are not produced for the running pod due to RunAsAny for the two group strategies above. Therefore, if no groups are defined in the pod definition (or in the image), the container(s) will have no supplemental groups predefined.
The following shows the default project and a custom SCC (my-custom-scc), which summarizes the interactions of the SCC and the project:
$ oc get project default -o yaml
...
metadata:
annotations:
openshift.io/sa.scc.mcs: s0:c1,c0
openshift.io/sa.scc.supplemental-groups: 1000000000/10000
openshift.io/sa.scc.uid-range: 1000000000/10000
$ oc get scc my-custom-scc -o yaml
...
fsGroup:
type: MustRunAs
ranges:
- min: 5000
max: 6000
runAsUser:
type: MustRunAsRange
uidRangeMin: 65534
uidRangeMax: 65634
seLinuxContext:
type: MustRunAs
SELinuxOptions:
user: <selinux-user-name>
role: ...
type: ...
level: ...
supplementalGroups:
type: MustRunAs
ranges:
- min: 5000
max: 6000- 1
- default is the name of the project.
- 2
- Default values are only produced when the corresponding SCC strategy is not RunAsAny.
- 3
- SELinux default when not defined in the pod definition or in the SCC.
- 4
- Range of allowable group IDs. ID validation only occurs when the SCC strategy is RunAsAny. There can be more than one range specified, separated by commas. See below for supported formats.
- 5
- Same as <4> but for user IDs. Also, only a single range of user IDs is supported.
- 6 10
- MustRunAs enforces group ID range checking and provides the container’s groups default. Based on this SCC definition, the default is 5000 (the minimum ID value). If the range was omitted from the SCC, then the default would be 1000000000 (derived from the project). The other supported type, RunAsAny, does not perform range checking, thus allowing any group ID, and produces no default groups.
- 7
- MustRunAsRange enforces user ID range checking and provides a UID default. Based on this SCC, the default UID is 65534 (the minimum value). If the minimum *and maximum range were omitted from the SCC, the default user ID would be *1000000000 (derived from the project). *MustRunAsNonRoot and RunAsAny are *the other supported types. The range of allowed IDs can be defined to include *any user IDs required for the target storage.
- 8
- When set to MustRunAs, the container is created with the SCC’s SELinux options, or the MCS default defined in the project. A type of RunAsAny indicates that SELinux context is not required, and, if not defined in the pod, is not set in the container.
- 9
- The SELinux user name, role name, type, and labels can be defined here.
Two formats are supported for allowed ranges:
-
M/N, whereMis the starting ID andNis the count, so the range becomesMthrough (and including)M+N-1. -
M-N, whereMis again the starting ID andNis the ending ID. The default group ID is the starting ID in the first range, which is1000000000in this project. If the SCC did not define a minimum group ID, then the project’s default ID is applied.
17.11.3. Supplemental Groups
Read SCCs, Defaults, and Allowed Ranges before working with supplemental groups.
Supplemental groups are regular Linux groups. When a process runs in Linux, it has a UID, a GID, and one or more supplemental groups. These attributes can be set for a container’s main process. The supplementalGroups IDs are typically used for controlling access to shared storage, such as NFS and GlusterFS, whereas fsGroup is used for controlling access to block storage, such as Ceph RBD and iSCSI.
The OpenShift Enterprise shared storage plug-ins mount volumes such that the POSIX permissions on the mount match the permissions on the target storage. For example, if the target storage’s owner ID is 1234 and its group ID is 5678, then the mount on the host node and in the container will have those same IDs. Therefore, the container’s main process must match one or both of those IDs in order to access the volume.
For example, consider the following NFS export.
On an OpenShift Enterprise node:
showmount requires access to the ports used by rpcbind and rpc.mount on the NFS server
# showmount -e <nfs-server-ip-or-hostname>
Export list for f21-nfs.vm:
/opt/nfs *On the NFS server:
# cat /etc/exports
/opt/nfs *(rw,sync,root_squash)
...
# ls -lZ /opt/nfs -d
drwxrws---. nfsnobody 5555 unconfined_u:object_r:usr_t:s0 /opt/nfs
# id nfsnobody
uid=65534(nfsnobody) gid=65534(nfsnobody) groups=65534(nfsnobody)In the above, the owner is 65534 (nfsnobody), but the suggestions and examples in this topic apply to any non-root owner.
The /opt/nfs/ export is accessible by UID 65534 and the group 5555. In general, containers should not run as root, so in this NFS example, containers which are not run as UID 65534 or are not members the group 5555 will not be able to access the NFS export.
Often, the SCC matching the pod does not allow a specific user ID to be specified, thus using supplemental groups is a more flexible way to grant storage access to a pod. For example, to grant NFS access to the export above, the group 5555 can be defined in the pod definition:
apiVersion: v1
kind: Pod
...
spec:
containers:
- name: ...
volumeMounts:
- name: nfs
mountPath: /usr/share/...
securityContext:
supplementalGroups: [5555]
volumes:
- name: nfs
nfs:
server: <nfs_server_ip_or_host>
path: /opt/nfs - 1
- Name of the volume mount. Must match the name in the
volumessection. - 2
- NFS export path as seen in the container.
- 3
- Pod global security context. Applies to all containers in the pod. Each container can also define its
securityContext, however group IDs are global to the pod and cannot be defined for individual containers. - 4
- Supplemental groups, which is an array of IDs, is set to 5555. This grants group access to the export.
- 5
- Name of the volume. Must match the name in the
volumeMountssection. - 6
- Actual NFS export path on the NFS server.
All containers in the above pod (assuming the matching SCC or project allows the group 5555) will be members of the group 5555 and have access to the volume, regardless of the container’s user ID. However, the assumption above is critical. Sometimes, the SCC does not define a range of allowable group IDs but requires group ID validation (due to supplementalGroups set to MustRunAs; note this is not the case for the restricted SCC). The project will not likely allow a group ID of 5555, unless the project has been customized for access to this NFS export. So in this scenario, the above pod will fail because its group ID of 5555 is not within the SCC’s or the project’s range of allowed group IDs.
Supplemental Groups and Custom SCCs
To remedy the situation in the previous example, a custom SCC can be created such that:
- a minimum and max group ID are defined,
- ID range checking is enforced, and
- the group ID of 5555 is allowed.
It is better to create new SCCs versus modifying a predefined SCC, or changing the range of allowed IDs in the predefined projects.
The easiest way to create a new SCC is to export an existing SCC and customize the YAML file to meet the requirements of the new SCC. For example:
Use the restricted SCC as a template for the new SCC:
$ oc export scc restricted > new-scc.yaml- Edit the new-scc.yaml file to your desired specifications.
Create the new SCC:
$ oc create -f new-scc.yaml
The oc edit scc command can be used to modify an instantiated SCC.
Here is a fragment of a new SCC named nfs-scc:
$ oc export scc nfs-scc
allowHostDirVolumePlugin: false
...
kind: SecurityContextConstraints
metadata:
...
name: nfs-scc
priority: 9
...
supplementalGroups:
type: MustRunAs
ranges:
- min: 5000
max: 6000
...- 1
- The
allow*bools are the same as for the restricted SCC. - 2
- Name of the new SCC.
- 3
- Numerically larger numbers have greater priority. Nil or omitted is the lowest priority. Higher priority SCCs sort before lower priority SCCs and thus have a better chance of matching a new pod.
- 4
supplementalGroupsis a strategy and it is set to MustRunAs, which means group ID checking is required.- 5
- Multiple ranges are supported. The allowed group ID range here is 5000 through 5999, with the default supplemental group being 5000.
When the same pod shown earlier runs against this new SCC (assuming, of course, the pod has access to the new SCC), it will start because the group 5555, supplied in the pod definition, is now allowed by the custom SCC.
17.11.4. fsGroup
Read SCCs, Defaults, and Allowed Ranges before working with supplemental groups.
It is generally preferable to use group IDs (supplemental or fsGroup) to gain access to persistent storage versus using user IDs.
fsGroup defines a pod’s "file system group" ID, which is added to the container’s supplemental groups. The supplementalGroups ID applies to shared storage, whereas the fsGroup ID is used for block storage.
Block storage, such as Ceph RBD, iSCSI, and various cloud storage, is typically dedicated to a single pod which has requested the block storage volume, either directly or using a PVC. Unlike shared storage, block storage is taken over by a pod, meaning that user and group IDs supplied in the pod definition (or image) are applied to the actual, physical block device. Typically, block storage is not shared.
A fsGroup definition is shown below in the following pod definition fragment:
kind: Pod
...
spec:
containers:
- name: ...
securityContext:
fsGroup: 5555
...
As with supplementalGroups, all containers in the above pod (assuming the matching SCC or project allows the group 5555) will be members of the group 5555, and will have access to the block volume, regardless of the container’s user ID. If the pod matches the restricted SCC, whose fsGroup strategy is RunAsAny, then any fsGroup ID (including 5555) will be accepted. However, if the SCC has its fsGroup strategy set to MustRunAs, and 5555 is not in the allowable range of fsGroup IDs, then the pod will fail to run.
fsGroups and Custom SCCs
To remedy the situation in the previous example, a custom SCC can be created such that:
- a minimum and maximum group ID are defined,
- ID range checking is enforced, and
- the group ID of 5555 is allowed.
It is better to create new SCCs versus modifying a predefined SCC, or changing the range of allowed IDs in the predefined projects.
Consider the following fragment of a new SCC definition:
# oc export scc new-scc
...
kind: SecurityContextConstraints
...
fsGroup:
type: MustRunAs
ranges:
- max: 6000
min: 5000
...- 1
- MustRunAs triggers group ID range checking, whereas RunAsAny does not require range checking.
- 2
- The range of allowed group IDs is 5000 through, and including, 5999. Multiple ranges are supported. The allowed group ID range here is 5000 through 5999, with the default
fsGroupbeing 5000. - 3
- The minimum value (or the entire range) can be omitted from the SCC, and thus range checking and generating a default value will defer to the project’s
openshift.io/sa.scc.supplemental-groupsrange.fsGroupandsupplementalGroupsuse the same group field in the project; there is not a separate range forfsGroup.
When the pod shown above runs against this new SCC (assuming, of course, the pod has access to the new SCC), it will start because the group 5555, supplied in the pod definition, is allowed by the custom SCC. Additionally, the pod will "take over" the block device, so when the block storage is viewed by a process outside of the pod, it will actually have 5555 as its group ID.
Currently the list of volumes which support block ownership (block) management include:
- AWS Elastic Block Store
- OpenStack Cinder
- Ceph RBD
- GCE Persistent Disk
- iSCSI
- emptyDir
- gitRepo
17.11.5. User IDs
Read SCCs, Defaults, and Allowed Ranges before working with supplemental groups.
It is generally preferable to use group IDs (supplemental or fsGroup) to gain access to persistent storage versus using user IDs.
User IDs can be defined in the container image or in the pod definition. In the pod definition, a single user ID can be defined globally to all containers, or specific to individual containers (or both). A user ID is supplied as shown in the pod definition fragment below:
spec:
containers:
- name: ...
securityContext:
runAsUser: 65534
ID 65534 in the above is container-specific and matches the owner ID on the export. If the NFS export’s owner ID was 54321, then that number would be used in the pod definition. Specifying securityContext outside of the container definition makes the ID global to all containers in the pod.
Similar to group IDs, user IDs may be validated according to policies set in the SCC and/or project. If the SCC’s runAsUser strategy is set to RunAsAny, then any user ID defined in the pod definition or in the image is allowed.
This means even a UID of 0 (root) is allowed.
If, instead, the runAsUser strategy is set to MustRunAsRange, then a supplied user ID will be validated against a range of allowed IDs. If the pod supplies no user ID, then the default ID is the minimum value of the range of allowable user IDs.
Returning to the earlier NFS example, the container needs its UID set to 65534, which is shown in the pod fragment above. Assuming the default project and the restricted SCC, the pod’s requested user ID of 65534 will not be allowed, and therefore the pod will fail. The pod fails because:
- it requests 65534 as its user ID,
-
all available SCCs use MustRunAsRange for their
runAsUserstrategy, so UID range checking is required, and - 65534 is not included in the SCC or project’s user ID range.
To address this situation, the recommended path would be to create a new SCC with the appropriate user ID range. A new project could also be created with the appropriate user ID range defined. There are other, less-preferred options:
- The restricted SCC could be modified to include 65534 within its minimum and maximum user ID range. This is not recommended as you should avoid modifying the predefined SCCs if possible.
-
The restricted SCC could be modified to use RunAsAny for the
runAsUservalue, thus eliminating ID range checking. This is strongly not recommended, as containers could run as root. - The default project’s UID range could be changed to allow a user ID of 65534. This is not generally advisable because only a single range of user IDs can be specified.
User IDs and Custom SCCs
It is good practice to avoid modifying the predefined SCCs if possible. The preferred approach is to create a custom SCC that better fits an organization’s security needs, or create a new project that supports the desired user IDs.
To remedy the situation in the previous example, a custom SCC can be created such that:
- a minimum and maximum user ID is defined,
- UID range checking is still enforced, and
- the UID of 65534 will be allowed.
For example:
$ oc export scc nfs-scc
allowHostDirVolumePlugin: false
...
kind: SecurityContextConstraints
metadata:
...
name: nfs-scc
priority: 9
requiredDropCapabilities: null
runAsUser:
type: MustRunAsRange
uidRangeMax: 65534
uidRangeMin: 65534
...- 1
- The
allow*bools are the same as for the restricted SCC. - 2
- The name of this new SCC is nfs-scc.
- 3
- Numerically larger numbers have greater priority. Nil or omitted is the lowest priority. Higher priority SCCs sort before lower priority SCCs, and thus have a better chance of matching a new pod.
- 4
- The
runAsUserstrategy is set to MustRunAsRange, which means UID range checking is enforced. - 5
- The UID range is 65534 through 65534 (a range of one value).
Now, with runAsUser: 65534 shown in the previous pod definition fragment, the pod matches the new nfs-scc and is able to run with a UID of 65534.
17.11.6. SELinux Options
All predefined SCCs, except for the privileged SCC, set the seLinuxContext to MustRunAs. So the SCCs most likely to match a pod’s requirements will force the pod to use an SELinux policy. The SELinux policy used by the pod can be defined in the pod itself, in the image, in the SCC, or in the project (which provides the default).
SELinux labels can be defined in a pod’s securityContext.seLinuxOptions section, and supports user, role, type, and level:
Level and MCS label are used interchangeably in this topic.
...
securityContext:
seLinuxOptions:
level: "s0:c123,c456"
...Here are fragments from an SCC and from the default project:
$ oc export scc scc-name
...
seLinuxContext:
type: MustRunAs
# oc export project default
...
metadata:
annotations:
openshift.io/sa.scc.mcs: s0:c1,c0
...
All predefined SCCs, except for the privileged SCC, set the seLinuxContext to MustRunAs. This forces pods to use MCS labels, which can be defined in the pod definition, the image, or provided as a default.
The SCC determines whether or not to require an SELinux label and can provide a default label. If the seLinuxContext strategy is set to MustRunAs and the pod (or image) does not define a label, OpenShift Enterprise defaults to a label chosen from the SCC itself or from the project.
If seLinuxContext is set to RunAsAny, then no default labels are provided, and the container determines the final label. In the case of Docker, the container will use a unique MCS label, which will not likely match the labeling on existing storage mounts. Volumes which support SELinux management will be relabeled so that they are accessible by the specified label and, depending on how exclusionary the label is, only that label.
This means two things for unprivileged containers:
-
The volume will be given a
typewhich is accessible by unprivileged containers. Thistypeis usually svirt_sandbox_file_t. -
If a
levelis specified, the volume will be labeled with the given MCS label.
For a volume to be accessible by a pod, the pod must have both categories of the volume. So a pod with s0:c1,c2 will be able to access a volume with s0:c1,c2. A volume with s0 will be accessible by all pods.
If pods fail authorization, or if the storage mount is failing due to permissions errors, then there is a possibility that SELinux enforcement is interfering. One way to check for this is to run:
# ausearch -m avc --start recentThis examines the log file for AVC (Access Vector Cache) errors.
Chapter 18. Persistent Storage Examples
18.1. Overview
The following sections provide detailed, comprehensive instructions on setting up and configuring common storage use cases. These examples cover both the administration of persistent volumes and their security, and how to claim against the volumes as a user of the system.
18.3. Complete Example Using Ceph RBD
18.3.1. Overview
This topic provides an end-to-end example of using an existing Ceph cluster as an OpenShift Enterprise persistent store. It is assumed that a working Ceph cluster is already set up. If not, consult the Overview of Red Hat Ceph Storage.
Persistent Storage Using Ceph Rados Block Device provides an explanation of persistent volumes (PVs), persistent volume claims (PVCs), and using Ceph RBD as persistent storage.
All oc … commands are executed on the OpenShift Enterprise master host.
18.3.2. Installing the ceph-common Package
The ceph-common library must be installed on all schedulable OpenShift Enterprise nodes:
The OpenShift Enterprise all-in-one host is not often used to run pod workloads and, thus, is not included as a schedulable node.
# yum install -y ceph-common18.3.3. Creating the Ceph Secret
The ceph auth get-key command is run on a Ceph MON node to display the key value for the client.admin user:
Example 18.5. Ceph Secret Definition
apiVersion: v1
kind: Secret
metadata:
name: ceph-secret
data:
key: QVFBOFF2SlZheUJQRVJBQWgvS2cwT1laQUhPQno3akZwekxxdGc9PQ== - 1
- This base64 key is generated on one of the Ceph MON nodes using the
ceph auth get-key client.admin | base64command, then copying the output and pasting it as the secret key’s value.
Save the secret definition to a file, for example ceph-secret.yaml, then create the secret:
$ oc create -f ceph-secret.yaml
secret "ceph-secret" createdVerify that the secret was created:
# oc get secret ceph-secret
NAME TYPE DATA AGE
ceph-secret Opaque 1 23d18.3.4. Creating the Persistent Volume
Next, before creating the PV object in OpenShift Enterprise, define the persistent volume file:
Example 18.6. Persistent Volume Object Definition Using Ceph RBD
apiVersion: v1
kind: PersistentVolume
metadata:
name: ceph-pv
spec:
capacity:
storage: 2Gi
accessModes:
- ReadWriteOnce
rbd:
monitors:
- 192.168.122.133:6789
pool: rbd
image: ceph-image
user: admin
secretRef:
name: ceph-secret
fsType: ext4
readOnly: false
persistentVolumeReclaimPolicy: Recycle- 1
- The name of the PV, which is referenced in pod definitions or displayed in various
ocvolume commands. - 2
- The amount of storage allocated to this volume.
- 3
accessModesare used as labels to match a PV and a PVC. They currently do not define any form of access control. All block storage is defined to be single user (non-shared storage).- 4
- This defines the volume type being used. In this case, the rbd plug-in is defined.
- 5
- This is an array of Ceph monitor IP addresses and ports.
- 6
- This is the Ceph secret, defined above. It is used to create a secure connection from OpenShift Enterprise to the Ceph server.
- 7
- This is the file system type mounted on the Ceph RBD block device.
Save the PV definition to a file, for example ceph-pv.yaml, and create the persistent volume:
# oc create -f ceph-pv.yaml
persistentvolume "ceph-pv" createdVerify that the persistent volume was created:
# oc get pv
NAME LABELS CAPACITY ACCESSMODES STATUS CLAIM REASON AGE
ceph-pv <none> 2147483648 RWO Available 2s18.3.5. Creating the Persistent Volume Claim
A persistent volume claim (PVC) specifies the desired access mode and storage capacity. Currently, based on only these two attributes, a PVC is bound to a single PV. Once a PV is bound to a PVC, that PV is essentially tied to the PVC’s project and cannot be bound to by another PVC. There is a one-to-one mapping of PVs and PVCs. However, multiple pods in the same project can use the same PVC.
Example 18.7. PVC Object Definition
kind: PersistentVolumeClaim
apiVersion: v1
metadata:
name: ceph-claim
spec:
accessModes:
- ReadWriteOnce
resources:
requests:
storage: 2Gi Save the PVC definition to a file, for example ceph-claim.yaml, and create the PVC:
# oc create -f ceph-claim.yaml
persistentvolumeclaim "ceph-claim" created
#and verify the PVC was created and bound to the expected PV:
# oc get pvc
NAME LABELS STATUS VOLUME CAPACITY ACCESSMODES AGE
ceph-claim <none> Bound ceph-pv 1Gi RWX 21s
- 1
- the claim was bound to the ceph-pv PV.
18.3.6. Creating the Pod
A pod definition file or a template file can be used to define a pod. Below is a pod specification that creates a single container and mounts the Ceph RBD volume for read-write access:
Example 18.8. Pod Object Definition
apiVersion: v1
kind: Pod
metadata:
name: ceph-pod1
spec:
containers:
- name: ceph-busybox
image: busybox
command: ["sleep", "60000"]
volumeMounts:
- name: ceph-vol1
mountPath: /usr/share/busybox
readOnly: false
volumes:
- name: ceph-vol1
persistentVolumeClaim:
claimName: ceph-claim - 1
- The name of this pod as displayed by
oc get pod. - 2
- The image run by this pod. In this case, we are telling busybox to sleep.
- 3 5
- The name of the volume. This name must be the same in both the
containersandvolumessections. - 4
- The mount path as seen in the container.
- 6
- The PVC that is bound to the Ceph RBD cluster.
Save the pod definition to a file, for example ceph-pod1.yaml, and create the pod:
# oc create -f ceph-pod1.yaml
pod "ceph-pod1" created
#verify pod was created
# oc get pod
NAME READY STATUS RESTARTS AGE
ceph-pod1 1/1 Running 0 2m
- 1
- After a minute or so, the pod will be in the Running state.
18.3.7. Defining Group and Owner IDs (Optional)
When using block storage, such as Ceph RBD, the physical block storage is managed by the pod. The group ID defined in the pod becomes the group ID of both the Ceph RBD mount inside the container, and the group ID of the actual storage itself. Thus, it is usually unnecessary to define a group ID in the pod specifiation. However, if a group ID is desired, it can be defined using fsGroup, as shown in the following pod definition fragment:
18.4. Complete Example Using GlusterFS
18.4.1. Overview
This topic provides an end-to-end example of how to use an existing Gluster cluster as an OpenShift Enterprise persistent store. It is assumed that a working Gluster cluster is already set up. If not, consult the Red Hat Gluster Storage Administration Guide.
Persistent Storage Using GlusterFS provides an explanation of persistent volumes (PVs), persistent volume claims (PVCs), and using GlusterFS as persistent storage.
All oc … commands are executed on the OpenShift Enterprise master host.
18.4.2. Installing the glusterfs-fuse Package
The glusterfs-fuse library must be installed on all schedulable OpenShift Enterprise nodes:
# yum install -y glusterfs-fuseThe OpenShift Enterprise all-in-one host is often not used to run pod workloads and, thus, is not included as a schedulable node.
18.4.3. Creating the Gluster Endpoints and Gluster Service for Persistence
The named endpoints define each node in the Gluster-trusted storage pool:
Example 18.10. GlusterFS Endpoint Definition
apiVersion: v1
kind: Endpoints
metadata:
name: gluster-endpoints
subsets:
- addresses:
- ip: 192.168.122.21
ports:
- port: 1
protocol: TCP
- addresses:
- ip: 192.168.122.22
ports:
- port: 1
protocol: TCPSave the endpoints definition to a file, for example gluster-endpoints.yaml, then create the endpoints object:
# oc create -f gluster-endpoints.yaml
endpoints "gluster-endpoints" createdVerify that the endpoints were created:
# oc get endpoints gluster-endpoints
NAME ENDPOINTS AGE
gluster-endpoints 192.168.122.21:1,192.168.122.22:1 1mTo persist the Gluster endpoints, you also need to create a service.
Example 18.11. GlusterFS Service Definition
Save the service definition to a file, for example gluster-service.yaml, then create the endpoints object:
# oc create -f gluster-service.yaml
endpoints "gluster-service" createdVerify that the service was created:
# oc get service gluster-service
NAME CLUSTER-IP EXTERNAL-IP PORT(S) AGE
gluster-service 10.0.0.130 <none> 1/TCP 9s18.4.4. Creating the Persistent Volume
Next, before creating the PV object, define the persistent volume in OpenShift Enterprise:
Example 18.12. Persistent Volume Object Definition Using GlusterFS
apiVersion: v1
kind: PersistentVolume
metadata:
name: gluster-pv
spec:
capacity:
storage: 1Gi
accessModes:
- ReadWriteMany
glusterfs:
endpoints: gluster-endpoints
path: /HadoopVol
readOnly: false
persistentVolumeReclaimPolicy: Retain - 1
- The name of the PV, which is referenced in pod definitions or displayed in various
ocvolume commands. - 2
- The amount of storage allocated to this volume.
- 3
accessModesare used as labels to match a PV and a PVC. They currently do not define any form of access control.- 4
- This defines the volume type being used. In this case, the glusterfs plug-in is defined.
- 5
- This references the endpoints named above.
- 6
- This is the Gluster volume name, preceded by
/. - 7
- A volume reclaim policy of retain indicates that the volume will be preserved after the pods accessing it terminate. Accepted values include Retain, Delete, and Recycle.
Save the PV definition to a file, for example gluster-pv.yaml, and create the persistent volume:
# oc create -f gluster-pv.yaml
persistentvolume "gluster-pv" createdVerify that the persistent volume was created:
# oc get pv
NAME LABELS CAPACITY ACCESSMODES STATUS CLAIM REASON AGE
gluster-pv <none> 1Gi RWX Available 37s18.4.5. Creating the Persistent Volume Claim
A persistent volume claim (PVC) specifies the desired access mode and storage capacity. Currently, based on only these two attributes, a PVC is bound to a single PV. Once a PV is bound to a PVC, that PV is essentially tied to the PVC’s project and cannot be bound to by another PVC. There is a one-to-one mapping of PVs and PVCs. However, multiple pods in the same project can use the same PVC.
Example 18.13. PVC Object Definition
apiVersion: v1
kind: PersistentVolumeClaim
metadata:
name: gluster-claim
spec:
accessModes:
- ReadWriteMany
resources:
requests:
storage: 1Gi Save the PVC definition to a file, for example gluster-claim.yaml, and create the PVC:
# oc create -f gluster-claim.yaml
persistentvolumeclaim "gluster-claim" createdVerify the PVC was created and bound to the expected PV:
# oc get pvc
NAME LABELS STATUS VOLUME CAPACITY ACCESSMODES AGE
gluster-claim <none> Bound gluster-pv 1Gi RWX 24s
- 1
- The claim was bound to the gluster-pv PV.
18.4.6. Defining GlusterFS Volume Access
Access is necessary to a node in the Gluster-trusted storage pool. On this node, examine the glusterfs-fuse mount:
# ls -lZ /mnt/glusterfs/
drwxrwx---. yarn hadoop system_u:object_r:fusefs_t:s0 HadoopVol
# id yarn
uid=592(yarn) gid=590(hadoop) groups=590(hadoop)
In order to access the HadoopVol volume, the container must match the SELinux label, and either run with a UID of 592, or with 590 in its supplemental groups. It is recommended to gain access to the volume by matching the Gluster mount’s groups, which is defined in the pod definition below.
By default, SELinux does not allow writing from a pod to a remote Gluster server. To enable writing to GlusterFS volumes with SELinux enforcing on each node, run:
# setsebool -P virt_sandbox_use_fusefs on
The virt_sandbox_use_fusefs boolean is defined by the docker-selinux package. If you get an error saying it is not defined, ensure that this package is installed.
18.4.7. Creating the Pod using NGINX Web Server image
A pod definition file or a template file can be used to define a pod. Below is a pod specification that creates a single container and mounts the Gluster volume for read-write access:
The NGINX image may require to run in privileged mode to create the mount and run properly. An easy way to accomplish this is to simply add your user to the privileged Security Context Constraint (SCC):
$ oadm policy add-scc-to-user privileged myuser
Then, add the privileged: true to the containers securityContext: section of the YAML file (as seen in the example below).
Managing Security Context Constraints provides additional information regarding SCCs.
Example 18.14. Pod Object Definition using NGINX image
apiVersion: v1
kind: Pod
metadata:
name: gluster-pod1
labels:
name: gluster-pod1
spec:
containers:
- name: gluster-pod1
image: nginx
ports:
- name: web
containerPort: 80
securityContext:
privileged: true
volumeMounts:
- name: gluster-vol1
mountPath: /usr/share/nginx/html
readOnly: false
securityContext:
supplementalGroups: [590]
volumes:
- name: gluster-vol1
persistentVolumeClaim:
claimName: gluster-claim - 1
- The name of this pod as displayed by
oc get pod. - 2
- The image run by this pod. In this case, we are using a standard NGINX image.
- 3 6
- The name of the volume. This name must be the same in both the
containersandvolumessections. - 4
- The mount path as seen in the container.
- 5
- The
SupplementalGroupID (Linux Groups) to be assigned at the pod level and as discussed this should match the POSIX permissions on the Gluster volume. - 7
- The PVC that is bound to the Gluster cluster.
Save the pod definition to a file, for example gluster-pod1.yaml, and create the pod:
# oc create -f gluster-pod1.yaml
pod "gluster-pod1" createdVerify the pod was created:
# oc get pod
NAME READY STATUS RESTARTS AGE
gluster-pod1 1/1 Running 0 31s
- 1
- After a minute or so, the pod will be in the Running state.
More details are shown in the oc describe pod command:
# oc describe pod gluster-pod1
Name: gluster-pod1
Namespace: default
Security Policy: privileged
Node: ose1.rhs/192.168.122.251
Start Time: Wed, 24 Aug 2016 12:37:45 -0400
Labels: name=gluster-pod1
Status: Running
IP: 172.17.0.2
Controllers: <none>
Containers:
gluster-pod1:
Container ID: docker://e67ed01729e1dc7369c5112d07531a27a7a02a7eb942f17d1c5fce32d8c31a2d
Image: nginx
Image ID: docker://sha256:4efb2fcdb1ab05fb03c9435234343c1cc65289eeb016be86193e88d3a5d84f6b
Port: 80/TCP
State: Running
Started: Wed, 24 Aug 2016 12:37:52 -0400
Ready: True
Restart Count: 0
Volume Mounts:
/usr/share/nginx/html/test from glustervol (rw)
/var/run/secrets/kubernetes.io/serviceaccount from default-token-1n70u (ro)
Environment Variables: <none>
Conditions:
Type Status
Initialized True
Ready True
PodScheduled True
Volumes:
glustervol:
Type: PersistentVolumeClaim (a reference to a PersistentVolumeClaim in the same namespace)
ClaimName: gluster-claim
ReadOnly: false
default-token-1n70u:
Type: Secret (a volume populated by a Secret)
SecretName: default-token-1n70u
QoS Tier: BestEffort
Events:
FirstSeen LastSeen Count From SubobjectPath Type Reason Message
--------- -------- ----- ---- ------------- -------- ------ -------
10s 10s 1 {default-scheduler } Normal Scheduled Successfully assigned gluster-pod1 to ose1.rhs
9s 9s 1 {kubelet ose1.rhs} spec.containers{gluster-pod1} Normal Pulling pulling image "nginx"
4s 4s 1 {kubelet ose1.rhs} spec.containers{gluster-pod1} Normal Pulled Successfully pulled image "nginx"
3s 3s 1 {kubelet ose1.rhs} spec.containers{gluster-pod1} Normal Created Created container with docker id e67ed01729e1
3s 3s 1 {kubelet ose1.rhs} spec.containers{gluster-pod1} Normal Started Started container with docker id e67ed01729e1
There is more internal information, including the SCC used to authorize the pod, the pod’s user and group IDs, the SELinux label, and more shown in the oc get pod <name> -o yaml command:
# oc get pod gluster-pod1 -o yaml
apiVersion: v1
kind: Pod
metadata:
annotations:
openshift.io/scc: privileged
creationTimestamp: 2016-08-24T16:37:45Z
labels:
name: gluster-pod1
name: gluster-pod1
namespace: default
resourceVersion: "482"
selfLink: /api/v1/namespaces/default/pods/gluster-pod1
uid: 15afda77-6a19-11e6-aadb-525400f7256d
spec:
containers:
- image: nginx
imagePullPolicy: Always
name: gluster-pod1
ports:
- containerPort: 80
name: web
protocol: TCP
resources: {}
securityContext:
privileged: true
terminationMessagePath: /dev/termination-log
volumeMounts:
- mountPath: /usr/share/nginx/html
name: glustervol
- mountPath: /var/run/secrets/kubernetes.io/serviceaccount
name: default-token-1n70u
readOnly: true
dnsPolicy: ClusterFirst
host: ose1.rhs
imagePullSecrets:
- name: default-dockercfg-20xg9
nodeName: ose1.rhs
restartPolicy: Always
securityContext:
supplementalGroups:
- 590
serviceAccount: default
serviceAccountName: default
terminationGracePeriodSeconds: 30
volumes:
- name: glustervol
persistentVolumeClaim:
claimName: gluster-claim
- name: default-token-1n70u
secret:
secretName: default-token-1n70u
status:
conditions:
- lastProbeTime: null
lastTransitionTime: 2016-08-24T16:37:45Z
status: "True"
type: Initialized
- lastProbeTime: null
lastTransitionTime: 2016-08-24T16:37:53Z
status: "True"
type: Ready
- lastProbeTime: null
lastTransitionTime: 2016-08-24T16:37:45Z
status: "True"
type: PodScheduled
containerStatuses:
- containerID: docker://e67ed01729e1dc7369c5112d07531a27a7a02a7eb942f17d1c5fce32d8c31a2d
image: nginx
imageID: docker://sha256:4efb2fcdb1ab05fb03c9435234343c1cc65289eeb016be86193e88d3a5d84f6b
lastState: {}
name: gluster-pod1
ready: true
restartCount: 0
state:
running:
startedAt: 2016-08-24T16:37:52Z
hostIP: 192.168.122.251
phase: Running
podIP: 172.17.0.2
startTime: 2016-08-24T16:37:45Z18.5. Backing Docker Registry with GlusterFS Storage
18.5.1. Overview
This topic reviews how to attach a GlusterFS persistent volume to the Docker Registry.
It is assumed that the Docker registry service has already been started and the Gluster volume has been created.
18.5.2. Prerequisites
- The docker-registry was deployed without configuring storage.
- A Gluster volume exists and glusterfs-fuse is installed on schedulable nodes.
Definitions written for GlusterFS endpoints and service, persistent volume (PV), and persistent volume claim (PVC).
For this guide, these will be:
- gluster-endpoints-service.yaml
- gluster-endpoints.yaml
- gluster-pv.yaml
- gluster-pvc.yaml
A user with the cluster-admin role binding.
- For this guide, that user is admin.
All oc commands are executed on the master node as the admin user.
18.5.3. Create the Gluster Persistent Volume
First, make the Gluster volume available to the registry.
$ oc create -f gluster-endpoints-service.yaml
$ oc create -f gluster-endpoints.yaml
$ oc create -f gluster-pv.yaml
$ oc create -f gluster-pvc.yamlCheck to make sure the PV and PVC were created and bound successfully. The expected output should resemble the following. Note that the PVC status is Bound, indicating that it has bound to the PV.
$ oc get pv
NAME LABELS CAPACITY ACCESSMODES STATUS CLAIM REASON AGE
gluster-pv <none> 1Gi RWX Available 37s
$ oc get pvc
NAME LABELS STATUS VOLUME CAPACITY ACCESSMODES AGE
gluster-claim <none> Bound gluster-pv 1Gi RWX 24sIf either the PVC or PV failed to create or the PVC failed to bind, refer back to the GlusterFS Persistent Storage guide. Do not proceed until they initialize and the PVC status is Bound.
18.5.4. Attach the PVC to the Docker Registry
Before moving forward, ensure that the docker-registry service is running.
$ oc get svc
NAME CLUSTER_IP EXTERNAL_IP PORT(S) SELECTOR AGE
docker-registry 172.30.167.194 <none> 5000/TCP docker-registry=default 18mIf either the docker-registry service or its associated pod is not running, refer back to the docker-registry setup instructions for troubleshooting before continuing.
Then, attach the PVC:
$ oc volume deploymentconfigs/docker-registry --add --name=v1 -t pvc \
--claim-name=gluster-claim --overwriteDeploying a Docker Registry provides more information on using the Docker registry.
18.5.5. Known Issues
18.5.5.1. Pod Cannot Resolve the Volume Host
In non-production cases where the dnsmasq server is located on the same node as the OpenShift Enterprise master service, pods might not resolve to the host machines when mounting the volume, causing errors in the docker-registry-1-deploy pod. This can happen when dnsmasq.service fails to start because of a collision with OpenShift Enterprise DNS on port 53. To run the DNS server on the master host, some configurations needs to be changed.
In /etc/dnsmasq.conf, add:
# Reverse DNS record for master
host-record=master.example.com,<master-IP>
# Wildcard DNS for OpenShift Applications - Points to Router
address=/apps.example.com/<master-IP>
# Forward .local queries to SkyDNS
server=/local/127.0.0.1#8053
# Forward reverse queries for service network to SkyDNS.
# This is for default OpenShift SDN - change as needed.
server=/17.30.172.in-addr.arpa/127.0.0.1#8053With these settings, dnsmasq will pull from the /etc/hosts file on the master node.
Add the appropriate host names and IPs for all necessary hosts.
In master-config.yaml, change bindAddress to:
dnsConfig:
bindAddress: 127.0.0.1:8053When pods are created, they receive a copy of /etc/resolv.conf, which typically contains only the master DNS server so they can resolve external DNS requests. To enable internal DNS resolution, insert the dnsmasq server at the top of the server list. This way, dnsmasq will attempt to resolve requests internally first.
In /etc/resolv.conf all scheduled nodes:
nameserver 192.168.1.100
nameserver 192.168.1.1 Once the configurations are changed, restart the OpenShift Enterprise master and dnsmasq services.
$ systemctl restart atomic-openshift-master
$ systemctl restart dnsmasq18.6. Mounting Volumes on Privileged Pods
18.6.1. Overview
Persistent volumes can be mounted to pods with the privileged security context constraint (SCC) attached.
While this topic uses GlusterFS as a sample use-case for mounting volumes onto privileged pods, it can be adapted to use any supported storage plug-in.
18.6.2. Prerequisites
- An existing Gluster volume.
- glusterfs-fuse installed on all hosts.
Definitions for GlusterFS:
- Endpoints and services: gluster-endpoints-service.yaml and gluster-endpoints.yaml
- Persistent volumes: gluster-pv.yaml
- Persistent volume claims: gluster-pvc.yaml
- Privileged pods: gluster-S3-pod.yaml
-
A user with the cluster-admin role binding. For this guide, that user is called
admin.
18.6.3. Creating the Persistent Volume
Creating the PersistentVolume makes the storage accessible to users, regardless of projects.
As the admin, create the service, endpoint object, and persistent volume:
$ oc create -f gluster-endpoints-service.yaml $ oc create -f gluster-endpoints.yaml $ oc create -f gluster-pv.yamlVerify that the objects were created:
$ oc get svc NAME CLUSTER_IP EXTERNAL_IP PORT(S) SELECTOR AGE gluster-cluster 172.30.151.58 <none> 1/TCP <none> 24s$ oc get ep NAME ENDPOINTS AGE gluster-cluster 192.168.59.102:1,192.168.59.103:1 2m$ oc get pv NAME LABELS CAPACITY ACCESSMODES STATUS CLAIM REASON AGE gluster-default-volume <none> 2Gi RWX Available 2d
18.6.4. Creating a Regular User
Adding a regular user to the privileged SCC (or to a group given access to the SCC) allows them to run privileged pods:
- As the admin, add a user to the SCC:
$ oadm policy add-scc-to-user privileged <username>- Log in as the regular user:
$ oc login -u <username> -p <password>- Then, create a new project:
$ oc new-project <project_name>18.6.5. Creating the Persistent Volume Claim
As a regular user, create the PersistentVolumeClaim to access the volume:
$ oc create -f gluster-pvc.yaml -n <project_name>Define your pod to access the claim:
Example 18.15. Pod Definition
apiVersion: v1 id: gluster-S3-pvc kind: Pod metadata: name: gluster-nginx-priv spec: containers: - name: gluster-nginx-priv image: fedora/nginx volumeMounts: - mountPath: /mnt/gluster1 name: gluster-volume-claim securityContext: privileged: true volumes: - name: gluster-volume-claim persistentVolumeClaim: claimName: gluster-claim2 Upon pod creation, the mount directory is created and the volume is attached to that mount point.
As regular user, create a pod from the definition:
$ oc create -f gluster-S3-pod.yamlVerify that the pod created successfully:
$ oc get pods NAME READY STATUS RESTARTS AGE gluster-S3-pod 1/1 Running 0 36mIt can take several minutes for the pod to create.
18.6.6. Verifying the Setup
18.6.6.1. Checking the Pod SCC
Export the pod configuration:
$ oc export pod <pod_name>Examine the output. Check that
openshift.io/scchas the value ofprivileged:Example 18.16. Export Snippet
metadata: annotations: openshift.io/scc: privileged
18.6.6.2. Verifying the Mount
Access the pod and check that the volume is mounted:
$ oc rsh <pod_name> [root@gluster-S3-pvc /]# mountExamine the output for the Gluster volume:
Example 18.17. Volume Mount
192.168.59.102:gv0 on /mnt/gluster type fuse.gluster (rw,relatime,user_id=0,group_id=0,default_permissions,allow_other,max_read=131072)
Chapter 19. Working with HTTP Proxies
19.1. Overview
Production environments can deny direct access to the Internet and instead have an HTTP or HTTPS proxy available. Configuring OpenShift Enterprise to use these proxies can be as simple as setting standard environment variables in configuration or JSON files. This can be done during an advanced installation or configured after installation.
The proxy configuration must be the same on each host in the cluster. Therefore, when setting up the proxy or modifying it, you must update the files on each OpenShift Enterprise host to the same values. Then, you must restart OpenShift Enterprise services on each host in the cluster.
The NO_PROXY, HTTP_PROXY, and HTTPS_PROXY environment variables are found in each host’s /etc/sysconfig/atomic-openshift-master file (for single master configuration), /etc/sysconfig/atomic-openshift-master-api, or /etc/sysconfig/atomic-openshift-master-controllers files (for multi-master configuration) and /etc/sysconfig/atomic-openshift-node.
19.2. Configuring NO_PROXY
The NO_PROXY environment variable lists all of the OpenShift Enterprise components and all IP addresses that are managed by OpenShift Enterprise.
NO_PROXY accepts a comma-separated list of hosts, IP addresses, or IP ranges in CIDR format:
- For master hosts
- Node host name
- Master IP or host name
- For node hosts
- Master IP or host name
- For the Docker service
- Registry service IP and host name
NO_PROXY also includes the SDN network and service IP addresses as found in the master-config.yaml file.
/etc/origin/master/master-config.yaml
networkConfig:
clusterNetworkCIDR: 10.1.0.0/16
serviceNetworkCIDR: 172.30.0.0/16
OpenShift Enterprise does not accept * as a wildcard attached to a domain suffix. For example, this works:
NO_PROXY=.example.comHowever, this does not:
NO_PROXY=*.example.com
The only wildcard NO_PROXY accepts is a single * character, which matches all hosts, and effectively disables the proxy.
Each name in this list is matched as either a domain which contains the host name as a suffix, or the host name itself.
For instance, example.com would match example.com, example.com:80, and www.example.com.
19.3. Configuring Hosts for Proxies
Edit the proxy environment variables in the OpenShift Enterprise control files. Ensure all of the files in the cluster are correct.
HTTP_PROXY=http://USERNAME:PASSWORD@10.0.1.1:8080/ HTTPS_PROXY=https://USERNAME:PASSWORD@10.0.0.1:8080/ NO_PROXY=master.hostname.example.com,10.1.0.0/16,172.30.0.0/161 - 1
- Supports host names and CIDRs. Must include the SDN network and service IP ranges
10.1.0.0/16,172.30.0.0/16by default.
Restart the master or node host as appropriate:
# systemctl restart atomic-openshift-master # systemctl restart atomic-openshift-nodeFor multi-master installations:
# systemctl restart atomic-openshift-master-controllers # systemctl restart atomic-openshift-master-api
19.4. Configuring Hosts for Proxies Using Ansible
During advanced installations, the NO_PROXY, HTTP_PROXY, and HTTPS_PROXY environment variables can be configured using the openshift_no_proxy, openshift_http_proxy, and openshift_https_proxy parameters, which are configurable in the inventory file.
Example 19.1. Example Proxy Configuration with Ansible
# Global Proxy Configuration
# These options configure HTTP_PROXY, HTTPS_PROXY, and NOPROXY environment
# variables for docker and master services.
openshift_http_proxy=http://USER:PASSWORD@IPADDR:PORT
openshift_https_proxy=https://USER:PASSWORD@IPADDR:PORT
openshift_no_proxy='.hosts.example.com,some-host.com'
#
# Most environments do not require a proxy between OpenShift masters, nodes, and
# etcd hosts. So automatically add those host names to the openshift_no_proxy list.
# If all of your hosts share a common domain you may wish to disable this and
# specify that domain above.
# openshift_generate_no_proxy_hosts=TrueThere are additional proxy settings that can be configured for builds using Ansible parameters. For example:
The openshift_builddefaults_git_http_proxy and openshift_builddefaults_git_https_proxy parameters allow you to use a proxy for Git cloning
The openshift_builddefaults_http_proxy and openshift_builddefaults_https_proxy parameters can make environment variables available to the Docker build strategy and Custom build strategy processes.
19.5. Proxying Docker Pull
OpenShift Enterprise node hosts need to perform push and pull operations to Docker registries. If you have a registry that does not need a proxy for nodes to access, include the NO_PROXY parameter with the registry’s host name, the registry service’s IP address, and service name. This blacklists that registry, leaving the external HTTP proxy as the only option.
Edit the /etc/sysconfig/docker file and add the variables in shell format:
HTTP_PROXY=http://USERNAME:PASSWORD@10.0.1.1:8080/ HTTPS_PROXY=https://USERNAME:PASSWORD@10.0.0.1:8080/ NO_PROXY=master.hostname.example.com,172.30.123.45,docker-registry.default.svc.cluster.localRestart the Docker service:
# systemctl restart docker
19.6. Configuring S2I Builds for Proxies
S2I builds fetch dependencies from various locations. You can use a .s2i/environment file to specify simple shell variables and OpenShift Enterprise will react accordingly when seeing build images.
The following are the supported proxy environment variables with example values:
HTTP_PROXY=http://USERNAME:PASSWORD@10.0.1.1:8080/
HTTPS_PROXY=https://USERNAME:PASSWORD@10.0.0.1:8080/
NO_PROXY=master.hostname.example.com19.7. Configuring Default Templates for Proxies
The example templates available in OpenShift Enterprise by default do not include settings for HTTP proxies. For existing applications based on these templates, modify the source section of the application’s build configuration and add proxy settings:
...
source:
type: Git
git:
uri: https://github.com/openshift/ruby-hello-world
httpProxy: http://proxy.example.com
httpsProxy: https://proxy.example.com
...This is similar to the process for using proxies for Git cloning.
19.8. Setting Proxy Environment Variables in Pods
You can set the NO_PROXY, HTTP_PROXY, and HTTPS_PROXY environment variables in the templates.spec.containers stanza in a deployment configuration to pass proxy connection information. The same can be done for configuring a Pod’s proxy at runtime:
...
containers:
- env:
- name: "HTTP_PROXY"
value: "http://USER:PASSWORD@IPADDR:PORT"
...
You can also use the oc set env command to update an existing deployment configuration with a new environment variable:
$ oc set env dc/frontend HTTP_PROXY=http://USER:PASSWORD@IPADDR:PORTIf you have a ConfigChange trigger set up in your OpenShift Enterprise instance, the changes happen automatically. Otherwise, manually redeploy your application for the changes to take effect.
19.9. Git Repository Access
If your Git repository can only be accessed using a proxy, you can define the proxy to use in the source section of the BuildConfig. You can configure both a HTTP and HTTPS proxy to use. Both fields are optional.
Your source URI must use the HTTP or HTTPS protocol for this to work.
source:
type: Git
git:
uri: "https://github.com/openshift/ruby-hello-world"
httpProxy: http://proxy.example.com
httpsProxy: https://proxy.example.comCluster administrators can also configure a global proxy for Git cloning using Ansible.
Chapter 20. Configuring Global Build Defaults and Overrides
20.1. Overview
Developers can define settings in specific build configurations within their projects, such as configuring a proxy for Git cloning. Rather than requiring developers to define certain settings in each of their build configurations, cluster administrators can use admission control plug-ins to configure global build defaults and overrides that automatically use these settings in any build.
The settings from these plug-ins are not set in the build configurations or builds themselves, but rather are only used during the build process. This allows administrators to change the global configuration at any time, and any builds that are re-run from existing build configurations or builds will get the new settings.
The BuildDefaults admission control plug-in allows administrators to set global defaults for settings such as the Git HTTP and HTTPS proxy, as well as default environment variables. These defaults do not overwrite values that have been configured for a specific build. However, if those values are not present on the build definition, they are set to the default value.
The BuildOverrides admission control plug-in allows administrators to override a setting in a build, regardless of the value stored in the build. It currently supports overriding the forcePull flag on a build strategy to enforce always refreshing the local image during a build by pulling the image from the registry. This ensures that a user can only build with an image that they are allowed to pull.
20.2. Setting Global Build Defaults
You can set global build defaults two ways:
20.2.1. Configuring Global Build Defaults with Ansible
During advanced installations, the BuildDefaults plug-in can be configured using the following parameters, which are configurable in the inventory file:
-
openshift_builddefaults_http_proxy -
openshift_builddefaults_https_proxy -
openshift_builddefaults_no_proxy -
openshift_builddefaults_git_http_proxy -
openshift_builddefaults_git_https_proxy
Example 20.1. Example Build Defaults Configuration with Ansible
# These options configure the BuildDefaults admission controller which injects
# environment variables into Builds. These values will default to the global proxy
# config values. You only need to set these if they differ from the global settings
# above. See BuildDefaults
# documentation at https://docs.okd.io/latest/admin_guide/build_defaults_overrides.html
#openshift_builddefaults_http_proxy=http://USER:PASSWORD@HOST:PORT
openshift_builddefaults_https_proxy=https://USER:PASSWORD@HOST:PORT
openshift_builddefaults_no_proxy=build_defaults
openshift_builddefaults_git_http_proxy=http://USER:PASSWORD@HOST:PORT
openshift_builddefaults_git_https_proxy=https://USER:PASSWORD@HOST:PORT
# Or you may optionally define your own serialized as json
#openshift_builddefaults_json='{"BuildDefaults":{"configuration":{"apiVersion":"v1","env":[{"name":"HTTP_PROXY","value":"http://proxy.example.com.redhat.com:3128"},{"name":"NO_PROXY","value":"ose3-master.example.com"}],"gitHTTPProxy":"http://proxy.example.com:3128","kind":"BuildDefaultsConfig"}}}'
There are additional proxy settings that can be configured for builds using Ansible parameters. For example: - The openshift_builddefaults_git_http_proxy and openshift_builddefaults_git_https_proxy parameters allow you to use a proxy for git cloning - The openshift_builddefaults_http_proxy and openshift_builddefaults_https_proxy parameters can make environment variables available to the Docker build strategy and Custom build strategy processes.
20.2.2. Manually Setting Global Build Defaults
To configure the BuildDefaults plug-in, add a configuration for it in the /etc/origin/master/master-config.yaml file on masters:
kubernetesMasterConfig:
admissionConfig:
pluginConfig:
BuildDefaults:
configuration:
apiVersion: v1
kind: BuildDefaultsConfig
gitHTTPProxy: http://my.proxy:8080
gitHTTPSProxy: https://my.proxy:8443
env:
- name: HTTP_PROXY
value: http://my.proxy:8080
- name: HTTPS_PROXY
value: https://my.proxy:8443
- name: CUSTOM_VAR
value: custom_value- 1
- Sets the HTTP proxy to use when cloning source code from a Git repository.
- 2
- Sets the HTTPS proxy to use when cloning source code from a Git repository.
- 3
- Default environment variable that sets the HTTP proxy to use during the build. This may be used for downloading dependencies during the assemble and build phases.
- 4
- Default environment variable that sets the HTTPS proxy to use during the build. This may be used for downloading dependencies during the assemble and build phases.
- 5
- (Optional) Additional default environment variable that will be added to every build.
Restart the master service for the changes to take effect:
# systemctl restart atomic-openshift-master20.3. Setting Global Build Overrides
To configure the BuildOverrides plug-in, add a configuration for it in the /etc/origin/master/master-config.yaml file on masters:
kubernetesMasterConfig:
admissionConfig:
pluginConfig:
BuildOverrides:
configuration:
apiVersion: v1
kind: BuildOverridesConfig
forcePull: true - 1
- Force all builds to pull their builder image and any source images before starting the build.
Restart the master service for the changes to take effect:
# systemctl restart atomic-openshift-masterChapter 21. Native Container Routing
21.1. Overview
This topic describes how to set up container networking using existing switches and routers and the kernel networking stack in Linux. The setup requires that the network administrator or a script modifies the router or routers when new nodes are added to the cluster.
The procedures outlined in this topic can be adapted to any type of router.
21.2. Network Layout
The following diagram shows the container networking setup described in this topic. It uses one Linux node with two network interface cards serving as a router, two switches, and three nodes connected to these switches.
21.3. Network Overview
The following describes a general network setup:
- 11.11.0.0/16 is the container network.
- The 11.11.x.0/24 subnet is reserved for each node and assigned to the Docker Linux bridge.
- Each node has a route to the router for reaching anything in the 11.11.0.0/16 range, except the local subnet.
- The router has routes for each node, so it can be directed to the right node.
- Existing nodes do not need any changes when new nodes are added, unless the network topology is modified.
- IP forwarding is enabled on each node.
21.4. Node setup
Assign an unused 11.11.x.0/24 subnet IP address to the Linux bridge on the node:
# brctl addbr lbr0 # ip addr add 11.11.1.1/24 dev lbr0 # ip link set dev lbr0 upModify the Docker startup script to use the new bridge. By default, the startup script is the
/etc/sysconfig/dockerfile:# docker -d -b lbr0 --other-optionsAdd a route to the router for the 11.11.0.0/16 network:
# ip route add 11.11.0.0/16 via 192.168.2.2 dev p3p1Enable IP forwarding on the node:
# sysctl -w net.ipv4.ip_forward=1
21.5. Router setup
The following procedure assumes a Linux box with multiple NICs is used as a router. Modify the steps as required to use the syntax for a particular router:
Enable IP forwarding on the router:
# sysctl -w net.ipv4.ip_forward=1Add a route for each node added to the cluster:
# ip route add <node_subnet> via <node_ip_address> dev <interface through which node is L2 accessible> # ip route add 11.11.1.0/24 via 192.168.2.1 dev p3p1 # ip route add 11.11.2.0/24 via 192.168.3.3 dev p3p2 # ip route add 11.11.3.0/24 via 192.168.3.4 dev p3p2
Chapter 22. Routing from Edge Load Balancers
22.1. Overview
Pods inside of an OpenShift Enterprise cluster are only reachable via their IP addresses on the cluster network. An edge load balancer can be used to accept traffic from outside networks and proxy the traffic to pods inside the OpenShift Enterprise cluster. In cases where the load balancer is not part of the cluster network, routing becomes a hurdle as the internal cluster network is not accessible to the edge load balancer.
To solve this problem where the OpenShift Enterprise cluster is using OpenShift SDN as the cluster networking solution, there are two ways to achieve network access to the pods.
22.2. Including the Load Balancer in the SDN
If possible, run an OpenShift Enterprise node instance on the load balancer itself that uses OpenShift Enterprise SDN as the networking plug-in. This way, the edge machine gets its own Open vSwitch bridge that the SDN automatically configures to provide access to the pods and nodes that reside in the cluster. The routing table is dynamically configured by the SDN as pods are created and deleted, and thus the routing software is able to reach the pods.
Mark the load balancer machine as an unschedulable node so that no pods end up on the load balancer itself:
$ oadm manage-node <load_balancer_hostname> --schedulable=falseIf the load balancer comes packaged as a container, then it is even easier to integrate with OpenShift Enterprise: Simply run the load balancer as a pod with the host port exposed. The pre-packaged HAProxy router in OpenShift Enterprise runs in precisely this fashion.
22.3. Establishing a Tunnel Using a Ramp Node
In some cases, the previous solution is not possible. For example, an F5 BIG-IP® host cannot run an OpenShift Enterprise node instance or the OpenShift Enterprise SDN because F5® uses a custom, incompatible Linux kernel and distribution.
Instead, to enable F5 BIG-IP® to reach pods, you can choose an existing node within the cluster network as a ramp node and establish a tunnel between the F5 BIG-IP® host and the designated ramp node. Because it is otherwise an ordinary OpenShift Enterprise node, the ramp node has the necessary configuration to route traffic to any pod on any node in the cluster network. The ramp node thus assumes the role of a gateway through which the F5 BIG-IP® host has access to the entire cluster network.
Following is an example of establishing an ipip tunnel between an F5 BIG-IP® host and a designated ramp node.
On the F5 BIG-IP® host:
Set the following variables:
# F5_IP=10.3.89.661 # RAMP_IP=10.3.89.892 # TUNNEL_IP1=10.3.91.2163 # CLUSTER_NETWORK=10.128.0.0/144 - 1 2
- The
F5_IPandRAMP_IPvariables refer to the F5 BIG-IP® host’s and the ramp node’s IP addresses, respectively, on a shared, internal network. - 3
- An arbitrary, non-conflicting IP address for the F5® host’s end of the ipip tunnel.
- 4
- The overlay network CIDR that the OpenShift Enterprise SDN uses to assign addresses to pods.
Delete any old route, self, tunnel and SNAT pool:
# tmsh delete net route $CLUSTER_NETWORK || true # tmsh delete net self SDN || true # tmsh delete net tunnels tunnel SDN || true # tmsh delete ltm snatpool SDN_snatpool || trueCreate the new tunnel, self, route and SNAT pool and use the SNAT pool in the virtual servers:
# tmsh create net tunnels tunnel SDN \ \{ description "OpenShift SDN" local-address \ $F5_IP profile ipip remote-address $RAMP_IP \} # tmsh create net self SDN \{ address \ ${TUNNEL_IP1}/24 allow-service all vlan SDN \} # tmsh create net route $CLUSTER_NETWORK interface SDN # tmsh create ltm snatpool SDN_snatpool members add { $TUNNEL_IP1 } # tmsh modify ltm virtual ose-vserver source-address-translation { type snat pool SDN_snatpool } # tmsh modify ltm virtual https-ose-vserver source-address-translation { type snat pool SDN_snatpool }
On the ramp node:
Set the following variables:
Delete any old tunnel:
# ip tunnel del tun1 || trueCreate the ipip tunnel on the ramp node, using a suitable L2-connected interface (e.g., eth0):
# ip tunnel add tun1 mode ipip \ remote $F5_IP dev eth0 # ip addr add $TUNNEL_IP2 dev tun1 # ip link set tun1 up # ip route add $TUNNEL_IP1 dev tun1 # ping -c 5 $TUNNEL_IP1SNAT the tunnel IP with an unused IP from the SDN subnet:
# source /run/openshift-sdn/config.env # tap1=$(ip -o -4 addr list tun0 | awk '{print $4}' | cut -d/ -f1 | head -n 1) # subaddr=$(echo ${OPENSHIFT_SDN_TAP1_ADDR:-"$tap1"} | cut -d "." -f 1,2,3) # export RAMP_SDN_IP=${subaddr}.254Assign this
RAMP_SDN_IPas an additional address to tun0 (the local SDN’s gateway):# ip addr add ${RAMP_SDN_IP} dev tun0Modify the OVS rules for SNAT:
# ipflowopts="cookie=0x999,ip" # arpflowopts="cookie=0x999, table=0, arp" # # ovs-ofctl -O OpenFlow13 add-flow br0 \ "${ipflowopts},nw_src=${TUNNEL_IP1},actions=mod_nw_src:${RAMP_SDN_IP},resubmit(,0)" # ovs-ofctl -O OpenFlow13 add-flow br0 \ "${ipflowopts},nw_dst=${RAMP_SDN_IP},actions=mod_nw_dst:${TUNNEL_IP1},resubmit(,0)" # ovs-ofctl -O OpenFlow13 add-flow br0 \ "${arpflowopts}, arp_tpa=${RAMP_SDN_IP}, actions=output:2" # ovs-ofctl -O OpenFlow13 add-flow br0 \ "${arpflowopts}, priority=200, in_port=2, arp_spa=${RAMP_SDN_IP}, arp_tpa=${CLUSTER_NETWORK}, actions=goto_table:5" # ovs-ofctl -O OpenFlow13 add-flow br0 \ "arp, table=5, priority=300, arp_tpa=${RAMP_SDN_IP}, actions=output:2" # ovs-ofctl -O OpenFlow13 add-flow br0 \ "ip,table=5,priority=300,nw_dst=${RAMP_SDN_IP},actions=output:2" # ovs-ofctl -O OpenFlow13 add-flow br0 "${ipflowopts},nw_dst=${TUNNEL_IP1},actions=output:2"Optionally, if you do not plan on configuring the ramp node to be highly available, mark the ramp node as unschedulable. Skip this step if you do plan to follow the next section and plan on creating a highly available ramp node.
$ oadm manage-node <ramp_node_hostname> --schedulable=false
The F5 router plug-in integrates with F5 BIG-IP®.
22.3.1. Configuring a Highly-Available Ramp Node
You can use OpenShift Enterprise’s ipfailover feature, which uses keepalived internally, to make the ramp node highly available from F5 BIG-IP®'s point of view. To do so, first bring up two nodes, for example called ramp-node-1 and ramp-node-2, on the same L2 subnet.
Then, choose some unassigned IP address from within the same subnet to use for your virtual IP, or VIP. This will be set as the RAMP_IP variable with which you will configure your tunnel on F5 BIG-IP®.
For example, suppose you are using the 10.20.30.0/24 subnet for your ramp nodes, and you have assigned 10.20.30.2 to ramp-node-1 and 10.20.30.3 to ramp-node-2. For your VIP, choose some unassigned address from the same 10.20.30.0/24 subnet, for example 10.20.30.4. Then, to configure ipfailover, mark both nodes with a label, such as f5rampnode:
$ oc label node ramp-node-1 f5rampnode=true
$ oc label node ramp-node-2 f5rampnode=trueSimilar to instructions from the ipfailover documentation, you must now create a service account and add it to the privileged SCC. First, create the f5ipfailover service account:
$ oc create serviceaccount f5ipfailover -n defaultNext, you can add the f5ipfailover service to the privileged SCC. To add the f5ipfailover in the default namespace to the privileged SCC, run:
$ oadm policy add-scc-to-user privileged system:serviceaccount:default:f5ipfailover
Finally, configure ipfailover using your chosen VIP (the RAMP_IP variable) and the f5ipfailover service account, assigning the VIP to your two nodes using the f5rampnode label you set earlier:
# RAMP_IP=10.20.30.4
# IFNAME=eth0
# oadm ipfailover <name-tag> \
--virtual-ips=$RAMP_IP \
--interface=$IFNAME \
--watch-port=0 \
--replicas=2 \
--service-account=f5ipfailover \
--selector='f5rampnode=true'- 1
- The interface where
RAMP_IPshould be configured.
With the above setup, the VIP (the RAMP_IP variable) is automatically re-assigned when the ramp node host that currently has it assigned fails.
Chapter 23. Aggregating Container Logs
23.1. Overview
As an OpenShift Enterprise cluster administrator, you can deploy the EFK stack to aggregate logs for a range of OpenShift Enterprise services. Application developers can view the logs of the projects for which they have view access. The EFK stack aggregates logs from hosts and applications, whether coming from multiple containers or even deleted pods.
The EFK stack is a modified version of the ELK stack and is comprised of:
- Elasticsearch: An object store where all logs are stored.
- Fluentd: Gathers logs from nodes and feeds them to Elasticsearch.
- Kibana: A web UI for Elasticsearch.
Once deployed in a cluster, the stack aggregates logs from all nodes and projects into Elasticsearch, and provides a Kibana UI to view any logs. Cluster administrators can view all logs, but application developers can only view logs for projects they have permission to view. The stack components communicate securely.
Managing Docker Container Logs discusses the use of json-file logging driver options to manage container logs and prevent filling node disks.
23.2. Pre-deployment Configuration
- Ensure that you have deployed a router for the cluster.
- Ensure that you have the necessary storage for Elasticsearch. Note that each Elasticsearch replica requires its own storage volume. See Elasticsearch for more information.
Ansible-based installs should create the logging-deployer-template template in the openshift project. Otherwise you can create it with the following command:
$ oc create -n openshift -f \ /usr/share/openshift/examples/infrastructure-templates/enterprise/logging-deployer.yamlCreate a new project. Once implemented in a single project, the EFK stack collects logs for every project within your OpenShift Enterprise cluster. The examples in this topic use logging as an example project:
$ oadm new-project logging --node-selector="" $ oc project loggingNoteSpecifying a non-empty node selector on the project is not recommended, as this would restrict where Fluentd can be deployed. Instead, specify node selectors for the deployer to be applied to your other deployment configurations.
Create a secret to provide security-related files to the deployer. Providing the secret is optional, and the objects will be randomly generated if not supplied.
You can supply the following files when creating a new secret:
Expand File Name Description kibana.crt
A browser-facing certificate for the Kibana server.
kibana.key
A key to be used with the Kibana certificate.
kibana-ops.crt
A browser-facing certificate for the Ops Kibana server.
kibana-ops.key
A key to be used with the Ops Kibana certificate.
server-tls.json
JSON TLS options to override the Kibana server defaults. Refer to Node.JS docs for available options.
ca.crt
A certificate for a CA that will be used to sign all certificates generated by the deployer.
ca.key
A matching CA key.
For example:
$ oc secrets new logging-deployer \ kibana.crt=/path/to/cert kibana.key=/path/to/keyIf a certificate file is not passed as a secret, the deployer will generate a self-signed certificate instead. However, a secret is still required for the deployer to run. In this case, you can create a "dummy" secret that does not specify a certificate value:
$ oc secrets new logging-deployer nothing=/dev/nullCreate the deployer service account:
$ oc create -f - <<API apiVersion: v1 kind: ServiceAccount metadata: name: logging-deployer secrets: - name: logging-deployer APIEnable the Fluentd service account, which the deployer will create, that requires special privileges to operate Fluentd. Add the service account user to the security context:
$ oadm policy add-scc-to-user \ privileged system:serviceaccount:logging:aggregated-logging-fluentd1 - 1
- Use the new project you created earlier (e.g., logging) when specifying this service account.
Give the Fluentd service account permission to read labels from all pods:
$ oadm policy add-cluster-role-to-user cluster-reader \ system:serviceaccount:logging:aggregated-logging-fluentd1 - 1
- Use the new project you created earlier (e.g., logging) when specifying this service account.
23.3. Deploying the EFK Stack
The EFK stack is deployed using a template.
Run the deployer, specifying at least the parameters in the following example (more are described in the table below):
$ oc new-app logging-deployer-template \ --param KIBANA_HOSTNAME=kibana.example.com \ --param ES_CLUSTER_SIZE=1 \ --param PUBLIC_MASTER_URL=https://localhost:8443Be sure to replace at least
KIBANA_HOSTNAMEandPUBLIC_MASTER_URLwith values relevant to your deployment.The available parameters are:
Expand Variable Name Description PUBLIC_MASTER_URL(Required with the
oc new-appcommand) The external URL for the master. For OAuth use.ENABLE_OPS_CLUSTERIf set to
true, configures a second Elasticsearch cluster and Kibana for operations logs. Fluentd splits logs between the main cluster and a cluster reserved for operations logs (which consists of /var/log/messages on nodes and the logs from the projects default, openshift, and openshift-infra). This means a second Elasticsearch and Kibana are deployed. The deployments are distinguishable by the -ops included in their names and have parallel deployment options listed below.KIBANA_HOSTNAME,KIBANA_OPS_HOSTNAME(Required with the
oc new-appcommand) The external host name for web clients to reach Kibana.ES_CLUSTER_SIZE,ES_OPS_CLUSTER_SIZE(Required with the
oc new-appcommand) The number of instances of Elasticsearch to deploy. Redundancy requires at least three, and more can be used for scaling.ES_INSTANCE_RAM,ES_OPS_INSTANCE_RAMAmount of RAM to reserve per Elasticsearch instance. The default is 8G (for 8GB), and it must be at least 512M. Possible suffixes are G,g,M,m.
ES_NODE_QUORUM,ES_OPS_NODE_QUORUMThe quorum required to elect a new master. Should be more than half the intended cluster size.
ES_RECOVER_AFTER_NODES,ES_OPS_RECOVER_AFTER_NODESWhen restarting the cluster, require this many nodes to be present before starting recovery. Defaults to one less than the cluster size to allow for one missing node.
ES_RECOVER_EXPECTED_NODES,ES_OPS_RECOVER_EXPECTED_NODESWhen restarting the cluster, wait for this number of nodes to be present before starting recovery. By default, the same as the cluster size.
ES_RECOVER_AFTER_TIME,ES_OPS_RECOVER_AFTER_TIMEWhen restarting the cluster, this is a timeout for waiting for the expected number of nodes to be present. Defaults to "5m".
IMAGE_PREFIXThe prefix for logging component images. For example, setting the prefix to registry.access.redhat.com/openshift3/ose- creates registry.access.redhat.com/openshift3/ose-logging-deployer:latest.
IMAGE_VERSIONThe version for logging component images. For example, setting the version to v3.2 creates registry.access.redhat.com/openshift3/ose-logging-deployer:v3.2.
Running the deployer creates a deployer pod and prints its name.
Wait until the pod is running. It may take several minutes for OpenShift Enterprise to retrieve the deployer image from the registry.
NoteThe logs for the openshift and openshift-infra projects are automatically aggregated and grouped into the .operations item in the Kibana interface.
The project where you have deployed the EFK stack (logging, as documented here) is not aggregated into .operations and is found under its ID.
You can watch its progress with:
$ oc get pod/<pod_name> -wIf it seems to be taking too long to start, you can retrieve more details about the pod and any associated events with:
$ oc describe pod/<pod_name>When it runs, you can check the logs of the resulting pod to see if the deployment was successful:
$ oc logs -f <pod_name>As a cluster administrator, deploy the
logging-support-templatetemplate that the deployer created:$ oc new-app logging-support-templateImportantDeployment of logging components should begin automatically. However, because deployment is triggered based on tags being imported into the ImageStreams created in this step, and not all tags are automatically imported, this mechanism has become unreliable as multiple versions are released. Therefore, manual importing may be necessary as follows.
For each ImageStream
logging-auth-proxy,logging-kibana,logging-elasticsearch, andlogging-fluentd, manually import the tag corresponding to theIMAGE_VERSIONspecified (or defaulted) for the deployer.$ oc import-image <name>:<version> --from <prefix><name>:<tag>For example:
$ oc import-image logging-auth-proxy:3.2.0 \ --from registry.access.redhat.com/openshift3/logging-auth-proxy:3.2.0 $ oc import-image logging-kibana:3.2.0 \ --from registry.access.redhat.com/openshift3/logging-kibana:3.2.0 $ oc import-image logging-elasticsearch:3.2.0 \ --from registry.access.redhat.com/openshift3/logging-elasticsearch:3.2.0 $ oc import-image logging-fluentd:3.2.0 \ --from registry.access.redhat.com/openshift3/logging-fluentd:3.2.0
23.4. Post-deployment Configuration
23.4.1. Elasticsearch
A highly-available environment requires at least three replicas of Elasticsearch; each on a different host. Elasticsearch replicas require their own storage, but an OpenShift Enterprise deployment configuration shares storage volumes between all its pods. So, when scaled up, the EFK deployer ensures each replica of Elasticsearch has its own deployment configuration.
Viewing all Elasticsearch Deployments
To view all current Elasticsearch deployments:
$ oc get dc --selector logging-infra=elasticsearchPersistent Elasticsearch Storage
The deployer creates an ephemeral deployment in which all of a pod’s data is lost upon restart. For production usage, add a persistent storage volume to each Elasticsearch deployment configuration.
The best-performing volumes are local disks, if it is possible to use them. Doing so requires some preparation as follows.
The relevant service account must be given the privilege to mount and edit a local volume, as follows:
$ oadm policy add-scc-to-user privileged \ system:serviceaccount:logging:aggregated-logging-elasticsearch1 - 1
- Use the new project you created earlier (e.g., logging) when specifying this service account.
Each Elasticsearch replica definition must be patched to claim that privilege, for example:
$ for dc in $(oc get deploymentconfig --selector logging-infra=elasticsearch -o name); do oc scale $dc --replicas=0 oc patch $dc \ -p '{"spec":{"template":{"spec":{"containers":[{"name":"elasticsearch","securityContext":{"privileged": true}}]}}}}' done- The Elasticsearch pods must be located on the correct nodes to use the local storage, and should not move around even if those nodes are taken down for a period of time. This requires giving each Elasticsearch replica a node selector that is unique to the node where an administrator has allocated storage for it. See below for directions on setting a node selector.
Once these steps are taken, a local host mount can be applied to each replica as in this example (where we assume storage is mounted at the same path on each node):
$ for dc in $(oc get deploymentconfig --selector logging-infra=elasticsearch -o name); do oc set volume $dc \ --add --overwrite --name=elasticsearch-storage \ --type=hostPath --path=/usr/local/es-storage oc scale $dc --replicas=1 done
If using host mounts is impractical or undesirable, it may be necessary to attach block storage as a PersistentVolumeClaim as in the following example:
$ oc set volume dc/logging-es-<unique> \
--add --overwrite --name=elasticsearch-storage \
--type=persistentVolumeClaim --claim-name=logging-es-1Using NFS storage directly or as a PersistentVolume (or via other NAS such as Gluster) is not supported for Elasticsearch storage, as Lucene relies on filesystem behavior that NFS does not supply. Data corruption and other problems can occur. If NFS storage is a requirement, you can allocate a large file on that storage to serve as a storage device and treat it as a host mount on each host. For example:
$ truncate -s 1T /nfs/storage/elasticsearch-1
$ mkfs.xfs /nfs/storage/elasticsearch-1
$ mount -o loop /nfs/storage/elasticsearch-1 /usr/local/es-storage
$ chown 1000:1000 /usr/local/es-storageThen, use /usr/local/es-storage as a host-mount as described above. Performance under this solution is significantly worse than using actual local drives.
Node Selector
Because Elasticsearch can use a lot of resources, all members of a cluster should have low latency network connections to each other. Ensure this by directing the instances to dedicated nodes, or a dedicated region within your cluster, using a node selector.
To configure a node selector, edit each deployment configuration and add the nodeSelector parameter to specify the label of the desired nodes:
apiVersion: v1
kind: DeploymentConfig
spec:
template:
spec:
nodeSelector:
nodelabel: logging-es-node-1
Alternatively you can use the oc patch command:
$ oc patch dc/logging-es-<unique_name> \
-p '{"spec":{"template":{"spec":{"nodeSelector":{"nodeLabel":"logging-es-node-1"}}}}}'Changing the Scale of Elasticsearch
If you need to scale up the number of Elasticsearch instances your cluster uses, it is not as simple as changing the number of Elasticsearch cluster nodes. This is due to the nature of persistent volumes and how Elasticsearch is configured to store its data and recover the cluster. Instead, you must create a deployment configuration for each Elasticsearch cluster node.
During installation, the deployer creates templates with the Elasticsearch configurations provided to it: logging-es-template and logging-es-ops-template if the deployer was run with ENABLE_OPS_CLUSTER=true.
The node quorum and recovery settings were initially set based on the CLUSTER_SIZE value provided to the deployer. Since the cluster size is changing, those values need to be updated.
- Prior to changing the number of Elasticsearch cluster nodes, the EFK stack should first be scaled down to preserve log data as described in Upgrading the EFK Logging Stack.
Edit the cluster template you are scaling up and change the parameters to the desired value:
-
NODE_QUORUMis the intended cluster size / 2 (rounded down) + 1. For an intended cluster size of 5, the quorum would be 3. -
RECOVER_EXPECTED_NODESis the same as the intended cluster size. RECOVER_AFTER_NODESis the intended cluster size - 1.$ oc edit template logging-es[-ops]-template
-
In addition to updating the template, all of the deployment configurations for that cluster also need to have the three environment variable values above updated. To edit each of the configurations for the cluster in series, you use the following.
$ oc get dc -l component=es[-ops] -o name | xargs -r oc editCreate an additional deployment configuration, run the following command against the Elasticsearch cluster you want to to scale up for (logging-es-template or logging-es-ops-template).
$ oc new-app logging-es[-ops]-templateThese deployments will be named differently, but all will have the logging-es prefix. Be aware of the cluster parameters (described in the deployer parameters) based on cluster size that may need corresponding adjustment in the template, as well as existing deployments.
After the intended number of deployment configurations are created, scale up your cluster, starting with Elasticsearch as described in Upgrading the EFK Logging Stack.
NoteThe
oc new-app logging-es[-ops]-templatecommand creates a deployment configuration with a persistent volume. If you want to create a Elasticsearch cluster node with a persistent volume attached to it, upon creation you can instead run the following command to create your deployment configuration with a persistent volume claim (PVC) attached.$ oc process logging-es-template | oc volume -f - \ --add --overwrite --name=elasticsearch-storage \ --type=persistentVolumeClaim --claim-name={your_pvc}`
23.4.2. Fluentd
Once Elasticsearch is running, scale Fluentd to every node to feed logs into Elasticsearch. The following example is for an OpenShift Enterprise instance with three nodes:
$ oc scale dc/logging-fluentd --replicas=3You will need to scale Fluentd if nodes are added or subtracted.
When you make changes to any part of the EFK stack, specifically Elasticsearch or Fluentd, you should first scale Elasicsearch down to zero and scale Fluentd so it does not match any other nodes. Then, make the changes and scale Elasicsearch and Fluentd back.
To scale Elasicsearch to zero:
$ oc scale --replicas=0 dc/<ELASTICSEARCH_DC>Change nodeSelector in the daemonset configuration to match zero:
Get the fluentd node selector:
$ oc get ds logging-fluentd -o yaml |grep -A 1 Selector
nodeSelector:
logging-infra-fluentd: "true"Use the oc patch command to modify the daemonset nodeSelector:
$ oc patch ds logging-fluentd -p '{"spec":{"template":{"spec":{"nodeSelector":{"nonexistlabel":"true"}}}}}'Get the fluentd node selector:
$ oc get ds logging-fluentd -o yaml |grep -A 1 Selector
nodeSelector:
"nonexistlabel: "true"Scale Elastcsearch back up from zero:
$ oc scale --replicas=# dc/<ELASTICSEARCH_DC>Change nodeSelector in the daemonset configuration back to logging-infra-fluentd: "true".
Use the oc patch command to modify the daemonset nodeSelector:
oc patch ds logging-fluentd -p '{"spec":{"template":{"spec":{"nodeSelector":{"logging-infra-fluentd":"true"}}}}}'23.4.3. Kibana
To access the Kibana console from the OpenShift Enterprise web console, add the loggingPublicURL parameter in the /etc/origin/master/master-config.yaml file, with the URL of the Kibana console (the KIBANA_HOSTNAME parameter). The value must be an HTTPS URL:
...
assetConfig:
...
loggingPublicURL: "https://kibana.example.com"
...
Setting the loggingPublicURL parameter creates a View Archive button on the OpenShift Enterprise web console under the Browse → Pods → <pod_name> → Logs tab. This links to the Kibana console.
You can scale the Kibana deployment as usual for redundancy:
$ oc scale dc/logging-kibana --replicas=2
You can see the UI by visiting the site specified at the KIBANA_HOSTNAME variable.
See the Kibana documentation for more information on Kibana.
23.4.4. Cleanup
You can remove everything generated during the deployment while leaving other project contents intact:
$ oc delete all --selector logging-infra=kibana
$ oc delete all --selector logging-infra=fluentd
$ oc delete all --selector logging-infra=elasticsearch
$ oc delete all --selector logging-infra=curator
$ oc delete all,sa,oauthclient --selector logging-infra=support
$ oc delete secret logging-fluentd logging-elasticsearch \
logging-es-proxy logging-kibana logging-kibana-proxy \
logging-kibana-ops-proxy23.5. Upgrading
To upgrade the EFK logging stack, see Manual Upgrades.
23.6. Troubleshooting Kibana
Using the Kibana console with OpenShift Enterprise can cause problems that are easily solved, but are not accompanied with useful error messages. Check the following troubleshooting sections if you are experiencing any problems when deploying Kibana on OpenShift Enterprise:
Login Loop
The OAuth2 proxy on the Kibana console must share a secret with the master host’s OAuth2 server. If the secret is not identical on both servers, it can cause a login loop where you are continuously redirected back to the Kibana login page.
To fix this issue, delete the current oauthclient, and create a new one, using the same template as before:
$ oc delete oauthclient/kibana-proxy
$ oc new-app logging-support-templateCryptic Error When Viewing the Console
When attempting to visit the Kibana console, you may instead receive a browser error:
{"error":"invalid_request","error_description":"The request is missing a required parameter,
includes an invalid parameter value, includes a parameter more than once, or is otherwise malformed."}This can be caused by a mismatch between the OAuth2 client and server. The return address for the client must be in a whitelist so the server can securely redirect back after logging in.
Fix this issue by replacing the OAuth client entry:
$ oc delete oauthclient/kibana-proxy
$ oc new-app logging-support-templateIf the problem persists, check that you are accessing Kibana at a URL listed in the OAuth client. This issue can be caused by accessing the URL at a forwarded port, such as 1443 instead of the standard 443 HTTPS port. You can adjust the server whitelist by editing the OAuth client:
$ oc edit oauthclient/kibana-proxy503 Error When Viewing the Console
If you receive a proxy error when viewing the Kibana console, it could be caused by one of two issues.
First, Kibana may not be recognizing pods. If Elasticsearch is slow in starting up, Kibana may timeout trying to reach it. Check whether the relevant service has any endpoints:
$ oc describe service logging-kibana
Name: logging-kibana
[...]
Endpoints: <none>If any Kibana pods are live, endpoints will be listed. If they are not, check the state of the Kibana pods and deployment. You may need to scale the deployment down and back up again.
The second possible issue may be caused if the route for accessing the Kibana service is masked. This can happen if you perform a test deployment in one project, then deploy in a different project without completely removing the first deployment. When multiple routes are sent to the same destination, the default router will only route to the first created. Check the problematic route to see if it is defined in multiple places:
$ oc get route --all-namespaces --selector logging-infra=support23.7. Sending Logs to an External Elasticsearch Instance
Fluentd sends logs to the value of the ES_HOST, ES_PORT, OPS_HOST, and OPS_PORT environment variables of the Elasticsearch deployment configuration. The application logs are directed to the ES_HOST destination, and operations logs to OPS_HOST.
To direct logs to a specific Elasticsearch instance, edit the deployment configuration and replace the value of the above variables with the desired instance:
$ oc edit dc/<deployment_configuration>
For an external Elasticsearch instance to contain both application and operations logs, you can set ES_HOST and OPS_HOST to the same destination, while ensuring that ES_PORT and OPS_PORT also have the same value.
If your externally hosted Elasticsearch instance does not use TLS, update the *_CLIENT_CERT, *_CLIENT_KEY, and *_CA variables to be empty. If it does use TLS, but not mutual TLS, update the *_CLIENT_CERT and *_CLIENT_KEY variables to be empty and patch or recreate the logging-fluentd secret with the appropriate *_CA value for communicating with your Elasticsearch instance. If it uses Mutual TLS as the provided Elasticsearch instance does, patch or recreate the logging-fluentd secret with your client key, client cert, and CA.
You can use oc edit dc/logging-fluentd to update your Fluentd configuration, making sure to first scale down your number of replicas to zero before editing the deployment configuration.
If you are not using the provided Kibana and Elasticsearch images, you will not have the same multi-tenant capabilities and your data will not be restricted by user access to a particular project.
23.8. Performing Elasticsearch Maintenance Operations
As of the Deployer version 3.2.0, an admin certificate, key, and CA that can be used to communicate with and perform administrative operations on Elasticsearch are provided within the logging-elasticsearch secret.
To confirm whether or not your EFK installation provides these, run:
$ oc describe secret logging-elasticsearchIf they are not available, refer to Manual Upgrades to ensure you are on the latest version first.
Connect to an Elasticsearch pod that is in the cluster on which you are attempting to perform maintenance.
To find a pod in a cluster use either:
$ oc get pods -l component=es -o name | head -1
$ oc get pods -l component=es-ops -o name | head -1Then, connect to a pod:
$ oc rsh <your_Elasticsearch_pod>Once connected to an Elasticsearch container, you can use the certificates mounted from the secret to communicate with Elasticsearch per its 1.5 Document APIs.
Fluentd sends its logs to Elasticsearch using the index format "{project_name}.{project_uuid}.YYYY.MM.DD" where YYYY.MM.DD is the date of the log record.
For example, to delete all logs for the logging project with uuid 3b3594fa-2ccd-11e6-acb7-0eb6b35eaee3 from June 15, 2016, we can run:
$ curl --key /etc/elasticsearch/keys/admin-key --cert /etc/elasticsearch/keys/admin-cert \
--cacert /etc/elasticsearch/keys/admin-ca -XDELETE \
"https://localhost:9200/logging.3b3594fa-2ccd-11e6-acb7-0eb6b35eaee3.2016.06.15"23.9. Configuring Curator
With Aggregated Logging version 3.2.1, Curator is available for use as Tech Preview. To start it, after completing an installation using the 3.2.1 Deployer, scale up the Curator deployment configuration that was created. (It defaults to zero replicas.)
There should be one Curator pod running per Elasticsearch cluster. If you deployed aggregated logging with ENABLE_OPS_CLUSTER=true, then you will have a second deployment configuration (one for the ops cluster and one for the non-ops cluster).
$ oc scale dc/logging-curator --replicas=1
$ oc scale dc/logging-curator-ops --replicas=1Curator allows administrators to configure scheduled Elasticsearch maintenance operations to be performed automatically on a per-project basis. It is scheduled to perform actions daily based on its configuration. Only one Curator pod is recommended per Elasticsearch cluster. Curator is configured via a mounted YAML configuration file with the following structure:
$PROJECT_NAME:
$ACTION:
$UNIT: $VALUE
$PROJECT_NAME:
$ACTION:
$UNIT: $VALUE
...The available parameters are:
| Variable Name | Description |
|---|---|
|
|
The actual name of a project, such as |
|
|
The action to take, currently only |
|
|
One of |
|
| An integer for the number of units. |
|
|
Use |
|
|
(Number) the hour of the day in 24-hour format at which to run the Curator jobs. For use with |
|
|
(Number) the minute of the hour at which to run the Curator jobs. For use with |
For example, to configure Curator to
-
delete indices in the
myapp-devproject older than1 day -
delete indices in the
myapp-qeproject older than1 week -
delete
operationslogs older than8 weeks -
delete all other projects indices after they are
30 daysold - run the Curator jobs at midnight every day
you would use:
myapp-dev:
delete:
days: 1
myapp-qe:
delete:
weeks: 1
.operations:
delete:
weeks: 8
.defaults:
delete:
days: 30
runhour: 0
runminute: 0
When you use month as the $UNIT for an operation, Curator starts counting at the first day of the current month, not the current day of the current month. For example, if today is April 15, and you want to delete indices that are 2 months older than today (delete: months: 2), Curator does not delete indices that are dated older than February 15; it deletes indices older than February 1. That is, it goes back to the first day of the current month, then goes back two whole months from that date. If you want to be exact with Curator, it is best to use days (for example, delete: days: 30).
23.9.1. Creating the Curator Configuration
To create the Curator configuration:
- Create a YAML file with your configuration settings using your favorite editor.
Create a secret from your created yaml file:
$ oc secrets new index-management settings=</path/to/your/yaml/file>Mount your created secret as a volume in your Curator DC:
$ oc volumes dc/logging-curator \ --add \ --type=secret \ --secret-name=index-management \ --mount-path=/etc/curator \ --name=index-management \ --overwriteNoteThe mount-path value (e.g.
/etc/curator) must match theCURATOR_CONF_LOCATIONin the environment.
You can also specify default values for the run hour, run minute, and age in days of the indices when processing the Curator template. Use CURATOR_RUN_HOUR and CURATOR_RUN_MINUTE to set the default runhour and runminute, and use CURATOR_DEFAULT_DAYS to set the default index age.
Chapter 24. Aggregate Logging Sizing Guidelines
24.1. Overview
The Elasticsearch, Fluentd, and Kibana (EFK) stack aggregates logs from nodes and applications running inside your OpenShift Enterprise installation. Once deployed it uses Fluentd to aggregate event logs from all nodes, projects, and pods into Elasticsearch (ES). It also provides a centralized Kibana web UI where users and administrators can create rich visualizations and dashboards with the aggregated data.
Fluentd bulk uploads logs to an index, in JSON format, then Elasticsearch routes your search requests to the appropriate shards.
24.2. Installation
The general procedure for installing an aggregate logging stack in OpenShift Enterprise is described in Aggregating Container Logs. There are some important things to keep in mind while going through the installation guide:
In order for the logging pods to spread evenly across your cluster, an empty node selector should be used.
$ oadm new-project logging --node-selector=""In conjunction with node labeling, which is done later, this controls pod placement across the logging project. You can now create the logging project.
$ oc project loggingIf you are installing in a PoC or testing environment, a local openshift-ansible template install is recommended.
$ oc create -f ${OPENSHIFT_ANSIBLE_REPO}/roles/openshift_examples/files/examples/${VERSION}/infrastructure-templates/origin/logging-deployer.yaml
Elasticsearch (ES) should be deployed with a cluster size of at least three for resiliency to node failures. This is specified by passing the ES_CLUSTER_SIZE parameter to the installer.
$ oc new-app logging-deployer-template \
--param ES_CLUSTER_SIZE=3 \
--param PUBLIC_MASTER_URL=$PUBLIC_MASTER_URL \
--param KIBANA_HOSTNAME=$KIBANA_URLRefer to Deploying the EFK Stack for a full list of parameters.
If you do not have an existing Kibana installation, you can use kibana.example.com as a value to KIBANA_HOSTNAME.
Now, ensure Fluentd pod spreading through labeling.
$ oc label nodes --all logging-infra-fluentd=true
This operation requires the cluster-admin default role.
Installation can take some time depending on whether the images were already retrieved from the registry or not, and on the size of your cluster.
Inside the logging namespace, you can check your deployment with oc get all.
$ oc get all
NAME REVISION REPLICAS TRIGGERED BY
logging-curator 1 1
logging-es-6cvk237t 1 1
logging-es-e5x4t4ai 1 1
logging-es-xmwvnorv 1 1
logging-kibana 1 1
NAME DESIRED CURRENT AGE
logging-curator-1 1 1 3d
logging-es-6cvk237t-1 1 1 3d
logging-es-e5x4t4ai-1 1 1 3d
logging-es-xmwvnorv-1 1 1 3d
logging-kibana-1 1 1 3d
NAME HOST/PORT PATH SERVICE TERMINATION LABELS
logging-kibana kibana.example.com logging-kibana reencrypt component=support,logging-infra=support,provider=openshift
logging-kibana-ops kibana-ops.example.com logging-kibana-ops reencrypt component=support,logging-infra=support,provider=openshift
NAME CLUSTER-IP EXTERNAL-IP PORT(S) AGE
logging-es 172.24.155.177 <none> 9200/TCP 3d
logging-es-cluster None <none> 9300/TCP 3d
logging-es-ops 172.27.197.57 <none> 9200/TCP 3d
logging-es-ops-cluster None <none> 9300/TCP 3d
logging-kibana 172.27.224.55 <none> 443/TCP 3d
logging-kibana-ops 172.25.117.77 <none> 443/TCP 3d
NAME READY STATUS RESTARTS AGE
logging-curator-1-6s7wy 1/1 Running 0 3d
logging-deployer-un6ut 0/1 Completed 0 3d
logging-es-6cvk237t-1-cnpw3 1/1 Running 0 3d
logging-es-e5x4t4ai-1-v933h 1/1 Running 0 3d
logging-es-xmwvnorv-1-adr5x 1/1 Running 0 3d
logging-fluentd-156xn 1/1 Running 0 3d
logging-fluentd-40biz 1/1 Running 0 3d
logging-fluentd-7dtom 0/1 Pending 0 2d
logging-fluentd-8k847 1/1 Running 0 3dYou should end up with a similar setup to the below.
$ oc get pods -o wide
NAME READY STATUS RESTARTS AGE NODE
logging-curator-1-6s7wy 1/1 Running 0 3d ip-172-31-24-239.us-west-2.compute.internal
logging-deployer-un6ut 0/1 Completed 0 3d ip-172-31-6-152.us-west-2.compute.internal
logging-es-6cvk237t-1-cnpw3 1/1 Running 0 3d ip-172-31-24-238.us-west-2.compute.internal
logging-es-e5x4t4ai-1-v933h 1/1 Running 0 3d ip-172-31-24-235.us-west-2.compute.internal
logging-es-xmwvnorv-1-adr5x 1/1 Running 0 3d ip-172-31-24-233.us-west-2.compute.internal
logging-fluentd-156xn 1/1 Running 0 3d ip-172-31-24-241.us-west-2.compute.internal
logging-fluentd-40biz 1/1 Running 0 3d ip-172-31-24-236.us-west-2.compute.internal
logging-fluentd-7dtom 0/1 Pending 0 2d ip-172-31-24-243.us-west-2.compute.internal
logging-fluentd-8k847 1/1 Running 0 3d ip-172-31-24-237.us-west-2.compute.internal
logging-fluentd-9a3qx 1/1 Running 0 3d ip-172-31-24-231.us-west-2.compute.internal
logging-fluentd-abvgj 1/1 Running 0 3d ip-172-31-24-228.us-west-2.compute.internal
logging-fluentd-bh74n 1/1 Running 0 3d ip-172-31-24-238.us-west-2.compute.internal
...
...Notice how the pods are placed in different cluster nodes.
By default the amount of RAM allocated to each ES instance is 8GB. ES_INSTANCE_RAM is the parameter used in the openshift-ansibletemplate. Keep in mind that half of this value will be passed to the individual elasticsearch pods java processes heap size.
24.3. Systemd-journald and rsyslog
Rate-limiting
In Red Hat Enterprise Linux (RHEL) 7 the systemd-journald.socket unit creates /dev/log during the boot process, and then passes input to systemd-journald.service. Every syslog() call goes to the journal.
Rsyslog uses the imjournal module as a default input mode for journal files. Refer to Interaction of rsyslog and journal for detailed information about this topic.
A simple test harness was developed, which uses logger across the cluster nodes to make entries of different sizes at different rates in the system log. During testing simulations under a default Red Hat Enterprise Linux (RHEL) 7 installation with systemd-219-19.el7.x86_64 at certain logging rates (approximately 40 log lines per second), we encountered the default rate limit of rsyslogd. After adjusting these limits, entries stopped being written to journald due to local journal file corruption. This issue is resolved in later versions of systemd.
Scaling up
As you scale up your project, the default logging environment might need some adjustments. After updating to systemd-219-22.el7.x86_64, we added:
$IMUXSockRateLimitInterval 0
$IMJournalRatelimitInterval 0to /etc/rsyslog.conf and:
# Disable rate limiting
RateLimitInterval=1s
RateLimitBurst=10000
Storage=volatile
Compress=no
MaxRetentionSec=5sto /etc/systemd/journald.conf.
Now, restart the services.
$ systemctl restart systemd-journald.service
$ systemctl restart rsyslog.serviceThese settings account for the bursty nature of uploading in bulk.
After removing the rate limit, you may see increased CPU utilization on the system logging daemons as it processes any messages that would have previously been throttled.
Rsyslog is configured (see ratelimit.interval, ratelimit.burst) to rate-limit entries read from the journal at 10,000 messages in 300 seconds. A good rule of thumb is to ensure that the rsyslog rate-limits account for the systemd-journald rate-limits.
24.4. Scaling up EFK Logging
If you do not indicate the desired scale at first deployment, the least disruptive way of adjusting your cluster is by re-running the deployer with the updated ES_CLUSTER_SIZE value and using the MODE=reinstall template parameter. Refer to the Performing Administrative Elasticsearch Operations section for more in-depth information.
$ oc edit configmap logging-deployer
[change es-cluster-size value to 5]
$ oc new-app logging-deployer-template --param MODE=reinstall24.5. Storage Considerations
An Elasticsearch index is a collection of shards and its corresponding replica shards. This is how ES implements high availability internally, therefore there is little need to use hardware based mirroring RAID variants. RAID 0 can still be used to increase overall disk performance.
Every search request needs to hit a copy of every shard in the index. Each ES instance requires its own individual storage, but an OpenShift Enterprise deployment can only provide volumes shared by all of its pods, which again means that Elasticsearch shouldn’t be implemented with a single node.
A persistent volume should be added to each Elasticsearch deployment configuration so that we have one volume per replica shard. On OpenShift Enterprise this is often achieved through Persistent Volume Claims
- 1 volume per shard
- 1 volume per replica shard
The PVCs must be named based on the es-pvc-prefix setting. Refer to Persistent Elasticsearch Storage for more details.
Below are capacity planning guidelines for OpenShift Enterprise aggregate logging. Example scenario
Assumptions:
- Which application: Apache
- Bytes per line: 256
- Lines per second load on application: 1
- Raw text data → JSON
Baseline (256 characters per minute → 15KB/min)
| Logging Infra Pods | Storage Throughput |
|---|---|
| 3 es 1 kibana 1 curator 1 fluentd | 6 pods total: 90000 x 86400 = 7,7 GB/day |
| 3 es 1 kibana 1 curator 11 fluentd | 16 pods total: 225000 x 86400 = 24,0 GB/day |
| 3 es 1 kibana 1 curator 20 fluentd | 25 pods total: 225000 x 86400 = 32,4 GB/day |
Calculating total logging throughput and disk space required for your logging environment requires knowledge of your application. For example, if one of your applications on average logs 10 lines-per-second, each 256 bytes-per-line, calculate per-application throughput and disk space as follows:
(bytes-per-line * (lines-per-second) = 2560 bytes per app per second
(2560) * (number-of-pods-per-node,100) = 256,000 bytes per second per node
256k * (number-of-nodes) = total logging throughput per clusterFluentd ships any logs from /var/log/messages and /var/lib/docker/containers/ to Elasticsearch. Learn more.
Local SSD drives are recommended in order to achieve the best performance. In Red Hat Enterprise Linux (RHEL) 7, the deadline IO scheduler is the default for all block devices except SATA disks. For SATA disks, the default IO scheduler is cfq.
Sizing storage for ES is greatly dependent on how you optimize your indices. Therefore, consider how much data you need in advance and that you are aggregating application log data.
Chapter 25. Enabling Cluster Metrics
25.1. Overview
The kubelet exposes metrics that can be collected and stored in back-ends by Heapster.
As an OpenShift Enterprise administrator, you can view a cluster’s metrics from all containers and components in one user interface. These metrics are also used by horizontal pod autoscalers in order to determine when and how to scale.
This topic describes using Hawkular Metrics as a metrics engine which stores the data persistently in a Cassandra database. When this is configured, CPU and memory-based metrics are viewable from the OpenShift Enterprise web console and are available for use by horizontal pod autoscalers.
Heapster retrieves a list of all nodes from the master server, then contacts each node individually through the /stats endpoint. From there, Heapster scrapes the metrics for CPU and memory usage, then exports them into Hawkular Metrics.
Browsing individual pods in the web console displays separate sparkline charts for memory and CPU. The time range displayed is selectable, and these charts automatically update every 30 seconds. If there are multiple containers on the pod, then you can select a specific container to display its metrics.
If resource limits are defined for your project, then you can also see a donut chart for each pod. The donut chart displays usage against the resource limit. For example: 145 Available of 200 MiB, with the donut chart showing 55 MiB Used.
25.2. Before You Begin
The components for cluster metrics must be deployed to the openshift-infra project. This allows horizontal pod autoscalers to discover the Heapster service and use it to retrieve metrics that can be used for autoscaling.
All of the following commands in this topic must be executed under the openshift-infra project. To switch to the openshift-infra project:
$ oc project openshift-infraTo enable cluster metrics, you must next configure the following:
25.3. Service Accounts
You must configure service accounts for:
25.3.1. Metrics Deployer Service Account
The Metrics Deployer will be discussed in a later step, but you must first set up a service account for it:
Create a metrics-deployer service account:
$ oc create -f - <<API apiVersion: v1 kind: ServiceAccount metadata: name: metrics-deployer secrets: - name: metrics-deployer APIBefore it can deploy components, the metrics-deployer service account must also be granted the
editpermission for the openshift-infra project:$ oadm policy add-role-to-user \ edit system:serviceaccount:openshift-infra:metrics-deployer
25.3.2. Heapster Service Account
The Heapster component requires access to the master server to list all available nodes and access the /stats endpoint for each node. Before it can do this, the Heapster service account requires the cluster-reader permission:
$ oadm policy add-cluster-role-to-user \
cluster-reader system:serviceaccount:openshift-infra:heapsterThe Heapster service account is created automatically during the Deploying the Metrics Components step.
25.4. Metrics Data Storage
You can store the metrics data to either persistent storage or to a temporary pod volume.
25.4.1. Persistent Storage
Running OpenShift Enterprise cluster metrics with persistent storage means that your metrics will be stored to a persistent volume and be able to survive a pod being restarted or recreated. This is ideal if you require your metrics data to be guarded from data loss.
The size of the persisted volume can be specified with the CASSANDRA_PV_SIZEtemplate parameter. By default it is set to 10 GB, which may or may not be sufficient for the size of the cluster you are using. If you require more space, for instance 100 GB, you could specify it with something like this:
$ oc process -f metrics-deployer.yaml -v \
HAWKULAR_METRICS_HOSTNAME=hawkular-metrics.example.com,CASSANDRA_PV_SIZE=100Gi \
| oc create -f -The size requirement of the Cassandra storage is dependent on the cluster size. It is the administrator’s responsibility to ensure that the size requirements are sufficient for their setup and to monitor usage to ensure that the disk does not become full.
Data loss will result if the Cassandra persisted volume runs out of sufficient space.
For cluster metrics to work with persistent storage, ensure that the persistent volume has the ReadWriteOnce access mode. If not, the persistent volume claim will not be able to find the persistent volume, and Cassandra will fail to start.
To use persistent storage with the metric components, ensure that a persistent volume of sufficient size is available. The creation of persistent volume claims is handled by the Metrics Deployer.
25.4.2. Non-Persistent Storage
Running OpenShift Enterprise cluster metrics with non-persistent storage means that any stored metrics will be deleted when the pod is deleted. While it is much easier to run cluster metrics with non-persistent data, running with non-persistent data does come with the risk of permanent data loss. However, metrics can still survive a container being restarted.
In order to use non-persistent storage, you must set the USE_PERSISTENT_STORAGEtemplate option to false for the Metrics Deployer.
25.5. Metrics Deployer
The Metrics Deployer deploys and configures all of the metrics components. You can configure it by passing in information from secrets and by passing parameters to the Metrics Deployer’s template.
25.5.1. Using Secrets
By default, the Metrics Deployer auto-generates self-signed certificates for use between components. Because these are self-signed certificates, they are not automatically trusted by a web browser. Therefore, it is recommended to use internal certificates for anything being accessed outside of the OpenShift Enterprise cluster, and then use the re-encrypting route to provide your own custom certificates. This is especially important for the Hawkular Metrics server as it must be accessible in a browser for the web console to function.
The Metrics Deployer requires that you manually create a metrics-deployer secret whether you are providing your own certificates or using generated self-signed certificates.
25.5.1.1. Providing Your Own Certificates
To provide your own certificates and replace the internally used ones, you can pass these values as secrets to the Metrics Deployer.
The preferred metrics deployment method is to pass the metrics secret with no certificates:
$ oc secrets new metrics-deployer nothing=/dev/nullThen, use the a re-encrypting route to pass your custom certificates to Heapster. This allows for greater control in modifying the certificates in the future.
Using a re-encrypting route allows the self-signed certificates to remain in use internally while allowing your own certificates to be used for externally access. To use a re-encrypting route, do not set the certificates as a secret, but a secret named metrics-deployer must still exist before the Metrics Deployer can complete.
Optionally, provide your own certificate that is configured to be trusted by your browser by pointing your secret to the certificate’s .pem and certificate authority certificate files:
$ oc secrets new metrics-deployer \
hawkular-metrics.pem=/home/openshift/metrics/hm.pem \
hawkular-metrics-ca.cert=/home/openshift/metrics/hm-ca.cert
Setting the value using secrets will replace the internally used certificates. Therefore, these certificates must be valid for both the externally used host names as well as the external host name. For hawkular-metrics, this means the certificate must have a value of the literal string hawkular-metrics as well as the value specified in HAWKULAR_METRICS_HOSTNAME.
If you are unable to add the internal host name to your certificate, then you can use the re-encrypting route method.
The following table contains more advanced configuration options, detailing all the secrets which can be used by the deployer:
| Secret Name | Description |
|---|---|
| hawkular-metrics.pem |
The pem file to use for the Hawkular Metrics certificate. This certificate must contain the literal string |
| hawkular-metrics-ca.cert | The certificate for the CA used to sign the hawkular-metrics.pem. This option is ignored if the hawkular-metrics.pem option is not specified. |
| hawkular-cassandra.pem | The .pem file to use for the Cassandra certificate. This certificate must contain the hawkular-cassandra host name. This file is auto-generated if unspecified. |
| hawkular-cassandra-ca.cert | The certificate for the CA used to sign the hawkular-cassandra.pem. This option is ignored if the hawkular-cassandra.pem option is not specified. |
| heapster.cert | The certificate for Heapster to use. This is auto-generated if unspecified. |
| heapster.key | The key to use with the Heapster certificate. This is ignored if heapster.cert is not specified |
| heapster_client_ca.cert | The certificate that generates heapster.cert. This is required if heapster.cert is specified. Otherwise, the main CA for the OpenShift Enterprise installation is used. In order for horizontal pod autoscaling to function properly, this should not be overridden. |
| heapster_allowed_users |
A file containing a comma-separated list of CN to accept from certificates signed with the specified CA. By default, this is set to allow the OpenShift Enterprise service proxy to connect. If you override this, make sure to add |
The Heapster component uses the service name DNS registry to connect to Hawkular Metrics. In the metrics code, the URL used by Heapster to connect to Hawkular Metrics is hard-coded. It attaches the search domain and resolves to the service IP.
25.5.1.2. Using Generated Self-Signed Certificates
The Metrics Deployer can accept multiple certificates using secrets. If a certificate is not passed as a secret, then the deployer generates a self-signed certificate instead, forcing users to accept the certificate as a security exception.
In order to use official certificates for the web console, you must use a re-encrypting route. This allows the self-signed certificates to remain in use internally, while allowing your own certificates to be used for external access. When using a re-encrypting route, do not set the certificates as a secret. A "dummy" secret named metrics-deployer must still exist for the Metrics Deployer to generate certificates.
To create a "dummy" secret that does not specify a certificate value:
$ oc secrets new metrics-deployer nothing=/dev/nullIf you do not use a re-encrypting route when using generated self-signed certificates you will encounter errors.
25.5.2. Modifying the Deployer Template
The OpenShift Enterprise installer uses a template to deploy the metrics components. The default template can be found at the following path:
/usr/share/openshift/examples/infrastructure-templates/enterprise/metrics-deployer.yamlIn case you need to make any changes to this file, copy it to another directory with the file name metrics-deployer.yaml and refer to the new location when using it in the following sections.
25.5.2.1. Deployer Template Parameters
The deployer template parameter options and their defaults are listed in the default metrics-deployer.yaml file. If required, you can override these values when creating the Metrics Deployer.
| Parameter | Description |
|---|---|
|
| The number of days metrics should be stored. |
|
| The persistent volume size for each of the Cassandra nodes. |
|
| Set to true for persistent storage; set to false to use non-persistent storage. |
|
| If set to true, the deployer will try to delete all the existing components before trying to redeploy. |
|
| External host name where clients can reach Hawkular Metrics. |
|
| Internal URL for the master, for authentication retrieval. |
|
| Specify version for metrics components. For example, for openshift/origin-metrics-deployer:latest, set version to latest. |
|
| Specify prefix for metrics components. For example, for openshift/origin-metrics-deployer:latest, set prefix to openshift/origin-. |
The only required parameter is HAWKULAR_METRICS_HOSTNAME. This value is required when creating the deployer because it specifies the hostname for the Hawkular Metrics route. This value should correspond to a fully qualified domain name. You will need to know the value of HAWKULAR_METRICS_HOSTNAME when configuring the console for metrics access.
If you are using persistent storage with Cassandra, it is the administrator’s responsibility to set a sufficient disk size for the cluster using the CASSANDRA_PV_SIZE parameter. It is also the administrator’s responsibility to monitor disk usage to make sure that it does not become full.
Data loss will result if the Cassandra persisted volume runs out of sufficient space.
All of the other parameters are optional and allow for greater customization. For instance, if you have a custom install in which the Kubernetes master is not available under https://kubernetes.default.svc:443 you can specify the value to use instead with the MASTER_URL parameter. To deploy a specific version of the metrics components, use the IMAGE_VERSION parameter.
25.6. Deploying the Metric Components
Because deploying and configuring all the metric components is handled by the Metrics Deployer, you can simply deploy everything in one step.
The following examples show you how to deploy metrics with and without persistent storage using the default template parameters. Optionally, you can specify any of the template parameters when calling these commands.
In accordance with upstream Kubernetes rules, metrics can be collected only on the default interface of eth0.
Example 25.1. Deploying with Persistent Storage
The following command sets the Hawkular Metrics route to use hawkular-metrics.example.com and is deployed using persistent storage.
You must have a persistent volume of sufficient size available.
$ oc new-app -f metrics-deployer.yaml \
-p HAWKULAR_METRICS_HOSTNAME=hawkular-metrics.example.comExample 25.2. Deploying without Persistent Storage
The following command sets the Hawkular Metrics route to use hawkular-metrics.example.com and deploy without persistent storage.
$ oc new-app -f metrics-deployer.yaml \
-p HAWKULAR_METRICS_HOSTNAME=hawkular-metrics.example.com \
-p USE_PERSISTENT_STORAGE=falseBecause this is being deployed without persistent storage, metric data loss can occur.
25.7. Using a Re-encrypting Route
The following section is not required if the hawkular-metrics.pem secret was specified as a deployer secret.
By default, the Hawkular Metrics server uses an internally signed certificate, which is not trusted by browsers or other external services. To provide your own trusted certificate to be used for external access, use a route with re-encryption termination.
Creating this new route requires deleting the default route that just passes through to an internally signed certificate:
First, delete the default route that uses the self-signed certificates:
$ oc delete route hawkular-metricsCreate a new route with re-encryption termination
$ oc create route reencrypt hawkular-metrics-reencrypt \ --hostname hawkular-metrics.example.com \1 --key /path/to/key \2 --cert /path/to/cert \3 --ca-cert /path/to/ca.crt \4 --service hawkular-metrics --dest-ca-cert /path/to/internal-ca.crt5 The CA used to sign the internal Hawkular Metrics certificate can be found from the hawkular-metrics-certificate secret:
$ base64 -d <<< \ `oc get -o yaml secrets hawkular-metrics-certificate \ | grep -i hawkular-metrics-ca.certificate | awk '{print $2}'` \ > /path/to/internal-ca.crt
25.8. Configuring OpenShift Enterprise
The OpenShift Enterprise web console uses the data coming from the Hawkular Metrics service to display its graphs. The URL for accessing the Hawkular Metrics service must be configured via the metricsPublicURL option in the master configuration file (/etc/origin/master/master-config.yaml). This URL corresponds to the route created with the HAWKULAR_METRICS_HOSTNAME template parameter during the deployment of the metrics components.
You must be able to resolve the HAWKULAR_METRICS_HOSTNAME from the browser accessing the console.
For example, if your HAWKULAR_METRICS_HOSTNAME corresponds to hawkular-metrics.example.com, then you must make the following change in the master-config.yaml file:
assetConfig:
...
metricsPublicURL: "https://hawkular-metrics.example.com/hawkular/metrics"Once you have updated and saved the master-config.yaml file, you must restart your OpenShift Enterprise instance.
When your OpenShift Enterprise server is back up and running, metrics will be displayed on the pod overview pages.
If you are using self-signed certificates, remember that the Hawkular Metrics service is hosted under a different host name and uses different certificates than the console. You may need to explicitly open a browser tab to the value specified in metricsPublicURL and accept that certificate.
To avoid this issue, use certificates which are configured to be acceptable by your browser.
25.9. Scaling OpenShift Enterprise Metrics Pods
One set of metrics pods (Cassandra/Hawkular/Heapster) is able to monitor at least 10,000 pods.
Pay attention to system load on nodes where OpenShift Enterprise metrics pods run. Use that information to determine if it is necessary to scale out a number of OpenShift Enterprise metrics pods and spread the load across multiple OpenShift Enterprise nodes. Scaling OpenShift Enterprise metrics heapster pods is not recommended.
Autoscaling the metrics components, such as Hawkular and Heapster, is not supported by OpenShift Enterprise.
25.9.1. Prerequisites
If persistent storage was used to deploy OpenShift Enterprise metrics, then you must create a persistent volume (PV) for the new Cassandra pod to use before you can scale out the number of OpenShift Enterprise metrics Cassandra pods. However, if Cassandra was deployed with dynamically provisioned PVs, then this step is not necessary.
25.9.2. Scaling the Cassandra Components
The Cassandra nodes use persistent storage, therefore scaling up or down is not possible with replication controllers.
Scaling a Cassandra cluster requires you to use the hawkular-cassandra-node template. By default, the Cassandra cluster is a single-node cluster.
To scale out the number of OpenShift Enterprise metrics hawkular pods to two replicas, run:
# oc scale -n openshift-infra --replicas=2 rc hawkular-metricsIf you add a new node to a Cassandra cluster, the data stored in the cluster rebalances across the cluster. The same thing happens if you remove a node from the Cluster.
25.10. Cleanup
You can remove everything deloyed by the metrics deployer by performing the following steps:
$ oc delete all,sa,templates,secrets,pvc --selector="metrics-infra"To remove the deployer components, perform the following steps:
$ oc delete sa,secret metrics-deployerChapter 26. Customizing the Web Console
26.1. Overview
Administrators can customize the web console using extensions, which let you run scripts and load custom stylesheets when the web console loads. You can change the look and feel of nearly any aspect of the user interface in this way.
26.2. Loading Custom Scripts and Stylesheets
To add scripts and stylesheets, edit the master configuration file. The scripts and stylesheet files must exist on the Asset Server and are added with the following options:
assetConfig:
...
extensionScripts:
- /path/to/script1.js
- /path/to/script2.js
- ...
extensionStylesheets:
- /path/to/stylesheet1.css
- /path/to/stylesheet2.css
- ...Relative paths are resolved relative to the master configuration file. To pick up configuration changes, restart the server.
Custom scripts and stylesheets are read once at server start time. To make developing extensions easier, you can reload scripts and stylesheets on every request by enabling development mode with the following setting:
assetConfig:
...
extensionDevelopment: trueWhen set, the web console reloads any changes to existing extension script or stylesheet files when you refresh the page in your browser. You still must restart the server when adding new extension stylesheets or scripts, however. This setting is only recommended for testing changes and not for production.
The examples in the following sections show common ways you can customize the web console.
Additional extension examples are available in the OpenShift Origin repository on GitHub.
26.2.1. Customizing the Logo
The following style changes the logo in the web console header:
#header-logo {
background-image: url("https://www.example.com/images/logo.png");
width: 190px;
height: 20px;
}Replace the example.com URL with a URL to an actual image, and adjust the width and height. The ideal height is 20px.
Save the style to a file (for example, logo.css) and add it to the master configuration file:
assetConfig:
...
extensionStylesheets:
- /path/to/logo.css26.2.2. Changing Links to Documentation
Links to external documentation are shown in various sections of the web console. The following example changes the URL for two given links to docs:
window.OPENSHIFT_CONSTANTS.HELP['get_started_cli'] = "https://example.com/doc1.html";
window.OPENSHIFT_CONSTANTS.HELP['basic_cli_operations'] = "https://example.com/doc2.html";Save this script to a file (for example, help-links.js) and add it to the master configuration file:
assetConfig:
...
extensionScripts:
- /path/to/help-links.js26.2.3. Adding or Changing Links to Download the CLI
The About page in the web console provides download links for the command line interface (CLI) tools. These links can be configured by providing both the link text and URL, so that you can choose to point them directly to file packages, or to an external page that points to the actual packages.
For example, to point directly to packages that can be downloaded, where the link text is the package platform:
window.OPENSHIFT_CONSTANTS.CLI = {
"Linux (32 bits)": "https://<cdn>/openshift-client-tools-linux-32bit.tar.gz",
"Linux (64 bits)": "https://<cdn>/openshift-client-tools-linux-64bit.tar.gz",
"Windows": "https://<cdn>/openshift-client-tools-windows.zip",
"Mac OS X": "https://<cdn>/openshift-client-tools-mac.zip"
};Alternatively, to point to a page that links the actual download packages, with the Latest Release link text:
window.OPENSHIFT_CONSTANTS.CLI = {
"Latest Release": "https://<cdn>/openshift-client-tools/latest.html"
};Save this script to a file (for example, cli-links.js) and add it to the master configuration file:
assetConfig:
...
extensionScripts:
- /path/to/cli-links.js26.3. Serving Static Files
You can serve other files from the Asset Server as well. For example, you might want to make the CLI executable available for download from the web console or add images to use in a custom stylesheet.
Add the directory with the files you want using the following configuration option:
assetConfig:
...
extensions:
- name: images
sourceDirectory: /path/to/my_imagesThe files under the /path/to/my_images directory will be available under the URL /<context>/extensions/images in the web console.
To reference these files from a stylesheet, you should generally use a relative path. For example:
#header-logo {
background-image: url("../extensions/images/my-logo.png");
}26.3.1. Enabling HTML5 Mode
The web console has a special mode for supporting certain static web applications that use the HTML5 history API:
assetConfig:
...
extensions:
- name: my_extension
sourceDirectory: /path/to/myExtension
html5Mode: true
Setting html5Mode to true enables two behaviors:
- Any request for a non-existent file under /<context>/extensions/my_extension/ instead serves /path/to/myExtension/index.html rather than a "404 Not Found" page.
-
The element
<base href="/">will be rewritten in /path/to/myExtension/index.html to use the actual base depending on the asset configuration; only this exact string is rewritten.
This is needed for JavaScript frameworks such as AngularJS that require base to be set in index.html.
26.4. Customizing the Login Page
You can also change the login page, and the login provider selection page for the web console. Run the following commands to create templates you can modify:
$ oadm create-login-template > login-template.html
$ oadm create-provider-selection-template > provider-selection-template.htmlEdit the file to change the styles or add content, but be careful not to remove any required parameters inside the curly brackets.
To use your custom login page or provider selection page, set the following options in the master configuration file:
oauthConfig:
...
templates:
login: /path/to/login-template.html
providerSelection: /path/to/provider-selection-template.htmlRelative paths are resolved relative to the master configuration file. You must restart the server after changing this configuration.
When there are multiple login providers configured or when the alwaysShowProviderSelection option in the master-config.yaml file is set to true, each time a user’s token to OpenShift Enterprise expires, the user is presented with this custom page before they can proceed with other tasks.
26.4.1. Example Usage
Custom login pages can be used to create Terms of Service information. They can also be helpful if you use a third-party login provider, like GitHub or Google, to show users a branded page that they trust and expect before being redirected to the authentication provider.
26.5. Customizing the OAuth Error Page
When errors occur during authentication, you can change the page shown.
Run the following command to create a template you can modify:
$ oadm create-error-template > error-template.htmlEdit the file to change the styles or add content.
You can use the
ErrorandErrorCodevariables in the template. To use your custom error page, set the following option in the master configuration file:oauthConfig: ... templates: error: /path/to/error-template.htmlRelative paths are resolved relative to the master configuration file.
- You must restart the server after changing this configuration.
26.6. Changing the Logout URL
You can change the location a console user is sent to when logging out of the console by modifying the logoutURL parameter in the /etc/origin/master/master-config.yaml file:
...
assetConfig:
logoutURL: "http://www.example.com"
...This can be useful when authenticating with Request Header and OAuth or OpenID identity providers, which require visiting an external URL to destroy single sign-on sessions.
26.7. Configuring Web Console Customizations with Ansible
During advanced installations, many modifications to the web console can be configured using the following parameters, which are configurable in the inventory file:
Example 26.1. Example Web Console Customization with Ansible
# Configure logoutURL in the master config for console customization
# See: https://docs.openshift.com/enterprise/latest/install_config/web_console_customization.html#changing-the-logout-url
#openshift_master_logout_url=http://example.com
# Configure extensionScripts in the master config for console customization
# See: https://docs.openshift.com/enterprise/latest/install_config/web_console_customization.html#loading-custom-scripts-and-stylesheets
#openshift_master_extension_scripts=['/path/on/host/to/script1.js','/path/on/host/to/script2.js']
# Configure extensionStylesheets in the master config for console customization
# See: https://docs.openshift.com/enterprise/latest/install_config/web_console_customization.html#loading-custom-scripts-and-stylesheets
#openshift_master_extension_stylesheets=['/path/on/host/to/stylesheet1.css','/path/on/host/to/stylesheet2.css']
# Configure extensions in the master config for console customization
# See: https://docs.openshift.com/enterprise/latest/install_config/web_console_customization.html#serving-static-files
#openshift_master_extensions=[{'name': 'images', 'sourceDirectory': '/path/to/my_images'}]
# Configure extensions in the master config for console customization
# See: https://docs.openshift.com/enterprise/latest/install_config/web_console_customization.html#serving-static-files
#openshift_master_oauth_template=/path/on/host/to/login-template.html
# Configure metricsPublicURL in the master config for cluster metrics. Ansible is also able to configure metrics for you.
# See: https://docs.openshift.com/enterprise/latest/install_config/cluster_metrics.html
#openshift_master_metrics_public_url=https://hawkular-metrics.example.com/hawkular/metrics
# Configure loggingPublicURL in the master config for aggregate logging. Ansible is also able to install logging for you.
# See: https://docs.openshift.com/enterprise/latest/install_config/aggregate_logging.html
#openshift_master_logging_public_url=https://kibana.example.comChapter 27. Revision History: Installation and Configuration
27.1. Wed Mar 07 2018
| Affected Topic | Description of Change |
|---|---|
| Added to instructions to scale EFK pods when changes are made in the Post-deployment Configuration section. |
27.2. Fri Jul 28 2017
| Affected Topic | Description of Change |
|---|---|
| Added the Redeploying a New etcd CA section. |
27.3. Thu May 25 2017
| Affected Topic | Description of Change |
|---|---|
27.4. Tue Apr 25 2017
| Affected Topic | Description of Change |
|---|---|
| Updated for new set of playbooks and options. |
27.5. Thu Apr 13 2017
| Affected Topic | Description of Change |
|---|---|
| Specified the UDP for port 4789. | |
| In the Known Issues multiple masters discussion, included the docker-common package in the removal process, following a failed setup play. | |
|
Added |
27.6. Mon Apr 03 2017
| Affected Topic | Description of Change |
|---|---|
| Added Registry and Router Certificates section with instructions on redeploying these certificates manually. |
27.7. Tue Mar 14 2017
| Affected Topic | Description of Change |
|---|---|
|
Renamed instances of | |
| Upgrading a Cluster → Performing Manual In-place Cluster Upgrades | Removed a repetitive step within the Updating the Default Image Streams and Templates section. |
27.8. Tue Mar 07 2017
| Affected Topic | Description of Change |
|---|---|
| Updated Before You Begin section to raise minimal Ansible version to 2.2.0. | |
| Provided guidance for preconfigured loadbalancers for OpenShift Enterprise with high availability. | |
| Added the Checking Certificate Expirations section. |
27.9. Tue Feb 21 2017
| Affected Topic | Description of Change |
|---|---|
|
Changed the value from |
27.10. Wed Feb 01 2017
| Affected Topic | Description of Change |
|---|---|
| Added instructions for installing and using the atomic-openshift-excluder and atomic-openshift-docker-excluder scripts during cluster installations and upgrades. | |
27.11. Mon Jan 30 2017
| Affected Topic | Description of Change |
|---|---|
|
Removed references to the deprecated |
27.12. Wed Jan 25 2017
| Affected Topic | Description of Change |
|---|---|
| Added information about required ports for Aggregated Logging. |
27.13. Mon Jan 16 2017
| Affected Topic | Description of Change |
|---|---|
|
Clarified the difference between |
27.14. Mon Jan 09 2017
| Affected Topic | Description of Change |
|---|---|
| Added clarifying details about HTTP proxies. |
27.15. Tue Dec 20 2016
| Affected Topic | Description of Change |
|---|---|
| Removed section on configuring Maven with http proxies. |
27.16. Mon Nov 14 2016
| Affected Topic | Description of Change |
|---|---|
| Advance LDAP Configuration → Setting up SSSD for LDAP Failover | Fixed error in Step 3: Apache Configuration section. |
27.17. Mon Oct 24 2016
| Affected Topic | Description of Change |
|---|---|
| Aded Note box to the Software Prerequisites section about subscription names. |
27.18. Mon Oct 17 2016
| Affected Topic | Description of Change |
|---|---|
| Updated information in the Offerings by Subscription Type section on which images are provided by which subscriptions. | |
|
Added more information to the |
27.19. Tue Oct 11 2016
| Affected Topic | Description of Change |
|---|---|
| Corrected steps in the Certificate Generation section. | |
| Advanced LDAP Configuration → Setting up SSSD for LDAP Failover | Fixed errors in the Phase 2: Authenticating Proxy Setup section. |
| Configuring Persistent Storage →Persistent Storage Using Ceph Rados Block Device (RBD) | Updated the persistentVolumeReclaimPolicy setting to retain in the Persistent Volume Object Definition Using Ceph RBD example. |
| Corrected steps in the Certificate Generation section. | |
| Advanced LDAP Configuration → Setting up SSSD for LDAP Failover | Fixed errors in the Phase 2: Authenticating Proxy Setup section. |
27.20. Tue Oct 04 2016
| Affected Topic | Description of Change |
|---|---|
| Advanced LDAP Configuration → Setting up SSSD for LDAP Failover | Fixed errors in the Phase 2: Authenticating Proxy Setup section. |
| Added troubleshooting guidance on Image Pruning Failures. | |
| Added information about disabling dnsmasq. | |
| Added example for a multi-master install with etcd on the same hosts. | |
| Configuring Persistent Storage →Persistent Storage Using Ceph Rados Block Device (RBD) | Updated the persistentVolumeReclaimPolicy setting to retain in the Persistent Volume Object Definition Using Ceph RBD example. |
| Persistent Storage Examples → Complete Example Using GlusterFS | Updated the GlusterFS persistent storage example to use NGNIX instead of busybox. |
|
Replaced | |
|
Fixed formatting of the | |
|
Removed |
27.21. Tue Sep 13 2016
| Affected Topic | Description of Change |
|---|---|
| Updated the Multiple Masters Using HAProxy Inventory File example with a line about enabling ntp on masters to ensure proper failover as part of HA configuration. | |
| Updated the F5 deployment instructions to reflect that the F5 router needs to be run in privileged mode. | |
| Enhanced descriptions of master and node configuration file parameters and created subsections for similar groupings. | |
| Renamed the User Agent section to Preventing CLI Version Mismatch With User Agent and added more information. | |
| New topic on aggregate logging sizing guidelines for Elasticsearch, Fluentd, and Kibana (EFK) stack aggregate logs from nodes and applications. |
27.22. Tue Sep 06 2016
| Affected Topic | Description of Change |
|---|---|
| Configuring Persistent Storage → Persistent Storage Using GlusterFS | Updated to use the Retain reclaim policy, as the Recycle policy is not currently supported with GlusterFS. |
|
Added more information about the | |
|
Added information about the | |
| Added information explaining that quick installations automatically handle the initial deployment of the Docker registry and the OpenShift Enterprise router. |
27.23. Mon Aug 29 2016
| Affected Topic | Description of Change |
|---|---|
| Fixed the tag references of images to be more generic. |
27.24. Tue Aug 23 2016
| Affected Topic | Description of Change |
|---|---|
| Clarified in the DNS section that the OpenShift Enterprise 3.2 DNS changes are not automatically applied to existing clusters during an upgrade from OpenShift Enterprise 3.1 to 3.2. | |
| Added an Important box about meeting prerequisites before upgrade. | |
| Added an Important box about meeting prerequisites before upgrade. | |
| Added details about configuring custom certificates with Ansible. | |
| Added details about configuring authentication with Ansible. | |
| Added details about configuring the SDN with Ansible. | |
| Added details about configuring for AWS with Ansible. | |
| Added details about configuring for OpenStack with Ansible. | |
| Added details about configuring HTTP proxies with Ansible. | |
| Added details about configuring global build defaults and overrides with Ansible. | |
| Added clarifying details to the Providing Your Own Certificates section. | |
| Added details about configuring the web console with Ansible. |
27.25. Thu Aug 18 2016
| Affected Topic | Description of Change |
|---|---|
| Added manual upgrade steps to get the latest templates from openshift-ansible-roles. | |
| Added references to the .NET Core for RHEL image streams in the Updating the Default Image Streams and Templates section. |
27.26. Mon Aug 15 2016
| Affected Topic | Description of Change |
|---|---|
| Added information on log locations within Kibana to the Deploying the EFK Stack section. | |
|
Removed the |
27.27. Thu Aug 11 2016
| Affected Topic | Description of Change |
|---|---|
| Added Google Cloud Storage (GCS) to the list of currently supported storage drivers in the Advanced: Overriding the Registry Configuration section. | |
| Clarified details in CloudFront configuration references. | |
| Minor updates for OpenShift Enterprise 3.2.1.13 relevance. |
27.28. Mon Aug 08 2016
| Affected Topic | Description of Change |
|---|---|
| New topic. Moves existing content on adding node hosts from the Quick Installation and Advanced Installation topics and combines with new content on adding master hosts. | |
| Added that NFS is a not suitable for Lucene storage, NFS is not supported, and how to use local storage. | |
| Distinguished between embedded and external etcd in the Preparing for a Manual Upgrade section. | |
|
Clarified the need for the |
27.29. Thu Aug 04 2016
| Affected Topic | Description of Change |
|---|---|
| Removed Microsoft Azure from the list of currently supported storage drivers in the Advanced: Overriding the Registry Configuration section. | |
| Configuring Persistent Storage → Persistent Storage Using GlusterFS | Added overviews for the existing dedicated storage cluster method and the new containerized storage cluster method, including a link to the new Deployment Guide for Containerized Red Hat Gluster Storage documentation. |
27.30. Mon Aug 01 2016
| Affected Topic | Description of Change |
|---|---|
| Added a link connecting F5 router and Routing from Edge Load Balancers topics within the Establishing a Tunnel Using a Ramp Node section. | |
| Added directions on changing the default configuration file in the Installing Docker section. | |
| Added support information for upstream registry configuration. |
27.31. Wed Jul 27 2016
| Affected Topic | Description of Change |
|---|---|
| Added Important advisories about file creation for cloud configurations in the Configuring Masters and Configuring Nodes sections. | |
| Added Important advisories about file creation for cloud configurations in the Configuring Masters and Configuring Nodes sections. | |
| Added Important advisories about file creation for cloud configurations in the Configuring Masters and Configuring Nodes sections. | |
| Added the Performing Elasticsearch Maintenance Operations section. | |
| Added TCP/UDP information to the xref:prereq-network-access[Network Access} tables. | |
| Fixed command in Syncing Repositories section. | |
|
Added a new section about | |
| Added step about logging in as an administrator. | |
| Added guidance on configuring Curator. | |
|
Added important box about changing | |
| Provided more details on OpenShift DNS requirements. | |
| Added a Preventing Connection Failures During Restarts section. |
27.32. Wed Jul 20 2016
| Affected Topic | Description of Change |
|---|---|
| Updated the Using the Installer to Upgrade section to note the installer now supports applying asynchronous errata updates as well as minor version upgrades. | |
| Updated the Running the Upgrade Playbook Directly section to detail usage of the new v3_2 upgrade playbook, which supports both upgrading to OpenShift Enterprise 3.2 and applying OpenShift Enterprise 3.2 asynchronous errata updates. | |
| Update location of nuke_images.sh file. | |
| Minor updates for OpenShift Enterprise 3.2.1.9 relevance. |
27.33. Thu Jul 14 2016
| Affected Topic | Description of Change |
|---|---|
| Added an Important box to the System Requirements section. | |
| Provided more details on OpenShift DNS requirements. | |
| Corrected sizing information in the Host Recommendations section. | |
| Described which required ports are necessary for master self-communication. | |
| Added the following variables to the Configuring Cluster Variables section:
| |
|
Replaced the deprecated | |
| Added a Upgrading Cluster Metrics section. | |
| Added a Upgrading Cluster Metrics section. | |
|
Added | |
| Corrected wording in the HTPasswd section. | |
| New set of topics for advanced LDAP configuration: | |
| Added a section on sending logs to an external source. | |
| Expanded documentation on scaling up Elasticsearch instances. | |
| Rewording and clarifications. | |
| Added deployer template parameters. | |
| Added requirement of using re-encrypting route for cluster metrics that use generated self-signed certs. |
27.34. Fri Jul 08 2016
| Affected Topic | Description of Change |
|---|---|
| Updated topic to be relevant for the OpenShift Enterprise 3.2 to 3.1 downgrade path. (BZ#1348324) |
27.35. Tue Jul 05 2016
| Affected Topic | Description of Change |
|---|---|
| Minor updates for OpenShift Enterprise 3.2.1.4 relevance. | |
| Minor updates for OpenShift Enterprise 3.2.1.4 relevance. |
27.36. Thu Jun 30 2016
| Affected Topic | Description of Change |
|---|---|
| Updated the Upgrading to OpenShift Enterprise 3.2 Asynchronous Releases section to remove an Important box about containerized hosts and to add a note about the v3_1_to_v3_2 upgrade playbook. | |
| Updated the topic to include manual upgrade steps for containerized hosts as well as RPM-based hosts. | |
| Updated the Upgrading the EFK Logging Stack section to add a required step for manually importing image tags. (BZ#1338965) |
27.37. Tue Jun 27 2016
| Affected Topic | Description of Change |
|---|---|
| Updated for Docker 1.10 support. | |
| Updated for OpenShift Enterprise 3.2.1.1 relevance and to note the automated upgrade playbook for asynchronous errata updates is in development. | |
| Updated for OpenShift Enterprise 3.2.1.1, including Docker 1.10 support. | |
| Noted that manual upgrade steps are currently only available for RPM-based installations, with steps for containerized installations to come in a documentation update. |
27.38. Tue Jun 14 2016
| Affected Topic | Description of Change |
|---|---|
|
Specified the correct units for | |
| Persistent Storage Examples → Mounting Volumes on Privileged Pods | Added Mounting Volumes on Privileged Pods file. |
| Added an Important box regarding default resource requests for router pods. | |
|
Added the | |
| Updated the setting guidance in Parallel Image Pulls with Docker 1.9+. | |
| Updated the example of using an existing persistent volume claim (PVC) to a matching configuration for Docker registry PVC. |
27.39. Fri Jun 10 2016
| Affected Topic | Description of Change |
|---|---|
| Added NetworkManager to the System Requirements section for nodes. | |
| Added NetworkManager as a prerequisite in the Environment Requirements section. | |
|
Replaced the | |
|
Fixed examples in the Securing the Registry section to use consistent | |
|
Added a note on how to obtain the | |
| Added that each time a user’s token to OpenShift Enterprise expires, the user is presented with a custom page. Also, added use cases for custom login pages. | |
|
Updated |
27.40. Wed Jun 08 2016
| Affected Topic | Description of Change |
|---|---|
| Updated to declare support for containerized upgrades as of the RHBA-2016:1208 advisory. | |
| Updated to declare support for containerized upgrades as of the RHBA-2016:1208 advisory. |
27.41. Tue Jun 07 2016
| Affected Topic | Description of Change |
|---|---|
| Updated to declare support for containerized upgrades as of the RHBA-2016:1208 advisory. |
27.42. Fri Jun 03 2016
| Affected Topic | Description of Change |
|---|---|
| Fixed an incomplete command for installing the docker-1.9.1 package in the Installing Docker section. | |
| Updated the location of the scaleup.yml playbook in the Adding Nodes to an Existing Cluster section. | |
| Added an Important box on manually importing tags for deployment to the Deploying the EFK Stack section. |
27.43. Mon May 30 2016
| Affected Topic | Description of Change |
|---|---|
| Added an Important box to the Sizing Recommendations section advising that oversubscribing the physical resources on a node affects resource guarantees the Kubernetes scheduler makes during pod placement. | |
| Added prerequisite information to node host section of System Requirements. | |
|
Updated the parameter name | |
| Fixed some outdated image names. | |
| Added sections describing how to create and modify router shards. | |
| Persistent Storage Examples → Backing Docker Registry with GlusterFS Storage | New topic about how to attach a GlusterFS persistent volume to the Docker Registry. |
|
Updated the example in the Configuring Default Templates for Proxies section to use | |
| Fixed error in the OpenShift SDN cluster network setup steps for the ramp node. | |
|
Updated with guidance to use | |
| Simplified the Using a Re-encrypting Route section. |
27.44. Wed May 18 2016
| Affected Topic | Description of Change |
|---|---|
|
Corrected a step in the Upgrading the EFK Logging Stack section to use |
27.45. Mon May 16 2016
| Affected Topic | Description of Change |
|---|---|
| Added a Configuring Global Proxy Options section. |
27.46. Thu May 12 2016
OpenShift Enterprise 3.2 initial release.
| Affected Topic | Description of Change |
|---|---|
| Added prerequisite information for CPU and GB size requirements to System Requirements, and Important boxes recommending the node and pod limits. | |
| Removed support for the Pacemaker HA method. | |
|
Updated the | |
|
Added | |
| Removed support for the Pacemaker HA method. | |
| Added the Registry Compute Resources section. | |
| Updated the Known Issues section to note the error caused when a pulled image is pushed to an image stream different from the one it is being pulled from. | |
|
Used | |
| Added a Whitelisting Docker Registries section. | |
| Added a step to the Securing the Registry procedure for updating the schema for the readiness probe. | |
| Added a Customizing the Router Service Ports section. | |
| Added a Forcing Route Host Names to a Custom Routing Subdomain section. | |
| Updated the Customizing the Default Routing Subdomain section for setting environment variables in the deployment configuration. | |
|
Updated an example in the Using Secured Routes section to use | |
|
Updated to use | |
| Added the Upgrading the EFK Logging Stack section. | |
| Added a Note box clarifying that the topic currently only supports the OpenShift Enterprise 3.1 to 3.0 downgrade path, and that the topic will be updated in the future for 3.2 to 3.1. | |
| Added information about alternate bindPassword/clientSecret methods. | |
| Added information about parallel pulls with Docker 1.9+. | |
|
Updated the Node Configuration Files section to reflect that | |
|
Updated the Master Configuration Files section to include the | |
| Added GitHub organization configuration information. | |
| Added extended attributes to the Request Header section. | |
| Added a GitLab section for the new GitLab identity provider. | |
| Updated the Identity Providers section to mention that the identity provider selection page can be customized. | |
| New topic on how a user wanting to leverage shared storage for use by two separate containers would configure the solution. | |
| New topic on setting up and configuring common storage use cases. | |
|
Added information about alternate | |
| Added the Customizing the OAuth Error Page section. | |
|
Updated to indicate that | |
| Updated to match the new OpenShift SDN cluster network (10.128.0.0/16) and add OpenFlow rules to get the ramp node working. | |
|
New topic convering the new | |
| Configuring Persistent Storage → Persistent Storage Using GCE Persistent Disk | Linked to Volume Owner Information. |
| Configuring Persistent Storage → Persistent Storage Using OpenStack Cinder | |
| Configuring Persistent Storage → Persistent Storage Using AWS Elastic Block Store | |
| Documented Volume Owner Information. | |
| In the Adding or Changing Links to Download the CLI section, added information about downloading the CLI from the About page. | |
| Updated web console extension examples. | |
| Added instructions on customizing the login provider selection page to the Customizing the Login Page section. | |
| Added a RFC 2307 with User-Defined Error Tolerances section. | |
|
Added the |
Legal Notice
Copyright © Red Hat
OpenShift documentation is licensed under the Apache License 2.0 (https://www.apache.org/licenses/LICENSE-2.0).
Modified versions must remove all Red Hat trademarks.
Portions adapted from https://github.com/kubernetes-incubator/service-catalog/ with modifications by Red Hat.
Red Hat, Red Hat Enterprise Linux, the Red Hat logo, the Shadowman logo, JBoss, OpenShift, Fedora, the Infinity logo, and RHCE are trademarks of Red Hat, Inc., registered in the United States and other countries.
Linux® is the registered trademark of Linus Torvalds in the United States and other countries.
Java® is a registered trademark of Oracle and/or its affiliates.
XFS® is a trademark of Silicon Graphics International Corp. or its subsidiaries in the United States and/or other countries.
MySQL® is a registered trademark of MySQL AB in the United States, the European Union and other countries.
Node.js® is an official trademark of the OpenJS Foundation.
The OpenStack® Word Mark and OpenStack logo are either registered trademarks/service marks or trademarks/service marks of the OpenStack Foundation, in the United States and other countries and are used with the OpenStack Foundation’s permission. We are not affiliated with, endorsed or sponsored by the OpenStack Foundation, or the OpenStack community.
All other trademarks are the property of their respective owners.