Billing
How to integrate with our payment partners and start invoicing your customers today.
Abstract
1. Configure Billing
In this tutorial you’ll learn how the 3scale billing system works and how to set it up.
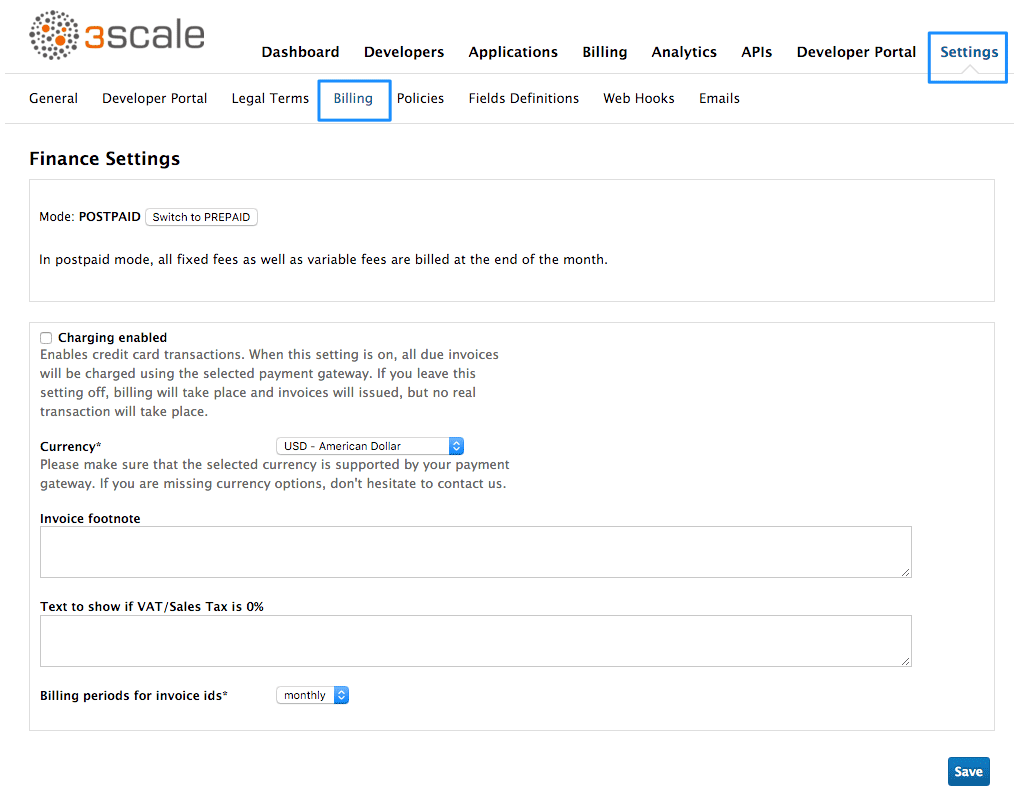
When setting up your billing configuration, you can choose between Prepaid and Postpaid.
- Prepaid mode: In prepaid mode, all fixed fees and setup fees are billed immediately at the beginning of the month or at the beginning of any pro-rated billing period. Variable costs are always calculated at the end of the month.
- Postpaid mode: In postpaid mode, all fixed fees as well as variable fees are billed at the end of the month.
Here is a visual example of billing for the prepaid mode and for the postpaid mode.
To do so, go to Settings > Billing
All paid plans are charged monthly.
2. Adding VAT rate on billing
API providers who charge their customers for using their API service often need to charge the tax as well. This article will explain how 3scale billing system supports VAT.
If you have Billing feature enabled, the steps to add VAT rates are as follows:
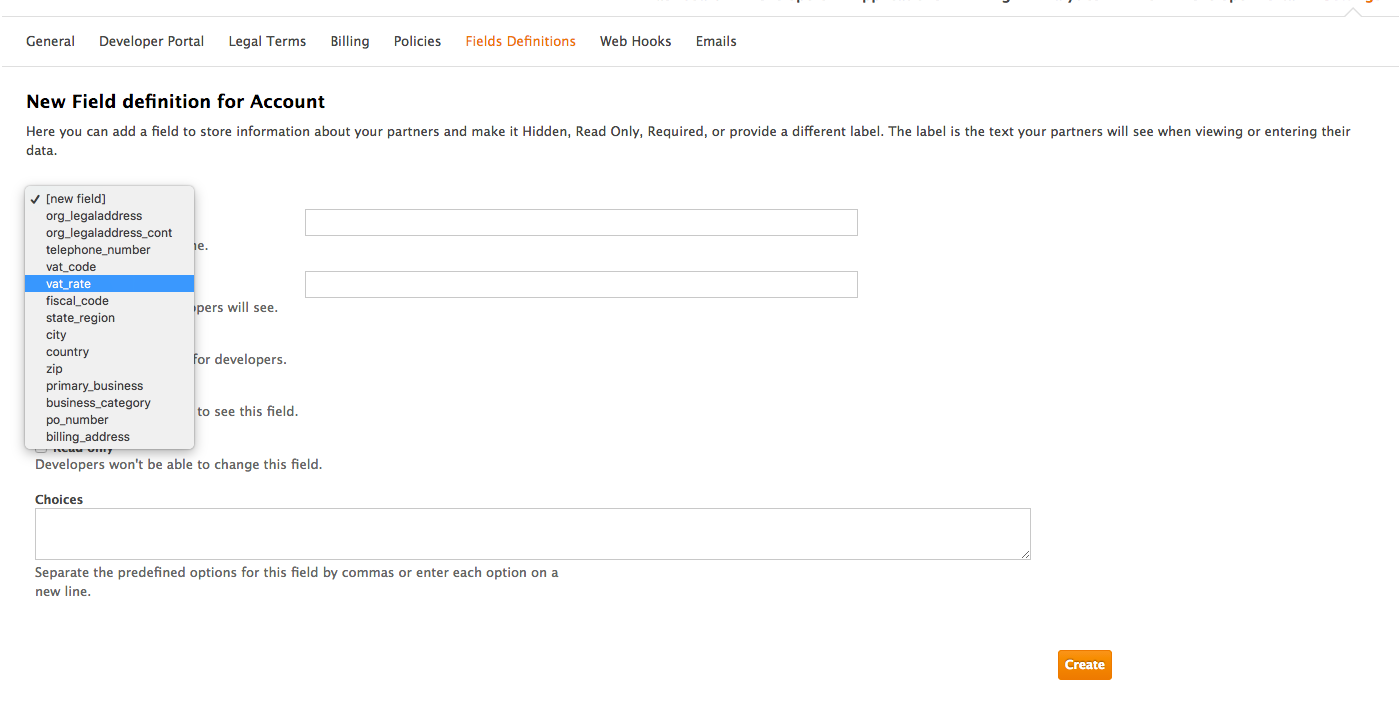
- From the Admin Portal go to >Settings>Field-Definitions
- Then in the "Account" object click "Create" on the right hand side to add a field
- From the "new field" drop down select "vat_rate"
Either you can allow developers to set their own VAT rate, or alternatively you can set the VAT rate for them. If you choose the latter you have the following options:
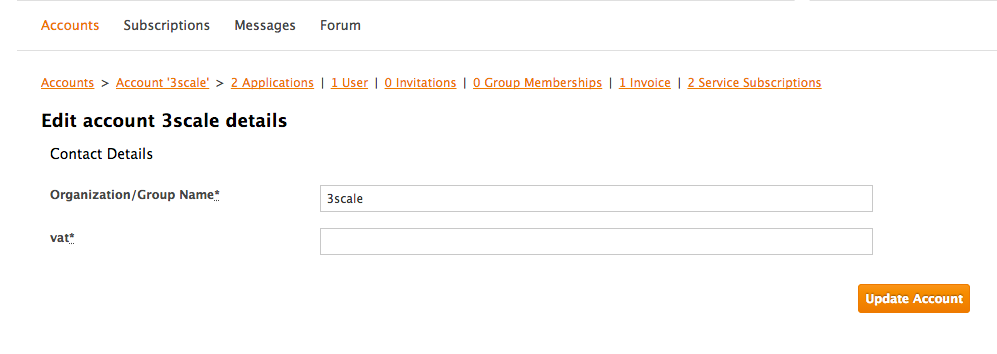
From your admin portal, going to a given account and editing the VAT field
- From the Account Management API, using the Account Update endpoint. If you want to update several accounts you will have to get them first using the Account List endpoint and then iterate over them updating the field. This could be combined into an automated flow using Webhooks to trigger your update requests when the Account is created or modified.
VAT rate will be calculated and reflected in invoices.
3. Adyen Integration
After completing these steps, you’ll have configured Adyen as a payment gateway for your account. This will allow your developers to enter their credit card details, and you can automatically charge them through Adyen for access to your API, according to the calculated invoices.
Setting up your payment gateway is a key step enabling credit card charging for use of your paid API. There are a number of alternative payment gateways you can use with your 3scale account. Here we cover the steps for Adyen.
3.1. Prerequisites
Before you start these steps, you’ll need to open an account with Adyen. You need a Company account and a Merchant account within it (sub-account). There are a number of requirements that must be fulfilled before you can apply for a live account with Adyen. You can see what those requirements are here.
3.2. Step 1: Find the information in your Adyen account
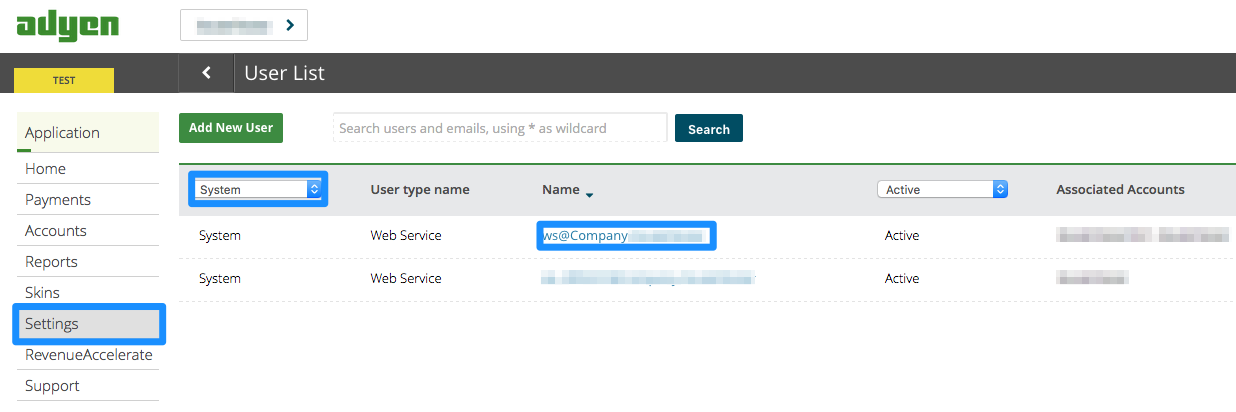
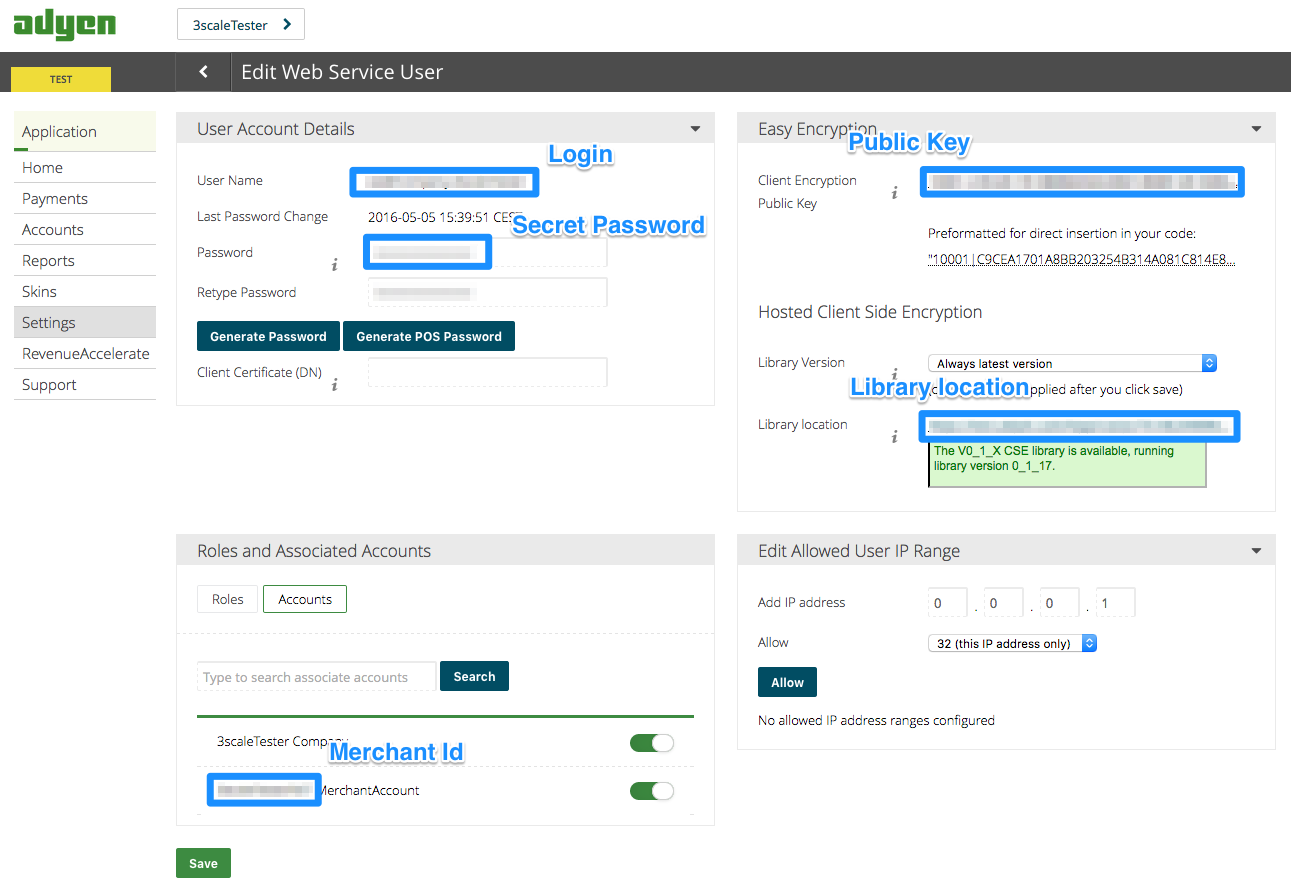
To begin, log into your Adyen account. Then find your credentials in the Settings > Users area, and select system from the dropdown menu in the following view:
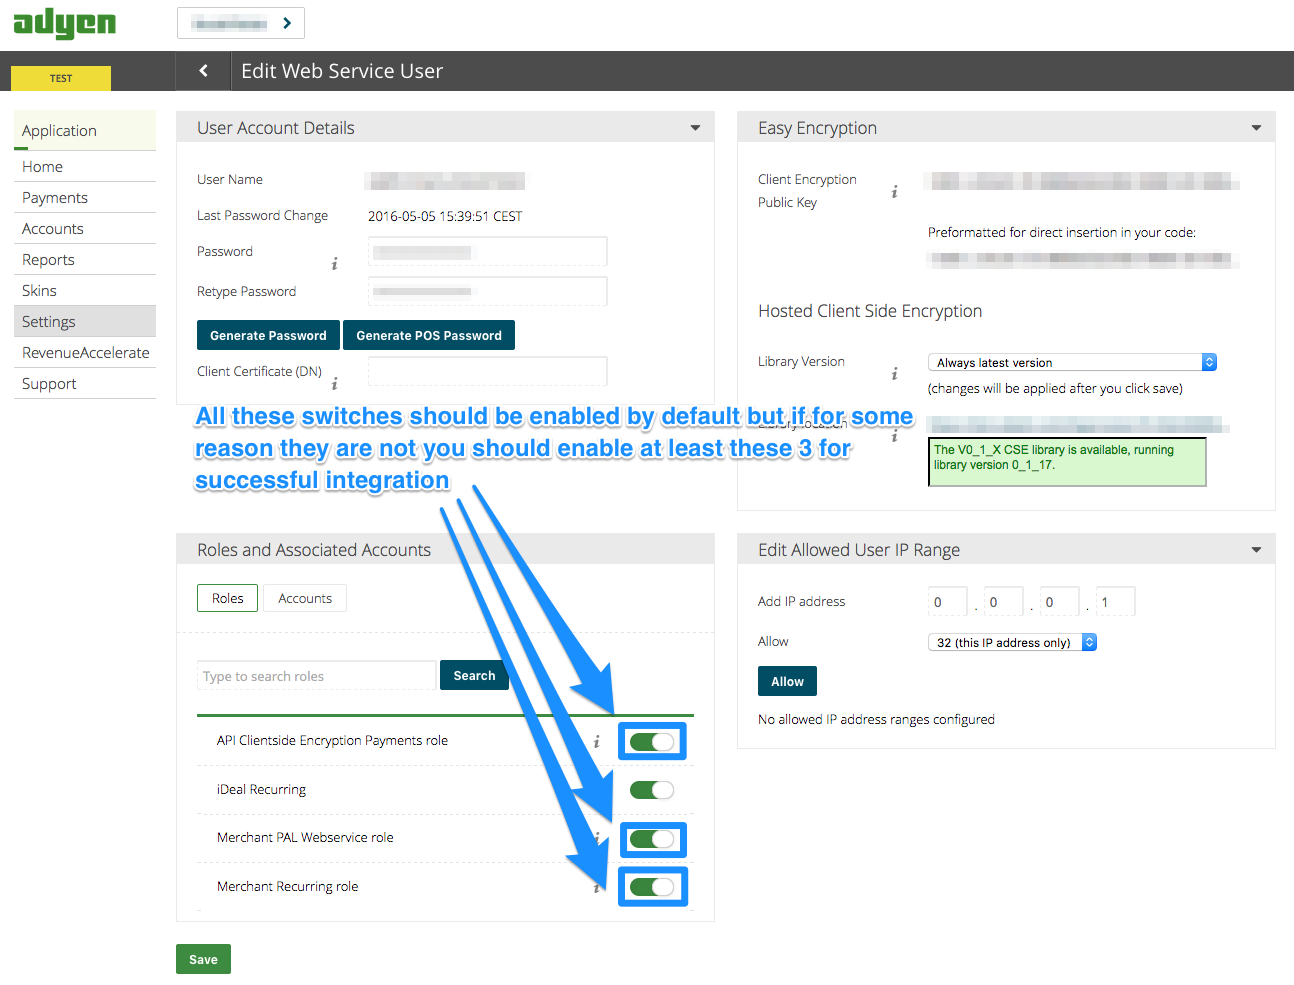
Click on the "Company" account (the account at the top of the list). You will then be taken to the Company account settings view:
Finally you have access to the Login, Secret Password, Client Encryption Public Key, Merchant ID and Library location that you will need for the 3scale billing settings. To be able to view the Public Key, you must click on "generate password" and copy this password somewhere.
3.2.1. Step 2: Configure your payment gateway in your 3scale account
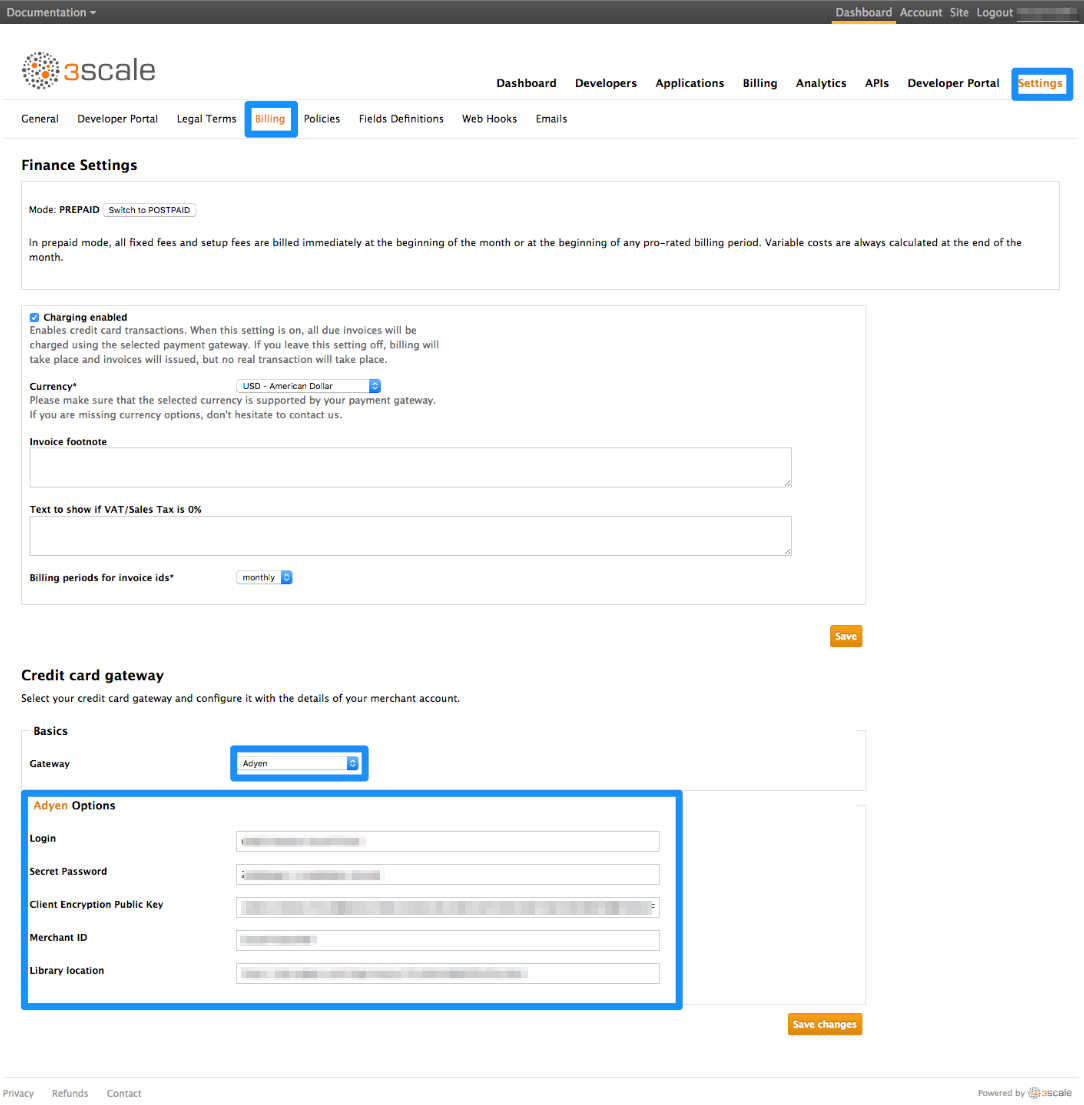
In the billing area of the Settings tab, enable charging by checking the box and click save. You will see all the fields that you need to setup to create the link to your Adyen gateway. Remember to select Adyen from the gateway dropdown menu and save changes.
3.2.2. Step 3: Enable the "alias" additional data in the Adyen API response
By default when credit card authorization requests are sent from 3scale to Adyen, the returned response does not include the unique identifier of the credit card. To ensure that the correct credit card reference is saved in 3scale and the correct card is charged, this additional data needs to be enabled. In order to do this, you should ask Adyen support to enable the "alias" additional data in the response for the authorization request.
3.2.3. Step 4: Test your billing workflow
Make sure you accelerate the test cycle by enabling Prepaid Mode to generate the charge within a day or so. Then choose an existing test account and create an invoice with a line item charge added. Charge the account immediately. This testing approach will incur some minor costs, but it is worth it for the peace of mind that everything works fine, before you have real paying developers using your API.
The payment gateway is now set up, but your users might not be able to use it yet since it is not configured in the CMS. Go to the developer portal tab, and find the template called Payment Gateway / Show on the left navigation pane.
If it’s not there already, add the following snippet after the block of code beginning with {% when "stripe" %}
- For accounts created before 11th May 2016 you must add the snippet above manually. After said date this will be included in the template by default.
-
In order to map your data from Adyen with your data on 3scale, you can use the Adyen field called
shopperReferencewhich is composed of3scale-[PROVIDER_ID]-[DEVELOPER_ACCOUNT_ID]
3.2.4. Troubleshooting
If your account is in sandbox mode and you encounter any problems, you’ll have to change it to production.
4. Braintree Integration
These are the steps to set up the Braintree gateway in order to to charge for use of your API.
4.1. Step 1: Get your API keys from Braintree
You’ll need to open an account with Braintree. You need a Gateway and Merchant account plus Vault. As an optional extra, you can choose to allow American Express cards as a payment method.
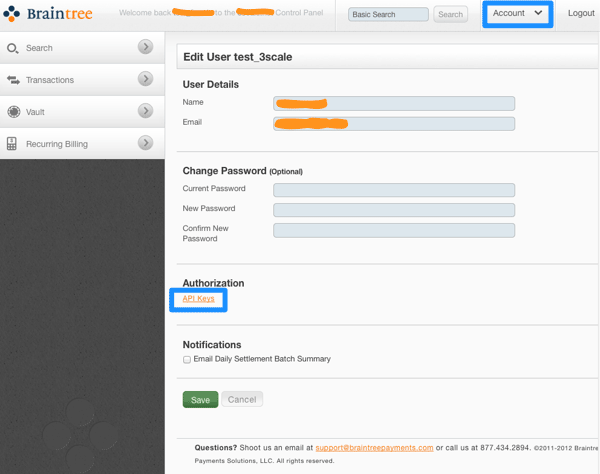
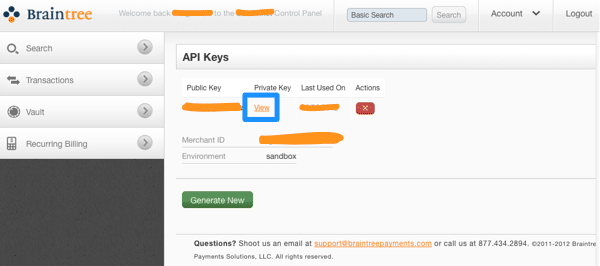
To begin, log in to your Braintree account. Then find your API keys in the Account > MyUser area:
The API keys page still hides the private key, so select the option to view it:
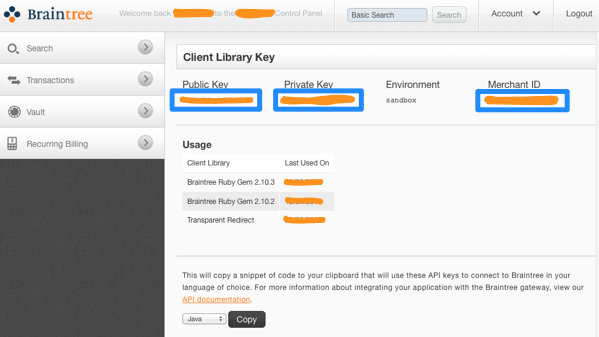
Finally you have the Public Key, Private Key, and Merchant ID that you’ll need for the 3scale billing settings:
4.2. Step 2: Configure your settings in 3scale
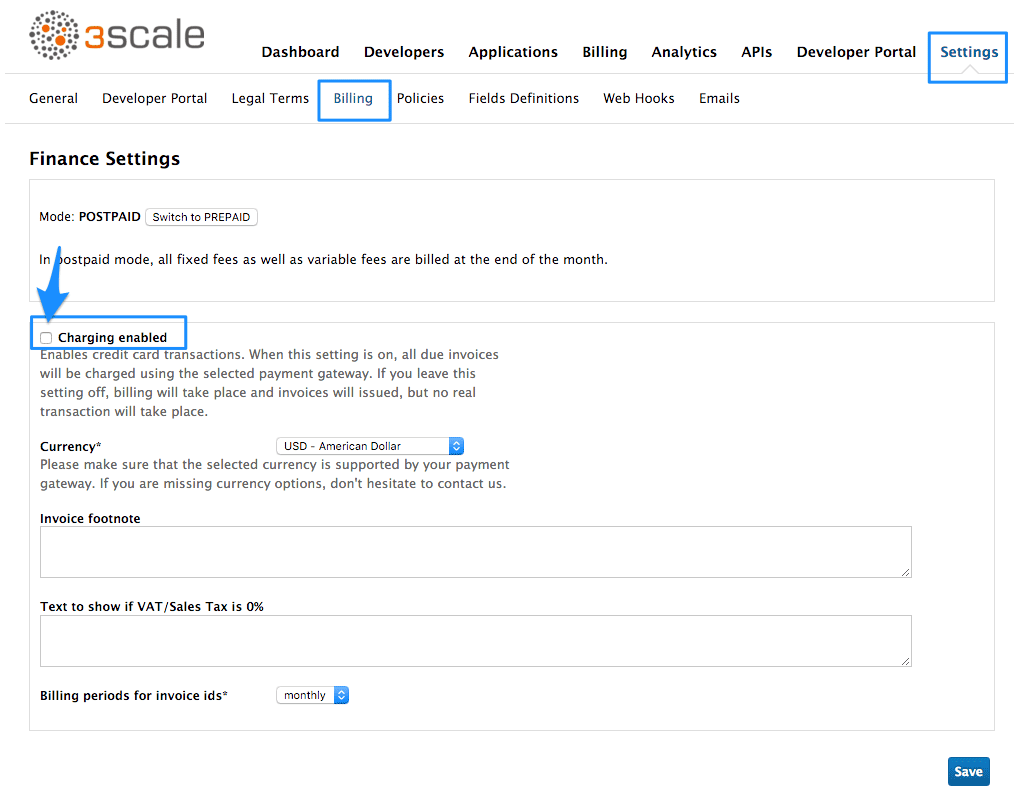
You need to tell 3scale to start using these API keys. To do this, log in to your 3scale Admin Portal and go to Settings > Billing.
If the Charging Enabled flag is not active, enable it and click Save.
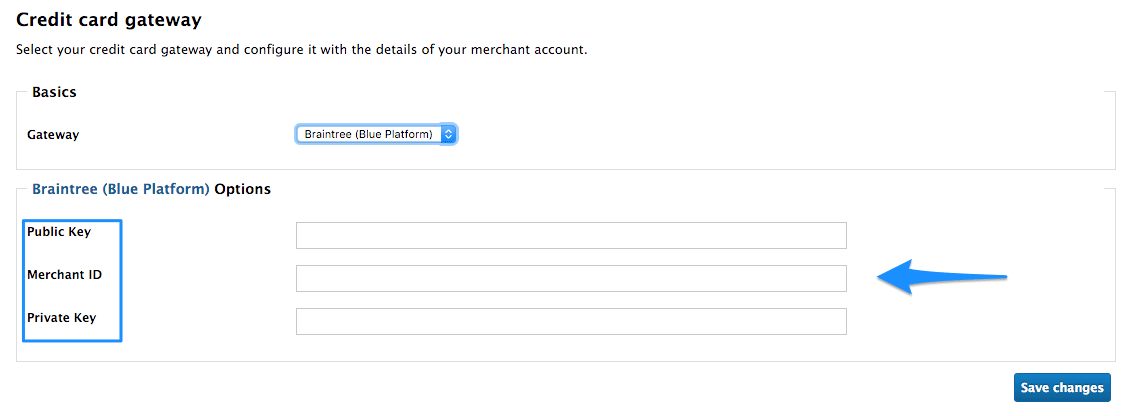
You should see a drop-down called Gateway near the bottom of the page. Change it to Braintree (Blue Platform).
The form below the drop-down should change to show two fields. Insert your Braintree keys and click Save.
You might see a couple of alerts when you change your payment gateway. This is expected. Read and accept them if they appear.
Your users should now be able to pay you using the Braintree gateway.
4.2.1. Note
In order to map your data from Braintree with your data on 3scale, you can use the Braintree field called customer.id which is composed of 3scale-[PROVIDER_ID]-[DEVELOPER_ACCOUNT_ID]
4.2.2. Troubleshooting
In case your account is in the sandbox mode and you encounter any problems, you will have to change it to production.
5. Credit Card Flow
This guide will help you define a great workflow in your Developer Portal to ensure that developers submit their credit card details before they gain access to your paid API(s).
It’s increasingly common to see businesses charge for access to their APIs. Sometimes the entire business model of a company is built around paid APIs, while other times it’s an important revenue stream to cover costs or generate profits for the company.
5.1. Prerequisites
- 3scale finance module (billing and charging) activated and configured
- Paid plans defined (usually application plans)
After following the steps detailed below, all the existing developers who have paid plans but no credit card details entered, will be redirected to the credit card details form. They will not be allowed to access the portal until they have successfully entered their credit card details.
5.3. Step 2: Enable Feature
To enable this feature, you must enable the following 2 switches:
Switches can be found in Developer portal > Feature visibility.
- Finance
- Credit Card on Signup (only available if you are on an older 3scale account.)
5.4. Step 4: Ensure credit card is entered by developer when upgrading from a free to a paid plan
You may allow developers to select plans when changing plans. The ideal setting is Request credit card entry for paid plans. This will ensure that if a paid plan is selected, the plan change can only be done instantly if a credit card is stored. Otherwise a notification is displayed to point the developer to the location to enter their card details.
This setting is defined from the Admin Portal. Go to API > Service > Settings > Application Plan Changing. Here you can select the option Request credit card entry for paid plans.
To enable this behaviour, you will need to make changes to the following CMS pages:
- applications/show template
- applications/form partial
5.4.1. Editing applications/show Template
You will need to look for plan_widget in the page code and change it to the following:
{% plan_widget application, wizard: true %}
{% plan_widget application, wizard: true %}
If you have added the plan_widget in any other pages, you will need to update those to match the above snippet.
5.4.2. Editing applications/form partial
Follow the same instructions above to change any instances of plan_widget in the applications/form partial to conform to the new snippet.
And that’s it! You can now enforce the addition of credit card details before allowing usage of your API for paid plans.
6. Stripe Integration (recommended)
After completing these steps you will have configured Stripe as a payment gateway for your account. This will allow your developers to enter their credit card details, and you can automatically charge them through Stripe for access to your API, according to the calculated invoices.
If you enable credit card charging for your paid API, then one key step is to setup your payment gateway. There are a number of alternative payment gateways which you can use with your 3scale account. Here we cover the steps for Stripe.
6.1. Prerequisites
Before you start these steps, you will need to open an account with Stripe.
6.2. Step 1: Get your API keys from Stripe
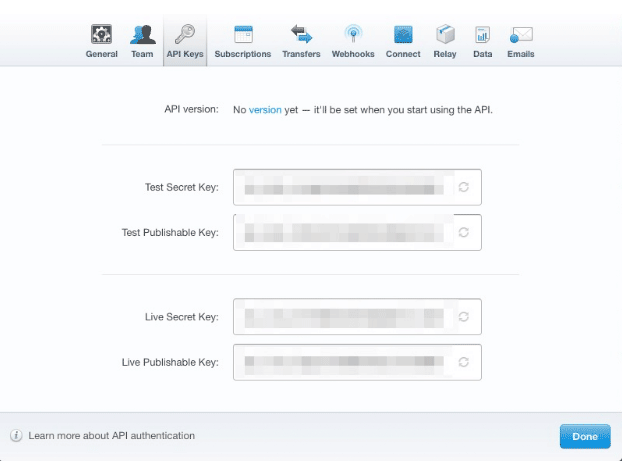
Log in to your Stripe account, and get your API keys at https://dashboard.stripe.com/account/apikeys. You will need two keys: a "secret" one, and a "publishable" one. Use the "test" set when you’re doing tests and the "live" ones when you are ready to start charging.
6.3. Configure settings in 3scale
You need to tell 3scale to start using these API keys. To do this, log in to your 3scale admin portal and go to Settings > Billing
If the Charging Enabled flag is not active, enable it and click Save.
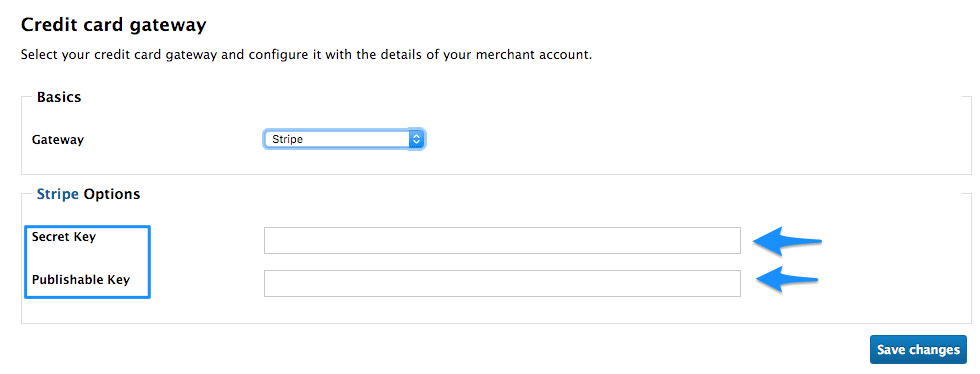
You should see a drop-down called Gateway near the bottom of the page. Change it to Stripe.
The form below the drop-down should change to show two fields. Insert your Stripe API keys and click Save.
You might see a couple of alerts when you change your payment gateway. This is expected. Read them and accept them if they appear.
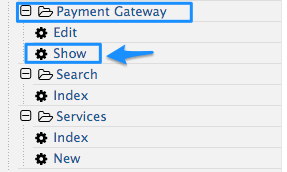
The payment gateway is now set up, but your users might not be able to use it yet since the it’s not configured in the CMS. Go to Developer portal, and click on the template called Payment Gateway / Show on the left navigation pane.
If it’s not there already, add the following code before {% when "braintree_blue" %}:
Finally click Save and Publish. Your users should now be able to pay you using the Stripe gateway.
6.3.1. Note
In order to map your data from Stripe with your data on 3scale, you can use the Stripe field called metadata.3scale_account_reference which is composed of 3scale-[PROVIDER_ID]-[DEVELOPER_ACCOUNT_ID]
