Security
Security
Abstract
Chapter 1. Security
Manage your security and role-based access control (RBAC) of Red Hat Advanced Cluster Management for Kubernetes components. Govern your cluster with defined policies and processes to identify and minimize risks. Use policies to define rules and set controls.
Prerequisite: You must configure authentication service requirements for Red Hat Advanced Cluster Management for Kubernetes to onboard workloads to Identity and Access Management (IAM). For more information see, Understanding authentication in OpenShift Container Platform documentation.
Review the following topics to learn more about securing your cluster:
1.1. Role-based access control
Red Hat Advanced Cluster Management for Kubernetes supports role-based access control (RBAC). Your role determines the actions that you can perform. RBAC is based on the authorization mechanisms in Kubernetes, similar to OpenShift Container Platform. For more information about RBAC, see the OpenShift RBAC overview in the OpenShift Container Platform documentation.
View the following sections for details of supported RBAC by component:
1.1.1. Overview of roles
Some product resources are cluster-scoped and some are namespace-scoped. View the table list of the following role definitions that are supported in Red Hat Advanced Cluster Management for Kubernetes:
| Role | Definition |
|---|---|
| cluster-admin |
A user with cluster-wide binding to the |
| open-cluster-management:cluster-manager-admin |
A user with cluster-wide binding to the |
| open-cluster-management:managed-cluster-x (admin) |
A user with cluster binding to the |
| open-cluster-management:managed-cluster-x (viewer) |
A user with cluster-wide binding to the |
| open-cluster-management:subscription-admin |
A user with the |
| admin, edit, view |
Admin, edit, and view are OpenShift Container Platform default roles. A user with a namespace-scoped binding to these roles has access to |
Important:
- Any user can create projects from OpenShift Container Platform, which gives administrator role permissions for the namespace.
-
If a user does not have role access to a cluster, the cluster name is not visible. The cluster name is displayed with the following symbol:
-.
1.1.2. RBAC implementation
RBAC is validated at the API level. When an user attempts an action from the console, the API might be allowed or rejected based on access role permissions. View the following sections for more information on RBAC for specific lifecycles in the product.
1.1.2.1. Cluster lifecycle RBAC
To perform cluster lifecycle operations, users must have access to the managedcluster namespace and custom resource. A user with cluster-wide binding to admin or view roles, has admin or view access to all management clusters and namespaces.
View the following examples:
To view
managedcluster xcluster information, the following roles are required:-
A cluster-wide binding to the
viewrole foropen-cluster-management. -
A namespace binding to the
viewrole for namespace "X".
-
A cluster-wide binding to the
To perform an upgrade to
managedcluster x, the following roles are required:-
A cluster-wide binding to the
adminrole foropen-cluster-management. -
A namespace binding to the
adminrole for namespace "X".
-
A cluster-wide binding to the
View the following console and API RBAC tables for Cluster lifecycle:
| Action | Admin | Edit | View |
|---|---|---|---|
| Clusters | read, update, delete | read, update | read |
| Provider connections | create, read, update, and delete | create, read, update, and delete | No access |
| Bare metal | Yes | read, update | read |
| API | Admin | Edit | View |
|---|---|---|---|
| klusterletaddonconfigs.agent.open-cluster-management.io | create, read, update, delete | read, update | read |
| manageclusters.cluster.open-cluster-management.io | create, read, update, delete | read, update | read |
| managedclusteractions.action.open-cluster-management.io | create, read, update, delete | read, update | read |
| managedclusterviews.view.open-cluster-management.io | create, read, update, delete | read, update | read |
| managedclusterinfos.internal.open-cluster-management.io | create, read, update, delete | read, update | read |
| manifestworks.work.open-cluster-management.io | create, read, update, delete | read, update | read |
1.1.2.2. Application lifecycle RBAC
When you create an application, the subscription namespace is created and the configuration map is created in the subscription namespace. When you want to apply a subscription, you must be a subscription administrator. For more information on managing applications, see Creating and managing subscriptions.
To perform Application lifecycle tasks, users with the admin role must have access to the namespace where the application is created and the managedcluster namespace. For example, the required access to create applications in namespace "N" is a namespace binding to the admin role for namespace "N".
View the following console and API RBAC tables for Application lifecycle:
| Action | Admin | Edit | View |
|---|---|---|---|
| Application | create, read, update, delete | create, read, update, delete | read |
| Channel | create, read, update, delete | create, read, update, delete | read |
| Subscription | create, read, update, delete | create, read, update, delete | read |
| Placement rule | create, read, update, delete | create, read, update, delete | read |
| API | Admin | Edit | View |
|---|---|---|---|
| applications.app.k8s.io | create, read, update, delete | create, read, update, delete | read |
| channels.apps.open-cluster-management.io | create, read, update, delete | create, read, update, delete | read |
| deployables.apps.open-cluster-management.io | create, read, update, delete | create, read, update, delete | read |
| helmreleases.apps.open-cluster-management.io | create, read, update, delete | create, read, update, delete | read |
| placementrules.apps.open-cluster-management.io | create, read, update, delete | create, read, update, delete | read |
| subscriptions.apps.open-cluster-management.io | create, read, update, delete | create, read, update, delete | read |
| configmaps | create, read, update, delete | create, read, update, delete | read |
| secrets | create, read, update, delete | create, read, update, delete | read |
| namespaces | create, read, update, delete | create, read, update, delete | read |
1.1.2.3. Governance lifecycle RBAC
To perform Governance lifecycle operations, users must have access to the namespace where a policy is created, and access to the managedcluster namespace. A user with cluster-wide binding to admin or view access, also have write and read access to all policies and all management clusters on the hub cluster.
View the following examples:
To view policies in namespace "N" the following role is required:
-
A namespace binding to the
viewrole for namespace "X".
-
A namespace binding to the
To create a policy in namespace "N" and apply it on
managedcluster x, the following roles are required:-
A namespace binding to the
adminrole for namespace "N". -
A namespace binding to the
adminrole for namespace "X".
-
A namespace binding to the
View the following console and API RBAC tables for Governance lifecycle:
| Action | Admin | Edit | View |
|---|---|---|---|
| Policies | create, read, update, delete | read | read |
| PlacementBindings | create, read, update, delete | read | read |
| PlacementRules | create, read, update, delete | read | read |
| API | Admin | Edit | View |
|---|---|---|---|
| policies.policy.open-cluster-management.io | create, read, update, delete | read | read |
| placementbindings.policy.open-cluster-management.io | create, read, update, delete | read | read |
Continue to learn more about securing your cluster, see Security.
1.2. Certificates
Various certificates are created and used throughout Red Hat Advanced Cluster Management for Kubernetes.
You can bring your own certificates. You must create a Kubernetes TLS Secret for your certificate. After you create your certificates, you can replace certain certificates that are created by the Red Hat Advanced Cluster Management for Kubernetes installer.
Required access: Cluster administrator or team administrator.
Note: Replacing certificates is supported only on native Red Hat Advanced Cluster Management for Kubernetes installations.
All certificates required by services that run on Red Hat Advanced Cluster Management for Kubernetes are created during the installation of Red Hat Advanced Cluster Management for Kubernetes. Certificates are created and managed by the Red Hat Advanced Cluster Management for Kubernetes Certificate manager (cert-manager) service.
See the following topics to replace certificates:
1.2.1. Certificates
The Red Hat Advanced Cluster Management for Kubernetes Root CA Certificate is stored within the Kubernetes Secret multicloud-ca-cert in the hub cluster namespace. The certificate can be imported into your client truststores to access Red Hat Advanced Cluster Management for Kubernetes Platform APIs.
1.2.1.1. Created and managed by Red Hat Advanced Cluster Management for Kubernetes Certificate manager (cert-manager)
View the following table of the internal services that use cert-manager to create and manage their certificates:
| Certificate Name | Issuer Name | Secret Name | Usage |
|---|---|---|---|
|
|
|
| Red Hat Advanced Cluster Management for Kubernetes Console CA cert |
|
|
|
| Red Hat Advanced Cluster Management for Kubernetes Govern and risk CA cert |
|
|
|
| Visual Web Terminal |
|
|
|
| Ingress |
|
|
|
| Red Hat Advanced Cluster Management for Kubernetes root CA |
|
|
|
| Search |
|
|
|
| Search |
|
|
|
| Search |
|
|
|
| Topology |
The OpenShift Container Platform certificate is not included in the Red Hat Advanced Cluster Management for Kubernetes management ingress. For more information, see the Security known issues. Use the certificate policy controller to create and manage certificate policies on managed clusters. See Policy controllers to learn more about controllers. Return to the Security page for more information.
1.2.2. Replacing the root CA certificate
You can replace the root CA certificate.
1.2.2.1. Prerequisites for root CA certificate
Verify that your Red Hat Advanced Cluster Management for Kubernetes cluster is running.
Back up the existing Red Hat Advanced Cluster Management for Kubernetes certificate resource by running the following command:
oc get cert multicloud-ca-cert -n open-cluster-management -o yaml > multicloud-ca-cert-backup.yaml1.2.2.2. Creating the root CA certificate with OpenSSL
Complete the following steps to create a root CA certificate with OpenSSL:
Generate your certificate authority (CA) RSA private key by running the following command:
openssl genrsa -out ca.key 4096Generate a self-signed CA certificate by using your CA key. Run the following command:
openssl req -x509 -new -nodes -key ca.key -days 400 -out ca.crt -config req.cnfYour
req.cnffile might resemble the following file:[ req ] # Main settings default_bits = 4096 # Default key size in bits. prompt = no # Disables prompting for certificate values so the configuration file values are used. default_md = sha256 # Specifies the digest algorithm. distinguished_name = dn # Specifies the section that includes the distinguished name information. x509_extensions = v3_ca # The extentions to add to the self signed cert [ dn ] # Distinguished name settings C = US # Country ST = North Carolina # State or province L = Raleigh # Locality O = Red Hat Open Shift # Organization OU = Red Hat Advanced Container Management # Organizational unit CN = www.redhat.com # Common name. [ v3_ca ] # x509v3 extensions basicConstraints=critical,CA:TRUE # Indicates whether the certificate is a CA certificate during the certificate chain verification process.
1.2.2.3. Replacing root CA certificates
Create a new secret with the CA certificate by running the following command:
kubectl -n open-cluster-management create secret tls byo-ca-cert --cert ./ca.crt --key ./ca.keyEdit the CA issuer to point to the BYO certificate. Run the following commnad:
oc edit issuer -n open-cluster-management multicloud-ca-issuer-
Replace the string
mulicloud-ca-certwithbyo-ca-cert. Save your deployment and quit the editor. Edit the management ingress deployment to reference the Bring Your Own (BYO) CA certificate. Run the following command:
oc edit deployment management-ingress-435ab-
Replace the
multicloud-ca-certstring with thebyo-ca-cert. Save your deployment and quit the editor. - Validate the custom CA is in use by logging in to the console and view the details of the certificate being used.
1.2.2.4. Refreshing cert-manager certificates
After the root CA is replaced, all certificates that are signed by the root CA must be refreshed and the services that use those certificates must be restarted. Cert-manager creates the default Issuer from the root CA so all of the certificates issued by cert-manager, and signed by the default ClusterIssuer must also be refreshed.
Delete the Kubernetes secrets associated with each cert-manager certificate to refresh the certificate and restart the services that use the certificate. Run the following command:
oc delete secret -n open-cluster-management $(oc get cert -n open-cluster-management -o wide | grep multicloud-ca-issuer | awk '{print $3}')1.2.2.5. Restoring root CA certificates
To restore the root CA certificate, update the CA issuer by completing the following steps:
Edit the CA issuer. Run the following command:
oc edit issuer -n open-cluster-management multicloud-ca-issuer-
Replace the
byo-ca-certstring withmulticloud-ca-certin the editor. Save the issuer and quit the editor. Edit the management ingress depolyment to reference the original CA certificate. Run the following command:
oc edit deployment management-ingress-435ab-
Replace the
byo-ca-certstring with themulticloud-ca-certstring. Save your deployment and quit the editor. Delete the BYO CA certificate. Run the following commnad:
oc delete secret -n open-cluster-management byo-ca-cert
Refresh all cert-manager certificates that use the CA. For more information, see the forementioned section, Refreshing cert-manager certificates.
See Certificates for more information about certificates that are created and managed by Red Hat Advanced Cluster Management.
1.2.3. Replacing the management ingress certificates
You can replace management ingress certificates. If you replace the default ingress certificate for OpenShift Container Platform, you need to make modifications to the management ingress. For more information see, 500 Internal error during login to the console in the Security known issues.
1.2.3.1. Prerequisites to replace management ingress certificate
Prepare and have your management-ingress certificates and private keys ready. If needed, you can generate a TLS certificate by using OpenSSL. Set the common name parameter,CN, on the certificate to manangement-ingress. If you are generating the certificate, include the following settings:
Include the following IP addresses and domain names in your certificate Subject Alternative Name (SAN) list:
-
The service name for the management ingress:
management-ingress. Include the route name for Red Hat Advanced Cluster Management for Kubernetes. Recieve the route name by running the following command:
oc get route -n open-cluster-managementYou might receieve the following response:
multicloud-console.apps.grchub2.dev08.red-chesterfield.com-
Add the localhost IP address:
127.0.0.1. -
Add the localhost entry:
localhost.
-
The service name for the management ingress:
1.2.3.1.1. Example configuration file for generating a certificate
The following example configuration file and OpenSSL commands provide an example for how to generate a TLS certificate by using OpenSSL. View the following csr.cnf configuration file, which defines the configuration settings for generating certificates with OpenSSL.
[ req ]               # Main settings
default_bits = 2048       # Default key size in bits.
prompt = no               # Disables prompting for certificate values so the configuration file values are used.
default_md = sha256       # Specifies the digest algorithm.
req_extensions = req_ext  # Specifies the configuration file section that includes any extensions.
distinguished_name = dn   # Specifies the section that includes the distinguished name information.

[ dn ]               # Distinguished name settings
C = US                    # Country
ST = North Carolina             # State or province
L = Raleigh                # Locality
O = Red Hat Open Shift     # Organization
OU = Red Hat Advanced Container Management        # Organizational unit
CN = management-ingress  # Common name.

[ req_ext ]          # Extensions
subjectAltName = @alt_names # Subject alternative names

[ alt_names ]        # Subject alternative names
DNS.1 = management-ingress
DNS.2 = multicloud-console.apps.grchub2.dev08.red-chesterfield.com
DNS.3 = localhost
DNS.4 = 127.0.0.1

[ v3_ext ]          # x509v3 extensions
authorityKeyIdentifier=keyid,issuer:always  # Specifies the public key that corresponds to the private key that is used to sign a certificate.
basicConstraints=CA:FALSE                   # Indicates whether the certificate is a CA certificate during the certificate chain verification process.
#keyUsage=keyEncipherment,dataEncipherment   # Defines the purpose of the key that is contained in the certificate.
extendedKeyUsage=serverAuth                 # Defines the purposes for which the public key can be used.
subjectAltName=@alt_names                   # Identifies the subject alternative names for the identify that is bound to the public key by the CA.
Be sure to update the SAN labeled, DNS.2 with the correct hostname for your management ingress.
1.2.3.1.2. OpenSSL commands for generating a certificate
The following OpenSSL commands are used with the preceding configuration file to generate the required TLS certificate.
Generate your certificate authority (CA) RSA private key:
openssl genrsa -out ca.key 4096Generate a self-signed CA certificate by using your CA key:
openssl req -x509 -new -nodes -key ca.key -subj "/C=US/ST=North Carolina/L=Raleigh/O=Red Hat OpenShift" -days 400 -out ca.crtGenerate the RSA private key for your certificate:
openssl genrsa -out ingress.key 4096Generate the Certificate Signing request (CSR) by using the private key:
openssl req -new -key ingress.key -out ingress.csr -config csr.cnfGenerate a signed certificate by using your CA certificate and key and CSR:
openssl x509 -req -in ingress.csr -CA ca.crt -CAkey ca.key -CAcreateserial -out ingress.crt -sha256 -days 300 -extensions v3_ext -extfile csr.cnfExamine the certificate contents:
openssl x509 -noout -text -in ./ingress.crt
1.2.3.2. Replace the Bring Your Own (BYO) ingress certificate
Complete the following steps to replace your BYO ingress certificate:
Create the
byo-ingress-tlssecret by using your certificate and private key. Run the following command:kubectl -n open-cluster-management create secret tls byo-ingress-tls-secret --cert ./ingress.crt --key ./ingress.keyVerify that the secret is created in the correct namespace.
kubectl get secret -n open-cluster-management | grep byo-ingress | grep tlsCreate a secret containing the CA certificate by running the following command:
kubectl -n open-cluster-management create secret tls byo-ca-cert --cert ./ca.crt --key ./ca.keyEdit the management ingress deployment. Get the name of the deployment. Run the following commands:
export MANAGEMENT_INGRESS=`oc get deployment -o custom-columns=:.metadata.name | grep management-ingress` oc edit deployment $MANAGEMENT_INGRESS -n open-cluster-management-
Replace the
multicloud-ca-certstring withbyo-ca-cert. -
Replace the
$MANAGEMENT_INGRESS-tls-secretstring withbyo-ingress-tls-secret. - Save your deployment and close the editor. The management ingress automatically restarts.
-
Replace the
- After the management ingress pod has restarted, navigate to the Red Hat Advanced Cluster Management for Kubernetes console from your browser. Verify that the current certificate is your certificate, and that all console access and login functionality remain the same.
1.2.3.3. Restore the default self-signed certificate for management ingress
Edit the management ingress deployment. Replace the string
multicloud-ca-certwithbyo-ca-cert. Get the name of the deployment. Run the following commands:export MANAGEMENT_INGRESS=`oc get deployment -o custom-columns=:.metadata.name | grep management-ingress` oc edit deployment $MANAGEMENT_INGRESS -n open-cluster-management-
Replace the
byo-ca-certstring withmulticloud-ca-cert. -
Replace the
byo-ingress-tls-secretstring with the$MANAGEMENT_INGRESS-tls-secret. - Save your deployment and close the editor. The management ingress automatically restarts.
-
Replace the
- After all pods are restarted, navigate to the Red Hat Advanced Cluster Management for Kubernetes console from your browser. Verify that the current certificate is your certificate, and that all console access and login functionality remain the same.
Delete the Bring Your Own (BYO) ingress secret and ingress CA certificate by running the following commands:
oc delete secret -n open-cluster-management byo-ingress-tls-secret
oc delete secret -n open-cluster-management byo-ca-cert
See Certificates for more information about certificates that are created and managed by Red Hat Advanced Cluster Management. Return to the Security page for more information on securing your cluster.
Chapter 2. Governance and risk
Enterprises must meet internal standards for software engineering, secure engineering, resiliency, security, and regulatory compliance for workloads hosted on private, multi and hybrid clouds. Red Hat Advanced Cluster Management for Kubernetes governance provides an extensible policy framework for enterprises to introduce their own security policies.
2.1. Governance architecture
Enhance the security for your cluster with the Red Hat Advanced Cluster Management for Kubernetes governance lifecycle. The product governance lifecycle is based on defined policies, processes, and procedures to manage security and compliance from a central interface page. View the following diagram of the governance architecture:
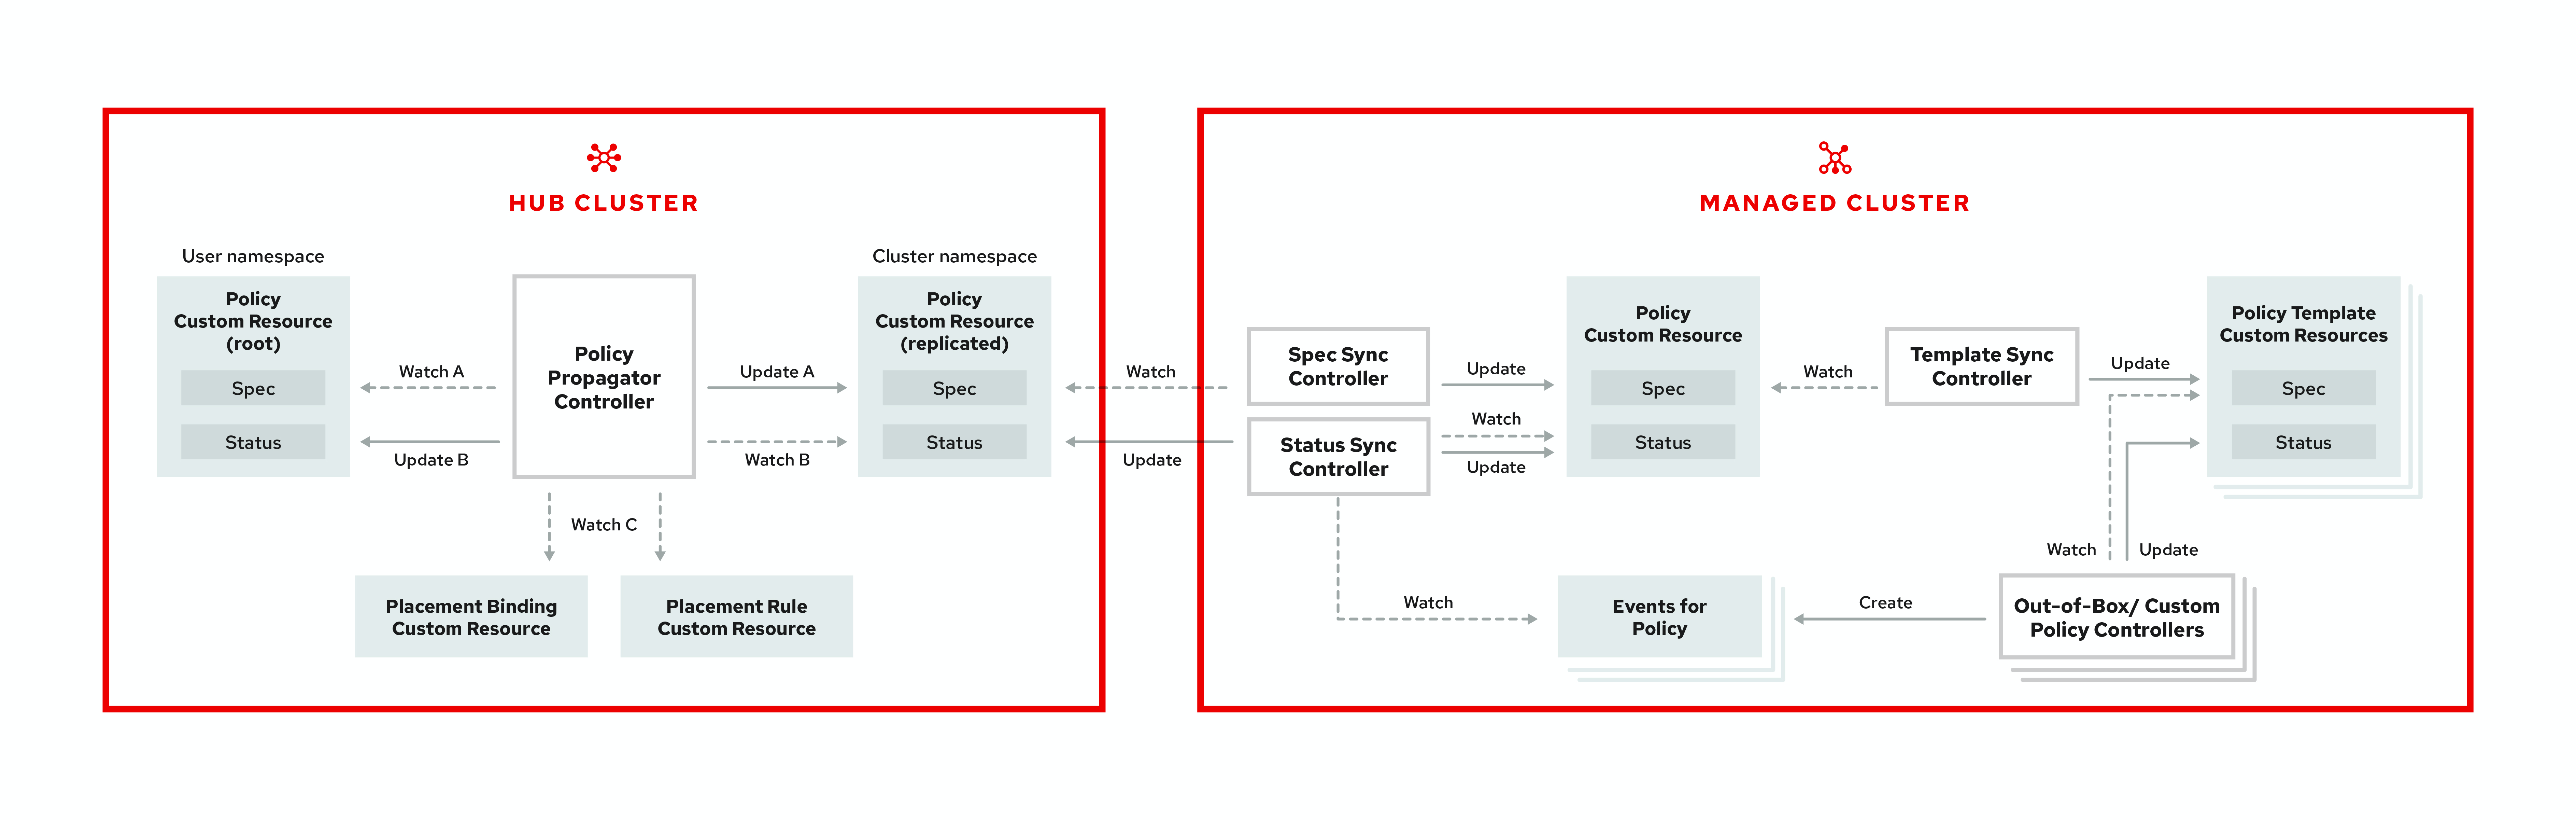
The governance architecture is composed of the following components:
- Governance and risk dashboard: Provides a summary of your cloud governance and risk details, which include policy and cluster violations.
-
Policy-based governance framework controllers: Support policy creation and deployment to various managed clusters based on attributes associated with clusters, such as a geographical region. See the
policy-collectionrepository to view examples of the predefined policies, and instructions on deploying policies to your cluster. You can also contribute custom policy controllers and policies. - Policy controller: Evaluates one or more policies on the managed cluster against your specified control, and generates Kubernetes events for violations. Violations are propagated to the hub cluster. Policy controllers that are included in your installation are the following: Kubernetes configuration, Certificate, and IAM. You can also create a custom policy controller.
You can customize your Summary view by filtering the violations by categories or standards. Collapse the summary to see less information. You can also search for policies.
Note:
-
When a policy is propagated to a managed cluster, the replicated policy is named as
namespaceName.policyName. When you create a policy, make sure that the length of thenamespaceName.policyNameis less than 63 characters due to the Kubernetes limit for object names. -
When you search for a policy in the hub cluster, you might also receive the name of the replicated policy on your managed cluster. For example, if you search for
policy-dhaz-cert, the following policy name from the hub cluster might appear:default.policy-dhaz-cert.
You can view a table list of violations. The following details are provided in the table: description, resources, severity, cluster, standards, controls, categories, and update time. You can filter the violation table view by policies or cluster violations.
Learn about the structure of an Red Hat Advanced Cluster Management for Kubernetes policy, and how to use the Red Hat Advanced Cluster Management for Kubernetes Governance and risk dashboard.
2.2. Policy overview
Use the Red Hat Advanced Cluster Management for Kubernetes security policy framework to create custom policy controllers and other policies. Kubernetes CustomResourceDefinition (CRD) instance are used to create policies. For more information about CRDs, see Extend the Kubernetes API with CustomResourceDefinitions.
Each Red Hat Advanced Cluster Management for Kubernetes policy can have at least one or more templates. For more details about the policy elements, view the following Policy YAML table section on this page.
The policy requires a PlacementRule that defines the clusters that the policy document is applied to, and a PlacementBinding that binds the Red Hat Advanced Cluster Management for Kubernetes policy to the placement rule.
Important:
-
You must create a
placementRuleto apply your policies to the managed cluster, and bind theplacementRulewith aPlacementBinding. - You can create a policy in any namespace on the hub cluster except the cluster namespace. If you create a policy in the cluster namespace, it is deleted by Red Hat Advanced Cluster Management for Kubernetes.
- Each client and provider is responsible for ensuring that their managed cloud environment meets internal enterprise security standards for software engineering, secure engineering, resiliency, security, and regulatory compliance for workloads hosted on Kubernetes clusters. Use the governance and security capability to gain visibility and remediate configurations to meet standards.
2.2.1. Policy YAML structure
When you create a policy, you must include required parameter fields and values. Depending on your policy controller, you might need to include other optional fields and values. View the following YAML structure for explained parameter fields:
apiVersion: policy.open-cluster-management.io/v1
kind: Policy
metadata:
  name:
  annotations:
    policy.open-cluster-management.io/standards:
    policy.open-cluster-management.io/categories:
    policy.open-cluster-management.io/controls:
spec:
  policy-templates:
    - objectDefinition:
        apiVersion:
        kind:
        metadata:
          name:
        spec:
  remediationAction:
  disabled:

---
apiVersion: apps.open-cluster-management.io/v1
kind: PlacementBinding
metadata:
  name:
placementRef:
  name:
  kind:
  apiGroup:
subjects:
- name:
  kind:
  apiGroup:

---
apiVersion: apps.open-cluster-management.io/v1
kind: PlacementRule
metadata:
  name:
spec:
  clusterConditions:
  - type:
  clusterLabels:
    matchLabels:
      cloud:
2.2.2. Policy YAML table
| Field | Description |
|---|---|
| apiVersion |
Required. Set the value to |
| kind |
Required. Set the value to |
| metadata.name | Required. The name for identifying the policy resource. |
| metadata.annotations | Optional. Used to specify a set of security details that describes the set of standards the policy is trying to validate. Note: You can view policy violations based on the standards and categories that you define for your policy on the Policies page, from the console. |
| annotations.policy.open-cluster-management.io/standards | The name or names of security standards the policy is related to. For example, National Institute of Standards and Technology (NIST) and Payment Card Industry (PCI). |
| annotations.policy.open-cluster-management.io/categories | A security control category represent specific requirements for one or more standards. For example, a System and Information Integrity category might indicate that your policy contains a data transfer protocol to protect personal information, as required by the HIPAA and PCI standards. |
| annotations.policy.open-cluster-management.io/controls | The name of the security control that is being checked. For example, certificate policy controller. |
| spec.policy-templates | Required. Used to create one or more policies to apply to a managed cluster. |
| spec.disabled |
Required. Set the value to |
| spec.remediationAction |
Optional. Specifies the remediation of your policy. The parameter values are |
2.2.3. Policy sample file
apiVersion: policy.open-cluster-management.io/v1
kind: Policy
metadata:
  name: policy-role
  annotations:
    policy.open-cluster-management.io/standards: NIST SP 800-53
    policy.open-cluster-management.io/categories: AC Access Control
    policy.open-cluster-management.io/controls: AC-3 Access Enforcement
spec:
  remediationAction: inform
  disabled: false
  policy-templates:
    - objectDefinition:
        apiVersion: policy.open-cluster-management.io/v1
        kind: ConfigurationPolicy
        metadata:
          name: policy-role-example
        spec:
          remediationAction: inform # the policy-template spec.remediationAction is overridden by the preceding parameter value for spec.remediationAction.
          severity: high
          namespaceSelector:
            exclude: ["kube-*"]
            include: ["default"]
          object-templates:
            - complianceType: mustonlyhave # role definition should exact match
              objectDefinition:
                apiVersion: rbac.authorization.k8s.io/v1
                kind: Role
                metadata:
                  name: sample-role
                rules:
                  - apiGroups: ["extensions", "apps"]
                    resources: ["deployments"]
                    verbs: ["get", "list", "watch", "delete","patch"]
---
apiVersion: policy.open-cluster-management.io/v1
kind: PlacementBinding
metadata:
  name: binding-policy-role
placementRef:
  name: placement-policy-role
  kind: PlacementRule
  apiGroup: apps.open-cluster-management.io
subjects:
- name: policy-role
  kind: Policy
  apiGroup: policy.open-cluster-management.io
---
apiVersion: apps.open-cluster-management.io/v1
kind: PlacementRule
metadata:
  name: placement-policy-role
spec:
  clusterConditions:
  - status: "True"
    type: ManagedClusterConditionAvailable
  clusterSelector:
    matchExpressions:
      - {key: environment, operator: In, values: ["dev"]}
See Managing security policies to create and update a policy. You can also enable and update Red Hat Advanced Cluster Management policy controllers to validate the compliance of your policies. See Policy controllers. See Governance and risk for more policy topics.
2.3. Policy controllers
Policy controllers monitor and report whether your cluster is compliant with a policy. Use the Red Hat Advanced Cluster Management for Kubernetes policy framework by using the out of the box policy templates to apply predefined policy controllers, and policies. The policy controllers are Kubernetes CustomResourceDefinition (CRD) instance. For more information about CRDs, see Extend the Kubernetes API with CustomResourceDefinitions. Policy controllers remediate policy violations to make the cluster status be compliant.
You can create custom policies and policy controllers with the product policy framework. See Creating a custom policy controller for more information.
Important: Only the configuration policy controller supports the enforce feature. You must manually remediate policies, where the policy controller does not support the enforce feature.
View the following topics to learn more about the following Red Hat Advanced Cluster Management for Kubernetes policy controllers:
Refer to Governance and risk for more topics about managing your policies.
2.3.1. Kubernetes configuration policy controller
Configuration policy controller can be used to configure any Kubernetes resource and apply security policies across your clusters.
The configuration policy controller communicates with the local Kubernetes API server to get the list of your configurations that are in your cluster. For more information about CRDs, see Extend the Kubernetes API with CustomResourceDefinitions.
The configuration policy controller is created on the hub cluster during installation. Configuration policy controller supports the enforce feature and monitors the compliance of the following policies:
When the remediationAction for the configuration policy is set to enforce, the controller creates a replicate policy on the target managed clusters.
2.3.1.1. Configuration policy controller YAML structure
Name:         configuration-policy-example
Namespace:
Labels:
APIVersion:   policy.open-cluster-management.io/v1
Kind:         ConfigPolicy
Metadata:
  Finalizers:
    finalizer.policy.open-cluster-management.io
Spec:
  Conditions:
    Ownership:
    NamespaceSelector:
      Exclude:
      Include:
    RemediationAction:
 Status:
   CompliancyDetails:
     Configuration-Policy-Example:
       Default:
       Kube - Public:
   Compliant:          Compliant
 Events:
2.3.1.2. Configuration policy sample
apiVersion: policy.open-cluster-management.io/v1
kind: ConfigPolicy
metadata:
  name: policy-config
spec:
  namespaceSelector:
    include: ["default"]
    exclude: []
  remediationAction: inform
    severity: low
    object-templates:
    - complianceType: musthave
      objectDefinition:
        apiVersion: v1
        kind: Pod
        metadata:
          name: nginx-pod
        spec:
          containers:
          - image: nginx:1.7.9
            name: nginx
            ports:
           - containerPort: 80
2.3.1.3. Configuration policy YAML table
| Field | Description |
|---|---|
| apiVersion |
Required. Set the value to |
| kind |
Required. Set the value to |
| metadata.name | Required. The name of the policy. |
| spec | Required. Specifications of which configuration policy to monitor and how to remediate them. |
| spec.namespaceSelector |
Required. The namespaces within the hub cluster that the policy is applied to. Enter at least one namespace for the |
| spec.remediationAction |
Required. Specifies the remediation of your policy. Enter |
| remediationAction.severity |
Required. Specifies the severity when the policy is non-compliant. Use the following parameter values: |
| remediationAction.complianceType | Required. Used to list expected behavior for roles and other Kubernetes object that must be evaluated or applied to the managed clusters. You must use the following verbs as parameter values:
|
Learn about how policies are applied on your hub cluster. See Policy samples for more details. Learn how to create and customize policies, Manage security policies.
See Policy controllers for more information about controllers.
2.3.2. Certificate policy controller
Certificate policy controller can be used to detect certificates that are close to expiring. Configure and customize the certificate policy controller by updating the minimum duration parameter in your controller policy. When a certificate expires in less than the minimum duration amount of time, the policy becomes noncompliant. The certificate policy controller is created on your hub cluster.
The certificate policy controller communicates with the local Kubernetes API server to get the list of secrets that contain certificates and determine all non-compliant certificates. For more information about CRDs, see Extend the Kubernetes API with CustomResourceDefinitions.
Certificate policy controller does not support the enforce feature.
2.3.2.1. Certificate policy controller YAML structure
View the following example of a certificate policy and review the element in the YAML table:
apiVersion: policy.open-cluster-management.io/v1
kind: CertificatePolicy
metadata:
  name: certificate-policy-example
  namespace:
  labels: category=system-and-information-integrity
spec:
  namespaceSelector:
    include: ["default"]
    exclude: ["kube-*"]
  remediationAction:
  severity:
  minimumDuration:
2.3.2.1.1. Certificate policy controller YAML table
| Field | Description |
|---|---|
| apiVersion |
Required. Set the value to |
| kind |
Required. Set the value to |
| metadata.name | Required. The name to identify the policy. |
| metadata.namespace | Required. The namespaces within the managed cluster where the policy is created. |
| metadata.labels |
Optional. In a certificate policy, the |
| spec | Required. Specifications of which certificates to monitor and refresh. |
| spec.namespaceSelector |
Required. Managed cluster namespace to which you want to apply the policy. Enter parameter values for
• When you create multiple certificate policies and apply them to the same managed cluster, each policy
• If the |
| spec.remediationAction |
Required. Specifies the remediation of your policy. Set the parameter value to |
| spec.severity |
Optional. Specifies the severity when the policy is non-compliant. Use the following parameter values: |
| spec.minimumDuration |
Required. Parameter specifies the smallest duration (in hours) before a certificate is considered non-compliant. When the certificate expiration is greater than the |
2.3.2.2. Certificate policy sample
When your certificate policy controller is created on your hub cluster, a replicated policy is created on your managed cluster. Your certificate policy on your managed cluster might resemble the following file:
apiVersion: policy.open-cluster-management.io/v1
kind: CertificatePolicy
metadata:
  name: certificate-policy-1
  namespace: kube-system
  label:
    category: "System-Integrity"
spec:
  namespaceSelector:
    include: ["default", "kube-*"]
    exclude: ["kube-system"]
  remediationAction: inform
  minimumDuration: 100h
Learn how to manage a certificate policy, see Managing certificate policies for more details. Refer to Policy controllers for more topics.
2.3.3. IAM policy controller
Identity and Access Management (IAM) policy controller can be used to receive notifications about IAM policies that are non-compliant. The compliance check is based on the parameters that you configure in the IAM policy.
The IAM policy controller checks for compliance of the number of cluster administrators that you allow in your cluster. IAM policy controller communicates with the local Kubernetes API server. For more information, see Extend the Kubernetes API with CustomResourceDefinitions.
The IAM policy controller runs on your managed cluster.
2.3.3.1. IAM policy YAML structure
apiVersion: policy.open-cluster-management.io/v1
kind: IamPolicy
metadata:
  name:
spec:
  severity:
  namespaceSelector:
    include:
    exclude:
  remediationAction:
  maxClusterRoleBindingUsers:
2.3.3.2. IAM policy YAMl table
| Field | Description |
|---|---|
| apiVersion |
Required. Set the value to |
| kind |
Required. Set the value to |
| metadata.name | Required. The name for identifying the policy resource. |
| spec | Required. Add configuration details for your policy. |
| spec.namespaceSelector |
Required. The namespaces within the hub cluster that the policy is applied to. Enter at least one namespace for the |
| spec.remediationAction |
Optional. Specifies the remediation of your policy. Enter |
| spec.maxClusterRoleBindingUsers | Required. Maximum number of IAM role bindings that are available before a policy is considered non-compliant. |
2.3.3.3. IAM policy sample
apiVersion: policy.open-cluster-management.io/v1
kind: IamPolicy # limit clusteradminrole and report violation
metadata:
  name: {{name}}-example
spec:
  severity: medium
  namespaceSelector:
    include: ["*"]
    exclude: ["kube-*", "openshift-*"]
  remediationAction: inform # will be overridden by remediationAction in parent policy
  maxClusterRoleBindingUsers: 5
Learn how to manage an IAM policy, see Managing IAM policies for more details. Refer to Policy controllers for more topics.
2.3.4. Creating a custom policy controller
Learn to write, apply, view, and update your custom policy controllers. You can create a YAML file for your policy controller to deploy onto your cluster. View the following sections to create a policy controller:
2.3.4.1. Writing a policy controller
Use the policy controller framework that is in the multicloud-operators-policy-controller repository. Complete the following steps to create a policy controller:
Clone the
multicloud-operators-policy-controllerrepository by running the following command:git clone git@github.com:open-cluster-management/multicloud-operators-policy-controller.gitCustomize the controller policy by updating the policy schema definition. Your policy might resemble the following content:
metadata:
  name: samplepolicies.policies.open-cluster-management.io
spec:
  group: policy.open-cluster-management.io
  names:
    kind: SamplePolicy
    listKind: SamplePolicyList
    plural: samplepolicies
    singular: samplepolicy
Update the policy controller to watch for the
SamplePolicykind. Run the following command:for file in $(find . -name "*.go" -type f); do sed -i "" "s/SamplePolicy/g" $file; done for file in $(find . -name "*.go" -type f); do sed -i "" "s/samplepolicy-controller/samplepolicy-controller/g" $file; doneRecompile and run the policy controller by completing the following steps:
- Log in to your cluster.
- Select the user icon, then click Configure client.
- Copy and paste the configuration information into your command line, and press Enter.
Run the following commands to apply your policy CRD and start the controller:
export GO111MODULE=on

kubectl apply -f deploy/crds/policy.open-cluster-management.io_samplepolicies_crd.yaml

operator-sdk run --local --verbose
You might receive the following output that indicates that your controller runs:
{“level”:”info”,”ts”:1578503280.511274,”logger”:”controller-runtime.manager”,”msg”:”starting metrics server”,”path”:”/metrics”}
{“level”:”info”,”ts”:1578503281.215883,”logger”:”controller-runtime.controller”,”msg”:”Starting Controller”,”controller”:”samplepolicy-controller”}
{“level”:”info”,”ts”:1578503281.3203468,”logger”:”controller-runtime.controller”,”msg”:”Starting workers”,”controller”:”samplepolicy-controller”,”worker count”:1}
Waiting for policies to be available for processing…
Create a policy and verify that the controller retrieves it and applies the policy onto your cluster. Run the following command:
kubectl apply -f deploy/crds/policy.open-cluster-management.io_samplepolicies_crd.yamlWhen the policy is applied, a message appears to indicate that policy is monitored and detected by your custom controller. The mesasge might resemble the following contents:
{"level":"info","ts":1578503685.643426,"logger":"controller_samplepolicy","msg":"Reconciling SamplePolicy","Request.Namespace":"default","Request.Name":"example-samplepolicy"}
{"level":"info","ts":1578503685.855259,"logger":"controller_samplepolicy","msg":"Reconciling SamplePolicy","Request.Namespace":"default","Request.Name":"example-samplepolicy"}
Available policies in namespaces:
namespace = kube-public; policy = example-samplepolicy
namespace = default; policy = example-samplepolicy
namespace = kube-node-lease; policy = example-samplepolicy
Check the
statusfield for compliance details by running the following command:kubectl describe SamplePolicy example-samplepolicy -n defaultYour output might resemble the following contents:
status:
  compliancyDetails:
    example-samplepolicy:
      cluster-wide:
      - 5 violations detected in namespace `cluster-wide`, there are 0 users violations
        and 5 groups violations
      default:
      - 0 violations detected in namespace `default`, there are 0 users violations
        and 0 groups violations
      kube-node-lease:
      - 0 violations detected in namespace `kube-node-lease`, there are 0 users violations
        and 0 groups violations
      kube-public:
      - 1 violations detected in namespace `kube-public`, there are 0 users violations
        and 1 groups violations
  compliant: NonCompliant
Change the policy rules and policy logic to introduce new rules for your policy controller. Complete the following steps:
Add new fields in your YAML file by updating the
SamplePolicySpec. Your specification might resemble the following content:spec: description: SamplePolicySpec defines the desired state of SamplePolicy properties: labelSelector: additionalProperties: type: string type: object maxClusterRoleBindingGroups: type: integer maxClusterRoleBindingUsers: type: integer maxRoleBindingGroupsPerNamespace: type: integer maxRoleBindingUsersPerNamespace: type: integer-
Update the
SamplePolicySpecstructure in the samplepolicy_controller.go with new fields. -
Update the
PeriodicallyExecSamplePoliciesfunction in thesamplepolicy_controller.gofile with new logic to run the policy controller. View an example of thePeriodicallyExecSamplePoliciesfield, see open-cluster-management/multicloud-operators-policy-controller. - Recompile and run the policy controller. See Writing a policy controller
Your policy controller is functional.
2.3.4.2. Deploying your controller to the cluster
Deploy your custom policy controller to your cluster and integrate the policy controller with the Governance and risk dashboard. Complete the following steps:
Build the policy controller image by running the following command:
operator-sdk build <username>/multicloud-operators-policy-controller:latestRun the following command to push the image to a repository of your choice. For example, run the following commands to push the image to Docker Hub:
docker login docker push <username>/multicloud-operators-policy-controller-
Configure
kubectlto point to a cluster managed by Red Hat Advanced Cluster Management for Kubernetes. Replace the operator manifest to use the built-in image name and update the namespace to watch for policies. The namespace must be the cluster namespace. Your manifest might resemble the following contents:
sed -i "" 's|open-cluster-management/multicloud-operators-policy-controller|ycao/multicloud-operators-policy-controller|g' deploy/operator.yaml
sed -i "" 's|value: default|value: <namespace>|g' deploy/operator.yaml
Update the RBAC role by running the following commands:
sed -i "" 's|samplepolicies|testpolicies|g' deploy/cluster_role.yaml
sed -i "" 's|namespace: default|namespace: <namespace>|g' deploy/cluster_role_binding.yaml
Deploy your policy controller to your cluster:
Set up a service account for cluster by runnng the following command:
kubectl apply -f deploy/service_account.yaml -n <namespace>Set up RBAC for the operator by running the following commands:
kubectl apply -f deploy/role.yaml -n <namespace>

kubectl apply -f deploy/role_binding.yaml -n <namespace>
Set up RBAC for your PolicyController. Run the following commands:
kubectl apply -f deploy/cluster_role.yaml
kubectl apply -f deploy/cluster_role_binding.yaml
Set up a CustomResourceDefinition (CRD) by running the following command:
kubectl apply -f deploy/crds/policies.open-cluster-management.io_samplepolicies_crd.yamlDeploy the
multicloud-operator-policy-controllerby running the following command:kubectl apply -f deploy/operator.yaml -n <namespace>Verify that the controller is functional by running the following command:
kubectl get pod -n <namespace>
-
You must integrate your policy controller by creating a
policy-templatefor the controller to monitor. For more information, see Creating a cluster security policy from the console.
2.3.4.2.1. Scaling your controller deployment
Policy controller deployments do not support deletetion or removal. You can scale your deployment to update which pods the deployment is applied to. Complete the following steps:
- Log in to your managed cluster.
- Navigate to the deployment for your custom policy controller.
- Scale the deployment. When you scale your deployment to zero pods, the policy controler deployment is disabled.
For more information on deployments, see OpenShift Container Platform Deployments.
Your policy controller is deployed and integrated on your cluster. View the product policy controllers, see Policy controllers for more information.
2.4. Policy samples
Create and manage policies in Red Hat Advanced Cluster Management for Kubernetes to define rules, processes, and controls on the hub cluster. View the following policy samples to view how specfic policies are applied:
- Kubernetes configuration policy controller sample
- Image vulnerability policy sample
- Memory usage policy sample
- Namespace policy sample
- Pod nginx policy sample
- Pod security policy sample
- Role policy sample
- Rolebinding policy sample
- Security context constraints policy sample
- Certificate policy sample
- IAM policy sample
Refer to Governance and risk for more topics.
2.4.1. Memory usage policy
Kubernetes configuration policy controller monitors the status of the memory usage policy. Use the memory usage policy to limit or restrict your memory and compute usage. For more information, see Limit Ranges in the Kubernetes documentation. Learn more details about the memory usage policy structure in the following sections.
2.4.1.1. Memory usage policy YAML structure
Your memory usage policy might resemble the following YAML file:
   apiVersion: policy.open-cluster-management.io/v1
   kind: Policy
   metadata:
     name: policy-limitrange
     namespace:
   spec:
     complianceType:
     remediationAction:
     namespaces:
       exclude:
       include:
     object-templates:
       - complianceType:
         objectDefinition:
           apiVersion:
           kind:
           metadata:
             name:
           spec:
             limits:
             - default:
                 memory:
               defaultRequest:
                 memory:
               type:
           ...
2.4.1.2. Memory usage policy table
| Field | Description |
|---|---|
| apiVersion |
Required. Set the value to |
| kind |
Required. Set the value to |
| metadata.name | Required. The name for identifying the policy resource. |
| metadata.namespaces | Optional. |
| spec.namespace |
Required. The namespaces within the hub cluster that the policy is applied to. Enter parameter values for |
| remediationAction |
Optional. Specifies the remediation of your policy. The parameter values are |
| disabled |
Required. Set the value to |
| spec.complianceType |
Required. Set the value to |
| spec.object-template | Optional. Used to list any other Kubernetes object that must be evaluated or applied to the managed clusters. |
2.4.1.3. Memory usage policy sample
   apiVersion: policy.open-cluster-management.io/v1
   kind: Policy
   metadata:
     name: policy-limitrange
     namespace: mcm
   spec:
     complianceType: musthave
     remediationAction: inform
     namespaces:
       exclude: ["kube-*"]
       include: ["default"]
     object-templates:
       - complianceType: musthave
         objectDefinition:
           apiVersion: v1
           kind: LimitRange # limit memory usage
           metadata:
             name: mem-limit-range
           spec:
             limits:
             - default:
                 memory: 512Mi
               defaultRequest:
                 memory: 256Mi
               type: Container
           ...
See Managing memory usage policies for more information. View other configuration policies that are monitored by controller, see the Kubernetes configuration policy controller page.
2.4.2. Namespace policy
Kubernetes configuration policy controller monitors the status of your namespace policy. Apply the namespace policy to define specific rules for your namespace. Learn more details about the namespace policy structure in the following sections.
2.4.2.1. Namespace policy YAML structure
   apiVersion: policy.open-cluster-management.io/v1
   kind: Policy
   metadata:
     name: policy-namespace-1
     namespace:
   spec:
     complianceType:
     remediationAction:
     namespaces:
       exclude:
       include:
     object-templates:
       - complianceType:
         objectDefinition:
           kind:
           apiVersion:
           metadata:
             name:
        ...
2.4.2.2. Namespace policy YAML table
| Field | Description |
|---|---|
| apiVersion |
Required. Set the value to |
| kind |
Required. Set the value to |
| metadata.name | Required. The name for identifying the policy resource. |
| metadata.namespaces | Optional. |
| spec.namespace |
Required. The namespaces within the hub cluster that the policy is applied to. Enter parameter values for |
| remediationAction |
Optional. Specifies the remediation of your policy. The parameter values are |
| disabled |
Required. Set the value to |
| spec.complianceType |
Required. Set the value to |
| spec.object-template | Optional. Used to list any other Kubernetes object that must be evaluated or applied to the managed clusters. |
2.4.2.3. Namespace policy sample
Your namespace policy might resemble the following YAML file:
   apiVersion: policy.open-cluster-management.io/v1
   kind: Policy
   metadata:
     name: policy-namespace-1
     namespace: open-cluster-management
   spec:
     complianceType: musthave
     remediationAction: inform
     namespaces:
       exclude: ["kube-*"]
       include: ["default"]
     object-templates:
       - complianceType: musthave
         objectDefinition:
           kind: Namespace # must have namespace 'prod'
           apiVersion: v1
           metadata:
             name: prod
        ...
Manage your namespace policy. See Managing namespace policies for more information. See Kubernetes configuration policy controller to learn about other configuration policies.
2.4.3. Image vulnerability policy
Apply the image vulnerability policy to detect if container images have vulnerabilities by leveraging the Container Security Operator. The policy installs the Container Security Operator on your managed cluster if it is not installed.
The image vulnerability policy is checked by the Kubernetes configuration policy controller. For more information about the Security Operator, see the Container Security Operator from the Quay repository.
Note: Image vulnerability policy is not functional during a disconnected installation.
2.4.3.1. Image vulnerability policy YAML structure
apiVersion: policy.open-cluster-management.io/v1
kind: Policy
metadata:
  name: policy-imagemanifestvulnpolicy
  namespace: default
  annotations:
    policy.open-cluster-management.io/standards: NIST-CSF
    policy.open-cluster-management.io/categories: DE.CM Security Continuous Monitoring
    policy.open-cluster-management.io/controls: DE.CM-8 Vulnerability Scans
spec:
  remediationAction:
  disabled:
  policy-templates:
  - objectDefinition:
      apiVersion: policy.open-cluster-management.io/v1
      kind: ConfigurationPolicy
      metadata:
        name:
      spec:
        remediationAction:
        severity: high
        object-templates:
          - complianceType:
            objectDefinition:
              apiVersion: operators.coreos.com/v1alpha1
              kind: Subscription
              metadata:
                name: container-security-operator
                namespace:
              spec:
                channel:
                installPlanApproval:
                name:
                source:
                sourceNamespace:
  - objectDefinition:
      apiVersion: policy.open-cluster-management.io/v1
      kind: ConfigurationPolicy
      metadata:
        name:
      spec:
        remediationAction:
        severity:
        namespaceSelector:
          exclude:
          include:
        object-templates:
          - complianceType:
            objectDefinition:
              apiVersion: secscan.quay.redhat.com/v1alpha1
              kind: ImageManifestVuln # checking for a kind
---
apiVersion: policy.open-cluster-management.io/v1
kind: PlacementBinding
metadata:
  name: binding-policy-imagemanifestvulnpolicy
  namespace: default
placementRef:
  name:
  kind:
  apiGroup:
subjects:
- name:
  kind:
  apiGroup:
---
apiVersion: apps.open-cluster-management.io/v1
kind: PlacementRule
metadata:
  name: placement-policy-imagemanifestvulnpolicy
  namespace: default
spec:
  clusterConditions:
  - status:
    type:
  clusterSelector:
    matchExpressions:
      []  # selects all clusters if not specified
2.4.3.2. Image vulnerability policy YAML table
| Field | Description |
|---|---|
| apiVersion |
Required. Set the value to |
| kind |
Required. Set the value to |
| metadata.name | Required. The name for identifying the policy resource. |
| metadata.namespaces | Optional. |
| spec.namespace |
Required. The namespaces within the hub cluster that the policy is applied to. Enter parameter values for |
| remediationAction |
Optional. Specifies the remediation of your policy. The parameter values are |
| disabled |
Required. Set the value to |
| spec.complianceType |
Required. Set the value to |
| spec.object-template | Optional. Used to list any other Kubernetes object that must be evaluated or applied to the managed clusters. |
2.4.3.3. Image vulnerability policy sample
apiVersion: policy.open-cluster-management.io/v1
kind: Policy
metadata:
  name: policy-imagemanifestvulnpolicy
  namespace: default
  annotations:
    policy.open-cluster-management.io/standards: NIST-CSF
    policy.open-cluster-management.io/categories: DE.CM Security Continuous Monitoring
    policy.open-cluster-management.io/controls: DE.CM-8 Vulnerability Scans
spec:
  remediationAction: inform
  disabled: false
  policy-templates:
  - objectDefinition:
      apiVersion: policy.open-cluster-management.io/v1
      kind: ConfigurationPolicy
      metadata:
        name: policy-imagemanifestvulnpolicy-example-sub
      spec:
        remediationAction: inform # will be overridden by remediationAction in parent policy
        severity: high
        object-templates:
          - complianceType: musthave
            objectDefinition:
              apiVersion: operators.coreos.com/v1alpha1
              kind: Subscription
              metadata:
                name: container-security-operator
                namespace: openshift-operators
              spec:
                channel: quay-v3.3
                installPlanApproval: Automatic
                name: container-security-operator
                source: redhat-operators
                sourceNamespace: openshift-marketplace
  - objectDefinition:
      apiVersion: policy.open-cluster-management.io/v1
      kind: ConfigurationPolicy
      metadata:
        name: policy-imagemanifestvulnpolicy-example-imv
      spec:
        remediationAction: inform # will be overridden by remediationAction in parent policy
        severity: high
        namespaceSelector:
          exclude: ["kube-*"]
          include: ["*"]
        object-templates:
          - complianceType: mustnothave # mustnothave any ImageManifestVuln object
            objectDefinition:
              apiVersion: secscan.quay.redhat.com/v1alpha1
              kind: ImageManifestVuln # checking for a kind
---
apiVersion: policy.open-cluster-management.io/v1
kind: PlacementBinding
metadata:
  name: binding-policy-imagemanifestvulnpolicy
  namespace: default
placementRef:
  name: placement-policy-imagemanifestvulnpolicy
  kind: PlacementRule
  apiGroup: apps.open-cluster-management.io
subjects:
- name: policy-imagemanifestvulnpolicy
  kind: Policy
  apiGroup: policy.open-cluster-management.io
---
apiVersion: apps.open-cluster-management.io/v1
kind: PlacementRule
metadata:
  name: placement-policy-imagemanifestvulnpolicy
  namespace: default
spec:
  clusterConditions:
  - status: "True"
    type: ManagedClusterConditionAvailable
  clusterSelector:
    matchExpressions:
      []  # selects all clusters if not specified
See Managing image vulnerability policies for more information. View other configuration policies that are monitored by the configuration controller, see Kubernetes configuration policy controller.
2.4.4. Pod nginx policy
Kubernetes configuration policy controller monitors the status of you pod nginx policies. Apply the pod policy to define the container rules for your pods. A nginx pod must exist in your cluster.
2.4.4.1. Pod nginx policy YAML structure
   apiVersion: policy.open-cluster-management.io/v1
   kind: Policy
   metadata:
     name: policy-pod
     namespace:
   spec:
     complianceType:
     remediationAction:
     namespaces:
       exclude:
       include:
     object-templates:
       - complianceType:
         objectDefinition:
           apiVersion:
           kind: Pod # nginx pod must exist
           metadata:
             name:
           spec:
             containers:
             - image:
               name:
               ports:
               - containerPort:
        ...
2.4.4.2. Pod nginx policy table
| Field | Description |
|---|---|
| apiVersion |
Required. Set the value to |
| kind |
Required. Set the value to |
| metadata.name | Required. The name for identifying the policy resource. |
| metadata.namespaces | Optional. |
| spec.namespace |
Required. The namespaces within the hub cluster that the policy is applied to. Enter parameter values for |
| remediationAction |
Optional. Specifies the remediation of your policy. The parameter values are |
| disabled |
Required. Set the value to |
| spec.complianceType |
Required. Set the value to |
| spec.object-template | Optional. Used to list any other Kubernetes object that must be evaluated or applied to the managed clusters. |
2.4.4.3. Pod nginx policy sample
Your pod policy nginx policy might resemble the following YAML file:
   apiVersion: policy.open-cluster-management.io/v1
   kind: Policy
   metadata:
     name: policy-pod
     namespace: open-cluster-management
   spec:
     complianceType: musthave
     remediationAction: inform
     namespaces:
       exclude: ["kube-*"]
       include: ["default"]
     object-templates:
       - complianceType: musthave
         objectDefinition:
           apiVersion: v1
           kind: Pod # nginx pod must exist
           metadata:
             name: nginx-pod
           spec:
             containers:
             - image: nginx:1.7.9
               name: nginx
               ports:
               - containerPort: 80
        ...
Learn how to manage a pod nginx policy, see Managing pod nginx policies for more details. View other configuration policies that are monitored by the configuration controller, see Kubernetes configuration policy controller. See Manage security policies to manage other policies.
2.4.5. Pod security policy
Kubernetes configuration policy controller monitors the status of the pod security policy. Apply a pod security policy to secure pods and containers. For more information, see Pod Security Policies in the Kubernetes documentation. Learn more details about the pod security policy structure in the following sections.
2.4.5.1. Pod security policy YAML structure
   apiVersion: policy.open-cluster-management.io/v1
   kind: Policy
   metadata:
     name: policy-podsecuritypolicy
     namespace:
   spec:
     complianceType:
     remediationAction:
     namespaces:
       exclude:
       include:
     object-templates:
       - complianceType:
         objectDefinition:
           apiVersion:
           kind: PodSecurityPolicy # no privileged pods
           metadata:
             name:
             annotations:
           spec:
             privileged:
             allowPrivilegeEscalation:
             allowedCapabilities:
             volumes:
             hostNetwork:
             hostPorts:
             hostIPC:
             hostPID:
             runAsUser:
               rule:
             seLinux:
               rule:
             supplementalGroups:
               rule:
             fsGroup:
               rule:
        ...
2.4.5.2. Pod security policy table
| Field | Description |
|---|---|
| apiVersion |
Required. Set the value to |
| kind |
Required. Set the value to |
| metadata.name | Required. The name for identifying the policy resource. |
| metadata.namespaces | Optional. |
| spec.namespace |
Required. The namespaces within the hub cluster that the policy is applied to. Enter parameter values for |
| remediationAction |
Optional. Specifies the remediation of your policy. The parameter values are |
| disabled |
Required. Set the value to |
| spec.complianceType |
Required. Set the value to |
| spec.object-template | Optional. Used to list any other Kubernetes object that must be evaluated or applied to the managed clusters. |
2.4.5.3. Pod security policy sample
Your pod security policy might resemble the following YAML file:
   apiVersion: policy.open-cluster-management.io/v1
   kind: Policy
   metadata:
     name: policy-podsecuritypolicy
     namespace: open-cluster-management
   spec:
     complianceType: musthave
     remediationAction: inform
     namespaces:
       exclude: ["kube-*"]
       include: ["default"]
     object-templates:
       - complianceType: musthave
         objectDefinition:
           apiVersion: policy/v1beta1
           kind: PodSecurityPolicy # no privileged pods
           metadata:
             name: restricted-open-cluster-management
             annotations:
            seccomp.security.alpha.kubernetes.io/allowedProfileNames: '*'
           spec:
             privileged: false # no priviliedged pods
             allowPrivilegeEscalation: false
             allowedCapabilities:
             - '*'
             volumes:
             - '*'
             hostNetwork: true
             hostPorts:
             - min: 1000 # ports < 1000 are reserved
               max: 65535
             hostIPC: false
             hostPID: false
             runAsUser:
               rule: 'RunAsAny'
             seLinux:
               rule: 'RunAsAny'
             supplementalGroups:
               rule: 'RunAsAny'
             fsGroup:
               rule: 'RunAsAny'
        ...
See Managing pod security policies for more information. View other configuration policies that are monitored by controller, see the Kubernetes configuration policy controller page.
2.4.6. Role policy
Kubernetes configuration policy controller monitors the status of role policies. Define roles in the object-template to set rules and permissions for specific roles in your cluster. Learn more details about the role policy structure in the following sections.
2.4.6.1. Role policy YAML structure
apiVersion: policy.open-cluster-management.io/v1
kind: Policy
metadata:
  name: policy-role
  namespace:
  annotations:
    policy.open-cluster-management.io/standards: NIST-CSF
    policy.open-cluster-management.io/categories: PR.AC Identity Management Authentication and Access Control
    policy.open-cluster-management.io/controls: PR.AC-4 Access Control
spec:
  remediationAction: inform
  disabled: false
  policy-templates:
    - objectDefinition:
        apiVersion: policy.open-cluster-management.io/v1
        kind: ConfigurationPolicy
        metadata:
          name: policy-role-example
        spec:
          remediationAction: inform # will be overridden by remediationAction in parent policy
          severity: high
          namespaceSelector:
            exclude: ["kube-*"]
            include: ["default"]
          object-templates:
            - complianceType: mustonlyhave # role definition should exact match
              objectDefinition:
                apiVersion: rbac.authorization.k8s.io/v1
                kind: Role
                metadata:
                  name: sample-role
                rules:
                  - apiGroups: ["extensions", "apps"]
                    resources: ["deployments"]
                    verbs: ["get", "list", "watch", "delete","patch"]
---
apiVersion: policy.open-cluster-management.io/v1
kind: PlacementBinding
metadata:
  name: binding-policy-role
  namespace:
placementRef:
  name: placement-policy-role
  kind: PlacementRule
  apiGroup: apps.open-cluster-management.io
subjects:
- name: policy-role
  kind: Policy
  apiGroup: policy.open-cluster-management.io
---
apiVersion: apps.open-cluster-management.io/v1
kind: PlacementRule
metadata:
  name: placement-policy-role
  namespace:
spec:
  clusterConditions:
    - type: ManagedClusterConditionAvailable
      status: "True"
  clusterSelector:
    matchExpressions:
      []

         ...
2.4.6.2. Role policy table
| Field | Description |
|---|---|
| apiVersion |
Required. Set the value to |
| kind |
Required. Set the value to |
| metadata.name | Required. The name for identifying the policy resource. |
| metadata.namespaces | Optional. |
| spec.namespace |
Required. The namespaces within the hub cluster that the policy is applied to. Enter parameter values for |
| remediationAction |
Optional. Specifies the remediation of your policy. The parameter values are |
| disabled |
Required. Set the value to |
| spec.complianceType |
Required. Set the value to |
| spec.object-template | Optional. Used to list any other Kubernetes object that must be evaluated or applied to the managed clusters. |
2.4.6.3. Role policy sample
Apply a role policy to set rules and permissions for specific roles in your cluster. For more information on roles, see Role-based access control. Your role policy might resemble the following YAML file:
   apiVersion: policy.open-cluster-management.io/v1
   kind: Policy
   metadata:
     name: policy-role
     namespace: open-cluster-management
   spec:
     complianceType: musthave
     remediationAction: inform
     namespaces:
       exclude: ["kube-*"]
       include: ["default"]
     role-templates:
       - apiVersion: open-cluster-management.io/v1/v1alpha1 # role must follow defined permissions
         metadata:
           namespace: "" # will be inferred
           name: operator-role-policy
         selector:
           matchLabels:
             dev: "true"
         complianceType: musthave # at this level, it means the role must exist with the rules that it must have the following
         rules:
           - complianceType: musthave # at this level, it means if the role exists the rule is a musthave
             policyRule:
               apiGroups: ["extensions", "apps"]
               resources: ["deployments"]
               verbs: ["get", "list", "watch", "create", "delete","patch"]
          - complianceType: "mustnothave" # at this level, it means if the role exists the rule is a mustnothave
            policyRule:
              apiGroups: ["core"]
              resources: ["secrets"]
              verbs: ["get", "list", "watch","delete", "create", "update", "patch"]
         ...
See Managing role policies for more information. View other configuration policies that are monitored by controller, see the Kubernetes configuration policy controller page. Learn more about Red Hat Advanced Cluster Management RBAC, see Role-based access control.
2.4.7. Rolebinding policy
Kubernetes configuration policy controller monitors the status of your rolebinding policy. Apply a rolebinding policy to bind a policy to a namespace in your managed cluster. Learn more details about the namespace policy structure in the following sections.
2.4.7.1. Rolebinding policy YAML structure
   apiVersion: policy.open-cluster-management.io/v1
   kind: Policy
   metadata:
     name:
     namespace:
   spec:
     complianceType:
     remediationAction:
     namespaces:
       exclude:
       include:
     object-templates:
       - complianceType:
         objectDefinition:
           kind: RoleBinding # role binding must exist
           apiVersion: rbac.authorization.k8s.io/v1
           metadata:
             name: operate-pods-rolebinding
           subjects:
           - kind: User
             name: admin # Name is case sensitive
             apiGroup:
           roleRef:
             kind: Role #this must be Role or ClusterRole
             name: operator # this must match the name of the Role or ClusterRole you wish to bind to
             apiGroup: rbac.authorization.k8s.io
       ...
2.4.7.2. Rolebinding policy table
| Field | Description |
|---|---|
| apiVersion |
Required. Set the value to |
| kind |
Required. Set the value to |
| metadata.name | Required. The name to identify the policy resource. |
| metadata.namespaces | Required. The namespace within the managed cluster where the policy is created. |
| spec | Required. Specifications of how compliance violations are identified and fixed. |
| metadata.name | Required. The name for identifying the policy resource. |
| metadata.namespaces | Optional. |
| spec.complianceType |
Required. Set the value to |
| spec.namespace |
Required. Managed cluster namespace to which you want to apply the policy. Enter parameter values for |
| spec.remediationAction |
Required. Specifies the remediation of your policy. The parameter values are |
| spec.object-template | Required. Used to list any other Kubernetes object that must be evaluated or applied to the managed clusters. |
2.4.7.3. Rolebinding policy sample
Your role binding policy might resemble the following YAML file:
   apiVersion: policy.open-cluster-management.io/v1
   kind: Policy
   metadata:
     name: policy-rolebinding
     namespace: open-cluster-management
   spec:
     complianceType: musthave
     remediationAction: inform
     namespaces:
       exclude: ["kube-*"]
       include: ["default"]
     object-templates:
       - complianceType: musthave
         objectDefinition:
           kind: RoleBinding # role binding must exist
           apiVersion: rbac.authorization.k8s.io/v1
           metadata:
             name: operate-pods-rolebinding
           subjects:
           - kind: User
             name: admin # Name is case sensitive
             apiGroup: rbac.authorization.k8s.io
           roleRef:
             kind: Role #this must be Role or ClusterRole
             name: operator # this must match the name of the Role or ClusterRole you wish to bind to
             apiGroup: rbac.authorization.k8s.io
       ...
Learn how to manage a rolebinding policy, see Managing rolebinding policies for more details. See Kubernetes configuration policy controller to learn about other configuration policies. See Manage security policies to manage other policies.
2.4.8. Security Context Constraints policy
Kubernetes configuration policy controller monitors the status of your Security Context Constraints (SCC) policy. Apply an Security Context Constraints (SCC) policy to control permissions for pods by defining conditions in the policy. Learn more details about SCC policies in the following sections.
2.4.8.1. SCC policy YAML structure
apiVersion: policy.open-cluster-management.io/v1
kind: Policy
metadata:
  name: policy-scc
  namespace: open-cluster-management-policies
spec:
  complianceType:
  remediationAction:
  namespaces:
    exclude:
    include:
  object-templates:
    - complianceType:
      objectDefinition:
        apiVersion:
        kind: SecurityContextConstraints # restricted scc
        metadata:
          annotations:
            kubernetes.io/description:
          name: sample-restricted-scc
        allowHostDirVolumePlugin:
        allowHostIPC:
        allowHostNetwork:
        allowHostPID:
        allowHostPorts:
        allowPrivilegeEscalation:
        allowPrivilegedContainer:
        allowedCapabilities:
        defaultAddCapabilities:
        fsGroup:
         type:
        groups:
        - system:
        priority:
        readOnlyRootFilesystem:
        requiredDropCapabilities:
        runAsUser:
          type:
        seLinuxContext:
          type:
        supplementalGroups:
          type:
        users:
        volumes:
2.4.8.2. SCC policy table
| Field | Description |
|---|---|
| apiVersion |
Required. Set the value to |
| kind |
Required. Set the value to |
| metadata.name | Required. The name to identify the policy resource. |
| metadata.namespace | Required. The namespace within the managed cluster where the policy is created. |
| spec.complianceType |
Required. Set the value to |
| spec.remediationAction |
Required. Specifies the remediation of your policy. The parameter values are |
| spec.namespace |
Required. Managed cluster namespace to which you want to apply the policy. Enter parameter values for |
| spec.object-template | Required. Used to list any other Kubernetes object that must be evaluated or applied to the managed clusters. |
For explanations on the contents of a SCC policy, see About Security Context Constraints from the OpenShift Container Platform documentation.
2.4.8.3. SCC policy sample
Apply an Security context constraints (SCC) policy to control permissions for pods by defining conditions in the policy. For more information see, Managing Security Context Constraints (SCC). Your SCC policy might resemble the following YAML file:
   apiVersion: policy.open-cluster-management.io/v1
   kind: Policy
   metadata:
     name: policy-scc
     namespace: open-cluster-management
     annotations:
       policy.open-cluster-management.io/standards: NIST-CSF
       policy.open-cluster-management.io/categories: PR.PT Protective Technology
       policy.open-cluster-management.io/controls: PR.PT-3 Least Functionality
   spec:
     complianceType: musthave
     remediationAction: inform
     disabled: false
     namespaces:
       exclude: ["kube-*"]
       include: ["default"]
     object-templates:
       - complianceType: musthave
         objectDefinition:
           apiVersion: security.openshift.io/v1
           kind: SecurityContextConstraints # restricted scc
           metadata:
             annotations:
               kubernetes.io/description: restricted denies access to all host features and requires pods to be run with a UID, and SELinux context that are allocated to the namespace.  This is the most restrictive SCC and it is used by default for authenticated users.
             name: sample-restricted-scc
           allowHostDirVolumePlugin: false
           allowHostIPC: false
           allowHostNetwork: false
           allowHostPID: false
           allowHostPorts: false
           allowPrivilegeEscalation: true
           allowPrivilegedContainer: false
           allowedCapabilities: []
           defaultAddCapabilities: []
           fsGroup:
             type: MustRunAs
           groups:
           - system:authenticated
           priority: null
           readOnlyRootFilesystem: false
           requiredDropCapabilities:
           - KILL
           - MKNOD
           - SETUID
           - SETGID
           runAsUser:
             type: MustRunAsRange
           seLinuxContext:
             type: MustRunAs
           supplementalGroups:
             type: RunAsAny
           users: []
           volumes:
           - configMap
           - downwardAPI
           - emptyDir
           - persistentVolumeClaim
           - projected
           - secret
   ---
   apiVersion: apps.open-cluster-management.io/v1
   kind: PlacementBinding
   metadata:
     name: binding-policy-scc
     namespace: open-cluster-management-policies
   placementRef:
     name: placement-policy-scc
     kind: PlacementRule
     apiGroup: apps.open-cluster-management.io
   subjects:
   - name: policy-scc
     kind: Policy
     apiGroup: policy.mcm.ibm.com
   ---
   apiVersion: apps.open-cluster-management.io/v1
   kind: PlacementBinding
   metadata:
     name: policy-scc-production-clusters
     namespace: open-cluster-management-policies
   placementRef:
     name: production-clusters
     kind: PlacementRule
     apiGroup: apps.open-cluster-management.io
   subjects:
   - name: policy-scc
     kind: Policy
     apiGroup: policy.mcm.ibm.com
   ---
   apiVersion: apps.open-cluster-management.io/v1
   kind: PlacementRule
   metadata:
     name: placement-policy-scc
     namespace: open-cluster-management-policies
   spec:
     clusterConditions:
       - type: ManagedClusterConditionAvailable
         status: "True"
     clusterSelector:
       matchExpressions: []
To learn how to manage an SCC policy, see Managing Security Context Constraints policies for more details. See Kubernetes configuration policy controller to learn about other configuration policies. See Manage security policies to manage other policies.
2.5. Manage security policies
Use the Governance and risk dashboard to create, view, and manage your security policies and policy violations. You can create YAML files for your policies from the CLI and console.
From the Policies page, you can customize your Summary view by filtering the violations by categories or standards, collapse the summary to see less information, and you can search for policies. You can also filter the violation table view by policies or cluster violations.
The table of policies list the following details of a policy: Policy name, Namespace, Remediation, Cluster violation, Standards, Categories, and Controls. You can apply, edit, disable, or remove a policy by selecting the Options icon.
When you select a policy in the table list, the following tabs of information are displayed from the console:
- Details: Select the Details tab to view Policy details, Placement details, and a table list of _Policy templates.
- Violations: Select the Violations tab to view a table list of violations.
- YAML tab: Select the YAML tab to view, and or edit your policy with the editor.
Review the following topics to learn more about creating and updating your security policies:
- Managing security policies
- Managing configuration policies
- Managing image vulnerability policies
- Managing memory usage policies
- Managing namespace policies
- Managing pod nginx policies
- Managing pod security policies
- Managing role policies
- Managing rolebinding policies
- Managing Security Context Constraints policies
- Managing certificate policies
- Managing IAM policies
Refer to Governance and risk for more topics.
2.5.1. Managing security policies
Create a security policy to report and validate your cluster compliance based on your specified security standards, categories, and controls. To create a policy for Red Hat Advanced Cluster Management for Kubernetes, you must create a YAML file on your managed clusters.
2.5.1.1. Creating a security policy
You can create a security policy from the command line interface (CLI) or from the console. Cluster administrator access is required.
The following objects are required for your Red Hat Advanced Cluster Management for Kubernetes policy:
- PlacementRule: Defines a cluster selector where the policy must be deployed.
- PlacementBinding: Binds the placement to a PlacementPolicy.
View more descriptions of the policy YAML files in the Policy overview.
2.5.1.1.1. Creating a security policy from the command line interface
Complete the following steps to create a policy from the command line interface (CLI):
Create a policy by running the following command:
kubectl create -f policy.yaml -n <namespace>Define the template that the policy uses. Edit your
.yamlfile by adding atemplatesfield to define a template. Your policy might resemble the following YAML file:apiVersion: policy.open-cluster-management.io/v1 kind: Policy metadata: name: policy1 spec: remediationAction: "enforce" # or inform disabled: false # or true namespaces: include: ["default"] exclude: ["kube*"] policy-templates: - objectDefinition: apiVersion: policy.open-cluster-management.io/v1 kind: ConfigurationPolicy metadata: namespace: kube-system # will be inferred name: operator spec: remediationAction: "inform" object-templates: complianceType: "musthave" # at this level, it means the role must exist and must have the following rules apiVersion: rbac.authorization.k8s.io/v1 kind: Role metadata: name: example objectDefinition: rules: - complianceType: "musthave" # at this level, it means if the role exists the rule is a musthave apiGroups: ["extensions", "apps"] resources: ["deployments"] verbs: ["get", "list", "watch", "create", "delete","patch"]Define a
PlacementRule. Be sure to change thePlacementRuleto specify the clusters where the policies need to be applied, either byclusterNames, orclusterLabels. View Creating and managing placement rules. YourPlacementRulemight resemble the following content:apiVersion: apps.open-cluster-management.io/v1 kind: PlacementRule metadata: name: placement1 spec: clusterConditions: - type: ManagedClusterConditionAvailable status: "True" clusterNames: - "cluster1" - "cluster2" clusterLabels: matchLabels: cloud: IBMDefine a
PlacementBindingto bind your policy and yourPlacementRule. YourPlacementBindingmight resemble the following YAML sample:apiVersion: policy.open-cluster-management.io/v1 kind: PlacementBinding metadata: name: binding1 placementRef: name: placement1 apiGroup: apps.open-cluster-management.io kind: PlacementRule subjects: - name: policy1 apiGroup: policy.mcm.ibm.com kind: Policy
2.5.1.1.1.1. Viewing your security policy from the CLI
Complete the following steps to view your security policy from the CLI:
View details for a specific security policy by running the following command:
kubectl get securityepolicy <policy-name> -n <namespace> -o yamlView a description of your security policy by running the following command:
kubectl describe securitypolicy <name> -n <namespace>
2.5.1.1.2. Creating a cluster security policy from the console
As you create your new policy from the console, a YAML file is also created in the YAML editor.
- From the navigation menu, click Govern risk.
- To create a policy, click Create policy.
From the Create policy page, enter the appropriate values for the following policy fields:
- Name
- Specifications
- Cluster selector
- Enforce (rememdiation action)
- Standards
- Categories
- Controls
NOTE: You can copy and paste an existing policy in to the Policy YAML. The values for the parameter fields are automatically entered when you paste your existing policy. You can search the contents in your policy YAML file with the search feature.
View the example Red Hat Advanced Cluster Management for Kubernetes security policy definition. Copy and paste the YAML file for your policy.
Important:
- You must define a PlacementPolicy and PlacementBinding to apply your policy to a specific cluster. Enter a value for the Cluster select field to define a PlacementPolicy and PlacementBinding.
-
Be sure to add values for the
policy.mcm.ibm.com/controlsandpolicy.mcm.ibm.com/standardsto display modal cards of what controls and standards are violated in the Policy Overview section.
Your YAML file might resemble the following policy:
+
 apiVersion: policy.open-cluster-management.io/v1
 kind: Policy
 metadata:
   name: policy-pod
   annotations:
     policy.open-cluster-management.io/categories: 'SystemAndCommunicationsProtections,SystemAndInformationIntegrity'
     policy.open-cluster-management.io/controls: 'control example'
     policy.open-cluster-management.io/standards: 'NIST,HIPAA'
 spec:
   complianceType: musthave
   namespaces:
     exclude: ["kube*"]
     include: ["default"]
   object-templates:
   - complianceType: musthave
     objectDefinition:
       apiVersion: v1
       kind: Pod
       metadata:
         name: nginx1
       spec:
         containers:
         - name: nginx
           image: 'nginx:1.7.9'
           ports:
           - containerPort: 80
   remediationAction: enforce
   disabled: false

 ---
 apiVersion: apps.open-cluster-management.io/v1
 kind: PlacementBinding
 metadata:
   name: binding-pod
 placementRef:
   name: placement-pod
   kind: PlacementRule
   apiGroup: apps.open-cluster-management.io
 subjects:
 - name: policy-pod
   kind: Policy
   apiGroup: policy.mcm.ibm.com

 ---
 apiVersion: apps.open-cluster-management.io/v1
 kind: PlacementRule
 metadata:
   name: placement-pod
 spec:
   clusterConditions:
     - type: ManagedClusterConditionAvailable
       status: "True"
   clusterLabels:
     matchLabels:
       cloud: "IBM"
Click Create Policy.
Your policy is enabled by default. You can disable your policy by selecting the
Disabledcheck box.
A security policy is created from the console.
2.5.1.1.2.1. Viewing your security policy from the console
You can view any security policy and its status from the console.
- Log in to your cluster from the console.
From the navigation menu, click Governance and risk to view a table list of your policies.
NoteYou can filter the table list of your policies by selecting the All policies tab or Cluster violations tab.
- Select one of your policies to view more details.
- View the policy violations by selecting the Violations tab.
2.5.1.2. Updating security policies
Learn to update security policies by viewing the following section.
2.5.1.2.1. Disabling security policies
Complete the following steps to disable your security policy:
- Log in to your Red Hat Advanced Cluster Management for Kubernetes console.
- From the navigation menu, click Govern risk to view a table list of your policies.
- Disable your policy by clicking the Options icon > Disable. The Disable Policy dialog box appears.
- Click Disable policy.
Your policy is disabled.
2.5.1.2.2. Deleting a security policy
Delete a security policy from the CLI or the console.
Delete a security policy from the CLI:
Delete a security policy by running the following command:
kubectl delete policy <securitypolicy-name> -n <open-cluster-management-namespace>After your policy is deleted, it is removed from your target cluster or clusters.
Verify that your policy is removed by running the following command:
kubectl get policy <securitypolicy-name> -n <open-cluster-management-namespace>
Delete a security policy from the console:
- From the navigation menu, click Govern risk to view a table list of your policies.
- Click the Options icon for the policy you want to delete in the policy violation table.
- Click Remove.
- From the Remove policy dialog box, click Remove policy
To manage other policies, see Managing security policies for more information. Refer to Governance and risk for more topics about policies.
2.5.2. Managing configuration policies
Learn to create, apply, view, and update your configuration policies.
2.5.2.1. Creating a configuration policy
You can create a YAML file for your configuration policy from the command line interface (CLI) or from the console. View the following sections to create a configuration policy:
2.5.2.1.1. Creating a configuration policy from the CLI
Complete the following steps to create a configuration policy from the (CLI):
Create a YAML file for your configuration policy. Run the following command:
kubectl create -f configpolicy-1.yamlYour configuration policy might resemble the following policy:
  apiVersion: policy.open-cluster-management.io/v1
  kind: Policy
  metadata:
    name: policy-1
    namespace: kube-system
  spec:
    namespaces:
      include: ["default", "kube-*"]
      exclude: ["kube-system"]
    remediationAction: inform
    disabled: false
    complianceType: musthave
    object-templates:
   ...
Apply the policy by running the following command:
kubectl apply -f <policy-file-name> --namespace=<namespace>Verify and list the policies by running the following command:
kubectl get policy --namespace=<namespace>
Your configuration policy is created.
2.5.2.1.1.1. Viewing your configuration policy from the CLI
Complete the following steps to view your configuration policy from the CLI:
View details for a specific configuration policy by running the following command:
kubectl get policy <policy-name> -n <namespace> -o yamlView a description of your configuration policy by running the following command:
kubectl describe policy <name> -n <namespace>
2.5.2.1.2. Creating a configuration policy from the console
As you create a configuration policy from the console, a YAML file is also created in the YAML editor. Complete the following steps to create a configuration policy from the console:
- Log in to your cluster from the console.
- From the navigation menu, click Governance and risk.
- Click Create policy.
Enter or select the appropriate values for the following fields:
- Name
- Namespace
- Specifications
- Cluster selector
- Remediation action
- Standards
- Categories
- Controls
- Disabled
- Click Create.
2.5.2.1.2.1. Viewing your configuration policy from the console
You can view any configuration policy and its status from the console.
- Log in to your cluster from the console.
From the navigation menu, click Govern risk to view a table list of your policies.
NoteYou can filter the table list of your policies by selecting the All policies tab or Cluster violations tab.
- Select one of your policies.
- View the policy violations by selecting the Violations tab.
2.5.2.2. Updating configuration policies
Learn to update configuration policies by viewing the following section.
2.5.2.2.1. Disabling configuration policies
Complete the following steps to disable your configuration policy:
- Log in to your Red Hat Advanced Cluster Management for Kubernetes console.
- From the navigation menu, click Govern risk to view a table list of your policies.
- Disable your policy by clicking the Options icon > Disable. The Disable Policy dialog box appears.
- Click Disable policy.
Your policy is disabled.
2.5.2.3. Deleting a configuration policy
Delete a configuration policy from the CLI or the console.
Delete a configuration policy from the CLI:
Delete a configuration policy by running the following command:
kubectl delete policy <policy-name> -n <mcm namespace>After your policy is deleted, it is removed from your target cluster or clusters.
- Verify that your policy is removed by running the following command:
kubectl get policy <policy-name> -n <mcm namespace>Delete a configuration policy from the console:
- From the navigation menu, click Govern risk to view a table list of your policies.
- Click the Options icon for the policy you want to delete in the policy violation table.
- Click Remove.
- From the Remove policy dialog box, click Remove policy.
Your policy is deleted.
View configuration policy samples, see Policy samples. See Managing security policies to manage other policies.
2.5.3. Managing image vulnerability policies
Configuration policy controller monitors the status of image vulnerability policies. Image vulnerability policies are applied to check if your containers have vulnerabilities. Learn to create, apply, view, and update your image vulnerability policy.
2.5.3.1. Creating an image vulnerability policy
You can create a YAML for your image vulnerability policy from the command line interface (CLI) or from the console. View the following sections to create an image vulnerability policy:
2.5.3.1.1. Creating an image vulnerability policy from the CLI
Complete the following steps to create an image vulnerability policy from the CLI:
Create a YAML file for your image vulnerability policy by running the following command:
kubectl create -f imagevulnpolicy-1.yamlApply the policy by running the following command:
kubectl apply -f <imagevuln-policy-file-name> --namespace=<namespace>List and verify the policies by running the following command:
kubectl get imagevulnpolicy --namespace=<namespace>
Your image vulnerability policy is created.
2.5.3.1.1.1. Viewing your image vulnerability policy from the CLI
Complete the following steps to view your image vulnerability policy from the CLI:
View details for a specific image vulnerability policy by running the following command:
kubectl get imagevulnpolicy <policy-name> -n <namespace> -o yamlView a description of your image vulnerability policy by running the following command:
kubectl describe imagevulnpolicy <name> -n <namespace>
2.5.3.2. Creating an image vulnerability policy from the console
As you create an image vulnerability policy from the console, a YAML file is also created in the YAML editor. Complete the following steps to create the image vulnerability policy from the console:
- Log in to your cluster from the console.
- From the navigation menu, click Governance and risk.
- Click Create policy.
- Select ImageManifestVulnPolicy from the Specifications field. Parameter values are automatically set. You can edit your values.
- Click Create.
An image vulnerability policy is created.
2.5.3.3. Viewing image vulnerability violations from the console
- From the navigation menu, click Govern risk to view a table list of your policies.
Select the
policy-imagemanifestvulnpolicypolicy > Violations tab to view the cluster location of the violation.Your image vulnerability violation might resemble the following:
imagemanifestvulns exist and should be deleted: [sha256.7ac7819e1523911399b798309025935a9968b277d86d50e5255465d6592c0266] in namespace default; [sha256.4109631e69d1d562f014dd49d5166f1c18b4093f4f311275236b94b21c0041c0] in namespace calamari; [sha256.573e9e0a1198da4e29eb9a8d7757f7afb7ad085b0771bc6aa03ef96dedc5b743, sha256.a56d40244a544693ae18178a0be8af76602b89abe146a43613eaeac84a27494e, sha256.b25126b194016e84c04a64a0ad5094a90555d70b4761d38525e4aed21d372820] in namespace open-cluster-management-agent-addon; [sha256.64320fbf95d968fc6b9863581a92d373bc75f563a13ae1c727af37450579f61a] in namespace openshift-cluster-version- Navigate to your OpenShift Container Platform console by selecting the Cluster link.
- From the navigation menu on the OpenShift Container Platform console, click Administration > Custom Resource Definitions.
-
Select
imagemanifestvulns> Instances tab to view all of theimagemanifestvulnsinstances. - Select an entry to view more details.
2.5.3.4. Updating image vulnerability policies
Learn to update image vulnerability policies by viewing the following section.
2.5.3.4.1. Disabling image vulnerability policies
Complete the following steps to disable your image vulnerability policy:
- Log in to your Red Hat Advanced Cluster Management for Kubernetes console.
- From the navigation menu, click Govern risk to view a table list of your policies.
- Disable your policy by clicking the Options icon > Disable. The Disable Policy dialog box appears.
- Click Disable policy.
Your policy is disabled.
2.5.3.4.2. Deleting an image vulnerability policy
Delete the image vulnerability policy from the CLI or the console.
Delete an image vulnerability policy from the CLI:
Delete a certificate policy by running the following command:
kubectl delete policy <imagevulnpolicy-name> -n <mcm namespace>After your policy is deleted, it is removed from your target cluster or clusters.
Verify that your policy is removed by running the following command:
kubectl get policy <imagevulnpolicy-name> -n <mcm namespace>
Delete an image vulnerability policy from the console:
- From the navigation menu, click Govern risk to view a table list of your policies.
- Click the Options icon for the policy you want to delete in the policy violation table.
- Click Remove.
- From the Remove policy dialog box, click Remove policy.
Your image vulnerability policy is deleted.
View a sample of an image vulnerability policy, see Image vulnerability policy sample from the Image vulnerability policy page. See Kubernetes configuration policy controller to learn about other policies that are monitored by the Kubernetes configuration policy controller. See Managing security policies to manage other policies.
2.5.4. Managing memory usage policies
Apply a memory usage policy to limit or restrict your memory and compute usage. Learn to create, apply, view, and update your memory usage policy in the following sections.
2.5.4.1. Creating a memory usage policy
You can create a YAML file for your memory usage policy from the command line interface (CLI) or from the console. View the following sections to create a memory usage policy:
2.5.4.1.1. Creating a memory usage policy from the CLI
Complete the following steps to create a memory usage policy from the CLI:
Create a YAML file for your memory usage policy by running the following command:
kubectl create -f memorypolicy-1.yamlApply the policy by running the following command:
kubectl apply -f <memory-policy-file-name> --namespace=<namespace>List and verify the policies by running the following command:
kubectl get memorypolicy --namespace=<namespace>
Your memory usage policy is created from the CLI.
2.5.4.1.1.1. Viewing your policy from the CLI
Complete the following steps to view your memory usage policy from the CLI:
View details for a specific memory usage policy by running the following command:
kubectl get memorypolicy <policy-name> -n <namespace> -o yamlView a description of your memory usage policy by running the following command:
kubectl describe memorypolicy <name> -n <namespace>
2.5.4.1.2. Creating an memory usage policy from the console
As you create a memory usage policy from the console, a YAML file is also created in the YAML editor. Complete the following steps to create the memory usage policy from the console:
- Log in to your Red Hat Advanced Cluster Management for Kubernetes console.
- From the navigation menu, click Governance and risk.
- Click Create policy.
- Select Limitrange from the Specifications field. Parameter values are automatically set. You can edit your values.
- Click Create.
2.5.4.1.2.1. Viewing your memory usage policy from the console
You can view any memory usage policy and its status from the console.
- Log in to your cluster from the console.
From the navigation menu, click Govern risk to view a table list of your policies.
NoteYou can filter the table list of your policies by selecting the All policies tab or Cluster violations tab.
- Select one of your policies to view more details.
- View the policy violations by selecting the Violations tab.
2.5.4.2. Updating memory usage policies
Learn to update memory usage policies by viewing the following section.
2.5.4.2.1. Disabling memory usage policies
Complete the following steps to disable your memory usage policy:
- Log in to your Red Hat Advanced Cluster Management for Kubernetes console.
- From the navigation menu, click Govern risk to view a table list of your policies.
- Disable your policy by clicking the Options icon > Disable. The Disable Policy dialog box appears.
- Click Disable policy.
Your policy is disabled.
2.5.4.2.2. Deleting a memory usage policy
Delete the memory usage policy from the CLI or the console.
Delete a memory usage policy from the CLI:
Delete a memory usage policy by running the following command:
kubectl delete policy <memorypolicy-name> -n <mcm namespace>After your policy is deleted, it is removed from your target cluster or clusters.
Verify that your policy is removed by running the following command:
kubectl get policy <memorypolicy-name> -n <mcm namespace>
Delete a memory usage policy from the console:
- From the navigation menu, click Govern risk to view a table list of your policies.
- Click the Options icon for the policy you want to delete in the policy violation table.
- Click Remove.
- From the Remove policy dialog box, click Remove policy.
Your memory usage policy is deleted.
View a sample of a memory usage policy, see Memory usage policy sample from the Memory usage policy page. See Kubernetes configuration policy controller to learn about other configuration policies. See Managing security policies to manage other policies.
2.5.5. Managing namespace policies
Namespace policies are applied to define specific rules for your namespace. Learn to create, apply, view, and update your memory usage policy in the following sections.
2.5.5.1. Creating a namespace policy
You can create a YAML file for your namespace policy from the command line interface (CLI) or from the console. View the following sections to create a namespace policy:
2.5.5.1.1. Creating a namespace policy from the CLI
Complete the following steps to create a namespace policy from the CLI:
Create a YAML file for your namespace policy by running the following command:
kubectl create -f namespacepolicy-1.yamlApply the policy by running the following command:
kubectl apply -f <namespace-policy-file-name> --namespace=<namespace>List and verify the policies by running the following command:
kubectl get namespacepolicy --namespace=<namespace>
Your namespace policy is created from the CLI.
2.5.5.1.1.1. Viewing your namespace policy from the CLI
Complete the following steps to view your namespace policy from the CLI:
View details for a specific namespace policy by running the following command:
kubectl get namespacepolicy <policy-name> -n <namespace> -o yamlView a description of your namespace policy by running the following command:
kubectl describe namespacepolicy <name> -n <namespace>
2.5.5.1.2. Creating a namespace policy from the console
As you create a namespace policy from the console, a YAML file is also created in the YAML editor. Complete the following steps to create a namespace policy from the console:
- Log in to your Red Hat Advanced Cluster Management for Kubernetes console.
- From the navigation menu, click Governance and risk.
- Click Create policy.
- Select Namespace from the Specifications field. Parameter values are automatically set. You can edit your values.
- Click Create.
2.5.5.1.2.1. Viewing your namespace policy from the console
You can view any namespace policy and its status from the console.
- Log in to your cluster from the console.
From the navigation menu, click Governance and risk to view a table list of your policies.
NoteYou can filter the table list of your policies by selecting the All policies tab or Cluster violations tab.
- Select one of your policies to view more details.
- View the policy violations by selecting the Violations tab.
2.5.5.2. Updating namespace policies
Learn to update namespace policies by viewing the following section.
2.5.5.2.1. Disabling namespace policies
Complete the following steps to disable your namespace policy:
- Log in to your Red Hat Advanced Cluster Management for Kubernetes console.
- From the navigation menu, click Govern risk to view a table list of your policies.
- Disable your policy by clicking the Options icon > Disable. The Disable Policy dialog box appears.
- Click Disable policy.
Your policy is disabled.
2.5.5.2.2. Deleting a namespace policy
Delete a namespace policy from the CLI or the console.
Delete a namespace policy from the CLI:
Delete a namespace policy by running the following command:
kubectl delete policy <memorypolicy-name> -n <mcm namespace>After your policy is deleted, it is removed from your target cluster or clusters.
Verify that your policy is removed by running the following command:
kubectl get policy <memorypolicy-name> -n <mcm namespace>
Delete a namespace policy from the console:
- From the navigation menu, click Govern risk to view a table list of your policies.
- Click the Options icon for the policy you want to delete in the policy violation table.
- Click Remove.
- From the Remove policy dialog box, click Remove policy.
Your namespace policy is deleted.
View a sample of a namespace policy, see Namespace policy sample on the Namespace policy page. See Kubernetes configuration policy controller to learn about other configuration policies. See Managing security policies to manage other policies.
2.5.6. Managing pod nginx policies
Kubernetes configuration policy controller monitors the status of you pod nginx policies. Pod nginx policies are applied to to define the container rules for your pods. Learn to create, apply, view, and update your pod nginx policy.
2.5.6.1. Creating a pod nginx policy
You can create a YAML for your pod nginx policy from the command line interface (CLI) or from the console. View the following sections to create a pod nginx policy:
2.5.6.1.1. Creating a pod nginx policy from the CLI
Complete the following steps to create a pod nginx policy from the CLI:
Create a YAML file for your pod nginx policy by running the following command:
kubectl create -f podnginxpolicy-1.yamlApply the policy by running the following command:
kubectl apply -f <podnginx-policy-file-name> --namespace=<namespace>List and verify the policies by running the following command:
kubectl get podnginxpolicy --namespace=<namespace>
Your image pod nginx policy is created from the CLI.
2.5.6.1.1.1. Viewing your nginx policy from the CLI
Complete the following steps to view your pod nginx policy from the CLI:
View details for a specific pod nginx policy by running the following command:
kubectl get podnginxpolicy <policy-name> -n <namespace> -o yamlView a description of your pod nginx policy by running the following command:
kubectl describe podnginxpolicy <name> -n <namespace>
2.5.6.2. Creating an pod nginx policy from the console
As you create a pod nginx policy from the console, a YAML file is also created in the YAML editor. Complete the following steps to create the pod nginx policy from the console:
- Log in to your Red Hat Advanced Cluster Management for Kubernetes console.
- From the navigation menu, click Govern risk.
- Click Create policy.
- Select Pod from the Specifications field. Parameter values are automatically set. You can edit your values.
- Click Create.
2.5.6.2.1. Viewing your pod nginx policy from the console
You can view any pod nginx policy and its status from the console.
- Log in to your cluster from the console.
From the navigation menu, click Govern risk to view a table list of your policies.
NoteYou can filter the table list of your policies by selecting the All policies tab or Cluster violations tab.
- Select one of your policies to view more details.
- View the policy violations by selecting the Violations tab.
2.5.6.3. Updating pod nginx policies
Learn to update pod nginx policies by viewing the following section.
2.5.6.3.1. Disabling pod nginx policies
Complete the following steps to disable your pod nginx policy:
- Log in to your Red Hat Advanced Cluster Management for Kubernetes console.
- From the navigation menu, click Govern risk to view a table list of your policies.
- Disable your policy by clicking the Options icon > Disable. The Disable Policy dialog box appears.
- Click Disable policy.
Your policy is disabled.
2.5.6.3.2. Deleting a pod nginx policy
Delete the pod nginx policy from the CLI or the console.
Delete a pod nginx policy from the CLI:
Delete a pod nginx policy by running the following command:
kubectl delete policy <podnginxpolicy-name> -n <namespace>After your policy is deleted, it is removed from your target cluster or clusters.
Verify that your policy is removed by running the following command:
kubectl get policy <podnginxpolicy-name> -n <namespace>
Delete a pod nginx policy from the console:
- From the navigation menu, click Govern risk to view a table list of your policies.
- Click the Options icon for the policy you want to delete in the policy violation table.
- Click Remove.
- From the Remove policy dialog box, click Remove policy.
Your pod nginx policy is deleted.
View a sample of a pod nginx policy, see Pod nginx policy sample from the Pod nginx policy page. See Kubernetes configuration policy controller to learn about other configuration policies. See Managing security policies to manage other policies.
2.5.7. Managing pod security policies
Apply a pod security policy to secure pods and containers. Learn to create, apply, view, and update your pod security policy in the following sections.
2.5.7.1. Creating a pod security policy
You can create a YAML file for your pod security policy from the command line interface (CLI) or from the console. View the following sections to create a pod security policy:
2.5.7.1.1. Creating a pod security policy from the CLI
Complete the following steps to create a pod security from the CLI:
Create a YAML file for your pod security policy by running the following command:
kubectl create -f podsecuritypolicy-1.yamlApply the policy by running the following command:
kubectl apply -f <podsecurity-policy-file-name> --namespace=<namespace>List and verify the policies by running the following command:
kubectl get podsecuritypolicy --namespace=<namespace>
Your pod security policy is created from the CLI.
2.5.7.1.1.1. Viewing your pod security policy from the CLI
Complete the following steps to view your pod security policy from the CLI:
View details for a specific pod security policy by running the following command:
kubectl get podsecuritypolicy <policy-name> -n <namespace> -o yamlView a description of your pod security policy by running the following command:
kubectl describe podsecuritypolicy <name> -n <namespace>
2.5.7.1.2. Creating a pod security policy from the console
As you create a pod security policy from the console, a YAML file is also created in the YAML editor. Complete the following steps to create the pod security policy from the console:
- Log in to your Red Hat Advanced Cluster Management for Kubernetes console.
- From the navigation menu, click Govern risk.
- Click Create policy.
- Select Podsecuritypolicy from the Specifications field. Parameter values are automatically set. You can edit your values.
- Click Create.
2.5.7.1.2.1. Viewing your pod security policy from the console
You can view any pod security policy and its status from the console.
- Log in to your cluster from the console.
From the navigation menu, click Govern risk to view a table list of your policies.
NoteYou can filter the table list of your policies by selecting the All policies tab or Cluster violations tab.
- Select one of your policies to view more details.
- View the policy violations by selecting the Violations tab.
2.5.7.2. Updating pod security policies
Learn to update pod security policies by viewing the following section.
2.5.7.2.1. Disabling pod security policies
Complete the following steps to disable your pod security policy:
- Log in to your Red Hat Advanced Cluster Management for Kubernetes console.
- From the navigation menu, click Govern risk to view a table list of your policies.
- Disable your policy by clicking the Options icon > Disable. The Disable Policy dialog box appears.
- Click Disable policy.
Your policy is disabled.
2.5.7.2.2. Deleting a pod security policy
Delete the pod security policy from the CLI or the console.
Delete a pod security policy from the CLI:
Delete a pod security policy by running the following command:
kubectl delete policy <podsecurity-policy-name> -n <mcm namespace>After your policy is deleted, it is removed from your target cluster or clusters.
Verify that your policy is removed by running the following command:
kubectl get policy <podsecurity-policy-name> -n <mcm namespace>
Delete a pod security policy from the console:
- From the navigation menu, click Govern risk to view a table list of your policies.
- Click the Options icon for the policy you want to delete in the policy violation table.
- Click Remove.
- From the Remove policy dialog box, click Remove policy.
Your pod security policy is deleted.
View a sample of a pod security policy, see Pod security policy sample on the Pod security policy page. See Kubernetes configuration policy controller to learn about other configuration policies. See Managing security policies to manage other policies.
2.5.8. Managing role policies
Kubernetes configuration policy controller monitors the status of role policies. Apply a role policy to set rules and permissions for specific roles in your cluster. Learn to create, apply, view, and update your role policy in the following sections.
2.5.8.1. Creating a role policy
You can create a YAML file for your role policy from the command line interface (CLI) or from the console. View the following sections to create a role policy:
2.5.8.1.1. Creating a role policy from the CLI
Complete the following steps to create a role from the CLI:
Create a YAML file for your role policy by running the following command:
kubectl create -f rolepolicy-1.yamlApply the policy by running the following command:
kubectl apply -f <role-policy-file-name> --namespace=<namespace>List and verify the policies by running the following command:
kubectl get rolepolicy --namespace=<namespace>
Your role policy is created from the CLI.
2.5.8.1.1.1. Viewing your role policy from the CLI
Complete the following steps to view your role policy from the CLI:
View details for a specific role policy by running the following command:
kubectl get rolepolicy <policy-name> -n <namespace> -o yamlView a description of your role policy by running the following command:
kubectl describe rolepolicy <name> -n <namespace>
2.5.8.1.2. Creating a role policy from the console
As you create a role policy from the console, a YAML file is also created in the YAML editor. Complete the following steps to create the role policy from the console:
- Log in to your Red Hat Advanced Cluster Management for Kubernetes console.
- From the navigation menu, click Govern risk.
- Click Create policy.
- Select Role from the Specifications field. Parameter values are automatically set. You can edit your values.
- Click Create.
2.5.8.1.2.1. Viewing your role policy from the console
You can view any role policy and its status from the console.
- Log in to your cluster from the console.
From the navigation menu, click Govern risk to view a table list of your policies.
NoteYou can filter the table list of your policies by selecting the All policies tab or Cluster violations tab.
- Select one of your policies to view more details.
- View the policy violations by selecting the Violations tab.
2.5.8.2. Updating role policies
Learn to update role policies by viewing the following section.
2.5.8.2.1. Disabling role policies
Complete the following steps to disable your role policy:
- Log in to your Red Hat Advanced Cluster Management for Kubernetes console.
- From the navigation menu, click Govern risk to view a table list of your policies.
- Disable your policy by clicking the Options icon > Disable. The Disable Policy dialog box appears.
- Click Disable policy.
Your policy is disabled.
2.5.8.2.2. Deleting a role policy
Delete the role policy from the CLI or the console.
Delete a role policy from the CLI:
Delete a role policy by running the following command:
kubectl delete policy <podsecurity-policy-name> -n <mcm namespace>After your policy is deleted, it is removed from your target cluster or clusters.
Verify that your policy is removed by running the following command:
kubectl get policy <podsecurity-policy-name> -n <mcm namespace>
Delete a role policy from the console:
- From the navigation menu, click Govern risk to view a table list of your policies.
- Click the Options icon for the policy you want to delete in the policy violation table.
- Click Remove.
- From the Remove policy dialog box, click Remove policy.
Your role policy is deleted.
View a sample of a role policy, see Role policy sample on the Role policy page. See Kubernetes configuration policy controller to learn about other configuration policies. See Managing security policies to manage other policies.
2.5.9. Managing rolebinding policies
Learn to create, apply, view, and update your rolebinding policies.
2.5.9.1. Creating a rolebinding policy
You can create a YAML file for your rolebinding policy from the command line interface (CLI) or from the console. View the following sections to create a rolebinding policy:
2.5.9.1.1. Creating a rolebinding policy from the CLI
Complete the following steps to create a rolebinding policy from the CLI:
Create a YAML file for your rolebinding policy. Run the following command:
kubectl create -f rolebindingpolicy.yamlApply the policy by running the following command:
kubectl apply -f <rolebinding-policy-file-name> --namespace=<namespace>Verify and list the policies by running the following command:
kubectl get rolebindingpolicy --namespace=<namespace>
Your rolebinding policy is created.
2.5.9.1.1.1. Viewing your rolebinding policy from the CLI
Complete the following steps to view your rolebinding policy from the CLI:
View details for a specific rolebinding policy by running the following command:
kubectl get rolebindingpolicy <policy-name> -n <namespace> -o yamlView a description of your rolebinding policy by running the following command:
kubectl describe rolebindingpolicy <name> -n <namespace>
2.5.9.1.2. Creating a rolebinding policy from the console
As you create a rolebinding policy from the console, a YAML file is also created in the YAML editor. Complete the following steps to create a rolebinding policy from the console:
- Log in to your cluster from the console.
- From the navigation menu, click Governance and risk.
- Click Create policy.
Enter or select the appropriate values for the following fields:
- Name
- Specifications
- Cluster selector
- Remediation action
- Standards
- Categories
- Controls
- Disabled
- Click Create.
A rolebinding policy is created.
2.5.9.1.2.1. Viewing your rolebinding policy from the console
You can view any rolebinding policy and its status from the console.
- Log in to your cluster from the console.
From the navigation menu, click Governance and risk to view a table list of your policies.
NoteYou can filter the table list of your policies by selecting the All policies tab or Cluster violations tab.
- Select one of your policies to view more details.
- View the rolebinding policy violations by selecting the Violations tab.
2.5.9.2. Updating rolebinding policies
Learn to update rolebinding policies by viewing the following section.
2.5.9.2.1. Disabling rolebinding policies
Complete the following steps to disable your rolebinding policy:
- Log in to your Red Hat Advanced Cluster Management for Kubernetes console.
- From the navigation menu, click Govern risk to view a table list of your policies.
- Disable your policy by clicking the Options icon > Disable. The Disable Policy dialog box appears.
- Click Disable policy.
Your policy is disabled.
2.5.9.2.2. Deleting a rolebinding policy
Delete the rolebinding policy from the CLI or the console.
Delete a rolebinding policy from the CLI:
Delete a rolebinding policy by running the following command:
kubectl delete policy <podsecurity-policy-name> -n <namespace>After your policy is deleted, it is removed from your target cluster or clusters.
Verify that your policy is removed by running the following command:
kubectl get policy <podsecurity-policy-name> -n <namespace>
Delete a rolebinding policy from the console:
- From the navigation menu, click Govern risk to view a table list of your policies.
- Click the Options icon for the policy you want to delete in the policy violation table.
- Click Remove.
- From the Remove policy dialog box, click Remove policy.
Your rolebinding policy is deleted.
View a sample of a rolebinding policy, see Rolebinding policy sample on the Rolebinding policy page. See Kubernetes configuration policy controller to learn about other configuration policies. See Managing security policies to manage other policies.
2.5.10. Managing Security Context Constraints policies
Learn to create, apply, view, and update your Security Context Constraints (SCC) policies.
2.5.10.1. Creating an SCC policy
You can create a YAML file for your SCC policy from the command line interface (CLI) or from the console. View the following sections to create an SCC policy:
2.5.10.1.1. Creating an SCC policy from the CLI
See Creating Security Context Constraints in the OpenShift Container Platform documentation for more details.
2.5.10.1.1.1. Viewing your SCC policy from the CLI
See Examining an SCC in the OpenShift Container Platform documentation for more details.
2.5.10.1.2. Creating an SCC policy from the console
As you create an SCC policy from the console, a YAML file is also created in the YAML editor. Complete the following steps to create an SCC policy from the console:
- Log in to your cluster from the console.
- From the navigation menu, click Governance and risk.
- Click Create policy.
Enter or select the appropriate values for the following fields:
- Name
- Specifications
- Cluster selector
- Remediation action
- Standards
- Categories
- Controls
- Disabled
- Click Create.
An SCC policy is created.
2.5.10.1.2.1. Viewing your SCC policy from the console
You can view any SCC policy and its status from the console.
- Log in to your cluster from the console.
From the navigation menu, click Governance and risk to view a table list of your policies.
NoteYou can filter the table list of your policies by selecting the All policies tab or Cluster violations tab.
- Select one of your policies to view more details.
- View the SCC policy violations by selecting the Violations tab.
2.5.10.2. Updating SCC policies
Learn to update SCC policies by viewing the following sections.
2.5.10.2.1. Disabling SCC policies
Complete the following steps to disable your SCC policy:
- Log in to your Red Hat Advanced Cluster Management for Kubernetes console.
- From the navigation menu, click Govern risk to view a table list of your policies.
- Disable your policy by clicking the Options icon > Disable. The Disable Policy dialog box appears.
- Click Disable policy.
Your policy is disabled.
2.5.10.2.2. Deleting an SCC policy
Delete the SCC policy from the CLI or the console.
See Deleting an SCC in the OpenShift Container Platform documentation to learn more about deleting an SCC policy from the CLI.
Delete an SCC policy from the console:
- From the navigation menu, click Govern risk to view a table list of your policies.
- Click the Options icon for the policy you want to delete in the policy violation table.
- Click Remove.
- From the Remove policy dialog box, click Remove policy.
Your SCC policy is deleted.
To view a sample of an SCC policy, see the Security context constraint policy sample section of Security Context Constraints policy. See Kubernetes configuration policy controller to learn about other configuration policies. See Managing security policies to manage other policies.
2.5.11. Managing certificate policies
Learn to create, apply, view, and update your certificate policies.
2.5.11.1. Creating a certificate policy
You can create a YAML file for your certificate policy from the command line interface (CLI) or from the console. View the following sections to create a certificate policy:
2.5.11.1.1. Creating a certificate policy from the CLI
Complete the following steps to create a certificate policy from the CLI:
Create a YAML file for your certificate policy. Run the following command:
kubectl create -f policy-1.yamlApply the policy by running the following command:
kubectl apply -f <certificate-policy-file-name> --namespace=<namespace>Verify and list the policies by running the following command:
kubectl get certificatepolicy --namespace=<namespace>
Your certificate policy is created.
2.5.11.1.1.1. Viewing your certificate policy from the CLI
Complete the following steps to view your certificate policy from the CLI:
View details for a specific certificate policy by running the following command:
kubectl get certificatepolicy <policy-name> -n <namespace> -o yamlView a description of your certificate policy by running the following command:
kubectl describe certificatepolicy <name> -n <namespace>
2.5.11.1.2. Creating a certificate policy from the console
As you create a certificate policy from the console, a YAML file is also created in the YAML editor. Complete the following steps to create a certificate policy from the console:
- Log in to your cluster from the console.
- From the navigation menu, click Governance and risk.
- Click Create policy.
Enter or select the appropriate values for the following fields:
- Name
- Specifications
- Cluster selector
- Remediation action
- Standards
- Categories
- Controls
- Click Create.
A certificate policy is created.
2.5.11.1.2.1. Viewing your certificate policy from the console
You can view any certificate policy and its status from the console.
- Log in to your cluster from the console.
From the navigation menu, click Governance and risk to view a table list of your policies.
NoteYou can filter the table list of your policies by selecting the All policies tab or Cluster violations tab.
- Select one of your policies to view more details.
- View the certificate policy violations by selecting the Violations tab.
2.5.11.2. Updating certificate policies
2.5.11.2.1. Bringing your own certificates
You can monitor your own certificates with the certificate policy controller. You must complete one of the following requirements to monitor your own certificates:
- Create a Kubernetes TLS Secret for your certificate.
-
Add the label
certificate_key_nameinto your Kubernetes secret to monitor your certificates.
Create a Kubernetes TLS secret to monitor your own certificates by running the following command:
kubectl -n <namespace> create secret tls <secret name> --cert=<path to certificate>/<certificate name> --key=<path to key>/<key name>2.5.11.2.2. Adding a label into your Kubernetes secret
Update the metadata parameter in your TLS Secret by adding the certificate_key_name label. Run the following command to add the certificate_key_name label:
kubectl label secret my-certificate -n default certificate_key_name=certYour updated TLS Secret might resemble the following content:
   apiVersion: policy.open-cluster-management.io/v1
   kind: Secret
   metadata:
     name: my-certificate
     namespace: default
     labels:
       certificate_key_name: cert
   type: Opaque
   data:
     cert: <Certificate Data>
key: <Private Key Data>When you add the label from the console, you must manually add the label into the TLS Secret YAML file.
2.5.11.2.3. Disabling certificate policies
When you create a certificate policy, it is enabled by default. Complete the following steps to disable a certificate policy from the CLI or the console:
Disable a certificate policy from the console:
- Log in to your Red Hat Advanced Cluster Management for Kubernetes console.
- From the navigation menu, click Govern risk to view a table list of your policies.
- Disable your policy by clicking the Options icon > Disable. The Disable Policy dialog box appears.
- Click Disable policy.
Your policy is disabled.
2.5.11.2.4. Deleting a certificate policy
Delete the certificate policy from the CLI or the console.
Delete a certificate policy from the CLI:
Delete a certificate policy by running the following command:
kubectl delete policy <cert-policy-name> -n <mcm namespace>After your policy is deleted, it is removed from your target cluster or clusters.
Verify that your policy is removed by running the following command:
kubectl get policy <policy-name> -n <mcm namespace>
Delete a certificate policy from the console:
- From the navigation menu, click Govern risk to view a table list of your policies.
- Click the Options icon for the policy you want to delete in the policy violation table.
- Click Remove.
- From the Remove policy dialog box, click Remove policy.
Your certificate policy is deleted.
View a sample of a certificate policy, see Certificate policy sample on the Certificate policy controller page. For more information about other policy controllers, see Policy controllers. See Managing security policies to manage other policies.
2.5.12. Managing IAM policies
Apply an IAM policy to check the number of cluster administrators that you allow in your managed cluster. Learn to create, apply, view, and update your IAM policies in the following sections.
2.5.12.1. Creating an IAM policy
You can create a YAML file for your IAM policy from the command line interface (CLI) or from the console.
2.5.12.1.1. Creating an IAM policy from the CLI
Complete the following steps to create an IAM policy from the CLI:
Create a YAML file with the IAM policy definition. Run the following command:
kubectl create -f iam-policy-1.yamlYour IAM policy might resemble the following YAML file:
apiVersion: policy.open-cluster-management.io/v1
kind: IamPolicy
metadata:
  name: iam-grc-policy
  label:
    category: "System-Integrity"
spec:
  namespaceSelector:
    include: ["default","kube-*"]
    exclude: ["kube-system"]
  remediationAction: inform
  disabled: false
  maxClusterRoleBindingUsers: 5
Apply the policy by running the following command:
kubectl apply -f <iam-policy-file-name> --namespace=<mcm_namespace>Verify and list the policy by running the following command:
kubectl get <iam-policy-file-name> --namespace=<mcm_namespace>
Your IAM policy is created.
2.5.12.1.1.1. Viewing your IAM policy from the CLI
Complete the following steps to view your IAM policy:
View details for specific IAM policy by running the following command:
kubectl get iampolicy <policy-name> -n <namespace> -o yamlView a description of your IAM policy by running the following command:
kubectl describe iampolicy <name> -n <namespace>
2.5.12.1.2. Creating an IAM policy from the console
As you create your IAM policy from the console, a YAML file is also created in the YAML editor. Complete the following steps to create an IAM policy from the console:
- Log in to your cluster from the console.
- From the navigation menu, click Govern risk.
- Click Create policy.
Enter or select the appropriate values for the following fields:
- Name
- Specifications
- Cluster selector
- Remediation action
- Standards
- Categories
- Controls
- Disabled
- Click Create.
An IAM policy is created.
2.5.12.1.2.1. Viewing your IAM policy from the console
You can view any IAM policy and its status from the console.
- Log in to your cluster from the console.
From the navigation menu, click Govern risk to view a table list of your policies.
NoteYou can filter the table list of your policies by selecting the All policies tab or Cluster violations tab.
- Select one of your policies to view more details.
- View the IAM policy violations by selecting the Violations tab.
2.5.12.2. Updating IAM policies
Learn to update IAM policies by viewing the following section.
2.5.12.2.1. Disabling IAM policies
Complete the following steps to disable your IAM policy:
- Log in to your Red Hat Advanced Cluster Management for Kubernetes console.
- From the navigation menu, click Govern risk to view a table list of your policies.
- Disable your policy by clicking the Options icon > Disable. The Disable Policy dialog box appears.
- Click Disable policy.
Your policy is disabled.
2.5.12.2.2. Deleting an IAM policy
Delete a configuration policy from the CLI or the console.
Delete an IAM policy from the CLI:
Delete an IAM policy by running the following command:
kubectl delete policy <iam-policy-name> -n <mcm namespace>After your policy is deleted, it is removed from your target cluster or clusters.
- Verify that your policy is removed by running the following command:
kubectl get policy <iam-policy-name> -n <mcm namespace>Delete an IAM policy from the console:
- From the navigation menu, click Govern risk to view a table list of your policies.
- Click the Options icon for the policy you want to delete in the policy violation table.
- Click Remove.
- From the Remove policy dialog box, click Remove policy.
Your policy is deleted.
View the IAM policy sample from the IAM policy controller page. See Managing security policies for more topics.