Client Connectivity Guide
Creating and tuning clients connections to message brokers
Copyright © 2011-2015 Red Hat, Inc. and/or its affiliates.
Abstract
Chapter 1. Introduction
Abstract
1.1. JBoss A-MQ Client APIs
Transports and protocols
- Simple Text Orientated Messaging Protocol(STOMP)—allows developers to use a wide variety of client APIs to connect to a broker.
- Discovery—allows clients to connect to one or more brokers without knowing the connection details for a specific broker. See Using Networks of Brokers.
- VM—allows clients to directly communicate with other clients in the same virtual machine. See Section 2.8, “Intra-JVM Connections”.
- Peer—allows clients to communicate with each other without using an external message broker. See Section 2.9, “Peer Protocol”.
Supported Client APIs
- C clients
- C++ clients
- C# and .NET clients
- Delphi clients
- Flash clients
- Perl clients
- PHP clients
- Pike clients
- Python clients
- C++ Clients
- Python clients
- .NET clients
Configuration
- transport options—configured on the connection. These options are configured using the connection URI and may be set by the broker. They apply to all clients using the connection.
- destination options—configured on a per destination basis. These options are configured when the destination is created and impact all of the clients that send or receive messages using the destination. They are always set by clients.
1.2. Preparing to use Maven
Overview
Prerequisites
- Maven installation—Maven is a free, open source build tool from Apache. You can download the latest version from the Maven download page.
- Network connection—whilst performing a build, Maven dynamically searches external repositories and downloads the required artifacts on the fly. By default, Maven looks for repositories that are accessed over the Internet. You can change this behavior so that Maven will prefer searching repositories that are on a local network.NoteMaven can run in an offline mode. In offline mode Maven will only look for artifacts in its local repository.
Adding the Red Hat JBoss A-MQ repository
settings.xml file. Maven looks for your settings.xml file in the .m2 directory of the user's home directory. If there is not a user specified settings.xml file, Maven will use the system-level settings.xml file at M2_HOME/conf/settings.xml.
.m2/settings.xml file or modify the system-level settings. In the settings.xml file, add the repository element for the JBoss A-MQ repository as shown in bold text in Example 1.1, “Adding the Red Hat JBoss A-MQ Repositories to Maven”.
Example 1.1. Adding the Red Hat JBoss A-MQ Repositories to Maven
<settings>
<profiles>
<profile>
<id>my-profile</id>
<activation>
<activeByDefault>true</activeByDefault>
</activation>
<repositories>
<repository>
<id>fusesource</id>
<url>http://repo.fusesource.com/nexus/content/groups/public/</url>
<snapshots>
<enabled>false</enabled>
</snapshots>
<releases>
<enabled>true</enabled>
</releases>
</repository> <repository>
<id>fusesource.snapshot</id>
<url>http://repo.fusesource.com/nexus/content/groups/public-snapshots/</url>
<snapshots>
<enabled>true</enabled>
</snapshots>
<releases>
<enabled>false</enabled>
</releases>
</repository>
<repository>
<id>apache-public</id>
<url>https://repository.apache.org/content/groups/public/</url>
<snapshots>
<enabled>true</enabled>
</snapshots>
<releases>
<enabled>true</enabled>
</releases>
</repository>
<!-- The rebuilt artifacts for the client aren't available in hosted
maven repository. There is a file-based repo that can optionally
be installed using the -maven-repo RPM files, creating a repo
at /usr/share/java/maven-repo -->
<repository>
<id>amq-client-repo</id>
<url>file:///usr/share/java/maven-repo</url>
<releases>
<enabled>true</enabled>
</releases>
<snapshots>
<enabled>false</enabled>
</snapshots>
</repository>
</repositories>
</profile>
</profiles>
...
</settings>fusesource-snapshotrepository—if you want to experiment with building your application using an Red Hat JBoss A-MQ snapshot kit, you can include this repository.apache-publicrepository—you might not always need this repository, but it is often useful to include it, because JBoss A-MQ depends on many of the artifacts from Apache.
Artifacts
Maven coordinates
{groupId, artifactId, version}. Sometimes Maven augments the basic set of coordinates with the additional coordinates, packaging and classifier. A tuple can be written with the basic coordinates, or with the additional packaging coordinate, or with the addition of both the packaging and classifier coordinates, as follows:
groupdId:artifactId:version
groupdId:artifactId:packaging:version
groupdId:artifactId:packaging:classifier:version- groupdId
- Defines a scope for the name of the artifact. You would typically use all or part of a package name as a group ID—for example,
org.fusesource.example. - artifactId
- Defines the artifact name (relative to the group ID).
- version
- Specifies the artifact's version. A version number can have up to four parts:
n.n.n.n, where the last part of the version number can contain non-numeric characters (for example, the last part of1.0-SNAPSHOTis the alphanumeric substring,0-SNAPSHOT). - packaging
- Defines the packaged entity that is produced when you build the project. For OSGi projects, the packaging is
bundle. The default value isjar. - classifier
- Enables you to distinguish between artifacts that were built from the same POM, but have different content.
<project ... >
  ...
  <groupId>org.fusesource.example</groupId>
  <artifactId>bundle-demo</artifactId>
  <packaging>bundle</packaging>
  <version>1.0-SNAPSHOT</version>
  ...
</project>dependency element to a POM:
<project ... >
  ...
  <dependencies>
    <dependency>
      <groupId>org.fusesource.example</groupId>
      <artifactId>bundle-demo</artifactId>
      <version>1.0-SNAPSHOT</version>
    </dependency>
  </dependencies>
  ...
</project>bundle package type in the preceding dependency, because a bundle is just a particular kind of JAR file and jar is the default Maven package type. If you do need to specify the packaging type explicitly in a dependency, however, you can use the type element.
1.3. Preparing to use AMQ with SSL
Overview
- To generate a certificate for the amq broker, create a directory on your system to hold the generated files. For example, mkdir certificates_dir
- To generate the certificates, navigate to the certificates directory and run the following command.
keytool -genkey -alias broker -keyalg RSA -keystore broker.ks \ -storepass ${general_passwd} -dname "O=RedHat Inc.,CN=$(hostname)" \ -keypass ${general_passwd} -validity 99999where,general_passwdis the value of the password that you need to specify andhostnamespecify the hostname as per the settings on your system
Setting up A-MQ for listening to amqp+ssl connection
activemq.xml file to include the authentication settings
- For Server authentication, add the amqp+ssl connector to the list if
transportConnectorsinactivemq.xml.<transportConnector name="amqp+ssl" uri="amqp+ssl://<hostname>:5671"/> - For Client authentication, add the amqp+ssl connector to the list if
transportConnectorsinactivemq.xml<transportConnector name="amqp+ssl" uri="amqp+ssl://<hostname>:5671?needClientAuth=true"/> - For skip SASL authentication, enable the anonymous access property for the
simpleAuthenticationPlugininactivemq.xml<simpleAuthenticationPlugin anonymousAccessAllowed="true"/>
Chapter 2. OpenWire ActiveMQ Client APIs
Abstract
2.1. General Approach to Establishing a Connection
Steps to establish a connection
- Get an instance of the Red Hat JBoss A-MQ connection factory.Depending on the environment, the application can create a new instance of the connection factory or use JNDI, or another mechanism, to look up the connection factory.
- Use the connection factory to create a connection.
- Get an instance of the destination used for sending or receiving messages.Destinations are administered objects that are typically created by the broker. The JBoss A-MQ allows clients to create destinations on-demand. You can also look up destinations using JNDI or another mechanism.
- Use the connection to create a session.The session is the factory for creating producers and consumers. The session also is a factory for creating messages.
- Use the session to create the message consumer or message producer.
- Start the connection.
2.2. OpenWire JMS Client API
Overview
The connection factory
ActiveMQConnectionFactory, is used to create connections to brokers and does not need to be looked up using JNDI. Instances are created using a broker URI that specifies one of the transport connectors configured on a broker and the connection factory will do the heavy lifting.
ActiveMQConnectionFactory constructors.
Example 2.1. Connection Factory Constructors
ActiveMQConnectionFactory(String brokerURI);ActiveMQConnectionFactory(URI brokerURI);ActiveMQConnectionFactory(String username,
String password,
String brokerURI);ActiveMQConnectionFactory(String username,
String password,
URI brokerURI);The connection
Connection object will suffice. However, JBoss A-MQ does provide an implementation, ActiveMQConnection, that provides a number of additional methods for working with the broker. Using ActiveMQConnection will make your client code less portable between JMS providers.
The session
Example
EXAMPLE.FOO.
Example 2.2. JMS Producer Connection
import org.apache.activemq.ActiveMQConnectionFactory;

import javax.jms.Connection;
import javax.jms.DeliveryMode;
import javax.jms.Destination;
import javax.jms.ExceptionListener;
import javax.jms.JMSException;
import javax.jms.Message;
import javax.jms.MessageConsumer;
import javax.jms.MessageProducer;
import javax.jms.Session;
import javax.jms.TextMessage;

...

// Create a ConnectionFactory
ActiveMQConnectionFactory connectionFactory = new ActiveMQConnectionFactory("tcp://localhost:61616");

// Create a Connection
Connection connection = connectionFactory.createConnection();

// Create a Session
Session session = connection.createSession(false, Session.AUTO_ACKNOWLEDGE);

// Create the destination
Destination destination = session.createQueue("EXAMPLE.FOO");

// Create a MessageProducer from the Session to the Queue
MessageProducer producer = session.createProducer(destination);

// Start the connection
connection.start();
2.3. OpenWire C++ Client API
Overview
The connection factory
ConnectionFactory. A ConnectionFactory allows you to create connections which maintain a connection to a message broker.
ConnectionFactory is to use the static createCMSConnectionFactory() method that all CMS provider libraries are required to implement. Example 2.3, “Creating a Connection Factory” demonstrates how to obtain a new ConnectionFactory.
Example 2.3. Creating a Connection Factory
std::auto_ptr<cms::ConnectionFactory> connectionFactory(
cms::ConnectionFactory::createCMSConnectionFactory( "tcp://127.0.0.1:61616" ) );createCMSConnectionFactory() takes a single string parameter which a URI that defines the connection that will be created by the factory. Additionally configuration information can be encoded in the URI. For details on how to construct a broker URI see the Connection Reference.
The connection
Connection is a object that manages the client's connection to the broker. Example 2.4, “Creating a Connection” shows the code to create a connection.
Example 2.4. Creating a Connection
std::auto_ptr<cms::Connection> connection( connectionFactory->createConnection() );CMSException is thrown with a description of the error that occurred stored in its message property.
- It encapsulates an open connection with a JMS provider. It typically represents an open TCP/IP socket between a client and a provider service daemon.
- Its creation is where client authentication takes place.
- It can specify a unique client identifier.
- It provides a
ConnectionMetaDataobject. - It supports an optional
ExceptionListenerobject.
The session
Example 2.5. Creating a Session
std::auto_ptr<cms::Session> session( connection->createSession(cms::Session::CLIENT_ACKNOWLEDGE) );| Acknowledge Mode | Description |
|---|---|
AUTO_ACKNOWLEDGE | The session automatically acknowledges a client's receipt of a message when the session returns successfully from a recieve call or when the message listener of the session returns successfully. |
CLIENT_ACKNOWLEDGE | The client acknowledges a consumed message by calling the message's acknowledge method. Acknowledging a consumed message acknowledges all messages that the session has consumed. |
DUPS_OK_ACKNOWLEDGE | The session to lazily acknowledges the delivery of messages. This is likely to result in the delivery of some duplicate messages if the broker fails, so it should only be used by consumers that can tolerate duplicate messages. Use of this mode can reduce session overhead by minimizing the work the session does to prevent duplicates. |
SESSION_TRANSACTED | The session is transacted and the acknowledge of messages is handled internally. |
INDIVIDUAL_ACKNOWLEDGE | Acknowledges are applied to a single message only. |
AUTO_ACKNOWLEDGE.
- It is a factory for producers and consumers.
- It supplies provider-optimized message factories.
- It is a factory for temporary topics and temporary queues.
- It provides a way to create a queue or a topic for those clients that need to dynamically manipulate provider-specific destination names.
- It supports a single series of transactions that combine work spanning its producers and consumers into atomic units.
- It defines a serial order for the messages it consumes and the messages it produces.
- It retains messages it consumes until they have been acknowledged.
- It serializes execution of message listeners registered with its message consumers.
Resources
Example
EXAMPLE.FOO.
Example 2.6. CMS Producer Connection
#include <decaf/lang/Thread.h>
#include <decaf/lang/Runnable.h>
#include <decaf/util/concurrent/CountDownLatch.h>
#include <decaf/lang/Integer.h>
#include <decaf/util/Date.h>
#include <activemq/core/ActiveMQConnectionFactory.h>
#include <activemq/util/Config.h>
#include <cms/Connection.h>
#include <cms/Session.h>
#include <cms/TextMessage.h>
#include <cms/BytesMessage.h>
#include <cms/MapMessage.h>
#include <cms/ExceptionListener.h>
#include <cms/MessageListener.h>
...

using namespace activemq::core;
using namespace decaf::util::concurrent;
using namespace decaf::util;
using namespace decaf::lang;
using namespace cms;
using namespace std;

...

// Create a ConnectionFactory
auto_ptr<ConnectionFactory> connectionFactory(
                ConnectionFactory::createCMSConnectionFactory( "tcp://127.1.0.1:61616?wireFormat=openwire" ) );

// Create a Connection
connection = connectionFactory->createConnection();
connection->start();

// Create a Session
session = connection->createSession( Session::AUTO_ACKNOWLEDGE );
destination = session->createQueue( "EXAMPLE.FOO" );

// Create a MessageProducer from the Session to the Queue
producer = session->createProducer( destination );

...
2.4. OpenWire .Net Client API
Overview
Resources
Example
EXAMPLE.FOO.
Example 2.7. NMS Producer Connection
using System;
using Apache.NMS;
using Apache.NMS.Util;
...

// NOTE: ensure the nmsprovider-activemq.config file exists in the executable folder.
IConnectionFactory factory = new ActiveMQ.ConnectionFactory("tcp://localhost:61616);

// Create a Connection
IConnection connection = factory.CreateConnection();

// Create a Session
ISession session = connection.CreateSession();

// Create the destination
IDestination destination = SessionUtil.GetDestination(session, "queue://EXAMPLE.FOO");

// Create a message producer from the Session to the Queue
IMessageProducer producer = session.CreateProducer(destination);

// Start the connection
connection.Start();
...
2.5. Configuring NMS.ActiveMQ
Abstract
Connection configuration using the generic NMSConnectionFactory class
NMSConnectionFactory class, you can configure an ActiveMQ endpoint as follows:
var cf = new NMSConnectionFactory(
    "activemq:tcp://localhost:61616?wireFormat.tightEncodingEnabled=true");
Connection configuration using the ActiveMQ ConnectionFactory class
ConnectionFactory class, you can configure an ActiveMQ endpoint as follows:
var cf = new Apache.NMS.ActiveMQ.ConnectionFactory(
    "tcp://localhost:61616?wireFormat.tightEncodingEnabled=true");
Protocol variants
|
Option Name
|
Description
|
|---|---|
tcp
|
Uses TCP/IP Sockets to connect to the Broker.
|
ssl
|
Uses TCP/IP Sockets to connect to the Broker with an added SSL layer.
|
discovery
|
Uses The Discovery Transport to find a Broker.
|
failover
|
Uses the Failover Transport to connect and reconnect to one or more Brokers.
|
TCP transport options
tcp transport supports the following options:
|
Option Name
|
Default
|
Description
|
|---|---|---|
transport.useLogging
|
false
|
Log data that is sent across the Transport.
|
transport.receiveBufferSize
|
8192
|
Amount of Data to buffer from the Socket.
|
transport.sendBufferSize
|
8192
|
Amount of Data to buffer before writing to the Socket.
|
transport.receiveTimeout
|
0
|
Time to wait for more data, zero means wait infinitely.
|
transport.sendTimeout
|
0
|
Timeout on sends, 0 means wait forever for completion.
|
transport.requestTimeout
|
0
|
Time to wait before a Request Command is considered to have failed.
|
Failover transport options
failover transport supports the following options:
|
Option Name
|
Default
|
Description
|
|---|---|---|
transport.timeout
|
-1
|
Time that a send operation blocks before failing.
|
transport.initialReconnectDelay
|
10
|
Time in Milliseconds that the transport waits before attempting to reconnect the first time.
|
transport.maxReconnectDelay
|
30000
|
The max time in Milliseconds that the transport will wait before attempting to reconnect.
|
transport.backOffMultiplier
|
2
|
The amount by which the reconnect delay will be multiplied by if useExponentialBackOff is enabled.
|
transport.useExponentialBackOff
|
true
|
Should the delay between connection attempt grow on each try up to the max reconnect delay.
|
transport.randomize
|
true
|
Should the Uri to connect to be chosen at random from the list of available Uris.
|
transport.maxReconnectAttempts
|
0
|
Maximum number of time the transport will attempt to reconnect before failing (0 means infinite retries)
|
transport.startupMaxReconnectAttempts
|
0
|
Maximum number of time the transport will attempt to reconnect before failing when there has never been a connection made. (0 means infinite retries) (included in NMS.ActiveMQ v1.5.0+)
|
transport.reconnectDelay
|
10
|
The delay in milliseconds that the transport waits before attempting a reconnection.
|
transport.backup
|
false
|
Should the Failover transport maintain hot backups.
|
transport.backupPoolSize
|
1
|
If enabled, how many hot backup connections are made.
|
transport.trackMessages
|
false
|
keep a cache of in-flight messages that will flushed to a broker on reconnect
|
transport.maxCacheSize
|
256
|
Number of messages that are cached if trackMessages is enabled.
|
transport.updateURIsSupported
|
true
|
Update the list of known brokers based on BrokerInfo messages sent to the client.
|
Connection Options
connection. prefix or the nms. prefix (in a similar way to the Java client's jms. prefixed settings).
|
Option Name
|
Default
|
Description
|
|---|---|---|
connection.AsyncSend
|
false
|
Are message sent Asynchronously.
|
connection.AsyncClose
|
true
|
Should the close command be sent Asynchronously
|
connection.AlwaysSyncSend
|
false
|
Causes all messages a Producer sends to be sent Asynchronously.
|
connection.CopyMessageOnSend
|
true
|
Copies the Message objects a Producer sends so that the client can reuse Message objects without affecting an in-flight message.
|
connection.ProducerWindowSize
|
0
|
The ProducerWindowSize is the maximum number of bytes in memory that a producer will transmit to a broker before waiting for acknowledgement messages from the broker that it has accepted the previously sent messages. In other words, this how you configure the producer flow control window that is used for async sends where the client is responsible for managing memory usage. The default value of 0 means no flow control at the client. See also Producer Flow Control
|
connection.useCompression
|
false
|
Should message bodies be compressed before being sent.
|
connection.sendAcksAsync
|
false
|
Should message acks be sent asynchronously
|
connection.messagePrioritySupported
|
true
|
Should messages be delivered to the client based on the value of the Message Priority header.
|
connection.dispatchAsync
|
false
|
Should the broker dispatch messages asynchronously to the connection's consumers.
|
connection.watchTopicAdvisories
|
true
|
Should the client watch for advisory messages from the broker to track the creation and deletion of temporary destinations.
|
OpenWire options
|
Option Name
|
Default
|
Description
|
|---|---|---|
wireFormat.stackTraceEnabled
|
false
|
Should the stack trace of exception that occur on the broker be sent to the client? Only used by openwire protocol.
|
wireFormat.cacheEnabled
|
false
|
Should commonly repeated values be cached so that less marshalling occurs? Only used by openwire protocol.
|
wireFormat.tcpNoDelayEnabled
|
false
|
Does not affect the wire format, but provides a hint to the peer that TCP nodelay should be enabled on the communications Socket. Only used by openwire protocol.
|
wireFormat.sizePrefixDisabled
|
false
|
Should serialized messages include a payload length prefix? Only used by openwire protocol.
|
wireFormat.tightEncodingEnabled
|
false
|
Should wire size be optimized over CPU usage? Only used by the openwire protocol.
|
wireFormat.maxInactivityDuration
|
30000
|
The maximum inactivity duration (before which the socket is considered dead) in milliseconds. On some platforms it can take a long time for a socket to appear to die, so we allow the broker to kill connections if they are inactive for a period of time. Use by some transports to enable a keep alive heart beat feature. Set to a value <= 0 to disable inactivity monitoring.
|
maxInactivityDurationInitalDelay
|
10000
|
The initial delay in starting the maximum inactivity checks (and, yes, the word 'Inital' is supposed to be misspelled like that)
|
Destination configuration
d = session.CreateTopic("com.foo?consumer.prefetchSize=2000&consumer.noLocal=true");General options
|
Option Name
|
Default
|
Description
|
|---|---|---|
consumer.prefetchSize
|
1000
|
The number of message the consumer will prefetch.
|
consumer.maximumPendingMessageLimit
|
0
|
Use to control if messages are dropped if a slow consumer situation exists.
|
consumer.noLocal
|
false
|
Same as the noLocal flag on a Topic consumer. Exposed here so that it can be used with a queue.
|
consumer.dispatchAsync
|
false
|
Should the broker dispatch messages asynchronously to the consumer.
|
consumer.retroactive
|
false
|
Is this a Retroactive Consumer.
|
consumer.selector
|
null
|
JMS Selector used with the consumer.
|
consumer.exclusive
|
false
|
Is this an Exclusive Consumer.
|
consumer.priority
|
0
|
Allows you to configure a Consumer Priority.
|
OpenWire specific options
|
Option Name
|
Default
|
Description
|
|---|---|---|
consumer.browser
|
false
|
|
consumer.networkSubscription
|
false
|
|
consumer.optimizedAcknowledge
|
false
|
Enables an optimised acknowledgement mode where messages are acknowledged in batches rather than individually. Alternatively, you could use
Session.DUPS_OK_ACKNOWLEDGE acknowledgement mode for the consumers which can often be faster. WARNING: enabling this issue could cause some issues with auto-acknowledgement on reconnection
|
consumer.noRangeAcks
|
false
|
|
consumer.retroactive
|
false
|
Sets whether or not retroactive consumers are enabled. Retroactive consumers allow non-durable topic subscribers to receive old messages that were published before the non-durable subscriber started.
|
2.6. Stomp Heartbeats
Abstract
Stomp 1.1 heartbeats
CONNECT
heart-beat:CltSend,CltRecv

CONNECTED:
heart-beat:SrvSend,SrvRecv- CltSend
- Indicates the minimum frequency of messages sent from the client, expressed as the maximum time between messages in units of milliseconds. If the client does not send a regular Stomp message within this time limit, it must send a special heartbeat message, in order to keep the connection alive.A value of zero indicates that the client does not send heartbeats.
- CltRecv
- Indicates how often the client expects to receive message from the server, expressed as the maximum time between messages in units of milliseconds. If the client does not receive any messages from the server within this time limit, it would time out the connection.A value of zero indicates that the client does not expect heartbeats and will not time out the connection.
- SrvSend
- Indicates the minimum frequency of messages sent from the server, expressed as the maximum time between messages in units of milliseconds. If the server does not send a regular Stomp message within this time limit, it must send a special heartbeat message, in order to keep the connection alive.A value of zero indicates that the server does not send heartbeats.
- SrvRecv
- Indicates how often the server expects to receive message from the client, expressed as the maximum time between messages in units of milliseconds. If the server does not receive any messages from the client within this time limit, it would time out the connection.A value of zero indicates that the server does not expect heartbeats and will not time out the connection.
Stomp 1.0 heartbeat compatibility
transport.defaultHeartBeat option in the broker's transportConnector element, as follows:
<transportConnector name="stomp" uri="stomp://0.0.0.0:0?transport.defaultHeartBeat=5000,0" />CONNECT
heart-beat:5000,00, indicates that the client does not expect to receive any heartbeats from the server (which makes sense, because Stomp 1.0 clients do not understand heartbeats).
transport.defaultHeartBeat such that the connection will stay alive, as long as the Stomp 1.0 clients are sending messages at their normal rate.
2.7. Stomp Composite Destinations
Abstract
Specify Composite Destinatons for Stomp in A-MQ
(dest-type/dest-name01,dest-type/dest-name02,dest-type/dest-name79)(topic/test01,topic/test02,topic/test15A)(queue/queuename01,queue/queuename02,queue/queuename31C)2.8. Intra-JVM Connections
Abstract
Overview
Figure 2.1. Clients Connected through the VM Transport
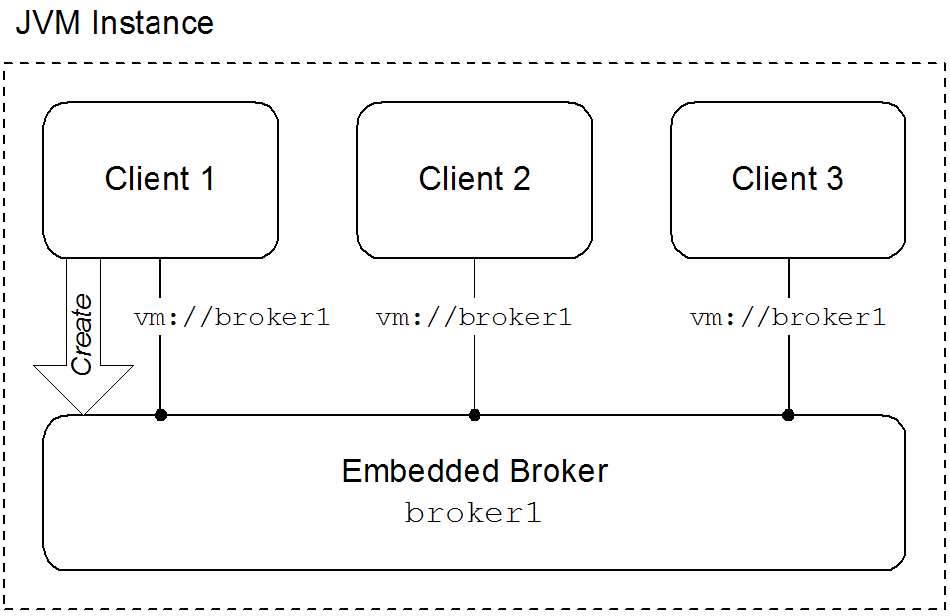
Embedded brokers
- explicitly defining the broker in the application's configuration
- explicitly creating the broker using the Java APIs
- automatically when the first client attempts to connect to it using the VM transport
waitForStart option or the create=false option to manage how the VM transport determines when to create a new embedded broker.
Using the VM transport
- simpleThe simple VM URI is used in most situations. It allows you to specify the name of the embedded broker to which the client will connect. It also allows for some basic broker configuration.Example 2.8, “Simple VM URI Syntax” shows the syntax for a simple VM URI.
Example 2.8. Simple VM URI Syntax
vm://BrokerName?TransportOptions- BrokerName specifies the name of the embedded broker to which the client connects.
- TransportOptions specifies the configuration for the transport. They are specified in the form of a query list. For details about the available options see the Connection Reference.ImportantThe broker configuration options specified on the VM URI are only meaningful if the client is responsible for instantiating the embedded broker. If the embedded broker is already started, the transport will ignore the broker configuration properties.
- advancedThe advanced VM URI provides you full control over how the embedded broker is configured. It uses a broker configuration URI similar to the one used by the administration tool to configure the embedded broker.Example 2.9, “Advanced VM URI Syntax” shows the syntax for an advanced VM URI.
Example 2.9. Advanced VM URI Syntax
vm://(BrokerConfigURI)?TransportOptions- BrokerConfigURI is a broker configuration URI.
- TransportOptions specifies the configuration for the transport. They are specified in the form of a query list. For details about the available options see the Connection Reference.
Examples
broker1.
Example 2.10. Basic VM URI
vm://broker1Example 2.11. Simple URI with broker options
vm://broker1?broker.persistent=falseExample 2.12. Advanced VM URI
vm:(broker:(tcp://localhost:6000)?persistent=false)?marshal=false2.9. Peer Protocol
Abstract
Overview
Figure 2.2. Peer Protocol Endpoints with Embedded Brokers
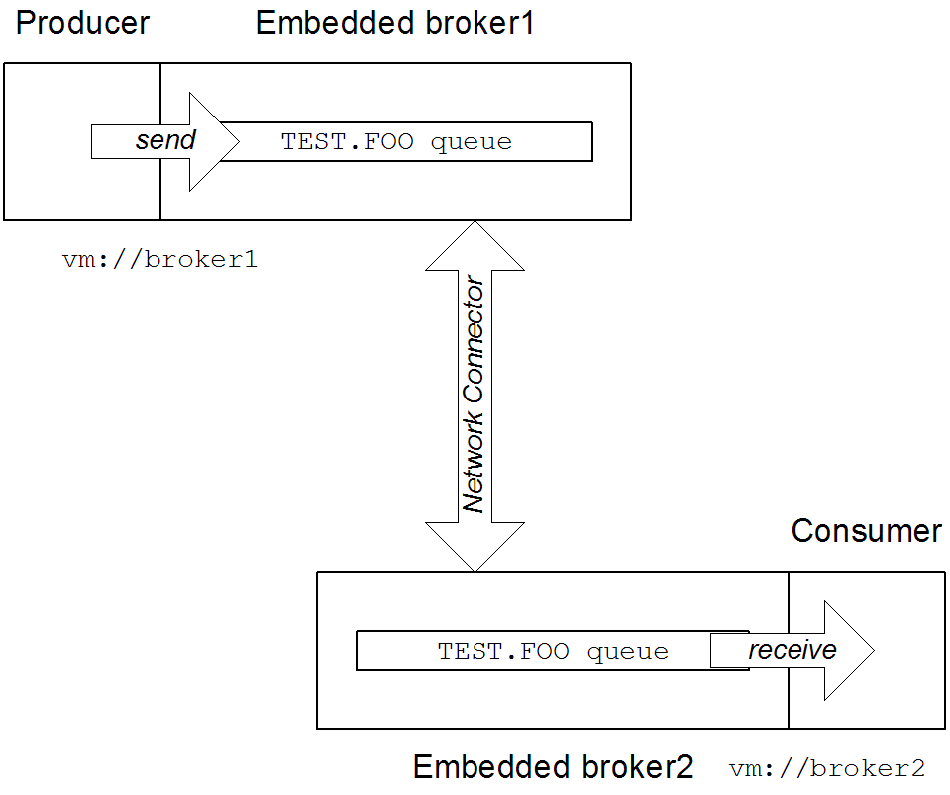
broker1, by connecting to the local VM endpoint, vm://broker1. The embedded brokers, broker1 and broker2, are linked together using a network connector which allows messages to flow in either direction between the brokers. When the producer sends a message to the queue, broker1 pushes the message across the network connector to broker2. The consumer receives the message from broker2.
Peer endpoint discovery
URI syntax
peer URI must conform to the following syntax:
peer://PeerGroup/BrokerName?BrokerOptionsSample URI
groupA, and creates an embedded broker with broker name, broker1:
peer://groupA/broker1?persistent=false2.10. Message Prefetch Behavior
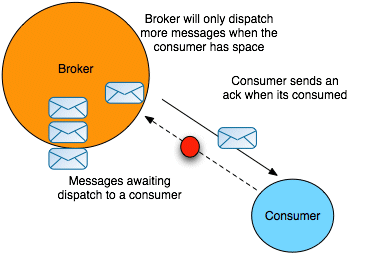
Overview
Figure 2.3. Consumer Prefetch Limit
Consumer specific prefetch limits
| Consumer Type | Property | Default |
|---|---|---|
| Queue consumer | queuePrefetch | 1000 |
| Queue browser | queueBrowserPrefetch | 500 |
| Topic consumer | topicPrefetch | 32766 |
| Durable topic subscriber | durableTopicPrefetch | 100 |
Setting prefetch limits per broker
destinationPolicy element as a child of the broker element in the broker's configuration, as shown in Example 2.13, “Configuring a Destination Policy”.
Example 2.13. Configuring a Destination Policy
<broker ... >
  ...
  <destinationPolicy>
    <policyMap>
      <policyEntries>
        <policyEntry queue="queue.>" queuePrefetch=”1”/>
        <policyEntry topic="topic.>" topicPrefetch=”1000”/>
      </policyEntries>
    </policyMap>
  </destinationPolicy>
  ...
</broker>queue. is set to 1 (the > character is a wildcard symbol that matches one or more name segments); and the topic prefetch limit for all topics whose names start with topic. is set to 1000.
Setting prefetch limits per connection
ActiveMQConnectionFactory instance. Example 2.14, “Setting Prefetch Limit Properties Per Connection” shows how to specify the prefetch limits for all consumer types on a connection factory.
Example 2.14. Setting Prefetch Limit Properties Per Connection
ActiveMQConnectionFactory factory = new ActiveMQConnectionFactory();

Properties props = new Properties();
props.setProperty("prefetchPolicy.queuePrefetch", "1000");
props.setProperty("prefetchPolicy.queueBrowserPrefetch", "500");
props.setProperty("prefetchPolicy.durableTopicPrefetch", "100");
props.setProperty("prefetchPolicy.topicPrefetch", "32766");

factory.setProperties(props);Setting prefetch limits per destination
TEST.QUEUE with a prefetch limit of 10. The option is set as a destination option as part of the URI used to create the queue.
Example 2.15. Setting the Prefetch Limit on a Destination
Queue queue = new ActiveMQQueue("TEST.QUEUE?consumer.prefetchSize=10");

MessageConsumer consumer = session.createConsumer(queue);
Disabling the prefetch extension logic
Example 2.16. Disabling the Prefetch Extension
<broker ... >
  ...
  <destinationPolicy>
    <policyMap>
      <policyEntries>
        <policyEntry queue=">" usePrefetchExtension=”false”/>
      </policyEntries>
    </policyMap>
  </destinationPolicy>
  ...
</broker>
2.11. Message Redelivery
Overview
- A transacted session is used and
rollback()is called. - A transacted session is closed before commit is called.
- A session is using
CLIENT_ACKNOWLEDGEandSession.recover()is called.
- On the broker, using the broker's redelivery plug-in,
- On the connection factory, using the connection URI,
- On the connection, using the
RedeliveryPolicy, - On destinations, using the connection's
RedeliveryPolicyMap.
Redelivery properties
| Option | Default | Description |
|---|---|---|
collisionAvoidanceFactor | 0.15 | Specifies the percentage of range of collision avoidance. |
maximumRedeliveries | 6 | Specifies the maximum number of times a message will be redelivered before it is considered a poisoned pill and returned to the broker so it can go to a dead letter queue. -1 specifies an infinite number of redeliveries. |
maximumRedeliveryDelay | -1 | Specifies the maximum delivery delay that will be applied if the useExponentialBackOff option is set. -1 specifies that no maximum be applied. |
initialRedeliveryDelay | 1000 | Specifies the initial redelivery delay in milliseconds. |
redeliveryDelay | 1000 | Specifies the delivery delay, in milliseconds, if initialRedeliveryDelay is 0. |
useCollisionAvoidance | false | Specifies if the redelivery policy uses collision avoidance. |
useExponentialBackOff | false | Specifies if the redelivery time out should be increased exponentially. |
backOffMultiplier | 5 | Specifies the back-off multiplier. |
Configuring the broker's redelivery plug-in
maximumRedeliveries to 0 on the destination).
redeliveryPlugin element. As shown in the following example this element is a child of the broker's plugins element and contains a policy map defining the desired behavior.
Example 2.17. Configuring the Redelivery Plug-In
<broker xmlns="http://activemq.apache.org/schema/core" ... >
  ....
  <plugins>
    <redeliveryPlugin ... >
      <redeliveryPolicyMap>
        <redeliveryPolicyMap>
          <redeliveryPolicyEntries> 1
            <!-- a destination specific policy -->
            <redeliveryPolicy queue="SpecialQueue"
                              maximumRedeliveries="3"
                              initialRedeliveryDelay="3000" />
          </redeliveryPolicyEntries>
          <!-- the fallback policy for all other destinations -->
          <defaultEntry> 2
            <redeliveryPolicy maximumRedeliveries="3"
                              initialRedeliveryDelay="3000" />
          </defaultEntry>
        </redeliveryPolicyMap>
      </redeliveryPolicyMap>
    </redeliveryPlugin>
  </plugins>
  ...
</broker>- 1
- The
redeliveryPolicyEntrieselement contains a list ofredeliveryPolicyelements that configures redelivery policies on a per-destination basis. - 2
- The
defaultEntryelement contains a singleredeliveryPolicyelement that configures the redelivery policy used by all destinations that do not match the one with a specific policy.
Configuring the redelivery using the broker URI
Example 2.18. Setting the Redelivery Policy using a Connection URI
ActiveMQConnectionFactory connectionFactory =
new ActiveMQConnectionFactory("tcp://localhost:61616?jms.redeliveryPolicy.maximumRedeliveries=4");Setting the redelivery policy on a connection
ActiveMQConnection class' getRedeliveryPolicy() method allows you to configure the redelivery policy for all consumer's using that connection.
getRedeliveryPolicy() returns a RedeliveryPolicy object that controls the redelivery policy for the connection. The RedeliveryPolicy object has setters for each of the properties listed in Table 2.3, “Redelivery Policy Options”.
Example 2.19. Setting the Redelivery Policy for a Connection
ActiveMQConnection connection =
  connectionFactory.createConnetion();

// Get the redelivery policy
RedeliveryPolicy policy = connection.getRedeliveryPolicy();

// Set the policy
policy.setMaximumRedeliveries(4);
Setting the redelivery policy on a destination
ActiveMQConnection class' getRedeliveryPolicyMap() method returns a RedeliveryPolicyMap object that is a map of RedeliveryPolicy objects with destination names as the key.
RedeliveryPolicy object controls the redelivery policy for all destinations whose name match the destination name specified in the map's key.
FRED.JOE can only be redelivered 4 times.
Example 2.20. Setting the Redelivery Policy for a Destination
ActiveMQConnection connection =
  connectionFactory.createConnetion();

// Get the redelivery policy
RedeliveryPolicy policy = new RedeliveryPolicy();
policy.setMaximumRedeliveries(4);

//Get the policy map
RedeliveryPolicyMap map = connection.getRedeliveryPolicyMap();
map.put(new ActiveMQQueue("FRED.JOE"), queuePolicy);
Chapter 3. AMQP 1.0 Client APIs
Abstract
3.1. Introduction to AMQP
What is AMQP?
- Open standard (defined by the OASIS AMQP Technical Committee)
- Defines a wire protocol
- Defines APIs for multiple languages (C++, Java)
- Interoperability between different AMQP implementations
JMS is an API
AMQP is a wire protocol
AMQP-to-JMS requires message conversion
3.2. JMS AMQP 1.0 Client API
3.2.1. Getting Started with AMQP
Getting started with AMQP
- Configure the broker to use AMQP—to enable AMQP in the broker, add an AMQP endpoint to the broker's configuration. This implicitly activates the broker's AMQP integration, ensuring that incoming messages are converted from AMQP message format to JMS message format, as required.
- Implement the AMQP clients—the AMQP clients are based on the Apache Qpid JMS client libraries.
3.2.2. Configuring the Broker for AMQP
Overview
- Make sure that you have appropriate user entries in the
etc/users.propertiesfile, so that the AMQP clients will be able to log on to the broker. - Add an AMQP endpoint to the broker (by inserting a
transportConnectorelement into the broker's XML configuration).
Steps to configure the broker
- This example assumes that you are working with a fresh install of a standalone JBoss A-MQ broker, InstallDir.
- Define a JAAS user for the AMQP clients, so that the AMQP clients can authenticate themselves to the broker using JAAS security (security is enabled by default in the broker). Edit the
InstallDir/etc/users.propertiesfile and add a new user entry, as follows:# # This file contains the valid users who can log into JBoss A-MQ. # Each line has to be of the format: # # USER=PASSWORD,ROLE1,ROLE2,... # # All users and roles entered in this file are available after JBoss A-MQ startup # and modifiable via the JAAS command group. These users reside in a JAAS domain # with the name "karaf".. # # You must have at least one users to be able to access JBoss A-MQ resources #admin=admin,admin guest=guestAt this point, you can add entries for any other secure users you want. In particular, it is advisable to have at least one user with theadminrole, so that you can log into the secure container remotely (remembering to choose a secure password for the admin user).NoteTo avoid authentication issue, include the user guest in the list ofauthorizationEntriesforjaasAuthenticationPlugininactivemq.xml - Add an AMQP endpoint to the broker configuration. Edit the broker configuration file,
InstallDir/etc/activemq.xml. As shown in the following XML fragment, add the highlightedtransportConnectorelement as a child of thetransportConnectorselement in the broker configuration:<beans ...> ... <broker ...> ... <transportConnectors> <transportConnector name="amqp" uri="amqp://127.0.0.1:5672"/> <transportConnector name="openwire" uri="tcp://${bindAddress}:${bindPort}"/> </transportConnectors> </broker> </beans> - To start the broker, open a new command prompt, change directory to
InstallDir/bin, and enter the following command:./amq
Message conversion
Reference
3.2.3. AMQP Example Clients
Overview
Prerequisites
Steps to implement and run the AMQP clients
- At any convenient location, download and extract the qpid-jms code for example
examples, to hold the example code:mkdir example - The extracted files should have the following directory structure for the
examplesproject:├── apache-qpid-jms │ ├── pom.xml │ └── src ├── LICENSE ├── NOTICE ├── pom.xml ├── qpid-jms-client │ ├── pom.xml │ └── src ├── qpid-jms-discovery │ ├── pom.xml │ └── src ├── qpid-jms-docs │ ├── Configuration.md │ ├── pom.xml │ └── README.txt ├── qpid-jms-examples │ ├── pom.xml │ ├── README.txt │ └── src ├── qpid-jms-interop-tests │ ├── pom.xml │ ├── qpid-jms-activemq-tests │ └── README.md ├── README.md └── target └── maven-shared-archive-resources - On the console, run the command mvn clean package dependency:copy-dependencies -DincludeScope=runtime -DskipTestsAfter building the code (and downloading any packages required by Maven), if the build is successful, you should see output like the following in the console window:
[INFO] ------------------------------------------------------------------------ [INFO] Reactor Summary: [INFO] [INFO] QpidJMS ............................................ SUCCESS [05:36 min] [INFO] QpidJMS Client ..................................... SUCCESS [01:04 min] [INFO] QpidJMS Discovery Library .......................... SUCCESS [ 33.068 s] [INFO] QpidJMS Broker Interop Tests ....................... SUCCESS [ 0.024 s] [INFO] QpidJMS ActiveMQ Interop Tests ..................... SUCCESS [ 18.120 s] [INFO] QpidJMS Examples ................................... SUCCESS [ 0.144 s] [INFO] QpidJMS Docs ....................................... SUCCESS [ 0.017 s] [INFO] Apache Qpid JMS .................................... SUCCESS [ 22.253 s] [INFO] ------------------------------------------------------------------------ [INFO] BUILD SUCCESS [INFO] ------------------------------------------------------------------------ [INFO] Total time: 08:33 min [INFO] Finished at: 2015-06-15T21:24:01+05:30 [INFO] Final Memory: 35M/200M [INFO] ------------------------------------------------------------------------ - Run the following java command:
java -cp "target/classes/:target/dependency/*" org.apache.qpid.jms.example.HelloWorldAfter building the code, this target proceeds to run the consumer client, which reads messages from thequeuequeue. You should see output like the following in the console window:Hello world!
A Simple Messaging Program in Java JMS
Example 3.1. "Hello world!" in Java
      package org.apache.qpid.jms.example;

     import javax.jms.Connection;
     import javax.jms.ConnectionFactory;
     import javax.jms.DeliveryMode;
     import javax.jms.Destination;
     import javax.jms.ExceptionListener;
     import javax.jms.JMSException;
     import javax.jms.Message;
     import javax.jms.MessageConsumer;
     import javax.jms.MessageProducer;
     import javax.jms.Session;
     import javax.jms.TextMessage;
     import javax.naming.Context;
     import javax.naming.InitialContext;

      public class HelloWorld {

       private static final String USER = "guest";
       private static final String PASSWORD = "guest";\


      public static void main(String[] args) throws Exception {

      try {

          // The configuration for the Qpid InitialContextFactory has been supplied in
          // a jndi.properties file in the classpath, which results in it being picked
          // up automatically by the InitialContext constructor.
          Context context = new InitialContext(); 1

          ConnectionFactory factory = (ConnectionFactory) context.lookup("myFactoryLookup"); 2
          Destination queue = (Destination) context.lookup("myQueueLookup");

          Connection connection = factory.createConnection(USER, PASSWORD); 3
          connection.setExceptionListener(new MyExceptionListener());
          connection.start();

          Session session = connection.createSession(false, Session.AUTO_ACKNOWLEDGE); 4

          MessageProducer messageProducer = session.createProducer(queue); 5
          MessageConsumer messageConsumer = session.createConsumer(queue); 6


          TextMessage message = session.createTextMessage("Hello world!");
              messageProducer.send(message, DeliveryMode.NON_PERSISTENT, Message.DEFAULT_PRIORITY, Message.DEFAULT_TIME_TO_LIVE);
              TextMessage receivedMessage = (TextMessage) messageConsumer.receive(2000L); 7

          if (receivedMessage != null) {
                System.out.println(receivedMessage.getText());
          } else {
                System.out.println("No message received within the given timeout!");
          }

          connection.close();  8
       } catch (Exception exp) {
          System.out.println("Caught exception, exiting.");
          exp.printStackTrace(System.out);
          System.exit(1);
       }
      }

      private static class MyExceptionListener implements ExceptionListener {
        @Override
        public void onException(JMSException exception) {
            System.out.println("Connection ExceptionListener fired, exiting.");
            exception.printStackTrace(System.out);
            System.exit(1);
        }
      }
    }
- 1
- Creates the JNDI initial context.
- 2
- Creates a JMS connection factory for Qpid.
- 3
- Creates a JMS connection.
- 4
- Creates a session. This session is not transactional (transactions='false'), and messages are automatically acknowledged.
- 5
- Creates a producer that sends messages to the topic exchange.
- 6
- Creates a consumer that reads messages from the topic exchange.
- 7
- Reads the next available message.
- 8
- Closes the connection, all sessions managed by the connection, and all senders and receivers managed by each session.
Example 3.2. JNDI Properties File for "Hello world!" example
              java.naming.factory.initial = org.apache.qpid.jms.jndi.JmsInitialContextFactory

              connectionfactory.myFactoryLookup = amqp://localhost:5672 1

              queue.myQueueLookup = queue
              topic.myTopicLookup = topic  2
- 1
- Defines a connection factory from which connections can be created. The syntax of a ConnectionURL is given in the section called “Apache Qpid JMS Client Configuration”.
- 2
- Defines a destination for which MessageProducers and/or MessageConsumers can be created to send and receive messages. The value for the destination in the properties file is an address string. In the JMS implementation MessageProducers are analogous to senders in the Qpid Message API, and MessageConsumers are analogous to receivers.
Apache Qpid JMS Client Configuration
Configuring a JNDI InitialContext
org.apache.qpid.jms.jndi.JmsInitialContextFactory. You can configure JNDI InitialContext in three ways.
- Using
jndi.propertiesfile on the Java Classpath.To configure JNDI InitialContext using the properties file, Include the filejndi.propertieson the Classpath and set thejava.naming.factory.initialproperty to valueorg.apache.qpid.jms.jndi.JmsInitialContextFactory. The Qpid InitialContextFactory implementation is discovered while instantiating InitialContext object.javax.naming.Context ctx = new javax.naming.InitialContext();The ConnectionFactory, Queue and Topic objects contained in the context are configured using properties, either directly within thejndi.propertiesfile, or in a separate file which is referenced injndi.propertiesusing thejava.naming.provider.urlproperty. - Using system properties.To configure JNDI InitialContext using the system properties, set the
java.naming.factory.initialto valueorg.apache.qpid.jms.jndi.JmsInitialContextFactory. The Qpid InitialContextFactory implementation is discovered while instantiating InitialContext object.javax.naming.Context ctx = new javax.naming.InitialContext();The ConnectionFactory, Queue and Topic objects contained in the context are configured using properties, which is passed using thejava.naming.provider.urlsystem property. - Programmatically using an environment Hashtable.The InitialContext can be configured by passing an environment during creation:
Hashtable<Object, Object> env = new Hashtable<Object, Object>();
env.put(Context.INITIAL_CONTEXT_FACTORY, "org.apache.qpid.jms.jndi.JmsInitialContextFactory");
javax.naming.Context context = new javax.naming.InitialContext(env);
The ConnectionFactory, Queue and Topic objects contained in the context are configured using properties, either directly within the environment Hashtable or a seperate file which is referenced using thejava.naming.provider.urlproperty within the environment Hashtable.
Syntax of the Properties file
- For ConnectionFactory, use
connectionfactory.lookupName = URI, for example,connectionfactory.myFactoryLookup = amqp://localhost:5672 - For a Queue, use
queue.lookupName = queueName, for example,queue.myQueueLookup = queueA - For a Topic, use
topic.lookupName = topicName,for example,topic.myTopicLookup = topicA
ConnectionFactory factory = (ConnectionFactory) context.lookup("myFactoryLookup");
Queue queue = (Queue) context.lookup("myQueueLookup");
Topic topic = (Topic) context.lookup("myTopicLookup");
Connection URI
amqp://hostname:port[?option=value[&option2=value...]]
JMS Configuration options
|
Option Name
|
Description
|
|---|---|
jms.username
|
User name value used to authenticate the connection
|
jms.password
|
Password value used to authenticate the connection.
|
jms.clientID
|
The ClientID value that is applied to the connection.
|
jms.forceAsyncSend
|
Configures whether all Messages sent from a MessageProducer are sent asynchronously or only those Message that qualify such as Messages inside a transaction or non-persistent messages.
|
jms.alwaysSyncSend
|
Override all asynchronous send conditions and always sends every Message from a MessageProducer synchronously.
|
jms.sendAcksAsync
|
Causes all Message acknowledgments to be sent asynchronously.
|
jms.localMessagePriority
|
If enabled prefetched messages are reordered locally based on their given Message priority value. Default value is false
|
jms.localMessageExpiry
|
Controls whether MessageConsumer instances locally filter expired Messages or deliver them. By default this value is set to true and expired messages are filtered
|
jms.validatePropertyNames
|
If message property names should be validated as valid Java identifiers. Default is true.
|
jms.queuePrefix
|
Optional prefix value added to the name of any Queue created from a JMS Session.
|
jms.topicPrefix
|
Optional prefix value added to the name of any Topic created from a JMS Session.
|
jms.closeTimeout
|
Timeout value that controls how long the client waits on Connection close before returning. (By default the client waits 15 seconds for a normal close completion event).
|
jms.connectTimeout
|
Timeout value that controls how long the client waits on Connection establishment before returning with an error. (By default the client waits 15 seconds for a connection to be established before failing).
|
jms.clientIDPrefix
|
Optional prefix value that is used for generated Client ID values when a new Connection is created for the JMS ConnectionFactory. The default prefix is 'ID:'.
|
jms.connectionIDPrefix
|
Optional prefix value that is used for generated Connection ID values when a new Connection is created for the JMS ConnectionFactory. This connection ID is used when logging some information from the JMS Connection object so a configurable prefix can make breadcrumbing the logs easier. The default prefix is 'ID:'.
|
jms.prefetchPolicy.queuePrefetchdefaults to 1000jms.prefetchPolicy.topicPrefetchdefaults to 1000jms.prefetchPolicy.queueBrowserPrefetchdefaults to 1000jms.prefetchPolicy.durableTopicPrefetchdefaults to 1000jms.prefetchPolicy.allused to set all prefetch values at once.
jms.redeliveryPolicy.maxRedeliveries controls when an incoming message is rejected based on the number of times it has been redelivered, the default value is (-1) disabled. A value of zero would indicate no message redeliveries are accepted, a value of five would allow a message to be redelivered five times, and so on.
TCP Transport Configuration options
amqp://localhost:5672?jms.clientID=foo&transport.connectTimeout=30000|
Option Name
|
Default Value
|
|---|---|
transport.sendBufferSize
|
64k
|
transport.receiveBufferSize
|
64k
|
transport.trafficClass
|
10
|
transport.connectTimeout
|
60 secs
|
transport.soTimeout
|
-1
|
transport.soLinger
|
-1
|
transport.tcpKeepAlive
|
false
|
transport.tcpNoDelay
|
true
|
SSL Transport Configuration options
amqps://localhost:5673
transport.keyStoreLocation
|
default is to read from the system property
javax.net.ssl.keyStore.
|
transport.keyStorePassword
|
default is to read from the system property
javax.net.ssl.keyStorePassword.
|
transport.trustStoreLocation
|
default is to read from the system property
javax.net.ssl.trustStore.
|
transport.trustStorePassword
|
default is to read from the system property
javax.net.ssl.trustStorePassword.
|
transport.storeType
|
The type of trust store being used. Default is "JKS".
|
transport.contextProtocol
|
The protocol argument used when getting an SSLContext. Default is "TLS".
|
transport.enabledCipherSuites
|
The cipher suites to enable, comma separated. The context default ciphers are used. Any disabled ciphers are removed.
|
transport.disabledCipherSuites
|
The cipher suites to disable, comma separated. Ciphers listed here are removed from the enabled ciphers. No default.
|
transport.enabledProtocols
|
The protocols to enable, comma separated, the context default protocols are used. Any disabled protocols are removed.
|
transport.disabledProtocols
|
The protocols to disable, comma separated. Protocols listed here are removed from the enabled protocols. Default is "SSLv2Hello,SSLv3".
|
transport.trustAll
|
Whether to trust the provided server certificate implicitly, regardless of any configured trust store. Defaults to false.
|
transport.verifyHost
|
Whether to verify that the hostname being connected to matches with the provided server certificate. Defaults to true.
|
transport.keyAlias
|
The alias to use when selecting a keypair from the keystore to send a client certificate to the server. No default.
|
Failover Configuration options
jms.* options are applied to the overall failover URI, outside the parentheses, and affect the JMS Connection object for its lifetime.
failover:(amqp://host1:5672,amqp://host2:5672)?jms.clientID=foo&failover.maxReconnectAttempts=20transport. or amqp. options defined earlier, with these being applied as each host is connected to:
failover:(amqp://host1:5672?amqp.option=value,amqp://host2:5672?transport.option=value)?jms.clientID=foo
failover.initialReconnectDelay
|
The amount of time the client will wait before the first attempt to reconnect to a remote peer. The default value is zero.
|
failover.reconnectDelay
|
Controls the delay between successive reconnection attempts, defaults to 10 milliseconds. If the backoff option is not enabled this value remains constant.
|
failover.maxReconnectDelay
|
The maximum time that the client will wait before attempting a reconnect. This value is used when the backoff feature is enabled to ensure that the delay is not too long. Defaults to 30 seconds.
|
failover.useReconnectBackOff
|
Controls whether the time between reconnection attempts should grow based on a configured multiplier. Defaults value is true.
|
failover.reconnectBackOffMultiplier
|
The multiplier used to grow the reconnection delay value, defaults to 2.0d.
|
failover.maxReconnectAttempts
|
The number of reconnection attempts allowed before reporting the connection as failed to the client. The default is no limit or (-1).
|
failover.startupMaxReconnectAttempts
|
For a client that has never connected to a remote peer. This option controls the number of attempts made to connect before reporting the connection as failed. The default value is maxReconnectAttempts.
|
failover.warnAfterReconnectAttempts
|
Controls how often the client logs a message indicating that failover reconnection is being attempted. The default is to log every 10 connection attempts.
|
transport.enabledProtocols
|
The protocols to enable, the values are comma separated and the context default protocols are used. Any disabled protocols are removed.
|
transport. and amqp. URI options outlined earlier for a non-failover broker URI but prefixed with failover.nested.
amqp.vhost option to every broker connected to you might have a URI like:
failover:(amqp://host1:5672,amqp://host2:5672)?jms.clientID=foo&failover.nested.amqp.vhost=myhost
AMQP Configuration options
amqp.idleTimeout: The idle timeout in milliseconds, the connection fails if the peer sends no AMQP frames. Default value 60000.amqp.vhost: The vhost to connect to. Used to populate the Sasl and Open hostname fields. Default is the main hostname from the Connection URI.amqp.saslLayer: Controls whether connections should use a SASL layer or not. Default is true.amqp.saslMechanisms: Which SASL mechanism(s) the client should allow selection of, if offered by the server and usable with the configured credentials. Comma separated if specifying more than 1 mechanism. Default is to allow selection from all the clients supported mechanisms, which are currently EXTERNAL, CRAM-MD5, PLAIN, and ANONYMOUS.amqp.maxFrameSize: The max-frame-size value in bytes that is advertised to the peer. Default is 1048576.
Discovery Configuration options
discovery:(<agent-uri>)?discovery.maxReconnectAttempts=20&discovery.discovered.jms.clientID=foo
discovery:(file:///path/to/monitored-file?updateInterval=60000)
updateInterval: Controls the frequency in milliseconds which the file is inspected for change. The default value is 30000.
discovery:(multicast://default?group=default)
group: Controls which multicast group messages are listened for on. The default value is "default".
JMS Client Logging
org.apache.qpid.jms.
- By setting the environment variable
PN_TRACE_FRMto true, which enables Proton to emit frame logging to stdout. - Add the option
amqp.traceFrames=trueto the connection URI. This enables the client to add a protocol tracer to Proton, and configure theorg.apache.qpid.jms.provider.amqp.FRAMESLogger to TRACE level to include the output in the logs.
3.3. .NET AMQP 1.0 Client API
3.3.1. Getting Started with .NET AMQP 1.0 Client API
3.3.1.1. Introduction to .NET AMQP 1.0 Client API
What is AMQPNet.Lite?
Hardware and Software Requirements to setup AMQPNet.Lite SDK
- Visual Studio version 2012 or 2013
- .NET Framework support for Common Language Runtime (CLR) versions 2.0 and 4.
- Windows Desktop machine
Installing the SDK
amqpnetlite-sdk-1.1.0.2.zip file in a directory on a windows machine.
Contents of the AMQPNet.Lite SDK
- The pre-compiled binary (.dll) files and the associated debug program database (.pdb) files.
- Source files of examples which demonstrate using this SDK and AMQP.
- Amqpnetlite API documentation,see
InstallDir\doc\html\index.html
AMQPNet.Lite Examples
- HelloWorld-simple Minimal send-receive through brokered topic.
- HelloWorld-robust Send-receive with more features.
- Interop.Drain, Interop.Spout-Interoperate with Apache Qpid using simple send and receive.
- Interop.Client, Interop.Server - Interoperate with Apache Qpid C++ Messaging using request and response.
- PeertoPeer - Client and Server programs illustrate using the Amqpnetlite library to create peer-to-peer connections without using an intermediate broker system.
- Receive Selector - Receive messages matching filter criteria
- Anonymous Relay - Like Interop.Client but detects and uses peer ANONYMOUS-RELAY capability for sending all messages over a single link, regardless of destination address.
InstallDir/amqpnetlite/Examples.
3.3.1.2. A Simple Messaging Program in AMQPNet.Lite
Building the Example
InstallDiramqpnetlite/amqp.sln and InstallDiramqpnetlite/amqp-vs2012.sln. The amqp.sln is the project file for Visual Studio 2013 solution and the amqp-vs2012.sln is the project file for Visual Studio 2012 solution.
- Go to the directory where you extracted the SDK, open
amqp.slnsolution file with Visual Studio 2013 - In the Solution Explorer window, you can view all the examples.
- To build the examples, click BUILD icon.
- The Output window shows the build status.
Running the Example
- On the terminal, navigate to the directory where SDK is installed, i.e
InstallDir/amqpnetlite/bin/Debug - On the command prompt enter the Helloworld-simple.exeBy default, this program connects to a broker running on localhost:5672. You can specify a host and port, and the AMQP endpoint address explicitly on the command line:, for example HelloWorld_simple amqp://localhost:5672 amq.topicBy default, this program addresses its messages to
amq.topic. In Amqp brokers amq.topic is a predefined endpoint address and is immediately available with no broker configuration. - On Success, you can see the output on the DOS prompt as: HelloWorld!
- In Visual Studio 2013 Solution Explorer window, right-click on Helloworld-simple example.
- Select Set as Startup Project option from the panel.
- In Solution Explorer window, click on
HelloWorld-simple.csfile and open the source codeusing System; using Amqp; namespace HelloWorld_simple { class HelloWorld_simple { static void Main(string[] args) { string broker = args.Length >= 1 ? args[0] : "amqp://localhost:5672"; string address = args.Length >= 2 ? args[1] : "amq.topic"; Address brokerAddr = new Address(broker); Connection connection = new Connection(brokerAddr); Session session = new Session(connection); SenderLink sender = new SenderLink(session, "helloworld-sender", address); ReceiverLink receiver = new ReceiverLink(session, "helloworld-receiver", address); Message helloOut = new Message("Hello World!"); sender.Send(helloOut); Message helloIn = receiver.Receive(); Console.WriteLine(helloIn.Body.ToString()); connection.Close(); } } } - Insert a breakpoint at the last line in the source file at
connection.Close();,and click - On success, you can see the output on the console window as
Hello World!
3.4. Python AMQP 1.0 Client API
3.4.1. Getting Started with Qpid Proton Python Client
3.4.1.1. Introduction to Qpid Proton Python Client
What is Qpid Proton
Introduction to the Qpid Proton Python Client
Container(name_of_a_handler_class(arguments)).run()
- Where the logic of the application is defined as a class handling particular events. A Container instance is created and passed an instance of that handler class.The call to
run()gives control to the Container, which performs the necessary IO operations and informs the handler of the events.Therun()returns when there is nothing to do.
3.4.2. Python Client Tutorials with examples
A Simple Sending and Receiving Program in Python
at-least-once guarantee, since each message should eventually be received at least once, though a given message may be received more than once.
sent and total, where, sent keeps track of the number of messages that are send and total maintains a count of number of messages to send.
Example 3.3. Sending reliable messages
import optparse
from proton import Message
from proton.handlers import MessagingHandler
from proton.reactor import Container

class Send(MessagingHandler):
    def __init__(self, url, messages):
        super(Send, self).__init__()
        self.url = url
        self.sent = 0
        self.confirmed = 0
        self.total = messages

    def on_start(self, event): 1
        event.container.create_sender(self.url)

    def on_sendable(self, event): 2
        while event.sender.credit and self.sent < self.total:
            msg = Message(id=(self.sent+1), body={'sequence':(self.sent+1)})
            event.sender.send(msg)  3
            self.sent += 1

    def on_accepted(self, event): 4
        self.confirmed += 1
        if self.confirmed == self.total:
            print "all messages confirmed"
            event.connection.close()

    def on_disconnected(self, event): 5
        self.sent = self.confirmed

parser = optparse.OptionParser(usage="usage: %prog [options]",
                               description="Send messages to the supplied address.")
parser.add_option("-a", "--address", default="localhost:5672/examples",
                  help="address to which messages are sent (default %default)")
parser.add_option("-m", "--messages", type="int", default=100,
                  help="number of messages to send (default %default)")
opts, args = parser.parse_args()

try:
    Container(Send(opts.address, opts.messages)).run()
except KeyboardInterrupt: pass- 1
On_start()method is called when the Container first starts to run.In this example it is used to establish a sending link over which the messages are transferred.- 2
On_sendable()method is called to known when the messages can be transferred.The callback checks that the sender has credit before sending messages and if the sender has already sent the required number of messages.NoteAMQP provides flow control allowing any component receiving messages to avoid being overwhelmed by the number of messages it is sent. In this example messages are sent when the broker has enabled their flow.- 3
Send()is an asynchronous call. The return of the call does not indicate that the messages has been transferred yet.- 4
on_accepted()notifies if the amq broker has received and accepted the message.In this example, we use this event to track the confirmation of the messages sent. The connection closes and exits when the amq broker has received all the messages.NoteTheon_accepted()call will be made by the Container when the amq broker accepts the message and not the receiving client.- 5
- Resets the sent count to reflect the confirmed messages. The library automatically reconnects to the sender and hence when the sender is ready, it can restart sending the remaining messages
Example 3.4. Receiving reliable messages
examples queue on a broker accessible on port 5672 on localhost. The program simply prints the body of the received messages.
import optparse
from proton.handlers import MessagingHandler
from proton.reactor import Container

class Recv(MessagingHandler):
    def __init__(self, url, count):
        super(Recv, self).__init__()
        self.url = url
        self.expected = count
        self.received = 0

    def on_start(self, event): 1
        event.container.create_receiver(self.url)

    def on_message(self, event): 2
        if event.message.id and event.message.id < self.received:
            # ignore duplicate message
            return
        if self.expected == 0 or self.received < self.expected:
            print event.message.body
            self.received += 1
            if self.received == self.expected:
                event.receiver.close()
                event.connection.close()

parser = optparse.OptionParser(usage="usage: %prog [options]")
parser.add_option("-a", "--address", default="localhost:5672/examples",
                  help="address from which messages are received (default %default)")
parser.add_option("-m", "--messages", type="int", default=100,
                  help="number of messages to receive; 0 receives indefinitely (default %default)")
opts, args = parser.parse_args()

try:
    Container(Recv(opts.address, opts.messages)).run()
except KeyboardInterrupt: pass- 1
On_start()method is called when the Container first starts to run.In this example it is used to establish a receiving link over which the messages are transferred.- 2
On_message()method is called when a message is received. It simply prints the messagesIn this example, the amq broker waits for a certain number of messages before closing and exiting the connection. The method checks for duplicate messages and ignores them. The logic to ignore duplicates is implement using the sequential id scheme
Sending and Receiving Program using SSL in Python
SSL Configuration
SSL settings for A-MQ to run Qpid Python client
- Generate pem trust certificate for Qpid Python client
keytool -importkeystore -srckeystore broker.ks -srcalias broker \ -srcstoretype JKS -deststoretype PKCS12 -destkeystore broker.pkcs12 \ -srcstorepass ${general_passwd} -deststorepass ${general_passwd} openssl pkcs12 -in broker.pkcs12 -out broker_cert.pem \ -passin pass:${general_passwd} -passout pass:${general_passwd} - Adjust A-MQ broker to use the certificate by modifying the A-MQ environment
sed -i '/KARAF_OPTS/d' ${A_MQ_HOME}/bin/setenvwhere,A_MQ_HOMEis the installation path of the amq broker executable file.echo "export KARAF_OPTS=\"-Djavax.net.ssl.keyStore=${certificates_dir}/broker.ks \ -Djavax.net.ssl.keyStorePassword=${general_passwd}\"" >> ${A_MQ_HOME}/bin/setenv - Generate the client certificate
 keytool -genkey -alias client -keyalg RSA -keystore client.ks \
-storepass ${general_passwd} -keypass ${general_passwd} \
-dname "O=Client,CN=client" -validity 99999
keytool -export -alias client -keystore client.ks -file client_cert \ -storepass ${general_passwd} - Add client certificate as trusted to the broker database
 keytool -import -alias client -keystore broker.ts -file client_cert \
-storepass ${general_passwd} -v -trustcacerts -noprompt
SSL certificate and keys settings for Qpid Python client
- Set SLL to prevent the private key and the certificate to be send to output.
openssl pkcs12 -nocerts -in client.pkcs12 -out client_private_key.pem \
 -passin pass:${general_passwd} -passout pass:${general_passwd}
openssl pkcs12 -nokeys -in client.pkcs12 -out client_cert.pem \ -passin pass:${general_passwd} -passout pass:${general_passwd} - Adjust A-MQ broker to use the certificate
sed -i '/KARAF_OPTS/d' ${A_MQ_HOME}/bin/setenvecho "export KARAF_OPTS=\"-Djavax.net.ssl.keyStore=${certificates_dir}/broker.ks \ -Djavax.net.ssl.keyStorePassword=${general_passwd} \ -Djavax.net.ssl.trustStore=${certificates_dir}/broker.ts \ -Djavax.net.ssl.trustStorePassword=${general_passwd}\"" >> ${A_MQ_HOME}/bin/setenv
Example
Example 3.5. Sending reliable messages over a secured connection
import optparse
from proton import Message
from proton.handlers import MessagingHandler
from proton.reactor import Container

class Send(MessagingHandler):
    def __init__(self, url, messages):
        super(Send, self).__init__()
        self.url = url
        self.sent = 0
        self.confirmed = 0
        self.total = messages

    def on_start(self, event):
        event.container.ssl.client.set_trusted_ca_db("/path/to/ca-certificate.pem")
        event.container.ssl.client.set_peer_authentication(SSLDomain.VERIFY_PEER) 1
        event.container.ssl.client.set_credentials("/path/to/client-certificate.pem",  "/path/to/client-private-key.pem", "client-password") 2
        event.container.create_sender(self.url)

    def on_sendable(self, event):
        while event.sender.credit and self.sent < self.total:
            msg = Message(id=(self.sent+1), body={'sequence':(self.sent+1)})
            event.sender.send(msg)
            self.sent += 1

    def on_accepted(self, event):
        self.confirmed += 1
        if self.confirmed == self.total:
            print "all messages confirmed"
            event.connection.close()

    def on_disconnected(self, event):
        self.sent = self.confirmed

parser = optparse.OptionParser(usage="usage: %prog [options]",
                               description="Send messages to the supplied address.")
parser.add_option("-a", "--address", default="localhost:5672/examples",
                  help="address to which messages are sent (default %default)")
parser.add_option("-m", "--messages", type="int", default=100,
                  help="number of messages to send (default %default)")
opts, args = parser.parse_args()

try:
    Container(Send(opts.address, opts.messages)).run()
except KeyboardInterrupt: pass- 1
set_trusted_ca_db("/path/to/ca-certificate.pem")call specifies the location of the CA's certificate in pem file formatset_peer_authentication(SSLDomain.VERIFY_PEER)call requests the servers certificate to be verified as valid using the specified CA's public key.To verify if the hostname used matches which the name specified in the servers certificate, replace theVERIFY_PEERmacro toVERIFY_PEER_NAME.NoteEnsure to update the program with the path of the certificates as per your environment before running the example.- 2
set_credentials("/path/to/client-certificate.pem", "/path/to/client-private-key.pem", "client-password")call is used if the client needs to authenticate itself. In such a case, you need to mention the clients public certificate, private key file both in pem format, and also specify the password required for the private keyNoteEnsure to update the program with the path of the client certificate, client private key as per your environment and the correct client-password before running the example.
A Request/Response Server and Client Program
Example 3.6. A simple server program to send responses
from proton import Message
from proton.handlers import MessagingHandler
from proton.reactor import Container

class Server(MessagingHandler):
    def __init__(self, url, address):
        super(Server, self).__init__()
        self.url = url
        self.address = address
        self.senders = {}

    def on_start(self, event):
        print "Listening on", self.url
        self.container = event.container
        self.conn = event.container.connect(self.url)
        self.receiver = event.container.create_receiver(self.conn, self.address)
        self.relay = None

    def on_connection_opened(self, event):
        if event.connection.remote_offered_capabilities and 'ANONYMOUS-RELAY' in event.connection.remote_offered_capabilities:
            self.relay = self.container.create_sender(self.conn, None)

    def on_message(self, event):
        print "Received", event.message
        sender = self.relay or self.senders.get(event.message.reply_to) 1

        if not sender:
            sender = self.container.create_sender(self.conn, event.message.reply_to)
            self.senders[event.message.reply_to] = sender
        sender.send(Message(address=event.message.reply_to, body=event.message.body.upper(),
                            correlation_id=event.message.correlation_id))

try:
    Container(Server("0.0.0.0:5672", "examples")).run()
except KeyboardInterrupt: pass- 1
On_message()method performs a lookup at thereply_toaddress on themessageand creates a sender over which the response can be send.In case there are more requests with the samereply_toaddress, the method will store the senders.
Run python client over SSL
- No server and client authentication
./sender.py -b "amqps://$(hostname):5672/examples" - Server authentication enabled
./sender.py -b "amqps://$(hostname):5672/examples" --conn-ssl-trust-store<certificates_dir>/broker_cert.pem --conn-ssl-verify-peer --conn-ssl-verify-peer-name - Server and client authentication enabled
./sender.py -b "amqps://$(hostname):5672/examples" --conn-ssl-certificate <certificates_dir>/client-certificate.pem --conn-ssl-private-key <certificates_dir>/client-private-key.pem --conn-ssl-trust-store <certificates_dir>/broker_cert.pem --conn-ssl-verify-peer --conn-ssl-verify-peer-name
A simple client program to receive the messages from the Server
examples broker.
Example 3.7. A simple client program to receive the messages from the Server
import optparse
from proton import Message
from proton.handlers import MessagingHandler
from proton.reactor import Container, DynamicNodeProperties

class Client(MessagingHandler):
    def __init__(self, url, requests):
        super(Client, self).__init__()
        self.url = url
        self.requests = requests

    def on_start(self, event):
        self.sender = event.container.create_sender(self.url)
        self.receiver = event.container.create_receiver(self.sender.connection, None, dynamic=True) 1


    def next_request(self):
        if self.receiver.remote_source.address:
            req = Message(reply_to=self.receiver.remote_source.address, body=self.requests[0])
            self.sender.send(req)

    def on_link_opened(self, event): 												2
        if event.receiver == self.receiver:
            self.next_request()

    def on_message(self, event):
        print "%s => %s" % (self.requests.pop(0), event.message.body)
        if self.requests:
            self.next_request()
        else:
            event.connection.close()

REQUESTS= ["Twas brillig, and the slithy toves",
           "Did gire and gymble in the wabe.",
           "All mimsy were the borogroves,",
           "And the mome raths outgrabe."]

parser = optparse.OptionParser(usage="usage: %prog [options]",
                               description="Send requests to the supplied address and print responses.")
parser.add_option("-a", "--address", default="localhost:5672/examples",
                  help="address to which messages are sent (default %default)")
opts, args = parser.parse_args()

Container(Client(opts.address, args or REQUESTS)).run()- 1
On_start()method creates a receiver to receive the responses from the serverIn this example, instead of using the localhost, we set the dynamic option which informs the amq broker that the client is connected to create a temporary address over which it can receive the responses.- 2
On_link_opened()method sends the first requests if the receiving link is setup and confirmed by the brokerHere, we use the address allocated by the broker as the reply_to address of the requests hence the broker needs to confirm that the receiving link is established.
Sending and Receiving using Transactions
TransactionHandler in addition to MessagingHandler as a base class for the handler definition.
Example 3.8. Sending messages using local transactions
import optparse
from proton import Message, Url
from proton.reactor import Container
from proton.handlers import MessagingHandler, TransactionHandler

class TxSend(MessagingHandler, TransactionHandler):
    def __init__(self, url, messages, batch_size):
        super(TxSend, self).__init__()
        self.url = Url(url)
        self.current_batch = 0
        self.committed = 0
        self.confirmed = 0
        self.total = messages
        self.batch_size = batch_size

    def on_start(self, event):
        self.container = event.container
        self.conn = self.container.connect(self.url)
        self.sender = self.container.create_sender(self.conn, self.url.path)
        self.container.declare_transaction(self.conn, handler=self) 1
        self.transaction = None

    def on_transaction_declared(self, event): 2
        self.transaction = event.transaction
        self.send()

    def on_sendable(self, event):
        self.send()

    def send(self): 3
        while self.transaction and self.sender.credit and (self.committed + self.current_batch) < self.total:
            seq = self.committed + self.current_batch + 1
            msg = Message(id=seq, body={'sequence':seq})
            self.transaction.send(self.sender, msg)
            self.current_batch += 1
            if self.current_batch == self.batch_size:
                self.transaction.commit() 4
                self.transaction = None

    def on_accepted(self, event):
        if event.sender == self.sender:
            self.confirmed += 1

    def on_transaction_committed(self, event): 5
        self.committed += self.current_batch
        if self.committed == self.total:
            print "all messages committed"
            event.connection.close()
        else:
            self.current_batch = 0
            self.container.declare_transaction(self.conn, handler=self)

    def on_disconnected(self, event):
        self.current_batch = 0

parser = optparse.OptionParser(usage="usage: %prog [options]",
                               description="Send messages transactionally to the supplied address.")
parser.add_option("-a", "--address", default="localhost:5672/examples",
                  help="address to which messages are sent (default %default)")
parser.add_option("-m", "--messages", type="int", default=100,
                  help="number of messages to send (default %default)")
parser.add_option("-b", "--batch-size", type="int", default=10,
                  help="number of messages in each transaction (default %default)")
opts, args = parser.parse_args()

try:
    Container(TxSend(opts.address, opts.messages, opts.batch_size)).run()
except KeyboardInterrupt: pass- 1
on_transaction_declared()method requests a newtransactionalcontext, passing themselves as the handler for the transaction- 2
on_transaction_declared()method is notified when that context is in place- 5
- When the
on_transaction_committed()method is called the committed count is incremented by the size of the current batch. If the committed count after that is equal to the number of message it was asked to send, it has completed all its work so closes the connection and the program will exit. If not, it starts a new transaction and sets the current batch to 0.The sender tracks the number of messages sent in the current_batch, as well as the number of messages committed . - 3
- Messages are sent when the transaction context has been declared and there is credit. The
send()method of the transaction is invoked, rather than on the sender itself. This ensures that send operation is tied to that transaction context. - 4
- The
current_batchcounter is incremented for each message. When that counter reaches the preconfigured batch size, thecommit()method is called on the transaction.
Example
current_batch and the overall number committed
Example 3.9. Receiving using local transactions
import optparse
from proton import Url
from proton.reactor import Container
from proton.handlers import MessagingHandler, TransactionHandler

class TxRecv(MessagingHandler, TransactionHandler):
    def __init__(self, url, messages, batch_size):
        super(TxRecv, self).__init__(prefetch=0, auto_accept=False)
        self.url = Url(url)
        self.expected = messages
        self.batch_size = batch_size
        self.current_batch = 0
        self.committed = 0

    def on_start(self, event):
        self.container = event.container
        self.conn = self.container.connect(self.url)
        self.receiver = self.container.create_receiver(self.conn, self.url.path)
        self.container.declare_transaction(self.conn, handler=self)
        self.transaction = None

    def on_message(self, event): 1
        self.receiver.flow(self.batch_size)
        print event.message.body
        self.transaction.accept(event.delivery)
        self.current_batch += 1
        if self.current_batch == self.batch_size:
            self.transaction.commit()
            self.transaction = None

    def on_transaction_declared(self, event): 2
        self.receiver.flow(self.batch_size)
        self.transaction = event.transaction

    def on_transaction_committed(self, event): 3
        self.committed += self.current_batch
        self.current_batch = 0
        if self.expected == 0 or self.committed < self.expected:
            self.container.declare_transaction(self.conn, handler=self)
        else:
            event.connection.close()

    def on_disconnected(self, event):
        self.current_batch = 0

parser = optparse.OptionParser(usage="usage: %prog [options]")
parser.add_option("-a", "--address", default="localhost:5672/examples",
                  help="address from which messages are received (default %default)")
parser.add_option("-m", "--messages", type="int", default=100,
                  help="number of messages to receive; 0 receives indefinitely (default %default)")
parser.add_option("-b", "--batch-size", type="int", default=10,
                  help="number of messages in each transaction (default %default)")
opts, args = parser.parse_args()

try:
    Container(TxRecv(opts.address, opts.messages, opts.batch_size)).run()
except KeyboardInterrupt: pass- 1
on_message()method the receiver calls theaccept()method on the transaction object to tie the acceptance to the context. It then increments thecurrent_batch. If thecurrent_batchis now equal to thebatch_size, the receiver calls thecommit()method on the transaction.- 2
on_transaction_declared()method controls the message flow. The receiver uses theflow()method on the receiver to request an equal number of messages that match thebatch_size- 3
- When the
on_transaction_committed()method is called the committed count is incremented, the application then tests whether it has received all expected messages. If all the messages are received, the application exists. If all messages are not received a new transactional context is declared and the batch is reset.
Using a Selector Filter
Example 3.10. Filtering messages using a selector
from proton.reactor import Container, Selector
from proton.handlers import MessagingHandler

class Recv(MessagingHandler):
    def __init__(self):
        super(Recv, self).__init__()

    def on_start(self, event):
        conn = event.container.connect("localhost:5672")
        event.container.create_receiver(conn, "examples", options=Selector(u"colour = 'green'")) 1

    def on_message(self, event):
        print event.message.body

try:
    Container(Recv()).run()
except KeyboardInterrupt: pass- 1
on_start()method implements a selector that filters messages based on the message headerWhile creating the receiver, specify the Selector object as an option. The options argument can be a single object or a list.
Sending and Receiving Best-Effort Messages
AtMostOnce to the options keyword arguments to Container.create_sender and Container.create_receiver. For AtMostOnce, the sender settles the message as soon as it sends it. If the connection is lost before the message is received by the receiver, the message will not be delivered. The AtMostOnce link option type is defined in proton.reactors.
Example 3.11. Receiving best-effort messages
import optparse
from proton.handlers import MessagingHandler
from proton.reactor import AtMostOnce, Container

class Recv(MessagingHandler):
    def __init__(self, url, count):
        super(Recv, self).__init__()
        self.url = url
        self.expected = count
        self.received = 0

    def on_start(self, event):
        event.container.create_receiver(self.url, options=AtMostOnce()) 1

    def on_message(self, event):
        if event.message.id and event.message.id < self.received:
            # ignore duplicate message
            return
        if self.expected == 0 or self.received < self.expected:
            print event.message.body
            self.received += 1
            if self.received == self.expected:
                event.receiver.close()
                event.connection.close()

parser = optparse.OptionParser(usage="usage: %prog [options]")
parser.add_option("-a", "--address", default="localhost:5672/examples",
                  help="address from which messages are received (default %default)")
parser.add_option("-m", "--messages", type="int", default=100,
                  help="number of messages to receive; 0 receives indefinitely (default %default)")
opts, args = parser.parse_args()

try:
    Container(Recv(opts.address, opts.messages)).run()
except KeyboardInterrupt: pass- 1
on_start()method uses the AtMostOnce option to receive the unacknowledged messages.If the connection is lost before the message is received by the receiver, the message will not be delivered.
on_accepted method is redundant. There is no distinction between confirmed and sent status and the on_disconnected method is redundant. Any shutdown would be triggered directly after sending.
Example 3.12. Sending best-effort messages
import optparse
from proton import Message
from proton.handlers import MessagingHandler
from proton.reactor import AtMostOnce, Container

class Send(MessagingHandler):
    def __init__(self, url, messages):
        super(Send, self).__init__()
        self.url = url
        self.sent = 0
        self.confirmed = 0
        self.total = messages

    def on_start(self, event):
        event.container.create_sender(self.url, options=AtMostOnce()) 1


    def on_sendable(self, event):
        while event.sender.credit and self.sent < self.total:
            msg = Message(id=(self.sent+1), body={'sequence':(self.sent+1)})
            event.sender.send(msg)
            self.sent += 1
            if self.sent == self.total:
                print "all messages sent"
                event.connection.close()

parser = optparse.OptionParser(usage="usage: %prog [options]",
                               description="Send messages to the supplied address.")
parser.add_option("-a", "--address", default="localhost:5672/examples",
                  help="address to which messages are sent (default %default)")
parser.add_option("-m", "--messages", type="int", default=100,
                  help="number of messages to send (default %default)")
opts, args = parser.parse_args()

try:
    Container(Send(opts.address, opts.messages)).run()
except KeyboardInterrupt: pass- 1
on_start()method uses the AtMostOnce option to send the unacknowledged messages.
3.5. C++ AMQP 1.0 Client API
3.5.1. Getting Started with C++ AMQP
Introduction to C++ AMQP 1.0 Client API
Downloading A-MQ C++ Client
3.5.2. C++ Example Clients
A Simple Messaging Program in C++
Example 3.13. Simple Asynchronous Consumer
#include <decaf/lang/Thread.h>
#include <decaf/lang/Runnable.h >
#include <decaf/util/concurrent/CountDownLatch.h>
#include <activemq/core/ActiveMQConnectionFactory.h>
#include <activemq/core/ActiveMQConnection.h>
#include <activemq/transport/DefaultTransportListener.h>
#include <activemq/library/ActiveMQCPP.h>
#include <decaf/lang/Integer.h>
#include <activemq/util/Config.h>
#include <decaf/util/Date.h>
#include <cms/Connection.h>
#include <cms/Session.h>
#include <cms/TextMessage.h>
#include <cms/BytesMessage.h>
#include <cms/MapMessage.h>
#include <cms/ExceptionListener.h>
#include <cms/MessageListener.h>
#include <stdlib.h>
#include <stdio.h>
#include <iostream>

using namespace activemq;
using namespace activemq::core;
using namespace activemq::transport;
using namespace decaf::lang;
using namespace decaf::util;
using namespace decaf::util::concurrent;
using namespace cms;
using namespace std;

class SimpleAsyncConsumer : public ExceptionListener,
                            public MessageListener,
                            public DefaultTransportListener {
private:

    Connection* connection;
    Session* session;
    Destination* destination;
    MessageConsumer* consumer;
    bool useTopic;
    std::string brokerURI;
    std::string destURI;
    bool clientAck;

private:

    SimpleAsyncConsumer( const SimpleAsyncConsumer& );
    SimpleAsyncConsumer& operator= ( const SimpleAsyncConsumer& );

public:

    SimpleAsyncConsumer( const std::string& brokerURI,
                         const std::string& destURI,
                         bool useTopic = false,
                         bool clientAck = false ) :
        connection(NULL),
        session(NULL),
        destination(NULL),
        consumer(NULL),
        useTopic(useTopic),
        brokerURI(brokerURI),
        destURI(destURI),
        clientAck(clientAck)  1
			      {
    }

    virtual ~SimpleAsyncConsumer() {
        this->cleanup();
    }

    void close() {
        this->cleanup();
    }

    void runConsumer() 2
		      {

        try {

            // Create a ConnectionFactory
            ActiveMQConnectionFactory* connectionFactory =
                new ActiveMQConnectionFactory( brokerURI );

            // Create a Connection
            connection = connectionFactory->createConnection();
            delete connectionFactory;

            ActiveMQConnection* amqConnection = dynamic_cast<ActiveMQConnection*>( connection );
            if( amqConnection != NULL ) {
                amqConnection->addTransportListener( this );
            }

            connection->start();

            connection->setExceptionListener(this);

            // Create a Session
            if( clientAck ) {
                session = connection->createSession( Session::CLIENT_ACKNOWLEDGE );
            } else {
                session = connection->createSession( Session::AUTO_ACKNOWLEDGE );
            }

            // Create the destination (Topic or Queue)
            if( useTopic ) {
                destination = session->createTopic( destURI );
            } else {
                destination = session->createQueue( destURI );
            }

            // Create a MessageConsumer from the Session to the Topic or Queue
            consumer = session->createConsumer( destination );
            consumer->setMessageListener( this );

        } catch (CMSException& e) {
            e.printStackTrace();
        }
    }

    // Called from the consumer since this class is a registered MessageListener.
    virtual void onMessage( const Message* message )  3
						      {

        static int count = 0;

        try
        {
            count++;
            const TextMessage* textMessage =
                dynamic_cast< const TextMessage* >( message );
            string text = "";

            if( textMessage != NULL ) {
                text = textMessage->getText();
            } else {
                text = "NOT A TEXTMESSAGE!";
            }

            if( clientAck ) {
                message->acknowledge();
            }

            printf( "Message #%d Received: %s\n", count, text.c_str() );
        } catch (CMSException& e) {
            e.printStackTrace();
        }
    }

    // If something bad happens you see it here as this class is also been
    // registered as an ExceptionListener with the connection.
    virtual void onException( const CMSException& ex AMQCPP_UNUSED ) {
        printf("CMS Exception occurred.  Shutting down client.\n");
        exit(1);
    }

    virtual void transportInterrupted() {
        std::cout << "The Connection's Transport has been Interrupted." << std::endl;
    }

    virtual void transportResumed() {
        std::cout << "The Connection's Transport has been Restored." << std::endl;
    }

private:

    void cleanup(){

        try {
            if( connection != NULL ) {
                connection->close();
            }
        } catch ( CMSException& e ) {
            e.printStackTrace();
        }

        delete destination;
        delete consumer;
        delete session;
        delete connection;
    }
};

////////////////////////////////////////////////////////////////////////////////
int main(int argc AMQCPP_UNUSED, char* argv[] AMQCPP_UNUSED) {

    activemq::library::ActiveMQCPP::initializeLibrary();

    std::cout << "=====================================================\n";
    std::cout << "Starting the example:" << std::endl;
    std::cout << "-----------------------------------------------------\n";

    // Set the URI to point to the IPAddress of your broker.
    // add any optional params to the url to enable things like
    // tightMarshalling or tcp logging etc.  See the CMS web site for
    // a full list of configuration options.
    //
    //  http://activemq.apache.org/cms/
    //
    std::string brokerURI =
        "failover:(tcp://127.0.0.1:61616)";

    //============================================================
    // This is the Destination Name and URI options.  Use this to
    // customize where the consumer listens, to have the consumer
    // use a topic or queue set the 'useTopics' flag.
    //============================================================
    std::string destURI = "TEST.FOO"; //?consumer.prefetchSize=1";

    //============================================================
    // set to true to use topics instead of queues
    // Note in the code above that this causes createTopic or
    // createQueue to be used in the consumer.
    //============================================================
    bool useTopics = false;

    //============================================================
    // set to true if you want the consumer to use client ack mode
    // instead of the default auto ack mode.
    //============================================================
    bool clientAck = false;

    // Create the consumer
    SimpleAsyncConsumer consumer( brokerURI, destURI, useTopics, clientAck );

    // Start it up and it will listen forever.
    consumer.runConsumer();

    // Wait to exit.
    std::cout << "Press 'q' to quit" << std::endl;
    while( std::cin.get() != 'q') {}

    // All CMS resources should be closed before the library is shutdown.
    consumer.close();

    std::cout << "-----------------------------------------------------\n";
    std::cout << "Finished with the example." << std::endl;
    std::cout << "=====================================================\n";

    activemq::library::ActiveMQCPP::shutdownLibrary();
}
- 1
- The constructor of the
SimpleAsyncConsumerclass. This constructor allows the user to create an instance of the class that connects to a particular broker and destination. It also identifies the destination as a Queue or a Topic - 2
- The
runConsumermethod creates a Connection to the broker and start a new Session configured with the configured Acknowledgment mode. Once a Session is created a new Consumer can then be created and attached to the configured Destination. To listen asynchronously for new messages theSimpleAsyncConsumerinherits fromcms::MessageListenerso that it can register itself as a Message Listener with theMessageConsumercreated inrunConsumermethod. - 3
- All the messages received by the application are dispatched to the
onMessagemethod and if the message is a TextMessage its contents are printed on the screen.
Example 3.14. A simple Asynchronous producer
#include <decaf/lang/Thread.h>
#include <decaf/lang/Runnable.h>
#include <decaf/util/concurrent/CountDownLatch.h>
#include <decaf/lang/Long.h>
#include <decaf/util/Date.h>
#include <activemq/core/ActiveMQConnectionFactory.h>
#include <activemq/util/Config.h>
#include <activemq/library/ActiveMQCPP.h>
#include <cms/Connection.h>
#include <cms/Session.h>
#include <cms/TextMessage.h>
#include <cms/BytesMessage.h>
#include <cms/MapMessage.h>
#include <cms/ExceptionListener.h>
#include <cms/MessageListener.h>
#include <stdlib.h>
#include <stdio.h>
#include <iostream>
#include <memory>

using namespace activemq;
using namespace activemq::core;
using namespace decaf;
using namespace decaf::lang;
using namespace decaf::util;
using namespace decaf::util::concurrent;
using namespace cms;
using namespace std;

////////////////////////////////////////////////////////////////////////////////
class SimpleProducer : public Runnable {
private:

    Connection* connection;
    Session* session;
    Destination* destination;
    MessageProducer* producer;
    bool useTopic;
    bool clientAck;
    unsigned int numMessages;
    std::string brokerURI;
    std::string destURI;

private:

    SimpleProducer( const SimpleProducer& );
    SimpleProducer& operator= ( const SimpleProducer& );

public:

    SimpleProducer( const std::string& brokerURI, unsigned int numMessages,
                    const std::string& destURI, bool useTopic = false, bool clientAck = false ) :
        connection(NULL),
        session(NULL),
        destination(NULL),
        producer(NULL),
        useTopic(useTopic),
        clientAck(clientAck),
        numMessages(numMessages),
        brokerURI(brokerURI),
        destURI(destURI) 1
			  {
    }

    virtual ~SimpleProducer(){
        cleanup();
    }

    void close() {
        this->cleanup();
    }

    virtual void run() 2
			{
        try {

            // Create a ConnectionFactory
            auto_ptr<ActiveMQConnectionFactory> connectionFactory(
                new ActiveMQConnectionFactory( brokerURI ) );

            // Create a Connection
            try{
                connection = connectionFactory->createConnection();
                connection->start();
            } catch( CMSException& e ) {
                e.printStackTrace();
                throw e;
            }

            // Create a Session
            if( clientAck ) {
                session = connection->createSession( Session::CLIENT_ACKNOWLEDGE );
            } else {
                session = connection->createSession( Session::AUTO_ACKNOWLEDGE );
            }

            // Create the destination (Topic or Queue)
            if( useTopic ) {
                destination = session->createTopic( destURI );
            } else {
                destination = session->createQueue( destURI );
            }

            // Create a MessageProducer from the Session to the Topic or Queue
            producer = session->createProducer( destination );
            producer->setDeliveryMode( DeliveryMode::NON_PERSISTENT );

            // Create the Thread Id String
            string threadIdStr = Long::toString( Thread::currentThread()->getId() );

            // Create a messages
            string text = (string)"Hello world! from thread " + threadIdStr;

            for( unsigned int ix=0; ix <numMessages; ++ix ){
                TextMessage* message = session->createTextMessage( text );

                message->setIntProperty( "Integer", ix );

                // Tell the producer to send the message
                printf( "Sent message #%d from thread %s\n", ix+1, threadIdStr.c_str() );
                producer->send( message );

                delete message;
            }

        }catch ( CMSException& e ) {
            e.printStackTrace();
        }
    }

private:

    void cleanup(){

        try {
            if( connection != NULL ) {
                connection->close();
            }
        } catch ( CMSException& e ) {
            e.printStackTrace();
        }

        delete destination;
        delete producer;
        delete session;
        delete connection;
    }
};

////////////////////////////////////////////////////////////////////////////////
int main(int argc AMQCPP_UNUSED, char* argv[] AMQCPP_UNUSED) {

    activemq::library::ActiveMQCPP::initializeLibrary();

    std::cout << "=====================================================\n";
    std::cout << "Starting the example:" << std::endl;
    std::cout << "-----------------------------------------------------\n";

    // Set the URI to point to the IPAddress of your broker.
    // add any optional params to the url to enable things like
    // tightMarshalling or tcp logging etc.  See the CMS web site for
    // a full list of configuration options.
    //
    //  http://activemq.apache.org/cms/
    //
    std::string brokerURI =
        "failover://(tcp://127.0.0.1:61616)";

    //============================================================
    // Total number of messages for this producer to send.
    //============================================================
    unsigned int numMessages = 2000;

    //============================================================
    // This is the Destination Name and URI options.  Use this to
    // customize where the Producer produces, to have the producer
    // use a topic or queue set the 'useTopics' flag.
    //============================================================
    std::string destURI = "TEST.FOO";

    //============================================================
    // set to true to use topics instead of queues
    // Note in the code above that this causes createTopic or
    // createQueue to be used in the producer.
    //============================================================
    bool useTopics = false;

    // Create the producer and run it.
    SimpleProducer producer( brokerURI, numMessages, destURI, useTopics );

    // Publish the given number of Messages
    producer.run();

    // Before exiting we ensure that all CMS resources are closed.
    producer.close();

    std::cout << "-----------------------------------------------------\n";
    std::cout << "Finished with the example." << std::endl;
    std::cout << "=====================================================\n";

    activemq::library::ActiveMQCPP::shutdownLibrary();
}
- 1
- The
SimpleProducerclass exposes a similar interface to the consumer example Example 3.13, “Simple Asynchronous Consumer”. The constructor creates an instance with the configuration options for the broker and destination and the number of messages to be send to the configured destination. - 2
- The
runmethod publishes the specified number of messages. Once the run method completes, the client can close theSimpleProducerapplication by calling theclose()method, which cleans up the allocated CMS resource and exits the application.
3.6. Interoperability between AMQP 1.0 Client APIs
Index
A
- ActiveMQConnection, The connection, Setting the redelivery policy on a connection, Setting the redelivery policy on a destination
- ActiveMQConnectionFactory, The connection factory
B
- backOffMultiplier, Redelivery properties
C
- collisionAvoidanceFactor, Redelivery properties
- Connection, The connection
- ConnectionFactory, The connection factory
D
- durableTopicPrefetch, Consumer specific prefetch limits
E
- embedded broker, Embedded brokers
G
- getRedeliveryPolicy(), Setting the redelivery policy on a connection
- getRedeliveryPolicyMap(), Setting the redelivery policy on a destination
I
- initialRedeliveryDelay, Redelivery properties
M
- maximumRedeliveries, Redelivery properties
- maximumRedeliveryDelay, Redelivery properties
P
- prefetch
- per broker, Setting prefetch limits per broker
- per connection, Setting prefetch limits per connection
- per destination, Setting prefetch limits per destination
Q
- queueBrowserPrefetch, Consumer specific prefetch limits
- queuePrefetch, Consumer specific prefetch limits
R
- redeliveryDelay, Redelivery properties
- redeliveryPlugin, Configuring the broker's redelivery plug-in
- RedeliveryPolicy, Setting the redelivery policy on a connection, Setting the redelivery policy on a destination
- RedeliveryPolicyMap, Setting the redelivery policy on a destination
T
- topicPrefetch, Consumer specific prefetch limits
U
- useCollisionAvoidance, Redelivery properties
- useExponentialBackOff, Redelivery properties
- usePrefetchExtension, Disabling the prefetch extension logic
V
- VM
- advanced URI, Using the VM transport
- broker name, Using the VM transport
- create, Embedded brokers
- embedded broker, Embedded brokers
- simple URI, Using the VM transport
- waitForStart, Embedded brokers
- VM URI
- advanced, Using the VM transport
- simple, Using the VM transport
Legal Notice
Trademark Disclaimer