Using AMQ Console
For Use with Red Hat AMQ 7.1
Abstract
Chapter 1. Overview
AMQ Console is a web console included in the AMQ Broker installation that enables you to use a web browser to manage AMQ Broker and AMQ Interconnect.
AMQ Console is based on hawtio.
1.1. Key Features
Monitor your AMQ brokers, routers, and clients
- View the topology
- View network health at a glance
- Manage AMQ brokers and routers
1.2. Key Concepts
AMQ Broker and AMQ Interconnect ship with hawtio, which is a modular web console for managing Java applications. They also include plug-ins for the broker and router.
1.3. Supported Configurations
The supported web browsers for AMQ Console are Firefox, Chrome, and Internet Explorer. For specific browser versions supported see AMQ 7 Supported Configurations.
1.4. Document Conventions
This document uses the following conventions for the sudo command and file paths.
The sudo Command
In this document, sudo is used for any command that requires root privileges. You should always exercise caution when using sudo, as any changes can affect the entire system.
For more information about using sudo, see The sudo Command.
About the Use of File Paths in this Document
In this document, all file paths are valid for Linux, UNIX, and similar operating systems (for example, /home/...). If you are using Microsoft Windows, you should use the equivalent Microsoft Windows paths (for example, C:\Users\...).
Chapter 2. Installation
AMQ Console is distributed as a set of plugins that provide the hawtio web console for Java applications, and custom functionality for managing AMQ Broker and AMQ Interconnect. These plugins are included in the AMQ Broker installation. Therefore, before you can use AMQ Console, you must install AMQ Broker. This is a requirement even if you only use AMQ Interconnect.
For more information about installing AMQ Broker, see Installation in Using AMQ Broker.
Chapter 3. Getting Started
After installing AMQ Console, you can log in and connect to the brokers and routers in your environment.
3.1. Accessing AMQ Console
You access AMQ Console through a single broker instance, regardless of how many brokers and routers are installed in your environment.
Procedure
Start the AMQ broker and router instances that you want to manage in AMQ Console.
For more information, see:
- Starting the Broker in Using AMQ Broker
- Starting the Router in Using AMQ Interconnect
Navigate to the web console address for the broker instance that you started.
The web console address is
http://HOST:PORT/console/login. If you are using the default address, navigate to http://localhost:8161/console/login.- Log in to AMQ Console using the default username and password that you created when you created the broker instance.
3.2. Connecting to Multiple Brokers
When you access AMQ Console, you are automatically connected to the broker through which you accessed AMQ Console. If you have additional brokers running in your environment, you must connect to them before you can manage them through AMQ Console.
Prerequisites
- At least one broker instance must be running.
Procedure
In AMQ Console, click the Connect tab.
In the Connection Settings section, complete the following fields:
Name- A name that describes the broker instance to which you are connecting.
Scheme-
If you have not configured AMQ Console security, choose
http. If you have configured security, choosehttps. Host-
The host name of the web server on the broker instance to which you want to connect. The host is defined in the broker instance’s
bootstrap.xmlconfiguration file, in the<web>element. The default host islocalhost. Port-
The port number on which to connect on the host. The port is defined in the broker instance’s
bootstrap.xmlconfiguration file, in the<web>element. The default port is8161.
Click Connect to remote server.
A new AMQ Console session appears in a new browser window.
3.3. Connecting to Routers
Before you can manage AMQ Interconnect from AMQ Console, you must first connect to a router running on your router network. After you connect to a router, you can access and manage any router on the network using the Dispatch Router page.
Prerequisites
- At least one AMQ Interconnect router must be running.
Procedure
In AMQ Console, click the Dispatch Router tab.
A connection page appears.
Enter the
AddressandPortof the router to which you want to connect, and then click Connect. Sethttp(boolean) toyesin the listener section of the broker configuration file to accept HTTP connections using AMQP over WebSockets. For more information about the broker configuration file, see the Configuration Reference section in the Using AMQ Interconnect guide.The
Overviewpage appears, showing a list of all routers running on your network.
Chapter 4. Configuration
4.1. Setting Up User Access to AMQ Console
You can access AMQ Console using the broker login credentials. The following table provides information about different methods to add additional broker users to access AMQ Console:
| Authentication Method | Description |
|---|---|
| Guest Authentication | Enables anonymous access. In this configuration, any user who connects without credentials or with the wrong credentials will be authenticated automatically and assigned a specific user and role. For more information, see Enabling Guest Access in Using AMQ Broker. |
| Basic User and Password Authentication | For each user, you must define a username and password and assign a security role. Users can only log into AMQ Console using these credentials. For more information, see Enabling Password Authentication in Using AMQ Broker. |
| LDAP Authentication | Users are authenticated and authorized by checking the credentials against user data stored in a central X.500 directory server. For more information, see Adding Certificate-Based Authentication in Using AMQ Broker. |
4.2. Securing AMQ Console and AMQ Broker Connections
To allow AMQ Console to access resources on the broker, specify the permitted origin URLs that can access it by editing the allow-origin parameters in the access management configuration file on the broker.
Prerequisite
-
You must first upgrade to AMQ Broker 7.1.0, during which the access management configuration file named
jolokia-access.xmlis added to the broker instance. For more information about upgrading, see Upgrading Your Broker to 7.1.0 in Using AMQ Broker.
Procedure
-
Open the
BROKER_INSTANCE_DIR/etc/jolokia-access.xmlfile in a text editor. Within the <cors> section, edit the
allow-originsettings to add each URL that you want to allow to access AMQ Console. For example:Copy to Clipboard Copied! Toggle word wrap Toggle overflow - Save the file.
Related Information
4.3. Securing Network Access to AMQ Console
To secure AMQ Console when it is being accessed over a WAN or the internet, use SSL to specify that network access uses https instead of http.
Prerequisites
The following should be located in the BROKER_INSTANCE_DIR/etc/:
- Java KeyStore (.jks)
- Java TrustStore (only if you want to require client authentication)
Procedure
-
Open the
BROKER_INSTANCE_DIR/etc/bootstrap.xmlfile. In the
<web>element, add the following attributes:Copy to Clipboard Copied! Toggle word wrap Toggle overflow bind-
Change the URI scheme to
https. keyStorePathThe path of the KeyStore file. For example:
keyStorePath="${artemis.instance}/etc/keystore.jks"keyStorePath="${artemis.instance}/etc/keystore.jks"Copy to Clipboard Copied! Toggle word wrap Toggle overflow keyStorePassword- The KeyStore’s password.
clientAuth-
Specifies whether client authentication is required. The default is
false, but you can change it totrueto enable authentication. trustStorePath-
The path of the TrustStore file. This attribute is only needed if
clientAuthistrue. trustStorePassword- The TrustStore’s password.
4.4. Configuring AMQ Interconnect for AMQ Console
To access AMQ Interconnect from AMQ Console, you must add a listener that accepts incoming WebSocket traffic from AMQ Console.
Procedure
Open the router’s configuration file.
The default router configuration file is located at
/etc/qpid-dispatch/qdrouterd.conf. If you have multiple routers, you should open the configuration file of the router through which you want to connect to AMQ Console.Add an incoming connection for AMQ Console management traffic.
Copy to Clipboard Copied! Toggle word wrap Toggle overflow name- The name of the incoming connection.
role-
Set this to
normal. host- Either an IP address (IPv4 or IPv6) or hostname.
port- The port number or symbolic service name.
http-
Set this to
yes.
Chapter 5. Monitoring Your AMQ Deployment
You can use the AMQ Console Dashboard page to monitor the status of AMQ, including brokers and routers. You can also create your own dashboards to display the real-time charts, diagrams, and metrics most important to you.
5.1. Viewing a Dashboard
Dashboards provide you with real-time data about your AMQ environment.
Procedure
In AMQ Console, click the Dashboard tab.
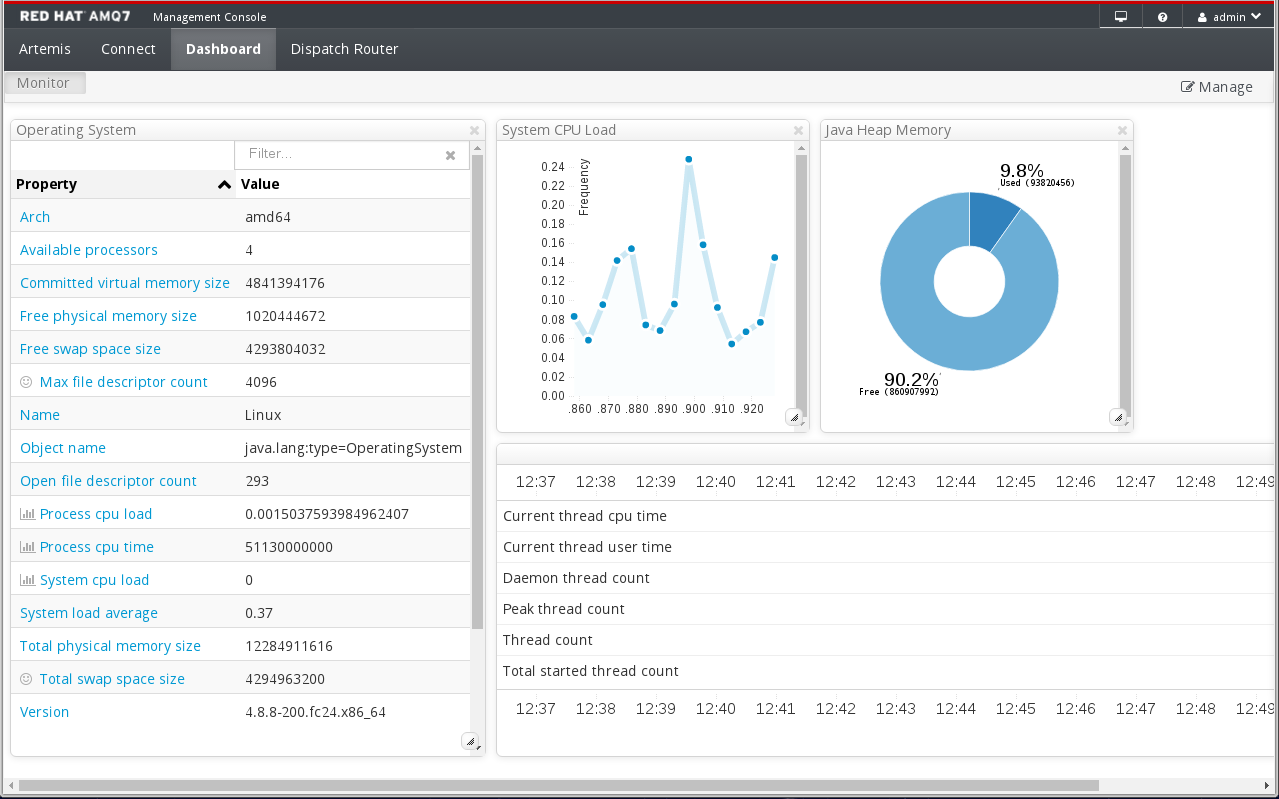
The
Monitordashboard appears displaying real-time data about hawtio.- To switch to a different dashboard, click a dashboard tab.
5.2. Creating AMQ Dashboards
You can create new dashboards to display real-time data for AMQ Broker and AMQ Interconnect.
Procedure
- Create a new dashboard.
Do any of the following:
- Change the dashboard layout as needed.
5.2.1. Creating a New Dashboard
Dashboards contain widgets, each of which can display a chart, diagram, or metrics. You can create as many dashboards as needed.
Procedure
- In AMQ Console, click the Dashboard tab.
On the navigation bar, click Manage.
The
Managepage appears displaying a list of existing dashboards.Do one of the following:
Expand To… Do this… Create a new, blank dashboard
Click Create.
Create a dashboard similar to an existing dashboard
- Click the checkbox next to an existing dashboard.
- Click Duplicate.
To change the name of the dashboard:
-
Hover over the dashboard name and click the pencil icon (
 ).
).
-
Enter a new name for the dashboard and then click the checkmark icon (
 ).
).
-
Hover over the dashboard name and click the pencil icon (
5.2.2. Adding AMQ Broker Data to the AMQ Console Dashboard
You can add any of the available queue and topic charts to a dashboard.
Procedure
- Click the Artemis tab.
- You can display Display a chart that you want to add to a dashboard.
On the navigation bar, click the Add icon (
 ).
).
The
Dashboardtab appears displaying a list of available dashboards.Select the dashboard (or dashboards) on which you want the chart to appear, and then click Add View To Dashboard.
The chart is added to the dashboards you selected.
5.2.3. Adding AMQ Interconnect Data to the AMQ Console Dashboard
You can add any of the available Dispatch Router charts that are based on AMQ Interconnect status details.
Procedure
- Click the Dispatch Router tab.
Display a chart that you want to add to a dashboard.
You can display charts about router status.
Click Add this chart to a dashboard.
The
Dashboardtab appears displaying a list of available dashboards.Select the dashboard (or dashboards) on which you want the chart to appear, and then click Add View To Dashboard.
The chart is added to the dashboards you selected.
5.2.4. Changing the Layout of a Dashboard
Dashboards contain widgets, which display metrics, diagrams, and charts. You can change the way these widgets are displayed on a dashboard.
Procedure
Do any of the following:
Expand To… Do this… Move or rearrange widgets
Click and drag a widget to a new position on the dashboard.
Change the title of a widget
-
Hover over the widget’s title bar and click the Edit icon (
 ).
).
-
Enter a name for the widget and then click the checkmark icon (
 ).
).
Resize a widget
In the bottom-right corner of the widget, click and drag the resize icon (
 ).
).
Remove a widget from the dashboard
In the widget’s title bar, click the close icon (
 ).
).
-
Hover over the widget’s title bar and click the Edit icon (
Chapter 6. Managing AMQ Broker
You can use AMQ Console to view important information about AMQ Broker brokers and manage the following resources:
- Incoming network connections (acceptors)
- Addresses
- Queues
6.1. Viewing Details about the Broker
You can view configuration properties and their values to see how the broker is configured.
Procedure
On the Artemis tab, in the folder tree, select a broker.
A list of configuration properties are displayed for the broker.
- Connections - Displays information about the client connections.
- Sessions - Displays information about the client sessions.
- Consumers - Displays information about the client consumers.
- Producers - Displays information about the session producers.
- Addresses - Displays information about the addresses.
- Queues - Displays information about the queues.
- Diagrams - Displays diagram of all AMQ Broker resources in your topology, including brokers (masters and slaves), producers and consumers, addresses, and queues.
- Attributes - Displays information about the configured attributes.
- Operations - Displays information about the operations that can be executed on the server.
- Chart - Displays real-time data for the selected attributes.
6.2. Viewing the Broker Diagram
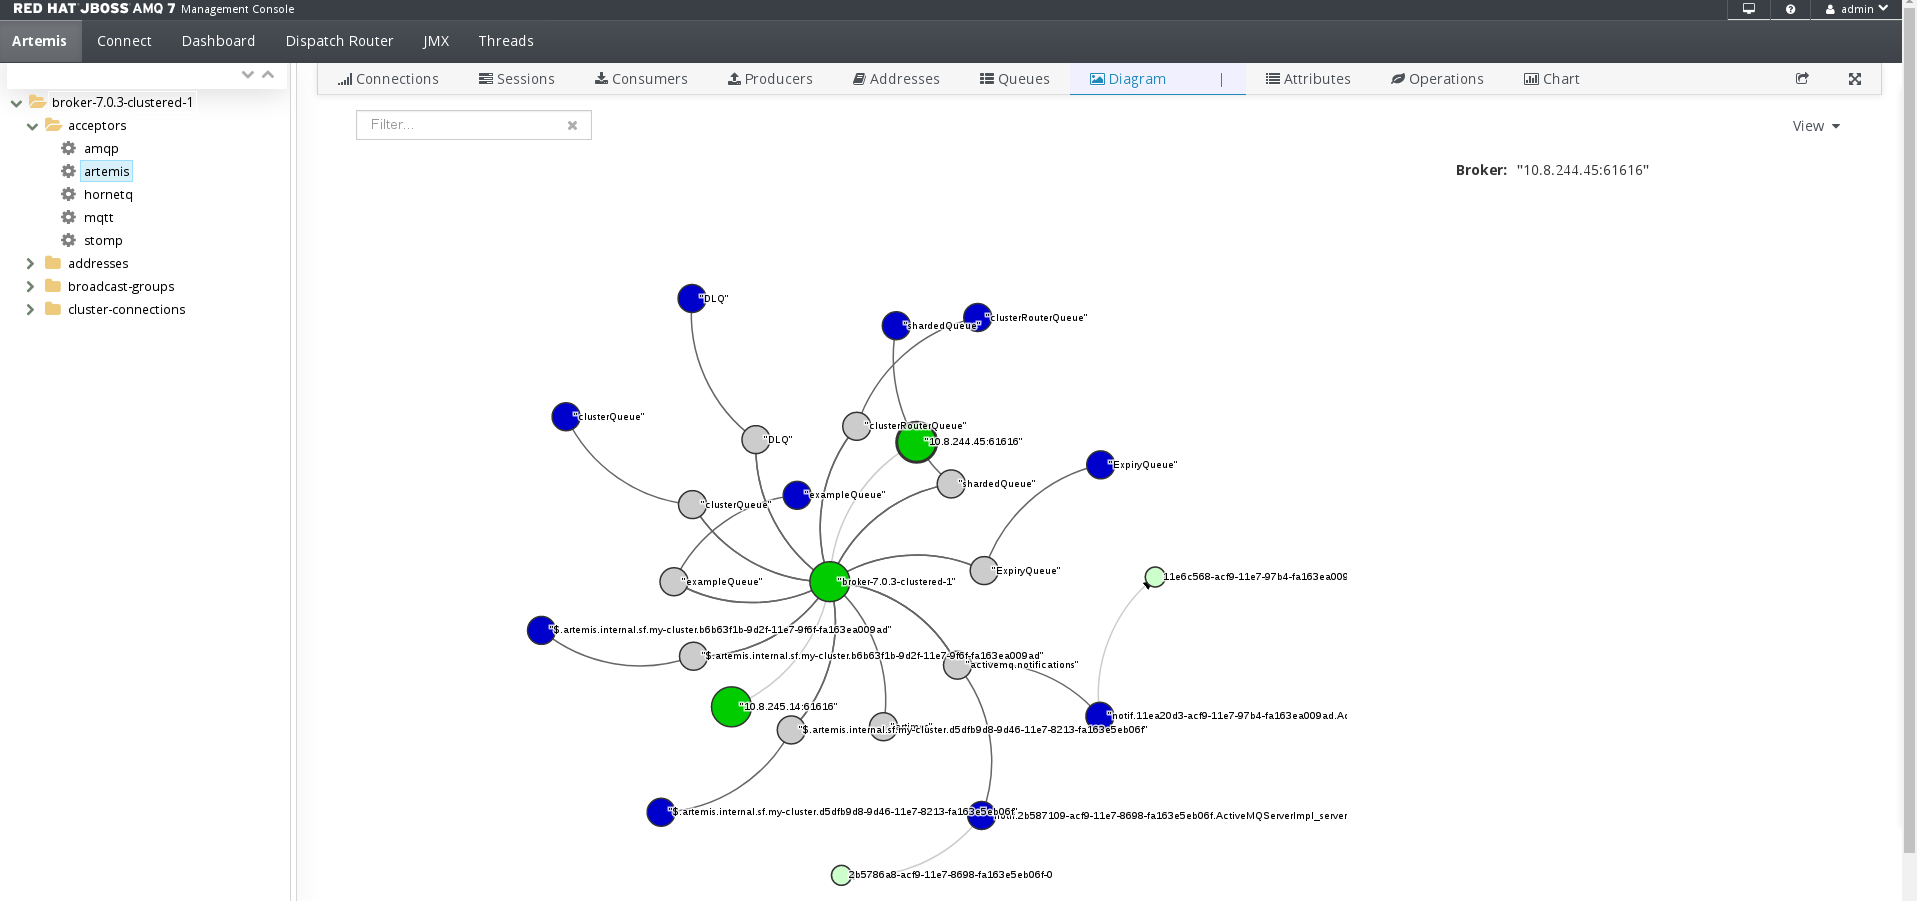
You can view a diagram of all AMQ Broker resources in your topology, including brokers (masters and slaves), producers and consumers, addresses, and queues.
Procedure
On the Artemis tab, click Diagram.
This example shows three brokers with 10 queues.
- To change what objects are displayed on the diagram, click the View drop-down and select the items that you want to be displayed.
6.3. Viewing Acceptors
You can view details about the acceptors configured for the broker.
Procedure
- On the Artemis tab, in the folder tree, expand the acceptors folder.
Click an acceptor to view details about how it is configured.
This example shows the configuration properties for the
amqpacceptor, which is the default acceptor provided for the AMQP protocol:
6.4. Managing Addresses and Queues
6.4.1. Creating Addresses
Procedure
- In the folder tree, select a broker.
On the navigation bar, click
 drop-down icon, and then click Create.
A page appears for creating an address.
Complete the following fields:
Address name- The routing name of the address.
Routing typeSelect one of the following options:
-
Multicast- Messages sent to this address will be distributed to all subscribers in a publish-subscribe manner. -
Anycast- Messages sent to this address will be distributed to only one subscriber in a point-to-point manner. -
Both- Enables you to define more than one routing type per address. However, this typically results in an anti-pattern and is therefore not recommended.
-
NoteIf an address does use both routing types, however, and the client does not show a preference for either one, the broker typically defaults to the
anycastrouting type. The one exception is when the client uses the MQTT protocol. In that case, the default routing type ismulticast.- Click Create Address.
6.4.2. Sending Messages to an Address
Procedure
- In the folder tree, select an address.
On the navigation bar, click
 drop-down icon, and then click Send.
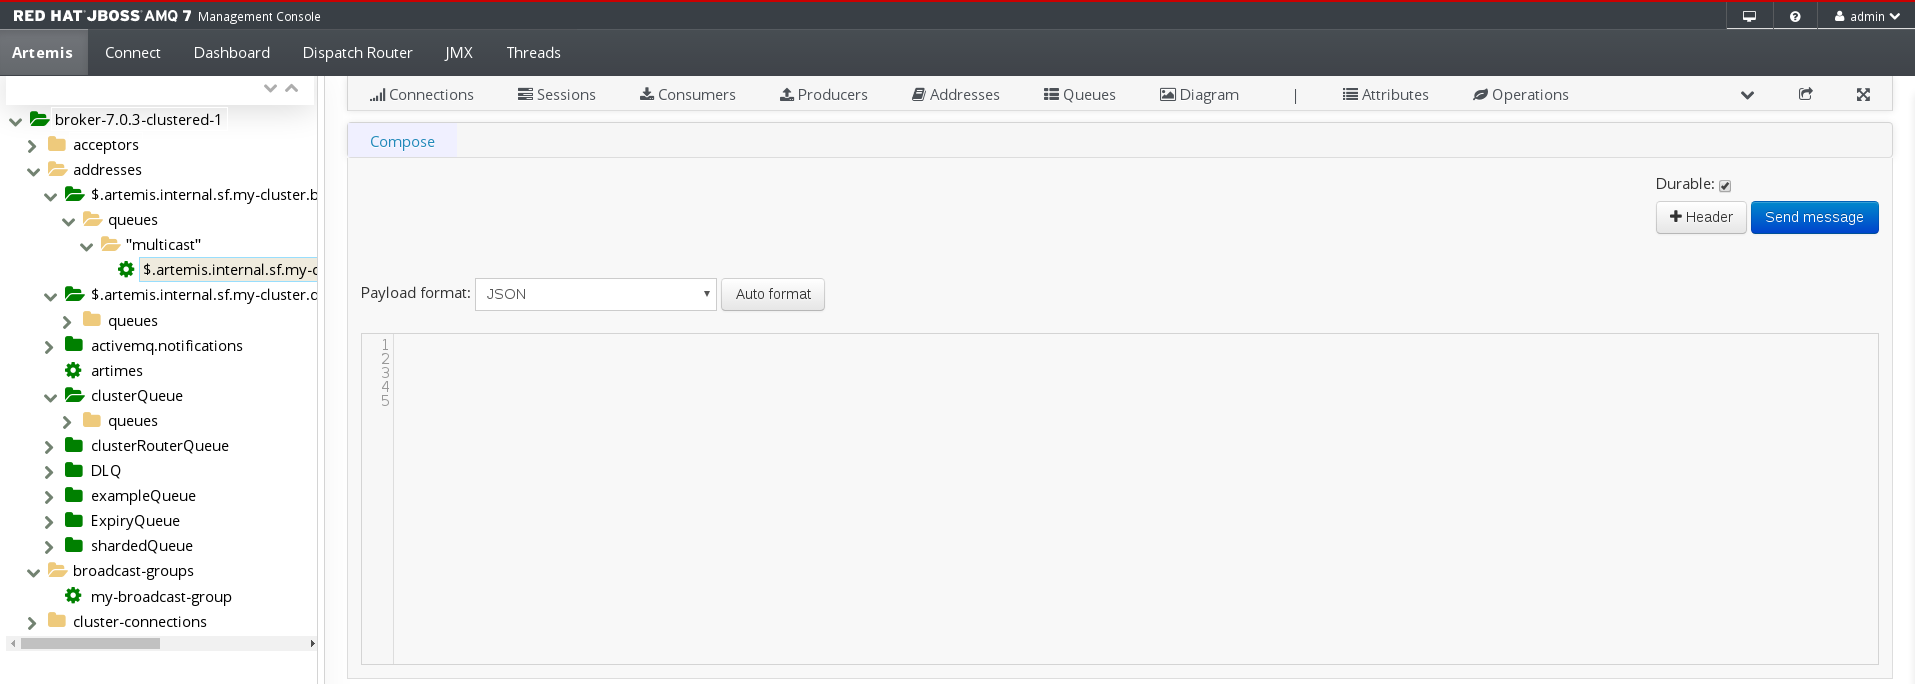
A page appears for you to compose the message.
- If necessary, click the Header button to add message header information.
- Enter the message body.
In the Payload format drop-down, select an option for the format of the message body, and then click Auto format.
The message body is formatted in a human-readable style for the format you selected.
Click Send message.
The message is sent.
- To send additional messages, change any of the information you entered, and then click Send message.
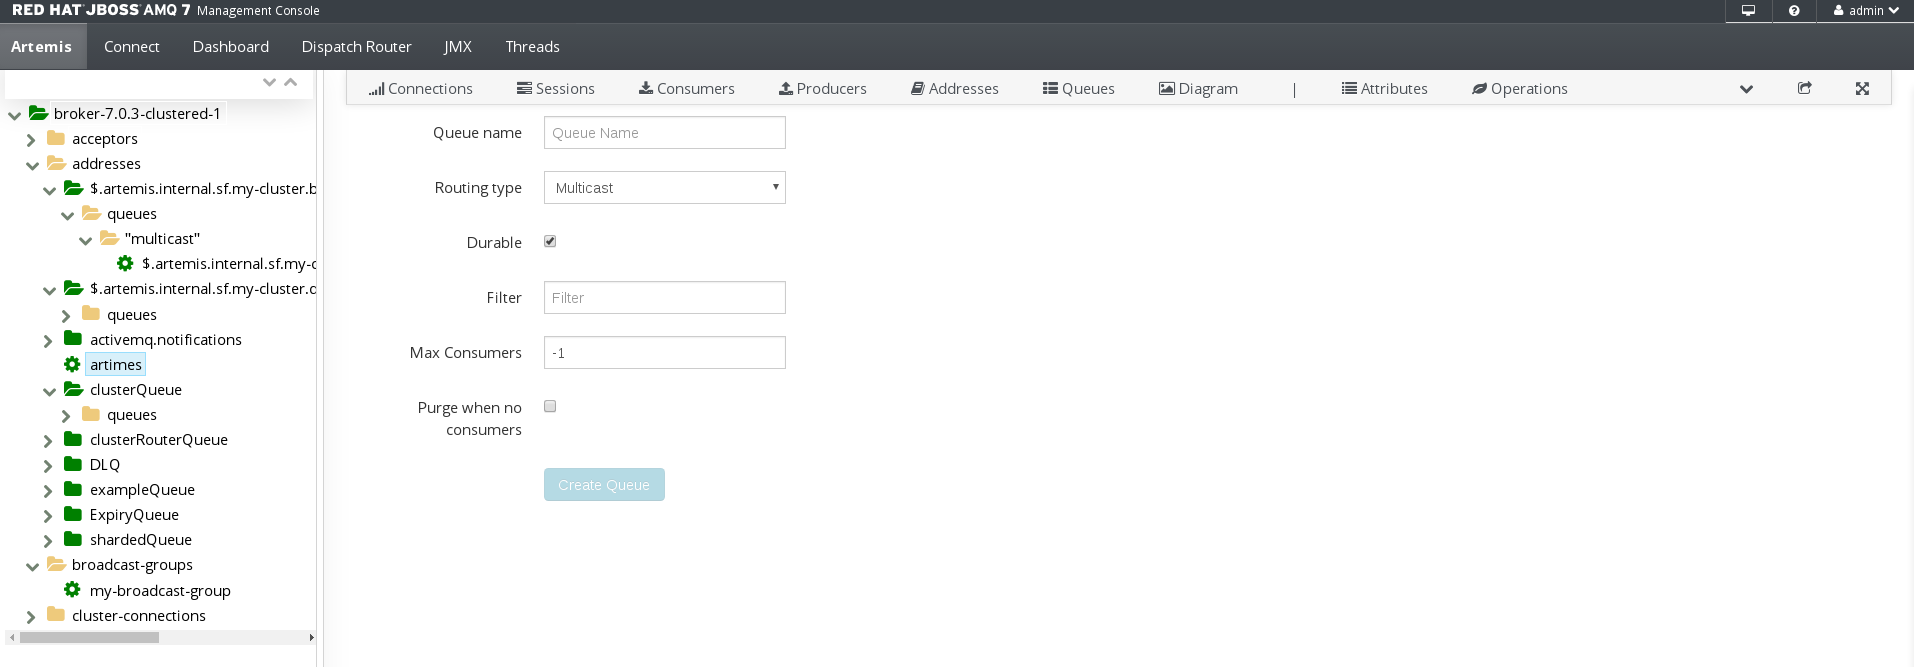
6.4.3. Creating Queues
Prerequisites
- The address to which you want to bind the queue must exist.
Procedure
- In the folder tree, select the address to which you want to bind the queue.
On the navigation bar, click
 drop-down icon, and then click Create.
A page appears for you to create the queue.
Complete the following fields:
Queue name- A unique name for the queue.
Routing typeSelect one of the following options:
-
Multicast- Messages sent to this address will be distributed to all queues bound to the address. -
Anycast- Only one queue bound to the parent address will receive a copy of the message. Messages will be distributed evenly among all of the queues bound to the address.
-
Durable- If you select this option, the queue and its messages will be persistent.
Filter- The username to be used when connecting to the broker.
Max Consumers- The maximum number of consumers that can access the queue at a given time.
Purge when no consumers- If selected, the queue will be purged when no consumers are connected.
Click Create Queue.
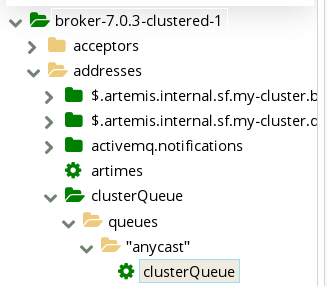
The queue is created. You can access it in the folder tree under the address to which it is bound. Queues for an address are organized into a
Queuesfolder. Within theQueuesfolder, queues are further organized by routing type (MULTICASTandANYCAST).In this example, the
clusterQueuequeue is located within theclusterQueueaddress:
6.4.4. Checking the Status of a Queue
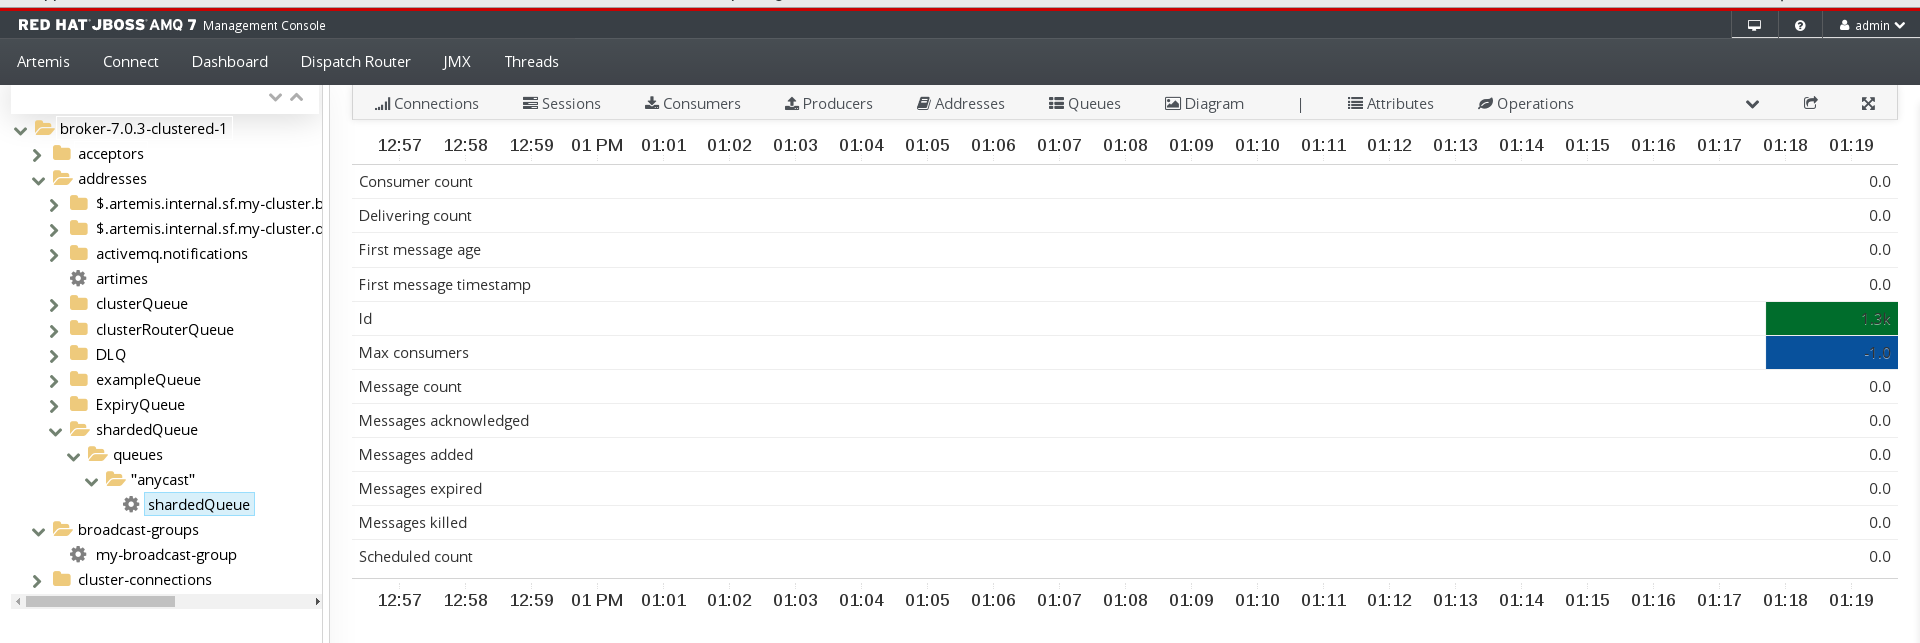
Charts provide a real-time view of the status of a queue on a broker.
Procedure
In the folder tree, navigate to a queue.
To view a chart for multiple queues for an address, select the
ANYCASTorMULTICASTfolder that contains the queues.On the navigation bar, click
 drop-down icon, and then click Chart.
A chart is displayed showing real-time data for all of the queue’s attributes.
If necessary, select different criteria for the chart:
-
On the navigation bar, click
 drop-down icon, and then click Edit Chart.
In the
Attributeslist, select one or more attributes that you want to include in the chart.To select multiple attributes, press and hold the Ctrl key and select each attribute.
Click the View Chart button.
The chart is displayed based on the criteria you selected.
-
On the navigation bar, click
6.4.5. Browsing Queues
Browsing a queue displays all of the messages in the queue. You can also filter and sort the list to find specific messages.
Procedure
In the folder tree, navigate to a queue.
Queues are located within the address to which they are bound.
On the navigation bar, click
 drop-down icon, and then click Browse.
The messages in the queue are displayed. By default, the first 200 messages are displayed.
To browse for a specific message or group of messages, do one of the following:
Expand To… Do this… Filter the list of messages
In the
Filter messagestext field, enter a filter criteria and then press Enter.Sort the list of messages
In the list of messages, click a column header. To sort the messages in descending order, click the header a second time.
To view the content of a message, click the message ID.
You can view the message header, properties, and body.
6.4.6. Sending Messages to a Queue
Procedure
- In the folder tree, select the queue to which you want to send the message.
On the navigation bar, click
 drop-down icon, and then click Send.
A page appears for you to compose the message.
- If necessary, click the Header button to add message header information.
- Enter the message body.
In the Payload format drop-down, select an option for the format of the message body, and then click Auto format.
The message body is formatted in a human-readable style for the format you selected.
Click Send message.
The message is sent.
- To send additional messages, change any of the information you entered, and click Send message.
6.4.7. Resending Messages to a Queue
You can resend previously sent messages.
Procedure
- Browse for the message you want to resend.
- Click the checkbox next to the message that you want to resend.
Click the Resend button.
The message is displayed.
- Update the message header and body as needed, and then click Send message.
6.4.8. Moving Messages to a Different Queue
You can move one or more messages in a queue to a different queue.
Procedure
- Browse for the messages you want to move.
- Click the checkbox next to each message that you want to move.
Click the Move button.
A confirmation dialog box appears.
- Enter the name of the queue to which you want to move the messages, and then click Move.
6.4.9. Deleting Queues
You can delete a queue or purge all of the messages from a queue.
Procedure
- Browse for the queue you want to delete or purge.
Do one of the following:
Expand To… Do this… Delete a message from the queue
- Click the checkbox next to each message you want to delete.
- Click the Delete button.
Purge all messages from the queue
- On the navigation bar, click Delete.
- Click the Purge queue button.
Delete the queue
- On the navigation bar, click Delete.
- Click the Delete queue button.
Chapter 7. Managing AMQ Interconnect
You can use AMQ Console to view important information about AMQ Interconnect routers and the router network, change a router’s configuration, and add new routers to the network.
7.1. Viewing Information about the Router Network
You can view details about routers, message addresses, links, and connections. You can also view the status of the router network.
7.1.1. Viewing Router Details
You can view a list of routers in the router network. You can also view detailed attributes for each router.
Procedure
- On the Dispatch Router tab, click Overview.
In the folder tree, click Routers.
The
Routerspage appears, displaying information about each router on the network.To view additional details for a router, click a router in the table.
To sort the list of routers, click a column header. To sort the routers in descending order, click the header a second time.
Related Information
7.1.2. Viewing Message Address Details
You can view a list of message-routed and link-routed addresses known to the router.
Procedure
- On the Dispatch Router tab, click Overview.
In the folder tree, click Addresses.
The
Addressespage appears, displaying information about each message address known to the router.To view additional details for a message address, click an address in the table.
To sort the list of addresses, click a column header. To sort the addresses in descending order, click the header a second time.
7.1.3. Viewing Link Details
You can view a list of AMQP links attached to the router from clients (senders and receivers), from and to other routers in the network, to other containers (such as brokers), and from the tool itself.
Procedure
- On the Dispatch Router tab, click Overview.
In the folder tree, click Links.
The
Linkspage appears, displaying information about each link attached to the router.To view additional details for a link, click a link in the table.
To sort the list of links, click a column header. To sort the links in descending order, click the header a second time.
7.1.4. Viewing Connection Details
You can view a list of connections to the router from clients (senders and receivers), from and to other routers in the network, and to other containers (such as brokers).
Procedure
- On the Dispatch Router tab, click Overview.
In the folder tree, click Connections.
The
Connectionspage appears, displaying information about each connection to or from the router.To view additional details for a connection, click a connection in the table.
To sort the list of connections, click a column header. To sort the connections in descending order, click the header a second time.
7.1.5. Viewing Recent Log Entries
You can view recent log entries for all of the routers in your router network.
Procedure
- On the Dispatch Router tab, click Overview.
In the folder tree, click Logs.
The
Recent Log Entriespage appears, showing a list of the logging modules along with the level at which they’re enabled and the number of available log entries.- Click a logging module to view its log entries.
Related Information
- Fetching Logs
- Logging Module Descriptions in Using AMQ Interconnect
7.1.6. Viewing the Router Topology
You can view a graphical topology of the router network to see how the routers are connected.
Procedure
On the Dispatch Router tab, click Topology.
The router topology is displayed.
To view more information about the topology, do one of the following:
Expand To view… Do this… Details about links between a client and router
Click a client.
Details about a router in the network
Click the router.
Details about a connection between routers
Click the connection arrow.
Related Information
7.1.7. Viewing Charts About Router Status
You can view charts about the real-time status of a router, policy, message address, or link.
Procedure
On the Dispatch Router tab, click Entities.
A page appears displaying all of the management entities for the router.
At the top of the folder tree, select a router from the drop-down menu.
The management entities are displayed for the router you selected.
To view additional details about a management entity, select an entity in the folder tree.
The entity’s attributes are displayed. The
Valuecolumn shows the value for the router you selected, and theAggregatecolumn (if applicable) shows the aggregate value for the entire router network.The values and aggregate values of these attributes can be either static or dynamic. Static values do not change unless you change them (for example, the
Idof therouter). However, the values of some attributes change in real time (for example, theDelivery Countfor anaddress), and are designated by a chart icon.- To view the real-time value of an attribute in a chart, click the chart icon next to the attribute’s value or aggregate value.
7.2. Modifying Routers
AMQ Console provides a list of router management entities that enable you to quickly make temporary updates to the following for any router in your router network:
- Network connections (listeners and connectors)
- Routing mechanisms (message routing and link routing)
- Logging
- Security (SSL/TLS)
If you modify a router by updating a router management entity, the changes take effect immediately. However, the changes will be lost if the router is stopped. To make permanent changes to a router, you should edit the router’s configuration file. For more information, see Configuration in Using AMQ Interconnect.
7.2.1. Creating Network Connections
You can create incoming and outgoing network connections for a router.
Procedure
On the Dispatch Router tab, click Entities.
A page appears displaying all of the management entities for the router.
At the top of the folder tree, select a router from the drop-down menu.
The management entities are displayed for the router you selected.
Do one of the following:
- To create an incoming connection, click listener.
- To create an outgoing connection, click connector.
On the toolbar, click Create.
The attributes become editable.
Update the attributes as needed.
At a minimum, you must update the
Nameto ensure that this network connection is unique. You can hover over an attribute to see a definition of the attribute.For additional information about network connections, see Network Connections in Using AMQ Interconnect.
- Click Create.
7.2.2. Deleting Network Connections
You can delete incoming and outgoing network connections for a router.
Procedure
On the Dispatch Router tab, click Entities.
A page appears displaying all of the management entities for the router.
At the top of the folder tree, select a router from the drop-down menu.
The management entities are displayed for the router you selected.
Do one of the following:
- To delete an incoming connection, click listener.
- To delete an outgoing connection, click connector.
Click the listener or connector that you want to delete.
The connection is displayed with all of its attributes.
- On the toolbar, click Delete.
7.2.3. Defining a Message Address Routing Configuration
You can specify the routing pattern to be used for a message address.
Procedure
On the Dispatch Router tab, click Entities.
A page appears displaying all of the management entities for the router.
At the top of the folder tree, select a router from the drop-down menu.
The management entities are displayed for the router you selected.
- Click address.
On the toolbar, click Create.
The attributes become editable.
Update the attributes as needed.
At a minimum, you must update the
Nameto ensure that this address configuration is unique. You can hover over an attribute to see a definition of the attribute.For additional information about message routing, see Configuring Message Routing in Using AMQ Interconnect.
- Click Create.
If this message address should be routed to a queue on a broker, add an autolink.
- In the folder tree, click autoLink.
- On the toolbar, click Create.
Update the attributes as needed.
At a minimum, you must update the
Nameto ensure that this autolink is unique. You can hover over an attribute to see a definition of the attribute.For additional information about autolinks, see Configuring Waypoints and Autolinks in Using AMQ Interconnect.
7.2.4. Deleting a Message Address Routing Configuration
If you do not want messages with a particular address prefix to be routed in a particular way, you can delete the message address configuration that defines the routing pattern for those message addresses.
Procedure
On the Dispatch Router tab, click Entities.
A page appears displaying all of the management entities for the router.
At the top of the folder tree, select a router from the drop-down menu.
The management entities are displayed for the router you selected.
- Click address.
Click the message address configuration you want to delete.
The address is displayed with all of its attributes.
- On the toolbar, click Delete.
7.2.5. Creating Link Routes
You can create link routes to connect a client to a broker.
Procedure
On the Dispatch Router tab, click Entities.
A page appears displaying all of the management entities for the router.
At the top of the folder tree, select a router from the drop-down menu.
The management entities are displayed for the router you selected.
Add an incoming link route:
- Click linkRoute.
On the toolbar, click Create.
The attributes become editable.
-
Set the
DirtoIn. Update the remaining attributes as needed.
At a minimum, you must update the
Nameto ensure that this link route is unique. You can hover over an attribute to see a definition of the attribute.For additional information about link routing, see Configuring Link Routing in Using AMQ Interconnect.
- Click Create.
Repeat Step 3 to create an outgoing link route.
For this link route, the
Dirshould be set toOut.
7.2.6. Deleting Link Routes
To delete a link route, you should delete both the incoming and outgoing link route entities.
Procedure
On the Dispatch Router tab, click Entities.
A page appears displaying all of the management entities for the router.
At the top of the folder tree, select a router from the drop-down menu.
The management entities are displayed for the router you selected.
- Click linkRoute.
Click the incoming link route you want to delete.
The link route is displayed with all of its attributes.
- On the toolbar, click Delete.
- Click the outgoing link route.
- On the toolbar, click Delete.
7.2.7. Updating Logging Modules
For each logging module, you can set the logging level, and update where the log messages are sent and how they are formatted.
Procedure
On the Dispatch Router tab, click Entities.
A page appears displaying all of the management entities for the router.
At the top of the folder tree, select a router from the drop-down menu.
The management entities are displayed for the router you selected.
- Click log.
- Click a logging module, and then click Update.
Update the logging module’s attributes as needed.
You can hover over an attribute to see a definition of the attribute.
For additional information about logging, see Configuring Logging Modules in Using AMQ Interconnect.
- Click Update.
Related Information
- Logging Modules You Can Configure in Using AMQ Interconnect
7.2.8. Fetching Logs
You can fetch logs for any of the routers in the router network.
Procedure
On the Dispatch Router tab, click Entities.
A page appears displaying all of the configuration entities for the router.
At the top of the folder tree, select a router from the drop-down menu.
The configuration entities are displayed for the router you selected.
-
Expand the
logfolder. Click a log, and then click Fetch.
The log is sent to the destination defined in its
Outputattribute.
Related Information
7.2.9. Creating SSL/TLS Profiles
You can create SSL/TLS profiles to enable a router’s network connections to be secured.
Prerequisites
Before you can set up SSL/TLS, you must have the following files in PEM format:
- An X.509 CA certificate (used for signing the router certificate for the SSL server authentication feature).
- A private key (with or without password protection) for the router.
- An X.509 router certificate signed by the X.509 CA certificate.
Procedure
On the Dispatch Router tab, click Entities.
A page appears displaying all of the management entities for the router.
At the top of the folder tree, select a router from the drop-down menu.
The management entities are displayed for the router you selected.
- Click sslProfile.
On the toolbar, click Create.
The attributes become editable.
Update the attributes as needed.
At a minimum, you must update the
Nameto ensure that this SSL/TLS profile is unique. You can hover over an attribute to see a definition of the attribute.For additional information about SSL/TLS profiles, see Setting Up SSL for Encryption and Authentication in Using AMQ Interconnect.
- Click Create.
7.2.10. Deleting SSL/TLS Profiles
You can delete SSL/TLS profiles that you no longer want to use.
Procedure
On the Dispatch Router tab, click Entities.
A page appears displaying all of the management entities for the router.
At the top of the folder tree, select a router from the drop-down menu.
The management entities are displayed for the router you selected.
- Click sslProfile.
Click the SSL/TLS profile you want to delete.
The SSL/TLS profile is displayed with all of its attributes.
- On the toolbar, click Delete.
Revised on 2018-05-21 15:49:38 EDT
