Red Hat Ansible Automation Platform Installation Guide
This guide provides procedures and reference information for the supported installation scenarios for Red Hat Ansible Automation Platform
Abstract
Preface
Thank you for your interest in Red Hat Ansible Automation Platform. Ansible Automation Platform is a commercial offering that helps teams manage complex multi-tier deployments by adding control, knowledge, and delegation to Ansible-powered environments.
This guide helps you to understand the installation requirements and processes behind installing Ansible Automation Platform. This document has been updated to include information for the latest release of Ansible Automation Platform.
Making open source more inclusive
Red Hat is committed to replacing problematic language in our code, documentation, and web properties. We are beginning with these four terms: master, slave, blacklist, and whitelist. Because of the enormity of this endeavor, these changes will be implemented gradually over several upcoming releases. For more details, see our CTO Chris Wright’s message.
Chapter 1. Planning your Red Hat Ansible Automation Platform installation
Red Hat Ansible Automation Platform is supported on both Red Hat Enterprise Linux and Red Hat OpenShift. Use this guide to plan your Red Hat Ansible Automation Platform installation on Red Hat Enterprise Linux.
To install Red Hat Ansible Automation Platform on your Red Hat OpenShift Container Platform environment, see Deploying the Red Hat Ansible Automation Platform operator on OpenShift Container Platform.
1.1. Red Hat Ansible Automation Platform system requirements
Use this information when planning your Red Hat Ansible Automation Platform installations and designing automation mesh topologies that fit your use case.
Your system must meet the following minimum system requirements to install and run Red Hat Ansible Automation Platform.
| Required | Notes | |
|---|---|---|
| Subscription | Valid Red Hat Ansible Automation Platform | |
| OS | Red Hat Enterprise Linux 8.4 or later 64-bit (x86) | Red Hat Ansible Automation Platform is also supported on OpenShift, see Deploying the Red Hat Ansible Automation Platform operator on OpenShift Container Platform for more information. |
| Ansible | version 2.11 (to install) | Ansible Automation Platform includes execution environments that contain ansible-core 2.13. |
| Python | 3.8 or later |
The following are necessary for you to work with project updates and collections:
Ensure that the following domain names are part of either the firewall or the proxy’s allowlist for successful connection and download of collections from automation hub or Galaxy server:
-
galaxy.ansible.com -
cloud.redhat.com -
console.redhat.com -
sso.redhat.com
-
- SSL inspection must be disabled either when using self signed certificates or for the Red Hat domains.
1.1.1. Automation controller
Automation controller is a distributed system, where different software components can be co-located or deployed across multiple compute nodes. In the installer, node types of control, hybrid, execution, and hop are provided as abstractions to help the user design the topology appropriate for their use case. The following table provides recommendations for node sizing:
On control and hybrid nodes, allocate a minimum of 20 GB to /var/lib/awx for execution environment storage.
| Execution nodes | Required | Notes |
| RAM | 16 GB |
|
| CPUs | 4 |
|
| Control nodes | Required | Notes |
| RAM | 16 GB | |
| CPUs | 4 |
|
| Hybrid nodes | Required | Notes |
| RAM | 16 GB |
|
| CPUs | 4 |
|
| Hop nodes | Required | Notes |
| RAM | 16 GB | |
| CPUs | 4 |
|
| Disk: service node | 40 GB dedicated hard disk space |
|
| Database node | Required | Notes |
| RAM | 16 GB | |
| CPUs | 4 | |
| Disk | 20 GB dedicated hard disk space |
|
| Browser | A currently supported version of Mozilla FireFox or Google Chrome | |
| Database | PostgreSQL version 13 |
1.1.2. Automation hub
Automation hub enables you to discover and use new certified automation content from Red Hat Ansible and Certified Partners. On Ansible automation hub, you can discover and manage Ansible Collections, which are supported automation content developed by Red Hat and its partners for use cases such as cloud automation, network automation, and security automation.
Automation hub has the following system requirements:
| Required | Notes | |
|---|---|---|
| RAM | 8 GB minimum |
|
| CPUs | 2 minimum |
|
| Disk: service node | 60 GB dedicated hard disk space |
|
| Database node | Required | Notes |
| RAM | 16 GB | |
| CPUs | 4 | |
| Disk | 20 GB dedicated hard disk space |
|
| Browser | A currently supported version of Mozilla FireFox or Google Chrome | |
| Database | PostgreSQL version 13 |
- All automation controller data is stored in the database. Database storage increases with the number of hosts managed, number of jobs run, number of facts stored in the fact cache, and number of tasks in any individual job. For example, a playbook run every hour (24 times a day) across 250, hosts, with 20 tasks will store over 800000 events in the database every week.
- If not enough space is reserved in the database, old job runs and facts will need cleaned on a regular basis. Refer to Management Jobs in the Automation Controller Administration Guide for more information
Amazon EC2
- Instance size of m5.large or larger
- An instance size of m4.xlarge or larger if there are more than 100 hosts
Additional notes for Red Hat Ansible Automation Platform requirements
-
Actual RAM requirements vary based on how many hosts automation controller will manage simultaneously (which is controlled by the
forksparameter in the job template or the systemansible.cfgfile). To avoid possible resource conflicts, Ansible recommends 1 GB of memory per 10 forks + 2 GB reservation for automation controller, see Automation controller Capacity Determination and Job Impact for further details. Ifforksis set to 400, 42 GB of memory is recommended. -
Automation controller hosts check if
umaskis set to 0022. If not, the setup fails. Setumask=0022to avoid this error. - A larger number of hosts can be addressed, though if the fork number is less than the total host count, more passes across the hosts are required. These RAM limitations are avoided when using rolling updates or when using the provisioning callback system built into automation controller, where each system requesting configuration enters a queue and is processed as quickly as possible; or in cases where automation controller is producing or deploying images such as AMIs. All of these are great approaches to managing larger environments.
- For questions, contact Ansible support through the Red Hat Customer portal.
- The requirements for systems managed by Ansible Automation Platform are the same as for Ansible. See Getting Started in the Ansible User Guide.
PostgreSQL requirements
Red Hat Ansible Automation Platform uses PostgreSQL 13.
- PostgreSQL user passwords are hashed with SCRAM-SHA-256 secure hashing algorithm before storing in the database.
-
To determine if your automation controller instance has access to the database, you can do so with the command,
awx-manage check_db.
PostgreSQL Configurations
Optionally, you can configure the PostgreSQL database as separate nodes that are not managed by the Red Hat Ansible Automation Platform installer. When the Ansible Automation Platform installer manages the database server, it configures the server with defaults that are generally recommended for most workloads. However, you can adjust these PostgreSQL settings for standalone database server node where ansible_memtotal_mb is the total memory size of the database server:
max_connections == 1024
shared_buffers == ansible_memtotal_mb*0.3
work_mem == ansible_memtotal_mb*0.03
maintenance_work_mem == ansible_memtotal_mb*0.04
Refer to the PostgreSQL documentation for more detail on tuning your PostgreSQL server.
While Red Hat Ansible Automation Platform depends on Ansible Playbooks and requires the installation of the latest stable version of Ansible before installing automation controller, manual installations of Ansible are no longer required.
Upon new installations, automation controller installs the latest release package of Ansible 2.2.
If performing a bundled Ansible Automation Platform installation, the installation program attempts to install Ansible (and its dependencies) from the bundle for you.
If you choose to install Ansible on your own, the Ansible Automation Platform installation program will detect that Ansible has been installed and will not attempt to reinstall it.
You must install Ansible using a package manager such as dnf, and the latest stable version of the package manager must be installed for Red Hat Ansible Automation Platform to work properly. Ansible version 2.11 is required for versions 2.2 and later.
1.2. Network ports and protocols
Red Hat Ansible Automation Platform uses a number of ports to communicate with its services. These ports must be open and available for incoming connection to the Red Hat Ansible Automation Platform server in order for it to work. Ensure that these ports are available and are not being blocked by the server firewall.
The following architectural diagram is an example of a fully deployed Ansible Automation Platform with all possible components.
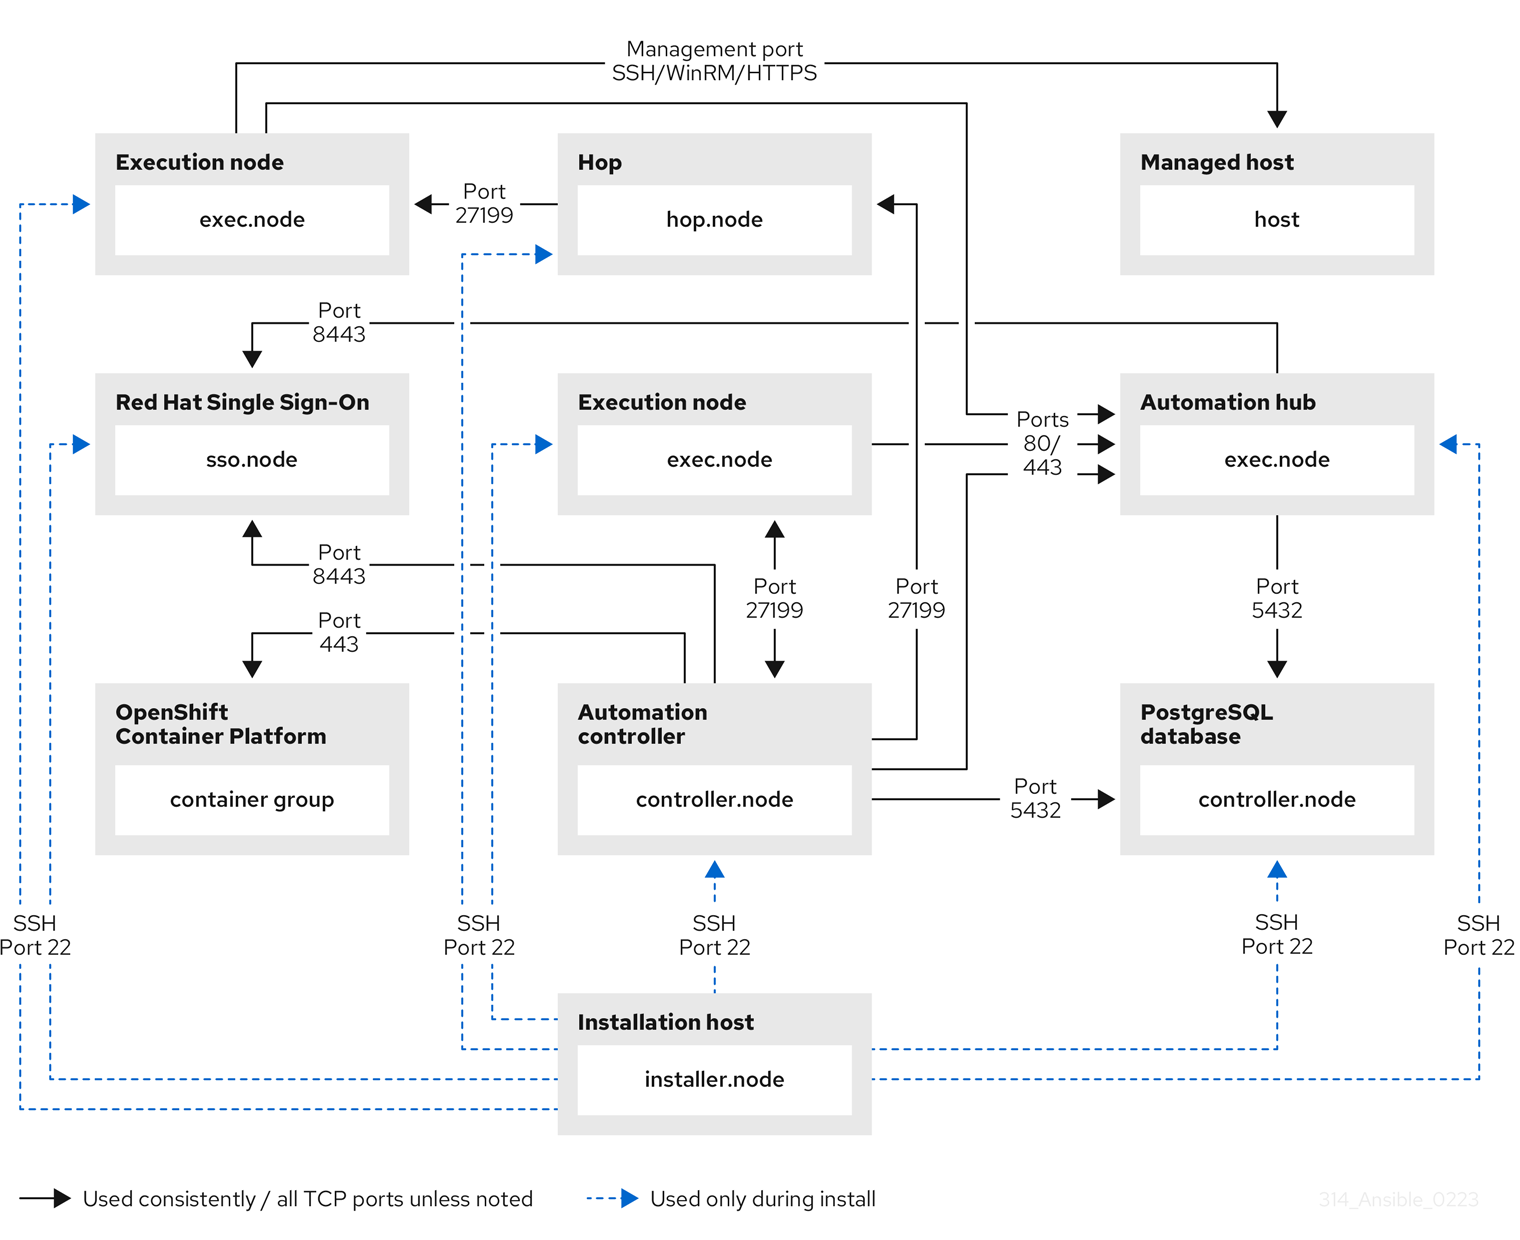
The following tables provide the default Red Hat Ansible Automation Platform destination ports required for each application.
The default destination ports and installer inventory listed below are configurable. If you choose to configure them to suit your environment, you may experience a change in behavior.
| Port | Protocol | Service | Direction | Installer Inventory Variable | Required for |
|---|---|---|---|---|---|
| 22 | TCP | SSH | Inbound and Outbound |
| Remote access during installation |
| 5432 | TCP | Postgres | Inbound and Outbound |
| Default port ALLOW connections from controller(s) to database port |
| Port | Protocol | Service | Direction | Installer Inventory Variable | Required for |
|---|---|---|---|---|---|
| 22 | TCP | SSH | Inbound and Outbound |
| Installation |
| 80 | TCP | HTTP | Inbound |
| UI/API |
| 443 | TCP | HTTPS | Inbound |
| UI/API |
| 5432 | TCP | PostgreSQL | Inbound and Outbound |
| Open only if the internal database is used along with another component. Otherwise, this port should not be open Hybrid mode in a cluster |
| 27199 | TCP | Receptor | Inbound and Outbound |
| ALLOW receptor listener port across all controllers for mandatory & automatic control plane clustering |
| Port | Protocol | Service | Direction | Installer Inventory Variable | Required for |
|---|---|---|---|---|---|
| 22 | TCP | SSH | Inbound and Outbound |
| Installation |
| 27199 | TCP | Receptor | Inbound and Outbound |
| Mesh ALLOW connection from controller(s) to Receptor port |
| Port | Protocol | Service | Direction | Installer Inventory Variable | Required for |
|---|---|---|---|---|---|
| 22 | TCP | SSH | Inbound and Outbound |
| Installation |
| 27199 | TCP | Receptor | Inbound and Outbound |
| Mesh - Nodes directly peered to controllers. No hop nodes involved. 27199 is bi-directional for the execution nodes ALLOW connections from controller(s) to Receptor port (non-hop connected nodes) ALLOW connections from hop node(s) to Receptor port (if relayed through hop nodes) |
| Port | Protocol | Service | Direction | Installer Inventory Variable | Required for |
|---|---|---|---|---|---|
| 22 | TCP | SSH | Inbound and Outbound |
| Installation |
| 27199 | TCP | Receptor | Inbound and Outbound |
| Mesh - Nodes directly peered to controllers. Direct nodes involved. 27199 is bi-diretional for execution nodes ENABLE connections from controller(s) to Receptor port for non-hop connected nodes ENABLE connections from hop node(s) to Receptor port if relayed through hop nodes |
| 443 | TCP | Podman | Inbound |
| UI/API |
| Port | Protocol | Service | Direction | Installer Inventory Variable | Required for |
|---|---|---|---|---|---|
| 22 | TCP | SSH | Inbound and Outbound |
| Installation |
| 27199 | TCP | Receptor | Inbound and Outbound |
| Mesh - Nodes directly peered to controllers. No hop nodes involved. 27199 is bi-directional for the execution nodes ENABLE connections from controller(s) to Receptor port for non-hop connected nodes ENABLE connections from hop node(s) to Receptor port if relayed through hop nodes |
| 443 | TCP | Podman | Inbound |
| UI/API |
| Port | Protocol | Service | Direction | Installer Inventory Variable | Required for |
|---|---|---|---|---|---|
| 22 | TCP | SSH | Inbound and Outbound |
| Installation |
| 80 | TCP | HTTP | Inbound | Fixed value | User interface |
| 443 | TCP | HTTPS | Inbound | Fixed value | User interface |
| 5432 | TCP | PostgreSQL | Inbound and Outbound |
| Open only if the internal database is used along with another component. Otherwise, this port should not be open |
| Port | Protocol | Service | Direction | Installer Inventory Variable | Required for |
|---|---|---|---|---|---|
| 22 | TCP | SSH | Inbound and Outbound |
| Installation |
| 443 | TCP | HTTPS | Inbound |
| Access to Service Catalog user interface |
| 5432 | TCP | PostgreSQL | Inbound and Outbound |
| Open only if the internal database is used. Otherwise, this port should not be open |
| URL | Required for |
|---|---|
| General account services, subscriptions | |
| Insights data upload | |
| Inventory upload and Cloud Connector connection | |
| Access to Insights dashboard |
| URL | Required for |
|---|---|
| General account services, subscriptions | |
| TCP | |
| Ansible Community curated Ansible content | |
| Access to container images provided by Red Hat and partners | |
| Red Hat and partner curated Ansible Collections |
| URL | Required for |
|---|---|
| Access to container images provided by Red Hat and partners | |
|
| Access to container images provided by Red Hat and partners |
|
| Access to container images provided by Red Hat and partners |
|
| Access to container images provided by Red Hat and partners |
|
| Access to container images provided by Red Hat and partners |
Image manifests and filesystem blobs are served directly from registry.redhat.io. However, from 1 May 2023, filesystem blobs are served from quay.io instead. To avoid problems pulling container images, you must enable outbound connections to the listed quay.io hostnames. Make this change to any firewall configuration that specifically enables outbound connections to registry.redhat.io. Use the hostnames instead of IP addresses when configuring firewall rules. After making this change, you can continue to pull images from registry.redhat.io. You do not need a quay.io login, or need to interact with the quay.io registry directly in any way to continue pulling Red Hat container images. For more information, see the article here.
1.3. Attaching your Red Hat Ansible Automation Platform subscription
You must have valid subscriptions attached on all nodes before installing Red Hat Ansible Automation Platform. Attaching your Ansible Automation Platform subscription allows you to access subcription-only resources necessary to proceed with the installation.
Attaching a subscription is unnecessary if you have enabled Simple Content Access Mode on your Red Hat account. Once enabled, you will need to register your systems to either Red Hat Subscription Management (RHSM) or Satellite before installing the Ansible Automation Platform. See Simple Content Access Mode for more information.
Procedure
Obtain the
pool_idfor your Red Hat Ansible Automation Platform subscription:# subscription-manager list --available --all | grep "Ansible Automation Platform" -B 3 -A 6Example
An example output of the
subsciption-manager listcommand. Obtain thepool_idas seen in thePool ID:section:Subscription Name: Red Hat Ansible Automation, Premium (5000 Managed Nodes) Provides: Red Hat Ansible Engine Red Hat Ansible Automation Platform SKU: MCT3695 Contract: ```` Pool ID: <pool_id> Provides Management: No Available: 4999 Suggested: 1Attach the subscription:
# subscription-manager attach --pool=<pool_id>
You have now attached your Red Hat Ansible Automation Platform subscriptions to all nodes.
Verification
- Verify the subscription was successfully attached:
# subscription-manager list --consumedTroubleshooting
If you are unable to locate certain packages that came bundled with the Ansible Automation Platform installer, or if you are seeing a
Repositories disabled by configurationmessage, try enabling the repository using the command:Red Hat Ansible Automation Platform 2.2 for RHEL 8
subscription-manager repos --enable ansible-automation-platform-2.2-for-rhel-8-x86_64-rpmsRed Hat Ansible Automation Platform 2.2 for RHEL 9
subscription-manager repos --enable ansible-automation-platform-2.2-for-rhel-9-x86_64-rpms
1.4. Red Hat Ansible Automation Platform platform components
Red Hat Ansible Automation Platform consists of the following components:
Ansible automation hub
A repository for certified content of Ansible Content Collections. Ansible automation hub is the centralized repository for Red Hat and its partners to publish content, and for customers to discover certified, supported Ansible Content Collections. Red Hat Ansible Certified Content provides users with content that has been tested and is supported by Red Hat.
Private automation hub
Private automation hub provides both disconnected and on premise solution for synchronizing content. You can synchronize collections and execution environment images from Red Hat cloud automation hub, storing and serving your own custom automation collections and execution images. You can also use other sources such as Ansible Galaxy or other container registries to provide content to your private automation hub. Private automation hub can integrate into your enterprise directory and your CI/CD pipelines.
Automation controller
An enterprise framework for controlling, securing, and managing Ansible automation with a user interface (UI) and RESTful application programming interface (API).
Automation services catalog
Automation services catalog is a service within Red Hat Ansible Automation Platform. Automation services catalog enables you to organize and govern product catalog sources on Ansible automation controller across various environments.
Using automation services catalog you can:
- Apply multi-level approval to individual platform inventories.
- Organize content in the form of products from your platforms into portfolios.
- Choose portfolios to share with specific groups of users.
- Set boundaries around values driving execution of user requests.
Automation mesh
Automation mesh is an overlay network intended to ease the distribution of work across a large and dispersed collection of workers through nodes that establish peer-to-peer connections with each other using existing networks.
Automation mesh provides:
- Dynamic cluster capacity that scales independently, allowing you to create, register, group, ungroup and deregister nodes with minimal downtime.
- Control and execution plane separation that enables you to scale playbook execution capacity independently from control plane capacity.
- Deployment choices that are resilient to latency, reconfigurable without outage, and that dynamically re-reroute to choose a different path when outages exist.
- Mesh routing changes.
- Connectivity that includes bi-directional, multi-hopped mesh communication possibilities which are Federal Information Processing Standards (FIPS) compliant.
Automation execution environments
A solution that includes the Ansible execution engine and hundreds of modules that help users automate all aspects of IT environments and processes. Execution environments automate commonly used operating systems, infrastructure platforms, network devices, and clouds.
Ansible Galaxy
A hub for finding, reusing, and sharing Ansible content. Community-provided Galaxy content, in the form of prepackaged roles, can help start automation projects. Roles for provisioning infrastructure, deploying applications, and completing other tasks can be dropped into Ansible Playbooks and be applied immediately to customer environments.
Automation content navigator
A textual user interface (TUI) that becomes the primary command line interface into the automation platform, covering use cases from content building, running automation locally in an execution environment, running automation in Ansible Automation Platform, and providing the foundation for future integrated development environments (IDEs).
1.5. Choosing and obtaining a Red Hat Ansible Automation Platform installer
Choose the Red Hat Ansible Automation Platform installer you need based on your Red Hat Enterprise Linux environment internet connectivity. Review the following scenarios and determine which Red Hat Ansible Automation Platform installer meets your needs.
A valid Red Hat customer account is required to access Red Hat Ansible Automation Platform installer downloads on the Red Hat Customer Portal.
Installing with internet access
Choose the Red Hat Ansible Automation Platform installer if your Red Hat Enterprise Linux environment is connected to the internet. Installing with internet access retrieves the latest required repositories, packages, and dependencies. Choose one of the following ways to set up your Ansible Automation Platform installer.
Tarball install
- Navigate to https://access.redhat.com/downloads/content/480
- Click for the Ansible Automation Platform <latest-version> Setup.
Extract the files:
$ tar xvzf ansible-automation-platform-setup-<latest-version>.tar.gz
RPM install
Install the Ansible Automation Platform Installer Package
v.2.2 for RHEL 8 for x86_64
$ sudo dnf install --enablerepo=ansible-automation-platform-2.2-for-rhel-8-x86_64-rpms ansible-automation-platform-installerv.2.2 for RHEL 9 for x86-64
$ sudo dnf install --enablerepo=ansible-automation-platform-2.2-for-rhel-9-x86_64-rpms ansible-automation-platform-installer
dnf install enables the repo as the repo is disabled by default.
When you use the RPM installer, the files are placed under the /opt/ansible-automation-platform/installer directory.
Installing without internet access
Use the Red Hat Ansible Automation Platform Bundle installer if you are unable to access the internet, or would prefer not to install separate components and dependencies from online repositories. Access to Red Hat Enterprise Linux repositories is still needed. All other dependencies are included in the tar archive.
- Navigate to https://access.redhat.com/downloads/content/480
- Click for the Ansible Automation Platform <latest-version> Setup Bundle.
Extract the files:
$ tar xvzf ansible-automation-platform-setup-bundle-<latest-version>.tar.gz
1.6. About the installer inventory file
Red Hat Ansible Automation Platform works against a list of managed nodes or hosts in your infrastructure that are logically organized, using an inventory file. You can use the Red Hat Ansible Automation Platform installer inventory file to specify your installation scenario and describe host deployments to Ansible. By using an inventory file, Ansible can manage a large number of hosts with a single command. Inventories also help you use Ansible more efficiently by reducing the number of command line options you have to specify.
The inventory file can be in one of many formats, depending on the inventory plugins that you have. The most common formats are INI and YAML. Inventory files listed in this document are shown in INI format.
The location of the inventory file depends on the installer you used. The following table shows possible locations:
| Installer | Location |
|---|---|
| Bundle tar |
|
| Non-bundle tar |
|
| RPM |
|
You can verify the hosts in your inventory using the command:
ansible all -i <path-to-inventory-file. --list-hostsExample inventory file
[automationcontroller]
host1.example.com
host2.example.com
Host4.example.com

[automationhub]
host3.example.com

[database]
Host5.example.com

[all:vars]
admin_password='<password>'

pg_host=''
pg_port=''

pg_database='awx'
pg_username='awx'
pg_password='<password>'

registry_url='registry.redhat.io'
registry_username='<registry username>'
registry_password='<registry password>'
The first part of the inventory file specifies the hosts or groups that Ansible can work with.
1.6.1. Guidelines for hosts and groups
Databases
-
When using an external database, ensure the
[database]sections of your inventory file are properly set up. - To improve performance, do not colocate the database and the automation controller on the same server.
automation hub
-
Add Ansible automation hub information in the
[automationhub]group. - Do not install Ansible automation hub and automation controller on the same node.
-
Provide a reachable IP address or fully qualified domain name (FQDN) for the
[automationhub]host to ensure that users can synchronize and install content from Ansible automation hub from a different node. Do not uselocalhost.
You must separate the installation of automation controller and Ansible automation hub because the [database] group does not distinguish between the two if both are installed at the same time.
If you use one value in [database] and both automation controller and Ansible automation hub define it, they would use the same database.
automation controller
- Automation controller does not configure replication or failover for the database that it uses. automation controller works with any replication that you have.
Clustered installations
- When upgrading an existing cluster, you can also reconfigure your cluster to omit existing instances or instance groups. Omitting the instance or the instance group from the inventory file is not enough to remove them from the cluster. In addition to omitting instances or instance groups from the inventory file, you must also deprovision instances or instance groups before starting the upgrade. See Deprovisioning nodes or groups. Otherwise, omitted instances or instance groups continue to communicate with the cluster, which can cause issues with automation controller services during the upgrade.
If you are creating a clustered installation setup, you must replace
[localhost]with the hostname or IP address of all instances. Installers for automation controller, automation hub, and automation services catalog do not accept[localhost]All nodes and instances must be able to reach any others by using this hostname or address. You cannot use the localhostansible_connection=localon one of the nodes. Use the same format for the host names of all the nodes.Therefore, this does not work:
[automationhub]
localhost ansible_connection=local
hostA
hostB.example.com
172.27.0.4
Instead, use these formats:
[automationhub]
hostA
hostB
hostC
or
[automationhub]
hostA.example.com
hostB.example.com
hostC.example.com
1.6.2. Deprovisioning nodes or groups
You can deprovision nodes and instance groups using the Ansible Automation Platform installer. Running the installer will remove all configuration files and logs attached to the nodes in the group.
You can deprovision any hosts in your inventory except for the first host specified in the [automationcontroller] group.
To deprovision nodes, append node_state=deprovision to the node or group within the inventory file.
For example:
To remove a single node from a deployment:
[automationcontroller]
host1.example.com
host2.example.com
host4.example.com   node_state=deprovision
or
To remove an entire instance group from a deployment:
[instance_group_restrictedzone]
host4.example.com
host5.example.com

[instance_group_restrictedzone:vars]
node_state=deprovision
1.6.3. Inventory variables
The second part of the example inventory file, following [all:vars], is a list of variables used by the installer. Using all means the variables apply to all hosts.
To apply variables to a particular host, use [hostname:vars]. For example, [automationhub:vars].
1.6.4. Rules for declaring variables in inventory files
The values of string variables are declared in quotes. For example:
pg_database='awx'
pg_username='awx'
pg_password='<password>'
When declared in a :vars section, INI values are interpreted as strings. For example, var=FALSE creates a string equal to FALSE. Unlike host lines, :vars sections accept only a single entry per line, so everything after the = must be the value for the entry. Host lines accept multiple key=value parameters per line. Therefore they need a way to indicate that a space is part of a value rather than a separator. Values that contain whitespace can be quoted (single or double). See the Python shlex parsing rules for details.
If a variable value set in an INI inventory must be a certain type (for example, a string or a boolean value), always specify the type with a filter in your task. Do not rely on types set in INI inventories when consuming variables.
Consider using YAML format for inventory sources to avoid confusion on the actual type of a variable. The YAML inventory plugin processes variable values consistently and correctly.
If a parameter value in the Ansible inventory file contains special characters, such as #, { or }, you must double-escape the value (that is enclose the value in both single and double quotation marks).
For example, to use mypasswordwith#hashsigns as a value for the variable pg_password, declare it as pg_password='"mypasswordwith#hashsigns"' in the Ansible host inventory file.
1.6.5. Securing secrets in the inventory file
You can encrypt sensitive or secret variables with Ansible Vault. However, encrypting the variable names as well as the variable values makes it hard to find the source of the values. To circumvent this, you can encrypt the variables individually using ansible-vault encrypt_string, or encrypt a file containing the variables.
Procedure
Create a file labeled
credentials.ymlto store the encrypted credentials.$ cat credentials.yml admin_password: my_long_admin_pw pg_password: my_long_pg_pw registry_password: my_long_registry_pwEncrypt the
credentials.ymlfile usingansible-vault.$ ansible-vault encrypt credentials.yml New Vault password: Confirm New Vault password: Encryption successfulImportantStore your encrypted vault password in a safe place.
Verify that the
credentials.ymlfile is encrypted.$ cat credentials.yml $ANSIBLE_VAULT;1.1; AES256363836396535623865343163333339613833363064653364656138313534353135303764646165393765393063303065323466663330646232363065316666310a373062303133376339633831303033343135343839626136323037616366326239326530623438396136396536356433656162333133653636616639313864300a353239373433313339613465326339313035633565353464356538653631633464343835346432376638623533613666326136343332313163343639393964613265616433363430633534303935646264633034383966336232303365383763Run
setup.shfor installation of Ansible Automation Platform 2.2 and pass bothcredentials.ymland the--ask-vault-pass option.$ ANSIBLE_BECOME_METHOD='sudo' ANSIBLE_BECOME=True ANSIBLE_HOST_KEY_CHECKING=False ./setup.sh -e @credentials.yml -- --ask-vault-pass
1.6.6. Additional inventory file variables
You can further configure your Red Hat Ansible Automation Platform installation by including additional variables in the inventory file. These configurations add optional features for managing your Red Hat Ansible Automation Platform. Add these variables by editing the inventory file using a text editor.
A table of predefined values for inventory file variables can be found in Appendix A: Inventory File Variables
1.7. Supported installation scenarios
Red Hat supports the following installations scenarios for Red Hat Ansible Automation Platform
1.7.1. Standalone automation controller with a database on the same node, or a non-installer managed database
This scenario includes installation of automation controller, including the web frontend, REST API backend, and database on a single machine. It installs PostgreSQL, and configures the automation controller to use that as its database. This is considered the standard automation controller installation scenario.
See Installing automation controller with a database on the same node in Installing Red Hat Ansible Automation Platform components on a single machine to get started.
1.7.2. Standalone automation controller with an external managed database
This scenario includes installation of the automation controller server on a single machine and configures communication with a remote PostgreSQL instance as its database. This remote PostgreSQL can be a server you manage, or can be provided by a cloud service such as Amazon RDS.
See Installing automation controller with an external managed database in Installing Red Hat Ansible Automation Platform components on a single machine to get started.
1.7.3. Standalone automation hub with a database on the same node, or a non-installer managed database
This scenario includes installation of automation hub, including the web frontend, REST API backend, and database on a single machine. It installs PostgreSQL, and configures the automation hub to use that as its database.
See Installing automation hub with a database on the same node in Installing Red Hat Ansible Automation Platform components on a single machine to get started.
1.7.4. Standalone automation hub with an external managed database
This scenario includes installation of the automation hub server on a single machine, and installs a remote PostgreSQL database, managed by the Red Hat Ansible Automation Platform installer.
See Installing automation hub with an external database in Installing Red Hat Ansible Automation Platform components on a single machine to get started.
1.7.5. Platform installation with a database on the automation controller node, or non-installer managed database
This scenario includes installation of automation controller and automation hub with a database on the automation controller node, or a non-installer managed database.
See Installing Red Hat Ansible Automation Platform with a database on the automation controller node or non-installer managed database in Installing Red Hat Ansible Automation Platform to get started.
1.7.6. Platform installation with an external managed database
This scenario includes installation of automation controller and automation hub and configures communication with a remote PostgreSQL instance as its database. This remote PostgreSQL can be a server you manage, or can be provided by a cloud service such as Amazon RDS.
See Installing Red Hat Ansible Automation Platform with an external managed database in Installing Red Hat Ansible Automation Platform to get started.
1.7.7. Multi-machine cluster installation with an external managed database
This scenario includes installation of multiple automation controller nodes and an automation hub instance and configures communication with a remote PostgreSQL instance as its database. This remote PostgreSQL can be a server you manage, or can be provided by a cloud service such as Amazon RDS. In this scenario, all automation controller are active and can execute jobs, and any node can receive HTTP requests.
Running in a cluster setup requires any database that automation controller uses to be external—PostgreSQL must be installed on a machine that is not one of the primary or secondary tower nodes. When in a redundant setup, the remote PostgreSQL version requirements is PostgreSQL 13.
- See Clustering for more information on configuring a clustered setup.
-
Provide a reachable IP address for the
[automationhub]host to ensure users can sync content from Private Automation Hub from a different node.
See Installing a multi-node Red Hat Ansible Automation Platform with an external managed database in Multi-machine cluster installation to get started.
Chapter 2. Installing Red Hat Ansible Automation Platform
Red Hat Ansible Automation Platform installation involves deploying automation controller and automation hub.
Installer does not require a user to be logged in as root to run ./setup.sh. The user will need to properly configure the environment variable ANSIBLE_BECOME_METHOD for the preferred method of privilege escalation to root. The default method is sudo.
This installation option includes two supported scenarios:
2.1. Installing Red Hat Ansible Automation Platform with a database on the automation controller node or non-installer managed database
You can use these instructions to install Red Hat Ansible Automation Platform (both automation controller and automation hub) with a database on the automation controller node, or a non-installer managed database.
2.1.1. Prerequisites
- You chose and obtained a platform installer from the Red Hat Ansible Automation Platform Product Software.
- You are installing on a machine that meets base system requirements.
- You have updated all of the packages to the recent version of your RHEL nodes.
You may experience errors if you do not fully upgrade your RHEL nodes prior to your Ansible Automation Platform installation.
- You have created a Red Hat Registry Service Account, following the instructions in the Creating Registry Service Accounts guide.
-
A container registry service is required to install Ansible Automation Platform. Access to a container registry enables you to load automation execution environments onto the Ansible Automation Platform, giving you a consistent and containerized environment for executing Ansible playbooks and roles. By default, the Ansible Automation Platform uses
registry.redhat.io, which requires a Red Hat registry service account. See the Creating Registry Service Accounts guide to create a registry service account. - You must configure an NTP client on all nodes. For more information, see Configuring NTP server using Chrony.
2.1.2. Editing the Red Hat Ansible Automation Platform installer inventory file
You can use the Red Hat Ansible Automation Platform installer inventory file to specify your installation scenario.
Procedure
Navigate to the installer
[bundled installer]
$ cd ansible-automation-platform-setup-bundle-<latest-version>[online installer]
$ cd ansible-automation-platform-setup-<latest-version>
-
Open the
inventoryfile with a text editor. -
Edit
inventoryfile parameters to specify your installation scenario. Follow the example below.
2.1.3. Example inventory file for a database on the automation controller node or a non-installer managed database
This example describes how you can populate the inventory file to install Red Hat Ansible Automation Platform. This installation inventory file includes both automation controller and automation hub with a database on the automation controller node or non-installer managed database.
- You cannot install automation controller and automation hub on the same node.
-
Provide a reachable IP address for the
[automationhub]host to ensure users can sync content from Private Automation Hub from a different node. -
Enter your Red Hat Registry Service Account credentials in
registry_usernameandregistry_passwordto link to the Red Hat container registry.
[automationcontroller]
controller.acme.org

[automationhub]
automationhub.acme.org

[all:vars]
admin_password='<password>'
pg_host=''
pg_port=''
pg_database='awx'
pg_username='awx'
pg_password='<password>'
pg_sslmode='prefer'  # set to 'verify-full' for client-side enforced SSL

registry_url='registry.redhat.io'
registry_username='<registry username>'
registry_password='<registry password>'

# Automation Hub Configuration
#
automationhub_admin_password='<password>'
automationhub_pg_host='controller.acme.org'
automationhub_pg_port='5432'
automationhub_pg_database='automationhub'
automationhub_pg_username='automationhub'
automationhub_pg_password='<password>'
automationhub_pg_sslmode='prefer'

# The default install will deploy a TLS enabled Automation Hub.
# If for some reason this is not the behavior wanted one can
# disable TLS enabled deployment.
#
# automationhub_disable_https = False
# The default install will generate self-signed certificates for the Automation
# Hub service. If you are providing valid certificate via automationhub_ssl_cert
# and automationhub_ssl_key, one should toggle that value to True.
#
# automationhub_ssl_validate_certs = False
# SSL-related variables
# If set, this will install a custom CA certificate to the system trust store.
# custom_ca_cert=/path/to/ca.crt
# Certificate and key to install in nginx for the web UI and API
# web_server_ssl_cert=/path/to/tower.cert
# web_server_ssl_key=/path/to/tower.key
# Certificate and key to install in Automation Hub node
# automationhub_ssl_cert=/path/to/automationhub.cert
# automationhub_ssl_key=/path/to/automationhub.key
# Server-side SSL settings for PostgreSQL (when we are installing it).
# postgres_use_ssl=False
# postgres_ssl_cert=/path/to/pgsql.crt
# postgres_ssl_key=/path/to/pgsql.key
2.1.4. Setup script flags and extra variables
You can also pass flags and extra variables when running the setup script to install automation controller:
| Argument | Description |
|---|---|
|
| Show this help message and exit |
|
|
Path to Ansible inventory file (default: |
|
| Set additional Ansible variables as key=value or YAML/JSON |
|
| Perform a database backup in lieu of installing |
|
| Perform a database restore in lieu of installing |
|
| Generate and distribute a SECRET_KEY. When you run the setup.sh script using this argument, by default, a new secret key is generated and distributed for the automation controller but not for the automation services catalog.
To generate and distribute a new secret key for both the automation controller and the automation services catalog, specify the variable |
Use the -- separator to add any Ansible arguments you wish to apply. For example: ./setup.sh -i my_awesome_inventory.yml -e matburt_is_country_gold=True — -K.
When passing
-rto perform a database restore default restore path is used unless EXTRA_VARS are provided with a non-default path. See the example below that passed an EXTRA_VAR specifying the restore path:./setup.sh -e 'restore_backup_file=/path/to/nondefault/location' -rYou can force an online installation by passing
-e bundle_install=false:$ ./setup.sh -e bundle_install=false
| Variable | Description | Default |
|---|---|---|
|
| When installing automation controller make sure Ansible is also up to date |
|
|
| When installing Tower also create the Demo Org, project, credential, Job Template, etc. |
|
|
| When installing from a bundle where to put the bundled repos |
|
|
| Disable HTTPS traffic through nginx, this is useful if offloading HTTPS to a load balancer |
|
|
| Disable HSTS web-security policy mechanism |
|
|
| Port to configure nginx to listen to for HTTP |
|
|
| Port to configure nginx to listen to for HTTPS |
|
|
| A temp location to use when backing up |
|
|
| Specify an alternative backup file to restore from | None |
|
| The minimum RAM required to install Tower (should only be changed for test installation) |
|
|
| The minimum open file descriptions (should only be changed for test installations) | None |
|
|
Ignore preflight checks, useful when installing into a template or other non-system image (overrides |
|
|
|
When you run the |
|
Examples
- To upgrade core:
./setup.sh -e upgrade_ansible_with_tower=1- To disable https handling at nginx:
./setup.sh -e nginx_disable_https=true- To specify a non-default path when restoring from a backup file:
./setup.sh -e 'restore_backup_file=/path/to/nondefault/location' -r2.1.5. Running the Red Hat Ansible Automation Platform installer setup script
You can run the setup script once you finish updating the inventory file with required parameters for installing your Private Automation Hub.
Procedure
Run the
setup.shscript$ ./setup.sh
The installation will begin.
2.1.6. Verifying automation controller installation
Once the installation completes, you can verify your automation controller has been installed successfully by logging in with the admin credentials you inserted into the inventory file.
Procedure
-
Navigate to the IP address specified for the automation controller node in the
inventoryfile. -
Log in with the Admin credentials you set in the
inventoryfile.
The automation controller server is accessible from port 80 (https://<TOWER_SERVER_NAME>/) but will redirect to port 443 so 443 needs to be available also.
If the installation fails and you are a customer who has purchased a valid license for Red Hat Ansible Automation Platform, please contact Ansible via the Red Hat Customer portal at https://access.redhat.com/.
Upon a successful login to automation controller, your installation of Red Hat Ansible Automation Platform 2.2 is now complete.
2.1.6.1. Additional automation controller configuration and resources
See the following resources to explore additional automation controller configurations.
| Link | Description |
|---|---|
| Set up automation controller and run your first playbook | |
| Configure automation controller administration through customer scripts, management jobs, etc. | |
| Configuring proxy support for Red Hat Ansible Automation Platform | Set up automation controller with a proxy server |
| Managing usability analytics and data collection from automation controller | Manage what automation controller information you share with Red Hat |
| Review automation controller functionality in more detail |
2.1.7. Verifying automation hub installation
Once the installation completes, you can verify your automation hub has been installed successfully by logging in with the admin credentials you inserted into the inventory file.
Procedure
-
Navigate to the IP address specified for the automation hub node in the
inventoryfile. -
Log in with the Admin credentials you set in the
inventoryfile.
If the installation fails and you are a customer who has purchased a valid license for Red Hat Ansible Automation Platform, please contact Ansible via the Red Hat Customer portal at https://access.redhat.com/.
Upon a successful login to automation hub, your installation of Red Hat Ansible Automation Platform 2.2 is now complete.
2.1.7.1. Additional automation hub configuration and resources
See the following resources to explore additional automation hub configurations.
| Link | Description |
|---|---|
| Configure user access for automation hub | |
| Managing Red Hat Certified and Ansible Galaxy collections in automation hub | Add content to your automation hub |
| Publishing proprietary content collections in automation hub | Publish internally developed collections on your automation hub |
2.1.8. What’s next with Ansible Automation Platform 2.2
Whether you are a new Ansible Automation Platform user looking to start automating, or an existing administrator looking to migrate old Ansible content to your latest installed version of Red Hat Ansible Automation Platform, explore the next steps to begin leveraging the new features of Ansible Automation Platform 2.2:
2.1.8.1. Migrating data to Ansible Automation Platform 2.2
For platform administrators looking to complete an upgrade to the Ansible Automation Platform 2.2, there may be additional steps needed to migrate data to a new instance:
2.1.8.1.1. Migrating from legacy virtual environments (venvs) to automation execution environments
Ansible Automation Platform 2.2 moves you away from custom Python virtual environments (venvs) in favor of automation execution environments - containerized images that packages the necessary components needed to run and scale your Ansible automation. This includes Ansible Core, Ansible Content Collections, Python dependencies, Red Hat Enterprise Linux UBI 8, and any additional package dependencies.
If you are looking to migrate your venvs to execution environments, you will (1) need to use the awx-manage command to list and export a list of venvs from your original instance, then (2) use ansible-builder to create execution environments. For more information, see the Upgrading to Automation Execution Environments guide and the Creating and Consuming Execution Environments.
2.1.8.1.2. Migrating to Ansible Engine 2.9 images using Ansible Builder
To migrate Ansible Engine 2.9 images for use with Ansible Automation Platform 2.2, the ansible-builder tool automates the process of rebuilding images (including its custom plugins and dependencies) for use with automation execution environments. For more information on using Ansible Builder to build execution environments, see the Creating and Consuming Execution Environments.
2.1.8.1.3. Migrating to Ansible Core 2.13
When upgrading to Ansible Core 2.13, you need to update your playbooks, plugins, or other parts of your Ansible infrastructure in order to be supported by the latest version of Ansible Core. For instructions on updating your Ansible content for Ansible Core 2.13 compatibility, see the Ansible-core 2.13 Porting Guide.
2.1.8.2. Scale up your automation using automation mesh
The automation mesh component of the Red Hat Ansible Automation Platform simplifies the process of distributing automation across multi-site deployments. For enterprises with multiple isolated IT environments, automation mesh provides a consistent and reliable way to deploy and scale up automation across your execution nodes using a peer-to-peer mesh communication network.
When upgrading from version 1.x to the latest version of the Ansible Automation Platform, you will need to migrate the data from your legacy isolated nodes into execution nodes necessary for automation mesh. You can implement automation mesh by planning out a network of hybrid and control nodes, then editing the inventory file found in the Ansible Automation Platform installer to assign mesh-related values to each of your execution nodes.
For instructions on how to migrate from isolated nodes to execution nodes, see the upgrade & migration guide.
For information about automation mesh and the various ways to design your automation mesh for your environment, see the Red Hat Ansible Automation Platform automation mesh guide.
2.2. Installing Red Hat Ansible Automation Platform with an external managed database
You can use these instructions to install Red Hat Ansible Automation Platform (both automation controller and automation hub) with an external managed database.
2.2.1. Prerequisites
- You chose and obtained a platform installer from the Red Hat Ansible Automation Platform Product Software.
- You are installing on a machine that meets base system requirements.
- You have updated all of the packages to the recent version of your RHEL nodes.
You may experience errors if you do not fully upgrade your RHEL nodes prior to your Ansible Automation Platform installation.
- You have created a Red Hat Registry Service Account, following the instructions in the Creating Registry Service Accounts guide.
- You must configure an NTP client on all nodes. For more information, see Configuring NTP server using Chrony.
2.2.2. Editing the Red Hat Ansible Automation Platform installer inventory file
You can use the Red Hat Ansible Automation Platform installer inventory file to specify your installation scenario.
Procedure
Navigate to the installer
[bundled installer]
$ cd ansible-automation-platform-setup-bundle-<latest-version>[online installer]
$ cd ansible-automation-platform-setup-<latest-version>
-
Open the
inventoryfile with a text editor. -
Edit
inventoryfile parameters to specify your installation scenario. Follow the example below.
2.2.3. Example Red Hat Ansible Automation Platform inventory file with an external managed database
This example describes how you can populate the inventory file to install Red Hat Ansible Automation Platform. This installation inventory file includes both automation controller and automation hub with an external managed database.
- You cannot install automation controller and automation hub on the same node.
-
Provide a reachable IP address for the
[automationhub]host to ensure users can sync content from Private Automation Hub from a different node. -
Enter your Red Hat Registry Service Account credentials in
registry_usernameandregistry_passwordto link to the Red Hat container registry.
[automationcontroller]
controller.acme.org

[automationhub]
automationhub.acme.org

[database]
database-01.acme.org

[all:vars]
admin_password='<password>'
pg_host='database-01.acme.org'
pg_port='5432'
pg_database='awx'
pg_username='awx'
pg_password='<password>'
pg_sslmode='prefer'  # set to 'verify-full' for client-side enforced SSL

registry_url='registry.redhat.io'
registry_username='<registry username>'
registry_password='<registry password>'

# Automation Hub Configuration
#
automationhub_admin_password='<password>'
automationhub_pg_host='database-01.acme.org'
automationhub_pg_port='5432'
automationhub_pg_database='automationhub'
automationhub_pg_username='automationhub'
automationhub_pg_password='<password>'
automationhub_pg_sslmode='prefer'

# The default install will deploy a TLS enabled Automation Hub.
# If for some reason this is not the behavior wanted one can
# disable TLS enabled deployment.
#
# automationhub_disable_https = False
# The default install will generate self-signed certificates for the Automation
# Hub service. If you are providing valid certificate via automationhub_ssl_cert
# and automationhub_ssl_key, one should toggle that value to True.
#
# automationhub_ssl_validate_certs = False
# SSL-related variables
# If set, this will install a custom CA certificate to the system trust store.
# custom_ca_cert=/path/to/ca.crt
# Certificate and key to install in nginx for the web UI and API
# web_server_ssl_cert=/path/to/tower.cert
# web_server_ssl_key=/path/to/tower.key
# Certificate and key to install in Automation Hub node
# automationhub_ssl_cert=/path/to/automationhub.cert
# automationhub_ssl_key=/path/to/automationhub.key
# Server-side SSL settings for PostgreSQL (when we are installing it).
# postgres_use_ssl=False
# postgres_ssl_cert=/path/to/pgsql.crt
# postgres_ssl_key=/path/to/pgsql.key
2.2.4. Setup script flags and extra variables
You can also pass flags and extra variables when running the setup script to install automation controller:
| Argument | Description |
|---|---|
|
| Show this help message and exit |
|
|
Path to Ansible inventory file (default: |
|
| Set additional Ansible variables as key=value or YAML/JSON |
|
| Perform a database backup in lieu of installing |
|
| Perform a database restore in lieu of installing |
|
| Generate and distribute a SECRET_KEY. When you run the setup.sh script using this argument, by default, a new secret key is generated and distributed for the automation controller but not for the automation services catalog.
To generate and distribute a new secret key for both the automation controller and the automation services catalog, specify the variable |
Use the -- separator to add any Ansible arguments you wish to apply. For example: ./setup.sh -i my_awesome_inventory.yml -e matburt_is_country_gold=True — -K.
When passing
-rto perform a database restore default restore path is used unless EXTRA_VARS are provided with a non-default path. See the example below that passed an EXTRA_VAR specifying the restore path:./setup.sh -e 'restore_backup_file=/path/to/nondefault/location' -rYou can force an online installation by passing
-e bundle_install=false:$ ./setup.sh -e bundle_install=false
| Variable | Description | Default |
|---|---|---|
|
| When installing automation controller make sure Ansible is also up to date |
|
|
| When installing Tower also create the Demo Org, project, credential, Job Template, etc. |
|
|
| When installing from a bundle where to put the bundled repos |
|
|
| Disable HTTPS traffic through nginx, this is useful if offloading HTTPS to a load balancer |
|
|
| Disable HSTS web-security policy mechanism |
|
|
| Port to configure nginx to listen to for HTTP |
|
|
| Port to configure nginx to listen to for HTTPS |
|
|
| A temp location to use when backing up |
|
|
| Specify an alternative backup file to restore from | None |
|
| The minimum RAM required to install Tower (should only be changed for test installation) |
|
|
| The minimum open file descriptions (should only be changed for test installations) | None |
|
|
Ignore preflight checks, useful when installing into a template or other non-system image (overrides |
|
|
|
When you run the |
|
Examples
- To upgrade core:
./setup.sh -e upgrade_ansible_with_tower=1- To disable https handling at nginx:
./setup.sh -e nginx_disable_https=true- To specify a non-default path when restoring from a backup file:
./setup.sh -e 'restore_backup_file=/path/to/nondefault/location' -r2.2.5. Running the Red Hat Ansible Automation Platform installer setup script
You can run the setup script once you finish updating the inventory file with required parameters for installing your Private Automation Hub.
Procedure
Run the
setup.shscript$ ./setup.sh
The installation will begin.
2.2.6. Verifying automation controller installation
Once the installation completes, you can verify your automation controller has been installed successfully by logging in with the admin credentials you inserted into the inventory file.
Procedure
-
Navigate to the IP address specified for the automation controller node in the
inventoryfile. -
Log in with the Admin credentials you set in the
inventoryfile.
The automation controller server is accessible from port 80 (https://<TOWER_SERVER_NAME>/) but will redirect to port 443 so 443 needs to be available also.
If the installation fails and you are a customer who has purchased a valid license for Red Hat Ansible Automation Platform, please contact Ansible via the Red Hat Customer portal at https://access.redhat.com/.
Upon a successful login to automation controller, your installation of Red Hat Ansible Automation Platform 2.2 is now complete.
2.2.6.1. Additional automation controller configuration and resources
See the following resources to explore additional automation controller configurations.
| Link | Description |
|---|---|
| Set up automation controller and run your first playbook | |
| Configure automation controller administration through customer scripts, management jobs, etc. | |
| Configuring proxy support for Red Hat Ansible Automation Platform | Set up automation controller with a proxy server |
| Managing usability analytics and data collection from automation controller | Manage what automation controller information you share with Red Hat |
| Review automation controller functionality in more detail |
2.2.7. Verifying automation hub installation
Once the installation completes, you can verify your automation hub has been installed successfully by logging in with the admin credentials you inserted into the inventory file.
Procedure
-
Navigate to the IP address specified for the automation hub node in the
inventoryfile. -
Log in with the Admin credentials you set in the
inventoryfile.
If the installation fails and you are a customer who has purchased a valid license for Red Hat Ansible Automation Platform, please contact Ansible via the Red Hat Customer portal at https://access.redhat.com/.
Upon a successful login to automation hub, your installation of Red Hat Ansible Automation Platform 2.2 is now complete.
2.2.7.1. Additional automation hub configuration and resources
See the following resources to explore additional automation hub configurations.
| Link | Description |
|---|---|
| Configure user access for automation hub | |
| Managing Red Hat Certified and Ansible Galaxy collections in automation hub | Add content to your automation hub |
| Publishing proprietary content collections in automation hub | Publish internally developed collections on your automation hub |
2.2.8. What’s next with Ansible Automation Platform 2.2
Whether you are a new Ansible Automation Platform user looking to start automating, or an existing administrator looking to migrate old Ansible content to your latest installed version of Red Hat Ansible Automation Platform, explore the next steps to begin leveraging the new features of Ansible Automation Platform 2.2:
2.2.8.1. Migrating data to Ansible Automation Platform 2.2
For platform administrators looking to complete an upgrade to the Ansible Automation Platform 2.2, there may be additional steps needed to migrate data to a new instance:
2.2.8.1.1. Migrating from legacy virtual environments (venvs) to automation execution environments
Ansible Automation Platform 2.2 moves you away from custom Python virtual environments (venvs) in favor of automation execution environments - containerized images that packages the necessary components needed to run and scale your Ansible automation. This includes Ansible Core, Ansible Content Collections, Python dependencies, Red Hat Enterprise Linux UBI 8, and any additional package dependencies.
If you are looking to migrate your venvs to execution environments, you will (1) need to use the awx-manage command to list and export a list of venvs from your original instance, then (2) use ansible-builder to create execution environments. For more information, see the Upgrading to Automation Execution Environments guide and the Creating and Consuming Execution Environments.
2.2.8.1.2. Migrating to Ansible Engine 2.9 images using Ansible Builder
To migrate Ansible Engine 2.9 images for use with Ansible Automation Platform 2.2, the ansible-builder tool automates the process of rebuilding images (including its custom plugins and dependencies) for use with automation execution environments. For more information on using Ansible Builder to build execution environments, see the Creating and Consuming Execution Environments.
2.2.8.1.3. Migrating to Ansible Core 2.13
When upgrading to Ansible Core 2.13, you need to update your playbooks, plugins, or other parts of your Ansible infrastructure in order to be supported by the latest version of Ansible Core. For instructions on updating your Ansible content for Ansible Core 2.13 compatibility, see the Ansible-core 2.13 Porting Guide.
2.2.8.2. Scale up your automation using automation mesh
The automation mesh component of the Red Hat Ansible Automation Platform simplifies the process of distributing automation across multi-site deployments. For enterprises with multiple isolated IT environments, automation mesh provides a consistent and reliable way to deploy and scale up automation across your execution nodes using a peer-to-peer mesh communication network.
When upgrading from version 1.x to the latest version of the Ansible Automation Platform, you will need to migrate the data from your legacy isolated nodes into execution nodes necessary for automation mesh. You can implement automation mesh by planning out a network of hybrid and control nodes, then editing the inventory file found in the Ansible Automation Platform installer to assign mesh-related values to each of your execution nodes.
For instructions on how to migrate from isolated nodes to execution nodes, see the upgrade & migration guide.
For information about automation mesh and the various ways to design your automation mesh for your environment, see the Red Hat Ansible Automation Platform automation mesh guide.
Chapter 3. Installing Red Hat Ansible Automation Platform components on a single machine
You can install Red Hat Ansible Automation Platform components on a single machine in one of the following supported scenarios.
3.1. Installing automation controller with a database on the same node
You can use these instructions to install a standalone instance of automation controller with a database on the same node, or a non-installer managed database. This scenario includes installation of automation controller, including the web frontend, REST API backend, and database on a single machine. It installs PostgreSQL, and configures the automation controller to use that as its database. This is considered the standard automation controller installation scenario.
3.1.1. Prerequisites
- You chose and obtained a platform installer from the Red Hat Ansible Automation Platform Product Software.
- You are installing on a machine that meets base system requirements.
- You have updated all of the packages to the recent version of your RHEL nodes.
You may experience errors if you do not fully upgrade your RHEL nodes prior to your Ansible Automation Platform installation.
- You have created a Red Hat Registry Service Account, following the instructions in the Creating Registry Service Accounts guide.
- You must configure an NTP client on all nodes. For more information, see Configuring NTP server using Chrony.
3.1.2. Editing the Red Hat Ansible Automation Platform installer inventory file
You can use the Red Hat Ansible Automation Platform installer inventory file to specify your installation scenario.
Procedure
Navigate to the installer
[bundled installer]
$ cd ansible-automation-platform-setup-bundle-<latest-version>[online installer]
$ cd ansible-automation-platform-setup-<latest-version>
-
Open the
inventoryfile with a text editor. -
Edit
inventoryfile parameters to specify your installation scenario. Follow the example below.
3.1.3. Example Red Hat Ansible Automation Platform single node inventory file
This example describes how you can populate the inventory file for a single node installation of automation controller.
-
Do not use special characters for
pg_password. It may cause the setup to fail. -
Enter your Red Hat Registry Service Account credentials in
registry_usernameandregistry_passwordto link to the Red Hat container registry.
[automationcontroller]
controller.example.com
[database]

[all:vars]
admin_password='<password>'

pg_host=''
pg_port=''

pg_database='awx'
pg_username='awx'
pg_password='<password>'

registry_url='registry.redhat.io'
registry_username='<registry username>'
registry_password='<registry password>'- 1
- This should be set as a FQDN/IP.
3.1.4. Setup script flags and extra variables
You can also pass flags and extra variables when running the setup script to install automation controller:
| Argument | Description |
|---|---|
|
| Show this help message and exit |
|
|
Path to Ansible inventory file (default: |
|
| Set additional Ansible variables as key=value or YAML/JSON |
|
| Perform a database backup in lieu of installing |
|
| Perform a database restore in lieu of installing |
|
| Generate and distribute a SECRET_KEY. When you run the setup.sh script using this argument, by default, a new secret key is generated and distributed for the automation controller but not for the automation services catalog.
To generate and distribute a new secret key for both the automation controller and the automation services catalog, specify the variable |
Use the -- separator to add any Ansible arguments you wish to apply. For example: ./setup.sh -i my_awesome_inventory.yml -e matburt_is_country_gold=True — -K.
When passing
-rto perform a database restore default restore path is used unless EXTRA_VARS are provided with a non-default path. See the example below that passed an EXTRA_VAR specifying the restore path:./setup.sh -e 'restore_backup_file=/path/to/nondefault/location' -rYou can force an online installation by passing
-e bundle_install=false:$ ./setup.sh -e bundle_install=false
| Variable | Description | Default |
|---|---|---|
|
| When installing automation controller make sure Ansible is also up to date |
|
|
| When installing Tower also create the Demo Org, project, credential, Job Template, etc. |
|
|
| When installing from a bundle where to put the bundled repos |
|
|
| Disable HTTPS traffic through nginx, this is useful if offloading HTTPS to a load balancer |
|
|
| Disable HSTS web-security policy mechanism |
|
|
| Port to configure nginx to listen to for HTTP |
|
|
| Port to configure nginx to listen to for HTTPS |
|
|
| A temp location to use when backing up |
|
|
| Specify an alternative backup file to restore from | None |
|
| The minimum RAM required to install Tower (should only be changed for test installation) |
|
|
| The minimum open file descriptions (should only be changed for test installations) | None |
|
|
Ignore preflight checks, useful when installing into a template or other non-system image (overrides |
|
|
|
When you run the |
|
Examples
- To upgrade core:
./setup.sh -e upgrade_ansible_with_tower=1- To disable https handling at nginx:
./setup.sh -e nginx_disable_https=true- To specify a non-default path when restoring from a backup file:
./setup.sh -e 'restore_backup_file=/path/to/nondefault/location' -r3.1.5. Running the Red Hat Ansible Automation Platform installer setup script
You can run the setup script once you finish updating the inventory file with required parameters for installing your Private Automation Hub.
Procedure
Run the
setup.shscript$ ./setup.sh
The installation will begin.
3.1.6. Verifying automation controller installation
Once the installation completes, you can verify your automation controller has been installed successfully by logging in with the admin credentials you inserted into the inventory file.
Procedure
-
Navigate to the IP address specified for the automation controller node in the
inventoryfile. -
Log in with the Admin credentials you set in the
inventoryfile.
The automation controller server is accessible from port 80 (https://<TOWER_SERVER_NAME>/) but will redirect to port 443 so 443 needs to be available also.
If the installation fails and you are a customer who has purchased a valid license for Red Hat Ansible Automation Platform, please contact Ansible via the Red Hat Customer portal at https://access.redhat.com/.
Upon a successful login to automation controller, your installation of Red Hat Ansible Automation Platform 2.2 is now complete.
3.1.6.1. Additional automation controller configuration and resources
See the following resources to explore additional automation controller configurations.
| Link | Description |
|---|---|
| Set up automation controller and run your first playbook | |
| Configure automation controller administration through customer scripts, management jobs, etc. | |
| Configuring proxy support for Red Hat Ansible Automation Platform | Set up automation controller with a proxy server |
| Managing usability analytics and data collection from automation controller | Manage what automation controller information you share with Red Hat |
| Review automation controller functionality in more detail |
3.1.7. What’s next with Ansible Automation Platform 2.2
Whether you are a new Ansible Automation Platform user looking to start automating, or an existing administrator looking to migrate old Ansible content to your latest installed version of Red Hat Ansible Automation Platform, explore the next steps to begin leveraging the new features of Ansible Automation Platform 2.2:
3.1.7.1. Migrating data to Ansible Automation Platform 2.2
For platform administrators looking to complete an upgrade to the Ansible Automation Platform 2.2, there may be additional steps needed to migrate data to a new instance:
3.1.7.1.1. Migrating from legacy virtual environments (venvs) to automation execution environments
Ansible Automation Platform 2.2 moves you away from custom Python virtual environments (venvs) in favor of automation execution environments - containerized images that packages the necessary components needed to run and scale your Ansible automation. This includes Ansible Core, Ansible Content Collections, Python dependencies, Red Hat Enterprise Linux UBI 8, and any additional package dependencies.
If you are looking to migrate your venvs to execution environments, you will (1) need to use the awx-manage command to list and export a list of venvs from your original instance, then (2) use ansible-builder to create execution environments. For more information, see the Upgrading to Automation Execution Environments guide and the Creating and Consuming Execution Environments.
3.1.7.1.2. Migrating to Ansible Engine 2.9 images using Ansible Builder
To migrate Ansible Engine 2.9 images for use with Ansible Automation Platform 2.2, the ansible-builder tool automates the process of rebuilding images (including its custom plugins and dependencies) for use with automation execution environments. For more information on using Ansible Builder to build execution environments, see the Creating and Consuming Execution Environments.
3.1.7.1.3. Migrating to Ansible Core 2.13
When upgrading to Ansible Core 2.13, you need to update your playbooks, plugins, or other parts of your Ansible infrastructure in order to be supported by the latest version of Ansible Core. For instructions on updating your Ansible content for Ansible Core 2.13 compatibility, see the Ansible-core 2.13 Porting Guide.
3.1.7.2. Scale up your automation using automation mesh
The automation mesh component of the Red Hat Ansible Automation Platform simplifies the process of distributing automation across multi-site deployments. For enterprises with multiple isolated IT environments, automation mesh provides a consistent and reliable way to deploy and scale up automation across your execution nodes using a peer-to-peer mesh communication network.
When upgrading from version 1.x to the latest version of the Ansible Automation Platform, you will need to migrate the data from your legacy isolated nodes into execution nodes necessary for automation mesh. You can implement automation mesh by planning out a network of hybrid and control nodes, then editing the inventory file found in the Ansible Automation Platform installer to assign mesh-related values to each of your execution nodes.
For instructions on how to migrate from isolated nodes to execution nodes, see the upgrade & migration guide.
For information about automation mesh and the various ways to design your automation mesh for your environment, see the Red Hat Ansible Automation Platform automation mesh guide.
3.2. Installing automation controller with an external managed database
You can use these instructions to install a standalone automation controller server on a single machine configured to communicate with a remote PostgreSQL instance as its database. This remote PostgreSQL can be a server you manage, or can be provided by a cloud service such as Amazon RDS.
3.2.1. Prerequisites
- You chose and obtained a platform installer from the Red Hat Ansible Automation Platform Product Software.
- You are installing on a machine that meets base system requirements.
- You have updated all of the packages to the recent version of your RHEL nodes.
You may experience errors if you do not fully upgrade your RHEL nodes prior to your Ansible Automation Platform installation.
- You have created a Red Hat Registry Service Account, following the instructions in the Creating Registry Service Accounts guide.
- You must configure an NTP client on all nodes. For more information, see Configuring NTP server using Chrony.
3.2.2. Editing the Red Hat Ansible Automation Platform installer inventory file
You can use the Red Hat Ansible Automation Platform installer inventory file to specify your installation scenario.
Procedure
Navigate to the installer
[bundled installer]
$ cd ansible-automation-platform-setup-bundle-<latest-version>[online installer]
$ cd ansible-automation-platform-setup-<latest-version>
-
Open the
inventoryfile with a text editor. -
Edit
inventoryfile parameters to specify your installation scenario. Follow the example below.
3.2.3. Example inventory file for a standalone automation controller with an external managed database
This example describes how you can populate the inventory file to deploy an installation of automation controller with an external database.
-
Do not use special characters for
pg_password. It may cause the setup to fail. -
Enter your Red Hat Registry Service Account credentials in
registry_usernameandregistry_passwordto link to the Red Hat container registry.
[automationcontroller]
controller.example.com
[database]
database.example.com

[all:vars]
admin_password='<password>'
pg_password='<password>'

pg_host='database.example.com'
pg_port='5432'

pg_database='awx'
pg_username='awx'

registry_url='registry.redhat.io'
registry_username='<registry username>'
registry_password='<registry password>'- 1
- This should be set as a FQDN/IP.
3.2.4. Setup script flags and extra variables
You can also pass flags and extra variables when running the setup script to install automation controller:
| Argument | Description |
|---|---|
|
| Show this help message and exit |
|
|
Path to Ansible inventory file (default: |
|
| Set additional Ansible variables as key=value or YAML/JSON |
|
| Perform a database backup in lieu of installing |
|
| Perform a database restore in lieu of installing |
|
| Generate and distribute a SECRET_KEY. When you run the setup.sh script using this argument, by default, a new secret key is generated and distributed for the automation controller but not for the automation services catalog.
To generate and distribute a new secret key for both the automation controller and the automation services catalog, specify the variable |
Use the -- separator to add any Ansible arguments you wish to apply. For example: ./setup.sh -i my_awesome_inventory.yml -e matburt_is_country_gold=True — -K.
When passing
-rto perform a database restore default restore path is used unless EXTRA_VARS are provided with a non-default path. See the example below that passed an EXTRA_VAR specifying the restore path:./setup.sh -e 'restore_backup_file=/path/to/nondefault/location' -rYou can force an online installation by passing
-e bundle_install=false:$ ./setup.sh -e bundle_install=false
| Variable | Description | Default |
|---|---|---|
|
| When installing automation controller make sure Ansible is also up to date |
|
|
| When installing Tower also create the Demo Org, project, credential, Job Template, etc. |
|
|
| When installing from a bundle where to put the bundled repos |
|
|
| Disable HTTPS traffic through nginx, this is useful if offloading HTTPS to a load balancer |
|
|
| Disable HSTS web-security policy mechanism |
|
|
| Port to configure nginx to listen to for HTTP |
|
|
| Port to configure nginx to listen to for HTTPS |
|
|
| A temp location to use when backing up |
|
|
| Specify an alternative backup file to restore from | None |
|
| The minimum RAM required to install Tower (should only be changed for test installation) |
|
|
| The minimum open file descriptions (should only be changed for test installations) | None |
|
|
Ignore preflight checks, useful when installing into a template or other non-system image (overrides |
|
|
|
When you run the |
|
Examples
- To upgrade core:
./setup.sh -e upgrade_ansible_with_tower=1- To disable https handling at nginx:
./setup.sh -e nginx_disable_https=true- To specify a non-default path when restoring from a backup file:
./setup.sh -e 'restore_backup_file=/path/to/nondefault/location' -r3.2.5. Running the Red Hat Ansible Automation Platform installer setup script
You can run the setup script once you finish updating the inventory file with required parameters for installing your Private Automation Hub.
Procedure
Run the
setup.shscript$ ./setup.sh
The installation will begin.
3.2.6. Verifying automation controller installation
Once the installation completes, you can verify your automation controller has been installed successfully by logging in with the admin credentials you inserted into the inventory file.
Procedure
-
Navigate to the IP address specified for the automation controller node in the
inventoryfile. -
Log in with the Admin credentials you set in the
inventoryfile.
The automation controller server is accessible from port 80 (https://<TOWER_SERVER_NAME>/) but will redirect to port 443 so 443 needs to be available also.
If the installation fails and you are a customer who has purchased a valid license for Red Hat Ansible Automation Platform, please contact Ansible via the Red Hat Customer portal at https://access.redhat.com/.
Upon a successful login to automation controller, your installation of Red Hat Ansible Automation Platform 2.2 is now complete.
3.2.6.1. Additional automation controller configuration and resources
See the following resources to explore additional automation controller configurations.
| Link | Description |
|---|---|
| Set up automation controller and run your first playbook | |
| Configure automation controller administration through customer scripts, management jobs, etc. | |
| Configuring proxy support for Red Hat Ansible Automation Platform | Set up automation controller with a proxy server |
| Managing usability analytics and data collection from automation controller | Manage what automation controller information you share with Red Hat |
| Review automation controller functionality in more detail |
3.2.7. What’s next with Ansible Automation Platform 2.2
Whether you are a new Ansible Automation Platform user looking to start automating, or an existing administrator looking to migrate old Ansible content to your latest installed version of Red Hat Ansible Automation Platform, explore the next steps to begin leveraging the new features of Ansible Automation Platform 2.2:
3.2.7.1. Migrating data to Ansible Automation Platform 2.2
For platform administrators looking to complete an upgrade to the Ansible Automation Platform 2.2, there may be additional steps needed to migrate data to a new instance:
3.2.7.1.1. Migrating from legacy virtual environments (venvs) to automation execution environments
Ansible Automation Platform 2.2 moves you away from custom Python virtual environments (venvs) in favor of automation execution environments - containerized images that packages the necessary components needed to run and scale your Ansible automation. This includes Ansible Core, Ansible Content Collections, Python dependencies, Red Hat Enterprise Linux UBI 8, and any additional package dependencies.
If you are looking to migrate your venvs to execution environments, you will (1) need to use the awx-manage command to list and export a list of venvs from your original instance, then (2) use ansible-builder to create execution environments. For more information, see the Upgrading to Automation Execution Environments guide and the Creating and Consuming Execution Environments.
3.2.7.1.2. Migrating to Ansible Engine 2.9 images using Ansible Builder
To migrate Ansible Engine 2.9 images for use with Ansible Automation Platform 2.2, the ansible-builder tool automates the process of rebuilding images (including its custom plugins and dependencies) for use with automation execution environments. For more information on using Ansible Builder to build execution environments, see the Creating and Consuming Execution Environments.
3.2.7.1.3. Migrating to Ansible Core 2.13
When upgrading to Ansible Core 2.13, you need to update your playbooks, plugins, or other parts of your Ansible infrastructure in order to be supported by the latest version of Ansible Core. For instructions on updating your Ansible content for Ansible Core 2.13 compatibility, see the Ansible-core 2.13 Porting Guide.
3.2.7.2. Scale up your automation using automation mesh
The automation mesh component of the Red Hat Ansible Automation Platform simplifies the process of distributing automation across multi-site deployments. For enterprises with multiple isolated IT environments, automation mesh provides a consistent and reliable way to deploy and scale up automation across your execution nodes using a peer-to-peer mesh communication network.
When upgrading from version 1.x to the latest version of the Ansible Automation Platform, you will need to migrate the data from your legacy isolated nodes into execution nodes necessary for automation mesh. You can implement automation mesh by planning out a network of hybrid and control nodes, then editing the inventory file found in the Ansible Automation Platform installer to assign mesh-related values to each of your execution nodes.
For instructions on how to migrate from isolated nodes to execution nodes, see the upgrade & migration guide.
For information about automation mesh and the various ways to design your automation mesh for your environment, see the Red Hat Ansible Automation Platform automation mesh guide.
3.3. Installing automation hub with a database on the same node
You can use these instructions to install a standalone instance of automation hub with a database on the same node, or a non-installer managed database.
3.3.1. Prerequisites
- You chose and obtained a platform installer from the Red Hat Ansible Automation Platform Product Software.
- You are installing on a machine that meets base system requirements.
- You have updated all of the packages to the recent version of your RHEL nodes.
You may experience errors if you do not fully upgrade your RHEL nodes prior to your Ansible Automation Platform installation.
- You have created a Red Hat Registry Service Account, following the instructions in the Creating Registry Service Accounts guide.
- You must configure an NTP client on all nodes. For more information, see Configuring NTP server using Chrony.
3.3.2. Editing the Red Hat Ansible Automation Platform installer inventory file
You can use the Red Hat Ansible Automation Platform installer inventory file to specify your installation scenario.
Procedure
Navigate to the installer
[bundled installer]
$ cd ansible-automation-platform-setup-bundle-<latest-version>[online installer]
$ cd ansible-automation-platform-setup-<latest-version>
-
Open the
inventoryfile with a text editor. -
Edit
inventoryfile parameters to specify your installation scenario. Follow the example below.
3.3.3. Example standalone automation hub inventory file
This example describes how you can populate the inventory file to deploy a standalone instance of automation hub.
-
For Red Hat Ansible Automation Platform or automation hub: Add an automation hub host in the
[automationhub]group. You cannot install automation controller and automation hub on the same node. -
Provide a reachable IP address or fully qualified domain name (FQDN) for the
[automationhub]host to ensure users can sync and install content from automation hub from a different node. Do not use 'localhost'. -
Enter your Red Hat Registry Service Account credentials in
registry_usernameandregistry_passwordto link to the Red Hat container registry.
[automationcontroller]


[automationhub]
<FQDN> ansible_connection=local

[all:vars]
registry_url='registry.redhat.io'
registry_username='<registry username>'
registry_password='<registry password>'

automationhub_admin_password= <PASSWORD>

automationhub_pg_host=''
automationhub_pg_port=''

automationhub_pg_database='automationhub'
automationhub_pg_username='automationhub'
automationhub_pg_password=<PASSWORD>
automationhub_pg_sslmode='prefer'

# The default install will deploy a TLS enabled Automation Hub.
# If for some reason this is not the behavior wanted one can
# disable TLS enabled deployment.
#
# automationhub_disable_https = False
# The default install will generate self-signed certificates for the Automation
# Hub service. If you are providing valid certificate via automationhub_ssl_cert
# and automationhub_ssl_key, one should toggle that value to True.
#
# automationhub_ssl_validate_certs = False
# SSL-related variables
# If set, this will install a custom CA certificate to the system trust store.
# custom_ca_cert=/path/to/ca.crt
# Certificate and key to install in Automation Hub node
# automationhub_ssl_cert=/path/to/automationhub.cert
# automationhub_ssl_key=/path/to/automationhub.key
3.3.4. Setup script flags and extra variables
You can also pass flags and extra variables when running the setup script to install automation controller:
| Argument | Description |
|---|---|
|
| Show this help message and exit |
|
|
Path to Ansible inventory file (default: |
|
| Set additional Ansible variables as key=value or YAML/JSON |
|
| Perform a database backup in lieu of installing |
|
| Perform a database restore in lieu of installing |
|
| Generate and distribute a SECRET_KEY. When you run the setup.sh script using this argument, by default, a new secret key is generated and distributed for the automation controller but not for the automation services catalog.
To generate and distribute a new secret key for both the automation controller and the automation services catalog, specify the variable |
Use the -- separator to add any Ansible arguments you wish to apply. For example: ./setup.sh -i my_awesome_inventory.yml -e matburt_is_country_gold=True — -K.
When passing
-rto perform a database restore default restore path is used unless EXTRA_VARS are provided with a non-default path. See the example below that passed an EXTRA_VAR specifying the restore path:./setup.sh -e 'restore_backup_file=/path/to/nondefault/location' -rYou can force an online installation by passing
-e bundle_install=false:$ ./setup.sh -e bundle_install=false
| Variable | Description | Default |
|---|---|---|
|
| When installing automation controller make sure Ansible is also up to date |
|
|
| When installing Tower also create the Demo Org, project, credential, Job Template, etc. |
|
|
| When installing from a bundle where to put the bundled repos |
|
|
| Disable HTTPS traffic through nginx, this is useful if offloading HTTPS to a load balancer |
|
|
| Disable HSTS web-security policy mechanism |
|
|
| Port to configure nginx to listen to for HTTP |
|
|
| Port to configure nginx to listen to for HTTPS |
|
|
| A temp location to use when backing up |
|
|
| Specify an alternative backup file to restore from | None |
|
| The minimum RAM required to install Tower (should only be changed for test installation) |
|
|
| The minimum open file descriptions (should only be changed for test installations) | None |
|
|
Ignore preflight checks, useful when installing into a template or other non-system image (overrides |
|
|
|
When you run the |
|
Examples
- To upgrade core:
./setup.sh -e upgrade_ansible_with_tower=1- To disable https handling at nginx:
./setup.sh -e nginx_disable_https=true- To specify a non-default path when restoring from a backup file:
./setup.sh -e 'restore_backup_file=/path/to/nondefault/location' -r3.3.5. Running the Red Hat Ansible Automation Platform installer setup script
You can run the setup script once you finish updating the inventory file with required parameters for installing your Private Automation Hub.
Procedure
Run the
setup.shscript$ ./setup.sh
The installation will begin.
3.3.6. Verifying automation hub installation
Once the installation completes, you can verify your automation hub has been installed successfully by logging in with the admin credentials you inserted into the inventory file.
Procedure
-
Navigate to the IP address specified for the automation hub node in the
inventoryfile. -
Log in with the Admin credentials you set in the
inventoryfile.
If the installation fails and you are a customer who has purchased a valid license for Red Hat Ansible Automation Platform, please contact Ansible via the Red Hat Customer portal at https://access.redhat.com/.
Upon a successful login to automation hub, your installation of Red Hat Ansible Automation Platform 2.2 is now complete.
3.3.6.1. Additional automation hub configuration and resources
See the following resources to explore additional automation hub configurations.
| Link | Description |
|---|---|
| Configure user access for automation hub | |
| Managing Red Hat Certified and Ansible Galaxy collections in automation hub | Add content to your automation hub |
| Publishing proprietary content collections in automation hub | Publish internally developed collections on your automation hub |
3.3.7. What’s next with Ansible Automation Platform 2.2
Whether you are a new Ansible Automation Platform user looking to start automating, or an existing administrator looking to migrate old Ansible content to your latest installed version of Red Hat Ansible Automation Platform, explore the next steps to begin leveraging the new features of Ansible Automation Platform 2.2:
3.3.7.1. Migrating data to Ansible Automation Platform 2.2
For platform administrators looking to complete an upgrade to the Ansible Automation Platform 2.2, there may be additional steps needed to migrate data to a new instance:
3.3.7.1.1. Migrating from legacy virtual environments (venvs) to automation execution environments
Ansible Automation Platform 2.2 moves you away from custom Python virtual environments (venvs) in favor of automation execution environments - containerized images that packages the necessary components needed to run and scale your Ansible automation. This includes Ansible Core, Ansible Content Collections, Python dependencies, Red Hat Enterprise Linux UBI 8, and any additional package dependencies.
If you are looking to migrate your venvs to execution environments, you will (1) need to use the awx-manage command to list and export a list of venvs from your original instance, then (2) use ansible-builder to create execution environments. For more information, see the Upgrading to Automation Execution Environments guide and the Creating and Consuming Execution Environments.
3.3.7.1.2. Migrating to Ansible Engine 2.9 images using Ansible Builder
To migrate Ansible Engine 2.9 images for use with Ansible Automation Platform 2.2, the ansible-builder tool automates the process of rebuilding images (including its custom plugins and dependencies) for use with automation execution environments. For more information on using Ansible Builder to build execution environments, see the Creating and Consuming Execution Environments.
3.3.7.1.3. Migrating to Ansible Core 2.13
When upgrading to Ansible Core 2.13, you need to update your playbooks, plugins, or other parts of your Ansible infrastructure in order to be supported by the latest version of Ansible Core. For instructions on updating your Ansible content for Ansible Core 2.13 compatibility, see the Ansible-core 2.13 Porting Guide.
3.3.7.2. Scale up your automation using automation mesh
The automation mesh component of the Red Hat Ansible Automation Platform simplifies the process of distributing automation across multi-site deployments. For enterprises with multiple isolated IT environments, automation mesh provides a consistent and reliable way to deploy and scale up automation across your execution nodes using a peer-to-peer mesh communication network.
When upgrading from version 1.x to the latest version of the Ansible Automation Platform, you will need to migrate the data from your legacy isolated nodes into execution nodes necessary for automation mesh. You can implement automation mesh by planning out a network of hybrid and control nodes, then editing the inventory file found in the Ansible Automation Platform installer to assign mesh-related values to each of your execution nodes.
For instructions on how to migrate from isolated nodes to execution nodes, see the upgrade & migration guide.
For information about automation mesh and the various ways to design your automation mesh for your environment, see the Red Hat Ansible Automation Platform automation mesh guide.
3.4. Installing automation hub with an external database
You can use these instructions to install a standalone instance of automation hub with an external managed database. This installs the automation hub server on a single machine and installs a remote PostgreSQL database using the Ansible Automation Platform installer.
3.4.1. Prerequisites
- You chose and obtained a platform installer from the Red Hat Ansible Automation Platform Product Software.
- You are installing on a machine that meets base system requirements.
- You have updated all of the packages to the recent version of your RHEL nodes.
You may experience errors if you do not fully upgrade your RHEL nodes prior to your Ansible Automation Platform installation.
- You have created a Red Hat Registry Service Account, following the instructions in the Creating Registry Service Accounts guide.
- You must configure an NTP client on all nodes. For more information, see Configuring NTP server using Chrony.
3.4.2. Editing the Red Hat Ansible Automation Platform installer inventory file
You can use the Red Hat Ansible Automation Platform installer inventory file to specify your installation scenario.
Procedure
Navigate to the installer
[bundled installer]
$ cd ansible-automation-platform-setup-bundle-<latest-version>[online installer]
$ cd ansible-automation-platform-setup-<latest-version>
-
Open the
inventoryfile with a text editor. -
Edit
inventoryfile parameters to specify your installation scenario. Follow the example below.
3.4.3. Example standalone automation hub inventory file
This example describes how you can populate the inventory file to deploy a standalone instance of automation hub.
-
For Red Hat Ansible Automation Platform or automation hub: Add an automation hub host in the
[automationhub]group. You cannot install automation controller and automation hub on the same node. -
Provide a reachable IP address or fully qualified domain name (FQDN) for the
[automationhub]host to ensure users can sync and install content from automation hub from a different node. Do not use 'localhost'. -
Enter your Red Hat Registry Service Account credentials in
registry_usernameandregistry_passwordto link to the Red Hat container registry.
[automationcontroller]


[automationhub]
<FQDN> ansible_connection=local

[database]
host2

[all:vars]
registry_url='registry.redhat.io'
registry_username='<registry username>'
registry_password='<registry password>'

automationhub_admin_password= <PASSWORD>

automationhub_pg_host=''
automationhub_pg_port=''

automationhub_pg_database='automationhub'
automationhub_pg_username='automationhub'
automationhub_pg_password=<PASSWORD>
automationhub_pg_sslmode='prefer'

# The default install will deploy a TLS enabled Automation Hub.
# If for some reason this is not the behavior wanted one can
# disable TLS enabled deployment.
#
# automationhub_disable_https = False
# The default install will generate self-signed certificates for the Automation
# Hub service. If you are providing valid certificate via automationhub_ssl_cert
# and automationhub_ssl_key, one should toggle that value to True.
#
# automationhub_ssl_validate_certs = False
# SSL-related variables
# If set, this will install a custom CA certificate to the system trust store.
# custom_ca_cert=/path/to/ca.crt
# Certificate and key to install in Automation Hub node
# automationhub_ssl_cert=/path/to/automationhub.cert
# automationhub_ssl_key=/path/to/automationhub.key
3.4.4. LDAP configuration on private automation hub
You must set the following six variables in your Red Hat Ansible Automation Platform installer inventory file to configure your private automation hub for LDAP authentication:
-
automationhub_authentication_backend -
automationhub_ldap_server_uri -
automationhub_ldap_bind_dn -
automationhub_ldap_bind_password -
automationhub_ldap_user_search_base_dn -
automationhub_ldap_group_search_base_dn
If any of these variables are missing, the Ansible Automation installer will not complete the installation.
3.4.4.1. Setting up your inventory file variables
When you configure your private automation hub with LDAP authentication, you must set the proper variables in your inventory files during the installation process.
Prerequisites
- Ensure that your system is running Red Hat Ansible Automation Platform 2.2.1 or later.
- Ensure that you are using private automation hub 4.5.2 or later.
Procedure
- Access your inventory file according to the procedure in Editing the Red Hat Ansible Automation Platform installer inventory file.
Use the following example as a guide to set up your Ansible Automation Platform inventory file:
automationhub_authentication_backend = "ldap" automationhub_ldap_server_uri = "ldap://ldap:389" (for LDAPs use automationhub_ldap_server_uri = "ldaps://ldap-server-fqdn") automationhub_ldap_bind_dn = "cn=admin,dc=ansible,dc=com" automationhub_ldap_bind_password = "GoodNewsEveryone" automationhub_ldap_user_search_base_dn = "ou=people,dc=ansible,dc=com" automationhub_ldap_group_search_base_dn = "ou=people,dc=ansible,dc=com"NoteThe following variables will be set with default values, unless you set them with other options.
auth_ldap_user_search_scope= `SUBTREE' auth_ldap_user_search_filter= `(uid=%(user)s)` auth_ldap_group_search_scope= 'SUBTREE' auth_ldap_group_search_filter= '(objectClass=Group)` auth_ldap_group_type_class= 'django_auth_ldap.config:GroupOfNamesType'- If you plan to set up extra parameters in your private automation hub (such as user groups, superuser access, mirroring, or others), proceed to the next section.
3.4.4.2. Configuring extra LDAP parameters
If you plan to set up superuser access, user groups, mirroring or other extra parameters, you can create a YAML file that comprises them in your ldap_extra_settings dictionary.
Procedure
Create a YAML file that will contain
ldap_extra_settings, such as the following:#ldapextras.yml --- ldap_extra_settings: AUTH_LDAP_USER_ATTR_MAP: '{"first_name": "givenName", "last_name": "sn", "email": "mail"}' ...Then run
setup.sh -e @ldapextras.ymlduring private automation hub installation.Use this example to set up a superuser flag based on membership in an LDAP group.
#ldapextras.yml
---
ldap_extra_settings:
  AUTH_LDAP_USER_FLAGS_BY_GROUP: {"is_superuser": "cn=pah-admins,ou=groups,dc=example,dc=com",}
...
Then run
setup.sh -e @ldapextras.ymlduring private automation hub installation.Use this example to set up superuser access.
#ldapextras.yml
---
ldap_extra_settings:
  AUTH_LDAP_USER_FLAGS_BY_GROUP: {"is_superuser": "cn=pah-admins,ou=groups,dc=example,dc=com",}
...
Then run
setup.sh -e @ldapextras.ymlduring private automation hub installation.Use this example to mirror all LDAP groups you belong to.
#ldapextras.yml
---
ldap_extra_settings:
  AUTH_LDAP_MIRROR_GROUPS: True
...
Then run
setup.sh -e @ldapextras.ymlduring private automation hub installation.Use this example to map LDAP user attributes (such as first name, last name, and email address of the user).
#ldapextras.yml
---
ldap_extra_settings:
  AUTH_LDAP_USER_ATTR_MAP: {"first_name": "givenName", "last_name": "sn", "email": "mail",}
...
Then run
setup.sh -e @ldapextras.ymlduring private automation hub installation.Use the following examples to grant or deny access based on LDAP group membership.
To grant private automation hub access (for example, members of the
cn=pah-nosoupforyou,ou=groups,dc=example,dc=comgroup):#ldapextras.yml --- ldap_extra_settings: AUTH_LDAP_REQUIRE_GROUP: "cn=pah-users,ou=groups,dc=example,dc=com' ...To deny private automation hub access (for example, members of the
cn=pah-nosoupforyou,ou=groups,dc=example,dc=comgroup):#ldapextras.yml --- ldap_extra_settings: AUTH_LDAP_DENY_GROUP: 'cn=pah-nosoupforyou,ou=groups,dc=example,dc=com' ...Then run
setup.sh -e @ldapextras.ymlduring private automation hub installation.
Use this example to enable LDAP debug logging.
#ldapextras.yml
---
ldap_extra_settings:
  GALAXY_LDAP_LOGGING: True
...
Then run
setup.sh -e @ldapextras.ymlduring private automation hub installation.NoteIf it is not practical to re-run
setup.shor if debug logging is enabled for a short time, you can add a line containingGALAXY_LDAP_LOGGING: Truemanually to the/etc/pulp/settings.pyfile on private automation hub. Restart bothpulpcore-api.serviceandnginx.servicefor the changes to take effect. To avoid failures due to human error, use this method only when necessary.Use this example to configure LDAP caching by setting the variable
AUTH_LDAP_CACHE_TIMEOUT.#ldapextras.yml --- ldap_extra_settings: AUTH_LDAP_CACHE_TIMEOUT: 3600 ...Then run
setup.sh -e @ldapextras.ymlduring private automation hub installation.
You can view all of your settings in the /etc/pulp/settings.py file on your private automation hub.
3.4.5. Setup script flags and extra variables
You can also pass flags and extra variables when running the setup script to install automation controller:
| Argument | Description |
|---|---|
|
| Show this help message and exit |
|
|
Path to Ansible inventory file (default: |
|
| Set additional Ansible variables as key=value or YAML/JSON |
|
| Perform a database backup in lieu of installing |
|
| Perform a database restore in lieu of installing |
|
| Generate and distribute a SECRET_KEY. When you run the setup.sh script using this argument, by default, a new secret key is generated and distributed for the automation controller but not for the automation services catalog.
To generate and distribute a new secret key for both the automation controller and the automation services catalog, specify the variable |
Use the -- separator to add any Ansible arguments you wish to apply. For example: ./setup.sh -i my_awesome_inventory.yml -e matburt_is_country_gold=True — -K.
When passing
-rto perform a database restore default restore path is used unless EXTRA_VARS are provided with a non-default path. See the example below that passed an EXTRA_VAR specifying the restore path:./setup.sh -e 'restore_backup_file=/path/to/nondefault/location' -rYou can force an online installation by passing
-e bundle_install=false:$ ./setup.sh -e bundle_install=false
| Variable | Description | Default |
|---|---|---|
|
| When installing automation controller make sure Ansible is also up to date |
|
|
| When installing Tower also create the Demo Org, project, credential, Job Template, etc. |
|
|
| When installing from a bundle where to put the bundled repos |
|
|
| Disable HTTPS traffic through nginx, this is useful if offloading HTTPS to a load balancer |
|
|
| Disable HSTS web-security policy mechanism |
|
|
| Port to configure nginx to listen to for HTTP |
|
|
| Port to configure nginx to listen to for HTTPS |
|
|
| A temp location to use when backing up |
|
|
| Specify an alternative backup file to restore from | None |
|
| The minimum RAM required to install Tower (should only be changed for test installation) |
|
|
| The minimum open file descriptions (should only be changed for test installations) | None |
|
|
Ignore preflight checks, useful when installing into a template or other non-system image (overrides |
|
|
|
When you run the |
|
Examples
- To upgrade core:
./setup.sh -e upgrade_ansible_with_tower=1- To disable https handling at nginx:
./setup.sh -e nginx_disable_https=true- To specify a non-default path when restoring from a backup file:
./setup.sh -e 'restore_backup_file=/path/to/nondefault/location' -r3.4.6. Running the Red Hat Ansible Automation Platform installer setup script
You can run the setup script once you finish updating the inventory file with required parameters for installing your Private Automation Hub.
Procedure
Run the
setup.shscript$ ./setup.sh
The installation will begin.
3.4.7. Verifying automation controller installation
Once the installation completes, you can verify your automation controller has been installed successfully by logging in with the admin credentials you inserted into the inventory file.
Procedure
-
Navigate to the IP address specified for the automation controller node in the
inventoryfile. -
Log in with the Admin credentials you set in the
inventoryfile.
The automation controller server is accessible from port 80 (https://<TOWER_SERVER_NAME>/) but will redirect to port 443 so 443 needs to be available also.
If the installation fails and you are a customer who has purchased a valid license for Red Hat Ansible Automation Platform, please contact Ansible via the Red Hat Customer portal at https://access.redhat.com/.
Upon a successful login to automation controller, your installation of Red Hat Ansible Automation Platform 2.2 is now complete.
3.4.7.1. Additional automation hub configuration and resources
See the following resources to explore additional automation hub configurations.
| Link | Description |
|---|---|
| Configure user access for automation hub | |
| Managing Red Hat Certified and Ansible Galaxy collections in automation hub | Add content to your automation hub |
| Publishing proprietary content collections in automation hub | Publish internally developed collections on your automation hub |
3.4.8. What’s next with Ansible Automation Platform 2.2
Whether you are a new Ansible Automation Platform user looking to start automating, or an existing administrator looking to migrate old Ansible content to your latest installed version of Red Hat Ansible Automation Platform, explore the next steps to begin leveraging the new features of Ansible Automation Platform 2.2:
3.4.8.1. Migrating data to Ansible Automation Platform 2.2
For platform administrators looking to complete an upgrade to the Ansible Automation Platform 2.2, there may be additional steps needed to migrate data to a new instance:
3.4.8.1.1. Migrating from legacy virtual environments (venvs) to automation execution environments
Ansible Automation Platform 2.2 moves you away from custom Python virtual environments (venvs) in favor of automation execution environments - containerized images that packages the necessary components needed to run and scale your Ansible automation. This includes Ansible Core, Ansible Content Collections, Python dependencies, Red Hat Enterprise Linux UBI 8, and any additional package dependencies.
If you are looking to migrate your venvs to execution environments, you will (1) need to use the awx-manage command to list and export a list of venvs from your original instance, then (2) use ansible-builder to create execution environments. For more information, see the Upgrading to Automation Execution Environments guide and the Creating and Consuming Execution Environments.
3.4.8.1.2. Migrating to Ansible Engine 2.9 images using Ansible Builder
To migrate Ansible Engine 2.9 images for use with Ansible Automation Platform 2.2, the ansible-builder tool automates the process of rebuilding images (including its custom plugins and dependencies) for use with automation execution environments. For more information on using Ansible Builder to build execution environments, see the Creating and Consuming Execution Environments.
3.4.8.1.3. Migrating to Ansible Core 2.13
When upgrading to Ansible Core 2.13, you need to update your playbooks, plugins, or other parts of your Ansible infrastructure in order to be supported by the latest version of Ansible Core. For instructions on updating your Ansible content for Ansible Core 2.13 compatibility, see the Ansible-core 2.13 Porting Guide.
3.4.8.2. Scale up your automation using automation mesh
The automation mesh component of the Red Hat Ansible Automation Platform simplifies the process of distributing automation across multi-site deployments. For enterprises with multiple isolated IT environments, automation mesh provides a consistent and reliable way to deploy and scale up automation across your execution nodes using a peer-to-peer mesh communication network.
When upgrading from version 1.x to the latest version of the Ansible Automation Platform, you will need to migrate the data from your legacy isolated nodes into execution nodes necessary for automation mesh. You can implement automation mesh by planning out a network of hybrid and control nodes, then editing the inventory file found in the Ansible Automation Platform installer to assign mesh-related values to each of your execution nodes.
For instructions on how to migrate from isolated nodes to execution nodes, see the upgrade & migration guide.
For information about automation mesh and the various ways to design your automation mesh for your environment, see the Red Hat Ansible Automation Platform automation mesh guide.
Chapter 4. Multi-machine cluster installation
You can install Ansible Automation Platform as clustered automation controller with automation hub with an external managed database. In this mode, multiple automation controller nodes are installed and active. Any node can receive HTTP requests and all nodes can execute jobs. This installs the Ansible Automation Platform server in a cluster and configures it to talk to a remote instance of PostgreSQL as its database. This remote PostgreSQL can be a server you manage, or can be provided by a cloud service such as Amazon RDS.
The Ansible Automation Platform installer allows you to deploy only one automation hub per inventory. You can use the Ansible Automation Platform installer for a standalone instance of automation hub and run the installer any number of times with any number of different inventories to deploy multiple automation hub nodes.
4.1. Installing a multi-node Red Hat Ansible Automation Platform with an external managed database
You can use these instructions to install Red Hat Ansible Automation Platform as multiple automation controller nodes and automation hub with an external managed database.
4.1.1. Prerequisites
- You chose and obtained a platform installer from the Red Hat Ansible Automation Platform Product Software.
- You are installing on a machine that meets base system requirements.
- You have updated all of the packages to the recent version of your RHEL nodes.
You may experience errors if you do not fully upgrade your RHEL nodes prior to your Ansible Automation Platform installation.
- You have created a Red Hat Registry Service Account, following the instructions in the Creating Registry Service Accounts guide.
- You must configure an NTP client on all nodes. For more information, see Configuring NTP server using Chrony.
4.1.2. Editing the Red Hat Ansible Automation Platform installer inventory file
You can use the Red Hat Ansible Automation Platform installer inventory file to specify your installation scenario.
Procedure
Navigate to the installer
[bundled installer]
$ cd ansible-automation-platform-setup-bundle-<latest-version>[online installer]
$ cd ansible-automation-platform-setup-<latest-version>
-
Open the
inventoryfile with a text editor. -
Edit
inventoryfile parameters to specify your installation scenario. Follow the example below.
4.1.3. Example Red Hat Ansible Automation Platform multi-node inventory file
This example describes how you can populate the inventory file for a multi-node cluster installation of automation controller.
- You cannot install automation controller and automation hub on the same node.
-
Provide a reachable IP address for the
[automationhub]host to ensure users can sync content from Private Automation Hub from a different node. -
Do not use special characters for
pg_password. It may cause the setup to fail. -
Enter your Red Hat Registry Service Account credentials in
registry_usernameandregistry_passwordto link to the Red Hat container registry.
[automationcontroller]
host1
host11
host12


[automationhub]
host2

[database]
[all:vars]
ansible_become=true

admin_password='<password>'

pg_host='dbnode.example.com'
pg_port='5432'

pg_database='tower'
pg_username='tower'
pg_password='<password>'

registry_url='registry.redhat.io'
registry_username='<registry username>'
registry_password='<registry password>'- 1
- Field should be empty.
4.1.4. Setup script flags and extra variables
You can also pass flags and extra variables when running the setup script to install automation controller:
| Argument | Description |
|---|---|
|
| Show this help message and exit |
|
|
Path to Ansible inventory file (default: |
|
| Set additional Ansible variables as key=value or YAML/JSON |
|
| Perform a database backup in lieu of installing |
|
| Perform a database restore in lieu of installing |
|
| Generate and distribute a SECRET_KEY. When you run the setup.sh script using this argument, by default, a new secret key is generated and distributed for the automation controller but not for the automation services catalog.
To generate and distribute a new secret key for both the automation controller and the automation services catalog, specify the variable |
Use the -- separator to add any Ansible arguments you wish to apply. For example: ./setup.sh -i my_awesome_inventory.yml -e matburt_is_country_gold=True — -K.
When passing
-rto perform a database restore default restore path is used unless EXTRA_VARS are provided with a non-default path. See the example below that passed an EXTRA_VAR specifying the restore path:./setup.sh -e 'restore_backup_file=/path/to/nondefault/location' -rYou can force an online installation by passing
-e bundle_install=false:$ ./setup.sh -e bundle_install=false
| Variable | Description | Default |
|---|---|---|
|
| When installing automation controller make sure Ansible is also up to date |
|
|
| When installing Tower also create the Demo Org, project, credential, Job Template, etc. |
|
|
| When installing from a bundle where to put the bundled repos |
|
|
| Disable HTTPS traffic through nginx, this is useful if offloading HTTPS to a load balancer |
|
|
| Disable HSTS web-security policy mechanism |
|
|
| Port to configure nginx to listen to for HTTP |
|
|
| Port to configure nginx to listen to for HTTPS |
|
|
| A temp location to use when backing up |
|
|
| Specify an alternative backup file to restore from | None |
|
| The minimum RAM required to install Tower (should only be changed for test installation) |
|
|
| The minimum open file descriptions (should only be changed for test installations) | None |
|
|
Ignore preflight checks, useful when installing into a template or other non-system image (overrides |
|
|
|
When you run the |
|
Examples
- To upgrade core:
./setup.sh -e upgrade_ansible_with_tower=1- To disable https handling at nginx:
./setup.sh -e nginx_disable_https=true- To specify a non-default path when restoring from a backup file:
./setup.sh -e 'restore_backup_file=/path/to/nondefault/location' -r4.1.5. Running the Red Hat Ansible Automation Platform installer setup script
You can run the setup script once you finish updating the inventory file with required parameters for installing your Private Automation Hub.
Procedure
Run the
setup.shscript$ ./setup.sh
The installation will begin.
4.1.6. Verifying automation controller installation
Once the installation completes, you can verify your automation controller has been installed successfully by logging in with the admin credentials you inserted into the inventory file.
Procedure
-
Navigate to the IP address specified for the automation controller node in the
inventoryfile. -
Log in with the Admin credentials you set in the
inventoryfile.
The automation controller server is accessible from port 80 (https://<TOWER_SERVER_NAME>/) but will redirect to port 443 so 443 needs to be available also.
If the installation fails and you are a customer who has purchased a valid license for Red Hat Ansible Automation Platform, please contact Ansible via the Red Hat Customer portal at https://access.redhat.com/.
Upon a successful login to automation controller, your installation of Red Hat Ansible Automation Platform 2.2 is now complete.
4.1.6.1. Additional automation controller configuration and resources
See the following resources to explore additional automation controller configurations.
| Link | Description |
|---|---|
| Set up automation controller and run your first playbook | |
| Configure automation controller administration through customer scripts, management jobs, etc. | |
| Configuring proxy support for Red Hat Ansible Automation Platform | Set up automation controller with a proxy server |
| Managing usability analytics and data collection from automation controller | Manage what automation controller information you share with Red Hat |
| Review automation controller functionality in more detail |
4.1.7. Verifying automation hub installation
Once the installation completes, you can verify your automation hub has been installed successfully by logging in with the admin credentials you inserted into the inventory file.
Procedure
-
Navigate to the IP address specified for the automation hub node in the
inventoryfile. -
Log in with the Admin credentials you set in the
inventoryfile.
If the installation fails and you are a customer who has purchased a valid license for Red Hat Ansible Automation Platform, please contact Ansible via the Red Hat Customer portal at https://access.redhat.com/.
Upon a successful login to automation hub, your installation of Red Hat Ansible Automation Platform 2.2 is now complete.
4.1.7.1. Additional automation hub configuration and resources
See the following resources to explore additional automation hub configurations.
| Link | Description |
|---|---|
| Configure user access for automation hub | |
| Managing Red Hat Certified and Ansible Galaxy collections in automation hub | Add content to your automation hub |
| Publishing proprietary content collections in automation hub | Publish internally developed collections on your automation hub |
4.1.8. What’s next with Ansible Automation Platform 2.2
Whether you are a new Ansible Automation Platform user looking to start automating, or an existing administrator looking to migrate old Ansible content to your latest installed version of Red Hat Ansible Automation Platform, explore the next steps to begin leveraging the new features of Ansible Automation Platform 2.2:
4.1.8.1. Migrating data to Ansible Automation Platform 2.2
For platform administrators looking to complete an upgrade to the Ansible Automation Platform 2.2, there may be additional steps needed to migrate data to a new instance:
4.1.8.1.1. Migrating from legacy virtual environments (venvs) to automation execution environments
Ansible Automation Platform 2.2 moves you away from custom Python virtual environments (venvs) in favor of automation execution environments - containerized images that packages the necessary components needed to run and scale your Ansible automation. This includes Ansible Core, Ansible Content Collections, Python dependencies, Red Hat Enterprise Linux UBI 8, and any additional package dependencies.
If you are looking to migrate your venvs to execution environments, you will (1) need to use the awx-manage command to list and export a list of venvs from your original instance, then (2) use ansible-builder to create execution environments. For more information, see the Upgrading to Automation Execution Environments guide and the Creating and Consuming Execution Environments.
4.1.8.1.2. Migrating to Ansible Engine 2.9 images using Ansible Builder
To migrate Ansible Engine 2.9 images for use with Ansible Automation Platform 2.2, the ansible-builder tool automates the process of rebuilding images (including its custom plugins and dependencies) for use with automation execution environments. For more information on using Ansible Builder to build execution environments, see the Creating and Consuming Execution Environments.
4.1.8.1.3. Migrating to Ansible Core 2.13
When upgrading to Ansible Core 2.13, you need to update your playbooks, plugins, or other parts of your Ansible infrastructure in order to be supported by the latest version of Ansible Core. For instructions on updating your Ansible content for Ansible Core 2.13 compatibility, see the Ansible-core 2.13 Porting Guide.
4.1.8.2. Scale up your automation using automation mesh
The automation mesh component of the Red Hat Ansible Automation Platform simplifies the process of distributing automation across multi-site deployments. For enterprises with multiple isolated IT environments, automation mesh provides a consistent and reliable way to deploy and scale up automation across your execution nodes using a peer-to-peer mesh communication network.
When upgrading from version 1.x to the latest version of the Ansible Automation Platform, you will need to migrate the data from your legacy isolated nodes into execution nodes necessary for automation mesh. You can implement automation mesh by planning out a network of hybrid and control nodes, then editing the inventory file found in the Ansible Automation Platform installer to assign mesh-related values to each of your execution nodes.
For instructions on how to migrate from isolated nodes to execution nodes, see the upgrade & migration guide.
For information about automation mesh and the various ways to design your automation mesh for your environment, see the Red Hat Ansible Automation Platform automation mesh guide.
Chapter 5. Configuring proxy support for Red Hat Ansible Automation Platform
You can configure Red Hat Ansible Automation Platform to communicate with traffic using a proxy. Proxy servers act as an intermediary for requests from clients seeking resources from other servers. A client connects to the proxy server, requesting some service or available resource from a different server, and the proxy server evaluates the request as a way to simplify and control its complexity. The following sections describe the supported proxy configurations and how to set them up.
5.1. Enable proxy support
To provide proxy server support, automation controller handles proxied requests (such as ALB, NLB , HAProxy, Squid, Nginx and tinyproxy in front of automation controller) via the REMOTE_HOST_HEADERS list variable in the automation controller settings. By default, REMOTE_HOST_HEADERS is set to ["REMOTE_ADDR", "REMOTE_HOST"].
To enable proxy server support, edit the REMOTE_HOST_HEADERS field in the settings page for your automation controller:
Procedure
- On your automation controller, navigate to → .
In the REMOTE_HOST_HEADERS field, enter the following values:
[
  "HTTP_X_FORWARDED_FOR",
  "REMOTE_ADDR",
  "REMOTE_HOST"
]
Automation controller determines the remote host’s IP address by searching through the list of headers in REMOTE_HOST_HEADERS until the first IP address is located.
5.2. Known proxies
When automation controller is configured with REMOTE_HOST_HEADERS = ['HTTP_X_FORWARDED_FOR', 'REMOTE_ADDR', 'REMOTE_HOST'], it assumes that the value of X-Forwarded-For has originated from the proxy/load balancer sitting in front of automation controller. If automation controller is reachable without use of the proxy/load balancer, or if the proxy does not validate the header, the value of X-Forwarded-For can be falsified to fake the originating IP addresses. Using HTTP_X_FORWARDED_FOR in the REMOTE_HOST_HEADERS setting poses a vulnerability.
To avoid this, you can configure a list of known proxies that are allowed using the PROXY_IP_ALLOWED_LIST field in the settings menu on your automation controller. Load balancers and hosts that are not on the known proxies list will result in a rejected request.
5.2.1. Configuring known proxies
To configure a list of known proxies for your automation controller, add the proxy IP addresses to the PROXY_IP_ALLOWED_LIST field in the settings page for your automation controller.
Procedure
- On your automation controller, navigate to → .
In the PROXY_IP_ALLOWED_LIST field, enter IP addresses that are allowed to connect to your automation controller, following the syntax in the example below:
Example PROXY_IP_ALLOWED_LIST entry
[
  "example1.proxy.com:8080",
  "example2.proxy.com:8080"
]
-
PROXY_IP_ALLOWED_LISTrequires proxies in the list are properly sanitizing header input and correctly setting anX-Forwarded-Forvalue equal to the real source IP of the client. Automation controller can rely on the IP addresses and hostnames inPROXY_IP_ALLOWED_LISTto provide non-spoofed values for theX-Forwarded-Forfield. Do not configure
HTTP_X_FORWARDED_FORas an item in `REMOTE_HOST_HEADERS`unless all of the following conditions are satisfied:- You are using a proxied environment with ssl termination;
-
The proxy provides sanitization or validation of the
X-Forwarded-Forheader to prevent client spoofing; -
/etc/tower/conf.d/remote_host_headers.pydefinesPROXY_IP_ALLOWED_LISTthat contains only the originating IP addresses of trusted proxies or load balancers.
5.3. Configuring a reverse proxy
You can support a reverse proxy server configuration by adding HTTP_X_FORWARDED_FOR to the REMOTE_HOST_HEADERS field in your automation controller settings. The X-Forwarded-For (XFF) HTTP header field identifies the originating IP address of a client connecting to a web server through an HTTP proxy or load balancer.
Procedure
- On your automation controller, navigate to → .
In the REMOTE_HOST_HEADERS field, enter the following values:
[
  "HTTP_X_FORWARDED_FOR",
  "REMOTE_ADDR",
  "REMOTE_HOST"
]
Chapter 6. Configuring automation controller websocket connections
You can configure automation controller in order to align the websocket configuration with your nginx or load balancer configuration.
6.1. Websocket configuration for automation controller
Automation controller nodes connect to all other automation controller nodes via websockets. This interconnect is used to distribute all websocket emitted messages to all other automation controller nodes. This is required because any browser client websocket can subscribe to any job that may be running on any automation controller node. Websocket clients are not routed to specific automation controller nodes. Any automation controller node can handle any websocket request and each automation controller node must know about all websocket messages destined for all clients.
Automation controller will automatically handle discovery of other automation controller nodes via the Instance record in the database.
- It is intended that your nodes are broadcasting websocket traffic across a private, trusted subnet (and not the open Internet). Therefore, if you turn off HTTPS for websocket broadcasting, the websocket traffic, comprised mostly of Ansible playbook stdout, is sent between automation controller nodes unencrypted.
6.1.1. Configuring automatic discovery of other automation controller nodes
You can configure websocket connections to enable automation controller to automatically handle discovery of other automation controller nodes through the Instance record in the database.
Edit automation controller websocket information for port, protocol, and whether or not to verify certificates when establishing the websocket connections.
BROADCAST_WEBSOCKET_PROTOCOL = 'http'
BROADCAST_WEBSOCKET_PORT = 80
BROADCAST_WEBSOCKET_VERIFY_CERT = False
Chapter 7. Managing usability analytics and data collection from automation controller
You can change how you participate in usability analytics and data collection from automation controller by opting out or changing your settings in the automation controller user interface.
7.1. Usability analytics and data collection
Usability data collection is included with automation controller to collect data to better understand how automation controller users specifically interact with automation controller, to help enhance future releases, and to continue streamlining your user experience.
Only users installing a trial of automation controller or a fresh installation of automation controller are opted-in for this data collection.
7.1.1. Controlling data collection from automation controller
You can control how automation controller collects data by setting your participation level in the User Interface tab in the settings menu.
Procedure
- Log in to your automation controller
- Navgate to Settings → User Interface
Select the desired level of data collection from the User Analytics Tracking State drop-down list:
- Off: Prevents any data collection.
- Anonymous: Enables data collection without your specific user data.
- Detailed: Enables data collection including your specific user data.
- Click Save to apply the settings or Cancel to abandon the changes.
Chapter 8. Renewing and changing the SSL certificate
If your current SSL certificate has expired or will expire soon, you can either renew or replace the SSL certificate used by Ansible Automation Platform.
You must renew the SSL certificate if you need to regenerate the SSL certificate with new information such as new hosts.
You must replace the SSL certificate if you want to use an SSL certificate signed by an internal certificate authority.
8.1. Renewing the self-signed SSL certificate
The following steps regenerate a new SSL certificate for both automation controller and automation hub.
Procedure
Add
aap_service_regen_cert=trueto the inventory file in the[all:vars]section:[all:vars] aap_service_regen_cert=true- Run the installer.
8.2. Changing SSL certificates
To change the SSL certificate, you can edit the inventory file and run the installer. The installer verifies that all Ansible Automation Platform components are working. The installer can take a long time to run.
Alternatively, you can change the SSL certificates manually. This is quicker, but there is no automatic verification.
8.2.1. Prerequisites
- If there is an intermediate certificate authority, you must append it to the server certificate.
- Both automation controller and automation hub use NGINX so the server certificate must be in PEM format.
- Use the correct order for the certificates: The server certificate comes first, followed by the intermediate certificate authority.
For further information, see the ssl certificate section of the NGINX documentation.
8.2.2. Changing the SSL certificate and key using the installer
The following procedure describes how to change the SSL certificate and key in the inventory file.
Procedure
- Copy the new SSL certificates and keys to a path relative to the Ansible Automation Platform installer.
Add the absolute paths of the SSL certificates and keys to the inventory file. Refer to the Automation controller variables and Automation hub variables sections of the Red Hat Ansible Automation Platform Installation Guide for guidance on setting these variables.
-
Automation controller:
web_server_ssl_cert,web_server_ssl_key,custom_ca_cert -
Automation hub:
automationhub_ssl_cert,automationhub_ssl_key,custom_ca_cert
NoteThe
custom_ca_certmust be the root certificate authority that signed the intermediate certificate authority. This file is installed in/etc/pki/ca-trust/source/anchors.-
Automation controller:
- Run the installer.
8.2.3. Changing the SSL certificate manually
8.2.3.1. Changing the SSL certificate and key manually on automation controller
The following procedure describes how to change the SSL certificate and key manually on Automation Controller.
Procedure
Backup the current SSL certificate:
cp /etc/tower/tower.cert /etc/tower/tower.cert-$(date +%F)Backup the current key files:
cp /etc/tower/tower.key /etc/tower/tower.key-$(date +%F)+-
Copy the new SSL certificate to
/etc/tower/tower.cert. -
Copy the new key to
/etc/tower/tower.key. Restore the SELinux context:
restorecon -v /etc/tower/tower.cert /etc/tower/tower.keySet appropriate permissions for the certificate and key files:
chown root:awx /etc/tower/tower.cert /etc/tower/tower.key
chmod 0600 /etc/tower/tower.cert /etc/tower/tower.key
Test the NGINX configuration:
nginx -tReload NGINX:
systemctl reload nginx.serviceVerify that new SSL certificate and key have been installed:
true | openssl s_client -showcerts -connect ${CONTROLLER_FQDN}:443
8.2.3.2. Changing the SSL certificate and key for automation controller on OpenShift Container Platform
The following procedure describes how to change the SSL certificate and key for automation controller running on OpenShift Container Platform.
Procedure
- Copy the signed SSL certificate and key to a secure location.
Create a TLS secret within OpenShift:
oc create secret tls ${CONTROLLER_INSTANCE}-certs-$(date +%F) --cert=/path/to/ssl.crt --key=/path/to/ssl.keyModify the automation controller custom resource to add
route_tls_secretand the name of the new secret to the spec section.oc edit automationcontroller/${CONTROLLER_INSTANCE}... spec: route_tls_secret: automation-controller-certs-2023-04-06 ...
The name of the TLS secret is arbitrary. In this example, it is timestamped with the date that the secret is created, to differentiate it from other TLS secrets applied to the automation controller instance.
- Wait a few minutes for the changes to be applied.
Verify that new SSL certificate and key have been installed:
true | openssl s_client -showcerts -connect ${CONTROLLER_FQDN}:443
8.2.3.3. Changing the SSL certificate and key manually on automation hub
The following procedure describes how to change the SSL certificate and key manually on automation hub.
Procedure
Backup the current SSL certificate:
cp /etc/pulp/certs/pulp_webserver.crt /etc/pulp/certs/pulp_webserver.crt-$(date +%F)Backup the current key files:
cp /etc/pulp/certs/pulp_webserver.key /etc/pulp/certs/pulp_webserver.key-$(date +%F)-
Copy the new SSL certificate to
/etc/pulp/certs/pulp_webserver.crt. -
Copy the new key to
/etc/pulp/certs/pulp_webserver.key. Restore the SELinux context:
restorecon -v /etc/pulp/certs/pulp_webserver.crt /etc/pulp/certs/pulp_webserver.keySet appropriate permissions for the certificate and key files:
chown root:pulp /etc/pulp/certs/pulp_webserver.crt /etc/pulp/certs/pulp_webserver.keychmod 0600 /etc/pulp/certs/pulp_webserver.crt /etc/pulp/certs/pulp_webserver.keyTest the NGINX configuration:
nginx -tReload NGINX:
systemctl reload nginx.serviceVerify that new SSL certificate and key have been installed:
true | openssl s_client -showcerts -connect ${CONTROLLER_FQDN}:443
Chapter 9. Supported inventory plugins templates
On upgrade, existing configurations will be migrated to the new format that will produce a backwards compatible inventory output. Use the templates below to help aid in migrating your inventories to the new style inventory plugin output.
9.1. Amazon Web Services EC2
compose:
  ansible_host: public_ip_address
  ec2_account_id: owner_id
  ec2_ami_launch_index: ami_launch_index | string
  ec2_architecture: architecture
  ec2_block_devices: dict(block_device_mappings | map(attribute='device_name') | list | zip(block_device_mappings | map(attribute='ebs.volume_id') | list))
  ec2_client_token: client_token
  ec2_dns_name: public_dns_name
  ec2_ebs_optimized: ebs_optimized
  ec2_eventsSet: events | default("")
  ec2_group_name: placement.group_name
  ec2_hypervisor: hypervisor
  ec2_id: instance_id
  ec2_image_id: image_id
  ec2_instance_profile: iam_instance_profile | default("")
  ec2_instance_type: instance_type
  ec2_ip_address: public_ip_address
  ec2_kernel: kernel_id | default("")
  ec2_key_name: key_name
  ec2_launch_time: launch_time | regex_replace(" ", "T") | regex_replace("(\+)(\d\d):(\d)(\d)$", ".\g<2>\g<3>Z")
  ec2_monitored: monitoring.state in ['enabled', 'pending']
  ec2_monitoring_state: monitoring.state
  ec2_persistent: persistent | default(false)
  ec2_placement: placement.availability_zone
  ec2_platform: platform | default("")
  ec2_private_dns_name: private_dns_name
  ec2_private_ip_address: private_ip_address
  ec2_public_dns_name: public_dns_name
  ec2_ramdisk: ramdisk_id | default("")
  ec2_reason: state_transition_reason
  ec2_region: placement.region
  ec2_requester_id: requester_id | default("")
  ec2_root_device_name: root_device_name
  ec2_root_device_type: root_device_type
  ec2_security_group_ids: security_groups | map(attribute='group_id') | list |  join(',')
  ec2_security_group_names: security_groups | map(attribute='group_name') | list |  join(',')
  ec2_sourceDestCheck: source_dest_check | default(false) | lower | string
  ec2_spot_instance_request_id: spot_instance_request_id | default("")
  ec2_state: state.name
  ec2_state_code: state.code
  ec2_state_reason: state_reason.message if state_reason is defined else ""
  ec2_subnet_id: subnet_id | default("")
  ec2_tag_Name: tags.Name
  ec2_virtualization_type: virtualization_type
  ec2_vpc_id: vpc_id | default("")
filters:
  instance-state-name:
  - running
groups:
  ec2: true
hostnames:
  - network-interface.addresses.association.public-ip
  - dns-name
  - private-dns-name
keyed_groups:
  - key: image_id | regex_replace("[^A-Za-z0-9\_]", "_")
    parent_group: images
    prefix: ''
    separator: ''
  - key: placement.availability_zone
    parent_group: zones
    prefix: ''
    separator: ''
  - key: ec2_account_id | regex_replace("[^A-Za-z0-9\_]", "_")
    parent_group: accounts
    prefix: ''
    separator: ''
  - key: ec2_state | regex_replace("[^A-Za-z0-9\_]", "_")
    parent_group: instance_states
    prefix: instance_state
  - key: platform | default("undefined") | regex_replace("[^A-Za-z0-9\_]", "_")
    parent_group: platforms
    prefix: platform
  - key: instance_type | regex_replace("[^A-Za-z0-9\_]", "_")
    parent_group: types
    prefix: type
  - key: key_name | regex_replace("[^A-Za-z0-9\_]", "_")
    parent_group: keys
    prefix: key
  - key: placement.region
    parent_group: regions
    prefix: ''
    separator: ''
  - key: security_groups | map(attribute="group_name") | map("regex_replace", "[^A-Za-z0-9\_]", "_") | list
    parent_group: security_groups
    prefix: security_group
  - key: dict(tags.keys() | map("regex_replace", "[^A-Za-z0-9\_]", "_") | list | zip(tags.values()
      | map("regex_replace", "[^A-Za-z0-9\_]", "_") | list))
    parent_group: tags
    prefix: tag
  - key: tags.keys() | map("regex_replace", "[^A-Za-z0-9\_]", "_") | list
    parent_group: tags
    prefix: tag
  - key: vpc_id | regex_replace("[^A-Za-z0-9\_]", "_")
    parent_group: vpcs
    prefix: vpc_id
  - key: placement.availability_zone
    parent_group: '{{ placement.region }}'
    prefix: ''
    separator: ''
plugin: amazon.aws.aws_ec2
use_contrib_script_compatible_sanitization: true
9.2. Google Compute Engine
auth_kind: serviceaccount
compose:
  ansible_ssh_host: networkInterfaces[0].accessConfigs[0].natIP | default(networkInterfaces[0].networkIP)
  gce_description: description if description else None
  gce_id: id
  gce_image: image
  gce_machine_type: machineType
  gce_metadata: metadata.get("items", []) | items2dict(key_name="key", value_name="value")
  gce_name: name
  gce_network: networkInterfaces[0].network.name
  gce_private_ip: networkInterfaces[0].networkIP
  gce_public_ip: networkInterfaces[0].accessConfigs[0].natIP | default(None)
  gce_status: status
  gce_subnetwork: networkInterfaces[0].subnetwork.name
  gce_tags: tags.get("items", [])
  gce_zone: zone
hostnames:
- name
- public_ip
- private_ip
keyed_groups:
- key: gce_subnetwork
  prefix: network
- key: gce_private_ip
  prefix: ''
  separator: ''
- key: gce_public_ip
  prefix: ''
  separator: ''
- key: machineType
  prefix: ''
  separator: ''
- key: zone
  prefix: ''
  separator: ''
- key: gce_tags
  prefix: tag
- key: status | lower
  prefix: status
- key: image
  prefix: ''
  separator: ''
plugin: google.cloud.gcp_compute
retrieve_image_info: true
use_contrib_script_compatible_sanitization: true
9.3. Microsoft Azure Resource Manager
conditional_groups:
  azure: true
default_host_filters: []
fail_on_template_errors: false
hostvar_expressions:
  computer_name: name
  private_ip: private_ipv4_addresses[0] if private_ipv4_addresses else None
  provisioning_state: provisioning_state | title
  public_ip: public_ipv4_addresses[0] if public_ipv4_addresses else None
  public_ip_id: public_ip_id if public_ip_id is defined else None
  public_ip_name: public_ip_name if public_ip_name is defined else None
  tags: tags if tags else None
  type: resource_type
keyed_groups:
- key: location
  prefix: ''
  separator: ''
- key: tags.keys() | list if tags else []
  prefix: ''
  separator: ''
- key: security_group
  prefix: ''
  separator: ''
- key: resource_group
  prefix: ''
  separator: ''
- key: os_disk.operating_system_type
  prefix: ''
  separator: ''
- key: dict(tags.keys() | map("regex_replace", "^(.*)$", "\1_") | list | zip(tags.values() | list)) if tags else []
  prefix: ''
  separator: ''
plain_host_names: true
plugin: azure.azcollection.azure_rm
use_contrib_script_compatible_sanitization: true
9.4. VMware vCenter
compose:
  ansible_host: guest.ipAddress
  ansible_ssh_host: guest.ipAddress
  ansible_uuid: 99999999 | random | to_uuid
  availablefield: availableField
  configissue: configIssue
  configstatus: configStatus
  customvalue: customValue
  effectiverole: effectiveRole
  guestheartbeatstatus: guestHeartbeatStatus
  layoutex: layoutEx
  overallstatus: overallStatus
  parentvapp: parentVApp
  recenttask: recentTask
  resourcepool: resourcePool
  rootsnapshot: rootSnapshot
  triggeredalarmstate: triggeredAlarmState
filters:
- runtime.powerState == "poweredOn"
keyed_groups:
- key: config.guestId
  prefix: ''
  separator: ''
- key: '"templates" if config.template else "guests"'
  prefix: ''
  separator: ''
plugin: community.vmware.vmware_vm_inventory
properties:
- availableField
- configIssue
- configStatus
- customValue
- datastore
- effectiveRole
- guestHeartbeatStatus
- layout
- layoutEx
- name
- network
- overallStatus
- parentVApp
- permission
- recentTask
- resourcePool
- rootSnapshot
- snapshot
- triggeredAlarmState
- value
- capability
- config
- guest
- runtime
- storage
- summary
strict: false
with_nested_properties: true
9.5. Red Hat Satellite 6
group_prefix: foreman_
keyed_groups:
- key: foreman['environment_name'] | lower | regex_replace(' ', '') | regex_replace('[^A-Za-z0-9_]', '_') | regex_replace('none', '')
  prefix: foreman_environment_
  separator: ''
- key: foreman['location_name'] | lower | regex_replace(' ', '') | regex_replace('[^A-Za-z0-9_]', '_')
  prefix: foreman_location_
  separator: ''
- key: foreman['organization_name'] | lower | regex_replace(' ', '') | regex_replace('[^A-Za-z0-9_]', '_')
  prefix: foreman_organization_
  separator: ''
- key: foreman['content_facet_attributes']['lifecycle_environment_name'] | lower | regex_replace(' ', '') | regex_replace('[^A-Za-z0-9_]', '_')
  prefix: foreman_lifecycle_environment_
  separator: ''
- key: foreman['content_facet_attributes']['content_view_name'] | lower | regex_replace(' ', '') | regex_replace('[^A-Za-z0-9_]', '_')
  prefix: foreman_content_view_
  separator: ''
legacy_hostvars: true
plugin: theforeman.foreman.foreman
validate_certs: false
want_facts: true
want_hostcollections: false
want_params: true
9.6. OpenStack
expand_hostvars: true
fail_on_errors: true
inventory_hostname: uuid
plugin: openstack.cloud.openstack
9.7. Red Hat Virtualization
compose:
  ansible_host: (devices.values() | list)[0][0] if devices else None
keyed_groups:
- key: cluster
  prefix: cluster
  separator: _
- key: status
  prefix: status
  separator: _
- key: tags
  prefix: tag
  separator: _
ovirt_hostname_preference:
- name
- fqdn
ovirt_insecure: false
plugin: ovirt.ovirt.ovirt
9.8. Automation controller
include_metadata: true
inventory_id: <inventory_id or url_quoted_named_url>
plugin: awx.awx.tower
validate_certs: <true or false>
Chapter 10. Supported attributes for custom notifications
This section describes the list of supported job attributes and the proper syntax for constructing the message text for notifications. The supported job attributes are:
-
allow_simultaneous- (boolean) indicates if multiple jobs can run simultaneously from the JT associated with this job -
controller_node- (string) the instance that managed the isolated execution environment -
created- (datetime) timestamp when this job was created -
custom_virtualenv- (string) custom virtual environment used to execute job -
description- (string) optional description of the job -
diff_mode- (boolean) if enabled, textual changes made to any templated files on the host are shown in the standard output -
elapsed- (decimal) elapsed time in seconds that the job ran -
execution_node- (string) node the job executed on -
failed- (boolean) true if job failed -
finished- (datetime) date and time the job finished execution -
force_handlers- (boolean) when handlers are forced, they will run when notified even if a task fails on that host (note that some conditions - e.g. unreachable hosts - can still prevent handlers from running) -
forks- (int) number of forks requested for job -
id- (int) database id for this job -
job_explanation- (string) status field to indicate the state of the job if it wasn’t able to run and capture stdout -
job_slice_count- (integer) if run as part of a sliced job, the total number of slices (if 1, job is not part of a sliced job) -
job_slice_number- (integer) if run as part of a sliced job, the ID of the inventory slice operated on (if not part of a sliced job, attribute is not used) -
job_tags- (string) only tasks with specified tags will execute -
job_type- (choice) run, check, or scan -
launch_type- (choice) manual, relaunch, callback, scheduled, dependency, workflow, sync, or scm -
limit- (string) playbook execution limited to this set of hosts, if specified -
modified- (datetime) timestamp when this job was last modified -
name- (string) name of this job -
playbook- (string) playbook executed -
scm_revision- (string) scm revision from the project used for this job, if available -
skip_tags- (string) playbook execution skips over this set of tag(s), if specified -
start_at_task- (string) playbook execution begins at the task matching this name, if specified -
started- (datetime) date and time the job was queued for starting -
status- (choice) new, pending, waiting, running, successful, failed, error, canceled -
timeout- (int) amount of time (in seconds) to run before the task is canceled -
type- (choice) data type for this job -
url- (string) URL for this job -
use_fact_cache- (boolean) if enabled for job, Tower acts as an Ansible Fact Cache Plugin, persisting facts at the end of a playbook run to the database and caching facts for use by Ansible -
verbosity- (choice) 0 through 5 (corresponding to Normal through WinRM Debug) host_status_counts(count of hosts uniquely assigned to each status)-
skipped(integer) -
ok(integer) -
changed(integer) -
failures(integer) -
dark(integer) -
processed(integer) -
rescued(integer) -
ignored(integer) -
failed(boolean)
-
summary_fields:inventory-
id- (integer) database ID for inventory -
name- (string) name of the inventory -
description- (string) optional description of the inventory -
has_active_failures- (boolean) (deprecated) flag indicating whether any hosts in this inventory have failed -
total_hosts- (deprecated) (int) total number of hosts in this inventory. -
hosts_with_active_failures- (deprecated) (int) number of hosts in this inventory with active failures -
total_groups- (deprecated) (int) total number of groups in this inventory -
groups_with_active_failures- (deprecated) (int) number of hosts in this inventory with active failures -
has_inventory_sources- (deprecated) (boolean) flag indicating whether this inventory has external inventory sources -
total_inventory_sources- (int) total number of external inventory sources configured within this inventory -
inventory_sources_with_failures- (int) number of external inventory sources in this inventory with failures -
organization_id- (id) organization containing this inventory -
kind- (choice) (empty string) (indicating hosts have direct link with inventory) or ‘smart’
-
project-
id- (int) database ID for project -
name- (string) name of the project -
description- (string) optional description of the project -
status- (choices) one of new, pending, waiting, running, successful, failed, error, canceled, never updated, ok, or missing -
scm_type(choice) - one of (empty string), git, hg, svn, insights
-
job_template-
id- (int) database ID for job template -
name- (string) name of job template -
description- (string) optional description for the job template
-
unified_job_template-
id- (int) database ID for unified job template -
name- (string) name of unified job template -
description- (string) optional description for the unified job template -
unified_job_type- (choice) unified job type (job, workflow_job, project_update, etc.)
-
instance_group-
id- (int) database ID for instance group -
name- (string) name of instance group
-
created_by-
id- (int) database ID of user that launched the operation -
username- (string) username that launched the operation -
first_name- (string) first name -
last_name- (string) last name
-
labels-
count- (int) number of labels -
results- list of dictionaries representing labels (e.g. {“id”: 5, “name”: “database jobs”})
-
Information about a job can be referenced in a custom notification message using grouped curly braces {{ }}. Specific job attributes are accessed using dotted notation, for example {{ job.summary_fields.inventory.name }}. Any characters used in front or around the braces, or plain text, can be added for clarification, such as ‘#’ for job ID and single-quotes to denote some descriptor. Custom messages can include a number of variables throughout the message:
{{ job_friendly_name }} {{ job.id }} ran on {{ job.execution_node }} in {{ job.elapsed }} seconds.In addition to the job attributes, there are some other variables that can be added to the template:
approval_node_name - (string) the approval node name
approval_status - (choice) one of approved, denied, and timed_out
url - (string) URL of the job for which the notification is emitted (this applies to start, success, fail, and approval notifications)
workflow_url - (string) URL to the relevant approval node. This allows the notification recipient to go to the relevant workflow job page to see what’s going on (i.e., This node can be viewed at: {{ workflow_url }}). In cases of approval-related notifications, both url and workflow_url are the same.
job_friendly_name - (string) the friendly name of the job
job_metadata - (string) job metadata as a JSON string, for example:
{'url': 'https://towerhost/$/jobs/playbook/13',
 'traceback': '',
 'status': 'running',
 'started': '2019-08-07T21:46:38.362630+00:00',
 'project': 'Stub project',
 'playbook': 'ping.yml',
 'name': 'Stub Job Template',
 'limit': '',
 'inventory': 'Stub Inventory',
 'id': 42,
 'hosts': {},
 'friendly_name': 'Job',
 'finished': False,
 'credential': 'Stub credential',
 'created_by': 'admin'}
Appendix A. Inventory file variables
The following tables contain information about the pre-defined variables used in Ansible installation inventory files.
Not all of these variables are required.
Chapter 11. General variables
| Variable | Description |
|---|---|
|
|
The default install registers the node to the Red Hat Insights for Red Hat Ansible Automation Platform Service if the node is registered with Subscription Manager. Set to
Default = |
|
|
Password credential for access to
Used for both
Enter your Red Hat Registry Service Account credentials in
When |
|
|
Used for both
Default = |
|
|
User credential for access to
Used for both
Enter your Red Hat Registry Service Account credentials in |
Chapter 12. Ansible automation hub variables
| Variable | Description |
|---|---|
|
| Required |
|
| If upgrading from Ansible Automation Platform 2.0 or earlier, you must either:
Generating a new token invalidates the existing token. |
|
|
This variable is not set by default. Set it to
When this is set to
|
|
| If a collection signing service is enabled, collections are not signed automatically by default.
Setting this parameter to
Default = |
|
| Optional
Ansible automation hub provides artifacts in
You can also set
Default = |
|
| If a collection signing service is enabled, you must provide this variable to ensure collections can be properly signed.
|
|
| If a collection signing service is enabled, you must provide this variable to ensure collections can be properly signed.
|
|
|
The default install does not create a signing service. If set to
Default = |
|
| The default install deploys a TLS enabled Ansible automation hub. Use if automation hub is deployed with HTTP Strict Transport Security (HSTS) web-security policy enabled. Unless specified otherwise, the HSTS web-security policy mechanism is enabled. This setting allows you to disable it if required.
Default = |
|
| Optional If Ansible automation hub is deployed with HTTPS enabled.
Default = |
|
|
When set to
Default = |
|
| Optional Dictionary of setting to pass to galaxy-importer. At import time collections can go through a series of checks.
Behavior is driven by
Examples are This parameter enables you to drive this configuration. |
For Ansible automation hub to connect to LDAP directly; the following variables must be configured. A list of other LDAP related variables (not covered by the automationhub_ldap_xxx variables below) that can be passed using the ldap_extra_settings variable can be found here: https://django-auth-ldap.readthedocs.io/en/latest/reference.html#settings
| Variable | Description |
|---|---|
|
|
The name to use when binding to the LDAP server with |
|
| Required
The password to use with |
|
|
An LDAPSearch object that finds all LDAP groups that users might belong to. If your configuration makes any references to LDAP groups, this and
Default = |
|
| Optional Search filter for finding group membership.
Default = |
|
| Optional
Default = |
|
| Optional
Default = |
|
| The URI of the LDAP server. This can be any URI that is supported by your underlying LDAP libraries. |
|
| An LDAPSearch object that locates a user in the directory. The filter parameter should contain the placeholder %(user)s for the username. It must return exactly one result for authentication to succeed. |
|
|
When using Single Sign-On, specify the main automation hub URL that clients will connect to, for example,
If not specified, the first node in the |
|
| Required The database name.
Default = |
|
| Required if not using internal database. |
|
| The password for the automation hub PostgreSQL database.
Do not use special characters for |
|
| Required if not using internal database. Default = 5432 |
|
| Required.
Default = |
|
| Required
Default = |
|
| Optional If automation hub enforces the approval mechanism before collections are made available. By default when you upload collections to automation hub an administrator must approve it before it is made available to the users.
If you want to disable the content approval flow, set the variable to
Default = |
|
| Optional
|
|
| Optional
Same as |
|
| For Red Hat Ansible Automation Platform 2.2 and later, this value is no longer used. If automation hub should validate certificate when requesting itself because by default, Ansible Automation Platform deploys with self-signed certificates.
Default = |
|
| If upgrading from Red Hat Ansible Automation Platform 2.0 or earlier, you must either:
|
|
| Relative or absolute path to the Fernet symmetric encryption key you want to import. The path is on the Ansible management node. It is used to encrypt certain fields in the database (such as credentials.) If not specified, a new key will be generated. |
Chapter 13. Red Hat Single Sign-On variables
*Use these variables for automationhub or automationcatalog.
| Variable | Description |
|---|---|
|
| Optional Used for Ansible Automation Platform managed and externally managed Red Hat Single Sign-On. Path to the directory where theme files are located. If changing this variable, you must provide your own theme files.
Default = |
|
| Optional Used for Ansible Automation Platform managed and externally managed Red Hat Single Sign-On. The name of the realm in SSO.
Default = |
|
| Optional Used for Ansible Automation Platform managed and externally managed Red Hat Single Sign-On. Display name for the realm.
Default = |
|
| Optional Used for Ansible Automation Platform managed and externally managed Red Hat Single Sign-On. SSO administration username.
Default = |
|
| Required Used for Ansible Automation Platform managed and externally managed Red Hat Single Sign-On. SSO administration password. |
|
| Optional Used for Ansible Automation Platform managed Red Hat Single Sign-On only. Customer-provided keystore for SSO. |
|
| Required Used for Ansible Automation Platform externally managed Red Hat Single Sign-On only. Automation hub and Automation services catalog require SSO and SSO administration credentials for authentication. SSO administration credentials are also required to set automation services catalog specific roles needed for the application. If SSO is not provided in the inventory for configuration, then you must use this variable to define the SSO host. |
|
| Optional Used for Ansible Automation Platform managed Red Hat Single Sign-On only.
Set to
Default = |
|
| Optional Used for Ansible Automation Platform managed Red Hat Single Sign-On only. Name of keystore for SSO.
Default = |
|
| Password for keystore for HTTPS enabled SSO.
Required when using Ansible Automation Platform managed SSO and when HTTPS is enabled. The default install deploys SSO with |
|
| Optional Used for Ansible Automation Platform managed and externally managed Red Hat Single Sign-On.
If This must be reachable from client machines. |
|
| Optional Used for Ansible Automation Platform managed and externally managed Red Hat Single Sign-On.
Set to
Default = |
|
| Optional Used for Ansible Automation Platform managed and externally managed Red Hat Single Sign-On. If Single Sign On uses https.
Default = |
Chapter 14. Automation services catalog variables
| Variable | Description |
|---|---|
|
| Used to generate a token from a controller host.
Requires |
|
| Used for a pre-created OAuth token for automation controller. This token will be used instead of generating a token. |
|
|
Used to generate a token from a controller host. Requires |
|
| Used to enable or disable SSL validation from automation services catalog to automation controller.
Default = |
|
| Used to enable or disable HSTS web-security policy for automation services catalog. Default = `false. |
|
| Used to enable or disable HSTS web-security policy for Services Catalog.
Default = |
|
| Used to control activation of analytics collection for automation services catalog |
|
| Used by the Red Hat Single Sign-On host configuration if there is an alternative hostname that needs to be used between the SSO and automation services catalog host. |
|
| The postgres database URL for your automation services catalog. |
|
| The PostgreSQL host (database node) for your automation services catalog |
|
| The password for the PostgreSQL database of your automation services catalog.
Do not use special characters for |
|
| The PostgreSQL port to use for your automation services catalog. Default = 5432 |
|
| The postgres ID for your automation services catalog. |
|
|
Path to a custom provided SSL certificate file. Requires |
|
| Path to a custom provided SSL certificate key file.
Requires The internally managed CA signs and creates the certificate if not provided and https is left enabled. |
Chapter 15. Automation controller variables
| Variable | Description |
|---|---|
|
| The password for an administration user to access the UI upon install completion. |
|
| For an alternative front end URL needed for SSO configuration with automation services catalog, provide the URL. Automation services catalog requires either Controller to be installed with automation controller, or a URL to an active and routable Controller server must be provided with this variable |
|
| Password for your automation controller instance. |
|
| Username for your automation controller instance. |
|
| Optional
The status of a node or group of nodes. Valid options are
Default = |
|
|
For
Two valid
A
A
Default for this group =
For Two valid node_types can be assigned for this group.
A
A
Default for this group = |
|
| Optional Peer relationships define node-to-node connections.
This variable is used to add
The peers variable can be a comma-separated list of hosts and/or groups from the inventory. This is resolved into a set of hosts that is used to construct the |
|
| The name of the postgres database.
Default = |
|
| The postgreSQL host, which can be an externally managed database. |
|
| The password for the postgreSQL database.
Do not use special characters for NOTE
You no longer need to provide a
When you supply |
|
| The postgreSQL port to use. Default = 5432 |
|
|
One of
Set to
Default = |
|
| Your postgres database username.
Default = |
|
| location of postgres ssl certificate.
|
| `postgres_ssl_key | location of postgres ssl key.
|
|
| Location of postgres user certificate.
|
|
| Location of postgres user key.
|
|
| If postgres is to use SSL. |
|
| Port to use for recptor connection. Default = 27199. |
|
| Optional
Same as |
|
| Optional
Same as |
Chapter 16. Ansible variables
The following variables control how Ansible Automation Platform interacts with remote hosts.
Additional information on variables specific to certain plugins can be found at https://docs.ansible.com/ansible-core/devel/collections/ansible/builtin/index.html
A list of global configuration options can be found at https://docs.ansible.com/ansible-core/devel/reference_appendices/config.html
| Variable | Description |
|---|---|
|
| The connection plugin used for the task on the target host.
This can be the name of any of ansible connection plugin. SSH protocol types are
Default = |
|
|
The ip or name of the target host to use instead of |
|
| The connection port number, if not, the default (22 for ssh). |
|
| The user name to use when connecting to the host. |
|
| The password to use to authenticate to the host. Never store this variable in plain text. Always use a vault. |
|
| Private key file used by ssh. Useful if using multiple keys and you do not want to use an SSH agent. |
|
|
This setting is always appended to the default command line for |
|
|
This setting is always appended to the default |
|
|
This setting is always appended to the default |
|
|
This setting is always appended to the default |
|
|
Determines if SSH pipelining is used. This can override the pipelining setting in |
|
| |
|
| This variable sets the SSH user for the installer to use and defaults to root. This user must allow SSH-based authentication without requiring a password. If using SSH key-based authentication, then the key must be managed by an SSH agent. |
|
| (added in version 2.2)
This setting overrides the default behavior to use the system ssh. This can override the ssh_executable setting in |
|
|
The shell type of the target system. You should not use this setting unless you have set the |
|
|
This sets the shell that the ansible controller uses on the target machine, and overrides the executable in
You should only change if it is not possible to use |
The following variables cannot be set directly by the user. Ansible will always override them to reflect internal state.
| Variable | Description |
|---|---|
|
| Boolean that indicates if we are in check mode or not |
|
| The names of the roles currently imported into the current play as dependencies of other plays |
|
|
Contents of the |
|
|
A dictionary or map containing extended loop information when enabled using |
|
| The name of the value provided to loop_control.loop_var. Added in 2.8 |
|
|
The name of the value provided to |
|
|
When the current role is being executed by means of an
For example: When role A includes role B, inside role B, |
|
|
When the current role is being executed by means of an |
|
|
List of active hosts in the current play run limited by the serial, aka |
|
| List of hosts in the current play run, not limited by the serial. Failed or unreachable hosts are excluded from this list. |
|
| List of all the hosts that were targeted by the play |
|
| The names of the roles currently imported into the current play. This list does not contain the role names that are implicitly included through dependencies. |
|
| The name of the currently executed play. Added in 2.8. (name attribute of the play, not file name of the playbook.) |
|
| Current search path for action plugins and lookups, in other words, where we search for relative paths when you do template: src=myfile |
|
|
Dictionary or map that contains information about the current running version of ansible, it has the following keys: |