Implementing security automation
Identify and manage security events using Ansible
Abstract
Providing feedback on Red Hat documentation
If you have a suggestion to improve this documentation, or find an error, you can contact technical support at https://access.redhat.com to open a request.
Chapter 1. Firewall policy management with Ansible security automation
As a security operator, you can use Ansible security automation to manage multiple firewall policies or create and delete firewall rules to block or unblock a source IP address from accessing a destination IP address.
1.1. About firewall policy management
An organization’s network firewall is the first line of defense against an attack and a vital component for maintaining a secure environment. As a security operator, you construct and manage secure networks to ensure that your firewall only allows inbound and outbound network traffic defined by your organization’s firewall policies. A firewall policy consists of security rules that protect the network against harmful incoming and outgoing traffic.
Managing multiple firewall rules across various products and vendors can be both challenging and time consuming for security teams. Manual workflow processes that involve complex tasks can result in errors and ultimately cause delays in investigating an application’s suspicious behavior or stopping an ongoing attack on a server. When every solution in a security portfolio is automated through the same language, both security analysts and operators can perform a series of actions across various products in a fraction of the time. This automated process maximizes the overall efficiency of the security team.
Ansible security automation interacts with a wide variety of security technologies from a range of vendors. Ansible enables security teams to manage different products, interfaces, and workflows in a unified way to produce a successful deployment. For example, your security team can automate tasks such as blocking and unblocking IP and URLs on supported technologies such as enterprise firewalls.
1.2. Automate firewall rules
Ansible security automation enables you to automate various firewall policies that require a series of actions across various products. You can use an Ansible role, such as the acl_manager role to manage your Access Control Lists (ACLs) for many firewall devices such as blocking or unblocking an IP or URL. Roles let you automatically load related vars, files, tasks, handlers, and other Ansible artifacts based on a known file structure. After you group your content in roles, you can easily reuse them and share them with other users.
The following lab environment is a simplified example of a real-world enterprise security architecture, which can be more complex and include additional vendor-specific tools. This is a typical incident response scenario where you receive an intrusion alert and immediately execute a playbook with the acl_manger role that blocks the attacker’s IP address.
Your entire team can use Ansible security automation to address investigations, threat hunting, and incident response all on one platform. Red Hat Ansible Automation Platform provides you with certified content collections that are easy to consume and reuse within your security team.

1.2.1. Creating a new firewall rule
Use the acl_manager role to create a new firewall rule for blocking a source IP address from accessing a destination IP address.
Prerequisites
- You have installed the latest version of ansible-core.
- You have access to the Check Point Management server to enforce the new policies
Procedure
Install the acl_manager role using the ansible-galaxy command.
ansible-galaxy install ansible_security.acl_manager
$ ansible-galaxy install ansible_security.acl_managerCopy to Clipboard Copied! Toggle word wrap Toggle overflow Create a new playbook and set the following parameter. For example, source object, destination object, access rule between the two objects and the actual firewall you are managing, such as Check Point:
Copy to Clipboard Copied! Toggle word wrap Toggle overflow Run the playbook
$ ansible-navigator run --ee false <playbook.yml>.

Verification
You have created a new firewall rule that blocks a source IP address from accessing a destination IP address. Access the MGMT server and verify that the new security policy has been created.
1.2.2. Deleting a firewall rule
Use the acl_manager role to delete a security rule.
Prerequisites
- You have installed Ansible 2.9 or later
- You have access to the firewall MGMT servers to enforce the new policies
Procedure
Install the acl_manager role using the ansible-galaxy command:
ansible-galaxy install ansible_security.acl_manager
$ ansible-galaxy install ansible_security.acl_managerCopy to Clipboard Copied! Toggle word wrap Toggle overflow Using CLI, create a new playbook with the acl_manger role and set the parameters, for example, source object, destination object, access rule between the two objects:
Copy to Clipboard Copied! Toggle word wrap Toggle overflow Run the playbook
$ ansible-navigator run --ee false <playbook.yml>:

Verification
You have deleted the firewall rule. Access the MGMT server and verify that the new security policy has been removed.
Chapter 2. Automating Network Intrusion Detection and Prevention Systems (IDPS) with Ansible Automation Platform
You can use Ansible Automation Platform to automate your Intrusion Detection and Prevention System (IDPS). For the purpose of this guide, we use Snort as the IDPS. Use automation hub to consume content collections, such as tasks, roles, and modules to create automated workflows.
2.1. Requirements and prerequisites
Before you begin automating your IDPS with Ansible Automation Platform, ensure that you have the proper installations and configurations necessary to successfully manage your IDPS.
- You have installed Ansible-core 2.15 or later.
- SSH connection and keys are configured.
- IDPS software (Snort) is installed and configured.
- You have access to the IDPS server (Snort) to enforce new policies.
2.1.1. Verifying your IDPS installation
Use the following procedure to verify that Snort has been configured successfully:
Procedure
Call snort using
sudoand ask for the version:Copy to Clipboard Copied! Toggle word wrap Toggle overflow Verify that the service is actively running using the following command:
sudo systemctl:Copy to Clipboard Copied! Toggle word wrap Toggle overflow -
If the Snort service is not actively running, restart it with
systemctl restart snortand recheck the status. -
When you confirm that the service is actively running, exit the Snort server by simultaneously pressing
CTRLandD, or by typingexiton the command line. All further interaction will be done through Ansible Automation Platform from the Ansible control host.
2.2. Automating your IDPS rules with Ansible Automation Platform
To automate your IDPS, use the ids_rule role to create and change Snort rules. Snort uses rule-based language that analyzes your network traffic and compares it against the given rule set.
The following lab environment demonstrates what an Ansible security automation integration would look like. A machine called “Attacker” simulates a potential attack pattern on the target machine on which the IDPS is running.
Keep in mind that a real world setup will feature other vendors and technologies.

2.2.1. Creating a new IDPS rule
Use the ids_rule role to manage your rules and signatures for IDPS. For example, you can set a new rule that looks for a certain pattern aligning with a previous attack on your firewall.
Currently, the ids_rule role only supports Snort IDPS.
Prerequisites
-
You need
rootprivileges to make any changes on the Snort server.
Procedure
Install the
ids_rulerole using the ansible-galaxy command:ansible-galaxy install ansible_security.ids_rule
$ ansible-galaxy install ansible_security.ids_ruleCopy to Clipboard Copied! Toggle word wrap Toggle overflow Create a new playbook file titled
add_snort_rule.yml. Set the following parameters:- name: Add Snort rule hosts: snort
- name: Add Snort rule hosts: snortCopy to Clipboard Copied! Toggle word wrap Toggle overflow Add the
becomeflag to ensure that Ansible handles privilege escalation.- name: Add Snort rule hosts: snort become: true
- name: Add Snort rule hosts: snort become: trueCopy to Clipboard Copied! Toggle word wrap Toggle overflow Specify the name of your IDPS provider by adding the following variables:
Copy to Clipboard Copied! Toggle word wrap Toggle overflow Add the following tasks and task-specific variables (e.g., rules, Snort rules file, and the state of the rule - present or absent) to the playbook:
Copy to Clipboard Copied! Toggle word wrap Toggle overflow Tasks are components that make changes on the target machine. Since you are using a role that defines these tasks, the
include_roleis the only entry you need.The
ids_rules_filevariable specifies a defined location for thelocal.rulesfile, while theids_rule_statevariable indicates that the rule should be created if it does not already exist.Run the playbook by executing the following command:
ansible-navigator run add_snort_rule.ym --mode stdout
$ ansible-navigator run add_snort_rule.ym --mode stdoutCopy to Clipboard Copied! Toggle word wrap Toggle overflow Once you run the playbook, all of your tasks will be executed in addition to your newly created rules. Your playbook output will confirm your PLAY, TASK, RUNNING HANDLER, and PLAY RECAP.
Verification
To verify that your IDPS rules were successfully created, SSH to the Snort server and view the content of the /etc/snort/rules/local.rules file.
Chapter 3. Ansible Automation Platform security automation use cases
Ansible Automation Platform provides organizations the opportunity to automate many of the manual tasks required to maintain a strong IT security posture. Areas where security operations might be automated include security event response and remediation, routine security operations, compliance with security policies and regulations, and security hardening of IT infrastructure.
3.1. Red Hat Ansible Automation Platform as part of a Security Operations Center
Protecting your organization is a critical task. Automating functions of your Security Operations Center (SOC) can help you streamline security operations, response, and remediation activities at scale to reduce the risk and cost of breaches. Red Hat Ansible Automation Platform can connect your security teams, tools, and processes for more successful automation adoption and use. Learn how automation can help you safeguard your business and respond to growing security threats faster.
Simplify your security operations center provides an overview of the benefits to automating SOC operations, including such use cases as:
- Investigation enrichment
- Threat hunting
- Incident response
3.2. Patch automation with Ansible Automation Platform
Software patching is a fundamental activity of security and IT operations teams everywhere. Keeping patches up to date is critical to remediating software vulnerabilities and meeting compliance requirements, but patching systems manually at scale can be time-consuming and error-prone. Organizations should put thought into patch management strategies that meet their security, compliance, and business objectives, to prioritize the types of patches to apply (known exploits, critical or important vulnerabilities, optimizations, routine updates, new features, and so on) against the IT assets available across the enterprise. Once policies and priorities have been defined and a patching plan is established, the manual tasks involved in patch management can be automated using Red Hat Ansible Automation Platform to improve patch deployment speed and accuracy, reduce human error, and limit downtime.
3.2.1. Benefits of patch automation
Automating the patching process provides a number of benefits:
- Reduces error-prone manual effort.
- Decreases time to deploy patches at scale.
- Ensures consistency of patches across similar systems. Manual patching of similar systems can result in human error (forgetting one or more, patching using different versions) that impacts consistency.
- Enables orchestration of complex patching scenarios where an update might require taking a system snapshot before applying a patch, or might require additional configuration changes when the patch is applied.
3.2.2. Patching examples
The following playbooks are provided as patching examples, and should be modified to fit the target environment and tested thoroughly before being used in production. These examples use the ansible.builtin.dnf module for managing packages on RHEL and other operating systems that use the dnf package manager. Modules for patching other Linux operating systems, Microsoft Windows, and many network devices are also available.
3.2.2.1. Keeping everything up to date
For some Red Hat Enterprise Linux servers, such as a lab or other non-production systems, you might want to install all available patches on a regular cadence. The following example playbook might be used in a job template that is scheduled to run weekly, and updates the system with all of the latest RPMs.
3.2.2.2. Installing security updates only
For organizations with a policy requiring that all RPMs including security errata be kept up to date, the following playbook might be used in a regularly scheduled job template.
3.2.2.3. Specifying package versions
For production systems, a well-established configuration management practice is to deploy only known, tested combinations of software to ensure that systems are configured correctly and perform as expected. This includes deploying only known versions of operating system software and patches to ensure that system updates do not introduce problems with production applications.
The following example playbook installs a specific version of the httpd RPM and its dependencies when the target host uses the RHEL 9 operating system. This playbook does not take action if the specified versions are already in place or if a different version of RHEL is installed.
By setting allow_downgrade: true, if a newer version of any defined package is installed on the system, it is downgraded to the specified version instead.
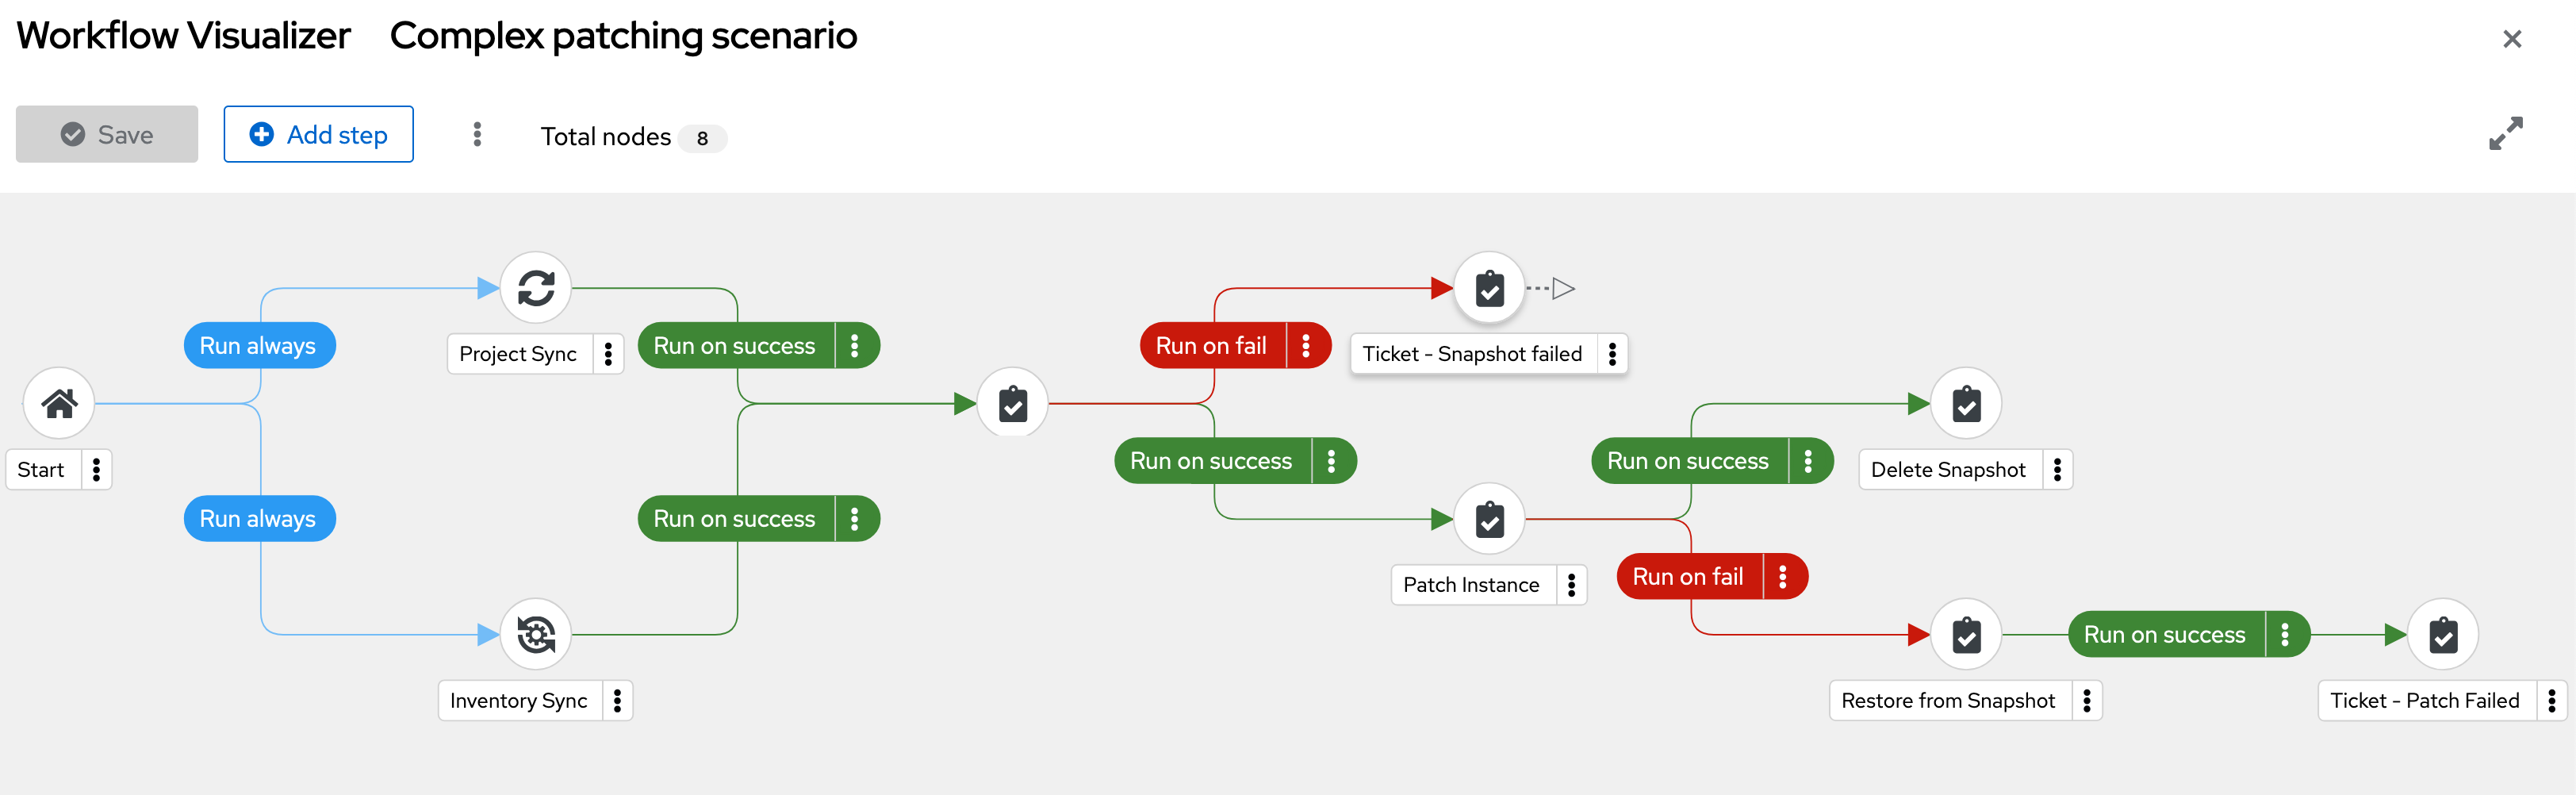
3.2.3. Complex patching scenarios
In Ansible Automation Platform, multiple automation jobs can be chained together into workflows, which can be used to coordinate multiple steps in a complex patching scenario.
The following example complex patching scenario demonstrates taking virtual machine snapshots, patching the virtual machines, and creating tickets when an error is encountered in the workflow.
- Run a project sync to ensure the latest playbooks are available. In parallel, run an inventory sync to make sure the latest list of target hosts is available.
Take a snapshot of each target host.
- If the snapshot task fails, submit a ticket with the relevant information.
Patch each of the target hosts.
- If the patching task fails, restore the snapshot and submit a ticket with the relevant information.
- Delete each snapshot where the patching task was successful.
The following workflow visualization shows how the components of the example complex patching scenario are executed:
Chapter 4. Event-Driven Ansible for reacting to security-related events
Ansible security automation enables the integration of multiple security technologies. This integration is technically complex and challenging, as it brings together different products, interfaces, and workflows and requires the alignment of different team processes within the security organization. Event-Driven Ansible resolves these challenges.
4.1. Use of Event-Driven Ansible for security
Event-Driven Ansible is a powerful automation framework that enables organizations to respond to real-time events dynamically. It listens for triggers from various sources, evaluates conditions, and executes automated responses using Ansible Playbooks.
In the context of security operations, Event-Driven Ansible enables rapid incident response, threat mitigation, and system hardening by automating reactions to security-related events. Event-driven automation is the process of responding automatically to changing conditions in an IT environment, enabling faster issue resolution and reducing routine, repetitive tasks. Event-Driven Ansible connects sources of events with corresponding actions using rules. Its decision-making capabilities receive an “event” from a monitoring tool and trigger the required action. Ansible Rulebooks define the source of the event and, using “if-this-then-that” instructions, explains the action to take when the event is encountered. Ansible Rulebooks map event conditions to an action, like running a playbook or directly executing a module. Through Ansible, this event-driven automation process is applied to security-related events for event-driven security. An extensive set of monitoring tools is required to promptly identify and address any security risk. When these tools identify an issue or concern, an event-driven automation solution delivers log sources back to a Security Information and Event Management (SIEM) system for human intervention, triage, or resolution. Example automated event-driven threat responses include shutting ports, IPs, or devices. If your event source is watching network routers and discovers that a router is not responding, it recognizes this as an event. Event-Driven Ansible receives this event and matches the event to the condition defined by the rule in the Rulebook, which in this case would be “if an event indicating ‘no response’ is encountered, then reset the router”. Event-Driven Ansible triggers the instructions in the Rulebook and the router is reset, restoring it to normal function. This can happen at any time without human intervention.
Event-Driven Ansible can automate the following common security use cases:
- Enterprise firewalls
- Intrusion Detection and Prevention Systems (IDPS)
- Security Information and Event Management (SIEM) systems
- Privileged Access Management (PAM) tools
- Endpoint Protection Platform (EPP)
- Threat detection and response
- Automated incident response
- Zero Trust Network Access (ZTNA)
- Compliance and hardening
- Phishing mitigation
The following is an example workflow scenario using Event-Driven Ansible for detection of and response to unauthorized SSH access:
- Event Source: A security monitoring tool detects multiple failed SSH login attempts.
- Trigger: The event is sent to Event-Driven Ansible.
- Event-Driven Ansible rulebook evaluation: If the failed login count exceeds a threshold, execute an Ansible Playbook.
- Automated response actions:
- Block the source IP in the firewall.
- Send a notification to security teams.
- Collect logs for forensic analysis.
4.2. Case Study with F5
Event-driven automation provides immediate response to suspicious activity. The versatility of Event-Driven Ansible is demonstrated by the F5 Application Delivery and Security Platform. When unusual or malicious activity is detected within the F5 Application Delivery and Security Platform through event monitoring tools such as Elasticsearch and Kibana, Event-Driven Ansible rulebooks respond immediately to stop a potential attack by using F5 solutions such as F5 Advanced WAF and BIG-IP Application Security Manager.
This agentless automation system uses existing transport mechanisms, such as APIs and webhooks, for easier interoperability. F5 content collections for Event-Driven Ansible are developed by F5 and certified by Red Hat to ensure reliable automation and support. Together, F5 and Red Hat help organizations to reduce risk, achieve a faster mean time to resolution, and ultimately free up limited resources to focus on high-value tasks.
4.2.1. Security operations use cases
The following security operations use cases benefit from automation with F5 and Event-Driven Ansible:
4.2.2. Enriched security investigations
Cyberattacks are perpetual threats to organizations, and security tools generate more alerts than understaffed security teams can investigate. Organizations can generate significant savings by enabling their security teams to identify and remediate issues more efficiently through automation. A common first step for security automation is to expedite the investigation phase of potential security incidents by following pre-defined investigation playbooks. When a new security event triggers an Ansible rulebook, automated workflows gather and correlate data from multiple F5 solutions to significantly decrease the amount of time that the security analyst must spend on the investigation, which results in a faster mean time to identify and contain an incident.
4.2.3. Improved threat hunting
Enterprises manage a large number of endpoint devices. This attack surface exposes an organization to multiple threat vectors. Many security teams lack the resources to invest in proactive threat hunting, but by using automation to monitor and correlate threat data and produce actionable insights, security teams can prevent security issues more effectively and quickly detect threat exposure.
4.2.4. Faster response to security incidents
In the context of automated cyberattacks, immediate threat response is vital. Security teams can use automation that executes pre-built, verified workflows for instant response to contain or prevent security incidents, which reduces attacker dwell time and damage. Rules determine which workflows to trigger based on specific events. When the event is detected, automation takes effect to remediate the issue, prevent attacker access, quarantine endpoints, or update security policies to prevent future occurrences. For example, if a malicious user is detected trying to access an application, event monitoring can trigger an Ansible Rulebook that instructs F5 Advanced WAF to block the malicious user while continuing to allow application access by legitimate users.
4.3. Example using F5 and Event-Driven Ansible
Example code using F5 and Event-Driven Ansible is available on GitHub. This code notes each instance of the watcher finding a match in its filter and then copies the source IP from that code into a CSV list. The list is then sent as a variable within the webhook along with the message to execute the code.
This high level workflow is described in the following diagram and code workflow example:
+

The workflow steps are:
- The F5 BIG-IP pushes the monitoring logs to Elastic.
- Elastic takes that data and stores it while using a watcher with its filters and criteria.
- The Watcher detects an event that matches its criteria and sends the webhook with payload to Event-Driven Ansible.
- Event-Driven Ansible’s rulebook triggers from the event which triggers a job template within Ansible Automation Platform, that sends the payload provided by Elastic.
- Ansible Automation Platform’s template executes a playbook to secure the F5 BIG-IP using the payload provided by Event-Driven Ansible (originally provided by Elastic).
4.3.1. Driving responses from logging events
Ansible validated content is a collection of pre-tested, validated, and trusted Ansible Roles and playbooks. This content is designed to make it easier to provide a secure, reliable, and consistent way to manage infrastructure across deployments. The validated content can be used out-of-the-box, reducing the time and effort required to create custom Ansible content. The following use case provides an example for Event-Driven Ansible’s response to log events.
4.3.2. Use case: AWS CloudTrail
AWS CloudTrail is a service that logs all the API calls made in your AWS account, including API calls made by other AWS services. By default, CloudTrail logs are stored in an S3 bucket in an unencrypted form. To verify that your CloudTrail logs are secure, enable encryption for CloudTrail logs using AWS KMS. Enable encryption for CloudTrail logs by creating a KMS key that is used to encrypt the S3 bucket where your CloudTrail logs are stored. Then configure CloudTrail to use this key to encrypt the logs.
With encryption enabled, all CloudTrail logs are automatically encrypted when they are written to the S3 bucket. The logs can only be decrypted using the KMS key that you specified. This establishes that your logs are secure and can only be accessed by authorized users and services.
Encrypting AWS CloudTrail logs is important for several reasons:
- Protection of sensitive information: CloudTrail logs contain a wealth of information about the AWS account, including API calls, user identities, and resource information. Encrypting CloudTrail logs helps protect this sensitive information from unauthorized access or tampering.
- Compliance requirements: Many compliance standards, such as HIPAA and PCI DSS, require log encryption to protect sensitive information. Encrypting CloudTrail logs enables compliance with these standards.
- Prevent tampering: CloudTrail’s log encryption helps prevent logs from being tampered with. This helps maintain log integrity and an accurate record of all API calls made to your AWS account.
- Secure data: CloudTrail log’s encryption provides an additional layer of security for data. In the event that your S3 bucket is compromised, the encrypted logs cannot be accessed without the encryption key.
The Event-Driven Ansible rulebook is comprised of the following components to assist in actions on the log files:
- Sources: define which event source will be used
- Rules: define which conditionals will be matched from the event source
- Actions: trigger events when conditions are met
In the following example, the rulebook implements a ruleset with three rules as follows:
Rule #1: Enable trail encryption
This rule handles the case when trail encryption is disabled. It is triggered when an UpdateTrail operation is performed on the trail and the parameters contained in the UpdateTrail request match these conditions:
event.CloudTrailEvent.requestParameters.kmsKeyId=="" AND event.CloudTrailEvent.requestParameters.name==vars.cloudtrail_name.
The action that is taken to mitigate this drift will run the
'playbooks/eda/aws_restore_cloudtrail_encryption.yml playbook` This playbook runs the Ansible validated role cloud.aws_ops.enable_cloudtrail_encryption_with_kms that re-enables the trail’s encryption, restoring the system to its status quo.
Rule#2: Re-create the trail
This rule handles the case when the trail is deleted.
When the following conditions are met:
event.CloudTrailEvent.eventName=="DeleteTrail" AND event.CloudTrailEvent.requestParameters.name==vars.cloudtrail_name
The action is running the playbooks/eda/aws_restore_cloudtrail.yml playbook. This playbook runs the Ansible validated content cloud.aws_ops.awsconfig_multiregion_cloudtrail role first, which re-creates the trail and then the cloud.aws_ops.enable_cloudtrail_encryption_with_kms role, to enable the encryption on the newly created trail.
Rule#3: Cancels the deletion of the KMS key and re-enables it
This rule responds to the case of a KMS key being deleted or disabled. This results in the condition
event.CloudTrailEvent.eventName=="ScheduleKeyDeletion" OR event.CloudTrailEvent.eventName=="DisableKey"
When someone attempts to delete a KMS key intentionally or accidentally, a ScheduleKeyDeletion event is displayed in AWS CloudTrail. The KMS key is not deleted immediately, because deleting a KMS key is destructive and potentially dangerous. AWS KMS requires setting a 7 – 30 day waiting period. This situation is handled promptly by running playbooks/eda/aws_restore_kms_key.yml playbook, which cancels the deletion of the KMS key. Similarly, when the KMS key is disabled, the playbook reactivates it to restore the original state of the system. The playbook sets the KMS key ARN and uses it to determine whether to cancel the KMS key deletion, to re-enable the KMS key, or both.
Ansible validated content for cloud.aws_ops and Event-Driven Ansible create many opportunities for automated issue resolution and observation of cloud computing environments, helping you to easily automate, mitigate security issues, and maximize your mastery of cloud environments. For more information on using rulebooks, see Validated content for Event-Driven ansible for AWS.