Red Hat Ansible Lightspeed with IBM watsonx Code Assistant User Guide
Learn how to use Red Hat Ansible Lightspeed with IBM watsonx Code Assistant.
Abstract
Making open source more inclusive
Red Hat is committed to replacing problematic language in our code, documentation, and web properties.
We are beginning with these four terms: master, slave, blacklist, and whitelist. Because of the enormity of this endeavor, these changes will be implemented gradually over several upcoming releases.
For more details, see our CTO Chris Wright’s message.
Chapter 1. Introduction to Red Hat Ansible Lightspeed
Learn about Red Hat Ansible Lightspeed with IBM watsonx Code Assistant, its benefits, key features, process, and data gathered to train the IBM watsonx Code Assistant models.
1.1. About Red Hat Ansible Lightspeed
Red Hat Ansible Lightspeed with IBM watsonx Code Assistant is a generative AI service that helps automation teams create, adopt, and maintain Ansible content more efficiently. It uses natural language prompts to generate code recommendations for automation tasks based on Ansible best practices.
Red Hat Ansible Lightspeed is the cloud service that enables integration of generative AI into Ansible Automation Platform. This document specifically describes the integration of Red Hat Ansible Lightspeed with IBM watsonx Code Assistant.
Red Hat Ansible Lightspeed uses IBM watsonx Code Assistant models trained on subject matter expertise across the Ansible ecosystem, which includes Galaxy, GitHub, and Ansible certified and validated content. For ease of use, Red Hat Ansible Lightspeed is integrated with your existing Ansible developer workflows. For example, you can use your existing Git repositories (both public and private) to train your IBM watsonx Code Assistant models. You can also access Lightspeed content suggestions in VS Code through the Ansible VS code extension.
1.1.1. Accessing Red Hat Ansible Lightspeed with IBM watsonx Code Assistant
This section contains information about accessing both Red Hat Ansible Lightspeed cloud service and on-premise deployment.
Red Hat Ansible Lightspeed cloud service
To use the Red Hat Ansible Lightspeed cloud service, you must meet one of the following requirements:
- Your organization has a trial or paid subscription to both the Red Hat Ansible Automation Platform and IBM watsonx Code Assistant.
Your organization has a trial or paid subscription to the Red Hat Ansible Automation Platform, and you have a Red Hat Ansible Lightspeed trial account.
NoteA Red Hat Ansible Lightspeed trial account does not require an IBM watsonx Code Assistant subscription.
Red Hat Ansible Lightspeed on-premise deployment
To use an on-premise deployment of Red Hat Ansible Lightspeed, your organization must have the following subscriptions:
- A trial or paid subscription to the Red Hat Ansible Automation Platform
- An installation of IBM watsonx Code Assistant for Red Hat Ansible Lightspeed on Cloud Pak for Data
1.1.2. Benefits of using Red Hat Ansible Lightspeed
Red Hat Ansible Lightspeed with IBM watsonx Code Assistant offers the following benefits:
Reduces the onboarding learning period for Ansible developers
With just a basic understanding of YAML syntax, Ansible developers can use natural language prompts in English language to describe the automation goal. Red Hat Ansible Lightspeed then offers Ansible code recommendations to help achieve the automation goal more efficiently. This combination of content and best practice suggestions reduces the learning curve and offers a smoother onboarding experience for new Ansible users.
For example, to get a multitask code recommendation, you can enter the prompt
Install postgresql-server & run postgresql-setup command. The Ansible Lightspeed service reads the text, interacts with IBM watsonx Code Assistant, and generates code recommendations to automate a multitask that installs a PostgreSQL server and sets up a PostgreSQL database. You can then view and accept the code recommendations to create tasks in an Ansible YAML file.Increases productivity with quality content creation
Red Hat Ansible Lightspeed offers automation code recommendations that adhere to Ansible best practices, and IBM watsonx Code Assistant provides model fine-tuning features to improve the accuracy of suggested content based on your organization’s existing Ansible content. Therefore, the AI-generated code recommendations are more accurate, more reliable, and integrated with your existing automation development workflows.
Extends trust with AI-generated code recommendations
The AI-generated code recommendations enable you to extend trust, with an automation code base that adheres to accepted Ansible best practices and significant data safeguards.
1.2. Key features of Red Hat Ansible Lightspeed
Red Hat Ansible Lightspeed offers the following key features:
Ansible-specific IBM watsonx Code Assistant models
Red Hat Ansible Lightspeed with IBM watsonx Code Assistant uses Ansible-specific IBM watsonx Granite models unique to your organization, which are provided, managed, and maintained by IBM.
Red Hat Ansible Lightspeed cloud service and on-premise deployments
Red Hat Ansible Lightspeed is available both as a cloud service and as an on-premise deployment. Red Hat Ansible Lightspeed on-premise deployments provide the Red Hat Ansible Automation Platform customers more control over their data and supports compliance with enterprise security policies. For example, organizations in sensitive industries with data privacy or air-gapped requirements can use on-premise deployments of both Red Hat Ansible Lightspeed and IBM watsonx Code Assistant for Red Hat Ansible Lightspeed on Cloud Pak for Data. Red Hat Ansible Lightspeed on-premise deployments are supported on Red Hat Ansible Automation Platform version 2.4 and later.
Red Hat Ansible Lightspeed trial
Existing Ansible users can now start a free 90-day Red Hat Ansible Lightspeed cloud service trial. You can create single-task and multitask recommendations, generate playbooks, and view playbook explanations with a trial account.
To start your Red Hat Ansible Lightspeed trial, you need a trial or paid subscription to the Red Hat Ansible Automation Platform; however, you do not need a trial or paid subscription to IBM watsonx Code Assistant. For more information, see Starting a trial of Red Hat Ansible Lightspeed.
Playbook and task generation
This includes the following capabilities:
Playbook generation and explanations
Using the Ansible VS Code extension, you can create Ansible playbooks using a natural language interface in English. Red Hat Ansible Lightspeed with IBM watsonx Code Assistant reads the natural language prompts and generates an entire playbook recommendation based on your intent. You can also view the explanations for new or existing playbooks. The playbook explanations describe what the playbook or task within the playbook does and contextualize its impact.
Single and multitask generation
Using natural language prompts, you can generate single task or multiple task recommendations for Ansible task files and playbooks. To request multitask code recommendations, you can enter a sequence of natural language task prompts in a YAML file comment separated by ampersand (&) symbols.
Currently, Red Hat Ansible Lightspeed supports user prompts in English language only. However, there could be instances where the training data that was used to train the IBM watsonx Code Assistant models included non-English language. In such scenarios, the model can generate code recommendations for prompts made in the same non-English language, but the generated code recommendations might or might not be accurate.
Content source matching
For each generated code recommendation, Red Hat Ansible Lightspeed lists content source matches, including details such as potential source, content author, and relevant licenses. You can use this data to gain insight into potential training data sources used to generate the code recommendations.
Post-processing capabilities
Red Hat Ansible Lightspeed offers post-processing capabilities that augment IBM watsonx Code Assistant and improve the quality and accuracy of code recommendations.
Content maintenance and modernization
The Ansible code bot scans existing content collections, roles, and playbooks through Git repositories, and proactively creates pull requests whenever best practices or quality improvement recommendations are available. The bot automatically submits pull requests to the repository, which proactively alerts the repository owner to a recommended change to their content.
Telemetry data collection on the Admin dashboard
Red Hat Ansible Lightspeed now collects Admin dashboard telemetry data that provides insight into how your organization users are using the Ansible Lightspeed service, and displays the metrics on the Admin dashboard. If you no longer want to collect and manage the Admin dashboard telemetry, you can disable it for your organization.
1.3. Using Red Hat Ansible Lightspeed with IBM watsonx Code Assistant
Review the following licensing and connectivity requirements for setting up Red Hat Ansible Lightspeed.
1.3.1. Prerequisites
To use the Red Hat Ansible Lightspeed cloud service, you must meet one of the following requirements:
- Your organization has a trial or paid subscription to both the Red Hat Ansible Automation Platform and IBM watsonx Code Assistant.
Your organization has a trial or paid subscription to the Red Hat Ansible Automation Platform, and you have a Red Hat Ansible Lightspeed trial account.
NoteA Red Hat Ansible Lightspeed trial account does not require an IBM watsonx Code Assistant subscription.
To use an on-premise deployment of Red Hat Ansible Lightspeed, your organization must have the following subscriptions:
- A trial or paid subscription to Red Hat Ansible Automation Platform
- An installation of IBM watsonx Code Assistant for Red Hat Ansible Lightspeed on Cloud Pak for Data
You must also install the following components:
- VS Code version 1.70.1 or later
- The Ansible extension for VS Code version 2.8 or later
1.3.2. Connectivity requirements
To generate code recommendations, the Ansible Lightspeed service in Visual Studio (VS) Code editor requires access to the following outbound domain:
The outbound connections are encrypted on TCP protocol port 443.
1.4. Data gathered to train the IBM watsonx Code Assistant models
This topic provides information about the data that is collected to train the IBM watsonx Code Assistant models.
1.4.1. Models
Red Hat Ansible Lightspeed with IBM watsonx Code Assistant uses Ansible-specific IBM watsonx Granite models unique to your organization. These models are provided, managed, and maintained by IBM.
1.4.2. Data sources
IBM watsonx Code Assistant models are trained on Ansible content from Ansible Galaxy, data from public Git repositories, and Red Hat Ansible subject matter expert examples.
If you publish content to Ansible Galaxy and want to restrict your Ansible Galaxy content from being used to train the models, you can opt out of sharing your Ansible Galaxy data in the Ansible Galaxy namespace configuration.
1.4.3. Data telemetry
Red Hat Ansible Lightspeed collects the following telemetry data by default:
- Operational telemetry data
- Admin dashboard telemetry data
No telemetry data is collected in an Red Hat Ansible Lightspeed on-premise deployment.
1.4.4. Telemetry data collection notice for the Admin dashboard
In connection with your use of this Red Hat offering, Red Hat may collect telemetry data about your use of the software. This data allows Red Hat to monitor the software and to improve Red Hat offerings and support, including identifying, troubleshooting, and responding to issues that impact users.
The telemetry data may also be used to enable you to track your entitlements to Red Hat subscriptions and take advantage of future Red Hat purchasing programs. It may also allow Red Hat to assist you in implementing upgrades to minimize service impact. The data may be shared internally within Red Hat to improve the user experience. If you are evaluating Red Hat software, the data will help Red Hat determine if you need assistance.
1.4.4.1. What information does Red Hat collect?
Tools within the software monitor various metrics and this information is transmitted to Red Hat. The following metrics are monitored:
Operational telemetry data
This is the data that is required to operate and troubleshoot the Ansible Lightspeed service. For more information, refer the Enterprise Agreement. You cannot disable the collection of operational telemetry data.
This includes the following data:
- Organization you are logged into (Organization ID, account number)
- Large language model (or models) that you are connected to
Admin dashboard telemetry data
This is the data that provides insight into how your organization users are using the Ansible Lightspeed service, and the metrics are displayed on the Admin dashboard.
This includes the following data:
- Prompts and content suggestions, including accept or reject of the content suggestions
User sentiment feedback
You can also disable the Admin dashboard telemetry if you no longer want to collect and monitor the telemetry data. For more information about Admin dashboard telemetry, see Viewing and managing Admin dashboard telemetry.
No telemetry data is collected in an Red Hat Ansible Lightspeed on-premise deployment.
1.4.4.2. Personal Data
Red Hat does not intend to collect personal information. If Red Hat discovers that personal information has been inadvertently received, Red Hat will delete such information. To the extent that any telemetry data constitutes personal data, refer to the Red Hat Privacy Statement for more information about Red Hat’s privacy practices.
Retention
Red Hat retains and stores telemetry data only for as long as it’s needed for the purposes described above or as otherwise required or permitted by law.
Data security
Red Hat employs technical and organizational measures designed to protect the telemetry data. Data stored in the Red Hat cloud is being protected, where possible, through encryption. Data is also segmented, and therefore is not accessible across organizations.
Data sharing
Red Hat may share telemetry data with its business partners in an aggregated form that does not identify customers. This data helps the partners better understand their markets and their customers' use of Red Hat offerings. The data also helps to ensure the successful integration of products jointly supported by those partners.
Third Party Service Providers
Red Hat may engage certain service providers to assist in the collection and storage of the telemetry data.
User control/ enabling and disabling Admin Dashboard telemetry collection
You cannot disable collection of operational telemetry data. Operational telemetry data includes only data that is necessary to operate and troubleshoot the service. However, you can disable the collection of Admin Dashboard telemetry data. For more information, see Disabling the Admin dashboard telemetry.
Chapter 2. Getting started with Red Hat Ansible Lightspeed
This guide shows how to get started with Red Hat Ansible Lightspeed.
2.1. Quick start for administrators
Administrators can leverage Red Hat Ansible Lightspeed’s powerful automation capabilities to streamline system management tasks, reduce human error, and maintain consistency across complex environments. Red Hat Ansible Lightspeed helps administrators and enables developers to work more efficiently, improving productivity and the overall quality of their work.
As an organization administrator, perform the following tasks to set up and manage Red Hat Ansible Lightspeed for your organization:
- Choose and configure your deployment
- Administer the Ansible Lightspeed service
2.1.1. Choosing and configuring your deployment
As an organization administrator, you can set up a Red Hat Ansible Lightspeed cloud service, as an on-premise deployment, or as a hybrid deployment.
Configure the Red Hat Ansible Lightspeed cloud service or on-premise deployment and connect it to your IBM watsonx Code Assistant instance. You can also set up a hybrid deployment, wherein Red Hat Ansible Lightspeed is an on-premise deployment, while IBM watsonx Code Assistant model is a cloud deployment.
You must have a trial or paid subscription to both Red Hat Ansible Automation Platform and IBM watsonx Code Assistant.
2.1.2. Administering the Ansible Lightspeed Service
As an organization administrator, you can manage the Ansible Lightspeed service after deploying Red Hat Ansible Lightspeed cloud service or on-premise deployment.
Perform one of the following tasks:
Log in to the Ansible Lightspeed admin portal
Use the Ansible Lightspeed admin portal to access and manage the Ansible Lightspeed service.
View and manage the Admin dashboard telemetry data
View the operational telemetry and Admin dashboard telemetry data from the Ansible Lightspeed Admin dashboard. If you no longer want to collect the telemetry data for your organization, you can disable the Admin dashboard telemetry.
2.2. Quick start for developers
Red Hat Ansible Lightspeed simplifies writing and managing infrastructure as code with intuitive automation and integrations, enabling fast, efficient coding. Developers can focus on applications, not infrastructure management, due to its simplified workflows.
After the organization administrators have set up Red Hat Ansible Lightspeed, automation developers can use the Ansible Lightspeed service to develop and use custom automation content.
Perform the following tasks to develop Ansible content:
- Install and configure the Ansible VS Code extension
- Develop Ansible content
2.2.1. Installing and configuring Ansible VS Code extension
To access Red Hat Ansible Lightspeed, all Ansible users must install and configure the Ansible VS Code extension in their VS Code editor. For the procedure, see Install and configure the Ansible VS Code extension.
2.2.2. Developing Ansible content
After installing and configuring the Ansible VS Code extension, developers can create custom Ansible content.
You can perform the following tasks:
Start a free 90-day trial of Red Hat Ansible Lightspeed
This is especially useful as you do not need a trial or paid subscription to IBM watsonx Code Assistant. After your 90-day trial expires, you must set up the cloud service or on-premise deployment to continue accessing the Ansible Lightspeed service.
Create single-task or multitask code recommendations
You can generate single-task or multitask code recommendations for your task intent using the Ansible VS Code extension.
Create Ansible playbooks and view playbook explanations
You can create Ansible playbooks and view explanations for new or existing playbooks by using the Ansible VS Code extension.
Create roles within a collection and view role explanations
You can generate roles within collections using the Ansible VS Code extension and view explanations for existing roles.
Chapter 3. Starting a trial of Red Hat Ansible Lightspeed
Red Hat Ansible Lightspeed cloud service provides a free 90-day trial for existing Ansible users.
3.1. Starting a trial of Red Hat Ansible Lightspeed
To start a free trial, you need a trial or paid subscription to the Red Hat Ansible Automation Platform, but you do not need a trial or paid subscription to IBM watsonx Code Assistant. This means that you do not need to configure the API key or model ID when setting up a trial account.
Using the trial account, you can create single-task and multitask recommendations, generate playbooks, and view playbook explanations.
Prerequisites
- You must have a trial or paid subscription to the Red Hat Ansible Automation Platform.
- You must have installed the Ansible VS Code extension. For the steps, see Installing the Ansible VS Code extension.
- You must have configured the Ansible VS Code extension to enable Red Hat Ansible Lightspeed. For the steps, see Configuring the Ansible VS Code extension.
Procedure
- Open the VS Code application.
- From the VS Code activity bar, click the Ansible icon to open the left panel.
- Ensure that you have configured the Ansible VS Code extension to enable Red Hat Ansible Lightspeed. For the steps, see Configuring the Ansible VS Code extension.
- In the Ansible Lightspeed view, click Connect.
- Enter your Red Hat account username and password.
- In the Ansible Lightspeed view, click Start trial. The Ansible Lightspeed portal login page opens.
On the Ansible Lightspeed Portal, select the checkbox to accept the IBM terms and conditions before proceeding.
You can also select to receive notifications about Red Hat products, services, and events. You can unsubscribe anytime if you no longer wish to receive the marketing emails.
- Click Start trial. Your Red Hat Ansible Lightspeed trial has started.
View the time remaining on your trial account:
- From the VS Code activity bar, click the Ansible icon.
- In the Ansible Lightspeed view, verify that you are logged in using your trial account and view the expiration date of your trial account.
Chapter 4. Setting up Red Hat Ansible Lightspeed for your organization
As a Red Hat customer portal administrator, you must configure Red Hat Ansible Lightspeed to connect to your IBM watsonx Code Assistant instance. This chapter provides information about configuring both the Red Hat Ansible Lightspeed cloud service and on-premise deployment.
4.1. Configuration requirements
Ensure that you meet the licensing and setup requirements specified below before you begin setting up Red Hat Ansible Lightspeed.
4.1.1. Licensing requirements
Red Hat Ansible Lightspeed cloud service
To use the Red Hat Ansible Lightspeed cloud service, you must meet one of the following requirements:
- Your organization has a trial or paid subscription to both the Red Hat Ansible Automation Platform and IBM watsonx Code Assistant.
Your organization has a trial or paid subscription to the Red Hat Ansible Automation Platform, and you have a Red Hat Ansible Lightspeed trial account.
NoteA Red Hat Ansible Lightspeed trial account does not require an IBM watsonx Code Assistant subscription.
Red Hat Ansible Lightspeed on-premise deployment
To use an on-premise deployment of Red Hat Ansible Lightspeed, your organization must have the following subscriptions:
- A trial or paid subscription to the Red Hat Ansible Automation Platform
- An installation of IBM watsonx Code Assistant for Red Hat Ansible Lightspeed on Cloud Pak for Data
4.1.2. Setup requirements
To set up Red Hat Ansible Lightspeed for your organization, you need the following IBM watsonx Code Assistant information:
API key
A unique API key authenticates all requests made from Red Hat Ansible Lightspeed to IBM watsonx Code Assistant. Each Red Hat organization with a valid Ansible Automation Platform subscription must have a configured API key. An authenticated RH-SSO user creating a task in Red Hat Ansible Lightspeed is authenticated to IBM watsonx Code Assistant through the user’s Red Hat organization API key.
Model ID
A unique model ID identifies an IBM watsonx Code Assistant model in your IBM Cloud account. The model ID that you configure in the Ansible Lightspeed administrator portal is used as the default model, and can be accessed by all Ansible Lightspeed users within your organization.
You must configure both the API key and the model ID when you are initially configuring Red Hat Ansible Lightspeed.
4.2. Setting up Red Hat Ansible Lightspeed cloud service
As a Red Hat customer portal administrator, you must configure Red Hat Ansible Lightspeed cloud service to connect to your IBM watsonx Code Assistant instance.
The IBM Cloud service instance of IBM watsonx Code Assistant is available in the following data centers:
-
Dallas (
us-south) -
Frankfurt (
eu-de) -
Sydney (
au-syd) (Essentials plan only)
Ansible Lightspeed cloud deployments are configured to connect exclusively to the US (Dallas) IBM data center. Attempts to connect from non-US data centers will result in connection failure. If you want to use a non-Dallas IBM data center, then you must set up Ansible Lightspeed in hybrid deployment model. For more information about IBM’s supported data centers, see the topic Setting up your watsonx Code Assistant for Red Hat Ansible Lightspeed service in IBM watsonx Code Assistant documentation.
4.2.1. Logging in to the Ansible Lightspeed administrator portal
Use the Ansible Lightspeed administrator portal to connect Red Hat Ansible Lightspeed to IBM watsonx Code Assistant.
Prerequisites
- You have organization administrator privileges to a Red Hat Customer Portal organization with a valid Red Hat Ansible Automation Platform subscription.
Procedure
- Log in to the Ansible Lightspeed portal as an organization administrator.
- Click → .
Enter your Red Hat account username and password. The Ansible Lightspeed Service uses Red Hat Single Sign-On (RH-SSO) for authentication.
As part of the authentication process, the Ansible Lightspeed Service checks whether your organization has an active Ansible Automation Platform subscription. On successful authentication, the login screen is displayed along with your username and your assigned user role.
From the login screen, click Admin Portal.
You are redirected to the Red Hat Ansible Lightspeed with IBM watsonx Code Assistant administrator portal where you can connect Red Hat Ansible Lightspeed to your IBM watsonx Code Assistant instance.
4.2.2. Configuring Red Hat Ansible Lightspeed cloud service
Use this procedure to configure the Red Hat Ansible Lightspeed cloud service.
Prerequisites
You have obtained an API key and a model ID from IBM watsonx Code Assistant that you want to use in Red Hat Ansible Lightspeed.
For information about how to obtain an API key and model ID from IBM watsonx Code Assistant, see the IBM watsonx Code Assistant documentation.
Procedure
- Log in to the Ansible Lightspeed portal as an organization administrator.
- From the login screen, click Admin Portal.
Specify the API key of your IBM watsonx Code Assistant instance:
- Under IBM Cloud API Key, click Add API key. A screen to enter the API Key is displayed.
- Enter the API Key.
- Optional: Click Test to validate the API key.
- Click Save.
Specify the model ID of the model that you want to use:
- Click Model Settings.
- Under Model ID, click Add Model ID. A screen to enter the Model Id is displayed.
- Enter the Model ID that you obtained in the previous procedure as the default model for your organization.
- Optional: Click Test model ID to validate the model ID.
Click Save.
When the API key and model ID is successfully validated, Red Hat Ansible Lightspeed is connected to your IBM watsonx Code Assistant instance.
4.3. Setting up Red Hat Ansible Lightspeed on-premise deployment
As an Red Hat Ansible Automation Platform administrator, you can set up a Red Hat Ansible Lightspeed on-premise deployment and connect it to an IBM watsonx Code Assistant instance. After the on-premise deployment is successful, you can start using the Ansible Lightspeed service with the Ansible Visual Studio (VS) Code extension.
- Red Hat Ansible Lightspeed on-premise deployments are supported on Red Hat Ansible Automation Platform version 2.4 and later.
The IBM Cloud service instance of IBM watsonx Code Assistant is available in the following data centers:
-
Dallas (
us-south) -
Frankfurt (
eu-de) -
Sydney (
au-syd) (Essentials plan only)
-
Dallas (
Ansible Lightspeed cloud deployments are configured to connect exclusively to the US (Dallas) IBM data center. Attempts to connect from non-US data centers will result in connection failure. If you want to use a non-Dallas IBM data center, then you must set up Ansible Lightspeed in hybrid deployment model. For more information about IBM’s supported data centers, see the topic Setting up your watsonx Code Assistant for Red Hat Ansible Lightspeed service in IBM watsonx Code Assistant documentation.
4.3.1. Overview
This section provides information about the system requirements, prerequisites, and the process for setting up a Red Hat Ansible Lightspeed on-premise deployment.
4.3.1.1. Deployment models
You can use one of the following modes of deployment:
On-premise deployment
Both Red Hat Ansible Lightspeed and the IBM watsonx Code Assistant model (IBM Cloud Pak for Data) are on-premise deployments. Telemetry data is not collected for an on-premise mode of deployment.
Hybrid deployment
Red Hat Ansible Lightspeed is an on-premise deployment, while IBM watsonx Code Assistant model is a cloud deployment. Telemetry data is not collected for hybrid deployments.
A hybrid deployment model provides the following benefits:
- Enables you to set up an on-premise deployment of Red Hat Ansible Lightspeed, with IBM watsonx Code Assistant model on a cloud environment.
- Provides the freedom and flexibility to choose an environment that best suits your organizational needs.
- Enables organizations to use the Ansible Automation Platform for user authentication, instead of logging into the Red Hat cloud.
- Enables organizations to deploy the Ansible Automation Platform in their preferred region.
4.3.1.2. System requirements
Your system must meet the following minimum system requirements to install and run the Red Hat Ansible Lightspeed on-premise deployment.
| Requirement | Minimum requirement |
|---|---|
| RAM | 5 GB |
| CPU | 1 |
| Local disk | 40 GB |
To see the rest of the Red Hat Ansible Automation Platform system requirements, see the System requirements section of Planning your installation.
You must also have installed IBM watsonx Code Assistant for Red Hat Ansible Lightspeed on Cloud Pak for Data. The installation includes a base model that you can use to set up your Red Hat Ansible Lightspeed on-premise deployment. For installation information, see the watsonx Code Assistant for Red Hat Ansible Lightspeed on Cloud Pak for Data documentation.
4.3.1.3. Prerequisites
- You have installed Red Hat Ansible Automation Platform on your Red Hat OpenShift Container Platform environment.
- You have administrator privileges for Red Hat Ansible Automation Platform.
- You have installed IBM watsonx Code Assistant for Red Hat Ansible Lightspeed on Cloud Pak for Data.
- Your system meets the minimum system requirements to set up Red Hat Ansible Lightspeed on-premise deployment.
You have obtained an API key and a model ID from IBM watsonx Code Assistant.
For information about obtaining an API key and model ID from IBM watsonx Code Assistant, see the IBM watsonx Code Assistant documentation. For information about installing IBM watsonx Code Assistant for Red Hat Ansible Lightspeed on Cloud Pak for Data, see the watsonx Code Assistant for Red Hat Ansible Lightspeed on Cloud Pak for Data documentation.
- You have an existing external PostgreSQL database configured for the Red Hat Ansible Automation Platform, or have a database created for you when configuring the Red Hat Ansible Lightspeed on-premise deployment.
4.3.2. Installing the Red Hat Ansible Automation Platform operator
Use this procedure to install the Ansible Automation Platform operator on the Red Hat OpenShift Container Platform.
Prerequisites
- You have installed and configured automation controller.
Procedure
- Log in to the Red Hat OpenShift Container Platform as an administrator.
Create a namespace:
- Go to → .
- Click Create Namespace.
- Enter a unique name for the namespace.
- Click Create.
Install the operator:
- Go to → .
- Select the namespace where you want to install the Red Hat Ansible Automation Platform operator.
- Search for the Ansible Automation Platform operator.
- From the search results, select the Ansible Automation Platform (provided by Red Hat) tile.
- Select an Update Channel. You can select either stable-2.x or stable-2.x-cluster-scoped as the channel.
- Select the destination namespace if you selected “stable-2.x” as the update channel.
- Select Install. It takes a few minutes for the operator to be installed.
- Click View Operator to see the details of your newly installed Red Hat Ansible Automation Platform operator.
4.3.3. Creating a model configuration secret
You must create a configuration secret to connect to an IBM watsonx Code Assistant model, which can be either an on-premise deployment or a cloud deployment.
Prerequisites
- You have installed the Ansible Automation Platform operator 2.5.0-0.1753402603 or later on the Red Hat OpenShift Container Platform.
- You have created an OAuth application in the automation controller.
You have obtained an API key and a model ID from IBM watsonx Code Assistant.
For information about obtaining an API key and model ID from IBM watsonx Code Assistant, see the IBM watsonx Code Assistant documentation. For information about installing IBM watsonx Code Assistant for Red Hat Ansible Lightspeed on Cloud Pak for Data, see the watsonx Code Assistant for Red Hat Ansible Lightspeed on Cloud Pak for Data documentation.
Procedure
- Go to the Red Hat OpenShift Container Platform.
- Select → .
- Click → .
- From the Projects list, select the namespace that you created when you installed the Red Hat Ansible Automation Platform operator.
- Click → .
-
In Secret name, enter a unique name for the secret. For example,
model-aiconnect. Add the following keys and their associated values individually:
Expand Key Value usernameFor on-premise deployment only
Enter the username you use to connect to an IBM Cloud Pak for Data deployment.
model_typeEnter one of the following values per your IBM watsonx Code Assistant model:
-
For on-premise deployment (IBM Cloud Pak for Data):
wca-onprem -
For cloud deployment (IBM Cloud):
wca
model_urlEnter the URL of the IBM watsonx Code Assistant model. For cloud deployment, the model URL could be
https://api.dataplatform.cloud.ibm.com.model_api_keyEnter the API key of your IBM watsonx Code Assistant model that was generated during the model installation.
model_idEnter the ID of your IBM watsonx Code Assistant model.
model_verify_sslOptional, and supported on Ansible Automation Platform 2.5 and later
This key controls whether the SSL certificate of the IBM watsonx Code Assistant model is verified.
Default =
truemodel_enable_anonymizationOptional and supported on Ansible Automation Platform 2.5.250730 and later
This key controls whether the anonymization of Personally Identifiable Information (PII) is enabled. PII information includes passwords, IP addresses, email addresses, and other sensitive data. When is enabled, users' personal information is modified to some generic values to protect their data and reduce the risk of data leaks.
You can turn off anonymization by setting the value to
falseto retain all original information entered by users and improve the quality of the answers. Disabling anonymization for Ansible Lightspeed hybrid deployments (the model is in IBM watsonx Code Assistant on IBM Cloud) results in users' PII being sent to IBM Cloud.Default =
trueImportantEnsure that you do not accidentally add any whitespace characters (extra line, space, and so on) to the value fields. If there are any extra or erroneous characters in the secret, the connection to IBM watsonx Code Assistant fails.
-
For on-premise deployment (IBM Cloud Pak for Data):
Click Create.
After you create the model configuration secret, you must update the YAML file of the Ansible Automation Platform operator.
4.3.4. Updating the YAML file of the Ansible Automation Platform operator
After you create the model configuration secret, you must update the YAML file of the Ansible Automation Platform operator to use the secret.
Procedure
- Go to the Red Hat OpenShift Container Platform.
- Select → .
- From the list of installed operators, select the Ansible Automation Platform operator.
- Locate and select the Ansible Automation Platform custom resource, and then click the required app.
- Select the YAML tab.
Scroll the text to find the
Lightspeedcategory, and add the following details under thespec:section:spec: lightspeed: disabled: false model_config_secret_name: <Name of the model configuration secret that you recently created.>- Click Save. The Ansible Lightspeed service takes a few minutes to set up.
4.3.5. Configuring Ansible VS Code extension for Red Hat Ansible Lightspeed on-premise deployment
To access the on-premise deployment of Red Hat Ansible Lightspeed, all Ansible users within your organization must install the Ansible Visual Studio (VS) Code extension in their VS Code editor, and configure the extension to connect to the on-premise deployment.
Prerequisites
- You have installed VS Code version 1.70.1 or later.
Procedure
Obtain the URL of your Ansible Lightspeed instance:
- In Red Hat OpenShift Container Platform, select → and locate the Red Hat Ansible Lightspeed instance that was created.
From the Location column, copy the URL of your Ansible Lightspeed instance.
The URL will be in the following format:
https://<lightspeed_route>/complete/aap/
- Open the VS Code application.
- From the Activity bar, click the Extensions icon.
- From the Installed Extensions list, select Ansible.
-
From the Ansible extension page, click the Settings icon (
 ) and select Extension Settings.
Select Ansible Lightspeed settings and specify the following information:
In the URL for Ansible Lightspeed field, enter the Route URL of the Red Hat Ansible Lightspeed on-premise deployment. Ansible users must have Ansible Automation Platform controller credentials.
After configuring Ansible VS Code extension to connect to Red Hat Ansible Lightspeed on-premise deployment, you must log in to Ansible Lightspeed through the Ansible VS Code extension.
NoteIf your organization recently subscribed to the Red Hat Ansible Automation Platform, it might take a few hours for Red Hat Ansible Lightspeed to detect the new subscription. In VS Code, use the Refresh button in the Ansible extension from the Activity bar to check again.
4.3.6. Connecting to a different IBM watsonx Code Assistant model
After you have set up the Red Hat Ansible Lightspeed on-premise deployment successfully, you can modify the deployment if you want to connect to another IBM watsonx Code Assistant model.
For example, you connected to the default IBM watsonx Code Assistant model but now want to connect to a custom model instead. To connect to another IBM watsonx Code Assistant model, you must create new connection secrets, and then update the connection secrets and parameters on an existing Ansible Automation Platform operator.
Prerequisites
- You have set up a Red Hat Ansible Lightspeed on-premise deployment.
- You have obtained an API key and a model ID of the IBM watsonx Code Assistant model you want to connect to.
- You have created a new model configuration secret for the IBM watsonx Code Assistant model that you want to connect to. For information about creating a model configuration secrets, see Creating a model configuration secret.
Procedure
- Go to the Red Hat OpenShift Container Platform.
- Select → .
- From the list of installed operators, select the Ansible Automation Platform operator.
- Locate and select the Ansible Automation Platform custom resource, and then click the required app.
- Select the YAML tab.
Scroll the text to find the
specsection underLightspeedcategory. For example:spec: lightspeed: disabled: false model_config_secret_name: <Name of the model configuration secret that you recently created.>-
Replace the
model_config_secret_namevalue with the name of the IBM watsonx Code Assistant that you want to connect to. Click Save.
The new Ansible Lightspeed pods are created. After the new pods are running successfully, the old Ansible Lightspeed pods are terminated.
4.3.7. Monitoring your Red Hat Ansible Lightspeed on-premise deployment
After the Red Hat Ansible Lightspeed on-premise deployment is successful, use the following procedure to monitor the metrics on an API endpoint /metrics.
Procedure
Create a system auditor user:
- Create a user with a system auditor role in the Red Hat Ansible Automation Platform. For the procedure, see the Creating a user section of Getting started with Ansible Automation Platform.
-
Verify that you can log in to the Ansible Lightspeed portal for on-premise deployment (
https://<lightspeed_route>/) as the newly-created system auditor user, and then log out.
Create a token for the system auditor user:
Log in to the Ansible Lightspeed portal for on-premise deployment (
https://<lightspeed_route>/admin) as an administrator by using the following credentials:- Username: admin
-
Password: The secret that is named as
<lightspeed-custom-resource-name>-admin-passwordin the Red Hat OpenShift Container Platform cluster namespace where Red Hat Ansible Lightspeed is deployed.
- On the Django administration window, select Users from the Users area. A list of users is displayed.
- Verify that the user with the system auditor role is listed in the Users list.
- From the Django Oauth toolkit area, select → .
Provide the following information and click Save:
- User: Use the magnifying glass icon to search and select the user with the system auditor role.
- Token: Specify a token for the user. Copy this token for later use.
- Id token: Select the token ID.
- Application: Select Ansible Lightspeed for VS Code.
- Expires: Select the date and time when you want the token to expire.
Scope: Specify the scope as read write.
An access token is created for the user with a system auditor role.
- Log out from the Ansible Lightspeed portal for on-premise deployment.
-
Monitor your Red Hat Ansible Lightspeed on-premise deployment, by using the authorization token of the user with the system auditor role, to access the metrics endpoint
https://<lightspeed_route>/metrics.
4.3.8. Using the Ansible Lightspeed REST API
As the platform administrator, you can configure and use the Ansible Lightspeed REST API to build a custom automation development and tooling workflow outside of VS Code. For information about the Ansible Lightspeed REST API, see Ansible AI Connect. 1.0.0 (v1) in the API catalog.
The Ansible Lightspeed REST API is available for Ansible Automation Platform 2.5 and later.
Prerequisite
- Ensure that you are using the Red Hat Ansible Automation Platform operator patch version 2.5-20250305.9 or later and Red Hat Ansible Lightspeed operator version 2.5.250225 or later.
Procedure
Select the platform user for whom you want to grant REST API access.
You can select an existing user or create a platform user in the Red Hat Ansible Automation Platform. For the procedure, see the Creating a user section of Getting started with Ansible Automation Platform.
-
Verify that you can log in to the Ansible Lightspeed portal for on-premise deployment (
https://<lightspeed_route>/) as the platform user you selected or created, and then log out. Create a token for the platform user:
Log in to the Ansible Lightspeed portal for on-premise deployment (
https://<lightspeed_route>/admin) as an administrator by using the following credentials:- Username: admin
-
Password: The secret that is named as
<lightspeed-custom-resource-name>-admin-passwordin the Red Hat OpenShift Container Platform cluster namespace where Red Hat Ansible Lightspeed is deployed.
- On the Django administration window, select Users from the Users area. A list of users is displayed.
- Verify that the platform user is listed in the Users list.
- From the Django Oauth toolkit area, select → .
Provide the following information and click Save:
- User: Use the magnifying glass icon to search and select the newly-created or existing user for whom you want to grant API access.
- Token: Specify a token for the user. Copy this token for later use.
- Id token: Select the token ID.
- Application: Select Ansible Lightspeed for VS Code.
- Expires: Select the date and time when you want the token to expire.
Scope: Specify the scope as read write.
An access token is created for the user.
- Log out from the Ansible Lightspeed portal for on-premise deployment.
Make a direct call to the Ansible Lightspeed REST API by specifying the newly-created token in the authorization header:
curl -H "Authorization: Bearer <token>"
https://<lightspeed_route>/api/v1/me/
Chapter 5. Developing Ansible content
As an automation developer, you can use Red Hat Ansible Lightspeed to implement your organization’s automation strategy. Red Hat Ansible Lightspeed can help you create and use custom automation content. This chapter provides information about how to get set up as an automation developer on Red Hat Ansible Lightspeed, with details on how to:
- Access the Ansible Lightspeed portal as an automation developer
- Install and configure the VS Code
- Create task recommendations
- Create playbooks and view playbook explanations
- Provide feedback on the Ansible Lightspeed service
5.1. Accessing the Ansible Lightspeed portal as an automation developer
You can access Red Hat Ansible Lightspeed through the Ansible Lightspeed portal. After you enter your Red Hat Single Sign-On (RH-SSO) account credentials, your account is authenticated and you are granted access. Your assigned user role is displayed on the login screen of the Ansible Lightspeed portal.
| Scenario | Result |
|---|---|
| You are a RH-SSO user. This is the typical scenario for accessing Red Hat Ansible Lightspeed as an Ansible user. | You are routed to the Red Hat Ansible Lightspeed paid commercial offering. |
| You are a RH-SSO user, but your organization administrator has not configured Red Hat Ansible Lightspeed to connect with IBM watsonx Code Assistant. | You are routed to the Red Hat Ansible Lightspeed paid commercial offering with a message that your organization administrator has not configured a model for your organization. |
5.1.1. Logging in to the Ansible Lightspeed portal as an automation developer
Use the following procedure to log into the Ansible Lightspeed portal with your Red Hat account.
Procedure
- Go to the Ansible Lightspeed portal login page.
- Click → .
Enter your Red Hat account username and password.
On successful authentication, the login screen is displayed along with your username and your assigned user role.
5.1.2. Logging out of the Ansible Lightspeed Service
To log out of the Ansible Lightspeed Service, you must log out of both the Ansible Lightspeed VS Code extension and the Ansible Lightspeed portal.
Procedure
Log out of the Ansible Lightspeed VS Code extension:
-
Click the Person icon
 . You will see a list of accounts that VS Code is logged into.
- Select → .
-
Click the Person icon
Log out of the Ansible Lightspeed portal:
- Navigate to the Ansible Lightspeed portal login page.
- Click Log out.
5.2. Installing and configuring the Ansible VS Code extension
Red Hat Ansible Lightspeed with IBM watsonx Code Assistant is integrated with the Ansible Visual Studio (VS) Code extension in VS Code. The Ansible VS Code extension, with Red Hat Ansible Lightspeed features enabled, automatically collects recommendations, usage telemetry, and Ansible YAML file state through automated events.
To access Red Hat Ansible Lightspeed, all Ansible users must install and configure the Ansible VS Code extension in their VS Code. The Ansible VS Code extension uses the Ansible-specific IBM watsonx Granite model configured in the Red Hat Ansible Lightspeed administrator portal as the default mode for all users in your organization.
5.2.1. Connectivity requirements
To generate code recommendations, the Ansible Lightspeed service in Visual Studio (VS) Code editor requires access to the following outbound domain:
The outbound connections are encrypted on TCP protocol port 443.
5.2.2. Installing the Ansible VS Code extension
Use the following procedure to install the Ansible Lightspeed extension in VS Code.
Prerequisites
- VS Code version 1.70.1 or later.
You can also install VScode derivatives, such as VScode Insider or VS Codium.
Procedure
- Open the VS Code application.
- From the navigation menu, click the Extensions icon.
- In the Search field, enter Ansible.
- Select Ansible to choose the Ansible language support extension published by Red Hat.
- Click Install.
After installation is complete, verify your VSCode installation:
-
Create a new YAML file using the
.ymlor.yamlfile extension. - From the Status toolbar, click the language indicator and select Ansible to associate the Ansible language type with the new YAML file.
- Start writing a test playbook. Contextual aids are displayed as you start creating your content.
-
Create a new YAML file using the
5.2.3. Configuring the Ansible VS Code extension
Configure third-party LLM providers, such as IBM watsonx Code Assistant or Google Gemini, within the Ansible VS Code extension.
Prerequisites
- You have installed the Ansible VS Code extension v25.12.3.
- You have obtained a valid API key for your chosen third-party LLM provider.
Procedure
- Open the VS Code application.
-
From the Activity bar, click the Extensions icon
 .
.
- From the Installed Extensions list, select Ansible.
- From the Ansible extension page, click the Settings icon and select Extension Settings.
Select Ansible Lightspeed settings, and specify the following information:
Expand UI field Description Ansible Lightspeed: Enabled
Select this checkbox to enable the Red Hat Ansible Lightspeed service.
Ansible Lightspeed: Provider
Select the active AI service for code generation.
Choose the AI provider from the following options:
-
wca: (Default setting) Uses IBM watsonx Code Assistant as the AI provider. -
google: Uses Google Gemini as the AI provider.
Ansible Lightspeed: Model Name
Specify the specific AI model version to use for code generation:
- For IBM watsonx Code Assistant: (Required) The IBM watsonx Code Assistant model name or ID that you want to use for code generation.
- For Google Gemini: (Optional) The system applies a recommended default model if left blank.
Ansible Lightspeed: Api Key
Specify the secret credential required to authenticate requests with third-party model providers.
- For IBM watsonx Code Assistant: (Optional) This field is not used for the IBM WCA provider. IBM watsonx Code Assistant relies on a separate OAuth2 login flow via the Red Hat portal.
- For Google Gemini: (Required) Paste your active Google Gemini API key into this field. This token authorizes the extension to send prompts to Google’s servers.
Ansible Lightspeed: Api Endpoint
Specify the destination URL for network requests sent by the Ansible VS Code extension.
-
For IBM watsonx Code Assistant: (Required) This field allows modification of the service URL for IBM watsonx Code Assistant connections. The default URL is
https://c.ai.ansible.redhat.com. - For Google Gemini: (Not configurable) This setting is not configurable when using the Google provider. The extension automatically manages the correct endpoint URL for Google services internally.
Ansible Lightspeed Suggestions: Enabled
Toggle the automatic display of inline code completions within the Ansible VS Code editor. Inline suggestions are currently available for the IBM watsonx Code Assistant provider only.
Ansible Lightspeed: Timeout
Define the maximum duration the Ansible VS Code extension waits for a server response. The default timeout for API calls is 3000 milliseconds.
-
Result
Your settings are automatically saved in VS Code.
If your organization recently subscribed to the Red Hat Ansible Automation Platform, it might take a few hours for Red Hat Ansible Lightspeed to detect the new subscription. In VS Code, use the Refresh button in the Ansible extension from the Activity bar to check again.
5.2.4. Logging in to Ansible Lightspeed through the Ansible VS Code extension
After installing and configuring the VS Code extension, you can log in to the Ansible Lightspeed service.
Red Hat Ansible Lightspeed provides different sign-in methods depending on whether you are using the cloud service or the on-premise deployment.
Ansible Lightspeed on-premise deployments
Users are authenticated using your Red Hat Ansible Automation Platform login.
To sign in, you can use the Connect button in the Ansible Lightspeed view, or the Sign in with Ansible Lightspeed to use Ansible option in the menu. Once prompted in the browser, select Log in with Ansible Automation Platform, and log in with the authorization mechanism that your automation controller is configured with.
Ansible Lightspeed cloud service
Users are authenticated using Red Hat Single Sign-On (RH-SSO).
To sign in from VS Code, you can use the Connect button in the Ansible Lightspeed view, or the Sign in with Ansible Lightspeed to use Ansible option in the menu. Follow the on-screen prompts to log in and access the Ansible Lightspeed service using your RH-SSO.
NoteIf you are using a cloud development environment at a domain unknown by Ansible Lightspeed, such as on-premise Red Hat OpenShift Dev Spaces, your sign-in menu provides the option Sign-in with Red Hat to use Ansible.
This option uses a device code flow to successfully complete the sign-in process and requires the Red Hat Authentication extension v0.2.0 or later. If you require this authentication flow but don’t see the Sign-in with Red Hat to use Ansible option, ensure you are using the Ansible VS Code extension v24.5.2 or later.
Procedure
- Open the VS Code application.
Sign in using either the Connect button in the Ansible Lightspeed view or the menu.
Sign in using the Connect button:
- From the VS Code activity bar, click the Ansible icon.
- In the Ansible Lightspeed view, click Connect.
- Follow the on-screen prompts to sign in to Ansible Lightspeed.
Sign in using the menu:
- From the VS Code activity bar, click the menu.
Sign in with Ansible Lightspeed to use Ansible or sign in with Red Hat to use Ansible, depending on the sign-in option you are presented with.
Note- The sign-in options are displayed when the VS Code extension is in an active state. The extension is activated after you open the Ansible side panel or after you open an Ansible file in the VS Code editor. If you do not see this option, use the Connect button to link to the Ansible Lightspeed service.
- If you are using a cloud development environment at a domain unknown by Ansible Lightspeed, such as on-premise Red Hat OpenShift Dev Spaces, your sign-in menu provides the option Sign-in with Red Hat to use Ansible. This option uses a device code flow to successfully complete the sign-in process and requires the Red Hat Authentication extension v0.2.0 or later. If you require this authentication flow but don’t see the Sign-in with Red Hat to use Ansible option, ensure you are using the Ansible VS Code extension v24.5.2 or later.
- Follow the on-screen prompts to sign in to Red Hat Ansible Lightspeed.
On successful authentication, the login screen is displayed along with your username and your assigned user role.
5.2.5. Logging out of the Ansible Lightspeed Service
To log out of the Ansible Lightspeed Service, you must log out of both the Ansible Lightspeed VS Code extension and the Ansible Lightspeed portal.
Procedure
Log out of the Ansible Lightspeed VS Code extension:
-
Click the Person icon
. You will see a list of accounts that VS Code is logged into.
- Select → .
-
Click the Person icon
Log out of the Ansible Lightspeed portal:
- Navigate to the Ansible Lightspeed portal login page.
- Click Log out.
5.3. Creating task recommendations
Red Hat Ansible Lightspeed is integrated into Visual Studio (VS) Code through the Ansible VS Code extension. You can request code recommendations for your task intent by using Ansible VS Code extension.
You can perform the following tasks from the Ansible VS Code extension:
Create single task or multitask requests by using natural language prompts
Create a single task prompt
Write a description of your task in the
- name:key of a new task line in your Ansible file. For example, to automate a task of installing PostgreSQL server, you can enter the prompt- name: Install postgresql-server.Create a multitask prompt
Place your cursor on a new line in your Ansible YAML file at the correct indentation, and start your prompt with a Pound key (#).
Write the descriptions of your tasks, separating each prompt by using Ampersand symbols (&). For example, to automate a multitask of installing PostgreSQL server and running the initial PostgreSQL setup command, you can enter the prompt
# Install postgresql-server & run postgresql-setup command.The Ansible Lightspeed service reads the text, interacts with the IBM watsonx Code Assistant model, and generates Ansible task recommendations based on your natural language prompt.
NoteCurrently, Red Hat Ansible Lightspeed supports user prompts in English language only. However, there could be instances where the training data that was used to train the IBM watsonx Code Assistant models included non-English language. In such scenarios, the model can generate code recommendations for prompts made in the same non-English language, but the generated code recommendations might or might not be accurate.
View the content source matching results
For each generated code recommendation, Red Hat Ansible Lightspeed lists content source matches, including details such as potential source, content author, and relevant licenses. You can use this data to gain insight into potential training data sources used to generate the code recommendations.
Provide feedback on the Ansible Lightspeed service
The Ansible Lightspeed service learns your organizational patterns and improves the code recommendation experience over time. You can provide feedback on whether the generated code recommendations were suitable for your task intent. This feedback enables Red Hat Ansible Lightspeed with IBM watsonx Code Assistant to improve on the quality of its suggestions.
5.3.1. Best practices to improve the recommended guidance
Follow these guidelines to improve the likelihood of a quality code recommendation.
- Ensure that your YAML file is properly formatted. See the Ansible YAML syntax guidelines for details.
Avoid context switching within a single playbook file.
The Ansible Lightspeed service attempts to correlate earlier tasks to the active recommendation, and the entire contents of the file before the cursor position are used as context by the model. If the earlier task is not relevant to your prompt, VS code provides inline suggestions instead of code recommendations.
Reword your natural language prompts to get code recommendations that match your task intent.
If you get a recommendation that does not align with the intent of your task name, then rewording your prompt to provide more information about what is desired can lead to improved results.
Use descriptive prompts and provide additional content to improve the code recommendations.
Red Hat Ansible Lightspeed reads the full Ansible YAML file when generating a code recommendation. Using descriptive prompts and having additional YAML file content related to the desired task improves the code recommendation. For example, you can add the previous Ansible tasks and appropriate playbook and variable names to improve the code recommendations.
5.3.2. Creating single task recommendations
You can request code recommendations for a single task by entering natural language prompts in Ansible VS Code extension. For example, to automate a task of installing a PostgreSQL server, you can enter the prompt - name: Install postgresql-server. The Ansible Lightspeed service reads the text, interacts with the IBM watsonx Code Assistant model, and generates the code recommendations.
Prerequisites
You meet one of the following requirements:
- Your organization has a trial or paid subscription to both the Red Hat Ansible Automation Platform and IBM watsonx Code Assistant.
- Your organization has a trial or paid subscription to the Red Hat Ansible Automation Platform, and you have a Red Hat Ansible Lightspeed trial account.
- You have installed and configured the Ansible VS Code extension.
Procedure
- Log in to VS Code with your Red Hat account.
Create a new YAML file or use an existing YAML file:
Create a YAML file:
- Select → .
- From the lower right of the screen, click Plain Text, and in the language mode, select Ansible.
-
Save the file as a YAML file format extension (
.ymlor.yaml).
Use an existing YAML file:
On the bottom right of the screen, click the existing language mode, and in the language mode settings, select Ansible.
NoteIf you do not see the language mode section in your VS Code editor, from the Command Palette, select → .
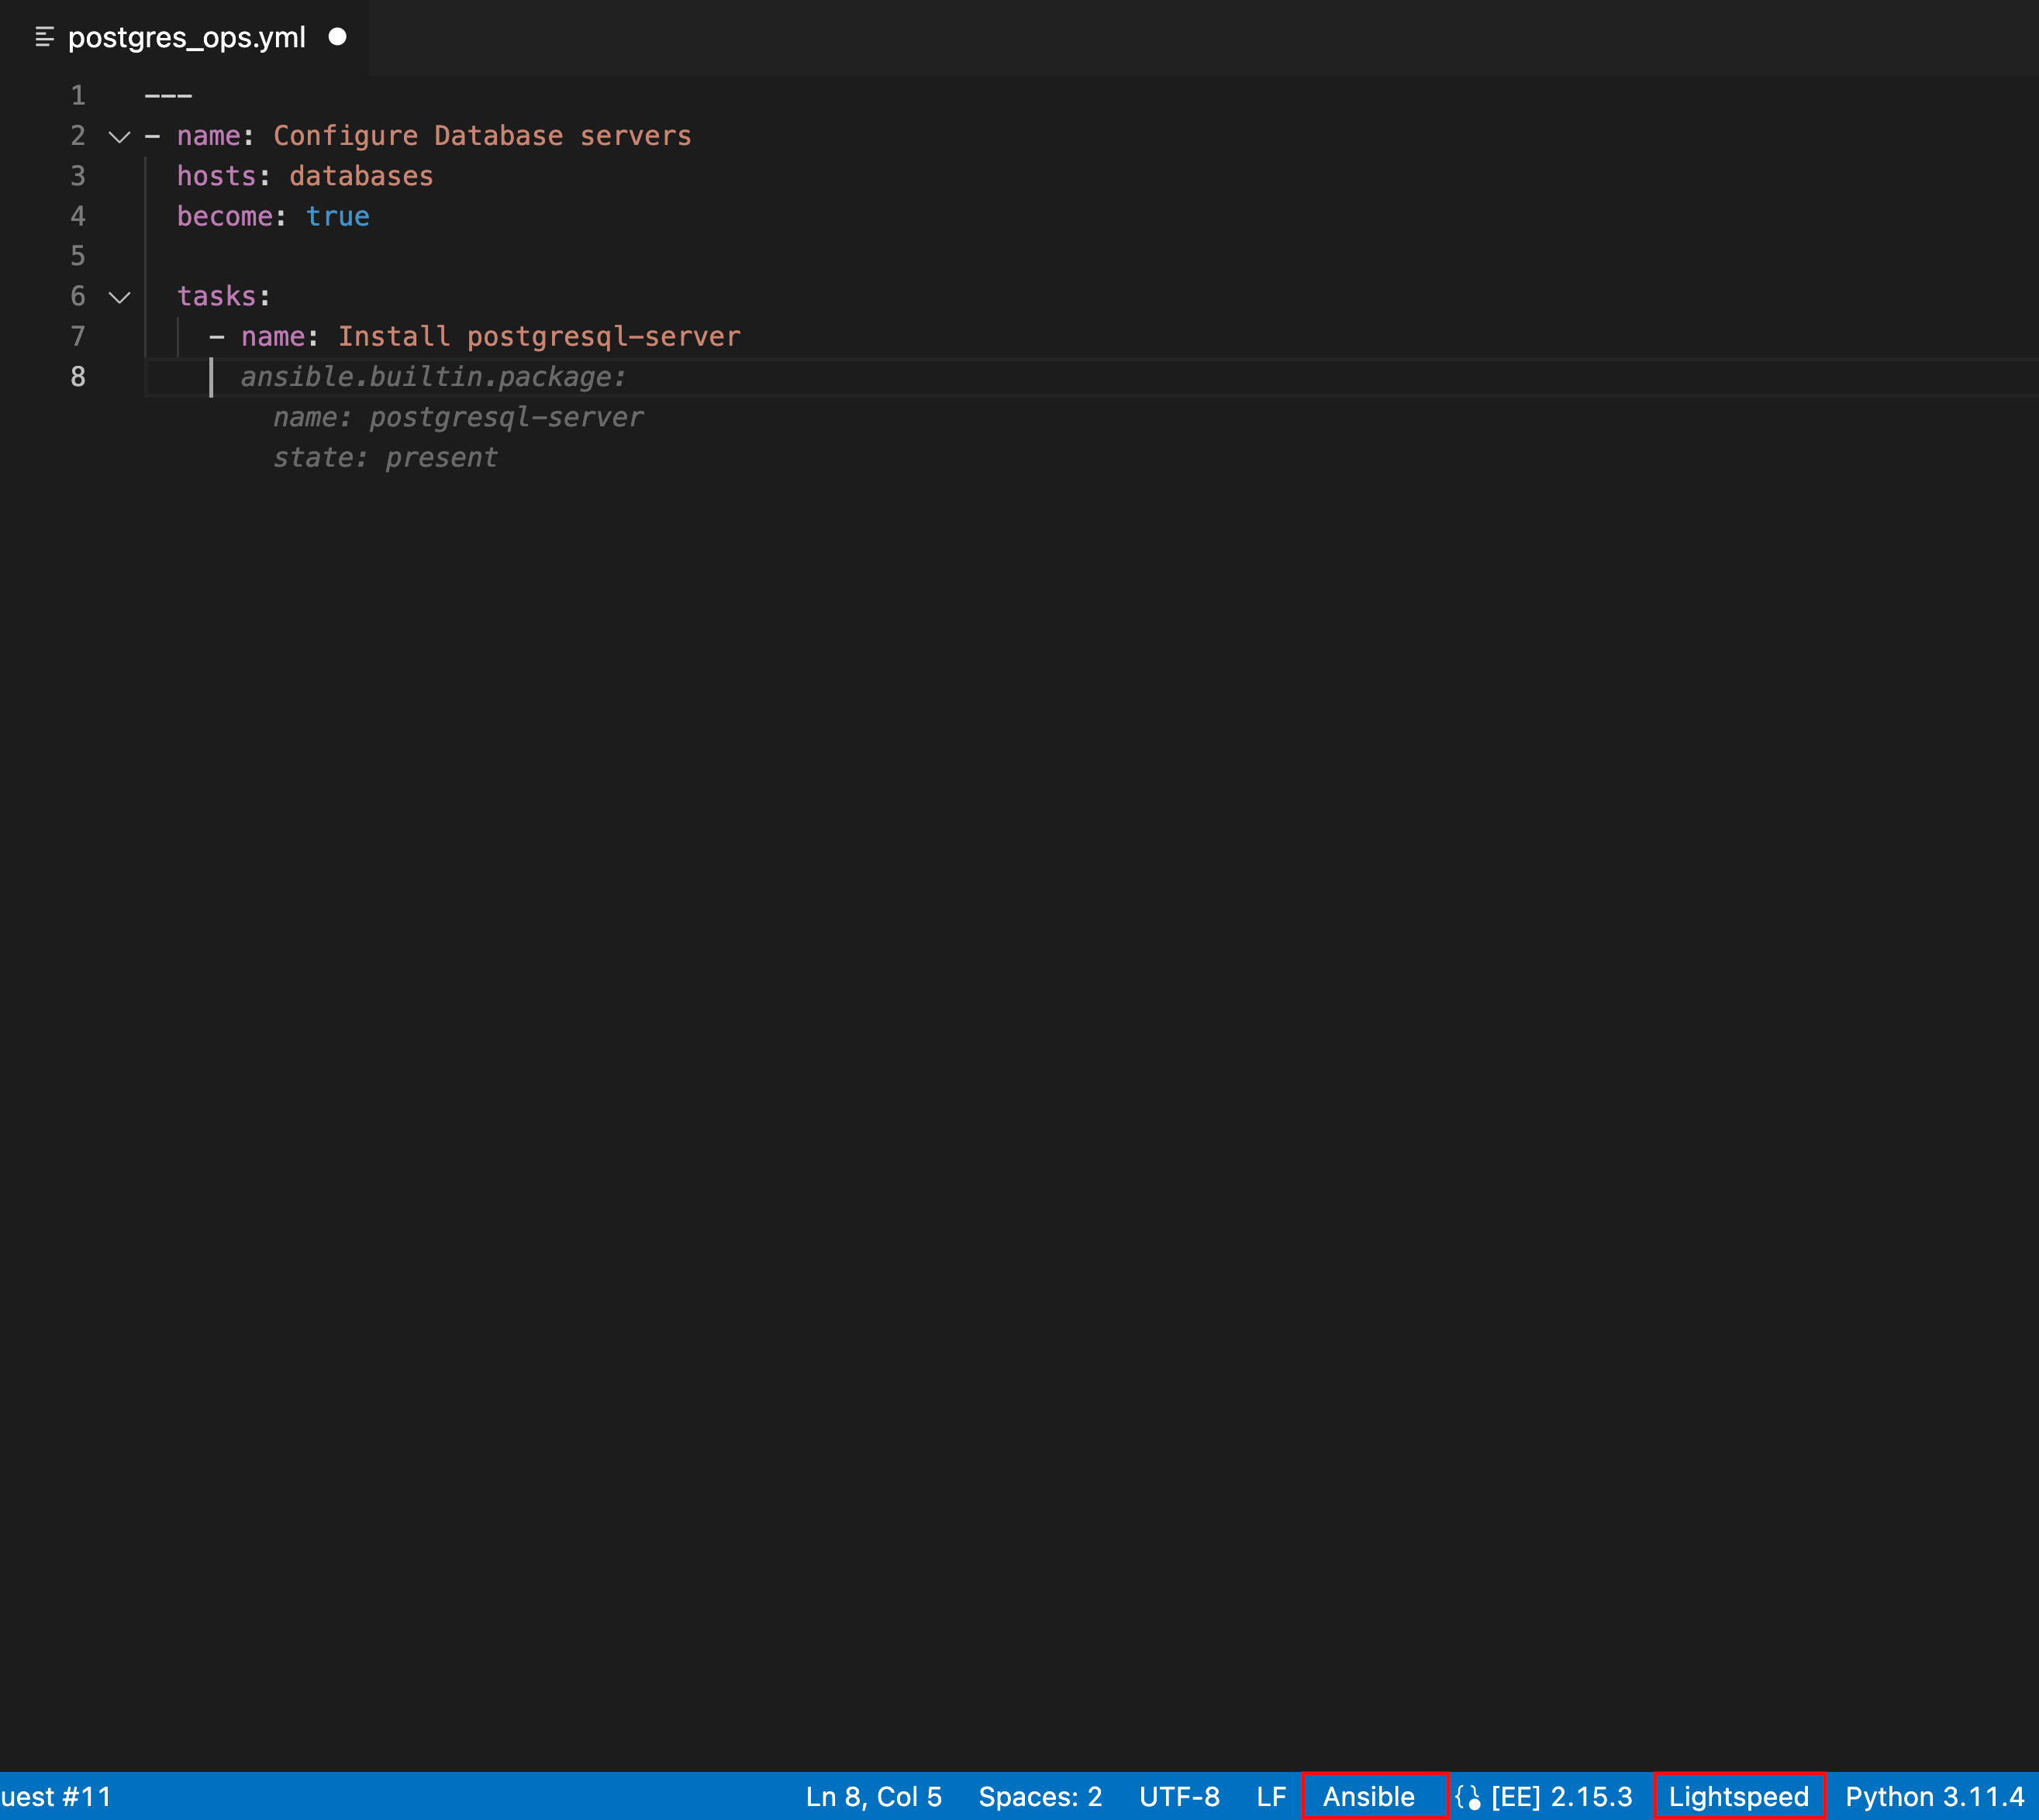
Verify that you see an entry for Lightspeed on the status bar at the lower right of VS Code.
If Ansible is already selected as the desired language but the Lightspeed entry is not displayed, re-select Ansible as the language mode. The following illustration shows Lightspeed and Ansible entries on the VS Code status bar.
Figure 5.1. Ansible and Lightspeed set as selected language mode
Optional: If you see an error message about missing Ansible lint, you can install the missing module or disable it. Perform any one of the following tasks:
- Install Ansible lint: For installation information, see the Installing section of the Ansible Lint documentation.
Disable Ansible lint:
-
From the Activity bar, click the Extensions icon
.
- From the Installed extensions list, select Ansible.
- From the Ansible extension page, click the Settings icon and select Extension Settings.
- Clear the Ansible › Validation › Lint: Enabled checkbox.
-
From the Activity bar, click the Extensions icon
Create a playbook or use an existing playbook.
For more information, see the Getting started with playbooks guide.
In the playbook, provide the following information to request code recommendations for a single task:
-
Add a new Ansible task by starting a new line with
- name:at the correct indentation. -
Add a detailed natural language prompt in the task description after
- name:on the same line. For example, you can specify the following single task prompt:- name: Install postgresql-server Press Enter directly after the task description. Keep the cursor at the same location in your file, and wait for the code recommendation results to populate.
The Ansible Lightspeed service is engaged, and it starts generating code recommendations for a single task.
ImportantAnsible Lightspeed service takes around 5 seconds per task to populate the code recommendations. If you are using a multitask prompt, the Ansible Lightspeed service takes a bit longer (number of tasks times 5 seconds) to populate the results. Do not move your cursor or press any key while the code recommendation is being generated. If you change the cursor location or press any key, Ansible VS Code extension cancels the request and the Ansible Lightspeed service does not process your request.
When the Ansible Lightspeed service is engaged, a Lightspeed processing status indicator is displayed in the lower right of the screen to denote that your code recommendation is being generated.

-
Add a new Ansible task by starting a new line with
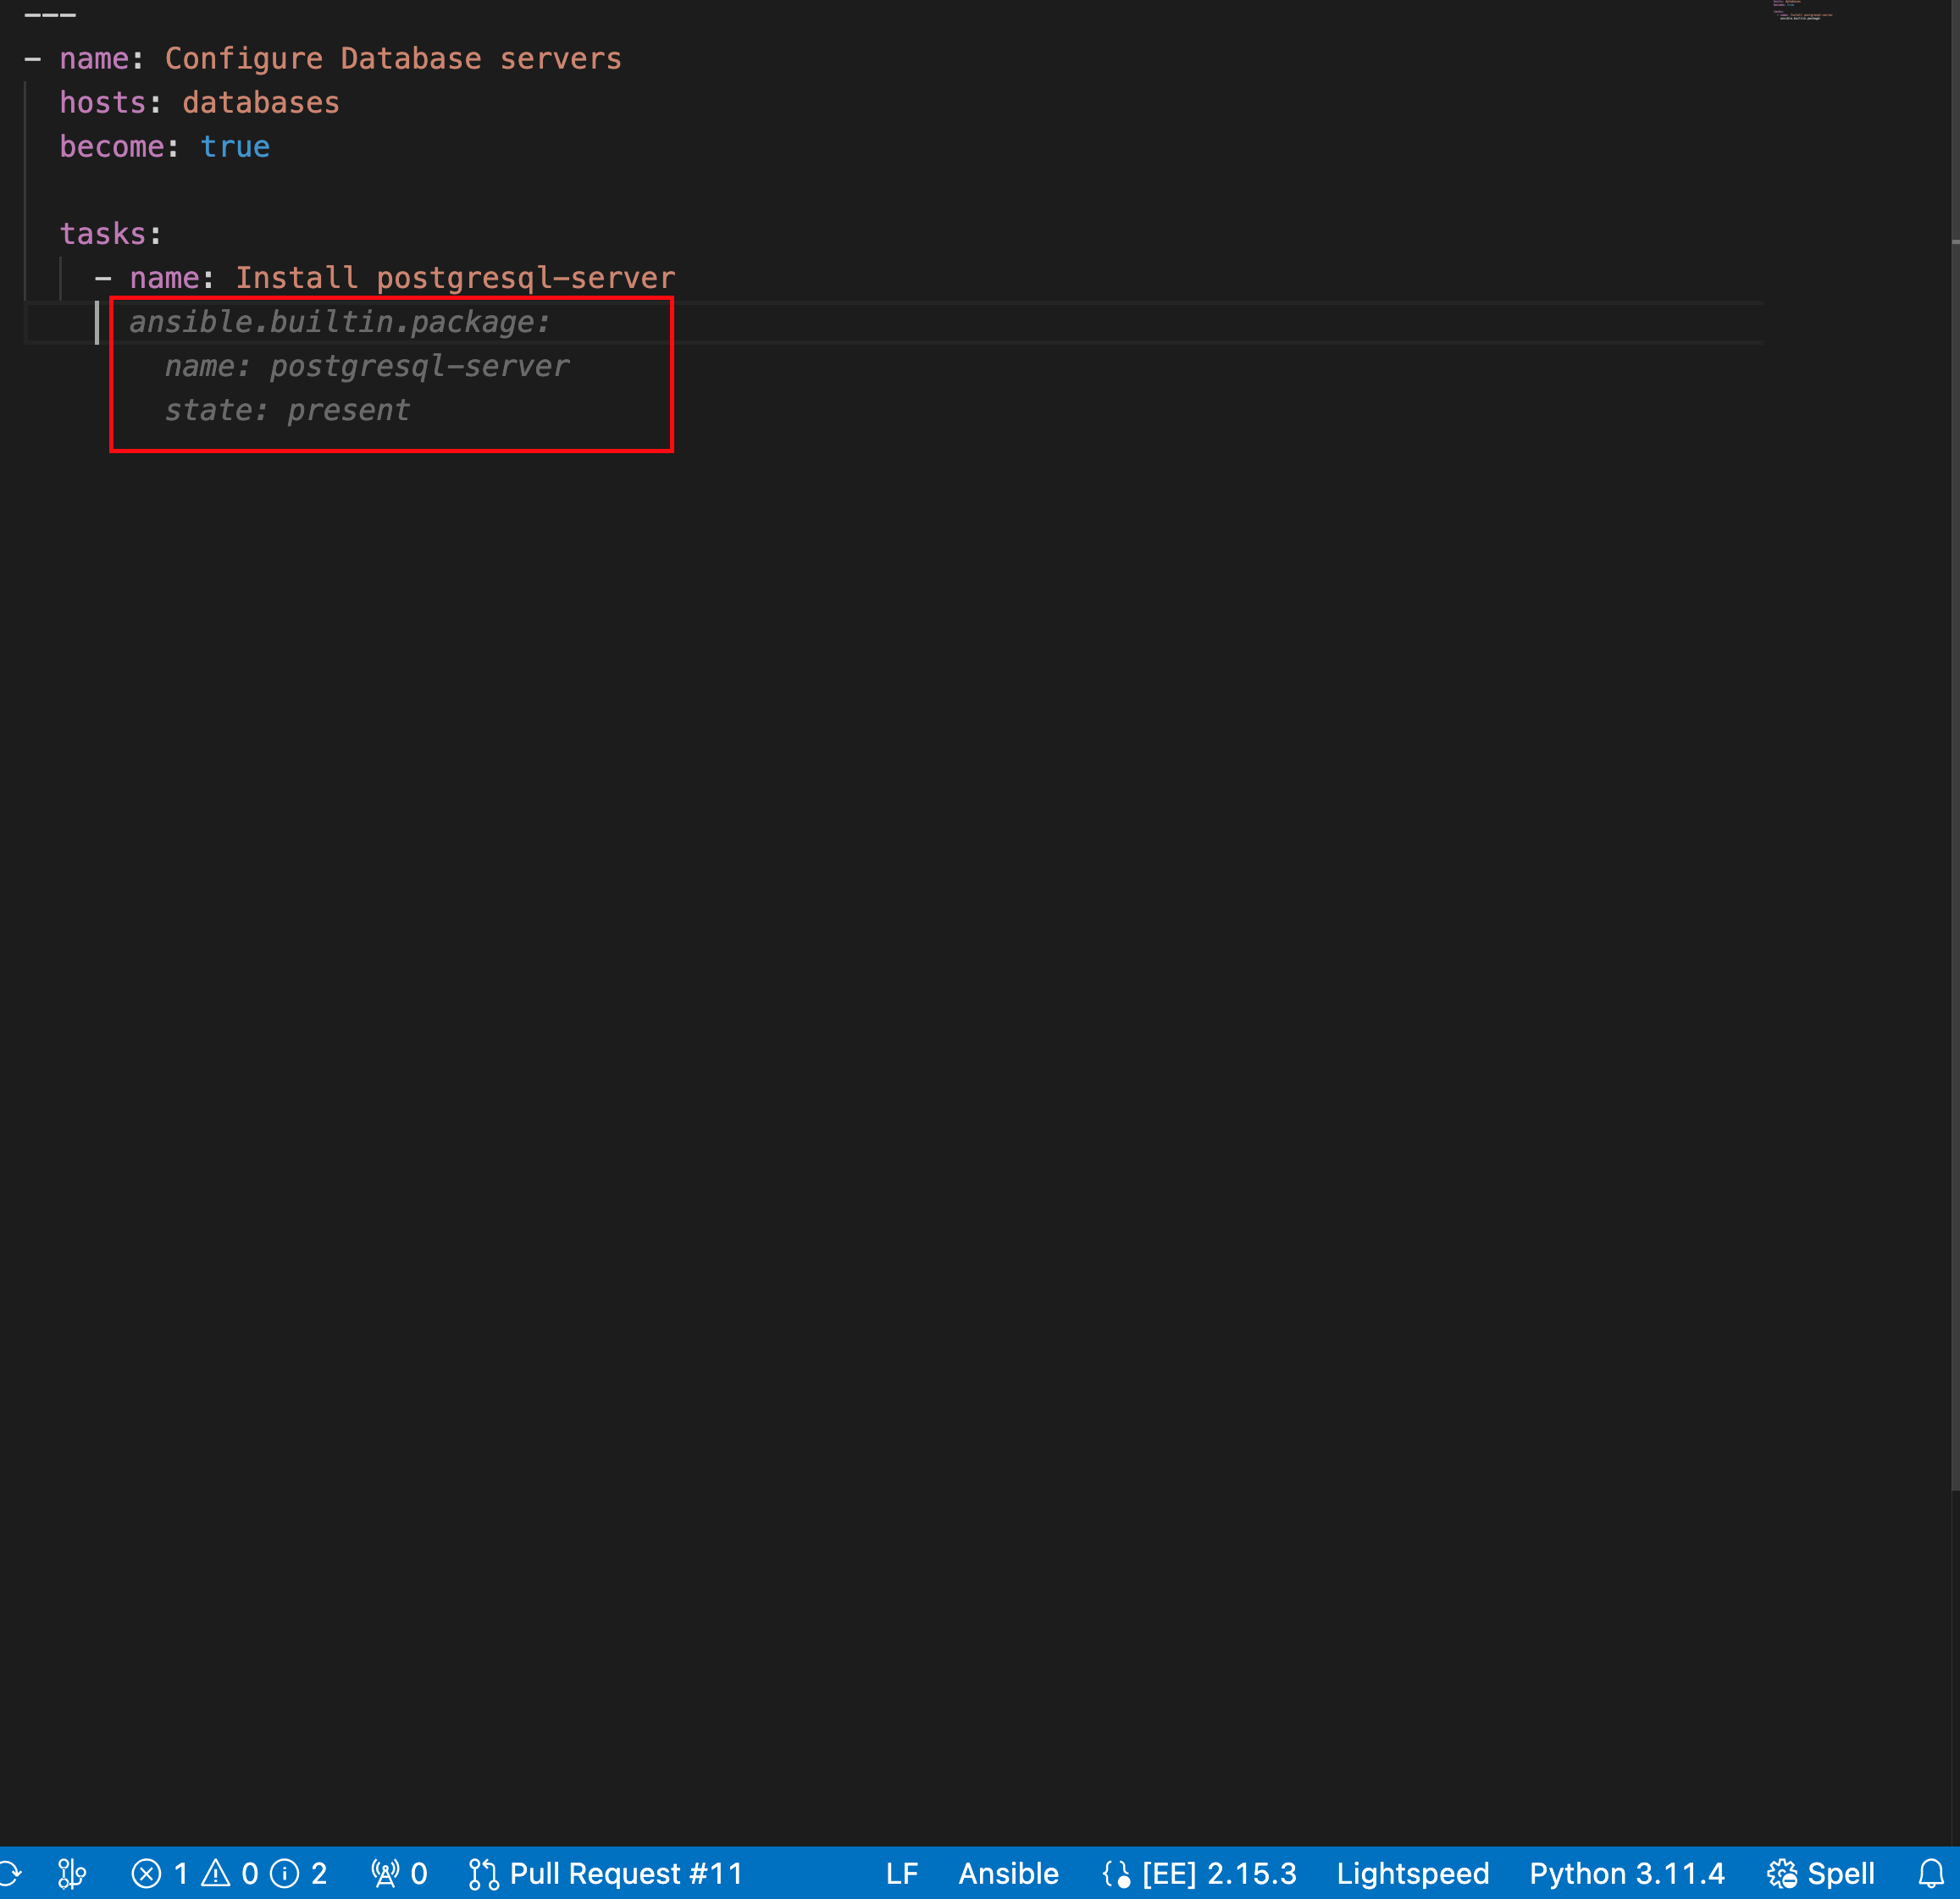
View your code recommendations and ensure that the recommendations match your task intent.
The following illustration shows the code recommendations generated by the Ansible Lightspeed service for the single task Install postgresql-server:
Accept or reject the code recommendations:
- To accept a code recommendation, press Tab.
To reject a code recommendation, press Esc.
NoteIf you reject a recommendation, you can modify the prompt and review the generated code recommendations once again to match your task intent.
After you accept the code recommendation, click the ANSIBLE tab to see the content source matching results.
For each generated code recommendation, Red Hat Ansible Lightspeed lists content source matches, including details such as potential source, content author, and relevant licenses. You can use this data to gain insight into potential training data sources used to generate the code recommendations.
- Click Save to save the code recommendation changes in your Ansible YAML file.
5.3.3. Creating multitask recommendations
You can request multitask code recommendations by entering a sequence of natural language task prompts in Ansible VS Code extension. In a YAML file, start your prompt with a pound symbol (#), and separate each prompt by using the ampersand symbol (&).
Example of a multitask prompt
# Install postgresql-server & run postgresql-setup commandFor better readability, you can split your multitask inline prompts over multiple lines. To achieve this, end your current line with an ampersand symbol (&) and start the next line with the hash symbol (#).
Example of a multitask prompt split over multiple lines
# Create a keypair called lightspeed-keypair & create a vpc & create vpc_id var &
# create a security group that allows SSH & create subnet with 10.0.1.0/24 cidr &
# create an internet gateway & create a route table
The Ansible Lightspeed service reads the text, interacts with the IBM watsonx Code Assistant model, and generates the code recommendations.
While entering a multitask prompt, the Ansible VS Code extension might display a warning if you have long lines in your prompt based on your ansible-lint settings. This warning is a minor readability error and does not impact the quality of your code recommendation output. To resolve the error, you can either ignore it or fix it by splitting your multitask inline prompt over multiple lines.
Prerequisites
You meet one of the following requirements:
- Your organization has a trial or paid subscription to both the Red Hat Ansible Automation Platform and IBM watsonx Code Assistant.
- Your organization has a trial or paid subscription to the Red Hat Ansible Automation Platform, and you have a Red Hat Ansible Lightspeed trial account.
- You have installed and configured the Ansible VS Code extension.
Procedure
- Log in to VS Code with your Red Hat account.
Create a new YAML file or use an existing YAML file.
Create a YAML file:
- Select → .
- From the lower right of the screen, click Plain Text, and in the language mode, select Ansible.
-
Save the file as a YAML file format extension (
.ymlor.yaml).
Use an existing YAML file:
On the bottom right of the screen, click the existing language mode, and in the language mode settings, select Ansible.
NoteIf you do not see the language mode section in your VS Code editor, from the Command Palette, select → .
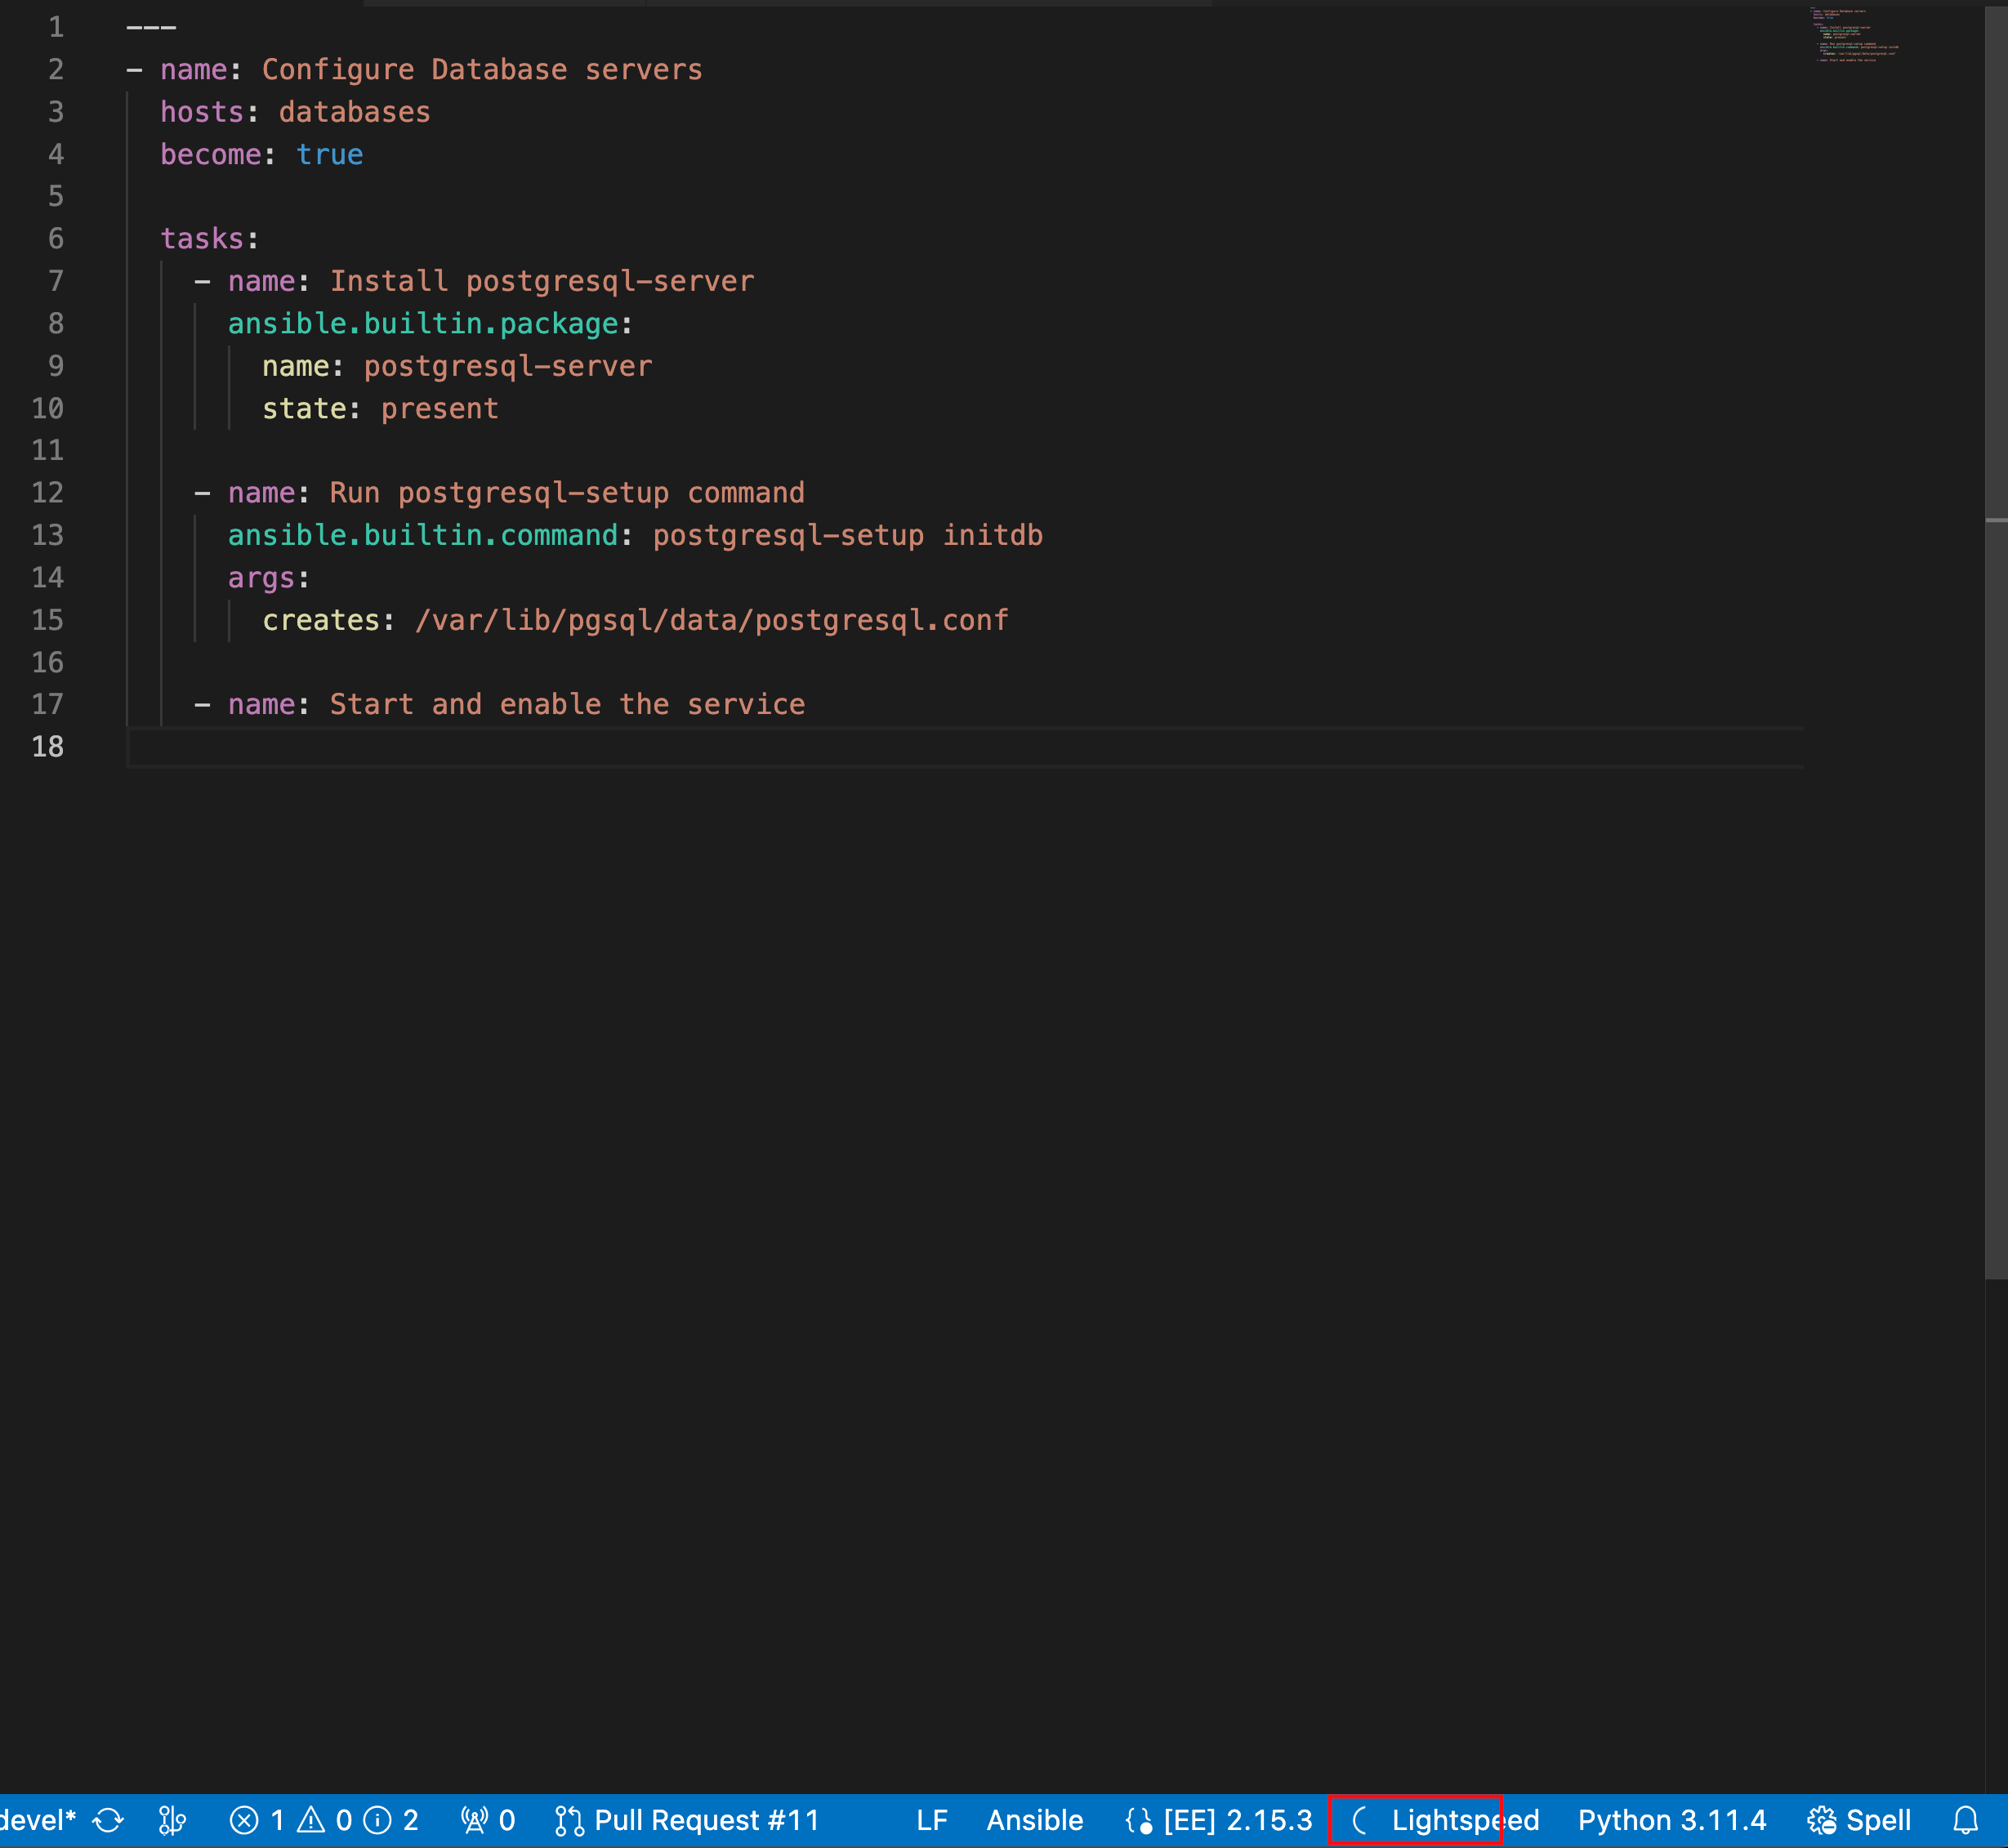
Verify that you see an entry for Lightspeed on the status bar at the lower right of VS Code.
If Ansible is already selected as the desired language but the Lightspeed entry is not displayed, re-select Ansible as the language mode. The following illustration shows Lightspeed entry on the VS Code status bar.
Figure 5.2. Ansible and Lightspeed set as selected language mode
Optional: If you see an error message about missing Ansible lint, you can install the missing module or disable it. Perform any one of the following tasks:
- Install Ansible lint: For installation information, see the Installing section of the Ansible Lint documentation.
Disable Ansible lint:
-
From the Activity bar, click the Extensions icon
.
- From the Installed extensions list, select Ansible.
- From the Ansible extension page, click the Settings icon and select Extension Settings.
- Clear the Ansible › Validation › Lint: Enabled checkbox.
-
From the Activity bar, click the Extensions icon
Create a playbook or use an existing playbook.
For more information, see the Getting started with playbooks guide.
In the playbook, provide the following information to request multitask code recommendations:
- Start a new YAML file comment by entering a pound symbol (#) at the correct indentation.
Add a detailed natural language prompt in a sequence, separating each task by using the ampersand symbol (&).
Example of a multitask prompt
# Install postgresql-server & run postgresql-setup commandFor better readability, split your multitask inline prompts over multiple lines. To achieve this, end your current line with an ampersand symbol (&) and start the next line with the hash symbol (#).
Example of a multitask prompt split over multiple lines
# Create a keypair called lightspeed-keypair & create a vpc & create vpc_id var &
# create a security group that allows SSH & create subnet with 10.0.1.0/24 cidr &
# create an internet gateway & create a route table
Press Enter directly after the task description. Keep the cursor at the same location in your file, and wait for the code recommendation results to populate.
The Ansible Lightspeed service is engaged, and it starts generating code recommendations for multiple tasks.
ImportantAnsible Lightspeed service takes around 5 seconds per task to populate the code recommendations. If you are using a multitask prompt, the Ansible Lightspeed service takes a bit longer (number of tasks times 5 seconds) to populate the results. Do not move your cursor or press any key while the code recommendation is being generated. If you change the cursor location or press any key, Ansible VS Code extension cancels the request and the Ansible Lightspeed service does not process your request.
When the Ansible Lightspeed service is engaged, a Lightspeed processing status indicator is displayed in the lower right of the screen to denote that your code recommendation is being generated.
- Optional: If multitask code recommendations are not being generated, log out of VS Code and log in again using your Red Hat account.
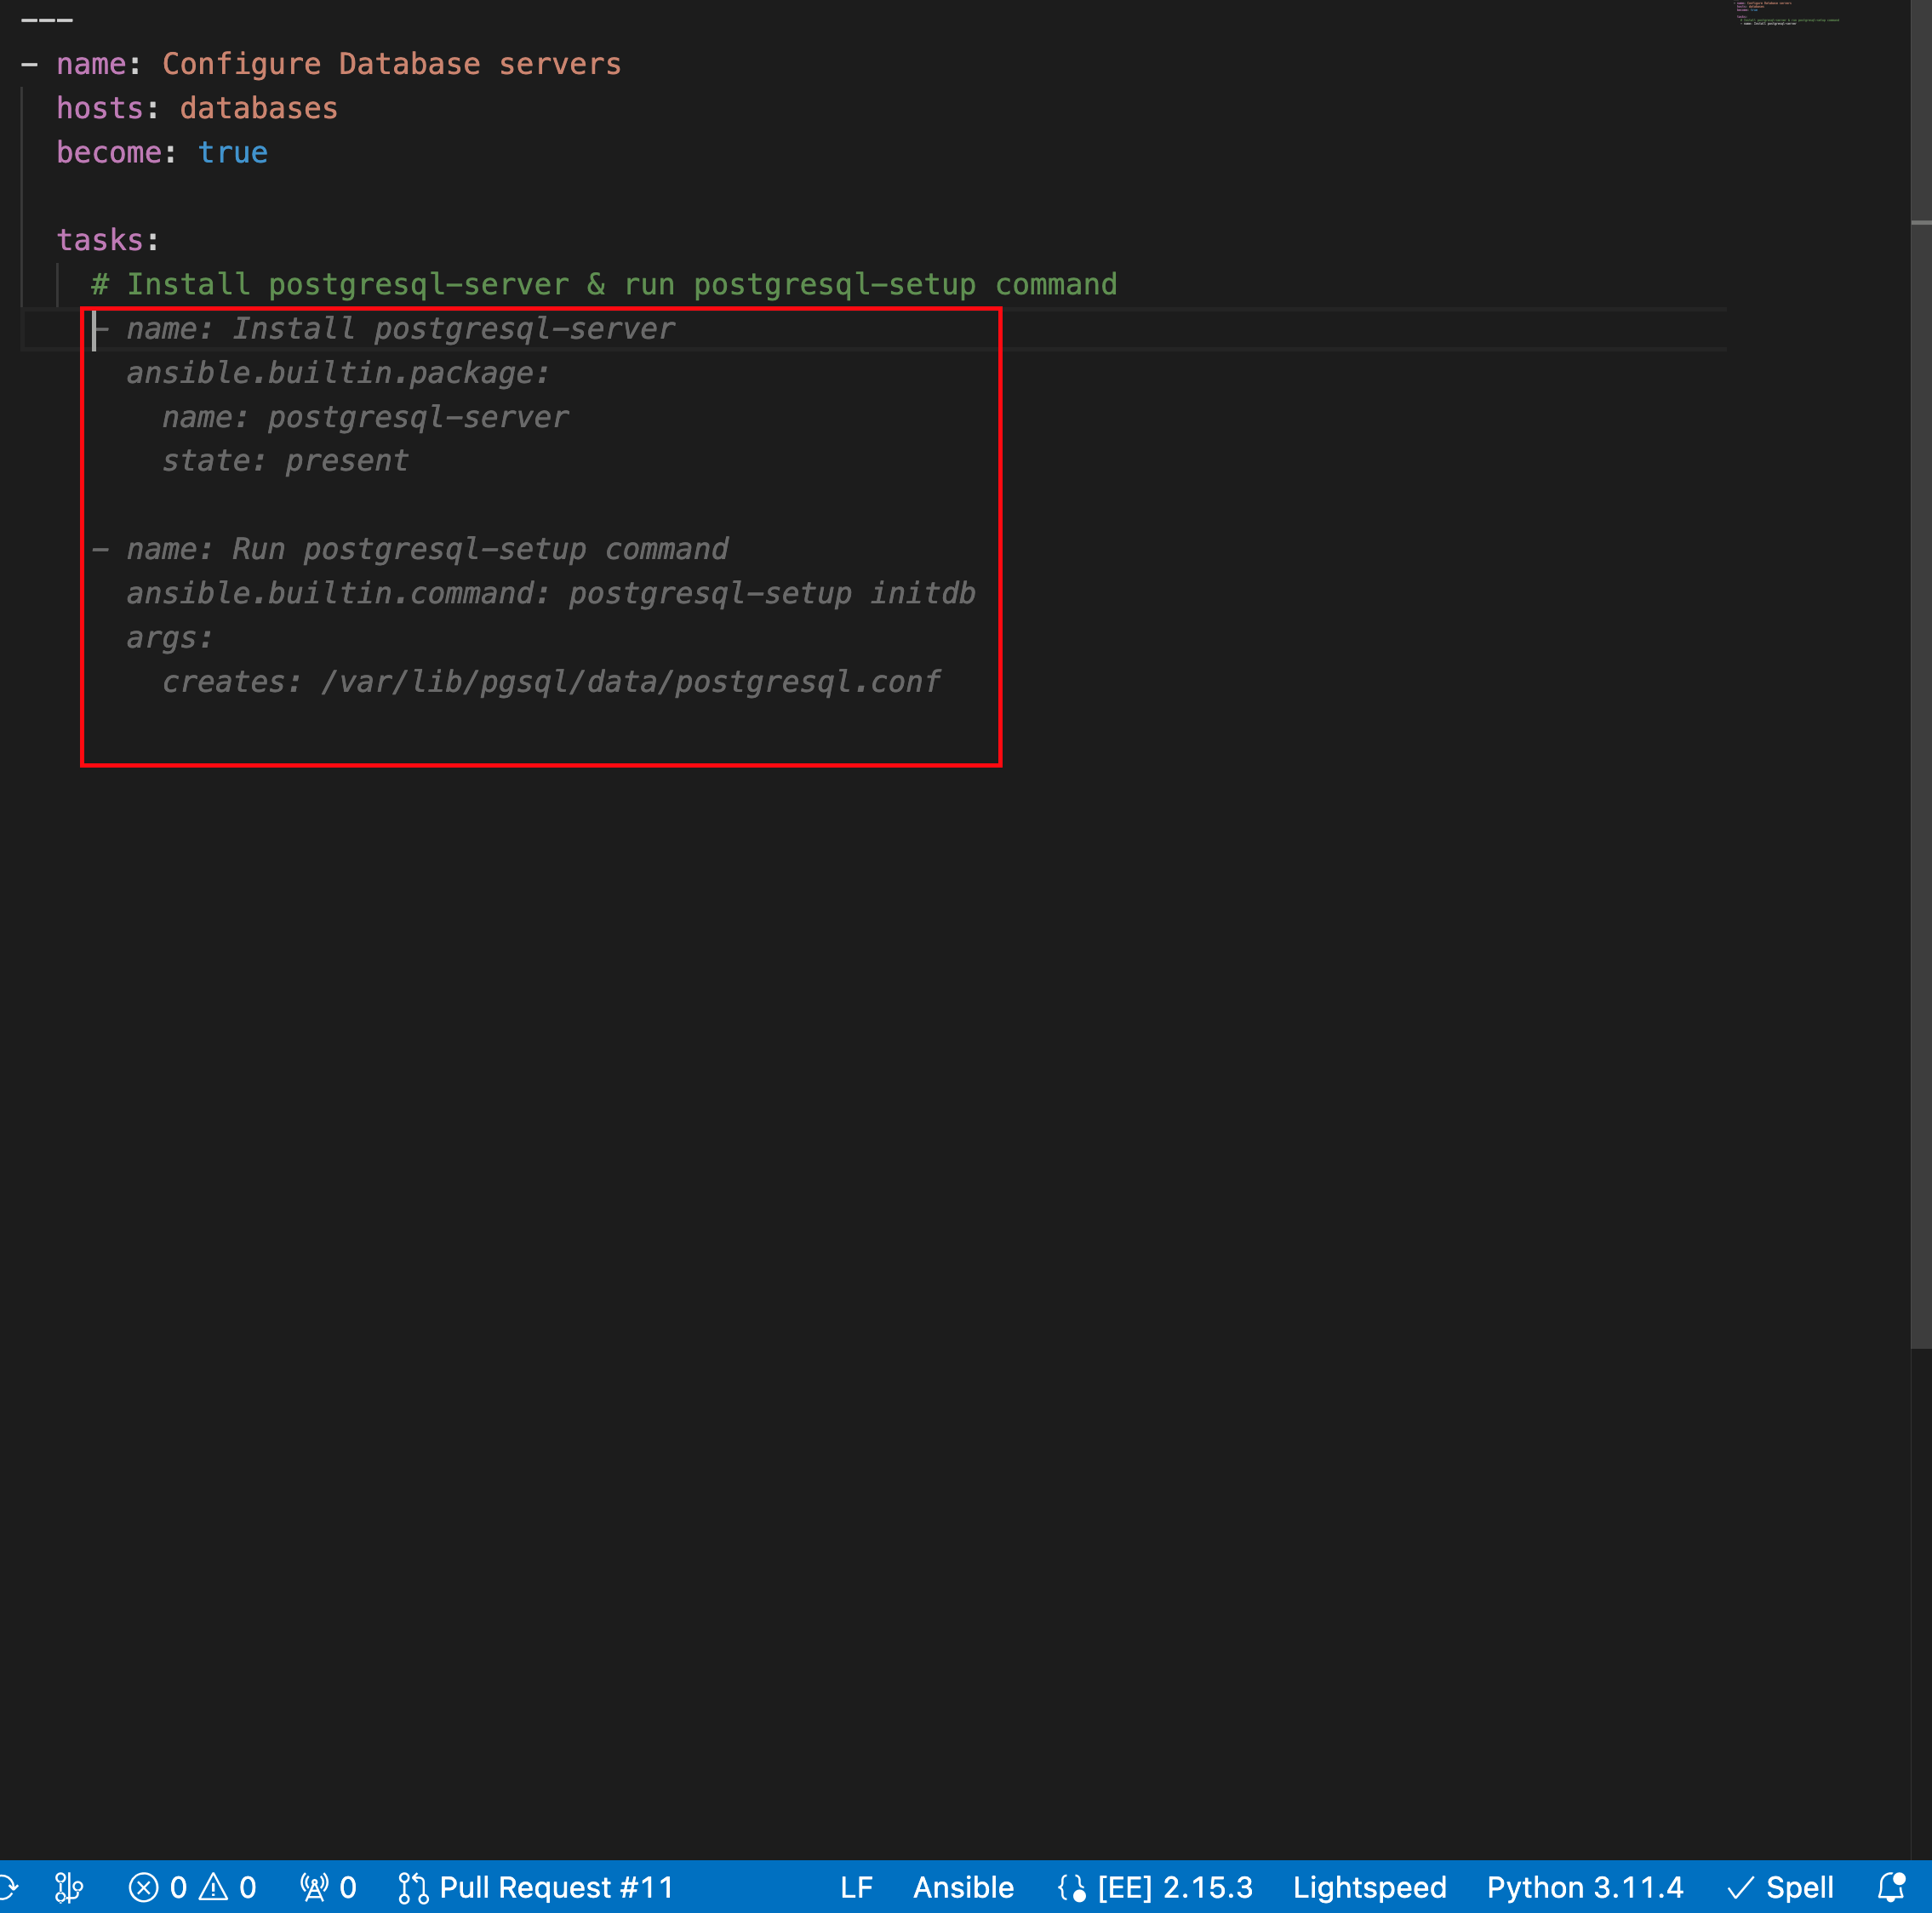
View your code recommendations and ensure that the recommendations match your task intent.
The following illustration shows the code recommendations generated by the Ansible Lightspeed service for the multitask prompt Install postgresql-server & run postgresql-setup command: :
Accept or reject the code recommendations:
- To accept a code recommendation, press Tab.
To reject a code recommendation, press Esc.
NoteIf you reject a recommendation, you can modify the prompt and review the generated code recommendations once again to match your task intent.
After you accept the code recommendation, click the ANSIBLE tab to see the content source matching results.
For each generated code recommendation, Red Hat Ansible Lightspeed lists content source matches, including details such as potential source, content author, and relevant licenses. You can use this data to gain insight into potential training data sources used to generate the code recommendations.
- Click Save to save the code recommendation changes in your Ansible YAML file.
5.3.4. Viewing the Ansible Lightspeed training matches
The Red Hat Ansible Lightspeed with IBM watsonx Code Assistant machine learning model is trained on the following content:
- Existing public or private Git repositories
- Content from Ansible Galaxy
IBM watsonx Code Assistant uses generative AI technology and various types of Ansible content to train the model. Therefore, it is not possible to trace the specific training data that produced a given code recommendation.
For each generated code recommendation, Red Hat Ansible Lightspeed lists the content source matches, including details such as potential source, content author, and relevant licenses. You can use this data to gain insight into potential training data sources used to generate the code recommendations.
After you enter a natural language prompt in VS Code and see the generated code recommendations, you can view the content source matches on the ANSIBLE: LIGHTSPEED TRAINING MATCHES tab.
For example, the following illustration shows the training matches for the multitask recommendation Install postgresql-server & run postgresql-setup command:
Figure 5.3. Training matches for a multitask recommendation
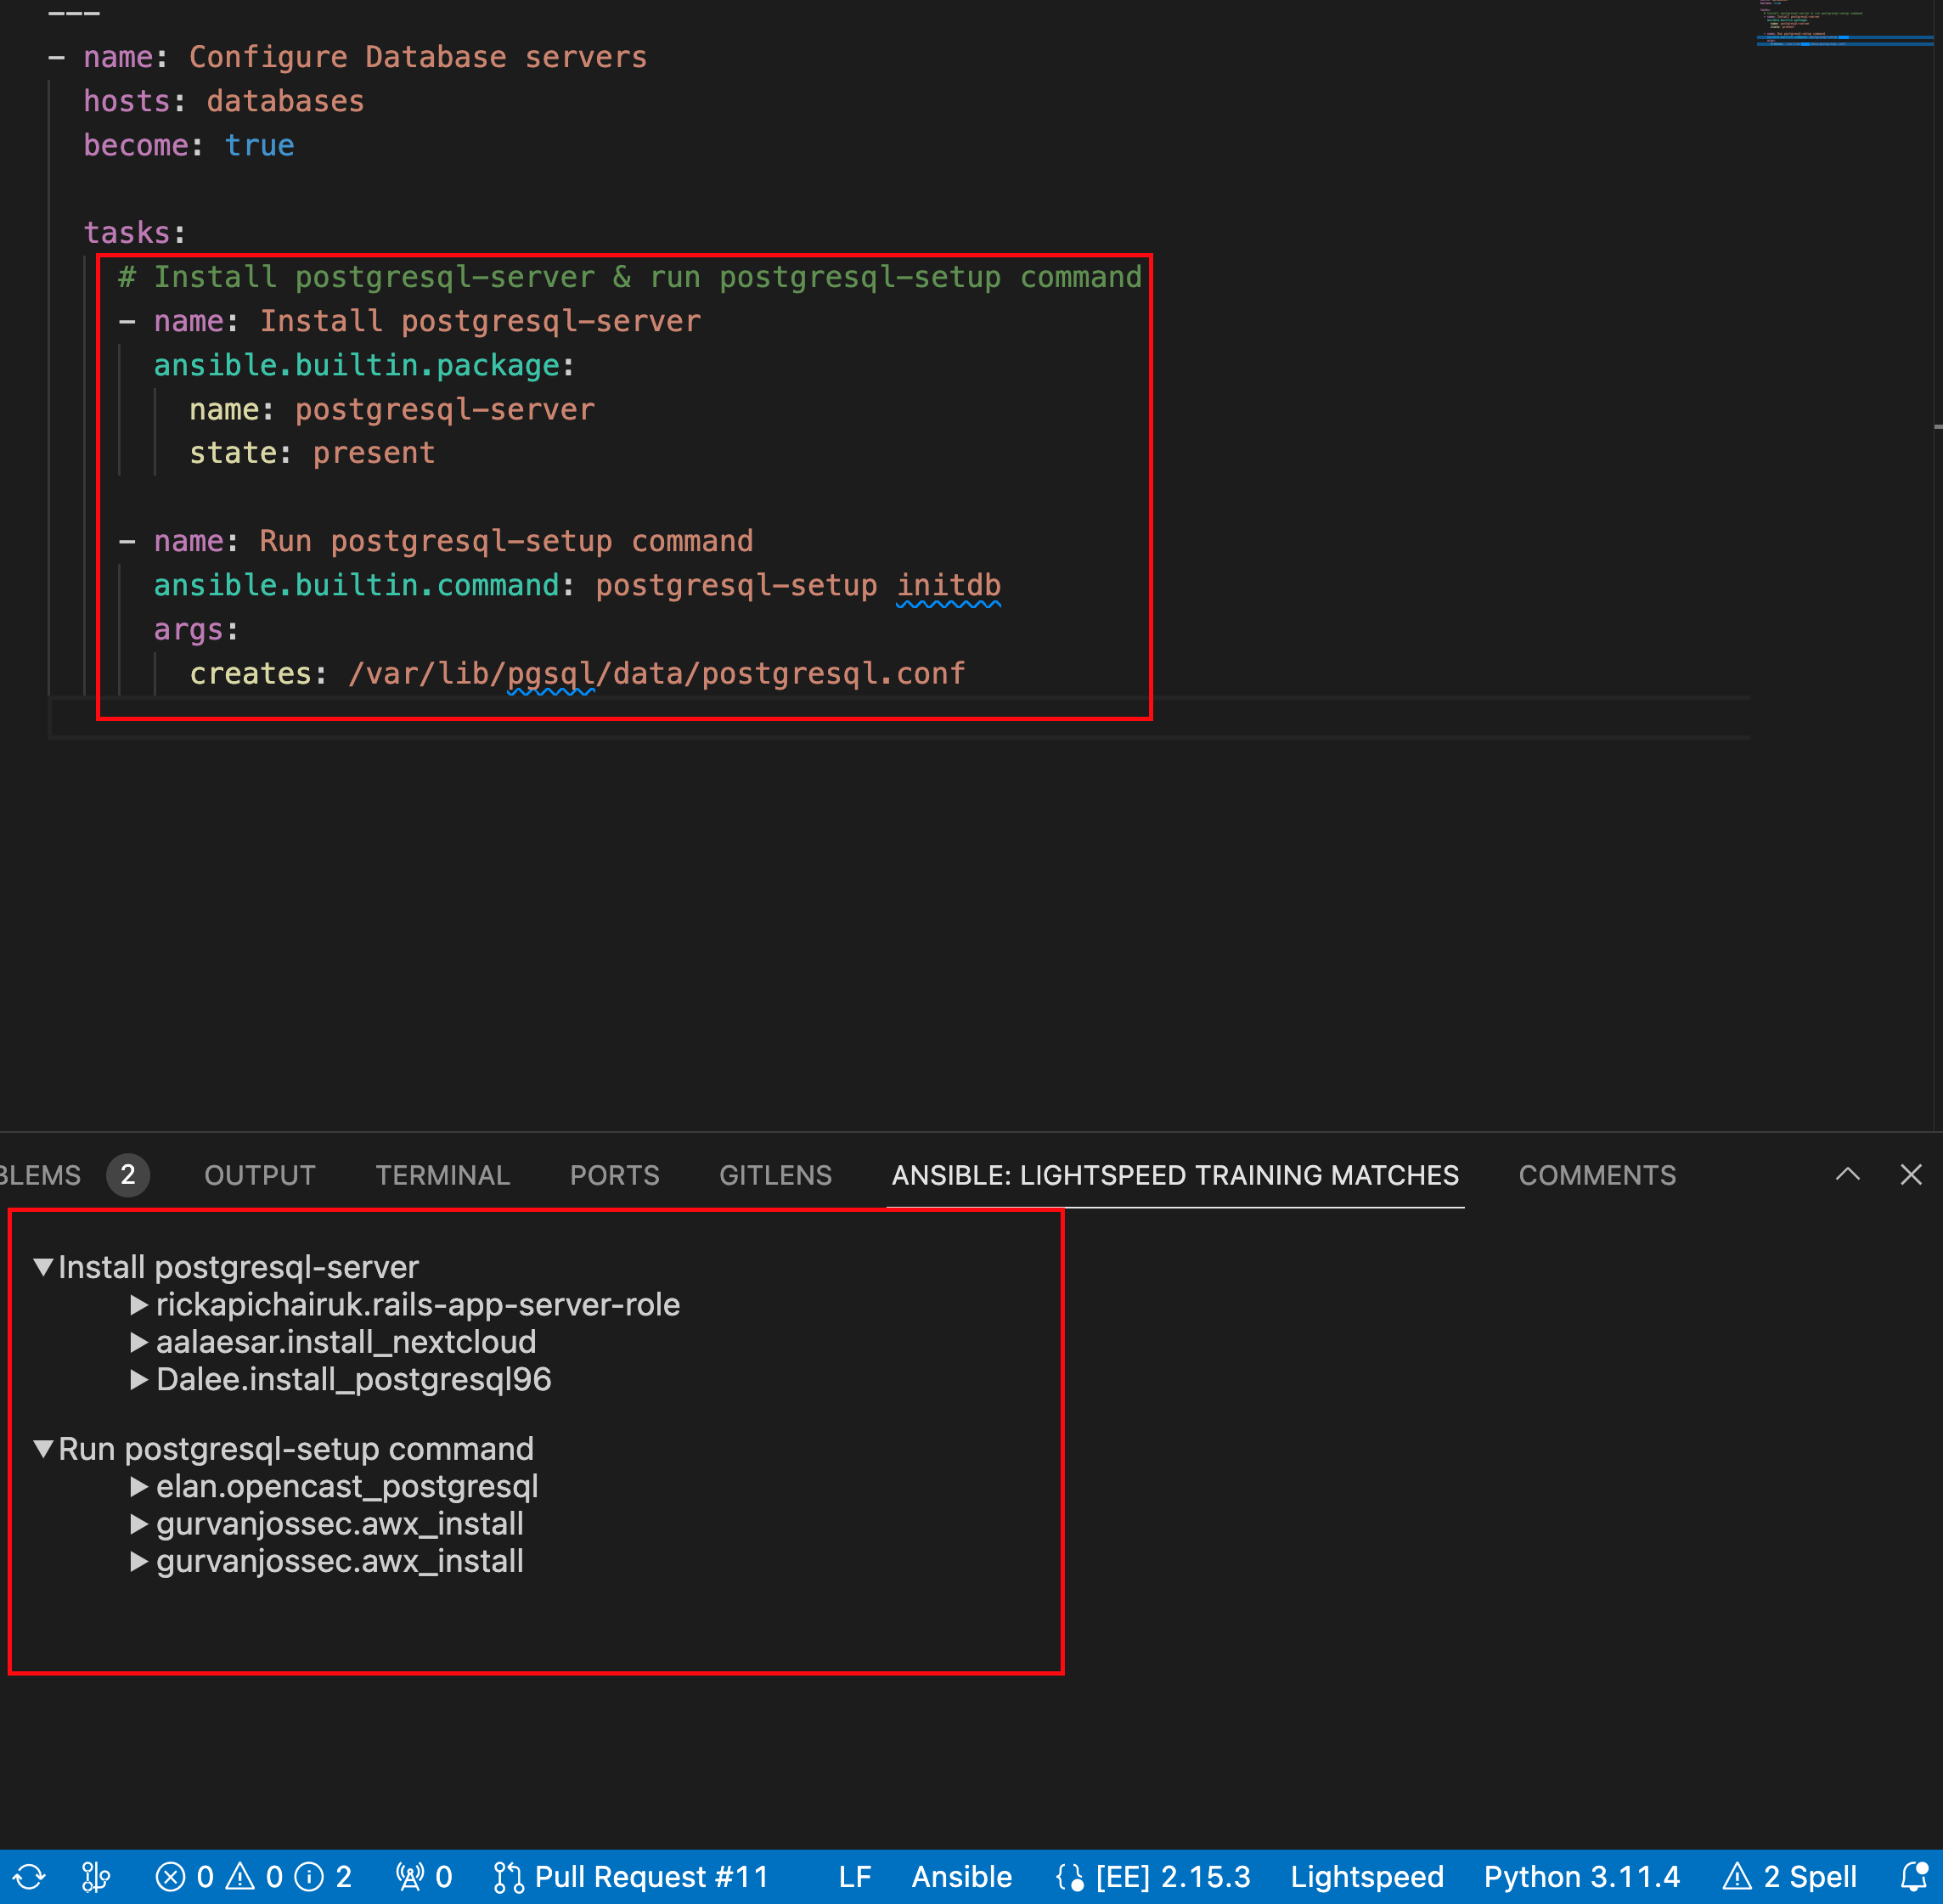
This capability enables you to find out the open source license terms that are associated with related training data. However, it is unlikely that either the training data used in fine-tuning the code or the output recommendations themselves are protected by copyright, or that the output reproduces training data that is controlled by copyright licensing terms.
Red Hat does not claim any copyright or other intellectual property rights in the suggestions generated by Red Hat Ansible Lightspeed with IBM watsonx Code Assistant.
5.4. Creating playbooks and viewing playbook explanations
Using the Ansible VS Code extension, you can create Ansible playbooks using a natural language interface in English.
Red Hat Ansible Lightspeed with IBM watsonx Code Assistant reads the natural language prompts and generates an entire playbook recommendation based on your intent. You can also view the explanations for new or existing playbooks. The playbook explanations describe what the playbook does and contextualize its impact.
These capabilities enable Ansible developers to use natural language prompts to create new Ansible playbooks quickly and more efficiently and also get an explanation for existing Ansible playbook, thereby reducing the overall onboarding learning period. For information about Ansible playbooks, see the Getting started with Ansible Playbooks guide.
You can create playbooks and view playbook explanations when connecting to the Red Hat Ansible Lightspeed cloud service and on-premise deployments.
5.4.1. Best practices to create playbooks
Follow these guidelines for the highest quality of a playbook recommendation.
Ensure that the goal statements directly specify what the playbook must do.
Your statement should start with the goal of the playbook, for example,
Apply security patches to RHEL9. Avoid starting statements withCreate a playbook that,Please prepare a playbook that, orI need help with.- Ensure that the goal statement does not contain new lines.
Ensure that the goal statement is not more than one sentence.
You might have to repeat the details in the goal statement to produce the best results. It is recommended that you use the generated outline as feedback about whether your goal statement might benefit from more or less details, and then modify the goal statement as necessary.
Ensure the following when you edit the outline:
- Do not restate the goal of the playbook.
- Verify that the steps considered capture the key steps in the playbook. The steps need not reflect each and every task that is expected in the playbook.
- Keep the step description in one sentence without adding new lines to the outline.
5.4.2. Generating Ansible playbooks
You can use the natural language interface in the Ansible VS Code extension to generate an entire Ansible playbook.
Prerequisites
You meet one of the following requirements:
- Your organization has a trial or paid subscription to both the Red Hat Ansible Automation Platform and IBM watsonx Code Assistant.
- Your organization has a trial or paid subscription to the Red Hat Ansible Automation Platform, and you have a Red Hat Ansible Lightspeed trial account.
- You have installed and configured the Ansible VS Code extension.
Procedure
- Log in to VS Code with your Red Hat account.
- From the Activity bar, click the Ansible icon.
Under Ansible Creator, click Get started. The Ansible Content Creator page is displayed.
The following illustration displays the Ansible Content Creator page:
Figure 5.4. Settings to create Ansible playbooks

- Select the Playbook with Ansible Lightspeed tile. The Create a playbook page is displayed.
In the What do you want the playbook to accomplish? field, enter the prompts to create a playbook and click Analyze.
After a few seconds, the recommended steps for your playbook intent are displayed in the Review the suggested steps for your playbook and modify as needed field.
Perform one of the following tasks:
- If the steps match your intent: Click Generate Playbook.
- If any modifications are required: Click the editor and update the tasks or steps to suit your intent.
- If the task suggestions do not match your intent: Click Back to change the original prompt and start over.
- If you want to restore the original task suggestions: Click Reset and proceed to the next step.
After you verify the steps, click Generate playbook.
It takes a few seconds for the playbook to generate, and The following playbook was generated for you field displays the newly generated playbook.
- Click Open editor. The generated playbook opens as an untitled YAML file in the VS Code editor.
- Save the untitled YAML file.
5.4.3. Viewing the playbook explanations
You can request explanations for a newly created playbook as well as an existing Ansible playbook.
Prerequisites
You meet one of the following requirements:
- Your organization has a trial or paid subscription to both the Red Hat Ansible Automation Platform and IBM watsonx Code Assistant.
- Your organization has a trial or paid subscription to the Red Hat Ansible Automation Platform, and you have a Red Hat Ansible Lightspeed trial account.
- You have installed and configured the Ansible VS Code extension.
- You have opened the playbook whose explanation you want to view.
Procedure
- Log in to VS Code with your Red Hat account.
- Open an Ansible playbook YAML file in VS Code.
Use one of the following methods to view the playbook explanation:
From an active playbook YAML file:
- Place your cursor anywhere within the playbook file.
- Right-click and select Explain the playbook with Ansible Lightspeed.
From the Ansible panel:
- From the navigation menu, click the Ansible icon.
Select Explain the current playbook.
The playbook explanation is displayed on the right panel of the VS Code screen.
The following illustration shows an example of a playbook explanation:
Figure 5.5. Example of a playbook explanation
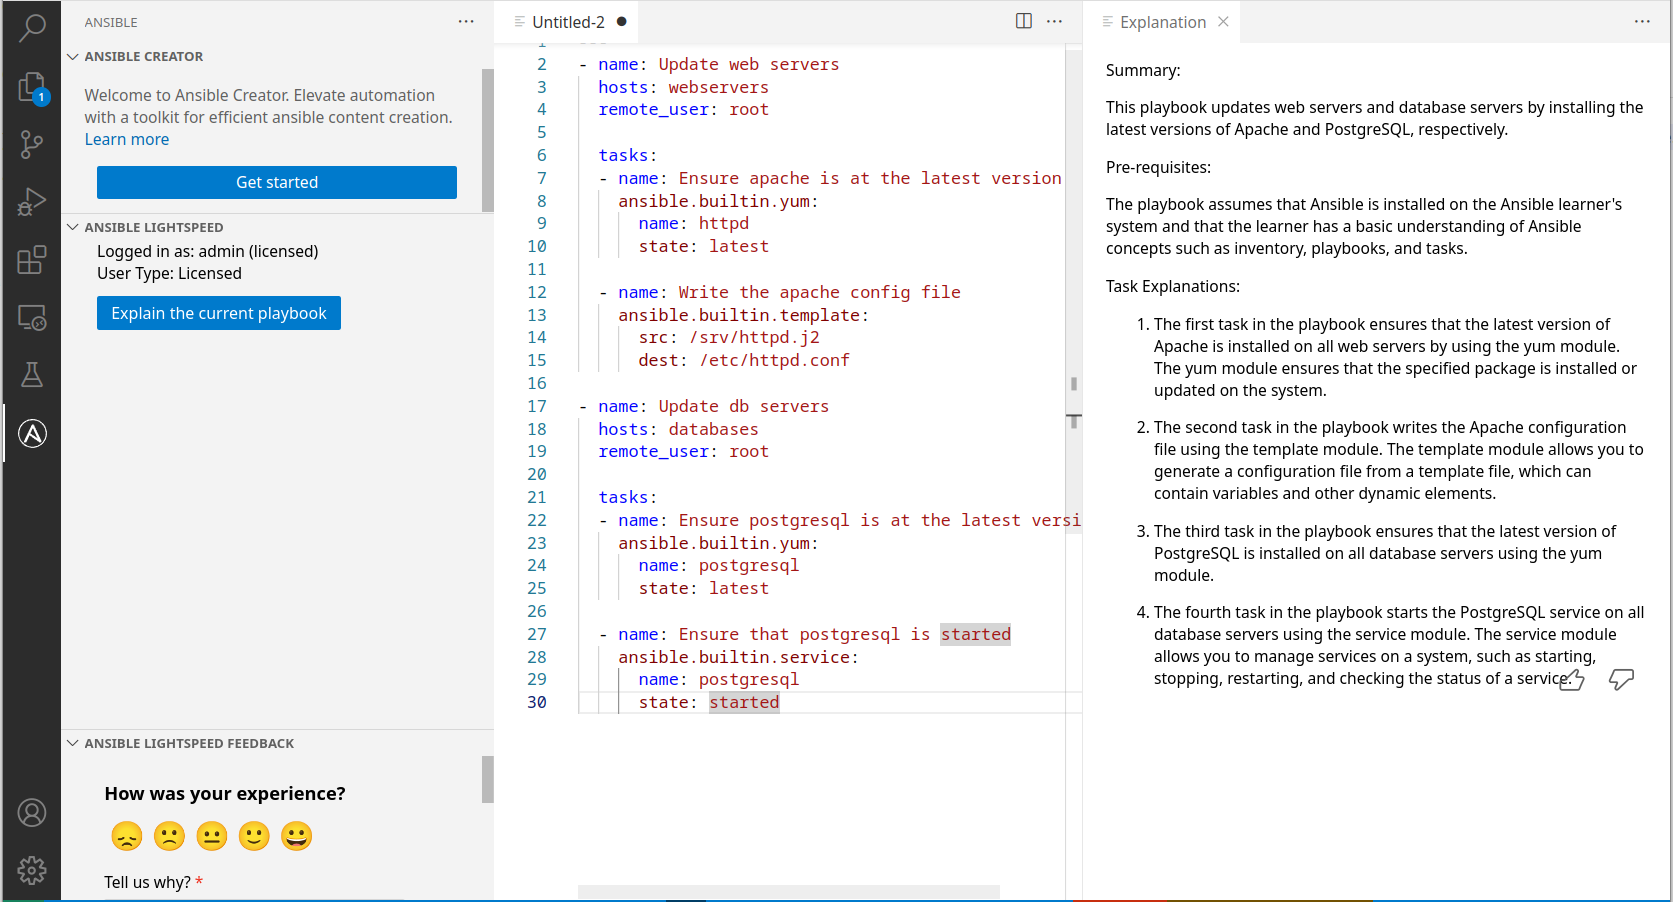
5.5. Creating roles and viewing role explanations
You can create roles within Ansible collections using the Ansible VS Code extension. To create roles, use the Ansible VS Code extension, select the Role Generation option, and then enter the natural language prompts in English language. Red Hat Ansible Lightspeed reads the natural language prompts and creates a role recommendation based on your intent. You can also view the explanations for new or existing roles. The role explanations describe what the role does and contextualize its impact.
These capabilities enable Ansible developers to use natural language prompts to create Ansible roles quickly and more efficiently, as well as get an explanation for existing Ansible roles. In addition to generating playbooks, role generation can now further reduce your team’s overall onboarding learning period. For information about Ansible roles, see Bundle content with Ansible roles in the Getting started with Ansible Automation Platform guide.
You can create roles and view role explanations when connecting to the Red Hat Ansible Lightspeed cloud service only.
5.5.1. Creating roles within collections
You can use the natural language interface in the Ansible VS Code extension to create one or more roles within an Ansible collection.
Prerequisites
You meet one of the following requirements:
- Your organization has a trial or paid subscription to both the Red Hat Ansible Automation Platform and IBM watsonx Code Assistant.
- Your organization has a trial or paid subscription to the Red Hat Ansible Automation Platform, and you have a Red Hat Ansible Lightspeed trial account.
- You have installed and configured the Ansible VS Code extension v25.3.0 or later. For the procedure, see Installing and configuring the Ansible VS Code extension.
- You have an existing Ansible environment configured with a valid collection directory within the Ansible VS Code extension.
Procedure
- Log in to VS Code with your Red Hat account.
- From the Activity bar, click the Ansible icon.
Use one of the following methods to create a role:
From the Ansible panel:
- From the navigation menu, click the Ansible icon.
- Click Generate a role.
- From the Command Palette:
From the Command Palette of the VS Code editor, click → , and then enter > Ansible Lightspeed: Role generation.
The Create a role with Ansible Lightspeed page is displayed on the right panel of the VS Code screen.
From the Select the collection to create role in list, choose the collection where you want to create the role. You must have a collection inside your workspace to create a role.
If you do not have a collection, you must create it by using one of the following methods:
By using the following command:
ansible-creator init collection myns.mycollection my_directoryAfter you run the command, open the new directory with VS Code.
By using the Ansible VS Code extension
For more information, see the topic About content collections in the Getting started with Ansible Automation Platform guide.
In the Describe what you want to achieve in natural language field, enter the prompts to create a role and then click Analyze.
After a few seconds, the recommended steps for your role intent are displayed in the Review the suggested steps for your role and modify as needed field.
Perform the following tasks:
- Review and optionally change the role name.
- Review the collection where the role will be created.
Verify that the suggested steps match your intent and then click Continue.
It takes a few seconds for the role to generate, and the newly generated role is displayed along with the list of files where the role was generated.
Note- If you want to modify the steps: Click the editor field, update the prompts or steps to suit your intent, and then click Continue.
- If the role suggestions do not match your intent: Click Back to change the original prompt and start over.
- If you want to restore to the original suggested steps: Click Reset and then click Continue to proceed to the next step.
- Click Save files. A list of files is displayed that includes the new role.
- Click the files to open them in the VS Code editor directly.
5.5.2. Viewing the role explanations
You can request explanations for a newly created role as well as an existing Ansible role.
Prerequisites
You meet one of the following requirements:
- Your organization has a trial or paid subscription to both the Red Hat Ansible Automation Platform and IBM watsonx Code Assistant.
- Your organization has a trial or paid subscription to the Red Hat Ansible Automation Platform, and you have a Red Hat Ansible Lightspeed trial account.
- You have installed and configured the Ansible VS Code extension v25.3.0 or later. For the procedure, see Installing and configuring the Ansible VS Code extension.
- You have opened the role whose explanation you want to view in the VS Code editor.
Procedure
- Log in to VS Code with your Red Hat account.
- Open an Ansible role YAML file within the roles directory in VS Code.
Use one of the following methods to view the playbook explanation:
From an active role YAML file:
- Place your cursor anywhere within the playbook file.
- Right-click and select Explain the role with Ansible Lightspeed.
From the Ansible panel:
- From the navigation menu, click the Ansible icon.
- Select Explain the current playbook.
From the Command Palette:
From the Command Palette of the VS Code editor, enter Explain the role with Ansible Lightspeed.
The role explanation is displayed on the right panel of the VS Code screen.
The following illustration shows an example of a role explanation:
Figure 5.6. Example of a role explanation
5.6. Viewing the audit logs
The Ansible Visual Studio (VS Code) extension now records all Red Hat Ansible Lightspeed operations in an audit log for future use. Each interaction is recorded with a timestamp, the type of action performed, details of the requested task, and other relevant information.
The logs are displayed in the Ansible Lightspeed Output Channel of the VS Code editor and are available until you close VS Code.
Procedure
- Open VS Code.
- Open the Command Palette of the VS Code editor.
Click → , and then select Ansible Lightspeed.
An Output panel is displayed at the bottom of the VS Code editor with a log of all user actions.
Following is an example of an audit log:
Figure 5.7. Audit log

5.7. Providing feedback on the Ansible Lightspeed service
Red Hat Ansible Lightspeed with IBM watsonx Code Assistant is designed to be improved through feedback on the quality of its suggestions. The technical details of user experiences with Red Hat Ansible Lightspeed are useful in informing further improvements.
You can submit feedback through the following channels:
From the Ansible VS Code extension: Use this method to provide feedback about the quality of the suggested code recommendations.
ImportantRed Hat Support cannot assist with the suggestion quality reports. Content quality issues are routed to IBM for resolution.
- From the Red Hat customer portal: Use this method to log bug reports and service disruption incidents, and feature requests.
Prerequisites
Ensure that you meet one of the following requirements:
- Your organization has a trial or paid subscription to both the Red Hat Ansible Automation Platform and IBM watsonx Code Assistant.
- Your organization has a trial or paid subscription to the Red Hat Ansible Automation Platform, and you have a Red Hat Ansible Lightspeed trial account.
Procedure
- Open Visual Studio Code.
- Click the Lightspeed entry in your status bar to see options.
- In the Tell us why field, provide your feedback. Here, provide feedback about what results you were expecting to receive, compared to what results were generated and the training match.
Select the issue type: Bug report, Feature request, or Suggestion feedback.
NoteTo raise a bug or feature request, contact Red Hat Support and open a support ticket. Bug features and feature requests made through Ansible Lightspeed feedback are not tracked through the Red Hat Service Level Agreement (SLA).
- Select the I understand that feedback is shared with Red Hat and IBM checkbox.
Click Send.
The following image shows an example of providing suggestion feedback:
Figure 5.8. Providing feedback on Ansible Lightspeed

Chapter 6. Administering the Ansible Lightspeed Service
As an organization administrator, you can use Red Hat Ansible Lightspeed to manage the Ansible Lightspeed service, so that your users and teams can create and use custom automation content. This chapter provides information about how to get set up as an organization administrator on Red Hat Ansible Lightspeed, with details on how to:
- Access the Ansible Lightspeed portal as an organization administrator
- View and manage the Admin dashboard telemetry data
If you are using a free 90-day trial account, you need a trial or paid subscription to the Red Hat Ansible Automation Platform, but you do not need a trial or paid subscription to IBM watsonx Code Assistant. This means that you do not need to configure the API key or model ID when setting up or using a trial account.
6.1. Logging in to the Ansible Lightspeed administrator portal
Use the Ansible Lightspeed administrator portal to connect Red Hat Ansible Lightspeed to IBM watsonx Code Assistant.
Prerequisites
- You have organization administrator privileges to a Red Hat Customer Portal organization with a valid Red Hat Ansible Automation Platform subscription.
Procedure
- Log in to the Ansible Lightspeed portal as an organization administrator.
- Click → .
Enter your Red Hat account username and password. The Ansible Lightspeed Service uses Red Hat Single Sign-On (RH-SSO) for authentication.
As part of the authentication process, the Ansible Lightspeed Service checks whether your organization has an active Ansible Automation Platform subscription. On successful authentication, the login screen is displayed along with your username and your assigned user role.
From the login screen, click Admin Portal.
You are redirected to the Red Hat Ansible Lightspeed with IBM watsonx Code Assistant administrator portal where you can connect Red Hat Ansible Lightspeed to your IBM watsonx Code Assistant instance.
6.1.1. Logging out of the Ansible Lightspeed Service
To log out of the Ansible Lightspeed Service, you must log out of both the Ansible Lightspeed VS Code extension and the Ansible Lightspeed portal.
Procedure
Log out of the Ansible Lightspeed VS Code extension:
-
Click the Person icon
. You will see a list of accounts that VS Code is logged into.
- Select → .
-
Click the Person icon
Log out of the Ansible Lightspeed portal:
- Navigate to the Ansible Lightspeed portal login page.
- Click Log out.
6.2. Viewing and managing the Admin dashboard telemetry
Red Hat Ansible Lightspeed collects the following telemetry data by default:
Operational telemetry data
This is the data that is required to operate and troubleshoot the Ansible Lightspeed service. For more information, refer the Enterprise Agreement. You cannot disable the collection of operational telemetry data.
This includes the following data:
- Organization you are logged into (Organization ID, account number)
- Large language model (or models) that you are connected to
Admin dashboard telemetry data
This is the data that provides insight into how your organization users are using the Ansible Lightspeed service, and the metrics are displayed on the Admin dashboard.
This includes the following data:
- Prompts and content suggestions, including accept or reject of the content suggestions
User sentiment feedback
You can also disable the Admin dashboard telemetry if you no longer want to collect and monitor the telemetry data.
Viewing telemetry data on the Admin dashboard is not yet supported on Red Hat Ansible Lightspeed on-premise deployments.
6.2.1. Prerequisites
To view and manage the Admin dashboard telemetry data, ensure that you have the following:
- You have organization administrator privileges to a Red Hat Customer Portal organization with a valid Red Hat Ansible Automation Platform subscription.
- You have installed the Ansible VS Code extension v2.13.148 that is required to collect Admin dashboard telemetry.
Red Hat Ansible Lightspeed does not collect users' personal information, such as usernames or passwords. If any personal information is inadvertently received, the data is deleted. For more information about Red Hat Ansible Lightspeed’s privacy practices, see the Telemetry Data Collection Notice for the Admin dashboard.
6.2.2. What telemetry data is collected?
Following is the list of telemetry data that Red Hat Ansible Lightspeed collects:
- Details of the organization that you are logged into, such as organization ID and account number
- Large language models that you are connected to
- Inline suggestions that were accepted, rejected, or ignored by your organization users
- User sentiment feedback
- Top 10 modules returned in code recommendations
6.2.3. Viewing the Admin dashboard telemetry
The Admin dashboard displays the analytics telemetry data that you can use to gain insight into how your organization users are using the Ansible Lightspeed service.
The Admin dashboard displays the following charts:
Inline suggestions accepted, rejected, or ignored by users
This graph tracks the number of inline suggestions that were accepted, rejected, or ignored by users in your organization. Use this graph to gain insight into how your organization users are using the Ansible Lightspeed service.
User sentiment
This graph measures the users' feedback (feelings, opinions). Use this graph to gain insight into the overall user experience with Red Hat Ansible Lightspeed.
Top 10 modules returned in code recommendations
This graph displays the top 10 modules returned in code recommendations. Use this metric to determine which modules are being suggested the most to your organization’s automation developers.
Procedure
- Log in to the Ansible Lightspeed with IBM watsonx Code Assistant Hybrid Cloud Console as an organization administrator.
From the navigation panel, select Ansible Lightspeed > Admin Dashboard.
The Admin dashboard displays a graphical representation of analytics telemetry data for the last 30 days by default.
Use the following filters to refine your telemetry data:
- To view the telemetry data for a specific time period or for a custom date range, select the date range from the Quick Date Range list.
- To view the telemetry data for a specific IBM watsonx Code Assistant model only, select the model ID from the Model Name list. By default, the Admin dashboard displays telemetry data for all models.
6.2.4. Disabling the Admin dashboard telemetry
Red Hat Ansible Lightspeed collects the Admin dashboard telemetry data by default. The data provides insight into how your organization users are using the Ansible Lightspeed service. If you no longer want to collect analytics telemetry data for your organization, you can disable the Admin dashboard telemetry.
After you disable the Admin dashboard telemetry, the Ansible Lightspeed service no longer collects the analytics telemetry data for your organization. The earlier telemetry data is still available on the Admin dashboard, but no latest data is displayed. If you re-enable the Admin dashboard telemetry, the Ansible Lightspeed service starts collecting data for your organization, and the metrics are displayed on the Admin dashboard after 24 hours.
Prerequisites
- You have organization administrator privileges to a Red Hat Customer Portal organization with a valid Red Hat Ansible Automation Platform subscription.
Procedure
- Log in to the Ansible Lightspeed portal as an organization administrator.
- From the login screen, click Admin Portal.
- Under Admin Portal, click Telemetry.
To disable the Admin dashboard telemetry, select Operational telemetry data only.
NoteTo re-enable the Admin dashboard telemetry, select Admin dashboard telemetry data.
- Click Save.
Chapter 7. Installing and configuring the Ansible code bot
The Ansible code bot was deprecated on October 1, 2025 and will be retired anytime after December 31, 2025. Red Hat is no longer actively maintaining or supporting the component.
Ansible code bot scans GitHub repositories (collections, roles, playbooks) and proactively creates pull requests with best practice or quality improvement recommendations.
Ansible code bot scans your code repositories to recommend code quality improvements. It promotes Ansible best practices while avoiding common errors that can lead to bugs or make code harder to maintain. The bot automatically submits pull requests to the repository, which proactively alerts the repository owner to a recommended change to their content. You can configure Ansible code bot to scan your existing Git repositories (both public and private).
Your organization must have an active subscription to Red Hat Ansible Automation Platform to use the Ansible code bot. However, IBM watsonx Code Assistant is not required to use the Ansible code bot.
After the Ansible code bot is installed, it automatically scans the selected repositories that are in Jinja format. Once the scanning is complete, the code bot generates an initial PR for each repository; the initial PR also contains the scan schedule configured to run weekly. You must review the initial PR for the suggested changes and merge the PR. Once the initial PR is merged, the scan schedule is triggered, and the subsequent repository scans are performed weekly. If required, you can change the scan schedule to a daily or monthly cadence.
You can access the Ansible code bot dashboard that displays all your repositories that have the bot installed along with their scan status. From the dashboard, you can start a manual scan, view the scan history, and view the repository. From GitHub, you can configure a schedule to scan your repository at regular intervals, and add or remove a repository from being scanned. For more information, see Managing repository scans.
Ansible code bot is supported on the following GitHub versions:
- GitHub.com
GitHub Enterprise Cloud
Ansible code bot is not supported on GitHub Enterprise Server. For more information, see GitHub’s plans in the GitHub documentation.
The following examples are code recommendations that the Ansible code bot can suggest:
- Available alternatives for deprecated legacy syntax or implementation patterns
Module version changes and updates, such as:
- Adding any new required parameters
- Flagging deprecated parameters
- Removing unused parameters
- Applying YAML best practices
- Adding comment blocks
- Fixing casing issues in name fields
7.1. Installing the Ansible code bot
Install the Ansible code bot to get code recommendations for your repositories, and then log in to the Ansible code bot dashboard to monitor and manage your repository scans.
Procedure
- Log in to GitHub by using the account associated with your organization.
- Go to the Ansible code bot GitHub app.
Select the Ansible repositories that you want the app to access:
- All repositories: Provides access to read the metadata of all repositories.
- Only select repositories: Provides access to read the metadata of only the repositories that you select.
- Optional: If you selected Only select repositories in the previous step, select the repositories that you want the Ansible code bot to access from the Select repositories list.
Click Install & Authorize. A message is displayed that specifies the following permissions are granted automatically to the bot during installation:
- Read access to metadata
- Read and write access to code and pull requests
- When prompted, log in to your Red Hat Single Sign-On account as an organization administrator.
Log in to the Ansible code bot dashboard:
- On the Authorize Ansible code bot page, verify your account and repository permissions.
Click Authorize Ansible.
From the Authorize Ansible code bot page, the following actions occur:
- Ansible code bot verifies that you are a part of an organization that has an active subscription to Red Hat Ansible Automation Platform.
GitHub requests read permissions to access the repositories associated with your account.
On successful authorization, you are logged in to Ansible code bot dashboard. The dashboard displays all your repositories that have the Ansible code bot installed along with their scan status.
Verification
After the Ansible code bot is installed, it automatically scans the selected repositories that are in Jinja format. When the scanning is complete, the code bot generates an initial PR for each repository; the initial PR also contains the scan schedule configured to run weekly.
Perform the following tasks:
Review the initial PR for the suggested changes, and merge the PR.
After you merge the initial PR, the configured scan schedule is triggered, and the subsequent repository scans are performed weekly.
NoteIf you do not merge the initial PR, the weekly scan schedule is not triggered and the Ansible code bot dashboard displays the repositories without any associated scan history.
The following illustration is an example of an initial PR being created:

- Optional: If required, you can manually scan your repositories or change the scan schedule to a daily or monthly cadence.
- Modify scanned repositories by adding repositories or removing existing repositories from being scanned.
7.2. Uninstalling the Ansible code bot
If you no longer want to use the Ansible code bot, you can uninstall it from GitHub. After the code bot is uninstalled, you can still access the Ansible code bot dashboard but you cannot see the repositories on the dashboard or scan your repositories.
Procedure
- Log in to GitHub by using the account associated with your organization.
- In GitHub, click your profile photo > Settings.
- Under Integrations, click Applications > Installed GitHub Apps.
- Click Configure beside the Ansible code bot app.
Under the Danger zone area, click Uninstall.
The Ansible code bot app is uninstalled from your GitHub account.
7.3. Managing repository scans
The Ansible code bot dashboard displays a list of your repositories where the code bot is installed, and indicates if the scan schedule is not set, or is set to manual or scheduled scan.
You can scan your Git repository by starting a manual scan, or configure a schedule to scan your repository at regular intervals. After the scan is completed, you can view the scan history. The scan history shows the start time, status, and type of scan. It also includes a link to the pull request if it was created, and the log message if the scan failed. You can also add new repositories for scanning or remove existing repositories from being scanned.
7.3.1. Manually scanning your Git repositories
You can manually scan your Git repositories if you did not set up a scanning schedule for your Ansible code bot or if you do not want to wait for the next scheduled scan. If you manually scan your repository, and no pull request was created, it is likely so because a duplicate pull request already exists. You can scan your repository from both the Ansible code bot dashboard and GitHub.
7.3.1.1. Manually scanning the repository from the Ansible code bot dashboard
You can manually scan your Git repositories if you did not set up a scanning schedule for your Ansible code bot or if you do not want to wait for the next scheduled scan.
Procedure
Log in to the Ansible code bot dashboard.
The Repositories list displays a list of repositories that you selected for scanning.
NoteIf you do not see your repository in the Repositories list, you can add it for scanning. For more information, see Adding or removing repositories from the Ansible code bot.
-
To start a manual scan of your repository, click the Ellipsis icon (
 ) beside the repository that you want to scan and select Scan now.
- Click Refresh to view the status of the scan job.
To view more details about your repository scans, click the Ellipsis icon (
) beside the repository and select View scan history.
The repository’s scan history is displayed along with the scan start time, scan status, type of scan (scheduled or manual), link to the pull request if it was created, and the log message if the scan failed.
-
To view your repository on GitHub, click the Ellipsis icon (
) beside the repository and select View repository.
7.3.1.2. Manually scanning the repository from GitHub
You can manually scan your Git repositories from GitHub if you did not set up a scanning schedule for your Ansible code bot or if you do not want to wait for the next scheduled scan.
Procedure
- In GitHub, go to the main page of the repository that you want to scan.
- To modify the repository settings, click the Settings icon beside the About area.
In the Topics field, enter the keyword topic ansible-code-bot-scan to the repository.
The following illustration shows the keyword topic for starting a manual scan:
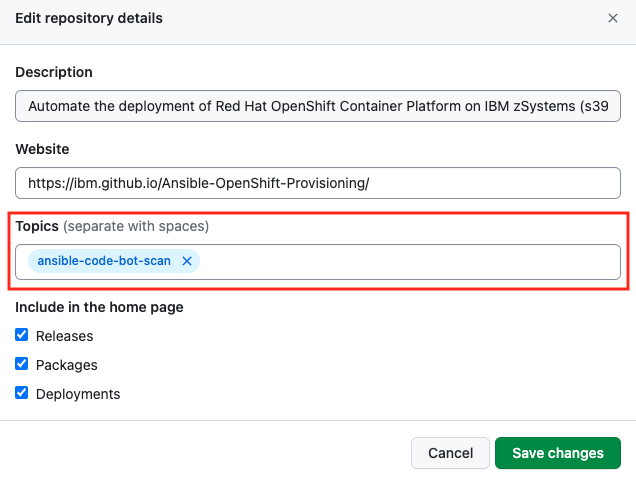
Click Save changes.
Based on the repository webhook event, Ansible code bot starts a manual scan of your repository. If the avoid duplicate pull requests condition is not met, then the manual scan results in a new pull request with all the necessary Ansible code bot recommendations.
7.3.2. Configuring the Ansible code bot to scan your repository at regular intervals
After installing the Ansible code bot, it automatically scans the selected repositories that are in Jinja format. Once the scanning is complete, the code bot generates an initial PR for each repository; the initial PR also contains the scan schedule configured to run weekly.
You must review the initial PR for the suggested changes and merge the PR. Once the initial PR is merged, the scan schedule is triggered, and the subsequent repository scans are performed weekly. If required, you can change the scan schedule to a daily or monthly cadence.
If you do not merge the initial PR, the weekly scan schedule is not triggered and the Ansible code bot dashboard displays the repositories without any associated scan history. In such a scenario, you must manually create a configuration file ansible-code-bot.yml and specify your scan schedule within the file.
You can specify one of following interval cadence to scan your Git repositories:
- Daily: Runs every day from Monday to Sunday.
- Weekly: Runs once a week on Monday. Per the initial configuration PR, the Ansible code bot is set to scan your repositories weekly until you change the schedule to daily or monthly.
- Monthly: Runs on the first day of the month, once each month.
For each interval cadence, Ansible code bot starts scanning your Git repositories at 9 AM UTC.
Procedure
- In GitHub, navigate to the repository that you want to scan.
-
Create a
.ymlconfiguration file namedansible-code-bot.ymlin your repository.githubfolder. For example,.github/ansible-code-bot.yml. In the configuration file, specify the scan schedule in the
intervalparameter. You can specify theintervalparameter asdaily,weekly, ormonthly. For example:schedule: interval: dailyCommit your changes.
The Ansible code bot starts scanning your repository per the schedule you configured at 9 AM UTC time.
7.3.3. Viewing your repository’s scan history
Use the Ansible code bot dashboard to see a list of your repositories and their scan history.
Procedure
Log in to the Ansible code bot dashboard.
The Ansible code bot dashboard displays a list of your repositories where the code bot is installed, and indicates if the scan schedule is not set, or is set to manual or scheduled scan.
To view the history of your repository’s scans, click the Ellipsis icon (
) beside the repository and select View scan history.
The repository’s scan history is displayed along with the scan start time, scan status, type of scan (scheduled or manual), link to the pull request if it was created, and the log message if the scan failed.
-
To view your repository on GitHub, click the Ellipsis icon (
) beside the repository and select View repository.
7.3.4. Adding or removing repositories from the Ansible code bot
You can enable the Ansible code bot for a repository, or remove repositories that you no longer want to manage.
Procedure
- Log in to the Ansible code bot dashboard.
- Click Manage Code Bot on GitHub.
- In GitHub, click your profile photo > Settings.
- Under Integrations, click Applications.
From the Repository access area, perform one of the following tasks:
- Add a new repository: From the Select repositories list, select the repository that you want to add. The newly-added repository is displayed on the Ansible code bot dashboard.
- Remove an existing repository: From the Select repositories list, click the Cross icon beside the repository that you want to delete. The deleted repository details are no longer visible on the Ansible code bot dashboard.
- Click Save.
7.4. How Ansible code bot handles duplicate pull requests
This section outlines the conditional logic used by the Ansible code bot to manage repository scanning and pull request generation.
- If Ansible code bot has created a pull request on the latest commit default branch, it does not scan the repository. The bot skips scanning the repository because the pull request was committed on the latest default branch, and no new commit was made after that pull request.
If there is an existing pull request that is not on the latest commit default branch, the Ansible code bot does a pull request difference to compare the changes in both branches. The following scenarios are possible:
- There is no difference in the existing and new scan results: Ansible code bot does not push the scan results as a new pull request.
- There are differences found in the existing and the new scan results: the Ansible code bot creates a new pull request. The newly-created pull request does not close the existing pull request, against which the pull request difference was noted. This behavior makes it easier for the repository administrator to review only the latest pull request created by the Ansible code bot, and the administrator can avoid reviewing the older pull requests created by the bot. If required, the administrator can close the older pull requests.
Chapter 8. Troubleshooting
This section contains information to help you diagnose and resolve issues with using Red Hat Ansible Lightspeed with IBM watsonx Code Assistant.
8.1. Troubleshooting Red Hat Ansible Lightspeed configuration errors
This section provides information about errors when configuring the Red Hat Ansible Lightspeed and their workarounds.
8.1.1. Cannot access the Ansible Lightspeed administrator portal
The Ansible Lightspeed administrator portal can be accessed by the Red Hat organization administrator only.
If you are the Red Hat organization administrator, before you access the Ansible Lightspeed administrator portal, ensure that:
- You have a valid Ansible Automation Platform subscription.
8.1.2. Cannot save the API key
When you enter the IBM watsonx Code Assistant API key, authentication fails and shows the following error message:
IBM Cloud API key is invalid
Red Hat Ansible Lightspeed verifies the API key by generating an associated access token. To resolve the error, ensure that you have not accidentally included any extra spaces when obtaining the API key from IBM watsonx Code Assistant. If you still cannot upload the API key, contact IBM Support.
8.1.3. Cannot configure the model ID due to authentication failure
When you enter the model ID in the Red Hat Ansible Lightspeed administrator portal, the authentication fails.
To resolve the error, ensure that:
- You have configured a valid API key before you upload the model ID.
- You have not accidentally included any extra spaces when entering the model ID.
8.1.4. Cannot configure the model ID due to inference failure
While validating the model ID, Red Hat Ansible Lightspeed performs a test inference. If Red Hat Ansible Lightspeed detects an error, the validation fails and an Inference failed message is displayed.
To resolve the error, ensure that:
- You have a valid API key and model ID.
- You have not accidentally included any extra spaces when obtaining the API key and model ID from IBM watsonx Code Assistant.
8.2. Troubleshooting Red Hat Ansible Lightspeed on-premise deployment errors
This section provides information about errors when configuring the Red Hat Ansible Lightspeed on-premise deployment and their workarounds.
8.2.1. Cannot log out of the Ansible Lightspeed portal
After you log out from the Ansible Lightspeed portal, you are redirected to the automation controller API page instead of Ansible Lightspeed.
This error indicates that the logout redirect URI was not configured while setting up your Red Hat Ansible Lightspeed on-premise deployment. You must configure the logout redirect URI by adding the LOGOUT_ALLOWED_HOSTS entry to the YAML file.
8.2.2. Cannot connect to the Ansible Lightspeed service from the Ansible VS Code extension
The following scenarios are possible:
The log-in attempt fails with the following error message:
Enable lightspeed services from settings to use the feature.This error indicates that Ansible Lightspeed is not enabled in the Ansible VS Code extension. To resolve this error, perform the following tasks:
- Open the VS Code application.
- From the Activity bar, click the Extensions icon.
- From the Installed Extensions list, select Ansible.
-
From the Ansible extension page, click the Settings icon (
) and select Extension Settings.
- Select Ansible Lightspeed settings and then select the Enable Ansible Lightspeed checkbox.
You are redirected to an incorrect Ansible Lightspeed instance on clicking the button.
This error indicates an incorrect route URL was used while configuring the Ansible Lightspeed service in Ansible VS Code extension. Ensure that you have configured the correct value in the route URL without any suffix. For more information, see Configuring Ansible VS Code extension for Red Hat Ansible Lightspeed on-premise deployment.
Cannot request code recommendations
The following error message is displayed:
An error occurred attempting to complete your request. Please try again later.This error indicates that the Ansible Lightspeed service is not running or is running with issues. Please check the Lightspeed service logs (the pod with suffix
-api) for more details and error codes.Cannot request code recommendations
The following error message is displayed:
The IBM watsonx Code Assistant is unavailable. Please try again later.or:
IBM watsonx Code Assistant Model ID is invalid. Please contact your administrator.This error indicates that the model secret contains incorrect values. To resolve this error, ensure that you have not accidentally added any whitespace characters (extra line, space, and so on) to the
username,model_url, andmodel_api_keyparameters in the model connection secret. For more information, see Creating connection secrets.
8.2.3. Cannot connect to the Ansible Lightspeed service due to SSL connection error
If you are using self-signed certificates on the model server, you might encounter SSL certification verification errors, causing the connection between Ansible Lightspeed service and the model server to fail. The following error message is displayed:
Caused by SSLError(SSLCertVerificationError(1, '[SSL: CERTIFICATE_VERIFY_FAILED]
certificate verify failed: self signed certificate in certificate chain (_ssl.c:1006)'))
To resolve this error, use one of the following workarounds based on your Ansible Automation Platform version:
- For Red Hat Ansible Automation Platform 2.5 and later:
Specify the optional key/value pair as model_verify_ssl=true in the model secret to connect to an IBM watsonx Code Assistant model. For details about the procedure, see Creating connection secrets.
- For Red Hat Ansible Automation Platform 2.4:
You can disable the SSL protection between the model server and the Ansible Lightspeed service. For example, you can disable the SSL protection when you are on a testing environment. To disable the SSL protection, you must add the following extra setting in the Red Hat Ansible Lightspeed Custom Resource Definition (CRD) YAML file under the spec: section:
extra_settings:
    - setting: ANSIBLE_AI_MODEL_MESH_API_VERIFY_SSL
value: falseReenabling the SSL protection You must re-enable the SSL protection when deploying on a production environment. To re-enable the SSL protection, simply remove the extra setting from the YAML file.
To reenable the SSL protection, perform the following tasks: . Go to the Red Hat OpenShift Container Platform. . Select → . . From the Projects list, select the namespace that you created when you installed the Red Hat Ansible Automation Platform operator. . Locate and select the Ansible Automation Platform operator. . Locate and select the Ansible Automation Platform custom resource, and then click the required app. . Select the YAML tab. The editor switches to a YAML editor view. . Scroll and find the spec: section, and add the following parameter under the spec: section:
extra_settings:
    - setting: ANSIBLE_AI_MODEL_MESH_API_VERIFY_SSL
value: false- Click Save.
Restart the automation controller pods to apply the revised YAML:
- From the Red Hat OpenShift Container Platform, select → .
- Locate and select the Ansible Lightspeed pod that you updated.
Click the Edit icon beside the pod and select Delete Pod.
The select pod gets deleted and a new pod gets created.
8.3. Troubleshooting Ansible Visual Studio Code extension errors
Use this topic to troubleshoot issues with Ansible VS Code.
8.3.1. Cannot view the generated code recommendations using the Ansible VS Code extension
The following scenarios are possible:
You receive a
403 errormessage.To resolve this error, ensure that:
- Your organization administrator has configured Red Hat Ansible Lightspeed for your organization.
You meet one of the following requirements:
- Your organization has a trial or paid subscription to both the Red Hat Ansible Automation Platform and IBM watsonx Code Assistant.
- Your organization has a trial or paid subscription to the Red Hat Ansible Automation Platform, and you have a Red Hat Ansible Lightspeed trial account.
You have not configured the required Ansible VS code extension settings.
- To resolve this error, ensure that you have enabled the Lightspeed:Enabled and → settings. For more information, see Configure the Ansible VS Code extension.
You receive a
Failure on completion requestserror when you make inference requests in VS Code.This error occurs because your organization has a trial or paid subscription to both Ansible Automation Platform and IBM watsonx Code Assistant. However, your organization administrator has not configured an IBM watsonx Code Assistant model for your organization.
You receive an
Ansible Lightspeed encountered an error. Try again after some time.error message when you make single-task or multitask requests.This error occurs when you use a remote SSH extension with VS Code to request single or multitask recommendations in playbooks. However, the task recommendations are generated when using a role. This error occurs in workspaces that contain a large number of roles.
Your VS Code Workspace settings override user settings.
If your Workspace settings are configured, they can override our user settings even if you have configured the Ansible VS Code extension correctly. The Workspace settings can disable your VS Code extension settings, and therefore you cannot access the Ansible Lightspeed service.
To resolve this error, ensure that there are no Workspace settings configured in VS Code. For more information, see Workspace settings in the VS Code documentation.
You entered a multitask prompt, but code recommendations were not generated.
To resolve this error, log out of VS Code and log in again using your Red Hat account.
You clicked a different location or switched to a different window; therefore, the populated code recommendations disappeared.
The Red Hat Ansible Lightspeed service could take multiple seconds per task to populate the code recommendations. If you are using a multitask prompt, the Red Hat Ansible Lightspeed service takes a bit longer to populate the results. Do not move your cursor or press any key while the code recommendation is being generated. If you change the cursor location or press any key, the Ansible VS Code extension cancels the request and the Red Hat Ansible Lightspeed service does not process your request. In this scenario, you must get the cursor back to its original position and repopulate the results.
8.3.2. Cannot request code recommendations by using the Ansible VS Code extension
The following error message is displayed: Your trial to the generative AI model has expired. Refer to your IBM Cloud Account to re-enable access to the IBM watsonx Code Assistant.
To resolve this error, refer to your IBM Cloud account and select an upgrade option.
8.3.3. Cannot connect to Ansible VS code extension when using a proxy configuration or a self-signed certificate or both
You might encounter errors when connecting with to the Ansible VS code extension through a proxy. Connections to the outbound domain https://c.ai.ansible.redhat.com fail and a network error message is displayed.
To resolve this issue, you must add the URL https://c.ai.ansible.redhat.com/ in VS Code proxy settings. If you are using Red Hat Single Sign-On (RH-SSO) to authenticate users, then you must also grant access to https://sso.redhat.com in VS code proxy settings.
To modify the proxy settings in VS code, perform the following tasks:
- Open Visual Studio Code.
- Navigate to File > Preferences > Settings.
- Select → in the sidebar.
In the Http: Proxy field, add the following URLs to the proxy:
-
https://c.ai.ansible.redhat.com/ -
https://sso.redhat.com, if you are using RH-SSO to authenticate users.
-
- In the http: Proxy Support drop down list, select Override.
Search for and select the following configuration keys:
- Electron Fetch
- System Certificates V2 if you are using your own Certificate Authority (CA).
For information about how to set up proxy support in VS Code, see Proxy server support in VS Code documentation and Proxy settings and fallback in The Chromium Project documentation.
8.3.4. Cannot connect to Ansible VS code extension due to network issues
If you encounter network issues, use the Network Proxy Test extension to test the connection:
- Install the VS code extension Network Proxy Test.
Use the Network Proxy Test: Test Connection action to target the server and the endpoint using the parameter
/check/status end-point.For example:
https://c.ai.ansible.redhat.com/check/status/to test the connection to Red Hat Ansible Lightspeed cloud service.
8.4. Troubleshooting Ansible code bot errors
This section provides information about errors when using the Ansible code bot and their workarounds.
8.4.1. Cannot access Ansible code bot
After you install Ansible code bot and attempt to log in, you receive the following error message:
Your organization does not have a valid Red Hat Ansible Lightspeed subscription
After you install Ansible code bot, you are redirected to a page that shows an active subscription status, as shown in the following image:
Figure 8.1. Ansible code bot login screen with an active subscription

If the login screen displays an inactive subscription status, Ansible code bot does not scan your Git repositories. The error occurs because your organization does not have a valid Ansible Automation Platform subscription. To resolve this error, ensure that you are part of an organization that has a valid Red Hat Ansible Automation Platform subscription.
8.4.2. Cannot scan your Git repository using Ansible code bot
If the Ansible code bot is not configured correctly, it does not scan your Git repositories or does not create pull requests.
To resolve Ansible code bot errors, ensure that:
- You have selected all the Git repositories that you want to scan.
-
You have a
.ymlconfiguration file namedansible-code-bot.ymlin your repository.githubfolder. For example,.github/ansible-code-bot.yml.
Run a manual scan on your git repositories by adding the ansible-code-bot-scan topic to your repository. For more information, see Manually scan your Git repositories.
If the Ansible code bot still cannot scan your Git repository, the following scenarios are possible:
- The Ansible code bot did not identify any ansible-lint violations in the Git repository.
- The Ansible code bot does not have permission to scan the Git repository.
- Your organization does not have a valid Red Hat Ansible Automation Platform subscription.
8.4.3. Cannot create pull requests
You might encounter an error where the Ansible code bot cannot create pull requests after scanning your Git repositories.
To resolve this error, ensure that:
- You have verified that there are are no duplicate pull requests. For more information, see How Ansible code bot handles duplicate pull requests.
- You have deleted the branches after closing the pull requests created by the Ansible code bot. For more information, see Deleting a branch used for a pull request.