HawtIO Diagnostic Console Guide
Manage your applications with HawtIO modular web console
Abstract
Preface
HawtIO provides enterprise monitoring tools for viewing and managing Red Hat HawtIO-enabled applications. It is a web-based console accessed from a browser to monitor and manage a running HawtIO-enabled container. HawtIO is based on the open source HawtIO software (https://hawt.io/). HawtIO Diagnostic Console Guide describes how to manage applications with HawtIO.
The audience for this guide are Apache Camel eco-system developers and administrators. This guide assumes familiarity with Apache Camel and the processing requirements for your organization.
Making open source more inclusive
Red Hat is committed to replacing problematic language in our code, documentation, and web properties. We are beginning with these four terms: master, slave, blacklist, and whitelist. Because of the enormity of this endeavor, these changes will be implemented gradually over several upcoming releases. For more details, see our CTO Chris Wright’s message.
Chapter 1. Overview of HawtIO
HawtIO is a diagnostic Console for the Red Hat build of Apache Camel and Red Hat build of AMQ. It is a pluggable Web diagnostic console built with modern Web technologies such as React and PatternFly. HawtIO provides a central interface to examine and manage the details of one or more deployed HawtIO-enabled containers. HawtIO is available when you install HawtIO standalone or use HawtIO on OpenShift. The integrations that you can view and manage in HawtIO depend on the plugins that are running. You can monitor HawtIO and system resources, perform updates, and start or stop services.
The pluggable architecture is based on Webpack Module Federation and is highly extensible; you can dynamically extend HawtIO with your plugins or automatically discover plugins inside the JVM. HawtIO has built-in plugins already to make it highly useful out of the box for your JVM application. The plugins include Apache Camel, Connect, JMX, Logs, Runtime, Quartz, and Spring Boot. HawtIO is primarily designed to be used with Camel Quarkus and Camel Spring Boot. It’s also a tool for managing microservice applications. HawtIO is cloud-native; it’s ready to go over the cloud! You can deploy it to Kubernetes and OpenShift with the HawtIO Operator.
Among the benefits of HawtIO are:
- Runtime management of JVM via JMX, especially that of Camel applications and AMQ broker, with specialized views
- Visualization and debugging/tracing of Camel routes
- Simple managing and monitoring of application metrics
The following diagram depicts the architectural overview of HawtIO:
HawtIO Standalone

HawtIO On OpenShift

Chapter 2. Installing HawtIO
There are several options to start using the HawtIO console:
2.1. Application Versions
- HawtIO: 4.3.0.redhat-00010
- Camel Spring Boot: 4.14.4.redhat-00010
- Jolokia: 2.4.0-redhat-00001
2.2. Adding Red Hat repositories to Maven
To access artifacts that are in Red Hat Maven repositories, you need to add those repositories to Maven’s settings.xml file. Maven looks for the settings.xml file in the .m2 directory of the user’s home directory. If there is not a user specified settings.xml file, Maven uses the system-level settings.xml file at M2_HOME/conf/settings.xml.
Prerequisite:
You know the location of the settings.xml file in which you want to add the Red Hat repositories.
Procedure:
In the
settings.xmlfile, addrepositoryelements for the Red Hat repositories as shown in this example:<?xml version="1.0"?> <settings> <profiles> <profile> <id>extra-repos</id> <activation> <activeByDefault>true</activeByDefault> </activation> <repositories> <repository> <id>redhat-ga-repository</id> <url>https://maven.repository.redhat.com/ga</url> <releases> <enabled>true</enabled> </releases> <snapshots> <enabled>false</enabled> </snapshots> </repository> <repository> <id>redhat-ea-repository</id> <url>https://maven.repository.redhat.com/earlyaccess/all</url> <releases> <enabled>true</enabled> </releases> <snapshots> <enabled>false</enabled> </snapshots> </repository> </repositories> <pluginRepositories> <pluginRepository> <id>redhat-ga-repository</id> <url>https://maven.repository.redhat.com/ga</url> <releases> <enabled>true</enabled> </releases> <snapshots> <enabled>false</enabled> </snapshots> </pluginRepository> <pluginRepository> <id>redhat-ea-repository</id> <url>https://maven.repository.redhat.com/earlyaccess/all</url> <releases> <enabled>true</enabled> </releases> <snapshots> <enabled>false</enabled> </snapshots> </pluginRepository> </pluginRepositories> </profile> </profiles> <activeProfiles> <activeProfile>extra-repos</activeProfile> </activeProfiles> </settings>
2.3. Running from CLI (JBang)
You can install and run HawtIO from CLI using JBang.
If you don’t have JBang locally yet, first install it: https://www.jbang.dev/download/
Procedure:
Install the latest version of HawtIO on your machine using the
jbangcommand:$ jbang app install -Dhawtio.jbang.version=4.3.0.redhat-00010 hawtio@hawtio/hawtioNoteThis installation method is available only with jbang>=0.115.0.
It will install the HawtIO command. Launch an HawtIO instance with the following command:
$ hawtioThe command will automatically open the console at http://localhost:8080/hawtio/. To change the port number, run the following command:
$ hawtio --port 8090For more information on the configuration options of the CLI, run the following code:
$ hawtio --help
Usage: hawtio [-hjoV] [-c=<contextPath>] [-d=<plugins>] [-e=<extraClassPath>]
              [-H=<host>] [-k=<keyStore>] [-l=<warLocation>] [-p=<port>]
              [-s=<keyStorePass>] [-w=<war>]
Run HawtIO
  -c, --context-path=<contextPath>
                      Context path.
  -d, --plugins-dir=<plugins>
                      Directory to search for .war files to install as 3rd
                        party plugins.
  -e, --extra-class-path=<extraClassPath>
                      Extra class path.
  -h, --help          Print usage help and exit.
  -H, --host=<host>   Hostname to listen to.
  -j, --join          Join server thread.
  -k, --key-store=<keyStore>
                      JKS keyStore with the keys for https.
  -l, --war-location=<warLocation>
                      Directory to search for .war files.
  -o, --open-url      Open the web console automatic in the web browser.
  -p, --port=<port>   Port number.
  -s, --key-store-pass=<keyStorePass>
                      Password for the JKS keyStore with the keys for https.
  -V, --version       Print HawtIO version
  -w, --war=<war>     War file or directory of the hawtio web application.
2.3.1. Connecting directly to a remote JVM from CLI
Starting from
HawtIO 4.3.0, it is possible to connect to remote Java applications directly from the CLI (#3731). Passing a remote Jolokia endpoint URL in the form[Name]=[Jolokia URL]to the--connectionor-noption will automatically attempt to connect to that endpoint when HawtIO starts.$ hawtio --connection=myconn=http://localhost:8778/jolokia/If you have previously connected to an endpoint URL with a name, the connection information is cached in the browser’s local storage via the Connect plugin. In that case, you can connect to that endpoint by simply specifying the same connection name without URL.
$ hawtio --connection=myconnYou can also connect to multiple JVMs at once by providing the
--connectionoptions multiple times.$ hawtio --connection=conn1 --connection=conn2 --connection=conn3- In this case, multiple tabs open simultaneously on the browser, each showing the Hawtio console connected to a different connection.
2.4. Running a Quarkus app
You can attach HawtIO to your Quarkus application by following below steps.
Procedure:
Add
io.hawt:hawtio-quarkusand the supporting Camel Quarkus extensions to the dependencies inpom.xml:<dependencyManagement> <dependencies> <dependency> <groupId>io.hawt</groupId> <artifactId>hawtio-bom</artifactId> <version>4.3.0.redhat-00010</version> <type>pom</type> <scope>import</scope> </dependency> </dependencies> <!-- ... other BOMs or dependencies ... --> </dependencyManagement> <dependencies> <dependency> <groupId>io.hawt</groupId> <artifactId>hawtio-quarkus</artifactId> </dependency> <!-- Mandatory for enabling Camel management via JMX / HawtIO --> <dependency> <groupId>org.apache.camel.quarkus</groupId> <artifactId>camel-quarkus-management</artifactId> </dependency> <!-- (Optional) Required for HawtIO Camel route diagram tab --> <dependency> <groupId>org.apache.camel.quarkus</groupId> <artifactId>camel-quarkus-jaxb</artifactId> </dependency> <!-- ... other dependencies ... --> </dependencies>Disable the authentication by adding the following configuration to
application.properties:quarkus.hawtio.authenticationEnabled = false- You can also configure authentication. Refer "Quarkus authentication mechanisms".
Run HawtIO with your Quarkus application in development mode as follows:
mvn compile quarkus:dev- Open http://localhost:8080/hawtio/ to view the HawtIO console.
Example:
See the following for a working Quarkus application example:
2.5. Running a Spring Boot app
You can attach HawtIO to your Spring Boot application by following below steps.
Procedure:
Add
io.hawt:hawtio-springbootand the supporting Camel Spring Boot starters to the dependencies inpom.xml:<dependencyManagement> <dependencies> <dependency> <groupId>io.hawt</groupId> <artifactId>hawtio-bom</artifactId> <version>4.3.0.redhat-00010</version> <type>pom</type> <scope>import</scope> </dependency> <!-- ... other BOMs or dependencies ... --> </dependencies> </dependencyManagement> <dependencies> <dependency> <groupId>io.hawt</groupId> <artifactId>hawtio-springboot</artifactId> </dependency> <!-- Mandatory for enabling Camel management via JMX / HawtIO --> <dependency> <groupId>org.apache.camel.springboot</groupId> <artifactId>camel-management-starter</artifactId> </dependency> <!-- (Optional) Required for HawtIO Camel route diagram tab --> <dependency> <groupId>org.apache.camel.springboot</groupId> <artifactId>camel-spring-boot-xml-starter</artifactId> </dependency> <!-- ... other dependencies ... --> </dependencies>Enable the HawtIO and Jolokia endpoints by adding the following lines to
application.properties:spring.jmx.enabled = true management.endpoints.web.exposure.include = hawtio,jolokiaRun HawtIO with your Spring Boot application in development mode as follows:
mvn spring-boot:run- Open http://localhost:8080/actuator/hawtio to view the HawtIO console.
2.5.1. Configuring HawtIO path
If you don’t prefer to have the /actuator base path for the HawtIO endpoint, you can also execute the following:
Customize the Spring Boot management base path with the
management.endpoints.web.base-pathproperty:management.endpoints.web.base-path = /You can also customize the path to the HawtIO endpoint by setting the
management.endpoints.web.path-mapping.hawtioproperty:management.endpoints.web.path-mapping.hawtio = hawtio/console
Example:
- There is a working Spring Boot example that shows how to monitor a web application that exposes information about Apache Camel routes, metrics, etc. with HawtIO Spring Boot example.
-
A good MBean for real-time values and charts is
java.lang/OperatingSystem. Try looking at Camel routes. Notice that as you change selections in the tree the list of tabs available changes dynamically based on the content.
Chapter 3. Configuration of HawtIO
HawtIO consists of two main components: The server runtime and client console.
The server runtime is the Java backend that runs on the server side, and the client console is the JavaScript frontend that is deployed and runs on the browser.
More information about the components can be found in HawtIO Architecture chapter.
Therefore, two types of configuration are provided for HawtIO:
HawtIO and its plugins can configure their behaviours through System properties.
- Configuration properties - The server runtime configuration
- hawtconfig.json - The client console configuration
3.1. Configuration properties
The HawtIO server runtime and its plugins can configure their behaviours through System properties.
The following table lists the configuration properties for the HawtIO core system and various plugins.
For the configuration properties related to security and authentication, refer to Security.
| System | Default | Description |
|---|---|---|
| hawtio.disableProxy |
|
With this property set to true, |
| hawtio.localAddressProbing |
|
Whether local address probing for proxy allowlist is enabled or not upon startup. Set this property to |
| hawtio.proxyAllowlist |
|
Comma-separated allowlist for target hosts that Connect plugin can connect to via |
| hawtio.proxyDisableCertificateValidation |
|
Whether to disable hostname verifier in HttpClient4 used by |
| hawtio.redirect.scheme |
The scheme of the redirect URL to login page when authentication is required. When this scheme is not configured, HawtIO sends redirects in the form of | |
| hawtio.sessionTimeout | The maximum time interval, in seconds, that the servlet container will keep this session open between client accesses. If this option is not configured, then HawtIo uses the default session timeout of the servlet container. | |
| hawtio.http.enableCORS |
|
Whether CORS filter is enabled and checks for permitted |
| hawtio.http.accessControlAllowOrigin |
|
When |
| hawtio.http.allowXFrameSameOrigin |
| When set to true, Hawtio sends response headers:
Otherwise (by default) HawtIO sends:
|
| hawtio.http.referrerPolicy |
|
What value HawtIO sends with |
3.2. Quarkus
For Quarkus, all those properties are configurable in application.properties or application.yaml with the quarkus.hawtio prefix.
For example:
quarkus.hawtio.disableProxy = true3.3. Spring Boot
For Spring Boot, all those properties are configurable in application.properties or application.yaml as is.
For example:
hawtio.disableProxy = true3.4. Configuring Jolokia through system properties
The Jolokia agent is deployed automatically with io.hawt.web.JolokiaConfiguredAgentServlet that extends Jolokia native org.jolokia.http.AgentServlet class, defined in hawtio-war/WEB-INF/web.xml.
If you want to customize the Jolokia Servlet with the configuration parameters that are defined in the Jolokia documentation, you can pass them as System properties prefixed with jolokia.
For example:
jolokia.policyLocation = file:///opt/hawtio/my-jolokia-access.xml
Since Jolokia 2.2.0 all Jolokia properties can be specified as jolokia. prefixed system properties or JOLOKIA_ prefixed environment variables.
3.5. Custom branding configuration of HawtIO
The hawtconfig.json is the entrypoint JSON file for configuring the frontend console of HawtIO. It can be used to customise the various parts of the console: the branding, styles and basic UI parts such as the login page and about modal, as well as the console-specific behaviours of some of the HawtIO plugins.
Here is an example file of hawtconfig.json:
Example hawtconfig.json:
{
  "branding":
  {
    "appName": "HawtIO Management Console",
    "showAppName": false,
    "appLogoUrl": "hawtio-logo.svg",
    "companyLogoUrl": "hawtio-logo.svg",
    "css": "",
    "favicon": "favicon.ico"
  },
  "login": {
    "description": "Login page for HawtIO Management Console.",
    "links": [
      { "url": "#terms", "text": "Terms of Use" },
      { "url": "#help", "text": "Help" },
      { "url": "#privacy", "text": "Privacy Policy" }
    ]
  },
  "about": {
    "title": "HawtIO Management Console",
    "description": "A HawtIO reimplementation based on TypeScript + React.",
    "imgSrc": "hawtio-logo.svg",
    "productInfo": [
      { "name": "ABC", "value": "1.2.3" },
      { "name": "XYZ", "value": "7.8.9" }
    ],
    "copyright": "© HawtIO project"
  },
  "disabledRoutes": [
    "/disabled"
  ]
}
3.5.1. Configuration options in hawtconfig.json
At the top level of hawtconfig.json the following options are currently provided:
Top-level configuration options
| Option | Descriptiom |
|---|---|
|
| The branding options for the console. |
|
| The login page configuration. |
|
| The about modal configuration. |
|
| The list of plugins that should be hidden from the console. |
|
| The JMX plugin configuration. |
|
| The HawtIO Online configuration. |
3.5.1.1. Branding
The branding configuration provides the options to customise the console’s branding, such as the application name, logos, styles and favicon.
Branding configuration options
| Option | Default | Description |
|---|---|---|
|
|
| Customise the application name of the console. The name is used in the browser title header and optionally in the header of the console page. |
|
|
| Show the application name in the header of the console page. |
|
|
| Use the URL to substitute the application logo. |
|
|
| Use the URL to substitute the company logo. |
|
| Provide the custom CSS to apply to the console. | |
|
| Use the URL to substitute the favicon. |
Here is how the branding configuration looks in hawtconfig.json:
"branding": {
  "appName": "HawtIO Management Console",
  "showAppName": false,
  "appLogoUrl": "hawtio-logo.svg",
  "companyLogoUrl": "hawtio-logo.svg",
  "css": "",
  "favicon": "favicon.ico"
}
3.5.1.2. Login
The login configuration provides the options to customise the information displayed in the HawtIO login page.
Login configuration options
| Option | Default | Description |
|---|---|---|
|
| Set the text displayed in the login page. | |
|
| [ ] |
Provide the links at the bottom of the login page. The value should be an array of objects with |
Here is how the login configuration looks in hawtconfig.json:
"login": {
  "description": "Login page for HawtIO Management Console.",
  "links": [
    { "url": "#terms", "text": "Terms of Use" },
    { "url": "#help", "text": "Help" },
    { "url": "#privacy", "text": "Privacy Policy" }
  ]
}
3.5.1.3. About
The about configuration provides the options to customise the information displayed in the HawtIO About modal.
About configuration options
| Option | Default | Description |
|---|---|---|
|
|
| Customise the title of the About modal. |
|
| Provide the description text to the About modal. | |
|
|
| Use the URL to substitute the logo image in the About modal. |
|
| [ ] |
Provide the information of names and versions about the additional components used in the console. The value should be an array of objects with |
|
| Set the copyright information in the About modal. |
Here is how the about configuration looks in hawtconfig.json:
"about":
{
  "title": "HawtIO Management Console",
  "description": "A HawtIO reimplementation based on TypeScript + React.",
  "imgSrc": "hawtio-logo.svg",
  "productInfo": [
    { "name": "ABC", "value": "1.2.3" },
    { "name": "XYZ", "value": "7.8.9" }
  ],
  "copyright": "© HawtIO project"
}
3.5.1.4. Disabled routes
The disabledRoutes configuration provides the option to hide the plugins from the console.
The value of the option should be an array of strings that represent the paths of the plugins that should be hidden.
Here is how the disabledRoutes configuration looks in hawtconfig.json:
"disabledRoutes": [
  "/disabled"
]
3.5.1.5. JMX plugin
The JMX plugin is customisable via the jmx configuration in hawtconfig.json.
By default HawtIO loads all MBeans into the workspace via the JMX plugin. Sometimes your custom HawtIO console might want to load only a portion of MBeans to reduce the load on the application. The jmx configuration provides an option to limit the MBeans to be loaded into the workspace.
JMX plugin configuration options
| Option | Default | Description |
|---|---|---|
|
| Specify the list of MBean domains and object names that should be loaded to the JMX plugin workspace. |
This option can either disable workspace completely by setting false, or specify an array of MBean paths in the form of:
<domain>/<prop1>=<value1>,<prop2>=<value2>,...to fine-tune which MBeans to load into workspace.
Disabling workspace should also deactivate all the plugins that depend on MBeans provided by workspace.
Here is how the jmx configuration looks in hawtconfig.json:
"jmx": {
  "workspace": [
    "hawtio",
    "java.lang/type=Memory",
    "org.apache.camel",
    "no.such.domain"
  ]
}
3.5.1.6. HawtIO Online
The frontend aspects of HawtIO Online can be configured via the online configuration in hawtconfig.json.
HawtIO Online configuration options
| Option | Default | Description |
|---|---|---|
|
|
Set the selector used to watch for projects. It is only applicable when the HawtIO deployment type is equal to | |
|
|
Configure the OpenShift Web console link. A link is added to the application menu when the HawtIO deployment is equal to |
ConsoleLink configuration options
| Option | Default | Description |
|---|---|---|
|
| Set the text display for the link. | |
|
|
Set the section of the application menu in which the link should appear. It is only applicable when the HawtIO deployment type is equal to | |
|
|
Set the path, relative to the HawtIO status URL, for the icon used in front of the link in the application menu. It is only applicable when the |
Here is how the HawtIO online configuration looks in hawtconfig.json:
"online": {
  "projectSelector": "myproject",
  "consoleLink": {
      "text": "HawtIO Management Console",
      "section": "HawtIO",
      "imageRelativePath": "/online/img/favicon.ico"
  }
}
3.5.2. Deploying hawtconfig.json
3.5.2.1. Quarkus
For a Quarkus application, the hawtconfig.json file, as well as the other companion static resources such as CSS files and images, should be placed under META-INF/resources/hawtio in the src/main/resources directory of the project.
You can find an example Quarkus project here.
3.5.2.2. Spring Boot
For a Spring Boot application, the hawtconfig.json file, as well as the other companion static resources such as CSS files and images, should be placed under hawtio-static in the src/main/resources directory of the project.
You can find an example Spring Boot project here.
3.5.3. Customising from plugins
While plugins cannot directly provide the hawtconfig.json file itself for the console, they can customise the configuration after the file is loaded from the main console application.
The @hawtio/react NPM package provides the configManager API. You can use this API in the plugin’s index.ts to customise the configuration of hawtconfig.json during the loading of the plugin.
Here is an example of how you can customise the hawtconfig.json configuration from a plugin:
import
{
  HawtIOPlugin, configManager
  } from '@hawtio/react'
...

/**
 * The entry function of your plugin.
 */
export const plugin: HawtIOPlugin = () =>
{
  ...
}

// Register the custom plugin version to HawtIO
// See package.json "replace-version" script for how to replace the version placeholder with a real version
configManager.addProductInfo('HawtIO Sample Plugin', '__PACKAGE_VERSION_PLACEHOLDER__')

/*
 * This example also demonstrates how branding and styles can be customised from a WAR plugin.
 *
 * The Plugin API `configManager` provides `configure(configurer: (config: Hawtconfig) => void)` method
 * and you can customise the `Hawtconfig` by invoking it from the plugin's `index.ts`.
 */
configManager.configure(config => {
  // Branding & styles
  config.branding =
  {
    appName: 'HawtIO Sample WAR Plugin',
    showAppName: true,
    appLogoUrl: '/sample-plugin/branding/Logo-RedHat-A-Reverse-RGB.png',
    css: '/sample-plugin/branding/app.css',
    favicon: '/sample-plugin/branding/favicon.ico',
  }
  // Login page
  config.login = {
    description: 'Login page for HawtIO Sample WAR Plugin application.',
    links: [
      { url: '#terms', text: 'Terms of use' },
      { url: '#help', text: 'Help' },
      { url: '#privacy', text: 'Privacy policy' },
    ],
  }
  // About modal
  if (!config.about) {
    config.about = {}
  }
  config.about.title = 'HawtIO Sample WAR Plugin'
  config.about.description = 'About page for HawtIO Sample WAR Plugin application.'
  config.about.imgSrc = '/sample-plugin/branding/Logo-RedHat-A-Reverse-RGB.png'
  if (!config.about.productInfo) {
    config.about.productInfo = []
  }
  config.about.productInfo.push(
    { name: 'HawtIO Sample Plugin - simple-plugin', value: '1.0.0' },
    { name: 'HawtIO Sample Plugin - custom-tree', value: '1.0.0' },
  )
  // If you want to disable specific plugins, you can specify the paths to disable them.
  //config.disabledRoutes = ['/simple-plugin']
})
You can find an example WAR plugin project here.
Chapter 4. Security and Authentication of HawtIO
You can enable access logging on the runtimes/containers (e.g. Quarkus, OpenShift) as a security defensive measure for validating access. Access records can be used to investigate access attempts in the event of a security incident.
HawtIO enables authentication out of the box depending on the runtimes/containers it runs with. To use HawtIO with your application, either setting up authentication for the runtime or disabling HawtIO authentication is necessary.
HawtIO enables authentication out of the box in three supported runtimes/environments:
Because the authentication mechanisms may vary between these environments (for example there’s no JAAS support in Hawtio Quarkus) there may be a need to provide some configuration. User may also disable the authentication entirely.
4.1. Configuration properties
The following table lists the Security-related configuration properties for the HawtIO core system. These are not specific to any selected deployment method, but may have some special flavors in a given environment (like Keycloak configuration).
| Name | Default | Description |
|---|---|---|
| hawtio.auth hawtio.authenticationEnabled |
| This option may be used to disable authentication if needed. |
| hawtio.authenticationThrottled |
| Whether to throttle authentication attempts to protect HawtIO from brute force attacks. |
| hawtio.noCredentials401 |
|
Whether to return HTTP status 401 when authentication is enabled, but no credentials have been provided. Returning 401 will cause the browser popup window to prompt for credentials. By default this option is |
| hawtio.realm |
|
The security realm used for the authentication. This is the value sent with WWW-Authenticate: Basic |
| hawtio.roles hawtio.role (deprecated) |
|
The user roles expected for the user being authenticated. Multiple roles can be separated by a comma. Set to |
| hawtio.userPrincipalClasses |
A list partially detected from configured JAAS login modules, including |
Fully qualified class name(s) implementing |
| hawtio.rolePrincipalClasses |
A list partially detected from configured JAAS login modules, including |
Fully qualified class name(s) implementing |
| hawtio.keycloakEnabled |
| Whether to enable or disable Keycloak integration. This is a native Keycloak integration which depends on Keycloak libraries availability and additional configuration. See more details in the Keycloak Integration chapter. Keycloak Identity Provider can also be used with Generic OIDC support (see OpenID Connect Integration). |
| hawtio.keycloakClientConfig |
|
Keycloak configuration file used for the frontend. Can be specified as |
| hawtio.oidcConfig |
|
A location of OpenID Connection configuration file. This file can be used to configure generic OpenID Connect authentication using external Identity Provider like Keycloak without any additional libraries. Can be specified as |
| hawtio.authenticationContainerDiscoveryClasses | io.hawt.web.tomcat.TomcatAuthenticationContainerDiscovery |
List of used |
| hawtio.tomcatUserFileLocation |
|
Specify an alternative location for the |
| hawtio.authenticationContainerTomcatDigestAlgorithm | NONE |
When using the Tomcat |
4.1.1. RBAC Restrictor
For some runtimes that support Hawtio RBAC (role-based access control), HawtIO provides a custom Jolokia restrictor implementation that provides an additional layer of protection over JMX operations based on the ACL (access control list) policy.
You cannot use Hawtio RBAC with Quarkus and Spring Boot yet. Enabling the RBAC restrictor on those runtimes only imposes additional load without any gains.
To activate the HawtIO RBAC restrictor, configure the Jolokia parameter restrictorClass via System property to use io.hawt.web.RBACRestrictor as follows:
jolokia.restrictorClass = io.hawt.system.RBACRestrictor4.2. Quarkus
HawtIO can be secured with the authentication mechanisms Quarkus provides, as well as Keycloak.
If you want to disable HawtIO authentication for Quarkus, add the following configuration to application.properties:
quarkus.hawtio.authenticationEnabled = false
Authentication in HawtIO deployed with Quarkus does not use JAAS and relies only on injected io.quarkus.security.identity.IdentityProviderManager interface.
4.2.1. Quarkus authentication mechanisms
HawtIO is just a web application in terms of Quarkus, so the various mechanisms Quarkus provides are used to authenticate HawtIO in the same way it authenticates a Web application.
Here we show how you can use the properties-based authentication with HawtIO for demonstrating purposes.
The properties-based authentication is not recommended for use in production. This mechanism is for development and testing purposes only.
To use the properties-based authentication with HawtIO, add the following dependency to
pom.xml:<dependency> <groupId>io.quarkus</groupId> <artifactId>quarkus-elytron-security-properties-file</artifactId> </dependency>You can then define users in
application.propertiesto enable the authentication. For example, defining a userhawtiowith passwords3cr3t!and roleadminwould look like the following:quarkus.security.users.embedded.enabled = true quarkus.security.users.embedded.plain-text = true quarkus.security.users.embedded.users.hawtio = s3cr3t! quarkus.security.users.embedded.roles.hawtio = admin
Example:
See Quarkus example for a working example of the properties-based authentication.
4.2.2. Quarkus with Keycloak
See Keycloak Integration - Quarkus chapter which uses Quarkus OIDC support at server side and Keycloak specific JavaScript library to handle OpenID Connect authentication in the browser..
4.3. Spring Boot
While HawtIO on Quarkus completely replaces JAAS with Quarkus specific authentication mechanisms, Spring Boot and Spring Security integrates with JAAS, so HawtIO can use common mechanism to authenticate users with or without Spring Security using JAAS.
The integration is provided by a special JAAS SecurityContextLoginModule, which effectively translates Spring Security org.springframework.security.core.Authentication object into a JAAS javax.security.auth.Subject with associated list of javax.security.auth.Principals.
If you want to disable HawtIO authentication for Spring Boot, add the following configuration to application.properties:
hawtio.authenticationEnabled = false4.3.1. Spring Security
To use Spring Security with HawtIO:
Add
org.springframework.boot:spring-boot-starter-securityto the dependencies inpom.xml:<dependency> <groupId>org.springframework.boot</groupId> <artifactId>spring-boot-starter-security</artifactId> </dependency>Spring Security configuration in
src/main/resources/application.propertiesshould look like the following:spring.security.user.name = hawtio spring.security.user.password = s3cr3t! spring.security.user.roles = admin,viewerA security config class has to be defined to set up how to secure the application with Spring Security:
@EnableWebSecurity public class SecurityConfig { @Bean public SecurityFilterChain filterChain(HttpSecurity http) throws Exception { http.authorizeRequests().anyRequest().authenticated() .and() .formLogin() .and() .httpBasic() .and() .csrf().csrfTokenRepository(CookieCsrfTokenRepository.withHttpOnlyFalse()); return http.build(); } }NoteRefreshing the token after authentication success and logout success is required because the
CsrfAuthenticationStrategyandCsrfLogoutHandlerwill clear the previous token. The client application will not be able to perform an unsafe HTTP request, such as a POST, without obtaining a fresh token.
Example:
See Spring Boot-security example for a working example.
4.3.2. Connecting to a remote application with Spring Security
If you try to connect to a remote Spring Boot application with Spring Security enabled, make sure the Spring Security configuration allows access from the HawtIO console. Most likely, the default CSRF protection prohibits remote access to the Jolokia endpoint and thus causes authentication failures at the HawtIO console.
Be aware that it will expose your application to the risk of CSRF attacks.
The easiest solution is to disable CSRF protection for the Jolokia endpoint at the remote application as follows.
import org.springframework.boot.actuate.autoconfigure.jolokia.JolokiaEndpoint; import org.springframework.boot.actuate.autoconfigure.security.servlet.EndpointRequest; @EnableWebSecurity public class SecurityConfig { @Bean public SecurityFilterChain filterChain(HttpSecurity http) throws Exception { ... // Disable CSRF protection for the Jolokia endpoint http.csrf().ignoringRequestMatchers(EndpointRequest.to(JolokiaEndpoint.class)); return http.build(); } }To secure the Jolokia endpoint even without Spring Security’s CSRF protection, you need to provide a
jolokia-access.xmlfile undersrc/main/resources/like the following (snippet) so that only trusted nodes can access it:<restrict> ... <cors> <allow-origin>http*://localhost:*</allow-origin> <allow-origin>http*://127.0.0.1:*</allow-origin> <allow-origin>http*://*.example.com</allow-origin> <allow-origin>http*://*.example.com:*</allow-origin> <strict-checking /> </cors> </restrict>
4.3.3. Spring Boot with Keycloak
See Keycloak Integration - Spring Boot chapter which uses Spring Security OAuth2 support at server side and Keycloak specific JavaScript library to handle OpenID Connect authentication in the browser.
4.4. JakartaEE Web Containers
HawtIO can be deployed to any Servlet API compliant container. The deployment artifact is a Web Archive (WAR). Most of the configuration is already provided in HawtIO’s WEB-INF/war.xml, but this configuration may be changed with generic Configuration Properties.
HawtIO authentication is enabled by default. If you want to disable Hawtio authentication, set the following system property:
hawtio.authenticationEnabled = falseThe following sections show container specific configuration options. These options are not specified in Servlet API.
While the standard Servlet API authentication relies on configuring web.xml elements like <login-config>, HawtIO does not use this declarative security configuration. HawtIO uses custom io.hawt.web.auth.AuthenticationFilter which can be configured using system properties.
4.4.1. Jetty
HawtIO can integrate with Jetty JAAS mechanisms. However not all Jetty JAAS modules work out of the box.
Jetty JAAS modules work with Jetty security infrastructure and the important thing is that it requires your web application (WAR) to use <login-config> configuration.
HawtIO provides customized org.eclipse.jetty.security.jaas.spi.PropertyFileLoginModule which is available in io.hawt.jetty.security.jaas.PropertyFileLoginModule class that lifts the restriction of having a <login-config> configuration. Additionally HawtIO provides ready to use *.mod file which can be copied directly to $JETTY_BASE/modules. This file describes Jetty module with references to required HawtIO Jetty library:
[description]
HawtIO JAAS Login Module Configuration for Jetty
[tags]
security
hawtio
[depends]
jaas
[files]
maven://io.hawt/hawtio-jetty-security/<version>|lib/hawtio-jetty-security-<version>.jar
[lib]
lib/hawtio-jetty-security-<version>.jar
After adding`` $JETTY_BASE/modules/hawtio-jetty-security.mod` file we can add this module (and jaas module) using:
$ cd $JETTY_BASE
$ java -jar $JETTY_HOME/start.jar --add-module=jaas,hawtio-jetty-security
INFO : jaas initialized in ${jetty.base}/start.d/jaas.ini
INFO : hawtio-jetty-security initialized in ${jetty.base}/start.d/hawtio-jetty-security.ini
INFO : copy ~/.m2/repository/io/hawt/hawtio-jetty-security/4.6.1/hawtio-jetty-security-<version>.jar to ${jetty.base}/lib/hawtio-jetty-security-<version>.jar
INFO : Base directory was modified
To use authentication with Jetty, you first have to set up some users with credentials and roles. To do that navigate to $JETTY_BASE/etc/ folder and create etc/login.properties file containing something like this:
etc/login.properties
scott=tiger,user
admin=CRYPT:adpexzg3FUZAk,admin,userYou have added two users: . The first one named scott with the password tiger, with the role user assigned to it. . The second user admin with password admin which is obfuscated (see password Obfuscation in Jetty documentation for details). This one has the admin and user role assigned.
Now create the second file in the same $JETTY_BASE/etc/ directory named login.conf. This is the JAAS login configuration file.
hawtio {
io.hawt.jetty.security.jaas.PropertyFileLoginModule required
debug="true"
file="${jetty.base}/etc/login.properties";
};Change the HawtIO configuration:
| Property | Value |
|---|---|
|
|
|
|
|
|
|
|
|
|
|
|
|
|
|
When Jetty jvm module is installed, we can specify HawtIO properties in $JETTY_BASE/start.d/jvm.ini:
--exec
-Dhawtio.authenticationEnabled=true
-Dhawtio.realm=hawtio
-Dhawtio.roles=admin
-Dhawtio.userPrincipalClasses=org.eclipse.jetty.security.UserPrincipal
-Dhawtio.rolePrincipalClasses=org.eclipse.jetty.security.jaas.JAASRole
Without jvm module the above options should be specified as system properties when running java -jar $JETTY_HOME/start.jar.
You have now enabled authentication for HawtIO. Only users with role admin are allowed to log in.
4.4.2. Apache Tomcat
HawtIO configuration properties can be passed to Tomcat using CATALINA_OPTS environment variable. This variable should contain system properties recognized by HawtIO.
By default, HawtIO authentication is enabled. You can disable authentication in Tomcat by adding this to bin/setenv.sh:
CATALINA_OPTS="$CATALINA_OPTS -Dhawtio.authenticationEnabled=false"
HawtIO will auto-detect that it is running in Tomcat. It will add dynamic JAAS login module that will be used to authenticate users declared in Tomcat’s conf/tomcat-users.xml file. All configuration options related to this file are supported by HawtIO. Additionally, when the file is modified, Hawtio will reload the user database.
The simplest content of conf/tomcat-users.xml may be:
<?xml version="1.0"?>
<tomcat-users xmlns="http://tomcat.apache.org/xml" version="1.0">
<user username="scott" password="tiger" roles="tomcat"/>
</tomcat-users>The above definition includes single scott user with tiger password assigned with tomcat role.
However, HawtIO also supports encoded/hashed password (see more details in Tomcat documentation on CredentialHandler). Tomcat itself may be configured like this:
<?xml version="1.0" encoding="UTF-8"?>
<Server port="8005" shutdown="SHUTDOWN">
...
<GlobalNamingResources>
<Resource name="UserDatabase" auth="Container"
type="org.apache.catalina.UserDatabase"
factory="org.apache.catalina.users.MemoryUserDatabaseFactory"
pathname="conf/tomcat-users.xml" />
</GlobalNamingResources>
<Service name="Catalina">
...
<Engine name="Catalina" defaultHost="localhost">
...
<Realm className="org.apache.catalina.realm.LockOutRealm">
<Realm className="org.apache.catalina.realm.UserDatabaseRealm" resourceName="UserDatabase">
<CredentialHandler className="org.apache.catalina.realm.MessageDigestCredentialHandler" algorithm="SHA-384" />
</Realm>
</Realm>
...
</Engine>
</Service>
</Server>
This tells Tomcat that the passwords are hashed using SHA-384 message digest algorithm. With such configuration, conf/tomcat-users.xml may look like this:
<?xml version="1.0"?>
<tomcat-users xmlns="http://tomcat.apache.org/xml" version="1.0">
<user username="hawtio" password="<salt>$<iteration count>$<digest>" roles="admin,manager,..."/>
</tomcat-users>
HawtIO supports all password formats specified in the MessageDigestCredentialHandler documentation.
If you only want users of a special role to be able to login Hawtio, you can set the role name in the CATALINA_OPTS environment variable as shown:
CATALINA_OPTS="$CATALINA_OPTS -Dhawtio.roles=Administrator,Operator"
Now the user must be in the Administrator or Operator role to be able to login, which we can set up in the conf/tomcat-users.xml file:
<role rolename="manager"/>
<user username="scott" password="tiger" roles="Administrator"/>4.5. Using different JAAS login modules
When deploying HawtIO in an environment where JAAS authentication is used, we can configure additional JAAS login modules that will participate in authentication process.
Knowledge of Java Authentication and Authorization Service is required to properly configure JAAS, as there are important aspects to be aware of when configuring multiple login modules.
HawtIO configures its own login modules (for example io.hawt.web.tomcat.TomcatUsersLoginModule) dynamically, but there’s also a JDK standard way of telling JAAS about the definition of login modules for named JAAS applications. We can use the below option to point HawtIO (and JDK itself) to standard JAAS configuration file:
-Djava.security.auth.login.config=/path/to/login.configThis file is structured as documented in JDK like this:
<name used by application to refer to this entry>
{
<LoginModule> <flag> <LoginModule options>;
<optional additional LoginModules, flags and options>;
};
<additional applications>Here’s where the concept of HawtIO realm is important. The default realm (when not specified) used by HawtIO is hawtio, but it may be changed using:
-Dhawtio.realm=myrealmThis realm is directly used by JAAS to find a set of login modules and is interpreted as name used by application to refer to this entry.
For example we can have this login.config file (selected using -Djava.security.auth.login.config property):
myrealm {
com.sun.security.auth.module.LdapLoginModule REQUIRED
userProvider="ldap://localhost:389"
authIdentity="uid={USERNAME},ou=users,dc=example,dc=com"
useSSL=false
debug=true;
};
Since HawtIO 4.6 we can have multiple login modules declared for hawtio realm (or any other realm defined with -Dhawtio.realm) in JAAS configuration file. Additionally HawtIO will dynamically add detected login modules to this list (for example by default when running in Tomcat, io.hawt.web.tomcat.TomcatUsersLoginModule will be added without explicitly declaring it in login.config file).
With pluggable nature of JAAS, it is possible for one Login Module to perform actual authentication (for example by looking up the user in LDAP server) and other modules to perform role/group lookup and mapping.
4.6. Keycloak Integration
This chapter presents the legacy method of integration between HawtIO and Keycloak. This method relies on the availability of Keycloak libraries and Keycloak-specific configuration files, as well as client side keycloak.js library.
Starting with Keycloak 25.0.0, Keycloak specific login modules are no longer available. For generic OpenID Connect integration (which also supports Keycloak server), please refer to OpenID Connect Integration chapter.
You can secure your HawtIO console with Keycloak. To integration HawtIO with Keycloak, you need to:
- Prepare Keycloak server
- Deploy HawtIO to your favourite runtime (Quarkus, Spring Boot, WildFly, Karaf, Jetty, Tomcat, etc.) and configure it to use Keycloak for authentication
4.6.1. Prepare Keycloak server
Install and run Keycloak server. The easiest way is to use a Docker image:
docker run -d --name keycloak \
-p 18080:8080 \
-e KEYCLOAK_ADMIN=admin \
-e KEYCLOAK_ADMIN_PASSWORD=admin \
quay.io/keycloak/keycloak start-dev
Here we use port number 18080 for the Keycloak server to avoid potential conflicts with the ports other applications might use.
You can log in to the Keycloak admin console http://localhost:18080/admin/ with user admin / password admin. Import hawtio-demo-realm.json into Keycloak. To do so, click Create Realm button and then import hawtio-demo-realm.json. It will create hawtio-demo realm.
The hawtio-demo realm has the hawtio-client application installed as a public client, and defines a couple of realm roles such as admin and viewer. The names of these roles are the same as the default HawtIO roles, which are allowed to log in to HawtIO admin console and to JMX.
There are also 3 users:
admin-
User with password
adminand roleadmin, who is allowed to login into HawtIO. viewer-
User with password
viewerand roleviewer, who is allowed to login into HawtIO. jdoe-
User with password
passwordand no role assigned, who is not allowed to login into HawtIO.
Currently, the difference in roles does not affect HawtIO access rights on Quarkus and Spring Boot, as HawtIO RBAC functionality is not yet implemented on those runtimes.
4.6.2. Configuration
HawtIO’s configuration for Keycloak integration consists of two parts: integration with Keycloak in the runtime (server side), and integration with Keycloak in the HawtIO console (client side).
The following settings need to be made for each part:
- Server side
- The runtime-specific configuration for the Keycloak adapter
- Client side
-
The HawtIO Keycloak configuration
keycloak-hawtio.json
Starting with Keycloak 25.0.0, Keycloak specific login modules are no longer available. Keycloak can be used with HawtIO using OpenID Connect Integration. We can also use Quarkus or SpringBoot specific support for OAuth2 / OpenID Connect which doesn’t rely on Keycloak libraries.
4.6.2.1. Quarkus
Firstly, apply the required configuration for attaching HawtIO to a Quarkus application.
What you need to integrate your Quarkus application with Keycloak is Quarkus OIDC extension. Add the following dependency to pom.xml:
pom.xml
<dependency>
<groupId>io.quarkus</groupId>
<artifactId>quarkus-oidc</artifactId>
</dependency>4.6.2.1.1. Server side
Then add the following lines to application.properties (which configures the server-side OIDC extension):
application.properties
quarkus.oidc.auth-server-url = http://localhost:18080/realms/hawtio-demo
quarkus.oidc.client-id = hawtio-client
quarkus.oidc.credentials.secret = secret
quarkus.oidc.application-type = web-app
quarkus.oidc.token-state-manager.split-tokens = true
quarkus.http.auth.permission.authenticated.paths = "/*"
quarkus.http.auth.permission.authenticated.policy = authenticated
quarkus.oidc.token-state-manager.split-tokens = true is important, as otherwise you might encounter a large size session cookie token issue and fail to integrate with Keycloak.
4.6.2.1.2. Client side
Finally create keycloak-hawtio.json under src/main/resources in the Quarkus application project (which serves as the client-side HawtIO JS configuration):
keycloak-hawtio.json
{
"realm": "hawtio-demo",
"clientId": "hawtio-client",
"url": "http://localhost:18080/",
"jaas": false,
"pkceMethod": "S256",
"logoutUri": "/hawtio/auth/logout"
}
Set pkceMethod to S256 depending on Proof Key for Code Exchange Code Challenge Method advanced settings configuration. If PKCE is not enabled, do not set this option.
Build and run the project and it will be integrated with Keycloak.
4.6.2.1.3. Example
See quarkus-keycloak example for a working example.
4.6.2.2. Spring Boot
Firstly, apply the required configuration for attaching HawtIO to a Spring Boot application.
What you need to integrate your Spring Boot application with Keycloak is to add the following dependency to pom.xml:
pom.xml
<dependency>
  <groupId>org.springframework.boot</groupId>
  <artifactId>spring-boot-starter-security</artifactId>
</dependency>
<dependency>
<groupId>org.springframework.boot</groupId>
<artifactId>spring-boot-starter-oauth2-client</artifactId>
</dependency>4.6.2.2.1. Server side
Then add the following lines in application.properties (which configures the server-side Keycloak adapter):
application.properties
hawtio.authenticationEnabled = true
hawtio.keycloakEnabled = true
hawtio.keycloakClientConfig = classpath:keycloak-hawtio.json

spring.security.oauth2.client.provider.keycloak.issuer-uri = http://localhost:18080/realms/hawtio-demo
spring.security.oauth2.client.registration.keycloak.client-id = hawtio-client
spring.security.oauth2.client.registration.keycloak.authorization-grant-type = authorization_code
spring.security.oauth2.client.registration.keycloak.scope = openid
4.6.2.2.2. Client side
Finally create keycloak-hawtio.json under src/main/resources in the Spring Boot project (which serves as the client-side HawtIO JS configuration):
keycloak-hawtio.json
{
  "realm": "hawtio-demo",
  "clientId": "hawtio-client",
  "url": "http://localhost:18080/",
  "jaas": false,
  "logoutUri": "/actuator/hawtio/auth/logout"
}
Build and run the project and it will be integrated with Keycloak.
4.6.2.2.3. Example
See springboot-keycloak example for a working example.
Chapter 5. Plugins
HawtIO is highly modular, and it includes plugins for different technologies out of the box. HawtIO plugins are essentially React components that are self-contained with all the JavaScript, CSS, and images to make them work. They can utilise HawtIO core features such as authentication and event notification through the Plugin API.
The only requirement for a plugin is to provide the entrypoint that HawtIO can load it from, which must conform to the specification of Webpack Module Federation.
HawtIO uses JMX to discover which MBeans are present and then dynamically updates the navigation bars and tabs based on what it finds. The UI is updated whenever HawtIO reloads the MBean, which it does periodically or a plugin can trigger explicitly.
Relying on JMX for discovery doesn’t mean that plugins can only interact with JMX. They can do anything at all that a browser can, e.g. use REST to discover UI capabilities and other plugins.
5.1. Built-in plugins
The following plugins are all included by default in HawtIO:
| Plugin | Description |
|---|---|
| Adds support for Apache Camel. Allows you to browse Camel contexts, routes, endpoints, etc.; visualise running routes and their metrics; create endpoints; send messages; trace message flows; and profile routes to identify which parts runs fast or slow.
| |
| Allows you to connect to local or remote JVMs.
| |
|
The JVM Diagnostics plugin allows you to retrieve information from and interact with the running JVM through the interfaces provided by This plugin comes with a Flight Recorder utility, a diagnostics and profiling tool integrated in the JVM that allows you to configure and make recordings with minimal overhead. Key features are the ability to configure recordings, make new recordings, check the history of previous recordings in the JVM and download them. These JFR files can later be opened using tools like Java Mission Control (JMC), which can be installed from Upstream Eclipse Mission Control. | |
| Provides the core JMX support for interacting with MBeans, viewing real time attributes, charting, and invoking operations. | |
| Provides support for viewing the logs inside the JVM.
| |
| Allows you to view the status of Quartz schedulers and configure them. Also allows you to configure and fire jobs and triggers from the console. If you use Camel Quartz component with your Camel application, this plugin will be automatically enabled. | |
| Provides general overview of the Java process including threads, system properties, and key metrics. | |
| Shows information about the Spring Boot application.
|
5.2. Known external plugins
The following plugins are developed by external communities.
- Apache ActiveMQ Artemis plugin
- Apache ActiveMQ Artemis ships with its own web management console, which is built on top of HawtIO with an external plugin that provides the dedicated view for Artemis brokers. You can navigate the acceptors and addresses through the console and operate on them. See Artemis User Manual - Management Console for more information.
5.3. Custom plugins
You can also extend the HawtIO capabilities by developing a custom plugin.
Typically, plugin development involves TypeScript, React, and PatternFly v4. For now, we have a few examples that demonstrate how you can develop a custom plugin to extend HawtIO.
- Sample plugin within the HawtIO project examples
-
https://github.com/jboss-fuse/hawtio-examples/tree/rhbac-4.14/sample-plugin
The simplest form of a HawtIO plugin. It packages itself as a JAR, and then can be used by including it as a dependency in a Java project. - Sample plugin for Spring Boot
-
https://github.com/hawtio/hawtio-sample-plugin-ts
This sample demonstrates how to write and use a custom HawtIO plugin in a Spring Boot application. - Sample plugin as a WAR application
-
https://github.com/hawtio/hawtio-sample-war-plugin-ts
This sample demonstrates how to write a custom HawtIO plugin as a WAR file, which can be later deployed to an application server such as Jetty, WildFly, and Tomcat.
5.3.1. Resources for plugin development
Here is a list of useful references for developing a HawtIO plugin.
Chapter 6. Setting up HawtIO on OpenShift 4
While HawtIO Online should be able to discover Fuse 7 apps, the Camel plugin that is included only supports Camel 4.x models. It is most likely unusable to manage Fuse 7 Camel routes with the HawtIO 4.
On OpenShift 4.x, setting up HawtIO involves installing and deploying it. The preferred mechanism for this installation is using the HawtIO Operator available from the OperatorHub Section 6.1, “Installing and deploying HawtIO on OpenShift 4 by using the OperatorHub”. Optionally, you can customize role-based access control (RBAC) for HawtIO as described in Section 6.2, “Role-based access control for HawtIO on OpenShift 4”.
6.1. Installing and deploying HawtIO on OpenShift 4 by using the OperatorHub
The HawtIO Operator is provided in the OpenShift OperatorHub for the installation of HawtIO. To deploy HawtIO you will have to deploy an instance of the installed operator as well as a HawtIO Custom Resource (CR).
To install and deploy HawtIO:
-
Log in to the OpenShift console in the web browser as a user with
cluster adminaccess. - Click Operators and then click OperatorHub.
- In the search field window, type HawtIO to filter the list of operators. Click HawtIO Operator.
In the HawtIO Operator install window, click Install. The Create Operator Subscription form opens:
- For Update Channel, select stable-v1.
For Installation Mode, accept the default (a specific namespace on the cluster).
NoteThis mode determines what namespaces the operator will monitor for HawtIO CRs. This is different to what namespaces HawtIO will monitor when it is fully deployed. The latter can be configured via the HawtIO CR.
- For Installed Namespace, select the namespace in which you want to install HawtIO Operator.
For the Update Approval, select Automatic or Manual to configure how OpenShift handles updates to HawtIO Operator.
- If the Automatic updates option is selected and a new version of HawtIO Operator is available, the OpenShift Operator Lifecycle Manager (OLM) automatically upgrades the running instance of HawtIO without human intervention;
- If the Manual updates option is selected and a newer version of an Operator is available, the OLM only creates an update request. A Cluster Administrator must then manually approve the update request to have HawtIO Operator updated to the new version.
- Click Install and OpenShift installs HawtIO Operator into the current namespace.
- To verify the installation, click Operators and then click Installed Operators. HawtIO should be visible in the list of operators.
To deploy HawtIO by using the OpenShift web console:
- In the list of Installed Operators, under the Name column, click HawtIO Operator.
- On the Operator Details page under Provided APIs, click Create HawtIO.
Accept the configuration default values or optionally edit them.
- For Replicas, to increase HawtIO performance (for example, in a high availability environment), the number of pods allocated to HawtIO can be increased;
- For RBAC (role-based access control), only specify a value in the Config Map field if you want to customize the default RBAC behaviour and if the ConfigMap file already exists in the namespace in which you installed HawtIO Operator
- For Nginx, see Performance tuning for HawtIO Operator installation
For Type, specify either:
- Cluster: for HawtIO to monitor all namespaces on the OpenShift cluster for any HawtIO-enabled applications;
- Namespace: for HawtIO to monitor only the HawtIO-enabled applications that have been deployed in the same namespace.
- Click Create. The HawtIO Operator Details page opens and shows the status of the deployment.
To open HawtIO:
- For a namespace deployment: In the OpenShift web console, open the project in which the HawtIO operator is installed, and then select Overview. In the Project Overview page, scroll down to the Launcher section and click the HawtIO link.
- For a cluster deployment, in the OpenShift web console’s title bar, click the grid icon. In the popup menu, under Red Hat Applications, click the HawtIO URL link.
- Log into HawtIO. An Authorize Access page opens in the browser listing the required permissions.
- Click Allow selected permissions. HawtIO opens in the browser and shows any HawtIO-enabled application pods that are authorized for access.
- Click Connect to view the monitored application. A new browser window opens showing the application in HawtIO.
6.2. Role-based access control for HawtIO on OpenShift 4
HawtIO offers role-based access control (RBAC) that infers access according to the user authorization provided by OpenShift. In HawtIO, RBAC determines a user’s ability to perform MBean operations on a pod.
For information on OpenShift authorization, see the Using RBAC to define and apply permissions section of the OpenShift documentation.
Role-based access is enabled by default when you use the Operator to install HawtIO on OpenShift. HawtIO RBAC leverages the user’s verb access on a pod resource in OpenShift to determine the user’s access to a pod’s MBean operations in HawtIO. By default, there are two user roles for HawtIO:
- admin: if a user can update a pod in OpenShift, then the user is conferred the admin role for HawtIO. The user can perform write MBean operations in HawtIO for the pod.
- viewer: if a user can get a pod in OpenShift, then the user is conferred the viewer role for HawtIO. The user can perform read-only MBean operations in HawtIO for the pod.
6.2.1. Determining access roles for HawtIO on OpenShift 4
HawtIO role-based access control is inferred from a user’s OpenShift permissions for a pod. To determine HawtIO access role granted to a particular user, obtain the OpenShift permissions granted to the user for a pod.
Prerequisites:
- The user’s name
- The pod’s name
Procedure:
To determine whether a user has HawtIO admin role for the pod, run the following command to see whether the user can update the pod on OpenShift:
oc auth can-i update pods/<pod> --as <user>- If the response is yes, the user has the admin role for the pod. The user can perform write operations in HawtIO for the pod.
To determine whether a user has HawtIO viewer role for the pod, run the following command to see whether the user can get a pod on OpenShift:
oc auth can-i get pods/<pod> --as <user>- If the response is yes, the user has the viewer role for the pod. The user can perform read-only operations in HawtIO for the pod. Depending on the context, HawtIO prevents the user with the viewer role from performing a write MBean operation, by disabling an option or by displaying an operation not allowed for this user message when the user attempts a write MBean operation.
- If the response is no, the user is not bound to any HawtIO roles and the user cannot view the pod in HawtIO.
6.2.2. Customizing role-based access to HawtIO on OpenShift 4
If you use the OperatorHub to install HawtIO, role-based access control (RBAC) is enabled by default. To customize HawtIO RBAC behaviour, before deployment of HawtIO, a ConfigMap resource (that defines the custom RBAC behaviour) must be provided. The name of this ConfigMap should be entered in the rbac configuration section of the HawtIO Custom Resource (CR).
The custom ConfigMap resource must be added in the same namespace in which the HawtIO Operator has been installed.
Prerequisite:
- The HawtIO Operator has been installed from the OperatorHub.
Procedure:
To customize HawtIO RBAC roles:
Create an RBAC ConfigMap:
Make sure the current OpenShift project is the project to which you want to install HawtIO. For example, to install HawtIO in the hawtio-test project, run this command:
oc project hawtio-test
Create a HawtIO RBAC ConfigMap file from the online example by executing this command:
oc create -f https://raw.githubusercontent.com/hawtio/hawtio-online/refs/heads/2.2.x-redhat/deploy/base/configmap-hawtio-rbac.yml --editThis will download the file and open the resource in an editor, allowing changes to be made to the resource prior to submission. Make the following edits:
- Change the namespace property to hawtio-test;
- Add a label named APP_NAME with the value custom-hawtio
After performing these edits, the updated configmap should look like:
kind: ConfigMap metadata: name: hawtio-rbac namespace: hawtio-test labels: APP_NAME: custom-hawtio- Save the file and the configmap will be submitted to the OpenShift cluster and created in the hawtio-test namespace
6.3. Migrating from Fuse Console
The version of the HawtIO Custom Resource Definition (CRD) has been upgraded in HawtIO from v1alpha1 to v2. This means that upon install of the HawtIO operator, all existing Fuse-Console Custom Resources (CRs) will be upgraded to this new version. The current schema properties of the CRD remain unchanged.
The CRD version property remains in the CRD but is no longer used by the HawtIO operator for installing HawtIO; it remains so that the Fuse-Console operator is still able to install Fuse-Console correctly.
HawtIO and Fuse-Console should perform as separate and independent applications.
6.4. Upgrading HawtIO on OpenShift 4
Red Hat OpenShift 4.x handles updates to operators, including HawtIO operators. For more information see the Operators OpenShift documentation. In turn, the operator updates will trigger application upgrades, depending on how the application is configured.
6.5. Tuning the performance of HawtIO on OpenShift 4
By default, HawtIO uses the following Nginx settings:
-
clientBodyBufferSize: 256k -
proxyBuffers: 16 128k -
subrequestOutputBufferSize: 10m
For descriptions of these settings, see the Nginx documentation.
To tune the performance of HawtIO, you can set any of the clientBodyBufferSize, proxyBuffers, and subrequestOutputBufferSize environment variables. For example, if you are using HawtIO to monitor numerous pods and routes (for instance, 100 routes in total), you can resolve a loading timeout issue by setting HawtIO’s subrequestOutputBufferSize environment variable between 60m to 100m.
6.5.1. Performance tuning for HawtIO Operator installation
On Openshift 4.x, you can set the Nginx performance tuning environment variables before or after you deploy HawtIO. If you do so afterwards, OpenShift redeploys HawtIO.
Prerequisite:
-
You must have
cluster adminaccess to the OpenShift cluster.
Procedure:
You can set the environment variables before or after you deploy HawtIO.
To set the environment variables before deploying HawtIO:
- In the OpenShift web console, in a project that has HawtIO Operator installed, select Operators> Installed Operators> HawtIO Operator.
- Click the HawtIO tab, and then click Create HawtIO.
- On the Create HawtIO page, in the Form view, scroll down to the Config> Nginx section.
Expand the Nginx section and then set the environment variables. For example:
-
clientBodyBufferSize: 256k -
proxyBuffers: 16 128k -
subrequestOutputBufferSize: 100m
-
- Click Create to deploy HawtIO.
- After the deployment completes, open the Deployments> HawtIO-console page, and then click Environment to verify that the environment variables are in the list.
To set the environment variables after you deploy HawtIO:
- In the OpenShift web console, open the project in which HawtIO is deployed.
- Select Operators> Installed Operators> HawtIO Operator.
- Click the HawtIO tab, and then click HawtIO.
- Select Actions> Edit HawtIO.
-
In the Editor window, scroll down to the
specsection. Under the
specsection, add a newnginxsection and specify one or more environment variables, for example:apiVersion: hawt.io/v2 kind: HawtIO metadata: name: hawtio-console spec: type: Namespace nginx: clientBodyBufferSize: 256k proxyBuffers: 16 128k subrequestOutputBufferSize: 100m- Click Save. OpenShift redeploys HawtIO.
- After the redeployment completes, open the Workloads> Deployments> HawtIO-console page, and then click Environment to see the environment variables in the list.
6.5.2. Performance tuning for viewing applications on HawtIO
Enhanced performance tuning capability of HawtIO allows viewing of the applications with a large number of MBeans. To use this capability perform the following steps.
Prerequisite:
-
You must have
cluster adminaccess to the OpenShift cluster.
Procedure:
Increase the memory limit for the applications.
To increase the memory limits after deploying HawtIO:
- In the OpenShift web console, open the project in which HawtIO is deployed.
- Select Operators> Installed Operators> HawtIO Operator.
- Click the HawtIO tab, and then click HawtIO.
- Select Actions> Edit HawtIO.
-
In the Editor window, scroll down to the
spec.resourcessection. - Update the values for both requests and limits to preferred amounts
- Click Save
- HawtIO should re-deploy using the new resource specification.
6.6. HawtIO CR properties
This section includes all custom resource properties that can be customized, including branding, about and console links.
auth: The authentication configuration | type: object
- internalSSL: Use SSL for internal communication. This should always be set to true for OpenShift installations.
- clientCertCheckSchedule: CronJob schedule that defines how often the expiry of the certificate will be checked. Client rotation isn’t enabled if the schedule isn’t set | type: string
- clientCertCommonName: The generated client certificate CN | type: string
- clientCertExpirationDate: The generated client certificate expiration date | type: string | format: date-time
- clientCertExpirationPeriod: The duration in hours before the expiration date, during which the certification can be rotated. The default is set to 24 hours | type: integer
config: The HawtIO console configuration | type: object
about: The information to be displayed in the About page | type: object
- additionalInfo: The text for the description section | type: string
- copyright: The text for the copyright section | type: string
- imgSrc: The image displayed in the page. It can be a path, relative to the HawtIO status URL, or an absolute URL | type: string
productInfo: List of product information | type: array
items: The product information displayed in the About page | type: object | required: [ "name", "value" ]
- name: The name of the product information | type: string
- value: The value of the product information | type: string
- title: The title of the page | type: string
branding: The UI branding | type: object
- appLogoUrl: The URL of the logo, that displays in the navigation bar. It can be a path, relative to the HawtIO status URL, or an absolute URL. | type: string
- appName: The application title, that usually displays in the Web browser tab. | type: string
- css: The URL of an external CSS stylesheet, that can be used to style the application. It can be a path, relative to the HawtIO status URL, or an absolute URL. | type: string
- favicon: The URL of the favicon, that usually displays in the Web browser tab. It can be a path, relative to the HawtIO status URL, or an absolute URL. | type: string
disabledRoutes: Disables UI components with matching routes | type: array |
- items: type: string
online: The OpenShift related configuration | type: object
consoleLink: The configuration for the OpenShift Web console link. A link is added to the application menu when the HawtIO deployment is equal to 'cluster'. Otherwise, a link is added to the HawtIO project dashboard. | type: object
-
imageRelativePath: The path, relative to the HawtIO status URL, for the icon used in front of the link in the application menu. It is only applicable when the HawtIO deployment type is equal to
cluster. The image should be square and will be shown at 24x24 pixels. | type: string - section: The section of the application menu in which the link should appear. It is only applicable when the HawtIO deployment type is equal to 'cluster'. | type: string
- text: The text display for the link | type: string
-
imageRelativePath: The path, relative to the HawtIO status URL, for the icon used in front of the link in the application menu. It is only applicable when the HawtIO deployment type is equal to
-
projectSelector: The selector used to watch for projects. It is only applicable when the HawtIO deployment type is equal to 'cluster'. By default, all the projects the logged in user has access to are watched. The string representation of the selector must be provided, as mandated by the
--selector, or-l, options from thekubectl getcommand. See: Kubernetes Labels and Selectors | type: string
externalRoutes: List of external route names that will be annotated by the operator to access the console using the routes | type: array |
- items: type: string
metadataPropagation: The configuration for which metadata on HawtIO custom resources to propagate to generated resources such as deployments, pods, services, and routes | type: object
annotations: Annotations to propagate | type: array |
- items: type: string
labels: Labels to propagate | type: array |
- items: type: string
nginx: The Nginx runtime configuration type: object
-
clientBodyBufferSize: The buffer size for reading client request body. Defaults to
256k. | type: string -
proxyBuffers: The number and size of the buffers used for reading a response from the proxied server, for a single connection. Defaults to
16 128k. | type: string -
subrequestOutputBufferSize: The size of the buffer used for storing the response body of a subrequest. Defaults to
10m. | type: string
-
clientBodyBufferSize: The buffer size for reading client request body. Defaults to
rbac: The RBAC configuration | type: object
- configMap: The name of the ConfigMap that contains the ACL definition. | type: string
-
disableRBACRegistry: Disable performance improvement brought by RBACRegistry and revert to the classic behavior. Defaults to
false. | type: boolean
- replicas: Number of desired pods. This is a pointer to distinguish between explicit zero and not specified. Defaults to 1. | type: integer | format: int32
resources: The HawtIO console compute resources | type: object
claims: Claims lists the names of resources, defined in spec.resourceClaims, that are used by this container. This is an alpha field and requires enabling the DynamicResourceAllocation feature gate. This field is immutable. It can only be set for containers. | type: array |
- items: ResourceClaim references one entry in PodSpec.ResourceClaims. | type: object | required: [ "name" ]
- name: Name must match the name of one entry in pod.spec.resourceClaims of the Pod where this field is used. It makes that resource available inside a container. | type: string
- limits: Limits describes the maximum amount of compute resources allowed. See: Kubernetes Resource Management for Pods and Containers | type: object
- requests: Requests describes the minimum amount of compute resources required. If Requests is omitted for a container, it defaults to Limits if that is explicitly specified, otherwise to an implementation-defined value. Requests cannot exceed Limits. See: Kubernetes Resource Management for Pods and Containers | type: object
route: Custom certificate configuration for the route (not necessary on most OpenShift installations). | type: object
caCert: Ca certificate secret key selector | type: object | required: [ "key" ]
- key: The key of the secret to select from. Must be a valid secret key. | type: string
- name: Name of the referent. See: Kubernetes Names | type: string
- optional: Specify whether the Secret or its key must be defined | type: boolean
certSecret: Name of the TLS secret with the custom certificate used for the route TLS termination | type: object
- name: Name of the referent. See: Kubernetes Names | type: string
- routeHostName: The edge host name of the route that exposes the HawtIO service externally. If not specified, it is automatically generated and is of the form: [-]. where is the default routing sub-domain as configured for the cluster. Note that the operator will recreate the route if the field is emptied, so that the host is re-generated. | type: string
healthChecks: The HawtIO health checking configuration. | type: object
- gatewayLivenessPeriod: Configure the period, in seconds, between gateway container liveness probe checks. | type: integer | format: int32
- gatewayReadinessPeriod: Configure the period, in seconds, between gateway container readiness probe checks. | type: integer | format: int32
- onlineLivenessPeriod: Configure the period, in seconds, between online container liveness probe checks. | type: integer | format: int32
- onlineReadinessPeriod: Configure the period, in seconds, between online container readiness probe checks. | type: integer | format: int32
logging: The HawtIO logging configuration. | type: object
-
gatewayLogLevel: Configure gateway log level {
info|debug}. Defaults toinfo. | type: string -
maskIPAddresses: Turn on/off the masking of IP addresses in logging {
true|false}. Defaults tofalse. This should be turned on with caution though since it can interfere with any mbean names that contain IP addresses. | type: string -
onlineLogLevel: Configure online log level {
emerg|alert|crit|error|warn|notice|info}. Defaults toinfo. | type: string
-
gatewayLogLevel: Configure gateway log level {
type: The deployment type. Defaults to
cluster. | type: string-
cluster: HawtIO is capable of discovering and managing applications across all namespaces the authenticated user has access to. -
namespace: HawtIO is capable of discovering and managing applications within the deployment namespace.
-
- version: The HawtIO console container image version. Deprecated: Remains for legacy purposes in respect of older operators (<1.0.0) still requiring it for their installs. | type: string
Chapter 7. Setting up Spring Boot applications for HawtIO Online with Jolokia
If stopping a Camel route is changing the health status to DOWN and triggering a pod restart by OpenShift, a possible solution to avoid this behavior is to set:
camel.routecontroller.enabled = trueIt will enable the supervised route controller so that the route will be with status Stopped and the overall status of the health check is UP.
This section describes the enabling of monitoring of a Spring Boot application by HawtIO. It starts from first principles in setting up a simple example application.
This application runs on OpenShift and is discovered and monitored by HawtIO online.
If you already have a Spring Boot application implemented, skip to Section 7.2, “Adding Jolokia Starter dependency to the application”.
The following is based on the jolokia sample application in the Apache Camel Spring-Boot examples repository.
Prerequisites
-
Maven has been installed and
mvnis available on the Command-line (CLI).
7.1. Setting up a sample Spring Boot application
To create a new Spring Boot application, you can either create the maven project directory structure manually, or execute an archetype to generate the scaffolding for a standard java project, which you can customize for individual applications.
Customize these values as needed:
archetypeVersion- 4.14.4.redhat-00010
groupId-
io.hawtio.online.examples artifactId-
hawtio-online-example-camel-springboot-os version-
1.0.0
Run the maven archetype:
mvn archetype:generate  \
  -DarchetypeGroupId=org.apache.camel.archetypes  \
  -DarchetypeArtifactId=camel-archetype-spring-boot  \
  -DarchetypeVersion=4.14.4.redhat-00010  \
  -DgroupId=io.hawt.online.examples  \
  -DartifactId=hawtio-online-example  \
  -Dversion=1.0.0  \
  -DinteractiveMode=false \
  -Dpackage=io.hawtio
Change into the new project named
artifactId(in the above example:hawtio-online-example)An example
hello worldapplication is created, and you can compile it.At this point, the application should be executable locally.
Use the
mvn spring-boot:runmaven goal to test the application:$ mvn spring-boot:run
7.2. Adding Jolokia Starter dependency to the application
In order to allow HawtIO to monitor the Camel route in the application, you must add the camel-jolokia-starter dependency. It contains all the necessary transitive dependencies.
Add the needed dependencies to the
<dependencies>section:<dependencies> ... <!-- Camel --> ... <!-- Dependency is mandatory for exposing Jolokia endpoint --> <dependency> <groupId>org.apache.camel.springboot</groupId> <artifactId>camel-jolokia-starter</artifactId> </dependency> <!-- Optional: enables debugging support for Camel --> <dependency> <groupId>org.apache.camel</groupId> <artifactId>camel-debug</artifactId> <version>4.10.3</version> </dependency> ... </dependencies>For configuration details, see the Jolokia component documentation
To enable inflight monitoring also add the following property to the
application.propertiesfile according to the Spring Boot documentation:camel.springboot.inflight-repository-browse-enabled=true
7.3. Configuring the application for Deployment to OpenShift
The starter already manages the configuration for the Kubernetes/OpenShift environment, so no specific extra configuration is needed.
The only mandatory configuration is the name of the port exposed by the POD, it must be named jolokia.
spec:
  containers:
    - name: my-container
      ports:
        - name: jolokia
          containerPort: 8778
          protocol: TCP
          ........
      .......
7.4. Deploying the Spring Boot application to OpenShift
Prerequisites
- The appropriate project selected (see Documentation);
- All files have been configured.
Run the following maven command:
mvn clean install -DskipTests -P openshiftThe application is compiled with S2I and deployed to OpenShift.
Verify that the Spring Boot application is running correctly:
Follow the Verification steps detailed in the Deploying Red Hat build of Quarkus Java applications to OpenShift Container Platform section of the Red Hat build of Quarkus documentation.
When your new Spring Boot application is running correctly, it is discovered by the HawtIO instance (depending on its mode - 'Namespace' mode requires it to be in the same project).
The new container should be displayed like in the following screenshot:

Click Connect to examine the Spring Boot application can be with HawtIO:
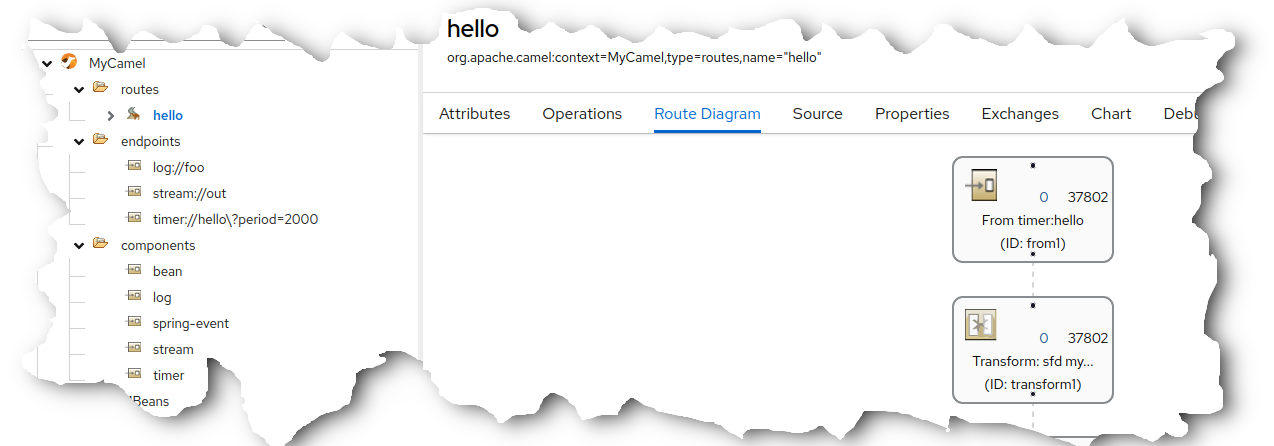
Chapter 8. Setting up Quarkus applications for HawtIO Online with Jolokia
This section describes the enabling of monitoring of a Quarkus application by HawtIO. It starts from first principles in setting up a simple example application. However, should a Quarkus application already have been implemented then skip to "Enabling Jolokia Java-Agent on the Example Quarkus Application".
For convenience, an example project based on this documentation has already been implemented and published here. Simply clone its parent repository and jump to "Deployment of the HawtIO-Enabled Quarkus Application to OpenShift”.
Explanation of Hawtio Online Component
- Any interactions either from users or Hawtio Next are communicated with the HTTP protocol to an Nginx web server
- The Nginx web server is the outward-facing interface and the only sub-component visible to external consumers
When a request is made, the Nginx web server hands off to the internal Gateway component, which serves 2 distinct purposes:
Master-Guard Agent
- Any request directed towards the target Master Cluster API Server (OpenShift) must pass through this component where checks are made to ensure the requested endpoint URL is approved. URLs that are not approved, eg. requests to secrets or configmaps (potentially security sensitive), are rejected;
Jolokia Agent
- Since pods reside on the Master Cluster, ultimately requests for Jolokia information from pods must also be protected and handled in a secure manner.
- This agent is responsible for converting a request from a client into the correct form for transmission to the target pod internally and passing the response back to the client.
8.1. Setting up an example Quarkus Application
For a new Quarkus application, the
maven quarkus quick-startis available, eg.mvn com.redhat.quarkus.platform:quarkus-maven-plugin:<quarkus.platform.version>:create\ -DprojectGroupId=org.hawtio \ -DprojectArtifactId=quarkus-helloworld \ -Dextensions='openshift,camel-quarkus-quartz'NoteUse latest
quarkus.platform.versionfrom the Camel Quarkus official documentation.-
Use the
quarkus-maven-pluginto generate the project scaffolding -
Set the project
maven groupIdtoorg.hawtioand customize as appropriate -
Set the project
maven artifactIdtoquarkus-helloworldand customize as appropriate Use the following Quarkus extensions:
- openshift: Enables maven to deploy to local OpenShift cluster;
-
camel-quarkus-quartz: Enables the Camel extension
quartzfor use in the example Quarkus application
- Execute the quick-start to create the scaffolding for the Quarkus project and then allow further customization for individual applications.
-
Use the
To build and deploy the application to OpenShift, the following properties should be specified in the file
src/main/resources/application.properties(see related documentation).# Set the Docker build strategy quarkus.openshift.build-strategy=docker # Expose the service to create an OpenShift Container Platform route quarkus.openshift.route.expose=true
8.2. Implementing an Example Camel Quarkus Application
For this example, a simple Camel ‘hello-world’ Quarkus application is to be implemented. Add the file
src/main/java/org/hawtio/SampleCamelRoute.javato the project with the following content:package org.hawtio; import jakarta.enterprise.context.ApplicationScoped; import org.apache.camel.builder.endpoint.EndpointRouteBuilder; @ApplicationScoped public class SampleCamelRoute extends EndpointRouteBuilder { @Override public void configure() { from(quartz("cron").cron("{{quartz.cron}}")).routeId("cron") .setBody().constant("Hello Camel! - cron") .to(stream("out")) .to(mock("result")); from("quartz:simple?trigger.repeatInterval={{quartz.repeatInterval}}").routeId("simple") .setBody().constant("Hello Camel! - simple") .to(stream("out")) .to(mock("result")); } }- This example logs "Hello Camel …" entries in the container log via a Camel route.
Modify the
src/main/resources/application.propertiesfile with the following properties:# Camel camel.context.name = SampleCamel # Uncomment the following to enable the Camel plugin Trace tab #camel.main.tracing = true #camel.main.backlogTracing = true #camel.main.useBreadcrumb = true # Uncomment to enable debugging of the application and in turn # enables the Camel plugin Debug tab even in non-development # environment #quarkus.camel.debug.enabled = true # Define properties for the Camel quartz component used in the # example quartz.cron = 0/10 * * * * ? quartz.repeatInterval = 10000Add the following dependencies to the
<dependencies>section of filepom.xml. These are required due to the route defined insrc/main/java/org/hawtio/SampleCamelRoute.java; these will need to be modified if the Camel route added to the application is changed:<dependency> <groupId>org.apache.camel.quarkus</groupId> <artifactId>camel-quarkus-stream</artifactId> </dependency> <dependency> <groupId>org.apache.camel.quarkus</groupId> <artifactId>camel-quarkus-mock</artifactId> </dependency>
8.3. Enabling Jolokia Java-Agent on the Example Quarkus Application
In order to ensure that maven properties can be passed through to the
src/main/resources/application.propertiesfile, the following should be added to the<build>section of the filepom.xml:<resources> <resource> <directory>src/main/resources</directory> <filtering>true</filtering> </resource> </resources>Add the following Jolokia properties to the
<properties>section of the filepom.xml. These will be used to configure the running jolokia java-agent in the Quarkus container (for an explanation of the properties, please refer to the Jolokia JVM Agent documentation):<properties> ... <!-- The current HawtIO Jolokia Version --> <jolokia-version>{jolokia-version}</jolokia-version> <!-- =============================================================== === Jolokia agent configuration for the connection with HawtIO =============================================================== It should use HTTPS and SSL client authentication at minimum. The client principal should match those the HawtIO instance provides (the default is `hawtio-online.hawtio.svc`). --> <jolokia.protocol>https</jolokia.protocol> <jolokia.host>*</jolokia.host> <jolokia.port>8778</jolokia.port> <jolokia.useSslClientAuthentication>true</jolokia.useSslClientAuthentication> <jolokia.caCert>/var/run/secrets/kubernetes.io/serviceaccount/service-ca.crt</jolokia.caCert> <jolokia.clientPrincipal.1>cn=hawtio-online.hawtio.svc</jolokia.clientPrincipal.1> <jolokia.extendedClientCheck>true</jolokia.extendedClientCheck> <jolokia.discoveryEnabled>false</jolokia.discoveryEnabled> ... </properties>Add the following dependencies to the
<dependencies>section of the filepom.xml:<!-- This dependency is required for enabling Camel management via JMX / HawtIO. --> <dependency> <groupId>org.apache.camel.quarkus</groupId> <artifactId>camel-quarkus-management</artifactId> </dependency> <!-- This dependency is optional for monitoring with HawtIO but is required for HawtIO view the Camel routes source XML. --> <dependency> <groupId>org.apache.camel.quarkus</groupId> <artifactId>camel-quarkus-jaxb</artifactId> </dependency> <!-- Add this optional dependency, to enable Camel plugin debugging feature. --> <dependency> <groupId>org.apache.camel.quarkus</groupId> <artifactId>camel-quarkus-debug</artifactId> </dependency> <!-- This dependency is required to include the Jolokia agent jvm for access to JMX beans. --> <dependency> <groupId>org.jolokia</groupId> <artifactId>jolokia-agent-jvm</artifactId> <version>${jolokia-version}</version> <classifier>javaagent</classifier> </dependency>With maven property filtering implemented, the
${jolokia…}environment variables should be passed-through from the pom.xml during the building of the application. The purpose of this property is to append a JVM option to the executing process of the container that runs the jolokia java-agent. Modify thesrc/main/resources/application.propertiesfile with the following property:# Enable the jolokia java-agent on the quarkus application quarkus.openshift.env.vars.JAVA_OPTS_APPEND=-javaagent:lib/main/org.jolokia.jolokia-agent-jvm-${jolokia-version}-javaagent.jar=protocol=${jolokia.protocol}\,host=${jolokia.host}\,port=${jolokia.port}\,useSslClientAuthentication=${jolokia.useSslClientAuthentication}\,caCert=${jolokia.caCert}\,clientPrincipal.1=${jolokia.clientPrincipal.1}\,extendedClientCheck=${jolokia.extendedClientCheck}\,discoveryEnabled=${jolokia.discoveryEnabled}
8.4. Exposing the Jolokia Port from the Quarkus Container for Discovery by HawtIO
For HawtIO to discover the deployed application, a port named
jolokiamust be present on the executing container. Therefore, it is necessary to add the following properties in thesrc/main/resources/application.propertiesfile:# Define the Jolokia port on the container for HawtIO access quarkus.openshift.ports.jolokia.container-port=${jolokia.port} quarkus.openshift.ports.jolokia.protocol=TCP
8.5. Deployment of the HawtIO-Enabled Quarkus Application to OpenShift
Pre-requsites:
- Command-line (CLI) is already logged-in to the OpenShift cluster and the project is selected.
When all files have been configured, the following maven command can be executed:
./mvnw clean package -Dquarkus.kubernetes.deploy=true- Verify that the Quarkus application is running correctly using the Verification steps detailed here.
Assuming the application is running correctly, the new Quarkus application should be discovered by an HawtIO instance (depending on its mode - 'Namespace' mode requires it to be in the same project). The new container should be displayed like in the following screenshot:

By clicking Connect, the Quarkus application can be examined by HawtIO.

See also:
Chapter 9. Setting up AMQ Broker for HawtIO Online with Jolokia
On OpenShift, you can configure an AMQ Broker deployment to use HawtIO Online instead of the AMQ Management Console. When you have configured your broker deployment appropriately, HawtIO Online discovers the brokers and displays a dedicated Artemis plugin. You can view the same broker runtime data that you do in the AMQ Management Console from a centralized Web UI. You can also perform the same basic management operations, such as creating addresses and queues.
The following procedure describes how to configure the Custom Resource (CR) instance for a broker deployment to enable HawtIO Online to discover and display brokers in the deployment.
9.1. Prerequisites
- HawtIO Online and AMQ Broker are both installed on the same OpenShift cluster.
If you configured HawtIO Online to monitor only applications deployed on the same namespace, AMQ Broker needs to be deployed on that namespace. Otherwise, AMQ Broker can be deployed on any namespace.
Note- For more information on installing HawtIO Online on OpenShift, see Chapter 6, Setting up HawtIO on OpenShift 4.
- For more information on installing AMQ Broker on OpenShift, see Deploying AMQ Broker on OpenShift.
9.2. Configuring AMQ Broker for HawtIO
The following procedure describes how to configure the Custom Resource (CR) instance for a broker deployment to enable HawtIO Online to discover and display brokers in the deployment.
- Open the CR created to deploy the AMQ Broker
In the
deploymentPlansection, add thejolokiaAgentEnabledandmanagementRBACEnabledproperties and specify values, as shown below.apiVersion: broker.amq.io/v1beta1 kind: ActiveMQArtemis metadata: name: ex-aao spec: deploymentPlan: size: 4 image: registry.redhat.io/amq7/amq-broker-rhel8:7.13 ... jolokiaAgentEnabled: true managementRBACEnabled: falsejolokiaAgentEnabled Specifies whether HawtIO Online can discover and display runtime data for the brokers in the deployment. To use HawtIO Online, set the value to
true.managementRBACEnabled Specifies whether role-based access control (RBAC) is enabled for the brokers in the deployment. You must set the value to
falseto use HawtIO Online because it uses its own role-based access control.ImportantIf you set the value of
managementRBACEnabledtofalseto enable use of HawtIO Online, management MBeans for the brokers no longer require authorization. You should not use the AMQ management console whilemanagementRBACEnabledis set tofalsebecause this potentially exposes all management operations on the brokers to unauthorized use.- Save the CR instance.
Switch to the project in which you previously created your broker deployment.
oc project <project_name>Apply the changes to the CR instance by running the following command:
oc apply -f <path/to/custom_resource_instance>.yaml- Open Hawtio Online in a browser. The AMQ Broker you configured should be visible on the list of HawtIO-enabled application pods that are authorized for access.
- Click Connect to view the AMQ Broker.
- A new browser window opens showing the application in HawtIO. The Artemis plugin is accessible via the main navigation menu.
Chapter 10. Viewing containers and applications
When you login to HawtIO for OpenShift, the HawtIO home page shows the available containers.
Procedure:
- To manage (create, edit, or delete) containers, use the OpenShift console.
- To view HawtIO-enabled applications and AMQ Brokers (if applicable) on the OpenShift cluster, click the Discover tab
Chapter 11. Viewing and managing Apache Camel applications
In HawtIO’s Camel tab, you view and manage Apache Camel contexts, routes, and dependencies.
You can view the following details:
- A list of all running Camel contexts
- Detailed information of each Camel context such as Camel version number and runtime statics
- Lists of all routes in each Camel application and their runtime statistics
- Graphical representation of the running routes along with real time metrics
You can also interact with a Camel application by:
- Starting and suspending contexts
- Managing the lifecycle of all Camel applications and their routes, so you can restart, stop, pause, resume, etc.
- Live tracing and debugging of running routes
- Browsing and sending messages to Camel endpoints
The Camel tab is only available when you connect to a container that uses one or more Camel routes.
11.1. Starting, suspending, or deleting a context
- In the Camel tab’s tree view, click Camel Contexts.
- Check the box next to one or more contexts in the list.
- Click Start or Suspend.
To delete a context:
- Stop the context.
- Click the ellipse icon and then select Delete from the dropdown menu.
When you delete a context, you remove it from the deployed application.
11.2. Viewing Camel application details
- In the Camel tab’s tree view, click a Camel application.
- To view a list of application attributes and values, click Attributes.
- To view a graphical representation of the application attributes, click Chart and then click Edit to select the attributes that you want to see in the chart.
- To view inflight and blocked exchanges, click Exchanges.
- To view application endpoints, click Endpoints. You can filter the list by URL, Route ID, and direction.
- To view, enable, and disable statistics related to the Camel built-in type conversion mechanism that is used to convert message bodies and message headers to different types, click Type Converters.
- To view and execute JMX operations, such as adding or updating routes from XML or finding all Camel components available in the classpath, click Operations.
11.3. Viewing a list of the Camel routes and interacting with them
To view a list of routes:
- Click the Camel tab.
In the tree view, click the application’s routes folder:

To start, stop, or delete one or more routes:
- Check the box next to one or more routes in the list.
- Click Start or Stop.
To delete a route, you must first stop it. Then click the ellipse icon and select Delete from the dropdown menu.
 Note
Note- When you delete a route, you remove it from the deployed application.
- You can also select a specific route in the tree view and then click the upper-right menu to start, stop, or delete it.
- To view a graphical diagram of the routes, click Route Diagram.
- To view inflight and blocked exchanges, click Exchanges.
- To view endpoints, click Endpoints. You can filter the list by URL, Route ID, and direction.
- Click Type Converters to view, enable, and disable statistics related to the Camel built-in type conversion mechanism, which is used to convert message bodies and message headers to different types.
To interact with a specific route:
- In the Camel tab’s tree view, select a route. To view a list of route attributes and values, click Attributes.
- To view a graphical representation of the route attributes, click Chart. You can click Edit to select the attributes that you want to see in the chart.
- To view inflight and blocked exchanges, click Exchanges.
- Click Operations to view and execute JMX operations on the route, such as dumping the route as XML or getting the route’s Camel ID value.
To trace messages through a route:
- In the Camel tab’s tree view, select a route.
- Select Trace, and then click Start tracing.
To send messages to a route:
- In the Camel tab’s tree view, open the context’s endpoints folder and then select an endpoint.
- Click the Send subtab.
- Configure the message in JSON or XML format.
- Click Send.
- Return to the route’s Trace tab to view the flow of messages through the route.
11.4. Debugging a route
- In the Camel tab’s tree view, select a route.
- Select Debug, and then click Start debugging.
To add a breakpoint, select a node in the diagram and then click Add breakpoint. A red dot appears in the node:

The node is added to the list of breakpoints:

Click the down arrow to step to the next node or the Resume button to resume running the route.

- Click the Pause button to suspend all threads for the route.
- Click Stop debugging when you are done. All breakpoints are cleared.
Chapter 12. Viewing and managing JMX domains and MBeans
Java Management Extensions (JMX) is a Java technology that allows you to manage resources (services, devices, and applications) dynamically at runtime. The resources are represented by objects called MBeans (for Managed Bean). You can manage and monitor resources as soon as they are created, implemented, or installed.
With the JMX plugin on HawtIO, you can view and manage JMX domains and MBeans. You can view MBean attributes, run commands, and create charts that show statistics for the MBeans.
The JMX tab provides a tree view of the active JMX domains and MBeans organized in folders. You can view details and execute commands on the MBeans.
Procedure:
To view and edit MBean attributes:
- In the tree view, select an MBean.
- Click the Attributes tab.
- Click an attribute to see its details.
To perform operations:
- In the tree view, select an MBean.
- Click the Operations tab, expand one of the listed operations.
- Click Execute to run the operation.
To view charts:
- In the tree view, select an item.
- Click the Chart tab.
Chapter 13. Viewing and managing Quartz Schedules
Quartz is a richly featured, open source job scheduling library that you can integrate within most Java applications. You can use Quartz to create simple or complex schedules for executing jobs.
A job is defined as a standard Java component that can execute virtually anything that you program it to do.
HawtIO shows the Quartz tab if your Camel route deploys the camel-quartz component. Note that you can alternately access Quartz mbeans through the JMX tree view.
Procedure:
- In HawtIO, click the Quartz tab. The Quartz page includes a tree view of the Quartz Schedulers and Scheduler, Triggers, and Jobs tabs.
- To pause or start a scheduler, click the buttons on the Scheduler tab.
Click the Triggers tab to view the triggers that determine when jobs will run. For example, a trigger can specify to start a job at a certain time of day (to the millisecond), on specified days, or repeated a specified number of times or at specific times.
- To filter the list of triggers select State, Group, Name, or Type from the drop-down list. You can then further filter the list by selecting or typing in the fill-on field.
- To pause, resume, update, or manually fire a trigger, click the options in the Action column.
- Click the Jobs tab to view the list of running jobs. You can sort the list by the columns in the table: Group, Name, Durable, Recover, Job ClassName, and Description.
Chapter 14. Viewing Threads
You can view and monitor the state of threads.
Procedure:
- Click the Runtime tab and then the Threads subtab.
- The Threads page lists active threads and stack trace details for each thread. By default, the thread list shows all threads in descending ID order.
- To sort the list by increasing ID, click the ID column label.
- Optionally, filter the list by thread state (for example, Blocked) or by thread name.
- To drill down to detailed information for a specific thread, such as the lock class name and full stack trace for that thread, in the Actions column, click More.
Chapter 15. Ensuring correct data displays in HawtIO
If the display of the queues and connections in HawtIO is missing queues, missing connections, or displaying inconsistent icons, adjust the Jolokia collection size parameter that specifies the maximum number of elements in an array that Jolokia marshals in a response.
Procedure:
In the upper right corner of HawtIO, click the user icon and then click Preferences.

- Increase the value of the Maximum collection size option (the default is 50,000).
- Click Close.
Chapter 16. OpenID Connect Integration
For a long time, HawtIO was supporting Keycloak as OpenID Provider. However, Keycloak already announced that these configuration methods used by HawtIO are deprecated.
Because, OpenID Connect Core 1.0 is a widespread specification and standard method for distributed authentication (based on OAuth 2), HawtIO 4 supports generic OpenID authentication.
16.1. Building blocks and terminology
To understand how HawtIO uses OpenID Connect and OAuth2, it is worth recalling some fundamental concepts.
There are 3 main parties involved in distributed authentication based on OpenID Connect (which is build on OAuth2):
Resource Server:
The server component hosting protected resource(s), where access is restricted or granted based on access tokens. Usually this server is accessed through REST API and doesn’t provide user interface on its own.
Client:
The application (typically with user interface) that accesses resource server on behalf of a user (which is treated as resource owner). In order to access resource server it is mandatory for the client to obtain an access token first.
In OpenID Connect specification, the client is named relying party (RP).
Authorization Server:
The server that coordinates communication between a client and resource server. The client asks authorization server to authenticate the user (resource owner) and if the authentication succeeds, an access token is issued for the client to access resource server.
In OpenID Connect specification, the authorization server is named OpenID Provider (OP).
The main goal of OAuth2 and OpenID Connect it to allow applications to access APIs without using user credentials and switch to token exchange.
It is important to know how HawtIO maps to the above roles:
- HawtIO Client application is an OAuth2 client. User interacts with HawtIO web application which in turn communicates with HawtIo Server (backend) with Jolokia agent running. Before accessing the Jolokia agent, HawtIO needs an OpenID Connect access token. To this end, HawtIO Client initiates OpenID Connect authentication process by redirecting user to Authorization Server.
- HawtIO Server application is a JakartaEE application exposing a Jolokia Agent API which authorizes user actions based on the content of an access token. Using OAuth2 terminology, HawtIO Server is a Resource Server.
The below UML diagram present the big picture.

The most important aspect is: HawtIO Client never deals with user credentials. User authenticates with Authorization Server and HawtIO Client only gets the access token used later to access HawtIO Server (and its Jolokia API).
16.2. Generic OpenID Connect authentication in HawtIO
HawtIO 4 can be used with existing OpenID Connect providers (like Keycloak, Microsoft Entra ID, Auth0, …) and uses these libraries to fullfill the task:
- Apache HTTP Client 4 to implement HTTP communication from HawtIO Server to OpenID Connect provider (e.g., to retrieve information about public keys for token signature validation).
- Nimbus JOSE + JWT library to manipulate and validate OpenID Connect / OAuth2 access tokens.
These libraries are included in HawtIO Server WAR, which means there’s no need to install/deploy any additional libraries (as it is the case with Keycloak specific configuration). In order to configure HawtIO with external OpenID Connect provider, we need to provide one configuration file and point HawtIO to its location.
The system property that specifies the location of OIDC (OpenID Connect) configuration is -Dhawtio.oidcConfig, but in case it’s not specified, a default location is checked. The defaults are:
-
For Karaf runtime,
${karaf.base}/etc/hawtio-oidc.properties -
For Jetty runtime,
${jetty.home}/etc/hawtio-oidc.properties -
For Tomcat runtime,
${catalina.home}/conf/hawtio-oidc.properties -
For JBoss/EAP/Wildfly runtime,
${jboss.server.config.dir}/hawtio-oidc.properties -
For Apache Artemis runtime,
${artemis.instance.etc}/hawtio-oidc.properties -
Falls back to
classpath:hawtio-oidc.properties(for embedded HawtIO usage)
Unlike with Keycloak legacy configuration specific configuration, there’s only one *.properties file needed that is used to configure all the aspects of OpenID Connect configuration.
Here’s the template:
# OpenID Connect configuration requred at client side

# URL of OpenID Connect Provider - the URL after which ".well-known/openid-configuration" can be appended for
# discovery purposes
provider = http://localhost:18080/realms/hawtio-demo
# OpenID client identifier
client_id = hawtio-client
# response mode according to https://openid.net/specs/oauth-v2-multiple-response-types-1_0.html
response_mode = fragment
# scope to request when performing OpenID authentication. MUST include "openid" and required permissions
scope = openid email profile
# redirect URI after OpenID authentication - must also be configured at provider side
redirect_uri = http://localhost:8080/hawtio
# challenge method according to https://datatracker.ietf.org/doc/html/rfc7636
code_challenge_method = S256
# prompt hint according to https://openid.net/specs/openid-connect-core-1_0.html#AuthRequest
prompt = login

# additional configuration for the server side

# if true, .well-known/openid-configuration will be fetched at server side. This is required
# for proper JWT access token validation
oidc.cacheConfig = true

# time in minutes to cache public keys from jwks_uri
jwks.cacheTime = 60

# a path for an array of roles found in JWT payload. Property placeholders can be used for parameterized parts
# of the path (like for Keycloak) - but only for properties from this particular file
# example for properly configured Entra ID token
#oidc.rolesPath = roles
# example for Keycloak with use-resource-role-mappings=true
#oidc.rolesPath = resource_access.${client_id}.roles
# example for Keycloak with use-resource-role-mappings=false
oidc.rolesPath = realm_access.roles

# properties for role mapping. Each property with "roleMapping." prefix is used to map an original role
# from JWT token (found at ${oidc.rolesPath}) to a role used by the application
roleMapping.admin = admin
roleMapping.user = user
roleMapping.viewer = viewer
roleMapping.manager = manager

# timeout for connection establishment (milliseconds)
http.connectionTimeout = 5000
# timeout for reading from established connection (milliseconds)
http.readTimeout = 10000
# HTTP proxy to use when connecting to OpenID Connect provider
#http.proxyURL = http://127.0.0.1:3128

# TLS configuration (system properties can be used, e.g., "${catalina.home}/conf/hawtio.jks")

#ssl.protocol = TLSv1.3
#ssl.truststore = src/test/resources/hawtio.jks
#ssl.truststorePassword = hawtio
#ssl.keystore = src/test/resources/hawtio.jks
#ssl.keystorePassword = hawtio
#ssl.keyAlias = openid connect test provider
#ssl.keyPassword = hawtio
This file configures several aspects of HawtIO+OpenID Connect:
- OAuth2 - configure the location of Authorization Server, client ID and several OpenID Connect related options
- JWKS - cache time for public keys obtained from jwks_uri, which is the endpoint that exposes public keys used by the Authorization Server.
- JWT token configuration - information about the claim (a field in JSON Web Token) that contains roles associated with the authenticated user. We also allow to map roles as defined in the Authorization Server to the roles used by the application (HawtIO Server and Jolokia).
- HTTP configuration - used by HTTP Client at server-side to connect to Authorization Server (to fetch OpenID Connect metadata and exposed public keys).
This example configuration can be adjusted to particular needs, but it also works as-is when used with containerized Keycloak. (See below).
16.3. JAAS role class configuration
OpenID Connect is used at HawtIO server side through JAAS. When HawtIO client obtains the access token, it is sent with every Jolokia request using HTTP Authorization: Bearer <access_token> header. Each role contained in the JWT token is (possibly after mapping) included as JAAS subject’s role principal. By default (when not configured explicitly) the class of role principal is io.hawt.web.auth.oidc.RolePrincipal.
However it is possible to configure another class (the requirement is - it has to contain single String-argument constructor) to be used as principal role class. For example, when used with Apache Artemis, the role should be org.apache.activemq.artemis.spi.core.security.jaas.RolePrincipal.
There’s a system property that specifies the role class:
-Dhawtio.rolePrincipalClasses=org.apache.activemq.artemis.spi.core.security.jaas.RolePrincipalHawtIO can analyze configure JAAS login modules and determine the role/user principal classes dynamically.
16.4. Using HawtIO and OpenID Connect authentication with Keycloak
The simplest way to run Keycloak instance is using a container:
podman run -d --name keycloak \
  -p 18080:8080 \
  -e KEYCLOAK_ADMIN=admin \
  -e KEYCLOAK_ADMIN_PASSWORD=admin \
  quay.io/keycloak/keycloak:latest start-dev
After it is started, browse to http://localhost:18080/admin/master/console/ and create a new realm:

At realm creation screen, upload hawtio-demo-realm.json which defines new hawtio-demo realm with pre-configured hawtio-client client and 3 users:
-
admin/admin with roles
manager,admin,vieweranduser -
viewer/viewer with roles
vieweranduser -
jdoe/jdoe with just
userrole
16.4.1. Investigating JWT token issues
In order to check the content of granted access token, we can use Keycloak interface. Navigate to "Clients", select "hawtio-client" and use "Client scopes" tab with "Evaluate" subtab:

Then in the "Users" field we can select for example "admin" and click "Generated access token". We can then examine an example token:
{
  "exp": 1709552728,
  "iat": 1709552428,
  "jti": "0f33971f-c4f7-4a5c-a240-c18ba3f97aa1",
  "iss": "http://localhost:18080/realms/hawtio-demo",
  "aud": "account",
  "sub": "84d156fa-e4cc-4785-91c1-4e0bda4b8ed9",
  "typ": "Bearer",
  "azp": "hawtio-client",
  "session_state": "181a30ac-fce1-4f4f-aaee-110304ccb0e6",
  "acr": "1",
  "allowed-origins":
  [
    "http://0.0.0.0:8181",
    "http://localhost:8080",
    "http://localhost:8181",
    "http://0.0.0.0:10001",
    "http://0.0.0.0:8080",
    "http://localhost:10001",
    "http://localhost:10000",
    "http://0.0.0.0:10000"
  ],
  "realm_access":
  {
    "roles":
    [
      "viewer",
      "manager",
      "admin",
      "user"
    ]
  },
  "resource_access":
  {
    "account":
    {
      "roles":
      [
        "manage-account",
        "manage-account-links",
        "view-profile"
      ]
    }
  },
  "scope": "openid profile email",
  "sid": "181a30ac-fce1-4f4f-aaee-110304ccb0e6",
  "email_verified": false,
  "name": "Admin HawtIO",
  "preferred_username": "admin",
  "given_name": "Admin",
  "family_name": "HawtIO",
  "email": "admin@hawt.io"
}
Knowing the structure of JWT access token we can check if role path is configured correctly:
# a path for a field in JWT payload that should be used as user identifier. Keycloak for example uses
# preferred_username, but it may be other field. The value will be used as user/identity JAAS Principal
oidc.userPath = preferred_username

# a path for an array of roles found in JWT payload. Property placeholders can be used for parameterized parts
# of the path (like for Keycloak) - but only for properties from this particular file.
# example for Keycloak with use-resource-role-mappings=true
#oidc.rolesPath = resource_access.${client_id}.roles
# example for Keycloak with use-resource-role-mappings=false
oidc.rolesPath = realm_access.roles
16.5. Using HawtIO and OpenID Connect authentication with Microsoft Entra ID
HawtIO 4 has also been tested with Microsoft Entra ID. While in theory, everything that should be required to use any OpenID Connect provider is to get access to relevant OpenID Provider Metadata, in practice we need some provider-specific configuration.
Clients are registered in Entra ID using "App registrations" blade. When registering an application, the most important decision is about a platform kind of the Redirect URI:

There are 2 options to choose from (we’re not considering "Public client/native (mobile & desktop)" platform). This UI is presented when configuring Redirect URIs later:

While it is not obvious what to choose at first glance, it is enough to state:
Web platform:
This kind of client is suitable for server-side applications and APIs.
SPA platform:
SPA applications are running within a browser where it’s natural to use "Authorization Code Flow" and so-called public client. The reason is that there’s no good way of storing credentials and secrets in browser application.
Choosing SPA platform gives us this mark in Entra ID UI:

16.5.1. Using single SPA client in Entra ID
After configuring the SPA client in Entra ID, we can already set relevant options in hawtio-oidc.properties. At "App registrations" blade in Entra ID we can click "Endpoints" tab and be presented with:

Tenant IDs are UUIDs specific to the Entra ID / Azure tenant being used. Here is the HawtIO configuration where provider is the base URL of your tenant and client_id is "Application (client) ID" from the Overview of App Registration page.
# OpenID Connect configuration requred at client side

# URL of OpenID Connect Provider - the URL after which ".well-known/openid-configuration" can be appended for
# discovery purposes
provider = https://login.microsoftonline.com/00000000-1111-2222-3333-444444444444/v2.0
# OpenID client identifier
client_id = 55555555-6666-7777-8888-999999999999
# response mode according to https://openid.net/specs/oauth-v2-multiple-response-types-1_0.html
response_mode = fragment
# scope to request when performing OpenID authentication. MUST include "openid" and required permissions
scope = openid email profile
# redirect URI after OpenID authentication - must also be configured at provider side
redirect_uri = http://localhost:8080/hawtio
# challenge method according to https://datatracker.ietf.org/doc/html/rfc7636
code_challenge_method = S256
# prompt hint according to https://openid.net/specs/openid-connect-core-1_0.html#AuthRequest
prompt = login
The problem with such configuration (where openid email profile is sent as a scope parameter) is that the assumed scope is in fact email openid profile User. Read and the granted access token is (showing only relevant JWT claims):
{
  "aud": "00000003-0000-0000-c000-000000000000",
  "iss": "https://sts.windows.net/8fd8ed3d-c739-410f-83ab-ac2228fa6bbf/",
...
  "app_displayname": "hawtio",
...
  "scp": "email openid profile User.Read",
...
}
The aud (audience) claim is 00000003-0000-0000-c000-000000000000 which is an OAuth2 Client ID of … Microsoft Graph API.
Not only such access token should not be used by HawtIO server (with Jolokia agent), also the signature is created using keys associated with Microsoft Graph API.
In order to properly configure Entra ID and ensure that the access tokens generated are consumable by HawtIO Server, we need two app registrations - both for HawtIO Client and HawtIO Server. See the following subchapter.
16.5.2. Using SPA together with Web client in Entra ID
What is recommended is to set up two app registrations in Entra ID:
- An SPA client for HawtIO Client application - this is the way to configure an OAuth2 public client with PKCE enabled.
-
A Web (API) client for HawtIO Server application (in fact, its Jolokia API) - this is the Entra ID which exposes an API represented as scope named (for example)
api://hawtio-server/Jolokia.Access, which is then configured in the above HawtIO Client application as permitted API.
Finally, when the Authorization Code Flow is initiated one of the requested scopes in the scope parameter is the scope defined for HawtIO Server application (like api://hawtio-server/Jolokia.Access).
Let’s summarize the configuration required in Entra ID.
-
Create
hawtio-serverapp registration with "Web" Redirect URI. In "Expose an API" section, add a scope representing the access scope that may be requested from HawtIO Client:

This will create a reference’able
api://hawtio-server/Jolokia.Accessscope we will use later.In "App roles" section for
hawtio-serverdefine any roles you want to assign to users within the scope of this client, for example:
In "Enterprise Applications" blade for
hawtio-servergo to "Users and groups" tab and add user-role assignment. For example:
Create
hawtio-clientapp registration with "SPA" Redirect URI.
In "API Permissions" section for
hawtio-clientapp registration, add a delegated permission forhawtio-serverexposed API:
This should configure a set of delegated permissions similar to:
 Note
NoteRead more about delegated permissions in Microsoft Entra ID documentation.
-
No User-Role mapping is required for
hawtio-clientin Enterprise Application blade. Having the above configured, we can properly set the
scopeparameter in HawtIO configuration:This will create a reference’able
api://hawtio-server/Jolokia.Accessscope we will use later.-
In "App roles" section for
hawtio-serverdefine any roles you want to assign to users within the scope of this client, for example: -
In "Enterprise Applications" blade for
hawtio-servergo to "Users and groups" tab and add user-role assignment. For example: -
Create
hawtio-clientapp registration with "SPA" Redirect URI In "API Permissions" section for
hawtio-clientapp registration, add a delegated permission forhawtio-serverexposed API:This should configure a set of delegated permissions similar to:
NoteRead more about delegated permissions in Microsoft Entra ID documentation.
-
No User-Role mapping is required for
hawtio-clientin Enterprise Application blade.
Having the above configured, we can properly set the scope parameter in HawtIO configuration:
# scope to request when performing OpenID authentication. MUST include "openid" and required permissions
scope = openid email profile api://hawtio-server/Jolokia.Access
16.5.3. Access token configuration
The final, but very important configuration item is the Token Configuration. For hawtio-server app registration, which is the app that represents HawtIO Server (and is the component that consumes granted access token) we have to ensure that groups claim is added to access token.
Here is the minimal configuration:

groups claim need to include security groups and directory roles and groups needs to be represented by names, not UUIDs:

For reference, here’s the relevant JSON snippet of hawtio-server app registration’s Manifest:
"optionalClaims":
{
  "idToken":
  [
    {
      "name": "groups",
      "source": null,
      "essential": false,
      "additionalProperties": []
    }
  ],
  "accessToken":
  [
    {
      "name": "groups",
      "source": null,
      "essential": false,
      "additionalProperties":
      [
        "sam_account_name"
      ]
    },
...
Now the granted access token is no longer specific for Microsft Graph API audience. It is intended for hawtio-server - aud claim is the UUID of hawtio-server app registration and appid claim is the UUID of hawtio-client app registration:
{
  "aud": "aaaaaaaa-bbbb-cccc-dddd-eeeeeeeeeeee",
  "iss": "https://sts.windows.net/.../",
  "iat": 1709626257,
  "nbf": 1709626257,
  "exp": 1709630939,
...
  "appid": "55555555-6666-7777-8888-999999999999",
...
  "groups":
  [
    ...
  ],
...
  "name": "hawtio-viewer",
...
  "roles":
  [
    "HawtIO.User"
  ],
  "scp": "Jolokia.Access",
The roles which are then transformed (possibly with mapping) are available at roles claim and this is reflected in the configuration:
# a path for an array of roles found in JWT payload. Property placeholders can be used for parameterized parts
# of the path (like for Keycloak) - but only for properties from this particular file
# example for properly configured Entra ID token
#oidc.rolesPath = roles
...
# properties for role mapping. Each property with "roleMapping." prefix is used to map an original role
# from JWT token (found at ${oidc.rolesPath}) to a role used by the application
roleMapping.HawtIO.User = user
...