Kaoto
Create and edit integrations based on Apache Camel with Kaoto
Abstract
Chapter 1. Overview of Kaoto
The VS Code extensions for Apache Camel are listed as development support. For more information about the scope of development support, see Development Support Scope of Coverage for Red Hat Build of Apache Camel.
Kaoto is an acronym for Kamel Orchestration Tool. It is a low code and no code integration designer to create and edit integrations based on Apache Camel. Kaoto is extendable, flexible, and adaptable to different use cases. For more information about the history of Kaoto, see Statistics and History of Kaoto.
Kaoto offers a rich catalog of building blocks for use in graphical design. By default, Kaoto loads the official upstream Camel Catalog and Kamelet Catalog.
Kaoto stands out as an intuitive visual platform for Apache Camel integrations, specifically designed to streamline the development process. It offers an accessible entry point for junior integration engineers through its low-code/no-code capabilities, making the initial steps of integration development straightforward. Moreover, Kaoto supports a seamless transition to more sophisticated features, allowing expert Camel developers to develop and fine-tune complex integration routes effectively.
The audience for this guide is Apache Camel developers. This guide assumes familiarity with Apache Camel and the processing requirements for your organization.
Benefits of using Kaoto can be listed as follows:
Enhanced Visual Development Experience
By leveraging Kaoto’s visual designing capabilities, users can intuitively create, view, and edit Camel integrations through the user interface. This low-code/no-code approach significantly reduces the learning curve for new users and accelerates the development process for seasoned developers.
Comprehensive Component Catalog Accessibility
Kaoto provides immediate access to a rich catalog of Camel components, enterprise integration patterns (EIPs), and Kamelets. This extensive Catalog enables developers to easily find and implement the necessary components for their integration solutions. By having these resources readily available, developers can focus more on solving business problems rather than spending time searching for and learning about different components.
Streamlined Integration Development Process
The platform is designed with an efficient user experience in mind, optimizing the steps required to create comprehensive integrations. This efficiency is achieved through features like auto-completion, configuration forms, and interactive feedback mechanisms. As a result, developers can quickly assemble and configure integrations, reducing the overall development time. This streamlined process encourages experimentation and innovation by making it easier to prototype and test different approaches.
1.1. Why Kaoto?
Camel at Heart
Using the power of Apache Camel: Kaoto utilizes the Apache Camel models and schemas to always offer you all available Camel features.
Local Development
VS Code Extension: We provide Kaoto as an extension you can install from the Microsoft Marketplace and also from the Open VSX Marketplace.
LCNC: Low Code and No Code
Care about developers: You can seamlessly switch between any IDE and Kaoto, allowing mixed teams and converting low-code integrators to developers.
FLOSS heart
Free Libre and Open Source Forever: Truly open with no vendor lock-in. Use, reuse, share, modify, and resell to the users' needs.
Chapter 2. Installing Kaoto
2.1. Pre-requisites
2.1.1. Microsoft Visual Studio Code
Kaoto ships as a Microsoft Visual Studio Code extension. If you haven’t installed VS Code on your manchine yet, do that now.
Visit the download page and follow the installation instructions that apply best for you.
2.1.2. Camel CLI
To give you the best user experience we recommend to install the Camel CLI, which offers various functionalities for Camel developers.
Follow the below steps to install it.
- Install JBang following these instructions.
Verify that JBang is working by executing the following from a command shell. This should output the version of installed JBang.
jbang versionRun the following command from a command shell to install the Camel CLI:
jbang app install camel@apache/camelCheck if the Camel CLI is working by executing the following from a command shell. This should output the version of the installed Camel CLI.
camel version
2.1.3. Citrus Testing
If you want to work with the Citrus testing framework, we strongly recommend to install the Citrus JBang plugin.
Follow the below steps to install it.
- Install JBang following these instructions.
Verify that JBang is working by executing the following from a command shell. This should output the version of installed JBang.
jbang versionRun the following command from a command shell to install the Citrus JBang plugin:
jbang app install citrus@citrusframework/citrusCheck if the Citrus JBang plugin is working by executing the following from a command shell. This should output the version of the installed Citrus JBang plugin.
citrus --version
2.2. Installation
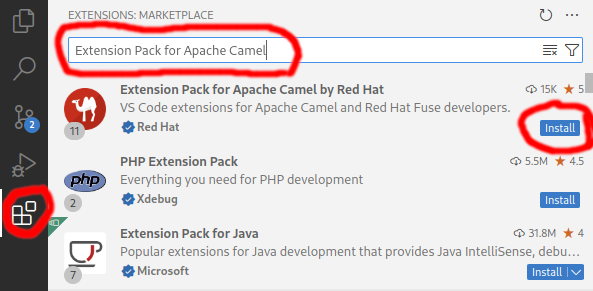
It is recommended to install the Extension Pack for Apache Camel by Red Hat. It will provide a set of tools to manage, edit, run, and debug Camel integrations in various contexts.
The following procedure explains how to install VS Code and other essential extensions required to get started with Kaoto.
- If you do not have Visual Studio Code installed, install it from here.
- Launch VS Code.
- Install the Extension Pack for Apache Camel by Red Hat into your Visual Studio Code instance.
To run and debug Camel integrations using VS Code UI, install JBang CLI. Optionally, to run Camel integrations from the command line, install Camel CLI.
Create and select a workspace folder where all the integration will be stored. Selecting a workspace is important to ensure all required commands will be available and behave correctly.
Chapter 3. Getting started with Kaoto
This section describes how to:
- Setup a workspace in VS Code
- Access the important commands to create your integration
- Create your first Camel route
- Run your Camel route locally
- Get access to the source code of the Camel route
3.1. Preparing the Workspace
Visual Studio Code requires you to create a workspace for your project to access the full functionality of the environment.
-
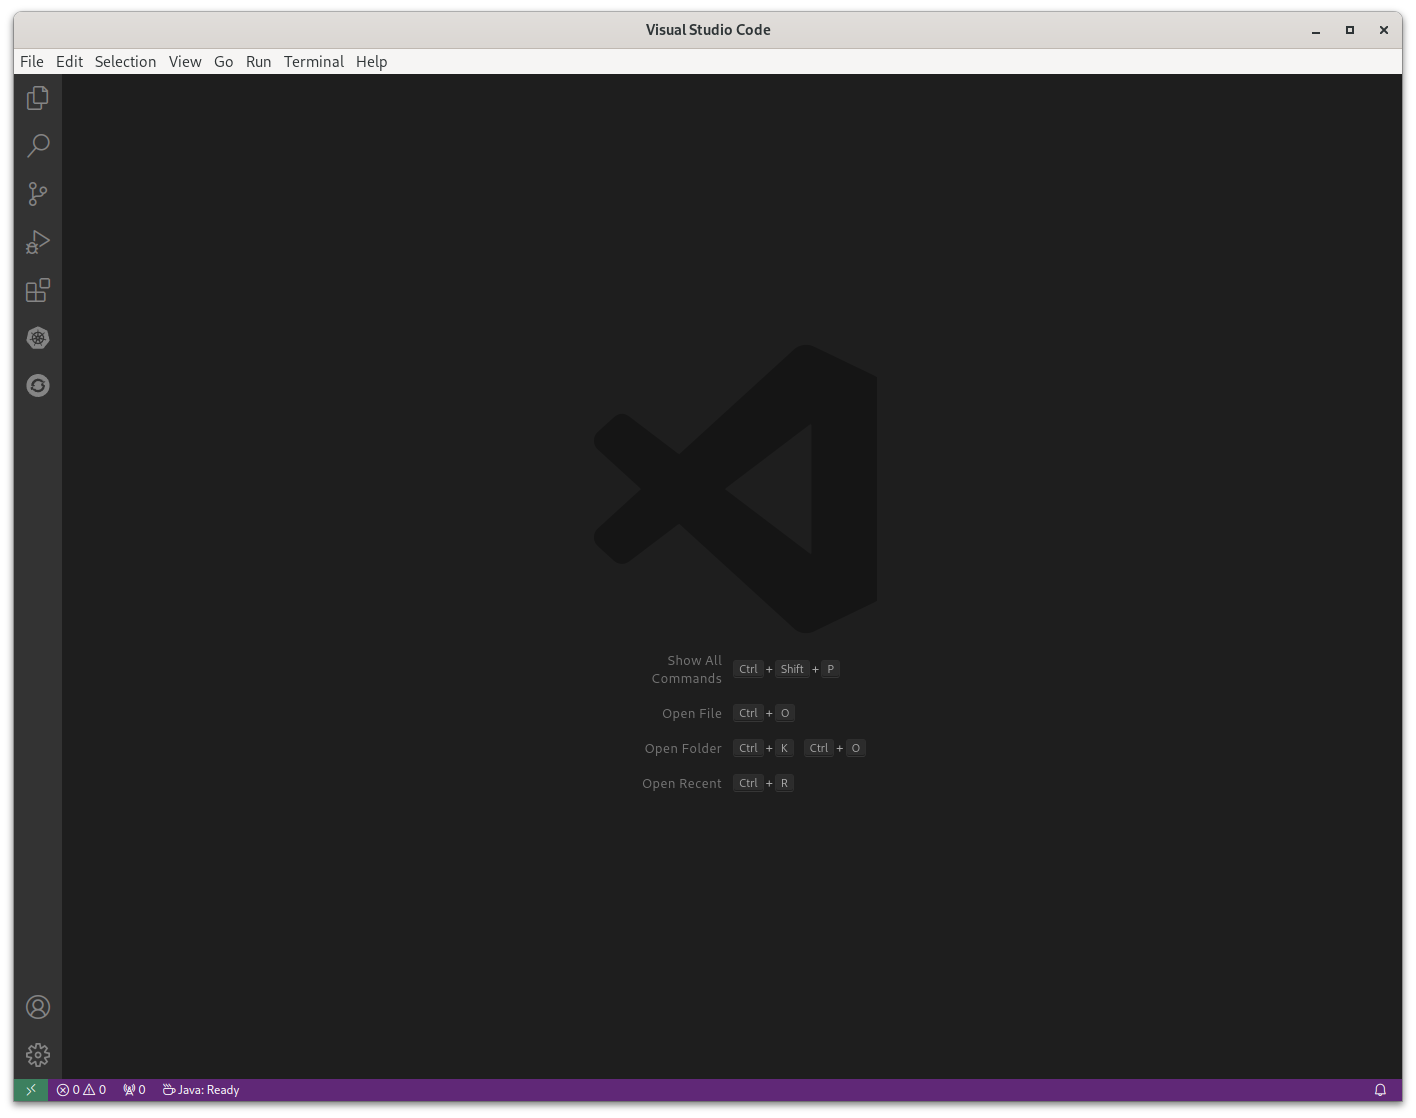
If you haven’t done so yet, open your Visual Studio Code instance. You can do that by finding the right launcher on your computer or by opening a command shell and executing
code. This should leave you with a window like the one below.
3.2. Executing VS Code Commands
The following procedure explains how to create and store integrations with Kaoto.
Select your workspace folder which will store your project files. Go to the
Filemenu and select the entryOpen Folder. In the following screen browse to the folder you would like to use and select it.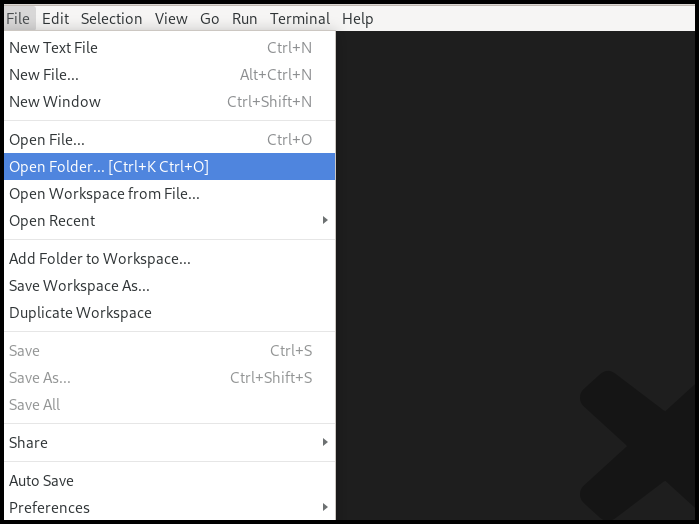 Note
NoteSome VS Code commands require a workspace to show up and function correctly. If you haven’t set one up and opened it you should check the Section 3.1, “Preparing the Workspace” section.
-
To access the VS Code command palette you have to press either
F1orCTRL+SHIFT+P. This will open up an entry field which you can use to filter for the commands you are interested in. In our case we are interested in the
Camelrelated commands, so lets typeCamelinto the field and check the filtered results.Create a Camel route using YAML DSL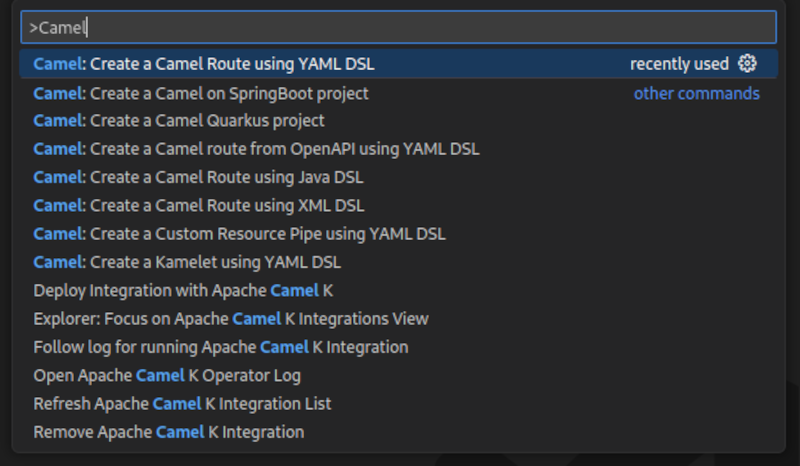
3.3. Creating Camel routes
-
If you followed the steps from Section 3.2, “Executing VS Code Commands” section, you should still see the filtered Camel commands. Select the command called
Camel: Create a Camel route using YAML DSLand hitEnter. Next you are asked to provide a name for the file to be created. Feel free to pick a name without stating a file extension (example:
simpleTest) and hitEnteragain.Note-
If all worked correctly you should now see your new file with the extension
`.camel.yamland the Kaoto Visual Designer should open up.
If the Kaoto editor doesn’t open check you followed the Installing Kaoto section and your file is named like filename.camel.yaml. If you named the file differently then rename it to match this naming rule.
You should now see a similar screen like the one below.

3.3.1. Launching the Camel route
The Camel route we created in the previous chapter can already be launched. Let’s try to start the Route by clicking the
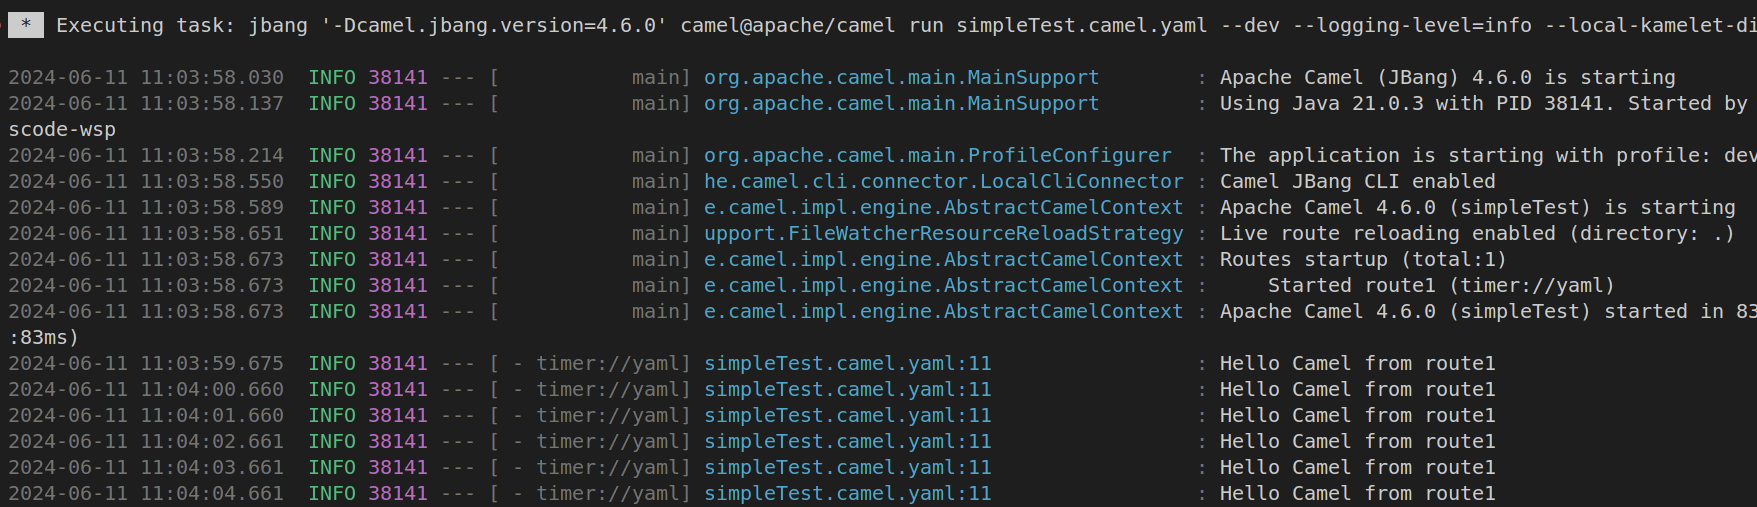
Run Camel Application with JBangbutton in the top right of the Kaoto Visual Editor.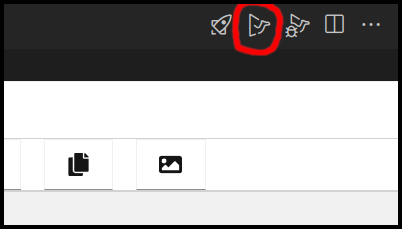
A terminal should open up and it will show you the output of your launched Camel route.
-
You can terminate the execution of your Camel route at any time by selecting the terminal window and pressing
CTRL+C.
3.3.2. Accessing the Source Code
You might wonder how the source of your new Camel route looks like. While Kaoto tries relief users from the burden of working with the source code, we still allow access to it via the default Visual Studio Code Text Editor.
To access your source code you can either right click the tab labeled with the filename and then select Reopen Editor with and then choosing Text Editor.
Another way of doing that is to right-click the file in the Explorer view on the left side of the window and then similarly selecting the menu item Open With and then choosing Text Editor.
If you want to revert back to the Kaoto Editor you can follow the same steps as above but instead of Text Editor you should then select Kaoto Editor.
Chapter 4. The Visual Designer
The following picture shows the different parts of the Kaoto Visual Editor.
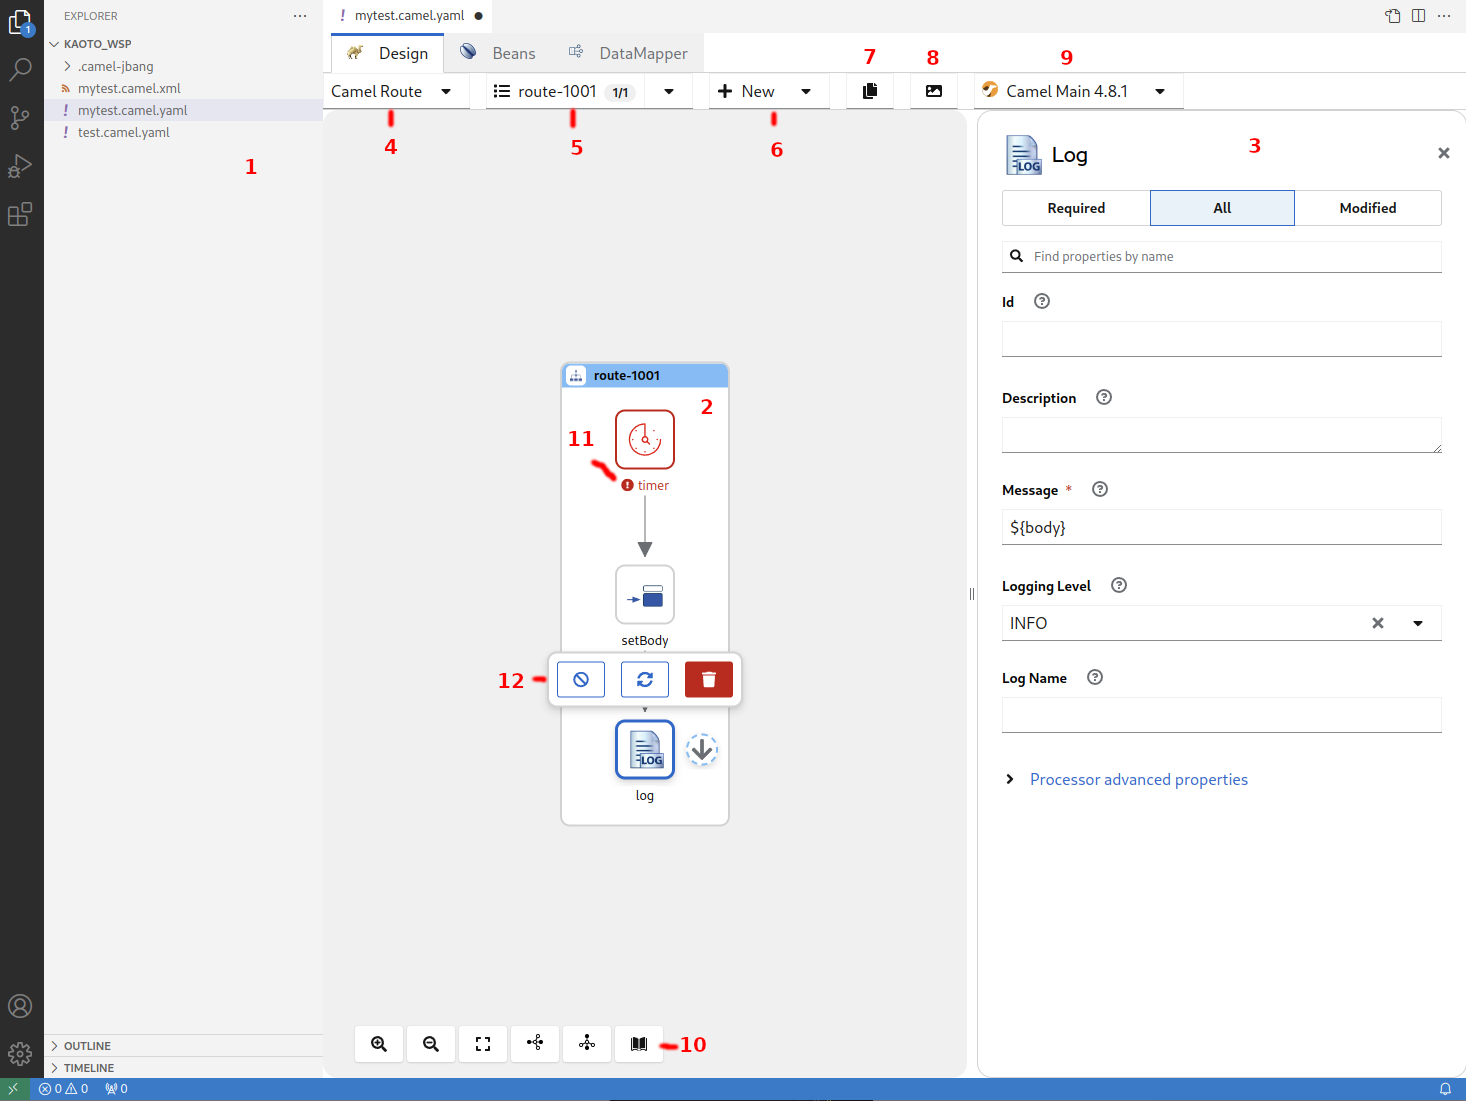
- The Explorer View with the selected file
- The currently displayed Integration
- The configuration panel where you can adjust and customize settings for the selected step
- Drop down showing the currently selected integration type, here Camel route
- Drop down showing the currently selected Camel route. This is handy if you have more than one Camel route defined in your file. You can rename, delete, select and switch the visibility for each Camel route
- Drop down enabling you to add more Routes or other global elements to your integration. Only visible for Camel routes!
- Copies the full source code of your integration to the Clipboard
- Exports the currently visible Integration as a PNG image
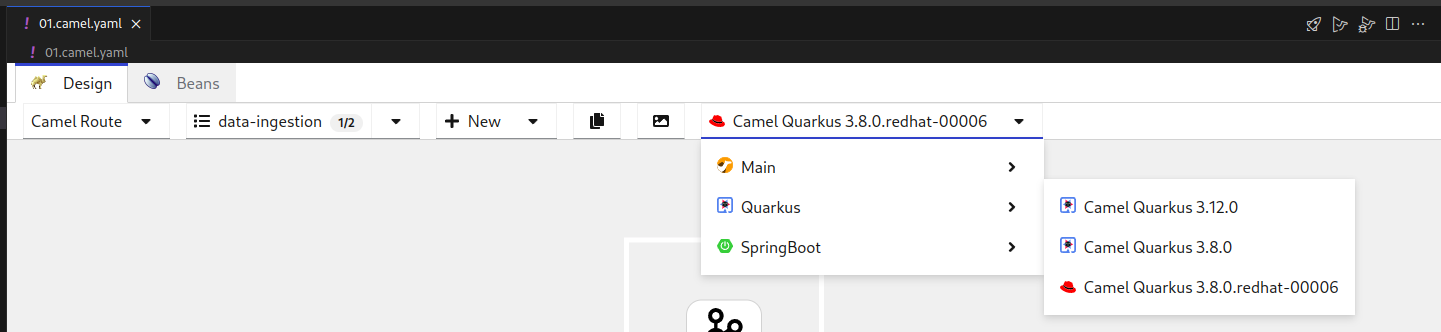
- Drop down showing the available Camel versions. Different runtimes are available, like Camel Main, Springboot and Quarkus.
- This button bar provides you with functionalities like Zoom In / Out, Reset the View, Switching the layout direction between horizontal and vertical and grants you access to the comprehensive Camel Catalog, containing all the available Components/Connectors, Enterprise Integration Patterns and Kamelets
- A step in your Integration with an Error-Marker to indicate a problem with the configuration of the step.
- The toolbar of the selected step. It provides available actions for the current selection.
4.1. Working with Camel routes
In Apache Camel, a route is a set of processing steps that are applied to a message as it travels from a source to a destination. A route typically consists of a series of processing steps that are connected in a linear sequence.
A Camel route is where the integration flow is defined. For example, you can write a Camel route to specify how two systems can be integrated. You can also specify how the data can be manipulated, routed, or mediated between the systems.
4.1.1. Creating a new Camel route
We already covered how to create a new Camel route YAML file in the chapter Create your first Camel route.
Let’s use another way of creating a new Camel route.
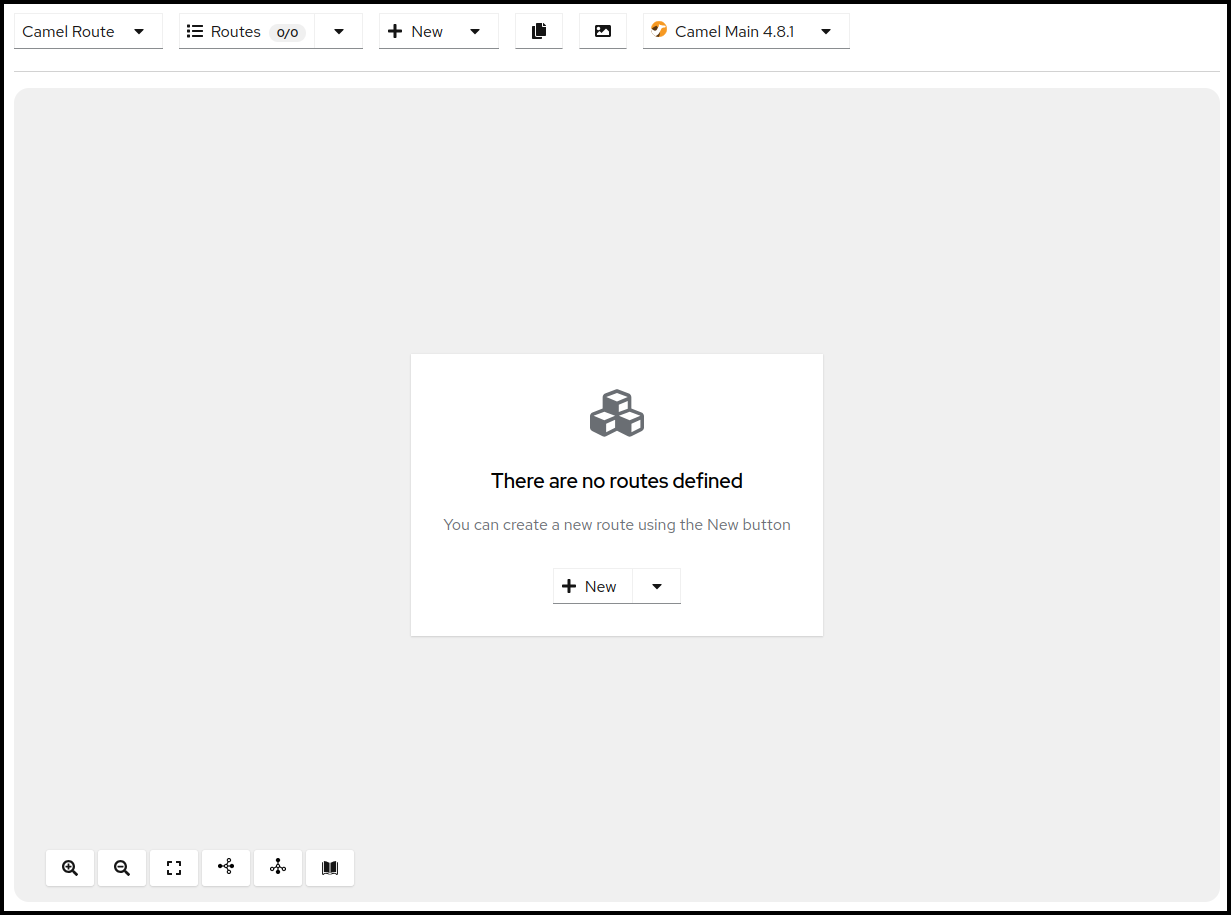
If you have your route from the other chapter still open, click on the Route selection drop down and then delete all the routes using the trashbin icon.
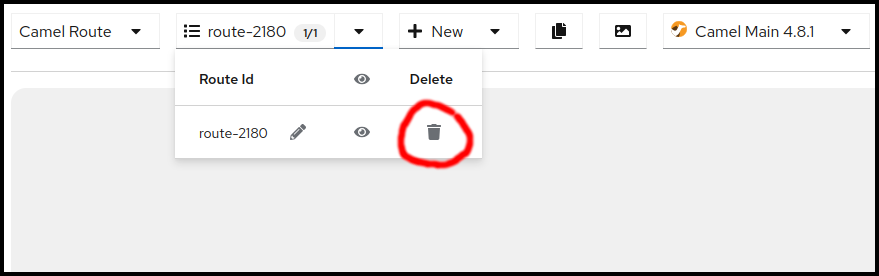
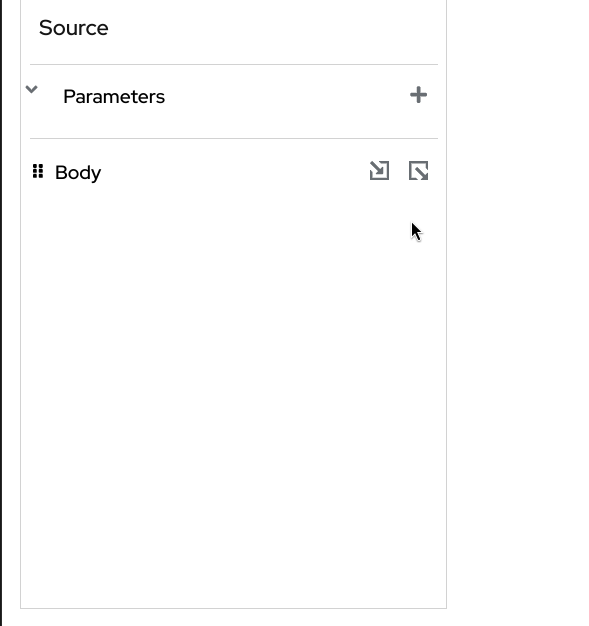
Once you confirmed the deletion of all your routes you should see a blank screen like below.
-
You can now create a new Camel route by either clicking the
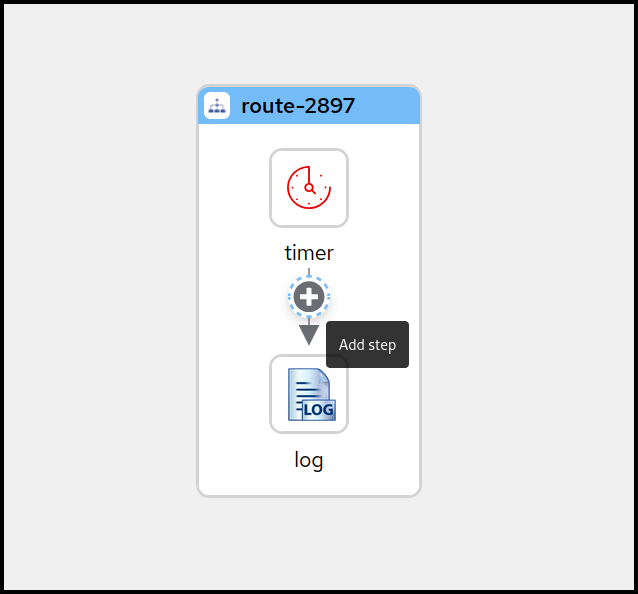
+ Newbutton in the center of the canvas or by using the same button in the upper menu bar of the Canvas, next to the Route selection drop down, which will both put a template route in place which uses a Timer component to send every second a message to the Log component.
4.1.2. Adding a step
Now lets add a new step between the Timer and the Log component to modify the message body.
There are two ways of adding a step to the route. You can either Right-Click on the step you want to insert before or after. This will bring up a context menu with the available actions to choose from. An easier alternative would be to hover over the connection between the two steps you want to insert between and then click on the + button that appears.
Hover over the connection between the Timer and the Log steps now and click the + button to execute the Add step action.
 Important
When using the right-click context menu, the set of available actions depend on the selected step and can vary. There are actions for appending, prepending, replacing and deleting steps as well as some more specialized actions.
This will open up the Camel Catalog where you can search the step you want to add.
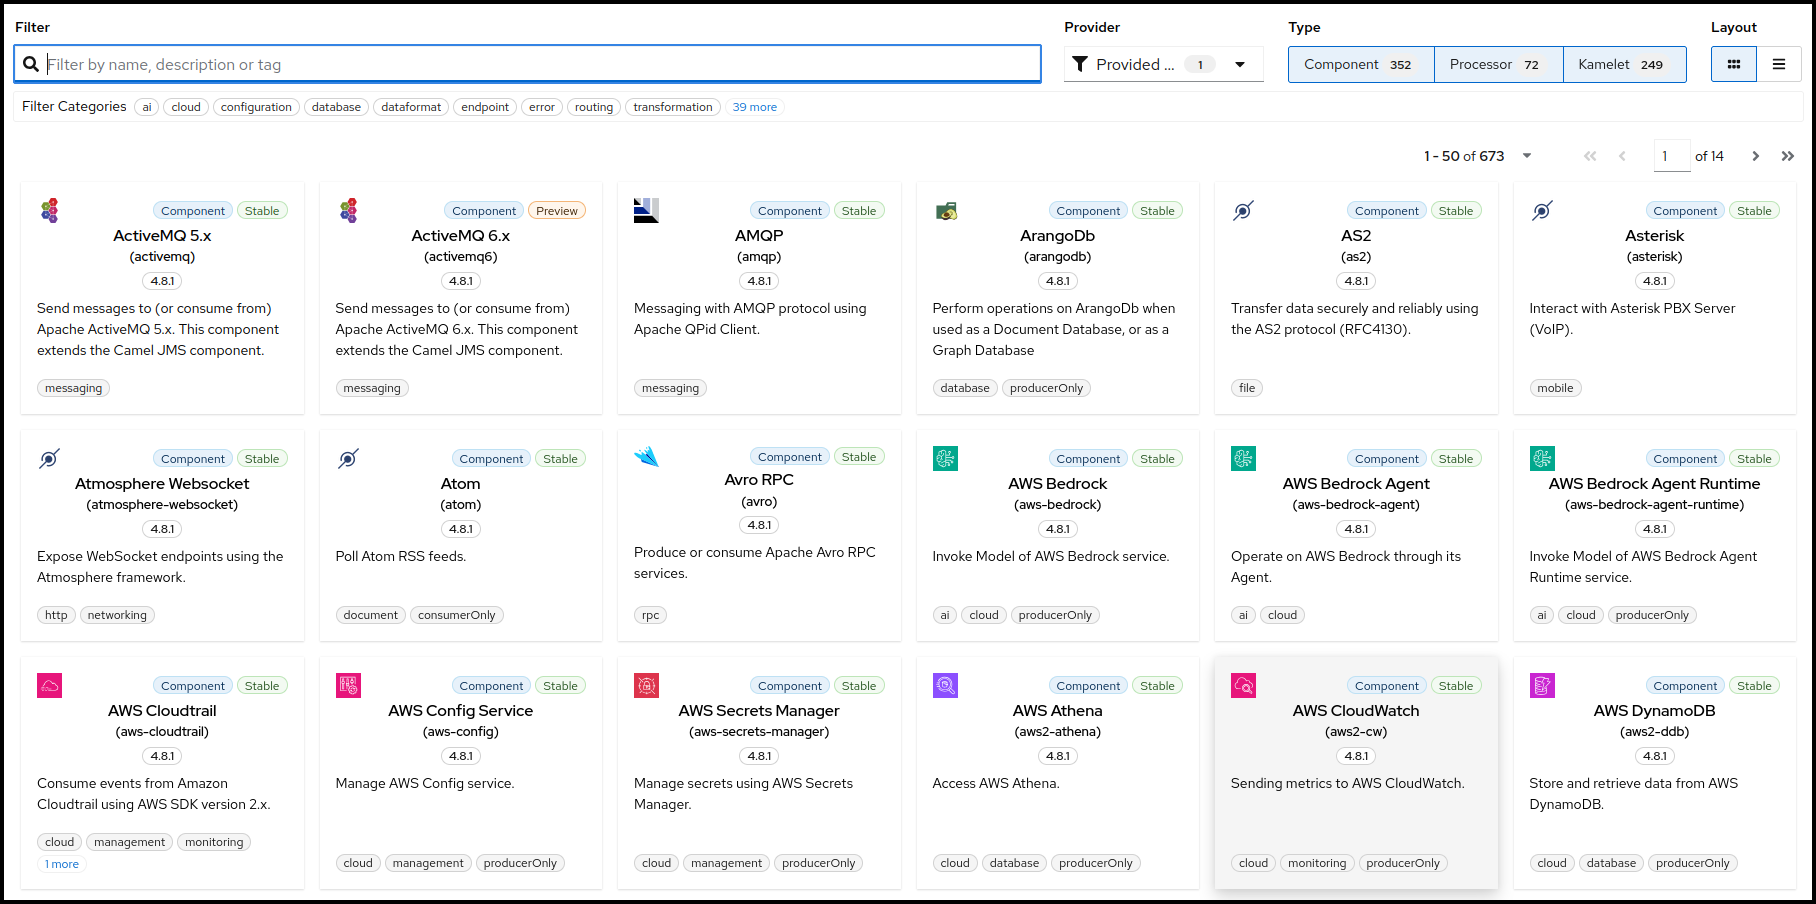
As already mentioned we would like to modify the message body before sending it along to the Log component. To achieve that we need to add a Processor called setBody. Let’s enter this name into the filter text field on top of the Catalog.
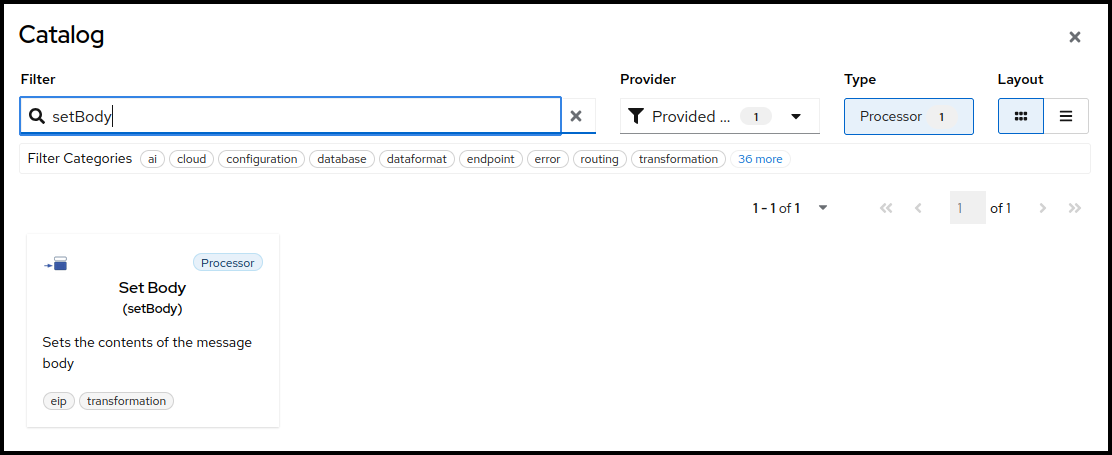
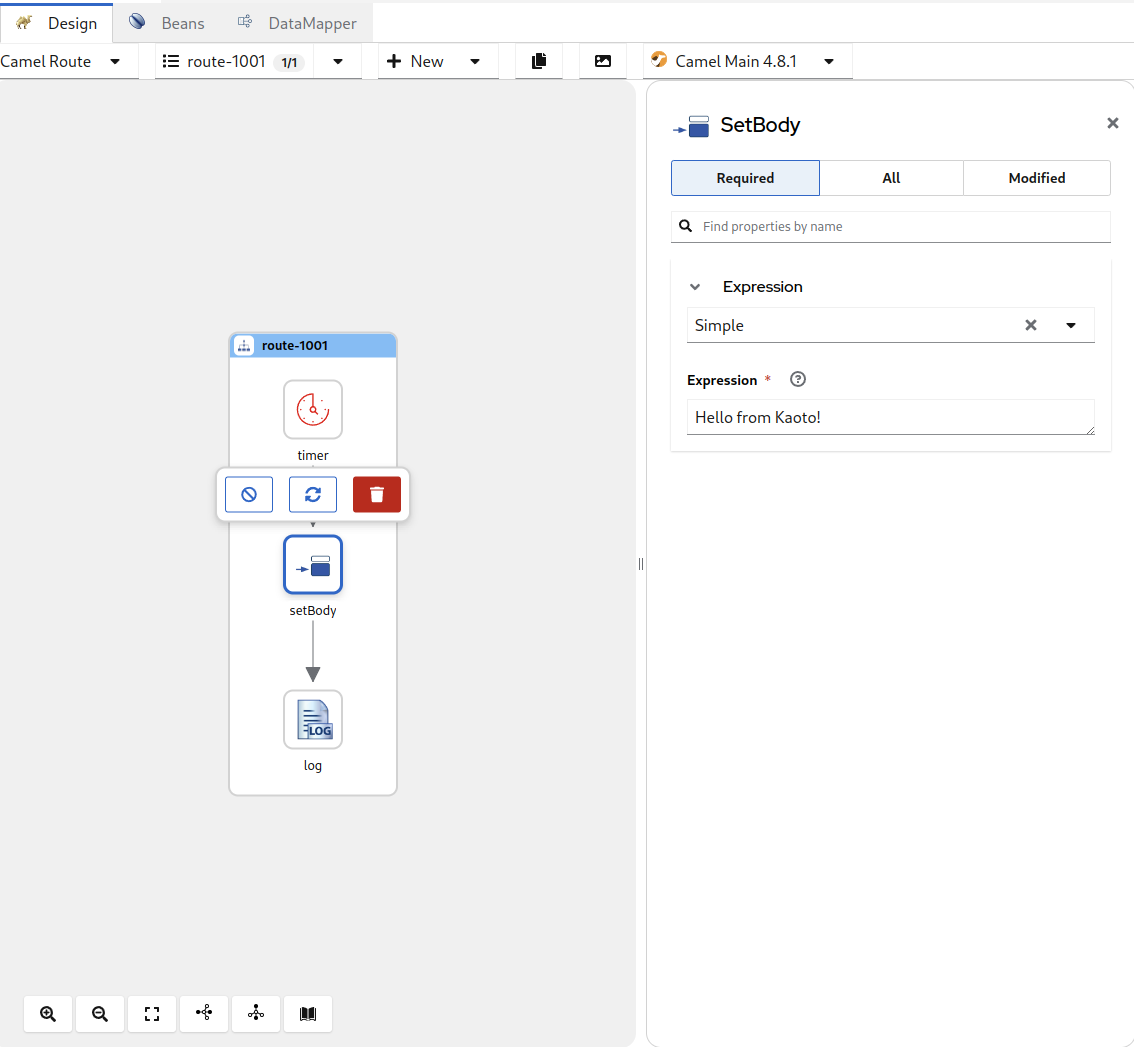
You can now select the setBody tile to add it to your route. Select the new added step now on the canvas to open the configuration form to the right.
-
Let’s change the Expression text field to
Hello from Kaoto!. Now the Log component will receive a
Hello from Kaoto!message every second and logs it to the console.ImportantWhen using the right click context menu of a step, adding new steps is usually done with two actions. Prepend can be used to add a step before the selected step and Append will add the new step after the selected step.
However, on the first step of a flow and on steps that can have children, the Add Step action is used.
4.1.3. Replacing a step
You can replace any step on the canvas by hovering over or by selecting the step. This will spawn a toolbar which contains a button for the Replace action.
- Alternatively you can do that also by invoking the context menu on a step and selecting the item Replace. Both ways it will open up the Camel Catalog and you can choose the replacement from there.
4.1.4. Deleting a step
When invoking the Delete action on a step with children or on a container element containing children there will be a confirmation dialog because you are about to delete not just the single step or container but also all the contained children. Be cautious!
You can delete any step on the canvas by hovering over or by selecting the step. This will spawn a toolbar which contains a button for the Delete action.
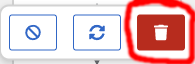
- Alternatively you can do that also by invoking the context menu on a step and selecting the item Delete. This will remove the step from your integration.
4.1.5. Enable / Disable a step
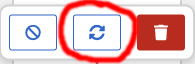
You can enable or disable any step on the canvas by hovering over or by selecting the step. This will spawn a toolbar which contains a button for the Enable / Disable action.
ImportantDisabling a step will instruct the Apache Camel runtime to ignore the step when executing the flow. This can be convenient when prototyping a new route.
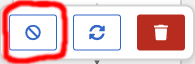
Alternatively you can enable / disable any step in your route by invoking the context menu on a step and selecting the item Enable / Disable.
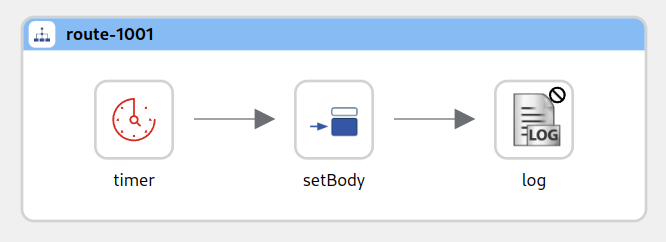
- In the picture above the Log component has been disabled. The icon is grayed out and there is a marker icon at the top right of the step to indicate it is disabled.
Chapter 5. Kaoto DataMapper
Currently Kaoto DataMapper is only supported inside the Visual Studio Code extension as a technical preview feature. In the future we will aim to bring this functionality also to the pure web version of Kaoto.
At the moment the DataMapper only supports XML schema for rendering the data structure and it internally generates a single XSLT step to perform configured data mappings at runtime. While you can consume multiple XML documents with using Camel Variables and/or Message Headers which are mapped to XSLT parameters, the output is only a Camel Message Body.
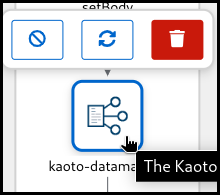
In addition to the regular Camel steps, Kaoto now supports a Kaoto DataMapper step to be placed in the Camel route. The Kaoto DataMapper step provides a graphical user interface to create data mappings inside the Camel route.
5.1. Adding a DataMapper step
Add a Kaoto DataMapper step in your Camel route. When you
Append,Prepend, orReplacea step in the Kaoto Design view, you can find the Kaoto DataMapper step in the catalog.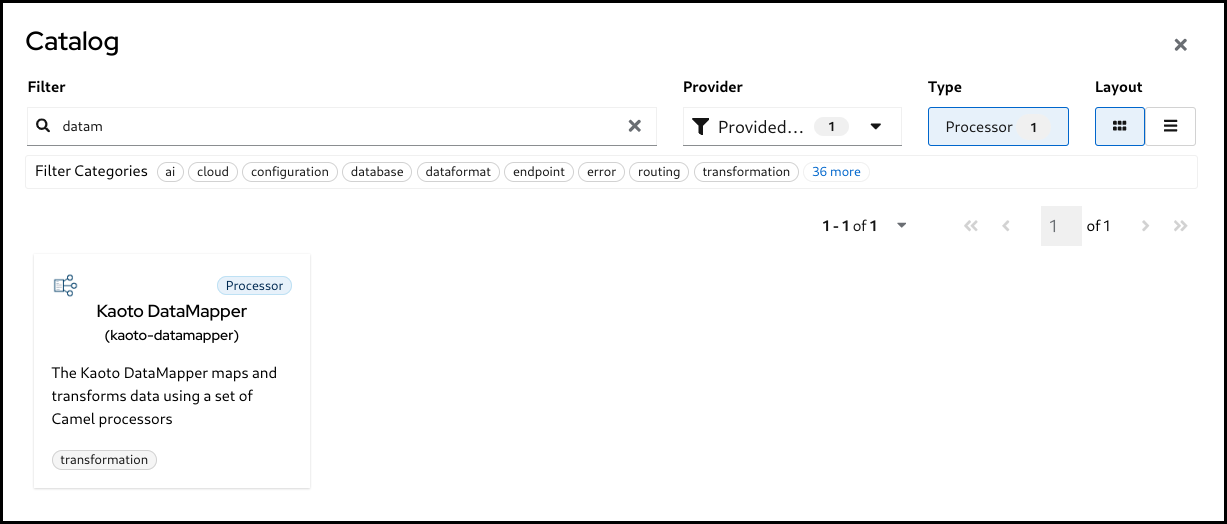
Click the added Kaoto DataMapper step in the Kaoto Design to open the config form.
In the Kaoto DataMapper config form, click the
Configurebutton.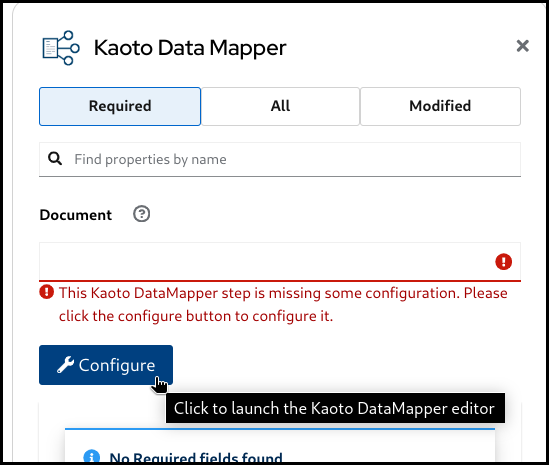
This will open the visual DataMapper editor.
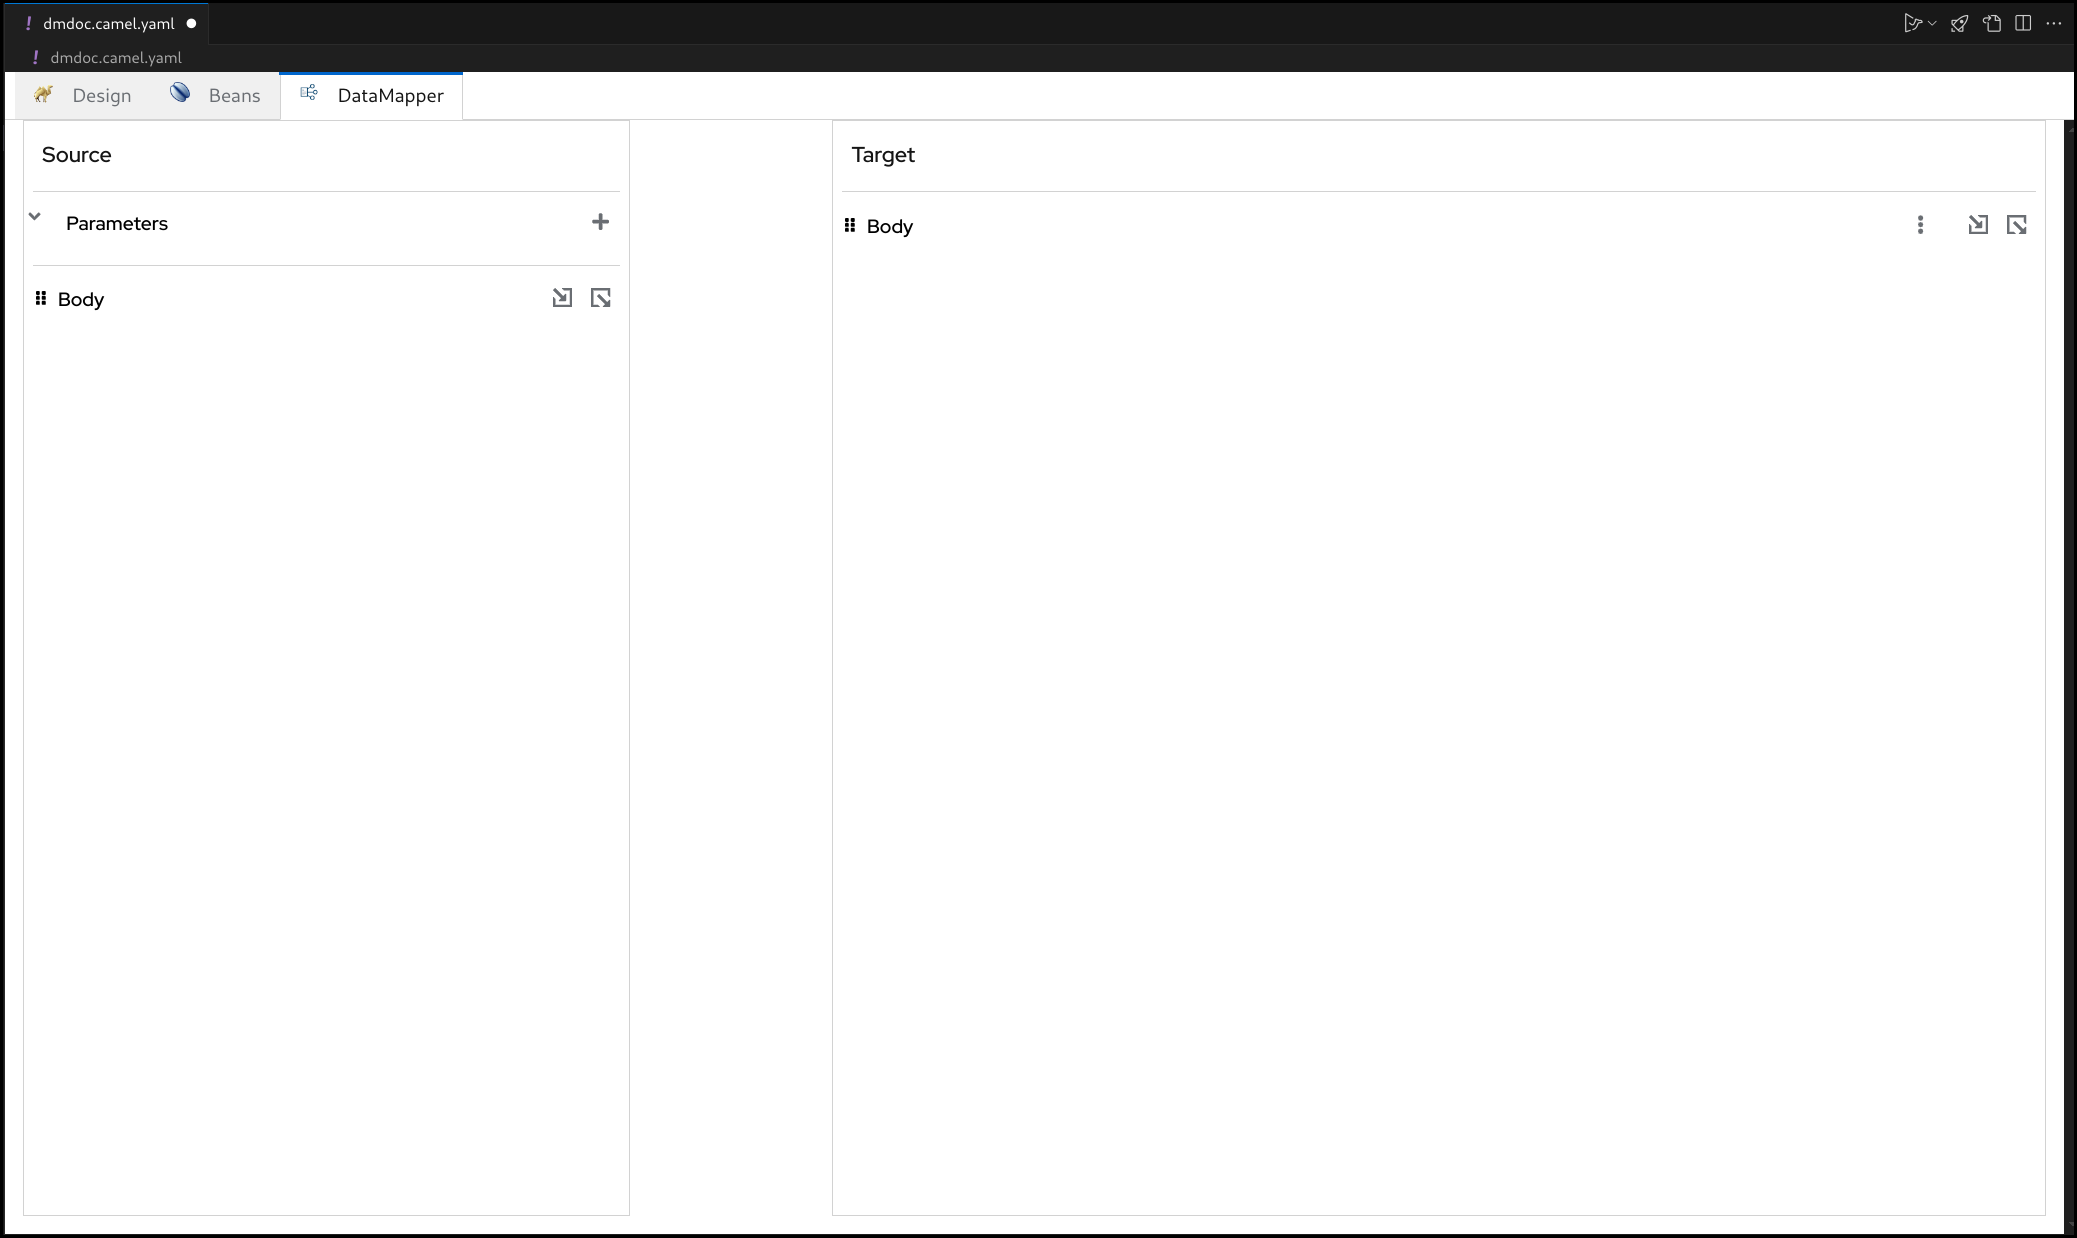
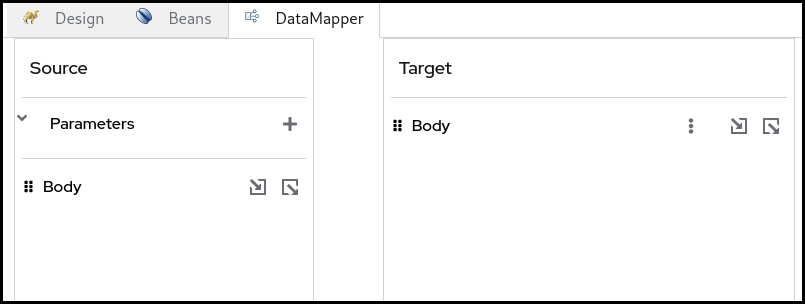
5.2. Source and Target
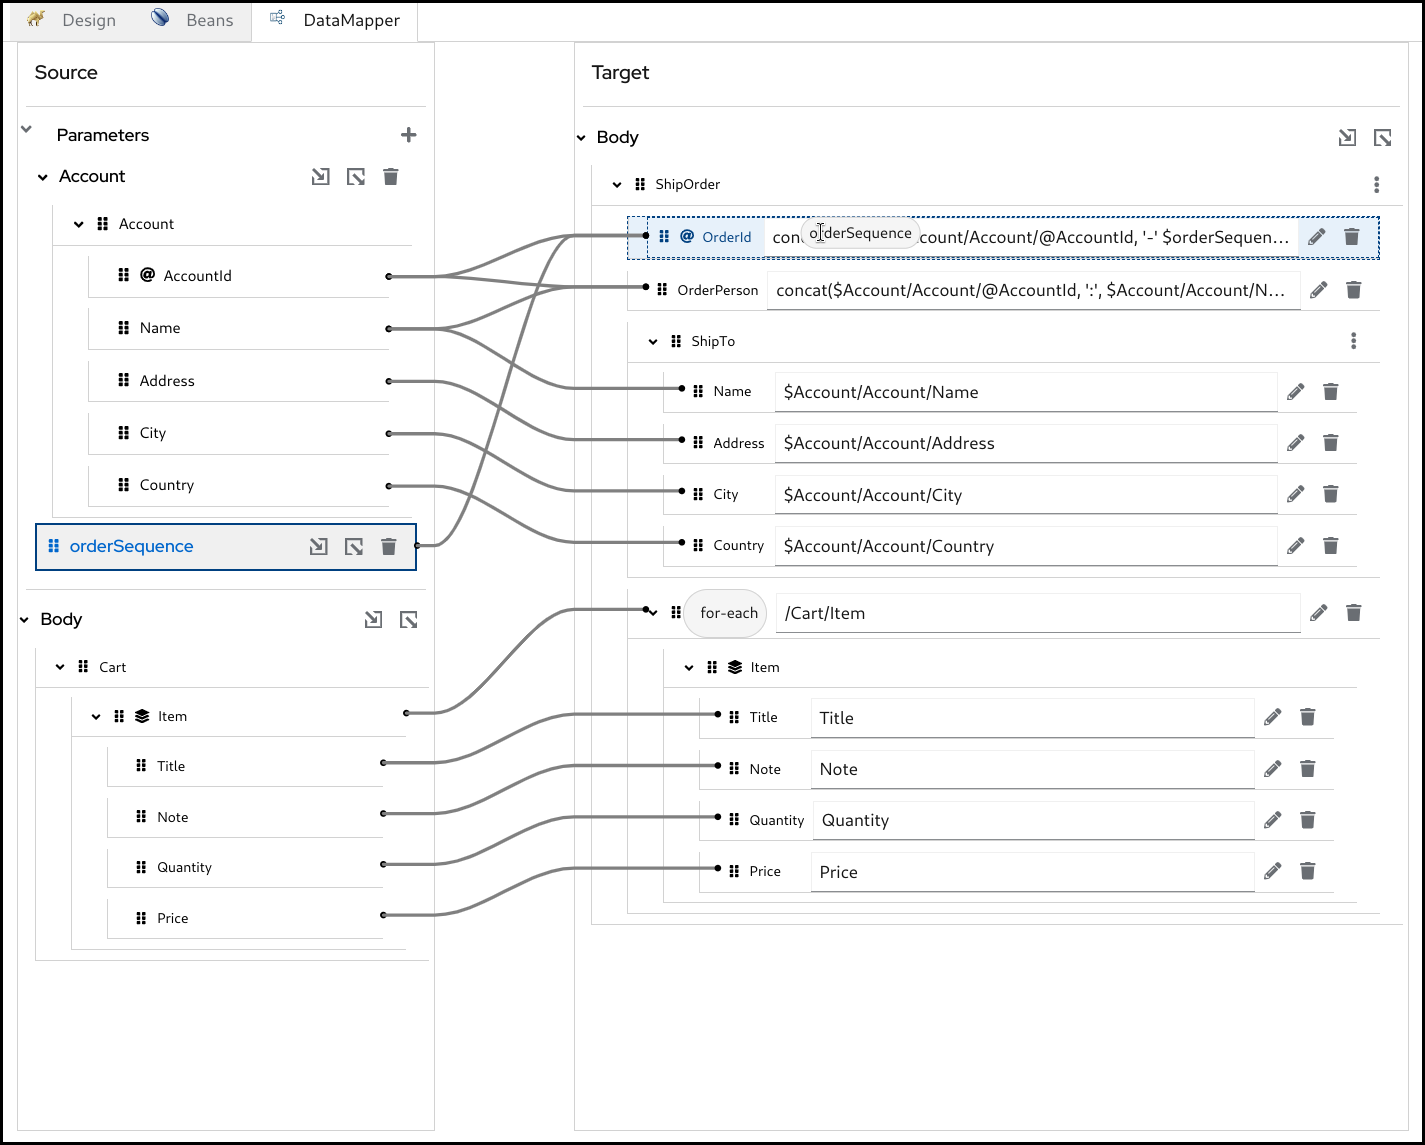
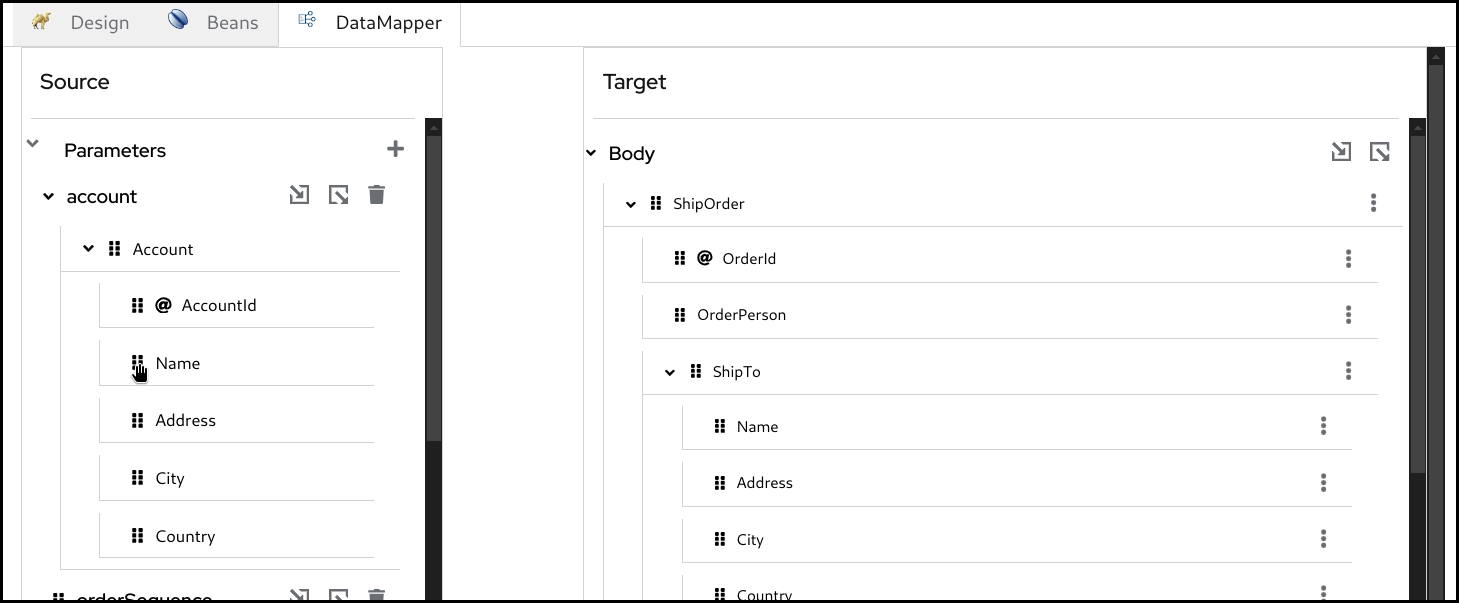
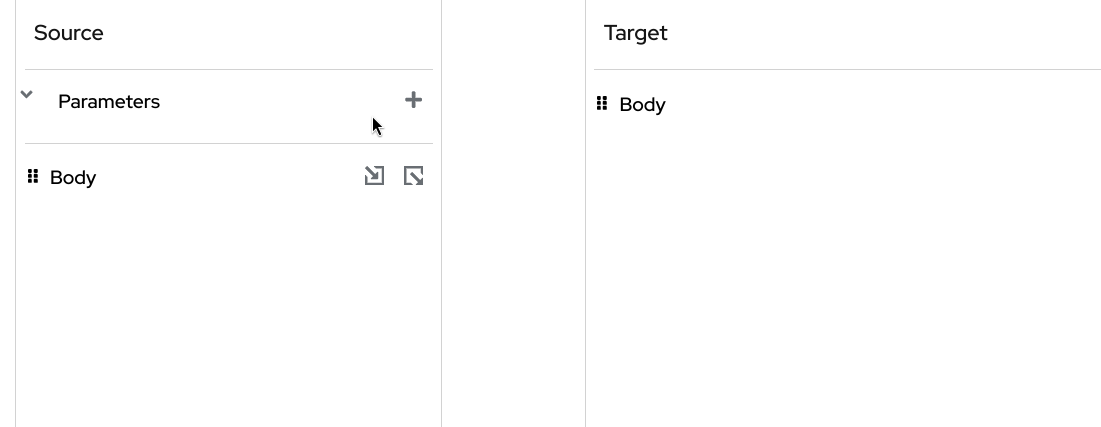
In the DataMapper canvas, you can see Source at the left and Target section at the right side.
The Source section represents the input side of your mappings, where the DataMapper step reads the data from. This is mapped to the incoming Camel Message as well as possible Camel Variables.
The Target section represents the output side of your mappings, where the DataMapper step writes the data to. This is mapped to the outgoing Camel Message.
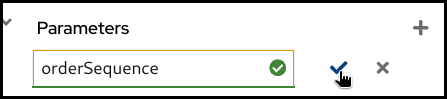
5.3. Parameters
The Parameters section inside the Source is mapped to any of incoming Camel Variables and Message Headers. For example, if there is an incoming Camel Variable orderSequence, you can consume it by adding a Parameter orderSequence in the DataMapper Source/Parameters section.
Follow the below steps to add a parameter:
Click the plus (+) button on the right side of the
Parameterstitle.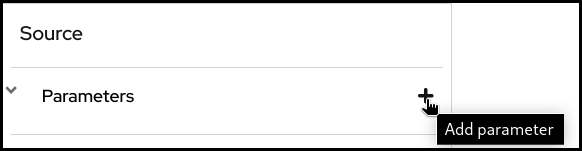
Now type the parameter name and click the check button on the right.
 Note
NoteWhile Camel Exchange Properties are also mapped to Parameters in current
camel-xslt-saxonimplementation, after the Camel Variables has been introduced, it is no longer recommended to store application data into Camel Exchange Properties. We encourage to use Camel Variables instead.
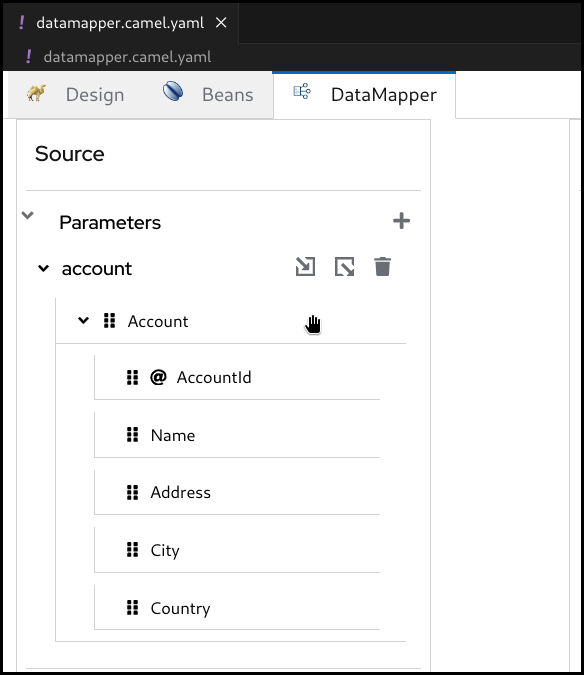
5.4. Attaching Document schema files
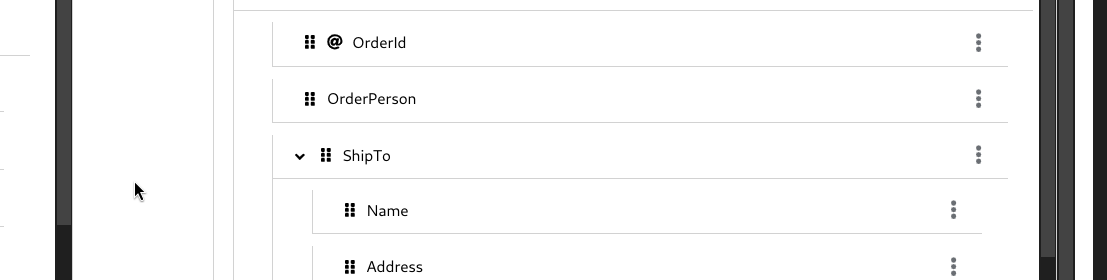
If any of Source Body, Target Body and/or Parameter(s) are structured data, you can attach a schema file and visualize the data structure in a tree style view.
If the data is not structured and just a primitive value, you don’t need to attach a schema file.
Follow the below steps to attach a schema file:
- Place schema file(s) inside the workspace directory.
Click
Attach a schemabutton in one of theSource Body,Target BodyorParameterssections.
Select the schema file to attach
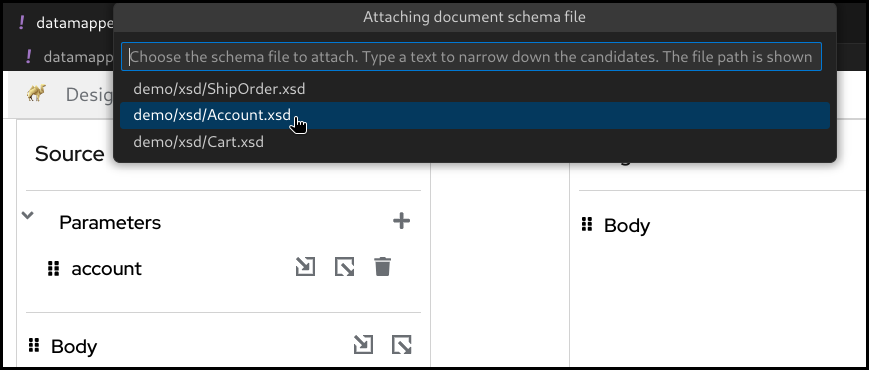
Now the document structure is rendered inside a tree.
5.5. Creating simple mappings
5.5.1. Creating a mapping by dragging and dropping a field
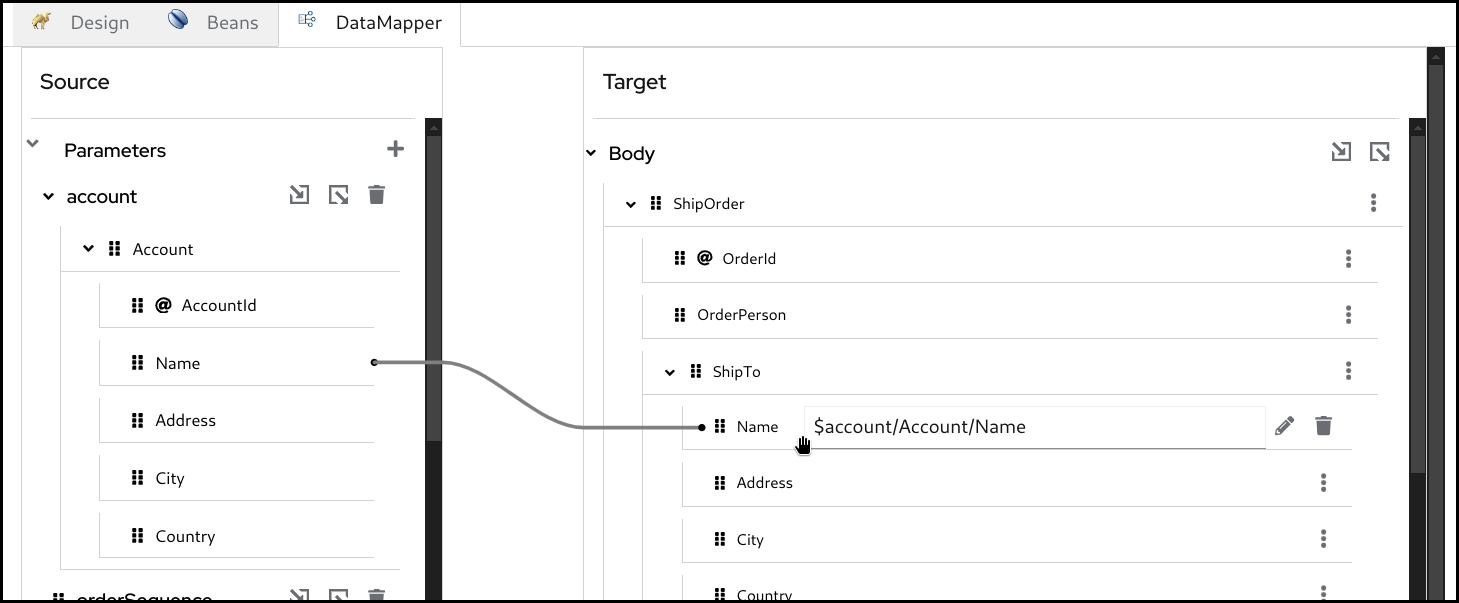
When you perform drag and drop between the source and the target, a mapping is created and a line is drawn between the fields.
Example: Mapping the Name fields by dragging and dropping the source Name field on the target Name field.
Before:
After:
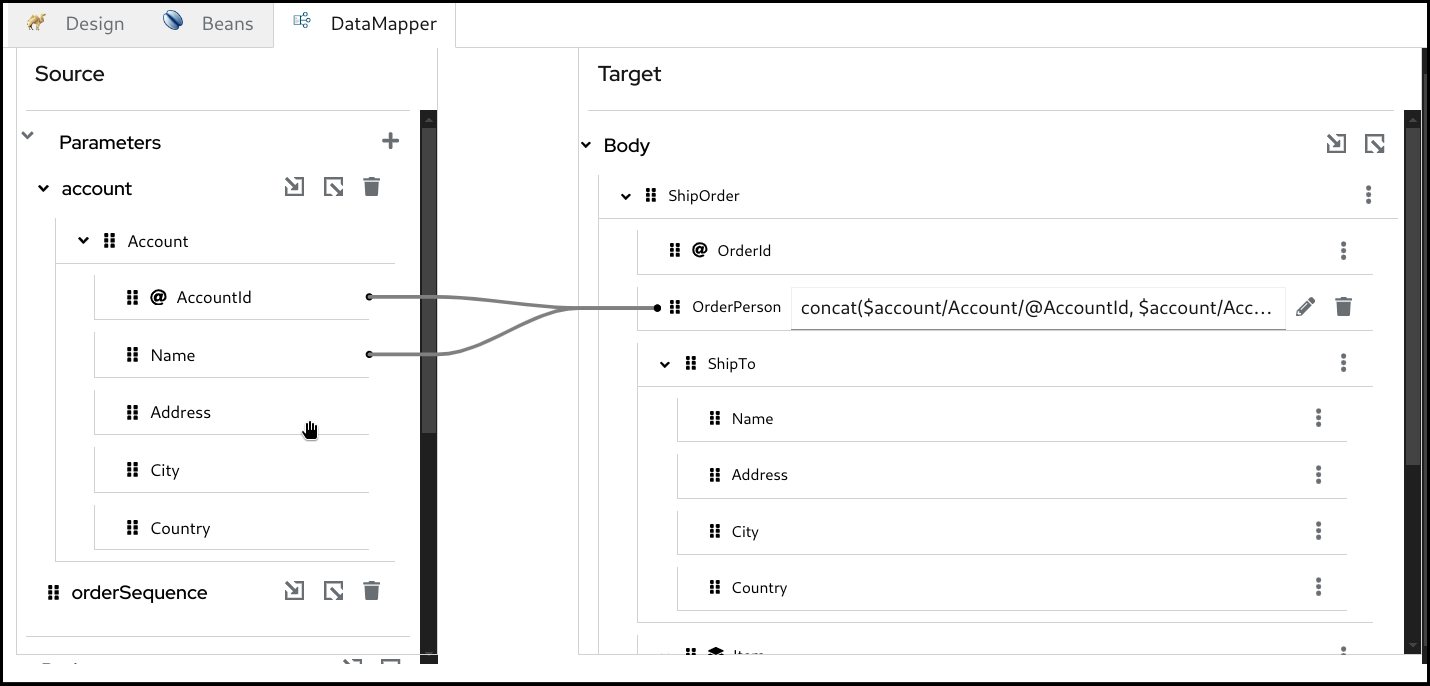
5.5.2. Creating a mapping by typing XPath expression
You can also create a mapping by entering a XPath expression.
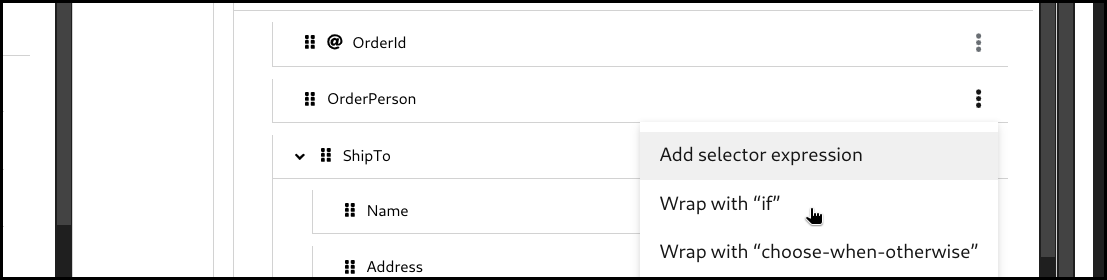
Click the 3 dots context menu and selecton the target field and choose
Add selector expression.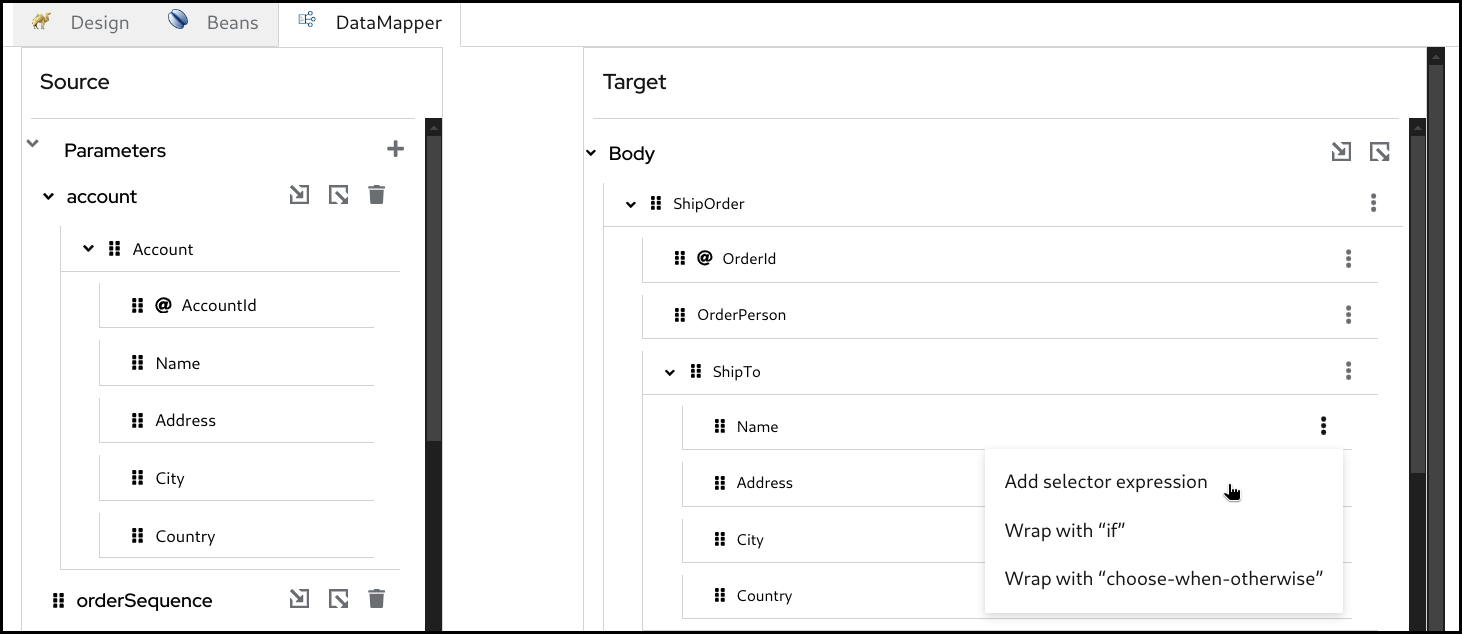
Then enter the
XPathexpression
5.6. Creating conditional mappings
The DataMapper supports creating 3 types of conditional mappings:
-
if- The mapping is created only when the specified condition is met. -
choose-when-otherwise- The mapping is created depending on how the condition is satisfied. If thewhenbranch condition is satisfied, thewhenbranch mapping is .created. If nowhenbranch condition is satisfied, then theotherwisebranch mapping is created. -
for-each- The mapping is created for each item in the collection. Collection means multiple occurrences, which is often represented as an array.
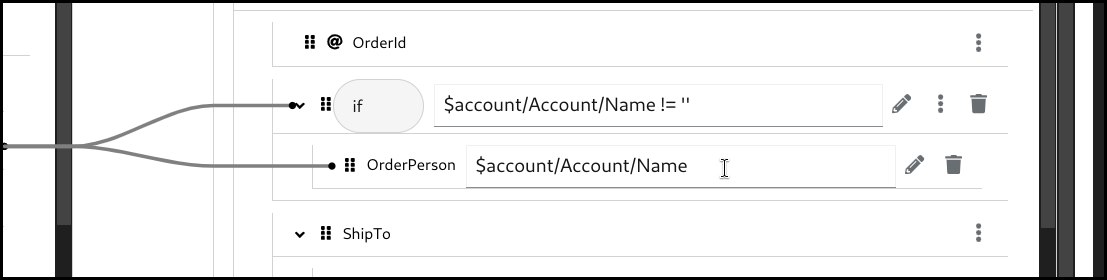
5.6.1. Creating an if mapping
Click the 3 dots context menu on the target section’s field. Then select
wrap with "if"to create a mapping.
Configure the
ifcondition. You can drag the source field and drop it into the input field to build a condition, or alternatively type everything manually.
Configure the mapping by using drag and drop or by typing it manually.
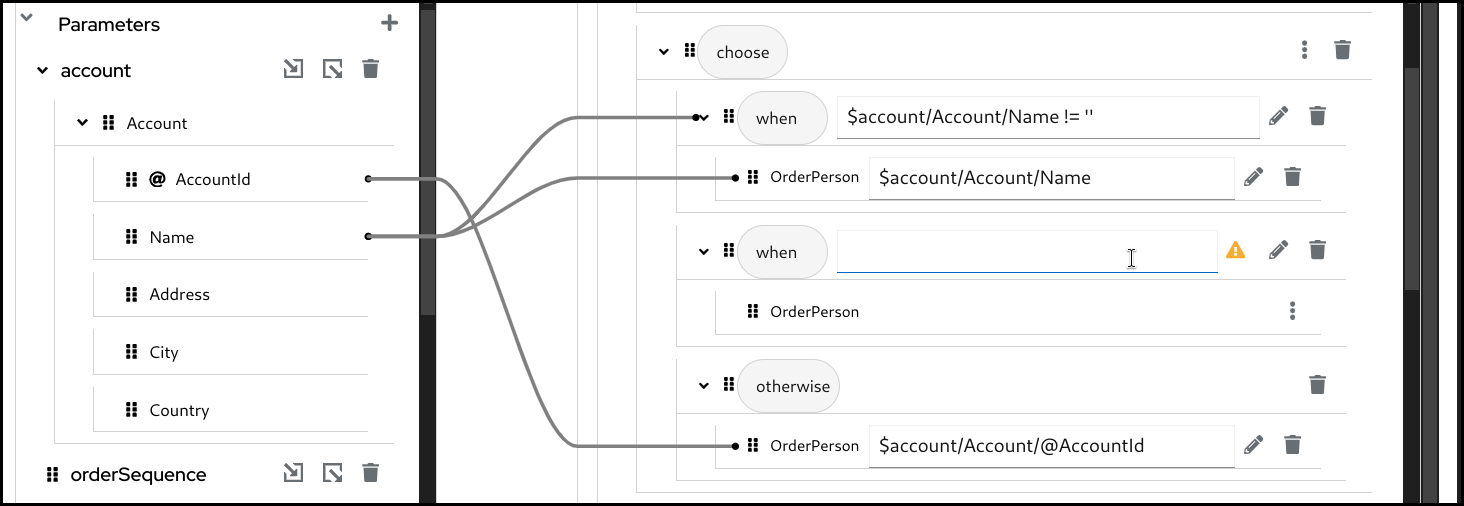
5.6.2. Creating a choose-when-otherwise mapping
Click the 3 dots context menu on the target section’s field. Then select
wrap with "choose-when-otherwise"to create a mapping.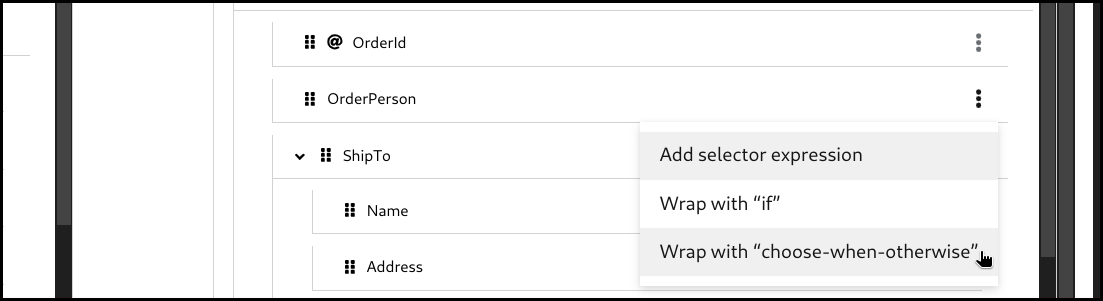
Configure the
whencondition.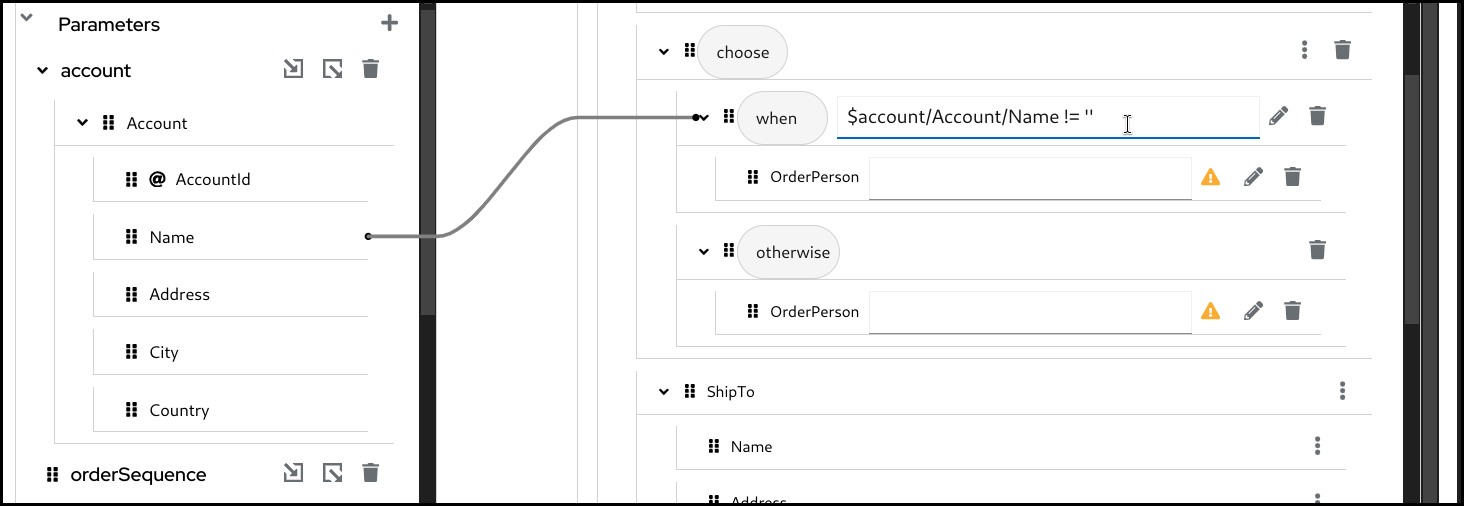
Configure the mapping for the
whenbranch.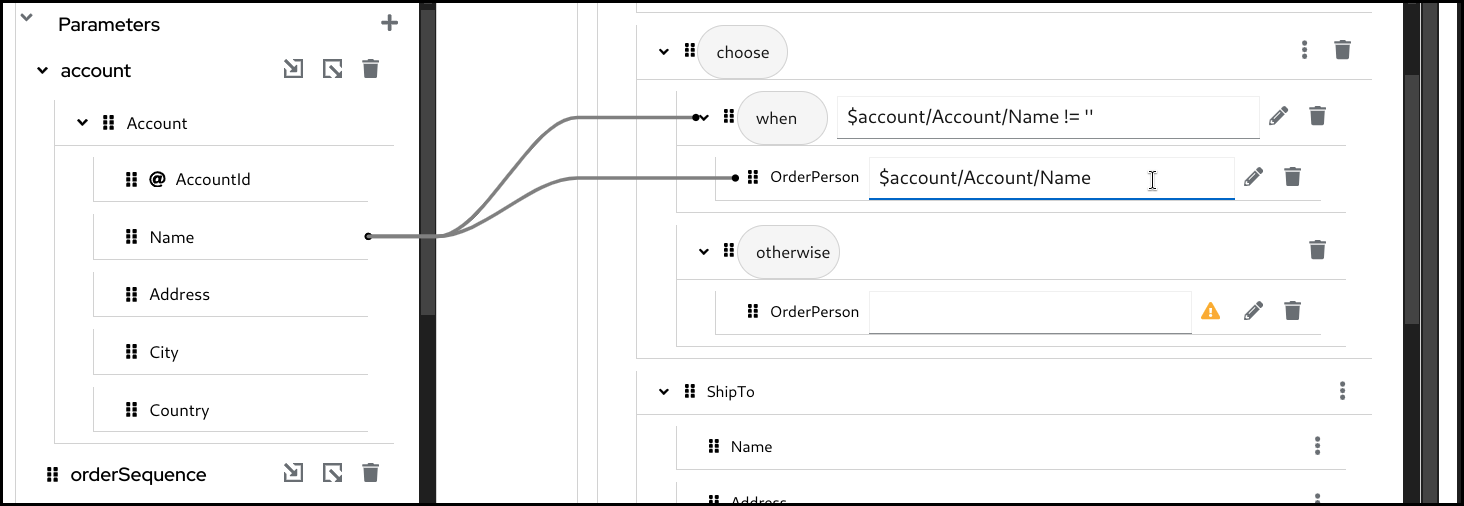
Configure the mapping for the
otherwisebranch.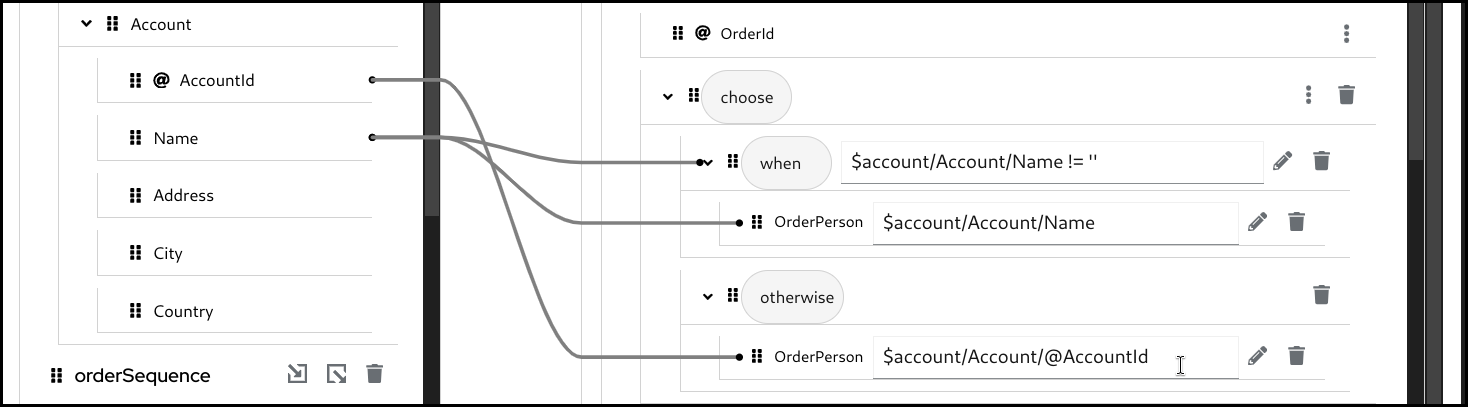
If required, you can add one or more
whenbranches. To add anotherwhenbranch you can click the 3 dots menu on thechoosefield in theTargetsection and then selectAdd "when".
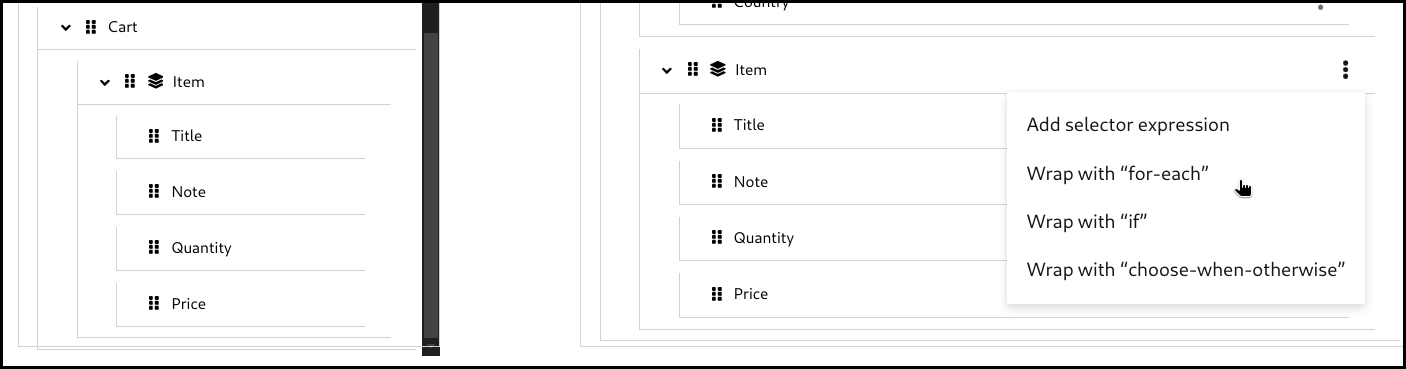
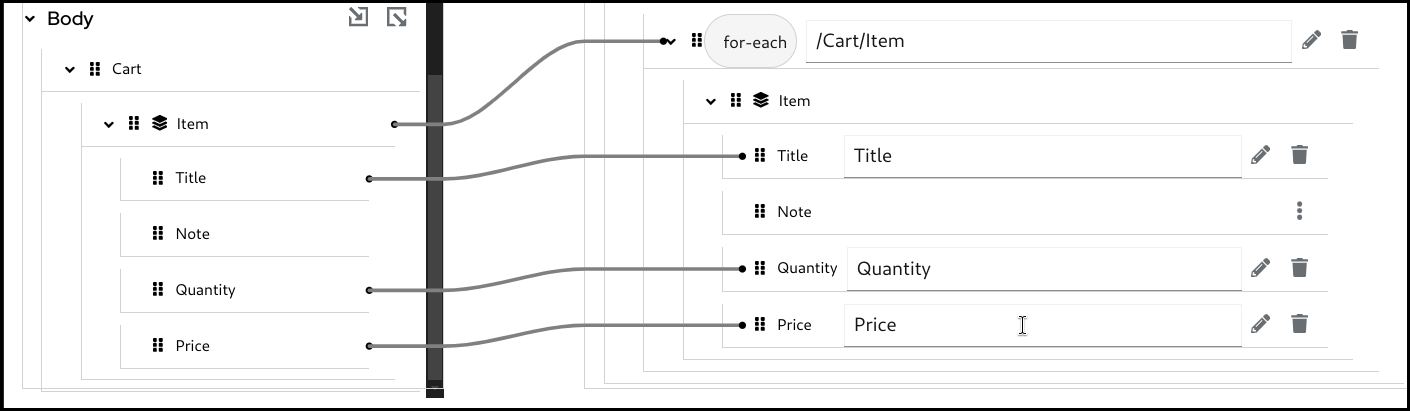
5.6.3. Creating a for-each mapping
When a field is a collection field (means multiple occurrences, often represented as an array), you can create a for-each mapping. The layer icon on the field indicates that it is a collection field.

Click the 3 dots context menu on the target section’s collection field. Then select wrap with "for-each" to create a mapping.
Configure the for-each condition by specifying the source collection field to iterate over.
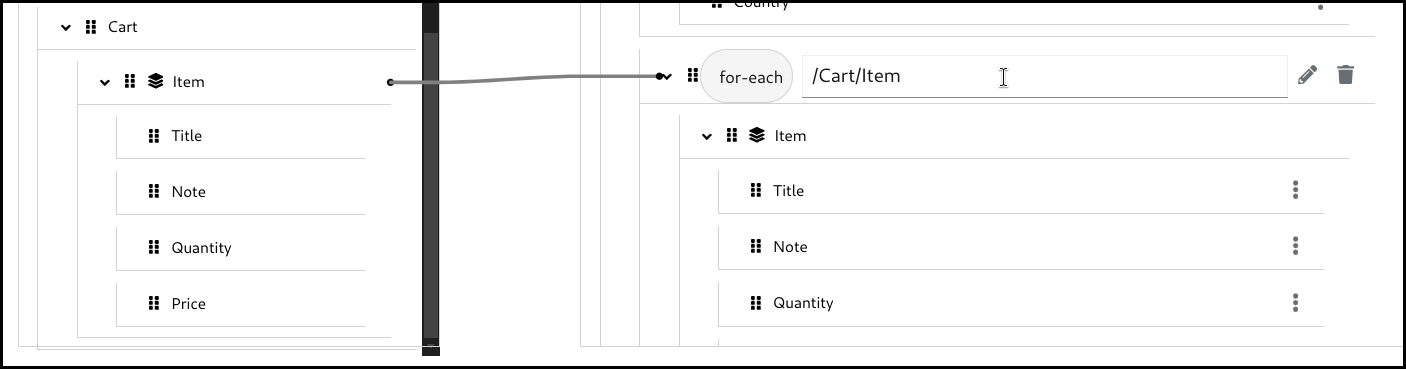
Configure the mappings below. Note that the mapping field path is now a relative path from the collection field specified in the for-each condition.
5.7. Using XPath expression editor
The XPath editor is still under initial development and it currently supports only limited drag and drop. In future releases, more syntax assisting features will be added.
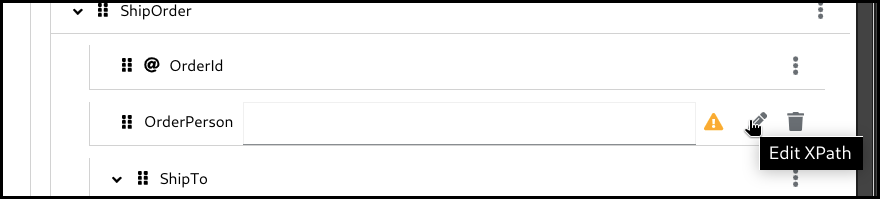
If you want to write something more in XPath expression rather than just a field path, you can launch the XPath expression editor and work with it. There is a pencil icon on the target field which launches the XPath expression editor when you click it.
Click the pencil button on a target field which has a mapping.
This will open up the
XPatheditor.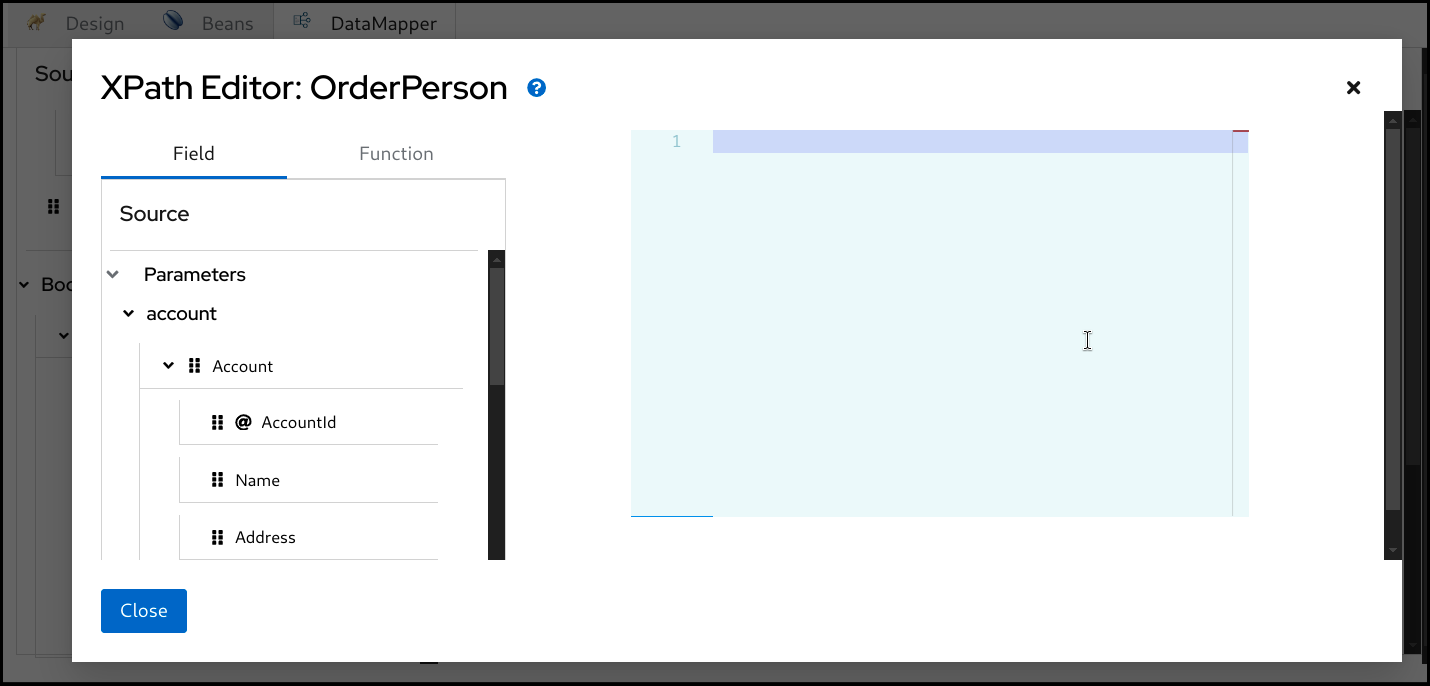
You can then type in the editor at the right or drag a
Fieldfrom the left and drop onto the editor.
You can also drag and drop
XPathfunctions from theFunctiontab on the left side.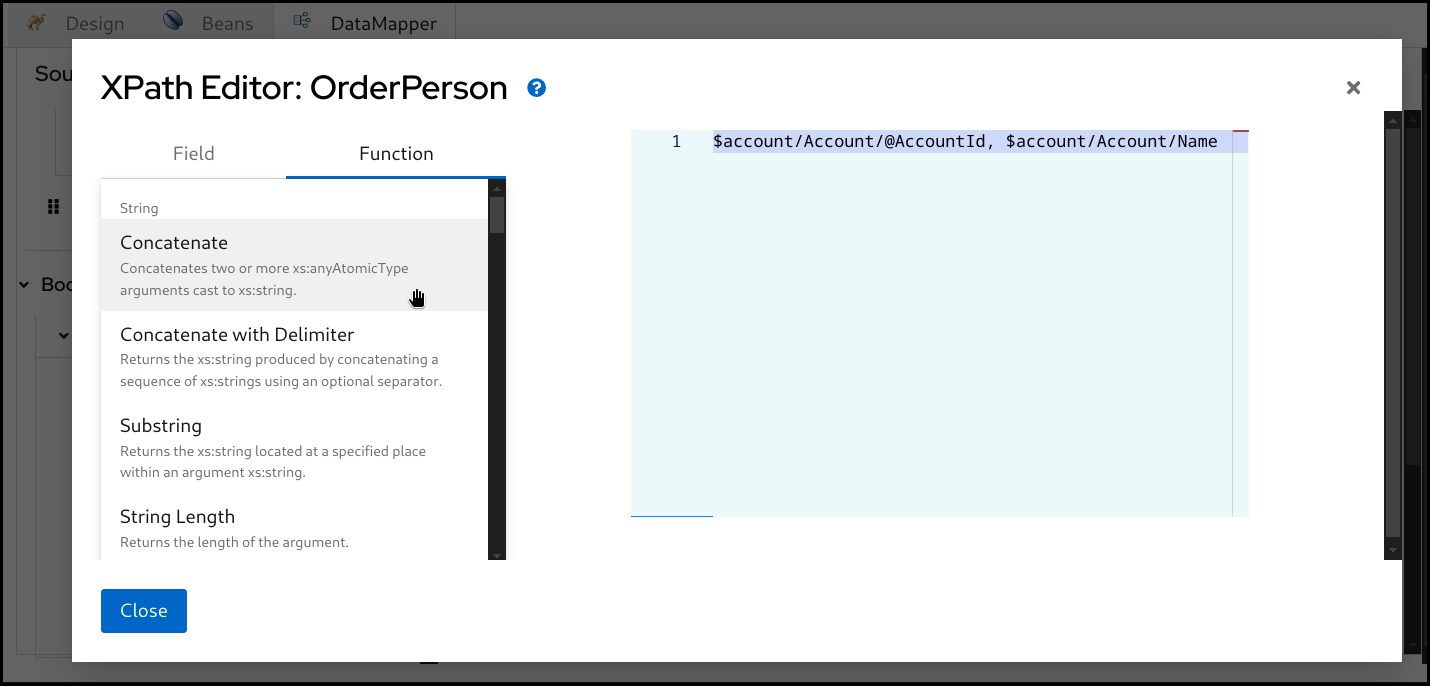
Drag the function and drop it onto the editor.
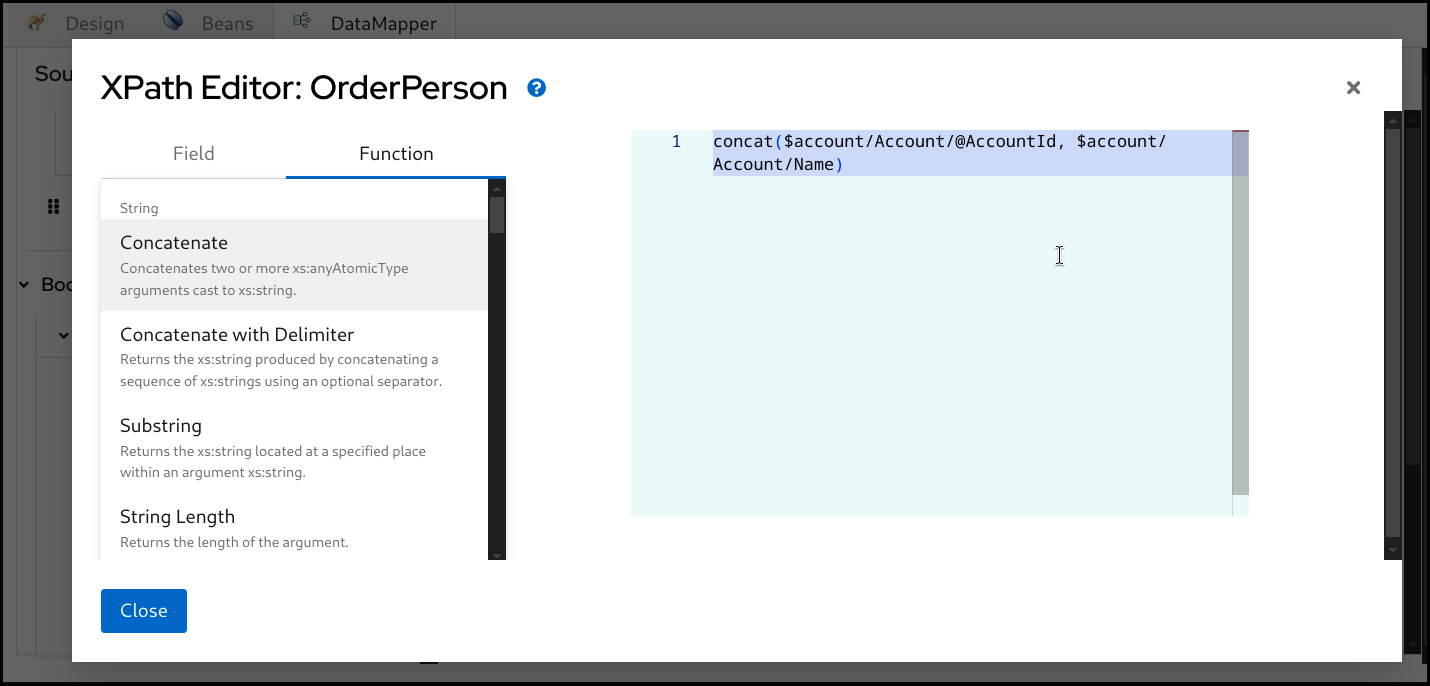
Once it’s completed, click the
Closebutton at the bottom left.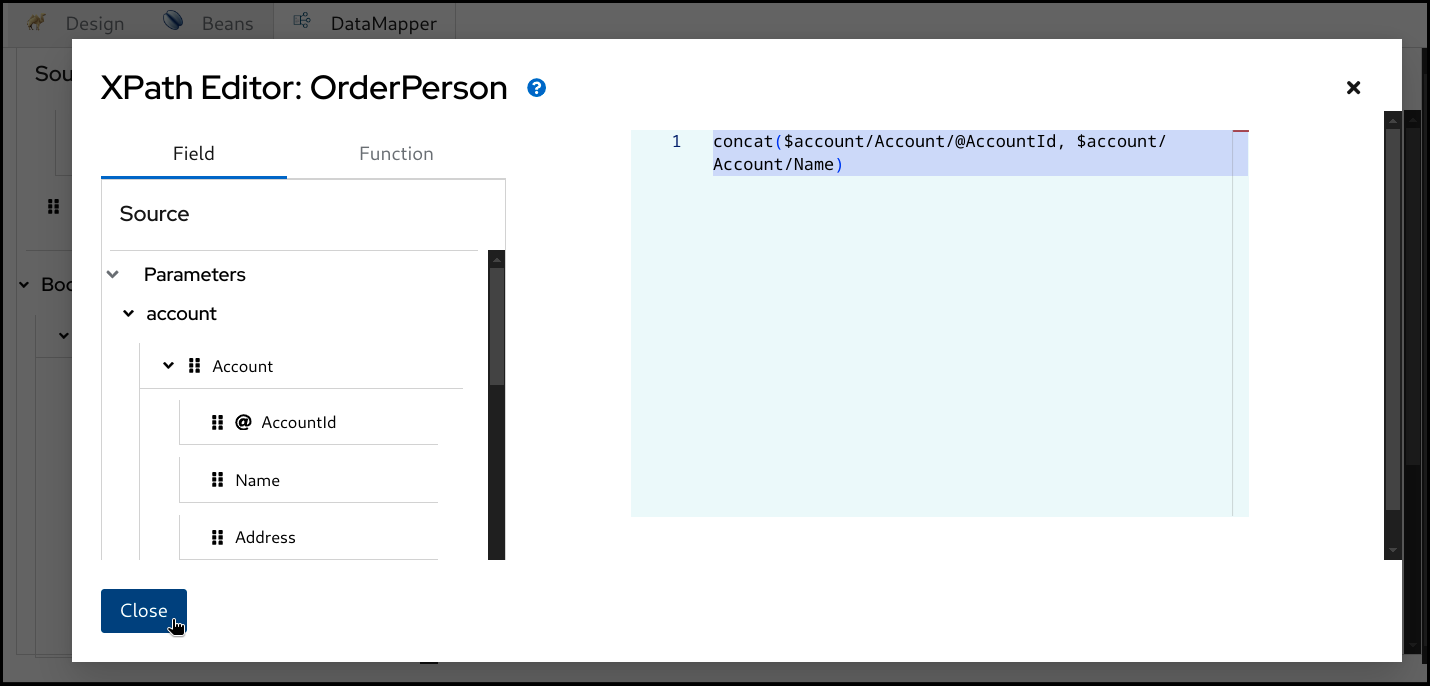
Now you can see the new mapping in the tree view.
5.8. Deleting a mapping
To delete a mapping you can click the dustbin button next to the target field.

You then have to confirm the deletion by clicking the
Confirmbutton.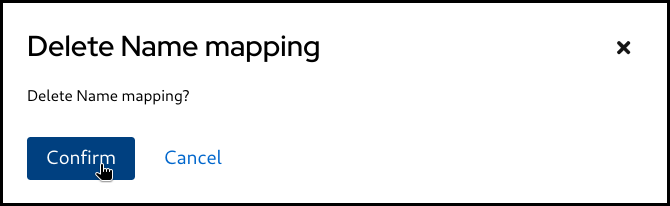
Mapping is deleted.
5.9. Deleting a parameter
To delete a parameter, click the dustbin button next to the parameter.
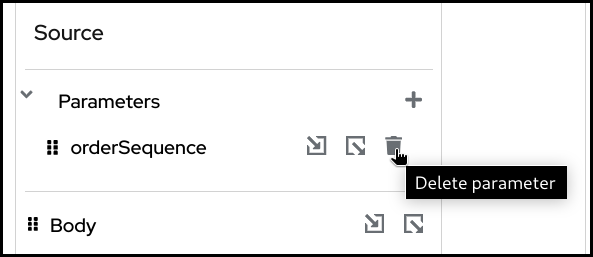
You then have to confirm the deletion by clicking the
Confirmbutton.
The parameter is deleted.
5.10. Detaching a schema
Similar to attaching a schema you can also remove / detach a schema.
Click the
Detach schemabutton.
Click the
Confirmbutton.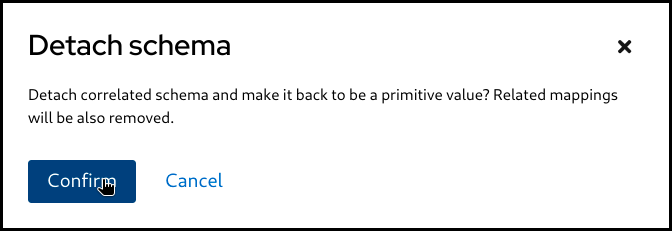
Now the Document got back to be a primitive value.
Chapter 6. Generating a catalog
6.1. Overview
By default, every Kaoto release includes the latest Camel version available at the moment of the build, nevertheless, generating a different set of catalogs is possible.
6.2. Catalog generator CLI
Kaoto provides a Camel catalog generator CLI to ease this process, it supports the following runtimes:
- Main
- Quarkus
- Springboot
6.2.1. Using Camel catalog
- Clone the Kaoto project
- Navigate to the packages/catalog-generator directory
Install the project dependencies:
./mvnw installRun the project with the following command:
./mvnw package; java -jar ./target/catalog-generator-0.0.1-SNAPSHOT.jar -o ./dist/camel-catalog -k 4.6.0 -m 4.6.0 -n "My Catalog"This will generate a Catalog library containing:
- Camel Main 4.6.0
- Camel Kamelets 4.6.0
-
The resulting files will be in the
packages/catalog-generator/dist/camel-catalogfolder - Providing that folder through a http server will make it available for using it in Kaoto
6.2.2. Creating a Catalog library with different runtimes
In order to add multiple runtimes to the Catalog library, we can provide each runtime with its version using the following flags:
 -m,--main <version>               Camel Main version. If not specified,
                                   it will use the generator installed
                                   version
 -q,--quarkus <version>            Camel Extensions for Quarkus version
 -s,--springboot <version>         Camel SpringBoot version
For instance, running the following command will create a Catalog library with Camel Main 4.6.0 and Camel extensions for Quarkus 3.8.0:
./mvnw package; java -jar ./target/catalog-generator-0.0.1-SNAPSHOT.jar -o ./dist/camel-catalog -k 4.6.0 -m 4.6.0 -q 3.8.0 -n "My Catalog"For a different Kamelets catalog version, the
--kamelets or -kflag can be specified../mvnw package; java -jar ./target/catalog-generator-0.0.1-SNAPSHOT.jar -o ./dist/camel-catalog -k 4.5.0 -m 4.6.0 -n "My Catalog"
6.2.3. Instructing Kaoto to use a specific Catalog library
In VSCode, go to the settings page and look for “Kaoto”
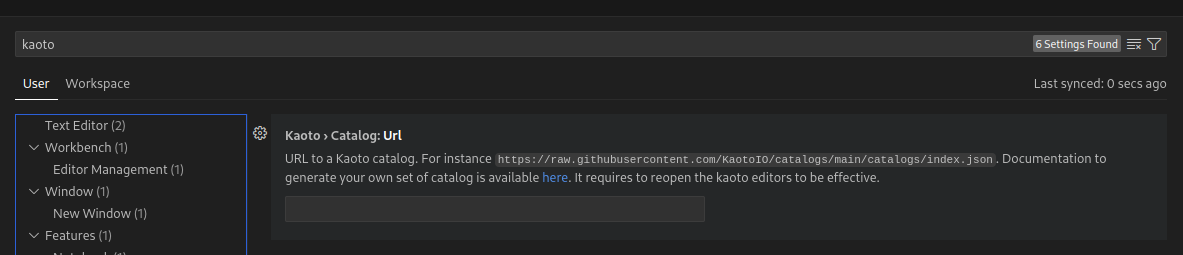
In the
TextField, provide the URL of theindex.jsonfile that specifies the location of the subsequent catalogs, for instance, the public Kaoto catalog can be used:
Restart Kaoto for the changes to have effect