Server Administration Guide
Abstract
Making open source more inclusive
Red Hat is committed to replacing problematic language in our code, documentation, and web properties. We are beginning with these four terms: master, slave, blacklist, and whitelist. Because of the enormity of this endeavor, these changes will be implemented gradually over several upcoming releases. For more details, see our CTO Chris Wright’s message.
Chapter 1. Red Hat build of Keycloak features and concepts
Red Hat build of Keycloak is a single sign on solution for web apps and RESTful web services. The goal of Red Hat build of Keycloak is to make security simple so that it is easy for application developers to secure the apps and services they have deployed in their organization. Security features that developers normally have to write for themselves are provided out of the box and are easily tailorable to the individual requirements of your organization. Red Hat build of Keycloak provides customizable user interfaces for login, registration, administration, and account management. You can also use Red Hat build of Keycloak as an integration platform to hook it into existing LDAP and Active Directory servers. You can also delegate authentication to third party identity providers like Facebook and Google.
1.1. Features
Red Hat build of Keycloak provides the following features:
- Single-Sign On and Single-Sign Out for browser applications.
- OpenID Connect support.
- OAuth 2.0 support.
- SAML support.
- Identity Brokering - Authenticate with external OpenID Connect or SAML Identity Providers.
- Social Login - Enable login with Google, GitHub, Facebook, Twitter, and other social networks.
- User Federation - Sync users from LDAP and Active Directory servers.
- Kerberos bridge - Automatically authenticate users that are logged-in to a Kerberos server.
- Admin Console for central management of users, roles, role mappings, clients and configuration.
- Account Management console that allows users to centrally manage their account.
- Theme support - Customize all user facing pages to integrate with your applications and branding.
- Two-factor Authentication - Support for TOTP/HOTP via Google Authenticator or FreeOTP.
- Login flows - optional user self-registration, recover password, verify email, require password update, etc.
- Session management - Admins and users themselves can view and manage user sessions.
- Token mappers - Map user attributes, roles, etc. how you want into tokens and statements.
- Not-before revocation policies per realm, application and user.
- CORS support - Client adapters have built-in support for CORS.
- Client adapters for JavaScript applications, JBoss EAP, etc.
- Supports any platform/language that has an OpenID Connect Relying Party library or SAML 2.0 Service Provider library.
1.2. Basic Red Hat build of Keycloak operations
Red Hat build of Keycloak is a separate server that you manage on your network. Applications are configured to point to and be secured by this server. Red Hat build of Keycloak uses open protocol standards like OpenID Connect or SAML 2.0 to secure your applications. Browser applications redirect a user’s browser from the application to the Red Hat build of Keycloak authentication server where they enter their credentials. This redirection is important because users are completely isolated from applications and applications never see a user’s credentials. Applications instead are given an identity token or assertion that is cryptographically signed. These tokens can have identity information like username, address, email, and other profile data. They can also hold permission data so that applications can make authorization decisions. These tokens can also be used to make secure invocations on REST-based services.
1.3. Core concepts and terms
Consider these core concepts and terms before attempting to use Red Hat build of Keycloak to secure your web applications and REST services.
- users
- Users are entities that are able to log into your system. They can have attributes associated with themselves like email, username, address, phone number, and birthday. They can be assigned group membership and have specific roles assigned to them.
- authentication
- The process of identifying and validating a user.
- authorization
- The process of granting access to a user.
- credentials
- Credentials are pieces of data that Red Hat build of Keycloak uses to verify the identity of a user. Some examples are passwords, one-time-passwords, digital certificates, or even fingerprints.
- roles
-
Roles identify a type or category of user.
Admin,user,manager, andemployeeare all typical roles that may exist in an organization. Applications often assign access and permissions to specific roles rather than individual users as dealing with users can be too fine-grained and hard to manage. - user role mapping
- A user role mapping defines a mapping between a role and a user. A user can be associated with zero or more roles. This role mapping information can be encapsulated into tokens and assertions so that applications can decide access permissions on various resources they manage.
- composite roles
-
A composite role is a role that can be associated with other roles. For example a
superusercomposite role could be associated with thesales-adminandorder-entry-adminroles. If a user is mapped to thesuperuserrole they also inherit thesales-adminandorder-entry-adminroles. - groups
- Groups manage groups of users. Attributes can be defined for a group. You can map roles to a group as well. Users that become members of a group inherit the attributes and role mappings that group defines.
- realms
- A realm manages a set of users, credentials, roles, and groups. A user belongs to and logs into a realm. Realms are isolated from one another and can only manage and authenticate the users that they control.
- clients
- Clients are entities that can request Red Hat build of Keycloak to authenticate a user. Most often, clients are applications and services that want to use Red Hat build of Keycloak to secure themselves and provide a single sign-on solution. Clients can also be entities that just want to request identity information or an access token so that they can securely invoke other services on the network that are secured by Red Hat build of Keycloak.
- client adapters
- Client adapters are plugins that you install into your application environment to be able to communicate and be secured by Red Hat build of Keycloak. Red Hat build of Keycloak has a number of adapters for different platforms that you can download. There are also third-party adapters you can get for environments that we don’t cover.
- consent
- Consent is when you as an admin want a user to give permission to a client before that client can participate in the authentication process. After a user provides their credentials, Red Hat build of Keycloak will pop up a screen identifying the client requesting a login and what identity information is requested of the user. User can decide whether or not to grant the request.
- client scopes
-
When a client is registered, you must define protocol mappers and role scope mappings for that client. It is often useful to store a client scope, to make creating new clients easier by sharing some common settings. This is also useful for requesting some claims or roles to be conditionally based on the value of
scopeparameter. Red Hat build of Keycloak provides the concept of a client scope for this. - client role
- Clients can define roles that are specific to them. This is basically a role namespace dedicated to the client.
- identity token
- A token that provides identity information about the user. Part of the OpenID Connect specification.
- access token
- A token that can be provided as part of an HTTP request that grants access to the service being invoked on. This is part of the OpenID Connect and OAuth 2.0 specification.
- assertion
- Information about a user. This usually pertains to an XML blob that is included in a SAML authentication response that provided identity metadata about an authenticated user.
- service account
- Each client has a built-in service account which allows it to obtain an access token.
- direct grant
- A way for a client to obtain an access token on behalf of a user via a REST invocation.
- protocol mappers
- For each client you can tailor what claims and assertions are stored in the OIDC token or SAML assertion. You do this per client by creating and configuring protocol mappers.
- session
- When a user logs in, a session is created to manage the login session. A session contains information like when the user logged in and what applications have participated within single-sign on during that session. Both admins and users can view session information.
- user federation provider
- Red Hat build of Keycloak can store and manage users. Often, companies already have LDAP or Active Directory services that store user and credential information. You can point Red Hat build of Keycloak to validate credentials from those external stores and pull in identity information.
- identity provider
- An identity provider (IDP) is a service that can authenticate a user. Red Hat build of Keycloak is an IDP.
- identity provider federation
- Red Hat build of Keycloak can be configured to delegate authentication to one or more IDPs. Social login via Facebook or Google+ is an example of identity provider federation. You can also hook Red Hat build of Keycloak to delegate authentication to any other OpenID Connect or SAML 2.0 IDP.
- identity provider mappers
- When doing IDP federation you can map incoming tokens and assertions to user and session attributes. This helps you propagate identity information from the external IDP to your client requesting authentication.
- required actions
-
Required actions are actions a user must perform during the authentication process. A user will not be able to complete the authentication process until these actions are complete. For example, an admin may schedule users to reset their passwords every month. An
update passwordrequired action would be set for all these users. - authentication flows
- Authentication flows are work flows a user must perform when interacting with certain aspects of the system. A login flow can define what credential types are required. A registration flow defines what profile information a user must enter and whether something like reCAPTCHA must be used to filter out bots. Credential reset flow defines what actions a user must do before they can reset their password.
- events
- Events are audit streams that admins can view and hook into.
- themes
- Every screen provided by Red Hat build of Keycloak is backed by a theme. Themes define HTML templates and stylesheets which you can override as needed.
Chapter 2. Creating the first administrator
After installing Red Hat build of Keycloak, you need an administrator account that can act as a super admin with full permissions to manage Red Hat build of Keycloak. With this account, you can log in to the Red Hat build of Keycloak Admin Console where you create realms and users and register applications that are secured by Red Hat build of Keycloak.
2.1. Creating the account on the local host
If your server is accessible from localhost, perform these steps.
Procedure
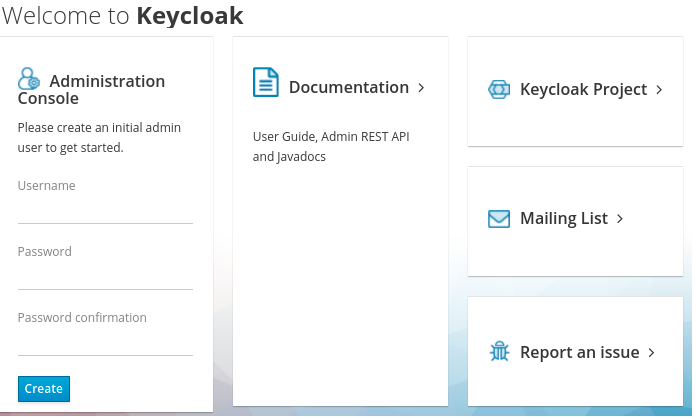
- In a web browser, go to the http://localhost:8080 URL.
Supply a username and password that you can recall.
Welcome page
2.2. Creating the account remotely
If you cannot access the server from a localhost address or just want to start Red Hat build of Keycloak from the command line, use the KEYCLOAK_ADMIN and KEYCLOAK_ADMIN_PASSWORD environment variables to create an initial admin account.
For example:
export KEYCLOAK_ADMIN=<username>
export KEYCLOAK_ADMIN_PASSWORD=<password>

bin/kc.[sh|bat] start
Chapter 3. Configuring realms
Once you have an administrative account for the Admin Console, you can configure realms. A realm is a space where you manage objects, including users, applications, roles, and groups. A user belongs to and logs into a realm. One Red Hat build of Keycloak deployment can define, store, and manage as many realms as there is space for in the database.
3.1. Using the Admin Console
You configure realms and perform most administrative tasks in the Red Hat build of Keycloak Admin Console.
Prerequisites
- You need an administrator account. See Creating the first administrator.
Procedure
Go to the URL for the Admin Console.
For example, for localhost, use this URL: http://localhost:8080/admin/
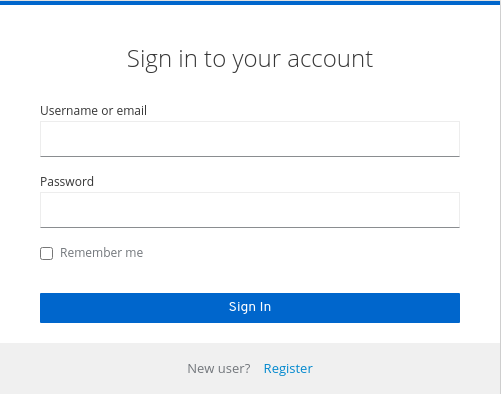
Login page
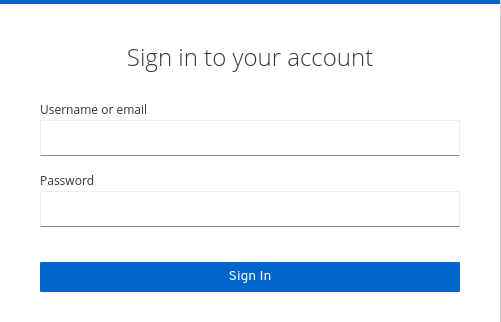
Enter the username and password you created on the Welcome Page or the
add-user-keycloakscript in the bin directory. This action displays the Admin Console.Admin Console
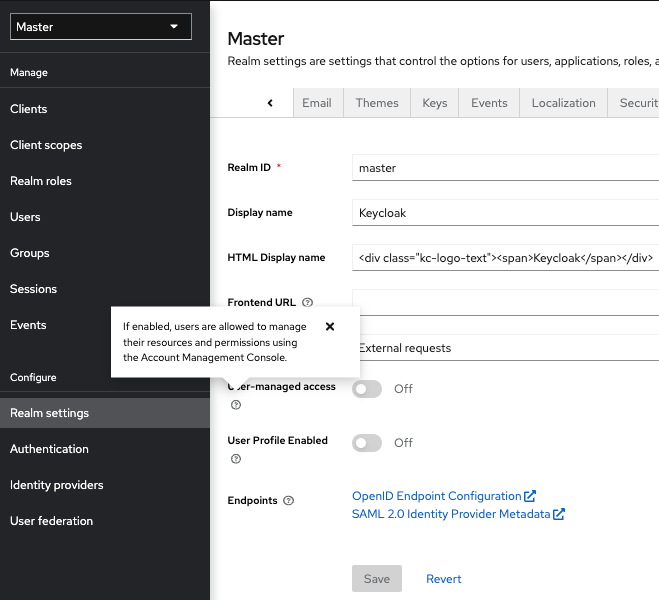
Note the menus and other options that you can use:
- Click the menu labeled Master to pick a realm you want to manage or to create a new one.
- Click the top right list to view your account or log out.
- Hover over a question mark ? icon to show a tooltip text that describes that field. The image above shows the tooltip in action.
- Click a question mark ? icon to show a tooltip text that describes that field. The image above shows the tooltip in action.
Export files from the Admin Console are not suitable for backups or data transfer between servers. Only boot-time exports are suitable for backups or data transfer between servers.
3.2. The master realm
In the Admin Console, two types of realms exist:
-
Master realm- This realm was created for you when you first started Red Hat build of Keycloak. It contains the administrator account you created at the first login. Use the master realm only to create and manage the realms in your system. -
Other realms- These realms are created by the administrator in the master realm. In these realms, administrators manage the users in your organization and the applications they need. The applications are owned by the users.
Realms and applications
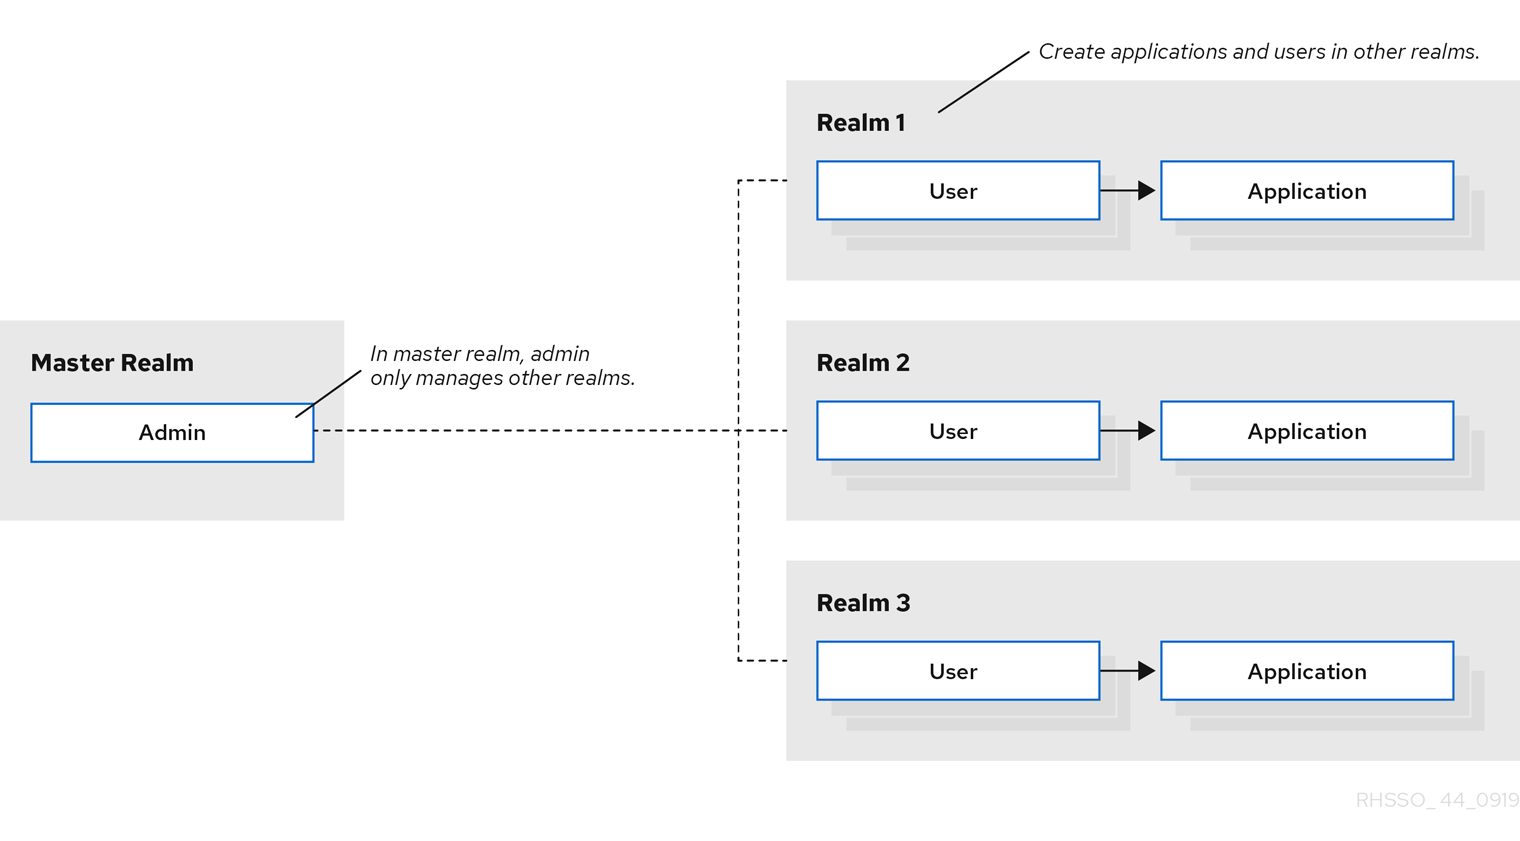
Realms are isolated from one another and can only manage and authenticate the users that they control. Following this security model helps prevent accidental changes and follows the tradition of permitting user accounts access to only those privileges and powers necessary for the successful completion of their current task.
Additional resources
- See Dedicated Realm Admin Consoles if you want to disable the master realm and define administrator accounts within any new realm you create. Each realm has its own dedicated Admin Console that you can log into with local accounts.
3.3. Creating a realm
You create a realm to provide a management space where you can create users and give them permissions to use applications. At first login, you are typically in the master realm, the top-level realm from which you create other realms.
When deciding what realms you need, consider the kind of isolation you want to have for your users and applications. For example, you might create a realm for the employees of your company and a separate realm for your customers. Your employees would log into the employee realm and only be able to visit internal company applications. Customers would log into the customer realm and only be able to interact with customer-facing apps.
Procedure
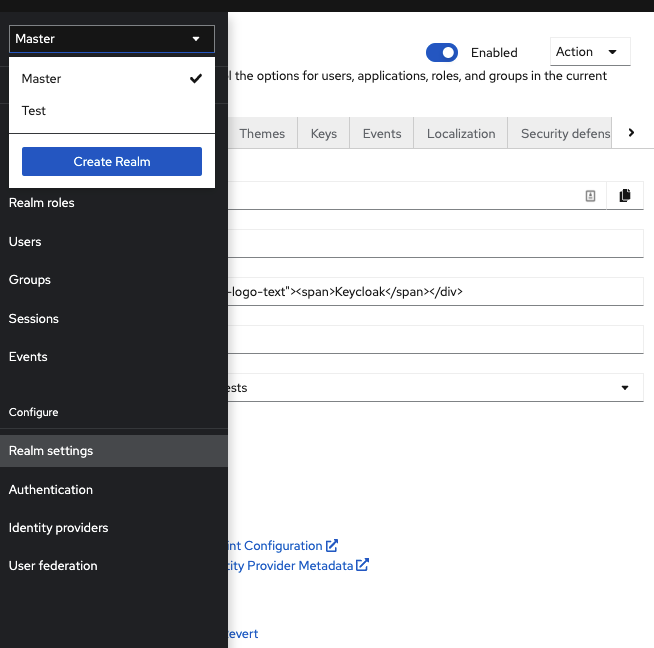
- Point to the top of the left pane.
Click Create Realm.
Add realm menu
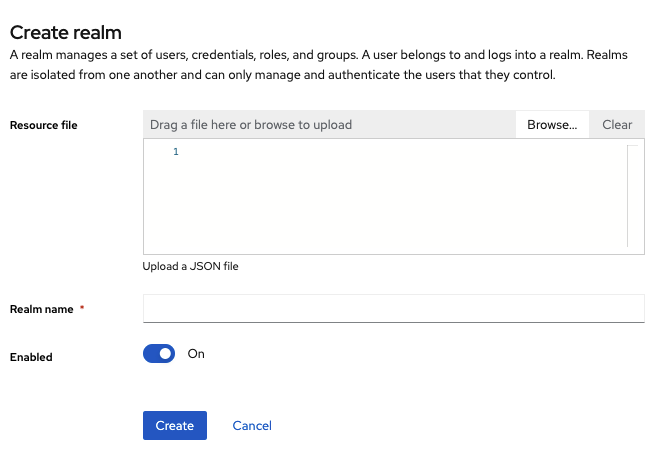
- Enter a name for the realm.
Click Create.
Create realm
The current realm is now set to the realm you just created. You can switch between realms by clicking the realm name in the menu.
3.4. Configuring SSL for a realm
Each realm has an associated SSL Mode, which defines the SSL/HTTPS requirements for interacting with the realm. Browsers and applications that interact with the realm honor the SSL/HTTPS requirements defined by the SSL Mode or they cannot interact with the server.
Procedure
- Click Realm settings in the menu.
Click the General tab.
General tab
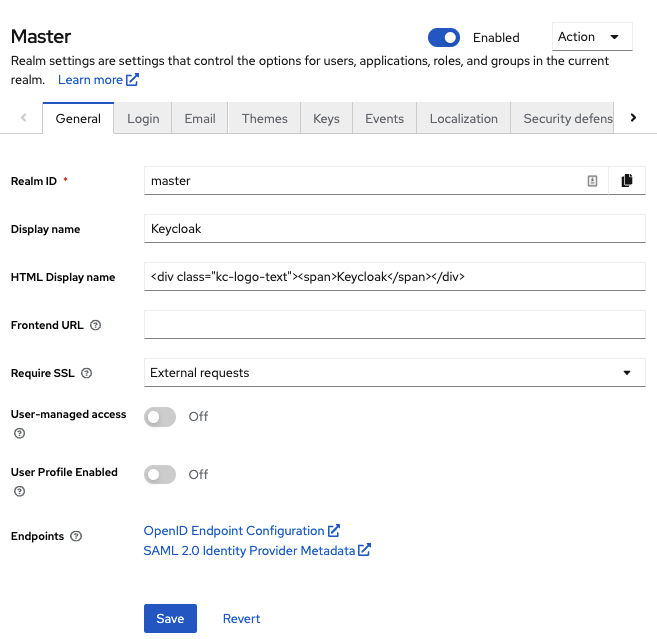
Set Require SSL to one of the following SSL modes:
-
External requests Users can interact with Red Hat build of Keycloak without SSL so long as they stick to private IP addresses such as
localhost,127.0.0.1,10.x.x.x,192.168.x.x, and172.16.x.x. If you try to access Red Hat build of Keycloak without SSL from a non-private IP address, you will get an error. - None Red Hat build of Keycloak does not require SSL. This choice applies only in development when you are experimenting and do not plan to support this deployment.
- All requests Red Hat build of Keycloak requires SSL for all IP addresses.
-
External requests Users can interact with Red Hat build of Keycloak without SSL so long as they stick to private IP addresses such as
3.5. Configuring email for a realm
Red Hat build of Keycloak sends emails to users to verify their email addresses, when they forget their passwords, or when an administrator needs to receive notifications about a server event. To enable Red Hat build of Keycloak to send emails, you provide Red Hat build of Keycloak with your SMTP server settings.
Procedure
- Click Realm settings in the menu.
Click the Email tab.
Email tab
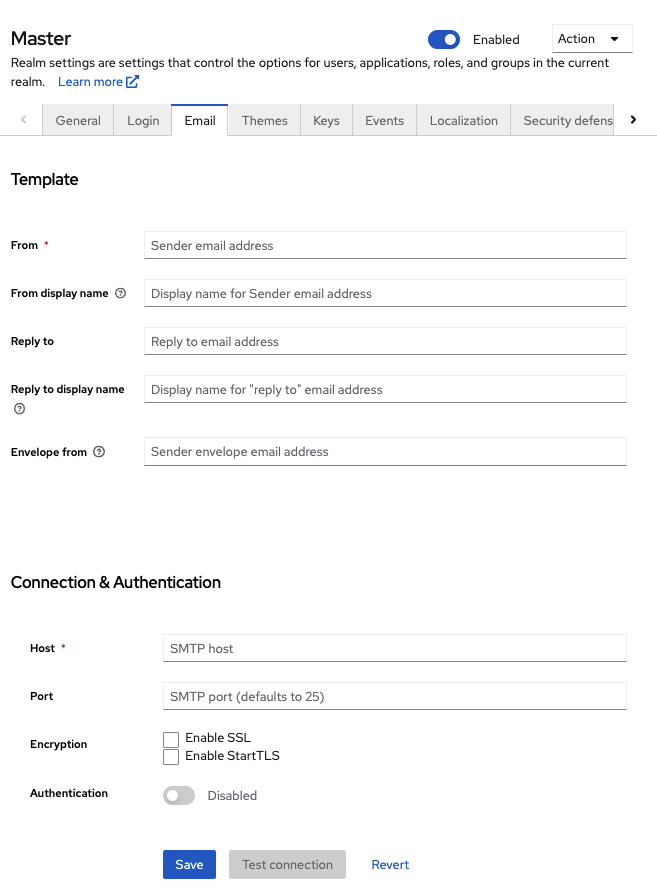
- Fill in the fields and toggle the switches as needed.
Template
- From
- From denotes the address used for the From SMTP-Header for the emails sent.
- From display name
- From display name allows to configure a user-friendly email address aliases (optional). If not set the plain From email address will be displayed in email clients.
- Reply to
- Reply to denotes the address used for the Reply-To SMTP-Header for the mails sent (optional). If not set the plain From email address will be used.
- Reply to display name
- Reply to display name allows to configure a user-friendly email address aliases (optional). If not set the plain Reply To email address will be displayed.
- Envelope from
- Envelope from denotes the Bounce Address used for the Return-Path SMTP-Header for the mails sent (optional).
Connection & Authentication
- Host
- Host denotes the SMTP server hostname used for sending emails.
- Port
- Port denotes the SMTP server port.
- Encryption
- Tick one of these checkboxes to support sending emails for recovering usernames and passwords, especially if the SMTP server is on an external network. You will most likely need to change the Port to 465, the default port for SSL/TLS.
- Authentication
- Set this switch to ON if your SMTP server requires authentication. When prompted, supply the Username and Password. The value of the Password field can refer a value from an external vault.
3.6. Configuring themes
For a given realm, you can change the appearance of any UI in Red Hat build of Keycloak by using themes.
Procedure
- Click Realm setting in the menu.
Click the Themes tab.
Themes tab
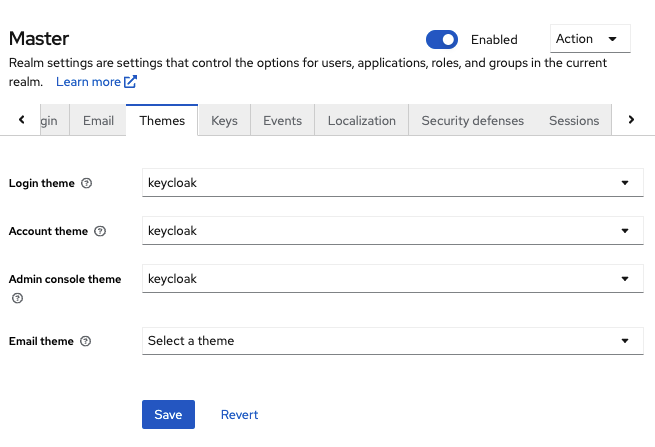
Pick the theme you want for each UI category and click Save.
- Login theme
- Username password entry, OTP entry, new user registration, and other similar screens related to login.
- Account theme
- Each user has a User Account Management UI.
- Admin console theme
- The skin of the Red Hat build of Keycloak Admin Console.
- Email theme
- Whenever Red Hat build of Keycloak has to send out an email, it uses templates defined in this theme to craft the email.
Additional resources
- The Server Developer Guide describes how to create a new theme or modify existing ones.
3.7. Enabling internationalization
Every UI screen is internationalized in Red Hat build of Keycloak. The default language is English, but you can choose which locales you want to support and what the default locale will be.
Procedure
- Click Realm Settings in the menu.
- Click the Localization tab.
- Enable Internationalization.
Select the languages you will support.
Localization tab
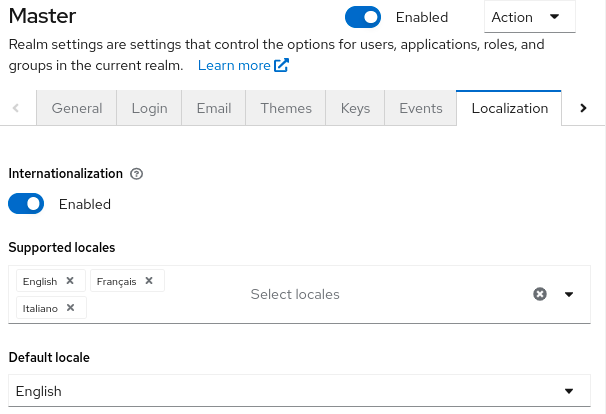
The next time a user logs in, that user can choose a language on the login page to use for the login screens, Account Console, and Admin Console.
Additional resources
- The Server Developer Guide explains how you can offer additional languages. All internationalized texts which are provided by the theme can be overwritten by realm-specific texts on the Localization tab.
3.7.1. User locale selection
A locale selector provider suggests the best locale on the information available. However, it is often unknown who the user is. For this reason, the previously authenticated user’s locale is remembered in a persisted cookie.
The logic for selecting the locale uses the first of the following that is available:
- User selected - when the user has selected a locale using the drop-down locale selector
- User profile - when there is an authenticated user and the user has a preferred locale set
- Client selected - passed by the client using for example ui_locales parameter
- Cookie - last locale selected on the browser
- Accepted language - locale from Accept-Language header
- Realm default
- If none of the above, fall back to English
When a user is authenticated an action is triggered to update the locale in the persisted cookie mentioned earlier. If the user has actively switched the locale through the locale selector on the login pages the users locale is also updated at this point.
If you want to change the logic for selecting the locale, you have an option to create custom LocaleSelectorProvider. For details, please refer to the Server Developer Guide.
3.8. Controlling login options
Red Hat build of Keycloak includes several built-in login page features.
3.8.1. Enabling forgot password
If you enable Forgot password, users can reset their login credentials if they forget their passwords or lose their OTP generator.
Procedure
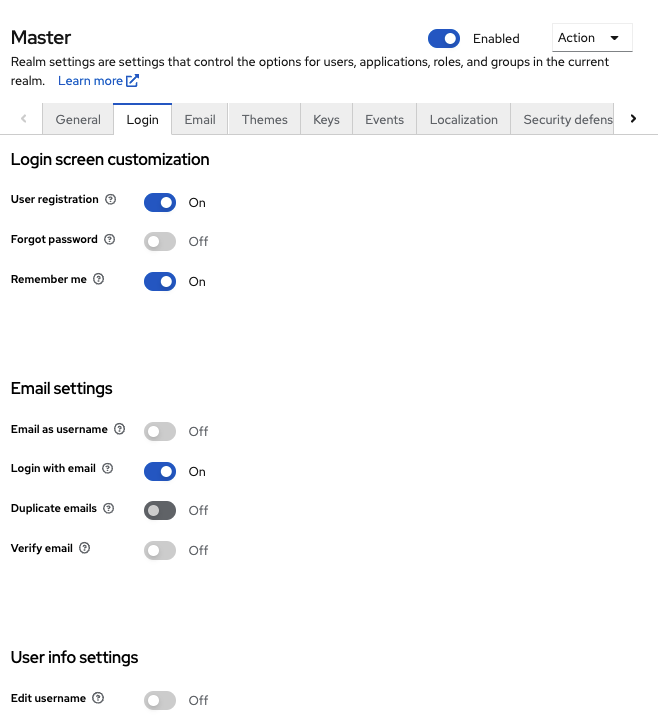
- Click Realm settings in the menu.
Click the Login tab.
Login tab
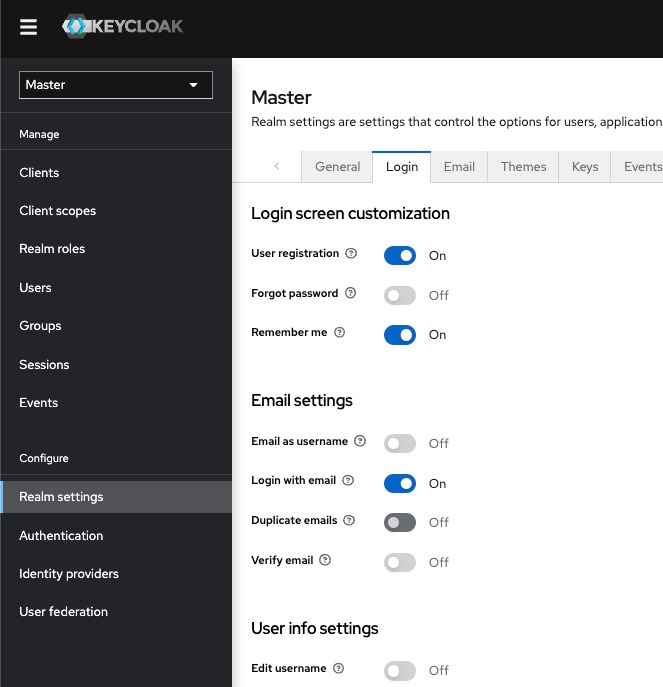
Toggle Forgot password to ON.
A
Forgot Password?link displays in your login pages.Forgot password link
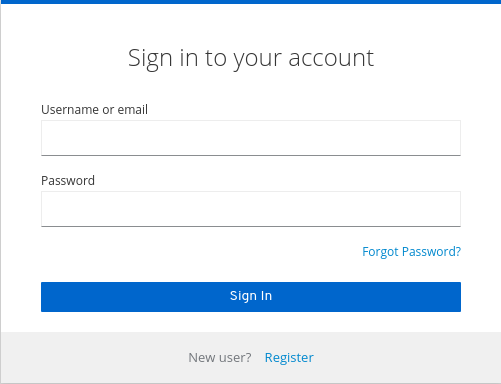
-
Specify
HostandFromin the Email tab in order for Keycloak to be able to send the reset email. Click this link to bring users where they can enter their username or email address and receive an email with a link to reset their credentials.
Forgot password page
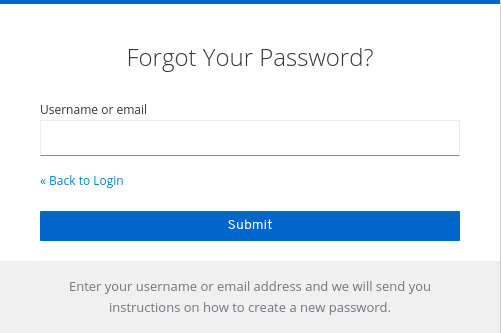
The text sent in the email is configurable. See Server Developer Guide for more information.
When users click the email link, Red Hat build of Keycloak asks them to update their password, and if they have set up an OTP generator, Red Hat build of Keycloak asks them to reconfigure the OTP generator. Depending on security requirements of your organization, you may not want users to reset their OTP generator through email.
To change this behavior, perform these steps:
Procedure
- Click Authentication in the menu.
- Click the Flows tab.
Select the Reset Credentials flow.
Reset credentials flow
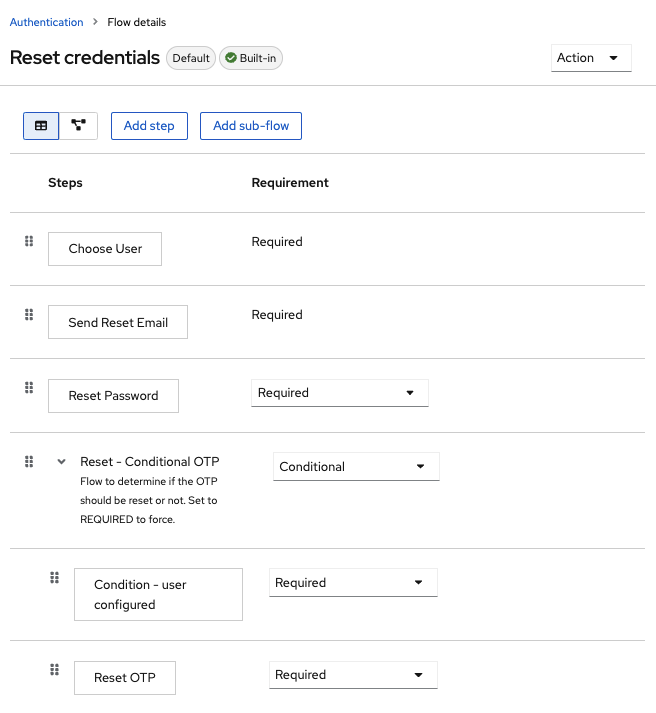
If you do not want to reset the OTP, set the
Reset OTPrequirement to Disabled.- Click Authentication in the menu.
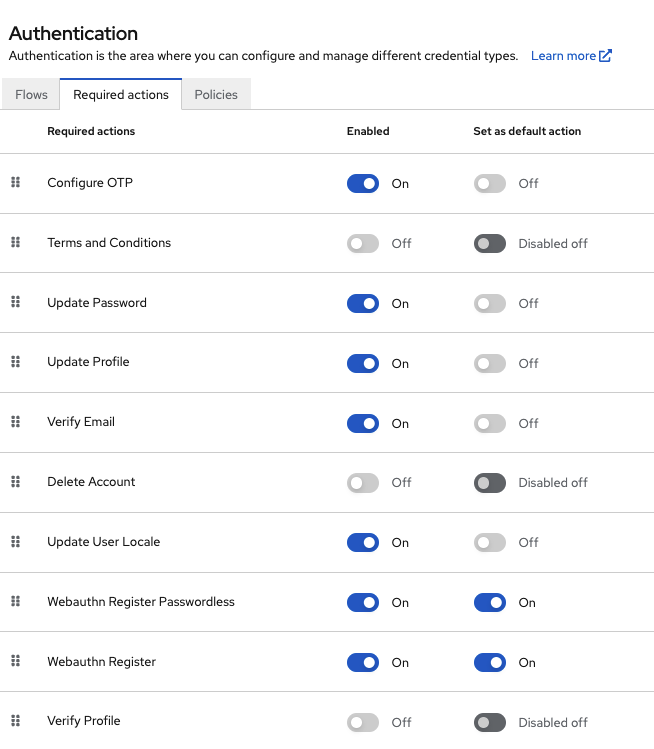
- Click the Required actions tab.
Ensure Update Password is enabled.
Required Actions
3.8.2. Enabling Remember Me
A logged-in user closing their browser destroys their session, and that user must log in again. You can set Red Hat build of Keycloak to keep the user’s login session open if that user clicks the Remember Me checkbox upon login. This action turns the login cookie from a session-only cookie to a persistence cookie.
Procedure
- Click Realm settings in the menu.
- Click the Login tab.
Toggle the Remember Me switch to On.
Login tab
When you save this setting, a
remember mecheckbox displays on the realm’s login page.Remember Me
3.8.3. ACR to Level of Authentication (LoA) Mapping
In the login settings of a realm, you can define which Authentication Context Class Reference (ACR) value is mapped to which Level of Authentication (LoA). The ACR can be any value, whereas the LoA must be numeric. The acr claim can be requested in the claims or acr_values parameter sent in the OIDC request and it is also included in the access token and ID token. The mapped number is used in the authentication flow conditions.
Mapping can be also specified at the client level in case that particular client needs to use different values than realm. However, a best practice is to stick to realm mappings.

For further details see Step-up Authentication and the official OIDC specification.
3.8.4. Update Email Workflow (UpdateEmail)
With this workflow, users will have to use an UPDATE_EMAIL action to change their own email address.
The action is associated with a single email input form. If the realm has email verification disabled, this action will allow to update the email without verification. If the realm has email verification enabled, the action will send an email update action token to the new email address without changing the account email. Only the action token triggering will complete the email update.
Applications are able to send their users to the email update form by leveraging UPDATE_EMAIL as an AIA (Application Initiated Action).
UpdateEmail is Technology Preview and is not fully supported. This feature is disabled by default.
To enable start the server with --features=preview or --features=update-email
If you enable this feature and you are migrating from a previous version, enable the Update Email required action in your realms. Otherwise, users cannot update their email addresses.
3.9. Configuring realm keys
The authentication protocols that are used by Red Hat build of Keycloak require cryptographic signatures and sometimes encryption. Red Hat build of Keycloak uses asymmetric key pairs, a private and public key, to accomplish this.
Red Hat build of Keycloak has a single active key pair at a time, but can have several passive keys as well. The active key pair is used to create new signatures, while the passive key pair can be used to verify previous signatures. This makes it possible to regularly rotate the keys without any downtime or interruption to users.
When a realm is created, a key pair and a self-signed certificate is automatically generated.
Procedure
- Click Realm settings in the menu.
- Click Keys.
- Select Passive keys from the filter dropdown to view passive keys.
- Select Disabled keys from the filter dropdown to view disabled keys.
A key pair can have the status Active, but still not be selected as the currently active key pair for the realm. The selected active pair which is used for signatures is selected based on the first key provider sorted by priority that is able to provide an active key pair.
3.9.1. Rotating keys
We recommend that you regularly rotate keys. Start by creating new keys with a higher priority than the existing active keys. You can instead create new keys with the same priority and making the previous keys passive.
Once new keys are available, all new tokens and cookies will be signed with the new keys. When a user authenticates to an application, the SSO cookie is updated with the new signature. When OpenID Connect tokens are refreshed new tokens are signed with the new keys. Eventually, all cookies and tokens use the new keys and after a while the old keys can be removed.
The frequency of deleting old keys is a tradeoff between security and making sure all cookies and tokens are updated. Consider creating new keys every three to six months and deleting old keys one to two months after you create the new keys. If a user was inactive in the period between the new keys being added and the old keys being removed, that user will have to re-authenticate.
Rotating keys also applies to offline tokens. To make sure they are updated, the applications need to refresh the tokens before the old keys are removed.
3.9.2. Adding a generated key pair
Use this procedure to generate a key pair including a self-signed certificate.
Procedure
- Select the realm in the Admin Console.
- Click Realm settings in the menu.
- Click the Keys tab.
- Click the Providers tab.
- Click Add provider and select rsa-generated.
- Enter a number in the Priority field. This number determines if the new key pair becomes the active key pair. The highest number makes the key pair active.
- Select a value for AES Key size.
- Click Save.
Changing the priority for a provider will not cause the keys to be re-generated, but if you want to change the keysize you can edit the provider and new keys will be generated.
3.9.3. Rotating keys by extracting a certificate
You can rotate keys by extracting a certificate from an RSA generated key pair and using that certificate in a new keystore.
Prerequisites
- A generated key pair
Procedure
- Select the realm in the Admin Console.
- Click Realm Settings.
Click the Keys tab.
A list of Active keys appears.
On a row with an RSA key, click Certificate under Public Keys.
The certificate appears in text form.
Save the certificate to a file and enclose it in these lines.
----Begin Certificate---- <Output> ----End Certificate----- Use the keytool command to convert the key file to PEM Format.
Remove the current RSA public key certificate from the keystore.
keytool -delete -keystore <keystore>.jks -storepass <password> -alias <key>Import the new certificate into the keystore
keytool -importcert -file domain.crt -keystore <keystore>.jks -storepass <password> -alias <key>Rebuild the application.
mvn clean install wildfly:deploy
3.9.4. Adding an existing key pair and certificate
To add a key pair and certificate obtained elsewhere select Providers and choose rsa from the dropdown. You can change the priority to make sure the new key pair becomes the active key pair.
Prerequisites
- A private key file. The file must be PEM formatted.
Procedure
- Select the realm in the Admin Console.
- Click Realm settings.
- Click the Keys tab.
- Click the Providers tab.
- Click Add provider and select rsa.
- Enter a number in the Priority field. This number determines if the new key pair becomes the active key pair.
- Click Browse… beside Private RSA Key to upload the private key file.
- If you have a signed certificate for your private key, click Browse… beside X509 Certificate to upload the certificate file. Red Hat build of Keycloak automatically generates a self-signed certificate if you do not upload a certificate.
- Click Save.
3.9.5. Loading keys from a Java Keystore
To add a key pair and certificate stored in a Java Keystore file on the host select Providers and choose java-keystore from the dropdown. You can change the priority to make sure the new key pair becomes the active key pair.
For the associated certificate chain to be loaded it must be imported to the Java Keystore file with the same Key Alias used to load the key pair.
Procedure
- Select the realm in the Admin Console.
- Click Realm settings in the menu.
- Click the Keys tab.
- Click the Providers tab.
- Click Add provider and select java-keystore.
- Enter a number in the Priority field. This number determines if the new key pair becomes the active key pair.
- Enter a value for Keystore.
- Enter a value for Keystore Password.
- Enter a value for Key Alias.
- Enter a value for Key Password.
- Click Save.
3.9.6. Making keys passive
Procedure
- Select the realm in the Admin Console.
- Click Realm settings in the menu.
- Click the Keys tab.
- Click the Providers tab.
- Click the provider of the key you want to make passive.
- Toggle Active to Off.
- Click Save.
3.9.7. Disabling keys
Procedure
- Select the realm in the Admin Console.
- Click Realm settings in the menu.
- Click the Keys tab.
- Click the Providers tab.
- Click the provider of the key you want to make passive.
- Toggle Enabled to Off.
- Click Save.
3.9.8. Compromised keys
Red Hat build of Keycloak has the signing keys stored just locally and they are never shared with the client applications, users or other entities. However, if you think that your realm signing key was compromised, you should first generate new key pair as described above and then immediately remove the compromised key pair.
Alternatively, you can delete the provider from the Providers table.
Procedure
- Click Clients in the menu.
- Click security-admin-console.
- Scroll down to the Access settings section.
- Fill in the Admin URL field.
- Click the Advanced tab.
- Click Set to now in the Revocation section.
- Click Push.
Pushing the not-before policy ensures that client applications do not accept the existing tokens signed by the compromised key. The client application is forced to download new key pairs from Red Hat build of Keycloak also so the tokens signed by the compromised key will be invalid.
REST and confidential clients must set Admin URL so Red Hat build of Keycloak can send clients the pushed not-before policy request.
Chapter 4. Using external storage
Organizations can have databases containing information, passwords, and other credentials. Typically, you cannot migrate existing data storage to a Red Hat build of Keycloak deployment so Red Hat build of Keycloak can federate existing external user databases. Red Hat build of Keycloak supports LDAP and Active Directory, but you can also code extensions for any custom user database by using the Red Hat build of Keycloak User Storage SPI.
When a user attempts to log in, Red Hat build of Keycloak examines that user’s storage to find that user. If Red Hat build of Keycloak does not find the user, Red Hat build of Keycloak iterates over each User Storage provider for the realm until it finds a match. Data from the external data storage then maps into a standard user model the Red Hat build of Keycloak runtime consumes. This user model then maps to OIDC token claims and SAML assertion attributes.
External user databases rarely have the data necessary to support all the features of Red Hat build of Keycloak, so the User Storage Provider can opt to store items locally in Red Hat build of Keycloak user data storage. Providers can import users locally and sync periodically with external data storage. This approach depends on the capabilities of the provider and the configuration of the provider. For example, your external user data storage may not support OTP. The OTP can be handled and stored by Red Hat build of Keycloak, depending on the provider.
4.1. Adding a provider
To add a storage provider, perform the following procedure:
Procedure
Click User Federation in the menu.
User federation
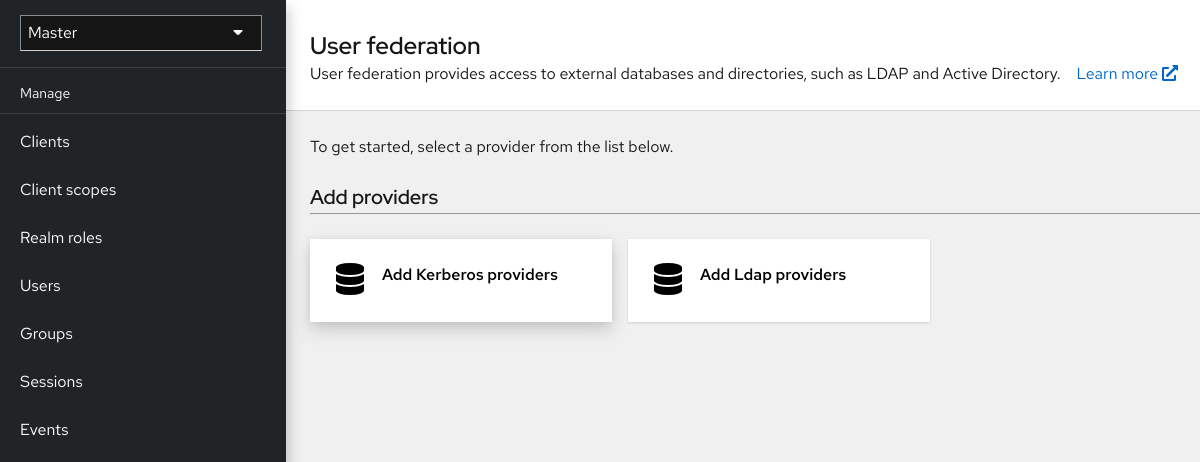
Select the provider type card from the listed cards.
Red Hat build of Keycloak brings you to that provider’s configuration page.
4.2. Dealing with provider failures
If a User Storage Provider fails, you may not be able to log in and view users in the Admin Console. Red Hat build of Keycloak does not detect failures when using a Storage Provider to look up a user, so it cancels the invocation. If you have a Storage Provider with a high priority that fails during user lookup, the login or user query fails with an exception and will not fail over to the next configured provider.
Red Hat build of Keycloak searches the local Red Hat build of Keycloak user database first to resolve users before any LDAP or custom User Storage Provider. Consider creating an administrator account stored in the local Red Hat build of Keycloak user database in case of problems connecting to your LDAP and back ends.
Each LDAP and custom User Storage Provider has an enable toggle on its Admin Console page. Disabling the User Storage Provider skips the provider when performing queries, so you can view and log in with user accounts in a different provider with lower priority. If your provider uses an import strategy and is disabled, imported users are still available for lookup in read-only mode.
When a Storage Provider lookup fails, Red Hat build of Keycloak does not fail over because user databases often have duplicate usernames or duplicate emails between them. Duplicate usernames and emails can cause problems because the user loads from one external data store when the admin expects them to load from another data store.
4.3. Lightweight Directory Access Protocol (LDAP) and Active Directory
Red Hat build of Keycloak includes an LDAP/AD provider. You can federate multiple different LDAP servers in one Red Hat build of Keycloak realm and map LDAP user attributes into the Red Hat build of Keycloak common user model.
By default, Red Hat build of Keycloak maps the username, email, first name, and last name of the user account, but you can also configure additional mappings. Red Hat build of Keycloak’s LDAP/AD provider supports password validation using LDAP/AD protocols and storage, edit, and synchronization modes.
4.3.1. Configuring federated LDAP storage
Procedure
Click User Federation in the menu.
User federation
Click Add LDAP providers.
Red Hat build of Keycloak brings you to the LDAP configuration page.
4.3.2. Storage mode
Red Hat build of Keycloak imports users from LDAP into the local Red Hat build of Keycloak user database. This copy of the user database synchronizes on-demand or through a periodic background task. An exception exists for synchronizing passwords. Red Hat build of Keycloak never imports passwords. Password validation always occurs on the LDAP server.
The advantage of synchronization is that all Red Hat build of Keycloak features work efficiently because any required extra per-user data is stored locally. The disadvantage is that each time Red Hat build of Keycloak queries a specific user for the first time, Red Hat build of Keycloak performs a corresponding database insert.
You can synchronize the import with your LDAP server. Import synchronization is unnecessary when LDAP mappers always read particular attributes from the LDAP rather than the database.
You can use LDAP with Red Hat build of Keycloak without importing users into the Red Hat build of Keycloak user database. The LDAP server backs up the common user model that the Red Hat build of Keycloak runtime uses. If LDAP does not support data that a Red Hat build of Keycloak feature requires, that feature will not work. The advantage of this approach is that you do not have the resource usage of importing and synchronizing copies of LDAP users into the Red Hat build of Keycloak user database.
The Import Users switch on the LDAP configuration page controls this storage mode. To import users, toggle this switch to ON.
If you disable Import Users, you cannot save user profile attributes into the Red Hat build of Keycloak database. Also, you cannot save metadata except for user profile metadata mapped to the LDAP. This metadata can include role mappings, group mappings, and other metadata based on the LDAP mappers' configuration.
When you attempt to change the non-LDAP mapped user data, the user update is not possible. For example, you cannot disable the LDAP mapped user unless the user’s enabled flag maps to an LDAP attribute.
4.3.3. Edit mode
Users and admins can modify user metadata, users through the Account Console, and administrators through the Admin Console. The Edit Mode configuration on the LDAP configuration page defines the user’s LDAP update privileges.
- READONLY
- You cannot change the username, email, first name, last name, and other mapped attributes. Red Hat build of Keycloak shows an error anytime a user attempts to update these fields. Password updates are not supported.
- WRITABLE
- You can change the username, email, first name, last name, and other mapped attributes and passwords and synchronize them automatically with the LDAP store.
- UNSYNCED
- Red Hat build of Keycloak stores changes to the username, email, first name, last name, and passwords in Red Hat build of Keycloak local storage, so the administrator must synchronize this data back to LDAP. In this mode, Red Hat build of Keycloak deployments can update user metadata on read-only LDAP servers. This option also applies when importing users from LDAP into the local Red Hat build of Keycloak user database.
When Red Hat build of Keycloak creates the LDAP provider, Red Hat build of Keycloak also creates a set of initial LDAP mappers. Red Hat build of Keycloak configures these mappers based on a combination of the Vendor, Edit Mode, and Import Users switches. For example, when edit mode is UNSYNCED, Red Hat build of Keycloak configures the mappers to read a particular user attribute from the database and not from the LDAP server. However, if you later change the edit mode, the mapper’s configuration does not change because it is impossible to detect if the configuration changes changed in UNSYNCED mode. Decide the Edit Mode when creating the LDAP provider. This note applies to Import Users switch also.
4.3.4. Other configuration options
- Console Display Name
- The name of the provider to display in the admin console.
- Priority
- The priority of the provider when looking up users or adding a user.
- Sync Registrations
- Toggle this switch to ON if you want new users created by Red Hat build of Keycloak added to LDAP.
- Allow Kerberos authentication
- Enable Kerberos/SPNEGO authentication in the realm with user data provisioned from LDAP. For more information, see the Kerberos section.
- Other options
- Hover the mouse pointer over the tooltips in the Admin Console to see more details about these options.
4.3.5. Connecting to LDAP over SSL
When you configure a secure connection URL to your LDAP store (for example,ldaps://myhost.com:636), Red Hat build of Keycloak uses SSL to communicate with the LDAP server. Configure a truststore on the Red Hat build of Keycloak server side so that Red Hat build of Keycloak can trust the SSL connection to LDAP.
Configure the global truststore for Red Hat build of Keycloak with the Truststore SPI. For more information about configuring the global truststore, see the Configuring a Truststore chapter. If you do not configure the Truststore SPI, the truststore falls back to the default mechanism provided by Java, which can be the file supplied by the javax.net.ssl.trustStore system property or the cacerts file from the JDK if the system property is unset.
The Use Truststore SPI configuration property, in the LDAP federation provider configuration, controls the truststore SPI. By default, Red Hat build of Keycloak sets the property to Always, which is adequate for most deployments. Red Hat build of Keycloak uses the Truststore SPI if the connection URL to LDAP starts with ldaps only.
4.3.6. Synchronizing LDAP users to Red Hat build of Keycloak
If you set the Import Users option, the LDAP Provider handles importing LDAP users into the Red Hat build of Keycloak local database. The first time a user logs in or is returned as part of a user query (e.g. using the search field in the admin console), the LDAP provider imports the LDAP user into the Red Hat build of Keycloak database. During authentication, the LDAP password is validated.
If you want to sync all LDAP users into the Red Hat build of Keycloak database, configure and enable the Sync Settings on the LDAP provider configuration page.
Two types of synchronization exist:
- Periodic Full sync
- This type synchronizes all LDAP users into the Red Hat build of Keycloak database. The LDAP users already in Red Hat build of Keycloak, but different in LDAP, directly update in the Red Hat build of Keycloak database.
- Periodic Changed users sync
- When synchronizing, Red Hat build of Keycloak creates or updates users created or updated after the last sync only.
The best way to synchronize is to click Synchronize all users when you first create the LDAP provider, then set up periodic synchronization of changed users.
4.3.7. LDAP mappers
LDAP mappers are listeners triggered by the LDAP Provider. They provide another extension point to LDAP integration. LDAP mappers are triggered when:
- Users log in by using LDAP.
- Users initially register.
- The Admin Console queries a user.
When you create an LDAP Federation provider, Red Hat build of Keycloak automatically provides a set of mappers for this provider. This set is changeable by users, who can also develop mappers or update/delete existing ones.
- User Attribute Mapper
-
This mapper specifies which LDAP attribute maps to the attribute of the Red Hat build of Keycloak user. For example, you can configure the
mailLDAP attribute to theemailattribute in the Red Hat build of Keycloak database. For this mapper implementation, a one-to-one mapping always exists. - FullName Mapper
-
This mapper specifies the full name of the user. Red Hat build of Keycloak saves the name in an LDAP attribute (usually
cn) and maps the name to thefirstNameandlastnameattributes in the Red Hat build of Keycloak database. Havingcnto contain the full name of the user is common for LDAP deployments.
When you register new users in Red Hat build of Keycloak and Sync Registrations is ON for the LDAP provider, the fullName mapper permits falling back to the username. This fallback is useful when using Microsoft Active Directory (MSAD). The common setup for MSAD is to configure the cn LDAP attribute as fullName and, at the same time, use the cn LDAP attribute as the RDN LDAP Attribute in the LDAP provider configuration. With this setup, Red Hat build of Keycloak falls back to the username. For example, if you create Red Hat build of Keycloak user "john123" and leave firstName and lastName empty, then the fullname mapper saves "john123" as the value of the cn in LDAP. When you enter "John Doe" for firstName and lastName later, the fullname mapper updates LDAP cn to the "John Doe" value as falling back to the username is unnecessary.
- Hardcoded Attribute Mapper
-
This mapper adds a hardcoded attribute value to each Red Hat build of Keycloak user linked with LDAP. This mapper can also force values for the
enabledoremailVerifieduser properties. - Role Mapper
-
This mapper configures role mappings from LDAP into Red Hat build of Keycloak role mappings. A single role mapper can map LDAP roles (usually groups from a particular branch of the LDAP tree) into roles corresponding to a specified client’s realm roles or client roles. You can configure more Role mappers for the same LDAP provider. For example, you can specify that role mappings from groups under
ou=main,dc=example,dc=orgmap to realm role mappings, and role mappings from groups underou=finance,dc=example,dc=orgmap to client role mappings of clientfinance. - Hardcoded Role Mapper
- This mapper grants a specified Red Hat build of Keycloak role to each Red Hat build of Keycloak user from the LDAP provider.
- Group Mapper
- This mapper maps LDAP groups from a branch of an LDAP tree into groups within Red Hat build of Keycloak. This mapper also propagates user-group mappings from LDAP into user-group mappings in Red Hat build of Keycloak.
- MSAD User Account Mapper
-
This mapper is specific to Microsoft Active Directory (MSAD). It can integrate the MSAD user account state into the Red Hat build of Keycloak account state, such as enabled account or expired password. This mapper uses the
userAccountControl, andpwdLastSetLDAP attributes, specific to MSAD and are not the LDAP standard. For example, if the value ofpwdLastSetis0, the Red Hat build of Keycloak user must update their password. The result is an UPDATE_PASSWORD required action added to the user. If the value ofuserAccountControlis514(disabled account), the Red Hat build of Keycloak user is disabled. - Certificate Mapper
-
This mapper maps X.509 certificates. Red Hat build of Keycloak uses it in conjunction with X.509 authentication and
Full certificate in PEM formatas an identity source. This mapper behaves similarly to theUser Attribute Mapper, but Red Hat build of Keycloak can filter for an LDAP attribute storing a PEM or DER format certificate. EnableAlways Read Value From LDAPwith this mapper.
User Attribute mappers that map basic Red Hat build of Keycloak user attributes, such as username, firstname, lastname, and email, to corresponding LDAP attributes. You can extend these and provide your own additional attribute mappings. The Admin Console provides tooltips to help with configuring the corresponding mappers.
4.3.8. Password hashing
When Red Hat build of Keycloak updates a password, Red Hat build of Keycloak sends the password in plain-text format. This action is different from updating the password in the built-in Red Hat build of Keycloak database, where Red Hat build of Keycloak hashes and salts the password before sending it to the database. For LDAP, Red Hat build of Keycloak relies on the LDAP server to hash and salt the password.
By default, LDAP servers such as MSAD, RHDS, or FreeIPA hash and salt passwords. Other LDAP servers such as OpenLDAP or ApacheDS store the passwords in plain-text unless you use the LDAPv3 Password Modify Extended Operation as described in RFC3062. Enable the LDAPv3 Password Modify Extended Operation in the LDAP configuration page. See the documentation of your LDAP server for more details.
Always verify that user passwords are properly hashed and not stored as plaintext by inspecting a changed directory entry using ldapsearch and base64 decode the userPassword attribute value.
4.3.9. Troubleshooting
It is useful to increase the logging level to TRACE for the category org.keycloak.storage.ldap. With this setting, many logging messages are sent to the server log in the TRACE level, including the logging for all queries to the LDAP server and the parameters, which were used to send the queries. When you are creating any LDAP question on user forum or JIRA, consider attaching the server log with enabled TRACE logging. If it is too big, the good alternative is to include just the snippet from server log with the messages, which were added to the log during the operation, which causes the issues to you.
- When you create an LDAP provider, a message appears in the server log in the INFO level starting with:
Creating new LDAP Store for the LDAP storage provider: ...
It shows the configuration of your LDAP provider. Before you are asking the questions or reporting bugs, it will be nice to include this message to show your LDAP configuration. Eventually feel free to replace some config changes, which you do not want to include, with some placeholder values. One example is bindDn=some-placeholder . For connectionUrl, feel free to replace it as well, but it is generally useful to include at least the protocol, which was used (ldap vs ldaps)`. Similarly it can be useful to include the details for configuration of your LDAP mappers, which are displayed with the message like this at the DEBUG level:
Mapper for provider: XXX, Mapper name: YYY, Provider: ZZZ ...Note those messages are displayed just with the enabled DEBUG logging.
-
For tracking the performance or connection pooling issues, consider setting the value of property
Connection Pool Debug Levelof the LDAP provider to valueall. This will add lots of additional messages to server log with the included logging for the LDAP connection pooling. This can be used to track the issues related to connection pooling or performance.
After changing the configuration of connection pooling, you may need to restart the Keycloak server to enforce re-initialization of the LDAP provider connection.
If no more messages appear for connection pooling even after server restart, it can indicate that connection pooling does not work with your LDAP server.
-
For the case of reporting LDAP issue, you may consider to attach some part of your LDAP tree with the target data, which causes issues in your environment. For example if login of some user takes lot of time, you can consider attach his LDAP entry showing count of
memberattributes of various "group" entries. In this case, it might be useful to add if those group entries are mapped to some Group LDAP mapper (or Role LDAP Mapper) in Red Hat build of Keycloak etc.
4.4. SSSD and FreeIPA Identity Management integration
Red Hat build of Keycloak includes the System Security Services Daemon (SSSD) plugin. SSSD is part of the Fedora and Red Hat Enterprise Linux (RHEL), and it provides access to multiple identities and authentication providers. SSSD also provides benefits such as failover and offline support. For more information, see the Red Hat Enterprise Linux Identity Management documentation.
SSSD integrates with the FreeIPA identity management (IdM) server, providing authentication and access control. With this integration, Red Hat build of Keycloak can authenticate against privileged access management (PAM) services and retrieve user data from SSSD. For more information about using Red Hat Identity Management in Linux environments, see the Red Hat Enterprise Linux Identity Management documentation.

Red Hat build of Keycloak and SSSD communicate through read-only D-Bus interfaces. For this reason, the way to provision and update users is to use the FreeIPA/IdM administration interface. By default, the interface imports the username, email, first name, and last name.
Red Hat build of Keycloak registers groups and roles automatically but does not synchronize them. Any changes made by the Red Hat build of Keycloak administrator in Red Hat build of Keycloak do not synchronize with SSSD.
4.4.1. FreeIPA/IdM server
The FreeIPA Container image is available at Quay.io. To set up the FreeIPA server, see the FreeIPA documentation.
Procedure
Run your FreeIPA server using this command:
 docker run --name freeipa-server-container -it \
 -h server.freeipa.local -e PASSWORD=YOUR_PASSWORD \
 -v /sys/fs/cgroup:/sys/fs/cgroup:ro \
 -v /var/lib/ipa-data:/data:Z freeipa/freeipa-server
The parameter
-hwithserver.freeipa.localrepresents the FreeIPA/IdM server hostname. ChangeYOUR_PASSWORDto a password of your own.After the container starts, change the
/etc/hostsfile to include:x.x.x.x server.freeipa.localIf you do not make this change, you must set up a DNS server.
Use the following command to enroll your Linux server in the IPA domain so that the SSSD federation provider starts and runs on Red Hat build of Keycloak:
ipa-client-install --mkhomedir -p admin -w passwordRun the following command on the client to verify the installation is working:
kinit admin- Enter your password.
Add users to the IPA server using this command:
$ ipa user-add <username> --first=<first name> --last=<surname> --email=<email address> --phone=<telephoneNumber> --street=<street> --city=<city> --state=<state> --postalcode=<postal code> --passwordForce set the user’s password using kinit.
kinit <username>Enter the following to restore normal IPA operation:
kdestroy -A
kinit admin
4.4.2. SSSD and D-Bus
The federation provider obtains the data from SSSD using D-BUS. It authenticates the data using PAM.
Procedure
Install the sssd-dbus RPM.
$ sudo yum install sssd-dbusRun the following provisioning script:
$ bin/federation-sssd-setup.shThe script can also be used as a guide to configure SSSD and PAM for Red Hat build of Keycloak. It makes the following changes to
/etc/sssd/sssd.conf:[domain/your-hostname.local] ... ldap_user_extra_attrs = mail:mail, sn:sn, givenname:givenname, telephoneNumber:telephoneNumber ... [sssd] services = nss, sudo, pam, ssh, ifp ... [ifp] allowed_uids = root, yourOSUsername user_attributes = +mail, +telephoneNumber, +givenname, +snThe
ifpservice is added to SSSD and configured to allow the OS user to interrogate the IPA server through this interface.The script also creates a new PAM service
/etc/pam.d/keycloakto authenticate users via SSSD:auth required pam_sss.so account required pam_sss.soRun
dbus-sendto ensure the setup is successful.dbus-send --print-reply --system --dest=org.freedesktop.sssd.infopipe /org/freedesktop/sssd/infopipe org.freedesktop.sssd.infopipe.GetUserAttr string:<username> array:string:mail,givenname,sn,telephoneNumber dbus-send --print-reply --system --dest=org.freedesktop.sssd.infopipe /org/freedesktop/sssd/infopipe org.freedesktop.sssd.infopipe.GetUserGroups string:<username>If the setup is successful, each command displays the user’s attributes and groups respectively. If there is a timeout or an error, the federation provider running on Red Hat build of Keycloak cannot retrieve any data. This error usually happens because the server is not enrolled in the FreeIPA IdM server, or does not have permission to access the SSSD service.
If you do not have permission to access the SSSD service, ensure that the user running the Red Hat build of Keycloak server is in the
/etc/sssd/sssd.conffile in the following section:[ifp] allowed_uids = root, yourOSUsernameAnd the
ipaapisystem user is created inside the host. This user is necessary for theifpservice. Check the user is created in the system.grep ipaapi /etc/passwd ipaapi:x:992:988:IPA Framework User:/:/sbin/nologin
4.4.3. Enabling the SSSD federation provider
Red Hat build of Keycloak uses DBus-Java project to communicate at a low level with D-Bus and JNA to authenticate via Operating System Pluggable Authentication Modules (PAM).
Although now Red Hat build of Keycloak contains all the needed libraries to run the SSSD provider, JDK version 17 is needed. Therefore the SSSD provider will only be displayed when the host configuration is correct and JDK 17 is used to run Red Hat build of Keycloak.
4.4.4. Configuring a federated SSSD store
After the installation, configure a federated SSSD store.
Procedure
- Click User Federation in the menu.
- If everything is setup successfully the Add Sssd providers button will be displayed in the page. Click on it.
- Assign a name to the new provider.
- Click Save.
You can now authenticate against Red Hat build of Keycloak using a FreeIPA/IdM user and credentials.
4.5. Custom providers
Red Hat build of Keycloak does have a Service Provider Interface (SPI) for User Storage Federation to develop custom providers. You can find documentation on developing customer providers in the Server Developer Guide.
Chapter 5. Managing users
From the Admin Console, you have a wide range of actions you can perform to manage users.
5.1. Creating users
You create users in the realm where you intend to have applications needed by those users. Avoid creating users in the master realm, which is only intended for creating other realms.
Prerequisite
- You are in a realm other than the master realm.
Procedure
- Click Users in the menu.
- Click Add User.
Enter the details for the new user.
NoteUsername is the only required field.
- Click Save. After saving the details, the Management page for the new user is displayed.
5.2. Defining user credentials
You can manage credentials of a user in the Credentials tab.
Credential management
You change the priority of credentials by dragging and dropping rows. The new order determines the priority of the credentials for that user. The topmost credential has the highest priority. The priority determines which credential is displayed first after a user logs in.
- Type
- This column displays the type of credential, for example password or OTP.
- User Label
- This is an assignable label to recognize the credential when presented as a selection option during login. It can be set to any value to describe the credential.
- Data
- This is the non-confidential technical information about the credential. It is hidden, by default. You can click Show data… to display the data for a credential.
- Actions
- Click Reset password to change the password for the user and Delete to remove the credential.
You cannot configure other types of credentials for a specific user in the Admin Console; that task is the user’s responsibility.
You can delete the credentials of a user in the event a user loses an OTP device or if credentials have been compromised. You can only delete credentials of a user in the Credentials tab.
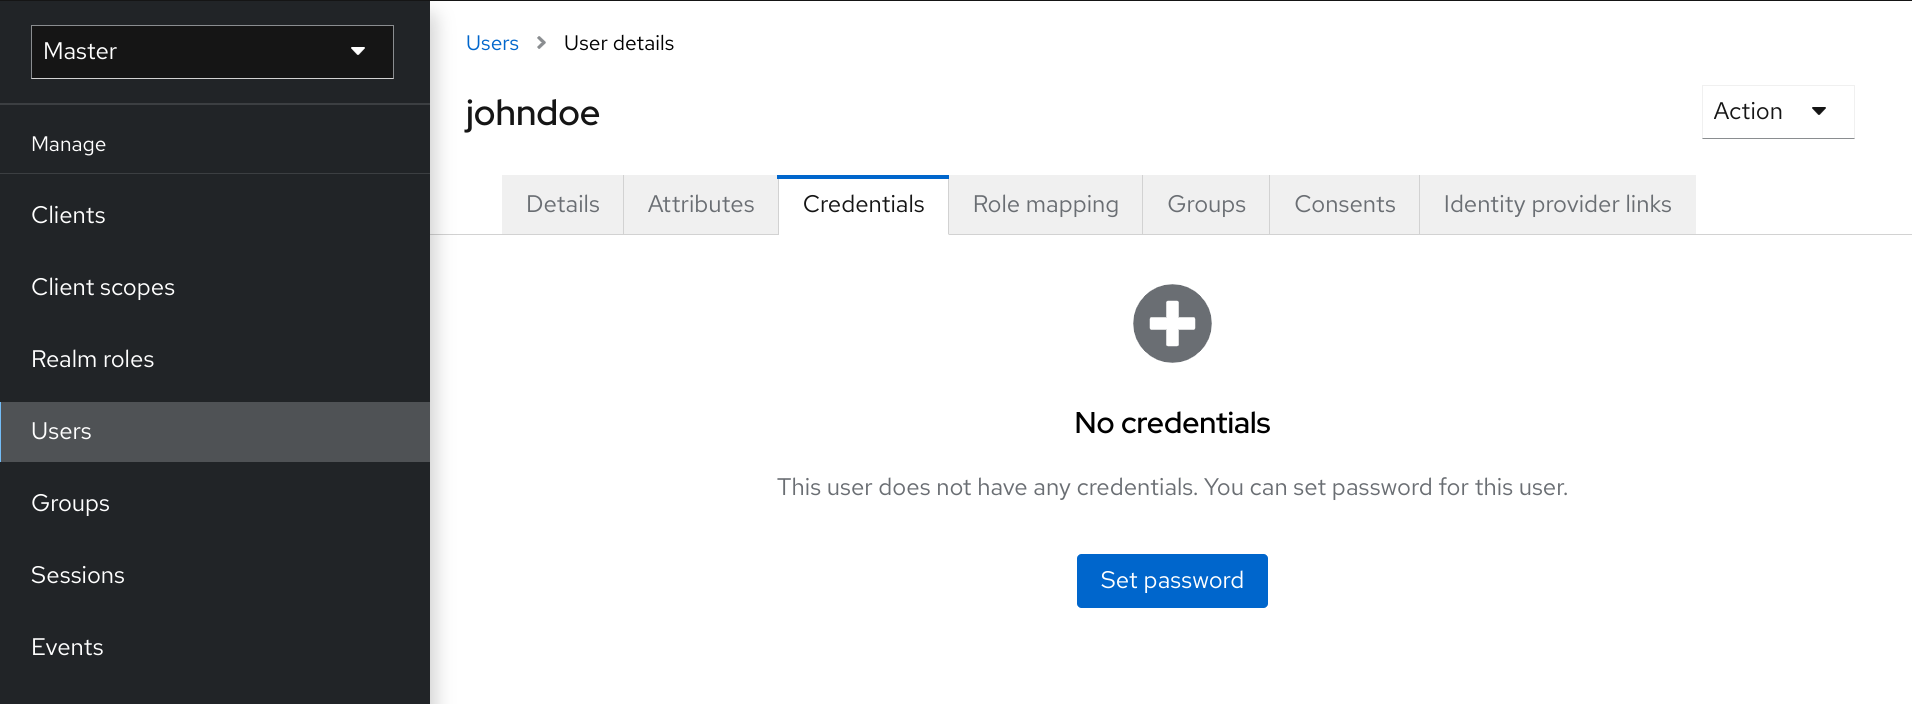
5.2.1. Setting a password for a user
If a user does not have a password, or if the password has been deleted, the Set Password section is displayed.
If a user already has a password, it can be reset in the Reset Password section.
Procedure
- Click Users in the menu. The Users page is displayed.
- Select a user.
- Click the Credentials tab.
- Type a new password in the Set Password section.
Click Set Password.
NoteIf Temporary is ON, the user must change the password at the first login. To allow users to keep the password supplied, set Temporary to OFF. The user must click Set Password to change the password.
5.2.2. Requesting a user reset a password
You can also request that the user reset the password.
Procedure
- Click Users in the menu. The Users page is displayed.
- Select a user.
- Click the Credentials tab.
- Click Credential Reset.
- Select Update Password from the list.
- Click Send Email. The sent email contains a link that directs the user to the Update Password window.
- Optionally, you can set the validity of the email link. This is set to the default preset in the Tokens tab in Realm Settings.
5.2.3. Creating an OTP
If OTP is conditional in your realm, the user must navigate to Red Hat build of Keycloak Account Console to reconfigure a new OTP generator. If OTP is required, then the user must reconfigure a new OTP generator when logging in.
Alternatively, you can send an email to the user that requests the user reset the OTP generator. The following procedure also applies if the user already has an OTP credential.
Prerequisite
- You are logged in to the appropriate realm.
Procedure
- Click Users in the main menu. The Users page is displayed.
- Select a user.
- Click the Credentials tab.
- Click Credential Reset.
- Set Reset Actions to Configure OTP.
- Click Send Email. The sent email contains a link that directs the user to the OTP setup page.
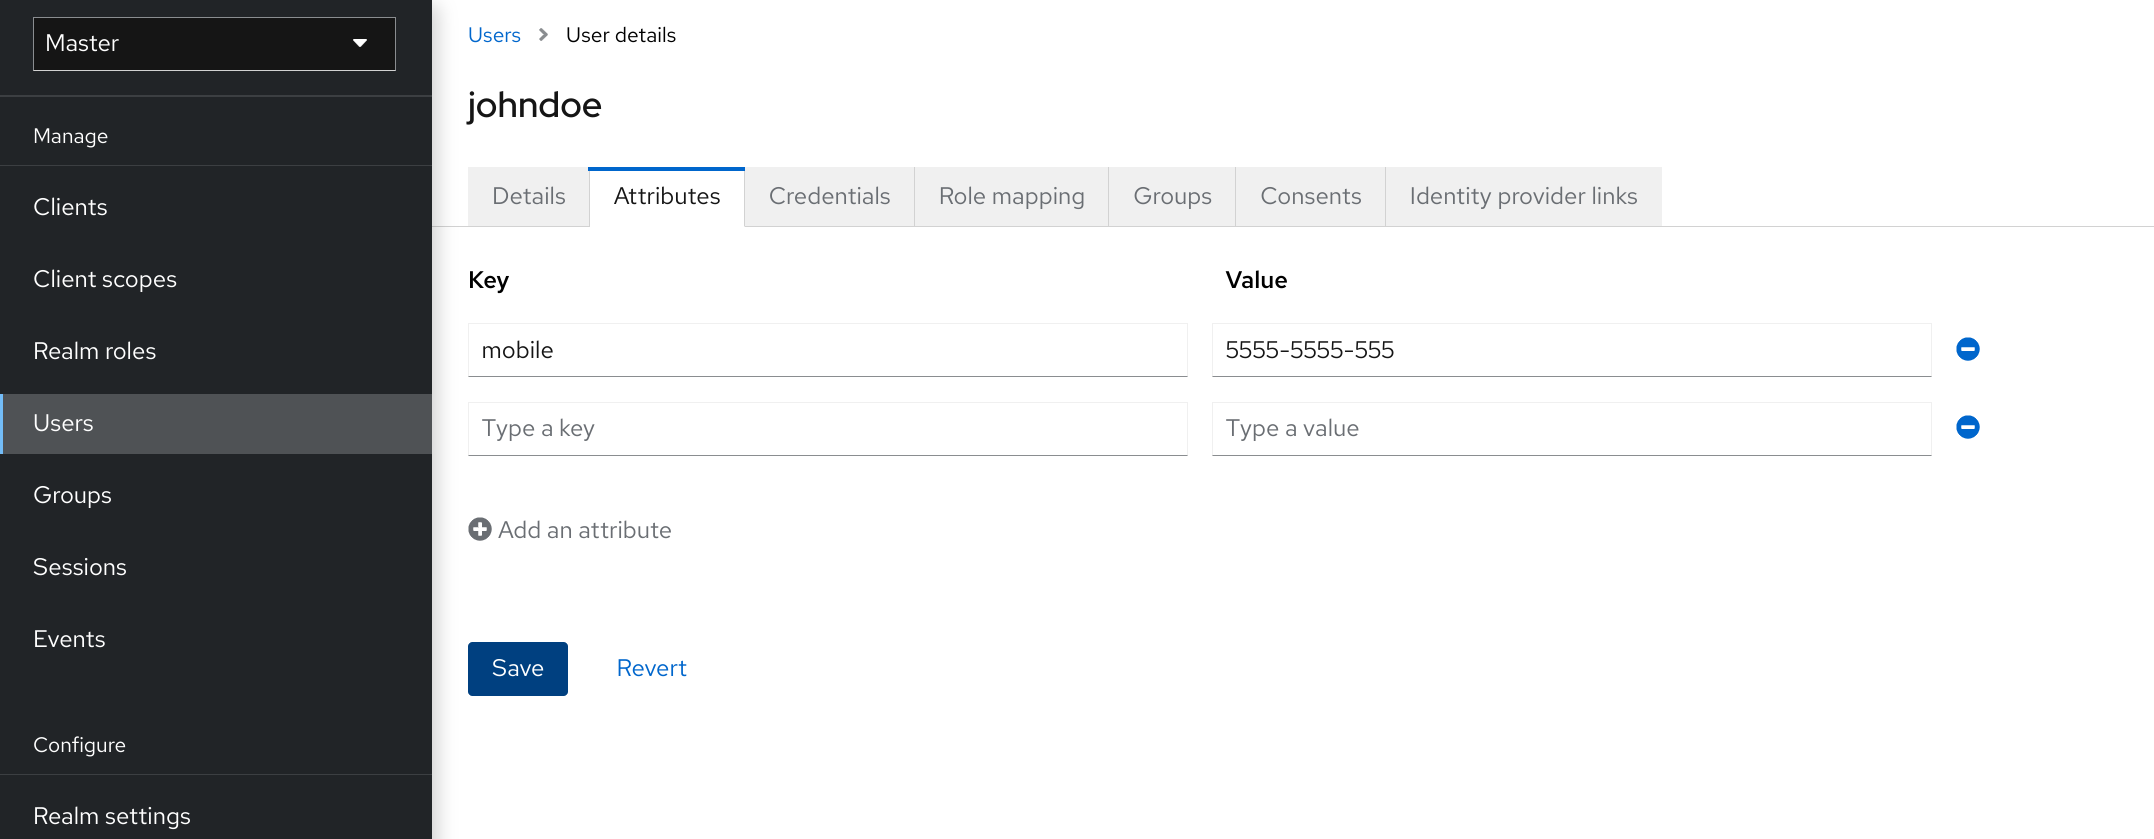
5.3. Configuring user attributes
User attributes provide a customized experience for each user. You can create a personalized identity for each user in the console by configuring user attributes.
Users
Prerequisite
- You are in the realm where the user exists.
Procedure
- Click Users in the menu.
- Select a user to manage.
- Click the Attributes tab.
- Enter the attribute name in the Key field.
- Enter the attribute value in the Value field.
- Click Save.
Some read-only attributes are not supposed to be updated by the administrators. This includes attributes that are read-only by design like for example LDAP_ID, which is filled automatically by the LDAP provider. Some other attributes should be read-only for typical user administrators due to security reasons. See the details in the Mitigating security threats chapter.
5.4. Allowing users to self-register
You can use Red Hat build of Keycloak as a third-party authorization server to manage application users, including users who self-register. If you enable self-registration, the login page displays a registration link so that user can create an account.
Registration link
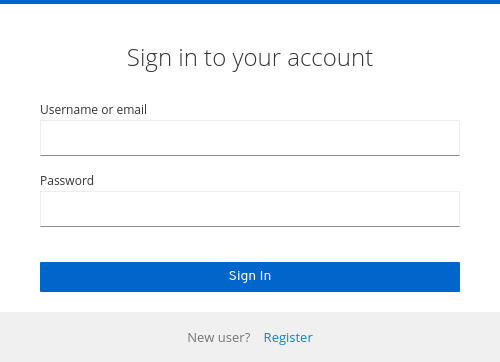
A user must add profile information to the registration form to complete registration. The registration form can be customized by removing or adding the fields that must be completed by a user.
Clarification on identity brokering and admin API
Even when self-registrations is disabled, new users can be still added to Red Hat build of Keycloak by either:
- Administrator can add new users with the usage of admin console (or admin REST API)
- When identity brokering is enabled, new users authenticated by identity provider may be automatically added/registered in Red Hat build of Keycloak storage. See the First login flow section in the Identity Brokering chapter for more information.
Also users coming from the 3rd-party user storage (for example LDAP) are automatically available in Red Hat build of Keycloak when the particular user storage is enabled
5.4.1. Enabling user registration
Enable users to self-register.
Procedure
- Click Realm Settings in the main menu.
- Click the Login tab.
- Toggle User Registration to ON.
After you enable this setting, a Register link displays on the login page of the Admin Console.
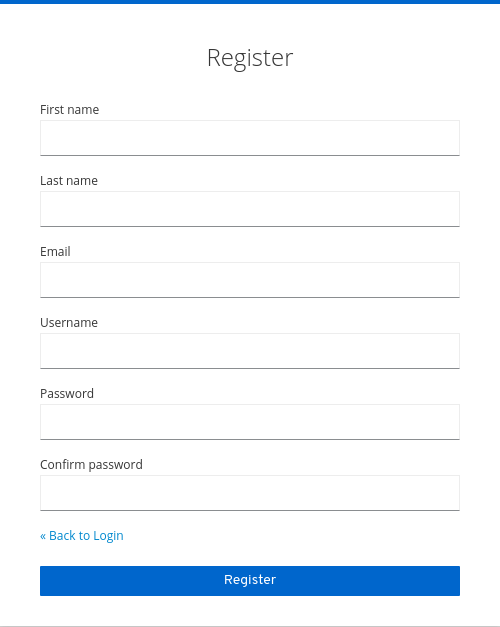
5.4.2. Registering as a new user
As a new user, you must complete a registration form to log in for the first time. You add profile information and a password to register.
Registration form
Prerequisite
- User registration is enabled.
Procedure
- Click the Register link on the login page. The registration page is displayed.
- Enter the user profile information.
- Enter the new password.
- Click Register.
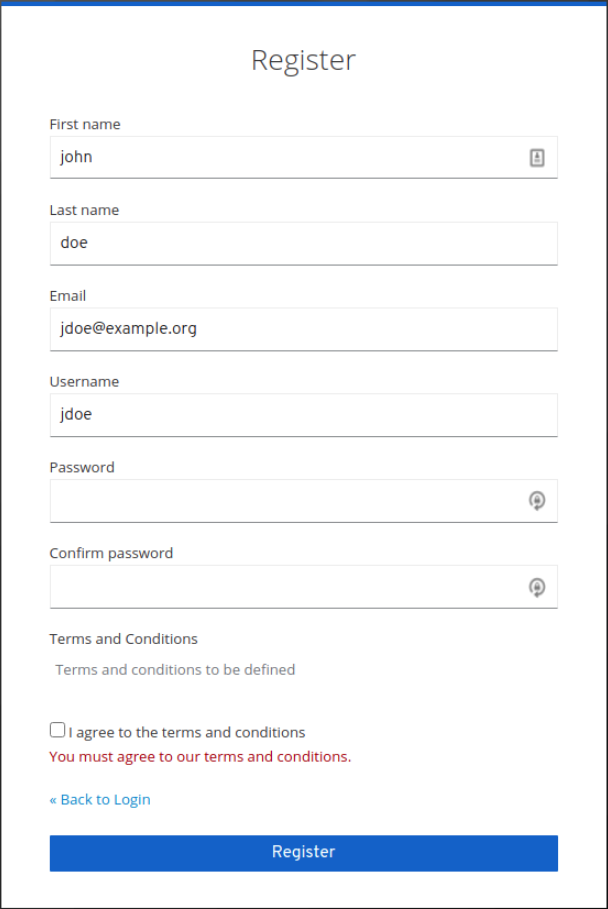
5.4.3. Requiring user to agree to terms and conditions during registration
For a user to register, you can require agreement to your terms and conditions.
Registration form with required terms and conditions agreement
Prerequisite
- User registration is enabled.
- Terms and conditions required action is enabled.
Procedure
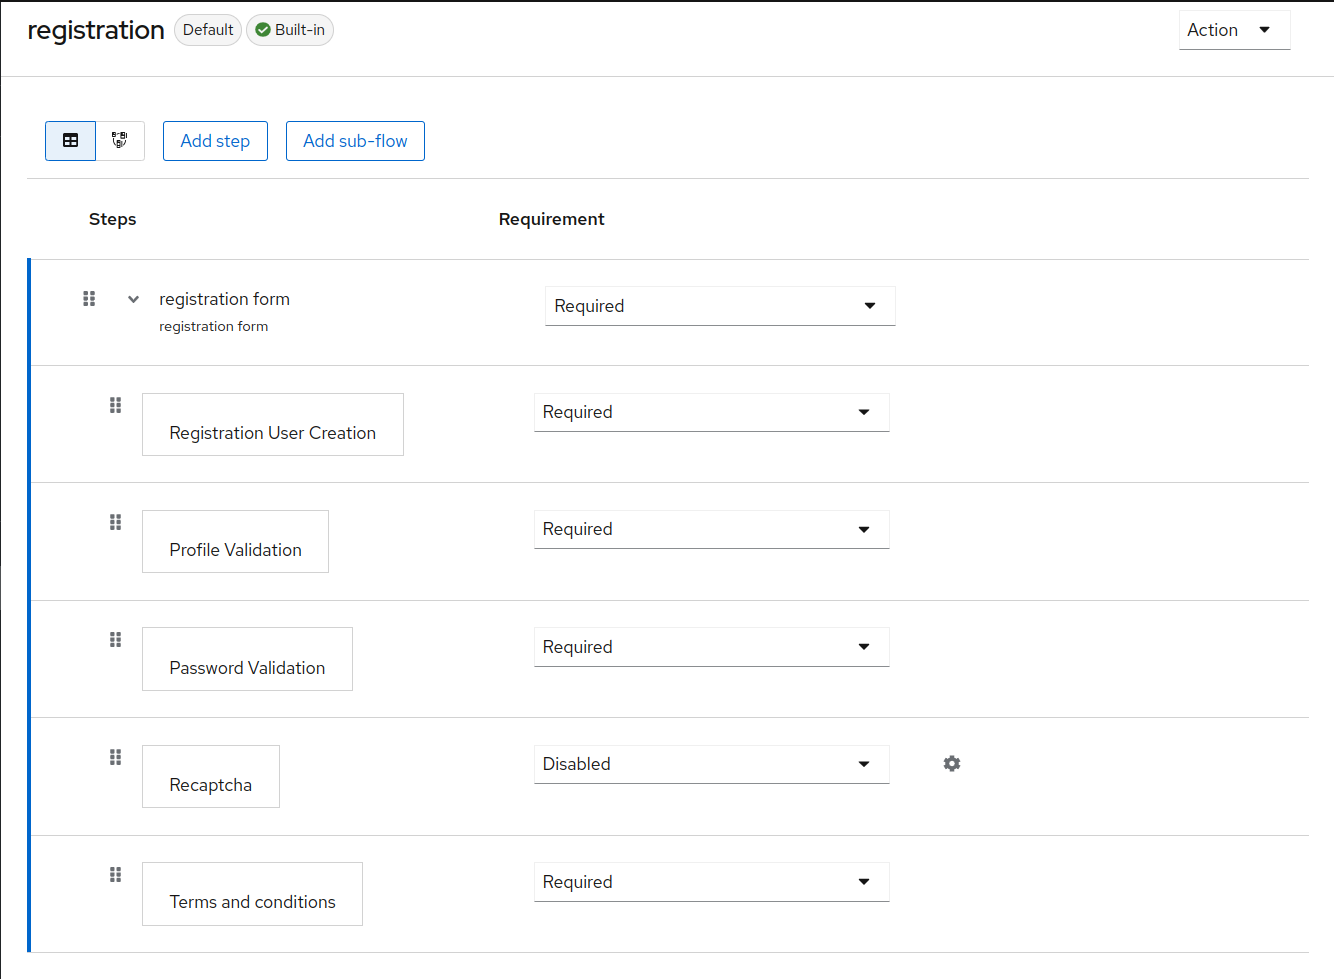
- Click Authentication in the menu. Click the Flows tab.
- Click the registration flow.
Select Required on the Terms and Conditions row.
Make the terms and conditions agreement required at registration
5.5. Defining actions required at login
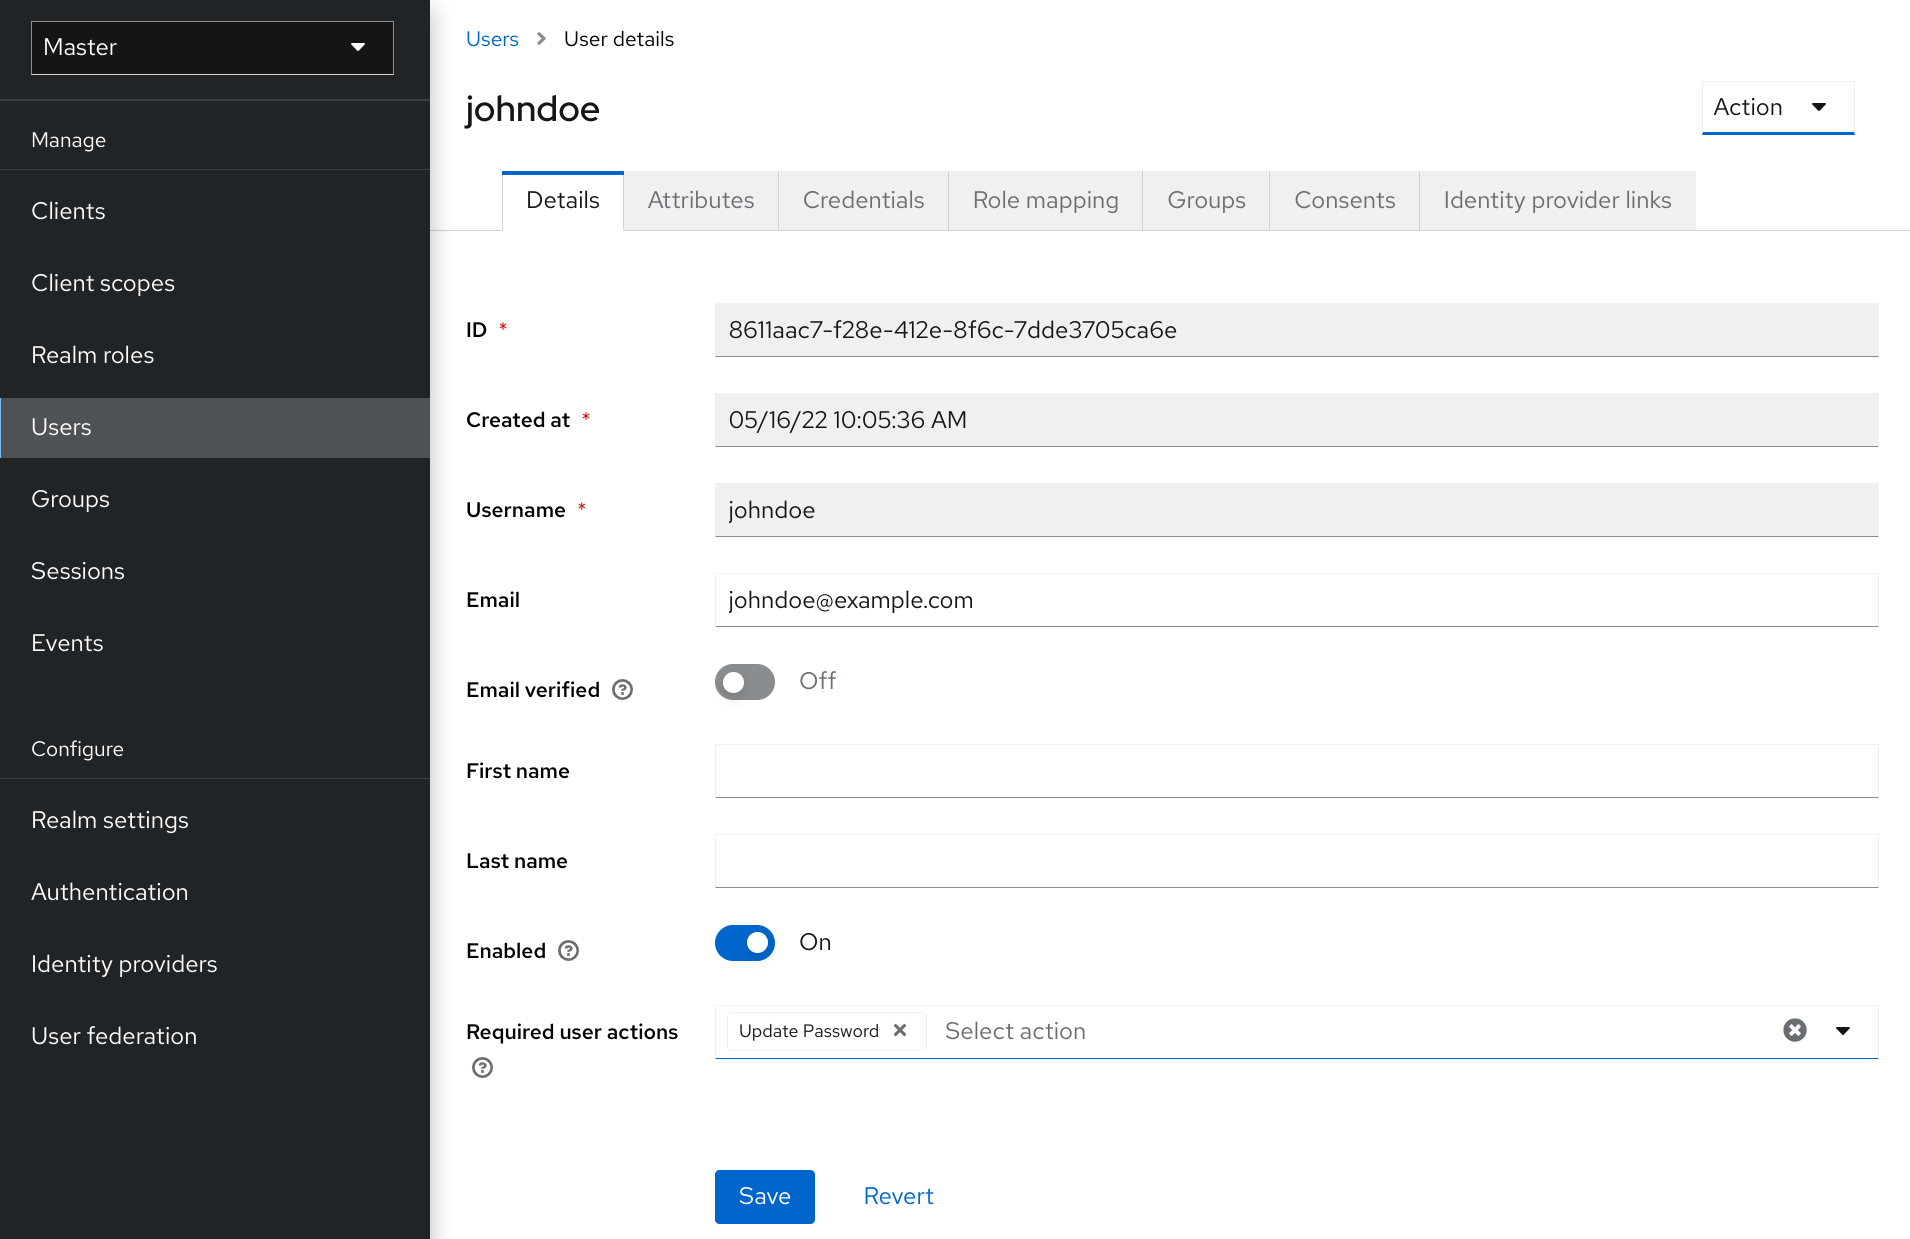
You can set the actions that a user must perform at the first login. These actions are required after the user provides credentials. After the first login, these actions are no longer required. You add required actions on the Details tab of that user.
Some required actions are automatically triggered for the user during login even if they are not explicitly added to this user by the administrator. For example Update password action can be triggered if Password policies are configured in a way that the user password needs to be changed every X days. Or verify profile action can require the user to update the User profile as long as some user attributes do not match the requirements according to the user profile configuration.
The following are examples of required action types:
- Update Password
- The user must change their password.
- Configure OTP
- The user must configure a one-time password generator on their mobile device using either the Free OTP or Google Authenticator application.
- Verify Email
- The user must verify their email account. An email will be sent to the user with a validation link that they must click. Once this workflow is successfully completed, the user will be allowed to log in.
- Update Profile
- The user must update profile information, such as name, address, email, and phone number.
5.5.1. Setting required actions for one user
You can set the actions that are required for any user.
Procedure
- Click Users in the menu.
- Select a user from the list.
Navigate to the Required User Actions list.

- Select all the actions you want to add to the account.
- Click the X next to the action name to remove it.
- Click Save after you select which actions to add.
5.5.2. Setting required actions for all users
You can specify what actions are required before the first login of all new users. The requirements apply to a user created by the Add User button on the Users page or the Register link on the login page.
Procedure
- Click Authentication in the menu.
- Click the Required Actions tab.
- Click the checkbox in the Set as default action column for one or more required actions. When a new user logs in for the first time, the selected actions must be executed.
5.5.3. Enabling terms and conditions as a required action
You can enable a required action that new users must accept the terms and conditions before logging in to Red Hat build of Keycloak for the first time.
Procedure
- Click Authentication in the menu.
- Click the Required Actions tab.
- Enable the Terms and Conditions action.
-
Edit the
terms.ftlfile in the base login theme.
Additional resources
- For more information on extending and creating themes, see the Server Developer Guide.
5.6. Application initiated actions
Application initiated actions (AIA) allow client applications to request a user to perform an action on the Red Hat build of Keycloak side. Usually, when an OIDC client application wants a user to log in, it redirects that user to the login URL as described in the OIDC section. After login, the user is redirected back to the client application. The user performs the actions that were required by the administrator as described in the previous section and then is immediately redirected back to the application. However, AIA allows the client application to request some required actions from the user during login. This can be done even if the user is already authenticated on the client and has an active SSO session. It is triggered by adding the kc_action parameter to the OIDC login URL with the value containing the requested action. For instance kc_action=UPDATE_PASSWORD parameter.
The kc_action parameter is a Red Hat build of Keycloak proprietary mechanism unsupported by the OIDC specification.
Application initiated actions are supported only for OIDC clients.
So if AIA is used, an example flow is similar to the following:
-
A client application redirects the user to the OIDC login URL with the additional parameter such as
kc_action=UPDATE_PASSWORD -
There is a
browserflow always triggered as described in the Authentication flows section. If the user was not authenticated, that user needs to authenticate as during normal login. In case the user was already authenticated, that user might be automatically re-authenticated by an SSO cookie without needing to actively re-authenticate and supply the credentials again. In this case, that user will be directly redirected to the screen with the particular action (update password in this case). However, in some cases, active re-authentication is required even if the user has an SSO cookie (See below for the details). -
The screen with particular action (in this case
update password) is displayed to the user, so that user needs to perform a particular action - Then user is redirected back to the client application
Note that AIA are used by the Red Hat build of Keycloak Account Console to request update password or to reset other credentials such as OTP or WebAuthn.
Even if the parameter kc_action was used, it is not sufficient to assume that the user always performs the action. For example, a user could have manually deleted the kc_action parameter from the browser URL. Therefore, no guarantee exists that the user has an OTP for the account after the client requested kc_action=CONFIGURE_TOTP. If you want to verify that the user configured two-factor authenticator, the client application may need to check it was configured. For instance by checking the claims like acr in the tokens.
5.6.1. Re-authentication during AIA
In case the user is already authenticated due to an active SSO session, that user usually does not need to actively re-authenticate. However, if that user actively authenticated longer than five minutes ago, the client can still request re-authentication when some AIA is requested. Exceptions exist from this guideline as follows:
-
The action
delete_accountwill always require the user to actively re-authenticate -
If you want to use a shorter re-authentication, you can still use a parameter query parameter such as
max_agewith the specified shorter value or eventuallyprompt=login, which will always require user to actively re-authenticate as described in the OIDC specification. Note that usingmax_agefor a longer value than the default five minutes is not supported. Themax_agecan be currently used only to make the value shorter than the default five minutes.
5.6.2. Available actions
To see all available actions, log in to the Admin Console and go to the top right top corner to click Realm info → tab Provider info → Find provider required-action . But note that this can be further restricted based on what actions are enabled for your realm in the Required actions tab.
5.7. Searching for a user
Search for a user to view detailed information about the user, such as the user’s groups and roles.
Prerequisite
- You are in the realm where the user exists.
Procedure
- Click Users in the main menu. This Users page is displayed.
Type the full name, last name, first name, or email address of the user you want to search for in the search box. The search returns all users that match your criteria.
The criteria used to match users depends on the syntax used on the search box:
-
"somevalue"→ performs exact search of the string"somevalue"; -
*somevalue*→ performs infix search, akin to aLIKE '%somevalue%'DB query; somevalue*orsomevalue→ performs prefix search, akin to aLIKE 'somevalue%'DB query.NoteSearches performed in the Users page encompasses searching both Red Hat build of Keycloak’s database and configured user federated backends, such as LDAP. Users found in federated backends will be imported into Red Hat build of Keycloak’s database if they don’t already exist there.
Additional resources
- For more information on user federation, see User Federation.
-
5.8. Deleting a user
You can delete a user, who no longer needs access to applications. If a user is deleted, the user profile and data is also deleted.
Procedure
- Click Users in the menu. The Users page is displayed.
Click View all users to find a user to delete.
NoteAlternatively, you can use the search bar to find a user.
- Click Delete from the action menu next to the user you want to remove and confirm deletion.
5.9. Enabling account deletion by users
End users and applications can delete their accounts in the Account Console if you enable this capability in the Admin Console. Once you enable this capability, you can give that capability to specific users.
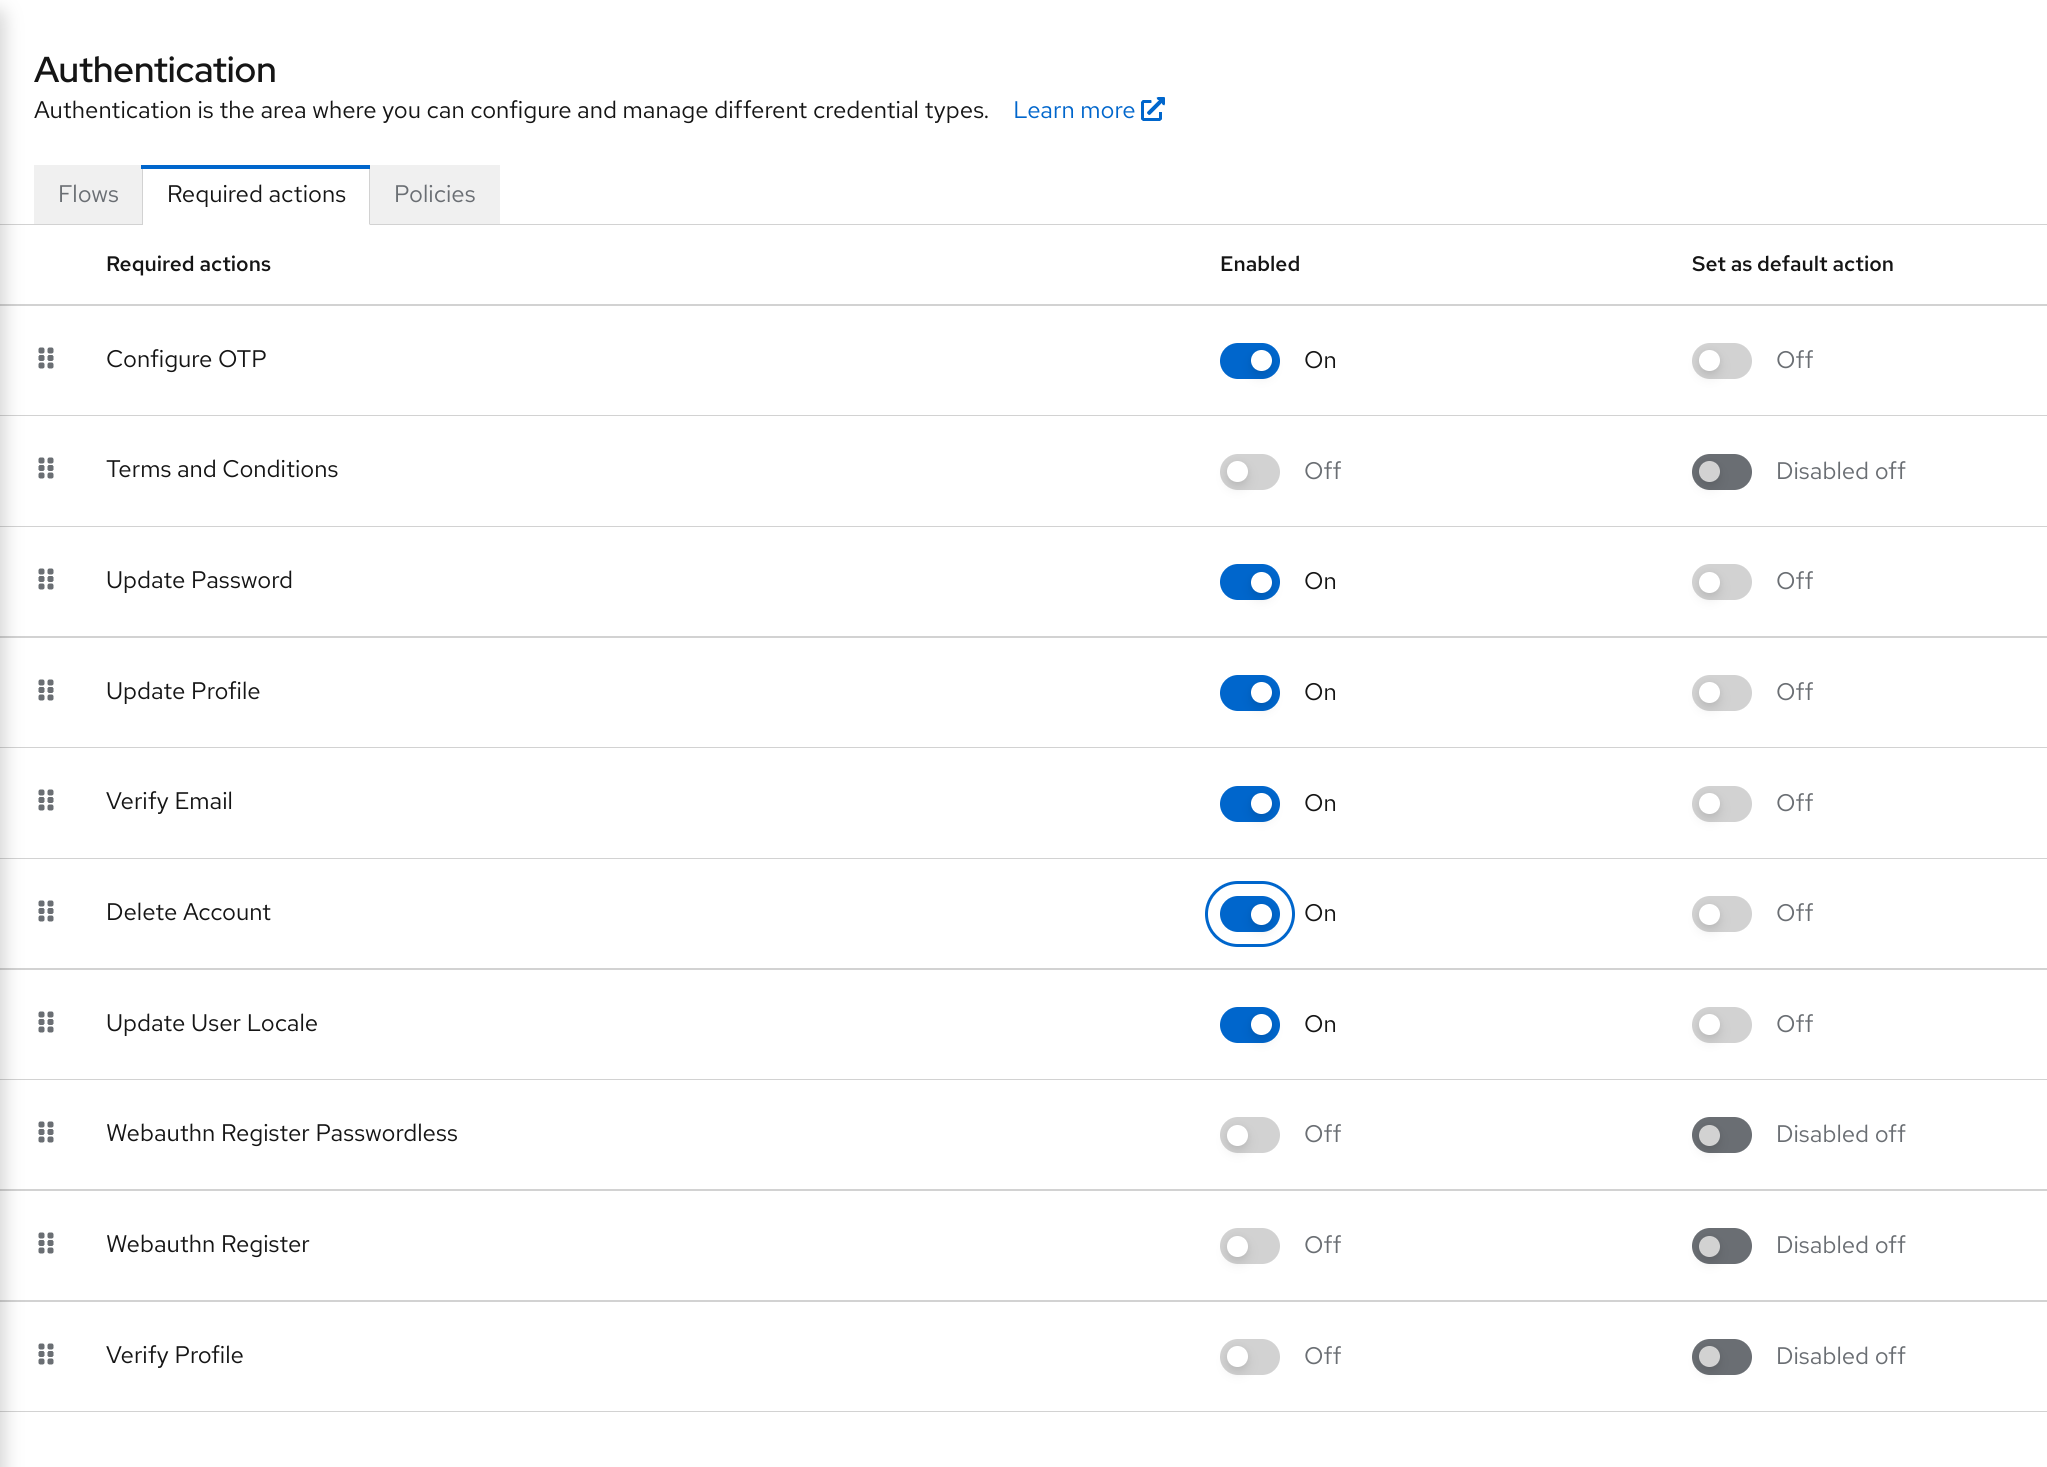
5.9.1. Enabling the Delete Account Capability
You enable this capability on the Required Actions tab.
Procedure
- Click Authentication in the menu.
- Click the Required Actions tab.
Select Enabled on the Delete Account row.
Delete account on required actions tab
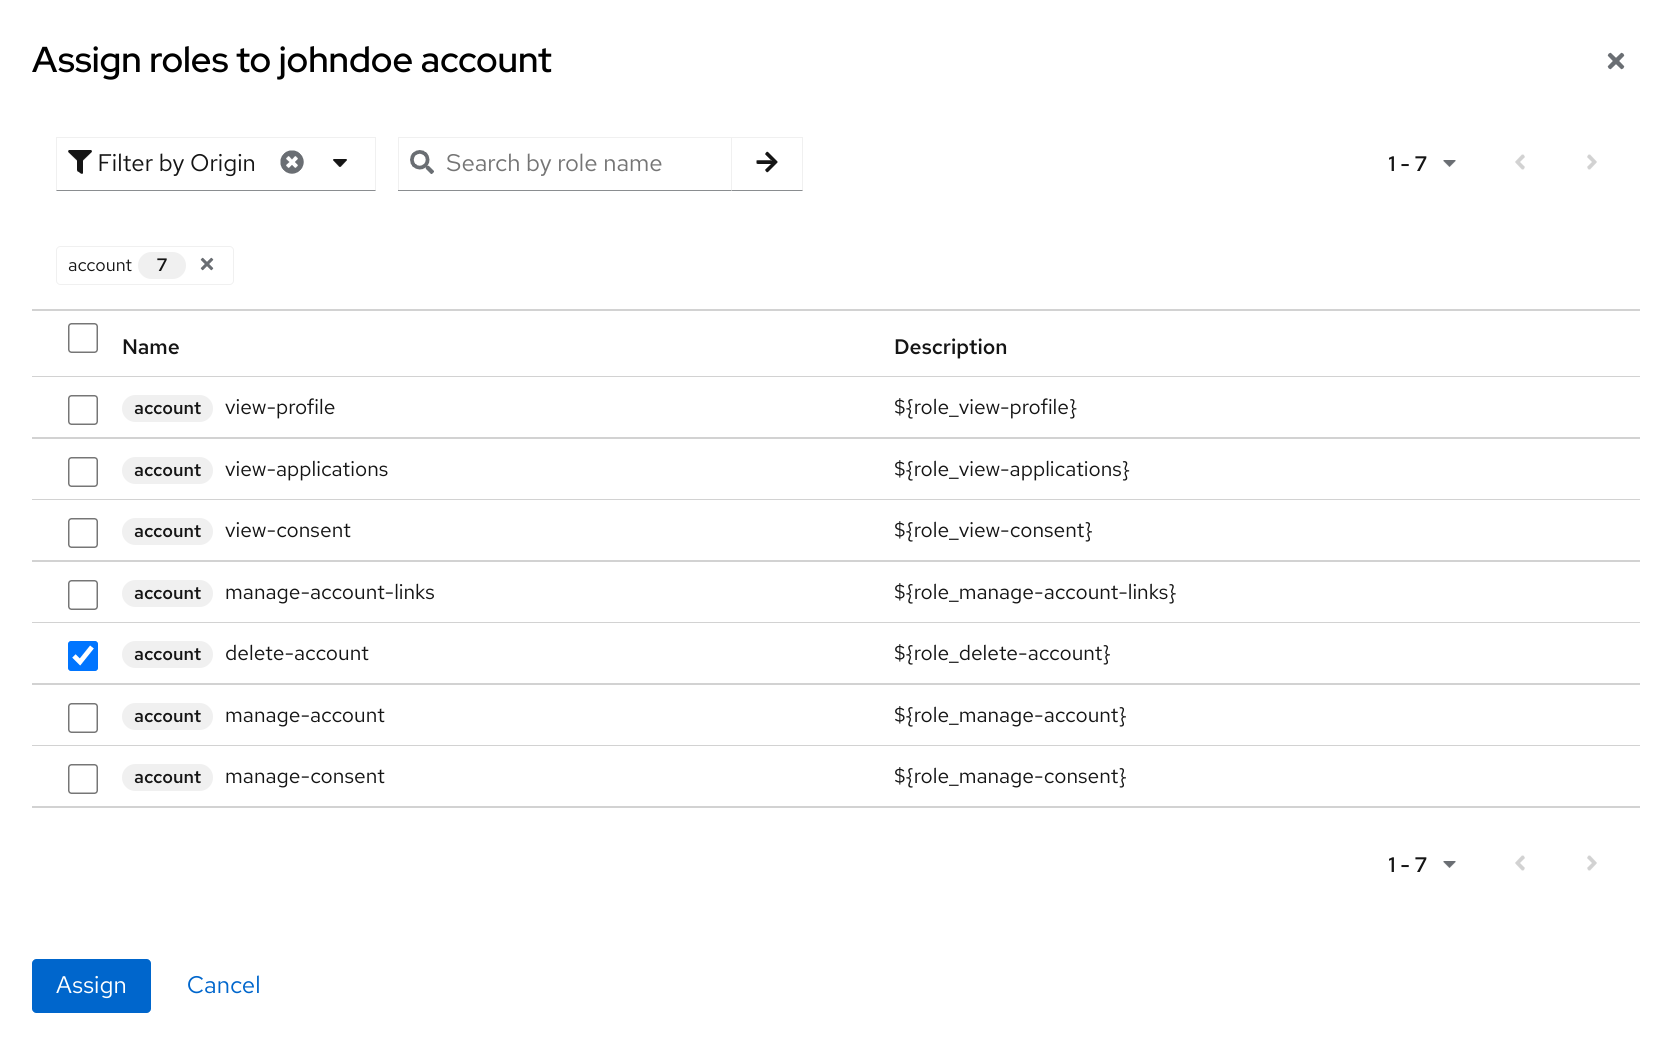
5.9.2. Giving a user the delete-account role
You can give specific users a role that allows account deletion.
Procedure
- Click Users in the menu.
- Select a user.
- Click the Role Mappings tab.
- Click the Assign role button.
- Click account delete-account.
Click Assign.
Delete-account role
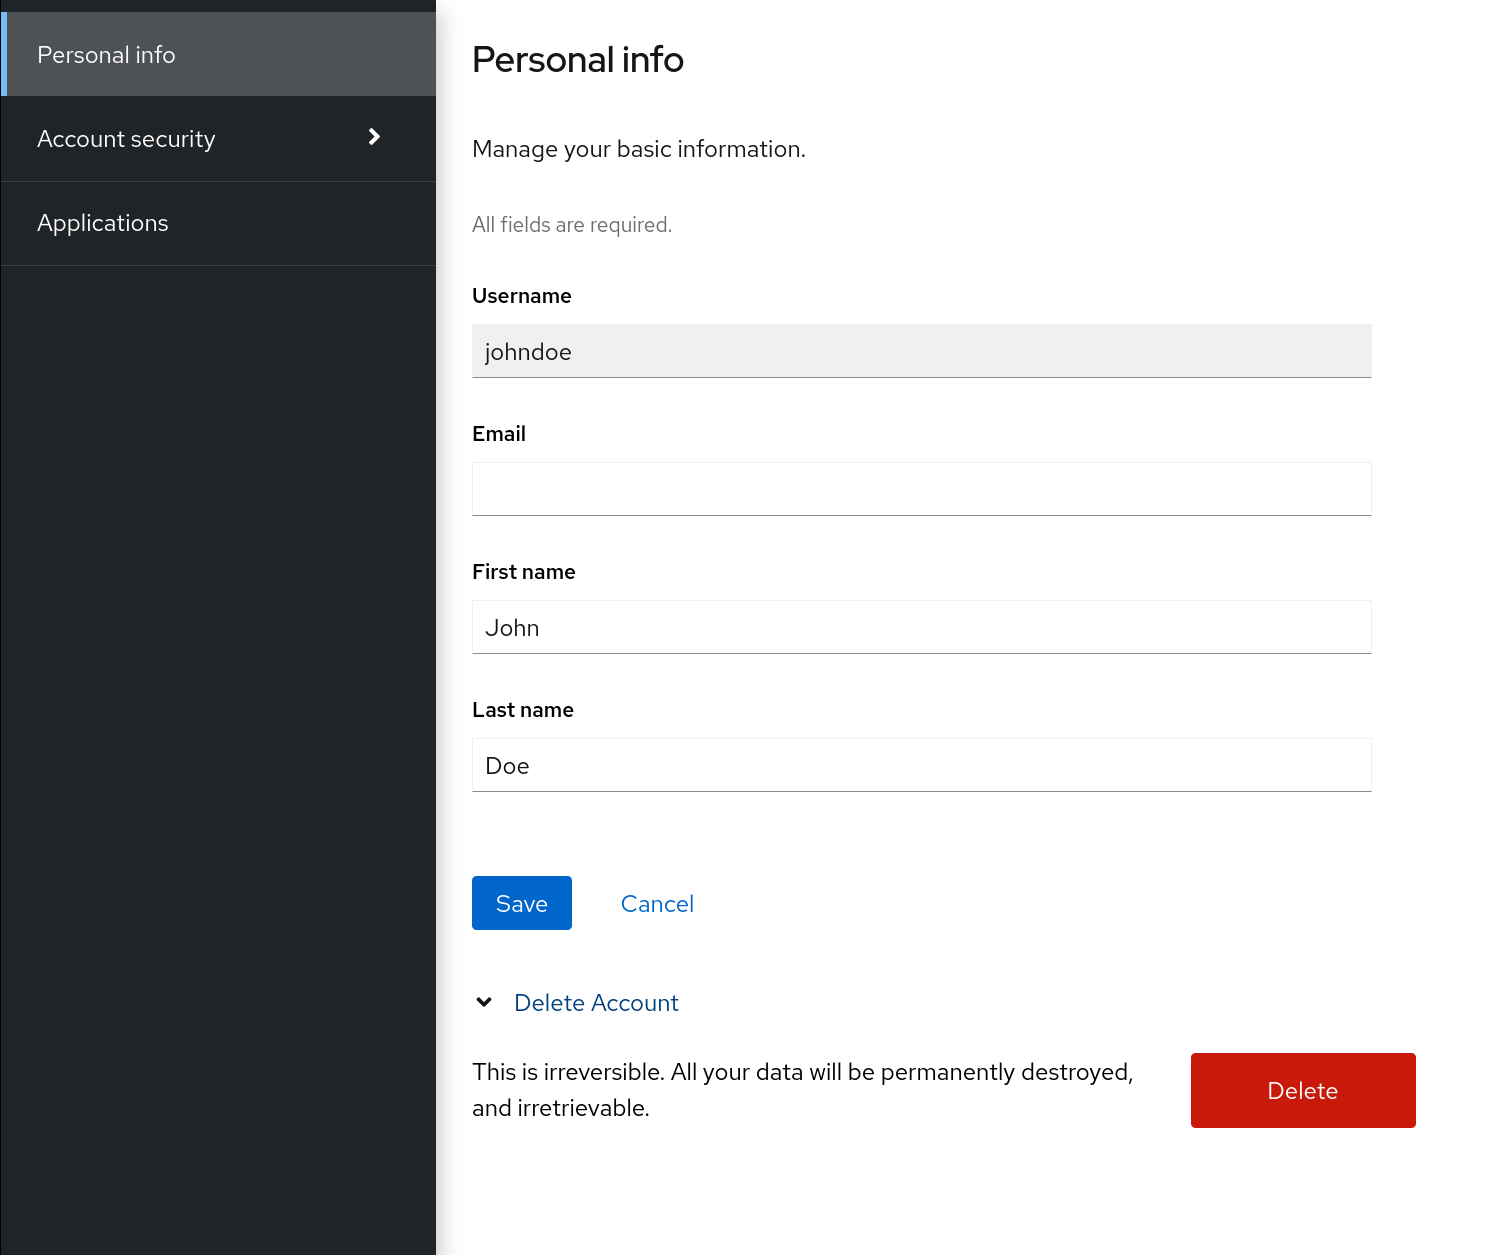
5.9.3. Deleting your account
Once you have the delete-account role, you can delete your own account.
- Log into the Account Console.
At the bottom of the Personal Info page, click Delete Account.
Delete account page
Enter your credentials and confirm the deletion.
Delete confirmation
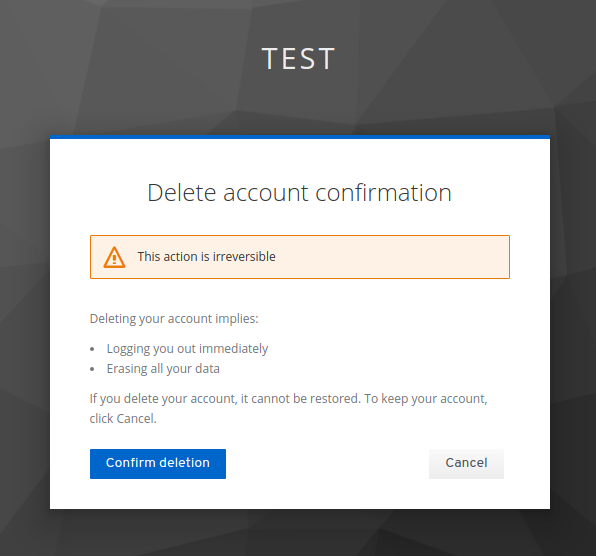 Note
NoteThis action is irreversible. All your data in Red Hat build of Keycloak will be removed.
5.10. Impersonating a user
An administrator with the appropriate permissions can impersonate a user. For example, if a user experiences a bug in an application, an administrator can impersonate the user to investigate or duplicate the issue.
Any user with the impersonation role in the realm can impersonate a user.
Procedure
- Click Users in the menu.
- Click a user to impersonate.
From the Actions list, select Impersonate.
- If the administrator and the user are in the same realm, then the administrator will be logged out and automatically logged in as the user being impersonated.
- If the administrator and user are in different realms, the administrator will remain logged in, and additionally will be logged in as the user in that user’s realm.
In both instances, the User Account Management page of the impersonated user is displayed.
Additional resources
- For more information on assigning administration permissions, see the Admin Console Access Control chapter.
5.11. Enabling reCAPTCHA
To safeguard registration against bots, Red Hat build of Keycloak has integration with Google reCAPTCHA.
Once reCAPTCHA is enabled, you can edit register.ftl in your login theme to configure the placement and styling of the reCAPTCHA button on the registration page.
Procedure
Enter the following URL in a browser:
https://developers.google.com/recaptcha/Create an API key to get your reCAPTCHA site key and secret. Note the reCAPTCHA site key and secret for future use in this procedure.
NoteThe localhost works by default. You do not have to specify a domain.
- Navigate to the Red Hat build of Keycloak admin console.
- Click Authentication in the menu.
- Click the Flows tab.
- Select Registration from the list.
- Set the reCAPTCHA requirement to Required. This enables reCAPTCHA.
- Click the gear icon ⚙️ on the reCAPTCHA row.
Click the Config link.
Recaptcha config page
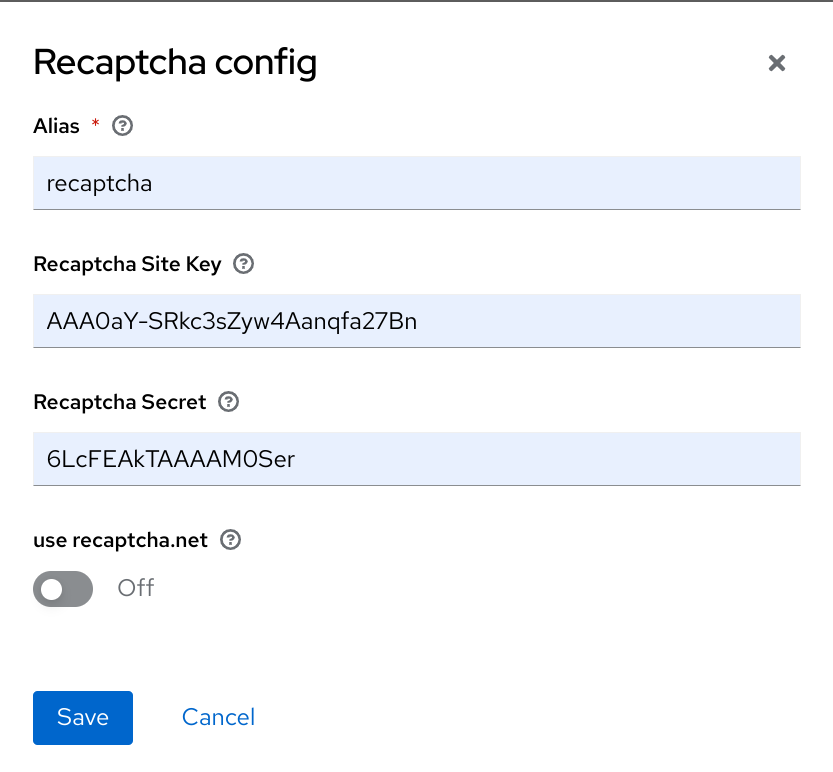
- Enter the Recaptcha Site Key generated from the Google reCAPTCHA website.
- Enter the Recaptcha Secret generated from the Google reCAPTCHA website.
Authorize Google to use the registration page as an iframe.
NoteIn Red Hat build of Keycloak, websites cannot include a login page dialog in an iframe. This restriction is to prevent clickjacking attacks. You need to change the default HTTP response headers that is set in Red Hat build of Keycloak.
- Click Realm Settings in the menu.
- Click the Security Defenses tab.
-
Enter
https://www.google.comin the field for the X-Frame-Options header. -
Enter
https://www.google.comin the field for the Content-Security-Policy header.
5.12. Defining a user profile
In Red Hat build of Keycloak a user is associated with a set of attributes. These attributes are used to better describe and identify users within Red Hat build of Keycloak as well as to pass over additional information about them to applications.
A user profile defines a well-defined schema for representing user attributes and how they are managed within a realm. By providing a consistent view over user information, it allows administrators to control the different aspects on how attributes are managed as well as to make it much easier to extend Red Hat build of Keycloak to support additional attributes.
Among other capabilities, user profile enables administrators to:
- Define a schema for user attributes
- Define whether an attribute is required based on contextual information (e.g.: if required only for users, or admins, or both, or depending on the scope being requested.)
- Define specific permissions for viewing and editing user attributes, making possible to adhere to strong privacy requirements where some attributes can not be seen or be changed by third-parties (including administrators)
- Dynamically enforce user profile compliance so that user information is always updated and in compliance with the metadata and rules associated with attributes
- Define validation rules on a per-attribute basis by leveraging the built-in validators or writing custom ones
- Dynamically render forms that users interact with like registration, update profile, brokering, and personal information in the account console, according to the attribute definitions and without any need to manually change themes.
The User Profile capabilities are backed by the User Profile SPI. By default, these capabilities are disabled and realms are configured to use a default configuration that keeps backward compatibility with the legacy behavior.
The legacy behavior is about keeping the default constraints used by Red Hat build of Keycloak when managing users root attributes such as username, email, first and last name, without any restriction on how custom attributes are managed. Regarding user flows such as registration, profile update, brokering, and managing accounts through the account console, users are restricted to use the attributes aforementioned with the possibility to change theme templates to support additional attributes.
If you are already using Red Hat build of Keycloak, the legacy behavior is what you have been using so far.
Differently than the legacy behavior, the declarative provider gives you a lot more flexibility to define the user profile configuration to a realm through the administration console and a well-defined JSON schema.
In the next sections, we’ll be looking at how to use the declarative provider to define your own user profile configuration.
In the future, the legacy behavior will no longer be supported in Red Hat build of Keycloak. Ideally, you should start looking at the new capabilities provided by the User Profile and migrate your realms accordingly.
5.12.1. Enabling the User Profile
Declarative User Profile is Technology Preview and is not fully supported. This feature is disabled by default.
To enable start the server with --features=preview or --features=declarative-user-profile
In addition to enabling the declarative_user_profile feature, you should enable User Profile for a realm. To do that, click on the Realm Settings link on the left side menu and turn on the User Profile Enabled switch.
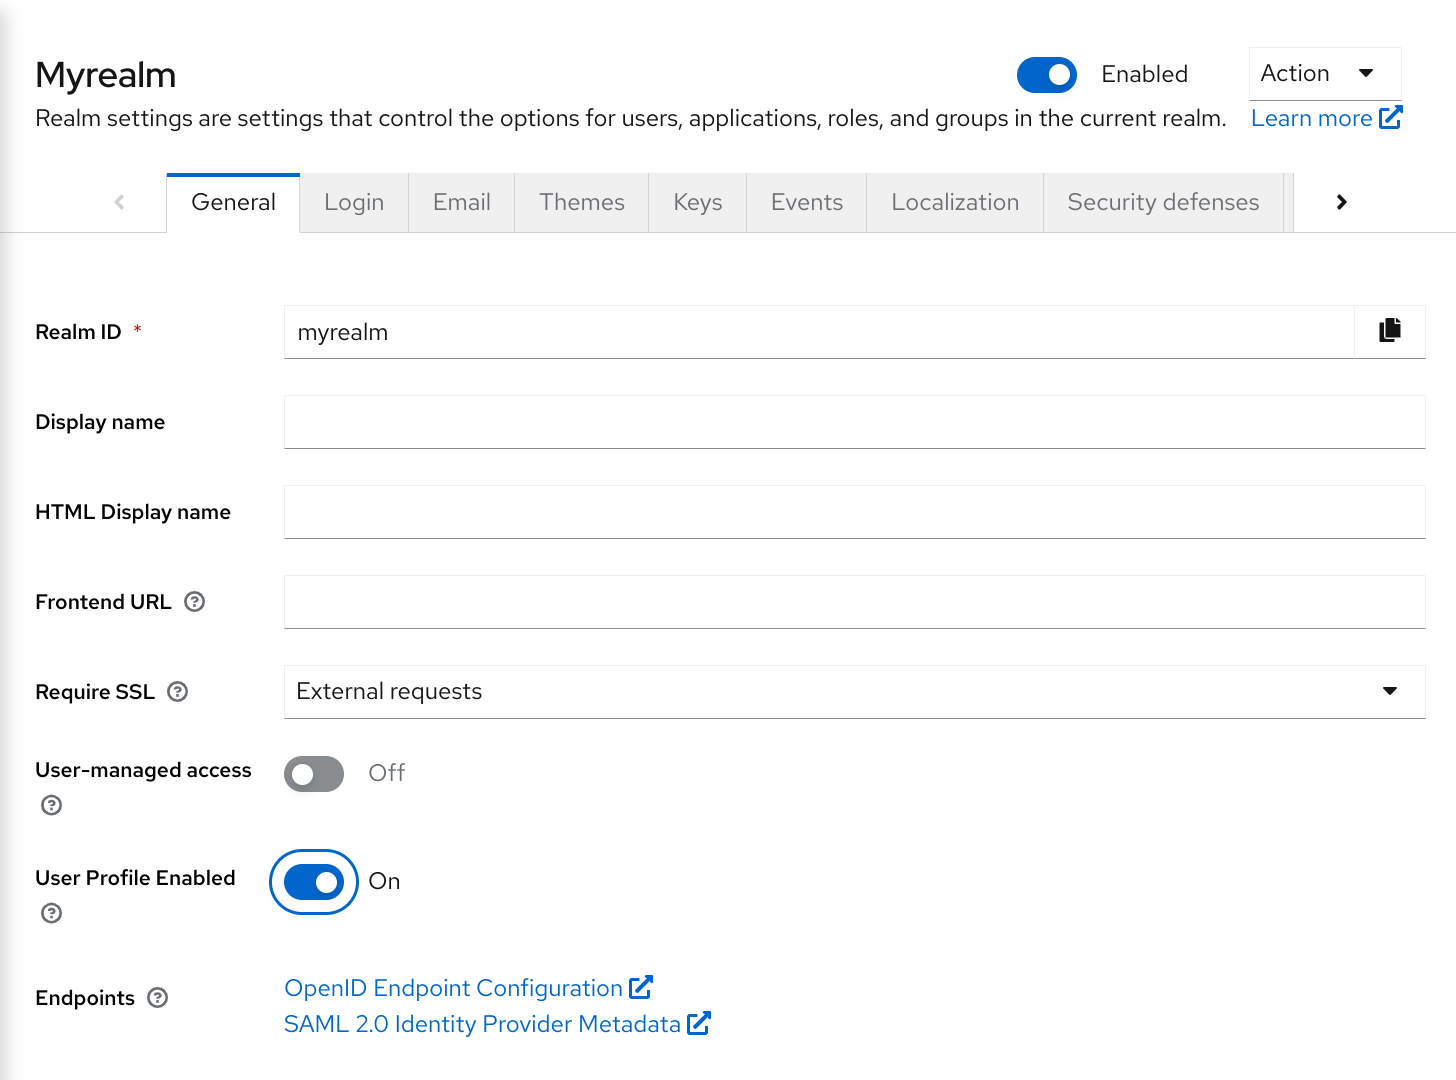
Once you enable it and click on the Save button, you can access the User Profile tab from where you can manage the configuration for user attributes.
By enabling the user profile for a realm, Red Hat build of Keycloak is going to impose additional constraints on how attributes are managed based on the user profile configuration. In summary, here is the list of what you should expect when the feature is enabled:
-
From an administration point of view, the
Attributestab at the user details page will only show the attributes defined in the user profile configuration. The conditions defined on a per-attribute basis will also be taken into account when managing attributes. - User facing forms like registration, update profile, brokering, and personal info in the account console, are going to be rendered dynamically based on the user profile configuration. For that, Red Hat build of Keycloak is going to rely on different templates to render these forms dynamically.
In the next topics, we’ll be exploring how to manage the user profile configuration and how it affects your realm.
5.12.2. Managing the User Profile
The user profile configuration is managed on a per-realm basis. For that, click on the Realm Settings link on the left side menu and then click on the User Profile tab.
User Profile Tab
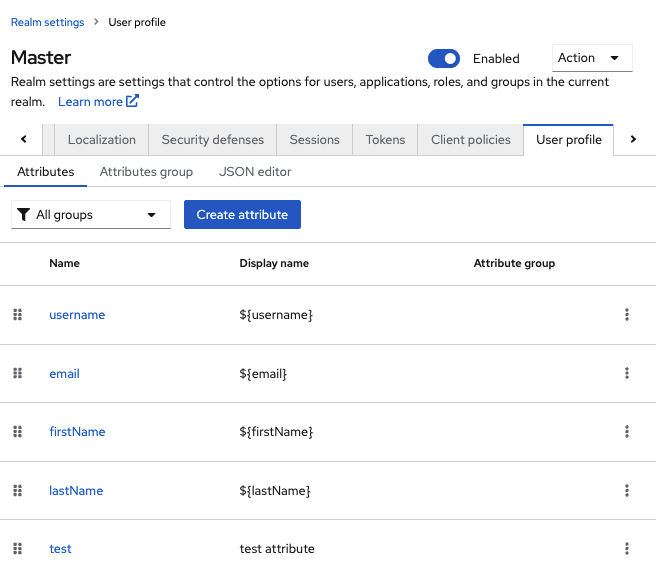
In the Attributes sub-tab you have a list of the attributes currently associated with the user profile. By default, the configuration is created based on the user root attributes and each attribute is configured with some defaults in terms of validation and permissioning.
In the Attribute Groups sub-tab you can manage attribute groups. An attribute group allows you to correlate attributes so that they are displayed together when rendering user facing forms.
For now, attribute groups are only used for rendering purposes but in the future they should also enable defining top-level configurations to the attributes they are linked to.
In the JSON Editor sub-tab you can view and edit the configuration using a well-defined JSON schema. Any change you make when at any other tab are reflected in the JSON configuration shown at this tab.
In the next section, you are going to learn how to manage the configuration from the Attributes sub-tab.
5.12.3. Managing Attributes
At the Attributes sub-tab you can create, edit, and delete the attributes associated with the user profile.
To define a new attribute and associate it with the user profile, click on the Create attribute button at the top the attribute listing.
Attribute Configuration
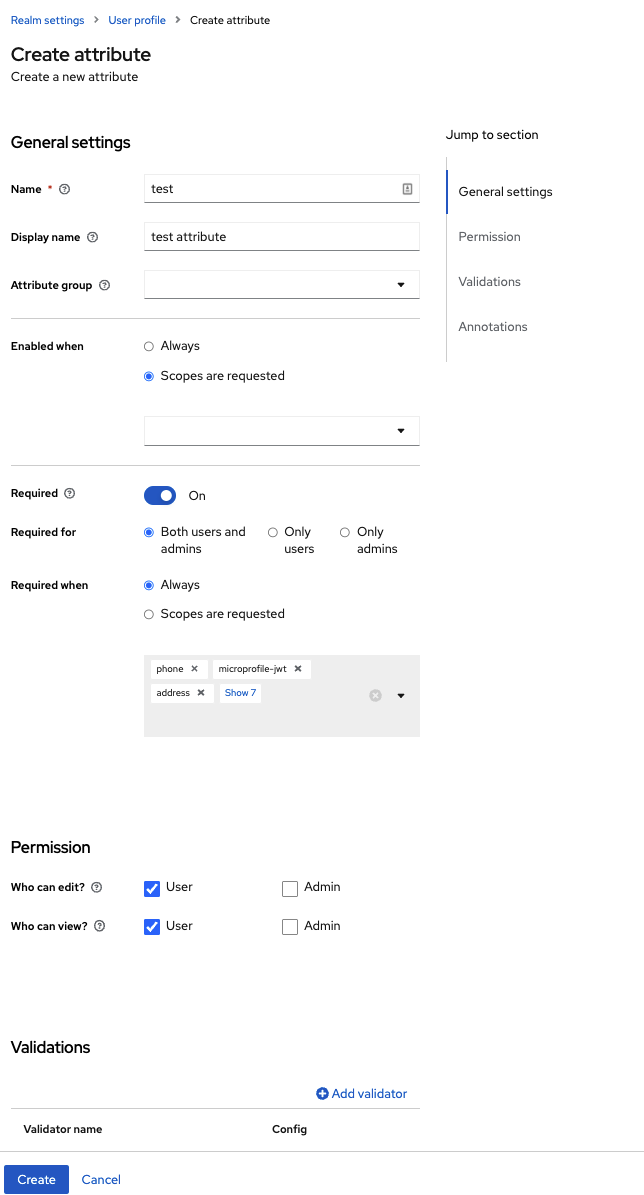
When configuring the attribute you can define the following settings:
- Name
- The name of the attribute.
- Display name
- A user-friendly name for the attribute, mainly used when rendering user-facing forms. It supports internationalization so that values can be loaded from message bundles.
- Attribute Group
- The attribute group to which the attribute belongs to, if any.
- Enabled when scope
- Allows you to define a list of scopes to dynamically enable an attribute. If not set, the attribute is always enabled and its constraints are always enforced when managing user profiles as well as when rendering user-facing forms. Otherwise, the same constraints only apply when any of the scopes in the list is requested by clients.
- Required
- Set the attribute as required. If not enabled, the attribute is optional. Otherwise, the attribute must be provided by users and administrators with the possibility to also make the attribute required only for users or administrators as well as based on the scopes requested by clients.
- Permission
- In this section, you can define read and write permissions for users and administrators.
- Validation
- In this section, you can define the validations that will be performed when managing the attribute value. Red Hat build of Keycloak provides a set of built-in validators you can choose from with the possibility to add your own.
- Annotation
- In this section, you can associate annotations to the attribute. Annotations are mainly useful to pass over additional metadata to frontends for rendering purposes.
5.12.3.1. Managing Permissions
In the Permission section, you can define the level of access users and administrators have to read and write to an attribute.
Attribute Permission
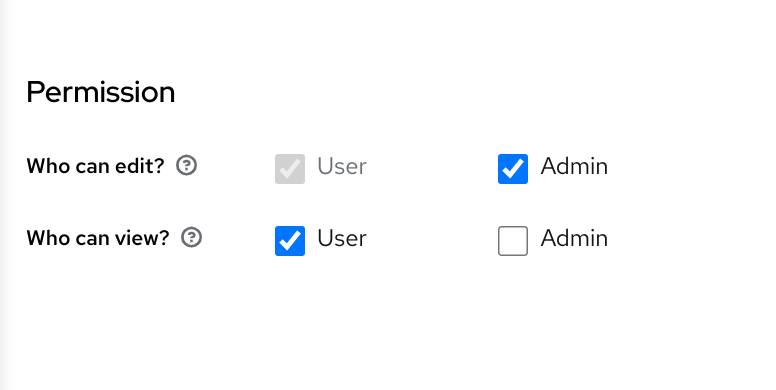
For that, you can use the following settings:
- Can user view?
- If enabled, users can view the attribute. Otherwise, users don’t have access to the attribute.
- Can user edit?
- If enabled, users can view and edit the attribute. Otherwise, users don’t have access to write to the attribute.
- Can admin view?
- If enabled, administrators can view the attribute. Otherwise, administrators don’t have access to the attribute.
- Can admin edit?
- If enabled, administrators can view and edit the attribute. Otherwise, administrators don’t have access to write to the attribute.
When you create an attribute, no permission is set to the attribute. Effectively, the attribute won’t be accessible by either users or administrators. Once you create the attribute, make sure to set the permissions accordingly to that the attribute is only visible by the target audience.
Permissioning has a direct impact on how and who can manage the attribute, as well as on how the attribute is rendered in user-facing forms.
For instance, by marking an attribute as only viewable by users, the administrators won’t have access to the attribute when managing users through the administration console (neither from the User API). Also, users won’t be able to change the attribute when updating their profiles. An interesting configuration if user attributes are fetched from an existing identity store (federation) and you just want to make attributes visible to users without any possibility to update the attribute other than through the source identity store.
Similarly, you can also mark an attribute as writable only for administrators with read-only access for users. In this case, only administrators are going to be allowed to manage the attribute.
Depending on your privacy requirements, you might also want attributes inaccessible to administrators but with read-write permissions for users.
Make sure to set the correct permissions whenever you add a new attribute to the user profile configuration.
5.12.3.2. Managing validations
In the Validation section, you can choose from different forms of validation to make sure the attribute value conforms to specific rules.
Attribute Validation
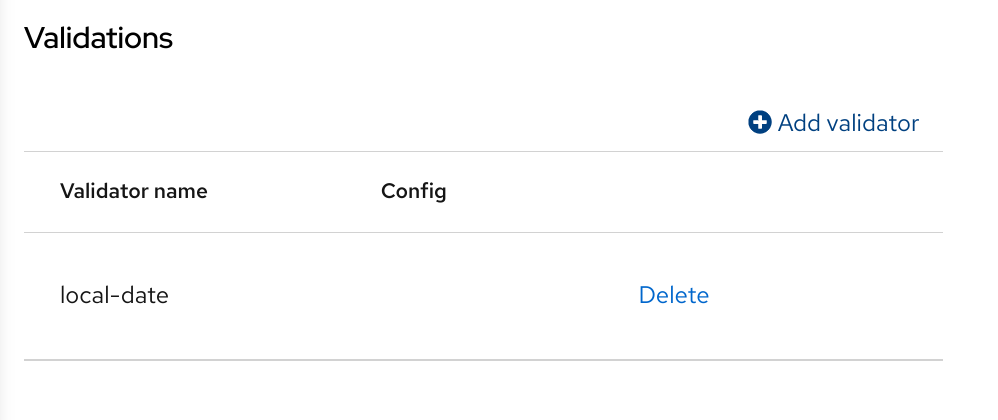
Red Hat build of Keycloak provides different validators out of the box:
| Name | Description | Configuration |
|---|---|---|
| length | Check the length of a string value based on a minimum and maximum length. | min: an integer to define the minimum allowed length. max: an integer to define the maximum allowed length. trim-disabled: a boolean to define whether the value is trimmed prior to validation. |
| integer | Check if the value is an integer and within a lower and/or upper range. If no range is defined, the validator only checks whether the value is a valid number. | min: an integer to define the lower range. max: an integer to define the upper range. |
| double | Check if the value is a double and within a lower and/or upper range. If no range is defined, the validator only checks whether the value is a valid number. | min: an integer to define the lower range. max: an integer to define the upper range. |
| uri | Check if the value is a valid URI. | None |
| pattern | Check if the value matches a specific RegEx pattern. | pattern: the RegEx pattern to use when validating values. error-message: the key of the error message in i18n bundle. If not set a generic message is used. |
| | Check if the value has a valid e-mail format. | None |
| local-date | Check if the value has a valid format based on the realm and/or user locale. | None |
| person-name-prohibited-characters | Check if the value is a valid person name as an additional barrier for attacks such as script injection. The validation is based on a default RegEx pattern that blocks characters not common in person names. | error-message: the key of the error message in i18n bundle. If not set a generic message is used. |
| username-prohibited-characters | Check if the value is a valid username as an additional barrier for attacks such as script injection. The validation is based on a default RegEx pattern that blocks characters not common in usernames. | error-message: the key of the error message in i18n bundle. If not set a generic message is used. |
| options | Check if the value is from the defined set of allowed values. Useful to validate values entered through select and multiselect fields. | options: array of strings containing allowed values. |
5.12.3.2.1. Managing annotations
In order to pass additional information to frontends, attributes can be decorated with annotations to dictate how attributes are rendered. This capability is mainly useful when extending Red Hat build of Keycloak themes to render pages dynamically based on the annotations associated with attributes. This mechanism is used for example to configure Form input filed for attribute.
Attribute Annotation
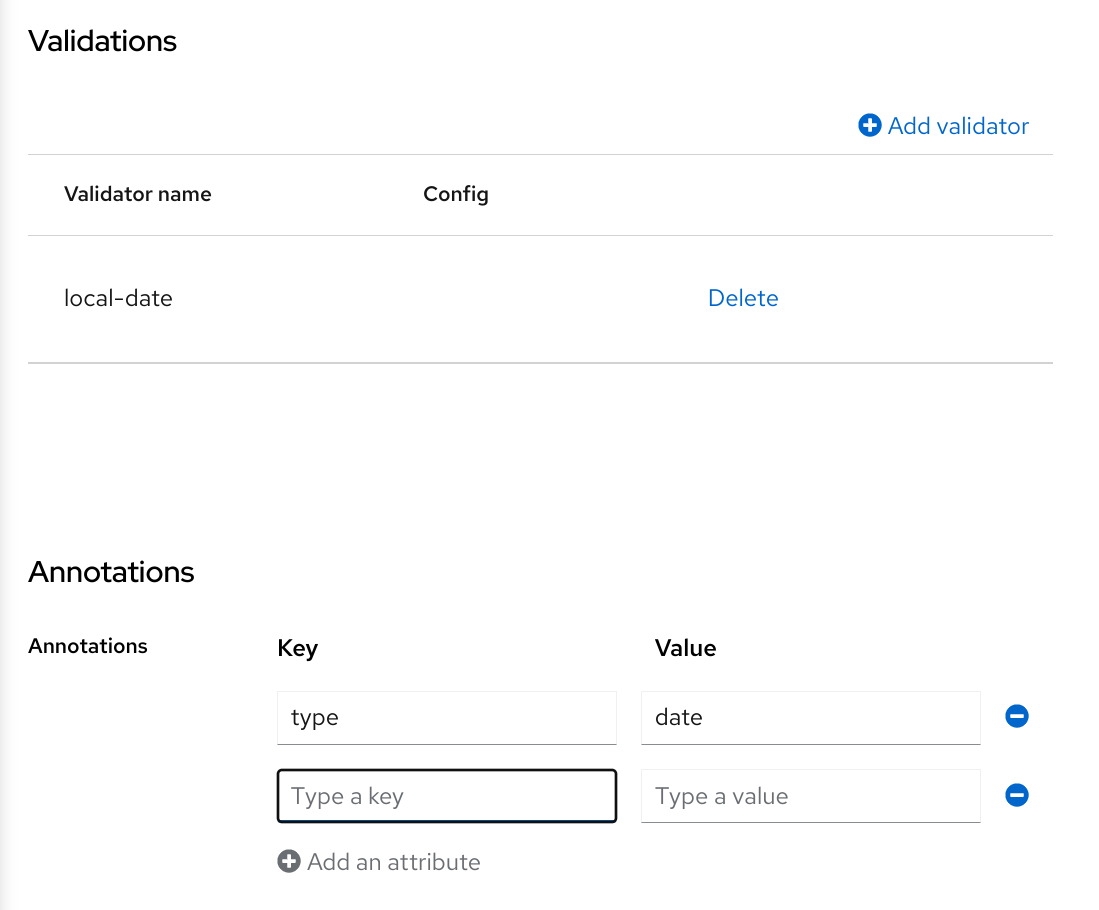
5.12.4. Managing Attribute Groups
At the Attribute Groups sub-tab you can create, edit, and delete attribute groups. An attribute group allows you to define a container for correlated attributes so that they are rendered together when at the user-facing forms.
Attribute Group List
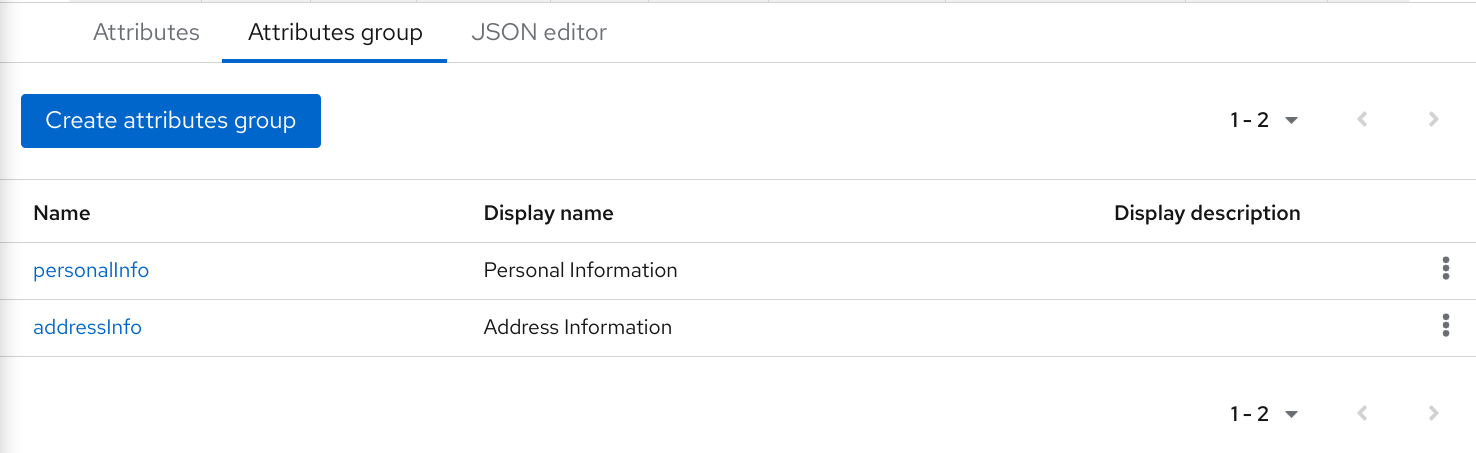
You can’t delete attribute groups that are bound to attributes. For that, you should first update the attributes to remove the binding.
To create a new group, click on the Create attributes group button on the top of the attribute groups listing.
Attribute Group Configuration
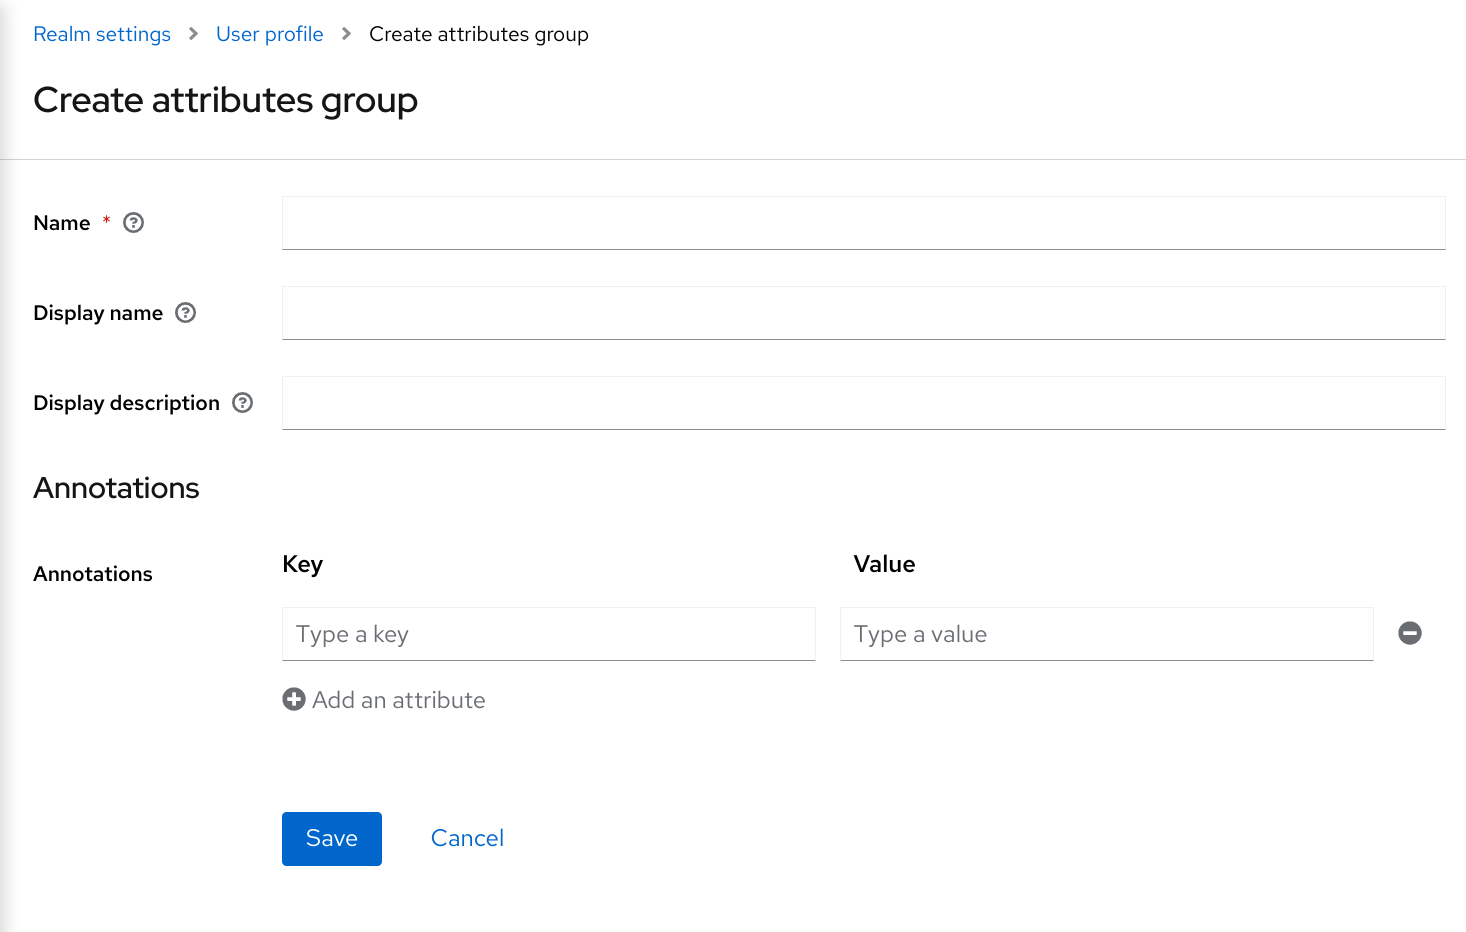
When configuring the group you can define the following settings:
- Name
- The name of the group.
- Display name
- A user-friendly name for the group, mainly used when rendering user-facing forms. It supports internationalization so that values can be loaded from message bundles.
- Display description
- A user-friendly text that will be displayed as a tooltip when rendering user-facing forms.
- Annotation
- In this section, you can associate annotations to the attribute. Annotations are mainly useful to pass over additional metadata to frontends for rendering purposes.
5.12.5. Using the JSON configuration
The user profile configuration is stored using a well-defined JSON schema. You can choose from editing the user profile configuration directly by clicking on the JSON Editor sub-tab.
JSON Configuration
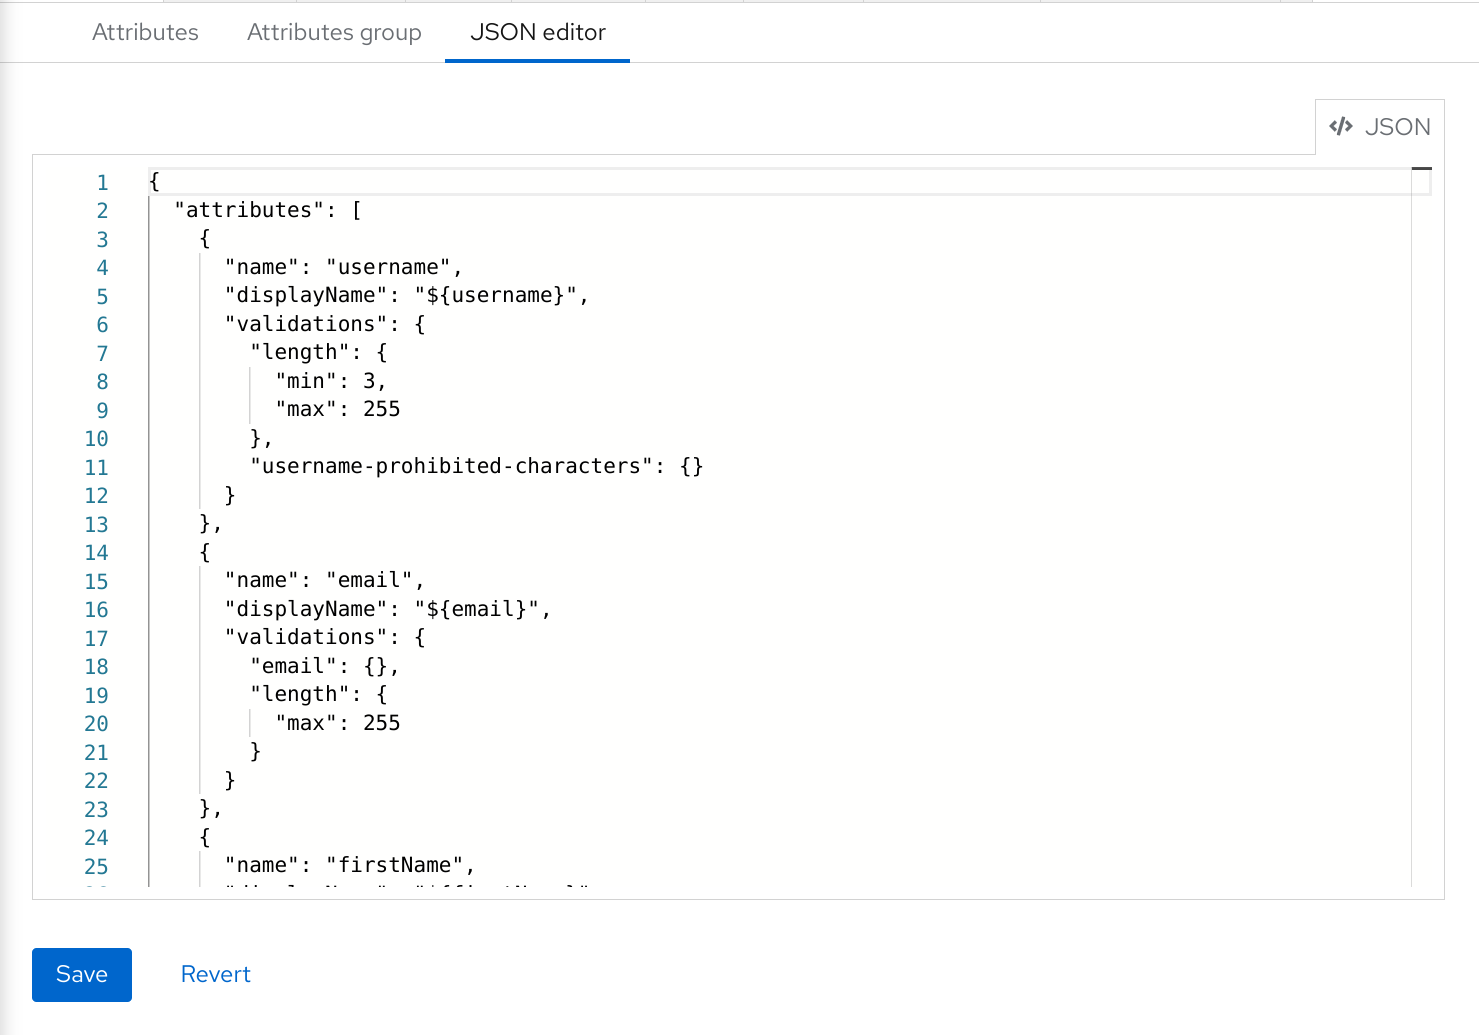
The JSON schema is defined as follows:
{
  "attributes": [
    {
      "name": "myattribute",
      "required": {
        "roles": [ "user", "admin" ],
        "scopes": [ "foo", "bar" ]
      },
      "permissions": {
        "view": [ "admin", "user" ],
        "edit": [ "admin", "user" ]
      },
      "validations": {
        "email": {},
        "length": {
          "max": 255
        }
      },
      "annotations": {
        "myannotation": "myannotation-value"
      }
    }
  ],
  "groups": [
    {
      "name": "personalInfo",
      "displayHeader": "Personal Information"
    }
  ]
}
The schema supports as many attributes as you need.
For each attribute you should define a name and, optionally, the required, permission, and the annotations settings.
5.12.5.1. Required property
The required setting defines whether an attribute is required. Red Hat build of Keycloak allows you to set an attribute as required based on different conditions.
When the required setting is defined as an empty object, the attribute is always required.
{
  "attributes": [
    {
      "name": "myattribute",
      "required": {}
  ]
}
On the other hand, you can choose to make the attribute required only for users, or administrators, or both. As well as mark the attribute as required only in case a specific scope is requested when the user is authenticating in Red Hat build of Keycloak.
To mark an attribute as required for a user and/or administrator, set the roles property as follows:
{
  "attributes": [
    {
      "name": "myattribute",
      "required": {
        "roles": ["user"]
      }
  ]
}
The roles property expects an array whose values can be either user or admin, depending on whether the attribute is required by the user or the administrator, respectively.
Similarly, you can choose to make the attribute required when a set of one or more scopes is requested by a client when authenticating a user. For that, you can use the scopes property as follows:
{
  "attributes": [
    {
      "name": "myattribute",
      "required": {
        "scopes": ["foo"]
      }
  ]
}
The scopes property is an array whose values can be any string representing a client scope.
5.12.5.2. Permissions property
The attribute-level permissions property can be used to define the read and write permissions to an attribute. The permissions are set based on whether these operations can be performed on the attribute by a user, or administrator, or both.
{
  "attributes": [
    {
      "name": "myattribute",
      "permissions": {
        "view": ["admin"],
        "edit": ["user"]
      }
  ]
}
Both view and edit properties expect an array whose values can be either user or admin, depending on whether the attribute is viewable or editable by the user or the administrator, respectively.
When the edit permission is granted, the view permission is implicitly granted.
5.12.5.3. Annotations property
The attribute-level annotation property can be used to associate additional metadata to attributes. Annotations are mainly useful for passing over additional information about attributes to frontends rendering user attributes based on the user profile configuration. Each annotation is a key/value pair.
{
  "attributes": [
    {
      "name": "myattribute",
      "annotations": {
        "foo": ["foo-value"],
        "bar": ["bar-value"]
      }
  ]
}
5.12.6. Using dynamic forms
One of the main capabilities of User Profile is the possibility to dynamically render user-facing forms based on attributes metadata. When you have the feature enabled to your realm, forms like registration and update profile are rendered using specific theme templates to dynamically render pages based on the user profile configuration.
That said, you shouldn’t need to customize templates at all if the default rendering mechanisms serves to your needs. In case you still need customizations to themes, here are the templates you should be looking at:
| Template | Description |
|---|---|
| base/login/update-user-profile.ftl | The template that renders the update profile page. |
| base/login/register-user-profile.ftl | The template that renders the registration page. |
| base/login/idp-review-user-profile.ftl | The template that renders the page to review/update the user profile when federating users through brokering. |
| base/login/user-profile-commons.ftl | The template that renders input fields in forms based on attributes configuration. Used from all three page templates described above. New input types can be implemented here. |
The default rendering mechanism provides the following capabilities:
- Dynamically display fields based on the permissions set to attributes.
- Dynamically render markers for required fields based on the constraints set to the attributes.
- Dynamically render field input type (text, date, number, select, multiselect) set to an attribute.
- Dynamically render read-only fields depending on the permissions set to an attribute.
- Dynamically order fields depending on the order set to the attributes.
- Dynamically group fields that belong to a same attribute group.
5.12.6.1. Ordering attributes
The attributes order is set by dragging and dropping the attribute rows on the attribute listing page.
Ordering Attributes
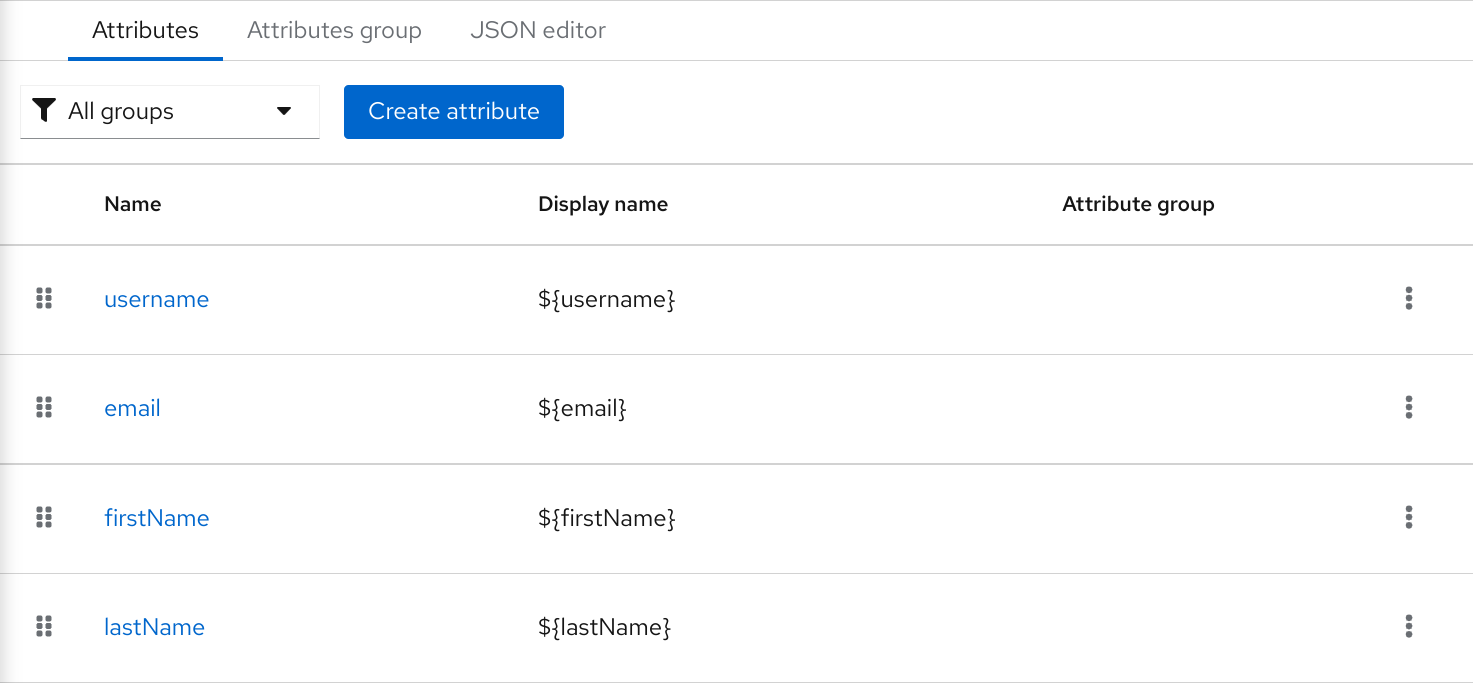
The order you set in this page is respected when fields are rendered in dynamic forms.
5.12.6.2. Grouping attributes
When dynamic forms are rendered, they will try to group together attributes that belong to a same attribute group.
Dynamic Update Profile Form
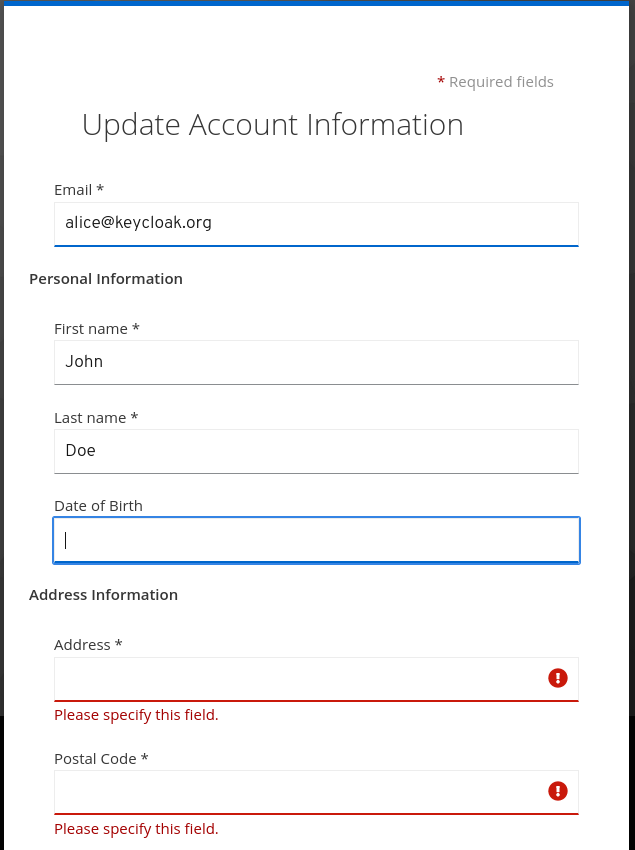
When attributes are linked to an attribute group, the attribute order is also important to make sure attributes within the same group are close together, within a same group header. Otherwise, if attributes within a group do not have a sequential order you might have the same group header rendered multiple times in the dynamic form.
5.12.6.3. Configuring Form input filed for Attributes
Red Hat build of Keycloak provides built-in annotations to configure which input type will be used for the attribute in dynamic forms and other aspects of it’s visualization.
Available annotations are:
| Name | Description |
|---|---|
| inputType | Type of the form input field. Available types are described in a table below. |
| inputHelperTextBefore |
Helper text rendered before (above) the input field. Direct text or internationalization pattern (like |
| inputHelperTextAfter |
Helper text rendered after (under) the input field. Direct text or internationalization pattern (like |
| inputOptionsFromValidation | Annotation for select and multiselect types. Optional name of custom attribute validation to get input options from. See detailed description below. |
| inputOptionLabelsI18nPrefix | Annotation for select and multiselect types. Internationalization key prefix to render options in UI. See detailed description below. |
| inputOptionLabels | Annotation for select and multiselect types. Optional map to define UI labels for options (directly or using internationalization). See detailed description below. |
| inputTypePlaceholder |
HTML input |
| inputTypeSize |
HTML input |
| inputTypeCols |
HTML input |
| inputTypeRows |
HTML input |
| inputTypePattern |
HTML input |
| inputTypeMaxLength |
HTML input |
| inputTypeMinLength |
HTML input |
| inputTypeMax |
HTML input |
| inputTypeMin |
HTML input |
| inputTypeStep |
HTML input |
Field types use HTML form field tags and attributes applied to them - they behave based on the HTML specifications and browser support for them.
Visual rendering also depends on css styles applied in the used theme.
Available inputType annotation values:
| Name | Description | HTML tag used |
|---|---|---|
| text | Single line text input. | input |
| textarea | Multiple line text input. | textarea |
| select | Common single select input. See description how to configure options below. | select |
| select-radiobuttons | Single select input through group of radio buttons. See description how to configure options below. | group of input |
| multiselect | Common multiselect input. See description how to configure options below. | select |
| multiselect-checkboxes | Multiselect input through group of checkboxes. See description how to configure options below. | group of input |
| html5-email | Single line text input for email address based on HTML 5 spec. | input |
| html5-tel | Single line text input for phone number based on HTML 5 spec. | input |
| html5-url | Single line text input for URL based on HTML 5 spec. | input |
| html5-number |
Single line input for number (integer or float depending on | input |
| html5-range | Slider for number entering based on HTML 5 spec. | input |
| html5-datetime-local | Date Time input based on HTML 5 spec. | input |
| html5-date | Date input based on HTML 5 spec. | input |
| html5-month | Month input based on HTML 5 spec. | input |
| html5-week | Week input based on HTML 5 spec. | input |
| html5-time | Time input based on HTML 5 spec. | input |
5.12.6.3.1. Defining options for select and multiselect fields
Options for select and multiselect fields are taken from validation applied to the attribute to be sure validation and field options presented in UI are always consistent. By default, options are taken from built-in options validation.
You can use various ways to provide nice human-readable labels for select and multiselect options. The simplest case is when attribute values are same as UI labels. No extra configuration is necessary in this case.
Option values same as UI labels
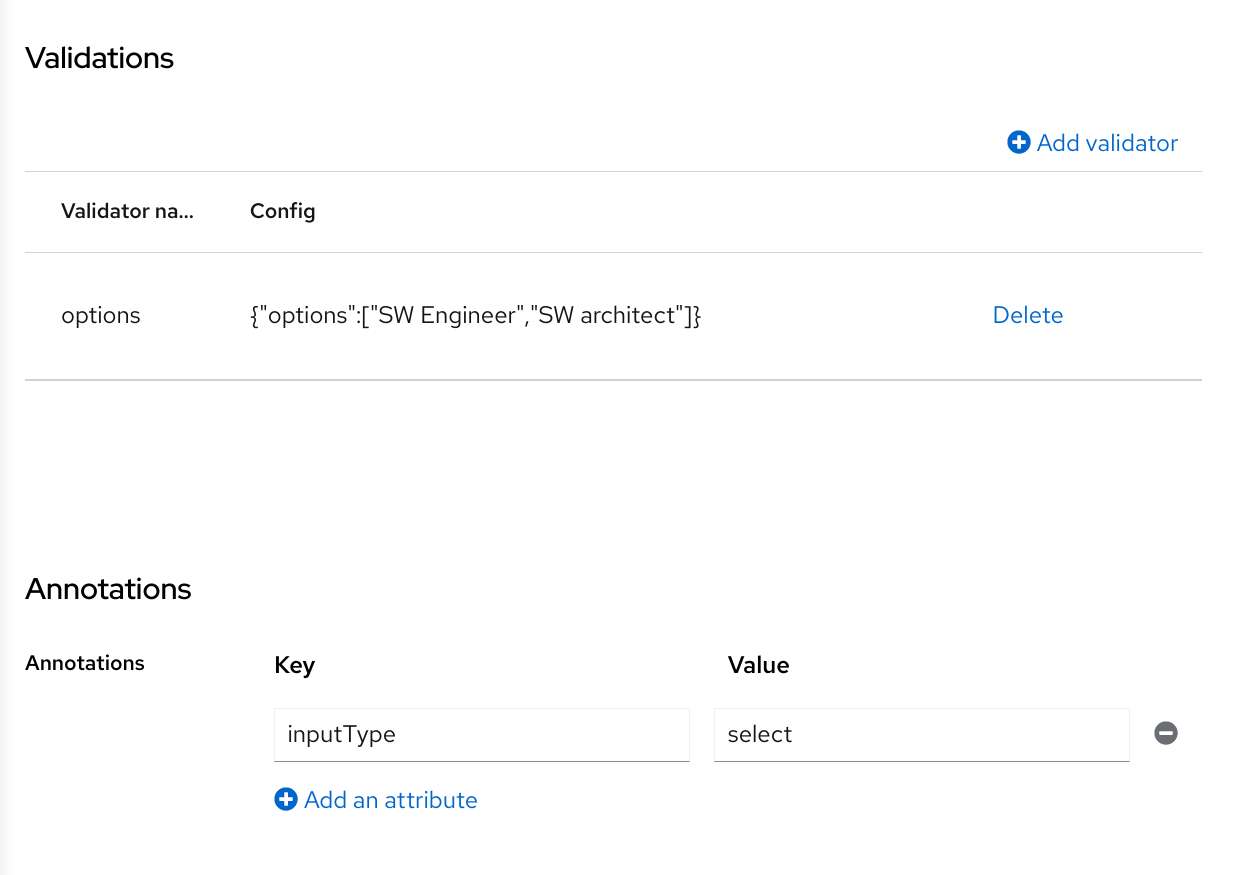
When attribute value is kind of ID not suitable for UI, you can use simple internationalization support provided by inputOptionLabelsI18nPrefix annotation. It defines prefix for internationalization keys, option value is dot appended to this prefix.
Simple internationalization for UI labels using i18n key prefix
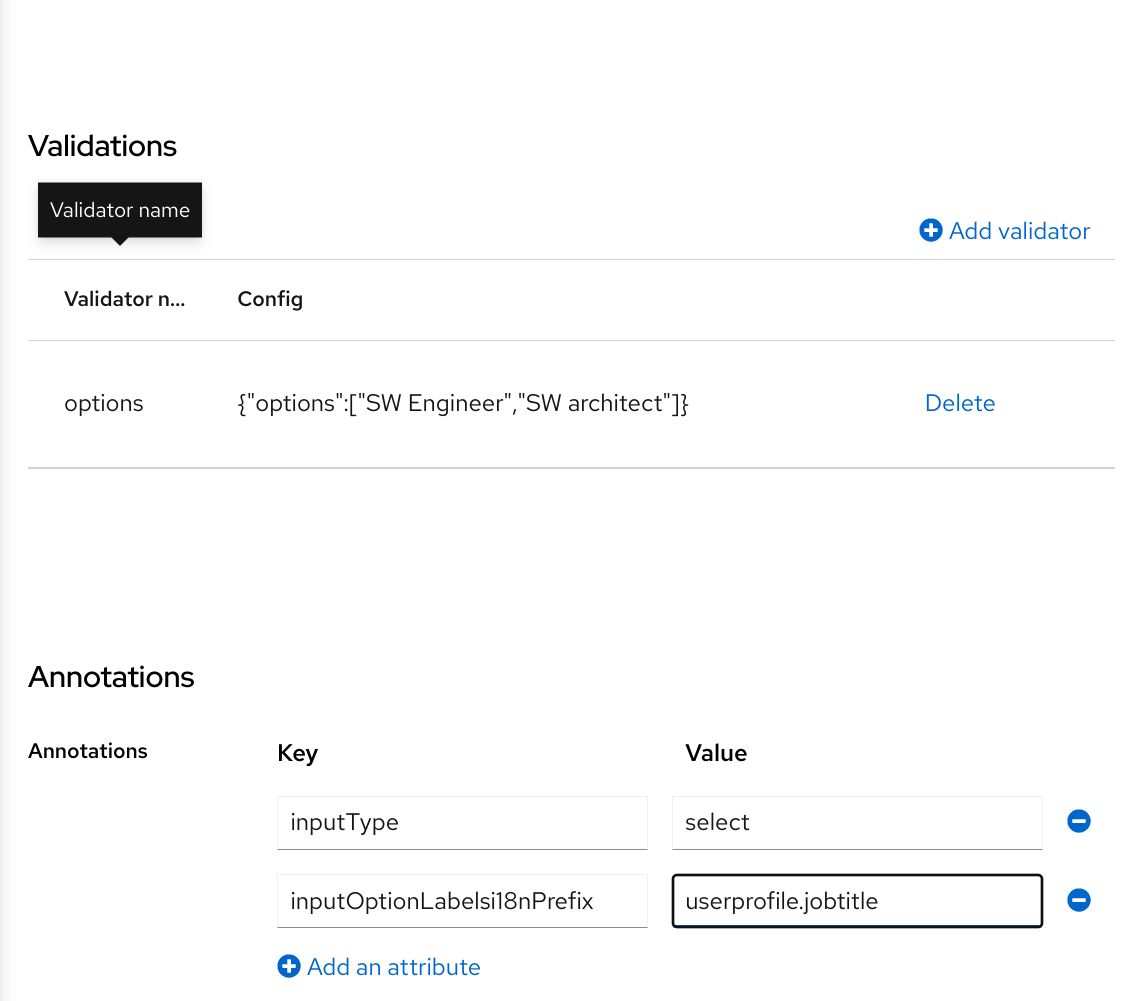
Localized UI label texts for option value have to be provided by userprofile.jobtitle.sweng and userprofile.jobtitle.swarch keys then, using common localization mechanism.
You can also use inputOptionLabels annotation to provide labels for individual options. It contains map of labels for option - key in the map is option value (defined in validation), and value in the map is UI label text itself or its internationalization pattern (like ${i18n.key}) for that option.
You have to use User Profile JSON Editor to enter map as inputOptionLabels annotation value.
Example of directly entered labels for individual options without internationalization:
"attributes": [
<...
{
  "name": "jobTitle",
  "validations": {
    "options": {
      "options":[
        "sweng",
        "swarch"
      ]
    }
  },
  "annotations": {
    "inputType": "select",
    "inputOptionLabels": {
      "sweng": "Software Engineer",
      "swarch": "Software Architect"
    }
  }
}
...
]
Example of the internationalized labels for individual options:
"attributes": [
...
{
  "name": "jobTitle",
  "validations": {
    "options": {
      "options":[
        "sweng",
        "swarch"
      ]
    }
  },
  "annotations": {
    "inputType": "select-radiobuttons",
    "inputOptionLabels": {
      "sweng": "${jobtitle.swengineer}",
      "swarch": "${jobtitle.swarchitect}"
    }
  }
}
...
]
Localized texts have to be provided by jobtitle.swengineer and jobtitle.swarchitect keys then, using common localization mechanism.
Custom validator can be used to provide options thanks to inputOptionsFromValidation attribute annotation. This validation have to have options config providing array of options. Internationalization works the same way as for options provided by built-in options validation.
Options provided by custom validator

5.12.7. Forcing User Profile compliance
In order to make sure user profiles are in compliance with the configuration, administrators may use the VerifyProfile required action to eventually force users to update their profiles when authenticating to Red Hat build of Keycloak.
The VerifyProfile action is similar to the UpdateProfile action. However, it leverages all the capabilities provided by the user profile to automatically enforce compliance with the user profile configuration.
When enabled, the VerifyProfile action is going to perform the following steps when the user is authenticating:
- Check whether the user profile is fully compliant with the user profile configuration set to the realm.
- If not, perform an additional step during the authentication so that the user can update any missing or invalid attribute.
- If the user profile is compliant with the configuration, no additional step is performed, and the user continues with the authentication process.
By default, the VerifyProfile action is disabled. To enabled it, click on the Authentication link on the left side menu and then click on the Required Actions tab. At this tab, select the Enabled switch of the VerifyProfile action.
Registering the VerifyProfile Required Action
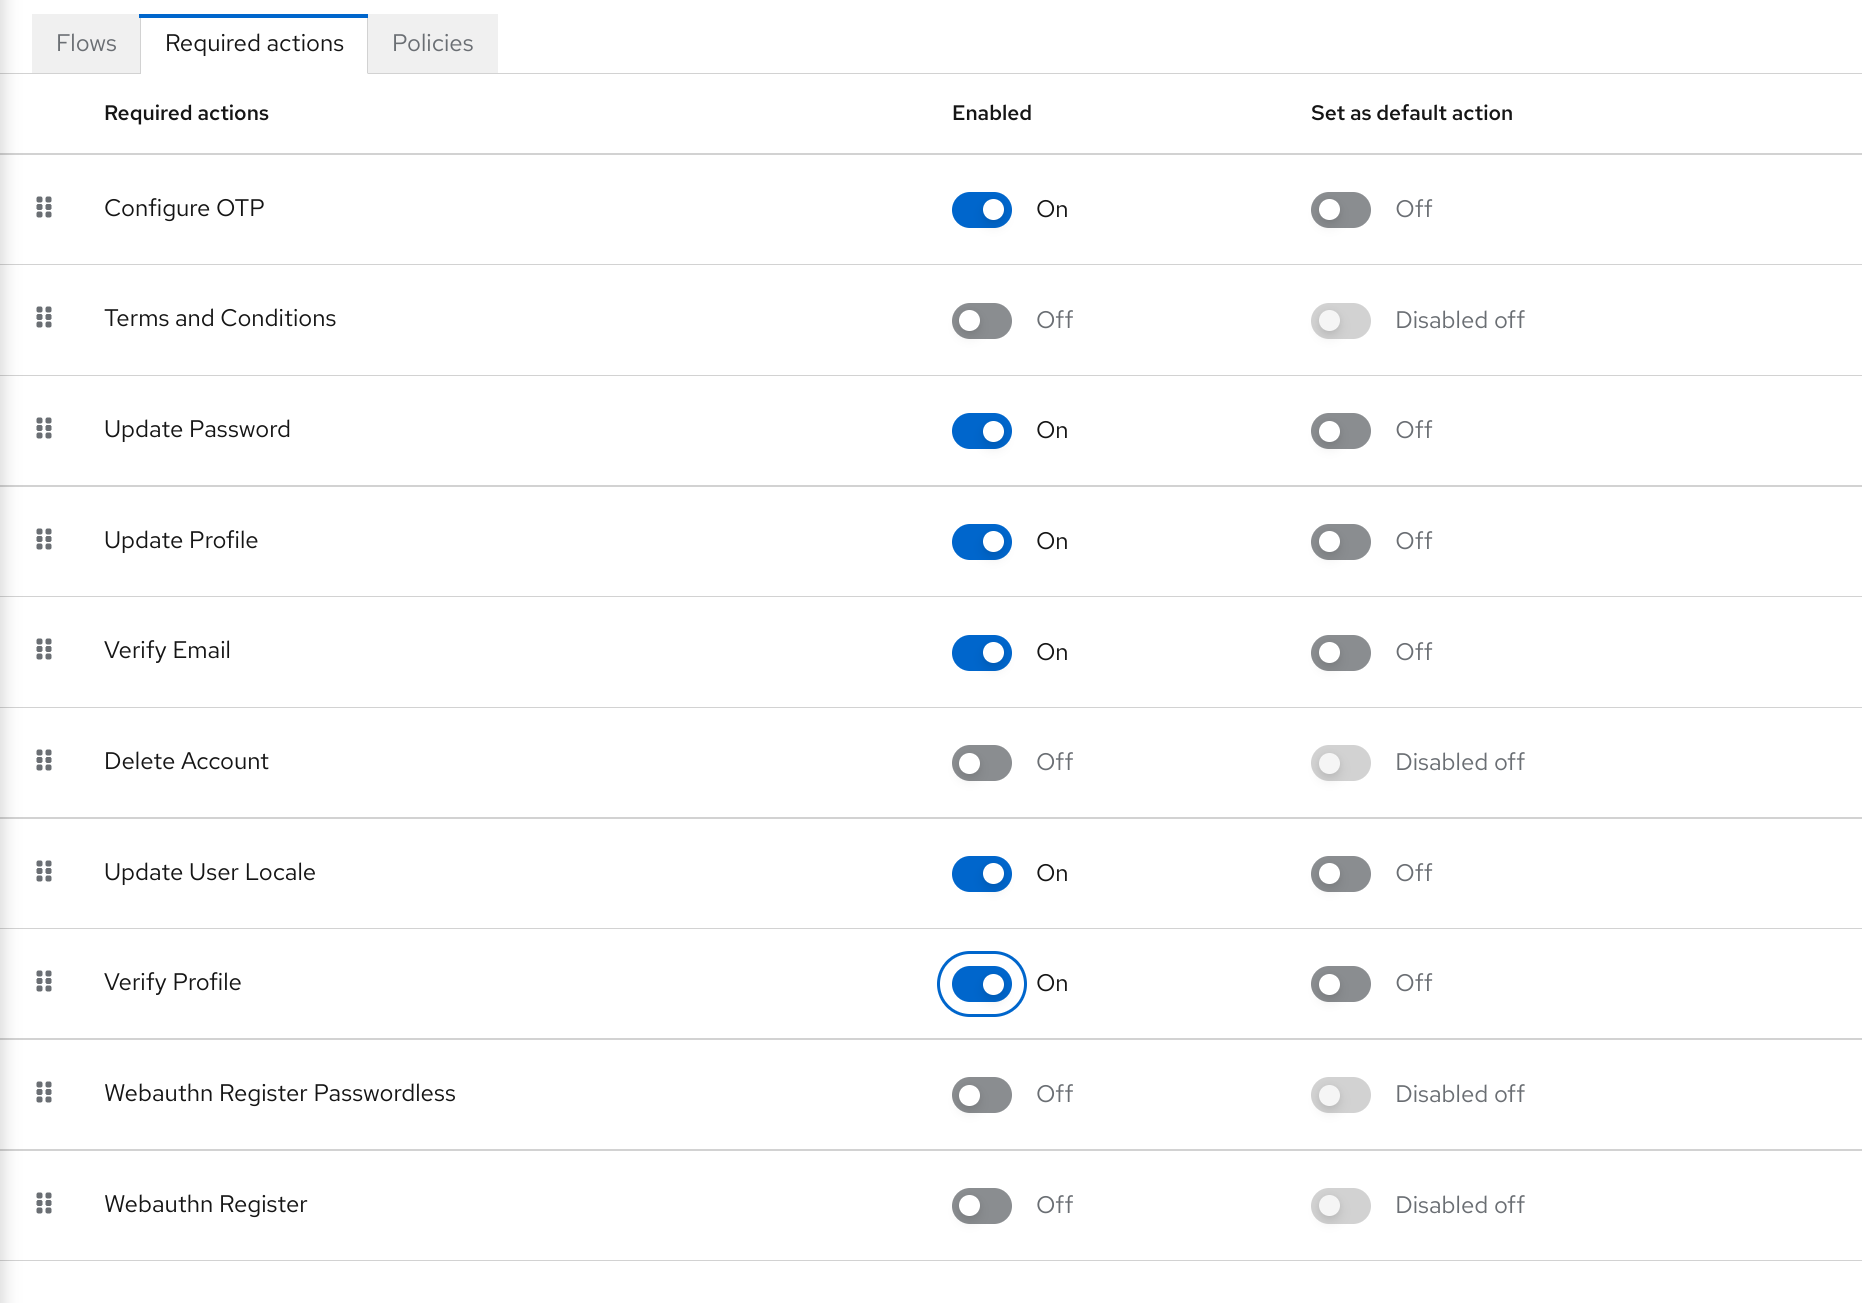
5.12.8. Migrating to User Profile
Before enabling the User Profile capabilities to a realm, there are some important considerations you should be aware of. By providing a single place to manage attribute metadata, the feature is very strict about the attributes that can be set to users and how they are managed.
In terms of user management, administrators are able to manage only the attributes defined in the user profile configuration. Any other attribute set to the user and not yet defined in the user profile configuration won’t be accessible. It is recommended to update your user profile configuration with all the user attributes you want to expose either to users or administrators.
The same recommendation applies for those accessing the User REST API to query user information.
In regards to Red Hat build of Keycloak internal user attributes such as LDAP_ID, LDAP_ENTRY_DN, or KERBEROS_PRINCIPAL, if you want to be able to access those attributes you should have them as attributes in your user profile configuration. The recommendation is to mark these attributes as viewable only to administrators so that you can look at them when managing the user attributes through the administration console or querying users via User API.
In regards to theming, if you already have customizations to the legacy templates (those hardcoded with user root attributes) your custom templates won’t be used when rendering user-facing forms but the new templates that render these forms dynamically. Ideally, you should avoid having any customizations to templates and try to stick with the behavior provided by these new templates to dynamically render forms for you. If they are still not enough to address your requirements, you can either customize them or provide us with any feedback so that we discuss whether it makes sense to enhance the new templates.
5.13. Personal data collected by Red Hat build of Keycloak
By default, Red Hat build of Keycloak collects the following data:
- Basic user profile data, such as the user email, first name, and last name.
- Basic user profile data used for social accounts and references to the social account when using a social login.
- Device information collected for audit and security purposes, such as the IP address, operating system name, and the browser name.
The information collected in Red Hat build of Keycloak is highly customizable. The following guidelines apply when making customizations:
- Registration and account forms can contain custom fields, such as birthday, gender, and nationality. An administrator can configure Red Hat build of Keycloak to retrieve data from a social provider or a user storage provider such as LDAP.
- Red Hat build of Keycloak collects user credentials, such as password, OTP codes, and WebAuthn public keys. This information is encrypted and saved in a database, so it is not visible to Red Hat build of Keycloak administrators. Each type of credential can include non-confidential metadata that is visible to administrators such as the algorithm that is used to hash the password and the number of hash iterations used to hash the password.
- With authorization services and UMA support enabled, Red Hat build of Keycloak can hold information about some objects for which a particular user is the owner.
Chapter 6. Managing user sessions
When users log into realms, Red Hat build of Keycloak maintains a user session for each user and remembers each client visited by the user within the session. Realm administrators can perform multiple actions on each user session:
- View login statistics for the realm.
- View active users and where they logged in.
- Log a user out of their session.
- Revoke tokens.
- Set up token timeouts.
- Set up session timeouts.
6.1. Administering sessions
To see a top-level view of the active clients and sessions in Red Hat build of Keycloak, click Sessions from the menu.
Sessions
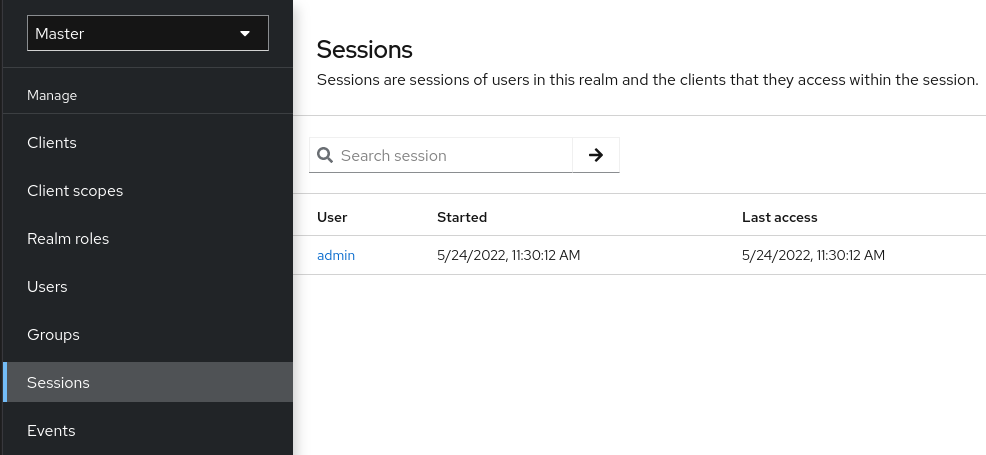
6.1.1. Signing out all active sessions
You can sign out all users in the realm. From the Action list, select Sign out all active sessions. All SSO cookies become invalid. Red Hat build of Keycloak notifies clients by using the Red Hat build of Keycloak OIDC client adapter of the logout event. Clients requesting authentication within active browser sessions must log in again. Client types such as SAML do not receive a back-channel logout request.
Clicking Sign out all active sessions does not revoke outstanding access tokens. Outstanding tokens must expire naturally. For clients using the Red Hat build of Keycloak OIDC client adapter, you can push a revocation policy to revoke the token, but this does not work for other adapters.
6.1.2. Viewing client sessions
Procedure
- Click Clients in the menu.
- Click the Sessions tab.
Click a client to see that client’s sessions.
Client sessions
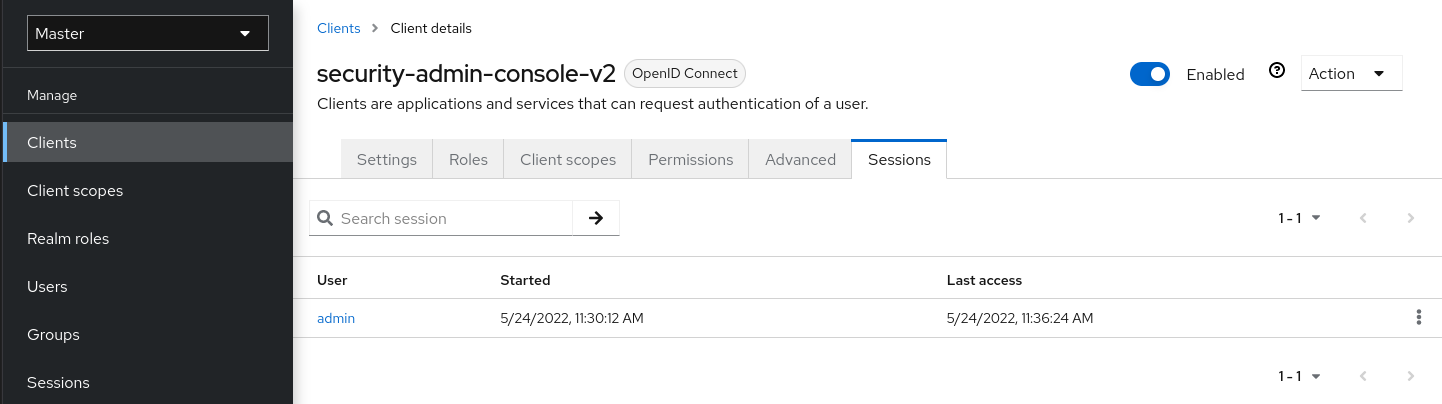
6.1.3. Viewing user sessions
Procedure
- Click Users in the menu.
- Click the Sessions tab.
Click a user to see that user’s sessions.
User sessions
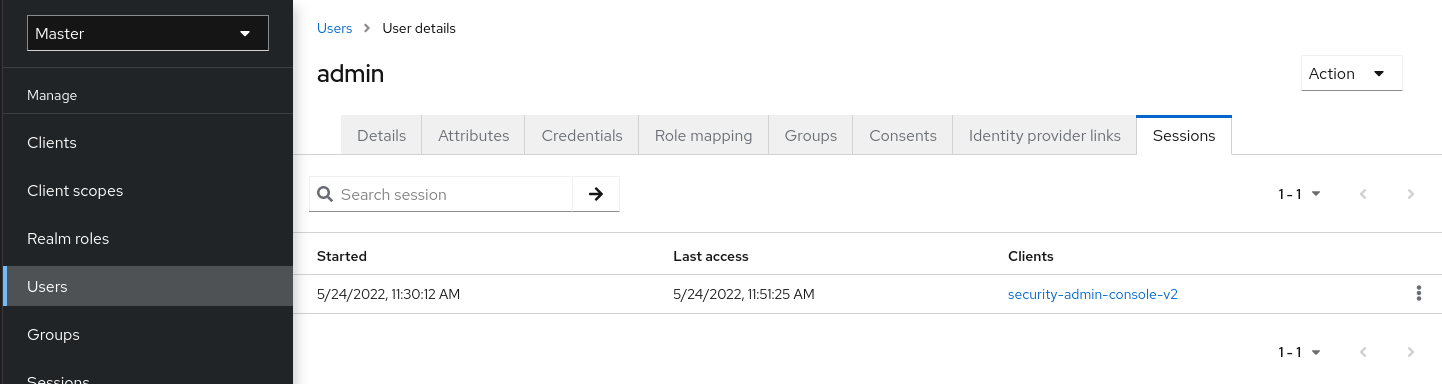
6.2. Revoking active sessions
If your system is compromised, you can revoke all active sessions and access tokens.
Procedure
- Click Sessions in the menu.
From the Actions list, select Revocation.
Revocation
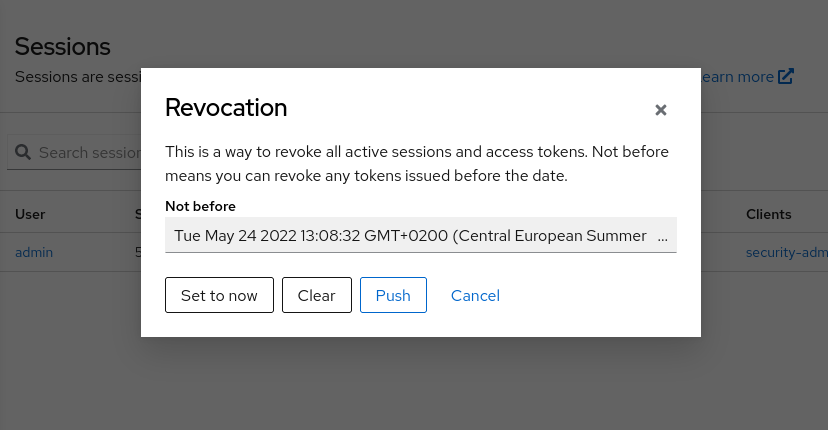
Specify a time and date where sessions or tokens issued before that time and date are invalid using this console.
- Click Set to now to set the policy to the current time and date.
- Click Push to push this revocation policy to any registered OIDC client with the Red Hat build of Keycloak OIDC client adapter.
6.3. Session and token timeouts
Red Hat build of Keycloak includes control of the session, cookie, and token timeouts through the Sessions and Tokens tabs in the Realm settings menu.
Sessions tab
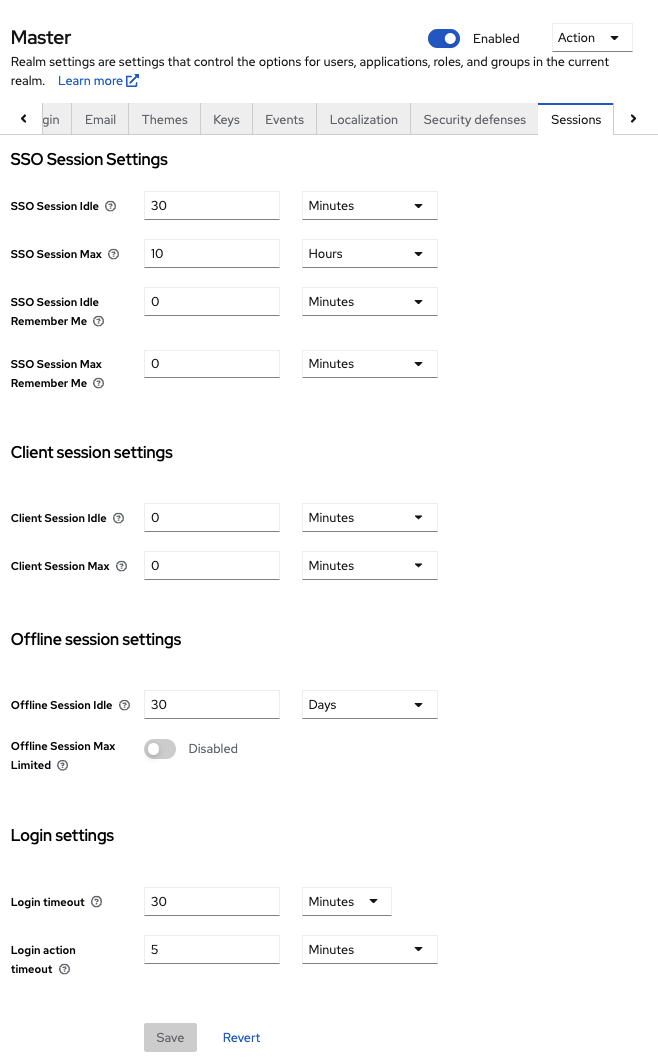
| Configuration | Description |
|---|---|
| SSO Session Idle | This setting is for OIDC clients only. If a user is inactive for longer than this timeout, the user session is invalidated. This timeout value resets when clients request authentication or send a refresh token request. Red Hat build of Keycloak adds a window of time to the idle timeout before the session invalidation takes effect. See the note later in this section. |
| SSO Session Max | The maximum time before a user session expires. |
| SSO Session Idle Remember Me | This setting is similar to the standard SSO Session Idle configuration but specific to logins with Remember Me enabled. Users can specify longer session idle timeouts when they click Remember Me when logging in. This setting is an optional configuration and, if its value is not greater than zero, it uses the same idle timeout as the SSO Session Idle configuration. |
| SSO Session Max Remember Me | This setting is similar to the standard SSO Session Max but specific to Remember Me logins. Users can specify longer sessions when they click Remember Me when logging in. This setting is an optional configuration and, if its value is not greater than zero, it uses the same session lifespan as the SSO Session Max configuration. |
| Client Session Idle | Idle timeout for the client session. If the user is inactive for longer than this timeout, the client session is invalidated and the refresh token requests bump the idle timeout. This setting never affects the general SSO user session, which is unique. Note the SSO user session is the parent of zero or more client sessions, one client session is created for every different client app the user logs in. This value should specify a shorter idle timeout than the SSO Session Idle. Users can override it for individual clients in the Advanced Settings client tab. This setting is an optional configuration and, when set to zero, uses the same idle timeout in the SSO Session Idle configuration. |
| Client Session Max | The maximum time for a client session and before a refresh token expires and invalidates. As in the previous option, this setting never affects the SSO user session and should specify a shorter value than the SSO Session Max. Users can override it for individual clients in the Advanced Settings client tab. This setting is an optional configuration and, when set to zero, uses the same max timeout in the SSO Session Max configuration.
|
| Offline Session Idle | This setting is for offline access. The amount of time the session remains idle before Red Hat build of Keycloak revokes its offline token. Red Hat build of Keycloak adds a window of time to the idle timeout before the session invalidation takes effect. See the note later in this section.
|
| Offline Session Max Limited | This setting is for offline access. If this flag is Enabled, Offline Session Max can control the maximum time the offline token remains active, regardless of user activity. If the flag is Disabled, offline sessions never expire by lifespan, only by idle. Once this option is activated, the Offline Session Max (global option at realm level) and Client Offline Session Max (specific client level option in the Advanced Settings tab) can be configured.
|
| Offline Session Max | This setting is for offline access, and it is the maximum time before Red Hat build of Keycloak revokes the corresponding offline token. This option controls the maximum amount of time the offline token remains active, regardless of user activity. |
| Login timeout | The total time a logging in must take. If authentication takes longer than this time, the user must start the authentication process again. |
| Login action timeout | The Maximum time users can spend on any one page during the authentication process. |
Tokens tab
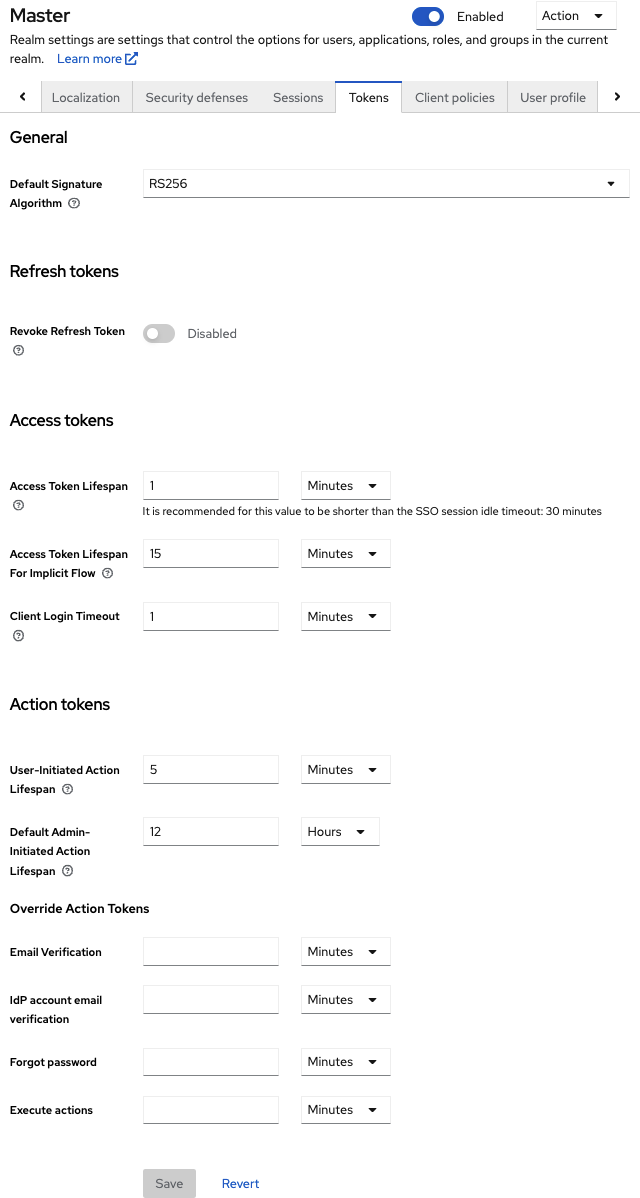
| Configuration | Description |
|---|---|
| Default Signature Algorithm | The default algorithm used to assign tokens for the realm.
|
| Revoke Refresh Token | When Enabled, Red Hat build of Keycloak revokes refresh tokens and issues another token that the client must use. This action applies to OIDC clients performing the refresh token flow. |
| Access Token Lifespan | When Red Hat build of Keycloak creates an OIDC access token, this value controls the lifetime of the token. |
| Access Token Lifespan For Implicit Flow | With the Implicit Flow, Red Hat build of Keycloak does not provide a refresh token. A separate timeout exists for access tokens created by the Implicit Flow. |
| Client login timeout | The maximum time before clients must finish the Authorization Code Flow in OIDC. |
| User-Initiated Action Lifespan | The maximum time before a user’s action permission expires. Keep this value short because users generally react to self-created actions quickly. |
| Default Admin-Initiated Action Lifespan | The maximum time before an action permission sent to a user by an administrator expires. Keep this value long to allow administrators to send e-mails to offline users. An administrator can override the default timeout before issuing the token. |
| Email Verification | Specifies independent timeout for email verification. |
| IdP account email verification | Specifies independent timeout for IdP account email verification. |
| Forgot password | Specifies independent timeout for forgot password. |
| Execute actions | Specifies independent timeout for execute actions. |
For idle timeouts, a two-minute window of time exists that the session is active. For example, when you have the timeout set to 30 minutes, it will be 32 minutes before the session expires.
This action is necessary for some scenarios in cluster and cross-data center environments where the token refreshes on one cluster node a short time before the expiration and the other cluster nodes incorrectly consider the session as expired because they have not yet received the message about a successful refresh from the refreshing node.
6.4. Offline access
During offline access logins, the client application requests an offline token instead of a refresh token. The client application saves this offline token and can use it for future logins if the user logs out. This action is useful if your application needs to perform offline actions on behalf of the user even when the user is not online. For example, a regular data backup.
The client application is responsible for persisting the offline token in storage and then using it to retrieve new access tokens from the Red Hat build of Keycloak server.
The difference between a refresh token and an offline token is that an offline token never expires and is not subject to the SSO Session Idle timeout and SSO Session Max lifespan. The offline token is valid after a user logout or server restart. You must use the offline token for a refresh token action at least once per thirty days or for the value of the Offline Session Idle.
If you enable Offline Session Max Limited, offline tokens expire after 60 days even if you use the offline token for a refresh token action. You can change this value, Offline Session Max, in the Admin Console.
When using offline access, client idle and max timeouts can be overridden at the client level. The options Client Offline Session Idle and Client Offline Session Max, in the client Advanced Settings tab, allow you to have a shorter offline timeouts for a specific application. Note that client session values also control the refresh token expiration but they never affect the global offline user SSO session. The option Client Offline Session Max is only evaluated in the client if Offline Session Max Limited is Enabled at the realm level.
If you enable the Revoke Refresh Token option, you can use each offline token once only. After refresh, you must store the new offline token from the refresh response instead of the previous one.
Users can view and revoke offline tokens that Red Hat build of Keycloak grants them in the User Account Console. Administrators can revoke offline tokens for individual users in the Admin Console in the Consents tab. Administrators can view all offline tokens issued in the Offline Access tab of each client. Administrators can revoke offline tokens by setting a revocation policy.
To issue an offline token, users must have the role mapping for the realm-level offline_access role. Clients must also have that role in their scope. Clients must add an offline_access client scope as an Optional client scope to the role, which is done by default.
Clients can request an offline token by adding the parameter scope=offline_access when sending their authorization request to Red Hat build of Keycloak. The Red Hat build of Keycloak OIDC client adapter automatically adds this parameter when you use it to access your application’s secured URL (such as, http://localhost:8080/customer-portal/secured?scope=offline_access). The Direct Access Grant and Service Accounts support offline tokens if you include scope=offline_access in the authentication request body.
Offline sessions are besides the Infinispan caches stored also in the database. Whenever the Red Hat build of Keycloak server is restarted or an offline session is evicted from the Infinispan cache, it is still available in the database. Any following attempt to access the offline session will load the session from the database, and also import it to the Infinispan cache. To reduce memory requirements, we introduced a configuration option to shorten lifespan for imported offline sessions. Such sessions will be evicted from the Infinispan caches after the specified lifespan, but still available in the database. This will lower memory consumption, especially for deployments with a large number of offline sessions. Currently, the offline session lifespan override is disabled by default. To specify the lifespan override for offline user sessions, start Red Hat build of Keycloak server with the following parameter:
--spi-user-sessions-infinispan-offline-session-cache-entry-lifespan-override=<lifespan-in-seconds>Similarly for offline client sessions:
--spi-user-sessions-infinispan-offline-client-session-cache-entry-lifespan-override=<lifespan-in-seconds>6.5. Offline sessions preloading
In addition to Infinispan caches, offline sessions are stored in a database which means they will be available even after server restart. By default, the offline sessions are not preloaded from the database into the Infinispan caches during the server startup, because this approach has a drawback if there are many offline sessions to be preloaded. It can significantly slow down the server startup time. Therefore, the offline sessions are lazily fetched from the database by default.
However, Red Hat build of Keycloak can be configured to preload the offline sessions from the database into the Infinispan caches during the server startup. It can be achieved by setting preloadOfflineSessionsFromDatabase property in the userSessions SPI to true.
The following example shows how to configure offline sessions preloading.
bin/kc.[sh|bat] start --spi-user-sessions-infinispan-preload-offline-sessions-from-database=true6.6. Transient sessions
You can conduct transient sessions in Red Hat build of Keycloak. When using transient sessions, Red Hat build of Keycloak does not create a user session after successful authentication. Red Hat build of Keycloak creates a temporary, transient session for the scope of the current request that successfully authenticates the user. Red Hat build of Keycloak can run protocol mappers using transient sessions after authentication.
During transient sessions, the client application cannot refresh tokens, introspect tokens, or validate a specific session. Sometimes these actions are unnecessary, so you can avoid the additional resource use of persisting user sessions. This session saves performance, memory, and network communication (in cluster and cross-data center environments) resources.
Chapter 7. Assigning permissions using roles and groups
Roles and groups have a similar purpose, which is to give users access and permissions to use applications. Groups are a collection of users to which you apply roles and attributes. Roles define specific applications permissions and access control.
A role typically applies to one type of user. For example, an organization may include admin, user, manager, and employee roles. An application can assign access and permissions to a role and then assign multiple users to that role so the users have the same access and permissions. For example, the Admin Console has roles that give permission to users to access different parts of the Admin Console.
There is a global namespace for roles and each client also has its own dedicated namespace where roles can be defined.
7.1. Creating a realm role
Realm-level roles are a namespace for defining your roles. To see the list of roles, click Realm Roles in the menu.
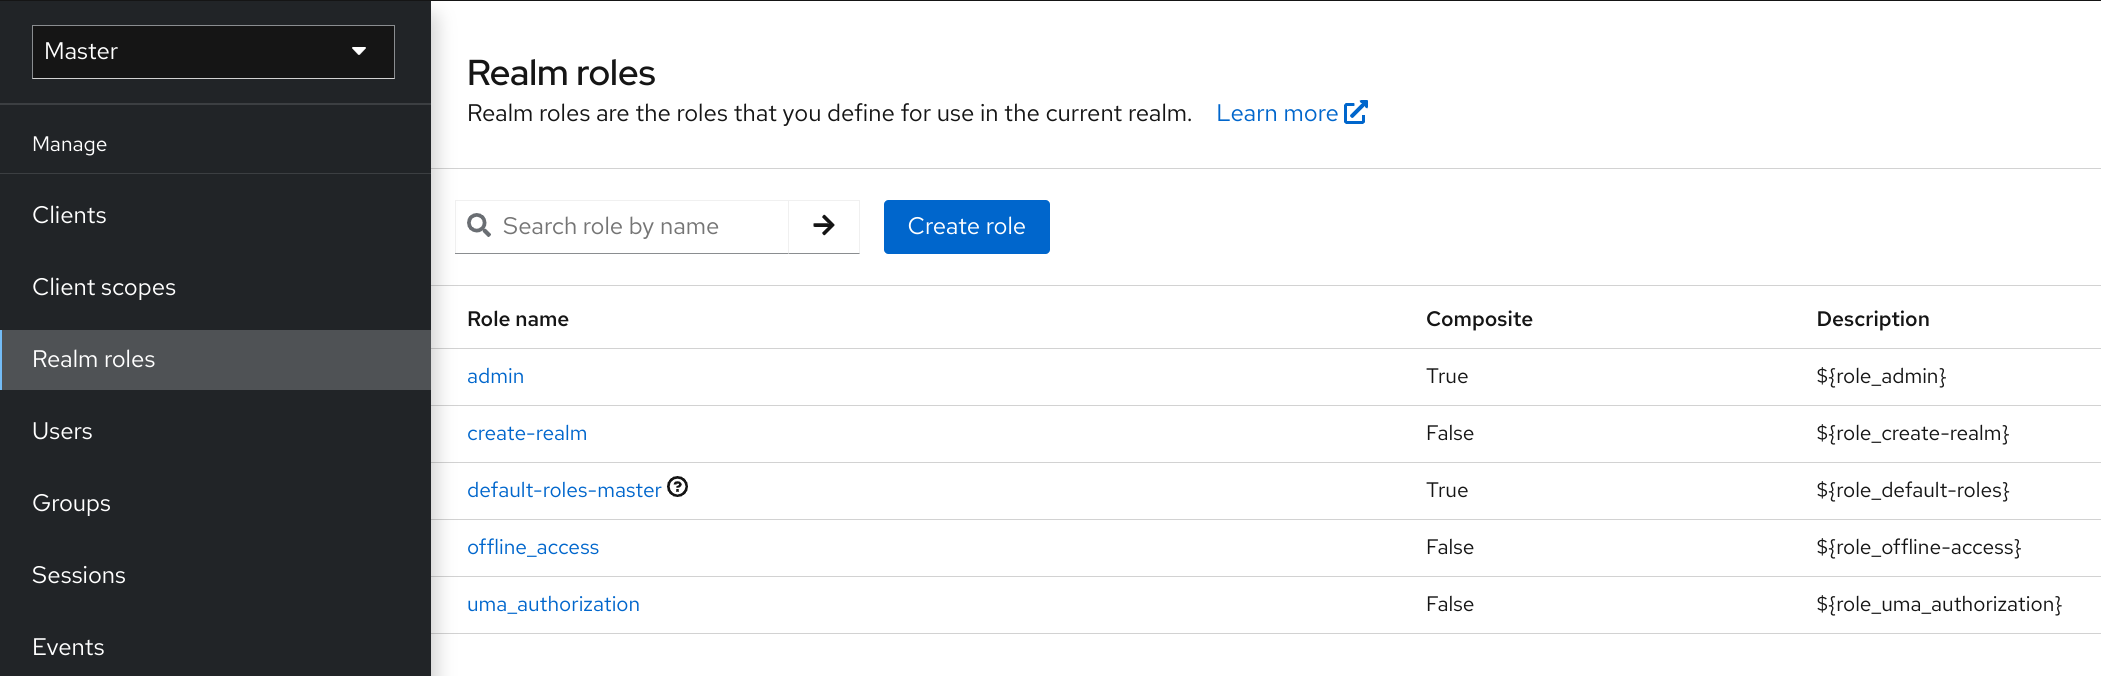
Procedure
- Click Create Role.
- Enter a Role Name.
- Enter a Description.
- Click Save.
Add role

The description field can be localized by specifying a substitution variable with ${var-name} strings. The localized value is configured to your theme within the themes property files. See the Server Developer Guide for more details.
7.2. Client roles
Client roles are namespaces dedicated to clients. Each client gets its own namespace. Client roles are managed under the Roles tab for each client. You interact with this UI the same way you do for realm-level roles.
7.3. Converting a role to a composite role
Any realm or client level role can become a composite role. A composite role is a role that has one or more additional roles associated with it. When a composite role is mapped to a user, the user gains the roles associated with the composite role. This inheritance is recursive so users also inherit any composite of composites. However, we recommend that composite roles are not overused.
Procedure
- Click Realm Roles in the menu.
- Click the role that you want to convert.
- From the Action list, select Add associated roles.
Composite role
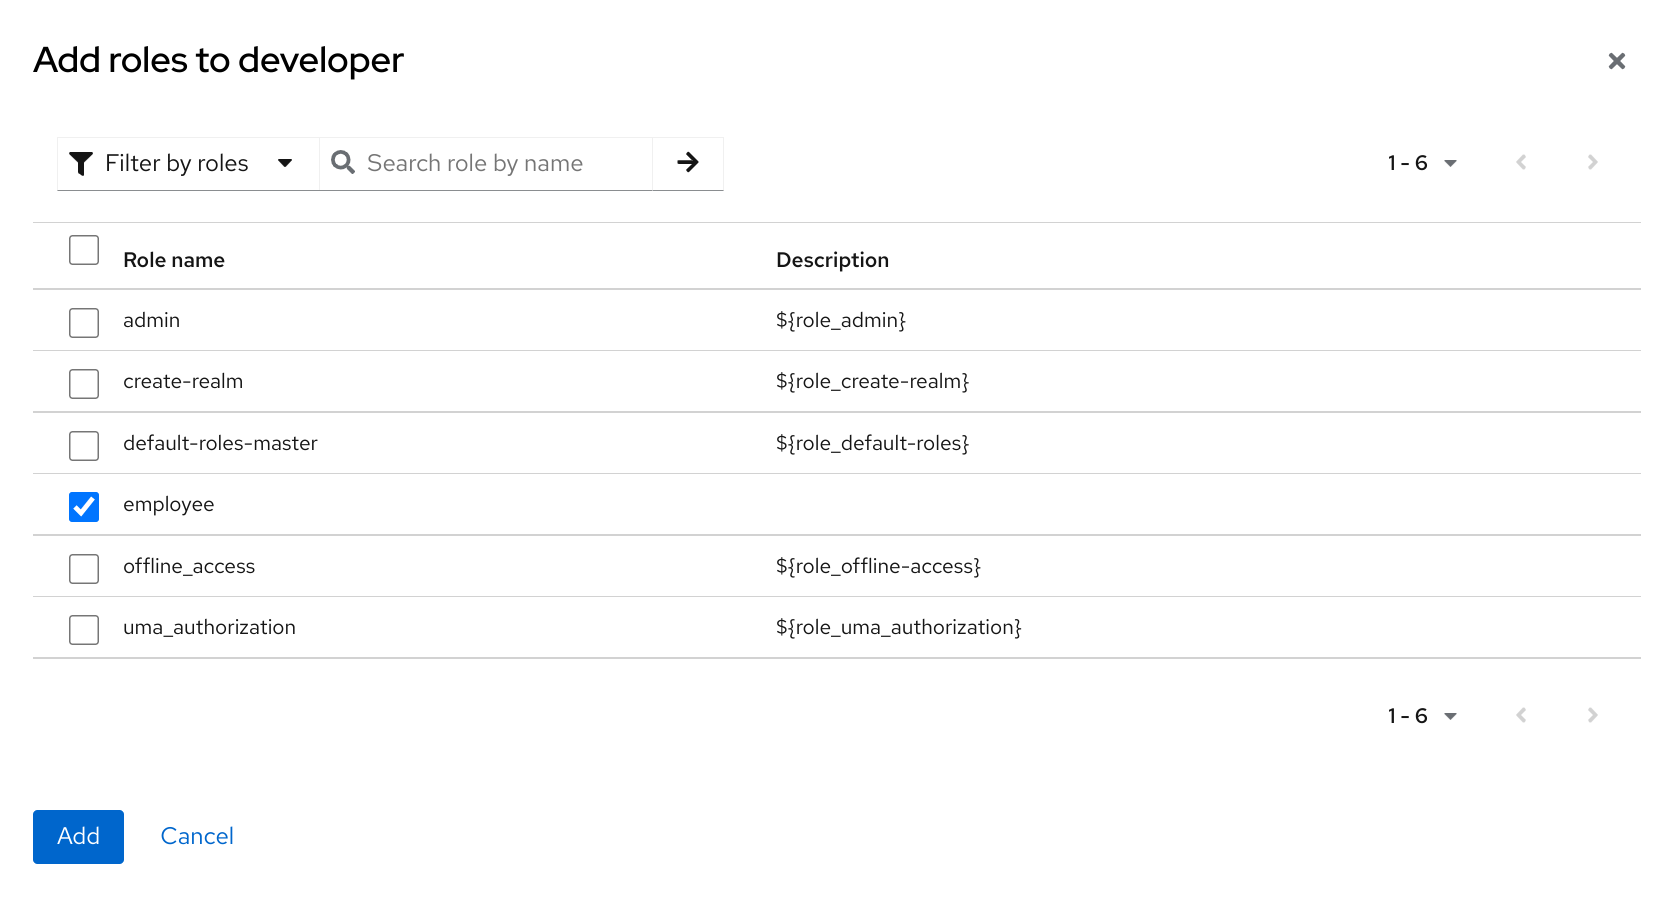
The role selection UI is displayed on the page and you can associate realm level and client level roles to the composite role you are creating.
In this example, the employee realm-level role is associated with the developer composite role. Any user with the developer role also inherits the employee role.
When creating tokens and SAML assertions, any composite also has its associated roles added to the claims and assertions of the authentication response sent back to the client.
7.4. Assigning role mappings
You can assign role mappings to a user through the Role Mappings tab for that user.
Procedure
- Click Users in the menu.
- Click the user that you want to perform a role mapping on.
- Click the Role mappings tab.
- Click Assign role.
- Select the role you want to assign to the user from the dialog.
- Click Assign.
Role mappings
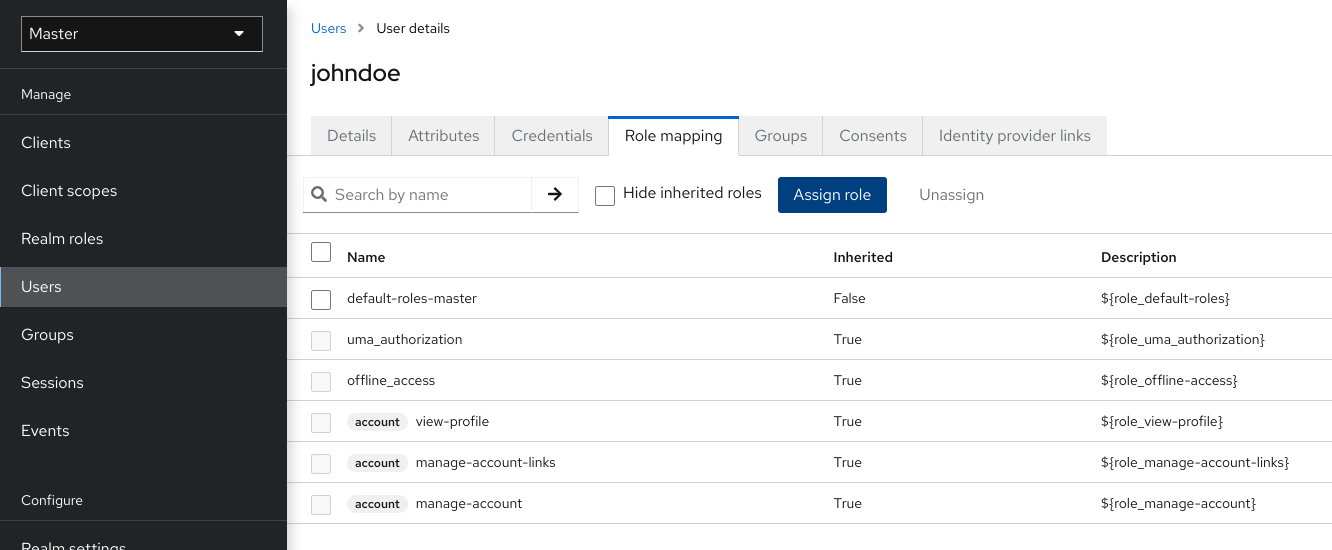
In the preceding example, we are assigning the composite role developer to a user. That role was created in the Composite Roles topic.
Effective role mappings

When the developer role is assigned, the employee role associated with the developer composite is displayed with Inherited "True". Inherited roles are the roles explicitly assigned to users and roles that are inherited from composites.
7.5. Using default roles
Use default roles to automatically assign user role mappings when a user is created or imported through Identity Brokering.
Procedure
- Click Realm settings in the menu.
Click the User registration tab.
Default roles
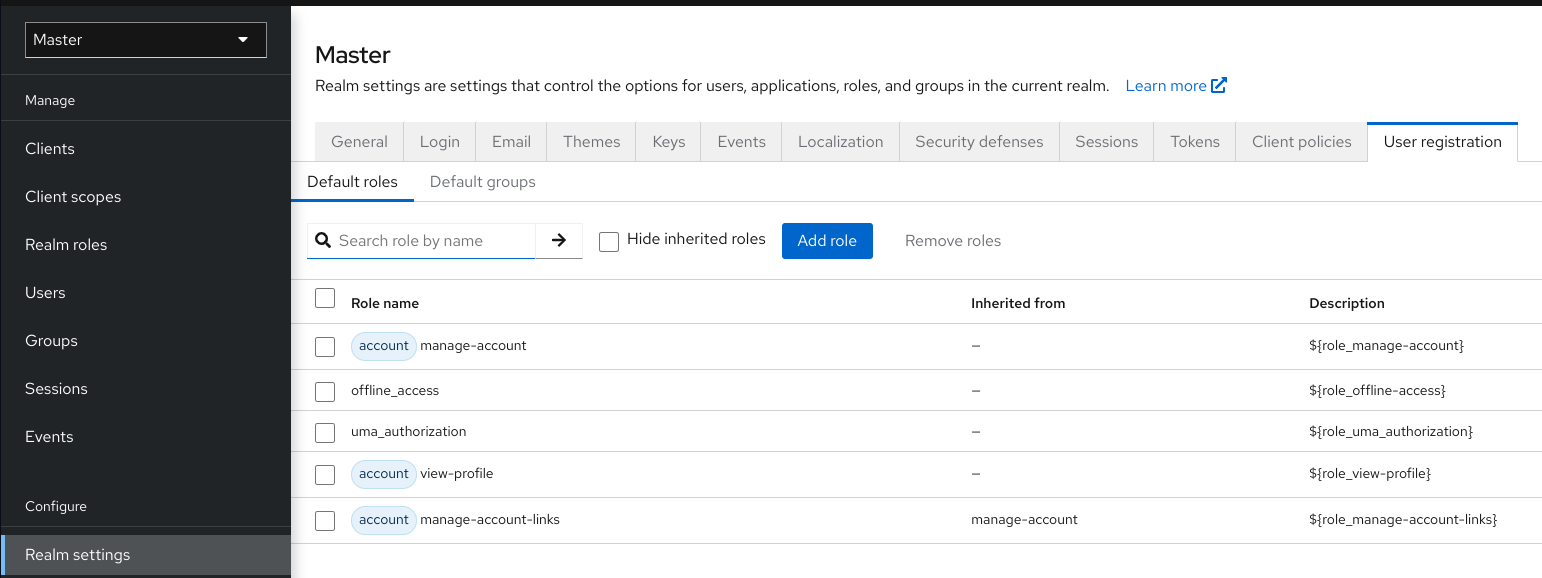
This screenshot shows that some default roles already exist.
7.6. Role scope mappings
On creation of an OIDC access token or SAML assertion, the user role mappings become claims within the token or assertion. Applications use these claims to make access decisions on the resources controlled by the application. Red Hat build of Keycloak digitally signs access tokens and applications re-use them to invoke remotely secured REST services. However, these tokens have an associated risk. An attacker can obtain these tokens and use their permissions to compromise your networks. To prevent this situation, use Role Scope Mappings.
Role Scope Mappings limit the roles declared inside an access token. When a client requests a user authentication, the access token they receive contains only the role mappings that are explicitly specified for the client’s scope. The result is that you limit the permissions of each individual access token instead of giving the client access to all the users permissions.
By default, each client gets all the role mappings of the user. You can view the role mappings for a client.
Procedure
- Click Clients in the menu.
- Click the client to go to the details.
- Click the Client scopes tab.
- Click the link in the row with Dedicated scope and mappers for this client
- Click the Scope tab.
Full scope
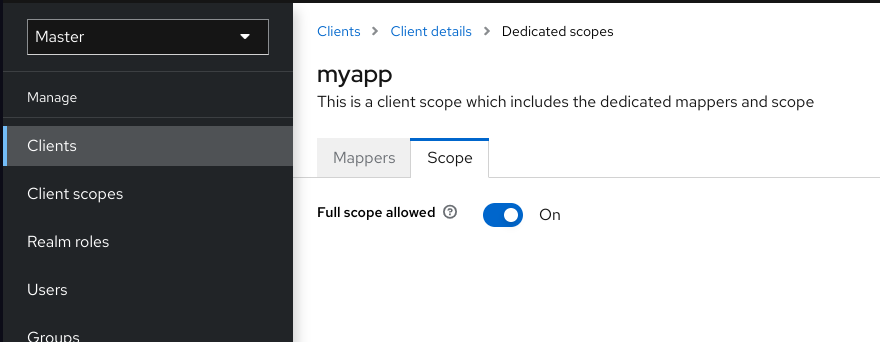
By default, the effective roles of scopes are every declared role in the realm. To change this default behavior, toggle Full Scope Allowed to OFF and declare the specific roles you want in each client. You can also use client scopes to define the same role scope mappings for a set of clients.
Partial scope
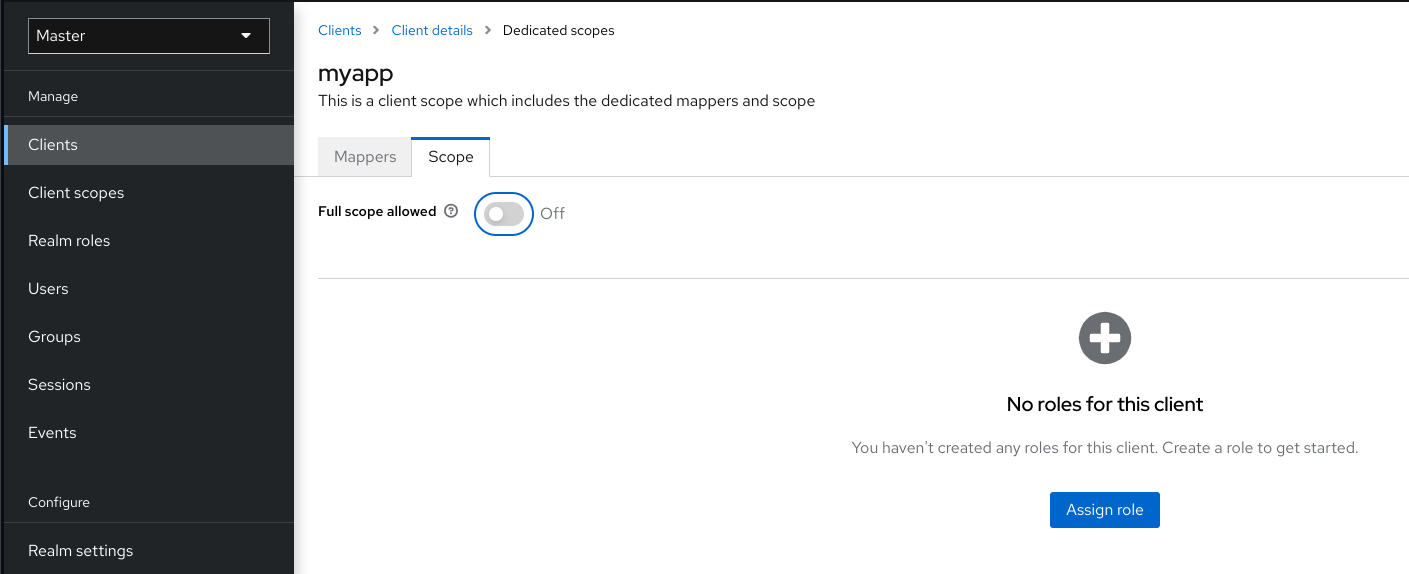
7.7. Groups
Groups in Red Hat build of Keycloak manage a common set of attributes and role mappings for each user. Users can be members of any number of groups and inherit the attributes and role mappings assigned to each group.
To manage groups, click Groups in the menu.
Groups
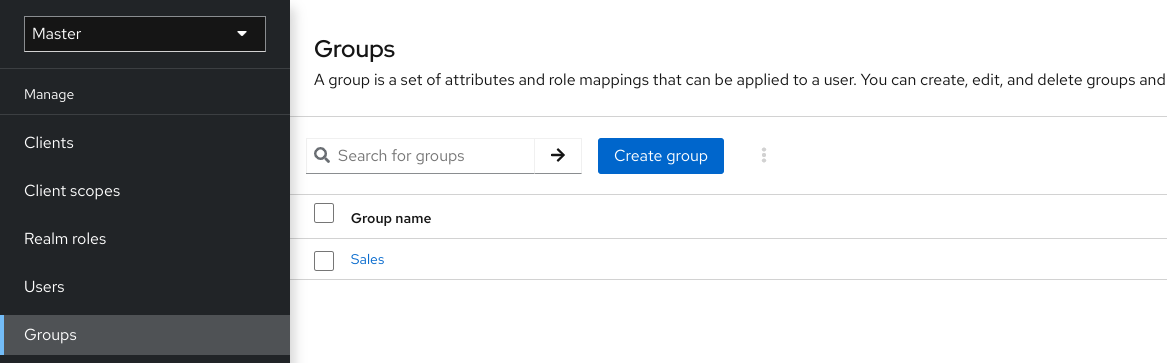
Groups are hierarchical. A group can have multiple subgroups but a group can have only one parent. Subgroups inherit the attributes and role mappings from their parent. Users inherit the attributes and role mappings from their parent as well.
If you have a parent group and a child group, and a user that belongs only to the child group, the user in the child group inherits the attributes and role mappings of both the parent group and the child group.
The following example includes a top-level Sales group and a child North America subgroup.
To add a group:
- Click the group.
- Click Create group.
- Enter a group name.
- Click Create.
Click the group name.
The group management page is displayed.
Group
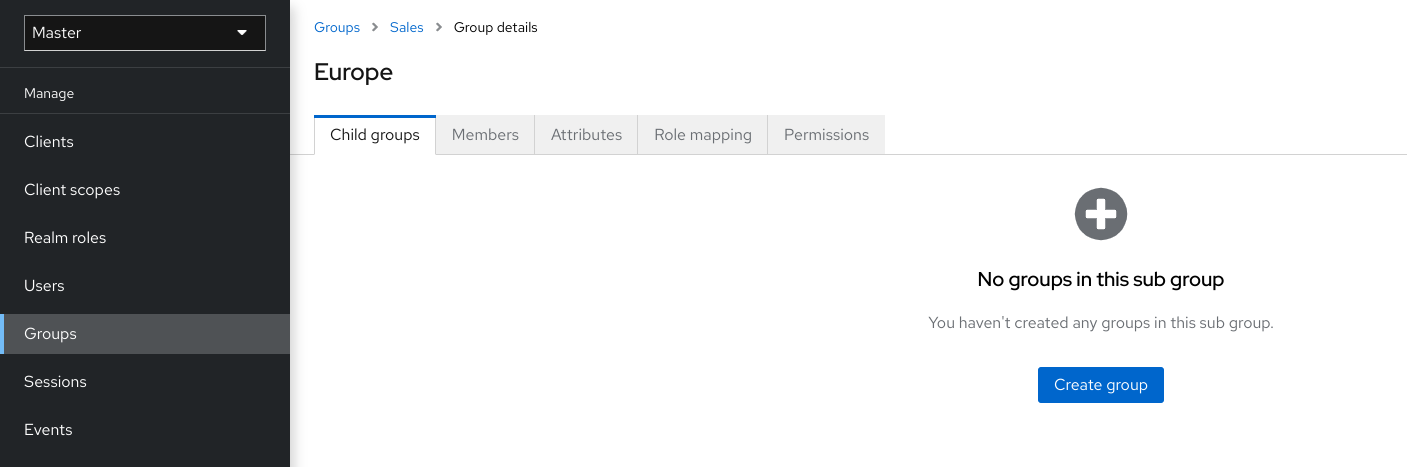
Attributes and role mappings you define are inherited by the groups and users that are members of the group.
To add a user to a group:
- Click Users in the menu.
- Click the user that you want to perform a role mapping on. If the user is not displayed, click View all users.
Click Groups.
User groups
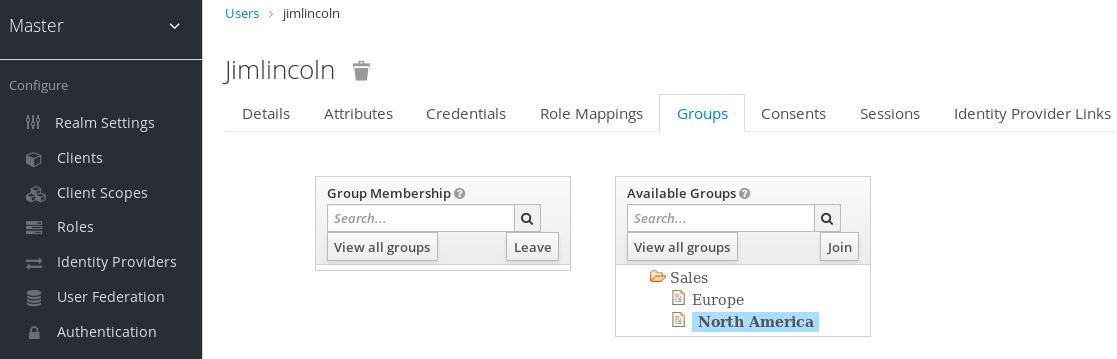
- Click Join Group.
- Select a group from the dialog.
- Select a group from the Available Groups tree.
- Click Join.
To remove a group from a user:
- Click Users in the menu.
- Click the user to be removed from the group.
- Click Leave on the group table row.
In this example, the user jimlincoln is in the North America group. You can see jimlincoln displayed under the Members tab for the group.
Group membership
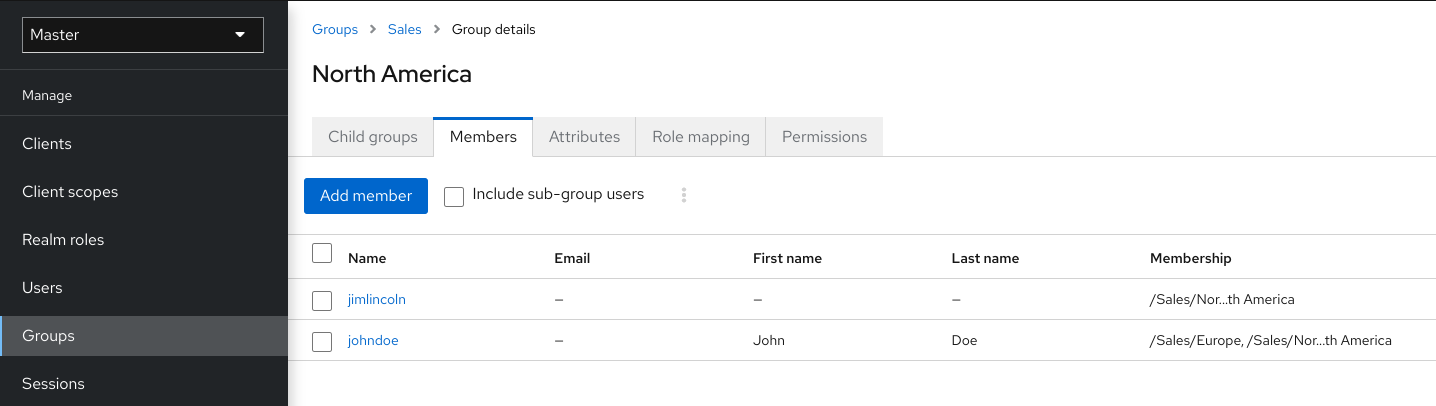
7.7.1. Groups compared to roles
Groups and roles have some similarities and differences. In Red Hat build of Keycloak, groups are a collection of users to which you apply roles and attributes. Roles define types of users and applications assign permissions and access control to roles.
Composite Roles are similar to Groups as they provide the same functionality. The difference between them is conceptual. Composite roles apply the permission model to a set of services and applications. Use composite roles to manage applications and services.
Groups focus on collections of users and their roles in an organization. Use groups to manage users.
7.7.2. Using default groups
To automatically assign group membership to any users who is created or who is imported through Identity Brokering, you use default groups.
- Click Realm settings in the menu.
- Click the User registration tab.
Click the Default Groups tab.
Default groups
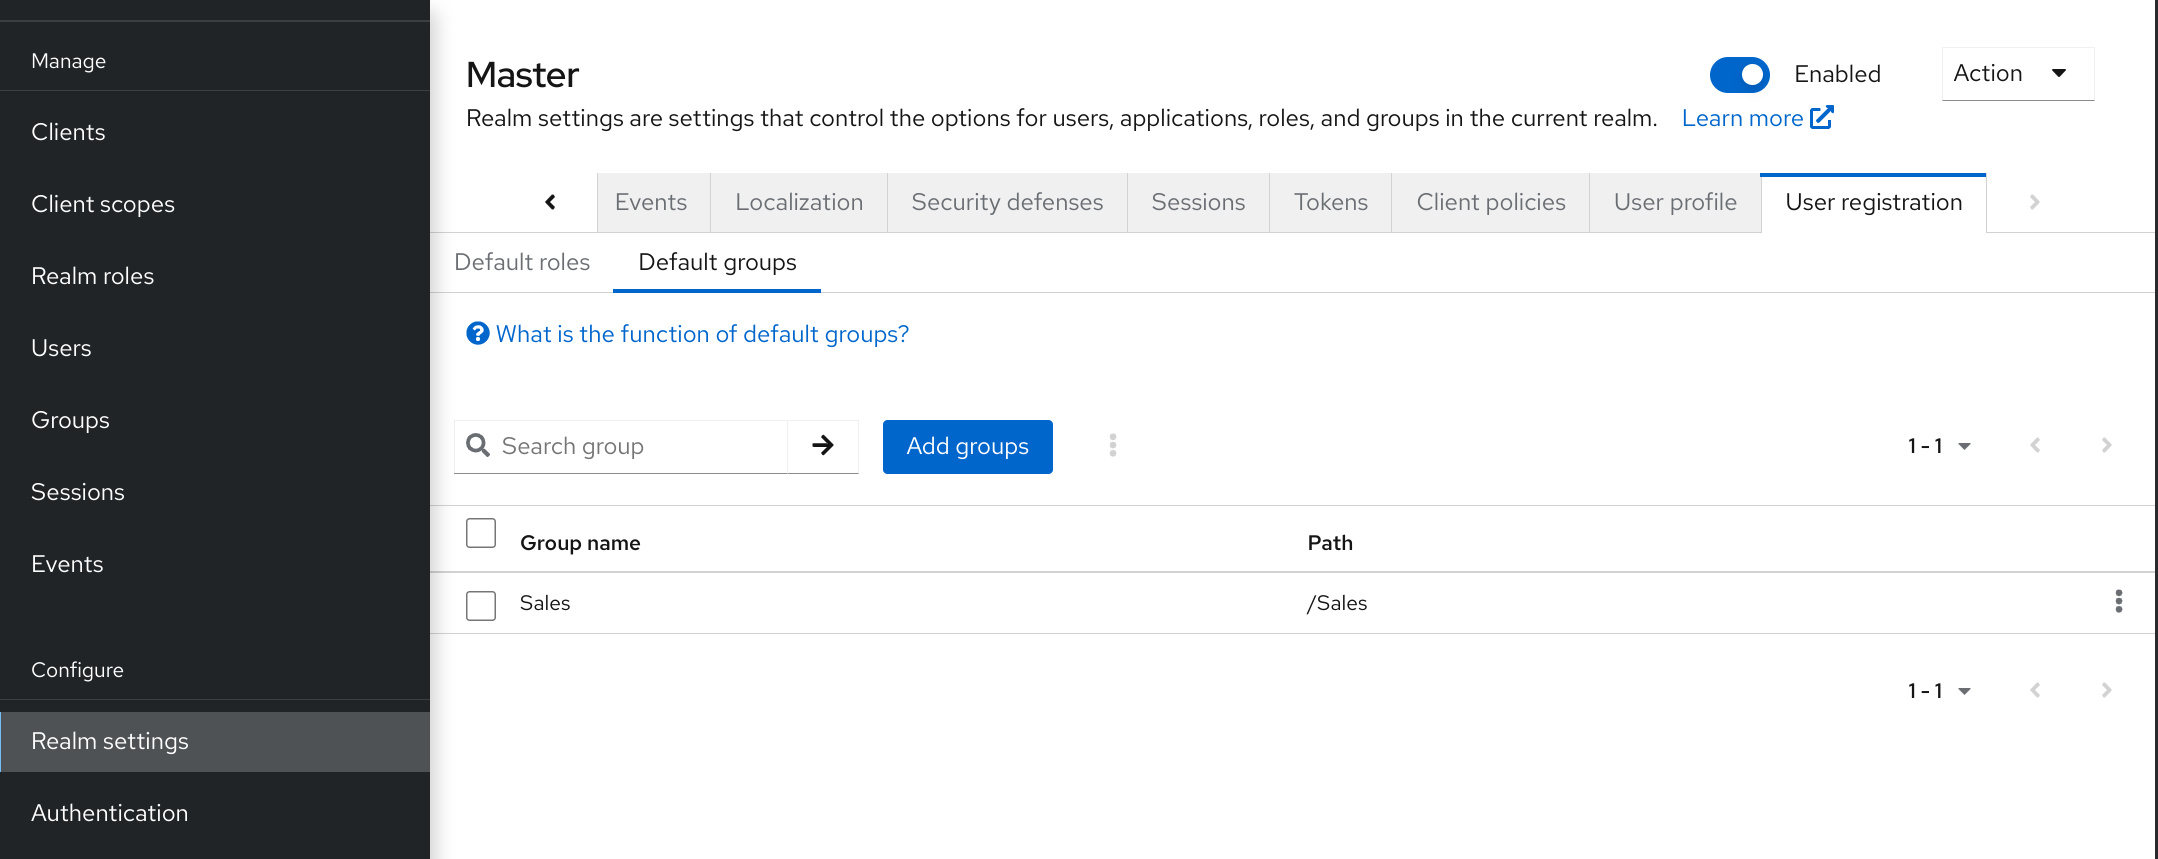
This screenshot shows that some default groups already exist.
Chapter 8. Configuring authentication
This chapter covers several authentication topics. These topics include:
- Enforcing strict password and One Time Password (OTP) policies.
- Managing different credential types.
- Logging in with Kerberos.
- Disabling and enabling built-in credential types.
8.1. Password policies
When Red Hat build of Keycloak creates a realm, it does not associate password policies with the realm. You can set a simple password with no restrictions on its length, security, or complexity. Simple passwords are unacceptable in production environments. Red Hat build of Keycloak has a set of password policies available through the Admin Console.
Procedure
- Click Authentication in the menu.
- Click the Policies tab.
- Select the policy to add in the Add policy drop-down box.
- Enter a value that applies to the policy chosen.
Click Save.
Password policy
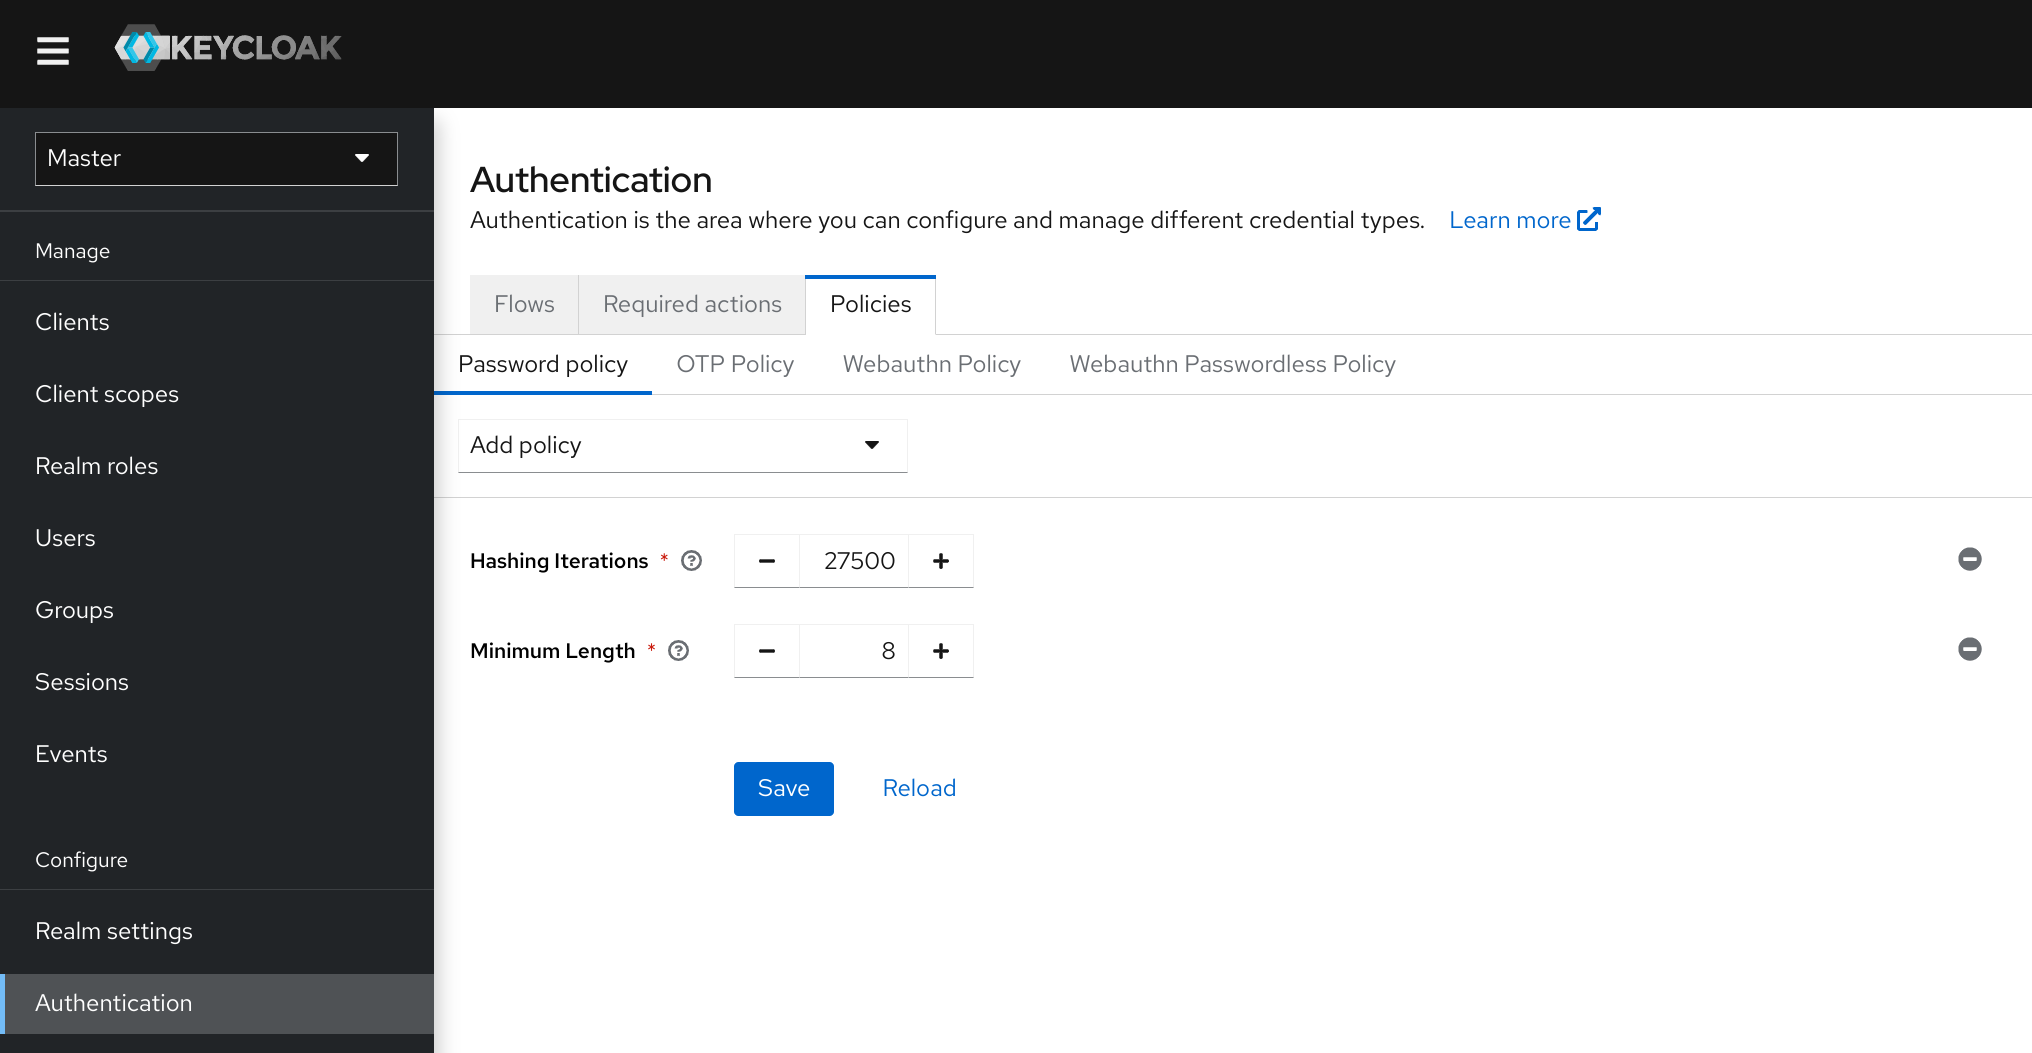
After saving the policy, Red Hat build of Keycloak enforces the policy for new users.
The new policy will not be effective for existing users. Therefore, make sure that you set the password policy from the beginning of the realm creation or add "Update password" to existing users or use "Expire password" to make sure that users update their passwords in next "N" days, which will actually adjust to new password policies.
8.1.1. Password policy types
8.1.1.1. HashAlgorithm
Passwords are not stored in cleartext. Before storage or validation, Red Hat build of Keycloak hashes passwords using standard hashing algorithms. PBKDF2 is the only built-in and default algorithm available. See the Server Developer Guide on how to add your own hashing algorithm.
If you change the hashing algorithm, password hashes in storage will not change until the user logs in.
8.1.1.2. Hashing iterations
Specifies the number of times Red Hat build of Keycloak hashes passwords before storage or verification. The default value is 27,500.
Red Hat build of Keycloak hashes passwords to ensure that hostile actors with access to the password database cannot read passwords through reverse engineering.
A high hashing iteration value can impact performance as it requires higher CPU power.
8.1.1.3. Digits
The number of numerical digits required in the password string.
8.1.1.4. Lowercase characters
The number of lower case letters required in the password string.
8.1.1.5. Uppercase characters
The number of upper case letters required in the password string.
8.1.1.6. Special characters
The number of special characters required in the password string.
8.1.1.7. Not username
The password cannot be the same as the username.
8.1.1.8. Not email
The password cannot be the same as the email address of the user.
8.1.1.9. Regular expression
Password must match one or more defined regular expression patterns.
8.1.1.10. Expire password
The number of days the password is valid. When the number of days has expired, the user must change their password.
8.1.1.11. Not recently used
Password cannot be already used by the user. Red Hat build of Keycloak stores a history of used passwords. The number of old passwords stored is configurable in Red Hat build of Keycloak.
8.1.1.12. Password blacklist
Password must not be in a blacklist file.
- Blacklist files are UTF-8 plain-text files with Unix line endings. Every line represents a blacklisted password.
- Red Hat build of Keycloak compares passwords in a case-insensitive manner. All passwords in the blacklist must be lowercase.
-
The value of the blacklist file must be the name of the blacklist file, for example,
100k_passwords.txt. Blacklist files resolve against
${kc.home.dir}/data/password-blacklists/by default. Customize this path using:-
The
keycloak.password.blacklists.pathsystem property. -
The
blacklistsPathproperty of thepasswordBlacklistpolicy SPI configuration. To configure the blacklist folder using the CLI, use--spi-password-policy-password-blacklist-blacklists-path=/path/to/blacklistsFolder.
-
The
A note about False Positives
The current implementation uses a BloomFilter for fast and memory efficient containment checks, such as whether a given password is contained in a blacklist, with the possibility for false positives.
-
By default a false positive probability of
0.01%is used. -
To change the false positive probability by CLI configuration, use
--spi-password-policy-password-blacklist-false-positive-probability=0.00001
8.2. One Time Password (OTP) policies
Red Hat build of Keycloak has several policies for setting up a FreeOTP or Google Authenticator One-Time Password generator.
Procedure
- Click Authentication in the menu.
- Click the Policy tab.
- Click the OTP Policy tab.
Otp Policy
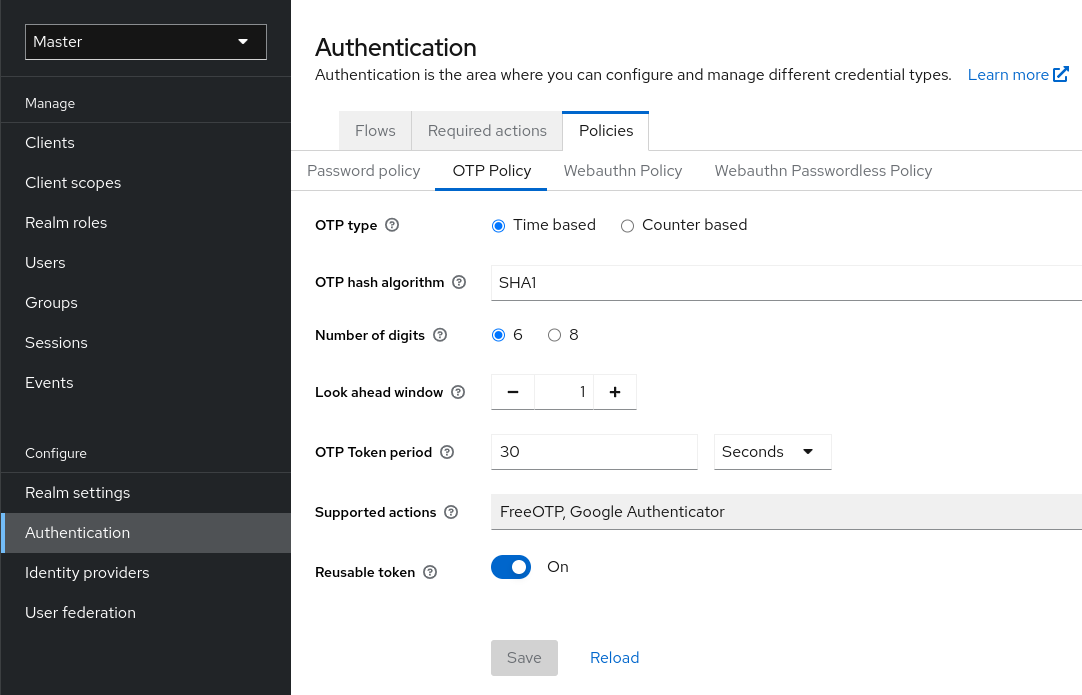
Red Hat build of Keycloak generates a QR code on the OTP set-up page, based on information configured in the OTP Policy tab. FreeOTP and Google Authenticator scan the QR code when configuring OTP.
8.2.1. Time-based or counter-based one time passwords
The algorithms available in Red Hat build of Keycloak for your OTP generators are time-based and counter-based.
With Time-Based One Time Passwords (TOTP), the token generator will hash the current time and a shared secret. The server validates the OTP by comparing the hashes within a window of time to the submitted value. TOTPs are valid for a short window of time.
With Counter-Based One Time Passwords (HOTP), Red Hat build of Keycloak uses a shared counter rather than the current time. The Red Hat build of Keycloak server increments the counter with each successful OTP login. Valid OTPs change after a successful login.
TOTP is more secure than HOTP because the matchable OTP is valid for a short window of time, while the OTP for HOTP is valid for an indeterminate amount of time. HOTP is more user-friendly than TOTP because no time limit exists to enter the OTP.
HOTP requires a database update every time the server increments the counter. This update is a performance drain on the authentication server during heavy load. To increase efficiency, TOTP does not remember passwords used, so there is no need to perform database updates. The drawback is that it is possible to re-use TOTPs in the valid time interval.
8.2.2. TOTP configuration options
8.2.2.1. OTP hash algorithm
The default algorithm is SHA1. The other, more secure options are SHA256 and SHA512.
8.2.2.2. Number of digits
The length of the OTP. Short OTP’s are user-friendly, easier to type, and easier to remember. Longer OTP’s are more secure than shorter OTP’s.
8.2.2.3. Look around window
The number of intervals the server attempts to match the hash. This option is present in Red Hat build of Keycloak if the clock of the TOTP generator or authentication server becomes out-of-sync. The default value of 1 is adequate. For example, if the time interval for a token is 30 seconds, the default value of 1 means it will accept valid tokens in the 90-second window (time interval 30 seconds + look ahead 30 seconds + look behind 30 seconds). Every increment of this value increases the valid window by 60 seconds (look ahead 30 seconds + look behind 30 seconds).
8.2.2.4. OTP token period
The time interval in seconds the server matches a hash. Each time the interval passes, the token generator generates a TOTP.
8.2.2.5. Reusable code
Determine whether OTP tokens can be reused in the authentication process or user needs to wait for the next token. Users cannot reuse those tokens by default, and the administrator needs to explicitly specify that those tokens can be reused.
8.2.3. HOTP configuration options
8.2.3.1. OTP hash algorithm
The default algorithm is SHA1. The other, more secure options are SHA256 and SHA512.
8.2.3.2. Number of digits
The length of the OTP. Short OTPs are user-friendly, easier to type, and easier to remember. Longer OTPs are more secure than shorter OTPs.
8.2.3.3. Look around window
The number of previous and following intervals the server attempts to match the hash. This option is present in Red Hat build of Keycloak if the clock of the TOTP generator or authentication server become out-of-sync. The default value of 1 is adequate. This option is present in Red Hat build of Keycloak to cover when the user’s counter gets ahead of the server.
8.2.3.4. Initial counter
The value of the initial counter.
8.3. Authentication flows
An authentication flow is a container of authentications, screens, and actions, during log in, registration, and other Red Hat build of Keycloak workflows.
8.3.1. Built-in flows
Red Hat build of Keycloak has several built-in flows. You cannot modify these flows, but you can alter the flow’s requirements to suit your needs.
Procedure
- Click Authentication in the menu.
- Click on the Browser item in the list to see the details.
Browser flow

8.3.1.1. Auth type
The name of the authentication or the action to execute. If an authentication is indented, it is in a sub-flow. It may or may not be executed, depending on the behavior of its parent.
Cookie
The first time a user logs in successfully, Red Hat build of Keycloak sets a session cookie. If the cookie is already set, this authentication type is successful. Since the cookie provider returned success and each execution at this level of the flow is alternative, Red Hat build of Keycloak does not perform any other execution. This results in a successful login.
Kerberos
This authenticator is disabled by default and is skipped during the Browser Flow.
Identity Provider Redirector
This action is configured through the Actions > Config link. It redirects to another IdP for identity brokering.
Forms
Since this sub-flow is marked as alternative, it will not be executed if the Cookie authentication type passed. This sub-flow contains an additional authentication type that needs to be executed. Red Hat build of Keycloak loads the executions for this sub-flow and processes them.
The first execution is the Username Password Form, an authentication type that renders the username and password page. It is marked as required, so the user must enter a valid username and password.
The second execution is the Browser - Conditional OTP sub-flow. This sub-flow is conditional and executes depending on the result of the Condition - User Configured execution. If the result is true, Red Hat build of Keycloak loads the executions for this sub-flow and processes them.
The next execution is the Condition - User Configured authentication. This authentication checks if Red Hat build of Keycloak has configured other executions in the flow for the user. The Browser - Conditional OTP sub-flow executes only when the user has a configured OTP credential.
The final execution is the OTP Form. Red Hat build of Keycloak marks this execution as required but it runs only when the user has an OTP credential set up because of the setup in the conditional sub-flow. If not, the user does not see an OTP form.
8.3.1.2. Requirement
A set of radio buttons that control the execution of an action executes.
8.3.1.2.1. Required
All Required elements in the flow must be successfully sequentially executed. The flow terminates if a required element fails.
8.3.1.2.2. Alternative
Only a single element must successfully execute for the flow to evaluate as successful. Because the Required flow elements are sufficient to mark a flow as successful, any Alternative flow element within a flow containing Required flow elements will not execute.
8.3.1.2.3. Disabled
The element does not count to mark a flow as successful.
8.3.1.2.4. Conditional
This requirement type is only set on sub-flows.
- A Conditional sub-flow contains executions. These executions must evaluate to logical statements.
- If all executions evaluate as true, the Conditional sub-flow acts as Required.
- If any executions evaluate as false, the Conditional sub-flow acts as Disabled.
- If you do not set an execution, the Conditional sub-flow acts as Disabled.
- If a flow contains executions and the flow is not set to Conditional, Red Hat build of Keycloak does not evaluate the executions, and the executions are considered functionally Disabled.
8.3.2. Creating flows
Important functionality and security considerations apply when you design a flow.
To create a flow, perform the following:
Procedure
- Click Authentication in the menu.
- Click Create flow.
You can copy and then modify an existing flow. Click the "Action list" (the three dots at the end of the row), click Duplicate, and enter a name for the new flow.
When creating a new flow, you must create a top-level flow first with the following options:
- Name
- The name of the flow.
- Description
- The description you can set to the flow.
- Top-Level Flow Type
- The type of flow. The type client is used only for the authentication of clients (applications). For all other cases, choose basic.
Create a top-level flow
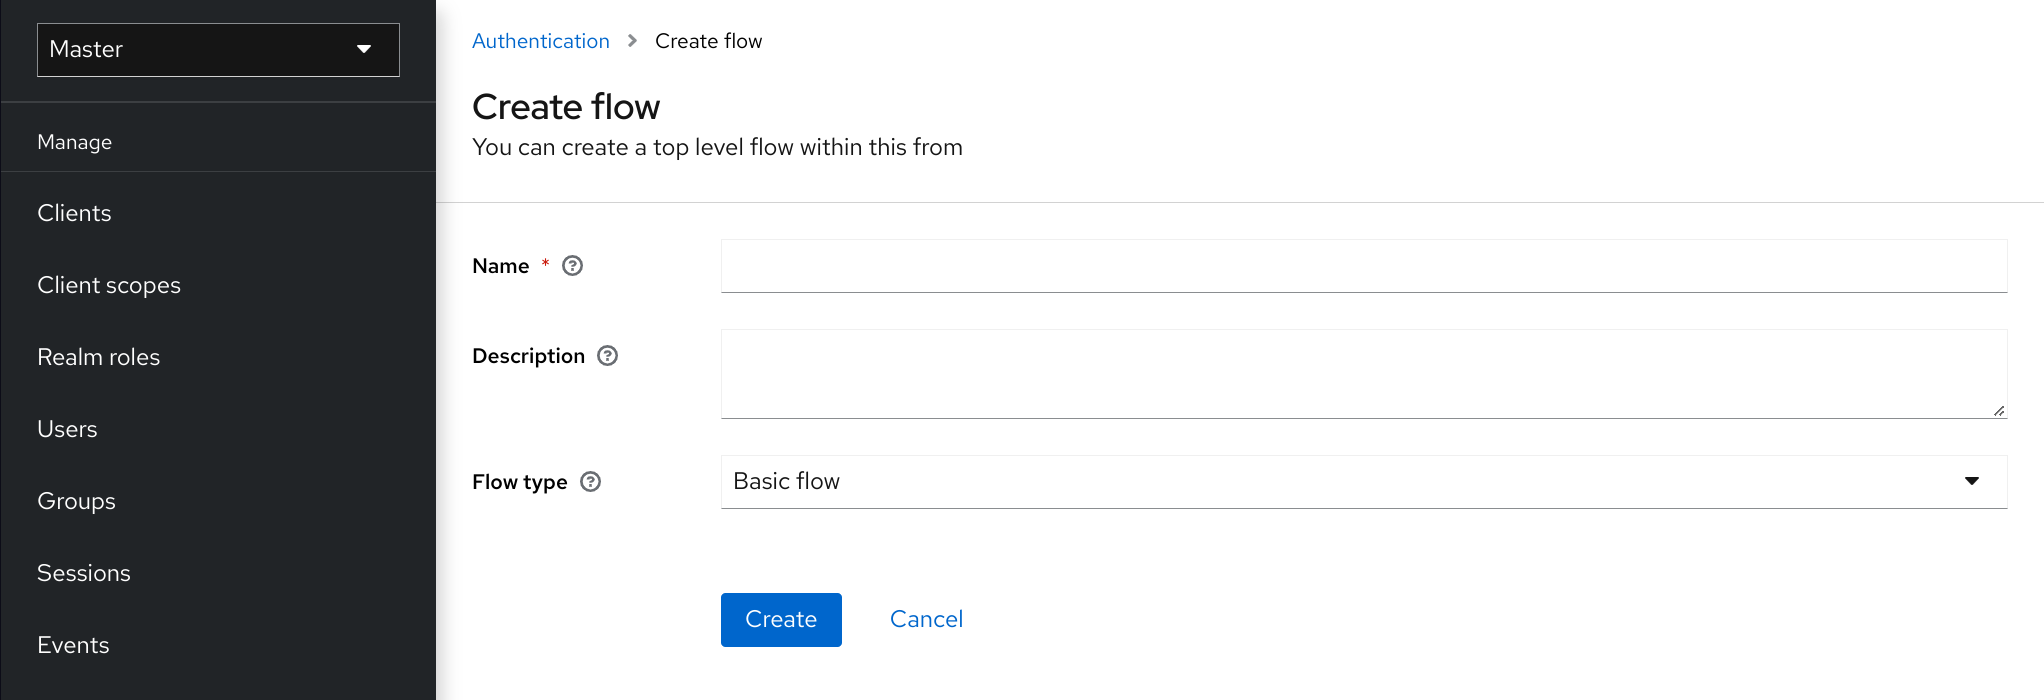
When Red Hat build of Keycloak has created the flow, Red Hat build of Keycloak displays the Add step, and Add sub-flow buttons.
An empty new flow
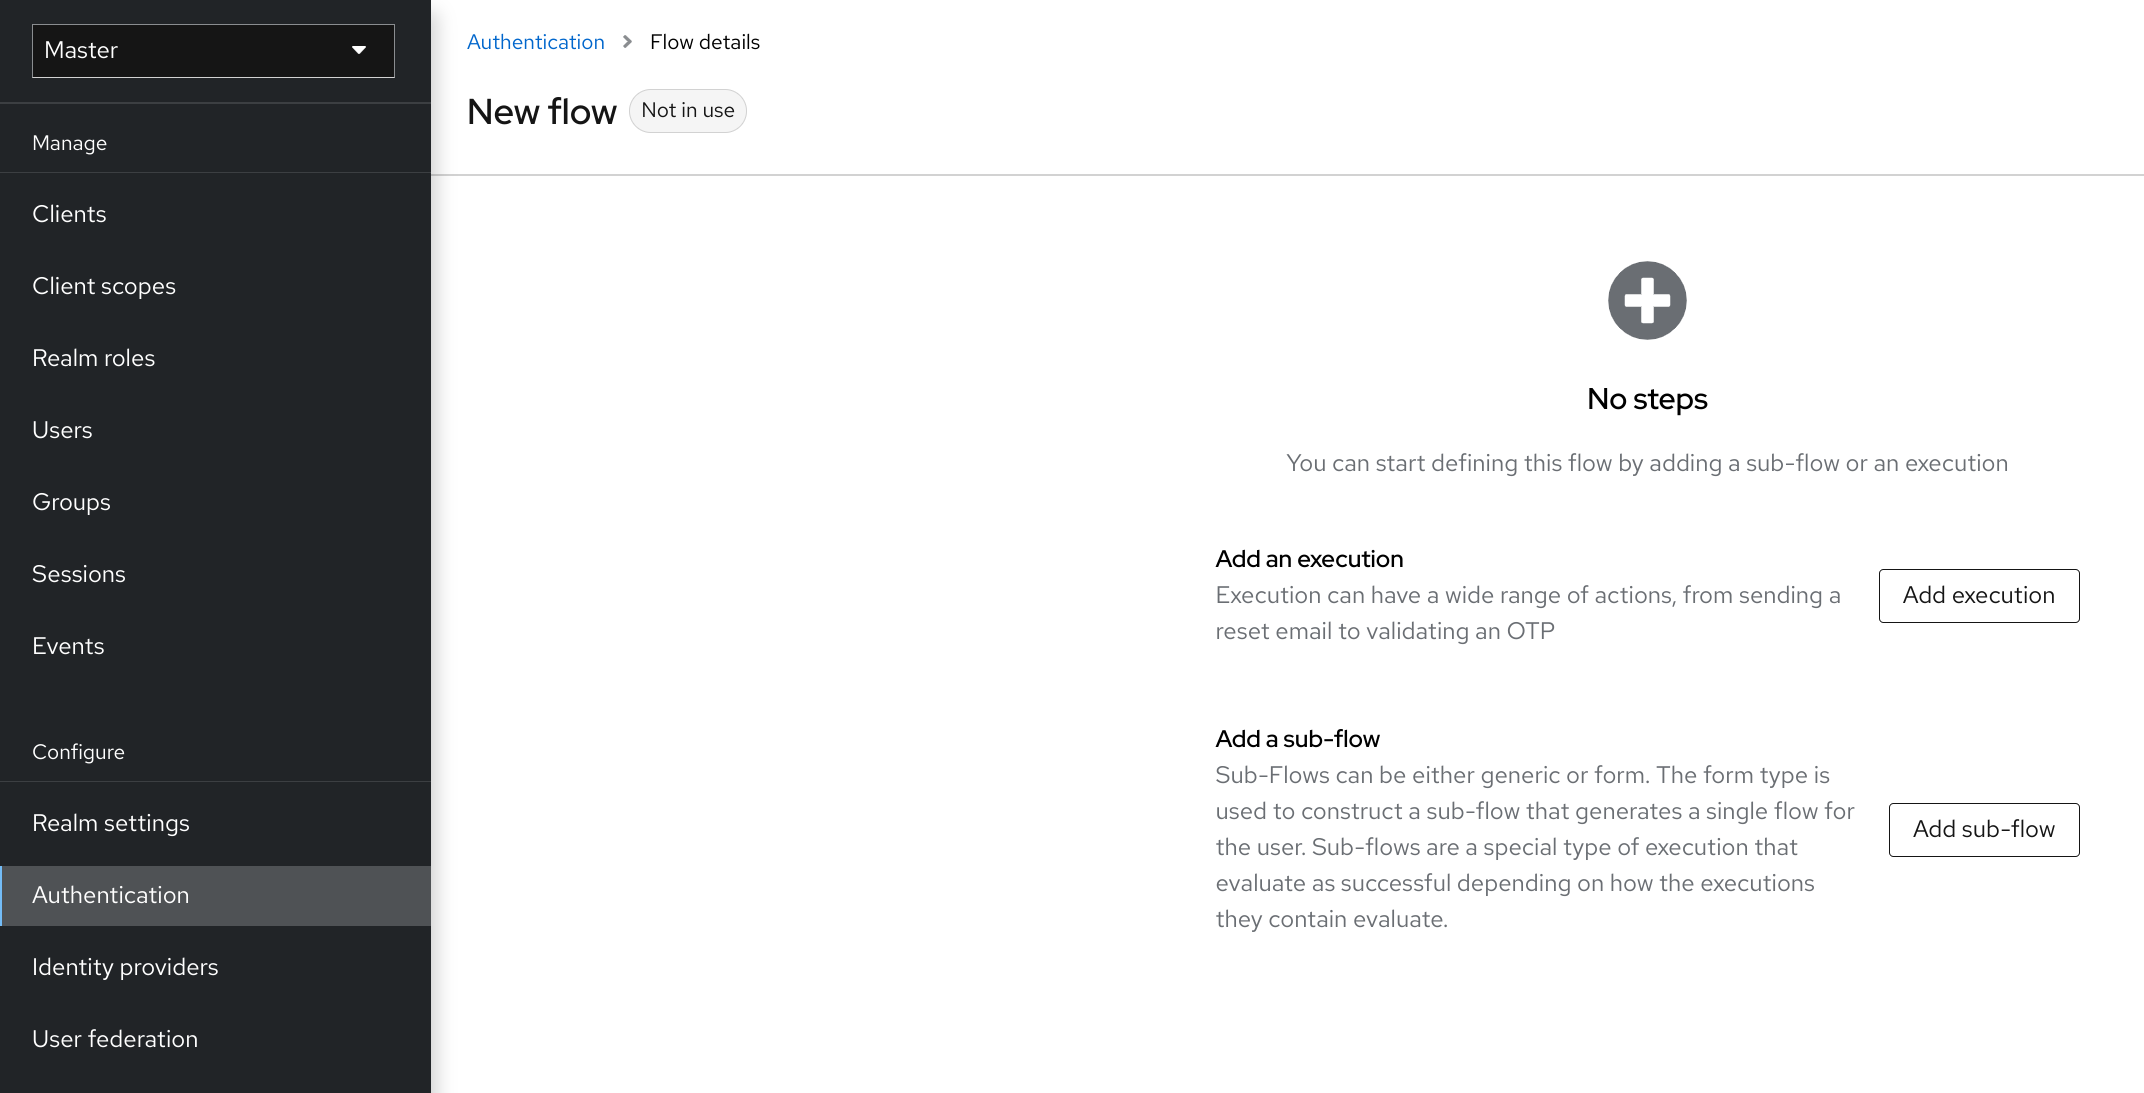
Three factors determine the behavior of flows and sub-flows.
- The structure of the flow and sub-flows.
- The executions within the flows
- The requirements set within the sub-flows and the executions.
Executions have a wide variety of actions, from sending a reset email to validating an OTP. Add executions with the Add step button.
Adding an authentication execution
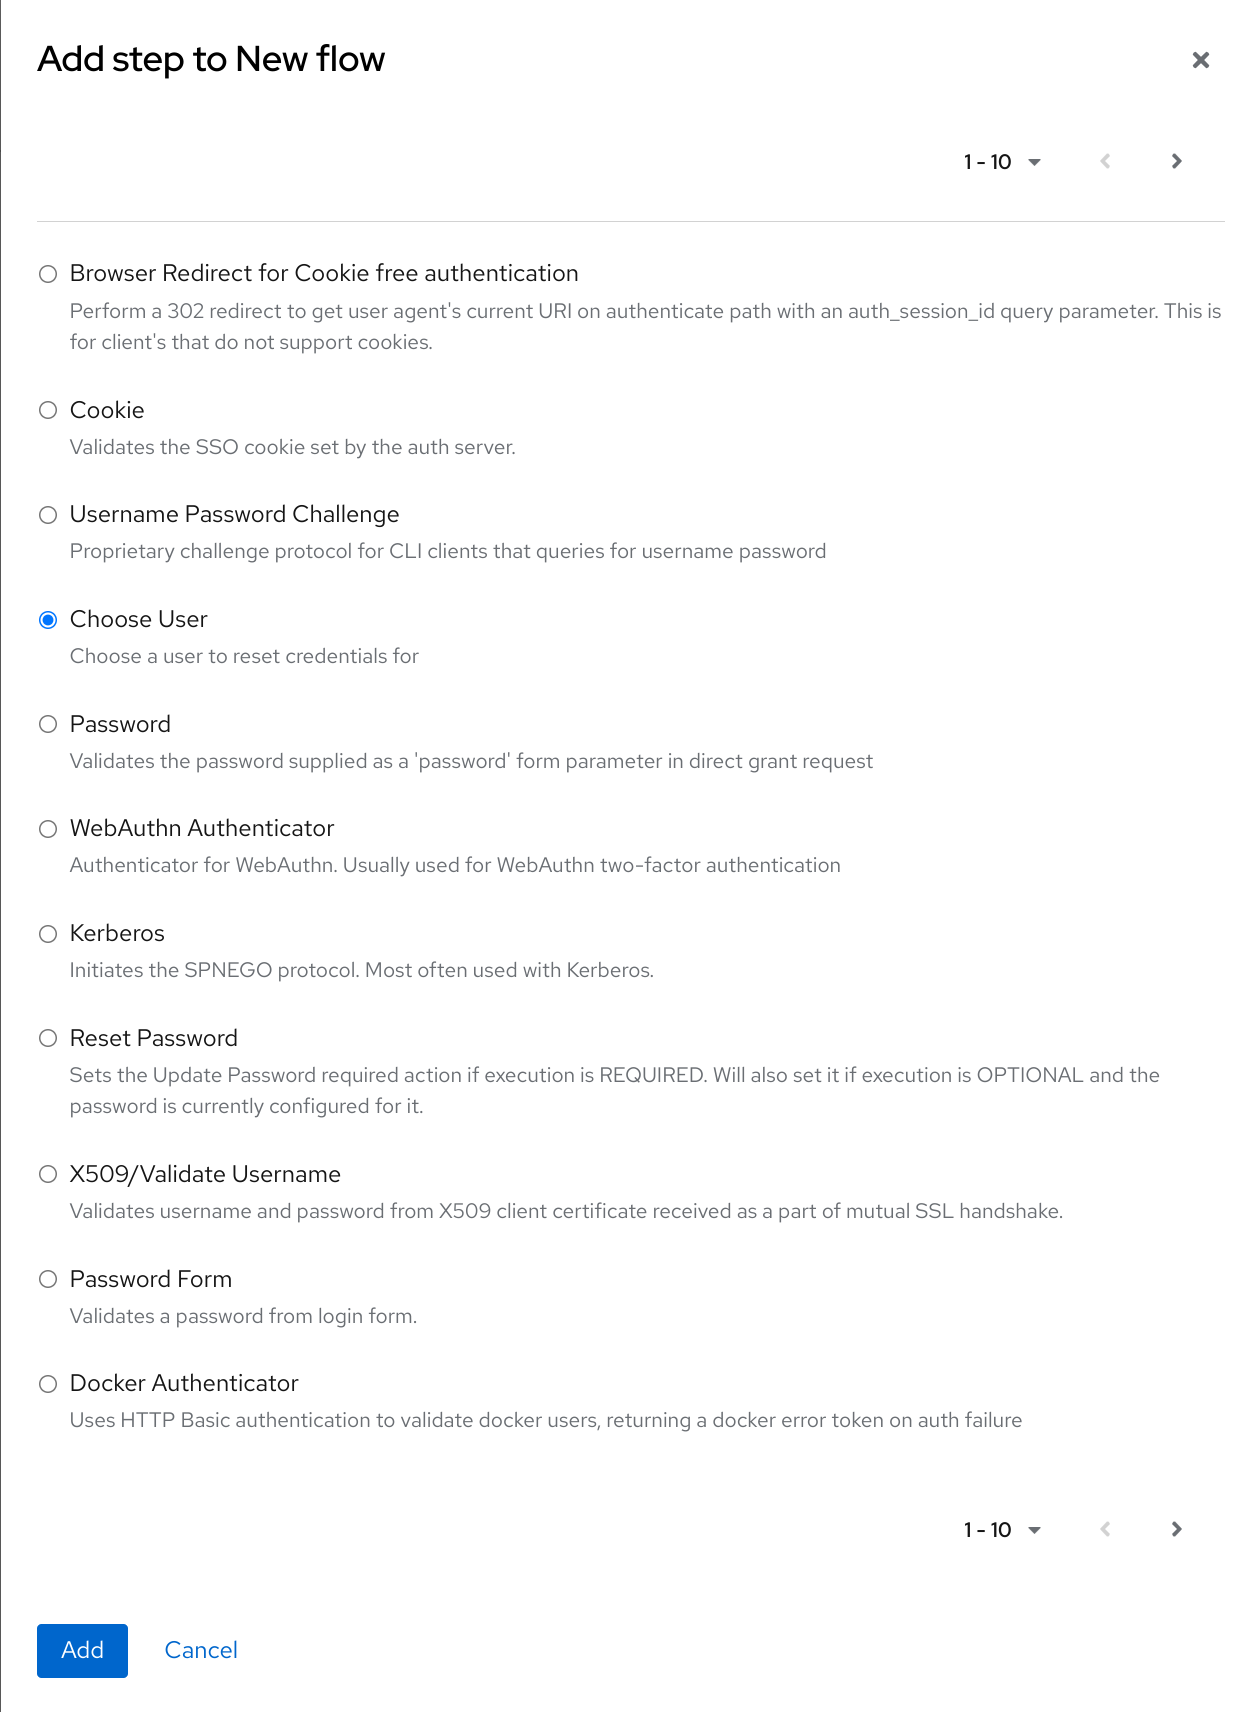
Two types of executions exist, automatic executions and interactive executions. Automatic executions are similar to the Cookie execution and will automatically perform their action in the flow. Interactive executions halt the flow to get input. Executions executing successfully set their status to success. For a flow to complete, it needs at least one execution with a status of success.
You can add sub-flows to top-level flows with the Add sub-flow button. The Add sub-flow button displays the Create Execution Flow page. This page is similar to the Create Top Level Form page. The difference is that the Flow Type can be basic (default) or form. The form type constructs a sub-flow that generates a form for the user, similar to the built-in Registration flow. Sub-flows success depends on how their executions evaluate, including their contained sub-flows. See the execution requirements section for an in-depth explanation of how sub-flows work.
After adding an execution, check the requirement has the correct value.
All elements in a flow have a Delete option next to the element. Some executions have a ⚙️ menu item (the gear icon) to configure the execution. It is also possible to add executions and sub-flows to sub-flows with the Add step and Add sub-flow links.
Since the order of execution is important, you can move executions and sub-flows up and down by dragging their names.
Make sure to properly test your configuration when you configure the authentication flow to confirm that no security holes exist in your setup. We recommend that you test various corner cases. For example, consider testing the authentication behavior for a user when you remove various credentials from the user’s account before authentication.
As an example, when 2nd-factor authenticators, such as OTP Form or WebAuthn Authenticator, are configured in the flow as REQUIRED and the user does not have credential of particular type, the user will be able to set up the particular credential during authentication itself. This situation means that the user does not authenticate with this credential as he set up it right during the authentication. So for browser authentication, make sure to configure your authentication flow with some 1st-factor credentials such as Password or WebAuthn Passwordless Authenticator.
8.3.3. Creating a password-less browser login flow
To illustrate the creation of flows, this section describes creating an advanced browser login flow. The purpose of this flow is to allow a user a choice between logging in using a password-less manner with WebAuthn, or two-factor authentication with a password and OTP.
Procedure
- Click Authentication in the menu.
- Click the Flows tab.
- Click Create flow.
-
Enter
Browser Password-lessas a name. - Click Create.
- Click Add execution.
- Select Cookie from the list.
- Click Add.
- Select Alternative for the Cookie authentication type to set its requirement to alternative.
- Click Add step.
- Select Kerberos from the list.
- Click Add.
- Click Add step.
- Select Identity Provider Redirector from the list.
- Click Add.
- Select Alternative for the Identity Provider Redirector authentication type to set its requirement to alternative.
- Click Add sub-flow.
- Enter Forms as a name.
- Click Add.
Select Alternative for the Forms authentication type to set its requirement to alternative.
The common part with the browser flow
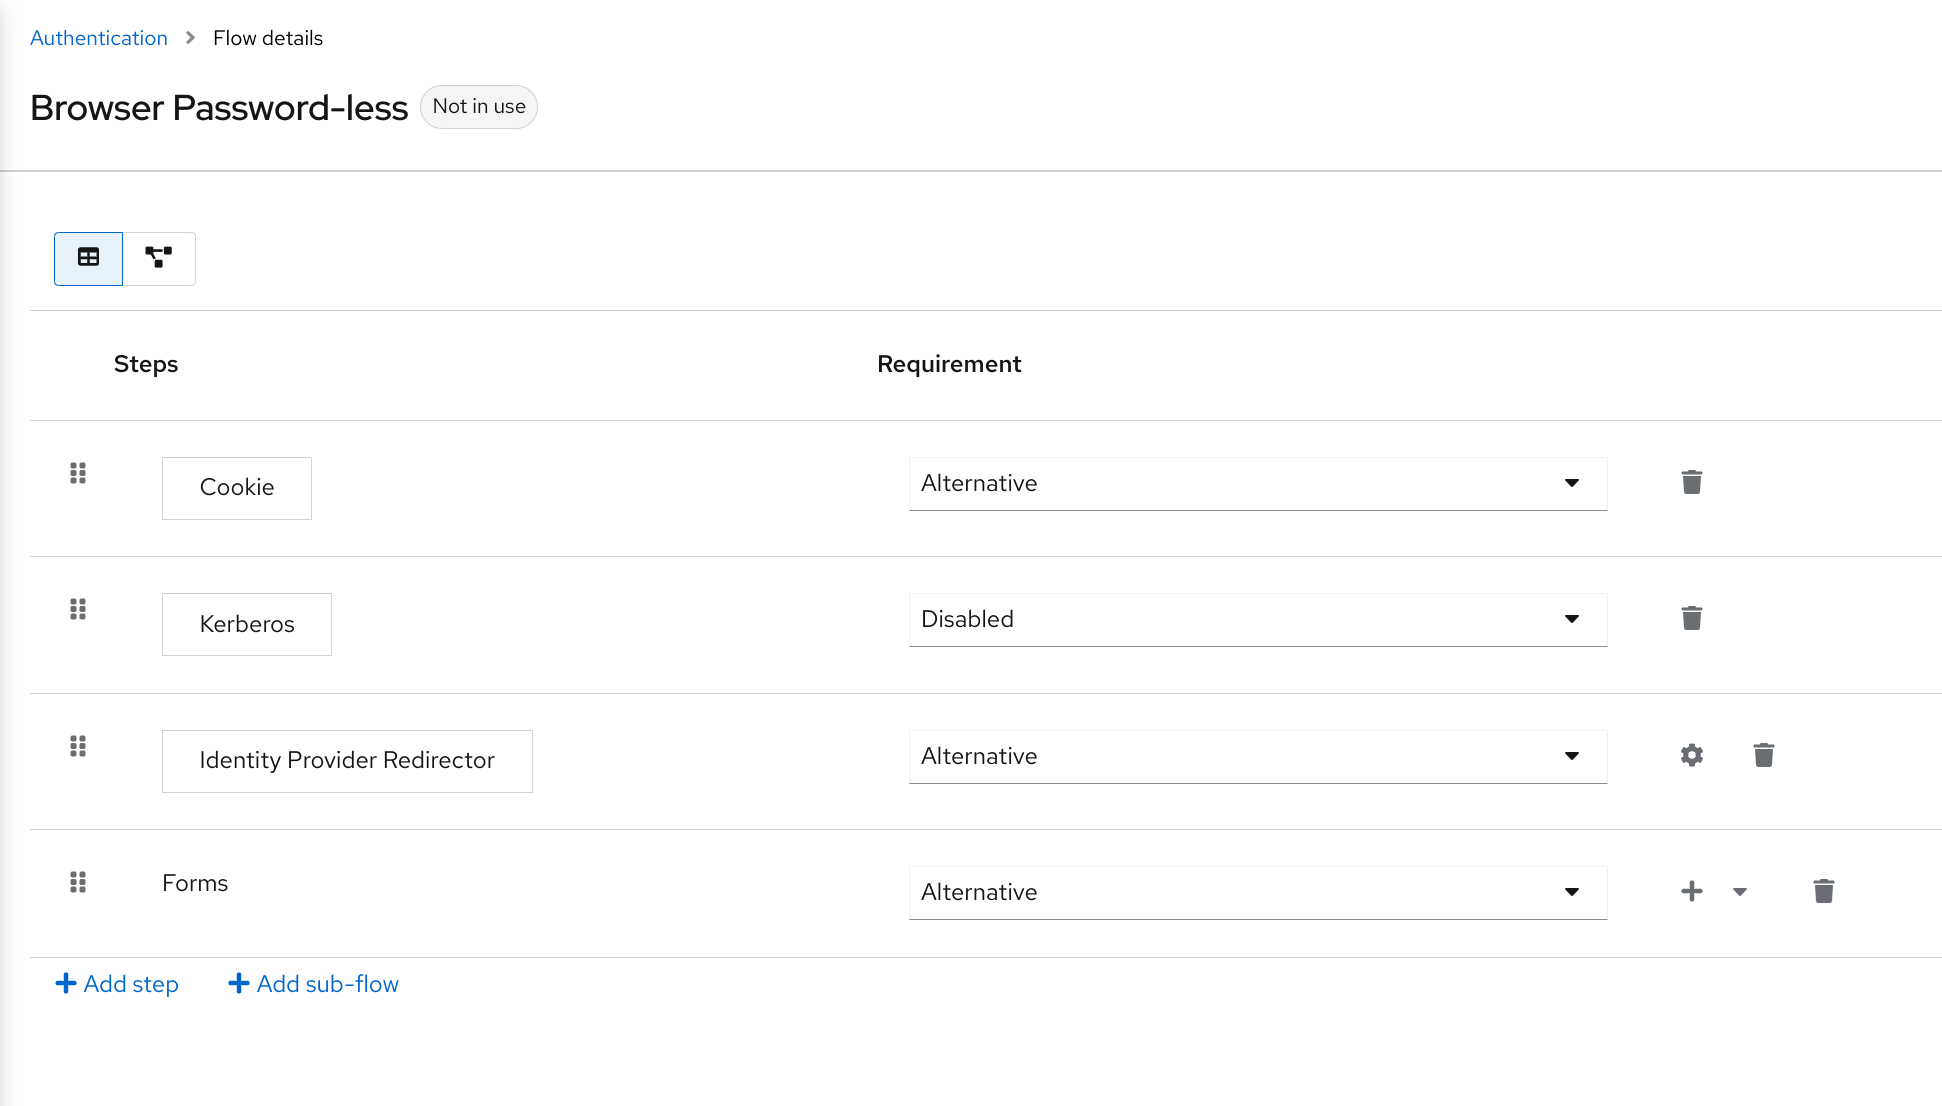
- Click + menu of the Forms execution.
- Select Add step.
- Select Username Form from the list.
- Click Add.
At this stage, the form requires a username but no password. We must enable password authentication to avoid security risks.
- Click + menu of the Forms sub-flow.
- Click Add sub-flow.
-
Enter
Authenticationas name. - Click Add.
- Select Required for the Authentication authentication type to set its requirement to required.
- Click + menu of the Authentication sub-flow.
- Click Add step.
- Select WebAuthn Passwordless Authenticator from the list.
- Click Add.
- Select Alternative for the Webauthn Passwordless Authenticator authentication type to set its requirement to alternative.
- Click + menu of the Authentication sub-flow.
- Click Add sub-flow.
-
Enter
Password with OTPas name. - Click Add.
- Select Alternative for the Password with OTP authentication type to set its requirement to alternative.
- Click + menu of the Password with OTP sub-flow.
- Click Add step.
- Select Password Form from the list.
- Click Add.
- Select Required for the Password Form authentication type to set its requirement to required.
- Click + menu of the Password with OTP sub-flow.
- Click Add step.
- Select OTP Form from the list.
- Click Add.
- Click Required for the OTP Form authentication type to set its requirement to required.
Finally, change the bindings.
- Click the Action menu at the top of the screen.
- Select Bind flow from the menu.
- Click the Browser Flow drop-down list.
- Click Save.
A password-less browser login
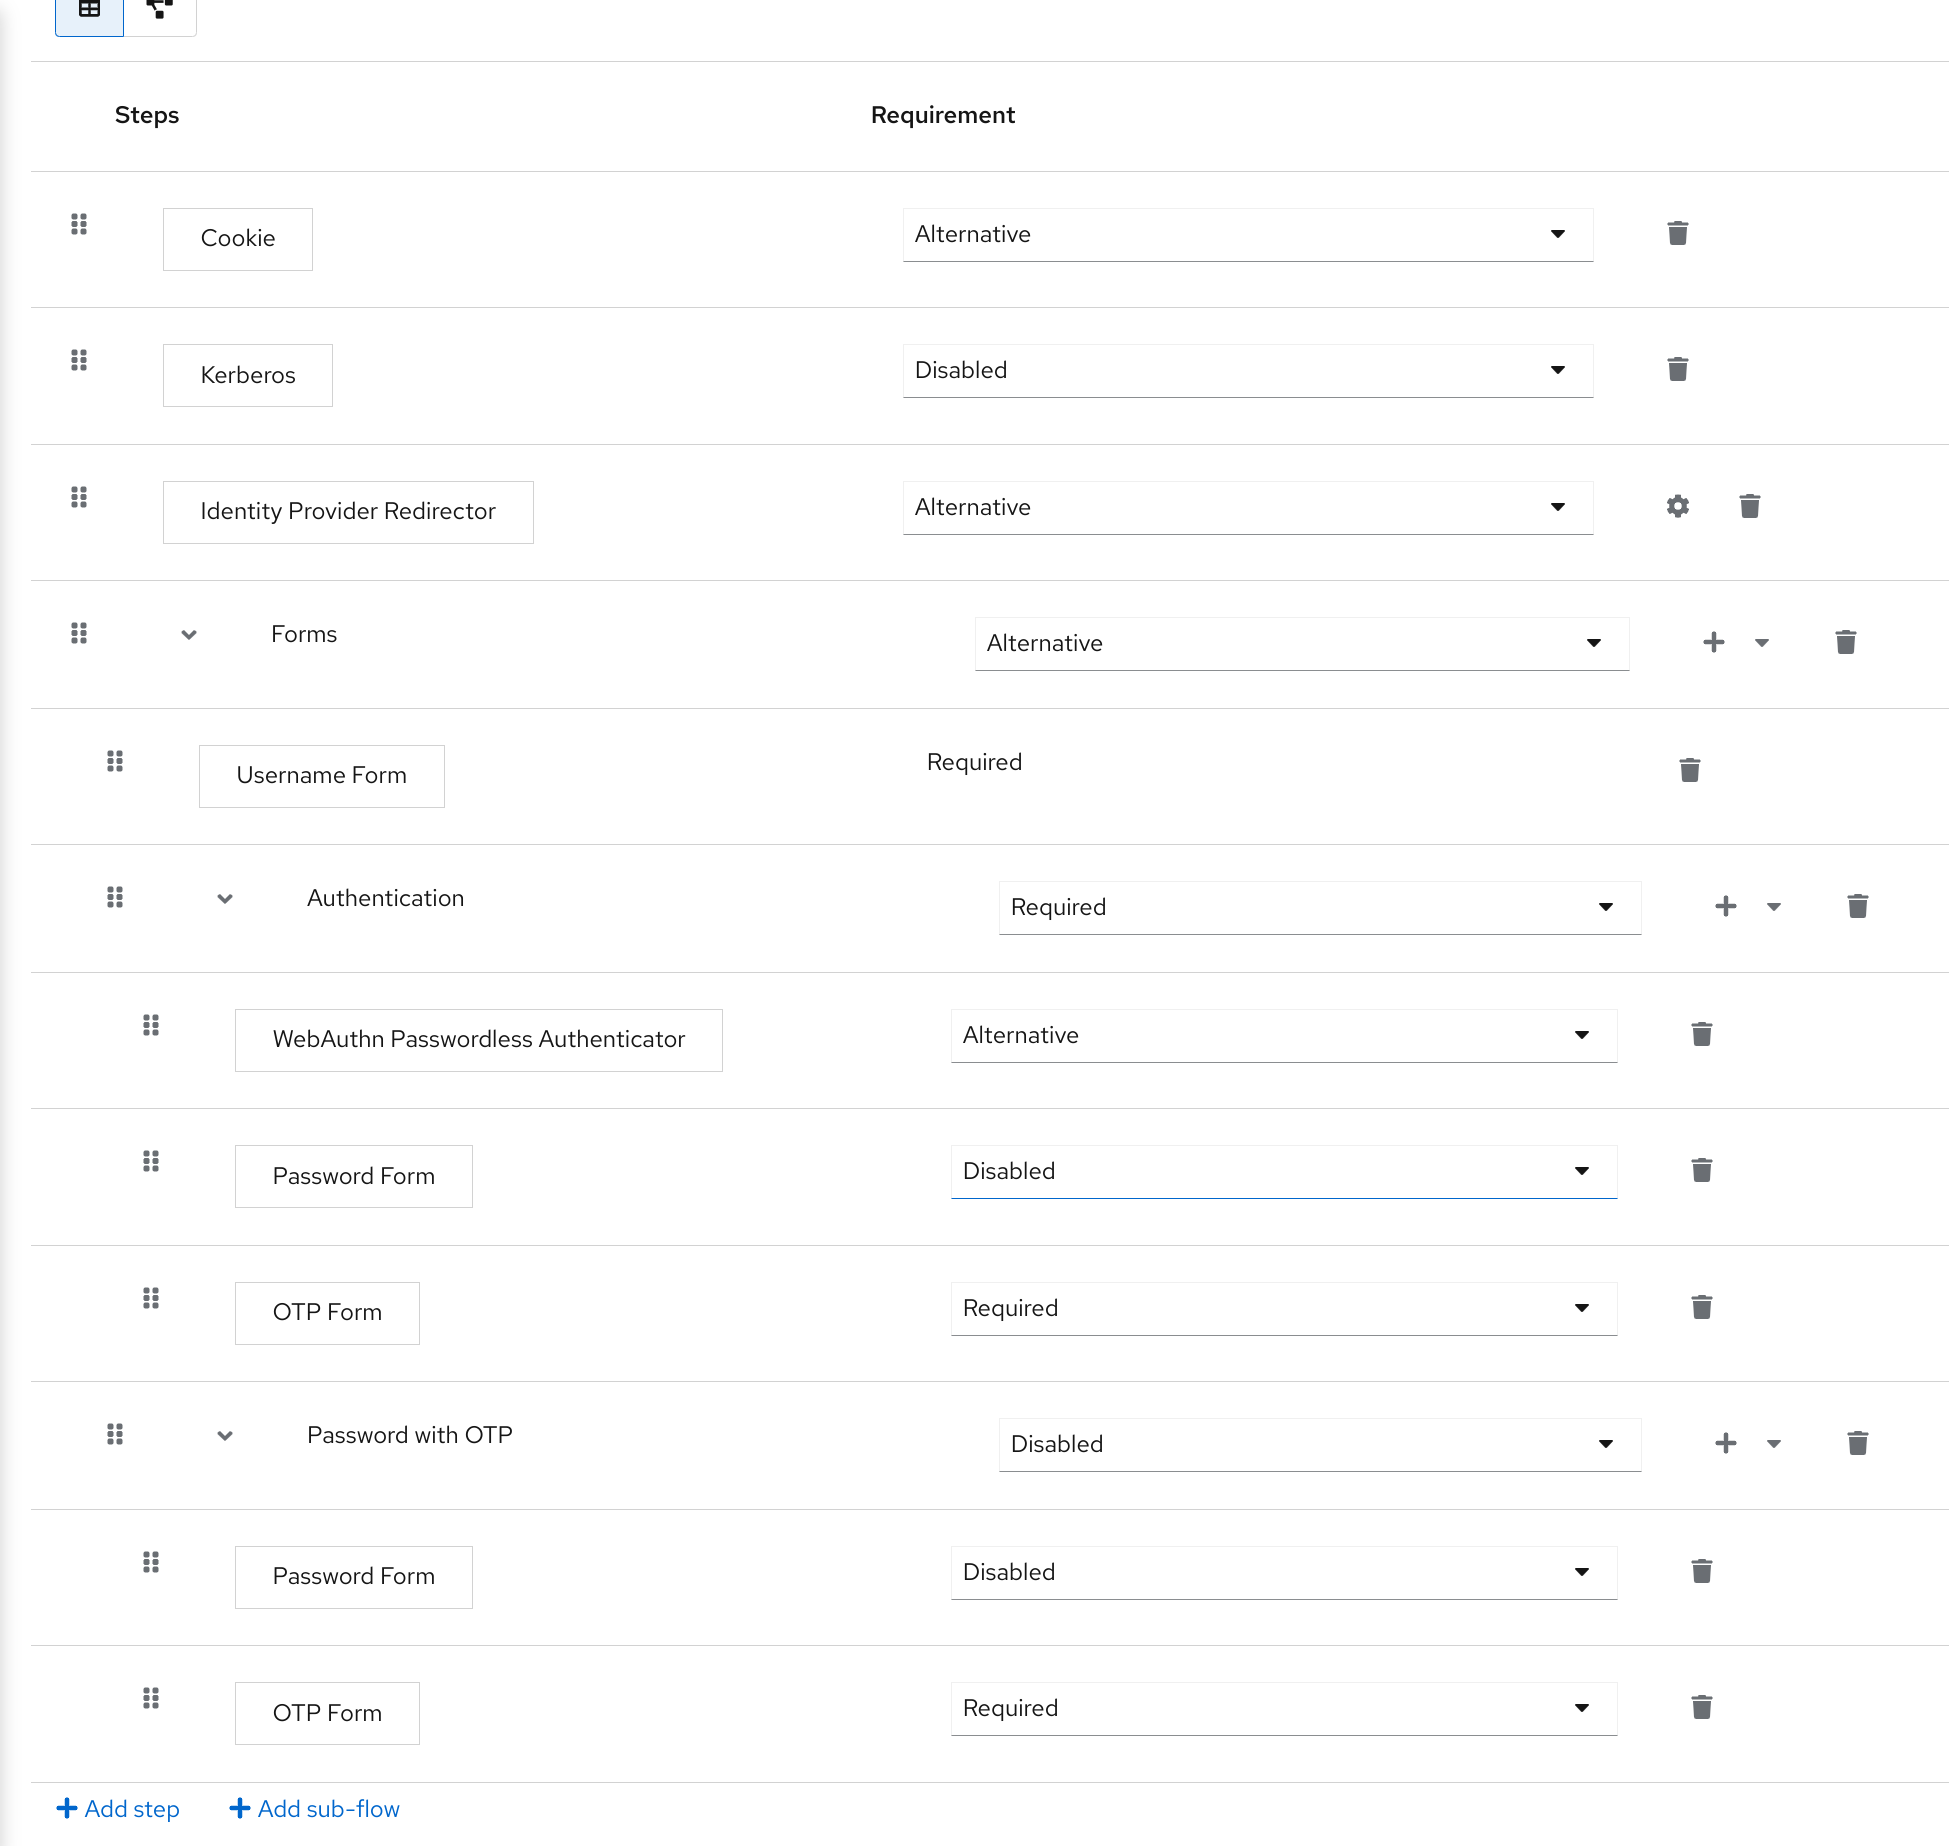
After entering the username, the flow works as follows:
If users have WebAuthn passwordless credentials recorded, they can use these credentials to log in directly. This is the password-less login. The user can also select Password with OTP because the WebAuthn Passwordless execution and the Password with OTP flow are set to Alternative. If they are set to Required, the user has to enter WebAuthn, password, and OTP.
If the user selects the Try another way link with WebAuthn passwordless authentication, the user can choose between Password and Security Key (WebAuthn passwordless). When selecting the password, the user will need to continue and log in with the assigned OTP. If the user has no WebAuthn credentials, the user must enter the password and then the OTP. If the user has no OTP credential, they will be asked to record one.
Since the WebAuthn Passwordless execution is set to Alternative rather than Required, this flow will never ask the user to register a WebAuthn credential. For a user to have a Webauthn credential, an administrator must add a required action to the user. Do this by:
- Enabling the Webauthn Register Passwordless required action in the realm (see the WebAuthn documentation).
- Setting the required action using the Credential Reset part of a user’s Credentials management menu.
Creating an advanced flow such as this can have side effects. For example, if you enable the ability to reset the password for users, this would be accessible from the password form. In the default Reset Credentials flow, users must enter their username. Since the user has already entered a username earlier in the Browser Password-less flow, this action is unnecessary for Red Hat build of Keycloak and suboptimal for user experience. To correct this problem, you can:
-
Duplicate the
Reset Credentialsflow. Set its name toReset Credentials for password-less, for example. - Click Delete (trash icon) of the Choose user step.
- In the Action menu, select Bind flow and select Reset credentials flow from the dropdown and click Save
8.3.4. Creating a browser login flow with step-up mechanism
This section describes how to create advanced browser login flow using the step-up mechanism. The purpose of step-up authentication is to allow access to clients or resources based on a specific authentication level of a user.
Procedure
- Click Authentication in the menu.
- Click the Flows tab.
- Click Create flow.
-
Enter
Browser Incl Step up Mechanismas a name. - Click Save.
- Click Add execution.
- Select Cookie from the list.
- Click Add.
- Select Alternative for the Cookie authentication type to set its requirement to alternative.
- Click Add sub-flow.
- Enter Auth Flow as a name.
- Click Add.
- Click Alternative for the Auth Flow authentication type to set its requirement to alternative.
Now you configure the flow for the first authentication level.
- Click + menu of the Auth Flow.
- Click Add sub-flow.
-
Enter
1st Condition Flowas a name. - Click Add.
- Click Conditional for the 1st Condition Flow authentication type to set its requirement to conditional.
- Click + menu of the 1st Condition Flow.
- Click Add condition.
- Select Conditional - Level Of Authentication from the list.
- Click Add.
- Click Required for the Conditional - Level Of Authentication authentication type to set its requirement to required.
- Click ⚙️ (gear icon).
-
Enter
Level 1as an alias. -
Enter
1for the Level of Authentication (LoA). -
Set Max Age to 36000. This value is in seconds and it is equivalent to 10 hours, which is the default
SSO Session Maxtimeout set in the realm. As a result, when a user authenticates with this level, subsequent SSO logins can re-use this level and the user does not need to authenticate with this level until the end of the user session, which is 10 hours by default. Click Save
Configure the condition for the first authentication level
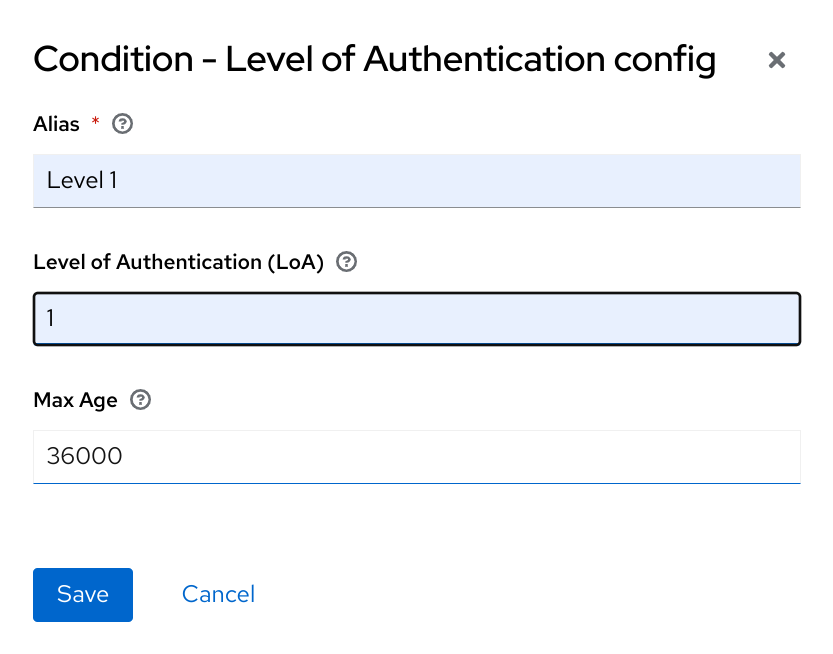
- Click + menu of the 1st Condition Flow.
- Click Add step.
- Select Username Password Form from the list.
- Click Add.
Now you configure the flow for the second authentication level.
- Click + menu of the Auth Flow.
- Click Add sub-flow.
-
Enter
2nd Condition Flowas an alias. - Click Add.
- Click Conditional for the 2nd Condition Flow authentication type to set its requirement to conditional.
- Click + menu of the 2nd Condition Flow.
- Click Add condition.
- Select Conditional - Level Of Authentication from the item list.
- Click Add.
- Click Required for the Conditional - Level Of Authentication authentication type to set its requirement to required.
- Click ⚙️ (gear icon).
-
Enter
Level 2as an alias. -
Enter
2for the Level of Authentication (LoA). - Set Max Age to 0. As a result, when a user authenticates, this level is valid just for the current authentication, but not any subsequent SSO authentications. So the user will always need to authenticate again with this level when this level is requested.
Click Save
Configure the condition for the second authentication level
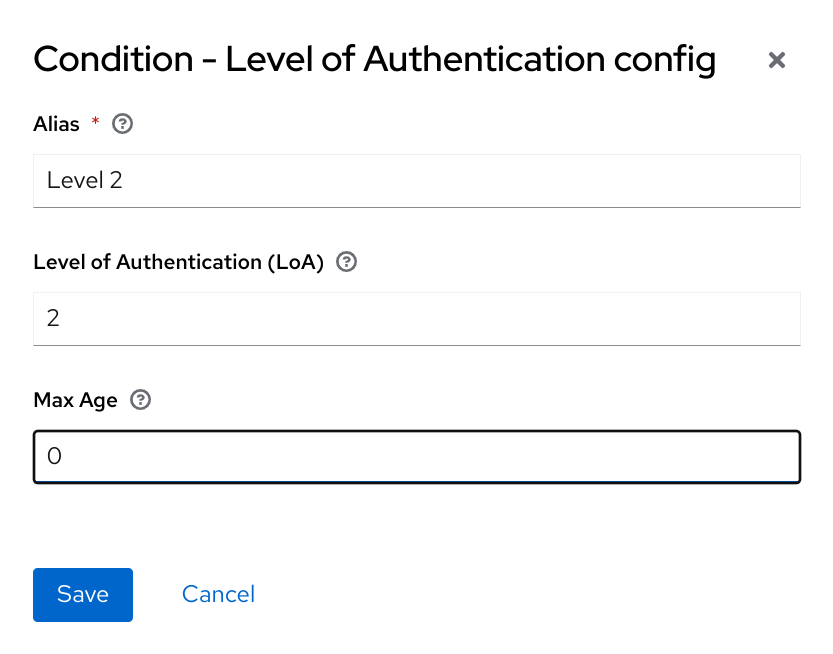
- Click + menu of the 2nd Condition Flow.
- Click Add step.
- Select OTP Form from the list.
- Click Add.
- Click Required for the OTP Form authentication type to set its requirement to required.
Finally, change the bindings.
- Click the Action menu at the top of the screen.
- Select Bind flow from the list.
- Select Browser Flow in the dropdown.
- Click Save.
Browser login with step-up mechanism
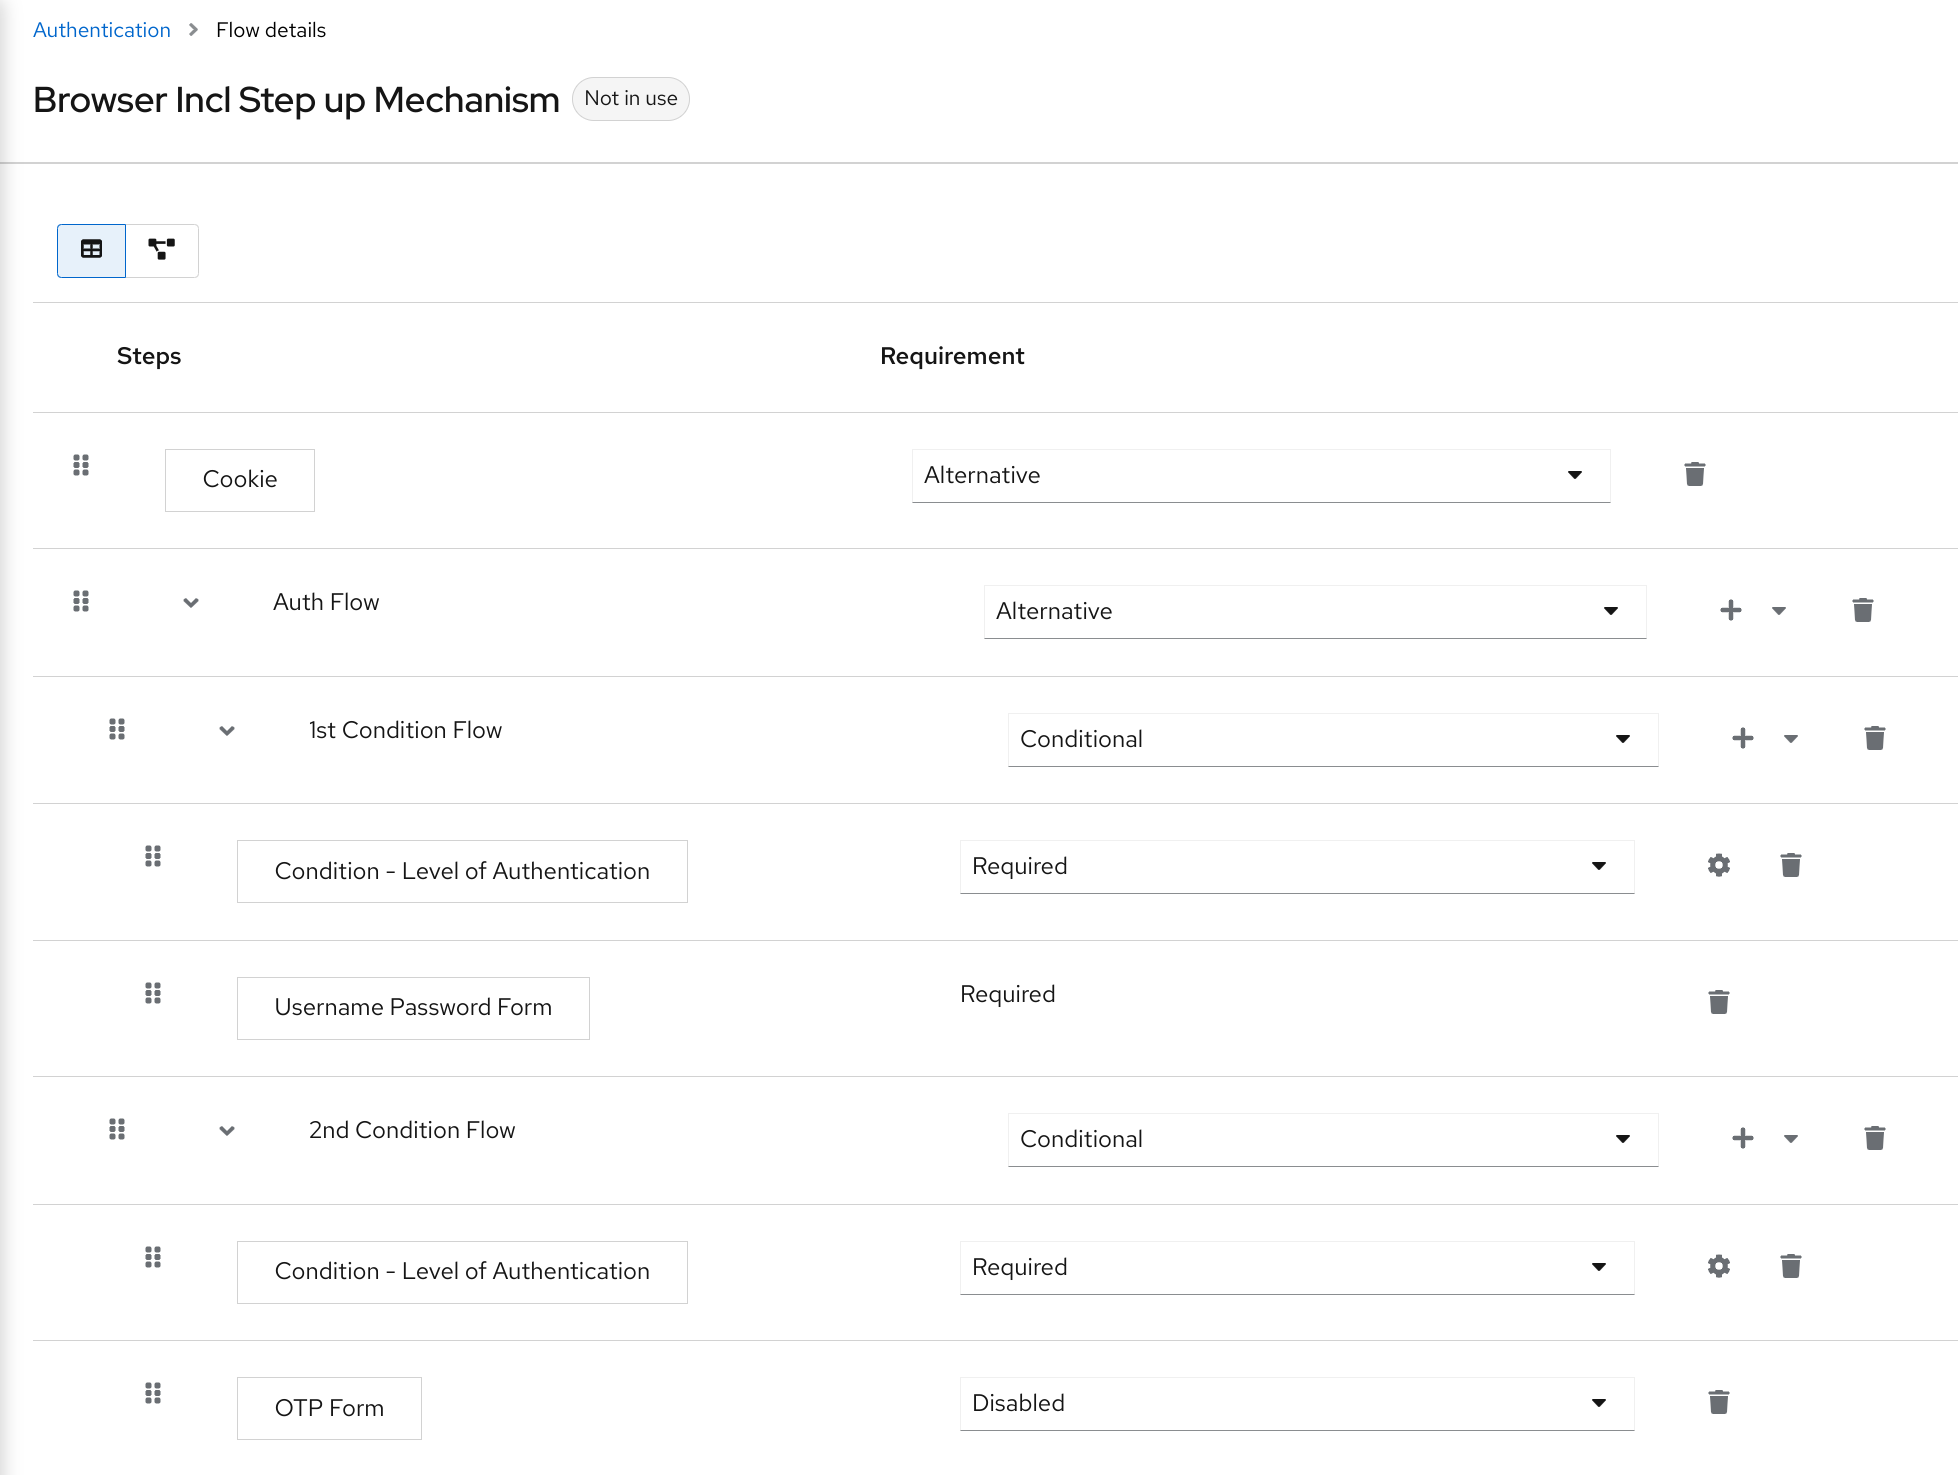
Request a certain authentication level
To use the step-up mechanism, you specify a requested level of authentication (LoA) in your authentication request. The claims parameter is used for this purpose:
https://{DOMAIN}/realms/{REALMNAME}/protocol/openid-connect/auth?client_id={CLIENT-ID}&redirect_uri={REDIRECT-URI}&scope=openid&response_type=code&response_mode=query&nonce=exg16fxdjcu&claims=%7B%22id_token%22%3A%7B%22acr%22%3A%7B%22essential%22%3Atrue%2C%22values%22%3A%5B%22gold%22%5D%7D%7D%7D
The claims parameter is specified in a JSON representation:
claims= {
            "id_token": {
                "acr": {
                    "essential": true,
                    "values": ["gold"]
                }
            }
        }
The Red Hat build of Keycloak javascript adapter has support for easy construct of this JSON and sending it in the login request. See Javascript adapter documentation for more details.
You can also use simpler parameter acr_values instead of claims parameter to request particular levels as non-essential. This is mentioned in the OIDC specification.
You can also configure the default level for the particular client, which is used when the parameter acr_values or the parameter claims with the acr claim is not present. For further details, see Client ACR configuration).
To request the acr_values as text (such as gold) instead of a numeric value, you configure the mapping between the ACR and the LoA. It is possible to configure it at the realm level (recommended) or at the client level. For configuration see ACR to LoA Mapping.
For more details see the official OIDC specification.
Flow logic
The logic for the previous configured authentication flow is as follows:
If a client request a high authentication level, meaning Level of Authentication 2 (LoA 2), a user has to perform full 2-factor authentication: Username/Password + OTP. However, if a user already has a session in Keycloak, that was logged in with username and password (LoA 1), the user is only asked for the second authentication factor (OTP).
The option Max Age in the condition determines how long (how much seconds) the subsequent authentication level is valid. This setting helps to decide whether the user will be asked to present the authentication factor again during a subsequent authentication. If the particular level X is requested by the claims or acr_values parameter and user already authenticated with level X, but it is expired (for example max age is configured to 300 and user authenticated before 310 seconds) then the user will be asked to re-authenticate again with the particular level. However if the level is not yet expired, the user will be automatically considered as authenticated with that level.
Using Max Age with the value 0 means, that particular level is valid just for this single authentication. Hence every re-authentication requesting that level will need to authenticate again with that level. This is useful for operations that require higher security in the application (e.g. send payment) and always require authentication with the specific level.
Note that parameters such as claims or acr_values might be changed by the user in the URL when the login request is sent from the client to the Red Hat build of Keycloak via the user’s browser. This situation can be mitigated if client uses PAR (Pushed authorization request), a request object, or other mechanisms that prevents the user from rewrite the parameters in the URL. Hence after the authentication, clients are encouraged to check the ID Token to double-check that acr in the token corresponds to the expected level.
If no explicit level is requested by parameters, the Red Hat build of Keycloak will require the authentication with the first LoA condition found in the authentication flow, such as the Username/Password in the preceding example. When a user was already authenticated with that level and that level expired, the user is not required to re-authenticate, but acr in the token will have the value 0. This result is considered as authentication based solely on long-lived browser cookie as mentioned in the section 2 of OIDC Core 1.0 specification.
A conflict situation may arise when an admin specifies several flows, sets different LoA levels to each, and assigns the flows to different clients. However, the rule is always the same: if a user has a certain level, it needs only have that level to connect to a client. It’s up to the admin to make sure that the LoA is coherent.
Example scenario
- Max Age is configured as 300 seconds for level 1 condition.
-
Login request is sent without requesting any acr. Level 1 will be used and the user needs to authenticate with username and password. The token will have
acr=1. -
Another login request is sent after 100 seconds. The user is automatically authenticated due to the SSO and the token will return
acr=1. -
Another login request is sent after another 201 seconds (301 seconds since authentication in point 2). The user is automatically authenticated due to the SSO, but the token will return
acr=0due the level 1 is considered expired. -
Another login request is sent, but now it will explicitly request ACR of level 1 in the
claimsparameter. User will be asked to re-authenticate with username/password and thenacr=1will be returned in the token.
ACR claim in the token
ACR claim is added to the token by the acr loa level protocol mapper defined in the acr client scope. This client scope is the realm default client scope and hence will be added to all newly created clients in the realm.
In case you do not want acr claim inside tokens or you need some custom logic for adding it, you can remove the client scope from your client.
Note when the login request initiates a request with the claims parameter requesting acr as essential claim, then Red Hat build of Keycloak will always return one of the specified levels. If it is not able to return one of the specified levels (For example if the requested level is unknown or bigger than configured conditions in the authentication flow), then Red Hat build of Keycloak will throw an error.
8.3.5. Registration or Reset credentials requested by client
Usually when the user is redirected to the Red Hat build of Keycloak from client application, the browser flow is triggered. This flow may allow the user to register in case that realm registration is enabled and the user clicks Register on the login screen. Also, if Forget password is enabled for the realm, the user can click Forget password on the login screen, which triggers the Reset credentials flow where users can reset credentials after email address confirmation.
Sometimes it can be useful for the client application to directly redirect the user to the Registration screen or to the Reset credentials flow. The resulting action will match the action of when the user clicks Register or Forget password on the normal login screen. Automatic redirect to the registration or reset-credentials screen can be done as follows:
-
When the client wants the user to be redirected directly to the registration, the OIDC client should replace the very last snippet from the OIDC login URL path (
/auth) with/registrations. So the full URL might be similar to the following:https://keycloak.example.com/realms/your_realm/protocol/openid-connect/registrations. -
When the client wants a user to be redirected directly to the
Reset credentialsflow, the OIDC client should replace the very last snippet from the OIDC login URL path (/auth) with/forgot-credentials.
The preceding steps are the only supported method for a client to directly request a registration or reset-credentials flow. For security purposes, it is not supported and recommended for client applications to bypass OIDC/SAML flows and directly redirect to other Red Hat build of Keycloak endpoints (such as for instance endpoints under /realms/realm_name/login-actions or /realms/realm_name/broker).
8.4. User session limits
Limits on the number of session that a user can have can be configured. Sessions can be limited per realm or per client.
To add session limits to a flow, perform the following steps.
- Click Add step for the flow.
- Select User session count limiter from the item list.
- Click Add.
- Click Required for the User Session Count Limiter authentication type to set its requirement to required.
- Click ⚙️ (gear icon) for the User Session Count Limiter.
- Enter an alias for this config.
- Enter the required maximum number of sessions that a user can have in this realm. For example, if 2 is the value, 2 SSO sessions is the maximum that each user can have in this realm. If 0 is the value, this check is disabled.
-
Enter the required maximum number of sessions a user can have for the client. For example, if 2 is the value, then 2 SSO sessions is the maximum in this realm for each client. So when a user is trying to authenticate to client
foo, but that user has already authenticated in 2 SSO sessions to clientfoo, either the authentication will be denied or an existing sessions will be killed based on the behavior configured. If a value of 0 is used, this check is disabled. If both session limits and client session limits are enabled, it makes sense to have client session limits to be always lower than session limits. The limit per client can never exceed the limit of all SSO sessions of this user. Select the behavior that is required when the user tries to create a session after the limit is reached. Available behaviors are:
- Deny new session - when a new session is requested and the session limit is reached, no new sessions can be created.
- Terminate oldest session - when a new session is requested and the session limit has been reached, the oldest session will be removed and the new session created.
- Optionally, add a custom error message to be displayed when the limit is reached.
Note that the user session limits should be added to your bound Browser flow, Direct grant flow, Reset credentials and also to any Post broker login flow. The authenticator should be added at the point when the user is already known during authentication (usually at the end of the authentication flow) and should be typically REQUIRED. Note that it is not possible to have ALTERNATIVE and REQUIRED executions at the same level.
For most of authenticators like Direct grant flow, Reset credentials or Post broker login flow, it is recommended to add the authenticator as REQUIRED at the end of the authentication flow. Here is an example for the Reset credentials flow:
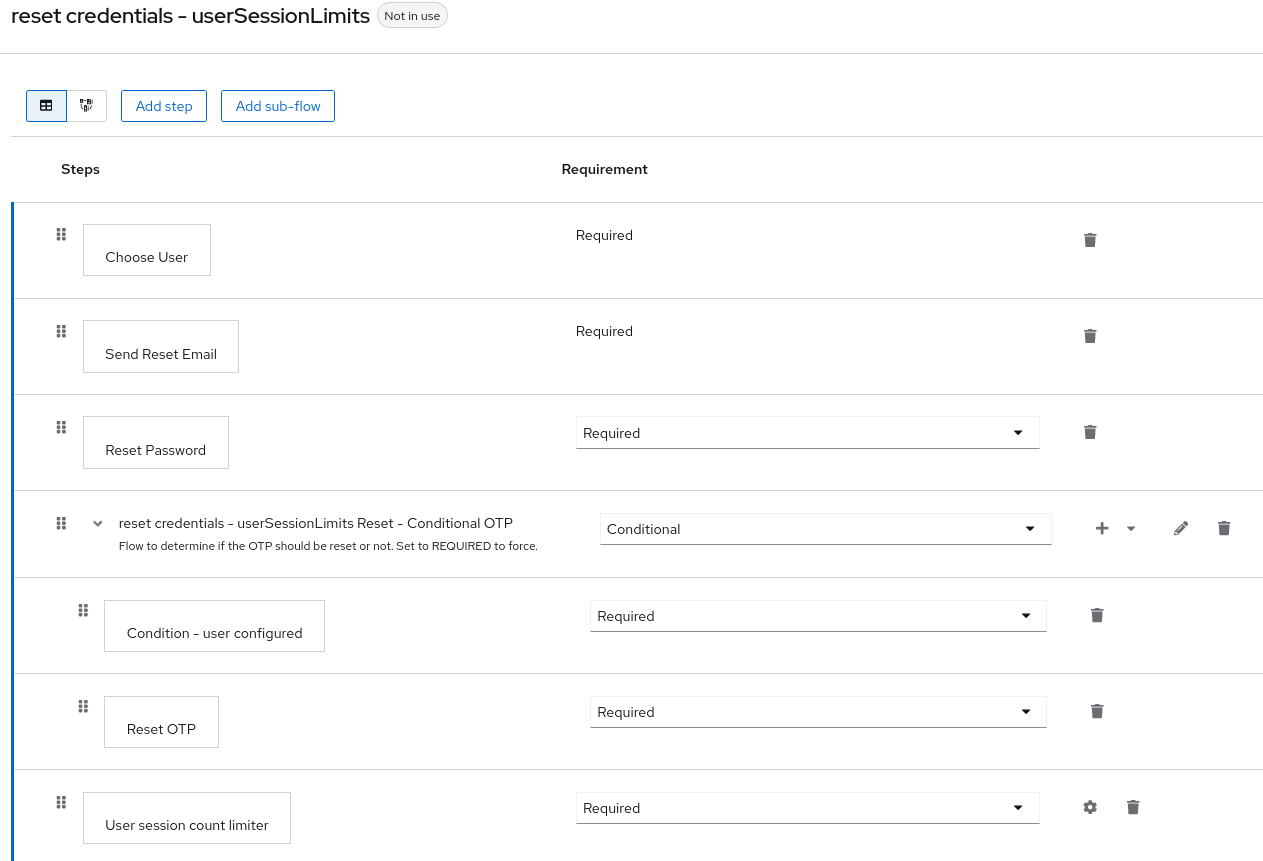
For Browser flow, consider not adding the Session Limits authenticator at the top level flow. This recommendation is due to the Cookie authenticator, which automatically re-authenticates users based on SSO cookie. It is at the top level and it is better to not check session limits during SSO re-authentication because a user session already exists. So instead, consider adding a separate ALTERNATIVE subflow, such as the following authenticate-user-with-session-limit example at the same level like Cookie. Then you can add a REQUIRED subflow, in the following real-authentication-subflow`example, as a nested subflow of `authenticate-user-with-session-limit and add a User Session Limit at the same level as well. Inside the real-authentication-subflow, you can add real authenticators in a similar fashion to the default browser flow. The following example flow allows to users to authenticate with an identity provider or with password and OTP:
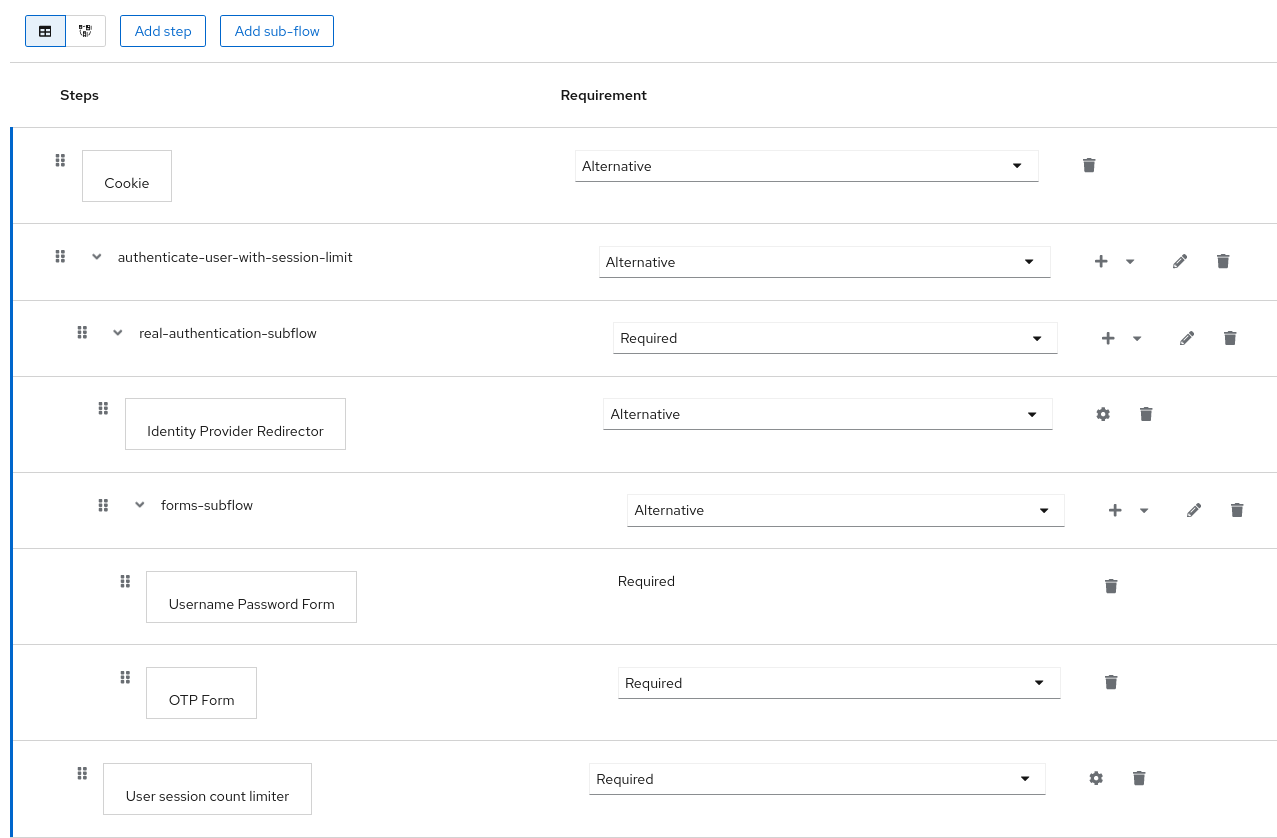
Regarding Post Broker login flow, you can add the User Session Limits as the only authenticator in the authentication flow as long as you have no other authenticators that you trigger after authentication with your identity provider. However, make sure that this flow is configured as Post Broker Flow at your identity providers. This requirement exists needed so that the authentication with Identity providers also participates in the session limits.
Currently, the administrator is responsible for maintaining consistency between the different configurations. So make sure that all your flows use same the configuration of User Session Limits.
User session limit feature is not available for CIBA.
8.5. Kerberos
Red Hat build of Keycloak supports login with a Kerberos ticket through the Simple and Protected GSSAPI Negotiation Mechanism (SPNEGO) protocol. SPNEGO authenticates transparently through the web browser after the user authenticates the session. For non-web cases, or when a ticket is not available during login, Red Hat build of Keycloak supports login with Kerberos username and password.
A typical use case for web authentication is the following:
- The user logs into the desktop.
- The user accesses a web application secured by Red Hat build of Keycloak using a browser.
- The application redirects to Red Hat build of Keycloak login.
-
Red Hat build of Keycloak renders the HTML login screen with status 401 and HTTP header
WWW-Authenticate: Negotiate -
If the browser has a Kerberos ticket from desktop login, the browser transfers the desktop sign-on information to Red Hat build of Keycloak in header
Authorization: Negotiate 'spnego-token'. Otherwise, it displays the standard login screen, and the user enters the login credentials. - Red Hat build of Keycloak validates the token from the browser and authenticates the user.
- If using LDAPFederationProvider with Kerberos authentication support, Red Hat build of Keycloak provisions user data from LDAP. If using KerberosFederationProvider, Red Hat build of Keycloak lets the user update the profile and pre-fill login data.
- Red Hat build of Keycloak returns to the application. Red Hat build of Keycloak and the application communicate through OpenID Connect or SAML messages. Red Hat build of Keycloak acts as a broker to Kerberos/SPNEGO login. Therefore Red Hat build of Keycloak authenticating through Kerberos is hidden from the application.
The Negotiate www-authenticate scheme allows NTLM as a fallback to Kerberos and on some web browsers in Windows NTLM is supported by default. If a www-authenticate challenge comes from a server outside a browsers permitted list, users may encounter an NTLM dialog prompt. A user would need to click the cancel button on the dialog to continue as Keycloak does not support this mechanism. This situation can happen if Intranet web browsers are not strictly configured or if Keycloak serves users in both the Intranet and Internet. A custom authenticator can be used to restrict Negotiate challenges to a whitelist of hosts.
Perform the following steps to set up Kerberos authentication:
- The setup and configuration of the Kerberos server (KDC).
- The setup and configuration of the Red Hat build of Keycloak server.
- The setup and configuration of the client machines.
8.5.1. Setup of Kerberos server
The steps to set up a Kerberos server depends on the operating system (OS) and the Kerberos vendor. Consult Windows Active Directory, MIT Kerberos, and your OS documentation for instructions on setting up and configuring a Kerberos server.
During setup, perform these steps:
- Add some user principals to your Kerberos database. You can also integrate your Kerberos with LDAP, so user accounts provision from the LDAP server.
Add service principal for "HTTP" service. For example, if the Red Hat build of Keycloak server runs on
www.mydomain.org, add the service principalHTTP/www.mydomain.org@<kerberos realm>.On MIT Kerberos, you run a "kadmin" session. On a machine with MIT Kerberos, you can use the command:
sudo kadmin.localThen, add HTTP principal and export its key to a keytab file with commands such as:
addprinc -randkey HTTP/www.mydomain.org@MYDOMAIN.ORG
ktadd -k /tmp/http.keytab HTTP/www.mydomain.org@MYDOMAIN.ORG
Ensure the keytab file /tmp/http.keytab is accessible on the host where Red Hat build of Keycloak is running.
8.5.2. Setup and configuration of Red Hat build of Keycloak server
Install a Kerberos client on your machine.
Procedure
- Install a Kerberos client. If your machine runs Fedora, Ubuntu, or RHEL, install the freeipa-client package, containing a Kerberos client and other utilities.
Configure the Kerberos client (on Linux, the configuration settings are in the /etc/krb5.conf file ).
Add your Kerberos realm to the configuration and configure the HTTP domains your server runs on.
For example, for the MYDOMAIN.ORG realm, you can configure the
domain_realmsection like this:[domain_realm] .mydomain.org = MYDOMAIN.ORG mydomain.org = MYDOMAIN.ORGExport the keytab file with the HTTP principal and ensure the file is accessible to the process running the Red Hat build of Keycloak server. For production, ensure that the file is readable by this process only.
For the MIT Kerberos example above, we exported keytab to the
/tmp/http.keytabfile. If your Key Distribution Centre (KDC) and Red Hat build of Keycloak run on the same host, the file is already available.
8.5.2.1. Enabling SPNEGO processing
By default, Red Hat build of Keycloak disables SPNEGO protocol support. To enable it, go to the browser flow and enable Kerberos.
Browser flow
Set the Kerberos requirement from disabled to alternative (Kerberos is optional) or required (browser must have Kerberos enabled). If you have not configured the browser to work with SPNEGO or Kerberos, Red Hat build of Keycloak falls back to the regular login screen.
8.5.2.2. Configure Kerberos user storage federation providers
You must now use User Storage Federation to configure how Red Hat build of Keycloak interprets Kerberos tickets. Two different federation providers exist with Kerberos authentication support.
To authenticate with Kerberos backed by an LDAP server, configure the LDAP Federation Provider.
Procedure
Go to the configuration page for your LDAP provider.
Ldap kerberos integration
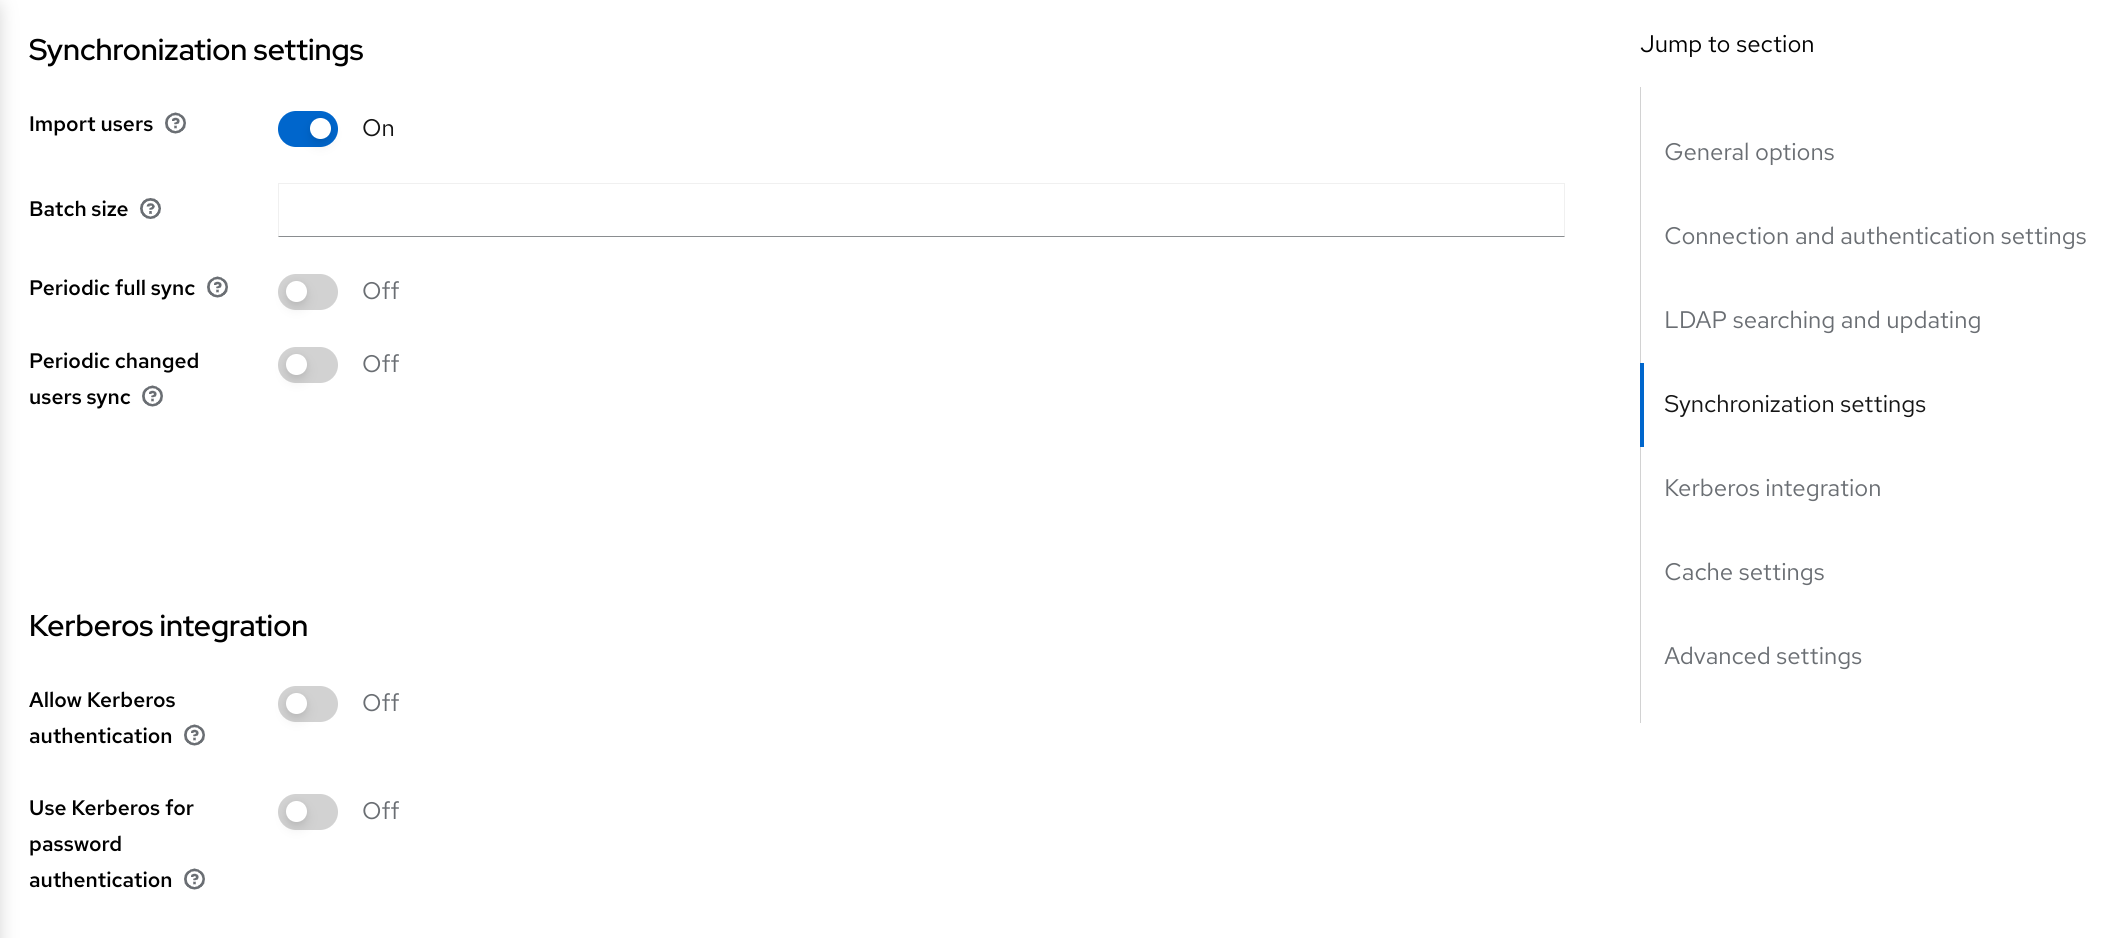
- Toggle Allow Kerberos authentication to ON
Allow Kerberos authentication makes Red Hat build of Keycloak use the Kerberos principal access user information so information can import into the Red Hat build of Keycloak environment.
If an LDAP server is not backing up your Kerberos solution, use the Kerberos User Storage Federation Provider.
Procedure
- Click User Federation in the menu.
Select Kerberos from the Add provider select box.
Kerberos user storage provider
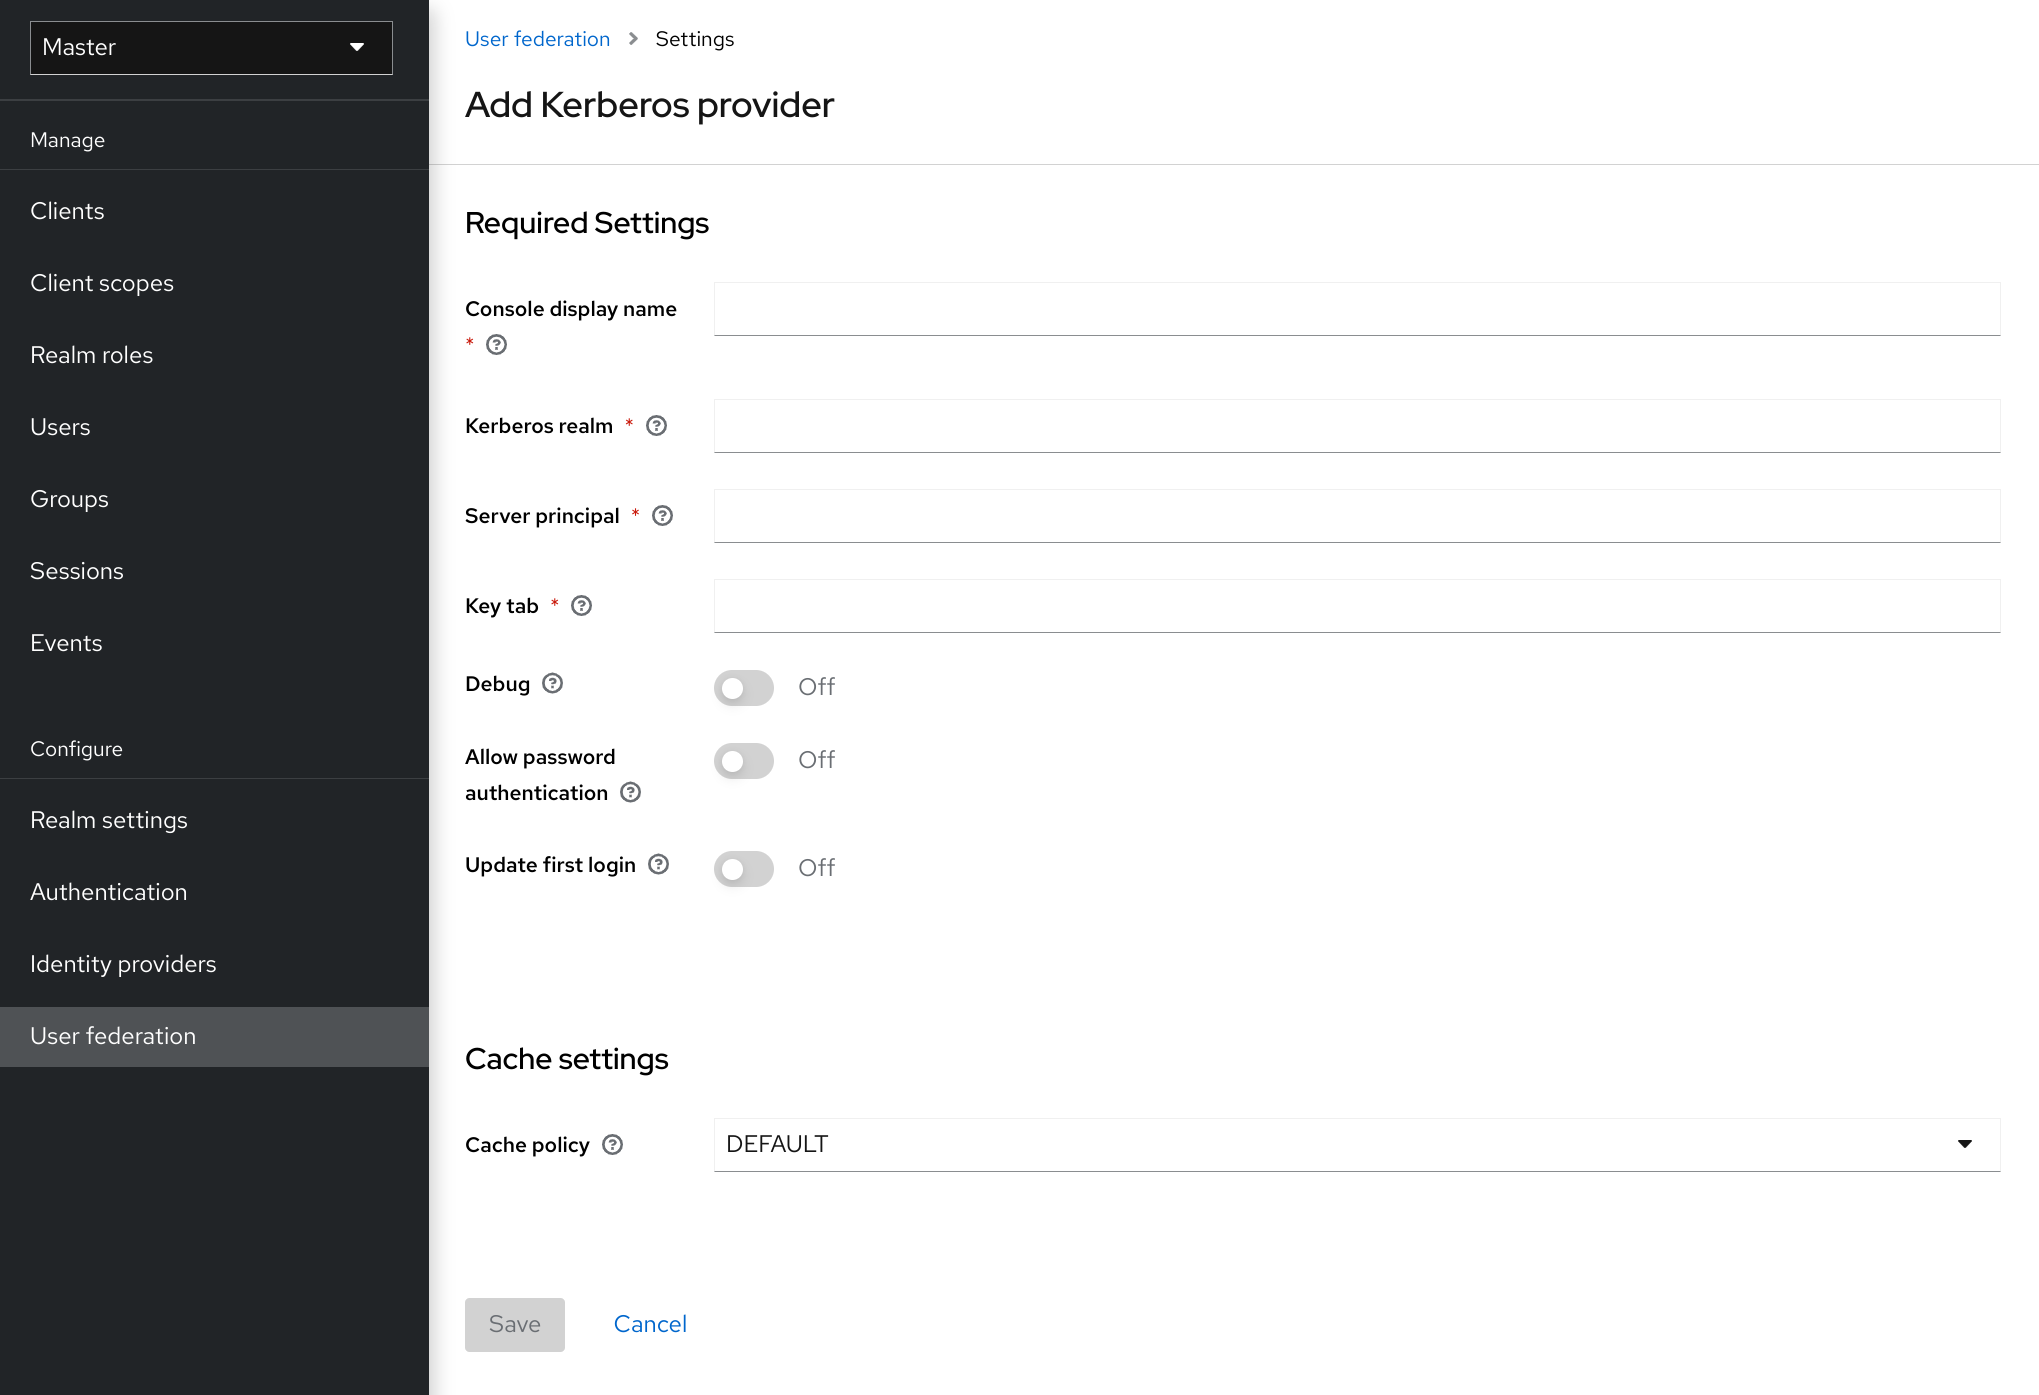
The Kerberos provider parses the Kerberos ticket for simple principal information and imports the information into the local Red Hat build of Keycloak database. User profile information, such as first name, last name, and email, are not provisioned.
8.5.3. Setup and configuration of client machines
Client machines must have a Kerberos client and set up the krb5.conf as described above. The client machines must also enable SPNEGO login support in their browser. See configuring Firefox for Kerberos if you are using the Firefox browser.
The .mydomain.org URI must be in the network.negotiate-auth.trusted-uris configuration option.
In Windows domains, clients do not need to adjust their configuration. Internet Explorer and Edge can already participate in SPNEGO authentication.
8.5.4. Credential delegation
Kerberos supports the credential delegation. Applications may need access to the Kerberos ticket so they can re-use it to interact with other services secured by Kerberos. Because the Red Hat build of Keycloak server processed the SPNEGO protocol, you must propagate the GSS credential to your application within the OpenID Connect token claim or a SAML assertion attribute. Red Hat build of Keycloak transmits this to your application from the Red Hat build of Keycloak server. To insert this claim into the token or assertion, each application must enable the built-in protocol mapper gss delegation credential. This mapper is available in the Mappers tab of the application’s client page. See Protocol Mappers chapter for more details.
Applications must deserialize the claim it receives from Red Hat build of Keycloak before using it to make GSS calls against other services. When you deserialize the credential from the access token to the GSSCredential object, create the GSSContext with this credential passed to the GSSManager.createContext method. For example:
// Obtain accessToken in your application.
KeycloakPrincipal keycloakPrincipal = (KeycloakPrincipal) servletReq.getUserPrincipal();
AccessToken accessToken = keycloakPrincipal.getKeycloakSecurityContext().getToken();

// Retrieve Kerberos credential from accessToken and deserialize it
String serializedGssCredential = (String) accessToken.getOtherClaims().
    get(org.keycloak.common.constants.KerberosConstants.GSS_DELEGATION_CREDENTIAL);

GSSCredential deserializedGssCredential = org.keycloak.common.util.KerberosSerializationUtils.
    deserializeCredential(serializedGssCredential);

// Create GSSContext to call other Kerberos-secured services
GSSContext context = gssManager.createContext(serviceName, krb5Oid,
    deserializedGssCredential, GSSContext.DEFAULT_LIFETIME);
Configure forwardable Kerberos tickets in krb5.conf file and add support for delegated credentials to your browser.
Credential delegation has security implications, so use it only if necessary and only with HTTPS. See this article for more details and an example.
8.5.5. Cross-realm trust
In the Kerberos protocol, the realm is a set of Kerberos principals. The definition of these principals exists in the Kerberos database, which is typically an LDAP server.
The Kerberos protocol allows cross-realm trust. For example, if 2 Kerberos realms, A and B, exist, then cross-realm trust will allow the users from realm A to access realm B’s resources. Realm B trusts realm A.
Kerberos cross-realm trust
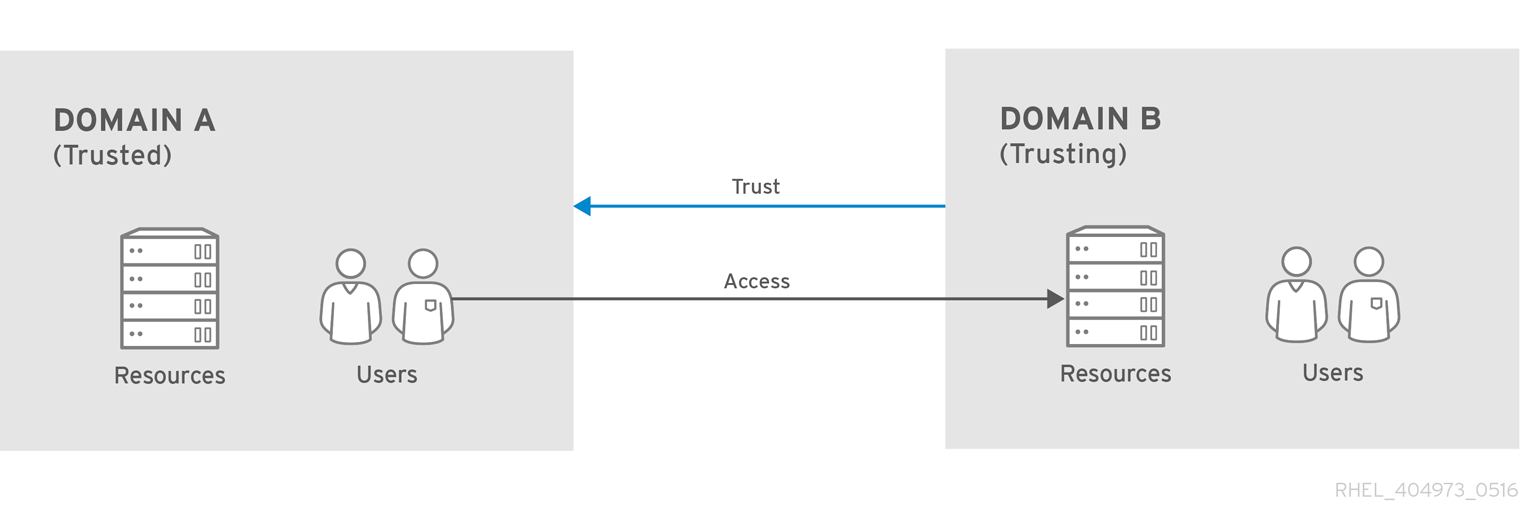
The Red Hat build of Keycloak server supports cross-realm trust. To implement this, perform the following:
-
Configure the Kerberos servers for the cross-realm trust. Implementing this step depends on the Kerberos server implementations. This step is necessary to add the Kerberos principal
krbtgt/B@Ato the Kerberos databases of realm A and B. This principal must have the same keys on both Kerberos realms. The principals must have the same password, key version numbers, and ciphers in both realms. Consult the Kerberos server documentation for more details.
The cross-realm trust is unidirectional by default. You must add the principal krbtgt/A@B to both Kerberos databases for bidirectional trust between realm A and realm B. However, trust is transitive by default. If realm B trusts realm A and realm C trusts realm B, then realm C trusts realm A without the principal, krbtgt/C@A, available. Additional configuration (for example, capaths) may be necessary on the Kerberos client-side so clients can find the trust path. Consult the Kerberos documentation for more details.
Configure Red Hat build of Keycloak server
-
When using an LDAP storage provider with Kerberos support, configure the server principal for realm B, as in this example:
HTTP/mydomain.com@B. The LDAP server must find the users from realm A if users from realm A are to successfully authenticate to Red Hat build of Keycloak, because Red Hat build of Keycloak must perform the SPNEGO flow and then find the users.
-
When using an LDAP storage provider with Kerberos support, configure the server principal for realm B, as in this example:
Finding users is based on the LDAP storage provider option Kerberos principal attribute. When this is configured for instance with value like userPrincipalName, then after SPNEGO authentication of user john@A, Red Hat build of Keycloak will try to lookup LDAP user with attribute userPrincipalName equivalent to john@A. If Kerberos principal attribute is left empty, then Red Hat build of Keycloak will lookup the LDAP user based on the prefix of his kerberos principal with the realm omitted. For example, Kerberos principal user john@A must be available in the LDAP under username john, so typically under an LDAP DN such as uid=john,ou=People,dc=example,dc=com. If you want users from realm A and B to authenticate, ensure that LDAP can find users from both realms A and B.
-
When using a Kerberos user storage provider (typically, Kerberos without LDAP integration), configure the server principal as
HTTP/mydomain.com@B, and users from Kerberos realms A and B must be able to authenticate.
Users from multiple Kerberos realms are allowed to authenticate as every user would have attribute KERBEROS_PRINCIPAL referring to the kerberos principal used for authentication and this is used for further lookups of this user. To avoid conflicts when there is user john in both kerberos realms A and B, the username of the Red Hat build of Keycloak user might contain the kerberos realm lowercased. For instance username would be john@a. Just in case when realm matches with the configured Kerberos realm, the realm suffix might be omitted from the generated username. For instance username would be john for the Kerberos principal john@A as long as the Kerberos realm is configured on the Kerberos provider is A.
8.5.6. Troubleshooting
If you have issues, enable additional logging to debug the problem:
-
Enable
Debugflag in the Admin Console for Kerberos or LDAP federation providers -
Enable TRACE logging for category
org.keycloakto receive more information in server logs -
Add system properties
-Dsun.security.krb5.debug=trueand-Dsun.security.spnego.debug=true
8.6. X.509 client certificate user authentication
Red Hat build of Keycloak supports logging in with an X.509 client certificate if you have configured the server to use mutual SSL authentication.
A typical workflow:
- A client sends an authentication request over SSL/TLS channel.
- During the SSL/TLS handshake, the server and the client exchange their x.509/v3 certificates.
- The container (JBoss EAP) validates the certificate PKIX path and the certificate expiration date.
The x.509 client certificate authenticator validates the client certificate by using the following methods:
- Checks the certificate revocation status by using CRL or CRL Distribution Points.
- Checks the Certificate revocation status by using OCSP (Online Certificate Status Protocol).
- Validates whether the key in the certificate matches the expected key.
- Validates whether the extended key in the certificate matches the expected extended key.
- If any of the these checks fail, the x.509 authentication fails. Otherwise, the authenticator extracts the certificate identity and maps it to an existing user.
When the certificate maps to an existing user, the behavior diverges depending on the authentication flow:
- In the Browser Flow, the server prompts users to confirm their identity or sign in with a username and password.
- In the Direct Grant Flow, the server signs in the user.
Note that it is the responsibility of the web container to validate certificate PKIX path. X.509 authenticator on the Red Hat build of Keycloak side provides just the additional support for check the certificate expiration, certificate revocation status and key usage. If you are using Red Hat build of Keycloak deployed behind reverse proxy, make sure that your reverse proxy is configured to validate PKIX path. If you do not use reverse proxy and users directly access the JBoss EAP, you should be fine as JBoss EAP makes sure that PKIX path is validated as long as it is configured as described below.
8.6.1. Features
Supported Certificate Identity Sources:
- Match SubjectDN by using regular expressions
- X500 Subject’s email attribute
- X500 Subject’s email from Subject Alternative Name Extension (RFC822Name General Name)
- X500 Subject’s other name from Subject Alternative Name Extension. This other name is the User Principal Name (UPN), typically.
- X500 Subject’s Common Name attribute
- Match IssuerDN by using regular expressions
- Certificate Serial Number
- Certificate Serial Number and IssuerDN
- SHA-256 Certificate thumbprint
- Full certificate in PEM format
8.6.1.1. Regular expressions
Red Hat build of Keycloak extracts the certificate identity from Subject DN or Issuer DN by using a regular expression as a filter. For example, this regular expression matches the email attribute:
emailAddress=(.*?)(?:,|$)
The regular expression filtering applies if the Identity Source is set to either Match SubjectDN using regular expression or Match IssuerDN using regular expression.
8.6.1.1.1. Mapping certificate identity to an existing user
The certificate identity mapping can map the extracted user identity to an existing user’s username, email, or a custom attribute whose value matches the certificate identity. For example, setting Identity source to Subject’s email or User mapping method to Username or email makes the X.509 client certificate authenticator use the email attribute in the certificate’s Subject DN as the search criteria when searching for an existing user by username or by email.
- If you disable Login with email at realm settings, the same rules apply to certificate authentication. Users are unable to log in by using the email attribute.
-
Using
Certificate Serial Number and IssuerDNas an identity source requires two custom attributes for the serial number and the IssuerDN. -
SHA-256 Certificate thumbprintis the lowercase hexadecimal representation of SHA-256 certificate thumbprint. -
Using
Full certificate in PEM formatas an identity source is limited to the custom attributes mapped to external federation sources, such as LDAP. Red Hat build of Keycloak cannot store certificates in its database due to length limitations, so in the case of LDAP, you must enableAlways Read Value From LDAP.
8.6.1.1.2. Extended certificate validation
- Revocation status checking using CRL.
- Revocation status checking using CRL/Distribution Point.
- Revocation status checking using OCSP/Responder URI.
- Certificate KeyUsage validation.
- Certificate ExtendedKeyUsage validation.
8.6.2. Adding X.509 client certificate authentication to browser flows
- Click Authentication in the menu.
- Click the Browser flow.
- From the Action list, select Duplicate.
- Enter a name for the copy.
- Click Duplicate.
- Click Add step.
- Click "X509/Validate Username Form".
Click Add.
X509 execution
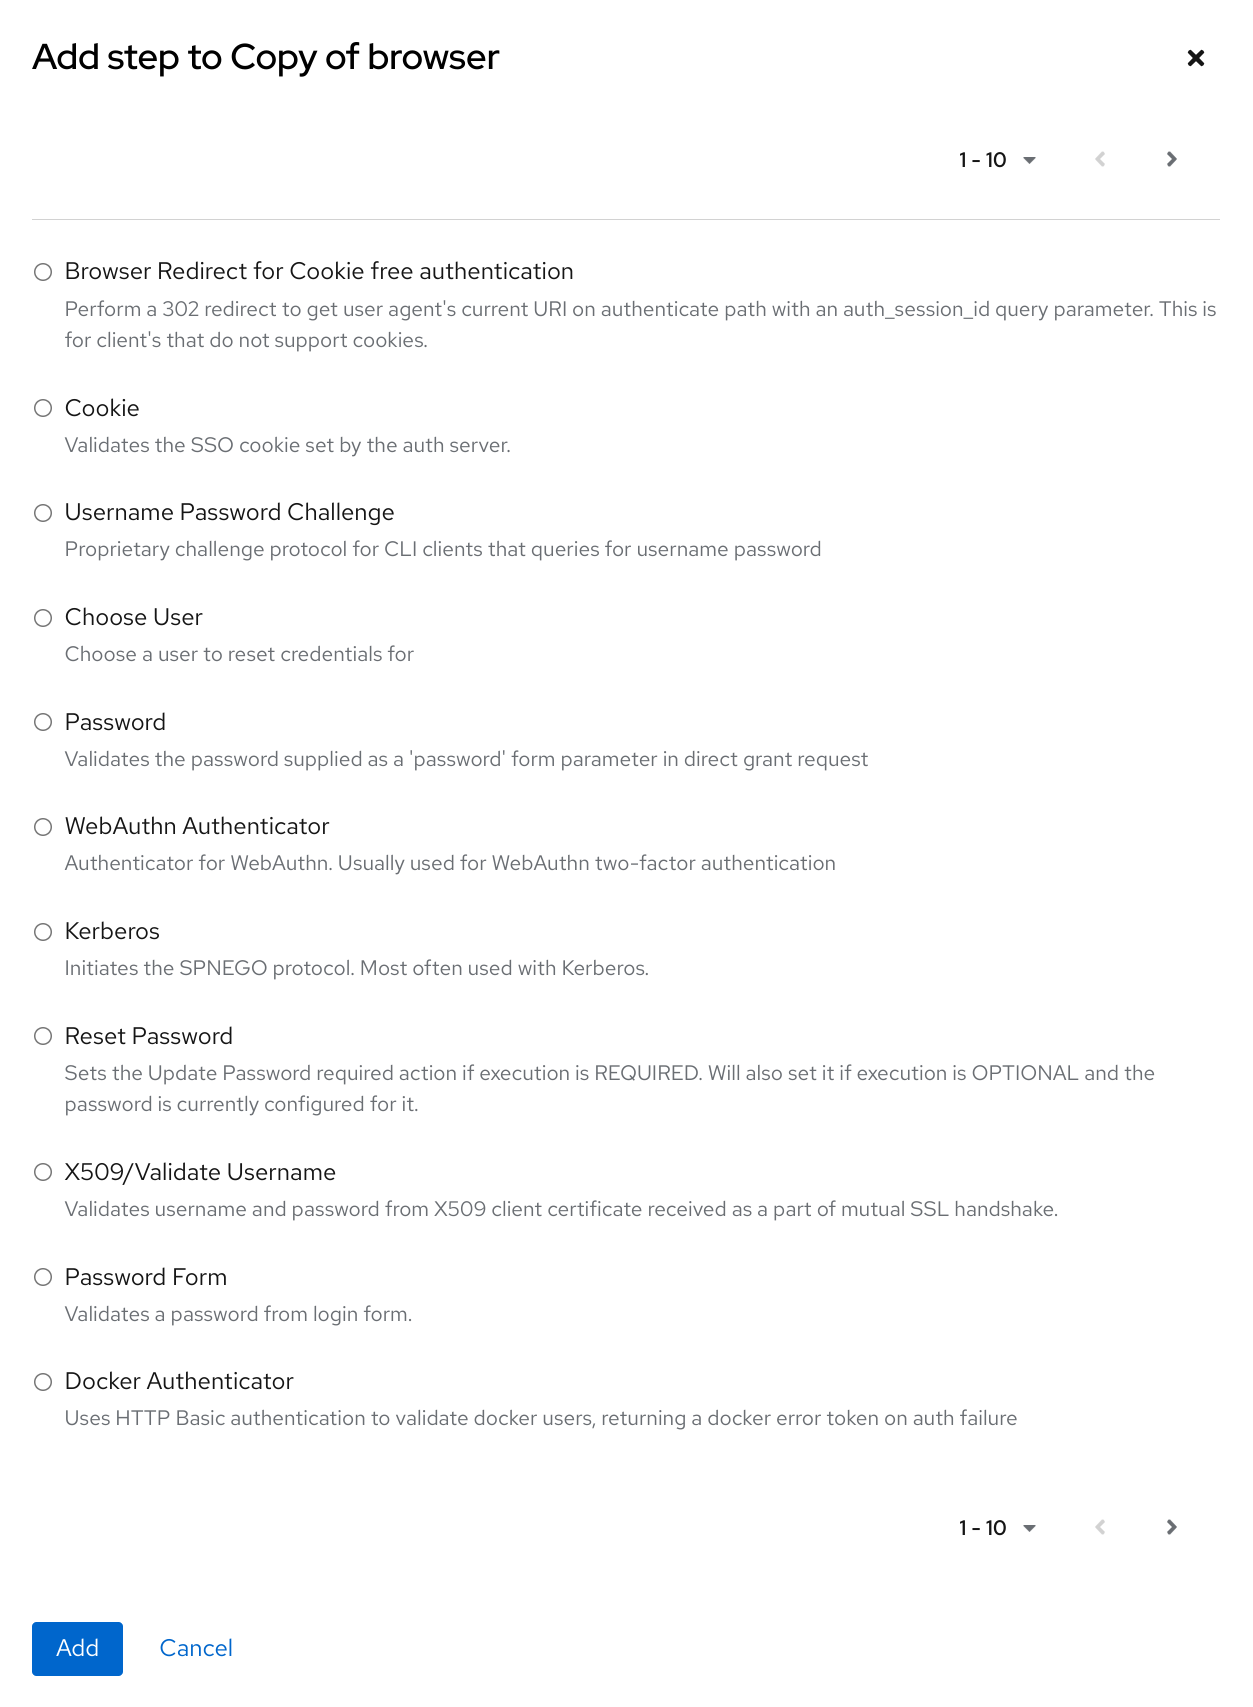
- Click and drag the "X509/Validate Username Form" over the "Browser Forms" execution.
Set the requirement to "ALTERNATIVE".
X509 browser flow
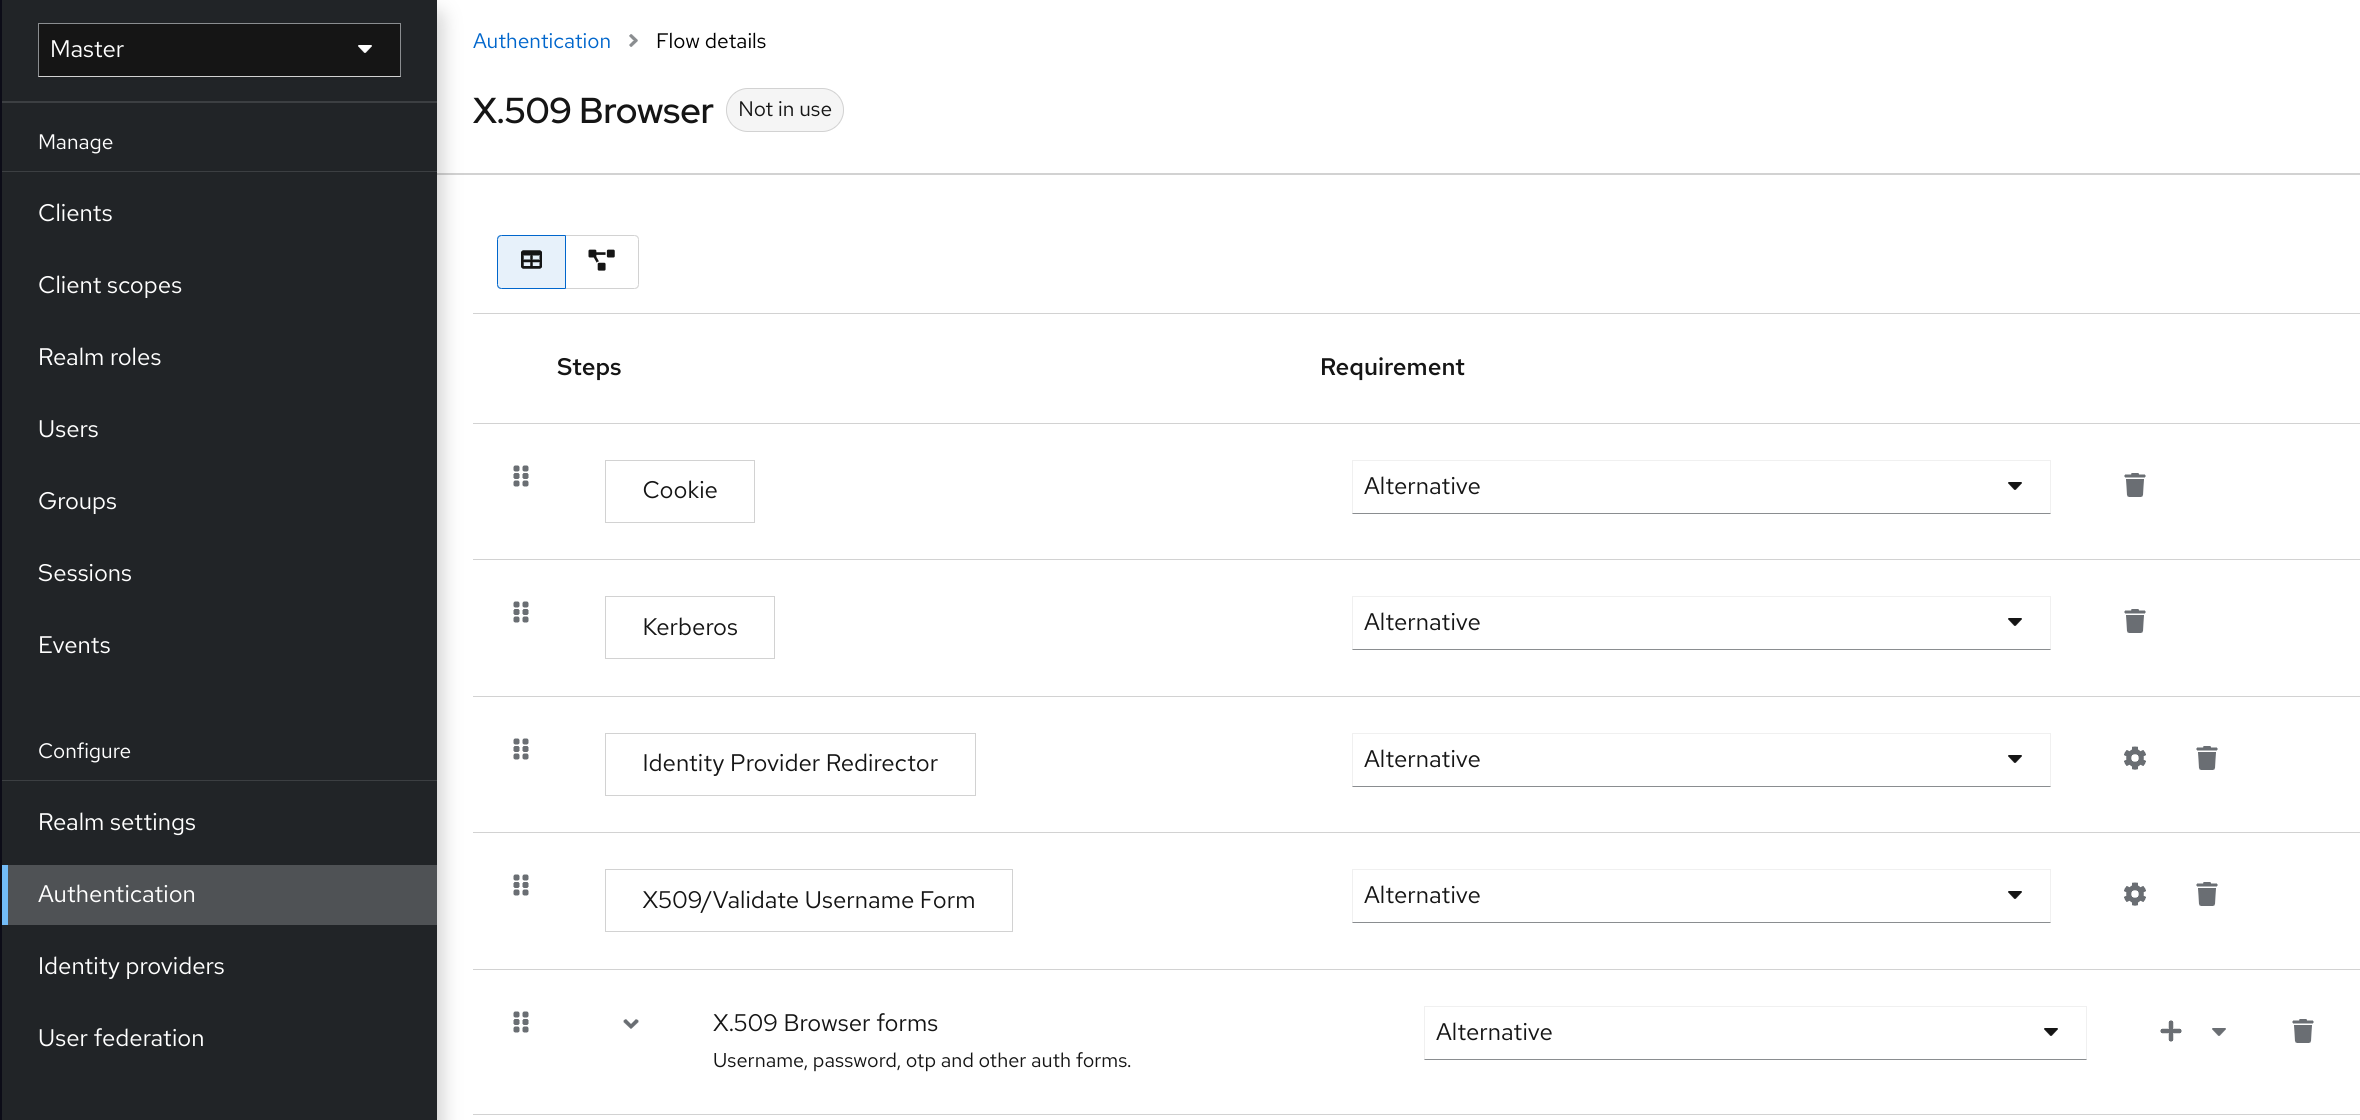
- Click the Action menu.
- Click the Bind flow.
- Click the Browser flow from the drop-down list.
Click Save.
X509 browser flow bindings

8.6.3. Configuring X.509 client certificate authentication
X509 configuration
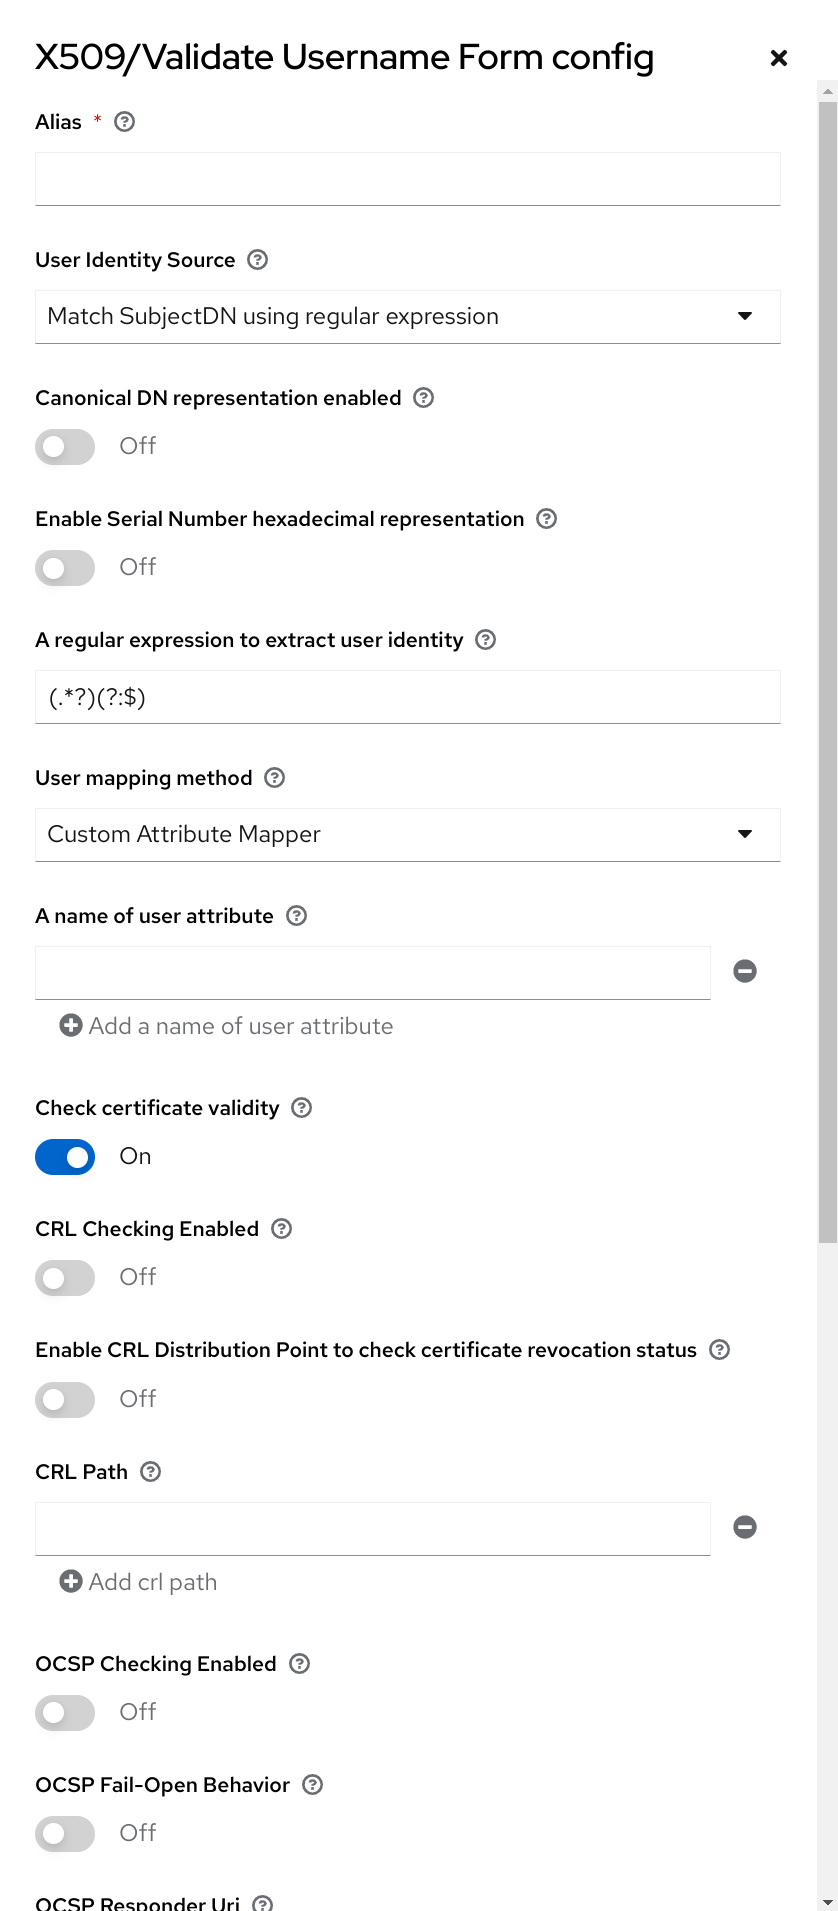
- User Identity Source
- Defines the method for extracting the user identity from a client certificate.
- Canonical DN representation enabled
- Defines whether to use canonical format to determine a distinguished name. The official Java API documentation describes the format. This option affects the two User Identity Sources Match SubjectDN using regular expression and Match IssuerDN using regular expression only. Enable this option when you set up a new Red Hat build of Keycloak instance. Disable this option to retain backward compatibility with existing Red Hat build of Keycloak instances.
- Enable Serial Number hexadecimal representation
- Represent the serial number as hexadecimal. The serial number with the sign bit set to 1 must be left padded with 00 octet. For example, a serial number with decimal value 161, or a1 in hexadecimal representation is encoded as 00a1, according to RFC5280. See RFC5280, appendix-B for more details.
- A regular expression
- A regular expression to use as a filter for extracting the certificate identity. The expression must contain a single group.
- User Mapping Method
- Defines the method to match the certificate identity with an existing user. Username or email searches for existing users by username or email. Custom Attribute Mapper searches for existing users with a custom attribute that matches the certificate identity. The name of the custom attribute is configurable.
- A name of user attribute
- A custom attribute whose value matches against the certificate identity. Use multiple custom attributes when attribute mapping is related to multiple values, For example, 'Certificate Serial Number and IssuerDN'.
- CRL Checking Enabled
- Check the revocation status of the certificate by using the Certificate Revocation List. The location of the list is defined in the CRL file path attribute.
- Enable CRL Distribution Point to check certificate revocation status
- Use CDP to check the certificate revocation status. Most PKI authorities include CDP in their certificates.
- CRL file path
- The path to a file containing a CRL list. The value must be a path to a valid file if the CRL Checking Enabled option is enabled.
- OCSP Checking Enabled
- Checks the certificate revocation status by using Online Certificate Status Protocol.
- OCSP Fail-Open Behavior
- By default the OCSP check must return a positive response in order to continue with a successful authentication. Sometimes however this check can be inconclusive: for example, the OCSP server could be unreachable, overloaded, or the client certificate may not contain an OCSP responder URI. When this setting is turned ON, authentication will be denied only if an explicit negative response is received by the OCSP responder and the certificate is definitely revoked. If a valid OCSP response is not available the authentication attempt will be accepted.
- OCSP Responder URI
- Override the value of the OCSP responder URI in the certificate.
- Validate Key Usage
- Verifies the certificate’s KeyUsage extension bits are set. For example, "digitalSignature,KeyEncipherment" verifies if bits 0 and 2 in the KeyUsage extension are set. Leave this parameter empty to disable the Key Usage validation. See RFC5280, Section-4.2.1.3 for more information. Red Hat build of Keycloak raises an error when a key usage mismatch occurs.
- Validate Extended Key Usage
- Verifies one or more purposes defined in the Extended Key Usage extension. See RFC5280, Section-4.2.1.12 for more information. Leave this parameter empty to disable the Extended Key Usage validation. Red Hat build of Keycloak raises an error when flagged as critical by the issuing CA and a key usage extension mismatch occurs.
- Validate Certificate Policy
- Verifies one or more policy OIDs as defined in the Certificate Policy extension. See RFC5280, Section-4.2.1.4. Leave the parameter empty to disable the Certificate Policy validation. Multiple policies should be separated using a comma.
- Certificate Policy Validation Mode
-
When more than one policy is specified in the
Validate Certificate Policysetting, it decides whether the matching should check for all requested policies to be present, or one match is enough for a successful authentication. Default value isAll, meaning that all requested policies should be present in the client certificate. - Bypass identity confirmation
- If enabled, X.509 client certificate authentication does not prompt the user to confirm the certificate identity. Red Hat build of Keycloak signs in the user upon successful authentication.
- Revalidate client certificate
- If set, the client certificate trust chain will be always verified at the application level using the certificates present in the configured trust store. This can be useful if the underlying web server does not enforce client certificate chain validation, for example because it is behind a non-validating load balancer or reverse proxy, or when the number of allowed CAs is too large for the mutual SSL negotiation (most browsers cap the maximum SSL negotiation packet size at 32767 bytes, which corresponds to about 200 advertised CAs). By default this option is off.
8.6.4. Adding X.509 Client Certificate Authentication to a Direct Grant Flow
- Click Authentication in the menu.
- Select Duplicate from the "Action list" to make a copy of the built-in "Direct grant" flow.
- Enter a name for the copy.
- Click Duplicate.
- Click the created flow.
- Click the trash can icon 🗑️ of the "Username Validation" and click Delete.
- Click the trash can icon 🗑️ of the "Password" and click Delete.
- Click Add step.
- Click "X509/Validate Username".
Click Add.
X509 direct grant execution

- Set up the x509 authentication configuration by following the steps described in the x509 Browser Flow section.
- Click the Bindings tab.
- Click the Direct Grant Flow drop-down list.
- Click the newly created "x509 Direct Grant" flow.
Click Save.
X509 direct grant flow bindings

8.7. W3C Web Authentication (WebAuthn)
Red Hat build of Keycloak provides support for W3C Web Authentication (WebAuthn). Red Hat build of Keycloak works as a WebAuthn’s Relying Party (RP).
WebAuthn’s operations success depends on the user’s WebAuthn supporting authenticator, browser, and platform. Make sure your authenticator, browser, and platform support the WebAuthn specification.
8.7.1. Setup
The setup procedure of WebAuthn support for 2FA is the following:
8.7.1.1. Enable WebAuthn authenticator registration
- Click Authentication in the menu.
- Click the Required Actions tab.
- Toggle the Webauthn Register switch to ON.
Toggle the Default Action switch to ON if you want all new users to be required to register their WebAuthn credentials.
8.7.2. Adding WebAuthn authentication to a browser flow
- Click Authentication in the menu.
- Click the Browser flow.
- Select Duplicate from the "Action list" to make a copy of the built-in Browser flow.
- Enter "WebAuthn Browser" as the name of the copy.
- Click Duplicate.
- Click the name to go to the details
- Click the trash can icon 🗑️ of the "WebAuthn Browser Browser - Conditional OTP" and click Delete.
If you require WebAuthn for all users:
- Click + menu of the WebAuthn Browser Forms.
- Click Add step.
- Click WebAuthn Authenticator.
- Click Add.
Select Required for the WebAuthn Authenticator authentication type to set its requirement to required.
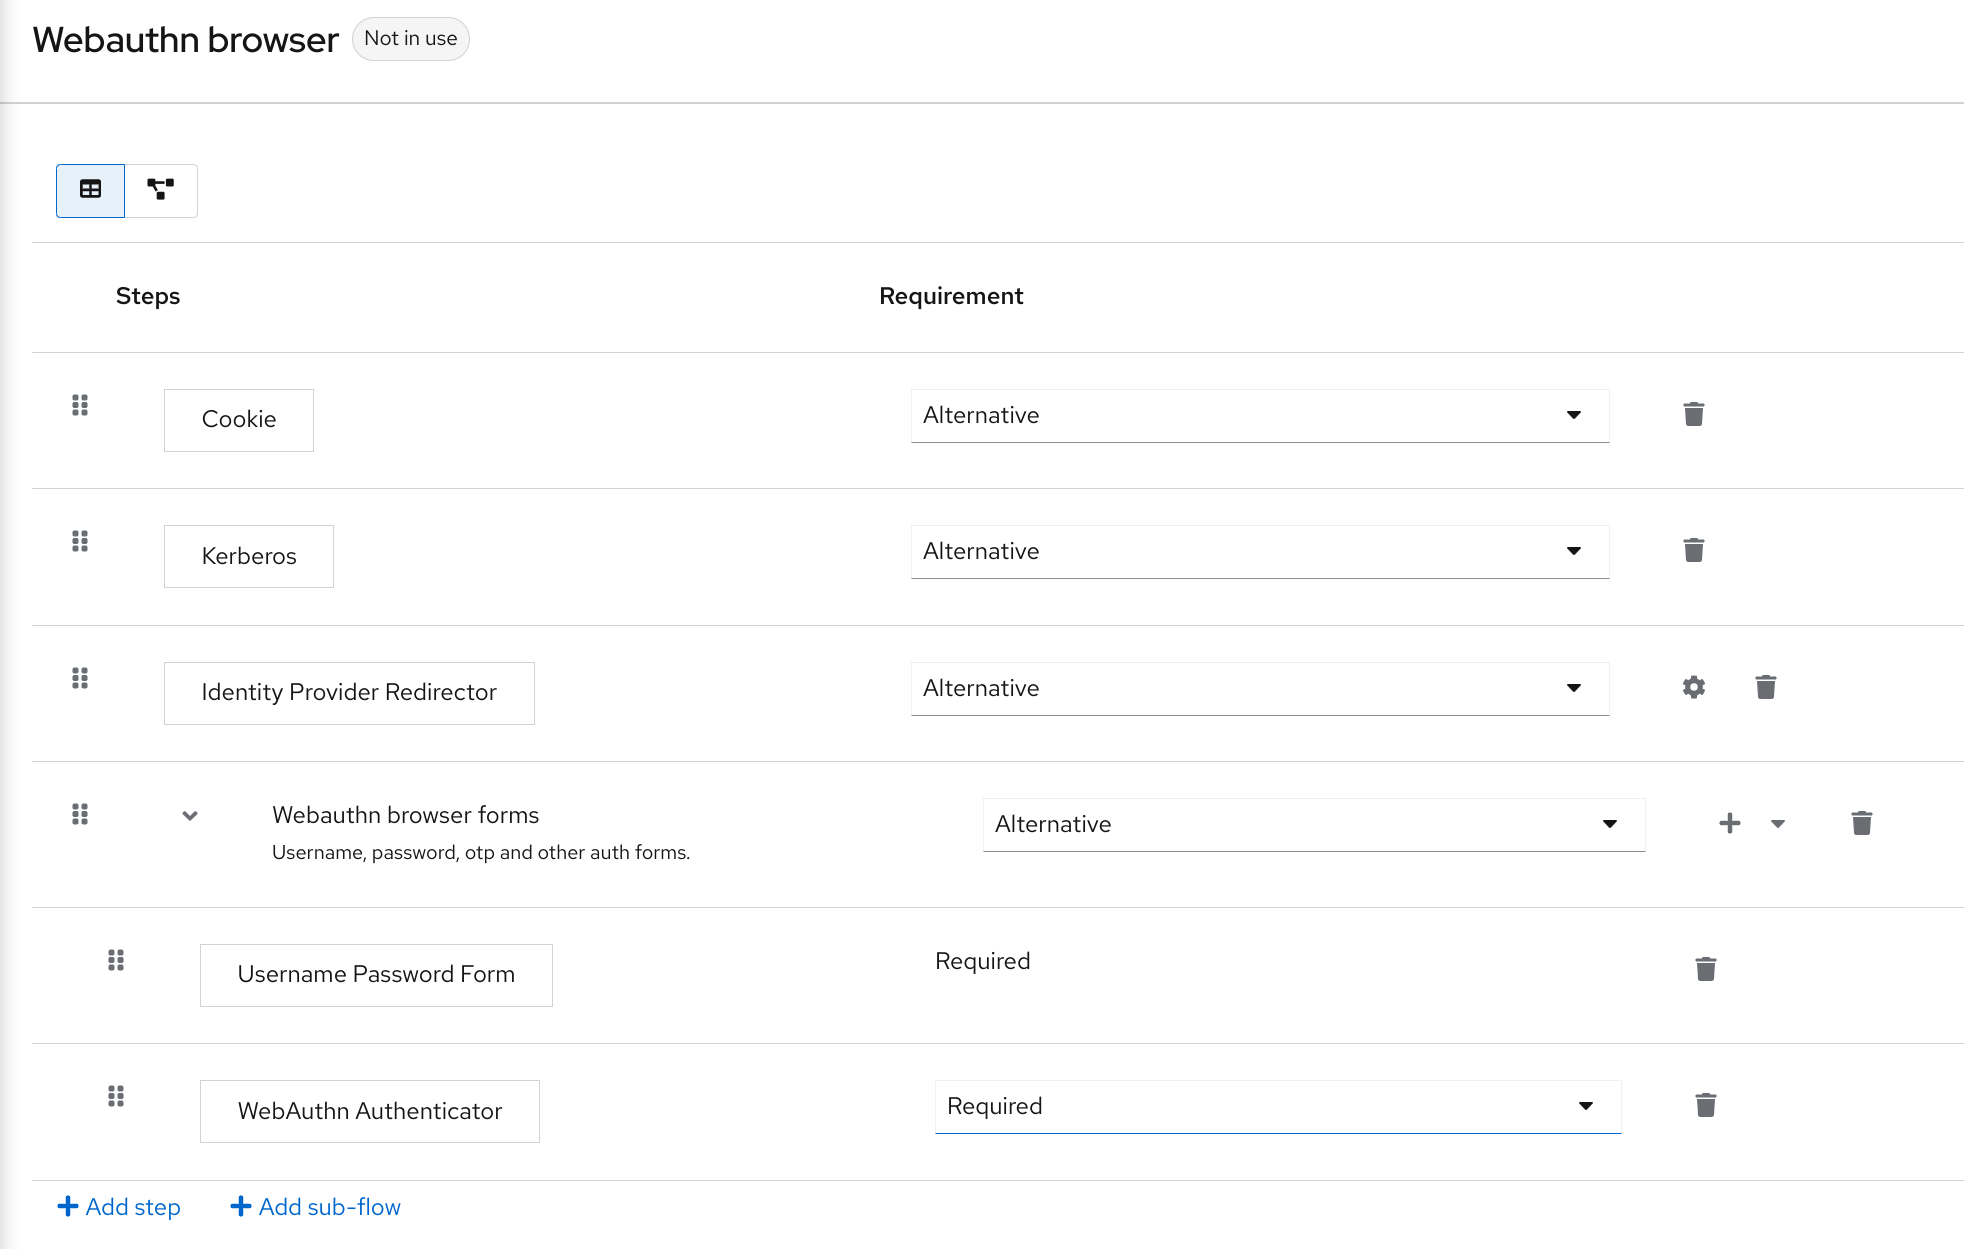
- Click the Action menu at the top of the screen.
- Select Bind flow from the drop-down list.
- Select Browser from the drop-down list.
- Click Save.
If a user does not have WebAuthn credentials, the user must register WebAuthn credentials.
Users can log in with WebAuthn if they have a WebAuthn credential registered only. So instead of adding the WebAuthn Authenticator execution, you can:
Procedure
- Click + menu of the WebAuthn Browser Forms row.
- Click Add sub-flow.
- Enter "Conditional 2FA" for the name field.
- Select Conditional for the Conditional 2FA to set its requirement to conditional.
- On the Conditional 2FA row, click the plus sign + and select Add condition.
- Click Add condition.
- Select Condition - User Configured.
- Click Add.
- Select Required for the Condition - User Configured to set its requirement to required.
- Drag and drop WebAuthn Authenticator into the Conditional 2FA flow
Select Alternative for the WebAuthn Authenticator to set its requirement to alternative.
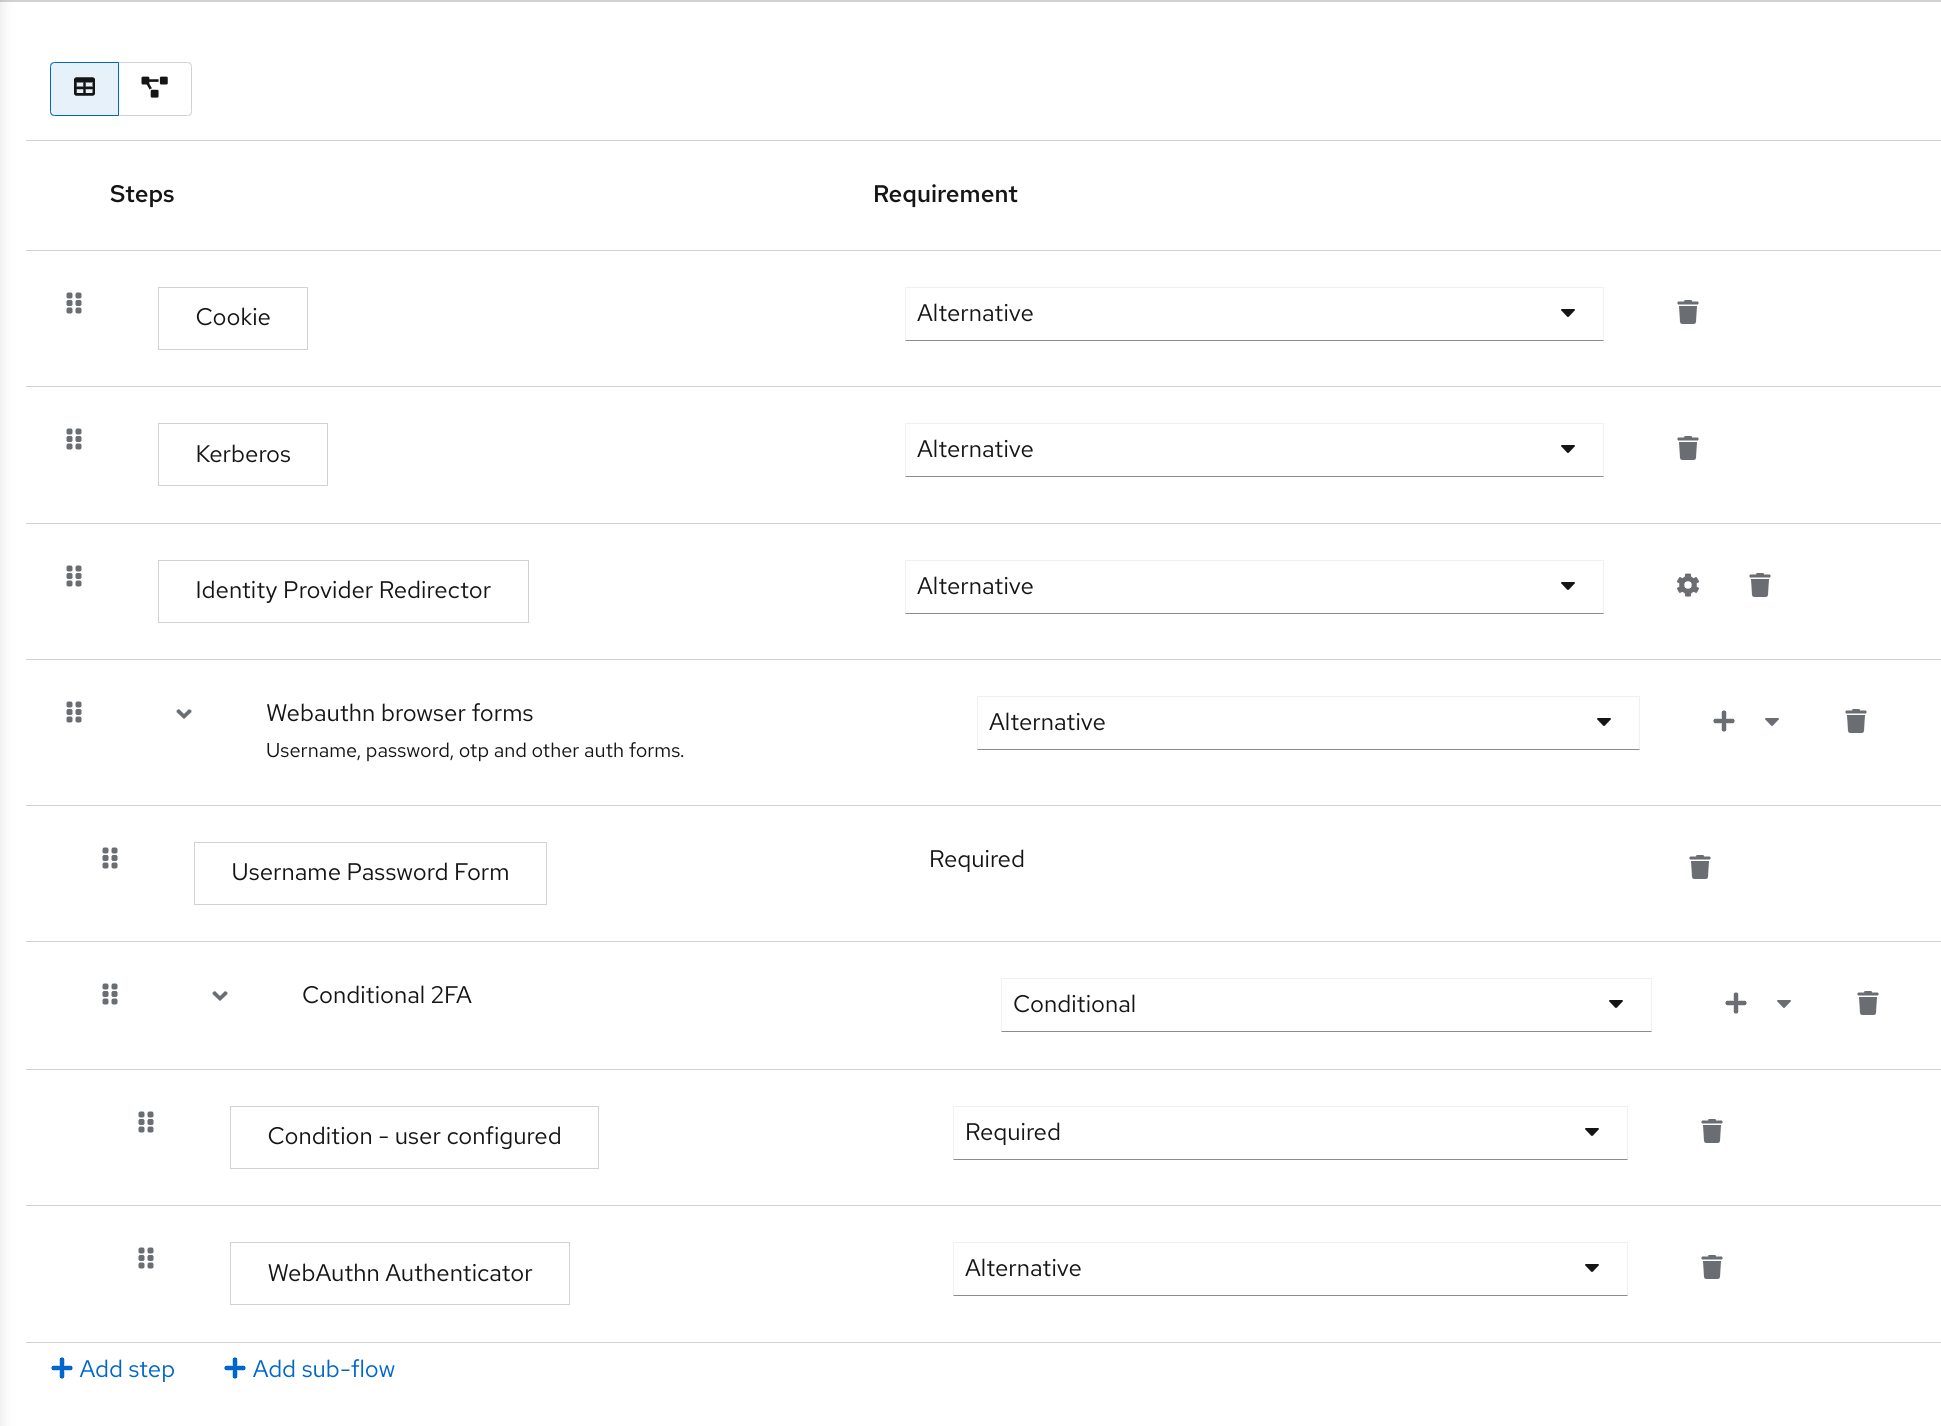
The user can choose between using WebAuthn and OTP for the second factor:
Procedure
- On the Conditional 2FA row, click the plus sign + and select Add step.
- Select OTP Form from the list.
- Click Add.
Select Alternative for the OTP Form to set its requirement to alternative.
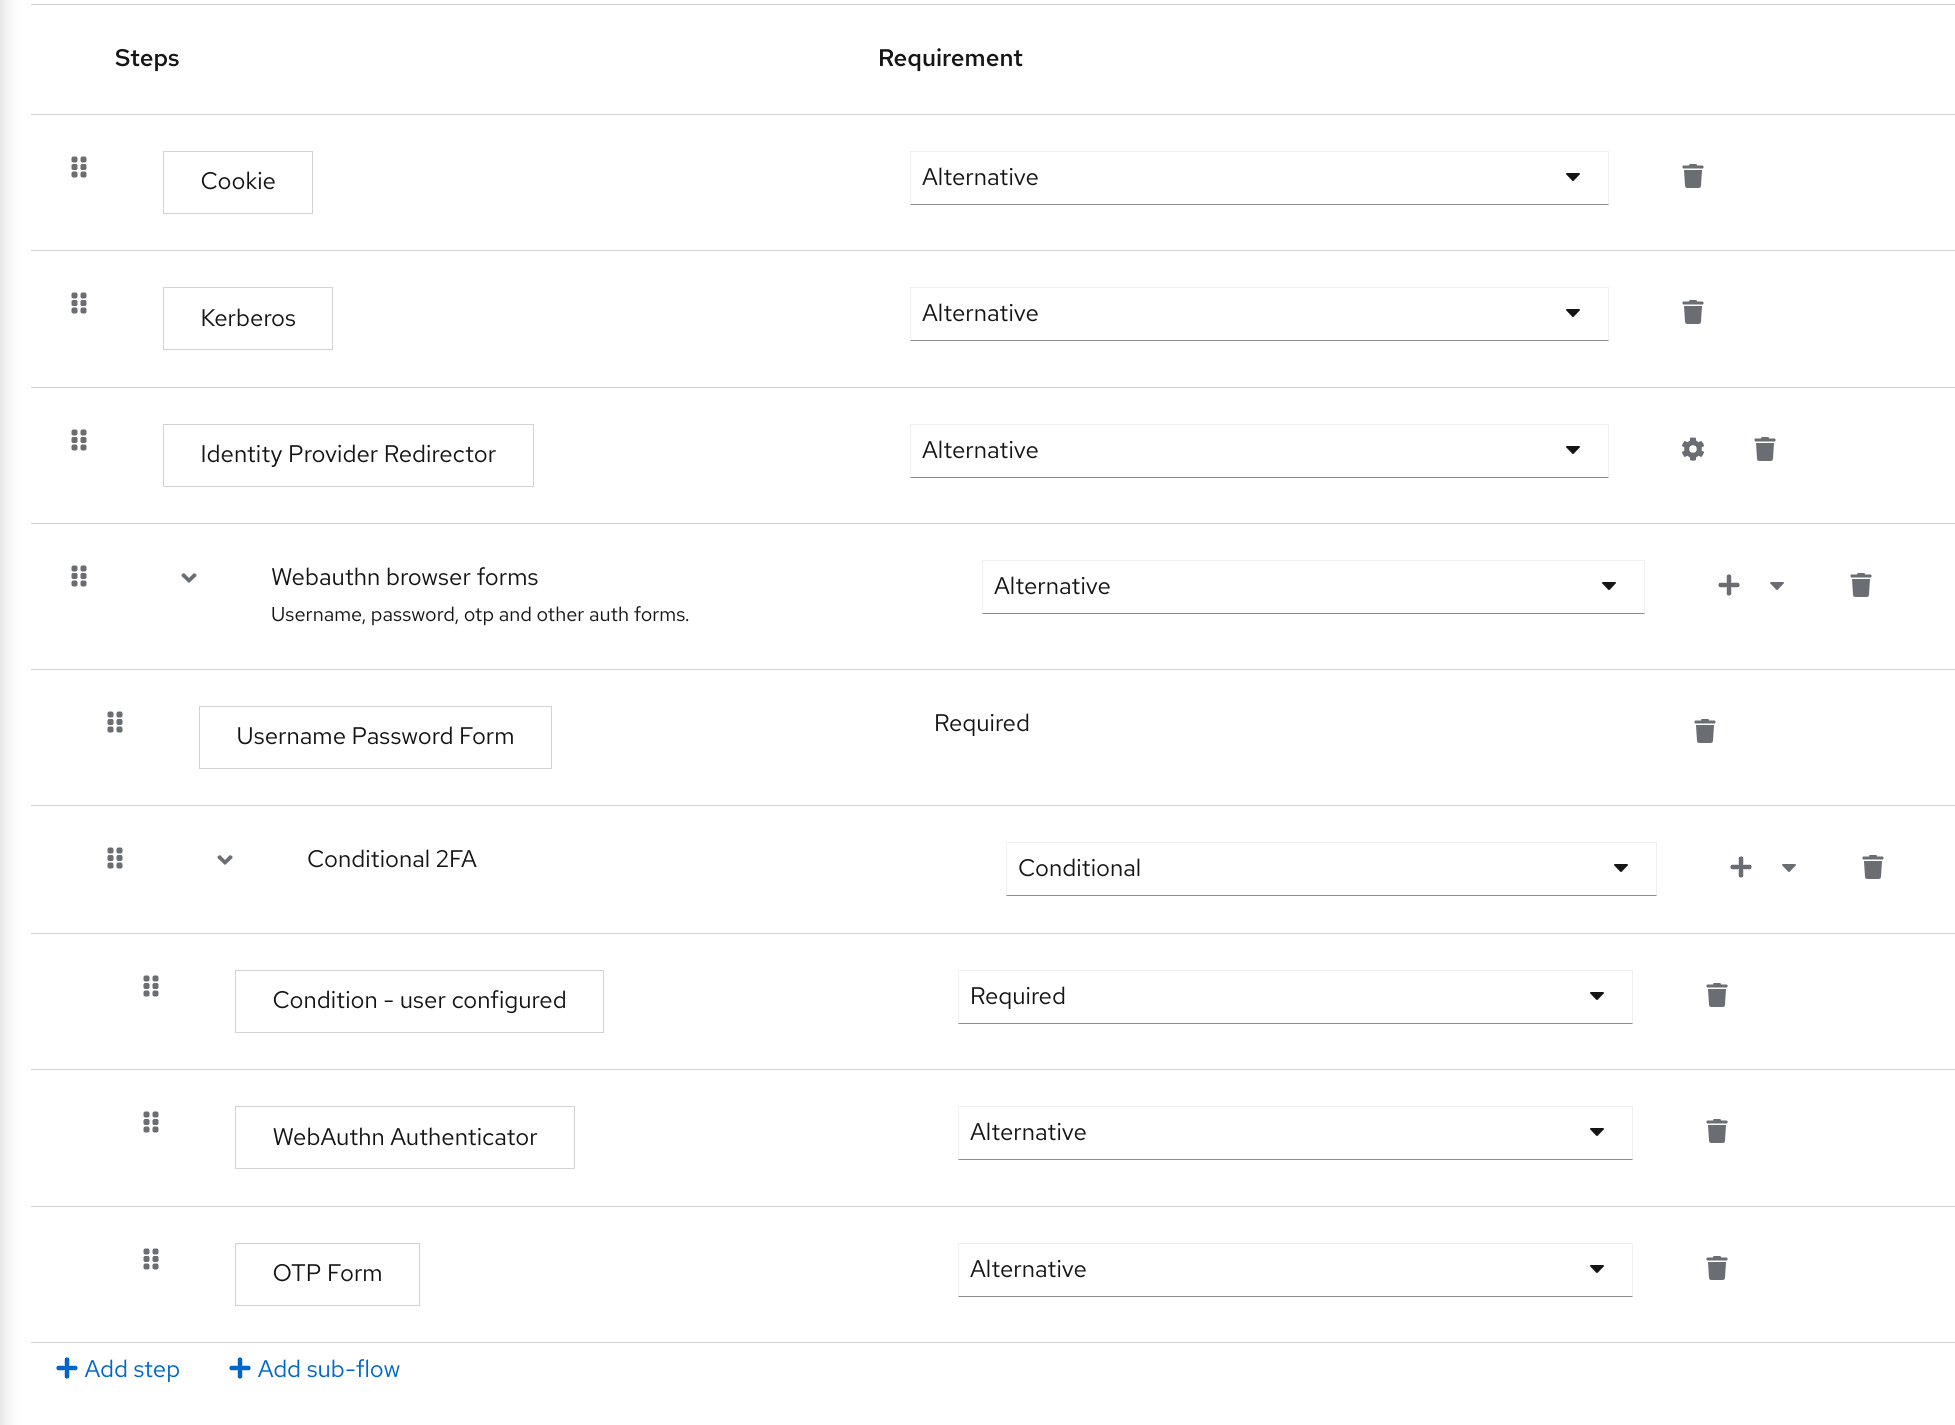
8.7.3. Authenticate with WebAuthn authenticator
After registering a WebAuthn authenticator, the user carries out the following operations:
- Open the login form. The user must authenticate with a username and password.
- The user’s browser asks the user to authenticate by using their WebAuthn authenticator.
8.7.4. Managing WebAuthn as an administrator
8.7.4.1. Managing credentials
Red Hat build of Keycloak manages WebAuthn credentials similarly to other credentials from User credential management:
- Red Hat build of Keycloak assigns users a required action to create a WebAuthn credential from the Reset Actions list and select Webauthn Register.
- Administrators can delete a WebAuthn credential by clicking Delete.
- Administrators can view the credential’s data, such as the AAGUID, by selecting Show data….
- Administrators can set a label for the credential by setting a value in the User Label field and saving the data.
8.7.4.2. Managing policy
Administrators can configure WebAuthn related operations as WebAuthn Policy per realm.
Procedure
- Click Authentication in the menu.
- Click the Policy tab.
- Click the WebAuthn Policy tab.
- Configure the items within the policy (see description below).
- Click Save.
The configurable items and their description are as follows:
| Configuration | Description |
|---|---|
| Relying Party Entity Name | The readable server name as a WebAuthn Relying Party. This item is mandatory and applies to the registration of the WebAuthn authenticator. The default setting is "keycloak". For more details, see WebAuthn Specification. |
| Signature Algorithms | The algorithms telling the WebAuthn authenticator which signature algorithms to use for the Public Key Credential. Red Hat build of Keycloak uses the Public Key Credential to sign and verify Authentication Assertions. If no algorithms exist, the default ES256 is adapted. ES256 is an optional configuration item applying to the registration of WebAuthn authenticators. For more details, see WebAuthn Specification. |
| Relying Party ID | The ID of a WebAuthn Relying Party that determines the scope of Public Key Credentials. The ID must be the origin’s effective domain. This ID is an optional configuration item applied to the registration of WebAuthn authenticators. If this entry is blank, Red Hat build of Keycloak adapts the host part of Red Hat build of Keycloak’s base URL. For more details, see WebAuthn Specification. |
| Attestation Conveyance Preference | The WebAuthn API implementation on the browser (WebAuthn Client) is the preferential method to generate Attestation statements. This preference is an optional configuration item applying to the registration of the WebAuthn authenticator. If no option exists, its behavior is the same as selecting "none". For more details, see WebAuthn Specification. |
| Authenticator Attachment | The acceptable attachment pattern of a WebAuthn authenticator for the WebAuthn Client. This pattern is an optional configuration item applying to the registration of the WebAuthn authenticator. For more details, see WebAuthn Specification. |
| Require Resident Key | The option requiring that the WebAuthn authenticator generates the Public Key Credential as Client-side-resident Public Key Credential Source. This option applies to the registration of the WebAuthn authenticator. If left blank, its behavior is the same as selecting "No". For more details, see WebAuthn Specification. |
| User Verification Requirement | The option requiring that the WebAuthn authenticator confirms the verification of a user. This is an optional configuration item applying to the registration of a WebAuthn authenticator and the authentication of a user by a WebAuthn authenticator. If no option exists, its behavior is the same as selecting "preferred". For more details, see WebAuthn Specification for registering a WebAuthn authenticator and WebAuthn Specification for authenticating the user by a WebAuthn authenticator. |
| Timeout | The timeout value, in seconds, for registering a WebAuthn authenticator and authenticating the user by using a WebAuthn authenticator. If set to zero, its behavior depends on the WebAuthn authenticator’s implementation. The default value is 0. For more details, see WebAuthn Specification for registering a WebAuthn authenticator and WebAuthn Specification for authenticating the user by a WebAuthn authenticator. |
| Avoid Same Authenticator Registration | If enabled, Red Hat build of Keycloak cannot re-register an already registered WebAuthn authenticator. |
| Acceptable AAGUIDs | The white list of AAGUIDs which a WebAuthn authenticator must register against. |
8.7.5. Attestation statement verification
When registering a WebAuthn authenticator, Red Hat build of Keycloak verifies the trustworthiness of the attestation statement generated by the WebAuthn authenticator. Red Hat build of Keycloak requires the trust anchor’s certificates imported into the truststore.
To omit this validation, disable this truststore or set the WebAuthn policy’s configuration item "Attestation Conveyance Preference" to "none".
8.7.6. Managing WebAuthn credentials as a user
8.7.6.1. Register WebAuthn authenticator
The appropriate method to register a WebAuthn authenticator depends on whether the user has already registered an account on Red Hat build of Keycloak.
8.7.6.2. New user
If the WebAuthn Register required action is Default Action in a realm, new users must set up the WebAuthn security key after their first login.
Procedure
- Open the login form.
- Click Register.
- Fill in the items on the form.
- Click Register.
After successfully registering, the browser asks the user to enter the text of their WebAuthn authenticator’s label.
8.7.6.3. Existing user
If WebAuthn Authenticator is set up as required as shown in the first example, then when existing users try to log in, they are required to register their WebAuthn authenticator automatically:
Procedure
- Open the login form.
- Enter the items on the form.
- Click Save.
- Click Login.
After successful registration, the user’s browser asks the user to enter the text of their WebAuthn authenticator’s label.
8.7.7. Passwordless WebAuthn together with Two-Factor
Red Hat build of Keycloak uses WebAuthn for two-factor authentication, but you can use WebAuthn as the first-factor authentication. In this case, users with passwordless WebAuthn credentials can authenticate to Red Hat build of Keycloak without a password. Red Hat build of Keycloak can use WebAuthn as both the passwordless and two-factor authentication mechanism in the context of a realm and a single authentication flow.
An administrator typically requires that Security Keys registered by users for the WebAuthn passwordless authentication meet different requirements. For example, the security keys may require users to authenticate to the security key using a PIN, or the security key attests with a stronger certificate authority.
Because of this, Red Hat build of Keycloak permits administrators to configure a separate WebAuthn Passwordless Policy. There is a required Webauthn Register Passwordless action of type and separate authenticator of type WebAuthn Passwordless Authenticator.
8.7.7.1. Setup
Set up WebAuthn passwordless support as follows:
-
(if not already present) Register a new required action for WebAuthn passwordless support. Use the steps described in Enable WebAuthn Authenticator Registration. Register the
Webauthn Register Passwordlessaction. - Configure the policy. You can use the steps and configuration options described in Managing Policy. Perform the configuration in the Admin Console in the tab WebAuthn Passwordless Policy. Typically the requirements for the security key will be stronger than for the two-factor policy. For example, you can set the User Verification Requirement to Required when you configure the passwordless policy.
Configure the authentication flow. Use the WebAuthn Browser flow described in Adding WebAuthn Authentication to a Browser Flow. Configure the flow as follows:
- The WebAuthn Browser Forms subflow contains Username Form as the first authenticator. Delete the default Username Password Form authenticator and add the Username Form authenticator. This action requires the user to provide a username as the first step.
- There will be a required subflow, which can be named Passwordless Or Two-factor, for example. This subflow indicates the user can authenticate with Passwordless WebAuthn credential or with Two-factor authentication.
- The flow contains WebAuthn Passwordless Authenticator as the first alternative.
- The second alternative will be a subflow named Password And Two-factor Webauthn, for example. This subflow contains a Password Form and a WebAuthn Authenticator.
The final configuration of the flow looks similar to this:
PasswordLess flow
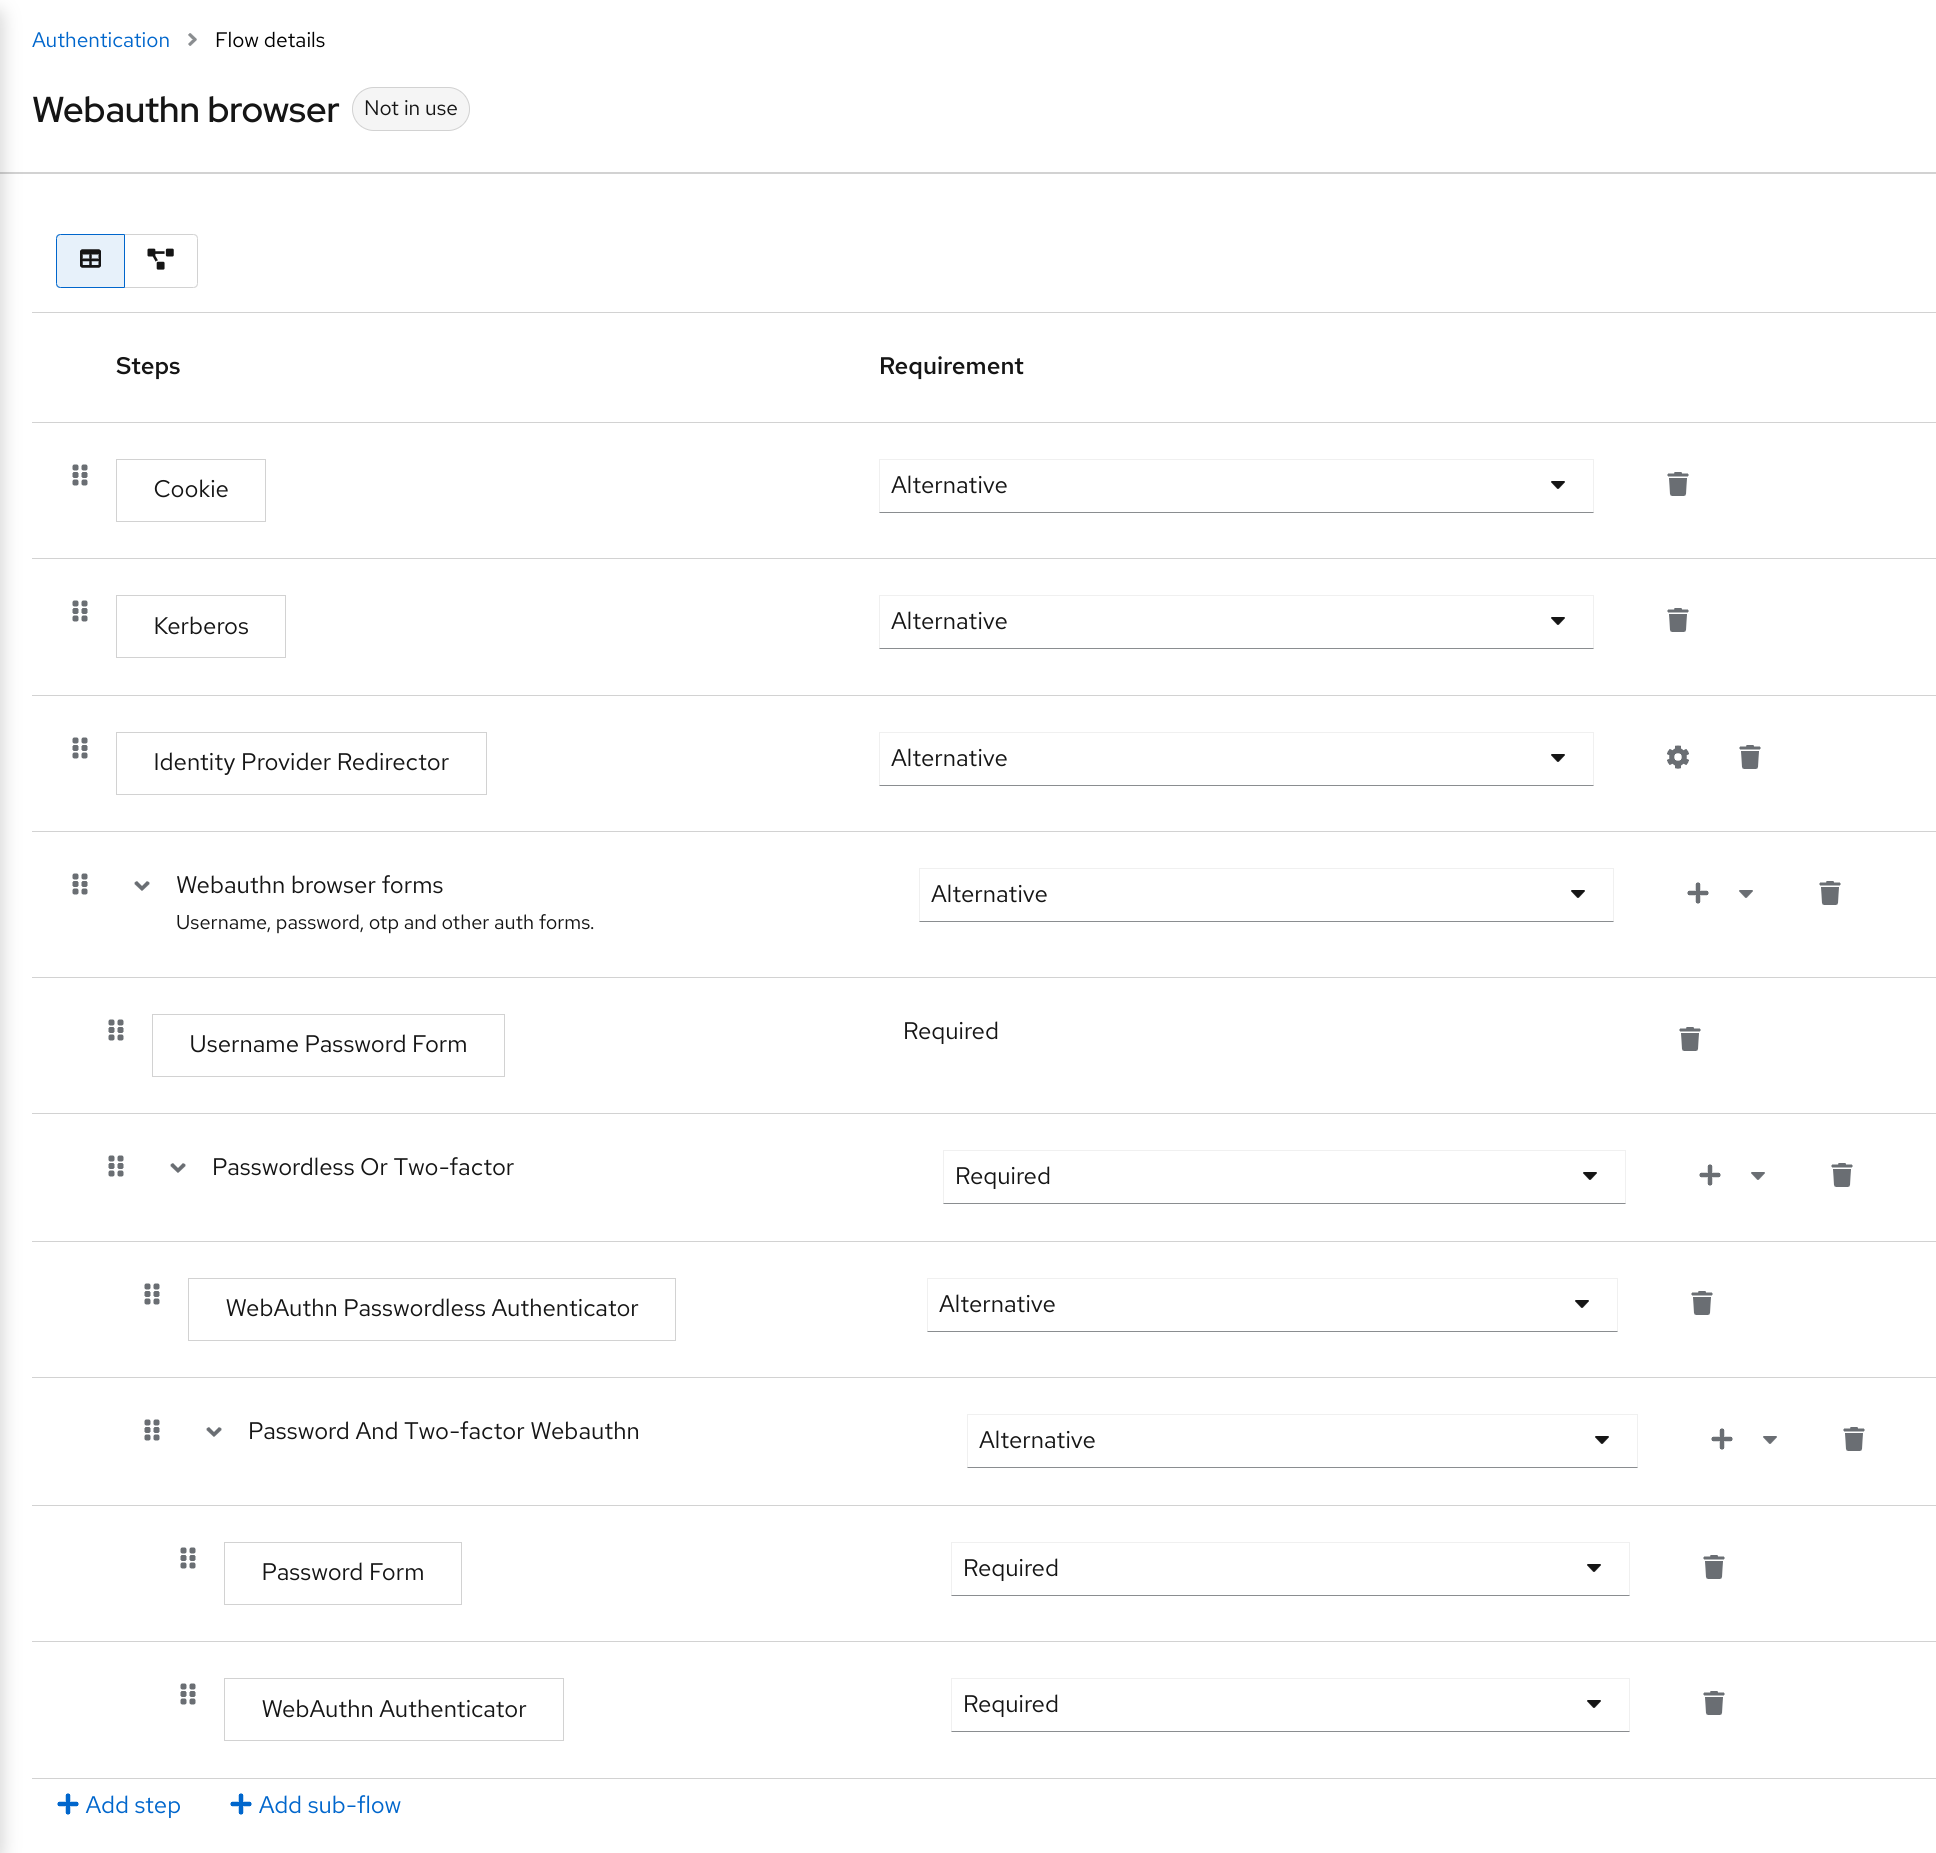
You can now add WebAuthn Register Passwordless as the required action to a user, already known to Red Hat build of Keycloak, to test this. During the first authentication, the user must use the password and second-factor WebAuthn credential. The user does not need to provide the password and second-factor WebAuthn credential if they use the WebAuthn Passwordless credential.
8.7.8. LoginLess WebAuthn
Red Hat build of Keycloak uses WebAuthn for two-factor authentication, but you can use WebAuthn as the first-factor authentication. In this case, users with passwordless WebAuthn credentials can authenticate to Red Hat build of Keycloak without submitting a login or a password. Red Hat build of Keycloak can use WebAuthn as both the loginless/passwordless and two-factor authentication mechanism in the context of a realm.
An administrator typically requires that Security Keys registered by users for the WebAuthn loginless authentication meet different requirements. Loginless authentication requires users to authenticate to the security key (for example by using a PIN code or a fingerprint) and that the cryptographic keys associated with the loginless credential are stored physically on the security key. Not all security keys meet that kind of requirements. Check with your security key vendor if your device supports 'user verification' and 'resident key'. See Supported Security Keys.
Red Hat build of Keycloak permits administrators to configure the WebAuthn Passwordless Policy in a way that allows loginless authentication. Note that loginless authentication can only be configured with WebAuthn Passwordless Policy and with WebAuthn Passwordless credentials. WebAuthn loginless authentication and WebAuthn passwordless authentication can be configured on the same realm but will share the same policy WebAuthn Passwordless Policy.
8.7.8.1. Setup
Procedure
Set up WebAuthn Loginless support as follows:
-
(if not already present) Register a new required action for WebAuthn passwordless support. Use the steps described in Enable WebAuthn Authenticator Registration. Register the
Webauthn Register Passwordlessaction. -
Configure the
WebAuthn Passwordless Policy. Perform the configuration in the Admin Console,Authenticationsection, in the tabPolicies→WebAuthn Passwordless Policy. You have to set User Verification Requirement to required and Require Resident Key to Yes when you configure the policy for loginless scenario. Note that since there isn’t a dedicated Loginless policy it won’t be possible to mix authentication scenarios with user verification=no/resident key=no and loginless scenarios (user verification=yes/resident key=yes). Storage capacity is usually very limited on security keys meaning that you won’t be able to store many resident keys on your security key. - Configure the authentication flow. Create a new authentication flow, add the "WebAuthn Passwordless" execution and set the Requirement setting of the execution to Required
The final configuration of the flow looks similar to this:
LoginLess flow

You can now add the required action WebAuthn Register Passwordless to a user, already known to Red Hat build of Keycloak, to test this. The user with the required action configured will have to authenticate (with a username/password for example) and will then be prompted to register a security key to be used for loginless authentication.
8.7.8.2. Vendor specific remarks
8.7.8.2.1. Compatibility check list
Loginless authentication with Red Hat build of Keycloak requires the security key to meet the following features
- FIDO2 compliance: not to be confused with FIDO/U2F
- User verification: the ability for the security key to authenticate the user (prevents someone finding your security key to be able to authenticate loginless and passwordless)
- Resident key: the ability for the security key to store the login and the cryptographic keys associated with the client application
8.7.8.2.2. Windows Hello
To use Windows Hello based credentials to authenticate against Red Hat build of Keycloak, configure the Signature Algorithms setting of the WebAuthn Passwordless Policy to include the RS256 value. Note that some browsers don’t allow access to platform security key (like Windows Hello) inside private windows.
8.7.8.2.3. Supported security keys
The following security keys have been successfully tested for loginless authentication with Red Hat build of Keycloak:
- Windows Hello (Windows 10 21H1/21H2)
- Yubico Yubikey 5 NFC
- Feitian ePass FIDO-NFC
8.8. Recovery Codes (RecoveryCodes)
You can configure Recovery codes for two-factor authentication by adding 'Recovery Authentication Code Form' as a two-factor authenticator to your authentication flow. For an example of configuring this authenticator, see WebAuthn.
RecoveryCodes is Technology Preview and is not fully supported. This feature is disabled by default.
To enable start the server with --features=preview or --features=recovery-codes
8.9. Conditions in conditional flows
As was mentioned in Execution requirements, Condition executions can be only contained in Conditional subflow. If all Condition executions evaluate as true, then the Conditional sub-flow acts as Required. You can process the next execution in the Conditional sub-flow. If some executions included in the Conditional sub-flow evaluate as false, then the whole sub-flow is considered as Disabled.
8.9.1. Available conditions
Condition - User RoleThis execution has the ability to determine if the user has a role defined by User role field. If the user has the required role, the execution is considered as true and other executions are evaluated. The administrator has to define the following fields:
- Alias
- Describes a name of the execution, which will be shown in the authentication flow.
- User role
-
Role the user should have to execute this flow. To specify an application role the syntax is
appname.approle(for examplemyapp.myrole).
Condition - User Configured- This checks if the other executions in the flow are configured for the user. The Execution requirements section includes an example of the OTP form.
Condition - User AttributeThis checks if the user has set up the required attribute: optionally, the check can also evaluate the group attributes. There is a possibility to negate output, which means the user should not have the attribute. The User Attributes section shows how to add a custom attribute. You can provide these fields:
- Alias
- Describes a name of the execution, which will be shown in the authentication flow.
- Attribute name
- Name of the attribute to check.
- Expected attribute value
- Expected value in the attribute.
- Include group attributes
- If On, the condition checks if any of the joined group has one attribute matching the configured name and value: this option can affect performance
- Negate output
- You can negate the output. In other words, the attribute should not be present.
8.9.2. Explicitly deny/allow access in conditional flows
You can allow or deny access to resources in a conditional flow. The two authenticators Deny Access and Allow Access control access to the resources by conditions.
Allow Access- Authenticator will always successfully authenticate. This authenticator is not configurable.
Deny AccessAccess will always be denied. You can define an error message, which will be shown to the user. You can provide these fields:
- Alias
- Describes a name of the execution, which will be shown in the authentication flow.
- Error message
-
Error message which will be shown to the user. The error message could be provided as a particular message or as a property in order to use it with localization. (i.e. "You do not have the role 'admin'.", my-property-deny in messages properties) Leave blank for the default message defined as property
access-denied.
Here is an example how to deny access to all users who do not have the role role1 and show an error message defined by a property deny-role1. This example includes Condition - User Role and Deny Access executions.
Browser flow
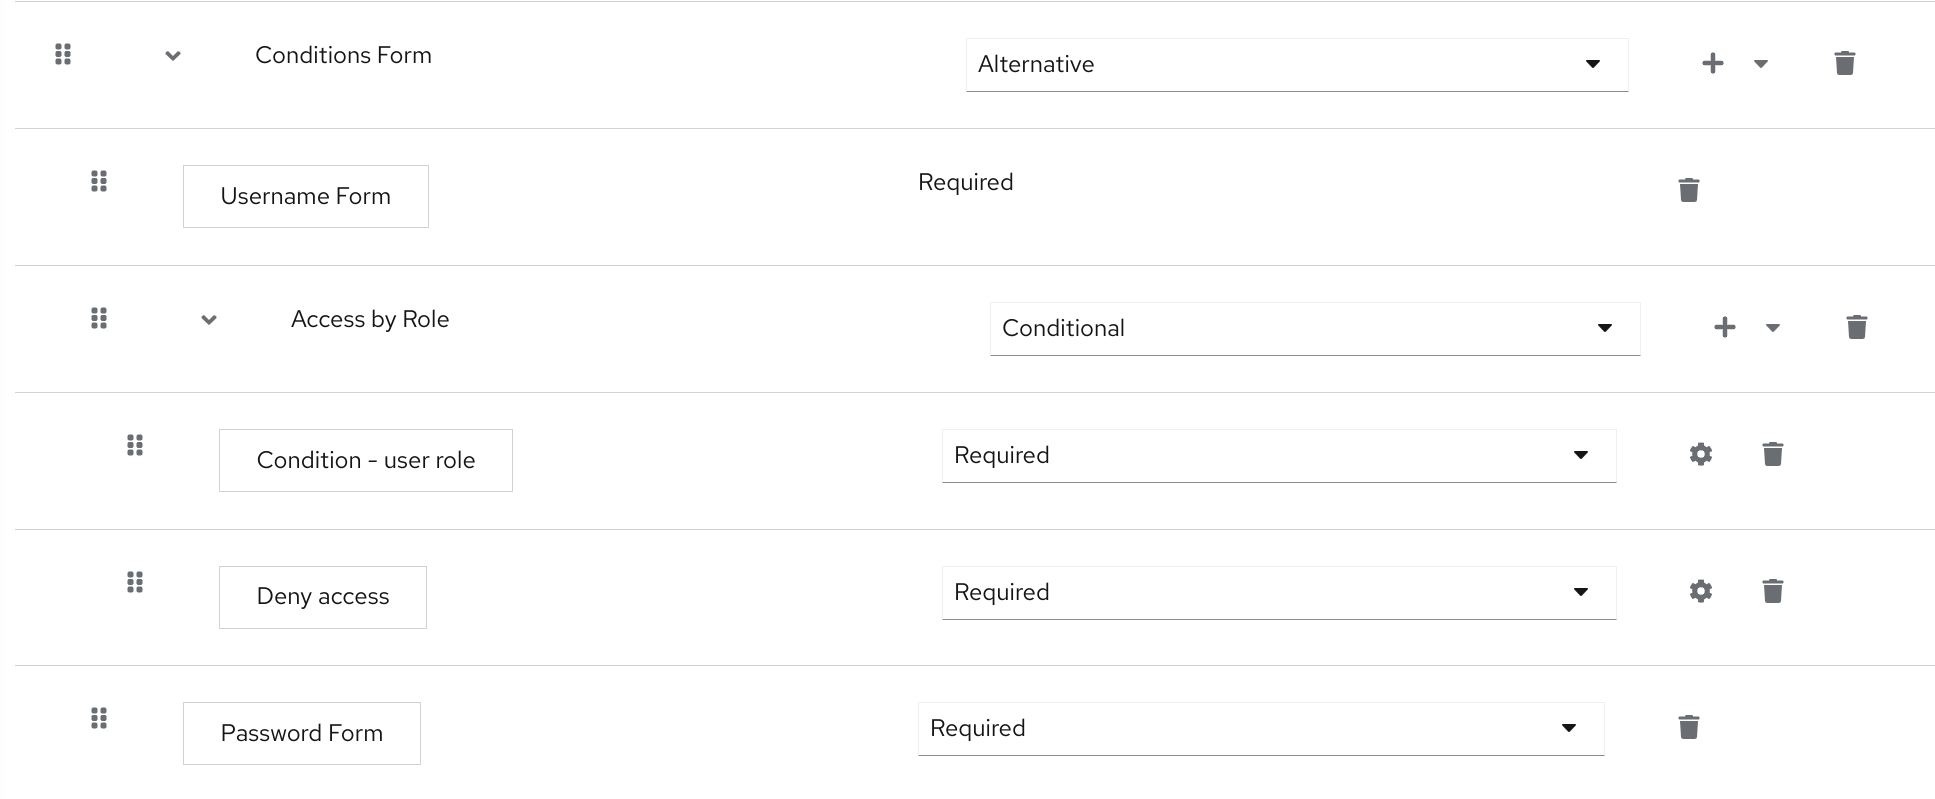
Condition - user role configuration
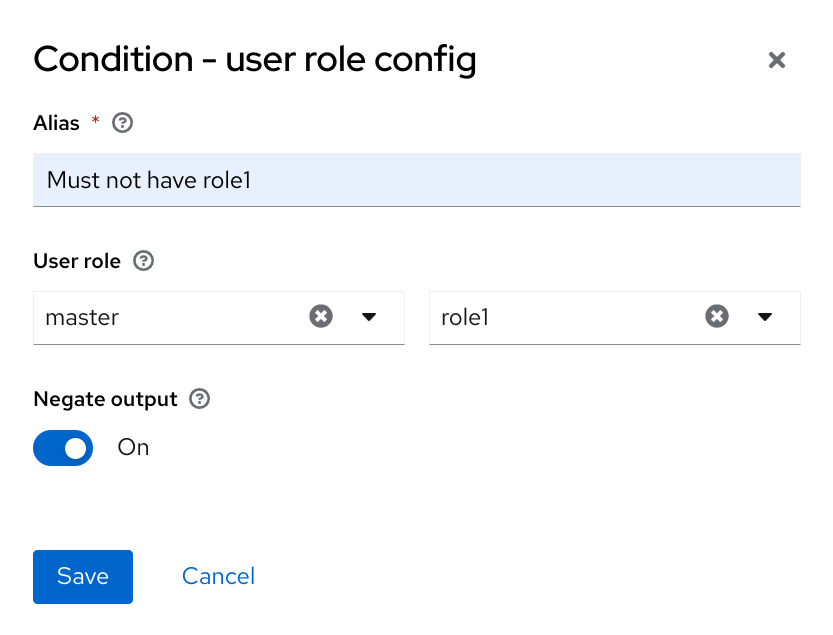
Configuration of the Deny Access is really easy. You can specify an arbitrary Alias and required message like this:
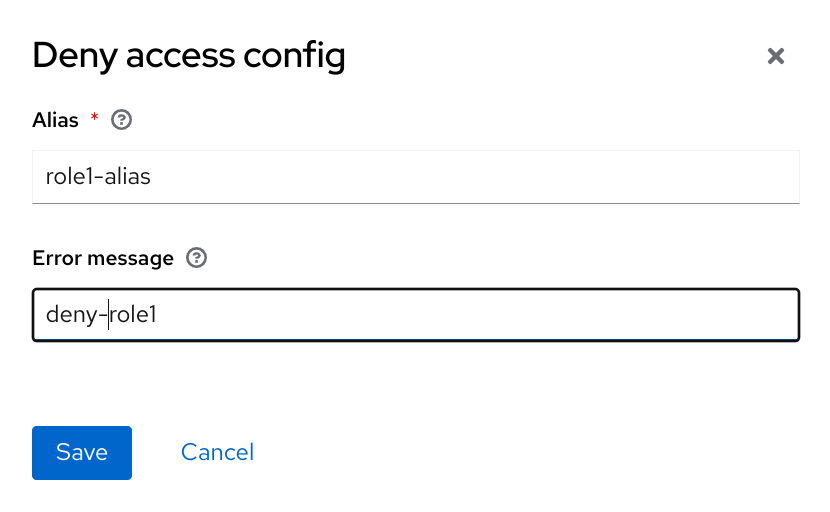
The last thing is defining the property with an error message in the login theme messages_en.properties (for English):
deny-role1 = You do not have required role!Chapter 9. Integrating identity providers
An Identity Broker is an intermediary service connecting service providers with identity providers. The identity broker creates a relationship with an external identity provider to use the provider’s identities to access the internal services the service provider exposes.
From a user perspective, identity brokers provide a user-centric, centralized way to manage identities for security domains and realms. You can link an account with one or more identities from identity providers or create an account based on the identity information from them.
An identity provider derives from a specific protocol used to authenticate and send authentication and authorization information to users. It can be:
- A social provider such as Facebook, Google, or Twitter.
- A business partner whose users need to access your services.
- A cloud-based identity service you want to integrate.
Typically, Red Hat build of Keycloak bases identity providers on the following protocols:
-
SAML v2.0 -
OpenID Connect v1.0 -
OAuth v2.0
9.1. Brokering overview
When using Red Hat build of Keycloak as an identity broker, Red Hat build of Keycloak does not force users to provide their credentials to authenticate in a specific realm. Red Hat build of Keycloak displays a list of identity providers from which they can authenticate.
If you configure a default identity provider, Red Hat build of Keycloak redirects users to the default provider.
Different protocols may require different authentication flows. All the identity providers supported by Red Hat build of Keycloak use the following flow.
Identity broker flow
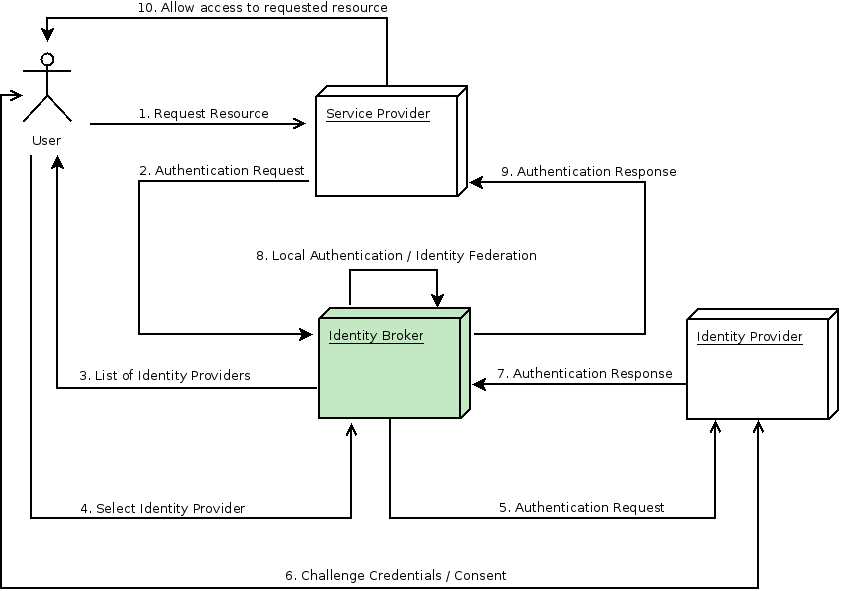
- The unauthenticated user requests a protected resource in a client application.
- The client application redirects the user to Red Hat build of Keycloak to authenticate.
- Red Hat build of Keycloak displays the login page with a list of identity providers configured in a realm.
- The user selects one of the identity providers by clicking its button or link.
- Red Hat build of Keycloak issues an authentication request to the target identity provider requesting authentication and redirects the user to the identity provider’s login page. The administrator has already set the connection properties and other configuration options for the Admin Console’s identity provider.
- The user provides credentials or consents to authenticate with the identity provider.
- Upon successful authentication by the identity provider, the user redirects back to Red Hat build of Keycloak with an authentication response. Usually, the response contains a security token used by Red Hat build of Keycloak to trust the identity provider’s authentication and retrieve user information.
- Red Hat build of Keycloak checks if the response from the identity provider is valid. If valid, Red Hat build of Keycloak imports and creates a user if the user does not already exist. Red Hat build of Keycloak may ask the identity provider for further user information if the token does not contain that information. This behavior is identity federation. If the user already exists, Red Hat build of Keycloak may ask the user to link the identity returned from the identity provider with the existing account. This behavior is account linking. With Red Hat build of Keycloak, you can configure Account linking and specify it in the First Login Flow. At this step, Red Hat build of Keycloak authenticates the user and issues its token to access the requested resource in the service provider.
- When the user authenticates, Red Hat build of Keycloak redirects the user to the service provider by sending the token previously issued during the local authentication.
- The service provider receives the token from Red Hat build of Keycloak and permits access to the protected resource.
Variations of this flow are possible. For example, the client application can request a specific identity provider rather than displaying a list of them, or you can set Red Hat build of Keycloak to force users to provide additional information before federating their identity.
At the end of the authentication process, Red Hat build of Keycloak issues its token to client applications. Client applications are separate from the external identity providers, so they cannot see the client application’s protocol or how they validate the user’s identity. The provider only needs to know about Red Hat build of Keycloak.
9.2. Default Identity Provider
Red Hat build of Keycloak can redirect to an identity provider rather than displaying the login form. To enable this redirection:
Procedure
- Click Authentication in the menu.
- Click the Browser flow.
- Click the gear icon ⚙️ on the Identity Provider Redirector row.
- Set Default Identity Provider to the identity provider you want to redirect users to.
If Red Hat build of Keycloak does not find the configured default identity provider, the login form is displayed.
This authenticator is responsible for processing the kc_idp_hint query parameter. See the client suggested identity provider section for more information.
9.3. General configuration
The foundations of the identity broker configuration are identity providers (IDPs). Red Hat build of Keycloak creates identity providers for each realm and enables them for every application by default. Users from a realm can use any of the registered identity providers when signing in to an application.
Procedure
Click Identity Providers in the menu.
Identity Providers
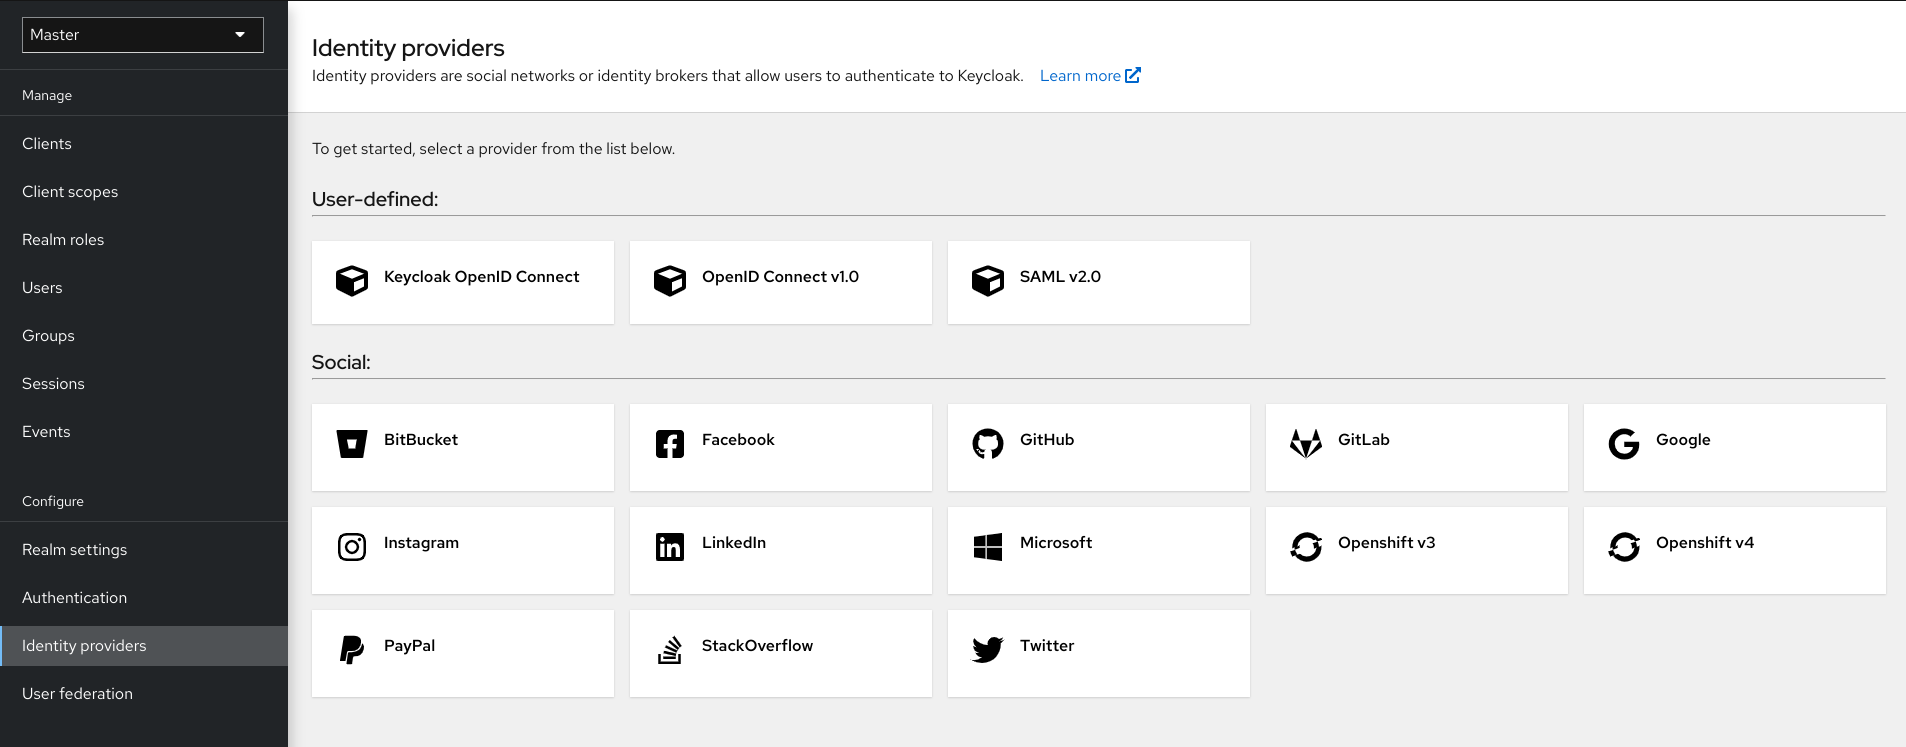
Select an identity provider. Red Hat build of Keycloak displays the configuration page for the identity provider you selected.
Add Facebook identity Provider
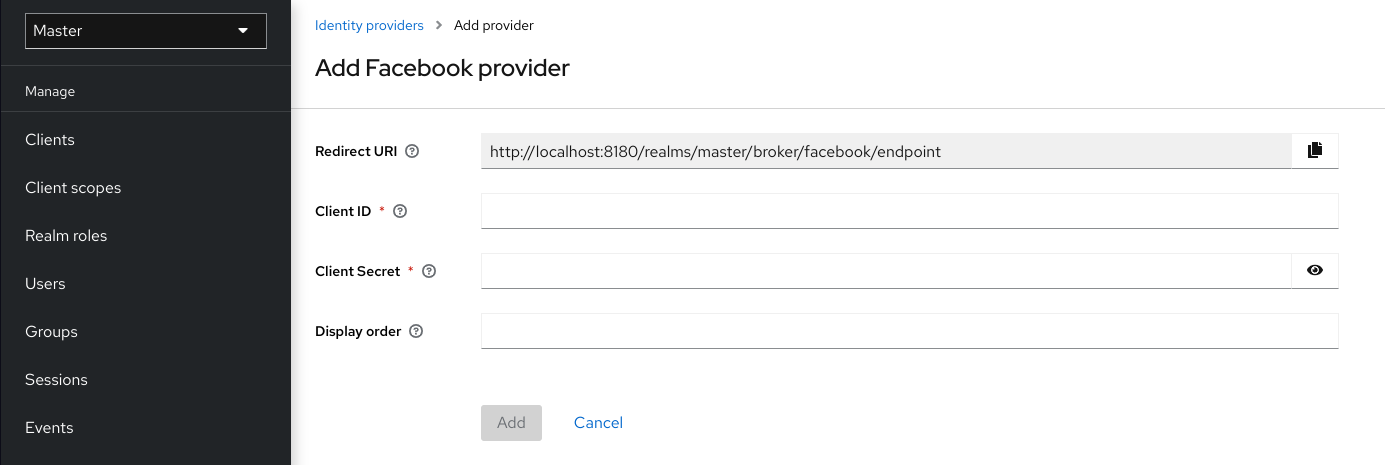
When you configure an identity provider, the identity provider appears on the Red Hat build of Keycloak login page as an option. You can place custom icons on the login screen for each identity provider. See custom icons for more information.
IDP login page
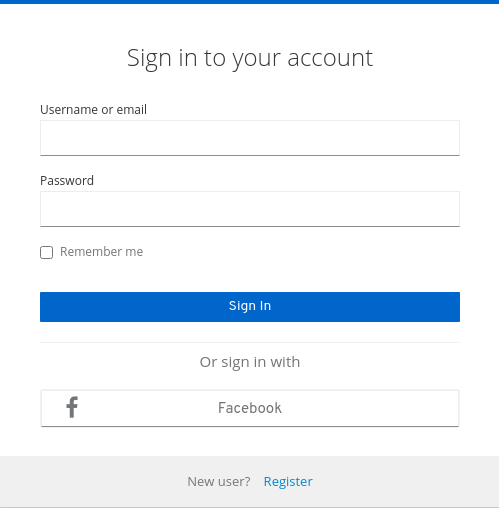
- Social
- Social providers enable social authentication in your realm. With Red Hat build of Keycloak, users can log in to your application using a social network account. Supported providers include Twitter, Facebook, Google, LinkedIn, Instagram, Microsoft, PayPal, Openshift v3, GitHub, GitLab, Bitbucket, and Stack Overflow.
- Protocol-based
- Protocol-based providers rely on specific protocols to authenticate and authorize users. Using these providers, you can connect to any identity provider compliant with a specific protocol. Red Hat build of Keycloak provides support for SAML v2.0 and OpenID Connect v1.0 protocols. You can configure and broker any identity provider based on these open standards.
Although each type of identity provider has its configuration options, all share a common configuration. The following configuration options available:
| Configuration | Description |
|---|---|
| Alias |
The alias is a unique identifier for an identity provider and references an internal identity provider. Red Hat build of Keycloak uses the alias to build redirect URIs for OpenID Connect protocols that require a redirect URI or callback URL to communicate with an identity provider. All identity providers must have an alias. Alias examples include |
| Enabled | Toggles the provider ON or OFF. |
| Hide on Login Page | When ON, Red Hat build of Keycloak does not display this provider as a login option on the login page. Clients can request this provider by using the 'kc_idp_hint' parameter in the URL to request a login. |
| Account Linking Only | When ON, Red Hat build of Keycloak links existing accounts with this provider. This provider cannot log users in, and Red Hat build of Keycloak does not display this provider as an option on the login page. |
| Store Tokens | When ON, Red Hat build of Keycloak stores tokens from the identity provider. |
| Stored Tokens Readable | When ON, users can retrieve the stored identity provider token. This action also applies to the broker client-level role read token. |
| Trust Email | When ON, Red Hat build of Keycloak trusts email addresses from the identity provider. If the realm requires email validation, users that log in from this identity provider do not need to perform the email verification process. |
| GUI Order | The sort order of the available identity providers on the login page. |
| Verify essential claim | When ON, ID tokens issued by the identity provider must have a specific claim, otherwise, the user can not authenticate through this broker |
| Essential claim | When Verify essential claim is ON, the name of the JWT token claim to filter (match is case sensitive) |
| Essential claim value | When Verify essential claim is ON, the value of the JWT token claim to match (supports regular expression format) |
| First Login Flow | The authentication flow Red Hat build of Keycloak triggers when users use this identity provider to log into Red Hat build of Keycloak for the first time. |
| Post Login Flow | The authentication flow Red Hat build of Keycloak triggers when a user finishes logging in with the external identity provider. |
| Sync Mode | Strategy to update user information from the identity provider through mappers. When choosing legacy, Red Hat build of Keycloak used the current behavior. Import does not update user data and force updates user data when possible. See Identity Provider Mappers for more information. |
9.5. OpenID Connect v1.0 identity providers
Red Hat build of Keycloak brokers identity providers based on the OpenID Connect protocol. These identity providers (IDPs) must support the Authorization Code Flow defined in the specification to authenticate users and authorize access.
Procedure
- Click Identity Providers in the menu.
From the
Add providerlist, selectOpenID Connect v1.0.Add identity provider
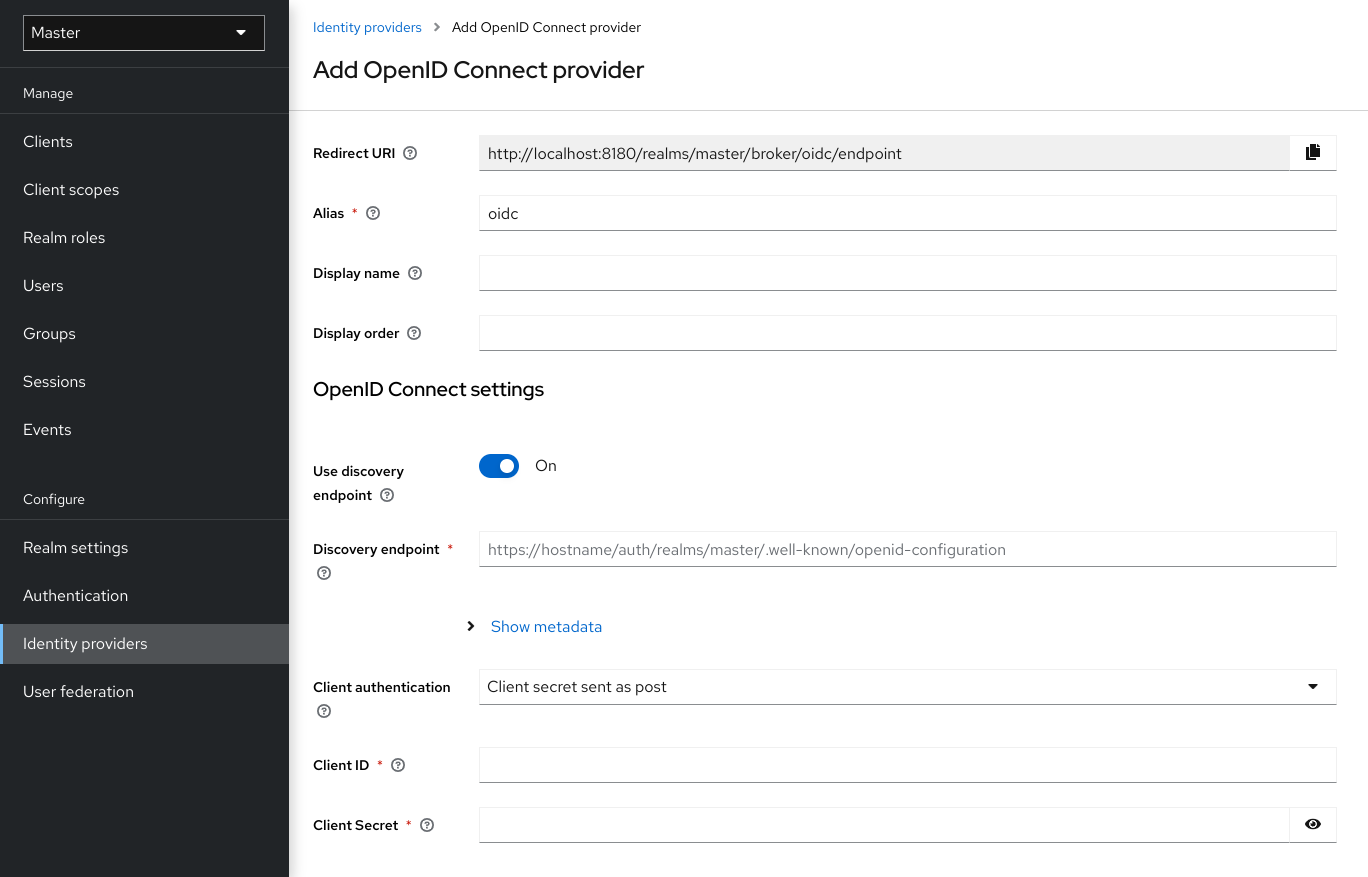
Enter your initial configuration options. See General IDP Configuration for more information about configuration options.
Expand Table 9.2. OpenID connect config Configuration Description Authorization URL
The authorization URL endpoint the OIDC protocol requires.
Token URL
The token URL endpoint the OIDC protocol requires.
Logout URL
The logout URL endpoint in the OIDC protocol. This value is optional.
Backchannel Logout
A background, out-of-band, REST request to the IDP to log out the user. Some IDPs perform logout through browser redirects only, as they may identify sessions using a browser cookie.
User Info URL
An endpoint the OIDC protocol defines. This endpoint points to user profile information.
Client Authentication
Defines the Client Authentication method Red Hat build of Keycloak uses with the Authorization Code Flow. In the case of JWT signed with a private key, Red Hat build of Keycloak uses the realm private key. In the other cases, define a client secret. See the Client Authentication specifications for more information.
Client ID
A realm acting as an OIDC client to the external IDP. The realm must have an OIDC client ID if you use the Authorization Code Flow to interact with the external IDP.
Client Secret
Client secret from an external vault. This secret is necessary if you are using the Authorization Code Flow.
Client Assertion Signature Algorithm
Signature algorithm to create JWT assertion as client authentication. In the case of JWT signed with private key or Client secret as jwt, it is required. If no algorithm is specified, the following algorithm is adapted.
RS256is adapted in the case of JWT signed with private key.HS256is adapted in the case of Client secret as jwt.Issuer
Red Hat build of Keycloak validates issuer claims, in responses from the IDP, against this value.
Default Scopes
A list of OIDC scopes Red Hat build of Keycloak sends with the authentication request. The default value is
openid. A space separates each scope.Prompt
The prompt parameter in the OIDC specification. Through this parameter, you can force re-authentication and other options. See the specification for more details.
Accepts prompt=none forward from client
Specifies if the IDP accepts forwarded authentication requests containing the
prompt=nonequery parameter. If a realm receives an auth request withprompt=none, the realm checks if the user is currently authenticated and returns alogin_requirederror if the user has not logged in. When Red Hat build of Keycloak determines a default IDP for the auth request (using thekc_idp_hintquery parameter or having a default IDP for the realm), you can forward the auth request withprompt=noneto the default IDP. The default IDP checks the authentication of the user there. Because not all IDPs support requests withprompt=none, Red Hat build of Keycloak uses this switch to indicate that the default IDP supports the parameter before redirecting the authentication request.If the user is unauthenticated in the IDP, the client still receives a
login_requirederror. If the user is authentic in the IDP, the client can still receive aninteraction_requirederror if Red Hat build of Keycloak must display authentication pages that require user interaction. This authentication includes required actions (for example, password change), consent screens, and screens set to display by thefirst broker loginflow orpost broker loginflow.Validate Signatures
Specifies if Red Hat build of Keycloak verifies signatures on the external ID Token signed by this IDP. If ON, Red Hat build of Keycloak must know the public key of the external OIDC IDP. For performance purposes, Red Hat build of Keycloak caches the public key of the external OIDC identity provider.
Use JWKS URL
This switch is applicable if
Validate Signaturesis ON. If Use JWKS URL is ON, Red Hat build of Keycloak downloads the IDP’s public keys from the JWKS URL. New keys download when the identity provider generates a new keypair. If OFF, Red Hat build of Keycloak uses the public key (or certificate) from its database, so when the IDP keypair changes, import the new key to the Red Hat build of Keycloak database as well.JWKS URL
The URL pointing to the location of the IDP JWK keys. For more information, see the JWK specification. If you use an external Red Hat build of Keycloak as an IDP, you can use a URL such as http://broker-keycloak:8180/realms/test/protocol/openid-connect/certs if your brokered Red Hat build of Keycloak is running on http://broker-keycloak:8180 and its realm is
test.Validating Public Key
The public key in PEM format that Red Hat build of Keycloak uses to verify external IDP signatures. This key applies if
Use JWKS URLis OFF.Validating Public Key Id
This setting applies if Use JWKS URL is OFF. This setting specifies the ID of the public key in PEM format. Because there is no standard way for computing key ID from the key, external identity providers can use different algorithms from what Red Hat build of Keycloak uses. If this field’s value is not specified, Red Hat build of Keycloak uses the validating public key for all requests, regardless of the key ID sent by the external IDP. When ON, this field’s value is the key ID used by Red Hat build of Keycloak for validating signatures from providers and must match the key ID specified by the IDP.
You can import all this configuration data by providing a URL or file that points to OpenID Provider Metadata. If you connect to a Red Hat build of Keycloak external IDP, you can import the IDP settings from <root>/realms/{realm-name}/.well-known/openid-configuration. This link is a JSON document describing metadata about the IDP.
If you want to use Json Web Encryption (JWE) ID Tokens or UserInfo responses in the provider, the IDP needs to know the public key to use with Red Hat build of Keycloak. The provider uses the realm keys defined for the different encryption algorithms to decrypt the tokens. Red Hat build of Keycloak provides a standard JWKS endpoint which the IDP can use for downloading the keys automatically.
9.6. SAML v2.0 Identity Providers
Red Hat build of Keycloak can broker identity providers based on the SAML v2.0 protocol.
Procedure
- Click Identity Providers in the menu.
From the
Add providerlist, selectSAML v2.0.Add identity provider
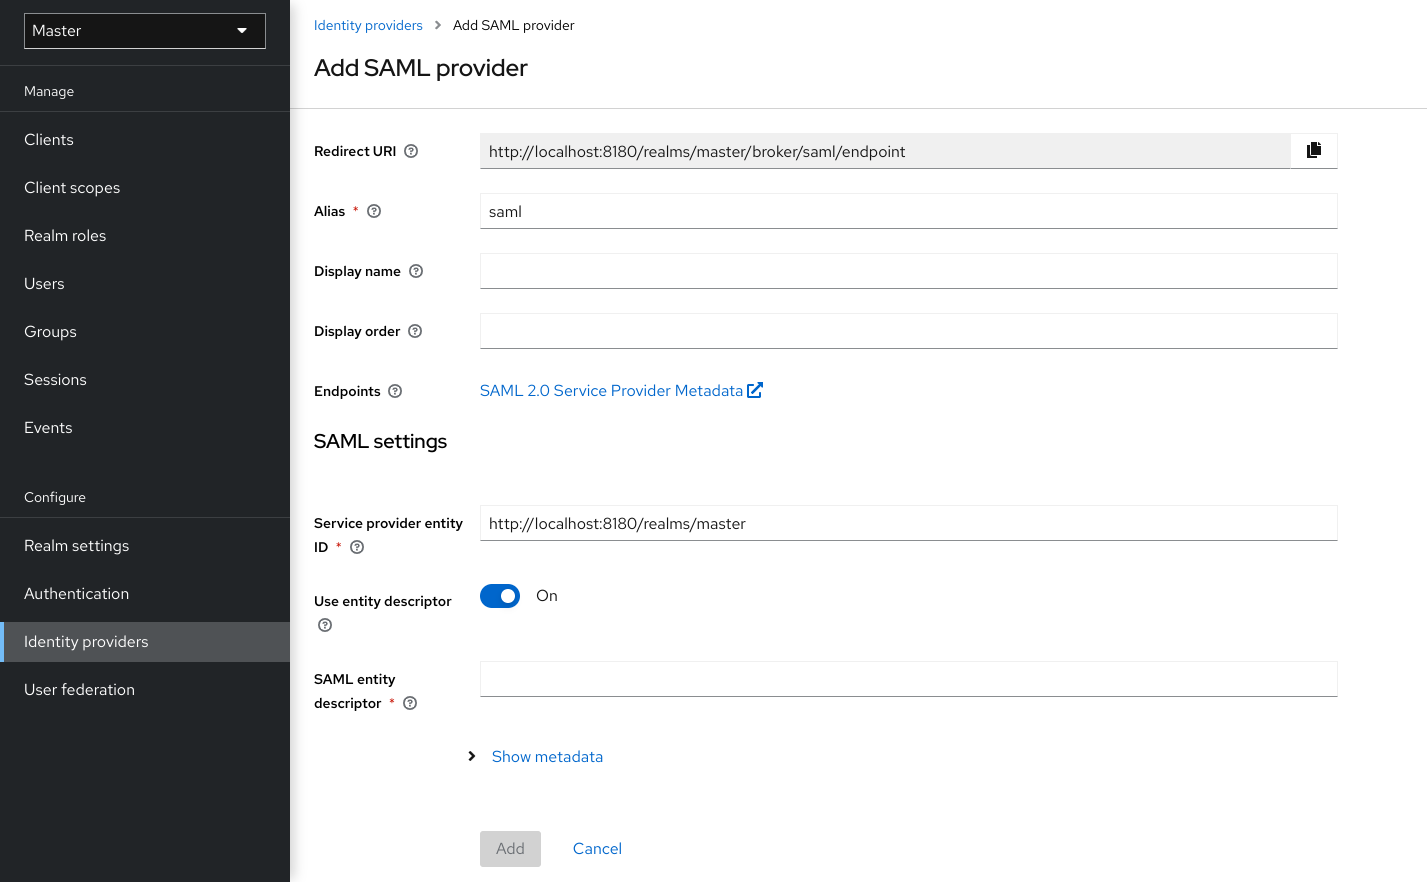
- Enter your initial configuration options. See General IDP Configuration for more information about configuration options.
| Configuration | Description |
|---|---|
| Service Provider Entity ID |
The SAML Entity ID that the remote Identity Provider uses to identify requests from this Service Provider. By default, this setting is set to the realms base URL |
| Identity Provider Entity ID | The Entity ID used to validate the Issuer for received SAML assertions. If empty, no Issuer validation is performed. |
| Single Sign-On Service URL | The SAML endpoint that starts the authentication process. If your SAML IDP publishes an IDP entity descriptor, the value of this field is specified there. |
| Single Logout Service URL | The SAML logout endpoint. If your SAML IDP publishes an IDP entity descriptor, the value of this field is specified there. |
| Backchannel Logout | Toggle this switch to ON if your SAML IDP supports back channel logout. |
| NameID Policy Format |
The URI reference corresponding to a name identifier format. By default, Red Hat build of Keycloak sets it to |
| Principal Type | Specifies which part of the SAML assertion will be used to identify and track external user identities. Can be either Subject NameID or SAML attribute (either by name or by friendly name). Subject NameID value can not be set together with 'urn:oasis:names:tc:SAML:2.0:nameid-format:transient' NameID Policy Format value. |
| Principal Attribute | If a Principal type is non-blank, this field specifies the name ("Attribute [Name]") or the friendly name ("Attribute [Friendly Name]") of the identifying attribute. |
| Allow create | Allow the external identity provider to create a new identifier to represent the principal. |
| HTTP-POST Binding Response | Controls the SAML binding in response to any SAML requests sent by an external IDP. When OFF, Red Hat build of Keycloak uses Redirect Binding. |
| HTTP-POST Binding for AuthnRequest | Controls the SAML binding when requesting authentication from an external IDP. When OFF, Red Hat build of Keycloak uses Redirect Binding. |
| Want AuthnRequests Signed | When ON, Red Hat build of Keycloak uses the realm’s keypair to sign requests sent to the external SAML IDP. |
| Want Assertions Signed | Indicates whether this service provider expects a signed Assertion. |
| Want Assertions Encrypted | Indicates whether this service provider expects an encrypted Assertion. |
| Signature Algorithm |
If Want AuthnRequests Signed is ON, the signature algorithm to use. Note that |
| Encryption Algorithm | Encryption algorithm, which is used by SAML IDP for encryption of SAML documents, assertions, or IDs. The corresponding decryption key for decrypt SAML document parts will be chosen based on this configured algorithm and should be available in realm keys for the encryption (ENC) usage. If the algorithm is not configured, any supported algorithm is allowed and a decryption key will be chosen based on the algorithm specified in SAML document itself. |
| SAML Signature Key Name |
Signed SAML documents sent using POST binding contain the identification of signing key in |
| Force Authentication | The user must enter their credentials at the external IDP even when the user is already logged in. |
| Validate Signature | When ON, the realm expects SAML requests and responses from the external IDP to be digitally signed. |
| Validating X509 Certificate | The public certificate Red Hat build of Keycloak uses to validate the signatures of SAML requests and responses from the external IDP. |
| Sign Service Provider Metadata | When ON, Red Hat build of Keycloak uses the realm’s key pair to sign the SAML Service Provider Metadata descriptor. |
| Pass subject |
Controls if Red Hat build of Keycloak forwards a |
| Attribute Consuming Service Index | Identifies the attribute set to request to the remote IDP. Red Hat build of Keycloak automatically adds the attributes mapped in the identity provider configuration to the autogenerated SP metadata document. |
| Attribute Consuming Service Name | A descriptive name for the set of attributes that are advertised in the autogenerated SP metadata document. |
You can import all configuration data by providing a URL or a file pointing to the SAML IDP entity descriptor of the external IDP. If you are connecting to a Red Hat build of Keycloak external IDP, you can import the IDP settings from the URL <root>/realms/{realm-name}/protocol/saml/descriptor. This link is an XML document describing metadata about the IDP. You can also import all this configuration data by providing a URL or XML file pointing to the external SAML IDP’s entity descriptor to connect to.
9.6.1. Requesting specific AuthnContexts
Identity Providers facilitate clients specifying constraints on the authentication method verifying the user identity. For example, asking for MFA, Kerberos authentication, or security requirements. These constraints use particular AuthnContext criteria. A client can ask for one or more criteria and specify how the Identity Provider must match the requested AuthnContext, exactly, or by satisfying other equivalents.
You can list the criteria your Service Provider requires by adding ClassRefs or DeclRefs in the Requested AuthnContext Constraints section. Usually, you need to provide either ClassRefs or DeclRefs, so check with your Identity Provider documentation which values are supported. If no ClassRefs or DeclRefs are present, the Identity Provider does not enforce additional constraints.
| Configuration | Description |
|---|---|
| Comparison |
The method the Identity Provider uses to evaluate the context requirements. The available values are |
| AuthnContext ClassRefs | The AuthnContext ClassRefs describing the required criteria. |
| AuthnContext DeclRefs | The AuthnContext DeclRefs describing the required criteria. |
9.6.2. SP Descriptor
When you access the provider’s SAML SP metadata, look for the Endpoints item in the identity provider configuration settings. It contains a SAML 2.0 Service Provider Metadata link which generates the SAML entity descriptor for the Service Provider. You can download the descriptor or copy its URL and then import it into the remote Identity Provider.
This metadata is also available publicly by going to the following URL:
http[s]://{host:port}/realms/{realm-name}/broker/{broker-alias}/endpoint/descriptorEnsure you save any configuration changes before accessing the descriptor.
9.6.3. Send subject in SAML requests
By default, a social button pointing to a SAML Identity Provider redirects the user to the following login URL:
http[s]://{host:port}/realms/${realm-name}/broker/{broker-alias}/login
Adding a query parameter named login_hint to this URL adds the parameter’s value to SAML request as a Subject attribute. If this query parameter is empty, Red Hat build of Keycloak does not add a subject to the request.
Enable the "Pass subject" option to send the subject in SAML requests.
9.7. Client-suggested Identity Provider
OIDC applications can bypass the Red Hat build of Keycloak login page by hinting at the identity provider they want to use. You can enable this by setting the kc_idp_hint query parameter in the Authorization Code Flow authorization endpoint.
With Red Hat build of Keycloak OIDC client adapters, you can specify this query parameter when you access a secured resource in the application.
For example:
GET /myapplication.com?kc_idp_hint=facebook HTTP/1.1
Host: localhost:8080
In this case, your realm must have an identity provider with a facebook alias. If this provider does not exist, the login form is displayed.
If you are using the keycloak.js adapter, you can also achieve the same behavior as follows:
const keycloak = new Keycloak('keycloak.json');

keycloak.createLoginUrl({
	idpHint: 'facebook'
});
With the kc_idp_hint query parameter, the client can override the default identity provider if you configure one for the Identity Provider Redirector authenticator. The client can disable the automatic redirecting by setting the kc_idp_hint query parameter to an empty value.
9.8. Mapping claims and assertions
You can import the SAML and OpenID Connect metadata, provided by the external IDP you are authenticating with, into the realm. After importing, you can extract user profile metadata and other information, so you can make it available to your applications.
Each user logging into your realm using an external identity provider has an entry in the local Red Hat build of Keycloak database, based on the metadata from the SAML or OIDC assertions and claims.
Procedure
- Click Identity Providers in the menu.
- Select one of the identity providers in the list.
Click the Mappers tab.
Identity provider mappers
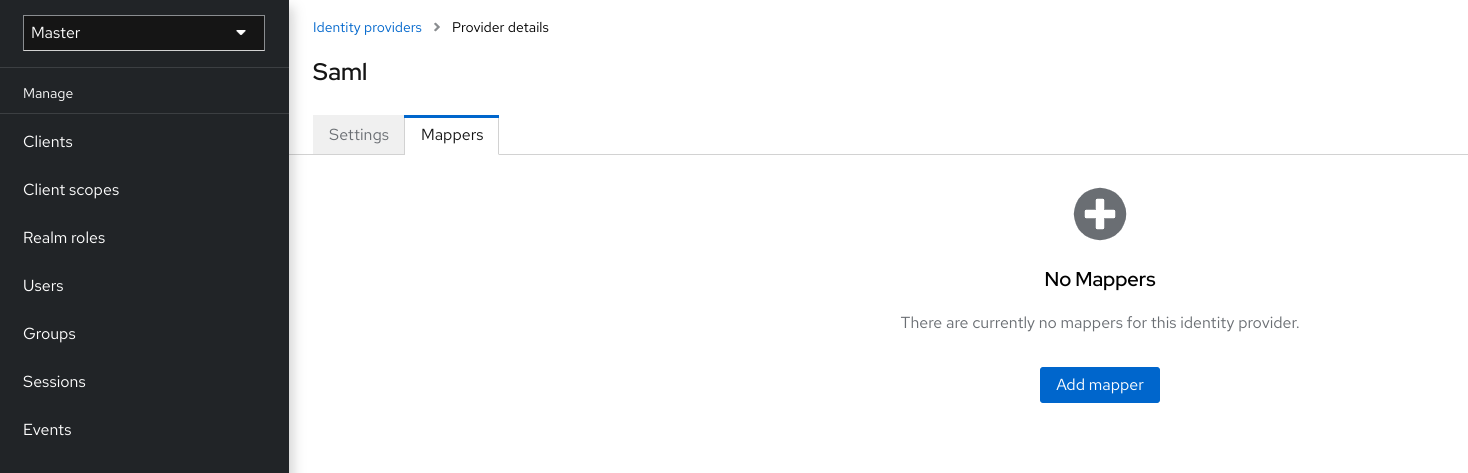
Click Add mapper.
Identity provider mapper
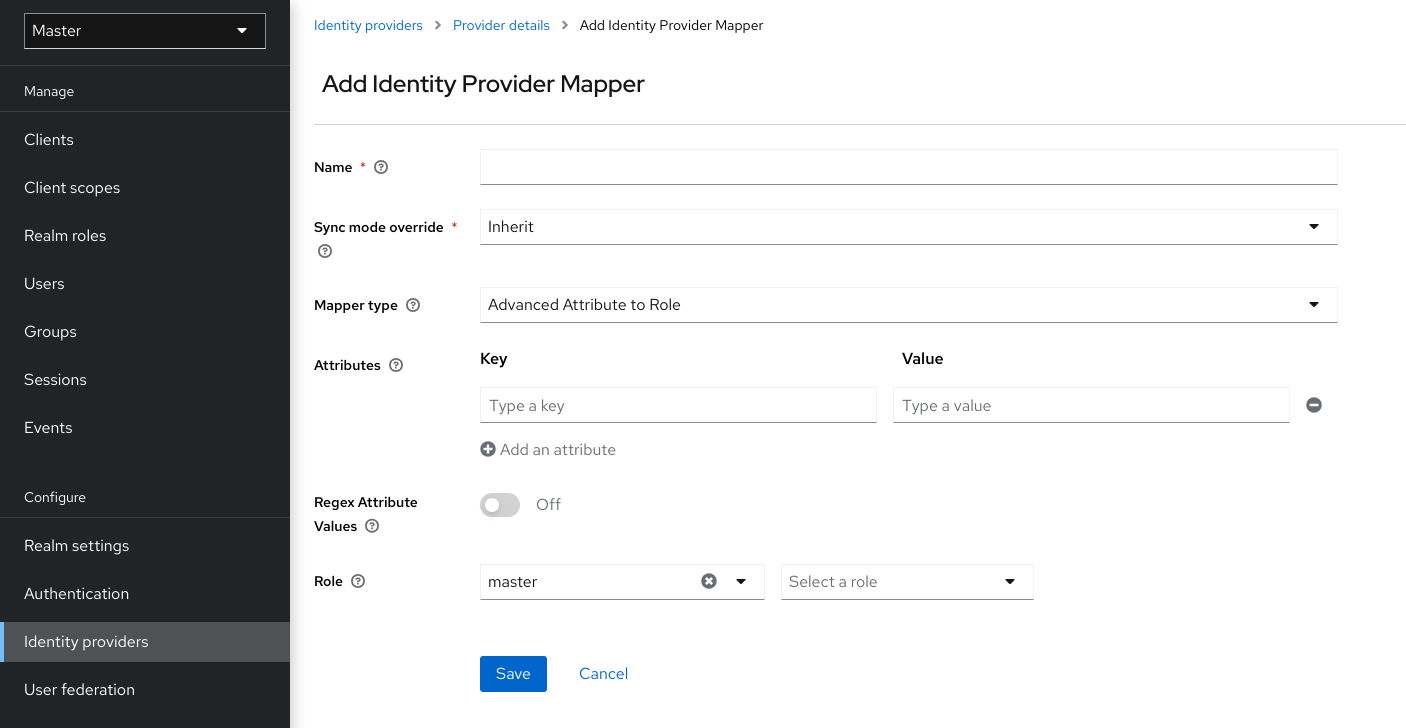
Select a value for Sync Mode Override. The mapper updates user information when users log in repeatedly according to this setting.
- Select legacy to use the behavior of the previous Red Hat build of Keycloak version.
- Select import to import data from when the user was first created in Red Hat build of Keycloak during the first login to Red Hat build of Keycloak with a particular identity provider.
- Select force to update user data at each user login.
- Select inherit to use the sync mode configured in the identity provider. All other options will override this sync mode.
- Select a mapper from the Mapper Type list. Hover over the Mapper Type for a description of the mapper and configuration to enter for the mapper.
- Click Save.
For JSON-based claims, you can use dot notation for nesting and square brackets to access array fields by index. For example, contact.address[0].country.
To investigate the structure of user profile JSON data provided by social providers, you can enable the DEBUG level logger org.keycloak.social.user_profile_dump when starting the server.
9.9. Available user session data
After a user login from an external IDP, Red Hat build of Keycloak stores user session note data that you can access. This data can be propagated to the client requesting log in using the token or SAML assertion passed back to the client using an appropriate client mapper.
- identity_provider
- The IDP alias of the broker used to perform the login.
- identity_provider_identity
-
The IDP username of the currently authenticated user. Often, but not always, the same as the Red Hat build of Keycloak username. For example, Red Hat build of Keycloak can link a user john` to a Facebook user
john123@gmail.com. In that case, the value of the user session note isjohn123@gmail.com.
You can use a Protocol Mapper of type User Session Note to propagate this information to your clients.
9.10. First login flow
When users log in through identity brokering, Red Hat build of Keycloak imports and links aspects of the user within the realm’s local database. When Red Hat build of Keycloak successfully authenticates users through an external identity provider, two situations can exist:
- Red Hat build of Keycloak has already imported and linked a user account with the authenticated identity provider account. In this case, Red Hat build of Keycloak authenticates as the existing user and redirects back to the application.
- No account exists for this user in Red Hat build of Keycloak. Usually, you register and import a new account into the Red Hat build of Keycloak database, but there may be an existing Red Hat build of Keycloak account with the same email address. Automatically linking the existing local account to the external identity provider is a potential security hole. You cannot always trust the information you get from the external identity provider.
Different organizations have different requirements when dealing with some of these situations. With Red Hat build of Keycloak, you can use the First Login Flow option in the IDP settings to choose a workflow for a user logging in from an external IDP for the first time. By default, the First Login Flow option points to the first broker login flow, but you can use your flow or different flows for different identity providers.
The flow is in the Admin Console under the Authentication tab. When you choose the First Broker Login flow, you see the authenticators used by default. You can re-configure the existing flow. For example, you can disable some authenticators, mark some of them as required, or configure some authenticators.
9.10.1. Default first login flow authenticators
- Review Profile
- This authenticator displays the profile information page, so the users can review their profile that Red Hat build of Keycloak retrieves from an identity provider.
-
You can set the
Update Profile On First Loginoption in the Actions menu. - When ON, users are presented with the profile page requesting additional information to federate the user’s identities.
- When missing, users are presented with the profile page if the identity provider does not provide mandatory information, such as email, first name, or last name.
-
When OFF, the profile page does not display unless the user clicks in a later phase on the
Review profile infolink in the page displayed by theConfirm Link Existing Accountauthenticator.
- Create User If Unique
This authenticator checks if there is already an existing Red Hat build of Keycloak account with the same email or username like the account from the identity provider. If it’s not, then the authenticator just creates a new local Red Hat build of Keycloak account and links it with the identity provider and the whole flow is finished. Otherwise it goes to the next
Handle Existing Accountsubflow. If you always want to ensure that there is no duplicated account, you can mark this authenticator asREQUIRED. In this case, the user will see the error page if there is an existing Red Hat build of Keycloak account and the user will need to link the identity provider account through Account management.- This authenticator verifies that there is already a Red Hat build of Keycloak account with the same email or username as the identity provider’s account.
- If an account does not exist, the authenticator creates a local Red Hat build of Keycloak account, links this account with the identity provider, and terminates the flow.
-
If an account exists, the authenticator implements the next
Handle Existing Accountsub-flow. -
To ensure there is no duplicated account, you can mark this authenticator as
REQUIRED. The user sees the error page if a Red Hat build of Keycloak account exists, and users must link their identity provider account through Account management.
- Confirm Link Existing Account
-
On the information page, users see a Red Hat build of Keycloak account with the same email. Users can review their profile again and use a different email or username. The flow restarts and goes back to the
Review Profileauthenticator. - Alternatively, users can confirm that they want to link their identity provider account with their existing Red Hat build of Keycloak account.
- Disable this authenticator if you do not want users to see this confirmation page and go straight to linking identity provider account by email verification or re-authentication.
-
On the information page, users see a Red Hat build of Keycloak account with the same email. Users can review their profile again and use a different email or username. The flow restarts and goes back to the
- Verify Existing Account By Email
-
This authenticator is
ALTERNATIVEby default. Red Hat build of Keycloak uses this authenticator if the realm has an SMTP setup configured. - The authenticator sends an email to users to confirm that they want to link the identity provider with their Red Hat build of Keycloak account.
- Disable this authenticator if you do not want to confirm linking by email, but want users to reauthenticate with their password.
-
This authenticator is
- Verify Existing Account By Re-authentication
- Use this authenticator if the email authenticator is not available. For example, you have not configured SMTP for your realm. This authenticator displays a login screen for users to authenticate to link their Red Hat build of Keycloak account with the Identity Provider.
- Users can also re-authenticate with another identity provider already linked to their Red Hat build of Keycloak account.
- You can force users to use OTP. Otherwise, it is optional and used if you have set OTP for the user account.
9.10.2. Automatically link existing first login flow
The AutoLink authenticator is dangerous in a generic environment where users can register themselves using arbitrary usernames or email addresses. Do not use this authenticator unless you are carefully curating user registration and assigning usernames and email addresses.
To configure a first login flow that links users automatically without prompting, create a new flow with the following two authenticators:
- Create User If Unique
- This authenticator ensures Red Hat build of Keycloak handles unique users. Set the authenticator requirement to Alternative.
- Automatically Set Existing User
- This authenticator sets an existing user to the authentication context without verification. Set the authenticator requirement to "Alternative".
This setup is the simplest setup available, but it is possible to use other authenticators. For example: * You can add the Review Profile authenticator to the beginning of the flow if you want end users to confirm their profile information. * You can add authentication mechanisms to this flow, forcing a user to verify their credentials. Adding authentication mechanisms requires a complex flow. For example, you can set the "Automatically Set Existing User" and "Password Form" as "Required" in an "Alternative" sub-flow.
9.10.3. Disabling automatic user creation
The Default first login flow looks up the Red Hat build of Keycloak account matching the external identity and offers to link them. If no matching Red Hat build of Keycloak account exists, the flow automatically creates one.
This default behavior may be unsuitable for some setups. One example is when you use a read-only LDAP user store, where all users are pre-created. In this case, you must switch off automatic user creation.
To disable user creation:
Procedure
- Click Authentication in the menu.
- Select First Broker Login from the list.
- Set Create User If Unique to DISABLED.
- Set Confirm Link Existing Account to DISABLED.
This configuration also implies that Red Hat build of Keycloak itself won’t be able to determine which internal account would correspond to the external identity. Therefore, the Verify Existing Account By Re-authentication authenticator will ask the user to provide both username and password.
Enabling or disabling user creation by identity provider is completely independent on the realm User Registration switch. You can have enabled user-creation by identity provider and at the same time disabled user self-registration in the realm login settings or vice-versa.
9.10.4. Detect existing user first login flow
In order to configure a first login flow in which:
- only users already registered in this realm can log in,
- users are automatically linked without being prompted,
create a new flow with the following two authenticators:
- Detect Existing Broker User
-
This authenticator ensures that unique users are handled. Set the authenticator requirement to
REQUIRED. - Automatically Set Existing User
-
Automatically sets an existing user to the authentication context without any verification. Set the authenticator requirement to
REQUIRED.
You have to set the First Login Flow of the identity provider configuration to that flow. You could set the also set Sync Mode to force if you want to update the user profile (Last Name, First Name…) with the identity provider attributes.
This flow can be used if you want to delegate the identity to other identity providers (such as GitHub, Facebook …) but you want to manage which users that can log in.
With this configuration, Red Hat build of Keycloak is unable to determine which internal account corresponds to the external identity. The Verify Existing Account By Re-authentication authenticator asks the provider for the username and password.
9.11. Retrieving external IDP tokens
With Red Hat build of Keycloak, you can store tokens and responses from the authentication process with the external IDP using the Store Token configuration option on the IDP’s settings page.
Application code can retrieve these tokens and responses to import extra user information or to request the external IDP securely. For example, an application can use the Google token to use other Google services and REST APIs. To retrieve a token for a particular identity provider, send a request as follows:
GET /realms/{realm}/broker/{provider_alias}/token HTTP/1.1
Host: localhost:8080
Authorization: Bearer <KEYCLOAK ACCESS TOKEN>
An application must authenticate with Red Hat build of Keycloak and receive an access token. This access token must have the broker client-level role read-token set, so the user must have a role mapping for this role, and the client application must have that role within its scope. In this case, since you are accessing a protected service in Red Hat build of Keycloak, send the access token issued by Red Hat build of Keycloak during the user authentication. You can assign this role to newly imported users in the broker configuration page by setting the Stored Tokens Readable switch to ON.
These external tokens can be re-established by logging in again through the provider or using the client-initiated account linking API.
9.12. Identity broker logout
When logging out, Red Hat build of Keycloak sends a request to the external identity provider that is used to log in initially and logs the user out of this identity provider. You can skip this behavior and avoid logging out of the external identity provider. See adapter logout documentation for more information.
Chapter 10. SSO protocols
This section discusses authentication protocols, the Red Hat build of Keycloak authentication server and how applications, secured by the Red Hat build of Keycloak authentication server, interact with these protocols.
10.1. OpenID Connect
OpenID Connect (OIDC) is an authentication protocol that is an extension of OAuth 2.0.
OAuth 2.0 is a framework for building authorization protocols and is incomplete. OIDC, however, is a full authentication and authorization protocol that uses the Json Web Token (JWT) standards. The JWT standards define an identity token JSON format and methods to digitally sign and encrypt data in a compact and web-friendly way.
In general, OIDC implements two use cases. The first case is an application requesting that a Red Hat build of Keycloak server authenticates a user. Upon successful login, the application receives an identity token and an access token. The identity token contains user information including user name, email, and profile information. The realm digitally signs the access token which contains access information (such as user role mappings) that applications use to determine the resources users can access in the application.
The second use case is a client accessing remote services.
- The client requests an access token from Red Hat build of Keycloak to invoke on remote services on behalf of the user.
- Red Hat build of Keycloak authenticates the user and asks the user for consent to grant access to the requesting client.
- The client receives the access token which is digitally signed by the realm.
- The client makes REST requests on remote services using the access token.
- The remote REST service extracts the access token.
- The remote REST service verifies the tokens signature.
- The remote REST service decides, based on access information within the token, to process or reject the request.
10.1.1. OIDC auth flows
OIDC has several methods, or flows, that clients or applications can use to authenticate users and receive identity and access tokens. The method depends on the type of application or client requesting access.
10.1.1.1. Authorization Code Flow
The Authorization Code Flow is a browser-based protocol and suits authenticating and authorizing browser-based applications. It uses browser redirects to obtain identity and access tokens.
- A user connects to an application using a browser. The application detects the user is not logged into the application.
- The application redirects the browser to Red Hat build of Keycloak for authentication.
- The application passes a callback URL as a query parameter in the browser redirect. Red Hat build of Keycloak uses the parameter upon successful authentication.
- Red Hat build of Keycloak authenticates the user and creates a one-time, short-lived, temporary code.
- Red Hat build of Keycloak redirects to the application using the callback URL and adds the temporary code as a query parameter in the callback URL.
- The application extracts the temporary code and makes a background REST invocation to Red Hat build of Keycloak to exchange the code for an identity and access and refresh token. To prevent replay attacks, the temporary code cannot be used more than once.
A system is vulnerable to a stolen token for the lifetime of that token. For security and scalability reasons, access tokens are generally set to expire quickly so subsequent token requests fail. If a token expires, an application can obtain a new access token using the additional refresh token sent by the login protocol.
Confidential clients provide client secrets when they exchange the temporary codes for tokens. Public clients are not required to provide client secrets. Public clients are secure when HTTPS is strictly enforced and redirect URIs registered for the client are strictly controlled. HTML5/JavaScript clients have to be public clients because there is no way to securely transmit the client secret to HTML5/JavaScript clients. For more details, see the Managing Clients chapter.
Red Hat build of Keycloak also supports the Proof Key for Code Exchange specification.
10.1.1.2. Implicit Flow
The Implicit Flow is a browser-based protocol. It is similar to the Authorization Code Flow but with fewer requests and no refresh tokens.
The possibility exists of access tokens leaking in the browser history when tokens are transmitted via redirect URIs (see below).
Also, this flow does not provide clients with refresh tokens. Therefore, access tokens have to be long-lived or users have to re-authenticate when they expire.
We do not advise using this flow. This flow is supported because it is in the OIDC and OAuth 2.0 specification.
The protocol works as follows:
- A user connects to an application using a browser. The application detects the user is not logged into the application.
- The application redirects the browser to Red Hat build of Keycloak for authentication.
- The application passes a callback URL as a query parameter in the browser redirect. Red Hat build of Keycloak uses the query parameter upon successful authentication.
- Red Hat build of Keycloak authenticates the user and creates an identity and access token. Red Hat build of Keycloak redirects to the application using the callback URL and additionally adds the identity and access tokens as a query parameter in the callback URL.
- The application extracts the identity and access tokens from the callback URL.
10.1.1.3. Resource owner password credentials grant (Direct Access Grants)
Direct Access Grants are used by REST clients to obtain tokens on behalf of users. It is a HTTP POST request that contains:
- The credentials of the user. The credentials are sent within form parameters.
- The id of the client.
- The clients secret (if it is a confidential client).
The HTTP response contains the identity, access, and refresh tokens.
10.1.1.4. Client credentials grant
The Client Credentials Grant creates a token based on the metadata and permissions of a service account associated with the client instead of obtaining a token that works on behalf of an external user. Client Credentials Grants are used by REST clients.
See the Service Accounts chapter for more information.
10.1.2. Refresh token grant
By default, Red Hat build of Keycloak returns refresh tokens in the token responses from most of the flows. Some exceptions are implicit flow or client credentials grant described above.
Refresh token is tied to the user session of the SSO browser session and can be valid for the lifetime of the user session. However, that client should send a refresh-token request at least once per specified interval. Otherwise, the session can be considered "idle" and can expire. See the timeouts section for more information.
Red Hat build of Keycloak supports offline tokens, which can be used typically when client needs to use refresh token even if corresponding browser SSO session is already expired.
10.1.2.1. Refresh token rotation
It is possible to specify that the refresh token is considered invalid once it is used. This means that client must always save the refresh token from the last refresh response because older refresh tokens, which were already used, would not be considered valid anymore by Red Hat build of Keycloak. This is possible to set with the use of Revoke Refresh token option as specified in the timeouts section.
Red Hat build of Keycloak also supports the situation that no refresh token rotation exists. In this case, a refresh token is returned during login, but subsequent responses from refresh-token requests will not return new refresh tokens. This practice is recommended for instance in the FAPI 2 draft specification. In Red Hat build of Keycloak, it is possible to skip refresh token rotation with the use of client policies. You can add executor suppress-refresh-token-rotation to some client profile and configure client policy to specify for which clients would be the profile triggered, which means that for those clients the refresh token rotation is going to be skipped.
10.1.2.2. Device authorization grant
This is used by clients running on internet-connected devices that have limited input capabilities or lack a suitable browser. Here’s a brief summary of the protocol:
- The application requests Red Hat build of Keycloak a device code and a user code. Red Hat build of Keycloak creates a device code and a user code. Red Hat build of Keycloak returns a response including the device code and the user code to the application.
- The application provides the user with the user code and the verification URI. The user accesses a verification URI to be authenticated by using another browser. You could define a short verification_uri that will be redirected to Keycloak verification URI (/realms/realm_name/device)outside Keycloak - fe in a proxy.
- The application repeatedly polls Red Hat build of Keycloak to find out if the user completed the user authorization. If user authentication is complete, the application exchanges the device code for an identity, access and refresh token.
10.1.2.3. Client initiated backchannel authentication grant
This feature is used by clients who want to initiate the authentication flow by communicating with the OpenID Provider directly without redirect through the user’s browser like OAuth 2.0’s authorization code grant. Here’s a brief summary of the protocol:
- The client requests Red Hat build of Keycloak an auth_req_id that identifies the authentication request made by the client. Red Hat build of Keycloak creates the auth_req_id.
- After receiving this auth_req_id, this client repeatedly needs to poll Red Hat build of Keycloak to obtain an Access Token, Refresh Token and ID Token from Red Hat build of Keycloak in return for the auth_req_id until the user is authenticated.
An administrator can configure Client Initiated Backchannel Authentication (CIBA) related operations as CIBA Policy per realm.
Also please refer to other places of Red Hat build of Keycloak documentation like Backchannel Authentication Endpoint section of Securing Applications and Services Guide and Client Initiated Backchannel Authentication Grant section of Securing Applications and Services Guide.
10.1.2.3.1. CIBA Policy
An administrator carries out the following operations on the Admin Console :
-
Open the
Authentication → CIBA Policytab. -
Configure items and click
Save.
The configurable items and their description follow.
| Configuration | Description |
|---|---|
| Backchannel Token Delivery Mode | Specifying how the CD (Consumption Device) gets the authentication result and related tokens. There are three modes, "poll", "ping" and "push". Red Hat build of Keycloak only supports "poll". The default setting is "poll". This configuration is required. For more details, see CIBA Specification. |
| Expires In | The expiration time of the "auth_req_id" in seconds since the authentication request was received. The default setting is 120. This configuration is required. For more details, see CIBA Specification. |
| Interval | The interval in seconds the CD (Consumption Device) needs to wait for between polling requests to the token endpoint. The default setting is 5. This configuration is optional. For more details, see CIBA Specification. |
| Authentication Requested User Hint | The way of identifying the end-user for whom authentication is being requested. The default setting is "login_hint". There are three modes, "login_hint", "login_hint_token" and "id_token_hint". Red Hat build of Keycloak only supports "login_hint". This configuration is required. For more details, see CIBA Specification. |
10.1.2.3.2. Provider Setting
The CIBA grant uses the following two providers.
- Authentication Channel Provider : provides the communication between Red Hat build of Keycloak and the entity that actually authenticates the user via AD (Authentication Device).
-
User Resolver Provider : get
UserModelof Red Hat build of Keycloak from the information provided by the client to identify the user.
Red Hat build of Keycloak has both default providers. However, the administrator needs to set up Authentication Channel Provider like this:
kc.[sh|bat] start --spi-ciba-auth-channel-ciba-http-auth-channel-http-authentication-channel-uri=https://backend.internal.example.comThe configurable items and their description follow.
| Configuration | Description |
|---|---|
| http-authentication-channel-uri | Specifying URI of the entity that actually authenticates the user via AD (Authentication Device). |
10.1.2.3.3. Authentication Channel Provider
CIBA standard document does not specify how to authenticate the user by AD. Therefore, it might be implemented at the discretion of products. Red Hat build of Keycloak delegates this authentication to an external authentication entity. To communicate with the authentication entity, Red Hat build of Keycloak provides Authentication Channel Provider.
Its implementation of Red Hat build of Keycloak assumes that the authentication entity is under the control of the administrator of Red Hat build of Keycloak so that Red Hat build of Keycloak trusts the authentication entity. It is not recommended to use the authentication entity that the administrator of Red Hat build of Keycloak cannot control.
Authentication Channel Provider is provided as SPI provider so that users of Red Hat build of Keycloak can implement their own provider in order to meet their environment. Red Hat build of Keycloak provides its default provider called HTTP Authentication Channel Provider that uses HTTP to communicate with the authentication entity.
If a user of Red Hat build of Keycloak user want to use the HTTP Authentication Channel Provider, they need to know its contract between Red Hat build of Keycloak and the authentication entity consisting of the following two parts.
- Authentication Delegation Request/Response
- Red Hat build of Keycloak sends an authentication request to the authentication entity.
- Authentication Result Notification/ACK
- The authentication entity notifies the result of the authentication to Red Hat build of Keycloak.
Authentication Delegation Request/Response consists of the following messaging.
- Authentication Delegation Request
- The request is sent from Red Hat build of Keycloak to the authentication entity to ask it for user authentication by AD.
POST [delegation_reception]- Headers
| Name | Value | Description |
|---|---|---|
| Content-Type | application/json | The message body is json formatted. |
| Authorization | Bearer [token] | The [token] is used when the authentication entity notifies the result of the authentication to Red Hat build of Keycloak. |
- Parameters
| Type | Name | Description |
|---|---|---|
| Path | delegation_reception | The endpoint provided by the authentication entity to receive the delegation request |
- Body
| Name | Description |
|---|---|
| login_hint |
It tells the authentication entity who is authenticated by AD. |
| scope |
It tells which scopes the authentication entity gets consent from the authenticated user. |
| is_consent_required |
It shows whether the authentication entity needs to get consent from the authenticated user about the scope. |
| binding_message |
Its value is intended to be shown in both CD and AD’s UI to make the user recognize that the authentication by AD is triggered by CD. |
| acr_values |
It tells the requesting Authentication Context Class Reference from CD. |
- Authentication Delegation Response
The response is returned from the authentication entity to Red Hat build of Keycloak to notify that the authentication entity received the authentication request from Red Hat build of Keycloak.
- Responses
| HTTP Status Code | Description |
|---|---|
| 201 | It notifies Red Hat build of Keycloak of receiving the authentication delegation request. |
Authentication Result Notification/ACK consists of the following messaging.
- Authentication Result Notification
- The authentication entity sends the result of the authentication request to Red Hat build of Keycloak.
POST /realms/[realm]/protocol/openid-connect/ext/ciba/auth/callback- Headers
| Name | Value | Description |
|---|---|---|
| Content-Type | application/json | The message body is json formatted. |
| Authorization | Bearer [token] | The [token] must be the one the authentication entity has received from Red Hat build of Keycloak in Authentication Delegation Request. |
- Parameters
| Type | Name | Description |
|---|---|---|
| Path | realm | The realm name |
- Body
| Name | Description |
|---|---|
| status |
It tells the result of user authentication by AD. |
- Authentication Result ACK
The response is returned from Red Hat build of Keycloak to the authentication entity to notify Red Hat build of Keycloak received the result of user authentication by AD from the authentication entity.
- Responses
| HTTP Status Code | Description |
|---|---|
| 200 | It notifies the authentication entity of receiving the notification of the authentication result. |
10.1.2.3.4. User Resolver Provider
Even if the same user, its representation may differ in each CD, Red Hat build of Keycloak and the authentication entity.
For CD, Red Hat build of Keycloak and the authentication entity to recognize the same user, this User Resolver Provider converts their own user representations among them.
User Resolver Provider is provided as SPI provider so that users of Red Hat build of Keycloak can implement their own provider in order to meet their environment. Red Hat build of Keycloak provides its default provider called Default User Resolver Provider that has the following characteristics.
-
Only support
login_hintparameter and is used as default. -
usernameof UserModel in Red Hat build of Keycloak is used to represent the user on CD, Red Hat build of Keycloak and the authentication entity.
10.1.3. OIDC Logout
OIDC has four specifications relevant to logout mechanisms:
Again since all of this is described in the OIDC specification we will only give a brief overview here.
10.1.3.1. Session Management
This is a browser-based logout. The application obtains session status information from Red Hat build of Keycloak at a regular basis. When the session is terminated at Red Hat build of Keycloak the application will notice and trigger its own logout.
10.1.3.2. RP-Initiated Logout
This is also a browser-based logout where the logout starts by redirecting the user to a specific endpoint at Red Hat build of Keycloak. This redirect usually happens when the user clicks the Log Out link on the page of some application, which previously used Red Hat build of Keycloak to authenticate the user.
Once the user is redirected to the logout endpoint, Red Hat build of Keycloak is going to send logout requests to clients to let them invalidate their local user sessions, and potentially redirect the user to some URL once the logout process is finished. The user might be optionally requested to confirm the logout in case the id_token_hint parameter was not used. After logout, the user is automatically redirected to the specified post_logout_redirect_uri as long as it is provided as a parameter. Note that you need to include either the client_id or id_token_hint parameter in case the post_logout_redirect_uri is included. Also the post_logout_redirect_uri parameter needs to match one of the Valid Post Logout Redirect URIs specified in the client configuration.
Depending on the client configuration, logout requests can be sent to clients through the front-channel or through the back-channel. For the frontend browser clients, which rely on the Session Management described in the previous section, Red Hat build of Keycloak does not need to send any logout requests to them; these clients automatically detect that SSO session in the browser is logged out.
10.1.3.3. Front-channel Logout
To configure clients to receive logout requests through the front-channel, look at the Front-Channel Logout client setting. When using this method, consider the following:
-
Logout requests sent by Red Hat build of Keycloak to clients rely on the browser and on embedded
iframesthat are rendered for the logout page. -
By being based on
iframes, front-channel logout might be impacted by Content Security Policies (CSP) and logout requests might be blocked. - If the user closes the browser prior to rendering the logout page or before logout requests are actually sent to clients, their sessions at the client might not be invalidated.
Consider using Back-Channel Logout as it provides a more reliable and secure approach to log out users and terminate their sessions on the clients.
If the client is not enabled with front-channel logout, then Red Hat build of Keycloak is going to try first to send logout requests through the back-channel using the Back-Channel Logout URL. If not defined, the server is going to fall back to using the Admin URL.
10.1.3.4. Backchannel Logout
This is a non-browser-based logout that uses direct backchannel communication between Red Hat build of Keycloak and clients. Red Hat build of Keycloak sends a HTTP POST request containing a logout token to all clients logged into Red Hat build of Keycloak. These requests are sent to a registered backchannel logout URLs at Red Hat build of Keycloak and are supposed to trigger a logout at client side.
10.1.4. Red Hat build of Keycloak server OIDC URI endpoints
The following is a list of OIDC endpoints that Red Hat build of Keycloak publishes. These endpoints can be used when a non-Red Hat build of Keycloak client adapter uses OIDC to communicate with the authentication server. They are all relative URLs. The root of the URL consists of the HTTP(S) protocol, hostname, and optionally the path: For example
https://localhost:8080- /realms/{realm-name}/protocol/openid-connect/auth
- Used for obtaining a temporary code in the Authorization Code Flow or obtaining tokens using the Implicit Flow, Direct Grants, or Client Grants.
- /realms/{realm-name}/protocol/openid-connect/token
- Used by the Authorization Code Flow to convert a temporary code into a token.
- /realms/{realm-name}/protocol/openid-connect/logout
- Used for performing logouts.
- /realms/{realm-name}/protocol/openid-connect/userinfo
- Used for the User Info service described in the OIDC specification.
- /realms/{realm-name}/protocol/openid-connect/revoke
- Used for OAuth 2.0 Token Revocation described in RFC7009.
- /realms/{realm-name}/protocol/openid-connect/certs
- Used for the JSON Web Key Set (JWKS) containing the public keys used to verify any JSON Web Token (jwks_uri)
- /realms/{realm-name}/protocol/openid-connect/auth/device
- Used for Device Authorization Grant to obtain a device code and a user code.
- /realms/{realm-name}/protocol/openid-connect/ext/ciba/auth
- This is the URL endpoint for Client Initiated Backchannel Authentication Grant to obtain an auth_req_id that identifies the authentication request made by the client.
- /realms/{realm-name}/protocol/openid-connect/logout/backchannel-logout
- This is the URL endpoint for performing backchannel logouts described in the OIDC specification.
In all of these, replace {realm-name} with the name of the realm.
10.2. SAML
SAML 2.0 is a similar specification to OIDC but more mature. It is descended from SOAP and web service messaging specifications so is generally more verbose than OIDC. SAML 2.0 is an authentication protocol that exchanges XML documents between authentication servers and applications. XML signatures and encryption are used to verify requests and responses.
In general, SAML implements two use cases.
The first use case is an application that requests the Red Hat build of Keycloak server authenticates a user. Upon successful login, the application will receive an XML document. This document contains an SAML assertion that specifies user attributes. The realm digitally signs the document which contains access information (such as user role mappings) that applications use to determine the resources users are allowed to access in the application.
The second use case is a client accessing remote services. The client requests a SAML assertion from Red Hat build of Keycloak to invoke on remote services on behalf of the user.
10.2.1. SAML bindings
Red Hat build of Keycloak supports three binding types.
10.2.1.1. Redirect binding
Redirect binding uses a series of browser redirect URIs to exchange information.
- A user connects to an application using a browser. The application detects the user is not authenticated.
- The application generates an XML authentication request document and encodes it as a query parameter in a URI. The URI is used to redirect to the Red Hat build of Keycloak server. Depending on your settings, the application can also digitally sign the XML document and include the signature as a query parameter in the redirect URI to Red Hat build of Keycloak. This signature is used to validate the client that sends the request.
- The browser redirects to Red Hat build of Keycloak.
- The server extracts the XML auth request document and verifies the digital signature, if required.
- The user enters their authentication credentials.
- After authentication, the server generates an XML authentication response document. The document contains a SAML assertion that holds metadata about the user, including name, address, email, and any role mappings the user has. The document is usually digitally signed using XML signatures, and may also be encrypted.
- The XML authentication response document is encoded as a query parameter in a redirect URI. The URI brings the browser back to the application. The digital signature is also included as a query parameter.
- The application receives the redirect URI and extracts the XML document.
- The application verifies the realm’s signature to ensure it is receiving a valid authentication response. The information inside the SAML assertion is used to make access decisions or display user data.
10.2.1.2. POST binding
POST binding is similar to Redirect binding but POST binding exchanges XML documents using POST requests instead of using GET requests. POST Binding uses JavaScript to make the browser send a POST request to the Red Hat build of Keycloak server or application when exchanging documents. HTTP responds with an HTML document which contains an HTML form containing embedded JavaScript. When the page loads, the JavaScript automatically invokes the form.
POST binding is recommended due to two restrictions:
- Security — With Redirect binding, the SAML response is part of the URL. It is less secure as it is possible to capture the response in logs.
- Size — Sending the document in the HTTP payload provides more scope for large amounts of data than in a limited URL.
10.2.1.3. ECP
Enhanced Client or Proxy (ECP) is a SAML v.2.0 profile which allows the exchange of SAML attributes outside the context of a web browser. It is often used by REST or SOAP-based clients.
10.2.2. Red Hat build of Keycloak Server SAML URI Endpoints
Red Hat build of Keycloak has one endpoint for all SAML requests.
http(s)://authserver.host/realms/{realm-name}/protocol/saml
All bindings use this endpoint.
10.3. OpenID Connect compared to SAML
The following lists a number of factors to consider when choosing a protocol.
For most purposes, Red Hat build of Keycloak recommends using OIDC.
OIDC
- OIDC is specifically designed to work with the web.
- OIDC is suited for HTML5/JavaScript applications because it is easier to implement on the client side than SAML.
- OIDC tokens are in the JSON format which makes them easier for Javascript to consume.
- OIDC has features to make security implementation easier. For example, see the iframe trick that the specification uses to determine a users login status.
SAML
- SAML is designed as a layer to work on top of the web.
- SAML can be more verbose than OIDC.
- Users pick SAML over OIDC because there is a perception that it is mature.
- Users pick SAML over OIDC existing applications that are secured with it.
10.4. Docker registry v2 authentication
Docker authentication is disabled by default. To enable docker authentication, see the Enabling and disabling features chapter.
Docker Registry V2 Authentication is a protocol, similar to OIDC, that authenticates users against Docker registries. Red Hat build of Keycloak’s implementation of this protocol lets Docker clients use a Red Hat build of Keycloak authentication server authenticate against a registry. This protocol uses standard token and signature mechanisms but it does deviate from a true OIDC implementation. It deviates by using a very specific JSON format for requests and responses as well as mapping repository names and permissions to the OAuth scope mechanism.
10.4.1. Docker authentication flow
The authentication flow is described in the Docker API documentation. The following is a summary from the perspective of the Red Hat build of Keycloak authentication server:
-
Perform a
docker login. - The Docker client requests a resource from the Docker registry. If the resource is protected and no authentication token is in the request, the Docker registry server responds with a 401 HTTP message with some information on the permissions that are required and the location of the authorization server.
-
The Docker client constructs an authentication request based on the 401 HTTP message from the Docker registry. The client uses the locally cached credentials (from the
docker logincommand) as part of the HTTP Basic Authentication request to the Red Hat build of Keycloak authentication server. - The Red Hat build of Keycloak authentication server attempts to authenticate the user and return a JSON body containing an OAuth-style Bearer token.
- The Docker client receives a bearer token from the JSON response and uses it in the authorization header to request the protected resource.
- The Docker registry receives the new request for the protected resource with the token from the Red Hat build of Keycloak server. The registry validates the token and grants access to the requested resource (if appropriate).
Red Hat build of Keycloak does not create a browser SSO session after successful authentication with the Docker protocol. The browser SSO session does not use the Docker protocol as it cannot refresh tokens or obtain the status of a token or session from the Red Hat build of Keycloak server; therefore a browser SSO session is not necessary. For more details, see the transient session section.
10.4.2. Red Hat build of Keycloak Docker Registry v2 Authentication Server URI Endpoints
Red Hat build of Keycloak has one endpoint for all Docker auth v2 requests.
http(s)://authserver.host/realms/{realm-name}/protocol/docker-v2
Chapter 11. Controlling access to the Admin Console
Each realm created on the Red Hat build of Keycloak has a dedicated Admin Console from which that realm can be managed. The master realm is a special realm that allows admins to manage more than one realm on the system. This chapter goes over all the scenarios for this.
11.1. Master realm access control
The master realm in Red Hat build of Keycloak is a special realm and treated differently than other realms. Users in the Red Hat build of Keycloak master realm can be granted permission to manage zero or more realms that are deployed on the Red Hat build of Keycloak server. When a realm is created, Red Hat build of Keycloak automatically creates various roles that grant fine-grain permissions to access that new realm. Access to The Admin Console and Admin REST endpoints can be controlled by mapping these roles to users in the master realm. It’s possible to create multiple superusers, as well as users that can only manage specific realms.
11.1.1. Global roles
There are two realm-level roles in the master realm. These are:
- admin
- create-realm
Users with the admin role are superusers and have full access to manage any realm on the server. Users with the create-realm role are allowed to create new realms. They will be granted full access to any new realm they create.
11.1.2. Realm specific roles
Admin users within the master realm can be granted management privileges to one or more other realms in the system. Each realm in Red Hat build of Keycloak is represented by a client in the master realm. The name of the client is <realm name>-realm. These clients each have client-level roles defined which define varying level of access to manage an individual realm.
The roles available are:
- view-realm
- view-users
- view-clients
- view-events
- manage-realm
- manage-users
- create-client
- manage-clients
- manage-events
- view-identity-providers
- manage-identity-providers
- impersonation
Assign the roles you want to your users and they will only be able to use that specific part of the administration console.
Admins with the manage-users role will only be able to assign admin roles to users that they themselves have. So, if an admin has the manage-users role but doesn’t have the manage-realm role, they will not be able to assign this role.
11.2. Dedicated realm admin consoles
Each realm has a dedicated Admin Console that can be accessed by going to the url /admin/{realm-name}/console. Users within that realm can be granted realm management permissions by assigning specific user role mappings.
Each realm has a built-in client called realm-management. You can view this client by going to the Clients left menu item of your realm. This client defines client-level roles that specify permissions that can be granted to manage the realm.
- view-realm
- view-users
- view-clients
- view-events
- manage-realm
- manage-users
- create-client
- manage-clients
- manage-events
- view-identity-providers
- manage-identity-providers
- impersonation
Assign the roles you want to your users and they will only be able to use that specific part of the administration console.
Chapter 12. Managing OpenID Connect and SAML Clients
Clients are entities that can request authentication of a user. Clients come in two forms. The first type of client is an application that wants to participate in single-sign-on. These clients just want Red Hat build of Keycloak to provide security for them. The other type of client is one that is requesting an access token so that it can invoke other services on behalf of the authenticated user. This section discusses various aspects around configuring clients and various ways to do it.
12.1. Managing OpenID Connect clients
OpenID Connect is the recommended protocol to secure applications. It was designed from the ground up to be web friendly and it works best with HTML5/JavaScript applications.
12.1.1. Creating an OpenID Connect client
To protect an application that uses the OpenID connect protocol, you create a client.
Procedure
- Click Clients in the menu.
Click Create client.
Create client
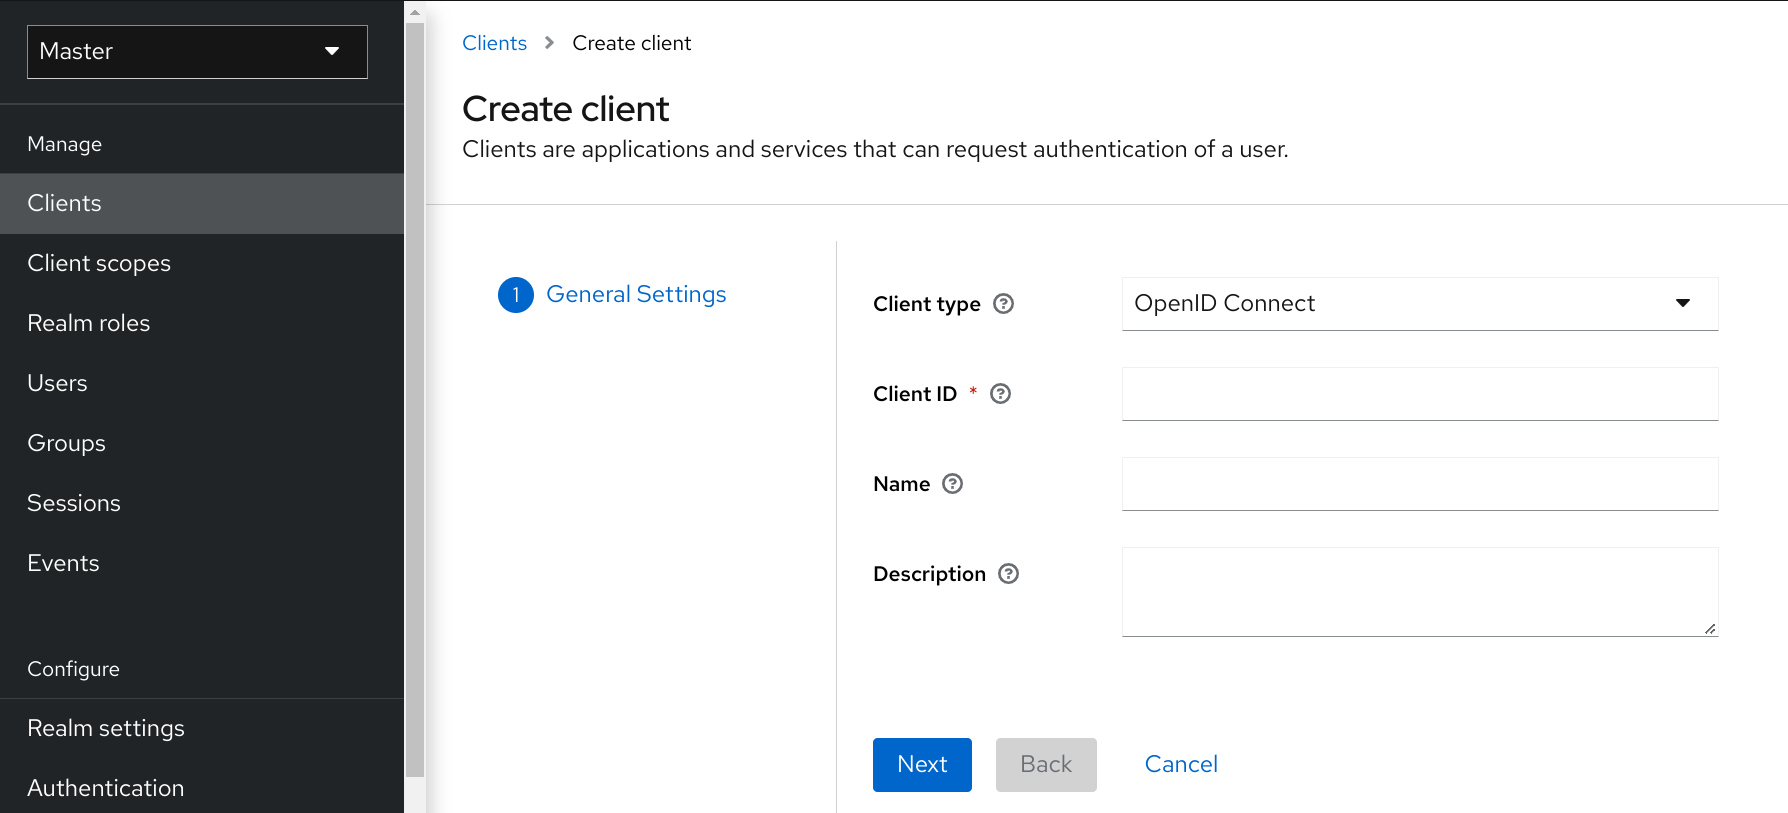
- Leave Client type set to OpenID Connect.
Enter a Client ID.
This ID is an alphanumeric string that is used in OIDC requests and in the Red Hat build of Keycloak database to identify the client.
Supply a Name for the client.
If you plan to localize this name, set up a replacement string value. For example, a string value such as ${myapp}. See the Server Developer Guide for more information.
- Click Save.
This action creates the client and bring you to the Settings tab, where you can perform Basic configuration.
12.1.2. Basic configuration
The Settings tab includes many options to configure this client.
Settings tab
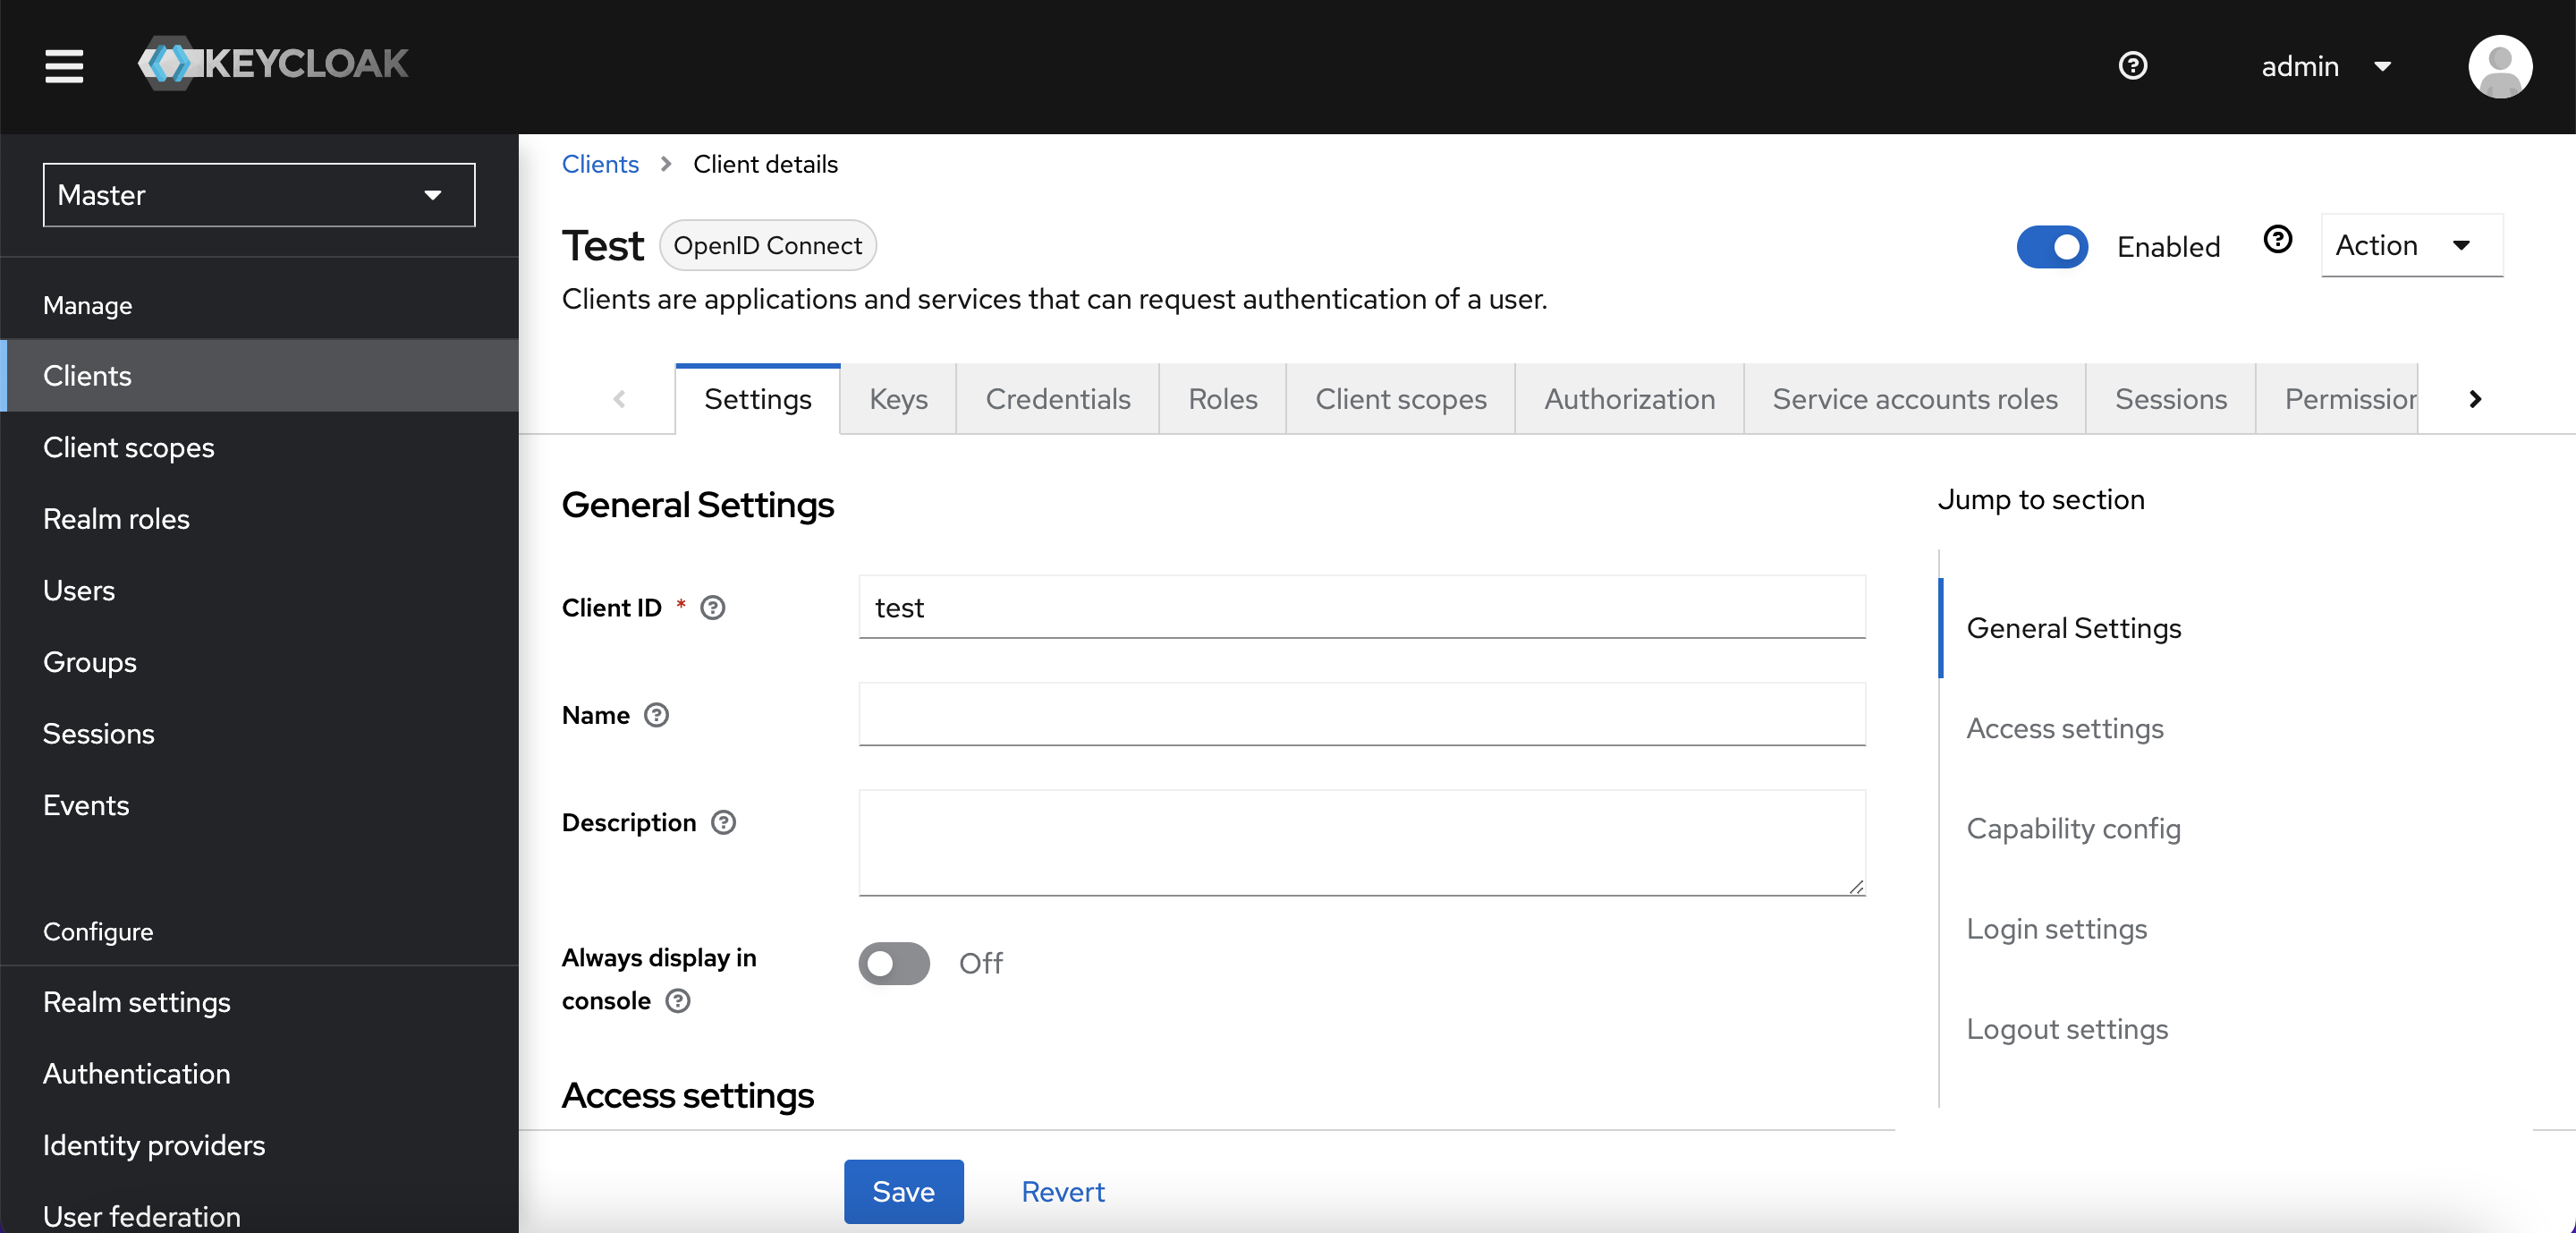
12.1.2.1. General Settings
- Client ID
- The alphanumeric ID string that is used in OIDC requests and in the Red Hat build of Keycloak database to identify the client.
- Name
- The name for the client in Red Hat build of Keycloak UI screen. To localize the name, set up a replacement string value. For example, a string value such as ${myapp}. See the Server Developer Guide for more information.
- Description
- The description of the client. This setting can also be localized.
- Always Display in Console
- Always list this client in the Account Console even if this user does not have an active session.
12.1.2.2. Access Settings
- Root URL
- If Red Hat build of Keycloak uses any configured relative URLs, this value is prepended to them.
- Home URL
- Provides the default URL for when the auth server needs to redirect or link back to the client.
- Valid Redirect URIs
Required field. Enter a URL pattern and click + to add and - to remove existing URLs and click Save. Exact (case sensitive) string matching is used to compare valid redirect URIs.
You can use wildcards at the end of the URL pattern. For example
http://host.com/path/*. To avoid security issues, if the passed redirect URI contains the userinfo part or its path manages access to parent directory (/../) no wildcard comparison is performed but the standard and secure exact string matching.The full wildcard
*valid redirect URI can also be configured to allow any http or https redirect URI. Please do not use it in production environments.Exclusive redirect URI patterns are typically more secure. See Unspecific Redirect URIs for more information.
- Web Origins
Enter a URL pattern and click + to add and - to remove existing URLs. Click Save.
This option handles Cross-Origin Resource Sharing (CORS). If browser JavaScript attempts an AJAX HTTP request to a server whose domain is different from the one that the JavaScript code came from, the request must use CORS. The server must handle CORS requests, otherwise the browser will not display or allow the request to be processed. This protocol protects against XSS, CSRF, and other JavaScript-based attacks.
Domain URLs listed here are embedded within the access token sent to the client application. The client application uses this information to decide whether to allow a CORS request to be invoked on it. Only Red Hat build of Keycloak client adapters support this feature. See Securing Applications and Services Guide for more information.
- Admin URL
- Callback endpoint for a client. The server uses this URL to make callbacks like pushing revocation policies, performing backchannel logout, and other administrative operations. For Red Hat build of Keycloak servlet adapters, this URL can be the root URL of the servlet application. For more information, see Securing Applications and Services Guide.
12.1.2.3. Capability Config
- Client authentication
The type of OIDC client.
ON
For server-side clients that perform browser logins and require client secrets when making an Access Token Request. This setting should be used for server-side applications.
OFF
For client-side clients that perform browser logins. As it is not possible to ensure that secrets can be kept safe with client-side clients, it is important to restrict access by configuring correct redirect URIs.
- Authorization
- Enables or disables fine-grained authorization support for this client.
- Standard Flow
- If enabled, this client can use the OIDC Authorization Code Flow.
- Direct Access Grants
- If enabled, this client can use the OIDC Direct Access Grants.
- Implicit Flow
- If enabled, this client can use the OIDC Implicit Flow.
- Service account roles
-
If enabled, this client can authenticate to Red Hat build of Keycloak and retrieve access token dedicated to this client. In terms of OAuth2 specification, this enables support of
Client Credentials Grantfor this client. - Auth 2.0 Device Authorization Grant
- If enabled, this client can use the OIDC Device Authorization Grant.
- OIDC CIBA Grant
- If enabled, this client can use the OIDC Client Initiated Backchannel Authentication Grant.
12.1.2.4. Login settings
- Login theme
- A theme to use for login, OTP, grant registration, and forgotten password pages.
- Consent required
If enabled, users have to consent to client access.
For client-side clients that perform browser logins. As it is not possible to ensure that secrets can be kept safe with client-side clients, it is important to restrict access by configuring correct redirect URIs.
- Display client on screen
This switch applies if Consent Required is Off.
Off
The consent screen will contain only the consents corresponding to configured client scopes.
On
There will be also one item on the consent screen about this client itself.
- Client consent screen text
- Applies if Consent required and Display client on screen are enabled. Contains the text that will be on the consent screen about permissions for this client.
12.1.2.5. Logout settings
- Front channel logout
-
If Front Channel Logout is enabled, the application should be able to log out users through the front channel as per OpenID Connect Front-Channel Logout specification. If enabled, you should also provide the
Front-Channel Logout URL. - Front-channel logout URL
- URL that will be used by Red Hat build of Keycloak to send logout requests to clients through the front-channel.
- Backchannel logout URL
- URL that will cause the client to log itself out when a logout request is sent to this realm (via end_session_endpoint). If omitted, no logout requests are sent to the client.
- Backchannel logout session required
- Specifies whether a session ID Claim is included in the Logout Token when the Backchannel Logout URL is used.
- Backchannel logout revoke offline sessions
- Specifies whether a revoke_offline_access event is included in the Logout Token when the Backchannel Logout URL is used. Red Hat build of Keycloak will revoke offline sessions when receiving a Logout Token with this event.
12.1.3. Advanced configuration
After completing the fields on the Settings tab, you can use the other tabs to perform advanced configuration.
12.1.3.1. Advanced tab
When you click the Advanced tab, additional fields are displayed. For details on a specific field, click the question mark icon for that field. However, certain fields are described in detail in this section.
12.1.3.2. Fine grain OpenID Connect configuration
Logo URL
URL that references a logo for the Client application.
Policy URL
URL that the Relying Party Client provides to the End-User to read about how the profile data will be used.
Terms of Service URL
URL that the Relying Party Client provides to the End-User to read about the Relying Party’s terms of service.
Signed and Encrypted ID Token Support
Red Hat build of Keycloak can encrypt ID tokens according to the Json Web Encryption (JWE) specification. The administrator determines if ID tokens are encrypted for each client.
The key used for encrypting the ID token is the Content Encryption Key (CEK). Red Hat build of Keycloak and a client must negotiate which CEK is used and how it is delivered. The method used to determine the CEK is the Key Management Mode. The Key Management Mode that Red Hat build of Keycloak supports is Key Encryption.
In Key Encryption:
- The client generates an asymmetric cryptographic key pair.
- The public key is used to encrypt the CEK.
- Red Hat build of Keycloak generates a CEK per ID token
- Red Hat build of Keycloak encrypts the ID token using this generated CEK
- Red Hat build of Keycloak encrypts the CEK using the client’s public key.
- The client decrypts this encrypted CEK using their private key
- The client decrypts the ID token using the decrypted CEK.
No party, other than the client, can decrypt the ID token.
The client must pass its public key for encrypting CEK to Red Hat build of Keycloak. Red Hat build of Keycloak supports downloading public keys from a URL provided by the client. The client must provide public keys according to the Json Web Keys (JWK) specification.
The procedure is:
- Open the client’s Keys tab.
- Toggle JWKS URL to ON.
- Input the client’s public key URL in the JWKS URL textbox.
Key Encryption’s algorithms are defined in the Json Web Algorithm (JWA) specification. Red Hat build of Keycloak supports:
- RSAES-PKCS1-v1_5(RSA1_5)
- RSAES OAEP using default parameters (RSA-OAEP)
- RSAES OAEP 256 using SHA-256 and MFG1 (RSA-OAEP-256)
The procedure to select the algorithm is:
- Open the client’s Advanced tab.
- Open Fine Grain OpenID Connect Configuration.
- Select the algorithm from ID Token Encryption Content Encryption Algorithm pulldown menu.
12.1.3.3. Open ID Connect Compatibility Modes
This section exists for backward compatibility. Click the question mark icons for details on each field.
OAuth 2.0 Mutual TLS Certificate Bound Access Tokens Enabled
Mutual TLS binds an access token and a refresh token together with a client certificate, which is exchanged during a TLS handshake. This binding prevents an attacker from using stolen tokens.
This type of token is a holder-of-key token. Unlike bearer tokens, the recipient of a holder-of-key token can verify if the sender of the token is legitimate.
If this setting is on, the workflow is:
- A token request is sent to the token endpoint in an authorization code flow or hybrid flow.
- Red Hat build of Keycloak requests a client certificate.
- Red Hat build of Keycloak receives the client certificate.
- Red Hat build of Keycloak successfully verifies the client certificate.
If verification fails, Red Hat build of Keycloak rejects the token.
In the following cases, Red Hat build of Keycloak will verify the client sending the access token or the refresh token:
- A token refresh request is sent to the token endpoint with a holder-of-key refresh token.
- A UserInfo request is sent to UserInfo endpoint with a holder-of-key access token.
- A logout request is sent to Logout endpoint with a holder-of-key refresh token.
See Mutual TLS Client Certificate Bound Access Tokens in the OAuth 2.0 Mutual TLS Client Authentication and Certificate Bound Access Tokens for more details.
Currently, Red Hat build of Keycloak client adapters do not support holder-of-key token verification. Red Hat build of Keycloak adapters treat access and refresh tokens as bearer tokens.
Advanced Settings for OIDC
The Advanced Settings for OpenID Connect allows you to configure overrides at the client level for session and token timeouts.
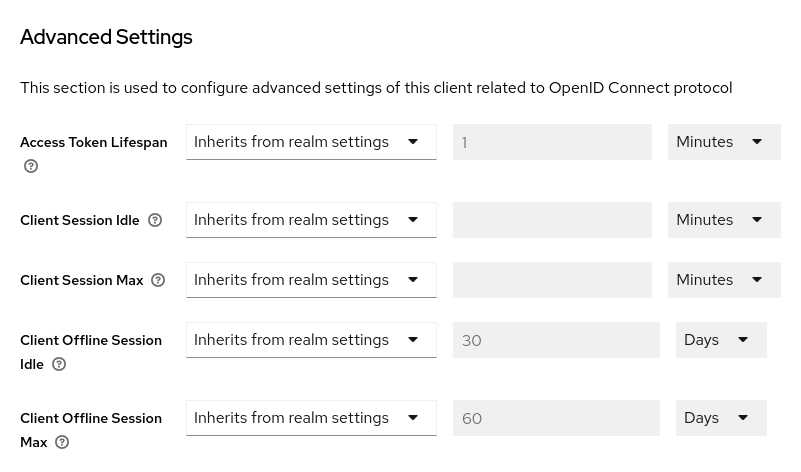
| Configuration | Description |
|---|---|
| Access Token Lifespan | The value overrides the realm option with same name. |
| Client Session Idle | The value overrides the realm option with same name. The value should be shorter than the global SSO Session Idle. |
| Client Session Max | The value overrides the realm option with same name. The value should be shorter than the global SSO Session Max. |
| Client Offline Session Idle | This setting allows you to configure a shorter offline session idle timeout for the client. The timeout is amount of time the session remains idle before Red Hat build of Keycloak revokes its offline token. If not set, realm Offline Session Idle is used. |
| Client Offline Session Max | This setting allows you to configure a shorter offline session max lifespan for the client. The lifespan is the maximum time before Red Hat build of Keycloak revokes the corresponding offline token. This option needs Offline Session Max Limited enabled globally in the realm, and defaults to Offline Session Max. |
Proof Key for Code Exchange Code Challenge Method
If an attacker steals an authorization code of a legitimate client, Proof Key for Code Exchange (PKCE) prevents the attacker from receiving the tokens that apply to the code.
An administrator can select one of these options:
- (blank)
- Red Hat build of Keycloak does not apply PKCE unless the client sends appropriate PKCE parameters to Red Hat build of Keycloaks authorization endpoint.
- S256
- Red Hat build of Keycloak applies to the client PKCE whose code challenge method is S256.
- plain
- Red Hat build of Keycloak applies to the client PKCE whose code challenge method is plain.
See RFC 7636 Proof Key for Code Exchange by OAuth Public Clients for more details.
ACR to Level of Authentication (LoA) Mapping
In the advanced settings of a client, you can define which Authentication Context Class Reference (ACR) value is mapped to which Level of Authentication (LoA). This mapping can be specified also at the realm as mentioned in the ACR to LoA Mapping. A best practice is to configure this mapping at the realm level, which allows to share the same settings across multiple clients.
The Default ACR Values can be used to specify the default values when the login request is sent from this client to Red Hat build of Keycloak without acr_values parameter and without a claims parameter that has an acr claim attached. See official OIDC dynamic client registration specification.
Note that default ACR values are used as the default level, however it cannot be reliably used to enforce login with the particular level. For example, assume that you configure the Default ACR Values to level 2. Then by default, users will be required to authenticate with level 2. However when the user explicitly attaches the parameter into login request such as acr_values=1, then the level 1 will be used. As a result, if the client really requires level 2, the client is encouraged to check the presence of the acr claim inside ID Token and double-check that it contains the requested level 2.
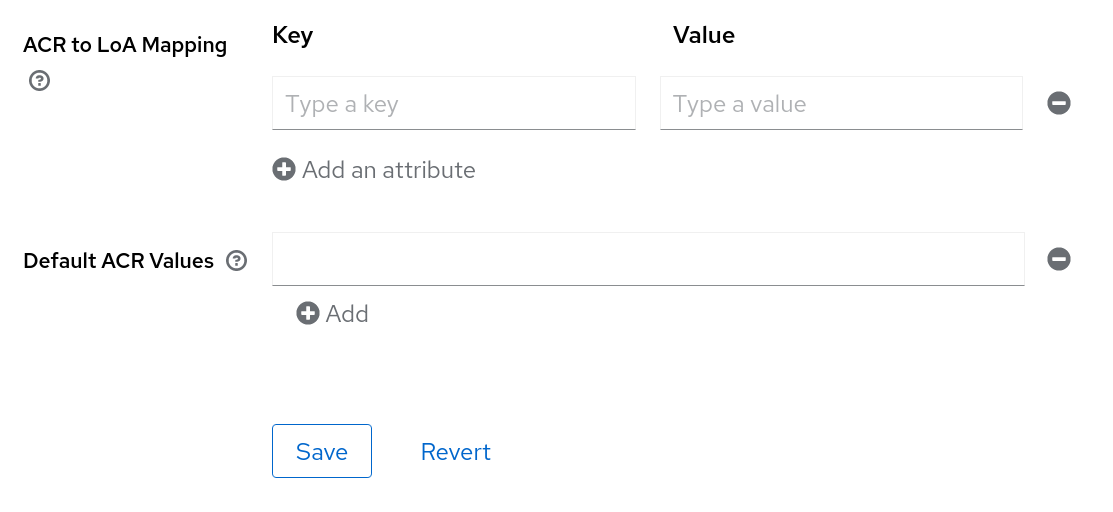
For further details see Step-up Authentication and the official OIDC specification.
12.1.4. Confidential client credentials
If the Client authentication of the client is set to ON, the credentials of the client must be configured under the Credentials tab.
Credentials tab
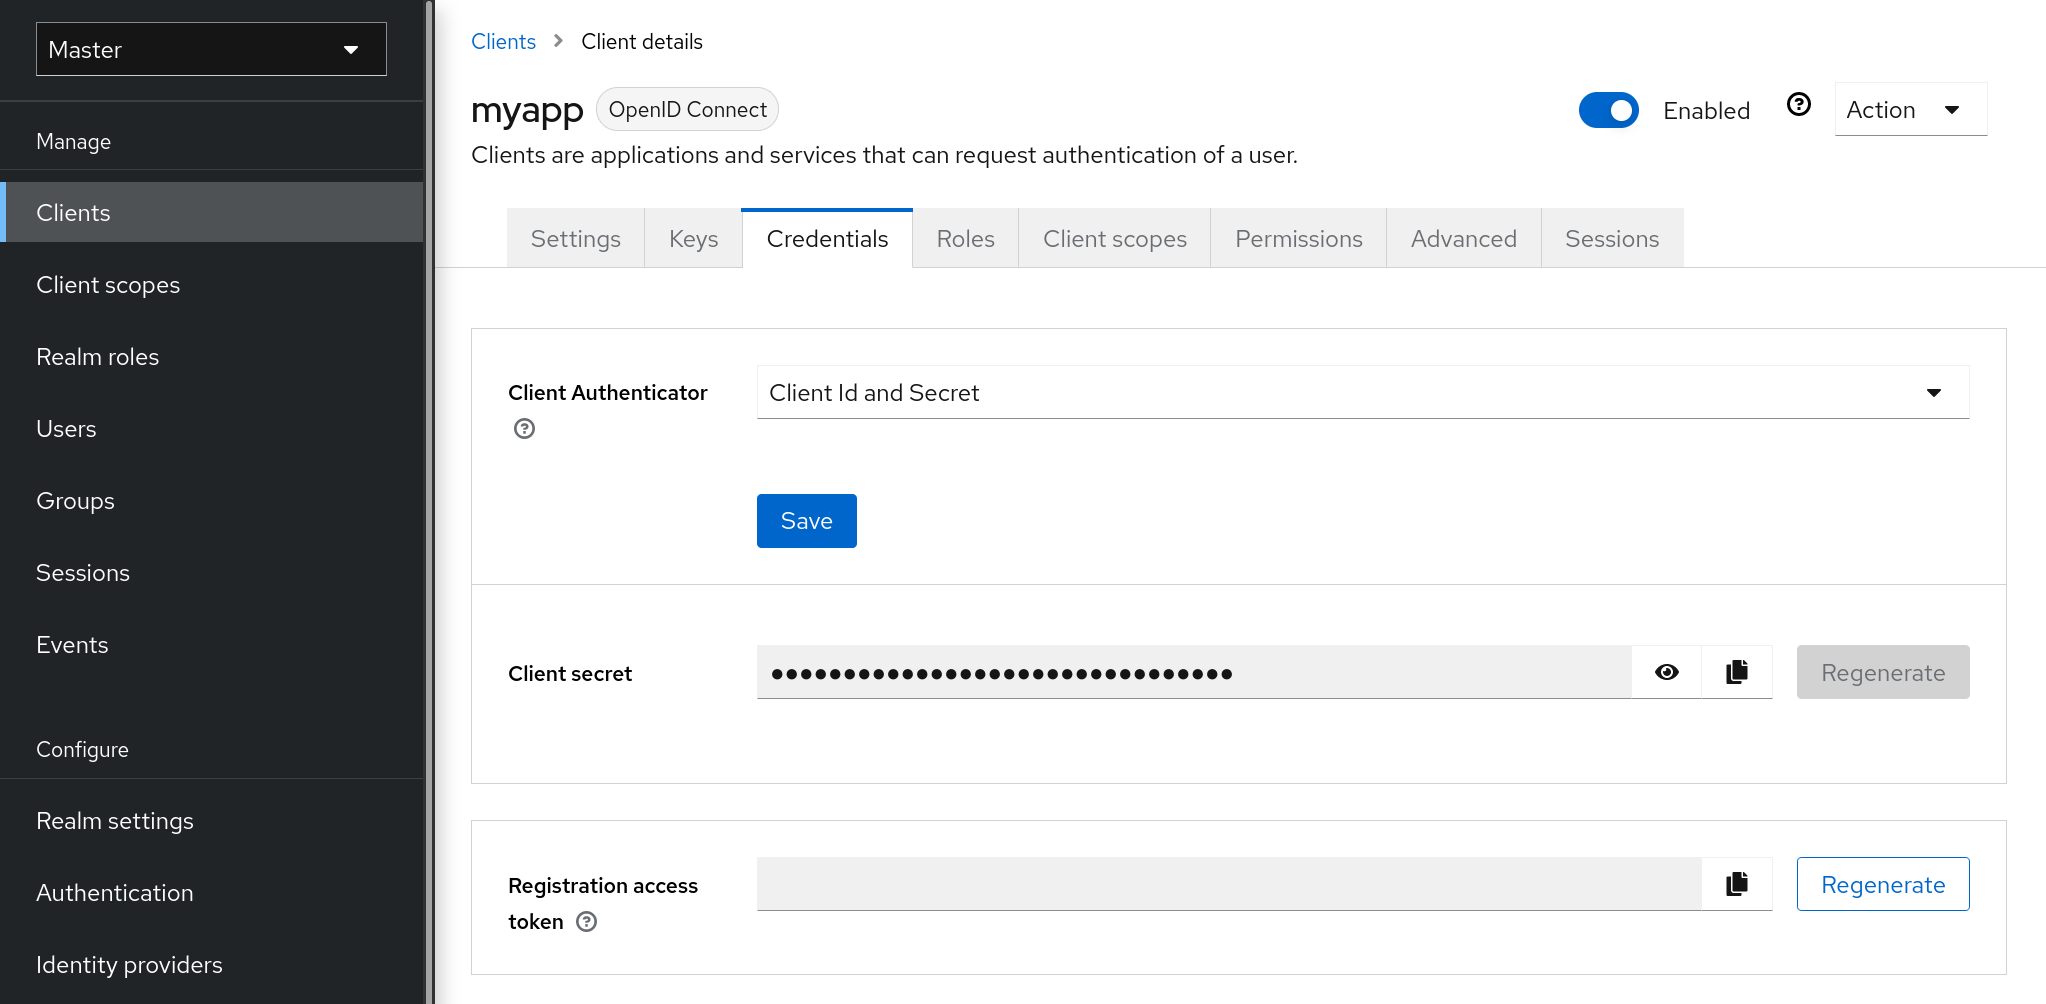
The Client Authenticator drop-down list specifies the type of credential to use for your client.
Client ID and Secret
This choice is the default setting. The secret is automatically generated. Click Regenerate to recreate the secret if necessary.
Signed JWT
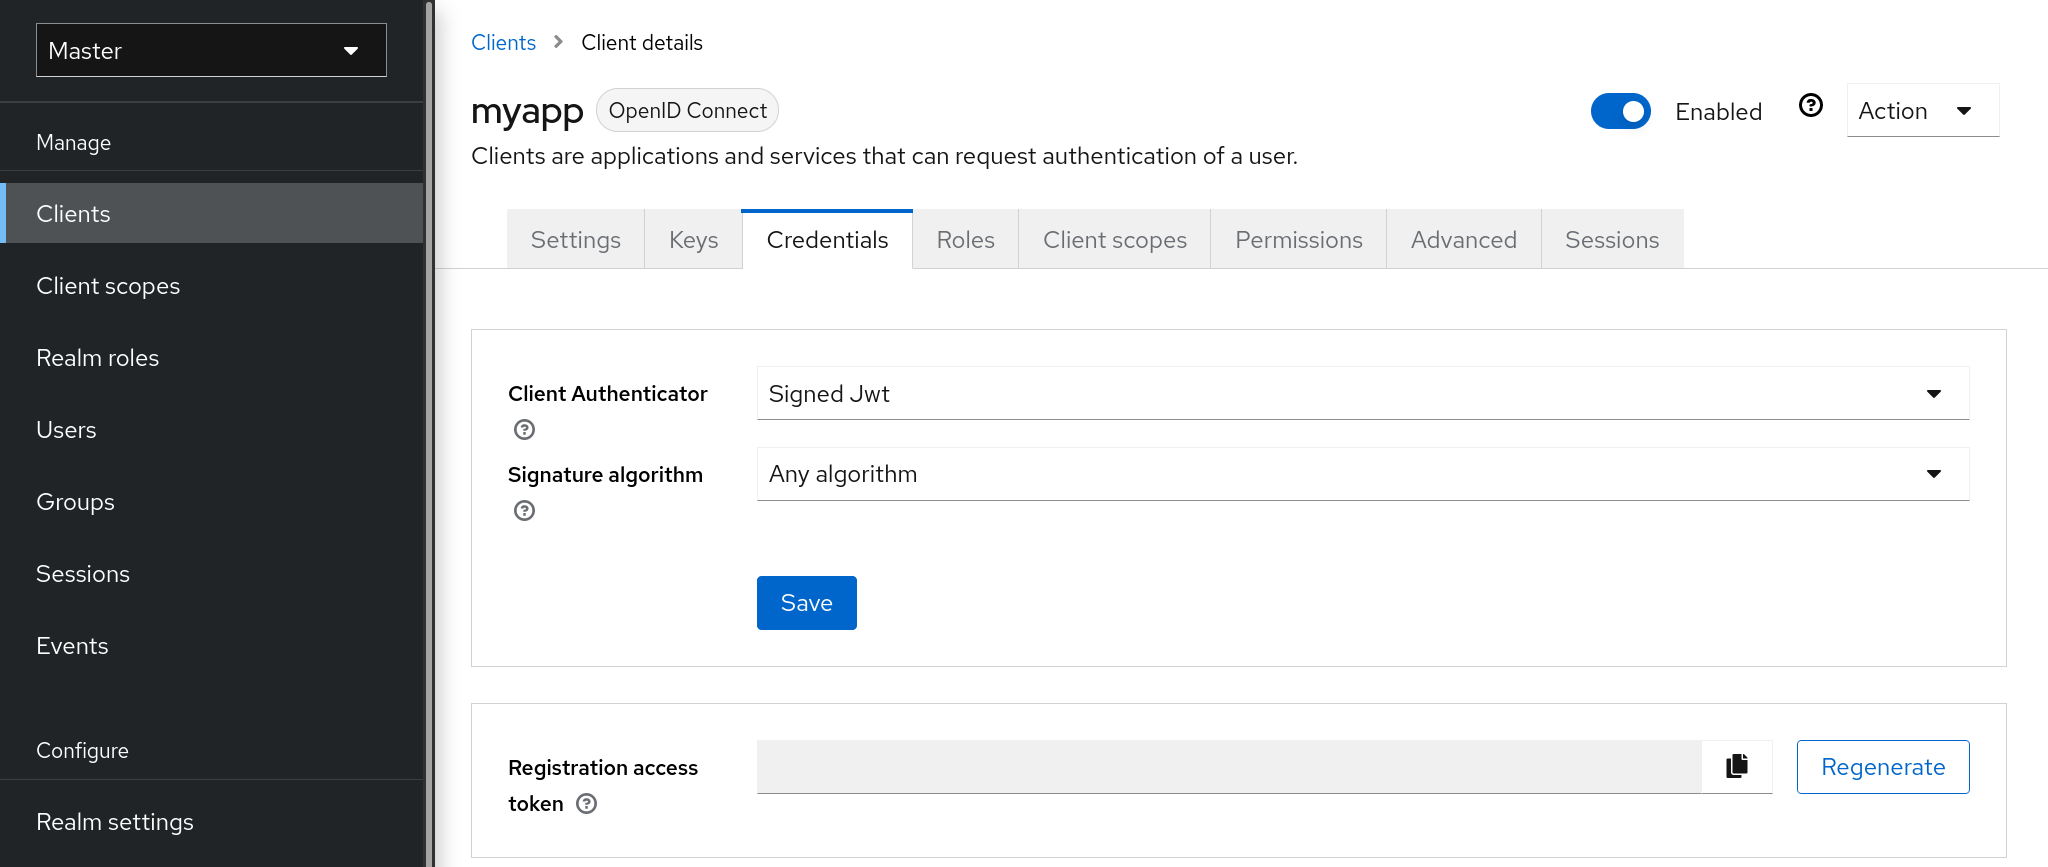
Signed JWT is "Signed Json Web Token".
When choosing this credential type you will have to also generate a private key and certificate for the client in the tab Keys. The private key will be used to sign the JWT, while the certificate is used by the server to verify the signature.
Keys tab
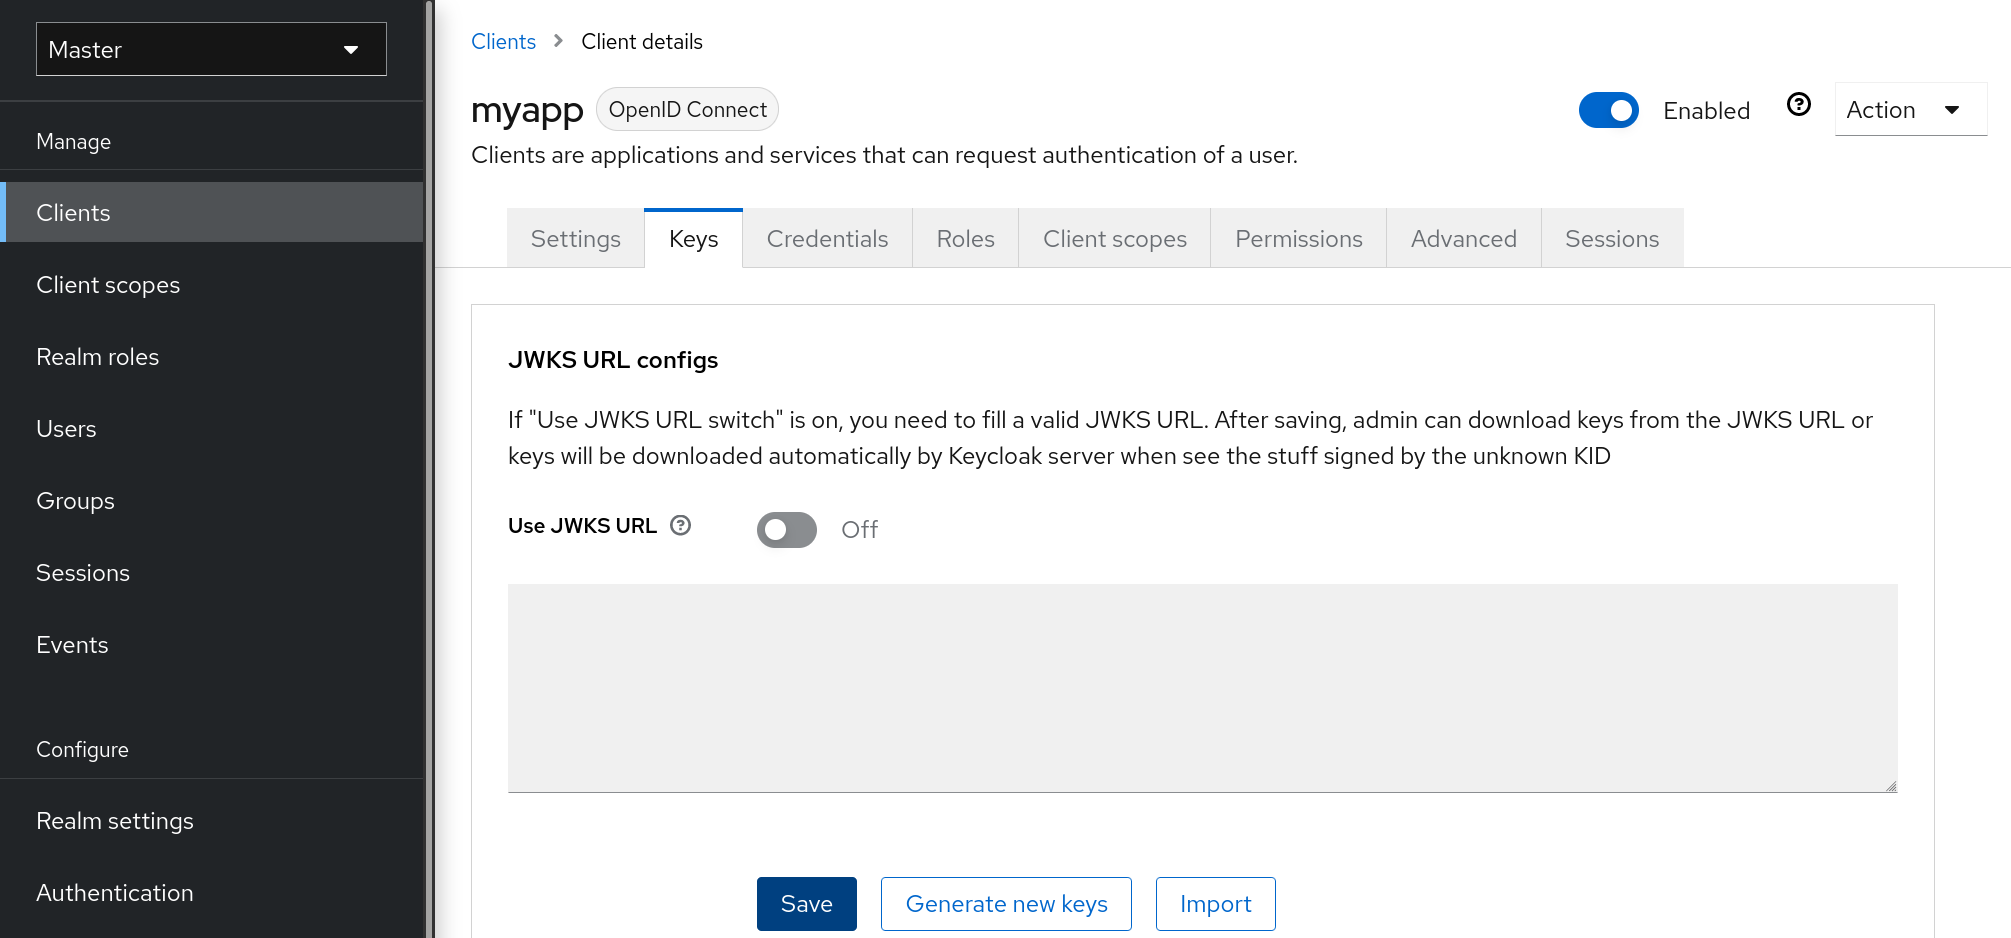
Click on the Generate new keys button to start this process.
Generate keys

- Select the archive format you want to use.
- Enter a key password.
- Enter a store password.
- Click Generate.
When you generate the keys, Red Hat build of Keycloak will store the certificate and you download the private key and certificate for your client.
You can also generate keys using an external tool and then import the client’s certificate by clicking Import Certificate.
Import certificate
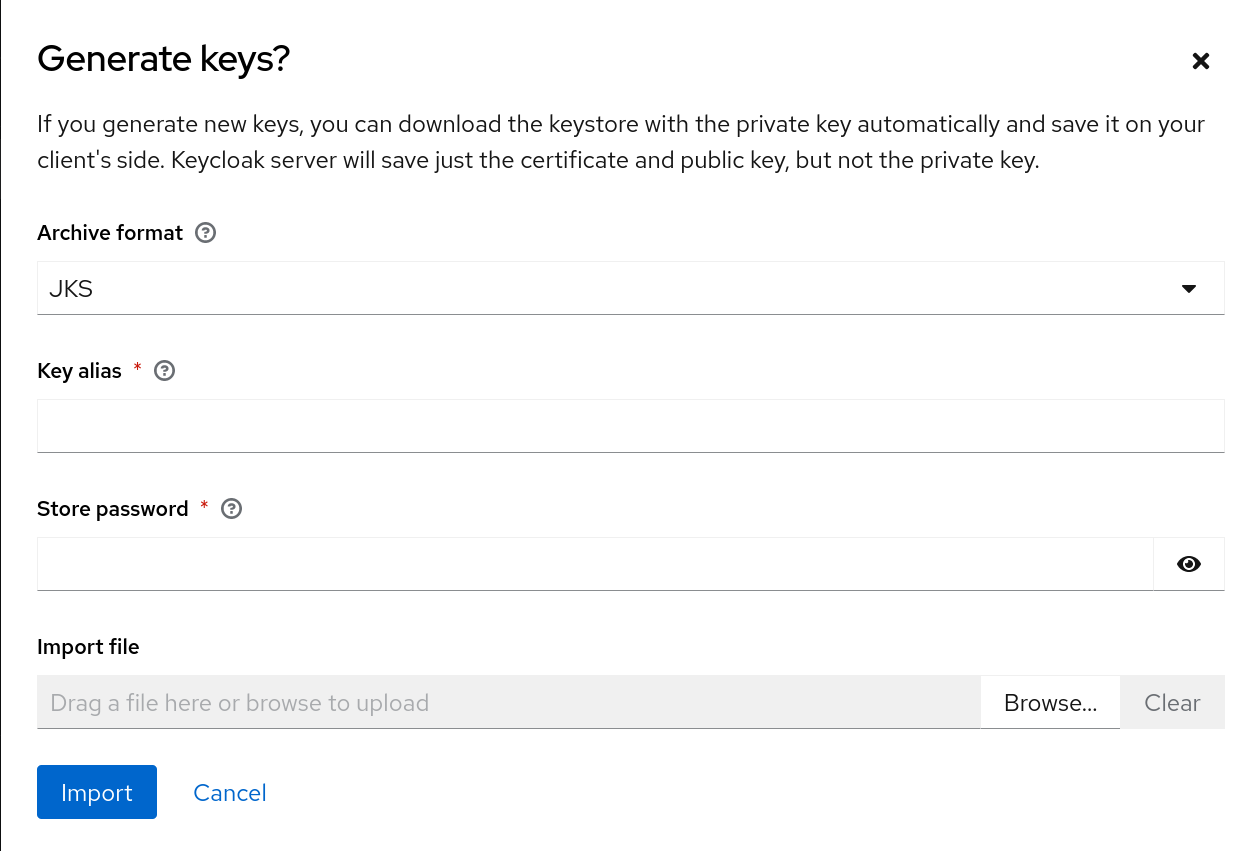
- Select the archive format of the certificate.
- Enter the store password.
- Select the certificate file by clicking Import File.
- Click Import.
Importing a certificate is unnecessary if you click Use JWKS URL. In this case, you can provide the URL where the public key is published in JWK format. With this option, if the key is ever changed, Red Hat build of Keycloak reimports the key.
If you are using a client secured by Red Hat build of Keycloak adapter, you can configure the JWKS URL in this format, assuming that https://myhost.com/myapp is the root URL of your client application:
https://myhost.com/myapp/k_jwksSee Server Developer Guide for more details.
Signed JWT with Client Secret
If you select this option, you can use a JWT signed by client secret instead of the private key.
The client secret will be used to sign the JWT by the client.
X509 Certificate
Red Hat build of Keycloak will validate if the client uses proper X509 certificate during the TLS Handshake.
X509 certificate
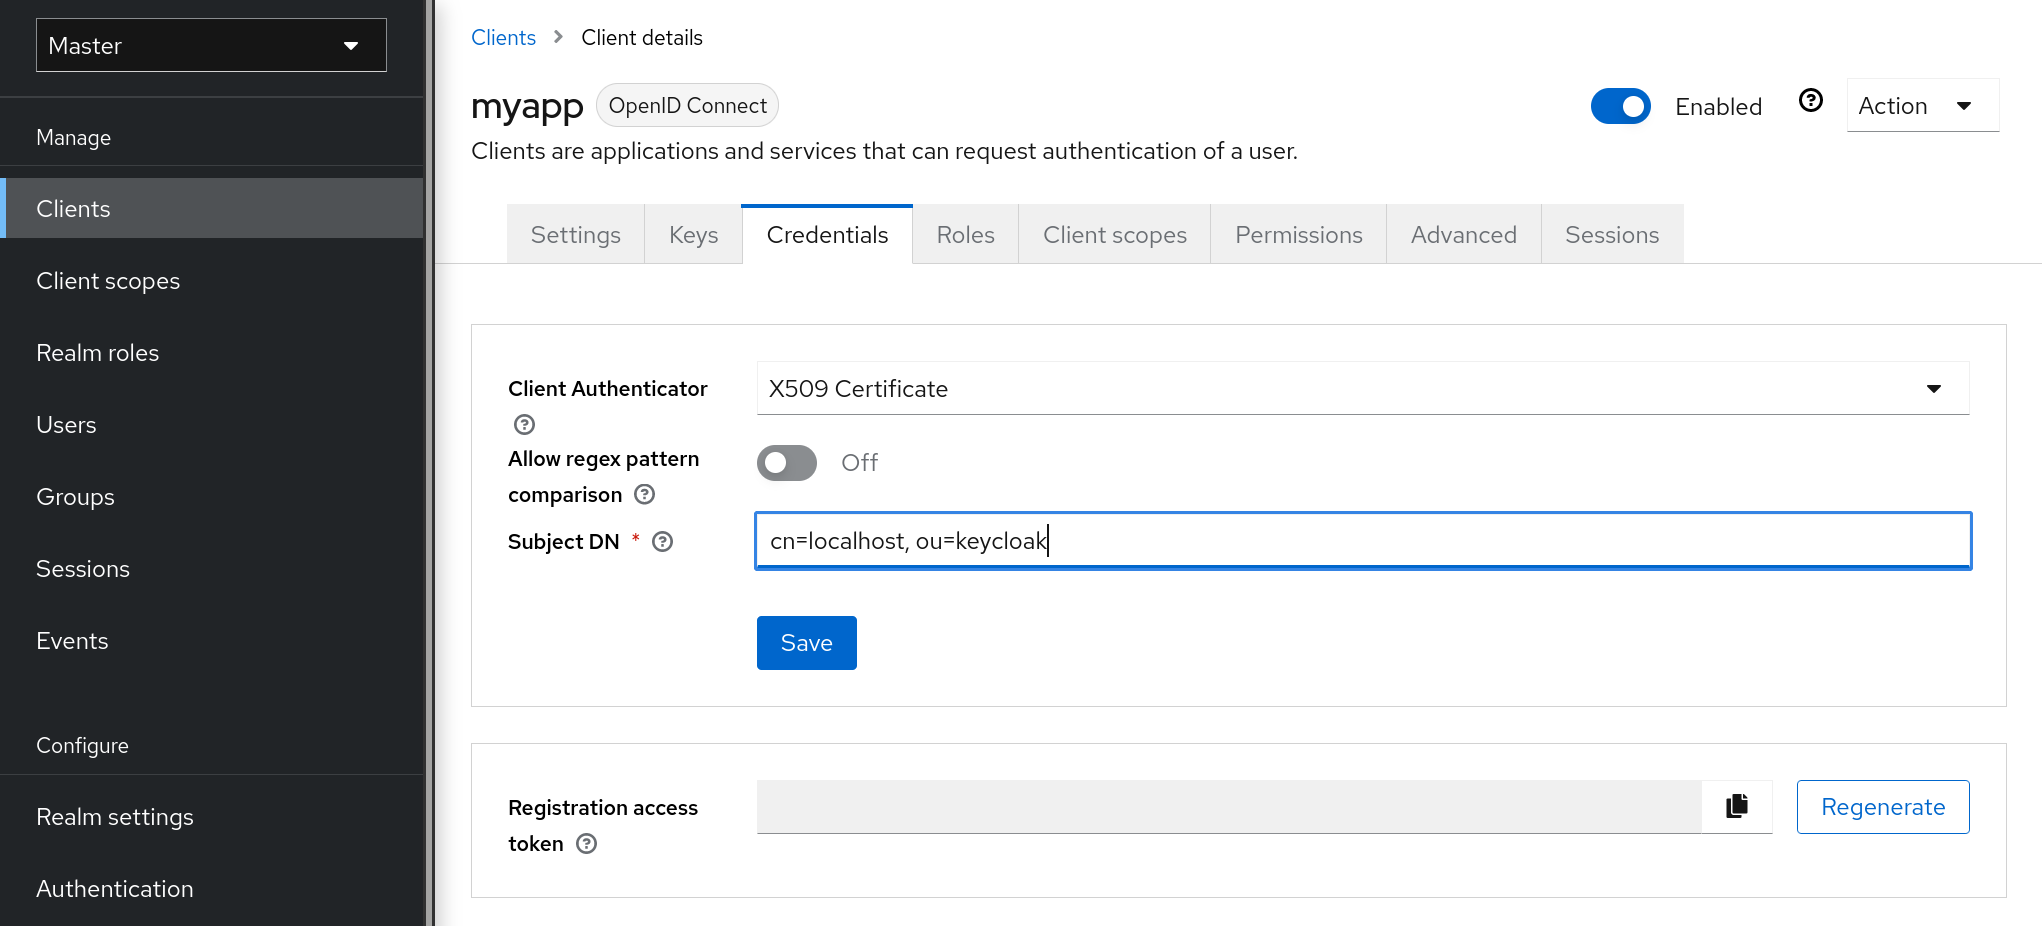
The validator also checks the Subject DN field of the certificate with a configured regexp validation expression. For some use cases, it is sufficient to accept all certificates. In that case, you can use (.*?)(?:$) expression.
Two ways exist for Red Hat build of Keycloak to obtain the Client ID from the request:
-
The
client_idparameter in the query (described in Section 2.2 of the OAuth 2.0 Specification). -
Supply
client_idas a form parameter.
12.1.5. Client Secret Rotation
Please note that Client Secret Rotation support is in development. Use this feature experimentally.
For a client with Confidential Client authentication Red Hat build of Keycloak supports the functionality of rotating client secrets through Client Policies.
The client secrets rotation policy provides greater security in order to alleviate problems such as secret leakage. Once enabled, Red Hat build of Keycloak supports up to two concurrently active secrets for each client. The policy manages rotations according to the following settings:
- Secret expiration: [seconds] - When the secret is rotated, this is the expiration of time of the new secret. The amount, in seconds, added to the secret creation date. Calculated at policy execution time.
- Rotated secret expiration: [seconds] - When the secret is rotated, this value is the remaining expiration time for the old secret. This value should be always smaller than Secret expiration. When the value is 0, the old secret will be immediately removed during client rotation. The amount, in seconds, added to the secret rotation date. Calculated at policy execution time.
- Remaining expiration time for rotation during update: [seconds] - Time period when an update to a dynamic client should perform client secret rotation. Calculated at policy execution time.
When a client secret rotation occurs, a new main secret is generated and the old client main secret becomes the secondary secret with a new expiration date.
12.1.5.1. Rules for client secret rotation
Rotations do not occur automatically or through a background process. In order to perform the rotation, an update action is required on the client, either through the Red Hat build of Keycloak Admin Console through the function of Regenerate Secret, in the client’s credentials tab or Admin REST API. When invoking a client update action, secret rotation occurs according to the rules:
- When the value of Secret expiration is less than the current date.
- During dynamic client registration client-update request, the client secret will be automatically rotated if the value of Remaining expiration time for rotation during update match the period between the current date and the Secret expiration.
Additionally it is possible through Admin REST API to force a client secret rotation at any time.
During the creation of new clients, if the client secret rotation policy is active, the behavior will be applied automatically.
To apply the secret rotation behavior to an existing client, update that client after you define the policy so that the behavior is applied.
12.1.6. Creating an OIDC Client Secret Rotation Policy
The following is an example of defining a secret rotation policy:
Procedure
- Click Realm Settings in the menu.
- Click Client Policies tab.
On the Profiles page, click Create client profile.
Create a profile
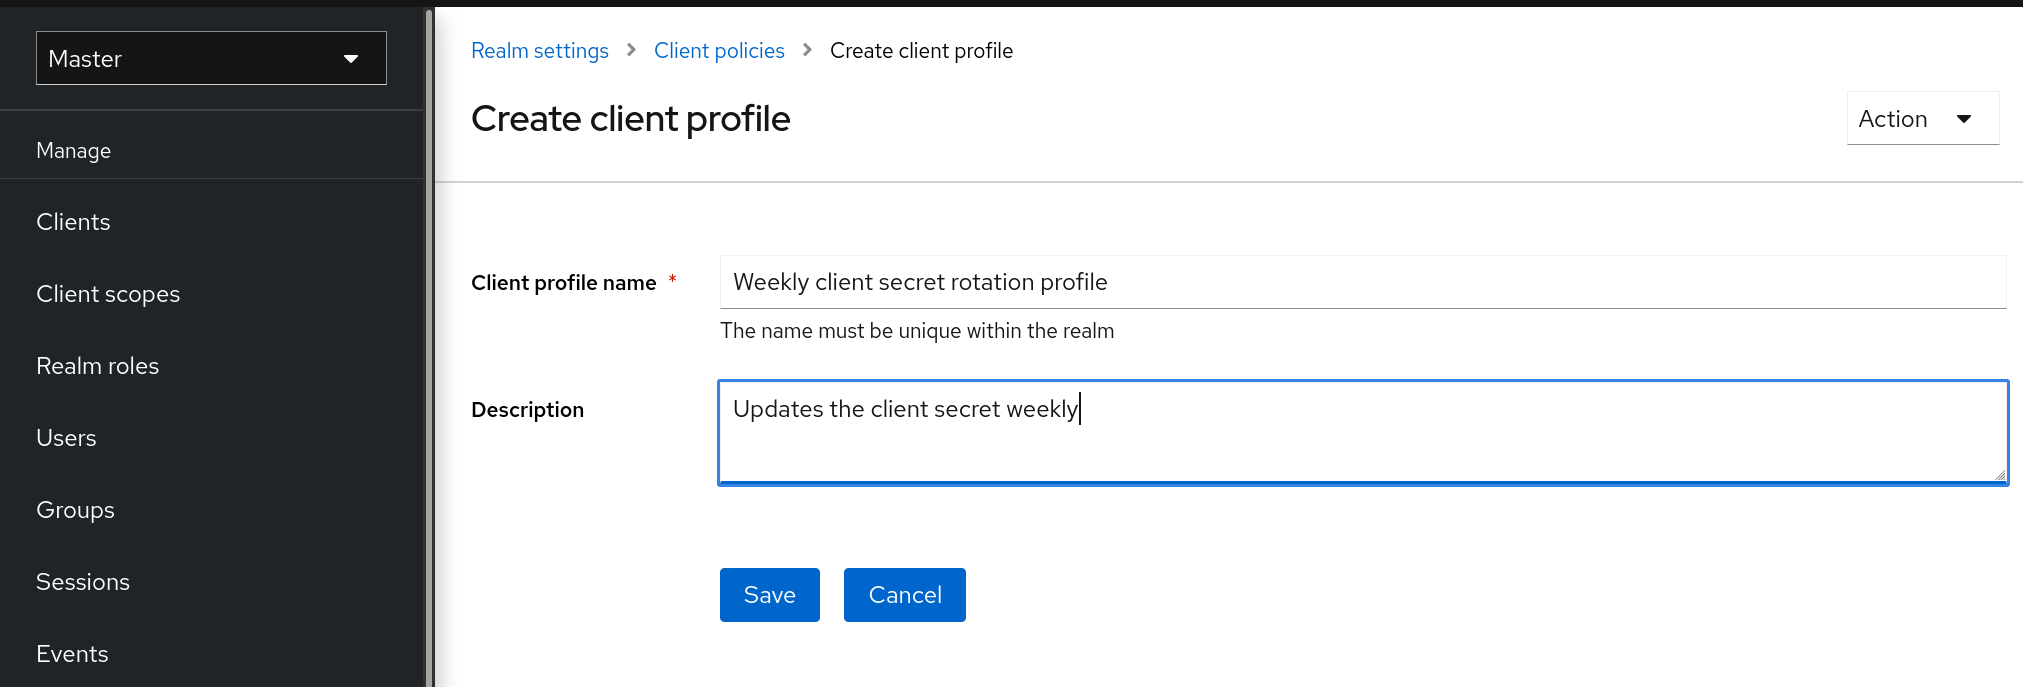
- Enter any name for Name.
- Enter a description that helps you identify the purpose of the profile for Description.
Click Save.
This action creates the profile and enables you to configure executors.
Click Add executor to configure an executor for this profile.
Create a profile executor
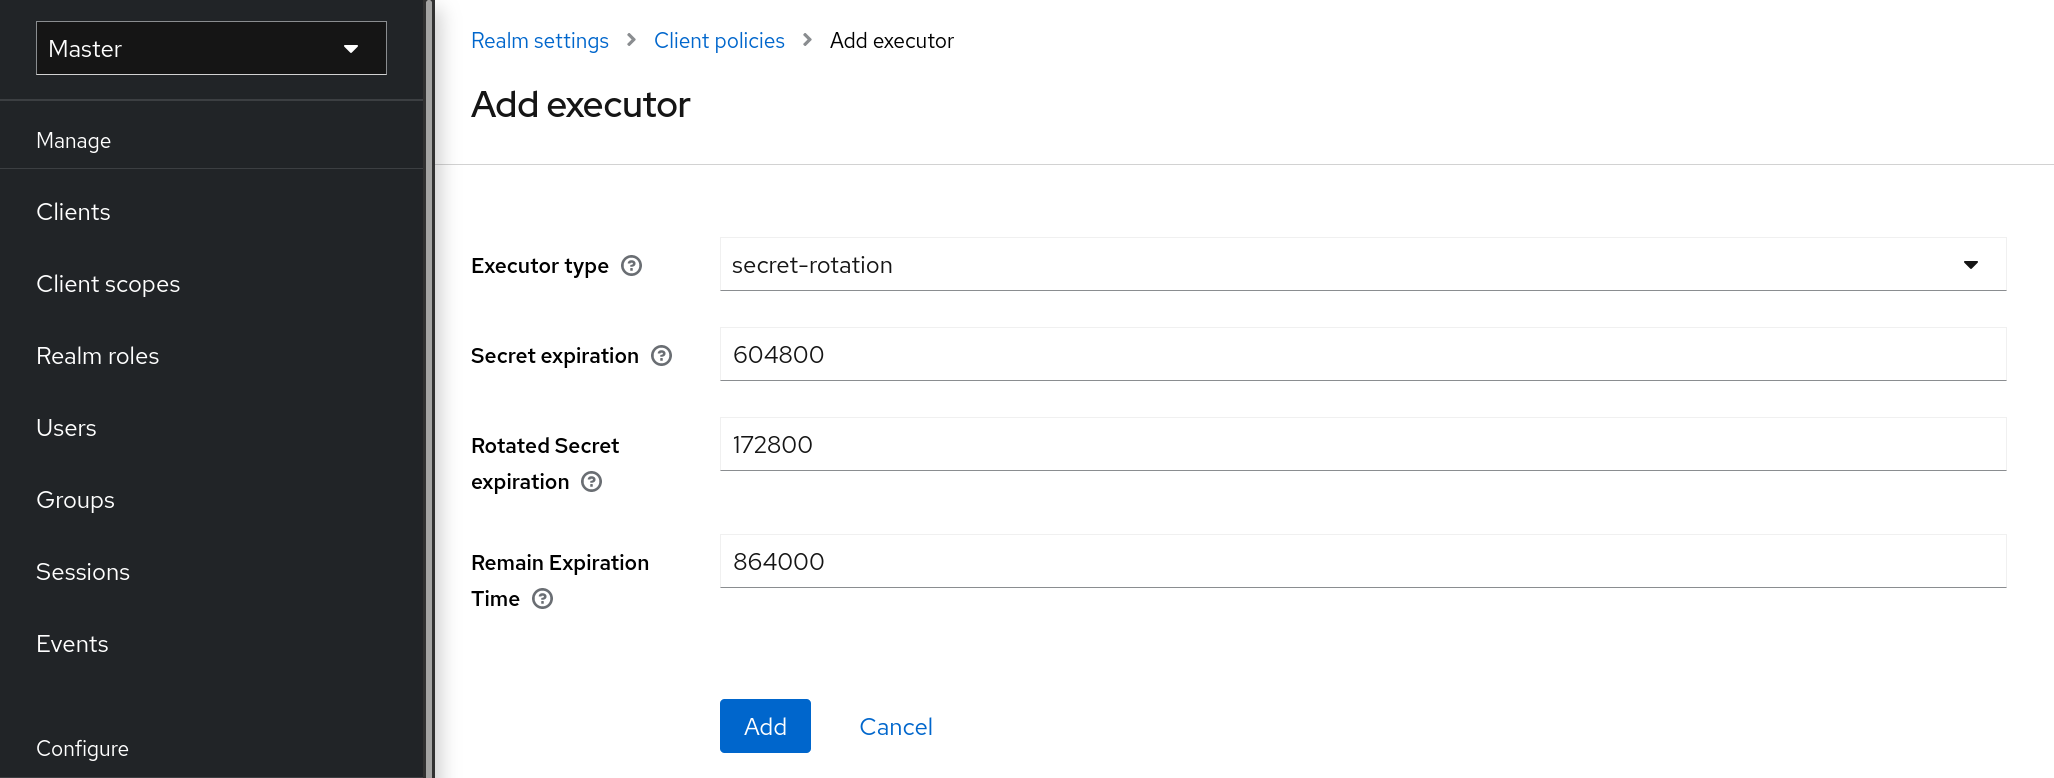
- Select secret-rotation for Executor Type.
- Enter the maximum duration time of each secret, in seconds, for Secret Expiration.
Enter the maximum duration time of each rotated secret, in seconds, for Rotated Secret Expiration.
WarningRemember that the Rotated Secret Expiration value must always be less than Secret Expiration.
- Enter the amount of time, in seconds, after which any update action will update the client for Remain Expiration Time.
Click Add.
In the example above:
- Each secret is valid for one week.
- The rotated secret expires after two days.
- The window for updating dynamic clients starts one day before the secret expires.
- Return to the Client Policies tab.
- Click Policies.
Click Create client policy.
Create the Client Secret Rotation Policy
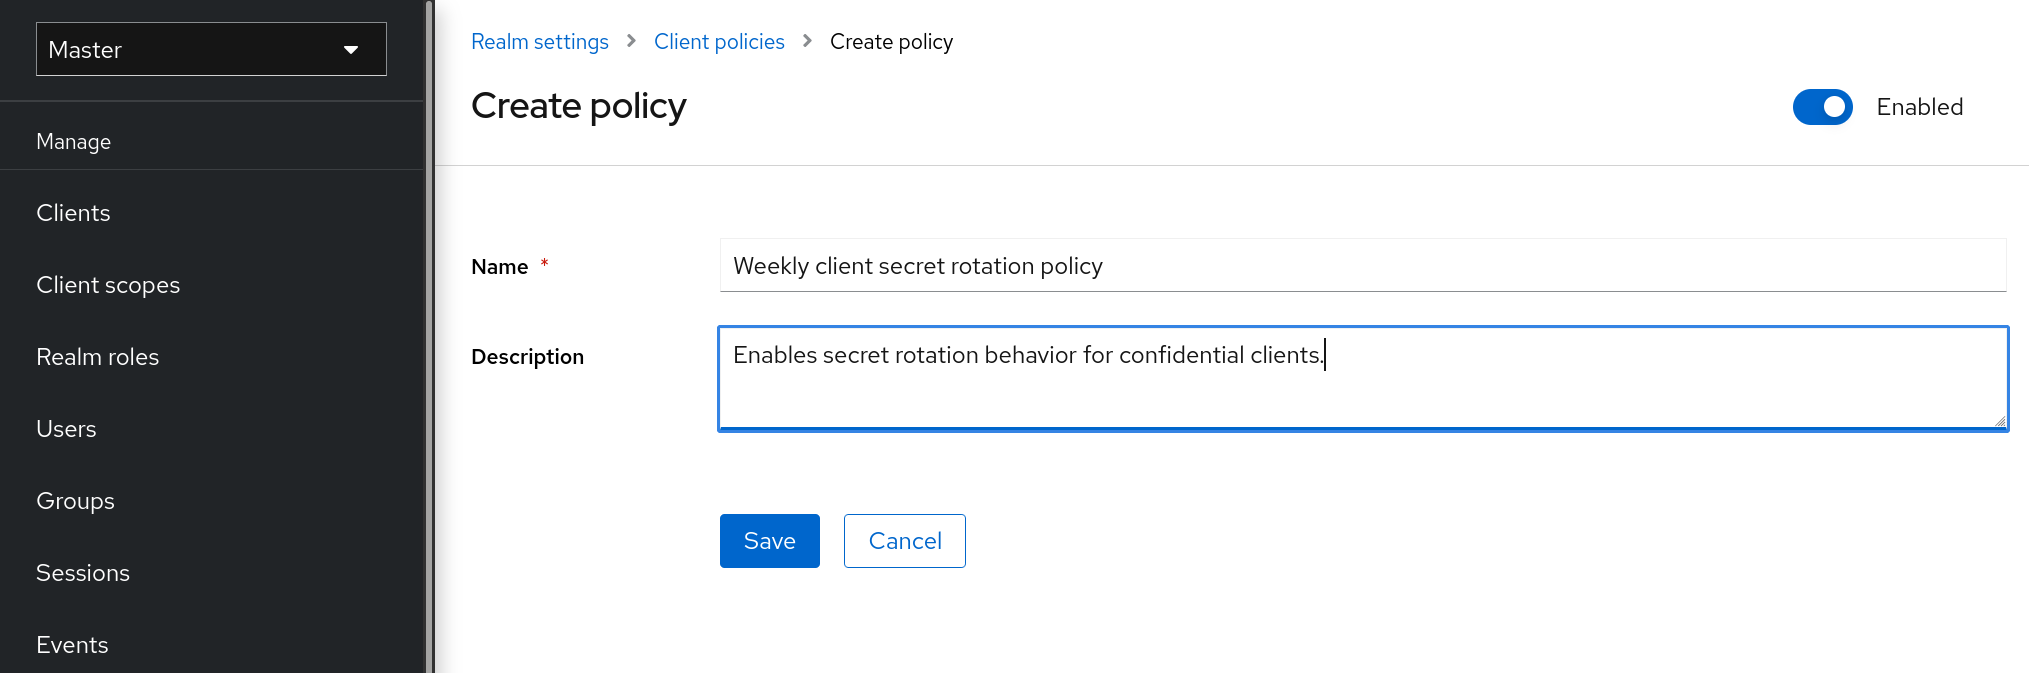
- Enter any name for Name.
- Enter a description that helps you identify the purpose of the policy for Description.
Click Save.
This action creates the policy and enables you to associate policies with profiles. It also allows you to configure the conditions for policy execution.
Under Conditions, click Add condition.
Create the Client Secret Rotation Policy Condition
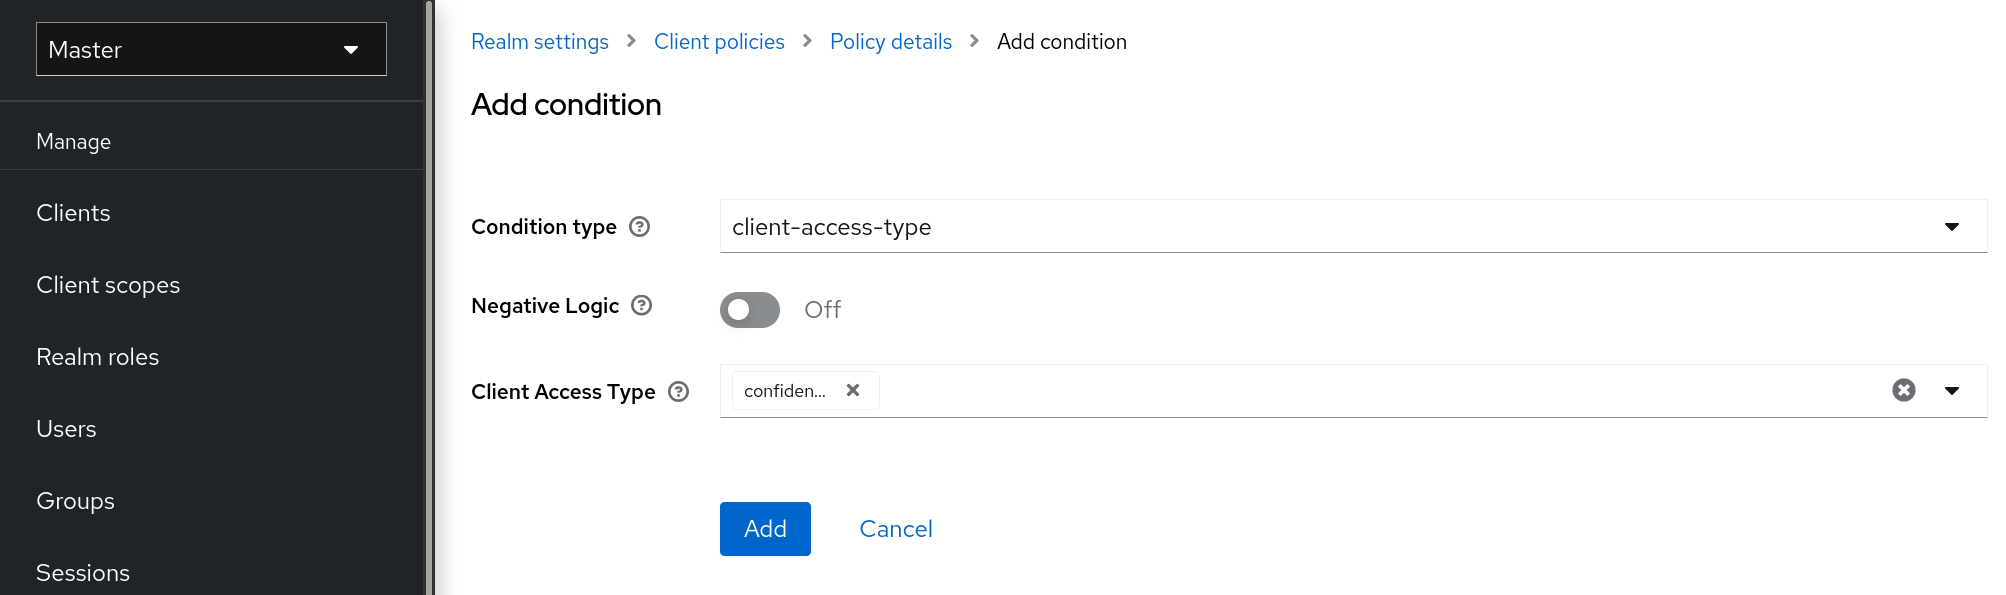
To apply the behavior to all confidential clients select client-access-type in the Condition Type field
NoteTo apply to a specific group of clients, another approach would be to select the client-roles type in the Condition Type field. In this way, you could create specific roles and assign a custom rotation configuration to each role.
- Add confidential to the field Client Access Type.
- Click Add.
Back in the policy setting, under Client Profiles, click Add client profile and then select Weekly Client Secret Rotation Profile from the list and then click Add.
Client Secret Rotation Policy
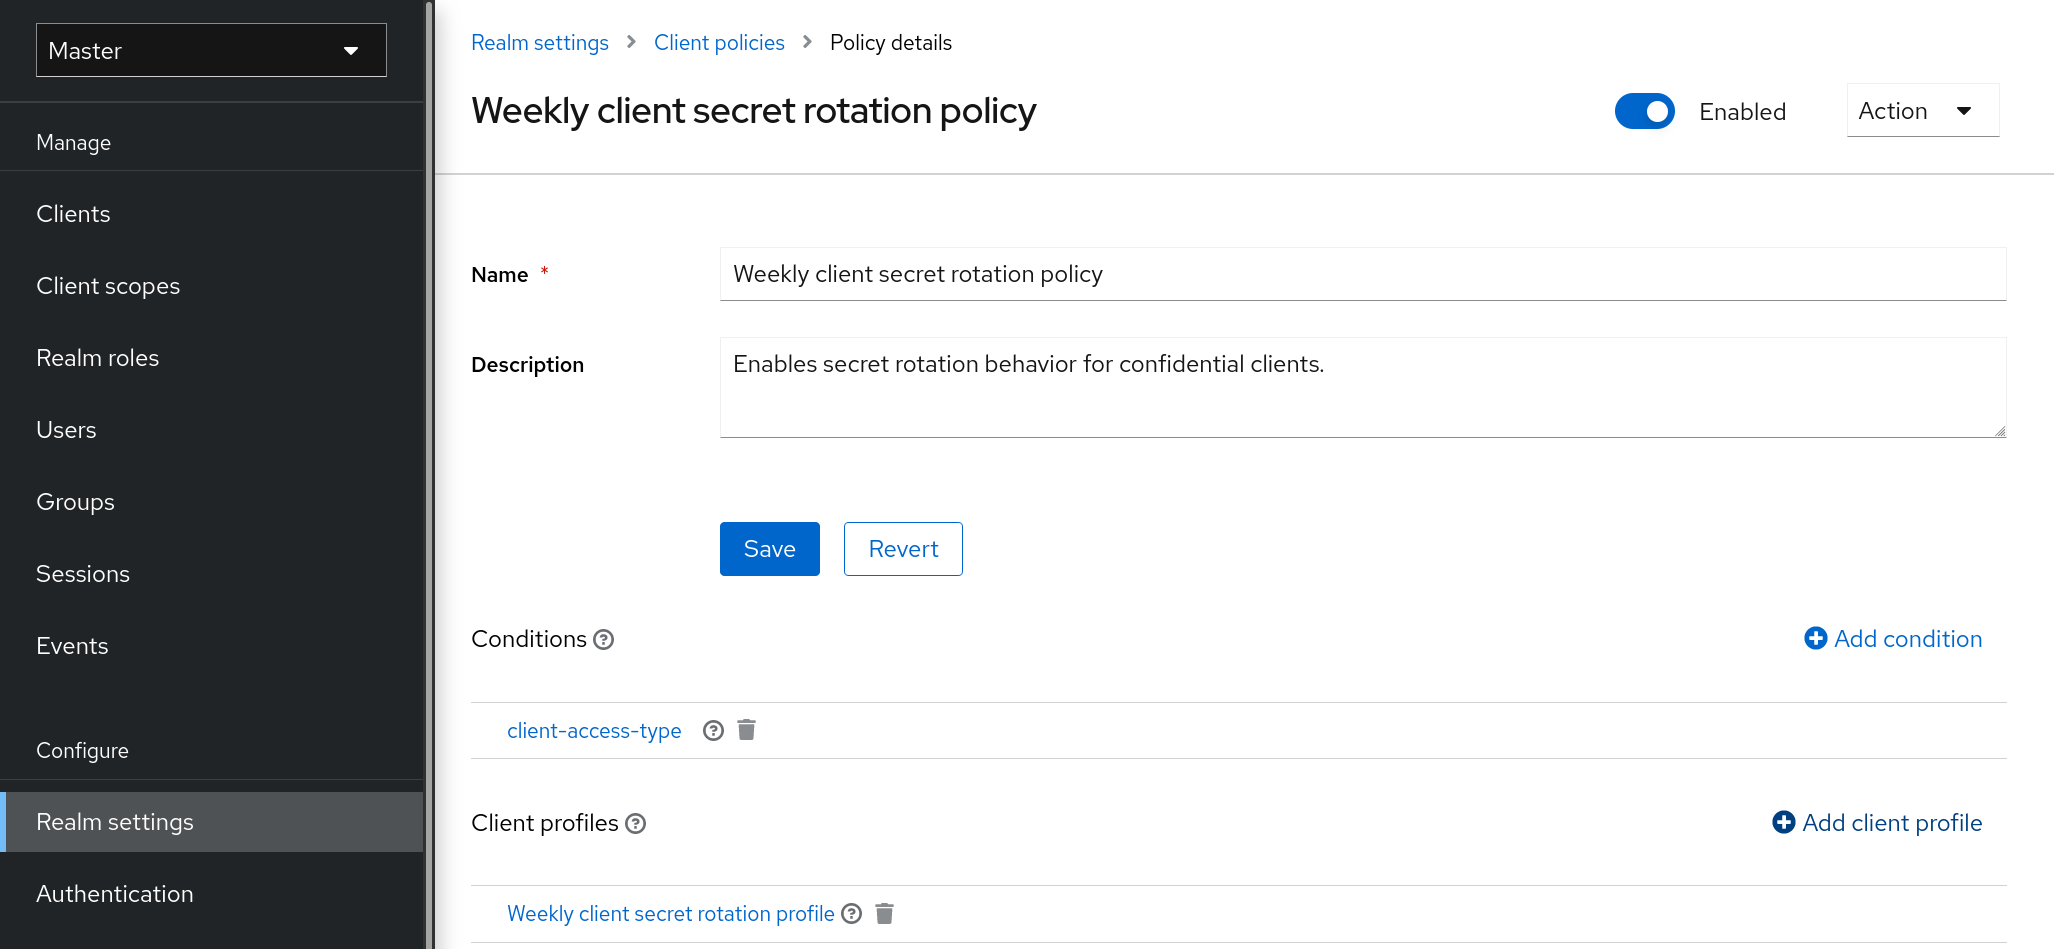
To apply the secret rotation behavior to an existing client, follow the following steps:
Using the Admin Console
- Click Clients in the menu.
- Click a client.
- Click the Credentials tab.
- Click Re-generate of the client secret.
Using client REST services it can be executed in two ways:
- Through an update operation on a client
- Through the regenerate client secret endpoint
12.1.7. Using a service account
Each OIDC client has a built-in service account. Use this service account to obtain an access token.
Procedure
- Click Clients in the menu.
- Select your client.
- Click the Settings tab.
- Toggle Client authentication to On.
- Select Service accounts roles.
- Click Save.
- Configure your client credentials.
- Click the Scope tab.
- Verify that you have roles or toggle Full Scope Allowed to ON.
- Click the Service Account Roles tab
- Configure the roles available to this service account for your client.
Roles from access tokens are the intersection of:
- Role scope mappings of a client combined with the role scope mappings inherited from linked client scopes.
- Service account roles.
The REST URL to invoke is /realms/{realm-name}/protocol/openid-connect/token. This URL must be invoked as a POST request and requires that you post the client credentials with the request.
By default, client credentials are represented by the clientId and clientSecret of the client in the Authorization: Basic header but you can also authenticate the client with a signed JWT assertion or any other custom mechanism for client authentication.
You also need to set the grant_type parameter to "client_credentials" as per the OAuth2 specification.
For example, the POST invocation to retrieve a service account can look like this:
    POST /realms/demo/protocol/openid-connect/token
    Authorization: Basic cHJvZHVjdC1zYS1jbGllbnQ6cGFzc3dvcmQ=
    Content-Type: application/x-www-form-urlencoded

    grant_type=client_credentials
The response would be similar to this Access Token Response from the OAuth 2.0 specification.
HTTP/1.1 200 OK
Content-Type: application/json;charset=UTF-8
Cache-Control: no-store
Pragma: no-cache

{
    "access_token":"2YotnFZFEjr1zCsicMWpAA",
    "token_type":"bearer",
    "expires_in":60
}
Only the access token is returned by default. No refresh token is returned and no user session is created on the Red Hat build of Keycloak side upon successful authentication by default. Due to the lack of a refresh token, re-authentication is required when the access token expires. However, this situation does not mean any additional overhead for the Red Hat build of Keycloak server because sessions are not created by default.
In this situation, logout is unnecessary. However, issued access tokens can be revoked by sending requests to the OAuth2 Revocation Endpoint as described in the OpenID Connect Endpoints section.
12.1.8. Audience support
Typically, the environment where Red Hat build of Keycloak is deployed consists of a set of confidential or public client applications that use Red Hat build of Keycloak for authentication.
Services (Resource Servers in the OAuth 2 specification) are also available that serve requests from client applications and provide resources to these applications. These services require an Access token (Bearer token) to be sent to them to authenticate a request. This token is obtained by the frontend application upon login to Red Hat build of Keycloak.
In the environment where trust among services is low, you may encounter this scenario:
- A frontend client application requires authentication against Red Hat build of Keycloak.
- Red Hat build of Keycloak authenticates a user.
- Red Hat build of Keycloak issues a token to the application.
- The application uses the token to invoke an untrusted service.
- The untrusted service returns the response to the application. However, it keeps the applications token.
- The untrusted service then invokes a trusted service using the applications token. This results in broken security as the untrusted service misuses the token to access other services on behalf of the client application.
This scenario is unlikely in environments with a high level of trust between services but not in environments where trust is low. In some environments, this workflow may be correct as the untrusted service may have to retrieve data from a trusted service to return data to the original client application.
An unlimited audience is useful when a high level of trust exists between services. Otherwise, the audience should be limited. You can limit the audience and, at the same time, allow untrusted services to retrieve data from trusted services. In this case, ensure that the untrusted service and the trusted service are added as audiences to the token.
To prevent any misuse of the access token, limit the audience on the token and configure your services to verify the audience on the token. The flow will change as follows:
- A frontend application authenticates against Red Hat build of Keycloak.
- Red Hat build of Keycloak authenticates a user.
Red Hat build of Keycloak issues a token to the application. The application knows that it will need to invoke an untrusted service so it places scope=<untrusted service> in the authentication request sent to Red Hat build of Keycloak (see Client Scopes section for more details about the scope parameter).
The token issued to the application contains a reference to the untrusted service in its audience ("audience": [ "<untrusted service>" ]) which declares that the client uses this access token to invoke the untrusted service.
- The untrusted service invokes a trusted service with the token. Invocation is not successful because the trusted service checks the audience on the token and find that its audience is only for the untrusted service. This behavior is expected and security is not broken.
If the client wants to invoke the trusted service later, it must obtain another token by reissuing the SSO login with scope=<trusted service>. The returned token will then contain the trusted service as an audience:
"audience": [ "<trusted service>" ]Use this value to invoke the <trusted service>.
12.1.8.1. Setup
When setting up audience checking:
- Ensure that services are configured to check audience on the access token sent to them by adding the flag verify-token-audience in the adapter configuration. See Adapter configuration for details.
- Ensure that access tokens issued by Red Hat build of Keycloak contain all necessary audiences. Audiences can be added using the client roles as described in the next section or hardcoded. See Hardcoded audience.
12.1.8.2. Automatically add audience
An Audience Resolve protocol mapper is defined in the default client scope roles. The mapper checks for clients that have at least one client role available for the current token. The client ID of each client is then added as an audience, which is useful if your service clients rely on client roles. Service client could be usually a client without any flows enabled, which may not have any tokens issued directly to itself. It represents an OAuth 2 Resource Server.
For example, for a service client and a confidential client, you can use the access token issued for the confidential client to invoke the service client REST service. The service client will be automatically added as an audience to the access token issued for the confidential client if the following are true:
- The service client has any client roles defined on itself.
- Target user has at least one of those client roles assigned.
- Confidential client has the role scope mappings for the assigned role.
If you want to ensure that the audience is not added automatically, do not configure role scope mappings directly on the confidential client. Instead, you can create a dedicated client scope that contains the role scope mappings for the client roles of your dedicated client scope.
Assuming that the client scope is added as an optional client scope to the confidential client, the client roles and the audience will be added to the token if explicitly requested by the scope=<trusted service> parameter.
The frontend client itself is not automatically added to the access token audience, therefore allowing easy differentiation between the access token and the ID token, since the access token will not contain the client for which the token is issued as an audience.
If you need the client itself as an audience, see the hardcoded audience option. However, using the same client as both frontend and REST service is not recommended.
12.1.8.3. Hardcoded audience
When your service relies on realm roles or does not rely on the roles in the token at all, it can be useful to use a hardcoded audience. A hardcoded audience is a protocol mapper, that will add the client ID of the specified service client as an audience to the token. You can use any custom value, for example a URL, if you want to use a different audience than the client ID.
You can add the protocol mapper directly to the frontend client. If the protocol mapper is added directly, the audience will always be added as well.
For more control over the protocol mapper, you can create the protocol mapper on the dedicated client scope, which will be called for example good-service.
Audience protocol mapper
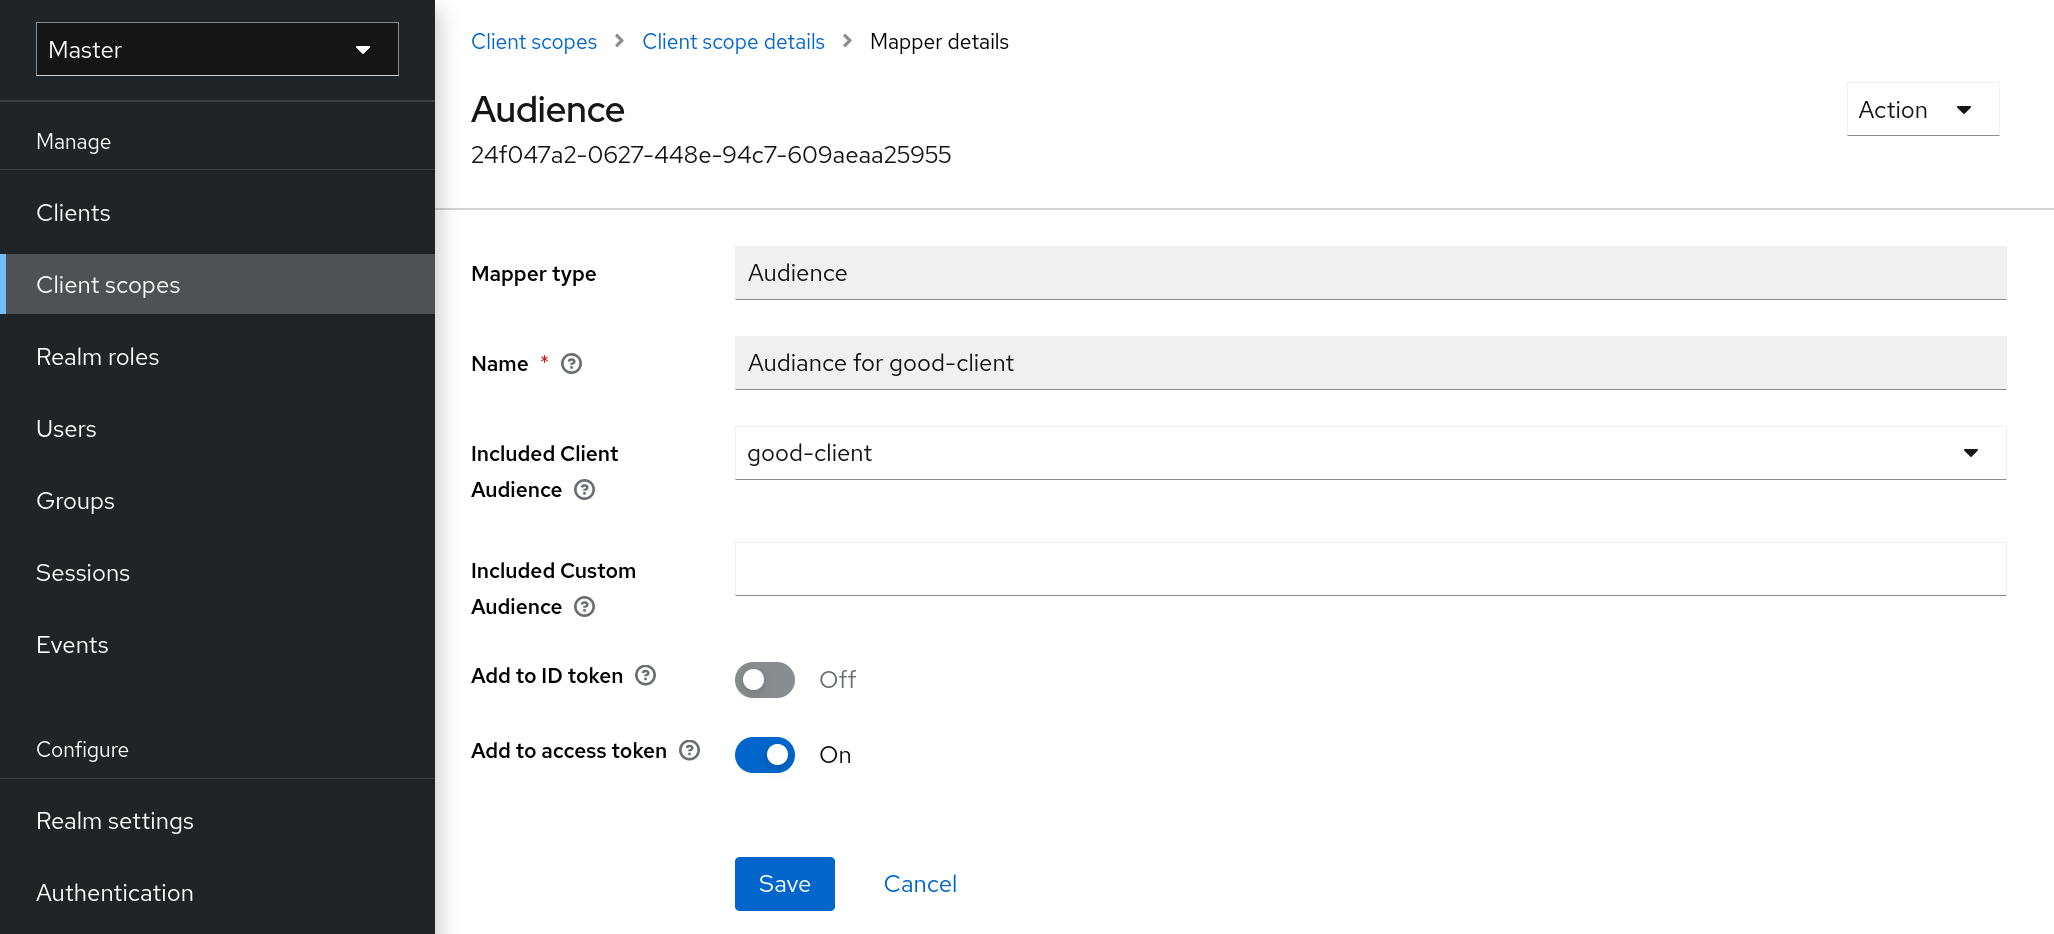
- From the Client details tab of the good-service client, you can generate the adapter configuration and confirm that verify-token-audience is set to true. This action forces the adapter to verify the audience if you use this configuration.
You need to ensure that the confidential client is able to request good-service as an audience in its tokens.
On the confidential client:
- Click the Client Scopes tab.
Assign good-service as an optional (or default) client scope.
See Client Scopes Linking section for more details.
- You can optionally Evaluate Client Scopes and generate an example access token. good-service will be added to the audience of the generated access token if good-service is included in the scope parameter, when you assigned it as an optional client scope.
In your confidential client application, ensure that the scope parameter is used. The value good-service must be included when you want to issue the token for accessing good-service.
See:
- parameters forwarding section if your application uses the servlet adapter.
- javascript adapter section if your application uses the javascript adapter.
Both the Audience and Audience Resolve protocol mappers add the audiences to the access token only, by default. The ID Token typically contains only a single audience, the client ID for which the token was issued, a requirement of the OpenID Connect specification. However, the access token does not necessarily have the client ID, which was the token issued for, unless the audience mappers added it.
12.2. Creating a SAML client
Red Hat build of Keycloak supports SAML 2.0 for registered applications. POST and Redirect bindings are supported. You can choose to require client signature validation. You can have the server sign and/or encrypt responses as well.
Procedure
- Click Clients in the menu.
- Click Create client to go to the Create client page.
Set Client type to SAML.
Create client
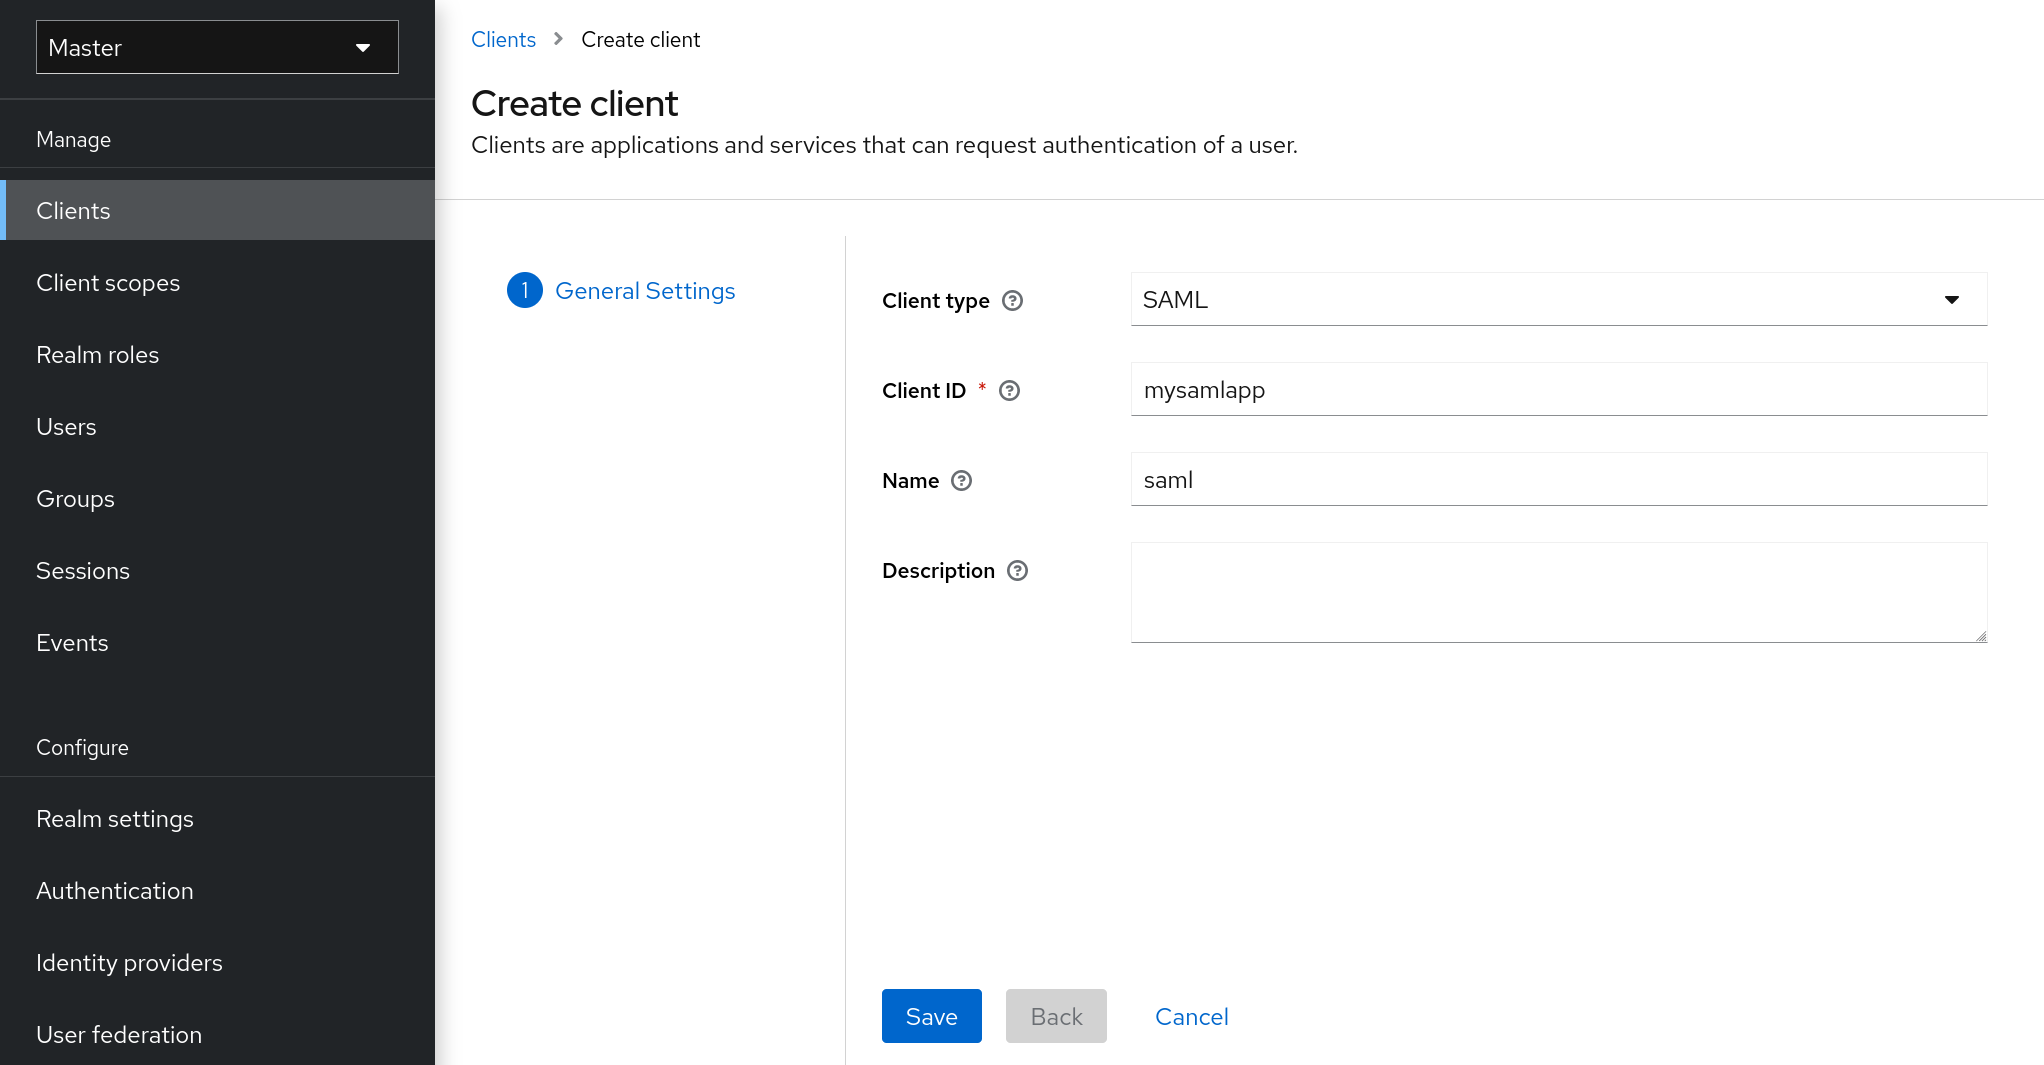
- Enter the Client ID of the client. This is often a URL and is the expected issuer value in SAML requests sent by the application.
- Click Save. This action creates the client and brings you to the Settings tab.
The following sections describe each setting on this tab.
12.2.1. Settings tab
The Settings tab includes many options to configure this client.
Client settings
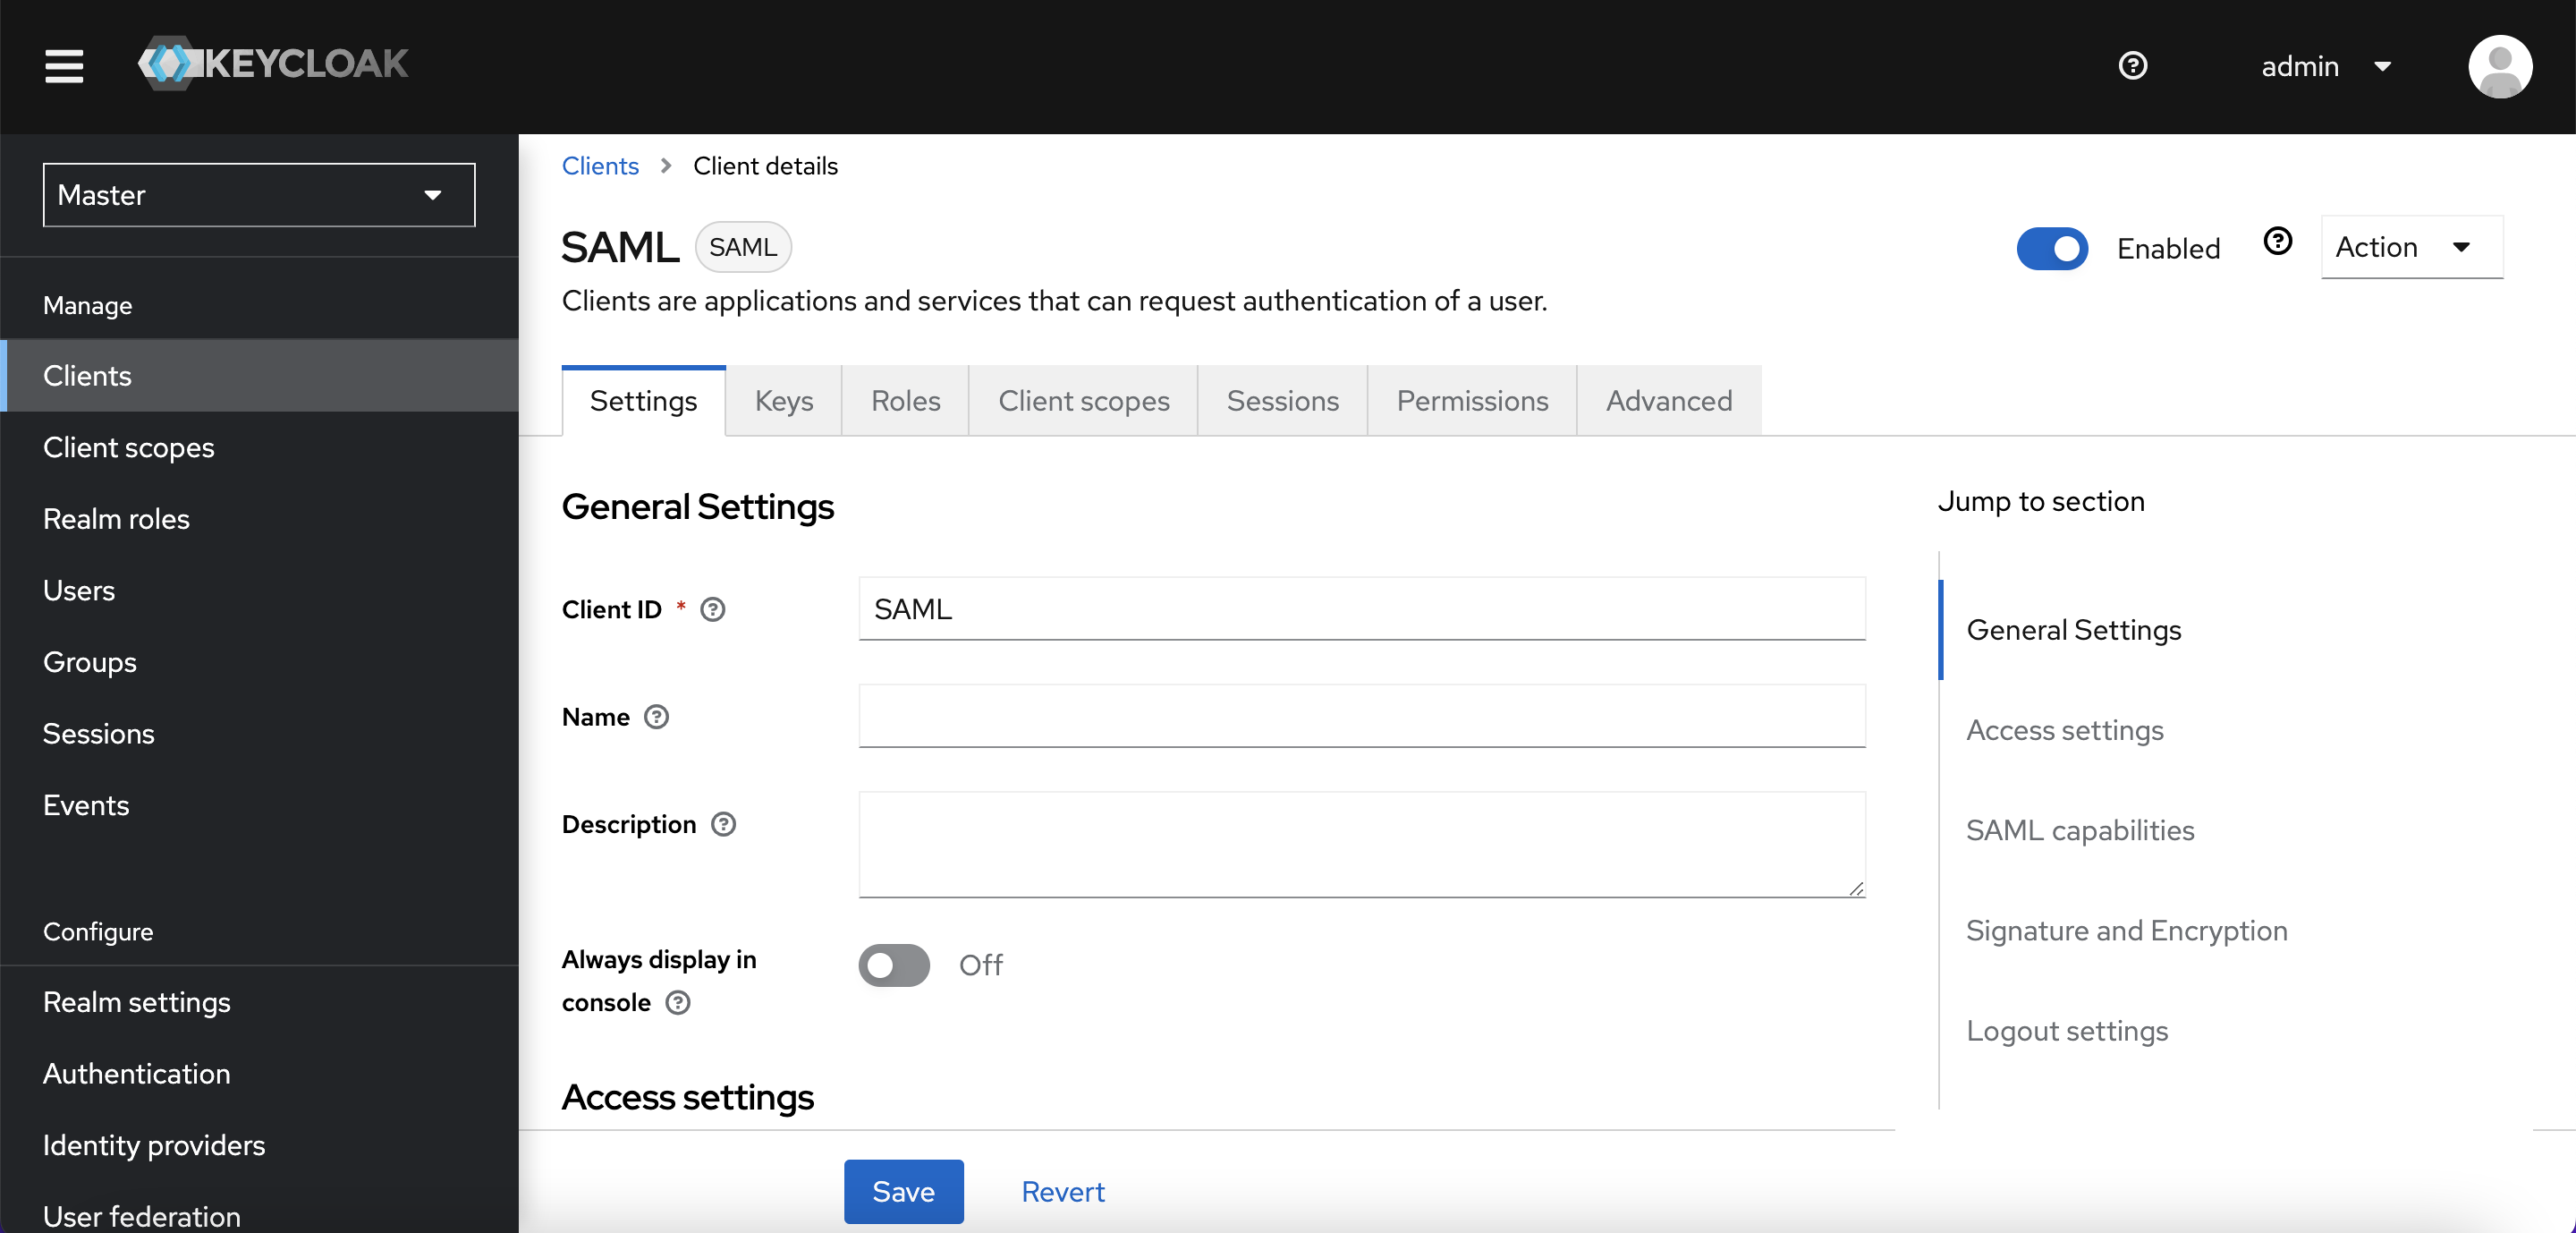
12.2.1.1. General settings
- Client ID
- The alphanumeric ID string that is used in OIDC requests and in the Red Hat build of Keycloak database to identify the client. This value must match the issuer value sent with AuthNRequests. Red Hat build of Keycloak pulls the issuer from the Authn SAML request and match it to a client by this value.
- Name
- The name for the client in a Red Hat build of Keycloak UI screen. To localize the name, set up a replacement string value. For example, a string value such as ${myapp}. See the Server Developer Guide for more information.
- Description
- The description of the client. This setting can also be localized.
- Always Display in Console
- Always list this client in the Account Console even if this user does not have an active session.
12.2.1.2. Access Settings
- Root URL
- When Red Hat build of Keycloak uses a configured relative URL, this value is prepended to the URL.
- Home URL
- If Red Hat build of Keycloak needs to link to a client, this URL is used.
- Valid Redirect URIs
- Enter a URL pattern and click the + sign to add. Click the - sign to remove. Click Save to save these changes. Wildcards values are allowed only at the end of a URL. For example, http://host.com/*$$. This field is used when the exact SAML endpoints are not registered and Red Hat build of Keycloak pulls the Assertion Consumer URL from a request.
- IDP-Initiated SSO URL name
- URL fragment name to reference client when you want to do IDP Initiated SSO. Leaving this empty will disable IDP Initiated SSO. The URL you will reference from your browser will be: server-root/realms/{realm}/protocol/saml/clients/{client-url-name}
- IDP Initiated SSO Relay State
- Relay state you want to send with SAML request when you want to do IDP Initiated SSO.
- Master SAML Processing URL
This URL is used for all SAML requests and the response is directed to the SP. It is used as the Assertion Consumer Service URL and the Single Logout Service URL.
If login requests contain the Assertion Consumer Service URL then those login requests will take precedence. This URL must be validated by a registered Valid Redirect URI pattern.
12.2.1.3. SAML capabilities
- Name ID Format
- The Name ID Format for the subject. This format is used if no name ID policy is specified in a request, or if the Force Name ID Format attribute is set to ON.
- Force Name ID Format
- If a request has a name ID policy, ignore it and use the value configured in the Admin Console under Name ID Format.
- Force POST Binding
- By default, Red Hat build of Keycloak responds using the initial SAML binding of the original request. By enabling Force POST Binding, Red Hat build of Keycloak responds using the SAML POST binding even if the original request used the redirect binding.
- Force artifact binding
- If enabled, response messages are returned to the client through the SAML ARTIFACT binding system.
- Include AuthnStatement
- SAML login responses may specify the authentication method used, such as password, as well as timestamps of the login and the session expiration. Include AuthnStatement is enabled by default, so that the AuthnStatement element will be included in login responses. Setting this to OFF prevents clients from determining the maximum session length, which can create client sessions that do not expire.
- Include OneTimeUse Condition
- If enable, a OneTimeUse Condition is included in login responses.
- Optimize REDIRECT signing key lookup
When set to ON, the SAML protocol messages include the Red Hat build of Keycloak native extension. This extension contains a hint with the signing key ID. The SP uses the extension for signature validation instead of attempting to validate the signature using keys.
This option applies to REDIRECT bindings where the signature is transferred in query parameters and this information is not found in the signature information. This is contrary to POST binding messages where key ID is always included in document signature.
This option is used when Red Hat build of Keycloak server and adapter provide the IDP and SP. This option is only relevant when Sign Documents is set to ON.
12.2.1.4. Signature and Encryption
- Sign Documents
- When set to ON, Red Hat build of Keycloak signs the document using the realms private key.
- Sign Assertions
- The assertion is signed and embedded in the SAML XML Auth response.
- Signature Algorithm
-
The algorithm used in signing SAML documents. Note that
SHA1based algorithms are deprecated and may be removed in a future release. We recommend the use of some more secure algorithm instead of*_SHA1. Also, with*_SHA1algorithms, verifying signatures do not work if the SAML client runs on Java 17 or higher. - SAML Signature Key Name
Signed SAML documents sent using POST binding contain the identification of the signing key in the KeyName element. This action can be controlled by the SAML Signature Key Name option. This option controls the contents of the Keyname.
- KEY_ID The KeyName contains the key ID. This option is the default option.
- CERT_SUBJECT The KeyName contains the subject from the certificate corresponding to the realm key. This option is expected by Microsoft Active Directory Federation Services.
- NONE The KeyName hint is completely omitted from the SAML message.
- Canonicalization Method
- The canonicalization method for XML signatures.
12.2.1.5. Login settings
- Login theme
- A theme to use for login, OTP, grant registration, and forgotten password pages.
- Consent required
If enabled, users have to consent to client access.
For client-side clients that perform browser logins. As it is not possible to ensure that secrets can be kept safe with client-side clients, it is important to restrict access by configuring correct redirect URIs.
- Display client on screen
This switch applies if Consent Required is Off.
Off
The consent screen will contain only the consents corresponding to configured client scopes.
On
There will be also one item on the consent screen about this client itself.
- Client consent screen text
- Applies if Consent required and Display client on screen are enabled. Contains the text that will be on the consent screen about permissions for this client.
12.2.1.6. Logout settings
- Front channel logout
- If Front Channel Logout is enabled, the application requires a browser redirect to perform a logout. For example, the application may require a cookie to be reset which could only be done via a redirect. If Front Channel Logout is disabled, Red Hat build of Keycloak invokes a background SAML request to log out of the application.
12.2.2. Keys tab
- Encrypt Assertions
- Encrypts the assertions in SAML documents with the realms private key. The AES algorithm uses a key size of 128 bits.
- Client Signature Required
-
If Client Signature Required is enabled, documents coming from a client are expected to be signed. Red Hat build of Keycloak will validate this signature using the client public key or cert set up in the
Keystab. - Allow ECP Flow
- If true, this application is allowed to use SAML ECP profile for authentication.
12.2.3. Advanced tab
This tab has many fields for specific situations. Some fields are covered in other topics. For details on other fields, click the question mark icon.
12.2.3.1. Fine Grain SAML Endpoint Configuration
- Logo URL
- URL that references a logo for the Client application.
- Policy URL
- URL that the Relying Party Client provides to the End-User to read about how the profile data will be used.
- Terms of Service URL
- URL that the Relying Party Client provides to the End-User to read about the Relying Party’s terms of service.
- Assertion Consumer Service POST Binding URL
- POST Binding URL for the Assertion Consumer Service.
- Assertion Consumer Service Redirect Binding URL
- Redirect Binding URL for the Assertion Consumer Service.
- Logout Service POST Binding URL
- POST Binding URL for the Logout Service.
- Logout Service Redirect Binding URL
- Redirect Binding URL for the Logout Service.
- Logout Service Artifact Binding URL
-
Artifact Binding URL for the Logout Service. When set together with the
Force Artifact Bindingoption, Artifact binding is forced for both login and logout flows. Artifact binding is not used for logout unless this property is set. - Logout Service SOAP Binding URL
- Redirect Binding URL for the Logout Service. Only applicable if back channel logout is used.
- Artifact Binding URL
- URL to send the HTTP artifact messages to.
- Artifact Resolution Service
-
URL of the client SOAP endpoint where to send the
ArtifactResolvemessages to.
12.2.4. IDP Initiated login
IDP Initiated Login is a feature that allows you to set up an endpoint on the Red Hat build of Keycloak server that will log you into a specific application/client. In the Settings tab for your client, you need to specify the IDP Initiated SSO URL Name. This is a simple string with no whitespace in it. After this you can reference your client at the following URL: root/realms/{realm}/protocol/saml/clients/{url-name}
The IDP initiated login implementation prefers POST over REDIRECT binding (check saml bindings for more information). Therefore the final binding and SP URL are selected in the following way:
- If the specific Assertion Consumer Service POST Binding URL is defined (inside Fine Grain SAML Endpoint Configuration section of the client settings) POST binding is used through that URL.
- If the general Master SAML Processing URL is specified then POST binding is used again throughout this general URL.
- As the last resort, if the Assertion Consumer Service Redirect Binding URL is configured (inside Fine Grain SAML Endpoint Configuration) REDIRECT binding is used with this URL.
If your client requires a special relay state, you can also configure this on the Settings tab in the IDP Initiated SSO Relay State field. Alternatively, browsers can specify the relay state in a RelayState query parameter, i.e. root/realms/{realm}/protocol/saml/clients/{url-name}?RelayState=thestate.
When using identity brokering, it is possible to set up an IDP Initiated Login for a client from an external IDP. The actual client is set up for IDP Initiated Login at broker IDP as described above. The external IDP has to set up the client for application IDP Initiated Login that will point to a special URL pointing to the broker and representing IDP Initiated Login endpoint for a selected client at the brokering IDP. This means that in client settings at the external IDP:
- IDP Initiated SSO URL Name is set to a name that will be published as IDP Initiated Login initial point,
Assertion Consumer Service POST Binding URL in the Fine Grain SAML Endpoint Configuration section has to be set to the following URL:
broker-root/realms/{broker-realm}/broker/{idp-name}/endpoint/clients/{client-id}, where:- broker-root is base broker URL
- broker-realm is name of the realm at broker where external IDP is declared
- idp-name is name of the external IDP at broker
- client-id is the value of IDP Initiated SSO URL Name attribute of the SAML client defined at broker. It is this client, which will be made available for IDP Initiated Login from the external IDP.
Please note that you can import basic client settings from the brokering IDP into client settings of the external IDP - just use SP Descriptor available from the settings of the identity provider in the brokering IDP, and add clients/client-id to the endpoint URL.
12.2.5. Using an entity descriptor to create a client
Instead of registering a SAML 2.0 client manually, you can import the client using a standard SAML Entity Descriptor XML file.
The Client page includes an Import client option.
Add client
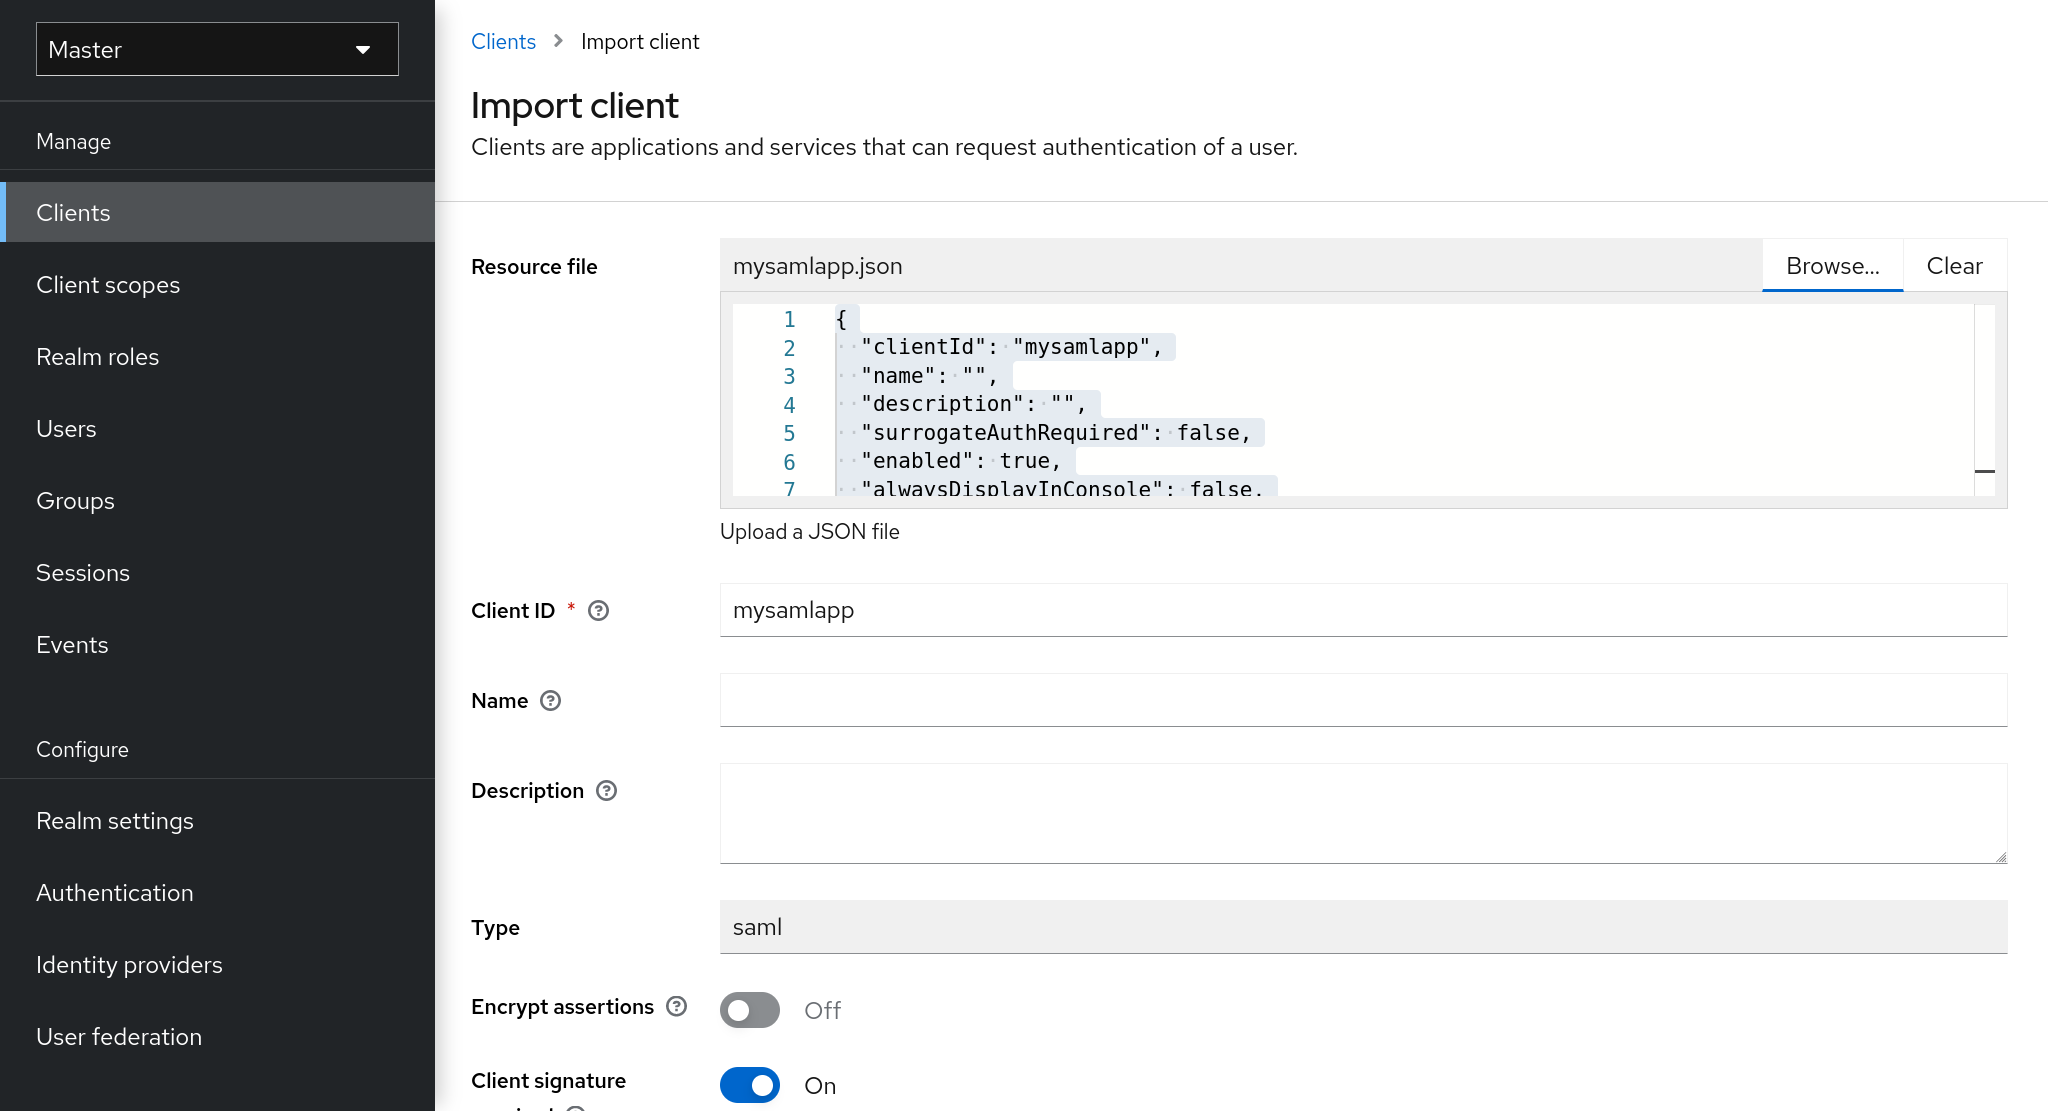
Procedure
- Click Browse.
- Load the file that contains the XML entity descriptor information.
- Review the information to ensure everything is set up correctly.
Some SAML client adapters, such as mod-auth-mellon, need the XML Entity Descriptor for the IDP. You can find this descriptor by going to this URL:
root/realms/{realm}/protocol/saml/descriptorwhere realm is the realm of your client.
12.3. Client links
To link from one client to another, Red Hat build of Keycloak provides a redirect endpoint: /realms/realm_name/clients/{client-id}/redirect.
If a client accesses this endpoint using a HTTP GET request, Red Hat build of Keycloak returns the configured base URL for the provided Client and Realm in the form of an HTTP 307 (Temporary Redirect) in the response’s Location header. As a result of this, a client needs only to know the Realm name and the Client ID to link to them. This indirection avoids hard-coding client base URLs.
As an example, given the realm master and the client-id account:
http://host:port/realms/master/clients/account/redirectThis URL temporarily redirects to: http://host:port/realms/master/account
12.4. OIDC token and SAML assertion mappings
Applications receiving ID tokens, access tokens, or SAML assertions may require different roles and user metadata.
You can use Red Hat build of Keycloak to:
- Hardcode roles, claims and custom attributes.
- Pull user metadata into a token or assertion.
- Rename roles.
You perform these actions in the Mappers tab in the Admin Console.
Mappers tab
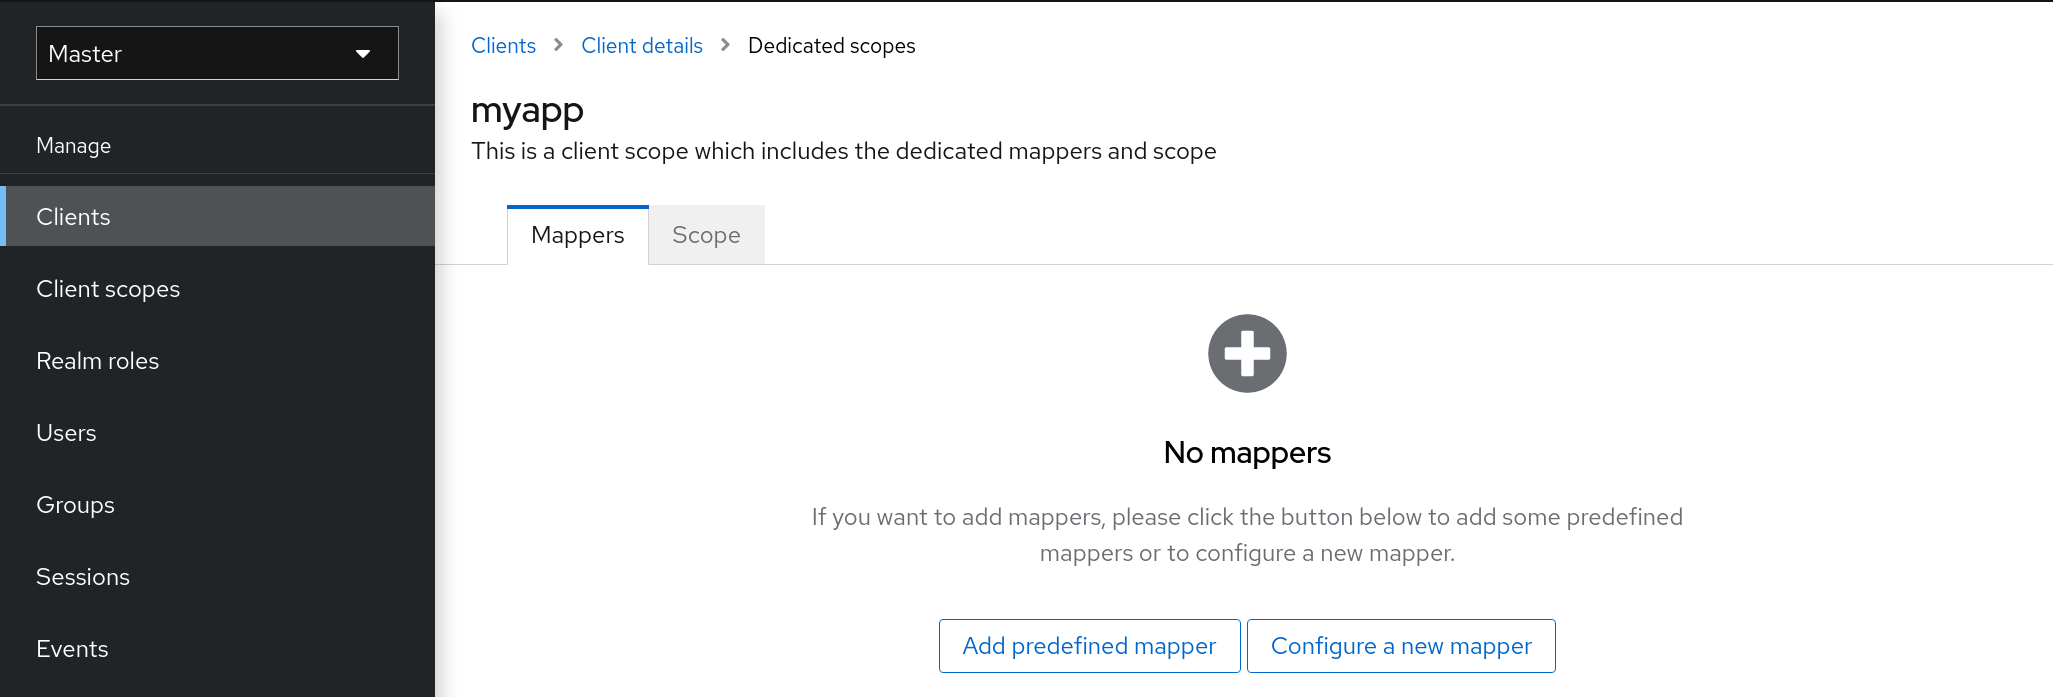
New clients do not have built-in mappers but they can inherit some mappers from client scopes. See the client scopes section for more details.
Protocol mappers map items (such as an email address, for example) to a specific claim in the identity and access token. The function of a mapper should be self-explanatory from its name. You add pre-configured mappers by clicking Add Builtin.
Each mapper has a set of common settings. Additional settings are available, depending on the mapper type. Click Edit next to a mapper to access the configuration screen to adjust these settings.
Mapper config
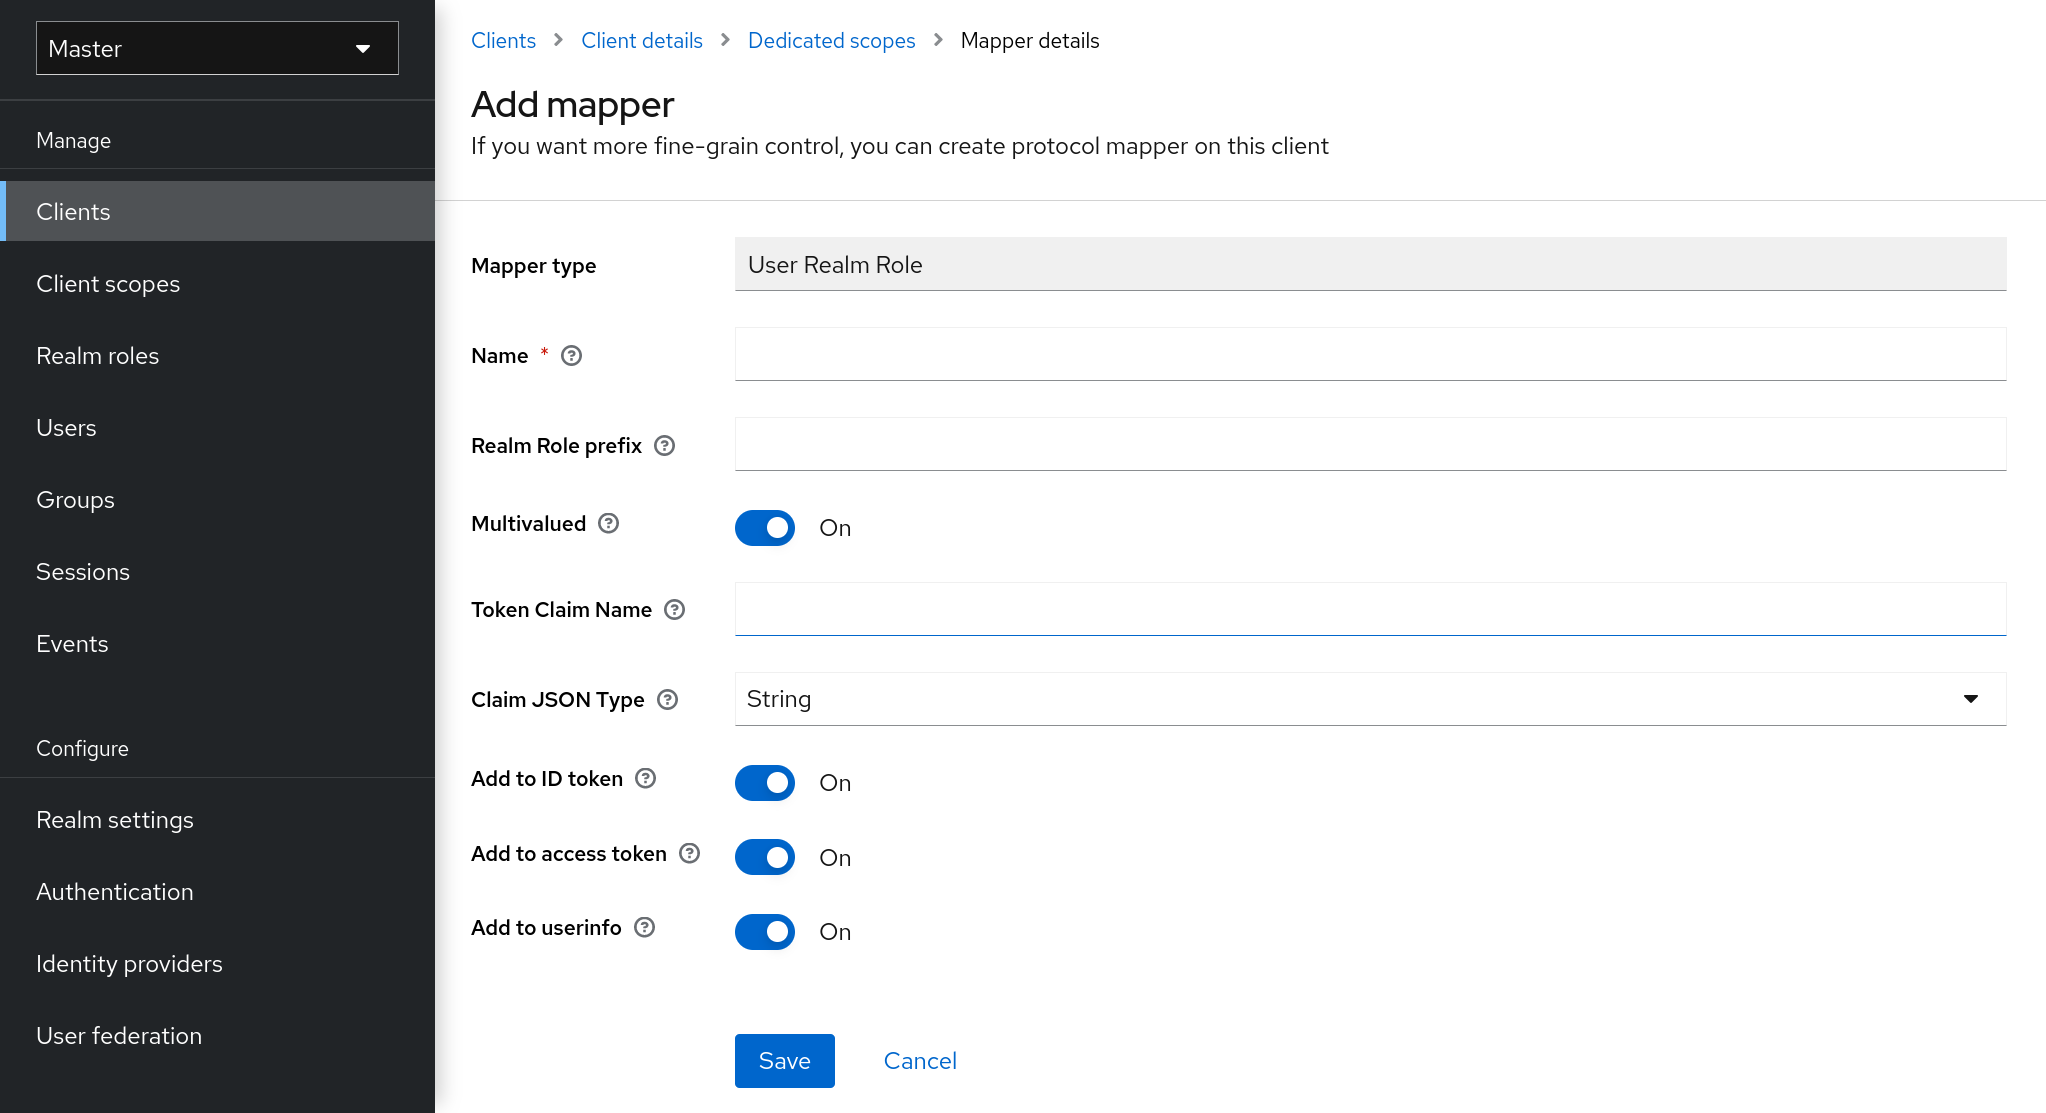
Details on each option can be viewed by hovering over its tooltip.
You can use most OIDC mappers to control where the claim gets placed. You opt to include or exclude the claim from the id and access tokens by adjusting the Add to ID token and Add to access token switches.
You can add mapper types as follows:
Procedure
- Go to the Mappers tab.
Click Configure a new mapper.
Add mapper
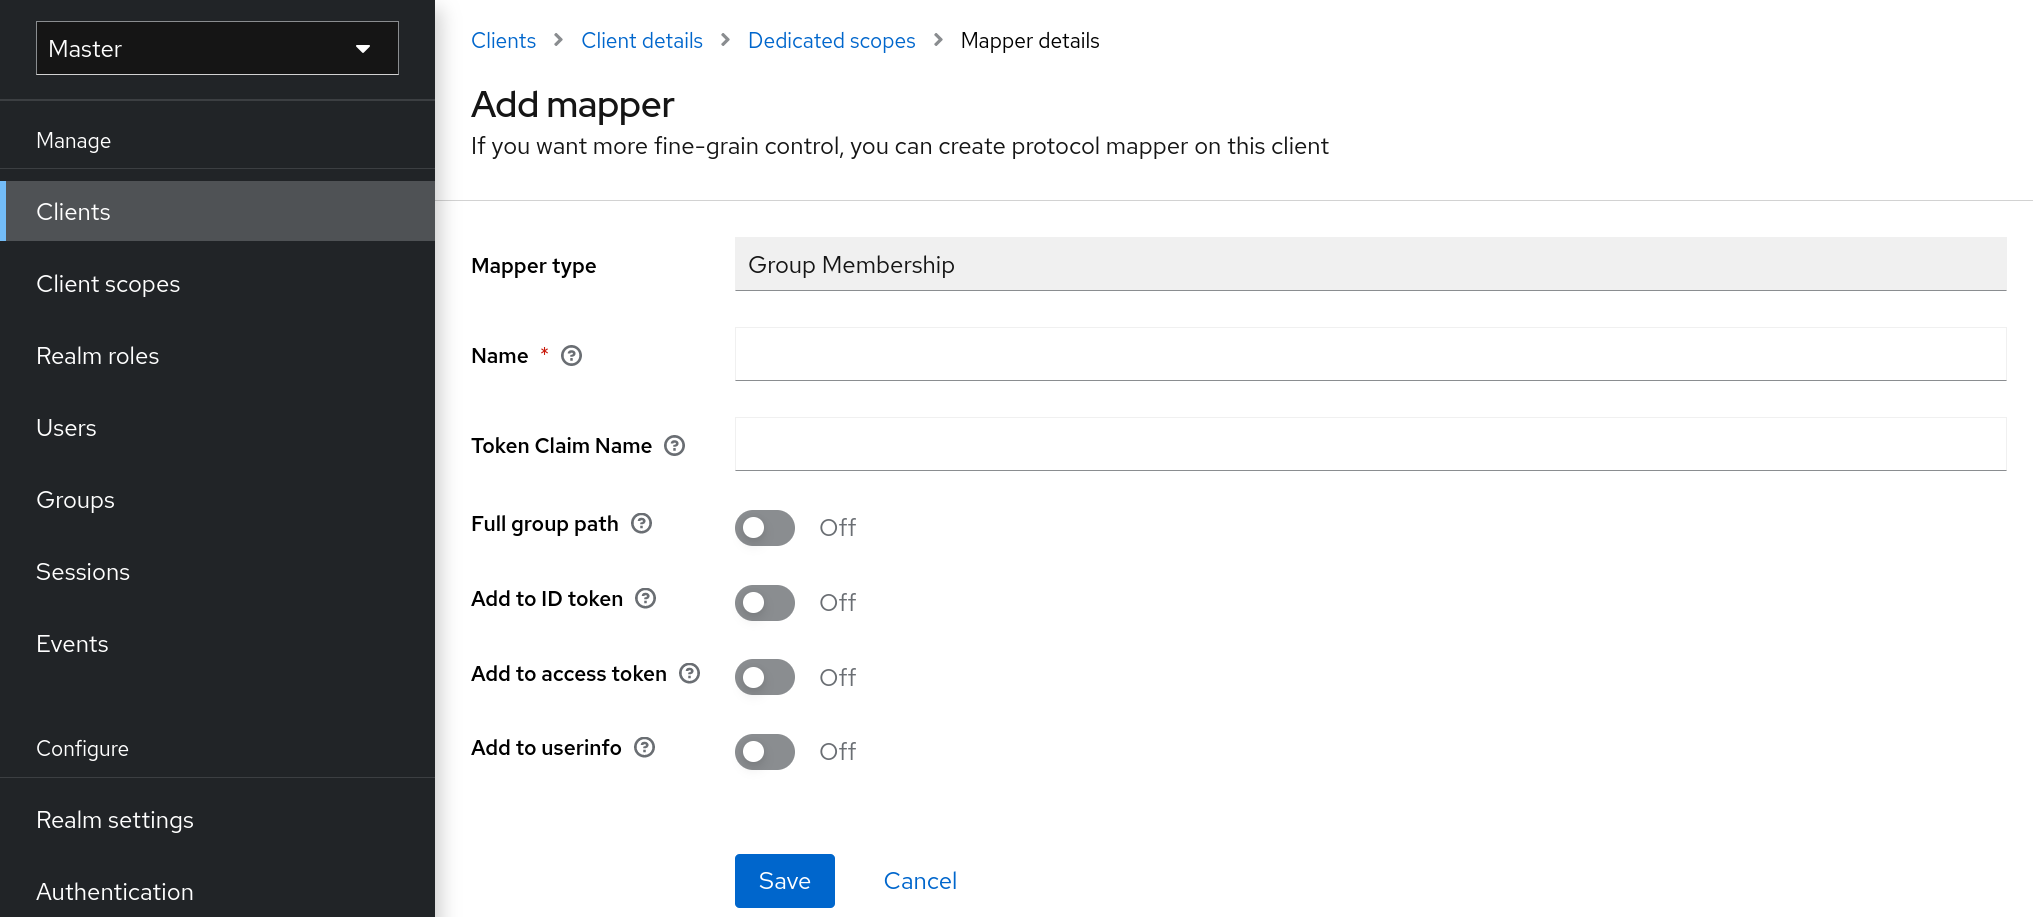
- Select a Mapper Type from the list box.
12.4.1. Priority order
Mapper implementations have priority order. Priority order is not the configuration property of the mapper. It is the property of the concrete implementation of the mapper.
Mappers are sorted by the order in the list of mappers. The changes in the token or assertion are applied in that order with the lowest applying first. Therefore, the implementations that are dependent on other implementations are processed in the necessary order.
For example, to compute the roles which will be included with a token:
- Resolve audiences based on those roles.
- Process a JavaScript script that uses the roles and audiences already available in the token.
12.4.2. OIDC user session note mappers
User session details are defined using mappers and are automatically included when you use or enable a feature on a client. Click Add builtin to include session details.
Impersonated user sessions provide the following details:
- IMPERSONATOR_ID: The ID of an impersonating user.
- IMPERSONATOR_USERNAME: The username of an impersonating user.
Service account sessions provide the following details:
- clientId: The client ID of the service account.
- client_id: The client ID of the service account.
- clientAddress: The remote host IP of the service account’s authenticated device.
- clientHost: The remote host name of the service account’s authenticated device.
12.4.3. Script mapper
Use the Script Mapper to map claims to tokens by running user-defined JavaScript code. For more details about deploying scripts to the server, see JavaScript Providers.
When scripts deploy, you should be able to select the deployed scripts from the list of available mappers.
12.5. Generating client adapter config
Red Hat build of Keycloak can generate configuration files that you can use to install a client adapter in your application’s deployment environment. A number of adapter types are supported for OIDC and SAML.
Click on the Action menu and select the Download adapter config option
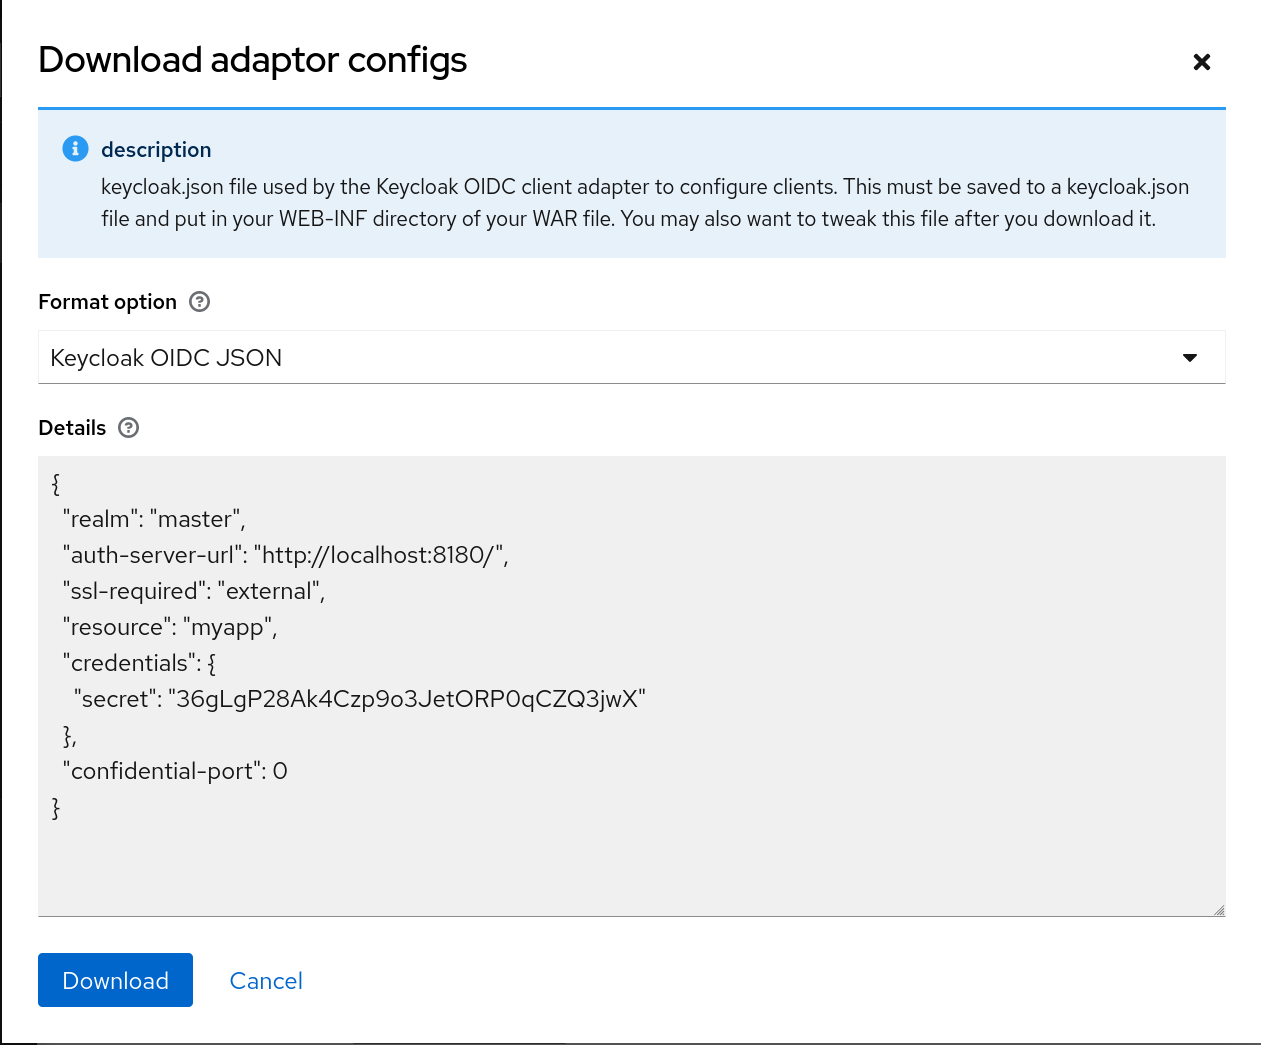
- Select the Format Option you want configuration generated for.
All Red Hat build of Keycloak client adapters for OIDC and SAML are supported. The mod-auth-mellon Apache HTTPD adapter for SAML is supported as well as standard SAML entity descriptor files.
12.6. Client scopes
Use Red Hat build of Keycloak to define a shared client configuration in an entity called a client scope. A client scope configures protocol mappers and role scope mappings for multiple clients.
Client scopes also support the OAuth 2 scope parameter. Client applications use this parameter to request claims or roles in the access token, depending on the requirement of the application.
To create a client scope, follow these steps:
Click Client Scopes in the menu.
Client scopes list
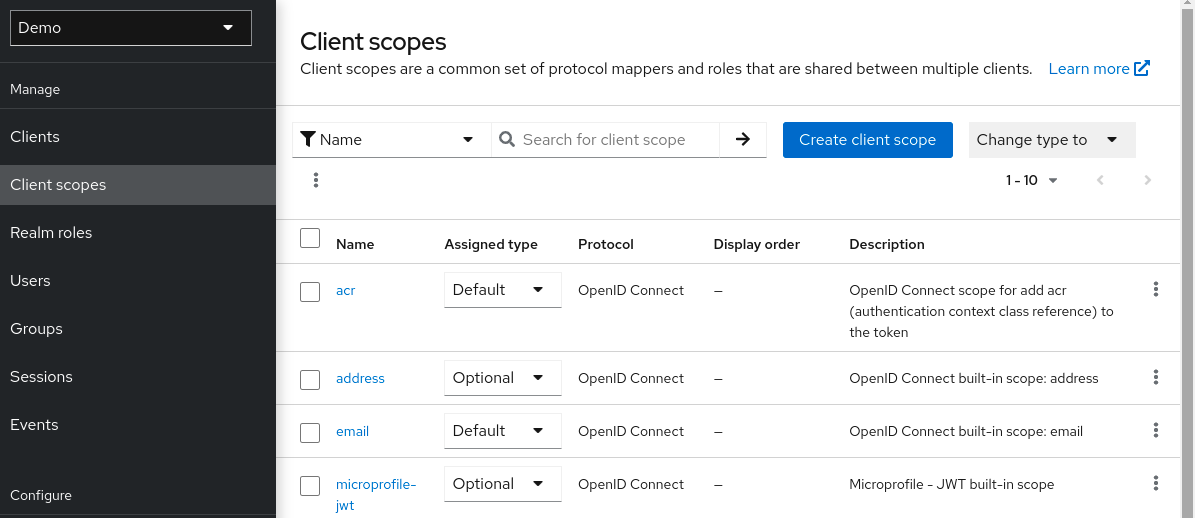
- Click Create.
- Name your client scope.
- Click Save.
A client scope has similar tabs to regular clients. You can define protocol mappers and role scope mappings. These mappings can be inherited by other clients and are configured to inherit from this client scope.
12.6.1. Protocol
When you create a client scope, choose the Protocol. Clients linked in the same scope must have the same protocol.
Each realm has a set of pre-defined built-in client scopes in the menu.
- SAML protocol: The role_list. This scope contains one protocol mapper for the roles list in the SAML assertion.
OpenID Connect protocol: Several client scopes are available:
roles
This scope is not defined in the OpenID Connect specification and is not added automatically to the scope claim in the access token. This scope has mappers, which are used to add the roles of the user to the access token and add audiences for clients that have at least one client role. These mappers are described in more detail in the Audience section.
web-origins
This scope is also not defined in the OpenID Connect specification and not added to the scope claiming the access token. This scope is used to add allowed web origins to the access token allowed-origins claim.
microprofile-jwt
This scope handles claims defined in the MicroProfile/JWT Auth Specification. This scope defines a user property mapper for the upn claim and a realm role mapper for the groups claim. These mappers can be changed so different properties can be used to create the MicroProfile/JWT specific claims.
offline_access
This scope is used in cases when clients need to obtain offline tokens. More details on offline tokens is available in the Offline Access section and in the OpenID Connect specification.
- profile
- address
- phone
The client scopes profile, email, address and phone are defined in the OpenID Connect specification. These scopes do not have any role scope mappings defined but they do have protocol mappers defined. These mappers correspond to the claims defined in the OpenID Connect specification.
For example, when you open the phone client scope and open the Mappers tab, you will see the protocol mappers which correspond to the claims defined in the specification for the scope phone.
Client scope mappers
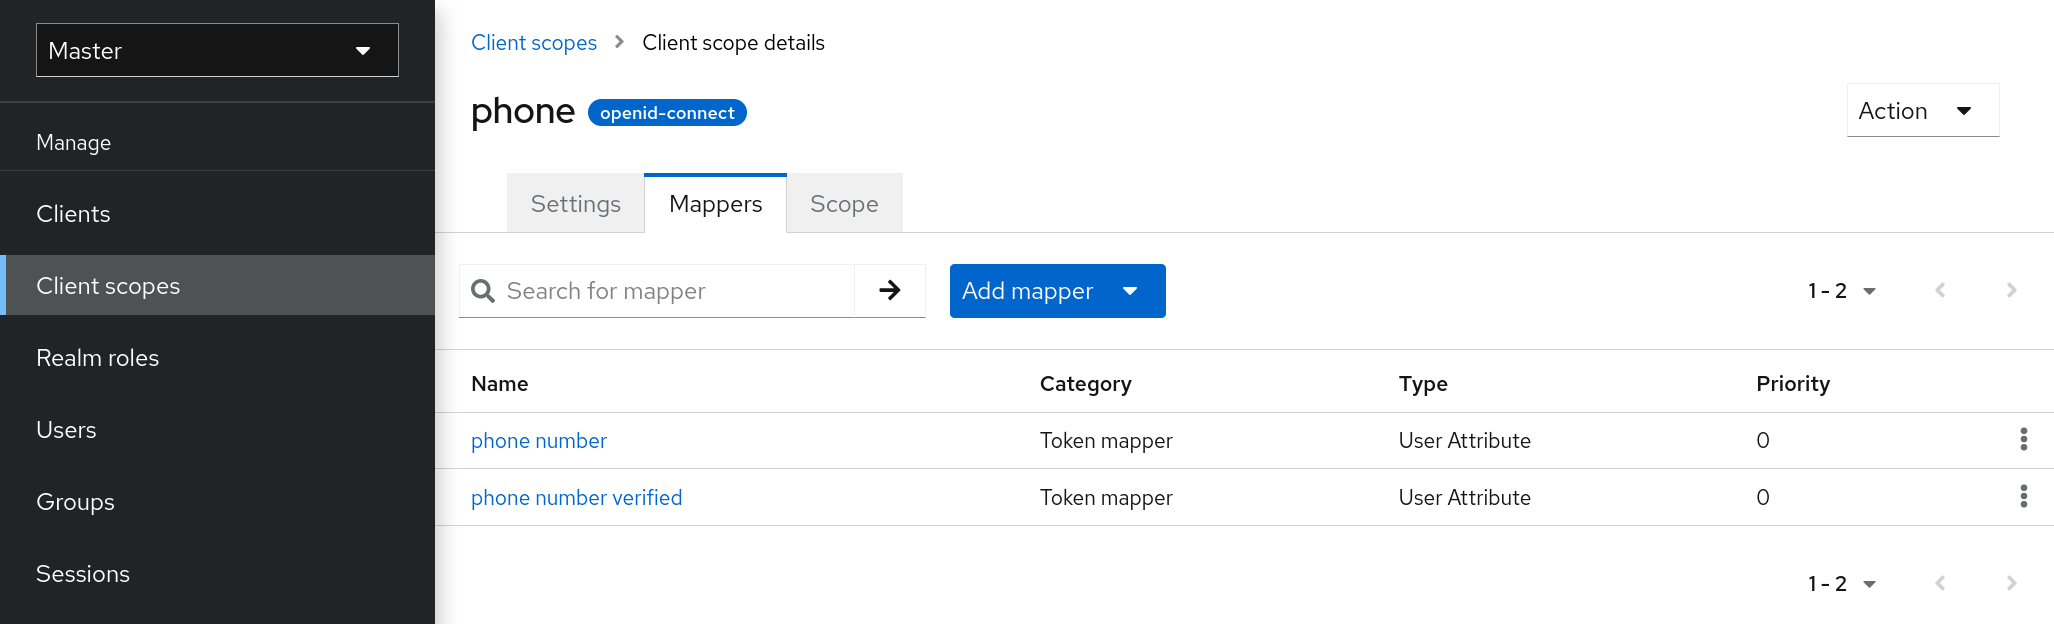
When the phone client scope is linked to a client, the client automatically inherits all the protocol mappers defined in the phone client scope. Access tokens issued for this client contain the phone number information about the user, assuming that the user has a defined phone number.
Built-in client scopes contain the protocol mappers as defined in the specification. You are free to edit client scopes and create, update, or remove any protocol mappers or role scope mappings.
12.6.3. Link client scope with the client
Linking between a client scope and a client is configured in the Client Scopes tab of the client. Two ways of linking between client scope and client are available.
- Default Client Scopes
- This setting is applicable to the OpenID Connect and SAML clients. Default client scopes are applied when issuing OpenID Connect tokens or SAML assertions for a client. The client will inherit Protocol Mappers and Role Scope Mappings that are defined on the client scope. For the OpenID Connect Protocol, the Mappers and Role Scope Mappings are always applied, regardless of the value used for the scope parameter in the OpenID Connect authorization request.
- Optional Client Scopes
- This setting is applicable only for OpenID Connect clients. Optional client scopes are applied when issuing tokens for this client but only when requested by the scope parameter in the OpenID Connect authorization request.
12.6.3.1. Example
For this example, assume the client has profile and email linked as default client scopes, and phone and address linked as optional client scopes. The client uses the value of the scope parameter when sending a request to the OpenID Connect authorization endpoint.
scope=openid phoneThe scope parameter contains the string, with the scope values divided by spaces. The value openid is the meta-value used for all OpenID Connect requests. The token will contain mappers and role scope mappings from the default client scopes profile and email as well as phone, an optional client scope requested by the scope parameter.
12.6.4. Evaluating Client Scopes
The Mappers tab contains the protocol mappers and the Scope tab contains the role scope mappings declared for this client. They do not contain the mappers and scope mappings inherited from client scopes. It is possible to see the effective protocol mappers (that is the protocol mappers defined on the client itself as well as inherited from the linked client scopes) and the effective role scope mappings used when generating a token for a client.
Procedure
- Click the Client Scopes tab for the client.
- Open the sub-tab Evaluate.
- Select the optional client scopes that you want to apply.
This will also show you the value of the scope parameter. This parameter needs to be sent from the application to the Red Hat build of Keycloak OpenID Connect authorization endpoint.
Evaluating client scopes
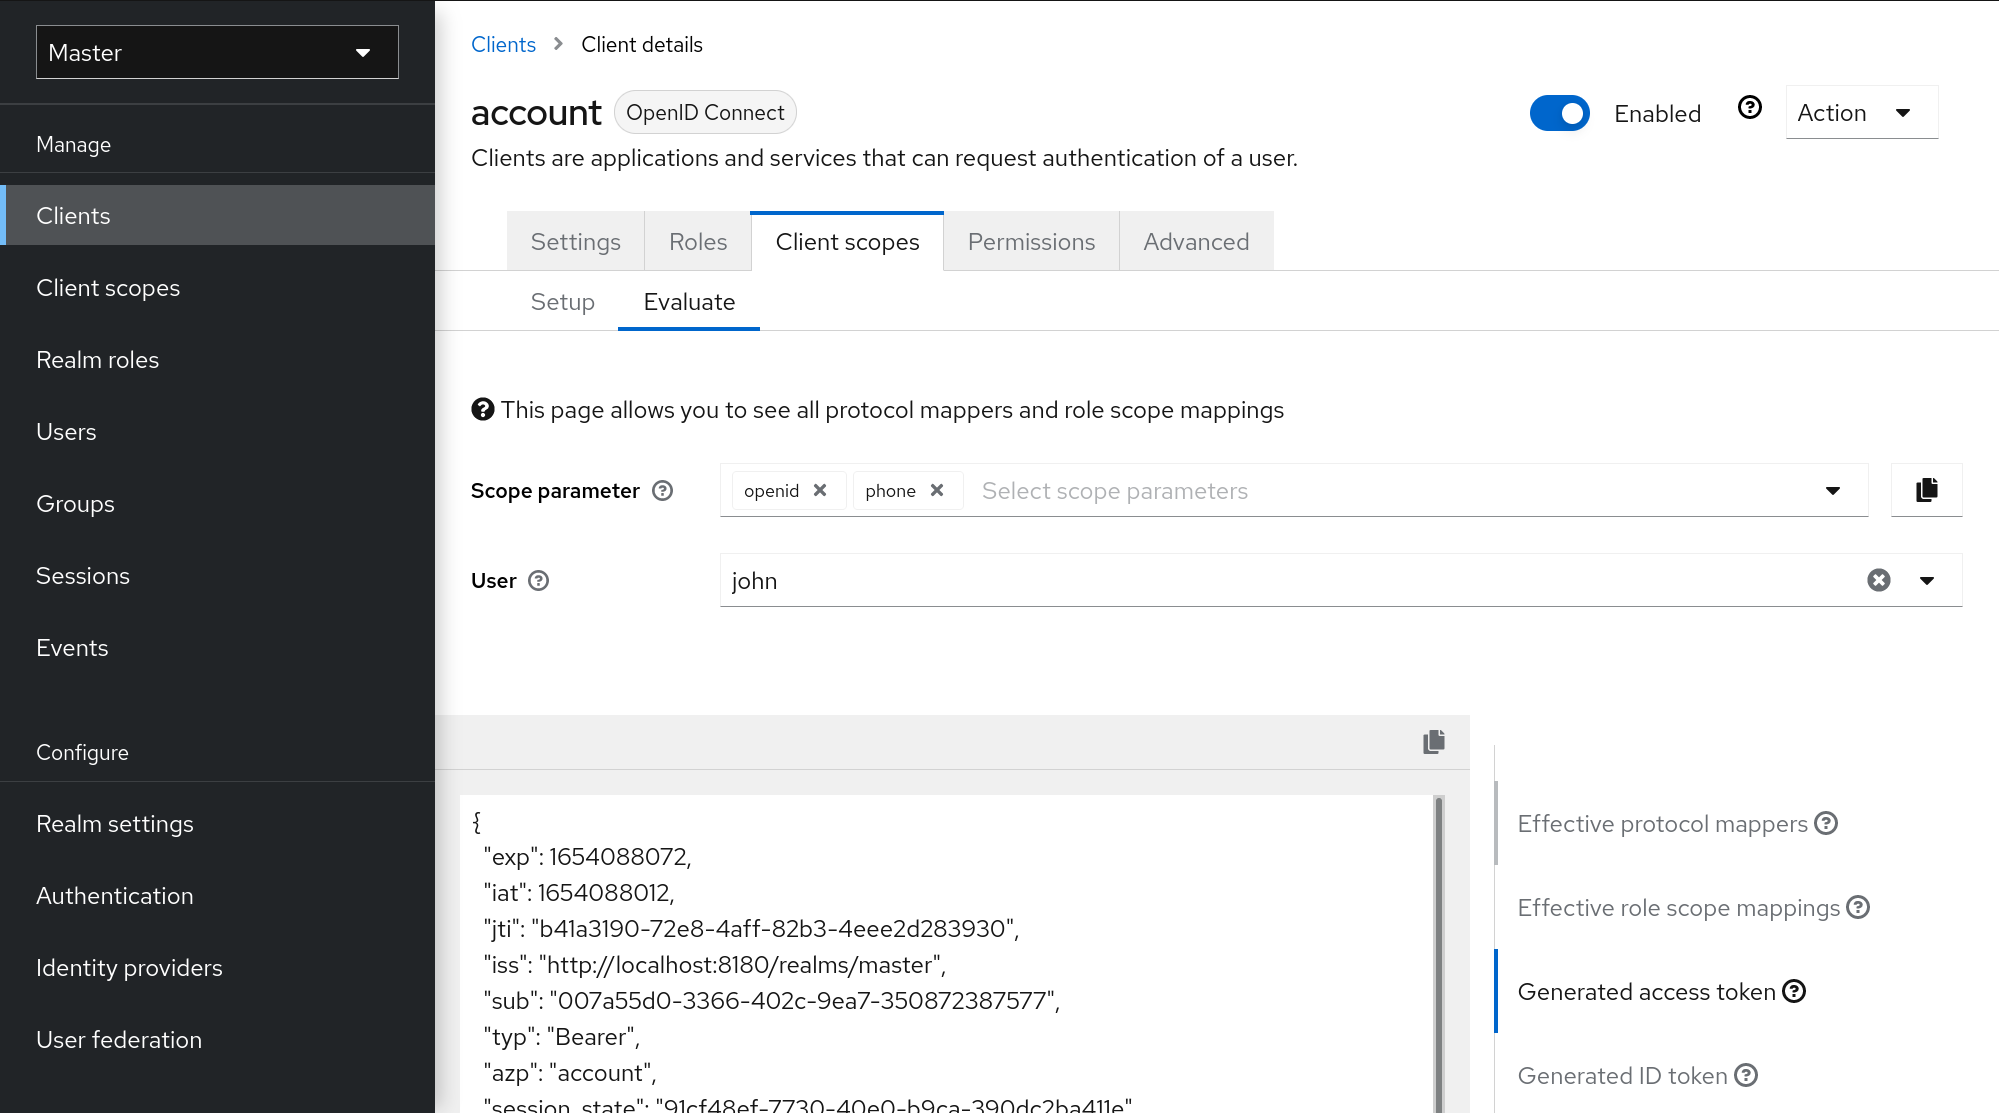
To send a custom value for a scope parameter from your application, see the parameters forwarding section, for servlet adapters or the javascript adapter section, for javascript adapters.
All examples are generated for the particular user and issued for the particular client, with the specified value of the scope parameter. The examples include all of the claims and role mappings used.
12.6.5. Client scopes permissions
When issuing tokens to a user, the client scope applies only if the user is permitted to use it.
When a client scope does not have any role scope mappings defined, each user is permitted to use this client scope. However, when a client scope has role scope mappings defined, the user must be a member of at least one of the roles. There must be an intersection between the user roles and the roles of the client scope. Composite roles are factored into evaluating this intersection.
If a user is not permitted to use the client scope, no protocol mappers or role scope mappings will be used when generating tokens. The client scope will not appear in the scope value in the token.
12.6.6. Realm default client scopes
Use Realm Default Client Scopes to define sets of client scopes that are automatically linked to newly created clients.
Procedure
- Click the Client Scopes tab for the client.
- Click Default Client Scopes.
From here, select the client scopes that you want to add as Default Client Scopes to newly created clients and Optional Client Scopes.
Default client scopes
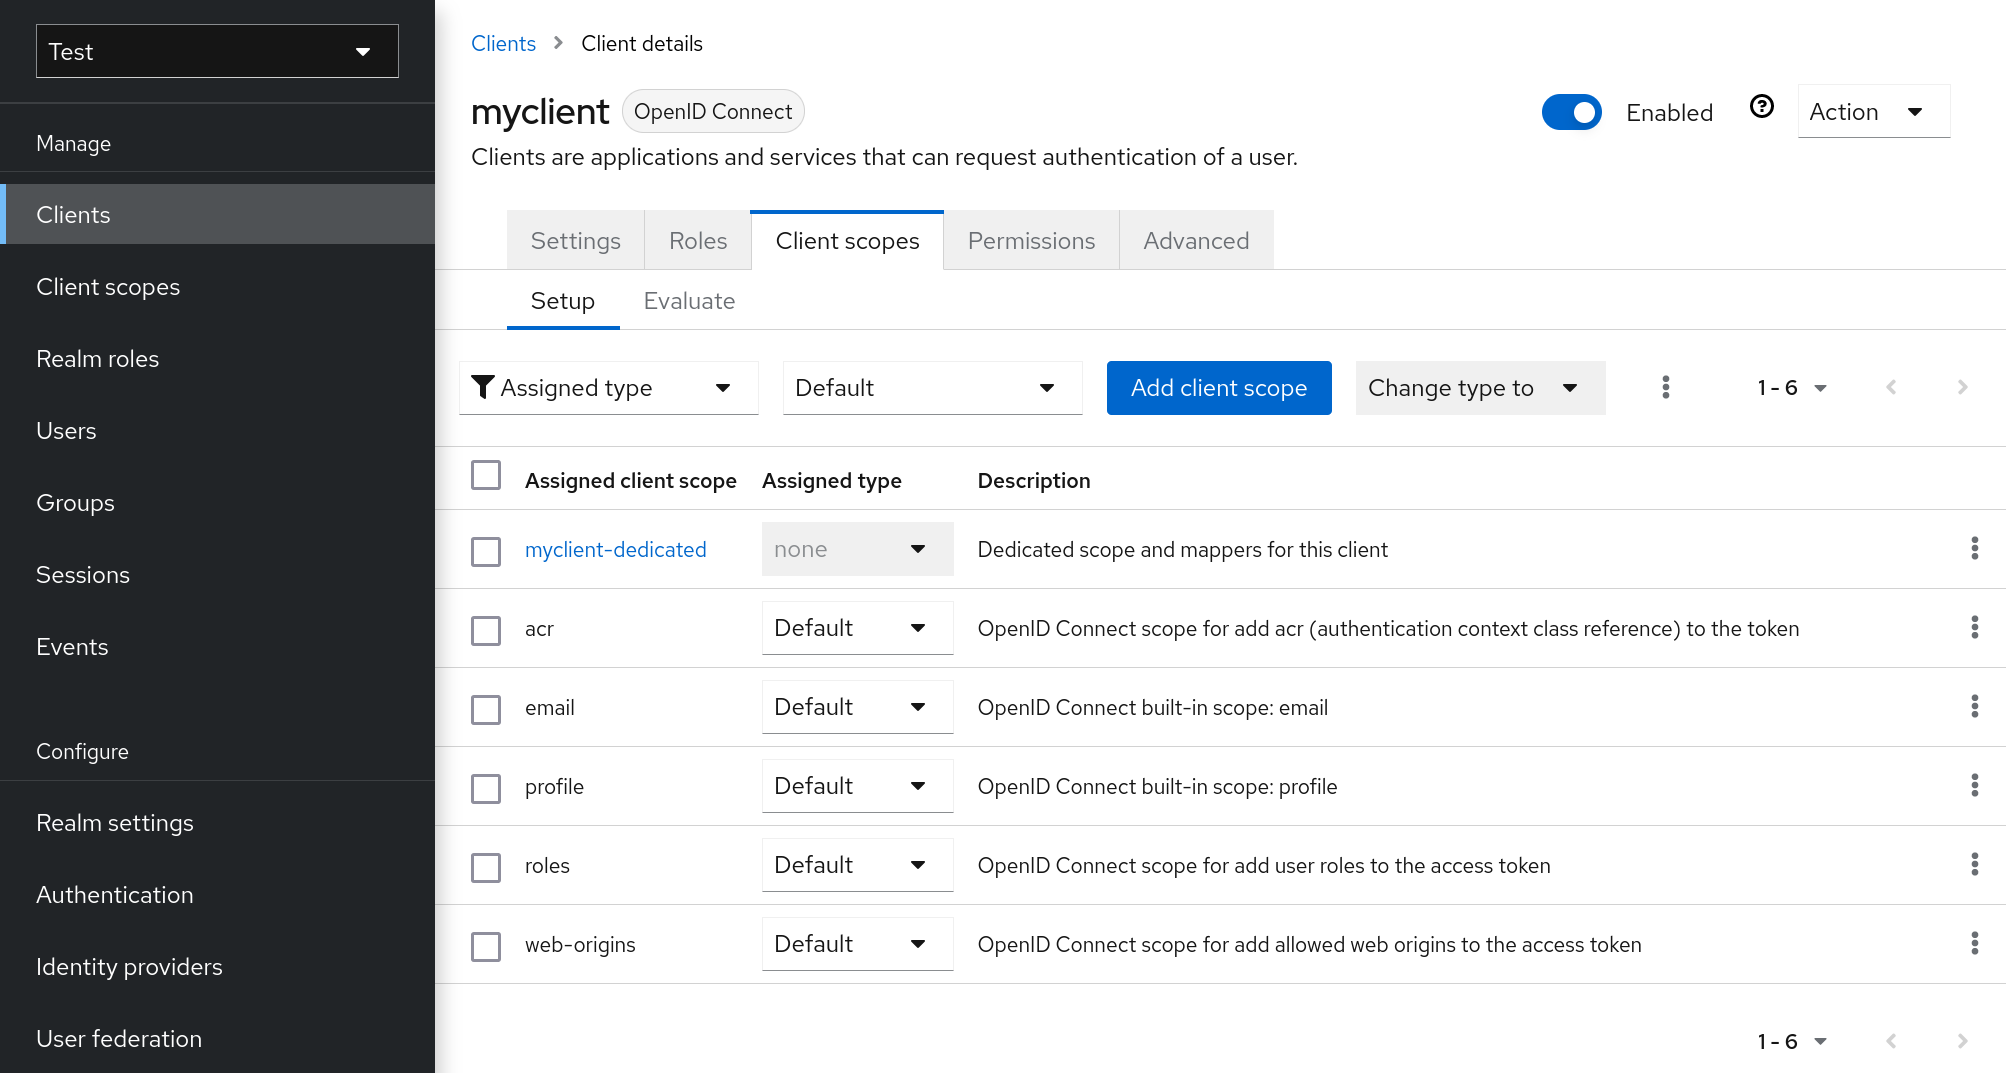
When a client is created, you can unlink the default client scopes, if needed. This is similar to removing Default Roles.
12.6.7. Scopes explained
- Client scope
- Client scopes are entities in Red Hat build of Keycloak that are configured at the realm level and can be linked to clients. Client scopes are referenced by their name when a request is sent to the Red Hat build of Keycloak authorization endpoint with a corresponding value of the scope parameter. See the client scopes linking section for more details.
- Role scope mapping
- This is available under the Scope tab of a client or client scope. Use Role scope mapping to limit the roles that can be used in the access tokens. See the Role Scope Mappings section for more details.
12.7. Client Policies
To make it easy to secure client applications, it is beneficial to realize the following points in a unified way.
- Setting policies on what configuration a client can have
- Validation of client configurations
- Conformance to a required security standards and profiles such as Financial-grade API (FAPI)
To realize these points in a unified way, Client Policies concept is introduced.
12.7.1. Use-cases
Client Policies realize the following points mentioned as follows.
- Setting policies on what configuration a client can have
- Configuration settings on the client can be enforced by client policies during client creation/update, but also during OpenID Connect requests to Red Hat build of Keycloak server, which are related to particular client. Red Hat build of Keycloak supports similar thing also through the Client Registration Policies described in the Securing Applications and Services Guide. However, Client Registration Policies can only cover OIDC Dynamic Client Registration. Client Policies cover not only what Client Registration Policies can do, but other client registration and configuration ways. The current plans are for Client Registration to be replaced by Client Policies.
- Validation of client configurations
- Red Hat build of Keycloak supports validation whether the client follows settings like Proof Key for Code Exchange, Request Object Signing Algorithm, Holder-of-Key Token, and so on some endpoints like Authorization Endpoint, Token Endpoint, and so on. These can be specified by each setting item (on Admin Console, switch, pull-down menu and so on). To make the client application secure, the administrator needs to set many settings in the appropriate way, which makes it difficult for the administrator to secure the client application. Client Policies can do these validation of client configurations mentioned just above and they can also be used to autoconfigure some client configuration switches to meet the advanced security requirements. In the future, individual client configuration settings may be replaced by Client Policies directly performing required validations.
- Conformance to a required security standards and profiles such as FAPI
- The Global client profiles are client profiles pre-configured in Red Hat build of Keycloak by default. They are pre-configured to be compliant with standard security profiles like FAPI, which makes it easy for the administrator to secure their client application to be compliant with the particular security profile. At this moment, Red Hat build of Keycloak has global profiles for the support of FAPI 1 specification. The administrator will just need to configure the client policies to specify which clients should be compliant with the FAPI. The administrator can configure client profiles and client policies, so that Red Hat build of Keycloak clients can be easily made compliant with various other security profiles like SPA, Native App, Open Banking and so on.
12.7.2. Protocol
The client policy concept is independent of any specific protocol. However, Red Hat build of Keycloak currently supports it only just for the OpenID Connect (OIDC) protocol.
12.7.3. Architecture
Client Policies consists of the four building blocks: Condition, Executor, Profile and Policy.
12.7.3.1. Condition
A condition determines to which client a policy is adopted and when it is adopted. Some conditions are checked at the time of client create/update when some other conditions are checked during client requests (OIDC Authorization request, Token endpoint request and so on). The condition checks whether one specified criteria is satisfied. For example, some condition checks whether the access type of the client is confidential.
The condition can not be used solely by itself. It can be used in a policy that is described afterwards.
A condition can be configurable the same as other configurable providers. What can be configured depends on each condition’s nature.
The following conditions are provided:
- The way of creating/updating a client
- Dynamic Client Registration (Anonymous or Authenticated with Initial access token or Registration access token)
- Admin REST API (Admin Console and so on)
So for example when creating a client, a condition can be configured to evaluate to true when this client is created by OIDC Dynamic Client Registration without initial access token (Anonymous Dynamic Client Registration). So this condition can be used for example to ensure that all clients registered through OIDC Dynamic Client Registration are FAPI compliant.
- Author of a client (Checked by presence to the particular role or group)
- On OpenID Connect dynamic client registration, an author of a client is the end user who was authenticated to get an access token for generating a new client, not Service Account of the existing client that actually accesses the registration endpoint with the access token. On registration by Admin REST API, an author of a client is the end user like the administrator of the Red Hat build of Keycloak.
- Client Access Type (confidential, public, bearer-only)
- For example when a client sends an authorization request, a policy is adopted if this client is confidential. Confidential client has enabled client authentication when public client has disabled client authentication. Bearer-only is a deprecated client type.
- Client Scope
-
Evaluates to true if the client has a particular client scope (either as default or as an optional scope used in current request). This can be used for example to ensure that OIDC authorization requests with scope
fapi-example-scopeneed to be FAPI compliant. - Client Role
- Applies for clients with the client role of the specified name. Typically you can create a client role of specified name to requested clients and use it as a "marker role" to make sure that specified client policy will be applied for requested clients.
- Client Domain Name, Host or IP Address
- Applied for specific domain names of client. Or for the cases when the administrator registers/updates client from particular Host or IP Address.
- Any Client
- This condition always evaluates to true. It can be used for example to ensure that all clients in the particular realm are FAPI compliant.
12.7.3.2. Executor
An executor specifies what action is executed on a client to which a policy is adopted. The executor executes one or several specified actions. For example, some executor checks whether the value of the parameter redirect_uri in the authorization request matches exactly with one of the pre-registered redirect URIs on Authorization Endpoint and rejects this request if not.
The executor can not be used solely by itself. It can be used in a profile that is described afterwards.
An executor can be configurable the same as other configurable providers. What can be configured depends on the nature of each executor.
An executor acts on various events. An executor implementation can ignore certain types of events (For example, executor for checking OIDC request object acts just on the OIDC authorization request). Events are:
- Creating a client (including creation through dynamic client registration)
- Updating a client
- Sending an authorization request
- Sending a token request
- Sending a token refresh request
- Sending a token revocation request
- Sending a token introspection request
- Sending a userinfo request
- Sending a logout request with a refresh token (note that logout with refresh token is proprietary Red Hat build of Keycloak functionality unsupported by any specification. It is rather recommended to rely on the official OIDC logout).
On each event, an executor can work in multiple phases. For example, on creating/updating a client, the executor can modify the client configuration by autoconfigure specific client settings. After that, the executor validates this configuration in validation phase.
One of several purposes for this executor is to realize the security requirements of client conformance profiles like FAPI. To do so, the following executors are needed:
- Enforce secure Client Authentication method is used for the client
- Enforce Holder-of-key tokens are used
- Enforce Proof Key for Code Exchange (PKCE) is used
- Enforce secure signature algorithm for Signed JWT client authentication (private-key-jwt) is used
- Enforce HTTPS redirect URI and make sure that configured redirect URI does not contain wildcards
-
Enforce OIDC
requestobject satisfying high security level - Enforce Response Type of OIDC Hybrid Flow including ID Token used as detached signature as described in the FAPI 1 specification, which means that ID Token returned from Authorization response won’t contain user profile data
-
Enforce more secure
stateandnonceparameters treatment for preventing CSRF - Enforce more secure signature algorithm when client registration
-
Enforce
binding_messageparameter is used for CIBA requests - Enforce Client Secret Rotation
- Enforce Client Registration Access Token
- Enforce checking if a client is the one to which an intent was issued in a use case where an intent is issued before starting an authorization code flow to get an access token like UK OpenBanking
- Enforce prohibiting implicit and hybrid flow
- Enforce checking if a PAR request includes necessary parameters included by an authorization request
- Enforce that refresh token rotation is skipped and there is no refresh token returned from the refresh token response
12.7.3.3. Profile
A profile consists of several executors, which can realize a security profile like FAPI. Profile can be configured by the Admin REST API (Admin Console) together with its executors. Three global profiles exist and they are configured in Red Hat build of Keycloak by default with pre-configured executors compliant with the FAPI Baseline, FAPI Advanced and FAPI CIBA specifications. More details exist in the FAPI section of the Securing Applications and Services Guide.
12.7.3.4. Policy
A policy consists of several conditions and profiles. The policy can be adopted to clients satisfying all conditions of this policy. The policy refers several profiles and all executors of these profiles execute their task against the client that this policy is adopted to.
12.7.4. Configuration
Policies, profiles, conditions, executors can be configured by Admin REST API, which means also the Admin Console. To do so, there is a tab Realm → Realm Settings → Client Policies , which means the administrator can have client policies per realm.
The Global Client Profiles are automatically available in each realm. However there are no client policies configured by default. This means that the administrator is always required to create any client policy if they want for example the clients of his realm to be FAPI compliant. Global profiles cannot be updated, but the administrator can easily use them as a template and create their own profile if they want to do some slight changes in the global profile configurations. There is JSON Editor available in the Admin Console, which simplifies the creation of new profile based on some global profile.
12.7.5. Backward Compatibility
Client Policies can replace Client Registration Policies described in the Securing Applications and Services Guide. However, Client Registration Policies also still co-exist. This means that for example during a Dynamic Client Registration request to create/update a client, both client policies and client registration policies are applied.
The current plans are for the Client Registration Policies feature to be removed and the existing client registration policies will be migrated into new client policies automatically.
12.7.6. Client Secret Rotation Example
See an example configuration for client secret rotation.
Chapter 13. Using a vault to obtain secrets
Keycloak currently provides two out-of-the-box implementations of the Vault SPI: a plain-text file-based vault and Java KeyStore-based vault.
To obtain a secret from a vault rather than entering it directly, enter the following specially crafted string into the appropriate field:
${vault.key}
where the key is the name of the secret recognized by the vault.
To prevent secrets from leaking across realms, Red Hat build of Keycloak combines the realm name with the key obtained from the vault expression. This method means that the key does not directly map to an entry in the vault but creates the final entry name according to the algorithm used to combine the key with the realm name. In case of the file-based vault, such combination reflects to a specific filename, for the Java KeyStore-based vault it’s a specific alias name.
You can obtain the secret from the vault in the following fields:
- SMTP password
- In the realm SMTP settings
- LDAP bind credential
- In the LDAP settings of LDAP-based user federation.
- OIDC identity provider secret
- In the Client Secret inside identity provider OpenID Connect Config
13.1. Key resolvers
All built-in providers support the configuration of key resolvers. A key resolver implements the algorithm or strategy for combining the realm name with the key, obtained from the ${vault.key} expression, into the final entry name used to retrieve the secret from the vault. Red Hat build of Keycloak uses the keyResolvers property to configure the resolvers that the provider uses. The value is a comma-separated list of resolver names. An example of the configuration for the files-plaintext provider follows:
kc.[sh|bat] start --spi-vault-file-key-resolvers=REALM_UNDERSCORE_KEY,KEY_ONLYThe resolvers run in the same order you declare them in the configuration. For each resolver, Red Hat build of Keycloak uses the last entry name the resolver produces, which combines the realm with the vault key to search for the vault’s secret. If Red Hat build of Keycloak finds a secret, it returns the secret. If not, Red Hat build of Keycloak uses the next resolver. This search continues until Red Hat build of Keycloak finds a non-empty secret or runs out of resolvers. If Red Hat build of Keycloak finds no secret, Red Hat build of Keycloak returns an empty secret.
In the previous example, Red Hat build of Keycloak uses the REALM_UNDERSCORE_KEY resolver first. If Red Hat build of Keycloak finds an entry in the vault that using that resolver, Red Hat build of Keycloak returns that entry. If not, Red Hat build of Keycloak searches again using the KEY_ONLY resolver. If Red Hat build of Keycloak finds an entry by using the KEY_ONLY resolver, Red Hat build of Keycloak returns that entry. If Red Hat build of Keycloak uses all resolvers, Red Hat build of Keycloak returns an empty secret.
A list of the currently available resolvers follows:
| Name | Description |
|---|---|
| KEY_ONLY | Red Hat build of Keycloak ignores the realm name and uses the key from the vault expression. |
| REALM_UNDERSCORE_KEY |
Red Hat build of Keycloak combines the realm and key by using an underscore character. Red Hat build of Keycloak escapes occurrences of underscores in the realm or key with another underscore character. For example, if the realm is called |
| REALM_FILESEPARATOR_KEY | Red Hat build of Keycloak combines the realm and key by using the platform file separator character. |
If you have not configured a resolver for the built-in providers, Red Hat build of Keycloak selects the REALM_UNDERSCORE_KEY.
Chapter 14. Configuring auditing to track events
Red Hat build of Keycloak includes a suite of auditing capabilities. You can record every login and administrator action and review those actions in the Admin Console. Red Hat build of Keycloak also includes a Listener SPI that listens for events and can trigger actions. Examples of built-in listeners include log files and sending emails if an event occurs.
14.1. Auditing user events
You can record and view every event that affects users. Red Hat build of Keycloak triggers login events for actions such as successful user login, a user entering an incorrect password, or a user account updating. By default, Red Hat build of Keycloak does not store or display events in the Admin Console. Only the error events are logged to the Admin Console and the server’s log file.
Procedure
Use this procedure to start auditing user events.
- Click Realm settings in the menu.
- Click the Events tab.
- Click the User events settings tab.
Toggle Save events to ON.
User events settings
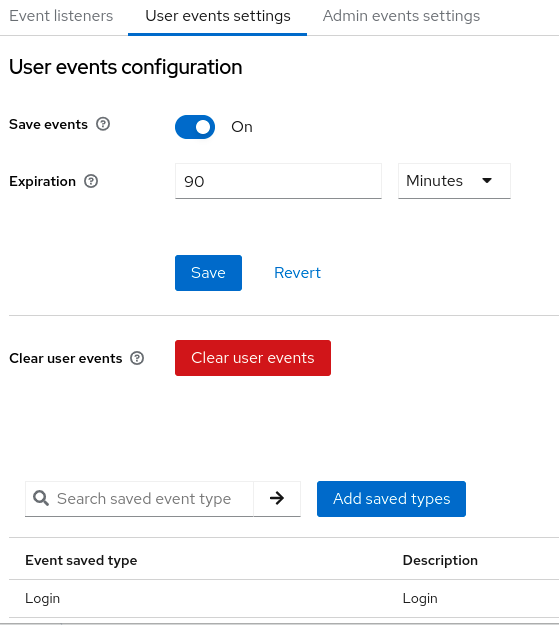
- Specify the length of time to store events in the Expiration field.
Click Add saved types to see other events you can save.
Add types
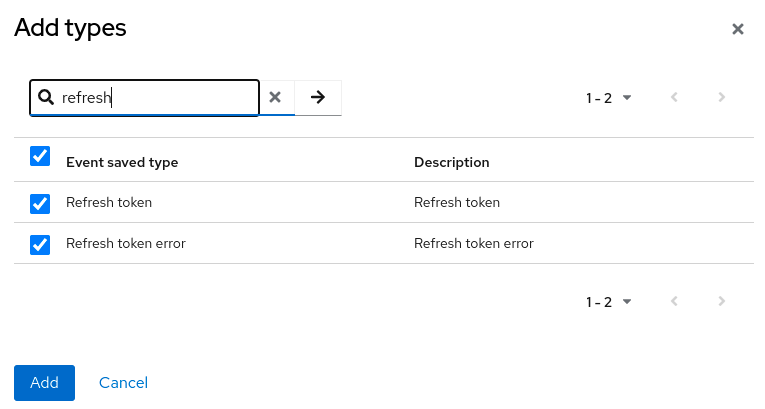
- Click Add.
Click Clear user events when you want to delete all saved events.
Procedure
You can now view events.
Click the Events tab in the menu.
User events
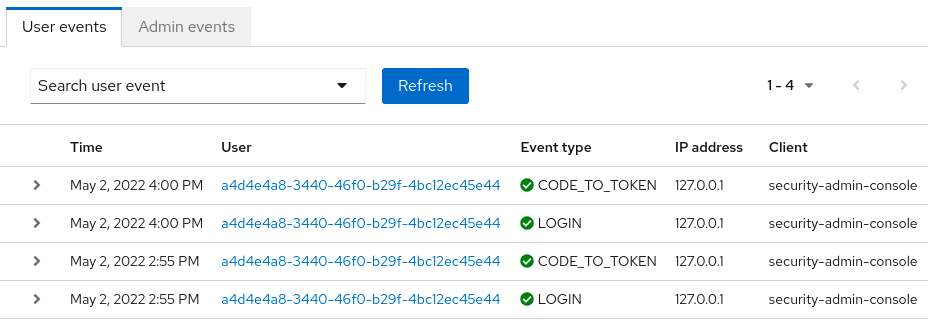
To filter events, click Search user event.
Search user event
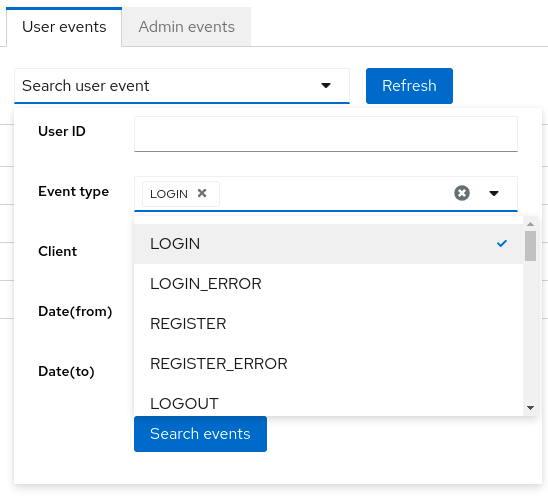
14.1.1. Event types
Login events:
| Event | Description |
|---|---|
| Login | A user logs in. |
| Register | A user registers. |
| Logout | A user logs out. |
| Code to Token | An application, or client, exchanges a code for a token. |
| Refresh Token | An application, or client, refreshes a token. |
Account events:
| Event | Description |
|---|---|
| Social Link | A user account links to a social media provider. |
| Remove Social Link | The link from a social media account to a user account severs. |
| Update Email | An email address for an account changes. |
| Update Profile | A profile for an account changes. |
| Send Password Reset | Red Hat build of Keycloak sends a password reset email. |
| Update Password | The password for an account changes. |
| Update TOTP | The Time-based One-time Password (TOTP) settings for an account changes. |
| Remove TOTP | Red Hat build of Keycloak removes TOTP from an account. |
| Send Verify Email | Red Hat build of Keycloak sends an email verification email. |
| Verify Email | Red Hat build of Keycloak verifies the email address for an account. |
Each event has a corresponding error event.
14.1.2. Event listener
Event listeners listen for events and perform actions based on that event. Red Hat build of Keycloak includes two built-in listeners, the Logging Event Listener and Email Event Listener.
14.1.2.1. The logging event listener
When the Logging Event Listener is enabled, this listener writes to a log file when an error event occurs.
An example log message from a Logging Event Listener:
11:36:09,965 WARN  [org.keycloak.events] (default task-51) type=LOGIN_ERROR, realmId=master,
                    clientId=myapp,
                    userId=19aeb848-96fc-44f6-b0a3-59a17570d374, ipAddress=127.0.0.1,
                    error=invalid_user_credentials, auth_method=openid-connect, auth_type=code,
                    redirect_uri=http://localhost:8180/myapp,
                    code_id=b669da14-cdbb-41d0-b055-0810a0334607, username=admin
You can use the Logging Event Listener to protect against hacker bot attacks:
-
Parse the log file for the
LOGIN_ERRORevent. - Extract the IP Address of the failed login event.
- Send the IP address to an intrusion prevention software framework tool.
The Logging Event Listener logs events to the org.keycloak.events log category. Red Hat build of Keycloak does not include debug log events in server logs, by default.
To include debug log events in server logs:
-
Change the log level for the
org.keycloak.eventscategory - Change the log level used by the Logging Event listener.
To change the log level used by the Logging Event listener, add the following:
bin/kc.[sh|bat] start --spi-events-listener-jboss-logging-success-level=info --spi-events-listener-jboss-logging-error-level=error
The valid values for log levels are debug, info, warn, error, and fatal.
14.1.2.2. The Email Event Listener
The Email Event Listener sends an email to the user’s account when an event occurs and supports the following events:
- Login Error.
- Update Password.
- Update Time-based One-time Password (TOTP).
- Remove Time-based One-time Password (TOTP).
Procedure
To enable the Email Listener:
- Click Realm settings in the menu.
- Click the Events tab.
- Click the Event listeners field.
Select
email.Event listeners
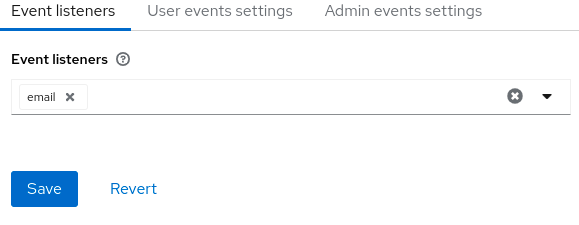
You can exclude events by using the --spi-events-listener-email-exclude-events argument. For example:
kc.[sh|bat] --spi-events-listener-email-exclude-events=UPDATE_TOTP,REMOVE_TOTP
You can set a maximum length of each Event detail in the database by using the --spi-events-store-jpa-max-detail-length argument. This setting is useful if a detail (for example, redirect_uri) is long. For example:
kc.[sh|bat] --spi-events-store-jpa-max-detail-length=1000
Also you can set a maximum length of all Event’s details by using the --spi-events-store-jpa-max-field-length argument. This setting is useful if you want to adhere to the underlying storage limitation. For example:
kc.[sh|bat] --spi-events-store-jpa-max-field-length=250014.2. Auditing admin events
You can record all actions that are performed by an administrator in the Admin Console. The Admin Console performs administrative actions by invoking the Red Hat build of Keycloak REST interface and Red Hat build of Keycloak audits these REST invocations. You can view the resulting events in the Admin Console.
Procedure
Use this procedure to start auditing admin actions.
- Click Realm settings in the menu.
- Click the Events tab.
- Click the Admin events settings tab.
Toggle Save events to ON.
Red Hat build of Keycloak displays the Include representation switch.
Toggle Include representation to ON.
The
Include Representationswitch includes JSON documents sent through the admin REST API so you can view the administrators actions.Admin events settings
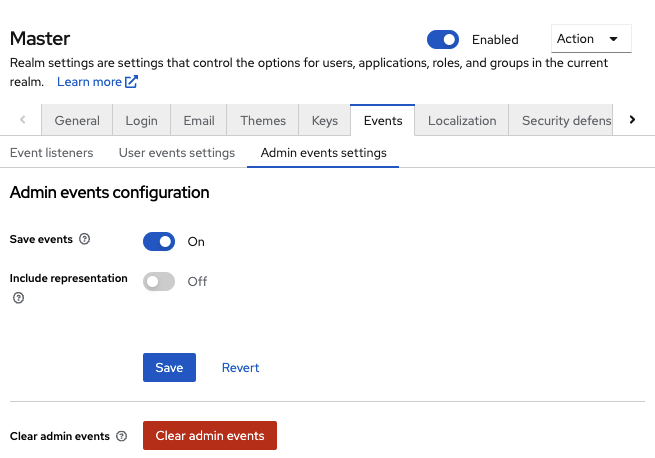
- Click Save.
- To clear the database of stored actions, click Clear admin events.
Procedure
You can now view admin events.
- Click Events in the menu.
Click the Admin events tab.
Admin events
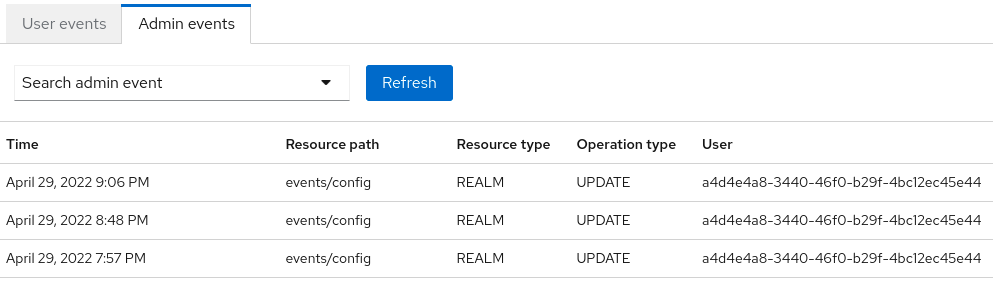
When the Include Representation switch is ON, it can lead to storing a lot of information in the database. You can set a maximum length of the representation by using the --spi-events-store-jpa-max-field-length argument. This setting is useful if you want to adhere to the underlying storage limitation. For example:
kc.[sh|bat] --spi-events-store-jpa-max-field-length=2500Chapter 15. Mitigating security threats
Security vulnerabilities exist in any authentication server. See the Internet Engineering Task Force’s (IETF) OAuth 2.0 Threat Model and the OAuth 2.0 Security Best Current Practice for more information.
15.1. Host
Red Hat build of Keycloak uses the public hostname in several ways, such as within token issuer fields and URLs in password reset emails.
By default, the hostname derives from request headers. No validation exists to ensure a hostname is valid. If you are not using a load balancer, or proxy, with Red Hat build of Keycloak to prevent invalid host headers, configure the acceptable hostnames.
The hostname’s Service Provider Interface (SPI) provides a way to configure the hostname for requests. You can use this built-in provider to set a fixed URL for frontend requests while allowing backend requests based on the request URI. If the built-in provider does not have the required capability, you can develop a customized provider.
15.2. Admin endpoints and Admin Console
Red Hat build of Keycloak exposes the administrative REST API and the web console on the same port as non-administrative usage. Do not expose administrative endpoints externally if external access is not necessary.
15.3. Brute force attacks
A brute force attack attempts to guess a user’s password by trying to log in multiple times. Red Hat build of Keycloak has brute force detection capabilities and can temporarily disable a user account if the number of login failures exceeds a specified threshold.
Red Hat build of Keycloak disables brute force detection by default. Enable this feature to protect against brute force attacks.
Procedure
To enable this protection:
- Click Realm Settings in the menu
- Click the Security Defenses tab.
Click the Brute Force Detection tab.
Brute force detection
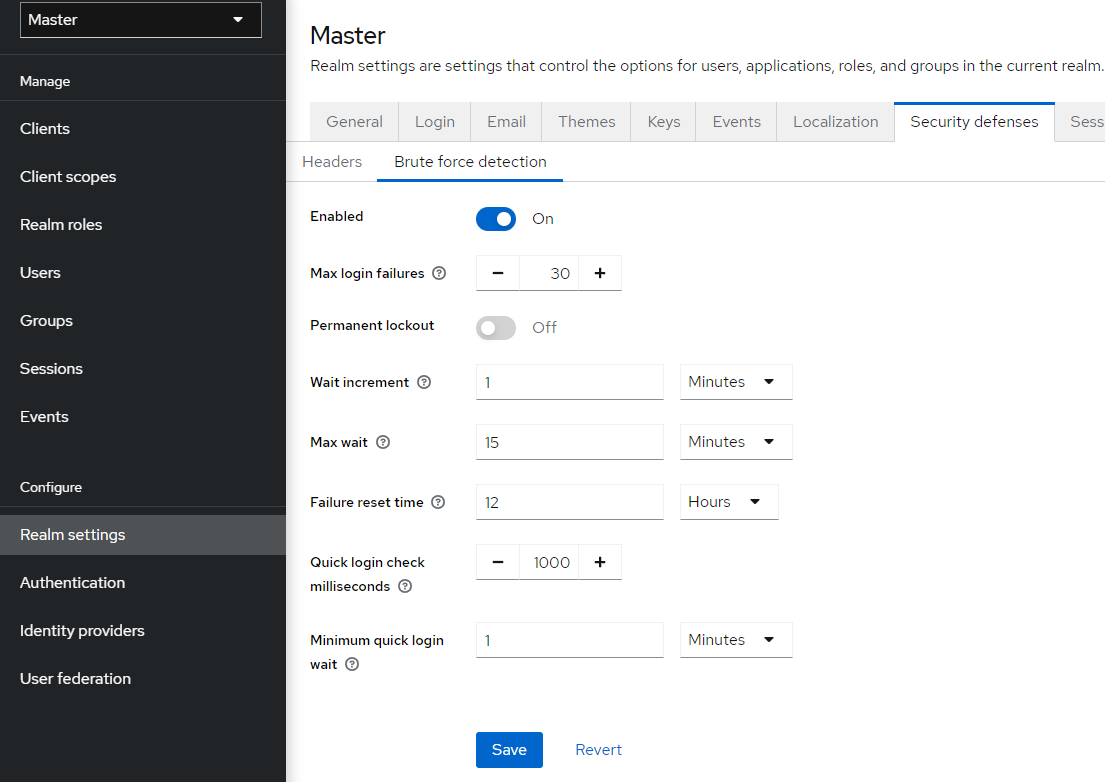
Red Hat build of Keycloak can deploy permanent lockout and temporary lockout actions when it detects an attack. Permanent lockout disables a user account until an administrator re-enables it. Temporary lockout disables a user account for a specific period of time. The time period that the account is disabled increases as the attack continues.
When a user is temporarily locked and attempts to log in, Red Hat build of Keycloak displays the default Invalid username or password error message. This message is the same error message as the message displayed for an invalid username or invalid password to ensure the attacker is unaware the account is disabled.
Common Parameters
| Name | Description | Default |
|---|---|---|
| Max Login Failures | The maximum number of login failures. | 30 failures. |
| Quick Login Check Milliseconds | The minimum time between login attempts. | 1000 milliseconds. |
| Minimum Quick Login Wait | The minimum time the user is disabled when login attempts are quicker than Quick Login Check Milliseconds. | 1 minute. |
Permanent Lockout Flow
On successful login
-
Reset
count
-
Reset
On failed login
-
Increment
count If
countgreater than Max Login Failures- Permanently disable user
Else if the time between this failure and the last failure is less than Quick Login Check Milliseconds
- Temporarily disable user for Minimum Quick Login Wait
-
Increment
When Red Hat build of Keycloak disables a user, the user cannot log in until an administrator enables the user. Enabling an account resets the count.
Temporary Lockout Parameters
| Name | Description | Default |
|---|---|---|
| Wait Increment | The time added to the time a user is temporarily disabled when the user’s login attempts exceed Max Login Failures. | 1 minute. |
| Max Wait | The maximum time a user is temporarily disabled. | 15 minutes. |
| Failure Reset Time | The time when the failure count resets. The timer runs from the last failed login. | 12 hours. |
Temporary Lockout Algorithm
On successful login
-
Reset
count
-
Reset
On failed login
If the time between this failure and the last failure is greater than Failure Reset Time
-
Reset
count
-
Reset
-
Increment
count -
Calculate
waitusing Wait Increment * (count/ Max Login Failures). The division is an integer division rounded down to a whole number If
waitequals 0 and the time between this failure and the last failure is less than Quick Login Check Milliseconds, setwaitto Minimum Quick Login Wait.-
Temporarily disable the user for the smallest of
waitand Max Wait seconds
-
Temporarily disable the user for the smallest of
count does not increment when a temporarily disabled account commits a login failure.
The downside of Red Hat build of Keycloak brute force detection is that the server becomes vulnerable to denial of service attacks. When implementing a denial of service attack, an attacker can attempt to log in by guessing passwords for any accounts it knows and eventually causing Red Hat build of Keycloak to disable the accounts.
Consider using intrusion prevention software (IPS). Red Hat build of Keycloak logs every login failure and client IP address failure. You can point the IPS to the Red Hat build of Keycloak server’s log file, and the IPS can modify firewalls to block connections from these IP addresses.
15.3.1. Password policies
Ensure you have a complex password policy to force users to choose complex passwords. See the Password Policies chapter for more information. Prevent password guessing by setting up the Red Hat build of Keycloak server to use one-time-passwords.
15.4. Read-only user attributes
Typical users who are stored in Red Hat build of Keycloak have various attributes related to their user profiles. Such attributes include email, firstName or lastName. However users may also have attributes, which are not typical profile data, but rather metadata. The metadata attributes usually should be read-only for the users and the typical users never should have a way to update those attributes from the Red Hat build of Keycloak user interface or Account REST API. Some of the attributes should be even read-only for the administrators when creating or updating user with the Admin REST API.
The metadata attributes are usually attributes from those groups:
-
Various links or metadata related to the user storage providers. For example in case of the LDAP integration, the
LDAP_IDattribute contains the ID of the user in the LDAP server. -
Metadata provisioned by User Storage. For example
createdTimestampprovisioned from the LDAP should be always read-only by user or administrator. -
Metadata related to various authenticators. For example
KERBEROS_PRINCIPALattribute can contain the kerberos principal name of the particular user. Similarly attributeusercertificatecan contain metadata related to binding the user with the data from the X.509 certificate, which is used typically when X.509 certificate authentication is enabled. -
Metadata related to the identificator of users by the applications/clients. For example
saml.persistent.name.id.for.my_appcan contain SAML NameID, which will be used by the client applicationmy_appas the identifier of the user. - Metadata related to the authorization policies, which are used for the attribute based access control (ABAC). Values of those attributes may be used for the authorization decisions. Hence it is important that those attributes cannot be updated by the users.
From the long term perspective, Red Hat build of Keycloak will have a proper User Profile SPI, which will allow fine-grained configuration of every user attribute. Currently this capability is not fully available yet. So Red Hat build of Keycloak has the internal list of user attributes, which are read-only for the users and read-only for the administrators configured at the server level.
This is the list of the read-only attributes, which are used internally by the Red Hat build of Keycloak default providers and functionalities and hence are always read-only:
-
For users:
KERBEROS_PRINCIPAL,LDAP_ID,LDAP_ENTRY_DN,CREATED_TIMESTAMP,createTimestamp,modifyTimestamp,userCertificate,saml.persistent.name.id.for.*,ENABLED,EMAIL_VERIFIED -
For administrators:
KERBEROS_PRINCIPAL,LDAP_ID,LDAP_ENTRY_DN,CREATED_TIMESTAMP,createTimestamp,modifyTimestamp
System administrators have a way to add additional attributes to this list. The configuration is currently available at the server level.
You can add this configuration by using the spi-user-profile-declarative-user-profile-read-only-attributes and `spi-user-profile-declarative-user-profile-admin-read-only-attributes options. For example:
kc.[sh|bat] start --spi-user-profile-declarative-user-profile-read-only-attributes=foo,bar*
For this example, users and administrators would not be able to update attribute foo. Users would not be able to edit any attributes starting with the bar. So for example bar or barrier. Configuration is case-insensitive, so attributes like FOO or BarRier will be denied as well for this example. The wildcard character * is supported only at the end of the attribute name, so the administrator can effectively deny all the attributes starting with the specified character. The * in the middle of the attribute is considered as a normal character.
15.5. Clickjacking
Clickjacking is a technique of tricking users into clicking on a user interface element different from what users perceive. A malicious site loads the target site in a transparent iFrame, overlaid on top of a set of dummy buttons placed directly under important buttons on the target site. When a user clicks a visible button, they are clicking a button on the hidden page. An attacker can steal a user’s authentication credentials and access their resources by using this method.
By default, every response by Red Hat build of Keycloak sets some specific HTTP headers that can prevent this from happening. Specifically, it sets X-Frame-Options and Content-Security-Policy. You should take a look at the definition of both of these headers as there is a lot of fine-grain browser access you can control.
Procedure
In the Admin Console, you can specify the values of the X-Frame-Options and Content-Security-Policy headers.
- Click the Realm Settings menu item.
Click the Security Defenses tab.
Security Defenses
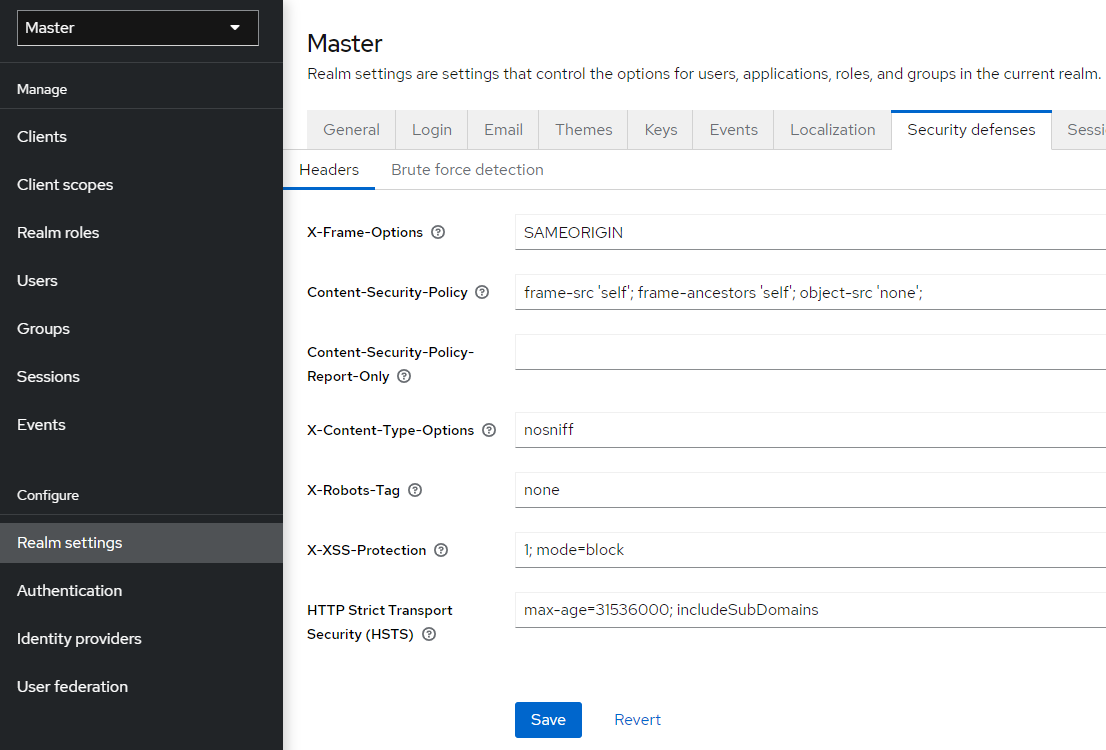
By default, Red Hat build of Keycloak only sets up a same-origin policy for iframes.
15.6. SSL/HTTPS requirement
OAuth 2.0/OpenID Connect uses access tokens for security. Attackers can scan your network for access tokens and use them to perform malicious operations for which the token has permission. This attack is known as a man-in-the-middle attack. Use SSL/HTTPS for communication between the Red Hat build of Keycloak auth server and the clients Red Hat build of Keycloak secures to prevent man-in-the-middle attacks.
Red Hat build of Keycloak has three modes for SSL/HTTPS. SSL is complex to set up, so Red Hat build of Keycloak allows non-HTTPS communication over private IP addresses such as localhost, 192.168.x.x, and other private IP addresses. In production, ensure you enable SSL and SSL is compulsory for all operations.
On the adapter/client-side, you can disable the SSL trust manager. The trust manager ensures the client’s identity that Red Hat build of Keycloak communicates with is valid and ensures the DNS domain name against the server’s certificate. In production, ensure that each of your client adapters uses a truststore to prevent DNS man-in-the-middle attacks.
15.7. CSRF attacks
A Cross-site request forgery (CSRF) attack uses HTTP requests from users that websites have already authenticated. Any site using cookie-based authentication is vulnerable to CSRF attacks. You can mitigate these attacks by matching a state cookie against a posted form or query parameter.
The OAuth 2.0 login specification requires that a state cookie matches against a transmitted state parameter. Red Hat build of Keycloak fully implements this part of the specification, so all logins are protected.
The Red Hat build of Keycloak Admin Console is a JavaScript/HTML5 application that makes REST calls to the backend Red Hat build of Keycloak admin REST API. These calls all require bearer token authentication and consist of JavaScript Ajax calls, so CSRF is impossible. You can configure the admin REST API to validate the CORS origins.
The user account management section in Red Hat build of Keycloak can be vulnerable to CSRF. To prevent CSRF attacks, Red Hat build of Keycloak sets a state cookie and embeds the value of this cookie in hidden form fields or query parameters within action links. Red Hat build of Keycloak checks the query/form parameter against the state cookie to verify that the user makes the call.
15.8. Unspecific redirect URIs
Make your registered redirect URIs as specific as feasible. Registering vague redirect URIs for Authorization Code Flows can allow malicious clients to impersonate another client with broader access. Impersonation can happen if two clients live under the same domain, for example.
15.9. FAPI compliance
To make sure that Red Hat build of Keycloak server will validate your client to be more secure and FAPI compliant, you can configure client policies for the FAPI support. Details are described in the FAPI section of Securing Applications and Services Guide. Among other things, this ensures some security best practices described above like SSL required for clients, secure redirect URI used and more of similar best practices.
15.10. Compromised access and refresh tokens
Red Hat build of Keycloak includes several actions to prevent malicious actors from stealing access tokens and refresh tokens. The crucial action is to enforce SSL/HTTPS communication between Red Hat build of Keycloak and its clients and applications. Red Hat build of Keycloak does not enable SSL by default.
Another action to mitigate damage from leaked access tokens is to shorten the token’s lifespans. You can specify token lifespans within the timeouts page. Short lifespans for access tokens force clients and applications to refresh their access tokens after a short time. If an admin detects a leak, the admin can log out all user sessions to invalidate these refresh tokens or set up a revocation policy.
Ensure refresh tokens always stay private to the client and are never transmitted.
You can mitigate damage from leaked access tokens and refresh tokens by issuing these tokens as holder-of-key tokens. See OAuth 2.0 Mutual TLS Client Certificate Bound Access Token for more information.
If an access token or refresh token is compromised, access the Admin Console and push a not-before revocation policy to all applications. Pushing a not-before policy ensures that any tokens issued before that time become invalid. Pushing a new not-before policy ensures that applications must download new public keys from Red Hat build of Keycloak and mitigate damage from a compromised realm signing key. See the keys chapter for more information.
You can disable specific applications, clients, or users if they are compromised.
15.11. Compromised authorization code
For the OIDC Auth Code Flow, Red Hat build of Keycloak generates a cryptographically strong random value for its authorization codes. An authorization code is used only once to obtain an access token.
On the timeouts page in the Admin Console, you can specify the length of time an authorization code is valid. Ensure that the length of time is less than 10 seconds, which is long enough for a client to request a token from the code.
You can also defend against leaked authorization codes by applying Proof Key for Code Exchange (PKCE) to clients.
15.12. Open redirectors
An open redirector is an endpoint using a parameter to automatically redirect a user agent to the location specified by the parameter value without validation. An attacker can use the end-user authorization endpoint and the redirect URI parameter to use the authorization server as an open redirector, using a user’s trust in an authorization server to launch a phishing attack.
Red Hat build of Keycloak requires that all registered applications and clients register at least one redirection URI pattern. When a client requests that Red Hat build of Keycloak performs a redirect, Red Hat build of Keycloak checks the redirect URI against the list of valid registered URI patterns. Clients and applications must register as specific a URI pattern as possible to mitigate open redirector attacks.
If an application requires a non http(s) custom scheme, it should be an explicit part of the validation pattern (for example custom:/app/*). For security reasons a general pattern like * does not cover non http(s) schemes.
15.13. Password database compromised
Red Hat build of Keycloak does not store passwords in raw text but as hashed text, using the PBKDF2 hashing algorithm. Red Hat build of Keycloak performs 27,500 hashing iterations, the number of iterations recommended by the security community. This number of hashing iterations can adversely affect performance as PBKDF2 hashing uses a significant amount of CPU resources.
15.14. Limiting scope
By default, new client applications have unlimited role scope mappings. Every access token for that client contains all permissions that the user has. If an attacker compromises the client and obtains the client’s access tokens, each system that the user can access is compromised.
Limit the roles of an access token by using the Scope menu for each client. Alternatively, you can set role scope mappings at the Client Scope level and assign Client Scopes to your client by using the Client Scope menu.
15.15. Limit token audience
In environments with low levels of trust among services, limit the audiences on the token. See the OAuth2 Threat Model and the Audience Support section for more information.
15.16. Limit Authentication Sessions
When a login page is opened for the first time in a web browser, Red Hat build of Keycloak creates an object called authentication session that stores some useful information about the request. Whenever a new login page is opened from a different tab in the same browser, Red Hat build of Keycloak creates a new record called authentication sub-session that is stored within the authentication session. Authentication requests can come from any type of clients such as the Admin CLI. In that case, a new authentication session is also created with one authentication sub-session. Please note that authentication sessions can be created also in other ways than using a browser flow. The text below is applicable regardless of the source flow.
This section describes deployments that use the Data Grid provider for authentication sessions.
Authentication session is internally stored as RootAuthenticationSessionEntity. Each RootAuthenticationSessionEntity can have multiple authentication sub-sessions stored within the RootAuthenticationSessionEntity as a collection of AuthenticationSessionEntity objects. Red Hat build of Keycloak stores authentication sessions in a dedicated Data Grid cache. The number of AuthenticationSessionEntity per RootAuthenticationSessionEntity contributes to the size of each cache entry. Total memory footprint of authentication session cache is determined by the number of stored RootAuthenticationSessionEntity and by the number of AuthenticationSessionEntity within each RootAuthenticationSessionEntity.
The number of maintained RootAuthenticationSessionEntity objects corresponds to the number of unfinished login flows from the browser. To keep the number of RootAuthenticationSessionEntity under control, using an advanced firewall control to limit ingress network traffic is recommended.
Higher memory usage may occur for deployments where there are many active RootAuthenticationSessionEntity with a lot of AuthenticationSessionEntity. If the load balancer does not support or is not configured for session stickiness, the load over network in a cluster can increase significantly. The reason for this load is that each request that lands on a node that does not own the appropriate authentication session needs to retrieve and update the authentication session record in the owner node which involves a separate network transmission for both the retrieval and the storage.
The maximum number of AuthenticationSessionEntity per RootAuthenticationSessionEntity can be configured in authenticationSessions SPI by setting property authSessionsLimit. The default value is set to 300 AuthenticationSessionEntity per a RootAuthenticationSessionEntity. When this limit is reached, the oldest authentication sub-session will be removed after a new authentication session request.
The following example shows how to limit the number of active AuthenticationSessionEntity per a RootAuthenticationSessionEntity to 100.
bin/kc.[sh|bat] start --spi-authentication-sessions-infinispan-auth-sessions-limit=10015.17. SQL injection attacks
Currently, Red Hat build of Keycloak has no known SQL injection vulnerabilities.
Chapter 16. Account Console
Red Hat build of Keycloak users can manage their accounts through the Account Console. Users can configure their profiles, add two-factor authentication, include identity provider accounts, and oversee device activity.
16.1. Accessing the Account Console
Any user can access the Account Console.
Procedure
- Make note of the realm name and IP address for the Red Hat build of Keycloak server where your account exists.
- In a web browser, enter a URL in this format: server-root/realms/{realm-name}/account.
- Enter your login name and password.
Account Console
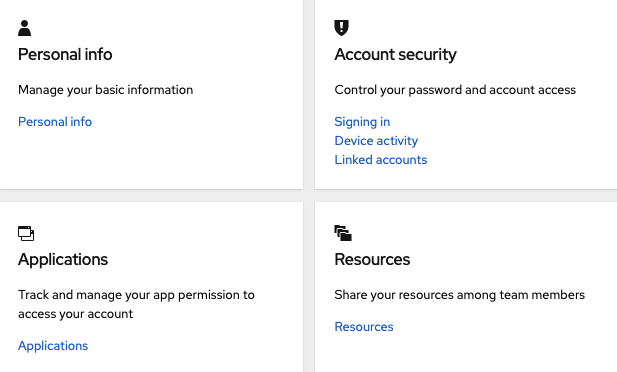
16.2. Configuring ways to sign in
You can sign in to this console using basic authentication (a login name and password) or two-factor authentication. For two-factor authentication, use one of the following procedures.
16.2.1. Two-factor authentication with OTP
Prerequisites
- OTP is a valid authentication mechanism for your realm.
Procedure
- Click Account security in the menu.
- Click Signing in.
Click Set up authenticator application.
Signing in
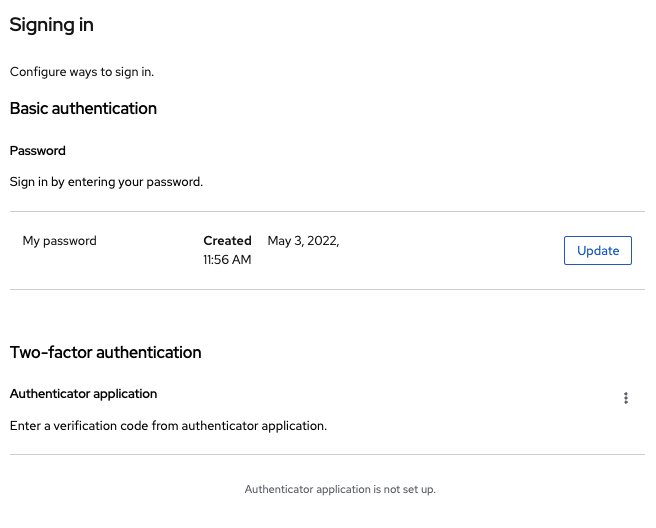
- Follow the directions that appear on the screen to use either FreeOTP or Google Authenticator on your mobile device as your OTP generator.
- Scan the QR code in the screen shot into the OTP generator on your mobile device.
- Log out and log in again.
- Respond to the prompt by entering an OTP that is provided on your mobile device.
16.2.2. Two-factor authentication with WebAuthn
Prerequisites
- WebAuthn is a valid two-factor authentication mechanism for your realm. Please follow the WebAuthn section for more details.
Procedure
- Click Account Security in the menu.
- Click Signing In.
Click Set up Security Key.
Signing In
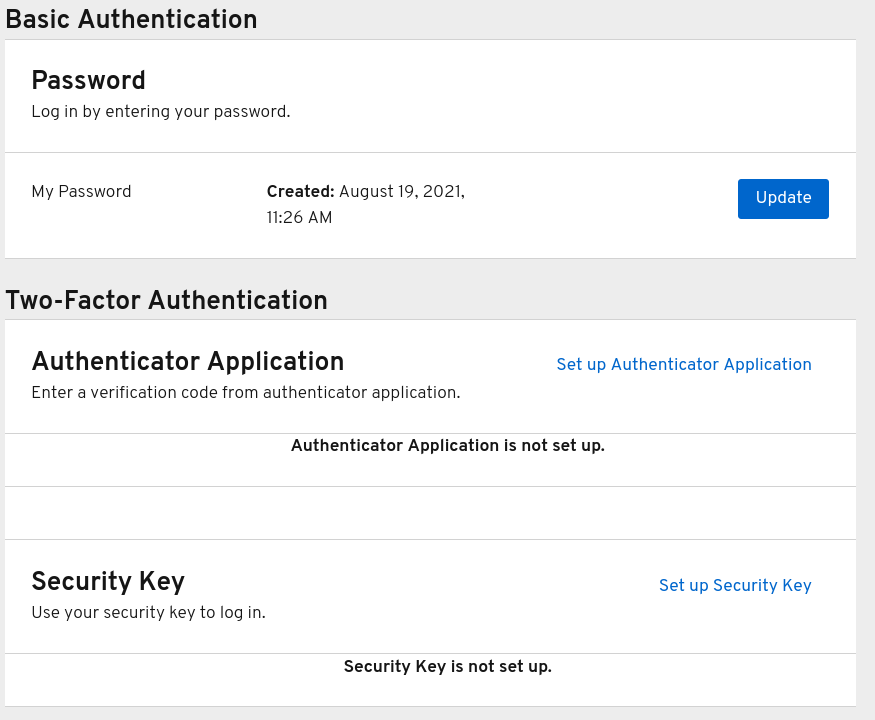
- Prepare your WebAuthn Security Key. How you prepare this key depends on the type of WebAuthn security key you use. For example, for a USB based Yubikey, you may need to put your key into the USB port on your laptop.
- Click Register to register your security key.
- Log out and log in again.
- Assuming authentication flow was correctly set, a message appears asking you to authenticate with your Security Key as second factor.
16.2.3. Passwordless authentication with WebAuthn
Prerequisites
- WebAuthn is a valid passwordless authentication mechanism for your realm. Please follow the Passwordless WebAuthn section for more details.
Procedure
- Click Account Security in the menu.
- Click Signing In.
Click Set up Security Key in the Passwordless section.
Signing In
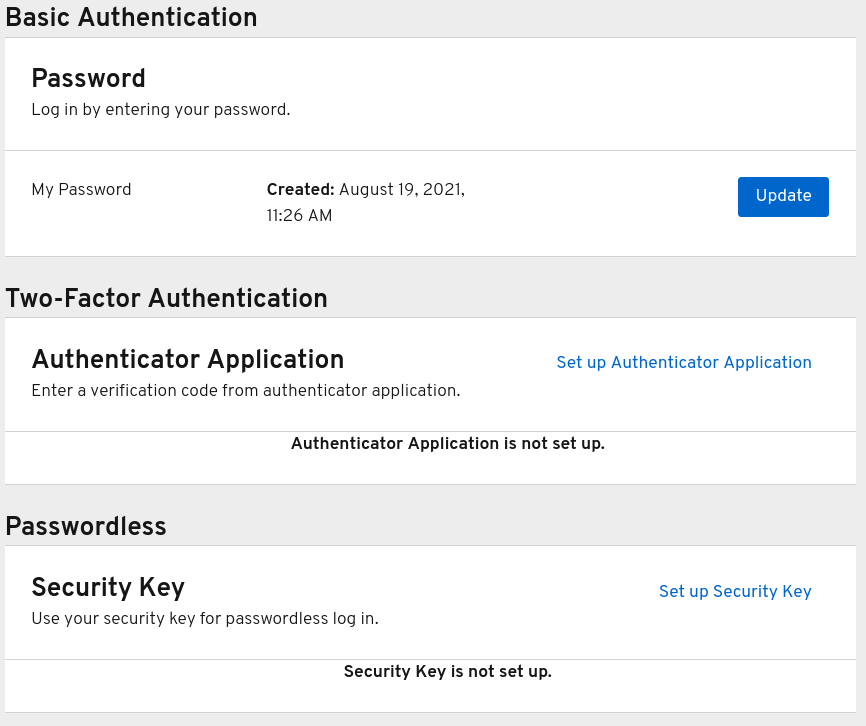
- Prepare your WebAuthn Security Key. How you prepare this key depends on the type of WebAuthn security key you use. For example, for a USB based Yubikey, you may need to put your key into the USB port on your laptop.
- Click Register to register your security key.
- Log out and log in again.
- Assuming authentication flow was correctly set, a message appears asking you to authenticate with your Security Key as second factor. You no longer need to provide your password to log in.
16.3. Viewing device activity
You can view the devices that are logged in to your account.
Procedure
- Click Account security in the menu.
- Click Device activity.
- Log out a device if it looks suspicious.
Devices
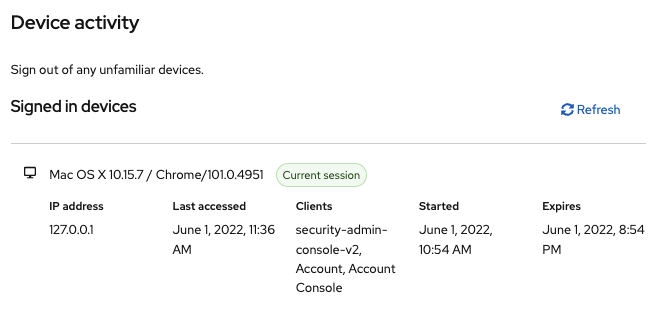
16.4. Adding an identity provider account
You can link your account with an identity broker. This option is often used to link social provider accounts.
Procedure
- Log into the Admin Console.
- Click Identity providers in the menu.
- Select a provider and complete the fields.
- Return to the Account Console.
- Click Account security in the menu.
- Click Linked accounts.
The identity provider you added appears in this page.
Linked Accounts
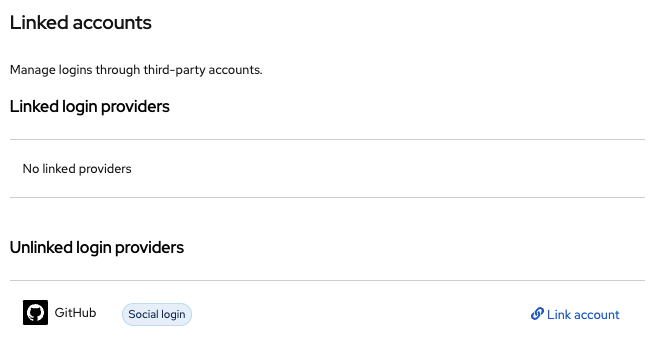
16.5. Accessing other applications
The Applications menu item shows users which applications you can access. In this case, only the Account Console is available.
Applications
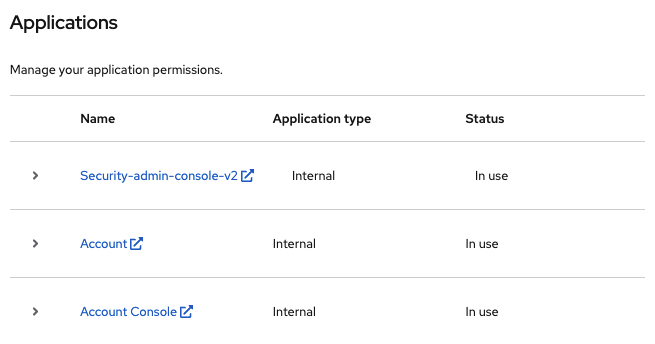
16.6. Viewing group memberships
You can view the groups you are associated with by clicking the Groups menu. If you select Direct membership checkbox, you will see only the groups you are direct associated with.
Prerequisites
- You need to have the view-groups account role for being able to view Groups menu.
View group memberships

Chapter 17. Admin CLI
With Red Hat build of Keycloak, you can perform administration tasks from the command-line interface (CLI) by using the Admin CLI command-line tool.
17.1. Installing the Admin CLI
Red Hat build of Keycloak packages the Admin CLI server distribution with the execution scripts in the bin directory.
The Linux script is called kcadm.sh, and the script for Windows is called kcadm.bat. Add the Red Hat build of Keycloak server directory to your PATH to use the client from any location on your file system.
For example:
Linux:
$ export PATH=$PATH:$KEYCLOAK_HOME/bin
$ kcadm.sh
Windows:
c:\> set PATH=%PATH%;%KEYCLOAK_HOME%\bin
c:\> kcadm
You must set the KEYCLOAK_HOME environment variable to the path where you extracted the Red Hat build of Keycloak Server distribution.
To avoid repetition, the rest of this document only uses Windows examples in places where the CLI differences are more than just in the kcadm command name.
17.2. Using the Admin CLI
The Admin CLI makes HTTP requests to Admin REST endpoints. Access to the Admin REST endpoints requires authentication.
Consult the Admin REST API documentation for details about JSON attributes for specific endpoints.
Start an authenticated session by logging in. You can now perform create, read, update, and delete (CRUD) operations.
For example:
Linux:
$ kcadm.sh config credentials --server http://localhost:8080 --realm demo --user admin --client admin
$ kcadm.sh create realms -s realm=demorealm -s enabled=true -o
$ CID=$(kcadm.sh create clients -r demorealm -s clientId=my_client -s 'redirectUris=["http://localhost:8980/myapp/*"]' -i)
$ kcadm.sh get clients/$CID/installation/providers/keycloak-oidc-keycloak-json
Windows:
c:\> kcadm config credentials --server http://localhost:8080 --realm demo --user admin --client admin
c:\> kcadm create realms -s realm=demorealm -s enabled=true -o
c:\> kcadm create clients -r demorealm -s clientId=my_client -s "redirectUris=[\"http://localhost:8980/myapp/*\"]" -i > clientid.txt
c:\> set /p CID=<clientid.txt
c:\> kcadm get clients/%CID%/installation/providers/keycloak-oidc-keycloak-json
In a production environment, access Red Hat build of Keycloak by using
https:to avoid exposing tokens. If a trusted certificate authority, included in Java’s default certificate truststore, has not issued a server’s certificate, prepare atruststore.jksfile and instruct the Admin CLI to use it.For example:
Linux:
$ kcadm.sh config truststore --trustpass $PASSWORD ~/.keycloak/truststore.jksWindows:
c:\> kcadm config truststore --trustpass %PASSWORD% %HOMEPATH%\.keycloak\truststore.jks
17.3. Authenticating
When you log in with the Admin CLI, you specify:
- A server endpoint URL
- A realm
- A user name
Another option is to specify a clientId only, which creates a unique service account for you to use.
When you log in using a user name, use a password for the specified user. When you log in using a clientId, you need the client secret only, not the user password. You can also use the Signed JWT rather than the client secret.
Ensure the account used for the session has the proper permissions to invoke Admin REST API operations. For example, the realm-admin role of the realm-management client can administer the realm of the user.
Two primary mechanisms are available for authentication. One mechanism uses kcadm config credentials to start an authenticated session.
$ kcadm.sh config credentials --server http://localhost:8080 --realm master --user admin --password admin
This mechanism maintains an authenticated session between the kcadm command invocations by saving the obtained access token and its associated refresh token. It can maintain other secrets in a private configuration file. See the next chapter for more information.
The second mechanism authenticates each command invocation for the duration of the invocation. This mechanism increases the load on the server and the time spent on round trips obtaining tokens. The benefit of this approach is that it is unnecessary to save tokens between invocations, so nothing is saved to disk. Red Hat build of Keycloak uses this mode when the --no-config argument is specified.
For example, when performing an operation, specify all the information required for authentication.
$ kcadm.sh get realms --no-config --server http://localhost:8080 --realm master --user admin --password admin
Run the kcadm.sh help command for more information on using the Admin CLI.
Run the kcadm.sh config credentials --help command for more information about starting an authenticated session.
17.4. Working with alternative configurations
By default, the Admin CLI maintains a configuration file named kcadm.config. Red Hat build of Keycloak places this file in the user’s home directory. In Linux-based systems, the full pathname is $HOME/.keycloak/kcadm.config. In Windows, the full pathname is %HOMEPATH%\.keycloak\kcadm.config.
You can use the --config option to point to a different file or location so you can maintain multiple authenticated sessions in parallel.
Perform operations tied to a single configuration file from a single thread.
Ensure the configuration file is invisible to other users on the system. It contains access tokens and secrets that must be private. Red Hat build of Keycloak creates the ~/.keycloak directory and its contents automatically with proper access limits. If the directory already exists, Red Hat build of Keycloak does not update the directory’s permissions.
It is possible to avoid storing secrets inside a configuration file, but doing so is inconvenient and increases the number of token requests. Use the --no-config option with all commands and specify the authentication information the config credentials command requires with each invocation of kcadm.
17.5. Basic operations and resource URIs
The Admin CLI can generically perform CRUD operations against Admin REST API endpoints with additional commands that simplify particular tasks.
The main usage pattern is listed here:
$ kcadm.sh create ENDPOINT [ARGUMENTS]
$ kcadm.sh get ENDPOINT [ARGUMENTS]
$ kcadm.sh update ENDPOINT [ARGUMENTS]
$ kcadm.sh delete ENDPOINT [ARGUMENTS]
The create, get, update, and delete commands map to the HTTP verbs POST, GET, PUT, and DELETE, respectively. ENDPOINT is a target resource URI and can be absolute (starting with http: or https:) or relative, that Red Hat build of Keycloak uses to compose absolute URLs in the following format:
SERVER_URI/admin/realms/REALM/ENDPOINT
For example, if you authenticate against the server http://localhost:8080 and realm is master, using users as ENDPOINT creates the http://localhost:8080/admin/realms/master/users resource URL.
If you set ENDPOINT to clients, the effective resource URI is http://localhost:8080/admin/realms/master/clients.
Red Hat build of Keycloak has a realms endpoint that is the container for realms. It resolves to:
SERVER_URI/admin/realms
Red Hat build of Keycloak has a serverinfo endpoint. This endpoint is independent of realms.
When you authenticate as a user with realm-admin powers, you may need to perform commands on multiple realms. If so, specify the -r option to tell the CLI which realm the command is to execute against explicitly. Instead of using REALM as specified by the --realm option of kcadm.sh config credentials, the command uses TARGET_REALM.
SERVER_URI/admin/realms/TARGET_REALM/ENDPOINTFor example:
$ kcadm.sh config credentials --server http://localhost:8080 --realm master --user admin --password admin
$ kcadm.sh create users -s username=testuser -s enabled=true -r demorealm
In this example, you start a session authenticated as the admin user in the master realm. You then perform a POST call against the resource URL http://localhost:8080/admin/realms/demorealm/users.
The create and update commands send a JSON body to the server. You can use -f FILENAME to read a pre-made document from a file. When you can use the -f - option, Red Hat build of Keycloak reads the message body from the standard input. You can specify individual attributes and their values, as seen in the create users example. Red Hat build of Keycloak composes the attributes into a JSON body and sends them to the server.
Several methods are available in Red Hat build of Keycloak to update a resource using the update command. You can determine the current state of a resource and save it to a file, edit that file, and send it to the server for an update.
For example:
$ kcadm.sh get realms/demorealm > demorealm.json
$ vi demorealm.json
$ kcadm.sh update realms/demorealm -f demorealm.json
This method updates the resource on the server with the attributes in the sent JSON document.
Another method is to perform an on-the-fly update by using the -s, --set options to set new values.
For example:
$ kcadm.sh update realms/demorealm -s enabled=false
This method sets the enabled attribute to false.
By default, the update command performs a get and then merges the new attribute values with existing values. In some cases, the endpoint may support the put command but not the get command. You can use the -n option to perform a no-merge update, which performs a put command without first running a get command.
17.6. Realm operations
Creating a new realm
Use the create command on the realms endpoint to create a new enabled realm. Set the attributes to realm and enabled.
$ kcadm.sh create realms -s realm=demorealm -s enabled=trueRed Hat build of Keycloak disables realms by default. You can use a realm immediately for authentication by enabling it.
A description for a new object can also be in JSON format.
$ kcadm.sh create realms -f demorealm.jsonYou can send a JSON document with realm attributes directly from a file or pipe the document to standard input.
For example:
Linux:
$ kcadm.sh create realms -f - << EOF
{ "realm": "demorealm", "enabled": true }
EOF
Windows:
c:\> echo { "realm": "demorealm", "enabled": true } | kcadm create realms -f -
Listing existing realms
This command returns a list of all realms.
$ kcadm.sh get realmsRed Hat build of Keycloak filters the list of realms on the server to return realms a user can see only.
The list of all realm attributes can be verbose, and most users are interested in a subset of attributes, such as the realm name and the enabled status of the realm. You can specify the attributes to return by using the --fields option.
$ kcadm.sh get realms --fields realm,enabledYou can display the result as comma-separated values.
$ kcadm.sh get realms --fields realm --format csv --noquotesGetting a specific realm
Append a realm name to a collection URI to get an individual realm.
$ kcadm.sh get realms/masterUpdating a realm
Use the
-soption to set new values for the attributes when you do not want to change all of the realm’s attributes.For example:
$ kcadm.sh update realms/demorealm -s enabled=falseIf you want to set all writable attributes to new values:
-
Run a
getcommand. - Edit the current values in the JSON file.
Resubmit.
For example:
$ kcadm.sh get realms/demorealm > demorealm.json
$ vi demorealm.json
$ kcadm.sh update realms/demorealm -f demorealm.json
-
Run a
Deleting a realm
Run the following command to delete a realm:
$ kcadm.sh delete realms/demorealmTurning on all login page options for the realm
Set the attributes that control specific capabilities to true.
For example:
$ kcadm.sh update realms/demorealm -s registrationAllowed=true -s registrationEmailAsUsername=true -s rememberMe=true -s verifyEmail=true -s resetPasswordAllowed=true -s editUsernameAllowed=trueListing the realm keys
Use the get operation on the keys endpoint of the target realm.
$ kcadm.sh get keys -r demorealmGenerating new realm keys
Get the ID of the target realm before adding a new RSA-generated key pair.
For example:
$ kcadm.sh get realms/demorealm --fields id --format csv --noquotesAdd a new key provider with a higher priority than the existing providers as revealed by
kcadm.sh get keys -r demorealm.For example:
Linux:
$ kcadm.sh create components -r demorealm -s name=rsa-generated -s providerId=rsa-generated -s providerType=org.keycloak.keys.KeyProvider -s parentId=959844c1-d149-41d7-8359-6aa527fca0b0 -s 'config.priority=["101"]' -s 'config.enabled=["true"]' -s 'config.active=["true"]' -s 'config.keySize=["2048"]'Windows:
c:\> kcadm create components -r demorealm -s name=rsa-generated -s providerId=rsa-generated -s providerType=org.keycloak.keys.KeyProvider -s parentId=959844c1-d149-41d7-8359-6aa527fca0b0 -s "config.priority=[\"101\"]" -s "config.enabled=[\"true\"]" -s "config.active=[\"true\"]" -s "config.keySize=[\"2048\"]"
Set the
parentIdattribute to the value of the target realm’s ID.The newly added key is now the active key, as revealed by
kcadm.sh get keys -r demorealm.
Adding new realm keys from a Java Key Store file
Add a new key provider to add a new key pair pre-prepared as a JKS file.
For example, on:
Linux:
$ kcadm.sh create components -r demorealm -s name=java-keystore -s providerId=java-keystore -s providerType=org.keycloak.keys.KeyProvider -s parentId=959844c1-d149-41d7-8359-6aa527fca0b0 -s 'config.priority=["101"]' -s 'config.enabled=["true"]' -s 'config.active=["true"]' -s 'config.keystore=["/opt/keycloak/keystore.jks"]' -s 'config.keystorePassword=["secret"]' -s 'config.keyPassword=["secret"]' -s 'config.keyAlias=["localhost"]'Windows:
c:\> kcadm create components -r demorealm -s name=java-keystore -s providerId=java-keystore -s providerType=org.keycloak.keys.KeyProvider -s parentId=959844c1-d149-41d7-8359-6aa527fca0b0 -s "config.priority=[\"101\"]" -s "config.enabled=[\"true\"]" -s "config.active=[\"true\"]" -s "config.keystore=[\"/opt/keycloak/keystore.jks\"]" -s "config.keystorePassword=[\"secret\"]" -s "config.keyPassword=[\"secret\"]" -s "config.keyAlias=[\"localhost\"]"
-
Ensure you change the attribute values for
keystore,keystorePassword,keyPassword, andaliasto match your specific keystore. -
Set the
parentIdattribute to the value of the target realm’s ID.
Making the key passive or disabling the key
Identify the key you want to make passive.
$ kcadm.sh get keys -r demorealm-
Use the key’s
providerIdattribute to construct an endpoint URI, such ascomponents/PROVIDER_ID. Perform an
update.For example:
Linux:
$ kcadm.sh update components/PROVIDER_ID -r demorealm -s 'config.active=["false"]'Windows:
c:\> kcadm update components/PROVIDER_ID -r demorealm -s "config.active=[\"false\"]"You can update other key attributes:
-
Set a new
enabledvalue to disable the key, for example,config.enabled=["false"]. -
Set a new
priorityvalue to change the key’s priority, for example,config.priority=["110"].
Deleting an old key
- Ensure the key you are deleting is inactive and you have disabled it. This action is to prevent existing tokens held by applications and users from failing.
Identify the key to delete.
$ kcadm.sh get keys -r demorealmUse the
providerIdof the key to perform the delete.$ kcadm.sh delete components/PROVIDER_ID -r demorealm
Configuring event logging for a realm
Use the update command on the events/config endpoint.
The eventsListeners attribute contains a list of EventListenerProviderFactory IDs, specifying all event listeners that receive events. Attributes are available that control built-in event storage, so you can query past events using the Admin REST API. Red Hat build of Keycloak has separate control over the logging of service calls (eventsEnabled) and the auditing events triggered by the Admin Console or Admin REST API (adminEventsEnabled). You can set up the eventsExpiration event to expire to prevent your database from filling. Red Hat build of Keycloak sets eventsExpiration to time-to-live expressed in seconds.
You can set up a built-in event listener that receives all events and logs the events through JBoss-logging. Using the org.keycloak.events logger, Red Hat build of Keycloak logs error events as WARN and other events as DEBUG.
For example:
Linux:
$ kcadm.sh update events/config -r demorealm -s 'eventsListeners=["jboss-logging"]'Windows:
c:\> kcadm update events/config -r demorealm -s "eventsListeners=[\"jboss-logging\"]"
For example:
You can turn on storage for all available ERROR events, not including auditing events, for two days so you can retrieve the events through Admin REST.
Linux:
$ kcadm.sh update events/config -r demorealm -s eventsEnabled=true -s 'enabledEventTypes=["LOGIN_ERROR","REGISTER_ERROR","LOGOUT_ERROR","CODE_TO_TOKEN_ERROR","CLIENT_LOGIN_ERROR","FEDERATED_IDENTITY_LINK_ERROR","REMOVE_FEDERATED_IDENTITY_ERROR","UPDATE_EMAIL_ERROR","UPDATE_PROFILE_ERROR","UPDATE_PASSWORD_ERROR","UPDATE_TOTP_ERROR","VERIFY_EMAIL_ERROR","REMOVE_TOTP_ERROR","SEND_VERIFY_EMAIL_ERROR","SEND_RESET_PASSWORD_ERROR","SEND_IDENTITY_PROVIDER_LINK_ERROR","RESET_PASSWORD_ERROR","IDENTITY_PROVIDER_FIRST_LOGIN_ERROR","IDENTITY_PROVIDER_POST_LOGIN_ERROR","CUSTOM_REQUIRED_ACTION_ERROR","EXECUTE_ACTIONS_ERROR","CLIENT_REGISTER_ERROR","CLIENT_UPDATE_ERROR","CLIENT_DELETE_ERROR"]' -s eventsExpiration=172800Windows:
c:\> kcadm update events/config -r demorealm -s eventsEnabled=true -s "enabledEventTypes=[\"LOGIN_ERROR\",\"REGISTER_ERROR\",\"LOGOUT_ERROR\",\"CODE_TO_TOKEN_ERROR\",\"CLIENT_LOGIN_ERROR\",\"FEDERATED_IDENTITY_LINK_ERROR\",\"REMOVE_FEDERATED_IDENTITY_ERROR\",\"UPDATE_EMAIL_ERROR\",\"UPDATE_PROFILE_ERROR\",\"UPDATE_PASSWORD_ERROR\",\"UPDATE_TOTP_ERROR\",\"VERIFY_EMAIL_ERROR\",\"REMOVE_TOTP_ERROR\",\"SEND_VERIFY_EMAIL_ERROR\",\"SEND_RESET_PASSWORD_ERROR\",\"SEND_IDENTITY_PROVIDER_LINK_ERROR\",\"RESET_PASSWORD_ERROR\",\"IDENTITY_PROVIDER_FIRST_LOGIN_ERROR\",\"IDENTITY_PROVIDER_POST_LOGIN_ERROR\",\"CUSTOM_REQUIRED_ACTION_ERROR\",\"EXECUTE_ACTIONS_ERROR\",\"CLIENT_REGISTER_ERROR\",\"CLIENT_UPDATE_ERROR\",\"CLIENT_DELETE_ERROR\"]" -s eventsExpiration=172800
You can reset stored event types to all available event types. Setting the value to an empty list is the same as enumerating all.
$ kcadm.sh update events/config -r demorealm -s enabledEventTypes=[]You can enable storage of auditing events.
$ kcadm.sh update events/config -r demorealm -s adminEventsEnabled=true -s adminEventsDetailsEnabled=trueYou can get the last 100 events. The events are ordered from newest to oldest.
$ kcadm.sh get events --offset 0 --limit 100You can delete all saved events.
$ kcadm delete eventsFlushing the caches
Use the
createcommand with one of these endpoints to clear caches:-
clear-realm-cache -
clear-user-cache -
clear-keys-cache
-
Set
realmto the same value as the target realm.For example:
$ kcadm.sh create clear-realm-cache -r demorealm -s realm=demorealm
$ kcadm.sh create clear-user-cache -r demorealm -s realm=demorealm
$ kcadm.sh create clear-keys-cache -r demorealm -s realm=demorealm
Importing a realm from exported .json file
-
Use the
createcommand on thepartialImportendpoint. -
Set
ifResourceExiststoFAIL,SKIP, orOVERWRITE. Use
-fto submit the exported realm.jsonfile.For example:
$ kcadm.sh create partialImport -r demorealm2 -s ifResourceExists=FAIL -o -f demorealm.jsonIf the realm does not yet exist, create it first.
For example:
$ kcadm.sh create realms -s realm=demorealm2 -s enabled=true
17.7. Role operations
Creating a realm role
Use the roles endpoint to create a realm role.
$ kcadm.sh create roles -r demorealm -s name=user -s 'description=Regular user with a limited set of permissions'Creating a client role
- Identify the client.
Use the
getcommand to list the available clients.$ kcadm.sh get clients -r demorealm --fields id,clientIdCreate a new role by using the
clientIdattribute to construct an endpoint URI, such asclients/ID/roles.For example:
$ kcadm.sh create clients/a95b6af3-0bdc-4878-ae2e-6d61a4eca9a0/roles -r demorealm -s name=editor -s 'description=Editor can edit, and publish any article'
Listing realm roles
Use the get command on the roles endpoint to list existing realm roles.
$ kcadm.sh get roles -r demorealm
You can use the get-roles command also.
$ kcadm.sh get-roles -r demorealmListing client roles
Red Hat build of Keycloak has a dedicated get-roles command to simplify the listing of realm and client roles. The command is an extension of the get command and behaves the same as the get command but with additional semantics for listing roles.
Use the get-roles command by passing it the clientId (--cclientid) option or the id (--cid) option to identify the client to list client roles.
For example:
$ kcadm.sh get-roles -r demorealm --cclientid realm-managementGetting a specific realm role
Use the get command and the role name to construct an endpoint URI for a specific realm role, roles/ROLE_NAME, where user is the existing role’s name.
For example:
$ kcadm.sh get roles/user -r demorealm
You can use the get-roles command, passing it a role name (--rolename option) or ID (--roleid option).
For example:
$ kcadm.sh get-roles -r demorealm --rolename userGetting a specific client role
Use the get-roles command, passing it the clientId attribute (--cclientid option) or ID attribute (--cid option) to identify the client, and pass the role name (--rolename option) or the role ID attribute (--roleid) to identify a specific client role.
For example:
$ kcadm.sh get-roles -r demorealm --cclientid realm-management --rolename manage-clientsUpdating a realm role
Use the update command with the endpoint URI you used to get a specific realm role.
For example:
$ kcadm.sh update roles/user -r demorealm -s 'description=Role representing a regular user'Updating a client role
Use the update command with the endpoint URI that you used to get a specific client role.
For example:
$ kcadm.sh update clients/a95b6af3-0bdc-4878-ae2e-6d61a4eca9a0/roles/editor -r demorealm -s 'description=User that can edit, and publish articles'Deleting a realm role
Use the delete command with the endpoint URI that you used to get a specific realm role.
For example:
$ kcadm.sh delete roles/user -r demorealmDeleting a client role
Use the delete command with the endpoint URI that you used to get a specific client role.
For example:
$ kcadm.sh delete clients/a95b6af3-0bdc-4878-ae2e-6d61a4eca9a0/roles/editor -r demorealmListing assigned, available, and effective realm roles for a composite role
Use the get-roles command to list assigned, available, and effective realm roles for a composite role.
To list assigned realm roles for the composite role, specify the target composite role by name (
--rnameoption) or ID (--ridoption).For example:
$ kcadm.sh get-roles -r demorealm --rname testroleUse the
--effectiveoption to list effective realm roles.For example:
$ kcadm.sh get-roles -r demorealm --rname testrole --effectiveUse the
--availableoption to list realm roles that you can add to the composite role.For example:
$ kcadm.sh get-roles -r demorealm --rname testrole --available
Listing assigned, available, and effective client roles for a composite role
Use the get-roles command to list assigned, available, and effective client roles for a composite role.
To list assigned client roles for the composite role, you can specify the target composite role by name (
--rnameoption) or ID (--ridoption) and client by the clientId attribute (--cclientidoption) or ID (--cidoption).For example:
$ kcadm.sh get-roles -r demorealm --rname testrole --cclientid realm-managementUse the
--effectiveoption to list effective realm roles.For example:
$ kcadm.sh get-roles -r demorealm --rname testrole --cclientid realm-management --effectiveUse the
--availableoption to list realm roles that you can add to the target composite role.For example:
$ kcadm.sh get-roles -r demorealm --rname testrole --cclientid realm-management --available
Adding realm roles to a composite role
Red Hat build of Keycloak provides an add-roles command for adding realm roles and client roles.
This example adds the user role to the composite role testrole.
$ kcadm.sh add-roles --rname testrole --rolename user -r demorealmRemoving realm roles from a composite role
Red Hat build of Keycloak provides a remove-roles command for removing realm roles and client roles.
The following example removes the user role from the target composite role testrole.
$ kcadm.sh remove-roles --rname testrole --rolename user -r demorealmAdding client roles to a realm role
Red Hat build of Keycloak provides an add-roles command for adding realm roles and client roles.
The following example adds the roles defined on the client realm-management, create-client, and view-users, to the testrole composite role.
$ kcadm.sh add-roles -r demorealm --rname testrole --cclientid realm-management --rolename create-client --rolename view-usersAdding client roles to a client role
Determine the ID of the composite client role by using the
get-rolescommand.For example:
$ kcadm.sh get-roles -r demorealm --cclientid test-client --rolename operations-
Assume that a client exists with a clientId attribute named
test-client, a client role namedsupport, and a client role namedoperationswhich becomes a composite role that has an ID of "fc400897-ef6a-4e8c-872b-1581b7fa8a71". Use the following example to add another role to the composite role.
$ kcadm.sh add-roles -r demorealm --cclientid test-client --rid fc400897-ef6a-4e8c-872b-1581b7fa8a71 --rolename supportList the roles of a composite role by using the
get-roles --allcommand.For example:
$ kcadm.sh get-roles --rid fc400897-ef6a-4e8c-872b-1581b7fa8a71 --all
Removing client roles from a composite role
Use the remove-roles command to remove client roles from a composite role.
Use the following example to remove two roles defined on the client realm-management, the create-client role and the view-users role, from the testrole composite role.
$ kcadm.sh remove-roles -r demorealm --rname testrole --cclientid realm-management --rolename create-client --rolename view-usersAdding client roles to a group
Use the add-roles command to add realm roles and client roles.
The following example adds the roles defined on the client realm-management, create-client and view-users, to the Group group (--gname option). Alternatively, you can specify the group by ID (--gid option).
See Group operations for more information.
$ kcadm.sh add-roles -r demorealm --gname Group --cclientid realm-management --rolename create-client --rolename view-usersRemoving client roles from a group
Use the remove-roles command to remove client roles from a group.
The following example removes two roles defined on the client realm management, create-client and view-users, from the Group group.
See Group operations for more information.
$ kcadm.sh remove-roles -r demorealm --gname Group --cclientid realm-management --rolename create-client --rolename view-users17.8. Client operations
Creating a client
Run the
createcommand on aclientsendpoint to create a new client.For example:
$ kcadm.sh create clients -r demorealm -s clientId=myapp -s enabled=trueSpecify a secret if to set a secret for adapters to authenticate.
For example:
$ kcadm.sh create clients -r demorealm -s clientId=myapp -s enabled=true -s clientAuthenticatorType=client-secret -s secret=d0b8122f-8dfb-46b7-b68a-f5cc4e25d000
Listing clients
Use the get command on the clients endpoint to list clients.
This example filters the output to list only the id and clientId attributes:
$ kcadm.sh get clients -r demorealm --fields id,clientIdGetting a specific client
Use the client ID to construct an endpoint URI that targets a specific client, such as clients/ID.
For example:
$ kcadm.sh get clients/c7b8547f-e748-4333-95d0-410b76b3f4a3 -r demorealmGetting the current secret for a specific client
Use the client ID to construct an endpoint URI, such as clients/ID/client-secret.
For example:
$ kcadm.sh get clients/$CID/client-secret -r demorealmGenerate a new secret for a specific client
Use the client ID to construct an endpoint URI, such as clients/ID/client-secret.
For example:
$ kcadm.sh create clients/$CID/client-secret -r demorealmUpdating the current secret for a specific client
Use the client ID to construct an endpoint URI, such as clients/ID.
For example:
$ kcadm.sh update clients/$CID -s "secret=newSecret" -r demorealmGetting an adapter configuration file (keycloak.json) for a specific client
Use the client ID to construct an endpoint URI that targets a specific client, such as clients/ID/installation/providers/keycloak-oidc-keycloak-json.
For example:
$ kcadm.sh get clients/c7b8547f-e748-4333-95d0-410b76b3f4a3/installation/providers/keycloak-oidc-keycloak-json -r demorealmGetting a WildFly subsystem adapter configuration for a specific client
Use the client ID to construct an endpoint URI that targets a specific client, such as clients/ID/installation/providers/keycloak-oidc-jboss-subsystem.
For example:
$ kcadm.sh get clients/c7b8547f-e748-4333-95d0-410b76b3f4a3/installation/providers/keycloak-oidc-jboss-subsystem -r demorealmGetting a Docker-v2 example configuration for a specific client
Use the client ID to construct an endpoint URI that targets a specific client, such as clients/ID/installation/providers/docker-v2-compose-yaml.
The response is in .zip format.
For example:
$ kcadm.sh get http://localhost:8080/admin/realms/demorealm/clients/8f271c35-44e3-446f-8953-b0893810ebe7/installation/providers/docker-v2-compose-yaml -r demorealm > keycloak-docker-compose-yaml.zipUpdating a client
Use the update command with the same endpoint URI that you use to get a specific client.
For example:
Linux:
$ kcadm.sh update clients/c7b8547f-e748-4333-95d0-410b76b3f4a3 -r demorealm -s enabled=false -s publicClient=true -s 'redirectUris=["http://localhost:8080/myapp/*"]' -s baseUrl=http://localhost:8080/myapp -s adminUrl=http://localhost:8080/myappWindows:
c:\> kcadm update clients/c7b8547f-e748-4333-95d0-410b76b3f4a3 -r demorealm -s enabled=false -s publicClient=true -s "redirectUris=[\"http://localhost:8080/myapp/*\"]" -s baseUrl=http://localhost:8080/myapp -s adminUrl=http://localhost:8080/myapp
Deleting a client
Use the delete command with the same endpoint URI that you use to get a specific client.
For example:
$ kcadm.sh delete clients/c7b8547f-e748-4333-95d0-410b76b3f4a3 -r demorealmAdding or removing roles for client’s service account
A client’s service account is a user account with username service-account-CLIENT_ID. You can perform the same user operations on this account as a regular account.
17.9. User operations
Creating a user
Run the create command on the users endpoint to create a new user.
For example:
$ kcadm.sh create users -r demorealm -s username=testuser -s enabled=trueListing users
Use the users endpoint to list users. The target user must change their password the next time they log in.
For example:
$ kcadm.sh get users -r demorealm --offset 0 --limit 1000
You can filter users by username, firstName, lastName, or email.
For example:
$ kcadm.sh get users -r demorealm -q email=google.com
$ kcadm.sh get users -r demorealm -q username=testuser
Filtering does not use exact matching. This example matches the value of the username attribute against the *testuser* pattern.
You can filter across multiple attributes by specifying multiple -q options. Red Hat build of Keycloak returns users that match the condition for all the attributes only.
Getting a specific user
Use the user ID to compose an endpoint URI, such as users/USER_ID.
For example:
$ kcadm.sh get users/0ba7a3fd-6fd8-48cd-a60b-2e8fd82d56e2 -r demorealmUpdating a user
Use the update command with the same endpoint URI that you use to get a specific user.
For example:
Linux:
$ kcadm.sh update users/0ba7a3fd-6fd8-48cd-a60b-2e8fd82d56e2 -r demorealm -s 'requiredActions=["VERIFY_EMAIL","UPDATE_PROFILE","CONFIGURE_TOTP","UPDATE_PASSWORD"]'Windows:
c:\> kcadm update users/0ba7a3fd-6fd8-48cd-a60b-2e8fd82d56e2 -r demorealm -s "requiredActions=[\"VERIFY_EMAIL\",\"UPDATE_PROFILE\",\"CONFIGURE_TOTP\",\"UPDATE_PASSWORD\"]"
Deleting a user
Use the delete command with the same endpoint URI that you use to get a specific user.
For example:
$ kcadm.sh delete users/0ba7a3fd-6fd8-48cd-a60b-2e8fd82d56e2 -r demorealmResetting a user’s password
Use the dedicated set-password command to reset a user’s password.
For example:
$ kcadm.sh set-password -r demorealm --username testuser --new-password NEWPASSWORD --temporaryThis command sets a temporary password for the user. The target user must change the password the next time they log in.
You can use --userid to specify the user by using the id attribute.
You can achieve the same result using the update command on an endpoint constructed from the one you used to get a specific user, such as users/USER_ID/reset-password.
For example:
$ kcadm.sh update users/0ba7a3fd-6fd8-48cd-a60b-2e8fd82d56e2/reset-password -r demorealm -s type=password -s value=NEWPASSWORD -s temporary=true -n
The -n parameter ensures that Red Hat build of Keycloak performs the PUT command without performing a GET command before the PUT command. This is necessary because the reset-password endpoint does not support GET.
Listing assigned, available, and effective realm roles for a user
You can use a get-roles command to list assigned, available, and effective realm roles for a user.
Specify the target user by user name or ID to list the user’s assigned realm roles.
For example:
$ kcadm.sh get-roles -r demorealm --uusername testuserUse the
--effectiveoption to list effective realm roles.For example:
$ kcadm.sh get-roles -r demorealm --uusername testuser --effectiveUse the
--availableoption to list realm roles that you can add to a user.For example:
$ kcadm.sh get-roles -r demorealm --uusername testuser --available
Listing assigned, available, and effective client roles for a user
Use a get-roles command to list assigned, available, and effective client roles for a user.
Specify the target user by user name (
--uusernameoption) or ID (--uidoption) and client by a clientId attribute (--cclientidoption) or an ID (--cidoption) to list assigned client roles for the user.For example:
$ kcadm.sh get-roles -r demorealm --uusername testuser --cclientid realm-managementUse the
--effectiveoption to list effective realm roles.For example:
$ kcadm.sh get-roles -r demorealm --uusername testuser --cclientid realm-management --effectiveUse the
--availableoption to list realm roles that you can add to a user.For example:
$ kcadm.sh get-roles -r demorealm --uusername testuser --cclientid realm-management --available
Adding realm roles to a user
Use an add-roles command to add realm roles to a user.
Use the following example to add the user role to user testuser:
$ kcadm.sh add-roles --uusername testuser --rolename user -r demorealmRemoving realm roles from a user
Use a remove-roles command to remove realm roles from a user.
Use the following example to remove the user role from the user testuser:
$ kcadm.sh remove-roles --uusername testuser --rolename user -r demorealmAdding client roles to a user
Use an add-roles command to add client roles to a user.
Use the following example to add two roles defined on the client realm management, the create-client role and the view-users role, to the user testuser.
$ kcadm.sh add-roles -r demorealm --uusername testuser --cclientid realm-management --rolename create-client --rolename view-usersRemoving client roles from a user
Use a remove-roles command to remove client roles from a user.
Use the following example to remove two roles defined on the realm management client:
$ kcadm.sh remove-roles -r demorealm --uusername testuser --cclientid realm-management --rolename create-client --rolename view-usersListing a user’s sessions
- Identify the user’s ID,
-
Use the ID to compose an endpoint URI, such as
users/ID/sessions. Use the
getcommand to retrieve a list of the user’s sessions.For example:
$ kcadm.sh get users/6da5ab89-3397-4205-afaa-e201ff638f9e/sessions -r demorealm
Logging out a user from a specific session
- Determine the session’s ID as described earlier.
-
Use the session’s ID to compose an endpoint URI, such as
sessions/ID. Use the
deletecommand to invalidate the session.For example:
$ kcadm.sh delete sessions/d0eaa7cc-8c5d-489d-811a-69d3c4ec84d1 -r demorealm
Logging out a user from all sessions
Use the user’s ID to construct an endpoint URI, such as users/ID/logout.
Use the create command to perform POST on that endpoint URI.
For example:
$ kcadm.sh create users/6da5ab89-3397-4205-afaa-e201ff638f9e/logout -r demorealm -s realm=demorealm -s user=6da5ab89-3397-4205-afaa-e201ff638f9e17.10. Group operations
Creating a group
Use the create command on the groups endpoint to create a new group.
For example:
$ kcadm.sh create groups -r demorealm -s name=GroupListing groups
Use the get command on the groups endpoint to list groups.
For example:
$ kcadm.sh get groups -r demorealmGetting a specific group
Use the group’s ID to construct an endpoint URI, such as groups/GROUP_ID.
For example:
$ kcadm.sh get groups/51204821-0580-46db-8f2d-27106c6b5ded -r demorealmUpdating a group
Use the update command with the same endpoint URI that you use to get a specific group.
For example:
$ kcadm.sh update groups/51204821-0580-46db-8f2d-27106c6b5ded -s 'attributes.email=["group@example.com"]' -r demorealmDeleting a group
Use the delete command with the same endpoint URI that you use to get a specific group.
For example:
$ kcadm.sh delete groups/51204821-0580-46db-8f2d-27106c6b5ded -r demorealmCreating a subgroup
Find the ID of the parent group by listing groups. Use that ID to construct an endpoint URI, such as groups/GROUP_ID/children.
For example:
$ kcadm.sh create groups/51204821-0580-46db-8f2d-27106c6b5ded/children -r demorealm -s name=SubGroupMoving a group under another group
- Find the ID of an existing parent group and the ID of an existing child group.
-
Use the parent group’s ID to construct an endpoint URI, such as
groups/PARENT_GROUP_ID/children. -
Run the
createcommand on this endpoint and pass the child group’s ID as a JSON body.
For example:
$ kcadm.sh create groups/51204821-0580-46db-8f2d-27106c6b5ded/children -r demorealm -s id=08d410c6-d585-4059-bb07-54dcb92c5094 -s name=SubGroupGet groups for a specific user
Use a user’s ID to determine a user’s membership in groups to compose an endpoint URI, such as users/USER_ID/groups.
For example:
$ kcadm.sh get users/b544f379-5fc4-49e5-8a8d-5cfb71f46f53/groups -r demorealmAdding a user to a group
Use the update command with an endpoint URI composed of a user’s ID and a group’s ID, such as users/USER_ID/groups/GROUP_ID, to add a user to a group.
For example:
$ kcadm.sh update users/b544f379-5fc4-49e5-8a8d-5cfb71f46f53/groups/ce01117a-7426-4670-a29a-5c118056fe20 -r demorealm -s realm=demorealm -s userId=b544f379-5fc4-49e5-8a8d-5cfb71f46f53 -s groupId=ce01117a-7426-4670-a29a-5c118056fe20 -nRemoving a user from a group
Use the delete command on the same endpoint URI you use for adding a user to a group, such as users/USER_ID/groups/GROUP_ID, to remove a user from a group.
For example:
$ kcadm.sh delete users/b544f379-5fc4-49e5-8a8d-5cfb71f46f53/groups/ce01117a-7426-4670-a29a-5c118056fe20 -r demorealmListing assigned, available, and effective realm roles for a group
Use a dedicated get-roles command to list assigned, available, and effective realm roles for a group.
Specify the target group by name (
--gnameoption), path (--gpathoption), or ID (--gidoption) to list assigned realm roles for the group.For example:
$ kcadm.sh get-roles -r demorealm --gname GroupUse the
--effectiveoption to list effective realm roles.For example:
$ kcadm.sh get-roles -r demorealm --gname Group --effectiveUse the
--availableoption to list realm roles that you can add to the group.For example:
$ kcadm.sh get-roles -r demorealm --gname Group --available
Listing assigned, available, and effective client roles for a group
Use the get-roles command to list assigned, available, and effective client roles for a group.
-
Specify the target group by name (
--gnameoption) or ID (--gidoption), Specify the client by the clientId attribute (
--cclientidoption) or ID (--idoption) to list assigned client roles for the user.For example:
$ kcadm.sh get-roles -r demorealm --gname Group --cclientid realm-managementUse the
--effectiveoption to list effective realm roles.For example:
$ kcadm.sh get-roles -r demorealm --gname Group --cclientid realm-management --effectiveUse the
--availableoption to list realm roles that you can still add to the group.For example:
$ kcadm.sh get-roles -r demorealm --gname Group --cclientid realm-management --available
17.11. Identity provider operations
Listing available identity providers
Use the serverinfo endpoint to list available identity providers.
For example:
$ kcadm.sh get serverinfo -r demorealm --fields 'identityProviders(*)'
Red Hat build of Keycloak processes the serverinfo endpoint similarly to the realms endpoint. Red Hat build of Keycloak does not resolve the endpoint relative to a target realm because it exists outside any specific realm.
Listing configured identity providers
Use the identity-provider/instances endpoint.
For example:
$ kcadm.sh get identity-provider/instances -r demorealm --fields alias,providerId,enabledGetting a specific configured identity provider
Use the identity provider’s alias attribute to construct an endpoint URI, such as identity-provider/instances/ALIAS, to get a specific identity provider.
For example:
$ kcadm.sh get identity-provider/instances/facebook -r demorealmRemoving a specific configured identity provider
Use the delete command with the same endpoint URI that you use to get a specific configured identity provider to remove a specific configured identity provider.
For example:
$ kcadm.sh delete identity-provider/instances/facebook -r demorealmConfiguring a Keycloak OpenID Connect identity provider
-
Use
keycloak-oidcas theproviderIdwhen you create a new identity provider instance. Provide the
configattributes:authorizationUrl,tokenUrl,clientId, andclientSecret.For example:
$ kcadm.sh create identity-provider/instances -r demorealm -s alias=keycloak-oidc -s providerId=keycloak-oidc -s enabled=true -s 'config.useJwksUrl="true"' -s config.authorizationUrl=http://localhost:8180/realms/demorealm/protocol/openid-connect/auth -s config.tokenUrl=http://localhost:8180/realms/demorealm/protocol/openid-connect/token -s config.clientId=demo-oidc-provider -s config.clientSecret=secret
Configuring an OpenID Connect identity provider
Configure the generic OpenID Connect provider the same way you configure the Keycloak OpenID Connect provider, except you set the providerId attribute value to oidc.
Configuring a SAML 2 identity provider
-
Use
samlas theproviderId. -
Provide the
configattributes:singleSignOnServiceUrl,nameIDPolicyFormat, andsignatureAlgorithm.
For example:
$ kcadm.sh create identity-provider/instances -r demorealm -s alias=saml -s providerId=saml -s enabled=true -s 'config.useJwksUrl="true"' -s config.singleSignOnServiceUrl=http://localhost:8180/realms/saml-broker-realm/protocol/saml -s config.nameIDPolicyFormat=urn:oasis:names:tc:SAML:2.0:nameid-format:persistent -s config.signatureAlgorithm=RSA_SHA256Configuring a Facebook identity provider
-
Use
facebookas theproviderId. Provide the
configattributes:clientIdandclientSecret. You can find these attributes in the Facebook Developers application configuration page for your application. See the Facebook identity broker page for more information.For example:
$ kcadm.sh create identity-provider/instances -r demorealm -s alias=facebook -s providerId=facebook -s enabled=true -s 'config.useJwksUrl="true"' -s config.clientId=FACEBOOK_CLIENT_ID -s config.clientSecret=FACEBOOK_CLIENT_SECRET
Configuring a Google identity provider
-
Use
googleas theproviderId. Provide the
configattributes:clientIdandclientSecret. You can find these attributes in the Google Developers application configuration page for your application. See the Google identity broker page for more information.For example:
$ kcadm.sh create identity-provider/instances -r demorealm -s alias=google -s providerId=google -s enabled=true -s 'config.useJwksUrl="true"' -s config.clientId=GOOGLE_CLIENT_ID -s config.clientSecret=GOOGLE_CLIENT_SECRET
Configuring a Twitter identity provider
-
Use
twitteras theproviderId. Provide the
configattributesclientIdandclientSecret. You can find these attributes in the Twitter Application Management application configuration page for your application. See the Twitter identity broker page for more information.For example:
$ kcadm.sh create identity-provider/instances -r demorealm -s alias=google -s providerId=google -s enabled=true -s 'config.useJwksUrl="true"' -s config.clientId=TWITTER_API_KEY -s config.clientSecret=TWITTER_API_SECRET
Configuring a GitHub identity provider
-
Use
githubas theproviderId. Provide the
configattributesclientIdandclientSecret. You can find these attributes in the GitHub Developer Application Settings page for your application. See the GitHub identity broker page for more information.For example:
$ kcadm.sh create identity-provider/instances -r demorealm -s alias=github -s providerId=github -s enabled=true -s 'config.useJwksUrl="true"' -s config.clientId=GITHUB_CLIENT_ID -s config.clientSecret=GITHUB_CLIENT_SECRET
Configuring a LinkedIn identity provider
-
Use
linkedinas theproviderId. Provide the
configattributesclientIdandclientSecret. You can find these attributes in the LinkedIn Developer Console application page for your application. See the LinkedIn identity broker page for more information.For example:
$ kcadm.sh create identity-provider/instances -r demorealm -s alias=linkedin -s providerId=linkedin -s enabled=true -s 'config.useJwksUrl="true"' -s config.clientId=LINKEDIN_CLIENT_ID -s config.clientSecret=LINKEDIN_CLIENT_SECRET
Configuring a Microsoft Live identity provider
-
Use
microsoftas theproviderId. Provide the
configattributesclientIdandclientSecret. You can find these attributes in the Microsoft Application Registration Portal page for your application. See the Microsoft identity broker page for more information.For example:
$ kcadm.sh create identity-provider/instances -r demorealm -s alias=microsoft -s providerId=microsoft -s enabled=true -s 'config.useJwksUrl="true"' -s config.clientId=MICROSOFT_APP_ID -s config.clientSecret=MICROSOFT_PASSWORD
Configuring a Stack Overflow identity provider
-
Use
stackoverflowcommand as theproviderId. Provide the
configattributesclientId,clientSecret, andkey. You can find these attributes in the Stack Apps OAuth page for your application. See the Stack Overflow identity broker page for more information.For example:
$ kcadm.sh create identity-provider/instances -r demorealm -s alias=stackoverflow -s providerId=stackoverflow -s enabled=true -s 'config.useJwksUrl="true"' -s config.clientId=STACKAPPS_CLIENT_ID -s config.clientSecret=STACKAPPS_CLIENT_SECRET -s config.key=STACKAPPS_KEY
17.12. Storage provider operations
Configuring a Kerberos storage provider
-
Use the
createcommand against thecomponentsendpoint. -
Specify the realm id as a value of the
parentIdattribute. -
Specify
kerberosas the value of theproviderIdattribute, andorg.keycloak.storage.UserStorageProvideras the value of theproviderTypeattribute. For example:
$ kcadm.sh create components -r demorealm -s parentId=demorealmId -s id=demokerberos -s name=demokerberos -s providerId=kerberos -s providerType=org.keycloak.storage.UserStorageProvider -s 'config.priority=["0"]' -s 'config.debug=["false"]' -s 'config.allowPasswordAuthentication=["true"]' -s 'config.editMode=["UNSYNCED"]' -s 'config.updateProfileFirstLogin=["true"]' -s 'config.allowKerberosAuthentication=["true"]' -s 'config.kerberosRealm=["KEYCLOAK.ORG"]' -s 'config.keyTab=["http.keytab"]' -s 'config.serverPrincipal=["HTTP/localhost@KEYCLOAK.ORG"]' -s 'config.cachePolicy=["DEFAULT"]'
Configuring an LDAP user storage provider
-
Use the
createcommand against thecomponentsendpoint. -
Specify
ldapas the value of theproviderIdattribute, andorg.keycloak.storage.UserStorageProvideras the value of theproviderTypeattribute. -
Provide the realm ID as the value of the
parentIdattribute. Use the following example to create a Kerberos-integrated LDAP provider.
$ kcadm.sh create components -r demorealm -s name=kerberos-ldap-provider -s providerId=ldap -s providerType=org.keycloak.storage.UserStorageProvider -s parentId=3d9c572b-8f33-483f-98a6-8bb421667867 -s 'config.priority=["1"]' -s 'config.fullSyncPeriod=["-1"]' -s 'config.changedSyncPeriod=["-1"]' -s 'config.cachePolicy=["DEFAULT"]' -s config.evictionDay=[] -s config.evictionHour=[] -s config.evictionMinute=[] -s config.maxLifespan=[] -s 'config.batchSizeForSync=["1000"]' -s 'config.editMode=["WRITABLE"]' -s 'config.syncRegistrations=["false"]' -s 'config.vendor=["other"]' -s 'config.usernameLDAPAttribute=["uid"]' -s 'config.rdnLDAPAttribute=["uid"]' -s 'config.uuidLDAPAttribute=["entryUUID"]' -s 'config.userObjectClasses=["inetOrgPerson, organizationalPerson"]' -s 'config.connectionUrl=["ldap://localhost:10389"]' -s 'config.usersDn=["ou=People,dc=keycloak,dc=org"]' -s 'config.authType=["simple"]' -s 'config.bindDn=["uid=admin,ou=system"]' -s 'config.bindCredential=["secret"]' -s 'config.searchScope=["1"]' -s 'config.useTruststoreSpi=["always"]' -s 'config.connectionPooling=["true"]' -s 'config.pagination=["true"]' -s 'config.allowKerberosAuthentication=["true"]' -s 'config.serverPrincipal=["HTTP/localhost@KEYCLOAK.ORG"]' -s 'config.keyTab=["http.keytab"]' -s 'config.kerberosRealm=["KEYCLOAK.ORG"]' -s 'config.debug=["true"]' -s 'config.useKerberosForPasswordAuthentication=["true"]'
Removing a user storage provider instance
-
Use the storage provider instance’s
idattribute to compose an endpoint URI, such ascomponents/ID. Run the
deletecommand against this endpoint.For example:
$ kcadm.sh delete components/3d9c572b-8f33-483f-98a6-8bb421667867 -r demorealm
Triggering synchronization of all users for a specific user storage provider
-
Use the storage provider’s
idattribute to compose an endpoint URI, such asuser-storage/ID_OF_USER_STORAGE_INSTANCE/sync. -
Add the
action=triggerFullSyncquery parameter. Run the
createcommand.For example:
$ kcadm.sh create user-storage/b7c63d02-b62a-4fc1-977c-947d6a09e1ea/sync?action=triggerFullSync
Triggering synchronization of changed users for a specific user storage provider
-
Use the storage provider’s
idattribute to compose an endpoint URI, such asuser-storage/ID_OF_USER_STORAGE_INSTANCE/sync. -
Add the
action=triggerChangedUsersSyncquery parameter. Run the
createcommand.For example:
$ kcadm.sh create user-storage/b7c63d02-b62a-4fc1-977c-947d6a09e1ea/sync?action=triggerChangedUsersSync
Test LDAP user storage connectivity
-
Run the
getcommand on thetestLDAPConnectionendpoint. -
Provide query parameters
bindCredential,bindDn,connectionUrl, anduseTruststoreSpi. Set the
actionquery parameter totestConnection.For example:
$ kcadm.sh create testLDAPConnection -s action=testConnection -s bindCredential=secret -s bindDn=uid=admin,ou=system -s connectionUrl=ldap://localhost:10389 -s useTruststoreSpi=always
Test LDAP user storage authentication
-
Run the
getcommand on thetestLDAPConnectionendpoint. -
Provide the query parameters
bindCredential,bindDn,connectionUrl, anduseTruststoreSpi. Set the
actionquery parameter totestAuthentication.For example:
$ kcadm.sh create testLDAPConnection -s action=testAuthentication -s bindCredential=secret -s bindDn=uid=admin,ou=system -s connectionUrl=ldap://localhost:10389 -s useTruststoreSpi=always
17.13. Adding mappers
Adding a hard-coded role LDAP mapper
-
Run the
createcommand on thecomponentsendpoint. -
Set the
providerTypeattribute toorg.keycloak.storage.ldap.mappers.LDAPStorageMapper. -
Set the
parentIdattribute to the ID of the LDAP provider instance. Set the
providerIdattribute tohardcoded-ldap-role-mapper. Ensure you provide a value ofroleconfiguration parameter.For example:
$ kcadm.sh create components -r demorealm -s name=hardcoded-ldap-role-mapper -s providerId=hardcoded-ldap-role-mapper -s providerType=org.keycloak.storage.ldap.mappers.LDAPStorageMapper -s parentId=b7c63d02-b62a-4fc1-977c-947d6a09e1ea -s 'config.role=["realm-management.create-client"]'
Adding an MS Active Directory mapper
-
Run the
createcommand on thecomponentsendpoint. -
Set the
providerTypeattribute toorg.keycloak.storage.ldap.mappers.LDAPStorageMapper. -
Set the
parentIdattribute to the ID of the LDAP provider instance. Set the
providerIdattribute tomsad-user-account-control-mapper.For example:
$ kcadm.sh create components -r demorealm -s name=msad-user-account-control-mapper -s providerId=msad-user-account-control-mapper -s providerType=org.keycloak.storage.ldap.mappers.LDAPStorageMapper -s parentId=b7c63d02-b62a-4fc1-977c-947d6a09e1ea
Adding a user attribute LDAP mapper
-
Run the
createcommand on thecomponentsendpoint. -
Set the
providerTypeattribute toorg.keycloak.storage.ldap.mappers.LDAPStorageMapper. -
Set the
parentIdattribute to the ID of the LDAP provider instance. Set the
providerIdattribute touser-attribute-ldap-mapper.For example:
$ kcadm.sh create components -r demorealm -s name=user-attribute-ldap-mapper -s providerId=user-attribute-ldap-mapper -s providerType=org.keycloak.storage.ldap.mappers.LDAPStorageMapper -s parentId=b7c63d02-b62a-4fc1-977c-947d6a09e1ea -s 'config."user.model.attribute"=["email"]' -s 'config."ldap.attribute"=["mail"]' -s 'config."read.only"=["false"]' -s 'config."always.read.value.from.ldap"=["false"]' -s 'config."is.mandatory.in.ldap"=["false"]'
Adding a group LDAP mapper
-
Run the
createcommand on thecomponentsendpoint. -
Set the
providerTypeattribute toorg.keycloak.storage.ldap.mappers.LDAPStorageMapper. -
Set the
parentIdattribute to the ID of the LDAP provider instance. Set the
providerIdattribute togroup-ldap-mapper.For example:
$ kcadm.sh create components -r demorealm -s name=group-ldap-mapper -s providerId=group-ldap-mapper -s providerType=org.keycloak.storage.ldap.mappers.LDAPStorageMapper -s parentId=b7c63d02-b62a-4fc1-977c-947d6a09e1ea -s 'config."groups.dn"=[]' -s 'config."group.name.ldap.attribute"=["cn"]' -s 'config."group.object.classes"=["groupOfNames"]' -s 'config."preserve.group.inheritance"=["true"]' -s 'config."membership.ldap.attribute"=["member"]' -s 'config."membership.attribute.type"=["DN"]' -s 'config."groups.ldap.filter"=[]' -s 'config.mode=["LDAP_ONLY"]' -s 'config."user.roles.retrieve.strategy"=["LOAD_GROUPS_BY_MEMBER_ATTRIBUTE"]' -s 'config."mapped.group.attributes"=["admins-group"]' -s 'config."drop.non.existing.groups.during.sync"=["false"]' -s 'config.roles=["admins"]' -s 'config.groups=["admins-group"]' -s 'config.group=[]' -s 'config.preserve=["true"]' -s 'config.membership=["member"]'
Adding a full name LDAP mapper
-
Run the
createcommand on thecomponentsendpoint. -
Set the
providerTypeattribute toorg.keycloak.storage.ldap.mappers.LDAPStorageMapper. -
Set the
parentIdattribute to the ID of the LDAP provider instance. Set the
providerIdattribute tofull-name-ldap-mapper.For example:
$ kcadm.sh create components -r demorealm -s name=full-name-ldap-mapper -s providerId=full-name-ldap-mapper -s providerType=org.keycloak.storage.ldap.mappers.LDAPStorageMapper -s parentId=b7c63d02-b62a-4fc1-977c-947d6a09e1ea -s 'config."ldap.full.name.attribute"=["cn"]' -s 'config."read.only"=["false"]' -s 'config."write.only"=["true"]'
17.14. Authentication operations
Setting a password policy
-
Set the realm’s
passwordPolicyattribute to an enumeration expression that includes the specific policy provider ID and optional configuration. Use the following example to set a password policy to default values. The default values include:
- 27,500 hashing iterations
- at least one special character
- at least one uppercase character
- at least one digit character
-
not be equal to a user’s
username be at least eight characters long
$ kcadm.sh update realms/demorealm -s 'passwordPolicy="hashIterations and specialChars and upperCase and digits and notUsername and length"'
- To use values different from defaults, pass the configuration in brackets.
Use the following example to set a password policy to:
- 25,000 hash iterations
- at least two special characters
- at least two uppercase characters
- at least two lowercase characters
- at least two digits
- be at least nine characters long
-
not be equal to a user’s
username not repeat for at least four changes back
$ kcadm.sh update realms/demorealm -s 'passwordPolicy="hashIterations(25000) and specialChars(2) and upperCase(2) and lowerCase(2) and digits(2) and length(9) and notUsername and passwordHistory(4)"'
Obtaining the current password policy
You can get the current realm configuration by filtering all output except for the passwordPolicy attribute.
For example, display passwordPolicy for demorealm.
$ kcadm.sh get realms/demorealm --fields passwordPolicyListing authentication flows
Run the get command on the authentication/flows endpoint.
For example:
$ kcadm.sh get authentication/flows -r demorealmGetting a specific authentication flow
Run the get command on the authentication/flows/FLOW_ID endpoint.
For example:
$ kcadm.sh get authentication/flows/febfd772-e1a1-42fb-b8ae-00c0566fafb8 -r demorealmListing executions for a flow
Run the get command on the authentication/flows/FLOW_ALIAS/executions endpoint.
For example:
$ kcadm.sh get authentication/flows/Copy%20of%20browser/executions -r demorealmAdding configuration to an execution
- Get execution for a flow.
- Note the ID of the flow.
-
Run the
createcommand on theauthentication/executions/{executionId}/configendpoint.
For example:
$ kcadm.sh create "authentication/executions/a3147129-c402-4760-86d9-3f2345e401c7/config" -r demorealm -b '{"config":{"x509-cert-auth.mapping-source-selection":"Match SubjectDN using regular expression","x509-cert-auth.regular-expression":"(.*?)(?:$)","x509-cert-auth.mapper-selection":"Custom Attribute Mapper","x509-cert-auth.mapper-selection.user-attribute-name":"usercertificate","x509-cert-auth.crl-checking-enabled":"","x509-cert-auth.crldp-checking-enabled":false,"x509-cert-auth.crl-relative-path":"crl.pem","x509-cert-auth.ocsp-checking-enabled":"","x509-cert-auth.ocsp-responder-uri":"","x509-cert-auth.keyusage":"","x509-cert-auth.extendedkeyusage":"","x509-cert-auth.confirmation-page-disallowed":""},"alias":"my_otp_config"}'Getting configuration for an execution
- Get execution for a flow.
-
Note its
authenticationConfigattribute, which contains the config ID. -
Run the
getcommand on theauthentication/config/IDendpoint.
For example:
$ kcadm get "authentication/config/dd91611a-d25c-421a-87e2-227c18421833" -r demorealmUpdating configuration for an execution
- Get the execution for the flow.
-
Get the flow’s
authenticationConfigattribute. - Note the config ID from the attribute.
-
Run the
updatecommand on theauthentication/config/IDendpoint.
For example:
$ kcadm update "authentication/config/dd91611a-d25c-421a-87e2-227c18421833" -r demorealm -b '{"id":"dd91611a-d25c-421a-87e2-227c18421833","alias":"my_otp_config","config":{"x509-cert-auth.extendedkeyusage":"","x509-cert-auth.mapper-selection.user-attribute-name":"usercertificate","x509-cert-auth.ocsp-responder-uri":"","x509-cert-auth.regular-expression":"(.*?)(?:$)","x509-cert-auth.crl-checking-enabled":"true","x509-cert-auth.confirmation-page-disallowed":"","x509-cert-auth.keyusage":"","x509-cert-auth.mapper-selection":"Custom Attribute Mapper","x509-cert-auth.crl-relative-path":"crl.pem","x509-cert-auth.crldp-checking-enabled":"false","x509-cert-auth.mapping-source-selection":"Match SubjectDN using regular expression","x509-cert-auth.ocsp-checking-enabled":""}}'Deleting configuration for an execution
- Get execution for a flow.
-
Get the flows
authenticationConfigattribute. - Note the config ID from the attribute.
-
Run the
deletecommand on theauthentication/config/IDendpoint.
For example:
$ kcadm delete "authentication/config/dd91611a-d25c-421a-87e2-227c18421833" -r demorealm
9.4. Social Identity ProvidersCopy linkLink copied to clipboard!
A social identity provider can delegate authentication to a trusted, respected social media account. Red Hat build of Keycloak includes support for social networks such as Google, Facebook, Twitter, GitHub, LinkedIn, Microsoft, and Stack Overflow.
9.4.1. BitbucketCopy linkLink copied to clipboard!
To log in with Bitbucket, perform the following procedure.
Procedure
From the Add provider list, select Bitbucket.
Add identity provider
In a separate browser tab, perform the OAuth on Bitbucket Cloud process. When you click Add Consumer:
Keyinto the Client ID field.Secretinto the Client Secret field.9.4.2. FacebookCopy linkLink copied to clipboard!
Procedure
From the Add provider list, select Facebook.
Add identity provider
In a separate browser tab, open the Meta for Developers.
Select Create App.
Add a use case
Select Other.
Select an app type
Select Consumer.
Create an app
Click Create app. Meta then brings you to the dashboard.
Add a product
App IDandApp Secretvalues from your Facebook app into the Client ID and Client Secret fields in Red Hat build of Keycloak.Red Hat build of Keycloak sends profile requests to
graph.facebook.com/me?fields=id,name,email,first_name,last_nameby default. The response contains the id, name, email, first_name, and last_name fields only. To fetch additional fields from the Facebook profile, add a corresponding scope and add the field name in theAdditional user’s profile fieldsconfiguration option field.9.4.3. GitHubCopy linkLink copied to clipboard!
To log in with GitHub, perform the following procedure.
Procedure
From the Add provider list, select Github.
Add identity provider
In a separate browser tab, create an OAUTH app.
Client IDinto the Client ID field.Client secretinto the Client Secret field.9.4.4. GitLabCopy linkLink copied to clipboard!
Procedure
From the Add provider list, select GitLab.
Add identity provider
In a separate browser tab, add a new GitLab application.
Application IDinto the Client ID field.Secretinto the Client Secret field.9.4.5. GoogleCopy linkLink copied to clipboard!
Procedure
From the Add provider list, select Google.
Add identity provider
In the Google dashboard:
Your Client IDinto the Client ID field.Your Client secretinto the Client Secret field.9.4.6. InstagramCopy linkLink copied to clipboard!
Procedure
From the Add provider list, select Instagram.
Add identity provider
In a separate browser tab, open the Meta for Developers.
Select Create App.
Add a use case
Select Other.
Select an app type
Select Consumer.
Create an app
Enter a URL for your site.
Add a product
Click Create New App.
Create a New Instagram App ID
Enter a value into the Display name field.
Set up the app
Instagram App IDinto the Client ID field.Instagram App Secretinto the Client Secret field.9.4.7. LinkedInCopy linkLink copied to clipboard!
Procedure
From the Add provider list, select LinkedIn.
Add identity provider
In a separate browser tab, create an app in the LinkedIn developer portal.
Client IDinto the Client ID field.Client Secretinto the Client Secret field.9.4.8. MicrosoftCopy linkLink copied to clipboard!
Procedure
From the Add provider list, select Microsoft.
Add identity provider
In a separate browser tab, register an app on Microsoft Azure under App registrations.
Application (client) IDinto the Client ID field.Valueof the secret into the Client Secret field.9.4.9. OpenShift 3Copy linkLink copied to clipboard!
Procedure
From the Add provider list, select Openshift v3.
Add identity provider
Register your client using the
occommand-line tool.nameof your OAuth client. Passed asclient_idrequest parameter when making requests to<openshift_master>/oauth/authorizeand<openshift_master>/oauth/token.secretRed Hat build of Keycloak uses for theclient_secretrequest parameter.redirect_uriparameter specified in requests to<openshift_master>/oauth/authorizeand<openshift_master>/oauth/tokenmust be equal to (or prefixed by) one of the URIs inredirectURIs. You can obtain this from the Redirect URI field in the Identity Provider screengrantMethodRed Hat build of Keycloak uses to determine the action when this client requests tokens but has not been granted access by the user.9.4.10. OpenShift 4Copy linkLink copied to clipboard!
Prerequisites
Procedure
Enter the Client ID and Client Secret and in the Base URL field, enter the API URL of your OpenShift 4 instance. Additionally, you can copy the Redirect URI to your clipboard.
Add identity provider
Register your client, either via OpenShift 4 Console (Home → API Explorer → OAuth Client → Instances) or using the
occommand-line tool.nameof your OAuth client. Passed asclient_idrequest parameter when making requests to<openshift_master>/oauth/authorizeand<openshift_master>/oauth/token. Thenameparameter must be the same in theOAuthClientobject and the Red Hat build of Keycloak configuration.secretRed Hat build of Keycloak uses as theclient_secretrequest parameter.redirect_uriparameter specified in requests to<openshift_master>/oauth/authorizeand<openshift_master>/oauth/tokenmust be equal to (or prefixed by) one of the URIs inredirectURIs. The easiest way to configure it correctly is to copy-paste it from Red Hat build of Keycloak OpenShift 4 Identity Provider configuration page (Redirect URIfield).grantMethodRed Hat build of Keycloak uses to determine the action when this client requests tokens but has not been granted access by the user.In the end you should see the OpenShift 4 Identity Provider on the login page of your Red Hat build of Keycloak instance. After clicking on it, you should be redirected to the OpenShift 4 login page.
Result
See official OpenShift documentation for more information.
9.4.11. PayPalCopy linkLink copied to clipboard!
Procedure
From the Add provider list, select PayPal.
Add identity provider
In a separate browser tab, open the PayPal Developer applications area.
localhost. If you want to use Red Hat build of Keycloak locally, replace thelocalhostin the Return URL by127.0.0.1and then access Red Hat build of Keycloak using127.0.0.1in the browser intead oflocalhost.Client IDinto the Client ID field.Secret key 1into the Client Secret field.9.4.12. Stack overflowCopy linkLink copied to clipboard!
Procedure
From the Add provider list, select Stack Overflow.
Add identity provider
In a separate browser tab, log into registering your application on Stack Apps.
Register application
Click Register Your Application.
Settings
Client Idinto the Client ID field.Client Secretinto the Client Secret field.Keyinto the Key field.9.4.13. TwitterCopy linkLink copied to clipboard!
Prerequisites
Procedure
From the Add provider list, select Twitter.
Add identity provider
In a separate browser tab, create an app in Twitter Application Management.
localhost.API Keyinto the Client ID field.API Key Secretinto the Client Secret field.