Operator Guide
Abstract
Chapter 1. Red Hat build of Keycloak Operator installation
How to install the Operator on OpenShift.
Use this procedure to install the Red Hat build of Keycloak Operator in an OpenShift cluster.
- Open the OpenShift Container Platform web console.
- In the left column, click Home, Operators, OperatorHub.
- Search for "Keycloak" on the search input box.
- Select the Operator from the list of results.
- Follow the instructions on the screen.
For general instructions on installing Operators by using either the CLI or web console, see Installing Operators in your namespace. In the default Catalog, the Operator is named
rhbk-operator1.1. Configuring Manual Approval for OLM Upgrades
Important: Automatic OLM Upgrades
By default, OLM automatically updates the Red Hat build of Keycloak Operator when a new version is released. This can cause several significant issues:
- When using the default Red Hat build of Keycloak image, the Operator uses a matching image of the corresponding Red Hat build of Keycloak version, resulting in unintended Red Hat build of Keycloak upgrades when the Operator is upgraded
- Even when using custom images, major Operator upgrades can introduce significant compatibility issues with your existing Keycloak CR configuration, potentially requiring manual intervention
- New fields in Keycloak CR or behavioral changes could impact existing deployments
- No option to downgrade to the previous Red Hat build of Keycloak version due to changes related to database migration
Recommendation:
We strongly recommend using manual approval mode for the Red Hat build of Keycloak Operator. This ensures you can:
- Review release notes and follow migration changes before approving upgrades
- Schedule maintenance windows for upgrades
- Test upgrades in a non-production environment first
- Back up the database to allow downgrading to the previous Red Hat build of Keycloak in case of issues
To prevent automatic upgrades by OLM, set the approval strategy to
Manual1.1.1. Using the OpenShift web console
When installing the Operator, select
Manual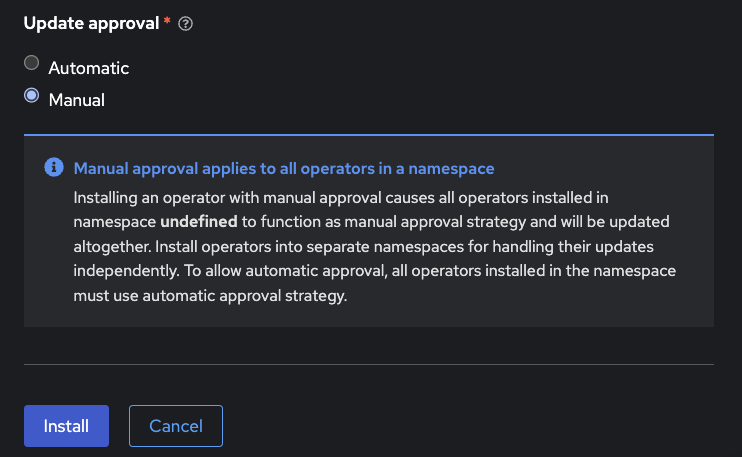
1.1.2. Using the CLI
For command-line installation, create a Subscription with
installPlanApproval: ManualapiVersion: operators.coreos.com/v1alpha1
kind: Subscription
metadata:
name: rhbk-operator
namespace: <target-namespace>
spec:
channel: <desired-channel>
name: rhbk-operator
source: redhat-operators
sourceNamespace: openshift-marketplace
installPlanApproval: ManualAfter installation, any upgrade will require manual approval through the OLM interface or via the CLI.
1.2. Installing Multiple Operators
It is not fully supported for the operator to watch multiple or all namespaces. To watch multiple namespaces, you install multiple operators.
In this situation, consider the following:
- All Operators share the Custom Resource Definitions (CRDs) as they are installed cluster wide.
- CRD revisions from newer Operator versions will not introduce breaking changes except for the eventual removal of fields that have been deprecated for some time. Thus newer CRDs are generally backward compatible.
- The last installed CRDs become the ones that are used. This rule also applies to OLM installations; the last installed Operator version also installs and overrides the CRDs if they already exist in the cluster.
- Older CRDs may not be forward compatible with new fields used by newer operators. When using OLM it will check if your custom resources are compatible with the CRDs being installed, so the usage of new fields can prevent the simultaneous installation of older operator versions.
- Fields introduced by newer CRDs are not supported by older Operators. Older Operators fail to handle CRs that use such new fields with a deserialization error for an unrecognized field.
Therefore, in a multiple Operator installation scenario, the recommended approach is to keep versions aligned as closely as possible to minimize the potential problems with different versions.
Chapter 2. Basic Red Hat build of Keycloak deployment
Install Red Hat build of Keycloak using the Operator.
2.1. Performing a basic Red Hat build of Keycloak deployment
This chapter describes how to perform a basic Red Hat build of Keycloak Deployment on OpenShift using the Operator.
2.1.1. Preparing for deployment
Once the Red Hat build of Keycloak Operator is installed and running in the cluster namespace, you can set up the other deployment prerequisites.
- Database
- Hostname
- TLS Certificate and associated keys
2.1.1.1. Database
A database should be available and accessible from the cluster namespace where Red Hat build of Keycloak is installed. For a list of supported databases, see Configuring the database. The Red Hat build of Keycloak Operator does not manage the database and you need to provision it yourself. Consider verifying your cloud provider offering or using a database operator.
For development purposes, you can use an ephemeral PostgreSQL pod installation. To provision it, follow the approach below:
Create YAML file
example-postgres.yamlapiVersion: apps/v1
kind: StatefulSet
metadata:
name: postgresql-db
spec:
serviceName: postgresql-db-service
selector:
matchLabels:
app: postgresql-db
replicas: 1
template:
metadata:
labels:
app: postgresql-db
spec:
containers:
- name: postgresql-db
image: postgres:15
volumeMounts:
- mountPath: /data
name: cache-volume
env:
- name: POSTGRES_USER
value: testuser
- name: POSTGRES_PASSWORD
value: testpassword
- name: PGDATA
value: /data/pgdata
- name: POSTGRES_DB
value: keycloak
volumes:
- name: cache-volume
emptyDir: {}
---
apiVersion: v1
kind: Service
metadata:
name: postgres-db
spec:
selector:
app: postgresql-db
type: LoadBalancer
ports:
- port: 5432
targetPort: 5432Apply the changes:
oc apply -f example-postgres.yaml2.1.1.2. Hostname
For a production ready installation, you need a hostname that can be used to contact Red Hat build of Keycloak. See Configuring the hostname (v2) for the available configurations.
For development purposes, this chapter will use
test.keycloak.orgWhen running on OpenShift, with ingress enabled, and with the spec.ingress.classname set to openshift-default, you may leave the spec.hostname.hostname unpopulated in the Keycloak CR. The operator will assign a default hostname to the stored version of the CR similar to what would be created by an OpenShift Route without an explicit host - that is ingress-namespace.appsDomain If the appsDomain changes, or should you need a different hostname for any reason, then update the Keycloak CR.
If you set the
hostname-adminhostname-admin-url2.1.1.3. TLS Certificate and key
See your Certification Authority to obtain the certificate and the key.
For development purposes, you can enter this command to obtain a self-signed certificate:
openssl req -subj '/CN=test.keycloak.org/O=Test Keycloak./C=US' -newkey rsa:2048 -nodes -keyout key.pem -x509 -days 365 -out certificate.pemYou should install it in the cluster namespace as a Secret by entering this command:
oc create secret tls example-tls-secret --cert certificate.pem --key key.pem2.1.2. Deploying Red Hat build of Keycloak
To deploy Red Hat build of Keycloak, you create a Custom Resource (CR) based on the Keycloak Custom Resource Definition (CRD).
Consider storing the Database credentials in a separate Secret. Enter the following commands:
oc create secret generic keycloak-db-secret \
  --from-literal=username=[your_database_username] \
  --from-literal=password=[your_database_password]
You can customize several fields using the Keycloak CRD. For a basic deployment, you can stick to the following approach:
Create YAML file
example-kc.yamlapiVersion: k8s.keycloak.org/v2alpha1
kind: Keycloak
metadata:
name: example-kc
spec:
instances: 1
db:
vendor: postgres
host: postgres-db
usernameSecret:
name: keycloak-db-secret
key: username
passwordSecret:
name: keycloak-db-secret
key: password
http:
tlsSecret: example-tls-secret
hostname:
hostname: test.keycloak.org
proxy:
headers: xforwarded # double check your reverse proxy sets and overwrites the X-Forwarded-* headersApply the changes:
oc apply -f example-kc.yamlTo check that the Red Hat build of Keycloak instance has been provisioned in the cluster, check the status of the created CR by entering the following command:
oc get keycloaks/example-kc -o go-template='{{range .status.conditions}}CONDITION: {{.type}}{{"\n"}} STATUS: {{.status}}{{"\n"}} MESSAGE: {{.message}}{{"\n"}}{{end}}'When the deployment is ready, look for output similar to the following:
CONDITION: Ready
  STATUS: true
  MESSAGE:
CONDITION: HasErrors
  STATUS: false
  MESSAGE:
CONDITION: RollingUpdate
  STATUS: false
  MESSAGE:
2.1.3. Accessing the Red Hat build of Keycloak deployment
The Red Hat build of Keycloak deployment can be exposed through a basic Ingress accessible through the provided hostname.
On installations with multiple default IngressClass instances or when running on OpenShift 4.12+ you should provide an ingressClassName by setting
ingressclassNameEdit YAML file
example-kc.yamlapiVersion: k8s.keycloak.org/v2alpha1
kind: Keycloak
metadata:
name: example-kc
spec:
...
ingress:
className: openshift-defaultThe operator annotates the Ingress to match expectations for TLS passthrough or TLS termination on OpenShift with the default IngressClass. See below for more on TLS termination.
2.1.3.1. Proxy modes with the basic Ingress
The operator annotates the Ingress to match expectations for TLS termination or passthrough on OpenShift with the default IngressClass. For this reason TLS reencryption is not yet considered supported by basic Ingress, but you may be able to specify the
tlsSecrethttpingressTLS passthrough is shown in the preceding
example-kctlsSecrethttptlsSecretTLS termination, or edge mode, is enabled by associating a
tlsSecretingressExample TLS Termination YAML:
apiVersion: k8s.keycloak.org/v2alpha1
kind: Keycloak
metadata:
  name: example-kc
spec:
  instances: 1
  db:
    vendor: postgres
    host: postgres-db
    usernameSecret:
      name: keycloak-db-secret
      key: username
    passwordSecret:
      name: keycloak-db-secret
      key: password
  http:
    httpEnabled: true
  ingress:
    tlsSecret: example-tls-secret
  hostname:
    hostname: test.keycloak.org
  proxy:
    headers: xforwarded # double check your reverse proxy sets and overwrites the X-Forwarded-* headers
2.1.3.2. Custom Access
If the default ingress does not fit your use case, disable it by setting
ingressenabledfalseEdit YAML file
example-kc.yamlapiVersion: k8s.keycloak.org/v2alpha1
kind: Keycloak
metadata:
name: example-kc
spec:
...
ingress:
enabled: falseApply the changes:
oc apply -f example-kc.yamlYou can then provide an alternative ingress resource pointing to the service
<keycloak-cr-name>-service.spec.ingress.enabled: false$ oc create route reencrypt --service=<keycloak-cr-name>-service --cert=<configured-certificate> --key=<certificate-key> --dest-ca-cert=<ca-certificate> --ca-cert=<ca-certificate> --hostname=<hostname>For debugging and development purposes, consider directly connecting to the Red Hat build of Keycloak service using a port forward. For example, enter this command:
oc port-forward service/example-kc-service 8443:84432.1.3.3. Configuring the reverse proxy settings matching your Ingress Controller
The Operator supports configuring which of the reverse proxy headers should be accepted by server, which includes
ForwardedX-Forwarded-*If you Ingress implementation sets and overwrites either
ForwardedX-Forwarded-*apiVersion: k8s.keycloak.org/v2alpha1
kind: Keycloak
metadata:
name: example-kc
spec:
...
proxy:
headers: forwarded|xforwardedIf the
proxy.headersproxy=passthroughWhen using the
proxy.headersForwardedX-Forwarded-*For more details refer to the Configuring a reverse proxy guide.
2.1.4. Accessing the Admin Console
When deploying Red Hat build of Keycloak, the operator generates an arbitrary initial admin
usernamepasswordChange the default admin credentials and enable MFA in Red Hat build of Keycloak before going to production.
To fetch the initial admin credentials, you have to read and decode the Secret. The Secret name is derived from the Keycloak CR name plus the fixed suffix
-initial-adminexample-kcoc get secret example-kc-initial-admin -o jsonpath='{.data.username}' | base64 --decode
oc get secret example-kc-initial-admin -o jsonpath='{.data.password}' | base64 --decodeYou can use those credentials to access the Admin Console or the Admin REST API.
2.1.5. Security Considerations
Anyone with the ability to create or edit Keycloak or KeycloakRealmImport CRs should be a namespace level admin.
Setting the Keycloak CR image requires a high degree of trust as whatever image is running will at least have access to any Secrets used for environment variables.
Similarly the unsupported podTemplate gives the ability to deploy alternative workloads which may be granted the same permissions as the operator itself - which includes the ability to access Secrets in the namespace.
Chapter 3. Automating a realm import
Automate a realm import using the operator.
3.1. Importing a Red Hat build of Keycloak Realm
Using the Red Hat build of Keycloak Operator, you can perform a realm import for the Keycloak Deployment.
- If a Realm with the same name already exists in Red Hat build of Keycloak, it will not be overwritten.
- The Realm Import CR only supports creation of new realms and does not update or delete those. Changes to the realm performed directly on Red Hat build of Keycloak are not synced back in the CR.
- Once the realm is imported you should delete the Realm Import CR as that will cleanup the associated Kubernetes Job and Pod resources.
3.1.1. Creating a Realm Import Custom Resource
The following is an example of a Realm Import Custom Resource (CR):
apiVersion: k8s.keycloak.org/v2alpha1
kind: KeycloakRealmImport
metadata:
  name: my-realm-kc
spec:
  keycloakCRName: <name of the keycloak CR>
  realm:
    ...
This CR should be created in the same namespace as the Keycloak Deployment CR, defined in the field
keycloakCRNamerealmThe recommended way to obtain a
RealmRepresentation- Export the Realm to a single file.
- Convert the JSON file to YAML.
-
Copy and paste the obtained YAML file as body for the key, making sure the indentation is correct.
realm
3.1.2. Applying the Realm Import CR
Use
ocCreate YAML file
example-realm-import.yamlapiVersion: k8s.keycloak.org/v2alpha1
kind: KeycloakRealmImport
metadata:
name: my-realm-kc
spec:
keycloakCRName: <name of the keycloak CR>
realm:
id: example-realm
realm: example-realm
displayName: ExampleRealm
enabled: trueApply the changes:
oc apply -f example-realm-import.yamlTo check the status of the running import, enter the following command:
oc get keycloakrealmimports/my-realm-kc -o go-template='{{range .status.conditions}}CONDITION: {{.type}}{{"\n"}} STATUS: {{.status}}{{"\n"}} MESSAGE: {{.message}}{{"\n"}}{{end}}'When the import has successfully completed, the output will look like the following example:
CONDITION: Done
  STATUS: true
  MESSAGE:
CONDITION: Started
  STATUS: false
  MESSAGE:
CONDITION: HasErrors
  STATUS: false
  MESSAGE:
3.1.3. Placeholders
Imports support placeholders referencing environment variables, see Importing and exporting realms for more. The
KeycloakRealmImportspec.placeholdersapiVersion: k8s.keycloak.org/v2alpha1
kind: KeycloakRealmImport
metadata:
name: my-realm-kc
spec:
keycloakCRName: <name of the keycloak CR>
placeholders:
ENV_KEY:
secret:
name: SECRET_NAME
key: SECRET_KEY
...In the above example placeholder replacement will be enabled and an environment variable with key
ENV_KEYSECRET_NAMESECRET_KEY3.1.4. Security Considerations
Anyone with the ability to create or edit KeycloakRealmImport CRs should be a namespace level admin.
Placeholder replacement gives access to all environment variables even sensitive ones.
Chapter 4. Advanced configuration
Tune advanced aspects of the Keycloak CR.
4.1. Advanced configuration
This chapter describes how to use Custom Resources (CRs) for advanced configuration of your Red Hat build of Keycloak deployment.
4.1.1. Server configuration details
Many server options are exposed as first-class citizen fields in the Keycloak CR. The structure of the CR is based on the configuration structure of Red Hat build of Keycloak. For example, to configure the
https-porthttpsPortapiVersion: k8s.keycloak.org/v2alpha1
kind: Keycloak
metadata:
name: example-kc
spec:
db:
vendor: postgres
usernameSecret:
name: usernameSecret
key: usernameSecretKey
passwordSecret:
name: passwordSecret
key: passwordSecretKey
host: host
database: database
port: 123
schema: schema
poolInitialSize: 1
poolMinSize: 2
poolMaxSize: 3
http:
httpEnabled: true
httpPort: 8180
httpsPort: 8543
tlsSecret: my-tls-secret
hostname:
hostname: https://my-hostname.tld
admin: https://my-hostname.tld/admin
strict: false
backchannelDynamic: true
features:
enabled:
- docker
- authorization
disabled:
- admin
- step-up-authentication
transaction:
xaEnabled: falseFor a list of options, see the Keycloak CRD. For details on configuring options, see All configuration.
4.1.1.1. Additional options
Some expert server options are unavailable as dedicated fields in the Keycloak CR. The following are examples of omitted fields:
- Fields that require deep understanding of the underlying Red Hat build of Keycloak implementation
- Fields that are not relevant to an OpenShift environment
- Fields for provider configuration because they are dynamic based on the used provider implementation
The
additionalOptionsThe values can be expressed as plain text strings or Secret object references as shown in this example:
apiVersion: k8s.keycloak.org/v2alpha1
kind: Keycloak
metadata:
  name: example-kc
spec:
  ...
  additionalOptions:
    - name: spi-connections-http-client--default--connection-pool-size
      secret: # Secret reference
        name: http-client-secret # Name of the Secret
        key: poolSize # Name of the Key in the Secret
    - name: spi-email-template--mycustomprovider--enabled
value: 'true' # Plain text value. Use quotes for numbers and boolean values.The name format of options defined in this way is identical to the key format of options specified in the configuration file. For details on various configuration formats, see Configuring Red Hat build of Keycloak.
If you configure mTLS with
https-client-authrequiredhttps-management-client-authrequestnone4.1.1.2. Custom environment variables
You may find a need to set custom environment variables - such as for theme properties or
kc.[sh|bat]spec.envspec.envspec.envadditionalOptionHere’s an example setting JAVA_OPTS_APPEND:
apiVersion: k8s.keycloak.org/v2alpha1
kind: Keycloak
metadata:
  name: example-kc
spec:
  ...
  env:
    - name: JAVA_OPTS_APPEND
      value: -Djava.net.preferIPv6Addresses=true
Similar to
additionalOptions4.1.2. Secret References
Secret References are used by some dedicated options in the Keycloak CR, such as a
tlsSecretadditionalOptionsSimilarly ConfigMap References are used by options such as the
configMapFileWhen specifying a Secret or ConfigMap Reference, make sure that a Secret or ConfigMap containing the referenced keys is present in the same namespace as the CR referencing it.
The operator will poll approximately every minute for changes to referenced Secrets or ConfigMaps. When a meaningful change is detected, the Operator performs a rolling restart of the Red Hat build of Keycloak Deployment to pick up the changes.
4.1.3. Unsupported features
The
unsupported4.1.3.1. Pod Template
The Pod Template is a raw API representation that is used for the Deployment Template. This field is a temporary workaround in case no supported field exists at the top level of the CR for your use case.
The Operator merges the fields of the provided template with the values generated by the Operator for the specific Deployment. With this feature, you have access to a high level of customizations. However, no guarantee exists that the Deployment will work as expected.
The following example illustrates injecting labels, annotations, volumes, and volume mounts:
apiVersion: k8s.keycloak.org/v2alpha1
kind: Keycloak
metadata:
  name: example-kc
spec:
  ...
  unsupported:
    podTemplate:
      metadata:
        labels:
          my-label: "keycloak"
      spec:
        containers:
          - volumeMounts:
              - name: test-volume
                mountPath: /mnt/test
        volumes:
          - name: test-volume
            secret:
              secretName: keycloak-additional-secret
4.1.3.1.1. Probe Configuration
The Keycloak CR exposes options to set periodSeconds and failureThreshold on each of the three probes (readiness, liveness and startup)
apiVersion: k8s.keycloak.org/v2alpha1
kind: Keycloak
metadata:
  name: example-kc
spec:
  readinessProbe:
    periodSeconds: 20
    failureThreshold: 5
  livenessProbe:
    periodSeconds: 20
    failureThreshold: 5
  startupProbe:
    periodSeconds: 20
    failureThreshold: 5
4.1.4. Disabling required options
Red Hat build of Keycloak and the Red Hat build of Keycloak Operator provide the best production-ready experience with security in mind. However, during the development phase, you can disable key security features.
Specifically, you can disable the hostname and TLS as shown in the following example:
apiVersion: k8s.keycloak.org/v2alpha1
kind: Keycloak
metadata:
  name: example-kc
spec:
  ...
  http:
    httpEnabled: true
  hostname:
    strict: false
4.1.5. Resource requirements
The Keycloak CR allows specifying the
resourcesWhen no values are specified, the default
requests1700MiBlimits2GiBIf no values are specified in the Realm Import CR, it falls back to the values specified in the Keycloak CR, or to the defaults as defined above.
You can specify your custom values based on your requirements as follows:
apiVersion: k8s.keycloak.org/v2alpha1
kind: Keycloak
metadata:
  name: example-kc
spec:
  ...
  resources:
    requests:
      cpu: 1200m
      memory: 896Mi
    limits:
      cpu: 6
      memory: 3Gi
Moreover, the Red Hat build of Keycloak container manages the heap size more effectively by providing relative values for the heap size. It is achieved by providing certain JVM options.
For more details, see Running Red Hat build of Keycloak in a container.
4.1.6. Scheduling
You may control several aspects of the server Pod scheduling via the Keycloak CR. The scheduling stanza exposes optional standard Kubernetes affinity, tolerations, topology spread constraints, and the priority class name to fine tune the scheduling and placement of your server Pods.
An example utilizing all scheduling fields:
apiVersion: k8s.keycloak.org/v2alpha1
kind: Keycloak
metadata:
  name: example-kc
spec:
  scheduling:
    priorityClassName: custom-high
    affinity:
      podAffinity:
        preferredDuringSchedulingIgnoredDuringExecution:
        - podAffinityTerm:
            labelSelector:
              matchLabels:
                app: keycloak
                app.kubernetes.io/managed-by: keycloak-operator
                app.kubernetes.io/component: server
                topologyKey: topology.kubernetes.io/zone
              weight: 10
    tolerations:
    - key: "some-taint"
      operator: "Exists"
      effect: "NoSchedule"
    topologySpreadConstraints:
    - maxSkew: 1
      topologyKey: kubernetes.io/hostname
      whenUnsatisfiable: DoNotSchedule
      ...
  ...
Please see the kubernetes docs for more on scheduling concepts.
If you do not specify a custom topology spread constraint, your Pods will have a spread constraint across zones and nodes to improve availability. These defaults do not affect import and update Jobs, only server Pods.
4.1.6.1. Job Scheduling
Realm import and update Jobs inherit the scheduling of the server Pods if it is specified in the Keycloak CR
spec.schedulingspec.update.schedulingspec.import.schedulingFor example the following will remove the use of any server Pod scheduling for the update Job:
apiVersion: k8s.keycloak.org/v2alpha1
kind: Keycloak
metadata:
  name: example-kc
spec:
  update:
    scheduling: {}
  ...
4.1.7. Management Interface
To change the port of the management interface, use the first-class citizen field
httpManagement.portadditionalOptionsYou can specify the
portadditionalOptionsapiVersion: k8s.keycloak.org/v2alpha1
kind: Keycloak
metadata:
name: example-kc
spec:
httpManagement:
port: 9001
additionalOptions:
- name: http-management-relative-path
value: /managementIf you are using a custom image, the Operator is unaware of any configuration options that might’ve been specified there. For instance, the management interface may use
httpshttptlsSecrettruststoresFor more details, see Configuring the Management Interface.
4.1.8. Truststores
If you need to provide trusted certificates, the Keycloak CR provides a top level feature for configuring the server’s truststore as discussed in Configuring trusted certificates.
Use the truststores stanza of the Keycloak spec to specify Secrets or ConfigMaps containing PEM encoded files, or PKCS12 files with extension
.p12.pfx.pkcs12apiVersion: k8s.keycloak.org/v2alpha1
kind: Keycloak
metadata:
name: example-kc
spec:
...
truststores:
my-truststore:
secret:
name: my-secretWhere the contents of my-secret could be a PEM file, for example:
apiVersion: v1
kind: Secret
metadata:
  name: my-secret
stringData:
  cert.pem: |
    -----BEGIN CERTIFICATE-----
    ...
When running on a Kubernetes or OpenShift environment well-known locations of trusted certificates are included automatically. This includes
/var/run/secrets/kubernetes.io/serviceaccount/ca.crt/var/run/secrets/kubernetes.io/serviceaccount/service-ca.crt4.1.9. Admin Bootstrapping
When you create a new instance the Keycloak CR spec.bootstrapAdmin stanza may be used to configure the bootstrap user and/or service account. If you do not specify anything for the spec.bootstrapAdmin, the operator will create a Secret named "metadata.name"-initial-admin with a username temp-admin and a generated password. If you specify a Secret name for the bootstrap admin user, then the Secret will need to contain
usernamepasswordclient-idclient-secretIf a master realm has already been created for your cluster, then the spec.boostrapAdmin is effectively ignored. If you need to create a recovery admin account, then you’ll need to run the CLI command against a Pod directly.
For more information on how to bootstrap a temporary admin user or service account and recover lost admin access, refer to the Bootstrapping and recovering an admin account guide.
4.1.10. Tracing (OpenTelemetry)
Tracing allows for detailed monitoring of each request’s lifecycle, which helps quickly identify and diagnose issues, leading to more efficient debugging and maintenance.
You can change tracing configuration via Keycloak CR fields as follows:
apiVersion: k8s.keycloak.org/v2alpha1
kind: Keycloak
metadata:
  name: example-kc
spec:
  tracing:
    enabled: true                             # default 'false'
    endpoint: http://my-tracing:4317          # default 'http://localhost:4317'
    samplerType: parentbased_traceidratio     # default 'traceidratio'
    samplerRatio: 0.01                        # default '1'
    resourceAttributes:
      some.attribute: something
  additionalOptions:
    - name: tracing-jdbc-enabled
      value: false                            # default 'true'
These fields should reflect 1:1 association with
tracing-*The
tracing-jdbc-enabledadditionalOptionsFor more details about tracing, see Root cause analysis with tracing.
4.1.11. Network Policies
NetworkPolicies allow you to specify rules for traffic flow within your cluster, and also between Pods and the outside world. Your cluster must use a network plugin that supports NetworkPolicy enforcement to restrict the network traffic.
The operator automatically creates a NetworkPolicy to deny access to the clustering port of your Red Hat build of Keycloak Pods. The HTTP(S) endpoint is open to traffic from any namespace and the outside world.
To disable the NetworkPolicy, set
spec.networkPolicy.enabledKeycloak CR with Network Policies enabled
apiVersion: k8s.keycloak.org/v2alpha1
kind: Keycloak
metadata:
  name: example-kc
spec:
  networkPolicy:
    enabled: false
By default, traffic to the HTTP endpoints and the management endpoint is allowed from all sources. The Keycloak CR can be extended to include a list of rules for each of the endpoints exposed by Red Hat build of Keycloak. These rules specify from where (the source) the traffic is allowed, and it is possible to communicate with the Red Hat build of Keycloak Pods.
Extended Network Policy configuration
apiVersion: k8s.keycloak.org/v2alpha1
kind: Keycloak
metadata:
  name: example-kc
spec:
  networkPolicy:
    enabled: true
    http: <list of rules>
https: <list of rules>
management: <list of rules> - 1
- It defines the rules for HTTP endpoint (port 8080 by default). Due to security reasons, the HTTP endpoint is disabled by default.
- 2
- It defines the access rules for HTTPS endpoint (port 8443 by default.
- 3
- It defines the access rules for management endpoint (port 9000 by default). The management endpoint is used by the Kubernetes Probes and to expose the Red Hat build of Keycloak metrics.
The rule syntax is the same as the one used by the Kubernetes Network Policy. It makes it easy to migrate your existing rules into your Keycloak CP. For more information, check the rule syntax.
4.1.11.1. Example with OpenShift
For a concrete example, let’s imagine we have a Red Hat build of Keycloak deployment running in a OpenShift cluster. Users have to access Red Hat build of Keycloak to login, so Red Hat build of Keycloak must be accessible from the Internet.
To make this example more interesting, let’s assume the Red Hat build of Keycloak is monitored too. The monitoring is enabled as described in this OpenShift documentation page: enabling Monitoring for user defined projects.
Based on those requirements, the Keycloak CR would be like this (most parts are omitted, like DB connection and security):
Keycloak CR
apiVersion: k8s.keycloak.org/v2alpha1
kind: Keycloak
metadata:
  name: example-kc
spec:
  ingress:
    enabled: true
  networkPolicy:
    enabled: true
    https:
    - namespaceSelector:
        matchLabels:
          kubernetes.io/metadata.name: openshift-ingress
    management:
    - namespaceSelector:
        matchLabels:
kubernetes.io/metadata.name: openshift-user-workload-monitoring - 1
- Enables Ingress for outside access.
- 2
- The default OpenShift Ingress class pods are running in
openshift-ingressnamespace. We allow traffic from these pods to access the Red Hat build of Keycloak HTTPS endpoint. The traffic from outside the OpenShift cluster goes through these pods. - 3
- Prometheus pods are running in
openshift-user-workload-monitoring. They need to access Red Hat build of Keycloak to scrape the available metrics.
Check the Kubernetes Network Policies documentation for more information about NetworkPolicies.
4.1.12. Parameterizing service labels and annotations
If you need to set custom labels or annotations to keycloak service you can do that through
spec.http.labelsspec.http.annotationsCustom service labels and annotations
apiVersion: k8s.keycloak.org/v2alpha1
kind: Keycloak
metadata:
  name: example-kc
spec:
  http:
    labels:
      label1: label-value1
      label2: label-value2
    annotations:
      annotation1: annotation-value1
      annotation2: annotation-value2
4.1.13. ServiceMonitor
A
ServiceMonitorServiceMonitorServiceMonitormonitoring.coreos.com/v1:ServiceMonitorThe Operator generates a
ServiceMonitorDefault ServiceMonitor
apiVersion: monitoring.coreos.com/v1
kind: ServiceMonitor
metadata:
  name: example-kc
namespace: example-namespace
spec:
  endpoints:
  - interval: 30s
    path: /metrics
    port: management
    scheme: https
    scrapeTimeout: 10s
    tlsConfig:
      insecureSkipVerify: true
  namespaceSelector:
    matchNames:
    - example-namespace
  selector:
    matchLabels:
      app: keycloak
      app.kubernetes.io/instance: example-kc
      app.kubernetes.io/managed-by: keycloak-operator
  scrapeProtocols:
- OpenMetricsText1.0.0- 1
- The
ServiceMonitoris created with the same name as the Keycloak CR. - 2 5 6
- The
ServiceMonitoris always deployed to the same namespace as the Keycloak CR and will only match a Service in that namespace. - 3
- The configured path defaults to
/metrics, but respects thehttp-management-relative-pathvalue if configured. - 4
- The configured scheme is changed automatically depending on whether TLS is enabled or not.
4.1.13.1. Modify ServiceMonitor configuration
You can configure the
intervalscrapeTimeoutServiceMonitorModified ServiceMonitor
apiVersion: k8s.keycloak.org/v2alpha1
kind: Keycloak
metadata:
  name: example-kc
spec:
  serviceMonitor:
    interval: 10s
    scrapeTimeout: 5s
4.1.13.2. Disable ServiceMonitor creation
You can prevent the Operator from creating a ServiceMonitor by configuring the Keycloak CR as follows:
Disabled ServiceMonitor
apiVersion: k8s.keycloak.org/v2alpha1
kind: Keycloak
metadata:
  name: example-kc
spec:
  serviceMonitor:
    enabled: false
Chapter 5. Avoiding downtime with rolling updates
Avoid downtime when changing themes, providers, or configurations in optimized images.
By default, the Red Hat build of Keycloak Operator will perform rolling updates on configuration changes without downtime, and recreate updates with downtime when the image name or tag changes.
This chapter describes how to minimize downtimes by configuring the Red Hat build of Keycloak Operator to perform rolling updates of Red Hat build of Keycloak automatically where possible, and how to override automatic detection for rolling updates.
Use it, for example, to avoid downtimes when rolling out an update to a theme, provider or build time configuration in a custom or optimized image.
5.1. Supported Update Strategies
The Operator supports the following update strategies:
- Rolling Updates
- Update the StatefulSet in a rolling fashion, avoiding a downtime when at least two replicas are running.
- Recreate Updates
- Scale down the StatefulSet before applying updates, causing temporary downtime.
5.2. Configuring the Update Strategy
Specify the update strategy within the
specapiVersion: k8s.keycloak.org/v2alpha1
kind: Keycloak
metadata:
name: example-kc
spec:
update:
strategy: RecreateOnImageChange|Auto|Explicit
revision: "abc" | Value | Downtime? | Description |
|---|---|---|
|
| On image name or tag change | Mimics Red Hat build of Keycloak 26.1 or older behavior. When the image field changes, the Operator scales down the StatefulSet before applying the new image. |
|
| On incompatible changes | The Red Hat build of Keycloak Operator detects if a rolling or recreate update is possible. In the current version, Red Hat build of Keycloak performs a rolling update if the Red Hat build of Keycloak version is the same for the old and the new image. Future versions of Red Hat build of Keycloak will change that behavior and use additional information from the configuration, the image and the version to determine if a rolling update is possible to reduce downtimes. |
|
| Only the | The Red Hat build of Keycloak Operator checks the |
5.2.1. Understanding Auto and Explicit Update Strategies
When using the
AutoIf the Keycloak CR configured a
podTemplateunsupportedpodTemplateAs a consequence, the Operator might draw the wrong conclusions if a rolling update is possible from changes to the
podTemplatepodTemplateTherefore, if you are using the unsupported
podTemplateThe
ExplicitrevisionrevisionrevisionExercise caution when using this with automatic Operator upgrades. The Operator Lifecycle Manager (OLM) may upgrade the Red Hat build of Keycloak Operator, and if the
ExplicitExplicit update strategy, thorough testing in a non-production environment is highly recommended before upgrading.
5.2.2. CR Statuses
The Keycloak CR status of
RecreateUpdateUsedlastTransitionTime| Status | Description |
|---|---|
|
| The initial state. It means no update has taken place. |
|
| The Operator applied the rolling update strategy in the last update. |
|
| The Operator applied the recreate update strategy in the last update. The |
5.3. Rolling updates for patch releases
This behavior is currently in an experimental mode, and it is not recommended for use in production.
It is possible to enable automatic rolling updates when upgrading to a newer patch version in the same
major.minorTo enable this behavior, enable feature
rolling-updates:v2apiVersion: k8s.keycloak.org/v2alpha1
kind: Keycloak
metadata:
name: example-kc
spec:
features:
enabled:
- rolling-updates:v2
update:
strategy: AutoRead more about rolling updates for patch releases in the Checking if rolling updates are possible chapter.
Chapter 6. Using custom Red Hat build of Keycloak images
Customize and optimize the Red Hat build of Keycloak container.
6.1. Red Hat build of Keycloak custom image with the Operator
With the Keycloak Custom Resource (CR), you can specify a custom container image for the Red Hat build of Keycloak server.
To ensure full compatibility of Operator and Operand, make sure that the version of Red Hat build of Keycloak release used in the custom image is aligned with the version of the operator.
6.1.1. Best practice
When using the default Red Hat build of Keycloak image, the server will perform a costly re-augmentation every time a Pod starts. To avoid this delay, you can provide a custom image with the augmentation built-in from the build time of the image.
With a custom image, you can also specify the Keycloak build-time configurations and extensions during the build of the container.
When using the optimized custom image,
health-enabledmetrics-enabledFor instructions on how to build such an image, see Running Red Hat build of Keycloak in a container.
6.1.2. Providing a custom Red Hat build of Keycloak image
To provide a custom image, you define the
imageapiVersion: k8s.keycloak.org/v2alpha1
kind: Keycloak
metadata:
name: example-kc
spec:
instances: 1
image: quay.io/my-company/my-keycloak:latest
http:
tlsSecret: example-tls-secret
hostname:
hostname: test.keycloak.orgWith custom images, every build time option passed either through a dedicated field or the
additionalOptionsThe Operator is unaware of any configuration options that are specified in a custom image. Use the Keycloak CR for any configuration that requires Operator awareness, namely the TLS and HTTP(S) settings reflected when configuring services and probes.
6.1.3. Non-optimized custom image
While it is considered a best practice to use a pre-augmented image, if you want to use a non-optimized custom image or build time properties with an augmented image that is still possible. You just need set the
startOptimizedfalseapiVersion: k8s.keycloak.org/v2alpha1
kind: Keycloak
metadata:
name: example-kc
spec:
instances: 1
image: quay.io/my-company/my-keycloak:latest
startOptimized: false
http:
tlsSecret: example-tls-secret
hostname:
hostname: test.keycloak.orgKeep in mind this will incur the re-augmentation cost on every start.