Container Guide
Deploying and Managing Red Hat Ceph Storage in Containers
Abstract
Chapter 1. Deploying Red Hat Ceph Storage in Containers
This chapter describes how to use the Ansible application with the ceph-ansible playbook to deploy Red Hat Ceph Storage 3 in containers.
- To install the Red Hat Ceph Storage, see Section 1.2, “Installing a Red Hat Ceph Storage Cluster in Containers”.
- To install the Ceph Object Gateway, see Section 1.4, “Installing the Ceph Object Gateway in a Container”.
- To install Metadata Servers, see Section 1.5, “Installing Metadata Servers”.
-
To learn about the Ansible
--limitoption, see Section 1.8, “Understanding thelimitoption”.
1.1. Prerequisites
- Obtain a valid customer subscription.
Prepare the cluster nodes. On each node:
1.1.1. Registering Red Hat Ceph Storage Nodes to the CDN and Attaching Subscriptions
Register each Red Hat Ceph Storage (RHCS) node to the Content Delivery Network (CDN) and attach the appropriate subscription so that the node has access to software repositories. Each RHCS node must be able to access the full Red Hat Enterprise Linux 7 base content and the extras repository content.
Prerequisites
- A valid Red Hat subscription
- RHCS nodes must be able to connect to the Internet.
For RHCS nodes that cannot access the internet during installation, you must first follow these steps on a system with internet access:
Start a local Docker registry:
docker run -d -p 5000:5000 --restart=always --name registry registry:2
# docker run -d -p 5000:5000 --restart=always --name registry registry:2Copy to Clipboard Copied! Toggle word wrap Toggle overflow Pull the Red Hat Ceph Storage 3.x image from the Red Hat Customer Portal:
docker pull registry.access.redhat.com/rhceph/rhceph-3-rhel7
# docker pull registry.access.redhat.com/rhceph/rhceph-3-rhel7Copy to Clipboard Copied! Toggle word wrap Toggle overflow Tag the image:
docker tag registry.access.redhat.com/rhceph/rhceph-3-rhel7 <local-host-fqdn>:5000/cephimageinlocalreg
# docker tag registry.access.redhat.com/rhceph/rhceph-3-rhel7 <local-host-fqdn>:5000/cephimageinlocalregCopy to Clipboard Copied! Toggle word wrap Toggle overflow Replace
<local-host-fqdn>with your local host FQDN.Push the image to the local Docker registry you started:
docker push <local-host-fqdn>:5000/cephimageinlocalreg
# docker push <local-host-fqdn>:5000/cephimageinlocalregCopy to Clipboard Copied! Toggle word wrap Toggle overflow Replace
<local-host-fqdn>with your local host FQDN.
Procedure
Perform the following steps on all nodes in the storage cluster as the root user.
Register the node. When prompted, enter your Red Hat Customer Portal credentials:
subscription-manager register
# subscription-manager registerCopy to Clipboard Copied! Toggle word wrap Toggle overflow Pull the latest subscription data from the CDN:
subscription-manager refresh
# subscription-manager refreshCopy to Clipboard Copied! Toggle word wrap Toggle overflow List all available subscriptions for Red Hat Ceph Storage:
subscription-manager list --available --all --matches="*Ceph*"
# subscription-manager list --available --all --matches="*Ceph*"Copy to Clipboard Copied! Toggle word wrap Toggle overflow Identify the appropriate subscription and retrieve its Pool ID.
Attach the subscription:
subscription-manager attach --pool=$POOL_ID
# subscription-manager attach --pool=$POOL_IDCopy to Clipboard Copied! Toggle word wrap Toggle overflow - Replace
-
$POOL_IDwith the Pool ID identified in the previous step.
-
Disable the default software repositories. Then, enable the Red Hat Enterprise Linux 7 Server, Red Hat Enterprise Linux 7 Server Extras, and RHCS repositories:
Copy to Clipboard Copied! Toggle word wrap Toggle overflow Update the system to receive the latest packages:
yum update
# yum updateCopy to Clipboard Copied! Toggle word wrap Toggle overflow
Additional Resources
- See the Registering a System and Managing Subscriptions chapter in the System Administrator’s Guide for Red Hat Enterprise Linux 7.
1.1.2. Creating an Ansible user with sudo access
Ansible must be able to log into all the Red Hat Ceph Storage (RHCS) nodes as a user that has root privileges to install software and create configuration files without prompting for a password. You must create an Ansible user with password-less root access on all nodes in the storage cluster when deploying and configuring a Red Hat Ceph Storage cluster with Ansible.
Prerequisite
-
Having
rootorsudoaccess to all nodes in the storage cluster.
Procedure
Log in to a Ceph node as the
rootuser:ssh root@$HOST_NAME
ssh root@$HOST_NAMECopy to Clipboard Copied! Toggle word wrap Toggle overflow - Replace
-
$HOST_NAMEwith the host name of the Ceph node.
-
Example
ssh root@mon01
# ssh root@mon01Copy to Clipboard Copied! Toggle word wrap Toggle overflow Enter the
rootpassword when prompted.Create a new Ansible user:
adduser $USER_NAME
adduser $USER_NAMECopy to Clipboard Copied! Toggle word wrap Toggle overflow - Replace
-
$USER_NAMEwith the new user name for the Ansible user.
-
Example
adduser admin
# adduser adminCopy to Clipboard Copied! Toggle word wrap Toggle overflow ImportantDo not use
cephas the user name. Thecephuser name is reserved for the Ceph daemons. A uniform user name across the cluster can improve ease of use, but avoid using obvious user names, because intruders typically use them for brute-force attacks.Set a new password for this user:
passwd $USER_NAME
# passwd $USER_NAMECopy to Clipboard Copied! Toggle word wrap Toggle overflow - Replace
-
$USER_NAMEwith the new user name for the Ansible user.
-
Example
passwd admin
# passwd adminCopy to Clipboard Copied! Toggle word wrap Toggle overflow Enter the new password twice when prompted.
Configure
sudoaccess for the newly created user:cat << EOF >/etc/sudoers.d/$USER_NAME $USER_NAME ALL = (root) NOPASSWD:ALL EOF
cat << EOF >/etc/sudoers.d/$USER_NAME $USER_NAME ALL = (root) NOPASSWD:ALL EOFCopy to Clipboard Copied! Toggle word wrap Toggle overflow - Replace
-
$USER_NAMEwith the new user name for the Ansible user.
-
Example
cat << EOF >/etc/sudoers.d/admin
admin ALL = (root) NOPASSWD:ALL
EOF
# cat << EOF >/etc/sudoers.d/admin
admin ALL = (root) NOPASSWD:ALL
EOF
Copy to Clipboard Copied! Toggle word wrap Toggle overflow Assign the correct file permissions to the new file:
chmod 0440 /etc/sudoers.d/$USER_NAME
chmod 0440 /etc/sudoers.d/$USER_NAMECopy to Clipboard Copied! Toggle word wrap Toggle overflow - Replace
-
$USER_NAMEwith the new user name for the Ansible user.
-
Example
chmod 0440 /etc/sudoers.d/admin
# chmod 0440 /etc/sudoers.d/adminCopy to Clipboard Copied! Toggle word wrap Toggle overflow
Additional Resources
- The Adding a New User section in the System Administrator’s Guide for Red Hat Enterprise Linux 7.
1.1.3. Enabling Password-less SSH for Ansible
Generate an SSH key pair on the Ansible administration node and distribute the public key to each node in the storage cluster so that Ansible can access the nodes without being prompted for a password.
Prerequisites
Procedure
Do the following steps from the Ansible administration node, and as the Ansible user.
Generate the SSH key pair, accept the default file name and leave the passphrase empty:
ssh-keygen
[user@admin ~]$ ssh-keygenCopy to Clipboard Copied! Toggle word wrap Toggle overflow Copy the public key to all nodes in the storage cluster:
ssh-copy-id $USER_NAME@$HOST_NAME
ssh-copy-id $USER_NAME@$HOST_NAMECopy to Clipboard Copied! Toggle word wrap Toggle overflow - Replace
-
$USER_NAMEwith the new user name for the Ansible user. -
$HOST_NAMEwith the host name of the Ceph node.
-
Example
ssh-copy-id admin@ceph-mon01
[user@admin ~]$ ssh-copy-id admin@ceph-mon01Copy to Clipboard Copied! Toggle word wrap Toggle overflow Create and edit the
~/.ssh/configfile.ImportantBy creating and editing the
~/.ssh/configfile you do not have to specify the-u $USER_NAMEoption each time you execute theansible-playbookcommand.Create the SSH
configfile:touch ~/.ssh/config
[user@admin ~]$ touch ~/.ssh/configCopy to Clipboard Copied! Toggle word wrap Toggle overflow Open the
configfile for editing. Set theHostnameandUseroptions for each node in the storage cluster:Copy to Clipboard Copied! Toggle word wrap Toggle overflow - Replace
-
$HOST_NAMEwith the host name of the Ceph node. -
$USER_NAMEwith the new user name for the Ansible user.
-
Example
Copy to Clipboard Copied! Toggle word wrap Toggle overflow
Set the correct file permissions for the
~/.ssh/configfile:chmod 600 ~/.ssh/config
[admin@admin ~]$ chmod 600 ~/.ssh/configCopy to Clipboard Copied! Toggle word wrap Toggle overflow
Additional Resources
-
The
ssh_config(5)manual page - The OpenSSH chapter in the System Administrator’s Guide for Red Hat Enterprise Linux 7
1.1.4. Configuring a firewall for Red Hat Ceph Storage
Red Hat Ceph Storage (RHCS) uses the firewalld service.
The Monitor daemons use port 6789 for communication within the Ceph storage cluster.
On each Ceph OSD node, the OSD daemons use several ports in the range 6800-7300:
- One for communicating with clients and monitors over the public network
- One for sending data to other OSDs over a cluster network, if available; otherwise, over the public network
- One for exchanging heartbeat packets over a cluster network, if available; otherwise, over the public network
The Ceph Manager (ceph-mgr) daemons use ports in range 6800-7300. Consider colocating the ceph-mgr daemons with Ceph Monitors on same nodes.
The Ceph Metadata Server nodes (ceph-mds) use ports in the range 6800-7300.
The Ceph Object Gateway nodes are configured by Ansible to use port 8080 by default. However, you can change the default port, for example to port 80.
To use the SSL/TLS service, open port 443.
Prerequisite
- Network hardware is connected.
Procedure
Run the following commands as the root user.
On all RHCS nodes, start the
firewalldservice. Enable it to run on boot, and ensure that it is running:systemctl enable firewalld systemctl start firewalld systemctl status firewalld
# systemctl enable firewalld
# systemctl start firewalld
# systemctl status firewalld
Copy to Clipboard Copied! Toggle word wrap Toggle overflow On all Monitor nodes, open port
6789on the public network:firewall-cmd --zone=public --add-port=6789/tcp firewall-cmd --zone=public --add-port=6789/tcp --permanent
[root@monitor ~]# firewall-cmd --zone=public --add-port=6789/tcp
[root@monitor ~]# firewall-cmd --zone=public --add-port=6789/tcp --permanent
Copy to Clipboard Copied! Toggle word wrap Toggle overflow To limit access based on the source address:
firewall-cmd --zone=public --add-rich-rule="rule family="ipv4" \
source address="IP_address/netmask_prefix" port protocol="tcp" \
port="6789" accept"
firewall-cmd --zone=public --add-rich-rule="rule family="ipv4" \
source address="IP_address/netmask_prefix" port protocol="tcp" \
port="6789" accept"
Copy to Clipboard Copied! Toggle word wrap Toggle overflow firewall-cmd --zone=public --add-rich-rule="rule family="ipv4" \ source address="IP_address/netmask_prefix" port protocol="tcp" \ port="6789" accept" --permanent
firewall-cmd --zone=public --add-rich-rule="rule family="ipv4" \ source address="IP_address/netmask_prefix" port protocol="tcp" \ port="6789" accept" --permanentCopy to Clipboard Copied! Toggle word wrap Toggle overflow - Replace
-
IP_addresswith the network address of the Monitor node. -
netmask_prefixwith the netmask in CIDR notation.
-
Example
firewall-cmd --zone=public --add-rich-rule="rule family="ipv4" \
source address="192.168.0.11/24" port protocol="tcp" \
port="6789" accept"
[root@monitor ~]# firewall-cmd --zone=public --add-rich-rule="rule family="ipv4" \
source address="192.168.0.11/24" port protocol="tcp" \
port="6789" accept"
Copy to Clipboard Copied! Toggle word wrap Toggle overflow firewall-cmd --zone=public --add-rich-rule="rule family="ipv4" \ source address="192.168.0.11/24" port protocol="tcp" \ port="6789" accept" --permanent
[root@monitor ~]# firewall-cmd --zone=public --add-rich-rule="rule family="ipv4" \
source address="192.168.0.11/24" port protocol="tcp" \
port="6789" accept" --permanent
Copy to Clipboard Copied! Toggle word wrap Toggle overflow On all OSD nodes, open ports
6800-7300on the public network:firewall-cmd --zone=public --add-port=6800-7300/tcp firewall-cmd --zone=public --add-port=6800-7300/tcp --permanent
[root@osd ~]# firewall-cmd --zone=public --add-port=6800-7300/tcp
[root@osd ~]# firewall-cmd --zone=public --add-port=6800-7300/tcp --permanent
Copy to Clipboard Copied! Toggle word wrap Toggle overflow If you have a separate cluster network, repeat the commands with the appropriate zone.
On all Ceph Manager (
ceph-mgr) nodes (usually the same nodes as Monitor ones), open ports6800-7300on the public network:firewall-cmd --zone=public --add-port=6800-7300/tcp firewall-cmd --zone=public --add-port=6800-7300/tcp --permanent
[root@monitor ~]# firewall-cmd --zone=public --add-port=6800-7300/tcp
[root@monitor ~]# firewall-cmd --zone=public --add-port=6800-7300/tcp --permanent
Copy to Clipboard Copied! Toggle word wrap Toggle overflow If you have a separate cluster network, repeat the commands with the appropriate zone.
On all Ceph Metadata Server (
ceph-mds) nodes, open port6800on the public network:firewall-cmd --zone=public --add-port=6800/tcp firewall-cmd --zone=public --add-port=6800/tcp --permanent
[root@monitor ~]# firewall-cmd --zone=public --add-port=6800/tcp
[root@monitor ~]# firewall-cmd --zone=public --add-port=6800/tcp --permanent
Copy to Clipboard Copied! Toggle word wrap Toggle overflow If you have a separate cluster network, repeat the commands with the appropriate zone.
On all Ceph Object Gateway nodes, open the relevant port or ports on the public network.
To open the default Ansible configured port of
8080:firewall-cmd --zone=public --add-port=8080/tcp firewall-cmd --zone=public --add-port=8080/tcp --permanent
[root@gateway ~]# firewall-cmd --zone=public --add-port=8080/tcp
[root@gateway ~]# firewall-cmd --zone=public --add-port=8080/tcp --permanent
Copy to Clipboard Copied! Toggle word wrap Toggle overflow To limit access based on the source address:
firewall-cmd --zone=public --add-rich-rule="rule family="ipv4" \
source address="IP_address/netmask_prefix" port protocol="tcp" \
port="8080" accept"
firewall-cmd --zone=public --add-rich-rule="rule family="ipv4" \
source address="IP_address/netmask_prefix" port protocol="tcp" \
port="8080" accept"
Copy to Clipboard Copied! Toggle word wrap Toggle overflow firewall-cmd --zone=public --add-rich-rule="rule family="ipv4" \ source address="IP_address/netmask_prefix" port protocol="tcp" \ port="8080" accept" --permanent
firewall-cmd --zone=public --add-rich-rule="rule family="ipv4" \ source address="IP_address/netmask_prefix" port protocol="tcp" \ port="8080" accept" --permanentCopy to Clipboard Copied! Toggle word wrap Toggle overflow - Replace
-
IP_addresswith the network address of the object gateway node. -
netmask_prefixwith the netmask in CIDR notation.
-
Example
firewall-cmd --zone=public --add-rich-rule="rule family="ipv4" \
source address="192.168.0.31/24" port protocol="tcp" \
port="8080" accept"
[root@gateway ~]# firewall-cmd --zone=public --add-rich-rule="rule family="ipv4" \
source address="192.168.0.31/24" port protocol="tcp" \
port="8080" accept"
Copy to Clipboard Copied! Toggle word wrap Toggle overflow firewall-cmd --zone=public --add-rich-rule="rule family="ipv4" \ source address="192.168.0.31/24" port protocol="tcp" \ port="8080" accept" --permanent
[root@gateway ~]# firewall-cmd --zone=public --add-rich-rule="rule family="ipv4" \
source address="192.168.0.31/24" port protocol="tcp" \
port="8080" accept" --permanent
Copy to Clipboard Copied! Toggle word wrap Toggle overflow Optional. If you installed Ceph Object Gateway using Ansible and changed the default port that Ansible configures Ceph Object Gateway to use from
8080, for example, to port80, open this port:firewall-cmd --zone=public --add-port=80/tcp firewall-cmd --zone=public --add-port=80/tcp --permanent
[root@gateway ~]# firewall-cmd --zone=public --add-port=80/tcp
[root@gateway ~]# firewall-cmd --zone=public --add-port=80/tcp --permanent
Copy to Clipboard Copied! Toggle word wrap Toggle overflow To limit access based on the source address, run the following commands:
firewall-cmd --zone=public --add-rich-rule="rule family="ipv4" \
source address="IP_address/netmask_prefix" port protocol="tcp" \
port="80" accept"
firewall-cmd --zone=public --add-rich-rule="rule family="ipv4" \
source address="IP_address/netmask_prefix" port protocol="tcp" \
port="80" accept"
Copy to Clipboard Copied! Toggle word wrap Toggle overflow firewall-cmd --zone=public --add-rich-rule="rule family="ipv4" \ source address="IP_address/netmask_prefix" port protocol="tcp" \ port="80" accept" --permanent
firewall-cmd --zone=public --add-rich-rule="rule family="ipv4" \ source address="IP_address/netmask_prefix" port protocol="tcp" \ port="80" accept" --permanentCopy to Clipboard Copied! Toggle word wrap Toggle overflow - Replace
-
IP_addresswith the network address of the object gateway node. -
netmask_prefixwith the netmask in CIDR notation.
-
Example
firewall-cmd --zone=public --add-rich-rule="rule family="ipv4" \
source address="192.168.0.31/24" port protocol="tcp" \
port="80" accept"
[root@gateway ~]# firewall-cmd --zone=public --add-rich-rule="rule family="ipv4" \
source address="192.168.0.31/24" port protocol="tcp" \
port="80" accept"
Copy to Clipboard Copied! Toggle word wrap Toggle overflow firewall-cmd --zone=public --add-rich-rule="rule family="ipv4" \ source address="192.168.0.31/24" port protocol="tcp" \ port="80" accept" --permanent
[root@gateway ~]# firewall-cmd --zone=public --add-rich-rule="rule family="ipv4" \
source address="192.168.0.31/24" port protocol="tcp" \
port="80" accept" --permanent
Copy to Clipboard Copied! Toggle word wrap Toggle overflow Optional. To use SSL/TLS, open port
443:firewall-cmd --zone=public --add-port=443/tcp firewall-cmd --zone=public --add-port=443/tcp --permanent
[root@gateway ~]# firewall-cmd --zone=public --add-port=443/tcp
[root@gateway ~]# firewall-cmd --zone=public --add-port=443/tcp --permanent
Copy to Clipboard Copied! Toggle word wrap Toggle overflow To limit access based on the source address, run the following commands:
firewall-cmd --zone=public --add-rich-rule="rule family="ipv4" \
source address="IP_address/netmask_prefix" port protocol="tcp" \
port="443" accept"
firewall-cmd --zone=public --add-rich-rule="rule family="ipv4" \
source address="IP_address/netmask_prefix" port protocol="tcp" \
port="443" accept"
Copy to Clipboard Copied! Toggle word wrap Toggle overflow firewall-cmd --zone=public --add-rich-rule="rule family="ipv4" \ source address="IP_address/netmask_prefix" port protocol="tcp" \ port="443" accept" --permanent
firewall-cmd --zone=public --add-rich-rule="rule family="ipv4" \ source address="IP_address/netmask_prefix" port protocol="tcp" \ port="443" accept" --permanentCopy to Clipboard Copied! Toggle word wrap Toggle overflow - Replace
-
IP_addresswith the network address of the object gateway node. -
netmask_prefixwith the netmask in CIDR notation.
-
Example
Copy to Clipboard Copied! Toggle word wrap Toggle overflow
Additional Resources
- For more information about public and cluster network, see Verifying the Network Configuration for Red Hat Ceph Storage.
-
For additional details on
firewalld, see the Using Firewalls chapter in the Security Guide for Red Hat Enterprise Linux 7.
1.1.5. Using a HTTP Proxy
If the Ceph nodes are behind a HTTP/HTTPS proxy, then docker will need to be configured to access the images in the registry. Do the following procedure to configure access for docker using a HTTP/HTTPS proxy.
Prerequisites
- A running HTTP/HTTPS proxy
Procedure
As
root, create a systemd directory for the docker service:mkdir /etc/systemd/system/docker.service.d/
# mkdir /etc/systemd/system/docker.service.d/Copy to Clipboard Copied! Toggle word wrap Toggle overflow As
root, create the HTTP/HTTPS configuration file.For HTTP, create the
/etc/systemd/system/docker.service.d/http-proxy.conffile and add the following lines to the file:[Service] Environment="HTTP_PROXY=http://proxy.example.com:80/"
[Service] Environment="HTTP_PROXY=http://proxy.example.com:80/"Copy to Clipboard Copied! Toggle word wrap Toggle overflow For HTTPS, create the
/etc/systemd/system/docker.service.d/https-proxy.conffile and add the following lines to the file:[Service] Environment="HTTPS_PROXY=https://proxy.example.com:443/"
[Service] Environment="HTTPS_PROXY=https://proxy.example.com:443/"Copy to Clipboard Copied! Toggle word wrap Toggle overflow
-
As
root, copy the HTTP/HTTPS configuration file to all Ceph nodes in the storage cluster before running theceph-ansibleplaybook.
1.2. Installing a Red Hat Ceph Storage Cluster in Containers
Use the Ansible application with the ceph-ansible playbook to install Red Hat Ceph Storage 3 in containers.
A Ceph cluster used in production usually consists of ten or more nodes. To deploy Red Hat Ceph Storage as a container image, Red Hat recommends to use a Ceph cluster that consists of at least three OSD and three Monitor nodes.
Ceph can run with one monitor; however, to ensure high availability in a production cluster, Red Hat will only support deployments with at least three monitor nodes.
Prerequisites
Using the root user account on the Ansible administration node, enable the Red Hat Ceph Storage 3 Tools repository and Ansible repository:
subscription-manager repos --enable=rhel-7-server-rhceph-3-tools-els-rpms --enable=rhel-7-server-ansible-2.6-rpms
[root@admin ~]# subscription-manager repos --enable=rhel-7-server-rhceph-3-tools-els-rpms --enable=rhel-7-server-ansible-2.6-rpmsCopy to Clipboard Copied! Toggle word wrap Toggle overflow Install the
ceph-ansiblepackage:yum install ceph-ansible
[root@admin ~]# yum install ceph-ansibleCopy to Clipboard Copied! Toggle word wrap Toggle overflow
Procedure
Run the following commands from the Ansible administration node unless instructed otherwise.
As the Ansible user, create the
ceph-ansible-keysdirectory where Ansible stores temporary values generated by theceph-ansibleplaybook.mkdir ~/ceph-ansible-keys
[user@admin ~]$ mkdir ~/ceph-ansible-keysCopy to Clipboard Copied! Toggle word wrap Toggle overflow As root, create a symbolic link to the
/usr/share/ceph-ansible/group_varsdirectory in the/etc/ansible/directory:ln -s /usr/share/ceph-ansible/group_vars /etc/ansible/group_vars
[root@admin ~]# ln -s /usr/share/ceph-ansible/group_vars /etc/ansible/group_varsCopy to Clipboard Copied! Toggle word wrap Toggle overflow Navigate to the
/usr/share/ceph-ansible/directory:cd /usr/share/ceph-ansible
[root@admin ~]$ cd /usr/share/ceph-ansibleCopy to Clipboard Copied! Toggle word wrap Toggle overflow Create new copies of the
yml.samplefiles:cp group_vars/all.yml.sample group_vars/all.yml cp group_vars/osds.yml.sample group_vars/osds.yml cp site-docker.yml.sample site-docker.yml
[root@admin ceph-ansible]# cp group_vars/all.yml.sample group_vars/all.yml
[root@admin ceph-ansible]# cp group_vars/osds.yml.sample group_vars/osds.yml
[root@admin ceph-ansible]# cp site-docker.yml.sample site-docker.yml
Copy to Clipboard Copied! Toggle word wrap Toggle overflow Edit the copied files.
Edit the
group_vars/all.ymlfile. See the table below for the most common required and optional parameters to uncomment. Note that the table does not include all parameters.ImportantDo not set the
cluster: cephparameter to any value other thancephbecause using custom cluster names is not supported.Expand Table 1.1. General Ansible Settings Option Value Required Notes monitor_interfaceThe interface that the Monitor nodes listen to
monitor_interface,monitor_address, ormonitor_address_blockis requiredmonitor_addressThe address that the Monitor nodes listen to
monitor_address_blockThe subnet of the Ceph public network
Use when the IP addresses of the nodes are unknown, but the subnet is known
ip_versionipv6Yes if using IPv6 addressing
journal_sizeThe required size of the journal in MB
No
public_networkThe IP address and netmask of the Ceph public network
Yes
The Verifying the Network Configuration for Red Hat Ceph Storage section in the Installation Guide for Red Hat Enterprise Linux
cluster_networkThe IP address and netmask of the Ceph cluster network
No
ceph_docker_imagerhceph/rhceph-3-rhel7, orcephimageinlocalregif using a local Docker registryYes
containerized_deploymenttrueYes
ceph_docker_registryregistry.access.redhat.com, or<local-host-fqdn>if using a local Docker registryYes
An example of the
all.ymlfile can look like:Copy to Clipboard Copied! Toggle word wrap Toggle overflow For additional details, see the
all.ymlfile.Edit the
group_vars/osds.ymlfile. See the table below for the most common required and optional parameters to uncomment. Note that the table does not include all parameters.ImportantUse a different physical device to install an OSD than the device where the operating system is installed. Sharing the same device between the operating system and OSDs causes performance issues.
Expand Table 1.2. OSD Ansible Settings Option Value Required Notes osd_scenariocollocatedto use the same device for write-ahead logging and key/value data (BlueStore) or journal (FileStore) and OSD datanon-collocatedto use a dedicated device, such as SSD or NVMe media to store write-ahead log and key/value data (BlueStore) or journal data (FileStore)lvmto use the Logical Volume Manager to store OSD dataYes
When using
osd_scenario: non-collocated,ceph-ansibleexpects the numbers of variables indevicesanddedicated_devicesto match. For example, if you specify 10 disks indevices, you must specify 10 entries indedicated_devices.osd_auto_discoverytrueto automatically discover OSDsYes if using
osd_scenario: collocatedCannot be used when
devicessetting is useddevicesList of devices where
ceph datais storedYes to specify the list of devices
Cannot be used when
osd_auto_discoverysetting is used. When usinglvmas theosd_scenarioand setting thedevicesoption,ceph-volume lvm batchmode creates the optimized OSD configuration.dedicated_devicesList of dedicated devices for non-collocated OSDs where
ceph journalis storedYes if
osd_scenario: non-collocatedShould be nonpartitioned devices
dmcrypttrueto encrypt OSDsNo
Defaults to
falselvm_volumesA list of FileStore or BlueStore dictionaries
Yes if using
osd_scenario: lvmand storage devices are not defined usingdevicesEach dictionary must contain a
data,journalanddata_vgkeys. Any logical volume or volume group must be the name and not the full path. Thedata, andjournalkeys can be a logical volume (LV) or partition, but do not use one journal for multipledataLVs. Thedata_vgkey must be the volume group containing thedataLV. Optionally, thejournal_vgkey can be used to specify the volume group containing the journal LV, if applicable. See the examples below for various supported configurations.osds_per_deviceThe number of OSDs to create per device.
No
Defaults to
1osd_objectstoreThe Ceph object store type for the OSDs.
No
Defaults to
bluestore. The other option isfilestore. Required for upgrades.The following are examples of the
osds.ymlfile when using the three OSD scenarios:collocated,non-collocated, andlvm. The default OSD object store format is BlueStore, if not specified.Collocated
osd_objectstore: filestore
osd_scenario: collocated
devices:
  - /dev/sda
  - /dev/sdb
osd_objectstore: filestore
osd_scenario: collocated
devices:
  - /dev/sda
  - /dev/sdb
Copy to Clipboard Copied! Toggle word wrap Toggle overflow Non-collocated - BlueStore
Copy to Clipboard Copied! Toggle word wrap Toggle overflow This non-collocated example will create four BlueStore OSDs, one per device. In this example, the traditional hard drives (
sda,sdb,sdc,sdd) are used for object data, and the solid state drives (SSDs) (/dev/nvme0n1,/dev/nvme1n1) are used for the BlueStore databases and write-ahead logs. This configuration pairs the/dev/sdaand/dev/sdbdevices with the/dev/nvme0n1device, and pairs the/dev/sdcand/dev/sdddevices with the/dev/nvme1n1device.Non-collocated - FileStore
Copy to Clipboard Copied! Toggle word wrap Toggle overflow LVM simple
osd_objectstore: bluestore
osd_scenario: lvm
devices:
  - /dev/sda
  - /dev/sdb
osd_objectstore: bluestore
osd_scenario: lvm
devices:
  - /dev/sda
  - /dev/sdb
Copy to Clipboard Copied! Toggle word wrap Toggle overflow or
Copy to Clipboard Copied! Toggle word wrap Toggle overflow With these simple configurations
ceph-ansibleuses batch mode (ceph-volume lvm batch) to create the OSDs.In the first scenario, if the
devicesare traditional hard drives or SSDs, then one OSD per device is created.In the second scenario, when there is a mix of traditional hard drives and SSDs, the data is placed on the traditional hard drives (
sda,sdb) and the BlueStore database (block.db) is created as large as possible on the SSD (nvme0n1).LVM advance
Copy to Clipboard Copied! Toggle word wrap Toggle overflow or
Copy to Clipboard Copied! Toggle word wrap Toggle overflow With these advance scenario examples, the volume groups and logical volumes must be created beforehand. They will not be created by
ceph-ansible.NoteIf using all NVMe SSDs set the
osd_scenario: lvmandosds_per_device: 4options. For more information, see the Configuring OSD Ansible settings for all NVMe Storage section in the Red Hat Ceph Storage Container Guide.For additional details, see the comments in the
osds.ymlfile.
Edit the Ansible inventory file located by default at
/etc/ansible/hosts. Remember to comment out example hosts.Add the Monitor nodes under the
[mons]section:[mons] <monitor-host-name> <monitor-host-name> <monitor-host-name>
[mons] <monitor-host-name> <monitor-host-name> <monitor-host-name>Copy to Clipboard Copied! Toggle word wrap Toggle overflow Add OSD nodes under the
[osds]section. If the nodes have sequential naming, consider using a range:[osds] <osd-host-name[1:10]>
[osds] <osd-host-name[1:10]>Copy to Clipboard Copied! Toggle word wrap Toggle overflow NoteFor OSDs in a new installation, the default object store format is BlueStore.
Alternatively, you can colocate Monitors with the OSD daemons on one node by adding the same node under the
[mons]and[osds]sections. See Chapter 2, Colocation of Containerized Ceph Daemons for details.
Optionally, for all deployments, bare-metal or in containers, you can create a custom CRUSH hierarchy using
ansible-playbook:Setup your Ansible inventory file. Specify where you want the OSD hosts to be in the CRUSH map’s hierarchy by using the
osd_crush_locationparameter. You must specify at least two CRUSH bucket types to specify the location of the OSD, and one buckettypemust be host. By default, these includeroot,datacenter,room,row,pod,pdu,rack,chassisandhost.Syntax
[osds]
CEPH_OSD_NAME osd_crush_location="{ 'root': ROOT_BUCKET_', 'rack': 'RACK_BUCKET', 'pod': 'POD_BUCKET', 'host': 'CEPH_HOST_NAME' }"
[osds] CEPH_OSD_NAME osd_crush_location="{ 'root': ROOT_BUCKET_', 'rack': 'RACK_BUCKET', 'pod': 'POD_BUCKET', 'host': 'CEPH_HOST_NAME' }"Copy to Clipboard Copied! Toggle word wrap Toggle overflow Example
[osds]
ceph-osd-01 osd_crush_location="{ 'root': 'default', 'rack': 'rack1', 'pod': 'monpod', 'host': 'ceph-osd-01' }"
[osds] ceph-osd-01 osd_crush_location="{ 'root': 'default', 'rack': 'rack1', 'pod': 'monpod', 'host': 'ceph-osd-01' }"Copy to Clipboard Copied! Toggle word wrap Toggle overflow Set the
crush_rule_configandcreate_crush_treeparameters toTrue, and create at least one CRUSH rule if you do not want to use the default CRUSH rules. For example, if you are using HDD devices, edit the paramters as follows:Copy to Clipboard Copied! Toggle word wrap Toggle overflow If you are using SSD devices, then edit the parameters as follows:
Copy to Clipboard Copied! Toggle word wrap Toggle overflow NoteThe default CRUSH rules fail if both ssd and hdd OSDs are not deployed because the default rules now include the class parameter, which must be defined.
NoteAdd the custom CRUSH hierarchy to the OSD files in the host_vars directory as described in a step below to make this configuration work.
Create
pools, with createdcrush_rulesingroup_vars/clients.ymlfile.Example
Copy to Clipboard Copied! Toggle word wrap Toggle overflow View the tree.
ceph osd tree
[root@mon ~]# ceph osd treeCopy to Clipboard Copied! Toggle word wrap Toggle overflow Validate the pools.
for i in $(rados lspools);do echo "pool: $i"; ceph osd pool get $i crush_rule;done

pool: pool1
crush_rule: HDD
# for i in $(rados lspools);do echo "pool: $i"; ceph osd pool get $i crush_rule;done

pool: pool1
crush_rule: HDD
Copy to Clipboard Copied! Toggle word wrap Toggle overflow
For all deployments, bare-metal or in containers, open for editing the Ansible inventory file, by default the
/etc/ansible/hostsfile. Comment out the example hosts.Add the Ceph Manager (
ceph-mgr) nodes under the[mgrs]section. Colocate the Ceph Manager daemon with Monitor nodes.[mgrs] <monitor-host-name> <monitor-host-name> <monitor-host-name>
[mgrs] <monitor-host-name> <monitor-host-name> <monitor-host-name>Copy to Clipboard Copied! Toggle word wrap Toggle overflow
As the Ansible user, ensure that Ansible can reach the Ceph hosts:
ansible all -m ping
[user@admin ~]$ ansible all -m pingCopy to Clipboard Copied! Toggle word wrap Toggle overflow As
root, create the/var/log/ansible/directory and assign the appropriate permissions for theansibleuser:mkdir /var/log/ansible chown ansible:ansible /var/log/ansible chmod 755 /var/log/ansible
[root@admin ~]# mkdir /var/log/ansible [root@admin ~]# chown ansible:ansible /var/log/ansible [root@admin ~]# chmod 755 /var/log/ansibleCopy to Clipboard Copied! Toggle word wrap Toggle overflow Edit the
/usr/share/ceph-ansible/ansible.cfgfile, updating thelog_pathvalue as follows:log_path = /var/log/ansible/ansible.log
log_path = /var/log/ansible/ansible.logCopy to Clipboard Copied! Toggle word wrap Toggle overflow
As the Ansible user, change to the
/usr/share/ceph-ansible/directory:cd /usr/share/ceph-ansible/
[user@admin ~]$ cd /usr/share/ceph-ansible/Copy to Clipboard Copied! Toggle word wrap Toggle overflow Run the
ceph-ansibleplaybook:ansible-playbook site-docker.yml
[user@admin ceph-ansible]$ ansible-playbook site-docker.ymlCopy to Clipboard Copied! Toggle word wrap Toggle overflow NoteIf you deploy Red Hat Ceph Storage to Red Hat Enterprise Linux Atomic Host hosts, use the
--skip-tags=with_pkgoption:ansible-playbook site-docker.yml --skip-tags=with_pkg
[user@admin ceph-ansible]$ ansible-playbook site-docker.yml --skip-tags=with_pkgCopy to Clipboard Copied! Toggle word wrap Toggle overflow NoteTo increase the deployment speed, use the
--forksoption toansible-playbook. By default,ceph-ansiblesets forks to20. With this setting, up to twenty nodes will be installed at the same time. To install up to thirty nodes at a time, runansible-playbook --forks 30 PLAYBOOK FILE. The resources on the admin node must be monitored to ensure they are not overused. If they are, lower the number passed to--forks.Using the root account on a Monitor node, verify the status of the Ceph cluster:
docker exec ceph-<mon|mgr>-<id> ceph health
docker exec ceph-<mon|mgr>-<id> ceph healthCopy to Clipboard Copied! Toggle word wrap Toggle overflow Replace:
-
<id>with the host name of the Monitor node:
For example:
docker exec ceph-mon-mon0 ceph health HEALTH_OK
[root@monitor ~]# docker exec ceph-mon-mon0 ceph health HEALTH_OKCopy to Clipboard Copied! Toggle word wrap Toggle overflow -
1.3. Configuring OSD Ansible settings for all NVMe storage
To optimize performance when using only non-volatile memory express (NVMe) devices for storage, configure four OSDs on each NVMe device. Normally only one OSD is configured per device, which will underutilize the throughput of an NVMe device.
If you mix SSDs and HDDs, then SSDs will be used for either journals or block.db, not OSDs.
In testing, configuring four OSDs on each NVMe device was found to provide optimal performance. It is recommended to set osds_per_device: 4, but it is not required. Other values may provide better performance in your environment.
Prerequisites
- Satisfying all software and hardware requirements for a Ceph cluster.
Procedure
Set
osd_scenario: lvmandosds_per_device: 4ingroup_vars/osds.yml:osd_scenario: lvm osds_per_device: 4
osd_scenario: lvm osds_per_device: 4Copy to Clipboard Copied! Toggle word wrap Toggle overflow List the NVMe devices under
devices:devices: - /dev/nvme0n1 - /dev/nvme1n1 - /dev/nvme2n1 - /dev/nvme3n1
devices: - /dev/nvme0n1 - /dev/nvme1n1 - /dev/nvme2n1 - /dev/nvme3n1Copy to Clipboard Copied! Toggle word wrap Toggle overflow The settings in
group_vars/osds.ymlwill look similar to this example:Copy to Clipboard Copied! Toggle word wrap Toggle overflow
You must use devices with this configuration, not lvm_volumes. This is because lvm_volumes is generally used with pre-created logical volumes and osds_per_device implies automatic logical volume creation by Ceph.
1.4. Installing the Ceph Object Gateway in a Container
Use the Ansible application with the ceph-ansible playbook to install the Ceph Object Gateway in a container.
Prerequisites
- A working Red Hat Ceph Storage cluster.
Procedure
Run the following commands from the Ansible administration node unless specified otherwise.
As the
rootuser, navigate to the/usr/share/ceph-ansible/directory.cd /usr/share/ceph-ansible/
[root@admin ~]# cd /usr/share/ceph-ansible/Copy to Clipboard Copied! Toggle word wrap Toggle overflow Uncomment the
radosgw_interfaceparameter in thegroup_vars/all.ymlfile.radosgw_interface: interface
radosgw_interface: interfaceCopy to Clipboard Copied! Toggle word wrap Toggle overflow Replace interface with the interface that the Ceph Object Gateway nodes listen to.
Optional. Change the default variables.
Create a new copy of the
rgws.yml.samplefile located in thegroup_varsdirectory.cp group_vars/rgws.yml.sample group_vars/rgws.yml
[root@admin ceph-ansible]# cp group_vars/rgws.yml.sample group_vars/rgws.ymlCopy to Clipboard Copied! Toggle word wrap Toggle overflow -
Edit the
group_vars/rgws.ymlfile. For additional details, see thergws.ymlfile.
Add the host name of the Ceph Object Gateway node to the
[rgws]section of the Ansible inventory file located by default at/etc/ansible/hosts.[rgws] gateway01
[rgws] gateway01Copy to Clipboard Copied! Toggle word wrap Toggle overflow Alternatively, you can colocate the Ceph Object Gateway with the OSD daemon on one node by adding the same node under the
[osds]and[rgws]sections. See Colocation of containerized Ceph daemons for details.As the Ansible user, run the
ceph-ansibleplaybook.ansible-playbook site-docker.yml --limit rgws
[user@admin ceph-ansible]$ ansible-playbook site-docker.yml --limit rgwsCopy to Clipboard Copied! Toggle word wrap Toggle overflow NoteIf you deploy Red Hat Ceph Storage to Red Hat Enterprise Linux Atomic Host hosts, use the
--skip-tags=with_pkgoption:ansible-playbook site-docker.yml --skip-tags=with_pkg
[user@admin ceph-ansible]$ ansible-playbook site-docker.yml --skip-tags=with_pkgCopy to Clipboard Copied! Toggle word wrap Toggle overflow Verify that the Ceph Object Gateway node was deployed successfully.
Connect to a Monitor node as the
rootuser:ssh hostname
ssh hostnameCopy to Clipboard Copied! Toggle word wrap Toggle overflow Replace hostname with the host name of the Monitor node, for example:
ssh root@monitor
[user@admin ~]$ ssh root@monitorCopy to Clipboard Copied! Toggle word wrap Toggle overflow Verify that the Ceph Object Gateway pools were created properly:
Copy to Clipboard Copied! Toggle word wrap Toggle overflow From any client on the same network as the Ceph cluster, for example the Monitor node, use the
curlcommand to send an HTTP request on port 8080 using the IP address of the Ceph Object Gateway host:curl http://IP-address:8080
curl http://IP-address:8080Copy to Clipboard Copied! Toggle word wrap Toggle overflow Replace IP-address with the IP address of the Ceph Object Gateway node. To determine the IP address of the Ceph Object Gateway host, use the
ifconfigoripcommands:curl http://192.168.122.199:8080 <?xml version="1.0" encoding="UTF-8"?><ListAllMyBucketsResult xmlns="http://s3.amazonaws.com/doc/2006-03-01/"><Owner><ID>anonymous</ID><DisplayName></DisplayName></Owner><Buckets></Buckets></ListAllMyBucketsResult>
[root@client ~]# curl http://192.168.122.199:8080 <?xml version="1.0" encoding="UTF-8"?><ListAllMyBucketsResult xmlns="http://s3.amazonaws.com/doc/2006-03-01/"><Owner><ID>anonymous</ID><DisplayName></DisplayName></Owner><Buckets></Buckets></ListAllMyBucketsResult>Copy to Clipboard Copied! Toggle word wrap Toggle overflow List buckets:
docker exec ceph-mon-mon1 radosgw-admin bucket list
[root@monitor ~]# docker exec ceph-mon-mon1 radosgw-admin bucket listCopy to Clipboard Copied! Toggle word wrap Toggle overflow
Additional Resources
- The Red Hat Ceph Storage 3 Ceph Object Gateway Guide for Red Hat Enterprise Linux
-
Understanding the
limitoption
1.5. Installing Metadata Servers
Use the Ansible automation application to install a Ceph Metadata Server (MDS). Metadata Server daemons are necessary for deploying a Ceph File System.
Prerequisites
- A working Red Hat Ceph Storage cluster.
Procedure
Perform the following steps on the Ansible administration node.
Add a new section
[mdss]to the/etc/ansible/hostsfile:[mdss] hostname hostname hostname
[mdss] hostname hostname hostnameCopy to Clipboard Copied! Toggle word wrap Toggle overflow Replace hostname with the host names of the nodes where you want to install the Ceph Metadata Servers.
Alternatively, you can colocate the Metadata Server with the OSD daemon on one node by adding the same node under the
[osds]and[mdss]sections. See Colocation of containerized Ceph daemons for details.Navigate to the
/usr/share/ceph-ansibledirectory:cd /usr/share/ceph-ansible
[root@admin ~]# cd /usr/share/ceph-ansibleCopy to Clipboard Copied! Toggle word wrap Toggle overflow Optional. Change the default variables.
Create a copy of the
group_vars/mdss.yml.samplefile namedmdss.yml:cp group_vars/mdss.yml.sample group_vars/mdss.yml
[root@admin ceph-ansible]# cp group_vars/mdss.yml.sample group_vars/mdss.ymlCopy to Clipboard Copied! Toggle word wrap Toggle overflow -
Optionally, edit parameters in
mdss.yml. Seemdss.ymlfor details.
As the Ansible user, run the Ansible playbook:
ansible-playbook site-docker.yml --limit mdss
[user@admin ceph-ansible]$ ansible-playbook site-docker.yml --limit mdssCopy to Clipboard Copied! Toggle word wrap Toggle overflow - After installing Metadata Servers, configure them. For details, see the Configuring Metadata Server Daemons chapter in the Ceph File System Guide for Red Hat Ceph Storage 3.
Additional Resources
- The Ceph File System Guide for Red Hat Ceph Storage 3
-
Understanding the
limitoption
1.6. Installing the NFS-Ganesha Gateway
The Ceph NFS Ganesha Gateway is an NFS interface built on top of the Ceph Object Gateway to provide applications with a POSIX filesystem interface to the Ceph Object Gateway for migrating files within filesystems to Ceph Object Storage.
Prerequisites
-
A running Ceph storage cluster, preferably in the
active + cleanstate. - At least one node running a Ceph Object Gateway.
- Perform the Before You Start procedure.
Procedure
Perform the following tasks on the Ansible administration node.
Create the
nfssfile from the sample file:cd /usr/share/ceph-ansible/group_vars cp nfss.yml.sample nfss.yml
[root@ansible ~]# cd /usr/share/ceph-ansible/group_vars [root@ansible ~]# cp nfss.yml.sample nfss.ymlCopy to Clipboard Copied! Toggle word wrap Toggle overflow Add gateway hosts to the
/etc/ansible/hostsfile under an[nfss]group to identify their group membership to Ansible. If the hosts have sequential naming, use a range. For example:[nfss] <nfs_host_name_1> <nfs_host_name_2> <nfs_host_name[3..10]>
[nfss] <nfs_host_name_1> <nfs_host_name_2> <nfs_host_name[3..10]>Copy to Clipboard Copied! Toggle word wrap Toggle overflow Navigate to the Ansible configuration directory,
/etc/ansible/:cd /usr/share/ceph-ansible
[root@ansible ~]# cd /usr/share/ceph-ansibleCopy to Clipboard Copied! Toggle word wrap Toggle overflow To copy the administrator key to the Ceph Object Gateway node, uncomment the
copy_admin_keysetting in the/usr/share/ceph-ansible/group_vars/nfss.ymlfile:copy_admin_key: true
copy_admin_key: trueCopy to Clipboard Copied! Toggle word wrap Toggle overflow Configure the FSAL (File System Abstraction Layer) sections of the
/usr/share/ceph-ansible/group_vars/nfss.ymlfile. Provide an ID, S3 user ID, S3 access key and secret. For NFSv4, it should look something like this:Copy to Clipboard Copied! Toggle word wrap Toggle overflow WarningAccess and secret keys are optional, and can be generated.
Run the Ansible playbook:
ansible-playbook site-docker.yml --limit nfss
[user@admin ceph-ansible]$ ansible-playbook site-docker.yml --limit nfssCopy to Clipboard Copied! Toggle word wrap Toggle overflow
Additional Resources
1.7. Installing the Ceph iSCSI gateway in a container
The Ansible deployment application installs the required daemons and tools to configure a Ceph iSCSI gateway in a container.
Prerequisites
- A working Red Hat Ceph Storage cluster.
Procedure
As the root user, open and edit the
/etc/ansible/hostsfile. Add a node name entry in the iSCSI gateway group:Example
[iscsigws] ceph-igw-1 ceph-igw-2
[iscsigws] ceph-igw-1 ceph-igw-2Copy to Clipboard Copied! Toggle word wrap Toggle overflow Navigate to the
/usr/share/ceph-ansibledirectory:cd /usr/share/ceph-ansible/
[root@admin ~]# cd /usr/share/ceph-ansible/Copy to Clipboard Copied! Toggle word wrap Toggle overflow Create a copy of the
iscsigws.yml.samplefile and name itiscsigws.yml:cp group_vars/iscsigws.yml.sample group_vars/iscsigws.yml
[root@admin ceph-ansible]# cp group_vars/iscsigws.yml.sample group_vars/iscsigws.ymlCopy to Clipboard Copied! Toggle word wrap Toggle overflow ImportantThe new file name (
iscsigws.yml) and the new section heading ([iscsigws]) are only applicable to Red Hat Ceph Storage 3.1 or higher. Upgrading from previous versions of Red Hat Ceph Storage to 3.1 will still use the old file name (iscsi-gws.yml) and the old section heading ([iscsi-gws]).ImportantCurrently, Red Hat does not support the following options to be installed using ceph-ansible for container-based deployments:
-
gateway_iqn -
rbd_devices -
client_connections
See the Configuring the Ceph iSCSI gateway in a container section for instructions on configuring these options manually.
-
-
Open the
iscsigws.ymlfile for editing. Configure the
gateway_ip_listoption by adding the iSCSI gateway IP addresses, using IPv4 or IPv6 addresses:Example
gateway_ip_list: 192.168.1.1,192.168.1.2
gateway_ip_list: 192.168.1.1,192.168.1.2Copy to Clipboard Copied! Toggle word wrap Toggle overflow ImportantYou cannot use a mix of IPv4 and IPv6 addresses.
Optionally, uncomment the
trusted_ip_listoption and add the IPv4 or IPv6 addresses accordingly, if you want to use SSL. You will needrootaccess to the iSCSI gateway containers to configure SSL. To configure SSL, do the following steps:-
If needed, install the
opensslpackage within all the iSCSI gateway containers. On the primary iSCSI gateway container, create a directory to hold the SSL keys:
mkdir ~/ssl-keys cd ~/ssl-keys
# mkdir ~/ssl-keys # cd ~/ssl-keysCopy to Clipboard Copied! Toggle word wrap Toggle overflow On the primary iSCSI gateway container, create the certificate and key files:
openssl req -newkey rsa:2048 -nodes -keyout iscsi-gateway.key -x509 -days 365 -out iscsi-gateway.crt
# openssl req -newkey rsa:2048 -nodes -keyout iscsi-gateway.key -x509 -days 365 -out iscsi-gateway.crtCopy to Clipboard Copied! Toggle word wrap Toggle overflow NoteYou will be prompted to enter the environmental information.
On the primary iSCSI gateway container, create a PEM file:
cat iscsi-gateway.crt iscsi-gateway.key > iscsi-gateway.pem
# cat iscsi-gateway.crt iscsi-gateway.key > iscsi-gateway.pemCopy to Clipboard Copied! Toggle word wrap Toggle overflow On the primary iSCSI gateway container, create a public key:
openssl x509 -inform pem -in iscsi-gateway.pem -pubkey -noout > iscsi-gateway-pub.key
# openssl x509 -inform pem -in iscsi-gateway.pem -pubkey -noout > iscsi-gateway-pub.keyCopy to Clipboard Copied! Toggle word wrap Toggle overflow -
From the primary iSCSI gateway container, copy the
iscsi-gateway.crt,iscsi-gateway.pem,iscsi-gateway-pub.key, andiscsi-gateway.keyfiles to the/etc/ceph/directory on the other iSCSI gateway containers.
-
If needed, install the
Optionally, review and uncomment any of the following iSCSI target API service options accordingly:
Copy to Clipboard Copied! Toggle word wrap Toggle overflow Optionally, review and uncomment any of the following resource options, updating them according to the workload needs:
Copy to Clipboard Copied! Toggle word wrap Toggle overflow As the Ansible user, run the Ansible playbook:
ansible-playbook site-docker.yml --limit iscsigws
[user@admin ceph-ansible]$ ansible-playbook site-docker.yml --limit iscsigwsCopy to Clipboard Copied! Toggle word wrap Toggle overflow For Red Hat Enterprise Linux Atomic, add the
--skip-tags=with_pkgoption:ansible-playbook site-docker.yml --limit iscsigws --skip-tags=with_pkg
[user@admin ceph-ansible]$ ansible-playbook site-docker.yml --limit iscsigws --skip-tags=with_pkgCopy to Clipboard Copied! Toggle word wrap Toggle overflow Once the Ansible playbook has finished, open TCP ports
3260and theapi_portspecified in theiscsigws.ymlfile on each node listed in thetrusted_ip_listoption.NoteIf the
api_portoption is not specified, the default port is5000.
Additional Resources
- For more information on installing Red Hat Ceph Storage in a container, see the Installing a Red Hat Ceph Storage cluster in containers section.
- For more information on Ceph’s iSCSI gateway options, see Table 8.1 in the Red Hat Ceph Storage Block Device Guide.
- For more information on the iSCSI target API options, see Table 8.2 in the Red Hat Ceph Storage Block Device Guide.
-
For an example of the
iscsigws.ymlfile, see Appendix A the Red Hat Ceph Storage Block Device Guide.
1.7.1. Configuring the Ceph iSCSI gateway in a container
The Ceph iSCSI gateway configuration is done with the gwcli command-line utility for creating and managing iSCSI targets, Logical Unit Numbers (LUNs) and Access Control Lists (ACLs).
Prerequisites
- A working Red Hat Ceph Storage cluster.
- Installation of the iSCSI gateway software.
Procedure
As the
rootuser, start the iSCSI gateway command-line interface:docker exec -it rbd-target-api gwcli
# docker exec -it rbd-target-api gwcliCopy to Clipboard Copied! Toggle word wrap Toggle overflow Create the iSCSI gateways using either IPv4 or IPv6 addresses:
Syntax
>/iscsi-target create iqn.2003-01.com.redhat.iscsi-gw:$TARGET_NAME > goto gateways > create $ISCSI_GW_NAME $ISCSI_GW_IP_ADDR > create $ISCSI_GW_NAME $ISCSI_GW_IP_ADDR
>/iscsi-target create iqn.2003-01.com.redhat.iscsi-gw:$TARGET_NAME > goto gateways > create $ISCSI_GW_NAME $ISCSI_GW_IP_ADDR > create $ISCSI_GW_NAME $ISCSI_GW_IP_ADDRCopy to Clipboard Copied! Toggle word wrap Toggle overflow Example
>/iscsi-target create iqn.2003-01.com.redhat.iscsi-gw:ceph-igw > goto gateways > create ceph-gw-1 10.172.19.21 > create ceph-gw-2 10.172.19.22
>/iscsi-target create iqn.2003-01.com.redhat.iscsi-gw:ceph-igw > goto gateways > create ceph-gw-1 10.172.19.21 > create ceph-gw-2 10.172.19.22Copy to Clipboard Copied! Toggle word wrap Toggle overflow ImportantYou cannot use a mix of IPv4 and IPv6 addresses.
Add a RADOS Block Device (RBD):
Syntax
> cd /disks >/disks/ create $POOL_NAME image=$IMAGE_NAME size=$IMAGE_SIZE[m|g|t] max_data_area_mb=$BUFFER_SIZE
> cd /disks >/disks/ create $POOL_NAME image=$IMAGE_NAME size=$IMAGE_SIZE[m|g|t] max_data_area_mb=$BUFFER_SIZECopy to Clipboard Copied! Toggle word wrap Toggle overflow Example
> cd /disks >/disks/ create rbd image=disk_1 size=50g max_data_area_mb=32
> cd /disks >/disks/ create rbd image=disk_1 size=50g max_data_area_mb=32Copy to Clipboard Copied! Toggle word wrap Toggle overflow ImportantThere can not be any periods (.) in the pool name or in the image name.
WarningDo NOT adjust the
max_data_area_mboption, unless Red Hat Support has instructed you to do so.The
max_data_area_mboption controls the amount of memory in megabytes that each image can use to pass SCSI command data between the iSCSI target and the Ceph cluster. If this value is too small, then it can result in excessive queue full retries which will affect performance. If the value is too large, then it can result in one disk using too much of the system’s memory, which can cause allocation failures for other subsystems. The default value is 8.This value can be changed using the
reconfigurecommand The image must not be in use by an iSCSI initiator for this command to take effect.Syntax
>/disks/ reconfigure max_data_area_mb $NEW_BUFFER_SIZE
>/disks/ reconfigure max_data_area_mb $NEW_BUFFER_SIZECopy to Clipboard Copied! Toggle word wrap Toggle overflow Example
>/disks/ reconfigure max_data_area_mb 64
>/disks/ reconfigure max_data_area_mb 64Copy to Clipboard Copied! Toggle word wrap Toggle overflow Create a client:
Syntax
> goto hosts > create iqn.1994-05.com.redhat:$CLIENT_NAME > auth chap=$USER_NAME/$PASSWORD
> goto hosts > create iqn.1994-05.com.redhat:$CLIENT_NAME > auth chap=$USER_NAME/$PASSWORDCopy to Clipboard Copied! Toggle word wrap Toggle overflow Example
> goto hosts > create iqn.1994-05.com.redhat:rh7-client > auth chap=iscsiuser1/temp12345678
> goto hosts > create iqn.1994-05.com.redhat:rh7-client > auth chap=iscsiuser1/temp12345678Copy to Clipboard Copied! Toggle word wrap Toggle overflow ImportantDisabling CHAP is only supported on Red Hat Ceph Storage 3.1 or higher. Red Hat does not support mixing clients, some with CHAP enabled and some CHAP disabled. All clients must have either CHAP enabled or have CHAP disabled. The default behavior is to only authenticate an initiator by its initiator name.
If initiators are failing to log into the target, then the CHAP authentication might be a misconfigured for some initiators.
Example
o- hosts ................................ [Hosts: 2: Auth: MISCONFIG]
o- hosts ................................ [Hosts: 2: Auth: MISCONFIG]Copy to Clipboard Copied! Toggle word wrap Toggle overflow Do the following command at the
hostslevel to reset all the CHAP authentication:Copy to Clipboard Copied! Toggle word wrap Toggle overflow Add disks to a client:
Syntax
>/iscsi-target..eph-igw/hosts> cd iqn.1994-05.com.redhat:$CLIENT_NAME > disk add $POOL_NAME.$IMAGE_NAME
>/iscsi-target..eph-igw/hosts> cd iqn.1994-05.com.redhat:$CLIENT_NAME > disk add $POOL_NAME.$IMAGE_NAMECopy to Clipboard Copied! Toggle word wrap Toggle overflow Example
>/iscsi-target..eph-igw/hosts> cd iqn.1994-05.com.redhat:rh7-client > disk add rbd.disk_1
>/iscsi-target..eph-igw/hosts> cd iqn.1994-05.com.redhat:rh7-client > disk add rbd.disk_1Copy to Clipboard Copied! Toggle word wrap Toggle overflow Run the following command to verify the iSCSI gateway configuration:
> ls
> lsCopy to Clipboard Copied! Toggle word wrap Toggle overflow Optionally, confirm that the API is using SSL correctly, look in the
/var/log/rbd-target-api.logfile forhttps, for example:Aug 01 17:27:42 test-node.example.com python[1879]: * Running on https://0.0.0.0:5000/
Aug 01 17:27:42 test-node.example.com python[1879]: * Running on https://0.0.0.0:5000/Copy to Clipboard Copied! Toggle word wrap Toggle overflow - The next step is to configure an iSCSI initiator.
Additional Resources
- For more information on installing Red Hat Ceph Storage in a container, see the Installing a Red Hat Ceph Storage cluster in containers section.
- For more information on installing the iSCSI gateway software in a container, see the Installing the Ceph iSCSI gateway in a container section.
- For more information on connecting an iSCSI initiator, see the Configuring the iSCSI Initiator section in the Red Hat Ceph Storage Block Device Guide.
1.7.2. Removing the Ceph iSCSI gateway in a container
The Ceph iSCSI gateway configuration can be removed using Ansible.
Prerequisites
- A working Red Hat Ceph Storage cluster.
- Installation of the iSCSI gateway software.
- Exported RBD images.
- Root-level access to the Red Hat Ceph Storage cluster.
- Root-level access to the iSCSI initiators.
- Access to the Ansible administration node.
Procedure
Disconnect all iSCSI initiators before purging the iSCSI gateway configuration. Follow the steps below for the appropriate operating system:
Red Hat Enterprise Linux initiators:
Run the following command as the
rootuser:Syntax
iscsiadm -m node -T TARGET_NAME --logout
iscsiadm -m node -T TARGET_NAME --logoutCopy to Clipboard Copied! Toggle word wrap Toggle overflow Replace TARGET_NAME with the configured iSCSI target name.
Example
iscsiadm -m node -T iqn.2003-01.com.redhat.iscsi-gw:ceph-igw --logout Logging out of session [sid: 1, target: iqn.2003-01.com.redhat.iscsi-gw:iscsi-igw, portal: 10.172.19.21,3260] Logging out of session [sid: 2, target: iqn.2003-01.com.redhat.iscsi-gw:iscsi-igw, portal: 10.172.19.22,3260] Logout of [sid: 1, target: iqn.2003-01.com.redhat.iscsi-gw:iscsi-igw, portal: 10.172.19.21,3260] successful. Logout of [sid: 2, target: iqn.2003-01.com.redhat.iscsi-gw:iscsi-igw, portal: 10.172.19.22,3260] successful.
# iscsiadm -m node -T iqn.2003-01.com.redhat.iscsi-gw:ceph-igw --logout Logging out of session [sid: 1, target: iqn.2003-01.com.redhat.iscsi-gw:iscsi-igw, portal: 10.172.19.21,3260] Logging out of session [sid: 2, target: iqn.2003-01.com.redhat.iscsi-gw:iscsi-igw, portal: 10.172.19.22,3260] Logout of [sid: 1, target: iqn.2003-01.com.redhat.iscsi-gw:iscsi-igw, portal: 10.172.19.21,3260] successful. Logout of [sid: 2, target: iqn.2003-01.com.redhat.iscsi-gw:iscsi-igw, portal: 10.172.19.22,3260] successful.Copy to Clipboard Copied! Toggle word wrap Toggle overflow Windows initiators:
See the Microsoft documentation for more details.
VMware ESXi initiators:
See the VMware documentation for more details.
As the
rootuser, run the iSCSI gateway command line utility:gwcli
# gwcliCopy to Clipboard Copied! Toggle word wrap Toggle overflow Remove the hosts:
Syntax
/> cd /iscsi-target/iqn.2003-01.com.redhat.iscsi-gw:_TARGET_NAME_/hosts /> /iscsi-target...TARGET_NAME/hosts> delete CLIENT_NAME
/> cd /iscsi-target/iqn.2003-01.com.redhat.iscsi-gw:_TARGET_NAME_/hosts /> /iscsi-target...TARGET_NAME/hosts> delete CLIENT_NAMECopy to Clipboard Copied! Toggle word wrap Toggle overflow Replace TARGET_NAME with the configured iSCSI target name, and replace CLIENT_NAME with iSCSI initiator name.
Example
/> cd /iscsi-target/iqn.2003-01.com.redhat.iscsi-gw:ceph-igw/hosts /> /iscsi-target...eph-igw/hosts> delete iqn.1994-05.com.redhat:rh7-client
/> cd /iscsi-target/iqn.2003-01.com.redhat.iscsi-gw:ceph-igw/hosts /> /iscsi-target...eph-igw/hosts> delete iqn.1994-05.com.redhat:rh7-clientCopy to Clipboard Copied! Toggle word wrap Toggle overflow Remove the disks:
Syntax
/> cd /disks/ /disks> delete POOL_NAME.IMAGE_NAME
/> cd /disks/ /disks> delete POOL_NAME.IMAGE_NAMECopy to Clipboard Copied! Toggle word wrap Toggle overflow Replace POOL_NAME with the name of the pool, and replace the IMAGE_NAME with the name of the image.
Example
/> cd /disks/ /disks> delete rbd.disk_1
/> cd /disks/ /disks> delete rbd.disk_1Copy to Clipboard Copied! Toggle word wrap Toggle overflow Remove the iSCSI target and gateway configuration:
/> cd /iscsi-target/ /iscsi-target> clearconfig confirm=true
/> cd /iscsi-target/ /iscsi-target> clearconfig confirm=trueCopy to Clipboard Copied! Toggle word wrap Toggle overflow On a Ceph Monitor or Client node, as the
rootuser, remove the iSCSI gateway configuration object (gateway.conf):rados rm -p pool gateway.conf
[root@mon ~]# rados rm -p pool gateway.confCopy to Clipboard Copied! Toggle word wrap Toggle overflow Optionally, if the exported Ceph RADOS Block Device (RBD) is no longer needed, then remove the RBD image. Run the following command on a Ceph Monitor or Client node, as the
rootuser:Syntax
rbd rm IMAGE_NAME
rbd rm IMAGE_NAMECopy to Clipboard Copied! Toggle word wrap Toggle overflow Example
rbd rm rbd01
[root@mon ~]# rbd rm rbd01Copy to Clipboard Copied! Toggle word wrap Toggle overflow
Additional Resources
- For more information on installing Red Hat Ceph Storage in a container, see the Installing a Red Hat Ceph Storage cluster in containers section.
- For more information on installing the iSCSI gateway software in a container, see the Installing the Ceph iSCSI gateway in a container section.
1.7.3. Optimizing the performance of the iSCSI Target
There are many settings that control how the iSCSI Target transfers data over the network. These settings can be used to optimize the performance of the iSCSI gateway.
Only change these settings if instructed to by Red Hat Support or as specified in this document.
The gwcli reconfigure subcommand
The gwcli reconfigure subcommand controls the settings that are used to optimize the performance of the iSCSI gateway.
Settings that affect the performance of the iSCSI target
- max_data_area_mb
- cmdsn_depth
- immediate_data
- initial_r2t
- max_outstanding_r2t
- first_burst_length
- max_burst_length
- max_recv_data_segment_length
- max_xmit_data_segment_length
Additional Resources
-
Information about
max_data_area_mb, including an example showing how to adjust it usinggwcli reconfigure, is in the section Configuring the iSCSI Target using the Command Line Interface for the Block Device Guide, and Configuring the Ceph iSCSI gateway in a container for the Container Guide.
1.8. Understanding the limit option
This section contains information about the Ansible --limit option.
Ansible supports the --limit option that enables you to use the site and site-docker Ansible playbooks for a particular section of the inventory file.
ansible-playbook site.yml|site-docker.yml --limit osds|rgws|clients|mdss|nfss|iscsigws
$ ansible-playbook site.yml|site-docker.yml --limit osds|rgws|clients|mdss|nfss|iscsigwsFor example, to redeploy only OSDs on containers, run the following command as the Ansible user:
ansible-playbook /usr/share/ceph-ansible/site-docker.yml --limit osds
$ ansible-playbook /usr/share/ceph-ansible/site-docker.yml --limit osds1.9. Additional Resources
- The Getting Started with Containers guide for Red Hat Enterprise Linux Atomic Host
Chapter 2. Colocation of Containerized Ceph Daemons
This section describes:
2.1. How colocation works and its advantages
You can colocate containerized Ceph daemons on the same node. Here are the advantages of colocating some of Ceph’s services:
- Significant improvement in total cost of ownership (TCO) at small scale
- Reduction from six nodes to three for the minimum configuration
- Easier upgrade
- Better resource isolation
How Colocation Works
You can colocate one daemon from the following list with an OSD daemon by adding the same node to appropriate sections in the Ansible inventory file.
-
The Ceph Object Gateway (
radosgw) - Metadata Server (MDS)
-
RBD mirror (
rbd-mirror) -
Monitor and the Ceph Manager daemon (
ceph-mgr) - NFS Ganesha
The following example shows how the inventory file with colocated daemons can look like:
Example 2.1. Ansible inventory file with colocated daemons
The Figure 2.1, “Colocated Daemons” and Figure 2.2, “Non-colocated Daemons” images shows the difference between clusters with colocated and non-colocated daemons.
Figure 2.1. Colocated Daemons
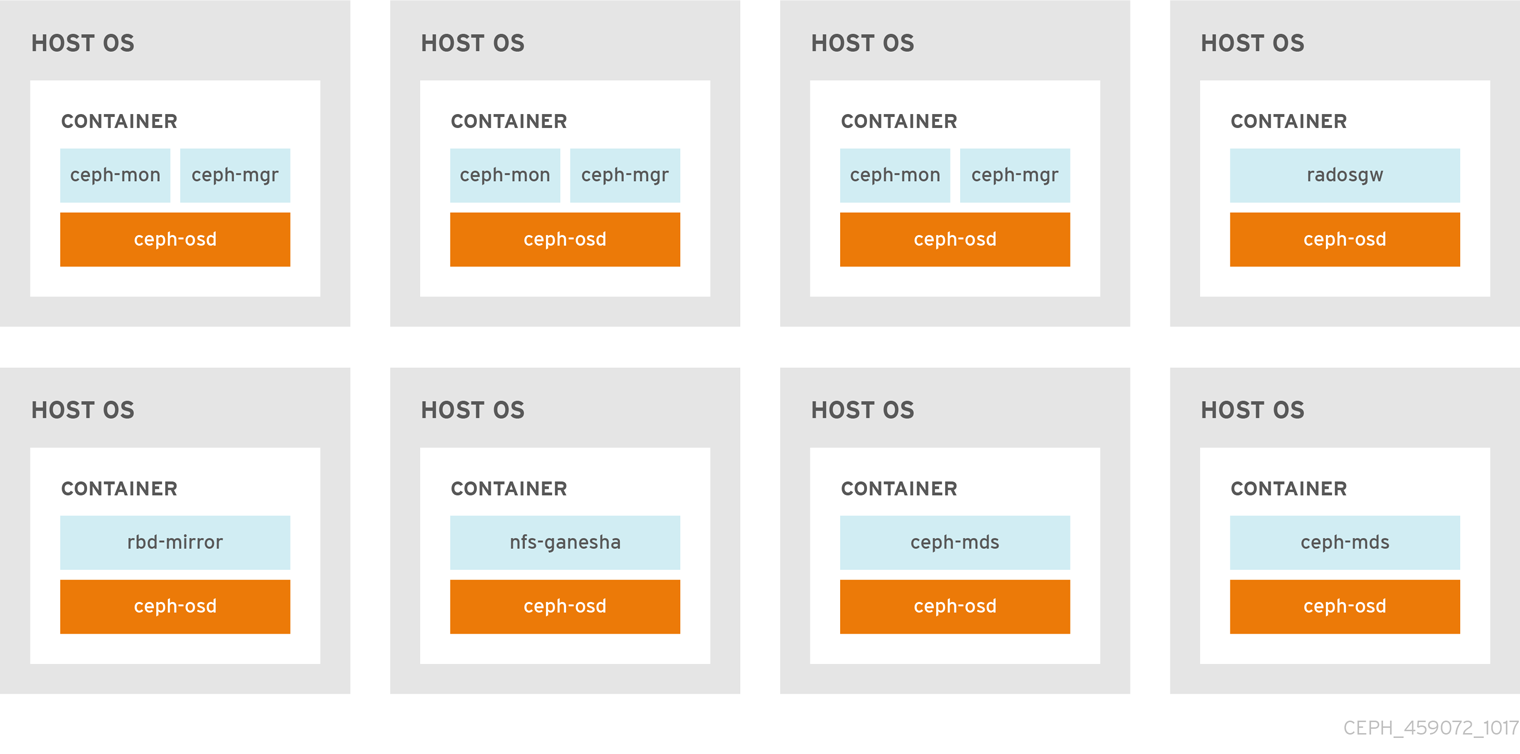
Figure 2.2. Non-colocated Daemons
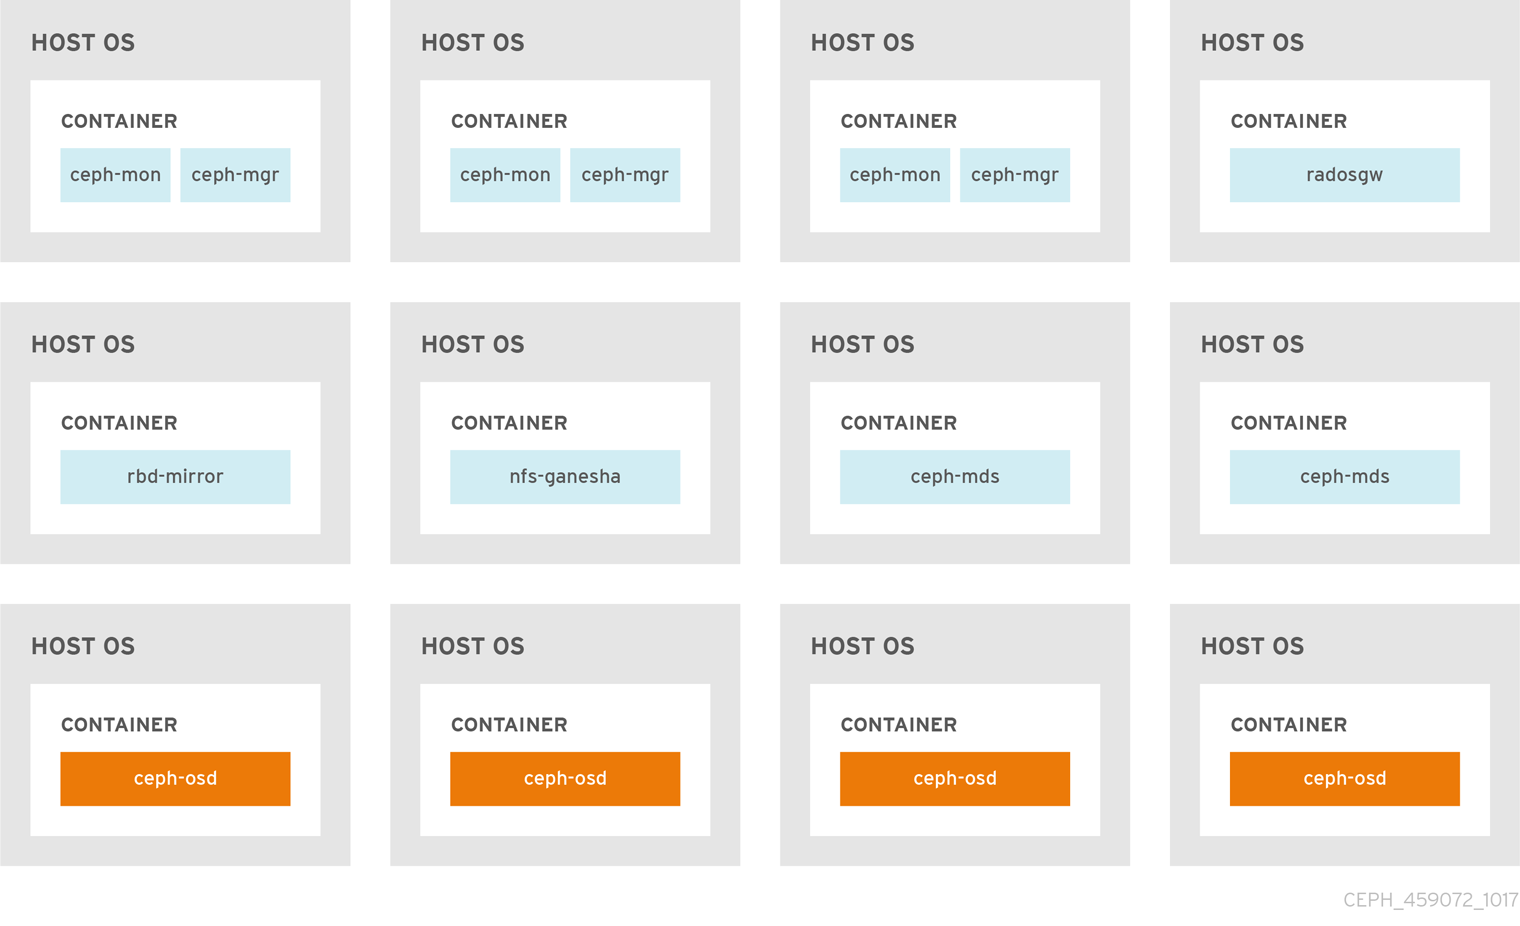
When you colocate two containerized Ceph daemons on a same node, the ceph-ansible playbook reserves dedicated CPU and RAM resources to each. By default, ceph-ansible uses values listed in the Recommended Minimum Hardware chapter in the Red Hat Ceph Storage Hardware Selection Guide 3. To learn how to change the default values, see the Setting Dedicated Resources for Colocated Daemons section.
2.2. Setting Dedicated Resources for Colocated Daemons
When colocating two Ceph daemon on the same node, the ceph-ansible playbook reserves CPU and RAM resources for each daemon. The default values that ceph-ansible uses are listed in the Recommended Minimum Hardware chapter in the Red Hat Ceph Storage Hardware Selection Guide. To change the default values, set the needed parameters when deploying Ceph daemons.
Procedure
To change the default CPU limit for a daemon, set the
ceph_daemon-type_docker_cpu_limitparameter in the appropriate.ymlconfiguration file when deploying the daemon. See the following table for details.Expand Daemon Parameter Configuration file OSD
ceph_osd_docker_cpu_limitosds.ymlMDS
ceph_mds_docker_cpu_limitmdss.ymlRGW
ceph_rgw_docker_cpu_limitrgws.ymlFor example, to change the default CPU limit to 2 for the Ceph Object Gateway, edit the
/usr/share/ceph-ansible/group_vars/rgws.ymlfile as follows:ceph_rgw_docker_cpu_limit: 2
ceph_rgw_docker_cpu_limit: 2Copy to Clipboard Copied! Toggle word wrap Toggle overflow To change the default RAM for OSD daemons, set the
osd_memory_targetin the/usr/share/ceph-ansible/group_vars/all.ymlfile when deploying the daemon. For example, to limit the OSD RAM to 6 GB:ceph_conf_overrides: osd: osd_memory_target=6000000000ceph_conf_overrides: osd: osd_memory_target=6000000000Copy to Clipboard Copied! Toggle word wrap Toggle overflow ImportantIn an hyperconverged infrastructure (HCI) configuration, using the
osd_memory_targetparameter is the recommended way to limit memory of OSDs. Theceph_osd_docker_memory_limitparameter should not be necessary, but if you wish to use it, then setceph_osd_docker_memory_limitto 50% higher thanosd_memory_target, so that the CGroup limit is more constraining than it is by default for an HCI configuration. For example, ifosd_memory_targetis set to 6 GB, setceph_osd_docker_memory_limitto 9 GB:ceph_osd_docker_memory_limit: 9g
ceph_osd_docker_memory_limit: 9gCopy to Clipboard Copied! Toggle word wrap Toggle overflow
The ceph_osd_docker_memory_limit parameter sets a hard limit. If the value is exceeded, the OSD can stop running if it is used. The osd_memory_target parameter sets a soft limit so the container will not stop running and interrupt service if the value is exceeded.
Additional Resources
-
The sample configuration files in the
/usr/share/ceph-ansible/group_vars/directory
2.3. Additional Resources
Chapter 3. Administering Ceph Clusters That Run in Containers
This chapter describes basic administration tasks to perform on Ceph clusters that run in containers, such as:
3.1. Starting, Stopping, and Restarting Ceph Daemons That Run in Containers
Use the systemctl command start, stop, or restart Ceph daemons that run in containers.
Procedure
To start, stop, or restart a Ceph daemon running in a container, run a
systemctlcommand asrootcomposed in the following format:systemctl action ceph-daemon@ID
systemctl action ceph-daemon@IDCopy to Clipboard Copied! Toggle word wrap Toggle overflow Where:
-
action is the action to perform;
start,stop, orrestart -
daemon is the daemon;
osd,mon,mds, orrgw ID is either
-
The short host name where the
ceph-mon,ceph-mds, orceph-rgwdaemons are running -
The ID of the
ceph-osddaemon if it was deployed theosd_scenarioparameter set tolvm -
The device name that the
ceph-osddaemon uses if it was deployed with theosd_scenarioparameter set tocollocatedornon-collocated
-
The short host name where the
For example, to restart a
ceph-osddaemon with the IDosd01:systemctl restart ceph-osd@osd01
# systemctl restart ceph-osd@osd01Copy to Clipboard Copied! Toggle word wrap Toggle overflow To start a
ceph-mondemon that runs on theceph-monitor01host:systemctl start ceph-mon@ceph-monitor01
# systemctl start ceph-mon@ceph-monitor01Copy to Clipboard Copied! Toggle word wrap Toggle overflow To stop a
ceph-rgwdaemon that runs on theceph-rgw01host:systemctl stop ceph-radosgw@ceph-rgw01
# systemctl stop ceph-radosgw@ceph-rgw01Copy to Clipboard Copied! Toggle word wrap Toggle overflow -
action is the action to perform;
Verify that the action was completed successfully.
systemctl status ceph-daemon@_ID
systemctl status ceph-daemon@_IDCopy to Clipboard Copied! Toggle word wrap Toggle overflow For example:
systemctl status ceph-mon@ceph-monitor01
# systemctl status ceph-mon@ceph-monitor01Copy to Clipboard Copied! Toggle word wrap Toggle overflow
Additional Resources
- The Running Ceph as a systemd Service section in the Administration Guide for Red Hat Ceph Storage 3.
3.2. Viewing Log Files of Ceph Daemons That Run in Containers
Use the journald daemon from the container host to view a log file of a Ceph daemon from a container.
Procedure
To view the entire Ceph log file, run a
journalctlcommand asrootcomposed in the following format:journalctl -u ceph-daemon@ID
journalctl -u ceph-daemon@IDCopy to Clipboard Copied! Toggle word wrap Toggle overflow Where:
-
daemon is the Ceph daemon;
osd,mon, orrgw ID is either
-
The short host name where the
ceph-mon,ceph-mds, orceph-rgwdaemons are running -
The ID of the
ceph-osddaemon if it was deployed theosd_scenarioparameter set tolvm -
The device name that the
ceph-osddaemon uses if it was deployed with theosd_scenarioparameter set tocollocatedornon-collocated
-
The short host name where the
For example, to view the entire log for the
ceph-osddaemon with the IDosd01:journalctl -u ceph-osd@osd01
# journalctl -u ceph-osd@osd01Copy to Clipboard Copied! Toggle word wrap Toggle overflow -
daemon is the Ceph daemon;
To show only the recent journal entries, use the
-foption.journalctl -fu ceph-daemon@ID
journalctl -fu ceph-daemon@IDCopy to Clipboard Copied! Toggle word wrap Toggle overflow For example, to view only recent journal entries for the
ceph-mondaemon that runs on theceph-monitor01host:journalctl -fu ceph-mon@ceph-monitor01
# journalctl -fu ceph-mon@ceph-monitor01Copy to Clipboard Copied! Toggle word wrap Toggle overflow
You can also use the sosreport utility to view the journald logs. For more details about SOS reports, see the What is a sosreport and how to create one in Red Hat Enterprise Linux 4.6 and later? solution on the Red Hat Customer Portal.
Additional Resources
-
The
journalctl(1)manual page
3.3. Adding a Ceph OSD using the command-line interface
Here is the high-level workflow for manually adding an OSD to a Red Hat Ceph Storage:
-
Install the
ceph-osdpackage and create a new OSD instance - Prepare and mount the OSD data and journal drives
- Add the new OSD node to the CRUSH map
- Update the owner and group permissions
-
Enable and start the
ceph-osddaemon
The ceph-disk command is deprecated. The ceph-volume command is now the preferred method for deploying OSDs from the command-line interface. Currently, the ceph-volume command only supports the lvm plugin. Red Hat will provide examples throughout this guide using both commands as a reference, allowing time for storage administrators to convert any custom scripts that rely on ceph-disk to ceph-volume instead.
See the Red Hat Ceph Storage Administration Guide, for more information on using the ceph-volume command.
For custom storage cluster names, use the --cluster $CLUSTER_NAME option with the ceph and ceph-osd commands.
Prerequisites
- A running Red Hat Ceph Storage cluster.
- Review the Requirements for Installing Red Hat Ceph Storage chapter in the Installation Guide for Red Hat Enterprise Linux or Ubuntu.
-
Having
rootaccess to the new nodes.
Procedure
Enable the Red Hat Ceph Storage 3 OSD software repository.
Red Hat Enterprise Linux
subscription-manager repos --enable=rhel-7-server-rhceph-3-osd- els-rpms
[root@osd ~]# subscription-manager repos --enable=rhel-7-server-rhceph-3-osd- els-rpmsCopy to Clipboard Copied! Toggle word wrap Toggle overflow -
Create the
/etc/ceph/directory: - On the new OSD node, copy the Ceph administration keyring and configuration files from one of the Ceph Monitor nodes:
Install the
ceph-osdpackage on the new Ceph OSD node:Red Hat Enterprise Linux
yum install ceph-osd
[root@osd ~]# yum install ceph-osdCopy to Clipboard Copied! Toggle word wrap Toggle overflow Decide if you want to collocate a journal or use a dedicated journal for the new OSDs.
NoteThe
--filestoreoption is required.For OSDs with a collocated journal:
Syntax
docker exec $CONTAINER_ID ceph-disk --setuser ceph --setgroup ceph prepare --filestore /dev/$DEVICE_NAME
[root@osd ~]# docker exec $CONTAINER_ID ceph-disk --setuser ceph --setgroup ceph prepare --filestore /dev/$DEVICE_NAMECopy to Clipboard Copied! Toggle word wrap Toggle overflow Example:
docker exec ceph-osd-osd1 ceph-disk --setuser ceph --setgroup ceph prepare --filestore /dev/sda
[root@osd ~]# docker exec ceph-osd-osd1 ceph-disk --setuser ceph --setgroup ceph prepare --filestore /dev/sdaCopy to Clipboard Copied! Toggle word wrap Toggle overflow For OSDs with a dedicated journal:
Syntax
docker exec $CONTAINER_ID ceph-disk --setuser ceph --setgroup ceph prepare --filestore /dev/$DEVICE_NAME /dev/$JOURNAL_DEVICE_NAME
[root@osd ~]# docker exec $CONTAINER_ID ceph-disk --setuser ceph --setgroup ceph prepare --filestore /dev/$DEVICE_NAME /dev/$JOURNAL_DEVICE_NAMECopy to Clipboard Copied! Toggle word wrap Toggle overflow or
docker exec $CONTAINER_ID ceph-volume lvm prepare --filestore --data /dev/$DEVICE_NAME --journal /dev/$JOURNAL_DEVICE_NAME
[root@osd ~]# docker exec $CONTAINER_ID ceph-volume lvm prepare --filestore --data /dev/$DEVICE_NAME --journal /dev/$JOURNAL_DEVICE_NAMECopy to Clipboard Copied! Toggle word wrap Toggle overflow Examples
docker exec ceph-osd-osd1 ceph-disk --setuser ceph --setgroup ceph prepare --filestore /dev/sda /dev/sdb
[root@osd ~]# docker exec ceph-osd-osd1 ceph-disk --setuser ceph --setgroup ceph prepare --filestore /dev/sda /dev/sdbCopy to Clipboard Copied! Toggle word wrap Toggle overflow docker exec ceph-osd-osd1 ceph-volume lvm prepare --filestore --data /dev/vg00/lvol1 --journal /dev/sdb
[root@osd ~]# docker exec ceph-osd-osd1 ceph-volume lvm prepare --filestore --data /dev/vg00/lvol1 --journal /dev/sdbCopy to Clipboard Copied! Toggle word wrap Toggle overflow
Set the
noupoption:ceph osd set noup
[root@osd ~]# ceph osd set noupCopy to Clipboard Copied! Toggle word wrap Toggle overflow Activate the new OSD:
Syntax
docker exec $CONTAINER_ID ceph-disk activate /dev/$DEVICE_NAME
[root@osd ~]# docker exec $CONTAINER_ID ceph-disk activate /dev/$DEVICE_NAMECopy to Clipboard Copied! Toggle word wrap Toggle overflow or
docker exec $CONTAINER_ID ceph-volume lvm activate --filestore $OSD_ID $OSD_FSID
[root@osd ~]# docker exec $CONTAINER_ID ceph-volume lvm activate --filestore $OSD_ID $OSD_FSIDCopy to Clipboard Copied! Toggle word wrap Toggle overflow Example
docker exec ceph-osd-osd1 ceph-disk activate /dev/sda
[root@osd ~]# docker exec ceph-osd-osd1 ceph-disk activate /dev/sdaCopy to Clipboard Copied! Toggle word wrap Toggle overflow docker exec ceph-osd-osd1 ceph-volume lvm activate --filestore 0 6cc43680-4f6e-4feb-92ff-9c7ba204120e
[root@osd ~]# docker exec ceph-osd-osd1 ceph-volume lvm activate --filestore 0 6cc43680-4f6e-4feb-92ff-9c7ba204120eCopy to Clipboard Copied! Toggle word wrap Toggle overflow Add the OSD to the CRUSH map:
Syntax
ceph osd crush add $OSD_ID $WEIGHT [$BUCKET_TYPE=$BUCKET_NAME ...]
ceph osd crush add $OSD_ID $WEIGHT [$BUCKET_TYPE=$BUCKET_NAME ...]Copy to Clipboard Copied! Toggle word wrap Toggle overflow Example
ceph osd crush add 4 1 host=node4
[root@osd ~]# ceph osd crush add 4 1 host=node4Copy to Clipboard Copied! Toggle word wrap Toggle overflow NoteIf you specify more than one bucket, the command places the OSD into the most specific bucket out of those you specified, and it moves the bucket underneath any other buckets you specified.
NoteYou can also edit the CRUSH map manually. See the Editing a CRUSH map section in the Storage Strategies guide for Red Hat Ceph Storage 3.
ImportantIf you specify only the root bucket, then the OSD attaches directly to the root, but the CRUSH rules expect OSDs to be inside of the host bucket.
Unset the
noupoption:ceph osd unset noup
[root@osd ~]# ceph osd unset noupCopy to Clipboard Copied! Toggle word wrap Toggle overflow Update the owner and group permissions for the newly created directories:
Syntax
chown -R $OWNER:$GROUP $PATH_TO_DIRECTORY
chown -R $OWNER:$GROUP $PATH_TO_DIRECTORYCopy to Clipboard Copied! Toggle word wrap Toggle overflow Example
chown -R ceph:ceph /var/lib/ceph/osd chown -R ceph:ceph /var/log/ceph chown -R ceph:ceph /var/run/ceph chown -R ceph:ceph /etc/ceph
[root@osd ~]# chown -R ceph:ceph /var/lib/ceph/osd [root@osd ~]# chown -R ceph:ceph /var/log/ceph [root@osd ~]# chown -R ceph:ceph /var/run/ceph [root@osd ~]# chown -R ceph:ceph /etc/cephCopy to Clipboard Copied! Toggle word wrap Toggle overflow If you use clusters with custom names, then add the following line to the appropriate file:
Red Hat Enterprise Linux
echo "CLUSTER=$CLUSTER_NAME" >> /etc/sysconfig/ceph
[root@osd ~]# echo "CLUSTER=$CLUSTER_NAME" >> /etc/sysconfig/cephCopy to Clipboard Copied! Toggle word wrap Toggle overflow Replace
$CLUSTER_NAMEwith the custom cluster name.To ensure that the new OSD is
upand ready to receive data, enable and start the OSD service:Syntax
systemctl enable ceph-osd@$OSD_ID systemctl start ceph-osd@$OSD_ID
systemctl enable ceph-osd@$OSD_ID systemctl start ceph-osd@$OSD_IDCopy to Clipboard Copied! Toggle word wrap Toggle overflow Example
systemctl enable ceph-osd@4 systemctl start ceph-osd@4
[root@osd ~]# systemctl enable ceph-osd@4 [root@osd ~]# systemctl start ceph-osd@4Copy to Clipboard Copied! Toggle word wrap Toggle overflow
3.4. Removing a Ceph OSD using the command-line interface
Removing an OSD from a storage cluster involves updating the cluster map, removing its authentication key, removing the OSD from the OSD map, and removing the OSD from the ceph.conf file. If the node has multiple drives, you might need to remove an OSD for each drive by repeating this procedure.
Prerequisites
- A running Red Hat Ceph Storage cluster.
-
Enough available OSDs so that the storage cluster is not at its
near fullratio. -
Having
rootaccess to the OSD node.
Procedure
Disable and stop the OSD service:
Syntax
systemctl disable ceph-osd@$DEVICE_NAME systemctl stop ceph-osd@$DEVICE_NAME
systemctl disable ceph-osd@$DEVICE_NAME systemctl stop ceph-osd@$DEVICE_NAMECopy to Clipboard Copied! Toggle word wrap Toggle overflow Example
systemctl disable ceph-osd@sdb systemctl stop ceph-osd@sdb
[root@osd ~]# systemctl disable ceph-osd@sdb [root@osd ~]# systemctl stop ceph-osd@sdbCopy to Clipboard Copied! Toggle word wrap Toggle overflow Once the OSD is stopped, it is
down.Remove the OSD from the storage cluster:
Syntax
ceph osd out $DEVICE_NAME
ceph osd out $DEVICE_NAMECopy to Clipboard Copied! Toggle word wrap Toggle overflow Example
ceph osd out sdb
[root@osd ~]# ceph osd out sdbCopy to Clipboard Copied! Toggle word wrap Toggle overflow ImportantOnce the OSD is out, Ceph will start rebalancing and copying data to other OSDs in the storage cluster. Red Hat recommends waiting until the storage cluster becomes
active+cleanbefore proceeding to the next step. To observe the data migration, run the following command:ceph -w
[root@monitor ~]# ceph -wCopy to Clipboard Copied! Toggle word wrap Toggle overflow Remove the OSD from the CRUSH map so that it no longer receives data.
Syntax
ceph osd crush remove $OSD_NAME
ceph osd crush remove $OSD_NAMECopy to Clipboard Copied! Toggle word wrap Toggle overflow Example
ceph osd crush remove osd.4
[root@osd ~]# ceph osd crush remove osd.4Copy to Clipboard Copied! Toggle word wrap Toggle overflow NoteYou can also decompile the CRUSH map, remove the OSD from the device list, remove the device as an item in the host bucket or remove the host bucket. If it is in the CRUSH map and you intend to remove the host, recompile the map and set it. See the Storage Strategies Guide for details.
Remove the OSD authentication key:
Syntax
ceph auth del osd.$DEVICE_NAME
ceph auth del osd.$DEVICE_NAMECopy to Clipboard Copied! Toggle word wrap Toggle overflow Example
ceph auth del osd.sdb
[root@osd ~]# ceph auth del osd.sdbCopy to Clipboard Copied! Toggle word wrap Toggle overflow Remove the OSD:
Syntax
ceph osd rm $DEVICE_NAME
ceph osd rm $DEVICE_NAMECopy to Clipboard Copied! Toggle word wrap Toggle overflow Example
ceph osd rm sdb
[root@osd ~]# ceph osd rm sdbCopy to Clipboard Copied! Toggle word wrap Toggle overflow Edit the storage cluster’s configuration file, by default
/etc/ceph.conf, and remove the OSD entry, if it exists:Example
[osd.4] host = $HOST_NAME
[osd.4] host = $HOST_NAMECopy to Clipboard Copied! Toggle word wrap Toggle overflow -
Remove the reference to the OSD in the
/etc/fstabfile, if the OSD was added manually. Copy the updated configuration file to the
/etc/ceph/directory of all other nodes in the storage cluster.Syntax
scp /etc/ceph/$CLUSTER_NAME.conf $USER_NAME@$HOST_NAME:/etc/ceph/
scp /etc/ceph/$CLUSTER_NAME.conf $USER_NAME@$HOST_NAME:/etc/ceph/Copy to Clipboard Copied! Toggle word wrap Toggle overflow Example
scp /etc/ceph/ceph.conf root@node4:/etc/ceph/
[root@osd ~]# scp /etc/ceph/ceph.conf root@node4:/etc/ceph/Copy to Clipboard Copied! Toggle word wrap Toggle overflow
3.5. Replacing an OSD drive while retaining the OSD ID
When replacing a failed OSD drive, you can keep the original OSD ID and CRUSH map entry.
The ceph-volume lvm commands defaults to BlueStore for OSDs. To use FileStore OSDs, then use the --filestore, --data and --journal options.
See the Preparing the OSD Data and Journal Drives section for more details.
Prerequisites
- A running Red Hat Ceph Storage cluster.
- A failed disk.
Procedure
Destroy the OSD:
ceph osd destroy $OSD_ID --yes-i-really-mean-it
ceph osd destroy $OSD_ID --yes-i-really-mean-itCopy to Clipboard Copied! Toggle word wrap Toggle overflow Example
ceph osd destroy 1 --yes-i-really-mean-it
$ ceph osd destroy 1 --yes-i-really-mean-itCopy to Clipboard Copied! Toggle word wrap Toggle overflow Optionally, if the replacement disk was used previously, then you need to
zapthe disk:docker exec $CONTAINER_ID ceph-volume lvm zap $DEVICE
docker exec $CONTAINER_ID ceph-volume lvm zap $DEVICECopy to Clipboard Copied! Toggle word wrap Toggle overflow Example
docker exec ceph-osd-osd1 ceph-volume lvm zap /dev/sdb
$ docker exec ceph-osd-osd1 ceph-volume lvm zap /dev/sdbCopy to Clipboard Copied! Toggle word wrap Toggle overflow Create the new OSD with the existing OSD ID:
docker exec $CONTAINER_ID ceph-volume lvm create --osd-id $OSD_ID --data $DEVICE
docker exec $CONTAINER_ID ceph-volume lvm create --osd-id $OSD_ID --data $DEVICECopy to Clipboard Copied! Toggle word wrap Toggle overflow Example
docker exec ceph-osd-osd1 ceph-volume lvm create --osd-id 1 --data /dev/sdb
$ docker exec ceph-osd-osd1 ceph-volume lvm create --osd-id 1 --data /dev/sdbCopy to Clipboard Copied! Toggle word wrap Toggle overflow
3.6. Purging Clusters Deployed by Ansible
If you no longer want to use a Ceph cluster, use the purge-docker-cluster.yml playbook to purge the cluster. Purging a cluster is also useful when the installation process failed and you want to start over.
After purging a Ceph cluster, all data on the OSDs are lost.
Prerequisites
-
Ensure that the
/var/log/ansible.logfile is writable.
Procedure
Use the following commands from the Ansible administration node.
As the
rootuser, navigate to the/usr/share/ceph-ansible/directory.cd /usr/share/ceph-ansible
[root@admin ~]# cd /usr/share/ceph-ansibleCopy to Clipboard Copied! Toggle word wrap Toggle overflow Copy the
purge-docker-cluster.ymlplaybook from the/usr/share/infrastructure-playbooks/directory to the current directory:cp infrastructure-playbooks/purge-docker-cluster.yml .
[root@admin ceph-ansible]# cp infrastructure-playbooks/purge-docker-cluster.yml .Copy to Clipboard Copied! Toggle word wrap Toggle overflow As the Ansible user, use the
purge-docker-cluster.ymlplaybook to purge the Ceph cluster.To remove all packages, containers, configuration files, and all the data created by the
ceph-ansibleplaybook:ansible-playbook purge-docker-cluster.yml
[user@admin ceph-ansible]$ ansible-playbook purge-docker-cluster.ymlCopy to Clipboard Copied! Toggle word wrap Toggle overflow To specify a different inventory file than the default one (
/etc/ansible/hosts), use-iparameter:ansible-playbook purge-docker-cluster.yml -i inventory-file
ansible-playbook purge-docker-cluster.yml -i inventory-fileCopy to Clipboard Copied! Toggle word wrap Toggle overflow Replace inventory-file with the path to the inventory file.
For example:
ansible-playbook purge-docker-cluster.yml -i ~/ansible/hosts
[user@admin ceph-ansible]$ ansible-playbook purge-docker-cluster.yml -i ~/ansible/hostsCopy to Clipboard Copied! Toggle word wrap Toggle overflow To skip the removal of the Ceph container image, use the
--skip-tags=”remove_img”option:ansible-playbook --skip-tags="remove_img" purge-docker-cluster.yml
[user@admin ceph-ansible]$ ansible-playbook --skip-tags="remove_img" purge-docker-cluster.ymlCopy to Clipboard Copied! Toggle word wrap Toggle overflow To skip the removal of the packages that were installed during the installation, use the
--skip-tags=”with_pkg”option:ansible-playbook --skip-tags="with_pkg" purge-docker-cluster.yml
[user@admin ceph-ansible]$ ansible-playbook --skip-tags="with_pkg" purge-docker-cluster.ymlCopy to Clipboard Copied! Toggle word wrap Toggle overflow
Chapter 4. Upgrading Red Hat Ceph Storage within containers
The Ansible application preforms the upgrade of Red Hat Ceph Storage running within containers.
4.1. Prerequisites
- A running Red Hat Ceph Storage cluster.
4.2. Upgrading a Red Hat Ceph Storage Cluster That Runs in Containers
This section describes how to upgrade to a newer minor or major version of the Red Hat Ceph Storage container image.
- To upgrade a storage cluster, see Section 4.3, “Upgrading the Storage Cluster”.
- To upgrade Red Hat Ceph Storage Dashboard, see Section 4.4, “Upgrading Red Hat Ceph Storage Dashboard”.
Use the Ansible rolling_update.yml playbook located in the /usr/share/ceph-ansible/infrastructure-playbooks/ directory from the administration node to upgrade between two major or minor versions of Red Hat Ceph Storage, or to apply asynchronous updates.
Ansible upgrades the Ceph nodes in the following order:
- Monitor nodes
- MGR nodes
- OSD nodes
- MDS nodes
- Ceph Object Gateway nodes
- All other Ceph client nodes
Red Hat Ceph Storage 3 introduces several changes in Ansible configuration files located in the /usr/share/ceph-ansible/group_vars/ directory; certain parameters were renamed or removed. Therefore, make backup copies of the all.yml and osds.yml files before creating new copies from the all.yml.sample and osds.yml.sample files after upgrading to version 3. For more details about the changes, see Appendix A, Changes in Ansible Variables Between Version 2 and 3.
Red Hat Ceph Storage 3.1 and later introduces new Ansible playbooks to optimize storage for performance when using Object Gateway and high speed NVMe based SSDs (and SATA SSDs). The playbooks do this by placing journals and bucket indexes together on SSDs, which can increase performance compared to having all journals on one device. These playbooks are designed to be used when installing Ceph. Existing OSDs continue to work and need no extra steps during an upgrade. There is no way to upgrade a Ceph cluster while simultaneously reconfiguring OSDs to optimize storage in this way. To use different devices for journals or bucket indexes requires reprovisioning OSDs. For more information see Using NVMe with LVM optimally in Ceph Object Gateway for Production.
The rolling_update.yml playbook includes the serial variable that adjusts the number of nodes to be updated simultaneously. Red Hat strongly recommends to use the default value (1), which ensures that Ansible will upgrade cluster nodes one by one.
When using the rolling_update.yml playbook to upgrade to any Red Hat Ceph Storage 3.x version, users who use the Ceph File System (CephFS) must manually update the Metadata Server (MDS) cluster. This is due to a known issue.
Comment out the MDS hosts in /etc/ansible/hosts before upgrading the entire cluster using ceph-ansible rolling_update.yml, and then upgrade MDS manually. In the /etc/ansible/hosts file:
#[mdss] #host-abc
#[mdss]
#host-abcFor more details about this known issue, including how to update the MDS cluster, refer to the Red Hat Ceph Storage 3.0 Release Notes.
When upgrading a Red Hat Ceph Storage cluster from a previous version to 3.2, the Ceph Ansible configuration will default the object store type to BlueStore. If you still want to use FileStore as the OSD object store, then explicitly set the Ceph Ansible configuration to FileStore. This ensures newly deployed and replaced OSDs are using FileStore.
When using the rolling_update.yml playbook to upgrade to any Red Hat Ceph Storage 3.x version, and if you are using a multisite Ceph Object Gateway configuration, then you do not have to manually update the all.yml file to specify the multisite configuration.
Prerequisites
-
Log in as the
rootuser on all nodes in the storage cluster. On all nodes in the storage cluster, enable the
rhel-7-server-extras-rpmsrepository.subscription-manager repos --enable=rhel-7-server-extras-rpms
# subscription-manager repos --enable=rhel-7-server-extras-rpmsCopy to Clipboard Copied! Toggle word wrap Toggle overflow If upgrading from Red Hat Ceph Storage 2.x to 3.x, on the Ansible administration node and the RBD mirroring node, enable the Red Hat Ceph Storage 3 Tools repository:
subscription-manager repos --enable=rhel-7-server-rhceph-3-tools-els-rpms
# subscription-manager repos --enable=rhel-7-server-rhceph-3-tools-els-rpmsCopy to Clipboard Copied! Toggle word wrap Toggle overflow On the Ansible adminstration node, enable the Ansible repository:
subscription-manager repos --enable=rhel-7-server-ansible-2.6-rpms
[root@admin ~]# subscription-manager repos --enable=rhel-7-server-ansible-2.6-rpmsCopy to Clipboard Copied! Toggle word wrap Toggle overflow On the Ansible administration node, ensure the latest version of the
ansibleandceph-ansiblepackages are installed.yum update ansible ceph-ansible
[root@admin ~]# yum update ansible ceph-ansibleCopy to Clipboard Copied! Toggle word wrap Toggle overflow
4.3. Upgrading the Storage Cluster
Procedure
Use the following commands from the Ansible administration node.
As the
rootuser, navigate to the/usr/share/ceph-ansible/directory:cd /usr/share/ceph-ansible/
[root@admin ~]# cd /usr/share/ceph-ansible/Copy to Clipboard Copied! Toggle word wrap Toggle overflow Skip this step when upgrading from Red Hat Ceph Storage version 3.x to the latest version. Back up the
group_vars/all.ymlandgroup_vars/osds.ymlfiles.cp group_vars/all.yml group_vars/all_old.yml cp group_vars/osds.yml group_vars/osds_old.yml cp group_vars/clients.yml group_vars/clients_old.yml
[root@admin ceph-ansible]# cp group_vars/all.yml group_vars/all_old.yml [root@admin ceph-ansible]# cp group_vars/osds.yml group_vars/osds_old.yml [root@admin ceph-ansible]# cp group_vars/clients.yml group_vars/clients_old.ymlCopy to Clipboard Copied! Toggle word wrap Toggle overflow Skip this step when upgrading from Red Hat Ceph Storage version 3.x to the latest version. When upgrading from Red Hat Ceph Storage 2.x to 3.x, create new copies of the
group_vars/all.yml.sample,group_vars/osds.yml.sampleandgroup_vars/clients.yml.samplefiles, and rename them togroup_vars/all.yml,group_vars/osds.yml, andgroup_vars/clients.ymlrespectively. Open and edit them accordingly. For details, see Appendix A, Changes in Ansible Variables Between Version 2 and 3 and Section 1.2, “Installing a Red Hat Ceph Storage Cluster in Containers” .cp group_vars/all.yml.sample group_vars/all.yml cp group_vars/osds.yml.sample group_vars/osds.yml cp group_vars/clients.yml.sample group_vars/clients.yml
[root@admin ceph-ansible]# cp group_vars/all.yml.sample group_vars/all.yml [root@admin ceph-ansible]# cp group_vars/osds.yml.sample group_vars/osds.yml [root@admin ceph-ansible]# cp group_vars/clients.yml.sample group_vars/clients.ymlCopy to Clipboard Copied! Toggle word wrap Toggle overflow Skip this step when upgrading from Red Hat Ceph Storage version 3.x to the latest version. When upgrading from Red Hat Ceph Storage 2.x to 3.x, open the
group_vars/clients.ymlfile, and uncomment the following lines:keys: - { name: client.test, caps: { mon: "allow r", osd: "allow class-read object_prefix rbd_children, allow rwx pool=test" }, mode: "{{ ceph_keyring_permissions }}" }keys: - { name: client.test, caps: { mon: "allow r", osd: "allow class-read object_prefix rbd_children, allow rwx pool=test" }, mode: "{{ ceph_keyring_permissions }}" }Copy to Clipboard Copied! Toggle word wrap Toggle overflow Replace
client.testwith the real client name, and add the client key to the client definition line, for example:key: "ADD-KEYRING-HERE=="
key: "ADD-KEYRING-HERE=="Copy to Clipboard Copied! Toggle word wrap Toggle overflow Now the whole line example would look similar to this:
- { name: client.test, key: "AQAin8tUMICVFBAALRHNrV0Z4MXupRw4v9JQ6Q==", caps: { mon: "allow r", osd: "allow class-read object_prefix rbd_children, allow rwx pool=test" }, mode: "{{ ceph_keyring_permissions }}" }- { name: client.test, key: "AQAin8tUMICVFBAALRHNrV0Z4MXupRw4v9JQ6Q==", caps: { mon: "allow r", osd: "allow class-read object_prefix rbd_children, allow rwx pool=test" }, mode: "{{ ceph_keyring_permissions }}" }Copy to Clipboard Copied! Toggle word wrap Toggle overflow NoteTo get the client key, run the
ceph auth get-or-createcommand to view the key for the named client.
When upgrading from 2.x to 3.x, in the
group_vars/all.ymlfile change theceph_docker_imageparameter to point to the Ceph 3 container version.ceph_docker_image: rhceph/rhceph-3-rhel7
ceph_docker_image: rhceph/rhceph-3-rhel7Copy to Clipboard Copied! Toggle word wrap Toggle overflow Add the
fetch_directoryparameter to thegroup_vars/all.ymlfile.fetch_directory: <full_directory_path>
fetch_directory: <full_directory_path>Copy to Clipboard Copied! Toggle word wrap Toggle overflow Replace:
-
<full_directory_path>with a writable location, such as the Ansible user’s home directory. Provide the existing path that was used for the initial storage cluster installation.
If the existing path is lost or missing, then do the following first:
Add the following options to the existing
group_vars/all.ymlfile:fsid: <add_the_fsid> generate_fsid: false
fsid: <add_the_fsid> generate_fsid: falseCopy to Clipboard Copied! Toggle word wrap Toggle overflow Run the
take-over-existing-cluster.ymlAnsible playbook:cp infrastructure-playbooks/take-over-existing-cluster.yml . ansible-playbook take-over-existing-cluster.yml
[user@admin ceph-ansible]$ cp infrastructure-playbooks/take-over-existing-cluster.yml . [user@admin ceph-ansible]$ ansible-playbook take-over-existing-cluster.ymlCopy to Clipboard Copied! Toggle word wrap Toggle overflow
-
If the cluster you want to upgrade contains any Ceph Object Gateway nodes, add the
radosgw_interfaceparameter to thegroup_vars/all.ymlfile.radosgw_interface: <interface>
radosgw_interface: <interface>Copy to Clipboard Copied! Toggle word wrap Toggle overflow Replace:
-
<interface>with the interface that the Ceph Object Gateway nodes listen to.
-
Starting with Red Hat Ceph Storage 3.2, the default OSD object store is BlueStore. To keep the traditional OSD object store, you must explicitly set the
osd_objectstoreoption tofilestorein thegroup_vars/all.ymlfile.osd_objectstore: filestore
osd_objectstore: filestoreCopy to Clipboard Copied! Toggle word wrap Toggle overflow NoteWith the
osd_objectstoreoption set tofilestore, replacing an OSD will use FileStore, instead of BlueStore.In the Ansible inventory file located at
/etc/ansible/hosts, add the Ceph Manager (ceph-mgr) nodes under the[mgrs]section. Colocate the Ceph Manager daemon with Monitor nodes. Skip this step when upgrading from version 3.x to the latest version.[mgrs] <monitor-host-name> <monitor-host-name> <monitor-host-name>
[mgrs]
<monitor-host-name>
<monitor-host-name>
<monitor-host-name>
Copy to Clipboard Copied! Toggle word wrap Toggle overflow Copy
rolling_update.ymlfrom theinfrastructure-playbooksdirectory to the current directory.cp infrastructure-playbooks/rolling_update.yml .
[root@admin ceph-ansible]# cp infrastructure-playbooks/rolling_update.yml .Copy to Clipboard Copied! Toggle word wrap Toggle overflow Create the
/var/log/ansible/directory and assign the appropriate permissions for theansibleuser:mkdir /var/log/ansible chown ansible:ansible /var/log/ansible chmod 755 /var/log/ansible
[root@admin ceph-ansible]# mkdir /var/log/ansible
[root@admin ceph-ansible]# chown ansible:ansible  /var/log/ansible
[root@admin ceph-ansible]# chmod 755 /var/log/ansible
Copy to Clipboard Copied! Toggle word wrap Toggle overflow Edit the
/usr/share/ceph-ansible/ansible.cfgfile, updating thelog_pathvalue as follows:log_path = /var/log/ansible/ansible.log
log_path = /var/log/ansible/ansible.logCopy to Clipboard Copied! Toggle word wrap Toggle overflow
As the Ansible user, run the playbook:
ansible-playbook rolling_update.yml
[user@admin ceph-ansible]$ ansible-playbook rolling_update.ymlCopy to Clipboard Copied! Toggle word wrap Toggle overflow To use the playbook only for a particular group of nodes on the Ansible inventory file, use the
--limitoption. For details, see Section 1.8, “Understanding thelimitoption”.While logged in as the
rootuser on the RBD mirroring daemon node, upgraderbd-mirrormanually:yum upgrade rbd-mirror
# yum upgrade rbd-mirrorCopy to Clipboard Copied! Toggle word wrap Toggle overflow Restart the daemon:
systemctl restart ceph-rbd-mirror@<client-id>
# systemctl restart ceph-rbd-mirror@<client-id>Copy to Clipboard Copied! Toggle word wrap Toggle overflow Verify that the cluster health is OK.
Log into a monitor node as the
rootuser and list all running containers.docker ps
[root@monitor ~]# docker psCopy to Clipboard Copied! Toggle word wrap Toggle overflow Verify the cluster health is OK.
docker exec ceph-mon-<mon-id> ceph -s
[root@monitor ~]# docker exec ceph-mon-<mon-id> ceph -sCopy to Clipboard Copied! Toggle word wrap Toggle overflow Replace:
-
<mon-id>with the name of the Monitor container found in the first step.
For example:
docker exec ceph-mon-monitor ceph -s
[root@monitor ~]# docker exec ceph-mon-monitor ceph -sCopy to Clipboard Copied! Toggle word wrap Toggle overflow -
If working in an OpenStack environment, update all the
cephxusers to use the RBD profile for pools. The following commands must be run as therootuser:Glance users
ceph auth caps client.glance mon 'profile rbd' osd 'profile rbd pool=<glance-pool-name>'
ceph auth caps client.glance mon 'profile rbd' osd 'profile rbd pool=<glance-pool-name>'Copy to Clipboard Copied! Toggle word wrap Toggle overflow Example
ceph auth caps client.glance mon 'profile rbd' osd 'profile rbd pool=images'
[root@monitor ~]# ceph auth caps client.glance mon 'profile rbd' osd 'profile rbd pool=images'Copy to Clipboard Copied! Toggle word wrap Toggle overflow Cinder users
ceph auth caps client.cinder mon 'profile rbd' osd 'profile rbd pool=<cinder-volume-pool-name>, profile rbd pool=<nova-pool-name>, profile rbd-read-only pool=<glance-pool-name>'
ceph auth caps client.cinder mon 'profile rbd' osd 'profile rbd pool=<cinder-volume-pool-name>, profile rbd pool=<nova-pool-name>, profile rbd-read-only pool=<glance-pool-name>'Copy to Clipboard Copied! Toggle word wrap Toggle overflow Example
ceph auth caps client.cinder mon 'profile rbd' osd 'profile rbd pool=volumes, profile rbd pool=vms, profile rbd-read-only pool=images'
[root@monitor ~]# ceph auth caps client.cinder mon 'profile rbd' osd 'profile rbd pool=volumes, profile rbd pool=vms, profile rbd-read-only pool=images'Copy to Clipboard Copied! Toggle word wrap Toggle overflow OpenStack general users
ceph auth caps client.openstack mon 'profile rbd' osd 'profile rbd-read-only pool=<cinder-volume-pool-name>, profile rbd pool=<nova-pool-name>, profile rbd-read-only pool=<glance-pool-name>'
ceph auth caps client.openstack mon 'profile rbd' osd 'profile rbd-read-only pool=<cinder-volume-pool-name>, profile rbd pool=<nova-pool-name>, profile rbd-read-only pool=<glance-pool-name>'Copy to Clipboard Copied! Toggle word wrap Toggle overflow Example
ceph auth caps client.openstack mon 'profile rbd' osd 'profile rbd-read-only pool=volumes, profile rbd pool=vms, profile rbd-read-only pool=images'
[root@monitor ~]# ceph auth caps client.openstack mon 'profile rbd' osd 'profile rbd-read-only pool=volumes, profile rbd pool=vms, profile rbd-read-only pool=images'Copy to Clipboard Copied! Toggle word wrap Toggle overflow ImportantDo these CAPS updates before performing any live client migrations. This allows clients to use the new libraries running in memory, causing the old CAPS settings to drop from cache and applying the new RBD profile settings.
4.4. Upgrading Red Hat Ceph Storage Dashboard
The following procedure outlines the steps to upgrade Red Hat Ceph Storage Dashboard from version 3.1 to 3.2.
Before upgrading, ensure Red Hat Ceph Storage is upgraded from version 3.1 to 3.2. See 4.1. Upgrading the Storage Cluster for instructions.
The upgrade procedure will remove historical Storage Dashboard data.
Procedure
As the
rootuser, update thecephmetrics-ansiblepackage from the Ansible administration node:yum update cephmetrics-ansible
[root@admin ~]# yum update cephmetrics-ansibleCopy to Clipboard Copied! Toggle word wrap Toggle overflow Change to the
/usr/share/cephmetrics-ansibledirectory:cd /usr/share/cephmetrics-ansible
[root@admin ~]# cd /usr/share/cephmetrics-ansibleCopy to Clipboard Copied! Toggle word wrap Toggle overflow Install the updated Red Hat Ceph Storage Dashboard:
ansible-playbook -v playbook.yml
[root@admin cephmetrics-ansible]# ansible-playbook -v playbook.ymlCopy to Clipboard Copied! Toggle word wrap Toggle overflow
Chapter 5. Monitoring Ceph Clusters Running in Containers with the Red Hat Ceph Storage Dashboard
The Red Hat Ceph Storage Dashboard provides a monitoring dashboard to visualize the state of a Ceph Storage Cluster. Also, the Red Hat Ceph Storage Dashboard architecture provides a framework for additional modules to add functionality to the storage cluster.
- To learn about the Dashboard, see Section 5.1, “The Red Hat Ceph Storage Dashboard”.
- To install the Dashboard, see Section 5.2, “Installing the Red Hat Ceph Storage Dashboard”.
- To access the Dashboard, see Section 5.3, “Accessing the Red Hat Ceph Storage Dashboard”.
- To change the default password after installing the Dashboard, see Section 5.4, “Changing the default Red Hat Ceph Storage dashboard password”.
- To learn about the Prometheus plugin, see Section 5.5, “The Prometheus plugin for Red Hat Ceph Storage”.
- To learn about the Red Hat Ceph Storage Dashboard alerts and how to configure them, see Section 5.6, “The Red Hat Ceph Storage Dashboard alerts”.
Prerequisites
- A Red Hat Ceph Storage cluster running in containers
5.1. The Red Hat Ceph Storage Dashboard
The Red Hat Ceph Storage Dashboard provides a monitoring dashboard for Ceph clusters to visualize the storage cluster state. The dashboard is accessible from a web browser and provides a number of metrics and graphs about the state of the cluster, Monitors, OSDs, Pools, or the network.
With the previous releases of Red Hat Ceph Storage, monitoring data was sourced through a collectd plugin, which sent the data to an instance of the Graphite monitoring utility. Starting with Red Hat Ceph Storage 3.3, monitoring data is sourced directly from the ceph-mgr daemon, using the ceph-mgr Prometheus plugin.
The introduction of Prometheus as the monitoring data source simplifies deployment and operational management of the Red Hat Ceph Storage Dashboard solution, along with reducing the overall hardware requirements. By sourcing the Ceph monitoring data directly, the Red Hat Ceph Storage Dashboard solution is better able to support Ceph clusters deployed in containers.
With this change in architecture, there is no migration path for monitoring data from Red Hat Ceph Storage 2.x and 3.0 to Red Hat Ceph Storage 3.3.
The Red Hat Ceph Storage Dashboard uses the following utilities:
- The Ansible automation application for deployment.
-
The embedded Prometheus
ceph-mgrplugin. -
The Prometheus
node-exporterdaemon, running on each node of the storage cluster. - The Grafana platform to provide a user interface and alerting.
The Red Hat Ceph Storage Dashboard supports the following features:
- General Features
- Support for Red Hat Ceph Storage 3.1 and higher
- SELinux support
- Support for FileStore and BlueStore OSD back ends
- Support for encrypted and non-encrypted OSDs
- Support for Monitor, OSD, the Ceph Object Gateway, and iSCSI roles
- Initial support for the Metadata Servers (MDS)
- Drill down and dashboard links
- 15 second granularity
- Support for Hard Disk Drives (HDD), Solid-state Drives (SSD), Non-volatile Memory Express (NVMe) interface, and Intel® Cache Acceleration Software (Intel® CAS)
- Node Metrics
- CPU and RAM usage
- Network load
- Configurable Alerts
- Out-of-Band (OOB) alerts and triggers
- Notification channel is automatically defined during the installation
The Ceph Health Summary dashboard created by default
See the Red Hat Ceph Storage Dashboard Alerts section for details.
- Cluster Summary
- OSD configuration summary
- OSD FileStore and BlueStore summary
- Cluster versions breakdown by role
- Disk size summary
- Host size by capacity and disk count
- Placement Groups (PGs) status breakdown
- Pool counts
- Device class summary, HDD vs. SSD
- Cluster Details
-
Cluster flags status (
noout,nodown, and others) -
OSD or Ceph Object Gateway hosts
upanddownstatus - Per pool capacity usage
- Raw capacity utilization
- Indicators for active scrub and recovery processes
- Growth tracking and forecast (raw capacity)
-
Information about OSDs that are
downornear full, including the OSD host and disk - Distribution of PGs per OSD
- OSDs by PG counts, highlighting the over or under utilized OSDs
-
Cluster flags status (
- OSD Performance
- Information about I/O operations per second (IOPS) and throughput by pool
- OSD performance indicators
- Disk statistics per OSD
- Cluster wide disk throughput
- Read/write ratio (client IOPS)
- Disk utilization heat map
- Network load by Ceph role
- The Ceph Object Gateway Details
- Aggregated load view
- Per host latency and throughput
- Workload breakdown by HTTP operations
- The Ceph iSCSI Gateway Details
- Aggregated views
- Configuration
- Performance
- Per Gateway resource utilization
- Per client load and configuration
- Per Ceph Block Device image performance
5.2. Installing the Red Hat Ceph Storage Dashboard
The Red Hat Ceph Storage Dashboard provides a visual dashboard to monitor various metrics in a running Ceph Storage Cluster.
For information on upgrading the Red Hat Ceph Storage Dashboard see Upgrading Red Hat Ceph Storage Dashboard in the Installation Guide for Red Hat Enterprise Linux.
Prerequisites
- A Ceph Storage cluster running in containers deployed with the Ansible automation application.
The storage cluster nodes use Red Hat Enterprise Linux 7.
For details, see Section 1.1.1, “Registering Red Hat Ceph Storage Nodes to the CDN and Attaching Subscriptions”.
- A separate node, the Red Hat Ceph Storage Dashboard node, for receiving data from the cluster nodes and providing the Red Hat Ceph Storage Dashboard.
Prepare the Red Hat Ceph Storage Dashboard node:
- Register the system with the Red Hat Content Delivery Network (CDN), attach subscriptions, and enable Red Hat Enterprise Linux repositories. For details, see Section 1.1.1, “Registering Red Hat Ceph Storage Nodes to the CDN and Attaching Subscriptions”.
Enable the Tools repository on all nodes.
For details, see the Enabling the Red Hat Ceph Storage Repositories section in the Red Hat Ceph Storage 3 Installation Guide for Red Hat Enterprise Linux.
If using a firewall, then ensure that the following TCP ports are open:
Expand Table 5.1. TCP Port Requirements Port Use Where? 3000Grafana
The Red Hat Ceph Storage Dashboard node.
9090Basic Prometheus graphs
The Red Hat Ceph Storage Dashboard node.
9100Prometheus'
node-exporterdaemonAll storage cluster nodes.
9283Gathering Ceph data
All
ceph-mgrnodes.9287Ceph iSCSI gateway data
All Ceph iSCSI gateway nodes.
For more details see the Using Firewalls chapter in the Security Guide for Red Hat Enterprise Linux 7.
Procedure
Run the following commands on the Ansible administration node as the root user.
Install the
cephmetrics-ansiblepackage.yum install cephmetrics-ansible
[root@admin ~]# yum install cephmetrics-ansibleCopy to Clipboard Copied! Toggle word wrap Toggle overflow Using the Ceph Ansible inventory as a base, add the Red Hat Ceph Storage Dashboard node under the
[ceph-grafana]section of the Ansible inventory file, by default located at/etc/ansible/hosts.[ceph-grafana] $HOST_NAME
[ceph-grafana] $HOST_NAMECopy to Clipboard Copied! Toggle word wrap Toggle overflow Replace:
-
$HOST_NAMEwith the name of the Red Hat Ceph Storage Dashboard node
For example:
[ceph-grafana]
node0
[ceph-grafana]
node0
Copy to Clipboard Copied! Toggle word wrap Toggle overflow -
Change to the
/usr/share/cephmetrics-ansible/directory.cd /usr/share/cephmetrics-ansible
[root@admin ~]# cd /usr/share/cephmetrics-ansibleCopy to Clipboard Copied! Toggle word wrap Toggle overflow Run the Ansible playbook.
ansible-playbook -v playbook.yml
[root@admin cephmetrics-ansible]# ansible-playbook -v playbook.ymlCopy to Clipboard Copied! Toggle word wrap Toggle overflow ImportantEvery time you update the cluster configuration, for example, you add or remove a MON or OSD node, you must re-run the
cephmetricsAnsible playbook.NoteThe
cephmetricsAnsible playbook does the following actions:-
Updates the
ceph-mgrinstance to enable the prometheus plugin and opens TCP port 9283. Deploys the Prometheus
node-exporterdaemon to each node in the storage cluster.- Opens TCP port 9100.
-
Starts the
node-exporterdaemon.
Deploys Grafana and Prometheus containers under Docker/systemd on the Red Hat Ceph Storage Dashboard node.
- Prometheus is configured to gather data from the ceph-mgr nodes and the node-exporters running on each ceph host
- Opens TCP port 3000.
- The dashboards, themes and user accounts are all created in Grafana.
- Outputs the URL of Grafana for the administrator.
-
Updates the
5.3. Accessing the Red Hat Ceph Storage Dashboard
Accessing the Red Hat Ceph Storage Dashboard gives you access to the web-based management tool for administrating Red Hat Ceph Storage clusters.
Prerequisites
- Install the Red Hat Ceph Storage Dashboard.
- Ensure that NTP is synchronizing clocks properly because a time lag can occur among the Ceph Storage Dashboard node, cluster nodes, and a browser when the nodes are not properly synced. See the Configuring the Network Time Protocol for Red Hat Ceph Storage section in the Red Hat Ceph Storage 3 Installation Guide for Red Hat Enterprise Linux or Ubuntu.
Procedure
Enter the following URL to a web browser:
http://$HOST_NAME:3000
http://$HOST_NAME:3000Copy to Clipboard Copied! Toggle word wrap Toggle overflow Replace:
-
$HOST_NAMEwith the name of the Red Hat Ceph Storage Dashboard node
For example:
http://cephmetrics:3000
http://cephmetrics:3000Copy to Clipboard Copied! Toggle word wrap Toggle overflow -
Enter the password for the
adminuser. If you did not set the password during the installation, useadmin, which is the default password.Once logged in, you are automatically placed on the Ceph At a Glance dashboard. The Ceph At a Glance dashboard provides a high-level overviews of capacity, performance, and node-level performance information.
Example
Additional Resources
- See the Changing the Default Red Hat Ceph Storage Dashboard Password section in the Red Hat Ceph Storage Administration Guide.
5.4. Changing the default Red Hat Ceph Storage dashboard password
The default user name and password for accessing the Red Hat Ceph Storage Dashboard is set to admin and admin. For security reasons, you might want to change the password after the installation.
To prevent the password from resetting to the default value, update the custom password in the /usr/share/cephmetrics-ansible/group_vars/all.yml file.
Prerequisites
Procedure
- Click the Grafana icon in the upper-left corner.
-
Hover over the user name you want to modify the password for. In this case
admin. -
Click
Profile. -
Click
Change Password. -
Enter the new password twice and click
Change Password.
Additional Resource
- If you forgot the password, follow the Reset admin password procedure on the Grafana web pages.
5.5. The Prometheus plugin for Red Hat Ceph Storage
As a storage administrator, you can gather performance data, export that data using the Prometheus plugin module for the Red Hat Ceph Storage Dashboard, and then perform queries on this data. The Prometheus module allows ceph-mgr to expose Ceph related state and performance data to a Prometheus server.
5.5.1. Prerequisites
- Running Red Hat Ceph Storage 3.1 or higher.
- Installation of the Red Hat Ceph Storage Dashboard.
5.5.2. The Prometheus plugin
The Prometheus plugin provides an exporter to pass on Ceph performance counters from the collection point in ceph-mgr. The Red Hat Ceph Storage Dashboard receives MMgrReport messages from all MgrClient processes, such as Ceph Monitors and OSDs. A circular buffer of the last number of samples contains the performance counter schema data and the actual counter data. This plugin creates an HTTP endpoint and retrieves the latest sample of every counter when polled. The HTTP path and query parameters are ignored; all extant counters for all reporting entities are returned in a text exposition format.
Additional Resources
- See the Prometheus documentation for more details on the text exposition format.
5.5.3. Managing the Prometheus environment
To monitor a Ceph storage cluster with Prometheus you can configure and enable the Prometheus exporter so the metadata information about the Ceph storage cluster can be collected.
Prerequisites
- A running Red Hat Ceph Storage 3.1 cluster
- Installation of the Red Hat Ceph Storage Dashboard
Procedure
As the
rootuser, open and edit the/etc/prometheus/prometheus.ymlfile.Under the
globalsection, set thescrape_intervalandevaluation_intervaloptions to 15 seconds.Example
global:
  scrape_interval:     15s
  evaluation_interval: 15s
global:
  scrape_interval:     15s
  evaluation_interval: 15s
Copy to Clipboard Copied! Toggle word wrap Toggle overflow Under the
scrape_configssection, add thehonor_labels: trueoption, and edit thetargets, andinstanceoptions for each of theceph-mgrnodes.Example
Copy to Clipboard Copied! Toggle word wrap Toggle overflow NoteUsing the
honor_labelsoption enables Ceph to output properly-labelled data relating to any node in the Ceph storage cluster. This allows Ceph to export the properinstancelabel without Prometheus overwriting it.To add a new node, simply add the
targets, andinstanceoptions in the following format:Example
- targets: [ 'new-node.example.com:9100' ]
  labels:
    instance: "new-node"
- targets: [ 'new-node.example.com:9100' ] labels: instance: "new-node"Copy to Clipboard Copied! Toggle word wrap Toggle overflow NoteThe
instancelabel has to match what appears in Ceph’s OSD metadatainstancefield, which is the short host name of the node. This helps to correlate Ceph stats with the node’s stats.
Add Ceph targets to the
/etc/prometheus/ceph_targets.ymlfile in the following format.Example
Copy to Clipboard Copied! Toggle word wrap Toggle overflow Enable the Prometheus module:
ceph mgr module enable prometheus
# ceph mgr module enable prometheusCopy to Clipboard Copied! Toggle word wrap Toggle overflow
5.5.4. Working with the Prometheus data and queries
The statistic names are exactly as Ceph names them, with illegal characters translated to underscores, and ceph_ prefixed to all names. All Ceph daemon statistics have a ceph_daemon label that identifies the type and ID of the daemon they come from, for example: osd.123. Some statistics can come from different types of daemons, so when querying you will want to filter on Ceph daemons starting with osd to avoid mixing in the Ceph Monitor and RocksDB stats. The global Ceph storage cluster statistics have labels appropriate to what they report on. For example, metrics relating to pools have a pool_id label. The long running averages that represent the histograms from core Ceph are represented by a pair of sum and count performance metrics.
The following example queries can be used in the Prometheus expression browser:
Show the physical disk utilization of an OSD
(irate(node_disk_io_time_ms[1m]) /10) and on(device,instance) ceph_disk_occupation{ceph_daemon="osd.1"}
(irate(node_disk_io_time_ms[1m]) /10) and on(device,instance) ceph_disk_occupation{ceph_daemon="osd.1"}Show the physical IOPS of an OSD as seen from the operating system
irate(node_disk_reads_completed[1m]) + irate(node_disk_writes_completed[1m]) and on (device, instance) ceph_disk_occupation{ceph_daemon="osd.1"}
irate(node_disk_reads_completed[1m]) + irate(node_disk_writes_completed[1m]) and on (device, instance) ceph_disk_occupation{ceph_daemon="osd.1"}Pool and OSD metadata series
Special data series are output to enable the displaying and the querying on certain metadata fields. Pools have a ceph_pool_metadata field, for example:
ceph_pool_metadata{pool_id="2",name="cephfs_metadata_a"} 1.0
ceph_pool_metadata{pool_id="2",name="cephfs_metadata_a"} 1.0
OSDs have a ceph_osd_metadata field, for example:
ceph_osd_metadata{cluster_addr="172.21.9.34:6802/19096",device_class="ssd",ceph_daemon="osd.0",public_addr="172.21.9.34:6801/19096",weight="1.0"} 1.0
ceph_osd_metadata{cluster_addr="172.21.9.34:6802/19096",device_class="ssd",ceph_daemon="osd.0",public_addr="172.21.9.34:6801/19096",weight="1.0"} 1.0Correlating drive statistics with node_exporter
The Prometheus output from Ceph is designed to be used in conjunction with the generic node monitoring from the Prometheus node exporter. Correlation of Ceph OSD statistics with the generic node monitoring drive statistics, special data series are output, for example:
ceph_disk_occupation{ceph_daemon="osd.0",device="sdd", exported_instance="node1"}
ceph_disk_occupation{ceph_daemon="osd.0",device="sdd", exported_instance="node1"}
To get disk statistics by an OSD ID, use either the and operator or the asterisk (*) operator in the Prometheus query. All metadata metrics have the value of 1 so they act neutral with asterisk operator. Using asterisk operator allows to use group_left and group_right grouping modifiers, so that the resulting metric has additional labels from one side of the query. For example:
rate(node_disk_bytes_written[30s]) and on (device,instance) ceph_disk_occupation{ceph_daemon="osd.0"}
rate(node_disk_bytes_written[30s]) and on (device,instance) ceph_disk_occupation{ceph_daemon="osd.0"}Using label_replace
The label_replace function can add a label to, or alter a label of, a metric within a query. To correlate an OSD and its disks write rate, the following query can be used:
label_replace(rate(node_disk_bytes_written[30s]), "exported_instance", "$1", "instance", "(.*):.*") and on (device,exported_instance) ceph_disk_occupation{ceph_daemon="osd.0"}
label_replace(rate(node_disk_bytes_written[30s]), "exported_instance", "$1", "instance", "(.*):.*") and on (device,exported_instance) ceph_disk_occupation{ceph_daemon="osd.0"}Additional Resources
- See Prometheus querying basics for more information on constructing queries.
-
See Prometheus'
label_replacedocumentation for more information.
5.5.5. Using the Prometheus expression browser
Use the builtin Prometheus expression browser to run queries against the collected data.
Prerequisites
- A running Red Hat Ceph Storage 3.1 cluster
- Installation of the Red Hat Ceph Storage Dashboard
Procedure
Enter the URL for the Prometh the web browser:
http://$DASHBOARD_SEVER_NAME:9090/graph
http://$DASHBOARD_SEVER_NAME:9090/graphCopy to Clipboard Copied! Toggle word wrap Toggle overflow Replace…
-
$DASHBOARD_SEVER_NAMEwith the name of the Red Hat Ceph Storage Dashboard server.
-
Click on Graph, then type in or paste the query into the query window and press the Execute button.
- View the results in the console window.
- Click on Graph to view the rendered data.
Additional Resources
- See the Prometheus expression browser documentation on the Prometheus web site for more information.
5.5.6. Additional Resources
5.6. The Red Hat Ceph Storage Dashboard alerts
This section includes information about alerting in the Red Hat Ceph Storage Dashboard.
- To learn about the Red Hat Ceph Storage Dashboard alerts, see Section 5.6.2, “About Alerts”.
- To view the alerts, see Section 5.6.3, “Accessing the Alert Status dashboard”.
- To configure the notification target, see Section 5.6.4, “Configuring the Notification Target”.
- To change the default alerts or add new ones, see Section 5.6.5, “Changing the Default Alerts and Adding New Ones”.
5.6.1. Prerequisites
5.6.2. About Alerts
The Red Hat Ceph Storage Dashboard supports alerting mechanism that is provided by the Grafana platform. You can configure the dashboard to send you a notification when a metric that you are interested in reaches certain value. Such metrics are in the Alert Status dashboard.
By default, Alert Status already includes certain metrics, such as Overall Ceph Health, OSDs Down, or Pool Capacity. You can add metrics that you are interested in to this dashboard or change their trigger values.
Here is a list of the pre-defined alerts that are included with Red Hat Ceph Storage Dashboard:
- Overall Ceph Health
- Disks Near Full (>85%)
- OSD Down
- OSD Host Down
- PG’s Stuck Inactive
- OSD Host Less - Free Capacity Check
- OSD’s With High Response Times
- Network Errors
- Pool Capacity High
- Monitors Down
- Overall Cluster Capacity Low
- OSDs With High PG Count
5.6.3. Accessing the Alert Status dashboard
Certain Red Hat Ceph Storage Dashboard alerts are configured by default in the Alert Status dashboard. This section shows two ways to access it.
Procedure
To access the dashboard:
- In the main At the Glance dashboard, click the Active Alerts panel in the upper-right corner.
Or..
- Click the dashboard menu from in the upper-left corner next to the Grafana icon. Select Alert Status.
5.6.4. Configuring the Notification Target
A notification channel called cephmetrics is automatically created during installation. All preconfigured alerts reference the cephmetrics channel but before you can receive the alerts, complete the notification channel definition by selecting the desired notification type. The Grafana platform supports a number of different notification types including email, Slack, and PagerDuty.
Procedure
- To configure the notification channel, follow the instructions in the Alert Notifications section on the Grafana web page.
5.6.5. Changing the Default Alerts and Adding New Ones
This section explains how to change the trigger value on already configured alerts and how to add new alerts to the Alert Status dashboard.
Procedure
To change the trigger value on alerts or to add new alerts, follow the Alerting Engine & Rules Guide on the Grafana web pages.
ImportantTo prevent overriding custom alerts, the Alert Status dashboard will not be updated when upgrading the Red Hat Ceph Storage Dashboard packages when you change the trigger values or add new alerts.
Additional Resources
- The Grafana web page
Appendix A. Changes in Ansible Variables Between Version 2 and 3
With Red Hat Ceph Storage 3, certain variables in the configuration files located in the /usr/share/ceph-ansible/group_vars/ directory have changed or have been removed. The following table lists all the changes. After upgrading to version 3, copy the all.yml.sample and osds.yml.sample files again to reflect these changes. See Upgrading a Red Hat Ceph Storage Cluster That Runs in Containers for details.
| Old Option | New Option | File |
|---|---|---|
|
|
|
|
|
|
|
|
|
|
|
|
|
|
|
|
|
|
|
|
|
|
|
|
|
|
|
|
|
|
|
|
|
|
|
|
|
|
|
|