Object Gateway Guide for Red Hat Enterprise Linux
Configuring and administering the Ceph Storage Object Gateway on Red Hat Enterprise Linux
Abstract
Chapter 1. Overview
Ceph Object Gateway, also known as RADOS Gateway (RGW) is an object storage interface built on top of librados to provide applications with a RESTful gateway to Ceph storage clusters. Ceph object gateway supports two interfaces:
- S3-compatible: Provides object storage functionality with an interface that is compatible with a large subset of the Amazon S3 RESTful API.
- Swift-compatible: Provides object storage functionality with an interface that is compatible with a large subset of the OpenStack Swift API.
The Ceph object gateway is a server for interacting with a Ceph storage cluster. Since it provides interfaces compatible with OpenStack Swift and Amazon S3, the Ceph object gateway has its own user management. Ceph object gateway can store data in the same Ceph storage cluster used to store data from Ceph block device clients; however, it would involve separate pools and likely a diffferent CRUSH hierarchy. The S3 and Swift APIs share a common namespace, so you may write data with one API and retrieve it with the other.

Do not use RADOS snapshots on pools used by RGW. Doing so can introduce undesirable data inconsistencies.
Chapter 2. Configuration
2.1. The CivetWeb front end
By default, the Ceph Object Gateway exposes its RESTful interfaces over HTTP using the CivetWeb web server. CivetWeb is a C/C++ embeddable web server.
Additional Resources
2.2. Changing the CivetWeb port
When the Ceph Object Gateway is installed using Ansible it configures CivetWeb to run on port 8080. Ansible does this by adding a line similar to the following in the Ceph configuration file:
rgw frontends = civetweb port=192.168.122.199:8080 num_threads=100
If the Ceph configuration file does not include the rgw frontends = civetweb line, the Ceph Object Gateway listens on port 7480. If it includes an rgw_frontends = civetweb line but there is no port specified, the Ceph Object Gateway listens on port 80.
Because Ansible configures the Ceph Object Gateway to listen on port 8080 and the supported way to install Red Hat Ceph Storage 3 is using ceph-ansible, port 8080 is considered the default port in the Red Hat Ceph Storage 3 documentation.
Prerequisites
- A running Red Hat Ceph Storage 3.3 cluster.
- A Ceph Object Gateway node.
Procedure
-
On the gateway node, open the Ceph configuration file in the
/etc/ceph/directory. Find an RGW client section similar to the example:
[client.rgw.gateway-node1]
host = gateway-node1
keyring = /var/lib/ceph/radosgw/ceph-rgw.gateway-node1/keyring
log file = /var/log/ceph/ceph-rgw-gateway-node1.log
rgw frontends = civetweb port=192.168.122.199:8080 num_threads=100
The
[client.rgw.gateway-node1]heading identifies this portion of the Ceph configuration file as configuring a Ceph Storage Cluster client where the client type is a Ceph Object Gateway as identified byrgw, and the name of the node isgateway-node1.To change the default Ansible configured port of
8080to80edit thergw frontendsline:rgw frontends = civetweb port=192.168.122.199:80 num_threads=100Ensure there is no whitespace between
port=port-numberin thergw_frontendskey/value pair.Repeat this step on any other gateway nodes you want to change the port on.
Restart the Ceph Object Gateway service from each gateway node to make the new port setting take effect:
# systemctl restart ceph-radosgw.targetEnsure the configured port is open on each gateway node’s firewall:
# firewall-cmd --list-allIf the port is not open, add the port and reload the firewall configuration:
# firewall-cmd --zone=public --add-port 80/tcp --permanent
# firewall-cmd --reload
Additional Resources
- See Using SSL with CivetWeb for more information.
- See Civetweb Configuration Options for more information.
2.3. Using SSL with Civetweb
In Red Hat Ceph Storage 1, Civetweb SSL support for the Ceph Object Gateway relied on HAProxy and keepalived. In Red Hat Ceph Storage 2 and later releases, Civetweb can use the OpenSSL library to provide Transport Layer Security (TLS).
Production deployments MUST use HAProxy and keepalived to terminate the SSL connection at HAProxy. Using SSL with Civetweb is recommended ONLY for small-to-medium sized test and pre-production deployments.
To use SSL with Civetweb, obtain a certificate from a Certificate Authority (CA) that matches the hostname of the gateway node. Red Hat recommends obtaining a certificate from a CA that has subject alternate name fields and a wildcard for use with S3-style subdomains.
Civetweb requires the key, server certificate and any other certificate authority or intermediate certificate in a single .pem file.
A .pem file contains the secret key. Protect the .pem file from unauthorized access.
To configure a port for SSL, add the port number to rgw_frontends and append an s to the port number to indicate that it is a secure port. Additionally, add ssl_certificate with a path to the .pem file. For example:
[client.rgw.{hostname}]
rgw_frontends = "civetweb port=443s ssl_certificate=/etc/ceph/private/server.pem"
2.4. Civetweb Configuration Options
The following Civetweb configuration options can be passed to the embedded web server in the Ceph configuration file for the RADOS Gateway. Each option has a default value and if a value is not specified, then the default value is empty.
| Option | Description | Default |
|---|---|---|
|
| Path to a file for access logs. Either full path, or relative to the current working directory. If absent (default), then accesses are not logged. | EMPTY |
|
| Path to a file for error logs. Either full path, or relative to the current working directory. If absent (default), then errors are not logged. | EMPTY |
|
| Number of worker threads. Civetweb handles each incoming connection in a separate thread. Therefore, the value of this option is effectively the number of concurrent HTTP connections Civetweb can handle. | 512 |
|
| Timeout for network read and network write operations, in milliseconds. If a client intends to keep long-running connection, either increase this value or (better) use keep-alive messages. | 30000 |
If you set num_threads, it will overwrite rgw_thread_pool_size. Therefore, either set them both to the same value, or only set rgw_thread_pool_size and do not set num_threads. By default, both variables are set to 512 by ceph-ansible.
The following is an example of the /etc/ceph/ceph.conf file with some of these options set:
...

[client.rgw.node1]
rgw frontends = civetweb request_timeout_ms=30000 error_log_file=/var/log/radosgw/civetweb.error.log access_log_file=/var/log/radosgw/civetweb.access.log
2.5. Using the Beast front end
The Ceph Object Gateway provides CivetWeb and Beast embedded HTTP servers as front ends. The Beast front end uses the Boost.Beast library for HTTP parsing and the Boost.Asio library for asynchronous network I/O. Since CivetWeb is the default front end, to use the Beast front end specify it in the rgw_frontends parameter in the Red Hat Ceph Storage configuration file.
Prerequisites
- A running Red Hat Ceph Storage cluster.
- Ceph Object Gateway is installed.
Procedure
Modify the
/etc/ceph/ceph.confconfiguration file on the administration server:-
Add a section entitled
[client.rgw.<gateway-node>], replacing<gateway-node>with the short node name of the Ceph Object Gateway node. -
Use
hostname -sto retrieve the host shortname. For example, if the gateway node name is
gateway-node1, add a section like the following after the[global]section in the/etc/ceph/ceph.conffile:[client.rgw.gateway-node1] rgw frontends = beast endpoint=192.168.0.100:80
-
Add a section entitled
Copy the updated configuration file to the Ceph Object Gateway node and other Ceph nodes.
# scp /etc/ceph/ceph.conf <ceph-node>:/etc/cephRestart the Ceph Object Gateway to enable the Beast front end:
# systemctl restart ceph-radosgw.targetEnsure that the configured port is open on the node’s firewall. If it is not open, add the port and reload the firewall configuration. For example, on the Ceph Object Gateway node, execute:
# firewall-cmd --list-all
# firewall-cmd --zone=public --add-port 80/tcp --permanent
# firewall-cmd --reload
Additional Resources
- See Beast configuration options for more information.
2.6. Beast configuration options
The following Beast configuration options can be passed to the embedded web server in the Ceph configuration file for the RADOS Gateway. Each option has a default value. If a value is not specified, the default value is empty.
| Option | Description | Default |
|---|---|---|
|
|
Sets the listening address in the form | EMPTY |
|
| Path to the SSL certificate file used for SSL-enabled endpoints. | EMPTY |
|
|
Optional path to the private key file used for SSL-enabled endpoints. If one is not given the file specified by | EMPTY |
Example /etc/ceph/ceph.conf file with Beast options using SSL:
...

[client.rgw.node1]
rgw frontends = beast ssl_endpoint=192.168.0.100:443 ssl_certificate=<path to SSL certificate>
Additional Resources
- See Using the Beast front end for more information.
2.7. Add a Wildcard to the DNS
To use Ceph with S3-style subdomains, for example bucket-name.domain-name.com, add a wildcard to the DNS record of the DNS server the ceph-radosgw daemon uses to resolve domain names.
For dnsmasq, add the following address setting with a dot (.) prepended to the host name:
address=/.{hostname-or-fqdn}/{host-ip-address}For example:
address=/.gateway-node1/192.168.122.75
For bind, add a wildcard to the DNS record. For example:
$TTL    604800
@       IN      SOA     gateway-node1. root.gateway-node1. (
                              2         ; Serial
                         604800         ; Refresh
                          86400         ; Retry
                        2419200         ; Expire
                         604800 )       ; Negative Cache TTL
;
@       IN      NS      gateway-node1.
@       IN      A       192.168.122.113
*       IN      CNAME   @
Restart the DNS server and ping the server with a subdomain to ensure that the ceph-radosgw daemon can process the subdomain requests:
ping mybucket.{hostname}For example:
ping mybucket.gateway-node1
If the DNS server is on the local machine, you may need to modify /etc/resolv.conf by adding a nameserver entry for the local machine.
Finally, specify the host name or address of the DNS server in the appropriate [client.rgw.{instance}] section of the Ceph configuration file using the rgw_dns_name = {hostname} setting. For example:
[client.rgw.rgw1]
...
rgw_dns_name = {hostname}
As a best practice, make changes to the Ceph configuration file at a centralized location such as an admin node or ceph-ansible and redistribute the configuration file as necessary to ensure consistency across the cluster.
Finally, restart the Ceph object gateway so that DNS setting takes effect.
2.8. Adjusting Logging and Debugging Output
Once you finish the setup procedure, check your logging output to ensure it meets your needs. If you encounter issues with your configuration, you can increase logging and debugging messages in the [global] section of your Ceph configuration file and restart the gateway(s) to help troubleshoot any configuration issues. For example:
[global]
#append the following in the global section.
debug ms = 1
debug rgw = 20
debug civetweb = 20
You may also modify these settings at runtime. For example:
# ceph tell osd.0 injectargs --debug_civetweb 10/20
The Ceph log files reside in /var/log/ceph by default.
For general details on logging and debugging, see Logging Configuration Reference chapter of the Configuration Guide for Red Hat Ceph Storage 3. For details on logging specific to the Ceph Object Gateway, see the The Ceph Object Gateway section in the Logging Configuration Reference chapter of this guide.
2.9. S3 API Server-side Encryption
The Ceph Object Gateway supports server-side encryption of uploaded objects for the S3 API. Server-side encryption means that the S3 client sends data over HTTP in its unencrypted form, and the Ceph Object Gateway stores that data in the Ceph Storage Cluster in encrypted form.
Red Hat does NOT support S3 object encryption of SLO(Static Large Object) and DLO(Dynamic Large Object).
To use encryption, client requests MUST send requests over an SSL connection. Red Hat does not support S3 encryption from a client unless the Ceph Object Gateway uses SSL. However, for testing purposes, administrators may disable SSL during testing by setting the rgw_crypt_require_ssl configuration setting to false at runtime, setting it to false in the Ceph configuration file and restarting the gateway instance, or setting it to false in the Ansible configuration files and replaying the Ansible playbooks for the Ceph Object Gateway.
There are two options for the management of encryption keys:
Customer-Provided Keys
When using customer-provided keys, the S3 client passes an encryption key along with each request to read or write encrypted data. It is the customer’s responsibility to manage those keys. Customers must remember which key the Ceph Object Gateway used to encrypt each object.
Ceph Object Gateway implements the customer-provided key behavior in the S3 API according to the Amazon SSE-C specification.
Since the customer handles the key management and the S3 client passes keys to the Ceph Object Gateway, the Ceph Object Gateway requires no special configuration to support this encryption mode.
Key Management Service
When using a key management service, the secure key management service stores the keys and the Ceph Object Gateway retrieves them on demand to serve requests to encrypt or decrypt data.
Ceph Object Gateway implements the key management service behavior in the S3 API according to the Amazon SSE-KMS specification.
Currently, the only tested key management implementation uses OpenStack Barbican. However, using OpenStack Barbican is not fully supported yet. The only way to use it in production is to get a support exception. For more information, please contact technical support.
2.10. Testing the Gateway
To use the REST interfaces, first create an initial Ceph Object Gateway user for the S3 interface. Then, create a subuser for the Swift interface. You then need to verify if the created users are able to access the gateway.
2.10.1. Create an S3 User
To test the gateway, create an S3 user and grant the user access. The man radosgw-admin command provides information on additional command options.
In a multi-site deployment, always create a user on a host in the master zone of the master zone group.
Prerequisites
-
rootorsudoaccess - Ceph Object Gateway installed
Procedure
Create an S3 user:
radosgw-admin user create --uid=name --display-name="First User"Replace name with the name of the S3 user, for example:
[root@master-zone]# radosgw-admin user create --uid="testuser" --display-name="First User"
{
    "user_id": "testuser",
    "display_name": "First User",
    "email": "",
    "suspended": 0,
    "max_buckets": 1000,
    "auid": 0,
    "subusers": [],
    "keys": [
        {
            "user": "testuser",
            "access_key": "CEP28KDIQXBKU4M15PDC",
            "secret_key": "MARoio8HFc8JxhEilES3dKFVj8tV3NOOYymihTLO"
        }
    ],
    "swift_keys": [],
    "caps": [],
    "op_mask": "read, write, delete",
    "default_placement": "",
    "placement_tags": [],
    "bucket_quota": {
        "enabled": false,
        "check_on_raw": false,
        "max_size": -1,
        "max_size_kb": 0,
        "max_objects": -1
    },
    "user_quota": {
        "enabled": false,
        "check_on_raw": false,
        "max_size": -1,
        "max_size_kb": 0,
        "max_objects": -1
    },
    "temp_url_keys": [],
    "type": "rgw"
}
Verify the output to ensure that the values of
access_keyandsecret_keydo not include a JSON escape character (\). These values are needed for access validation, but certain clients cannot handle if the values include JSON escape character. To fix this problem, perform one of the following actions:- Remove the JSON escape character.
- Encapsulate the string in quotes.
- Regenerate the key and ensure that is does not include a JSON escape character.
- Specify the key and secret manually.
Do not remove the forward slash
/because it is a valid character.
2.10.2. Create a Swift User
To test the Swift interface, create a Swift subuser. Creating a Swift user is a two step process. The first step is to create the user. The second step is to create the secret key.
In a multi-site deployment, always create a user on a host in the master zone of the master zone group.
Prerequisites
-
rootorsudoaccess - Ceph Object Gateway installed
Procedure
Create the Swift user:
radosgw-admin subuser create --uid=name --subuser=name:swift --access=fullReplace name with the name of the Swift user, for example:
[root@master-zone]# radosgw-admin subuser create --uid=testuser --subuser=testuser:swift --access=full
{
    "user_id": "testuser",
    "display_name": "First User",
    "email": "",
    "suspended": 0,
    "max_buckets": 1000,
    "auid": 0,
    "subusers": [
        {
            "id": "testuser:swift",
            "permissions": "full-control"
        }
    ],
    "keys": [
        {
            "user": "testuser",
            "access_key": "O8JDE41XMI74O185EHKD",
            "secret_key": "i4Au2yxG5wtr1JK01mI8kjJPM93HNAoVWOSTdJd6"
        }
    ],
    "swift_keys": [
        {
            "user": "testuser:swift",
            "secret_key": "13TLtdEW7bCqgttQgPzxFxziu0AgabtOc6vM8DLA"
        }
    ],
    "caps": [],
    "op_mask": "read, write, delete",
    "default_placement": "",
    "placement_tags": [],
    "bucket_quota": {
        "enabled": false,
        "check_on_raw": false,
        "max_size": -1,
        "max_size_kb": 0,
        "max_objects": -1
    },
    "user_quota": {
        "enabled": false,
        "check_on_raw": false,
        "max_size": -1,
        "max_size_kb": 0,
        "max_objects": -1
    },
    "temp_url_keys": [],
    "type": "rgw"
}
Create the secret key:
radosgw-admin key create --subuser=name:swift --key-type=swift --gen-secretReplace name with the name of the Swift user, for example:
[root@master-zone]# radosgw-admin key create --subuser=testuser:swift --key-type=swift --gen-secret
{
    "user_id": "testuser",
    "display_name": "First User",
    "email": "",
    "suspended": 0,
    "max_buckets": 1000,
    "auid": 0,
    "subusers": [
        {
            "id": "testuser:swift",
            "permissions": "full-control"
        }
    ],
    "keys": [
        {
            "user": "testuser",
            "access_key": "O8JDE41XMI74O185EHKD",
            "secret_key": "i4Au2yxG5wtr1JK01mI8kjJPM93HNAoVWOSTdJd6"
        }
    ],
    "swift_keys": [
        {
            "user": "testuser:swift",
            "secret_key": "a4ioT4jEP653CDcdU8p4OuhruwABBRZmyNUbnSSt"
        }
    ],
    "caps": [],
    "op_mask": "read, write, delete",
    "default_placement": "",
    "placement_tags": [],
    "bucket_quota": {
        "enabled": false,
        "check_on_raw": false,
        "max_size": -1,
        "max_size_kb": 0,
        "max_objects": -1
    },
    "user_quota": {
        "enabled": false,
        "check_on_raw": false,
        "max_size": -1,
        "max_size_kb": 0,
        "max_objects": -1
    },
    "temp_url_keys": [],
    "type": "rgw"
}
2.10.3. Test S3 Access
You need to write and run a Python test script for verifying S3 access. The S3 access test script will connect to the radosgw, create a new bucket and list all buckets. The values for aws_access_key_id and aws_secret_access_key are taken from the values of access_key and secret_key returned by the radosgw_admin command.
Execute the following steps:
Enable the common repository.
# subscription-manager repos --enable=rhel-7-server-rh-common-rpmsInstall the
python-botopackage.sudo yum install python-botoCreate the Python script:
vi s3test.pyAdd the following contents to the file:
import boto import boto.s3.connection access_key = $access secret_key = $secret boto.config.add_section('s3') conn = boto.connect_s3( aws_access_key_id = access_key, aws_secret_access_key = secret_key, host = 's3.<zone>.hostname', port = <port>, is_secure=False, calling_format = boto.s3.connection.OrdinaryCallingFormat(), ) bucket = conn.create_bucket('my-new-bucket') for bucket in conn.get_all_buckets(): print "{name}\t{created}".format( name = bucket.name, created = bucket.creation_date, )-
Replace
<zone>with the zone name of the host where you have configured the gateway service. That is, thegateway host. Ensure that thehostsetting resolves with DNS. Replace<port>with the port number of the gateway. -
Replace
$accessand$secretwith theaccess_keyandsecret_keyvalues from the Create an S3 User section.
-
Replace
Run the script:
python s3test.pyThe output will be something like the following:
my-new-bucket 2015-02-16T17:09:10.000Z
2.10.4. Test Swift Access
Swift access can be verified via the swift command line client. The command man swift will provide more information on available command line options.
To install swift client, execute the following:
sudo yum install python-setuptools
sudo easy_install pip
sudo pip install --upgrade setuptools
sudo pip install --upgrade python-swiftclient
To test swift access, execute the following:
swift -A http://{IP ADDRESS}:{port}/auth/1.0 -U testuser:swift -K '{swift_secret_key}' list
Replace {IP ADDRESS} with the public IP address of the gateway server and {swift_secret_key} with its value from the output of radosgw-admin key create command executed for the swift user. Replace {port} with the port number you are using with Civetweb (e.g., 8080 is the default). If you don’t replace the port, it will default to port 80.
For example:
swift -A http://10.19.143.116:8080/auth/1.0 -U testuser:swift -K '244+fz2gSqoHwR3lYtSbIyomyPHf3i7rgSJrF/IA' listThe output should be:
my-new-bucket2.11. Configuring HAProxy/keepalived
The Ceph Object Gateway allows you to assign many instances of the object gateway to a single zone so that you can scale out as load increases, that is, the same zone group and zone; however, you do not need a federated architecture to use HAProxy/keepalived. Since each object gateway instance has its own IP address, you can use HAProxy and keepalived to balance the load across Ceph Object Gateway servers.
Another use case for HAProxy and keepalived is to terminate HTTPS at the HAProxy server. Red Hat Ceph Storage (RHCS) 1.3.x uses Civetweb, and the implementation in RHCS 1.3.x doesn’t support HTTPS. You can use an HAProxy server to terminate HTTPS at the HAProxy server and use HTTP between the HAProxy server and the Civetweb gateway instances.
2.11.1. HAProxy/keepalived Prerequisites
To set up an HA Proxy with the Ceph Object Gateway, you must have:
- A running Ceph cluster
-
At least two Ceph Object Gateway servers within the same zone configured to run on port
80. If you follow the simple installation procedure, the gateway instances are in the same zone group and zone by default. If you are using a federated architecture, ensure that the instances are in the same zone group and zone; and, -
At least two servers for HAProxy and
keepalived.
This section assumes that you have at least two Ceph Object Gateway servers running, and that you get a valid response from each of them when running test scripts over port 80.
For a detailed discussion of HAProxy and keepalived, see Load Balancer Administration.
2.11.2. Preparing HAProxy Nodes
The following setup assumes two HAProxy nodes named haproxy and haproxy2 and two Ceph Object Gateway servers named rgw1 and rgw2. You may use any naming convention you prefer. Perform the following procedure on your at least two HAProxy nodes:
- Install RHEL 7.x.
Register the nodes.
[root@haproxy]# subscription-manager registerEnable the RHEL server repository.
[root@haproxy]# subscription-manager repos --enable=rhel-7-server-rpmsUpdate the server.
[root@haproxy]# yum update -y-
Install admin tools (e.g.,
wget,vim, etc.) as needed. Open port
80.[root@haproxy]# firewall-cmd --zone=public --add-port 80/tcp --permanent [root@haproxy]# firewall-cmd --reloadFor HTTPS, open port
443.[root@haproxy]# firewall-cmd --zone=public --add-port 443/tcp --permanent [root@haproxy]# firewall-cmd --reload
2.11.3. Installing and Configuring keepalived
Perform the following procedure on your at least two HAProxy nodes:
Prerequisites
- A minimum of two HAProxy nodes.
- A minimum of two Object Gateway nodes.
Procedure
Install
keepalived:[root@haproxy]# yum install -y keepalivedConfigure
keepalivedon both HAProxy nodes:[root@haproxy]# vim /etc/keepalived/keepalived.confIn the configuration file, there is a script to check the
haproxyprocesses:vrrp_script chk_haproxy { script "killall -0 haproxy" # check the haproxy process interval 2 # every 2 seconds weight 2 # add 2 points if OK }Next, the instance on the master and backup load balancers uses
eno1as the network interface. It also assigns a virtual IP address, that is,192.168.1.20.Master load balancer node
vrrp_instance RGW {
    state MASTER # might not be necessary. This is on the Master LB node.
    @main interface eno1
    priority 100
    advert_int 1
    interface eno1
    virtual_router_id 50
    @main unicast_src_ip 10.8.128.43 80
    unicast_peer {
           10.8.128.53
           }
    authentication {
        auth_type PASS
        auth_pass 1111
    }
    virtual_ipaddress {
        192.168.1.20
    }
    track_script {
      chk_haproxy
    }
}
virtual_server 192.168.1.20 80 eno1 { #populate correct interface
    delay_loop 6
    lb_algo wlc
    lb_kind dr
    persistence_timeout 600
    protocol TCP
    real_server 10.8.128.43 80 { # ip address of rgw2 on physical interface, haproxy listens here, rgw listens to localhost:8080 or similar
        weight 100
        TCP_CHECK { # perhaps change these to a HTTP/SSL GET?
            connect_timeout 3
        }
    }
    real_server 10.8.128.53 80 { # ip address of rgw3 on physical interface, haproxy listens here, rgw listens to localhost:8080 or similar
        weight 100
        TCP_CHECK { # perhaps change these to a HTTP/SSL GET?
            connect_timeout 3
        }
    }
}
Backup load balancer node
vrrp_instance RGW {
    state BACKUP # might not be necessary?
    priority 99
    advert_int 1
    interface eno1
    virtual_router_id 50
    unicast_src_ip 10.8.128.53 80
    unicast_peer {
           10.8.128.43
           }
    authentication {
        auth_type PASS
        auth_pass 1111
    }
    virtual_ipaddress {
        192.168.1.20
    }
    track_script {
      chk_haproxy
    }
}
virtual_server 192.168.1.20 80 eno1 { #populate correct interface
    delay_loop 6
    lb_algo wlc
    lb_kind dr
    persistence_timeout 600
    protocol TCP
    real_server 10.8.128.43 80 { # ip address of rgw2 on physical interface, haproxy listens here, rgw listens to localhost:8080 or similar
        weight 100
        TCP_CHECK { # perhaps change these to a HTTP/SSL GET?
            connect_timeout 3
        }
    }
    real_server 10.8.128.53 80 { # ip address of rgw3 on physical interface, haproxy listens here, rgw listens to localhost:8080 or similar
        weight 100
        TCP_CHECK { # perhaps change these to a HTTP/SSL GET?
            connect_timeout 3
        }
    }
}
Enable and start the
keepalivedservice:[root@haproxy]# systemctl enable keepalived [root@haproxy]# systemctl start keepalived
Additional Resources
-
For a detailed discussion of configuring
keepalived, refer to Initial Load Balancer Configuration with Keepalived.
2.11.4. Installing and Configuring HAProxy
Perform the following procedure on your at least two HAProxy nodes:
Install
haproxy.[root@haproxy]# yum install haproxyConfigure
haproxyfor SELinux and HTTP.[root@haproxy]# vim /etc/firewalld/services/haproxy-http.xmlAdd the following lines:
<?xml version="1.0" encoding="utf-8"?>
<service>
<short>HAProxy-HTTP</short>
<description>HAProxy load-balancer</description>
<port protocol="tcp" port="80"/>
</service>
As
root, assign the correct SELinux context and file permissions to thehaproxy-http.xmlfile.[root@haproxy]# cd /etc/firewalld/services [root@haproxy]# restorecon haproxy-http.xml [root@haproxy]# chmod 640 haproxy-http.xmlIf you intend to use HTTPS, configure
haproxyfor SELinux and HTTPS.[root@haproxy]# vim /etc/firewalld/services/haproxy-https.xmlAdd the following lines:
<?xml version="1.0" encoding="utf-8"?>
<service>
<short>HAProxy-HTTPS</short>
<description>HAProxy load-balancer</description>
<port protocol="tcp" port="443"/>
</service>
As
root, assign the correct SELinux context and file permissions to thehaproxy-https.xmlfile.# cd /etc/firewalld/services # restorecon haproxy-https.xml # chmod 640 haproxy-https.xmlIf you intend to use HTTPS, generate keys for SSL. If you do not have a certificate, you may use a self-signed certificate. To generate a key, see to Generating a New Key and Certificate section in the System Administrator’s Guide for Red Hat Enterprise Linux 7.
Finally, put the certificate and key into a PEM file.
[root@haproxy]# cat example.com.crt example.com.key > example.com.pem
[root@haproxy]# cp example.com.pem /etc/ssl/private/
Configure
haproxy.[root@haproxy]# vim /etc/haproxy/haproxy.cfgThe
globalanddefaultsmay remain unchanged. After thedefaultssection, you will need to configurefrontendandbackendsections. For example:frontend http_web *:80 mode http default_backend rgw frontend rgw-https bind *:443 ssl crt /etc/ssl/private/example.com.pem default_backend rgw backend rgw balance roundrobin mode http server rgw1 10.0.0.71:80 check server rgw2 10.0.0.80:80 checkFor a detailed discussion of HAProxy configuration, refer to HAProxy Configuration.
Enable/start
haproxy[root@haproxy]# systemctl enable haproxy [root@haproxy]# systemctl start haproxy
2.11.5. Testing the HAProxy Configuration
On your HAProxy nodes, check to ensure the virtual IP address from your keepalived configuration appears.
[root@haproxy]# ip addr showOn your calamari node, see if you can reach the gateway nodes via the load balancer configuration. For example:
[root@haproxy]# wget haproxyThis should return the same result as:
[root@haproxy]# wget rgw1
If it returns an index.html file with the following contents:
<?xml version="1.0" encoding="UTF-8"?>
	<ListAllMyBucketsResult xmlns="http://s3.amazonaws.com/doc/2006-03-01/">
		<Owner>
			<ID>anonymous</ID>
			<DisplayName></DisplayName>
		</Owner>
		<Buckets>
		</Buckets>
	</ListAllMyBucketsResult>
Then, your configuration is working properly.
2.12. Configuring Gateways for Static Web Hosting
Traditional web hosting involves setting up a web server for each website, which can use resources inefficiently when content does not change dynamically. Ceph Object Gateway can host static web sites in S3 buckets—that is, sites that do not use server-side services like PHP, servlets, databases, nodejs and the like. This approach is substantially more economical than setting up VMs with web servers for each site.
2.12.1. Static Web Hosting Assumptions
Static web hosting requires at least one running Ceph Storage Cluster, and at least two Ceph Object Gateway instances for static web sites. Red Hat assumes that each zone will have multiple gateway instances load balanced by HAProxy/keepalived.
See Configuring HAProxy/keepalived for additional details on HAProxy/keepalived.
Red Hat DOES NOT support using a Ceph Object Gateway instance to deploy both standard S3/Swift APIs and static web hosting simultaneously.
2.12.2. Static Web Hosting Requirements
Static web hosting functionality uses its own API, so configuring a gateway to use static web sites in S3 buckets requires the following:
- S3 static web hosting uses Ceph Object Gateway instances that are separate and distinct from instances used for standard S3/Swift API use cases.
- Gateway instances hosting S3 static web sites should have separate, non-overlapping domain names from the standard S3/Swift API gateway instances.
- Gateway instances hosting S3 static web sites should use separate public-facing IP addresses from the standard S3/Swift API gateway instances.
- Gateway instances hosting S3 static web sites load balance, and if necessary terminate SSL, using HAProxy/keepalived.
2.12.3. Static Web Hosting Gateway Setup
To enable a gateway for static web hosting, edit the Ceph configuration file and add the following settings:
[client.rgw.<STATIC-SITE-HOSTNAME>]
...
rgw_enable_static_website = true
rgw_enable_apis = s3, s3website
rgw_dns_name = objects-zonegroup.domain.com
rgw_dns_s3website_name = objects-website-zonegroup.domain.com
rgw_resolve_cname = true
...
The rgw_enable_static_website setting MUST be true. The rgw_enable_apis setting MUST enable the s3website API. The rgw_dns_name and rgw_dns_s3website_name settings must provide their fully qualified domains. If the site will use canonical name extensions, set rgw_resolve_cname to true.
The FQDNs of rgw_dns_name and rgw_dns_s3website_name MUST NOT overlap.
2.12.4. Static Web Hosting DNS Configuration
The following is an example of assumed DNS settings, where the first two lines specify the domains of the the gateway instance using a standard S3 interface and point to the IPv4 and IPv6 addresses respectively. The third line provides a wildcard CNAME setting for S3 buckets using canonical name extensions. The fourth and fifth lines specify the domains for the gateway instance using the S3 website interface and point to their IPv4 and IPv6 addresses respectively.
objects-zonegroup.domain.com. IN    A 192.0.2.10
objects-zonegroup.domain.com. IN AAAA 2001:DB8::192:0:2:10
*.objects-zonegroup.domain.com. IN CNAME objects-zonegroup.domain.com.
objects-website-zonegroup.domain.com. IN    A 192.0.2.20
objects-website-zonegroup.domain.com. IN AAAA 2001:DB8::192:0:2:20The IP addresses in the first two lines differ from the IP addresses in the fourth and fifth lines.
If using Ceph Object Gateway in a multi-site configuration, consider using a routing solution to route traffic to the gateway closest to the client.
The Amazon Web Service (AWS) requires static web host buckets to match the host name. Ceph provides a few different ways to configure the DNS, and HTTPS will work if the proxy has a matching certificate.
Hostname to a Bucket on a Subdomain
To use AWS-style S3 subdomains, use a wildcard in the DNS entry and can redirect requests to any bucket. A DNS entry might look like the following:
*.objects-website-zonegroup.domain.com. IN CNAME objects-website-zonegroup.domain.com.Access the bucket name in the following manner:
http://bucket1.objects-website-zonegroup.domain.com
Where the bucket name is bucket1.
Hostname to Non-Matching Bucket
Ceph supports mapping domain names to buckets without including the bucket name in the request, which is unique to Ceph Object Gateway. To use a domain name to access a bucket, map the domain name to the bucket name. A DNS entry might look like the following:
www.example.com. IN CNAME bucket2.objects-website-zonegroup.domain.com.
Where the bucket name is bucket2.
Access the bucket in the following manner:
http://www.example.comHostname to Long Bucket with CNAME
AWS typically requires the bucket name to match the domain name. To configure the DNS for static web hosting using CNAME, the DNS entry might look like the following:
www.example.com. IN CNAME www.example.com.objects-website-zonegroup.domain.com.Access the bucket in the following manner:
http://www.example.comHostname to Long Bucket without CNAME
If the DNS name contains other non-CNAME records such as SOA, NS, MX or TXT, the DNS record must map the domain name directly to the IP address. For example:
www.example.com. IN A 192.0.2.20
www.example.com. IN AAAA 2001:DB8::192:0:2:20
Access the bucket in the following manner:
http://www.example.com2.12.5. Creating a Static Web Hosting Site
To create a static website perform the following steps:
-
Create an S3 bucket. The bucket name MAY be the same as the website’s domain name. For example,
mysite.commay have a bucket name ofmysite.com. This is required for AWS, but it is NOT required for Ceph. See DNS Settings for details. -
Upload the static website content to the bucket. Contents may include HTML, CSS, client-side JavaScript, images, audio/video content and other downloadable files. A website MUST have an
index.htmlfile and MAY haveerror.htmlfile. - Verify the website’s contents. At this point, only the creator of the bucket will have access to the the contents.
- Set permissions on the files so that they are publicly readable.
2.13. Exporting the Namespace to NFS-Ganesha
In Red Hat Ceph Storage 3, the Ceph Object Gateway provides the ability to export S3 object namespaces by using NFS version 3 and NFS version 4.1 for production systems.
The NFS Ganesha feature is not for general use, but rather for migration to an S3 cloud only.
The implementation conforms to Amazon Web Services (AWS) hierarchical namespace conventions which map UNIX-style path names onto S3 buckets and objects. The top level of the attached namespace, which is subordinate to the NFSv4 pseudo root if present, consists of the Ceph Object Gateway S3 buckets, where buckets are represented as NFS directories. Objects within a bucket are presented as NFS file and directory hierarchies, following S3 conventions. Operations to create files and directories are supported.
Creating or deleting hard or soft links IS NOT supported. Performing rename operations on buckets or directories IS NOT supported via NFS, but rename on files IS supported within and between directories, and between a file system and an NFS mount. File rename operations are more expensive when conducted over NFS, as they change the target directory and typically forces a full readdir to refresh it.
Editing files via the NFS mount IS NOT supported.
The Ceph Object Gateway requires applications to write sequentially from offset 0 to the end of a file. Attempting to write out of order causes the upload operation to fail. To work around this issue, use utilities like cp, cat, or rsync when copying files into NFS space. Always mount with the sync option.
The Ceph Object Gateway with NFS is based on an in-process library packaging of the Gateway server and a File System Abstraction Layer (FSAL) namespace driver for the NFS-Ganesha NFS server. At runtime, an instance of the Ceph Object Gateway daemon with NFS combines a full Ceph Object Gateway daemon, albeit without the Civetweb HTTP service, with an NFS-Ganesha instance in a single process. To make use of this feature, deploy NFS-Ganesha version 2.3.2 or later.
Perform the steps in the Before you Start and Configuring an NFS-Ganesha Instance procedures on the host that will contain the NFS-Ganesha (nfs-ganesha-rgw) instance.
Running Multiple NFS Gateways
Each NFS-Ganesha instance acts as a full gateway endpoint, with the current limitation that an NFS-Ganesha instance cannot be configured to export HTTP services. As with ordinary gateway instances, any number of NFS-Ganesha instances can be started, exporting the same or different resources from the cluster. This enables the clustering of NFS-Ganesha instances. However, this does not imply high availability.
When regular gateway instances and NFS-Ganesha instances overlap the same data resources, they will be accessible from both the standard S3 API and through the NFS-Ganesha instance as exported. You can co-locate the NFS-Ganesha instance with a Ceph Object Gateway instance on the same host.
Before you Start
- Disable any running kernel NFS service instances on any host that will run NFS-Ganesha before attempting to run NFS-Ganesha. NFS-Ganesha will not start if another NFS instance is running.
As
root, enable the Red Hat Ceph Storage 3 Tools repository:# subscription-manager repos --enable=rhel-7-server-rhceph-3-tools-els-rpmsMake sure that the
rpcbindservice is running:# systemctl start rpcbindNoteThe
rpcbindpackage that providesrpcbindis usually installed by default. If that is not the case, install the package first.For details on how NFS uses
rpcbind, see the Required Services section in the Storage Administration Guide for Red Hat Enterprise Linux 7.If the
nfs-serviceservice is running, stop and disable it:# systemctl stop nfs-server.service # systemctl disable nfs-server.service
Configuring an NFS-Ganesha Instance
Install the
nfs-ganesha-rgwpackage:# yum install nfs-ganesha-rgwCopy the Ceph configuration file from a Ceph Monitor node to the
/etc/ceph/directory of the NFS-Ganesha host, and edit it as necessary:# scp <mon-host>:/etc/ceph/ceph.conf <nfs-ganesha-rgw-host>:/etc/cephNoteThe Ceph configuration file must contain a valid
[client.rgw.{instance-name}]section and corresponding parameters for the various required Gateway configuration variables such asrgw_data,keyring, orrgw_frontends. If exporting Swift containers that do not conform to valid S3 bucket naming requirements, setrgw_relaxed_s3_bucket_namestotruein the[client.rgw]section of the Ceph configuration file. For example, if a Swift container name contains underscores, it is not a valid S3 bucket name and will not get synchronized unlessrgw_relaxed_s3_bucket_namesis set totrue. When adding objects and buckets outside of NFS, those objects will appear in the NFS namespace in the time set byrgw_nfs_namespace_expire_secs, which is about 5 minutes by default. Override the default value forrgw_nfs_namespace_expire_secsin the Ceph configuration file to change the refresh rate.Open the NFS-Ganesha configuration file:
# vim /etc/ganesha/ganesha.confConfigure the
EXPORTsection with anFSAL(File System Abstraction Layer) block. Provide an ID, S3 user ID, S3 access key, and secret. For NFSv4, it should look something like this:EXPORT { Export_ID={numeric-id}; Path = "/"; Pseudo = "/"; Access_Type = RW; SecType = "sys"; NFS_Protocols = 4; Transport_Protocols = TCP; Squash = No_Root_Squash; FSAL { Name = RGW; User_Id = {s3-user-id}; Access_Key_Id ="{s3-access-key}"; Secret_Access_Key = "{s3-secret}"; } }The
Pathoption instructs Ganesha where to find the export. For the VFS FSAL, this is the location within the server’s namespace. For other FSALs, it may be the location within the filesystem managed by that FSAL’s namespace. For example, if the Ceph FSAL is used to export an entire CephFS volume,Pathwould be/.The
Pseudooption instructs Ganesha where to place the export within NFS v4’s pseudo file system namespace. NFS v4 specifies the server may construct a pseudo namespace that may not correspond to any actual locations of exports, and portions of that pseudo filesystem may exist only within the realm of the NFS server and not correspond to any physical directories. Further, an NFS v4 server places all its exports within a single namespace. It is possible to have a single export exported as the pseudo filesystem root, but it is much more common to have multiple exports placed in the pseudo filesystem. With a traditional VFS, often thePseudolocation is the same as thePathlocation. Returning to the example CephFS export with/as thePath, if multiple exports are desired, the export would likely have something else as thePseudooption. For example,/ceph.Any
EXPORTblock which should support NFSv3 should include version 3 in theNFS_Protocolssetting. Additionally, NFSv3 is the last major version to support the UDP transport. Early versions of the standard included UDP, but RFC 7530 forbids its use. To enable UDP, include it in theTransport_Protocolssetting. For example:EXPORT { ... NFS_Protocols = 3,4; Transport_Protocols = UDP,TCP; ... }Setting
SecType = sys;allows clients to attach without Kerberos authentication.Setting
Squash = No_Root_Squash;enables a user to change directory ownership in the NFS mount.NFS clients using a conventional OS-native NFS 4.1 client typically see a federated namespace of exported file systems defined by the destination server’s
pseudofsroot. Any number of these can be Ceph Object Gateway exports.Each export has its own tuple of
name,User_Id,Access_Key, andSecret_Access_Keyand creates a proxy of the object namespace visible to the specified user.An export in
ganesha.confcan also contain anNFSV4block. Red Hat Ceph Storage supports theAllow_Numeric_OwnersandOnly_Numberic_Ownersparameters as an alternative to setting up theidmapperprogram.NFSV4 { Allow_Numeric_Owners = true; Only_Numeric_Owners = true; }Configure an
NFS_CORE_PARAMblock.NFS_CORE_PARAM{ mount_path_pseudo = true; }When the
mount_path_pseudoconfiguration setting is set totrue, it will make the NFS v3 and NFS v4.x mounts use the same server side path to reach an export, for example:mount -o vers=3 <IP ADDRESS>:/export /mnt mount -o vers=4 <IP ADDRESS>:/export /mntPath Pseudo Tag Mechanism Mount /export/test1 /export/test1 test1 v3 Pseudo mount -o vers=3 server:/export/test1 /export/test1 /export/test1 test1 v3 Tag mount -o vers=3 server:test1 /export/test1 /export/test1 test1 v4 Pseudo mount -o vers=4 server:/export/test1 / /export/ceph1 ceph1 v3 Pseudo mount -o vers=3 server:/export/ceph1 / /export/ceph1 ceph1 v3 Tag mount -o vers=3 server:ceph1 / /export/ceph1 ceph1 v4 Pseudo mount -o vers=4 server:/export/ceph1 / /export/ceph2 ceph2 v3 Pseudo mount -o vers=3 server:/export/ceph2 / /export/ceph2 ceph2 v3 Tag mount -o vers=3 server:ceph2 / /export/ceph2 ceph2 v4 Pseudo mount -o vers=4When the
mount_path_pseudoconfiguration setting is set tofalse, NFS v3 mounts use thePathoption and NFS v4.x mounts use thePseudooption.Path Pseudo Tag Mechanism Mount /export/test1 /export/test1 test1 v3 Path mount -o vers=3 server:/export/test1 /export/test1 /export/test1 test1 v3 Tag mount -o vers=3 server:test1 /export/test1 /export/test1 test1 v4 Pseudo mount -o vers=4 server:/export/test1 / /export/ceph1 ceph1 v3 Path mount -o vers=3 server:/ / /export/ceph1 ceph1 v3 Tag mount -o vers=3 server:ceph1 / /export/ceph1 ceph1 v4 Pseudo mount -o vers=4 server:/export/ceph1 / /export/ceph2 ceph2 v3 Path not accessible / /export/ceph2 ceph2 v3 Tag mount -o vers=3 server:ceph2 / /export/ceph2 ceph2 v4 Pseudo mount -o vers=4 server:/export/ceph2Configure the
RGWsection. Specify the name of the instance, provide a path to the Ceph configuration file, and specify any initialization arguments:RGW { name = "client.rgw.{instance-name}"; ceph_conf = "/etc/ceph/ceph.conf"; init_args = "--{arg}={arg-value}"; }-
Save the
/etc/ganesha/ganesha.confconfiguration file. Enable and start the
nfs-ganeshaservice.# systemctl enable nfs-ganesha # systemctl start nfs-ganeshaFor very large pseudo directories, set the configurable parameter
rgw_nfs_s3_fast_attrstotruein theceph.conffile to make the namespace immutable and accelerated:rgw_nfs_s3_fast_attrs= trueRestart the Ceph Object Gateway service from each gateway node
# systemctl restart ceph-radosgw.target
Configuring NFSv4 clients
To access the namespace, mount the configured NFS-Ganesha export(s) into desired locations in the local POSIX namespace. As noted, this implementation has a few unique restrictions:
- Only the NFS 4.1 and higher protocol flavors are supported.
-
To enforce write ordering, use the
syncmount option.
To mount the NFS-Ganesha exports, add the following entry to the /etc/fstab file on the client host:
<ganesha-host-name>:/ <mount-point> nfs noauto,soft,nfsvers=4.1,sync,proto=tcp 0 0Specify the NFS-Ganesha host name and the path to the mount point on the client.
To successfully mount the NFS-Ganesha exports, the /sbin/mount.nfs file must exist on the client. The nfs-tools package provides this file. In most cases, the package is installed by default. However, verify that the nfs-tools package is installed on the client and if not, install it.
For additional details on NFS, see the Network File System (NFS) chapter in the Storage Administration Guide for Red Hat Enterprise Linux 7.
Configuring NFSv3 clients
Linux clients can be configured to mount with NFSv3 by supplying nfsvers=3 and noacl as mount options. To use UDP as the transport, add proto=udp to the mount options. However, TCP is the preferred protocol.
<ganesha-host-name>:/ <mount-point> nfs noauto,noacl,soft,nfsvers=3,sync,proto=tcp 0 0
Configure the NFS Ganesha EXPORT block Protocols setting with version 3 and the Transports setting with UDP if the mount will use version 3 with UDP.
Since NFSv3 does not communicate client OPEN and CLOSE operations to file servers, RGW NFS cannot use these operations to mark the beginning and ending of file upload transactions. Instead, RGW NFS attempts to start a new upload when the first write is sent to a file at offset 0, and finalizes the upload when no new writes to the file have been seen for a period of time—by default, 10 seconds. To change this value, set a value for rgw_nfs_write_completion_interval_s in the RGW section(s) of the Ceph configuration file.
Chapter 3. Administration
Administrators can manage the Ceph Object Gateway using the radosgw-admin command-line interface.
3.1. Administrative Data Storage
A Ceph Object Gateway stores administrative data in a series of pools defined in an instance’s zone configuration. For example, the buckets, users, user quotas and usage statistics discussed in the subsequent sections are stored in pools in the Ceph Storage Cluster. By default, Ceph Object Gateway will create the following pools and map them to the default zone.
-
.rgw -
.rgw.control -
.rgw.gc -
.log -
.intent-log -
.usage -
.users -
.users.email -
.users.swift -
.users.uid
You should consider creating these pools manually so that you can set the CRUSH ruleset and the number of placement groups. In a typical configuration, the pools that store the Ceph Object Gateway’s administrative data will often use the same CRUSH ruleset and use fewer placement groups, because there are 10 pools for the administrative data. See Pools and the Storage Strategies guide for Red Hat Ceph Storage 3 for additional details.
Also see Ceph Placement Groups (PGs) per Pool Calculator for placement group calculation details. The mon_pg_warn_max_per_osd setting warns you if assign too many placement groups to a pool (i.e., 300 by default). You may adjust the value to suit your needs and the capabilities of your hardware where n is the maximum number of PGs per OSD.
mon_pg_warn_max_per_osd = n3.2. Creating Storage Policies
The Ceph Object Gateway stores the client bucket and object data by identifying placement targets, and storing buckets and objects in the pools associated with a placement target. If you don’t configure placement targets and map them to pools in the instance’s zone configuration, the Ceph Object Gateway will use default targets and pools, for example, default_placement.
Storage policies give Ceph Object Gateway clients a way of accessing a storage strategy, that is, the ability to target a particular type of storage, for example, SSDs, SAS drives, SATA drives. A particular way of ensuring durability, replication, erasure coding, and so on. For details, see the Storage Strategies guide for Red Hat Ceph Storage 3.
To create a storage policy, use the following procedure:
-
Create a new pool
.rgw.buckets.specialwith the desired storage strategy. For example, a pool customized with erasure-coding, a particular CRUSH ruleset, the number of replicas, and thepg_numandpgp_numcount. Get the zone group configuration and store it in a file, for example,
zonegroup.json:Syntax
[root@master-zone]# radosgw-admin zonegroup --rgw-zonegroup=<zonegroup_name> get > zonegroup.jsonExample
[root@master-zone]# radosgw-admin zonegroup --rgw-zonegroup=default get > zonegroup.jsonAdd a
special-placemententry underplacement_targetin thezonegroup.jsonfile.{ "name": "default", "api_name": "", "is_master": "true", "endpoints": [], "hostnames": [], "master_zone": "", "zones": [{ "name": "default", "endpoints": [], "log_meta": "false", "log_data": "false", "bucket_index_max_shards": 5 }], "placement_targets": [{ "name": "default-placement", "tags": [] }, { "name": "special-placement", "tags": [] }], "default_placement": "default-placement" }Set the zone group with the modified
zonegroup.jsonfile:[root@master-zone]# radosgw-admin zonegroup set < zonegroup.jsonGet the zone configuration and store it in a file, for example,
zone.json:[root@master-zone]# radosgw-admin zone get > zone.jsonEdit the zone file and add the new placement policy key under
placement_pool:{ "domain_root": ".rgw", "control_pool": ".rgw.control", "gc_pool": ".rgw.gc", "log_pool": ".log", "intent_log_pool": ".intent-log", "usage_log_pool": ".usage", "user_keys_pool": ".users", "user_email_pool": ".users.email", "user_swift_pool": ".users.swift", "user_uid_pool": ".users.uid", "system_key": { "access_key": "", "secret_key": "" }, "placement_pools": [{ "key": "default-placement", "val": { "index_pool": ".rgw.buckets.index", "data_pool": ".rgw.buckets", "data_extra_pool": ".rgw.buckets.extra" } }, { "key": "special-placement", "val": { "index_pool": ".rgw.buckets.index", "data_pool": ".rgw.buckets.special", "data_extra_pool": ".rgw.buckets.extra" } }] }Set the new zone configuration.
[root@master-zone]# radosgw-admin zone set < zone.jsonUpdate the zone group map.
[root@master-zone]# radosgw-admin period update --commitThe
special-placemententry is listed as aplacement_target.
To specify the storage policy when making a request:
Example:
$ curl -i http://10.0.0.1/swift/v1/TestContainer/file.txt -X PUT -H "X-Storage-Policy: special-placement" -H "X-Auth-Token: AUTH_rgwtxxxxxx"3.3. Creating Indexless Buckets
It is possible to configure a placement target where created buckets do not use the bucket index to store objects index; that is, indexless buckets. Placement targets that do not use data replication or listing may implement indexless buckets.
Indexless buckets provides a mechanism in which the placement target does not track objects in specific buckets. This removes a resource contention that happens whenever an object write happens and reduces the number of round trips that Ceph Object Gateway needs to make to the Ceph Storage cluster. This can have a positive effect on concurrent operations and small object write performance.
To specify a placement target as indexless, use the following procedure:
Get the configuration for
zone.json:$ radosgw-admin zone get --rgw-zone=<zone> > zone.jsonModify
zone.jsonby adding a new placement target or by modifying an existing one to have"index_type": 1, for example:"placement_pools": [ { "key": "default-placement", "val": { "index_pool": "default.rgw.buckets.index", "data_pool": "default.rgw.buckets.data", "data_extra_pool": "default.rgw.buckets.non-ec", "index_type": 1, "compression": "" } }, { "key": "indexless", "val": { "index_pool": "default.rgw.buckets.index", "data_pool": "default.rgw.buckets.data", "data_extra_pool": "default.rgw.buckets.non-ec", "index_type": 1 } } ],Set the configuration for
zone.json:$ radosgw-admin zone set --rgw-zone=<zone> --infile zone.jsonMake sure the
zonegrouprefers to the new placement target if you created a new placement target:$ radosgw-admin zonegroup get --rgw-zonegroup=<zonegroup> > zonegroup.jsonSet the zonegroup’s
default_placement:$ radosgw-admin zonegroup placement default --placement-id indexlessModify the
zonegroup.jsonas needed. For example:"placement_targets": [ { "name": "default-placement", "tags": [] }, { "name": "indexless", "tags": [] } ], "default_placement": "default-placement",$ radosgw-admin zonegroup set --rgw-zonegroup=<zonegroup> < zonegroup.jsonUpdate and commit the period if the cluster is in a multi-site configuration:
$ radosgw-admin period update --commit
In this example, the buckets created in the "indexless" target will be indexless buckets.
The bucket index will not reflect the correct state of the bucket, and listing these buckets will not correctly return their list of objects. This affects multiple features. Specifically, these buckets will not be synced in a multi-zone environment because the bucket index is not used to store change information. It is not recommended to use S3 object versioning on indexless buckets because the bucket index is necessary for this feature.
Using indexless buckets removes the limit of the max number of objects in a single bucket.
Objects in indexless buckets cannot be listed from NFS
3.4. Configuring Bucket Sharding
The Ceph Object Gateway stores bucket index data in the index pool (index_pool), which defaults to .rgw.buckets.index. When the client puts many objects—hundreds of thousands to millions of objects—in a single bucket without having set quotas for the maximum number of objects per bucket, the index pool can suffer significant performance degradation.
Bucket index sharding helps prevent performance bottlenecks when allowing a high number of objects per bucket.
You can configure bucket index sharding for new buckets or change the bucket index on already existing ones.
To configure bucket index sharding:
-
For new buckets in simple configurations, use the
rgw_override_bucket_index_max_shardsoption. See Section 3.4.2, “Configuring Bucket Index Sharding in Simple Configurations” -
For new buckets in multi-site configurations, use the
bucket_index_max_shardsoption. See Section 3.4.3, “Configuring Bucket Index Sharding in Multisite Configurations”
To reshard a bucket:
- Dynamically, see Section 3.4.4, “Dynamic Bucket Index Resharding”
- Manually, see Section 3.4.5, “Manual Bucket Index Resharding”
- In a multi-site configurations, see Manually Resharding Buckets with Multi-site
3.4.1. Bucket Sharding Limitations
Use the following limitations with caution. There are implications related to your hardware selections, so you should always discuss these requirements with your Red Hat account team.
- Maximum number of objects in one bucket before it needs sharding: Red Hat Recommends a maximum of 102,400 objects per bucket index shard. To take full advantage of sharding, provide a sufficient number of OSDs in the Ceph Object Gateway bucket index pool to get maximum parallelism.
- Maximum number of objects when using sharding: Based on prior testing, the number of bucket index shards currently supported is 65521. Red Hat quality assurance has NOT performed full scalability testing on bucket sharding.
3.4.2. Configuring Bucket Index Sharding in Simple Configurations
To enable and configure bucket index sharding on all new buckets, use the rgw_override_bucket_index_max_shards parameter. Set the parameter to:
-
0to disable bucket index sharding. This is the default value. -
A value greater than
0to enable bucket sharding and to set the maximum number of shards.
Prerequisites
- Read the bucket sharding limitations.
Procedure
Calculate the recommended number of shards. To do so, use the following formula:
number of objects expected in a bucket / 100,000Note that maximum number of shards is 65521.
Add
rgw_override_bucket_index_max_shardsto the Ceph configuration file:rgw_override_bucket_index_max_shards = valueReplace value with the recommended number of shards calculated in the previous step, for example:
rgw_override_bucket_index_max_shards = 10-
To configure bucket index sharding for all instances of the Ceph Object Gateway, add
rgw_override_bucket_index_max_shardsunder the[global]section. -
To configure bucket index sharding only for a particular instance of the Ceph Object Gateway, add
rgw_override_bucket_index_max_shardsunder the instance.
-
To configure bucket index sharding for all instances of the Ceph Object Gateway, add
Restart the Ceph Object Gateway:
# systemctl restart ceph-radosgw.target
Additional resources
3.4.3. Configuring Bucket Index Sharding in Multisite Configurations
In multisite configurations, each zone can have a different index_pool setting to manage failover. To configure a consistent shard count for zones in one zone group, set the bucket_index_max_shards setting in the configuration for that zone group. Set the parameter to:
-
0to disable bucket index sharding. This is the default value. -
A value greater than
0to enable bucket sharding and to set the maximum number of shards.
Mapping the index pool (for each zone, if applicable) to a CRUSH ruleset of SSD-based OSDs might also help with bucket index performance.
Prerequisites
- Read the bucket sharding limitations.
Procedure
Calculate the recommended number of shards. To do so, use the following formula:
number of objects expected in a bucket / 100,000Note that maximum number of shards is 65521.
Extract the zone group configuration to the
zonegroup.jsonfile:$ radosgw-admin zonegroup get > zonegroup.jsonIn the
zonegroup.jsonfile, set thebucket_index_max_shardssetting for each named zone.bucket_index_max_shards = valueReplace value with the recommended number of shards calculated in the previous step, for example:
bucket_index_max_shards = 10Reset the zone group:
$ radosgw-admin zonegroup set < zonegroup.jsonUpdate the period:
$ radosgw-admin period update --commit
Additional resources
3.4.4. Dynamic Bucket Index Resharding
The process for dynamic bucket resharding periodically checks all the Ceph Object Gateway buckets and detects buckets that require resharding. If a bucket has grown larger than the value specified in the rgw_max_objs_per_shard parameter, the Ceph Object Gateway reshards the bucket dynamically in the background. The default value for rgw_max_objs_per_shard is 100k objects per shard.
Currently, Red Hat does not support dynamic bucket resharding in multi-site configurations. To reshard bucket index in such configuration, see Manually Resharding Buckets with Multi-site.
Prerequisites
- Read the bucket sharding limitations.
Procedure
To enable dynamic bucket index resharding
-
Set the
rgw_dynamic_reshardingsetting in the Ceph configuration file totrue, which is the default value. Optional. Change the following parameters in the Ceph configuration file if needed:
-
rgw_reshard_num_logs: The number of shards for the resharding log. The default value is16. -
rgw_reshard_bucket_lock_duration: The duration of the lock on a bucket during resharding. The default value is120seconds. -
rgw_dynamic_resharding: Enables or disables dynamic resharding. The default value istrue. -
rgw_max_objs_per_shard: The maximum number of objects per shard. The default value is100000objects per shard. -
rgw_reshard_thread_interval: The maximum time between rounds of reshard thread processing. The default value is600seconds.
-
-
Set the
To add a bucket to the resharding queue:
radosgw-admin reshard add --bucket BUCKET_NAME --num-shards NUMBERReplace:
- BUCKET_NAME with the name of the bucket to reshard.
- NUMBER with the new number of shards.
Example:
$ radosgw-admin reshard add --bucket data --num-shards 10To list the resharding queue:
$ radosgw-admin reshard listTo check bucket resharding status:
radosgw-admin reshard status --bucket BUCKET_NAMEReplace:
- BUCKET_NAME with the name of the bucket to reshard
Example:
$ radosgw-admin reshard status --bucket dataNoteThe
radosgw-admin reshard statuscommand will display one of the following status identifiers:-
not-resharding -
in-progress -
done
To process entries on the resharding queue immediately :
$ radosgw-admin reshard processTo cancel pending bucket resharding:
radosgw-admin reshard cancel --bucket BUCKET_NAMEReplace:
- BUCKET_NAME with the name of the pending bucket.
Example:
$ radosgw-admin reshard cancel --bucket dataImportantYou can only cancel pending resharding operations. Do not cancel ongoing resharding operations.
- If you use Red Hat Ceph Storage 3.1 and previous versions, remove stale bucket entries as described in the Cleaning stale instances after resharding section.
Additional resources
3.4.5. Manual Bucket Index Resharding
If a bucket has grown larger than the initial configuration was optimized for, reshard the bucket index pool by using the radosgw-admin bucket reshard command. This command:
- Creates a new set of bucket index objects for the specified bucket.
- Distributes object entries across these bucket index objects.
- Creates a new bucket instance.
- Links the new bucket instance with the bucket so that all new index operations go through the new bucket indexes.
- Prints the old and the new bucket ID to the command output.
Use this procedure only in simple configurations. To reshard buckets in multi-site configurations, see Manually Resharding Buckets with Multi-site.
Prerequisites
- Read the bucket sharding limitations.
Procedure
Back up the original bucket index:
radosgw-admin bi list --bucket=BUCKET > BUCKET.list.backupReplace:
- BUCKET with the name of the bucket to reshard
For example, for a bucket named
data, enter:$ radosgw-admin bi list --bucket=data > data.list.backupReshard the bucket index:
radosgw-admin bucket reshard --bucket=BUCKET --num-shards=NUMBERReplace:
- BUCKET with the name of the bucket to reshard
- NUMBER with the new number of shards
For example, for a bucket named
dataand the required number of shards being100, enter:$ radosgw-admin bucket reshard --bucket=data --num-shards=100- If you use Red Hat Ceph Storage 3.1 and previous versions, remove stale bucket entries as described in the Cleaning stale instances after resharding section.
3.4.6. Cleaning stale instances after resharding
In Red Hat Ceph Storage 3.1 and previous versions, the resharding process does not clean stale instances of bucket entries automatically. These stale instances can impact performance of the cluster if they are not cleaned manually.
Use this procedure only in simple configurations not in multi-site clusters.
Prerequisites
- Ceph Object Gateway installed.
Procedure
List stale instances:
$ radosgw-admin reshard stale-instances listClean the stale instances:
$ radosgw-admin reshard stale-instances rm
3.5. Enabling Compression
The Ceph Object Gateway supports server-side compression of uploaded objects using any of Ceph’s compression plugins. These include:
-
zlib: Supported. -
snappy: Technology Preview. -
zstd: Technology Preview.
The snappy and zstd compression plugins are Technology Preview features and as such they are not fully supported, as Red Hat has not completed quality assurance testing on them yet.
Configuration
To enable compression on a zone’s placement target, provide the --compression=<type> option to the radosgw-admin zone placement modify command. The compression type refers to the name of the compression plugin to use when writing new object data.
Each compressed object stores the compression type. Changing the setting does not hinder the ability to decompress existing compressed objects, nor does it force the Ceph Object Gateway to recompress existing objects.
This compression setting applies to all new objects uploaded to buckets using this placement target.
To disable compression on a zone’s placement target, provide the --compression=<type> option to the radosgw-admin zone placement modify command and specify an empty string or none.
For example:
$ radosgw-admin zone placement modify --rgw-zone=default --placement-id=default-placement --compression=zlib
{
...
    "placement_pools": [
        {
            "key": "default-placement",
            "val": {
                "index_pool": "default.rgw.buckets.index",
                "data_pool": "default.rgw.buckets.data",
                "data_extra_pool": "default.rgw.buckets.non-ec",
                "index_type": 0,
                "compression": "zlib"
            }
        }
    ],
...
}
After enabling or disabling compression, restart the Ceph Object Gateway instance so the change will take effect.
Ceph Object Gateway creates a default zone and a set of pools. For production deployments, see the Ceph Object Gateway for Production guide, more specifically, the Creating a Realm section first. See also Multisite.
Statistics
While all existing commands and APIs continue to report object and bucket sizes based on their uncompressed data, the radosgw-admin bucket stats command includes compression statistics for a given bucket.
$ radosgw-admin bucket stats --bucket=<name>
{
...
    "usage": {
        "rgw.main": {
            "size": 1075028,
            "size_actual": 1331200,
            "size_utilized": 592035,
            "size_kb": 1050,
            "size_kb_actual": 1300,
            "size_kb_utilized": 579,
            "num_objects": 104
        }
    },
...
}
The size_utilized and size_kb_utilized fields represent the total size of compressed data in bytes and kilobytes respectively.
3.6. User Management
Ceph Object Storage user management refers to users that are client applications of the Ceph Object Storage service; not the Ceph Object Gateway as a client application of the Ceph Storage Cluster. You must create a user, access key and secret to enable client applications to interact with the Ceph Object Gateway service.
There are two user types:
- User: The term 'user' reflects a user of the S3 interface.
- Subuser: The term 'subuser' reflects a user of the Swift interface. A subuser is associated to a user .
You can create, modify, view, suspend and remove users and subusers.
When managing users in a multi-site deployment, ALWAYS execute the radosgw-admin command on a Ceph Object Gateway node within the master zone of the master zone group to ensure that users synchronize throughout the multi-site cluster. DO NOT create, modify or delete users on a multi-site cluster from a secondary zone or a secondary zone group. This document uses [root@master-zone]# as a command line convention for a host in the master zone of the master zone group.
In addition to creating user and subuser IDs, you may add a display name and an email address for a user. You can specify a key and secret, or generate a key and secret automatically. When generating or specifying keys, note that user IDs correspond to an S3 key type and subuser IDs correspond to a swift key type. Swift keys also have access levels of read, write, readwrite and full.
User management command-line syntax generally follows the pattern user <command> <user-id> where <user-id> is either the --uid= option followed by the user’s ID (S3) or the --subuser= option followed by the user name (Swift). For example:
[root@master-zone]# radosgw-admin user <create|modify|info|rm|suspend|enable|check|stats> <--uid={id}|--subuser={name}> [other-options]Additional options may be required depending on the command you execute.
3.6.1. Multi Tenancy
In Red Hat Ceph Storage 2 and later, the Ceph Object Gateway supports multi-tenancy for both the S3 and Swift APIs, where each user and bucket lies under a "tenant." Multi tenancy prevents namespace clashing when multiple tenants are using common bucket names, such as "test", "main" and so forth.
Each user and bucket lies under a tenant. For backward compatibility, a "legacy" tenant with an empty name is added. Whenever referring to a bucket without specifically specifying a tenant, the Swift API will assume the "legacy" tenant. Existing users are also stored under the legacy tenant, so they will access buckets and objects the same way as earlier releases.
Tenants as such do not have any operations on them. They appear and and disappear as needed, when users are administered. In order to create, modify, and remove users with explicit tenants, either an additional option --tenant is supplied, or a syntax "<tenant>$<user>" is used in the parameters of the radosgw-admin command.
To create a user testx$tester for S3, execute the following:
[root@master-zone]# radosgw-admin --tenant testx --uid tester \
                    --display-name "Test User" --access_key TESTER \
                    --secret test123 user create
To create a user testx$tester for Swift, execute one of the following:
[root@master-zone]# radosgw-admin --tenant testx --uid tester \
                    --display-name "Test User" --subuser tester:swift \
                    --key-type swift --access full subuser create

[root@master-zone]# radosgw-admin key create --subuser 'testx$tester:swift' \
--key-type swift --secret test123The subuser with explicit tenant had to be quoted in the shell.
3.6.2. Create a User
Use the user create command to create an S3-interface user. You MUST specify a user ID and a display name. You may also specify an email address. If you DO NOT specify a key or secret, radosgw-admin will generate them for you automatically. However, you may specify a key and/or a secret if you prefer not to use generated key/secret pairs.
[root@master-zone]# radosgw-admin user create --uid=<id> \
[--key-type=<type>] [--gen-access-key|--access-key=<key>]\
[--gen-secret | --secret=<key>] \
[--email=<email>] --display-name=<name>
For example:
[root@master-zone]# radosgw-admin user create --uid=janedoe --display-name="Jane Doe" --email=jane@example.com{ "user_id": "janedoe",
"display_name": "Jane Doe",
"email": "jane@example.com",
"suspended": 0,
"max_buckets": 1000,
"auid": 0,
"subusers": [],
"keys": [
{ "user": "janedoe",
"access_key": "11BS02LGFB6AL6H1ADMW",
"secret_key": "vzCEkuryfn060dfee4fgQPqFrncKEIkh3ZcdOANY"}],
"swift_keys": [],
"caps": [],
"op_mask": "read, write, delete",
"default_placement": "",
"placement_tags": [],
"bucket_quota": { "enabled": false,
"max_size_kb": -1,
"max_objects": -1},
"user_quota": { "enabled": false,
"max_size_kb": -1,
"max_objects": -1},
"temp_url_keys": []}
Check the key output. Sometimes radosgw-admin generates a JSON escape (\) character, and some clients do not know how to handle JSON escape characters. Remedies include removing the JSON escape character (\), encapsulating the string in quotes, regenerating the key and ensuring that it does not have a JSON escape character or specify the key and secret manually.
3.6.3. Create a Subuser
To create a subuser (Swift interface), you must specify the user ID (--uid={username}), a subuser ID and the access level for the subuser. If you DO NOT specify a key or secret, radosgw-admin will generate them for you automatically. However, you may specify a key and/or a secret if you prefer not to use generated key/secret pairs.
full is not readwrite, as it also includes the access control policy.
[root@master-zone]# radosgw-admin subuser create --uid={uid} --subuser={uid} --access=[ read | write | readwrite | full ]For example:
[root@master-zone]# radosgw-admin subuser create --uid=janedoe --subuser=janedoe:swift --access=full{ "user_id": "janedoe",
"display_name": "Jane Doe",
"email": "jane@example.com",
"suspended": 0,
"max_buckets": 1000,
"auid": 0,
"subusers": [
{ "id": "janedoe:swift",
"permissions": "full-control"}],
"keys": [
{ "user": "janedoe",
"access_key": "11BS02LGFB6AL6H1ADMW",
"secret_key": "vzCEkuryfn060dfee4fgQPqFrncKEIkh3ZcdOANY"}],
"swift_keys": [],
"caps": [],
"op_mask": "read, write, delete",
"default_placement": "",
"placement_tags": [],
"bucket_quota": { "enabled": false,
"max_size_kb": -1,
"max_objects": -1},
"user_quota": { "enabled": false,
"max_size_kb": -1,
"max_objects": -1},
"temp_url_keys": []}3.6.4. Get User Information
To get information about a user, you must specify user info and the user ID (--uid={username}).
# radosgw-admin user info --uid=janedoe3.6.5. Modify User Information
To modify information about a user, you must specify the user ID (--uid={username}) and the attributes you want to modify. Typical modifications are to keys and secrets, email addresses, display names and access levels. For example:
[root@master-zone]# radosgw-admin user modify --uid=janedoe / --display-name="Jane E. Doe"
To modify subuser values, specify subuser modify and the subuser ID. For example:
[root@master-zone]# radosgw-admin subuser modify --subuser=janedoe:swift / --access=full3.6.6. Enable and Suspend Users
When you create a user, the user is enabled by default. However, you may suspend user privileges and re-enable them at a later time. To suspend a user, specify user suspend and the user ID.
[root@master-zone]# radosgw-admin user suspend --uid=johndoe
To re-enable a suspended user, specify user enable and the user ID. :
[root@master-zone]# radosgw-admin user enable --uid=johndoeDisabling the user disables the subuser.
3.6.7. Remove a User
When you remove a user, the user and subuser are removed from the system. However, you may remove just the subuser if you wish. To remove a user (and subuser), specify user rm and the user ID.
[root@master-zone]# radosgw-admin user rm --uid=<uid> [--purge-keys] [--purge-data]For example:
[root@master-zone]# radosgw-admin user rm --uid=johndoe --purge-data
To remove the subuser only, specify subuser rm and the subuser name.
[root@master-zone]# radosgw-admin subuser rm --subuser=johndoe:swift --purge-keysOptions include:
-
Purge Data: The
--purge-dataoption purges all data associated to the UID. -
Purge Keys: The
--purge-keysoption purges all keys associated to the UID.
3.6.8. Remove a Subuser
When you remove a sub user, you are removing access to the Swift interface. The user will remain in the system. The Ceph Object Gateway To remove the subuser, specify subuser rm and the subuser ID.
[root@master-zone]# radosgw-admin subuser rm --subuser=johndoe:testOptions include:
-
Purge Keys: The
--purge-keysoption purges all keys associated to the UID.
3.6.9. Rename a User
To change a name of a user, use the radosgw-admin user rename command. The time that this command takes depends on the number of buckets and objects that the user has. If the number is large, Red Hat recommends to use the command in the Screen utility provided by the screen package.
Prerequisites
- A working Ceph cluster
-
rootorsudoaccess - Installed Ceph Object Gateway
Procedure
Rename a user:
radosgw-admin user rename --uid=current-user-name --new-uid=new-user-nameFor example, to rename
user1touser2:# radosgw-admin user rename --uid=user1 --new-uid=user2 { "user_id": "user2", "display_name": "user 2", "email": "", "suspended": 0, "max_buckets": 1000, "auid": 0, "subusers": [], "keys": [ { "user": "user2", "access_key": "59EKHI6AI9F8WOW8JQZJ", "secret_key": "XH0uY3rKCUcuL73X0ftjXbZqUbk0cavD11rD8MsA" } ], "swift_keys": [], "caps": [], "op_mask": "read, write, delete", "default_placement": "", "placement_tags": [], "bucket_quota": { "enabled": false, "check_on_raw": false, "max_size": -1, "max_size_kb": 0, "max_objects": -1 }, "user_quota": { "enabled": false, "check_on_raw": false, "max_size": -1, "max_size_kb": 0, "max_objects": -1 }, "temp_url_keys": [], "type": "rgw" }If a user is inside a tenant, use the tenant$user-name format:
radosgw-admin user rename --uid=tenant$current-user-name --new-uid=tenant$new-user-nameFor example, to rename
user1touser2inside atesttenant:# radosgw-admin user rename --uid=test$user1 --new-uid=test$user2 1000 objects processed in tvtester1. Next marker 80_tVtester1_99 2000 objects processed in tvtester1. Next marker 64_tVtester1_44 3000 objects processed in tvtester1. Next marker 48_tVtester1_28 4000 objects processed in tvtester1. Next marker 2_tVtester1_74 5000 objects processed in tvtester1. Next marker 14_tVtester1_53 6000 objects processed in tvtester1. Next marker 87_tVtester1_61 7000 objects processed in tvtester1. Next marker 6_tVtester1_57 8000 objects processed in tvtester1. Next marker 52_tVtester1_91 9000 objects processed in tvtester1. Next marker 34_tVtester1_74 9900 objects processed in tvtester1. Next marker 9_tVtester1_95 1000 objects processed in tvtester2. Next marker 82_tVtester2_93 2000 objects processed in tvtester2. Next marker 64_tVtester2_9 3000 objects processed in tvtester2. Next marker 48_tVtester2_22 4000 objects processed in tvtester2. Next marker 32_tVtester2_42 5000 objects processed in tvtester2. Next marker 16_tVtester2_36 6000 objects processed in tvtester2. Next marker 89_tVtester2_46 7000 objects processed in tvtester2. Next marker 70_tVtester2_78 8000 objects processed in tvtester2. Next marker 51_tVtester2_41 9000 objects processed in tvtester2. Next marker 33_tVtester2_32 9900 objects processed in tvtester2. Next marker 9_tVtester2_83 { "user_id": "test$user2", "display_name": "User 2", "email": "", "suspended": 0, "max_buckets": 1000, "auid": 0, "subusers": [], "keys": [ { "user": "test$user2", "access_key": "user2", "secret_key": "123456789" } ], "swift_keys": [], "caps": [], "op_mask": "read, write, delete", "default_placement": "", "placement_tags": [], "bucket_quota": { "enabled": false, "check_on_raw": false, "max_size": -1, "max_size_kb": 0, "max_objects": -1 }, "user_quota": { "enabled": false, "check_on_raw": false, "max_size": -1, "max_size_kb": 0, "max_objects": -1 }, "temp_url_keys": [], "type": "rgw" }Verify that the user has been renamed successfully:
radosgw-admin user info --uid=new-user-nameFor example:
# radosgw-admin user info --uid=user2If a user is inside a tenant, use the tenant$user-name format:
radosgw-admin user info --uid=tenant$new-user-name# radosgw-admin user info --uid=test$user2
Additional Resources
-
The
screen(1)manual page
3.6.10. Create a Key
To create a key for a user, you must specify key create. For a user, specify the user ID and the s3 key type. To create a key for subuser, you must specify the subuser ID and the swift keytype. For example:
[root@master-zone]# radosgw-admin key create --subuser=johndoe:swift --key-type=swift --gen-secret{ "user_id": "johndoe",
"rados_uid": 0,
"display_name": "John Doe",
"email": "john@example.com",
"suspended": 0,
"subusers": [
{ "id": "johndoe:swift",
"permissions": "full-control"}],
"keys": [
{ "user": "johndoe",
"access_key": "QFAMEDSJP5DEKJO0DDXY",
"secret_key": "iaSFLDVvDdQt6lkNzHyW4fPLZugBAI1g17LO0+87"}],
"swift_keys": [
{ "user": "johndoe:swift",
"secret_key": "E9T2rUZNu2gxUjcwUBO8n\/Ev4KX6\/GprEuH4qhu1"}]}3.6.11. Add and Remove Access Keys
Users and subusers must have access keys to use the S3 and Swift interfaces. When you create a user or subuser and you do not specify an access key and secret, the key and secret get generated automatically. You may create a key and either specify or generate the access key and/or secret. You may also remove an access key and secret. Options include:
-
--secret=<key>specifies a secret key (e.g,. manually generated). -
--gen-access-keygenerates random access key (for S3 user by default). -
--gen-secretgenerates a random secret key. -
--key-type=<type>specifies a key type. The options are: swift, s3
To add a key, specify the user:
[root@master-zone]# radosgw-admin key create --uid=johndoe --key-type=s3 --gen-access-key --gen-secretYou may also specify a key and a secret.
To remove an access key, you need to specify the user and the key:
Find the access key for the specific user:
[root@master-zone]# radosgw-admin user info --uid=<testid>The access key is the
"access_key"value in the output, for example:$ radosgw-admin user info --uid=johndoe { "user_id": "johndoe", ... "keys": [ { "user": "johndoe", "access_key": "0555b35654ad1656d804", "secret_key": "h7GhxuBLTrlhVUyxSPUKUV8r/2EI4ngqJxD7iBdBYLhwluN30JaT3Q==" } ], ... }Specify the user ID and the access key from the previous step to remove the access key:
[root@master-zone]# radosgw-admin key rm --uid=<user_id> --access-key <access_key>For example:
[root@master-zone]# radosgw-admin key rm --uid=johndoe --access-key 0555b35654ad1656d804
3.6.12. Add and Remove Administrative Capabilities
The Ceph Storage Cluster provides an administrative API that enables users to execute administrative functions via the REST API. By default, users DO NOT have access to this API. To enable a user to exercise administrative functionality, provide the user with administrative capabilities.
To add administrative capabilities to a user:
[root@master-zone]# radosgw-admin caps add --uid={uid} --caps={caps}You can add read, write or all capabilities to users, buckets, metadata and usage (utilization). For example:
--caps="[users|buckets|metadata|usage|zone]=[*|read|write|read, write]"For example:
[root@master-zone]# radosgw-admin caps add --uid=johndoe --caps="users=*"To remove administrative capabilities from a user:
[root@master-zone]# radosgw-admin caps rm --uid=johndoe --caps={caps}3.7. Quota Management
The Ceph Object Gateway enables you to set quotas on users and buckets owned by users. Quotas include the maximum number of objects in a bucket and the maximum storage size in megabytes.
-
Bucket: The
--bucketoption allows you to specify a quota for buckets the user owns. -
Maximum Objects: The
--max-objectssetting allows you to specify the maximum number of objects. A negative value disables this setting. -
Maximum Size: The
--max-sizeoption allows you to specify a quota for the maximum number of bytes. A negative value disables this setting. -
Quota Scope: The
--quota-scopeoption sets the scope for the quota. The options arebucketanduser. Bucket quotas apply to buckets a user owns. User quotas apply to a user.
Buckets with a large number of objects can cause serious performance issues. The recommended maximum number of objects in a one bucket is 100,000. To increase this number, configure bucket index sharding. See Section 3.4, “Configuring Bucket Sharding” for details.
3.7.1. Set User Quotas
Before you enable a quota, you must first set the quota parameters. For example:
[root@master-zone]# radosgw-admin quota set --quota-scope=user --uid=<uid> [--max-objects=<num objects>] [--max-size=<max size>]For example:
radosgw-admin quota set --quota-scope=user --uid=johndoe --max-objects=1024 --max-size=1024A negative value for num objects and / or max size means that the specific quota attribute check is disabled.
3.7.2. Enable and Disable User Quotas
Once you set a user quota, you may enable it. For example:
[root@master-zone]# radosgw-admin quota enable --quota-scope=user --uid=<uid>You may disable an enabled user quota. For example:
[root@master-zone]# radosgw-admin quota disable --quota-scope=user --uid=<uid>3.7.3. Set Bucket Quotas
Bucket quotas apply to the buckets owned by the specified uid. They are independent of the user.
[root@master-zone]# radosgw-admin quota set --uid=<uid> --quota-scope=bucket [--max-objects=<num objects>] [--max-size=<max size]A negative value for num objects and / or max size means that the specific quota attribute check is disabled.
3.7.4. Enable and Disable Bucket Quotas
Once you set a bucket quota, you can enable it. For example:
[root@master-zone]# radosgw-admin quota enable --quota-scope=bucket --uid=<uid>To disable an enabled bucket quota:
[root@master-zone]# radosgw-admin quota disable --quota-scope=bucket --uid=<uid>3.7.5. Get Quota Settings
You may access each user’s quota settings via the user information API. To read user quota setting information with the CLI interface, execute the following:
# radosgw-admin user info --uid=<uid>3.7.6. Update Quota Stats
Quota stats get updated asynchronously. You can update quota statistics for all users and all buckets manually to retrieve the latest quota stats.
[root@master-zone]# radosgw-admin user stats --uid=<uid> --sync-stats3.7.7. Get User Quota Usage Stats
To see how much of the quota a user has consumed, execute the following:
# radosgw-admin user stats --uid=<uid>
You should execute radosgw-admin user stats with the --sync-stats option to receive the latest data.
3.7.8. Quota Cache
Quota statistics are cached for each Ceph Gateway instance. If there are multiple instances, then the cache can keep quotas from being perfectly enforced, as each instance will have a different view of the quotas. The options that control this are rgw bucket quota ttl, rgw user quota bucket sync interval and rgw user quota sync interval. The higher these values are, the more efficient quota operations are, but the more out-of-sync multiple instances will be. The lower these values are, the closer to perfect enforcement multiple instances will achieve. If all three are 0, then quota caching is effectively disabled, and multiple instances will have perfect quota enforcement. See Chapter 4, Configuration Reference for more details on these options.
3.7.9. Reading and Writing Global Quotas
You can read and write quota settings in a zonegroup map. To get a zonegroup map:
[root@master-zone]# radosgw-admin global quota get
The global quota settings can be manipulated with the global quota counterparts of the quota set, quota enable, and quota disable commands, for example:
[root@master-zone]# radosgw-admin global quota set --quota-scope bucket --max-objects 1024
[root@master-zone]# radosgw-admin global quota enable --quota-scope bucket
In a multi-site configuration, where there is a realm and period present, changes to the global quotas must be committed using period update --commit. If there is no period present, the Ceph Object Gateways must be restarted for the changes to take effect.
3.8. Usage
The Ceph Object Gateway logs usage for each user. You can track user usage within date ranges too.
Options include:
-
Start Date: The
--start-dateoption allows you to filter usage stats from a particular start date (format:yyyy-mm-dd[HH:MM:SS]). -
End Date: The
--end-dateoption allows you to filter usage up to a particular date (format:yyyy-mm-dd[HH:MM:SS]). -
Log Entries: The
--show-log-entriesoption allows you to specify whether or not to include log entries with the usage stats (options:true|false).
You may specify time with minutes and seconds, but it is stored with 1 hour resolution.
3.8.1. Show Usage
To show usage statistics, specify the usage show. To show usage for a particular user, you must specify a user ID. You may also specify a start date, end date, and whether or not to show log entries.
# radosgw-admin usage show \
                --uid=johndoe --start-date=2012-03-01 \
                --end-date=2012-04-01
You may also show a summary of usage information for all users by omitting a user ID.
# radosgw-admin usage show --show-log-entries=false3.8.2. Trim Usage
With heavy use, usage logs can begin to take up storage space. You can trim usage logs for all users and for specific users. You may also specify date ranges for trim operations.
[root@master-zone]# radosgw-admin usage trim --start-date=2010-01-01 \
                    --end-date=2010-12-31

[root@master-zone]# radosgw-admin usage trim --uid=johndoe
[root@master-zone]# radosgw-admin usage trim --uid=johndoe --end-date=2013-12-31
3.8.3. Finding Orphan Objects
Normally, in a healthy storage cluster you should not have any leaking objects, but in some cases leaky objects can occur. For example, if the RADOS Gateway goes down in the middle of an operation, this may cause some RADOS objects to become orphans. Also, unknown bugs may cause these orphan objects to occur. The radosgw-admin command provides you a tool to search for these orphan objects and clean them up. With the --pool option, you can specify which pool to scan for leaky RADOS objects. With the --num-shards option, you may specify the number of shards to use for keeping temporary scan data.
Create a new log pool:
Example
# rados mkpool .logSearch for orphan objects:
Syntax
# radosgw-admin orphans find --pool=<data_pool> --job-id=<job_name> [--num-shards=<num_shards>] [--orphan-stale-secs=<seconds>]Example
# radosgw-admin orphans find --pool=.rgw.buckets --job-id=abc123Clean up the search data:
Syntax
# radosgw-admin orphans finish --job-id=<job_name>Example
# radosgw-admin orphans finish --job-id=abc123
3.9. Bucket management
As a storage administrator, when using the Ceph Object Gateway you can manage buckets by moving them between users and renaming them.
3.9.1. Moving buckets
The radosgw-admin bucket utility provides the ability to move buckets between users. To do so, link the bucket to a new user and change the ownership of the bucket to the new user.
You can move buckets:
3.9.1.1. Prerequisites
- A running Red Hat Ceph Storage cluster
- Ceph Object Gateway is installed
- A bucket
- Various tenanted and non-tenanted users
3.9.1.2. Moving buckets between non-tenanted users
The radosgw-admin bucket chown command provides the ability to change the ownership of buckets and all objects they contain from one user to another. To do so, unlink a bucket from the current user, link it to a new user, and change the ownership of the bucket to the new user.
Procedure
Link the bucket to a new user:
radosgw-admin bucket link --uid=user --bucket=bucketReplace:
- user with the user name of the user to link the bucket to
- bucket with the name of the bucket
For example, to link the
databucket to the user nameduser2:# radosgw-admin bucket link --uid=user2 --bucket=dataVerify that the bucket has been linked to
user2successfully:# radosgw-admin bucket list --uid=user2 [ "data" ]Change the ownership of the bucket to the new user:
radosgw-admin bucket chown --uid=user --bucket=bucketReplace:
- user with the user name of the user to change the bucket ownership to
- bucket with the name of the bucket
For example, to change the ownership of the
databucket touser2:# radosgw-admin bucket chown --uid=user2 --bucket=dataVerify that the ownership of the
databucket has been successfully changed by checking theownerline in the output of the following command:# radosgw-admin bucket list --bucket=data
3.9.1.3. Moving buckets between tenanted users
You can move buckets between one tenanted user to another.
Procedure
Link the bucket to a new user:
radosgw-admin bucket link --bucket=current-tenant/bucket --uid=new-tenant$userReplace:
- current-tenant with the name of the tenant the bucket is
- bucket with the name of the bucket to link
- new-tenant with the name of the tenant where the new user is
- user with the user name of the new user
For example, to link the
databucket from thetesttenant to the user nameduser2in thetest2tenant:# radosgw-admin bucket link --bucket=test/data --uid=test2$user2Verify that the bucket has been linked to
user2successfully:# radosgw-admin bucket list --uid=test$user2 [ "data" ]Change the ownership of the bucket to the new user:
radosgw-admin bucket chown --bucket=new-tenant/bucket --uid=new-tenant$userReplace:
- bucket with the name of the bucket to link
- new-tenant with the name of the tenant where the new user is
- user with the user name of the new user
For example, to change the ownership of the
databucket to theuser2inside thetest2tenant:# radosgw-admin bucket chown --bucket='test2/data' --uid='test$tuser2'Verify that the ownership of the
databucket has been successfully changed by checking theownerline in the output of the following command:# radosgw-admin bucket list --bucket=test2/data
3.9.1.4. Moving buckets from non-tenanted users to tenanted users
You can move buckets from a non-tenanted user to a tenanted user.
Procedure
Optional. If you do not already have multiple tenants, you can create them by enabling
rgw_keystone_implicit_tenantsand accessing the Ceph Object Gateway from an external tenant:Open and edit the Ceph configuration file, by default
/etc/ceph/ceph.conf. Enable thergw_keystone_implicit_tenantsoption:rgw_keystone_implicit_tenants = trueAccess the Ceph Object Gateway from an eternal tenant using either the
s3cmdorswiftcommand:# swift listOr use
s3cmd:# s3cmd lsThe first access from an external tenant creates an equivalent Ceph Object Gateway user.
Move a bucket to a tenanted user:
radosgw-admin bucket link --bucket=/bucket --uid='tenant$user'Replace:
- bucket with the name of the bucket
- tenant with the name of the tenant where the new user is
- user with the user name of the new user
For example, to move the
databucket to thetenanted-userinside thetesttenant:# radosgw-admin bucket link --bucket=/data --uid='test$tenanted-user'Verify that the
databucket has been linked totenanted-usersuccessfully:# radosgw-admin bucket list --uid='test$tenanted-user' [ "data" ]Change the ownership of the bucket to the new user:
radosgw-admin bucket chown --bucket='tenant/bucket name' --uid='tenant$user'Replace:
- bucket with the name of the bucket
- tenant with the name of the tenant where the new user is
- user with the user name of the new user
For example, to change the ownership of the
databucket totenanted-userthat is inside thetesttenant:# radosgw-admin bucket chown --bucket='test/data' --uid='test$tenanted-user'Verify that the ownership of the
databucket has been successfully changed by checking theownerline in the output of the following command:# radosgw-admin bucket list --bucket=test/data
3.9.2. Renaming buckets
You can rename buckets.
Prerequisites
- A running Red Hat Ceph Storage cluster.
- Ceph Object Gateway is installed.
- A bucket.
Procedure
List the buckets:
radosgw-admin bucket listFor example, note a bucket from the output:
# radosgw-admin bucket list
[
    "34150b2e9174475db8e191c188e920f6/swcontainer",
    "s3bucket1",
    "34150b2e9174475db8e191c188e920f6/swimpfalse",
    "c278edd68cfb4705bb3e07837c7ad1a8/ec2container",
    "c278edd68cfb4705bb3e07837c7ad1a8/demoten1",
    "c278edd68cfb4705bb3e07837c7ad1a8/demo-ct",
    "c278edd68cfb4705bb3e07837c7ad1a8/demopostup",
    "34150b2e9174475db8e191c188e920f6/postimpfalse",
    "c278edd68cfb4705bb3e07837c7ad1a8/demoten2",
    "c278edd68cfb4705bb3e07837c7ad1a8/postupsw"
]
Rename the bucket:
radosgw-admin bucket link --bucket=original-name --bucket-new-name=new-name --uid=user-IDFor example, to rename the
s3bucket1bucket tos3newb:# radosgw-admin bucket link --bucket=s3bucket1 --bucket-new-name=s3newb --uid=testuserIf the bucket is inside a tenant, specify the tenant as well:
radosgw-admin bucket link --bucket=tenant/original-name --bucket-new-name=new-name --uid=tenant$user-IDFor example:
# radosgw-admin bucket link --bucket=test/s3bucket1 --bucket-new-name=s3newb --uid=test$testuserVerify the bucket was renamed:
radosgw-admin bucket listFor example, a bucket named
s3newbexists now:# radosgw-admin bucket list [ "34150b2e9174475db8e191c188e920f6/swcontainer", "34150b2e9174475db8e191c188e920f6/swimpfalse", "c278edd68cfb4705bb3e07837c7ad1a8/ec2container", "s3newb", "c278edd68cfb4705bb3e07837c7ad1a8/demoten1", "c278edd68cfb4705bb3e07837c7ad1a8/demo-ct", "c278edd68cfb4705bb3e07837c7ad1a8/demopostup", "34150b2e9174475db8e191c188e920f6/postimpfalse", "c278edd68cfb4705bb3e07837c7ad1a8/demoten2", "c278edd68cfb4705bb3e07837c7ad1a8/postupsw" ]
3.9.3. Additional Resources
- See Using Keystone to Authenticate Ceph Object Gateway Users for more information.
- See the Developer Guide for more information.
3.10. Optimize the Ceph Object Gateway’s garbage collection
When new data objects are written into the storage cluster, the Ceph Object Gateway immediately allocates the storage for these new objects. After you delete or overwrite data objects in the storage cluster, the Ceph Object Gateway deletes those objects from the bucket index. Some time afterward, the Ceph Object Gateway then purges the space that was used to store the objects in the storage cluster. The process of purging the deleted object data from the storage cluster is known as Garbage Collection, or GC.
Garbage collection operations typically run in the background. You can configure these operations to either execute continuously, or to run only during intervals of low activity and light workloads. By default, the Ceph Object Gateway conducts GC operations continuously. Because GC operations are a normal part of Ceph Object Gateway operations, deleted objects that are eligible for garbage collection exist most of the time.
3.10.1. Viewing the garbage collection queue
Before you purge deleted and overwritten objects from the storage cluster, use radosgw-admin to view the objects awaiting garbage collection.
Prerequisites
- A running Red Hat Ceph Storage cluster.
- Root-level access to the Ceph Object Gateway.
Procedure
To view the queue of objects awaiting garbage collection:
Example
[root@rgw ~] radosgw-admin gc list
To list all entries in the queue, including unexpired entries, use the --include-all option.
3.10.2. Adjusting garbage collection for delete-heavy workloads
Some workloads may temporarily or permanently outpace the rate of garbage collection (GC) activity. This is especially true of delete-heavy workloads, where many objects get stored for a short period of time and are then deleted. For these types of workloads, consider increasing the priority of garbage collection operations relative to other operations. Contact Red Hat Support with any additional questions about Ceph Object Gateway Garbage Collection.
Prerequisites
- A running Red Hat Ceph Storage cluster.
- Root-level access to all nodes in the storage cluster.
Procedure
-
Open
/etc/ceph/ceph.conffor editing. Set the value of
rgw_gc_max_concurrent_ioto 20, and the value ofrgw_gc_max_trim_chunkto 64.rgw_gc_max_concurrent_io = 20 rgw_gc_max_trim_chunk = 64- Save and close the file.
- Restart the Ceph Object Gateway to allow the changed settings to take effect.
- Monitor the storage cluster during GC activity to verify that the increased values do not adversely affect performance.
Never modify the value for the rgw_gc_max_objs option in a running cluster. You should only change this value before deploying the RGW nodes.
Additional Resources
Chapter 4. Configuration Reference
The following settings may be added to the Ceph configuration file, that is, usually ceph.conf, under the [client.rgw.<instance_name>] section. The settings may contain default values. If you do not specify each setting in the Ceph configuration file, the default value will be set automatically.
Configuration variables set under the [client.rgw.<instance_name>] section will not apply to rgw or radosgw-admin commands without an instance_name specified in the command. Therefore, variables meant to be applied to all Ceph Object Gateway instances or all radosgw-admin commands can be put into the [global] or the [client] section to avoid specifying instance_name.
4.1. General Settings
| Name | Description | Type | Default |
|---|---|---|---|
|
| Sets the location of the data files for Ceph Object Gateway. | String |
|
|
| Enables the specified APIs. | String |
|
|
| Whether the Ceph Object Gateway cache is enabled. | Boolean |
|
|
| The number of entries in the Ceph Object Gateway cache. | Integer |
|
|
|
The socket path for the domain socket. | String | N/A |
|
| The host for the Ceph Object Gateway instance. Can be an IP address or a hostname. | String |
|
|
| Port the instance listens for requests. If not specified, Ceph Object Gateway runs external FastCGI. | String | None |
|
|
The DNS name of the served domain. See also the | String | None |
|
|
The alternative value for the | String | None |
|
|
The alternative value for the | String | None |
|
|
Enable | Boolean |
|
|
|
The remote address parameter. For example, the HTTP field containing the remote address, or the | String |
|
|
| The timeout in seconds for open threads. | Integer |
|
|
|
The time | Integer |
|
|
|
The size of the thread pool. This variable is overwritten by | Integer |
|
|
|
The number of notification objects used for cache synchronization between different | Integer |
|
|
| The number of seconds before Ceph Object Gateway gives up on initialization. | Integer |
|
|
| The path and location of the MIME types. Used for Swift auto-detection of object types. | String |
|
|
| The maximum number of objects that may be handled by garbage collection in one garbage collection processing cycle. | Integer |
|
|
| The minimum wait time before the object may be removed and handled by garbage collection processing. | Integer |
|
|
| The maximum time between the beginning of two consecutive garbage collection processing cycles. | Integer |
|
|
| The cycle time for garbage collection processing. | Integer |
|
|
|
The alternate success status response for | Integer |
|
|
|
Whether | Boolean |
|
|
| The size of an object stripe for Ceph Object Gateway objects. | Integer |
|
|
| Add new set of attributes that could be set on an object. These extra attributes can be set through HTTP header fields when putting the objects. If set, these attributes will return as HTTP fields when doing GET/HEAD on the object. | String | None. For example: "content_foo, content_bar" |
|
| Number of seconds to wait for a process before exiting unconditionally. | Integer |
|
|
| The window size in bytes for a single object request. | Integer |
|
|
| The maximum request size of a single get operation sent to the Ceph Storage Cluster. | Integer |
|
|
| Enables relaxed S3 bucket names rules for zone group buckets. | Boolean |
|
|
| The maximum number of buckets to retrieve in a single operation when listing user buckets. | Integer |
|
|
|
The number of shards for the bucket index object. A value of
This variable should be set in the | Integer |
|
|
| The maximum number of shards for keeping inter-zonegroup copy progress information. | Integer |
|
|
|
The minimum time between opstate updates on a single upload. | Integer |
|
|
|
The timeout in milliseconds for certain | Integer |
|
|
| Enables output of object progress during long copy operations. | Boolean |
|
|
| The minimum bytes between copy progress output. | Integer |
|
|
| The entry point for an admin request URL. | String |
|
|
| Enable compatability handling of FCGI requests with both CONTENT_LENGTH AND HTTP_CONTENT_LENGTH set. | Boolean |
|
|
| The default maximum number of objects per bucket. This value is set on new users if no other quota is specified. It has no effect on existing users.
This variable should be set in the | Integer |
|
|
| The amount of time in seconds cached quota information is trusted. After this timeout, the quota information will be re-fetched from the cluster. | Integer |
|
|
| The amount of time in seconds bucket quota information is accumulated before syncing to the cluster. During this time, other RGW instances will not see the changes in bucket quota stats from operations on this instance. | Integer |
|
|
| The amount of time in seconds user quota information is accumulated before syncing to the cluster. During this time, other RGW instances will not see the changes in user quota stats from operations on this instance. | Integer |
|
4.2. About Pools
Ceph zones map to a series of Ceph Storage Cluster pools.
Manually Created Pools vs. Generated Pools
If the user key for the Ceph Object Gateway contains write capabilities, the gateway has the ability to create pools automatically. This is convenient for getting started. However, the Ceph Object Storage Cluster uses the placement group default values unless they were set in the Ceph configuration file. Additionally, Ceph will use the default CRUSH hierarchy. These settings are NOT ideal for production systems.
To set up production systems, see the Ceph Object Gateway for Production guide for Red Hat Ceph Storage 3. For storage strategies, see the Developing Storage Strategies section in the Ceph Object Gateway for Production guide.
The default pools for the Ceph Object Gateway’s default zone include:
-
.rgw.root -
.default.rgw.control -
.default.rgw.gc -
.default.log -
.default.intent-log -
.default.usage -
.default.users -
.default.users.email -
.default.users.swift -
.default.users.uid
The Ceph Object Gateway creates pools on a per zone basis. If you create the pools manually, prepend the zone name. The system pools store objects related to system control, garbage collection, logging, user information, usage, etc. By convention, these pool names have the zone name prepended to the pool name.
-
.<zone-name>.rgw.control: The control pool. -
.<zone-name>.rgw.gc: The garbage collection pool, which contains hash buckets of objects to be deleted. -
.<zone-name>.log: The log pool contains logs of all bucket/container and object actions such as create, read, update and delete. -
.<zone-name>.intent-log: The intent log pool contains a copy of an object update request to facilitate undo/redo if a request fails. -
.<zone-name>.users.uid: The user ID pool contains a map of unique user IDs. -
.<zone-name>.users.keys: The keys pool contains access keys and secret keys for each user ID. -
.<zone-name>.users.email: The email pool contains email addresses associated to a user ID. -
.<zone-name>.users.swift: The Swift pool contains the Swift subuser information for a user ID. -
.<zone-name>.usage: The usage pool contains a usage log on a per user basis.
Ceph Object Gateways store data for the bucket index (index_pool) and bucket data (data_pool) in placement pools. These may overlap; that is, you may use the same pool for the index and the data. The index pool for default placement is {zone-name}.rgw.buckets.index and for the data pool for default placement is {zone-name}.rgw.buckets.
| Name | Description | Type | Default |
|---|---|---|---|
|
| The pool for storing all zone group-specific information. | String |
|
|
| The pool for storing zone-specific information. | String |
|
4.3. Swift Settings
| Name | Description | Type | Default |
|---|---|---|---|
|
| Enforces the Swift Access Control List (ACL) settings. | Boolean |
|
|
| The time in seconds for expiring a Swift token. | Integer |
|
|
| The URL for the Ceph Object Gateway Swift API. | String | None |
|
|
The URL prefix for the Swift API (e.g., |
| N/A |
|
| Default URL for verifying v1 auth tokens (if not using internal Swift auth). | String | None |
|
| The entry point for a Swift auth URL. | String |
|
4.4. Logging Settings
| Name | Description | Type | Default |
|---|---|---|---|
|
| Enables Ceph Object Gateway to log a request for a non-existent bucket. | Boolean |
|
|
| The logging format for an object name. See manpage date for details about format specifiers. | Date |
|
|
|
Whether a logged object name includes a UTC time. If | Boolean |
|
|
| The maximum number of shards for usage logging. | Integer |
|
|
| The maximum number of shards used for a single user’s usage logging. | Integer |
|
|
| Enable logging for each successful Ceph Object Gateway operation. | Boolean |
|
|
| Enable the usage log. | Boolean |
|
|
| Whether the operations log should be written to the Ceph Storage Cluster backend. | Boolean |
|
|
| The Unix domain socket for writing operations logs. | String | None |
|
| The maximum data backlog data size for operations logs written to a Unix domain socket. | Integer |
|
|
| The number of dirty merged entries in the usage log before flushing synchronously. | Integer | 1024 |
|
|
Flush pending usage log data every | Integer |
|
|
| The logging format for the intent log object name. See manpage date for details about format specifiers. | Date |
|
|
|
Whether the intent log object name includes a UTC time. If | Boolean |
|
|
| The data log entries window in seconds. | Integer |
|
|
| The number of in-memory entries to hold for the data changes log. | Integer |
|
|
| The number of shards (objects) on which to keep the data changes log. | Integer |
|
|
| The object name prefix for the data log. | String |
|
|
| The object name prefix for the replica log. | String |
|
|
| The maximum number of shards for the metadata log. | Integer |
|
4.5. Keystone Settings
| Name | Description | Type | Default |
|---|---|---|---|
|
| The URL for the Keystone server. | String | None |
|
| The Keystone admin token (shared secret). | String | None |
|
| The roles requires to serve requests. | String |
|
|
| The maximum number of entries in each Keystone token cache. | Integer |
|
|
| The number of seconds between token revocation checks. | Integer |
|
4.6. LDAP Settings
| Name | Description | Type | Example |
|---|---|---|---|
|
| A space-separated list of LDAP servers in URI format. | String |
|
|
| The LDAP search domain name, also known as base domain. | String |
|
|
| The gateway will bind with this LDAP entry (user match). | String |
|
|
|
A file containing credentials for | String |
|
|
| LDAP attribute containing Ceph object gateway user names (to form binddns). | String |
|
Chapter 5. Multisite
A single zone configuration typically consists of one zone group containing one zone and one or more ceph-radosgw instances where you may load-balance gateway client requests between the instances. In a single zone configuration, typically multiple gateway instances point to a single Ceph storage cluster. However, Red Hat supports several multi-site configuration options for the Ceph Object Gateway:
-
Multi-zone: A more advanced configuration consists of one zone group and multiple zones, each zone with one or more
ceph-radosgwinstances. Each zone is backed by its own Ceph Storage Cluster. Multiple zones in a zone group provides disaster recovery for the zone group should one of the zones experience a significant failure. In Red Hat Ceph Storage 2 and later, each zone is active and may receive write operations. In addition to disaster recovery, multiple active zones may also serve as a foundation for content delivery networks. To configure multiple zones without replication, see Section 5.11, “Configuring Multiple Zones without Replication”. - Multi-zone-group: Formerly called 'regions', Ceph Object Gateway can also support multiple zone groups, each zone group with one or more zones. Objects stored to zone groups within the same realm share a global namespace, ensuring unique object IDs across zone groups and zones.
- Multiple Realms: In Red Hat Ceph Storage 2 and later, the Ceph Object Gateway supports the notion of realms, which can be a single zone group or multiple zone groups and a globally unique namespace for the realm. Multiple realms provides the ability to support numerous configurations and namespaces.
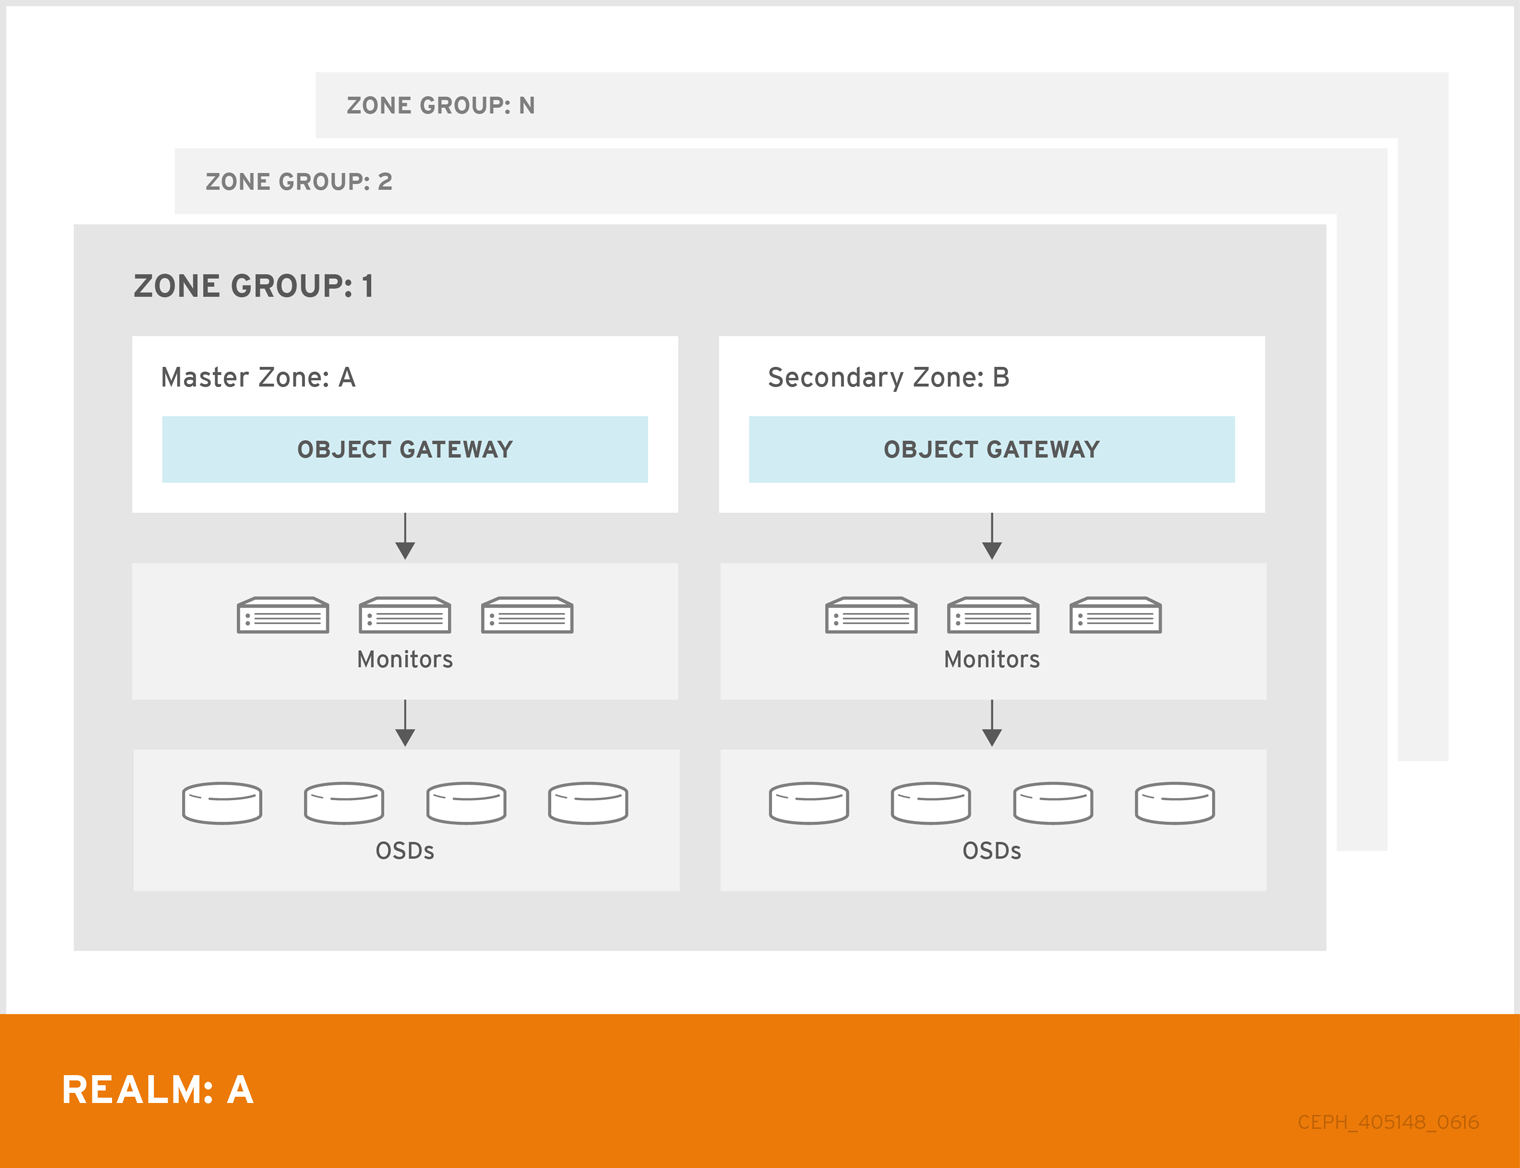
5.1. Requirements and Assumptions
A multi-site configuration requires at least two Ceph storage clusters, and at least two Ceph object gateway instances, one for each Ceph storage cluster.
This guide assumes at least two Ceph storage clusters in geographically separate locations; however, the configuration can work on the same physical site. This guide also assumes four Ceph object gateway servers named rgw1, rgw2, rgw3 and rgw4 respectively.
A multi-site configuration requires a master zone group and a master zone. Additionally, each zone group requires a master zone. Zone groups may have one or more secondary or non-master zones.
The master zone within the master zone group of a realm is responsible for storing the master copy of the realm’s metadata, including users, quotas and buckets (created by the radosgw-admin CLI). This metadata gets synchronized to secondary zones and secondary zone groups automatically. Metadata operations executed with the radosgw-admin CLI MUST be executed on a host within the master zone of the master zone group in order to ensure that they get synchronized to the secondary zone groups and zones. Currently, it is possible to execute metadata operations on secondary zones and zone groups, but it is NOT recommended because they WILL NOT be syncronized, leading to fragmented metadata.
In the following examples, the rgw1 host will serve as the master zone of the master zone group; the rgw2 host will serve as the secondary zone of the master zone group; the rgw3 host will serve as the master zone of the secondary zone group; and the rgw4 host will serve as the secondary zone of the secondary zone group.
5.2. Pools
Red Hat recommends using the Ceph Placement Group’s per Pool Calculator to calculate a suitable number of placement groups for the pools the ceph-radosgw daemon will create. Set the calculated values as defaults in your Ceph configuration file. For example:
osd pool default pg num = 50
osd pool default pgp num = 50Make this change to the Ceph configuration file on your storage cluster; then, either make a runtime change to the configuration so that it will use those defaults when the gateway instance creates the pools.
Alternatively, create the pools manually. See Pools chapter in the Storage Strategies guide for details on creating pools.
Pool names particular to a zone follow the naming convention {zone-name}.pool-name. For example, a zone named us-east will have the following pools:
-
.rgw.root -
us-east.rgw.control -
us-east.rgw.data.root -
us-east.rgw.gc -
us-east.rgw.log -
us-east.rgw.intent-log -
us-east.rgw.usage -
us-east.rgw.users.keys -
us-east.rgw.users.email -
us-east.rgw.users.swift -
us-east.rgw.users.uid -
us-east.rgw.buckets.index -
us-east.rgw.buckets.data
5.3. Installing an Object Gateway
To install the Ceph Object Gateway, see the Red Hat Ceph Storage 3 Installation Guide for Red Hat Enterprise Linux.
All Ceph Object Gateway nodes must follow the tasks listed in the Requirements for Installing Red Hat Ceph Storage section.
Ansible can install and configure Ceph Object Gateways for use with a Ceph Storage cluster. For multi-site and multi-site group deployments, you should have an Ansible configuration for each zone.
If you install Ceph Object Gateway with Ansible, the Ansible playbooks will handle the initial configuration for you. To install the Ceph Object Gateway with Ansible, add your hosts to the /etc/ansible/hosts file. Add the Ceph Object Gateway hosts under an [rgws] section to identify their roles to Ansible. If your hosts have sequential naming, you may use a range. For example:
[rgws]
<rgw-host-name-1>
<rgw-host-name-2>
<rgw-host-name[3..10]>
Once you have added the hosts, you may rerun your Ansible playbooks.
Ansible will ensure your gateway is running, so the default zones and pools may need to be deleted manually. This guide provides those steps.
When updating an existing multi-site cluster with an asynchronous update, follow the installation instruction for the update. Then, restart the gateway instances.
There is no required order for restarting the instances. Red Hat recommends restarting the master zone group and master zone first, followed by the secondary zone groups and secondary zones.
5.4. Establish a Multisite Realm
All gateways in a cluster have a configuration. In a multi-site realm, these gateways may reside in different zone groups and zones. Yet, they must work together within the realm. In a multi-site realm, all gateway instances MUST retrieve their configuration from a ceph-radosgw daemon on a host within the master zone group and master zone.
Consequently, the first step in creating a multi-site cluster involves establishing the realm, master zone group and master zone. To configure your gateways in a multi-site configuration, choose a ceph-radosgw instance that will hold the realm configuration, master zone group and master zone.
5.4.1. Create a Realm
A realm contains the multi-site configuration of zone groups and zones and also serves to enforce a globally unique namespace within the realm.
Create a new realm for the multi-site configuration by opening a command line interface on a host identified to serve in the master zone group and zone. Then, execute the following:
[root@master-zone]# radosgw-admin realm create --rgw-realm={realm-name} [--default]For example:
[root@master-zone]# radosgw-admin realm create --rgw-realm=movies --default
If the cluster will have a single realm, specify the --default flag. If --default is specified, radosgw-admin will use this realm by default. If --default is not specified, adding zone-groups and zones requires specifying either the --rgw-realm flag or the --realm-id flag to identify the realm when adding zone groups and zones.
After creating the realm, radosgw-admin will echo back the realm configuration. For example:
{
    "id": "0956b174-fe14-4f97-8b50-bb7ec5e1cf62",
    "name": "movies",
    "current_period": "1950b710-3e63-4c41-a19e-46a715000980",
    "epoch": 1
}Ceph generates a unique ID for the realm, which allows the renaming of a realm if the need arises.
5.4.2. Create a Master Zone Group
A realm must have at least one zone group, which will serve as the master zone group for the realm.
Create a new master zone group for the multi-site configuration by opening a command line interface on a host identified to serve in the master zone group and zone. Then, execute the following:
[root@master-zone]# radosgw-admin zonegroup create --rgw-zonegroup={name} --endpoints={url} [--rgw-realm={realm-name}|--realm-id={realm-id}] --master --defaultFor example:
[root@master-zone]# radosgw-admin zonegroup create --rgw-zonegroup=us --endpoints=http://rgw1:80 --rgw-realm=movies --master --default
If the realm will only have a single zone group, specify the --default flag. If --default is specified, radosgw-admin will use this zone group by default when adding new zones. If --default is not specified, adding zones will require either the --rgw-zonegroup flag or the --zonegroup-id flag to identify the zone group when adding or modifying zones.
After creating the master zone group, radosgw-admin will echo back the zone group configuration. For example:
{
    "id": "f1a233f5-c354-4107-b36c-df66126475a6",
    "name": "us",
    "api_name": "us",
    "is_master": "true",
    "endpoints": [
        "http:\/\/rgw1:80"
    ],
    "hostnames": [],
    "hostnames_s3webzone": [],
    "master_zone": "",
    "zones": [],
    "placement_targets": [],
    "default_placement": "",
    "realm_id": "0956b174-fe14-4f97-8b50-bb7ec5e1cf62"
}
5.4.3. Create a Master Zone
Zones must be created on a Ceph Object Gateway node that will be within the zone.
Create a master zone for the multi-site configuration by opening a command line interface on a host identified to serve in the master zone group and zone. Then, execute the following:
[root@master-zone]# radosgw-admin zone create
                            --rgw-zonegroup={zone-group-name} \
                            --rgw-zone={zone-name} \
                            --master --default \
                            --endpoints={http://fqdn:port}[,{http://fqdn:port}]
For example:
[root@master-zone]# radosgw-admin zone create --rgw-zonegroup=us \
                            --rgw-zone=us-east \
                            --master --default \
                            --endpoints={http://fqdn:port}[,{http://fqdn:port}]
The --access-key and --secret aren’t specified. These settings will be added to the zone once the user is created in the next section.
The following steps assume a multi-site configuration using newly installed systems that aren’t storing data yet. DO NOT DELETE the default zone and its pools if you are already using it to store data, or the data will be deleted and unrecoverable.
5.4.4. Delete the Default Zone Group and Zone
Delete the default zone if it exists. Make sure to remove it from the default zone group first.
[root@master-zone]# radosgw-admin zonegroup remove --rgw-zonegroup=default --rgw-zone=default
[root@master-zone]# radosgw-admin period update --commit
[root@master-zone]# radosgw-admin zone delete --rgw-zone=default
[root@master-zone]# radosgw-admin period update --commit
[root@master-zone]# radosgw-admin zonegroup delete --rgw-zonegroup=default
[root@master-zone]# radosgw-admin period update --commit
Finally, delete the default pools in your Ceph storage cluster if they exist.
The following step assumes a multi-site configuration using newly installed systems that aren’t currently storing data. DO NOT DELETE the default zone group if you are already using it to store data.
In order to access old data in the default zone and zonegroup, use --rgw-zone default and --rgw-zonegroup default in radosgw-admin commands
# rados rmpool default.rgw.control default.rgw.control --yes-i-really-really-mean-it
# rados rmpool default.rgw.data.root default.rgw.data.root --yes-i-really-really-mean-it
# rados rmpool default.rgw.gc default.rgw.gc --yes-i-really-really-mean-it
# rados rmpool default.rgw.log default.rgw.log --yes-i-really-really-mean-it
# rados rmpool default.rgw.users.uid default.rgw.users.uid --yes-i-really-really-mean-it
5.4.5. Create a System User
The ceph-radosgw daemons must authenticate before pulling realm and period information. In the master zone, create a system user to facilitate authentication between daemons.
[root@master-zone]# radosgw-admin user create --uid="{user-name}" --display-name="{Display Name}" --systemFor example:
[root@master-zone]# radosgw-admin user create --uid="synchronization-user" --display-name="Synchronization User" --system
Make a note of the access_key and secret_key, as the secondary zones will require them to authenticate with the master zone.
Finally, add the system user to the master zone.
[root@master-zone]# radosgw-admin zone modify --rgw-zone=us-east --access-key={access-key} --secret={secret}
[root@master-zone]# radosgw-admin period update --commit
5.4.6. Update the Period
After updating the master zone configuration, update the period.
# radosgw-admin period update --commitUpdating the period changes the epoch, and ensures that other zones will receive the updated configuration.
5.4.7. Update the Ceph Configuration File
Update the Ceph configuration file on master zone hosts by adding the rgw_zone configuration option and the name of the master zone to the instance entry.
[client.rgw.{instance-name}]
...
rgw_zone={zone-name}
For example:
[client.rgw.rgw1]
host = rgw1
rgw frontends = "civetweb port=80"
rgw_zone=us-east
5.4.8. Start the Gateway
On the object gateway host, start and enable the Ceph Object Gateway service:
# systemctl start ceph-radosgw@rgw.`hostname -s`
# systemctl enable ceph-radosgw@rgw.`hostname -s`
If the service is already running, restart the service instead of starting and enabling it:
# systemctl restart ceph-radosgw@rgw.`hostname -s`5.5. Establish a Secondary Zone
Zones within a zone group replicate all data to ensure that each zone has the same data. When creating the secondary zone, execute ALL of the radosgw-admin zone operations on a host identified to serve the secondary zone.
To add a additional zones, follow the same procedures as for adding the secondary zone. Use a different zone name.
You must execute metadata operations, such as user creation and quotas, on a host within the master zone of the master zonegroup. The master zone and the secondary zone can receive bucket operations from the RESTful APIs, but the secondary zone redirects bucket operations to the master zone. If the master zone is down, bucket operations will fail. If you create a bucket using the radosgw-admin CLI, you must execute it on a host within the master zone of the master zone group, or the buckets will not synchronize to other zone groups and zones.
5.5.1. Pull the Realm
Using the URL path, access key and secret of the master zone in the master zone group, pull the realm to the host. To pull a non-default realm, specify the realm using the --rgw-realm or --realm-id configuration options.
# radosgw-admin realm pull --url={url-to-master-zone-gateway} --access-key={access-key} --secret={secret}If this realm is the default realm or the only realm, make the realm the default realm.
# radosgw-admin realm default --rgw-realm={realm-name}5.5.2. Pull the Period
Using the URL path, access key and secret of the master zone in the master zone group, pull the period to the host. To pull a period from a non-default realm, specify the realm using the --rgw-realm or --realm-id configuration options.
# radosgw-admin period pull --url={url-to-master-zone-gateway} --access-key={access-key} --secret={secret}Pulling the period retrieves the latest version of the zone group and zone configurations for the realm.
5.5.3. Create a Secondary Zone
Zones must be created on a Ceph Object Gateway node that will be within the zone.
Create a secondary zone for the multi-site configuration by opening a command line interface on a host identified to serve the secondary zone. Specify the zone group ID, the new zone name and an endpoint for the zone. DO NOT use the --master or --default flags. In Red Hat Ceph Storage 2, all zones run in an active-active configuration by default; that is, a gateway client may write data to any zone and the zone will replicate the data to all other zones within the zone group. If the secondary zone should not accept write operations, specify the --read-only flag to create an active-passive configuration between the master zone and the secondary zone. Additionally, provide the access_key and secret_key of the generated system user stored in the master zone of the master zone group. Execute the following:
[root@second-zone]# radosgw-admin zone create \
                           --rgw-zonegroup={zone-group-name}\
                           --rgw-zone={zone-name} --endpoints={url} \
                           --access-key={system-key} --secret={secret}\
                           --endpoints=http://{fqdn}:80 \
                           [--read-only]
For example:
[root@second-zone]# radosgw-admin zone create --rgw-zonegroup=us \
                            --rgw-zone=us-west \
                            --access-key={system-key} --secret={secret} \
                            --endpoints=http://rgw2:80
The following steps assume a multi-site configuration using newly installed systems that aren’t storing data. DO NOT DELETE the default zone and its pools if you are already using them to store data, or the data will be lost and unrecoverable.
Delete the default zone if needed.
[root@second-zone]# radosgw-admin zone delete --rgw-zone=defaultFinally, delete the default pools in your Ceph storage cluster if needed.
# rados rmpool default.rgw.control default.rgw.control --yes-i-really-really-mean-it
# rados rmpool default.rgw.data.root default.rgw.data.root --yes-i-really-really-mean-it
# rados rmpool default.rgw.gc default.rgw.gc --yes-i-really-really-mean-it
# rados rmpool default.rgw.log default.rgw.log --yes-i-really-really-mean-it
# rados rmpool default.rgw.users.uid default.rgw.users.uid --yes-i-really-really-mean-it
5.5.4. Update the Period
After updating the master zone configuration, update the period.
# radosgw-admin period update --commitUpdating the period changes the epoch, and ensures that other zones will receive the updated configuration.
5.5.5. Update the Ceph Configuration File
Update the Ceph configuration file on the secondary zone hosts by adding the rgw_zone configuration option and the name of the secondary zone to the instance entry.
[client.rgw.{instance-name}]
...
rgw_zone={zone-name}
For example:
[client.rgw.rgw2]
host = rgw2
rgw frontends = "civetweb port=80"
rgw_zone=us-west
5.5.6. Start the Gateway
On the object gateway host, start and enable the Ceph Object Gateway service:
# systemctl start ceph-radosgw@rgw.`hostname -s`
# systemctl enable ceph-radosgw@rgw.`hostname -s`
If the service is already running, restart the service instead of starting and enabling it:
# systemctl restart ceph-radosgw@rgw.`hostname -s`5.6. Failover and Disaster Recovery
If the master zone should fail, failover to the secondary zone for disaster recovery.
Make the secondary zone the master and default zone. For example:
# radosgw-admin zone modify --rgw-zone={zone-name} --master --defaultBy default, Ceph Object Gateway will run in an active-active configuration. If the cluster was configured to run in an active-passive configuration, the secondary zone is a read-only zone. Remove the
--read-onlystatus to allow the zone to receive write operations. For example:# radosgw-admin zone modify --rgw-zone={zone-name} --master --defaultUpdate the period to make the changes take effect.
# radosgw-admin period update --commitFinally, restart the Ceph Object Gateway.
# systemctl restart ceph-radosgw@rgw.`hostname -s`
If the former master zone recovers, revert the operation.
From the recovered zone, pull the realm from the current master zone.
# radosgw-admin realm pull --url={url-to-master-zone-gateway} \
                            --access-key={access-key} --secret={secret}
Make the recovered zone the master and default zone.
# radosgw-admin zone modify --rgw-zone={zone-name} --master --defaultUpdate the period to make the changes take effect.
# radosgw-admin period update --commitThen, restart the Ceph Object Gateway in the recovered zone.
# systemctl restart ceph-radosgw@rgw.`hostname -s`If the secondary zone needs to be a read-only configuration, update the secondary zone.
# radosgw-admin zone modify --rgw-zone={zone-name} --read-onlyUpdate the period to make the changes take effect.
# radosgw-admin period update --commitFinally, restart the Ceph Object Gateway in the secondary zone.
# systemctl restart ceph-radosgw@rgw.`hostname -s`
5.7. Migrating a Single Site System to Multi-Site
To migrate from a single site system with a default zone group and zone to a multi site system, use the following steps:
Create a realm. Replace
<name>with the realm name.[root@master-zone]# radosgw-admin realm create --rgw-realm=<name> --defaultRename the default zone and zonegroup. Replace
<name>with the zonegroup or zone name.[root@master-zone]# radosgw-admin zonegroup rename --rgw-zonegroup default --zonegroup-new-name=<name> [root@master-zone]# radosgw-admin zone rename --rgw-zone default --zone-new-name us-east-1 --rgw-zonegroup=<name>Configure the master zonegroup. Replace
<name>with the realm or zonegroup name. Replace<fqdn>with the fully qualified domain name(s) in the zonegroup.[root@master-zone]# radosgw-admin zonegroup modify --rgw-realm=<name> --rgw-zonegroup=<name> --endpoints http://<fqdn>:80 --master --defaultConfigure the master zone. Replace
<name>with the realm, zonegroup or zone name. Replace<fqdn>with the fully qualified domain name(s) in the zonegroup.[root@master-zone]# radosgw-admin zone modify --rgw-realm=<name> --rgw-zonegroup=<name> \ --rgw-zone=<name> --endpoints http://<fqdn>:80 \ --access-key=<access-key> --secret=<secret-key> \ --master --defaultCreate a system user. Replace
<user-id>with the username. Replace<display-name>with a display name. It may contain spaces.[root@master-zone]# radosgw-admin user create --uid=<user-id> \ --display-name="<display-name>" \ --access-key=<access-key> --secret=<secret-key> \ --systemCommit the updated configuration.
# radosgw-admin period update --commitFinally, restart the Ceph Object Gateway.
# systemctl restart ceph-radosgw@rgw.`hostname -s`
After completing this procedure, proceed to Establish a Secondary Zone to create a secondary zone in the master zone group.
5.8. Multisite Command Line Usage
5.8.1. Realms
A realm represents a globally unique namespace consisting of one or more zonegroups containing one or more zones, and zones containing buckets, which in turn contain objects. A realm enables the Ceph Object Gateway to support multiple namespaces and their configuration on the same hardware.
A realm contains the notion of periods. Each period represents the state of the zone group and zone configuration in time. Each time you make a change to a zonegroup or zone, update the period and commit it.
By default, the Ceph Object Gateway version 2 does not create a realm for backward compatibility with version 1.3 and earlier releases. However, as a best practice, Red Hat recommends creating realms for new clusters.
5.8.1.1. Creating a Realm
To create a realm, execute realm create and specify the realm name. If the realm is the default, specify --default.
[root@master-zone]# radosgw-admin realm create --rgw-realm={realm-name} [--default]For example:
[root@master-zone]# radosgw-admin realm create --rgw-realm=movies --default
By specifying --default, the realm will be called implicitly with each radosgw-admin call unless --rgw-realm and the realm name are explicitly provided.
5.8.1.2. Making a Realm the Default
One realm in the list of realms should be the default realm. There may be only one default realm. If there is only one realm and it wasn’t specified as the default realm when it was created, make it the default realm. Alternatively, to change which realm is the default, execute:
[root@master-zone]# radosgw-admin realm default --rgw-realm=movies
When the realm is default, the command line assumes --rgw-realm=<realm-name> as an argument.
5.8.1.3. Deleting a Realm
To delete a realm, execute realm delete and specify the realm name.
[root@master-zone]# radosgw-admin realm delete --rgw-realm={realm-name}For example:
[root@master-zone]# radosgw-admin realm delete --rgw-realm=movies5.8.1.4. Getting a Realm
To get a realm, execute realm get and specify the realm name.
# radosgw-admin realm get --rgw-realm=<name>For example:
# radosgw-admin realm get --rgw-realm=movies [> filename.json]The CLI will echo a JSON object with the realm properties.
{
    "id": "0a68d52e-a19c-4e8e-b012-a8f831cb3ebc",
    "name": "movies",
    "current_period": "b0c5bbef-4337-4edd-8184-5aeab2ec413b",
    "epoch": 1
}
Use > and an output file name to output the JSON object to a file.
5.8.1.5. Setting a Realm
To set a realm, execute realm set, specify the realm name, and --infile= with an input file name.
[root@master-zone]# radosgw-admin realm set --rgw-realm=<name> --infile=<infilename>For example:
[root@master-zone]# radosgw-admin realm set --rgw-realm=movies --infile=filename.json5.8.1.6. Listing Realms
To list realms, execute realm list.
# radosgw-admin realm list5.8.1.7. Listing Realm Periods
To list realm periods, execute realm list-periods.
# radosgw-admin realm list-periods5.8.1.8. Pulling a Realm
To pull a realm from the node containing the master zone group and master zone to a node containing a secondary zone group or zone, execute realm pull on the node that will receive the realm configuration.
# radosgw-admin realm pull --url={url-to-master-zone-gateway} --access-key={access-key} --secret={secret}5.8.1.9. Renaming a Realm
A realm is not part of the period. Consequently, renaming the realm is only applied locally, and will not get pulled with realm pull. When renaming a realm with multiple zones, run the command on each zone. To rename a realm, execute the following:
# radosgw-admin realm rename --rgw-realm=<current-name> --realm-new-name=<new-realm-name>
Do NOT use realm set to change the name parameter. That changes the internal name only. Specifying --rgw-realm would still use the old realm name.
5.8.2. Zone Groups
The Ceph Object Gateway supports multi-site deployments and a global namespace by using the notion of zone groups. Formerly called a region in Red Hat Ceph Storage 1.3, a zone group defines the geographic location of one or more Ceph Object Gateway instances within one or more zones.
Configuring zone groups differs from typical configuration procedures, because not all of the settings end up in a Ceph configuration file. You can list zone groups, get a zone group configuration, and set a zone group configuration.
The radosgw-admin zonegroup operations MAY be performed on any host within the realm, because the step of updating the period propagates the changes throughout the cluster. However, radosgw-admin zone operations MUST be performed on a host within the zone.
5.8.2.1. Creating a Zone Group
Creating a zone group consists of specifying the zone group name. Creating a zone assumes it will live in the default realm unless --rgw-realm=<realm-name> is specified. If the zonegroup is the default zonegroup, specify the --default flag. If the zonegroup is the master zonegroup, specify the --master flag. For example:
# radosgw-admin zonegroup create --rgw-zonegroup=<name> [--rgw-realm=<name>][--master] [--default]
Use zonegroup modify --rgw-zonegroup=<zonegroup-name> to modify an existing zone group’s settings.
5.8.2.2. Making a Zone Group the Default
One zonegroup in the list of zonegroups should be the default zonegroup. There may be only one default zonegroup. If there is only one zonegroup and it wasn’t specified as the default zonegroup when it was created, make it the default zonegroup. Alternatively, to change which zonegroup is the default, execute:
# radosgw-admin zonegroup default --rgw-zonegroup=comedy
When the zonegroup is default, the command line assumes --rgw-zonegroup=<zonegroup-name> as an argument.
Then, update the period:
# radosgw-admin period update --commit5.8.2.3. Adding a Zone to a Zone Group
To add a zone to a zonegroup, you MUST execute this step on a host that will be in the zone. To add a zone to a zonegroup, execute the following:
# radosgw-admin zonegroup add --rgw-zonegroup=<name> --rgw-zone=<name>Then, update the period:
# radosgw-admin period update --commit5.8.2.4. Removing a Zone from a Zone Group
To remove a zone from a zonegroup, execute the following:
# radosgw-admin zonegroup remove --rgw-zonegroup=<name> --rgw-zone=<name>Then, update the period:
# radosgw-admin period update --commit5.8.2.5. Renaming a Zone Group
To rename a zonegroup, execute the following:
# radosgw-admin zonegroup rename --rgw-zonegroup=<name> --zonegroup-new-name=<name>Then, update the period:
# radosgw-admin period update --commit5.8.2.6. Deleting a Zone Group
To delete a zonegroup, execute the following:
# radosgw-admin zonegroup delete --rgw-zonegroup=<name>Then, update the period:
# radosgw-admin period update --commit5.8.2.7. Listing Zone Groups
A Ceph cluster contains a list of zone groups. To list the zone groups, execute:
# radosgw-admin zonegroup list
The radosgw-admin returns a JSON formatted list of zone groups.
{
    "default_info": "90b28698-e7c3-462c-a42d-4aa780d24eda",
    "zonegroups": [
        "us"
    ]
}
5.8.2.8. Getting a Zone Group
To view the configuration of a zone group, execute:
# radosgw-admin zonegroup get [--rgw-zonegroup=<zonegroup>]The zone group configuration looks like this:
{
    "id": "90b28698-e7c3-462c-a42d-4aa780d24eda",
    "name": "us",
    "api_name": "us",
    "is_master": "true",
    "endpoints": [
        "http:\/\/rgw1:80"
    ],
    "hostnames": [],
    "hostnames_s3website": [],
    "master_zone": "9248cab2-afe7-43d8-a661-a40bf316665e",
    "zones": [
        {
            "id": "9248cab2-afe7-43d8-a661-a40bf316665e",
            "name": "us-east",
            "endpoints": [
                "http:\/\/rgw1"
            ],
            "log_meta": "true",
            "log_data": "true",
            "bucket_index_max_shards": 0,
            "read_only": "false"
        },
        {
            "id": "d1024e59-7d28-49d1-8222-af101965a939",
            "name": "us-west",
            "endpoints": [
                "http:\/\/rgw2:80"
            ],
            "log_meta": "false",
            "log_data": "true",
            "bucket_index_max_shards": 0,
            "read_only": "false"
        }
    ],
    "placement_targets": [
        {
            "name": "default-placement",
            "tags": []
        }
    ],
    "default_placement": "default-placement",
    "realm_id": "ae031368-8715-4e27-9a99-0c9468852cfe"
}
5.8.2.9. Setting a Zone Group
Defining a zone group consists of creating a JSON object, specifying at least the required settings:
-
name: The name of the zone group. Required. -
api_name: The API name for the zone group. Optional. -
is_master: Determines if the zone group is the master zone group. Required. note: You can only have one master zone group. -
endpoints: A list of all the endpoints in the zone group. For example, you may use multiple domain names to refer to the same zone group. Remember to escape the forward slashes (\/). You may also specify a port (fqdn:port) for each endpoint. Optional. -
hostnames: A list of all the hostnames in the zone group. For example, you may use multiple domain names to refer to the same zone group. Optional. Thergw dns namesetting will automatically be included in this list. You should restart the gateway daemon(s) after changing this setting. -
master_zone: The master zone for the zone group. Optional. Uses the default zone if not specified. note: You can only have one master zone per zone group. -
zones: A list of all zones within the zone group. Each zone has a name (required), a list of endpoints (optional), and whether or not the gateway will log metadata and data operations (false by default). -
placement_targets: A list of placement targets (optional). Each placement target contains a name (required) for the placement target and a list of tags (optional) so that only users with the tag can use the placement target (i.e., the user’splacement_tagsfield in the user info). -
default_placement: The default placement target for the object index and object data. Set todefault-placementby default. You may also set a per-user default placement in the user info for each user.
To set a zone group, create a JSON object consisting of the required fields, save the object to a file (e.g., zonegroup.json); then, execute the following command:
# radosgw-admin zonegroup set --infile zonegroup.json
Where zonegroup.json is the JSON file you created.
The default zone group is_master setting is true by default. If you create a new zone group and want to make it the master zone group, you must either set the default zone group is_master setting to false, or delete the default zone group.
Finally, update the period:
# radosgw-admin period update --commit5.8.2.10. Setting a Zone Group Map
Setting a zone group map consists of creating a JSON object consisting of one or more zone groups, and setting the master_zonegroup for the cluster. Each zone group in the zone group map consists of a key/value pair, where the key setting is equivalent to the name setting for an individual zone group configuration, and the val is a JSON object consisting of an individual zone group configuration.
You may only have one zone group with is_master equal to true, and it must be specified as the master_zonegroup at the end of the zone group map. The following JSON object is an example of a default zone group map.
{
    "zonegroups": [
        {
            "key": "90b28698-e7c3-462c-a42d-4aa780d24eda",
            "val": {
                "id": "90b28698-e7c3-462c-a42d-4aa780d24eda",
                "name": "us",
                "api_name": "us",
                "is_master": "true",
                "endpoints": [
                    "http:\/\/rgw1:80"
                ],
                "hostnames": [],
                "hostnames_s3website": [],
                "master_zone": "9248cab2-afe7-43d8-a661-a40bf316665e",
                "zones": [
                    {
                        "id": "9248cab2-afe7-43d8-a661-a40bf316665e",
                        "name": "us-east",
                        "endpoints": [
                            "http:\/\/rgw1"
                        ],
                        "log_meta": "true",
                        "log_data": "true",
                        "bucket_index_max_shards": 0,
                        "read_only": "false"
                    },
                    {
                        "id": "d1024e59-7d28-49d1-8222-af101965a939",
                        "name": "us-west",
                        "endpoints": [
                            "http:\/\/rgw2:80"
                        ],
                        "log_meta": "false",
                        "log_data": "true",
                        "bucket_index_max_shards": 0,
                        "read_only": "false"
                    }
                ],
                "placement_targets": [
                    {
                        "name": "default-placement",
                        "tags": []
                    }
                ],
                "default_placement": "default-placement",
                "realm_id": "ae031368-8715-4e27-9a99-0c9468852cfe"
            }
        }
    ],
    "master_zonegroup": "90b28698-e7c3-462c-a42d-4aa780d24eda",
    "bucket_quota": {
        "enabled": false,
        "max_size_kb": -1,
        "max_objects": -1
    },
    "user_quota": {
        "enabled": false,
        "max_size_kb": -1,
        "max_objects": -1
    }
}
To set a zone group map, execute the following:
# radosgw-admin zonegroup-map set --infile zonegroupmap.json
Where zonegroupmap.json is the JSON file you created. Ensure that you have zones created for the ones specified in the zone group map. Finally, update the period.
# radosgw-admin period update --commit5.8.3. Zones
Ceph Object Gateway supports the notion of zones. A zone defines a logical group consisting of one or more Ceph Object Gateway instances.
Configuring zones differs from typical configuration procedures, because not all of the settings end up in a Ceph configuration file. You can list zones, get a zone configuration and set a zone configuration.
All radosgw-admin zone operations MUST be executed on a host that operates or will operate within the zone.
5.8.3.1. Creating a Zone
To create a zone, specify a zone name. If it is a master zone, specify the --master option. Only one zone in a zone group may be a master zone. To add the zone to a zonegroup, specify the --rgw-zonegroup option with the zonegroup name.
Zones must be created on a Ceph Object Gateway node that will be within the zone.
[root@zone] radosgw-admin zone create --rgw-zone=<name> \
                [--zonegroup=<zonegroup-name]\
                [--endpoints=<endpoint:port>[,<endpoint:port>] \
                [--master] [--default] \
                --access-key $SYSTEM_ACCESS_KEY --secret $SYSTEM_SECRET_KEY
Then, update the period:
# radosgw-admin period update --commit5.8.3.2. Deleting a Zone
To delete zone, first remove it from the zonegroup.
# radosgw-admin zonegroup remove --zonegroup=<name>\
                                 --zone=<name>
Then, update the period:
# radosgw-admin period update --commitNext, delete the zone.
This procedure MUST be executed on a host within the zone.
Execute the following:
[root@zone]# radosgw-admin zone delete --rgw-zone<name>Finally, update the period:
# radosgw-admin period update --commitDo not delete a zone without removing it from a zone group first. Otherwise, updating the period will fail.
If the pools for the deleted zone will not be used anywhere else, consider deleting the pools. Replace <del-zone> in the example below with the deleted zone’s name.
Once Ceph deletes the zone pools, it deletes all of the data within them in an unrecoverable manner. Only delete the zone pools if Ceph clients no longer need the pool contents.
In a multi-realm cluster, deleting the .rgw.root pool along with the zone pools will remove ALL the realm information for the cluster. Ensure that .rgw.root does not contain other active realms before deleting the .rgw.root pool.
# rados rmpool <del-zone>.rgw.control <del-zone>.rgw.control --yes-i-really-really-mean-it
# rados rmpool <del-zone>.rgw.data.root <del-zone>.rgw.data.root --yes-i-really-really-mean-it
# rados rmpool <del-zone>.rgw.gc <del-zone>.rgw.gc --yes-i-really-really-mean-it
# rados rmpool <del-zone>.rgw.log <del-zone>.rgw.log --yes-i-really-really-mean-it
# rados rmpool <del-zone>.rgw.users.uid <del-zone>.rgw.users.uid --yes-i-really-really-mean-it
5.8.3.3. Modifying a Zone
To modify a zone, specify the zone name and the parameters you wish to modify.
Zones should be modified on a Ceph Object Gateway node that will be within the zone.
[root@zone]# radosgw-admin zone modify [options]
--access-key=<key>--secret/--secret-key=<key>--master--default--endpoints=<list>
Then, update the period:
# radosgw-admin period update --commit5.8.3.4. Listing Zones
As root, to list the zones in a cluster, execute:
# radosgw-admin zone list5.8.3.5. Getting a Zone
As root, to get the configuration of a zone, execute:
# radosgw-admin zone get [--rgw-zone=<zone>]
The default zone looks like this:
{ "domain_root": ".rgw",
  "control_pool": ".rgw.control",
  "gc_pool": ".rgw.gc",
  "log_pool": ".log",
  "intent_log_pool": ".intent-log",
  "usage_log_pool": ".usage",
  "user_keys_pool": ".users",
  "user_email_pool": ".users.email",
  "user_swift_pool": ".users.swift",
  "user_uid_pool": ".users.uid",
  "system_key": { "access_key": "", "secret_key": ""},
  "placement_pools": [
      {  "key": "default-placement",
         "val": { "index_pool": ".rgw.buckets.index",
                  "data_pool": ".rgw.buckets"}
      }
    ]
  }
5.8.3.6. Setting a Zone
Configuring a zone involves specifying a series of Ceph Object Gateway pools. For consistency, we recommend using a pool prefix that is the same as the zone name. See Pools_ for details of configuring pools.
Zones should be set on a Ceph Object Gateway node that will be within the zone.
To set a zone, create a JSON object consisting of the pools, save the object to a file (e.g., zone.json); then, execute the following command, replacing {zone-name} with the name of the zone:
[root@zone]# radosgw-admin zone set --rgw-zone={zone-name} --infile zone.json
Where zone.json is the JSON file you created.
Then, as root, update the period:
# radosgw-admin period update --commit5.8.3.7. Renaming a Zone
To rename a zone, specify the zone name and the new zone name. Execute the following on a host within the zone:
[root@zone]# radosgw-admin zone rename --rgw-zone=<name> --zone-new-name=<name>Then, update the period:
# radosgw-admin period update --commit5.9. Zone Group and Zone Configuration Settings
When configuring a default zone group and zone, the pool name includes the zone name. For example:
-
default.rgw.control
To change the defaults, include the following settings in your Ceph configuration file under each [client.rgw.{instance-name}] instance.
| Name | Description | Type | Default |
|---|---|---|---|
|
| The name of the zone for the gateway instance. | String | None |
|
| The name of the zone group for the gateway instance. | String | None |
|
| The root pool for the zone group. | String |
|
|
| The root pool for the zone. | String |
|
|
| The OID for storing the default zone group. We do not recommend changing this setting. | String |
|
|
| The maximum number of shards for keeping inter-zone group synchronization progress. | Integer |
|
5.10. Manually Resharding Buckets with Multisite
{storage-product} DOES NOT support dynamic bucket resharding for multisite clusters. You can use the following procedure to manually reshard buckets in a multisite cluster.
- NOTE
- Manual resharding is a very expensive process, especially for huge buckets that warrant manual resharding. Every secondary zone deletes all of the objects, and then resynchronizes them from the master zone.
Prerequisites
- Stop all Object Gateway instances.
Procedure
On a node within the master zone of the master zone group, execute the following command:
# radosgw-admin bucket sync disable --bucket=BUCKET_NAMEWait for
sync statuson all zones to report that data synchronization is up to date.-
Stop ALL
ceph-radosgwdaemons in ALL zones. On a node within the master zone of the master zone group, reshard the bucket. For example:
# radosgw-admin bucket reshard --bucket=BUCKET_NAME --num-shards=NEW_SHARDS_NUMBEROn EACH secondary zone, execute the following:
# radosgw-admin bucket rm --purge-objects --bucket=BUCKET_NAME-
Restart ALL
ceph-radosgwdaemons in ALL zones. On a node within the master zone of the master zone group, execute the following command:
# radosgw-admin bucket sync enable --bucket=BUCKET_NAME
The metadata synchronization process will fetch the updated bucket entry point and bucket instance metadata. The data synchronization process will perform a full synchronization.
Additional resources
5.11. Configuring Multiple Zones without Replication
You can configure multiple zones that will not replicate each other. For example you can create a dedicated zone for each team in a company.
Prerequisites
- A Ceph Storage Cluster with the Ceph Object Gateway installed.
Procedure
Create a realm.
radosgw-admin realm create --rgw-realm=realm-name [--default]For example:
[root@master-zone]# radosgw-admin realm create --rgw-realm=movies --default
{
    "id": "0956b174-fe14-4f97-8b50-bb7ec5e1cf62",
    "name": "movies",
    "current_period": "1950b710-3e63-4c41-a19e-46a715000980",
    "epoch": 1
}
Create a zone group.
radosgw-admin zonegroup create --rgw-zonegroup=zone-group-name --endpoints=url [--rgw-realm=realm-name|--realm-id=realm-id] --master --defaultFor example:
[root@master-zone]# radosgw-admin zonegroup create --rgw-zonegroup=us --endpoints=http://rgw1:80 --rgw-realm=movies --master --default
{
    "id": "f1a233f5-c354-4107-b36c-df66126475a6",
    "name": "us",
    "api_name": "us",
    "is_master": "true",
    "endpoints": [
        "http:\/\/rgw1:80"
    ],
    "hostnames": [],
    "hostnames_s3webzone": [],
    "master_zone": "",
    "zones": [],
    "placement_targets": [],
    "default_placement": "",
    "realm_id": "0956b174-fe14-4f97-8b50-bb7ec5e1cf62"
}
Create one or more zones depending on your use case.
radosgw-admin zone create
             --rgw-zonegroup=zone-group-name \
             --rgw-zone=zone-name \
             --master --default \
             --endpoints=http://fqdn:port[,http://fqdn:port]
For example:
[root@master-zone]# radosgw-admin zone create --rgw-zonegroup=us \
                                              --rgw-zone=us-east \
                                              --master --default \
                                              --endpoints=http://rgw1:80
Get the JSON file with the configuration of the zone group.
radosgw-admin zonegroup get --rgw-zonegroup=zone-group-name > zonegroup.jsonFor example:
[root@master-zone]# radosgw-admin zonegroup get --rgw-zonegroup=us > zonegroup.jsonIn the file, set the
log_meta,log_data, andsync_from_allparameters tofalse.{ "id": "72f3a886-4c70-420b-bc39-7687f072997d", "name": "default", "api_name": "", "is_master": "true", "endpoints": [], "hostnames": [], "hostnames_s3website": [], "master_zone": "a5e44ecd-7aae-4e39-b743-3a709acb60c5", "zones": [ { "id": "975558e0-44d8-4866-a435-96d3e71041db", "name": "testzone", "endpoints": [], "log_meta": "false", "log_data": "false", "bucket_index_max_shards": 0, "read_only": "false", "tier_type": "", "sync_from_all": "false", "sync_from": [] }, { "id": "a5e44ecd-7aae-4e39-b743-3a709acb60c5", "name": "default", "endpoints": [], "log_meta": "false", "log_data": "false", "bucket_index_max_shards": 0, "read_only": "false", "tier_type": "", "sync_from_all": "false", "sync_from": [] } ], "placement_targets": [ { "name": "default-placement", "tags": [] } ], "default_placement": "default-placement", "realm_id": "2d988e7d-917e-46e7-bb18-79350f6a5155" }Use the updated JSON file.
radosgw-admin zonegroup set --rgw-zonegroup=zone-group-name --infile=zonegroup.jsonFor example:
[root@master-zone]# radosgw-admin zonegroup set --rgw-zonegroup=us --infile=zonegroup.jsonUpdate the period.
# radosgw-admin period update --commit
Additional Resources
5.12. Configuring multiple realms in the same storage cluster
This section discusses how to configure multiple realms in the same storage cluster. This is a more advanced use case for Multisite. Configuring multiple realms in the same storage cluster enables you to use a local realm to handle local RGW client traffic, as well as a replicated realm for data that will be replicated to a secondary site.
Red Hat recommends that each realm has its own Ceph Object Gateway.
Prerequisites
- The access key and secret key for each data center in the storage cluster.
- Two running {storage-product} data centers in a storage cluster.
- Each data center has its own local realm. They share a realm that replicates on both sites.
- On the Ceph Object Gateway nodes, perform the tasks listed in the Requirements for Installing Red Hat Ceph Storage found in the {storage-product} Installation Guide.
- For each Ceph Object Gateway node, perform steps 1-7 in the Installing the Ceph Object Gateway section of the {storage-product} Installation Guide.
Procedure
Create the synchronization user:
Syntax
radosgw-admin user create --uid="SYNCHRONIZATION_USER" --display-name="Synchronization User" --systemCreate one local realm on the first data center in the storage cluster:
Syntax
radosgw-admin realm create --rgw-realm=REALM_NAME --defaultExample
[user@rgw1]$ radosgw-admin realm create --rgw-realm=ldc1 --defaultCreate one local master zonegroup on the first data center:
Syntax
radosgw-admin zonegroup create --rgw-zonegroup=ZONE_GROUP_NAME --endpoints=http://RGW_NODE_NAME:80 --rgw-realm=REALM_NAME --master --defaultExample
[user@rgw1]$ radosgw-admin zonegroup create --rgw-zonegroup=ldc1zg --endpoints=http://rgw1:80 --rgw-realm=ldc1 --master --defaultCreate one local zone on the first data center:
Syntax
radosgw-admin zone create --rgw-zonegroup=ZONE_GROUP_NAME --rgw-zone=ZONE_NAME --master --default --endpoints=HTTP_FQDN[,HTTP_FQDN]Example
[user@rgw1]$ radosgw-admin zone create --rgw-zonegroup=ldc1zg --rgw-zone=ldc1z --master --default --endpoints=http://rgw.example.comCommit the period:
Example
[user@rgw1]$ radosgw-admin period update --commitUpdate
ceph.confwith thergw_realm,rgw_zonegroupandrgw_zonenames:Syntax
rgw_realm = REALM_NAME
rgw_zonegroup = ZONE_GROUP_NAME
rgw_zone = ZONE_NAME
Example
rgw_realm = ldc1
rgw_zonegroup = ldc1zg
rgw_zone = ldc1z
Restart the RGW daemon:
Syntax
systemctl restart ceph-radosgw@rgw.$(hostname -s).rgw0.serviceCreate one local realm on the second data center in the storage cluster:
Syntax
radosgw-admin realm create --rgw-realm=REALM_NAME --defaultExample
[user@rgw2]$ radosgw-admin realm create --rgw-realm=ldc2 --defaultCreate one local master zonegroup on the second data center:
Syntax
radosgw-admin zonegroup create --rgw-zonegroup=ZONE_GROUP_NAME --endpoints=http://RGW_NODE_NAME:80 --rgw-realm=REALM_NAME --master --defaultExample
[user@rgw2]$ radosgw-admin zonegroup create --rgw-zonegroup=ldc2zg --endpoints=http://rgw2:80 --rgw-realm=ldc2 --master --defaultCreate one local zone on the second data center:
Syntax
radosgw-admin zone create --rgw-zonegroup=ZONE_GROUP_NAME --rgw-zone=ZONE_NAME --master --default --endpoints=HTTP_FQDN[, HTTP_FQDN]Example
[user@rgw2]$ radosgw-admin zone create --rgw-zonegroup=ldc2zg --rgw-zone=ldc2z --master --default --endpoints=http://rgw.example.comCommit the period:
Example
[user@rgw2]$ radosgw-admin period update --commitUpdate
ceph.confwith thergw_realm,rgw_zonegroupandrgw_zonenames:Syntax
rgw_realm = REALM_NAME
rgw_zonegroup = ZONE_GROUP_NAME
rgw_zone = ZONE_NAME
Example
rgw_realm = ldc2
rgw_zonegroup = ldc2zg
rgw_zone = ldc2z
Restart the RGW daemon:
Syntax
systemctl restart ceph-radosgw@rgw.$(hostname -s).rgw0.serviceCreate a replication/synchronization user:
Syntax
radosgw-admin user create --uid="r_REPLICATION_SYNCHRONIZATION_USER_" --display-name="Replication-Synchronization User" --systemCreate a replicated realm on the first data center in the storage cluster:
Syntax
radosgw-admin realm create --rgw-realm=REPLICATED_REALM_1Example
[user@rgw1] radosgw-admin realm create --rgw-realm=rdc1Create a master zonegroup for the first data center:
Syntax
radosgw-admin zonegroup create --rgw-zonegroup=RGW_ZONE_GROUP --endpoints=http://_RGW_NODE_NAME:80 --rgw-realm=_RGW_REALM_NAME --master --defaultExample
[user@rgw1] radosgw-admin zonegroup create --rgw-zonegroup=rdc1zg --endpoints=http://rgw1:80 --rgw-realm=rdc1 --master --defaultCreate a master zone on the first data center:
Syntax
radosgw-admin zone create --rgw-zonegroup=RGW_ZONE_GROUP --rgw-zone=_MASTER_RGW_NODE_NAME --master --default --endpoints=HTTP_FQDN[,HTTP_FQDN]Example
[user@rgw1] radosgw-admin zone create --rgw-zonegroup=rdc1zg --rgw-zone=rdc1z --master --default --endpoints=http://rgw.example.comCommit the period:
Syntax
radosgw-admin period update --commitUpdate
ceph.confwith thergw_realm,rgw_zonegroupandrgw_zonenames for the first data center:Syntax
rgw_realm = REALM_NAME
rgw_zonegroup = ZONE_GROUP_NAME
rgw_zone = ZONE_NAME
Example
rgw_realm = rdc1
rgw_zonegroup = rdc1zg
rgw_zone = rdc1z
Restart the RGW daemon:
Syntax
systemctl restart ceph-radosgw@rgw.$(hostname -s).rgw0.servicePull the replicated realm on the second data center:
Syntax
radosgw-admin realm pull --url=https://tower-osd1.cephtips.com --access-key=ACCESS_KEY --secret-key=SECRET_KEYExample
radosgw-admin realm pull --url=https://tower-osd1.cephtips.com --access-key=3QV0D6ZMMCJZMSCXJ2QJ --secret-key=VpvQWcsfI9OPzUCpR4kynDLAbqa1OIKqRB6WEnH8Pull the period from the first data center:
Syntax
radosgw-admin period pull --url=https://tower-osd1.cephtips.com --access-key=ACCESS_KEY --secret-key=SECRET_KEYExample
radosgw-admin period pull --url=https://tower-osd1.cephtips.com --access-key=3QV0D6ZMMCJZMSCXJ2QJ --secret-key=VpvQWcsfI9OPzUCpR4kynDLAbqa1OIKqRB6WEnH8Create the secondary zone on the second data center:
Syntax
radosgw-admin zone create --rgw-zone=RGW_ZONE --rgw-zonegroup=RGW_ZONE_GROUP --endpoints=https://tower-osd4.cephtips.com --access-key=_ACCESS_KEY --secret-key=SECRET_KEYExample
[user@rgw2] radosgw-admin zone create --rgw-zone=rdc2z --rgw-zonegroup=rdc1zg --endpoints=https://tower-osd4.cephtips.com --access-key=3QV0D6ZMMCJZMSCXJ2QJ --secret-key=VpvQWcsfI9OPzUCpR4kynDLAbqa1OIKqRB6WEnH8Commit the period:
Syntax
radosgw-admin period update --commitUpdate
ceph.confwith thergw_realm,rgw_zonegroupandrgw_zonenames for the second data center:Syntax
rgw_realm = REALM_NAME
rgw_zonegroup = ZONE_GROUP_NAME
rgw_zone = ZONE_NAME
Example
rgw realm = rdc1
rgw zonegroup = rdc1zg
rgw zone = rdc2z
Restart the RGW daemon:
Syntax
systemctl restart ceph-radosgw@rgw.$(hostname -s).rgw0.service-
Log in as
rooton the endpoint for the second data center. Verify the synchronization status on the master realm:
Syntax
radosgw-admin sync statusExample
[root@tower-osd4 ceph-ansible]# radosgw-admin sync status realm 59762f08-470c-46de-b2b1-d92c50986e67 (ldc2) zonegroup 7cf8daf8-d279-4d5c-b73e-c7fd2af65197 (ldc2zg) zone 034ae8d3-ae0c-4e35-8760-134782cb4196 (ldc2z) metadata sync no sync (zone is master)-
Log in as
rooton the endpoint for the first data center. Verify the synchronization status for the replication-synchronization realm:
Syntax
radosgw-admin sync status --rgw-realm RGW_REALM_NAMEFor example:
[root@tower-osd4 ceph-ansible]# [root@tower-osd4 ceph-ansible]# radosgw-admin sync status --rgw-realm rdc1
          realm 73c7b801-3736-4a89-aaf8-e23c96e6e29d (rdc1)
      zonegroup d67cc9c9-690a-4076-89b8-e8127d868398 (rdc1zg)
           zone 67584789-375b-4d61-8f12-d1cf71998b38 (rdc2z)
  metadata sync syncing
                full sync: 0/64 shards
                incremental sync: 64/64 shards
                metadata is caught up with master
      data sync source: 705ff9b0-68d5-4475-9017-452107cec9a0 (rdc1z)
                        syncing
                        full sync: 0/128 shards
                        incremental sync: 128/128 shards
                        data is caught up with source
To store and access data in the local site, create the user for local realm:
Syntax
radosgw-admin user create --uid="LOCAL_USER" --display-name="Local user" --rgw-realm=_REALM_NAME --rgw-zonegroup=ZONE_GROUP_NAME --rgw-zone=ZONE_NAMEExample
[user@rgw2] #radosgw-admin user create --uid="local-user" --display-name="Local user" --rgw-realm=ldc1 --rgw-zonegroup=ldc1zg --rgw-zone=ldc1z
By default, users are added to the multi-site configuration. For the users to access data in the local zone, the radosgw-admin command requires the --rgw-realm arugument.