Block Device Guide
Managing, creating, configuring, and using Red Hat Ceph Storage Block Devices
Abstract
Chapter 1. Introduction to Ceph block devices
A block is a set length of bytes in a sequence, for example, a 512-byte block of data. Combining many blocks together into a single file can be used as a storage device that you can read from and write to. Block-based storage interfaces are the most common way to store data with rotating media such as:
- Hard drives
- CD/DVD discs
- Floppy disks
- Traditional 9-track tapes
The ubiquity of block device interfaces makes a virtual block device an ideal candidate for interacting with a mass data storage system like Red Hat Ceph Storage.
Ceph block devices are thin-provisioned, resizable and store data striped over multiple Object Storage Devices (OSD) in a Ceph storage cluster. Ceph block devices are also known as Reliable Autonomic Distributed Object Store (RADOS) Block Devices (RBDs). Ceph block devices leverage RADOS capabilities such as:
- Snapshots
- Replication
- Data consistency
Ceph block devices interact with OSDs by using the librbd library.
Ceph block devices deliver high performance with infinite scalability to Kernel Virtual Machines (KVMs), such as Quick Emulator (QEMU), and cloud-based computing systems, like OpenStack, that rely on the libvirt and QEMU utilities to integrate with Ceph block devices. You can use the same storage cluster to operate the Ceph Object Gateway and Ceph block devices simultaneously.
To use Ceph block devices, requires you to have access to a running Ceph storage cluster. For details on installing a Red Hat Ceph Storage cluster, see the Red Hat Ceph Storage Installation Guide.
Chapter 2. Ceph block device commands
As a storage administrator, being familiar with Ceph’s block device commands can help you effectively manage the Red Hat Ceph Storage cluster. You can create and manage block devices pools and images, along with enabling and disabling the various features of Ceph block devices.
2.1. Prerequisites
- A running Red Hat Ceph Storage cluster.
2.2. Displaying the command help
Display command, and sub-command online help from the command-line interface.
The -h option still displays help for all available commands.
Prerequisites
- A running Red Hat Ceph Storage cluster.
- Root-level access to the client node.
Procedure
Use the
rbd helpcommand to display help for a particularrbdcommand and its subcommand:Syntax
rbd help COMMAND SUBCOMMANDTo display help for the
snap listcommand:[root@rbd-client ~]# rbd help snap list
2.3. Creating a block device pool
Before using the block device client, ensure a pool for rbd exists, is enabled and initialized.
You MUST create a pool first before you can specify it as a source.
Prerequisites
- A running Red Hat Ceph Storage cluster.
- Root-level access to the client node.
Procedure
To create an
rbdpool, execute the following:Syntax
ceph osd pool create POOL_NAME PG_NUM
ceph osd pool application enable POOL_NAME rbd
rbd pool init -p POOL_NAME
Example
[root@rbd-client ~]# ceph osd pool create example 128
[root@rbd-client ~]# ceph osd pool application enable example rbd
[root@rbd-client ~]# rbd pool init -p example
Additional Resources
- See the Pools chapter in the Red Hat Ceph Storage Storage Strategies Guide for additional details.
2.4. Creating a block device image
Before adding a block device to a node, create an image for it in the Ceph storage cluster.
Prerequisites
- A running Red Hat Ceph Storage cluster.
- Root-level access to the client node.
Procedure
To create a block device image, execute the following command:
Syntax
rbd create IMAGE_NAME --size MEGABYTES --pool POOL_NAMEExample
[root@rbd-client ~]# rbd create data --size 1024 --pool stackThis example creates a 1 GB image named
datathat stores information in a pool namedstack.NoteEnsure the pool exists before creating an image.
Additional Resources
- See the Creating a block device pool section in the Red Hat Ceph Storage Block Device Guide for additional details.
2.5. Listing the block device images
List the block device images.
Prerequisites
- A running Red Hat Ceph Storage cluster.
- Root-level access to the client node.
Procedure
To list block devices in the
rbdpool, execute the following (rbdis the default pool name):[root@rbd-client ~]# rbd lsTo list block devices in a particular pool, execute the following, but replace
POOL_NAMEwith the name of the pool:Syntax
rbd ls POOL_NAMEExample
[root@rbd-client ~]# rbd ls swimmingpool
2.6. Retrieving the block device image information
Retrieve information on the block device image.
Prerequisites
- A running Red Hat Ceph Storage cluster.
- Root-level access to the client node.
Procedure
To retrieve information from a particular image, execute the following, but replace
IMAGE_NAMEwith the name for the image:Syntax
rbd --image IMAGE_NAME infoExample
[root@rbd-client ~]# rbd --image foo infoTo retrieve information from an image within a pool, execute the following, but replace
IMAGE_NAMEwith the name of the image and replacePOOL_NAMEwith the name of the pool:Syntax
rbd --image IMAGE_NAME -p POOL_NAME infoExample
[root@rbd-client ~]# rbd --image bar -p swimmingpool info
2.7. Resizing a block device image
Ceph block device images are thin-provisioned. They do not actually use any physical storage until you begin saving data to them. However, they do have a maximum capacity that you set with the --size option.
Prerequisites
- A running Red Hat Ceph Storage cluster.
- Root-level access to the client node.
Procedure
To increase or decrease the maximum size of a Ceph block device image:
Syntax
[root@rbd-client ~]# rbd resize --image IMAGE_NAME --size SIZE
2.8. Removing a block device image
Remove a block device image.
Prerequisites
- A running Red Hat Ceph Storage cluster.
- Root-level access to the client node.
Procedure
To remove a block device, execute the following, but replace
IMAGE_NAMEwith the name of the image you want to remove:Syntax
rbd rm IMAGE_NAMEExample
[root@rbd-client ~]# rbd rm fooTo remove a block device from a pool, execute the following, but replace
IMAGE_NAMEwith the name of the image to remove and replacePOOL_NAMEwith the name of the pool:Syntax
rbd rm IMAGE_NAME -p POOL_NAMEExample
[root@rbd-client ~]# rbd rm bar -p swimmingpool
2.9. Managing block device images using the trash command
RADOS Block Device (RBD) images can be moved to the trash using the rbd trash command.
This command provides a wide array of options such as:
- Removing images from the trash.
- Listing images from the trash.
- Deferring deletion of images from the trash.
- Deleting images from the trash.
- Restoring images from the trash
- Restoring images from the trash and renaming them.
- Purging expired images from the trash.
- Scheduling purge from the trash.
Prerequisites
- A running Red Hat Ceph Storage cluster.
- Root-level access to the client node.
Procedure
Move an image to the trash:
Syntax
rbd trash mv POOL_NAME/IMAGE_NAMEExample
[root@rbd-client ~]# rbd trash mv mypool/myimageOnce an image is in the trash, a unique image ID is assigned.
NoteYou need this image ID to specify the image later if you need to use any of the trash options.
List the images in the trash:
Syntax
rbd trash ls POOL_NAMEExample
[root@rbd-client ~]# rbd trash ls mypool

1558a57fa43b rename_image
The unique IMAGE_ID
1558a57fa43bcan used for anytrashoptions.Move an image to the trash and defer the deletion of the image from the trash:
Syntax
rbd trash mv POOL_NAME/IMAGE_NAME --expires-at "EXPIRATION_TIME"The EXPIRATION_TIME can be a number of seconds, hours, date, time in "HH:MM:SS", or "tomorrow".
Example
[root@rbd-client ~]# rbd trash mv mypool/myimage --expires-at "60 seconds"In this example,
myimageis moved to trash. However, you cannot delete it from trash until 60 seconds.Restore the image from the trash:
Syntax
rbd trash restore POOL_NAME/IMAGE_IDExample
[root@rbd-client ~]# rbd trash restore mypool/14502ff9ee4dDelete the image from the trash:
Syntax
rbd trash rm POOL_NAME/IMAGE_ID [--force]Example
[root@rbd-client ~]# rbd trash rm mypool/14502ff9ee4d
Removing image: 100% complete...done.
If the image is deferred for deletion, then you cannot delete it from the trash until expiration. You get the following error message:
Example
Deferment time has not expired, please use --force if you really want to remove the image Removing image: 0% complete...failed. 2021-12-02 06:37:49.573 7fb5d237a500 -1 librbd::api::Trash: remove: error: deferment time has not expired.ImportantOnce an image is deleted from the trash, it cannot be restored.
Rename the image and then restore it from the trash:
Syntax
rbd trash restore POOL_NAME/IMAGE_ID --image NEW_IMAGE_NAMEExample
[root@rbd-client ~]# rbd trash restore mypool/14502ff9ee4d --image test_imageRemove expired images from the trash:
Syntax
rbd trash purge POOL_NAMEExample
[root@rbd-client ~]# rbd trash purge mypoolIn this example, all the images that are trashed from
mypoolare removed.
2.10. Enabling and disabling image features
You can enable or disable image features, such as fast-diff, exclusive-lock, object-map, or journaling, on already existing images.
The deep flatten feature can be only disabled on already existing images but not enabled. To use deep flatten, enable it when creating images.
Prerequisites
- A running Red Hat Ceph Storage cluster.
- Root-level access to the client node.
Procedure
To enable a feature.
Syntax
rbd feature enable POOL_NAME/IMAGE_NAME FEATURE_NAMETo enable the
exclusive-lockfeature on theimage1image in thedatapool:Example
[root@rbd-client ~]# rbd feature enable data/image1 exclusive-lockImportantIf you enable the
fast-diffandobject-mapfeatures, then rebuild the object map:+ .Syntax
rbd object-map rebuild POOL_NAME/IMAGE_NAME
To disable a feature.
Syntax
rbd feature disable POOL_NAME/IMAGE_NAME FEATURE_NAMETo disable the
fast-difffeature on theimage2image in thedatapool:Example
[root@rbd-client ~]# rbd feature disable data/image2 fast-diff
2.11. Working with image metadata
Ceph supports adding custom image metadata as key-value pairs. The pairs do not have any strict format.
Also, by using metadata, you can set the RADOS Block Device (RBD) configuration parameters for particular images.
Use the rbd image-meta commands to work with metadata.
Prerequisites
- A running Red Hat Ceph Storage cluster.
- Root-level access to the client node.
Procedure
To set a new metadata key-value pair:
Syntax
rbd image-meta set POOL_NAME/IMAGE_NAME KEY VALUEExample
[root@rbd-client ~]# rbd image-meta set data/dataset last_update 2016-06-06This example sets the
last_updatekey to the2016-06-06value on thedatasetimage in thedatapool.To remove a metadata key-value pair:
Syntax
rbd image-meta remove POOL_NAME/IMAGE_NAME KEYExample
[root@rbd-client ~]# rbd image-meta remove data/dataset last_updateThis example removes the
last_updatekey-value pair from thedatasetimage in thedatapool.To view a value of a key:
Syntax
rbd image-meta get POOL_NAME/IMAGE_NAME KEYExample
[root@rbd-client ~]# rbd image-meta get data/dataset last_updateThis example views the value of the
last_updatekey.To show all metadata on an image:
Syntax
rbd image-meta list POOL_NAME/IMAGE_NAMEExample
[root@rbd-client ~]# rbd data/dataset image-meta listThis example lists the metadata set for the
datasetimage in thedatapool.To override the RBD image configuration settings set in the Ceph configuration file for a particular image:
Syntax
rbd config image set POOL_NAME/IMAGE_NAME PARAMETER VALUEExample
[root@rbd-client ~]# rbd config image set data/dataset rbd_cache falseThis example disables the RBD cache for the
datasetimage in thedatapool.
Additional Resources
- See the Block device general options section in the Red Hat Ceph Storage Block Device Guide for a list of possible configuration options.
2.12. Moving images between pools
You can move RADOS Block Device (RBD) images between different pools within the same cluster. The migration can be between replicated pools, erasure-coded pools, or between replicated and erasure-coded pools.
During this process, the source image is copied to the target image with all snapshot history and optionally with link to the source image’s parent to help preserve sparseness. The source image is read only, the target image is writable. The target image is linked to the source image while the migration is in progress.
You can safely run this process in the background while the new target image is in use. However, stop all clients using the target image before the preparation step to ensure that clients using the image are updated to point to the new target image.
The krbd kernel module does not support live migration at this time.
Prerequisites
- Stop all clients that use the source image.
- Root-level access to the client node.
Procedure
Prepare for migration by creating the new target image that cross-links the source and target images:
Syntax
rbd migration prepare SOURCE_IMAGE TARGET_IMAGEReplace:
- SOURCE_IMAGE with the name of the image to be moved. Use the POOL/IMAGE_NAME format.
- TARGET_IMAGE with the name of the new image. Use the POOL/IMAGE_NAME format.
Example
[root@rbd-client ~]# rbd migration prepare data/source stack/targetVerify the state of the new target image, which is supposed to be
prepared:Syntax
rbd status TARGET_IMAGEExample
[root@rbd-client ~]# rbd status stack/target Watchers: none Migration: source: data/source (5e2cba2f62e) destination: stack/target (5e2ed95ed806) state: prepared- Optionally, restart the clients using the new target image name.
Copy the source image to target image:
Syntax
rbd migration execute TARGET_IMAGEExample
[root@rbd-client ~]# rbd migration execute stack/targetEnsure that the migration is completed:
Example
[root@rbd-client ~]# rbd status stack/target
Watchers:
    watcher=1.2.3.4:0/3695551461 client.123 cookie=123
Migration:
            source: data/source (5e2cba2f62e)
            destination: stack/target (5e2ed95ed806)
            state: executed
Commit the migration by removing the cross-link between the source and target images, and this also removes the source image:
Syntax
rbd migration commit TARGET_IMAGEExample
[root@rbd-client ~]# rbd migration commit stack/targetIf the source image is a parent of one or more clones, use the
--forceoption after ensuring that the clone images are not in use:Example
[root@rbd-client ~]# rbd migration commit stack/target --force- If you did not restart the clients after the preparation step, restart them using the new target image name.
2.13. The rbdmap service
The systemd unit file, rbdmap.service, is included with the ceph-common package. The rbdmap.service unit executes the rbdmap shell script.
This script automates the mapping and unmapping of RADOS Block Devices (RBD) for one or more RBD images. The script can be ran manually at any time, but the typical use case is to automatically mount RBD images at boot time, and unmount at shutdown. The script takes a single argument, which can be either map, for mounting or unmap, for unmounting RBD images. The script parses a configuration file, the default is /etc/ceph/rbdmap, but can be overridden using an environment variable called RBDMAPFILE. Each line of the configuration file corresponds to an RBD image.
The format of the configuration file format is as follows:
IMAGE_SPEC RBD_OPTS
Where IMAGE_SPEC specifies the POOL_NAME / IMAGE_NAME, or just the IMAGE_NAME, in which case the POOL_NAME defaults to rbd. The RBD_OPTS is an optional list of options to be passed to the underlying rbd map command. These parameters and their values should be specified as a comma-separated string:
OPT1=VAL1,OPT2=VAL2,…,OPT_N=VAL_N
This will cause the script to issue an rbd map command like the following:
rbd map POOLNAME/IMAGE_NAME --OPT1 VAL1 --OPT2 VAL2
For options and values which contain commas or equality signs, a simple apostrophe can be used to prevent replacing them.
When successful, the rbd map operation maps the image to a /dev/rbdX device, at which point a udev rule is triggered to create a friendly device name symlink, for example, /dev/rbd/POOL_NAME/IMAGE_NAME, pointing to the real mapped device. For mounting or unmounting to succeed, the friendly device name must have a corresponding entry in /etc/fstab file. When writing /etc/fstab entries for RBD images, it is a good idea to specify the noauto or nofail mount option. This prevents the init system from trying to mount the device too early, before the device exists.
2.14. Configuring the rbdmap service
To automatically map and mount, or unmap and unmount, RADOS Block Devices (RBD) at boot time, or at shutdown respectively.
Prerequisites
- Root-level access to the node doing the mounting.
-
Installation of the
ceph-commonpackage.
Procedure
-
Open for editing the
/etc/ceph/rbdmapconfiguration file. Add the RBD image or images to the configuration file:
Example
foo/bar1 id=admin,keyring=/etc/ceph/ceph.client.admin.keyring foo/bar2 id=admin,keyring=/etc/ceph/ceph.client.admin.keyring,options='lock_on_read,queue_depth=1024'- Save changes to the configuration file.
Enable the RBD mapping service:
Example
[root@client ~]# systemctl enable rbdmap.service
2.15. Monitoring performance of Ceph Block Devices using the command-line interface
Starting with Red Hat Ceph Storage 4.1, a performance metrics gathering framework is integrated within the Ceph OSD and Manager components. This framework provides a built-in method to generate and process performance metrics upon which other Ceph Block Device performance monitoring solutions are built.
A new Ceph Manager module,rbd_support, aggregates the performance metrics when enabled. The rbd command has two new actions: iotop and iostat.
The initial use of these actions can take around 30 seconds to populate the data fields.
Prerequisites
- User-level access to a Ceph Monitor node.
Procedure
Enable the
rbd_supportCeph Manager module:Example
[user@mon ~]$ ceph mgr module enable rbd_supportTo display an "iotop"-style of images:
Example
[user@mon ~]$ rbd perf image iotopNoteThe write ops, read-ops, write-bytes, read-bytes, write-latency, and read-latency columns can be sorted dynamically by using the right and left arrow keys.
To display an "iostat"-style of images:
Example
[user@mon ~]$ rbd perf image iostatNoteThe output from this command can be in JSON or XML format, and then can be sorted using other command-line tools.
2.16. Additional Resources
-
See Chapter 3, The
rbdkernel module for details on mapping and unmapping block devices.
Chapter 3. The rbd kernel module
As a storage administrator, you can access Ceph block devices through the rbd kernel module. You can map and unmap a block device, and displaying those mappings. Also, you can get a list of images through the rbd kernel module.
Kernel clients on Linux distributions other than Red Hat Enterprise Linux (RHEL) are permitted but not supported. If issues are found in the storage cluster when using these kernel clients, Red Hat will address them, but if the root cause is found to be on the kernel client side, the issue will have to be addressed by the software vendor.
3.1. Prerequisites
- A running Red Hat Ceph Storage cluster.
3.2. Create a Ceph Block Device and use it from a Linux kernel module client
As a storage administrator, you can create a Ceph Block Device for a Linux kernel module client in the Red Hat Ceph Storage Dashboard. As a system administrator, you can map that block device on a Linux client, and partition, format, and mount it, using the command line. After this, you can read and write files to it.
Prerequisites
- A running Red Hat Ceph Storage cluster.
- A Red Hat Enterprise Linux client.
3.2.1. Create a Ceph Block Device for a Linux kernel module client using Dashboard
You can create a Ceph Block Device specifically for a Linux kernel module client using the Dashboard web interface by enabling only the features it requires.
Prerequisites
- A running Red Hat Ceph Storage cluster.
Procedure
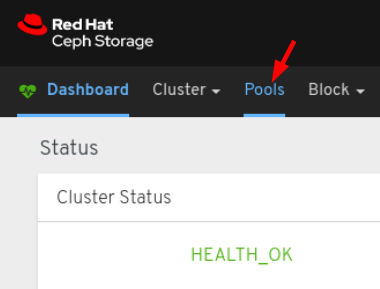
- Log in to the Dashboard.
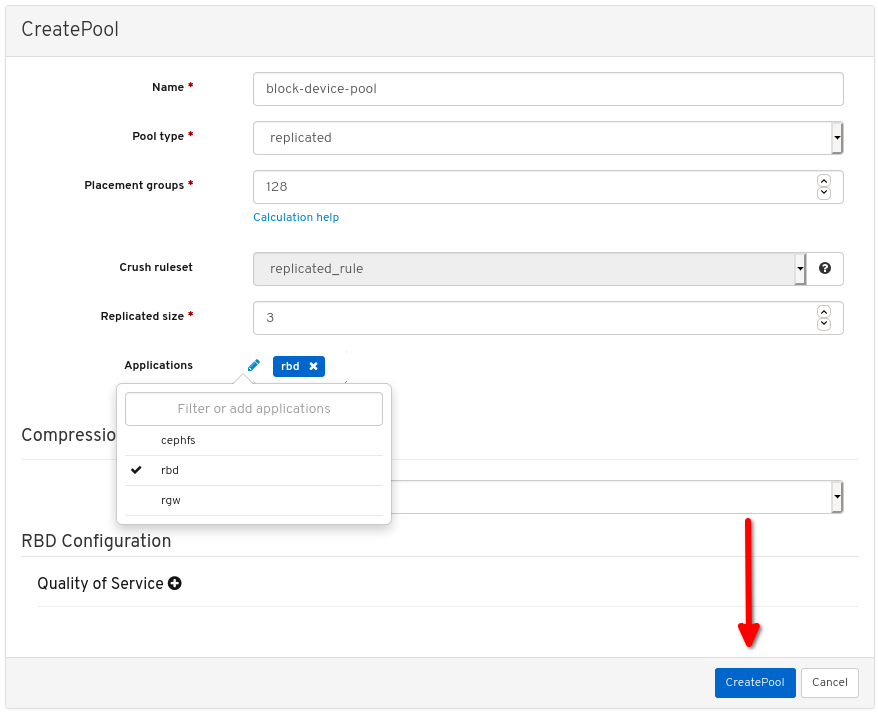
On the navigation bar, click Pools:
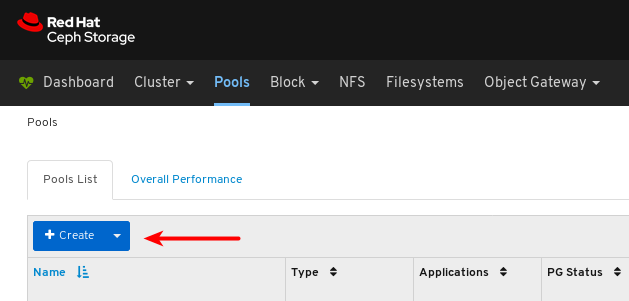
Click the Create button:
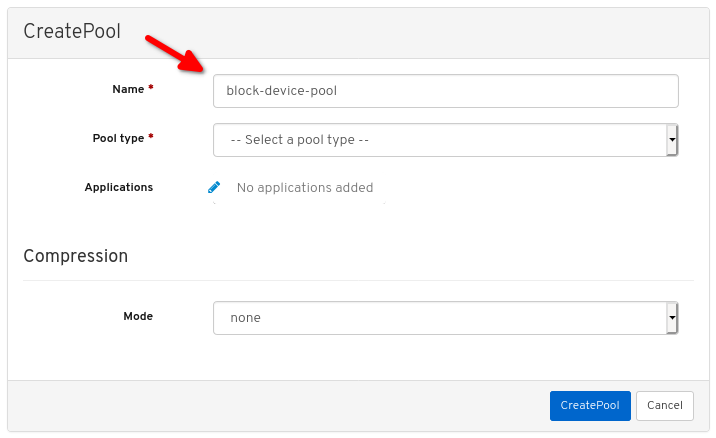
In the dialog window, set the name:
Set the Pool type to replicated:

Set the Placement Group (PG) number:
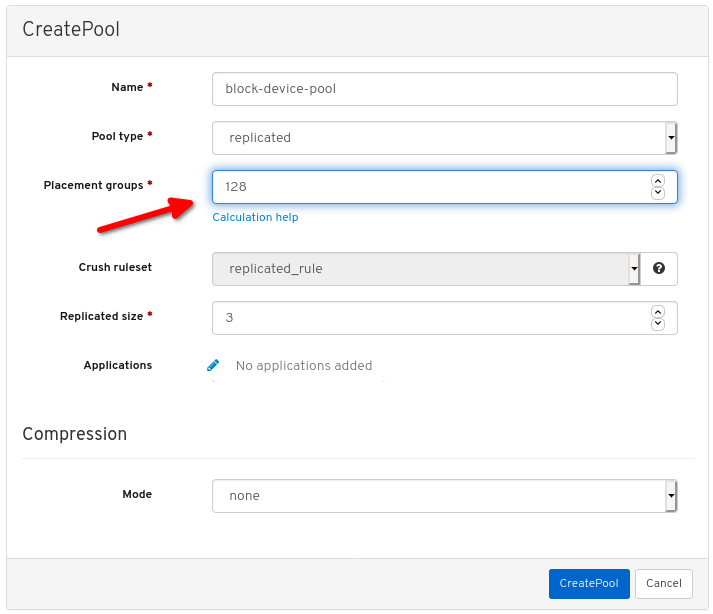
For assistance in choosing the PG number, use the PG calculator. Contact Red Hat Technical Support if unsure.
Set the replicated size:

Enable the
rbdapplication:
Click Create pool:
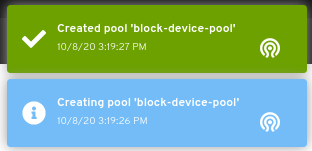
View the notifications indicating the pool was created successfully:
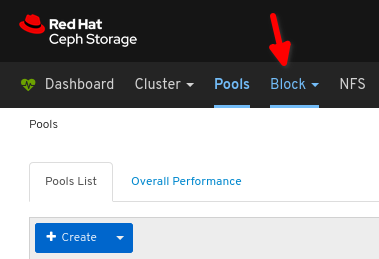
Click Block:
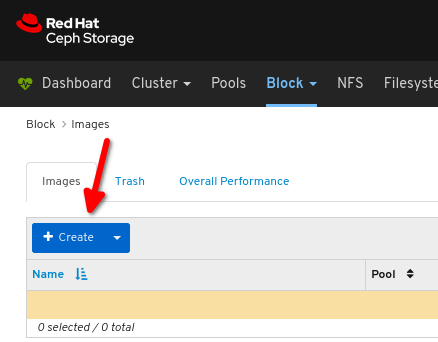
Click Images:

Click Create:
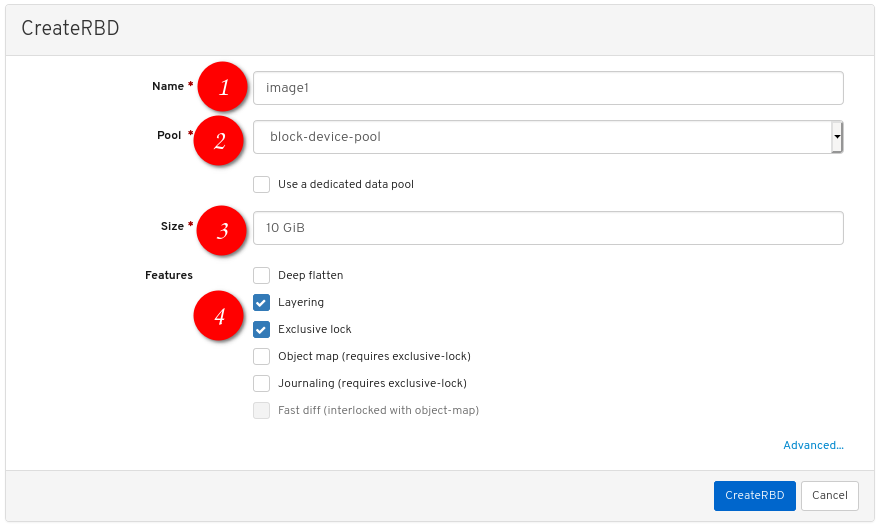
Configure the following:
 the desired image name,
 set Pool to the pool created earlier,
 set the desired size of the image,
 ensure Layering and Exclusive lock are the only enabled features:
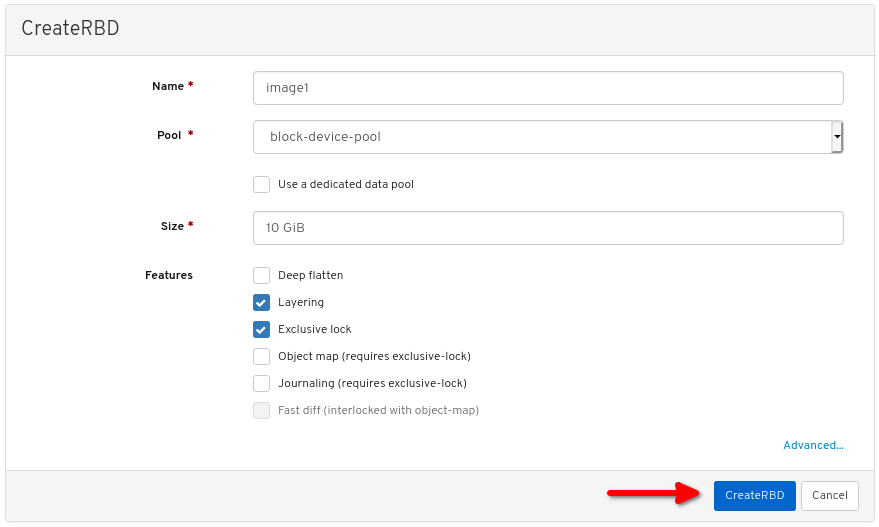
Click CreateRBD:
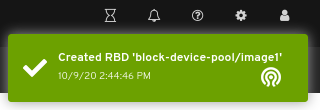
View the notification indicating the image was created successfully:
Additional Resources
- For more information, see Map and mount a Ceph Block Device on Linux using the command line.
- For more information, see the Dashboard Guide.
3.2.2. Map and mount a Ceph Block Device on Linux using the command line
You can map a Ceph Block Device from a Red Hat Enterprise Linux client using the Linux rbd kernel module. After mapping it, you can partition, format, and mount it, so you can write files to it.
Prerequisites
- A running Red Hat Ceph Storage cluster.
- A Ceph block device for a Linux kernel module client was created.
- A Red Hat Enterprise Linux client.
Procedure
On the Red Hat Enterprise Linux client node, enable the Red Hat Ceph Storage 4 Tools repository:
Red Hat Enterprise Linux 7
[root@client1 ~]# subscription-manager repos --enable=rhel-7-server-rhceph-4-tools-rpmsRed Hat Enterprise Linux 8
[root@client1 ~]# subscription-manager repos --enable=rhceph-4-tools-for-rhel-8-x86_64-rpmsInstall the
ceph-commonRPM package:Red Hat Enterprise Linux 7
[root@client1 ~]# yum install ceph-commonRed Hat Enterprise Linux 8
[root@client1 ~]# dnf install ceph-commonCopy the Ceph configuration file from a Monitor node to the Client node:
scp root@MONITOR_NODE:/etc/ceph/ceph.conf /etc/ceph/ceph.confExample
[root@client1 ~]# scp root@cluster1-node2:/etc/ceph/ceph.conf /etc/ceph/ceph.conf
root@192.168.0.32's password:
ceph.conf                                                                          100%  497   724.9KB/s   00:00
Copy the key file from a Monitor node to the Client node:
scp root@MONITOR_NODE:/etc/ceph/ceph.client.admin.keyring /etc/ceph/ceph.client.admin.keyringExample
[root@client1 ~]# scp root@cluster1-node2:/etc/ceph/ceph.client.admin.keyring /etc/ceph/ceph.client.admin.keyring
root@192.168.0.32's password:
ceph.client.admin.keyring                                                          100%  151   265.0KB/s   00:00
Map the image:
rbd map --pool POOL_NAME IMAGE_NAME --id adminExample
[root@client1 ~]# rbd map --pool block-device-pool image1 --id admin
/dev/rbd0
[root@client1 ~]#
Create a partition table on the block device:
parted /dev/MAPPED_BLOCK_DEVICE mklabel msdosExample
[root@client1 ~]# parted /dev/rbd0 mklabel msdos
Information: You may need to update /etc/fstab.
Create a partition for an XFS file system:
parted /dev/MAPPED_BLOCK_DEVICE mkpart primary xfs 0% 100%Example
[root@client1 ~]# parted /dev/rbd0 mkpart primary xfs 0% 100%
Information: You may need to update /etc/fstab.
Format the partition:
mkfs.xfs /dev/MAPPED_BLOCK_DEVICE_WITH_PARTITION_NUMBERExample
[root@client1 ~]# mkfs.xfs /dev/rbd0p1
meta-data=/dev/rbd0p1            isize=512    agcount=16, agsize=163824 blks
         =                       sectsz=512   attr=2, projid32bit=1
         =                       crc=1        finobt=1, sparse=1, rmapbt=0
         =                       reflink=1
data     =                       bsize=4096   blocks=2621184, imaxpct=25
         =                       sunit=16     swidth=16 blks
naming   =version 2              bsize=4096   ascii-ci=0, ftype=1
log      =internal log           bsize=4096   blocks=2560, version=2
         =                       sectsz=512   sunit=16 blks, lazy-count=1
realtime =none                   extsz=4096   blocks=0, rtextents=0
Create a directory to mount the new file system on:
mkdir PATH_TO_DIRECTORYExample
[root@client1 ~]# mkdir /mnt/cephMount the file system:
mount /dev/MAPPED_BLOCK_DEVICE_WITH_PARTITION_NUMBER PATH_TO_DIRECTORYExample
[root@client1 ~]# mount /dev/rbd0p1 /mnt/ceph/Verify that the file system is mounted and showing the correct size:
df -h PATH_TO_DIRECTORYExample
[root@client1 ~]# df -h /mnt/ceph/
Filesystem      Size  Used Avail Use% Mounted on
/dev/rbd0p1      10G  105M  9.9G   2% /mnt/ceph
Additional Resources
- For more information, see Create a Ceph Block Device for a Linux kernel module client using Dashboard.
- For more information, see Managing file systems for Red Hat Enterprise Linux 8.
- For more information, see Storage Administration Guide for Red Hat Enterprise Linux 7.
3.3. Getting a list of images
Get a list of Ceph block device images.
Prerequisites
- A running Red Hat Ceph Storage cluster.
- Root-level access to the node.
Procedure
To mount a block device image, first return a list of the images:
[root@rbd-client ~]# rbd list
3.4. Mapping a block device
Use rbd to map an image name to a kernel module. You must specify the image name, the pool name and the user name. rbd will load the RBD kernel module if it is not already loaded.
Prerequisites
- A running Red Hat Ceph Storage cluster.
- Root-level access to the node.
Procedure
Map an image name to a kernel module:
Syntax
rbd device map POOL_NAME/IMAGE_NAME --id USER_NAMEExample
[root@rbd-client ~]# rbd device map rbd/myimage --id adminSpecify a secret when using
cephxauthentication by either the keyring or a file containing the secret:Syntax
[root@rbd-client ~]# rbd device map POOL_NAME/IMAGE_NAME --id USER_NAME --keyring PATH_TO_KEYRINGor
[root@rbd-client ~]# rbd device map POOL_NAME/IMAGE_NAME --id USER_NAME --keyfile PATH_TO_FILE
3.5. Displaying mapped block devices
You can display which block device images are mapped to the kernel module with the rbd command.
Prerequisites
- A running Red Hat Ceph Storage cluster.
- Root-level access to the node.
Procedure
Display the mapped block devices:
[root@rbd-client ~]# rbd device list
3.6. Unmapping a block device
You can unmap a block device image with the rbd command, by using the unmap option and providing the device name.
Prerequisites
- A running Red Hat Ceph Storage cluster.
- Root-level access to the node.
Procedure
Unmap the block device image:
Syntax
rbd device unmap /dev/rbd/POOL_NAME/IMAGE_NAMEExample
[root@rbd-client ~]# rbd device unmap /dev/rbd/rbd/foo
3.7. Segregating images within isolated namespaces within the same pool
When using Ceph Block Devices directly without a higher-level system, such as OpenStack or OpenShift Container Storage, it was not possible to restrict user access to specific block device images. When combined with CephX capabilities, users can be restricted to specific pool namespaces to restrict access to the images.
You can use RADOS namespaces, a new level of identity to identify an object, to provide isolation between rados clients within a pool. For example, a client can only have full permissions on a namespace specific to them. This makes using a different RADOS client for each tenant feasible, which is particularly useful for a block device where many different tenants are accessing their own block device images.
You can segregate block device images within isolated namespaces within the same pool.
Prerequisites
- A running Red Hat Ceph Storage cluster.
- Upgrade all the kernels to 4x and to librbd and librados on all clients.
- Root-level access to the monitor and client nodes.
Procedure
Create an
rbdpool:Syntax
ceph osd pool create POOL_NAME PG_NUMExample
[root@mon ~]# ceph osd pool create mypool 100
pool 'mypool' created
Associate the
rbdpool with the RBD application:Syntax
ceph osd pool application enable POOL_NAME rbdExample
[root@mon ~]# ceph osd pool application enable mypool rbd
enabled application 'rbd' on pool 'mypool'
Initialize the pool with the RBD application:
Syntax
rbd pool init -p POOL_NAMEExample
[root@mon ~]# rbd pool init -p mypoolCreate two namespaces:
Syntax
rbd namespace create --namespace NAMESPACEExample
[root@mon ~]# rbd namespace create --namespace namespace1

[root@mon ~]# rbd namespace create --namespace namespace2

[root@mon ~]# rbd namespace ls --format=json
[{"name":"namespace2"},{"name":"namespace1"}]
Provide access to the namespaces for two users:
Syntax
ceph auth get-or-create client.USER_NAME mon 'profile rbd' osd 'profile rbd pool=rbd namespace=NAMESPACE' -o /etc/ceph/client.USER_NAME.keyringExample
[root@mon ~]# ceph auth get-or-create client.testuser mon 'profile rbd' osd 'profile rbd pool=rbd namespace=namespace1' -o /etc/ceph/client.testuser.keyring

[root@mon ~]# ceph auth get-or-create client.newuser mon 'profile rbd' osd 'profile rbd pool=rbd namespace=namespace2' -o /etc/ceph/client.newuser.keyring
Get the key of the clients:
Syntax
ceph auth get client.USER_NAMEExample
[root@mon ~]# ceph auth get client.testuser

[client.testuser]
	key = AQDMp61hBf5UKRAAgjQ2In0Z3uwAase7mrlKnQ==
	caps mon = "profile rbd"
	caps osd = "profile rbd pool=rbd namespace=namespace1"
exported keyring for client.testuser

[root@mon ~]# ceph auth get client.newuser

[client.newuser]
	key = AQDfp61hVfLFHRAA7D80ogmZl80ROY+AUG4A+Q==
	caps mon = "profile rbd"
	caps osd = "profile rbd pool=rbd namespace=namespace2"
exported keyring for client.newuser
Create the block device images and use the pre-defined namespace within a pool:
Syntax
rbd create --namespace NAMESPACE IMAGE_NAME --size SIZE_IN_GBExample
[root@mon ~]# rbd create --namespace namespace1 image01 --size 1G

[root@mon ~]# rbd create --namespace namespace2 image02 --size 1G
Optional: Get the details of the namespace and the associated image:
Syntax
rbd --namespace NAMESPACE ls --longExample
[root@mon ~]#  rbd --namespace namespace1 ls --long
NAME    SIZE  PARENT FMT PROT LOCK
image01 1 GiB          2

[root@mon ~]# rbd --namespace namespace2 ls --long
NAME    SIZE  PARENT FMT PROT LOCK
image02 1 GiB          2
Copy the Ceph configuration file from the Ceph Monitor node to the client node:
scp /etc/ceph/ceph.conf root@CLIENT_NODE:/etc/ceph/Example
[root@mon ~]# scp /etc/ceph/ceph.conf root@host02:/etc/ceph/

root@host02's password:
ceph.conf                                                                          100%  497   724.9KB/s   00:00
Copy the admin keyring from the Ceph Monitor node to the client node:
Syntax
scp /etc/ceph/ceph.client.admin.keyring root@CLIENT_NODE:/etc/cephExample
[root@mon ~]# scp /etc/ceph/ceph.client.admin.keyring root@host02:/etc/ceph/

root@host02's password:
ceph.client.admin.keyring                                                          100%  151   265.0KB/s   00:00
Copy the keyrings of the users from the Ceph Monitor node to the client node:
Syntax
scp /etc/ceph/ceph.client.USER_NAME.keyring root@CLIENT_NODE:/etc/ceph/Example
[root@mon ~]# scp /etc/ceph/client.newuser.keyring root@host02:/etc/ceph/

[root@mon ~]# scp /etc/ceph/client.testuser.keyring root@host02:/etc/ceph/
Map the block device image:
Syntax
rbd map --name NAMESPACE IMAGE_NAME -n client.USER_NAME --keyring /etc/ceph/client.USER_NAME.keyringExample
[root@mon ~]# rbd map --namespace namespace1 image01  -n  client.testuser --keyring=/etc/ceph/client.testuser.keyring

/dev/rbd0

[root@mon ~]# rbd map --namespace namespace2 image02 -n client.newuser --keyring=/etc/ceph/client.newuser.keyring

/dev/rbd1
This does not allow access to users in the other namespaces in the same pool.
Example
[root@mon ~]# rbd map --namespace namespace2 image02  -n  client.testuser --keyring=/etc/ceph/client.testuser.keyring

rbd: warning: image already mapped as /dev/rbd1
rbd: sysfs write failed
rbd: error asserting namespace: (1) Operation not permitted
In some cases useful info is found in syslog - try "dmesg | tail".
2021-12-06 02:49:08.106 7f8d4fde2500 -1 librbd::api::Namespace: exists: error asserting namespace: (1) Operation not permitted
rbd: map failed: (1) Operation not permitted

[root@mon ~]# rbd map --namespace namespace1 image01 -n client.newuser --keyring=/etc/ceph/client.newuser.keyring

rbd: warning: image already mapped as /dev/rbd0
rbd: sysfs write failed
rbd: error asserting namespace: (1) Operation not permitted
In some cases useful info is found in syslog - try "dmesg | tail".
2021-12-03 12:16:24.011 7fcad776a040 -1 librbd::api::Namespace: exists: error asserting namespace: (1) Operation not permitted
rbd: map failed: (1) Operation not permitted
Verify the device:
Example
[root@mon ~]# rbd showmapped

id pool namespace      image   snap device
0  rbd  namespace1  image01 -  /dev/rbd0
1  rbd  namespace2   image02 -  /dev/rbd1
Chapter 4. Snapshot management
As a storage administrator, being familiar with Ceph’s snapshotting feature can help you manage the snapshots and clones of images stored in the Red Hat Ceph Storage cluster.
4.1. Prerequisites
- A running Red Hat Ceph Storage cluster.
4.2. Ceph block device snapshots
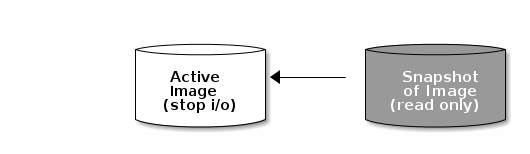
A snapshot is a read-only copy of the state of an image at a particular point in time. One of the advanced features of Ceph block devices is that you can create snapshots of the images to retain a history of an image’s state. Ceph also supports snapshot layering, which allows you to clone images quickly and easily, for example a virtual machine image. Ceph supports block device snapshots using the rbd command and many higher level interfaces, including QEMU, libvirt, OpenStack and CloudStack.
If a snapshot is taken while I/O is occurring, then the snapshot might not get the exact or latest data of the image and the snapshot might have to be cloned to a new image to be mountable. Red Hat recommends stopping I/O before taking a snapshot of an image. If the image contains a filesystem, the filesystem must be in a consistent state before taking a snapshot. To stop I/O you can use fsfreeze command. For virtual machines, the qemu-guest-agent can be used to automatically freeze filesystems when creating a snapshot.
Additional Resources
-
See the
fsfreeze(8)man page for more details.
4.3. The Ceph user and keyring
When cephx is enabled, you must specify a user name or ID and a path to the keyring containing the corresponding key for the user.
cephx is enabled by default.
You might also add the CEPH_ARGS environment variable to avoid re-entry of the following parameters:
Syntax
rbd --id USER_ID --keyring=/path/to/secret [commands]
rbd --name USERNAME --keyring=/path/to/secret [commands]
Example
[root@rbd-client ~]# rbd --id admin --keyring=/etc/ceph/ceph.keyring [commands]
[root@rbd-client ~]# rbd --name client.admin --keyring=/etc/ceph/ceph.keyring [commands]
Add the user and secret to the CEPH_ARGS environment variable so that you do not need to enter them each time.
4.4. Creating a block device snapshot
Create a snapshot of a Ceph block device.
Prerequisites
- A running Red Hat Ceph Storage cluster.
- Root-level access to the node.
Procedure
Specify the
snap createoption, the pool name and the image name:Syntax
rbd --pool POOL_NAME snap create --snap SNAP_NAME IMAGE_NAME
rbd snap create POOL_NAME/IMAGE_NAME@SNAP_NAME
Example
[root@rbd-client ~]# rbd --pool rbd snap create --snap snapname foo
[root@rbd-client ~]# rbd snap create rbd/foo@snapname
4.5. Listing the block device snapshots
List the block device snapshots.
Prerequisites
- A running Red Hat Ceph Storage cluster.
- Root-level access to the node.
Procedure
Specify the pool name and the image name:
Syntax
rbd --pool POOL_NAME snap ls IMAGE_NAME
rbd snap ls POOL_NAME/IMAGE_NAME
Example
[root@rbd-client ~]# rbd --pool rbd snap ls foo
[root@rbd-client ~]# rbd snap ls rbd/foo
4.6. Rolling back a block device snapshot
Rollback a block device snapshot.
Rolling back an image to a snapshot means overwriting the current version of the image with data from a snapshot. The time it takes to execute a rollback increases with the size of the image. It is faster to clone from a snapshot than to rollback an image to a snapshot, and it is the preferred method of returning to a pre-existing state.
Prerequisites
- A running Red Hat Ceph Storage cluster.
- Root-level access to the node.
Procedure
Specify the
snap rollbackoption, the pool name, the image name and the snap name:Syntax
rbd --pool POOL_NAME snap rollback --snap SNAP_NAME IMAGE_NAME
rbd snap rollback POOL_NAME/IMAGE_NAME@SNAP_NAME
Example
[root@rbd-client ~]# rbd --pool rbd snap rollback --snap snapname foo
[root@rbd-client ~]# rbd snap rollback rbd/foo@snapname
4.7. Deleting a block device snapshot
Delete a snapshot for Ceph block devices.
Prerequisites
- A running Red Hat Ceph Storage cluster.
- Root-level access to the node.
Procedure
Specify the
snap rmoption, the pool name, the image name and the snapshot name:Syntax
rbd --pool POOL_NAME snap rm --snap SNAP_NAME IMAGE_NAME
rbd snap rm POOL_NAME-/IMAGE_NAME@SNAP_NAME
Example
[root@rbd-client ~]# rbd --pool rbd snap rm --snap snapname foo
[root@rbd-client ~]# rbd snap rm rbd/foo@snapname
If an image has any clones, the cloned images retain reference to the parent image snapshot. To delete the parent image snapshot, you must flatten the child images first.
Ceph OSD daemons delete data asynchronously, so deleting a snapshot does not free up the disk space immediately.
Additional Resources
- See the Flattening cloned images in the Red Hat Ceph Storage Block Device Guide for details.
4.8. Purging the block device snapshots
Purge block device snapshots.
Prerequisites
- A running Red Hat Ceph Storage cluster.
- Root-level access to the node.
Procedure
Specify the
snap purgeoption and the image name:Syntax
rbd --pool POOL_NAME snap purge IMAGE_NAME
rbd snap purge POOL_NAME/IMAGE_NAME
Example
[root@rbd-client ~]# rbd --pool rbd snap purge foo
[root@rbd-client ~]# rbd snap purge rbd/foo
4.9. Renaming a block device snapshot
Rename a block device snapshot.
Prerequisites
- A running Red Hat Ceph Storage cluster.
- Root-level access to the node.
Procedure
To rename a snapshot:
Syntax
rbd snap rename POOL_NAME/IMAGE_NAME@ORIGINAL_SNAPSHOT_NAME POOL_NAME/IMAGE_NAME@NEW_SNAPSHOT_NAMEExample
[root@rbd-client ~]# rbd snap rename data/dataset@snap1 data/dataset@snap2This renames
snap1snapshot of thedatasetimage on thedatapool tosnap2.-
Execute the
rbd help snap renamecommand to display additional details on renaming snapshots.
4.10. Ceph block device layering
Ceph supports the ability to create many copy-on-write (COW) or copy-on-read (COR) clones of a block device snapshot. Snapshot layering enables Ceph block device clients to create images very quickly. For example, you might create a block device image with a Linux VM written to it. Then, snapshot the image, protect the snapshot, and create as many clones as you like. A snapshot is read-only, so cloning a snapshot simplifies semantics—making it possible to create clones rapidly.
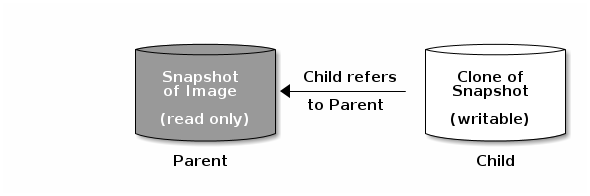
The terms parent and child mean a Ceph block device snapshot, parent, and the corresponding image cloned from the snapshot, child. These terms are important for the command line usage below.
Each cloned image, the child, stores a reference to its parent image, which enables the cloned image to open the parent snapshot and read it. This reference is removed when the clone is flattened that is, when information from the snapshot is completely copied to the clone.
A clone of a snapshot behaves exactly like any other Ceph block device image. You can read to, write from, clone, and resize the cloned images. There are no special restrictions with cloned images. However, the clone of a snapshot refers to the snapshot, so you MUST protect the snapshot before you clone it.
A clone of a snapshot can be a copy-on-write (COW) or copy-on-read (COR) clone. Copy-on-write (COW) is always enabled for clones while copy-on-read (COR) has to be enabled explicitly. Copy-on-write (COW) copies data from the parent to the clone when it writes to an unallocated object within the clone. Copy-on-read (COR) copies data from the parent to the clone when it reads from an unallocated object within the clone. Reading data from a clone will only read data from the parent if the object does not yet exist in the clone. Rados block device breaks up large images into multiple objects. The default is set to 4 MB and all copy-on-write (COW) and copy-on-read (COR) operations occur on a full object, that is writing 1 byte to a clone will result in a 4 MB object being read from the parent and written to the clone if the destination object does not already exist in the clone from a previous COW/COR operation.
Whether or not copy-on-read (COR) is enabled, any reads that cannot be satisfied by reading an underlying object from the clone will be rerouted to the parent. Since there is practically no limit to the number of parents, meaning that you can clone a clone, this reroute continues until an object is found or you hit the base parent image. If copy-on-read (COR) is enabled, any reads that fail to be satisfied directly from the clone result in a full object read from the parent and writing that data to the clone so that future reads of the same extent can be satisfied from the clone itself without the need of reading from the parent.
This is essentially an on-demand, object-by-object flatten operation. This is specially useful when the clone is in a high-latency connection away from it’s parent, that is the parent in a different pool, in another geographical location. Copy-on-read (COR) reduces the amortized latency of reads. The first few reads will have high latency because it will result in extra data being read from the parent, for example, you read 1 byte from the clone but now 4 MB has to be read from the parent and written to the clone, but all future reads will be served from the clone itself.
To create copy-on-read (COR) clones from snapshot you have to explicitly enable this feature by adding rbd_clone_copy_on_read = true under [global] or [client] section in the ceph.conf file.
Additional Resources
-
For more information on
flattening, see the Flattening cloned images section in the Red Hat Ceph Storage Block Device Gudie.
4.11. Protecting a block device snapshot
Clones access the parent snapshots. All clones would break if a user inadvertently deleted the parent snapshot. To prevent data loss, by default, you MUST protect the snapshot before you can clone it.
Prerequisites
- A running Red Hat Ceph Storage cluster.
- Root-level access to the node.
Procedure
Specify
POOL_NAME,IMAGE_NAME, andSNAP_SHOT_NAMEin the following command:Syntax
rbd --pool POOL_NAME snap protect --image IMAGE_NAME --snap SNAPSHOT_NAME
rbd snap protect POOL_NAME/IMAGE_NAME@SNAPSHOT_NAME
Example
[root@rbd-client ~]# rbd --pool rbd snap protect --image my-image --snap my-snapshot [root@rbd-client ~]# rbd snap protect rbd/my-image@my-snapshotNoteYou cannot delete a protected snapshot.
4.12. Cloning a block device snapshot
Clone a block device snapshot to create a read or write child image of the snapshot within the same pool or in another pool. One use case would be to maintain read-only images and snapshots as templates in one pool, and writable clones in another pool.
By default, you must protect the snapshot before you can clone it. To avoid having to protect the snapshot before you clone it, set ceph osd set-require-min-compat-client mimic. You can set it to higher versions than mimic as well.
Prerequisites
- A running Red Hat Ceph Storage cluster.
- Root-level access to the node.
Procedure
To clone a snapshot, you need to specify the parent pool, snapshot, child pool and image name:
Syntax
rbd --pool POOL_NAME --image PARENT_IMAGE --snap SNAP_NAME --dest-pool POOL_NAME --dest CHILD_IMAGE_NAME
rbd clone POOL_NAME/PARENT_IMAGE@SNAP_NAME  POOL_NAME/CHILD_IMAGE_NAME
Example
[root@rbd-client ~]# rbd --pool rbd --image my-image --snap my-snapshot --dest-pool rbd --dest new-image
[root@rbd-client ~]# rbd clone rbd/my-image@my-snapshot rbd/new-image
4.13. Unprotecting a block device snapshot
Before you can delete a snapshot, you must unprotect it first. Additionally, you may NOT delete snapshots that have references from clones. You must flatten each clone of a snapshot, before you can delete the snapshot.
Prerequisites
- A running Red Hat Ceph Storage cluster.
- Root-level access to the node.
Procedure
Run the following commands:
Syntax
rbd --pool POOL_NAME snap unprotect --image IMAGE_NAME --snap SNAPSHOT_NAME
rbd snap unprotect POOL_NAME/IMAGE_NAME@SNAPSHOT_NAME
Example
[root@rbd-client ~]# rbd --pool rbd snap unprotect --image my-image --snap my-snapshot
[root@rbd-client ~]# rbd snap unprotect rbd/my-image@my-snapshot
4.14. Listing the children of a snapshot
List the children of a snapshot.
Prerequisites
- A running Red Hat Ceph Storage cluster.
- Root-level access to the node.
Procedure
To list the children of a snapshot, execute the following:
Syntax
rbd --pool POOL_NAME children --image IMAGE_NAME --snap SNAP_NAME
rbd children POOL_NAME/IMAGE_NAME@SNAPSHOT_NAME
Example
rbd --pool rbd children --image my-image --snap my-snapshot
rbd children rbd/my-image@my-snapshot
4.15. Flattening cloned images
Cloned images retain a reference to the parent snapshot. When you remove the reference from the child clone to the parent snapshot, you effectively "flatten" the image by copying the information from the snapshot to the clone. The time it takes to flatten a clone increases with the size of the snapshot. Because a flattened image contains all the information from the snapshot, a flattened image will use more storage space than a layered clone.
If the deep flatten feature is enabled on an image, the image clone is dissociated from its parent by default.
Prerequisites
- A running Red Hat Ceph Storage cluster.
- Root-level access to the node.
Procedure
To delete a parent image snapshot associated with child images, you must flatten the child images first:
Syntax
rbd --pool POOL_NAME flatten --image IMAGE_NAME
rbd flatten POOL_NAME/IMAGE_NAME
Example
[root@rbd-client ~]# rbd --pool rbd flatten --image my-image
[root@rbd-client ~]# rbd flatten rbd/my-image
Chapter 5. Mirroring Ceph block devices
As a storage administrator, you can add another layer of redundancy to Ceph block devices by mirroring data images between Red Hat Ceph Storage clusters. Understanding and using Ceph block device mirroring can provide you protection against data loss, such as a site failure. There are two configurations for mirroring Ceph block devices, one-way mirroring or two-way mirroring, and you can configure mirroring on pools and individual images.
5.1. Prerequisites
- A minimum of two healthy running Red Hat Ceph Storage clusters.
- Network connectivity between the two storage clusters.
- Access to a Ceph client node for each Red Hat Ceph Storage cluster.
5.2. Ceph block device mirroring
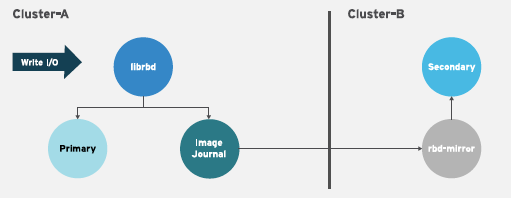
RADOS Block Device (RBD) mirroring is a process of asynchronous replication of Ceph block device images between two or more Ceph storage clusters. By locating a Ceph storage cluster in different geographic locations, RBD Mirroring can help you recover from a site disaster. Journal-based Ceph block device mirroring ensures point-in-time consistent replicas of all changes to an image, including reads and writes, block device resizing, snapshots, clones and flattening.
RBD mirroring uses exclusive locks and the journaling feature to record all modifications to an image in the order in which they occur. This ensures that a crash-consistent mirror of an image is available.
The CRUSH hierarchies supporting primary and secondary pools that mirror block device images must have the same capacity and performance characteristics, and must have adequate bandwidth to ensure mirroring without excess latency. For example, if you have X MB/s average write throughput to images in the primary storage cluster, the network must support N * X throughput in the network connection to the secondary site plus a safety factor of Y% to mirror N images.
The rbd-mirror daemon is responsible for synchronizing images from one Ceph storage cluster to another Ceph storage cluster by pulling changes from the remote primary image and writes those changes to the local, non-primary image. The rbd-mirror daemon can run either on a single Ceph storage cluster for one-way mirroring or on two Ceph storage clusters for two-way mirroring that participate in the mirroring relationship.
For RBD mirroring to work, either using one-way or two-way replication, a couple of assumptions are made:
- A pool with the same name exists on both storage clusters.
- A pool contains journal-enabled images you want to mirror.
In one-way or two-way replication, each instance of rbd-mirror must be able to connect to the other Ceph storage cluster simultaneously. Additionally, the network must have sufficient bandwidth between the two data center sites to handle mirroring.
One-way Replication
One-way mirroring implies that a primary image or pool of images in one storage cluster gets replicated to a secondary storage cluster. One-way mirroring also supports replicating to multiple secondary storage clusters.
On the secondary storage cluster, the image is the non-primary replicate; that is, Ceph clients cannot write to the image. When data is mirrored from a primary storage cluster to a secondary storage cluster, the rbd-mirror runs ONLY on the secondary storage cluster.
For one-way mirroring to work, a couple of assumptions are made:
- You have two Ceph storage clusters and you want to replicate images from a primary storage cluster to a secondary storage cluster.
-
The secondary storage cluster has a Ceph client node attached to it running the
rbd-mirrordaemon. Therbd-mirrordaemon will connect to the primary storage cluster to sync images to the secondary storage cluster.
Two-way Replication
Two-way replication adds an rbd-mirror daemon on the primary cluster so images can be demoted on it and promoted on the secondary cluster. Changes can then be made to the images on the secondary cluster and they will be replicated in the reverse direction, from secondary to primary. Both clusters must have rbd-mirror running to allow promoting and demoting images on either cluster. Currently, two-way replication is only supported between two sites.
For two-way mirroring to work, a couple of assumptions are made:
- You have two storage clusters and you want to be able to replicate images between them in either direction.
-
Both storage clusters have a client node attached to them running the
rbd-mirrordaemon. Therbd-mirrordaemon running on the secondary storage cluster will connect to the primary storage cluster to synchronize images to secondary, and therbd-mirrordaemon running on the primary storage cluster will connect to the secondary storage cluster to synchronize images to primary.

As of Red Hat Ceph Storage 4, running multiple active rbd-mirror daemons in a single cluster is supported.
Mirroring Modes
Mirroring is configured on a per-pool basis with mirror peering storage clusters. Ceph supports two mirroring modes, depending on the type of images in the pool.
- Pool Mode
- All images in a pool with the journaling feature enabled are mirrored.
- Image Mode
- Only a specific subset of images within a pool are mirrored. You must enable mirroring for each image separately.
Image States
Whether or not an image can be modified depends on its state:
- Images in the primary state can be modified.
- Images in the non-primary state cannot be modified.
Images are automatically promoted to primary when mirroring is first enabled on an image. The promotion can happen:
- Implicitly by enabling mirroring in pool mode.
- Explicitly by enabling mirroring of a specific image.
It is possible to demote primary images and promote non-primary images.
Additional Resources
- See the Image promotion and demotion section of the Red Hat Ceph Storage Block Device Guide for more details.
5.3. Configuring one-way mirroring using Ansible
This procedure uses ceph-ansible to configure one-way replication of images on a primary storage cluster known as site-a, to a secondary storage cluster known as site-b. In the following examples, data is the name of the pool that contains the images to be mirrored.
Prerequisites
- Two running Red Hat Ceph Storage clusters.
- A Ceph client node.
- A pool with the same name exists on both clusters.
- Images within the pool must have exclusive-lock and journaling enabled for journal-based mirroring.
When using one-way replication, you can mirror to multiple secondary storage clusters.
Procedure
On the cluster where the images originate, enable the exclusive-lock and journaling features on an image.
For new images, use the
--image-featureoption:Syntax
rbd create IMAGE_NAME --size MEGABYTES --pool POOL_NAME --image-feature FEATURE[,FEATURE]Example
[root@rbd-client ~]# rbd create image1 --size 1024 --pool data --image-feature exclusive-lock,journalingFor existing images, use the
rbd feature enablecommand:Syntax
rbd feature enable POOL_NAME/IMAGE_NAME FEATURE_NAMEExample
[root@rbd-client ~]# rbd feature enable data/image1 exclusive-lock,journalingTo enable exclusive-lock and journaling on all new images by default, add the following setting to the Ceph configuration file:
rbd_default_features = 125
In the
site-acluster, complete the following steps:On a monitor node, create the user that the
rbd-mirrordaemon will use to connect to the cluster. The example creates asite-auser and outputs the key to a file namedsite-a.client.site-a.keyring:Syntax
ceph auth get-or-create client.CLUSTER_NAME mon 'profile rbd' osd 'profile rbd pool=data' -o /etc/ceph/CLUSTER_NAME.client.USER_NAME.keyringExample
[root@mon ~]# ceph auth get-or-create client.site-a mon 'profile rbd' osd 'profile rbd pool=data' -o /etc/ceph/site-a.client.site-a.keyring-
Copy the Ceph configuration file and the newly created key file from the monitor node to the
site-bmonitor and client nodes. -
Rename the Ceph configuration file from
ceph.confto CLUSTER-NAME.conf. In these examples, the file is/etc/ceph/site-a.conf.
In the
site-bcluster, complete the following steps:-
On the Ansible administration node, add an
[rbdmirrors]group in the Ansible inventory file. The usual inventory file is/etc/ansible/hosts. Under the
[rbdmirrors]group, add the name of thesite-bclient node on which therbd-mirrordaemon will run. The daemon will pull image changes fromsite-atosite-b.[rbdmirrors] ceph-clientNavigate to the
/usr/share/ceph-ansible/directory:[root@admin ~]# cd /usr/share/ceph-ansibleCreate a new
rbdmirrors.ymlfile by copyinggroup_vars/rbdmirrors.yml.sampletogroup_vars/rbdmirrors.yml:[root@admin ceph-ansible]# cp group_vars/rbdmirrors.yml.sample group_vars/rbdmirrors.yml-
Open the
group_vars/rbdmirrors.ymlfile for editing. Set
ceph_rbd_mirror_configuretotrue. Setceph_rbd_mirror_poolto the pool in which you want to mirror images. In these examples,datais the name of the pool.ceph_rbd_mirror_configure: true ceph_rbd_mirror_pool: "data"By default,
ceph-ansibleconfigures mirroring using pool mode, which mirrors all images in a pool. Enable image mode where only images that have mirroring explicitly enabled are mirrored. To enable image mode, setceph_rbd_mirror_modetoimage:ceph_rbd_mirror_mode: imageSet a name for the cluster that
rbd-mirrorwill pull from. In these examples, the other cluster issite-a.ceph_rbd_mirror_remote_cluster: "site-a"On the Ansible administration node, set the user name of the key using
ceph_rbd_mirror_remote_user. Use the same name you used when you created the key. In these examples the user is namedclient.site-a.ceph_rbd_mirror_remote_user: "client.site-a"As the ceph-ansible user, run the Ansible playbook:
Bare-metal deployments:
[user@admin ceph-ansible]$ ansible-playbook site.yml --limit rbdmirrors -i hostsContainer deployments:
[ansible@admin ceph-ansible]$ ansible-playbook site-container.yml --limit rbdmirrors -i hosts
-
On the Ansible administration node, add an
Explicitly enable mirroring on the desired images in both
site-aandsite-bclusters:Syntax
Journal-based mirroring:
rbd mirror image enable POOL/IMAGESnapshot-based mirroring:
rbd mirror image enable POOL/IMAGE snapshotExample
[root@mon ~]# rbd mirror image enable data/image1 [root@mon ~]# rbd mirror image enable data/image1 snapshotNoteRepeat this step whenever you want to mirror new image to peer cluster.
Verify the mirroring status. Run the following command from a Ceph Monitor node in the
site-bcluster:Example
Journal-based mirroring:
[root@mon ~]# rbd mirror image status data/image1
image1:
  global_id:   7d486c3f-d5a1-4bee-ae53-6c4f1e0c8eac
  state:       up+replaying
1 description: replaying, master_position=[object_number=3, tag_tid=1, entry_tid=3], mirror_position=[object_number=3, tag_tid=1, entry_tid=3], entries_behind_master=0 last_update: 2019-04-22 13:19:27Snapshot-based mirroring:
[root@mon ~]# rbd mirror image status data/image1
image1:
  global_id:   06acc9e6-a63d-4aa1-bd0d-4f3a79b0ae33
  state:       up+replaying
1 description: replaying, {"bytes_per_second":0.0,"bytes_per_snapshot":0.0,"local_snapshot_timestamp":1642689843,"remote_snapshot_timestamp":1642689843,"replay_state":"idle"} service: admin on ceph-rbd2-vasi-43-5hwia4-node2 last_update: 2022-01-20 12:41:57NoteBased on the connection between the sites, mirroring can take a long time to sync the images.
5.4. Configuring two-way mirroring using Ansible
This procedure uses ceph-ansible to configure two-way replication so images can be mirrored in either direction between two clusters known as site-a and site-b. In the following examples, data is the name of the pool that contains the images to be mirrored.
Two-way mirroring does not allow simultaneous writes to be made to the same image on either cluster. Images are promoted on one cluster and demoted on another. Depending on their status, they will mirror in one direction or the other.
Prerequisites
- Two running Red Hat Ceph Storage clusters.
- Each cluster has a client node.
- A pool with the same name exists on both clusters.
- Images within the pool must have exclusive-lock and journaling enabled for journal-based mirroring.
Procedure
On the cluster where the images originate, enable the exclusive-lock and journaling features on an image.
For new images, use the
--image-featureoption:Syntax
rbd create IMAGE_NAME --size MEGABYTES --pool POOL_NAME --image-feature FEATURE[,FEATURE]Example
[root@rbd-client ~]# rbd create image1 --size 1024 --pool data --image-feature exclusive-lock,journalingFor existing images, use the
rbd feature enablecommand:Syntax
rbd feature enable POOL_NAME/IMAGE_NAME FEATURE_NAMEExample
[root@rbd-client ~]# rbd feature enable data/image1 exclusive-lock,journalingTo enable exclusive-lock and journaling on all new images by default, add the following setting to the Ceph configuration file:
rbd_default_features = 125
In the
site-acluster, complete the following steps:On a monitor node, create the user the
rbd-mirrordaemon will use to connect to the cluster. The example creates asite-auser and outputs the key to a file namedsite-a.client.site-a.keyring, and the Ceph configuration file is/etc/ceph/site-a.conf.Syntax
ceph auth get-or-create client.PRIMARY_CLUSTER_NAME mon 'profile rbd' osd 'profile rbd pool=data' -o /etc/ceph/PRIMARY_CLUSTER_NAME.client.USER_NAME.keyring -c /etc/ceph/PRIMARY_CLUSTER_NAME.confExample
[root@mon ~]# ceph auth get-or-create client.site-a mon 'profile rbd' osd 'profile rbd pool=data' -o /etc/ceph/site-a.client.site-a.keyring -c /etc/ceph/site-a.confCopy the keyring to the
site-bcluster. Copy the file to the client node in thesite-bcluster that therbd-daemonwill run on. Save the file to/etc/ceph/site-a.client.site-a.keyring:Syntax
scp /etc/ceph/PRIMARY_CLUSTER_NAME.client.USER_NAME.keyring root@SECONDARY_CLIENT_NODE_NAME:/etc/ceph/PRIMARY_CLUSTER_NAME.client.USER_NAME.keyringExample
[root@mon ~]# scp /etc/ceph/site-a.client.site-a.keyring root@client.site-b:/etc/ceph/site-a.client.site-a.keyringCopy the Ceph configuration file from the monitor node to the
site-bmonitor node and client nodes. The Ceph configuration file in this example is/etc/ceph/site-a.conf.Syntax
scp /etc/ceph/PRIMARY_CLUSTER_NAME.conf root@SECONDARY_MONITOR_NODE_NAME:/etc/ceph/PRIMARY_CLUSTER_NAME.conf
scp /etc/ceph/PRIMARY_CLUSTER_NAME.conf user@SECONDARY_CLIENT_NODE_NAME:/etc/ceph/PRIMARY_CLUSTER_NAME.conf
Example
[root@mon ~]# scp /etc/ceph/site-a.conf root@mon.site-b:/etc/ceph/site-a.conf
[root@mon ~]# scp /etc/ceph/site-a.conf user@client.site-b:/etc/ceph/site-a.conf
In the
site-bcluster, complete the following steps:-
Configure mirroring from
site-atosite-b. On the Ansible administration node, add an[rbdmirrors]group in the Ansible inventory file, usually/usr/share/ceph-ansible/hosts. Under the
[rbdmirrors]group, add the name of asite-bclient node that therbd-mirrordaemon will run on. This daemon pulls image changes fromsite-atosite-b.Example
[rbdmirrors]
client.site-b
Navigate to the
/usr/share/ceph-ansible/directory:[root@admin ~]$ cd /usr/share/ceph-ansibleCreate a new
rbdmirrors.ymlfile by copyinggroup_vars/rbdmirrors.yml.sampletogroup_vars/rbdmirrors.yml:[root@admin ceph-ansible]# cp group_vars/rbdmirrors.yml.sample group_vars/rbdmirrors.yml-
Open for editing the
group_vars/rbdmirrors.ymlfile. Set
ceph_rbd_mirror_configuretotrue, and setceph_rbd_mirror_poolto the pool you want to mirror images in. In these examples,datais the name of the pool.ceph_rbd_mirror_configure: true ceph_rbd_mirror_pool: "data"By default,
ceph-ansibleconfigures mirroring using pool mode, which mirrors all images in a pool. Enable image mode where only images that have mirroring explicitly enabled are mirrored. To enable image mode, setceph_rbd_mirror_modetoimage:ceph_rbd_mirror_mode: imageSet a name for the cluster that
rbd-mirrorin thegroup_vars/rbdmirrors.ymlfile. In these examples, the other cluster issite-a.ceph_rbd_mirror_remote_cluster: "site-a"On the Ansible administration node, set the user name of the key using
ceph_rbd_mirror_remote_userin thegroup_vars/rbdmirrors.ymlfile. Use the same name you used when you created the key. In these examples the user is namedclient.site-a.ceph_rbd_mirror_remote_user: "client.site-a"As the ansible user, run the Ansible playbook:
Bare-metal deployments:
[user@admin ceph-ansible]$ ansible-playbook site.yml --limit rbdmirrors -i hostsContainer deployments:
[user@admin ceph-ansible]$ ansible-playbook site-container.yml --limit rbdmirrors -i hosts
-
Configure mirroring from
Verify the mirroring status. Run the following command from a Ceph Monitor node on the
site-bcluster:Example
Journal-based mirroring:
[root@mon ~]# rbd mirror image status data/image1
image1:
  global_id:   7d486c3f-d5a1-4bee-ae53-6c4f1e0c8eac
  state:       up+replaying
1 description: replaying, master_position=[object_number=3, tag_tid=1, entry_tid=3], mirror_position=[object_number=3, tag_tid=1, entry_tid=3], entries_behind_master=0 last_update: 2021-04-22 13:19:27Snapshot-based mirroring:
[root@mon ~]# rbd mirror image status data/image1
image1:
  global_id:   06acc9e6-a63d-4aa1-bd0d-4f3a79b0ae33
  state:       up+replaying
1 description: replaying, {"bytes_per_second":0.0,"bytes_per_snapshot":0.0,"local_snapshot_timestamp":1642689843,"remote_snapshot_timestamp":1642689843,"replay_state":"idle"} service: admin on ceph-rbd2-vasi-43-5hwia4-node2 last_update: 2022-01-20 12:41:57NoteBased on the connection between the sites, mirroring can take a long time to sync the images.
In the
site-bcluster, complete the following steps. The steps are largely the same as above:On a monitor node, create the user the
rbd-mirrordaemon will use to connect to the cluster. The example creates asite-buser and outputs the key to a file namedsite-b.client.site-b.keyring, and the Ceph configuration file is/etc/ceph/site-b.conf.Syntax
ceph auth get-or-create client.SECONDARY_CLUSTER_NAME mon 'profile rbd' osd 'profile rbd pool=data' -o /etc/ceph/SECONDARY_CLUSTER_NAME.client.USER_NAME.keyring -c /etc/ceph/SECONDARY_CLUSTER_NAME.confExample
[root@mon ~]# ceph auth get-or-create client.site-b mon 'profile rbd' osd 'profile rbd pool=data' -o /etc/ceph/site-b.client.site-b.keyring -c /etc/ceph/site-b.confCopy the keyring to the
site-acluster. Copy the file to the client node in thesite-acluster that therbd-daemonwill run on. Save the file to/etc/ceph/site-b.client.site-b.keyring:Syntax
scp /etc/ceph/SECONDARY_CLUSTER_NAME.client.USER_NAME.keyring root@PRIMARY_CLIENT_NODE_NAME:/etc/ceph/SECONDARY_CLUSTER_NAME.client.USER_NAME.keyringExample
[root@mon ~]# scp /etc/ceph/site-b.client.site-b.keyring root@client.site-a:/etc/ceph/site-b.client.site-b.keyringCopy the Ceph configuration file from the monitor node to the
site-amonitor node and client nodes. The Ceph configuration file in this example is/etc/ceph/site-b.conf.Syntax
scp /etc/ceph/SECONDARY_CLUSTER_NAME.conf root@PRIMARY_MONITOR_NODE_NAME:/etc/ceph/SECONDARY_CLUSTER_NAME.conf
scp /etc/ceph/SECONDARY_CLUSTER_NAME.conf user@PRIMARY_CLIENT_NODE_NAME:/etc/ceph/SECONDARY_CLUSTER_NAME.conf
Example
[root@mon ~]# scp /etc/ceph/site-b.conf root@mon.site-a:/etc/ceph/site-b.conf
[root@mon ~]# scp /etc/ceph/site-b.conf user@client.site-a:/etc/ceph/site-b.conf
In the
site-acluster, complete the following steps:-
Configure mirroring from
site-btosite-a. On the Ansible administration node, add an[rbdmirrors]group in the Ansible inventory file, usually/usr/share/ceph-ansible/hosts. Under the
[rbdmirrors]group, add the name of asite-aclient node that therbd-mirrordaemon will run on. This daemon pulls image changes fromsite-btosite-a.Example
[rbdmirrors]
client.site-a
Navigate to the
/usr/share/ceph-ansible/directory:[root@admin ~]# cd /usr/share/ceph-ansibleCreate a new
rbdmirrors.ymlfile by copyinggroup_vars/rbdmirrors.yml.sampletogroup_vars/rbdmirrors.yml:[root@admin ceph-ansible]# cp group_vars/rbdmirrors.yml.sample group_vars/rbdmirrors.yml-
Open for editing the
group_vars/rbdmirrors.ymlfile. Set
ceph_rbd_mirror_configuretotrue, and setceph_rbd_mirror_poolto the pool you want to mirror images in. In these examples,datais the name of the pool.ceph_rbd_mirror_configure: true ceph_rbd_mirror_pool: "data"By default,
ceph-ansibleconfigures mirroring using pool mode which mirrors all images in a pool. Enable image mode where only images that have mirroring explicitly enabled are mirrored. To enable image mode, setceph_rbd_mirror_modetoimage:ceph_rbd_mirror_mode: imageOn the Ansible administration node, set a name for the cluster that
rbd-mirrorin thegroup_vars/rbdmirrors.ymlfile. Following the examples, the other cluster is namedsite-b.ceph_rbd_mirror_remote_cluster: "site-b"On the Ansible administration node, set the user name of the key using
ceph_rbd_mirror_remote_useringroup_vars/rbdmirrors.ymlfile. In these examples the user is namedclient.site-b.ceph_rbd_mirror_remote_user: "client.site-b"As the Ansible user on the administration node, run the Ansible playbook:
Bare-metal deployments:
[user@admin ceph-ansible]$ ansible-playbook site.yml --limit rbdmirrors -i hostsContainer deployments:
[user@admin ceph-ansible]$ ansible-playbook site-container.yml --limit rbdmirrors -i hosts
-
Configure mirroring from
Explicitly enable mirroring on the desired images in both
site-aandsite-bclusters:Syntax
Journal-based mirroring:
rbd mirror image enable POOL/IMAGESnapshot-based mirroring:
rbd mirror image enable POOL/IMAGE snapshotExample
[root@mon ~]# rbd mirror image enable data/image1 [root@mon ~]# rbd mirror image enable data/image1 snapshotNoteRepeat this step whenever you want to mirror new image to peer cluster.
Verify the mirroring status. Run the following command from the client node on the
site-acluster:Example
Journal-based mirroring:
[root@mon ~]# rbd mirror image status data/image1
image1:
  global_id:   08027096-d267-47f8-b52e-59de1353a034
  state:       up+stopped
1 description: local image is primary last_update: 2021-04-16 15:45:31Snapshot-based mirroring:
[root@mon ~]# rbd mirror image status data/image1
image1:
  global_id:   47fd1aae-5f19-4193-a5df-562b5c644ea7
  state:       up+stopped
1 description: local image is primary service: admin on ceph-rbd1-vasi-43-5hwia4-node2 last_update: 2022-01-20 12:42:54 peer_sites: name: rbd-mirror.site-b state: up+replaying description: replaying, {"bytes_per_second":0.0,"bytes_per_snapshot":0.0,"local_snapshot_timestamp":1642693094,"remote_snapshot_timestamp":1642693094,"replay_state":"idle"} last_update: 2022-01-20 12:42:59 snapshots: 5 .mirror.primary.47fd1aae-5f19-4193-a5df-562b5c644ea7.dda146c6-5f21-4e75-ba93-660f6e57e301 (peer_uuids:[bfd09289-c9c9-40c8-b2d3-ead9b6a99a45])
5.5. Configuring one-way mirroring using the command-line interface
This procedure configures one-way replication of a pool from the primary storage cluster to a secondary storage cluster.
When using one-way replication you can mirror to multiple secondary storage clusters.
Examples in this section will distinguish between two storage clusters by referring to the primary storage cluster with the primary images as site-a, and the secondary storage cluster you are replicating the images to, as site-b. The pool name used in these examples is called data.
Prerequisites
- A minimum of two healthy and running Red Hat Ceph Storage clusters.
- Root-level access to a Ceph client node for each storage cluster.
- A CephX user with administrator-level capabilities.
- Images within the pool must have exclusive-lock and journaling enabled for journal-based mirroring.
Procedure
Install the
rbd-mirrorpackage on the client node connected to thesite-bstorage cluster:Red Hat Enterprise Linux 7
[root@rbd-client ~]# yum install rbd-mirrorRed Hat Enterprise Linux 8
[root@rbd-client ~]# dnf install rbd-mirrorNoteThe package is provided by the Red Hat Ceph Storage Tools repository.
Enable the exclusive-lock, and journaling features on an image.
For new images, use the
--image-featureoption:Syntax
rbd create IMAGE_NAME --size MEGABYTES --pool POOL_NAME --image-feature FEATURE [,FEATURE]Example
[root@rbd-client ~]# rbd create image1 --size 1024 --pool data --image-feature exclusive-lock,journalingFor existing images, use the
rbd feature enablecommand:Syntax
rbd feature enable POOL_NAME/IMAGE_NAME FEATURE [,FEATURE]Example
[root@rbd-client ~]# rbd feature enable data/image1 exclusive-lock,journalingTo enable exclusive-lock and journaling on all new images by default, add the following setting to the Ceph configuration file:
rbd_default_features = 125
Choose the mirroring mode, either pool or image mode.
ImportantUse image mode for snapshot-based mirroring.
Enabling pool mode:
Syntax
rbd mirror pool enable POOL_NAME MODEExample
[root@rbd-client ~]# rbd mirror pool enable data poolThis example enables mirroring of the whole pool named
data.Enabling image mode:
Syntax
rbd mirror pool enable POOL_NAME MODEExample
[root@rbd-client ~]# rbd mirror pool enable data imageThis example enables image mode mirroring on the pool named
data.Verify that mirroring has been successfully enabled:
Syntax
rbd mirror pool info POOL_NAMEExample
[root@rbd-client ~]# rbd mirror pool info data
Mode: image
Site Name: 94cbd9ca-7f9a-441a-ad4b-52a33f9b7148

Peer Sites: none
In the
site-acluster, complete the following steps:On the Ceph client node, create a user:
Syntax
ceph auth get-or-create client.PRIMARY_CLUSTER_NAME mon 'profile rbd-mirror' osd 'profile rbd' -o /etc/ceph/ceph.PRIMARY_CLUSTER_NAME.keyringExample
[root@rbd-client-site-a ~]# ceph auth get-or-create client.rbd-mirror.site-a mon 'profile rbd-mirror' osd 'profile rbd' -o /etc/ceph/ceph.client.rbd-mirror.site-a.keyringCopy keyring to
site-bcluster:Syntax
scp /etc/ceph/ceph.PRIMARY_CLUSTER_NAME.keyring root@SECONDARY_CLUSTER:_PATH_Example
[root@rbd-client-site-a ~]# scp /etc/ceph/ceph.client.rbd-mirror.site-a.keyring root@rbd-client-site-b:/etc/ceph/On a Ceph client node, bootstrap the storage cluster peers.
Register the storage cluster peer to the pool:
Syntax
rbd mirror pool peer bootstrap create --site-name LOCAL_SITE_NAME POOL_NAME > PATH_TO_BOOTSTRAP_TOKENExample
[root@rbd-client-site-a ~]# rbd mirror pool peer bootstrap create --site-name rbd-mirror.site-a data > /root/bootstrap_token_rbd-mirror.site-aNoteThis example bootstrap command creates the
client.rbd-mirror-peerCeph user.Copy the bootstrap token file to the
site-bstorage cluster.Syntax
scp PATH_TO_BOOTSTRAP_TOKEN root@SECONDARY_CLUSTER:/root/Example
[root@rbd-client-site-a ~]# scp /root/bootstrap_token_site-a root@ceph-rbd2:/root/
In the
site-bcluster, complete the following steps:On the client node, create a user:
Syntax
ceph auth get-or-create client.SECONDARY_CLUSTER_NAME mon 'profile rbd-mirror' osd 'profile rbd' -o /etc/ceph/ceph.SECONDARY_CLUSTER_NAME.keyringExample
[root@rbd-client-site-b ~]# ceph auth get-or-create client.rbd-mirror.site-b mon 'profile rbd-mirror' osd 'profile rbd' -o /etc/ceph/ceph.client.rbd-mirror.site-b.keyringCopy keyring to the
site-acluster, the Ceph client node:Syntax
scp /etc/ceph/ceph.SECONDARY_CLUSTER_NAME.keyring root@PRIMARY_CLUSTER:_PATH_Example
[root@rbd-client-site-b ~]# scp /etc/ceph/ceph.client.rbd-mirror.site-b.keyring root@rbd-client-site-a:/etc/ceph/Import the bootstrap token:
Syntax
rbd mirror pool peer bootstrap import --site-name LOCAL_SITE_NAME --direction rx-only POOL_NAME PATH_TO_BOOTSTRAP_TOKENExample
[root@rbd-client-site-b ~]# rbd mirror pool peer bootstrap import --site-name rbd-mirror.site-b --direction rx-only data /root/bootstrap_token_rbd-mirror.site-aNoteFor one-way RBD mirroring, you must use the
--direction rx-onlyargument, as two-way mirroring is the default when bootstrapping peers.Enable and start the
rbd-mirrordaemon on client node:Syntax
systemctl enable ceph-rbd-mirror.target
systemctl enable ceph-rbd-mirror@rbd-mirror.CLIENT_ID
systemctl start ceph-rbd-mirror@rbd-mirror.CLIENT_ID
Replace
CLIENT_IDwith the Ceph user created earlier.Example
[root@rbd-client-site-b ~]# systemctl enable ceph-rbd-mirror.target
[root@rbd-client-site-b ~]# systemctl enable ceph-rbd-mirror@rbd-mirror.site-a
[root@rbd-client-site-b ~]# systemctl start ceph-rbd-mirror@rbd-mirror.site-a
ImportantEach
rbd-mirrordaemon must have a unique Client ID.To verify the mirroring status, run the following command from a Ceph Monitor node in the
site-aandsite-bclusters:Syntax
rbd mirror image status POOL_NAME/IMAGE_NAMEExample
Journal-based mirroring:
[root@mon-site-a ~]# rbd mirror image status data/image1
image1:
  global_id:   08027096-d267-47f8-b52e-59de1353a034
  state:       up+stopped
1 description: local image is primary last_update: 2021-04-22 13:45:31Snapshot-based mirroring:
[root@mon-site-a ~]# rbd mirror image status data/image1
image1:
  global_id:   47fd1aae-5f19-4193-a5df-562b5c644ea7
  state:       up+stopped
1 description: local image is primary service: admin on ceph-rbd1-vasi-43-5hwia4-node2 last_update: 2022-01-20 12:42:54 peer_sites: name: rbd-mirror.site-b state: up+replaying description: replaying, {"bytes_per_second":0.0,"bytes_per_snapshot":0.0,"local_snapshot_timestamp":1642693094,"remote_snapshot_timestamp":1642693094,"replay_state":"idle"} last_update: 2022-01-20 12:42:59 snapshots: 5 .mirror.primary.47fd1aae-5f19-4193-a5df-562b5c644ea7.dda146c6-5f21-4e75-ba93-660f6e57e301 (peer_uuids:[bfd09289-c9c9-40c8-b2d3-ead9b6a99a45])Example
Journal-based mirroring:
[root@mon-site-b ~]# rbd mirror image status data/image1
image1:
  global_id:   7d486c3f-d5a1-4bee-ae53-6c4f1e0c8eac
  state:       up+replaying
1 description: replaying, master_position=[object_number=3, tag_tid=1, entry_tid=3], mirror_position=[object_number=3, tag_tid=1, entry_tid=3], entries_behind_master=0 last_update: 2021-04-22 14:19:27Snapshot-based mirroring:
[root@mon-site-b ~]# rbd mirror image status data/image1
image1:
  global_id:   06acc9e6-a63d-4aa1-bd0d-4f3a79b0ae33
  state:       up+replaying
1 description: replaying, {"bytes_per_second":0.0,"bytes_per_snapshot":0.0,"local_snapshot_timestamp":1642689843,"remote_snapshot_timestamp":1642689843,"replay_state":"idle"} service: admin on ceph-rbd2-vasi-43-5hwia4-node2 last_update: 2022-01-20 12:41:57NoteDepending on the connection between the sites, mirroring can take a long time to sync the images.
Additional Resources
- See the Ceph block device mirroring section in the Red Hat Ceph Storage Block Device Guide for more details.
- See the User Management section in the Red Hat Ceph Storage Administration Guide for more details on Ceph users.
5.6. Configuring two-way mirroring using the command-line interface
This procedure configures two-way replication of a pool between the primary storage cluster, and a secondary storage cluster.
When using two-way replication you can only mirror between two storage clusters.
Examples in this section will distinguish between two storage clusters by referring to the primary storage cluster with the primary images as site-a, and the secondary storage cluster you are replicating the images to, as site-b. The pool name used in these examples is called data.
Prerequisites
- A minimum of two healthy and running Red Hat Ceph Storage clusters.
- Root-level access to a Ceph client node for each storage cluster.
- A CephX user with administrator-level capabilities.
- Images within the pool must have exclusive-lock and journaling enabled for journal-based mirroring.
Procedure
Install the
rbd-mirrorpackage on the client node connected to thesite-astorage cluster, and the client node connected to thesite-bstorage cluster:Red Hat Enterprise Linux 7
[root@rbd-client ~]# yum install rbd-mirrorRed Hat Enterprise Linux 8
[root@rbd-client ~]# dnf install rbd-mirrorNoteThe package is provided by the Red Hat Ceph Storage Tools repository.
Enable the exclusive-lock, and journaling features on an image.
For new images, use the
--image-featureoption:Syntax
rbd create IMAGE_NAME --size MEGABYTES --pool POOL_NAME --image-feature FEATURE [,FEATURE]Example
[root@rbd-client ~]# rbd create image1 --size 1024 --pool data --image-feature exclusive-lock,journalingFor existing images, use the
rbd feature enablecommand:Syntax
rbd feature enable POOL_NAME/IMAGE_NAME FEATURE [,FEATURE]Example
[root@rbd-client ~]# rbd feature enable data/image1 exclusive-lock,journalingTo enable exclusive-lock and journaling on all new images by default, add the following setting to the Ceph configuration file:
rbd_default_features = 125
Choose the mirroring mode, either pool or image mode.
ImportantUse image mode for snapshot-based mirroring.
Enabling pool mode:
Syntax
rbd mirror pool enable POOL_NAME MODEExample
[root@rbd-client ~]# rbd mirror pool enable data poolThis example enables mirroring of the whole pool named
data.Enabling image mode:
Syntax
rbd mirror pool enable POOL_NAME MODEExample
[root@rbd-client ~]# rbd mirror pool enable data imageThis example enables image mode mirroring on the pool named
data.Verify that mirroring has been successfully enabled:
Syntax
rbd mirror pool info POOL_NAMEExample
[root@rbd-client ~]# rbd mirror pool info data
Mode: image
Site Name: 94cbd9ca-7f9a-441a-ad4b-52a33f9b7148

Peer Sites: none
In the
site-acluster, complete the following steps:On the Ceph client node, create a user:
Syntax
ceph auth get-or-create client.PRIMARY_CLUSTER_NAME mon 'profile rbd-mirror' osd 'profile rbd' -o /etc/ceph/ceph.PRIMARY_CLUSTER_NAME.keyringExample
[root@rbd-client-site-a ~]# ceph auth get-or-create client.rbd-mirror.site-a mon 'profile rbd-mirror' osd 'profile rbd' -o /etc/ceph/ceph.client.rbd-mirror.site-a.keyringCopy keyring to
site-bcluster:Syntax
scp /etc/ceph/ceph.PRIMARY_CLUSTER_NAME.keyring root@SECONDARY_CLUSTER:_PATH_Example
[root@rbd-client-site-a ~]# scp /etc/ceph/ceph.client.rbd-mirror.site-a.keyring root@rbd-client-site-b:/etc/ceph/On a Ceph client node, bootstrap the storage cluster peers.
Register the storage cluster peer to the pool:
Syntax
rbd mirror pool peer bootstrap create --site-name LOCAL_SITE_NAME POOL_NAME > PATH_TO_BOOTSTRAP_TOKENExample
[root@rbd-client-site-a ~]# rbd mirror pool peer bootstrap create --site-name rbd-mirror.site-a data > /root/bootstrap_token_rbd-mirror.site-aNoteThis example bootstrap command creates the
client.rbd-mirror-peerCeph user.Copy the bootstrap token file to the
site-bstorage cluster.Syntax
scp PATH_TO_BOOTSTRAP_TOKEN root@SECONDARY_CLUSTER:/root/Example
[root@rbd-client-site-a ~]# scp /root/bootstrap_token_site-a root@ceph-rbd2:/root/
In the
site-bcluster, complete the following steps:On the client node, create a user:
Syntax
ceph auth get-or-create client.SECONDARY_CLUSTER_NAME mon 'profile rbd-mirror' osd 'profile rbd' -o /etc/ceph/ceph.SECONDARY_CLUSTER_NAME.keyringExample
[root@rbd-client-site-b ~]# ceph auth get-or-create client.rbd-mirror.site-b mon 'profile rbd-mirror' osd 'profile rbd' -o /etc/ceph/ceph.client.rbd-mirror.site-b.keyringCopy keyring to the
site-acluster, the Ceph client node:Syntax
scp /etc/ceph/ceph.SECONDARY_CLUSTER_NAME.keyring root@PRIMARY_CLUSTER:_PATH_Example
[root@rbd-client-site-b ~]# scp /etc/ceph/ceph.client.rbd-mirror.site-b.keyring root@rbd-client-site-a:/etc/ceph/Import the bootstrap token:
Syntax
rbd mirror pool peer bootstrap import --site-name LOCAL_SITE_NAME --direction rx-tx POOL_NAME PATH_TO_BOOTSTRAP_TOKENExample
[root@rbd-client-site-b ~]# rbd mirror pool peer bootstrap import --site-name rbd-mirror.site-b --direction rx-tx data /root/bootstrap_token_rbd-mirror.site-aNoteThe
--directionargument is optional, as two-way mirroring is the default when bootstrapping peers.
Enable and start the
rbd-mirrordaemon on the primary and secondary client nodes:Syntax
systemctl enable ceph-rbd-mirror.target
systemctl enable ceph-rbd-mirror@rbd-mirror.CLIENT_ID
systemctl start ceph-rbd-mirror@rbd-mirror.CLIENT_ID
Replace
CLIENT_IDwith the Ceph user created earlier.Example
[root@rbd-client-site-a ~]# systemctl enable ceph-rbd-mirror.target
[root@rbd-client-site-a ~]# systemctl enable ceph-rbd-mirror@rbd-mirror.site-a
[root@rbd-client-site-a ~]# systemctl start ceph-rbd-mirror@rbd-mirror.site-a
[root@rbd-client-site-a ~]# systemctl enable ceph-rbd-mirror@rbd-mirror.site-b
[root@rbd-client-site-a ~]# systemctl start ceph-rbd-mirror@rbd-mirror.site-b
In the above example, users are enabled in the primary cluster
site-aExample
[root@rbd-client-site-b ~]# systemctl enable ceph-rbd-mirror.target
[root@rbd-client-site-b ~]# systemctl enable ceph-rbd-mirror@rbd-mirror.site-a
[root@rbd-client-site-b ~]# systemctl start ceph-rbd-mirror@rbd-mirror.site-a
[root@rbd-client-site-b ~]# systemctl enable ceph-rbd-mirror@rbd-mirror.site-b
[root@rbd-client-site-b ~]# systemctl start ceph-rbd-mirror@rbd-mirror.site-b
In the above example, users are enabled in the secondary cluster
site-bImportantEach
rbd-mirrordaemon must have a unique Client ID.To verify the mirroring status, run the following command from a Ceph Monitor node in the
site-aandsite-bclusters:Syntax
rbd mirror image status POOL_NAME/IMAGE_NAMEExample
Journal-based mirroring:
[root@mon-site-a ~]# rbd mirror image status data/image1
image1:
  global_id:   08027096-d267-47f8-b52e-59de1353a034
  state:       up+stopped
1 description: local image is primary last_update: 2021-04-22 13:45:31Snapshot-based mirroring:
[root@mon-site-a ~]# rbd mirror image status data/image1
image1:
  global_id:   47fd1aae-5f19-4193-a5df-562b5c644ea7
  state:       up+stopped
1 description: local image is primary service: admin on ceph-rbd1-vasi-43-5hwia4-node2 last_update: 2022-01-20 12:42:54 peer_sites: name: rbd-mirror.site-b state: up+replaying description: replaying, {"bytes_per_second":0.0,"bytes_per_snapshot":0.0,"local_snapshot_timestamp":1642693094,"remote_snapshot_timestamp":1642693094,"replay_state":"idle"} last_update: 2022-01-20 12:42:59 snapshots: 5 .mirror.primary.47fd1aae-5f19-4193-a5df-562b5c644ea7.dda146c6-5f21-4e75-ba93-660f6e57e301 (peer_uuids:[bfd09289-c9c9-40c8-b2d3-ead9b6a99a45])Example
Journal-based mirroring:
[root@mon-site-b ~]# rbd mirror image status data/image1
image1:
  global_id:   7d486c3f-d5a1-4bee-ae53-6c4f1e0c8eac
  state:       up+replaying
1 description: replaying, master_position=[object_number=3, tag_tid=1, entry_tid=3], mirror_position=[object_number=3, tag_tid=1, entry_tid=3], entries_behind_master=0 last_update: 2021-04-22 14:19:27Snapshot-based mirroring:
[root@mon-site-b ~]# rbd mirror image status data/image1
image1:
  global_id:   06acc9e6-a63d-4aa1-bd0d-4f3a79b0ae33
  state:       up+replaying
1 description: replaying, {"bytes_per_second":0.0,"bytes_per_snapshot":0.0,"local_snapshot_timestamp":1642689843,"remote_snapshot_timestamp":1642689843,"replay_state":"idle"} service: admin on ceph-rbd2-vasi-43-5hwia4-node2 last_update: 2022-01-20 12:41:57NoteDepending on the connection between the sites, mirroring can take a long time to sync the images.
Additional Resources
- See the Ceph block device mirroring section in the Red Hat Ceph Storage Block Device Guide for more details.
- See the User Management section in the Red Hat Ceph Storage Administration Guide for more details on Ceph users.
5.7. Administration for mirroring Ceph block devices
As a storage administrator, you can do various tasks to help you manage the Ceph block device mirroring environment. You can do the following tasks:
- Viewing information about storage cluster peers.
- Add or remove a storage cluster peer.
- Getting mirroring status for a pool or image.
- Enabling mirroring on a pool or image.
- Disabling mirroring on a pool or image.
- Delaying block device replication.
- Promoting and demoting an image.
5.7.1. Prerequisites
- A minimum of two healthy running Red Hat Ceph Storage cluster.
- Root-level access to the Ceph client nodes.
- A one-way or two-way Ceph block device mirroring relationship.
5.7.2. Viewing information about peers
View information about storage cluster peers.
Prerequisites
- A running Red Hat Ceph Storage cluster.
- Root-level access to the node.
Procedure
To view information about the peers:
Syntax
rbd mirror pool info POOL_NAMEExample
[root@rbd-client ~]# rbd mirror pool info data
Mode: pool
Site Name: site-a

Peer Sites:

UUID: 950ddadf-f995-47b7-9416-b9bb233f66e3
Name: site-b
Mirror UUID: 4696cd9d-1466-4f98-a97a-3748b6b722b3
Direction: rx-tx
Client: client.site-b
5.7.3. Enabling mirroring on a pool
Enable mirroring on a pool by running the following commands on both peer clusters.
Prerequisites
- A running Red Hat Ceph Storage cluster.
- Root-level access to the node.
Procedure
To enable mirroring on a pool:
Syntax
rbd mirror pool enable POOL_NAME MODEExample
[root@rbd-client ~]# rbd mirror pool enable data poolThis example enables mirroring of the whole pool named
data.Example
[root@rbd-client ~]# rbd mirror pool enable data imageThis example enables image mode mirroring on the pool named
data.
Additional Resources
- See the Mirroring Ceph block devices section in the Red Hat Ceph Storage Block Device Guide for details.
5.7.4. Disabling mirroring on a pool
Before disabling mirroring, remove the peer clusters.
When you disable mirroring on a pool, you also disable it on any images within the pool for which mirroring was enabled separately in image mode.
Prerequisites
- A running Red Hat Ceph Storage cluster.
- Root-level access to the node.
Procedure
To disable mirroring on a pool:
Syntax
rbd mirror pool disable POOL_NAMEExample
[root@rbd-client ~]# rbd mirror pool disable dataThis example disables mirroring of a pool named
data.
Additional Resources
- See the Configuring image one-way mirroring section in the Red Hat Ceph Storage Block Device Guide for details.
- See the Removing a storage cluster peer section in the Red Hat Ceph Storage Block Device Guide for details.
5.7.5. Enabling image mirroring
Enable mirroring on the whole pool in image mode on both peer storage clusters.
Prerequisites
- A running Red Hat Ceph Storage cluster.
- Root-level access to the node.
Procedure
Enable mirroring for a specific image within the pool:
Syntax
rbd mirror image enable POOL_NAME/IMAGE_NAMEExample
[root@rbd-client ~]# rbd mirror image enable data/image2This example enables mirroring for the
image2image in thedatapool.
Additional Resources
- See the Enabling mirroring on a pool section in the Red Hat Ceph Storage Block Device Guide for details.
5.7.6. Disabling image mirroring
Disable the mirror for images.
Prerequisites
- A running Red Hat Ceph Storage cluster.
- Root-level access to the node.
Procedure
To disable mirroring for a specific image:
Syntax
rbd mirror image disable POOL_NAME/IMAGE_NAMEExample
[root@rbd-client ~]# rbd mirror image disable data/image2This example disables mirroring of the
image2image in thedatapool.
5.7.7. Image promotion and demotion
Promote or demote an image.
Do not force promote non-primary images that are still syncing, because the images will not be valid after the promotion.
Prerequisites
- A running Red Hat Ceph Storage cluster.
- Root-level access to the node.
Procedure
To demote an image to non-primary:
Syntax
rbd mirror image demote POOL_NAME/IMAGE_NAMEExample
[root@rbd-client ~]# rbd mirror image demote data/image2This example demotes the
image2image in thedatapool.To promote an image to primary:
Syntax
rbd mirror image promote POOL_NAME/IMAGE_NAMEExample
[root@rbd-client ~]# rbd mirror image promote data/image2This example promotes
image2in thedatapool.Depending on which type of mirroring you are using, see either Recovering from a disaster with one-way mirroring or Recovering from a disaster with two-way mirroring for details.
Use the
--forceoption to force promote a non-primary image:Syntax
rbd mirror image promote --force POOL_NAME/IMAGE_NAMEExample
[root@rbd-client ~]# rbd mirror image promote --force data/image2Use forced promotion when the demotion cannot be propagated to the peer Ceph storage cluster. For example, because of cluster failure or communication outage.
Additional Resources
- See the Failover after a non-orderly shutdown section in the Red Hat Ceph Storage Block Device Guide for details.
5.7.8. Image resynchronization
Re-synchronize an image. In case of an inconsistent state between the two peer clusters, the rbd-mirror daemon does not attempt to mirror the image that is causing the inconsistency.
Prerequisites
- A running Red Hat Ceph Storage cluster.
- Root-level access to the node.
Procedure
To request a resynchronization to the primary image:
Syntax
rbd mirror image resync POOL_NAME/IMAGE_NAMEExample
[root@rbd-client ~]# rbd mirror image resync data/image2This example requests resynchronization of
image2in thedatapool.
Additional Resources
- To recover from an inconsistent state because of a disaster, see either Recovering from a disaster with one-way mirroring or Recovering from a disaster with two-way mirroring for details.
5.7.9. Adding a storage cluster peer
Add a storage cluster peer for the rbd-mirror daemon to discover its peer storage cluster. For example, to add the site-a storage cluster as a peer to the site-b storage cluster, then follow this procedure from the client node in the site-b storage cluster.
Prerequisites
- A running Red Hat Ceph Storage cluster.
- Root-level access to the node.
Procedure
Register the peer to the pool:
Syntax
rbd --cluster CLUSTER_NAME mirror pool peer add POOL_NAME PEER_CLIENT_NAME@PEER_CLUSTER_NAME -n CLIENT_NAMEExample
[root@rbd-client ~]# rbd --cluster site-b mirror pool peer add data client.site-a@site-a -n client.site-b
5.7.10. Removing a storage cluster peer
Remove a storage cluster peer by specifying the peer UUID.
Prerequisites
- A running Red Hat Ceph Storage cluster.
- Root-level access to the node.
Procedure
Specify the pool name and the peer Universally Unique Identifier (UUID).
Syntax
rbd mirror pool peer remove POOL_NAME PEER_UUIDExample
[root@rbd-client ~]# rbd mirror pool peer remove data 7e90b4ce-e36d-4f07-8cbc-42050896825dTipTo view the peer UUID, use the
rbd mirror pool infocommand.
5.7.11. Getting mirroring status for a pool
Get the mirror status for a pool.
Prerequisites
- A running Red Hat Ceph Storage cluster.
- Root-level access to the node.
Procedure
To get the mirroring pool summary:
Syntax
rbd mirror pool status POOL_NAMEExample
[root@rbd-client ~]# rbd mirror pool status data health: OK images: 1 totalTipTo output status details for every mirroring image in a pool, use the
--verboseoption.
5.7.12. Getting mirroring status for a single image
Get the mirror status for an image.
Prerequisites
- A running Red Hat Ceph Storage cluster.
- Root-level access to the node.
Procedure
To get the status of a mirrored image:
Syntax
rbd mirror image status POOL_NAME/IMAGE_NAMEExample
[root@rbd-client ~]# rbd mirror image status data/image2
image2:
  global_id:   703c4082-100d-44be-a54a-52e6052435a5
  state:       up+replaying
  description: replaying, master_position=[object_number=0, tag_tid=3, entry_tid=0], mirror_position=[object_number=0, tag_tid=3, entry_tid=0], entries_behind_master=0
  last_update: 2019-04-23 13:39:15
This example gets the status of the
image2image in thedatapool.
5.7.13. Delaying block device replication
Whether you are using one- or two-way replication, you can delay replication between RADOS Block Device (RBD) mirroring images. You might want to implement delayed replication if you want a window of cushion time in case an unwanted change to the primary image needs to be reverted before being replicated to the secondary image.
To implement delayed replication, the rbd-mirror daemon within the destination storage cluster should set the rbd_mirroring_replay_delay = MINIMUM_DELAY_IN_SECONDS configuration option. This setting can either be applied globally within the ceph.conf file utilized by the rbd-mirror daemons, or on an individual image basis.
Prerequisites
- A running Red Hat Ceph Storage cluster.
- Root-level access to the node.
Procedure
To utilize delayed replication for a specific image, on the primary image, run the following
rbdCLI command:Syntax
rbd image-meta set POOL_NAME/IMAGE_NAME conf_rbd_mirroring_replay_delay MINIMUM_DELAY_IN_SECONDSExample
[root@rbd-client ~]# rbd image-meta set vms/vm-1 conf_rbd_mirroring_replay_delay 600This example sets a 10 minute minimum replication delay on image
vm-1in thevmspool.
5.7.14. Asynchronous updates and Ceph block device mirroring
When updating a storage cluster using Ceph block device mirroring with an asynchronous update, follow the update instruction in the Red Hat Ceph Storage Installation Guide. Once updating is done, restart the Ceph block device instances.
There is no required order for restarting the instances. Red Hat recommends restarting the instance pointing to the pool with primary images followed by the instance pointing to the mirrored pool.
5.7.15. Creating an image mirror-snapshot
Create an image mirror-snapshot when it is required to mirror the changed contents of an RBD image when using snapshot-based mirroring.
Prerequisites
- A minimum of two healthy running Red Hat Ceph Storage clusters.
- Root-level access to the Ceph client nodes for the Red Hat Ceph Storage clusters.
- A CephX user with administrator-level capabilities.
- Access to the Red Hat Ceph Storage cluster where a snapshot mirror will be created.
By default only 3 image mirror-snapshots can be created per image. The most recent image mirror-snapshot is automatically removed if the limit is reached. If required, the limit can be overridden through the rbd_mirroring_max_mirroring_snapshots configuration. Image mirror-snapshots are automatically deleted when the image is removed or when mirroring is disabled.
Procedure
To create an image-mirror snapshot:
Syntax
rbd --cluster CLUSTER_NAME mirror image snapshot POOL_NAME/IMAGE_NAMEExample
root@rbd-client ~]# rbd --cluster site-a mirror image snapshot data/image1
Additional Resources
- See the Mirroring Ceph block devices section in the Red Hat Ceph Storage Block Device Guide for details.
5.7.16. Scheduling mirror-snapshots
Mirror-snapshots can be automatically created when mirror-snapshot schedules are defined. The mirror-snapshot can be scheduled globally, per-pool or per-image levels. Multiple mirror-snapshot schedules can be defined at any level but only the most specific snapshot schedules that match an individual mirrored image will run.
Additional Resources
- See the Mirroring Ceph block devices section in the Red Hat Ceph Storage Block Device Guide for details.
5.7.17. Creating a mirror-snapshot schedule
Create a mirror-snapshot schedule.
Prerequisites
- A minimum of two healthy running Red Hat Ceph Storage clusters.
- Root-level access to the Ceph client nodes for the Red Hat Ceph Storage clusters.
- A CephX user with administrator-level capabilities.
- Access to the Red Hat Ceph Storage cluster where a snapshot mirror will be created.
Procedure
To create a mirror-snapshot schedule:
Syntax
rbd mirror snapshot schedule add --pool POOL_NAME --image IMAGE_NAME INTERVAL START_TIMEThe interval can be specified in days, hours, or minutes using d, h, or m suffix respectively. The optional START_TIME can be specified using the ISO 8601 time format.
Example
Scheduling at image level:
[root@rbd-client ~]# rbd mirror snapshot schedule add --pool data --image image1 6hScheduling at pool level:
[root@rbd-client ~]# rbd mirror snapshot schedule add --pool data 24h 14:00:00-05:00Scheduling at global level:
[root@rbd-client ~]# rbd mirror snapshot schedule add 48h
Additional Resources
- See the Mirroring Ceph block devices section in the Red Hat Ceph Storage Block Device Guide for details.
5.7.18. Listing all snapshot schedules at a specific level
List all snapshot schedules at a specific level.
Prerequisites
- A minimum of two healthy running Red Hat Ceph Storage clusters.
- Root-level access to the Ceph client nodes for the Red Hat Ceph Storage clusters.
- A CephX user with administrator-level capabilities.
- Access to the Red Hat Ceph Storage cluster where a snapshot mirror will be created.
Procedure
To list all snapshot schedules for a specific global, pool or image level, with an optional pool or image name:
Syntax
rbd --cluster site-a mirror snapshot schedule ls --pool POOL_NAME --recursiveAdditionally, the
`--recursiveoption can be specified to list all schedules at the specified level as shown below:Example
[root@rbd-client ~]# rbd --cluster site-a mirror snapshot schedule ls --pool data --recursive
POOL        NAMESPACE IMAGE  SCHEDULE
data         -         -      every 1d starting at 14:00:00-05:00
data         -        image1   every 6h
Additional Resources
- See the Mirroring Ceph block devices section in the Red Hat Ceph Storage Block Device Guide for details.
5.7.19. Removing a mirror-snapshot schedule
Remove a mirror-snapshot schedule.
Prerequisites
- A minimum of two healthy running Red Hat Ceph Storage clusters.
- Root-level access to the Ceph client nodes for the Red Hat Ceph Storage clusters.
- A CephX user with administrator-level capabilities.
- Access to the Red Hat Ceph Storage cluster where a snapshot mirror will be created.
Procedure
To remove a mirror-snapshot schedule:
Syntax
rbd --cluster CLUSTER_NAME mirror snapshot schedule remove POOL_NAME/IMAGE_NAME INTERVAL START_TIMEThe interval can be specified in days, hours, or minutes using d, h, m suffix respectively. The optional START_TIME can be specified using the ISO 8601 time format.
Example
[root@rbd-client ~]# rbd --cluster site-a mirror snapshot schedule remove data/image1 6hExample
[root@rbd-client ~]# rbd --cluster site-a mirror snapshot schedule remove data/image1 24h 14:00:00-05:00
Additional Resources
- See the Mirroring Ceph block devices section in the Red Hat Ceph Storage Block Device Guide for details.
5.7.20. Viewing the status for the next snapshots to be created
View the status for the next snapshots to be created for snapshot-based mirroring RBD images.
Prerequisites
- A minimum of two healthy running Red Hat Ceph Storage clusters.
- Root-level access to the Ceph client nodes for the Red Hat Ceph Storage clusters.
- A CephX user with administrator-level capabilities.
- Access to the Red Hat Ceph Storage cluster where a snapshot mirror will be created.
Procedure
To view the status for the next snapshots to be created:
Syntax
rbd --cluster site-a mirror snapshot schedule status POOL_NAME/IMAGE_NAMEExample
[root@rbd-client ~]# rbd --cluster site-a mirror snapshot schedule status
SCHEDULE    TIME       IMAGE
2020-02-26 18:00:00 data/image1
Additional Resources
- See the Mirroring Ceph block devices section in the Red Hat Ceph Storage Block Device Guide for details.
5.8. Recover from a disaster
As a storage administrator, you can be prepared for eventual hardware failure by knowing how to recover the data from another storage cluster where mirroring was configured.
In the examples, the primary storage cluster is known as the site-a, and the secondary storage cluster is known as the site-b. Additionally, the storage clusters both have a data pool with two images, image1 and image2.
5.8.1. Prerequisites
- A running Red Hat Ceph Storage cluster.
- One-way or two-way mirroring was configured.
5.8.2. Disaster recovery
Asynchronous replication of block data between two or more Red Hat Ceph Storage clusters reduces downtime and prevents data loss in the event of a significant data center failure. These failures have a widespread impact, also referred as a large blast radius, and can be caused by impacts to the power grid and natural disasters.
Customer data needs to be protected during these scenarios. Volumes must be replicated with consistency and efficiency and also within Recovery Point Objective (RPO) and Recovery Time Objective (RTO) targets. This solution is called a Wide Area Network- Disaster Recovery (WAN-DR).
In such scenarios it is hard to restore the primary system and the data center. The quickest way to recover is to failover the applications to an alternate Red Hat Ceph Storage cluster (disaster recovery site) and make the cluster operational with the latest copy of the data available. The solutions that are used to recover from these failure scenarios are guided by the application:
- Recovery Point Objective (RPO): The amount of data loss, an application tolerate in the worst case.
- Recovery Time Objective (RTO): The time taken to get the application back on line with the latest copy of the data available.
Additional Resources
- See the Mirroring Ceph block devices section in the Red Hat Ceph Storage Block Device Guide for details.
- See the Encryption in transit section in the Red Hat Ceph Storage Data Security and Hardening Guide to know more about data transmission over the wire in an encrypted state.
5.8.3. Recover from a disaster with one-way mirroring
To recover from a disaster when using one-way mirroring use the following procedures. They show how to fail over to the secondary cluster after the primary cluster terminates, and how to fail back. The shutdown can be orderly or non-orderly.
One-way mirroring supports multiple secondary sites. If you are using additional secondary clusters, choose one of the secondary clusters to fail over to. Synchronize from the same cluster during fail back.
5.8.4. Recover from a disaster with two-way mirroring
To recover from a disaster when using two-way mirroring use the following procedures. They show how to fail over to the mirrored data on the secondary cluster after the primary cluster terminates, and how to failback. The shutdown can be orderly or non-orderly.
Additional Resources
- For details on demoting, promoting, and resyncing images, see the Configure mirroring on a image section in the Red Hat Ceph Storage Block Device Guide.
5.8.5. Failover after an orderly shutdown
Failover to the secondary storage cluster after an orderly shutdown.
Prerequisites
- Minimum of two running Red Hat Ceph Storage clusters.
- Root-level access to the node.
- Pool mirroring or image mirroring configured with one-way mirroring.
Procedure
- Stop all clients that use the primary image. This step depends on which clients use the image. For example, detach volumes from any OpenStack instances that use the image.
Demote the primary images located on the
site-acluster by running the following commands on a monitor node in thesite-acluster:Syntax
rbd mirror image demote POOL_NAME/IMAGE_NAMEExample
[root@rbd-client ~]# rbd mirror image demote data/image1
[root@rbd-client ~]# rbd mirror image demote data/image2
Promote the non-primary images located on the
site-bcluster by running the following commands on a monitor node in thesite-bcluster:Syntax
rbd mirror image promote POOL_NAME/IMAGE_NAMEExample
[root@rbd-client ~]# rbd mirror image promote data/image1
[root@rbd-client ~]# rbd mirror image promote data/image2
After some time, check the status of the images from a monitor node in the
site-bcluster. They should show a state ofup+stoppedand be listed as primary:[root@rbd-client ~]# rbd mirror image status data/image1 image1: global_id: 08027096-d267-47f8-b52e-59de1353a034 state: up+stopped description: local image is primary last_update: 2019-04-17 16:04:37 [root@rbd-client ~]# rbd mirror image status data/image2 image2: global_id: 596f41bc-874b-4cd4-aefe-4929578cc834 state: up+stopped description: local image is primary last_update: 2019-04-17 16:04:37- Resume the access to the images. This step depends on which clients use the image.
Additional Resources
- See the Block Storage and Volumes chapter in the Red Hat OpenStack Platform Storage Guide.
5.8.6. Failover after a non-orderly shutdown
Failover to secondary storage cluster after a non-orderly shutdown.
Prerequisites
- Minimum of two running Red Hat Ceph Storage clusters.
- Root-level access to the node.
- Pool mirroring or image mirroring configured with one-way mirroring.
Procedure
- Verify that the primary storage cluster is down.
- Stop all clients that use the primary image. This step depends on which clients use the image. For example, detach volumes from any OpenStack instances that use the image.
Promote the non-primary images from a Ceph Monitor node in the
site-bstorage cluster. Use the--forceoption, because the demotion cannot be propagated to thesite-astorage cluster:Syntax
rbd mirror image promote --force POOL_NAME/IMAGE_NAMEExample
[root@rbd-client ~]# rbd mirror image promote --force data/image1
[root@rbd-client ~]# rbd mirror image promote --force data/image2
Check the status of the images from a Ceph Monitor node in the
site-bstorage cluster. They should show a state ofup+stopping_replayand the description should sayforce promoted:Example
[root@rbd-client ~]# rbd mirror image status data/image1
image1:
  global_id:   08027096-d267-47f8-b52e-59de1353a034
  state:       up+stopping_replay
  description: force promoted
  last_update: 2019-04-17 13:25:06
[root@rbd-client ~]# rbd mirror image status data/image2
image2:
  global_id:   596f41bc-874b-4cd4-aefe-4929578cc834
  state:       up+stopping_replay
  description: force promoted
  last_update: 2019-04-17 13:25:06
Additional Resources
- See the Block Storage and Volumes chapter in the Red Hat OpenStack Platform Storage Guide.
5.8.7. Prepare for fail back
If two storage clusters were originally configured only for one-way mirroring, in order to fail back, configure the primary storage cluster for mirroring in order to replicate the images in the opposite direction.
Prerequisites
- A running Red Hat Ceph Storage cluster.
- Root-level access to the node.
Procedure
On the client node of the
site-astorage cluster, install therbd-mirrorpackage:[root@rbd-client ~]# yum install rbd-mirrorNoteThe package is provided by the Red Hat Ceph Storage Tools repository.
On the client node of the
site-astorage cluster, specify the storage cluster name by adding theCLUSTERoption to the/etc/sysconfig/cephfile:CLUSTER=site-bCopy the
site-bCeph configuration file and keyring file from thesite-bCeph Monitor node to thesite-aCeph Monitor and client nodes:Syntax
scp /etc/ceph/ceph.conf USER@SITE_A_MON_NODE_NAME:/etc/ceph/site-b.conf scp /etc/ceph/site-b.client.site-b.keyring root@SITE_A_MON_NODE_NAME:/etc/ceph/ scp /etc/ceph/ceph.conf user@SITE_A_CLIENT_NODE_NAME:/etc/ceph/site-b.conf scp /etc/ceph/site-b.client.site-b.keyring user@SITE_A_CLIENT_NODE_NAME:/etc/ceph/NoteThe
scpcommands that transfer the Ceph configuration file from thesite-bCeph Monitor node to thesite-aCeph Monitor and client nodes renames the file tosite-a.conf. The keyring file name stays the same.Copy the
site-akeyring file from thesite-aCeph Monitor node to thesite-aclient node:Syntax
scp /etc/ceph/site-a.client.site-a.keyring <user>@SITE_A_CLIENT_HOST_NAME:/etc/ceph/Enable and start the
rbd-mirrordaemon on thesite-aclient node:Syntax
systemctl enable ceph-rbd-mirror.target
systemctl enable ceph-rbd-mirror@CLIENT_ID
systemctl start ceph-rbd-mirror@CLIENT_ID
Change
CLIENT_IDto the Ceph Storage cluster user that therbd-mirrordaemon will use. The user must have the appropriatecephxaccess to the storage cluster.Example
[root@rbd-client ~]# systemctl enable ceph-rbd-mirror.target
[root@rbd-client ~]# systemctl enable ceph-rbd-mirror@site-a
[root@rbd-client ~]# systemctl start ceph-rbd-mirror@site-a
From the client node on the
site-acluster, add thesite-bcluster as a peer:Example
[root@rbd-client ~]# rbd --cluster site-a mirror pool peer add data client.site-b@site-b -n client.site-aIf you are using multiple secondary storage clusters, only the secondary storage cluster chosen to fail over to, and fail back from, must be added.
From a monitor node in the
site-astorage cluster, verify thesite-bstorage cluster was successfully added as a peer:Syntax
rbd mirror pool info POOL_NAMEExample
[root@rbd-client ~]# rbd mirror pool info data
Mode: image
Site Name: site-a

Peer Sites:

UUID: 950ddadf-f995-47b7-9416-b9bb233f66e3
Name: site-b
Mirror UUID: 4696cd9d-1466-4f98-a97a-3748b6b722b3
Direction: rx-tx
Client: client.site-b
Additional Resources
- For detailed information, see the User Management chapter in the Red Hat Ceph Storage Administration Guide.
5.8.7.1. Fail back to the primary storage cluster
When the formerly primary storage cluster recovers, fail back to the primary storage cluster.
Prerequisites
- Minimum of two running Red Hat Ceph Storage clusters.
- Root-level access to the node.
- Pool mirroring or image mirroring configured with one-way mirroring.
Procedure
Check the status of the images from a monitor node in the
site-bcluster again. They should show a state ofup-stoppedand the description should saylocal image is primary:Example
[root@rbd-client ~]# rbd mirror image status data/image1
image1:
  global_id:   08027096-d267-47f8-b52e-59de1353a034
  state:       up+stopped
  description: local image is primary
  last_update: 2019-04-22 17:37:48
[root@rbd-client ~]# rbd mirror image status data/image2
image2:
  global_id:   08027096-d267-47f8-b52e-59de1353a034
  state:       up+stopped
  description: local image is primary
  last_update: 2019-04-22 17:38:18
From a Ceph Monitor node on the
site-astorage cluster determine if the images are still primary:Syntax
rbd info POOL_NAME/IMAGE_NAMEExample
[root@rbd-client ~]# rbd info data/image1
[root@rbd-client ~]# rbd info data/image2
In the output from the commands, look for
mirroring primary: trueormirroring primary: false, to determine the state.Demote any images that are listed as primary by running a command like the following from a Ceph Monitor node in the
site-astorage cluster:Syntax
rbd mirror image demote POOL_NAME/IMAGE_NAMEExample
[root@rbd-client ~]# rbd mirror image demote data/image1Resynchronize the images ONLY if there was a non-orderly shutdown. Run the following commands on a monitor node in the
site-astorage cluster to resynchronize the images fromsite-btosite-a:Syntax
rbd mirror image resync POOL_NAME/IMAGE_NAMEExample
[root@rbd-client ~]# rbd mirror image resync data/image1
Flagged image for resync from primary
[root@rbd-client ~]# rbd mirror image resync data/image2
Flagged image for resync from primary
After some time, ensure resynchronization of the images is complete by verifying they are in the
up+replayingstate. Check their state by running the following commands on a monitor node in thesite-astorage cluster:Syntax
rbd mirror image status POOL_NAME/IMAGE_NAMEExample
[root@rbd-client ~]# rbd mirror image status data/image1
[root@rbd-client ~]# rbd mirror image status data/image2
Demote the images on the
site-bstorage cluster by running the following commands on a Ceph Monitor node in thesite-bstorage cluster:Syntax
rbd mirror image demote POOL_NAME/IMAGE_NAMEExample
[root@rbd-client ~]# rbd mirror image demote data/image1 [root@rbd-client ~]# rbd mirror image demote data/image2NoteIf there are multiple secondary storage clusters, this only needs to be done from the secondary storage cluster where it was promoted.
Promote the formerly primary images located on the
site-astorage cluster by running the following commands on a Ceph Monitor node in thesite-astorage cluster:Syntax
rbd mirror image promote POOL_NAME/IMAGE_NAMEExample
[root@rbd-client ~]# rbd mirror image promote data/image1
[root@rbd-client ~]# rbd mirror image promote data/image2
Check the status of the images from a Ceph Monitor node in the
site-astorage cluster. They should show a status ofup+stoppedand the description should saylocal image is primary:Syntax
rbd mirror image status POOL_NAME/IMAGE_NAMEExample
[root@rbd-client ~]# rbd mirror image status data/image1
image1:
  global_id:   08027096-d267-47f8-b52e-59de1353a034
  state:       up+stopped
  description: local image is primary
  last_update: 2019-04-22 11:14:51
[root@rbd-client ~]# rbd mirror image status data/image2
image2:
  global_id:   596f41bc-874b-4cd4-aefe-4929578cc834
  state:       up+stopped
  description: local image is primary
  last_update: 2019-04-22 11:14:51
5.8.8. Remove two-way mirroring
After fail back is complete, you can remove two-way mirroring and disable the Ceph block device mirroring service.
Prerequisites
- A running Red Hat Ceph Storage cluster.
- Root-level access to the node.
Procedure
Remove the
site-bstorage cluster as a peer from thesite-astorage cluster:Example
[root@rbd-client ~]# rbd mirror pool peer remove data client.remote@remote --cluster local
[root@rbd-client ~]# rbd --cluster site-a mirror pool peer remove data client.site-b@site-b -n client.site-a
Stop and disable the
rbd-mirrordaemon on thesite-aclient:Syntax
systemctl stop ceph-rbd-mirror@CLIENT_ID
systemctl disable ceph-rbd-mirror@CLIENT_ID
systemctl disable ceph-rbd-mirror.target
Example
[root@rbd-client ~]# systemctl stop ceph-rbd-mirror@site-a
[root@rbd-client ~]# systemctl disable ceph-rbd-mirror@site-a
[root@rbd-client ~]# systemctl disable ceph-rbd-mirror.target
Chapter 6. Using the Ceph block device Python module
The rbd python module provides file-like access to Ceph block device images. In order to use this built-in tool, import the rbd and rados Python modules.
Prerequisites
- A running Red Hat Ceph Storage cluster.
- Root-level access to the node.
Procedure
Connect to RADOS and open an IO context:
cluster = rados.Rados(conffile='my_ceph.conf')
cluster.connect()
ioctx = cluster.open_ioctx('mypool')
Instantiate an
:class:rbd.RBDobject, which you use to create the image:rbd_inst = rbd.RBD() size = 4 * 1024**3 # 4 GiB rbd_inst.create(ioctx, 'myimage', size)To perform I/O on the image, instantiate an
:class:rbd.Imageobject:image = rbd.Image(ioctx, 'myimage') data = 'foo' * 200 image.write(data, 0)This writes 'foo' to the first 600 bytes of the image. Note that data cannot be
:type:unicode-librbddoes not know how to deal with characters wider than a:c:type:char.Close the image, the IO context and the connection to RADOS:
image.close()
ioctx.close()
cluster.shutdown()
To be safe, each of these calls must to be in a separate
:finallyblock:import rados import rbd cluster = rados.Rados(conffile='my_ceph_conf') try: ioctx = cluster.open_ioctx('my_pool') try: rbd_inst = rbd.RBD() size = 4 * 1024**3 # 4 GiB rbd_inst.create(ioctx, 'myimage', size) image = rbd.Image(ioctx, 'myimage') try: data = 'foo' * 200 image.write(data, 0) finally: image.close() finally: ioctx.close() finally: cluster.shutdown()This can be cumbersome, so the Rados, Ioctx, and Image classes can be used as context managers that close or shut down automatically. Using them as context managers, the above example becomes:
with rados.Rados(conffile='my_ceph.conf') as cluster:
    with cluster.open_ioctx('mypool') as ioctx:
        rbd_inst = rbd.RBD()
        size = 4 * 1024**3  # 4 GiB
        rbd_inst.create(ioctx, 'myimage', size)
        with rbd.Image(ioctx, 'myimage') as image:
            data = 'foo' * 200
            image.write(data, 0)
Chapter 7. The Ceph iSCSI Gateway (Limited Availability)
As a storage administrator, you can install and configure an iSCSI gateway for the Red Hat Ceph Storage cluster. With Ceph’s iSCSI gateway you can effectively run a fully integrated block-storage infrastructure with all features and benefits of a conventional Storage Area Network (SAN).
This technology is Limited Availability. See the Deprecated functionality chapter for additional information.
SCSI persistent reservations are not supported. Mapping multiple iSCSI initiators to an RBD image is supported, if using a cluster aware file system or clustering software that does not rely on SCSI persistent reservations. For example, VMware vSphere environments using ATS is supported, but using Microsoft’s clustering server (MSCS) is not supported.
7.1. Introduction to the Ceph iSCSI gateway
Traditionally, block-level access to a Ceph storage cluster has been limited to QEMU and librbd, which is a key enabler for adoption within OpenStack environments. Block-level access to the Ceph storage cluster can now take advantage of the iSCSI standard to provide data storage.
The iSCSI gateway integrates Red Hat Ceph Storage with the iSCSI standard to provide a highly available (HA) iSCSI target that exports RADOS Block Device (RBD) images as SCSI disks. The iSCSI protocol allows clients, known as initiators, to send SCSI commands to SCSI storage devices, known as targets, over a TCP/IP network. This allows for heterogeneous clients, such as Microsoft Windows, to access the Red Hat Ceph Storage cluster.
Figure 7.1. Ceph iSCSI Gateway HA Design
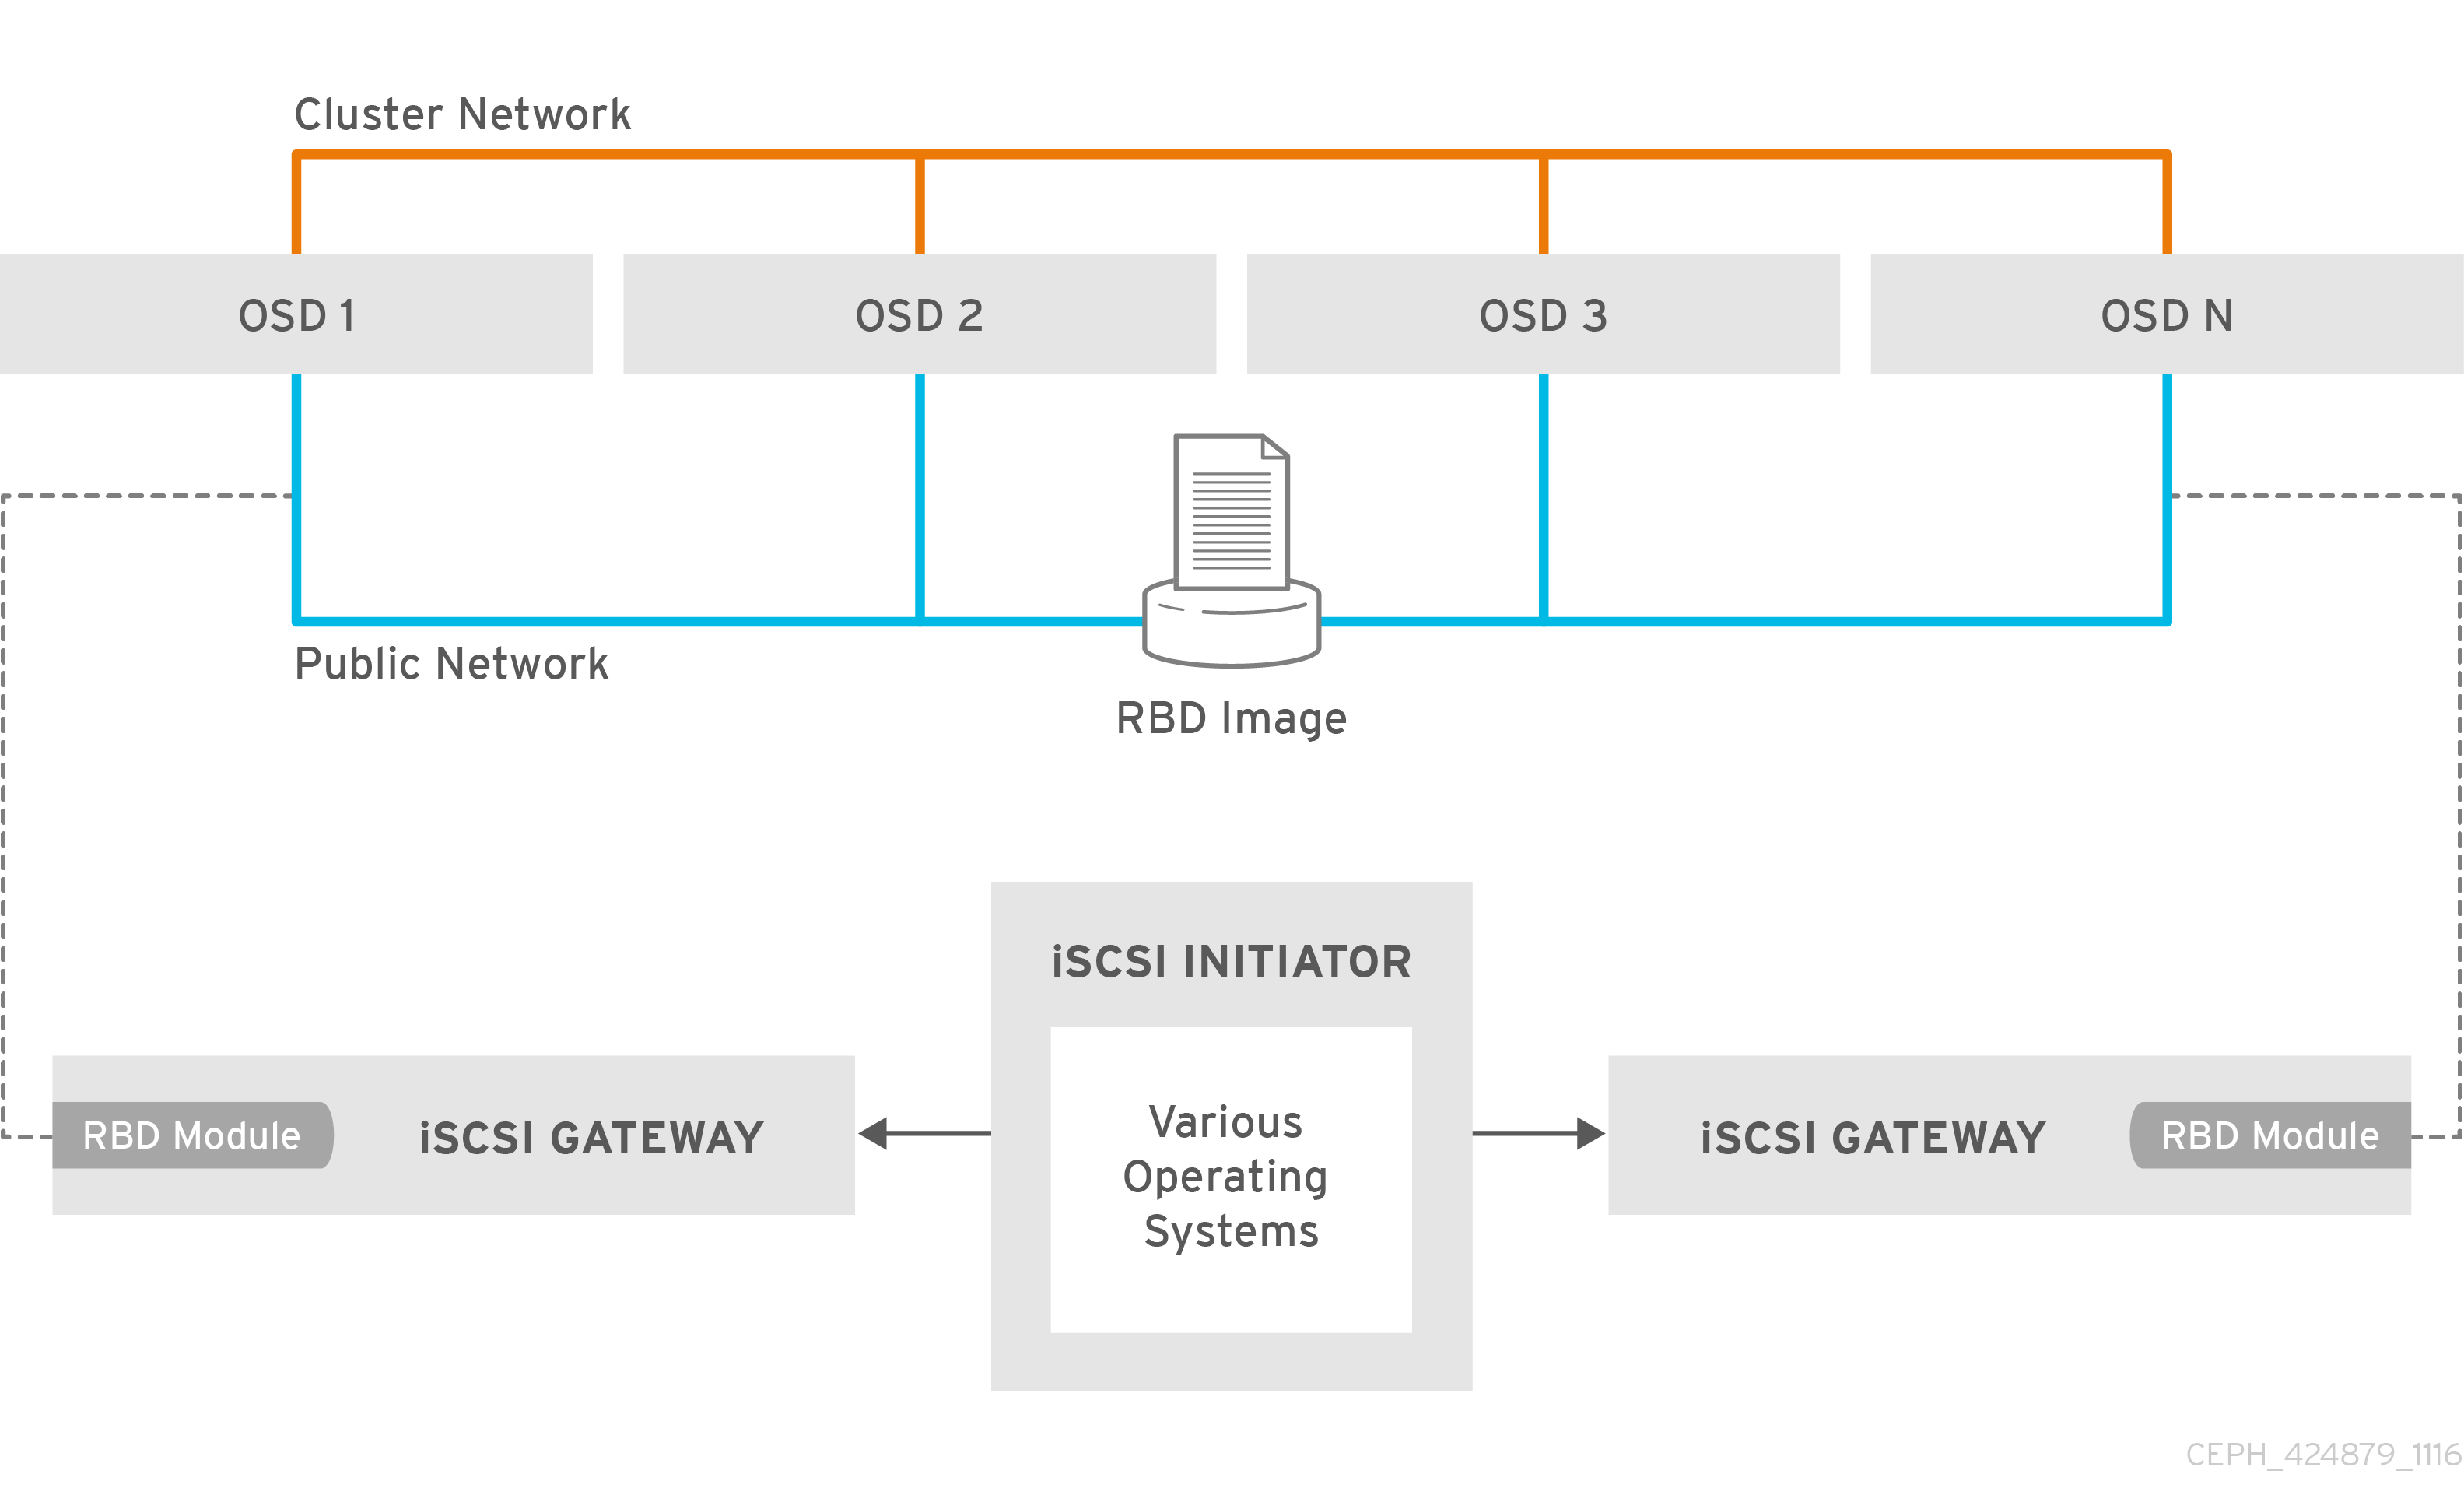
7.2. Requirements for the iSCSI target
The Red Hat Ceph Storage Highly Available (HA) iSCSI gateway solution has requirements for the number of gateway nodes, memory capacity, and timer settings to detect down OSDs.
Required Number of Nodes
Install a minimum of two iSCSI gateway nodes. To increase resiliency and I/O handling, install up to four iSCSI gateway nodes.
Memory Requirements
The memory footprint of the RBD images can grow to a large size. Each RBD image mapped on the iSCSI gateway nodes uses roughly 90 MB of memory. Ensure the iSCSI gateway nodes have enough memory to support each mapped RBD image.
Detecting Down OSDs
There are no specific iSCSI gateway options for the Ceph Monitors or OSDs, but it is important to lower the default timers for detecting down OSDs to reduce the possibility of initiator timeouts. Follow the instructions in Lowering timer settings for detecting down OSDs to reduce the possibility of initiator timeouts.
Additional Resources
- See the Red Hat Ceph Storage Hardware Selection Guide for more information.
7.3. Installing the iSCSI gateway
As a storage administrator, before you can utilize the benefits of the Ceph iSCSI gateway, you must install the required software packages. You can install the Ceph iSCSI gateway by using the Ansible deployment tool, or by using the command-line interface.
Each iSCSI gateway runs the Linux I/O target kernel subsystem (LIO) to provide iSCSI protocol support. LIO utilizes a user-space passthrough (TCMU) to interact with the Ceph librbd library to expose RBD images to iSCSI clients. With the Ceph iSCSI gateway you can effectively run a fully integrated block-storage infrastructure with all features and benefits of a conventional Storage Area Network (SAN).
7.3.1. Prerequisites
- Red Hat Enterprise Linux 8 or 7.7 or higher.
- A running Red Hat Ceph Storage 4 or higher cluster.
7.3.2. Installing the Ceph iSCSI gateway using Ansible
Use the Ansible utility to install packages and set up the daemons for the Ceph iSCSI gateway.
Prerequisites
-
The Ansible administration node with the
ceph-ansiblepackage installed.
Procedure
- On the iSCSI gateway nodes, enable the Red Hat Ceph Storage 4 Tools repository. For details, see the Enabling the Red Hat Ceph Storage Repositories section in the Red Hat Ceph Storage Installation Guide.
On the Ansible administration node, add an entry in
/etc/ansible/hostsfile for the gateway group. If you colocate the iSCSI gateway with an OSD node, add the OSD node to the[iscsigws]section.[iscsigws] ceph-igw-1 ceph-igw-2-
Ansible places a file in the
/usr/share/ceph-ansible/group_vars/directory callediscsigws.yml.sample. Create a copy of theiscsigws.yml.samplefile named itiscsigws.yml. -
Open the
iscsigws.ymlfile for editing. Uncomment the
trusted_ip_listoption and update the values accordingly, using IPv4 or IPv6 addresses.Example
Adding two gateways with the IPv4 addresses of 10.172.19.21 and 10.172.19.22, configure
trusted_ip_listlike this:trusted_ip_list: 10.172.19.21,10.172.19.22Optionally, review the Ansible variables and descriptions in the iSCSI Gateway Variables section and update
iscsigws.ymlas needed.WarningGateway configuration changes are only supported from one gateway at a time. Attempting to run changes concurrently through multiple gateways might lead to configuration instability and inconsistency.
WarningAnsible installs the
ceph-iscsipackage, creates, and updates the/etc/ceph/iscsi-gateway.cfgfile based on settings in thegroup_vars/iscsigws.ymlfile when theansible-playbookcommand is used. If you have previously installed theceph-iscsipackage using the command-line interface described in Installing the iSCSI gateway using the command-line interface, copy the existing settings from theiscsi-gateway.cfgfile to thegroup_vars/iscsigws.ymlfile.On the Ansible administration node, execute the Ansible playbook.
Bare-metal deployments:
[admin@ansible ~]$ cd /usr/share/ceph-ansible
[admin@ansible ceph-ansible]$ ansible-playbook site.yml -i hosts
Container deployments:
[admin@ansible ~]$ cd /usr/share/ceph-ansible [admin@ansible ceph-ansible]$ ansible-playbook site-container.yml -i hostsWarningOn stand-alone iSCSI gateway nodes, verify that the correct Red Hat Ceph Storage 4 software repositories are enabled. If they are unavailable, Ansible might install incorrect packages.
To create targets, LUNs, and clients, use the
gwcliutility or the Red Hat Ceph Storage Dashboard.ImportantDo not use the
targetcliutility to change the configuration, this will result in the following issues: ALUA misconfiguration and path failover problems. There is the potential to corrupt data, to have mismatched configuration across iSCSI gateways, and to have mismatched WWN information, which will lead to client pathing problems.
Additional Resources
-
See the Sample
iscsigws.ymlfile to view the full sample file. - Configuring the iSCSI target using the command-line interface
- Creating iSCSI targets
7.3.3. Installing the Ceph iSCSI gateway using the command-line interface
The Ceph iSCSI gateway is the iSCSI target node and also a Ceph client node. The Ceph iSCSI gateway can be a standalone node or be colocated on a Ceph Object Store Disk (OSD) node. Complete the following steps to install the Ceph iSCSI gateway.
Prerequisites
- Red Hat Enterprise Linux 8 or 7.7 and later
- A Red Hat Ceph Storage 4 cluster or later
On all Ceph Monitor nodes in the storage cluster, restart the
ceph-monservice, as therootuser:Syntax
systemctl restart ceph-mon@MONITOR_HOST_NAMEExample
[root@mon ~]# systemctl restart ceph-mon@monitor1-
If the Ceph iSCSI gateway is not colocated on an OSD node, copy the Ceph configuration files, located in the
/etc/ceph/directory, from a running Ceph node in the storage cluster to the all iSCSI Gateway nodes. The Ceph configuration files must exist on the iSCSI gateway nodes under/etc/ceph/. - On all Ceph iSCSI gateway nodes, enable the Ceph Tools repository. For details see the Enabling the Red Hat Ceph Storage Repositories section in the Installation Guide.
- On all Ceph iSCSI gateway nodes, install and configure the Ceph command-line interface. For details, see the Installing the Ceph Command Line Interface chapter in the Red Hat Ceph Storage 4 Installation Guide.
- If needed, open TCP ports 3260 and 5000 on the firewall on all Ceph iSCSI nodes.
- Create a new or use an existing RADOS Block Device (RBD).
Procedure
On all Ceph iSCSI gateway nodes, install the
ceph-iscsiandtcmu-runnerpackages:[root@iscsigw ~]# yum install ceph-iscsi tcmu-runnerImportantIf previous versions of these packages exist, remove them before installing the newer versions. You must install these newer versions from a Red Hat Ceph Storage repository.
Optionally, on all Ceph iSCSI gateway nodes, install and configure the OpenSSL utility, if needed.
Install the
opensslpackage:[root@iscsigw ~]# yum install opensslOn the primary iSCSI gateway node, create a directory to hold the SSL keys:
[root@iscsigw ~]# mkdir ~/ssl-keys
[root@iscsigw ~]# cd ~/ssl-keys
On the primary iSCSI gateway node, create the certificate and key files. Enter the environmental information when prompted.
[root@iscsigw ~]# openssl req -newkey rsa:2048 -nodes -keyout iscsi-gateway.key -x509 -days 365 -out iscsi-gateway.crtOn the primary iSCSI gateway node, create a PEM file:
[root@iscsigw ~]# cat iscsi-gateway.crt iscsi-gateway.key > iscsi-gateway.pemOn the primary iSCSI gateway node, create a public key:
[root@iscsigw ~]# openssl x509 -inform pem -in iscsi-gateway.pem -pubkey -noout > iscsi-gateway-pub.key-
From the primary iSCSI gateway node, copy the
iscsi-gateway.crt,iscsi-gateway.pem,iscsi-gateway-pub.key, andiscsi-gateway.keyfiles to the/etc/ceph/directory on the other iSCSI gateway nodes.
Create a configuration file on a Ceph iSCSI gateway node, and then copy it to all iSCSI gateway nodes.
Create a file named
iscsi-gateway.cfgin the/etc/ceph/directory:[root@iscsigw ~]# touch /etc/ceph/iscsi-gateway.cfgEdit the
iscsi-gateway.cfgfile and add the following lines:Syntax
[config]
cluster_name = CLUSTER_NAME
gateway_keyring = CLIENT_KEYRING
api_secure = false
trusted_ip_list = IP_ADDR,IP_ADDR
Example
[config] cluster_name = ceph gateway_keyring = ceph.client.admin.keyring api_secure = false trusted_ip_list = 192.168.0.10,192.168.0.11-
Copy the
iscsi-gateway.cfgfile to all iSCSI gateway nodes. Note that the file must be identical on all iSCSI gateway nodes.
On all Ceph iSCSI gateway nodes, enable and start the API services:
[root@iscsigw ~]# systemctl enable rbd-target-api [root@iscsigw ~]# systemctl start rbd-target-api [root@iscsigw ~]# systemctl enable rbd-target-gw [root@iscsigw ~]# systemctl start rbd-target-gw- Next, configure targets, LUNs, and clients. See the Configuring the iSCSI target using the command-line interface section for details.
Additional Resources
- See the iSCSI Gateway variables section for more details on the options.
- Creating iSCSI targets
7.3.4. Additional Resources
- See Appendix B, iSCSI Gateway Variables for more information on Ceph iSCSI gateway Anisble variables.
7.4. Configuring the iSCSI target
As a storage administrator, you can configure targets, LUNs, and clients, using the gwcli command-line utility. You can also optimize performance of the iSCSI target, use the gwcli reconfigure subcommand.
Red Hat does not support managing Ceph block device images exported by the Ceph iSCSI gateway tools, such as gwcli and ceph-ansible. Also, using the rbd command to rename or remove RBD images exported by the Ceph iSCSI gateway, can result in an unstable storage cluster.
Before removing RBD images from the iSCSI gateway configuration, follow the standard procedures for removing a storage device from the operating system. For details, see the Removing a storage device chapter in the Storage Administration Guide for Red Hat Enterprise Linux 7 or the System Design Guide for Red Hat Enterprise Linux 8.
7.4.1. Prerequisites
- Installation of the Ceph iSCSI gateway software.
7.4.2. Configuring the iSCSI target using the command-line interface
The Ceph iSCSI gateway is the iSCSI target node and also a Ceph client node. Configure the Ceph iSCSI gateway either on a standalone node, or colocate it with a Ceph Object Storage Device (OSD) node.
Do not adjust other options using the gwcli reconfigure subcommand unless specified in this document or Red Hat Support has instructed you to do so.
Prerequisites
- Installation of the Ceph iSCSI gateway software.
Procedure
Start the iSCSI gateway command-line interface:
[root@iscsigw ~]# gwcliCreate the iSCSI gateways using either IPv4 or IPv6 addresses:
Syntax
>/iscsi-targets create iqn.2003-01.com.redhat.iscsi-gw:_target_name_
> goto gateways
> create ISCSI_GW_NAME IP_ADDR_OF_GW
> create ISCSI_GW_NAME IP_ADDR_OF_GW
Example
>/iscsi-targets create iqn.2003-01.com.redhat.iscsi-gw:ceph-igw > goto gateways > create ceph-gw-1 10.172.19.21 > create ceph-gw-2 10.172.19.22NoteYou cannot use a mix of IPv4 and IPv6 addresses.
Add a Ceph block device:
Syntax
> cd /disks
>/disks/ create POOL_NAME image=IMAGE_NAME size=IMAGE_SIZE_m|g|t
Example
> cd /disks >/disks/ create rbd image=disk_1 size=50gNoteDo not use any periods (
.) in the pool or image name.Create a client:
Syntax
> goto hosts
> create iqn.1994-05.com.redhat:_client_name_
> auth use username=USER_NAME password=PASSWORD
Example
> goto hosts > create iqn.1994-05.com.redhat:rh7-client > auth username=iscsiuser1 password=temp12345678ImportantRed Hat does not support mixing clients, some with Challenge Handshake Authentication Protocol (CHAP) enabled and some CHAP disabled. All clients must have either CHAP enabled or have CHAP disabled. The default behavior is to only authenticate an initiator by its initiator name.
If initiators are failing to log into the target, the CHAP authentication might not be configured correctly for some initiators, for example:
o- hosts ................................ [Hosts: 2: Auth: MISCONFIG]Use the following command at the
hostslevel to reset all the CHAP authentication:/> goto hosts /iscsi-target...csi-igw/hosts> auth nochap ok ok /iscsi-target...csi-igw/hosts> ls o- hosts ................................ [Hosts: 2: Auth: None] o- iqn.2005-03.com.ceph:esx ........... [Auth: None, Disks: 4(310G)] o- iqn.1994-05.com.redhat:rh7-client .. [Auth: None, Disks: 0(0.00Y)]Add disks to a client:
Syntax
>/iscsi-target..eph-igw/hosts
> cd iqn.1994-05.com.redhat:_CLIENT_NAME_
> disk add POOL_NAME/IMAGE_NAME
Example
>/iscsi-target..eph-igw/hosts
> cd iqn.1994-05.com.redhat:rh7-client
> disk add rbd/disk_1
To confirm that the API is using SSL correctly, search the
rbd-target-apilog file, located at/var/log/rbd-target-api.logor/var/log/rbd-target/rbd-target-api.log, forhttps, for example:Aug 01 17:27:42 test-node.example.com python[1879]: * Running on https://0.0.0.0:5000/Verifying that the Ceph ISCSI gateways are working:
/> goto gateways
/iscsi-target...-igw/gateways> ls
o- gateways ............................ [Up: 2/2, Portals: 2]
  o- ceph-gw-1  ........................ [ 10.172.19.21 (UP)]
  o- ceph-gw-2  ........................ [ 10.172.19.22 (UP)]
If the status is
UNKNOWN, check for network issues and any misconfigurations. If using a firewall, verify that the appropriate TCP port is open. Verify that the iSCSI gateway is listed in thetrusted_ip_listoption. Verify that therbd-target-apiservice is running on the iSCSI gateway node.Optionally, reconfigure the
max_data_area_mboption:Syntax
>/disks/ reconfigure POOL_NAME/IMAGE_NAME max_data_area_mb NEW_BUFFER_SIZEExample
>/disks/ reconfigure rbd/disk_1 max_data_area_mb 64NoteThe
max_data_area_mboption controls the amount of memory in megabytes that each image can use to pass SCSI command data between the iSCSI target and the Ceph cluster. If this value is too small, it can result in excessive queue full retries which will affect performance. If the value is too large, it can result in one disk using too much of the system memory, which can cause allocation failures for other subsystems. The default value for themax_data_area_mboption is8.- Configure an iSCSI initiator.
Additional Resources
- See Installing the iSCSI gateway for details.
- See Configuring the iSCSI initiator section for more information.
7.4.3. Optimize the performance of the iSCSI Target
There are many settings that control how the iSCSI Target transfers data over the network. These settings can be used to optimize the performance of the iSCSI gateway.
Only change these settings if instructed to by Red Hat Support or as specified in this document.
The gwcli reconfigure subcommand controls the settings that are used to optimize the performance of the iSCSI gateway.
Settings that affect the performance of the iSCSI target
-
max_data_area_mb -
cmdsn_depth -
immediate_data -
initial_r2t -
max_outstanding_r2t -
first_burst_length -
max_burst_length -
max_recv_data_segment_length -
max_xmit_data_segment_length
Additional Resources
-
Information about
max_data_area_mb, including an example showing how to adjust it usinggwcli reconfigure, is in the section Configuring the iSCSI Target using the Command Line Interface.
7.4.4. Lowering timer settings for detecting down OSDs
Sometimes it is necessary to lower the timer settings for detecting down OSDs. For example, when using Red Hat Ceph Storage as an iSCSI gateway, you can reduce the possibility of initiator timeouts by lowering the timer settings for detecting down OSDs.
Prerequisites
- A running Red Hat Ceph Storage cluster.
- Access to the Ansible administration node.
Procedure
Configure Ansible to use the new timer settings.
On the Ansible administration node, add a
ceph_conf_overridessection in thegroup_vars/all.ymlfile that looks like this, or edit any existingceph_conf_overridessection as follows:ceph_conf_overrides: osd: osd_client_watch_timeout: 15 osd_heartbeat_grace: 20 osd_heartbeat_interval: 5The above settings will be added to the
ceph.confconfiguration files on the OSD nodes when the Ansible playbook runs.Change to the
ceph-ansibledirectory:[admin@ansible ~]$ cd /usr/share/ceph-ansibleUse Ansible to update the
ceph.conffile and restart the OSD daemons on all the OSD nodes. On the Ansible admin node, run the following command:Bare-metal Deployments
[admin@ansible ceph-ansible]$ ansible-playbook site.yml --limit osdsContainer Deployments
[admin@ansible ceph-ansible]$ ansible-playbook site-container.yml --limit osds -i hosts
Verify the timer settings are the same as set in
ceph_conf_overrides:Syntax
ceph daemon osd.OSD_ID config get osd_client_watch_timeout
ceph daemon osd.OSD_ID config get osd_heartbeat_grace
ceph daemon osd.OSD_ID config get osd_heartbeat_interval
Example
[root@osd ~]# ceph daemon osd.0 config get osd_client_watch_timeout
{
    "osd_client_watch_timeout": "15"
}

[root@osd ~]#  ceph daemon osd.0 config get osd_heartbeat_grace
{
    "osd_heartbeat_grace": "20"
}

[root@osd ~]# ceph daemon osd.0 config get osd_heartbeat_interval
{
    "osd_heartbeat_interval": "5"
}
Optional: If you cannot restart the OSD daemons immediately, you can do online updates from Ceph Monitor nodes, or update all Ceph OSD nodes directly. Once you are able to restart the OSD daemons, use Ansible as described above to add the new timer settings into
ceph.confso that the settings persist across reboots.To do an online update of OSD timer settings from a Ceph Monitor node:
Syntax
ceph tell osd.OSD_ID injectargs '--osd_client_watch_timeout 15'
ceph tell osd.OSD_ID injectargs '--osd_heartbeat_grace 20'
ceph tell osd.OSD_ID injectargs '--osd_heartbeat_interval 5'
Example
[root@mon ~]# ceph tell osd.0 injectargs '--osd_client_watch_timeout 15'
[root@mon ~]# ceph tell osd.0 injectargs '--osd_heartbeat_grace 20'
[root@mon ~]# ceph tell osd.0 injectargs '--osd_heartbeat_interval 5'
To do an online update of OSD timer settings from an Ceph OSD node:
Syntax
ceph daemon osd.OSD_ID config set osd_client_watch_timeout 15
ceph daemon osd.OSD_ID config set osd_heartbeat_grace 20
ceph daemon osd.OSD_ID config set osd_heartbeat_interval 5
Example
[root@osd ~]# ceph daemon osd.0 config set osd_client_watch_timeout 15
[root@osd ~]# ceph daemon osd.0 config set osd_heartbeat_grace 20
[root@osd ~]# ceph daemon osd.0 config set osd_heartbeat_interval 5
Additional Resources
- For more information about using Red Hat Ceph Storage as an iSCSI gateway, see The Ceph iSCSI gateway in the Red Hat Ceph Storage Block Device Guide.
7.4.5. Configuring iSCSI host groups using the command-line interface
The Ceph iSCSI gateway can configure host groups for managing multiple servers that share the same disk configuration. iSCSI host groups creates a logical grouping of hosts and the disks that each host in the group has access to.
The sharing of disk devices to multiple hosts must use a cluster-aware file system.
Prerequisites
- Installation of the Ceph iSCSI gateway software.
- Root-level access to the Ceph iSCSI gateway node.
Procedure
Start the iSCSI gateway command-line interface:
[root@iscsigw ~]# gwcliCreate a new host group:
Syntax
cd iscsi-targets/
cd IQN/host-groups
create group_name=GROUP_NAME
Example
/> cd iscsi-targets/
/iscsi-targets> cd iqn.2003-01.com.redhat.iscsi-gw:ceph-igw/host-groups/
/iscsi-target.../host-groups> create group_name=igw_grp01
Add a host to the host group:
Syntax
cd GROUP_NAME
host add client_iqn=CLIENT_IQN
Example
> cd igw_grp01
/iscsi-target.../host-groups/igw_grp01> host add client_iqn=iqn.1994-05.com.redhat:rh8-client
Repeat this step to add additional hosts to the group.
Add a disk to the host group:
Syntax
cd /disks/
/disks> create pool=POOL image=IMAGE_NAME size=SIZE
cd /IQN/host-groups/GROUP_NAME
disk add POOL/IMAGE_NAME
Example
> cd /disks/
/disks> create pool=rbd image=rbdimage size=1G
/> cd iscsi-targets/iqn.2003-01.com.redhat.iscsi-gw:ceph-igw/host-groups/igw_grp01/
/iscsi-target...s/igw_grp01> disk add rbd/rbdimage
Repeat this step to add additional disks to the group.
7.4.6. Additional Resources
- For details on configuring iSCSI targets using the Red Hat Ceph Storage Dashboard, see the Creating iSCSI targets section in the Red Hat Ceph Storage Dashboard Guide.
7.5. Configuring the iSCSI initiator
You can configure the iSCSI initiator to connect to the Ceph iSCSI gateway on the following platforms.
7.5.1. Configuring the iSCSI initiator for Red Hat Enterprise Linux
Prerequisites
- Red Hat Enterprise Linux 7.7 or higher.
-
Package
iscsi-initiator-utils-6.2.0.873-35or newer must be installed. -
Package
device-mapper-multipath-0.4.9-99or newer must be installed.
Procedure
Install the iSCSI initiator and multipath tools:
[root@rhel ~]# yum install iscsi-initiator-utils [root@rhel ~]# yum install device-mapper-multipath-
Set the initiator name by editing the
/etc/iscsi/initiatorname.iscsifile. Note that the initiator name must match the initiator name that was used during the initial setup using thegwclicommand. Configure multipath I/O.
Create the default
/etc/multipath.conffile and enable themultipathdservice:[root@rhel ~]# mpathconf --enable --with_multipathd yUpdate the
/etc/multipath.conffile as follows:devices { device { vendor "LIO-ORG" product "TCMU device" hardware_handler "1 alua" path_grouping_policy "failover" path_selector "queue-length 0" failback 60 path_checker tur prio alua prio_args exclusive_pref_bit fast_io_fail_tmo 25 no_path_retry queue } }Restart the
multipathdservice:[root@rhel ~]# systemctl reload multipathd
Set up CHAP and iSCSI discovery and login.
Provide a CHAP user name and password by updating the
/etc/iscsi/iscsid.conffile accordingly, for example:node.session.auth.authmethod = CHAP node.session.auth.username = user node.session.auth.password = passwordDiscover the target portals:
Syntax
iscsiadm -m discovery -t st -p IP_ADDRLog in to target:
Syntax
iscsiadm -m node -T TARGET -l
View the multipath I/O configuration. The
multipathddaemon sets up devices automatically based on the settings in themultipath.conffile.Use the
multipathcommand to show devices setup in a failover configuration with a priority group for each path, for example:Example
[root@rhel ~]# multipath -ll
mpathbt (360014059ca317516a69465c883a29603) dm-1 LIO-ORG,TCMU device
size=1.0G features='0' hwhandler='1 alua' wp=rw
|-+- policy='queue-length 0' prio=50 status=active
| `- 28:0:0:1 sde  8:64  active ready running
`-+- policy='queue-length 0' prio=10 status=enabled
  `- 29:0:0:1 sdc  8:32  active ready running
The
multipath -lloutputpriovalue indicates the ALUA state, whereprio=50indicates it is the path to the owning iSCSI gateway in the ALUA Active-Optimized state andprio=10indicates it is an Active-non-Optimized path. Thestatusfield indicates which path is being used, whereactiveindicates the currently used path, andenabledindicates the failover path, if theactivefails.To match the device name, for example,
sdein themultipath -lloutput, to the iSCSI gateway:Example
[root@rhel ~]# iscsiadm -m session -P 3The
Persistent Portalvalue is the IP address assigned to the iSCSI gateway listed in thegwcliutility.
7.5.2. Configuring the iSCSI initiator for Red Hat Virtualization
Prerequisites
- Red Hat Virtualization 4.1
- Configured MPIO devices on all Red Hat Virtualization nodes
-
The
iscsi-initiator-utils-6.2.0.873-35package or newer -
The
device-mapper-multipath-0.4.9-99package or newer
Procedure
Configure multipath I/O.
Update the
/etc/multipath/conf.d/DEVICE_NAME.conffile as follows:devices { device { vendor "LIO-ORG" product "TCMU device" hardware_handler "1 alua" path_grouping_policy "failover" path_selector "queue-length 0" failback 60 path_checker tur prio alua prio_args exclusive_pref_bit fast_io_fail_tmo 25 no_path_retry queue } }Restart the
multipathdservice:[root@rhv ~]# systemctl reload multipathd
- Click the Storage resource tab to list the existing storage domains.
- Click the New Domain button to open the New Domain window.
- Enter the Name of the new storage domain.
- Use the Data Center drop-down menu to select an data center.
- Use the drop-down menus to select the Domain Function and the Storage Type. The storage domain types that are not compatible with the chosen domain function are not available.
- Select an active host in the Use Host field. If this is not the first data domain in a data center, you must select the data center’s SPM host.
The New Domain window automatically displays known targets with unused LUNs when iSCSI is selected as the storage type. If the target that you are adding storage from is not listed then you can use target discovery to find it, otherwise proceed to the next step.
- Click Discover Targets to enable target discovery options. When targets have been discovered and logged in to, the New Domain window automatically displays targets with LUNs unused by the environment. Note that LUNs external to the environment are also displayed. You can use the Discover Targets options to add LUNs on many targets, or multiple paths to the same LUNs.
- Enter the fully qualified domain name or IP address of the iSCSI host in the Address field.
-
Enter the port to connect to the host on when browsing for targets in the Port field. The default is
3260. - If the Challenge Handshake Authentication Protocol (CHAP) is being used to secure the storage, select the User Authentication check box. Enter the CHAP user name and CHAP password.
- Click the Discover button.
Select the target to use from the discovery results and click the Login button. Alternatively, click the Login All to log in to all of the discovered targets.
ImportantIf more than one path access is required, ensure to discover and log in to the target through all the required paths. Modifying a storage domain to add additional paths is currently not supported.
- Click the + button next to the desired target. This will expand the entry and display all unused LUNs attached to the target.
- Select the check box for each LUN that you are using to create the storage domain.
Optionally, you can configure the advanced parameters.
- Click Advanced Parameters.
- Enter a percentage value into the Warning Low Space Indicator field. If the free space available on the storage domain is below this percentage, warning messages are displayed to the user and logged.
- Enter a GB value into the Critical Space Action Blocker field. If the free space available on the storage domain is below this value, error messages are displayed to the user and logged, and any new action that consumes space, even temporarily, will be blocked.
-
Select the Wipe After Delete check box to enable the
wipe after deleteoption. You can edit this option after creating the domain, but doing so does not change thewipe after deleteproperty of disks that already exist. - Select the Discard After Delete check box to enable the discard after delete option. You can edit this option after creating the domain. This option is only available to block storage domains.
- Click OK to create the storage domain and close the window.
7.5.3. Configuring the iSCSI initiator for Microsoft Windows
Prerequisites
- Microsoft Windows Server 2016
Procedure
Install the iSCSI initiator and configure discovery and setup.
- Install the iSCSI initiator driver and MPIO tools.
- Launch the MPIO program, click the Discover Multi-Paths tab, check the Add support for iSCSI devices box, and click Add.
- Reboot the MPIO program.
On the iSCSI Initiator Properties window, on the Discovery tab
, add a target portal. Enter the IP address or DNS name
and Port
of the Ceph iSCSI gateway:
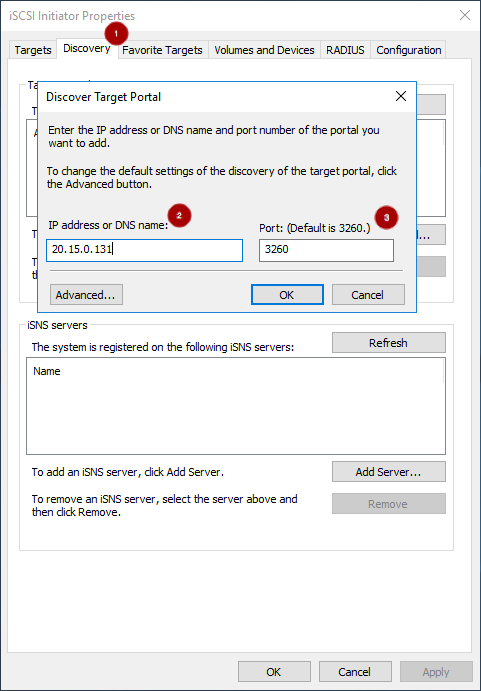
On the Targets tab
, select the target and click Connect
:
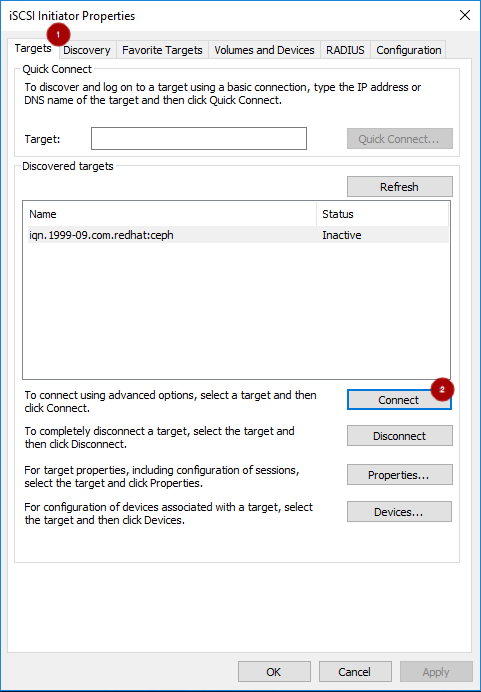
On the Connect To Target window, select the Enable multi-path option
, and click the Advanced button
:

Under the Connect using section, select a Target portal IP
. Select Enable CHAP login on
and enter the Name and Target secret values
from the Ceph iSCSI client credentials section, and click OK
:
 Important
Windows Server 2016 does not accept a CHAP secret less than 12 bytes.
- Repeat the previous two steps for each target portal defined when setting up the iSCSI gateway.
If the initiator name is different than the initiator name used during the initial setup, rename the initiator name. From iSCSI Initiator Properties window, on the Configuration tab
, click the Change button
to rename the initiator name.
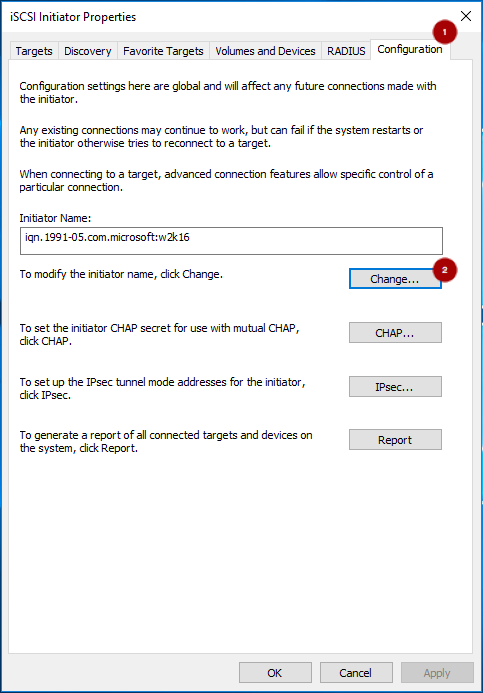
Set up
multipathI/O. In PowerShell, use thePDORemovePeriodcommand to set the MPIO load balancing policy and thempclaimcommand to set the load balancing policy. The iSCSI Initiator Tool configures the remaining options.NoteRed Hat recommends increasing the
PDORemovePeriodoption to 120 seconds from PowerShell. You might need to adjust this value based on the application. When all paths are down, and 120 seconds expires, the operating system starts failing I/O requests.Set-MPIOSetting -NewPDORemovePeriod 120Set the failover policy
mpclaim.exe -l -m 1Verify the failover policy
mpclaim -s -m
MSDSM-wide Load Balance Policy: Fail Over Only
Using the iSCSI Initiator tool, from the Targets tab
click on the Devices… button
:
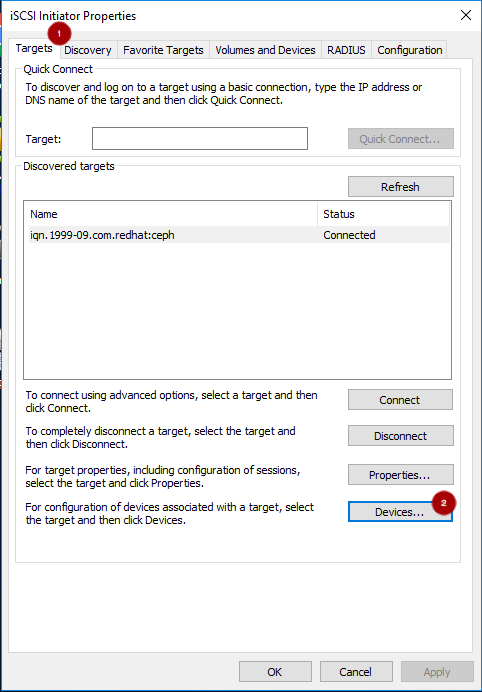
From the Devices window, select a disk
and click the MPIO… button
:

The Device Details window displays the paths to each target portal. The Load Balancing Policy Fail Over Only must be selected.

View the
multipathconfiguration from the PowerShell:mpclaim -s -d MPIO_DISK_IDReplace MPIO_DISK_ID with the appropriate disk identifier.
NoteThere is one Active/Optimized path which is the path to the iSCSI gateway node that owns the LUN, and there is an Active/Unoptimized path for each other iSCSI gateway node.
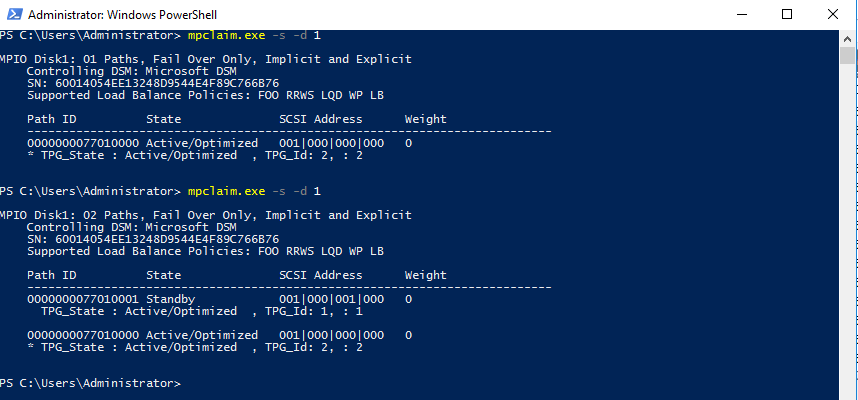
Optionally, tune the settings. Consider using the following registry settings:
Windows Disk Timeout
Key
HKEY_LOCAL_MACHINE\System\CurrentControlSet\Services\DiskValue
TimeOutValue = 65Microsoft iSCSI Initiator Driver
Key
HKEY_LOCAL_MACHINE\\SYSTEM\CurrentControlSet\Control\Class\{4D36E97B-E325-11CE-BFC1-08002BE10318}\<Instance_Number>\ParametersValues
LinkDownTime = 25
SRBTimeoutDelta = 15
7.5.4. Configuring the iSCSI initiator for VMware ESXi
Prerequisites
- See the iSCSI Gateway (IGW) section in the Customer Portal Knowledgebase article for supported VMware ESXi versions.
- Access to the VMware Host Client.
-
Root access to VMware ESXi host to execute the
esxclicommand.
Procedure
Disable
HardwareAcceleratedMove(XCOPY):> esxcli system settings advanced set --int-value 0 --option /DataMover/HardwareAcceleratedMoveEnable the iSCSI software. From the Navigator pane, click Storage
. Select the Adapters tab
. Click on Configure iSCSI
:

Verify the initiator name in the Name & alias section
.

If the initiator name is different than the initiator name used when creating the client during the initial setup using
gwcli, change the initiator name: From the VMware ESX host, use theseesxclicommands.Get the adapter name for the iSCSI software:
> esxcli iscsi adapter list
> Adapter  Driver     State   UID            Description
> -------  ---------  ------  -------------  ----------------------
> vmhba64  iscsi_vmk  online  iscsi.vmhba64  iSCSI Software Adapter
Set the initiator name:
Syntax
> esxcli iscsi adapter set -A ADAPTOR_NAME -n INITIATOR_NAMEExample
> esxcli iscsi adapter set -A vmhba64 -n iqn.1994-05.com.redhat:rh7-client
Configure CHAP. Expand the CHAP authentication section
. Select “Do not use CHAP unless required by target”
. Enter the CHAP Name and Secret
credentials that were used in the initial setup. Verify the Mutual CHAP authentication section
has “Do not use CHAP” selected.
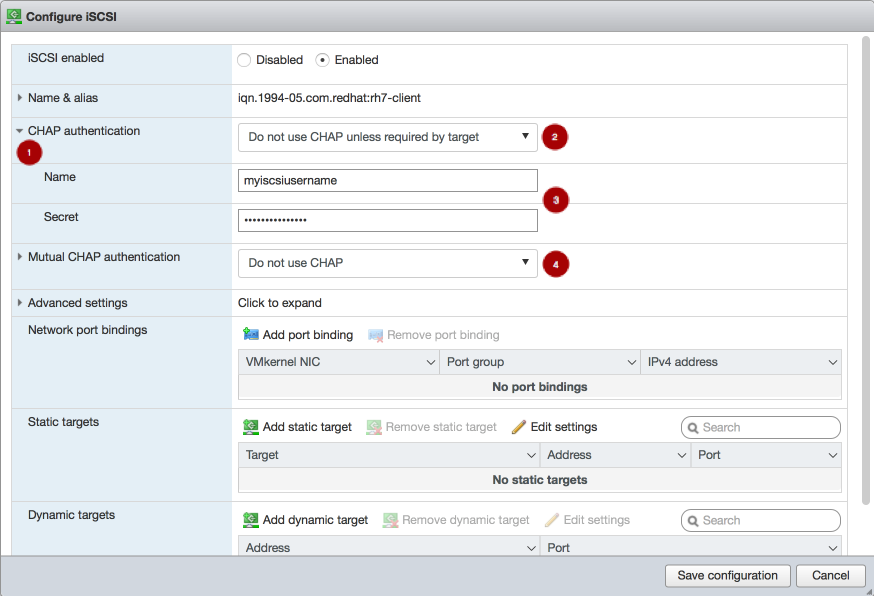 Warning
Due to a bug in the VMware Host Client, the CHAP settings are not used initially. On the Ceph iSCSI gateway node, the kernel logs include the following errors as an indication of this bug:
> kernel: CHAP user or password not set for Initiator ACL
> kernel: Security negotiation failed.
> kernel: iSCSI Login negotiation failed.
To work around this bug, configure the CHAP settings using the
esxclicommand. Theauthnameargument is the Name in the vSphere Web Client:> esxcli iscsi adapter auth chap set --direction=uni --authname=myiscsiusername --secret=myiscsipassword --level=discouraged -A vmhba64Configure the iSCSI settings. Expand Advanced settings
. Set the RecoveryTimeout value to 25
.
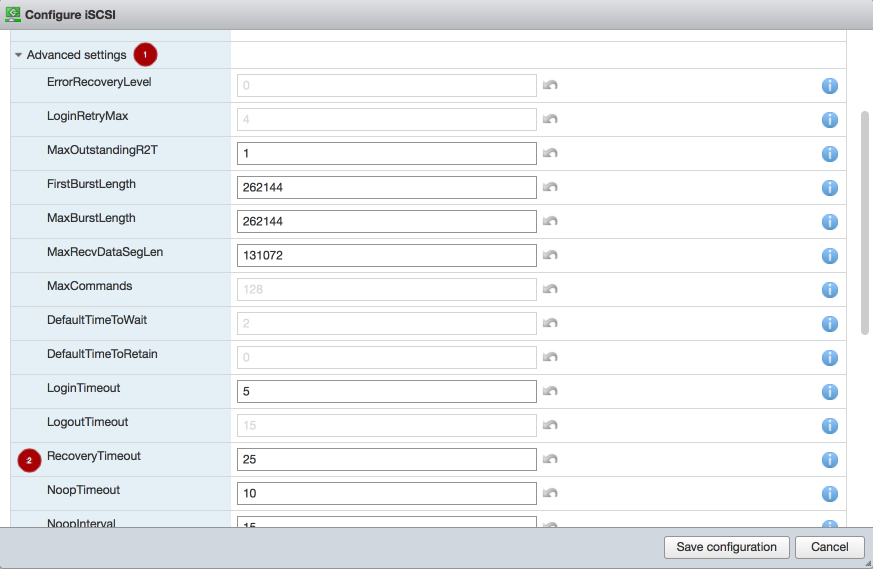
Set the discovery address. In the Dynamic targets section
, click Add dynamic target
. Under Address
add an IP addresses for one of the Ceph iSCSI gateways. Only one IP address needs to be added. Finally, click the Save configuration button
. From the main interface, on the Devices tab, you will see the RBD image.
 Note
NoteLUN is configured automatically, using the ALUA SATP and MRU PSP. Do not use other SATPs and PSPs. You can verify this by the
esxclicommand:Syntax
esxcli storage nmp path list -d eui.DEVICE_IDReplace DEVICE_ID with the appropriate device identifier.
Verify that multipathing has been set up correctly.
List the devices:
Example
> esxcli storage nmp device list | grep iSCSI
   Device Display Name: LIO-ORG iSCSI Disk (naa.6001405f8d087846e7b4f0e9e3acd44b)
   Device Display Name: LIO-ORG iSCSI Disk (naa.6001405057360ba9b4c434daa3c6770c)
Get the multipath information for the Ceph iSCSI disk from the previous step:
Example
> esxcli storage nmp path list -d naa.6001405f8d087846e7b4f0e9e3acd44b

iqn.2005-03.com.ceph:esx1-00023d000001,iqn.2003-01.com.redhat.iscsi-gw:iscsi-igw,t,1-naa.6001405f8d087846e7b4f0e9e3acd44b
   Runtime Name: vmhba64:C0:T0:L0
   Device: naa.6001405f8d087846e7b4f0e9e3acd44b
   Device Display Name: LIO-ORG iSCSI Disk (naa.6001405f8d087846e7b4f0e9e3acd44b)
   Group State: active
   Array Priority: 0
   Storage Array Type Path Config: {TPG_id=1,TPG_state=AO,RTP_id=1,RTP_health=UP}
   Path Selection Policy Path Config: {current path; rank: 0}

iqn.2005-03.com.ceph:esx1-00023d000002,iqn.2003-01.com.redhat.iscsi-gw:iscsi-igw,t,2-naa.6001405f8d087846e7b4f0e9e3acd44b
   Runtime Name: vmhba64:C1:T0:L0
   Device: naa.6001405f8d087846e7b4f0e9e3acd44b
   Device Display Name: LIO-ORG iSCSI Disk (naa.6001405f8d087846e7b4f0e9e3acd44b)
   Group State: active unoptimized
   Array Priority: 0
   Storage Array Type Path Config: {TPG_id=2,TPG_state=ANO,RTP_id=2,RTP_health=UP}
   Path Selection Policy Path Config: {non-current path; rank: 0}
From the example output, each path has an iSCSI or SCSI name with the following parts:
Initiator name =
iqn.2005-03.com.ceph:esx1ISID =00023d000002Target name =iqn.2003-01.com.redhat.iscsi-gw:iscsi-igwTarget port group =2Device id =naa.6001405f8d087846e7b4f0e9e3acd44bThe
Group Statevalue ofactiveindicates this is the Active-Optimized path to the iSCSI gateway. Thegwclicommand lists theactiveas the iSCSI gateway owner. The rest of the paths have theGroup Statevalue ofunoptimizedand are the failover path, if theactivepath goes into adeadstate.
To match all paths to their respective iSCSI gateways:
Example
> esxcli iscsi session connection list
vmhba64,iqn.2003-01.com.redhat.iscsi-gw:iscsi-igw,00023d000001,0
   Adapter: vmhba64
   Target: iqn.2003-01.com.redhat.iscsi-gw:iscsi-igw
   ISID: 00023d000001
   CID: 0
   DataDigest: NONE
   HeaderDigest: NONE
   IFMarker: false
   IFMarkerInterval: 0
   MaxRecvDataSegmentLength: 131072
   MaxTransmitDataSegmentLength: 262144
   OFMarker: false
   OFMarkerInterval: 0
   ConnectionAddress: 10.172.19.21
   RemoteAddress: 10.172.19.21
   LocalAddress: 10.172.19.11
   SessionCreateTime: 08/16/18 04:20:06
   ConnectionCreateTime: 08/16/18 04:20:06
   ConnectionStartTime: 08/16/18 04:30:45
   State: logged_in

vmhba64,iqn.2003-01.com.redhat.iscsi-gw:iscsi-igw,00023d000002,0
   Adapter: vmhba64
   Target: iqn.2003-01.com.redhat.iscsi-gw:iscsi-igw
   ISID: 00023d000002
   CID: 0
   DataDigest: NONE
   HeaderDigest: NONE
   IFMarker: false
   IFMarkerInterval: 0
   MaxRecvDataSegmentLength: 131072
   MaxTransmitDataSegmentLength: 262144
   OFMarker: false
   OFMarkerInterval: 0
   ConnectionAddress: 10.172.19.22
   RemoteAddress: 10.172.19.22
   LocalAddress: 10.172.19.12
   SessionCreateTime: 08/16/18 04:20:06
   ConnectionCreateTime: 08/16/18 04:20:06
   ConnectionStartTime: 08/16/18 04:30:41
   State: logged_in
Match the path name with the
ISIDvalue, and theRemoteAddressvalue is the IP address of the owning iSCSI gateway.
7.6. Managing iSCSI services
The ceph-iscsi package installs the configuration management logic, and the rbd-target-gw and rbd-target-api systemd services.
The rbd-target-api service restores the Linux iSCSI target state at startup, and responds to ceph-iscsi REST API calls from tools like gwcli and Red Hat Ceph Storage Dashboard. The rbd-target-gw service provides metrics using the Prometheus plug-in.
The rbd-target-api service assumes it is the only user of the Linux kernel’s target layer. Do not use the target service installed with the targetcli package when using rbd-target-api. Ansible automatically disables the targetcli target service during the Ceph iSCSI gateway installation.
Procedure
To start the services:
# systemctl start rbd-target-api
# systemctl start rbd-target-gw
To restart the services:
# systemctl restart rbd-target-api
# systemctl restart rbd-target-gw
To reload the services:
# systemctl reload rbd-target-api
# systemctl reload rbd-target-gw
The
reloadrequest forcesrbd-target-apito reread the configuration and apply it to the current running environment. This is normally not required, because changes are deployed in parallel from Ansible to all iSCSI gateway nodes.To stop the services:
# systemctl stop rbd-target-api
# systemctl stop rbd-target-gw
The
stoprequest closes the gateway’s portal interfaces, dropping connections to clients and wipes the current Linux iSCSI target configuration from the kernel. This returns the iSCSI gateway to a clean state. When clients are disconnected, active I/O is rescheduled to the other iSCSI gateways by the client side multipathing layer.
7.7. Adding more iSCSI gateways
As a storage administrator, you can expand the initial two iSCSI gateways to four iSCSI gateways by using the gwcli command-line tool or the Red Hat Ceph Storage Dashboard. Adding more iSCSI gateways provides you more flexibility when using load-balancing and failover options, along with providing more redundancy.
7.7.1. Prerequisites
- A running Red Hat Ceph Storage 4 cluster
- Spare nodes or existing OSD nodes
-
rootpermissions
7.7.2. Using Ansible to add more iSCSI gateways
You can using the Ansible automation utility to add more iSCSI gateways. This procedure expands the default installation of two iSCSI gateways to four iSCSI gateways. You can configure the iSCSI gateway on a standalone node or it can be collocated with existing OSD nodes.
Prerequisites
- Red Hat Enterprise Linux 7.7 or later.
- A running Red Hat Ceph Storage cluster.
- Installation of the iSCSI gateway software.
-
Having
adminuser access on the Ansible administration node. -
Having
rootuser access on the new nodes.
Procedure
On the new iSCSI gateway nodes, enable the Red Hat Ceph Storage Tools repository:
Red Hat Enterprise Linux 7
[root@iscsigw ~]# subscription-manager repos --enable=rhel-7-server-rhceph-4-tools-rpmsRed Hat Enterprise Linux 8
[root@iscsigw ~]# subscription-manager repos --enable=rhceph-4-tools-for-rhel-8-x86_64-rpmsInstall the
ceph-iscsi-configpackage:[root@iscsigw ~]# yum install ceph-iscsi-configAppend to the list in
/etc/ansible/hostsfile for the gateway group:Example
[iscsigws] ... ceph-igw-3 ceph-igw-4NoteIf colocating the iSCSI gateway with an OSD node, add the OSD node to the
[iscsigws]section.Change to the
ceph-ansibledirectory:[admin@ansible ~]$ cd /usr/share/ceph-ansibleOn the Ansible administration node, run the appropriate Ansible playbook:
Bare-metal deployments:
[admin@ansible ceph-ansible]$ ansible-playbook site.yml -i hostsContainer deployments:
[admin@ansible ceph-ansible]$ ansible-playbook site-container.yml -i hosts
ImportantProviding IP addresses for the
gateway_ip_listoption is required. You cannot use a mix of IPv4 and IPv6 addresses.- From the iSCSI initiators, re-login to use the newly added iSCSI gateways.
Additional Resources
- See the Configure the iSCSI Initiator for more details on using an iSCSI Initiator.
- See the Enabling the Red Hat Ceph Storage Repositories section in the Red Hat Ceph Storage Installation Guide for more details.
7.7.3. Using gwcli to add more iSCSI gateways
You can use the gwcli command-line tool to add more iSCSI gateways. This procedure expands the default of two iSCSI gateways to four iSCSI gateways.
Prerequisites
- Red Hat Enterprise Linux 7.7 or later.
- A running Red Hat Ceph Storage cluster.
- Installation of the iSCSI gateway software.
-
Having
rootuser access to the new nodes or OSD nodes.
Procedure
-
If the Ceph iSCSI gateway is not colocated on an OSD node, copy the Ceph configuration files, located in the
/etc/ceph/directory, from a running Ceph node in the storage cluster to the new iSCSI Gateway node. The Ceph configuration files must exist on the iSCSI gateway node under the/etc/ceph/directory. - Install and configure the Ceph command-line interface.
On the new iSCSI gateway nodes, enable the Red Hat Ceph Storage Tools repository:
Red Hat Enterprise Linux 7
[root@iscsigw ~]# subscription-manager repos --enable=rhel-7-server-rhceph-4-tools-rpmsRed Hat Enterprise Linux 8
[root@iscsigw ~]# subscription-manager repos --enable=rhceph-4-tools-for-rhel-8-x86_64-rpmsInstall the
ceph-iscsi, andtcmu-runnerpackages:Red Hat Enterprise Linux 7
[root@iscsigw ~]# yum install ceph-iscsi tcmu-runnerRed Hat Enterprise Linux 8
[root@iscsigw ~]# dnf install ceph-iscsi tcmu-runnerIf needed, install the
opensslpackage:Red Hat Enterprise Linux 7
[root@iscsigw ~]# yum install opensslRed Hat Enterprise Linux 8
[root@iscsigw ~]# dnf install openssl
On one of the existing iSCSI gateway nodes, edit the
/etc/ceph/iscsi-gateway.cfgfile and append thetrusted_ip_listoption with the new IP addresses for the new iSCSI gateway nodes. For example:[config] ... trusted_ip_list = 10.172.19.21,10.172.19.22,10.172.19.23,10.172.19.24Copy the updated
/etc/ceph/iscsi-gateway.cfgfile to all the iSCSI gateway nodes.ImportantThe
iscsi-gateway.cfgfile must be identical on all iSCSI gateway nodes.-
Optionally, if using SSL, also copy the
~/ssl-keys/iscsi-gateway.crt,~/ssl-keys/iscsi-gateway.pem,~/ssl-keys/iscsi-gateway-pub.key, and~/ssl-keys/iscsi-gateway.keyfiles from one of the existing iSCSI gateway nodes to the/etc/ceph/directory on the new iSCSI gateway nodes. Enable and start the API service on the new iSCSI gateway nodes:
[root@iscsigw ~]# systemctl enable rbd-target-api
[root@iscsigw ~]# systemctl start rbd-target-api
Start the iSCSI gateway command-line interface:
[root@iscsigw ~]# gwcliCreating the iSCSI gateways using either IPv4 or IPv6 addresses:
Syntax
>/iscsi-target create iqn.2003-01.com.redhat.iscsi-gw:_TARGET_NAME_
> goto gateways
> create ISCSI_GW_NAME IP_ADDR_OF_GW
> create ISCSI_GW_NAME IP_ADDR_OF_GW
Example
>/iscsi-target create iqn.2003-01.com.redhat.iscsi-gw:ceph-igw > goto gateways > create ceph-gw-3 10.172.19.23 > create ceph-gw-4 10.172.19.24ImportantYou cannot use a mix of IPv4 and IPv6 addresses.
- From the iSCSI initiators, re-login to use the newly added iSCSI gateways.
Additional Resources
- See Configure the iSCSI Initiator for more details on using an iSCSI Initiator.
- For details, see the Installing the Ceph Command Line Interface chapter in the Red Hat Ceph Storage Installation Guide.
7.8. Verifying that the initiator is connected to the iSCSI target
After installing the iSCSI gateway and configuring the iSCSI target and an initiator, verify that the initiator is properly connected to the iSCSI target.
Prerequisites
- Installation of the Ceph iSCSI gateway software.
- Configured the iSCSI target.
- Configured the iSCSI initiator.
Procedure
Start the iSCSI gateway command-line interface:
[root@iscsigw ~]# gwcliVerify that the initiator is connected the iSCSI target:
/> goto hosts
/iscsi-target...csi-igw/hosts> ls
o- hosts .............................. [Hosts: 1: Auth: None]
  o- iqn.1994-05.com.redhat:rh7-client  [LOGGED-IN, Auth: None, Disks: 0(0.00Y)]
The initiator status is
LOGGED-INif it is connected.Verify that LUNs are balanced across iSCSI gateways:
/> goto hosts
/iscsi-target...csi-igw/hosts> ls
o- hosts ................................. [Hosts: 2: Auth: None]
  o- iqn.2005-03.com.ceph:esx ............ [Auth: None, Disks: 4(310G)]
  | o- lun 0 ............................. [rbd.disk_1(100G), Owner: ceph-gw-1]
  | o- lun 1 ............................. [rbd.disk_2(10G), Owner: ceph-gw-2]
When creating a disk, the disk is assigned an iSCSI gateway as its
Ownerbased on what gateways have the lowest number of mapped LUNs. If this number is balanced, gateways are assigned based on a round robin allocation. Currently, the balancing of LUNs is not dynamic and cannot be selected by the user.When the initiator is logged into the target, and the
multipathlayer is in a optimized state, the initiator’s operating systemmultipathutilities report the path to theOwnergateway as being in ALUA Active-Optimized (AO) state. Themultipathutilities report the other paths as being in the ALUA Active-non-Optimized (ANO) state.If the AO path fails, one of the other iSCSI gateways is used. The ordering for the failover gateway depends on the initiator’s
multipathlayer, where normally, the order is based on which path was discovered first.
7.9. Upgrading the Ceph iSCSI gateway using Ansible
Upgrading the Red Hat Ceph Storage iSCSI gateways can be done by using an Ansible playbook designed for rolling upgrades.
Prerequisites
- A running Ceph iSCSI gateway.
- A running Red Hat Ceph Storage cluster.
- Admin-level access to all nodes in the storage cluster.
You can run the upgrade procedure as an administrative user or as root. If you want to run it as root, make sure that you have ssh set up for use with Ansible.
Procedure
-
Verify that the correct iSCSI gateway nodes are listed in the Ansible inventory file (
/etc/ansible/hosts). Run the rolling upgrade playbook:
[admin@ansible ceph-ansible]$ ansible-playbook rolling_update.ymlRun the appropriate playbook to finish the upgrade:
Bare-metal deployments
[admin@ansible ceph-ansible]$ ansible-playbook site.yml --limit iscsigws -i hostsContainer deployments
[admin@ansible ceph-ansible]$ ansible-playbook site-container.yml --limit iscsigws -i hosts
Additional Resources
7.10. Upgrading the Ceph iSCSI gateway using the command-line interface
Upgrading the Red Hat Ceph Storage iSCSI gateways can be done in a rolling fashion, by upgrading one bare-metal iSCSI gateway node at a time.
Do not upgrade the iSCSI gateway while upgrading and restarting Ceph OSDs. Wait until the OSD upgrades are finished and the storage cluster is in an active+clean state.
Prerequisites
- A running Ceph iSCSI gateway.
- A running Red Hat Ceph Storage cluster.
-
Having
rootaccess to the iSCSI gateway node.
Procedure
Update the iSCSI gateway packages:
[root@iscsigw ~]# yum update ceph-iscsiStop the iSCSI gateway daemons:
[root@iscsigw ~]# systemctl stop rbd-target-api
[root@iscsigw ~]# systemctl stop rbd-target-gw
Verify that the iSCSI gateway daemons stopped cleanly:
[root@iscsigw ~]# systemctl status rbd-target-gw-
If the
rbd-target-gwservice successfully stops, then skip to step 4. If the
rbd-target-gwservice fails to stop, then do the following steps:If the
targetclipackage is not install, then install thetargetclipackage:[root@iscsigw ~]# yum install targetcliCheck for existing target objects:
[root@iscsigw ~]# targetcli lsExample
o- / ............................................................. [...]
o- backstores .................................................... [...]
| o- user:rbd ..................................... [Storage Objects: 0]
o- iscsi .................................................. [Targets: 0]
If the
backstoresandStorage Objectsare empty, then the iSCSI target has been shutdown cleanly and you can skip to step 4.If you have still have target objects, use the following command to force remove all target objects:
[root@iscsigw ~]# targetcli clearconfig confirm=TrueWarningIf multiple services are using the iSCSI target, use
targetcliin interactive mode to delete those specific objects.
-
If the
Update the
tcmu-runnerpackage:[root@iscsigw ~]# yum update tcmu-runnerStop the
tcmu-runnerservice:[root@iscsigw ~]# systemctl stop tcmu-runnerRestart the iSCSI gateway services in the following order:
[root@iscsigw ~]# systemctl start tcmu-runner
[root@iscsigw ~]# systemctl start rbd-target-gw
[root@iscsigw ~]# systemctl start rbd-target-api
7.11. Monitoring the iSCSI gateways
Red Hat Ceph Storage cluster now incorporates a generic metric gathering framework within the OSDs and MGRs to provide built-in monitoring. The metrics are generated within the Red Hat Ceph Storage cluster and there is no need to access client nodes to scrape metrics. To monitor the performance of RBD images, Ceph has a built-in MGR Prometheus exporter module to translate individual RADOS object metrics into aggregated RBD image metrics for Input/Output(I/O) operations per second, throughput, and latency. The Ceph iSCSI gateway also provides a Prometheus exporter for Linux-IO (LIO) level performance metrics, supporting monitoring and visualization tools like Grafana. These metrics include the information about defined Target Portal Groups (TPGs) and mapped Logical Unit Numbers (LUNs), per LUN state and the number of Input Output operations per second (IOPS), read bytes and write bytes per LUN per client. By default, the Prometheus exporter is enabled. You can change the default settings by using the following options in the iscsi-gateway.cfg:
Example
[config]

prometheus_exporter = True
prometheus_port = 9287
prometheus_host = xx.xx.xx.xxx
The gwtop tool used for Ceph iSCSI gateway environments to monitor performance of exported Ceph block device (RBD) images is deprecated.
7.12. Removing the iSCSI configuration
To remove the iSCSI configuration, use the gwcli utility to remove hosts and disks, and the Ansible purge-iscsi-gateways.yml playbook to remove the iSCSI target configuration.
Using the purge-iscsi-gateways.yml playbook is a destructive action against the iSCSI gateway environment.
An attempt to use purge-iscsi-gateways.yml fails if RBD images have snapshots or clones and are exported through the Ceph iSCSI gateway.
Prerequisites
Disconnect all iSCSI initiators:
Red Hat Enterprise Linux initiators:
Syntax
iscsiadm -m node -T TARGET_NAME --logoutReplace
TARGET_NAMEwith the configured iSCSI target name, for example:Example
# iscsiadm -m node -T iqn.2003-01.com.redhat.iscsi-gw:ceph-igw --logout
Logging out of session [sid: 1, target: iqn.2003-01.com.redhat.iscsi-gw:iscsi-igw, portal: 10.172.19.21,3260]
Logging out of session [sid: 2, target: iqn.2003-01.com.redhat.iscsi-gw:iscsi-igw, portal: 10.172.19.22,3260]
Logout of [sid: 1, target: iqn.2003-01.com.redhat.iscsi-gw:iscsi-igw, portal: 10.172.19.21,3260] successful.
Logout of [sid: 2, target: iqn.2003-01.com.redhat.iscsi-gw:iscsi-igw, portal: 10.172.19.22,3260] successful.
Windows initiators:
See the Microsoft documentation for more details.
VMware ESXi initiators:
See the VMware documentation for more details.
Procedure
Run the iSCSI gateway command line utility:
[root@iscsigw ~]# gwcliRemove the hosts:
Syntax
/> cd /iscsi-target/iqn.2003-01.com.redhat.iscsi-gw:$TARGET_NAME/hosts
/> /iscsi-target...TARGET_NAME/hosts> delete CLIENT_NAME
Replace
TARGET_NAMEwith the configured iSCSI target name, and replaceCLIENT_NAMEwith iSCSI initiator name, for example:Example
/> cd /iscsi-target/iqn.2003-01.com.redhat.iscsi-gw:ceph-igw/hosts
/> /iscsi-target...eph-igw/hosts> delete iqn.1994-05.com.redhat:rh7-client
Remove the disks:
Syntax
/> cd /disks/
/disks> delete POOL_NAME.IMAGE_NAME
Replace
POOL_NAMEwith the name of the pool and theIMAGE_NAMEwith the name of the image.Example
/> cd /disks/
/disks> delete rbd.disk_1
As a root user, for the containerized deployment ensure all the Red Hat Ceph Storage tools and repositories are enabled on the iSCSI gateway nodes:
Red Hat Enterprise Linux 7
[root@admin ~]# subscription-manager repos --enable=rhel-7-server-rpms
[root@admin ~]# subscription-manager repos --enable=rhel-7-server-extras-rpms
[root@admin ~]# subscription-manager repos --enable=rhel-7-server-rhceph-4-tools-rpms --enable=rhel-7-server-ansible-2.9-rpms
Red Hat Enterprise Linux 8
[root@admin ~]# subscription-manager repos --enable=rhel-8-for-x86_64-baseos-rpms [root@admin ~]# subscription-manager repos --enable=rhel-8-for-x86_64-appstream-rpms [root@admin ~]# subscription-manager repos --enable=rhceph-4-tools-for-rhel-8-x86_64-rpms --enable=ansible-2.9-for-rhel-8-x86_64-rpmsNoteFor bare-metal deployment, the Ceph tools are enabled with client install.
On each of the iSCSI gateway nodes, install the
ceph-commonandceph-iscsipackages:Red Hat Enterprise Linux 7
[root@admin ~]# yum install -y ceph-common
[root@admin ~]# yum install -y ceph-iscsi
Red Hat Enterprise Linux 8
[root@admin ~]# dnf install -y ceph-common [root@admin ~]# dnf install -y ceph-iscsi-
Run the
yum history listcommand and get the transaction ID of theceph-iscsiinstallation. Switch to Ansible user:
Example
[root@admin ~]# su ansibleNavigate to the
/usr/share/ceph-ansible/directory:Example
[ansible@admin ~]# cd /usr/share/ceph-ansibleAs the ansible user, run the iSCSI gateway purge Ansible playbook:
[ansible@admin ceph-ansible]$ ansible-playbook purge-iscsi-gateways.ymlEnter the type of purge when prompted:
lio- In this mode the Linux iSCSI target configuration is purged on all iSCSI gateways that are defined. Disks that were created are left untouched within the Ceph storage cluster.
all-
When
allis chosen, the Linux iSCSI target configuration is removed together with all RBD images that were defined within the iSCSI gateway environment, other unrelated RBD images will not be removed. Be sure to choose the correct mode because this operation deletes data.
Example
[ansible@rh7-iscsi-client ceph-ansible]$ ansible-playbook purge-iscsi-gateways.yml
Which configuration elements should be purged? (all, lio or abort) [abort]: all


PLAY [Confirm removal of the iSCSI gateway configuration] *********************


GATHERING FACTS ***************************************************************
ok: [localhost]


TASK: [Exit playbook if user aborted the purge] *******************************
skipping: [localhost]


TASK: [set_fact ] *************************************************************
ok: [localhost]


PLAY [Removing the gateway configuration] *************************************


GATHERING FACTS ***************************************************************
ok: [ceph-igw-1]
ok: [ceph-igw-2]


TASK: [igw_purge | purging the gateway configuration] *************************
changed: [ceph-igw-1]
changed: [ceph-igw-2]


TASK: [igw_purge | deleting configured rbd devices] ***************************
changed: [ceph-igw-1]
changed: [ceph-igw-2]


PLAY RECAP ********************************************************************
ceph-igw-1                 : ok=3    changed=2    unreachable=0    failed=0
ceph-igw-2                 : ok=3    changed=2    unreachable=0    failed=0
localhost                  : ok=2    changed=0    unreachable=0    failed=0
Check if the active containers are removed:
Red Hat Enterprise Linux 7
[root@admin ~]# docker psRed Hat Enterprise Linux 8
[root@admin ~]# podman psThe Ceph iSCSI container IDs are removed.
Optional: Remove the
ceph-iscsipackage:Syntax
yum history undo TRANSACTION_IDExample
[root@admin ~]# yum history undo 4WarningDo not remove the
ceph-commonpackages. This removes the contents of/etc/cephand renders the daemons on that node unable to start.
7.13. Additional Resources
- For details on managing iSCSI gateway using the Red Hat Ceph Storage Dashboard, see the iSCSI functions section in the Dashboard Guide for Red Hat Ceph Storage 4
Appendix A. Ceph block device configuration reference
As a storage administrator, you can fine tune the behavior of Ceph block devices through the various options that are available. You can use this reference for viewing such things as the default Ceph block device options, and Ceph block device caching options.
A.1. Prerequisites
- A running Red Hat Ceph Storage cluster.
A.2. Block device default options
It is possible to override the default settings for creating an image. Ceph will create images with format 2 and no striping.
- rbd_default_format
- Description
-
The default format (
2) if no other format is specified. Format1is the original format for a new image, which is compatible with all versions oflibrbdand the kernel module, but does not support newer features like cloning. Format2is supported bylibrbdand the kernel module since version 3.11 (except for striping). Format2adds support for cloning and is more easily extensible to allow more features in the future. - Type
- Integer
- Default
-
2
- rbd_default_order
- Description
- The default order if no other order is specified.
- Type
- Integer
- Default
-
22
- rbd_default_stripe_count
- Description
- The default stripe count if no other stripe count is specified. Changing the default value requires striping v2 feature.
- Type
- 64-bit Unsigned Integer
- Default
-
0
- rbd_default_stripe_unit
- Description
-
The default stripe unit if no other stripe unit is specified. Changing the unit from
0(that is, the object size) requires the striping v2 feature. - Type
- 64-bit Unsigned Integer
- Default
-
0
- rbd_default_features
- Description
The default features enabled when creating an block device image. This setting only applies to format 2 images. The settings are:
1: Layering support. Layering enables you to use cloning.
2: Striping v2 support. Striping spreads data across multiple objects. Striping helps with parallelism for sequential read/write workloads.
4: Exclusive locking support. When enabled, it requires a client to get a lock on an object before making a write.
8: Object map support. Block devices are thin-provisioned—meaning, they only store data that actually exists. Object map support helps track which objects actually exist (have data stored on a drive). Enabling object map support speeds up I/O operations for cloning, or importing and exporting a sparsely populated image.
16: Fast-diff support. Fast-diff support depends on object map support and exclusive lock support. It adds another property to the object map, which makes it much faster to generate diffs between snapshots of an image, and the actual data usage of a snapshot much faster.
32: Deep-flatten support. Deep-flatten makes
rbd flattenwork on all the snapshots of an image, in addition to the image itself. Without it, snapshots of an image will still rely on the parent, so the parent will not be delete-able until the snapshots are deleted. Deep-flatten makes a parent independent of its clones, even if they have snapshots.64: Journaling support. Journaling records all modifications to an image in the order they occur. This ensures that a crash-consistent mirror of the remote image is available locally
The enabled features are the sum of the numeric settings.
- Type
- Integer
- Default
61- layering, exclusive-lock, object-map, fast-diff, and deep-flatten are enabledImportantThe current default setting is not compatible with the RBD kernel driver nor older RBD clients.
- rbd_default_map_options
- Description
-
Most of the options are useful mainly for debugging and benchmarking. See
man rbdunderMap Optionsfor details. - Type
- String
- Default
-
""
A.3. Block device general options
- rbd_op_threads
- Description
- The number of block device operation threads.
- Type
- Integer
- Default
-
1
Do not change the default value of rbd_op_threads because setting it to a number higher than 1 might cause data corruption.
- rbd_op_thread_timeout
- Description
- The timeout (in seconds) for block device operation threads.
- Type
- Integer
- Default
-
60
- rbd_non_blocking_aio
- Description
-
If
true, Ceph will process block device asynchronous I/O operations from a worker thread to prevent blocking. - Type
- Boolean
- Default
-
true
- rbd_concurrent_management_ops
- Description
- The maximum number of concurrent management operations in flight (for example, deleting or resizing an image).
- Type
- Integer
- Default
-
10
- rbd_request_timed_out_seconds
- Description
- The number of seconds before a maintenance request times out.
- Type
- Integer
- Default
-
30
- rbd_clone_copy_on_read
- Description
-
When set to
true, copy-on-read cloning is enabled. - Type
- Boolean
- Default
-
false
- rbd_enable_alloc_hint
- Description
-
If
true, allocation hinting is enabled, and the block device will issue a hint to the OSD back end to indicate the expected size object. - Type
- Boolean
- Default
-
true
- rbd_skip_partial_discard
- Description
-
If
true, the block device will skip zeroing a range when trying to discard a range inside an object. - Type
- Boolean
- Default
-
false
- rbd_tracing
- Description
-
Set this option to
trueto enable the Linux Trace Toolkit Next Generation User Space Tracer (LTTng-UST) tracepoints. See Tracing RADOS Block Device (RBD) Workloads with the RBD Replay Feature for details. - Type
- Boolean
- Default
-
false
- rbd_validate_pool
- Description
-
Set this option to
trueto validate empty pools for RBD compatibility. - Type
- Boolean
- Default
-
true
- rbd_validate_names
- Description
-
Set this option to
trueto validate image specifications. - Type
- Boolean
- Default
-
true
A.4. Block device caching options
The user space implementation of the Ceph block device, that is, librbd, cannot take advantage of the Linux page cache, so it includes its own in-memory caching, called RBD caching. Ceph block device caching behaves just like well-behaved hard disk caching. When the operating system sends a barrier or a flush request, all dirty data is written to the Ceph OSDs. This means that using write-back caching is just as safe as using a well-behaved physical hard disk with a virtual machine that properly sends flushes, that is, Linux kernel version 2.6.32 or higher. The cache uses a Least Recently Used (LRU) algorithm, and in write-back mode it can coalesce contiguous requests for better throughput.
Ceph block devices support write-back caching. To enable write-back caching, set rbd_cache = true to the [client] section of the Ceph configuration file. By default, librbd does not perform any caching. Writes and reads go directly to the storage cluster, and writes return only when the data is on disk on all replicas. With caching enabled, writes return immediately, unless there are more than rbd_cache_max_dirty unflushed bytes. In this case, the write triggers write-back and blocks until enough bytes are flushed.
Ceph block devices support write-through caching. You can set the size of the cache, and you can set targets and limits to switch from write-back caching to write-through caching. To enable write-through mode, set rbd_cache_max_dirty to 0. This means writes return only when the data is on disk on all replicas, but reads may come from the cache. The cache is in memory on the client, and each Ceph block device image has its own. Since the cache is local to the client, there is no coherency if there are others accessing the image. Running other file systems, such as GFS or OCFS, on top of Ceph block devices will not work with caching enabled.
The Ceph configuration settings for Ceph block devices must be set in the [client] section of the Ceph configuration file, by default, /etc/ceph/ceph.conf.
The settings include:
- rbd_cache
- Description
- Enable caching for RADOS Block Device (RBD).
- Type
- Boolean
- Required
- No
- Default
-
true
- rbd_cache_size
- Description
- The RBD cache size in bytes.
- Type
- 64-bit Integer
- Required
- No
- Default
-
32 MiB
- rbd_cache_max_dirty
- Description
-
The
dirtylimit in bytes at which the cache triggers write-back. If0, uses write-through caching. - Type
- 64-bit Integer
- Required
- No
- Constraint
-
Must be less than
rbd cache size. - Default
-
24 MiB
- rbd_cache_target_dirty
- Description
-
The
dirty targetbefore the cache begins writing data to the data storage. Does not block writes to the cache. - Type
- 64-bit Integer
- Required
- No
- Constraint
-
Must be less than
rbd cache max dirty. - Default
-
16 MiB
- rbd_cache_max_dirty_age
- Description
- The number of seconds dirty data is in the cache before writeback starts.
- Type
- Float
- Required
- No
- Default
-
1.0
- rbd_cache_max_dirty_object
- Description
-
The dirty limit for objects - set to
0for auto calculate fromrbd_cache_size. - Type
- Integer
- Default
-
0
- rbd_cache_block_writes_upfront
- Description
-
If
true, it will block writes to the cache before theaio_writecall completes. Iffalse, it will block before theaio_completionis called. - Type
- Boolean
- Default
-
false
- rbd_cache_writethrough_until_flush
- Description
- Start out in write-through mode, and switch to write-back after the first flush request is received. Enabling this is a conservative but safe setting in case VMs running on rbd are too old to send flushes, like the virtio driver in Linux before 2.6.32.
- Type
- Boolean
- Required
- No
- Default
-
true
A.5. Block device parent and child read options
- rbd_balance_snap_reads
- Description
- Ceph typically reads objects from the primary OSD. Since reads are immutable, you may enable this feature to balance snap reads between the primary OSD and the replicas.
- Type
- Boolean
- Default
-
false
- rbd_localize_snap_reads
- Description
-
Whereas
rbd_balance_snap_readswill randomize the replica for reading a snapshot. If you enablerbd_localize_snap_reads, the block device will look to the CRUSH map to find the closest or local OSD for reading the snapshot. - Type
- Boolean
- Default
-
false
- rbd_balance_parent_reads
- Description
- Ceph typically reads objects from the primary OSD. Since reads are immutable, you may enable this feature to balance parent reads between the primary OSD and the replicas.
- Type
- Boolean
- Default
-
false
- rbd_localize_parent_reads
- Description
-
Whereas
rbd_balance_parent_readswill randomize the replica for reading a parent. If you enablerbd_localize_parent_reads, the block device will look to the CRUSH map to find the closest or local OSD for reading the parent. - Type
- Boolean
- Default
-
true
A.6. Block device read ahead options
RBD supports read-ahead/prefetching to optimize small, sequential reads. This should normally be handled by the guest OS in the case of a VM, but boot loaders may not issue efficient reads. Read-ahead is automatically disabled if caching is disabled.
- rbd_readahead_trigger_requests
- Description
- Number of sequential read requests necessary to trigger read-ahead.
- Type
- Integer
- Required
- No
- Default
-
10
- rbd_readahead_max_bytes
- Description
- Maximum size of a read-ahead request. If zero, read-ahead is disabled.
- Type
- 64-bit Integer
- Required
- No
- Default
-
512 KiB
- rbd_readahead_disable_after_bytes
- Description
- After this many bytes have been read from an RBD image, read-ahead is disabled for that image until it is closed. This allows the guest OS to take over read-ahead once it is booted. If zero, read-ahead stays enabled.
- Type
- 64-bit Integer
- Required
- No
- Default
-
50 MiB
A.7. Block device blacklist options
- rbd_blacklist_on_break_lock
- Description
- Whether to blacklist clients whose lock was broken.
- Type
- Boolean
- Default
-
true
- rbd_blacklist_expire_seconds
- Description
- The number of seconds to blacklist - set to 0 for OSD default.
- Type
- Integer
- Default
-
0
A.8. Block device journal options
- rbd_journal_order
- Description
-
The number of bits to shift to compute the journal object maximum size. The value is between
12and64. - Type
- 32-bit Unsigned Integer
- Default
-
24
- rbd_journal_splay_width
- Description
- The number of active journal objects.
- Type
- 32-bit Unsigned Integer
- Default
-
4
- rbd_journal_commit_age
- Description
- The commit time interval in seconds.
- Type
- Double Precision Floating Point Number
- Default
-
5
- rbd_journal_object_flush_interval
- Description
- The maximum number of pending commits per a journal object.
- Type
- Integer
- Default
-
0
- rbd_journal_object_flush_bytes
- Description
- The maximum number of pending bytes per a journal object.
- Type
- Integer
- Default
-
0
- rbd_journal_object_flush_age
- Description
- The maximum time interval in seconds for pending commits.
- Type
- Double Precision Floating Point Number
- Default
-
0
- rbd_journal_pool
- Description
- Specifies a pool for journal objects.
- Type
- String
- Default
-
""
A.9. Block device configuration override options
Block device configuration override options for global and pool levels. The QoS settings for the block device configuration works only with librbd and not krbd.
Global level
Available keys
rbd_qos_bps_burst- Description
- The desired burst limit of IO bytes.
- Type
- Integer
- Default
-
0
rbd_qos_bps_limit- Description
- The desired limit of IO bytes per second.
- Type
- Integer
- Default
-
0
rbd_qos_iops_burst- Description
- The desired burst limit of IO operations.
- Type
- Integer
- Default
-
0
rbd_qos_iops_limit- Description
- The desired limit of IO operations per second.
- Type
- Integer
- Default
-
0
rbd_qos_read_bps_burst- Description
- The desired burst limit of read bytes.
- Type
- Integer
- Default
-
0
rbd_qos_read_bps_limit- Description
- The desired limit of read bytes per second.
- Type
- Integer
- Default
-
0
rbd_qos_read_iops_burst- Description
- The desired burst limit of read operations.
- Type
- Integer
- Default
-
0
rbd_qos_read_iops_limit- Description
- The desired limit of read operations per second.
- Type
- Integer
- Default
-
0
rbd_qos_write_bps_burst- Description
- The desired burst limit of write bytes.
- Type
- Integer
- Default
-
0
rbd_qos_write_bps_limit- Description
- The desired limit of write bytes per second.
- Type
- Integer
- Default
-
0
rbd_qos_write_iops_burst- Description
- The desired burst limit of write operations.
- Type
- Integer
- Default
-
0
rbd_qos_write_iops_limit- Description
- The desired burst limit of write operations per second.
- Type
- Integer
- Default
-
0
The above keys can be used for the following:
rbd config global set CONFIG_ENTITY KEY VALUE- Description
- Set a global level configuration override.
rbd config global get CONFIG_ENTITY KEY- Description
- Get a global level configuration override.
rbd config global list CONFIG_ENTITY- Description
- List the global level configuration overrides.
rbd config global remove CONFIG_ENTITY KEY- Description
- Remove a global level configuration override.
Pool level
rbd config pool set POOL_NAME KEY VALUE- Description
- Set a pool level configuration override.
rbd config pool get POOL_NAME KEY- Description
- Get a pool level configuration override.
rbd config pool list POOL_NAME- Description
- List the pool level configuration overrides.
rbd config pool remove POOL_NAME KEY- Description
- Remove a pool level configuration override.
CONFIG_ENTITY is global, client or client id. KEY is the config key. VALUE is the config value. POOL_NAME is the name of the pool.
Appendix B. iSCSI Gateway Variables
iSCSI Gateway General Variables
seed_monitor- Purpose
-
Each iSCSI gateway needs access to the Ceph storage cluster for RADOS and RBD calls. This means the iSCSI gateway must have an appropriate
/etc/ceph/directory defined. Theseed_monitorhost is used to populate the iSCSI gateway’s/etc/ceph/directory.
gateway_keyring- Purpose
- Define a custom keyring name.
perform_system_checks- Purpose
-
This is a Boolean value that checks for multipath and LVM configuration settings on each iSCSI gateway. It must be set to
truefor at least the first run to ensure themultipathddaemon and LVM are configured properly.
iSCSI Gateway RBD-TARGET-API Variables
api_user- Purpose
-
The user name for the API. The default is
admin.
api_password- Purpose
-
The password for using the API. The default is
admin.
api_port- Purpose
-
The TCP port number for using the API. The default is
5000.
api_secure- Purpose
-
Value can be
trueorfalse. The default isfalse.
loop_delay- Purpose
-
Controls the sleeping interval in seconds for polling the iSCSI management object. The default value is
1.
trusted_ip_list- Purpose
- A list of IPv4 or IPv6 addresses that have access to the API. By default, only the iSCSI gateway nodes have access.
Appendix C. Sample iscsigws.yml file
# Variables here are applicable to all host groups NOT roles

# This sample file generated by generate_group_vars_sample.sh

# Dummy variable to avoid error because ansible does not recognize the
# file as a good configuration file when no variable in it.
dummy:

# You can override vars by using host or group vars

###########
# GENERAL #
###########
# Whether or not to generate secure certificate to iSCSI gateway nodes
#generate_crt: False

#iscsi_conf_overrides: {}
#iscsi_pool_name: rbd
#iscsi_pool_size: "{{ osd_pool_default_size }}"

#copy_admin_key: True

##################
# RBD-TARGET-API #
##################
# Optional settings related to the CLI/API service
#api_user: admin
#api_password: admin
#api_port: 5000
#api_secure: false
#loop_delay: 1
#trusted_ip_list: 192.168.122.1


##########
# DOCKER #
##########

# Resource limitation
# For the whole list of limits you can apply see: docs.docker.com/engine/admin/resource_constraints
# Default values are based from: https://access.redhat.com/documentation/en-us/red_hat_ceph_storage/2/html/red_hat_ceph_storage_hardware_guide/minimum_recommendations
# These options can be passed using the 'ceph_mds_docker_extra_env' variable.

# TCMU_RUNNER resource limitation
#ceph_tcmu_runner_docker_memory_limit: "{{ ansible_memtotal_mb }}m"
#ceph_tcmu_runner_docker_cpu_limit: 1

# RBD_TARGET_GW resource limitation
#ceph_rbd_target_gw_docker_memory_limit: "{{ ansible_memtotal_mb }}m"
#ceph_rbd_target_gw_docker_cpu_limit: 1

# RBD_TARGET_API resource limitation
#ceph_rbd_target_api_docker_memory_limit: "{{ ansible_memtotal_mb }}m"
#ceph_rbd_target_api_docker_cpu_limit: 1