Installation Guide
Installing Red Hat Ceph Storage on Red Hat Enterprise Linux
Abstract
Chapter 1. What is Red Hat Ceph Storage?
Red Hat Ceph Storage is a scalable, open, software-defined storage platform that combines an enterprise-hardened version of the Ceph storage system with a Ceph management platform, deployment utilities, and support services. Red Hat Ceph Storage is designed for cloud infrastructure and web-scale object storage. Red Hat Ceph Storage clusters consist of the following types of nodes:
Red Hat Ceph Storage Ansible administration
The Ansible administration node replaces the traditional Ceph administration node used in previous versions of Red Hat Ceph Storage. The Ansible administration node provides the following functions:
- Centralized storage cluster management.
- The Ceph configuration files and keys.
- Optionally, local repositories for installing Ceph on nodes that cannot access the Internet for security reasons.
Ceph Monitor
Each Ceph Monitor node runs the ceph-mon daemon, which maintains a master copy of the storage cluster map. The storage cluster map includes the storage cluster topology. A client connecting to the Ceph storage cluster retrieves the current copy of the storage cluster map from the Ceph Monitor, which enables the client to read from and write data to the storage cluster.
The storage cluster can run with only one Ceph Monitor; however, to ensure high availability in a production storage cluster, Red Hat will only support deployments with at least three Ceph Monitor nodes. Red Hat recommends deploying a total of 5 Ceph Monitors for storage clusters exceeding 750 Ceph OSDs.
Ceph OSD
Each Ceph Object Storage Device (OSD) node runs the ceph-osd daemon, which interacts with logical disks attached to the node. The storage cluster stores data on these Ceph OSD nodes.
Ceph can run with very few OSD nodes, which the default is three, but production storage clusters realize better performance beginning at modest scales. For example, 50 Ceph OSDs in a storage cluster. Ideally, a Ceph storage cluster has multiple OSD nodes, allowing for the possibility to isolate failure domains by configuring the CRUSH map accordingly.
Ceph MDS
Each Ceph Metadata Server (MDS) node runs the ceph-mds daemon, which manages metadata related to files stored on the Ceph File System (CephFS). The Ceph MDS daemon also coordinates access to the shared storage cluster.
Ceph Object Gateway
Ceph Object Gateway node runs the ceph-radosgw daemon, and is an object storage interface built on top of librados to provide applications with a RESTful access point to the Ceph storage cluster. The Ceph Object Gateway supports two interfaces:
S3
Provides object storage functionality with an interface that is compatible with a large subset of the Amazon S3 RESTful API.
Swift
Provides object storage functionality with an interface that is compatible with a large subset of the OpenStack Swift API.
Additional Resources
- For details on the Ceph architecture, see the Red Hat Ceph Storage Architecture Guide.
- For the minimum hardware recommendations, see the Red Hat Ceph Storage Hardware Selection Guide.
Chapter 2. Red Hat Ceph Storage considerations and recommendations
As a storage administrator, you can have a basic understanding about what things to consider before running a Red Hat Ceph Storage cluster. Understanding such things as, the hardware and network requirements, understanding what type of workloads work well with a Red Hat Ceph Storage cluster, along with Red Hat’s recommendations. Red Hat Ceph Storage can be used for different workloads based on a particular business need or set of requirements. Doing the necessary planning before installing a Red Hat Ceph Storage is critical to the success of running a Ceph storage cluster efficiently, achieving the business requirements.
Want help with planning a Red Hat Ceph Storage cluster for a specific use case? Please contact your Red Hat representative for assistance.
2.1. Prerequisites
- Time to understand, consider, and plan a storage solution.
2.2. Basic Red Hat Ceph Storage considerations
The first consideration for using Red Hat Ceph Storage is developing a storage strategy for the data. A storage strategy is a method of storing data that serves a particular use case. If you need to store volumes and images for a cloud platform like OpenStack, you can choose to store data on faster Serial Attached SCSI (SAS) drives with Solid State Drives (SSD) for journals. By contrast, if you need to store object data for an S3- or Swift-compliant gateway, you can choose to use something more economical, like traditional Serial Advanced Technology Attachment (SATA) drives. Red Hat Ceph Storage can accommodate both scenarios in the same storage cluster, but you need a means of providing the fast storage strategy to the cloud platform, and a means of providing more traditional storage for your object store.
One of the most important steps in a successful Ceph deployment is identifying a price-to-performance profile suitable for the storage cluster’s use case and workload. It is important to choose the right hardware for the use case. For example, choosing IOPS-optimized hardware for a cold storage application increases hardware costs unnecessarily. Whereas, choosing capacity-optimized hardware for its more attractive price point in an IOPS-intensive workload will likely lead to unhappy users complaining about slow performance.
Red Hat Ceph Storage can support multiple storage strategies. Use cases, cost versus benefit performance tradeoffs, and data durability are the primary considerations that help develop a sound storage strategy.
Use Cases
Ceph provides massive storage capacity, and it supports numerous use cases, such as:
- The Ceph Block Device client is a leading storage backend for cloud platforms that provides limitless storage for volumes and images with high performance features like copy-on-write cloning.
- The Ceph Object Gateway client is a leading storage backend for cloud platforms that provides a RESTful S3-compliant and Swift-compliant object storage for objects like audio, bitmap, video and other data.
- The Ceph File System for traditional file storage.
Cost vs. Benefit of Performance
Faster is better. Bigger is better. High durability is better. However, there is a price for each superlative quality, and a corresponding cost versus benefit trade off. Consider the following use cases from a performance perspective: SSDs can provide very fast storage for relatively small amounts of data and journaling. Storing a database or object index can benefit from a pool of very fast SSDs, but proves too expensive for other data. SAS drives with SSD journaling provide fast performance at an economical price for volumes and images. SATA drives without SSD journaling provide cheap storage with lower overall performance. When you create a CRUSH hierarchy of OSDs, you need to consider the use case and an acceptable cost versus performance trade off.
Data Durability
In large scale storage clusters, hardware failure is an expectation, not an exception. However, data loss and service interruption remain unacceptable. For this reason, data durability is very important. Ceph addresses data durability with multiple replica copies of an object or with erasure coding and multiple coding chunks. Multiple copies or multiple coding chunks present an additional cost versus benefit tradeoff: it is cheaper to store fewer copies or coding chunks, but it can lead to the inability to service write requests in a degraded state. Generally, one object with two additional copies, or two coding chunks can allow a storage cluster to service writes in a degraded state while the storage cluster recovers.
Replication stores one or more redundant copies of the data across failure domains in case of a hardware failure. However, redundant copies of data can become expensive at scale. For example, to store 1 petabyte of data with triple replication would require a cluster with at least 3 petabytes of storage capacity.
Erasure coding stores data as data chunks and coding chunks. In the event of a lost data chunk, erasure coding can recover the lost data chunk with the remaining data chunks and coding chunks. Erasure coding is substantially more economical than replication. For example, using erasure coding with 8 data chunks and 3 coding chunks provides the same redundancy as 3 copies of the data. However, such an encoding scheme uses approximately 1.5x of the initial data stored compared to 3x with replication.
The CRUSH algorithm aids this process by ensuring that Ceph stores additional copies or coding chunks in different locations within the storage cluster. This ensures that the failure of a single storage device or node does not lead to a loss of all of the copies or coding chunks necessary to preclude data loss. You can plan a storage strategy with cost versus benefit tradeoffs, and data durability in mind, then present it to a Ceph client as a storage pool.
ONLY the data storage pool can use erasure coding. Pools storing service data and bucket indexes use replication.
Ceph’s object copies or coding chunks make RAID solutions obsolete. Do not use RAID, because Ceph already handles data durability, a degraded RAID has a negative impact on performance, and recovering data using RAID is substantially slower than using deep copies or erasure coding chunks.
2.3. Red Hat Ceph Storage workload considerations
One of the key benefits of a Ceph storage cluster is the ability to support different types of workloads within the same storage cluster using performance domains. Different hardware configurations can be associated with each performance domain. Storage administrators can deploy storage pools on the appropriate performance domain, providing applications with storage tailored to specific performance and cost profiles. Selecting appropriately sized and optimized servers for these performance domains is an essential aspect of designing a Red Hat Ceph Storage cluster.
To the Ceph client interface that reads and writes data, a Ceph storage cluster appears as a simple pool where the client stores data. However, the storage cluster performs many complex operations in a manner that is completely transparent to the client interface. Ceph clients and Ceph object storage daemons, referred to as Ceph OSDs, or simply OSDs, both use the Controlled Replication Under Scalable Hashing (CRUSH) algorithm for storage and retrieval of objects. Ceph OSDs can run on bare-metal servers or virtual machines within the storage cluster, using containers or RPM based deployments.
A CRUSH map describes a topography of cluster resources, and the map exists both on client nodes as well as Ceph Monitor nodes within the cluster. Ceph clients and Ceph OSDs both use the CRUSH map and the CRUSH algorithm. Ceph clients communicate directly with OSDs, eliminating a centralized object lookup and a potential performance bottleneck. With awareness of the CRUSH map and communication with their peers, OSDs can handle replication, backfilling, and recovery—allowing for dynamic failure recovery.
Ceph uses the CRUSH map to implement failure domains. Ceph also uses the CRUSH map to implement performance domains, which simply take the performance profile of the underlying hardware into consideration. The CRUSH map describes how Ceph stores data, and it is implemented as a simple hierarchy, specifically a acyclic graph, and a ruleset. The CRUSH map can support multiple hierarchies to separate one type of hardware performance profile from another. Ceph implements performance domains with device "classes".
For example, you can have these performance domains coexisting in the same Red Hat Ceph Storage cluster:
- Hard disk drives (HDDs) are typically appropriate for cost- and capacity-focused workloads.
- Throughput-sensitive workloads typically use HDDs with Ceph write journals on solid state drives (SSDs).
- IOPS-intensive workloads such as MySQL and MariaDB often use SSDs.
Workloads
Red Hat Ceph Storage is optimized for three primary workloads:
IOPS optimized: Input, output per second (IOPS) optimization deployments are suitable for cloud computing operations, such as running MYSQL or MariaDB instances as virtual machines on OpenStack. IOPS optimized deployments require higher performance storage such as 15k RPM SAS drives and separate SSD journals to handle frequent write operations. Some high IOPS scenarios use all flash storage to improve IOPS and total throughput.
An IOPS-optimized storage cluster has the following properties:
- Lowest cost per IOPS.
- Highest IOPS per GB.
- 99th percentile latency consistency.
Uses for an IOPS-optimized storage cluster are:
- Typically block storage.
- 3x replication for hard disk drives (HDDs) or 2x replication for solid state drives (SSDs).
- MySQL on OpenStack clouds.
Throughput optimized: Throughput-optimized deployments are suitable for serving up significant amounts of data, such as graphic, audio and video content. Throughput-optimized deployments require high bandwidth networking hardware, controllers and hard disk drives with fast sequential read and write characteristics. If fast data access is a requirement, then use a throughput-optimized storage strategy. Also, if fast write performance is a requirement, using Solid State Disks (SSD) for journals will substantially improve write performance.
A throughput-optimized storage cluster has the following properties:
- Lowest cost per MBps (throughput).
- Highest MBps per TB.
- Highest MBps per BTU.
- Highest MBps per Watt.
- 97th percentile latency consistency.
Uses for an throughput-optimized storage cluster are:
- Block or object storage.
- 3x replication.
- Active performance storage for video, audio, and images.
- Streaming media, such as 4k video.
Capacity optimized: Capacity-optimized deployments are suitable for storing significant amounts of data as inexpensively as possible. Capacity-optimized deployments typically trade performance for a more attractive price point. For example, capacity-optimized deployments often use slower and less expensive SATA drives and co-locate journals rather than using SSDs for journaling.
A cost- and capacity-optimized storage cluster has the following properties:
- Lowest cost per TB.
- Lowest BTU per TB.
- Lowest Watts required per TB.
Uses for an cost- and capacity-optimized storage cluster are:
- Typically object storage.
- Erasure coding for maximizing usable capacity
- Object archive.
- Video, audio, and image object repositories.
Carefully consider the workload being ran by a Red Hat Ceph Storage clusters BEFORE considering what hardware to purchase, because it can significantly impact the price and performance of the storage cluster. For example, if the workload is capacity-optimized and the hardware is better suited to a throughput-optimized workload, then hardware will be more expensive than necessary. Conversely, if the workload is throughput-optimized and the hardware is better suited to a capacity-optimized workload, then storage cluster can suffer from poor performance.
2.4. Network considerations for Red Hat Ceph Storage
An important aspect of a cloud storage solution is that storage clusters can run out of IOPS due to network latency, and other factors. Also, the storage cluster can run out of throughput due to bandwidth constraints long before the storage clusters run out of storage capacity. This means that the network hardware configuration must support the chosen workloads in order to meet price versus performance requirements.
Storage administrators prefer that a storage cluster recovers as quickly as possible. Carefully consider bandwidth requirements for the storage cluster network, be mindful of network link oversubscription, and segregate the intra-cluster traffic from the client-to-cluster traffic. Also consider that network performance is increasingly important when considering the use of Solid State Disks (SSD), flash, NVMe, and other high performing storage devices.
Ceph supports a public network and a storage cluster network. The public network handles client traffic and communication with Ceph Monitors. The storage cluster network handles Ceph OSD heartbeats, replication, backfilling and recovery traffic. At a minimum, a single 10 GB Ethernet link should be used for storage hardware, and you can add additional 10 GB Ethernet links for connectivity and throughput.
Red Hat recommends allocating bandwidth to the storage cluster network, such that, it is a multiple of the public network using osd_pool_default_size as the basis for the multiple on replicated pools. Red Hat also recommends running the public and storage cluster networks on separate network cards.
Red Hat recommends using 10 GB Ethernet for Red Hat Ceph Storage deployments in production. A 1 GB Ethernet network is not suitable for production storage clusters.
In the case of a drive failure, replicating 1 TB of data across a 1 GB Ethernet network takes 3 hours, and 3 TB takes 9 hours. Using 3 TB is the typical drive configuration. By contrast, with a 10 GB Ethernet network, the replication times would be 20 minutes and 1 hour respectively. Remember that when a Ceph OSD fails, the storage cluster will recover by replicating the data it contained to other Ceph OSDs within the pool.
The failure of a larger domain such as a rack means that the storage cluster will utilize considerably more bandwidth. When building a storage cluster consisting of multiple racks, which is common for large storage implementations, consider utilizing as much network bandwidth between switches in a "fat tree" design for optimal performance. A typical 10 GB Ethernet switch has 48 10 GB ports and four 40 GB ports. Use the 40 GB ports on the spine for maximum throughput. Alternatively, consider aggregating unused 10 GB ports with QSFP+ and SFP+ cables into more 40 GB ports to connect to other rack and spine routers. Also, consider using LACP mode 4 to bond network interfaces. Additionally, use jumbo frames, maximum transmission unit (MTU) of 9000, especially on the backend or cluster network.
Before installing and testing a Red Hat Ceph Storage cluster, verify the network throughput. Most performance-related problems in Ceph usually begin with a networking issue. Simple network issues like a kinked or bent Cat-6 cable could result in degraded bandwidth. Use a minimum of 10 GB ethernet for the front side network. For large clusters, consider using 40 GB ethernet for the backend or cluster network.
For network optimization, Red Hat recommends using jumbo frames for a better CPU per bandwidth ratio, and a non-blocking network switch back-plane. Red Hat Ceph Storage requires the same MTU value throughout all networking devices in the communication path, end-to-end for both public and cluster networks. Verify that the MTU value is the same on all nodes and networking equipment in the environment before using a Red Hat Ceph Storage cluster in production.
2.5. Tuning considerations for the Linux kernel when running Ceph
Production Red Hat Ceph Storage clusters generally benefit from tuning the operating system, specifically around limits and memory allocation. Ensure that adjustments are set for all nodes within the storage cluster. You can also open a case with Red Hat support asking for additional guidance.
Reserving Free Memory for Ceph OSDs
To help prevent insufficient memory-related errors during Ceph OSD memory allocation requests, set the specific amount of physical memory to keep in reserve. Red Hat recommends the following settings based on the amount of system RAM.
For 64 GB, reserve 1 GB:
vm.min_free_kbytes = 1048576
vm.min_free_kbytes = 1048576Copy to Clipboard Copied! Toggle word wrap Toggle overflow For 128 GB, reserve 2 GB:
vm.min_free_kbytes = 2097152
vm.min_free_kbytes = 2097152Copy to Clipboard Copied! Toggle word wrap Toggle overflow For 256 GB, reserve 3 GB:
vm.min_free_kbytes = 3145728
vm.min_free_kbytes = 3145728Copy to Clipboard Copied! Toggle word wrap Toggle overflow
Increase the File Descriptors
The Ceph Object Gateway can hang if it runs out of file descriptors. You can modify the /etc/security/limits.conf file on Ceph Object Gateway nodes to increase the file descriptors for the Ceph Object Gateway.
ceph soft nofile unlimited
ceph soft nofile unlimitedAdjusting the ulimit value for Large Storage Clusters
When running Ceph administrative commands on large storage clusters, for example, with 1024 Ceph OSDs or more, create an /etc/security/limits.d/50-ceph.conf file on each node that runs administrative commands with the following contents:
USER_NAME soft nproc unlimited
USER_NAME soft nproc unlimitedReplace USER_NAME with the name of the non-root user account that runs the Ceph administrative commands.
The root user’s ulimit value is already set to unlimited by default on Red Hat Enterprise Linux.
2.6. Considerations for using a RAID controller with OSD nodes
Optionally, you can consider using a RAID controller on the OSD nodes. Here are some things to consider:
- If an OSD node has a RAID controller with 1-2GB of cache installed, enabling the write-back cache might result in increased small I/O write throughput. However, the cache must be non-volatile.
- Most modern RAID controllers have super capacitors that provide enough power to drain volatile memory to non-volatile NAND memory during a power-loss event. It is important to understand how a particular controller and its firmware behave after power is restored.
- Some RAID controllers require manual intervention. Hard drives typically advertise to the operating system whether their disk caches should be enabled or disabled by default. However, certain RAID controllers and some firmware do not provide such information. Verify that disk level caches are disabled to avoid file system corruption.
- Create a single RAID 0 volume with write-back for each Ceph OSD data drive with write-back cache enabled.
- If Serial Attached SCSI (SAS) or SATA connected Solid-state Drive (SSD) disks are also present on the RAID controller, then investigate whether the controller and firmware support pass-through mode. Enabling pass-through mode helps avoid caching logic, and generally results in much lower latency for fast media.
2.7. Considerations for using NVMe with Object Gateway
Optionally, you can consider using NVMe for the Ceph Object Gateway.
If you plan to use the object gateway feature of Red Hat Ceph Storage and the OSD nodes are using NVMe-based SSDs, then consider following the procedures found in the Using NVMe with LVM optimally section of the Ceph Object Gateway for Production Guide. These procedures explain how to use specially designed Ansible playbooks which will place journals and bucket indexes together on SSDs, which can increase performance compared to having all journals on one device.
2.8. Minimum hardware considerations for Red Hat Ceph Storage
Red Hat Ceph Storage can run on non-proprietary commodity hardware. Small production clusters and development clusters can run without performance optimization with modest hardware.
Red Hat Ceph Storage has slightly different requirements depending on a bare-metal or containerized deployment.
Disk space requirements are based on the Ceph daemons' default path under /var/lib/ceph/ directory.
| Process | Criteria | Minimum Recommended |
|---|---|---|
|
| Processor | 1x AMD64 or Intel 64 |
| RAM |
For | |
| OS Disk | 1x OS disk per host | |
| Volume Storage | 1x storage drive per daemon | |
|
|
Optional, but Red Hat recommended, 1x SSD or NVMe or Optane partition or logical volume per daemon. Sizing is 4% of | |
|
|
Optional, 1x SSD or NVMe or Optane partition or logical volume per daemon. Use a small size, for example 10 GB, and only if it’s faster than the | |
| Network | 2x 10 GB Ethernet NICs | |
|
| Processor | 1x AMD64 or Intel 64 |
| RAM | 1 GB per daemon | |
| Disk Space | 15 GB per daemon | |
| Monitor Disk |
Optionally,1x SSD disk for | |
| Network | 2x 1 GB Ethernet NICs | |
|
| Processor | 1x AMD64 or Intel 64 |
| RAM | 1 GB per daemon | |
| Network | 2x 1 GB Ethernet NICs | |
|
| Processor | 1x AMD64 or Intel 64 |
| RAM | 1 GB per daemon | |
| Disk Space | 5 GB per daemon | |
| Network | 1x 1 GB Ethernet NICs | |
|
| Processor | 1x AMD64 or Intel 64 |
| RAM | 2 GB per daemon
This number is highly dependent on the configurable MDS cache size. The RAM requirement is typically twice as much as the amount set in the | |
| Disk Space | 2 MB per daemon, plus any space required for logging, which might vary depending on the configured log levels. | |
| Network | 2x 1 GB Ethernet NICs Note that this is the same network as the OSDs. If you have a 10 GB network on your OSDs you should use the same on your MDS so that the MDS is not disadvantaged when it comes to latency. |
| Process | Criteria | Minimum Recommended |
|---|---|---|
|
| Processor | 1x AMD64 or Intel 64 CPU CORE per OSD container |
| RAM | Minimum of 5 GB of RAM per OSD container | |
| OS Disk | 1x OS disk per host | |
| OSD Storage | 1x storage drive per OSD container. Cannot be shared with OS Disk. | |
|
|
Optional, but Red Hat recommended, 1x SSD or NVMe or Optane partition or lvm per daemon. Sizing is 4% of | |
|
|
Optionally, 1x SSD or NVMe or Optane partition or logical volume per daemon. Use a small size, for example 10 GB, and only if it’s faster than the | |
| Network | 2x 10 GB Ethernet NICs, 10 GB Recommended | |
|
| Processor | 1x AMD64 or Intel 64 CPU CORE per mon-container |
| RAM |
3 GB per | |
| Disk Space |
10 GB per | |
| Monitor Disk |
Optionally, 1x SSD disk for | |
| Network | 2x 1 GB Ethernet NICs, 10 GB Recommended | |
|
| Processor |
1x AMD64 or Intel 64 CPU CORE per |
| RAM |
3 GB per | |
| Network | 2x 1 GB Ethernet NICs, 10 GB Recommended | |
|
| Processor | 1x AMD64 or Intel 64 CPU CORE per radosgw-container |
| RAM | 1 GB per daemon | |
| Disk Space | 5 GB per daemon | |
| Network | 1x 1 GB Ethernet NICs | |
|
| Processor | 1x AMD64 or Intel 64 CPU CORE per mds-container |
| RAM |
3 GB per
This number is highly dependent on the configurable MDS cache size. The RAM requirement is typically twice as much as the amount set in the | |
| Disk Space |
2 GB per | |
| Network | 2x 1 GB Ethernet NICs, 10 GB Recommended Note that this is the same network as the OSD containers. If you have a 10 GB network on your OSDs you should use the same on your MDS so that the MDS is not disadvantaged when it comes to latency. |
Chapter 3. Requirements for Installing Red Hat Ceph Storage
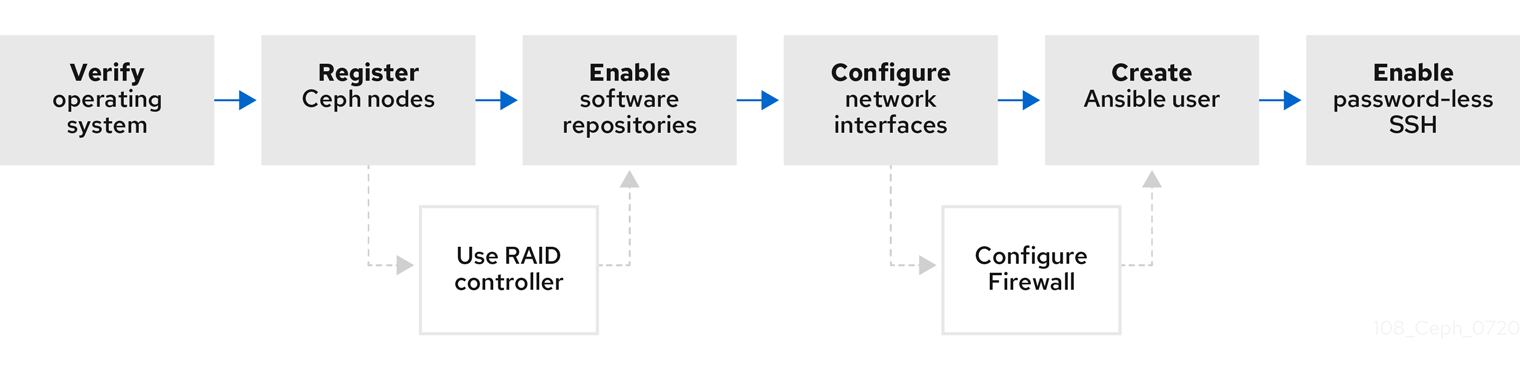
Figure 3.1. Prerequisite Workflow
Before installing Red Hat Ceph Storage, review the following requirements and prepare each Monitor, OSD, Metadata Server, and client nodes accordingly.
To know about Red Hat Ceph Storage releases and corresponding Red Hat Ceph Storage package versions, see What are the Red Hat Ceph Storage releases and corresponding Ceph package versions article on the Red Hat Customer Portal.
3.1. Prerequisites
- Verify the hardware meets the minimum requirements for Red Hat Ceph Storage 4.
3.2. Requirements checklist for installing Red Hat Ceph Storage
| Task | Required | Section | Recommendation |
|---|---|---|---|
| Verifying the operating system version | Yes | Section 3.3, “Operating system requirements for Red Hat Ceph Storage” | |
| Registering Ceph nodes | Yes | Section 3.4, “Registering Red Hat Ceph Storage nodes to the CDN and attaching subscriptions” | |
| Enabling Ceph software repositories | Yes | Section 3.5, “Enabling the Red Hat Ceph Storage repositories” | |
| Using a RAID controller with OSD nodes | No | Section 2.6, “Considerations for using a RAID controller with OSD nodes” | Enabling write-back caches on a RAID controller might result in increased small I/O write throughput for OSD nodes. |
| Configuring the network | Yes | Section 3.6, “Verifying the network configuration for Red Hat Ceph Storage” | At minimum, a public network is required. However, a private network for cluster communication is recommended. |
| Configuring a firewall | No | Section 3.7, “Configuring a firewall for Red Hat Ceph Storage” | A firewall can increase the level of trust for a network. |
| Creating an Ansible user | Yes | Creating the Ansible user is required on all Ceph nodes. | |
| Enabling password-less SSH | Yes | Required for Ansible. |
By default, ceph-ansible installs NTP/chronyd as a requirement. If NTP/chronyd is customized, refer to Configuring the Network Time Protocol for Red Hat Ceph Storage in Manually Installing Red Hat Ceph Storage section to understand how NTP/chronyd must be configured to function properly with Ceph.
3.3. Operating system requirements for Red Hat Ceph Storage
Red Hat Enterprise Linux entitlements are included in the Red Hat Ceph Storage subscription.
The initial release of Red Hat Ceph Storage 4 is supported on Red Hat Enterprise Linux 7.7 or Red Hat Enterprise Linux 8.1. The current version of Red Hat Ceph Storage 4.3 is supported on Red Hat Enterprise Linux 7.9, 8.2 EUS, 8.4 EUS, 8.5, 8.6, 8.7, 8.8.
Red Hat Ceph Storage 4 is supported on RPM-based deployments or container-based deployments.
Deploying Red Hat Ceph Storage 4 in containers running on Red Hat Enterprise Linux 7, deploys Red Hat Ceph Storage 4 running on Red Hat Enterprise Linux 8 container image.
Use the same operating system version, architecture, and deployment type across all nodes. For example, do not use a mixture of nodes with both AMD64 and Intel 64 architectures, a mixture of nodes with both Red Hat Enterprise Linux 7 and Red Hat Enterprise Linux 8 operating systems, or a mixture of nodes with both RPM-based deployments and container-based deployments.
Red Hat does not support clusters with heterogeneous architectures, operating system versions, or deployment types.
SELinux
By default, SELinux is set to Enforcing mode and the ceph-selinux packages are installed. For additional information on SELinux please see the Data Security and Hardening Guide, Red Hat Enterprise Linux 7 SELinux User’s and Administrator’s Guide, and Red Hat Enterprise Linux 8 Using SELinux Guide.
Additional Resources
- The documentation set for Red Hat Enterprise Linux 8 is available at https://access.redhat.com/documentation/en-us/red_hat_enterprise_linux/8/
- The documentation set for Red Hat Enterprise Linux 7 is available at https://access.redhat.com/documentation/en-us/red_hat_enterprise_linux/7/.
3.4. Registering Red Hat Ceph Storage nodes to the CDN and attaching subscriptions
Register each Red Hat Ceph Storage node to the Content Delivery Network (CDN) and attach the appropriate subscription so that the node has access to software repositories. Each Red Hat Ceph Storage node must be able to access the full Red Hat Enterprise Linux 8 base content and the extras repository content. Perform the following steps on all bare-metal and container nodes in the storage cluster, unless otherwise noted.
For bare-metal Red Hat Ceph Storage nodes that cannot access the Internet during the installation, provide the software content by using the Red Hat Satellite server. Alternatively, mount a local Red Hat Enterprise Linux 8 Server ISO image and point the Red Hat Ceph Storage nodes to the ISO image. For additional details, contact Red Hat Support.
For more information on registering Ceph nodes with the Red Hat Satellite server, see the How to Register Ceph with Satellite 6 and How to Register Ceph with Satellite 5 articles on the Red Hat Customer Portal.
Prerequisites
- A valid Red Hat subscription.
- Red Hat Ceph Storage nodes must be able to connect to the Internet.
- Root-level access to the Red Hat Ceph Storage nodes.
Procedure
For container deployments only, when the Red Hat Ceph Storage nodes do NOT have access to the Internet during deployment. You must follow these steps first on a node with Internet access:
Start a local container registry:
Red Hat Enterprise Linux 7
docker run -d -p 5000:5000 --restart=always --name registry registry:2
# docker run -d -p 5000:5000 --restart=always --name registry registry:2Copy to Clipboard Copied! Toggle word wrap Toggle overflow Red Hat Enterprise Linux 8
podman run -d -p 5000:5000 --restart=always --name registry registry:2
# podman run -d -p 5000:5000 --restart=always --name registry registry:2Copy to Clipboard Copied! Toggle word wrap Toggle overflow Verify
registry.redhat.iois in the container registry search path.Open for editing the
/etc/containers/registries.conffile:[registries.search] registries = [ 'registry.access.redhat.com', 'registry.fedoraproject.org', 'registry.centos.org', 'docker.io']
[registries.search] registries = [ 'registry.access.redhat.com', 'registry.fedoraproject.org', 'registry.centos.org', 'docker.io']Copy to Clipboard Copied! Toggle word wrap Toggle overflow If
registry.redhat.iois not included in the file, add it:[registries.search] registries = ['registry.redhat.io', 'registry.access.redhat.com', 'registry.fedoraproject.org', 'registry.centos.org', 'docker.io']
[registries.search] registries = ['registry.redhat.io', 'registry.access.redhat.com', 'registry.fedoraproject.org', 'registry.centos.org', 'docker.io']Copy to Clipboard Copied! Toggle word wrap Toggle overflow Pull the Red Hat Ceph Storage 4 image, Prometheus image, and Dashboard image from the Red Hat Customer Portal:
Red Hat Enterprise Linux 7
docker pull registry.redhat.io/rhceph/rhceph-4-rhel8:latest docker pull registry.redhat.io/openshift4/ose-prometheus-node-exporter:v4.6 docker pull registry.redhat.io/rhceph/rhceph-4-dashboard-rhel8:latest docker pull registry.redhat.io/openshift4/ose-prometheus:v4.6 docker pull registry.redhat.io/openshift4/ose-prometheus-alertmanager:v4.6
# docker pull registry.redhat.io/rhceph/rhceph-4-rhel8:latest # docker pull registry.redhat.io/openshift4/ose-prometheus-node-exporter:v4.6 # docker pull registry.redhat.io/rhceph/rhceph-4-dashboard-rhel8:latest # docker pull registry.redhat.io/openshift4/ose-prometheus:v4.6 # docker pull registry.redhat.io/openshift4/ose-prometheus-alertmanager:v4.6Copy to Clipboard Copied! Toggle word wrap Toggle overflow Red Hat Enterprise Linux 8
podman pull registry.redhat.io/rhceph/rhceph-4-rhel8:latest podman pull registry.redhat.io/openshift4/ose-prometheus-node-exporter:v4.6 podman pull registry.redhat.io/rhceph/rhceph-4-dashboard-rhel8:latest podman pull registry.redhat.io/openshift4/ose-prometheus:v4.6 podman pull registry.redhat.io/openshift4/ose-prometheus-alertmanager:v4.6
# podman pull registry.redhat.io/rhceph/rhceph-4-rhel8:latest # podman pull registry.redhat.io/openshift4/ose-prometheus-node-exporter:v4.6 # podman pull registry.redhat.io/rhceph/rhceph-4-dashboard-rhel8:latest # podman pull registry.redhat.io/openshift4/ose-prometheus:v4.6 # podman pull registry.redhat.io/openshift4/ose-prometheus-alertmanager:v4.6Copy to Clipboard Copied! Toggle word wrap Toggle overflow NoteRed Hat Enterprise Linux 7 and 8 both use the same container image, based on Red Hat Enterprise Linux 8.
Tag the image:
The Prometheus image tag version is v4.6 for Red Hat Ceph Storage 4.2.
Red Hat Enterprise Linux 7
docker tag registry.redhat.io/rhceph/rhceph-4-rhel8:latest LOCAL_NODE_FQDN:5000/rhceph/rhceph-4-rhel8:latest # docker tag registry.redhat.io/openshift4/ose-prometheus-node-exporter:v4.6 LOCAL_NODE_FQDN:5000/openshift4/ose-prometheus-node-exporter:v4.6 # docker tag registry.redhat.io/rhceph/rhceph-4-dashboard-rhel8:latest LOCAL_NODE_FQDN:5000/rhceph/rhceph-4-dashboard-rhel8:latest # docker tag registry.redhat.io/openshift4/ose-prometheus-alertmanager:v4.6 LOCAL_NODE_FQDN:5000/openshift4/ose-prometheus-alertmanager:v4.6 # docker tag registry.redhat.io/openshift4/ose-prometheus:v4.6 LOCAL_NODE_FQDN:5000/openshift4/ose-prometheus:v4.6
# docker tag registry.redhat.io/rhceph/rhceph-4-rhel8:latest LOCAL_NODE_FQDN:5000/rhceph/rhceph-4-rhel8:latest # docker tag registry.redhat.io/openshift4/ose-prometheus-node-exporter:v4.6 LOCAL_NODE_FQDN:5000/openshift4/ose-prometheus-node-exporter:v4.6 # docker tag registry.redhat.io/rhceph/rhceph-4-dashboard-rhel8:latest LOCAL_NODE_FQDN:5000/rhceph/rhceph-4-dashboard-rhel8:latest # docker tag registry.redhat.io/openshift4/ose-prometheus-alertmanager:v4.6 LOCAL_NODE_FQDN:5000/openshift4/ose-prometheus-alertmanager:v4.6 # docker tag registry.redhat.io/openshift4/ose-prometheus:v4.6 LOCAL_NODE_FQDN:5000/openshift4/ose-prometheus:v4.6Copy to Clipboard Copied! Toggle word wrap Toggle overflow - Replace
- LOCAL_NODE_FQDN with your local host FQDN.
Red Hat Enterprise Linux 8
podman tag registry.redhat.io/rhceph/rhceph-4-rhel8:latest LOCAL_NODE_FQDN:5000/rhceph/rhceph-4-rhel8:latest # podman tag registry.redhat.io/openshift4/ose-prometheus-node-exporter:v4.6 LOCAL_NODE_FQDN:5000/openshift4/ose-prometheus-node-exporter:v4.6 # podman tag registry.redhat.io/rhceph/rhceph-4-dashboard-rhel8:latest LOCAL_NODE_FQDN:5000/rhceph/rhceph-4-dashboard-rhel8:latest # podman tag registry.redhat.io/openshift4/ose-prometheus-alertmanager:v4.6 LOCAL_NODE_FQDN:5000/openshift4/ose-prometheus-alertmanager:v4.6 # podman tag registry.redhat.io/openshift4/ose-prometheus:v4.6 LOCAL_NODE_FQDN:5000/openshift4/ose-prometheus:v4.6
# podman tag registry.redhat.io/rhceph/rhceph-4-rhel8:latest LOCAL_NODE_FQDN:5000/rhceph/rhceph-4-rhel8:latest # podman tag registry.redhat.io/openshift4/ose-prometheus-node-exporter:v4.6 LOCAL_NODE_FQDN:5000/openshift4/ose-prometheus-node-exporter:v4.6 # podman tag registry.redhat.io/rhceph/rhceph-4-dashboard-rhel8:latest LOCAL_NODE_FQDN:5000/rhceph/rhceph-4-dashboard-rhel8:latest # podman tag registry.redhat.io/openshift4/ose-prometheus-alertmanager:v4.6 LOCAL_NODE_FQDN:5000/openshift4/ose-prometheus-alertmanager:v4.6 # podman tag registry.redhat.io/openshift4/ose-prometheus:v4.6 LOCAL_NODE_FQDN:5000/openshift4/ose-prometheus:v4.6Copy to Clipboard Copied! Toggle word wrap Toggle overflow - Replace
- LOCAL_NODE_FQDN with your local host FQDN.
Edit the
/etc/containers/registries.conffile and add the node’s FQDN with the port in the file, and save:[registries.insecure] registries = ['LOCAL_NODE_FQDN:5000']
[registries.insecure] registries = ['LOCAL_NODE_FQDN:5000']Copy to Clipboard Copied! Toggle word wrap Toggle overflow NoteThis step must be done on all storage cluster nodes that access the local Docker registry.
Push the image to the local Docker registry you started:
Red Hat Enterprise Linux 7
docker push --remove-signatures LOCAL_NODE_FQDN:5000/rhceph/rhceph-4-rhel8 # docker push --remove-signatures LOCAL_NODE_FQDN:5000/openshift4/ose-prometheus-node-exporter:v4.6 # docker push --remove-signatures LOCAL_NODE_FQDN:5000/rhceph/rhceph-4-dashboard-rhel8 # docker push --remove-signatures LOCAL_NODE_FQDN:5000/openshift4/ose-prometheus-alertmanager:v4.6 # docker push --remove-signatures LOCAL_NODE_FQDN:5000/openshift4/ose-prometheus:v4.6
# docker push --remove-signatures LOCAL_NODE_FQDN:5000/rhceph/rhceph-4-rhel8 # docker push --remove-signatures LOCAL_NODE_FQDN:5000/openshift4/ose-prometheus-node-exporter:v4.6 # docker push --remove-signatures LOCAL_NODE_FQDN:5000/rhceph/rhceph-4-dashboard-rhel8 # docker push --remove-signatures LOCAL_NODE_FQDN:5000/openshift4/ose-prometheus-alertmanager:v4.6 # docker push --remove-signatures LOCAL_NODE_FQDN:5000/openshift4/ose-prometheus:v4.6Copy to Clipboard Copied! Toggle word wrap Toggle overflow - Replace
- LOCAL_NODE_FQDN with your local host FQDN.
Red Hat Enterprise Linux 8
podman push --remove-signatures LOCAL_NODE_FQDN:5000/rhceph/rhceph-4-rhel8 # podman push --remove-signatures LOCAL_NODE_FQDN:5000/openshift4/ose-prometheus-node-exporter:v4.6 # podman push --remove-signatures LOCAL_NODE_FQDN:5000/rhceph/rhceph-4-dashboard-rhel8 # podman push --remove-signatures LOCAL_NODE_FQDN:5000/openshift4/ose-prometheus-alertmanager:v4.6 # podman push --remove-signatures LOCAL_NODE_FQDN:5000/openshift4/ose-prometheus:v4.6
# podman push --remove-signatures LOCAL_NODE_FQDN:5000/rhceph/rhceph-4-rhel8 # podman push --remove-signatures LOCAL_NODE_FQDN:5000/openshift4/ose-prometheus-node-exporter:v4.6 # podman push --remove-signatures LOCAL_NODE_FQDN:5000/rhceph/rhceph-4-dashboard-rhel8 # podman push --remove-signatures LOCAL_NODE_FQDN:5000/openshift4/ose-prometheus-alertmanager:v4.6 # podman push --remove-signatures LOCAL_NODE_FQDN:5000/openshift4/ose-prometheus:v4.6Copy to Clipboard Copied! Toggle word wrap Toggle overflow - Replace
- LOCAL_NODE_FQDN with your local host FQDN.
For Red Hat Enterprise Linux 7, restart the
dockerservice:systemctl restart docker
# systemctl restart dockerCopy to Clipboard Copied! Toggle word wrap Toggle overflow NoteSee the Installing a Red Hat Ceph Storage cluster for an example of the
all.ymlfile when the Red Hat Ceph Storage nodes do NOT have access to the Internet during deployment.
For all deployments, bare-metal or in containers:
Register the node, and when prompted, enter the appropriate Red Hat Customer Portal credentials:
subscription-manager register
# subscription-manager registerCopy to Clipboard Copied! Toggle word wrap Toggle overflow Pull the latest subscription data from the CDN:
subscription-manager refresh
# subscription-manager refreshCopy to Clipboard Copied! Toggle word wrap Toggle overflow List all available subscriptions for Red Hat Ceph Storage:
subscription-manager list --available --all --matches="*Ceph*"
# subscription-manager list --available --all --matches="*Ceph*"Copy to Clipboard Copied! Toggle word wrap Toggle overflow Copy the Pool ID from the list of available subscriptions for Red Hat Ceph Storage.
Attach the subscription:
subscription-manager attach --pool=POOL_ID
# subscription-manager attach --pool=POOL_IDCopy to Clipboard Copied! Toggle word wrap Toggle overflow - Replace
- POOL_ID with the Pool ID identified in the previous step.
Disable the default software repositories, and enable the server and the extras repositories on the respective version of Red Hat Enterprise Linux:
Red Hat Enterprise Linux 7
subscription-manager repos --disable=* subscription-manager repos --enable=rhel-7-server-rpms subscription-manager repos --enable=rhel-7-server-extras-rpms
# subscription-manager repos --disable=* # subscription-manager repos --enable=rhel-7-server-rpms # subscription-manager repos --enable=rhel-7-server-extras-rpmsCopy to Clipboard Copied! Toggle word wrap Toggle overflow Red Hat Enterprise Linux 8
subscription-manager repos --disable=* subscription-manager repos --enable=rhel-8-for-x86_64-baseos-rpms subscription-manager repos --enable=rhel-8-for-x86_64-appstream-rpms
# subscription-manager repos --disable=* # subscription-manager repos --enable=rhel-8-for-x86_64-baseos-rpms # subscription-manager repos --enable=rhel-8-for-x86_64-appstream-rpmsCopy to Clipboard Copied! Toggle word wrap Toggle overflow
Update the system to receive the latest packages.
For Red Hat Enterprise Linux 7:
yum update
# yum updateCopy to Clipboard Copied! Toggle word wrap Toggle overflow For Red Hat Enterprise Linux 8:
dnf update
# dnf updateCopy to Clipboard Copied! Toggle word wrap Toggle overflow
Additional Resources
- See the Using and Configuring Red Hat Subscription Manager guide for Red Hat Subscription Management.
- See the Enabling the Red Hat Ceph Storage repositories.
3.5. Enabling the Red Hat Ceph Storage repositories
Before you can install Red Hat Ceph Storage, you must choose an installation method. Red Hat Ceph Storage supports two installation methods:
Content Delivery Network (CDN)
For Ceph Storage clusters with Ceph nodes that can connect directly to the internet, use Red Hat Subscription Manager to enable the required Ceph repository.
Local Repository
For Ceph Storage clusters where security measures preclude nodes from accessing the internet, install Red Hat Ceph Storage 4 from a single software build delivered as an ISO image, which will allow you to install local repositories.
Prerequisites
- Valid customer subscription.
For CDN installations:
- Red Hat Ceph Storage nodes must be able to connect to the internet.
- Register the cluster nodes with CDN.
If enabled, then disable the Extra Packages for Enterprise Linux (EPEL) software repository:
yum install yum-utils vim -y yum-config-manager --disable epel
[root@monitor ~]# yum install yum-utils vim -y [root@monitor ~]# yum-config-manager --disable epelCopy to Clipboard Copied! Toggle word wrap Toggle overflow
Procedure
For CDN installations:
On the Ansible administration node, enable the Red Hat Ceph Storage 4 Tools repository and Ansible repository:
Red Hat Enterprise Linux 7
subscription-manager repos --enable=rhel-7-server-rhceph-4-tools-rpms --enable=rhel-7-server-ansible-2.9-rpms
[root@admin ~]# subscription-manager repos --enable=rhel-7-server-rhceph-4-tools-rpms --enable=rhel-7-server-ansible-2.9-rpmsCopy to Clipboard Copied! Toggle word wrap Toggle overflow Red Hat Enterprise Linux 8
subscription-manager repos --enable=rhceph-4-tools-for-rhel-8-x86_64-rpms --enable=ansible-2.9-for-rhel-8-x86_64-rpms
[root@admin ~]# subscription-manager repos --enable=rhceph-4-tools-for-rhel-8-x86_64-rpms --enable=ansible-2.9-for-rhel-8-x86_64-rpmsCopy to Clipboard Copied! Toggle word wrap Toggle overflow By default, Red Hat Ceph Storage repositories are enabled by
ceph-ansibleon the respective nodes. To manually enable the repositories:NoteDo not enable these repositories on containerized deployments as they are not needed.
On the Ceph Monitor nodes, enable the Red Hat Ceph Storage 4 Monitor repository:
Red Hat Enterprise Linux 7
subscription-manager repos --enable=rhel-7-server-rhceph-4-mon-rpms
[root@monitor ~]# subscription-manager repos --enable=rhel-7-server-rhceph-4-mon-rpmsCopy to Clipboard Copied! Toggle word wrap Toggle overflow Red Hat Enterprise Linux 8
subscription-manager repos --enable=rhceph-4-mon-for-rhel-8-x86_64-rpms
[root@monitor ~]# subscription-manager repos --enable=rhceph-4-mon-for-rhel-8-x86_64-rpmsCopy to Clipboard Copied! Toggle word wrap Toggle overflow On the Ceph OSD nodes, enable the Red Hat Ceph Storage 4 OSD repository:
Red Hat Enterprise Linux 7
subscription-manager repos --enable=rhel-7-server-rhceph-4-osd-rpms
[root@osd ~]# subscription-manager repos --enable=rhel-7-server-rhceph-4-osd-rpmsCopy to Clipboard Copied! Toggle word wrap Toggle overflow Red Hat Enterprise Linux 8
subscription-manager repos --enable=rhceph-4-osd-for-rhel-8-x86_64-rpms
[root@osd ~]# subscription-manager repos --enable=rhceph-4-osd-for-rhel-8-x86_64-rpmsCopy to Clipboard Copied! Toggle word wrap Toggle overflow Enable the Red Hat Ceph Storage 4 Tools repository on the following node types: RBD mirroring, Ceph clients, Ceph Object Gateways, Metadata Servers, NFS, iSCSI gateways, and Dashboard servers.
Red Hat Enterprise Linux 7
subscription-manager repos --enable=rhel-7-server-rhceph-4-tools-rpms
[root@client ~]# subscription-manager repos --enable=rhel-7-server-rhceph-4-tools-rpmsCopy to Clipboard Copied! Toggle word wrap Toggle overflow Red Hat Enterprise Linux 8
subscription-manager repos --enable=rhceph-4-tools-for-rhel-8-x86_64-rpms
[root@client ~]# subscription-manager repos --enable=rhceph-4-tools-for-rhel-8-x86_64-rpmsCopy to Clipboard Copied! Toggle word wrap Toggle overflow For ISO installations:
- Log in to the Red Hat Customer Portal.
- Click Downloads to visit the Software & Download center.
- In the Red Hat Ceph Storage area, click Download Software to download the latest version of the software.
Additional Resources
- The Using and Configuring Red Hat Subscription Manager guide for Red Hat Subscription Management 1
3.6. Verifying the network configuration for Red Hat Ceph Storage
All Red Hat Ceph Storage nodes require a public network. You must have a network interface card configured to a public network where Ceph clients can reach Ceph monitors and Ceph OSD nodes.
You might have a network interface card for a cluster network so that Ceph can conduct heart-beating, peering, replication, and recovery on a network separate from the public network.
Configure the network interface settings and ensure to make the changes persistent.
Red Hat does not recommend using a single network interface card for both a public and private network.
Prerequisites
- Network interface card connected to the network.
Procedure
Do the following steps on all Red Hat Ceph Storage nodes in the storage cluster, as the root user.
Verify the following settings are in the
/etc/sysconfig/network-scripts/ifcfg-*file corresponding the public-facing network interface card:-
The
BOOTPROTOparameter is set tononefor static IP addresses. The
ONBOOTparameter must be set toyes.If it is set to
no, the Ceph storage cluster might fail to peer on reboot.If you intend to use IPv6 addressing, you must set the IPv6 parameters such as
IPV6INITtoyes, except theIPV6_FAILURE_FATALparameter.Also, edit the Ceph configuration file,
/etc/ceph/ceph.conf, to instruct Ceph to use IPv6, otherwise, Ceph uses IPv4.
-
The
Additional Resources
- For details on configuring network interface scripts for Red Hat Enterprise Linux 8, see the Configuring ip networking with ifcfg files chapter in the Configuring and managing networking guide for Red Hat Enterprise Linux 8.
- For more information on network configuration see the Ceph network configuration section in the Configuration Guide for Red Hat Ceph Storage 4.
3.7. Configuring a firewall for Red Hat Ceph Storage
Red Hat Ceph Storage uses the firewalld service. The firewalld service contains the list of ports for each daemon.
The Ceph Monitor daemons use ports 3300 and 6789 for communication within the Ceph storage cluster.
On each Ceph OSD node, the OSD daemons use several ports in the range 6800-7300:
- One for communicating with clients and monitors over the public network
- One for sending data to other OSDs over a cluster network, if available; otherwise, over the public network
- One for exchanging heartbeat packets over a cluster network, if available; otherwise, over the public network
The Ceph Manager (ceph-mgr) daemons use ports in range 6800-7300. Consider colocating the ceph-mgr daemons with Ceph Monitors on same nodes.
The Ceph Metadata Server nodes (ceph-mds) use port range 6800-7300.
The Ceph Object Gateway nodes are configured by Ansible to use port 8080 by default. However, you can change the default port, for example to port 80.
To use the SSL/TLS service, open port 443.
The following steps are optional if firewalld is enabled. By default, ceph-ansible includes the below setting in group_vars/all.yml, which automatically opens the appropriate ports:
configure_firewall: True
configure_firewall: TruePrerequisite
- Network hardware is connected.
-
Having
rootorsudoaccess to all nodes in the storage cluster.
Procedure
On all nodes in the storage cluster, start the
firewalldservice. Enable it to run on boot, and ensure that it is running:systemctl enable firewalld systemctl start firewalld systemctl status firewalld
# systemctl enable firewalld # systemctl start firewalld # systemctl status firewalldCopy to Clipboard Copied! Toggle word wrap Toggle overflow On all monitor nodes, open port
3300and6789on the public network:Copy to Clipboard Copied! Toggle word wrap Toggle overflow To limit access based on the source address:
firewall-cmd --zone=public --add-rich-rule='rule family=ipv4 \ source address=IP_ADDRESS/NETMASK_PREFIX port protocol=tcp \ port=6789 accept' --permanent
firewall-cmd --zone=public --add-rich-rule='rule family=ipv4 \ source address=IP_ADDRESS/NETMASK_PREFIX port protocol=tcp \ port=6789 accept' --permanentCopy to Clipboard Copied! Toggle word wrap Toggle overflow - Replace
- IP_ADDRESS with the network address of the Monitor node.
NETMASK_PREFIX with the netmask in CIDR notation.
Example
firewall-cmd --zone=public --add-rich-rule='rule family=ipv4 \ source address=192.168.0.11/24 port protocol=tcp \ port=6789 accept' --permanent
[root@monitor ~]# firewall-cmd --zone=public --add-rich-rule='rule family=ipv4 \ source address=192.168.0.11/24 port protocol=tcp \ port=6789 accept' --permanentCopy to Clipboard Copied! Toggle word wrap Toggle overflow
On all OSD nodes, open ports
6800-7300on the public network:firewall-cmd --zone=public --add-port=6800-7300/tcp firewall-cmd --zone=public --add-port=6800-7300/tcp --permanent firewall-cmd --permanent --add-service=ceph firewall-cmd --add-service=ceph
[root@osd ~]# firewall-cmd --zone=public --add-port=6800-7300/tcp [root@osd ~]# firewall-cmd --zone=public --add-port=6800-7300/tcp --permanent [root@osd ~]# firewall-cmd --permanent --add-service=ceph [root@osd ~]# firewall-cmd --add-service=cephCopy to Clipboard Copied! Toggle word wrap Toggle overflow If you have a separate cluster network, repeat the commands with the appropriate zone.
On all Ceph Manager (
ceph-mgr) nodes, open ports6800-7300on the public network:firewall-cmd --zone=public --add-port=6800-7300/tcp firewall-cmd --zone=public --add-port=6800-7300/tcp --permanent
[root@monitor ~]# firewall-cmd --zone=public --add-port=6800-7300/tcp [root@monitor ~]# firewall-cmd --zone=public --add-port=6800-7300/tcp --permanentCopy to Clipboard Copied! Toggle word wrap Toggle overflow If you have a separate cluster network, repeat the commands with the appropriate zone.
On all Ceph Metadata Server (
ceph-mds) nodes, open ports6800-7300on the public network:firewall-cmd --zone=public --add-port=6800-7300/tcp firewall-cmd --zone=public --add-port=6800-7300/tcp --permanent
[root@monitor ~]# firewall-cmd --zone=public --add-port=6800-7300/tcp [root@monitor ~]# firewall-cmd --zone=public --add-port=6800-7300/tcp --permanentCopy to Clipboard Copied! Toggle word wrap Toggle overflow If you have a separate cluster network, repeat the commands with the appropriate zone.
On all Ceph Object Gateway nodes, open the relevant port or ports on the public network.
To open the default Ansible configured port of
8080:firewall-cmd --zone=public --add-port=8080/tcp firewall-cmd --zone=public --add-port=8080/tcp --permanent
[root@gateway ~]# firewall-cmd --zone=public --add-port=8080/tcp [root@gateway ~]# firewall-cmd --zone=public --add-port=8080/tcp --permanentCopy to Clipboard Copied! Toggle word wrap Toggle overflow To limit access based on the source address:
firewall-cmd --zone=public --add-rich-rule="rule family="ipv4" \ source address="IP_ADDRESS/NETMASK_PREFIX" port protocol="tcp" \ port="8080" accept"
firewall-cmd --zone=public --add-rich-rule="rule family="ipv4" \ source address="IP_ADDRESS/NETMASK_PREFIX" port protocol="tcp" \ port="8080" accept"Copy to Clipboard Copied! Toggle word wrap Toggle overflow firewall-cmd --zone=public --add-rich-rule="rule family="ipv4" \ source address="IP_ADDRESS/NETMASK_PREFIX" port protocol="tcp" \ port="8080" accept" --permanent
firewall-cmd --zone=public --add-rich-rule="rule family="ipv4" \ source address="IP_ADDRESS/NETMASK_PREFIX" port protocol="tcp" \ port="8080" accept" --permanentCopy to Clipboard Copied! Toggle word wrap Toggle overflow - Replace
- IP_ADDRESS with the network address of the Monitor node.
NETMASK_PREFIX with the netmask in CIDR notation.
Example
firewall-cmd --zone=public --add-rich-rule="rule family="ipv4" \ source address="192.168.0.31/24" port protocol="tcp" \ port="8080" accept"
[root@gateway ~]# firewall-cmd --zone=public --add-rich-rule="rule family="ipv4" \ source address="192.168.0.31/24" port protocol="tcp" \ port="8080" accept"Copy to Clipboard Copied! Toggle word wrap Toggle overflow firewall-cmd --zone=public --add-rich-rule="rule family="ipv4" \ source address="192.168.0.31/24" port protocol="tcp" \ port="8080" accept" --permanent
[root@gateway ~]# firewall-cmd --zone=public --add-rich-rule="rule family="ipv4" \ source address="192.168.0.31/24" port protocol="tcp" \ port="8080" accept" --permanentCopy to Clipboard Copied! Toggle word wrap Toggle overflow
Optionally, if you installed Ceph Object Gateway using Ansible and changed the default port that Ansible configures the Ceph Object Gateway to use from
8080, for example, to port80, then open this port:firewall-cmd --zone=public --add-port=80/tcp firewall-cmd --zone=public --add-port=80/tcp --permanent
[root@gateway ~]# firewall-cmd --zone=public --add-port=80/tcp [root@gateway ~]# firewall-cmd --zone=public --add-port=80/tcp --permanentCopy to Clipboard Copied! Toggle word wrap Toggle overflow To limit access based on the source address, run the following commands:
firewall-cmd --zone=public --add-rich-rule="rule family="ipv4" \ source address="IP_ADDRESS/NETMASK_PREFIX" port protocol="tcp" \ port="80" accept"
firewall-cmd --zone=public --add-rich-rule="rule family="ipv4" \ source address="IP_ADDRESS/NETMASK_PREFIX" port protocol="tcp" \ port="80" accept"Copy to Clipboard Copied! Toggle word wrap Toggle overflow firewall-cmd --zone=public --add-rich-rule="rule family="ipv4" \ source address="IP_ADDRESS/NETMASK_PREFIX" port protocol="tcp" \ port="80" accept" --permanent
firewall-cmd --zone=public --add-rich-rule="rule family="ipv4" \ source address="IP_ADDRESS/NETMASK_PREFIX" port protocol="tcp" \ port="80" accept" --permanentCopy to Clipboard Copied! Toggle word wrap Toggle overflow - Replace
- IP_ADDRESS with the network address of the Monitor node.
- NETMASK_PREFIX with the netmask in CIDR notation.
Example
firewall-cmd --zone=public --add-rich-rule="rule family="ipv4" \ source address="192.168.0.31/24" port protocol="tcp" \ port="80" accept"
[root@gateway ~]# firewall-cmd --zone=public --add-rich-rule="rule family="ipv4" \ source address="192.168.0.31/24" port protocol="tcp" \ port="80" accept"Copy to Clipboard Copied! Toggle word wrap Toggle overflow firewall-cmd --zone=public --add-rich-rule="rule family="ipv4" \ source address="192.168.0.31/24" port protocol="tcp" \ port="80" accept" --permanent
[root@gateway ~]# firewall-cmd --zone=public --add-rich-rule="rule family="ipv4" \ source address="192.168.0.31/24" port protocol="tcp" \ port="80" accept" --permanentCopy to Clipboard Copied! Toggle word wrap Toggle overflow Optional. To use SSL/TLS, open port
443:firewall-cmd --zone=public --add-port=443/tcp firewall-cmd --zone=public --add-port=443/tcp --permanent
[root@gateway ~]# firewall-cmd --zone=public --add-port=443/tcp [root@gateway ~]# firewall-cmd --zone=public --add-port=443/tcp --permanentCopy to Clipboard Copied! Toggle word wrap Toggle overflow To limit access based on the source address, run the following commands:
firewall-cmd --zone=public --add-rich-rule="rule family="ipv4" \ source address="IP_ADDRESS/NETMASK_PREFIX" port protocol="tcp" \ port="443" accept"
firewall-cmd --zone=public --add-rich-rule="rule family="ipv4" \ source address="IP_ADDRESS/NETMASK_PREFIX" port protocol="tcp" \ port="443" accept"Copy to Clipboard Copied! Toggle word wrap Toggle overflow firewall-cmd --zone=public --add-rich-rule="rule family="ipv4" \ source address="IP_ADDRESS/NETMASK_PREFIX" port protocol="tcp" \ port="443" accept" --permanent
firewall-cmd --zone=public --add-rich-rule="rule family="ipv4" \ source address="IP_ADDRESS/NETMASK_PREFIX" port protocol="tcp" \ port="443" accept" --permanentCopy to Clipboard Copied! Toggle word wrap Toggle overflow - Replace
- IP_ADDRESS with the network address of the Monitor node.
- NETMASK_PREFIX with the netmask in CIDR notation.
Example
Copy to Clipboard Copied! Toggle word wrap Toggle overflow
Additional Resources
- For more information about public and cluster network, see Verifying the Network Configuration for Red Hat Ceph Storage.
-
For additional details on
firewalld, see the Using and configuring firewalls chapter in the Securing networks guide for Red Hat Enterprise Linux 8.
3.8. Creating an Ansible user with sudo access
Ansible must be able to log into all the Red Hat Ceph Storage (RHCS) nodes as a user that has root privileges to install software and create configuration files without prompting for a password. You must create an Ansible user with password-less root access on all nodes in the storage cluster when deploying and configuring a Red Hat Ceph Storage cluster with Ansible.
Prerequisite
-
Having
rootorsudoaccess to all nodes in the storage cluster.
Procedure
Log into the node as the
rootuser:ssh root@HOST_NAME
ssh root@HOST_NAMECopy to Clipboard Copied! Toggle word wrap Toggle overflow - Replace
HOST_NAME with the host name of the Ceph node.
Example
ssh root@mon01
# ssh root@mon01Copy to Clipboard Copied! Toggle word wrap Toggle overflow Enter the
rootpassword when prompted.
Create a new Ansible user:
adduser USER_NAME
adduser USER_NAMECopy to Clipboard Copied! Toggle word wrap Toggle overflow - Replace
USER_NAME with the new user name for the Ansible user.
Example
adduser admin
# adduser adminCopy to Clipboard Copied! Toggle word wrap Toggle overflow ImportantDo not use
cephas the user name. Thecephuser name is reserved for the Ceph daemons. A uniform user name across the cluster can improve ease of use, but avoid using obvious user names, because intruders typically use them for brute-force attacks.
Set a new password for this user:
passwd USER_NAME
# passwd USER_NAMECopy to Clipboard Copied! Toggle word wrap Toggle overflow - Replace
USER_NAME with the new user name for the Ansible user.
Example
passwd admin
# passwd adminCopy to Clipboard Copied! Toggle word wrap Toggle overflow Enter the new password twice when prompted.
Configure
sudoaccess for the newly created user:cat << EOF >/etc/sudoers.d/USER_NAME $USER_NAME ALL = (root) NOPASSWD:ALL EOF
cat << EOF >/etc/sudoers.d/USER_NAME $USER_NAME ALL = (root) NOPASSWD:ALL EOFCopy to Clipboard Copied! Toggle word wrap Toggle overflow - Replace
USER_NAME with the new user name for the Ansible user.
Example
cat << EOF >/etc/sudoers.d/admin admin ALL = (root) NOPASSWD:ALL EOF
# cat << EOF >/etc/sudoers.d/admin admin ALL = (root) NOPASSWD:ALL EOFCopy to Clipboard Copied! Toggle word wrap Toggle overflow
Assign the correct file permissions to the new file:
chmod 0440 /etc/sudoers.d/USER_NAME
chmod 0440 /etc/sudoers.d/USER_NAMECopy to Clipboard Copied! Toggle word wrap Toggle overflow - Replace
USER_NAME with the new user name for the Ansible user.
Example
chmod 0440 /etc/sudoers.d/admin
# chmod 0440 /etc/sudoers.d/adminCopy to Clipboard Copied! Toggle word wrap Toggle overflow
Additional Resources
- The Managing user accounts section in the Configuring basic system settings guide Red Hat Enterprise Linux 8
3.9. Enabling password-less SSH for Ansible
Generate an SSH key pair on the Ansible administration node and distribute the public key to each node in the storage cluster so that Ansible can access the nodes without being prompted for a password.
This procedure is not required if installing Red Hat Ceph Storage using the Cockpit web-based interface. This is because the Cockpit Ceph Installer generates its own SSH key. Instructions for copying the Cockpit SSH key to all nodes in the cluster are in the chapter Installing Red Hat Ceph Storage using the Cockpit web interface.
Prerequisites
- Access to the Ansible administration node.
-
Creating an Ansible user with
sudoaccess.
Procedure
Generate the SSH key pair, accept the default file name and leave the passphrase empty:
ssh-keygen
[ansible@admin ~]$ ssh-keygenCopy to Clipboard Copied! Toggle word wrap Toggle overflow Copy the public key to all nodes in the storage cluster:
ssh-copy-id USER_NAME@HOST_NAME
ssh-copy-id USER_NAME@HOST_NAMECopy to Clipboard Copied! Toggle word wrap Toggle overflow - Replace
- USER_NAME with the new user name for the Ansible user.
HOST_NAME with the host name of the Ceph node.
Example
ssh-copy-id ceph-admin@ceph-mon01
[ansible@admin ~]$ ssh-copy-id ceph-admin@ceph-mon01Copy to Clipboard Copied! Toggle word wrap Toggle overflow
Create the user’s SSH
configfile:touch ~/.ssh/config
[ansible@admin ~]$ touch ~/.ssh/configCopy to Clipboard Copied! Toggle word wrap Toggle overflow Open for editing the
configfile. Set values for theHostnameandUseroptions for each node in the storage cluster:Copy to Clipboard Copied! Toggle word wrap Toggle overflow - Replace
- HOST_NAME with the host name of the Ceph node.
USER_NAME with the new user name for the Ansible user.
Example
Copy to Clipboard Copied! Toggle word wrap Toggle overflow ImportantBy configuring the
~/.ssh/configfile you do not have to specify the-u USER_NAMEoption each time you execute theansible-playbookcommand.
Set the correct file permissions for the
~/.ssh/configfile:chmod 600 ~/.ssh/config
[admin@admin ~]$ chmod 600 ~/.ssh/configCopy to Clipboard Copied! Toggle word wrap Toggle overflow
Additional Resources
-
The
ssh_config(5)manual page. - See the Using secure communications between two systems with OpenSSH chapter in the Securing networks for Red Hat Enterprise Linux 8.
Chapter 4. Installing Red Hat Ceph Storage using the Cockpit web interface
This chapter describes how to use the Cockpit web-based interface to install a Red Hat Ceph Storage cluster and other components, such as Metadata Servers, the Ceph client, or the Ceph Object Gateway.
The process consists of installing the Cockpit Ceph Installer, logging into Cockpit, and configuring and starting the cluster install using different pages within the installer.
The Cockpit Ceph Installer uses Ansible and the Ansible playbooks provided by the ceph-ansible RPM to perform the actual install. It is still possible to use these playbooks to install Ceph without Cockpit. That process is relevant to this chapter and is referred to as a direct Ansible install, or using the Ansible playbooks directly.
The Cockpit Ceph installer does not currently support IPv6 networking. If you require IPv6 networking, install Ceph using the Ansible playbooks directly.
The dashboard web interface, used for administration and monitoring of Ceph, is installed by default by the Ansible playbooks in the ceph-ansible RPM, which Cockpit uses on the back-end. Therefore, whether you use Ansible playbooks directly, or use Cockpit to install Ceph, the dashboard web interface will be installed as well.
4.1. Prerequisites
- Complete the general prerequisites required for direct Ansible Red Hat Ceph Storage installs.
- A recent version of Firefox or Chrome.
- If using multiple networks to segment intra-cluster traffic, client-to-cluster traffic, RADOS Gateway traffic, or iSCSI traffic, ensure the relevant networks are already configured on the hosts. For more information, see network considerations in the Hardware Guide and the section in this chapter on completing the Network page of the Cockpit Ceph Installer
-
Ensure the default port for Cockpit web-based interface,
9090, is accessible.
4.2. Installation requirements
- One node to act as the Ansible administration node.
- One node to provide the performance metrics and alerting platform. This may be colocated with the Ansible administration node.
- One or more nodes to form the Ceph cluster. The installer supports an all-in-one installation called Development/POC. In this mode all Ceph services can run from the same node, and data replication defaults to disk rather than host level protection.
4.3. Install and configure the Cockpit Ceph Installer
Before you can use the Cockpit Ceph Installer to install a Red Hat Ceph Storage cluster, you must install the Cockpit Ceph Installer on the Ansible administration node.
Prerequisites
- Root-level access to the Ansible administration node.
-
The
ansibleuser account for use with the Ansible application.
Procedure
Verify Cockpit is installed.
rpm -q cockpit
$ rpm -q cockpitCopy to Clipboard Copied! Toggle word wrap Toggle overflow Example:
rpm -q cockpit cockpit-196.3-1.el8.x86_64
[admin@jb-ceph4-admin ~]$ rpm -q cockpit cockpit-196.3-1.el8.x86_64Copy to Clipboard Copied! Toggle word wrap Toggle overflow If you see similar output to the example above, skip to the step Verify Cockpit is running. If the output is
package cockpit is not installed, continue to the step Install Cockpit.Optional: Install Cockpit.
For Red Hat Enterprise Linux 8:
dnf install cockpit
# dnf install cockpitCopy to Clipboard Copied! Toggle word wrap Toggle overflow For Red Hat Enterprise Linux 7:
yum install cockpit
# yum install cockpitCopy to Clipboard Copied! Toggle word wrap Toggle overflow
Verify Cockpit is running.
systemctl status cockpit.socket
# systemctl status cockpit.socketCopy to Clipboard Copied! Toggle word wrap Toggle overflow If you see
Active: active (listening)in the output, skip to the step Install the Cockpit plugin for Red Hat Ceph Storage. If instead you seeActive: inactive (dead), continue to the step Enable Cockpit.Optional: Enable Cockpit.
Use the
systemctlcommand to enable Cockpit:systemctl enable --now cockpit.socket
# systemctl enable --now cockpit.socketCopy to Clipboard Copied! Toggle word wrap Toggle overflow You will see a line like the following:
Created symlink /etc/systemd/system/sockets.target.wants/cockpit.socket → /usr/lib/systemd/system/cockpit.socket.
Created symlink /etc/systemd/system/sockets.target.wants/cockpit.socket → /usr/lib/systemd/system/cockpit.socket.Copy to Clipboard Copied! Toggle word wrap Toggle overflow Verify Cockpit is running:
systemctl status cockpit.socket
# systemctl status cockpit.socketCopy to Clipboard Copied! Toggle word wrap Toggle overflow You will see a line like the following:
Active: active (listening) since Tue 2020-01-07 18:49:07 EST; 7min ago
Active: active (listening) since Tue 2020-01-07 18:49:07 EST; 7min agoCopy to Clipboard Copied! Toggle word wrap Toggle overflow
Install the Cockpit Ceph Installer for Red Hat Ceph Storage.
For Red Hat Enterprise Linux 8:
dnf install cockpit-ceph-installer
# dnf install cockpit-ceph-installerCopy to Clipboard Copied! Toggle word wrap Toggle overflow For Red Hat Enterprise Linux 7:
yum install cockpit-ceph-installer
# yum install cockpit-ceph-installerCopy to Clipboard Copied! Toggle word wrap Toggle overflow
As the Ansible user, log in to the container catalog using sudo:
NoteBy default, the Cockpit Ceph Installer uses the
rootuser to install Ceph. To use the Ansible user created as a part of the prerequisites to install Ceph, run the rest of the commands in this procedure withsudoas the Ansible user.Red Hat Enterprise Linux 7
sudo docker login -u CUSTOMER_PORTAL_USERNAME https://registry.redhat.io
$ sudo docker login -u CUSTOMER_PORTAL_USERNAME https://registry.redhat.ioCopy to Clipboard Copied! Toggle word wrap Toggle overflow Example
sudo docker login -u myusername https://registry.redhat.io Password: Login Succeeded!
[admin@jb-ceph4-admin ~]$ sudo docker login -u myusername https://registry.redhat.io Password: Login Succeeded!Copy to Clipboard Copied! Toggle word wrap Toggle overflow Red Hat Enterprise Linux 8
sudo podman login -u CUSTOMER_PORTAL_USERNAME https://registry.redhat.io
$ sudo podman login -u CUSTOMER_PORTAL_USERNAME https://registry.redhat.ioCopy to Clipboard Copied! Toggle word wrap Toggle overflow Example
sudo podman login -u myusername https://registry.redhat.io Password: Login Succeeded!
[admin@jb-ceph4-admin ~]$ sudo podman login -u myusername https://registry.redhat.io Password: Login Succeeded!Copy to Clipboard Copied! Toggle word wrap Toggle overflow Verify
registry.redhat.iois in the container registry search path.Open for editing the
/etc/containers/registries.conffile:[registries.search] registries = [ 'registry.access.redhat.com', 'registry.fedoraproject.org', 'registry.centos.org', 'docker.io']
[registries.search] registries = [ 'registry.access.redhat.com', 'registry.fedoraproject.org', 'registry.centos.org', 'docker.io']Copy to Clipboard Copied! Toggle word wrap Toggle overflow If
registry.redhat.iois not included in the file, add it:[registries.search] registries = ['registry.redhat.io', 'registry.access.redhat.com', 'registry.fedoraproject.org', 'registry.centos.org', 'docker.io']
[registries.search] registries = ['registry.redhat.io', 'registry.access.redhat.com', 'registry.fedoraproject.org', 'registry.centos.org', 'docker.io']Copy to Clipboard Copied! Toggle word wrap Toggle overflow
As the Ansible user, start the
ansible-runner-serviceusing sudo.sudo ansible-runner-service.sh -s
$ sudo ansible-runner-service.sh -sCopy to Clipboard Copied! Toggle word wrap Toggle overflow Example
Copy to Clipboard Copied! Toggle word wrap Toggle overflow The last line of output includes the URL to the Cockpit Ceph Installer. In the example above the URL is
https://jb-ceph4-admin:9090/cockpit-ceph-installer. Take note of the URL printed in your environment.
4.4. Copy the Cockpit Ceph Installer SSH key to all nodes in the cluster
The Cockpit Ceph Installer uses SSH to connect to and configure the nodes in the cluster. In order for it to do this automatically the installer generates an SSH key pair so it can access the nodes without being prompted for a password. The SSH public key must be transferred to all nodes in the cluster.
Prerequisites
- An Ansible user with sudo access has been created.
- The Cockpit Ceph Installer is installed and configured.
Procedure
Log in to the Ansible administration node as the Ansible user.
ssh ANSIBLE_USER@HOST_NAME
ssh ANSIBLE_USER@HOST_NAMECopy to Clipboard Copied! Toggle word wrap Toggle overflow Example:
ssh admin@jb-ceph4-admin
$ ssh admin@jb-ceph4-adminCopy to Clipboard Copied! Toggle word wrap Toggle overflow Copy the SSH public key to the first node:
sudo ssh-copy-id -f -i /usr/share/ansible-runner-service/env/ssh_key.pub _ANSIBLE_USER_@_HOST_NAME_
sudo ssh-copy-id -f -i /usr/share/ansible-runner-service/env/ssh_key.pub _ANSIBLE_USER_@_HOST_NAME_Copy to Clipboard Copied! Toggle word wrap Toggle overflow Example:
Copy to Clipboard Copied! Toggle word wrap Toggle overflow Repeat this step for all nodes in the cluster
4.5. Log in to Cockpit
You can view the Cockpit Ceph Installer web interface by logging into Cockpit.
Prerequisites
- The Cockpit Ceph Installer is installed and configured.
- You have the URL printed as a part of configuring the Cockpit Ceph Installer
Procedure
Open the URL in a web browser.
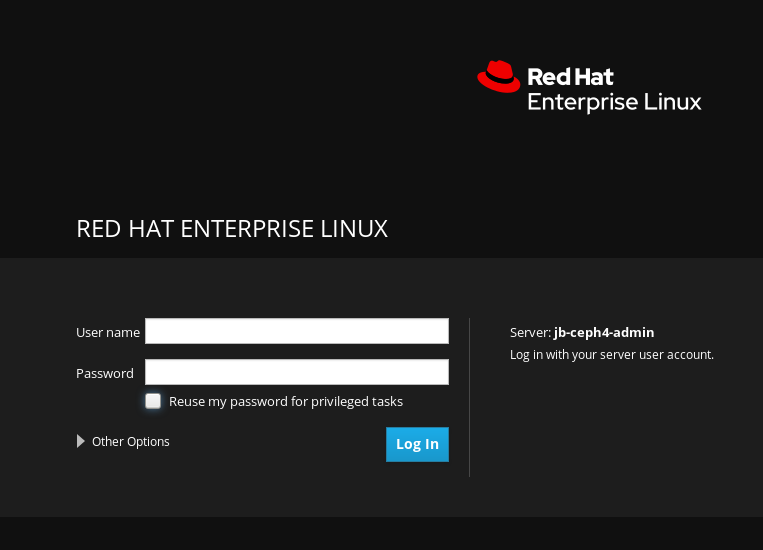
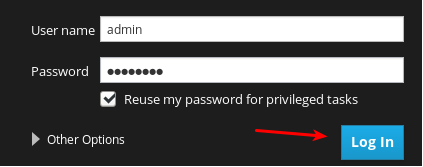
Enter the Ansible user name and its password.

Click the radio button for Reuse my password for privileged tasks.

Click Log In.
Review the welcome page to understand how the installer works and the overall flow of the installation process.
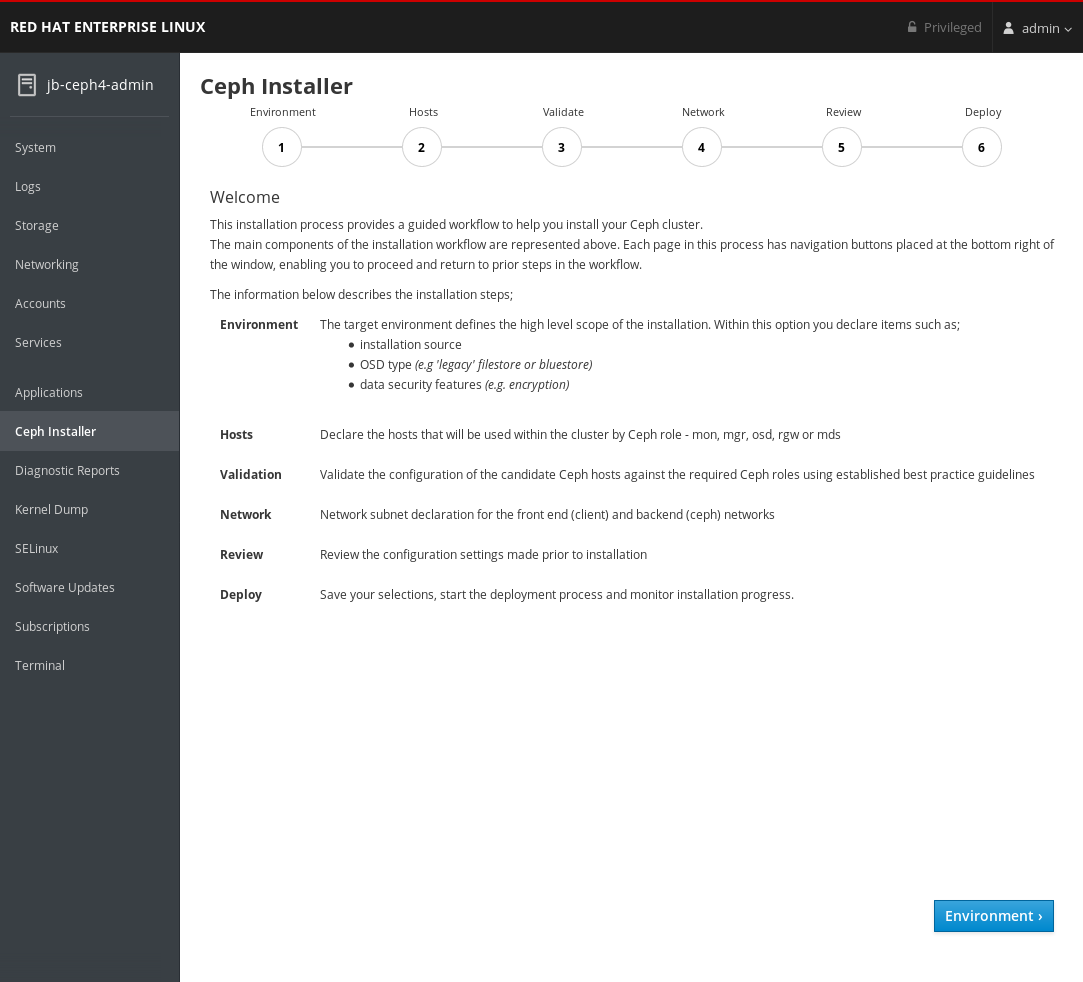
Click the Environment button at the bottom right corner of the web page after you have reviewed the information in the welcome page.
4.6. Complete the Environment page of the Cockpit Ceph Installer
The Environment page allows you to configure overall aspects of the cluster, like what installation source to use and how to use Hard Disk Drives (HDDs) and Solid State Drives (SSDs) for storage.
Prerequisites
- The Cockpit Ceph Installer is installed and configured.
- You have the URL printed as a part of configuring the Cockpit Ceph Installer.
- You have created a registry service account.
In the dialogs to follow, there are tooltips to the right of some of the settings. To view them, hover the mouse cursor over the icon that looks like an i with a circle around it.
Procedure
Select the Installation Source. Choose Red Hat to use repositories from Red Hat Subscription Manager, or ISO to use a CD image downloaded from the Red Hat Customer Portal.

If you choose Red Hat, Target Version will be set to RHCS 4 without any other options. If you choose ISO, Target Version will be set to the ISO image file.
ImportantIf you choose ISO, the image file must be in the
/usr/share/ansible-runner-service/isodirectory and its SELinux context must be set tocontainer_file_t.ImportantThe Community and Distribution options for Installation Source are not supported.
Select the Cluster Type. The Production selection prohibits the install from proceeding if certain resource requirements like CPU number and memory size are not met. To allow the cluster installation to proceed even if the resource requirements are not met, select Development/POC.
 Important
Do not use Development/POC mode to install a Ceph cluster that will be used in production.
Set the Service Account Login and Service Account Token. If you do not have a Red Hat Registry Service Account, create one using the Registry Service Account webpage.

Set Configure Firewall to ON to apply rules to
firewalldto open ports for Ceph services. Use the OFF setting if you are not usingfirewalld.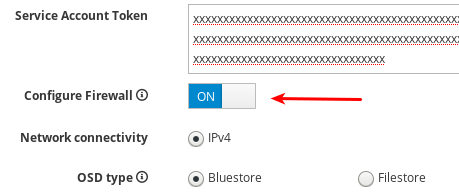
Currently, the Cockpit Ceph Installer only supports IPv4. If you require IPv6 support, discountinue use of the Cockpit Ceph Installer and proceed with installing Ceph using the Ansible scripts directly.

Set OSD Type to BlueStore or FileStore.
 Important
BlueStore is the default OSD type. Previously, Ceph used FileStore as the object store. This format is deprecated for new Red Hat Ceph Storage 4.0 installs because BlueStore offers more features and improved performance. It is still possible to use FileStore, but using it requires a support exception. For more information on BlueStore, see Ceph BlueStore in the Architecture Guide.
Set Flash Configuration to Journal/Logs or OSD data. If you have Solid State Drives (SSDs), whether they use NVMe or a traditional SATA/SAS interface, you can choose to use them just for write journaling and logs while the actual data goes on Hard Disk Drives (HDDs), or you can use the SSDs for journaling, logs, and data, and not use HDDs for any Ceph OSD functions.

Set Encryption to None or Encrypted. This refers to at rest encryption of storage devices using the LUKS1 format.

Set Installation type to Container or RPM. Traditionally, Red Hat Package Manager (RPM) was used to install software on Red Hat Enterprise Linux. Now, you can install Ceph using RPM or containers. Installing Ceph using containers can provide improved hardware utilization since services can be isolated and collocated.

Review all the Environment settings and click the Hosts button at the bottom right corner of the webpage.
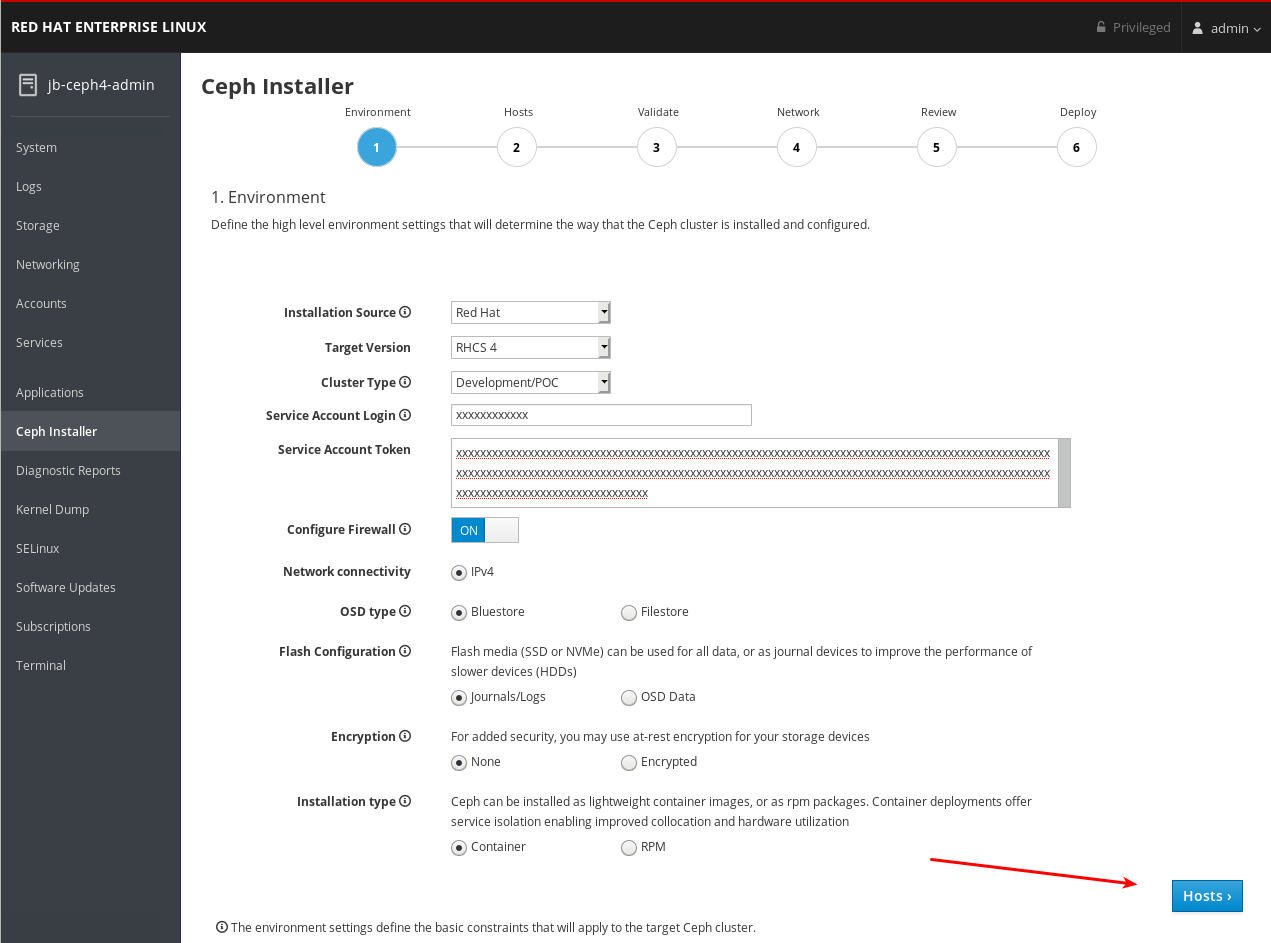
4.7. Complete the Hosts page of the Cockpit Ceph Installer
The Hosts page allows you inform the Cockpit Ceph Installer what hosts to install Ceph on, and what roles each host will be used for. As you add the hosts, the installer will check them for SSH and DNS connectivity.
Prerequisites
- The Environment page of the Cockpit Ceph Installer has been completed.
- The Cockpit Ceph Installer SSH key has been copied to all nodes in the cluster.
Procedure
Click the Add Host(s) button.
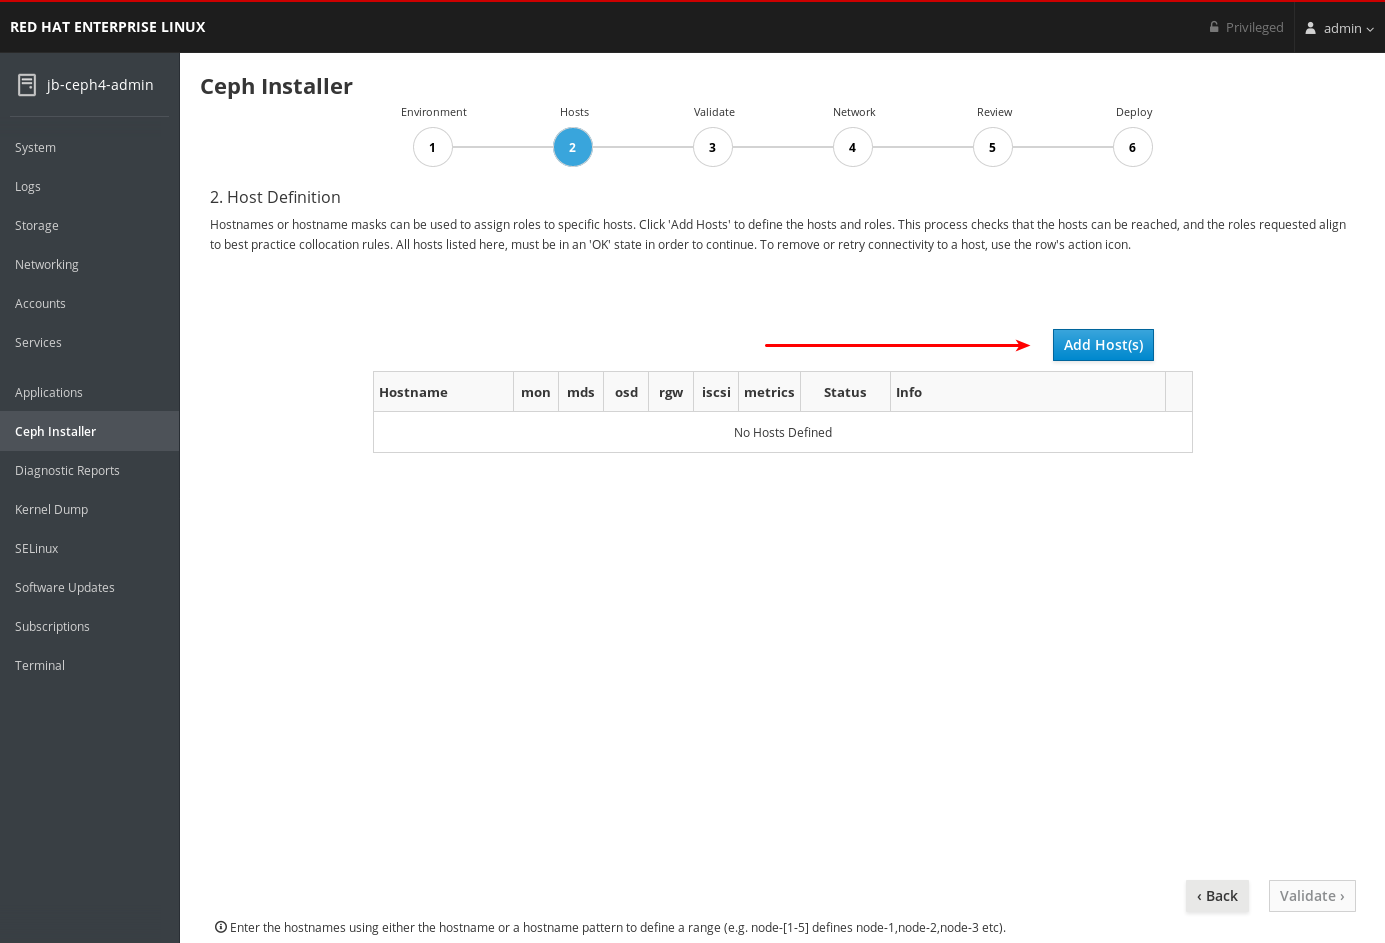
Enter the hostname for a Ceph OSD node, check the box for OSD, and click the Add button.
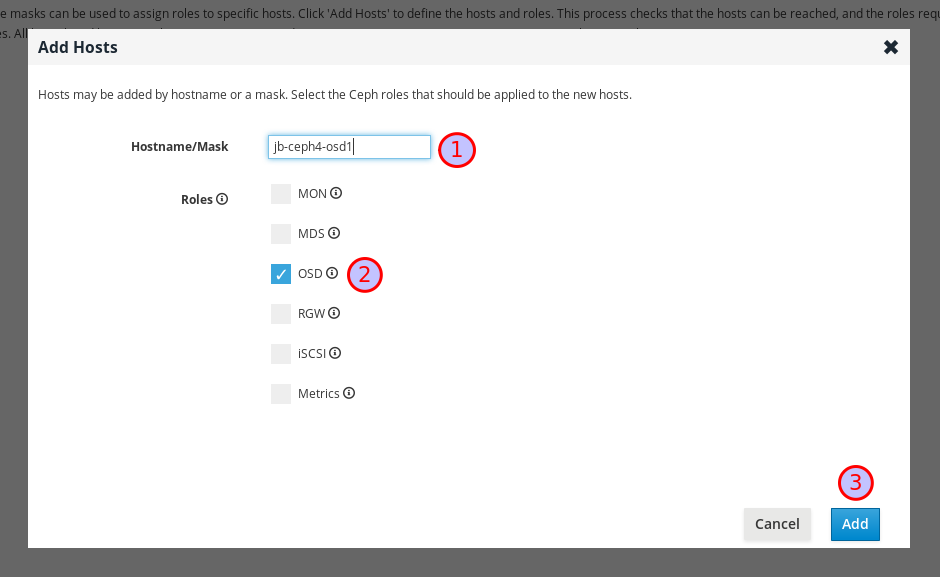
The first Ceph OSD node is added.

For production clusters, repeat this step until you have added at least three Ceph OSD nodes.
Optional: Use a host name pattern to define a range of nodes. For example, to add
jb-ceph4-osd2andjb-ceph4-osd3at the same time, enterjb-ceph4-osd[2-3].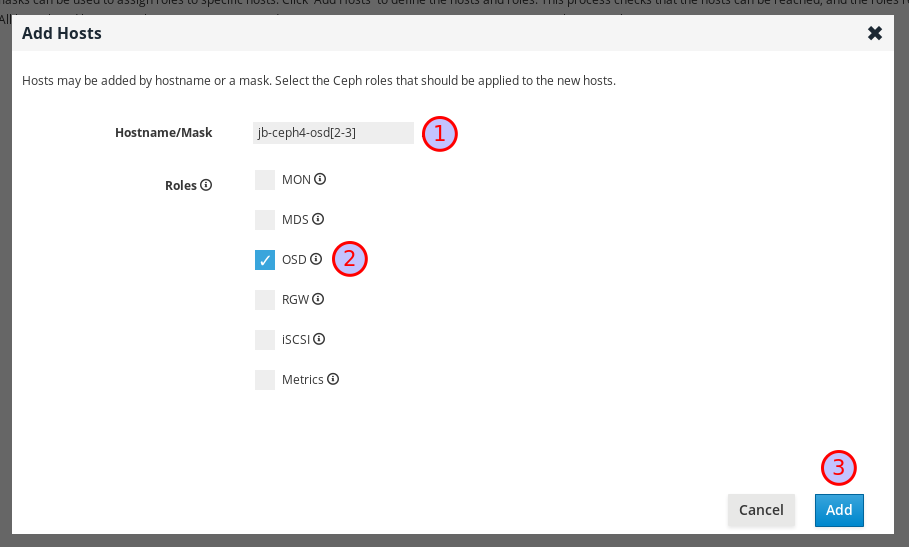
Both
jb-ceph4-osd2andjb-ceph4-ods3are added.
Repeat the above steps for the other nodes in your cluster.
-
For production clusters, add at least three Ceph Monitor nodes. In the dialog, the role is listed as
MON. -
Add a node with the
Metricsrole. TheMetricsrole installs Grafana and Prometheus to provide real-time insights into the performance of the Ceph cluster. These metrics are presented in the Ceph Dashboard, which allows you to monitor and manage the cluster. The installation of the dashboard, Grafana, and Prometheus are required. You can colocate the metrics functions on the Ansible Administration node. If you do, ensure the system resources of the node are greater than what is required for a stand alone metrics node. -
Optional: Add a node with the
MDSrole. TheMDSrole installs the Ceph Metadata Server (MDS). Metadata Server daemons are necessary for deploying a Ceph File System. -
Optional: Add a node with the
RGWrole. TheRGWrole installs the Ceph Object Gateway, also know as the RADOS gateway, which is an object storage interface built on top of the librados API to provide applications with a RESTful gateway to Ceph storage clusters. It supports the Amazon S3 and OpenStack Swift APIs. -
Optional: Add a node with the
iSCSIrole. TheiSCSIrole installs an iSCSI gateway so you can share Ceph Block Devices over iSCSI. To use iSCSI with Ceph, you must install the iSCSI gateway on at least two nodes for multipath I/O.
-
For production clusters, add at least three Ceph Monitor nodes. In the dialog, the role is listed as
Optional: Colocate more than one service on the same node by selecting multiple roles when adding the node.

For more information on colocating daemons, see Colocation of containerized Ceph daemons in the Installation Guide.
Optional: Modify the roles assigned to a node by checking or unchecking roles in the table.

Optional: To delete a node, on the far right side of the row of the node you want to delete, click the kebab icon and then click Delete.

Click the Validate button at the bottom right corner of the page after you have added all the nodes in your cluster and set all the required roles.

For production clusters, the Cockpit Ceph installer will not proceed unless you have three or five monitors. In these examples Cluster Type is set to Development/POC so the install can proceed with only one monitor.
4.8. Complete the Validate page of the Cockpit Ceph Installer
The Validate page allows you to probe the nodes you provided on the Hosts page to verify they meet the hardware requirements for the roles you intend to use them for.
Prerequisites
- The Hosts page of the Cockpit Ceph Installer has been completed.
Procedure
Click the Probe Hosts button.

To continue you must select at least three hosts which have an OK Status.
Optional: If warnings or errors were generated for hosts, click the arrow to the left of the check mark for the host to view the issues.

 Important
If you set Cluster Type to Production, any errors generated will cause Status to be NOTOK and you will not be able to select them for installation. Read the next step for information on how to resolve errors.
ImportantIf you set Cluster Type to Development/POC, any errors generated will be listed as warnings so Status is always OK. This allows you to select the hosts and install Ceph on them regardless of whether the hosts meet the requirements or suggestions. You can still resolve warnings if you want to. Read the next step for information on how to resolve warnings.
Optional: To resolve errors and warnings use one or more of the following methods.
The easiest way to resolve errors or warnings is to disable certain roles completely or to disable a role on one host and enable it on another host which has the required resources.
Experiment with enabling or disabling roles until you find a combination where, if you are installing a Development/POC cluster, you are comfortable proceeding with any remaining warnings, or if you are installing a Production cluster, at least three hosts have all the resources required for the roles assigned to them and you are comfortable proceeding with any remaining warnings.
You can also use a new host which meets the requirements for the roles required. First go back to the Hosts page and delete the hosts with issues.

Then, add the new hosts.
- If you want to upgrade the hardware on a host or modify it in some other way so it will meet the requirements or suggestions, first make the desired changes to the host, and then click Probe Hosts again. If you have to reinstall the operating system you will have to copy the SSH key again.
Select the hosts to install Red Hat Ceph Storage on by checking the box next to the host.
 Important
If installing a production cluster, you must resolve any errors before you can select them for installation.
Click the Network button at the bottom right corner of the page to review and configure networking for the cluster.

4.9. Complete the Network page of the Cockpit Ceph Installer
The Network page allows you to isolate certain cluster communication types to specific networks. This requires multiple different networks configured across the hosts in the cluster.
The Network page uses information gathered from the probes done on the Validate page to display the networks your hosts have access to. Currently, if you have already proceeded to the Network page, you cannot add new networks to hosts, go back to the Validate page, reprobe the hosts, and proceed to the Network page again and use the new networks. They will not be displayed for selection. To use networks added to the hosts after already going to the Network page you must refresh the web page completely and restart the install from the beginning.
For production clusters you must segregate intra-cluster-traffic from client-to-cluster traffic on separate NICs. In addition to segregating cluster traffic types, there are other networking considerations to take into account when setting up a Ceph cluster. For more information, see Network considerations in the Hardware Guide.
Prerequisites
- The Validate page of the Cockpit Ceph Installer has been completed.
Procedure
Take note of the network types you can configure on the Network page. Each type has its own column. Columns for Cluster Network and Public Network are always displayed. If you are installing hosts with the RADOS Gateway role, the S3 Network column will be displayed. If you are installing hosts with the iSCSI role, the iSCSI Network column will be displayed. In the example below, columns for Cluster Network, Public Network, and S3 Network are shown.
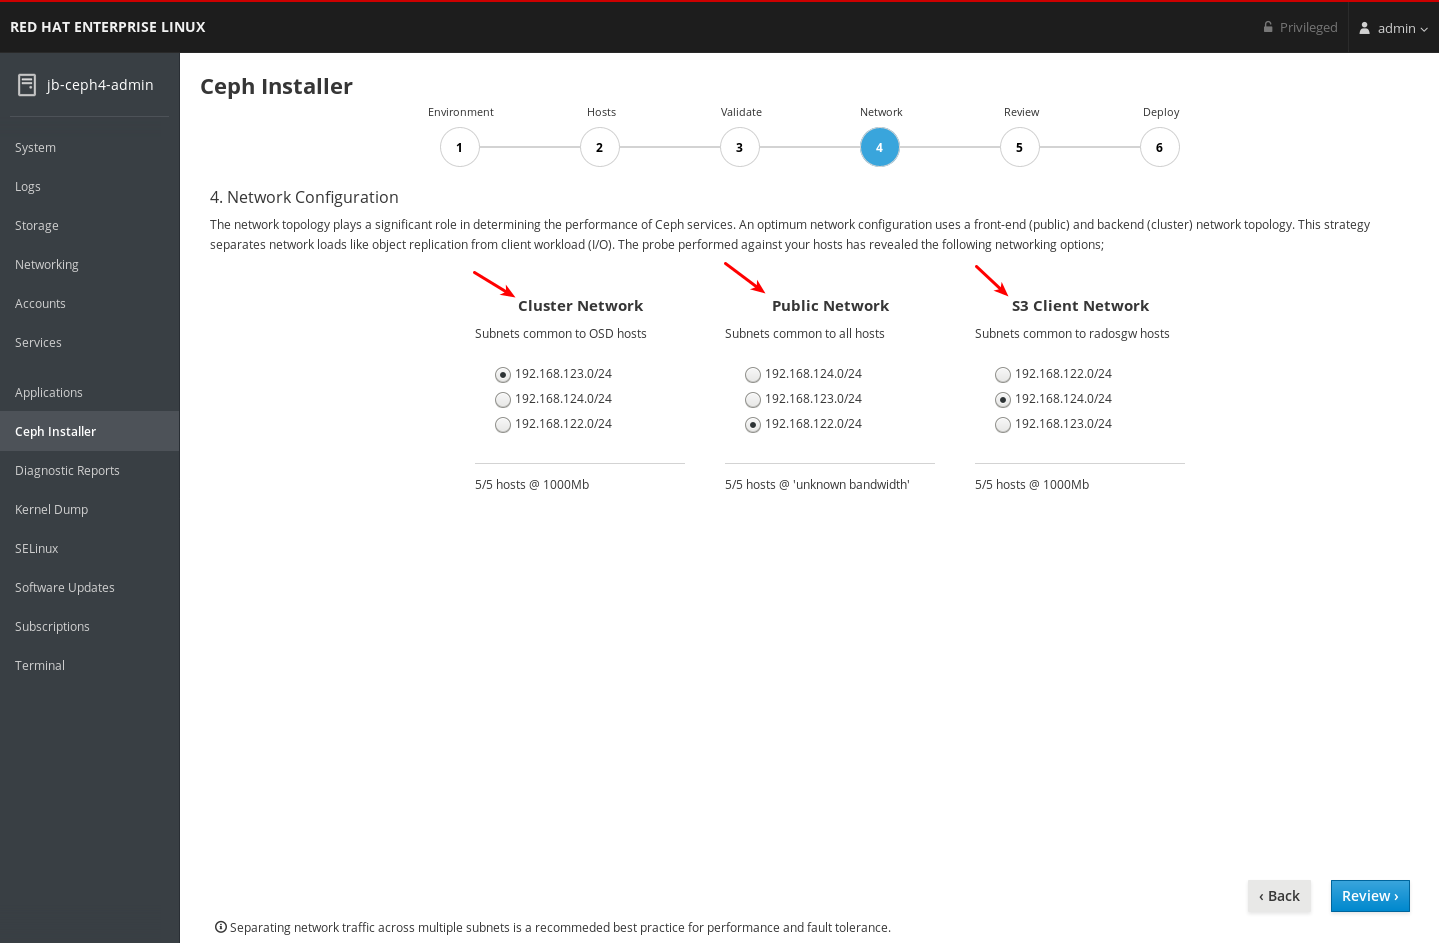
Take note of the networks you can select for each network type. Only the networks which are available on all hosts that make up a particular network type are shown. In the example below, there are three networks which are available on all hosts in the cluster. Because all three networks are available on every set of hosts which make up a network type, each network type lists the same three networks.

The three networks available are
192.168.122.0/24,192.168.123.0/24, and192.168.124.0/24.Take note of the speed each network operates at. This is the speed of the NICs used for the particular network. In the example below,
192.168.123.0/24, and192.168.124.0/24are at 1,000 mbps. The Cockpit Ceph Installer could not determine the speed for the192.168.122.0/24network.
Select the networks you want to use for each network type. For production clusters, you must select separate networks for Cluster Network and Public Network. For development/POC clusters, you can select the same network for both types, or if you only have one network configured on all hosts, only that network will be displayed and you will not be able to select other networks.
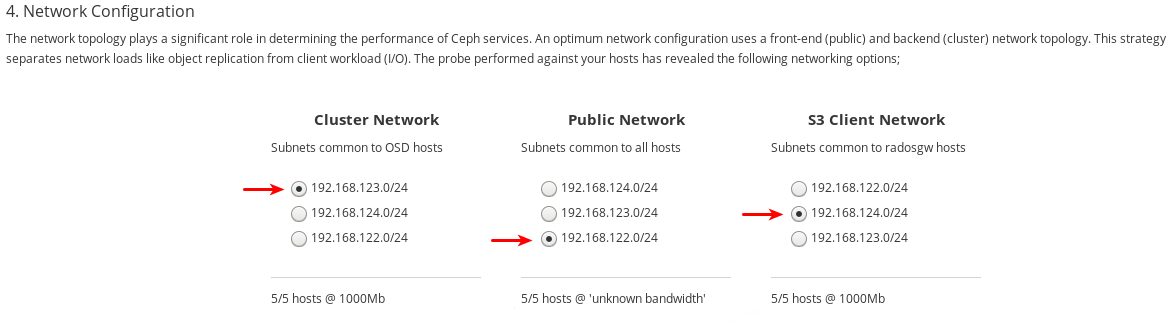
The
192.168.122.0/24network will be used for the Public Network, the192.168.123.0/24network will be used for the Cluster Network, and the192.168.124.0/24network will be used for the S3 Network.Click the Review button at the bottom right corner of the page to review the entire cluster configuration before installation.
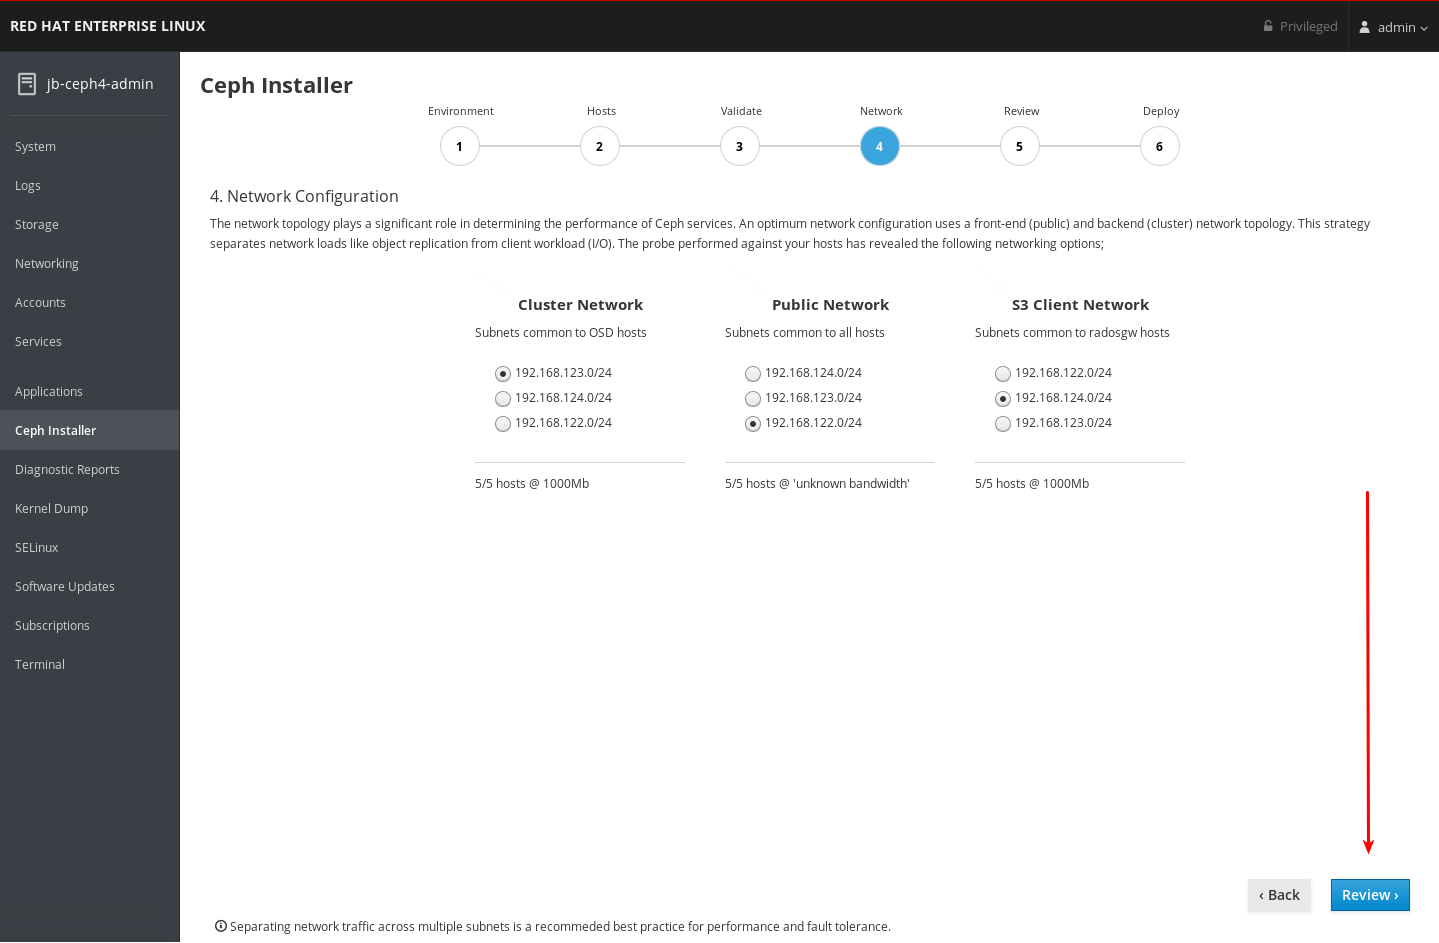
4.10. Review the installation configuration
The Review page allows you to view all the details of the Ceph cluster installation configuration that you set on the previous pages, and details about the hosts, some of which were not included in previous pages.
Prerequisites
- The Network page of the Cockpit Ceph Installer has been completed.
Procedure
View the review page.

Verify the information from each previous page is as you expect it as shown on the Review page. A summary of information from the Environment page is at 1, followed by the Hosts page at 2, the Validate page at 3, the Network page at 4, and details about the hosts, including some additional details which were not included in previous pages, are at 5.

Click the Deploy button at the bottom right corner of the page to go to the Deploy page where you can finalize and start the actual installation process.

4.11. Deploy the Ceph cluster
The Deploy page allows you save the installation settings in their native Ansible format, review or modify them if required, start the install, monitor its progress, and view the status of the cluster after the install finishes successfully.
Prerequisites
- Installation configuration settings on the Review page have been verified.
Procedure
Click the Save button at the bottom right corner of the page to save the installation settings to the Ansible playbooks that will be used by Ansible to perform the actual install.

-
Optional: View or further customize the settings in the Ansible playbooks located on the Ansible administration node. The playbooks are located in
/usr/share/ceph-ansible. For more information about the Ansible playbooks and how to use them to customize the install, see Installing a Red Hat Ceph Storage cluster. -
Secure the default user names and passwords for Grafana and dashboard. Starting with Red Hat Ceph Storage 4.1, you must uncomment or set
dashboard_admin_passwordandgrafana_admin_passwordin/usr/share/ceph-ansible/group_vars/all.yml. Set secure passwords for each. Also set custom user names fordashboard_admin_userandgrafana_admin_user. Click the Deploy button at the bottom right corner of the page to start the install.

Observe the installation progress while it is running.
The information at 1 shows whether the install is running or not, the start time, and elapsed time. The information at 2 shows a summary of the Ansible tasks that have been attempted. The information at 3 shows which roles have been installed or are installing. Green represents a role where all hosts that were assigned that role have had that role installed on them. Blue represents a role where hosts that have that role assigned to them are still being installed. At 4 you can view details about the current task or view failed tasks. Use the Filter by menu to switch between current task and failed tasks.
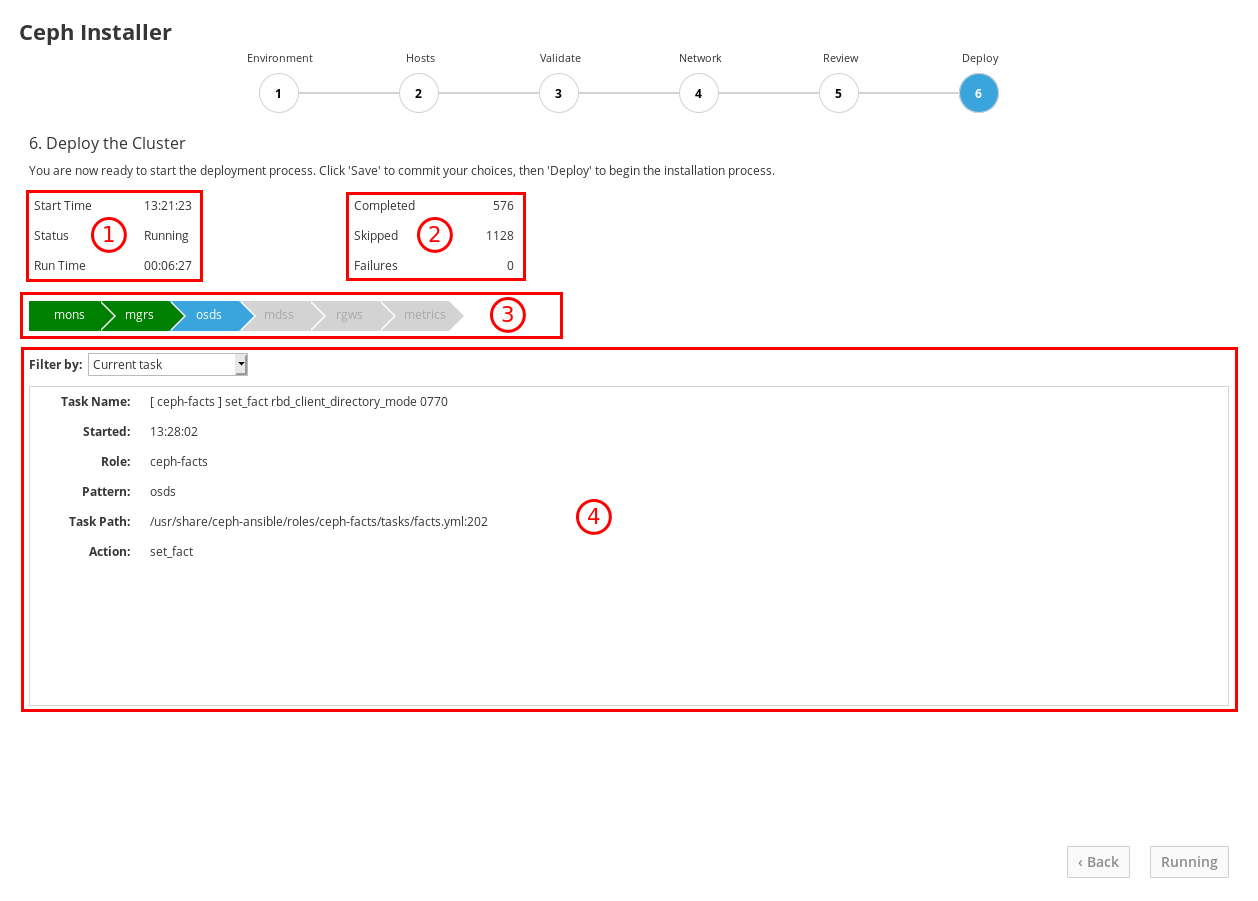
The role names come from the Ansible inventory file. The equivalency is:
monsare Monitors,mgrsare Managers, note the Manager role is installed alongside the Monitor role,osdsare Object Storage Devices,mdssare Metadata Servers,rgwsare RADOS Gateways,metricsare Grafana and Prometheus services for dashboard metrics. Not shown in the example screenshot:iscsigwsare iSCSI Gateways.After the installation finishes, click the Complete button at the bottom right corner of the page. This opens a window which displays the output of the command
ceph status, as well as dashboard access information.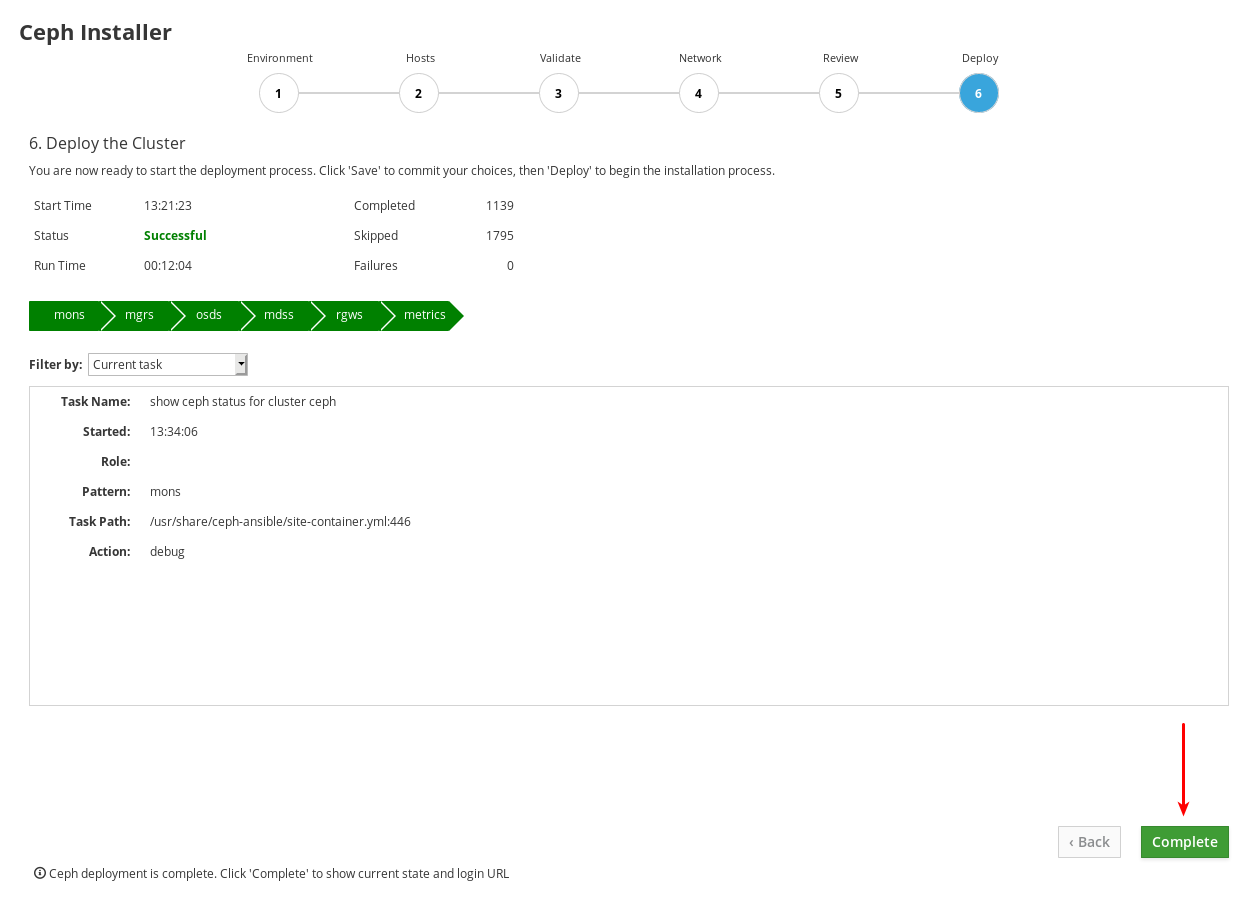
Compare cluster status information in the example below with the cluster status information on your cluster. The example shows a healthy cluster, with all OSDs up and in, and all services active. PGs are in the
active+cleanstate. If some aspects of your cluster are not the same, refer to the Troubleshoting Guide for information on how to resolve the issues.
At the bottom of the Ceph Cluster Status window, the dashboard access information is displayed, including the URL, user name, and password. Take note of this information.

Use the information from the previous step along with the Dashboard Guide to access the dashboard.

The dashboard provides a web interface so you can administer and monitor the Red Hat Ceph Storage cluster. For more information, see the Dashboard Guide.
-
Optional: View the
cockpit-ceph-installer.logfile. This file records a log of the selections made and any associated warnings the probe process generated. It is located in the home directory of the user that ran the installer script,ansible-runner-service.sh.
Chapter 5. Installing Red Hat Ceph Storage using Ansible
This chapter describes how to use the Ansible application to deploy a Red Hat Ceph Storage cluster and other components, such as Metadata Servers or the Ceph Object Gateway.
- To install a Red Hat Ceph Storage cluster, see Section 5.2, “Installing a Red Hat Ceph Storage cluster”.
- To install Metadata Servers, see Section 5.4, “Installing Metadata servers”.
-
To install the
ceph-clientrole, see Section 5.5, “Installing the Ceph Client Role”. - To install the Ceph Object Gateway, see Section 5.6, “Installing the Ceph Object Gateway”.
- To configure a multisite Ceph Object Gateway, see Section 5.7, “Configuring multisite Ceph Object Gateways”.
-
To learn about the Ansible
--limitoption, see Section 5.10, “Understanding thelimitoption”.
5.1. Prerequisites
- Obtain a valid customer subscription.
Prepare the cluster nodes, by doing the following on each node:
5.2. Installing a Red Hat Ceph Storage cluster
Use the Ansible application with the ceph-ansible playbook to install Red Hat Ceph Storage on bare-metal or in containers. Using a Ceph storage clusters in production must have a minimum of three monitor nodes and three OSD nodes containing multiple OSD daemons. A typical Ceph storage cluster running in production usually consists of ten or more nodes.
In the following procedure, run the commands from the Ansible administration node, unless instructed otherwise. This procedure applies to both bare-metal and container deployments, unless specified.
Ceph can run with one monitor; however, to ensure high availability in a production cluster, Red Hat will only support deployments with at least three monitor nodes.
Deploying Red Hat Ceph Storage 4 in containers on Red Hat Enterprise Linux 7.7 will deploy Red Hat Ceph Storage 4 on a Red Hat Enterprise Linux 8 container image.
Prerequisites
- A valid customer subscription.
- Root-level access to the Ansible administration node.
-
The
ansibleuser account for use with the Ansible application. - Enable Red Hat Ceph Storage Tools and Ansible repositories
- For ISO installation, download the latest ISO image on the Ansible node. See the section For ISO Installations in Enabling the Red Hat Ceph Storage repositories chapter in the Red Hat Ceph Storage Installation Guide.
Procedure
-
Log in as the
rootuser account on the Ansible administration node. For all deployments, bare-metal or in containers, install the
ceph-ansiblepackage:Red Hat Enterprise Linux 7
yum install ceph-ansible
[root@admin ~]# yum install ceph-ansibleCopy to Clipboard Copied! Toggle word wrap Toggle overflow Red Hat Enterprise Linux 8
dnf install ceph-ansible
[root@admin ~]# dnf install ceph-ansibleCopy to Clipboard Copied! Toggle word wrap Toggle overflow Navigate to the
/usr/share/ceph-ansible/directory:cd /usr/share/ceph-ansible
[root@admin ~]# cd /usr/share/ceph-ansibleCopy to Clipboard Copied! Toggle word wrap Toggle overflow Create new
ymlfiles:cp group_vars/all.yml.sample group_vars/all.yml cp group_vars/osds.yml.sample group_vars/osds.yml
[root@admin ceph-ansible]# cp group_vars/all.yml.sample group_vars/all.yml [root@admin ceph-ansible]# cp group_vars/osds.yml.sample group_vars/osds.ymlCopy to Clipboard Copied! Toggle word wrap Toggle overflow Bare-metal deployments:
cp site.yml.sample site.yml
[root@admin ceph-ansible]# cp site.yml.sample site.ymlCopy to Clipboard Copied! Toggle word wrap Toggle overflow Container deployments:
cp site-container.yml.sample site-container.yml
[root@admin ceph-ansible]# cp site-container.yml.sample site-container.ymlCopy to Clipboard Copied! Toggle word wrap Toggle overflow
Edit the new files.
Open for editing the
group_vars/all.ymlfile.ImportantUsing a custom storage cluster name is not supported. Do not set the
clusterparameter to any value other thanceph. Using a custom storage cluster name is only supported with Ceph clients, such as:librados, the Ceph Object Gateway, and RADOS block device mirroring.WarningBy default, Ansible attempts to restart an installed, but masked
firewalldservice, which can cause the Red Hat Ceph Storage deployment to fail. To work around this issue, set theconfigure_firewalloption tofalsein theall.ymlfile. If you are running thefirewalldservice, then there is no requirement to use theconfigure_firewalloption in theall.ymlfile.NoteHaving the
ceph_rhcs_versionoption set to4will pull in the latest version of Red Hat Ceph Storage 4.NoteRed Hat recommends leaving the
dashboard_enabledoption set toTruein thegroup_vars/all.ymlfile, and not changing it toFalse. If you want to disable the dashboard, see Disabling the Ceph Dashboard.NoteDashboard related components are containerized. Therefore, for Bare-metal or Container deployment,
ceph_docker_registry_usernameandceph_docker_registry_passwordparameters have to be included so that ceph-ansible can fetch container images required for the dashboard.NoteIf you do not have a Red Hat Registry Service Account, create one using the Registry Service Account webpage. See the Red Hat Container Registry Authentication Knowledgebase article for details on how to create and manage tokens.
NoteIn addition to using a Service Account for the
ceph_docker_registry_usernameandceph_docker_registry_passwordparameters, you can also use your Customer Portal credentials, but to ensure security, encrypt theceph_docker_registry_passwordparameter. For more information, see Encrypting Ansible password variables with ansible-vault.Bare-metal example of the
all.ymlfile for CDN installation:Copy to Clipboard Copied! Toggle word wrap Toggle overflow - 1
- This is the interface on the public network.
ImportantStarting with Red Hat Ceph Storage 4.1, you must uncomment or set
dashboard_admin_passwordandgrafana_admin_passwordin/usr/share/ceph-ansible/group_vars/all.yml. Set secure passwords for each. Also set custom user names fordashboard_admin_userandgrafana_admin_user.NoteFor Red Hat Ceph Storage 4.2, if you have used local registry for installation, use 4.6 for Prometheus image tags.
Bare-metal example of the
all.ymlfile for ISO installation:Copy to Clipboard Copied! Toggle word wrap Toggle overflow - 1
- This is the interface on the public network.
Containers example of the
all.ymlfile:Copy to Clipboard Copied! Toggle word wrap Toggle overflow - 1
- This is the interface on the public network.
ImportantLook up the latest container images tags on the Red Hat Ecosystem Catalog to install the latest container images with all the latest patches applied.
Containers example of the
all.ymlfile, when the Red Hat Ceph Storage nodes do NOT have access to the Internet during deployment:Copy to Clipboard Copied! Toggle word wrap Toggle overflow - 1
- This is the interface on the public network.
- Replace
- LOCAL_NODE_FQDN with your local host FQDN.
From Red Hat Ceph Storage 4.2,
dashboard_protocolis set tohttpsand Ansible generates the dashboard and grafana keys and certificates. For custom certificates, in theall.ymlfile, update the path at Ansible installer host fordashboard_crt,dashboard_key,grafana_crt, andgrafana_keyfor bare-metal or container deployment.Syntax
Copy to Clipboard Copied! Toggle word wrap Toggle overflow
To install Red Hat Ceph Storage using a container registry reachable with a http or https proxy, set the
ceph_docker_http_proxyorceph_docker_https_proxyvariables in thegroup_vars/all.ymlfile.Example
ceph_docker_http_proxy: http://192.168.42.100:8080 ceph_docker_https_proxy: https://192.168.42.100:8080
ceph_docker_http_proxy: http://192.168.42.100:8080 ceph_docker_https_proxy: https://192.168.42.100:8080Copy to Clipboard Copied! Toggle word wrap Toggle overflow If you need to exclude some host for the proxy configuration, use the
ceph_docker_no_proxyvariable in thegroup_vars/all.ymlfile.Example
ceph_docker_no_proxy: "localhost,127.0.0.1"
ceph_docker_no_proxy: "localhost,127.0.0.1"Copy to Clipboard Copied! Toggle word wrap Toggle overflow In addition to editing the
all.ymlfile for proxy installation of Red Hat Ceph Storage, edit the/etc/environmentfile:Example
HTTP_PROXY: http://192.168.42.100:8080 HTTPS_PROXY: https://192.168.42.100:8080 NO_PROXY: "localhost,127.0.0.1"
HTTP_PROXY: http://192.168.42.100:8080 HTTPS_PROXY: https://192.168.42.100:8080 NO_PROXY: "localhost,127.0.0.1"Copy to Clipboard Copied! Toggle word wrap Toggle overflow This triggers the podman to start the containerized services such as prometheus, grafana-server, alertmanager, and node-exporter, and download the required images.
For all deployments, bare-metal or in containers, edit the
group_vars/osds.ymlfile.ImportantDo not install an OSD on the device the operating system is installed on. Sharing the same device between the operating system and OSDs causes performance issues.
Ceph-ansible uses the
ceph-volumetool to prepare storage devices for Ceph usage. You can configureosds.ymlto use your storage devices in different ways to optimize performance for your particular workload.ImportantAll the examples below use the BlueStore object store, which is the format Ceph uses to store data on devices. Previously, Ceph used FileStore as the object store. This format is deprecated for new Red Hat Ceph Storage 4.0 installs because BlueStore offers more features and improved performance. It is still possible to use FileStore, but using it requires a Red Hat support exception. For more information on BlueStore, see Ceph BlueStore in the Red Hat Ceph Storage Architecture Guide.
Auto discovery
osd_auto_discovery: true
osd_auto_discovery: trueCopy to Clipboard Copied! Toggle word wrap Toggle overflow The above example uses all empty storage devices on the system to create the OSDs, so you do not have to specify them explicitly. The
ceph-volumetool checks for empty devices, so devices which are not empty will not be used.NoteIf you later decide to remove the cluster using
purge-docker-cluster.ymlorpurge-cluster.yml, you must comment outosd_auto_discoveryand declare the OSD devices in theosds.ymlfile. For more information, see Purging storage clusters deployed by Ansible.Simple configuration
First Scenario
devices: - /dev/sda - /dev/sdb
devices: - /dev/sda - /dev/sdbCopy to Clipboard Copied! Toggle word wrap Toggle overflow or
Second Scenario
Copy to Clipboard Copied! Toggle word wrap Toggle overflow or
Third Scenario
lvm_volumes: - data: /dev/sdb - data: /dev/sdc
lvm_volumes: - data: /dev/sdb - data: /dev/sdcCopy to Clipboard Copied! Toggle word wrap Toggle overflow or
Fourth Scenario
lvm_volumes: - data: /dev/sdb - data:/dev/nvme0n1lvm_volumes: - data: /dev/sdb - data:/dev/nvme0n1Copy to Clipboard Copied! Toggle word wrap Toggle overflow When using the
devicesoption alone,ceph-volume lvm batchmode automatically optimizes OSD configuration.In the first scenario, if the
devicesare traditional hard drives or SSDs, then one OSD per device is created.In the second scenario, when there is a mix of traditional hard drives and SSDs, the data is placed on the traditional hard drives (
sda,sdb) and the BlueStore database is created as large as possible on the SSD (nvme0n1). Similarly, the data is placed on the traditional hard drives (sdc,sdd), and the BlueStore database is created on the SSDnvme1n1irrespective of the order of devices mentioned.NoteBy default
ceph-ansibledoes not override the default values ofbluestore_block_db_sizeandbluestore_block_wal_size. You can setbluestore_block_db_sizeusingceph_conf_overridesin thegroup_vars/all.ymlfile. The value ofbluestore_block_db_sizeshould be greater than 2 GB.In the third scenario, data is placed on the traditional hard drives (
sdb,sdc), and the BlueStore database is collocated on the same devices.In the fourth scenario, data is placed on the traditional hard drive (
sdb) and on the SSD (nvme1n1), and the BlueStore database is collocated on the same devices. This is different from using thedevicesdirective, where the BlueStore database is placed on the SSD.ImportantThe
ceph-volume lvm batch modecommand creates the optimized OSD configuration by placing data on the traditional hard drives and the BlueStore database on the SSD. If you want to specify the logical volumes and volume groups to use, you can create them directly by following the Advanced configuration scenarios below.Advanced configuration
First Scenario
Copy to Clipboard Copied! Toggle word wrap Toggle overflow or
Second Scenario
Copy to Clipboard Copied! Toggle word wrap Toggle overflow In the first scenario, there are two OSDs. The
sdaandsdbdevices each have their own data segments and write-ahead logs. The additional dictionarydedicated_devicesis used to isolate their databases, also known asblock.db, onsdxandsdy, respectively.In the second scenario, another additional dictionary,
bluestore_wal_devices, is used to isolate the write-ahead log on NVMe devicesnvme0n1andnvme0n2. Using thedevices,dedicated_devices, andbluestore_wal_devices,options together, this allows you to isolate all components of an OSD onto separate devices. Laying out the OSDs like this can increase overall performance.Pre-created logical volumes
First Scenario
Copy to Clipboard Copied! Toggle word wrap Toggle overflow or
Second Scenario
Copy to Clipboard Copied! Toggle word wrap Toggle overflow By default, Ceph uses Logical Volume Manager to create logical volumes on the OSD devices. In the Simple configuration and Advanced configuration examples above, Ceph creates logical volumes on the devices automatically. You can use previously created logical volumes with Ceph by specifying the
lvm_volumesdictionary.In the first scenario, the data is placed on dedicated logical volumes, database, and WAL. You can also specify just data, data and WAL, or data and database. The
data:line must specify the logical volume name where data is to be stored, anddata_vg:must specify the name of the volume group the data logical volume is contained in. Similarly,db:is used to specify the logical volume the database is stored on anddb_vg:is used to specify the volume group its logical volume is in. Thewal:line specifies the logical volume the WAL is stored on and thewal_vg:line specifies the volume group that contains it.In the second scenario, the actual device name is set for the
data:option, and doing so, does not require specifying thedata_vg:option. You must specify the logical volume name and the volume group details for the BlueStore database and WAL devices.ImportantWith
lvm_volumes:, the volume groups and logical volumes must be created beforehand. The volume groups and logical volumes will not be created byceph-ansible.NoteIf using all NVMe SSDs, then set
osds_per_device: 2. For more information, see Configuring OSD Ansible settings for all NVMe Storage in the Red Hat Ceph Storage Installation Guide.NoteAfter rebooting a Ceph OSD node, there is a possibility that the block device assignments will change. For example,
sdcmight becomesdd. You can use persistent naming devices, such as the/dev/disk/by-path/device path, instead of the traditional block device name.
For all deployments, bare-metal or in containers, create the Ansible inventory file and then open it for editing:
cd /usr/share/ceph-ansible/ touch hosts
[root@admin ~]# cd /usr/share/ceph-ansible/ [root@admin ceph-ansible]# touch hostsCopy to Clipboard Copied! Toggle word wrap Toggle overflow Edit the
hostsfile accordingly.NoteFor information about editing the Ansible inventory location, see Configuring Ansible inventory location.
Add a node under
[grafana-server]. This role installs Grafana and Prometheus to provide real-time insights into the performance of the Ceph cluster. These metrics are presented in the Ceph Dashboard, which allows you to monitor and manage the cluster. The installation of the dashboard, Grafana, and Prometheus are required. You can colocate the metrics functions on the Ansible Administration node. If you do, ensure the system resources of the node are greater than than what is required for a stand alone metrics node.[grafana-server] GRAFANA-SERVER_NODE_NAME
[grafana-server] GRAFANA-SERVER_NODE_NAMECopy to Clipboard Copied! Toggle word wrap Toggle overflow Add the monitor nodes under the
[mons]section:[mons] MONITOR_NODE_NAME_1 MONITOR_NODE_NAME_2 MONITOR_NODE_NAME_3
[mons] MONITOR_NODE_NAME_1 MONITOR_NODE_NAME_2 MONITOR_NODE_NAME_3Copy to Clipboard Copied! Toggle word wrap Toggle overflow Add OSD nodes under the
[osds]section:[osds] OSD_NODE_NAME_1 OSD_NODE_NAME_2 OSD_NODE_NAME_3
[osds] OSD_NODE_NAME_1 OSD_NODE_NAME_2 OSD_NODE_NAME_3Copy to Clipboard Copied! Toggle word wrap Toggle overflow NoteYou can add a range specifier (
[1:10]) to the end of the node name, if the node names are numerically sequential. For example:[osds] example-node[1:10]
[osds] example-node[1:10]Copy to Clipboard Copied! Toggle word wrap Toggle overflow NoteFor OSDs in a new installation, the default object store format is BlueStore.
-
Optionally, in container deployments, colocate Ceph Monitor daemons with the Ceph OSD daemons on one node by adding the same node under the
[mon]and[osd]sections. In the Additional Resources section below, see the link on colocating Ceph daemons for more information. Add the Ceph Manager (
ceph-mgr) nodes under the[mgrs]section. This is colocating the Ceph Manager daemon with Ceph Monitor daemon.[mgrs] MONITOR_NODE_NAME_1 MONITOR_NODE_NAME_2 MONITOR_NODE_NAME_3
[mgrs] MONITOR_NODE_NAME_1 MONITOR_NODE_NAME_2 MONITOR_NODE_NAME_3Copy to Clipboard Copied! Toggle word wrap Toggle overflow
Optionally, if you want to use host specific parameters, for all deployments, bare-metal or in containers, create the
host_varsdirectory with host files to include any parameters specific to hosts.Create the
host_varsdirectory:mkdir /usr/share/ceph-ansible/host_vars
[ansible@admin ~]$ mkdir /usr/share/ceph-ansible/host_varsCopy to Clipboard Copied! Toggle word wrap Toggle overflow Change to the
host_varsdirectory:cd /usr/share/ceph-ansible/host_vars
[ansible@admin ~]$ cd /usr/share/ceph-ansible/host_varsCopy to Clipboard Copied! Toggle word wrap Toggle overflow Create the host files. Use the host-name-short-name format for the name of the files, for example:
touch tower-osd6
[ansible@admin host_vars]$ touch tower-osd6Copy to Clipboard Copied! Toggle word wrap Toggle overflow Update the file with any host specific parameters, for example:
In bare-metal deployments use the
devicesparameter to specify devices that the OSD nodes will use. Usingdevicesis useful when OSDs use devices with different names or when one of the devices failed on one of the OSDs.devices: DEVICE_1 DEVICE_2devices: DEVICE_1 DEVICE_2Copy to Clipboard Copied! Toggle word wrap Toggle overflow Example
devices: /dev/sdb /dev/sdcdevices: /dev/sdb /dev/sdcCopy to Clipboard Copied! Toggle word wrap Toggle overflow NoteWhen specifying no devices, set the
osd_auto_discoveryparameter totruein thegroup_vars/osds.ymlfile.
Optionally, for all deployments, bare-metal or in containers, you can create a custom CRUSH hierarchy using Ceph Ansible:
Setup your Ansible inventory file. Specify where you want the OSD hosts to be in the CRUSH map’s hierarchy by using the
osd_crush_locationparameter. You must specify at least two CRUSH bucket types to specify the location of the OSD, and one buckettypemust be host. By default, these includeroot,datacenter,room,row,pod,pdu,rack,chassisandhost.Syntax
[osds] CEPH_OSD_NAME osd_crush_location="{ 'root': ROOT_BUCKET_', 'rack': 'RACK_BUCKET', 'pod': 'POD_BUCKET', 'host': 'CEPH_HOST_NAME' }"[osds] CEPH_OSD_NAME osd_crush_location="{ 'root': ROOT_BUCKET_', 'rack': 'RACK_BUCKET', 'pod': 'POD_BUCKET', 'host': 'CEPH_HOST_NAME' }"Copy to Clipboard Copied! Toggle word wrap Toggle overflow Example
[osds] ceph-osd-01 osd_crush_location="{ 'root': 'default', 'rack': 'rack1', 'pod': 'monpod', 'host': 'ceph-osd-01' }"[osds] ceph-osd-01 osd_crush_location="{ 'root': 'default', 'rack': 'rack1', 'pod': 'monpod', 'host': 'ceph-osd-01' }"Copy to Clipboard Copied! Toggle word wrap Toggle overflow Edit the
group_vars/osds.ymlfile, and set thecrush_rule_configandcreate_crush_treeparameters toTrue. Create at least one CRUSH rule if you do not want to use the default CRUSH rules, for example:Copy to Clipboard Copied! Toggle word wrap Toggle overflow If you are using faster SSD devices, then edit the parameters as follows:
Copy to Clipboard Copied! Toggle word wrap Toggle overflow NoteThe default CRUSH rules fail if both
ssdandhddOSDs are not deployed because the default rules now include theclassparameter, which must be defined.Create
pools, with createdcrush_rulesingroup_vars/clients.ymlfile:Example
Copy to Clipboard Copied! Toggle word wrap Toggle overflow View the tree:
ceph osd tree
[root@mon ~]# ceph osd treeCopy to Clipboard Copied! Toggle word wrap Toggle overflow Validate the pools:
for i in $(rados lspools); do echo "pool: $i"; ceph osd pool get $i crush_rule; done pool: pool1 crush_rule: HDD
[root@mon ~]# for i in $(rados lspools); do echo "pool: $i"; ceph osd pool get $i crush_rule; done pool: pool1 crush_rule: HDDCopy to Clipboard Copied! Toggle word wrap Toggle overflow
For all deployments, bare-metal or in containers, log in with or switch to the
ansibleuser.Create the
ceph-ansible-keysdirectory where Ansible stores temporary values generated by theceph-ansibleplaybook:mkdir ~/ceph-ansible-keys
[ansible@admin ~]$ mkdir ~/ceph-ansible-keysCopy to Clipboard Copied! Toggle word wrap Toggle overflow Change to the
/usr/share/ceph-ansible/directory:cd /usr/share/ceph-ansible/
[ansible@admin ~]$ cd /usr/share/ceph-ansible/Copy to Clipboard Copied! Toggle word wrap Toggle overflow Verify that Ansible can reach the Ceph nodes:
ansible all -m ping -i hosts
[ansible@admin ceph-ansible]$ ansible all -m ping -i hostsCopy to Clipboard Copied! Toggle word wrap Toggle overflow
Run the
ceph-ansibleplaybook.Bare-metal deployments:
ansible-playbook site.yml -i hosts
[ansible@admin ceph-ansible]$ ansible-playbook site.yml -i hostsCopy to Clipboard Copied! Toggle word wrap Toggle overflow Container deployments:
ansible-playbook site-container.yml -i hosts
[ansible@admin ceph-ansible]$ ansible-playbook site-container.yml -i hostsCopy to Clipboard Copied! Toggle word wrap Toggle overflow NoteIf you deploy Red Hat Ceph Storage to Red Hat Enterprise Linux Atomic Host hosts, use the
--skip-tags=with_pkgoption:ansible-playbook site-container.yml --skip-tags=with_pkg -i hosts
[user@admin ceph-ansible]$ ansible-playbook site-container.yml --skip-tags=with_pkg -i hostsCopy to Clipboard Copied! Toggle word wrap Toggle overflow NoteTo increase the deployment speed, use the
--forksoption toansible-playbook. By default,ceph-ansiblesets forks to20. With this setting, up to twenty nodes will be installed at the same time. To install up to thirty nodes at a time, runansible-playbook --forks 30 PLAYBOOK FILE -i hosts. The resources on the admin node must be monitored to ensure they are not overused. If they are, lower the number passed to--forks.
Wait for the Ceph deployment to finish.
Example output
Copy to Clipboard Copied! Toggle word wrap Toggle overflow Verify the status of the Ceph storage cluster.
Bare-metal deployments:
ceph health HEALTH_OK
[root@mon ~]# ceph health HEALTH_OKCopy to Clipboard Copied! Toggle word wrap Toggle overflow Container deployments:
Red Hat Enterprise Linux 7
docker exec ceph-mon-ID ceph health
[root@mon ~]# docker exec ceph-mon-ID ceph healthCopy to Clipboard Copied! Toggle word wrap Toggle overflow Red Hat Enterprise Linux 8
podman exec ceph-mon-ID ceph health
[root@mon ~]# podman exec ceph-mon-ID ceph healthCopy to Clipboard Copied! Toggle word wrap Toggle overflow - Replace
IDwith the host name of the Ceph Monitor node:Example
podman exec ceph-mon-mon0 ceph health HEALTH_OK
[root@mon ~]# podman exec ceph-mon-mon0 ceph health HEALTH_OKCopy to Clipboard Copied! Toggle word wrap Toggle overflow
For all deployments, bare-metal or in containers, verify the storage cluster is functioning using
rados.From a Ceph Monitor node, create a test pool with eight placement groups (PG):
Syntax
ceph osd pool create POOL_NAME PG_NUMBER
[root@mon ~]# ceph osd pool create POOL_NAME PG_NUMBERCopy to Clipboard Copied! Toggle word wrap Toggle overflow Example
ceph osd pool create test 8
[root@mon ~]# ceph osd pool create test 8Copy to Clipboard Copied! Toggle word wrap Toggle overflow Create a file called
hello-world.txt:Syntax
vim FILE_NAME
[root@mon ~]# vim FILE_NAMECopy to Clipboard Copied! Toggle word wrap Toggle overflow Example
vim hello-world.txt
[root@mon ~]# vim hello-world.txtCopy to Clipboard Copied! Toggle word wrap Toggle overflow Upload
hello-world.txtto the test pool using the object namehello-world:Syntax
rados --pool POOL_NAME put OBJECT_NAME OBJECT_FILE_NAME
[root@mon ~]# rados --pool POOL_NAME put OBJECT_NAME OBJECT_FILE_NAMECopy to Clipboard Copied! Toggle word wrap Toggle overflow Example
rados --pool test put hello-world hello-world.txt
[root@mon ~]# rados --pool test put hello-world hello-world.txtCopy to Clipboard Copied! Toggle word wrap Toggle overflow Download
hello-worldfrom the test pool as file namefetch.txt:Syntax
rados --pool POOL_NAME get OBJECT_NAME OBJECT_FILE_NAME
[root@mon ~]# rados --pool POOL_NAME get OBJECT_NAME OBJECT_FILE_NAMECopy to Clipboard Copied! Toggle word wrap Toggle overflow Example
rados --pool test get hello-world fetch.txt
[root@mon ~]# rados --pool test get hello-world fetch.txtCopy to Clipboard Copied! Toggle word wrap Toggle overflow Check the contents of
fetch.txt:[root@mon ~]# cat fetch.txt "Hello World!"
[root@mon ~]# cat fetch.txt "Hello World!"Copy to Clipboard Copied! Toggle word wrap Toggle overflow NoteIn addition to verifying the storage cluster status, you can use the
ceph-medicutility to overall diagnose the Ceph Storage cluster. See the Installing and Usingceph-medicto Diagnose a Ceph Storage Cluster chapter in the Red Hat Ceph Storage 4 Troubleshooting Guide.
Additional Resources
- List of the common Ansible settings.
- List of the common OSD settings.
- See Colocation of containerized Ceph daemons for details.
5.3. Configuring OSD Ansible settings for all NVMe storage
To increase overall performance, you can configure Ansible to use only non-volatile memory express (NVMe) devices for storage. Normally only one OSD is configured per device, which underutilizes the throughput potential of an NVMe device.
If you mix SSDs and HDDs, then SSDs will be used for the database, or block.db, not for data in OSDs.
In testing, configuring two OSDs on each NVMe device was found to provide optimal performance. Red Hat recommends setting the osds_per_device option to 2, but it is not required. Other values might provide better performance in your environment.
Prerequisites
- Access to an Ansible administration node.
-
Installation of the
ceph-ansiblepackage.
Procedure
Set
osds_per_device: 2ingroup_vars/osds.yml:osds_per_device: 2
osds_per_device: 2Copy to Clipboard Copied! Toggle word wrap Toggle overflow List the NVMe devices under
devices:devices: - /dev/nvme0n1 - /dev/nvme1n1 - /dev/nvme2n1 - /dev/nvme3n1
devices: - /dev/nvme0n1 - /dev/nvme1n1 - /dev/nvme2n1 - /dev/nvme3n1Copy to Clipboard Copied! Toggle word wrap Toggle overflow The settings in
group_vars/osds.ymlwill look similar to this example:Copy to Clipboard Copied! Toggle word wrap Toggle overflow
You must use devices with this configuration, not lvm_volumes. This is because lvm_volumes is generally used with pre-created logical volumes and osds_per_device implies automatic logical volume creation by Ceph.
Additional Resources
- See the Installing a Red Hat Ceph Storage Cluster in the Red Hat Ceph Storage Installation Guide for more details.
5.4. Installing Metadata servers
Use the Ansible automation application to install a Ceph Metadata Server (MDS). Metadata Server daemons are necessary for deploying a Ceph File System.
Prerequisites
- A working Red Hat Ceph Storage cluster.
- Enable passwordless SSH access.
Procedure
Perform the following steps on the Ansible administration node.
Add a new section
[mdss]to the/etc/ansible/hostsfile:[mdss] MDS_NODE_NAME1 MDS_NODE_NAME2 MDS_NODE_NAME3
[mdss] MDS_NODE_NAME1 MDS_NODE_NAME2 MDS_NODE_NAME3Copy to Clipboard Copied! Toggle word wrap Toggle overflow Replace MDS_NODE_NAME with the host names of the nodes where you want to install the Ceph Metadata servers.
Alternatively, you can colocate the Metadata server with the OSD daemon on one node by adding the same node under the
[osds]and[mdss]sections.Navigate to the
/usr/share/ceph-ansibledirectory:cd /usr/share/ceph-ansible
[root@admin ~]# cd /usr/share/ceph-ansibleCopy to Clipboard Copied! Toggle word wrap Toggle overflow Optionally, you can change the default variables.
Create a copy of the
group_vars/mdss.yml.samplefile namedmdss.yml:cp group_vars/mdss.yml.sample group_vars/mdss.yml
[root@admin ceph-ansible]# cp group_vars/mdss.yml.sample group_vars/mdss.ymlCopy to Clipboard Copied! Toggle word wrap Toggle overflow -
Optionally, edit the parameters in
mdss.yml. Seemdss.ymlfor details.
As the
ansibleuser, run the Ansible playbook:Bare-metal deployments:
ansible-playbook site.yml --limit mdss -i hosts
[user@admin ceph-ansible]$ ansible-playbook site.yml --limit mdss -i hostsCopy to Clipboard Copied! Toggle word wrap Toggle overflow Container deployments:
ansible-playbook site-container.yml --limit mdss -i hosts
[ansible@admin ceph-ansible]$ ansible-playbook site-container.yml --limit mdss -i hostsCopy to Clipboard Copied! Toggle word wrap Toggle overflow
- After installing the Metadata servers, you can now configure them. For details, see the The Ceph File System Metadata Server chapter in the Red Hat Ceph Storage File System Guide.
Additional Resources
- The Ceph File System Guide for Red Hat Ceph Storage 4
- See Colocation of containerized Ceph daemons for details.
-
See Understanding the
limitoption for details.
5.5. Installing the Ceph Client Role
The ceph-ansible utility provides the ceph-client role that copies the Ceph configuration file and the administration keyring to nodes. In addition, you can use this role to create custom pools and clients.
Prerequisites
-
A running Ceph storage cluster, preferably in the
active + cleanstate. - Perform the tasks listed in requirements.
- Enable passwordless SSH access.
Procedure
Perform the following tasks on the Ansible administration node.
Add a new section
[clients]to the/etc/ansible/hostsfile:[clients] CLIENT_NODE_NAME
[clients] CLIENT_NODE_NAMECopy to Clipboard Copied! Toggle word wrap Toggle overflow Replace CLIENT_NODE_NAME with the host name of the node where you want to install the
ceph-clientrole.Navigate to the
/usr/share/ceph-ansibledirectory:cd /usr/share/ceph-ansible
[root@admin ~]# cd /usr/share/ceph-ansibleCopy to Clipboard Copied! Toggle word wrap Toggle overflow Create a new copy of the
clients.yml.samplefile namedclients.yml:cp group_vars/clients.yml.sample group_vars/clients.yml
[root@admin ceph-ansible ~]# cp group_vars/clients.yml.sample group_vars/clients.ymlCopy to Clipboard Copied! Toggle word wrap Toggle overflow Open the
group_vars/clients.ymlfile, and uncomment the following lines:keys: - { name: client.test, caps: { mon: "allow r", osd: "allow class-read object_prefix rbd_children, allow rwx pool=test" }, mode: "{{ ceph_keyring_permissions }}" }keys: - { name: client.test, caps: { mon: "allow r", osd: "allow class-read object_prefix rbd_children, allow rwx pool=test" }, mode: "{{ ceph_keyring_permissions }}" }Copy to Clipboard Copied! Toggle word wrap Toggle overflow Replace
client.testwith the real client name, and add the client key to the client definition line, for example:key: "ADD-KEYRING-HERE=="
key: "ADD-KEYRING-HERE=="Copy to Clipboard Copied! Toggle word wrap Toggle overflow Now the whole line example would look similar to this:
- { name: client.test, key: "AQAin8tUMICVFBAALRHNrV0Z4MXupRw4v9JQ6Q==", caps: { mon: "allow r", osd: "allow class-read object_prefix rbd_children, allow rwx pool=test" }, mode: "{{ ceph_keyring_permissions }}" }- { name: client.test, key: "AQAin8tUMICVFBAALRHNrV0Z4MXupRw4v9JQ6Q==", caps: { mon: "allow r", osd: "allow class-read object_prefix rbd_children, allow rwx pool=test" }, mode: "{{ ceph_keyring_permissions }}" }Copy to Clipboard Copied! Toggle word wrap Toggle overflow NoteThe
ceph-authtool --gen-print-keycommand can generate a new client key.
Optionally, instruct
ceph-clientto create pools and clients.Update
clients.yml.-
Uncomment the
user_configsetting and set it totrue. -
Uncomment the
poolsandkeyssections and update them as required. You can define custom pools and client names altogether with thecephxcapabilities.
-
Uncomment the
Add the
osd_pool_default_pg_numsetting to theceph_conf_overridessection in theall.ymlfile:ceph_conf_overrides: global: osd_pool_default_pg_num: NUMBERceph_conf_overrides: global: osd_pool_default_pg_num: NUMBERCopy to Clipboard Copied! Toggle word wrap Toggle overflow Replace NUMBER with the default number of placement groups.
As the
ansibleuser, run the Ansible playbook:Bare-metal deployments:
ansible-playbook site.yml --limit clients -i hosts
[ansible@admin ceph-ansible]$ ansible-playbook site.yml --limit clients -i hostsCopy to Clipboard Copied! Toggle word wrap Toggle overflow Container deployments:
ansible-playbook site-container.yml --limit clients -i hosts
[ansible@admin ceph-ansible]$ ansible-playbook site-container.yml --limit clients -i hostsCopy to Clipboard Copied! Toggle word wrap Toggle overflow
Additional Resources
-
See Understanding the
limitoption for details.
5.6. Installing the Ceph Object Gateway
The Ceph Object Gateway, also know as the RADOS gateway, is an object storage interface built on top of the librados API to provide applications with a RESTful gateway to Ceph storage clusters.
Prerequisites
-
A running Red Hat Ceph Storage cluster, preferably in the
active + cleanstate. - Enable passwordless SSH access.
- On the Ceph Object Gateway node, perform the tasks listed in Chapter 3, Requirements for Installing Red Hat Ceph Storage.
If you intend to use Ceph Object Gateway in a multisite configuration, only complete steps 1 - 6. Do not run the Ansible playbook before configuring multisite as this will start the Object Gateway in a single site configuration. Ansible cannot reconfigure the gateway to a multisite setup after it has already been started in a single site configuration. After you complete steps 1 - 6, proceed to the Configuring multisite Ceph Object Gateways section to set up multisite.
Procedure
Perform the following tasks on the Ansible administration node.
Add gateway hosts to the
/etc/ansible/hostsfile under the[rgws]section to identify their roles to Ansible. If the hosts have sequential naming, use a range, for example:[rgws] <rgw_host_name_1> <rgw_host_name_2> <rgw_host_name[3..10]>
[rgws] <rgw_host_name_1> <rgw_host_name_2> <rgw_host_name[3..10]>Copy to Clipboard Copied! Toggle word wrap Toggle overflow Navigate to the Ansible configuration directory:
cd /usr/share/ceph-ansible
[root@ansible ~]# cd /usr/share/ceph-ansibleCopy to Clipboard Copied! Toggle word wrap Toggle overflow Create the
rgws.ymlfile from the sample file:cp group_vars/rgws.yml.sample group_vars/rgws.yml
[root@ansible ~]# cp group_vars/rgws.yml.sample group_vars/rgws.ymlCopy to Clipboard Copied! Toggle word wrap Toggle overflow Open and edit the
group_vars/rgws.ymlfile. To copy the administrator key to the Ceph Object Gateway node, uncomment thecopy_admin_keyoption:copy_admin_key: true
copy_admin_key: trueCopy to Clipboard Copied! Toggle word wrap Toggle overflow In the
all.ymlfile, you MUST specify aradosgw_interface.radosgw_interface: <interface>
radosgw_interface: <interface>Copy to Clipboard Copied! Toggle word wrap Toggle overflow Replace:
-
<interface>with the interface that the Ceph Object Gateway nodes listen to
For example:
radosgw_interface: eth0
radosgw_interface: eth0Copy to Clipboard Copied! Toggle word wrap Toggle overflow Specifying the interface prevents Civetweb from binding to the same IP address as another Civetweb instance when running multiple instances on the same host.
For additional details, see the
all.ymlfile.-
Generally, to change default settings, uncomment the settings in the
rgws.ymlfile, and make changes accordingly. To make additional changes to settings that are not in thergws.ymlfile, useceph_conf_overrides:in theall.ymlfile.ceph_conf_overrides: client.rgw.rgw1: rgw_override_bucket_index_max_shards: 16 rgw_bucket_default_quota_max_objects: 1638400ceph_conf_overrides: client.rgw.rgw1: rgw_override_bucket_index_max_shards: 16 rgw_bucket_default_quota_max_objects: 1638400Copy to Clipboard Copied! Toggle word wrap Toggle overflow For advanced configuration details, see the Red Hat Ceph Storage 4 Ceph Object Gateway for Production guide. Advanced topics include:
- Configuring Ansible Groups
Developing Storage Strategies. See the Creating the Root Pool, Creating System Pools, and Creating Data Placement Strategies sections for additional details on how create and configure the pools.
See Bucket Sharding for configuration details on bucket sharding.
Run the Ansible playbook:
WarningDo not run the Ansible playbook if you intend to set up multisite. Proceed to the Configuring multisite Ceph Object Gateways section to set up multisite.
Bare-metal deployments:
ansible-playbook site.yml --limit rgws -i hosts
[user@admin ceph-ansible]$ ansible-playbook site.yml --limit rgws -i hostsCopy to Clipboard Copied! Toggle word wrap Toggle overflow Container deployments:
ansible-playbook site-container.yml --limit rgws -i hosts
[user@admin ceph-ansible]$ ansible-playbook site-container.yml --limit rgws -i hostsCopy to Clipboard Copied! Toggle word wrap Toggle overflow
Ansible ensures that each Ceph Object Gateway is running.
For a single site configuration, add Ceph Object Gateways to the Ansible configuration.
For multi-site deployments, you should have an Ansible configuration for each zone. That is, Ansible will create a Ceph storage cluster and gateway instances for that zone.
After installation for a multi-site cluster is complete, proceed to the Multi-site chapter in the Red Hat Ceph Storage 4 Object Gateway Guide for details on configuring a cluster for multi-site.
Additional Resources
-
See Understanding the
limitoption for details. - The Red Hat Ceph Storage 4 Object Gateway Guide
5.7. Configuring multisite Ceph Object Gateways
As a system administrator, you can configure multisite Ceph Object Gateways to mirror data across clusters for disaster recovery purposes.
You can configure multisite with one or more RGW realms. A realm allows the RGWs inside of it to be independent and isolated from RGWs outside of the realm. This way, data written to an RGW in one realm cannot be accessed by an RGW in another realm.
Ceph-ansible cannot reconfigure gateways to a multisite setup after they have already been used in single site configurations. You can deploy this configuration manually. Contact Red hat Support for assistance.
From Red Hat Ceph Storage 4.1, you do not need to set the value of rgw_multisite_endpoints_list in group_vars/all.yml file.
See the Multisite section in the Red Hat Ceph Storage Object Gateway Configuration and Administration Guide for more information.
5.7.1. Prerequisites
- Two Red Hat Ceph Storage clusters.
- On the Ceph Object Gateway nodes, perform the tasks listed in the Requirements for Installing Red Hat Ceph Storage section in the Red Hat Ceph Storage Installation Guide.
- For each Object Gateway node, perform steps 1 - 6 in Installing the Ceph Object Gateway section in the Red Hat Ceph Storage Installation Guide.
5.7.2. Configuring a multi-site Ceph Object Gateway with one realm
Ceph-ansible configures Ceph Object Gateways to mirror data in one realm across multiple storage clusters with multiple Ceph Object Gateway instances.
Ceph-ansible cannot reconfigure gateways to a multisite setup after they have already been used in single site configurations. You can deploy this configuration manually. Contact Red hat Support for assistance.
Prerequisites
- Two running Red Hat Ceph Storage clusters.
- On the Ceph Object Gateway nodes, perform the tasks listed in the Requirements for Installing Red Hat Ceph Storage section in the Red Hat Ceph Storage Installation Guide.
- For each Object Gateway node, perform steps 1 - 6 in Installing the Ceph Object Gateway. section in the Red Hat Ceph Storage Installation Guide.
Procedure
Generate the system keys and capture their output in the
multi-site-keys.txtfile:[root@ansible ~]# echo system_access_key: $(cat /dev/urandom | tr -dc 'a-zA-Z0-9' | fold -w 20 | head -n 1) > multi-site-keys.txt [root@ansible ~]# echo system_secret_key: $(cat /dev/urandom | tr -dc 'a-zA-Z0-9' | fold -w 40 | head -n 1) >> multi-site-keys.txt
[root@ansible ~]# echo system_access_key: $(cat /dev/urandom | tr -dc 'a-zA-Z0-9' | fold -w 20 | head -n 1) > multi-site-keys.txt [root@ansible ~]# echo system_secret_key: $(cat /dev/urandom | tr -dc 'a-zA-Z0-9' | fold -w 40 | head -n 1) >> multi-site-keys.txtCopy to Clipboard Copied! Toggle word wrap Toggle overflow
Primary storage cluster
Navigate to the Ceph-ansible configuration directory:
cd /usr/share/ceph-ansible
[root@ansible ~]# cd /usr/share/ceph-ansibleCopy to Clipboard Copied! Toggle word wrap Toggle overflow Open and edit the
group_vars/all.ymlfile. Uncomment thergw_multisiteline and set it totrue. Uncomment thergw_multisite_protoparameter.rgw_multisite: true rgw_multisite_proto: "http"
rgw_multisite: true rgw_multisite_proto: "http"Copy to Clipboard Copied! Toggle word wrap Toggle overflow Create a
host_varsdirectory in/usr/share/ceph-ansible:mkdir host_vars
[root@ansible ceph-ansible]# mkdir host_varsCopy to Clipboard Copied! Toggle word wrap Toggle overflow Create a file in
host_varsfor each of the Object Gateway nodes on the primary storage cluster. The file name should be the same name as used in the Ansible inventory file. For example, if the Object Gateway node is namedrgw-primary, create the filehost_vars/rgw-primary.Syntax
touch host_vars/NODE_NAME
touch host_vars/NODE_NAMECopy to Clipboard Copied! Toggle word wrap Toggle overflow Example
touch host_vars/rgw-primary
[root@ansible ceph-ansible]# touch host_vars/rgw-primaryCopy to Clipboard Copied! Toggle word wrap Toggle overflow NoteIf there are multiple Ceph Object Gateway nodes in the cluster used for the multi-site configuration, then create separate files for each of the nodes.
Edit the files and add the configuration details for all the instances on the respective Object Gateway nodes. Configure the following settings, along with updating the ZONE_NAME, ZONE_GROUP_NAME, ZONE_USER_NAME, ZONE_DISPLAY_NAME, and REALM_NAME accordingly. Use the random strings saved in the
multi-site-keys.txtfile for ACCESS_KEY and SECRET_KEY.Syntax
Copy to Clipboard Copied! Toggle word wrap Toggle overflow Example
Copy to Clipboard Copied! Toggle word wrap Toggle overflow Optional: For creating multiple instances, edit the files and add the configuration details to all the instances on the respective Object Gateway nodes. Configure the following settings along with updating the items under
rgw_instances. Use the random strings saved in themulti-site-keys-realm-1.txtfile for ACCESS_KEY_1 and SECRET_KEY_1.Syntax
Copy to Clipboard Copied! Toggle word wrap Toggle overflow Example
Copy to Clipboard Copied! Toggle word wrap Toggle overflow
Secondary storage cluster
Navigate to the Ceph-ansible configuration directory:
cd /usr/share/ceph-ansible
[root@ansible ~]# cd /usr/share/ceph-ansibleCopy to Clipboard Copied! Toggle word wrap Toggle overflow Open and edit the
group_vars/all.ymlfile. Uncomment thergw_multisiteline and set it totrue. Uncomment thergw_multisite_protoparameter.rgw_multisite: true rgw_multisite_proto: "http"
rgw_multisite: true rgw_multisite_proto: "http"Copy to Clipboard Copied! Toggle word wrap Toggle overflow Create a
host_varsdirectory in/usr/share/ceph-ansible:mkdir host_vars
[root@ansible ceph-ansible]# mkdir host_varsCopy to Clipboard Copied! Toggle word wrap Toggle overflow Create a file in
host_varsfor each of the Object Gateway nodes on the secondary storage cluster. The file name should be the same name as used in the Ansible inventory file. For example, if the Object Gateway node is namedrgw-secondary, create the filehost_vars/rgw-secondary.Syntax
touch host_vars/NODE_NAME
touch host_vars/NODE_NAMECopy to Clipboard Copied! Toggle word wrap Toggle overflow Example
touch host_vars/rgw-secondary
[root@ansible ceph-ansible]# touch host_vars/rgw-secondaryCopy to Clipboard Copied! Toggle word wrap Toggle overflow NoteIf there are multiple Ceph Object Gateway nodes in the cluster used for the multi-site configuration, then create files for each of the nodes.
Configure the following settings. Use the same values as used on the first cluster for ZONE_USER_NAME, ZONE_DISPLAY_NAME, ACCESS_KEY, SECRET_KEY, REALM_NAME, and ZONE_GROUP_NAME. Use a different value for ZONE_NAME from the primary storage cluster. Set MASTER_RGW_NODE_NAME to the Ceph Object Gateway node for the master zone. Note that, compared to the primary storage cluster, the settings for
rgw_zonemaster,rgw_zonesecondary, andrgw_zonegroupmasterare reversed.Syntax
Copy to Clipboard Copied! Toggle word wrap Toggle overflow Example
Copy to Clipboard Copied! Toggle word wrap Toggle overflow Optional: For creating multiple instances, edit the files and add the configuration details to all the instances on the respective Object Gateway nodes. Configure the following settings along with updating the items under
rgw_instances. Use the random strings saved in themulti-site-keys-realm-1.txtfile for ACCESS_KEY_1 and SECRET_KEY_1. Set RGW_PRIMARY_HOSTNAME to the Object Gateway node in the primary storage cluster.Syntax
Copy to Clipboard Copied! Toggle word wrap Toggle overflow Example
Copy to Clipboard Copied! Toggle word wrap Toggle overflow
On both sites, run the following steps:
Run the Ansible playbook on the primary storage cluster:
Bare-metal deployments:
ansible-playbook site.yml -i hosts
[user@ansible ceph-ansible]$ ansible-playbook site.yml -i hostsCopy to Clipboard Copied! Toggle word wrap Toggle overflow Container deployments:
ansible-playbook site-container.yml -i hosts
[user@ansible ceph-ansible]$ ansible-playbook site-container.yml -i hostsCopy to Clipboard Copied! Toggle word wrap Toggle overflow
Verify the secondary storage cluster can access the API on the primary storage cluster.
From the Object Gateway nodes on the secondary storage cluster, use
curlor another HTTP client to connect to the API on the primary cluster. Compose the URL using the information used to configurergw_pull_proto,rgw_pullhost, andrgw_pull_portinall.yml. Following the example above, the URL ishttp://cluster0-rgw-000:8080. If you cannot access the API, verify the URL is right and updateall.ymlif required. Once the URL works and any network issues are resolved, continue with the next step to run the Ansible playbook on the secondary storage cluster.Run the Ansible playbook on the secondary storage cluster:
NoteIf the cluster is deployed and you are making changes to the Ceph Object Gateway, then use the
--limit rgwsoption.Bare-metal deployments:
ansible-playbook site.yml -i hosts
[user@ansible ceph-ansible]$ ansible-playbook site.yml -i hostsCopy to Clipboard Copied! Toggle word wrap Toggle overflow Container deployments:
ansible-playbook site-container.yml -i hosts
[user@ansible ceph-ansible]$ ansible-playbook site-container.yml -i hostsCopy to Clipboard Copied! Toggle word wrap Toggle overflow After running the Ansible playbook on the primary and secondary storage clusters, the Ceph Object Gateways run in an active-active state.
Verify the multisite Ceph Object Gateway configuration on both the sites:
Syntax
radosgw-admin sync status
radosgw-admin sync statusCopy to Clipboard Copied! Toggle word wrap Toggle overflow
5.7.3. Configuring a multi-site Ceph Object Gateway with multiple realms and multiple instances
Ceph-ansible configures Ceph Object Gateways to mirror data in multiple realms across multiple storage clusters with multiple Ceph Object Gateway instances.
Ceph-ansible cannot reconfigure gateways to a multi-site setup after they have already been used in single site configurations. You can deploy this configuration manually. Contact Red hat Support for assistance.
Prerequisites
- Two running Red Hat Ceph Storage clusters.
- At least two Object Gateway nodes in each storage cluster.
- On the Ceph Object Gateway nodes, perform the tasks listed in the Requirements for Installing Red Hat Ceph Storage section in the Red Hat Ceph Storage Installation Guide.
- For each Object Gateway node, perform steps 1 - 6 in Installing the Ceph Object Gateway section in the Red Hat Ceph Storage Installation Guide.
Procedure
On any node, generate the system access keys and secret keys for realm one and two, and save them in files named
multi-site-keys-realm-1.txtandmulti-site-keys-realm-2.txt, respectively:echo system_access_key: $(cat /dev/urandom | tr -dc 'a-zA-Z0-9' | fold -w 20 | head -n 1) > multi-site-keys-realm-1.txt [root@ansible ~]# echo system_secret_key: $(cat /dev/urandom | tr -dc 'a-zA-Z0-9' | fold -w 40 | head -n 1) >> multi-site-keys-realm-1.txt echo system_access_key: $(cat /dev/urandom | tr -dc 'a-zA-Z0-9' | fold -w 20 | head -n 1) > multi-site-keys-realm-2.txt [root@ansible ~]# echo system_secret_key: $(cat /dev/urandom | tr -dc 'a-zA-Z0-9' | fold -w 40 | head -n 1) >> multi-site-keys-realm-2.txt
# echo system_access_key: $(cat /dev/urandom | tr -dc 'a-zA-Z0-9' | fold -w 20 | head -n 1) > multi-site-keys-realm-1.txt [root@ansible ~]# echo system_secret_key: $(cat /dev/urandom | tr -dc 'a-zA-Z0-9' | fold -w 40 | head -n 1) >> multi-site-keys-realm-1.txt # echo system_access_key: $(cat /dev/urandom | tr -dc 'a-zA-Z0-9' | fold -w 20 | head -n 1) > multi-site-keys-realm-2.txt [root@ansible ~]# echo system_secret_key: $(cat /dev/urandom | tr -dc 'a-zA-Z0-9' | fold -w 40 | head -n 1) >> multi-site-keys-realm-2.txtCopy to Clipboard Copied! Toggle word wrap Toggle overflow
Site-A storage cluster
Navigate to the Ansible configuration directory:
cd /usr/share/ceph-ansible
[root@ansible ~]# cd /usr/share/ceph-ansibleCopy to Clipboard Copied! Toggle word wrap Toggle overflow Open and edit the
group_vars/all.ymlfile. Uncomment thergw_multisiteline and set it totrue. Uncomment thergw_multisite_protoparameter.rgw_multisite: true rgw_multisite_proto: "http"
rgw_multisite: true rgw_multisite_proto: "http"Copy to Clipboard Copied! Toggle word wrap Toggle overflow Create a
host_varsdirectory in/usr/share/ceph-ansible:mkdir host_vars
[root@ansible ceph-ansible]# mkdir host_varsCopy to Clipboard Copied! Toggle word wrap Toggle overflow Create a file in
host_varsfor each of the Object Gateway nodes on the site-A storage cluster. The file name should be the same name as used in the Ansible inventory file. For example, if the Object Gateway node is namedrgw-site-a, create the filehost_vars/rgw-site-a.Syntax
touch host_vars/NODE_NAME
touch host_vars/NODE_NAMECopy to Clipboard Copied! Toggle word wrap Toggle overflow Example
touch host_vars/rgw-site-a
[root@ansible ceph-ansible]# touch host_vars/rgw-site-aCopy to Clipboard Copied! Toggle word wrap Toggle overflow NoteIf there are multiple Ceph Object Gateway nodes in the cluster used for the multi-site configuration, then create separate files for each of the nodes.
For creating multiple instances for the first realm, edit the files and add the configuration details to all the instances on the respective Object Gateway nodes. Configure the following settings along with updating the items under
rgw_instancesfor the first realm. Use the random strings saved in themulti-site-keys-realm-1.txtfile for ACCESS_KEY_1 and SECRET_KEY_1.Syntax
Copy to Clipboard Copied! Toggle word wrap Toggle overflow Example
Copy to Clipboard Copied! Toggle word wrap Toggle overflow NoteSkip next step and run it, followed by running Ansible playbook, after configuring all realms on site-B as site-A is secondary to those realms.
For multiple instances for other realms, configure the following settings along with updating the items under
rgw_instances. Use the random strings saved in themulti-site-keys-realm-2.txtfile for ACCESS_KEY_2 and SECRET_KEY_2.Syntax
Copy to Clipboard Copied! Toggle word wrap Toggle overflow Example
Copy to Clipboard Copied! Toggle word wrap Toggle overflow Run the Ansible playbook on the site-A storage cluster:
Bare-metal deployments:
ansible-playbook site.yml -i hosts
[user@ansible ceph-ansible]$ ansible-playbook site.yml -i hostsCopy to Clipboard Copied! Toggle word wrap Toggle overflow Container deployments:
ansible-playbook site-container.yml -i hosts
[user@ansible ceph-ansible]$ ansible-playbook site-container.yml -i hostsCopy to Clipboard Copied! Toggle word wrap Toggle overflow
Site-B Storage Cluster
Navigate to the Ceph-ansible configuration directory:
cd /usr/share/ceph-ansible
[root@ansible ~]# cd /usr/share/ceph-ansibleCopy to Clipboard Copied! Toggle word wrap Toggle overflow Open and edit the
group_vars/all.ymlfile. Uncomment thergw_multisiteline and set it totrue. Uncomment thergw_multisite_protoparameter.rgw_multisite: true rgw_multisite_proto: "http"
rgw_multisite: true rgw_multisite_proto: "http"Copy to Clipboard Copied! Toggle word wrap Toggle overflow Create a
host_varsdirectory in/usr/share/ceph-ansible:mkdir host_vars
[root@ansible ceph-ansible]# mkdir host_varsCopy to Clipboard Copied! Toggle word wrap Toggle overflow Create a file in
host_varsfor each of the Object Gateway nodes on the site-B storage cluster. The file name should be the same name as used in the Ansible inventory file. For example, if the Object Gateway node is namedrgw-site-b, create the filehost_vars/rgw-site-b.Syntax
touch host_vars/NODE_NAME
touch host_vars/NODE_NAMECopy to Clipboard Copied! Toggle word wrap Toggle overflow Example
touch host_vars/rgw-site-b
[root@ansible ceph-ansible]# touch host_vars/rgw-site-bCopy to Clipboard Copied! Toggle word wrap Toggle overflow NoteIf there are multiple Ceph Object Gateway nodes in the cluster used for the multi-site configuration, then create files for each of the nodes.
For creating multiple instances for the first realm, edit the files and add the configuration details to all the instances on the respective Object Gateway nodes. Configure the following settings along with updating the items under
rgw_instancesfor the first realm. Use the random strings saved in themulti-site-keys-realm-1.txtfile for ACCESS_KEY_1 and SECRET_KEY_1. Set RGW_SITE_A_PRIMARY_HOSTNAME_ENDPOINT to the Object Gateway node in the site-A storage cluster.Syntax
Copy to Clipboard Copied! Toggle word wrap Toggle overflow Example
Copy to Clipboard Copied! Toggle word wrap Toggle overflow For multiple instances for the other realms, configure the following settings along with updating the items under
rgw_instances. Use the random strings saved in themulti-site-keys-realm-2.txtfile for ACCESS_KEY_2 and SECRET_KEY_2. Set RGW_SITE_A_PRIMARY_HOSTNAME_ENDPOINT to the Object Gateway node in the site-A storage cluster.Syntax
Copy to Clipboard Copied! Toggle word wrap Toggle overflow Example
Copy to Clipboard Copied! Toggle word wrap Toggle overflow Run the Ansible playbook on the site-B storage cluster:
Bare-metal deployments:
ansible-playbook site.yml -i hosts
[user@ansible ceph-ansible]$ ansible-playbook site.yml -i hostsCopy to Clipboard Copied! Toggle word wrap Toggle overflow Container deployments:
ansible-playbook site-container.yml -i hosts
[user@ansible ceph-ansible]$ ansible-playbook site-container.yml -i hostsCopy to Clipboard Copied! Toggle word wrap Toggle overflow Run the Ansible playbook again on the site-A storage cluster for other realms of site-A.
After running the Ansible playbook on the site-A and site-B storage clusters, the Ceph Object Gateways run in an active-active state.
Verification
Verify the multisite Ceph Object Gateway configuration:
-
From the Ceph Monitor and Object Gateway nodes at each site, site-A and site-B, use
curlor another HTTP client to verify the APIs are accessible from the other site. Run the
radosgw-admin sync statuscommand on both sites.Syntax
radosgw-admin sync status radosgw-admin sync status --rgw -realm REALM_NAME
radosgw-admin sync status radosgw-admin sync status --rgw -realm REALM_NAME1 Copy to Clipboard Copied! Toggle word wrap Toggle overflow - 1
- Use this option for multiple realms on the respective nodes of the storage cluster.
Example
radosgw-admin sync status radosgw-admin sync status --rgw -realm usa
[user@ansible ceph-ansible]$ radosgw-admin sync status [user@ansible ceph-ansible]$ radosgw-admin sync status --rgw -realm usaCopy to Clipboard Copied! Toggle word wrap Toggle overflow
-
From the Ceph Monitor and Object Gateway nodes at each site, site-A and site-B, use
5.8. Deploying OSDs with different hardware on the same host
You can deploy mixed OSDs, for example, HDDs and SSDs, on the same host, with the device_class feature in Ansible.
Prerequisites
- A valid customer subscription.
- Root-level access to Ansible Administration node.
- Enable Red Hat Ceph Storage Tools and Ansible repositories.
- The ansible user account for use with the Ansible application.
- OSDs are deployed.
Procedure
Create
crush_rulesin thegroup_vars/mons.ymlfile:Example
Copy to Clipboard Copied! Toggle word wrap Toggle overflow NoteIf you are not using SSD or HDD devices in the cluster, do not define the
crush_rulesfor that device.Create
pools, with createdcrush_rulesingroup_vars/clients.ymlfile.Example
Copy to Clipboard Copied! Toggle word wrap Toggle overflow Sample the inventory file to assign roots to OSDs:
Example
Copy to Clipboard Copied! Toggle word wrap Toggle overflow View the tree.
Syntax
ceph osd tree
[root@mon ~]# ceph osd treeCopy to Clipboard Copied! Toggle word wrap Toggle overflow Example
Copy to Clipboard Copied! Toggle word wrap Toggle overflow Validate the pools.
Example
for i in $(rados lspools);do echo "pool: $i"; ceph osd pool get $i crush_rule;done pool: pool1 crush_rule: HDD
# for i in $(rados lspools);do echo "pool: $i"; ceph osd pool get $i crush_rule;done pool: pool1 crush_rule: HDDCopy to Clipboard Copied! Toggle word wrap Toggle overflow
Additional Resources
- See the Installing a Red Hat Ceph Storage Cluster in the Red Hat Ceph Storage Installation Guide for more details.
- See Device Classes in Red Hat Ceph Storage Storage Strategies Guide for more details.
5.9. Installing the NFS-Ganesha Gateway
The Ceph NFS Ganesha Gateway is an NFS interface built on top of the Ceph Object Gateway to provide applications with a POSIX filesystem interface to the Ceph Object Gateway for migrating files within filesystems to Ceph Object Storage.
Prerequisites
-
A running Ceph storage cluster, preferably in the
active + cleanstate. - At least one node running a Ceph Object Gateway.
- Disable any running kernel NFS service instances on any host that will run NFS-Ganesha before attempting to run NFS-Ganesha. NFS-Ganesha will not start if another NFS instance is running.
*Enable passwordless SSH access.
Ensure the rpcbind service is running:
systemctl start rpcbind
# systemctl start rpcbindCopy to Clipboard Copied! Toggle word wrap Toggle overflow NoteThe rpcbind package that provides rpcbind is usually installed by default. If that is not the case, install the package first.
If the nfs-service service is running, stop and disable it:
systemctl stop nfs-server.service systemctl disable nfs-server.service
# systemctl stop nfs-server.service # systemctl disable nfs-server.serviceCopy to Clipboard Copied! Toggle word wrap Toggle overflow
Procedure
Perform the following tasks on the Ansible administration node.
Create the
nfss.ymlfile from the sample file:cd /usr/share/ceph-ansible/group_vars cp nfss.yml.sample nfss.yml
[root@ansible ~]# cd /usr/share/ceph-ansible/group_vars [root@ansible ~]# cp nfss.yml.sample nfss.ymlCopy to Clipboard Copied! Toggle word wrap Toggle overflow Add gateway hosts to the
/etc/ansible/hostsfile under an[nfss]group to identify their group membership to Ansible.[nfss] NFS_HOST_NAME_1 NFS_HOST_NAME_2 NFS_HOST_NAME[3..10]
[nfss] NFS_HOST_NAME_1 NFS_HOST_NAME_2 NFS_HOST_NAME[3..10]Copy to Clipboard Copied! Toggle word wrap Toggle overflow If the hosts have sequential naming, then you can use a range specifier, for example:
[3..10].Navigate to the Ansible configuration directory:
cd /usr/share/ceph-ansible
[root@ansible ~]# cd /usr/share/ceph-ansibleCopy to Clipboard Copied! Toggle word wrap Toggle overflow To copy the administrator key to the Ceph Object Gateway node, uncomment the
copy_admin_keysetting in the/usr/share/ceph-ansible/group_vars/nfss.ymlfile:copy_admin_key: true
copy_admin_key: trueCopy to Clipboard Copied! Toggle word wrap Toggle overflow Configure the FSAL (File System Abstraction Layer) sections of the
/usr/share/ceph-ansible/group_vars/nfss.ymlfile. Provide an export ID (NUMERIC_EXPORT_ID), S3 user ID (S3_USER), S3 access key (ACCESS_KEY) and secret key (SECRET_KEY):Copy to Clipboard Copied! Toggle word wrap Toggle overflow WarningAccess and secret keys are optional, and can be generated.
Run the Ansible playbook:
Bare-metal deployments:
ansible-playbook site.yml --limit nfss -i hosts
[ansible@admin ceph-ansible]$ ansible-playbook site.yml --limit nfss -i hostsCopy to Clipboard Copied! Toggle word wrap Toggle overflow Container deployments:
ansible-playbook site-container.yml --limit nfss -i hosts
[ansible@admin ceph-ansible]$ ansible-playbook site-container.yml --limit nfss -i hostsCopy to Clipboard Copied! Toggle word wrap Toggle overflow
Additional Resources
5.10. Understanding the limit option
This section contains information about the Ansible --limit option.
Ansible supports the --limit option that enables you to use the site and site-container Ansible playbooks for a particular role of the inventory file.
ansible-playbook site.yml|site-container.yml --limit osds|rgws|clients|mdss|nfss|iscsigws -i hosts
ansible-playbook site.yml|site-container.yml --limit osds|rgws|clients|mdss|nfss|iscsigws -i hostsBare-metal
For example, to redeploy only OSDs on bare-metal, run the following command as the Ansible user:
ansible-playbook site.yml --limit osds -i hosts
[ansible@ansible ceph-ansible]$ ansible-playbook site.yml --limit osds -i hostsContainers
For example, to redeploy only OSDs on containers, run the following command as the Ansible user:
ansible-playbook site-container.yml --limit osds -i hosts
[ansible@ansible ceph-ansible]$ ansible-playbook site-container.yml --limit osds -i hosts5.11. The placement group autoscaler
Placement group (PG) tuning use to be a manual process of plugging in numbers for pg_num by using the PG calculator. Starting with Red Hat Ceph Storage 4.1, PG tuning can be done automatically by enabling the pg_autoscaler Ceph manager module. The PG autoscaler is configured on a per-pool basis, and scales the pg_num by a power of two. The PG autoscaler only proposes a change to pg_num, if the suggested value is more than three times the actual value.
The PG autoscaler has three modes:
warn-
The default mode for new and existing pools. A health warning is generated if the suggested
pg_numvalue varies too much from the currentpg_numvalue. on-
The pool’s
pg_numis adjusted automatically. off-
The autoscaler can be turned off for any pool, but storage administrators will need to manually set the
pg_numvalue for the pool.
Once the PG autoscaler in enabled for a pool, you can view the value adjustments by running the ceph osd pool autoscale-status command. The autoscale-status command displays the current state of the pools. Here are the autoscale-status column descriptions:
SIZE- Reports the total amount of data, in bytes, that are stored in the pool. This size includes object data and OMAP data.
TARGET SIZE- Reports the expected size of the pool as provided by the storage administrator. This value is used to calculate the pool’s ideal number of PGs.
RATE- The replication factor for replicated buckets or the ratio for erasure-coded pools.
RAW CAPACITY- The raw storage capacity of a storage device that a pool is mapped to based on CRUSH.
RATIO- The ratio of total storage being consumed by the pool.
TARGET RATIO- A ratio specifying what fraction of the total storage cluster’s space is consumed by the pool as provided by the storage administrator.
PG_NUM- The current number of placement groups for the pool.
NEW PG_NUM- The proposed value. This value might not be set.
AUTOSCALE- The PG autoscaler mode set for the pool.
Additional Resources
5.11.1. Configuring the placement group autoscaler
You can configure Ceph Ansible to enable and configure the PG autoscaler for new pools in the Red Hat Ceph Storage cluster. By default, the placement group (PG) autoscaler is off.
Currently, you can only configure the placement group autoscaler on new Red Hat Ceph Storage deployments, and not existing Red Hat Ceph Storage installations.
Prerequisites
- Access to the Ansible administration node.
- Access to a Ceph Monitor node.
Procedure
-
On the Ansible administration node, open the
group_vars/all.ymlfile for editing. Set the
pg_autoscale_modeoption toTrue, and set thetarget_size_ratiovalue for a new or existing pool:Example
openstack_pools: - {"name": backups, "target_size_ratio": 0.1, "pg_autoscale_mode": True, "application": rbd} - {"name": volumes, "target_size_ratio": 0.5, "pg_autoscale_mode": True, "application": rbd} - {"name": vms, "target_size_ratio": 0.2, "pg_autoscale_mode": True, "application": rbd} - {"name": images, "target_size_ratio": 0.2, "pg_autoscale_mode": True, "application": rbd}openstack_pools: - {"name": backups, "target_size_ratio": 0.1, "pg_autoscale_mode": True, "application": rbd} - {"name": volumes, "target_size_ratio": 0.5, "pg_autoscale_mode": True, "application": rbd} - {"name": vms, "target_size_ratio": 0.2, "pg_autoscale_mode": True, "application": rbd} - {"name": images, "target_size_ratio": 0.2, "pg_autoscale_mode": True, "application": rbd}Copy to Clipboard Copied! Toggle word wrap Toggle overflow NoteThe
target_size_ratiovalue is the weight percentage relative to other pools in the storage cluster.-
Save the changes to the
group_vars/all.ymlfile. Run the appropriate Ansible playbook:
Bare-metal deployments
ansible-playbook site.yml -i hosts
[ansible@admin ceph-ansible]$ ansible-playbook site.yml -i hostsCopy to Clipboard Copied! Toggle word wrap Toggle overflow Containers deployments
ansible-playbook site-container.yml -i hosts
[ansible@admin ceph-ansible]$ ansible-playbook site-container.yml -i hostsCopy to Clipboard Copied! Toggle word wrap Toggle overflow Once the Ansible playbook finishes, check the autoscaler status from a Ceph Monitor node:
ceph osd pool autoscale-status
[user@mon ~]$ ceph osd pool autoscale-statusCopy to Clipboard Copied! Toggle word wrap Toggle overflow
5.12. Additional Resources
Chapter 6. Colocation of containerized Ceph daemons
This section describes:
6.1. How colocation works and its advantages
You can colocate containerized Ceph daemons on the same node. Here are the advantages of colocating some of Ceph’s services:
- Significant improvement in total cost of ownership (TCO) at small scale.
- Reduction from six nodes to three for the minimum configuration.
- Easier upgrade.
- Better resource isolation.
See the Knowledgebase article Red Hat Ceph Storage: Supported Configurations for more information on collocation of daemons in the Red Hat Ceph Storage cluster.
How Colocation Works
You can colocate one daemon from the following list with an OSD daemon (ceph-osd) by adding the same node to the appropriate sections in the Ansible inventory file.
-
Ceph Metadata Server (
ceph-mds) -
Ceph Monitor (
ceph-mon) and Ceph Manager (ceph-mgr) daemons -
NFS Ganesha (
nfs-ganesha) -
RBD Mirror (
rbd-mirror) -
iSCSI Gateway (
iscsigw)
Starting with Red Hat Ceph Storage 4.2, Metadata Server (MDS) can be co-located with one additional scale-out daemon.
Additionally, for Ceph Object Gateway (radosgw) or Grafana, you can colocate either with an OSD daemon plus a daemon from the above list, excluding RBD mirror.z For example, the following is a valid five node colocated configuration:
| Node | Daemon | Daemon | Daemon |
|---|---|---|---|
| node1 | OSD | Monitor | Grafana |
| node2 | OSD | Monitor | RADOS Gateway |
| node3 | OSD | Monitor | RADOS Gateway |
| node4 | OSD | Metadata Server | |
| node5 | OSD | Metadata Server |
To deploy a five node cluster like the above setup, configure the Ansible inventory file like so:
Ansible inventory file with colocated daemons
Because ceph-mon and ceph-mgr work together closely they do not count as two separate daemons for the purposes of colocation.
Colocating Grafana with any other daemon is not supported with Cockpit based installation. Use ceph-ansible to configure the storage cluster.
Red Hat recommends colocating the Ceph Object Gateway with OSD containers to increase performance. To achieve the highest performance without incurring an additional cost, use two gateways by setting radosgw_num_instances: 2 in group_vars/all.yml. For more information, see Red Hat Ceph Storage RGW deployment strategies and sizing guidance.
Adequate CPU and network resources are required to colocate Grafana with two other containers. If resource exhaustion occurs, colocate Grafana with a Monitor only, and if resource exhaustion still occurs, run Grafana on a dedicated node.
The Figure 6.1, “Colocated Daemons” and Figure 6.2, “Non-colocated Daemons” images shows the difference between clusters with colocated and non-colocated daemons.
Figure 6.1. Colocated Daemons

Figure 6.2. Non-colocated Daemons
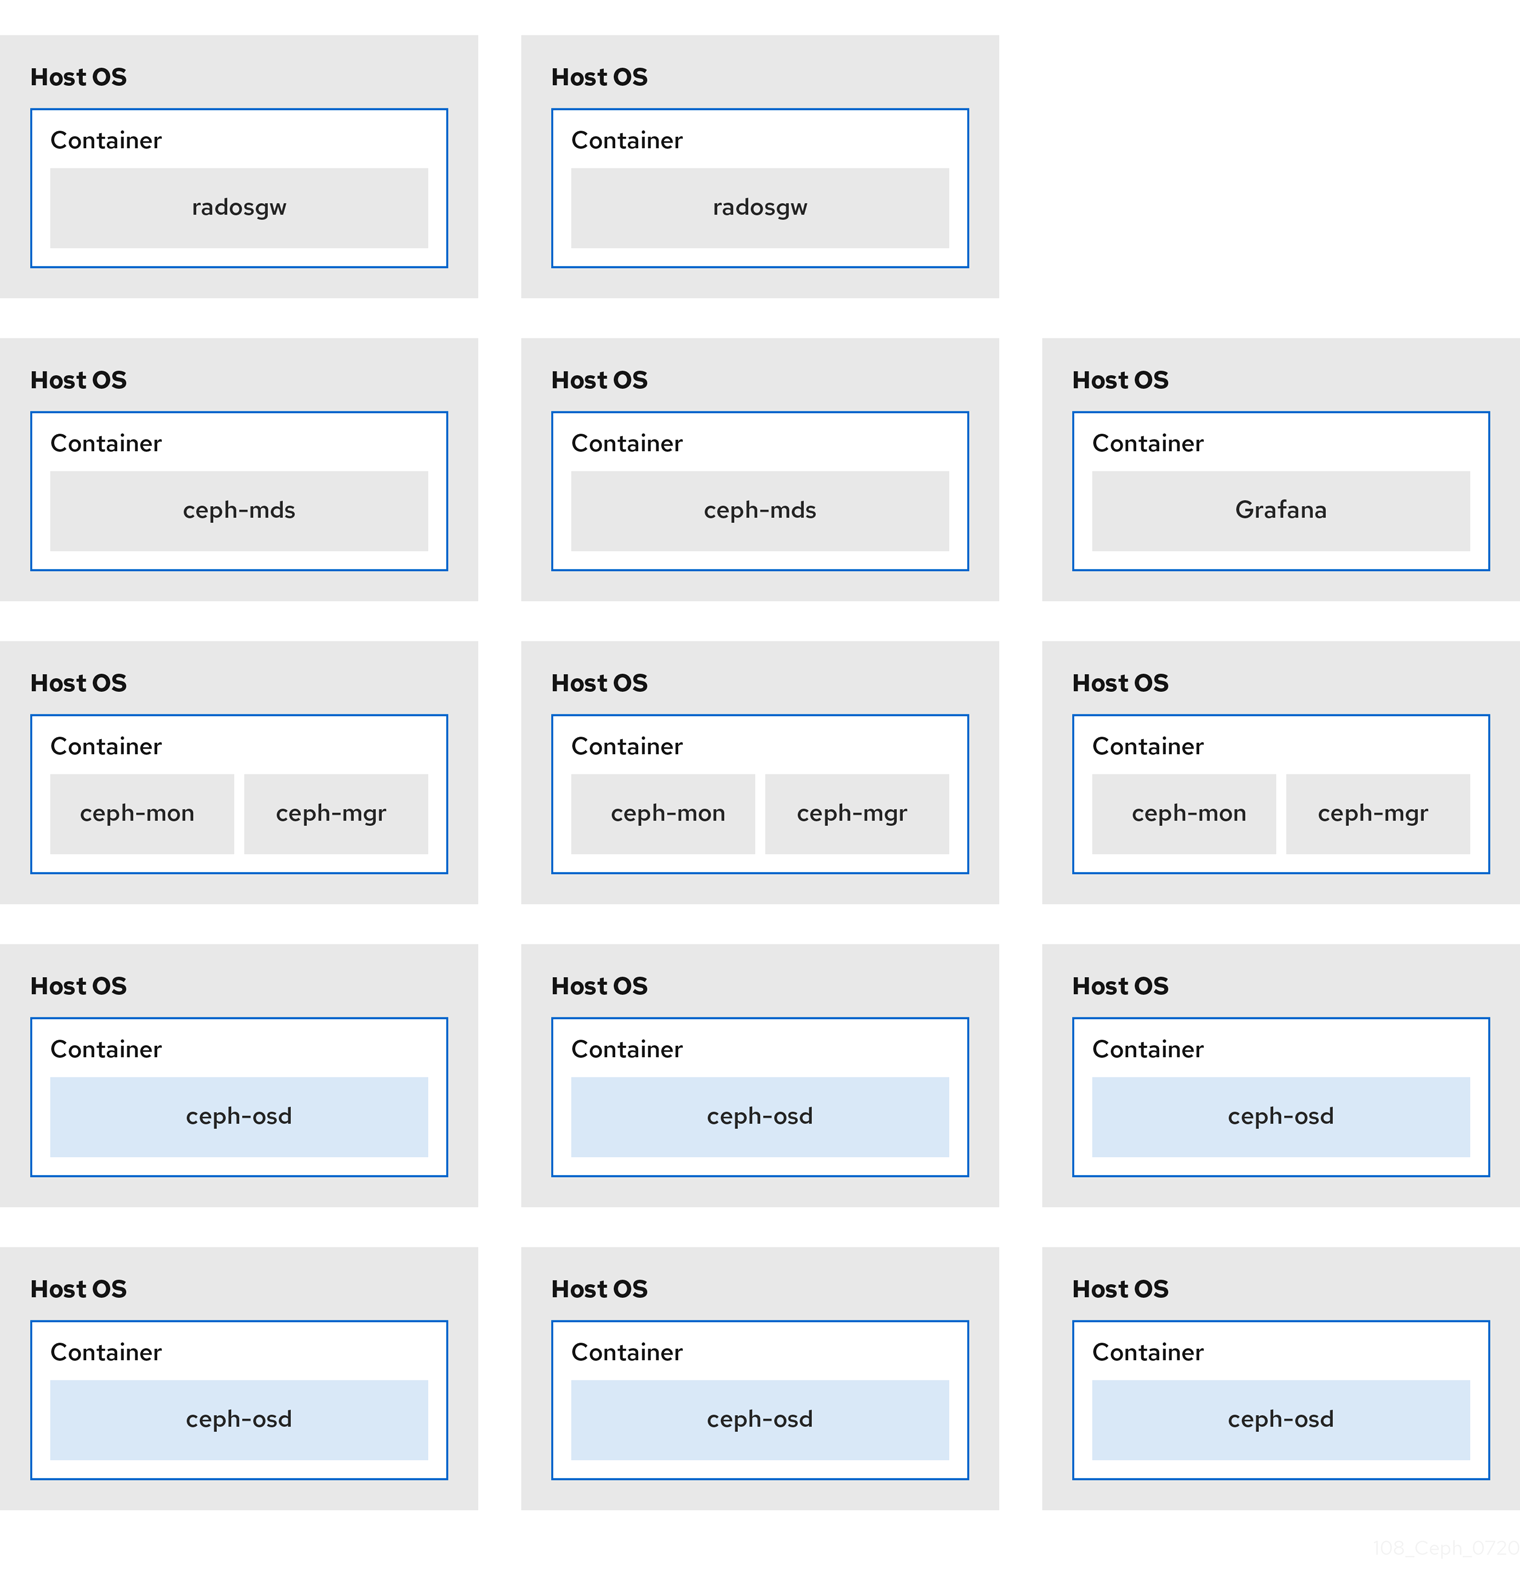
When you colocate multiple containerized Ceph daemons on the same node, the ceph-ansible playbook reserves dedicated CPU and RAM resources to each. By default, ceph-ansible uses values listed in the Recommended Minimum Hardware chapter in the Red Hat Ceph Storage Hardware Guide. To learn how to change the default values, see the Setting Dedicated Resources for Colocated Daemons section.
6.2. Setting Dedicated Resources for Colocated Daemons
When colocating two Ceph daemon on the same node, the ceph-ansible playbook reserves CPU and RAM resources for each daemon. The default values that ceph-ansible uses are listed in the Recommended Minimum Hardware chapter in the Red Hat Ceph Storage Hardware Selection Guide. To change the default values, set the needed parameters when deploying Ceph daemons.
Procedure
To change the default CPU limit for a daemon, set the
ceph_daemon-type_docker_cpu_limitparameter in the appropriate.ymlconfiguration file when deploying the daemon. See the following table for details.Expand Daemon Parameter Configuration file OSD
ceph_osd_docker_cpu_limitosds.ymlMDS
ceph_mds_docker_cpu_limitmdss.ymlRGW
ceph_rgw_docker_cpu_limitrgws.ymlFor example, to change the default CPU limit to 2 for the Ceph Object Gateway, edit the
/usr/share/ceph-ansible/group_vars/rgws.ymlfile as follows:ceph_rgw_docker_cpu_limit: 2
ceph_rgw_docker_cpu_limit: 2Copy to Clipboard Copied! Toggle word wrap Toggle overflow To change the default RAM for OSD daemons, set the
osd_memory_targetin the/usr/share/ceph-ansible/group_vars/all.ymlfile when deploying the daemon. For example, to limit the OSD RAM to 6 GB:ceph_conf_overrides: osd: osd_memory_target=6000000000ceph_conf_overrides: osd: osd_memory_target=6000000000Copy to Clipboard Copied! Toggle word wrap Toggle overflow ImportantIn an hyperconverged infrastructure (HCI) configuration, you can also use the
ceph_osd_docker_memory_limitparameter in theosds.ymlconfiguration file to change the Docker memory CGroup limit. In this case, setceph_osd_docker_memory_limitto 50% higher thanosd_memory_target, so that the CGroup limit is more constraining than it is by default for an HCI configuration. For example, ifosd_memory_targetis set to 6 GB, setceph_osd_docker_memory_limitto 9 GB:ceph_osd_docker_memory_limit: 9g
ceph_osd_docker_memory_limit: 9gCopy to Clipboard Copied! Toggle word wrap Toggle overflow
Additional Resources
-
The sample configuration files in the
/usr/share/ceph-ansible/group_vars/directory
6.3. Additional Resources
Chapter 7. Upgrading a Red Hat Ceph Storage cluster
As a storage administrator, you can upgrade a Red Hat Ceph Storage cluster to a new major version or to a new minor version or to just apply asynchronous updates to the current version. The rolling_update.yml Ansible playbook performs upgrades for bare-metal or containerized deployments of Red Hat Ceph Storage. Ansible upgrades the Ceph nodes in the following order:
- Monitor nodes
- MGR nodes
- OSD nodes
- MDS nodes
- Ceph Object Gateway nodes
- All other Ceph client nodes
Starting with Red Hat Ceph Storage 3.1, new Ansible playbooks were added to optimize storage for performance when using Object Gateway and high speed NVMe based SSDs (and SATA SSDs). The playbooks do this by placing journals and bucket indexes together on SSDs; this increases performance compared to having all journals on one device. These playbooks are designed to be used when installing Ceph. Existing OSDs continue to work and need no extra steps during an upgrade. There is no way to upgrade a Ceph cluster while simultaneously reconfiguring OSDs to optimize storage in this way. To use different devices for journals or bucket indexes requires reprovisioning OSDs. For more information see Using NVMe with LVM optimally in Ceph Object Gateway for Production Guide.
When upgrading a Red Hat Ceph Storage cluster from a previous supported version to version 4.2z2, the upgrade completes with the storage cluster in a HEALTH_WARN state stating that monitors are allowing insecure global_id reclaim. This is due to a patched CVE, the details of which are available in the CVE-2021-20288. This issue is fixed by CVE for Red Hat Ceph Storage 4.2z2.
Recommendations to mute health warnings:
-
Identify clients that are not updated by checking the
ceph health detailoutput for theAUTH_INSECURE_GLOBAL_ID_RECLAIMalert. - Upgrade all clients to Red Hat Ceph Storage 4.2z2 release.
After validating all clients have been updated and the AUTH_INSECURE_GLOBAL_ID_RECLAIM alert is no longer present for a client, set
auth_allow_insecure_global_id_reclaimtofalse. When this option is set tofalse, then an unpatched client cannot reconnect to the storage cluster after an intermittent network disruption breaking its connection to a monitor, or be able to renew its authentication ticket when it times out, which is 72 hours by default.Syntax
ceph config set mon auth_allow_insecure_global_id_reclaim false
ceph config set mon auth_allow_insecure_global_id_reclaim falseCopy to Clipboard Copied! Toggle word wrap Toggle overflow -
Ensure that no clients are listed with the
AUTH_INSECURE_GLOBAL_ID_RECLAIMalert.
The rolling_update.yml playbook includes the serial variable that adjusts the number of nodes to be updated simultaneously. Red Hat strongly recommends to use the default value (1), which ensures that Ansible will upgrade cluster nodes one by one.
If the upgrade fails at any point, check the cluster status with the ceph status command to understand the upgrade failure reason. If you are not sure of the failure reason and how to resolve , please contact Red hat Support for assistance.
If upgrading a multisite setup from Red Hat Ceph Storage 3 to Red Hat Ceph Storage 4, heed the following recommendations or else replication may break. Set rgw_multisite: false in all.yml before running rolling_update.yml. Do not re-enable rgw_multisite after upgrade. Use it only if you need to add new gateways after upgrade. Only upgrade a Red Hat Ceph Storage 3 cluster at version 3.3z5 or higher to Red Hat Ceph Storage 4. If you cannot update to 3.3z5 or a higher, disable synchronization between sites before upgrading the clusters. To disable synchronization, set rgw_run_sync_thread = false and restart the RADOS Gateway daemon. Upgrade the primary cluster first. Upgrade to Red Hat Ceph Storage 4.1 or later. To see the package versions that correlate to 3.3z5 see What are the Red Hat Ceph Storage releases and corresponding Ceph package versions? For instructions on how to disable synchronization, see How to disable RGW Multisite sync temporarily?
When using Ceph Object Gateway and upgrading from Red Hat Ceph Storage 3.x to Red Hat Ceph Storage 4.x, the front end is automatically changed from CivetWeb to Beast, which is the new default. For more information, see Configuration in the Object Gateway Configuration and Administration Guide.
If using RADOS Gateway, Ansible will switch the front end from CivetWeb to Beast. In the process of this the RGW instance names are changed from rgw.HOSTNAME to rgw.HOSTNAME.rgw0. Due to the name change Ansible does not update the existing RGW configuration in ceph.conf and instead appends a default configuration, leaving intact the old CivetWeb based RGW setup, however it is not used. Custom RGW configuration changes would then be lost, which could cause an RGW service interruption. To avoid this, before upgrade, add the existing RGW configuration in the ceph_conf_overrides section of all.yml, but change the RGW instance names by appending .rgw0, then restart the RGW service. This will preserve non-default RGW configuration changes after upgrade. For information on ceph_conf_overrides, see Overriding Ceph Default Settings.
7.1. Supported Red Hat Ceph Storage upgrade scenarios
Red Hat supports the following upgrade scenarios.
Read the tables for bare-metal, and containerized to understand what pre-upgrade state your cluster must be in to move to certain post-upgrade states.
Use ceph-ansible to perform bare-metal and containerized upgrades where the bare-metal or host operating system does not change major versions. Upgrading from Red Hat Enterprise Linux 7 to Red Hat Enterprise Linux 8 is not supported with ceph-ansible. To upgrade the bare-metal operating system from Red Hat Enterprise Linux 7.9 to Red Hat Enterprise Linux 8.4 as a part of upgrading Red Hat Ceph Storage, see the Manually upgrading a Red Hat Ceph Storage cluster and operating system section in the Red Hat Ceph Storage Installation Guide.
To upgrade your cluster to Red Hat Ceph Storage 4, Red Hat recommends your cluster to be on the latest version of the Red Hat Ceph Storage 3. To know the latest version of Red Hat Ceph Storage, see the What are the Red Hat Ceph Storage releases? Knowledgebase article for more information.
| Pre-upgrade state | Post-upgrade state | ||
|---|---|---|---|
| Red Hat Enterprise Linux version | Red Hat Ceph Storage version | Red Hat Enterprise Linux version | Red Hat Ceph Storage version |
| 7.6 | 3.3 | 7.9 | 4.2 |
| 7.6 | 3.3 | 8.4 | 4.2 |
| 7.7 | 3.3 | 7.9 | 4.2 |
| 7.7 | 4.0 | 7.9 | 4.2 |
| 7.8 | 3.3 | 7.9 | 4.2 |
| 7.8 | 3.3 | 8.4 | 4.2 |
| 7.9 | 3.3 | 8.4 | 4.2 |
| 8.1 | 4.0 | 8.4 | 4.2 |
| 8.2 | 4.1 | 8.4 | 4.2 |
| 8.2 | 4.1 | 8.4 | 4.2 |
| 8.3 | 4.1 | 8.4 | 4.2 |
| Pre-upgrade state | Post-upgrade state | ||||
|---|---|---|---|---|---|
| Host Red Hat Enterprise Linux version | Container Red Hat Enterprise Linux version | Red Hat Ceph Storage version | Host Red Hat Enterprise Linux version | Container Red Hat Enterprise Linux version | Red Hat Ceph Storage version |
| 7.6 | 7.8 | 3.3 | 7.9 | 8.4 | 4.2 |
| 7.7 | 7.8 | 3.3 | 7.9 | 8.4 | 4.2 |
| 7.7 | 8.1 | 4.0 | 7.9 | 8.4 | 4.2 |
| 7.8 | 7.8 | 3.3 | 7.9 | 8.4 | 4.2 |
| 8.1 | 8.1 | 4.0 | 8.4 | 8.4 | 4.2 |
| 8.2 | 8.2 | 4.1 | 8.4 | 8.4 | 4.2 |
| 8.3 | 8.3 | 4.1 | 8.4 | 8.4 | 4.2 |
7.2. Preparing for an upgrade
There are a few things to complete before you can start an upgrade of a Red Hat Ceph Storage cluster. These steps apply to both bare-metal and container deployments of a Red Hat Ceph Storage cluster, unless specified for one or the other.
You can only upgrade to the latest version of Red Hat Ceph Storage 4. For example, if version 4.1 is available, you cannot upgrade from 3 to 4.0; you must go directly to 4.1.
If using the FileStore object store, after upgrading from Red Hat Ceph Storage 3 to Red Hat Ceph Storage 4, you must migrate to BlueStore.
You cannot use ceph-ansible to upgrade Red Hat Ceph Storage while also upgrading Red Hat Enterprise Linux 7 to Red Hat Enterprise Linux 8. You must stay on Red Hat Enterprise Linux 7. To upgrade the operating system as well, see Manually upgrading a Red Hat Ceph Storage cluster and operating system.
The option bluefs_buffered_io is set to True by default for Red Hat Ceph Storage 4.2z2 and later versions. This option enables BlueFS to perform buffered reads in some cases and enables the kernel page cache to act as a secondary cache for reads like RocksDB block reads. For example, if the RocksDB block cache is not large enough to hold all blocks during the OMAP iteration, it may be possible to read them from the page cache instead of the disk. This can dramatically improve performance when osd_memory_target is too small to hold all entries in the block cache. Currently enabling bluefs_buffered_io and disabling the system level swap prevents performance degradation.
Prerequisites
- Root-level access to all nodes in the storage cluster.
- The system clocks on all nodes in the storage cluster are synchronized. If the Monitor nodes are out of sync, the upgrade process might not complete properly.
- If upgrading from version 3, the version 3 cluster is upgraded to the latest version of Red Hat Ceph Storage 3.
Before upgrading to version 4, if the Prometheus node exporter service is running, then stop the service:
Example
systemctl stop prometheus-node-exporter.service
[root@mon ~]# systemctl stop prometheus-node-exporter.serviceCopy to Clipboard Copied! Toggle word wrap Toggle overflow ImportantThis is a known issue, that will be fixed in an upcoming Red Hat Ceph Storage release. See the Red Hat Knowledgebase article for more details regarding this issue.
NoteFor Bare-metal or Container Red Hat Ceph Storage cluster nodes that cannot access the internet during an upgrade, follow the procedure provided in the section Registering Red Hat Ceph Storage nodes to the CDN and attaching subscriptions in the Red Hat Ceph Storage Installation Guide.
Procedure
-
Log in as the
rootuser on all nodes in the storage cluster. - If the Ceph nodes are not connected to the Red Hat Content Delivery Network (CDN), you can use an ISO image to upgrade Red Hat Ceph Storage by updating the local repository with the latest version of Red Hat Ceph Storage.
If upgrading Red Hat Ceph Storage from version 3 to version 4, remove an existing Ceph dashboard installation.
On the Ansible administration node, change to the
cephmetrics-ansibledirectory:cd /usr/share/cephmetrics-ansible
[root@admin ~]# cd /usr/share/cephmetrics-ansibleCopy to Clipboard Copied! Toggle word wrap Toggle overflow Run the
purge.ymlplaybook to remove an existing Ceph dashboard installation:ansible-playbook -v purge.yml
[root@admin cephmetrics-ansible]# ansible-playbook -v purge.ymlCopy to Clipboard Copied! Toggle word wrap Toggle overflow
If upgrading Red Hat Ceph Storage from version 3 to version 4, enable the Ceph and Ansible repositories on the Ansible administration node:
Red Hat Enterprise Linux 7
subscription-manager repos --enable=rhel-7-server-rhceph-4-tools-rpms --enable=rhel-7-server-ansible-2.9-rpms
[root@admin ~]# subscription-manager repos --enable=rhel-7-server-rhceph-4-tools-rpms --enable=rhel-7-server-ansible-2.9-rpmsCopy to Clipboard Copied! Toggle word wrap Toggle overflow Red Hat Enterprise Linux 8
subscription-manager repos --enable=rhceph-4-tools-for-rhel-8-x86_64-rpms --enable=ansible-2.9-for-rhel-8-x86_64-rpms
[root@admin ~]# subscription-manager repos --enable=rhceph-4-tools-for-rhel-8-x86_64-rpms --enable=ansible-2.9-for-rhel-8-x86_64-rpmsCopy to Clipboard Copied! Toggle word wrap Toggle overflow On the Ansible administration node, ensure the latest versions of the
ansibleandceph-ansiblepackages are installed.Red Hat Enterprise Linux 7
yum update ansible ceph-ansible
[root@admin ~]# yum update ansible ceph-ansibleCopy to Clipboard Copied! Toggle word wrap Toggle overflow Red Hat Enterprise Linux 8
dnf update ansible ceph-ansible
[root@admin ~]# dnf update ansible ceph-ansibleCopy to Clipboard Copied! Toggle word wrap Toggle overflow Edit the
infrastructure-playbooks/rolling_update.ymlplaybook and change thehealth_osd_check_retriesandhealth_osd_check_delayvalues to50and30respectively:health_osd_check_retries: 50 health_osd_check_delay: 30
health_osd_check_retries: 50 health_osd_check_delay: 30Copy to Clipboard Copied! Toggle word wrap Toggle overflow For each OSD node, these values cause Ansible to wait for up to 25 minutes, and will check the storage cluster health every 30 seconds, waiting before continuing the upgrade process.
NoteAdjust the
health_osd_check_retriesoption value up or down based on the used storage capacity of the storage cluster. For example, if you are using 218 TB out of 436 TB, basically using 50% of the storage capacity, then set thehealth_osd_check_retriesoption to50.If the storage cluster you want to upgrade contains Ceph Block Device images that use the
exclusive-lockfeature, ensure that all Ceph Block Device users have permissions to blacklist clients:ceph auth caps client.ID mon 'allow r, allow command "osd blacklist"' osd 'EXISTING_OSD_USER_CAPS'
ceph auth caps client.ID mon 'allow r, allow command "osd blacklist"' osd 'EXISTING_OSD_USER_CAPS'Copy to Clipboard Copied! Toggle word wrap Toggle overflow If the storage cluster was originally installed using Cockpit, create a symbolic link in the
/usr/share/ceph-ansibledirectory to the inventory file where Cockpit created it, at/usr/share/ansible-runner-service/inventory/hosts:Change to the
/usr/share/ceph-ansibledirectory:cd /usr/share/ceph-ansible
# cd /usr/share/ceph-ansibleCopy to Clipboard Copied! Toggle word wrap Toggle overflow Create the symbolic link:
ln -s /usr/share/ansible-runner-service/inventory/hosts hosts
# ln -s /usr/share/ansible-runner-service/inventory/hosts hostsCopy to Clipboard Copied! Toggle word wrap Toggle overflow
To upgrade the cluster using
ceph-ansible, create the symbolic link in theetc/ansible/hostsdirectory to thehostsinventory file:ln -s /etc/ansible/hosts hosts
# ln -s /etc/ansible/hosts hostsCopy to Clipboard Copied! Toggle word wrap Toggle overflow If the storage cluster was originally installed using Cockpit, copy the Cockpit generated SSH keys to the Ansible user’s
~/.sshdirectory:Copy the keys:
cp /usr/share/ansible-runner-service/env/ssh_key.pub /home/ANSIBLE_USERNAME/.ssh/id_rsa.pub cp /usr/share/ansible-runner-service/env/ssh_key /home/ANSIBLE_USERNAME/.ssh/id_rsa
# cp /usr/share/ansible-runner-service/env/ssh_key.pub /home/ANSIBLE_USERNAME/.ssh/id_rsa.pub # cp /usr/share/ansible-runner-service/env/ssh_key /home/ANSIBLE_USERNAME/.ssh/id_rsaCopy to Clipboard Copied! Toggle word wrap Toggle overflow Replace ANSIBLE_USERNAME with the username for Ansible, usually
admin.Example
cp /usr/share/ansible-runner-service/env/ssh_key.pub /home/admin/.ssh/id_rsa.pub cp /usr/share/ansible-runner-service/env/ssh_key /home/admin/.ssh/id_rsa
# cp /usr/share/ansible-runner-service/env/ssh_key.pub /home/admin/.ssh/id_rsa.pub # cp /usr/share/ansible-runner-service/env/ssh_key /home/admin/.ssh/id_rsaCopy to Clipboard Copied! Toggle word wrap Toggle overflow Set the appropriate owner, group, and permissions on the key files:
chown ANSIBLE_USERNAME:_ANSIBLE_USERNAME_ /home/ANSIBLE_USERNAME/.ssh/id_rsa.pub chown ANSIBLE_USERNAME:_ANSIBLE_USERNAME_ /home/ANSIBLE_USERNAME/.ssh/id_rsa chmod 644 /home/ANSIBLE_USERNAME/.ssh/id_rsa.pub chmod 600 /home/ANSIBLE_USERNAME/.ssh/id_rsa
# chown ANSIBLE_USERNAME:_ANSIBLE_USERNAME_ /home/ANSIBLE_USERNAME/.ssh/id_rsa.pub # chown ANSIBLE_USERNAME:_ANSIBLE_USERNAME_ /home/ANSIBLE_USERNAME/.ssh/id_rsa # chmod 644 /home/ANSIBLE_USERNAME/.ssh/id_rsa.pub # chmod 600 /home/ANSIBLE_USERNAME/.ssh/id_rsaCopy to Clipboard Copied! Toggle word wrap Toggle overflow Replace ANSIBLE_USERNAME with the username for Ansible, usually
admin.Example
chown admin:admin /home/admin/.ssh/id_rsa.pub chown admin:admin /home/admin/.ssh/id_rsa chmod 644 /home/admin/.ssh/id_rsa.pub chmod 600 /home/admin/.ssh/id_rsa
# chown admin:admin /home/admin/.ssh/id_rsa.pub # chown admin:admin /home/admin/.ssh/id_rsa # chmod 644 /home/admin/.ssh/id_rsa.pub # chmod 600 /home/admin/.ssh/id_rsaCopy to Clipboard Copied! Toggle word wrap Toggle overflow
Additional Resources
- See Enabling the Red Hat Ceph Storage repositories for details.
- For more information about clock synchronization and clock skew, see the Clock Skew section in the Red Hat Ceph Storage Troubleshooting Guide.
7.3. Upgrading the storage cluster using Ansible
Using the Ansible deployment tool, you can upgrade a Red Hat Ceph Storage cluster by doing a rolling upgrade. These steps apply to both bare-metal and container deployment, unless otherwise noted.
Prerequisites
- Root-level access to the Ansible administration node.
-
An
ansibleuser account.
Procedure
Navigate to the
/usr/share/ceph-ansible/directory:Example
cd /usr/share/ceph-ansible/
[root@admin ~]# cd /usr/share/ceph-ansible/Copy to Clipboard Copied! Toggle word wrap Toggle overflow If upgrading from Red Hat Ceph Storage 3 to Red Hat Ceph Storage 4, make backup copies of the
group_vars/all.yml,group_vars/osds.yml, andgroup_vars/clients.ymlfiles:cp group_vars/all.yml group_vars/all_old.yml cp group_vars/osds.yml group_vars/osds_old.yml cp group_vars/clients.yml group_vars/clients_old.yml
[root@admin ceph-ansible]# cp group_vars/all.yml group_vars/all_old.yml [root@admin ceph-ansible]# cp group_vars/osds.yml group_vars/osds_old.yml [root@admin ceph-ansible]# cp group_vars/clients.yml group_vars/clients_old.ymlCopy to Clipboard Copied! Toggle word wrap Toggle overflow If upgrading from Red Hat Ceph Storage 3 to Red Hat Ceph Storage 4, create new copies of the
group_vars/all.yml.sample,group_vars/osds.yml.sampleandgroup_vars/clients.yml.samplefiles, and rename them togroup_vars/all.yml,group_vars/osds.yml, andgroup_vars/clients.ymlrespectively. Open and edit them accordingly, basing the changes on your previously backed up copies.cp group_vars/all.yml.sample group_vars/all.yml cp group_vars/osds.yml.sample group_vars/osds.yml cp group_vars/clients.yml.sample group_vars/clients.yml
[root@admin ceph-ansible]# cp group_vars/all.yml.sample group_vars/all.yml [root@admin ceph-ansible]# cp group_vars/osds.yml.sample group_vars/osds.yml [root@admin ceph-ansible]# cp group_vars/clients.yml.sample group_vars/clients.ymlCopy to Clipboard Copied! Toggle word wrap Toggle overflow Edit the
group_vars/osds.ymlfile. Add and set the following options:nb_retry_wait_osd_up: 60 delay_wait_osd_up: 10
nb_retry_wait_osd_up: 60 delay_wait_osd_up: 10Copy to Clipboard Copied! Toggle word wrap Toggle overflow NoteThese are the default values; you can modify the values as per your use case.
If upgrading to a new minor version of Red Hat Ceph Storage 4, verify the value for
grafana_container_imageingroup_vars/all.ymlis the same as ingroup_vars/all.yml.sample. If it is not the same, edit it so it is.Example
grafana_container_image: registry.redhat.io/rhceph/rhceph-4-dashboard-rhel8:4
grafana_container_image: registry.redhat.io/rhceph/rhceph-4-dashboard-rhel8:4Copy to Clipboard Copied! Toggle word wrap Toggle overflow NoteThe image path shown is included in
ceph-ansibleversion 4.0.23-1.Copy the latest
site.ymlorsite-container.ymlfile from the sample files:For bare-metal deployments:
cp site.yml.sample site.yml
[root@admin ceph-ansible]# cp site.yml.sample site.ymlCopy to Clipboard Copied! Toggle word wrap Toggle overflow For container deployments:
cp site-container.yml.sample site-container.yml
[root@admin ceph-ansible]# cp site-container.yml.sample site-container.ymlCopy to Clipboard Copied! Toggle word wrap Toggle overflow
Open the
group_vars/all.ymlfile and edit the following options.Add the
fetch_directoryoption:fetch_directory: FULL_DIRECTORY_PATH
fetch_directory: FULL_DIRECTORY_PATHCopy to Clipboard Copied! Toggle word wrap Toggle overflow - Replace
- FULL_DIRECTORY_PATH with a writable location, such as the Ansible user’s home directory.
If the cluster you want to upgrade contains any Ceph Object Gateway nodes, add the
radosgw_interfaceoption:radosgw_interface: INTERFACE
radosgw_interface: INTERFACECopy to Clipboard Copied! Toggle word wrap Toggle overflow - Replace
- INTERFACE with the interface that the Ceph Object Gateway nodes listen to.
If your current setup has SSL certificates configured, you need to edit the following:
radosgw_frontend_ssl_certificate: /etc/pki/ca-trust/extracted/CERTIFICATE_NAME radosgw_frontend_port: 443
radosgw_frontend_ssl_certificate: /etc/pki/ca-trust/extracted/CERTIFICATE_NAME radosgw_frontend_port: 443Copy to Clipboard Copied! Toggle word wrap Toggle overflow The default OSD object store is BlueStore. To keep the traditional OSD object store, you must explicitly set the
osd_objectstoreoption tofilestore:osd_objectstore: filestore
osd_objectstore: filestoreCopy to Clipboard Copied! Toggle word wrap Toggle overflow NoteWith the
osd_objectstoreoption set tofilestore, replacing an OSD will use FileStore, instead of BlueStore.ImportantStarting with Red Hat Ceph Storage 4, FileStore is a deprecated feature. Red Hat recommends migrating the FileStore OSDs to BlueStore OSDs.
-
Starting with Red Hat Ceph Storage 4.1, you must uncomment or set
dashboard_admin_passwordandgrafana_admin_passwordin/usr/share/ceph-ansible/group_vars/all.yml. Set secure passwords for each. Also set custom user names fordashboard_admin_userandgrafana_admin_user. For both bare-metal and containers deployments:
Uncomment the
upgrade_ceph_packagesoption and set it toTrue:upgrade_ceph_packages: True
upgrade_ceph_packages: TrueCopy to Clipboard Copied! Toggle word wrap Toggle overflow Set the
ceph_rhcs_versionoption to4:ceph_rhcs_version: 4
ceph_rhcs_version: 4Copy to Clipboard Copied! Toggle word wrap Toggle overflow NoteSetting the
ceph_rhcs_versionoption to4will pull in the latest version of Red Hat Ceph Storage 4.Add the
ceph_docker_registryinformation toall.yml:Syntax
ceph_docker_registry: registry.redhat.io ceph_docker_registry_username: SERVICE_ACCOUNT_USER_NAME ceph_docker_registry_password: TOKEN
ceph_docker_registry: registry.redhat.io ceph_docker_registry_username: SERVICE_ACCOUNT_USER_NAME ceph_docker_registry_password: TOKENCopy to Clipboard Copied! Toggle word wrap Toggle overflow NoteIf you do not have a Red Hat Registry Service Account, create one using the Registry Service Account webpage. See the Red Hat Container Registry Authentication Knowledgebase article for more details.
NoteIn addition to using a Service Account for the
ceph_docker_registry_usernameandceph_docker_registry_passwordparameters, you can also use your Customer Portal credentials, but to ensure security, encrypt theceph_docker_registry_passwordparameter. For more information, see Encrypting Ansible password variables with ansible-vault.
For containers deployments:
Change the
ceph_docker_imageoption to point to the Ceph 4 container version:ceph_docker_image: rhceph/rhceph-4-rhel8
ceph_docker_image: rhceph/rhceph-4-rhel8Copy to Clipboard Copied! Toggle word wrap Toggle overflow Change the
ceph_docker_image_tagoption to point to the latest version ofrhceph/rhceph-4-rhel8:ceph_docker_image_tag: latest
ceph_docker_image_tag: latestCopy to Clipboard Copied! Toggle word wrap Toggle overflow
-
If upgrading from Red Hat Ceph Storage 3 to Red Hat Ceph Storage 4, open the Ansible inventory file for editing,
/etc/ansible/hostsby default, and add the Ceph dashboard node name or IP address under the[grafana-server]section. If this section does not exist, then also add this section along with the node name or IP address. Switch to or log in as the Ansible user, then run the
rolling_update.ymlplaybook:ansible-playbook infrastructure-playbooks/rolling_update.yml -i hosts
[ansible@admin ceph-ansible]$ ansible-playbook infrastructure-playbooks/rolling_update.yml -i hostsCopy to Clipboard Copied! Toggle word wrap Toggle overflow ImportantUsing the
--limitAnsible option with therolling_update.ymlplaybook is not supported.As the
rootuser on the RBD mirroring daemon node, upgrade therbd-mirrorpackage manually:yum upgrade rbd-mirror
[root@rbd ~]# yum upgrade rbd-mirrorCopy to Clipboard Copied! Toggle word wrap Toggle overflow Restart the
rbd-mirrordaemon:systemctl restart ceph-rbd-mirror@CLIENT_ID
systemctl restart ceph-rbd-mirror@CLIENT_IDCopy to Clipboard Copied! Toggle word wrap Toggle overflow Verify the health status of the storage cluster.
For bare-metal deployments, log into a monitor node as the
rootuser and run the Ceph status command:ceph -s
[root@mon ~]# ceph -sCopy to Clipboard Copied! Toggle word wrap Toggle overflow For container deployments, log into a Ceph Monitor node as the
rootuser.List all running containers:
Red Hat Enterprise Linux 7
docker ps
[root@mon ~]# docker psCopy to Clipboard Copied! Toggle word wrap Toggle overflow Red Hat Enterprise Linux 8
podman ps
[root@mon ~]# podman psCopy to Clipboard Copied! Toggle word wrap Toggle overflow Check health status:
Red Hat Enterprise Linux 7
docker exec ceph-mon-MONITOR_NAME ceph -s
[root@mon ~]# docker exec ceph-mon-MONITOR_NAME ceph -sCopy to Clipboard Copied! Toggle word wrap Toggle overflow Red Hat Enterprise Linux 8
podman exec ceph-mon-MONITOR_NAME ceph -s
[root@mon ~]# podman exec ceph-mon-MONITOR_NAME ceph -sCopy to Clipboard Copied! Toggle word wrap Toggle overflow - Replace
MONITOR_NAME with the name of the Ceph Monitor container found in the previous step.
Example
podman exec ceph-mon-mon01 ceph -s
[root@mon ~]# podman exec ceph-mon-mon01 ceph -sCopy to Clipboard Copied! Toggle word wrap Toggle overflow
Optional: If upgrading from Red Hat Ceph Storage 3.x to Red Hat Ceph Storage 4.x, you might see this health warning: Legacy BlueStore stats reporting detected on 336 OSD(s). This is caused by newer code calculating pool stats differently. You can resolve this by setting the
bluestore_fsck_quick_fix_on_mountparameter.Set
bluestore_fsck_quick_fix_on_mounttotrue:Example
ceph config set osd bluestore_fsck_quick_fix_on_mount true
[root@mon ~]# ceph config set osd bluestore_fsck_quick_fix_on_mount trueCopy to Clipboard Copied! Toggle word wrap Toggle overflow Set the
nooutandnorebalanceflags to prevent data movement while OSDs are down:Example
ceph osd set noout ceph osd set norebalance
[root@mon ~]# ceph osd set noout [root@mon ~]# ceph osd set norebalanceCopy to Clipboard Copied! Toggle word wrap Toggle overflow For bare-metal deployment, restart
ceph-osd.targeton every OSD node of the storage cluster:Example
systemctl restart ceph-osd.target
[root@osd ~]# systemctl restart ceph-osd.targetCopy to Clipboard Copied! Toggle word wrap Toggle overflow For containerized deployment, restart the individual OSDs one after the other and wait for all the placement groups to be in
active+cleanstate.Syntax
systemctl restart ceph-osd@OSD_ID.service
systemctl restart ceph-osd@OSD_ID.serviceCopy to Clipboard Copied! Toggle word wrap Toggle overflow Example
systemctl restart ceph-osd@0.service
[root@osd ~]# systemctl restart ceph-osd@0.serviceCopy to Clipboard Copied! Toggle word wrap Toggle overflow When all the OSDs are repaired, unset the
noutandnorebalanceflags:Example
ceph osd unset noout ceph osd unset norebalance
[root@mon ~]# ceph osd unset noout [root@mon ~]# ceph osd unset norebalanceCopy to Clipboard Copied! Toggle word wrap Toggle overflow Set the
bluestore_fsck_quick_fix_on_mounttofalseonce all the OSDs are repaired:Example
ceph config set osd bluestore_fsck_quick_fix_on_mount false
[root@mon ~]# ceph config set osd bluestore_fsck_quick_fix_on_mount falseCopy to Clipboard Copied! Toggle word wrap Toggle overflow Optional: An alternate method for bare-metal deployment is to stop the OSD service, run the repair function on the OSD using the
ceph-bluestore-toolcommand, and then start the OSD service:Stop the OSD service:
systemctl stop ceph-osd.target
[root@osd ~]# systemctl stop ceph-osd.targetCopy to Clipboard Copied! Toggle word wrap Toggle overflow Run the repair function on the OSD, specifying its actual OSD ID:
Syntax
ceph-bluestore-tool --path /var/lib/ceph/osd/ceph-OSDID repair
ceph-bluestore-tool --path /var/lib/ceph/osd/ceph-OSDID repairCopy to Clipboard Copied! Toggle word wrap Toggle overflow Example
ceph-bluestore-tool --path /var/lib/ceph/osd/ceph-2 repair
[root@osd ~]# ceph-bluestore-tool --path /var/lib/ceph/osd/ceph-2 repairCopy to Clipboard Copied! Toggle word wrap Toggle overflow Start the OSD service:
systemctl start ceph-osd.target
[root@osd ~]# systemctl start ceph-osd.targetCopy to Clipboard Copied! Toggle word wrap Toggle overflow
Once the upgrade finishes, you can migrate the FileStore OSDs to BlueStore OSDs, by running the Ansible playbook:
Syntax
ansible-playbook infrastructure-playbooks/filestore-to-bluestore.yml --limit OSD_NODE_TO_MIGRATE
ansible-playbook infrastructure-playbooks/filestore-to-bluestore.yml --limit OSD_NODE_TO_MIGRATECopy to Clipboard Copied! Toggle word wrap Toggle overflow Example
ansible-playbook infrastructure-playbooks/filestore-to-bluestore.yml --limit osd01
[ansible@admin ceph-ansible]$ ansible-playbook infrastructure-playbooks/filestore-to-bluestore.yml --limit osd01Copy to Clipboard Copied! Toggle word wrap Toggle overflow Once the migration completes do the following sub steps.
Open for editing the
group_vars/osds.ymlfile, and set theosd_objectstoreoption tobluestore, for example:osd_objectstore: bluestore
osd_objectstore: bluestoreCopy to Clipboard Copied! Toggle word wrap Toggle overflow If you are using the
lvm_volumesvariable, then change thejournalandjournal_vgoptions todbanddb_vgrespectively, for example:Before
Copy to Clipboard Copied! Toggle word wrap Toggle overflow After converting to Bluestore
Copy to Clipboard Copied! Toggle word wrap Toggle overflow
If working in an OpenStack environment, update all the
cephxusers to use the RBD profile for pools. The following commands must be run as therootuser:Glance users:
Syntax
ceph auth caps client.glance mon 'profile rbd' osd 'profile rbd pool=GLANCE_POOL_NAME'
ceph auth caps client.glance mon 'profile rbd' osd 'profile rbd pool=GLANCE_POOL_NAME'Copy to Clipboard Copied! Toggle word wrap Toggle overflow Example
ceph auth caps client.glance mon 'profile rbd' osd 'profile rbd pool=images'
[root@mon ~]# ceph auth caps client.glance mon 'profile rbd' osd 'profile rbd pool=images'Copy to Clipboard Copied! Toggle word wrap Toggle overflow Cinder users:
Syntax
ceph auth caps client.cinder mon 'profile rbd' osd 'profile rbd pool=CINDER_VOLUME_POOL_NAME, profile rbd pool=NOVA_POOL_NAME, profile rbd-read-only pool=GLANCE_POOL_NAME'
ceph auth caps client.cinder mon 'profile rbd' osd 'profile rbd pool=CINDER_VOLUME_POOL_NAME, profile rbd pool=NOVA_POOL_NAME, profile rbd-read-only pool=GLANCE_POOL_NAME'Copy to Clipboard Copied! Toggle word wrap Toggle overflow Example
ceph auth caps client.cinder mon 'profile rbd' osd 'profile rbd pool=volumes, profile rbd pool=vms, profile rbd-read-only pool=images'
[root@mon ~]# ceph auth caps client.cinder mon 'profile rbd' osd 'profile rbd pool=volumes, profile rbd pool=vms, profile rbd-read-only pool=images'Copy to Clipboard Copied! Toggle word wrap Toggle overflow OpenStack general users:
Syntax
ceph auth caps client.openstack mon 'profile rbd' osd 'profile rbd-read-only pool=CINDER_VOLUME_POOL_NAME, profile rbd pool=NOVA_POOL_NAME, profile rbd-read-only pool=GLANCE_POOL_NAME'
ceph auth caps client.openstack mon 'profile rbd' osd 'profile rbd-read-only pool=CINDER_VOLUME_POOL_NAME, profile rbd pool=NOVA_POOL_NAME, profile rbd-read-only pool=GLANCE_POOL_NAME'Copy to Clipboard Copied! Toggle word wrap Toggle overflow Example
ceph auth caps client.openstack mon 'profile rbd' osd 'profile rbd-read-only pool=volumes, profile rbd pool=vms, profile rbd-read-only pool=images'
[root@mon ~]# ceph auth caps client.openstack mon 'profile rbd' osd 'profile rbd-read-only pool=volumes, profile rbd pool=vms, profile rbd-read-only pool=images'Copy to Clipboard Copied! Toggle word wrap Toggle overflow ImportantDo these CAPS updates before performing any live client migrations. This allows clients to use the new libraries running in memory, causing the old CAPS settings to drop from cache and applying the new RBD profile settings.
Optional: On client nodes, restart any applications that depend on the Ceph client-side libraries.
NoteIf you are upgrading OpenStack Nova compute nodes that have running QEMU or KVM instances or use a dedicated QEMU or KVM client, stop and start the QEMU or KVM instance because restarting the instance does not work in this case.
7.4. Upgrading the storage cluster using the command-line interface
You can upgrade from Red Hat Ceph Storage 3.3 to Red Hat Ceph Storage 4 while the storage cluster is running. An important difference between these versions is that Red Hat Ceph Storage 4 uses the msgr2 protocol by default, which uses port 3300. If it is not open, the cluster will issue a HEALTH_WARN error.
Here are the constraints to consider when upgrading the storage cluster:
-
Red Hat Ceph Storage 4 uses
msgr2protocol by default. Ensure port3300is open on Ceph Monitor nodes -
Once you upgrade the
ceph-monitordaemons from Red Hat Ceph Storage 3 to Red Hat Ceph Storage 4, the Red Hat Ceph Storage 3ceph-osddaemons cannot create new OSDs until you upgrade them to Red Hat Ceph Storage 4. - Do not create any pools while the upgrade is in progress.
Prerequisites
- Root-level access to the Ceph Monitor, OSD, and Object Gateway nodes.
Procedure
Ensure that the cluster has completed at least one full scrub of all PGs while running Red Hat Ceph Storage 3. Failure to do so can cause your monitor daemons to refuse to join the quorum on start, leaving them non-functional. To ensure the cluster has completed at least one full scrub of all PGs, execute the following:
ceph osd dump | grep ^flags
# ceph osd dump | grep ^flagsCopy to Clipboard Copied! Toggle word wrap Toggle overflow To proceed with an upgrade from Red Hat Ceph Storage 3 to Red Hat Ceph Storage 4, the OSD map must include the
recovery_deletesandpurged_snapdirsflags.Ensure the cluster is in a healthy and clean state.
ceph health HEALTH_OK
ceph health HEALTH_OKCopy to Clipboard Copied! Toggle word wrap Toggle overflow For nodes running
ceph-monandceph-manager, execute:subscription-manager repos --enable=rhel-7-server-rhceph-4-mon-rpms
# subscription-manager repos --enable=rhel-7-server-rhceph-4-mon-rpmsCopy to Clipboard Copied! Toggle word wrap Toggle overflow Once the Red Hat Ceph Storage 4 package is enabled, execute the following on each of the
ceph-monandceph-managernodes:firewall-cmd --add-port=3300/tcp firewall-cmd --add-port=3300/tcp --permanent yum update -y systemctl restart ceph-mon@<mon-hostname> systemctl restart ceph-mgr@<mgr-hostname>
# firewall-cmd --add-port=3300/tcp # firewall-cmd --add-port=3300/tcp --permanent # yum update -y # systemctl restart ceph-mon@<mon-hostname> # systemctl restart ceph-mgr@<mgr-hostname>Copy to Clipboard Copied! Toggle word wrap Toggle overflow Replace
<mon-hostname>and<mgr-hostname>with the hostname of the target host.Before upgrading OSDs, set the
nooutandnodeep-scrubflags on a Ceph Monitor node to prevent OSDs from rebalancing during upgrade.ceph osd set noout ceph osd det nodeep-scrub
# ceph osd set noout # ceph osd det nodeep-scrubCopy to Clipboard Copied! Toggle word wrap Toggle overflow On each OSD node, execute:
subscription-manager repos --enable=rhel-7-server-rhceph-4-osd-rpms
# subscription-manager repos --enable=rhel-7-server-rhceph-4-osd-rpmsCopy to Clipboard Copied! Toggle word wrap Toggle overflow Once the Red Hat Ceph Storage 4 package is enabled, update the OSD node:
yum update -y
# yum update -yCopy to Clipboard Copied! Toggle word wrap Toggle overflow For each OSD daemon running on the node, execute:
systemctl restart ceph-osd@<osd-num>
# systemctl restart ceph-osd@<osd-num>Copy to Clipboard Copied! Toggle word wrap Toggle overflow Replace
<osd-num>with the osd number to restart. Ensure all OSDs on the node have restarted before proceeding to the next OSD node.If there are any OSDs in the storage cluster deployed with
ceph-disk, instructceph-volumeto start the daemons.ceph-volume simple scan ceph-volume simple activate --all
# ceph-volume simple scan # ceph-volume simple activate --allCopy to Clipboard Copied! Toggle word wrap Toggle overflow Enable the Nautilus only functionality:
ceph osd require-osd-release nautilus
# ceph osd require-osd-release nautilusCopy to Clipboard Copied! Toggle word wrap Toggle overflow ImportantFailure to execute this step will make it impossible for OSDs to communicate after
msgr2is enabled.After upgrading all OSD nodes, unset the
nooutandnodeep-scrubflags on a Ceph Monitor node.ceph osd unset noout ceph osd unset nodeep-scrub
# ceph osd unset noout # ceph osd unset nodeep-scrubCopy to Clipboard Copied! Toggle word wrap Toggle overflow Switch any existing CRUSH buckets to the latest bucket type
straw2.ceph osd getcrushmap -o backup-crushmap ceph osd crush set-all-straw-buckets-to-straw2
# ceph osd getcrushmap -o backup-crushmap # ceph osd crush set-all-straw-buckets-to-straw2Copy to Clipboard Copied! Toggle word wrap Toggle overflow Once all the daemons are updated after upgrading from Red Hat Ceph Storage 3 to Red Hat Ceph Storage 4, run the following steps:
Enable the messenger v2 protocol,
msgr2:ceph mon enable-msgr2
ceph mon enable-msgr2Copy to Clipboard Copied! Toggle word wrap Toggle overflow This instructs all Ceph Monitors that bind to the old default port of 6789, to also bind to the new port of 3300.
Verify the status of the monitor:
ceph mon dump
ceph mon dumpCopy to Clipboard Copied! Toggle word wrap Toggle overflow NoteRunning nautilus OSDs does not bind to their v2 address automatically. They must be restarted.
-
For each host upgraded from Red Hat Ceph Storage 3 to Red Hat Ceph Storage 4, update the
ceph.conffile to either not specify any monitor port or reference both the v2 and v1 addresses and ports. Import any configuration options in
ceph.conffile into the storage cluster’s configuration database.Example
ceph config assimilate-conf -i /etc/ceph/ceph.conf
[root@mon ~]# ceph config assimilate-conf -i /etc/ceph/ceph.confCopy to Clipboard Copied! Toggle word wrap Toggle overflow Check the storage cluster’s configuration database.
Example
ceph config dump
[root@mon ~]# ceph config dumpCopy to Clipboard Copied! Toggle word wrap Toggle overflow Optional: After upgrading to Red Hat Ceph Storage 4, create a minimal
ceph.conffile for each host:Example
ceph config generate-minimal-conf > /etc/ceph/ceph.conf.new mv /etc/ceph/ceph.conf.new /etc/ceph/ceph.conf
[root@mon ~]# ceph config generate-minimal-conf > /etc/ceph/ceph.conf.new [root@mon ~]# mv /etc/ceph/ceph.conf.new /etc/ceph/ceph.confCopy to Clipboard Copied! Toggle word wrap Toggle overflow
On Ceph Object Gateway nodes, execute:
subscription-manager repos --enable=rhel-7-server-rhceph-4-tools-rpms
# subscription-manager repos --enable=rhel-7-server-rhceph-4-tools-rpmsCopy to Clipboard Copied! Toggle word wrap Toggle overflow Once the Red Hat Ceph Storage 4 package is enabled, update the node and restart the
ceph-rgwdaemon:yum update -y systemctl restart ceph-rgw@<rgw-target>
# yum update -y # systemctl restart ceph-rgw@<rgw-target>Copy to Clipboard Copied! Toggle word wrap Toggle overflow Replace
<rgw-target>with the rgw target to restart.For the administration node, execute:
subscription-manager repos --enable=rhel-7-server-rhceph-4-tools-rpms yum update -y
# subscription-manager repos --enable=rhel-7-server-rhceph-4-tools-rpms # yum update -yCopy to Clipboard Copied! Toggle word wrap Toggle overflow Ensure the cluster is in a healthy and clean state.
ceph health HEALTH_OK
# ceph health HEALTH_OKCopy to Clipboard Copied! Toggle word wrap Toggle overflow Optional: On client nodes, restart any applications that depend on the Ceph client-side libraries.
NoteIf you are upgrading OpenStack Nova compute nodes that have running QEMU or KVM instances or use a dedicated QEMU or KVM client, stop and start the QEMU or KVM instance because restarting the instance does not work in this case.
7.5. Manually upgrading the Ceph File System Metadata Server nodes
You can manually upgrade the Ceph File System (CephFS) Metadata Server (MDS) software on a Red Hat Ceph Storage cluster running either Red Hat Enterprise Linux 7 or 8.
Before you upgrade the storage cluster, reduce the number of active MDS ranks to one per file system. This eliminates any possible version conflicts between multiple MDS. In addition, take all standby nodes offline before upgrading.
This is because the MDS cluster does not possess built-in versioning or file system flags. Without these features, multiple MDS might communicate using different versions of the MDS software, and could cause assertions or other faults to occur.
Prerequisites
- A running Red Hat Ceph Storage cluster.
- The nodes are using Red Hat Ceph Storage version 3.3z64 or 4.1.
- Root-level access to all nodes in the storage cluster.
The underlying XFS filesystem must be formatted with ftype=1 or with d_type support. Run the command xfs_info /var to ensure the ftype is set to 1. If the value of ftype is not 1, attach a new disk or create a volume. On top of this new device, create a new XFS filesystem and mount it on /var/lib/containers.
Starting with Red Hat Enterprise Linux 8.0, mkfs.xfs enables ftype=1 by default.
Procedure
Reduce the number of active MDS ranks to 1:
Syntax
ceph fs set FILE_SYSTEM_NAME max_mds 1
ceph fs set FILE_SYSTEM_NAME max_mds 1Copy to Clipboard Copied! Toggle word wrap Toggle overflow Example
ceph fs set fs1 max_mds 1
[root@mds ~]# ceph fs set fs1 max_mds 1Copy to Clipboard Copied! Toggle word wrap Toggle overflow Wait for the cluster to stop all of the MDS ranks. When all of the MDS have stopped, only rank 0 should be active. The rest should be in standby mode. Check the status of the file system:
ceph status
[root@mds ~]# ceph statusCopy to Clipboard Copied! Toggle word wrap Toggle overflow Use
systemctlto take all standby MDS offline:systemctl stop ceph-mds.target
[root@mds ~]# systemctl stop ceph-mds.targetCopy to Clipboard Copied! Toggle word wrap Toggle overflow Confirm that only one MDS is online, and that it has rank 0 for your file system:
ceph status
[root@mds ~]# ceph statusCopy to Clipboard Copied! Toggle word wrap Toggle overflow If you are upgrading from Red Hat Ceph Storage 3 on RHEL 7, disable the Red Hat Ceph Storage 3 tools repository and enable the Red Hat Ceph Storage 4 tools repository:
subscription-manager repos --disable=rhel-7-server-rhceph-3-tools-rpms subscription-manager repos --enable=rhel-7-server-rhceph-4-tools-rpms
[root@mds ~]# subscription-manager repos --disable=rhel-7-server-rhceph-3-tools-rpms [root@mds ~]# subscription-manager repos --enable=rhel-7-server-rhceph-4-tools-rpmsCopy to Clipboard Copied! Toggle word wrap Toggle overflow Update the node and restart the ceph-mds daemon:
yum update -y systemctl restart ceph-mds.target
[root@mds ~]# yum update -y [root@mds ~]# systemctl restart ceph-mds.targetCopy to Clipboard Copied! Toggle word wrap Toggle overflow Follow the same processes for the standby daemons. Disable and enable the tools repositories, and then upgrade and restart each standby MDS:
subscription-manager repos --disable=rhel-7-server-rhceph-3-tools-rpms subscription-manager repos --enable=rhel-7-server-rhceph-4-tools-rpms yum update -y systemctl restart ceph-mds.target
[root@mds ~]# subscription-manager repos --disable=rhel-7-server-rhceph-3-tools-rpms [root@mds ~]# subscription-manager repos --enable=rhel-7-server-rhceph-4-tools-rpms [root@mds ~]# yum update -y [root@mds ~]# systemctl restart ceph-mds.targetCopy to Clipboard Copied! Toggle word wrap Toggle overflow When you have finished restarting all of the MDS in standby, restore the previous value of
max_mdsfor the storage cluster:Syntax
ceph fs set FILE_SYSTEM_NAME max_mds ORIGINAL_VALUE
ceph fs set FILE_SYSTEM_NAME max_mds ORIGINAL_VALUECopy to Clipboard Copied! Toggle word wrap Toggle overflow Example
ceph fs set fs1 max_mds 5
[root@mds ~]# ceph fs set fs1 max_mds 5Copy to Clipboard Copied! Toggle word wrap Toggle overflow
7.6. Additional Resources
- To see the package versions that correlate to 3.3z5 see What are the Red Hat Ceph Storage releases and corresponding Ceph package versions?
Chapter 8. Manually upgrading a Red Hat Ceph Storage cluster and operating system
Normally, using ceph-ansible, it is not possible to upgrade Red Hat Ceph Storage and Red Hat Enterprise Linux to a new major release at the same time. For example, if you are on Red Hat Enterprise Linux 7, using ceph-ansible, you must stay on that version. As a system administrator, you can do this manually, however.
Use this chapter to manually upgrade a Red Hat Ceph Storage cluster at version 4.1 or 3.3z6 running on Red Hat Enterprise Linux 7.9, to a Red Hat Ceph Storage cluster at version 4.2 running on Red Hat Enterprise Linux 8.4.
To upgrade a containerized Red Hat Ceph Storage cluster at version 3.x or 4.x to a version 4.2, see the following three sections, Supported Red Hat Ceph Storage upgrade scenarios, Preparing for an upgrade, and Upgrading the storage cluster using Ansible in the Red Hat Ceph Storage Installation Guide.
To migrate existing systemd templates, run docker-to-podman playbook:
ansible-playbook infrastructure-playbooks/docker-to-podman.yml -i hosts
[user@admin ceph-ansible]$ ansible-playbook infrastructure-playbooks/docker-to-podman.yml -i hostsWhere user is the Ansible user.
If a node is collocated with more than one daemon, follow the specific section in this chapter , for the daemons collocated in the node. For example a node collocated with the Ceph Monitor daemon and the OSD daemon:
see Manually upgrading Ceph Monitor nodes and their operating systems and Manually upgrading Ceph OSD nodes and their operating systems.
Manually upgrading Ceph OSD nodes and their operating systems will not work with encrypted OSD partitions as the Leapp upgrade utility does not support upgrading with OSD encryption.
8.1. Prerequisites
- A running Red Hat Ceph Storage cluster.
- The nodes are running Red Hat Enterprise Linux 7.9.
- The nodes are using Red Hat Ceph Storage version 3.3z6 or 4.1
- Access to the installation source for Red Hat Enterprise Linux 8.3.
8.2. Manually upgrading Ceph Monitor nodes and their operating systems
As a system administrator, you can manually upgrade the Ceph Monitor software on a Red Hat Ceph Storage cluster node and the Red Hat Enterprise Linux operating system to a new major release at the same time.
Perform the procedure on only one Monitor node at a time. To prevent cluster access issues, ensure the current upgraded Monitor node has returned to normal operation prior to proceeding to the next node.
Prerequisites
- A running Red Hat Ceph Storage cluster.
- The nodes are running Red Hat Enterprise Linux 7.9.
- The nodes are using Red Hat Ceph Storage version 3.3z6 or 4.1
- Access to the installation source for Red Hat Enterprise Linux 8.3.
Procedure
Stop the monitor service:
Syntax
systemctl stop ceph-mon@MONITOR_ID
systemctl stop ceph-mon@MONITOR_IDCopy to Clipboard Copied! Toggle word wrap Toggle overflow Replace MONITOR_ID with the Monitor’s ID number.
If using Red Hat Ceph Storage 3, disable the Red Hat Ceph Storage 3 repositories.
Disable the tools repository:
subscription-manager repos --disable=rhel-7-server-rhceph-3-tools-rpms
[root@mon ~]# subscription-manager repos --disable=rhel-7-server-rhceph-3-tools-rpmsCopy to Clipboard Copied! Toggle word wrap Toggle overflow Disable the mon repository:
subscription-manager repos --disable=rhel-7-server-rhceph-3-mon-rpms
[root@mon ~]# subscription-manager repos --disable=rhel-7-server-rhceph-3-mon-rpmsCopy to Clipboard Copied! Toggle word wrap Toggle overflow
If using Red Hat Ceph Storage 4, disable the Red Hat Ceph Storage 4 repositories.
Disable the tools repository:
subscription-manager repos --disable=rhel-7-server-rhceph-4-tools-rpms
[root@mon ~]# subscription-manager repos --disable=rhel-7-server-rhceph-4-tools-rpmsCopy to Clipboard Copied! Toggle word wrap Toggle overflow Disable the mon repository:
subscription-manager repos --disable=rhel-7-server-rhceph-4-mon-rpms
[root@mon ~]# subscription-manager repos --disable=rhel-7-server-rhceph-4-mon-rpmsCopy to Clipboard Copied! Toggle word wrap Toggle overflow
-
Install the
leapputility. See Upgrading from Red Hat Enterprise Linux 7 to Red Hat Enterprise Linux 8. - Run through the leapp preupgrade checks. See Assessing upgradability from the command line.
-
Set
PermitRootLogin yesin/etc/ssh/sshd_config. Restart the OpenSSH SSH daemon:
systemctl restart sshd.service
[root@mon ~]# systemctl restart sshd.serviceCopy to Clipboard Copied! Toggle word wrap Toggle overflow Remove the iSCSI module from the Linux kernel:
modprobe -r iscsi
[root@mon ~]# modprobe -r iscsiCopy to Clipboard Copied! Toggle word wrap Toggle overflow - Perform the upgrade by following Performing the upgrade from RHEL 7 to RHEL 8.
- Reboot the node.
Enable the repositories for Red Hat Ceph Storage 4 for Red Hat Enterprise Linux 8.
Enable the tools repository:
subscription-manager repos --enable=rhceph-4-tools-for-rhel-8-x86_64-rpms
[root@mon ~]# subscription-manager repos --enable=rhceph-4-tools-for-rhel-8-x86_64-rpmsCopy to Clipboard Copied! Toggle word wrap Toggle overflow Enable the mon repository:
subscription-manager repos --enable=rhceph-4-mon-for-rhel-8-x86_64-rpms
[root@mon ~]# subscription-manager repos --enable=rhceph-4-mon-for-rhel-8-x86_64-rpmsCopy to Clipboard Copied! Toggle word wrap Toggle overflow
Install the
ceph-monpackage:dnf install ceph-mon
[root@mon ~]# dnf install ceph-monCopy to Clipboard Copied! Toggle word wrap Toggle overflow If the manager service is colocated with the monitor service, install the
ceph-mgrpackage:dnf install ceph-mgr
[root@mon ~]# dnf install ceph-mgrCopy to Clipboard Copied! Toggle word wrap Toggle overflow -
Restore the
ceph-client-admin.keyringandceph.conffiles from a Monitor node which has not been upgraded yet or from a node that has already had those files restored. Switch any existing CRUSH buckets to the latest bucket type
straw2.ceph osd getcrushmap -o backup-crushmap ceph osd crush set-all-straw-buckets-to-straw2
# ceph osd getcrushmap -o backup-crushmap # ceph osd crush set-all-straw-buckets-to-straw2Copy to Clipboard Copied! Toggle word wrap Toggle overflow Once all the daemons are updated after upgrading from Red Hat Ceph Storage 3 to Red Hat Ceph Storage 4, run the following steps:
Enable the messenger v2 protocol,
msgr2:ceph mon enable-msgr2
ceph mon enable-msgr2Copy to Clipboard Copied! Toggle word wrap Toggle overflow This instructs all Ceph Monitors that bind to the old default port of 6789, to also bind to the new port of 3300.
ImportantEnsure all the Ceph Monitors are upgraded from Red Hat Ceph Storage 3 to Red Hat Ceph Storage 4 before performing any further Ceph Monitor configuration.
Verify the status of the monitor:
ceph mon dump
ceph mon dumpCopy to Clipboard Copied! Toggle word wrap Toggle overflow NoteRunning nautilus OSDs does not bind to their v2 address automatically. They must be restarted.
For each host upgraded from Red Hat Ceph Storage 3 to Red Hat Ceph Storage 4, update the
ceph.conffile to either not specify any monitor port or reference both the v2 and v1 addresses and ports. Import any configuration options inceph.conffile into the storage cluster’s configuration database.Example
ceph config assimilate-conf -i /etc/ceph/ceph.conf
[root@mon ~]# ceph config assimilate-conf -i /etc/ceph/ceph.confCopy to Clipboard Copied! Toggle word wrap Toggle overflow Check the storage cluster’s configuration database.
Example
ceph config dump
[root@mon ~]# ceph config dumpCopy to Clipboard Copied! Toggle word wrap Toggle overflow Optional: After upgrading to Red Hat Ceph Storage 4, create a minimal
ceph.conffile for each host:Example
ceph config generate-minimal-conf > /etc/ceph/ceph.conf.new mv /etc/ceph/ceph.conf.new /etc/ceph/ceph.conf
[root@mon ~]# ceph config generate-minimal-conf > /etc/ceph/ceph.conf.new [root@mon ~]# mv /etc/ceph/ceph.conf.new /etc/ceph/ceph.confCopy to Clipboard Copied! Toggle word wrap Toggle overflow
Install the
leveldbpackage:dnf install leveldb
[root@mon ~]# dnf install leveldbCopy to Clipboard Copied! Toggle word wrap Toggle overflow Start the monitor service:
systemctl start ceph-mon.target
[root@mon ~]# systemctl start ceph-mon.targetCopy to Clipboard Copied! Toggle word wrap Toggle overflow If the manager service is colocated with the monitor service, start the manager service too:
systemctl start ceph-mgr.target
[root@mon ~]# systemctl start ceph-mgr.targetCopy to Clipboard Copied! Toggle word wrap Toggle overflow Verify the monitor service came back up and is in quorum.
ceph -s
[root@mon ~]# ceph -sCopy to Clipboard Copied! Toggle word wrap Toggle overflow On the mon: line under services:, ensure the node is listed as in quorum and not as out of quorum.
Example
mon: 3 daemons, quorum ceph4-mon,ceph4-mon2,ceph4-mon3 (age 2h)
mon: 3 daemons, quorum ceph4-mon,ceph4-mon2,ceph4-mon3 (age 2h)Copy to Clipboard Copied! Toggle word wrap Toggle overflow If the manager service is colocated with the monitor service, verify it is up too:
ceph -s
[root@mon ~]# ceph -sCopy to Clipboard Copied! Toggle word wrap Toggle overflow Look for the manager’s node name on the mgr: line under services.
Example
mgr: ceph4-mon(active, since 2h), standbys: ceph4-mon3, ceph4-mon2
mgr: ceph4-mon(active, since 2h), standbys: ceph4-mon3, ceph4-mon2Copy to Clipboard Copied! Toggle word wrap Toggle overflow - Repeat the above steps on all Monitor nodes until they have all been upgraded.
8.3. Manually upgrading Ceph OSD nodes and their operating systems
As a system administrator, you can manually upgrade the Ceph OSD software on a Red Hat Ceph Storage cluster node and the Red Hat Enterprise Linux operating system to a new major release at the same time.
This procedure should be performed for each OSD node in the Ceph cluster, but typically only for one OSD node at a time. A maximum of one failure domains worth of OSD nodes may be performed in parallel. For example, if per-rack replication is in use, one entire rack’s OSD nodes can be upgraded in parallel. To prevent data access issues, ensure the current OSD node’s OSDs have returned to normal operation and all of the cluster’s PGs are in the active+clean state prior to proceeding to the next OSD.
This procedure will not work with encrypted OSD partitions as the Leapp upgrade utility does not support upgrading with OSD encryption.
If the OSDs were created using ceph-disk, and are still managed by ceph-disk, you must use ceph-volume to take over management of them. This is covered in an optional step below.
Prerequisites
- A running Red Hat Ceph Storage cluster.
- The nodes are running Red Hat Enterprise Linux 7.9.
- The nodes are using Red Hat Ceph Storage version 3.3z6 or 4.0
- Access to the installation source for Red Hat Enterprise Linux 8.3.
Procedure
Set the OSD
nooutflag to prevent OSDs from getting marked down during the migration:ceph osd set noout
ceph osd set nooutCopy to Clipboard Copied! Toggle word wrap Toggle overflow Set the OSD
nobackfill,norecover,norrebalance,noscrubandnodeep-scrubflags to avoid unnecessary load on the cluster and to avoid any data reshuffling when the node goes down for migration:ceph osd set nobackfill ceph osd set norecover ceph osd set norebalance ceph osd set noscrub ceph osd set nodeep-scrub
ceph osd set nobackfill ceph osd set norecover ceph osd set norebalance ceph osd set noscrub ceph osd set nodeep-scrubCopy to Clipboard Copied! Toggle word wrap Toggle overflow Gracefully shut down all the OSD processes on the node:
systemctl stop ceph-osd.target
[root@mon ~]# systemctl stop ceph-osd.targetCopy to Clipboard Copied! Toggle word wrap Toggle overflow If using Red Hat Ceph Storage 3, disable the Red Hat Ceph Storage 3 repositories.
Disable the tools repository:
subscription-manager repos --disable=rhel-7-server-rhceph-3-tools-rpms
[root@mon ~]# subscription-manager repos --disable=rhel-7-server-rhceph-3-tools-rpmsCopy to Clipboard Copied! Toggle word wrap Toggle overflow Disable the osd repository:
subscription-manager repos --disable=rhel-7-server-rhceph-3-osd-rpms
[root@mon ~]# subscription-manager repos --disable=rhel-7-server-rhceph-3-osd-rpmsCopy to Clipboard Copied! Toggle word wrap Toggle overflow
If using Red Hat Ceph Storage 4, disable the Red Hat Ceph Storage 4 repositories.
Disable the tools repository:
subscription-manager repos --disable=rhel-7-server-rhceph-4-tools-rpms
[root@mon ~]# subscription-manager repos --disable=rhel-7-server-rhceph-4-tools-rpmsCopy to Clipboard Copied! Toggle word wrap Toggle overflow Disable the osd repository:
subscription-manager repos --disable=rhel-7-server-rhceph-4-osd-rpms
[root@mon ~]# subscription-manager repos --disable=rhel-7-server-rhceph-4-osd-rpmsCopy to Clipboard Copied! Toggle word wrap Toggle overflow
-
Install the
leapputility. See Upgrading from Red Hat Enterprise Linux 7 to Red Hat Enterprise Linux 8. - Run through the leapp preupgrade checks. See Assessing upgradability from the command line.
-
Set
PermitRootLogin yesin/etc/ssh/sshd_config. Restart the OpenSSH SSH daemon:
systemctl restart sshd.service
[root@mon ~]# systemctl restart sshd.serviceCopy to Clipboard Copied! Toggle word wrap Toggle overflow Remove the iSCSI module from the Linux kernel:
modprobe -r iscsi
[root@mon ~]# modprobe -r iscsiCopy to Clipboard Copied! Toggle word wrap Toggle overflow - Perform the upgrade by following Performing the upgrade from RHEL 7 to RHEL 8.
- Reboot the node.
Enable the repositories for Red Hat Ceph Storage 4 for Red Hat Enterprise Linux 8.
Enable the tools repository:
subscription-manager repos --enable=rhceph-4-tools-for-rhel-8-x86_64-rpms
[root@mon ~]# subscription-manager repos --enable=rhceph-4-tools-for-rhel-8-x86_64-rpmsCopy to Clipboard Copied! Toggle word wrap Toggle overflow Enable the osd repository:
subscription-manager repos --enable=rhceph-4-osd-for-rhel-8-x86_64-rpms
[root@mon ~]# subscription-manager repos --enable=rhceph-4-osd-for-rhel-8-x86_64-rpmsCopy to Clipboard Copied! Toggle word wrap Toggle overflow
Install the
ceph-osdpackage:dnf install ceph-osd
[root@mon ~]# dnf install ceph-osdCopy to Clipboard Copied! Toggle word wrap Toggle overflow Install the
leveldbpackage:dnf install leveldb
[root@mon ~]# dnf install leveldbCopy to Clipboard Copied! Toggle word wrap Toggle overflow -
Restore the
ceph.conffile from a node which has not been upgraded yet or from a node that has already had those files restored. Unset the
noout,nobackfill,norecover,norrebalance,noscrubandnodeep-scrubflags:Copy to Clipboard Copied! Toggle word wrap Toggle overflow Switch any existing CRUSH buckets to the latest bucket type
straw2.ceph osd getcrushmap -o backup-crushmap ceph osd crush set-all-straw-buckets-to-straw2
# ceph osd getcrushmap -o backup-crushmap # ceph osd crush set-all-straw-buckets-to-straw2Copy to Clipboard Copied! Toggle word wrap Toggle overflow Optional: If the OSDs were created using
ceph-disk, and are still managed byceph-disk, you must useceph-volumeto take over management of them.Mount each object storage device:
Syntax
/dev/DRIVE /var/lib/ceph/osd/ceph-OSD_ID
/dev/DRIVE /var/lib/ceph/osd/ceph-OSD_IDCopy to Clipboard Copied! Toggle word wrap Toggle overflow Replace DRIVE with the storage device name and partition number.
Replace OSD_ID with the OSD ID.
Example
mount /dev/sdb1 /var/lib/ceph/osd/ceph-0
[root@mon ~]# mount /dev/sdb1 /var/lib/ceph/osd/ceph-0Copy to Clipboard Copied! Toggle word wrap Toggle overflow Verify the ID_NUMBER is correct.
Syntax
cat /var/lib/ceph/osd/ceph-OSD_ID/whoami
cat /var/lib/ceph/osd/ceph-OSD_ID/whoamiCopy to Clipboard Copied! Toggle word wrap Toggle overflow Replace OSD_ID with the OSD ID.
Example
[root@mon ~]# cat /var/lib/ceph/osd/ceph-0/whoami 0
[root@mon ~]# cat /var/lib/ceph/osd/ceph-0/whoami 0Copy to Clipboard Copied! Toggle word wrap Toggle overflow Repeat the above steps for any additional object store devices.
Scan the newly mounted devices:
Syntax
ceph-volume simple scan /var/lib/ceph/osd/ceph-OSD_ID
ceph-volume simple scan /var/lib/ceph/osd/ceph-OSD_IDCopy to Clipboard Copied! Toggle word wrap Toggle overflow Replace OSD_ID with the OSD ID.
Example
Copy to Clipboard Copied! Toggle word wrap Toggle overflow Repeat the above step for any additional object store devices.
Activate the device:
Syntax
ceph-volume simple activate OSD_ID UUID
ceph-volume simple activate OSD_ID UUIDCopy to Clipboard Copied! Toggle word wrap Toggle overflow Replace OSD_ID with the OSD ID and UUID with the UUID printed in the scan output from earlier.
Example
Copy to Clipboard Copied! Toggle word wrap Toggle overflow Repeat the above step for any additional object store devices.
Optional: If your OSDs were created with
ceph-volumeand you did not complete the previous step, start the OSD service now:systemctl start ceph-osd.target
[root@mon ~]# systemctl start ceph-osd.targetCopy to Clipboard Copied! Toggle word wrap Toggle overflow Activate the OSDs:
BlueStore
ceph-volume lvm activate --all
[root@mon ~]# ceph-volume lvm activate --allCopy to Clipboard Copied! Toggle word wrap Toggle overflow Verify that the OSDs are
upandin, and that they are in theactive+cleanstate.ceph -s
[root@mon ~]# ceph -sCopy to Clipboard Copied! Toggle word wrap Toggle overflow On the osd: line under services:, ensure that all OSDs are
upandin:Example
osd: 3 osds: 3 up (since 8s), 3 in (since 3M)
osd: 3 osds: 3 up (since 8s), 3 in (since 3M)Copy to Clipboard Copied! Toggle word wrap Toggle overflow - Repeat the above steps on all OSD nodes until they have all been upgraded.
If upgrading from Red Hat Ceph Storage 3, disallow pre-Nautilus OSDs and enable the Nautilus-only functionality:
ceph osd require-osd-release nautilus
[root@mon ~]# ceph osd require-osd-release nautilusCopy to Clipboard Copied! Toggle word wrap Toggle overflow NoteFailure to execute this step makes it impossible for OSDs to communicate after
msgrv2is enabled.Once all the daemons are updated after upgrading from Red Hat Ceph Storage 3 to Red Hat Ceph Storage 4, run the following steps:
Enable the messenger v2 protocol,
msgr2:ceph mon enable-msgr2
[root@mon ~]# ceph mon enable-msgr2Copy to Clipboard Copied! Toggle word wrap Toggle overflow This instructs all Ceph Monitors that bind to the old default port of 6789, to also bind to the new port of 3300.
On every node, import any configuration options in
ceph.conffile into the storage cluster’s configuration database:Example
ceph config assimilate-conf -i /etc/ceph/ceph.conf
[root@mon ~]# ceph config assimilate-conf -i /etc/ceph/ceph.confCopy to Clipboard Copied! Toggle word wrap Toggle overflow NoteWhen you assimilate a config into your monitors, for example, if you have different config values set for the same set of options, the end result depends on the order in which the files are assimilated.
Check the storage cluster’s configuration database:
Example
ceph config dump
[root@mon ~]# ceph config dumpCopy to Clipboard Copied! Toggle word wrap Toggle overflow
8.4. Manually upgrading Ceph Object Gateway nodes and their operating systems
As a system administrator, you can manually upgrade the Ceph Object Gateway (RGW) software on a Red Hat Ceph Storage cluster node and the Red Hat Enterprise Linux operating system to a new major release at the same time.
This procedure should be performed for each RGW node in the Ceph cluster, but only for one RGW node at a time. Ensure the current upgraded RGW has returned to normal operation prior to proceeding to the next node to prevent any client access issues.
Prerequisites
- A running Red Hat Ceph Storage cluster.
- The nodes are running Red Hat Enterprise Linux 7.9.
- The nodes are using Red Hat Ceph Storage version 3.3z6 or 4.1
- Access to the installation source for Red Hat Enterprise Linux 8.3.
Procedure
Stop the Ceph Object Gateway service:
systemctl stop ceph-radosgw.target
# systemctl stop ceph-radosgw.targetCopy to Clipboard Copied! Toggle word wrap Toggle overflow If using Red Hat Ceph Storage 3, disable the Red Hat Ceph Storage 3 tool repository:
subscription-manager repos --disable=rhel-7-server-rhceph-3-tools-rpms
# subscription-manager repos --disable=rhel-7-server-rhceph-3-tools-rpmsCopy to Clipboard Copied! Toggle word wrap Toggle overflow If using Red Hat Ceph Storage 4, disable the Red Hat Ceph Storage 4 tools repository:
subscription-manager repos --disable=rhel-7-server-rhceph-4-tools-rpms
# subscription-manager repos --disable=rhel-7-server-rhceph-4-tools-rpmsCopy to Clipboard Copied! Toggle word wrap Toggle overflow -
Install the
leapputility. See Upgrading from Red Hat Enterprise Linux 7 to Red Hat Enterprise Linux 8. - Run through the leapp preupgrade checks. See Assessing upgradability from the command line.
-
Set
PermitRootLogin yesin/etc/ssh/sshd_config. Restart the OpenSSH SSH daemon:
systemctl restart sshd.service
# systemctl restart sshd.serviceCopy to Clipboard Copied! Toggle word wrap Toggle overflow Remove the iSCSI module from the Linux kernel:
modprobe -r iscsi
# modprobe -r iscsiCopy to Clipboard Copied! Toggle word wrap Toggle overflow - Perform the upgrade by following Performing the upgrade from RHEL 7 to RHEL 8.
- Reboot the node.
Enable the tools repositories for Red Hat Ceph Storage 4 for Red Hat Enterprise Linux 8.
subscription-manager repos --enable=rhceph-4-tools-for-rhel-8-x86_64-rpms
# subscription-manager repos --enable=rhceph-4-tools-for-rhel-8-x86_64-rpmsCopy to Clipboard Copied! Toggle word wrap Toggle overflow Install the
ceph-radosgwpackage:dnf install ceph-radosgw
# dnf install ceph-radosgwCopy to Clipboard Copied! Toggle word wrap Toggle overflow - Optional: Install the packages for any Ceph services that are colocated on this node. Enable additional Ceph repositories if needed.
Optional: Install the
leveldbpackage which is needed by other Ceph services.dnf install leveldb
# dnf install leveldbCopy to Clipboard Copied! Toggle word wrap Toggle overflow -
Restore the
ceph-client-admin.keyringandceph.conffiles from a node which has not been upgraded yet or from a node that has already had those files restored. Start the RGW service:
systemctl start ceph-radosgw.target
# systemctl start ceph-radosgw.targetCopy to Clipboard Copied! Toggle word wrap Toggle overflow Switch any existing CRUSH buckets to the latest bucket type
straw2.ceph osd getcrushmap -o backup-crushmap ceph osd crush set-all-straw-buckets-to-straw2
# ceph osd getcrushmap -o backup-crushmap # ceph osd crush set-all-straw-buckets-to-straw2Copy to Clipboard Copied! Toggle word wrap Toggle overflow Verify the daemon is active:
ceph -s
# ceph -sCopy to Clipboard Copied! Toggle word wrap Toggle overflow There is an rgw: line under services:.
Example
rgw: 1 daemon active (jb-ceph4-rgw.rgw0)
rgw: 1 daemon active (jb-ceph4-rgw.rgw0)Copy to Clipboard Copied! Toggle word wrap Toggle overflow - Repeat the above steps on all Ceph Object Gateway nodes until they have all been upgraded.
Additional Resources
- See Manually upgrading a Red Hat Ceph Storage cluster and operating system in the Installation Guide for more information.
- See Upgrading from Red Hat Enterprise Linux 7 to Red Hat Enterprise Linux 8 for more information.
8.5. Manually upgrading the Ceph Dashboard node and its operating system
As a system administrator, you can manually upgrade the Ceph Dashboard software on a Red Hat Ceph Storage cluster node and the Red Hat Enterprise Linux operating system to a new major release at the same time.
Prerequisites
- A running Red Hat Ceph Storage cluster.
- The node is running Red Hat Enterprise Linux 7.9.
- The node is running Red Hat Ceph Storage version 3.3z6 or 4.1
- Access to the installation source for Red Hat Enterprise Linux 8.3.
Procedure
Uninstall the existing dashboard from the cluster.
Change to the
/usr/share/cephmetrics-ansibledirectory:cd /usr/share/cephmetrics-ansible
# cd /usr/share/cephmetrics-ansibleCopy to Clipboard Copied! Toggle word wrap Toggle overflow Run the
purge.ymlAnsible playbook:ansible-playbook -v purge.yml
# ansible-playbook -v purge.ymlCopy to Clipboard Copied! Toggle word wrap Toggle overflow
If using Red Hat Ceph Storage 3, disable the Red Hat Ceph Storage 3 tools repository:
subscription-manager repos --disable=rhel-7-server-rhceph-3-tools-rpms
# subscription-manager repos --disable=rhel-7-server-rhceph-3-tools-rpmsCopy to Clipboard Copied! Toggle word wrap Toggle overflow If using Red Hat Ceph Storage 4, disable the Red Hat Ceph Storage 4 tools repository:
subscription-manager repos --disable=rhel-7-server-rhceph-4-tools-rpms
# subscription-manager repos --disable=rhel-7-server-rhceph-4-tools-rpmsCopy to Clipboard Copied! Toggle word wrap Toggle overflow -
Install the
leapputility. See Upgrading from Red Hat Enterprise Linux 7 to Red Hat Enterprise Linux 8. -
Run through the
leapppreupgrade checks. See Assessing upgradability from the command line. -
Set
PermitRootLogin yesin/etc/ssh/sshd_config. Restart the OpenSSH SSH daemon:
systemctl restart sshd.service
# systemctl restart sshd.serviceCopy to Clipboard Copied! Toggle word wrap Toggle overflow Remove the iSCSI module from the Linux kernel:
modprobe -r iscsi
# modprobe -r iscsiCopy to Clipboard Copied! Toggle word wrap Toggle overflow - Perform the upgrade by following Performing the upgrade from RHEL 7 to RHEL 8.
- Reboot the node.
Enable the tools repository for Red Hat Ceph Storage 4 for Red Hat Enterprise Linux 8:
subscription-manager repos --enable=rhceph-4-tools-for-rhel-8-x86_64-rpms
# subscription-manager repos --enable=rhceph-4-tools-for-rhel-8-x86_64-rpmsCopy to Clipboard Copied! Toggle word wrap Toggle overflow Enable the Ansible repository:
subscription-manager repos --enable=ansible-2.9-for-rhel-8-x86_64-rpms
# subscription-manager repos --enable=ansible-2.9-for-rhel-8-x86_64-rpmsCopy to Clipboard Copied! Toggle word wrap Toggle overflow -
Configure
ceph-ansibleto manage the cluster. It will install the dashboard. Follow the instructions in Installing Red Hat Ceph Storage using Ansible, including the prerequisites. -
After you run
ansible-playbook site.ymlas a part of the above procedures, the URL for the dashboard will be printed. See Installing dashboard using Ansible in the Dashboard guide for more information on locating the URL and accessing the dashboard.
Additional Resources
- See Manually upgrading a Red Hat Ceph Storage cluster and operating system in the Installation Guide for more information.
- See Upgrading from Red Hat Enterprise Linux 7 to Red Hat Enterprise Linux 8 for more information.
- See Installing dashboard using Ansible in the Dashboard guide for more information.
8.6. Manually upgrading Ceph Ansible nodes and reconfiguring settings
Manually upgrade the Ceph Ansible software on a Red Hat Ceph Storage cluster node and the Red Hat Enterprise Linux operating system to a new major release at the same time. This procedure applies to both bare-metal and container deployments, unless specified.
Before upgrading hostOS on the Ceph Ansible node, take a backup of group_vars and hosts file. Use the created backup before re-configuring the Ceph Ansible node.
Prerequisites
- A running Red Hat Ceph Storage cluster.
- The node is running Red Hat Enterprise Linux 7.9.
- The node is running Red Hat Ceph Storage version 3.3z6 or 4.1
- Access to the installation source for Red Hat Enterprise Linux 8.3.
Procedure
Enable the tools repository for Red Hat Ceph Storage 4 for Red Hat Enterprise Linux 8:
subscription-manager repos --enable=rhceph-4-tools-for-rhel-8-x86_64-rpms
[root@dashboard ~]# subscription-manager repos --enable=rhceph-4-tools-for-rhel-8-x86_64-rpmsCopy to Clipboard Copied! Toggle word wrap Toggle overflow Enable the Ansible repository:
subscription-manager repos --enable=ansible-2.9-for-rhel-8-x86_64-rpms
[root@dashboard ~]# subscription-manager repos --enable=ansible-2.9-for-rhel-8-x86_64-rpmsCopy to Clipboard Copied! Toggle word wrap Toggle overflow -
Configure
ceph-ansibleto manage the storage cluster. It will install the dashboard. Follow the instructions in Installing Red Hat Ceph Storage using Ansible, including the prerequisites. -
After you run
ansible-playbook site.ymlas a part of the above procedures, the URL for the dashboard will be printed. See Installing dashboard using Ansible in the Dashboard guide for more information on locating the URL and accessing the dashboard.
Additional Resources
- See Manually upgrading a Red Hat Ceph Storage cluster and operating system in the Installation Guide for more information.
- See Upgrading from Red Hat Enterprise Linux 7 to Red Hat Enterprise Linux 8 for more information.
- See Installing dashboard using Ansible in the Dashboard guide for more information.
8.7. Manually upgrading the Ceph File System Metadata Server nodes and their operating systems
You can manually upgrade the Ceph File System (CephFS) Metadata Server (MDS) software on a Red Hat Ceph Storage cluster and the Red Hat Enterprise Linux operating system to a new major release at the same time.
Before you upgrade the storage cluster, reduce the number of active MDS ranks to one per file system. This eliminates any possible version conflicts between multiple MDS. In addition, take all standby nodes offline before upgrading.
This is because the MDS cluster does not possess built-in versioning or file system flags. Without these features, multiple MDS might communicate using different versions of the MDS software, and could cause assertions or other faults to occur.
Prerequisites
- A running Red Hat Ceph Storage cluster.
- The nodes are running Red Hat Enterprise Linux 7.9.
- The nodes are using Red Hat Ceph Storage version 3.3z6 or 4.1.
- Access to the installation source for Red Hat Enterprise Linux 8.3.
- Root-level access to all nodes in the storage cluster.
The underlying XFS filesystem must be formatted with ftype=1 or with d_type support. Run the command xfs_info /var to ensure the ftype is set to 1. If the value of ftype is not 1, attach a new disk or create a volume. On top of this new device, create a new XFS filesystem and mount it on /var/lib/containers.
Starting with Red Hat Enterprise Linux 8, mkfs.xfs enables ftype=1 by default.
Procedure
Reduce the number of active MDS ranks to 1:
Syntax
ceph fs set FILE_SYSTEM_NAME max_mds 1
ceph fs set FILE_SYSTEM_NAME max_mds 1Copy to Clipboard Copied! Toggle word wrap Toggle overflow Example
ceph fs set fs1 max_mds 1
[root@mds ~]# ceph fs set fs1 max_mds 1Copy to Clipboard Copied! Toggle word wrap Toggle overflow Wait for the cluster to stop all of the MDS ranks. When all of the MDS have stopped, only rank 0 should be active. The rest should be in standby mode. Check the status of the file system:
ceph status
[root@mds ~]# ceph statusCopy to Clipboard Copied! Toggle word wrap Toggle overflow Use
systemctlto take all standby MDS offline:systemctl stop ceph-mds.target
[root@mds ~]# systemctl stop ceph-mds.targetCopy to Clipboard Copied! Toggle word wrap Toggle overflow Confirm that only one MDS is online, and that it has rank 0 for the file system:
ceph status
[root@mds ~]# ceph statusCopy to Clipboard Copied! Toggle word wrap Toggle overflow Disable the tools repository for the operating system version:
If you are upgrading from Red Hat Ceph Storage 3 on RHEL 7, disable the Red Hat Ceph Storage 3 tools repository:
subscription-manager repos --disable=rhel-7-server-rhceph-3-tools-rpms
[root@mds ~]# subscription-manager repos --disable=rhel-7-server-rhceph-3-tools-rpmsCopy to Clipboard Copied! Toggle word wrap Toggle overflow If you are using Red Hat Ceph Storage 4, disable the Red Hat Ceph Storage 4 tools repository:
subscription-manager repos --disable=rhel-7-server-rhceph-4-tools-rpms
[root@mds ~]# subscription-manager repos --disable=rhel-7-server-rhceph-4-tools-rpmsCopy to Clipboard Copied! Toggle word wrap Toggle overflow
-
Install the
leapputility. For more information aboutleapp, refer to Upgrading from Red Hat Enterprise Linux 7 to Red Hat Enterprise Linux 8. -
Run through the
leapppreupgrade checks. For more information, refer to Assessing upgradability from the command line. -
Edit
/etc/ssh/sshd_configand setPermitRootLogintoyes. Restart the OpenSSH SSH daemon:
systemctl restart sshd.service
[root@mds ~]# systemctl restart sshd.serviceCopy to Clipboard Copied! Toggle word wrap Toggle overflow Remove the iSCSI module from the Linux kernel:
modprobe -r iscsi
[root@mds ~]# modprobe -r iscsiCopy to Clipboard Copied! Toggle word wrap Toggle overflow - Perform the upgrade. See Performing the upgrade from RHEL 7 to RHEL 8.
- Reboot the MDS node.
Enable the tools repositories for Red Hat Ceph Storage 4 for Red Hat Enterprise Linux 8:
subscription-manager repos --enable=rhceph-4-tools-for-rhel-8-x86_64-rpms
[root@mds ~]# subscription-manager repos --enable=rhceph-4-tools-for-rhel-8-x86_64-rpmsCopy to Clipboard Copied! Toggle word wrap Toggle overflow Install the
ceph-mdspackage:dnf install ceph-mds -y
[root@mds ~]# dnf install ceph-mds -yCopy to Clipboard Copied! Toggle word wrap Toggle overflow - Optional: Install the packages for any Ceph services that are colocated on this node. Enable additional Ceph repositories, if needed.
Optional: Install the
leveldbpackage, which is needed by other Ceph services:dnf install leveldb
[root@mds ~]# dnf install leveldbCopy to Clipboard Copied! Toggle word wrap Toggle overflow -
Restore the
ceph-client-admin.keyringandceph.conffiles from a node that has not been upgraded yet, or from a node that has already had those files restored. Switch any existing CRUSH buckets to the latest bucket type
straw2.ceph osd getcrushmap -o backup-crushmap ceph osd crush set-all-straw-buckets-to-straw2
# ceph osd getcrushmap -o backup-crushmap # ceph osd crush set-all-straw-buckets-to-straw2Copy to Clipboard Copied! Toggle word wrap Toggle overflow Start the MDS service:
systemctl restart ceph-mds.target
[root@mds ~]# systemctl restart ceph-mds.targetCopy to Clipboard Copied! Toggle word wrap Toggle overflow Verify that the daemon is active:
ceph -s
[root@mds ~]# ceph -sCopy to Clipboard Copied! Toggle word wrap Toggle overflow - Follow the same processes for the standby daemons.
When you have finished restarting all of the MDS in standby, restore the previous value of
max_mdsfor your cluster:Syntax
ceph fs set FILE_SYSTEM_NAME max_mds ORIGINAL_VALUE
ceph fs set FILE_SYSTEM_NAME max_mds ORIGINAL_VALUECopy to Clipboard Copied! Toggle word wrap Toggle overflow Example
ceph fs set fs1 max_mds 5
[root@mds ~]# ceph fs set fs1 max_mds 5Copy to Clipboard Copied! Toggle word wrap Toggle overflow
8.8. Recovering from an operating system upgrade failure on an OSD node
As a system administrator, if you have a failure when using the procedure Manually upgrading Ceph OSD nodes and their operating systems, you can recover from the failure using the following procedure. In the procedure you will do a fresh install of Red Hat Enterprise Linux 8.4 on the node and still be able to recover the OSDs without any major backfilling of data besides the writes to the OSDs that were down while they were out.
DO NOT touch the media backing the OSDs or their respective wal.db or block.db databases.
Prerequisites
- A running Red Hat Ceph Storage cluster.
- An OSD node that failed to upgrade.
- Access to the installation source for Red Hat Enterprise Linux 8.4.
Procedure
Perform a standard installation of Red Hat Enterprise Linux 8.4 on the failed node and enable the Red Hat Enterprise Linux repositories.
Enable the repositories for Red Hat Ceph Storage 4 for Red Hat Enterprise Linux 8.
Enable the tools repository:
subscription-manager repos --enable=rhceph-4-tools-for-rhel-8-x86_64-rpms
# subscription-manager repos --enable=rhceph-4-tools-for-rhel-8-x86_64-rpmsCopy to Clipboard Copied! Toggle word wrap Toggle overflow Enable the osd repository:
subscription-manager repos --enable=rhceph-4-osd-for-rhel-8-x86_64-rpms
# subscription-manager repos --enable=rhceph-4-osd-for-rhel-8-x86_64-rpmsCopy to Clipboard Copied! Toggle word wrap Toggle overflow
Install the
ceph-osdpackage:dnf install ceph-osd
# dnf install ceph-osdCopy to Clipboard Copied! Toggle word wrap Toggle overflow -
Restore the
ceph.conffile to/etc/cephfrom a node which has not been upgraded yet or from a node that has already had those files restored. Start the OSD service:
systemctl start ceph-osd.target
# systemctl start ceph-osd.targetCopy to Clipboard Copied! Toggle word wrap Toggle overflow Activate the object store devices:
ceph-volume lvm activate --all
ceph-volume lvm activate --allCopy to Clipboard Copied! Toggle word wrap Toggle overflow Watch the recovery of the OSDs and cluster backfill writes to recovered OSDs:
ceph -w
# ceph -wCopy to Clipboard Copied! Toggle word wrap Toggle overflow Monitor the output until all PGs are in state
active+clean.
Additional Resources
- See Manually upgrading a Red Hat Ceph Storage cluster and operating system in the Installation Guide for more information.
- See Upgrading from Red Hat Enterprise Linux 7 to Red Hat Enterprise Linux 8 for more information.
8.9. Additional Resources
- If you do not need to upgrade the operating system to a new major release, see Upgrading a Red Hat Ceph Storage cluster.
Chapter 9. What to do next?
This is only the beginning of what Red Hat Ceph Storage can do to help you meet the challenging storage demands of the modern data center. Here are links to more information on a variety of topics:
- Benchmarking performance and accessing performance counters, see the Benchmarking Performance chapter in the Administration Guide for Red Hat Ceph Storage 4.
- Creating and managing snapshots, see the Snapshots chapter in the Block Device Guide for Red Hat Ceph Storage 4.
- Expanding the Red Hat Ceph Storage cluster, see the Managing the storage cluster size chapter in the Operations Guide for Red Hat Ceph Storage 4.
- Mirroring Ceph Block Devices, see the Block Device Mirroring chapter in the Block Device Guide for Red Hat Ceph Storage 4.
- Process management, see the Process Management chapter in the Administration Guide for Red Hat Ceph Storage 4.
- Tunable parameters, see the Configuration Guide for Red Hat Ceph Storage 4.
- Using Ceph as the back end storage for OpenStack, see the Back-ends section in the Storage Guide for Red Hat OpenStack Platform.
- Monitor the health and capacity of the Red Hat Ceph Storage cluster with the Ceph Dashboard. See the Dashboard Guide for additional details.
Appendix A. Troubleshooting
A.1. Ansible stops installation because it detects less devices than expected
The Ansible automation application stops the installation process and returns the following error:
What this means:
When the osd_auto_discovery parameter is set to true in the /usr/share/ceph-ansible/group_vars/osds.yml file, Ansible automatically detects and configures all the available devices. During this process, Ansible expects that all OSDs use the same devices. The devices get their names in the same order in which Ansible detects them. If one of the devices fails on one of the OSDs, Ansible fails to detect the failed device and stops the whole installation process.
Example situation:
-
Three OSD nodes (
host1,host2,host3) use the/dev/sdb,/dev/sdc, anddev/sdddisks. -
On
host2, the/dev/sdcdisk fails and is removed. -
Upon the next reboot, Ansible fails to detect the removed
/dev/sdcdisk and expects that only two disks will be used forhost2,/dev/sdband/dev/sdc(formerly/dev/sdd). - Ansible stops the installation process and returns the above error message.
To fix the problem:
In the /etc/ansible/hosts file, specify the devices used by the OSD node with the failed disk (host2 in the Example situation above):
[osds] host1 host2 devices="[ '/dev/sdb', '/dev/sdc' ]" host3
[osds]
host1
host2 devices="[ '/dev/sdb', '/dev/sdc' ]"
host3See Chapter 5, Installing Red Hat Ceph Storage using Ansible for details.
Appendix B. Using the command-line interface to install the Ceph software
As a storage administrator, you can choose to manually install various components of the Red Hat Ceph Storage software.
B.1. Installing the Ceph Command Line Interface
The Ceph command-line interface (CLI) enables administrators to execute Ceph administrative commands. The CLI is provided by the ceph-common package and includes the following utilities:
-
ceph -
ceph-authtool -
ceph-dencoder -
rados
Prerequisites
-
A running Ceph storage cluster, preferably in the
active + cleanstate.
Procedure
On the client node, enable the Red Hat Ceph Storage 4 Tools repository:
subscription-manager repos --enable=rhceph-4-tools-for-rhel-8-x86_64-rpms
[root@gateway ~]# subscription-manager repos --enable=rhceph-4-tools-for-rhel-8-x86_64-rpmsCopy to Clipboard Copied! Toggle word wrap Toggle overflow On the client node, install the
ceph-commonpackage:yum install ceph-common
# yum install ceph-commonCopy to Clipboard Copied! Toggle word wrap Toggle overflow From the initial monitor node, copy the Ceph configuration file, in this case
ceph.conf, and the administration keyring to the client node:Syntax
scp /etc/ceph/ceph.conf <user_name>@<client_host_name>:/etc/ceph/ scp /etc/ceph/ceph.client.admin.keyring <user_name>@<client_host_name:/etc/ceph/
# scp /etc/ceph/ceph.conf <user_name>@<client_host_name>:/etc/ceph/ # scp /etc/ceph/ceph.client.admin.keyring <user_name>@<client_host_name:/etc/ceph/Copy to Clipboard Copied! Toggle word wrap Toggle overflow Example
scp /etc/ceph/ceph.conf root@node1:/etc/ceph/ scp /etc/ceph/ceph.client.admin.keyring root@node1:/etc/ceph/
# scp /etc/ceph/ceph.conf root@node1:/etc/ceph/ # scp /etc/ceph/ceph.client.admin.keyring root@node1:/etc/ceph/Copy to Clipboard Copied! Toggle word wrap Toggle overflow Replace
<client_host_name>with the host name of the client node.
B.2. Manually Installing Red Hat Ceph Storage
Red Hat does not support or test upgrading manually deployed clusters. Therefore, Red Hat recommends to use Ansible to deploy a new cluster with Red Hat Ceph Storage 4. See Chapter 5, Installing Red Hat Ceph Storage using Ansible for details.
You can use command-line utilities, such as Yum, to upgrade manually deployed clusters, but Red Hat does not support or test this approach.
All Ceph clusters require at least one monitor, and at least as many OSDs as copies of an object stored on the cluster. Red Hat recommends using three monitors for production environments and a minimum of three Object Storage Devices (OSD).
Bootstrapping the initial monitor is the first step in deploying a Ceph storage cluster. Ceph monitor deployment also sets important criteria for the entire cluster, such as:
- The number of replicas for pools
- The number of placement groups per OSD
- The heartbeat intervals
- Any authentication requirement
Most of these values are set by default, so it is useful to know about them when setting up the cluster for production.
Installing a Ceph storage cluster by using the command line interface involves these steps:
- Bootstrapping the initial Monitor node
- Adding an Object Storage Device (OSD) node
Monitor Bootstrapping
Bootstrapping a Monitor and by extension a Ceph storage cluster, requires the following data:
- Unique Identifier
-
The File System Identifier (
fsid) is a unique identifier for the cluster. Thefsidwas originally used when the Ceph storage cluster was principally used for the Ceph file system. Ceph now supports native interfaces, block devices, and object storage gateway interfaces too, sofsidis a bit of a misnomer. - Monitor Name
-
Each Monitor instance within a cluster has a unique name. In common practice, the Ceph Monitor name is the node name. Red Hat recommend one Ceph Monitor per node, and no co-locating the Ceph OSD daemons with the Ceph Monitor daemon. To retrieve the short node name, use the
hostname -scommand. - Monitor Map
Bootstrapping the initial Monitor requires you to generate a Monitor map. The Monitor map requires:
-
The File System Identifier (
fsid) -
The cluster name, or the default cluster name of
cephis used - At least one host name and its IP address.
-
The File System Identifier (
- Monitor Keyring
- Monitors communicate with each other by using a secret key. You must generate a keyring with a Monitor secret key and provide it when bootstrapping the initial Monitor.
- Administrator Keyring
-
To use the
cephcommand-line interface utilities, create theclient.adminuser and generate its keyring. Also, you must add theclient.adminuser to the Monitor keyring.
The foregoing requirements do not imply the creation of a Ceph configuration file. However, as a best practice, Red Hat recommends creating a Ceph configuration file and populating it with the fsid, the mon initial members and the mon host settings at a minimum.
You can get and set all of the Monitor settings at runtime as well. However, the Ceph configuration file might contain only those settings which overrides the default values. When you add settings to a Ceph configuration file, these settings override the default settings. Maintaining those settings in a Ceph configuration file makes it easier to maintain the cluster.
To bootstrap the initial Monitor, perform the following steps:
Enable the Red Hat Ceph Storage 4 Monitor repository:
subscription-manager repos --enable=rhceph-4-mon-for-rhel-8-x86_64-rpms
[root@monitor ~]# subscription-manager repos --enable=rhceph-4-mon-for-rhel-8-x86_64-rpmsCopy to Clipboard Copied! Toggle word wrap Toggle overflow On your initial Monitor node, install the
ceph-monpackage asroot:yum install ceph-mon
# yum install ceph-monCopy to Clipboard Copied! Toggle word wrap Toggle overflow As
root, create a Ceph configuration file in the/etc/ceph/directory.touch /etc/ceph/ceph.conf
# touch /etc/ceph/ceph.confCopy to Clipboard Copied! Toggle word wrap Toggle overflow As
root, generate the unique identifier for your cluster and add the unique identifier to the[global]section of the Ceph configuration file:echo "[global]" > /etc/ceph/ceph.conf echo "fsid = `uuidgen`" >> /etc/ceph/ceph.conf
# echo "[global]" > /etc/ceph/ceph.conf # echo "fsid = `uuidgen`" >> /etc/ceph/ceph.confCopy to Clipboard Copied! Toggle word wrap Toggle overflow View the current Ceph configuration file:
cat /etc/ceph/ceph.conf [global] fsid = a7f64266-0894-4f1e-a635-d0aeaca0e993
$ cat /etc/ceph/ceph.conf [global] fsid = a7f64266-0894-4f1e-a635-d0aeaca0e993Copy to Clipboard Copied! Toggle word wrap Toggle overflow As
root, add the initial Monitor to the Ceph configuration file:Syntax
echo "mon initial members = <monitor_host_name>[,<monitor_host_name>]" >> /etc/ceph/ceph.conf
# echo "mon initial members = <monitor_host_name>[,<monitor_host_name>]" >> /etc/ceph/ceph.confCopy to Clipboard Copied! Toggle word wrap Toggle overflow Example
echo "mon initial members = node1" >> /etc/ceph/ceph.conf
# echo "mon initial members = node1" >> /etc/ceph/ceph.confCopy to Clipboard Copied! Toggle word wrap Toggle overflow As
root, add the IP address of the initial Monitor to the Ceph configuration file:Syntax
echo "mon host = <ip-address>[,<ip-address>]" >> /etc/ceph/ceph.conf
# echo "mon host = <ip-address>[,<ip-address>]" >> /etc/ceph/ceph.confCopy to Clipboard Copied! Toggle word wrap Toggle overflow Example
echo "mon host = 192.168.0.120" >> /etc/ceph/ceph.conf
# echo "mon host = 192.168.0.120" >> /etc/ceph/ceph.confCopy to Clipboard Copied! Toggle word wrap Toggle overflow NoteTo use IPv6 addresses, you set the
ms bind ipv6option totrue. For details, see the Bind section in the Configuration Guide for Red Hat Ceph Storage 4.As
root, create the keyring for the cluster and generate the Monitor secret key:ceph-authtool --create-keyring /tmp/ceph.mon.keyring --gen-key -n mon. --cap mon 'allow *' creating /tmp/ceph.mon.keyring
# ceph-authtool --create-keyring /tmp/ceph.mon.keyring --gen-key -n mon. --cap mon 'allow *' creating /tmp/ceph.mon.keyringCopy to Clipboard Copied! Toggle word wrap Toggle overflow As
root, generate an administrator keyring, generate aceph.client.admin.keyringuser and add the user to the keyring:Syntax
ceph-authtool --create-keyring /etc/ceph/ceph.client.admin.keyring --gen-key -n client.admin --set-uid=0 --cap mon '<capabilites>' --cap osd '<capabilites>' --cap mds '<capabilites>'
# ceph-authtool --create-keyring /etc/ceph/ceph.client.admin.keyring --gen-key -n client.admin --set-uid=0 --cap mon '<capabilites>' --cap osd '<capabilites>' --cap mds '<capabilites>'Copy to Clipboard Copied! Toggle word wrap Toggle overflow Example
ceph-authtool --create-keyring /etc/ceph/ceph.client.admin.keyring --gen-key -n client.admin --set-uid=0 --cap mon 'allow *' --cap osd 'allow *' --cap mds 'allow' creating /etc/ceph/ceph.client.admin.keyring
# ceph-authtool --create-keyring /etc/ceph/ceph.client.admin.keyring --gen-key -n client.admin --set-uid=0 --cap mon 'allow *' --cap osd 'allow *' --cap mds 'allow' creating /etc/ceph/ceph.client.admin.keyringCopy to Clipboard Copied! Toggle word wrap Toggle overflow As
root, add theceph.client.admin.keyringkey to theceph.mon.keyring:ceph-authtool /tmp/ceph.mon.keyring --import-keyring /etc/ceph/ceph.client.admin.keyring importing contents of /etc/ceph/ceph.client.admin.keyring into /tmp/ceph.mon.keyring
# ceph-authtool /tmp/ceph.mon.keyring --import-keyring /etc/ceph/ceph.client.admin.keyring importing contents of /etc/ceph/ceph.client.admin.keyring into /tmp/ceph.mon.keyringCopy to Clipboard Copied! Toggle word wrap Toggle overflow Generate the Monitor map. Specify using the node name, IP address and the
fsid, of the initial Monitor and save it as/tmp/monmap:Syntax
monmaptool --create --add <monitor_host_name> <ip-address> --fsid <uuid> /tmp/monmap
$ monmaptool --create --add <monitor_host_name> <ip-address> --fsid <uuid> /tmp/monmapCopy to Clipboard Copied! Toggle word wrap Toggle overflow Example
monmaptool --create --add node1 192.168.0.120 --fsid a7f64266-0894-4f1e-a635-d0aeaca0e993 /tmp/monmap monmaptool: monmap file /tmp/monmap monmaptool: set fsid to a7f64266-0894-4f1e-a635-d0aeaca0e993 monmaptool: writing epoch 0 to /tmp/monmap (1 monitors)
$ monmaptool --create --add node1 192.168.0.120 --fsid a7f64266-0894-4f1e-a635-d0aeaca0e993 /tmp/monmap monmaptool: monmap file /tmp/monmap monmaptool: set fsid to a7f64266-0894-4f1e-a635-d0aeaca0e993 monmaptool: writing epoch 0 to /tmp/monmap (1 monitors)Copy to Clipboard Copied! Toggle word wrap Toggle overflow As
rooton the initial Monitor node, create a default data directory:Syntax
mkdir /var/lib/ceph/mon/ceph-<monitor_host_name>
# mkdir /var/lib/ceph/mon/ceph-<monitor_host_name>Copy to Clipboard Copied! Toggle word wrap Toggle overflow Example
mkdir /var/lib/ceph/mon/ceph-node1
# mkdir /var/lib/ceph/mon/ceph-node1Copy to Clipboard Copied! Toggle word wrap Toggle overflow As
root, populate the initial Monitor daemon with the Monitor map and keyring:Syntax
ceph-mon --mkfs -i <monitor_host_name> --monmap /tmp/monmap --keyring /tmp/ceph.mon.keyring
# ceph-mon --mkfs -i <monitor_host_name> --monmap /tmp/monmap --keyring /tmp/ceph.mon.keyringCopy to Clipboard Copied! Toggle word wrap Toggle overflow Example
ceph-mon --mkfs -i node1 --monmap /tmp/monmap --keyring /tmp/ceph.mon.keyring ceph-mon: set fsid to a7f64266-0894-4f1e-a635-d0aeaca0e993 ceph-mon: created monfs at /var/lib/ceph/mon/ceph-node1 for mon.node1
# ceph-mon --mkfs -i node1 --monmap /tmp/monmap --keyring /tmp/ceph.mon.keyring ceph-mon: set fsid to a7f64266-0894-4f1e-a635-d0aeaca0e993 ceph-mon: created monfs at /var/lib/ceph/mon/ceph-node1 for mon.node1Copy to Clipboard Copied! Toggle word wrap Toggle overflow View the current Ceph configuration file:
cat /etc/ceph/ceph.conf [global] fsid = a7f64266-0894-4f1e-a635-d0aeaca0e993 mon_initial_members = node1 mon_host = 192.168.0.120
# cat /etc/ceph/ceph.conf [global] fsid = a7f64266-0894-4f1e-a635-d0aeaca0e993 mon_initial_members = node1 mon_host = 192.168.0.120Copy to Clipboard Copied! Toggle word wrap Toggle overflow For more details on the various Ceph configuration settings, see the Configuration Guide for Red Hat Ceph Storage 4. The following example of a Ceph configuration file lists some of the most common configuration settings:
Example
Copy to Clipboard Copied! Toggle word wrap Toggle overflow As
root, create thedonefile:Syntax
touch /var/lib/ceph/mon/ceph-<monitor_host_name>/done
# touch /var/lib/ceph/mon/ceph-<monitor_host_name>/doneCopy to Clipboard Copied! Toggle word wrap Toggle overflow Example
touch /var/lib/ceph/mon/ceph-node1/done
# touch /var/lib/ceph/mon/ceph-node1/doneCopy to Clipboard Copied! Toggle word wrap Toggle overflow As
root, update the owner and group permissions on the newly created directory and files:Syntax
chown -R <owner>:<group> <path_to_directory>
# chown -R <owner>:<group> <path_to_directory>Copy to Clipboard Copied! Toggle word wrap Toggle overflow Example
Copy to Clipboard Copied! Toggle word wrap Toggle overflow NoteIf the Ceph Monitor node is co-located with an OpenStack Controller node, then the Glance and Cinder keyring files must be owned by
glanceandcinderrespectively. For example:ls -l /etc/ceph/ ... -rw-------. 1 glance glance 64 <date> ceph.client.glance.keyring -rw-------. 1 cinder cinder 64 <date> ceph.client.cinder.keyring ...
# ls -l /etc/ceph/ ... -rw-------. 1 glance glance 64 <date> ceph.client.glance.keyring -rw-------. 1 cinder cinder 64 <date> ceph.client.cinder.keyring ...Copy to Clipboard Copied! Toggle word wrap Toggle overflow As
root, start and enable theceph-monprocess on the initial Monitor node:Syntax
systemctl enable ceph-mon.target systemctl enable ceph-mon@<monitor_host_name> systemctl start ceph-mon@<monitor_host_name>
# systemctl enable ceph-mon.target # systemctl enable ceph-mon@<monitor_host_name> # systemctl start ceph-mon@<monitor_host_name>Copy to Clipboard Copied! Toggle word wrap Toggle overflow Example
systemctl enable ceph-mon.target systemctl enable ceph-mon@node1 systemctl start ceph-mon@node1
# systemctl enable ceph-mon.target # systemctl enable ceph-mon@node1 # systemctl start ceph-mon@node1Copy to Clipboard Copied! Toggle word wrap Toggle overflow As
root, verify the monitor daemon is running:Syntax
systemctl status ceph-mon@<monitor_host_name>
# systemctl status ceph-mon@<monitor_host_name>Copy to Clipboard Copied! Toggle word wrap Toggle overflow Example
Copy to Clipboard Copied! Toggle word wrap Toggle overflow
To add more Red Hat Ceph Storage Monitors to the storage cluster, see the Adding a Monitor section in the Administration Guide for Red Hat Ceph Storage 4.
OSD Bootstrapping
Once you have your initial monitor running, you can start adding the Object Storage Devices (OSDs). Your cluster cannot reach an active + clean state until you have enough OSDs to handle the number of copies of an object.
The default number of copies for an object is three. You will need three OSD nodes at minimum. However, if you only want two copies of an object, therefore only adding two OSD nodes, then update the osd pool default size and osd pool default min size settings in the Ceph configuration file.
For more details, see the OSD Configuration Reference section in the Configuration Guide for Red Hat Ceph Storage 4.
After bootstrapping the initial monitor, the cluster has a default CRUSH map. However, the CRUSH map does not have any Ceph OSD daemons mapped to a Ceph node.
To add an OSD to the cluster and updating the default CRUSH map, execute the following on each OSD node:
Enable the Red Hat Ceph Storage 4 OSD repository:
subscription-manager repos --enable=rhceph-4-osd-for-rhel-8-x86_64-rpms
[root@osd ~]# subscription-manager repos --enable=rhceph-4-osd-for-rhel-8-x86_64-rpmsCopy to Clipboard Copied! Toggle word wrap Toggle overflow As
root, install theceph-osdpackage on the Ceph OSD node:yum install ceph-osd
# yum install ceph-osdCopy to Clipboard Copied! Toggle word wrap Toggle overflow Copy the Ceph configuration file and administration keyring file from the initial Monitor node to the OSD node:
Syntax
scp <user_name>@<monitor_host_name>:<path_on_remote_system> <path_to_local_file>
# scp <user_name>@<monitor_host_name>:<path_on_remote_system> <path_to_local_file>Copy to Clipboard Copied! Toggle word wrap Toggle overflow Example
scp root@node1:/etc/ceph/ceph.conf /etc/ceph scp root@node1:/etc/ceph/ceph.client.admin.keyring /etc/ceph
# scp root@node1:/etc/ceph/ceph.conf /etc/ceph # scp root@node1:/etc/ceph/ceph.client.admin.keyring /etc/cephCopy to Clipboard Copied! Toggle word wrap Toggle overflow Generate the Universally Unique Identifier (UUID) for the OSD:
uuidgen b367c360-b364-4b1d-8fc6-09408a9cda7a
$ uuidgen b367c360-b364-4b1d-8fc6-09408a9cda7aCopy to Clipboard Copied! Toggle word wrap Toggle overflow As
root, create the OSD instance:Syntax
ceph osd create <uuid> [<osd_id>]
# ceph osd create <uuid> [<osd_id>]Copy to Clipboard Copied! Toggle word wrap Toggle overflow Example
ceph osd create b367c360-b364-4b1d-8fc6-09408a9cda7a 0
# ceph osd create b367c360-b364-4b1d-8fc6-09408a9cda7a 0Copy to Clipboard Copied! Toggle word wrap Toggle overflow NoteThis command outputs the OSD number identifier needed for subsequent steps.
As
root, create the default directory for the new OSD:Syntax
mkdir /var/lib/ceph/osd/ceph-<osd_id>
# mkdir /var/lib/ceph/osd/ceph-<osd_id>Copy to Clipboard Copied! Toggle word wrap Toggle overflow Example
mkdir /var/lib/ceph/osd/ceph-0
# mkdir /var/lib/ceph/osd/ceph-0Copy to Clipboard Copied! Toggle word wrap Toggle overflow As
root, prepare the drive for use as an OSD, and mount it to the directory you just created. Create a partition for the Ceph data and journal. The journal and the data partitions can be located on the same disk. This example is using a 15 GB disk:Syntax
parted <path_to_disk> mklabel gpt parted <path_to_disk> mkpart primary 1 10000 mkfs -t <fstype> <path_to_partition> mount -o noatime <path_to_partition> /var/lib/ceph/osd/ceph-<osd_id> echo "<path_to_partition> /var/lib/ceph/osd/ceph-<osd_id> xfs defaults,noatime 1 2" >> /etc/fstab
# parted <path_to_disk> mklabel gpt # parted <path_to_disk> mkpart primary 1 10000 # mkfs -t <fstype> <path_to_partition> # mount -o noatime <path_to_partition> /var/lib/ceph/osd/ceph-<osd_id> # echo "<path_to_partition> /var/lib/ceph/osd/ceph-<osd_id> xfs defaults,noatime 1 2" >> /etc/fstabCopy to Clipboard Copied! Toggle word wrap Toggle overflow Example
Copy to Clipboard Copied! Toggle word wrap Toggle overflow As
root, initialize the OSD data directory:Syntax
ceph-osd -i <osd_id> --mkfs --mkkey --osd-uuid <uuid>
# ceph-osd -i <osd_id> --mkfs --mkkey --osd-uuid <uuid>Copy to Clipboard Copied! Toggle word wrap Toggle overflow Example
ceph-osd -i 0 --mkfs --mkkey --osd-uuid b367c360-b364-4b1d-8fc6-09408a9cda7a ... auth: error reading file: /var/lib/ceph/osd/ceph-0/keyring: can't open /var/lib/ceph/osd/ceph-0/keyring: (2) No such file or directory ... created new key in keyring /var/lib/ceph/osd/ceph-0/keyring
# ceph-osd -i 0 --mkfs --mkkey --osd-uuid b367c360-b364-4b1d-8fc6-09408a9cda7a ... auth: error reading file: /var/lib/ceph/osd/ceph-0/keyring: can't open /var/lib/ceph/osd/ceph-0/keyring: (2) No such file or directory ... created new key in keyring /var/lib/ceph/osd/ceph-0/keyringCopy to Clipboard Copied! Toggle word wrap Toggle overflow As
root, register the OSD authentication key.Syntax
ceph auth add osd.<osd_id> osd 'allow *' mon 'allow profile osd' -i /var/lib/ceph/osd/ceph-<osd_id>/keyring
# ceph auth add osd.<osd_id> osd 'allow *' mon 'allow profile osd' -i /var/lib/ceph/osd/ceph-<osd_id>/keyringCopy to Clipboard Copied! Toggle word wrap Toggle overflow Example
ceph auth add osd.0 osd 'allow *' mon 'allow profile osd' -i /var/lib/ceph/osd/ceph-0/keyring added key for osd.0
# ceph auth add osd.0 osd 'allow *' mon 'allow profile osd' -i /var/lib/ceph/osd/ceph-0/keyring added key for osd.0Copy to Clipboard Copied! Toggle word wrap Toggle overflow As
root, add the OSD node to the CRUSH map:Syntax
ceph osd crush add-bucket <host_name> host
# ceph osd crush add-bucket <host_name> hostCopy to Clipboard Copied! Toggle word wrap Toggle overflow Example
ceph osd crush add-bucket node2 host
# ceph osd crush add-bucket node2 hostCopy to Clipboard Copied! Toggle word wrap Toggle overflow As
root, place the OSD node under thedefaultCRUSH tree:Syntax
ceph osd crush move <host_name> root=default
# ceph osd crush move <host_name> root=defaultCopy to Clipboard Copied! Toggle word wrap Toggle overflow Example
ceph osd crush move node2 root=default
# ceph osd crush move node2 root=defaultCopy to Clipboard Copied! Toggle word wrap Toggle overflow As
root, add the OSD disk to the CRUSH mapSyntax
ceph osd crush add osd.<osd_id> <weight> [<bucket_type>=<bucket-name> ...]
# ceph osd crush add osd.<osd_id> <weight> [<bucket_type>=<bucket-name> ...]Copy to Clipboard Copied! Toggle word wrap Toggle overflow Example
ceph osd crush add osd.0 1.0 host=node2 add item id 0 name 'osd.0' weight 1 at location {host=node2} to crush map# ceph osd crush add osd.0 1.0 host=node2 add item id 0 name 'osd.0' weight 1 at location {host=node2} to crush mapCopy to Clipboard Copied! Toggle word wrap Toggle overflow NoteYou can also decompile the CRUSH map, and add the OSD to the device list. Add the OSD node as a bucket, then add the device as an item in the OSD node, assign the OSD a weight, recompile the CRUSH map and set the CRUSH map. For more details, see the Editing a CRUSH map section in the Storage Strategies Guide for Red Hat Ceph Storage 4 for more details.
As
root, update the owner and group permissions on the newly created directory and files:Syntax
chown -R <owner>:<group> <path_to_directory>
# chown -R <owner>:<group> <path_to_directory>Copy to Clipboard Copied! Toggle word wrap Toggle overflow Example
chown -R ceph:ceph /var/lib/ceph/osd chown -R ceph:ceph /var/log/ceph chown -R ceph:ceph /var/run/ceph chown -R ceph:ceph /etc/ceph
# chown -R ceph:ceph /var/lib/ceph/osd # chown -R ceph:ceph /var/log/ceph # chown -R ceph:ceph /var/run/ceph # chown -R ceph:ceph /etc/cephCopy to Clipboard Copied! Toggle word wrap Toggle overflow The OSD node is in your Ceph storage cluster configuration. However, the OSD daemon is
downandin. The new OSD must beupbefore it can begin receiving data. Asroot, enable and start the OSD process:Syntax
systemctl enable ceph-osd.target systemctl enable ceph-osd@<osd_id> systemctl start ceph-osd@<osd_id>
# systemctl enable ceph-osd.target # systemctl enable ceph-osd@<osd_id> # systemctl start ceph-osd@<osd_id>Copy to Clipboard Copied! Toggle word wrap Toggle overflow Example
systemctl enable ceph-osd.target systemctl enable ceph-osd@0 systemctl start ceph-osd@0
# systemctl enable ceph-osd.target # systemctl enable ceph-osd@0 # systemctl start ceph-osd@0Copy to Clipboard Copied! Toggle word wrap Toggle overflow Once you start the OSD daemon, it is
upandin.
Now you have the monitors and some OSDs up and running. You can watch the placement groups peer by executing the following command:
ceph -w
$ ceph -wTo view the OSD tree, execute the following command:
ceph osd tree
$ ceph osd treeExample
To expand the storage capacity by adding new OSDs to the storage cluster, see the Adding an OSD section in the Administration Guide for Red Hat Ceph Storage 4.
B.3. Manually installing Ceph Manager
Usually, the Ansible automation utility installs the Ceph Manager daemon (ceph-mgr) when you deploy the Red Hat Ceph Storage cluster. However, if you do not use Ansible to manage Red Hat Ceph Storage, you can install Ceph Manager manually. Red Hat recommends to colocate the Ceph Manager and Ceph Monitor daemons on a same node.
Prerequisites
- A working Red Hat Ceph Storage cluster
-
rootorsudoaccess -
The
rhceph-4-mon-for-rhel-8-x86_64-rpmsrepository enabled -
Open ports
6800-7300on the public network if firewall is used
Procedure
Use the following commands on the node where ceph-mgr will be deployed and as the root user or with the sudo utility.
Install the
ceph-mgrpackage:yum install ceph-mgr
[root@node1 ~]# yum install ceph-mgrCopy to Clipboard Copied! Toggle word wrap Toggle overflow Create the
/var/lib/ceph/mgr/ceph-hostname/directory:mkdir /var/lib/ceph/mgr/ceph-hostname
mkdir /var/lib/ceph/mgr/ceph-hostnameCopy to Clipboard Copied! Toggle word wrap Toggle overflow Replace hostname with the host name of the node where the
ceph-mgrdaemon will be deployed, for example:mkdir /var/lib/ceph/mgr/ceph-node1
[root@node1 ~]# mkdir /var/lib/ceph/mgr/ceph-node1Copy to Clipboard Copied! Toggle word wrap Toggle overflow In the newly created directory, create an authentication key for the
ceph-mgrdaemon:ceph auth get-or-create mgr.`hostname -s` mon 'allow profile mgr' osd 'allow *' mds 'allow *' -o /var/lib/ceph/mgr/ceph-node1/keyring
[root@node1 ~]# ceph auth get-or-create mgr.`hostname -s` mon 'allow profile mgr' osd 'allow *' mds 'allow *' -o /var/lib/ceph/mgr/ceph-node1/keyringCopy to Clipboard Copied! Toggle word wrap Toggle overflow Change the owner and group of the
/var/lib/ceph/mgr/directory toceph:ceph:chown -R ceph:ceph /var/lib/ceph/mgr
[root@node1 ~]# chown -R ceph:ceph /var/lib/ceph/mgrCopy to Clipboard Copied! Toggle word wrap Toggle overflow Enable the
ceph-mgrtarget:systemctl enable ceph-mgr.target
[root@node1 ~]# systemctl enable ceph-mgr.targetCopy to Clipboard Copied! Toggle word wrap Toggle overflow Enable and start the
ceph-mgrinstance:systemctl enable ceph-mgr@hostname systemctl start ceph-mgr@hostname
systemctl enable ceph-mgr@hostname systemctl start ceph-mgr@hostnameCopy to Clipboard Copied! Toggle word wrap Toggle overflow Replace hostname with the host name of the node where the
ceph-mgrwill be deployed, for example:systemctl enable ceph-mgr@node1 systemctl start ceph-mgr@node1
[root@node1 ~]# systemctl enable ceph-mgr@node1 [root@node1 ~]# systemctl start ceph-mgr@node1Copy to Clipboard Copied! Toggle word wrap Toggle overflow Verify that the
ceph-mgrdaemon started successfully:ceph -s
ceph -sCopy to Clipboard Copied! Toggle word wrap Toggle overflow The output will include a line similar to the following one under the
services:section:mgr: node1(active)
mgr: node1(active)Copy to Clipboard Copied! Toggle word wrap Toggle overflow -
Install more
ceph-mgrdaemons to serve as standby daemons that become active if the current active daemon fails.
Additional resources
B.4. Manually Installing Ceph Block Device
The following procedure shows how to install and mount a thin-provisioned, resizable Ceph Block Device.
Ceph Block Devices must be deployed on separate nodes from the Ceph Monitor and OSD nodes. Running kernel clients and kernel server daemons on the same node can lead to kernel deadlocks.
Prerequisites
- Ensure to perform the tasks listed in the Section B.1, “Installing the Ceph Command Line Interface” section.
- If you use Ceph Block Devices as a back end for virtual machines (VMs) that use QEMU, increase the default file descriptor. See the Ceph - VM hangs when transferring large amounts of data to RBD disk Knowledgebase article for details.
Procedure
Create a Ceph Block Device user named
client.rbdwith full permissions to files on OSD nodes (osd 'allow rwx') and output the result to a keyring file:ceph auth get-or-create client.rbd mon 'profile rbd' osd 'profile rbd pool=<pool_name>' \ -o /etc/ceph/rbd.keyring
ceph auth get-or-create client.rbd mon 'profile rbd' osd 'profile rbd pool=<pool_name>' \ -o /etc/ceph/rbd.keyringCopy to Clipboard Copied! Toggle word wrap Toggle overflow Replace
<pool_name>with the name of the pool that you want to allowclient.rbdto have access to, for examplerbd:ceph auth get-or-create \ client.rbd mon 'allow r' osd 'allow rwx pool=rbd' \ -o /etc/ceph/rbd.keyring
# ceph auth get-or-create \ client.rbd mon 'allow r' osd 'allow rwx pool=rbd' \ -o /etc/ceph/rbd.keyringCopy to Clipboard Copied! Toggle word wrap Toggle overflow See the User Management section in the Red Hat Ceph Storage 4 Administration Guide for more information about creating users.
Create a block device image:
rbd create <image_name> --size <image_size> --pool <pool_name> \ --name client.rbd --keyring /etc/ceph/rbd.keyring
rbd create <image_name> --size <image_size> --pool <pool_name> \ --name client.rbd --keyring /etc/ceph/rbd.keyringCopy to Clipboard Copied! Toggle word wrap Toggle overflow Specify
<image_name>,<image_size>, and<pool_name>, for example:rbd create image1 --size 4G --pool rbd \ --name client.rbd --keyring /etc/ceph/rbd.keyring
$ rbd create image1 --size 4G --pool rbd \ --name client.rbd --keyring /etc/ceph/rbd.keyringCopy to Clipboard Copied! Toggle word wrap Toggle overflow WarningThe default Ceph configuration includes the following Ceph Block Device features:
-
layering -
exclusive-lock -
object-map -
deep-flatten -
fast-diff
If you use the kernel RBD (
krbd) client, you may not be able to map the block device image.To work around this problem, disable the unsupported features. Use one of the following options to do so:
Disable the unsupported features dynamically:
rbd feature disable <image_name> <feature_name>
rbd feature disable <image_name> <feature_name>Copy to Clipboard Copied! Toggle word wrap Toggle overflow For example:
rbd feature disable image1 object-map deep-flatten fast-diff
# rbd feature disable image1 object-map deep-flatten fast-diffCopy to Clipboard Copied! Toggle word wrap Toggle overflow -
Use the
--image-feature layeringoption with therbd createcommand to enable onlylayeringon newly created block device images. Disable the features be default in the Ceph configuration file:
rbd_default_features = 1
rbd_default_features = 1Copy to Clipboard Copied! Toggle word wrap Toggle overflow
This is a known issue, for details see the Known Issues chapter in the Release Notes for Red Hat Ceph Storage 4.
All these features work for users that use the user-space RBD client to access the block device images.
-
Map the newly created image to the block device:
rbd map <image_name> --pool <pool_name>\ --name client.rbd --keyring /etc/ceph/rbd.keyring
rbd map <image_name> --pool <pool_name>\ --name client.rbd --keyring /etc/ceph/rbd.keyringCopy to Clipboard Copied! Toggle word wrap Toggle overflow For example:
rbd map image1 --pool rbd --name client.rbd \ --keyring /etc/ceph/rbd.keyring
# rbd map image1 --pool rbd --name client.rbd \ --keyring /etc/ceph/rbd.keyringCopy to Clipboard Copied! Toggle word wrap Toggle overflow Use the block device by creating a file system:
mkfs.ext4 /dev/rbd/<pool_name>/<image_name>
mkfs.ext4 /dev/rbd/<pool_name>/<image_name>Copy to Clipboard Copied! Toggle word wrap Toggle overflow Specify the pool name and the image name, for example:
mkfs.ext4 /dev/rbd/rbd/image1
# mkfs.ext4 /dev/rbd/rbd/image1Copy to Clipboard Copied! Toggle word wrap Toggle overflow This action can take a few moments.
Mount the newly created file system:
mkdir <mount_directory> mount /dev/rbd/<pool_name>/<image_name> <mount_directory>
mkdir <mount_directory> mount /dev/rbd/<pool_name>/<image_name> <mount_directory>Copy to Clipboard Copied! Toggle word wrap Toggle overflow For example:
mkdir /mnt/ceph-block-device mount /dev/rbd/rbd/image1 /mnt/ceph-block-device
# mkdir /mnt/ceph-block-device # mount /dev/rbd/rbd/image1 /mnt/ceph-block-deviceCopy to Clipboard Copied! Toggle word wrap Toggle overflow
Additional Resources
- The Block Device Guide for Red Hat Ceph Storage 4.
B.5. Manually Installing Ceph Object Gateway
The Ceph object gateway, also know as the RADOS gateway, is an object storage interface built on top of the librados API to provide applications with a RESTful gateway to Ceph storage clusters.
Prerequisites
-
A running Ceph storage cluster, preferably in the
active + cleanstate. - Perform the tasks listed in Chapter 3, Requirements for Installing Red Hat Ceph Storage.
Procedure
Enable the Red Hat Ceph Storage 4 Tools repository:
subscription-manager repos --enable=rhceph-4-tools-for-rhel-8-x86_64-debug-rpms
[root@gateway ~]# subscription-manager repos --enable=rhceph-4-tools-for-rhel-8-x86_64-debug-rpmsCopy to Clipboard Copied! Toggle word wrap Toggle overflow On the Object Gateway node, install the
ceph-radosgwpackage:yum install ceph-radosgw
# yum install ceph-radosgwCopy to Clipboard Copied! Toggle word wrap Toggle overflow On the initial Monitor node, do the following steps.
Update the Ceph configuration file as follows:
[client.rgw.<obj_gw_hostname>] host = <obj_gw_hostname> rgw frontends = "civetweb port=80" rgw dns name = <obj_gw_hostname>.example.com
[client.rgw.<obj_gw_hostname>] host = <obj_gw_hostname> rgw frontends = "civetweb port=80" rgw dns name = <obj_gw_hostname>.example.comCopy to Clipboard Copied! Toggle word wrap Toggle overflow Where
<obj_gw_hostname>is a short host name of the gateway node. To view the short host name, use thehostname -scommand.Copy the updated configuration file to the new Object Gateway node and all other nodes in the Ceph storage cluster:
Syntax
scp /etc/ceph/ceph.conf <user_name>@<target_host_name>:/etc/ceph
# scp /etc/ceph/ceph.conf <user_name>@<target_host_name>:/etc/cephCopy to Clipboard Copied! Toggle word wrap Toggle overflow Example
scp /etc/ceph/ceph.conf root@node1:/etc/ceph/
# scp /etc/ceph/ceph.conf root@node1:/etc/ceph/Copy to Clipboard Copied! Toggle word wrap Toggle overflow Copy the
ceph.client.admin.keyringfile to the new Object Gateway node:Syntax
scp /etc/ceph/ceph.client.admin.keyring <user_name>@<target_host_name>:/etc/ceph/
# scp /etc/ceph/ceph.client.admin.keyring <user_name>@<target_host_name>:/etc/ceph/Copy to Clipboard Copied! Toggle word wrap Toggle overflow Example
scp /etc/ceph/ceph.client.admin.keyring root@node1:/etc/ceph/
# scp /etc/ceph/ceph.client.admin.keyring root@node1:/etc/ceph/Copy to Clipboard Copied! Toggle word wrap Toggle overflow
On the Object Gateway node, create the data directory:
mkdir -p /var/lib/ceph/radosgw/ceph-rgw.`hostname -s`
# mkdir -p /var/lib/ceph/radosgw/ceph-rgw.`hostname -s`Copy to Clipboard Copied! Toggle word wrap Toggle overflow On the Object Gateway node, add a user and keyring to bootstrap the object gateway:
Syntax
ceph auth get-or-create client.rgw.`hostname -s` osd 'allow rwx' mon 'allow rw' -o /var/lib/ceph/radosgw/ceph-rgw.`hostname -s`/keyring
# ceph auth get-or-create client.rgw.`hostname -s` osd 'allow rwx' mon 'allow rw' -o /var/lib/ceph/radosgw/ceph-rgw.`hostname -s`/keyringCopy to Clipboard Copied! Toggle word wrap Toggle overflow Example
ceph auth get-or-create client.rgw.`hostname -s` osd 'allow rwx' mon 'allow rw' -o /var/lib/ceph/radosgw/ceph-rgw.`hostname -s`/keyring
# ceph auth get-or-create client.rgw.`hostname -s` osd 'allow rwx' mon 'allow rw' -o /var/lib/ceph/radosgw/ceph-rgw.`hostname -s`/keyringCopy to Clipboard Copied! Toggle word wrap Toggle overflow ImportantWhen you provide capabilities to the gateway key you must provide the read capability. However, providing the Monitor write capability is optional; if you provide it, the Ceph Object Gateway will be able to create pools automatically.
In such a case, ensure to specify a reasonable number of placement groups in a pool. Otherwise, the gateway uses the default number, which is most likely not suitable for your needs. See Ceph Placement Groups (PGs) per Pool Calculator for details.
On the Object Gateway node, create the
donefile:touch /var/lib/ceph/radosgw/ceph-rgw.`hostname -s`/done
# touch /var/lib/ceph/radosgw/ceph-rgw.`hostname -s`/doneCopy to Clipboard Copied! Toggle word wrap Toggle overflow On the Object Gateway node, change the owner and group permissions:
chown -R ceph:ceph /var/lib/ceph/radosgw chown -R ceph:ceph /var/log/ceph chown -R ceph:ceph /var/run/ceph chown -R ceph:ceph /etc/ceph
# chown -R ceph:ceph /var/lib/ceph/radosgw # chown -R ceph:ceph /var/log/ceph # chown -R ceph:ceph /var/run/ceph # chown -R ceph:ceph /etc/cephCopy to Clipboard Copied! Toggle word wrap Toggle overflow On the Object Gateway node, open TCP port 8080:
firewall-cmd --zone=public --add-port=8080/tcp firewall-cmd --zone=public --add-port=8080/tcp --permanent
# firewall-cmd --zone=public --add-port=8080/tcp # firewall-cmd --zone=public --add-port=8080/tcp --permanentCopy to Clipboard Copied! Toggle word wrap Toggle overflow On the Object Gateway node, start and enable the
ceph-radosgwprocess:Syntax
systemctl enable ceph-radosgw.target systemctl enable ceph-radosgw@rgw.<rgw_hostname> systemctl start ceph-radosgw@rgw.<rgw_hostname>
# systemctl enable ceph-radosgw.target # systemctl enable ceph-radosgw@rgw.<rgw_hostname> # systemctl start ceph-radosgw@rgw.<rgw_hostname>Copy to Clipboard Copied! Toggle word wrap Toggle overflow Example
systemctl enable ceph-radosgw.target systemctl enable ceph-radosgw@rgw.node1 systemctl start ceph-radosgw@rgw.node1
# systemctl enable ceph-radosgw.target # systemctl enable ceph-radosgw@rgw.node1 # systemctl start ceph-radosgw@rgw.node1Copy to Clipboard Copied! Toggle word wrap Toggle overflow
Once installed, the Ceph Object Gateway automatically creates pools if the write capability is set on the Monitor. See the Pools chapter in the Storage Strategies Guide for details on creating pools manually.
Additional Resources
- The Red Hat Ceph Storage 4 Object Gateway Configuration and Administration Guide
Appendix C. Configuring Ansible inventory location
As an option, you can configure inventory location files for the ceph-ansible staging and production environments.
Prerequisites
- An Ansible administration node.
- Root-level access to the Ansible administration node.
-
The
ceph-ansiblepackage is installed on the node.
Procedure
Navigate to the
/usr/share/ceph-ansibledirectory:cd /usr/share/ceph-ansible
[ansible@admin ~]# cd /usr/share/ceph-ansibleCopy to Clipboard Copied! Toggle word wrap Toggle overflow Create subdirectories for staging and production:
mkdir -p inventory/staging inventory/production
[ansible@admin ceph-ansible]$ mkdir -p inventory/staging inventory/productionCopy to Clipboard Copied! Toggle word wrap Toggle overflow Edit the
ansible.cfgfile and add the following lines:[defaults] inventory = ./inventory/staging # Assign a default inventory directory
[defaults] inventory = ./inventory/staging # Assign a default inventory directoryCopy to Clipboard Copied! Toggle word wrap Toggle overflow Create an inventory 'hosts' file for each environment:
touch inventory/staging/hosts touch inventory/production/hosts
[ansible@admin ceph-ansible]$ touch inventory/staging/hosts [ansible@admin ceph-ansible]$ touch inventory/production/hostsCopy to Clipboard Copied! Toggle word wrap Toggle overflow Open and edit each
hostsfile and add the Ceph Monitor nodes under the[mons]section:[mons] MONITOR_NODE_NAME_1 MONITOR_NODE_NAME_1 MONITOR_NODE_NAME_1
[mons] MONITOR_NODE_NAME_1 MONITOR_NODE_NAME_1 MONITOR_NODE_NAME_1Copy to Clipboard Copied! Toggle word wrap Toggle overflow Example
[mons] mon-stage-node1 mon-stage-node2 mon-stage-node3
[mons] mon-stage-node1 mon-stage-node2 mon-stage-node3Copy to Clipboard Copied! Toggle word wrap Toggle overflow NoteBy default, playbooks run in the staging environment. To run the playbook in the production environment:
ansible-playbook -i inventory/production playbook.yml
[ansible@admin ceph-ansible]$ ansible-playbook -i inventory/production playbook.ymlCopy to Clipboard Copied! Toggle word wrap Toggle overflow
Additional Resources
-
For more information about installing the
ceph-ansiblepackage, see Installing a Red Hat Storage Cluster.
Appendix D. Overriding Ceph Default Settings
Unless otherwise specified in the Ansible configuration files, Ceph uses its default settings.
Because Ansible manages the Ceph configuration file, edit the /usr/share/ceph-ansible/group_vars/all.yml file to change the Ceph configuration. Use the ceph_conf_overrides setting to override the default Ceph configuration.
Ansible supports the same sections as the Ceph configuration file; [global], [mon], [osd], [mds], [rgw], and so on. You can also override particular instances, such as a particular Ceph Object Gateway instance. For example:
Do not use a variable as a key in the ceph_conf_overrides setting. You must pass the absolute label for the host for the section(s) for which you want to override particular configuration value.
Ansible does not include braces when referring to a particular section of the Ceph configuration file. Sections and settings names are terminated with a colon.
Do not set the cluster network with the cluster_network parameter in the CONFIG OVERRIDE section because this can cause two conflicting cluster networks being set in the Ceph configuration file.
To set the cluster network, use the cluster_network parameter in the CEPH CONFIGURATION section. For details, see Installing a Red Hat Ceph Storage cluster in the Red Hat Ceph Storage Installation Guide.
Appendix E. Importing an Existing Ceph Cluster to Ansible
You can configure Ansible to use a cluster deployed without Ansible. For example, if you upgraded Red Hat Ceph Storage 1.3 clusters to version 2 manually, configure them to use Ansible by following this procedure:
- After manually upgrading from version 1.3 to version 2, install and configure Ansible on the administration node.
-
Ensure that the Ansible administration node has passwordless
sshaccess to all Ceph nodes in the cluster. See Section 3.9, “Enabling password-less SSH for Ansible” for more details. As
root, create a symbolic link to the Ansiblegroup_varsdirectory in the/etc/ansible/directory:ln -s /usr/share/ceph-ansible/group_vars /etc/ansible/group_vars
# ln -s /usr/share/ceph-ansible/group_vars /etc/ansible/group_varsCopy to Clipboard Copied! Toggle word wrap Toggle overflow As
root, create anall.ymlfile from theall.yml.samplefile and open it for editing:cd /etc/ansible/group_vars cp all.yml.sample all.yml vim all.yml
# cd /etc/ansible/group_vars # cp all.yml.sample all.yml # vim all.ymlCopy to Clipboard Copied! Toggle word wrap Toggle overflow -
Set the
generate_fsidsetting tofalseingroup_vars/all.yml. -
Get the current cluster
fsidby executingceph fsid. -
Set the retrieved
fsidingroup_vars/all.yml. -
Modify the Ansible inventory in
/etc/ansible/hoststo include Ceph hosts. Add monitors under a[mons]section, OSDs under an[osds]section and gateways under an[rgws]section to identify their roles to Ansible. Make sure
ceph_conf_overridesis updated with the originalceph.confoptions used for[global],[osd],[mon], and[client]sections in theall.ymlfile.Options like
osd journal,public_networkandcluster_networkshould not be added inceph_conf_overridesbecause they are already part ofall.yml. Only the options that are not part ofall.ymland are in the originalceph.confshould be added toceph_conf_overrides.From the
/usr/share/ceph-ansible/directory run the playbook.cd /usr/share/ceph-ansible/ ansible-playbook infrastructure-playbooks/take-over-existing-cluster.yml -u <username> -i hosts
# cd /usr/share/ceph-ansible/ # ansible-playbook infrastructure-playbooks/take-over-existing-cluster.yml -u <username> -i hostsCopy to Clipboard Copied! Toggle word wrap Toggle overflow
Appendix F. Purging storage clusters deployed by Ansible
If you no longer want to use a Ceph storage cluster, then use the purge-docker-cluster.yml playbook to remove the cluster. Purging a storage cluster is also useful when the installation process failed and you want to start over.
After purging a Ceph storage cluster, all data on the OSDs is permanently lost.
Prerequisites
- Root-level access to the Ansible administration node.
-
Access to the
ansibleuser account. For bare-metal deployments:
-
If the
osd_auto_discoveryoption in the/usr/share/ceph-ansible/group-vars/osds.ymlfile is set totrue, then Ansible will fail to purge the storage cluster. Therefore, comment outosd_auto_discoveryand declare the OSD devices in theosds.ymlfile.
-
If the
-
Ensure that the
/var/log/ansible/ansible.logfile is writable by theansibleuser account.
Procedure
Navigate to the
/usr/share/ceph-ansible/directory:cd /usr/share/ceph-ansible
[root@admin ~]# cd /usr/share/ceph-ansibleCopy to Clipboard Copied! Toggle word wrap Toggle overflow As the
ansibleuser, run the purge playbook.For bare-metal deployments, use the
purge-cluster.ymlplaybook to purge the Ceph storage cluster:ansible-playbook infrastructure-playbooks/purge-cluster.yml
[ansible@admin ceph-ansible]$ ansible-playbook infrastructure-playbooks/purge-cluster.ymlCopy to Clipboard Copied! Toggle word wrap Toggle overflow For container deployments:
Use the
purge-docker-cluster.ymlplaybook to purge the Ceph storage cluster:ansible-playbook infrastructure-playbooks/purge-docker-cluster.yml
[ansible@admin ceph-ansible]$ ansible-playbook infrastructure-playbooks/purge-docker-cluster.ymlCopy to Clipboard Copied! Toggle word wrap Toggle overflow NoteThis playbook removes all packages, containers, configuration files, and all the data created by the Ceph Ansible playbook.
To specify a different inventory file other than the default (
/etc/ansible/hosts), use-iparameter:Syntax
ansible-playbook infrastructure-playbooks/purge-docker-cluster.yml -i INVENTORY_FILE
[ansible@admin ceph-ansible]$ ansible-playbook infrastructure-playbooks/purge-docker-cluster.yml -i INVENTORY_FILECopy to Clipboard Copied! Toggle word wrap Toggle overflow - Replace
INVENTORY_FILE with the path to the inventory file.
Example
ansible-playbook infrastructure-playbooks/purge-docker-cluster.yml -i ~/ansible/hosts
[ansible@admin ceph-ansible]$ ansible-playbook infrastructure-playbooks/purge-docker-cluster.yml -i ~/ansible/hostsCopy to Clipboard Copied! Toggle word wrap Toggle overflow
To skip the removal of the Ceph container image, use the
--skip-tags=”remove_img”option:ansible-playbook --skip-tags="remove_img" infrastructure-playbooks/purge-docker-cluster.yml
[ansible@admin ceph-ansible]$ ansible-playbook --skip-tags="remove_img" infrastructure-playbooks/purge-docker-cluster.ymlCopy to Clipboard Copied! Toggle word wrap Toggle overflow To skip the removal of the packages that were installed during the installation, use the
--skip-tags=”with_pkg”option:ansible-playbook --skip-tags="with_pkg" infrastructure-playbooks/purge-docker-cluster.yml
[ansible@admin ceph-ansible]$ ansible-playbook --skip-tags="with_pkg" infrastructure-playbooks/purge-docker-cluster.ymlCopy to Clipboard Copied! Toggle word wrap Toggle overflow
Additional Resources
- See the OSD Ansible settings for more details.
Appendix G. Purging the Ceph dashboard using Ansible
If you no longer want the dashboard installed, use the purge-dashboard.yml playbook to remove the dashboard. You might also want to purge the dashboard when troubleshooting an issue with the dashboard or its components.
Prerequisites
- Red Hat Ceph Storage 4.3 or later.
- Ceph-ansible shipped with the latest version of Red Hat Ceph Storage.
- Sudo-level access to all nodes in the storage cluster.
Procedure
- Log in to the Ansible administration node.
Navigate to the
/usr/share/ceph-ansible/directory:Example
cd /usr/share/ceph-ansible/
[ansible@admin ~]$ cd /usr/share/ceph-ansible/Copy to Clipboard Copied! Toggle word wrap Toggle overflow Run the Ansible
purge-dashboard.ymlplaybook, and when prompted, typeyesto confirm purging of the dashboard:Example
ansible-playbook infrastructure-playbooks/purge-dashboard.yml -i hosts -vvvv
[ansible@admin ceph-ansible]$ ansible-playbook infrastructure-playbooks/purge-dashboard.yml -i hosts -vvvvCopy to Clipboard Copied! Toggle word wrap Toggle overflow
Verification
Run the
ceph mgr servicescommand to verify dashboard is no longer running:Syntax
ceph mgr services
ceph mgr servicesCopy to Clipboard Copied! Toggle word wrap Toggle overflow The dashboard URL is not displayed.
Appendix H. Encrypting Ansible password variables with ansible-vault
You can use ansible-vault to encrypt Ansible variables used to store passwords so they are not readable as plaintext. For example, in group_vars/all.yml the ceph_docker_registry_username and ceph_docker_registry_password variables can be set to Service Account credentials, or Customer Portal credentials. The Service Account is designed to be shared, but the Customer Portal password should be secured. In addition to encrypting ceph_docker_registry_password, you may also want to encrypt dashboard_admin_password and grafana_admin_password.
Prerequisites
- A running Red Hat Ceph Storage cluster.
- Access to the Ansible administration node.
Procedure
- Log in to the Ansible administration node.
Change to the
/usr/share/ceph-ansible/directory:cd /usr/share/ceph-ansible/
[admin@admin ~]$ cd /usr/share/ceph-ansible/Copy to Clipboard Copied! Toggle word wrap Toggle overflow Run
ansible-vaultand create a new vault password:Example
ansible-vault encrypt_string --stdin-name 'ceph_docker_registry_password_vault' New Vault password:
[admin@admin ceph-ansible]$ ansible-vault encrypt_string --stdin-name 'ceph_docker_registry_password_vault' New Vault password:Copy to Clipboard Copied! Toggle word wrap Toggle overflow Re-enter the vault password to confirm it:
Example
ansible-vault encrypt_string --stdin-name 'ceph_docker_registry_password_vault' New Vault password: Confirm New Vault password:
[admin@admin ceph-ansible]$ ansible-vault encrypt_string --stdin-name 'ceph_docker_registry_password_vault' New Vault password: Confirm New Vault password:Copy to Clipboard Copied! Toggle word wrap Toggle overflow Enter the password to encrypt, then enter CTRL+D twice to complete the entry:
Syntax
ansible-vault encrypt_string --stdin-name 'ceph_docker_registry_password_vault' New Vault password: Confirm New Vault password: Reading plaintext input from stdin. (ctrl-d to end input) PASSWORD
ansible-vault encrypt_string --stdin-name 'ceph_docker_registry_password_vault' New Vault password: Confirm New Vault password: Reading plaintext input from stdin. (ctrl-d to end input) PASSWORDCopy to Clipboard Copied! Toggle word wrap Toggle overflow Replace PASSWORD with the password:
Example
ansible-vault encrypt_string --stdin-name 'ceph_docker_registry_password_vault' New Vault password: Confirm New Vault password: Reading plaintext input from stdin. (ctrl-d to end input) SecurePassword
[admin@admin ceph-ansible]$ ansible-vault encrypt_string --stdin-name 'ceph_docker_registry_password_vault' New Vault password: Confirm New Vault password: Reading plaintext input from stdin. (ctrl-d to end input) SecurePasswordCopy to Clipboard Copied! Toggle word wrap Toggle overflow Do not hit enter after typing the password or it will include a new-line as a part of the password in the encrypted string.
Take note of the output that begins with
ceph_docker_registry_password_vault: !vault |and ends with a few lines of numbers, as it will be used in the next step:Example
Copy to Clipboard Copied! Toggle word wrap Toggle overflow The output you need begins immediately after the password, without spaces or new lines.
Open for editing
group_vars/all.ymland paste the output from above into the file:Example
Copy to Clipboard Copied! Toggle word wrap Toggle overflow Add a line below the encrypted password with the following:
Example
ceph_docker_registry_password: "{{ ceph_docker_registry_password_vault }}"ceph_docker_registry_password: "{{ ceph_docker_registry_password_vault }}"Copy to Clipboard Copied! Toggle word wrap Toggle overflow NoteUsing two variables as seen above is required due to a bug in Ansible that breaks the string type when assigning the vault value directly to the Ansible variable.
Configure Ansible to ask for the vault password when running
ansible-playbook.Open for editing
/usr/share/ceph-ansible/ansible.cfgand add the following line in the[defaults]section:ask_vault_pass = True
ask_vault_pass = TrueCopy to Clipboard Copied! Toggle word wrap Toggle overflow Optionally, you can pass
--ask-vault-passevery time you run ansible-playbook:Example
ansible-playbook -v site.yml --ask-vault-pass
[admin@admin ceph-ansible]$ ansible-playbook -v site.yml --ask-vault-passCopy to Clipboard Copied! Toggle word wrap Toggle overflow
Re-run
site.ymlorsite-container.ymlto ensure there are no errors related to the encrypted password.Example
ansible-playbook -v site.yml -i hosts --ask-vault-pass
[admin@admin ceph-ansible]$ ansible-playbook -v site.yml -i hosts --ask-vault-passCopy to Clipboard Copied! Toggle word wrap Toggle overflow The
-i hostsoption is only needed if you are not using the default Ansible inventory location of/etc/ansible/hosts.
Appendix I. General Ansible settings
These are the most common configurable Ansible parameters. There are two sets of parameters depending on the deployment method, either bare-metal or containers.
This is not an exhaustive list of all the available Ansible parameters.
Bare-metal and Containers Settings
monitor_interfaceThe interface that the Ceph Monitor nodes listen on.
- Value
- User-defined
- Required
- Yes
- Notes
-
Assigning a value to at least one of the
monitor_*parameters is required.
monitor_addressThe address that the Ceph Monitor nodes listen too.
- Value
- User-defined
- Required
- Yes
- Notes
-
Assigning a value to at least one of the
monitor_*parameters is required.
monitor_address_blockThe subnet of the Ceph public network.
- Value
- User-defined
- Required
- Yes
- Notes
-
Use when the IP addresses of the nodes are unknown, but the subnet is known. Assigning a value to at least one of the
monitor_*parameters is required.
ip_version- Value
-
ipv6 - Required
- Yes, if using IPv6 addressing.
public_networkThe IP address and netmask of the Ceph public network, or the corresponding IPv6 address, if using IPv6.
- Value
- User-defined
- Required
- Yes
- Notes
- For more information, see Verifying the Network Configuration for Red Hat Ceph Storage.
cluster_networkThe IP address and netmask of the Ceph cluster network, or the corresponding IPv6 address, if using IPv6.
- Value
- User-defined
- Required
- No
- Notes
- For more information, see Verifying the Network Configuration for Red Hat Ceph Storage.
configure_firewallAnsible will try to configure the appropriate firewall rules.
- Value
-
trueorfalse - Required
- No
Bare-metal-specific Settings
ceph_origin- Value
-
repositoryordistroorlocal - Required
- Yes
- Notes
-
The
repositoryvalue means Ceph will be installed through a new repository. Thedistrovalue means that no separate repository file will be added, and you will get whatever version of Ceph that is included with the Linux distribution. Thelocalvalue means the Ceph binaries will be copied from the local machine.
ceph_repository_type- Value
-
cdnoriso - Required
- Yes
ceph_rhcs_version- Value
-
4 - Required
- Yes
ceph_rhcs_iso_pathThe full path to the ISO image.
- Value
- User-defined
- Required
-
Yes, if
ceph_repository_typeis set toiso.
Container-specific Settings
ceph_docker_image- Value
-
rhceph/rhceph-4-rhel8, orcephimageinlocalreg, if using a local Docker registry. - Required
- Yes
ceph_docker_image_tag- Value
-
The
latestversion ofrhceph/rhceph-4-rhel8or thecustomtaggiven during the local registry configuration. - Required
- Yes
containerized_deployment- Value
-
true - Required
- Yes
ceph_docker_registry- Value
-
registry.redhat.io, orLOCAL_FQDN_NODE_NAME, if using a local Docker registry. - Required
- Yes
Appendix J. OSD Ansible settings
These are the most common configurable OSD Ansible parameters.
osd_auto_discoveryAutomatically find empty devices to use as OSDs.
- Value
-
false - Required
- No
- Notes
-
Cannot be used with
devices. Cannot be used withpurge-docker-cluster.ymlorpurge-cluster.yml. To use those playbooks, comment outosd_auto_discoveryand declare the OSD devices usingdevices.
devicesList of devices where Ceph’s data is stored.
- Value
- User-defined
- Required
- Yes, if specifying a list of devices.
- Notes
-
Cannot be used when
osd_auto_discoverysetting is used. When using thedevicesoption,ceph-volume lvm batchmode creates the optimized OSD configuration.
dmcryptTo encrypt the OSDs.
- Value
-
true - Required
- No
- Notes
-
The default value is
false.
lvm_volumesA list of FileStore or BlueStore dictionaries.
- Value
- User-defined
- Required
-
Yes, if storage devices are not defined using the
devicesparameter. - Notes
-
Each dictionary must contain a
data,journalanddata_vgkeys. Any logical volume or volume group must be the name and not the full path. Thedata, andjournalkeys can be a logical volume (LV) or partition, but do not use one journal for multipledataLVs. Thedata_vgkey must be the volume group containing thedataLV. Optionally, thejournal_vgkey can be used to specify the volume group containing the journal LV, if applicable.
osds_per_deviceThe number of OSDs to create per device.
- Value
- User-defined
- Required
- No
- Notes
-
The default value is
1.
osd_objectstoreThe Ceph object store type for the OSDs.
- Value
-
bluestoreorfilestore - Required
- No
- Notes
-
The default value is
bluestore. Required for upgrades.