Installation Guide
Installing Red Hat Ceph Storage on Red Hat Enterprise Linux
Abstract
Chapter 1. Red Hat Ceph Storage
Red Hat Ceph Storage is a scalable, open, software-defined storage platform that combines an enterprise-hardened version of the Ceph storage system, with a Ceph management platform, deployment utilities, and support services.
Red Hat Ceph Storage is designed for cloud infrastructure and web-scale object storage. Red Hat Ceph Storage clusters consist of the following types of nodes:
Ceph Monitor
Each Ceph Monitor node runs the ceph-mon daemon, which maintains a master copy of the storage cluster map. The storage cluster map includes the storage cluster topology. A client connecting to the Ceph storage cluster retrieves the current copy of the storage cluster map from the Ceph Monitor, which enables the client to read from and write data to the storage cluster.
The storage cluster can run with only one Ceph Monitor; however, to ensure high availability in a production storage cluster, Red Hat will only support deployments with at least three Ceph Monitor nodes. Red Hat recommends deploying a total of 5 Ceph Monitors for storage clusters exceeding 750 Ceph OSDs.
Ceph Manager
The Ceph Manager daemon, ceph-mgr, co-exists with the Ceph Monitor daemons running on Ceph Monitor nodes to provide additional services. The Ceph Manager provides an interface for other monitoring and management systems using Ceph Manager modules. Running the Ceph Manager daemons is a requirement for normal storage cluster operations.
Ceph OSD
Each Ceph Object Storage Device (OSD) node runs the ceph-osd daemon, which interacts with logical disks attached to the node. The storage cluster stores data on these Ceph OSD nodes.
Ceph can run with very few OSD nodes, of which the default is three, but production storage clusters realize better performance beginning at modest scales. For example, 50 Ceph OSDs in a storage cluster. Ideally, a Ceph storage cluster has multiple OSD nodes, allowing for the possibility to isolate failure domains by configuring the CRUSH map accordingly.
Ceph MDS
Each Ceph Metadata Server (MDS) node runs the ceph-mds daemon, which manages metadata related to files stored on the Ceph File System (CephFS). The Ceph MDS daemon also coordinates access to the shared storage cluster.
Ceph Object Gateway
Ceph Object Gateway node runs the ceph-radosgw daemon, and is an object storage interface built on top of librados to provide applications with a RESTful access point to the Ceph storage cluster. The Ceph Object Gateway supports two interfaces:
S3
Provides object storage functionality with an interface that is compatible with a large subset of the Amazon S3 RESTful API.
Swift
Provides object storage functionality with an interface that is compatible with a large subset of the OpenStack Swift API.
Additional Resources
- For details on the Ceph architecture, see the Red Hat Ceph Storage Architecture Guide.
- For the minimum hardware recommendations, see the Red Hat Ceph Storage Hardware Selection Guide.
Chapter 2. Red Hat Ceph Storage considerations and recommendations
As a storage administrator, you can have a basic understanding about what things to consider before running a Red Hat Ceph Storage cluster. Understanding such things as, the hardware and network requirements, understanding what type of workloads work well with a Red Hat Ceph Storage cluster, along with Red Hat’s recommendations. Red Hat Ceph Storage can be used for different workloads based on a particular business need or set of requirements. Doing the necessary planning before installing a Red Hat Ceph Storage is critical to the success of running a Ceph storage cluster efficiently and achieving the business requirements.
Want help with planning a Red Hat Ceph Storage cluster for a specific use case? Contact your Red Hat representative for assistance.
2.1. Basic Red Hat Ceph Storage considerations
The first consideration for using Red Hat Ceph Storage is developing a storage strategy for the data. A storage strategy is a method of storing data that serves a particular use case. If you need to store volumes and images for a cloud platform like OpenStack, you can choose to store data on faster Serial Attached SCSI (SAS) drives with Solid State Drives (SSD) for journals. By contrast, if you need to store object data for an S3- or Swift-compliant gateway, you can choose to use something more economical, like traditional Serial Advanced Technology Attachment (SATA) drives. Red Hat Ceph Storage can accommodate both scenarios in the same storage cluster, but you need a means of providing the fast storage strategy to the cloud platform, and a means of providing more traditional storage for your object store.
One of the most important steps in a successful Ceph deployment is identifying a price-to-performance profile suitable for the storage cluster’s use case and workload. It is important to choose the right hardware for the use case. For example, choosing IOPS-optimized hardware for a cold storage application increases hardware costs unnecessarily. Whereas, choosing capacity-optimized hardware for its more attractive price point in an IOPS-intensive workload will likely lead to unhappy users complaining about slow performance.
Red Hat Ceph Storage can support multiple storage strategies. Use cases, cost versus benefit performance tradeoffs, and data durability are the primary considerations that help develop a sound storage strategy.
Use Cases
Ceph provides massive storage capacity, and it supports numerous use cases, such as:
- The Ceph Block Device client is a leading storage backend for cloud platforms that provides limitless storage for volumes and images with high performance features like copy-on-write cloning.
- The Ceph Object Gateway client is a leading storage backend for cloud platforms that provides a RESTful S3-compliant and Swift-compliant object storage for objects like audio, bitmap, video, and other data.
- The Ceph File System for traditional file storage.
Cost vs. Benefit of Performance
Faster is better. Bigger is better. High durability is better. However, there is a price for each superlative quality, and a corresponding cost versus benefit tradeoff. Consider the following use cases from a performance perspective: SSDs can provide very fast storage for relatively small amounts of data and journaling. Storing a database or object index can benefit from a pool of very fast SSDs, but proves too expensive for other data. SAS drives with SSD journaling provide fast performance at an economical price for volumes and images. SATA drives without SSD journaling provide cheap storage with lower overall performance. When you create a CRUSH hierarchy of OSDs, you need to consider the use case and an acceptable cost versus performance tradeoff.
Data Durability
In large scale storage clusters, hardware failure is an expectation, not an exception. However, data loss and service interruption remain unacceptable. For this reason, data durability is very important. Ceph addresses data durability with multiple replica copies of an object or with erasure coding and multiple coding chunks. Multiple copies or multiple coding chunks present an additional cost versus benefit tradeoff: it is cheaper to store fewer copies or coding chunks, but it can lead to the inability to service write requests in a degraded state. Generally, one object with two additional copies, or two coding chunks can allow a storage cluster to service writes in a degraded state while the storage cluster recovers.
Replication stores one or more redundant copies of the data across failure domains in case of a hardware failure. However, redundant copies of data can become expensive at scale. For example, to store 1 petabyte of data with triple replication would require a cluster with at least 3 petabytes of storage capacity.
Erasure coding stores data as data chunks and coding chunks. In the event of a lost data chunk, erasure coding can recover the lost data chunk with the remaining data chunks and coding chunks. Erasure coding is substantially more economical than replication. For example, using erasure coding with 8 data chunks and 3 coding chunks provides the same redundancy as 3 copies of the data. However, such an encoding scheme uses approximately 1.5x the initial data stored compared to 3x with replication.
The CRUSH algorithm aids this process by ensuring that Ceph stores additional copies or coding chunks in different locations within the storage cluster. This ensures that the failure of a single storage device or host does not lead to a loss of all of the copies or coding chunks necessary to preclude data loss. You can plan a storage strategy with cost versus benefit tradeoffs, and data durability in mind, then present it to a Ceph client as a storage pool.
ONLY the data storage pool can use erasure coding. Pools storing service data and bucket indexes use replication.
Ceph’s object copies or coding chunks make RAID solutions obsolete. Do not use RAID, because Ceph already handles data durability, a degraded RAID has a negative impact on performance, and recovering data using RAID is substantially slower than using deep copies or erasure coding chunks.
2.2. Red Hat Ceph Storage workload considerations
One of the key benefits of a Ceph storage cluster is the ability to support different types of workloads within the same storage cluster using performance domains. Different hardware configurations can be associated with each performance domain. Storage administrators can deploy storage pools on the appropriate performance domain, providing applications with storage tailored to specific performance and cost profiles. Selecting appropriately sized and optimized servers for these performance domains is an essential aspect of designing a Red Hat Ceph Storage cluster.
To the Ceph client interface that reads and writes data, a Ceph storage cluster appears as a simple pool where the client stores data. However, the storage cluster performs many complex operations in a manner that is completely transparent to the client interface. Ceph clients and Ceph object storage daemons, referred to as Ceph OSDs, or simply OSDs, both use the Controlled Replication Under Scalable Hashing (CRUSH) algorithm for the storage and retrieval of objects. Ceph OSDs can run in containers within the storage cluster.
A CRUSH map describes a topography of cluster resources, and the map exists both on client hosts as well as Ceph Monitor hosts within the cluster. Ceph clients and Ceph OSDs both use the CRUSH map and the CRUSH algorithm. Ceph clients communicate directly with OSDs, eliminating a centralized object lookup and a potential performance bottleneck. With awareness of the CRUSH map and communication with their peers, OSDs can handle replication, backfilling, and recovery—allowing for dynamic failure recovery.
Ceph uses the CRUSH map to implement failure domains. Ceph also uses the CRUSH map to implement performance domains, which simply take the performance profile of the underlying hardware into consideration. The CRUSH map describes how Ceph stores data, and it is implemented as a simple hierarchy, specifically an acyclic graph, and a ruleset. The CRUSH map can support multiple hierarchies to separate one type of hardware performance profile from another. Ceph implements performance domains with device "classes".
For example, you can have these performance domains coexisting in the same Red Hat Ceph Storage cluster:
- Hard disk drives (HDDs) are typically appropriate for cost and capacity-focused workloads.
- Throughput-sensitive workloads typically use HDDs with Ceph write journals on solid state drives (SSDs).
- IOPS-intensive workloads, such as MySQL and MariaDB, often use SSDs.
Figure 2.1. Performance and Failure Domains

Workloads
Red Hat Ceph Storage is optimized for three primary workloads.
Carefully consider the workload being run by Red Hat Ceph Storage clusters BEFORE considering what hardware to purchase, because it can significantly impact the price and performance of the storage cluster. For example, if the workload is capacity-optimized and the hardware is better suited to a throughput-optimized workload, then hardware will be more expensive than necessary. Conversely, if the workload is throughput-optimized and the hardware is better suited to a capacity-optimized workload, then the storage cluster can suffer from poor performance.
IOPS optimized: Input, output per second (IOPS) optimization deployments are suitable for cloud computing operations, such as running MYSQL or MariaDB instances as virtual machines on OpenStack. IOPS optimized deployments require higher performance storage such as 15k RPM SAS drives and separate SSD journals to handle frequent write operations. Some high IOPS scenarios use all flash storage to improve IOPS and total throughput.
An IOPS-optimized storage cluster has the following properties:
- Lowest cost per IOPS.
- Highest IOPS per GB.
- 99th percentile latency consistency.
Uses for an IOPS-optimized storage cluster are:
- Typically block storage.
- 3x replication for hard disk drives (HDDs) or 2x replication for solid state drives (SSDs).
- MySQL on OpenStack clouds.
Throughput optimized: Throughput-optimized deployments are suitable for serving up significant amounts of data, such as graphic, audio, and video content. Throughput-optimized deployments require high bandwidth networking hardware, controllers, and hard disk drives with fast sequential read and write characteristics. If fast data access is a requirement, then use a throughput-optimized storage strategy. Also, if fast write performance is a requirement, using Solid State Disks (SSD) for journals will substantially improve write performance.
A throughput-optimized storage cluster has the following properties:
- Lowest cost per MBps (throughput).
- Highest MBps per TB.
- Highest MBps per BTU.
- Highest MBps per Watt.
- 97th percentile latency consistency.
Uses for a throughput-optimized storage cluster are:
- Block or object storage.
- 3x replication.
- Active performance storage for video, audio, and images.
- Streaming media, such as 4k video.
Capacity optimized: Capacity-optimized deployments are suitable for storing significant amounts of data as inexpensively as possible. Capacity-optimized deployments typically trade performance for a more attractive price point. For example, capacity-optimized deployments often use slower and less expensive SATA drives and co-locate journals rather than using SSDs for journaling.
A cost and capacity-optimized storage cluster has the following properties:
- Lowest cost per TB.
- Lowest BTU per TB.
- Lowest Watts required per TB.
Uses for a cost and capacity-optimized storage cluster are:
- Typically object storage.
- Erasure coding for maximizing usable capacity
- Object archive.
- Video, audio, and image object repositories.
2.3. Network considerations for Red Hat Ceph Storage
An important aspect of a cloud storage solution is that storage clusters can run out of IOPS due to network latency, and other factors. Also, the storage cluster can run out of throughput due to bandwidth constraints long before the storage clusters run out of storage capacity. This means that the network hardware configuration must support the chosen workloads to meet price versus performance requirements.
Storage administrators prefer that a storage cluster recovers as quickly as possible. Carefully consider bandwidth requirements for the storage cluster network, be mindful of network link oversubscription, and segregate the intra-cluster traffic from the client-to-cluster traffic. Also consider that network performance is increasingly important when considering the use of Solid State Disks (SSD), flash, NVMe, and other high performing storage devices.
Ceph supports a public network and a storage cluster network. The public network handles client traffic and communication with Ceph Monitors. The storage cluster network handles Ceph OSD heartbeats, replication, backfilling, and recovery traffic. At a minimum, a single 10 Gb/s Ethernet link should be used for storage hardware, and you can add additional 10 Gb/s Ethernet links for connectivity and throughput.
Red Hat recommends allocating bandwidth to the storage cluster network, such that it is a multiple of the public network using the osd_pool_default_size as the basis for the multiple on replicated pools. Red Hat also recommends running the public and storage cluster networks on separate network cards.
Red Hat recommends using 10 Gb/s Ethernet for Red Hat Ceph Storage deployments in production. A 1 Gb/s Ethernet network is not suitable for production storage clusters.
In the case of a drive failure, replicating 1 TB of data across a 1 Gb/s network takes 3 hours and replicating 10 TB across a 1 Gb/s network takes 30 hours. Using 10 TB is the typical drive configuration. By contrast, with a 10 Gb/s Ethernet network, the replication times would be 20 minutes for 1 TB and 1 hour for 10 TB. Remember that when a Ceph OSD fails, the storage cluster will recover by replicating the data it contained to other Ceph OSDs within the pool.
The failure of a larger domain such as a rack means that the storage cluster utilizes considerably more bandwidth. When building a storage cluster consisting of multiple racks, which is common for large storage implementations, consider utilizing as much network bandwidth between switches in a "fat tree" design for optimal performance. A typical 10 Gb/s Ethernet switch has 48 10 Gb/s ports and four 40 Gb/s ports. Use the 40 Gb/s ports on the spine for maximum throughput. Alternatively, consider aggregating unused 10 Gb/s ports with QSFP+ and SFP+ cables into more 40 Gb/s ports to connect to other rack and spine routers. Also, consider using LACP mode 4 to bond network interfaces. Additionally, use jumbo frames, with a maximum transmission unit (MTU) of 9000, especially on the backend or cluster network.
Before installing and testing a Red Hat Ceph Storage cluster, verify the network throughput. Most performance-related problems in Ceph usually begin with a networking issue. Simple network issues like a kinked or bent Cat-6 cable could result in degraded bandwidth. Use a minimum of 10 Gb/s ethernet for the front side network. For large clusters, consider using 40 Gb/s ethernet for the backend or cluster network.
For network optimization, Red Hat recommends using jumbo frames for a better CPU per bandwidth ratio, and a non-blocking network switch back-plane. Red Hat Ceph Storage requires the same MTU value throughout all networking devices in the communication path, end-to-end for both public and cluster networks. Verify that the MTU value is the same on all hosts and networking equipment in the environment before using a Red Hat Ceph Storage cluster in production.
2.4. Considerations for using a RAID controller with OSD hosts
Optionally, you can consider using a RAID controller on the OSD hosts. Here are some things to consider:
- If an OSD host has a RAID controller with 1-2 Gb of cache installed, enabling the write-back cache might result in increased small I/O write throughput. However, the cache must be non-volatile.
- Most modern RAID controllers have super capacitors that provide enough power to drain volatile memory to non-volatile NAND memory during a power-loss event. It is important to understand how a particular controller and its firmware behave after power is restored.
- Some RAID controllers require manual intervention. Hard drives typically advertise to the operating system whether their disk caches should be enabled or disabled by default. However, certain RAID controllers and some firmware do not provide such information. Verify that disk level caches are disabled to avoid file system corruption.
- Create a single RAID 0 volume with write-back for each Ceph OSD data drive with write-back cache enabled.
- If Serial Attached SCSI (SAS) or SATA connected Solid-state Drive (SSD) disks are also present on the RAID controller, then investigate whether the controller and firmware support pass-through mode. Enabling pass-through mode helps avoid caching logic, and generally results in much lower latency for fast media.
2.5. Tuning considerations for the Linux kernel when running Ceph
Production Red Hat Ceph Storage clusters generally benefit from tuning the operating system, specifically around limits and memory allocation. Ensure that adjustments are set for all hosts within the storage cluster. You can also open a case with Red Hat support asking for additional guidance.
Increase the File Descriptors
The Ceph Object Gateway can hang if it runs out of file descriptors. You can modify the /etc/security/limits.conf file on Ceph Object Gateway hosts to increase the file descriptors for the Ceph Object Gateway.
ceph soft nofile unlimitedAdjusting the ulimit value for Large Storage Clusters
When running Ceph administrative commands on large storage clusters, for example, with 1024 Ceph OSDs or more, create an /etc/security/limits.d/50-ceph.conf file on each host that runs administrative commands with the following contents:
USER_NAME soft nproc unlimitedReplace USER_NAME with the name of the non-root user account that runs the Ceph administrative commands.
The root user’s ulimit value is already set to unlimited by default on Red Hat Enterprise Linux.
2.6. How colocation works and its advantages
You can colocate containerized Ceph daemons on the same host. Here are the advantages of colocating some of Ceph’s services:
- Significant improvement in total cost of ownership (TCO) at small scale
- Reduction from six hosts to three for the minimum configuration
- Easier upgrade
- Better resource isolation
How Colocation Works
With the help of the Cephadm orchestrator, you can colocate one daemon from the following list with one or more OSD daemons (ceph-osd):
-
Ceph Monitor (
ceph-mon) and Ceph Manager (ceph-mgr) daemons -
NFS Ganesha (
nfs-ganesha) for Ceph Object Gateway (nfs-ganesha) -
RBD Mirror (
rbd-mirror) - Observability Stack (Grafana)
Additionally, for Ceph Object Gateway (radosgw) (RGW) and Ceph File System (ceph-mds), you can colocate either with an OSD daemon plus a daemon from the above list, excluding RBD mirror.
Collocating two of the same kind of daemons on a given node is not supported.
Because ceph-mon and ceph-mgr work together closely they do not count as two separate daemons for the purposes of colocation.
Red Hat recommends colocating the Ceph Object Gateway with Ceph OSD containers to increase performance.
With the colocation rules shared above, we have the following minimum clusters sizes that comply with these rules:
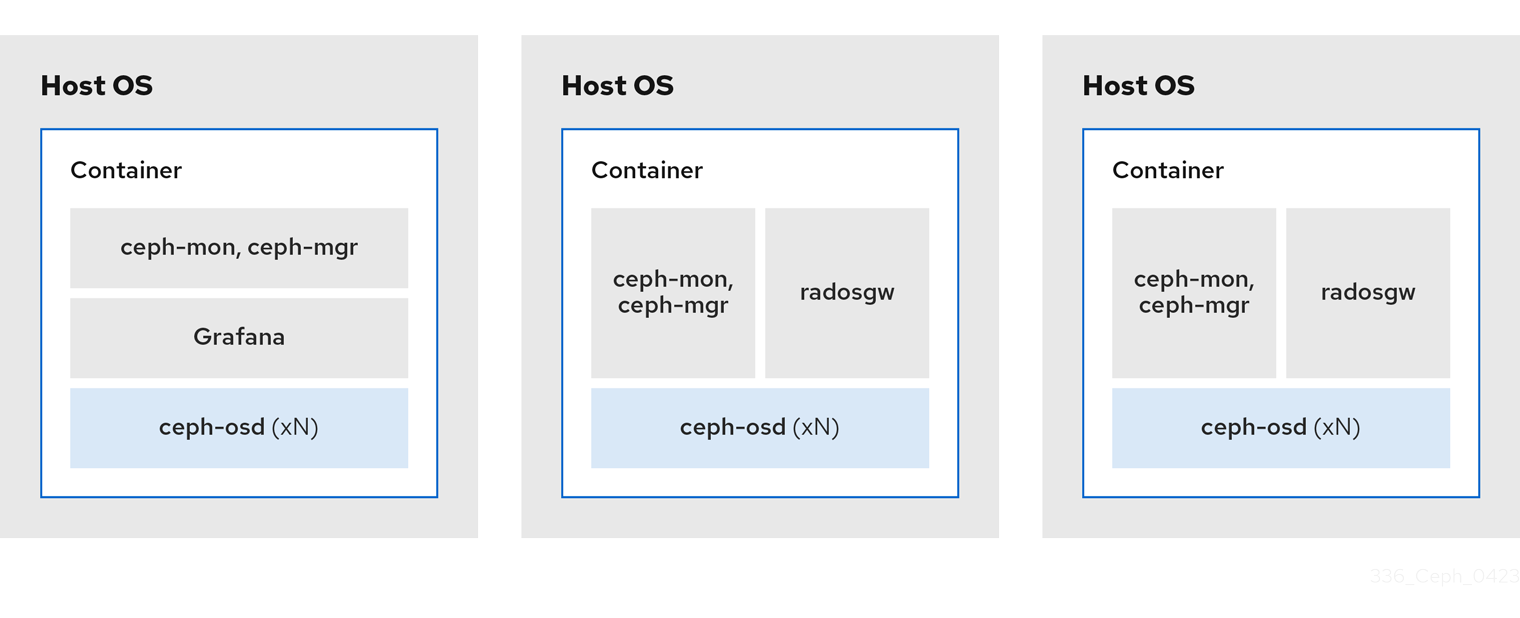
Example 1
- Media: Full flash systems (SSDs)
- Use case: Block (RBD) and File (CephFS), or Object (Ceph Object Gateway)
- Number of nodes: 3
- Replication scheme: 2
| Host | Daemon | Daemon | Daemon |
|---|---|---|---|
| host1 | OSD | Monitor/Manager | Grafana |
| host2 | OSD | Monitor/Manager | RGW or CephFS |
| host3 | OSD | Monitor/Manager | RGW or CephFS |
The minimum size for a storage cluster with three replicas is four nodes. Similarly, the size of a storage cluster with two replicas is a three node cluster. It is a requirement to have a certain number of nodes for the replication factor with an extra node in the cluster to avoid extended periods with the cluster in a degraded state.
Figure 2.2. Colocated Daemons Example 1
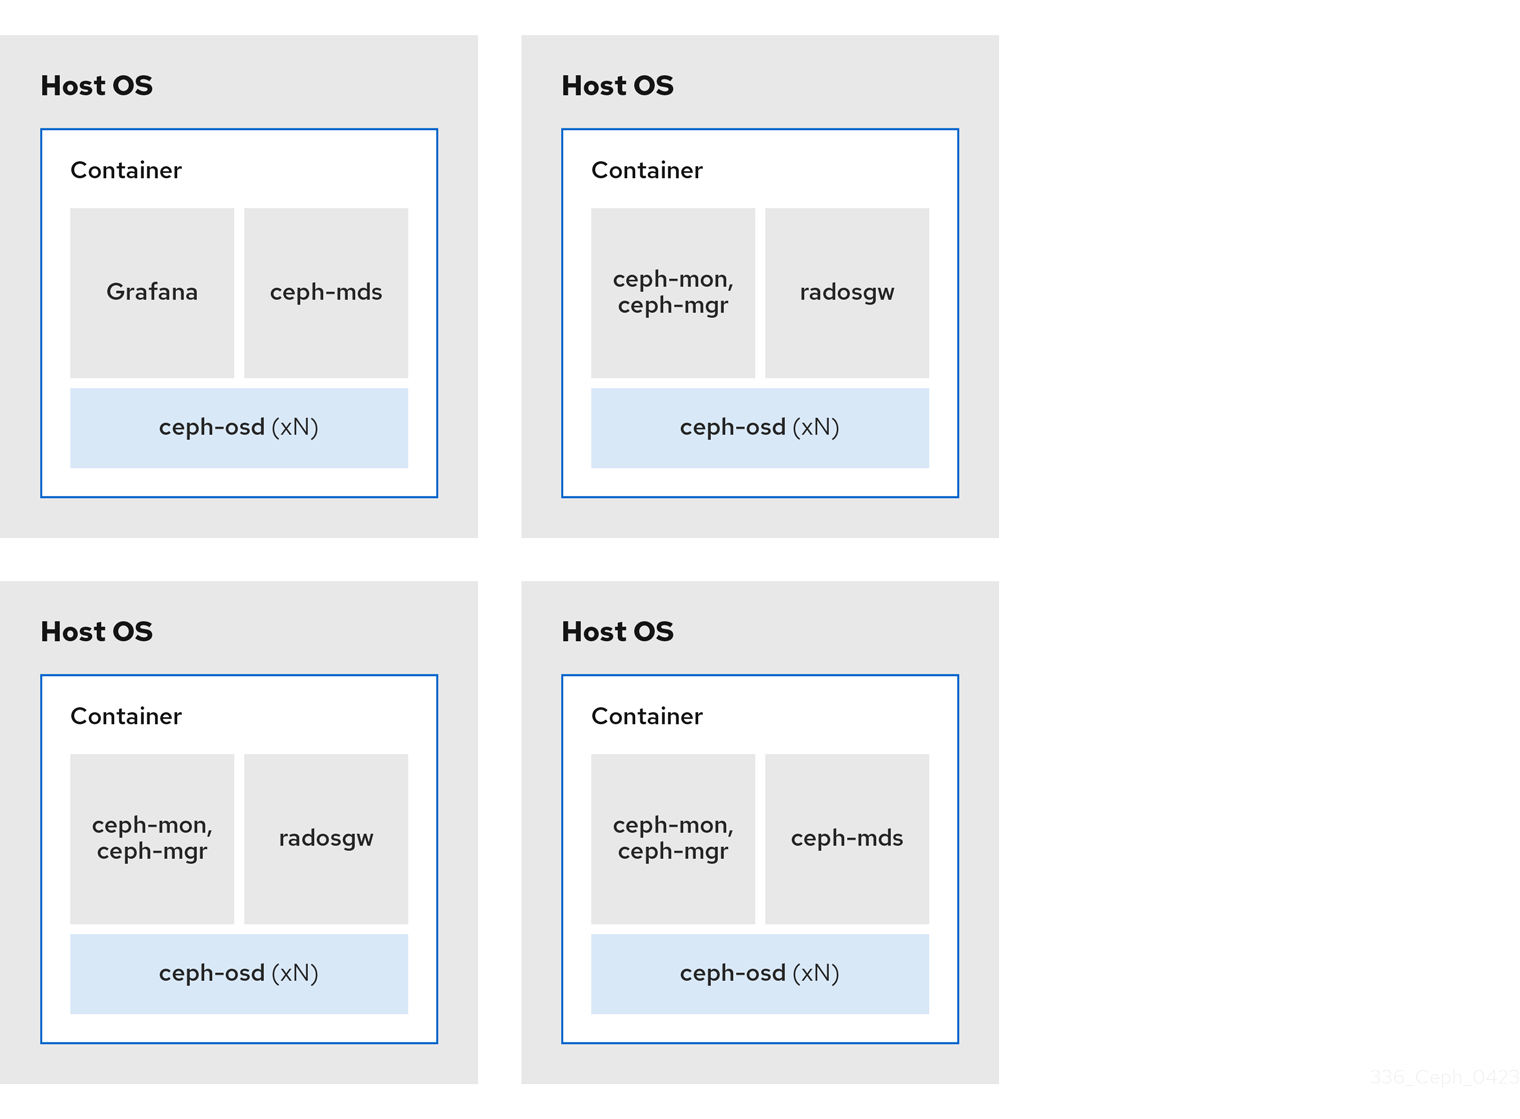
Example 2
- Media: Full flash systems (SSDs) or spinning devices (HDDs)
- Use case: Block (RBD), File (CephFS), and Object (Ceph Object Gateway)
- Number of nodes: 4
- Replication scheme: 3
| Host | Daemon | Daemon | Daemon |
|---|---|---|---|
| host1 | OSD | Grafana | CephFS |
| host2 | OSD | Monitor/Manager | RGW |
| host3 | OSD | Monitor/Manager | RGW |
| host4 | OSD | Monitor/Manager | CephFS |
Figure 2.3. Colocated Daemons Example 2
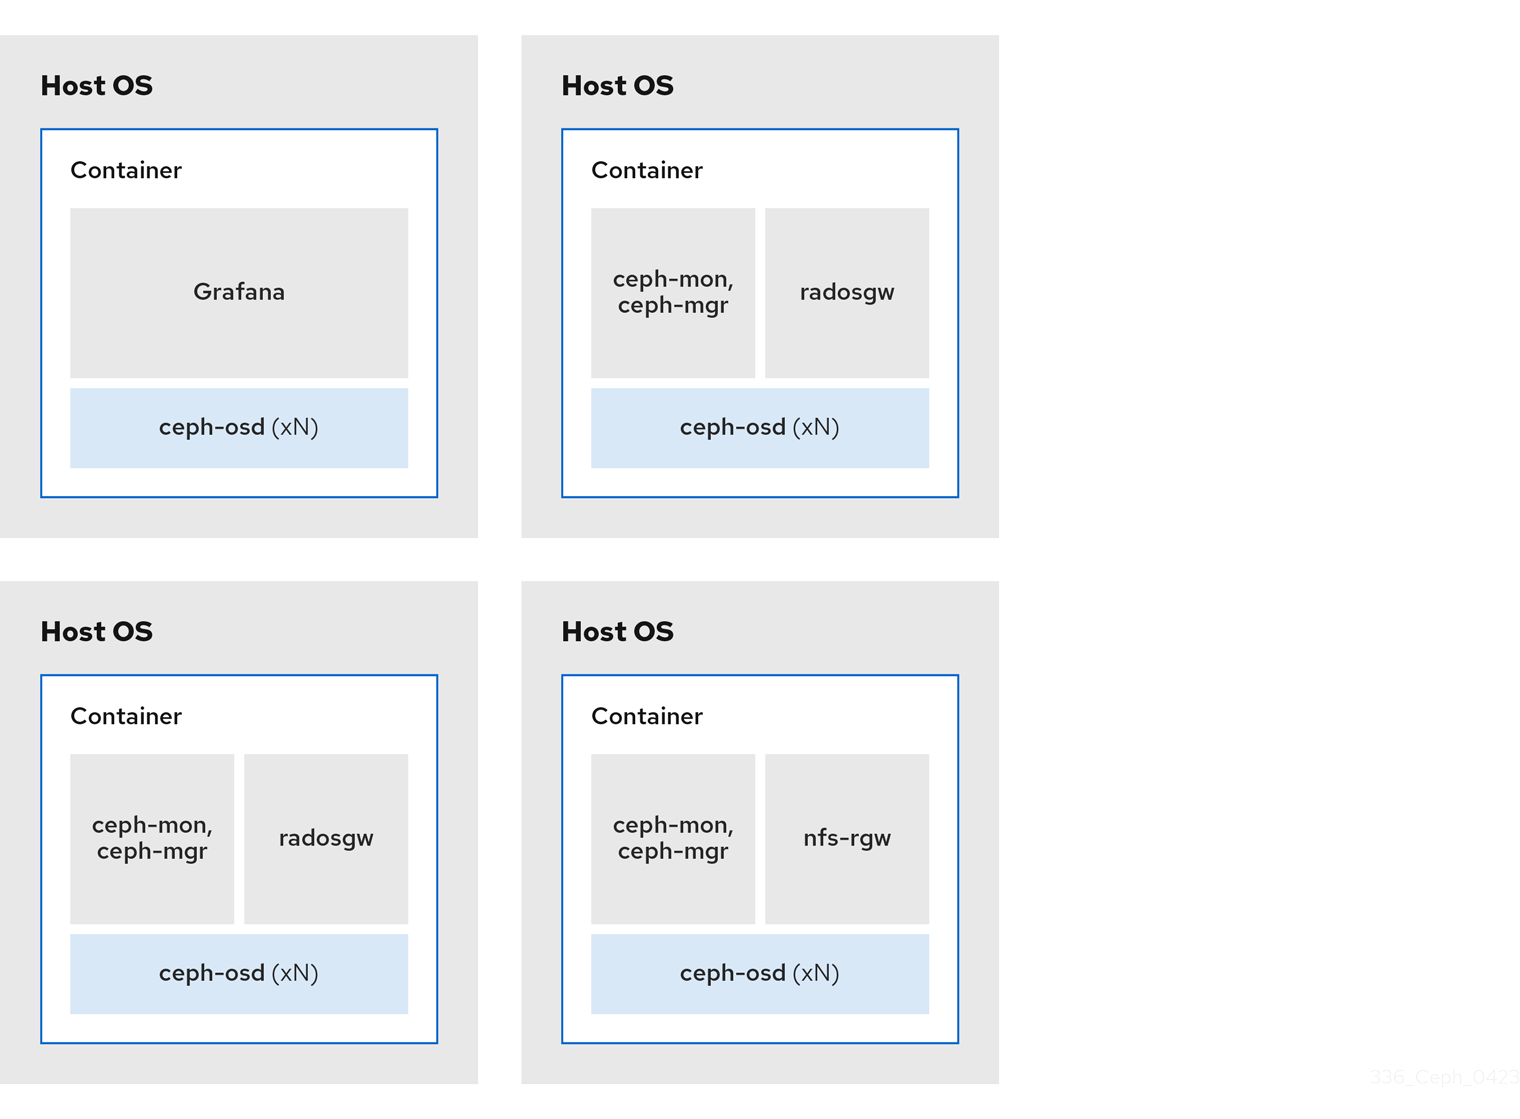
Example 3
- Media: Full flash systems (SSDs) or spinning devices (HDDs)
- Use case: Block (RBD), Object (Ceph Object Gateway), and NFS for Ceph Object Gateway
- Number of nodes: 4
- Replication scheme: 3
| Host | Daemon | Daemon | Daemon |
|---|---|---|---|
| host1 | OSD | Grafana | |
| host2 | OSD | Monitor/Manager | RGW |
| host3 | OSD | Monitor/Manager | RGW |
| host4 | OSD | Monitor/Manager | NFS (RGW) |
Figure 2.4. Colocated Daemons Example 3
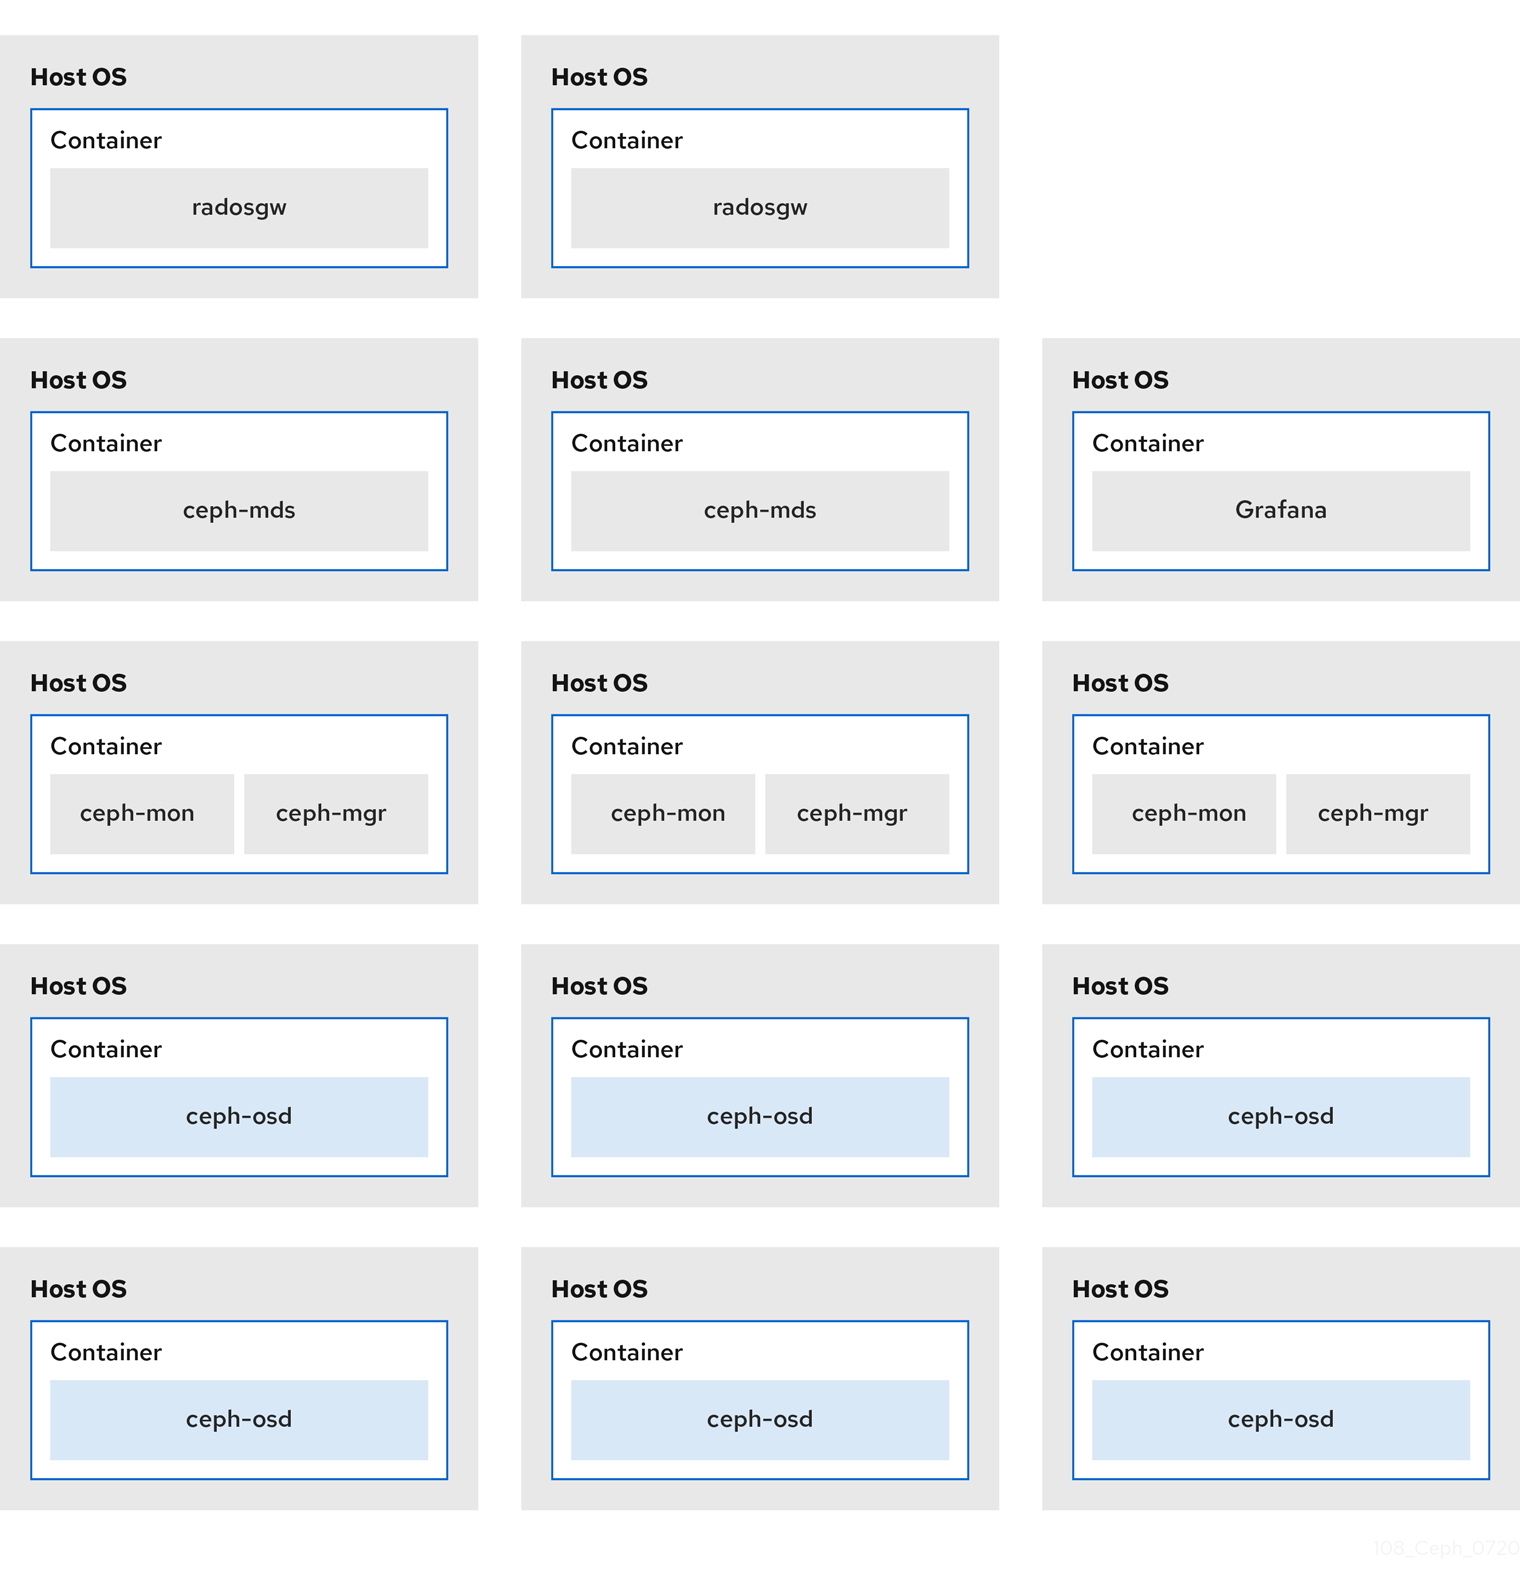
The diagrams below shows the differences between storage clusters with colocated and non-colocated daemons.
Figure 2.5. Colocated Daemons
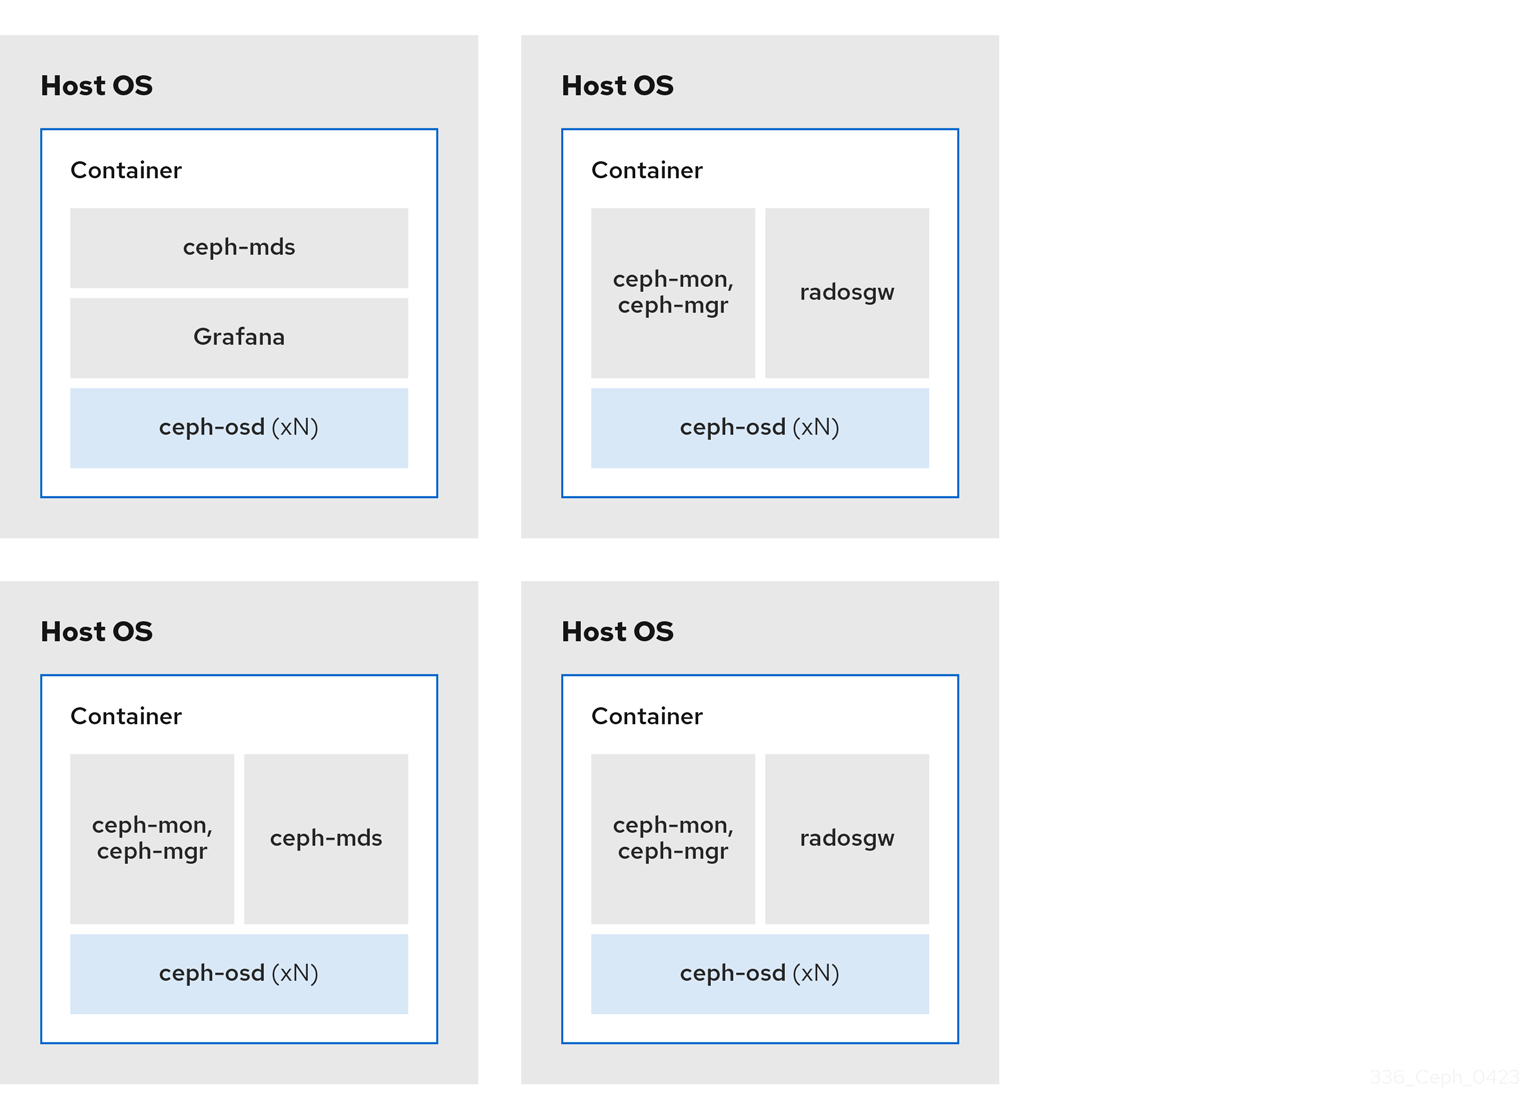
Figure 2.6. Non-colocated Daemons
2.7. Operating system requirements for Red Hat Ceph Storage
Red Hat Enterprise Linux entitlements are included in the Red Hat Ceph Storage subscription.
For full compatibility information, see Compatibility Guide.
Red Hat Ceph Storage 7 is supported on container-based deployments only.
Use the same architecture and deployment type across all nodes. For example, do not use a mixture of nodes with both AMD64 and Intel 64 architectures, or a mixture of nodes with container-based deployments.
Red Hat does not support clusters with heterogeneous architectures or deployment types.
SELinux
By default, SELinux is set to Enforcing mode and the ceph-selinux packages are installed. For additional information on SELinux, see the Data Security and Hardening Guide, and Red Hat Enterprise Linux 9 Using SELinux Guide.
2.8. Minimum hardware considerations for Red Hat Ceph Storage
Red Hat Ceph Storage can run on non-proprietary commodity hardware. Small production clusters and development clusters can run without performance optimization with modest hardware.
Disk space requirements are based on the Ceph daemons' default path under /var/lib/ceph/ directory.
| Process | Criteria | Minimum Recommended |
|---|---|---|
|
| Processor | 1x AMD64 or Intel 64 CPU CORE per OSD container. |
| RAM | Minimum of 5 GB of RAM per OSD container. | |
| Number of nodes | Minimum of 3 nodes required. | |
| OS Disk | 1x OS disk per host. | |
| OSD Storage | 1x storage drive per OSD container. Cannot be shared with OS Disk. | |
|
|
Optional, but Red Hat recommended, 1x SSD or NVMe or Optane partition or lvm per daemon. Sizing is 4% of | |
|
|
Optionally, 1x SSD or NVMe or Optane partition or logical volume per daemon. Use a small size, for example 10 GB, and only if it’s faster than the | |
| Network | 2x 10 GB Ethernet NICs |
|
| Processor | 1x AMD64 or Intel 64 CPU CORE per mon-container | |
| RAM |
3 GB per | |
| Disk Space | 10 GB per mon-container, 50 GB Recommended | |
| Monitor Disk |
Optionally, 1x SSD disk for | |
| Network | 2x 1 GB Ethernet NICs, 10 GB Recommended | |
| Prometheus |
20 GB to 50 GB under |
|
| Processor |
1x AMD64 or Intel 64 CPU CORE per | |
| RAM |
3 GB per | |
| Network | 2x 1 GB Ethernet NICs, 10 GB Recommended |
|
| Processor | 1x AMD64 or Intel 64 CPU CORE per radosgw-container | |
| RAM | 1 GB per daemon | |
| Disk Space | 5 GB per daemon | |
| Network | 1x 1 GB Ethernet NICs |
|
| Processor | 1x AMD64 or Intel 64 CPU CORE per mds-container | |
| RAM |
3 GB per
This number is highly dependent on the configurable MDS cache size. The RAM requirement is typically twice as much as the amount set in the | |
| Disk Space | 2 GB per 'mds-container', plus taking into consideration any additional space required for possible debug logging, 20GB is a good start. |
Chapter 3. Red Hat Ceph Storage installation
As a storage administrator, you can use the cephadm utility to deploy new Red Hat Ceph Storage clusters.
The cephadm utility manages the entire life cycle of a Ceph cluster. Installation and management tasks comprise two types of operations:
- Day One operations involve installing and bootstrapping a bare-minimum, containerized Ceph storage cluster, running on a single node. Day One also includes deploying the Monitor and Manager daemons and adding Ceph OSDs.
-
Day Two operations use the Ceph orchestration interface,
cephadm orch, or the Red Hat Ceph Storage Dashboard to expand the storage cluster by adding other Ceph services to the storage cluster.
Prerequisites
- At least one running virtual machine (VM) or bare-metal server with an active internet connection.
-
Red Hat Enterprise Linux 9.2 with
ansible-corebundled into AppStream. - A valid Red Hat subscription with the appropriate entitlements.
- Root-level access to all nodes.
- An active Red Hat Network (RHN) or service account to access the Red Hat Registry.
- Remove troubling configurations in iptables so that refresh of iptables services does not cause issues to the cluster. For an example, refer to the Verifying firewall rules are configured for default Ceph ports section of the Red Hat Ceph Storage Configuration Guide.
3.1. The cephadm utility
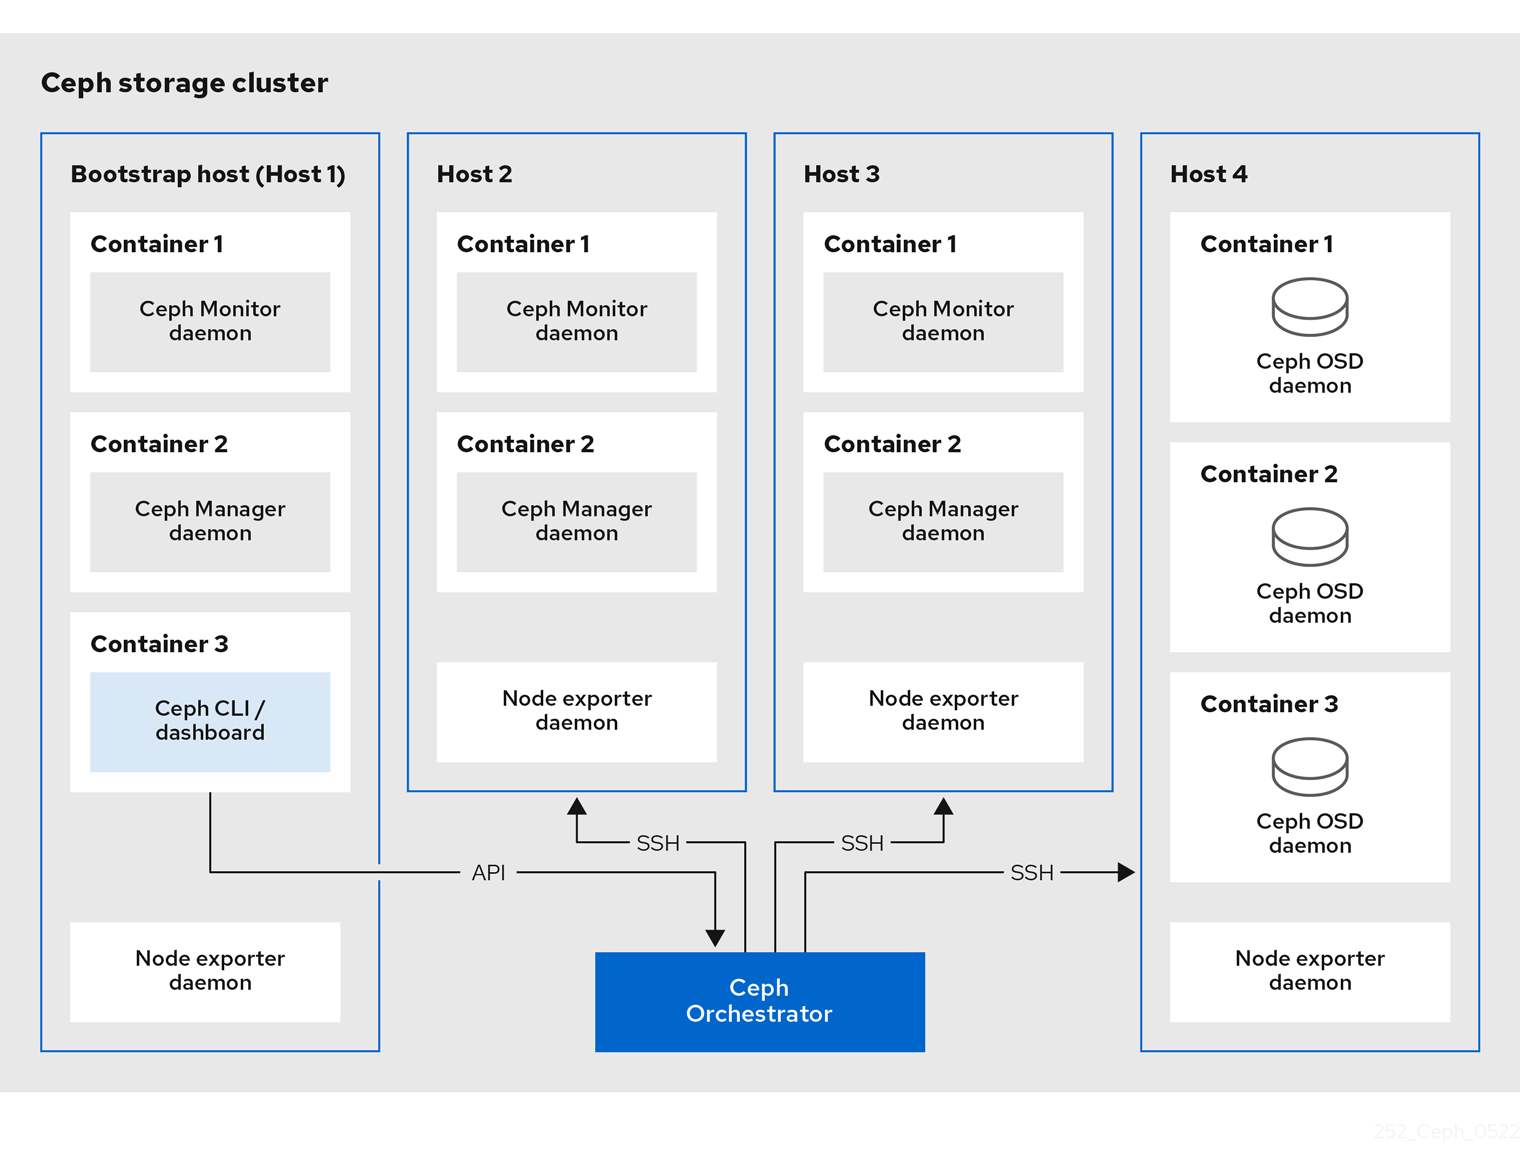
The cephadm utility deploys and manages a Ceph storage cluster. It is tightly integrated with both the command-line interface (CLI) and the Red Hat Ceph Storage Dashboard web interface so that you can manage storage clusters from either environment. cephadm uses SSH to connect to hosts from the manager daemon to add, remove, or update Ceph daemon containers. It does not rely on external configuration or orchestration tools such as Ansible or Rook.
The cephadm utility is available after running the preflight playbook on a host.
The cephadm utility consists of two main components:
-
The
cephadmshell. -
The
cephadmorchestrator.
The cephadm shell
The cephadm shell starts a bash shell within a container. Use the shell to complete “Day One” cluster setup tasks, such as installation and bootstrapping, and to use ceph commands.
For more information about how to start the cephadm shell, see Starting the cephadm shell.
The cephadm orchestrator
Use the cephadm orchestrator to perform “Day Two” Ceph functions, such as expanding the storage cluster and provisioning Ceph daemons and services. You can use the cephadm orchestrator through either the command-line interface (CLI) or the web-based Red Hat Ceph Storage Dashboard. Orchestrator commands take the form ceph orch.
The cephadm script interacts with the Ceph orchestration module used by the Ceph Manager.
3.2. How cephadm works
The cephadm command manages the full lifecycle of a Red Hat Ceph Storage cluster. The cephadm command can perform the following operations:
- Bootstrap a new Red Hat Ceph Storage cluster.
- Launch a containerized shell that works with the Red Hat Ceph Storage command-line interface (CLI).
- Aid in debugging containerized daemons.
The cephadm command uses ssh to communicate with the nodes in the storage cluster. This allows you to add, remove, or update Red Hat Ceph Storage containers without using external tools. Generate the ssh key pair during the bootstrapping process, or use your own ssh key.
The cephadm bootstrapping process creates a small storage cluster on a single node, consisting of one Ceph Monitor and one Ceph Manager, as well as any required dependencies. You then use the orchestrator CLI or the Red Hat Ceph Storage Dashboard to expand the storage cluster to include nodes, and to provision all of the Red Hat Ceph Storage daemons and services. You can perform management functions through the CLI or from the Red Hat Ceph Storage Dashboard web interface.
3.3. The cephadm-ansible playbooks
The cephadm-ansible package is a collection of Ansible playbooks to simplify workflows that are not covered by cephadm. After installation, the playbooks are located in /usr/share/cephadm-ansible/.
The cephadm-ansible package includes the following playbooks:
-
cephadm-preflight.yml -
cephadm-clients.yml -
cephadm-purge-cluster.yml
The cephadm-preflight playbook
Use the cephadm-preflight playbook to initially setup hosts before bootstrapping the storage cluster and before adding new nodes or clients to your storage cluster. This playbook configures the Ceph repository and installs some prerequisites such as podman, lvm2, chrony, and cephadm.
The cephadm-clients playbook
Use the cephadm-clients playbook to set up client hosts. This playbook handles the distribution of configuration and keyring files to a group of Ceph clients.
The cephadm-purge-cluster playbook
Use the cephadm-purge-cluster playbook to remove a Ceph cluster. This playbook purges a Ceph cluster managed with cephadm.
3.4. Registering the Red Hat Ceph Storage nodes to the CDN and attaching subscriptions
When using Red Hat Enterprise Linux 8.x, the Admin node must be running a supported Red Hat Enterprise Linux 9.x version for your Red Hat Ceph Storage.
For full compatibility information, see Compatibility Guide.
Prerequisites
- At least one running virtual machine (VM) or bare-metal server with an active internet connection.
- For Red Hat Ceph Storage 7.0, Red Hat Enterprise Linux 9.2 with ansible-core bundled into AppStream. For Red Hat Ceph Storage 7.1, Red Hat Enterprise Linux 8.10, 9.4, 9.5, or 9.6 with ansible-core bundled into AppStream.
- A valid Red Hat subscription with the appropriate entitlements.
- Root-level access to all nodes.
Procedure
Register the node, and when prompted, enter your Red Hat Customer Portal credentials:
Syntax
subscription-manager registerPull the latest subscription data from the CDN:
Syntax
subscription-manager refreshList all available subscriptions for Red Hat Ceph Storage:
Syntax
subscription-manager list --available --matches 'Red Hat Ceph Storage'- Identify the appropriate subscription and retrieve its Pool ID.
Attach a pool ID to gain access to the software entitlements. Use the Pool ID you identified in the previous step.
Syntax
subscription-manager attach --pool=POOL_IDDisable the default software repositories, and then enable the server and the extras repositories on the respective version of Red Hat Enterprise Linux:
Red Hat Enterprise Linux 9
subscription-manager repos --disable=*
subscription-manager repos --enable=rhel-9-for-x86_64-baseos-rpms
subscription-manager repos --enable=rhel-9-for-x86_64-appstream-rpms
Update the system to receive the latest packages for Red Hat Enterprise Linux:
Syntax
# dnf update- Subscribe to Red Hat Ceph Storage 7 content. Follow the instructions in How to Register Ceph with Red Hat Satellite 6.
Enable the
ceph-toolsrepository:Red Hat Enterprise Linux 9
subscription-manager repos --enable=rhceph-7-tools-for-rhel-9-x86_64-rpms- Repeat the above steps on all nodes you are adding to the cluster.
Install
cephadm-ansible:Syntax
dnf install cephadm-ansible
3.5. Configuring Ansible inventory location
You can configure inventory location files for the cephadm-ansible staging and production environments. The Ansible inventory hosts file contains all the hosts that are part of the storage cluster. You can list nodes individually in the inventory hosts file or you can create groups such as [mons],[osds], and [rgws] to provide clarity to your inventory and ease the usage of the --limit option to target a group or node when running a playbook.
If deploying clients, client nodes must be defined in a dedicated [clients] group.
Prerequisites
- An Ansible administration node.
- Root-level access to the Ansible administration node.
-
The
cephadm-ansiblepackage is installed on the node.
Procedure
Navigate to the
/usr/share/cephadm-ansible/directory:[root@admin ~]# cd /usr/share/cephadm-ansibleOptional: Create subdirectories for staging and production:
[root@admin cephadm-ansible]# mkdir -p inventory/staging inventory/productionOptional: Edit the
ansible.cfgfile and add the following line to assign a default inventory location:[defaults] inventory = ./inventory/stagingOptional: Create an inventory
hostsfile for each environment:[root@admin cephadm-ansible]# touch inventory/staging/hosts [root@admin cephadm-ansible]# touch inventory/production/hostsOpen and edit each
hostsfile and add the nodes and[admin]group:NODE_NAME_1 NODE_NAME_2 [admin] ADMIN_NODE_NAME_1- Replace NODE_NAME_1 and NODE_NAME_2 with the Ceph nodes such as monitors, OSDs, MDSs, and gateway nodes.
Replace ADMIN_NODE_NAME_1 with the name of the node where the admin keyring is stored.
Example
host02 host03 host04 [admin] host01NoteIf you set the inventory location in the
ansible.cfgfile to staging, you need to run the playbooks in the staging environment as follows:Syntax
ansible-playbook -i inventory/staging/hosts PLAYBOOK.ymlTo run the playbooks in the production environment:
Syntax
ansible-playbook -i inventory/production/hosts PLAYBOOK.yml
3.6. Enabling SSH login as root user on Red Hat Enterprise Linux 9
Red Hat Enterprise Linux 9 does not support SSH login as a root user even if PermitRootLogin parameter is set to yes in the /etc/ssh/sshd_config file. You get the following error:
Example
[root@host01 ~]# ssh root@myhostname
root@myhostname password:
Permission denied, please try again.
You can run one of the following methods to enable login as a root user:
- Use "Allow root SSH login with password" flag while setting the root password during installation of Red Hat Enterprise Linux 9.
-
Manually set the
PermitRootLoginparameter after Red Hat Enterprise Linux 9 installation.
This section describes manual setting of the PermitRootLogin parameter.
Prerequisites
- Root-level access to all nodes.
Procedure
Open the
etc/ssh/sshd_configfile and set thePermitRootLogintoyes:Example
[root@admin ~]# echo 'PermitRootLogin yes' >> /etc/ssh/sshd_config.d/01-permitrootlogin.confRestart the
SSHservice:Example
[root@admin ~]# systemctl restart sshd.serviceLogin to the node as the
rootuser:Syntax
ssh root@HOST_NAMEReplace HOST_NAME with the host name of the Ceph node.
Example
[root@admin ~]# ssh root@host01Enter the
rootpassword when prompted.
3.7. Creating an Ansible user with sudo access
You can create an Ansible user with password-less root access on all nodes in the storage cluster to run the cephadm-ansible playbooks. The Ansible user must be able to log into all the Red Hat Ceph Storage nodes as a user that has root privileges to install software and create configuration files without prompting for a password.
Prerequisites
- Root-level access to all nodes.
- For Red Hat Enterprise Linux 9, to log in as a root user, see Enabling SSH log in as root user on Red Hat Enterprise Linux 9
Procedure
Log in to the node as the
rootuser:Syntax
ssh root@HOST_NAMEReplace HOST_NAME with the host name of the Ceph node.
Example
[root@admin ~]# ssh root@host01Enter the
rootpassword when prompted.Create a new Ansible user:
Syntax
adduser USER_NAMEReplace USER_NAME with the new user name for the Ansible user.
Example
[root@host01 ~]# adduser ceph-adminImportantDo not use
cephas the user name. Thecephuser name is reserved for the Ceph daemons. A uniform user name across the cluster can improve ease of use, but avoid using obvious user names, because intruders typically use them for brute-force attacks.Set a new password for this user:
Syntax
passwd USER_NAMEReplace USER_NAME with the new user name for the Ansible user.
Example
[root@host01 ~]# passwd ceph-adminEnter the new password twice when prompted.
Configure
sudoaccess for the newly created user:Syntax
cat << EOF >/etc/sudoers.d/USER_NAME
$USER_NAME ALL = (root) NOPASSWD:ALL
EOF
Replace USER_NAME with the new user name for the Ansible user.
Example
[root@host01 ~]# cat << EOF >/etc/sudoers.d/ceph-admin
ceph-admin ALL = (root) NOPASSWD:ALL
EOF
Assign the correct file permissions to the new file:
Syntax
chmod 0440 /etc/sudoers.d/USER_NAMEReplace USER_NAME with the new user name for the Ansible user.
Example
[root@host01 ~]# chmod 0440 /etc/sudoers.d/ceph-admin- Repeat the above steps on all nodes in the storage cluster.
3.8. Enabling password-less SSH for Ansible
Generate an SSH key pair on the Ansible administration node and distribute the public key to each node in the storage cluster so that Ansible can access the nodes without being prompted for a password.
Prerequisites
- Access to the Ansible administration node.
- Ansible user with sudo access to all nodes in the storage cluster.
- For Red Hat Enterprise Linux 9, to log in as a root user, see Enabling SSH log in as root user on Red Hat Enterprise Linux 9
Procedure
Generate the SSH key pair, accept the default file name and leave the passphrase empty:
[ceph-admin@admin ~]$ ssh-keygenCopy the public key to all nodes in the storage cluster:
ssh-copy-id USER_NAME@HOST_NAMEReplace USER_NAME with the new user name for the Ansible user. Replace HOST_NAME with the host name of the Ceph node.
Example
[ceph-admin@admin ~]$ ssh-copy-id ceph-admin@host01Create the user’s SSH
configfile:[ceph-admin@admin ~]$ touch ~/.ssh/configOpen for editing the
configfile. Set values for theHostnameandUseroptions for each node in the storage cluster:Host host01 Hostname HOST_NAME User USER_NAME Host host02 Hostname HOST_NAME User USER_NAME ...Replace HOST_NAME with the host name of the Ceph node. Replace USER_NAME with the new user name for the Ansible user.
Example
Host host01 Hostname host01 User ceph-admin Host host02 Hostname host02 User ceph-admin Host host03 Hostname host03 User ceph-adminImportantBy configuring the
~/.ssh/configfile you do not have to specify the-u USER_NAMEoption each time you execute theansible-playbookcommand.Set the correct file permissions for the
~/.ssh/configfile:[ceph-admin@admin ~]$ chmod 600 ~/.ssh/config
3.9. Running the preflight playbook
This Ansible playbook configures the Ceph repository and prepares the storage cluster for bootstrapping. It also installs some prerequisites, such as podman, lvm2, chrony, and cephadm. The default location for cephadm-ansible and cephadm-preflight.yml is /usr/share/cephadm-ansible.
The preflight playbook uses the cephadm-ansible inventory file to identify all the admin and nodes in the storage cluster.
The default location for the inventory file is /usr/share/cephadm-ansible/hosts. The following example shows the structure of a typical inventory file:
Example
host02
host03
host04

[admin]
host01
The [admin] group in the inventory file contains the name of the node where the admin keyring is stored. On a new storage cluster, the node in the [admin] group will be the bootstrap node. To add additional admin hosts after bootstrapping the cluster see Setting up the admin node in the Installation Guide for more information.
Run the preflight playbook before you bootstrap the initial host.
If you are performing a disconnected installation, see Running the preflight playbook for a disconnected installation.
Prerequisites
- Root-level access to the Ansible administration node.
Ansible user with sudo and passwordless
sshaccess to all nodes in the storage cluster.NoteIn the below example, host01 is the bootstrap node.
Procedure
-
Navigate to the the
/usr/share/cephadm-ansibledirectory. Open and edit the
hostsfile and add your nodes:Example
host02
host03
host04

[admin]
host01
Run the preflight playbook:
Syntax
ansible-playbook -i INVENTORY_FILE cephadm-preflight.yml --extra-vars "ceph_origin=rhcs"Example
[ceph-admin@admin cephadm-ansible]$ ansible-playbook -i hosts cephadm-preflight.yml --extra-vars "ceph_origin=rhcs"After installation is complete,
cephadmresides in the/usr/sbin/directory.Use the
--limitoption to run the preflight playbook on a selected set of hosts in the storage cluster:Syntax
ansible-playbook -i INVENTORY_FILE cephadm-preflight.yml --extra-vars "ceph_origin=rhcs" --limit GROUP_NAME|NODE_NAMEReplace GROUP_NAME with a group name from your inventory file. Replace NODE_NAME with a specific node name from your inventory file.
NoteOptionally, you can group your nodes in your inventory file by group name such as
[mons],[osds], and[mgrs]. However, admin nodes must be added to the[admin]group and clients must be added to the[clients]group.Example
[ceph-admin@admin cephadm-ansible]$ ansible-playbook -i hosts cephadm-preflight.yml --extra-vars "ceph_origin=rhcs" --limit clients
[ceph-admin@admin cephadm-ansible]$ ansible-playbook -i hosts cephadm-preflight.yml --extra-vars "ceph_origin=rhcs" --limit host01
When you run the preflight playbook,
cephadm-ansibleautomatically installschronyandceph-commonon the client nodes.The preflight playbook installs
chronybut configures it for a single NTP source. If you want to configure multiple sources or if you have a disconnected environment, see the following documentation for more information:
3.10. Bootstrapping a new storage cluster
The cephadm utility performs the following tasks during the bootstrap process:
- Installs and starts a Ceph Monitor daemon and a Ceph Manager daemon for a new Red Hat Ceph Storage cluster on the local node as containers.
-
Creates the
/etc/cephdirectory. -
Writes a copy of the public key to
/etc/ceph/ceph.pubfor the Red Hat Ceph Storage cluster and adds the SSH key to the root user’s/root/.ssh/authorized_keysfile. -
Applies the
_adminlabel to the bootstrap node. -
Writes a minimal configuration file needed to communicate with the new cluster to
/etc/ceph/ceph.conf. -
Writes a copy of the
client.adminadministrative secret key to/etc/ceph/ceph.client.admin.keyring. -
Deploys a basic monitoring stack with Prometheus, Grafana, and other tools including
node-exporterandAlertmanager.
If you are performing a disconnected installation, see Performing a disconnected installation.
If you have existing Prometheus services that you want to run with the new storage cluster, or if you are deploying Ceph with Rook, pass the --skip-monitoring-stack option to the cephadm bootstrap command. This option bypasses the basic monitoring stack so that you can manually configure it later.
If you are deploying the monitoring stack, see Deploying the monitoring stack using the Ceph Orchestrator in the Red Hat Ceph Storage Operations Guide.
Bootstrapping provides the default user name and password for the initial login to the Dashboard. Bootstrap requires you to change the password after you log in.
Before you begin the bootstrapping process, make sure that the container image that you want to use has the same version of Red Hat Ceph Storage as cephadm. If the two versions do not match, bootstrapping fails at the Creating initial admin user stage.
Before you begin the bootstrapping process, you must create a username and password for the registry.redhat.io container registry. For more information about Red Hat container registry authentication, see the knowledge base article Red Hat Container Registry Authentication
Prerequisites
- An IP address for the first Ceph Monitor container, which is also the IP address for the first node in the storage cluster.
-
Login access to
registry.redhat.io. -
A minimum of 10 GB of free space for
/var/lib/containers/. - Root-level access to all nodes.
If the storage cluster includes multiple networks and interfaces, be sure to choose a network that is accessible by any node that uses the storage cluster.
If the local node uses fully-qualified domain names (FQDN), then add the --allow-fqdn-hostname option to cephadm bootstrap on the command line.
Run cephadm bootstrap on the node that you want to be the initial Monitor node in the cluster. The IP_ADDRESS option should be the IP address of the node you are using to run cephadm bootstrap.
If you want to deploy a storage cluster using IPV6 addresses, then use the IPV6 address format for the --mon-ip IP_ADDRESS option. For example: cephadm bootstrap --mon-ip 2620:52:0:880:225:90ff:fefc:2536 --registry-json /etc/mylogin.json
Procedure
Bootstrap a storage cluster:
Syntax
cephadm bootstrap --cluster-network NETWORK_CIDR --mon-ip IP_ADDRESS --registry-url registry.redhat.io --registry-username USER_NAME --registry-password PASSWORD --yes-i-knowExample
[root@host01 ~]# cephadm bootstrap --cluster-network 10.10.128.0/24 --mon-ip 10.10.128.68 --registry-url registry.redhat.io --registry-username myuser1 --registry-password mypassword1 --yes-i-knowNoteIf you want internal cluster traffic routed over the public network, you can omit the
--cluster-network NETWORK_CIDRoption.The script takes a few minutes to complete. Once the script completes, it provides the credentials to the Red Hat Ceph Storage Dashboard URL, a command to access the Ceph command-line interface (CLI), and a request to enable telemetry.
Ceph Dashboard is now available at:

             URL: https://host01:8443/
            User: admin
        Password: i8nhu7zham

Enabling client.admin keyring and conf on hosts with "admin" label
You can access the Ceph CLI with:

        sudo /usr/sbin/cephadm shell --fsid 266ee7a8-2a05-11eb-b846-5254002d4916 -c /etc/ceph/ceph.conf -k /etc/ceph/ceph.client.admin.keyring

Please consider enabling telemetry to help improve Ceph:

        ceph telemetry on

For more information see:

        https://docs.ceph.com/docs/master/mgr/telemetry/

Bootstrap complete.
Additional Resources
- For more information about the recommended bootstrap command options, see Recommended cephadm bootstrap command options.
- For more information about the options available for the bootstrap command, see Bootstrap command options.
- For information about using a JSON file to contain login credentials for the bootstrap process, see Using a JSON file to protect login information.
3.10.1. Recommended cephadm bootstrap command options
The cephadm bootstrap command has multiple options that allow you to specify file locations, configure ssh settings, set passwords, and perform other initial configuration tasks.
Red Hat recommends that you use a basic set of command options for cephadm bootstrap. You can configure additional options after your initial cluster is up and running.
The following examples show how to specify the recommended options.
Syntax
cephadm bootstrap --ssh-user USER_NAME --mon-ip IP_ADDRESS --allow-fqdn-hostname --registry-json REGISTRY_JSONExample
[root@host01 ~]# cephadm bootstrap --ssh-user ceph --mon-ip 10.10.128.68 --allow-fqdn-hostname --registry-json /etc/mylogin.json3.10.2. Using a JSON file to protect login information
As a storage administrator, you might choose to add login and password information to a JSON file, and then refer to the JSON file for bootstrapping. This protects the login credentials from exposure.
You can also use a JSON file with the cephadm --registry-login command.
Prerequisites
- An IP address for the first Ceph Monitor container, which is also the IP address for the first node in the storage cluster.
-
Login access to
registry.redhat.io. -
A minimum of 10 GB of free space for
/var/lib/containers/. - Root-level access to all nodes.
Procedure
Create the JSON file. In this example, the file is named
mylogin.json.Syntax
{
 "url":"REGISTRY_URL",
 "username":"USER_NAME",
 "password":"PASSWORD"
}
Example
{
 "url":"registry.redhat.io",
 "username":"myuser1",
 "password":"mypassword1"
}
Bootstrap a storage cluster:
Syntax
cephadm bootstrap --mon-ip IP_ADDRESS --registry-json /etc/mylogin.jsonExample
[root@host01 ~]# cephadm bootstrap --mon-ip 10.10.128.68 --registry-json /etc/mylogin.json
3.10.3. Bootstrapping a storage cluster using a service configuration file
To bootstrap the storage cluster and configure additional hosts and daemons using a service configuration file, use the --apply-spec option with the cephadm bootstrap command. The configuration file is a .yaml file that contains the service type, placement, and designated nodes for services that you want to deploy.
If you want to use a non-default realm or zone for applications such as multi-site, configure your Ceph Object Gateway daemons after you bootstrap the storage cluster, instead of adding them to the configuration file and using the --apply-spec option. This gives you the opportunity to create the realm or zone you need for the Ceph Object Gateway daemons before deploying them. See the Red Hat Ceph Storage Operations Guide for more information.
If deploying a NFS-Ganesha gateway, or Metadata Server (MDS) service, configure them after bootstrapping the storage cluster.
- To deploy a Ceph NFS-Ganesha gateway, you must create a RADOS pool first.
- To deploy the MDS service, you must create a CephFS volume first.
See the Red Hat Ceph Storage Operations Guide for more information.
Prerequisites
- At least one running virtual machine (VM) or server.
- For Red Hat Ceph Storage 7.0, Red Hat Enterprise Linux 9.2 with ansible-core bundled into AppStream. For Red Hat Ceph Storage 7.1, Red Hat Enterprise Linux 8.10, 9.4, 9.5, or 9.6 with ansible-core bundled into AppStream.
- Root-level access to all nodes.
-
Login access to
registry.redhat.io. -
Passwordless
sshis set up on all hosts in the storage cluster. -
cephadmis installed on the node that you want to be the initial Monitor node in the storage cluster.
Procedure
- Log in to the bootstrap host.
Create the service configuration
.yamlfile for your storage cluster. The example file directscephadm bootstrapto configure the initial host and two additional hosts, and it specifies that OSDs be created on all available disks.Example
service_type: host
addr: host01
hostname: host01
---
service_type: host
addr: host02
hostname: host02
---
service_type: host
addr: host03
hostname: host03
---
service_type: host
addr: host04
hostname: host04
---
service_type: mon
placement:
  host_pattern: "host[0-2]"
---
service_type: osd
service_id: my_osds
placement:
  host_pattern: "host[1-3]"
data_devices:
  all: true
Bootstrap the storage cluster with the
--apply-specoption:Syntax
cephadm bootstrap --apply-spec CONFIGURATION_FILE_NAME --mon-ip MONITOR_IP_ADDRESS --registry-url registry.redhat.io --registry-username USER_NAME --registry-password PASSWORDExample
[root@host01 ~]# cephadm bootstrap --apply-spec initial-config.yaml --mon-ip 10.10.128.68 --registry-url registry.redhat.io --registry-username myuser1 --registry-password mypassword1The script takes a few minutes to complete. Once the script completes, it provides the credentials to the Red Hat Ceph Storage Dashboard URL, a command to access the Ceph command-line interface (CLI), and a request to enable telemetry.
- Once your storage cluster is up and running, see the Red Hat Ceph Storage Operations Guide for more information about configuring additional daemons and services.
3.10.4. Bootstrapping the storage cluster as a non-root user
You can bootstrap the storage cluster as a non-root user if you have passwordless sudo privileges.
To bootstrap the Red Hat Ceph Storage cluster as a non-root user on the bootstrap node, use the --ssh-user option with the cephadm bootstrap command. --ssh-user specifies a user for SSH connections to cluster nodes.
Non-root users must have passwordless sudo access.
Prerequisites
- An IP address for the first Ceph Monitor container, which is also the IP address for the initial Monitor node in the storage cluster.
-
Login access to
registry.redhat.io. -
A minimum of 10 GB of free space for
/var/lib/containers/. - Optional: SSH public and private keys.
-
Passwordless
sudoaccess to the bootstrap node. -
Non-root users have passwordless
sudoaccess on all nodes intended to be part of the cluster. -
cephadminstalled on the node that you want to be the initial Monitor node in the storage cluster.
Procedure
Change to
sudoon the bootstrap node:Syntax
su - SSH_USER_NAMEExample
[root@host01 ~]# su - ceph
Last login: Tue Sep 14 12:00:29 EST 2021 on pts/0
Check the SSH connection to the bootstrap node:
Example
[ceph@host01 ~]$ ssh host01
Last login: Tue Sep 14 12:03:29 EST 2021 on pts/0
Optional: Invoke the
cephadm bootstrapcommand.NoteUsing private and public keys is optional. If SSH keys have not previously been created, these can be created during this step.
Include the
--ssh-private-keyand--ssh-public-keyoptions:Syntax
sudo cephadm bootstrap --ssh-user USER_NAME --mon-ip IP_ADDRESS --ssh-private-key PRIVATE_KEY --ssh-public-key PUBLIC_KEY --registry-url registry.redhat.io --registry-username USER_NAME --registry-password PASSWORDExample
sudo cephadm bootstrap --ssh-user ceph --mon-ip 10.10.128.68 --ssh-private-key /home/ceph/.ssh/id_rsa --ssh-public-key /home/ceph/.ssh/id_rsa.pub --registry-url registry.redhat.io --registry-username myuser1 --registry-password mypassword1
3.10.5. Bootstrap command options
The cephadm bootstrap command bootstraps a Ceph storage cluster on the local host. It deploys a MON daemon and a MGR daemon on the bootstrap node, automatically deploys the monitoring stack on the local host, and calls ceph orch host add HOSTNAME.
The following table lists the available options for cephadm bootstrap.
cephadm bootstrap option | Description |
|---|---|
| --config CONFIG_FILE, -c CONFIG_FILE |
CONFIG_FILE is the |
| --cluster-network NETWORK_CIDR |
Use the subnet defined by NETWORK_CIDR for internal cluster traffic. This is specified in CIDR notation. For example: |
| --mon-id MON_ID | Bootstraps on the host named MON_ID. Default value is the local host. |
| --mon-addrv MON_ADDRV | mon IPs (e.g., [v2:localipaddr:3300,v1:localipaddr:6789]) |
| --mon-ip IP_ADDRESS |
IP address of the node you are using to run |
| --mgr-id MGR_ID | Host ID where a MGR node should be installed. Default: randomly generated. |
| --fsid FSID | Cluster FSID. |
| --output-dir OUTPUT_DIR | Use this directory to write config, keyring, and pub key files. |
| --output-keyring OUTPUT_KEYRING | Use this location to write the keyring file with the new cluster admin and mon keys. |
| --output-config OUTPUT_CONFIG | Use this location to write the configuration file to connect to the new cluster. |
| --output-pub-ssh-key OUTPUT_PUB_SSH_KEY | Use this location to write the public SSH key for the cluster. |
| --skip-ssh | Skip the setup of the ssh key on the local host. |
| --initial-dashboard-user INITIAL_DASHBOARD_USER | Initial user for the dashboard. |
| --initial-dashboard-password INITIAL_DASHBOARD_PASSWORD | Initial password for the initial dashboard user. |
| --ssl-dashboard-port SSL_DASHBOARD_PORT | Port number used to connect with the dashboard using SSL. |
| --dashboard-key DASHBOARD_KEY | Dashboard key. |
| --dashboard-crt DASHBOARD_CRT | Dashboard certificate. |
| --ssh-config SSH_CONFIG | SSH config. |
| --ssh-private-key SSH_PRIVATE_KEY | SSH private key. |
| --ssh-public-key SSH_PUBLIC_KEY | SSH public key. |
| --ssh-user SSH_USER | Sets the user for SSH connections to cluster hosts. Passwordless sudo is needed for non-root users. |
| --skip-mon-network | Sets mon public_network based on the bootstrap mon ip. |
| --skip-dashboard | Do not enable the Ceph Dashboard. |
| --dashboard-password-noupdate | Disable forced dashboard password change. |
| --no-minimize-config | Do not assimilate and minimize the configuration file. |
| --skip-ping-check | Do not verify that the mon IP is pingable. |
| --skip-pull | Do not pull the latest image before bootstrapping. |
| --skip-firewalld | Do not configure firewalld. |
| --allow-overwrite | Allow the overwrite of existing –output-* config/keyring/ssh files. |
| --allow-fqdn-hostname | Allow fully qualified host name. |
| --skip-prepare-host | Do not prepare host. |
| --orphan-initial-daemons | Do not create initial mon, mgr, and crash service specs. |
| --skip-monitoring-stack | Do not automatically provision the monitoring stack] (prometheus, grafana, alertmanager, node-exporter). |
| --apply-spec APPLY_SPEC | Apply cluster spec file after bootstrap (copy ssh key, add hosts and apply services). |
| --registry-url REGISTRY_URL |
Specifies the URL of the custom registry to log into. For example: |
| --registry-username REGISTRY_USERNAME | User name of the login account to the custom registry. |
| --registry-password REGISTRY_PASSWORD | Password of the login account to the custom registry. |
| --registry-json REGISTRY_JSON | JSON file containing registry login information. |
3.10.6. Configuring a private registry for a disconnected installation
You can use a disconnected installation procedure to install cephadm and bootstrap your storage cluster on a private network. A disconnected installation uses a private registry for installation. Use this procedure when the Red Hat Ceph Storage nodes do NOT have access to the Internet during deployment.
Follow this procedure to set up a secure private registry using authentication and a self-signed certificate. Perform these steps on a node that has both Internet access and access to the local cluster.
Using an insecure registry for production is not recommended.
Prerequisites
- At least one running virtual machine (VM) or server with an active internet connection.
- For Red Hat Ceph Storage 7.0, Red Hat Enterprise Linux 9.2 with ansible-core bundled into AppStream. For Red Hat Ceph Storage 7.1, Red Hat Enterprise Linux 8.10, 9.4, 9.5, or 9.6 with ansible-core bundled into AppStream.
-
Login access to
registry.redhat.io. - Root-level access to all nodes.
Procedure
- Log in to the node that has access to both the public network and the cluster nodes.
Register the node, and when prompted, enter the appropriate Red Hat Customer Portal credentials:
Example
[root@admin ~]# subscription-manager registerPull the latest subscription data:
Example
[root@admin ~]# subscription-manager refreshList all available subscriptions for Red Hat Ceph Storage:
Example
[root@admin ~]# subscription-manager list --available --all --matches="*Ceph*"Copy the Pool ID from the list of available subscriptions for Red Hat Ceph Storage.
Attach the subscription to get access to the software entitlements:
Syntax
subscription-manager attach --pool=POOL_IDReplace POOL_ID with the Pool ID identified in the previous step.
Disable the default software repositories, and enable the server and the extras repositories:
Red Hat Enterprise Linux 9
[root@admin ~]# subscription-manager repos --disable=*
[root@admin ~]# subscription-manager repos --enable=rhel-9-for-x86_64-baseos-rpms
[root@admin ~]# subscription-manager repos --enable=rhel-9-for-x86_64-appstream-rpms
Install the
podmanandhttpd-toolspackages:Example
[root@admin ~]# dnf install -y podman httpd-toolsCreate folders for the private registry:
Example
[root@admin ~]# mkdir -p /opt/registry/{auth,certs,data}The registry will be stored in
/opt/registryand the directories are mounted in the container running the registry.-
The
authdirectory stores thehtpasswdfile the registry uses for authentication. -
The
certsdirectory stores the certificates the registry uses for authentication. -
The
datadirectory stores the registry images.
-
The
Create credentials for accessing the private registry:
Syntax
htpasswd -bBc /opt/registry/auth/htpasswd PRIVATE_REGISTRY_USERNAME PRIVATE_REGISTRY_PASSWORD-
The
boption provides the password from the command line. -
The
Boption stores the password usingBcryptencryption. -
The
coption creates thehtpasswdfile. - Replace PRIVATE_REGISTRY_USERNAME with the username to create for the private registry.
Replace PRIVATE_REGISTRY_PASSWORD with the password to create for the private registry username.
Example
[root@admin ~]# htpasswd -bBc /opt/registry/auth/htpasswd myregistryusername myregistrypassword1
-
The
Create a self-signed certificate:
Syntax
openssl req -newkey rsa:4096 -nodes -sha256 -keyout /opt/registry/certs/domain.key -x509 -days 365 -out /opt/registry/certs/domain.crt -addext "subjectAltName = DNS:LOCAL_NODE_FQDN"Replace LOCAL_NODE_FQDN with the fully qualified host name of the private registry node.
NoteYou will be prompted for the respective options for your certificate. The
CN=value is the host name of your node and should be resolvable by DNS or the/etc/hostsfile.Example
[root@admin ~]# openssl req -newkey rsa:4096 -nodes -sha256 -keyout /opt/registry/certs/domain.key -x509 -days 365 -out /opt/registry/certs/domain.crt -addext "subjectAltName = DNS:admin.lab.redhat.com"NoteWhen creating a self-signed certificate, be sure to create a certificate with a proper Subject Alternative Name (SAN). Podman commands that require TLS verification for certificates that do not include a proper SAN, return the following error: x509: certificate relies on legacy Common Name field, use SANs or temporarily enable Common Name matching with GODEBUG=x509ignoreCN=0
Create a symbolic link to
domain.certto allowskopeoto locate the certificate with the file extension.cert:Example
[root@admin ~]# ln -s /opt/registry/certs/domain.crt /opt/registry/certs/domain.certAdd the certificate to the trusted list on the private registry node:
Syntax
cp /opt/registry/certs/domain.crt /etc/pki/ca-trust/source/anchors/
update-ca-trust
trust list | grep -i "LOCAL_NODE_FQDN"
Replace LOCAL_NODE_FQDN with the FQDN of the private registry node.
Example
[root@admin ~]# cp /opt/registry/certs/domain.crt /etc/pki/ca-trust/source/anchors/
[root@admin ~]# update-ca-trust
[root@admin ~]# trust list | grep -i "admin.lab.redhat.com"

    label: admin.lab.redhat.com
Copy the certificate to any nodes that will access the private registry for installation and update the trusted list:
Example
[root@admin ~]# scp /opt/registry/certs/domain.crt root@host01:/etc/pki/ca-trust/source/anchors/
[root@admin ~]# ssh root@host01
[root@host01 ~]# update-ca-trust
[root@host01 ~]# trust list | grep -i "admin.lab.redhat.com"

    label: admin.lab.redhat.com
Start the local secure private registry:
Syntax
podman run --restart=always --name NAME_OF_CONTAINER \
-p 5000:5000 -v /opt/registry/data:/var/lib/registry:z \
-v /opt/registry/auth:/auth:z \
-v /opt/registry/certs:/certs:z \
-e "REGISTRY_AUTH=htpasswd" \
-e "REGISTRY_AUTH_HTPASSWD_REALM=Registry Realm" \
-e REGISTRY_AUTH_HTPASSWD_PATH=/auth/htpasswd \
-e "REGISTRY_HTTP_TLS_CERTIFICATE=/certs/domain.crt" \
-e "REGISTRY_HTTP_TLS_KEY=/certs/domain.key" \
-e REGISTRY_COMPATIBILITY_SCHEMA1_ENABLED=true \
-d registry:2
Replace NAME_OF_CONTAINER with a name to assign to the container.
Example
[root@admin ~]# podman run --restart=always --name myprivateregistry \
-p 5000:5000 -v /opt/registry/data:/var/lib/registry:z \
-v /opt/registry/auth:/auth:z \
-v /opt/registry/certs:/certs:z \
-e "REGISTRY_AUTH=htpasswd" \
-e "REGISTRY_AUTH_HTPASSWD_REALM=Registry Realm" \
-e REGISTRY_AUTH_HTPASSWD_PATH=/auth/htpasswd \
-e "REGISTRY_HTTP_TLS_CERTIFICATE=/certs/domain.crt" \
-e "REGISTRY_HTTP_TLS_KEY=/certs/domain.key" \
-e REGISTRY_COMPATIBILITY_SCHEMA1_ENABLED=true \
-d registry:2
This starts the private registry on port 5000 and mounts the volumes of the registry directories in the container running the registry.
On the local registry node, verify that
registry.redhat.iois in the container registry search path.Open for editing the
/etc/containers/registries.conffile, and addregistry.redhat.ioto theunqualified-search-registrieslist, if it does not exist:Example
unqualified-search-registries = ["registry.redhat.io", "registry.access.redhat.com", "registry.fedoraproject.org", "registry.centos.org", "docker.io"]
Login to
registry.redhat.iowith your Red Hat Customer Portal credentials:Syntax
podman login registry.redhat.ioCopy the following Red Hat Ceph Storage 7 image, Prometheus images, and Dashboard image from the Red Hat Customer Portal to the private registry:
NoteFind the latest available supported container images on the Red Hat Ecosystem Catalog.
Expand Table 3.1. Custom image details for monitoring stack Monitoring stack component Image details for Red Hat Ceph Storage 7.0 Image details for Red Hat Ceph Storage 7.1 Prometheus
registry.redhat.io/openshift4/ose-prometheus:v4.12
registry.redhat.io/openshift4/ose-prometheus:v4.15
Grafana
registry.redhat.io/rhceph/grafana-rhel9:latest
registry.redhat.io/rhceph/grafana-rhel9:latest
Node-exporter
registry.redhat.io/openshift4/ose-prometheus-node-exporter:v4.12
registry.redhat.io/openshift4/ose-prometheus-node-exporter:v4.15
AlertManager
registry.redhat.io/openshift4/ose-prometheus-alertmanager:v4.12
registry.redhat.io/openshift4/ose-prometheus-alertmanager:v4.15
HAProxy
registry.redhat.io/rhceph/rhceph-haproxy-rhel9:latest
registry.redhat.io/rhceph/rhceph-haproxy-rhel9:latest
Keepalived
registry.redhat.io/rhceph/keepalived-rhel9:latest
registry.redhat.io/rhceph/keepalived-rhel9:latest
SNMP Gateway
registry.redhat.io/rhceph/snmp-notifier-rhel9:latest
registry.redhat.io/rhceph/snmp-notifier-rhel9:latest
Loki
registry.redhat.io/openshift-logging/logging-loki-rhel8:v2.6.1
registry.redhat.io/openshift-logging/logging-loki-rhel8:v2.6.1
Promtail
registry.redhat.io/rhceph/rhceph-promtail-rhel9:v2.4.0
registry.redhat.io/rhceph/rhceph-promtail-rhel9:v2.4.0
Syntax
podman run -v /CERTIFICATE_DIRECTORY_PATH:/certs:Z -v /CERTIFICATE_DIRECTORY_PATH/domain.cert:/certs/domain.cert:Z --rm registry.redhat.io/rhel9/skopeo:8.5-8 skopeo copy --remove-signatures --src-creds RED_HAT_CUSTOMER_PORTAL_LOGIN:RED_HAT_CUSTOMER_PORTAL_PASSWORD --dest-cert-dir=./certs/ --dest-creds PRIVATE_REGISTRY_USERNAME:PRIVATE_REGISTRY_PASSWORD docker://registry.redhat.io/SRC_IMAGE:SRC_TAG docker://LOCAL_NODE_FQDN:5000/DST_IMAGE:DST_TAG- Replace CERTIFICATE_DIRECTORY_PATH with the directory path to the self-signed certificates.
- Replace RED_HAT_CUSTOMER_PORTAL_LOGIN and RED_HAT_CUSTOMER_PORTAL_PASSWORD with your Red Hat Customer Portal credentials.
- Replace PRIVATE_REGISTRY_USERNAME and PRIVATE_REGISTRY_PASSWORD with the private registry credentials.
- Replace SRC_IMAGE and SRC_TAG with the name and tag of the image to copy from registry.redhat.io.
- Replace DST_IMAGE and DST_TAG with the name and tag of the image to copy to the private registry.
Replace LOCAL_NODE_FQDN with the FQDN of the private registry.
Example
[root@admin ~]#  podman run -v /opt/registry/certs:/certs:Z -v /opt/registry/certs/domain.cert:/certs/domain.cert:Z --rm registry.redhat.io/rhel9/skopeo skopeo copy --remove-signatures --src-creds myusername:mypassword1 --dest-cert-dir=./certs/ --dest-creds myregistryusername:myregistrypassword1 docker://registry.redhat.io/rhceph/rhceph-7-rhel9:latest docker://admin.lab.redhat.com:5000/rhceph/rhceph-7-rhel9:latest

[root@admin ~]# podman run -v /opt/registry/certs:/certs:Z -v /opt/registry/certs/domain.cert:/certs/domain.cert:Z --rm registry.redhat.io/rhel9/skopeo skopeo copy --remove-signatures --src-creds myusername:mypassword1 --dest-cert-dir=./certs/ --dest-creds myregistryusername:myregistrypassword1 docker://registry.redhat.io/openshift4/ose-prometheus-node-exporter:v4.12 docker://admin.lab.redhat.com:5000/openshift4/ose-prometheus-node-exporter:v4.12

[root@admin ~]# podman run -v /opt/registry/certs:/certs:Z -v /opt/registry/certs/domain.cert:/certs/domain.cert:Z --rm registry.redhat.io/rhel9/skopeo skopeo copy --remove-signatures --src-creds myusername:mypassword1 --dest-cert-dir=./certs/ --dest-creds myregistryusername:myregistrypassword1 docker://registry.redhat.io/rhceph/grafana-rhel9:latest docker://admin.lab.redhat.com:5000/rhceph/grafana-rhel9:latest

[root@admin ~]# podman run -v /opt/registry/certs:/certs:Z -v /opt/registry/certs/domain.cert:/certs/domain.cert:Z --rm registry.redhat.io/rhel9/skopeo skopeo copy --remove-signatures --src-creds myusername:mypassword1 --dest-cert-dir=./certs/ --dest-creds myregistryusername:myregistrypassword1 docker://registry.redhat.io/openshift4/ose-prometheus:v4.12 docker://admin.lab.redhat.com:5000/openshift4/ose-prometheus:v4.12

[root@admin ~]# podman run -v /opt/registry/certs:/certs:Z -v /opt/registry/certs/domain.cert:/certs/domain.cert:Z --rm registry.redhat.io/rhel9/skopeo skopeo copy --remove-signatures --src-creds myusername:mypassword1 --dest-cert-dir=./certs/ --dest-creds myregistryusername:myregistrypassword1 docker://registry.redhat.io/openshift4/ose-prometheus-alertmanager:v4.12 docker://admin.lab.redhat.com:5000/openshift4/ose-prometheus-alertmanager:v4.12
Using the
curlcommand, verify the images reside in the local registry:Syntax
curl -u PRIVATE_REGISTRY_USERNAME:PRIVATE_REGISTRY_PASSWORD https://LOCAL_NODE_FQDN:5000/v2/_catalogExample
[root@admin ~]# curl -u myregistryusername:myregistrypassword1 https://admin.lab.redhat.com:5000/v2/_catalog

{"repositories":["openshift4/ose-prometheus","openshift4/ose-prometheus-alertmanager","openshift4/ose-prometheus-node-exporter","rhceph/rhceph-7-dashboard-rhel9","rhceph/rhceph-7-rhel9"]}
3.10.7. Running the preflight playbook for a disconnected installation
You use the cephadm-preflight.yml Ansible playbook to configure the Ceph repository and prepare the storage cluster for bootstrapping. It also installs some prerequisites, such as podman, lvm2, chrony, and cephadm.
The preflight playbook uses the cephadm-ansible inventory hosts file to identify all the nodes in the storage cluster. The default location for cephadm-ansible, cephadm-preflight.yml, and the inventory hosts file is /usr/share/cephadm-ansible/.
The following example shows the structure of a typical inventory file:
Example
host02
host03
host04

[admin]
host01
The [admin] group in the inventory file contains the name of the node where the admin keyring is stored.
Run the preflight playbook before you bootstrap the initial host.
Prerequisites
-
The
cephadm-ansiblepackage is installed on the Ansible administration node. - Root-level access to all nodes in the storage cluster.
-
Passwordless
sshis set up on all hosts in the storage cluster. Nodes configured to access a local YUM repository server with the following repositories enabled:
- rhel-9-for-x86_64-baseos-rpms
- rhel-9-for-x86_64-appstream-rpms
- rhceph-7-tools-for-rhel-9-x86_64-rpms
For more information about setting up a local YUM repository, see the knowledge base article Creating a Local Repository and Sharing with Disconnected/Offline/Air-gapped Systems
Procedure
-
Navigate to the
/usr/share/cephadm-ansibledirectory on the Ansible administration node. -
Open and edit the
hostsfile and add your nodes. Run the preflight playbook with the
ceph_originparameter set tocustomto use a local YUM repository:Syntax
ansible-playbook -i INVENTORY_FILE cephadm-preflight.yml --extra-vars "ceph_origin=custom" -e "custom_repo_url=CUSTOM_REPO_URL"Example
[ceph-admin@admin cephadm-ansible]$ ansible-playbook -i hosts cephadm-preflight.yml --extra-vars "ceph_origin=custom" -e "custom_repo_url=http://mycustomrepo.lab.redhat.com/x86_64/os/"After installation is complete,
cephadmresides in the/usr/sbin/directory.NotePopulate the contents of the
registries.conffile with the Ansible playbook:Syntax
ansible-playbook -vvv -i INVENTORY_HOST_FILE_ cephadm-set-container-insecure-registries.yml -e insecure_registry=REGISTRY_URLExample
[root@admin ~]# ansible-playbook -vvv -i hosts cephadm-set-container-insecure-registries.yml -e insecure_registry=host01:5050Alternatively, you can use the
--limitoption to run the preflight playbook on a selected set of hosts in the storage cluster:Syntax
ansible-playbook -i INVENTORY_FILE cephadm-preflight.yml --extra-vars "ceph_origin=custom" -e "custom_repo_url=CUSTOM_REPO_URL" --limit GROUP_NAME|NODE_NAMEReplace GROUP_NAME with a group name from your inventory file. Replace NODE_NAME with a specific node name from your inventory file.
Example
[ceph-admin@admin cephadm-ansible]$ ansible-playbook -i hosts cephadm-preflight.yml --extra-vars "ceph_origin=custom" -e "custom_repo_url=http://mycustomrepo.lab.redhat.com/x86_64/os/" --limit clients [ceph-admin@admin cephadm-ansible]$ ansible-playbook -i hosts cephadm-preflight.yml --extra-vars "ceph_origin=custom" -e "custom_repo_url=http://mycustomrepo.lab.redhat.com/x86_64/os/" --limit host02NoteWhen you run the preflight playbook,
cephadm-ansibleautomatically installschronyandceph-commonon the client nodes.
3.10.8. Performing a disconnected installation
Before you can perform the installation, you must obtain a Red Hat Ceph Storage container image, either from a proxy host that has access to the Red Hat registry or by copying the image to your local registry.
If your local registry uses a self-signed certificate with a local registry, ensure you have added the trusted root certificate to the bootstrap host. For more information, see Configuring a private registry for a disconnected installation.
Before you begin the bootstrapping process, make sure that the container image that you want to use has the same version of Red Hat Ceph Storage as cephadm. If the two versions do not match, bootstrapping fails at the Creating initial admin user stage.
Prerequisites
- At least one running virtual machine (VM) or server.
- Root-level access to all nodes.
-
Passwordless
sshis set up on all hosts in the storage cluster. - The preflight playbook has been run on the bootstrap host in the storage cluster. For more information, see Running the preflight playbook for a disconnected installation.
- A private registry has been configured and the bootstrap node has access to it. For more information, see Configuring a private registry for a disconnected installation.
- A Red Hat Ceph Storage container image resides in the custom registry.
Procedure
- Log in to the bootstrap host.
Bootstrap the storage cluster:
Syntax
cephadm --image PRIVATE_REGISTRY_NODE_FQDN:5000/CUSTOM_IMAGE_NAME:IMAGE_TAG bootstrap --mon-ip IP_ADDRESS --registry-url PRIVATE_REGISTRY_NODE_FQDN:5000 --registry-username PRIVATE_REGISTRY_USERNAME --registry-password PRIVATE_REGISTRY_PASSWORD- Replace PRIVATE_REGISTRY_NODE_FQDN with the fully qualified domain name of your private registry.
- Replace CUSTOM_IMAGE_NAME and IMAGE_TAG with the name and tag of the Red Hat Ceph Storage container image that resides in the private registry.
-
Replace IP_ADDRESS with the IP address of the node you are using to run
cephadm bootstrap. - Replace PRIVATE_REGISTRY_USERNAME with the username to create for the private registry.
Replace PRIVATE_REGISTRY_PASSWORD with the password to create for the private registry username.
Example
[root@host01 ~]# cephadm --image admin.lab.redhat.com:5000/rhceph-7-rhel9:latest bootstrap --mon-ip 10.10.128.68 --registry-url admin.lab.redhat.com:5000 --registry-username myregistryusername --registry-password myregistrypassword1The script takes a few minutes to complete. Once the script completes, it provides the credentials to the Red Hat Ceph Storage Dashboard URL, a command to access the Ceph command-line interface (CLI), and a request to enable telemetry.
Ceph Dashboard is now available at:

             URL: https://host01:8443/
            User: admin
        Password: i8nhu7zham

Enabling client.admin keyring and conf on hosts with "admin" label
You can access the Ceph CLI with:

        sudo /usr/sbin/cephadm shell --fsid 266ee7a8-2a05-11eb-b846-5254002d4916 -c /etc/ceph/ceph.conf -k /etc/ceph/ceph.client.admin.keyring

Please consider enabling telemetry to help improve Ceph:

        ceph telemetry on

For more information see:

        https://docs.ceph.com/docs/master/mgr/telemetry/

Bootstrap complete.
After the bootstrap process is complete, see Changing configurations of custom container images for disconnected installations to configure the container images.
3.10.9. Changing configurations of custom container images for disconnected installations
After you perform the initial bootstrap for disconnected nodes, you must specify custom container images for monitoring stack daemons. You can override the default container images for monitoring stack daemons, since the nodes do not have access to the default container registry.
Make sure that the bootstrap process on the initial host is complete before making any configuration changes.
By default, the monitoring stack components are deployed based on the primary Ceph image. For disconnected environment of the storage cluster, you can use the latest available monitoring stack component images.
When using a custom registry, be sure to log in to the custom registry on newly added nodes before adding any Ceph daemons.
Syntax
# ceph cephadm registry-login --registry-url CUSTOM_REGISTRY_NAME --registry_username REGISTRY_USERNAME --registry_password REGISTRY_PASSWORDExample
# ceph cephadm registry-login --registry-url myregistry --registry_username myregistryusername --registry_password myregistrypassword1Prerequisites
- At least one running virtual machine (VM) or server.
- For Red Hat Ceph Storage 7.0, Red Hat Enterprise Linux 9.2 with ansible-core bundled into AppStream. For Red Hat Ceph Storage 7.1, Red Hat Enterprise Linux 8.10, 9.4, 9.5, or 9.6 with ansible-core bundled into AppStream.
- Root-level access to all nodes.
-
Passwordless
sshis set up on all hosts in the storage cluster.
Procedure
Set the custom container images with the
ceph configcommand:Syntax
ceph config set mgr mgr/cephadm/OPTION_NAME CUSTOM_REGISTRY_NAME/CONTAINER_NAMEUse the following options for OPTION_NAME:
container_image_prometheus
container_image_grafana
container_image_alertmanager
container_image_node_exporter
Example
[root@host01 ~]# ceph config set mgr mgr/cephadm/container_image_prometheus myregistry/mycontainer
[root@host01 ~]# ceph config set mgr mgr/cephadm/container_image_grafana myregistry/mycontainer
[root@host01 ~]# ceph config set mgr mgr/cephadm/container_image_alertmanager myregistry/mycontainer
[root@host01 ~]# ceph config set mgr mgr/cephadm/container_image_node_exporter myregistry/mycontainer
Redeploy
node-exporter:Syntax
ceph orch redeploy node-exporter
If any of the services do not deploy, you can redeploy them with the ceph orch redeploy command.
By setting a custom image, the default values for the configuration image name and tag will be overridden, but not overwritten. The default values change when updates become available. By setting a custom image, you will not be able to configure the component for which you have set the custom image for automatic updates. You will need to manually update the configuration image name and tag to be able to install updates.
If you choose to revert to using the default configuration, you can reset the custom container image. Use
ceph config rmto reset the configuration option:Syntax
ceph config rm mgr mgr/cephadm/OPTION_NAMEExample
ceph config rm mgr mgr/cephadm/container_image_prometheus
3.11. Distributing SSH keys
You can use the cephadm-distribute-ssh-key.yml playbook to distribute the SSH keys instead of creating and distributing the keys manually. The playbook distributes an SSH public key over all hosts in the inventory.
You can also generate an SSH key pair on the Ansible administration node and distribute the public key to each node in the storage cluster so that Ansible can access the nodes without being prompted for a password.
Prerequisites
- Ansible is installed on the administration node.
- Access to the Ansible administration node.
- Ansible user with sudo access to all nodes in the storage cluster.
- Bootstrapping is completed. See the Bootstrapping a new storage cluster section in the Red Hat Ceph Storage Installation Guide.
Procedure
Navigate to the
/usr/share/cephadm-ansibledirectory on the Ansible administration node:Example
[ansible@admin ~]$ cd /usr/share/cephadm-ansibleFrom the Ansible administration node, distribute the SSH keys. The optional
cephadm_pubkey_pathparameter is the full path name of the SSH public key file on the ansible controller host.NoteIf
cephadm_pubkey_pathis not specified, the playbook gets the key from thecephadm get-pub-keycommand. This implies that you have at least bootstrapped a minimal cluster.Syntax
ansible-playbook -i INVENTORY_HOST_FILE cephadm-distribute-ssh-key.yml -e cephadm_ssh_user=USER_NAME -e cephadm_pubkey_path= home/cephadm/ceph.key -e admin_node=ADMIN_NODE_NAME_1Example
[ansible@admin cephadm-ansible]$ ansible-playbook -i hosts cephadm-distribute-ssh-key.yml -e cephadm_ssh_user=ceph-admin -e cephadm_pubkey_path=/home/cephadm/ceph.key -e admin_node=host01

[ansible@admin cephadm-ansible]$ ansible-playbook -i hosts cephadm-distribute-ssh-key.yml -e cephadm_ssh_user=ceph-admin -e admin_node=host01
3.12. Starting the cephadm shell
The cephadm shell command opens a bash shell in a container with all Ceph packages installed. Use the shell to run “Day One” cluster setup tasks, such as installation and bootstrapping, and to run ceph commands.
If the node contains configuration and keyring files in /etc/ceph/, the container environment uses the values in those files as defaults for the cephadm shell. If you execute the cephadm shell on a MON node, the cephadm shell inherits its default configuration from the MON container, instead of using the default configuration.
Prerequisites
- A storage cluster that has been installed and bootstrapped.
- Root-level access to all nodes in the storage cluster.
Procedure
Open the cephadm shell in one of the following ways:
Enter
cephadm shellat the system prompt. This example runs theceph -scommand from within the shell.Example
[root@host01 ~]# cephadm shell
[ceph: root@host01 /]# ceph -s
At the system prompt, type
cephadm shelland the command you want to run:Example
[root@host01 ~]# cephadm shell ceph -s
To exit the cephadm shell, use the exit command.
[ceph: root@host01 /]# exit
[root@host01 ~]#
3.13. Verifying the cluster installation
Once the cluster installation is complete, you can verify that the Red Hat Ceph Storage 7 installation is running properly.
There are two ways of verifying the storage cluster installation as a root user:
-
Run the
podman pscommand. -
Run the
cephadm shell ceph -s.
Prerequisites
- Root-level access to all nodes in the storage cluster.
Procedure
Run the
podman pscommand:Example
[root@host01 ~]# podman psNoteIn Red Hat Ceph Storage 7, the format of the
systemdunits has changed. In theNAMEScolumn, the unit files now include theFSID.Run the
cephadm shell ceph -scommand:Example
[root@host01 ~]# cephadm shell ceph -s cluster: id: f64f341c-655d-11eb-8778-fa163e914bcc health: HEALTH_OK services: mon: 3 daemons, quorum host01,host02,host03 (age 94m) mgr: host01.lbnhug(active, since 59m), standbys: host02.rofgay, host03.ohipra mds: 1/1 daemons up, 1 standby osd: 18 osds: 18 up (since 10m), 18 in (since 10m) rgw: 4 daemons active (2 hosts, 1 zones) data: volumes: 1/1 healthy pools: 8 pools, 225 pgs objects: 230 objects, 9.9 KiB usage: 271 MiB used, 269 GiB / 270 GiB avail pgs: 225 active+clean io: client: 85 B/s rd, 0 op/s rd, 0 op/s wrNoteThe health of the storage cluster is in HEALTH_WARN status as the hosts and the daemons are not added.
3.14. Adding hosts
Bootstrapping the Red Hat Ceph Storage installation creates a working storage cluster, consisting of one Monitor daemon and one Manager daemon within the same container. As a storage administrator, you can add additional hosts to the storage cluster and configure them.
-
Running the preflight playbook installs
podman,lvm2,chrony, andcephadmon all hosts listed in the Ansible inventory file. When using a custom registry, be sure to log in to the custom registry on newly added nodes before adding any Ceph daemons.
.Syntax
[source,subs="verbatim,quotes"]
----
# ceph cephadm registry-login --registry-url _CUSTOM_REGISTRY_NAME_  --registry_username _REGISTRY_USERNAME_ --registry_password _REGISTRY_PASSWORD_
----
.Example ---- # ceph cephadm registry-login --registry-url myregistry --registry_username myregistryusername --registry_password myregistrypassword1 ----
Prerequisites
- A running Red Hat Ceph Storage cluster.
- Root-level or user with sudo access to all nodes in the storage cluster.
- Register the nodes to the CDN and attach subscriptions.
-
Ansible user with sudo and passwordless
sshaccess to all nodes in the storage cluster.
Procedure
+
In the following procedure, use either root, as indicated, or the username with which the user is bootstrapped.
From the node that contains the admin keyring, install the storage cluster’s public SSH key in the root user’s
authorized_keysfile on the new host:Syntax
ssh-copy-id -f -i /etc/ceph/ceph.pub user@NEWHOSTExample
[root@host01 ~]# ssh-copy-id -f -i /etc/ceph/ceph.pub root@host02
[root@host01 ~]# ssh-copy-id -f -i /etc/ceph/ceph.pub root@host03
Navigate to the
/usr/share/cephadm-ansibledirectory on the Ansible administration node.Example
[ceph-admin@admin ~]$ cd /usr/share/cephadm-ansibleFrom the Ansible administration node, add the new host to the Ansible inventory file. The default location for the file is
/usr/share/cephadm-ansible/hosts. The following example shows the structure of a typical inventory file:Example
[ceph-admin@admin ~]$ cat hosts host02 host03 host04 [admin] host01NoteIf you have previously added the new host to the Ansible inventory file and run the preflight playbook on the host, skip to step 4.
Run the preflight playbook with the
--limitoption:Syntax
ansible-playbook -i INVENTORY_FILE cephadm-preflight.yml --extra-vars "ceph_origin=rhcs" --limit NEWHOSTExample
[ceph-admin@admin cephadm-ansible]$ ansible-playbook -i hosts cephadm-preflight.yml --extra-vars "ceph_origin=rhcs" --limit host02The preflight playbook installs
podman,lvm2,chrony, andcephadmon the new host. After installation is complete,cephadmresides in the/usr/sbin/directory.From the bootstrap node, use the
cephadmorchestrator to add the new host to the storage cluster:Syntax
ceph orch host add NEWHOSTExample
[ceph: root@host01 /]# ceph orch host add host02
Added host 'host02' with addr '10.10.128.69'
[ceph: root@host01 /]# ceph orch host add host03
Added host 'host03' with addr '10.10.128.70'
Optional: You can also add nodes by IP address, before and after you run the preflight playbook. If you do not have DNS configured in your storage cluster environment, you can add the hosts by IP address, along with the host names.
Syntax
ceph orch host add HOSTNAME IP_ADDRESSExample
[ceph: root@host01 /]# ceph orch host add host02 10.10.128.69
Added host 'host02' with addr '10.10.128.69'
Verification
View the status of the storage cluster and verify that the new host has been added. The STATUS of the hosts is blank, in the output of the
ceph orch host lscommand.Example
[ceph: root@host01 /]# ceph orch host ls
3.14.1. Using the addr option to identify hosts
The addr option offers an additional way to contact a host. Add the IP address of the host to the addr option. If ssh cannot connect to the host by its hostname, then it uses the value stored in addr to reach the host by its IP address.
Prerequisites
- A storage cluster that has been installed and bootstrapped.
- Root-level access to all nodes in the storage cluster.
Procedure
Run this procedure from inside the cephadm shell.
Add the IP address:
Syntax
ceph orch host add HOSTNAME IP_ADDRExample
[ceph: root@host01 /]# ceph orch host add host01 10.10.128.68
If adding a host by hostname results in that host being added with an IPv6 address instead of an IPv4 address, use ceph orch host to specify the IP address of that host:
ceph orch host set-addr HOSTNAME IP_ADDRTo convert the IP address from IPv6 format to IPv4 format for a host you have added, use the following command:
ceph orch host set-addr HOSTNAME IPV4_ADDRESS3.14.2. Adding multiple hosts
Use a YAML file to add multiple hosts to the storage cluster at the same time.
Be sure to create the hosts.yaml file within a host container, or create the file on the local host and then use the cephadm shell to mount the file within the container. The cephadm shell automatically places mounted files in /mnt. If you create the file directly on the local host and then apply the hosts.yaml file instead of mounting it, you might see a File does not exist error.
Prerequisites
- A storage cluster that has been installed and bootstrapped.
- Root-level access to all nodes in the storage cluster.
Procedure
-
Copy over the public
sshkey to each of the hosts that you want to add. -
Use a text editor to create a
hosts.yamlfile. Add the host descriptions to the
hosts.yamlfile, as shown in the following example. Include the labels to identify placements for the daemons that you want to deploy on each host. Separate each host description with three dashes (---).Example
service_type: host
addr:
hostname: host02
labels:
- mon
- osd
- mgr
---
service_type: host
addr:
hostname: host03
labels:
- mon
- osd
- mgr
---
service_type: host
addr:
hostname: host04
labels:
- mon
- osd
If you created the
hosts.yamlfile within the host container, invoke theceph orch applycommand:Example
[root@host01 ~]# ceph orch apply -i hosts.yaml
Added host 'host02' with addr '10.10.128.69'
Added host 'host03' with addr '10.10.128.70'
Added host 'host04' with addr '10.10.128.71'
If you created the
hosts.yamlfile directly on the local host, use thecephadmshell to mount the file:Example
[root@host01 ~]# cephadm shell --mount hosts.yaml -- ceph orch apply -i /mnt/hosts.yamlView the list of hosts and their labels:
Example
[root@host01 ~]# ceph orch host ls HOST ADDR LABELS STATUS host02 host02 mon,osd,mgr host03 host03 mon,osd,mgr host04 host04 mon,osdNoteIf a host is online and operating normally, its status is blank. An offline host shows a status of OFFLINE, and a host in maintenance mode shows a status of MAINTENANCE.
3.14.3. Adding hosts in disconnected deployments
If you are running a storage cluster on a private network and your host domain name server (DNS) cannot be reached through private IP, you must include both the host name and the IP address for each host you want to add to the storage cluster.
Prerequisites
- A running storage cluster.
- Root-level access to all hosts in the storage cluster.
Procedure
Invoke the
cephadmshell.Syntax
[root@host01 ~]# cephadm shellAdd the host:
Syntax
ceph orch host add HOST_NAME HOST_ADDRESSExample
[ceph: root@host01 /]# ceph orch host add host03 10.10.128.70
3.14.4. Removing hosts
You can remove hosts of a Ceph cluster with the Ceph Orchestrators. All the daemons are removed with the drain option which adds the _no_schedule label to ensure that you cannot deploy any daemons or a cluster till the operation is complete.
If you are removing the bootstrap host, be sure to copy the admin keyring and the configuration file to another host in the storage cluster before you remove the host.
Prerequisites
- A running Red Hat Ceph Storage cluster.
- Root-level access to all the nodes.
- Hosts are added to the storage cluster.
- All the services are deployed.
- Cephadm is deployed on the nodes where the services have to be removed.
Procedure
Log into the Cephadm shell:
Example
[root@host01 ~]# cephadm shellFetch the host details:
Example
[ceph: root@host01 /]# ceph orch host lsDrain all the daemons from the host:
Syntax
ceph orch host drain HOSTNAMEExample
[ceph: root@host01 /]# ceph orch host drain host02The
_no_schedulelabel is automatically applied to the host which blocks deployment.Check the status of OSD removal:
Example
[ceph: root@host01 /]# ceph orch osd rm statusWhen no placement groups (PG) are left on the OSD, the OSD is decommissioned and removed from the storage cluster.
Check if all the daemons are removed from the storage cluster:
Syntax
ceph orch ps HOSTNAMEExample
[ceph: root@host01 /]# ceph orch ps host02Remove the host:
Syntax
ceph orch host rm HOSTNAMEExample
[ceph: root@host01 /]# ceph orch host rm host02
3.15. Labeling hosts
The Ceph orchestrator supports assigning labels to hosts. Labels are free-form and have no specific meanings. This means that you can use mon, monitor, mycluster_monitor, or any other text string. Each host can have multiple labels.
For example, apply the mon label to all hosts on which you want to deploy Ceph Monitor daemons, mgr for all hosts on which you want to deploy Ceph Manager daemons, rgw for Ceph Object Gateway daemons, and so on.
Labeling all the hosts in the storage cluster helps to simplify system management tasks by allowing you to quickly identify the daemons running on each host. In addition, you can use the Ceph orchestrator or a YAML file to deploy or remove daemons on hosts that have specific host labels.
3.15.1. Adding a label to a host
Use the Ceph Orchestrator to add a label to a host. Labels can be used to specify placement of daemons.
A few examples of labels are mgr, mon, and osd based on the service deployed on the hosts. Each host can have multiple labels.
You can also add the following host labels that have special meaning to cephadm and they begin with _:
-
_no_schedule: This label preventscephadmfrom scheduling or deploying daemons on the host. If it is added to an existing host that already contains Ceph daemons, it causescephadmto move those daemons elsewhere, except OSDs which are not removed automatically. When a host is added with the_no_schedulelabel, no daemons are deployed on it. When the daemons are drained before the host is removed, the_no_schedulelabel is set on that host. -
_no_autotune_memory: This label does not autotune memory on the host. It prevents the daemon memory from being tuned even when theosd_memory_target_autotuneoption or other similar options are enabled for one or more daemons on that host. -
_admin: By default, the_adminlabel is applied to the bootstrapped host in the storage cluster and theclient.adminkey is set to be distributed to that host with theceph orch client-keyring {ls|set|rm}function. Adding this label to additional hosts normally causescephadmto deploy configuration and keyring files in the/etc/cephdirectory.
Prerequisites
- A storage cluster that has been installed and bootstrapped.
- Root-level access to all nodes in the storage cluster.
- Hosts are added to the storage cluster.
Procedure
Log in to the Cephadm shell:
Example
[root@host01 ~]# cephadm shellAdd a label to a host:
Syntax
ceph orch host label add HOSTNAME LABELExample
[ceph: root@host01 /]# ceph orch host label add host02 mon
Verification
List the hosts:
Example
[ceph: root@host01 /]# ceph orch host ls
3.15.2. Removing a label from a host
You can use the Ceph orchestrator to remove a label from a host.
Prerequisites
- A storage cluster that has been installed and bootstrapped.
- Root-level access to all nodes in the storage cluster.
Procedure
Launch the
cephadmshell:[root@host01 ~]# cephadm shell [ceph: root@host01 /]#Remove the label.
Syntax
ceph orch host label rm HOSTNAME LABELExample
[ceph: root@host01 /]# ceph orch host label rm host02 mon
Verification
List the hosts:
Example
[ceph: root@host01 /]# ceph orch host ls
3.15.3. Using host labels to deploy daemons on specific hosts
You can use host labels to deploy daemons to specific hosts. There are two ways to use host labels to deploy daemons on specific hosts:
-
By using the
--placementoption from the command line. - By using a YAML file.
Prerequisites
- A storage cluster that has been installed and bootstrapped.
- Root-level access to all nodes in the storage cluster.
Procedure
Log into the Cephadm shell:
Example
[root@host01 ~]# cephadm shellList current hosts and labels:
Example
[ceph: root@host01 /]# ceph orch host ls
HOST      ADDR     LABELS               STATUS
host01              _admin,mon,osd,mgr
host02              mon,osd,mgr,mylabel
Method 1: Use the
--placementoption to deploy a daemon from the command line:Syntax
ceph orch apply DAEMON --placement="label:LABEL"Example
[ceph: root@host01 /]# ceph orch apply prometheus --placement="label:mylabel"Method 2 To assign the daemon to a specific host label in a YAML file, specify the service type and label in the YAML file:
Create the
placement.ymlfile:Example
[ceph: root@host01 /]# vi placement.ymlSpecify the service type and label in the
placement.ymlfile:Example
service_type: prometheus
placement:
  label: "mylabel"
Apply the daemon placement file:
Syntax
ceph orch apply -i FILENAMEExample
[ceph: root@host01 /]# ceph orch apply -i placement.yml
Scheduled prometheus update…
Verification
List the status of the daemons:
Syntax
ceph orch ps --daemon_type=DAEMON_NAMEExample
[ceph: root@host01 /]# ceph orch ps --daemon_type=prometheus
NAME               HOST   PORTS   STATUS        REFRESHED  AGE  MEM USE  MEM LIM  VERSION  IMAGE ID      CONTAINER ID
prometheus.host02  host02  *:9095  running (2h)     8m ago   2h    85.3M        -  2.22.2   ac25aac5d567  ad8c7593d7c0
3.16. Adding Monitor service
A typical Red Hat Ceph Storage storage cluster has three or five monitor daemons deployed on different hosts. If your storage cluster has five or more hosts, Red Hat recommends that you deploy five Monitor nodes.
In the case of a firewall, see the Firewall settings for Ceph Monitor node section of the Red Hat Ceph Storage Configuration Guide for details.
The bootstrap node is the initial monitor of the storage cluster. Be sure to include the bootstrap node in the list of hosts to which you want to deploy.
If you want to apply Monitor service to more than one specific host, be sure to specify all of the host names within the same ceph orch apply command. If you specify ceph orch apply mon --placement host1 and then specify ceph orch apply mon --placement host2, the second command removes the Monitor service on host1 and applies a Monitor service to host2.
If your Monitor nodes or your entire cluster are located on a single subnet, then cephadm automatically adds up to five Monitor daemons as you add new hosts to the cluster. cephadm automatically configures the Monitor daemons on the new hosts. The new hosts reside on the same subnet as the first (bootstrap) host in the storage cluster. cephadm can also deploy and scale monitors to correspond to changes in the size of the storage cluster.
Prerequisites
- Root-level access to all hosts in the storage cluster.
- A running storage cluster.
Procedure
Apply the five Monitor daemons to five random hosts in the storage cluster:
ceph orch apply mon 5Disable automatic Monitor deployment:
ceph orch apply mon --unmanaged
3.16.1. Adding Monitor nodes to specific hosts
Use host labels to identify the hosts that contain Monitor nodes.
Prerequisites
- Root-level access to all nodes in the storage cluster.
- A running storage cluster.
Procedure
Assign the
monlabel to the host:Syntax
ceph orch host label add HOSTNAME monExample
[ceph: root@host01 /]# ceph orch host label add host01 monView the current hosts and labels:
Syntax
ceph orch host lsExample
[ceph: root@host01 /]# ceph orch host label add host02 mon
[ceph: root@host01 /]# ceph orch host label add host03 mon
[ceph: root@host01 /]# ceph orch host ls
HOST   ADDR   LABELS  STATUS
host01        mon
host02        mon
host03        mon
host04
host05
host06
Deploy monitors based on the host label:
Syntax
ceph orch apply mon label:monDeploy monitors on a specific set of hosts:
Syntax
ceph orch apply mon HOSTNAME1,HOSTNAME2,HOSTNAME3Example
[root@host01 ~]# ceph orch apply mon host01,host02,host03NoteBe sure to include the bootstrap node in the list of hosts to which you want to deploy.
3.17. Setting up a custom SSH key on an existing cluster
As a storage administrator, with Cephadm, you can use an SSH key to securely authenticate with remote hosts. The SSH key is stored in the monitor to connect to remote hosts.
When the cluster is bootstrapped, this SSH key is generated automatically and no additional configuration is necessary. However, you can generate a new SSH key with the ceph cephadm generate-key command.
Prerequisites
- An Ansible administration node.
- Root-level access to the Ansible administration node.
-
The
cephadm-ansiblepackage is installed on the node.
Procedure
-
Navigate to the
cephadm-ansibledirectory. Generate a new SSH key:
Example
[ceph-admin@admin cephadm-ansible]$ ceph cephadm generate-keyRetrieve the public portion of the SSH key:
Example
[ceph-admin@admin cephadm-ansible]$ ceph cephadm get-pub-keyDelete the currently stored SSH key:
Example
[ceph-admin@admin cephadm-ansible]$ceph cephadm clear-keyRestart the mgr daemon to reload the configuration:
Example
[ceph-admin@admin cephadm-ansible]$ ceph mgr fail
3.17.1. Configuring a different SSH user
As a storage administrator, you can configure a non-root SSH user who can log into all the Ceph cluster nodes with enough privileges to download container images, start containers, and execute commands without prompting for a password.
Prior to configuring a non-root SSH user, the cluster SSH key needs to be added to the user’s authorized_keys file and non-root users must have passwordless sudo access.
Prerequisites
- A running Red Hat Ceph Storage cluster.
- An Ansible administration node.
- Root-level access to the Ansible administration node.
-
The
cephadm-ansiblepackage is installed on the node. -
Add the cluster SSH keys to the user’s
authorized_keys. - Enable passwordless sudo access for the non-root users.
Procedure
-
Navigate to the
cephadm-ansibledirectory. Provide Cephadm the name of the user who is going to perform all the Cephadm operations:
Syntax
[ceph-admin@admin cephadm-ansible]$ ceph cephadm set-user <user>Example
[ceph-admin@admin cephadm-ansible]$ ceph cephadm set-user userRetrieve the SSH public key.
Syntax
ceph cephadm get-pub-key > ~/ceph.pubExample
[ceph-admin@admin cephadm-ansible]$ ceph cephadm get-pub-key > ~/ceph.pubCopy the SSH keys to all the hosts.
Syntax
ssh-copy-id -f -i ~/ceph.pub USER@HOSTExample
[ceph-admin@admin cephadm-ansible]$ ssh-copy-id ceph-admin@host01
3.18. Setting up the admin node
Use an admin node to administer the storage cluster.
An admin node contains both the cluster configuration file and the admin keyring. Both of these files are stored in the directory /etc/ceph and use the name of the storage cluster as a prefix.
For example, the default ceph cluster name is ceph. In a cluster using the default name, the admin keyring is named /etc/ceph/ceph.client.admin.keyring. The corresponding cluster configuration file is named /etc/ceph/ceph.conf.
To set up additional hosts in the storage cluster as admin nodes, apply the _admin label to the host you want to designate as an administrator node.
By default, after applying the _admin label to a node, cephadm copies the ceph.conf and client.admin keyring files to that node. The _admin label is automatically applied to the bootstrap node unless the --skip-admin-label option was specified with the cephadm bootstrap command.
Prerequisites
-
A running storage cluster with
cephadminstalled. - The storage cluster has running Monitor and Manager nodes.
- Root-level access to all nodes in the cluster.
Procedure
Use
ceph orch host lsto view the hosts in your storage cluster:Example
[root@host01 ~]# ceph orch host ls
HOST   ADDR   LABELS  STATUS
host01        mon,mgr,_admin
host02        mon
host03        mon,mgr
host04
host05
host06
Use the
_adminlabel to designate the admin host in your storage cluster. For best results, this host should have both Monitor and Manager daemons running.Syntax
ceph orch host label add HOSTNAME _adminExample
[root@host01 ~]# ceph orch host label add host03 _adminVerify that the admin host has the
_adminlabel.Example
[root@host01 ~]# ceph orch host ls HOST ADDR LABELS STATUS host01 mon,mgr,_admin host02 mon host03 mon,mgr,_admin host04 host05 host06- Log in to the admin node to manage the storage cluster.
3.18.1. Deploying Ceph monitor nodes using host labels
A typical Red Hat Ceph Storage storage cluster has three or five Ceph Monitor daemons deployed on different hosts. If your storage cluster has five or more hosts, Red Hat recommends that you deploy five Ceph Monitor nodes.
If your Ceph Monitor nodes or your entire cluster are located on a single subnet, then cephadm automatically adds up to five Ceph Monitor daemons as you add new nodes to the cluster. cephadm automatically configures the Ceph Monitor daemons on the new nodes. The new nodes reside on the same subnet as the first (bootstrap) node in the storage cluster. cephadm can also deploy and scale monitors to correspond to changes in the size of the storage cluster.
Use host labels to identify the hosts that contain Ceph Monitor nodes.
Prerequisites
- Root-level access to all nodes in the storage cluster.
- A running storage cluster.
Procedure
Assign the mon label to the host:
Syntax
ceph orch host label add HOSTNAME monExample
[ceph: root@host01 /]# ceph orch host label add host02 mon
[ceph: root@host01 /]# ceph orch host label add host03 mon
View the current hosts and labels:
Syntax
ceph orch host lsExample
[ceph: root@host01 /]# ceph orch host ls
HOST   ADDR   LABELS  STATUS
host01        mon,mgr,_admin
host02        mon
host03        mon
host04
host05
host06
Deploy Ceph Monitor daemons based on the host label:
Syntax
ceph orch apply mon label:monDeploy Ceph Monitor daemons on a specific set of hosts:
Syntax
ceph orch apply mon HOSTNAME1,HOSTNAME2,HOSTNAME3Example
[ceph: root@host01 /]# ceph orch apply mon host01,host02,host03NoteBe sure to include the bootstrap node in the list of hosts to which you want to deploy.
3.18.2. Adding Ceph Monitor nodes by IP address or network name
A typical Red Hat Ceph Storage storage cluster has three or five monitor daemons deployed on different hosts. If your storage cluster has five or more hosts, Red Hat recommends that you deploy five Monitor nodes.
If your Monitor nodes or your entire cluster are located on a single subnet, then cephadm automatically adds up to five Monitor daemons as you add new nodes to the cluster. You do not need to configure the Monitor daemons on the new nodes. The new nodes reside on the same subnet as the first node in the storage cluster. The first node in the storage cluster is the bootstrap node. cephadm can also deploy and scale monitors to correspond to changes in the size of the storage cluster.
Prerequisites
- Root-level access to all nodes in the storage cluster.
- A running storage cluster.
Procedure
To deploy each additional Ceph Monitor node:
Syntax
ceph orch apply mon NODE:IP_ADDRESS_OR_NETWORK_NAME [NODE:IP_ADDRESS_OR_NETWORK_NAME...]Example
[ceph: root@host01 /]# ceph orch apply mon host02:10.10.128.69 host03:mynetwork
3.19. Adding Manager service
cephadm automatically installs a Manager daemon on the bootstrap node during the bootstrapping process. Use the Ceph orchestrator to deploy additional Manager daemons.
The Ceph orchestrator deploys two Manager daemons by default. To deploy a different number of Manager daemons, specify a different number. If you do not specify the hosts where the Manager daemons should be deployed, the Ceph orchestrator randomly selects the hosts and deploys the Manager daemons to them.
If you want to apply Manager daemons to more than one specific host, be sure to specify all of the host names within the same ceph orch apply command. If you specify ceph orch apply mgr --placement host1 and then specify ceph orch apply mgr --placement host2, the second command removes the Manager daemon on host1 and applies a Manager daemon to host2.
Red Hat recommends that you use the --placement option to deploy to specific hosts.
In director-deployed Red Hat Ceph Storage environments, replacing Controller nodes can affect the Ceph Monitor service and lead to storage outages if Monitor IP addresses change. For more information, see Managing the Ceph Monitor service with Red Hat OpenStack Platform.
Prerequisites
- A running storage cluster.
Procedure
To specify that you want to apply a certain number of Manager daemons to randomly selected hosts:
Syntax
ceph orch apply mgr NUMBER_OF_DAEMONSExample
[ceph: root@host01 /]# ceph orch apply mgr 3To add Manager daemons to specific hosts in your storage cluster:
Syntax
ceph orch apply mgr --placement "HOSTNAME1 HOSTNAME2 HOSTNAME3"Example
[ceph: root@host01 /]# ceph orch apply mgr --placement "host02 host03 host04"
3.20. Adding OSDs
Cephadm will not provision an OSD on a device that is not available. A storage device is considered available if it meets all of the following conditions:
- The device must have no partitions.
- The device must not be mounted.
- The device must not contain a file system.
- The device must not contain a Ceph BlueStore OSD.
- The device must be larger than 5 GB.
Prerequisites
- A running Red Hat Ceph Storage cluster.
Procedure
List the available devices to deploy OSDs:
Syntax
ceph orch device ls [--hostname=HOSTNAME1 HOSTNAME2] [--wide] [--refresh]Example
[ceph: root@host01 /]# ceph orch device ls --wide --refreshYou can either deploy the OSDs on specific hosts or on all the available devices:
To create an OSD from a specific device on a specific host:
Syntax
ceph orch daemon add osd HOSTNAME:DEVICE_PATHExample
[ceph: root@host01 /]# ceph orch daemon add osd host02:/dev/sdbTo deploy OSDs on any available and unused devices, use the
--all-available-devicesoption.Example
[ceph: root@host01 /]# ceph orch apply osd --all-available-devices
This command creates colocated WAL and DB daemons. If you want to create non-colocated daemons, do not use this command.
3.21. Running the cephadm-clients playbook
The cephadm-clients.yml playbook handles the distribution of configuration and admin keyring files to a group of Ceph clients.
If you do not specify a configuration file when you run the playbook, the playbook will generate and distribute a minimal configuration file. By default, the generated file is located at /etc/ceph/ceph.conf.
If you are not using the cephadm-ansible playbooks, after upgrading your Ceph cluster, you must upgrade the ceph-common package and client libraries on your client nodes. For more information, see Upgrading the Red Hat Ceph Storage cluster section in the Red Hat Ceph Storage Upgrade Guide.
Prerequisites
- Root-level access to the Ansible administration node.
-
Ansible user with sudo and passwordless
sshaccess to all nodes in the storage cluster. -
The
cephadm-ansiblepackage is installed. - The preflight playbook has been run on the initial host in the storage cluster. For more information, see Running the preflight playbook.
-
The
client_groupvariable must be specified in the Ansible inventory file. -
The
[admin]group is defined in the inventory file with a node where the admin keyring is present at/etc/ceph/ceph.client.admin.keyring.
Procedure
- Navigate to the /usr/share/cephadm-ansible directory.
Run the
cephadm-clients.ymlplaybook on the initial host in the group of clients. Use the full path name to the admin keyring on the admin host for PATH_TO_KEYRING. Optional: If you want to specify an existing configuration file to use, specify the full path to the configuration file for CONFIG-FILE. Use the Ansible group name for the group of clients for ANSIBLE_GROUP_NAME. Use the FSID of the cluster where the admin keyring and configuration files are stored for FSID. The default path for the FSID is/var/lib/ceph/.Syntax
ansible-playbook -i hosts cephadm-clients.yml -extra-vars '{"fsid":"FSID", "client_group":"ANSIBLE_GROUP_NAME", "keyring":"PATH_TO_KEYRING", "conf":"CONFIG_FILE"}'Example
[ceph-admin@admin cephadm-ansible]$ ansible-playbook -i hosts cephadm-clients.yml --extra-vars '{"fsid":"be3ca2b2-27db-11ec-892b-005056833d58","client_group":"fs_clients","keyring":"/etc/ceph/fs.keyring", "conf": "/etc/ceph/ceph.conf"}'
After installation is complete, the specified clients in the group have the admin keyring. If you did not specify a configuration file, cephadm-ansible creates a minimal default configuration file on each client.
3.22. Purging the Ceph storage cluster
Purging the Ceph storage cluster clears any data or connections that remain from previous deployments on your server. Use the cephadm rm-cluster command since Ansible is not supported.
Prerequisites
- A running Red Hat Ceph Storage cluster.
Procedure
Disable
cephadmto stop all the orchestration operations to avoid deploying new daemons:Example
[ceph: root#host01 /]# ceph mgr module disable cephadmGet the FSID of the cluster:
Example
[ceph: root#host01 /]# ceph fsidExit the cephadm shell.
Example
[ceph: root@host01 /]# exitPurge the Ceph daemons from all hosts in the cluster:
Syntax
cephadm rm-cluster --force --zap-osds --fsid FSIDExample
[root@host01 ~]# cephadm rm-cluster --force --zap-osds --fsid a6ca415a-cde7-11eb-a41a-002590fc2544
3.23. Deploying client nodes
As a storage administrator, you can deploy client nodes by running the cephadm-preflight.yml and cephadm-clients.yml playbooks. The cephadm-preflight.yml playbook configures the Ceph repository and prepares the storage cluster for bootstrapping. It also installs some prerequisites, such as podman, lvm2, chrony, and cephadm.
The cephadm-clients.yml playbook handles the distribution of configuration and keyring files to a group of Ceph clients.
if you are not using the cephadm-ansible playbooks, after upgrading your Ceph cluster, you must upgrade the ceph-common package and client libraries on your client nodes. For more information, see Upgrading the Red Hat Ceph Storage cluster.
Prerequisites
- Root-level access to the Ansible administration node.
-
Ansible user with sudo and passwordless
sshaccess to all nodes in the storage cluster. -
Installation of the
cephadm-ansiblepackage. -
The
[clients]group variable must be specified in the Ansible inventory file. -
The
[admin]group is defined in the inventory file with a node where the admin keyring is present at/etc/ceph/ceph.client.admin.keyring.
Procedure
As an Ansible user, navigate to the
/usr/share/cephadm-ansibledirectory on the Ansible administration node:Example
[ceph-admin@admin ~]$ cd /usr/share/cephadm-ansibleOpen and edit the
hostsinventory file and add the[clients]group and clients to your inventory:Example
host02
host03
host04

[admin]
host01

[clients]
client01
client02
client03
Run the
cephadm-preflight.ymlplaybook to install the prerequisites on the clients:Syntax
ansible-playbook -i INVENTORY_FILE cephadm-preflight.yml --limit CLIENT_GROUP_NAME|CLIENT_NODE_NAMEExample
[ceph-admin@admin cephadm-ansible]$ ansible-playbook -i hosts cephadm-preflight.yml --limit clientsRun the
cephadm-clients.ymlplaybook to distribute the keyring and Ceph configuration files to a set of clients.To copy the keyring with a custom destination keyring name:
Syntax
ansible-playbook -i INVENTORY_FILE cephadm-clients.yml --extra-vars '{"fsid":"FSID","keyring":"KEYRING_PATH","client_group":"CLIENT_GROUP_NAME","conf":"CEPH_CONFIGURATION_PATH","keyring_dest":"KEYRING_DESTINATION_PATH"}'- Replace INVENTORY_FILE with the Ansible inventory file name.
- Replace FSID with the FSID of the cluster.
- Replace KEYRING_PATH with the full path name to the keyring on the admin host that you want to copy to the client.
- Optional: Replace CLIENT_GROUP_NAME with the Ansible group name for the clients to set up.
- Optional: Replace CEPH_CONFIGURATION_PATH with the full path to the Ceph configuration file on the admin node.
Optional: Replace KEYRING_DESTINATION_PATH with the full path name of the destination where the keyring will be copied.
NoteIf you do not specify a configuration file with the conf option when you run the playbook, the playbook generates and distributes a minimal configuration file. By default, the generated file is located at
/etc/ceph/ceph.conf.Example
[ceph-admin@host01 cephadm-ansible]$ ansible-playbook -i hosts cephadm-clients.yml --extra-vars '{"fsid":"266ee7a8-2a05-11eb-b846-5254002d4916","keyring":"/etc/ceph/ceph.client.admin.keyring","client_group":"clients","conf":"/etc/ceph/ceph.conf","keyring_dest":"/etc/ceph/custom.name.ceph.keyring"}'
To copy a keyring with the default destination keyring name of
ceph.keyringand using the default group of clients:Syntax
ansible-playbook -i INVENTORY_FILE cephadm-clients.yml --extra-vars '{"fsid":"FSID","keyring":"KEYRING_PATH","conf":"CONF_PATH"}'
Verification
Log into the client nodes and verify that the keyring and configuration files exist.
Example
[user@client01 ~]# ls -l /etc/ceph/

-rw-------. 1 ceph ceph 151 Jul 11 12:23 custom.name.ceph.keyring
-rw-------. 1 ceph ceph 151 Jul 11 12:23 ceph.keyring
-rw-------. 1 ceph ceph 269 Jul 11 12:23 ceph.conf
Chapter 4. Managing a Red Hat Ceph Storage cluster using cephadm-ansible modules
As a storage administrator, you can use cephadm-ansible modules in Ansible playbooks to administer your Red Hat Ceph Storage cluster. The cephadm-ansible package provides several modules that wrap cephadm calls to let you write your own unique Ansible playbooks to administer your cluster.
At this time, cephadm-ansible modules only support the most important tasks. Any operation not covered by cephadm-ansible modules must be completed using either the command or shell Ansible modules in your playbooks.
4.1. The cephadm-ansible modules
The cephadm-ansible modules are a collection of modules that simplify writing Ansible playbooks by providing a wrapper around cephadm and ceph orch commands. You can use the modules to write your own unique Ansible playbooks to administer your cluster using one or more of the modules.
The cephadm-ansible package includes the following modules:
-
cephadm_bootstrap -
ceph_orch_host -
ceph_config -
ceph_orch_apply -
ceph_orch_daemon -
cephadm_registry_login
4.2. The cephadm-ansible modules options
The following tables list the available options for the cephadm-ansible modules. Options listed as required need to be set when using the modules in your Ansible playbooks. Options listed with a default value of true indicate that the option is automatically set when using the modules and you do not need to specify it in your playbook. For example, for the cephadm_bootstrap module, the Ceph Dashboard is installed unless you set dashboard: false.
cephadm_bootstrap | Description | Required | Default |
|---|---|---|---|
|
| Ceph Monitor IP address. | true | |
|
| Ceph container image. | false | |
|
|
Use | false | |
|
| Define the Ceph FSID. | false | |
|
| Pull the Ceph container image. | false | true |
|
| Deploy the Ceph Dashboard. | false | true |
|
| Specify a specific Ceph Dashboard user. | false | |
|
| Ceph Dashboard password. | false | |
|
| Deploy the monitoring stack. | false | true |
|
| Manage firewall rules with firewalld. | false | true |
|
| Allow overwrite of existing --output-config, --output-keyring, or --output-pub-ssh-key files. | false | false |
|
| URL for custom registry. | false | |
|
| Username for custom registry. | false | |
|
| Password for custom registry. | false | |
|
| JSON file with custom registry login information. | false | |
|
|
SSH user to use for | false | |
|
|
SSH config file path for | false | |
|
| Allow hostname that is a fully-qualified domain name (FQDN). | false | false |
|
| Subnet to use for cluster replication, recovery and heartbeats. | false |
ceph_orch_host | Description | Required | Default |
|---|---|---|---|
|
| The FSID of the Ceph cluster to interact with. | false | |
|
| The Ceph container image to use. | false | |
|
| Name of the host to add, remove, or update. | true | |
|
| IP address of the host. |
true when | |
|
|
Set the | false | false |
|
| The list of labels to apply to the host. | false | [] |
|
|
If set to | false | present |
ceph_config | Description | Required | Default |
|---|---|---|---|
|
| The FSID of the Ceph cluster to interact with. | false | |
|
| The Ceph container image to use. | false | |
|
|
Whether to | false | set |
|
| Which daemon to set the configuration to. | true | |
|
|
Name of the parameter to | true | |
|
| Value of the parameter to set. |
true if action is |
ceph_orch_apply | Description | Required |
|---|---|---|
|
| The FSID of the Ceph cluster to interact with. | false |
|
| The Ceph container image to use. | false |
|
| The service specification to apply. | true |
ceph_orch_daemon | Description | Required |
|---|---|---|
|
| The FSID of the Ceph cluster to interact with. | false |
|
| The Ceph container image to use. | false |
|
|
The desired state of the service specified in | true
If
If
If |
|
| The ID of the service. | true |
|
| The type of service. | true |
cephadm_registry_login | Description | Required | Default |
|---|---|---|---|
|
| Login or logout of a registry. | false | login |
|
|
Use | false | |
|
| The URL for custom registry. | false | |
|
| Username for custom registry. |
| |
|
| Password for custom registry. |
| |
|
| The path to a JSON file. This file must be present on remote hosts prior to running this task. This option is currently not supported. |
4.3. Bootstrapping a storage cluster using the cephadm_bootstrap and cephadm_registry_login modules
As a storage administrator, you can bootstrap a storage cluster using Ansible by using the cephadm_bootstrap and cephadm_registry_login modules in your Ansible playbook.
Prerequisites
- An IP address for the first Ceph Monitor container, which is also the IP address for the first node in the storage cluster.
-
Login access to
registry.redhat.io. -
A minimum of 10 GB of free space for
/var/lib/containers/. - For Red Hat Ceph Storage 7.0, Red Hat Enterprise Linux 9.2 with ansible-core bundled into AppStream. For Red Hat Ceph Storage 7.1, Red Hat Enterprise Linux 8.10, 9.4, 9.5, or 9.6 with ansible-core bundled into AppStream.
-
Installation of the
cephadm-ansiblepackage on the Ansible administration node. - Passwordless SSH is set up on all hosts in the storage cluster.
- Hosts are registered with CDN.
Procedure
- Log in to the Ansible administration node.
Navigate to the
/usr/share/cephadm-ansibledirectory on the Ansible administration node:Example
[ceph-admin@admin ~]$ cd /usr/share/cephadm-ansibleCreate the
hostsfile and add hosts, labels, and monitor IP address of the first host in the storage cluster:Syntax
sudo vi INVENTORY_FILE

HOST1 labels="['LABEL1', 'LABEL2']"
HOST2 labels="['LABEL1', 'LABEL2']"
HOST3 labels="['LABEL1']"

[admin]
ADMIN_HOST monitor_address=MONITOR_IP_ADDRESS labels="['ADMIN_LABEL', 'LABEL1', 'LABEL2']"
Example
[ceph-admin@admin cephadm-ansible]$ sudo vi hosts

host02 labels="['mon', 'mgr']"
host03 labels="['mon', 'mgr']"
host04 labels="['osd']"
host05 labels="['osd']"
host06 labels="['osd']"

[admin]
host01 monitor_address=10.10.128.68 labels="['_admin', 'mon', 'mgr']"
Run the preflight playbook:
Syntax
ansible-playbook -i INVENTORY_FILE cephadm-preflight.yml --extra-vars "ceph_origin=rhcs"Example
[ceph-admin@admin cephadm-ansible]$ ansible-playbook -i hosts cephadm-preflight.yml --extra-vars "ceph_origin=rhcs"Create a playbook to bootstrap your cluster:
Syntax
sudo vi PLAYBOOK_FILENAME.yml

---
- name: NAME_OF_PLAY
  hosts: BOOTSTRAP_HOST
  become: USE_ELEVATED_PRIVILEGES
  gather_facts: GATHER_FACTS_ABOUT_REMOTE_HOSTS
  tasks:
    -name: NAME_OF_TASK
     cephadm_registry_login:
       state: STATE
       registry_url: REGISTRY_URL
       registry_username: REGISTRY_USER_NAME
       registry_password: REGISTRY_PASSWORD

    - name: NAME_OF_TASK
      cephadm_bootstrap:
        mon_ip: "{{ monitor_address }}"
        dashboard_user: DASHBOARD_USER
        dashboard_password: DASHBOARD_PASSWORD
        allow_fqdn_hostname: ALLOW_FQDN_HOSTNAME
        cluster_network: NETWORK_CIDR
Example
[ceph-admin@admin cephadm-ansible]$ sudo vi bootstrap.yml

---
- name: bootstrap the cluster
  hosts: host01
  become: true
  gather_facts: false
  tasks:
    - name: login to registry
      cephadm_registry_login:
        state: login
        registry_url: registry.redhat.io
        registry_username: user1
        registry_password: mypassword1

    - name: bootstrap initial cluster
      cephadm_bootstrap:
        mon_ip: "{{ monitor_address }}"
        dashboard_user: mydashboarduser
        dashboard_password: mydashboardpassword
        allow_fqdn_hostname: true
        cluster_network: 10.10.128.0/28
Run the playbook:
Syntax
ansible-playbook -i INVENTORY_FILE PLAYBOOK_FILENAME.yml -vvvExample
[ceph-admin@admin cephadm-ansible]$ ansible-playbook -i hosts bootstrap.yml -vvv
Verification
- Review the Ansible output after running the playbook.
4.4. Adding or removing hosts using the ceph_orch_host module
As a storage administrator, you can add and remove hosts in your storage cluster by using the ceph_orch_host module in your Ansible playbook.
Prerequisites
- A running Red Hat Ceph Storage cluster.
- Register the nodes to the CDN and attach subscriptions.
- Ansible user with sudo and passwordless SSH access to all nodes in the storage cluster.
-
Installation of the
cephadm-ansiblepackage on the Ansible administration node. - New hosts have the storage cluster’s public SSH key. For more information about copying the storage cluster’s public SSH keys to new hosts, see Adding hosts.
Procedure
Use the following procedure to add new hosts to the cluster:
- Log in to the Ansible administration node.
Navigate to the
/usr/share/cephadm-ansibledirectory on the Ansible administration node:Example
[ceph-admin@admin ~]$ cd /usr/share/cephadm-ansibleAdd the new hosts and labels to the Ansible inventory file.
Syntax
sudo vi INVENTORY_FILE

NEW_HOST1 labels="['LABEL1', 'LABEL2']"
NEW_HOST2 labels="['LABEL1', 'LABEL2']"
NEW_HOST3 labels="['LABEL1']"

[admin]
ADMIN_HOST monitor_address=MONITOR_IP_ADDRESS labels="['ADMIN_LABEL', 'LABEL1', 'LABEL2']"
Example
[ceph-admin@admin cephadm-ansible]$ sudo vi hosts

host02 labels="['mon', 'mgr']"
host03 labels="['mon', 'mgr']"
host04 labels="['osd']"
host05 labels="['osd']"
host06 labels="['osd']"

[admin]
host01 monitor_address= 10.10.128.68 labels="['_admin', 'mon', 'mgr']"
Run the preflight playbook with the
--limitoption:Syntax
ansible-playbook -i INVENTORY_FILE cephadm-preflight.yml --extra-vars "ceph_origin=rhcs" --limit NEWHOSTExample
[ceph-admin@admin cephadm-ansible]$ ansible-playbook -i hosts cephadm-preflight.yml --extra-vars "ceph_origin=rhcs" --limit host02The preflight playbook installs
podman,lvm2,chrony, andcephadmon the new host. After installation is complete,cephadmresides in the/usr/sbin/directory.Create a playbook to add the new hosts to the cluster:
Syntax
sudo vi PLAYBOOK_FILENAME.yml --- - name: PLAY_NAME hosts: HOSTS_OR_HOST_GROUPS become: USE_ELEVATED_PRIVILEGES gather_facts: GATHER_FACTS_ABOUT_REMOTE_HOSTS tasks: - name: NAME_OF_TASK ceph_orch_host: name: "{{ ansible_facts['hostname'] }}" address: "{{ ansible_facts['default_ipv4']['address'] }}" labels: "{{ labels }}" delegate_to: HOST_TO_DELEGATE_TASK_TO - name: NAME_OF_TASK when: inventory_hostname in groups['admin'] ansible.builtin.shell: cmd: CEPH_COMMAND_TO_RUN register: REGISTER_NAME - name: NAME_OF_TASK when: inventory_hostname in groups['admin'] debug: msg: "{{ REGISTER_NAME.stdout }}"NoteBy default, Ansible executes all tasks on the host that matches the
hostsline of your playbook. Theceph orchcommands must run on the host that contains the admin keyring and the Ceph configuration file. Use thedelegate_tokeyword to specify the admin host in your cluster.Example
[ceph-admin@admin cephadm-ansible]$ sudo vi add-hosts.yml

---
- name: add additional hosts to the cluster
  hosts: all
  become: true
  gather_facts: true
  tasks:
    - name: add hosts to the cluster
      ceph_orch_host:
        name: "{{ ansible_facts['hostname'] }}"
        address: "{{ ansible_facts['default_ipv4']['address'] }}"
        labels: "{{ labels }}"
      delegate_to: host01

    - name: list hosts in the cluster
      when: inventory_hostname in groups['admin']
      ansible.builtin.shell:
        cmd: ceph orch host ls
      register: host_list

    - name: print current list of hosts
      when: inventory_hostname in groups['admin']
      debug:
        msg: "{{ host_list.stdout }}"
In this example, the playbook adds the new hosts to the cluster and displays a current list of hosts.
Run the playbook to add additional hosts to the cluster:
Syntax
ansible-playbook -i INVENTORY_FILE PLAYBOOK_FILENAME.ymlExample
[ceph-admin@admin cephadm-ansible]$ ansible-playbook -i hosts add-hosts.yml
Use the following procedure to remove hosts from the cluster:
- Log in to the Ansible administration node.
Navigate to the
/usr/share/cephadm-ansibledirectory on the Ansible administration node:Example
[ceph-admin@admin ~]$ cd /usr/share/cephadm-ansibleCreate a playbook to remove a host or hosts from the cluster:
Syntax
sudo vi PLAYBOOK_FILENAME.yml

---
- name: NAME_OF_PLAY
  hosts: ADMIN_HOST
  become: USE_ELEVATED_PRIVILEGES
  gather_facts: GATHER_FACTS_ABOUT_REMOTE_HOSTS
  tasks:
    - name: NAME_OF_TASK
      ceph_orch_host:
        name: HOST_TO_REMOVE
        state: STATE

    - name: NAME_OF_TASK
      ceph_orch_host:
        name: HOST_TO_REMOVE
        state: STATE
      retries: NUMBER_OF_RETRIES
      delay: DELAY
      until: CONTINUE_UNTIL
      register: REGISTER_NAME

    - name: NAME_OF_TASK
      ansible.builtin.shell:
        cmd: ceph orch host ls
      register: REGISTER_NAME

    - name: NAME_OF_TASK
        debug:
          msg: "{{ REGISTER_NAME.stdout }}"
Example
[ceph-admin@admin cephadm-ansible]$ sudo vi remove-hosts.yml

---
- name: remove host
  hosts: host01
  become: true
  gather_facts: true
  tasks:
    - name: drain host07
      ceph_orch_host:
        name: host07
        state: drain

    - name: remove host from the cluster
      ceph_orch_host:
        name: host07
        state: absent
      retries: 20
      delay: 1
      until: result is succeeded
      register: result

     - name: list hosts in the cluster
       ansible.builtin.shell:
         cmd: ceph orch host ls
       register: host_list

     - name: print current list of hosts
       debug:
         msg: "{{ host_list.stdout }}"
In this example, the playbook tasks drain all daemons on
host07, removes the host from the cluster, and displays a current list of hosts.Run the playbook to remove host from the cluster:
Syntax
ansible-playbook -i INVENTORY_FILE PLAYBOOK_FILENAME.ymlExample
[ceph-admin@admin cephadm-ansible]$ ansible-playbook -i hosts remove-hosts.yml
Verification
Review the Ansible task output displaying the current list of hosts in the cluster:
Example
TASK [print current hosts] ******************************************************************************************************
Friday 24 June 2022  14:52:40 -0400 (0:00:03.365)       0:02:31.702 ***********
ok: [host01] =>
  msg: |-
    HOST    ADDR           LABELS          STATUS
    host01  10.10.128.68   _admin mon mgr
    host02  10.10.128.69   mon mgr
    host03  10.10.128.70   mon mgr
    host04  10.10.128.71   osd
    host05  10.10.128.72   osd
    host06  10.10.128.73   osd
4.5. Setting configuration options using the ceph_config module
As a storage administrator, you can set or get Red Hat Ceph Storage configuration options using the ceph_config module.
Prerequisites
- A running Red Hat Ceph Storage cluster.
- Ansible user with sudo and passwordless SSH access to all nodes in the storage cluster.
-
Installation of the
cephadm-ansiblepackage on the Ansible administration node. - The Ansible inventory file contains the cluster and admin hosts. For more information about adding hosts to your storage cluster, see Adding or removing hosts using the ceph_orch_host module.
Procedure
- Log in to the Ansible administration node.
Navigate to the
/usr/share/cephadm-ansibledirectory on the Ansible administration node:Example
[ceph-admin@admin ~]$ cd /usr/share/cephadm-ansibleCreate a playbook with configuration changes:
Syntax
sudo vi PLAYBOOK_FILENAME.yml

---
- name: PLAY_NAME
  hosts: ADMIN_HOST
  become: USE_ELEVATED_PRIVILEGES
  gather_facts: GATHER_FACTS_ABOUT_REMOTE_HOSTS
  tasks:
    - name: NAME_OF_TASK
      ceph_config:
        action: GET_OR_SET
        who: DAEMON_TO_SET_CONFIGURATION_TO
        option: CEPH_CONFIGURATION_OPTION
        value: VALUE_OF_PARAMETER_TO_SET

    - name: NAME_OF_TASK
      ceph_config:
        action: GET_OR_SET
        who: DAEMON_TO_SET_CONFIGURATION_TO
        option: CEPH_CONFIGURATION_OPTION
      register: REGISTER_NAME

    - name: NAME_OF_TASK
      debug:
        msg: "MESSAGE_TO_DISPLAY {{ REGISTER_NAME.stdout }}"
Example
[ceph-admin@admin cephadm-ansible]$ sudo vi change_configuration.yml

---
- name: set pool delete
  hosts: host01
  become: true
  gather_facts: false
  tasks:
    - name: set the allow pool delete option
      ceph_config:
        action: set
        who: mon
        option: mon_allow_pool_delete
        value: true

    - name: get the allow pool delete setting
      ceph_config:
        action: get
        who: mon
        option: mon_allow_pool_delete
      register: verify_mon_allow_pool_delete

    - name: print current mon_allow_pool_delete setting
      debug:
        msg: "the value of 'mon_allow_pool_delete' is {{ verify_mon_allow_pool_delete.stdout }}"
In this example, the playbook first sets the
mon_allow_pool_deleteoption tofalse. The playbook then gets the currentmon_allow_pool_deletesetting and displays the value in the Ansible output.Run the playbook:
Syntax
ansible-playbook -i INVENTORY_FILE _PLAYBOOK_FILENAME.ymlExample
[ceph-admin@admin cephadm-ansible]$ ansible-playbook -i hosts change_configuration.yml
Verification
Review the output from the playbook tasks.
Example
TASK [print current mon_allow_pool_delete setting] *************************************************************
Wednesday 29 June 2022  13:51:41 -0400 (0:00:05.523)       0:00:17.953 ********
ok: [host01] =>
  msg: the value of 'mon_allow_pool_delete' is true
4.6. Applying a service specification using the ceph_orch_apply module
As a storage administrator, you can apply service specifications to your storage cluster using the ceph_orch_apply module in your Ansible playbooks. A service specification is a data structure to specify the service attributes and configuration settings that is used to deploy the Ceph service. You can use a service specification to deploy Ceph service types like mon, crash, mds, mgr, osd, rdb, or rbd-mirror.
Prerequisites
- A running Red Hat Ceph Storage cluster.
- Ansible user with sudo and passwordless SSH access to all nodes in the storage cluster.
-
Installation of the
cephadm-ansiblepackage on the Ansible administration node. - The Ansible inventory file contains the cluster and admin hosts. For more information about adding hosts to your storage cluster, see Adding or removing hosts using the ceph_orch_host module.
Procedure
- Log in to the Ansible administration node.
Navigate to the
/usr/share/cephadm-ansibledirectory on the Ansible administration node:Example
[ceph-admin@admin ~]$ cd /usr/share/cephadm-ansibleCreate a playbook with the service specifications:
Syntax
sudo vi PLAYBOOK_FILENAME.yml

---
- name: PLAY_NAME
  hosts: HOSTS_OR_HOST_GROUPS
  become: USE_ELEVATED_PRIVILEGES
  gather_facts: GATHER_FACTS_ABOUT_REMOTE_HOSTS
  tasks:
    - name: NAME_OF_TASK
      ceph_orch_apply:
        spec: |
          service_type: SERVICE_TYPE
          service_id: UNIQUE_NAME_OF_SERVICE
          placement:
            host_pattern: 'HOST_PATTERN_TO_SELECT_HOSTS'
            label: LABEL
          spec:
            SPECIFICATION_OPTIONS:
Example
[ceph-admin@admin cephadm-ansible]$ sudo vi deploy_osd_service.yml

---
- name: deploy osd service
  hosts: host01
  become: true
  gather_facts: true
  tasks:
    - name: apply osd spec
      ceph_orch_apply:
        spec: |
          service_type: osd
          service_id: osd
          placement:
            host_pattern: '*'
            label: osd
          spec:
            data_devices:
              all: true
In this example, the playbook deploys the Ceph OSD service on all hosts with the label
osd.Run the playbook:
Syntax
ansible-playbook -i INVENTORY_FILE _PLAYBOOK_FILENAME.ymlExample
[ceph-admin@admin cephadm-ansible]$ ansible-playbook -i hosts deploy_osd_service.yml
Verification
- Review the output from the playbook tasks.
4.7. Managing Ceph daemon states using the ceph_orch_daemon module
As a storage administrator, you can start, stop, and restart Ceph daemons on hosts using the ceph_orch_daemon module in your Ansible playbooks.
Prerequisites
- A running Red Hat Ceph Storage cluster.
- Ansible user with sudo and passwordless SSH access to all nodes in the storage cluster.
-
Installation of the
cephadm-ansiblepackage on the Ansible administration node. - The Ansible inventory file contains the cluster and admin hosts. For more information about adding hosts to your storage cluster, see Adding or removing hosts using the ceph_orch_host module.
Procedure
- Log in to the Ansible administration node.
Navigate to the
/usr/share/cephadm-ansibledirectory on the Ansible administration node:Example
[ceph-admin@admin ~]$ cd /usr/share/cephadm-ansibleCreate a playbook with daemon state changes:
Syntax
sudo vi PLAYBOOK_FILENAME.yml

---
- name: PLAY_NAME
  hosts: ADMIN_HOST
  become: USE_ELEVATED_PRIVILEGES
  gather_facts: GATHER_FACTS_ABOUT_REMOTE_HOSTS
  tasks:
    - name: NAME_OF_TASK
      ceph_orch_daemon:
        state: STATE_OF_SERVICE
        daemon_id: DAEMON_ID
        daemon_type: TYPE_OF_SERVICE
Example
[ceph-admin@admin cephadm-ansible]$ sudo vi restart_services.yml

---
- name: start and stop services
  hosts: host01
  become: true
  gather_facts: false
  tasks:
    - name: start osd.0
      ceph_orch_daemon:
        state: started
        daemon_id: 0
        daemon_type: osd

    - name: stop mon.host02
      ceph_orch_daemon:
        state: stopped
        daemon_id: host02
        daemon_type: mon
In this example, the playbook starts the OSD with an ID of
0and stops a Ceph Monitor with an id ofhost02.Run the playbook:
Syntax
ansible-playbook -i INVENTORY_FILE _PLAYBOOK_FILENAME.ymlExample
[ceph-admin@admin cephadm-ansible]$ ansible-playbook -i hosts restart_services.yml
Verification
- Review the output from the playbook tasks.
Chapter 5. What to do next? Day 2
As a storage administrator, once you have installed and configured Red Hat Ceph Storage 7, you are ready to perform "Day Two" operations for your storage cluster. These operations include adding metadata servers (MDS) and object gateways (RGW), and configuring services such as NFS.
For more information about how to use the cephadm orchestrator to perform "Day Two" operations, refer to the Red Hat Ceph Storage 7 Operations Guide.
To deploy, configure, and administer the Ceph Object Gateway on "Day Two" operations, refer to the Red Hat Ceph Storage 7 Object Gateway Guide.
Appendix A. Comparison between Ceph Ansible and Cephadm
Cephadm is used for the containerized deployment of the storage cluster.
The tables compare Cephadm with Ceph-Ansible playbooks for managing the containerized deployment of a Ceph cluster for day one and day two operations.
| Description | Ceph-Ansible | Cephadm |
|---|---|---|
| Installation of the Red Hat Ceph Storage cluster |
Run the |
Run |
| Addition of hosts | Use the Ceph Ansible inventory. |
Run |
| Addition of monitors |
Run the |
Run the |
| Addition of managers |
Run the |
Run the |
| Addition of OSDs |
Run the |
Run the |
| Addition of OSDs on specific devices |
Select the |
Select the |
| Addition of MDS |
Run the |
Run the |
| Addition of Ceph Object Gateway |
Run the |
Run the |
| Description | Ceph-Ansible | Cephadm |
|---|---|---|
| Removing hosts | Use the Ansible inventory. |
Run |
| Removing monitors |
Run the |
Run |
| Removing managers |
Run the |
Run |
| Removing OSDs |
Run the |
Run |
| Removing MDS |
Run the |
Run |
| Exporting Ceph File System over NFS Protocol. | Not supported on Red Hat Ceph Storage 4. |
Run |
| Deployment of Ceph Object Gateway |
Run the |
Run |
| Removing Ceph Object Gateway |
Run the |
Run |
| Block device mirroring |
Run the |
Run |
| Minor version upgrade of Red Hat Ceph Storage |
Run the |
Run |
| Deployment of monitoring stack |
Edit the |
Run the |
Appendix B. The cephadm commands
The cephadm is a command line tool to manage the local host for the Cephadm Orchestrator. It provides commands to investigate and modify the state of the current host.
Some of the commands are generally used for debugging.
cephadm is not required on all hosts, however, it is useful when investigating a particular daemon. The cephadm-ansible-preflight playbook installs cephadm on all hosts and the cephadm-ansible purge playbook requires cephadm be installed on all hosts to work properly.
adopt- Description
-
Convert an upgraded storage cluster daemon to run
cephadm. - Syntax
cephadm adopt [-h] --name DAEMON_NAME --style STYLE [--cluster CLUSTER] --legacy-dir [LEGACY_DIR] --config-json CONFIG_JSON] [--skip-firewalld] [--skip-pull]- Example
[root@host01 ~]# cephadm adopt --style=legacy --name prometheus.host02
ceph-volume- Description
-
This command is used to list all the devices on the particular host. Run the
ceph-volumecommand inside a container Deploys OSDs with different device technologies likelvmor physical disks using pluggable tools and follows a predictable, and robust way of preparing, activating, and starting OSDs. - Syntax
cephadm ceph-volume inventory/simple/raw/lvm [-h] [--fsid FSID] [--config-json CONFIG_JSON] [--config CONFIG, -c CONFIG] [--keyring KEYRING, -k KEYRING]- Example
[root@nhost01 ~]# cephadm ceph-volume inventory --fsid f64f341c-655d-11eb-8778-fa163e914bcc
check-host- Description
- Check the host configuration that is suitable for a Ceph cluster.
- Syntax
cephadm check-host [--expect-hostname HOSTNAME]- Example
[root@host01 ~]# cephadm check-host --expect-hostname host02
deploy- Description
- Deploys a daemon on the local host.
- Syntax
cephadm shell deploy DAEMON_TYPE [-h] [--name DAEMON_NAME] [--fsid FSID] [--config CONFIG, -c CONFIG] [--config-json CONFIG_JSON] [--keyring KEYRING] [--key KEY] [--osd-fsid OSD_FSID] [--skip-firewalld] [--tcp-ports TCP_PORTS] [--reconfig] [--allow-ptrace] [--memory-request MEMORY_REQUEST] [--memory-limit MEMORY_LIMIT] [--meta-json META_JSON]- Example
[root@host01 ~]# cephadm shell deploy mon --fsid f64f341c-655d-11eb-8778-fa163e914bcc
enter- Description
- Run an interactive shell inside a running daemon container.
- Syntax
cephadm enter [-h] [--fsid FSID] --name NAME [command [command …]]- Example
[root@host01 ~]# cephadm enter --name 52c611f2b1d9
help- Description
-
View all the commands supported by
cephadm. - Syntax
cephadm help- Example
[root@host01 ~]# cephadm help
install- Description
- Install the packages.
- Syntax
cephadm install PACKAGES- Example
[root@host01 ~]# cephadm install ceph-common ceph-osd
inspect-image- Description
- Inspect the local Ceph container image.
- Syntax
cephadm --image IMAGE_ID inspect-image- Example
[root@host01 ~]# cephadm --image 13ea90216d0be03003d12d7869f72ad9de5cec9e54a27fd308e01e467c0d4a0a inspect-image
list-networks- Description
- List the IP networks.
- Syntax
cephadm list-networks- Example
[root@host01 ~]# cephadm list-networks
ls- Description
-
List daemon instances known to
cephadmon the hosts. You can use--no-detailfor the command to run faster, which gives details of the daemon name, fsid, style, and systemd unit per daemon. You can use--legacy-diroption to specify a legacy base directory to search for daemons. - Syntax
cephadm ls [--no-detail] [--legacy-dir LEGACY_DIR]- Example
[root@host01 ~]# cephadm ls --no-detail
logs- Description
-
Print
journaldlogs for a daemon container. This is similar to thejournalctlcommand. - Syntax
cephadm logs [--fsid FSID] --name DAEMON_NAME cephadm logs [--fsid FSID] --name DAEMON_NAME -- -n NUMBER # Last N lines cephadm logs [--fsid FSID] --name DAEMON_NAME -- -f # Follow the logs- Example
[root@host01 ~]# cephadm logs --fsid 57bddb48-ee04-11eb-9962-001a4a000672 --name osd.8
[root@host01 ~]# cephadm logs --fsid 57bddb48-ee04-11eb-9962-001a4a000672 --name osd.8 -- -n 20
[root@host01 ~]# cephadm logs --fsid 57bddb48-ee04-11eb-9962-001a4a000672 --name osd.8 -- -f
prepare-host- Description
-
Prepare a host for
cephadm. - Syntax
cephadm prepare-host [--expect-hostname HOSTNAME]- Example
[root@host01 ~]# cephadm prepare-host
[root@host01 ~]# cephadm prepare-host --expect-hostname host01
pull- Description
- Pull the Ceph image.
- Syntax
cephadm [-h] [--image IMAGE_ID] pull- Example
[root@host01 ~]# cephadm --image 13ea90216d0be03003d12d7869f72ad9de5cec9e54a27fd308e01e467c0d4a0a pull
registry-login- Description
- Give cephadm login information for an authenticated registry. Cephadm attempts to log the calling host into that registry.
- Syntax
cephadm registry-login --registry-url [REGISTRY_URL] --registry-username [USERNAME] --registry-password [PASSWORD] [--fsid FSID] [--registry-json JSON_FILE]- Example
[root@host01 ~]# cephadm registry-login --registry-url registry.redhat.io --registry-username myuser1 --registry-password mypassword1You can also use a JSON registry file containing the login info formatted as:
- Syntax
cat REGISTRY_FILE { "url":"REGISTRY_URL", "username":"REGISTRY_USERNAME", "password":"REGISTRY_PASSWORD" }- Example
[root@host01 ~]# cat registry_file

{
 "url":"registry.redhat.io",
 "username":"myuser",
 "password":"mypass"
}

[root@host01 ~]# cephadm registry-login -i registry_file
rm-daemon- Description
-
Remove a specific daemon instance. If you run the
cephadm rm-daemoncommand on the host directly, although the command removes the daemon, thecephadm mgrmodule notices that the daemon is missing and redeploys it. This command is problematic and should be used only for experimental purposes and debugging. - Syntax
cephadm rm-daemon [--fsid FSID] [--name DAEMON_NAME] [--force ] [--force-delete-data]- Example
[root@host01 ~]# cephadm rm-daemon --fsid f64f341c-655d-11eb-8778-fa163e914bcc --name osd.8
rm-cluster- Description
-
Remove all the daemons from a storage cluster on that specific host where it is run. Similar to
rm-daemon, if you remove a few daemons this way and the Ceph Orchestrator is not paused and some of those daemons belong to services that are not unmanaged, thecephadmorchestrator just redeploys them there. - Syntax
cephadm rm-cluster [--fsid FSID] [--force]- Example
[root@host01 ~]# cephadm rm-cluster --fsid f64f341c-655d-11eb-8778-fa163e914bccImportantTo better clean up the node as part of performing the cluster removal, cluster logs under
/var/log/cephdirectory are deleted whencephadm rm-clustercommand is run. The cluster logs are removed as long as--keep-logsis not passed to therm-clustercommand.NoteIf the
cephadm rm-clustercommand is run on a host that is part of an existing cluster where the host is managed by Cephadm and the Cephadm Manager module is still enabled and running, then Cephadm might immediately start deploying new daemons, and more logs could appear. To avoid this, disable the cephadm mgr module before purging the cluster.# ceph mgr module disable cephadm
rm-repo- Description
- Remove a package repository configuration. This is mainly used for the disconnected installation of Red Hat Ceph Storage.
- Syntax
cephadm rm-repo [-h]- Example
[root@host01 ~]# cephadm rm-repo
run- Description
- Run a Ceph daemon, in a container, in the foreground.
- Syntax
cephadm run [--fsid FSID] --name DAEMON_NAME- Example
[root@host01 ~]# cephadm run --fsid f64f341c-655d-11eb-8778-fa163e914bcc --name osd.8
shell- Description
-
Run an interactive shell with access to Ceph commands over the inferred or specified Ceph cluster. You can enter the shell using the
cephadm shellcommand and run all the orchestrator commands within the shell. - Syntax
cephadm shell [--fsid FSID] [--name DAEMON_NAME, -n DAEMON_NAME] [--config CONFIG, -c CONFIG] [--mount MOUNT, -m MOUNT] [--keyring KEYRING, -k KEYRING] [--env ENV, -e ENV]- Example
[root@host01 ~]# cephadm shell -- ceph orch ls
[root@host01 ~]# cephadm shell
unit- Description
-
Start, stop, restart, enable, and disable the daemons with this operation. This operates on the daemon’s
systemdunit. - Syntax
cephadm unit [--fsid FSID] --name DAEMON_NAME start/stop/restart/enable/disable- Example
[root@host01 ~]# cephadm unit --fsid f64f341c-655d-11eb-8778-fa163e914bcc --name osd.8 start
version- Description
- Provides the version of the storage cluster.
- Syntax
cephadm version- Example
[root@host01 ~]# cephadm version