Developer Guide
For use with Red Hat JBoss Data Grid 6.5.1
Abstract
Part I. Programmable APIs
- Cache
- Batching
- Grouping
- Persistence (formerly CacheStore)
- ConfigurationBuilder
- Externalizable
- Notification (also known as the Listener API because it deals with Notifications and Listeners)
Chapter 1. The Cache API
ConcurrentMap interface. How entries are stored depends on the cache mode in use. For example, an entry may be replicated to a remote node or an entry may be looked up in a cache store.
Note
1.1. Using the ConfigurationBuilder API to Configure the Cache API
ConfigurationBuilder helper object.
Procedure 1.1. Programmatic Cache Configuration
Configuration c = new ConfigurationBuilder().clustering().cacheMode(CacheMode.REPL_SYNC).build();

String newCacheName = "repl";
manager.defineConfiguration(newCacheName, c);
Cache<String, String> cache = manager.getCache(newCacheName);
Configuration c = new ConfigurationBuilder().clustering().cacheMode(CacheMode.REPL_SYNC).build();

String newCacheName = "repl";
manager.defineConfiguration(newCacheName, c);
Cache<String, String> cache = manager.getCache(newCacheName);- In the first line of the configuration, a new cache configuration object (named
c) is created using theConfigurationBuilder. Configurationcis assigned the default values for all cache configuration options except the cache mode, which is overridden and set to synchronous replication (REPL_SYNC). - In the second line of the configuration, a new variable (of type
String) is created and assigned the valuerepl. - In the third line of the configuration, the cache manager is used to define a named cache configuration for itself. This named cache configuration is called
repland its configuration is based on the configuration provided for cache configurationcin the first line. - In the fourth line of the configuration, the cache manager is used to obtain a reference to the unique instance of the
replthat is held by the cache manager. This cache instance is now ready to be used to perform operations to store and retrieve data.
Note
org.infinispan.jmx.JmxDomainConflictException: Domain already registered org.infinispan.
1.2. Per-Invocation Flags
1.2.1. Per-Invocation Flag Functions
putForExternalRead() method in Red Hat JBoss Data Grid's Cache API uses flags internally. This method can load a JBoss Data Grid cache with data loaded from an external resource. To improve the efficiency of this call, JBoss Data Grid calls a normal put operation passing the following flags:
- The
ZERO_LOCK_ACQUISITION_TIMEOUTflag: JBoss Data Grid uses an almost zero lock acquisition time when loading data from an external source into a cache. - The
FAIL_SILENTLYflag: If the locks cannot be acquired, JBoss Data Grid fails silently without throwing any lock acquisition exceptions. - The
FORCE_ASYNCHRONOUSflag: If clustered, the cache replicates asynchronously, irrespective of the cache mode set. As a result, a response from other nodes is not required.
putForExternalRead calls of this type are used because the client can retrieve the required data from a persistent store if the data cannot be found in memory. If the client encounters a cache miss, it retries the operation.
1.2.2. Configure Per-Invocation Flags
withFlags() method call.
Example 1.1. Configuring Per-Invocation Flags
Cache cache = ...
	cache.getAdvancedCache()
	   .withFlags(Flag.SKIP_CACHE_STORE, Flag.CACHE_MODE_LOCAL)
	   .put("local", "only");
Cache cache = ...
	cache.getAdvancedCache()
	   .withFlags(Flag.SKIP_CACHE_STORE, Flag.CACHE_MODE_LOCAL)
.put("local", "only");Note
withFlags() method for each invocation. If the cache operation must be replicated onto another node, the flags are also carried over to the remote nodes.
1.2.3. Per-Invocation Flags Example
put(), must not return the previous value, the IGNORE_RETURN_VALUES flag is used. This flag prevents a remote lookup (to get the previous value) in a distributed environment, which in turn prevents the retrieval of the undesired, potential, previous value. Additionally, if the cache is configured with a cache loader, this flag prevents the previous value from being loaded from its cache store.
Example 1.2. Using the IGNORE_RETURN_VALUES Flag
Cache cache = ...
	cache.getAdvancedCache()
	   .withFlags(Flag.IGNORE_RETURN_VALUES)
	   .put("local", "only")
Cache cache = ...
	cache.getAdvancedCache()
	   .withFlags(Flag.IGNORE_RETURN_VALUES)
.put("local", "only")1.3. The AdvancedCache Interface
AdvancedCache interface, geared towards extending JBoss Data Grid, in addition to its simple Cache Interface. The AdvancedCache Interface can:
- Inject custom interceptors
- Access certain internal components
- Apply flags to alter the behavior of certain cache methods
AdvancedCache:
AdvancedCache advancedCache = cache.getAdvancedCache();
AdvancedCache advancedCache = cache.getAdvancedCache();1.3.1. Flag Usage with the AdvancedCache Interface
AdvancedCache.withFlags() to apply any number of flags to a cache invocation.
Example 1.3. Applying Flags to a Cache Invocation
advancedCache.withFlags(Flag.CACHE_MODE_LOCAL, Flag.SKIP_LOCKING)
   .withFlags(Flag.FORCE_SYNCHRONOUS)
   .put("hello", "world");
advancedCache.withFlags(Flag.CACHE_MODE_LOCAL, Flag.SKIP_LOCKING)
   .withFlags(Flag.FORCE_SYNCHRONOUS)
.put("hello", "world");1.3.2. Custom Interceptors and the AdvancedCache Interface
AdvancedCache Interface provides a mechanism that allows advanced developers to attach custom interceptors. Custom interceptors can alter the behavior of the Cache API methods and the AdvacedCache Interface can be used to attach such interceptors programmatically at run time.
1.3.3. Limitations of Map Methods
size(), values(), keySet() and entrySet(), can be used with certain limitations with Red Hat JBoss Data Grid as they are unreliable. These methods do not acquire locks (global or local) and concurrent modification, additions and removals are excluded from consideration in these calls. Furthermore, the listed methods are only operational on the local cache and do not provide a global view of state.
From Red Hat JBoss Data Grid 6.3 onwards, the map methods size(), values(), keySet(), and entrySet() include entries in the cache loader by default whereas previously these methods only included the local data container. The underlying cache loader directly affects the performance of these commands. As an example, when using a database, these methods run a complete scan of the table where data is stored which can result in slower processing. Use Cache.getAdvancedCache().withFlags(Flag.SKIP_CACHE_LOAD).values() to maintain the old behavior and not loading from the cache loader which would avoid the slower performance.
In JBoss Data Grid 6.3 the Cache#size() method returned only the number of entries on the local node, ignoring other nodes for clustered caches and including any expired entries. While the default behavior was not changed in JBoss Data Grid 6.4 or later, accurate results can be enabled for bulk operations, including size(), by setting the infinispan.accurate.bulk.ops system property to true. In this mode of operation, the result returned by the size() method is affected by the flags org.infinispan.context.Flag#CACHE_MODE_LOCAL, to force it to return the number of entries present on the local node, and org.infinispan.context.Flag#SKIP_CACHE_LOAD, to ignore any passivated entries.
In JBoss Data Grid 6.3, the Hot Rod size() method obtained the size of a cache by invoking the STATS operation and using the returned numberOfEntries statistic. This statistic is not an accurate measurement of the number of entries in a cache because it does not take into account expired and passivated entries and it is only local to the node that responded to the operation. As an additional result, when security was enabled, the client would need the ADMIN permission instead of the more appropriate BULK_READ.
SIZE operation, and the clients have been updated to use this operation for the size() method. The JBoss Data Grid server will need to be started with the infinispan.accurate.bulk.ops system property set to true so that size can be computed accurately.
1.3.4. Custom Interceptors
1.3.4.1. Custom Interceptor Design
- A custom interceptor must extend the
CommandInterceptor. - A custom interceptor must declare a public, empty constructor to allow for instantiation.
- A custom interceptor must have JavaBean style setters defined for any property that is defined through the
propertyelement.
1.3.4.2. Adding Custom Interceptors Declaratively
Procedure 1.2. Adding Custom Interceptors
Define Custom Interceptors
All custom interceptors must extend org.infinispan.interceptors.base.BaseCustomInterceptor.Define the Position of the New Custom Interceptor
Interceptors must have a defined position. These options are mutually exclusive, meaning an interceptor cannot have both a position attribute and index attribute. Valid options are:via Position Attribute
FIRST- Specifies that the new interceptor is placed first in the chain.LAST- Specifies that the new interceptor is placed last in the chain.OTHER_THAN_FIRST_OR_LAST- Specifies that the new interceptor can be placed anywhere except first or last in the chain.
via Index Attribute
- The
indexidentifies the position of this interceptor in the chain, with 0 being the first position. - The
aftermethod places the new interceptor directly after the instance of the named interceptor specified via its fully qualified class name. - The
beforemethod places the new interceptor directly before the instance of the named interceptor specified via its fully qualified class name.
Define Interceptor Properties
Define specific interceptor properties.
Apply Other Custom Interceptors
In this example, the next custom interceptor is called CustomInterceptor2.
Note
OTHER_THAN_FIRST_OR_LAST may cause the CacheManager to fail.
Note
1.3.4.3. Adding Custom Interceptors Programmatically
AdvancedCache.
Example 1.4. Obtain a Reference to the AdvancedCache
CacheManager cm = getCacheManager();
Cache aCache = cm.getCache("aName");
AdvancedCache advCache = aCache.getAdvancedCache();
CacheManager cm = getCacheManager();
Cache aCache = cm.getCache("aName");
AdvancedCache advCache = aCache.getAdvancedCache();addInterceptor() method to add the interceptor.
Example 1.5. Add the Interceptor
advCache.addInterceptor(new MyInterceptor(), 0);
advCache.addInterceptor(new MyInterceptor(), 0);1.4. Placing and Retrieving Sets of Data
AdvancedCache and RemoteCache interfaces include methods to either put or get a Map of existing data in bulk. These operations are typically much more efficient than an equivalent sequence of individual operations, especially when using them in server-client mode, as a single network operation occurs as opposed to multiple transactions.
get or put operation must accommodate for the full Map in a single execution.
AdvancedCache:Map<K,V>getAll(Set<?> keys)- returns aMapcontaining the values associated with the set of keys requested.- void
putAll(Map<? extends K, ? extends V> map, Metadata metadata)- copies all of the mappings from the specified map to this cache, which takes an instance ofMetadatato provide metadata information such as the lifespan, version, etc. on the entries being stored.
RemoteCache:Map<K,V>getAll(Set<? extends K> keys)- returns aMapcontaining the values associated with the set of keys requested.- void
putAll(Map<? extends K, ? extends V> map)- copies all of the mappings from the specified map to this cache. - void
putAll(Map<? extends K, ? extends V> map, long lifespan, TimeUnit unit)- copies all of the mappings from the specified map to this cache, along with a lifespan before the entry is expired. - void
putAll(Map<? extends K, ? extends V> map, long lifespan, TimeUnit lifespanUnit, long maxIdleTime, TimeUnit maxIdleTimeUnit)- copies all of the mappings from the specified map to this cache, along with both a timespan before the entries are expired and the maximum amount of time the entry is allowed to be idle before it is considered to be expired.
Chapter 2. The Batching API
Note
2.1. About Java Transaction API
- First, it retrieves the transactions currently associated with the thread.
- If not already done, it registers an
XAResourcewith the transaction manager to receive notifications when a transaction is committed or rolled back.
2.2. Batching and the Java Transaction API (JTA)
- Locks acquired during an invocation are retained until the transaction commits or rolls back.
- All changes are replicated in a batch on all nodes in the cluster as part of the transaction commit process. Ensuring that multiple changes occur within the single transaction, the replication traffic remains lower and improves performance.
- When using synchronous replication or invalidation, a replication or invalidation failure causes the transaction to roll back.
- When a cache is transactional and a cache loader is present, the cache loader is not enlisted in the cache's transaction. This results in potential inconsistencies at the cache loader level when the transaction applies the in-memory state but (partially) fails to apply the changes to the store.
- All configurations related to a transaction apply for batching as well.
Example 2.1. Configuring a Transaction that Applies for Batching
<transaction syncRollbackPhase="false"
	     syncCommitPhase="false"
	     useEagerLocking="true"
	     eagerLockSingleNode="true" />
<transaction syncRollbackPhase="false"
	     syncCommitPhase="false"
	     useEagerLocking="true"
eagerLockSingleNode="true" />Note
2.3. Using the Batching API
2.3.1. Configure the Batching API
To configure the Batching API in the XML file, the transactionMode must be TRANSACTIONAL to enable invocationBatching:
<transaction transactionMode="TRANSACTIONAL">
<invocationBatching enabled="true" />
<transaction transactionMode="TRANSACTIONAL">
<invocationBatching enabled="true" />To configure the Batching API programmatically use:
Configuration c = new ConfigurationBuilder().invocationBatching().enable().build();
Configuration c = new ConfigurationBuilder().invocationBatching().enable().build();Note
2.3.2. Use the Batching API
startBatch() and endBatch() on the cache as follows to use batching:
Cache cache = cacheManager.getCache();
Cache cache = cacheManager.getCache();Example 2.2. Without Using Batch
cache.put("key", "value");
cache.put("key", "value"); cache.put(key, value); line executes, the values are replaced immediately.
Example 2.3. Using Batch
cache.endBatch(true); executes, all modifications made since the batch started are replicated.
cache.endBatch(false); executes, changes made in the batch are discarded.
2.3.3. Batching API Usage Example
Example 2.4. Batching API Usage Example
Chapter 3. The Grouping API
3.1. Grouping API Operations
- Every node can determine which node owns a particular key without expensive metadata updates across nodes.
- Redundancy is improved because ownership information does not need to be replicated if a node fails.
- Intrinsic to the entry, which means it was generated by the key class.
- Extrinsic to the entry, which means it was generated by an external function.
3.2. Grouping API Use Case
Example 3.1. Grouping API Example
DistributedExecutor only checks node AB and quickly and easily retrieves the required employee records.
3.3. Configure the Grouping API
- Enable groups using either the declarative or programmatic method.
- Specify either an intrinsic or extrinsic group. For more information about these group types, see Section 3.1, “Grouping API Operations”
- Register all specified groupers.
3.3.1. Enable Groups
Example 3.2. Declaratively Enable Groups
<clustering>
  <hash>
     <groups enabled="true" />
  </hash>
</clustering>
<clustering>
  <hash>
     <groups enabled="true" />
  </hash>
</clustering>Example 3.3. Programmatically Enable Groups
Configuration c = new ConfigurationBuilder().clustering().hash().groups().enabled().build();
Configuration c = new ConfigurationBuilder().clustering().hash().groups().enabled().build();3.3.2. Specify an Intrinsic Group
- the key class definition can be altered, that is if it is not part of an unmodifiable library.
- if the key class is not concerned with the determination of a key/value pair group.
@Group annotation in the relevant method to specify an intrinsic group. The group must always be a String, as illustrated in the example:
Example 3.4. Specifying an Intrinsic Group Example
3.3.3. Specify an Extrinsic Group
- the key class definition cannot be altered, that is if it is part of an unmodifiable library.
- if the key class is concerned with the determination of a key/value pair group.
Grouper interface. This interface uses the computeGroup method to return the group.
Grouper interface acts as an interceptor by passing the computed value to computeGroup. If the @Group annotation is used, the group using it is passed to the first Grouper. As a result, using an intrinsic group provides even greater control.
Example 3.5. Specifying an Extrinsic Group Example
Grouper that uses the key class to extract the group from a key using a pattern. Any group information specified on the key class is ignored in such a situation.
3.3.4. Register Groupers
Example 3.6. Declaratively Register a Grouper
Example 3.7. Programmatically Register a Grouper
Configuration c = new ConfigurationBuilder().clustering().hash().groups().addGrouper(new KXGrouper()).enabled().build();
Configuration c = new ConfigurationBuilder().clustering().hash().groups().addGrouper(new KXGrouper()).enabled().build();Chapter 4. The Persistence SPI
- Memory is volatile and a cache store can increase the life span of the information in the cache, which results in improved durability.
- Using persistent external stores as a caching layer between an application and a custom storage engine provides improved Write-Through functionality.
- Using a combination of eviction and passivation, only the frequently required information is stored in-memory and other data is stored in the external storage.
4.1. Persistence SPI Benefits
- Alignment with JSR-107 (http://jcp.org/en/jsr/detail?id=107). JBoss Data Grid's
CacheWriterandCacheLoaderinterfaces are similar to the JSR-107 writer and reader. As a result, alignment with JSR-107 provides improved portability for stores across JCache-compliant vendors. - Simplified transaction integration. JBoss Data Grid handles locking automatically and so implementations do not have to coordinate concurrent access to the store. Depending on the locking mode, concurrent writes on the same key may not occur. However, implementors expect operations on the store to originate from multiple threads and add the implementation code accordingly.
- Reduced serialization, resulting in reduced CPU usage. The new SPI exposes stored entries in a serialized format. If an entry is fetched from persistent storage to be sent remotely, it does not need to be deserialized (when reading from the store) and then serialized again (when writing to the wire). Instead, the entry is written to the wire in the serialized format as fetched from the storage.
4.2. Programmatically Configure the Persistence SPI
Example 4.1. Configure the Single File Store via the Persistence SPI
Note
Chapter 5. The ConfigurationBuilder API
- Chain coding of configuration options in order to make the coding process more efficient
- Improve the readability of the configuration
5.1. Using the ConfigurationBuilder API
5.1.1. Programmatically Create a CacheManager and Replicated Cache
Procedure 5.1. Configure the CacheManager Programmatically
- Create a CacheManager as a starting point in an XML file. If required, this CacheManager can be programmed in runtime to the specification that meets the requirements of the use case.
- Create a new synchronously replicated cache programmatically.
- Create a new configuration object instance using the ConfigurationBuilder helper object:In the first line of the configuration, a new cache configuration object (named
c) is created using theConfigurationBuilder. Configurationcis assigned the default values for all cache configuration options except the cache mode, which is overridden and set to synchronous replication (REPL_SYNC). - Define or register the configuration with a manager:In the third line of the configuration, the cache manager is used to define a named cache configuration for itself. This named cache configuration is called
repland its configuration is based on the configuration provided for cache configurationcin the first line. - In the fourth line of the configuration, the cache manager is used to obtain a reference to the unique instance of the
replthat is held by the cache manager. This cache instance is now ready to be used to perform operations to store and retrieve data.
Note
5.1.2. Create a Customized Cache Using the Default Named Cache
infinispan-config-file.xml specifies the configuration for a replicated cache as a default and a distributed cache with a customized lifespan value is required. The required distributed cache must retain all aspects of the default cache specified in the infinispan-config-file.xml file except the mentioned aspects.
Procedure 5.2. Customize the Default Cache
- Read an instance of a default Configuration object to get the default configuration:
- Use the ConfigurationBuilder to construct and modify the cache mode and L1 cache lifespan on a new configuration object:
- Register/define your cache configuration with a cache manager, where cacheName is name of cache specified in
infinispan-config-file.xml: - Get default cache with custom configuration changes.
5.1.3. Create a Customized Cache Using a Non-Default Named Cache
replicatedCache as the base instead of the default cache.
Procedure 5.3. Creating a Customized Cache Using a Non-Default Named Cache
- Read the
replicatedCacheto get the default configuration. - Use the ConfigurationBuilder to construct and modify the desired configuration on a new configuration object.
- Register/define your cache configuration with a cache manager where newCacheName is the name of cache specified in
infinispan-config-file.xml - Get a
newCacheNamecache with custom configuration changes.
5.1.4. Using the Configuration Builder to Create Caches Programmatically
5.1.5. Global Configuration Examples
5.1.5.1. Globally Configure the Transport Layer
Example 5.1. Configuring the Transport Layer
GlobalConfiguration globalConfig = new GlobalConfigurationBuilder()
  .globalJmxStatistics().enable()
  .build();
GlobalConfiguration globalConfig = new GlobalConfigurationBuilder()
  .globalJmxStatistics().enable()
.build();5.1.5.2. Globally Configure the Cache Manager Name
Example 5.2. Configuring the Cache Manager Name
5.1.5.3. Globally Customize Thread Pool Executors
Example 5.3. Customize Thread Pool Executors
GlobalConfiguration globalConfig = new GlobalConfigurationBuilder()
  .replicationQueueScheduledExecutor()
    .factory(new DefaultScheduledExecutorFactory())
    .addProperty("threadNamePrefix", "RQThread")
  .build();
GlobalConfiguration globalConfig = new GlobalConfigurationBuilder()
  .replicationQueueScheduledExecutor()
    .factory(new DefaultScheduledExecutorFactory())
    .addProperty("threadNamePrefix", "RQThread")
.build();5.1.6. Cache Level Configuration Examples
5.1.6.1. Cache Level Configuration for the Cluster Mode
Example 5.4. Configure Cluster Mode at Cache Level
5.1.6.2. Cache Level Eviction and Expiration Configuration
Example 5.5. Configuring Expiration and Eviction at the Cache Level
5.1.6.3. Cache Level Configuration for JTA Transactions
Example 5.6. Configuring JTA Transactions at Cache Level
5.1.6.4. Cache Level Configuration Using Chained Persistent Stores
Example 5.7. Configuring Chained Persistent Stores at Cache Level
5.1.6.5. Cache Level Configuration for Advanced Externalizers
Example 5.8. Configuring Advanced Externalizers at Cache Level
GlobalConfiguration globalConfig = new GlobalConfigurationBuilder()
  .serialization()
    .addAdvancedExternalizer(new PersonExternalizer())
    .addAdvancedExternalizer(999, new AddressExternalizer())
  .build();
GlobalConfiguration globalConfig = new GlobalConfigurationBuilder()
  .serialization()
    .addAdvancedExternalizer(new PersonExternalizer())
    .addAdvancedExternalizer(999, new AddressExternalizer())
.build();Chapter 6. The Externalizable API
Externalizer is a class that can:
- Marshall a given object type to a byte array.
- Unmarshall the contents of a byte array into an instance of the object type.
6.1. Customize Externalizers
- Use an Externalizable Interface. For details, see Chapter 6, The Externalizable API.
- Use an advanced externalizer.
6.2. Annotating Objects for Marshalling Using @SerializeWith
@SerializeWith indicating the Externalizer class to use.
Example 6.1. Using the @SerializeWith Annotation
@SerializeWith annotation. JBoss Marshalling will therefore marshall the object using the Externalizer class passed.
- The payload sizes generated using this method are not the most efficient. This is due to some constraints in the model, such as support for different versions of the same class, or the need to marshall the Externalizer class.
- This model requires the marshalled class to be annotated with
@SerializeWith, however an Externalizer may need to be provided for a class for which source code is not available, or for any other constraints, it cannot be modified. - Annotations used in this model may be limiting for framework developers or service providers that attempt to abstract lower level details, such as the marshalling layer, away from the user.
Note
6.3. Using an Advanced Externalizer
- Define and implement the
readObject()andwriteObject()methods. - Link externalizers with marshaller classes.
- Register the advanced externalizer.
6.3.1. Implement the Methods
readObject() and writeObject() methods. The following is a sample definition:
Example 6.2. Define and Implement the Methods
Note
6.3.2. Link Externalizers with Marshaller Classes
getTypeClasses() to discover the classes that this externalizer can marshall and to link the readObject() and writeObject() classes.
ReplicableCommandExternalizer indicates that it can externalize several command types. This sample marshalls all commands that extend the ReplicableCommand interface but the framework only supports class equality comparison so it is not possible to indicate that the classes marshalled are all children of a particular class or interface.
@Override
public Set<Class<? extends List>> getTypeClasses() {
 return Util.<Class<? extends List>>asSet(
       Util.<List>loadClass("java.util.Collections$SingletonList", null));
}
@Override
public Set<Class<? extends List>> getTypeClasses() {
 return Util.<Class<? extends List>>asSet(
       Util.<List>loadClass("java.util.Collections$SingletonList", null));
}6.3.3. Register the Advanced Externalizer (Declaratively)
Procedure 6.1. Register the Advanced Externalizer
- Add the
globalelement to theinfinispanelement. - Add the
serializationelement to theglobalelement. - Add the
advancedExternalizerselement to add information about the new advanced externalizer. - Define the externalizer class using the
externalizerClassattributes. Replace the $IdViaAnnotationObj and $AdvancedExternalizer values as required.
6.3.4. Register the Advanced Externalizer (Programmatically)
Example 6.3. Registering the Advanced Externalizer Programmatically
GlobalConfigurationBuilder builder = ...
builder.serialization()
   .addAdvancedExternalizer(new Person.PersonExternalizer());
GlobalConfigurationBuilder builder = ...
builder.serialization()
.addAdvancedExternalizer(new Person.PersonExternalizer());6.3.5. Register Multiple Externalizers
GlobalConfiguration.addExternalizer() accepts varargs. Before registering the new externalizers, ensure that their IDs are already defined using the @Marshalls annotation.
Example 6.4. Registering Multiple Externalizers
builder.serialization()
   .addAdvancedExternalizer(new Person.PersonExternalizer(),
                            new Address.AddressExternalizer());
builder.serialization()
   .addAdvancedExternalizer(new Person.PersonExternalizer(),
new Address.AddressExternalizer());6.4. Custom Externalizer ID Values
| ID Range | Reserved For |
|---|---|
| 1000-1099 | The Infinispan Tree Module |
| 1100-1199 | Red Hat JBoss Data Grid Server modules |
| 1200-1299 | Hibernate Infinispan Second Level Cache |
| 1300-1399 | JBoss Data Grid Lucene Directory |
| 1400-1499 | Hibernate OGM |
| 1500-1599 | Hibernate Search |
| 1600-1699 | Infinispan Query Module |
| 1700-1799 | Infinispan Remote Query Module |
6.4.1. Customize the Externalizer ID (Declaratively)
Procedure 6.2. Customizing the Externalizer ID (Declaratively)
- Add the
globalelement to theinfinispanelement. - Add the
serializationelement to theglobalelement. - Add the
advancedExternalizerelement to add information about the new advanced externalizer. - Define the externalizer ID using the
idattribute. Ensure that the selected ID is not from the range of IDs reserved for other modules. - Define the externalizer class using the
externalizerClassattribute. Replace the $IdViaAnnotationObj and $AdvancedExternalizer values as required.
6.4.2. Customize the Externalizer ID (Programmatically)
Example 6.5. Assign an ID to the Externalizer
GlobalConfiguration globalConfiguration = new GlobalConfigurationBuilder()
            .serialization()
               .addAdvancedExternalizer($ID, new Person.PersonExternalizer())
            .build();
GlobalConfiguration globalConfiguration = new GlobalConfigurationBuilder()
            .serialization()
               .addAdvancedExternalizer($ID, new Person.PersonExternalizer())
.build();Chapter 7. The Notification/Listener API
7.1. Listener Example
Example 7.1. Configuring a Listener
7.2. Cache Entry Modified Listener Configuration
getValue() method's behavior is specific to whether the callback is triggered before or after the actual operation has been performed. For example, if event.isPre() is true, then event.getValue() would return the old value, prior to modification. If event.isPre() is false, then event.getValue() would return new value. If the event is creating and inserting a new entry, the old value would be null. For more information about isPre(), see the Red Hat JBoss Data Grid API Documentation's listing for the org.infinispan.notifications.cachelistener.event package.
7.3. Listener Notifications
@Listener. A Listenable is an interface that denotes that the implementation can have listeners attached to it. Each listener is registered using methods defined in the Listenable.
7.3.1. About Cache-level Notifications
7.3.2. Cache Manager-level Notifications
- Nodes joining or leaving a cluster;
- The starting and stopping of caches
7.3.3. About Synchronous and Asynchronous Notifications
@Listener (sync = false)
public class MyAsyncListener { .... }
@Listener (sync = false)
public class MyAsyncListener { .... }<asyncListenerExecutor/> element in the configuration file to tune the thread pool that is used to dispatch asynchronous notifications.
7.4. Modifying Cache Entries
7.4.1. Cache Entry Modified Listener Configuration
getValue() method's behavior is specific to whether the callback is triggered before or after the actual operation has been performed. For example, if event.isPre() is true, then event.getValue() would return the old value, prior to modification. If event.isPre() is false, then event.getValue() would return new value. If the event is creating and inserting a new entry, the old value would be null. For more information about isPre(), see the Red Hat JBoss Data Grid API Documentation's listing for the org.infinispan.notifications.cachelistener.event package.
7.4.2. Cache Entry Modified Listener Example
Example 7.2. Modified Listener
7.5. Clustered Listeners
Note
7.5.1. Configuring Clustered Listeners
Procedure 7.1. Clustered Listener Configuration
- Clustered listeners are enabled by annotating the
@Listenerclass withclustered=true. - The following methods are annotated to allow client applications to be notified when entries are added, modified, or removed.
@CacheEntryCreated@CacheEntryModified@CacheEntryRemoved
- The listener is registered with a cache, with the option of passing on a filter or converter.
- A cluster listener can only listen to entries that are created, modified, or removed. No other events are listened to by a clustered listener.
- Only post events are sent to a clustered listener, pre events are ignored.
7.5.2. The Cache Listener API
@CacheListener API via the addListener method.
Example 7.3. The Cache Listener API
- The Cache API
- The local or clustered listener can be registered with the
cache.addListenermethod, and is active until one of the following events occur.- The listener is explicitly unregistered by invoking
cache.removeListener. - The node on which the listener was registered crashes.
- Listener Annotation
- The listener annotation is enhanced with two attributes:
clustered():This attribute defines whether the annotated listener is clustered or not. Note that clustered listeners can only be notified for@CacheEntryRemoved,@CacheEntryCreated, and@CacheEntryModifiedevents. This attribute is false by default.includeCurrentState(): This attribute applies to clustered listeners only, and is false by default. When set totrue, the entire existing state within the cluster is evaluated. When being registered, a listener will immediately be sent aCacheCreatedEventfor every entry in the cache.
oldValueandoldMetadata- The
oldValueandoldMetadatavalues are extra methods on the accept method ofCacheEventFilterandCacheEventConverterclasses. They values are provided to any listener, including local listeners. For more information about these values, see the JBoss Data Grid API Documentation. EventType- The
EventTypeincludes the type of event, whether it was a retry, and if it was a pre or post event.
includeCurrentState.
7.5.3. Clustered Listener Example
Example 7.4. Use Case: Filtering and Converting the New York orders
7.5.4. Optimized Cache Filter Converter
CacheEventFilterConverter, in order to perform the filtering and converting of results into one step.
CacheEventFilterConverter is an optimization that allows the event filter and conversion to be performed in one step. This can be used when an event filter and converter are most efficiently used as the same object, composing the filtering and conversion in the same method. This can only be used in situations where your conversion will not return a null value, as a returned value of null indicates that the value did not pass the filter. To convert a null value, use the CacheEventFilter and the CacheEventConverter interfaces independently.
CacheEventFilterConverter:
Example 7.5. CacheEventFilterConverter
FilterConverter as both arguments to the filter and converter:
OrderDateFilterConverter filterConverter = new OrderDateFilterConverter("NY", "New York");
cache.addListener(listener, filterConveter, filterConverter);
OrderDateFilterConverter filterConverter = new OrderDateFilterConverter("NY", "New York");
cache.addListener(listener, filterConveter, filterConverter);7.6. NotifyingFutures
Futures, but a sub-interface known as a NotifyingFuture. Unlike a JDK Future, a listener can be attached to a NotifyingFuture to notify the user about a completed future.
Note
NotifyingFutures are only available in JBoss Data Grid Library mode.
7.6.1. NotifyingFutures Example
NotifyingFutures in Red Hat JBoss Data Grid:
Example 7.6. Configuring NotifyingFutures
7.7. Remote Event Listeners (Hot Rod)
CacheEntryCreated, CacheEntryModified, and CacheEntryRemoved. Clients can choose whether or not to listen to these events to avoid flooding connected clients. This assumes that clients maintain persistent connections to the servers.
Example 7.7. Event Print Listener
ClientCacheEntryCreatedEventandClientCacheEntryModifiedEventinstances provide information on the key and version of the entry. This version can be used to invoke conditional operations on the server, such areplaceWithVersionorremoveWithVersion.ClientCacheEntryRemovedEventevents are only sent when the remove operation succeeds. If a remove operation is invoked and no entry is found or there are no entries to remove, no event is generated. If users require remove events regardless of whether or not they are successful, a customized event logic can be created.- All client cache entry created, modified, and removed events provide a
boolean isCommandRetried()method that will returntrueif the write command that caused it has to be retried due to a topology change. This indicates that the event has been duplicated or that another event was dropped and replaced, such as where a Modified event replaced a Created event.
Important
Important
7.7.1. Adding and Removing Event Listeners
The following example registers the Event Print Listener with the server. See Example 7.7, “Event Print Listener”.
Example 7.8. Adding an Event Listener
RemoteCache<Integer, String> cache = rcm.getCache();
cache.addClientListener(new EventLogListener());
RemoteCache<Integer, String> cache = rcm.getCache();
cache.addClientListener(new EventLogListener());
A client event listener can be removed as follows
Example 7.9. Removing an Event Listener
EventLogListener listener = ...
cache.removeClientListener(listener);
EventLogListener listener = ...
cache.removeClientListener(listener);
7.7.2. Remote Event Client Listener Example
Procedure 7.2. Configuring Remote Event Listeners
Download the Red Hat JBoss Data Grid Server distribution from the Red Hat Customer Portal
The latest Red Hat JBoss Data Grid distribution includes the Hot Rod server with which the client will communicate.Start the server
Start the JBoss Data Grid server by using the following command from the root of the server../bin/standalone.sh
$ ./bin/standalone.shCopy to Clipboard Copied! Toggle word wrap Toggle overflow Write an application to interact with the Hot Rod server
Maven users
Create an application with the following dependency, changing the version to6.3.0-Final-redhat-1or better.Copy to Clipboard Copied! Toggle word wrap Toggle overflow - Non-Maven users, adjust according to your chosen build tool or download the distribution containing all JBoss Data Grid jars.
Write the client application
The following demonstrates a simple remote event listener that logs all events received.Copy to Clipboard Copied! Toggle word wrap Toggle overflow Use the remote event listener to execute operations against the remote cache
The following example demonstrates a simple main java class, which adds the remote event listener and executes some operations against the remote cache.Copy to Clipboard Copied! Toggle word wrap Toggle overflow
Once executed, the console output should appear similar to the following:
ClientCacheEntryCreatedEvent(key=1,dataVersion=1)
ClientCacheEntryModifiedEvent(key=1,dataVersion=2)
ClientCacheEntryRemovedEvent(key=1)
ClientCacheEntryCreatedEvent(key=1,dataVersion=1)
ClientCacheEntryModifiedEvent(key=1,dataVersion=2)
ClientCacheEntryRemovedEvent(key=1)
7.7.3. Filtering Remote Events
Example 7.10. KeyValueFilter
7.7.3.1. Custom Filters for Remote Events
Procedure 7.3. Using a Custom Filter
- Create a
JARfile with the filter implementation within it. Each factory must have a name assigned to it via theorg.infinispan.filter.NamedFactoryannotation. The example uses aKeyValueFilterFactory. - Create a
META-INF/services/org.infinispan.notifications.cachelistener.filter. CacheEventFilterFactoryfile within theJARfile, and within it write the fully qualified class name of the filter class implementation. - Deploy the
JARfile in the JBoss Data Grid Server by performing any of the following options:Procedure 7.4. Option 1: Deploy the JAR through the deployment scanner.
- Copy the
JARto the$JDG_HOME/standalone/deployments/directory. The deployment scanner actively monitors this directory and will deploy the newly placed file.
Procedure 7.5. Option 2: Deploy the JAR through the CLI
- Connect to the desired instance with the CLI:
$JDG_HOME] $ bin/jboss-cli.sh --connect=$IP:$PORT
$JDG_HOME] $ bin/jboss-cli.sh --connect=$IP:$PORTCopy to Clipboard Copied! Toggle word wrap Toggle overflow - Once connected execute the
deploycommand:/] deploy /path/to/artifact.jar
/] deploy /path/to/artifact.jarCopy to Clipboard Copied! Toggle word wrap Toggle overflow
Procedure 7.6. Option 3: Deploy the JAR as a custom module
- Connect to the JDG server by running the below command:
$JDG_HOME] $ bin/jboss-cli.sh --connect=$IP:$PORT
$JDG_HOME] $ bin/jboss-cli.sh --connect=$IP:$PORTCopy to Clipboard Copied! Toggle word wrap Toggle overflow - The jar containing the Custom Filter must be defined as a module for the Server; to add this substitute the desired name of the module and the .jar name in the below command, adding additional dependencies as necessary for the Custom Filter:
module add --name=$MODULE-NAME --resources=$JAR-NAME.jar --dependencies=org.infinispan
module add --name=$MODULE-NAME --resources=$JAR-NAME.jar --dependencies=org.infinispanCopy to Clipboard Copied! Toggle word wrap Toggle overflow - In a different window add the newly added module as a dependency to the
org.infinispanmodule by editing$JDG_HOME/modules/system/layers/base/org/infinispan/main/module.xml. In this file add the following entry:<dependencies> [...] <module name="$MODULE-NAME"> </dependencies>
<dependencies> [...] <module name="$MODULE-NAME"> </dependencies>Copy to Clipboard Copied! Toggle word wrap Toggle overflow - Restart the JDG server.
@ClientListener annotation to indicate the filter factory to use with the listener.
Example 7.11. Add Filter Factory to the Listener
@org.infinispan.client.hotrod.annotation.ClientListener(filterFactoryName = "basic-filter-factory")
public class BasicFilteredEventLogListener extends EventLogListener {}
@org.infinispan.client.hotrod.annotation.ClientListener(filterFactoryName = "basic-filter-factory")
public class BasicFilteredEventLogListener extends EventLogListener {}
Example 7.12. Register the Listener with the Server
The following demonstrates the resulting system output from the provided example.
Important
7.7.3.2. Enhanced Filter Factories
Example 7.13. Configuring an Enhanced Filter Factory
Example 7.14. Running an Enhanced Filter Factory
The provided example results in the following output:
7.7.4. Customizing Remote Events
CacheEventConverter instances, which are created by implementing a CacheEventConverterFactory class. Each factory must have a name associated to it via the @NamedFactory annotation.
Procedure 7.7. Using a Converter
- Create a
JARfile with the converter implementation within it. Each factory must have a name assigned to it via theorg.infinispan.filter.NamedFactoryannotation. - Create a
META-INF/services/org.infinispan.notifications.cachelistener.filter.CacheEventConverterFactoryfile within theJARfile and within it, write the fully qualified class name of the converter class implementation. - Deploy the
JARfile in the JBoss Data Grid Server by performing any of the following options:Procedure 7.8. Option 1: Deploy the JAR through the deployment scanner.
- Copy the
JARto the$JDG_HOME/standalone/deployments/directory. The deployment scanner actively monitors this directory and will deploy the newly placed file.
Procedure 7.9. Option 2: Deploy the JAR through the CLI
- Connect to the desired instance with the CLI:
$JDG_HOME] $ bin/jboss-cli.sh --connect=$IP:$PORT
$JDG_HOME] $ bin/jboss-cli.sh --connect=$IP:$PORTCopy to Clipboard Copied! Toggle word wrap Toggle overflow - Once connected execute the
deploycommand:/] deploy /path/to/artifact.jar
/] deploy /path/to/artifact.jarCopy to Clipboard Copied! Toggle word wrap Toggle overflow
Procedure 7.10. Option 3: Deploy the JAR as a custom module
- Connect to the JDG server by running the below command:
$JDG_HOME] $ bin/jboss-cli.sh --connect=$IP:$PORT
$JDG_HOME] $ bin/jboss-cli.sh --connect=$IP:$PORTCopy to Clipboard Copied! Toggle word wrap Toggle overflow - The jar containing the Custom Converter must be defined as a module for the Server; to add this substitute the desired name of the module and the .jar name in the below command, adding additional dependencies as necessary for the Custom Converter:
module add --name=$MODULE-NAME --resources=$JAR-NAME.jar --dependencies=org.infinispan
module add --name=$MODULE-NAME --resources=$JAR-NAME.jar --dependencies=org.infinispanCopy to Clipboard Copied! Toggle word wrap Toggle overflow - In a different window add the newly added module as a dependency to the
org.infinispanmodule by editing$JDG_HOME/modules/system/layers/base/org/infinispan/main/module.xml. In this file add the following entry:<dependencies> [...] <module name="$MODULE-NAME"> </dependencies>
<dependencies>
  [...]
  <module name="$MODULE-NAME">
</dependencies>
Copy to Clipboard Copied! Toggle word wrap Toggle overflow - Restart the JDG server.
7.7.4.1. Adding a Converter
getConverter method to get a org.infinispan.filter.Converter class instance to customize events server side.
Example 7.15. Sending Custom Events
7.7.4.2. Lightweight Events
JAR file including a service definition inside the META-INF/services/org.infinispan.notifications.cachelistener.filter.CacheEventConverterFactory file as follows:
sample.ValueAddedConverterFactor
sample.ValueAddedConverterFactor@ClientListener annotation.
@ClientListener(converterFactoryName = "value-added-converter-factory")
public class CustomEventLogListener { ... }
@ClientListener(converterFactoryName = "value-added-converter-factory")
public class CustomEventLogListener { ... }
7.7.4.3. Dynamic Converter Instances
Example 7.16. Dynamic Converter
RemoteCache<Integer, String> cache = rcm.getCache();
cache.addClientListener(new EventLogListener(), null, new Object[]{1});
RemoteCache<Integer, String> cache = rcm.getCache();
cache.addClientListener(new EventLogListener(), null, new Object[]{1});
7.7.4.4. Adding a Remote Client Listener for Custom Events
ClientCacheEntryCustomEvent<T>, where T is the type of custom event we are sending from the server. For example:
Example 7.17. Custom Event Listener Implementation
Example 7.18. Execute Operations against the Remote Cache
Once executed, the console output should appear similar to the following:
ClientCacheEntryCustomEvent(eventData=ValueAddedEvent{key=1, value='one'}, eventType=CLIENT_CACHE_ENTRY_CREATED)
ClientCacheEntryCustomEvent(eventData=ValueAddedEvent{key=1, value='new-one'}, eventType=CLIENT_CACHE_ENTRY_MODIFIED)
ClientCacheEntryCustomEvent(eventData=ValueAddedEvent{key=1, value='null'}, eventType=CLIENT_CACHE_ENTRY_REMOVED
Important
7.7.5. Event Marshalling
Procedure 7.11. Deploying a Marshaller
- Create a
JARfile with the converter implementation within it. Each factory must have a name assigned to it via theorg.infinispan.filter.NamedFactoryannotation. - Create a
META-INF/services/org.infinispan.commons.marshall.Marshallerfile within theJARfile and within it, write the fully qualified class name of the marshaller class implementation - Deploy the
JARfile in the JBoss Data Grid Server by performing any of the following options:Procedure 7.12. Option 1: Deploy the JAR through the deployment scanner.
- Copy the
JARto the$JDG_HOME/standalone/deployments/directory. The deployment scanner actively monitors this directory and will deploy the newly placed file.
Procedure 7.13. Option 2: Deploy the JAR through the CLI
- Connect to the desired instance with the CLI:
$JDG_HOME] $ bin/jboss-cli.sh --connect=$IP:$PORT
$JDG_HOME] $ bin/jboss-cli.sh --connect=$IP:$PORTCopy to Clipboard Copied! Toggle word wrap Toggle overflow - Once connected execute the
deploycommand:/] deploy /path/to/artifact.jar
/] deploy /path/to/artifact.jarCopy to Clipboard Copied! Toggle word wrap Toggle overflow
Procedure 7.14. Option 3: Deploy the JAR as a custom module
- Connect to the JDG server by running the below command:
$JDG_HOME] $ bin/jboss-cli.sh --connect=$IP:$PORT
$JDG_HOME] $ bin/jboss-cli.sh --connect=$IP:$PORTCopy to Clipboard Copied! Toggle word wrap Toggle overflow - The jar containing the Custom Marshaller must be defined as a module for the Server; to add this substitute the desired name of the module and the .jar name in the below command, adding additional dependencies as necessary for the Custom Marshaller:
module add --name=$MODULE-NAME --resources=$JAR-NAME.jar --dependencies=org.infinispan
module add --name=$MODULE-NAME --resources=$JAR-NAME.jar --dependencies=org.infinispanCopy to Clipboard Copied! Toggle word wrap Toggle overflow - In a different window add the newly added module as a dependency to the
org.infinispanmodule by editing$JDG_HOME/modules/system/layers/base/org/infinispan/main/module.xml. In this file add the following entry:<dependencies> [...] <module name="$MODULE-NAME"> </dependencies>
<dependencies> [...] <module name="$MODULE-NAME"> </dependencies>Copy to Clipboard Copied! Toggle word wrap Toggle overflow - Restart the JDG server.
Note
7.7.6. Remote Event Clustering and Failover
The @ClientListener annotation has an optional includeCurrentState parameter, which when enabled, has the server send CacheEntryCreatedEvent event instances for all existing cache entries to the client. As this behavior is driven by the client it detects when the node where the listener is registered goes offline and automatically registers the listener on another node in the cluster. By enabling includeCurrentState clients may recompute their state or computation in the event the Hot Rod client transparently fails over registered listeners. The performance of the includeCurrentState parameter is impacted by the cache size, and therefore it is disabled by default.
Rather than relying on receiving state, users can define a method with the @ClientCacheFailover annotation, which receives ClientCacheFailoverEvent parameter inside the client listener implementation. If the node where a Hot Rod client has registered a client listener fails, the Hot Rod client detects it transparently, and fails over all listeners registered in the node that failed to another node.
includeCurrentState parameter can be set to true. With this enabled a client is able to clear its data, receive all of the CacheEntryCreatedEvent instances, and cache these events with all keys. Alternatively, Hot Rod clients can be made aware of failover events by adding a callback handler. This callback method is an efficient solution to handling cluster topology changes affecting client listeners, and allows the client listener to determine how to behave on a failover. Near Caching takes this approach and clears the near cache upon receiving a ClientCacheFailoverEvent.
Example 7.19. @ClientCacheFailover
Note
ClientCacheFailoverEvent is only thrown when the node that has the client listener installed fails.
Chapter 8. JSR-107 (JCache) API
8.1. Dependencies
In order to use the JCache implementation the following dependencies need to be added to the Maven pom.xml depending on how it is used:
- embedded:
Copy to Clipboard Copied! Toggle word wrap Toggle overflow - remote:
Copy to Clipboard Copied! Toggle word wrap Toggle overflow
When not using Maven the necessary jar files must be on the classpath at runtime. Having these available at runtime may either be accomplished by embedding the jar files directly, by specifying them at runtime, or by adding them into the container used to deploy the application.
Procedure 8.1. Embedded Mode
- Download the
Red Hat JBoss Data Grid 6.5.1 Libraryfrom the Red Hat Customer Portal. - Extract the downloaded archive to a local directory.
- Locate the following files:
jboss-datagrid-6.5.1-library/infinispan-embedded-6.3.1.Final-redhat-4.jarjboss-datagrid-6.5.1-library/lib/cache-api-1.0.0.redhat-1.jar
- Ensure both of the above jar files are on the classpath at runtime.
Procedure 8.2. Remote Mode
- Download the
Red Hat JBoss Data Grid 6.5.1 Hot Rod Java Clientand theRed Hat JBoss Data Grid 6.5.1 Libraryfrom the Red Hat Customer Portal. - Extract both archives to a local directory.
- Locate the following files:
jboss-datagrid-6.5.1-remote-java-client/infinispan-remote-6.3.1.Final-redhat-5.jarjboss-datagrid-6.5.1-library/lib/cache-api-1.0.0.redhat-1.jar
- Ensure both of the above jar files are on the classpath at runtime.
8.2. Create a local cache
Warning
storeByValue, so that object state mutations outside of operations to the cache, won’t have an impact in the objects stored in the cache. JBoss Data Grid has so far implemented this using serialization/marshalling to make copies to store in the cache, and that way adhere to the spec. Hence, if using default JCache configuration with Infinispan, data stored must be marshallable.
Cache<String, String> cache = cacheManager.createCache("namedCache",
      new MutableConfiguration<String, String>().setStoreByValue(false));
Cache<String, String> cache = cacheManager.createCache("namedCache",
new MutableConfiguration<String, String>().setStoreByValue(false));Library Mode
CacheManager may be configured by specifying the location of a configuration file via the URL parameter of CachingProvider.getCacheManager. This allows the opportunity to define clustered caches, which a reference can be later obtained to using the CacheManager.getCache method; otherwise local caches can only be used, created from the CacheManager.createCache.
Client-Server Mode
CacheManager is performed by passing standard HotRod client properties via properties parameter of CachingProvider.getCacheManager. The remote servers referenced must be running and able to receive the request.
CacheManager.createCache must be used so that the cache may be registered internally. Subsequent queries may be performed via CacheManager.getCache.
8.3. Store and retrieve data
put and getAndPut. The former returns void whereas the latter returns the previous value associated with the key. The equivalent of java.util.Map.put(K) in JCache is javax.cache.Cache.getAndPut(K).
Note
8.4. Comparing java.util.concurrent.ConcurrentMap and javax.cache.Cache APIs
| Operation |
java.util.concurrent.ConcurrentMap<K,V> |
javax.cache.Cache<K,V> |
|---|---|---|
| store and no return | N/A |
void put(K key) |
| store and return previous value |
V put(K key) |
V getAndPut(K key) |
| store if not present |
V putIfAbsent(K key, V Value) |
boolean putIfAbsent(K key, V value) |
| retrieve |
V get(Object key) |
V get(K key) |
| delete if present |
V remove(Object key) |
boolean remove(K key) |
| delete and return previous value |
V remove(Object key) |
V getAndRemove(K key) |
| delete conditional |
boolean remove(Object key, Object value) |
boolean remove(K key, V oldValue) |
| replace if present |
V replace(K key, V value) |
boolean replace(K key, V value) |
| replace and return previous value |
V replace(K key, V value) |
V getAndReplace(K key, V value) |
| replace conditional |
boolean replace(K key, V oldValue, V newValue) |
boolean replace(K key, V oldValue, V newValue) |
| Operation |
java.util.concurrent.ConcurrentMap<K,V> |
javax.cache.Cache<K,V> |
|---|---|---|
| calculate size of cache |
int size() | N/A |
| return all keys in the cache |
Set<K> keySet() | N/A |
| return all values in the cache |
Collection<V> values() | N/A |
| return all entries in the cache |
Set<Map.Entry<K, V>> entrySet() | N/A |
| iterate over the cache | use iterator() method on keySet, values, or entrySet |
Iterator<Cache.Entry<K, V>> iterator() |
8.5. Clustering JCache instances
<namedCache name="namedCache">
    <clustering mode="replication"/>
</namedCache>
<namedCache name="namedCache">
    <clustering mode="replication"/>
</namedCache>8.6. Multiple Caching Providers
javax.cache.Caching using the overloaded getCachingProvider() method; by default this method will attempt to load any META-INF/services/javax.cache.spi.CachingProvider files found in the classpath. If one is found it will determine the caching provider in use.
getCachingProvider(ClassLoader classLoader)getCachingProvider(String fullyQualifiedClassName)
javax.cache.spi.CachingProviders that are detected or have been loaded by the Caching class are maintained in an internal registry, and subsequent requests for the same caching provider will be returned from this registry instead of being reloaded or reinstantiating the caching provider implementation. To view the current caching providers either of the following methods may be used:
getCachingProviders()- provides a list of caching providers in the default class loader.getCachingProviders(ClassLoader classLoader)- provides a list of caching providers in the specified class loader.
Part II. Securing Data in Red Hat JBoss Data Grid
JBoss Data Grid features role-based access control for operations on designated secured caches. Roles can be assigned to users who access your application, with roles mapped to permissions for cache and cache-manager operations. Only authenticated users are able to perform the operations that are authorized for their role.
Node-level security requires new nodes or merging partitions to authenticate before joining a cluster. Only authenticated nodes that are authorized to join the cluster are permitted to do so. This provides data protection by preventing authorized servers from storing your data.
JBoss Data Grid increases data security by supporting encrypted communications between the nodes in a cluster by using a user-specified cryptography algorithm, as supported by Java Cryptography Architecture (JCA).
Chapter 9. Red Hat JBoss Data Grid Security: Authorization and Authentication
9.1. Red Hat JBoss Data Grid Security: Authorization and Authentication
SecureCache. SecureCache is a simple wrapper around a cache, which checks whether the "current user" has the permissions required to perform an operation. The "current user" is a Subject associated with the AccessControlContext.

Figure 9.1. Roles and Permissions Mapping
9.2. Permissions
| Permission | Function | Description |
|---|---|---|
| CONFIGURATION | defineConfiguration | Whether a new cache configuration can be defined. |
| LISTEN | addListener | Whether listeners can be registered against a cache manager. |
| LIFECYCLE | stop, start | Whether the cache manager can be stopped or started respectively. |
| ALL | A convenience permission which includes all of the above. |
| Permission | Function | Description |
|---|---|---|
| READ | get, contains | Whether entries can be retrieved from the cache. |
| WRITE | put, putIfAbsent, replace, remove, evict | Whether data can be written/replaced/removed/evicted from the cache. |
| EXEC | distexec, mapreduce | Whether code execution can be run against the cache. |
| LISTEN | addListener | Whether listeners can be registered against a cache. |
| BULK_READ | keySet, values, entrySet,query | Whether bulk retrieve operations can be executed. |
| BULK_WRITE | clear, putAll | Whether bulk write operations can be executed. |
| LIFECYCLE | start, stop | Whether a cache can be started / stopped. |
| ADMIN | getVersion, addInterceptor*, removeInterceptor, getInterceptorChain, getEvictionManager, getComponentRegistry, getDistributionManager, getAuthorizationManager, evict, getRpcManager, getCacheConfiguration, getCacheManager, getInvocationContextContainer, setAvailability, getDataContainer, getStats, getXAResource | Whether access to the underlying components/internal structures is allowed. |
| ALL | A convenience permission which includes all of the above. | |
| ALL_READ | Combines READ and BULK_READ. | |
| ALL_WRITE | Combines WRITE and BULK_WRITE. |
Note
9.3. Role Mapping
PrincipalRoleMapper must be specified in the global configuration. Red Hat JBoss Data Grid ships with three mappers, and also allows you to provide a custom mapper.
| Mapper Name | Java | XML | Description |
|---|---|---|---|
| IdentityRoleMapper | org.infinispan.security.impl.IdentityRoleMapper | <identity-role-mapper /> | Uses the Principal name as the role name. |
| CommonNameRoleMapper | org.infinispan.security.impl.CommonRoleMapper | <common-name-role-mapper /> | If the Principal name is a Distinguished Name (DN), this mapper extracts the Common Name (CN) and uses it as a role name. For example the DN cn=managers,ou=people,dc=example,dc=com will be mapped to the role managers. |
| ClusterRoleMapper | org.infinispan.security.impl.ClusterRoleMapper | <cluster-role-mapper /> | Uses the ClusterRegistry to store principal to role mappings. This allows the use of the CLI’s GRANT and DENY commands to add/remove roles to a Principal. |
| Custom Role Mapper | <custom-role-mapper class="a.b.c" /> | Supply the fully-qualified class name of an implementation of org.infinispan.security.impl.PrincipalRoleMapper |
9.4. Configuring Authentication and Role Mapping using JBoss EAP Login Modules
IdentityRoleMapper:
Example 9.1. Mapping a Principal from JBoss EAP's Login Module
Example 9.2. Example of JBoss EAP LDAP login module configuration
Example 9.3. Example of JBoss EAP Login Module Configuration
Important
9.5. Configuring Red Hat JBoss Data Grid for Authorization
The following is an example configuration for authorization at the CacheManager level:
Example 9.4. CacheManager Authorization (Declarative Configuration)
- whether to use authorization.
- a class which will map principals to a set of roles.
- a set of named roles and the permissions they represent.
Roles may be applied on a cache-per-cache basis, using the roles defined at the cache-container level, as follows:
Example 9.5. Defining Roles
<local-cache name="secured">
  <security>
    <authorization roles="admin reader writer supervisor"/>
  </security>
</local-cache>
<local-cache name="secured">
  <security>
    <authorization roles="admin reader writer supervisor"/>
  </security>
</local-cache>Important
The following example shows how to set up the same authorization parameters for Library mode using programmatic configuration:
Example 9.6. CacheManager Authorization Programmatic Configuration
9.6. Data Security for Library Mode
9.6.1. Subject and Principal Classes
Subject class is the central class in JAAS. A Subject represents information for a single entity, such as a person or service. It encompasses the entity's principals, public credentials, and private credentials. The JAAS APIs use the existing Java 2 java.security.Principal interface to represent a principal, which is a typed name.
public Set getPrincipals() {...}
public Set getPrincipals(Class c) {...}
public Set getPrincipals() {...}
public Set getPrincipals(Class c) {...}
getPrincipals() returns all principals contained in the subject. getPrincipals(Class c) returns only those principals that are instances of class c or one of its subclasses. An empty set is returned if the subject has no matching principals.
Note
java.security.acl.Group interface is a sub-interface of java.security.Principal, so an instance in the principals set may represent a logical grouping of other principals or groups of principals.
9.6.2. Obtaining a Subject
javax.security.auth.Subject. The Subject represents information for a single cache entity, such as a person or a service.
Subject subject = SecurityContextAssociation.getSubject();
Subject subject = SecurityContextAssociation.getSubject();- Servlets:
ServletRequest.getUserPrincipal() - EJBs:
EJBContext.getCallerPrincipal() - MessageDrivenBeans:
MessageDrivenContext.getCallerPrincipal()
mapper is then used to identify the principals associated with the Subject and convert them into roles that correspond to those you have defined at the container level.
java.security.AccessControlContext. Either the container sets the Subject on the AccessControlContext, or the user must map the Principal to an appropriate Subject before wrapping the call to the JBoss Data Grid API using a Security.doAs() method.
Example 9.7. Obtaining a Subject
Security.doAs() method is in place of the typical Subject.doAs() method. Unless the AccessControlContext must be modified for reasons specific to your application's security model, using Security.doAs() provides a performance advantage.
Security.getSubject();, which will retrieve the Subject from either the JBoss Data Grid context, or from the AccessControlContext.
9.6.3. Subject Authentication
- An application instantiates a
LoginContextand passes in the name of the login configuration and aCallbackHandlerto populate theCallbackobjects, as required by the configurationLoginModules. - The
LoginContextconsults aConfigurationto load all theLoginModulesincluded in the named login configuration. If no such named configuration exists theotherconfiguration is used as a default. - The application invokes the
LoginContext.loginmethod. - The login method invokes all the loaded
LoginModules. As eachLoginModuleattempts to authenticate the subject, it invokes the handle method on the associatedCallbackHandlerto obtain the information required for the authentication process. The required information is passed to the handle method in the form of an array ofCallbackobjects. Upon success, theLoginModules associate relevant principals and credentials with the subject. - The
LoginContextreturns the authentication status to the application. Success is represented by a return from the login method. Failure is represented through a LoginException being thrown by the login method. - If authentication succeeds, the application retrieves the authenticated subject using the
LoginContext.getSubjectmethod. - After the scope of the subject authentication is complete, all principals and related information associated with the subject by the
loginmethod can be removed by invoking theLoginContext.logoutmethod.
LoginContext class provides the basic methods for authenticating subjects and offers a way to develop an application that is independent of the underlying authentication technology. The LoginContext consults a Configuration to determine the authentication services configured for a particular application. LoginModule classes represent the authentication services. Therefore, you can plug different login modules into an application without changing the application itself. The following code shows the steps required by an application to authenticate a subject.
LoginModule interface. This allows an administrator to plug different authentication technologies into an application. You can chain together multiple LoginModules to allow for more than one authentication technology to participate in the authentication process. For example, one LoginModule may perform user name/password-based authentication, while another may interface to hardware devices such as smart card readers or biometric authenticators.
LoginModule is driven by the LoginContext object against which the client creates and issues the login method. The process consists of two phases. The steps of the process are as follows:
- The
LoginContextcreates each configuredLoginModuleusing its public no-arg constructor. - Each
LoginModuleis initialized with a call to its initialize method. TheSubjectargument is guaranteed to be non-null. The signature of the initialize method is:public void initialize(Subject subject, CallbackHandler callbackHandler, Map sharedState, Map options) - The
loginmethod is called to start the authentication process. For example, a method implementation might prompt the user for a user name and password and then verify the information against data stored in a naming service such as NIS or LDAP. Alternative implementations might interface to smart cards and biometric devices, or simply extract user information from the underlying operating system. The validation of user identity by eachLoginModuleis considered phase 1 of JAAS authentication. The signature of theloginmethod isboolean login() throws LoginException. ALoginExceptionindicates failure. A return value of true indicates that the method succeeded, whereas a return value of false indicates that the login module should be ignored. - If the
LoginContext's overall authentication succeeds,commitis invoked on eachLoginModule. If phase 1 succeeds for aLoginModule, then the commit method continues with phase 2 and associates the relevant principals, public credentials, and/or private credentials with the subject. If phase 1 fails for aLoginModule, thencommitremoves any previously stored authentication state, such as user names or passwords. The signature of thecommitmethod is:boolean commit() throws LoginException. Failure to complete the commit phase is indicated by throwing aLoginException. A return of true indicates that the method succeeded, whereas a return of false indicates that the login module should be ignored. - If the
LoginContext's overall authentication fails, then theabortmethod is invoked on eachLoginModule. Theabortmethod removes or destroys any authentication state created by the login or initialize methods. The signature of theabortmethod isboolean abort() throws LoginException. Failure to complete theabortphase is indicated by throwing aLoginException. A return of true indicates that the method succeeded, whereas a return of false indicates that the login module should be ignored. - To remove the authentication state after a successful login, the application invokes
logouton theLoginContext. This in turn results in alogoutmethod invocation on eachLoginModule. Thelogoutmethod removes the principals and credentials originally associated with the subject during thecommitoperation. Credentials should be destroyed upon removal. The signature of thelogoutmethod is:boolean logout() throws LoginException. Failure to complete the logout process is indicated by throwing aLoginException. A return of true indicates that the method succeeded, whereas a return of false indicates that the login module should be ignored.
LoginModule must communicate with the user to obtain authentication information, it uses a CallbackHandler object. Applications implement the CallbackHandler interface and pass it to the LoginContext, which send the authentication information directly to the underlying login modules.
CallbackHandler both to gather input from users, such as a password or smart card PIN, and to supply information to users, such as status information. By allowing the application to specify the CallbackHandler, underlying LoginModules remain independent from the different ways applications interact with users. For example, a CallbackHandler's implementation for a GUI application might display a window to solicit user input. On the other hand, a CallbackHandler implementation for a non-GUI environment, such as an application server, might simply obtain credential information by using an application server API. The CallbackHandler interface has one method to implement:
void handle(Callback[] callbacks)
    throws java.io.IOException,
           UnsupportedCallbackException;
void handle(Callback[] callbacks)
    throws java.io.IOException,
           UnsupportedCallbackException;
Callback interface is the last authentication class we will look at. This is a tagging interface for which several default implementations are provided, including the NameCallback and PasswordCallback used in an earlier example. A LoginModule uses a Callback to request information required by the authentication mechanism. LoginModules pass an array of Callbacks directly to the CallbackHandler.handle method during the authentication's login phase. If a callbackhandler does not understand how to use a Callback object passed into the handle method, it throws an UnsupportedCallbackException to abort the login call.
9.6.4. Authorization Using a SecurityManager
java -Djava.security.manager ...
java -Djava.security.manager ...
System.setSecurityManager(new SecurityManager());
System.setSecurityManager(new SecurityManager());9.6.5. Security Manager in Java
9.6.5.1. About the Java Security Manager
The Java Security Manager is a class that manages the external boundary of the Java Virtual Machine (JVM) sandbox, controlling how code executing within the JVM can interact with resources outside the JVM. When the Java Security Manager is activated, the Java API checks with the security manager for approval before executing a wide range of potentially unsafe operations.
9.6.5.2. About Java Security Manager Policies
A set of defined permissions for different classes of code. The Java Security Manager compares actions requested by applications against the security policy. If an action is allowed by the policy, the Security Manager will permit that action to take place. If the action is not allowed by the policy, the Security Manager will deny that action. The security policy can define permissions based on the location of code, on the code's signature, or based on the subject's principals.
java.security.manager and java.security.policy.
A security policy's entry consists of the following configuration elements, which are connected to the policytool:
- CodeBase
- The URL location (excluding the host and domain information) where the code originates from. This parameter is optional.
- SignedBy
- The alias used in the keystore to reference the signer whose private key was used to sign the code. This can be a single value or a comma-separated list of values. This parameter is optional. If omitted, presence or lack of a signature has no impact on the Java Security Manager.
- Principals
- A list of
principal_type/principal_namepairs, which must be present within the executing thread's principal set. The Principals entry is optional. If it is omitted, it signifies that the principals of the executing thread will have no impact on the Java Security Manager. - Permissions
- A permission is the access which is granted to the code. Many permissions are provided as part of the Java Enterprise Edition 6 (Java EE 6) specification. This document only covers additional permissions which are provided by JBoss EAP 6.
Important
9.6.5.3. Write a Java Security Manager Policy
An application called policytool is included with most JDK and JRE distributions, for the purpose of creating and editing Java Security Manager security policies. Detailed information about policytool is linked from http://docs.oracle.com/javase/6/docs/technotes/tools/.
Procedure 9.1. Setup a new Java Security Manager Policy
Start
policytool.Start thepolicytooltool in one of the following ways.Red Hat Enterprise Linux
From your GUI or a command prompt, run/usr/bin/policytool.Microsoft Windows Server
Runpolicytool.exefrom your Start menu or from thebin\of your Java installation. The location can vary.
Create a policy.
To create a policy, select . Add the parameters you need, then click .Edit an existing policy
Select the policy from the list of existing policies, and select the button. Edit the parameters as needed.Delete an existing policy.
Select the policy from the list of existing policies, and select the button.
9.6.5.4. Run Red Hat JBoss Data Grid Server Within the Java Security Manager
domain.sh or standalone.sh scripts. The following procedure guides you through the steps of configuring your instance to run within a Java Security Manager policy.
Prerequisites
- Before you following this procedure, you need to write a security policy, using the
policytoolcommand which is included with your Java Development Kit (JDK). This procedure assumes that your policy is located atJDG_HOME/bin/server.policy. As an alternative, write the security policy using any text editor and manually save it asJDG_HOME/bin/server.policy - The domain or standalone server must be completely stopped before you edit any configuration files.
Procedure 9.2. Configure the Security Manager for JBoss Data Grid Server
Open the configuration file.
Open the configuration file for editing. This file is located in one of two places, depending on whether you use a managed domain or standalone server. This is not the executable file used to start the server or domain.Managed Domain
- For Linux:
JDG_HOME/bin/domain.conf - For Windows:
JDG_HOME\bin\domain.conf.bat
Standalone Server
- For Linux:
JDG_HOME/bin/standalone.conf - For Windows:
JDG_HOME\bin\standalone.conf.bat
Add the Java options to the file.
To ensure the Java options are used, add them to the code block that begins with:if [ "x$JAVA_OPTS" = "x" ]; then
if [ "x$JAVA_OPTS" = "x" ]; thenCopy to Clipboard Copied! Toggle word wrap Toggle overflow You can modify the-Djava.security.policyvalue to specify the exact location of your security policy. It should go onto one line only, with no line break. Using==when setting the-Djava.security.policyproperty specifies that the security manager will use only the specified policy file. Using=specifies that the security manager will use the specified policy combined with the policy set in thepolicy.urlsection ofJAVA_HOME/lib/security/java.security.Important
JBoss Enterprise Application Platform releases from 6.2.2 onwards require that the system propertyjboss.modules.policy-permissionsis set to true.Example 9.8. domain.conf
JAVA_OPTS="$JAVA_OPTS -Djava.security.manager -Djava.security.policy==$PWD/server.policy -Djboss.home.dir=/path/to/JDG_HOME -Djboss.modules.policy-permissions=true"
JAVA_OPTS="$JAVA_OPTS -Djava.security.manager -Djava.security.policy==$PWD/server.policy -Djboss.home.dir=/path/to/JDG_HOME -Djboss.modules.policy-permissions=true"Copy to Clipboard Copied! Toggle word wrap Toggle overflow Example 9.9. domain.conf.bat
set "JAVA_OPTS=%JAVA_OPTS% -Djava.security.manager -Djava.security.policy==\path\to\server.policy -Djboss.home.dir=\path\to\JDG_HOME -Djboss.modules.policy-permissions=true"
set "JAVA_OPTS=%JAVA_OPTS% -Djava.security.manager -Djava.security.policy==\path\to\server.policy -Djboss.home.dir=\path\to\JDG_HOME -Djboss.modules.policy-permissions=true"Copy to Clipboard Copied! Toggle word wrap Toggle overflow Example 9.10. standalone.conf
JAVA_OPTS="$JAVA_OPTS -Djava.security.manager -Djava.security.policy==$PWD/server.policy -Djboss.home.dir=$JBOSS_HOME -Djboss.modules.policy-permissions=true"
JAVA_OPTS="$JAVA_OPTS -Djava.security.manager -Djava.security.policy==$PWD/server.policy -Djboss.home.dir=$JBOSS_HOME -Djboss.modules.policy-permissions=true"Copy to Clipboard Copied! Toggle word wrap Toggle overflow Example 9.11. standalone.conf.bat
set "JAVA_OPTS=%JAVA_OPTS% -Djava.security.manager -Djava.security.policy==\path\to\server.policy -Djboss.home.dir=%JBOSS_HOME% -Djboss.modules.policy-permissions=true"
set "JAVA_OPTS=%JAVA_OPTS% -Djava.security.manager -Djava.security.policy==\path\to\server.policy -Djboss.home.dir=%JBOSS_HOME% -Djboss.modules.policy-permissions=true"Copy to Clipboard Copied! Toggle word wrap Toggle overflow Start the domain or server.
Start the domain or server as normal.
9.7. Data Security for Remote Client Server Mode
9.7.1. About Security Realms
ManagementRealmstores authentication information for the Management API, which provides the functionality for the Management CLI and web-based Management Console. It provides an authentication system for managing JBoss Data Grid Server itself. You could also use theManagementRealmif your application needed to authenticate with the same business rules you use for the Management API.ApplicationRealmstores user, password, and role information for Web Applications and EJBs.
REALM-users.propertiesstores usernames and hashed passwords.REALM-roles.propertiesstores user-to-role mappings.mgmt-groups.propertiesstores user-to-role mapping file forManagementRealm.
domain/configuration/ and standalone/configuration/ directories. The files are written simultaneously by the add-user.sh or add-user.bat command. When you run the command, the first decision you make is which realm to add your new user to.
9.7.2. Add a New Security Realm
Run the Management CLI.
Start thecli.shorcli.batcommand and connect to the server.Create the new security realm itself.
Run the following command to create a new security realm namedMyDomainRealmon a domain controller or a standalone server./host=master/core-service=management/security-realm=MyDomainRealm:add()
/host=master/core-service=management/security-realm=MyDomainRealm:add()Copy to Clipboard Copied! Toggle word wrap Toggle overflow Create the references to the properties file which will store information about the new role.
Run the following command to create a pointer a file namedmyfile.properties, which will contain the properties pertaining to the new role.Note
The newly-created properties file is not managed by the includedadd-user.shandadd-user.batscripts. It must be managed externally./host=master/core-service=management/security-realm=MyDomainRealm/authentication=properties:add(path=myfile.properties)
/host=master/core-service=management/security-realm=MyDomainRealm/authentication=properties:add(path=myfile.properties)Copy to Clipboard Copied! Toggle word wrap Toggle overflow
Your new security realm is created. When you add users and roles to this new realm, the information will be stored in a separate file from the default security realms. You can manage this new file using your own applications or procedures.
9.7.3. Add a User to a Security Realm
Run the
add-user.shoradd-user.batcommand.Open a terminal and change directories to theJDG_HOME/bin/directory. If you run Red Hat Enterprise Linux or another UNIX-like operating system, runadd-user.sh. If you run Microsoft Windows Server, runadd-user.bat.Choose whether to add a Management User or Application User.
For this procedure, typebto add an Application User.Choose the realm the user will be added to.
By default, the only available realm isApplicationRealm. If you have added a custom realm, you can type its name instead.Type the username, password, and roles, when prompted.
Type the desired username, password, and optional roles when prompted. Verify your choice by typingyes, or typenoto cancel the changes. The changes are written to each of the properties files for the security realm.
9.7.4. Configuring Security Realms Declaratively
authentication and an authorization section.
Example 9.12. Configuring Security Realms Declaratively
server-identities parameter can also be used to specify certificates.
9.7.5. Loading Roles from LDAP for Authorization (Remote Client-Server Mode)
memberOf attributes; a group entity may map which users belong to it through uniqueMember attributes; or both mappings may be maintained by the LDAP server.
force attribute is set to "false". When force is true, the search is performed again during authorization (while loading groups). This is typically done when different servers perform authentication and authorization.
Important
force attribute. It is required, even when set to the default value of false.
username-to-dn
username-to-dn element specifies how to map the user name to the distinguished name of their entry in the LDAP directory. This element is only required when both of the following are true:
- The authentication and authorization steps are against different LDAP servers.
- The group search uses the distinguished name.
- 1:1 username-to-dn
- This specifies that the user name entered by the remote user is the user's distinguished name.
<username-to-dn force="false">
   <username-is-dn />
</username-to-dn>
<username-to-dn force="false">
   <username-is-dn />
</username-to-dn>
Copy to Clipboard Copied! Toggle word wrap Toggle overflow This defines a 1:1 mapping and there is no additional configuration. - username-filter
- The next option is very similar to the simple option described above for the authentication step. A specified attribute is searched for a match against the supplied user name.
<username-to-dn force="true">
    <username-filter base-dn="dc=people,dc=harold,dc=example,dc=com" recursive="false" attribute="sn" user-dn-attribute="dn" />
</username-to-dn>
<username-to-dn force="true"> <username-filter base-dn="dc=people,dc=harold,dc=example,dc=com" recursive="false" attribute="sn" user-dn-attribute="dn" /> </username-to-dn>Copy to Clipboard Copied! Toggle word wrap Toggle overflow The attributes that can be set here are:base-dn: The distinguished name of the context to begin the search.recursive: Whether the search will extend to sub contexts. Defaults tofalse.attribute: The attribute of the users entry to try and match against the supplied user name. Defaults touid.user-dn-attribute: The attribute to read to obtain the users distinguished name. Defaults todn.
- advanced-filter
- The final option is to specify an advanced filter, as in the authentication section this is an opportunity to use a custom filter to locate the users distinguished name.
<username-to-dn force="true">
    <advanced-filter base-dn="dc=people,dc=harold,dc=example,dc=com" recursive="false" filter="sAMAccountName={0}" user-dn-attribute="dn" />
</username-to-dn>
<username-to-dn force="true"> <advanced-filter base-dn="dc=people,dc=harold,dc=example,dc=com" recursive="false" filter="sAMAccountName={0}" user-dn-attribute="dn" /> </username-to-dn>Copy to Clipboard Copied! Toggle word wrap Toggle overflow For the attributes that match those in the username-filter example, the meaning and default values are the same. There is one new attribute:filter: Custom filter used to search for a user's entry where the user name will be substituted in the{0}place holder.
Important
The XML must remain valid after the filter is defined so if any special characters are used such as&ensure the proper form is used. For example&for the&character.
The Group Search
Example 9.13. Principal to Group - LDIF example.
TestUserOne who is a member of GroupOne, GroupOne is in turn a member of GroupFive. The group membership is shown by the use of a memberOf attribute which is set to the distinguished name of the group of which the user (or group) is a member.
memberOf attributes set, one for each group of which the user is directly a member.
Example 9.14. Group to Principal - LDIF Example
TestUserOne who is a member of GroupOne which is in turn a member of GroupFive - however in this case it is an attribute uniqueMember from the group to the user being used for the cross reference.
General Group Searching
<group-search group-name="..." iterative="..." group-dn-attribute="..." group-name-attribute="..." >
    ...
</group-search>
<group-search group-name="..." iterative="..." group-dn-attribute="..." group-name-attribute="..." >
    ...
</group-search>group-name: This attribute is used to specify the form that should be used for the group name returned as the list of groups of which the user is a member. This can either be the simple form of the group name or the group's distinguished name. If the distinguished name is required this attribute can be set toDISTINGUISHED_NAME. Defaults toSIMPLE.iterative: This attribute is used to indicate if, after identifying the groups a user is a member of, we should also iteratively search based on the groups to identify which groups the groups are a member of. If iterative searching is enabled we keep going until either we reach a group that is not a member if any other groups or a cycle is detected. Defaults tofalse.
Important
group-dn-attribute: On an entry for a group which attribute is its distinguished name. Defaults todn.group-name-attribute: On an entry for a group which attribute is its simple name. Defaults touid.
Example 9.15. Principal to Group Example Configuration
memberOf attribute on the user.
principal-to-group element has been added with a single attribute.
group-attribute: The name of the attribute on the user entry that matches the distinguished name of the group the user is a member of. Defaults tomemberOf.
Example 9.16. Group to Principal Example Configuration
group-to-principal is added. This element is used to define how searches for groups that reference the user entry will be performed. The following attributes are set:
base-dn: The distinguished name of the context to use to begin the search.recursive: Whether sub-contexts also be searched. Defaults tofalse.search-by: The form of the role name used in searches. Valid values areSIMPLEandDISTINGUISHED_NAME. Defaults toDISTINGUISHED_NAME.
principal-attribute: The name of the attribute on the group entry that references the user entry. Defaults tomember.
9.7.6. Hot Rod Interface Security
9.7.6.1. Publish Hot Rod Endpoints as a Public Interface
interface parameter in the socket-binding element from management to public as follows:
<socket-binding name="hotrod" interface="public" port="11222" />
<socket-binding name="hotrod" interface="public" port="11222" />9.7.6.2. Encryption of communication between Hot Rod Server and Hot Rod client
Procedure 9.3. Secure Hot Rod Using SSL/TLS
Generate a Keystore
Create a Java Keystore using the keytool application distributed with the JDK and add your certificate to it. The certificate can be either self signed, or obtained from a trusted CA depending on your security policy.Place the Keystore in the Configuration Directory
Put the keystore in the~/JDG_HOME/standalone/configurationdirectory with thestandalone-hotrod-ssl.xmlfile from the~/JDG_HOME/docs/examples/configsdirectory.Declare an SSL Server Identity
Declare an SSL server identity within a security realm in the management section of the configuration file. The SSL server identity must specify the path to a keystore and its secret key.Copy to Clipboard Copied! Toggle word wrap Toggle overflow See Section 9.7.7.4, “Configure Hot Rod Authentication (X.509)” for details about these parameters.Add the Security Element
Add the security element to the Hot Rod connector as follows:<hotrod-connector socket-binding="hotrod" cache-container="local"> <encryption ssl="true" security-realm="ApplicationRealm" require-ssl-client-auth="false" /> </hotrod-connector><hotrod-connector socket-binding="hotrod" cache-container="local"> <encryption ssl="true" security-realm="ApplicationRealm" require-ssl-client-auth="false" /> </hotrod-connector>Copy to Clipboard Copied! Toggle word wrap Toggle overflow Server Authentication of Certificate
If you require the server to perform authentication of the client certificate, create a truststore that contains the valid client certificates and set therequire-ssl-client-authattribute totrue.
Start the Server
Start the server using the following:This will start a server with a Hot Rod endpoint on port 11222. This endpoint will only accept SSL connections.bin/standalone.sh -c standalone-hotrod-ssl.xml
bin/standalone.sh -c standalone-hotrod-ssl.xmlCopy to Clipboard Copied! Toggle word wrap Toggle overflow
Example 9.17. Secure Hot Rod Using SSL/TLS
Important
9.7.6.3. Securing Hot Rod to LDAP Server using SSL
PLAIN username/password. When the username/password is checked against credentials in LDAP, a secure connection from the Hot Rod server to the LDAP server is also required. To enable connection from the Hot Rod server to LDAP via SSL, a security realm must be defined as follows:
Example 9.18. Hot Rod Client Authentication to LDAP Server
Example 9.19. Hot Rod Client Authentication to LDAP Server
Important
9.7.7. User Authentication over Hot Rod Using SASL
PLAINis the least secure mechanism because credentials are transported in plain text format. However, it is also the simplest mechanism to implement. This mechanism can be used in conjunction with encryption (SSL) for additional security.DIGEST-MD5is a mechanism than hashes the credentials before transporting them. As a result, it is more secure than thePLAINmechanism.GSSAPIis a mechanism that uses Kerberos tickets. As a result, it requires a correctly configured Kerberos Domain Controller (for example, Microsoft Active Directory).EXTERNALis a mechanism that obtains the required credentials from the underlying transport (for example, from aX.509client certificate) and therefore requires client certificate encryption to work correctly.
9.7.7.1. Configure Hot Rod Authentication (GSSAPI/Kerberos)
Procedure 9.4. Configure SASL GSSAPI/Kerberos Authentication
Server-side Configuration
The following steps must be configured on the server-side:- Define a Kerberos security login module using the security domain subsystem:
Copy to Clipboard Copied! Toggle word wrap Toggle overflow - Ensure that the cache-container has authorization roles defined, and these roles are applied in the cache's authorization block as seen in Section 9.5, “Configuring Red Hat JBoss Data Grid for Authorization”.
- Configure a Hot Rod connector as follows:
Copy to Clipboard Copied! Toggle word wrap Toggle overflow - The
server-nameattribute specifies the name that the server declares to incoming clients. The client configuration must also contain the same server name value. - The
server-context-nameattribute specifies the name of the login context used to retrieve a server subject for certain SASL mechanisms (for example, GSSAPI). - The
mechanismsattribute specifies the authentication mechanism in use. See Section 9.7.7, “User Authentication over Hot Rod Using SASL” for a list of supported mechanisms. - The
qopattribute specifies the SASL quality of protection value for the configuration. Supported values for this attribute areauth(authentication),auth-int(authentication and integrity, meaning that messages are verified against checksums to detect tampering), andauth-conf(authentication, integrity, and confidentiality, meaning that messages are also encrypted). Multiple values can be specified, for example,auth-int auth-conf. The ordering implies preference, so the first value which matches both the client and server's preference is chosen. - The
strengthattribute specifies the SASL cipher strength. Valid values arelow,medium, andhigh. - The
no-anonymouselement within thepolicyelement specifies whether mechanisms that accept anonymous login are permitted. Set this value tofalseto permit andtrueto deny.
Client-side Configuration
The following steps must be configured on the client-side:- Define a login module in a login configuration file (
gss.conf) on the client side:GssExample { com.sun.security.auth.module.Krb5LoginModule required client=TRUE; };GssExample { com.sun.security.auth.module.Krb5LoginModule required client=TRUE; };Copy to Clipboard Copied! Toggle word wrap Toggle overflow - Set up the following system properties:
java.security.auth.login.config=gss.conf java.security.krb5.conf=/etc/krb5.conf
java.security.auth.login.config=gss.conf java.security.krb5.conf=/etc/krb5.confCopy to Clipboard Copied! Toggle word wrap Toggle overflow Note
Thekrb5.conffile is dependent on the environment and must point to the Kerberos Key Distribution Center. - Configure the Hot Rod Client:
Copy to Clipboard Copied! Toggle word wrap Toggle overflow
9.7.7.2. Configure Hot Rod Authentication (MD5)
Procedure 9.5. Configure Hot Rod Authentication (MD5)
- Set up the Hot Rod Connector configuration by adding the
saslelement to theauthenticationelement (for details on theauthenticationelement, see Section 9.7.4, “Configuring Security Realms Declaratively”) as follows:Copy to Clipboard Copied! Toggle word wrap Toggle overflow - The
server-nameattribute specifies the name that the server declares to incoming clients. The client configuration must also contain the same server name value. - The
mechanismsattribute specifies the authentication mechanism in use. See Section 9.7.7, “User Authentication over Hot Rod Using SASL” for a list of supported mechanisms. - The
qopattribute specifies the SASL quality of production value for the configuration. Supported values for this attribute areauth,auth-int, andauth-conf.
- Connect the client to the configured Hot Rod connector as follows:
Copy to Clipboard Copied! Toggle word wrap Toggle overflow
9.7.7.3. Configure Hot Rod Using LDAP/Active Directory
- The
security-realmelement'snameparameter specifies the security realm to reference to use when establishing the connection. - The
authenticationelement contains the authentication details. - The
ldapelement specifies how LDAP searches are used to authenticate a user. First, a connection to LDAP is established and a search is conducted using the supplied user name to identify the distinguished name of the user. A subsequent connection to the server is established using the password supplied by the user. If the second connection succeeds, the authentication is a success.- The
connectionparameter specifies the name of the connection to use to connect to LDAP. - The (optional)
recursiveparameter specifies whether the filter is executed recursively. The default value for this parameter isfalse. - The
base-dnparameter specifies the distinguished name of the context to use to begin the search from. - The (optional)
user-dnparameter specifies which attribute to read for the user's distinguished name after the user is located. The default value for this parameter isdn.
- The
outbound-connectionselement specifies the name of the connection used to connect to the LDAP. directory. - The
ldapelement specifies the properties of the outgoing LDAP connection.- The
nameparameter specifies the unique name used to reference this connection. - The
urlparameter specifies the URL used to establish the LDAP connection. - The
search-dnparameter specifies the distinguished name of the user to authenticate and to perform the searches. - The
search-credentialparameter specifies the password required to connect to LDAP as thesearch-dn. - The (optional)
initial-context-factoryparameter allows the overriding of the initial context factory. the default value of this parameter iscom.sun.jndi.ldap.LdapCtxFactory.
9.7.7.4. Configure Hot Rod Authentication (X.509)
X.509 certificate can be installed at the node, and be made available to other nodes for authentication purposes for inbound and outbound SSL connections. This is enabled using the <server-identities/> element of a security realm definition, which defines how a server appears to external applications. This element can be used to configure a password to be used when establishing a remote connection, as well as the loading of an X.509 key.
X.509 certificate on the node.
| Parameter | Mandatory/Optional | Description |
|---|---|---|
path | Mandatory | This is the path to the keystore, this can be an absolute path or relative to the next attribute. |
relative-to | Optional | The name of a service representing a path the keystore is relative to. |
keystore-password | Mandatory | The password required to open the keystore. |
alias | Optional | The alias of the entry to use from the keystore - for a keystore with multiple entries in practice the first usable entry is used but this should not be relied on and the alias should be set to guarantee which entry is used. |
key-password | Optional | The password to load the key entry, if omitted the keystore-password will be used instead. |
Note
key-password as well as an alias to ensure only one key is loaded.
UnrecoverableKeyException: Cannot recover key
UnrecoverableKeyException: Cannot recover key9.8. Active Directory Authentication (Non-Kerberos)
9.9. Active Directory Authentication Using Kerberos (GSSAPI)
Procedure 9.6. Configure Kerberos Authentication for Active Directory (Library Mode)
- Configure JBoss EAP server to authenticate itself to Kerberos. This can be done by configuring a dedicated security domain, for example:
Copy to Clipboard Copied! Toggle word wrap Toggle overflow - The security domain for authentication must be configured correctly for JBoss EAP, an application must have a valid Kerberos ticket. To initiate the Kerberos ticket, you must reference another security domain using. This points to the standard Kerberos login module described in Step 3.
<module-option name="usernamePasswordDomain" value="krb-admin"/>
<module-option name="usernamePasswordDomain" value="krb-admin"/>Copy to Clipboard Copied! Toggle word wrap Toggle overflow Copy to Clipboard Copied! Toggle word wrap Toggle overflow - The security domain authentication configuration described in the previous step points to the following standard Kerberos login module:
Copy to Clipboard Copied! Toggle word wrap Toggle overflow
9.10. The Security Audit Logger
org.infinispan.security.impl.DefaultAuditLogger. This logger outputs audit logs using the available logging framework (for example, JBoss Logging) and provides results at the TRACE level and the AUDIT category.
AUDIT category to either a log file, a JMS queue, or a database, use the appropriate log appender.
9.10.1. Configure the Security Audit Logger (Library Mode)
GlobalConfigurationBuilder global = new GlobalConfigurationBuilder();
global.security()
.authorization()
.auditLogger(new DefaultAuditLogger());
GlobalConfigurationBuilder global = new GlobalConfigurationBuilder();
global.security()
.authorization()
.auditLogger(new DefaultAuditLogger());9.10.2. Configure the Security Audit Logger (Remote Client-Server Mode)
<authorization> element. The <authorization> element must be within the <cache-container> element in the Infinispan subsystem (in the standalone.xml configuration file).
Note
org.jboss.as.clustering.infinispan.subsystem.ServerAuditLogger which sends the log messages to the server audit log. See the Management Interface Audit Logging chapter in the JBoss Enterprise Application Platform Administration and Configuration Guide for more information.
9.10.3. Custom Audit Loggers
org.infinispan.security.AuditLogger interface. If no custom logger is provided, the default logger (DefaultAuditLogger) is used.
Chapter 10. Security for Cluster Traffic
10.1. Node Authentication and Authorization (Remote Client-Server Mode)
DIGEST-MD5 or GSSAPI mechanisms are currently supported.
Example 10.1. Configure SASL Authentication
DIGEST-MD5 mechanism to authenticate against the ClusterRealm. In order to join, nodes must have the cluster role.
cluster-role attribute determines the role all nodes must belong to in the security realm in order to JOIN or MERGE with the cluster. Unless it has been specified, the cluster-role attribute is the name of the clustered <cache-container> by default. Each node identifies itself using the client-name property. If none is specified, the hostname on which the server is running will be used.
jboss.node.name system property that can be overridden on the command line. For example:
clustered.sh -Djboss.node.name=node001
$ clustered.sh -Djboss.node.name=node001Note
10.1.1. Configure Node Authentication for Cluster Security (DIGEST-MD5)
DIGEST-MD5 with a properties-based security realm, with a dedicated realm for cluster node.
Example 10.2. Using the DIGEST-MD5 Mechanism
node001, node002, node003, the cluster-users.properties will contain:
node001=/<node001passwordhash>/node002=/<node002passwordhash>/node003=/<node003passwordhash>/
cluster-roles.properties will contain:
- node001=clustered
- node002=clustered
- node003=clustered
add-users.sh script can be used:
add-user.sh -up cluster-users.properties -gp cluster-roles.properties -r ClusterRealm -u node001 -g clustered -p <password>
$ add-user.sh -up cluster-users.properties -gp cluster-roles.properties -r ClusterRealm -u node001 -g clustered -p <password>MD5 password hash of the node must also be placed in the "client_password" property of the <sasl/> element.
<property name="client_password>...</property>
<property name="client_password>...</property>Note
JOINing and MERGEing node's credentials against the realm before letting the node become part of the cluster view.
10.1.2. Configure Node Authentication for Cluster Security (GSSAPI/Kerberos)
GSSAPI mechanism, the client_name is used as the name of a Kerberos-enabled login module defined within the security domain subsystem. For a full procedure on how to do this, see Section 9.7.7.1, “Configure Hot Rod Authentication (GSSAPI/Kerberos)”.
Example 10.3. Using the Kerberos Login Module
<sasl <!-- Additional configuration information here --> >
<property name="login_module_name">
<!-- Additional configuration information here -->
</property>
</sasl>
<sasl <!-- Additional configuration information here --> >
<property name="login_module_name">
<!-- Additional configuration information here -->
</property>
</sasl>authentication section of the security realm is ignored, as the nodes will be validated against the Kerberos Domain Controller. The authorization configuration is still required, as the node principal must belong to the required cluster-role.
jgroups/$NODE_NAME/$CACHE_CONTAINER_NAME@REALM
jgroups/$NODE_NAME/$CACHE_CONTAINER_NAME@REALM10.2. Configure Node Security in Library Mode
SASL protocol to your JGroups XML configuration.
CallbackHandlers, to obtain certain information necessary for the authentication handshake. Users must supply their own CallbackHandlers on both client and server sides.
Important
JAAS API is only available when configuring user authentication and authorization, and is not available for node security.
Note
CallbackHandler classes are examples only, and not contained in the Red Hat JBoss Data Grid release. Users must provide the appropriate CallbackHandler classes for their specific LDAP implementation.
Example 10.4. Setting Up SASL Authentication in JGroups
DIGEST-MD5 mechanism. Each node must declare the user and password it will use when joining the cluster.
Important
CallbackHandler class. In this example, login and password are checked against values provided via Java properties when JBoss Data Grid is started, and authorization is checked against role which is defined in the class ("test_user").
Example 10.5. Callback Handler Class
javax.security.auth.callback.NameCallback and javax.security.auth.callback.PasswordCallback callbacks
javax.security.sasl.AuthorizeCallback callback.
10.2.1. Simple Authorizing Callback Handler
SimpleAuthorizingCallbackHandler class may be used. To enable this set both the server_callback_handler and the client_callback_handler to org.jgroups.auth.sasl.SimpleAuthorizingCallbackHandler, as seen in the below example:
SimpleAuthorizingCallbackHandler may be configured either programmatically, by passing the constructor an instance of of java.util.Properties, or via standard Java system properties, set on the command line using the -DpropertyName=propertyValue notation. The following properties are available:
sasl.credentials.properties- the path to a property file which contains principal/credential mappings represented as principal=password .sasl.local.principal- the name of the principal that is used to identify the local node. It must exist in the sasl.credentials.properties file.sasl.roles.properties- (optional) the path to a property file which contains principal/roles mappings represented as principal=role1,role2,role3 .sasl.role- (optional) if present, authorizes joining nodes only if their principal is.sasl.realm- (optional) the name of the realm to use for the SASL mechanisms that require it
10.2.2. Configure Node Authentication for Library Mode (DIGEST-MD5)
CallbackHandlers are required:
- The
server_callback_handler_classis used by the coordinator. - The
client_callback_handler_classis used by other nodes.
CallbackHandlers.
Example 10.6. Callback Handlers
10.2.3. Configure Node Authentication for Library Mode (GSSAPI)
login_module_name parameter must be specified instead of callback.
server_name must also be specified, as the client principal is constructed as jgroups/$server_name@REALM.
Example 10.7. Specifying the login module and server on the coordinator node
<SASL mech="GSSAPI"
server_name="node0/clustered"
login_module_name="krb-node0"
server_callback_handler_class="org.infinispan.test.integration.security.utils.SaslPropCallbackHandler" />
<SASL mech="GSSAPI"
server_name="node0/clustered"
login_module_name="krb-node0"
server_callback_handler_class="org.infinispan.test.integration.security.utils.SaslPropCallbackHandler" />server_callback_handler_class must be specified for node authorization. This will determine if the authenticated joining node has permission to join the cluster.
Note
jgroups/server_name, therefore the server principal in Kerberos must also be jgroups/server_name. For example, if the server name in Kerberos is jgroups/node1/mycache, then the server name must be node1/mycache.
10.2.4. Node Authorization in Library Mode
SASL protocol in JGroups is concerned only with the authentication process. To implement node authorization, you can do so within the server callback handler by throwing an Exception.
Example 10.8. Implementing Node Authorization
10.3. JGroups ENCRYPT
ENCRYPT protocol to provide encryption for cluster traffic.
encrypt_entire_message must be true. ENCRYPT must also be below any protocols with headers that must be encrypted.
ENCRYPT layer is used to encrypt and decrypt communication in JGroups. The JGroups ENCRYPT protocol can be used in two ways:
- Configured with a secretKey in a keystore.
- Configured with algorithms and key sizes.
10.3.1. ENCRYPT Configured with a secretKey in a Key Store
ENCRYPT class can be configured with a secretKey in a keystore so it is usable at any layer in JGroups without requiring a coordinator. This also provides protection against passive monitoring without the complexity of key exchange.
<ENCRYPT key_store_name="defaultStore.keystore" store_password="${VAULT::VAULT_BLOCK::ATTRIBUTE_NAME::ENCRYPTED_VALUE}" alias="myKey"/>
<ENCRYPT key_store_name="defaultStore.keystore" store_password="${VAULT::VAULT_BLOCK::ATTRIBUTE_NAME::ENCRYPTED_VALUE}" alias="myKey"/>ENCRYPT layer in this manner. The directory containing the keystore file must be on the application classpath.
Note
KeyStoreGenerator java file is included in the demo package that can be used to generate a suitable keystore.
10.3.2. ENCRYPT Using a Key Store
ENCRYPT uses store type JCEKS. To generate a keystore compatible with JCEKS, use the following command line options:
keytool -genseckey -alias myKey -keypass changeit -storepass changeit -keyalg Blowfish -keysize 56 -keystore defaultStore.keystore -storetype JCEKS
$ keytool -genseckey -alias myKey -keypass changeit -storepass changeit -keyalg Blowfish -keysize 56 -keystore defaultStore.keystore -storetype JCEKSENCRYPT can then be configured by adding the following information to the JGroups file used by the application.
<ENCRYPT key_store_name="defaultStore.keystore"
store_password="${VAULT::VAULT_BLOCK::ATTRIBUTE_NAME::ENCRYPTED_VALUE}"
alias="myKey"/>
<ENCRYPT key_store_name="defaultStore.keystore"
store_password="${VAULT::VAULT_BLOCK::ATTRIBUTE_NAME::ENCRYPTED_VALUE}"
alias="myKey"/>-D option during start up.
infinispan-embedded.jar, alternatively, you can create your own configuration file. See the Configure JGroups (Library Mode) section in the Red Hat JBoss Data Grid Administration and Configuration Guide for instructions on how to set up JBoss Data Grid to use custom JGroups configurations in library mode.
Note
defaultStore.keystore must be found in the classpath.
10.3.3. ENCRYPT Configured with Algorithms and Key Sizes
- The secret key is generated and distributed by the controller.
- When a view change occurs, a peer requests the secret key by sending a key request with its own public key.
- The controller encrypts the secret key with the public key, and sends it back to the peer.
- The peer then decrypts and installs the key as its own secret key.
ENCRYPT layer must be placed above the GMS protocol in the configuration.
Example 10.9. ENCRYPT Layer
NAKACK and UNICAST protocols will be encrypted.
10.3.4. ENCRYPT Configuration Parameters
ENCRYPT JGroups protocol:
| Name | Description |
|---|---|
| alias | Alias used for recovering the key. Change the default. |
| asymAlgorithm | Cipher engine transformation for asymmetric algorithm. Default is RSA. |
| asymInit | Initial public/private key length. Default is 512. |
| asymProvider | Cryptographic Service Provider. Default is Bouncy Castle Provider. |
| encrypt_entire_message | |
| id | Give the protocol a different ID if needed so we can have multiple instances of it in the same stack. |
| keyPassword | Password for recovering the key. Change the default. |
| keyStoreName | File on classpath that contains keystore repository. |
| level | Sets the logger level (see javadocs). |
| name | Give the protocol a different name if needed so we can have multiple instances of it in the same stack. |
| stats | Determines whether to collect statistics (and expose them via JMX). Default is true. |
| storePassword | Password used to check the integrity/unlock the keystore. Change the default. It is recommended that passwords are stored using Vault. |
| symAlgorithm | Cipher engine transformation for symmetric algorithm. Default is AES. |
| symInit | Initial key length for matching symmetric algorithm. Default is 128. |
Part III. Advanced Features in Red Hat JBoss Data Grid
- Transactions
- Marshalling
- Listeners and Notifications
- The Infinispan CDI Module
- MapReduce
- Distributed Execution
- Interoperability and Compatibility Mode
Chapter 11. Transactions
11.1. About Java Transaction API
- First, it retrieves the transactions currently associated with the thread.
- If not already done, it registers an
XAResourcewith the transaction manager to receive notifications when a transaction is committed or rolled back.
11.2. Transactions Spanning Multiple Cache Instances
11.3. The Transaction Manager
TransactionManager tm = cache.getAdvancedCache().getTransactionManager();
TransactionManager tm = cache.getAdvancedCache().getTransactionManager();Example 11.1. Performing Operations
Note
XAResource xar = cache.getAdvancedCache().getXAResource();
XAResource xar = cache.getAdvancedCache().getXAResource();11.4. About JTA Transaction Manager Lookup Classes
TransactionManagerLookup interface. When initialized, the cache creates an instance of the specified class and invokes its getTransactionManager() method to locate and return a reference to the Transaction Manager.
| Class Name | Details |
|---|---|
| org.infinispan.transaction.lookup.DummyTransactionManagerLookup | Used primarily for testing environments. This testing transaction manager is not for use in a production environment and is severely limited in terms of functionality, specifically for concurrent transactions and recovery. |
| org.infinispan.transaction.lookup.JBossStandaloneJTAManagerLookup | It is a fully functional JBoss Transactions based transaction manager that overcomes the functionality limits of the DummyTransactionManager. |
| org.infinispan.transaction.lookup.GenericTransactionManagerLookup | GenericTransactionManagerLookup is used by default when no transaction lookup class is specified. This lookup class is recommended when using JBoss Data Grid with Java EE-compatible environment that provides a TransactionManager interface, and is capable of locating the Transaction Manager in most Java EE application servers. If no transaction manager is located, it defaults to DummyTransactionManager. |
JBossStandaloneJTAManagerLookup, which uses JBoss Transactions.
Chapter 12. Marshalling
- transform data for relay to other JBoss Data Grid nodes within the cluster.
- transform data to be stored in underlying cache stores.
12.1. About Marshalling Framework
java.io.ObjectOutput and java.io.ObjectInput implementations compared to the standard java.io.ObjectOutputStream and java.io.ObjectInputStream.
12.2. Support for Non-Serializable Objects
Serializable or Externalizable support into your classes, you could (as an example) use XStream to convert the non-serializable objects into a String that can be stored in JBoss Data Grid.
Note
12.3. Hot Rod and Marshalling
- All data stored by clients on the JBoss Data Grid server are provided either as a byte array, or in a primitive format that is marshalling compatible for JBoss Data Grid.On the server side of JBoss Data Grid, marshalling occurs where the data stored in primitive format are converted into byte array and replicated around the cluster or stored to a cache store. No marshalling configuration is required on the server side of JBoss Data Grid.
- At the client level, marshalling must have a
Marshallerconfiguration element specified in the RemoteCacheManager configuration in order to serialize and deserialize POJOs.Due to Hot Rod's binary nature, it relies on marshalling to transform POJOs, specifically keys or values, into byte array.
12.4. Configuring the Marshaller using the RemoteCacheManager
marshaller configuration element in the RemoteCacheManager, the value of which must be the name of the class implementing the Marshaller interface. The default value for this property is org.infinispan.commons.marshall.jboss.GenericJBossMarshaller.
Procedure 12.1. Define a Marshaller
Create a ConfigurationBuilder
Create a ConfigurationBuilder and configure it with the required settings.ConfigurationBuilder builder = new ConfigurationBuilder(); //... (other configuration)
ConfigurationBuilder builder = new ConfigurationBuilder(); //... (other configuration)Copy to Clipboard Copied! Toggle word wrap Toggle overflow Add a Marshaller Class
Add a Marshaller class specification within the Marshaller method.builder.marshaller(GenericJBossMarshaller.class);
builder.marshaller(GenericJBossMarshaller.class);Copy to Clipboard Copied! Toggle word wrap Toggle overflow - Alternatively, specify a custom Marshaller instance.
builder.marshaller(new GenericJBossMarshaller());
builder.marshaller(new GenericJBossMarshaller());Copy to Clipboard Copied! Toggle word wrap Toggle overflow
Start the RemoteCacheManager
Build the configuration containing the Marshaller, and start a new RemoteCacheManager with it.Configuration configuration = builder.build(); RemoteCacheManager manager = new RemoteCacheManager(configuration);
Configuration configuration = builder.build(); RemoteCacheManager manager = new RemoteCacheManager(configuration);Copy to Clipboard Copied! Toggle word wrap Toggle overflow
Note
12.5. Troubleshooting
12.5.1. Marshalling Troubleshooting
Example 12.1. Exception Stack Trace
in object and stack traces are read in the same way: the highest in object message is the innermost one and the outermost in object message is the lowest.
java.lang.Object instance within an org.infinispan.commands.write.PutKeyValueCommand instance cannot be serialized because java.lang.Object@b40ec4 is not serializable.
DEBUG or TRACE logging levels are enabled, marshalling exceptions will contain toString() representations of objects in the stack trace. The following is an example that depicts such a scenario:
Example 12.2. Exceptions with Logging Levels Enabled
Example 12.3. Unmarshalling Exceptions
IOException was thrown when an instance of the inner class org.infinispan.marshall.VersionAwareMarshallerTest$1 is unmarshalled.
DEBUG or TRACE logging levels are enabled, the class type's classloader information is provided. An example of this classloader information is as follows:
Example 12.4. Classloader Information
12.5.2. Other Marshalling Related Issues
EOFException. During a state transfer, if an EOFException is logged that states that the state receiver has Read past end of file, this can be dealt with depending on whether the state provider encounters an error when generating the state. For example, if the state provider is currently providing a state to a node, when another node requests a state, the state generator log can contain:
Example 12.5. State Generator Log
EOFException, displayed as follows, when failing to read the transaction log that was not written by the sender:
Example 12.6. EOFException
Chapter 13. The Infinispan CDI Module
infinispan-cdi module. The infinispan-cdi module offers:
- Configuration and injection using the Cache API.
- A bridge between the cache listeners and the CDI event system.
- Partial support for the JCACHE caching annotations.
13.1. Using Infinispan CDI
13.1.1. Infinispan CDI Prerequisites
- Ensure that the most recent version of the infinispan-cdi module is used.
- Ensure that the correct dependency information is set.
13.1.2. Set the CDI Maven Dependency
pom.xml file in your maven project:
13.2. Using the Infinispan CDI Module
- To configure and inject Infinispan caches into CDI Beans and Java EE components.
- To configure cache managers.
- To control storage and retrieval using CDI annotations.
13.2.1. Configure and Inject Infinispan Caches
13.2.1.1. Inject an Infinispan Cache
public class MyCDIBean {
@Inject
Cache<String, String> cache;
}
public class MyCDIBean {
@Inject
Cache<String, String> cache;
}13.2.1.2. Inject a Remote Infinispan Cache
public class MyCDIBean {
@Inject
RemoteCache<String, String> remoteCache;
}
public class MyCDIBean {
@Inject
RemoteCache<String, String> remoteCache;
}13.2.1.3. Set the Injection's Target Cache
- Create a qualifier annotation.
- Add a producer class.
- Inject the desired class.
13.2.1.3.1. Create a Qualifier Annotation
Example 13.1. Custom Cache Qualifier
@javax.inject.Qualifier
@Target({ElementType.FIELD, ElementType.PARAMETER, ElementType.METHOD})
@Retention(RetentionPolicy.RUNTIME)
@Documented
public @interface SmallCache {}
@javax.inject.Qualifier
@Target({ElementType.FIELD, ElementType.PARAMETER, ElementType.METHOD})
@Retention(RetentionPolicy.RUNTIME)
@Documented
public @interface SmallCache {}@SmallCache qualifier to specify how to create specific caches.
13.2.1.3.2. Add a Producer Class
@SmallCache qualifier (created in the previous step) specifies a way to create a cache:
Example 13.2. Using the @SmallCache Qualifier
@ConfigureCachespecifies the name of the cache.@SmallCacheis the cache qualifier.
13.2.1.3.3. Inject the Desired Class
@SmallCache qualifier and the new producer class to inject a specific cache into the CDI bean as follows:
public class MyCDIBean {
@Inject @SmallCache
Cache<String, String> mySmallCache;
}
public class MyCDIBean {
@Inject @SmallCache
Cache<String, String> mySmallCache;
}13.2.2. Configure Cache Managers with CDI
13.2.2.1. Specify the Default Configuration
Example 13.3. Specifying the Default Configuration
Note
@Default qualifier if no other qualifiers are provided.
@Produces annotation is placed in a method that returns a Configuration instance, the method is invoked when a Configuration object is required.
13.2.2.2. Override the Creation of the Embedded Cache Manager
After a producer method is annotated, this method will be called when creating an EmbeddedCacheManager, as follows:
Example 13.4. Create a Non Clustered Cache
@ApplicationScoped annotation specifies that the method is only called once.
The following configuration can be used to create an EmbeddedCacheManager that can create clustered caches.
Example 13.5. Create Clustered Caches
The method annotated with @Produces in the non clustered method generates Configuration objects. The methods in the clustered cache example annonated with @Produces generate EmbeddedCacheManager objects.
EmbeddedCacheManager and injects it into the code at runtime.
Example 13.6. Generate an EmbeddedCacheManager
... @Inject EmbeddedCacheManager cacheManager; ...
...
@Inject
EmbeddedCacheManager cacheManager;
...13.2.2.3. Configure a Remote Cache Manager
RemoteCacheManager is configured in a manner similar to EmbeddedCacheManagers, as follows:
Example 13.7. Configuring the Remote Cache Manager
13.2.2.4. Configure Multiple Cache Managers with a Single Class
Example 13.8. Configure Multiple Cache Managers
13.2.3. Storage and Retrieval Using CDI Annotations
13.2.3.1. Configure Cache Annotations
javax.cache package.
13.2.3.2. Enable Cache Annotations
beans.xml file. Adding the following code adds interceptors such as the CacheResultInterceptor, CachePutInterceptor, CacheRemoveEntryInterceptor and the CacheRemoveAllInterceptor:
Example 13.9. Adding Interceptors
Note
beans.xml file for Red Hat JBoss Data Grid to use javax.cache annotations.
13.2.3.3. Caching the Result of a Method Invocation
toCelsiusFormatted method again and stores the result in the cache.
@CacheResult annotation instead, as follows:
toCelsiusFormatted() method call.
Note
13.2.3.3.1. Specify the Cache Used
cacheName) to the @CacheResult annotation to specify the cache to check for results of the method call:
@CacheResult(cacheName = "mySpecialCache")
public String doSomething(String parameter) {
<!-- Additional configuration information here -->
}
@CacheResult(cacheName = "mySpecialCache")
public String doSomething(String parameter) {
<!-- Additional configuration information here -->
}13.2.3.3.2. Cache Keys for Cached Results
@CacheResult annotation creates a key for the results fetched from a cache. The key consists of a combination of all parameters in the relevant method.
@CacheKey annotation as follows:
Example 13.10. Create a Custom Key
p1 and p2 are used to create the cache key. The value of dontCare is not used when determining the cache key.
13.2.3.3.3. Generate a Custom Key
cacheKeyGenerator to the @CacheResult annotation as follows:
@CacheResult(cacheKeyGenerator = MyCacheKeyGenerator.class)
public void doSomething(String p1, String p2) {
<!-- Additional configuration information here -->
}
@CacheResult(cacheKeyGenerator = MyCacheKeyGenerator.class)
public void doSomething(String p1, String p2) {
<!-- Additional configuration information here -->
}p1 contains the custom key.
13.2.4. Cache Operations
13.2.4.1. Update a Cache Entry
@CachePut annotation is invoked, a parameter (normally passed to the method annotated with @CacheValue) is stored in the cache.
Example 13.11. Sample @CachePut Annotated Method
cacheName and cacheKeyGenerator in the @CachePut method. Additionally, some parameters in the invoked method may be annotated with @CacheKey to control key generation.
13.2.4.2. Remove an Entry from the Cache
@CacheRemoveEntry annotated method that is used to remove an entry from the cache:
Example 13.12. Removing an Entry from the Cache
cacheName and cacheKeyGenerator attributes.
13.2.4.3. Clear the Cache
@CacheRemoveAll method to clear all entries from the cache.
Example 13.13. Clear All Entries from the Cache with @CacheRemoveAll
import javax.cache.annotation.CacheResult
@CacheRemoveAll (cacheName = "statisticsCache")
public void resetStatistics() {
<!-- Additional configuration information here -->
}
import javax.cache.annotation.CacheResult
@CacheRemoveAll (cacheName = "statisticsCache")
public void resetStatistics() {
<!-- Additional configuration information here -->
}cacheName attribute.
Chapter 14. Rolling Upgrades
14.1. Rolling Upgrades Using Hot Rod
Important
- For JBoss Data Grid 6.1, use Hot Rod protocol version 1.2
- For JBoss Data Grid 6.2, use Hot Rod protocol version 1.3
- For JBoss Data Grid 6.3, use Hot Rod protocol version 2.0
- For JBoss Data Grid 6.4, use Hot Rod protocol version 2.0
- For JBoss Data Grid 6.5, use Hot Rod protocol version 2.0
This procedure assumes that a cluster is already configured and running, and that it is using an older version of JBoss Data Grid. This cluster is referred to below as the Source Cluster and the Target Cluster refers to the new cluster to which data will be migrated.
Configure the Target Cluster
Use either different network settings or a different JGroups cluster name to set the Target Cluster (consisting of nodes with new JBoss Data Grid) apart from the Source Cluster. For each cache, configure aRemoteCacheStorewith the following settings:- Ensure that
remote-serverpoints to the Source Cluster. - Ensure that the cache name matches the name of the cache on the Source Cluster.
- Ensure that
hotrod-wrappingis enabled (set totrue). - Ensure that
purgeis disabled (set tofalse). - Ensure that
passivationis disabled (set tofalse).
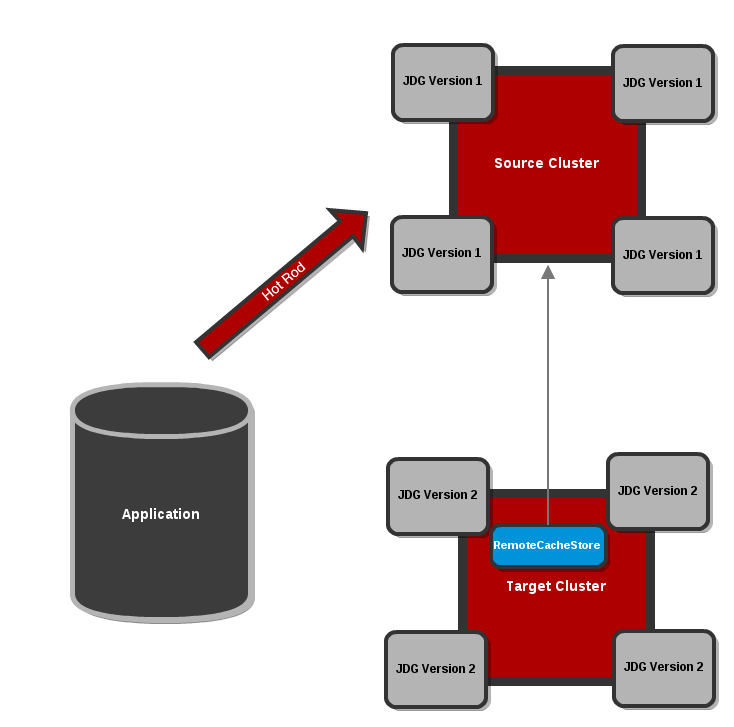
Figure 14.1. Configure the Target Cluster with a RemoteCacheStore
Note
See the$JDG_HOME/docs/examples/configs/standalone-hotrod-rolling-upgrade.xmlfile for a full example of the Target Cluster configuration for performing Rolling Upgrades.Start the Target Cluster
Start the Target Cluster's nodes. Configure each client to point to the Target Cluster instead of the Source Cluster. Eventually, the Target Cluster handles all requests instead of the Source Cluster. The Target Cluster then lazily loads data from the Source Cluster on demand using theRemoteCacheStore.
Figure 14.2. Clients point to the Target Cluster with the Source Cluster as
RemoteCacheStorefor the Target Cluster.Dump the Source Cluster keyset
When all connections are using the Target Cluster, the keyset on the Source Cluster must be dumped. This can be done using either JMX or the CLI:JMX
Invoke therecordKnownGlobalKeysetoperation on theRollingUpgradeManagerMBean on the Source Cluster for every cache that must be migrated.CLI
Invoke theupgrade --dumpkeyscommand on the Source Cluster for every cache that must be migrated, or use the--allswitch to dump all caches in the cluster.
Fetch remaining data from the Source Cluster
The Target Cluster fetches all remaining data from the Source Cluster. Again, this can be done using either JMX or CLI:JMX
Invoke thesynchronizeDataoperation and specify thehotrodparameter on theRollingUpgradeManagerMBean on the Target Cluster for every cache that must be migrated.CLI
Invoke theupgrade --synchronize=hotrodcommand on the Target Cluster for every cache that must be migrated, or use the--allswitch to synchronize all caches in the cluster.
Disabling the
RemoteCacheStoreOnce the Target Cluster has obtained all data from the Source Cluster, theRemoteCacheStoreon the Target Cluster must be disabled. This can be done as follows:JMX
Invoke thedisconnectSourceoperation specifying thehotrodparameter on theRollingUpgradeManagerMBean on the Target Cluster.CLI
Invoke theupgrade --disconnectsource=hotrodcommand on the Target Cluster.
Decommission the Source Cluster
As a final step, decommission the Source Cluster.
14.2. Rolling Upgrades Using REST
Procedure 14.1. Perform Rolling Upgrades Using REST
Configure the Target Cluster
Use either different network settings or a different JGroups cluster name to set the Target Cluster (consisting of nodes with new JBoss Data Grid) apart from the Source Cluster. For each cache, configure aRestCacheStorewith the following settings:- Ensure that the host and port values point to the Source Cluster.
- Ensure that the path value points to the Source Cluster's REST endpoint.
Start the Target Cluster
Start the Target Cluster's nodes. Configure each client to point to the Target Cluster instead of the Source Cluster. Eventually, the Target Cluster handles all requests instead of the Source Cluster. The Target Cluster then lazily loads data from the Source Cluster on demand using theRestCacheStore.Do not dump the Key Set during REST Rolling Upgrades
The REST Rolling Upgrades use case is designed to fetch all the data from the Source Cluster without using therecordKnownGlobalKeysetoperation.Warning
Do not invoke therecordKnownGlobalKeysetoperation for REST Rolling Upgrades. If you invoke this operation, it will cause data corruption and REST Rolling Upgrades will not complete successfully.Fetch the Remaining Data
The Target Cluster must fetch all the remaining data from the Source Cluster. This is done either using JMX or the CLI as follows:Using JMX
Invoke thesynchronizeDataoperation with therestparameter specified on theRollingUpgradeManagerMBean on the Target Cluster for all caches to be migrated.Using the CLI
Run theupgrade --synchronize=reston the Target Cluster for all caches to be migrated. Optionally, use the--allswitch to synchronize all caches in the cluster.
Disable the RestCacheStore
Disable theRestCacheStoreon the Target Cluster using either JMX or the CLI as follows:Using JMX
Invoke thedisconnectSourceoperation with therestparameter specified on theRollingUpgradeManagerMBean on the Target Cluster.Using the CLI
Run theupgrade --disconnectsource=restcommand on the Target Cluster. Optionally, use the--allswitch to disconnect all caches in the cluster.
Migration to the Target Cluster is complete. The Source Cluster can now be decommissioned.
14.3. RollingUpgradeManager Operations
RollingUpgradeManager Mbean handles the operations that allow data to be migrated from one version of Red Hat JBoss Data Grid to another when performing rolling upgrades. The RollingUpgradeManager operations are:
recordKnownGlobalKeysetretrieves the entire keyset from the cluster running on the old version of JBoss Data Grid.synchronizeDataperforms the migration of data from the Source Cluster to the Target Cluster, which is running the new version of JBoss Data Grid.disconnectSourcedisables the Source Cluster, the older version of JBoss Data Grid, once data migration to the Target Cluster is complete.
14.4. RemoteCacheStore Parameters for Rolling Upgrades
14.4.1. rawValues and RemoteCacheStore
rawValues parameter causes the raw values to be stored instead for interoperability with direct access by RemoteCacheManagers.
rawValues must be enabled in order to interact with a Hot Rod cache via both RemoteCacheStore and RemoteCacheManager.
14.4.2. hotRodWrapping
hotRodWrapping parameter is a shortcut that enables rawValues and sets an appropriate marshaller and entry wrapper for performing Rolling Upgrades.
Chapter 15. MapReduce
- The user initiates a task on a cache instance, which runs on a cluster node (the master node).
- The master node receives the task input, divides the task, and sends tasks for map phase execution on the grid.
- Each node executes a
Mapperfunction on its input, and returns intermediate results back to the master node.- If the
useIntermediateSharedCacheparameter is set to"true", the map results are inserted in an intermediary cache, rather than being returned to the master node. - If a
Combinerhas been specified withtask.combinedWith(combiner), theCombineris called on theMapperresults and the combiner's results are returned to the master node or inserted in the intermediary cache.Note
Combiners are not required but can only be used when the function is both commutative (changing the order of the operands does not change the results) and associative (the order in which the operations are performed does not matter as long as the sequence of the operands is not changed). Combiners are advantageous to use because they can improve the speeds of MapReduceTask executions.
- The master node collects all intermediate results from the map phase and merges all intermediate values associated with the same intermediate key.
- If the
distributedReducePhaseparameter is set totrue, the merging of the intermediate values is done on each node, as theMapperorCombinerresults are inserted in the intermediary cache.The master node only receives the intermediate keys.
- The master node sends intermediate key/value pairs for reduction on the grid.
- If the
distributedReducePhaseparameter is set to"false", the reduction phase is executed only on the master node.
- The final results of the reduction phase are returned. Optionally specify the target cache for the results using the instructions in Section 15.1.2, “Specify the Target Cache”.
- If the
distributedReducePhaseparameter is set to"true", the master node running the task receives all results from the reduction phase and returns the final result to the MapReduce task initiator. - If no target cache is specified and no collator is specified (using
task.execute(Collator)), the result map is returned to the master node.
15.1. The MapReduce API
MapperReducerCollatorMapReduceTaskCombiners
Mapper class implementation is a component of MapReduceTask, which is invoked once per input cache entry key/value pair. Map is a process of applying a given function to each element of a list, returning a list of results.
Mapper on a given cache entry key/value input pair. It then transforms this cache entry key/value pair into an intermediate key/value pair, which is emitted into the provided Collector instance.
Note
Example 15.1. Executing the Mapper
Reducer. JBoss Data Grid's distributed execution environment creates one instance of Reducer per execution node.
Example 15.2. Reducer
Reducer interface is used for Combiners. A Combiner is similar to a Reducer, except that it must be able to work on partial results. The Combiner is executed on the results of the Mapper, on the same node, without considering the other nodes that might have generated values for the same intermediate key.
Note
Combiners only see a part of the intermediate values, they cannot be used in all scenarios, however when used they can reduce network traffic and memory consumption in the intermediate cache significantly.
Collator coordinates results from Reducers that have been executed on JBoss Data Grid, and assembles a final result that is delivered to the initiator of the MapReduceTask. The Collator is applied to the final map key/value result of MapReduceTask.
Example 15.3. Assembling the Result
15.1.1. MapReduceTask
MapReduceTask is a distributed task, which unifies the Mapper, Combiner, Reducer, and Collator components into a cohesive computation, which can be parallelized and executed across a large-scale cluster.
Example 15.4. Specifying MapReduceTask Components
new MapReduceTask(cache)
.mappedWith(new MyMapper())
.combinedWith(new MyCombiner())
.reducedWith(new MyReducer())
.execute(new MyCollator());
new MapReduceTask(cache)
.mappedWith(new MyMapper())
.combinedWith(new MyCombiner())
.reducedWith(new MyReducer())
.execute(new MyCollator());MapReduceTask requires a cache containing data that will be used as input for the task. The JBoss Data Grid execution environment will instantiate and migrate instances of provided Mappers and Reducers seamlessly across the nodes.
onKeys method as an input key filter.
MapReduceTask constructor parameters that determine how the intermediate values are processed:
distributedReducePhase- When set tofalse, the default setting, the reducers are only executed on the master node. If set totrue, the reducers are executed on every node in the cluster.useIntermediateSharedCache- Only important ifdistributedReducePhaseis set totrue. Iftrue, which is the default setting, this task will share intermediate value cache with other executing MapReduceTasks on the grid. If set tofalse, this task will use its own dedicated cache for intermediate values.
Note
MapReduceTask is 0 (zero). That is, the task will wait indefinitely for its completion by default.
15.1.2. Specify the Target Cache
public void execute(Cache<KOut, VOut> resultsCache) throws CacheException
public void execute(Cache<KOut, VOut> resultsCache) throws CacheExceptionpublic void execute(String resultsCache) throws CacheException
public void execute(String resultsCache) throws CacheException15.1.3. Mapper and CDI
Mapper is invoked with appropriate input key/value pairs on an executing node, however Red Hat JBoss Data Grid also provides a CDI injection for an input cache. The CDI injection can be used where additional data from the input cache is required in order to complete map transformation.
Mapper is executed on a JBoss Data Grid executing node, the JBoss Data Grid CDI module provides an appropriate cache reference, which is injected to the executing Mapper. To use the JBoss Data Grid CDI module with Mapper:
- Declare a cache field in
Mapper. - Annotate the cache field
Mapperwith@org.infinispan.cdi.Input. - Annotate with mandatory
@Inject annotation.
Example 15.5. Using a CDI Injection
15.2. MapReduceTask Distributed Execution
Mapper and Reducer seamlessly across JBoss Data Grid nodes.
Note
- Mapping phase.
- Outgoing Key and Outgoing Value Migration.
- Reduce phase.
- Map Phase
- MapReduceTask hashes task input keys and groups them by the execution node that they are hashed to. After key node mapping, MapReduceTask sends a map function and inputs keys to each node. The map function is invoked using given keys and locally loaded corresponding values.Results are collected with a Red Hat JBoss Data Grid supplied Collector, and the combine phase is initiated. A Combiner, if specified, takes KOut keys and immediately invokes the reduce phase on keys. The result of mapping phase executed on each node is KOut/VOut map. There is one resulting map per execution node per launched MapReduceTask.
Figure 15.1. Map Phase
- Intermediate KOut/VOut migration phase
- In order to proceed with reduce phase, all intermediate keys and values must be grouped by intermediate KOut keys. As map phases around the cluster can produce identical intermediate keys, all identical intermediate keys and their values must be grouped before reduce is executed on any particular intermediate key.At the end of the combine phase, each intermediate KOut key is hashed and migrated with its VOut values to the JBoss Data Grid node where keys KOut are hashed to. This is achieved using a temporary distributed cache and underlying consistent hashing mechanism.
Figure 15.2. Kout/VOut Migration
Once Map and Combine phase have finished execution, a list of KOut keys is returned to a master node and it is initiating MapReduceTask. VOut values are not returned as they are not required at the master task node. MapReduceTask is ready to start with reduce phase. - Reduce Phase
- To complete reduce phase, MapReduceTask groups KOut keys by execution node N they are hashed to. For each node and its grouped input KOut keys, MapReduceTask sends a reduce command to a node where KOut keys are hashed. Once the reduce command is executed on the target execution node, it locates the temporary cache belonging to MapReduce task. For each KOut key, the reduce command obtains a list of VOut values, wraps it with an Iterator, and invokes reduce on it.

Figure 15.3. Reduce Phase
The result of each reduce is a map where each key is KOut and value is VOut. Each JBoss Data Grid execution node returns one map with KOut/VOut result values. As all initiated reduce commands return to a calling node, MapReduceTask combines all resulting maps into a map and returns the map as a result of MapReduceTask.Distributed reduce phase is enabled by using a MapReduceTask constructor specifying the cache to use as input data for the task and boolean parameterdistributeReducePhaseset totrue. For more information, see the Map/Reduce section of the Red Hat JBoss Data Grid API Documentation.
15.3. Map Reduce Example
- Key is a String.
- Each sentence is a String.
Example 15.6. Implementing the Distributed Task
Collator is defined, which will transform the result of MapReduceTask Map<KOut,VOut> into a String that is returned to a task invoker. The Collator is a transformation function applied to a final result of MapReduceTask.
Example 15.7. Defining the Collator
Chapter 16. Distributed Execution
ExecutorService interface. Tasks submitted for execution are executed on an entire cluster of JBoss Data Grid nodes, rather than being executed in a local JVM.
- Each
DistributedExecutorServiceis bound to a single cache. Tasks submitted have access to key/value pairs from that particular cache if the task submitted is an instance ofDistributedCallable. - Every
Callable,Runnable, and/orDistributedCallablesubmitted must be eitherSerializableorExternalizable, in order to prevent task migration to other nodes each time one of these tasks is performed. The value returned from aCallablemust also beSerializableorExternalizable.
16.1. Distributed Executor Service
DistributedExecutorService controls the execution of DistributedCallable, and other Callable and Runnable, classes on the cluster. These instances are tied to a specific cache that is passed in upon instantiation:
DistributedExecutorService des = new DefaultExecutorService(cache);
DistributedExecutorService des = new DefaultExecutorService(cache);DistributedTask against a subset of keys if DistributedCallable is extended, as discussed in Section 16.2, “DistributedCallable API”. If a task is submitted in this manner to a single node, then JBoss Data Grid will locate the nodes containing the indicated keys, migrate the DistributedCallable to this node, and return a NotifyingFuture. Alternatively, if a task is submitted to all available nodes in this manner then only the nodes containing the indicated keys will receive the task.
DistributedTask has been created it may be submitted to the cluster using any of the below methods:
- The task can be submitted to all available nodes and key/value pairs on the cluster using the
submitEverywheremethod:des.submitEverywhere(task)
des.submitEverywhere(task)Copy to Clipboard Copied! Toggle word wrap Toggle overflow - The
submitEverywheremethod can also take a set of keys as an argument. Passing in keys in this manner will submit the task only to available nodes that contain the indicated keys:des.submitEverywhere(task, $KEY)
des.submitEverywhere(task, $KEY)Copy to Clipboard Copied! Toggle word wrap Toggle overflow - If a key is specified, then the task will be executed on a single node that contains at least one of the specified keys. Any keys not present locally will be retrieved from the cluster. This version of the
submitmethod accepts one or more keys to be operated on, as seen in the following examples:des.submit(task, $KEY) des.submit(task, $KEY1, $KEY2, $KEY3)
des.submit(task, $KEY) des.submit(task, $KEY1, $KEY2, $KEY3)Copy to Clipboard Copied! Toggle word wrap Toggle overflow - A specific node can be instructed to execute the task by passing the node's
Addressto thesubmitmethod. The below will only be executed on the cluster'sCoordinator:des.submit(cache.getCacheManager().getCoordinator(), task)
des.submit(cache.getCacheManager().getCoordinator(), task)Copy to Clipboard Copied! Toggle word wrap Toggle overflow Note
By default tasks are automatically balanced, and there is typically no need to indicate a specific node to execute against.
16.2. DistributedCallable API
DistributedCallable interface is a subtype of the existing Callable from java.util.concurrent.package, and can be executed in a remote JVM and receive input from Red Hat JBoss Data Grid. The DistributedCallable interface is used to facilitate tasks that require access to JBoss Data Grid cache data.
DistributedCallable API to execute a task, the task's main algorithm remains unchanged, however the input source is changed.
Callable interface must extend DistributedCallable if access to the cache or the set of passed in keys is required.
Example 16.1. Using the DistributedCallable API
16.3. Callable and CDI
DistributedCallable cannot be implemented or is not appropriate, and a reference to input cache used in DistributedExecutorService is still required, there is an option to inject the input cache by CDI mechanism.
Callable task arrives at a Red Hat JBoss Data Grid executing node, JBoss Data Grid's CDI mechanism provides an appropriate cache reference, and injects it to the executing Callable.
Callable:
- Declare a
Cachefield inCallableand annotate it withorg.infinispan.cdi.Input - Include the mandatory
@Injectannotation.
Example 16.2. Using Callable and the CDI
16.4. Distributed Task Failover
- Failover due to a node failure where a task is executing.
- Failover due to a task failure; for example, if a
Callabletask throws an exception.
Runnable, Callable, and DistributedCallable tasks fail without invoking any failover mechanism.
Distributed task on another random node if one is available.
Example 16.3. Random Failover Execution Policy
DistributedTaskFailoverPolicy interface can also be implemented to provide failover management.
Example 16.4. Distributed Task Failover Policy Interface
16.5. Distributed Task Execution Policy
DistributedTaskExecutionPolicy allows tasks to specify a custom execution policy across the Red Hat JBoss Data Grid cluster, by scoping execution of tasks to a subset of nodes.
DistributedTaskExecutionPolicy can be used to manage task execution in the following cases:
- where a task is to be exclusively executed on a local network site instead of a backup remote network center.
- where only a dedicated subset of a certain JBoss Data Grid rack nodes are required for specific task execution.
Example 16.5. Using Rack Nodes to Execute a Specific Task
16.6. Distributed Execution and Locality
DistributionManager and ConsistentHash, is theoretical; neither of these classes have any knowledge if data is actively in the cache. Instead, these classes are used to determine which node should store the specified key.
- Option 1: Confirm that the key is both found in the cache and the
DistributionManagerindicates it is local, as seen in the following example:(cache.getAdvancedCache().withFlags(SKIP_REMOTE_LOOKUP).containsKey(key) && cache.getAdvancedCache().getDistributionManager().getLocality(key).isLocal())
(cache.getAdvancedCache().withFlags(SKIP_REMOTE_LOOKUP).containsKey(key) && cache.getAdvancedCache().getDistributionManager().getLocality(key).isLocal())Copy to Clipboard Copied! Toggle word wrap Toggle overflow - Option 2: Query the
DataContainerdirectly:cache.getAdvancedCache().getDataContainer().containsKey(key)
cache.getAdvancedCache().getDataContainer().containsKey(key)Copy to Clipboard Copied! Toggle word wrap Toggle overflow Note
If the entry is passivated then theDataContainerwill returnFalse, regardless of the key's presence.
16.7. Distributed Execution Example
- As shown below, the area of a square is:Area of a Square (S) = 4r 2
- The following is an equation for the area of a circle:Area of a Circle (C) = π x r 2
- Isolate r 2 from the first equation:r 2 = S/4
- Inject this value of r 2 into the second equation to find a value for Pi:C = Sπ/4
- Isolating π in the equation results in:C = Sπ/44C = Sπ4C/S = π

Figure 16.1. Distributed Execution Example
Example 16.6. Distributed Execution Example
Chapter 17. Data Interoperability
17.1. Interoperability Between Library and Remote Client-Server Endpoints
- store and retrieve data in a local (embedded) way
- store and retrieve data remotely using various endpoints
17.2. Using Compatibility Mode
- all endpoints configurations specify the same cache manager
- all endpoints can interact with the same target cache
17.3. Protocol Interoperability
The compatibility element's enabled parameter is set to true or false to determine whether compatibility mode is in use.
Example 17.1. Compatibility Mode Enabled
<cache-container name="local" default-cache="default" statistics="true">
<local-cache name="default" start="EAGER" statistics="true">
<compatibility enabled="true"/>
</local-cache>
</cache-container>
<cache-container name="local" default-cache="default" statistics="true">
<local-cache name="default" start="EAGER" statistics="true">
<compatibility enabled="true"/>
</local-cache>
</cache-container>Use a configurationBuilder with the compatibility mode enabled as follows:
ConfigurationBuilder builder = ... builder.compatibility().enable();
ConfigurationBuilder builder = ...
builder.compatibility().enable();
The compatibility element's enabled parameter is set to true or false to determine whether compatibility mode is in use.
<namedCache name="compatcache"> <compatibility enabled="true"/> </namedCache>
<namedCache name="compatcache">
<compatibility enabled="true"/>
</namedCache>17.3.1. Use Cases and Requirements
| Use Case | Client A (Reader or Writer) | Client B (Write/Read Counterpart of Client A) |
|---|---|---|
| 1 | Memcached | Hot Rod Java |
| 2 | REST | Hot Rod Java |
| 3 | Memcached | REST |
| 4 | Hot Rod Java | Hot Rod C++ |
| 5 | Embedded | Hot Rod Java |
| 6 | REST | Hot Rod C++ |
| 7 | Memcached | Hot Rod C++ |
Person instance, it would use a String as a key.
Client A Side
- A uses a third-party marshaller, such as Protobuf or Avro, to serialize the
Personvalue into a byte[]. A UTF-8 encoded string must be used as the key (according to Memcached protocol requirements). - A writes a key-value pair to the server (key as UTF-8 string, the value as byte arrays).
Client B Side
- B must read a
Personfor a specific key (String). - B serializes the same UTF-8 key into the corresponding byte[].
- B invokes
get(byte[]) - B obtains a byte[] representing the serialized object.
- B uses the same marshaller as A to unmarshall the byte[] into the corresponding
Personobject.
Note
- In Use Case 4, the Protostream Marshaller, which is included with the Hot Rod Java client, is recommended. For the Hot Rod C++ client, the Protobuf Marshaller from Google (https://developers.google.com/protocol-buffers/docs/overview) is recommended.
- In Use Case 5, the default Hot Rod marshaller can be used.
17.3.2. Protocol Interoperability Over REST
application/x-java-serialized-object, application/xml, or application/json. Any other byte arrays are treated as application/octet-stream.
Chapter 18. Near Caching
get or getVersioned operations.
Note
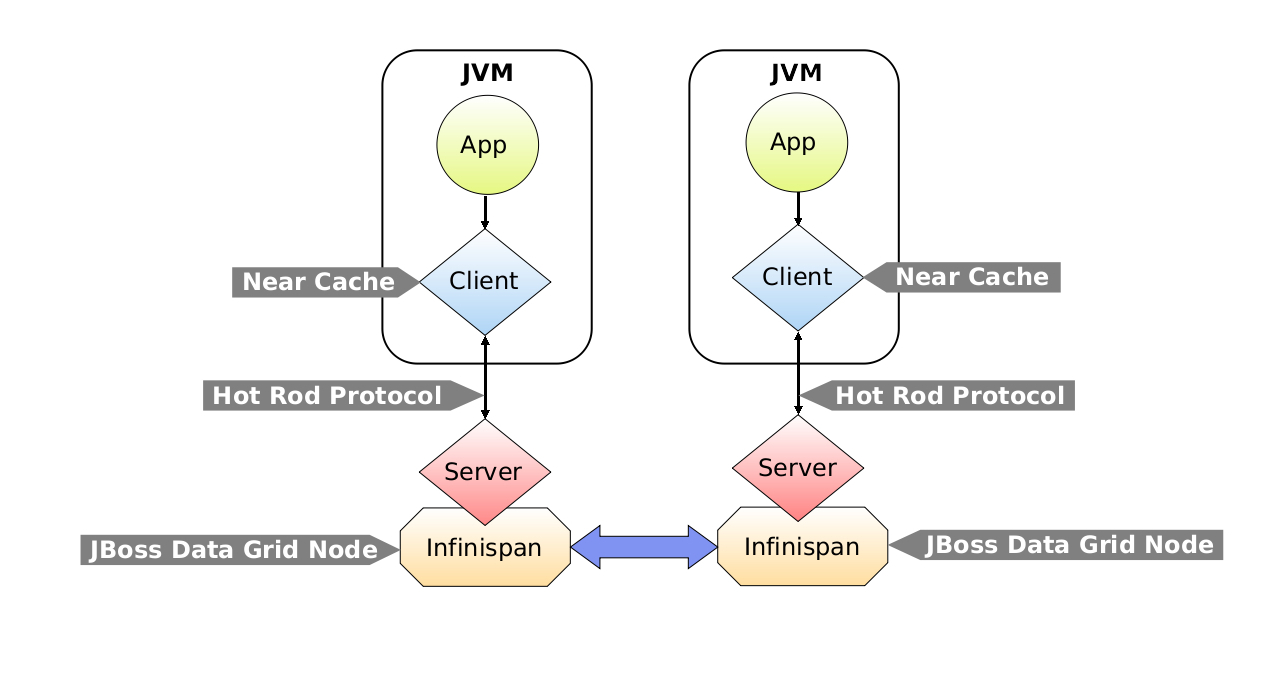
Figure 18.1. Near Caching Architecture
18.1. Lazy and Eager Near Caches
- Lazy Near Cache
- Entries are only added to lazy near caches when they are received remotely via
getorgetVersioned. If a cache entry is modified or removed on the server side, the Hot Rod client receives the events, which then invalidate the near cache entries by removing them from the near cache. This is an efficient way of maintaining near cache consistency as the events sent back to the client only contain key information. However, if a cache entry is retrieved after being modified the Hot Rod client must then retrieve it from the remote server. - Eager Near Cache
- Eager near caches are eagerly populated as entries are created on the server. When entries are modified, the latest value is sent along with the notification to the client, which stores it in the near cache. Eager caches are also populated when an entry is retrieved remotely, provided it is not already present. Eager near caches have the advantage of reducing the cost of accessing the server by having newly created entries present in the near cache before requests to retrieve them are received.Eager near caches also allow modified entries that are re-queried by the client to be fetched directly from the near cache. The drawback of using eager near caching is that events received from the server are larger in size due to shipping value information, and entries may be sent to the client that will not be queried.
Warning
Although the eager near caching setting is provided, it is not supported for production use, as with high number of events, value sizes, or clients, eager near caching can generate a large amount of network traffic and potentially overload clients. For production use, it is recommended to use lazy near caches instead.
18.2. Configuring Near Caches
NearCacheMode enumeration.
Example 18.1. Configuring Lazy Near Cache Mode
Example 18.2. Configuring Eager Near Cache Mode
Note
Example 18.3. Configuring Near Cache Maximum Size
import org.infinispan.client.hotrod.configuration.ConfigurationBuilder; ... ConfigurationBuilder builder = new ConfigurationBuilder(); builder.nearCache().maxEntries(100);
import org.infinispan.client.hotrod.configuration.ConfigurationBuilder;
...
ConfigurationBuilder builder = new ConfigurationBuilder();
builder.nearCache().maxEntries(100);Note
18.3. Near Caches Eviction
ReentrantReadWrite lock to deal with concurrent updates.
18.4. Near Caches in a Clustered Environment
Appendix A. Revision History
| Revision History | |||||
|---|---|---|---|---|---|
| Revision 6.5.0-4 | Thu Oct 29 2015 | ||||
| |||||
| Revision 6.5.0-3 | Mon Sep 14 2015 | ||||
| |||||
| Revision 6.5.0-2 | Mon June 01 2015 | ||||
| |||||
| Revision 6.5.0-1 | Fri 29 May 2015 | ||||
| |||||
| Revision 6.5.0-0 | Thu 15 Jan 2015 | ||||
| |||||