BRMS Getting Started Guide
For JBoss Administrators
Edition 5.3.1
Abstract
Preface
Chapter 1. Introduction
1.1. JBoss Enterprise Business Rules Management System Platform
Chapter 2. Installation
2.1. Installation Options
2.2. Installing the Standalone Package
Procedure 2.1. Installing the Standalone Package
- Download the standalone package zip file from the Red Hat Customer Support Portal at https://access.redhat.com. Select → → , then select the version. The current version is
5.3.0, these instructions use the package names for 5.3.0 but also apply to earlier versions except where noted. - Extract the contents of the standalone zip archive to install the server. This creates the
brms-standalone-5.3.0directory which includes an installation of JBoss Enterprise Application Platform with JBoss Enterprise BRMS Platform deployed.Note
JBoss Enterprise BRMS Platform 5.3.0 is deployed to either thedefaultorproductionprofiles. This guide uses thedefaultprofile. - Enable Users. The default configuration uses the BRMS JAAS application profile. This profile stores user names and passwords in the
brms-standalone-5.3.0/jboss-as/server/default/conf/props/brms-users.propertiesfile.Users are added by adding entries to this file in the formatusername=password. Entries can be commented out by adding a hash character (#) to the beginning of the line.#admin=password jsmith=s@r@hSm1th tandrews=pp3rrss0nn3ll
#admin=password jsmith=s@r@hSm1th tandrews=pp3rrss0nn3llCopy to Clipboard Copied! Toggle word wrap Toggle overflow Refer to the BRMS Administration Guide for information about changing the JAAS profile to one that supports a different authentication system, such as LDAP. - The default configurations use embedded databases that are not suitable or supported for production environments. Before deploying into a production environment this configuration must be changed to a supported database. Please refer to the BRMS Administration Guide for database configuration instructions.
- Start the server from the command line with the
run.shcommand on a UNIX or Linux system, orrun.baton a Microsoft Windows system../run.sh -c default
[localhost ]$ ./run.sh -c defaultCopy to Clipboard Copied! Toggle word wrap Toggle overflow Therun.shandrun.batscripts are located in thebindirectory.For example, the full path to the bin directory for the BRMS 5.3.0 standalone server isbrms-standalone-5.3.0/jboss-as/bin/.After successfully starting a message is displayed on the command line reporting how long it took the server to start.
2.3. Installing the Deployable Package
- JBoss Enterprise Application Platform 5.1.2, 5.2.0, and 6.0.0
- JBoss Enterprise SOA Platform 5.3.0
- JBoss Enterprise Web Server 1.0.2 and 2.0.0
Procedure 2.2. Installing the Deployable Package
- Download the deployable package zip file from the Red Hat Customer Support Portal at https://access.redhat.com.Select → → , and then select the version and choose the deployable package.Users installing to JBoss Enterprise Application Platform 6 should download the package that includes EE6 as part of the filename. All other users should download the package that does not include EE6 as part of the filename.
- Extracting the downloaded archive creates the following zip archives:
jboss-brms-engine.zipjboss-brms-manager.zipjboss-jbpm-console.zipjboss-jbpm-engine.zipmodeshape.zip
Modeshape is a Java Content Repository (JCR) that is included in JBoss Enterprise BRMS 5.3.1 as a technical preview; see the BRMS Administration Guide for further details. - Extract
jboss-brms.warfrom thejboss-brms-manager.ziparchive and copy to the application server's deploy directory.The deploy directories are as follow:- JBoss Enterprise Application Platform 5.x:
jboss-as/server/profile/deploy/ - JBoss Enterprise Application Platform 6.0:
jboss-eap-6.0/standalone/deployments/ - JBoss Enterprise SOA Platform:
jboss-esb/server/profile/deploy/ - JBoss Enterprise Web Server 1:
tomcat6/webapps/ - JBoss Enterprise Web Server 2:
tomcat7/webapps/
- Extract
business-central.war,business-central-server.war,designer.war, andjbpm-human-task.warfrom thejboss-jbpm-console.ziparchive and copy to the application server's deploy directory as above. - JBoss Enterprise Web Server users must remove the
.warextension from the name of the war archives. After the archives have been renamed thewebapps/directory should contains the following subdirectories:- jboss-brms
- business-central
- business-central-server
- designer
- jbpm-human-task
- JBoss Enterprise Application Platform 6 users must create the following empty files in the
jboss-eap-6.0/standalone/deployments/directory:- jboss-brms.war.dodeploy
- business-central.war.dodeploy
- business-central-server.war.dodeploy
- designer.war.dodeploy
- jbpm-human-task.war.dodeploy
- Extract the
jboss-jbpm-engine.zipdirectory and copy thenetty.jarfile fromjboss-jbpm-engine/lib/into a directory that will be on the classpath.- JBoss Enterprise Application Platform 5:
common/lib/ - JBoss Enterprise SOA Platform 5.x:
common/lib/ - JBoss Enterprise Web Server 1:
tomcat6/lib/ - JBoss Enterprise Web Server 2:
tomcat7/lib/
Note
Both JBoss Enterprise Application Platform 5.x and JBoss Enterprise SOA Platform include a netty.jar file; however, JBoss Enterprise BRMS requires the specific version of netty.jar that is included with the JBoss Enterprise BRMS download.JBoss Enterprise Application Platform 6 users do not need to extract netty.jar from thejboss-jbpm-engine.zipdirectory. Instead, edit thejboss-eap-6.0/standalone/configuration/standalone.xmlfile so that the application server will load the required netty library.Update the"urn:jboss:domain:ee:1.1"subsystem property to match the following code snippet:Copy to Clipboard Copied! Toggle word wrap Toggle overflow - When deploying to JBoss Enterprise Web Server, copy the
antlr,common-collections,dom4j,javassist,jta,hibernate,log4j, andslf4jjar files from thejboss-jbpm-engine/lib/directory to the application server'slibdirectory.- JBoss Enterprise Web Server 1:
tomcat6/lib/ - JBoss Enterprise Web Server 2:
tomcat7/lib/
- The default configurations use embedded databases that are not suitable or supported for production environments. Before deploying into a production environment, this configuration must be changed to a supported database. Please refer to the BRMS Administration Guide for database configuration instructions.
2.4. Installing on JBoss Enterprise Application Platform 6
Procedure 2.3. Installing the Deployable Package
- Download the deployable package zip file from the Red Hat Customer Support Portal at https://access.redhat.com.Select → → → .
- Extracting the downloaded archive creates the following zip archives:
jboss-brms-engine.zipjboss-brms-manager-ee6.zipjboss-jbpm-console-ee6.zipjboss-jbpm-engine.zipmodeshape.zip
Modeshape is a Java Content Repository (JCR) that is included in JBoss BRMS 5.3 as a technical preview, see the BRMS Administration Guide for further details. - Extract
jboss-brms.warfrom thejboss-brms-manager.ziparchive and copy to thejboss-eap-6.0/standalone/deployments/directory. - Extract
business-central.war,business-central-server.war,desginer.war, andjbpm-human-task.warfrom thejboss-jbpm-console-ee6.ziparchive and copy to thejboss-eap-6.0/standalone/deployments/directory. - Create the following empty files in the
jboss-eap-6.0/standalone/deployments/directory:- jboss-brms.war.dodeploy
- business-central.war.dodeploy
- business-central-server.war.dodeploy
- desginer.war.dodeploy
- jbpm-human-task.war.dodeploy
- Edit the
jboss-eap-6.0/standalone/configuration/standalone.xmlfile so that the application server will load the required netty library.Update the"urn:jboss:domain:ee:1.1"subsystem property to match the following code snippet:Copy to Clipboard Copied! Toggle word wrap Toggle overflow - Edit the name of the datebase in
jboss-eap-6.0/standalone/configuration/standalone.xmlchanging it tojbpmDS:Copy to Clipboard Copied! Toggle word wrap Toggle overflow Note
The included H2 database is not supported. It is provided for demonstration purposes only and must be changed to a supported database. Please refer to the JBoss BRMS 5 Administration Guide for database configuration instructions.
2.5. Configuring Authentication
jmx-console JAAS application profile. If deploying to an existing application server, it is possible that this profile has already been modified. In that case, refer to the application server documentation for instructions on adding new users. To change the default authentication, or add additional users, refer to the JBoss Enterprise BRMS Administrator Guide.
When deploying to JBoss Enterprise Application Platform 5.x or JBoss Enterprise SOA Platform, add the login module policy to server/profile/login-config.xml. The org.jboss.security.auth.spi.UsersRolesLoginModule in the example below is provided as an example only.
When deploying to JBoss Enterprise Application Platform 6, edit the jaas-config-name property in jboss-eap-6.0/standalone/deployments/jboss-brms.war/WEB-INF/components.xml to brms:
<security:identity authenticate-method="#{authenticator.authenticate}" jaas-config-name="brms"/>
<security:identity authenticate-method="#{authenticator.authenticate}" jaas-config-name="brms"/>
When deploying to JBoss Enterprise Web Server, create a jaas.config file, and add the login module policy. The org.jboss.security.auth.spi.UsersRolesLoginModule in the example below is provided as an example only.
brms {
org.jboss.security.auth.spi.UsersRolesLoginModule required debug=true;
};
brms {
org.jboss.security.auth.spi.UsersRolesLoginModule required debug=true;
};
- JBoss Enterprise Web Server 1:
tomcat6/conf/ - JBoss Enterprise Web Server 2:
tomcat7/conf
Note
jbosssx.jar from the JBoss Enterprise standalone download. Copy the jbosssx.jar file from the standalone download jboss-as/lib/ to the tomcat6/lib/ directory.
tomcat/6/bin/catalina.sh file and search for the following line:
----- Execute The Requested Command ------
# ----- Execute The Requested Command ------JAVA_OPTS="$JAVA_OPTS -Xms1303m -Xmx1303m -XX:MaxPermSize=512m -Djava.security.auth.login.config=$CATALINA_BASE/conf/jaas.config"
JAVA_OPTS="$JAVA_OPTS -Xms1303m -Xmx1303m -XX:MaxPermSize=512m -Djava.security.auth.login.config=$CATALINA_BASE/conf/jaas.config"2.6. Adding Users
username=password
username=passwordusername=JBossAdmin,httpInvoker,user,admin
username=JBossAdmin,httpInvoker,user,adminbrms-users.properties file for usernames and passwords and brms-roles.properties to define roles.
users.properties file for usernames and passwords and roles.properties to define roles. JBoss Enterprise Web Server users must also add the username, passwords, and roles to the tomcat6/conf/tomcat-users.xml file:
Note
- JBoss Enterprise Application Platform 5.x:
jboss-as/server/profile/conf/props/ - JBoss Enterprise SOA Platform:
jboss-esb/server/profile/conf/props/ - JBoss Enterprise Web Server 1:
tomcat6/lib/ - JBoss Enterprise Web Server 2
tomcat7/lib/ - JBoss Enterprise Application Platform 6:
jboss-eap-6.0/standalone/configuration/
brms-users.properties and brms-roles.properties by editing the jboss-eap-6.0/standalone/configuration/standalone.xml by adding the following XML:
2.7. Password Configuration for JAAS
brms-users.properties file, they also need to be synchronized for the Process Designer and Business Central Console.
Procedure 2.4. Synchronizing Usernames and Passwords
- Process Designer: To edit the usernames and passwords for the Process Designer, which is a separate application integrated with JBoss Enterprise BRMS, open the
designer.war/profiles/jbpm.xmlfile and edit theusrandpwdproperties:usr="admin" pwd="admin"
usr="admin" pwd="admin"Copy to Clipboard Copied! Toggle word wrap Toggle overflow - Business Central Console. To edit the usernames and passwords for the Business Central Console, open the
business-central-server.war/WEB-INF/classes/jbpm.console.propertiesfile and edit theguvnor.usrandguvnor.pwdproperties:guvnor.usr=admin guvnor.pwd=admin
guvnor.usr=admin guvnor.pwd=adminCopy to Clipboard Copied! Toggle word wrap Toggle overflow
2.8. Configuring Business Process Management
Procedure 2.5. Configuring Business Process Management
- Configure the human task server by editing
web.xml, which is located injbpm-human-task.war/WEB-INF/. The human task server defaults to HornetQ.web.xmlis annotated with instructions. If further information is required, please refer to the Human Tasks chapter of the JBoss BRMS Business Process Management Guide. - Configure the Business Central Console by editing the
jbpm.console.propertiesfile, which is located in thebusiness-central-server.war/WEB-INF/classes/directory. Thisjbpm.console.propertiesfile allows users to configure the console host and port number, task server connectivity, and repository connectivity. Refer to the Business Central Console chapter of the JBoss BRMS Business Process Management Guide for further details. - Configure the process designer by editing the
jbpm.xmlfile, which is located in thedesigner.war/profiles/directory. Thejbpm.xmlfile allows users to set the host and port number, username and password. Refer to the Process Designer chapter of the JBoss BRMS Business Process Management Guide for further details.
2.9. Starting the Server
run.sh command on a Unix or Linux system, or run.bat command on a Microsoft Windows system.
standalone.sh command.
startup.sh command on a UNIX or Linux system or startup.bat command on a Microsoft Windows system.
./run.sh -c default
[localhost ]$ ./run.sh -c default2.10. Clustering the Business Central Console
Procedure 2.6. Installing the Business Central Console as a Cluster
- Download the JBoss BRMS standalone package file from the Red Hat Customer Support Portal at https://access.redhat.com. Select → → and then select the version.
- Copy the downloaded archive onto the host where the JBoss BRMS engine, user interface, repository, and process designer will be installed. Extract the contents of the standalone zip archive to install the server. This creates the
brms-standalone-5.3.1directory which includes an installation of JBoss Enterprise Application Platform with JBoss Enterprise BRMS Platform deployed. - Remove the following directories:
jbpm-console.war,business-central-server.war, andjbpm-human-task.warfromjboss-as/server/default/deploy/as they will be deployed on other hosts. If theproductionprofile is being used, remove the directories fromjboss-as/server/production/deploy/. - Edit the
preferences.propertiesfile located injboss-brms.war/WEB-INF/classes/by replacing the wordlocalhostwith the host's IP address for both thedesigner.urlandguvnor.urlproperties. - Edit the
jbpm.xmlfile located indesigner.war/profilesby replacing the wordlocalhostwith the host's IP address for theexternalloadurlproperty. - Copy the downloaded JBoss BRMS standalone archive onto the hosts where the Business Central Console and engine will be installed. Extract the contents of the standalone zip archive.
- Remove the following directories
jboss-brms.waranddesigner.warfromjboss-as/server/default/deploy/as they have already been installed on the first host and are not required. If theproductionprofile is being used, remove the directories fromjboss-as/server/production/deploy/. - Edit the
jbpm.console.propertiesfile, located inbusiness-central-server.war/WEB-INF/classes/, by replacing the word localhost from theguvnor.hostproperty with the IP address of the first host created in this procedure. This tells the current host where to locate the BRMS repository which is shared across the cluster. - Add the current host's IP address to the
jbpm.console.server.hostproperty. This should be done for each node in the cluster where the Business Central Console will be installed. - Update the
persistence.xmlfile located in bothbusiness-central-server/WEB-INF/classes/META-INF/andjbpm-human-task.war/WEB-INF/classes/META-INF/to include the data source.<jta-data-source>java:/myDataSource</jta-data-source>
<jta-data-source>java:/myDataSource</jta-data-source>Copy to Clipboard Copied! Toggle word wrap Toggle overflow Remove the following line frompersistence.xmlin both directories:<property name="hibernate.dialect" value="org.hibernate.dialect.HSQLDialect"/>
<property name="hibernate.dialect" value="org.hibernate.dialect.HSQLDialect"/>Copy to Clipboard Copied! Toggle word wrap Toggle overflow Edit the following line to include the valueupdate:<property name="hibernate.hbm2ddl.auto" value="update" />
<property name="hibernate.hbm2ddl.auto" value="update" />Copy to Clipboard Copied! Toggle word wrap Toggle overflow - Start each of the nodes in the cluster with the following command, remembering to provide the partition name, UDP multicast address address, and host IP address:
./run.sh -c node1 -g partitionName -Djboss.messaging.ServerPeerID=1 -u UDPMulticastAddress -b hostIPAddress
./run.sh -c node1 -g partitionName -Djboss.messaging.ServerPeerID=1 -u UDPMulticastAddress -b hostIPAddressCopy to Clipboard Copied! Toggle word wrap Toggle overflow
2.11. Logging On
Procedure 2.7. Logging on
- Log on to the BRMS user interface by pointing a web browser to http://localhost:8080/jboss-brms and entering the user credentials created when enabling users.If this is the first log on, a prompt will ask if a sample repository should be installed. The sample rules are useful for training, testing and demonstrative proposes.
- Log on to Business Central Console by pointing a web browser to http://localhost:8080/business-central and entering the user credentials created when enabling users. The Business Central Console allows users to manage business processes.
Chapter 3. User Authorization
3.1. Enabling Role-Based Authorization
Procedure 3.1. Enable Role-Based Authorization
- Before enabling role-based authorization, it is necessary to assign one trusted user the admin role.
- From the JBoss Enterprise BRMS web user interface navigation panel, select → .
- Click Create new user mapping and enter the name of the user to be granted Admin permissions. Note, this user must already exist in the
brms-users.propertiesfile. - Click Open next to the username whose permissions are being changed.
- Click the plus icon to add permissions, and select admin, click OK, and click Save changes.After the system has saved the changes Yes will be displayed under Administrator.
- Shut down the application server before making these changes.
- Open the
jboss-as/server/production/deploy/jboss-brms.war/WEB-INF/components.xmlfile in a text editor. - In the default
components.xmlfile, locate the following code and replacefalsewith true:<component name="org.jboss.seam.security.roleBasedPermissionResolver"> <property name="enableRoleBasedAuthorization">false</property> </component>
<component name="org.jboss.seam.security.roleBasedPermissionResolver"> <property name="enableRoleBasedAuthorization">false</property> </component>Copy to Clipboard Copied! Toggle word wrap Toggle overflow Note
In versions 5.1 and earlier, locate and edit the following XML replacing false with true:<security:role-based-permission-resolver enable-role-based-authorization="false"/<
<security:role-based-permission-resolver enable-role-based-authorization="false"/<Copy to Clipboard Copied! Toggle word wrap Toggle overflow - Restart the application server.
- Log back into the BRMS web user interface. From the navigation panel, select → and assign users roles as required.
- Click Open next to the username whose permissions are being changed. Select the required role for the user, click OK, and click Save changes.
Note
Users can be assigned more than one role.Users assigned the admin role can modify the roles and permissions of other users.
Chapter 4. JBoss Developer Studio
4.1. JBoss Developer Studio
4.2. Installing the JBoss Developer Studio Plug-ins
Procedure 4.1. Install the Drools and jBPM JBoss Developer Studio Plug-in
- Start JBoss Developer Studio.
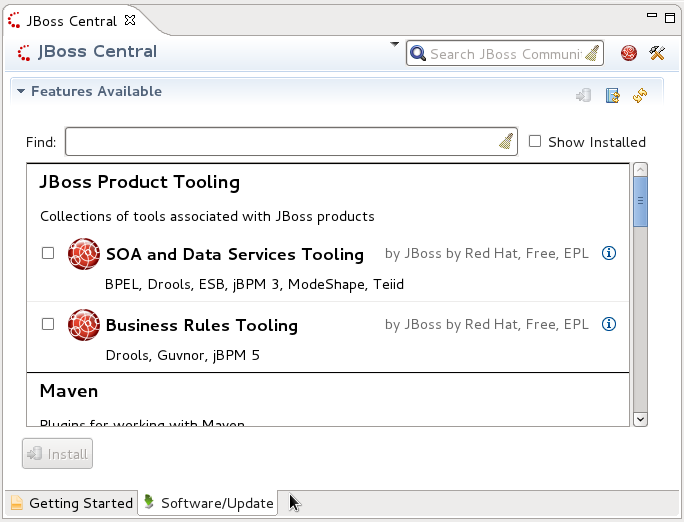
- From the welcome page, select Get started with JBoss Central.
- Select Software/Update from JBoss Central.
Figure 4.1. JBoss Central Software/Update
- Select Business Rules Tooling and click Install.
- Review the installation details and click Next and then Next again.
- Read the license and accept it by selecting the appropriate radio button, and click Finished.
- After installation of the plug-ins has completed, restart JBoss Developer Studio.
4.3. Setting the Drools and jBPM Runtimes
Procedure 4.2. Configure Drools Runtime
- From the JBoss Developer Studio menu, select Preferences.
- Select → .
- Click Add...; provide a name for the new runtime, and click Browse to navigate to the directory where the drools runtime is located. For instance, in the BRMS 5.3.1 standalone installation, the drools runtime is located
brms-standalone-5.3.1/jboss-as/client/drools/. - Click OK and select the new runtime. A dialogue box will indicate JBDS must be restarted to update the Runtime.
Procedure 4.3. Configure jBPM Runtime
- From the JBoss Developer Studio menu, select Preferences.
- Select → .
- Click Add..., provide a name for the new runtime, and click Browse to navigate to the directory where the jBPM runtime is located. For instance, in the BRMS 5.3 standalone installation the jBPM runtime is located
brms-standalone-5.3.1/jboss-as/client/jbpm/. - Click OK and select the new runtime. A dialogue box will indicate JBDS must be restarted to update the Runtime.
4.4. Configuring the JBoss BRMS Server
Procedure 4.4. Configure the Server
- Open the Drools view by selecting → → and select Drools and click OK.
- Add the server view by selecting → → and select → .
- Open the server menu by right clicking the Servers panel and select → .
- Define the server by selecting → .
- Set the home directory by clicking the Add... link next to Server runtime environment.Provide a name for the server in the Name field.Click Browse to set the Home Directory; navigate to the BRMS installation and select the
jboss-asdirectory.Select the server profileProductionfrom the configuration options and click Finish and then Finish again.
4.5. JBoss Developer Studio Perspectives
- Drools
- Guvnor Repository Exploring
- jBPM
4.6. Connecting JBoss Developer Studio to the Asset Repository
Procedure 4.5. Connect JBDS to the Asset Repository
- Start the JBoss BRMS server by selecting the server from the server tab and click the start icon.
- Open the Guvnor repository by selecting → → .Select → and click OK.
- Add the Guvnor connection by selecting Add a Guvnor repository connection icon from the Guvnor Repository view.
- Confirm the repository details displayed are correct.Enter the Guvnor username and password and click Finish.
The JBoss Developer Studio preferences for the Guvnor plug-ins allows user to choose whether or not to save authentication information when connecting to a Guvnor repository, and it allows users to define a Guvnor URL template for creating new connections.
4.7. Working with Guvnor Files Locally
Importing Guvnor Repository Resources
- Select → → → .
- Select the repository connection.
- Select the resources to be copied.
- Select the target location in the local workspace.
- Update Action:
- The Update action is available for one or more Guvnor resources that are not synchronized with the Guvnor repository master copies. These files would be out of synchronization due to one or both of the following conditions:
- There are local changes to the resources.
- The master copies have been changed in the Guvnor repository.
Performing the Update action replaces the contents of the local file with the contents of the associated master copies in the Guvnor repository. - Add Action:
- The Add action adds a local file that is not associated with a Guvnor repository master copy to the Guvnor repository.
- Commit Action:
- The Commit action is enabled for one or more Guvnor repository associated files that have local changes. The Commit action will write the local changes back to the associated Guvnor repository files and update the association for the new revision.If a local change is based on an older revision of a file than is currently in the Guvnor repository (for example, someone else changed the same file), then the Commit action will ask whether you wish to overwrite the current version in the Guvnor repository with the local content. When such conflicts occur, you should use the Eclipse Guvnor version tools, along with Eclipse standard tools, to determine the differences and merge content based on the current version in the Guvnor repository.
- Show History Action:
- The Show History action shows a file's revision history.
- Compare with Version Action:
- The Compare With Version action opens a wizard that allows versions of a file to be compared for changes.
- Switch to Version Action:
- The Switch to Version action replaces the current version of a file with the selected version from the revision history.
- Delete Action:
- The Delete action removes the files in the Guvnor repository and deletes local metadata for the Guvnor repository association.
- Disconnect Action:
- The Disconnect action is enabled for one or more Guvnor repository associated files, and it removes local metadata for the Guvnor repository association.
The JBoss Developer Studio preferences for the Guvnor plug-ins allows user to set decoration preferences for local Guvnor resources to identify changes to local files.
Chapter 5. JBoss Developer Studio and JBoss BRMS Examples
5.1. Creating a New Package
Procedure 5.1. Creating a New Package
- Start the server if it is not already running.
- Log on to the user interface at http://localhost:8080/jboss-brms/org.drools.guvnor.Guvnor/Guvnor.html
- From the navigation panel, select Knowledge Bases and then select → .
- Enter a name and a description for the new package and click Create Package.
5.2. JBoss Central
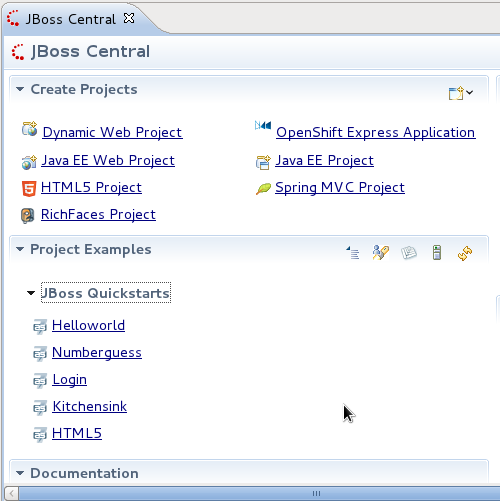
Figure 5.1. JBoss Central
5.3. Creating a jBPM Project
Procedure 5.2. Creating a New JBDS Project
- From the main menu select → → .Select → .
- Enter a name for the project into the Project name: text box and click Next.
Note
JBDS provides the option to add a sample HelloWorld Process to the project. Accept this default to test the sample project in the next step. - To test the project, right click the Java file that contains the main method and select → → .The output will be displayed in the console tab.
Procedure 5.3. Add the jBPM Project to JBoss BRMS
- From the navigation panel, locate the sample.bpmn file.The sample.bpmn file is located by opening the test jBPM projectv and navigating to
src/main/resources/. - Right click the file and select → and click Next; expand the repository displayed to locate the package the file should be added to and click Finish.
- View the process or rule in BRMS by logging onto the BRMS user interface.From the navigation panel, select Knowledge Bases and expand the package explorer to locate the package.Select Processes and click Open from the list of processes.
5.4. Creating a Drools Project
Procedure 5.4. Creating a New JBDS Project
- From the main menu, select → → .Select → .
- Enter a name for the project into the Project name: text box and click Next.
Note
JBDS provides the option to add a sample HelloWorld Rule file to the project. Accept this default to test the sample project in the next step. - To test the project, right click the Java file that contains the main method and select → → .The output will be displayed in the console tab.
- From the navigation panel locate the sample.bpmn or sample.drl file.The sample.drl file is located by opening the test drools project and navigating to
src/main/rules/. - Right click the file and select → and click Next; expand the repository displayed to locate the package the file should be added to and click Finish.
- View the process or rule by logging onto the BRMS user interface.From the navigation panel, select Knowledge Bases and expand the package explorer to locate the package.Select Technical rule assets and click Open from the list of rules.
Appendix A. Revision History
| Revision History | |||
|---|---|---|---|
| Revision 5.3.1-24.400 | 2013-10-31 | ||
| |||
| Revision 5.3.1-24 | Tue Jun 11 2013 | ||
| |||