Managing projects in Business Central
Abstract
Preface
As a process administrator, you can use Business Central in Red Hat Decision Manager to manage new, sample, and imported projects on a single or multiple branches.
Prerequisites
- Red Hat JBoss Enterprise Application Platform 7.2 is installed. For details, see the Red Hat JBoss Enterprise Application Platform 7.2 Installation Guide.
- Red Hat Decision Manager is installed and configured with Decision Server. For more information, see Installing and configuring Red Hat Decision Manager on Red Hat JBoss EAP 7.2.
-
Red Hat Decision Manager is running and you can log in to Business Central with the
developerrole. For more information, see Planning a Red Hat Decision Manager installation.
Chapter 1. Red Hat Decision Manager projects
Red Hat Decision Manager projects contain the business assets that you develop in Red Hat Decision Manager and are assigned to a space (for example, MyProject within MySpace). Projects also contain configuration files such as a Maven project object model file (pom.xml), which contains build, environment, and other information about the project, and a KIE module descriptor file (kmodule.xml), which contains the KIE Base and KIE Session configurations for the assets in the project.
Chapter 2. Modifying existing projects in Business Central
Business Central includes a number of sample projects that you can use to get familiar with the product and its features. The sample projects have been designed and created to demonstrate a variety of business scenarios. You can modify the sample projects to meet your specific business needs. For example, Red Hat Decision Manager 7.3 contains the Mortgages sample project, which consists of predefined data objects, guided decision tables, guided rules, forms, and a business process. You can edit the sample to refine your business process.
If none of the existing Business Central project samples align with your requirements, you can create a new project or import one from a Git repository. For more information, see Chapter 4, Importing projects from Git repositories. You can import any other project from Git. For example, a project that was developed in another Business Central instance.
Chapter 3. Creating a project
A project can contain data models, business processes, business rules, forms or any other assets that are specific to your project’s requirements. When you create a project in Business Central it is added to the Git repository that is connected to your Red Hat Decision Manager installation.
Procedure
- In Business Central, go to Menu → Design → Projects.
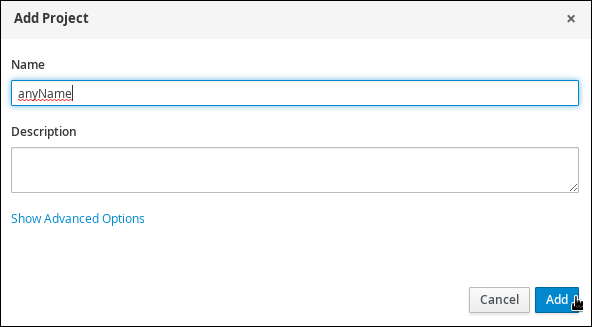
- Click Add Project.
Type
anyNamein the Name field of the Add Project window and click Add. WhereanyNameis any name that you want to name the new project.Figure 3.1. Add the
anyNameproject
The Assets view of the project opens when you successfully create the project.
3.1. Modifying the Mortgages sample project
The Mortgages sample project consists of predefined data objects, guided decision tables, guided rules, forms, and a business process. Using the sample project provides a quick way to get acclimated with Red Hat Decision Manager. In a real business scenario, you would create all of the assets by providing data that is specific to your business requirements.
Navigate to the Mortgages sample project to view the predefined assets.
Procedure
- In Business Central, go to Menu → Design → Projects.
-
Click
 in the upper-right corner of the screen and select Try Samples.
- Select Mortgages and click Ok. The Assets view of the project opens.
- Click on an asset that you want to modify. All of the assets can be edited to meet your project requirements.
Chapter 4. Importing projects from Git repositories
Git is a distributed version control system. It implements revisions as commit objects. When you save your changes to a repository, a new commit object in the Git repository is created.
Business Central uses Git to store project data, including assets such as rules and processes. When you create a project in Business Central, it is added to a Git repository that is connected to Business Central. If you have projects in Git repositories, you can import those projects into the Business Central Git repository through Business Central spaces.
Prerequisites
- Red Hat Decision Manager projects exist in an external Git repository.
- Credentials required for read access to that external Git repository are available.
Procedure
- In Business Central, click Menu → Design → Projects.
- Select or create the space into which you want to import the projects. The default space is mySpace.
-
Click
on the right side of the screen and select Import Project.
- In the Import Project window, enter the URL and credentials for the Git repository that contains the project that you want to import and click Import. The project is added to the Business Central Git repository and is available in the created or default space.
Chapter 5. Revising project versions
You can revise the version number of a project in Red Hat Decision Manager before you build and deploy a new instance of the project. Creating a new version of a project preserves the old version in case there is a problem with the new one and you need to revert back.
Prerequisites
The Decision Server is deployed and connected to the Business Central.
Procedure
- In Business Central, go to Menu → Design → Projects.
- Click on the project you want to deploy, for example Mortgages.
Click Deploy.
- If there is no container with the project name, a container with default values is automatically created.
If an older version of the project is already deployed, go to the project settings and change the project version. When finished, save the change and click Deploy. This will deploy a new version of the same project with the latest changes in place, alongside the older version(s).
NoteYou can also select the Build & Install option to build the project and publish the KJAR file to the configured Maven repository without deploying to a Decision Server. In a development environment, you can click Deploy to deploy the built KJAR file to a Decision Server without stopping any running instances (if applicable), or click Redeploy to deploy the built KJAR file and stop any running instances. The next time you deploy or redeploy the built KJAR, the previous deployment unit (KIE container) is automatically updated in the same target Decision Server. In a production environment, the Redeploy option is disabled and you can click Deploy only to deploy the built KJAR file to a new deployment unit (KIE container) on a Decision Server.
To configure the Decision Server environment mode, set the
org.kie.server.modesystem property toorg.kie.server.mode=developmentororg.kie.server.mode=production. To configure the deployment behavior for a corresponding project in Business Central, go to project Settings → General Settings → Version and toggle the Development Mode option. By default, Decision Server and all new projects in Business Central are in development mode. You cannot deploy a project with Development Mode turned on or with a manually addedSNAPSHOTversion suffix to a Decision Server that is in production mode.
-
To verify the deployment, click Menu → Manage → Process Definitions, and click
 .
.
-
Click
in the Actions column and select Start to start a new instance of the process.
Chapter 6. Multiple branches in Business Central
Multiple branches support in Business Central provides the ability to create a new branch based on an existing one, including all of its assets. All new, imported, and sample projects open in the default master branch. You can create as many branches as you need and can work on multiple branches interchangeably without impacting the original project on the master branch.
Red Hat Decision Manager 7.3 includes support for persisting branches, which means that Business Central remembers the last branch used and will open in that branch when you log back in.
6.1. Creating branches
You can create new branches in Business Central and name them whatever you like. Initially, you will only have the default master branch. When you create a new branch for a project, you are making a copy of the selected branch. You can make changes to the project on the new branch without impacting the original master branch version.
Procedure
- In Business Central, go to Menu → Design → Projects.
- Click on the project to create the new branch, for example the Mortgages sample project.
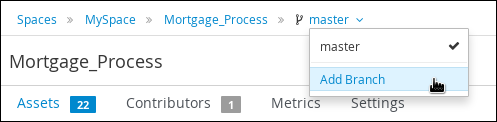
Click master → Add Branch.
Figure 6.1. Create the new branch menu
-
Type
testBranch1in the Name field and select master from the Add Branch window. WheretestBranch1is any name that you want to name the new branch. - Select the branch that will be the base for the new branch from the Add Branch window. This can be any existing branch.
Click Add.
Figure 6.2. Add the new branch window

After adding the new branch, you will be redirected to it, and it will contain all of the assets that you had in your project in the master branch.
6.2. Selecting branches
You can switch between branches to make modifications to project assets and test the revised functionality.
Procedure
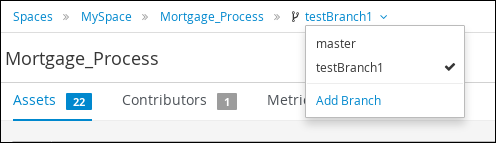
Click on the current branch name and select the desired project branch from the drop-down list.
Figure 6.3. Select a branch menu
After selecting the branch, you are redirected to that branch containing the project and all of the assets that you had defined.
6.3. Deleting branches
You can delete any branch except for the master branch. Business Central does not allow you to delete the master branch to avoid corrupting your environment. You must be in any branch other than master for the following procedure to work.
Procedure
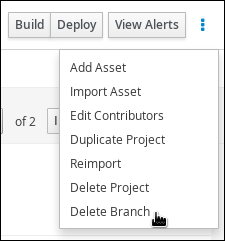
Click
in the upper-right corner of the screen and select Delete Branch.
Figure 6.4. Deleting a branch menu
- Input the branch name to be deleted in the Delete Branch window and click Delete Branch.
6.4. Building and deploying projects
After your project is developed, you can build the project from the specified branch in Business Central and deploy it to the configured Decision Server.
Procedure
- In Business Central, go to Menu → Design → Projects and click the project name.
In the upper-right corner, click Deploy to build the project and deploy it to Decision Server. If the build fails, address any problems described in the Alerts panel at the bottom of the screen. For more information about project deployment options, see Packaging and deploying a Red Hat Decision Manager project.
NoteYou can also select the Build & Install option to build the project and publish the KJAR file to the configured Maven repository without deploying to a Decision Server. In a development environment, you can click Deploy to deploy the built KJAR file to a Decision Server without stopping any running instances (if applicable), or click Redeploy to deploy the built KJAR file and stop any running instances. The next time you deploy or redeploy the built KJAR, the previous deployment unit (KIE container) is automatically updated in the same target Decision Server. In a production environment, the Redeploy option is disabled and you can click Deploy only to deploy the built KJAR file to a new deployment unit (KIE container) on a Decision Server.
To configure the Decision Server environment mode, set the
org.kie.server.modesystem property toorg.kie.server.mode=developmentororg.kie.server.mode=production. To configure the deployment behavior for a corresponding project in Business Central, go to project Settings → General Settings → Version and toggle the Development Mode option. By default, Decision Server and all new projects in Business Central are in development mode. You cannot deploy a project with Development Mode turned on or with a manually addedSNAPSHOTversion suffix to a Decision Server that is in production mode.
Appendix A. Versioning information
Documentation last updated on Wednesday, May 8, 2019.