Configuring and managing replication
Replicating data to other Directory Server instances
Abstract
Providing feedback on Red Hat Directory Server
We appreciate your input on our documentation and products. Please let us know how we could make it better. To do so:
For submitting feedback on the Red Hat Directory Server documentation through Jira (account required):
- Go to the Red Hat Issue Tracker.
- Enter a descriptive title in the Summary field.
- Enter your suggestion for improvement in the Description field. Include links to the relevant parts of the documentation.
- Click Create at the bottom of the dialogue.
For submitting feedback on the Red Hat Directory Server product through Jira (account required):
- Go to the Red Hat Issue Tracker.
- On the Create Issue page, click .
- Fill in the Summary field.
- Select the component in the Component field.
Fill in the Description field including:
- The version number of the selected component.
- Steps to reproduce the problem or your suggestion for improvement.
- Click Create.
Chapter 1. Configuring single-supplier replication using the command line
In a single-supplier replication environment, one writable supplier replicates data to one or multiple read-only consumers. For example, set up single-supplier replication if a suffix receives a large number of search requests but only a small number of write requests. To distribute the load, clients can then search for the suffix on read-only consumers and send write requests to the supplier.
This section assumes that you have an existing Directory Server instance running on a host named supplier.example.com that will act as a supplier in the replication topology to be set up. The procedures describe how to add a read-only consumer named consumer.example.com to the topology, and how to configure single-supplier replication for the dc=example,dc=com suffix.
1.1. Preparing the new consumer using the command line
To prepare the consumer.example.com host, enable replication. This process:
- Configures the role of this server in the replication topology
- Defines the suffix that is replicated
- Creates the replication manager account the supplier uses to connect to this host
Perform this procedure on the consumer that you want to add to the replication topology.
Prerequisites
- You installed the Directory Server instance. For details, see Setting up a new instance on the command line using a .inf file.
-
The database for the
dc=example,dc=comsuffix exists.
Procedure
Enable replication for the
dc=example,dc=comsuffix:dsconf -D "cn=Directory Manager" ldap://consumer.example.com replication enable --suffix "dc=example,dc=com" --role "consumer" --bind-dn "cn=replication manager,cn=config" --bind-passwd "password"
# dsconf -D "cn=Directory Manager" ldap://consumer.example.com replication enable --suffix "dc=example,dc=com" --role "consumer" --bind-dn "cn=replication manager,cn=config" --bind-passwd "password"Copy to Clipboard Copied! Toggle word wrap Toggle overflow This command configures the
consumer.example.comhost as a consumer for thedc=example,dc=comsuffix. Additionally, the command creates thecn=replication manager,cn=configuser with the specified password and allows this account to replicate changes for the suffix to this host.
Verification
Display the replication configuration:
Copy to Clipboard Copied! Toggle word wrap Toggle overflow These parameters indicate:
-
nsDS5ReplicaBindDNspecifies the replication manager account. -
nsDS5ReplicaRootsets the suffix that is replicated. -
nsDS5ReplicaTypeset to2defines that this host is a consumer.
-
1.2. Configuring the existing server as a supplier to the consumer using the command line
To prepare the supplier.example.com host, you need to:
- Enable replication for the suffix.
- Create a replication agreement to the consumer.
- Initialize the consumer.
Perform this procedure on the existing supplier in the replication topology.
Prerequisites
-
You enabled replication for the
dc=example,dc=comsuffix on the consumer.
Procedure
Enable replication for the
dc=example,dc=comsuffix:dsconf -D "cn=Directory Manager" ldap://supplier.example.com replication enable --suffix "dc=example,dc=com" --role "supplier" --replica-id 1
# dsconf -D "cn=Directory Manager" ldap://supplier.example.com replication enable --suffix "dc=example,dc=com" --role "supplier" --replica-id 1Copy to Clipboard Copied! Toggle word wrap Toggle overflow This command configures the
supplier.example.comhost as a supplier for thedc=example,dc=comsuffix, and sets the replica ID of this entry to1.ImportantThe replica ID must be a unique integer between
1and65534for a suffix across all suppliers in the topology.Add the replication agreement and initialize the consumer:
dsconf -D "cn=Directory Manager" ldap://supplier.example.com repl-agmt create --suffix "dc=example,dc=com" --host "consumer.example.com" --port 389 --conn-protocol=LDAP --bind-dn "cn=replication manager,cn=config" --bind-passwd "password" --bind-method=SIMPLE --init example-agreement
# dsconf -D "cn=Directory Manager" ldap://supplier.example.com repl-agmt create --suffix "dc=example,dc=com" --host "consumer.example.com" --port 389 --conn-protocol=LDAP --bind-dn "cn=replication manager,cn=config" --bind-passwd "password" --bind-method=SIMPLE --init example-agreementCopy to Clipboard Copied! Toggle word wrap Toggle overflow This command creates a replication agreement named
example-agreement. The replication agreement defines settings, such as the consumer’s host name, protocol, and authentication information that the supplier uses when connecting and replicating data to this consumer.After the agreement was created, Directory Server initializes
consumer.example.com. Depending on the amount of data to replicate, initialization can be time-consuming.
Verification
Display the replication configuration:
Copy to Clipboard Copied! Toggle word wrap Toggle overflow These parameters indicate:
-
nsDS5ReplicaRootsets the suffix that is replicated. -
nsDS5ReplicaTypeset to3defines that this host is a supplier.
-
Verify whether the initialization was successful:
dsconf -D "cn=Directory Manager" ldap://supplier.example.com repl-agmt init-status --suffix "dc=example,dc=com" example-agreement
Agreement successfully initialized.
# dsconf -D "cn=Directory Manager" ldap://supplier.example.com repl-agmt init-status --suffix "dc=example,dc=com" example-agreement
Agreement successfully initialized.
Copy to Clipboard Copied! Toggle word wrap Toggle overflow Display the replication status:
Copy to Clipboard Copied! Toggle word wrap Toggle overflow Verify the
Replication StatusandLast Update Statusfields.
Troubleshooting
By default, the replication idle timeout for all agreements on a server is 1 hour. If the initialization of large databases fails due to timeouts, set the
nsslapd-idletimeoutparameter to a higher value. For example, to set the parameter to7200(2 hours), enter:dsconf -D "cn=Directory Manager" ldap://supplier.example.com config replace nsslapd-idletimeout=7200
# dsconf -D "cn=Directory Manager" ldap://supplier.example.com config replace nsslapd-idletimeout=7200Copy to Clipboard Copied! Toggle word wrap Toggle overflow To set an unlimited period, set
nsslapd-idletimeoutto0.
Chapter 2. Configuring single-supplier replication using the web console
In a single-supplier replication environment, one writable supplier replicates data to one or multiple read-only consumers. For example, set up single-supplier replication if a suffix receives a large number of search requests but only a small number of write requests. To distribute the load, clients can then search for the suffix on read-only consumers and send write requests to the supplier.
This section assumes that you have an existing Directory Server instance running on a host named supplier.example.com that will act as a supplier in the replication topology to be set up. The procedures describe how to add a read-only consumer named consumer.example.com to the topology, and how to configure single-supplier replication for the dc=example,dc=com suffix.
2.1. Preparing the new consumer using the web console
To prepare the consumer.example.com host, enable replication. This process:
- Configures the role of this server in the replication topology
- Defines the suffix that is replicated
- Creates the replication manager account the supplier uses to connect to this host
Perform this procedure on the consumer that you want to add to the replication topology.
Prerequisites
- You installed the Directory Server instance. For details, see Setting up a new instance using the web console.
-
The database for the
dc=example,dc=comsuffix exists. - You are logged in to the instance in the web console.
Procedure
-
Open the
Replicationmenu. -
Select the
dc=example,dc=comsuffix. - Click .
Select
Consumerin theReplication Rolefield, and enter the replication manager account and the password to create: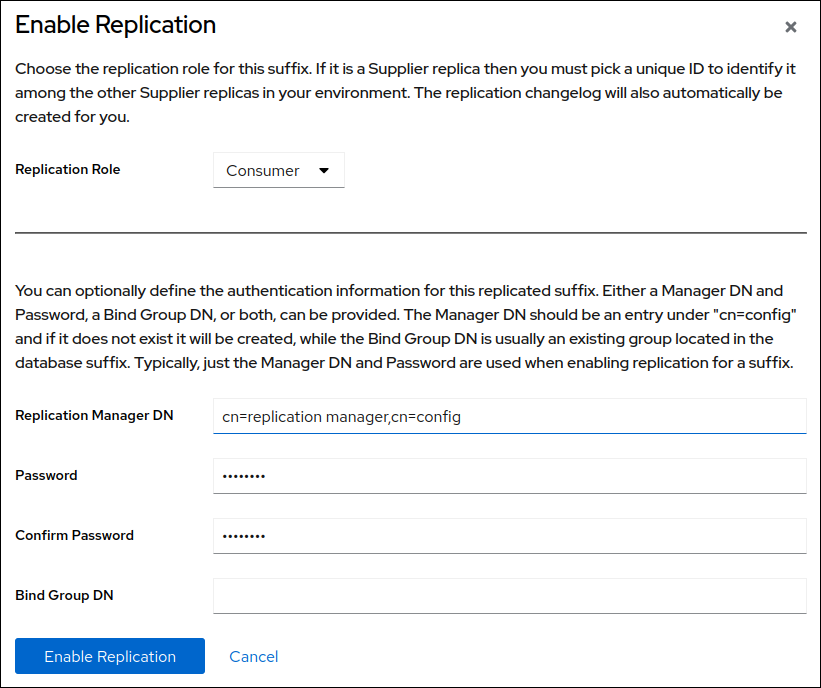
These settings configure the host as a consumer for the
dc=example,dc=comsuffix. Additionally, the server creates thecn=replication manager,cn=configuser with the specified password and allows this account to replicate changes for the suffix to this host.- Click .
Verification
-
Open the
Replicationmenu. -
Select the
dc=example,dc=comsuffix. -
If the
Replica Rolefield contains the valueConsumer, replication is enabled, and the host is configured as a consumer.
2.2. Configuring the existing server as a supplier to the consumer using the web console
To prepare the supplier.example.com host, you need to:
- Enable replication for the suffix.
- Create a replication agreement to the consumer.
- Initialize the consumer.
Perform this procedure on the existing supplier in the replication topology.
Prerequisites
-
You enabled replication for the
dc=example,dc=comsuffix on the consumer. - You are logged in to the instance in the web console.
Procedure
-
Open the
Replicationmenu. -
Select the
dc=example,dc=comsuffix. Enable replication:
- Click .
Select
Supplierin theReplication Rolefield, enter a replica ID, replication manager credentials, and leave theBind Group DNfield empty: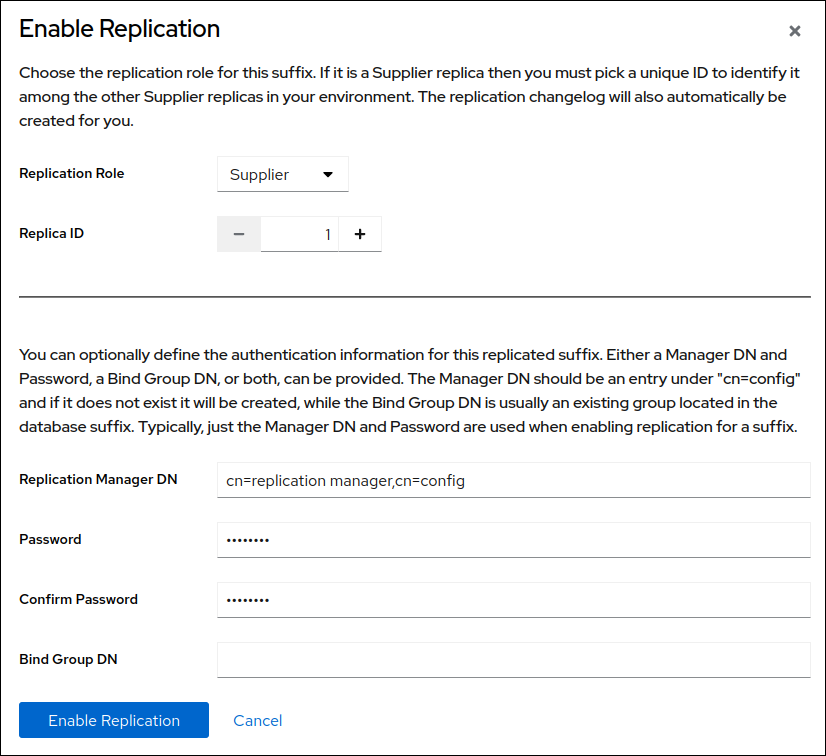
These settings configure the host as a supplier for the
dc=example,dc=comsuffix and set the replica ID of this entry to1.ImportantThe replica ID must be a unique integer between
1and65534for a suffix across all suppliers in the topology.- Click .
Add a replication agreement and initialize the consumer:
On the
Agreementstab, click , and fill the fields: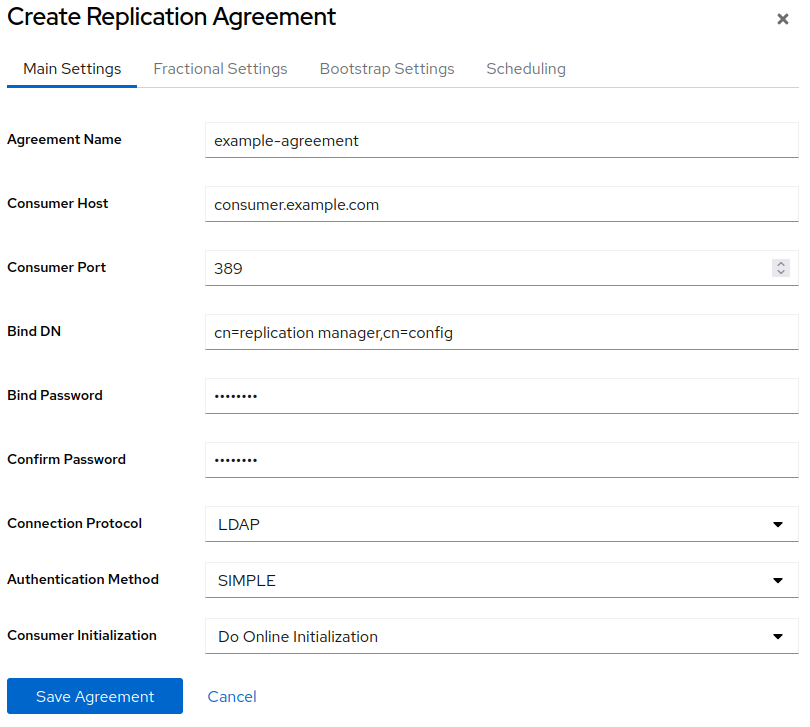
These settings create a replication agreement named
example-agreement. The replication agreement defines settings, such as the consumer’s host name, protocol, and authentication information that the supplier uses when connecting and replicating data to this consumer.-
Select
Do Online Initializationin theConsumer Initializationfield to automatically initialize the consumer after saving the agreement. Click .
After the agreement was created, Directory Server initializes
consumer.example.com. Depending on the amount of data to replicate, initialization can be time-consuming.
Verification
-
Open the
Replicationmenu. -
Select the
dc=example,dc=comsuffix. On the
Agreementstab, verify the status of the agreement in theStatecolumn of the table.
Chapter 3. Configuring multi-supplier replication using the command line
In a multi-supplier replication environment, two or more writable suppliers replicate data with each other. For example, set up multi-supplier replication to provide a fail-over environment and distribute the load over multiple servers. Clients can then perform read and write operations on any host that is a read-write replica.
This section assumes that you have an existing Directory Server instance running on a host named supplier1.example.com. The procedures describe how to add another read-write replica named supplier2.example.com to the topology, and how to configure multi-supplier replication for the dc=example,dc=com suffix.
3.1. Preparing the new supplier using the command line
To prepare the supplier2.example.com host, enable replication. This process:
- Configures the role of this server in the replication topology
- Defines the suffix that is replicated
- Creates the replication manager account the supplier uses to connect to this host
Perform this procedure on the supplier that you want to add to the replication topology.
Prerequisites
- You installed the Directory Server instance. For details, see Setting up a new instance on the command line using a .inf file.
-
The database for the
dc=example,dc=comsuffix exists.
Procedure
Enable replication for the
dc=example,dc=comsuffix:dsconf -D "cn=Directory Manager" ldap://supplier2.example.com replication enable --suffix "dc=example,dc=com" --role "supplier" --replica-id 1 --bind-dn "cn=replication manager,cn=config" --bind-passwd "password"
# dsconf -D "cn=Directory Manager" ldap://supplier2.example.com replication enable --suffix "dc=example,dc=com" --role "supplier" --replica-id 1 --bind-dn "cn=replication manager,cn=config" --bind-passwd "password"Copy to Clipboard Copied! Toggle word wrap Toggle overflow This command configures the
supplier2.example.comhost as a supplier for thedc=example,dc=comsuffix, and sets the replica ID of this entry to1. Additionally, the command creates thecn=replication manager,cn=configuser with the specified password and allows this account to replicate changes for the suffix to this host.ImportantThe replica ID must be a unique integer between
1and65534for a suffix across all suppliers in the topology.
Verification
Display the replication configuration:
Copy to Clipboard Copied! Toggle word wrap Toggle overflow These parameters indicate:
-
nsDS5ReplicaBindDNspecifies the replication manager account. -
nsDS5ReplicaRootsets the suffix that is replicated. -
nsDS5ReplicaTypeset to3defines that this host is a supplier.
-
3.2. Configuring the existing server as a supplier to the new server using the command line
To prepare the existing server supplier1.example.com as a supplier, you need to:
- Enable replication for the suffix.
- Create a replication agreement to the new supplier.
- Initialize the new supplier.
Perform this procedure on the existing supplier in the replication topology.
Prerequisites
-
You enabled replication for the
dc=example,dc=comsuffix on the supplier to join.
Procedure
Enable replication for the
dc=example,dc=comsuffix:dsconf -D "cn=Directory Manager" ldap://supplier1.example.com replication enable --suffix "dc=example,dc=com" --role "supplier" --replica-id 2 --bind-dn "cn=replication manager,cn=config" --bind-passwd "password"
# dsconf -D "cn=Directory Manager" ldap://supplier1.example.com replication enable --suffix "dc=example,dc=com" --role "supplier" --replica-id 2 --bind-dn "cn=replication manager,cn=config" --bind-passwd "password"Copy to Clipboard Copied! Toggle word wrap Toggle overflow This command configures the
supplier1.example.comhost as a supplier for thedc=example,dc=comsuffix, and sets the replica ID of this entry to2. Additionally, the command creates thecn=replication manager,cn=configuser with the specified password and allows this account to replicate changes for the suffix to this host.ImportantThe replica ID must be a unique integer between
1and65534for a suffix across all suppliers in the topology.Add the replication agreement and initialize the new server:
dsconf -D "cn=Directory Manager" ldap://supplier1.example.com repl-agmt create --suffix "dc=example,dc=com" --host "supplier2.example.com" --port 389 --conn-protocol LDAP --bind-dn "cn=replication manager,cn=config" --bind-passwd "password" --bind-method SIMPLE --init example-agreement-supplier1-to-supplier2
# dsconf -D "cn=Directory Manager" ldap://supplier1.example.com repl-agmt create --suffix "dc=example,dc=com" --host "supplier2.example.com" --port 389 --conn-protocol LDAP --bind-dn "cn=replication manager,cn=config" --bind-passwd "password" --bind-method SIMPLE --init example-agreement-supplier1-to-supplier2Copy to Clipboard Copied! Toggle word wrap Toggle overflow This command creates a replication agreement named
example-agreement-supplier1-to-supplier2. The replication agreement defines settings, such as the new supplier’s host name, protocol, and authentication information that the supplier uses when connecting and replicating data to the new supplier.After the agreement was created, Directory Server initializes
supplier2.example.com. Depending on the amount of data to replicate, initialization can be time-consuming.
Verification
Display the replication configuration:
Copy to Clipboard Copied! Toggle word wrap Toggle overflow These parameters indicate:
-
nsDS5ReplicaBindDNspecifies the replication manager account. -
nsDS5ReplicaRootsets the suffix that is replicated. -
nsDS5ReplicaTypeset to3defines that this host is a supplier.
-
Verify whether the initialization was successful:
dsconf -D "cn=Directory Manager" ldap://supplier1.example.com repl-agmt init-status --suffix "dc=example,dc=com" example-agreement-supplier1-to-supplier2
Agreement successfully initialized.
# dsconf -D "cn=Directory Manager" ldap://supplier1.example.com repl-agmt init-status --suffix "dc=example,dc=com" example-agreement-supplier1-to-supplier2
Agreement successfully initialized.
Copy to Clipboard Copied! Toggle word wrap Toggle overflow Display the replication status:
Copy to Clipboard Copied! Toggle word wrap Toggle overflow Verify the
Replication StatusandLast Update Statusfields.
Troubleshooting
By default, the replication idle timeout for all agreements on a server is 1 hour. If the initialization of large databases fails due to timeouts, set the
nsslapd-idletimeoutparameter to a higher value. For example, to set the parameter to7200(2 hours), enter:dsconf -D "cn=Directory Manager" ldap://supplier1.example.com config replace nsslapd-idletimeout=7200
# dsconf -D "cn=Directory Manager" ldap://supplier1.example.com config replace nsslapd-idletimeout=7200Copy to Clipboard Copied! Toggle word wrap Toggle overflow To set an unlimited period, set
nsslapd-idletimeoutto0.
3.3. Configuring the new server as a supplier to the existing server using the command line
To prepare the new server supplier2.example.com as a supplier, use either of the following methods:
- Enable replication for the suffix.
- Create a replication agreement to the existing server.
Do not initialize the existing supplier from the new server. Otherwise, the empty database from the new server overrides the database on the existing supplier.
Apply the following procedure on the existing supplier:
- Create a replication agreement to the new server.
- Initialize the new server.
Prerequisites
-
You enabled replication for the
dc=example,dc=comsuffix on the new server. -
You enabled replication for the
dc=example,dc=comsuffix on the existing server. - The new server to join is successfully initialized.
Procedure
Add the replication agreement to the existing instance:
dsconf -D "cn=Directory Manager" ldap://supplier2.example.com repl-agmt create --suffix "dc=example,dc=com" --host "supplier1.example.com" --port 389 --conn-protocol LDAP --bind-dn "cn=replication manager,cn=config" --bind-passwd "password" --bind-method SIMPLE example-agreement-supplier2-to-supplier1
# dsconf -D "cn=Directory Manager" ldap://supplier2.example.com repl-agmt create --suffix "dc=example,dc=com" --host "supplier1.example.com" --port 389 --conn-protocol LDAP --bind-dn "cn=replication manager,cn=config" --bind-passwd "password" --bind-method SIMPLE example-agreement-supplier2-to-supplier1Copy to Clipboard Copied! Toggle word wrap Toggle overflow Add the replication agreement to the new instance by using
--initoption:dsconf -D "cn=Directory Manager" ldap://supplier1.example.com repl-agmt create --suffix "dc=example,dc=com" --host "supplier2.example.com" --port 389 --conn-protocol LDAP --bind-dn "cn=replication manager,cn=config" --bind-passwd "password" --bind-method SIMPLE --init example-agreement-supplier1-to-supplier2
# dsconf -D "cn=Directory Manager" ldap://supplier1.example.com repl-agmt create --suffix "dc=example,dc=com" --host "supplier2.example.com" --port 389 --conn-protocol LDAP --bind-dn "cn=replication manager,cn=config" --bind-passwd "password" --bind-method SIMPLE --init example-agreement-supplier1-to-supplier2Copy to Clipboard Copied! Toggle word wrap Toggle overflow
Verification
Display the agreement status:
dsconf -D "cn=Directory Manager" ldap://supplier2.example.com repl-agmt init-status --suffix "dc=example,dc=com" example-agreement-supplier2-to-supplier1
Agreement successfully initialized.
# dsconf -D "cn=Directory Manager" ldap://supplier2.example.com repl-agmt init-status --suffix "dc=example,dc=com" example-agreement-supplier2-to-supplier1
Agreement successfully initialized.
Copy to Clipboard Copied! Toggle word wrap Toggle overflow Display the replication status:
Copy to Clipboard Copied! Toggle word wrap Toggle overflow Verify the
Replication StatusandLast Update Statusfields.
Troubleshooting
By default, the replication idle timeout for all agreements on a server is 1 hour. If the initialization of large databases fails due to timeouts, set the
nsslapd-idletimeoutparameter to a higher value. For example, to set the parameter to7200(2 hours), enter:dsconf -D "cn=Directory Manager" ldap://supplier2.example.com config replace nsslapd-idletimeout=7200
# dsconf -D "cn=Directory Manager" ldap://supplier2.example.com config replace nsslapd-idletimeout=7200Copy to Clipboard Copied! Toggle word wrap Toggle overflow To set an unlimited period, set
nsslapd-idletimeoutto0.
Chapter 4. Configuring multi-supplier replication using the web console
In a multi-supplier replication environment, two or more writable suppliers replicate data with each other. For example, set up multi-supplier replication to provide a fail-over environment and distribute the load over multiple servers. Clients can then perform read and write operations on any host that is a read-write replica.
This section assumes that you have an existing Directory Server instance running on a host named supplier1.example.com. The procedures describe how to add another read-write replica named supplier2.example.com to the topology, and how to configure multi-supplier replication for the dc=example,dc=com suffix.
4.1. Preparing the new supplier using the web console
To prepare the supplier2.example.com host, enable replication. This process:
- Configures the role of this server in the replication topology
- Defines the suffix that is replicated
- Creates the replication manager account the supplier uses to connect to this host
Perform this procedure on the supplier that you want to add to the replication topology.
Prerequisites
- You installed the Directory Server instance. For details, see Setting up a new instance using the web console.
-
The database for the
dc=example,dc=comsuffix exists. - You are logged in to the instance in the web console.
Procedure
-
Open the
Replicationmenu. -
Select the
dc=example,dc=comsuffix. Enable replication:
- Click .
Select
Supplierin theReplication Rolefield, enter a replica ID, as well as the distinguished name (DN) and password of the replication manager account to create: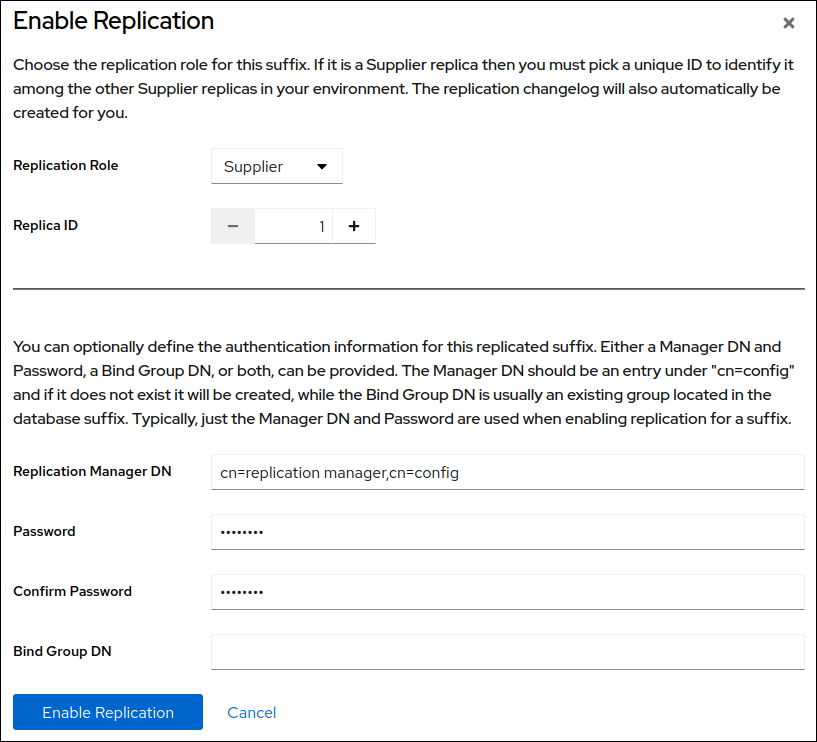
These settings configure the host as a supplier for the
dc=example,dc=comsuffix and set the replica ID of this entry to1.ImportantThe replica ID must be a unique integer between
1and65534for a suffix across all suppliers in the topology.If you set no replication manager DN, set a bind group DN. You can then use any member of this group in the replication agreement.
- Click .
Verification
-
Open the
Replicationmenu. -
Select the
dc=example,dc=comsuffix. -
If the
Replica Rolefield contains the valueSupplier, replication is enabled, and the host is configured as a supplier.
4.2. Configuring the existing server as a supplier to the new server using the web console
To prepare the existing server supplier1.example.com as a supplier, you need to:
- Enable replication for the suffix.
- Create a replication agreement to the new supplier.
- Initialize the new supplier.
Perform this procedure on the existing supplier in the replication topology.
Prerequisites
-
You enabled replication for the
dc=example,dc=comsuffix on the supplier to join. - You are logged in to the instance in the web console.
Procedure
-
Open the
Replicationmenu. -
Select the
dc=example,dc=comsuffix. Enable replication:
- Click .
Select
Supplierin theReplication Rolefield, enter a replica ID, as well as the distinguished name (DN) and password of the replication manager account to create: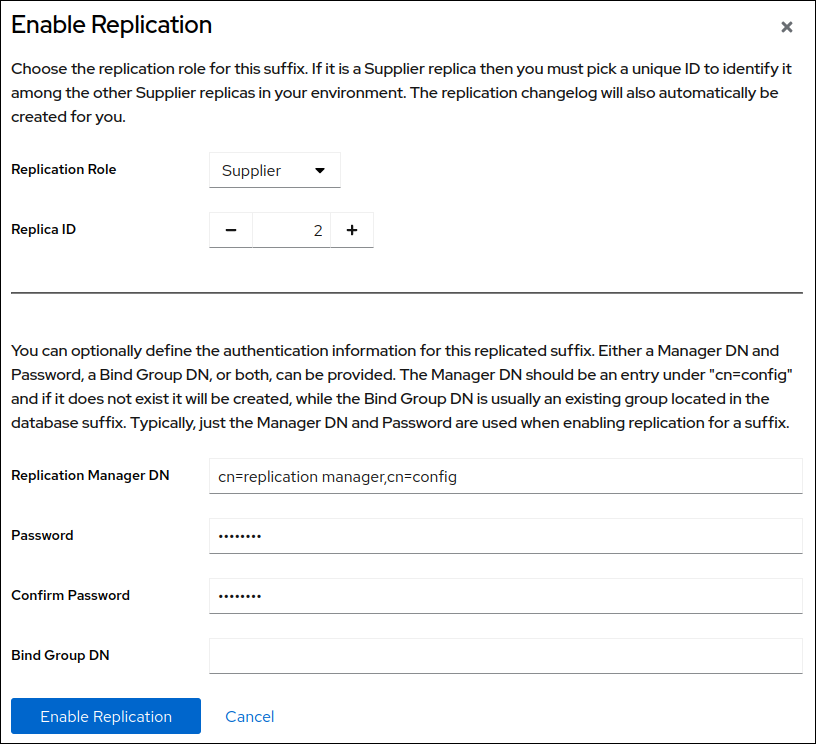
These settings configure the host as a supplier for the
dc=example,dc=comsuffix and set the replica ID of this entry to2.ImportantThe replica ID must be a unique integer between
1and65534for a suffix across all suppliers in the topology.- Click .
Add a replication agreement and initialize the new server:
On the
Agreementstab, click , and fill the fields: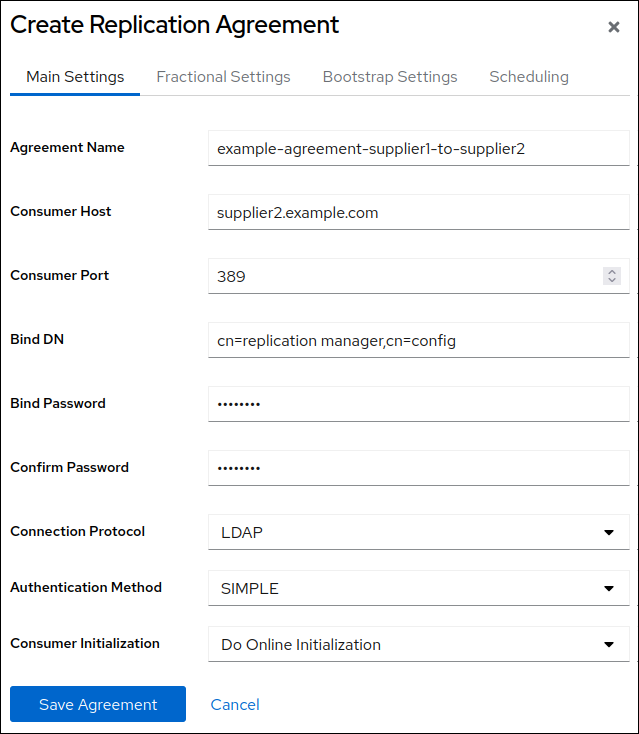
These settings create a replication agreement named
example-agreement-supplier1-to-supplier2. The replication agreement defines settings, such as the new supplier’s host name, protocol, and authentication information that the supplier uses when connecting and replicating data to the new supplier.-
Select
Do Online Initializationin theConsumer Initializationfield to automatically initialize the new server after saving the agreement. Click .
After the agreement was created, Directory Server initializes
supplier2.example.com. Depending on the amount of data to replicate, initialization can be time-consuming.
Verification
-
Open the
Replicationmenu. -
Select the
dc=example,dc=comsuffix. On the
Agreementstab, verify the status of the agreement in theStatecolumn of the table.
4.3. Configuring the new server as a supplier to the existing server using the web console
To prepare the new server supplier2.example.com as a supplier, you need to:
- Enable replication for the suffix.
- Create a replication agreement to the existing server.
- Initialize the existing server.
Perform this procedure on the existing supplier in the replication topology.
Do not continue if you have not initialized the replication agreement on the existing server. Otherwise, the empty database from the new server overrides the database on the existing supplier.
Prerequisites
-
You enabled replication for the
dc=example,dc=comsuffix on the new server. -
You enabled replication for the
dc=example,dc=comsuffix on the existing server. - The new server to join is successfully initialized.
- You are logged in to the instance in the web console.
Procedure
-
Open the
Replicationmenu. -
Select the
dc=example,dc=comsuffix. Add a replication agreement and initialize the existing server:
On the
Agreementstab, click , and fill the fields:
These settings create a replication agreement named
example-agreement-supplier2-to-supplier1. The replication agreement defines settings, such as the existing server’s host name, protocol, and authentication information that the supplier uses when connecting and replicating data to the existing supplier.-
Select
Do Online Initializationin theConsumer Initializationfield to automatically initialize the new server after saving the agreement. Click .
After the agreement was created, Directory Server initializes
supplier1.example.com. Depending on the amount of data to replicate, initialization can be time-consuming.
Verification
-
Open the
Replicationmenu. -
Select the
dc=example,dc=comsuffix. On the
Agreementstab, verify the status of the agreement in theStatecolumn of the table.
Chapter 5. Configuring multi-supplier replication with certificate-based authentication
When you set up replication between two Directory Server instances, you can use certificate-based authentication instead of using a bind DN and password to authenticate to a replication partner.
You can do so by adding a new server to the replication topology and setting up replication agreements between the new host and the existing server using certificate-based authentication.
Certificate-based authentication requires TLS-encrypted connections.
5.1. Preparing accounts and a bind group for the use in replication agreements with certificate-based authentication
To use certificate-based authentication in replication agreements, first prepare the accounts and store the client certificates in the userCertificate attributes of these accounts. Additionally, this procedure creates a bind group that you later use in the replication agreements.
Perform this procedure on the existing host server1.example.com.
Prerequisites
- You enabled TLS encryption in Directory Server.
You stored the client certificates in distinguished encoding rules (DER) format in the
/root/server1.derand/root/server2.derfiles.For details about client certificates and how to request them from your certificate authority (CA), see your CA’s documentation.
Procedure
Create the
ou=servicesentry if it does not exist:Copy to Clipboard Copied! Toggle word wrap Toggle overflow Create accounts for both servers, such as
cn=server1,ou=services,dc=example,dc=comandcn=server1,ou=services,dc=example,dc=com:Copy to Clipboard Copied! Toggle word wrap Toggle overflow Create a group, such as
cn=repl_servers,dc=groups,dc=example,dc=com:dsidm -D "cn=Directory Manager" ldaps://server1.example.com -b "dc=example,dc=com" group create --cn "repl_servers"
# dsidm -D "cn=Directory Manager" ldaps://server1.example.com -b "dc=example,dc=com" group create --cn "repl_servers"Copy to Clipboard Copied! Toggle word wrap Toggle overflow Add the two replication accounts as members to the group:
dsidm -D "cn=Directory Manager" ldaps://server1.example.com -b "dc=example,dc=com" group add_member repl_servers "cn=server1,ou=services,dc=example,dc=com"

dsidm -D "cn=Directory Manager" ldaps://server1.example.com -b "dc=example,dc=com" group add_member repl_servers "cn=server2,ou=services,dc=example,dc=com"
# dsidm -D "cn=Directory Manager" ldaps://server1.example.com -b "dc=example,dc=com" group add_member repl_servers "cn=server1,ou=services,dc=example,dc=com"

# dsidm -D "cn=Directory Manager" ldaps://server1.example.com -b "dc=example,dc=com" group add_member repl_servers "cn=server2,ou=services,dc=example,dc=com"
Copy to Clipboard Copied! Toggle word wrap Toggle overflow
5.2. Initializing a new server using a temporary replication manager account
Certificate-based authentication uses the certificates stored in the directory. However, before you initialize a new server, the database on server2.example.com is empty and the accounts with the associated certificates do not exist. Therefore, replication using certificates is not possible before the database is initialized. You can overcome this problem by initializing server2.example.com with a temporary replication manager account.
Prerequisites
-
You installed the Directory Server instance on
server2.example.com. For details, see Setting up a new instance on the command line using a .inf file. -
The database for the
dc=example,dc=comsuffix exists. -
You enabled TLS encryption in Directory Server on both servers,
server1.example.comandserver2.example.com.
Procedure
On
server2.example.com, enable replication for thedc=example,dc=comsuffix:dsconf -D "cn=Directory Manager" ldaps://server2.example.com replication enable --suffix "dc=example,dc=com" --role "supplier" --replica-id 2 --bind-dn "cn=replication manager,cn=config" --bind-passwd "password"
# dsconf -D "cn=Directory Manager" ldaps://server2.example.com replication enable --suffix "dc=example,dc=com" --role "supplier" --replica-id 2 --bind-dn "cn=replication manager,cn=config" --bind-passwd "password"Copy to Clipboard Copied! Toggle word wrap Toggle overflow This command configures the
server2.example.comhost as a supplier for thedc=example,dc=comsuffix, and sets the replica ID of this host to2. Additionally, the command creates a temporarycn=replication manager,cn=configuser with the specified password and allows this account to replicate changes for the suffix to this host.The replica ID must be a unique integer between
1and65534for a suffix across all suppliers in the topology.On
server1.example.com:Enable replication:
dsconf -D "cn=Directory Manager" ldaps://server1.example.com replication enable --suffix="dc=example,dc=com" --role="supplier" --replica-id="1"
# dsconf -D "cn=Directory Manager" ldaps://server1.example.com replication enable --suffix="dc=example,dc=com" --role="supplier" --replica-id="1"Copy to Clipboard Copied! Toggle word wrap Toggle overflow Create a temporary replication agreement which uses the temporary account from the previous step for authentication:
dsconf -D "cn=Directory Manager" ldaps://server1.example.com repl-agmt create --suffix="dc=example,dc=com" --host="server1.example.com" --port=636 --conn-protocol=LDAPS --bind-dn="cn=Replication Manager,cn=config" --bind-passwd="password" --bind-method=SIMPLE --init temporary_agreement
# dsconf -D "cn=Directory Manager" ldaps://server1.example.com repl-agmt create --suffix="dc=example,dc=com" --host="server1.example.com" --port=636 --conn-protocol=LDAPS --bind-dn="cn=Replication Manager,cn=config" --bind-passwd="password" --bind-method=SIMPLE --init temporary_agreementCopy to Clipboard Copied! Toggle word wrap Toggle overflow
Verification
Verify that the initialization was successful:
dsconf -D "cn=Directory Manager" ldaps://server1.example.com repl-agmt init-status --suffix "dc=example,dc=com" temporary_agreement
Agreement successfully initialized.
# dsconf -D "cn=Directory Manager" ldaps://server1.example.com repl-agmt init-status --suffix "dc=example,dc=com" temporary_agreement
Agreement successfully initialized.
Copy to Clipboard Copied! Toggle word wrap Toggle overflow
5.3. Configuring multi-supplier replication with certificate-based authentication
In a multi-supplier replication environment with certificate-based authentication, the replicas authenticate each others using certificates.
Prerequisites
-
You set up certificate-based authentication on both hosts,
server1.example.comandserver2.example.com. - Directory Server trusts the certificate authority (CA) that issues the client certificates.
-
The client certificates meet the requirements set in
/etc/dirsrv/slapd-instance_name/certmap.confon the servers.
Procedure
On
server1.example.com:Remove the temporary replication agreement:
dsconf -D "cn=Directory Manager" ldaps://server1.example.com repl-agmt delete --suffix="dc=example,dc=com" temporary_agreement
# dsconf -D "cn=Directory Manager" ldaps://server1.example.com repl-agmt delete --suffix="dc=example,dc=com" temporary_agreementCopy to Clipboard Copied! Toggle word wrap Toggle overflow Add the
cn=repl_servers,dc=groups,dc=example,dc=combind group to the replication settings:dsconf -D "cn=Directory Manager" ldaps://server1.example.com replication set --suffix="dc=example,dc=com" --repl-bind-group "cn=repl_servers,dc=groups,dc=example,dc=com"
# dsconf -D "cn=Directory Manager" ldaps://server1.example.com replication set --suffix="dc=example,dc=com" --repl-bind-group "cn=repl_servers,dc=groups,dc=example,dc=com"Copy to Clipboard Copied! Toggle word wrap Toggle overflow Configure Directory Server to automatically check for changes in the bind group:
dsconf -D "cn=Directory Manager" ldaps://server1.example.com replication set --suffix="dc=example,dc=com" --repl-bind-group-interval=0
# dsconf -D "cn=Directory Manager" ldaps://server1.example.com replication set --suffix="dc=example,dc=com" --repl-bind-group-interval=0Copy to Clipboard Copied! Toggle word wrap Toggle overflow
On
server2.example.com:Remove the temporary replication manager account:
dsconf -D "cn=Directory Manager" ldaps://server2.example.com replication delete-manager --suffix="dc=example,dc=com" --name="Replication Manager"
# dsconf -D "cn=Directory Manager" ldaps://server2.example.com replication delete-manager --suffix="dc=example,dc=com" --name="Replication Manager"Copy to Clipboard Copied! Toggle word wrap Toggle overflow Add the
cn=repl_servers,dc=groups,dc=example,dc=combind group to the replication settings:dsconf -D "cn=Directory Manager" ldaps://server2.example.com replication set --suffix="dc=example,dc=com" --repl-bind-group "cn=repl_servers,dc=groups,dc=example,dc=com"
# dsconf -D "cn=Directory Manager" ldaps://server2.example.com replication set --suffix="dc=example,dc=com" --repl-bind-group "cn=repl_servers,dc=groups,dc=example,dc=com"Copy to Clipboard Copied! Toggle word wrap Toggle overflow Configure Directory Server to automatically check for changes in the bind group:
dsconf -D "cn=Directory Manager" ldap://server2.example.com replication set --suffix="dc=example,dc=com" --repl-bind-group-interval=0
# dsconf -D "cn=Directory Manager" ldap://server2.example.com replication set --suffix="dc=example,dc=com" --repl-bind-group-interval=0Copy to Clipboard Copied! Toggle word wrap Toggle overflow Create the replication agreement with certificate-based authentication:
dsconf -D "cn=Directory Manager" ldaps://server2.example.com repl-agmt create --suffix="dc=example,dc=com" --host="server1.example.com" --port=636 --conn-protocol=LDAPS --bind-method="SSLCLIENTAUTH" --init server2-to-server1
dsconf -D "cn=Directory Manager" ldaps://server2.example.com repl-agmt create --suffix="dc=example,dc=com" --host="server1.example.com" --port=636 --conn-protocol=LDAPS --bind-method="SSLCLIENTAUTH" --init server2-to-server1Copy to Clipboard Copied! Toggle word wrap Toggle overflow
On
server1.example.com, create the replication agreement with certificate-based authentication:dsconf -D "cn=Directory Manager" ldaps://server1.example.com repl-agmt create --suffix="dc=example,dc=com" --host="server2.example.com" --port=636 --conn-protocol=LDAPS --bind-method="SSLCLIENTAUTH" --init server1-to-server2
dsconf -D "cn=Directory Manager" ldaps://server1.example.com repl-agmt create --suffix="dc=example,dc=com" --host="server2.example.com" --port=636 --conn-protocol=LDAPS --bind-method="SSLCLIENTAUTH" --init server1-to-server2Copy to Clipboard Copied! Toggle word wrap Toggle overflow
Verification
Verify on each server that the initialization was successful:
dsconf -D "cn=Directory Manager" ldaps://server1.example.com repl-agmt init-status --suffix "dc=example,dc=com" server1-to-server2
Agreement successfully initialized.

dsconf -D "cn=Directory Manager" ldaps://server2.example.com repl-agmt init-status --suffix "dc=example,dc=com" server2-to-server1
Agreement successfully initialized.
# dsconf -D "cn=Directory Manager" ldaps://server1.example.com repl-agmt init-status --suffix "dc=example,dc=com" server1-to-server2
Agreement successfully initialized.

# dsconf -D "cn=Directory Manager" ldaps://server2.example.com repl-agmt init-status --suffix "dc=example,dc=com" server2-to-server1
Agreement successfully initialized.
Copy to Clipboard Copied! Toggle word wrap Toggle overflow
Chapter 6. Configuring cascading replication using the command line
In a cascading replication scenario, one server, a hub, acts both as a consumer and a supplier. The hub is a read-only replica that maintains a changelog. It receives updates from the supplier and supplies these updates to a consumer. Use cascading replication for balancing heavy traffic loads or to keep suppliers based locally in geographically-distributed environments.
6.1. Preparing the new hub server using the command line
To prepare the hub.example.com host, enable replication. This process:
- Configures the role of this server in the replication topology
- Defines the suffix that is replicated
- Creates the replication manager account the supplier uses to connect to this host
Perform this procedure on the hub that you want to add to the replication topology.
Prerequisites
- You installed the Directory Server instance.
- The database for the dc=example,dc=com suffix exists.
Procedure
Enable replication for the
dc=example,dc=comsuffix:dsconf -D "cn=Directory Manager" ldap://hub.example.com replication enable --suffix "dc=example,dc=com" --role "hub" --bind-dn "cn=replication manager,cn=config" --bind-passwd "password"
# dsconf -D "cn=Directory Manager" ldap://hub.example.com replication enable --suffix "dc=example,dc=com" --role "hub" --bind-dn "cn=replication manager,cn=config" --bind-passwd "password"Copy to Clipboard Copied! Toggle word wrap Toggle overflow This command configures the
hub.example.comhost as a hub for thedc=example,dc=comsuffix. Additionally, the command creates thecn=replication manager,cn=configuser with the specified password and allows this account to replicate changes for the suffix to this host.
Verification
Display the replication configuration:
Copy to Clipboard Copied! Toggle word wrap Toggle overflow These parameters indicate:
-
nsDS5ReplicaBindDNspecifies the replication manager account. -
nsDS5ReplicaRootsets the suffix that is replicated. -
nsDS5ReplicaTypeset to2defines that this host is a consumer, which is also valid for a hub. -
nsDS5ReplicaIdset to65535defines that this host is a hub. Thedsconfutility automatically sets this value if you define the--role "hub"option.
-
6.2. Configuring the existing server as a supplier to the hub server using the command line
To prepare the existing server as a supplier, you need to:
- Enable replication for the suffix.
- Create a replication agreement to the hub.
- Initialize the hub.
Perform this procedure on the existing supplier in the replication topology.
Prerequisites
-
You enabled replication for the
dc=example,dc=comsuffix on the hub to join.
Procedure
Enable replication for the
dc=example,dc=comsuffix:dsconf -D "cn=Directory Manager" ldap://supplier.example.com replication enable --suffix "dc=example,dc=com" --role "supplier" --replica-id 1
# dsconf -D "cn=Directory Manager" ldap://supplier.example.com replication enable --suffix "dc=example,dc=com" --role "supplier" --replica-id 1Copy to Clipboard Copied! Toggle word wrap Toggle overflow This command configures the
supplier.example.comhost as a supplier for thedc=example,dc=comsuffix, and sets the replica ID of this entry to1.ImportantThe replica ID must be a unique integer between
1and65534for a suffix across all suppliers in the topology.Add the replication agreement and initialize the new server:
dsconf -D "cn=Directory Manager" ldap://supplier.example.com repl-agmt create --suffix "dc=example,dc=com" --host "hub.example.com" --port 389 --conn-protocol LDAP --bind-dn "cn=replication manager,cn=config" --bind-passwd "password" --bind-method SIMPLE --init example-agreement-supplier-to-hub
# dsconf -D "cn=Directory Manager" ldap://supplier.example.com repl-agmt create --suffix "dc=example,dc=com" --host "hub.example.com" --port 389 --conn-protocol LDAP --bind-dn "cn=replication manager,cn=config" --bind-passwd "password" --bind-method SIMPLE --init example-agreement-supplier-to-hubCopy to Clipboard Copied! Toggle word wrap Toggle overflow This command creates a replication agreement named
example-agreement-supplier-to-hub. The replication agreement defines settings, such as the hub’s host name, protocol, and authentication information that the supplier uses when connecting and replicating data to the hub.After the agreement was created, Directory Server initializes
hub.example.com. Depending on the amount of data to replicate, initialization can be time-consuming.
Verification
Display the replication configuration:
Copy to Clipboard Copied! Toggle word wrap Toggle overflow These parameters indicate:
-
nsDS5ReplicaRootsets the suffix that is replicated. -
nsDS5ReplicaTypeset to3defines that this host is a supplier.
-
Verify whether the initialization was successful:
dsconf -D "cn=Directory Manager" ldap://supplier.example.com repl-agmt init-status --suffix "dc=example,dc=com" example-agreement-supplier-to-hub
Agreement successfully initialized.
# dsconf -D "cn=Directory Manager" ldap://supplier.example.com repl-agmt init-status --suffix "dc=example,dc=com" example-agreement-supplier-to-hub
Agreement successfully initialized.
Copy to Clipboard Copied! Toggle word wrap Toggle overflow Display the replication status:
Copy to Clipboard Copied! Toggle word wrap Toggle overflow Verify the
Replication StatusandLast Update Statusfields.
Troubleshooting
By default, the replication idle timeout for all agreements on a server is 1 hour. If the initialization of large databases fails due to timeouts, set the
nsslapd-idletimeoutparameter to a higher value. For example, to set the parameter to7200(2 hours), enter:dsconf -D "cn=Directory Manager" ldap://supplier1.example.com config replace nsslapd-idletimeout=7200
# dsconf -D "cn=Directory Manager" ldap://supplier1.example.com config replace nsslapd-idletimeout=7200Copy to Clipboard Copied! Toggle word wrap Toggle overflow To set an unlimited period, set
nsslapd-idletimeoutto0.
6.3. Preparing the new consumer of the hub using the command line
To prepare the consumer.example.com host, enable replication. This process:
- Configures the role of this server in the replication topology
- Defines the suffix that is replicated
- Creates the replication manager account the hub uses to connect to this host
Perform this procedure on the consumer that you want to add to the replication topology.
Prerequisites
- You installed the Directory Server instance. For details, see Setting up a new instance on the command line using a .inf file.
-
The database for the
dc=example,dc=comsuffix exists.
Procedure
Enable replication for the
dc=example,dc=comsuffix:dsconf -D "cn=Directory Manager" ldap://consumer.example.com replication enable --suffix "dc=example,dc=com" --role "consumer" --bind-dn "cn=replication manager,cn=config" --bind-passwd "password"
# dsconf -D "cn=Directory Manager" ldap://consumer.example.com replication enable --suffix "dc=example,dc=com" --role "consumer" --bind-dn "cn=replication manager,cn=config" --bind-passwd "password"Copy to Clipboard Copied! Toggle word wrap Toggle overflow This command configures the
consumer.example.comhost as a consumer for thedc=example,dc=comsuffix. Additionally, the command creates thecn=replication manager,cn=configuser with the specified password and allows this account to replicate changes for the suffix to this host.
Verification
Display the replication configuration:
Copy to Clipboard Copied! Toggle word wrap Toggle overflow These parameters indicate:
-
nsDS5ReplicaBindDNspecifies the replication manager account. -
nsDS5ReplicaRootsets the suffix that is replicated. -
nsDS5ReplicaTypeset to2defines that this host is a consumer.
-
6.4. Configuring the hub server as a supplier for the consumer using the command line
To prepare the hub, you need to:
- Create a replication agreement to the consumer.
- Initialize the consumer.
Perform this procedure on the hub in the replication topology.
Prerequisites
- The hub is initialized, and replication from the supplier to the hub works.
-
You enabled replication for the
dc=example,dc=comsuffix on the hub.
Procedure
Add the replication agreement and initialize the consumer:
dsconf -D "cn=Directory Manager" ldap://hub.example.com repl-agmt create --suffix "dc=example,dc=com" --host "consumer.example.com" --port 389 --conn-protocol LDAP --bind-dn "cn=replication manager,cn=config" --bind-passwd "password" --bind-method SIMPLE --init example-agreement-hub-to-consumer
# dsconf -D "cn=Directory Manager" ldap://hub.example.com repl-agmt create --suffix "dc=example,dc=com" --host "consumer.example.com" --port 389 --conn-protocol LDAP --bind-dn "cn=replication manager,cn=config" --bind-passwd "password" --bind-method SIMPLE --init example-agreement-hub-to-consumerCopy to Clipboard Copied! Toggle word wrap Toggle overflow This command creates a replication agreement named
example-agreement-hub-to-consumer. The replication agreement defines settings, such as the consumer’s host name, protocol, and authentication information that the supplier uses when connecting and replicating data to this consumer.After the agreement was created, Directory Server initializes
consumer.example.com. Depending on the amount of data to replicate, initialization can be time-consuming.
Verification
Verify whether the initialization was successful:
dsconf -D "cn=Directory Manager" ldap://hub.example.com repl-agmt init-status --suffix "dc=example,dc=com" example-agreement-hub-to-consumer
Agreement successfully initialized.
# dsconf -D "cn=Directory Manager" ldap://hub.example.com repl-agmt init-status --suffix "dc=example,dc=com" example-agreement-hub-to-consumer
Agreement successfully initialized.
Copy to Clipboard Copied! Toggle word wrap Toggle overflow Display the replication status:
Copy to Clipboard Copied! Toggle word wrap Toggle overflow Verify the
Replication StatusandLast Update Statusfields.
Troubleshooting
By default, the replication idle timeout for all agreements on a server is 1 hour. If the initialization of large databases fails due to timeouts, set the
nsslapd-idletimeoutparameter to a higher value. For example, to set the parameter to7200(2 hours), enter:dsconf -D "cn=Directory Manager" ldap://hub .example.com config replace nsslapd-idletimeout=7200
# dsconf -D "cn=Directory Manager" ldap://hub .example.com config replace nsslapd-idletimeout=7200Copy to Clipboard Copied! Toggle word wrap Toggle overflow To set an unlimited period, set
nsslapd-idletimeoutto0.
Chapter 7. Configuring cascading replication using the web console
In a cascading replication scenario, one server, a hub, acts both as a consumer and a supplier. The hub is a read-only replica that maintains a changelog. It receives updates from the supplier and supplies these updates to a consumer. Use cascading replication for balancing heavy traffic loads or to keep suppliers based locally in geographically-distributed environments.
7.1. Preparing the new hub server using the web console
To prepare the hub.example.com host, enable replication. This process:
- Configures the role of this server in the replication topology
- Defines the suffix that is replicated
- Creates the replication manager account the supplier uses to connect to this host
Perform this procedure on the hub that you want to add to the replication topology.
Prerequisites
- You installed the Directory Server instance.
- The database for the dc=example,dc=com suffix exists.
- You are logged in to the instance in the web console.
Procedure
-
Open the
Replicationmenu. -
Select the
dc=example,dc=comsuffix. Enable replication:
- Click .
Select
Consumerin theReplication Rolefield, and enter the replication manager account and the password to create:
These settings configure the host as a hub for the
dc=example,dc=comsuffix.- Click .
Verification
-
Open the
Replicationmenu. -
Select the
dc=example,dc=comsuffix. -
If the
Replica Rolefield contains the valueHub, replication is enabled, and the host is configured as a consumer.
7.2. Configuring the existing server as a supplier to the hub server using the web console
To prepare the existing server as a supplier, you need to:
- Enable replication for the suffix.
- Create a replication agreement to the hub.
- Initialize the hub.
Perform this procedure on the existing supplier in the replication topology.
Prerequisites
-
You enabled replication for the
dc=example,dc=comsuffix on the hub to join. - You are logged in to the instance in the web console.
Procedure
-
Open the
Replicationmenu. -
Select the
dc=example,dc=comsuffix. Enable replication:
- Click .
Select
Supplierin theReplication Rolefield, enter a replica ID, as well as the distinguished name (DN) and password of the replication manager account to create:
These settings configure the host as a supplier for the
dc=example,dc=comsuffix and set the replica ID of this entry to1.ImportantThe replica ID must be a unique integer between
1and65534for a suffix across all suppliers in the topology.- Click .
Add a replication agreement and initialize the new server:
On the
Agreementstab, click , and fill the fields: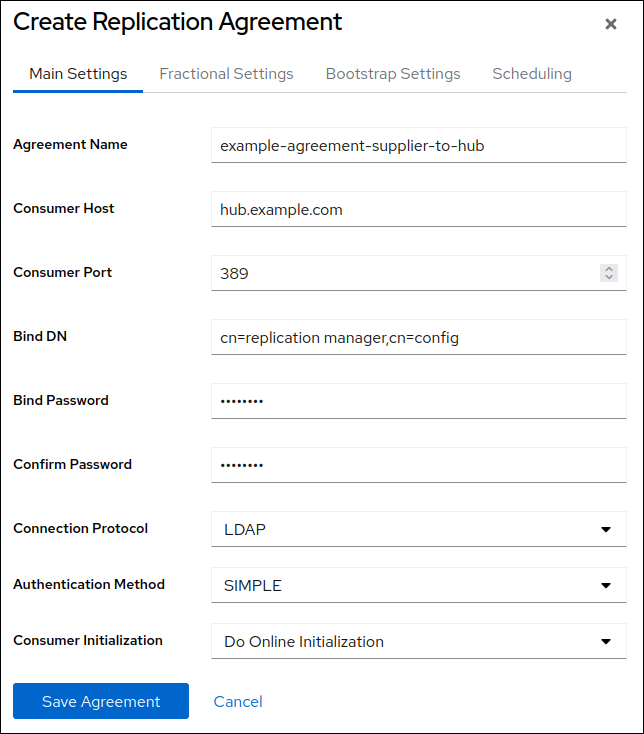
These settings create a replication agreement named
example-agreement-supplier-to-hub. The replication agreement defines settings, such as the hub’s host name, protocol, and authentication information that the supplier uses when connecting and replicating data to this hub.-
Select
Do Online Initializationin theConsumer Initializationfield to automatically initialize the new server after saving the agreement. Click .
After the agreement was created, Directory Server initializes
hub.example.com. Depending on the amount of data to replicate, initialization can be time-consuming.
Verification
-
Open the
Replicationmenu. -
Select the
dc=example,dc=comsuffix. On the
Agreementstab, verify the status of the agreement in theStatecolumn of the table.
7.3. Preparing the new consumer of the hub using the web console
To prepare the consumer.example.com host, enable replication. This process:
- Configures the role of this server in the replication topology
- Defines the suffix that is replicated
- Creates the replication manager account the supplier uses to connect to this host
Perform this procedure on the consumer that you want to add to the replication topology.
Prerequisites
- You installed the Directory Server instance. For details, see Setting up a new instance using the web console.
-
The database for the
dc=example,dc=comsuffix exists. - You are logged in to the instance in the web console.
Procedure
-
Open the
Replicationmenu. -
Select the
dc=example,dc=comsuffix. - Click .
Select
Consumerin theReplication Rolefield, and enter the replication manager account and the password to create:
These settings configure the host as a consumer for the
dc=example,dc=comsuffix. Additionally, the server creates thecn=replication manager,cn=configuser with the specified password and allows this account to replicate changes for the suffix to this host.- Click .
Verification
-
Open the
Replicationmenu. -
Select the
dc=example,dc=comsuffix. -
If the
Replica Rolefield contains the valueConsumer, replication is enabled, and the host is configured as a consumer.
7.4. Configuring the hub server as a supplier for the consumer using the web console
To prepare the hub, you need to:
- Create a replication agreement to the consumer.
- Initialize the consumer.
Perform this procedure on the hub in the replication topology.
Prerequisites
- The hub is initialized, and replication from the supplier to the hub works.
- You enabled replication for the dc=example,dc=com suffix on the hub.
- You are logged in to the instance in the web console.
Procedure
-
Open the
Replicationmenu. -
Select the
dc=example,dc=comsuffix. Add a replication agreement and initialize the consumer:
On the
Agreementstab, click , and fill the fields:
These settings create a replication agreement named
example-agreement-hub-to-consumer. The replication agreement defines settings, such as the consumer’s host name, protocol, and authentication information that the hub uses when connecting and replicating data to this consumer.-
Select
Do Online Initializationin theConsumer Initializationfield to automatically initialize the consumer after saving the agreement. Click .
After the agreement was created, Directory Server initializes
consumer.example.com. Depending on the amount of data to replicate, initialization can be time-consuming.
Verification
-
Open the
Replicationmenu. -
Select the
dc=example,dc=comsuffix. On the
Agreementstab, verify the status of the agreement in theStatecolumn of the table.
Chapter 8. Improving the latency in a multi-supplier replication environment
In certain multi-supplier replication environments, for example if the servers are connected over a wide area network (WAN), the replication latency can be high if multiple suppliers receive updates at the same time. This happens when one supplier exclusively accesses a replica without releasing it for a long time. In such situations, other suppliers cannot send updates to this consumer, which increases the replication latency.
To release a replica after a fixed amount of time, set the nsds5ReplicaReleaseTimeout parameter on suppliers and hubs.
The 60 seconds default value is ideal for most environments. A value set too high or too low can have a negative impact on the replication performance. If you set the value too low, replication servers are constantly reacquiring each other, and servers are not able to send many updates. In a high-traffic replication environment, a longer timeout can improve situations where one supplier exclusively accesses a replica. However, in most cases, a value higher than 120 seconds slows down replication.
8.1. Setting the replication release timeout using the command line
To improve the replication efficiency in a multi-supplier replication environment, update the replication release timeout value on all hubs and suppliers.
Prerequisites
- You configured replication between multiple suppliers and hubs.
Procedure
Set the timeout value for the suffix:
dsconf -D "cn=Directory Manager" ldap://supplier.example.com replication set --suffix="dc=example,dc=com" --repl-release-timeout=70
# dsconf -D "cn=Directory Manager" ldap://supplier.example.com replication set --suffix="dc=example,dc=com" --repl-release-timeout=70Copy to Clipboard Copied! Toggle word wrap Toggle overflow This command changes the replication timeout of the
example,dc=comsuffix to70seconds.Restart the instance:
dsctl instance_name restart
# dsctl instance_name restartCopy to Clipboard Copied! Toggle word wrap Toggle overflow
8.2. Setting the replication release timeout using the web console
To improve the replication efficiency in a multi-supplier replication environment, update the replication release timeout value on all hubs and suppliers.
Prerequisites
- You configured replication between multiple suppliers and hubs.
Procedure
- On the tab, select the suffix entry.
-
Click
Show Advanced Settings. -
Update the value in the
Replication Release Timeoutfield. - Click .
Chapter 9. Initializing a consumer in a replication topology
After creating the replication agreement, you must initialize the consumer, otherwise Directory Server does not start the replication. During initialization operation, the supplier copies the existing data to the consumer.
9.1. When to initialize a consumer
Consumer initialization involves copying data from a supplier server to a consumer server. Once the subtree has been physically placed on the consumer, the supplier server can begin replaying update operations to the consumer server.
Under normal operations, you must not reinitialize the consumer. However, in case of large discrepancy between the supplier’s and consumer’s data, perform the consumer reinitialization.
For example, if you restored data on the supplier server from a backup, then you must also reinitialize all consumers supplied by that server. Another example is when the supplier could not contact the consumer for a long time (a week or more), and the supplier determines that the consumer is too far out of date to be updated and must be reinitialized.
Use online or offline method to initialize a consumer depending on your topology:
- In case of a small number of consumers, perform online consumer initialization by using the web console. Online consumer initialization is the method to use when the consumer is initialized as part of the replication agreement configuration on the supplier server.
- In case of large number of replicas or large databases, perform manual consumer initialization from a single LDIF file by using the command line.
9.2. Initializing a consumer when the instance is online using the command line
You can initialize a consumer by using the command line, when supplier and consumer instances are online.
Prerequisites
-
You enabled replication for the
dc=example,dc=comsuffix on a supplier and consumer servers. - You created a replication agreement between supplier and consumer servers.
Procedure
To initialize a consumer, run:
dsconf <supplier_instance_name> repl-agmt init --suffix="dc=example,dc=com" <supplier_consumer_agreement_name>
# dsconf <supplier_instance_name> repl-agmt init --suffix="dc=example,dc=com" <supplier_consumer_agreement_name>Copy to Clipboard Copied! Toggle word wrap Toggle overflow Depending on the amount of data to replicate, the initialization can be time-consuming.
Verification
Display the agreement status:
dsconf <supplier_instance_name> repl-agmt init-status --suffix "dc=example,dc=com" <supplier_consumer_agreement_name>
Agreement successfully initialized.
# dsconf <supplier_instance_name> repl-agmt init-status --suffix "dc=example,dc=com" <supplier_consumer_agreement_name>
Agreement successfully initialized.
Copy to Clipboard Copied! Toggle word wrap Toggle overflow
9.3. Initializing a consumer online by using the web console
You can initialize a consumer by using the web console only if supplier and consumer instances are online.
Prerequisites
-
You enabled replication for the
dc=example,dc=comsuffix on a supplier and consumer servers. - You created a replication agreement between supplier and consumer servers.
- You are logged in to the Directory Server instance in the web console.
Procedure
- Open the Replication menu, and select the suffix you plan to replicate.
- On the Agreements tab, click the Options menu (⋮) next to the name of the replication agreement, and select .
Confirm the initialization by checking Yes, I am sure checkbox in the pop-up window.
Depending on the amount of data to replicate, the initialization can be time-consuming.
Verification
- If the initialization completed successfully, you see the Initialized state in the Last Init Status column.
9.4. Initializing a consumer when the instance is offline
If you have a large database or many consumers, consider using the offline initialization by using the command line. This procedure involves exporting data from a supplier server and importing this data to a consumer server.
Prerequisites
-
You enabled replication for the
dc=example,dc=comsuffix on a supplier and consumer servers. - You created a replication agreement between supplier and consumer servers.
Procedure
On a supplier server, perform the following steps:
Shut down the instance on the supplier:
dsctl <supplier_instance_name> stop
# dsctl <supplier_instance_name> stopCopy to Clipboard Copied! Toggle word wrap Toggle overflow Export the
userRootdatabase that contains the suffix to replicate into the/var/lib/dirsrv/slapd-<supplier_instance_name>/ldif/example.ldiffile with replication information:dsctl <supplier_instance_name> db2ldif userRoot /var/lib/dirsrv/slapd-<supplier_instance_name>/ldif/example.ldif
# dsctl <supplier_instance_name> db2ldif userRoot /var/lib/dirsrv/slapd-<supplier_instance_name>/ldif/example.ldifCopy to Clipboard Copied! Toggle word wrap Toggle overflow Start the instance on the supplier:
dsctl <supplier_instance_name> start
# dsctl <supplier_instance_name> startCopy to Clipboard Copied! Toggle word wrap Toggle overflow
On a consumer server, perform the following steps:
Shut down the instance on the consumer:
dsctl <consumer_instance_name> stop
# dsctl <consumer_instance_name> stopCopy to Clipboard Copied! Toggle word wrap Toggle overflow -
Copy the exported
example.ldiffile to the/var/lib/dirsrv/slapd-<consumer_instance_name>/ldif/directory on the consumer. -
Import the
userRootdatabase from the/var/lib/dirsrv/slapd-<consumer_instance_name>/ldif/example.ldiffile. For more information how to import data by using thedsctl ldif2dbcommand, see Importing data using the command line while the server is offline. Start the instance on the consumer:
dsctl <consumer_instance_name> start
# dsctl <consumer_instance_name> startCopy to Clipboard Copied! Toggle word wrap Toggle overflow
Verification
Display the agreement status:
dsconf <supplier_instance_name> repl-agmt init-status --suffix "dc=example,dc=com" <supplier_consumer_agreement_name>
Agreement successfully initialized.
# dsconf <supplier_instance_name> repl-agmt init-status --suffix "dc=example,dc=com" <supplier_consumer_agreement_name>
Agreement successfully initialized.
Copy to Clipboard Copied! Toggle word wrap Toggle overflow
9.5. Setting initialization timeout
If initialization of large databases fails due to timeouts, set one of the following parameters to a longer or unlimited period:
-
The
nsslapd-idletimeoutconfiguration parameter in thecn=configentry that sets the timeout for all replication agreements on the server. -
The
nsIdleTimeoutparameter in the replication manager’s DN that sets the timeout for all agreements that use this replication manager entry.
Prerequisites
- You have root permissions.
Procedure
To disable the timeout globally, set
nsslapd-idletimeoutto0:dsconf <instance_name> config replace nsslapd-idletimeout=0 Successfully replaced value(s) for 'nsslapd-idletimeout': '0'
# dsconf <instance_name> config replace nsslapd-idletimeout=0
Successfully replaced value(s) for 'nsslapd-idletimeout': '0'
Copy to Clipboard Copied! Toggle word wrap Toggle overflow To disable the timeout for the
cn=replication manager,cn=configentry:Copy to Clipboard Copied! Toggle word wrap Toggle overflow
Chapter 10. Removing an instance from a replication topology
In certain situations, such as hardware outages or structural changes, administrators want to remove Directory Server instances from a replication topology. The procedure of removing an instance depends on the role of the replica you want to remove.
10.1. Removing a consumer or hub from a replication topology
If a consumer or hub is no longer needed in a replication topology, remove it.
Prerequisites
- The instance to remove is a consumer or hub.
- If the host to remove is a hub that also acts as a supplier to other servers in the topology, you configured other suppliers or hubs to replicate data to these servers to prevent them from becoming isolated.
Procedure
On the consumer or hub to remove:
List the suffixes and their corresponding databases:
dsconf -D "cn=Directory Manager" ldap://host-to-remove.example.com backend suffix list
dc=example,dc=com (userroot)
# dsconf -D "cn=Directory Manager" ldap://host-to-remove.example.com backend suffix list
dc=example,dc=com (userroot)
Copy to Clipboard Copied! Toggle word wrap Toggle overflow Note the name of the databases.
Set the databases into read-only mode to prevent any further updates:
dsconf -D "cn=Directory Manager" ldap://host-to-remove.example.com backend suffix set --enable-readonly "userroot"
# dsconf -D "cn=Directory Manager" ldap://host-to-remove.example.com backend suffix set --enable-readonly "userroot"Copy to Clipboard Copied! Toggle word wrap Toggle overflow
On all suppliers that have a replication agreement with the consumer or hub you want to remove:
List the replication agreements for the suffix that is replicated:
dsconf -D "cn=Directory Manager" ldap://server.example.com repl-agmt list --suffix "dc=example,dc=com"
dn: cn=example-agreement,cn=replica,cn=dc\3Dexample\2Cdc\3Dcom,cn=mapping tree,cn=config
cn: example-agreement
...
# dsconf -D "cn=Directory Manager" ldap://server.example.com repl-agmt list --suffix "dc=example,dc=com"
dn: cn=example-agreement,cn=replica,cn=dc\3Dexample\2Cdc\3Dcom,cn=mapping tree,cn=config
cn: example-agreement
...
Copy to Clipboard Copied! Toggle word wrap Toggle overflow The
cnattribute contains the replication agreement name that you need in the next step.Remove the replication agreement:
dsconf -D "cn=Directory Manager" ldap://server.example.com repl-agmt delete --suffix "dc=example,dc=com" example-agreement
# dsconf -D "cn=Directory Manager" ldap://server.example.com repl-agmt delete --suffix "dc=example,dc=com" example-agreementCopy to Clipboard Copied! Toggle word wrap Toggle overflow
On the consumer or hub to remove, disable replication for all suffixes:
dsconf -D "cn=Directory Manager" ldap://host-to-remove.example.com replication disable --suffix "dc=example,dc=com"
# dsconf -D "cn=Directory Manager" ldap://host-to-remove.example.com replication disable --suffix "dc=example,dc=com"Copy to Clipboard Copied! Toggle word wrap Toggle overflow If this host was a hub, disabling replication automatically also deletes all replication agreements for this suffix on this server.
Next steps
If you want to use the removed instance for testing purposes, disable the read-only mode:
dsconf -D "cn=Directory Manager" ldap://host-to-remove.example.com backend suffix set --disable-readonly userroot
# dsconf -D "cn=Directory Manager" ldap://host-to-remove.example.com backend suffix set --disable-readonly userrootCopy to Clipboard Copied! Toggle word wrap Toggle overflow ImportantIf you want to use the instance you removed from the topology for testing purposes, ensure that no clients continue using it.
Remove the instance:
dsctl instance_name remove --do-it
# dsctl instance_name remove --do-itCopy to Clipboard Copied! Toggle word wrap Toggle overflow
10.2. Removing a supplier from a replication topology
Removing a supplier cleanly from a replication topology is more complex than removing a hub or consumer. This is because every supplier in the topology stores information about other suppliers, and they retain that information even if a supplier suddenly becomes unavailable.
Directory Server maintains information about the replication topology in a set of metadata called the replica update vector (RUV). The RUV contains information about the supplier, such as its ID, URL, latest change state number (CSN) on the local server, and the CSN of the first change. Both suppliers and consumers store RUV information, and they use it to control replication updates.
To remove a supplier cleanly, you must remove its metadata along with the configuration entries.
Prerequisites
- The instance to remove is a supplier.
- If the host to remove also acts as a supplier to other servers in the topology, you configured other suppliers or hubs to replicate data to these servers to prevent them from becoming isolated.
Procedure
On the supplier to remove:
List the suffixes and their corresponding databases:
dsconf -D "cn=Directory Manager" ldap://host-to-remove.example.com backend suffix list
dc=example,dc=com (userroot)
# dsconf -D "cn=Directory Manager" ldap://host-to-remove.example.com backend suffix list
dc=example,dc=com (userroot)
Copy to Clipboard Copied! Toggle word wrap Toggle overflow Note the name of the databases.
Set the databases into read-only mode to prevent any further updates:
dsconf -D "cn=Directory Manager" ldap://host-to-remove.example.com backend suffix set --enable-readonly "userroot"
# dsconf -D "cn=Directory Manager" ldap://host-to-remove.example.com backend suffix set --enable-readonly "userroot"Copy to Clipboard Copied! Toggle word wrap Toggle overflow Wait until all other servers in the topology received all data from this supplier. To verify, ensure that the CSN on other servers is equal or greater than the CSN on the supplier to remove:
Copy to Clipboard Copied! Toggle word wrap Toggle overflow Display the replica ID:
dsconf -D "cn=Directory Manager" ldap://host-to-remove.example.com replication get --suffix "dc=example,dc=com" | grep -i "nsds5replicaid"
nsDS5ReplicaId: 1
# dsconf -D "cn=Directory Manager" ldap://host-to-remove.example.com replication get --suffix "dc=example,dc=com" | grep -i "nsds5replicaid"
nsDS5ReplicaId: 1
Copy to Clipboard Copied! Toggle word wrap Toggle overflow In this example, the replica ID is
1. Remember your replica ID for the last step of this procedure.
On all suppliers that have a replication agreement with the host you want to remove:
List the replication agreements for the suffix that is replicated:
dsconf -D "cn=Directory Manager" ldap://server.example.com repl-agmt list --suffix "dc=example,dc=com"
dn: cn=example-agreement,cn=replica,cn=dc\3Dexample\2Cdc\3Dcom,cn=mapping tree,cn=config
cn: example-agreement
...
# dsconf -D "cn=Directory Manager" ldap://server.example.com repl-agmt list --suffix "dc=example,dc=com"
dn: cn=example-agreement,cn=replica,cn=dc\3Dexample\2Cdc\3Dcom,cn=mapping tree,cn=config
cn: example-agreement
...
Copy to Clipboard Copied! Toggle word wrap Toggle overflow The
cnattribute contains the replication agreement name that you need in the next step.Remove the replication agreement:
dsconf -D "cn=Directory Manager" ldap://server.example.com repl-agmt delete --suffix "dc=example,dc=com" example-agreement
# dsconf -D "cn=Directory Manager" ldap://server.example.com repl-agmt delete --suffix "dc=example,dc=com" example-agreementCopy to Clipboard Copied! Toggle word wrap Toggle overflow
On the supplier to remove, disable replication for all suffixes:
dsconf -D "cn=Directory Manager" ldap://host-to-remove.example.com replication disable --suffix "dc=example,dc=com"
# dsconf -D "cn=Directory Manager" ldap://host-to-remove.example.com replication disable --suffix "dc=example,dc=com"Copy to Clipboard Copied! Toggle word wrap Toggle overflow Disabling replication automatically also deletes all replication agreements for this suffix on this server.
-
Before you proceed, ensure that all Directory Server instances listed in the
Replica RUVsection of theds-replcheckoutput are online. On one of the remaining suppliers in the topology, clean the RUVs for the replica ID:
dsconf -D "cn=Directory Manager" ldap://server.example.com repl-tasks cleanallruv --suffix "dc=example,dc=com" --replica-id 1
# dsconf -D "cn=Directory Manager" ldap://server.example.com repl-tasks cleanallruv --suffix "dc=example,dc=com" --replica-id 1Copy to Clipboard Copied! Toggle word wrap Toggle overflow This command requires that you specify the replica ID displayed in an earlier step of this procedure.
Verification
Verify in the output of the
ds-replcheckcommand that no entries with the replica ID and URL of the host you removed are left:ds-replcheck online -D "cn=Directory Manager" -w password -m ldap://host-to-remove.example.com:389 -r ldap://server.example.com:389 -b dc=example,dc=com
# ds-replcheck online -D "cn=Directory Manager" -w password -m ldap://host-to-remove.example.com:389 -r ldap://server.example.com:389 -b dc=example,dc=comCopy to Clipboard Copied! Toggle word wrap Toggle overflow
Next steps
If you want to use the removed instance for testing purposes, disable the read-only mode:
dsconf -D "cn=Directory Manager" ldap://host-to-remove.example.com backend suffix set --disable-readonly userroot
# dsconf -D "cn=Directory Manager" ldap://host-to-remove.example.com backend suffix set --disable-readonly userrootCopy to Clipboard Copied! Toggle word wrap Toggle overflow ImportantIf you want to use the instance you removed from the topology for testing purposes, ensure that no clients continue using it.
Remove the instance:
dsctl instance_name remove --do-it
# dsctl instance_name remove --do-itCopy to Clipboard Copied! Toggle word wrap Toggle overflow
Chapter 11. Preventing monopolization of a replica in a multi-supplier replication topology
In a multi-supplier replication topology, a supplier under heavy update load can monopolize a replica so that other suppliers are not able to update it as well.
This section describes the circumstances when monopolization happens, how to identify this problem, and provides information on how to configure suppliers to avoid monopolization situations.
11.1. When monopolization happens
One of the features of multi-supplier replication is that a supplier acquires exclusive access to a replica. If the supplier attempts to acquire access while being locked out, the replica sends back a busy response, and the supplier waits for the time set in the nsds5ReplicaBusyWaitTime parameter before it starts another attempt. In the meantime, the supplier sends its update to another replica. When the first replica is free again, the supplier sends the updates to this host.
It can be a problem if the supplier that is locked out is under a heavy update load or has a lot of pending updates in the changelog. In this situation, the locking supplier finishes sending updates and immediately attempts to reacquire the same replica. Such an attempt succeeds in most cases, because other suppliers might still be waiting. You can set a pause between two update sessions in the nsds5ReplicaSessionPauseTime parameter. This can cause a single supplier to monopolize a replica for several hours or longer.
11.2. Enabling replication logging to identify monopolization of replicas
If one or more suppliers are often under a heavy update load, and replicas frequently do not receive updates, enable logging of replication messages to identify monopolization situations.
Prerequisites
- There are multiple suppliers in the replication topology.
Procedure
Enable replication logging:
dsconf -D "cn=Directory Manager" ldap://server.example.com config replace nsslapd-errorlog-level=8192
# dsconf -D "cn=Directory Manager" ldap://server.example.com config replace nsslapd-errorlog-level=8192Copy to Clipboard Copied! Toggle word wrap Toggle overflow Note that this command enables only replication logging, and logging other error messages is disabled.
Monitor the
/var/log/dirsrv/slapd-instance_name/errorslog file and search for the following error message:Replica Busy! Status: [Error (1) Replication error acquiring replica: replica busy]
Replica Busy! Status: [Error (1) Replication error acquiring replica: replica busy]Copy to Clipboard Copied! Toggle word wrap Toggle overflow Note that it is normal if Directory Server occasionally logs this error. However, if replicas frequently do not receive updates, and the suppliers log this error, consider updating your configuration to solve this problem.
11.3. Configuring suppliers to avoid monopolization of replicas
This procedure describes how to set parameters on a supplier to prevent monopolization of replicas.
Due to the differences of environments and load, set only the parameters that are relevant in your situation, and adjust the values according to your environment.
Prerequisites
- There are multiple suppliers in the replication topology.
-
Directory Server frequently logs
Replica Busy! Status: [Error (1) Replication error acquiring replica: replica busy]errors.
Procedure
Set the
nsds5ReplicaBusyWaitTimeparameter to configure the time a supplier waits before starting another attempt to acquire access to a replica after the replica sent a busy response:dsconf -D "cn=Directory Manager" ldap://supplier.example.com repl-agmt set --suffix "dc=example,dc=com" --busy-wait-time 5 replication_agreement_name
# dsconf -D "cn=Directory Manager" ldap://supplier.example.com repl-agmt set --suffix "dc=example,dc=com" --busy-wait-time 5 replication_agreement_nameCopy to Clipboard Copied! Toggle word wrap Toggle overflow This command sets the time to wait to
5seconds. This setting applies only to the specified replication agreement.Set the
nsds5ReplicaSessionPauseTimeparameter to configure the time a supplier waits between two update sessions:dsconf -D "cn=Directory Manager" ldap://supplier.example.com repl-agmt set --suffix "dc=example,dc=com" --session-pause-time 15 replication_agreement_name
# dsconf -D "cn=Directory Manager" ldap://supplier.example.com repl-agmt set --suffix "dc=example,dc=com" --session-pause-time 15 replication_agreement_nameCopy to Clipboard Copied! Toggle word wrap Toggle overflow This command sets the pause to
15seconds. By default,nsds5ReplicaSessionPauseTimeis one second longer than the value innsds5ReplicaBusyWaitTime. This setting applies only to the specified replication agreement.Set the
nsds5ReplicaReleaseTimeoutparameter to terminate replication sessions after a given amount of time regardless of whether or not sending the update is complete:dsconf -D "cn=Directory Manager" ldap://supplier.example.com replication set --suffix "dc=example,dc=com" --repl-release-timeout 90
# dsconf -D "cn=Directory Manager" ldap://supplier.example.com replication set --suffix "dc=example,dc=com" --repl-release-timeout 90Copy to Clipboard Copied! Toggle word wrap Toggle overflow This command sets the timeout to
90seconds. This setting applies to all replication agreements for the specified suffix.Optional: Set a timeout period for a supplier so that it does not stay connected to a consumer infinitely attempting to send updates over a slow or broken connection:
dsconf -D "cn=Directory Manager" ldap://supplier.example.com repl-agmt set --conn-timeout 600 --suffix "dc=example,dc=com" replication_agreement_name
# dsconf -D "cn=Directory Manager" ldap://supplier.example.com repl-agmt set --conn-timeout 600 --suffix "dc=example,dc=com" replication_agreement_nameCopy to Clipboard Copied! Toggle word wrap Toggle overflow This command sets the timeout to
600seconds (10 minutes). To identify the optimum value, check the access log for the average amount of time the replication process takes, and set the timeout period accordingly.
Chapter 12. Forcing replication updates after an instance in a replication environment was offline
If you stop a Directory Server instance that is involved in replication for regular maintenance, the supplier must update the directory data immediately when it comes back online. You can enforce this update using the command line and the web console.
12.1. Forcing replication updates using the command line
Perform the following steps on the suppliers to enforce replication updates for the dc=example,dc=com suffix in example-agreement.
Prerequisites
- The replication is set up.
- The consumer has been initialized.
Procedure
Check if the replication agreement has an update schedule configured:
dsconf -D "cn=Directory Manager" ldap://server.example.com repl-agmt get --suffix "dc=example,dc=com" example-agreement
# dsconf -D "cn=Directory Manager" ldap://server.example.com repl-agmt get --suffix "dc=example,dc=com" example-agreementCopy to Clipboard Copied! Toggle word wrap Toggle overflow If the output of the command contains
nsDS5ReplicaUpdateSchedule: *or thensDS5ReplicaUpdateScheduleparameter is not present, no update schedule is configured.If
nsDS5ReplicaUpdateSchedulecontains a schedule, such as shown in the following, note the value:nsDS5ReplicaUpdateSchedule: 0800-2200 0246
nsDS5ReplicaUpdateSchedule: 0800-2200 0246Copy to Clipboard Copied! Toggle word wrap Toggle overflow If an update schedule is configured, enter the following command to temporary disable it:
dsconf -D "cn=Directory Manager" ldap://server.example.com repl-agmt set --schedule \ --suffix "dc=example,dc=com" example-agreement*
# dsconf -D "cn=Directory Manager" ldap://server.example.com repl-agmt set --schedule \ --suffix "dc=example,dc=com" example-agreement*Copy to Clipboard Copied! Toggle word wrap Toggle overflow Temporarily disable the replication agreement:
dsconf -D "cn=Directory Manager" ldap://server.example.com repl-agmt disable --suffix "dc=example,dc=com" example-agreement
# dsconf -D "cn=Directory Manager" ldap://server.example.com repl-agmt disable --suffix "dc=example,dc=com" example-agreementCopy to Clipboard Copied! Toggle word wrap Toggle overflow Re-enable the replication agreement to force the replication update:
dsconf -D "cn=Directory Manager" ldap://server.example.com repl-agmt enable --suffix "dc=example,dc=com" example-agreement
# dsconf -D "cn=Directory Manager" ldap://server.example.com repl-agmt enable --suffix "dc=example,dc=com" example-agreementCopy to Clipboard Copied! Toggle word wrap Toggle overflow If a replication schedule was configured at the beginning of this procedure, set the schedule to the previous value:
dsconf -D "cn=Directory Manager" ldap://server.example.com repl-agmt set --schedule "0800-2200 0246" --suffix "dc=example,dc=com" example-agreement
# dsconf -D "cn=Directory Manager" ldap://server.example.com repl-agmt set --schedule "0800-2200 0246" --suffix "dc=example,dc=com" example-agreementCopy to Clipboard Copied! Toggle word wrap Toggle overflow
Verification
Display the replication status:
Copy to Clipboard Copied! Toggle word wrap Toggle overflow
12.2. Forcing replication updates using the web console
Perform the following steps on the suppliers to enforce replication updates.
Prerequisites
- The replication is set up.
- The consumer has been initialized
- You are logged in to the instance in the web console.
Procedure
-
Open the
Replicationmenu. -
Select the
dc=example,dc=comsuffix. -
Open the
Agreementstab. Check if the replication agreement has an update schedule configured:
-
Click the overflow menu next to the agreement, and select
Edit Agreement. On the
Schedulingtab, note the values that are currently set.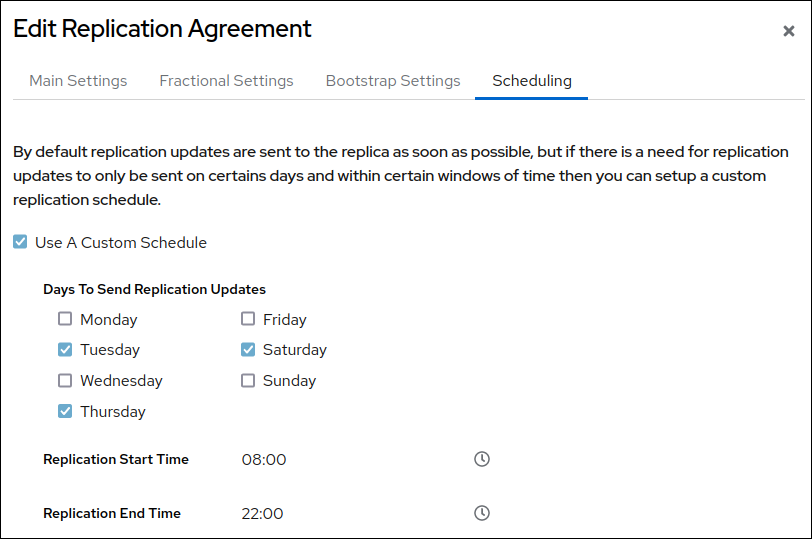
If
Use A Custom Scheduleis not selected, no schedule is configured.
-
Click the overflow menu next to the agreement, and select
Click the overflow menu next to the replication agreement, and select
Disable/Enable Agreementto disable the agreement.The status of the agreement in the
Statecolumn is nowDisabled.Click the overflow menu next to the replication agreement again, and select
Disable/Enable Agreementto re-enable the replication agreement and enforce the replication update.The status of the agreement in the
Statecolumn is nowEnabled.If a replication schedule was configured at the beginning of this procedure, set the schedule to the previous values:
- Click click the overflow menu, and select → .
-
On the
Schedulingtab, set the previous values.
Verification
Display the replication status:
Copy to Clipboard Copied! Toggle word wrap Toggle overflow
Chapter 13. Changing the role of a replica
In a replication topology, you can change the role of replicas. For example, if a supplier is unavailable due to a hardware outage, you can promote a consumer to a supplier. The other way around, you can demote, for example, a supplier with low hardware resources to a consumer and later add another supplier with new hardware.
13.1. Promoting a replica using the command line
You can promote:
- A consumer to a hub or supplier
- A hub to a supplier
This section describes how to promote a replica of the dc=example,dc=com suffix.
Prerequisites
- The Directory Server instance is a member of a replication topology.
- The replica to promote is a consumer or hub.
Procedure
If the replica to promote is a hub with replication agreements, and the hub should no longer send data to other hosts after the promotion, remove the replication agreements:
List the replication agreements on the hub:
dsconf -D "cn=Directory Manager" ldap://server.example.com repl-agmt list --suffix "dc=example,dc=com"
dn: cn=example-agreement,cn=replica,cn=dc\3Dexample\2Cdc\3Dcom,cn=mapping tree,cn=config
cn: example-agreement
...
# dsconf -D "cn=Directory Manager" ldap://server.example.com repl-agmt list --suffix "dc=example,dc=com"
dn: cn=example-agreement,cn=replica,cn=dc\3Dexample\2Cdc\3Dcom,cn=mapping tree,cn=config
cn: example-agreement
...
Copy to Clipboard Copied! Toggle word wrap Toggle overflow The
cnattribute contains the replication agreement name that you need in the next step.Remove the replication agreement from the hub:
dsconf -D "cn=Directory Manager" ldap://server.example.com repl-agmt delete --suffix "dc=example,dc=com" example-agreement
# dsconf -D "cn=Directory Manager" ldap://server.example.com repl-agmt delete --suffix "dc=example,dc=com" example-agreementCopy to Clipboard Copied! Toggle word wrap Toggle overflow
Promote the instance:
If you promote a consumer or hub to a supplier, enter:
dsconf -D "cn=Directory Manager" ldap://server.example.com replication promote --suffix "dc=example,dc=com" --newrole "supplier" --replica-id 2
# dsconf -D "cn=Directory Manager" ldap://server.example.com replication promote --suffix "dc=example,dc=com" --newrole "supplier" --replica-id 2Copy to Clipboard Copied! Toggle word wrap Toggle overflow ImportantThe replica ID must be a unique integer value between
1and65534for a suffix across all suppliers in the topology.If you promote a consumer to a hub, enter:
dsconf -D "cn=Directory Manager" ldap://server.example.com replication promote --suffix "dc=example,dc=com" --newrole "hub"
# dsconf -D "cn=Directory Manager" ldap://server.example.com replication promote --suffix "dc=example,dc=com" --newrole "hub"Copy to Clipboard Copied! Toggle word wrap Toggle overflow
- If the replica in its new role should send updates to other hosts in the topology, create replication agreements.
13.2. Promoting a replica using the web console
You can promote:
- A consumer to a hub or supplier
- A hub to a supplier
This section describes how to promote a replica of the dc=example,dc=com suffix.
Prerequisites
- The Directory Server instance is a member of a replication topology.
- The replica to promote is a consumer or hub.
- You are logged in to the instance in the web console.
Procedure
If the replica to promote is a hub with replication agreements, and the hub should no longer send data to other hosts after the promotion, remove the replication agreements:
- Navigate to → .
-
Click next to the agreement you want to delete, and select
Delete Agreement.
Navigate to → , and click the button.
If you promote a consumer or hub to a supplier, select
Supplier, and enter a unique replica ID.ImportantThe replica ID must be a unique integer value between
1and65534for a suffix across all suppliers in the topology.-
If you promote a consumer to a hub, select
Hub.
-
Select
Yes, I am sure. - Click .
- If the replica in its new role should send updates to other hosts in the topology, create replication agreements.
13.3. Demoting a replica using the command line
You can demote:
- A supplier or hub to a consumer
- A hub to a consumer
This section describes how to demote a replica of the dc=example,dc=com suffix.
Prerequisites
- The Directory Server instance is a member of a replication topology.
- The replica to demote is a supplier or hub.
Procedure
If the replica to demote has replication agreements that are no longer needed, for example, because you demote the replica to a consumer, remove the replication agreements:
List the replication agreements on the replica:
dsconf -D "cn=Directory Manager" ldap://server.example.com repl-agmt list --suffix "dc=example,dc=com"
dn: cn=example-agreement,cn=replica,cn=dc\3Dexample\2Cdc\3Dcom,cn=mapping tree,cn=config
cn: example-agreement
...
# dsconf -D "cn=Directory Manager" ldap://server.example.com repl-agmt list --suffix "dc=example,dc=com"
dn: cn=example-agreement,cn=replica,cn=dc\3Dexample\2Cdc\3Dcom,cn=mapping tree,cn=config
cn: example-agreement
...
Copy to Clipboard Copied! Toggle word wrap Toggle overflow The
cnattribute contains the replication agreement name that you need in the next step.Remove the replication agreement from the replica:
dsconf -D "cn=Directory Manager" ldap://server.example.com repl-agmt delete --suffix "dc=example,dc=com" example-agreement
# dsconf -D "cn=Directory Manager" ldap://server.example.com repl-agmt delete --suffix "dc=example,dc=com" example-agreementCopy to Clipboard Copied! Toggle word wrap Toggle overflow
Demote the instance:
dsconf -D "cn=Directory Manager" ldap://server.example.com replication demote --suffix "dc=example,dc=com" --newrole "hub_or_consumer"
# dsconf -D "cn=Directory Manager" ldap://server.example.com replication demote --suffix "dc=example,dc=com" --newrole "hub_or_consumer"Copy to Clipboard Copied! Toggle word wrap Toggle overflow Depending on the role you want to configure, set the
--newroleparameter tohuborconsumer.- If you configured the replica as a hub and it should send updates to other hosts in the topology, create replication agreements.
13.4. Demoting a replica using the web console
You can demote:
- A supplier or hub to a consumer
- A hub to a consumer
This section describes how to demote a replica of the dc=example,dc=com suffix.
Prerequisites
- The Directory Server instance is a member of a replication topology.
- The replica to demote is a supplier or hub.
- You are logged in to the instance in the web console.
Procedure
If the replica to demote has replication agreements that are no longer needed, for example, because you demote the replica to a consumer, remove the replication agreements:
- Navigate to → .
-
Click next to the agreement you want to delete, and select
Delete Agreement.
- Navigate to → , and click button.
- Select the new replica role.
-
Select
Yes, I am sure. - Click .
- If the replica in its new role should send updates to other hosts in the topology, create replication agreements.
Chapter 14. Trimming the replication changelog
The Directory Server changelog manages a list of received and processed changes. It includes client changes and changes received from replication partners.
By default, Directory Server trims the changelog entries that are older than seven day. However, you can configure:
-
A maximum age of entries in the changelog in the
nsslapd-changelogmaxageparameter. -
The total number of records in the changelog in the
nsslapd-changelogmaxentriesparameter.
If you enabled at least one of these settings, Directory Server trims the changelog every five minutes by default (nsslapd-changelogtrim-interval).
Even with the trimming settings enabled, any record and records subsequently created remain in the changelog until they are successfully replicated to all servers in the topology. If you remove the supplier from the topology as described in Removing a supplier from a replication topology, then Directory Server trims all the updates of this supplier from changelogs on other servers.
14.1. Configuring replication changelog trimming using the command line
Directory Server trims the changelog entries that are older than seven days by default. However, you can configure the time after which Directory Server removes entries. You can also configure Directory Server to automatically remove entries if the number of entries exceeds a configured value.
This section describes how to configure changelog trimming for the dc=example,dc=com suffix.
Red Hat recommends setting a maximum age instead of a maximum number of entries. The maximum age should match the replication purge delay set in the nsDS5ReplicaPurgeDelay parameter in the cn=replica,cn=suffixDN,cn=mapping tree,cn=config entry.
Perform this procedure on the supplier.
Prerequisites
-
You enabled replication for the
dc=example,dc=comsuffix.
Procedure
Configure change log trimming:
To set a maximum age of changelog entries, enter:
dsconf -D "cn=Directory Manager" ldap://server.example.com replication set-changelog --suffix "dc=example,dc=com" --max-age "4w"
# dsconf -D "cn=Directory Manager" ldap://server.example.com replication set-changelog --suffix "dc=example,dc=com" --max-age "4w"Copy to Clipboard Copied! Toggle word wrap Toggle overflow This command sets the maximum age to 4 weeks. The parameter supports the following units:
-
s(S) for seconds -
m(M) for minutes -
h(H) for hours -
d(D) for days -
w(W) for weeks
-
To set a maximum number of entries, enter:
dsconf -D "cn=Directory Manager" ldap://server.example.com replication set-changelog --suffix "dc=example,dc=com" --max-entries "100000"
# dsconf -D "cn=Directory Manager" ldap://server.example.com replication set-changelog --suffix "dc=example,dc=com" --max-entries "100000"Copy to Clipboard Copied! Toggle word wrap Toggle overflow This command sets the maximum number of entries in the changelog to 100,000.
By default, Directory Server trims the changelog every 5 minutes (300 seconds). To set a different interval, enter:
dsconf -D "cn=Directory Manager" ldap://server.example.com replication set-changelog --suffix "dc=example,dc=com" --trim-interval 600
# dsconf -D "cn=Directory Manager" ldap://server.example.com replication set-changelog --suffix "dc=example,dc=com" --trim-interval 600Copy to Clipboard Copied! Toggle word wrap Toggle overflow This command sets the interval to 10 minutes (600 seconds).
Verification
Display the changelog settings of the suffix:
Copy to Clipboard Copied! Toggle word wrap Toggle overflow The command only displays the parameters that are different to their default.
14.2. Manually reducing the size of a large changelog
In certain situations, such as if replication changelog trimming was not enabled, the changelog can grow to an excessively large size. To fix this, you can reduce the changelog size manually.
This procedure describes how to trim the changelog of the dc=example,dc=com suffix. Perform this procedure on the supplier.
Prerequisites
-
You enabled replication for the
dc=example,dc=comsuffix.
Procedure
Optional: Display the size of the changelog:
Identify the back-end database of the
dc=example,dc=comsuffix:dsconf -D "cn=Directory Manager" ldap://server.example.com backend suffix list dc=example,dc=com (userroot)
# dsconf -D "cn=Directory Manager" ldap://server.example.com backend suffix list dc=example,dc=com (userroot)Copy to Clipboard Copied! Toggle word wrap Toggle overflow The name in parentheses is the back-end database that stores the data of the corresponding suffix.
Display the size of the changelog file of the
userrootbackend:ls -lh /var/lib/dirsrv/slapd-instance_name/db/userroot/replication_changelog.db -rw-------. 1 dirsrv dirsrv 517M Jul 5 12:58 /var/lib/dirsrv/slapd-instance_name/db/userroot/replication_changelog.db
# ls -lh /var/lib/dirsrv/slapd-instance_name/db/userroot/replication_changelog.db -rw-------. 1 dirsrv dirsrv 517M Jul 5 12:58 /var/lib/dirsrv/slapd-instance_name/db/userroot/replication_changelog.dbCopy to Clipboard Copied! Toggle word wrap Toggle overflow
To be able to reset the parameters after reducing the changelog size, display and note the current values of the corresponding parameters:
dsconf -D "cn=Directory Manager" ldap://server.example.com replication get-changelog --suffix "dc=example,dc=com" dn: cn=changelog,cn=userroot,cn=ldbm database,cn=plugins,cn=config cn: changelog nsslapd-changelogmaxage: 4w nsslapd-changelogtrim-interval: 300
# dsconf -D "cn=Directory Manager" ldap://server.example.com replication get-changelog --suffix "dc=example,dc=com" dn: cn=changelog,cn=userroot,cn=ldbm database,cn=plugins,cn=config cn: changelog nsslapd-changelogmaxage: 4w nsslapd-changelogtrim-interval: 300Copy to Clipboard Copied! Toggle word wrap Toggle overflow If you do not see any specific attributes in the output, Directory Server uses their default values.
Temporarily, reduce trimming-related parameters:
dsconf -D "cn=Directory Manager" ldap://server.example.com replication set-changelog --suffix "dc=example,dc=com" --max-age "300s" --max-entries 500 --trim-interval 60
# dsconf -D "cn=Directory Manager" ldap://server.example.com replication set-changelog --suffix "dc=example,dc=com" --max-age "300s" --max-entries 500 --trim-interval 60Copy to Clipboard Copied! Toggle word wrap Toggle overflow ImportantFor performance reasons, do not permanently use too short interval settings.
-
Wait until the time set in the
--trim-intervalparameter expires. Compact the changelog to regain disk space:
dsconf -D "cn=Directory Manager" ldap://server.example.com backend compact-db --only-changelog
# dsconf -D "cn=Directory Manager" ldap://server.example.com backend compact-db --only-changelogCopy to Clipboard Copied! Toggle word wrap Toggle overflow Reset the changelog parameters to the values they had before you temporarily reduced them:
dsconf -D "cn=Directory Manager" ldap://server.example.com replication set-changelog --suffix "dc=example,dc=com" --max-age "4w" --trim-interval 300
# dsconf -D "cn=Directory Manager" ldap://server.example.com replication set-changelog --suffix "dc=example,dc=com" --max-age "4w" --trim-interval 300Copy to Clipboard Copied! Toggle word wrap Toggle overflow
Verification
Display the size of the changelog:
ls -lh /var/lib/dirsrv/slapd-instance_name/db/userroot/replication_changelog.db -rw-------. 1 dirsrv dirsrv 12M Jul 5 12:58 /var/lib/dirsrv/slapd-instance_name/db/userroot/replication_changelog.db
# ls -lh /var/lib/dirsrv/slapd-instance_name/db/userroot/replication_changelog.db -rw-------. 1 dirsrv dirsrv 12M Jul 5 12:58 /var/lib/dirsrv/slapd-instance_name/db/userroot/replication_changelog.dbCopy to Clipboard Copied! Toggle word wrap Toggle overflow
Chapter 15. Encrypting the replication changelog
Encrypt the replication changelog to increase the security of your instance, in case that an attacker gains access to the file system of your server.
Changelog encryption uses the server’s TLS encryption key and the same PIN to unlock the key. You must either enter the PIN manually upon server startup or use a PIN file.
Directory Server uses randomly generated symmetric cipher keys to encrypt and decrypt the changelog. The server uses a separate key for each configured cipher. These keys are wrapped using the public key from the server’s TLS certificate, and the resulting wrapped key is stored within the server’s configuration files. The effective strength of the attribute encryption is the same as the strength of the server’s TLS key used for wrapping. Without access to the server’s private key and the PIN, it is not possible to recover the symmetric keys from the wrapped copies.
15.1. Encrypting the changelog using the command line
To increase the security in a replication topology, encrypt the changelog on suppliers and hubs. This procedure describes how to enable changelog encryption for the dc=example,dc=com suffix.
Prerequisites
- The server has TLS encryption enabled.
- The host is a supplier or hub in a replication topology.
Procedure
Export the changelog, for example, to the
/tmp/changelog.ldiffile:dsconf -D "cn=Directory Manager" ldap://server.example.com replication export-changelog to-ldif -o /tmp/changelog.ldif -r "dc=example,dc=com"
# dsconf -D "cn=Directory Manager" ldap://server.example.com replication export-changelog to-ldif -o /tmp/changelog.ldif -r "dc=example,dc=com"Copy to Clipboard Copied! Toggle word wrap Toggle overflow Enable change log encryption for the
dc=example,dc=comsuffix:dsconf -D "cn=Directory Manager" ldap://server.example.com replication --suffix "dc=example,dc=com" --encrypt
# dsconf -D "cn=Directory Manager" ldap://server.example.com replication --suffix "dc=example,dc=com" --encryptCopy to Clipboard Copied! Toggle word wrap Toggle overflow Import the changelog from the
/tmp/changelog.ldiffile:dsconf -D "cn=Directory Manager" ldap://server.example.com replication import-changelog from-ldif -r "dc=example,dc=com" /tmp/changelog.ldif
# dsconf -D "cn=Directory Manager" ldap://server.example.com replication import-changelog from-ldif -r "dc=example,dc=com" /tmp/changelog.ldifCopy to Clipboard Copied! Toggle word wrap Toggle overflow Restart the instance:
dsctl instance_name restart
# dsctl instance_name restartCopy to Clipboard Copied! Toggle word wrap Toggle overflow
Verification
- Make a change in the LDAP directory, such as updating an entry.
Stop the instance:
dsctl instance_name stop
# dsctl instance_name stopCopy to Clipboard Copied! Toggle word wrap Toggle overflow List the suffixes and their corresponding databases:
dsconf -D "cn=Directory Manager" ldap://server.example.com backend suffix list
dc=example,dc=com (userroot)
# dsconf -D "cn=Directory Manager" ldap://server.example.com backend suffix list
dc=example,dc=com (userroot)
Copy to Clipboard Copied! Toggle word wrap Toggle overflow Note the name of the database for which you enabled changelog encryption.
Enter the following command to display parts of the changelog:
dbscan -f /var/lib/dirsrv/slapd-instance_name/db/userroot/replication_changelog.db | tail -50
# dbscan -f /var/lib/dirsrv/slapd-instance_name/db/userroot/replication_changelog.db | tail -50Copy to Clipboard Copied! Toggle word wrap Toggle overflow If the changelog is encrypted, you see only encrypted data.
Start the instance.
dsctl instance_name start
# dsctl instance_name startCopy to Clipboard Copied! Toggle word wrap Toggle overflow
Chapter 17. Managing attributes within fractional replication
Fractional replication sets attributes that Directory Server does not replicate from a supplier to a consumer (or another supplier). Therefore, Directory Server can replicate a database without replicating all the information that it contains or all of the information in every entry improving the server performance and security.
Use fractional replication in the following cases:
- You want to limit the number of large attributes that are sent over a slow network.
-
You want to reduce the number of times that Directory Server runs fixup tasks, such as
memberOfcalculations. - You want to exclude sensitive attributes from replication if a consumer server is placed on an untrusted network.
Fractional replication is enabled and configured per replication agreement, not per entry. Excluding attributes from replication is applied equally to all entries within the replication agreement’s scope. You can set different attributes to be replicated for an incremental update (nsDS5ReplicatedAttributeList) and a total update (nsDS5ReplicatedAttributeListTotal) and prevent empty updates during fractional replication (nsds5ReplicaStripAttrs).
Fractional replication parameters are part of the replication agreement and you can configure these parameters using the command line when the replication agreement is created or in the replication agreement wizard in the web console.
17.1. Excluding attributes from total and incremental updates using the command line
In a basic scenario, fractional replication excludes the same list of attributes from total and incremental updates. However, you can configure Directory Server to exclude different attributes from incremental and total updates for performance reasons by using the following configuration attributes:
nsDS5ReplicatedAttributeList-
This is the primary fractional replication attribute. When you set only
nsDS5ReplicatedAttributeList, Directory Server excludes specified attributes from both incremental and total updates. nsDS5ReplicatedAttributeListTotal- This fractional replication attribute specifies the list of attributes that Directory Server must exclude only from total (initial) updates.
For example, every time you add a memberOf attribute to an entry, Directory Server runs a memberOf fixup task to resolve the group membership. This can cause overhead on the server if Directory Server runs the task every time replication occurs. Since a total update only occurs for a database that is newly-added to replication or that has been offline for a long time, running a memberOf fixup task after a total update is an acceptable option. In this case, the nsDS5ReplicatedAttributeList attribute contains memberOf and excludes it from incremental updates, but nsDS5ReplicatedAttributeListTotal does not contains memberOf so that it is included in total updates.
The following procedure excludes different attributes from incremental and total updates.
Prerequisites
-
You replicate
dc=example,dc=comsuffix and the replication agreementexample_agreementexists.
Procedure
Use the
dsconfutility to configure the fractional replication:dsconf -D "cn=Directory Manager" instance_name repl-agmt set example_agreement --suffix="dc=example,dc=com" --frac-list="authorityRevocationList accountUnlockTime memberof" --frac-list-total="accountUnlockTime"
# dsconf -D "cn=Directory Manager" instance_name repl-agmt set example_agreement --suffix="dc=example,dc=com" --frac-list="authorityRevocationList accountUnlockTime memberof" --frac-list-total="accountUnlockTime"Copy to Clipboard Copied! Toggle word wrap Toggle overflow The command excludes the
authorityRevocationList,accountUnlockTime, andmemberofattributes from incremental updates and excludes onlyaccountUnlockTimefrom total updates.- NOTE
-
If you want to exclude the same list of attributes from total and incremental updates, add the list of excluded attributes only to the
nsDS5ReplicatedAttributeListconfiguration attribute using the--frac-listoption.
-
Optional: If you want to prevent empty replication updates, use the
--strip-listoption to add attributes that Directory Server removes from replication. For details, see Preventing empty updates in fractional replication.
Verification
View the replication agreement settings:
dsconf instance_name repl-agmt list --suffix=dc=example,dc=com | grep -i nsDS5ReplicatedAttributeList

nsDS5ReplicatedAttributeList: (objectclass=) $ EXCLUDE authorityRevocationList accountUnlockTime memberof nsDS5ReplicatedAttributeListTotal: (objectclass=) $ EXCLUDE accountUnlockTime
# dsconf instance_name repl-agmt list --suffix=dc=example,dc=com | grep -i nsDS5ReplicatedAttributeList

nsDS5ReplicatedAttributeList: (objectclass=) $ EXCLUDE authorityRevocationList accountUnlockTime memberof nsDS5ReplicatedAttributeListTotal: (objectclass=) $ EXCLUDE accountUnlockTime
Copy to Clipboard Copied! Toggle word wrap Toggle overflow - IMPORTANT
-
The value of
nsDS5ReplicatedAttributeListandnsDS5ReplicatedAttributeListTotalmust contain the(objectclass=*) $ EXCLUDEpart. If you edit the attribute directly, for example by using theldapmodifyutility, you must specify this part together with the list of excluded attributes.
17.2. Excluding attributes from total and incremental updates using the web console
In a basic scenario, fractional replication excludes the same list of attributes from total and incremental updates. However, you can configure Directory Server to exclude different attributes from incremental updates for performance reasons.
Prerequisites
-
You replicate
dc=example,dc=comsuffix and the replication agreementexample_agreementexists.
Procedure
- Navigate to → .
- Click the Options menu (⋮) of the agreement, where you want to configure the fractional replication, and select to open the wizard window.
Open the Fractional Settings tab and set the following fields:
- If you want to exclude the same attributes from total and incremental updates, add these attributes only to the Exclude Attributes field.
If you want to exclude different attributes from total and incremental updates:
-
Add attributes excluded from incremental updates to the Exclude Attributes field that configures the
nsDS5ReplicatedAttributeListparameter. -
Add attributes excluded from total (initial) updates to the Exclude Init Attributes field that configures the
nsDS5ReplicatedAttributeListTotalparameter.
-
Add attributes excluded from incremental updates to the Exclude Attributes field that configures the
- Optional: If you want to prevent empty replication updates, add attributes that Directory Server removes from replication to the Strip Attributes field.
- Click Save Agreement button.
Verification
- Open the replication agreement setting to view the changes.
17.3. Preventing empty updates in fractional replication
Fractional replication excludes attributes from replication updates (nsDS5ReplicatedAttributeList, nsDS5ReplicatedAttributeListTotal). However, a change to an excluded attribute still triggers a modify event and generates an empty replication update.
To prevent empty updates, use the nsds5ReplicaStripAttrs parameter that adds a list of attributes that Directory Server does not send in an empty replication event and strips from the update sequence. This logically must include operational attributes like modifiersName. If a replication event is not empty, Directory Server still replicates the stripped attributes with other changes.
For example, you excluded the accountUnlockTime attribute from the replication. For a locked user, when the time period set in accountUnlockTime expires, Directory Server automatically unlocks the user. Only the accountUnlockTime attribute has changed, and that attribute is excluded from replication. However, this unlock event also changes the operational attribute internalmodifytimestamp. This triggers a replication event because the user account was modified. But the only data to replicate is the new modify time stamp, otherwise the update is empty. If you have a large number of attributes related to login times or password expiration times, this can create many empty replication updates that negatively affect server performance or interfere with associated applications.
The following procedure strips unnecessary attributes to prevent empty updates.
Prerequisites
-
You replicate
dc=example,dc=comsuffix and the replication agreementexample_agreementexists.
Procedure
Use
dsconfutility to tune the fractional replication:dsconf -D "cn=Directory Manager" instance_name repl-agmt set example_agreement \ --suffix="dc=example,dc=com" --strip-list="modifiersname \ modifytimestamp internalmodifiersname" Successfully updated agreement# dsconf -D "cn=Directory Manager" instance_name repl-agmt set example_agreement \ --suffix="dc=example,dc=com" --strip-list="modifiersname \ modifytimestamp internalmodifiersname" Successfully updated agreementCopy to Clipboard Copied! Toggle word wrap Toggle overflow
Verification
View the replication agreement settings:
dsconf instance_name repl-agmt list --suffix=dc=example,dc=com | grep -i nsds5ReplicaStripAttrs
nsds5ReplicaStripAttrs: modifiersname modifytimestamp internalmodifiersname
# dsconf instance_name repl-agmt list --suffix=dc=example,dc=com | grep -i nsds5ReplicaStripAttrs
nsds5ReplicaStripAttrs: modifiersname modifytimestamp internalmodifiersname
Copy to Clipboard Copied! Toggle word wrap Toggle overflow
17.4. Viewing replication keep-alive entries
When you update an attribute on a supplier in a replication topology, the changelog change sequence number (CSN) is increased on the supplier. Then the supplier connects to the first consumer and compares the local CSN with the CSN on the consumer. If it is lower, the update is retrieved from the local changelog and replicated to the consumer. In a replication topology with fractional replication enabled, this can cause problems. For example, if only attributes are updated on the supplier that are excluded from replication, no update to replicate is found, and therefore the CSN is not updated on the consumer. In addition, unnecessary searches for updates on the supplier can cause other servers to receive the data later than needed. To work around this problem, Directory Server uses keep-alive entries.
If all updated attributes on the supplier are excluded from replication and the number of skipped updates exceeds 100, Directory Server updates the keepalivetimestamp attribute on the supplier, replicates it to the consumer, and changes the CSN on the consumer. Now CSN on the consumer equals to the CSN on the supplier, and the next time the supplier connects to the consumer only updates that are newer than the CSN on the consumer are searched. This reduces the time a supplier spends to search for new updates to send.
Directory Server automatically creates or updates the replication keep-alive entry on a supplier in the following situations:
- When a fractional replication agreement skips more than 100 updates and does not send any updates before ending the replication session.
- When a supplier initializes a consumer, initially it creates its own keep-alive entry. A consumer that is also a supplier does not create its own keep-alive entry unless it also initializes another consumer.
The following procedure searches for the keep-alive entry details that you can use to solve replication problems.
Prerequisites
- The Directory Manager password
Procedure
Use the
ldapsearchutility to find the keep-alive entry:Copy to Clipboard Copied! Toggle word wrap Toggle overflow Each keep-alive entry is specific to a given supplier and contains the replica ID of the supplier in the distinguished name (DN). In the example, the replica ID is
1.
Chapter 18. Monitoring the replication topology using the command line
To monitor the state of the directory data replication between suppliers, consumers, and hubs, you can use replication topology report that provides information on the replication progress, replica IDs, number of changes, and other parameters. To generate the report faster and make it more readable, you can configure your own credentials and aliases.
18.1. Displaying a replication topology report using the command line
To view overall information about the replication status for each agreement in your replication topology, you can display the replication topology report. To do so, use the dsconf replication monitor command.
Prerequisites
- The host is a member of replication topology.
- You initialized the consumers.
Procedure
To view a replication topology report, enter:
dsconf -D "cn=Directory Manager" ldap://supplier.example.com replication monitor
# dsconf -D "cn=Directory Manager" ldap://supplier.example.com replication monitorCopy to Clipboard Copied! Toggle word wrap Toggle overflow The
dsconfutility will request authentication credentials for each instance in the topology:Copy to Clipboard Copied! Toggle word wrap Toggle overflow
18.2. Setting credentials for replication monitoring in the .dsrc file
By default, the dsconf replication monitor command asks for bind DNs and passwords when authenticating to remote instances. To generate the report faster and easier in the future, you can set the bind DNs, and optionally passwords, for each server in the topology in the user’s ~/.dsrc file.
Prerequisites
- The host is a member of replication topology.
- You initialized the consumers.
Procedure
-
Optional: Create the
~/.dsrcfile. In the
~/.dsrcfile, set the bind DNs, and passwords. For example:[repl-monitor-connections] connection1 = server1.example.com:389:cn=Directory Manager:* connection2 = server2.example.com:389:cn=Directory Manager:[~/pwd.txt] connection3 = hub1.example.com:389:cn=Directory Manager:S3cret
[repl-monitor-connections] connection1 = server1.example.com:389:cn=Directory Manager:* connection2 = server2.example.com:389:cn=Directory Manager:[~/pwd.txt] connection3 = hub1.example.com:389:cn=Directory Manager:S3cretCopy to Clipboard Copied! Toggle word wrap Toggle overflow This example uses connection1 to connection3 as keys for each entry. However, you can use any unique key.
When you run the
dsconf replication monitorcommand, thedsconfutility connects to all servers configured in replication agreements of the instance. If the utility finds the hostname in~/.dsrc, it uses the defined credentials to authenticate to the remote server. In the example above,dsconfuses the following credentials when connecting to a server:Expand Hostname Bind DN Password setup method server1.example.com
cn=Directory Manager
Requests the password
server2.example.com
cn=Directory Manager
Reads the password from
~/pwd.txthub1.example.com
cn=Directory Manager
S3cret
Verification
-
Run the
dsconf replication monitorcommand to see Ifdsconfutility uses credentials configured in the~/.dsrcfile. For more information, see Displaying a replication topology report using the command line.
18.3. Using aliases in the replication topology monitoring output
To make the report more readable, you can set your own aliases that will be displayed in the report output. By default, the replication monitoring report contains the hostnames of remote servers.
Prerequisites
- The host is a member of replication topology.
- You initialized the consumers.
Procedure
If you want to see aliases in the report, use one of the following methods:
Define the aliases in the
~/.dsrcfile:[repl-monitor-aliases] M1 = server1.example.com:389 M2 = server2.example.com:389
[repl-monitor-aliases] M1 = server1.example.com:389 M2 = server2.example.com:389Copy to Clipboard Copied! Toggle word wrap Toggle overflow Define the aliases by passing the
-a alias=host_name:portparameter to thedsconf replication monitorcommand:dsconf -D "cn=Directory Manager" ldap://server.example.com replication monitor -a M1=server1.example.com:389 M2=server2.example.com:389
# dsconf -D "cn=Directory Manager" ldap://server.example.com replication monitor -a M1=server1.example.com:389 M2=server2.example.com:389Copy to Clipboard Copied! Toggle word wrap Toggle overflow
In both cases, the dsconf replication monitor command displays the alias in the output:
Chapter 19. Monitoring the replication topology using the web console
To monitor the state of the directory data replication between suppliers, consumers, and hubs, you can use replication topology report that provides information on the replication progress, replica IDs, number of changes, and other parameters. To generate the report faster and make it more readable, you can configure your own credentials and aliases.
19.1. Displaying a replication topology report using the web console
To view overall information about the replication status for each agreement in your replication topology, you can display the replication topology report.
Prerequisites
- The host is a member of replication topology.
- You initialized the consumers.
- You are logged in to the web console.
Procedure
- Navigate to → . The page opens.
- Click .
Enter the passwords for login to remote instances and click . Directory Server uses bind DNs values from existing replication agreements.
The replication topology report will be generated on the tab.
NoteTo generate another replication topology report, go to the tab.
19.2. Setting credentials for replication monitoring using the web console
To generate the replication topology report faster and easier, you can set your own bind DNs, and optionally passwords, for each server in the topology for authentication. In this case, you do not need to confirm replication credentials each time you want to generate a replication topology report. By default, Directory Server takes these credentials from existing replication agreements.
Prerequisites
- The host is a member of replication topology.
- You initialized the consumer.
- You are logged in to the web console.
Procedure
- Navigate to → . The page opens.
- Click .
Enter replication login credentials you want to use for authentication to remote instances:
-
Hostname. A remote instance hostname you want the server to authenticate to. -
Port. A remote instance port. -
Bind DN. Bind DN used for authentication to the remote instance. -
Password. A password used for authentication. -
Interactive Input. If checked, Directory Server will ask for a password every time you generate a replication topology report.
-
- Click .
Verification
Generate the replication topology report to see If the report asks for the credentials. For more information, see Displaying a replication topology report using the web console.
19.3. Configuring replication naming aliases using the web console
To make the report more readable, you can set your own aliases that will be displayed in the report output. By default, the replication monitoring report contains the hostnames of servers.
Prerequisites
- The host is a member of replication topology.
- You initialized the consumers.
- You are logged in to the web console.
Procedure
- Navigate to → . The page opens.
- Click .
Enter alias details:
-
Alias. An alias that will be displayed in the replication topology report. -
Hostname. An instance hostname. -
Port. An instance port.
-
- Click .
Verification
- Generate the replication topology report to see If the report uses new aliases. For more information, see Displaying a replication topology report using the web console.
Chapter 20. Comparing two Directory Server instances
You can verify that two Directory Server instances are synchronized using ds-replcheck utility. You can compare two servers either online or using two LDIF-formatted files in offline mode.
20.1. Displaying the replication status of two Directory Server instances
You can use the ds-replcheck utility to display the replication status of two Directory Server instances.
Procedure
Use the following command to display the replication status of two Directory Server instances:
ds-replcheck state -D "cn=Directory Manager" -W -m ldap://server1.example.com:389 -r ldap://server2.example.com:389 -b "dc=example,dc=com"
Replication State: Replica is behind Supplier by: 264 seconds
# ds-replcheck state -D "cn=Directory Manager" -W -m ldap://server1.example.com:389 -r ldap://server2.example.com:389 -b "dc=example,dc=com"
Replication State: Replica is behind Supplier by: 264 seconds
Copy to Clipboard Copied! Toggle word wrap Toggle overflow
20.2. Comparing two online Directory Server instances
If you compare two online servers, the contents of the databases usually differ, if they are under heavy load. To work around this problem, the ds-replcheck uses a lag time value by passing the -l time_in_seconds parameter to ds-replcheck. By default, this value is set to 300 seconds (5 minutes). If the utility detects an inconsistency that is within the lag time, the utility does not report it. This helps to reduce false positives.
By default, if you have excluded certain attributes in the replication agreement from being replicated, ds-replcheck reports these attributes as different. To ignore these attributes, pass the -i attribute_list parameter to the utility.
Procedure
To compare the
dc=example,dc=comsuffix ofsupplier.example.comandreplica.example.comonline, enter:ds-replcheck online -D "cn=Directory Manager" -W -m ldap://supplier.example.com:389 -r ldap://replica.example.com:389 -b "dc=example,dc=com"
# ds-replcheck online -D "cn=Directory Manager" -W -m ldap://supplier.example.com:389 -r ldap://replica.example.com:389 -b "dc=example,dc=com"Copy to Clipboard Copied! Toggle word wrap Toggle overflow The
-mand-rparameters set the URLs to the supplier and replica.
20.3. Comparing offline two Directory Server instances
To compare two offline Directory Server instances, export the databases on both hosts and compare them using ds-replcheck.
By default, if you have excluded certain attributes in the replication agreement from being replicated, ds-replcheck reports these attributes as different. To ignore these attributes, pass the -i attribute_list parameter to the utility.
Procedure
On the supplier, list the suffixes and their corresponding databases:
dsconf -D "cn=Directory Manager" ldap://supplier.example.com backend suffix list
dc=example,dc=com (userroot)
o=test (test_database)
# dsconf -D "cn=Directory Manager" ldap://supplier.example.com backend suffix list
dc=example,dc=com (userroot)
o=test (test_database)
Copy to Clipboard Copied! Toggle word wrap Toggle overflow Note the name or suffix of the database you want to compare.
Export the database while the instance is running:
dsconf -D "cn=Directory Manager" ldap://supplier.example.com backend export -r -l /var/lib/dirsrv/slapd-instance_name/ldif/export-supplier.ldif userRoot
# dsconf -D "cn=Directory Manager" ldap://supplier.example.com backend export -r -l /var/lib/dirsrv/slapd-instance_name/ldif/export-supplier.ldif userRootCopy to Clipboard Copied! Toggle word wrap Toggle overflow The
-rparameter ensures that the export includes replication state information, and-lsets the path to the export file. Note that thedirsrvuser must have write permissions in the destination directory to create that file.- Repeat the previous steps on the replica you want to compare with the supplier.
Copy the exported file from one host to the other. For example, to copy the LDIF file from
replica.example.comtosupplier.example.com, enter the following command on the replica:scp /var/lib/dirsrv/slapd-instance_name/ldif/export-replica.ldif supplier.example.com:/var/lib/dirsrv/slapd-instance_name/ldif/
# scp /var/lib/dirsrv/slapd-instance_name/ldif/export-replica.ldif supplier.example.com:/var/lib/dirsrv/slapd-instance_name/ldif/Copy to Clipboard Copied! Toggle word wrap Toggle overflow Note that this command requires that you can access the supplier using SSH.
On the supplier, compare the two LDIF files:
ds-replcheck offline -m /var/lib/dirsrv/slapd-instance_name/ldif/export-supplier.ldif -r /var/lib/dirsrv/slapd-instance_name/ldif/export-replica.ldif -rid 1 -b "dc=example,dc=com"
# ds-replcheck offline -m /var/lib/dirsrv/slapd-instance_name/ldif/export-supplier.ldif -r /var/lib/dirsrv/slapd-instance_name/ldif/export-replica.ldif -rid 1 -b "dc=example,dc=com"Copy to Clipboard Copied! Toggle word wrap Toggle overflow The
-mand-rparameters set the paths to the supplier and replica, and-ridsets the replica identifier of the supplier.
20.4. Explanation of the ds-replcheck output
The output of the ds-replcheck utility contains the following sections:
- Database RUV’s
Lists the Replication Update Vectors (RUV) of the databases including the minimum and maximum Change Sequence Numbers (CSN). For example:
Copy to Clipboard Copied! Toggle word wrap Toggle overflow - Entry Count
Displays the total number of entries on the both servers, including tombstone entries. For example:
  Supplier:  12
  Replica: 10
  Supplier:  12
  Replica: 10
Copy to Clipboard Copied! Toggle word wrap Toggle overflow - Tombstones
Displays the number of tombstone entries on each replica. These entries are added to the total entry count. For example:
  Supplier:  4
  Replica: 2
  Supplier:  4
  Replica: 2
Copy to Clipboard Copied! Toggle word wrap Toggle overflow - Conflict Entries
Lists the Distinguished Names (DN) of each conflict entry, the conflict type, and the date it was created. For example:
Copy to Clipboard Copied! Toggle word wrap Toggle overflow - Missing Entries
Lists the DNs of each missing entry and the creation date from the other server where the entry resides. For example:
Copy to Clipboard Copied! Toggle word wrap Toggle overflow - Entry Inconsistencies
Lists the DNs of the entry that contain attributes that are different to those on the other server. If a state information is available, it is also displayed. If no state information for an attribute is available, it is listed as an origin value. This means that the value was not updated since the replication was initialized for the first time. For example:
Copy to Clipboard Copied! Toggle word wrap Toggle overflow
Chapter 21. Solving common replication problems
Multi-supplier replication uses an eventually-consistency replication model. This means that the same entries can be changed on different servers. When replication occurs between these two servers, Directory Server needs to resolve the conflicting changes. Mostly, resolution occurs automatically, based on the timestamp associated with the change on each server. The most recent change has priority. However, there are some cases where conflicts require manual intervention in order to reach a resolution.
21.1. Identifying and solving naming conflicts
When several supplier servers receive a request to create an entry with the same distinguished name (DN), each server creates the entry with this DN and a different entry unique identifier (entry ID). The entry ID is stored in the nsuniqueid operational attribute.
For example, Server A and Server B receive a request to create uid=user_name,ou=people,dc=example,dc=com user entry. As a result, each server has its own entry:
On Server A, the entry has:
-
uid=user_name,ou=people,dc=example,dc=com -
nsuniqueid=a7f1758b-512211ec-b115e2e9-7dc2d46b
-
On Server B, the entry has:
-
uid=user_name,ou=people,dc=example,dc=com -
nsuniqueid=643a461e-b61311e1-b23be826-4afeed5f
-
During replication, Server A replicates newly created entry uid=user_name,ou=people,dc=example,dc=com to Server B, and Server B replicates newly created entry to Server A, and a naming conflict occurs on each server. By comparing change sequence numbers (CSN), each server determines which entry was created earlier. For example, the entry on Server B was created earlier.
The automatic conflict resolution procedure changes the last entry created (the entry on Server A) the following way:
-
Adds the
nsuniqueidvalue to the non-unique DN. -
Adds the
nsds5replconflictattribute with the description which operation caused the conflict. -
Adds the
ldapsubentryobjectclass.
Now the following entries exist on both servers:
The valid entry with:
-
uid=user_name,ou=people,dc=example,dc=com -
nsuniqueid=643a461e-b61311e1-b23be826-4afeed5f
-
The conflict entry with:
-
nsuniqueid=a7f1758b-512211ec-b115e2e9-7dc2d46b+uid=user_name,ou=people,dc=example,dc=com -
nsuniqueid=a7f1758b-512211ec-b115e2e9-7dc2d46b
-
To solve the naming conflict manually, use the following procedure on each server.
Procedure
List the conflict entries:
Copy to Clipboard Copied! Toggle word wrap Toggle overflow If conflict entries exist, decide how to proceed:
To keep only the valid entry (
uid=user_name,ou=people,dc=example,dc=com) and delete the conflict entry, enter:dsconf -D "cn=Directory Manager" ldap://server.example.com repl-conflict delete nsuniqueid=a7f1758b-512211ec-b115e2e9-7dc2d46b+uid=user_name,ou=People,dc=example,dc=com
# dsconf -D "cn=Directory Manager" ldap://server.example.com repl-conflict delete nsuniqueid=a7f1758b-512211ec-b115e2e9-7dc2d46b+uid=user_name,ou=People,dc=example,dc=comCopy to Clipboard Copied! Toggle word wrap Toggle overflow To keep only the conflict entry (
nsuniqueid=a7f1758b-512211ec-b115e2e9-7dc2d46b+uid=user_name,ou=People,dc=example,dc=com) and delete the valid entry, enter:dsconf -D "cn=Directory Manager" ldap://server.example.com repl-conflict swap nsuniqueid=a7f1758b-512211ec-b115e2e9-7dc2d46b+uid=user_name,ou=People,dc=example,dc=com
# dsconf -D "cn=Directory Manager" ldap://server.example.com repl-conflict swap nsuniqueid=a7f1758b-512211ec-b115e2e9-7dc2d46b+uid=user_name,ou=People,dc=example,dc=comCopy to Clipboard Copied! Toggle word wrap Toggle overflow To keep both entries, specify a new relative distinguished name (RDN) to rename the conflict entry:
dsconf -D "cn=Directory Manager" ldap://server.example.com repl-conflict convert --new-rdn=uid=user_name_NEW nsuniqueid=a7f1758b-512211ec-b115e2e9-7dc2d46b+uid=user_name,ou=people,dc=example,dc=com
# dsconf -D "cn=Directory Manager" ldap://server.example.com repl-conflict convert --new-rdn=uid=user_name_NEW nsuniqueid=a7f1758b-512211ec-b115e2e9-7dc2d46b+uid=user_name,ou=people,dc=example,dc=comCopy to Clipboard Copied! Toggle word wrap Toggle overflow This command renames the conflict entry to
uid=user_name_NEW,ou=people,dc=example,dc=com.
Directory Server replicates LDAP operations performed on a conflict entry. Usually replicated operations target the entry by using the nsuniqueid of the original operation entry rather than by using the operation dn. However, in cases with conflict entries, the behavior might differ.
21.2. Identifying and solving orphan entry conflicts
When Directory Server replicates a delete operation and the consumer server finds that the entry to be deleted has child entries, the conflict resolution procedure creates a glue entry to avoid having orphaned entries in the directory.
In the same way, when Directory Server replicates an add operation and the consumer server cannot find the parent entry, the conflict resolution procedure creates a glue entry for the parent.
Glue entries are temporary entries that include the object classes glue and extensibleObject. Glue entries can be created in several ways:
If the conflict resolution procedure finds a deleted entry with a matching unique identifier, the glue entry has the same attributes as the deleted entry, but with the added
glueobject class and thensds5ReplConflictattribute.In such cases, either modify the glue entry to remove the
glueobject class and thensds5ReplConflictattribute to keep the entry as a normal entry or delete the glue entry and its child entries.-
The server creates an entry with the
glueandextensibleObjectobject classes.
Procedure
List the orphan entry conflicts:
Copy to Clipboard Copied! Toggle word wrap Toggle overflow If orphan entry conflicts exist, decide how to proceed:
To delete a glue entry and its child entries, enter:
Copy to Clipboard Copied! Toggle word wrap Toggle overflow To convert a glue entry into a regular entry, enter:
dsconf -D "cn=Directory Manager" ldap://server.example.com repl-conflict convert-glue "ou=parent,dc=example,dc=com"
# dsconf -D "cn=Directory Manager" ldap://server.example.com repl-conflict convert-glue "ou=parent,dc=example,dc=com"Copy to Clipboard Copied! Toggle word wrap Toggle overflow
21.3. Identifying and solving errors about obsolete or missing suppliers
Directory Server stores information about the replication topology, such as all suppliers that send updates to other replicas, in a set of metadata called replica update vector (RUV). An RUV contains information about the supplier, such as its ID and URL, the last change state number (CSN) on the local server, and the CSN of the first change. Both suppliers and consumers store RUV information, and they use it to control replication updates.
When you remove a supplier from the replication topology, information about it can remain in another replica’s RUV. You can use a cleanallruv task to remove the RUV entry form all suppliers in the topology.
Prerequisites
- Replication is enabled.
Procedure
Monitor the
/var/log/dirsrv/slapd-instance_name/errorslog file and search for entries similar to the following:[22/Jan/2021:17:16:01 -0500] NSMMReplicationPlugin - ruv_compare_ruv: RUV [changelog max RUV] does not contain element [{replica 8 ldap://server2.example.com:389} 4aac3e59000000080000 4c6f2a02000000080000] which is present in RUV [database RUV] ... [22/Jan/2021:17:16:01 -0500] NSMMReplicationPlugin - replica_check_for_data_reload: Warning: for replica dc=example,dc=com there were some differences between the changelog max RUV and the database RUV. If there are obsolete elements in the database RUV, you should remove them using the CLEANALLRUV task. If they are not obsolete, you should check their status to see why there are no changes from those servers in the changelog.[22/Jan/2021:17:16:01 -0500] NSMMReplicationPlugin - ruv_compare_ruv: RUV [changelog max RUV] does not contain element [{replica 8 ldap://server2.example.com:389} 4aac3e59000000080000 4c6f2a02000000080000] which is present in RUV [database RUV] ... [22/Jan/2021:17:16:01 -0500] NSMMReplicationPlugin - replica_check_for_data_reload: Warning: for replica dc=example,dc=com there were some differences between the changelog max RUV and the database RUV. If there are obsolete elements in the database RUV, you should remove them using the CLEANALLRUV task. If they are not obsolete, you should check their status to see why there are no changes from those servers in the changelog.Copy to Clipboard Copied! Toggle word wrap Toggle overflow In this case, the replica ID
8causes this error.Display all RUV records and replica IDs, both valid and invalid:
Copy to Clipboard Copied! Toggle word wrap Toggle overflow Note the list of returned replica IDs:
1,2, and8.Run cleanup tasks for the replica IDs
8.dsconf -D "cn=Directory Manager" ldap://server1.example.com repl-tasks cleanallruv --suffix="dc=example,dc=com" --replica-id=8
# dsconf -D "cn=Directory Manager" ldap://server1.example.com repl-tasks cleanallruv --suffix="dc=example,dc=com" --replica-id=8Copy to Clipboard Copied! Toggle word wrap Toggle overflow Note that Directory Server replicates RUV cleanup tasks. Therefore, you need to start the tasks on only one supplier.
If one of the replicas can not be joined, for example if it is down, you can use the
--force-cleaningoption to achieve an immediate clean up of the RUV.
Verification
Display the RUV records and replica IDs:
Copy to Clipboard Copied! Toggle word wrap Toggle overflow The command no longer returns RUV entries for the replica IDs
8.
21.4. Stopping cleanallruv task on a supplier
For performance or maintenance purposes, it is possible to stop the cleanallruv task if the task runs for a long time. You can use the dsconf utility to stop the task.
Prerequisites
- Replication is enabled.
Procedure
Display all
cleanallruvtasks on a supplier:Copy to Clipboard Copied! Toggle word wrap Toggle overflow The example shows that the
cleanallruvtask cannot be completed because the replica became unresponsive. In some cases, it can negatively impact the server performance.Stop the
cleanallruvtask:dsconf <instance_name> repl-tasks abort-cleanallruv --suffix "dc=example,dc=com" --replica-id 12
# dsconf <instance_name> repl-tasks abort-cleanallruv --suffix "dc=example,dc=com" --replica-id 12Copy to Clipboard Copied! Toggle word wrap Toggle overflow Additionally, you can use the
--certifyoption to force Directory Server to stop thecleanallruvtask on all replicas.
Verification
Display all
cleanallruvtasks on the supplier:Copy to Clipboard Copied! Toggle word wrap Toggle overflow
Chapter 22. Setting up content synchronization using the SyncRepl protocol
To support the SyncRepl protocol according to RFC 4533, Directory Server uses the Content Synchronization plugin. With the Content Synchronization plugin, LDAP servers and clients can use Red Hat Directory Server as a source to synchronize their local database with the changing content of the directory.
To use the SyncRepl protocol, you need to perform the following configurations:
On the Directory Server side:
-
Configure the Content Synchronization and Retro Changelog plugins. The Retro Changelog plugin must log the
nsuniqueidoperational attribute. - Optional: Create a new user that your client will use to bind to Directory Server. The new user must have permissions to read the content in the directory. For details, see Adding an LDAP entry using the command line.
-
Configure the Content Synchronization and Retro Changelog plugins. The Retro Changelog plugin must log the
- Configure your client. For example, set the search base for a subtree to synchronize. For further details, see your client’s documentation.
The following procedure configures the Content Synchronization and Retro Changelog plugins by using the command line.
Prerequisites
-
You have
rootpermissions.
Procedure
Verify if the Retro Changelog is enabled:
dsconf <instance_name> plugin retro-changelog show
...
nsslapd-pluginEnabled: off
# dsconf <instance_name> plugin retro-changelog show
...
nsslapd-pluginEnabled: off
Copy to Clipboard Copied! Toggle word wrap Toggle overflow If the Retro Changelog plugin is disabled, enable it:
dsconf <instance_name> plugin retro-changelog enable
Enabled plugin 'Retro Changelog Plugin'
# dsconf <instance_name> plugin retro-changelog enable
Enabled plugin 'Retro Changelog Plugin'
Copy to Clipboard Copied! Toggle word wrap Toggle overflow Add the
nsuniqueidoperational attribute with thetargetUniqueIdalias to the Retro Changelog plugin configuration:dsconf <instance_name> plugin retro-changelog add --attribute nsuniqueid:targetUniqueId Successfully changed the cn=Retro Changelog Plugin,cn=plugins,cn=config
# dsconf <instance_name> plugin retro-changelog add --attribute nsuniqueid:targetUniqueId
Successfully changed the cn=Retro Changelog Plugin,cn=plugins,cn=config
Copy to Clipboard Copied! Toggle word wrap Toggle overflow Optional: Apply the following recommendations to improve performance:
Configure the maximum age of the Retro Changelog entries. For example, set the age to
2days (2d):dsconf <instance_name> plugin retro-changelog set --max-age 2d Successfully changed the cn=Retro Changelog Plugin,cn=plugins,cn=config
# dsconf <instance_name> plugin retro-changelog set --max-age 2d
Successfully changed the cn=Retro Changelog Plugin,cn=plugins,cn=config
Copy to Clipboard Copied! Toggle word wrap Toggle overflow If you know which backend or subtree your client accesses to synchronize data, limit the scope of the Retro Changelog plugin. For example, to exclude the
cn=marketing,dc=example,dc=comsubtree, enter:dsconf <instance_name> plugin retro-changelog set --exclude-suffix "cn=marketing,dc=example,dc=com" Successfully changed the cn=Retro Changelog Plugin,cn=plugins,cn=config
# dsconf <instance_name> plugin retro-changelog set --exclude-suffix "cn=marketing,dc=example,dc=com"
Successfully changed the cn=Retro Changelog Plugin,cn=plugins,cn=config
Copy to Clipboard Copied! Toggle word wrap Toggle overflow
Enable the Content Synchronization plugin:
dsconf <instance_name> plugin contentsync enable
Enabled plugin 'Content Synchronization'
# dsconf <instance_name> plugin contentsync enable
Enabled plugin 'Content Synchronization'
Copy to Clipboard Copied! Toggle word wrap Toggle overflow Optional: Adjust the ACI to limit who can use the
SyncReplcontrol. By default, Directory Server creates the following access control instruction (ACI) in theoid=1.3.6.1.4.1.4203.1.9.1.1,cn=features,cn=configentry that enables all users to use theSyncReplprotocol:aci: (targetattr != "aci")(version 3.0; acl "Sync Request Control"; allow( read, search ) userdn = "ldap:///all";)
aci: (targetattr != "aci")(version 3.0; acl "Sync Request Control"; allow( read, search ) userdn = "ldap:///all";)Copy to Clipboard Copied! Toggle word wrap Toggle overflow For details about how to adjust the ACI, see Defining ACI bind rules.
Restart the server:
dsctl <instance_name> restart
# dsctl <instance_name> restartCopy to Clipboard Copied! Toggle word wrap Toggle overflow
Now your clients can synchronize data with Directory Server by using the SyncRepl protocol.