Configuring authentication and authorization in RHEL
Using SSSD, authselect, and sssctl to configure authentication and authorization
Abstract
Providing feedback on Red Hat documentation
We are committed to providing high-quality documentation and value your feedback. To help us improve, you can submit suggestions or report errors through the Red Hat Jira tracking system.
Procedure
Log in to the Jira website.
If you do not have an account, select the option to create one.
- Click Create in the top navigation bar.
- Enter a descriptive title in the Summary field.
- Enter your suggestion for improvement in the Description field. Include links to the relevant parts of the documentation.
- Click Create at the bottom of the dialogue.
Chapter 1. Introduction to system authentication
Secure networks require verifying user identities before granting access. Red Hat Enterprise Linux provides tools to manage these identities, ranging from local system files to external domains like Kerberos and Samba.
1.1. Authentication methods in RHEL
Authentication verifies identity using credentials, while authorization determines access rights. RHEL supports multiple verification mechanisms, including passwords, certificates, and tokens, to ensure secure network interactions.
Authentication requires that an entity presents some kind of credential to verify its identity. The kind of credential that is required is defined by the authentication mechanism being used.
1.1.1. Types of authentication for local users on a system
- Password-based authentication
- Almost all software permits the user to authenticate by providing a recognized username and password. This is also called simple authentication.
- Certificate-based authentication
- Client authentication based on certificates is part of the Secure Sockets Layer (SSL) protocol. The client digitally signs a randomly generated piece of data and sends both the certificate and the signed data across the network. The server validates the signature and confirms the validity of the certificate.
- Kerberos authentication
- Kerberos establishes a system of short-lived credentials, called ticket-granting tickets (TGTs). The user presents credentials, that is, user name and password, that identify the user and indicate to the system that the user can be issued a ticket. TGT can then be repeatedly used to request access tickets to other services, like websites and email. Authentication using Kerberos allows the user to undergo only a single authentication process in this way.
- Smart card-based authentication
This is a variant of certificate-based authentication. The smart card (or token) stores user certificates; when a user inserts the token into a system, the system reads the certificates and grants access. Single sign-on using smart cards goes through three steps:
- A user inserts a smart card into the card reader. Pluggable authentication modules (PAMs) on Red Hat Enterprise Linux detect the inserted smart card.
- The system maps the certificate to the user entry and then compares the presented certificates on the smart card, which are encrypted with a private key as explained under the certificate-based authentication, to the certificates stored in the user entry.
- If the certificate is successfully validated against the key distribution center (KDC), then the user is allowed to log in.
Smart card-based authentication builds on the simple authentication layer established by Kerberos by adding certificates as additional identification mechanisms as well as by adding physical access requirements.
- One-time password authentication
- One-time passwords bring an additional step to your authentication security. The authentication uses your password in combination with an automatically generated one time password.
- Passkey authentication
- A passkey is a FIDO2 authentication device that is supported by the libfido2 library, such as Yubikey 5 and Nitrokey. It allows passwordless and multi-factor authentication. If your system is enrolled and connected to an IdM environment, this authentication method issues a Kerberos ticket automatically, which enables single sign-on (SSO) for an Identity Management (IdM) user.
- External identity providers
- You can associate users with external identity providers (IdP) that support the OAuth 2 device authorization flow. When these users authenticate with the SSSD version available in RHEL 9.1 or later, they receive RHEL Identity Management (IdM) single sign-on capabilities with Kerberos tickets after performing authentication and authorization at the external IdP.
1.2. Overview of single sign-on in RHEL
Single sign-on (SSO) consolidates credentials, allowing users to log in once for access to all network resources. RHEL implements SSO through Kerberos and smart cards, creating a centralized identity store that improves both convenience and security.
Red Hat Enterprise Linux supports SSO for several resources, including logging into workstations, unlocking screen savers, and accessing secured web pages using Mozilla Firefox. With other available system services such as Privileged Access Management (PAM), Name Service Switch (NSS), and Kerberos, other system applications can be configured to use those identity sources.
SSO is both a convenience to users and another layer of security for the server and the network. SSO hinges on secure and effective authentication. RHEL provides two authentication mechanisms to enable SSO:
- Kerberos-based authentication, through both Kerberos realms and Active Directory domains
- Smart card-based authentication
Both methods create a centralized identity store (either through a Kerberos realm or a certificate authority in a public key infrastructure), and the local system services then use those identity domains rather than maintaining multiple local stores.
1.3. Services available for local user authentication
Red Hat Enterprise Linux provides specific services to configure local user authentication. Use these tools to manage identity backends, control low-level system calls, and enforce authentication policies.
- Authentication setup
-
The Authentication Configuration tool
authselectsets up different identity back ends and means of authentication (such as passwords, fingerprints, or smart cards) for the system.
-
The Authentication Configuration tool
- Identity back end setup
- The Security System Services Daemon (SSSD) sets up multiple identity providers, primarily LDAP-based directories such as Microsoft Active Directory or IdM. Both the local system and applications can use these identity providers for authentication. SSSD caches passwords and tickets, allowing offline authentication and single sign-on by reusing credentials.
-
The
realmdservice is a command-line utility that allows you to configure an authentication back end, which is SSSD for IdM. Therealmdservice detects available IdM domains based on the DNS records, configures SSSD, and then joins the system as an account to a domain. -
Name Service Switch (NSS) is a mechanism for low-level system calls that return information about users, groups, or hosts. NSS determines what source, that is, which modules, should be used to obtain the required information. For example, user information can be located in traditional UNIX files, such as the
/etc/passwdfile, or in LDAP-based directories, while host addresses can be read from files, such as the/etc/hostsfile, or the DNS records; NSS locates where the information is stored.
- Authentication mechanisms
- Pluggable Authentication Modules (PAM) provide a system to set up authentication policies. An application using PAM for authentication loads different modules that control different aspects of authentication; which PAM module an application uses is based on how the application is configured. The available PAM modules include Kerberos, Winbind, SSSD, or local UNIX file-based authentication.
Other services and applications are also available, but these are common ones.
Chapter 2. Configuring user authentication using authselect
The authselect utility simplifies system identity and authentication configuration. Utilize specific profiles to automatically manage PAM and NSS settings, ensuring consistent access controls for local and remote users.
2.1. What is authselect used for
Authselect simplifies system identity management by providing ready-made configuration profiles. Select a profile to automatically generate the necessary PAM and NSS settings, ensuring consistent authentication across local and remote sources.
You can use the default profile set or create a custom profile. Note that you must manually update custom profiles to keep them up to date with your system.
Authselect profiles
- local
-
Configures authentication to handle local users without SSSD by using traditional system files such as
/etc/passwdand/etc/shadow. This is the default profile. - sssd
- Enables SSSD for systems that use LDAP authentication. Use this profile to integrate remote identity providers and support features such as smart cards, GSSAPI, and session recording.
- winbind
- Enables the Winbind utility for systems directly integrated with Microsoft Active Directory.
After selecting an authselect profile for a given host, the profile applies to all users logging into the host.
Red Hat recommends using authselect to manage authentication settings in semi-centralized identity management environments, for example if your organization utilizes LDAP or Winbind databases to authenticate users to use services in your domain.
If the provided profile set is not sufficient, you can create a custom profile.
You do not need to use authselect if:
-
Your host is part of Red Hat Enterprise Linux Identity Management (IdM). Joining your host to an IdM domain with the
ipa-client-installcommand automatically configures SSSD authentication on your host. -
Your host is part of Active Directory via SSSD. Calling the
realm joincommand to join your host to an Active Directory domain automatically configures SSSD authentication on your host.
Red Hat recommends against changing the authselect profiles configured by ipa-client-install or realm join. If you need to modify them, display the current settings before making any modifications, so you can revert back to them if necessary:
$ authselect current
Profile ID: sssd
Enabled features:
- with-sudo
- with-mkhomedir
- with-smartcard
2.1.1. Files and directories modified by authselect
authselect modifies only a limited set of configuration files, making it easier to manage and troubleshoot authentication settings.
|
| The GNU C Library and other applications use this Name Service Switch (NSS) configuration file to determine the sources from which to obtain name-service information in a range of categories, and in what order. Each category of information is identified by a database name. |
|
| Linux-PAM (Pluggable Authentication Modules) is a system of modules that handle the authentication tasks of applications (services) on the system. The nature of the authentication is dynamically configurable: the system administrator can choose how individual service-providing applications will authenticate users.
The configuration files in the Among other things, these files contain information about:
|
|
|
This directory holds configuration profiles for the |
2.2. Choosing an authselect profile
Select specific authselect profiles to enforce authentication policies on a host. This process configures the system to use the chosen identity provider for all user logins.
Prerequisites
-
You need
rootcredentials to runauthselectcommands
Make sure that the configuration files that are relevant for your profile are configured properly before finishing the authselect select procedure. For example, if the sssd daemon is not configured correctly and active, running authselect select results in only local users being able to authenticate, using pam_unix.
Procedure
Select the
authselectprofile that is appropriate for your authentication provider. Replace<profile>with the profile name that you want to use:# authselect select <profile>Optional: You can modify the default profile settings by enabling or disabling features that the selected profile provides.
# authselect select <profile> <feature>For example to select the
sssdprofile and enable smart card authentication in addition to password authentication:# authselect select sssd with-smartcard
Verification
Verify
sssentries for SSSD are present in/etc/nsswitch.conf:passwd: sss files group: sss files netgroup: sss files automount: sss files services: sss files ...Review the contents of the
/etc/pam.d/system-authfile forpam_sss.soentries:# Do not modify this file manually, use authselect instead. Any user changes will be overwritten. # You can stop authselect from managing your configuration by calling 'authselect opt-out'. # See authselect(8) for more details. auth required pam_env.so auth required pam_faildelay.so delay=2000000 auth [default=1 ignore=ignore success=ok] pam_succeed_if.so uid >= 1000 quiet auth [default=1 ignore=ignore success=ok] pam_localuser.so auth sufficient pam_unix.so nullok try_first_pass auth requisite pam_succeed_if.so uid >= 1000 quiet_success auth sufficient pam_sss.so forward_pass auth required pam_deny.so account required pam_unix.so account sufficient pam_localuser.so ...
2.3. Creating and deploying your own authselect profile
Create custom profiles by duplicating default templates to accommodate specific requirements. This approach permits detailed configuration changes while maintaining system compatibility. Applying the profile enforces these settings for all users.
Procedure
To create your custom profile, run the
authselect create-profilecommand. Replace<custom_profile>with the desired profile name. For example, to create a profile based on the ready-madesssdprofile with the option to configure the items in the/etc/nsswitch.conffile yourself, use the following command:# authselect create-profile <custom_profile> -b sssd --symlink-meta --symlink-pamNew profile was created at /etc/authselect/custom/<custom_profile>WarningIf you are planning to modify
/etc/authselect/custom/<custom_profile>/{password-auth,system-auth,fingerprint-auth,smartcard-auth,postlogin}, then enter the command above without the--symlink-pamoption. This is to ensure that the modification persists during the upgrade ofauthselect-libs.Including the
--symlink-pamoption in the command means that PAM templates are symbolic links to the origin profile files instead of their copy; including the--symlink-metaoption means that meta files, such as README and REQUIREMENTS are symbolic links to the origin profile files instead of their copy. This ensures that all future updates to the PAM templates and meta files in the original profile are reflected in your custom profile, too.The command creates a copy of the
/etc/nsswitch.conffile in the/etc/authselect/custom/<custom_profile>/directory.-
Configure the
/etc/authselect/custom/<custom_profile>/nsswitch.conffile. Select the custom profile by running the
authselect selectcommand withcustom/<custom_profile>as a parameter:# authselect select custom/<custom_profile>Selecting the
<custom_profile>profile for your machine means that if thesssdprofile is subsequently updated by Red Hat, you benefit from all the updates with the exception of updates made to the/etc/nsswitch.conffile.Example creating a custom profile based on the sssd profile:
You can create a profile based on the
sssdprofile which only consults the local static table lookup for hostnames in the/etc/hostsfile, not in thednsormyhostnamedatabases.Edit the
/etc/nsswitch.conffile by editing the following line:hosts: filesCreate a custom profile based on
sssdthat excludes changes to/etc/nsswitch.conf:# authselect create-profile custom-sssd-profile -b sssd --symlink-meta --symlink-pamSelect the profile:
# authselect select custom/custom-sssd-profileOptional: Check that selecting the custom profile has
-
created the
/etc/pam.d/system-authfile according to the chosensssdprofile left the configuration in the
/etc/nsswitch.confunchanged:hosts: filesNoteRunning
authselect selectsssdwould, in contrast, result inhosts: files dns myhostname
-
created the
2.4. Opting out of using authselect
You cannot uninstall authselect but can opt out to stop it from managing configurations. This action restores PAM and NSS files to their default locations, returning full manual control over authentication settings.
Authselect ensures consistent and supported management of system authentication and identity configuration. Opting out might lead to unsupported or inconsistent configurations, which can cause authentication issues. If you require a special configuration, consider creating a custom profile within the authselect framework.
Procedure
To stop
authselectfrom managing your system’s configuration:# authselect opt-outTo start using
authselectagain, runauthselect select <profile_name>.
Chapter 3. Understanding SSSD and its benefits
The System Security Services Daemon (SSSD) connects local systems to remote identity providers, including LDAP and Active Directory. It retrieves and caches credentials to enable offline authentication, reduce network traffic, and streamline access control for system services.
3.1. How SSSD works
SSSD functions by linking a local client to an external backend provider. The service operates in two stages: connecting to the remote source to retrieve identity data, then creating a local cache to verify credentials without creating permanent local accounts.
SSSD supports multiple identity and authentication providers, such as:
- LDAP directories
- Identity Management (IdM) domains
- Active Directory (AD) domains
- Kerberos realms
SSSD works in two stages:
- It connects the client to a remote provider to retrieve identity and authentication information.
- It uses the obtained authentication information to create a local cache of users and credentials on the client.
Users on the local system are then able to authenticate using the user accounts stored in the remote provider.
SSSD does not create user accounts on the local system. However, SSSD can be configured to create home directories for IdM users. Once created, an IdM user home directory and its contents on the client are not deleted when the user logs out.
Figure 3.1. How SSSD works

SSSD can also provide caches for several system services, such as Name Service Switch (NSS) or Pluggable Authentication Modules (PAM).
Only use the SSSD service for caching user information. Running both Name Service Caching Daemon (NSCD) and SSSD for caching on the same system might lead to performance issues and conflicts.
3.2. Benefits of using SSSD
The System Security Services Daemon (SSSD) enhances system efficiency by caching credentials locally. This capability enables offline authentication, minimizes traffic to remote providers, and consolidates network access into a single user account.
- Offline authentication
- SSSD optionally keeps a cache of user identities and credentials retrieved from remote providers. In this setup, a user - provided they have already authenticated once against the remote provider at the start of the session - can successfully authenticate to resources even if the remote provider or the client are offline.
- A single user account: improved consistency of the authentication process
With SSSD, it is not necessary to maintain both a central account and a local user account for offline authentication. The conditions are:
- In a particular session, the user must have logged in at least once: the client must be connected to the remote provider when the user logs in for the first time.
Caching must be enabled in SSSD.
Without SSSD, remote users often have multiple user accounts. For example, to connect to a virtual private network (VPN), remote users have one account for the local system and another account for the VPN system. In this scenario, you must first authenticate on the private network to fetch the user from the remote server and cache the user credentials locally.
With SSSD, thanks to caching and offline authentication, remote users can connect to network resources simply by authenticating to their local machine. SSSD then maintains their network credentials.
- Reduced load on identity and authentication providers
- When requesting information, the clients first check the local SSSD cache. SSSD contacts the remote providers only if the information is not available in the cache.
3.3. Multiple SSSD configuration files on a per-client basis
The System Security Services Daemon (SSSD) builds its configuration by combining the primary file with modular files in the conf.d directory. This structure helps you to maintain global defaults while applying specific overrides or extensions for individual clients.
The default configuration file for SSSD is /etc/sssd/sssd.conf. Apart from this file, SSSD can read its configuration from all *.conf files in the /etc/sssd/conf.d/ directory.
This combination allows you to use the default /etc/sssd/sssd.conf file on all clients and add additional settings in further configuration files to extend the functionality individually on a per-client basis.
SSSD reads the configuration files in this order:
-
The primary
/etc/sssd/sssd.conffile. -
Other
*.conffiles in/etc/sssd/conf.d/, processed in alphabetical order.
If the same parameter appears in multiple configuration files, SSSD uses the last read parameter.
SSSD does not read hidden files (files starting with .) in the conf.d directory.
3.4. Identity and authentication providers for SSSD
SSSD links local clients to external backends like LDAP, Identity Management (IdM), Active Directory (AD), and Kerberos. Configure these connections as domains, assigning specific providers to handle identity, authentication, or access control tasks.
3.4.1. Identity and authentication providers as SSSD domains
Define SSSD domains in /etc/sssd/sssd.conf to map backends to specific functions. You can configure a single domain to handle identity lookups, authentication requests, and access control either separately or together.
The providers are listed in the [domain/<domain_name>] or [domain/default] section of the file.
You can configure a single domain as one of the following providers:
An identity provider, which supplies user information such as UID and GID.
-
Specify a domain as the identity provider by using the
id_provideroption in the[domain/<domain_name>]section of the/etc/sssd/sssd.conffile.
-
Specify a domain as the identity provider by using the
An authentication provider, which handles authentication requests.
-
Specify a domain as the authentication provider by using the
auth_provideroption in the[domain/<domain_name>]section of/etc/sssd/sssd.conf.
-
Specify a domain as the authentication provider by using the
An access control provider, which handles authorization requests.
-
Specify a domain as the access control provider using the
access_provideroption in the[domain/<domain_name>]section of/etc/sssd/sssd.conf. By default, the option is set topermit, which always allows all access. See the sssd.conf(5) man page for details.
-
Specify a domain as the access control provider using the
A combination of these providers, for example if all the corresponding operations are performed within a single server.
-
In this case, the
id_provider,auth_provider, andaccess_provideroptions are all listed in the same[domain/<domain_name>]or[domain/default]section of/etc/sssd/sssd.conf.
-
In this case, the
You can configure multiple domains for SSSD. You must configure at least one domain, otherwise SSSD will not start.
3.4.2. Proxy providers
Proxy providers serve as intermediaries for resources SSSD cannot directly access. SSSD connects to the proxy service to load external libraries, enabling integration with legacy systems like NIS and alternative authentication hardware.
You can configure SSSD to use a proxy provider to enable:
- Alternative authentication methods, such as a fingerprint scanner
- Legacy systems, such as NIS
-
A local system account defined in the
/etc/passwdfile as an identity provider and a remote authentication provider, for example Kerberos - Authentication of local users using smart cards
3.4.3. Available combinations of identity and authentication providers
With SSSD, you can mix specific providers for identity and authentication tasks. You can configure unified backends like Active Directory or hybrid setups, such as combining LDAP directories with Kerberos realms.
| Identity Provider | Authentication Provider |
|---|---|
| Identity Management [a] | Identity Management |
| Active Directory | Active Directory |
| LDAP | LDAP |
| LDAP | Kerberos |
| Proxy | Proxy |
| Proxy | LDAP |
| Proxy | Kerberos |
[a]
An extension of the LDAP provider type.
| |
Chapter 4. Configuring SSSD to use LDAP and require TLS authentication
Configure the System Security Services Daemon (SSSD) to authenticate users against standalone LDAP servers. Enforcing TLS encryption ensures secure communication, protecting identity data from interception during retrieval.
The SSSD configuration option to enforce TLS, ldap_id_use_start_tls, defaults to false. When using ldap:// without TLS for identity lookups, it can pose a risk for an attack vector, namely a man-in-the-middle (MITM) attack which could allow you to impersonate a user by altering, for example, the UID or GID of an object returned in an LDAP search.
Ensure that your setup operates in a trusted environment and decide if it is safe to use unencrypted communication for id_provider = ldap. Note id_provider = ad and id_provider = ipa are not affected as they use encrypted connections protected by SASL and GSSAPI.
If it is not safe to use unencrypted communication, you should enforce TLS by setting the ldap_id_use_start_tls option to true in the /etc/sssd/sssd.conf file.
4.1. An OpenLDAP client using SSSD to retrieve data from LDAP in an encrypted way
SSSD operates as a client to retrieve identity data from OpenLDAP servers. This configuration utilizes encrypted connections and supports authentication through either Kerberos tickets or standard LDAP passwords.
Configuring SSSD with LDAP is a complex procedure requiring a high level of expertise in SSSD and LDAP. Consider using an integrated and automated solution such as Active Directory or Identity Management (IdM) instead. For details about IdM, see Planning Identity Management.
4.2. Configuring SSSD to use LDAP and require TLS authentication
Establish a secure connection between Red Hat Enterprise Linux (RHEL) and an OpenLDAP server by configuring SSSD to enforce TLS. This process ensures that all identity data retrieval and authentication requests occur over an encrypted channel.
Use the following client configuration:
- The RHEL system authenticates users stored in an OpenLDAP user account database.
- The RHEL system uses the System Security Services Daemon (SSSD) service to retrieve user data.
- The RHEL system communicates with the OpenLDAP server over a TLS-encrypted connection.
You can alternatively use this procedure to configure your RHEL system as a client of a Red Hat Directory Server.
Prerequisites
- The OpenLDAP server is installed and configured with user information.
- You have root permissions on the host you are configuring as the LDAP client.
-
On the host you are configuring as the LDAP client, the
/etc/sssd/sssd.conffile has been created and configured to specifyldapas theautofs_providerand theid_provider. -
You have a PEM-formatted copy of the root CA signing certificate chain from the Certificate Authority that issued the OpenLDAP server certificate, stored in a local file named
core-dirsrv.ca.pem.
Procedure
Install the requisite packages:
# dnf -y install openldap-clients sssd sssd-ldap oddjob-mkhomedirSwitch the authentication provider to
sssd:# authselect select sssd with-mkhomedirCopy the
core-dirsrv.ca.pemfile containing the root CA signing certificate chain from the Certificate Authority that issued the OpenLDAP server’s SSL/TLS certificate into the/etc/openldap/certsfolder.# cp core-dirsrv.ca.pem /etc/openldap/certsAdd the URL and suffix of your LDAP server to the
/etc/openldap/ldap.conffile:URI ldap://ldap-server.example.com/ BASE dc=example,dc=comIn the
/etc/openldap/ldap.conffile, add a line pointing the TLS_CACERT parameter to/etc/openldap/certs/core-dirsrv.ca.pem:# When no CA certificates are specified the Shared System Certificates # are in use. In order to have these available along with the ones specified # by TLS_CACERTDIR one has to include them explicitly: TLS_CACERT /etc/openldap/certs/core-dirsrv.ca.pemIn the
/etc/sssd/sssd.conffile, add your environment values to theldap_uriandldap_search_baseparameters and set theldap_id_use_start_tlstoTrue:[domain/default] id_provider = ldap autofs_provider = ldap auth_provider = ldap chpass_provider = ldap ldap_uri = ldap://ldap-server.example.com/ ldap_search_base = dc=example,dc=com ldap_id_use_start_tls = True cache_credentials = True ldap_tls_cacertdir = /etc/openldap/certs ldap_tls_reqcert = allow [sssd] services = nss, pam, autofs domains = default [nss] homedir_substring = /home …In
/etc/sssd/sssd.conf, specify the TLS authentication requirement by modifying theldap_tls_cacertandldap_tls_reqcertvalues in the[domain]section:… cache_credentials = True ldap_tls_cacert = /etc/openldap/certs/core-dirsrv.ca.pem ldap_tls_reqcert = hard …Change the permissions on the
/etc/sssd/sssd.conffile:# chmod 600 /etc/sssd/sssd.confRestart and enable the SSSD service and the
oddjobddaemon:# systemctl restart sssd oddjobd # systemctl enable sssd oddjobdOptional: If your LDAP server uses the deprecated TLS 1.0 or TLS 1.1 protocols, switch the system-wide cryptographic policy on the client system to the LEGACY level to allow RHEL to communicate using these protocols:
# update-crypto-policies --set LEGACYFor more details, see the Strong crypto defaults in RHEL 8 and deprecation of weak crypto algorithms Knowledgebase article on the Red Hat Customer Portal and the
update-crypto-policies(8)man page on your system.
Verification
Verify you can retrieve user data from your LDAP server by using the
idcommand and specifying an LDAP user:# id <ldap_user>uid=17388( <ldap_user>) gid=45367(sysadmins) groups=45367(sysadmins),25395(engineers),10(wheel),1202200000(admins)
The system administrator can now query users from LDAP using the id command. The command returns a correct user ID and group membership.
Chapter 5. Additional configuration for identity and authentication providers
Extend the System Security Services Daemon (SSSD) functionality beyond basic connectivity by modifying the /etc/sssd/sssd.conf file. Advanced configurations include customizing user name formats, enabling offline access, dynamically discovering servers via DNS, and enforcing granular access control rules.
- Adjust how SSSD interprets and prints full user names to enable offline authentication.
- Configure DNS Service Discovery, simple Access Provider Rules, and SSSD to apply an LDAP Access Filter.
5.1. Adjusting how SSSD interprets full user names
The System Security Services Daemon (SSSD) parses user inputs into name and domain components using Python-compatible regular expressions. You can override the default parsing logic by defining custom patterns with the re_expression parameter to match specific organizational naming conventions.
By default, SSSD interprets full user names in the format <user_name>@<domain_name> based on the following regular expression in Python syntax:
(?P_<name>_[^@]+)@?(?P_<domain>_[^@]*$)
For Identity Management and Active Directory providers, the default user name format is <user_name>@<domain_name> or <NetBIOS_name>\<user_name>.
You can adjust how SSSD interprets full user names by adding the re_expression option to the /etc/sssd/sssd.conf file and defining a custom regular expression.
Prerequisites
-
rootaccess
Procedure
-
Open the
/etc/sssd/sssd.conffile. Use the
re_expressionoption to define a custom regular expression.To define regular expressions globally for all domains, add
re_expressionto the[sssd]section of thesssd.conffile.You can use the following global expression to define the username in the format of
<domain>\_<username>_or<domain>@<user_name>:[sssd] [... file truncated ...] re_expression = (?P_<domain>_[\\]*?)\\?(?P_<name>_[\\]+$)To define the regular expressions individually for a particular domain, add
re_expressionto the corresponding domain section of thesssd.conffile.You can use the following global expression to define the username in the format of
<domain>\_<username>_or<domain>@<user_name>for the LDAP domain:[domain/LDAP] [... file truncated ...] re_expression = (?P_<domain>_[\\]*?)\\?(?P_<name>_[\\]+$)
5.2. Adjusting how SSSD prints full user names
The System Security Services Daemon (SSSD) displays fully qualified user names, for example, user@domain, by default when use_fully_qualified_names is active. You can customize this output format using the full_name_format option to match legacy requirements, such as displaying domain\user.
If the use_fully_qualified_names option is enabled in the /etc/sssd/sssd.conf file, SSSD prints full user names in the format <name>@<domain> based on the following expansion by default:
%1$s@%2$s
If use_fully_qualified_names is not set or is explicitly set to false for trusted domains, it only prints the user name without the domain component.
You can adjust the format in which SSSD prints full user names by adding the full_name_format option to the /etc/sssd/sssd.conf file and defining a custom expansion.
Prerequisites
-
rootaccess
Procedure
-
As
root, open the/etc/sssd/sssd.conffile. To define the expansion globally for all domains, add
full_name_formatto the[sssd]section ofsssd.conf.[sssd] [... file truncated ...] full_name_format = %1$s@%2$sIn this case the user name is displayed as
user@domain.test.To define the user name printing format for a particular domain, add
full_name_formatto the corresponding domain section ofsssd.conf.To configure the expansion for the Active Directory (AD) domain using
%2$s\%1$s:[domain/ad.domain] [... file truncated ...] full_name_format = %2$s\%1$sIn this case the user name is displayed as
ad.domain\user.To configure the expansion for the Active Directory (AD) domain using
%3$s\%1$s:[domain/ad.domain] [... file truncated ...] full_name_format = %3$s\%1$sIn this case the user name is displayed as
AD\userif the flat domain name of the Active Directory domain is set toAD.
NoteSSSD can strip the domain component of the name in some name configurations, which can cause authentication errors. If you set
full_name_formatto a non-standard value, you will get a warning prompting you to change it to a standard format.
5.3. Enabling offline authentication
The System Security Services Daemon (SSSD) requires credential caching to enable authentication when the identity provider is unreachable. Enabling cache_credentials allows users to log in using locally stored hashes of their passwords during network outages, ensuring business continuity.
You can enable credential caching by setting cache_credentials to true in the /etc/sssd/sssd.conf file. Cached credentials refer to passwords and the first authentication factor if two-factor authentication is used. Note that for passkey and smart card authentication, you do not need to set cache_credentials to true or set any additional configuration; they are expected to work offline as long as a successful online authentication is recorded in the cache.
SSSD never caches passwords in plain text. It stores only a hash of the password.
While credentials are stored as a salted SHA-512 hash, this potentially poses a security risk in case an attacker manages to access the cache file and break a password using a brute force attack. Accessing a cache file requires privileged access, which is the default on RHEL.
Prerequisites
-
rootaccess
Procedure
-
Open the
/etc/sssd/sssd.conffile. In a domain section, add the
cache_credentials = truesetting:[domain/<domain_name>] cache_credentials = trueOptional, but recommended: Configure a time limit for how long SSSD allows offline authentication if the identity provider is unavailable:
- Configure the PAM service to work with SSSD.
Use the
offline_credentials_expirationoption to specify the time limit.Note that the limit is set in days.
For example, to specify that users are able to authenticate offline for 3 days since the last successful login, use:
[pam]
offline_credentials_expiration = 3
5.4. Configuring DNS Service Discovery
DNS service discovery allows the System Security Services Daemon (SSSD) to automatically locate identity servers by using SRV records. This configuration removes the need to hardcode server IP addresses, enabling dynamic failover and load balancing by querying the DNS infrastructure.
If the identity or authentication server is not explicitly defined in the /etc/sssd/sssd.conf file, SSSD can discover the server dynamically using DNS service discovery.
For example, if sssd.conf includes the id_provider = ldap setting, but the ldap_uri option does not specify any host name or IP address, SSSD uses DNS service discovery to discover the server dynamically.
SSSD cannot dynamically discover backup servers, only the primary server.
Prerequisites
-
rootaccess
Procedure
-
Open the
/etc/sssd/sssd.conffile. Set the primary server value to
_srv_.For an LDAP provider, the primary server is set using the
ldap_urioption:[domain/<ldap_domain_name>] id_provider = ldap ldap_uri = _srv_Enable service discovery in the password change provider by setting a service type:
[domain/<ldap_domain_name>] id_provider = ldap ldap_uri = _srv_ chpass_provider = ldap ldap_chpass_dns_service_name = ldap-
Optional: By default, the service discovery uses the domain portion of the system host name as the domain name. To use a different DNS domain, specify the domain name by using the
dns_discovery_domainoption. -
Optional: By default, the service discovery scans for the LDAP service type. To use a different service type, specify the type by using the
ldap_dns_service_nameoption. -
Optional: By default, SSSD attempts to look up an IPv4 address. If the attempt fails, SSSD attempts to look up an IPv6 address. To customize this behavior, use the
lookup_family_orderoption. For every service with which you want to use service discovery, add a DNS record to the DNS server:
_<service_name>.<protocol>.<domain_name> <TTL> <priority> <weight> <port_number> <hostname>_
5.5. Configuring simple Access Provider Rules
The simple access provider restricts system login access based on explicit lists of users or groups. Configure allow or deny rules directly in sssd.conf to enforce security policies locally without modifying the remote backend directory.
For example, you can use the simple access provider to restrict access to a specific user or group. Other users or groups will not be allowed to log in even if they authenticate successfully against the configured authentication provider.
Prerequisites
-
rootaccess
Procedure
-
Open the
/etc/sssd/sssd.conffile. Set the
access_provideroption tosimple:[domain/<domain_name>] access_provider = simpleDefine the access control rules for users.
-
To allow access to users, use the
simple_allow_usersoption. -
To deny access to users, use the
simple_deny_usersoption.
ImportantIf you deny access to specific users, you automatically allow access to everyone else. Allowing access to specific users is considered safer than denying.
-
To allow access to users, use the
Define the access control rules for groups. Choose one of the following:
-
To allow access to groups, use the
simple_allow_groupsoption. To deny access to groups, use the
simple_deny_groupsoption.ImportantIf you deny access to specific groups, you automatically allow access to everyone else. Allowing access to specific groups is considered safer than denying.
For example, you can grant access to
alice,bob, and members of theengineersgroup, while denying access to all other users:[domain/<domain_name>] access_provider = simple simple_allow_users = alice, bob simple_allow_groups = engineersImportantKeeping the deny list empty can lead to allowing access to everyone.
NoteIf you are adding a trusted AD user to the
simple_allow_userslist, ensure that you use the fully qualified domain name (FQDN) format, for example, aduser@ad.example.com. As short names in different domains can be the same, this prevents issues with the access control configuration.-
To allow access to groups, use the
5.6. Configuring SSSD to apply an LDAP access filter
LDAP access filters refine authorization by requiring specific attribute matches in the directory entry. SSSD evaluates these filters during login, granting access only if the user object satisfies the defined criteria, such as membership in a specific group.
When the access_provider option is set in /etc/sssd/sssd.conf, SSSD uses the specified access provider to evaluate which users are granted access to the system. If the access provider you are using is an extension of the LDAP provider type, you can also specify an LDAP access control filter that a user must match to be allowed access to the system.
For example, when using the Active Directory (AD) server as the access provider, you can restrict access to the Linux system only to specified AD users. All other users that do not match the specified filter have access denied.
The access filter is applied on the LDAP user entry only. Therefore, using this type of access control on nested groups might not work. To apply access control on nested groups, see Configuring simple access provider rules.
When using offline caching, SSSD checks if the user’s most recent online login attempt was successful. Users who logged in successfully during the most recent online login will still be able to log in offline, even if they do not match the access filter.
Prerequisites
-
rootaccess
Procedure
-
Open the
/etc/sssd/sssd.conffile. In the
[domain]section, specify the access control filter.-
For an LDAP, use the
ldap_access_filteroption. For an AD, use the
ad_access_filteroption. Additionally, you must disable the GPO-based access control by setting thead_gpo_access_controloption todisabled.For example, to allow access only to AD users who belong to the
adminsuser group and have aunixHomeDirectoryattribute set, use:[domain/<ad_domain_name>] access provider = ad [... file truncated ...] ad_access_filter = (&(memberOf=cn=admins,ou=groups,dc=example,dc=com)(unixHomeDirectory=*)) ad_gpo_access_control = disabledSSSD can also check results by the
authorizedServiceorhostattribute in an entry. In fact, all options MDASH LDAP filter,authorizedService, andhostMDASH can be evaluated, depending on the user entry and the configuration. Theldap_access_orderparameter lists all access control methods to use, ordered as how they should be evaluated.[domain/example.com] access_provider = ldap ldap_access_filter = memberOf=cn=allowedusers,ou=Groups,dc=example,dc=com ldap_access_order = filter, host, authorized_service
-
For an LDAP, use the
Chapter 6. SSSD client-side view
The sss_override utility helps you to create a local view of user data. This tool modifies POSIX attributes on a specific machine without altering the central identity provider, handling conflicts or local requirements effectively.
You can configure overrides for all id_provider values, except ipa.
If you are using the ipa provider, define ID views centrally in IPA. For more information, see Using an ID view to override a user attribute value on an IdM client.
For information about a potential negative impact on the SSSD performance, see Potential negative impact of ID views on SSSD performance.
6.1. Overriding the LDAP username attribute
LDAP user names may conflict with local system policies or naming conventions. Use the sss_override command to map a remote LDAP user name to a distinct local alias, ensuring compatibility with the specific host.
Prerequisites
-
rootaccess -
Have
sssd-toolspackage installed
Procedure
Display the current information for the user:
# id <ldap_username>Replace
<ldap_username>with the LDAPusernameof the user. For example:# id sjonesuid=1001(sjones) gid=6003 groups=6003,10(wheel)Add the local username:
# sss_override user-add <ldap_username> -n <local_username>Replace
<ldap_username>with the LDAPusernameand replace<local_username>with the desired local username. For example:# sss_override user-add sjones -n sarahAfter creating the first override using the
sss_override user-addcommand, restart SSSD for the changes to take effect:# systemctl restart sssd
Verification
Verify that the local username is added:
# id <local_username>For example:
# id sarahuid=1001(sjones) gid=6003(sjones) groups=6003(sjones),10(wheel)# sss_override user-show sjones user@ldap.example.com:sarah::::::Optional: Display the overrides for the user:
# sss_override user-show <ldap_username>user@ldap.example.com:_<local_username>_::::::
6.2. Overriding the LDAP UID attribute
Conflicting numeric identifiers can cause file permission errors. You can override the unique identifier (UID) provided by LDAP with a specific local value using sss_override, ensuring the user matches local file ownership requirements.
Prerequisites
-
rootaccess -
Have
sssd-toolspackage installed
Procedure
Display the current UID of the user:
# id -u <ldap_username>Replace
<ldap_username>with the LDAPusernameof the user. For example:# id -u sarah1001Override the UID of the user’s account:
# sss_override user-add <ldap_username> -u <local_uid>Replace
<ldap_username>with the LDAPusernameof the user and replace<local_uid>with the new UID number. For example:# sss_override user-add sarah -u 6666Expire the in-memory cache:
# sss_cache --usersAfter creating the first override using the
sss_override user-addcommand, restart SSSD for the changes to take effect:# systemctl restart sssd
Verification
Verify that the local UID has been applied:
# id -u <ldap_username>Optional: Display the overrides for the user:
# sss_override user-show <ldap_username>user@ldap.example.com::_<local_uid>_:::::
6.3. Overriding the LDAP GID attribute
You can change the group identifier (GID) for an LDAP user on the local system. This action ensures the user’s primary group matches specific local requirements, facilitating correct file access and group membership.
Prerequisites
-
rootaccess -
Installed
sssd-tools
Procedure
Display the current GID of the user:
# id -g <ldap_username>Replace
<ldap_username>with the name of the user. For example:# id -g sarah6003Override the GID of the user’s account:
# sss_override user-add <ldap_username> -g <local_gid>Replace
<ldap_username>with the name of the user and replace<local_gid>with the local GID number. For example:# sss_override user-add sarah -g 6666Expire the in-memory cache:
# sss_cache --usersAfter creating the first override using the
sss_override user-addcommand, restart SSSD for the changes to take effect:# systemctl restart sssd
Verification
Verify that the local GID is applied:
# id -g <ldap_username>Optional: Display the overrides for the user:
# sss_override user-show <ldap_username>user@ldap.example.com::: 6666::::
6.4. Overriding the LDAP home directory attribute
Remote home directory paths often do not exist on every client machine. Overriding this attribute helps you to map users to a valid local path, ensuring they land in an existing directory upon login.
Prerequisites
-
rootaccess -
Installed
sssd-tools
Procedure
Display the current home directory of the user as stored locally:
# getent passwd <ldap_username><ldap_username>:x:XXXX:XXXX::/home/<home_directory>:/bin/bashReplace
<ldap_username>with the name of the user. The output shows the home directory value as seen locally, which might be different from the LDAP record. For example:# getent passwd sarahsarah:x:1001:6003::sarah:/bin/bashOverride the home directory of the user:
# sss_override user-add <ldap_username> -h <new_home_directory>Replace
<ldap_username>with the name of the user and replace<new_home_directory>with the new home directory. For example:# sss_override user-add sarah -h adminRestart SSSD for the changes to take effect:
# systemctl restart sssd
Verification
Verify that the new home directory is defined:
# getent passwd <ldap_username><ldap_username>:x:XXXX:XXXX::/home/<new_home_directory>:/bin/bashOptional: Display the overrides for the user:
# sss_override user-show <ldap_username>user@ldap.example.com:::::::<new_home_directory>::
6.5. Overriding the LDAP shell attribute
The default shell assigned in LDAP may be restricted or unavailable on specific clients. You can override this attribute to assign a valid local shell, such as /bin/bash or /sbin/nologin, appropriate for the host’s specific purpose.
Prerequisites
-
rootaccess -
Installed
sssd-tools
Procedure
Display the current shell of the user as stored locally:
# getent passwd <ldap_username><ldap_username>:x:XXXX:XXXX::/home/<home_directory>:_<currentshell>_Replace
<ldap_username>with the name of the user.Override the shell of the user:
# sss_override user-add <ldap_username> -s <new_shell>Replace
<ldap_username>with the name of the user and replace<new_shell>with the new shell.Restart SSSD for the changes to take effect:
# systemctl restart sssd
Verification
Verify that the new shell is defined:
# getent passwd <ldap_username><ldap_username>:x:XXXX:XXXX::/home/<home_directory>:_<new_shell>_Optional: Display the overrides for the user:
# sss_override user-show <ldap_username>user@ldap.example.com::::::_<new_shell>_:For example, to change the shell of the user
sarahfrom/bin/bashtosbin/nologin:Display the current shell of the user
sarah:# getent passwd sarahsarah:x:1001:6003::sarah:/bin/bashOverride the shell of the user sarah with new
/sbin/nologinshell:# sss_override user-add sarah -s /sbin/nologinRestart SSSD for the changes to take effect:
# systemctl restart sssdVerify that the new shell is defined and overrides for the user display correctly:
# getent passwd sarahsarah:x:1001:6003::sarah:/sbin/nologin# sss_override user-show sarahuser@ldap.example.com::::::/sbin/nologin:
6.6. Listing overrides on a host
You must audit local modifications to ensure configuration consistency. The sss_override tool provides search functions to list all currently active user and group overrides stored in the local cache.
Prerequisites
-
rootaccess -
Installed
sssd-tools
Procedure
List all user overrides:
# sss_override user-finduser1@ldap.example.com::8000::::/bin/zsh: user2@ldap.example.com::8001::::/bin/bash: ...List all group overrides:
# sss_override group-findgroup1@ldap.example.com::7000 group2@ldap.example.com::7001 ...
6.7. Removing a local override
Removing an override reverts the user or group attributes to the values provided by the central directory. Use deletion commands to clean up obsolete configurations or restore default identity data immediately.
Prerequisites
-
rootaccess -
Installed
sssd-tools
Procedure
To remove the override for a user account, use:
# sss_override user-del <local_username>Replace <local_username> with the name of the user. The changes take effect immediately.
To remove an override for a group, use:
# sss_override group-del <group_name>After removing the first override using the
sss_override user-delorsss_override group-delcommand, restart SSSD for the changes to take effect:# systemctl restart sssdWhen you remove overrides for a user or group, all overrides for this object are removed.
6.8. Exporting and importing local view
Local overrides reside in the SSSD cache and risk deletion during cache clearing. Exporting these configurations to a backup file helps you to restore custom views quickly after system maintenance or migrations.
Prerequisites
-
rootaccess -
Installed
sssd-tools
Procedure
To back up user and group view, use:
# sss_override user-export /var/lib/sss/backup/sssd_user_overrides.bak
# sss_override group-export /var/lib/sss/backup/sssd_group_overrides.bak
To restore user and group view, use:
# sss_override user-import /var/lib/sss/backup/sssd_user_overrides.bak
# sss_override group-import /var/lib/sss/backup/sssd_group_overrides.bak
Chapter 7. Configuring a RHEL host to use AD as an authentication provider
Configure Red Hat Enterprise Linux (RHEL) to authenticate against Active Directory (AD) without a domain join. This method utilizes SSSD proxies and Kerberos to verify credentials, allowing centralized authentication while preserving local administrative control.
Use this approach if:
- You do not want AD administrators to have control over enabling and disabling the host.
- The host, which can be a corporate PC, is only meant to be used by one user in your company.
Use this approach only if you have a specific reason to avoid joining your host to AD.
Consider fully joining the system to AD or Identity Management (IdM) instead. Joining the RHEL host to a domain makes the setup easier to manage. If you are concerned about client access licences related to joining clients into AD directly, consider leveraging an IdM server that is in a trust agreement with AD. For more information about an IdM-AD trust, see Planning a cross-forest trust between IdM and AD and
After you complete this procedure, AD_user can log in to rhel_host system using their the password set in the AD user database in the example.com domain. The EXAMPLE.COM Kerberos realm corresponds to the example.com domain.
Prerequisites
- You have root access to rhel_host.
- The AD_user user account exists in the example.com domain.
- The Kerberos realm is EXAMPLE.COM.
-
rhel_host has not been joined to AD using the
realm joincommand. You have installed the
sssd-proxypackage.# dnf install sssd-proxy
Procedure
Create the AD_user user account locally without assigning a password to it:
# useradd AD_userOpen the
/etc/nsswitch.conffile for editing, and make sure that it contains the following lines:passwd: sss files systemd group: sss files systemd shadow: files sssOpen the
/etc/krb5.conffile for editing, and make sure that it contains the following sections and items:# To opt out of the system crypto-policies configuration of krb5, remove the # symlink at /etc/krb5.conf.d/crypto-policies which will not be recreated. includedir /etc/krb5.conf.d/ [logging] default = FILE:/var/log/krb5libs.log kdc = FILE:/var/log/krb5kdc.log admin_server = FILE:/var/log/kadmind.log [libdefaults] dns_lookup_realm = false ticket_lifetime = 24h renew_lifetime = 7d forwardable = true rdns = false pkinit_anchors = /etc/pki/tls/certs/ca-bundle.crt spake_preauth_groups = edwards25519 default_realm = EXAMPLE.COM default_ccache_name = KEYRING:persistent:%{uid} [realms] EXAMPLE.COM = { kdc = ad.example.com admin_server = ad.example.com } [domain_realm] .example.com = EXAMPLE.COM example.com = EXAMPLE.COMCreate the
/etc/sssd/sssd.conffile and insert the following sections and lines into it:[sssd] services = nss, pam domains = EXAMPLE.COM [domain/EXAMPLE.COM] id_provider = proxy proxy_lib_name = files auth_provider = krb5 krb5_realm = EXAMPLE.COM krb5_server = ad.example.comChange the permissions on the
/etc/sssd/sssd.conffile:# chmod 600 /etc/sssd/sssd.confStart the Security System Services Daemon (SSSD):
# systemctl start sssdEnable SSSD:
# systemctl enable sssdOpen the
/etc/pam.d/system-authfile, and modify it so that it contains the following sections and lines:# Generated by authselect on Wed May 8 08:55:04 2019 # Do not modify this file manually. auth required pam_env.so auth required pam_faildelay.so delay=2000000 auth [default=1 ignore=ignore success=ok] pam_succeed_if.so uid >= 1000 quiet auth [default=1 ignore=ignore success=ok] pam_localuser.so auth sufficient pam_unix.so nullok try_first_pass auth requisite pam_succeed_if.so uid >= 1000 quiet_success auth sufficient pam_sss.so forward_pass auth required pam_deny.so account required pam_unix.so account sufficient pam_localuser.so account sufficient pam_succeed_if.so uid < 1000 quiet account [default=bad success=ok user_unknown=ignore] pam_sss.so account required pam_permit.so password requisite pam_pwquality.so try_first_pass local_users_only password sufficient pam_unix.so sha512 shadow nullok try_first_pass use_authtok password sufficient pam_sss.so use_authtok password required pam_deny.so session optional pam_keyinit.so revoke session required pam_limits.so -session optional pam_systemd.so session [success=1 default=ignore] pam_succeed_if.so service in crond quiet use_uid session required pam_unix.so session optional pam_sss.soCopy the contents of the
/etc/pam.d/system-authfile into the/etc/pam.d/password-authfile. Enter yes to confirm the overwriting of the current contents of the file:# cp /etc/pam.d/system-auth /etc/pam.d/password-authcp: overwrite '/etc/pam.d/password-auth'? yes
Verification
Request a Kerberos ticket-granting ticket (TGT) for AD_user. Enter the password of AD_user as requested:
# kinit AD_userPassword for AD_user@EXAMPLE.COM:Display the obtained TGT:
# klistTicket cache: KEYRING:persistent:0:0 Default principal: AD_user@EXAMPLE.COM Valid starting Expires Service principal 11/02/20 04:16:38 11/02/20 14:16:38 krbtgt/EXAMPLE.COM@EXAMPLE.COM renew until 18/02/20 04:16:34
AD_user has successfully logged in to rhel_host using the credentials from the EXAMPLE.COM Kerberos domain.
Chapter 8. Reporting on user access on hosts using SSSD
The Security System Services Daemon (SSSD) tracks user access rights across network clients. Use the sssctl command-line tool to generate detailed access control reports and audit user data for security compliance.
8.1. Prerequisites
- SSSD packages are installed in your network environment
8.2. The sssctl command
The sssctl utility provides a unified interface for monitoring the Security System Services Daemon (SSSD) status. Use this tool to manage caches, review logs, and audit domain states or user authentication access.
You can use the sssctl utility to gather information about:
- Domain state
- Client user authentication
- User access on clients of a particular domain
- Information about cached content
With the sssctl tool, you can:
- Manage the SSSD cache
- Manage logs
- Check configuration files
The sssctl tool replaces sss_cache and sss_debuglevel tools.
8.3. Generating access control reports using sssctl
The Security System Services Daemon (SSSD) enforces login permissions on the local machine. Generating an access control report lists the specific rules currently applied to the host, helping you to verify active security policies.
The access report is not accurate because the tool does not track users locked out by the Key Distribution Center (KDC).
Prerequisites
- You must be logged in with administrator privileges.
Procedure
To generate an access control report, run the following command, replacing
<domain_name>:[root@client1 ~]# sssctl access-report <domain_name>1 rule cached Rule name: example.user Member users: example.user Member services: sshd
8.4. Displaying user authorization details using sssctl
The sssctl user-checks command validates specific user permissions against PAM services. Run this diagnostic tool to troubleshoot login failures and view data from the Name Service Switch (NSS) or InfoPipe responder.
Run sssctl user-checks <user_name> to display user data available from Name Service Switch (NSS) and the InfoPipe responder for the D-Bus interface. The output shows whether the user is authorized to log in using the system-auth Pluggable Authentication Module (PAM) service.
The command has two options:
-
-afor a PAM action -
-sfor a PAM service
If you do not specify -a and -s options, the sssctl tool uses default options: -a acct -s system-auth.
Prerequisites
- You must be logged in with administrator privileges.
Procedure
To display user data for a particular user, enter:
[root@client1 ~]# sssctl user-checks -a acct -s sshd <user_name>user: example.user action: acct service: sshd ...
Chapter 9. Querying domain information using SSSD
The sssctl utility retrieves domain data from the System Security Services Daemon (SSSD), covering Identity Management and trusted Active Directory realms. Use this tool to audit available domains and verify connection status for troubleshooting.
9.1. Listing domains using sssctl
The sssctl domain-list command outputs all detected identity domains, including local files and trusted external directories. This list helps you to verify the domain topology and ensure complete visibility of identity sources.
The status might not be available immediately. If the domain is not visible, repeat the command.
Prerequisites
- You must be logged in with administrator privileges.
Procedure
Optional: To display help for the
sssctlcommand, enter:[user@client1 ~]$ sssctl --help ...To display a list of available domains, enter:
[root@client1 ~]# sssctl domain-listimplicit_files idm.example.com ad.example.com sub1.ad.example.comThe list includes domains in the cross-forest trust between Active Directory and Identity Management.
9.2. Verifying the domain status using sssctl
The sssctl domain-status command checks the real-time connectivity of a specific domain. This utility confirms server reachability and online status, assisting you in diagnosing network or configuration failures.
The status might not be available immediately. If the domain is not visible, repeat the command.
Prerequisites
- You must be logged in with administrator privileges.
Procedure
Optional: To display help for the
sssctlcommand, enter:[user@client1 ~]$ sssctl --helpTo display user data for a particular domain, replace
<domain_name>with the actual domain name and enter:[root@client1 ~]# sssctl domain-status <domain_name>Example output for the domain idm.example.com
Online status: Online

Active servers:
IPA: server.idm.example.com

Discovered IPA servers:
- server.idm.example.com
The domain
idm.example.comis online and visible from the client where you applied the command.If the domain is not available, the result is:
[root@client1 ~]# sssctl domain-status <domain_name>Unable to get online status
Chapter 10. Restricting domains for PAM services using SSSD
The System Security Services Daemon (SSSD) restricts Pluggable Authentication Modules (PAMs) service access to specific identity domains based on the user running the service. With this evaluation mechanism, you can enforce granular control, ensuring services only interact with authorized identity providers.
10.1. Introduction to PAM
Pluggable Authentication Modules (PAM) provide a modular framework for system authentication. Applications offload identity verification to centrally configured PAM stacks, helping you to implement flexible policies involving Kerberos, SSSD, or local files.
PAM is pluggable because a PAM module exists for different types of authentication sources, such as Kerberos, SSSD, NIS, or the local file system. You can prioritize different authentication sources.
This modular architecture offers administrators a great deal of flexibility in setting authentication policies for the system. PAM is a useful system for developers and administrators for several reasons:
- PAM provides a common authentication scheme, which can be used with a wide variety of applications.
- PAM provides significant flexibility and control over authentication for system administrators.
- PAM provides a single, fully-documented library, which allows developers to write programs without having to create their own authentication schemes.
10.1.1. PAM configuration file format
Pluggable Authentication Module (PAM) configuration files consist of directives that control module behavior. Each line specifies the interface type, a control flag, the module library name, and optional arguments, instructing the system on how to process specific authentication tasks.
module_type control_flag <module_name> <module_arguments>For example:
auth required pam_unix.so10.1.1.1. PAM module types
PAM defines four interface types: account, authentication, password, and session. These categories determine the specific task a module performs, such as verifying credentials, setting up the user environment, or enforcing password complexity policies.
An individual module can provide any or all types of authentication tasks. For example, pam_unix.so provides all four authentication tasks.
The module name, such as pam_unix.so, provides PAM with the name of the library containing the specified module type. The directory name is omitted because the application is linked to the appropriate version of libpam, which can locate the correct version of the module.
Module type directives can be stacked, or placed upon one another, so that multiple modules are used together for one purpose. The order of the modules is important, along with the control flags, it determines how significant the success or failure of a particular module is to the overall goal of authenticating the user to the service.
You can stack PAM modules to enforce specific conditions that must be met before a user is allowed to authenticate.
10.1.1.2. PAM control flags
Control flags dictate how PAM handles module results. Keywords like required, requisite, and sufficient determine whether the authentication stack continues processing or immediately returns a success or failure status to the application.
Simple flags use a keyword, more complex syntax follows [<value1>=<action1> <value2>=<action2> …] format.
When a module’s control flag uses the sufficient or requisite value, the order in which the modules are listed is important to the authentication process.
For a detailed description of PAM control flags, including a list of options, see the pam.conf(5) man page.
10.2. Domain-access restriction options
Manage control domain access by using pam_trusted_users and pam_public_domains in sssd.conf. Additionally, the domains option in PAM configuration files limits specific services to a defined list of authentication providers.
To restrict access to selected domains, you can use the following options:
- pam_trusted_users in /etc/sssd/sssd.conf
-
Lists numerical UIDs or user names for PAM services that SSSD trusts. The default setting is
all, which means all service users are trusted and can access any domain. - pam_public_domains in /etc/sssd/sssd.conf
-
Specifies public SSSD domains that are accessible by untrusted PAM service users. The option accepts the
allandnonevalues. The default value isnone, which means no domains are public and untrusted service users cannot access any domain. - domains for PAM configuration files
Specifies a list of domains against which a PAM service can authenticate. If you use
domainswithout specifying any domain, the PAM service cannot authenticate against any domain, for example:auth required pam_sss.so domains=If the PAM configuration file uses
domains, the PAM service is able to authenticate against all domains when that service is running under a trusted user.The
domainsoption in the/etc/sssd/sssd.confSSSD configuration file also specifies a list of domains to which SSSD attempts to authenticate. Note that thedomainsoption in a PAM configuration file cannot extend the list of domains insssd.conf, it can only restrict thesssd.conflist of domains by specifying a shorter list. Therefore, if a domain is specified in the PAM file but not insssd.conf, the PAM service cannot authenticate against the domain.
The default settings pam_trusted_users = all and pam_public_domains = none specify that all PAM service users are trusted and can access any domain. Use the domains option in PAM configuration files to restrict domain access.
Specifying a domain using domains in the PAM configuration file while sssd.conf contains pam_public_domains also requires to specify the domain in pam_public_domains. The pam_public_domains option without including the required domain leads the PAM service to unsuccessful authentication against the domain in case this service is running under an untrusted user.
Domain restrictions defined in a PAM configuration file apply to authentication actions only, not to user lookups.
10.3. Restricting domains for a PAM service
You can lock specific PAM services to a subset of available SSSD domains. This configuration forces the service to authenticate only against the specified providers, isolating critical applications from other identity sources.
Prerequisites
- SSSD installed and running.
Procedure
Configure SSSD to access the required domain or domains. Define the domains against which SSSD can authenticate in the
domainsoption in the/etc/sssd/sssd.conffile:[sssd] domains = <idm.example.com>, <ad.example.com>, <ldap.example.com>Specify the domain or domains to which a PAM service can authenticate by setting the`domains` option in the PAM configuration file. For example:
auth        sufficient    pam_sss.so forward_pass domains=<idm.example.com>
account     [default=bad success=ok user_unknown=ignore] pam_sss.so
password    sufficient    pam_sss.so use_authtok
This configuration restricts the PAM service to authenticate against
<idm.example.com>only.
Verification
-
Authenticate against
<idm.example.com>. It must be successful.
10.4. About PAM configuration files
PAM configuration files in /etc/pam.d/ define policies for individual applications. Each file stacks specific modules to enforce security requirements, such as password quality checks or root access limits, for the service it controls.
For example, the login program has a corresponding PAM configuration file named /etc/pam.d/login.
Manual editing of PAM configuration files might lead to authentication and access issues. Configure PAMs using the authselect tool.
See an example of PAM configuration file with the detailed description.
Annotated PAM configuration example
#%PAM-1.0
auth		required	pam_securetty.so
auth		required	pam_unix.so nullok
auth		required	pam_nologin.so
account		required	pam_unix.so
password	required	pam_pwquality.so retry=3
password	required	pam_unix.so shadow nullok use_authtok
session		required	pam_unix.so
where:
auth required pam_securetty.so-
Ensures that the root login is allowed only from a terminal which is listed in the
/etc/securettyfile, if this file exists. If the terminal is not listed in the file, the login as root fails with aLogin incorrectmessage. auth required pam_unix.so nullok-
Prompts the user for a password and checks it against the information stored in
/etc/passwdand, if it exists,/etc/shadow. Thenullokargument allows a blank password. auth required pam_nologin.soChecks if
/etc/nologinfile exists. If it exists, and the user is not root, authentication fails.NoteIn this example, all three
authmodules are checked, even if the firstauthmodule fails. This is a good security approach that prevents potential attacker from knowing at what stage their authentication failed.account required pam_unix.so-
Verifies the user’s account. For example, if shadow passwords have been enabled, the account type of the
pam_unix.somodule checks for expired accounts or if the user needs to change the password. password required pam_pwquality.so retry=3-
Prompts for a new password if the current one has expired or when the user manually requests a password change. Then it checks the strength of the newly created password to ensure it meets quality requirements and is not easily determined by a dictionary-based password cracking program. The argument
retry=3specifies that user has three attempts to create a strong password. password required pam_unix.so shadow nullok use_authtok-
The
pam_unix.somodule manages password changes. Theshadowargument instructs the module to create shadow passwords when updating a user’s password. Thenullokargument allows the user to change their password from a blank password, otherwise a null password is treated as an account lock. Theuse_authtokargument accepts any password that was entered previously without prompting the user again. In this way, all new passwords must pass thepam_pwquality.socheck for secure passwords before being accepted. session required pam_unix.so-
The
pam_unix.somodule manages the session and logs the user name and service type at the beginning and end of each session. Logs are collected by thesystemd-journaldservice and can be viewed by using thejournalctlcommand. Logs are also stored in/var/log/secure. This module can be supplemented by stacking it with other session modules for additional functionality.
Chapter 11. Eliminating typographical errors in local SSSD configuration
Use the sssctl config-check command to validate the syntax of SSSD configuration files. This utility detects typos and invalid parameters in /etc/sssd/sssd.conf, ensuring clean configuration before restarting the service.
Prerequisites
- You are logged in as root.
-
The
sssd-toolspackage is installed.
Procedure
Enter the
sssctl config-checkcommand:# sssctl config-checkIssues identified by validators: 1 [rule/allowed_domain_options]: Attribute 'ldap_search' is not allowed in section 'domain/<domain_name>'. Check for typos. Messages generated during configuration merging: 0 Used configuration snippet files: 0Open the
/etc/sssd/sssd.conffile and correct the typo. If you, for example, received the error message in the previous step, replaceldap_searchwithldap_search_base:[...] [domain/<domain_name>] ldap_search_base = dc=<domain_component>,dc=<tld> [...]- Save the file.
Restart SSSD:
# systemctl restart sssd
Verification
Enter the
sssctl config-checkcommand:# sssctl config-checkThe output should indicate that no issues were found:
Issues identified by validators: 0

Messages generated during configuration merging: 0

Used configuration snippet files: 0
The /etc/sssd/sssd.conf file now has no typographical errors.
Chapter 12. Troubleshooting authentication with SSSD in IdM
Troubleshoot SSSD by analyzing interactions between clients, back-end servers, and authentication protocols. Tracing data flows helps isolate failures to specific components within the Identity Management infrastructure.
Authentication in an Identity Management (IdM) environment involves many components:
- On the IdM client
- The SSSD service.
- The Name Services Switch (NSS).
- Pluggable Authentication Modules (PAM).
- On the IdM server
- The SSSD service.
- The IdM Directory Server.
- The IdM Kerberos Key Distribution Center (KDC).
- If you are authenticating as an Active Directory (AD) user
- The Directory Server on an AD Domain Controller.
- The Kerberos server on an AD Domain Controller.
To authenticate users, you must be able to perform the following functions with the SSSD service:
- Retrieve user information from the authentication server.
- Prompt the user for their credentials, pass those credentials to the authentication server, and process the outcome.
Troubleshooting involves understanding how information flows between the SSSD service and the servers that store user information. This helps you to identify where the issue occurs and narrow down potential causes.
12.1. Data flow when retrieving IdM user information with SSSD
SSSD retrieves user data by routing libc requests through the NSS responder to the backend process. The service checks local caches first, querying the remote IdM server only when necessary to fetch current identity information.
The following diagram is a simplification of the information flow between an IdM client and an IdM server during a request for IdM user information with the command getent passwd <idm_user_name>.
Information flow between an IdM client and server for user information retrieval using getent passwd
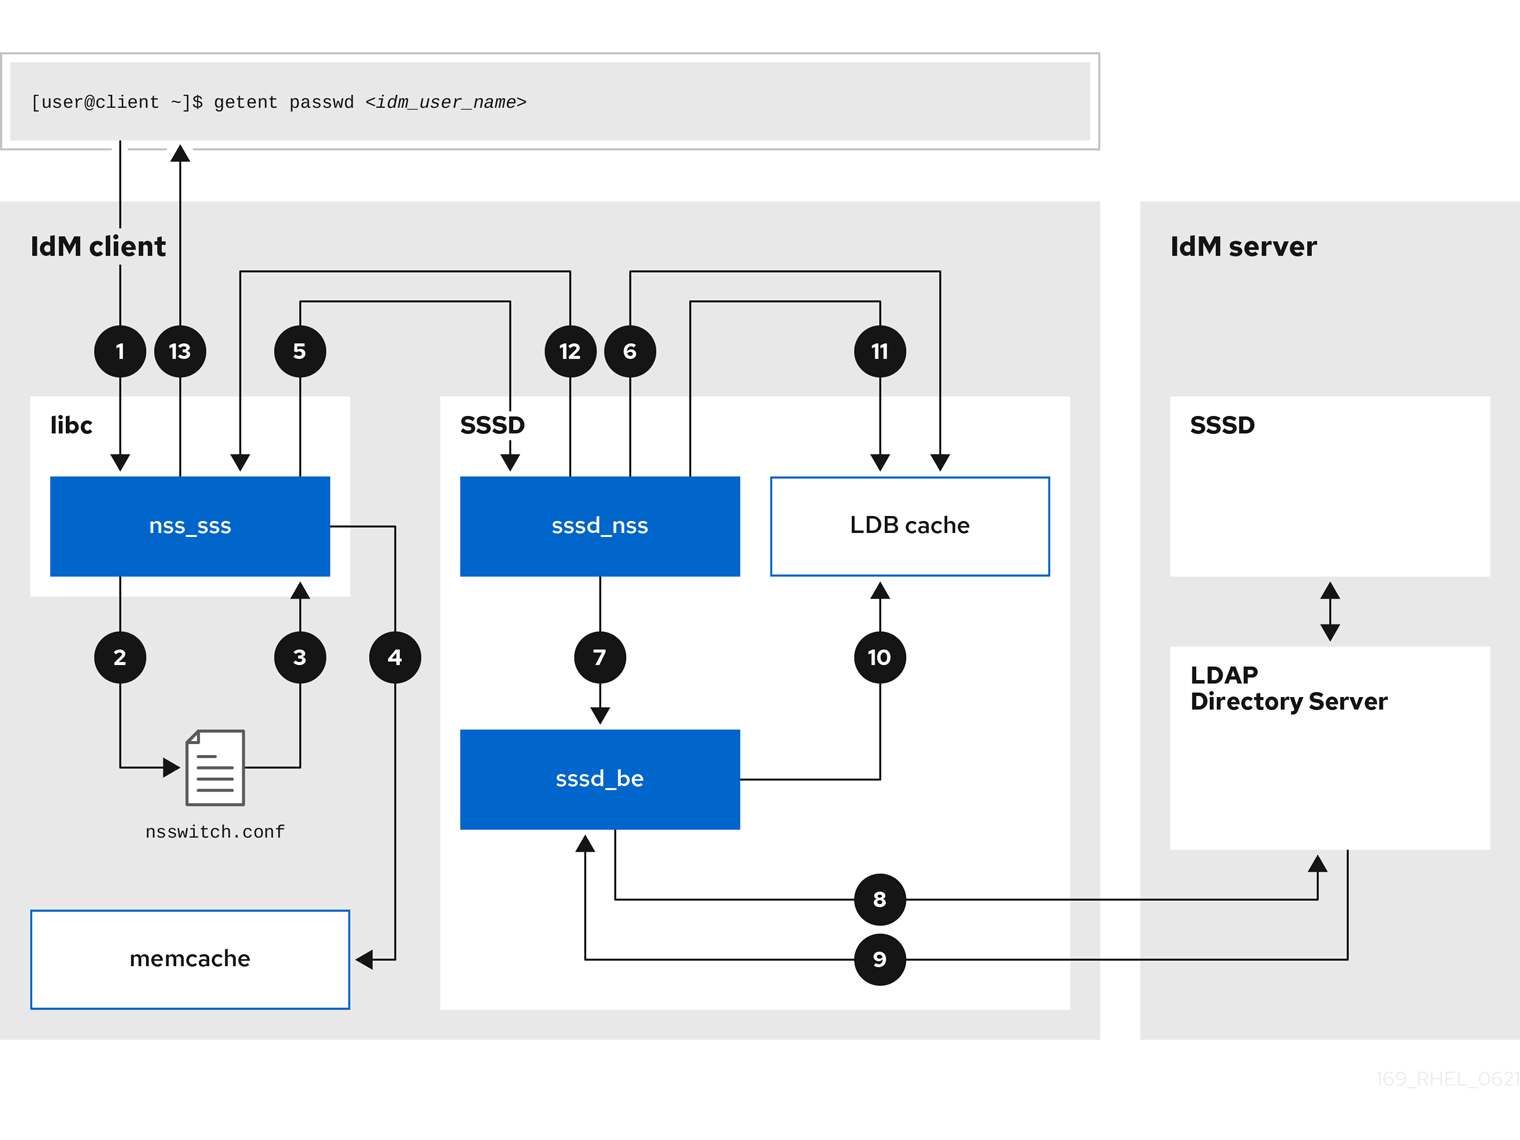
-
The
getentcommand triggers thegetpwnamcall from thelibclibrary. -
The
libclibrary references the/etc/nsswitch.confconfiguration file to check which service is responsible for providing user information, and discovers the entrysssfor the SSSD service. -
The
libclibrary opens thenss_sssmodule. -
The nss_sss module checks the memory-mapped cache for the user information. If the data is present in the cache, the
nss_sssmodule returns it. -
If the user information is not in the memory-mapped cache, the request is passed to the SSSD
sssd_nssresponder process. -
The SSSD service checks its cache. If the data is present in the cache and valid, the
sssd_nssresponder reads the data from the cache and returns it to the application. -
If the data is not present in the cache or it is expired, the
sssd_nssresponder queries the appropriate back-end process and waits for a reply. The SSSD service uses the IPA backend in an IdM environment, enabled by the settingid_provider=ipain thesssd.confconfiguration file. -
The
sssd_beback-end process connects to the IdM server and requests the information from the IdM LDAP Directory Server. - The SSSD back-end on the IdM server responds to the SSSD back-end process on the IdM client.
- The SSSD back-end on the client stores the resulting data in the SSSD cache and alerts the responder process that the cache has been updated.
-
The
sssd_nssfront-end responder process retrieves the information from the SSSD cache. -
The
sssd_nssresponder sends the user information to thenss_sssresponder, completing the request. -
The
libclibrary returns the user information to the application that requested it.
12.2. Data flow when retrieving AD user information with SSSD
Retrieving Active Directory (AD) data involves the IdM server acting as a bridge. The client SSSD service queries the IdM server, which triggers the extdom_extop plugin to fetch identity records from the AD Domain Controller.
If you have established a cross-forest trust between your IdM environment and an AD domain, the information flow when retrieving AD user information about an IdM client is very similar to the information flow when retrieving IdM user information, with the additional step of contacting the AD user database.
The following diagram is a simplification of the information flow when a user requests information about an AD user with the command getent passwd <user_name@ad.example.com>. This diagram does not include the internal details discussed in the Data flow when retrieving IdM user information with SSSD section. It focuses on the communication between the SSSD service on an IdM client, the SSSD service on an IdM server, and the LDAP database on an AD Domain Controller.
Information flow for retrieval of AD user information between an IdM client, IdM server, and AD Domain controller image::169_RHEL_IdM_with_SSSD_0621-ad_user_info.png["A diagram with numbered arrows representing the flow of information between an IdM client, an IdM server, and an AD Domain Controller. The following numbered list describes each step in the process."]
- The IdM client looks to its local SSSD cache for AD user information.
-
If the IdM client does not have the user information, or the information is stale, the SSSD service on the client contacts the
extdom_extopplugin on the IdM server to perform an LDAP extended operation and requests the information. - The SSSD service on the IdM server looks for the AD user information in its local cache.
- If the IdM server does not have the user information in its SSSD cache, or its information is stale, it performs an LDAP search to request the user information from an AD Domain Controller.
- The SSSD service on the IdM server receives the AD user information from the AD domain controller and stores it in its cache.
-
The
extdom_extopplugin receives the information from the SSSD service on the IdM server, which completes the LDAP extended operation. - The SSSD service on the IdM client receives the AD user information from the LDAP extended operation.
- The IdM client stores the AD user information in its SSSD cache and returns the information to the application that requested it.
12.3. Data flow when authenticating as a user with SSSD in IdM
Services invoke the Pluggable Authentication Module (PAM) stack to initiate authentication. SSSD processes these requests by spawning child processes to validate credentials against the IdM Kerberos Key Distribution Center (KDC), supporting both standard password and smart card verification methods.
Authenticating as a user on an IdM server or client involves the following components:
-
The service that initiates the authentication request, such as the
sshdservice. - The PAM library and its modules.
- The SSSD service, its responders, and back-ends.
- A smart card reader, if smart card authentication is configured.
The authentication server:
- IdM users are authenticated against an IdM KDC.
- Active Directory (AD) users are authenticated against an AD Domain Controller (DC).
The following diagram is a simplification of the information flow when a user needs to authenticate during an attempt to log in locally to a host via the SSH service on the command line.
Information flow between an IdM client and an IdM server or AD Domain Controller during an authentication attempt 
-
The authentication attempt with the
sshcommand triggers thelibpamlibrary. The
libpamlibrary references the PAM file in the/etc/pam.d/directory that corresponds to the service requesting the authentication attempt. In this example involving authenticating via the SSH service on the local host, thelibpamlibrary checks the/etc/pam.d/system-authconfiguration file and discovers thepam_sss.soentry for the SSSD PAM:auth sufficient pam_sss.so-
To determine which authentication methods are available, the
libpamlibrary opens thepam_sssmodule and sends anSSS_PAM_PREAUTHrequest to thesssd_pamPAM responder of the SSSD service. -
If smart card authentication is configured, the SSSD service spawns a temporary
p11_childprocess to check for a smart card and retrieve certificates from it. -
If smart card authentication is configured for the user, the
sssd_pamresponder attempts to match the certificate from the smart card with the user. Thesssd_pamresponder also performs a search for the groups that the user belongs to, since group membership might affect access control. -
The
sssd_pamresponder sends anSSS_PAM_PREAUTHrequest to thesssd_beback-end responder to see which authentication methods the server supports, such as passwords or 2-factor authentication. In an IdM environment, where the SSSD service uses the IPA responder, the default authentication method is Kerberos. For this example, the user authenticates with a simple Kerberos password. -
The
sssd_beresponder spawns a temporarykrb5_childprocess. -
The
krb5_childprocess contacts the KDC on the IdM server and checks for available authentication methods. The KDC responds to the request:
-
The
krb5_childprocess evaluates the reply and sends the results back to thesssd_bebackend process. -
The
sssd_bebackend process receives the result. -
The
sssd_pamresponder receives the result. -
The
pam_sssmodule receives the result.
-
The
-
If password authentication is configured for the user, the
pam_sssmodule prompts the user for their password. If smart card authentication is configured, thepam_sssmodule prompts the user for their smart card PIN. The module sends an
SSS_PAM_AUTHENTICATErequest with the user name and password, which travels to:-
The
sssd_pamresponder. -
The
sssd_beback-end process.
-
The
-
The
sssd_beprocess spawns a temporarykrb5_childprocess to contact the KDC. -
The
krb5_childprocess attempts to retrieve a Kerberos Ticket Granting Ticket (TGT) from the KDC with the user name and password the user provided. -
The
krb5_childprocess receives the result of the authentication attempt. The
krb5_childprocess:- Stores the TGT in a credential cache.
-
Returns the authentication result to the
sssd_beback-end process.
The authentication result travels from the
sssd_beprocess to:-
The
sssd_pamresponder. -
The
pam_sssmodule.
-
The
-
The
pam_sssmodule sets an environment variable with the location of the user’s TGT so other applications can reference it.
12.4. Narrowing the scope of authentication issues
Diagnosing login failures requires validating the authentication chain step-by-step. Verify network connectivity, service status, and KDC reachability before analyzing specific authorization rules.
To successfully authenticate a user, you must be able to retrieve user information with the SSSD service from the database that stores user information. Follow the steps to test different components of the authentication process so you can narrow the scope of authentication issues when a user is unable to log in.
Procedure
Verify that the SSSD service and its processes are running.
[root@client ~]# pstree -a | grep sssd|-sssd -i --logger=files | |-sssd_be --domain implicit_files --uid 0 --gid 0 --logger=files | |-sssd_be --domain <domain_name> --uid 0 --gid 0 --logger=files | |-sssd_ifp --uid 0 --gid 0 --logger=files | |-sssd_nss --uid 0 --gid 0 --logger=files | |-sssd_pac --uid 0 --gid 0 --logger=files | |-sssd_pam --uid 0 --gid 0 --logger=files | |-sssd_ssh --uid 0 --gid 0 --logger=files | `-sssd_sudo --uid 0 --gid 0 --logger=files |-sssd_kcm --uid 0 --gid 0 --logger=filesVerify that the client can contact the user database server via the IP address.
[user@client ~]$ ping <IP_address_of_the_database_server>If this step fails, check that your network and firewall settings allow direct communication between IdM clients and servers. See Using and configuring firewalld.
Verify that the client can discover and contact the IdM LDAP server (for IdM users) or AD domain controller (for AD users) via the fully qualified host name.
[user@client ~]$ dig -t SRV ldap._tcp.<domain>@<server_name>
[user@client ~]$ ping <fully_qualified_host_name_of_the_server>
If this step fails, check your Dynamic Name Service (DNS) settings, including the
/etc/resolv.conffile. See Configuring the order of DNS servers.NoteBy default, the SSSD service attempts to automatically discover LDAP servers and AD DCs through DNS service (SRV) records. To restrict SSSD to specific servers, define them in the
sssd.confconfiguration file using the following options:-
ipa_server = <fully_qualified_host_name_of_the_server> -
ad_server = <fully_qualified_host_name_of_the_server> -
ldap_uri = <fully_qualified_host_name_of_the_server>
If you use these options, verify you can contact the servers listed in them.
-
Verify that the client can authenticate to the LDAP server and retrieve user information with
ldapsearchcommands.If your LDAP server is an IdM server, like
server.example.com, retrieve a Kerberos ticket for the host and perform the database search authenticating with the host Kerberos principal:[user@client ~]$ kinit -k 'host/client.example.com@EXAMPLE.COM' [user@client ~]$ ldapsearch -LLL -Y GSSAPI -h server.example.com -b "dc=example,dc=com" uid=<idm_user>If your LDAP server is an Active Directory (AD) Domain Controller (DC), like
server.ad.example.com, retrieve a Kerberos ticket for the host and perform the database search authenticating with the host Kerberos principal:[user@client ~]$ kinit -k 'CLIENT$@AD.EXAMPLE.COM' [user@client ~]$ ldapsearch -LLL -Y GSSAPI -h server.ad.example.com -b "dc=example,dc=com" sAMAccountname=<idm_user>If your LDAP server is a plain LDAP server, and you have set the
ldap_default_bind_dnandldap_default_authtokoptions in thesssd.conffile, authenticate as the sameldap_default_bind_dnaccount:[user@client ~]$ ldapsearch -xLLL -D "cn=ldap_default_bind_dn_value" -W -h ldapserver.example.com -b "dc=example,dc=com" uid=<idm_user>
If this step fails, verify that your database settings allow your host to search the LDAP server.
Since the SSSD service uses Kerberos encryption, verify you can obtain a Kerberos ticket as the user that is unable to log in.
If your LDAP server is an IdM server:
[user@client ~]$ kinit <idm_user>If LDAP server database is an AD server:
[user@client ~]$ kinit <ad_user@AD.EXAMPLE.COM>
If this step fails, verify that your Kerberos server is operating properly, all servers have their times synchronized, and that the user account is not locked.
Verify you can retrieve user information about the command line.
[user@client ~]$ getent passwd <idm_user>
[user@client ~]$ id <idm_user>
If this step fails, verify that the SSSD service on the client can receive information from the user database:
-
Review errors in the
/var/log/messageslog file. - Enable detailed logging in the SSSD service, collect debugging logs, and review the logs for indications to the source of the issue.
- Optional: Open a Red Hat Technical Support case and provide the troubleshooting information you have gathered.
-
Review errors in the
If you have
sudoprivileges on the host, use thesssctlutility to verify the user is allowed to log in.[user@client ~]$ sudo sssctl user-checks -a auth -s ssh <idm_user>If this step fails, verify your authorization settings, such as your PAM configuration, IdM HBAC rules, and IdM RBAC rules:
-
Ensure that the user’s UID is equal to or higher than
UID_MIN, which is defined in the/etc/login.defsfile. -
Review authorization errors in the
/var/log/secureand/var/log/messageslog files. - Enable detailed logging in the SSSD service, collect debugging logs, and review the logs for indications to the source of the issue.
- Optional: Open a Red Hat Technical Support case and provide the troubleshooting information you have gathered.
-
Ensure that the user’s UID is equal to or higher than
12.5. SSSD log files and logging levels
SSSD segregates logs by domain and component in the /var/log/sssd/ directory. Configure debug levels ranging from 0 to 9 to control verbosity, balancing disk usage with diagnostic detail.
For an IdM server in the example.com IdM domain, its log files might look like this:
[root@server ~]# ls -l /var/log/sssd/total 620
-rw-------. 1 root root 0 Mar 29 09:21 krb5_child.log
-rw-------. 1 root root 14324 Mar 29 09:50 ldap_child.log
-rw-------. 1 root root 212870 Mar 29 09:50 sssd_example.com.log
-rw-------. 1 root root 0 Mar 29 09:21 sssd_ifp.log
-rw-------. 1 root root 0 Mar 29 09:21 sssd_implicit_files.log
-rw-------. 1 root root 0 Mar 29 09:21 sssd.log
-rw-------. 1 root root 219873 Mar 29 10:03 sssd_nss.log
-rw-------. 1 root root 0 Mar 29 09:21 sssd_pac.log
-rw-------. 1 root root 13105 Mar 29 09:21 sssd_pam.log
-rw-------. 1 root root 9390 Mar 29 09:21 sssd_ssh.log
-rw-------. 1 root root 0 Mar 29 09:21 sssd_sudo.log12.5.1. SSSD log file purposes
Each SSSD component maintains a dedicated log file to isolate specific operations. These files capture data from helper processes, responders, and domain backends, simplifying the search for relevant error messages.
krb5_child.log- Log file for the short-lived helper process involved in Kerberos authentication.
ldap_child.log- Log file for the short-lived helper process involved in getting a Kerberos ticket for the communication with the LDAP server.
sssd_<domain_name>.logFor each domain section in the
sssd.conffile, the SSSD service logs information about communication with the LDAP server to a separate log file. For example, in an environment with an IdM domain namedexample.com, the SSSD service logs its information in a file namedsssd_example.com.log. If a host is directly integrated with an AD domain namedad.example.com, information is logged to a file namedsssd_ad.example.com.log.NoteIf you have an IdM environment and a cross-forest trust with an AD domain, information about the AD domain is still logged to the log file for the IdM domain.
Similarly, if a host is directly integrated to an AD domain, information about any child domains is written in the log file for the primary domain.
selinux_child.log- Log file for the short-lived helper process that retrieves and sets SELinux information.
sssd.log- Log file for SSSD monitoring and communicating with its responder and backend processes.
sssd_ifp.log- Log file for the InfoPipe responder, which provides a public D-Bus interface accessible over the system bus.
sssd_nss.log- Log file for the Name Services Switch (NSS) responder that retrieves user and group information.
sssd_pac.log- Log file for the Microsoft Privilege Attribute Certificate (PAC) responder, which collects the PAC from AD Kerberos tickets and derives information about AD users from the PAC, which avoids requesting it directly from AD.
sssd_pam.log- Log file for the Pluggable Authentication Module (PAM) responder.
sssd_ssh.log- Log file for the SSH responder process.
12.5.2. SSSD logging levels
Debug levels define the granularity of recorded events. Higher integer values capture increasingly detailed trace messages and internal function data, while lower levels record only critical or fatal service failures.
Setting a debug level also enables all debug levels below it. For example, setting the debug level at 6 also enables debug levels 0 through 5.
| Level | Description |
|---|---|
| 0 | Fatal failures. Errors that prevent the SSSD service from starting up or cause it to terminate. |
| 1 | Critical failures. Errors that do not terminate the SSSD service, but at least one major feature is not working properly. |
| 2 | Serious failures. Errors announcing that a particular request or operation has failed. This is the default debug log level. |
| 3 | Minor failures. Errors that cause the operation failures captured at level 2. |
| 4 | Configuration settings. |
| 5 | Function data. |
| 6 | Trace messages for operation functions. |
| 7 | Trace messages for internal control functions. |
| 8 | Contents of function-internal variables. |
| 9 | Extremely low-level tracing information. |
12.6. Enabling detailed logging for SSSD in the sssd.conf file
Enable persistent verbose logging by modifying the sssd.conf file. Setting the debug_level parameter in specific configuration sections captures detailed data across service restarts.
By default, the SSSD service only logs serious failures (debug level 2), but it does not log at the level of detail necessary to troubleshoot authentication issues.
To enable detailed logging persistently across SSSD service restarts, add the option debug_level=<integer> in each section of the /etc/sssd/sssd.conf configuration file, where the <integer> value is a number between 0 and 9. Debug levels up to 3 log larger failures, and levels 8 and higher provide a large number of detailed log messages. Level 6 is a good starting point for debugging authentication issues.
Prerequisites
-
You need the root password to edit the
sssd.confconfiguration file and restart the SSSD service.
Procedure
-
Open the
/etc/sssd/sssd.conffile in a text editor. Add the
debug_leveloption to every section of the file, and set the debug level to the verbosity of your choice.[domain/<domain_name>] debug_level = 6 id_provider = ipa ... [sssd] debug_level = 6 services = nss, pam, ifp, ssh, sudo domains = <domain_name> [nss] debug_level = 6 [pam] debug_level = 6 [sudo] debug_level = 6 [ssh] debug_level = 6 [pac] debug_level = 6 [ifp] debug_level = 6-
Save and close the
sssd.conffile. Restart the SSSD service to load the new configuration settings.
[root@server ~]# systemctl restart sssd
12.7. Enabling detailed logging for SSSD with the sssctl command
The sssctl utility adjusts logging verbosity immediately without editing configuration files. With this command, you can increase debug levels to capture specific events during active troubleshooting sessions.
By default, the SSSD service only logs serious failures (debug level 2), but it does not log at the level of detail necessary to troubleshoot authentication issues.
You can change the debug level of the SSSD service on the command line with the sssctl debug-level <integer> command, where the <integer> value is a number between 0 and 9. Debug levels up to 3 log larger failures, and levels 8 and higher provide a large number of detailed log messages. Level 6 is a good starting point for debugging authentication issues.
Prerequisites
-
You need the root password to run the
sssctlcommand.
Procedure
Use the
sssctl debug-levelcommand to set the debug level to your desired verbosity. For example:[root@server ~]# sssctl debug-level 6
12.8. Gathering debugging logs from the SSSD service to troubleshoot authentication issues with an IdM server
Resolving server-side authentication errors involves capturing a clean set of logs during a reproduction attempt. Clear old logs and caches before triggering the failure to generate a focused dataset.
If you experience issues when attempting to authenticate as an IdM user to an IdM server, enable detailed debug logging in the SSSD service on the server and gather logs of an attempt to retrieve information about the user.
Prerequisites
-
You have
rootpermissions.
Procedure
Enable detailed SSSD debug logging on the IdM server.
[root@server ~]# sssctl debug-level 6Invalidate objects in the SSSD cache for the user that is experiencing authentication issues, so you do not bypass the LDAP server and retrieve information SSSD has already cached.
[root@server ~]# sssctl cache-expire -u <idm_user>Minimize the troubleshooting dataset by removing older SSSD logs.
[root@server ~]# sssctl logs-removeAttempt to switch to the user experiencing authentication problems, while gathering timestamps before and after the attempt. These timestamps further narrow the scope of the dataset.
[root@server sssd]# date; su <idm_user>; dateMon Mar 29 15:33:48 EDT 2021 su: user idm_user does not exist Mon Mar 29 15:33:49 EDT 2021Optional: Lower the debug level if you do not wish to continue gathering detailed SSSD logs.
[root@server ~]# sssctl debug-level 2Review SSSD logs for information about the failed request. For example, reviewing the
/var/log/sssd/sssd_example.com.logfile shows that the SSSD service did not find the user in thecn=accounts,dc=example,dc=comLDAP subtree. This might indicate that the user does not exist, or exists in another location.(Mon Mar 29 15:33:48 2021) [sssd[be[example.com]]] [dp_get_account_info_send] (0x0200): Got request for [0x1][BE_REQ_USER][name=idm_user@example.com] ... (Mon Mar 29 15:33:48 2021) [sssd[be[example.com]]] [sdap_get_generic_ext_step] (0x0400): calling ldap_search_ext with [(&(uid=idm_user)(objectclass=posixAccount)(uid=)(&(uidNumber=)(!(uidNumber=0))))][cn=accounts,dc=example,dc=com]. (Mon Mar 29 15:33:48 2021) [sssd[be[example.com]]] [sdap_get_generic_op_finished] (0x0400): Search result: Success(0), no errmsg set (Mon Mar 29 15:33:48 2021) [sssd[be[example.com]]] [sdap_search_user_process] (0x0400): Search for users, returned 0 results. (Mon Mar 29 15:33:48 2021) [sssd[be[example.com]]] [sysdb_search_by_name] (0x0400): No such entry (Mon Mar 29 15:33:48 2021) [sssd[be[example.com]]] [sysdb_delete_user] (0x0400): Error: 2 (No such file or directory) (Mon Mar 29 15:33:48 2021) [sssd[be[example.com]]] [sysdb_search_by_name] (0x0400): No such entry (Mon Mar 29 15:33:49 2021) [sssd[be[example.com]]] [ipa_id_get_account_info_orig_done] (0x0080): Object not found, ending requestIf you are unable to determine the cause of the authentication issue:
Collect the SSSD logs you recently generated.
[root@server ~]# sssctl logs-fetch sssd-logs-Mar29.tarOpen a Red Hat Technical Support case and provide:
-
The SSSD logs:
sssd-logs-Mar29.tar The console output, including the time stamps and user name, of the request that corresponds to the logs:
[root@server sssd]# date; id <idm_user>; dateMon Mar 29 15:33:48 EDT 2021 id: 'idm_user': no such user Mon Mar 29 15:33:49 EDT 2021
-
The SSSD logs:
12.9. Gathering debugging logs from the SSSD service to troubleshoot authentication issues with an IdM client
Client-side issues require simultaneous analysis of both client and server logs. Configure the client to contact a specific server, synchronizing log capture to trace the request across the network.
If you experience issues when attempting to authenticate as an IdM user to an IdM client, verify that you can retrieve user information about the IdM server. If you cannot retrieve the user information about an IdM server, you will not be able to retrieve it on an IdM client (which retrieves information from the IdM server).
After you have confirmed that authentication issues do not originate from the IdM server, gather SSSD debugging logs from both the IdM server and IdM client.
Prerequisites
- The user only has authentication issues on IdM clients, not IdM servers.
-
You need the root password to run the
sssctlcommand and restart the SSSD service.
Procedure
-
On the client: Open the
/etc/sssd/sssd.conffile in a text editor. On the client: Add the
ipa_serveroption to the[domain]section of the file and set it to an IdM server using its fully qualified domain name (FQDN). This avoids the IdM client autodiscovering other IdM servers, thus limiting this test to just one client and one server.[domain/<idm_domain_name>] ipa_server = <idm_server_fqdn> ...-
On the client: Save and close the
sssd.conffile. On the client: Restart the SSSD service to load the configuration changes.
[root@client ~]# systemctl restart sssdOn the server and client: Enable detailed SSSD debug logging.
[root@server ~]# sssctl debug-level 6[root@client ~]# sssctl debug-level 6On the server and client: Invalidate objects in the SSSD cache for the user experiencing authentication issues, so you do not bypass the LDAP database and retrieve information SSSD has already cached.
[root@server ~]# sssctl cache-expire -u <idm_user>[root@client ~]# sssctl cache-expire -u <idm_user>On the server and client: Minimize the troubleshooting dataset by removing older SSSD logs.
[root@server ~]# sssctl logs-remove[root@server ~]# sssctl logs-removeOn the client: Attempt to switch to the user experiencing authentication problems while gathering timestamps before and after the attempt. These timestamps further narrow the scope of the dataset.
[root@client sssd]# date; su <idm_user>; dateMon Mar 29 16:20:13 EDT 2021 su: user idm_user does not exist Mon Mar 29 16:20:14 EDT 2021Optional: On the server and client: Lower the debug level if you do not wish to continue gathering detailed SSSD logs.
[root@server ~]# sssctl debug-level 0[root@client ~]# sssctl debug-level 0On the server and client: Review SSSD logs for information about the failed request.
- Review the request from the client in the client logs.
- Review the request from the client in the server logs.
- Review the result of the request in the server logs.
- Review the outcome of the client receiving the results of the request from the server.
If you are unable to determine the cause of the authentication issue:
Collect the SSSD logs you recently generated on the IdM server and IdM client. Label them according to their hostname or role.
[root@server ~]# sssctl logs-fetch sssd-logs-server-Mar29.tar[root@client ~]# sssctl logs-fetch sssd-logs-client-Mar29.tarOpen a Red Hat Technical Support case and provide:
The SSSD debug logs:
-
sssd-logs-server-Mar29.tarfrom the server -
sssd-logs-client-Mar29.tarfrom the client
-
The console output, including the time stamps and user name, of the request that corresponds to the logs:
[root@client sssd]# date; su <idm_user>; dateMon Mar 29 16:20:13 EDT 2021 su: user idm_user does not exist Mon Mar 29 16:20:14 EDT 2021
12.10. Tracking client requests in the SSSD backend
SSSD assigns unique Request IDs (RID) and Client IDs (CID) to track operations asynchronously. Trace these identifiers through the backend logs to correlate complex sequences of internal events.
To track client request in the back-end logs, you can use the unique request identifier RID#<integer> and client ID `[CID #<integer>]. These identifiers help isolate logs to follow an individual request from start to finish across log files from multiple SSSD components.
Prerequisites
- You have enabled debug logging and a request has been submitted from an IdM client.
-
You have
rootprivileges.
Procedure
To review your SSSD log file, open the log file
/var/log/sssd/sssd_<domain_name>.logusing thelessutility. For example:[root@server ~]# less /var/log/sssd/sssd_example.com.logReview the SSSD logs for information about the client request.
(2021-07-26 18:26:37): [be[testidm.com]] [dp_req_destructor] (0x0400): [RID#3] Number of active DP request: 0
(2021-07-26 18:26:37): [be[testidm.com]] [dp_req_reply_std] (0x1000): [RID#3] DP Request AccountDomain #3: Returning [Internal Error]: 3,1432158301,GetAccountDomain() not supported
(2021-07-26 18:26:37): [be[testidm.com]] [dp_attach_req] (0x0400): [RID#4] DP Request Account #4: REQ_TRACE: New request. [sssd.nss CID #1] Flags [0x0001].
(2021-07-26 18:26:37): [be[testidm.com]] [dp_attach_req] (0x0400): [RID#4] Number of active DP request: 1
This sample output from an SSSD log file shows the unique identifiers
RID#3andRID#4for two different requests.However, a single client request to the SSSD client interface often triggers multiple requests in the backend and as a result it is not a 1-to-1 correlation between client request and requests in the backend. Though the multiple requests in the backend have different RID numbers, each initial backend request includes the unique client ID so an administrator can track the multiple RID numbers to the single client request.
The following example shows one client request
[sssd.nss CID #1]and the multiple requests generated in the backend,[RID#5]to[RID#13]:(2021-10-29 13:24:16): [be[ad.vm]] [dp_attach_req] (0x0400): [RID#5] DP Request [Account #5]: REQ_TRACE: New request. [sssd.nss CID #1] Flags [0x0001]. (2021-10-29 13:24:16): [be[ad.vm]] [dp_attach_req] (0x0400): [RID#6] DP Request [AccountDomain #6]: REQ_TRACE: New request. [sssd.nss CID #1] Flags [0x0001]. (2021-10-29 13:24:16): [be[ad.vm]] [dp_attach_req] (0x0400): [RID#7] DP Request [Account #7]: REQ_TRACE: New request. [sssd.nss CID #1] Flags [0x0001]. (2021-10-29 13:24:17): [be[ad.vm]] [dp_attach_req] (0x0400): [RID#8] DP Request [Initgroups #8]: REQ_TRACE: New request. [sssd.nss CID #1] Flags [0x0001]. (2021-10-29 13:24:17): [be[ad.vm]] [dp_attach_req] (0x0400): [RID#9] DP Request [Account #9]: REQ_TRACE: New request. [sssd.nss CID #1] Flags [0x0001]. (2021-10-29 13:24:17): [be[ad.vm]] [dp_attach_req] (0x0400): [RID#10] DP Request [Account #10]: REQ_TRACE: New request. [sssd.nss CID #1] Flags [0x0001]. (2021-10-29 13:24:17): [be[ad.vm]] [dp_attach_req] (0x0400): [RID#11] DP Request [Account #11]: REQ_TRACE: New request. [sssd.nss CID #1] Flags [0x0001]. (2021-10-29 13:24:17): [be[ad.vm]] [dp_attach_req] (0x0400): [RID#12] DP Request [Account #12]: REQ_TRACE: New request. [sssd.nss CID #1] Flags [0x0001]. (2021-10-29 13:24:17): [be[ad.vm]] [dp_attach_req] (0x0400): [RID#13] DP Request [Account #13]: REQ_TRACE: New request. [sssd.nss CID #1] Flags [0x0001].
12.11. Tracking client requests using the log analyzer tool
The System Security Services Daemon (SSSD) log analyzer tool parses verbose logs to reconstruct request chains. This utility filters the output to show only relevant entries for a specific client request, simplifying the analysis of dense log files.
You can use the tool to track requests from start to finish across log files from multiple SSSD components.
12.11.1. How the log analyzer tool works
The analyzer links NSS and PAM requests across multiple SSSD processes. It tracks the lifecycle of a request using Client IDs, helping you to isolate specific authentication or lookup attempts.
Using the log parsing tool, you can track SSSD requests from start to finish across log files from multiple SSSD components. You run the analyzer tool using the sssctl analyze command.
The log analyzer tool helps you to troubleshoot NSS and PAM issues in SSSD and more easily review SSSD debug logs. You can extract and print SSSD logs related only to certain client requests across SSSD processes.
SSSD tracks user and group identity information (id, getent) separately from user authentication (su, ssh) information. The client ID (CID) in the NSS responder is independent of the CID in the PAM responder and you see overlapping numbers when analyzing NSS and PAM requests. Use the --pam option with the sssctl analyze command to review PAM requests.
Requests returned from the SSSD memory cache are not logged and cannot be tracked by the log analyzer tool.
12.11.2. Running the log analyzer tool
Use sssctl analyze to list recent requests and display their associated logs. This workflow identifies the unique Client ID and extracts the specific log entries required for troubleshooting.
Prerequisites
-
You must set
debug_levelto at least 7 in the[$responder]section, and[domain/$domain]section of the/etc/sssd/sssd.conffile to enable log parsing functionality. -
Logs to analyze must be from a compatible version of SSSD built with
libteventchain ID support, that is SSSD in RHEL 8.5 and later.
Procedure
Run the log analyzer tool in
listmode to determine the client ID of the request you are tracking, adding the-voption to display verbose output:# sssctl analyze request list -vA verbose list of recent client requests made to SSSD is displayed.
NoteIf analyzing PAM requests, run the
sssctl analyze request listcommand with the--pamoption.Run the log analyzer tool with the
show [unique client ID]option to display logs pertaining to the specified client ID number:# sssctl analyze request show 20If required, you can run the log analyzer tool against log files, for example:
# sssctl analyze --logdir=/tmp/var/log/sssd request list
Chapter 13. Configuring applications for a single sign-on
Single sign-on (SSO) simplifies authentication by allowing users to access multiple systems via a single login procedure. Configure applications like browsers and email clients to accept Kerberos tickets, SSL certificates, or tokens as valid credentials.
The configuration of different applications may vary. This chapter shows how to configure SSO authentication schema for the Mozilla Thunderbird email client and Mozilla Firefox web browser as the examples.
13.1. Prerequisites
Verify that the target system hosts the required versions of Mozilla Firefox and Mozilla Thunderbird before attempting configuration. Ensure these applications are installed and accessible to the user. Mozilla Firefox version 88 Mozilla Thunderbird version 78
13.2. Configuring Firefox to use Kerberos for single sign-on
Configure Firefox to negotiate Kerberos authentication with intranet sites. Adding specific domains to the trusted URI list in the configuration settings permits the browser to pass existing Kerberos credentials to the Key Distribution Center (KDC) automatically.
Even after configuring Firefox to pass Kerberos credentials, you still need a valid Kerberos ticket. To generate a Kerberos ticket, use the kinit command and supply the user password for the user on the KDC.
[jsmith@host ~] $ kinitPassword for jsmith@EXAMPLE.COM:Procedure
-
In the address bar of Firefox, type
about:configto display the list of current configuration options. -
In the Filter field, type
negotiateto restrict the list of options. - Double-click the network.negotiate-auth.trusted-uris entry.
Enter the name of the domain against which to authenticate, including the preceding period (.). If you want to add multiple domains, enter them in a comma separated list.
Manual Firefox Configuration

13.3. Viewing certificates in Firefox
By inspecting the Certificate Manager, users can verify currently installed authorities and personal credentials. This audit ensures the browser possesses the necessary trust anchors for secure connections.
You can view stored certificates in Mozilla Firefox to verify authentication settings.
Procedure
In Mozilla Firefox, open the Firefox menu and select Preferences.

In the left panel, select the Privacy & Security section.

- Scroll down to the Certificates section.
Click View Certificates to open the Certificate Manager.

13.4. Importing CA certificates in Firefox
Importing a Certificate Authority (CA) certificate establishes trust with external servers. Adding the CA file to the browser’s store enables secure, encrypted connections to websites and applications issued by that authority.
Prerequisites
- You have a CA certificate on your device.
Procedure
- Open Certificate Manager.
Select the Authorities tab and click Import.
Figure 13.1. Importing the CA Certificate in Firefox

- Select the downloaded CA certificate from your device.
13.5. Editing certificate trust settings in Firefox
Modify trust settings to define how the browser interacts with specific certificates. Adjusting these permissions determines if the browser validates the certificate for identifying websites or email users.
Prerequisites
- You have successfully imported a certificate.
Procedure
- Open Certificate Manager.
- Under the Authorities tab, select the appropriate certificate and click Edit Trust.
Edit the certificate trust settings.
Figure 13.2. Editing the Certificate Trust Settings in Firefox

13.6. Importing personal certificate for authentication in Firefox
Personal certificates identify the user to remote web services. Importing these files into the browser enables client-side authentication, allowing access to secure sites that require identity verification beyond simple passwords.
Prerequisites
- You have a personal certificate stored on your device.
Procedure
- Open Certificate Manager.
Select the Your Certificates tab and click Import.
Figure 13.3. Importing a Personal Certificate for Authentication in Firefox

- Import the appropriate certificate from your computer.
13.7. Viewing certificates in Thunderbird
By accessing the Certificate Manager in Thunderbird, users can audit stored security credentials. Reviewing these files ensures the email client contains the correct authorities and personal keys for encrypted communication.
Procedure
In Thunderbird, open the main menu and select Preferences.
Figure 13.4. Selecting Preferences from menu

In the left panel, select the Privacy & Security section.
Figure 13.5. Selecting security section

- Scroll down to the Certificates section.
Click Manage Certificates to open the Certificate Manager.
Figure 13.6. Opening Certificate Manager

13.8. Importing certificates in Thunderbird
Importing Certificate Authority (CA) files enables the email client to validate secure connections. Adding these authorities ensures Thunderbird trusts the SSL/TLS certificates presented by mail servers during data exchange.
Prerequisites
- You have a CA certificate stored on your device.
Procedure
- Open Certificate Manager.
Select the Authorities tab and click Import.
Figure 13.7. Importing the CA certificate in Thunderbird

- Select the downloaded CA certificate.
13.9. Editing certificate trust settings in Thunderbird
Modifying trust attributes controls how Thunderbird validates certificates for specific operations. Adjust these settings to explicitly authorize authorities for identifying mail servers or signing email messages.
Prerequisites
- You have successfully imported a certificate.
Procedure
- Open Certificate Manager.
- Under the Authorities tab, select the appropriate certificate and click Edit Trust.
Edit the certificate trust settings.
Figure 13.8. Editing the certificate trust settings in Thunderbird

13.10. Importing personal certificate in Thunderbird
Personal certificates enable S/MIME functionality for signing and encrypting emails. Importing these keys into the personal store allows the client to prove the sender’s identity and decrypt incoming secure messages.
Prerequisites
- You have a personal certificate stored on your device.
Procedure
- Open Certificate Manager.
Under the Your Certificates tab, click Import.
Figure 13.9. Importing a personal certificate for authentication in Thunderbird

- Import the required certificate from your computer.
- Close the Certificate Manager.
Open the main menu and select Account Settings.
Figure 13.10. Selecting Account Settings from menu

Select End-To-End Encryption in the left panel under your account email address.
Selecting End-To-End Encryption section.

- Under S/MIME section, click the first Select button to choose your personal certificate to use for signing messages.
Under S/MIME section, click the second Select button to choose your personal certificate for encrypting and decrypting messages.
Choosing certificate for signing and encryption/decryption.
 Note
NoteIf you forgot to import valid certificate, you can open Certificate Manager directly using the Manage S/MIME certificate option.