Hypervisor Deployment Guide
The complete guide to installing, deploying and maintaining Red Hat Enterprise Virtualization Hypervisors.
Edition 9
Abstract
Preface
Chapter 1. Introducing Red Hat Enterprise Virtualization Hypervisors
Chapter 2. Understanding the Red Hat Enterprise Virtualization Hypervisor
2.1. Red Hat Enterprise Virtualization Hypervisor directories
/config- The
/configdirectory contains all persistent configuration files for the Red Hat Enterprise Virtualization Hypervisor. These files control passwords, storage configuration, security and networking.The/configdirectory must be at least 5MB. /boot- The
/bootdirectory contains the boot loader, the kernel and theinitramfsfile.The/bootdirectory is not mounted by default. Theovirt-config-bootboot command mounts the partition only when needed for an upgrade.The/bootdirectory must be exactly 50MB. /liveos- The
/liveosdirectory contains a compressed Red Hat Enterprise Virtualization Hypervisor live CD image. The Red Hat Enterprise Virtualization Hypervisor boots and runs from the ISO image file in this directory.The/liveosdirectory is not normally visible on the running system. This is the folder containing the livecd ISO. During an upgrade/dev/HostVG/Rootis temporarily mounted to/liveos /var/log- Contains all the logs for the Hypervisor.The
logdirectory must be at least 2048MB. The default size of thelogdirectory is 2048MB. /var/log/core- Contains core dumps from the Hypervisor which can be used for debugging and support.
/var/vdsm/- The
/var/vdsm/is used by the vdsmd daemon for storing volatile data, including/var/vdsm/tswhich stores vdsm truststore. /rhev/data-center- Contains links to Storage Domains.
/data- This directory contains virtual machine cache data and other miscellaneous files.The data partition must be at least as large as the RAM on the host system plus an additional 512MB in size. A data partition at least one and a half times as large as the RAM on the host system is recommended.The default size for the data partition is the remaining available disk space.
Chapter 3. Requirements and limitations of Red Hat Enterprise Virtualization Hypervisors
3.1. System requirements
- A CPU with the hardware virtualization extensions; either an AMD system with AMD-V™ or an Intel system with Intel VT®.When the Red Hat Enterprise Virtualization Hypervisor boots a message may appear:
Virtualization hardware is unavailable.
   (No virtualization hardware was detected on this system)
This warning indicates the virtualization extensions are either disabled or not present on your processor.Important
Some systems have the virtualization extensions disabled in BIOS; virtualization extensions must be enabled in BIOS. First, boot into rescue mode (by typinglinux rescueat the RHEV Hypervisor boot prompt) or by entering the shell from the configuration menu. Determine whether your processor has virtualization extensions with this command:$ grep -E 'svm|vmx' /proc/cpuinfoIf any output is shown, the processor is hardware virtualization capable. However in some circumstances manufacturers disable the virtualization extensions in BIOS. As an additional check, verify that thekvmmodules are loaded in the kernel:# lsmod | grep kvmIf the output includeskvm_intelorkvm_amdthen thekvmhardware virtualization modules are loaded and your system meets requirements. - An Intel® 64 or AMD64 CPU extension.
- At least one network controller with a minimum bandwidth of 1Gbps.
- At least 512MB of RAM.
- Sufficient RAM for guest virtual machines. The amount of RAM required for virtual machines depends on:
- the guest operating system's requirements,
- the virtual machine's application requirements, and
- memory activity and usage of the virtual machine.
KVM can overcommit physical RAM for virtual machines by only allocating RAM for virtual machines as required, and shifting under-utilized virtual machines into swap. - The minimum supported internal storage for a Hypervisor is the total of the following list:
- The root partitions require exactly 512MB of storage.
- The boot partition requires exactly 50MB of storage.
- The logging partition is required and the recommended size is 2048MB.
- The default and minimum size for the configuration partition is 5MB.
- Swap is required and the recommended size is the recommended swap partition (from this article on Red Hat Knowledgebase) and the overcommit ratio multiplied by the RAM (the default overcommit ratio is 0.5). The minimum size for the swap partition is 5 MB.
Recommended swap + (RAM * overcommit) = swap partition size - The default size of the data partition is the size of the system's RAM plus 512MB. The minimum size is 256MB.
Example 3.1. Determining minimum storage requirements
The root partitions          = 512MB
The boot partition          = 50MB
The logging partition       = 2048MB
The config partition        = 5MB
The swap partition (using a 0.6 overcommit ratio)
4GB (4096MB) + (0.6 * 14GB) = 12698MB
The data partition is the size of the system's RAM plus 512MB
             (14GB + 512MB) = 14750MB
-------------------------------------------------------------
Total = 30063MB3.2. Limitations
- A maximum of 64 physical CPUs on the host.
- A maximum of 1TB of RAM.
- A maximum of 16 virtualized CPUs per virtual machine.
- A maximum of 256GB of virtualized RAM per 64 bit virtual machine.
- A maximum of 4GB of virtualized RAM per 32 bit virtual machine. Note, the virtual machine may not register the entire 4GB. How much RAM the virtual machine recognizes is limited by its operating system.
- A maximum of 8 virtualized storage devices per virtual machine.
- A maximum of 8 virtualized network interface controllers per virtual machine.
- A maximum of 32 virtualized PCI devices per virtual machine.
3.3. RHEV guest operating system support
- Red Hat Enterprise Linux 3 (32 bit and 64 bit)
- Red Hat Enterprise Linux 4 (32 bit and 64 bit)
- Red Hat Enterprise Linux 5 (32 bit and 64 bit)
- Windows XP Service Pack 3 and newer (32 bit only)
- Windows Server 2003 Service Pack 2 and newer (32 bit and 64 bit)
- Windows Server 2008 (32 bit and 64 bit)
- Windows Server 2008 R2 (64 bit only)
- Windows 7 (32 bit and 64 bit)
3.4. Para-virtualized driver support
| Guest operating system | Para-virtualized drivers |
|---|---|
| Windows XP | Block and network drivers |
| Windows 7 (32 bit and 64 bit) | Block and network drivers |
| Windows Server 2008 (32 bit and 64 bit) | Block and network drivers |
| Windows Server 2003 R2 (32 bit and 64 bit) | Block and network drivers |
| Red Hat Enterprise Linux 4.8 and newer (32 bit and 64 bit) | Block and network drivers |
| Red Hat Enterprise Linux 5.4 and newer (32 bit and 64 bit) | Block and network drivers |
Chapter 4. Preparing Red Hat Enterprise Virtualization Hypervisor installation media
4.1. Preparation instructions
Red Hat Enterprise Virtualization Hypervisor 5 channel must be available to your RHN account to download the RHEV Hypervisor images.
Procedure 4.1. Downloading and Installing the Package
- Download the latest rhev-hypervisor* package from Red Hat Network onto a Red Hat Enterprise Linux system to which you have root access. The list of Hypervisor packages is available at https://rhn.redhat.com/rhn/channels/PackageList.do?cid=9462.
- As
root, navigate to the location of the downloaded package. Install it to the system in preparation for creation of the boot media.# yum localinstall rhev-hypervisor*.rpm - Extract the
livecd-iso-to-pxebootandlivecd-iso-to-diskcommands from the ISO. To do this:- Change to the directory the Hypervisor ISO is installed in, while logged in as
root.# cd /usr/share/rhev-hypervisor - Create a directory to which the ISO file will be mounted on a temporary basis.
# mkdir iso/ - Mount the ISO file as a
loopbackdevice. Use the directory created in the previous step as the mount target.# mount -o loop rhev-hypervisor.iso iso/ - Copy the
livecd-iso-to-pxebootandlivecd-iso-to-diskscripts to the current directory.# cp iso/LiveOS/livecd-iso-to-* ./ - Unmount the ISO file and remove the temporary directory.
# umount iso/
# rmdir iso/
/usr/share/rhev-hypervisor/ directory and named rhev-hypervisor.iso.
4.1.1. BIOS settings and boot process troubleshooting
- 3.5 inch diskette
- CD-ROM or DVD device
- Local hard disk
Warning
4.1.2. Confirm hardware virtualization support
- Boot the RHEV Hypervisor from removable media. For example, a USB stick or CD-ROM.
- Once the Hypervisor boot prompt is displayed, enter the command:
: linux rescue - Once the Hypervisor boots, verify your CPU contains the virtualization extensions with the following command:
# grep -E 'svm|vmx' /proc/cpuinfoOutput displays if the processor has the hardware virtualization extensions. - Verify that the KVM modules load by default:
# lsmod | grep kvmIf the output includeskvm_intelorkvm_amdthen the kvm hardware virtualization modules are loaded and the system meets the requirements.
4.2. Deploying RHEV Hypervisors with PXE and tftp
PXE and tftp. Configuring the DHCP and tftp servers for PXE booting is outside the scope of this book.
- Install the rhev-hypervisor package and extract the
livecd-iso-to-pxebootscript. Refer to Procedure 4.1, “Downloading and Installing the Package”. - Create
vmlinuzandinitrdimages withlivecd-iso-to-pxeboot:# /usr/share/rhev-hypervisor/livecd-iso-to-pxeboot /usr/share/rhev-hypervisor/rhev-hypervisor.isoYour pxeboot image is complete. Copy tftpboot/ subdirectory to /tftpboot or a subdirectory of /tftpboot. Set up your DHCP, TFTP and PXE server to serve /tftpboot/.../pxeboot.0 Note: The initrd image contains the whole CD ISO and is consequently very large. You will notice when pxebooting that initrd can take a long time to download. This is normal behaviour. - The output of
livecd-iso-to-pxebootcommand is a directory calledtftpbootthat has the following files in it:pxelinux.0pxelinux.cfg/defaultvmlinuz0initrd0.img
- The
vmlinuzandinitrdfiles can be imported into a cobbler server or any other PXE andtftpservers.Import the files to the appropriate directory. - The
pxelinux.cfg/defaultfile provides a template for configuring the PXE server to export the Hypervisor image:DEFAULT pxeboot TIMEOUT 20 PROMPT 0 LABEL pxeboot KERNEL vmlinuz0 APPEND rootflags=loop initrd=initrd0.img root=/rhev-hypervisor.iso rootfstype=auto ro liveimg check crashkernel=128M@16M elevator=deadline processor.max_cstate=1 ONERROR LOCALBOOT 0PXE booted Hypervisors rely on the PXE server passing the MAC address of the PXE interface to the kernel. This is provided by using theIPAPPEND 2parameter.Modify the templates as required for your environment.
Warning
root=/rhev-hypervisor.iso parameter in pxelinux.cfg/default is a default value. If the ISO file you are using has a name other than rhev-hypervisor.iso it should be passed when calling livecd-iso-to-pxeboot. For example, for the ISO file rhev_hypervisor_2_2.iso use the command livecd-iso-to-pxeboot rhev_hypervisor_2_2.iso. This will produce the correct parameter root=/rhev_hypervisor_2_2.iso in pxelinux.cfg/default.
4.2.1. Booting a RHEV Hypervisor with PXE
- Enter your system's BIOS. On most systems, the key or combination of keys is prompted shortly after the system has power. Usually, this key is delete, F1 or F2.
- Enable network booting if network booting is disabled.
- Set the network interface card as the first boot device.
- Boot the system. If the PXE parameters are configured correctly an automated installation should begin.
- Change or disable network booting after the RHEV Hypervisor is installed. This is to avoid overwriting the installation on each reboot (unless this is desired functionality) and to prevent certain security vulnerabilities.
Warning
Note
4.3. Preparing a RHEV Hypervisor USB storage device
Note
4.3.1. Making a bootable RHEV Hypervisor USB storage device
livecd-iso-to-disk command can install a RHEV Hypervisor onto a USB storage device. The livecd-iso-to-disk command is part of the rhev-hypervisor package. Devices created with this command can boot the RHEV Hypervisors on systems which support booting via USB.
livecd-iso-to-disk command usage follows this structure:
# /usr/share/rhev-hypervisor/livecd-iso-to-disk image devicedevice parameter is the partition name of the USB storage device to install to. The image parameter is a ISO image of the RHEV Hypervisor. The default RHEV Hypervisor image location is /usr/share/rhev-hypervisor/rhev-hypervisor.iso. The livecd-iso-to-disk command requires devices to be formatted with the FAT or EXT3 file system.
Note
livecd-iso-to-disk uses a FAT or EXT3 formatted partition or block device.
/dev/sdb or similar device name.
/dev/sdb1 or similar device name.
- Install the rhev-hypervisor package and extract the
livecd-iso-to-diskscript. Refer to Procedure 4.1, “Downloading and Installing the Package”. - Use the
livecd-iso-to-diskcommand to copy the .iso file to the disk. The--formatparameter formats the disk. The--reset-mbrinitializes the Master Boot Record (MBR). The example uses a USB storage device named/dev/sdc.# /usr/share/rhev-hypervisor/livecd-iso-to-disk --format --reset-mbr /usr/share/rhev-hypervisor/rhev-hypervisor.iso /dev/sdc Verifying image... /usr/share/rhev-hypervisor/rhev-hypervisor.iso: eccc12a0530b9f22e5ba62b848922309 Fragment sums: 8688f5473e9c176a73f7a37499358557e6c397c9ce2dafb5eca5498fb586 Fragment count: 20 Checking: 100.0% The media check is complete, the result is: PASS. It is OK to use this media. Copying live image to USB stick Updating boot config file Installing boot loader syslinux: only 512-byte sectors are supported USB stick set up as live image!
/dev/sdc1) is ready to boot a RHEV Hypervisor.
4.3.2. Booting a RHEV Hypervisor USB storage device
- Enter the system's BIOS menu to enable USB storage device booting if not already enabled.
- Enable USB booting if this feature is disabled.
- Set booting USB storage devices to be first boot device.
- Shut down the system.
- Insert the RHEV Hypervisor bootable USB storage device.
- Restart the system
- The RHEV Hypervisor should boot automatically.
4.4. Preparing a RHEV Hypervisor from a CD-ROM or DVD
4.4.1. Making a bootable RHEV Hypervisor CD-ROM
cdrecord command. The cdrecord command is part of the cdrecord package which is installed on Red Hat Enterprise Linux by default.
- Verify that the cdrecord package is installed on the system.
# rpm -q cdrecord
cdrecord-2.01-10.7.el5
If the package version is in the output, as seen above, the package is available.If it is not present, install cdrecord:# yum install cdrecord - Insert a blank CD-ROM or DVD into your CD or DVD writer.
- Record the ISO file to the disc. The cdrecord command uses the following:
cdrecord dev=device /iso/file/path/This example uses the first CD-RW (/dev/cdrw) device available and the default RHEV Hypervisor image location,/usr/share/rhev-hypervisor/rhev-hypervisor.iso.# cdrecord dev=/dev/cdrw /usr/share/rhev-hypervisor/rhev-hypervisor.iso
isomd5sum) to verify the integrity of the installation media every time the Hypervisor is booted. If media errors are reported in the boot sequence you have a bad CD-ROM. Follow the procedure above to create a new CD-ROM or DVD.
4.4.2. Booting a RHEV Hypervisor CD-ROM
Chapter 5. Installing Red Hat Enterprise Virtualization Hypervisors
Important
- Installing with the Hypervisor Configuration Menu menu (refer to Section 5.1.2, “The RHEV Hypervisor Configuration Menu”
- Installing with kernel command line parameters (refer to Section 5.2, “RHEV Hypervisor Kernel Parameters and Automated Installation”
5.1. Red Hat Enterprise Virtualization Hypervisor interactive installation
5.1.1. Booting the Hypervisor for installation
Procedure 5.1. Booting the Hypervisor
- Insert the RHEV Hypervisor installation media.
- Power on the system and ensure the system boots from the installation media.
- Once the RHEV Hypervisor has completed the boot phase, the kernel parameter prompt appears.
ISOLINUX 3.11 2005-09-02  Copyright (C) 1994-2005 H. Peter Anvin
This is the Red Hat Enterprise Virtualization Hypervisor 5.7-2.2 (4.2)
- to boot press the <ENTER> key
or type linux and press the <ENTER> key.
- Extra kernel command line parameters can be passed following the
linux keyword.
- Boot parameters summary:
BOOTIF=link|eth*|<MAC>(pxelinux format)
storage_init=[usb|scsi|cciss[:serial#]]|/dev/...
storage_vol=:SWAP_MB::CONFIG_MB:LOGGING_MB:DATA_MB
mem_overcommit=<overcommit_ratio>
upgrade
ip=<client-ip> netmask=<netmask> gateway=<gw-ip>
vlan=<VLAN-id>
dns=server[:server]
ntp=server[:server]
hostname=fqdn
management_server=RHEVM-host[:port]
netconsole_server=RHEVM-host[:port]
boot:
Enter any required kernel arguments. For example::linux firstboot
Important
Note
upgrade parameter. This will automatically upgrade and reboot the system, rather than taking you to the interactive configuration menu. For more information, refer to Section 5.2.6, “Other parameters”.
Note
/pxelinux.cfg/default). This can be used to run an automated setup, covered in Section 5.2, “RHEV Hypervisor Kernel Parameters and Automated Installation”, and may be more useful depending on your environment.
5.1.2. The RHEV Hypervisor Configuration Menu
Example 5.1. Red Hat Enterprise Virtualization Hypervisor Configuration Menu
Red Hat Enterprise Virtualization Hypervisor release 5.7-2.2

Hypervisor Configuration Menu

1) Configure storage partitions    6) Configure the host for RHEV
2) Configure authentication        7) View logs
3) Set the hostname                8) Install locally and reboot
4) Networking setup                9) Support Menu
5) Register Host to RHN
Choose an option to configure:5.1.3. Remove existing RHEV Hypervisor installations
Important
firstboot parameter may be required to trigger the interactive installation. To use the firstboot parameter, append it to other kernel parameters. On a system with an existing RHEV Hypervisor, use the following kernel parameters to activate the interactive installation:
: linux firstboot5.1.4. Partitioning the disk
Warning
storage_init parameter.
Procedure 5.2. The Storage Configuration menu
- Select the Configure storage partitions option from the main menu to open the Configure storage partitions menu.
- Select Commit configuration to accept the partitions. The following warning displays:
!!WARNING!!WARNING!!WARNING!!WARNING!!WARNING!!WARNING!!WARNING!!WARNING!! !!WARNING!!WARNING!!WARNING!!WARNING!!WARNING!!WARNING!!WARNING!!WARNING!! !!WARNING!! !!WARNING!! !!WARNING!! !!WARNING!! !!WARNING!! If you proceed, all data on your selected storage !!WARNING!! !!WARNING!! device will be destroyed and your hard disk !!WARNING!! !!WARNING!! will be irreversibly reconfigured. !!WARNING!! !!WARNING!! !!WARNING!! !!WARNING!! !!WARNING!! !!WARNING!!WARNING!!WARNING!!WARNING!!WARNING!!WARNING!!WARNING!!WARNING!! !!WARNING!!WARNING!!WARNING!!WARNING!!WARNING!!WARNING!!WARNING!!WARNING!! Do you wish to proceed([Y]es or [N]o)?- Press Y to proceed and format the partitions.
5.1.5. Set the administrator password
Procedure 5.3. Set the administrator password
- Select Configure authentication from the main configuration menu.
- Select Set the administrator password.
- The password prompt displays.
Set the system administrator's (root) password:
New UNIX password:
Enter the preferred password. You will be prompted to retype the password. Changing password for user root. passwd: all authentication tokens updated successfully. storing to /config : /etc/shadow File persistedThis message indicates that the password has been set and saved to local storage.
Procedure 5.4. Optional: Configure SSH password authentication
- Select Toggle SSH password authentication from the Configure authentication menu.
Enable SSH password authentication ([Y]es or [N]o)?Press y to enable SSH password authentication.- If successful, the following message is displayed:
SSH remote access is currently enabled.
5.1.6. Set the hostname
DHCP and DNS, a hostname can be assigned to the Hypervisor at boot time.
- Select the Set the hostname option from the main menu.
- Enter the hostname in the following format:
anyname.domain.example.com. Whereanynameis the individual name for the host on the specified domain.What is this Hypervisor's hostname?Enter the hostname for the Hypervisor and press Enter. - If the hostname setting procedure is successful, this message is displayed:
The hostname is set.
Procedure 5.5. Resetting hostnames
- Open the Set the hostname menu.
- The specify a hostname prompt appears:
What is this Hypervisor's hostname?Press the Enter key without typing anything else to reset the hostname.
5.1.7. Set up Networking
Important
- Select the Networking setup option.
- The network devices attached to your system are listed.
Choose an interface or a configuration option:Select the network interface which will be used to connect to the RHEV Manager. On systems with one network interface there is onlyeth0to choose from.Important
Wireless and logical network devices are presently unsupported.Identifying the interface
Hypervisors include a tool to assist in physically identifying which network interface was selected.Help identify eth0 by blinking the lights for 10 seconds ([Y]es or [N]o)?Press y to identify which socketeth0is. This is useful for systems with multiple network interfaces.If assistance is not required, continue by pressing n.If the selected network interface does not support this feature, the system will display the following message:Blinking is not supported by your network interface.VLANs
A prompt will be displayed asking whether to include VLAN support:Include VLAN support ([Y]es, [N]o or [A]bort)?- If VLAN support is not required, press n.
- To enable VLAN support, enter y.
What is the VLAN ID for this device (a=abort)Enter the VLAN ID number when prompted.
IPv4
The IPv4 prompt appears.Enable IPv4 support ([S]tatic IP, [D]HCP, [N]o or [A]bort)?Select DHCP or Static IP depending on your networking environment.- Press D to enable IPv4 support with
DHCP. It is required to statically map all IP addresses for each RHEV Hypervisor on your DHCP server. - Alternatively, assign a static IP address by pressing S. You are then prompted for the IP address, Netmask and gateway.
Confirm your settings.Is this correct ([Y]es, [N]o or [A]bort)?If the settings are correct, press Y to continue.DNS
Configure DNS if using static network configuration or of your DHCP server is not assigning DNS servers.- Enter the IP address of the first DNS gateway or press Enter to abort.
Enter the first DNS server (or press the Enter key to exit): - Enter the IP address of the second DNS gateway or press Enter to skip.
Enter the second DNS server (or press the Enter key to exit): - Confirm your settings.
Is this correct ([Y]es, [N]o or [A]bort)?Press Y if correct to continue.
Network Time Protocol (NTP)
The Network Time Protocol (NTP) keeps system clocks in time with the rest of the world. NTP is crucial for some host systems with inconsistent clocks, as inaccurate timekeeping prevents Hypervisors from migrating virtual machines.Enter an NTP server:Enter the IP address or hostname of an NTP server, or press Enter to abort.- You will be prompted to enter additional NTP servers. Enter as many as required and press Enter on a blank line to save your selection.
- Select Save And Return To Menu to save the configuration.
- If the network is configured correctly, the output should be similar to Figure 5.1, “Working network configuration”.

Figure 5.1. Working network configuration
5.1.8. Register to RHN
- Select Register Host to RHN from the main menu.
- To register to the public RHN system, select 1) Register to public RHN
Enter RHN account username:Enter your RHN account username.Enter password for RHN account:Enter your RHN account password.Enter profile name for this system (optional):Enter a profile name for this system. This parameter is optional. If a blank profile name is provided, the system hostname will be used by default.Enter HTTP proxy in host:port format, e.g. proxy.example.com:3128 (leave blank if not required):Enter your HTTP proxy address. This parameter is optional. If a blank proxy address is provided, no proxy server will be used.
- To register to an RHN Satellite, select 2) Register to RHN Satellite
Enter URL of RHN Satellite (ie. https://satellite.example.com)Enter your the URL of your RHN Satellite.Enter location of satellite cert (https://satellite.example.com/pub/RHN-ORG-TRUSTED-SSL-CERT):Enter the URL of your satellite certificate, or press enter to select the default URL shown.Enter RHN account username:Enter your RHN account username.Enter password for RHN account:Enter your RHN account password.Enter profile name for this system (optional):Enter a profile name for this system. This parameter is optional. If a blank profile name is provided, the system hostname will be used by default.Enter HTTP proxy in host:port format, e.g. proxy.example.com:3128 (leave blank if not required):Enter your HTTP proxy address. This parameter is optional. If a blank proxy address is provided, no proxy server will be used.
5.1.9. Configure the host for RHEV
Important
| Type | Format | Example |
|---|---|---|
| IP address | IP[:port] | 127.0.0.1:443 |
| Host Name | host.name.domain[:port] | www.redhat.com:443 |
- Select Configure the host for RHEV from the main menu.
Connecting RHEV Manager
Once the Configure the host for RHEV menu item is selected the following output displays:Enter the RHEV Manager's hostname or IP address. Optionally: append a port after the hostname or IP address For example, 10.0.0.1:443 or rhev.example.com:443- Enter the RHEV Manager's hostname or IP address in the specified format.If the RHEV Manager port is skipped the setup will use the default port, port 443. However, if a port has previously been assigned, the RHEV Hypervisor uses that port as the default instead. For example, if port 12345 was specified during a previous installation then the default port for future installations is port 12345.
Note
RHEV Managers use port 443 by default. If you configured another port when installing the RHEV Manager, use it instead. Once another port is specified for the RHEV Hypervisor, that port will be recorded as the new default port. - If the RHEV Manager is successfully located, the following output is displayed:
The RHEV Manager's address is set.
The RHEV Manager's port is set.
NetConsole access
Enter the NetConsole manager's hostname or IP address. Optionally: append a port after the hostname or IP address For example, 10.0.0.1:25285 or rhev.redhat.com:25285 If you are unsure, use the RHEV Manager's address, without a port.- Enter the NetConsole server and port. In most cases, this server is the RHEV Manager. The NetConsole port is the NetConsole port number specified during the installation of the RHEV Manager.
- If the NetConsole server is successfully found, the following output is displayed before being returned to the configuration menu:
The NetConsole manager address is set.
The NetConsole manager port is set.
5.1.10. View logs
/var/log/ovirt.log- Contains detailed information about the hypervisor installation and configuration procedure.
/var/log/messages- Contains general messages from the system and core services.
/var/log/secure- Contains authentication and security messages, including failed login attempts.
5.1.11. Installation
- Select Install locally and reboot from the Hypervisor Configuration Menu.
This option exits the menu and requires a reboot.
Ensure local storage and networking is configured
correctly on the previous menu before continuing.

The current kernel boot parameters are
crashkernel=128M@16M elevator=deadline processor.max_cstate=1

Enter additional kernel boot parameters (press Enter to use the present arguments):
Press Enter to continue.Do you wish to proceed ([Y]es or [N]o)?Press Y to continue.
Note
5.2. RHEV Hypervisor Kernel Parameters and Automated Installation
5.2.1. How the kernel arguments work
- The
ovirt-earlyscript sets storage, network and management parameters in the/etc/default/ovirtfile. These parameters are determined from the kernel arguments passed to the Hypervisor during the boot sequence. - The
/etc/init.d/ovirt-firstbootscript executes special RHEV scripts and start up procedures. - An automated installation begins if all the required parameters are set.
5.2.2. Required parameters
storage_initto initialize a local storage device.BOOTIFto specify the network interface which the Hypervisor uses to connect to the Manager. When using PXE boot,BOOTIFmay be automatically supplied by pxelinux.management_serverto specify the Manager server.
5.2.3. Storage parameters
5.2.3.1. storage_init
storage_init parameter is required for an automated installation.
storage_init parameter initializes a local storage device. Presently, RHEV Hypervisors use one storage device for local installation. There are four methods for defining which disk to initialize and install on.
- For USB storage devices, use the
usbparameter to select disk type, as reported byudev ID_BUS. Optionally, append a serial number to explicitly define which device to use. For example:storage_init=usb:Generic_STORAGE_DEVICE_0000145418-0:0 - For SCSI hard drives, use
storage_init=scsi:serialnumber. Optionally, append a serial number to explicitly define which device to use. For example:storage_init=scsi:SCSI_HITACHI_HTS5416_SBADDFF - For CCISS devices, use
storage_init=cciss:serialnumber. Optionally, append a serial number to explicitly define which device to use. For example:storage_init=cciss:3600508b100104a3953545233304c0003 - Alternatively, the storage device can be specified by using the Linux device name as the
storage_initparameter. Using device names in the format /dev/disk/by-id is not supported.storage_initmust use the format /dev/mapper/$DISK or /dev/$DISK. In this example the/dev/sdadevice is specified:storage_init=/dev/sdaNote that these device names are not guaranteed to refer to the same device every time the system boots.
Note
for d in /dev/sd?; do eval $(udevinfo -q env -n $d); echo $d $ID_SERIAL;done5.2.3.2. storage_vol
storage_vol parameter is used to partition the storage device set by the storage_init parameter.
storage_vol= there are six values separated by colons.
-1 sets the partition to take up all remaining disk space. Note that this can only be used with the Data partition.
storage_vol parameter with each element described in the list below.
Example 5.5. Format of the storage_vol parameter
storage_vol=:SWAP::CONFIG:LOGGING:DATASWAP- The swap partition is used for swapping underused memory to the hard drive to speed up memory performance. The default size of the swap partition is calculated from amount of RAM and overcommit ratio (default is 0.5). RHEV Hypervisors must have a swap partition and the swap partition cannot be disabled by setting its size to 0. The minimum size for the swap partition is 5MB.Red Hat Knowledgebase has an article on determining the size of the swap partition.Use the formula from the Red Hat Knowledgebase and add storage for the overcommit ratio (RAM multiplied by the overcommit ratio).
Recommended swap + (RAM * overcommit) = swap partition sizeLeaving the value empty sets a recommended value for the swap partition. CONFIG- The config partition stores configuration files for the Hypervisor. The default and minimum size for the configuration partition is 5MB.
LOGGING- The logging partition stores all logs for the Hypervisor. The logging partition is required and the recommended size is 2048MB.
DATA- The data partition must be large enough to hold core files for KVM. Core files depend on the RAM size for the virtual machine. The data partition must also be large enough to store kernel dump files, also known as kdumps. A kdump file is usually the same size the host's system RAM. The data partition also stores the RHEV Hypervisor ISO file for RHEV Hypervisor upgrades.The data partition should be at least 1.5x as large as the RAM on the host system plus an additional 512MB in size. The minimum size is 256MB.The default size for the data partition is the remaining available disk space (labeled as -1).
Example 5.6. Example: Using the storage_vol parameter to partition default sizes
storage_vol=:::::Example 5.7. Example: Using the storage_vol parameter to partition certain sizes sizes
storage_vol parameter such that the following are true:
- The Boot partition is defined as the fixed size of 50MB.
- The Swap partition is defined as 4000MB.
- The Root partition is defined as the fixed size of 512MB.
- The Config partition is defined as 5MB.
- The Logging partition is defined as 2048MB.
- The Data partition is defined to take up all remaining disk space.
storage_vol parameter will look like this:
storage_vol=:4000::5:2048:-15.2.4. Networking and RHEV Manager parameters
- Setting the IP address or DHCP.
- Setting the hostname if the hostname is not resolved with DHCP.
- The interface the RHEV Manager network is attached to.
Networking and RHEV Manager parameters
BOOTIF- Required for automated installations.
BOOTIFspecifies the network interface that the Hypervisor uses to connect to the RHEV Manager. It takes arguments in one of three forms:link- Indicates to use the first interface (as enumerated by the kernel) with an active link. This is useful for systems with multiple network interface controllers but only one plugged in.
eth#(where#is the number of the NIC)- Indicates to use the NIC as determined by the kernel driver initialization order. To determine the number boot into RHEV and select Shell from the Hypervisor Configuration Menu. Use
ifconfig | grep eth*to list the network interfaces attached to the system. There is no guarantee that on the next reboot the network interface controller will have the sameeth#mapping.BOOTIF=eth0 <MAC>- Indicates to use the MAC address explicitly defined inside the brackets.
Important
When using PXE to boot Hypervisors for installation using theIPAPPEND 2directive causesBOOTIF=<MAC>to be automatically appended to the kernel arguments. If you use the IPAPPEND 2 directive you do not need to use theBOOTIFparameter. ip- Sets the IP address for the network interface controller defined by the
BOOTIFparameter. Theipparameter accepts either an IP address (in the form 0.0.0.0) or the valuedhcp(for DHCP).ip=192.168.1.1ip=dhcp netmask- The
netmaskparameter sets the subnet mask for the IP address defined with theipparameter.netmask=255.255.255.0 gateway- The
gatewayparameter sets the Internet gateway.gateway=192.168.1.246 dns- The
dnsparameter sets the addresses of one or more DNS servers. Each DNS server must be separated by a colon.dns=192.168.1.243:192.168.1.244 hostname- The
hostnameparameter sets the hostname. The hostname must be a fully-qualified and resolvable domain name.hostname=rhev1.example.com ntp- The
ntpparameter sets the addresses of one or more Network Time Protocol servers. Each NTP server must be separated by a colon.ntp=192.168.2.253:192.168.2.254 vlan- The
vlanparameter sets the VLAN identifier for the network connected to the RHEV Manager. Set this parameter if you are using VLANs.vlan=VLAN-ID
5.2.5. Red Hat Network (RHN) parameters
rhn_activationkey or both the rhn_username and rhn_password parameters must be provided. If you are registering to a satellite server, you must also provide a value for the rhn_url parameter.
rhn_username- The
rhn_usernameparameter sets the username used to connect to RHN.rhn_username=testuser rhn_password- The
rhn_passwordparameter sets the password used to connect to RHN.rhn_password=testpassword rhn_activationkey- The
rhn_activationkeyparameter sets the activation key used to connect to RHN. Activation keys are used to register systems, entitle them to an RHN service level, and subscribe them to specific channels and system groups, all in one action. If bothrhn_activationkeyandrhn_usernameare provided, therhn_activationkeyvalue will be used.rhn_activationkey=7202f3b7d218cf59b764f9f6e9fa281b rhn_url- The
rhn_urlparameter sets the URL of the satellite server used to register the host.rhn_url=https://your-satellite.example.com rhn_ca_cert- The
rhn_ca_certparameter sets the URL of the CA certificate used to connect to the satellite server. If it is not provided, the default value isrhn_url/pub/RHN-ORG-TRUSTED-SSL-CERTrhn_ca_cert=https://your-satellite.example.com/pub/RHN-ORG-TRUSTED-SSL-CERT rhn_profile- The
rhn_profileparameter sets the name of the profile to be registered with RHN for this host. The default value is the system hostname.rhn_profile=testhost
5.2.6. Other parameters
management_server- The
management_serverparameter is required for an automated installation.Themanagement_serverparameter sets the address of the RHEV Manager. Themanagement_serverparameter takes an IP address or fully qualified domain name and, optionally, a port (the default port is 443). It is required for an automated installation.management_server=rhev.example.com:443 netconsole_server- The
netconsole_serverparameter sets the address of the RHEV Manager. Thenetconsole_serverparameter takes an IP address or fully qualified domain name and, optionally, a port (the default port is 25285).netconsole_server=rhev.example.com:25285 mem_overcommit- The
mem_overcommitparameter specifies the multiplier to use for adding extra swap to support memory overcommit. The default overcommit value is 0.5.mem_overcommit=0.7 firstboot- The
firstbootparameter starts the interactive configuration menu. On systems that have a RHEV Hypervisor installed and some systems with LVM volumes, thefirstbootparameter may be required to trigger the interactive installation. Refer to Section 5.1.2, “The RHEV Hypervisor Configuration Menu” for installation from the configuration menu. upgrade- The
upgradeparameter will upgrade the existing hypervisor image to the version provided by the boot media. The hypervisor will be automatically upgraded and rebooted once complete. If a hypervisor image is not yet installed, the image will be installed to the device selected with thestorage_initparameter. When performing an upgrade, the previous boot entry is saved as BACKUP ingrub.conf. If the reboot following the upgrade procedure fails, the BACKUP boot entry will be automatically selected as the new default. local_boot- The
local_bootparameter is an alias for theupgradeparameter. nocheck- The
nocheckparameter will skip the MD5 check of the installation ISO, which can be time consuming if the media is remote or slow. qemu_pxe- The
qemu_pxeparameter is used to select which network bootloader is used in virtual machines. Possible values aregpxeandetherboot. For compatibility with RHEV Hypervisor 5.4-2.1, the default value isetherboot.qemu_pxe=gpxe
5.2.7. Example: Automated RHEV Hypervisor Installation
Warning
rhevm.example.com.
:linux storage_init=/dev/sda storage_vol=::::: local_boot BOOTIF=eth0 management_server=rhevm.example.com netconsole=rhevm.example.comNote
Chapter 6. Maintaining and Administrating Red Hat Enterprise Virtualization Hypervisors
6.1. Enabling kdumps
/data partition of the storage on the RHEV Hypervisor host. When installing a RHEV Hypervisor host, ensure there is sufficient persistent storage space for kdump files. The size of the kdump file is proportional to the amount of RAM installed on the host. For a system with 32GB of RAM, a Hypervisor requires a /data partition of at least 32GB plus additional space for RHEV specific data (approximately 512MB).
Note
- Access a Linux, UNIX, or similar operating system with SSH and the
scpcommand installed. Thescpcommand has the following format:scp source-user@source_IP_OR_hostname:/path/to/files destination-user@destination_IP_OR_hostname:/path/to/destination - This example copies all kdump files to the
/tmp/RHEVkdumpsdirectory on the local system. Use the administrator (root) username and password configured during RHEV Hypervisor installation. Replace the example hostname,rhevh.example.com, with a valid IP address or hostname for the RHEV Hypervisor.$ scp -r root@rhevh.example.com:'/data/core/*' /tmp/RHEVkdumps - Once this procedure completes you can delete all the original kdump files on the Hypervisor. Log into the Hypervisor as root and execute the following.
# rm -rf /data/core/*
6.2. Setting the root password
Gaining temporary root access
- Method 1: SSH using a key pair. This procedure is run from the RHEV Manager server.
- Download the latest versions of
putty.exeandputtygen.exeto your RHEV Manager server from http://www.chiark.greenend.org.uk/~sgtatham/putty/download.html - Use puttygen to generate a new private key.
- Run
puttygen.exe. From the top menu, select conversion -> Import key - Select
C:\Program Files\RedHat\RHEVManager\Service\ca\keys\rhevm.pem - Enter the passphrase for this key: mypass
- Click save private key
- Use the private key to connect to the RHEV Hypervisor host.
- Run
putty.exe. Enter the IP address of the RHEV Hypervisor host you wish to connect to. - From the left panel select SSH -> Auth
- Browse to the private key you just generated, click open
- Enter the username root and use the password mypass. Open the SSH connection. You should now have a root shell open on the RHEV Hypervisor host.
- Method 2: Boot into rescue mode. This procedure requires physical access to the RHEV Hypervisor host, and is run from its physical console.
- Reboot the machine and wait for the GRUB prompt. Hit enter to interrupt normal booting.
- Modify the kernel line to boot into rescue mode. To do this, append the string
rescueto the kernel line, separated from the rest of the line with a space character. Once the system boots, you will be dropped to a a single user root shell. The system must be rebooted into multi-user mode after following the instructions below.
Setting the root password
Once you have successfully gained root access, you can set the root password for future use.- Run the command
setup - Select option #1 Configure authentication
- Select option #2 Toggle SSH password authentication
- Enable SSH password authentication
- Select option #1 Set administrator password
- Enter your new root password
- Select option #3 Return to the Hypervisor Configuration Menu
- Select option #7 Exit Hypervisor Configuration Menu
Chapter 7. Upgrading Red Hat Enterprise Virtualization Hypervisors
7.1. Upgrading a RHEV Hypervisor with a RHEV Manager
Warning
7.1.1. Prerequisites
- Download the latest RHEV Hypervisor RPM package from Red Hat Network.Or, download the latest RHEV Hypervisor ISO image from Red Hat Network
- Copy the ISO image file to the
C:\Program Files\RedHat\RHEVManager\Service\RHEV-H Installerfolder on the Red Hat Enterprise Virtualization Manager server. - Change the file permissions so that
NETWORK SERVICEhas full control of the iso file.- Use Windows Explorer to navigate to
C:\Program Files\RedHat\RHEVManager\Service\. - Right-click on the updated file, for example,
rhev-hypervisor.iso, and select the Properties option. The Properties dialog displays. - Click the Security tab, and select NETWORK SERVICE from the Group or user names panel.
- In the Permissions panel, click the Allow Full Control check box.
- Click .
Important
7.1.2. Upgrading a RHEV Hypervisor
- Click the Hosts tab.A list of hosts displays. Select the host that you intend to upgrade.If the host is not displayed, perform a search.
- On the Details pane, click the General Tab.
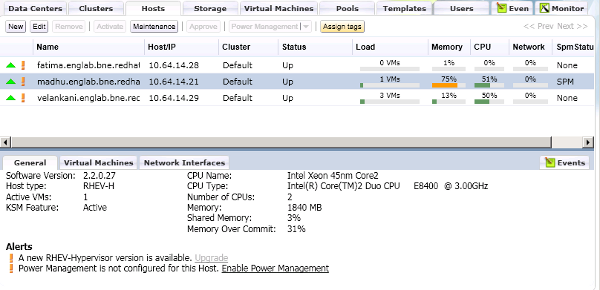
Figure 7.1. General Pane with Upgrade Button
An Alert Message indicates that a new version of the RHEV Hypervisor is available. The link is disabled if the host is has a status of Up. A tooltip directs you to switch to maintenance mode to enable upgrade.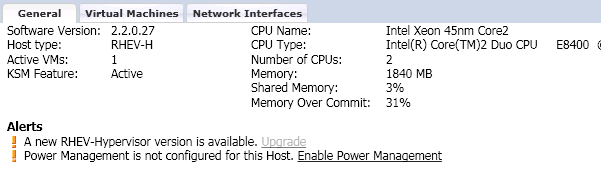
Figure 7.2. Upgrade Button
- Select the host and click the button. This will cause any virtual machines running on the host to be migrated to other hosts. If the host is the SPM, this function will be moved to another host. The status of the host changes as it enters maintenance mode. When the host status is Maintenance, the message in the general tab changes, providing you with a selectable link to re-install or upgrade the host.
- Click the link. The Install Host dialog displays.
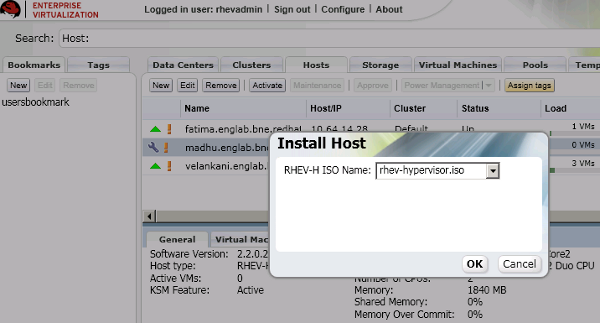
Figure 7.3. Install Host Dialog
- Select the appropriate file from the list of available ISOs to upgrade the host. This is usually rhev-hypervisor.iso.
- Click to upgrade and re-install the host. The dialog closes, the details of the host are updated in the Hosts tab, and the status changes appropriately.The host status transitions through the following stages: Installing, Reboot, Non Responsive, and Up. These are all normal, and may take some time.
- Once successfully upgraded, the host displays a status of Up. Any virtual machines that were migrated off the host, may be migrated back onto the upgraded host.
7.2. Upgrading a RHEV Hypervisor with local media
ISOLINUX 3.11 2005-09-02  Copyright (C) 1994-2005 H. Peter Anvin
This is the Red Hat Enterprise Virtualization Hypervisor 5.7-2.2 (4.2)
- to boot press the <ENTER> key
or type linux and press the <ENTER> key.
- Extra kernel command line parameters can be passed following the
linux keyword.
- Boot parameters summary:
BOOTIF=link|eth*|<MAC>(pxelinux format)
storage_init=[usb|scsi|cciss[:serial#]]|/dev/...
storage_vol=:SWAP_MB::CONFIG_MB:LOGGING_MB:DATA_MB
mem_overcommit=<overcommit_ratio>
upgrade
ip=<client-ip> netmask=<netmask> gateway=<gw-ip>
vlan=<VLAN-id>
dns=server[:server]
ntp=server[:server]
hostname=fqdn
management_server=RHEVM-host[:port]
netconsole_server=RHEVM-host[:port]
boot: linux upgrade
Figure 7.4. Booting with the upgrade parameter
7.3. Re-installing RHEV Hypervisors with the RHEV Manager
Chapter 8. Security topics
iptables firewall are fully configured and enabled by default.
- ICMP requests must be accepted. ICMP packets are used for network testing by the Red Hat Enterprise Virtualization Manager.
- Port 22 should be open for SSH access and the initial installation.
- Ports 80 or 443 (depending on the security settings on the Red Hat Enterprise Virtualization Manager) are used by the vdsm-reg service to communicate information about the host.
- Ports 5634 to 6166 are used for guest virtual machine console access.
- Ports 49152 to 49216 are used for migrations. Migration may use any port in this range depending on the number of concurrent migrations occurring.
- Port 54321 is used by default, by VDSM for management, storage and inter-host communication. This port can be modified.
Appendix A. Uninstalling Red Hat Enterprise Virtualization Hypervisors from local storage devices
Procedure A.1. Removing RHEV Hypervisors
- Boot the RHEV Hypervisor. Refer to Chapter 4, Preparing Red Hat Enterprise Virtualization Hypervisor installation media for details on booting Red Hat Enterprise Virtualization Hypervisors.The
firstbootkernel parameter is required for uninstalling hypervisors.: linux firstboot - Select from the Hypervisor Configuration Menu. From the Support Menu select .
- The following message will appear:
!!!!!!!!!!!!!!!!!!!!!!!!!!!!!!!!!!!!!!!!!!!!!!!!!!!!!!!!!!!!!!!!!!!!!!!!!!!!!!!
!!                                                                           !!
!! WARNING !! WARNING !! WARNING !! WARNING !! WARNING !! WARNING !! WARNING !!
!!                                                                           !!
!!!!!!!!!!!!!!!!!!!!!!!!!!!!!!!!!!!!!!!!!!!!!!!!!!!!!!!!!!!!!!!!!!!!!!!!!!!!!!!

   If you proceed, you will DESTROY any existing data related to the RHEV
   installation on this machine.

Do you wish to continue and uninstall this Hypervisor (Y/N)?
Press Y to confirm and remove the Hypervisor.
Appendix B. Revision History
| Revision History | ||||
|---|---|---|---|---|
| Revision 5.9-6.400 | 2013-10-31 | |||
| ||||
| Revision 5.9-6 | Sat Jan 5 2013 | |||
| ||||
| Revision 5.9-4 | Wed Sep 12 2012 | |||
| ||||
| Revision 5.9-3 | Friday June 01 2012 | |||
| ||||
| Revision 5.9-1 | Thursday May 31 2012 | |||
| ||||
| Revision 5.8-9 | Tuesday February 21 2012 | |||
| ||||
| Revision 4-0 | Thursday June 30 2011 | |||
| ||||
| Revision 3-0 | Tuesday July 6 2010 | |||
| ||||
| Revision 2-0 | Thursday June 24 2010 | |||
| ||||
| Revision 1-0 | Thursday June 10 2010 | |||
| ||||