International Language Support Guide
Internationalization Guide
Edition 0
Copyright ©
Abstract
Chapter 1. Introduction
- install the packages that are required to support your language, such as fonts to display its characters and input methods.
- set the language so that used applications will run and appear in the chosen language.
- configure the keyboard in order to input your language correctly.
- use the SCIM input method for Asian languages.
Chapter 2. Installing and supporting languages
- East Asian Languages - Chinese (Simplified), Chinese (Traditional), Japanese and Korean.
- European Languages - French, German, Italian, Portuguese (Brazilian), Russian and Spanish.
- Indic Languages - Assamese, Bengali, Gujarati, Hindi, Kannada, Malayalam, Marathi, Oriya, Punjabi, Sinhalese, Tamil and Telugu.
| Territory | Language | Locale | Fonts | Package Names |
|---|---|---|---|---|
| China | Simplified Chinese | zh_CN.UTF-8 | AR PL (ShanHeiSun and Zenkai) Uni | fonts-chinese, scim-pinyin, scim-tables |
| Japan | Japanese | ja_JP.UTF-8 | Sazanami (Gothic and Mincho) | fonts-japanese, scim-anthy |
| Korea | Hangul | ko_KR.UTF-8 | Baekmuk (Batang, Dotum, Gulim, Headline) | fonts-korean, scim-hangul |
| Taiwan | Traditional Chinese | zh_TW.UTF-8 | AR PL (ShanHeiSun and Zenkai) Uni | fonts-chinese, scim-chewing, scim-tables |
| Brazil | Portuguese | pt_BR.UTF-8 | standard latin fonts | |
| France | French | ft_FR.UTF-8 | standard latin fonts | |
| Germany | German | de_DE.UTF-8 | standard latin fonts | |
| Italy | Italy | it_IT.UTF-8 | standard latin fonts | |
| Russia | Russian | ru_RU.UTF-8 | KOI8-R, fonts-KOI8-R-100dpi, fonts-KOI8-R-75dpi and xorg-x11-fonts-cyrillic | fonts-KO18-R, fonts-KO18-R-100 dpi,fonts-KO18-R-75dpi, xorg-x11-fonts-cyrillic |
| Spain | Spanish | es_ES.UTF-8 | standard latin fonts | |
| India | Assamese | as_IN.UTF-8 | Lohit Bengali | fonts-bengali, scim-m17n, m17n-db-assamese |
| Bengali | bn_IN.UTF-8 | Lohit Bengali | fonts-bengali, scim-m17n, m17n-db-bengali | |
| Gujarati | gu_IN.UTF-8 | Lohit Gujarati | fonts-gujarati, scim-m17n, m17n-db-gujarati | |
| Hindi | hi_IN.UTF-8 | Lohit Hindi | fonts-hindi, scim-m17n, m17n-db-hindi | |
| Kannada | kn_IN.UTF-8 | Lohit Kannada | fonts-kannada, scim-m17n, m17n-db-kannada | |
| Malayalam | ml_IN.UTF-8 | Lohit Malayalam | fonts-malayalam, scim-m17n, m17n-db-malayalam | |
| Marathi | mr_IN.UTF-8 | Lohit Hindi | fonts-hindi, scim-m17n, m17n-db-marathi | |
| Oriya | or_IN.UTF-8 | Lohit Oriya | fonts-oriya, scim-m17n, m17n-db-oriya | |
| Punjabi | pa_IN.UTF-8 | Lohit Punjabi | fonts-punjabi, scim-m17n, m17n-db-punjabi | |
| Tamil | ta_IN.UTF-8 | Lohit Tamil | fonts-tamil, scim-m17n, m17n-db-tamil | |
| Telugu | te_IN.UTF-8 | Lohit Telugu | fonts-telugu, scim-m17n, m17n-db-telugu | |
| Sri Lanka | Sinhala | si_LK.UTF-8 | LKLUG | fonts-sinhala, scim-sinhala, scim-m17n, m17n-db-sinhala |
Note
2.1. Adding language support during installation
- user interface,
- documentation,
- fonts,
- date, time formats and locale information,
- input methods for Asian languages.
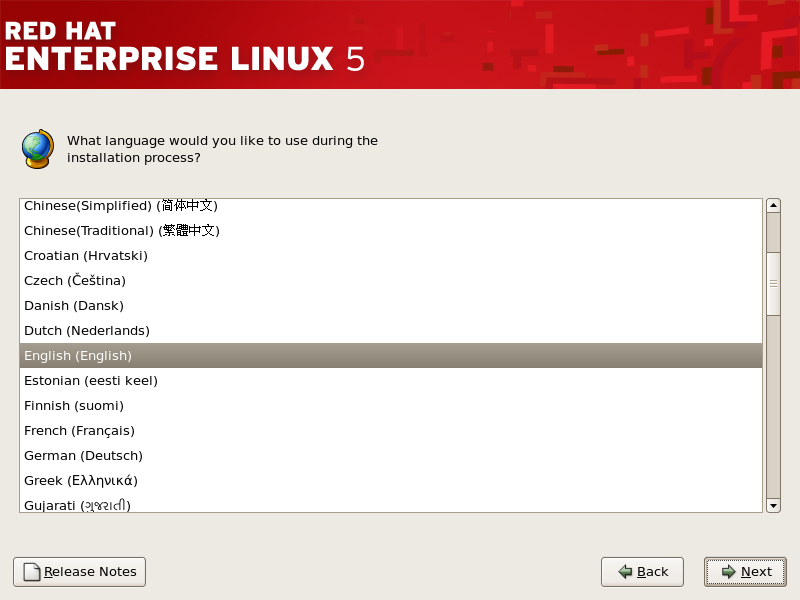
Figure 2.1. Select installation language
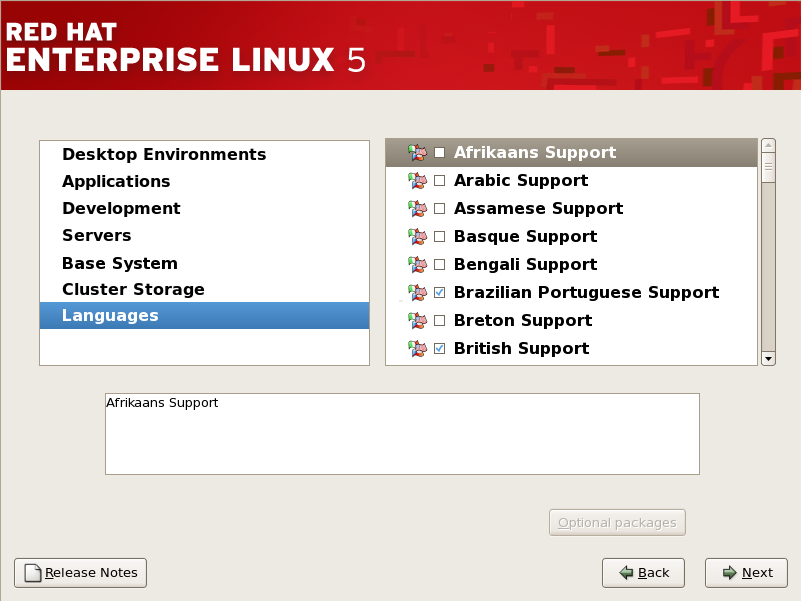
Figure 2.2. Package selection
2.2. Adding language support after installation
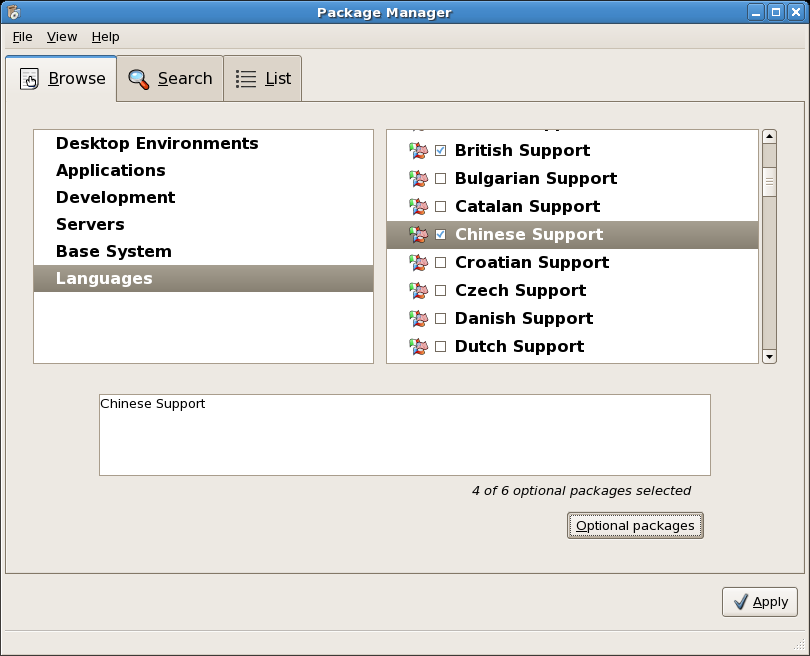
Figure 2.3. Package Manager
Chapter 3. Changing the default language
system-config-language from a terminal. This displays a list of supported languages from which you can select your preference. Clicking on the OK button sets the selected language as default. The figure below illustrates the language selection application.
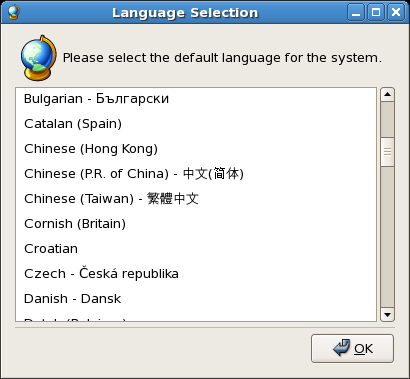
Figure 3.1. Language selection
Chapter 4. Keyboard installation and configuration
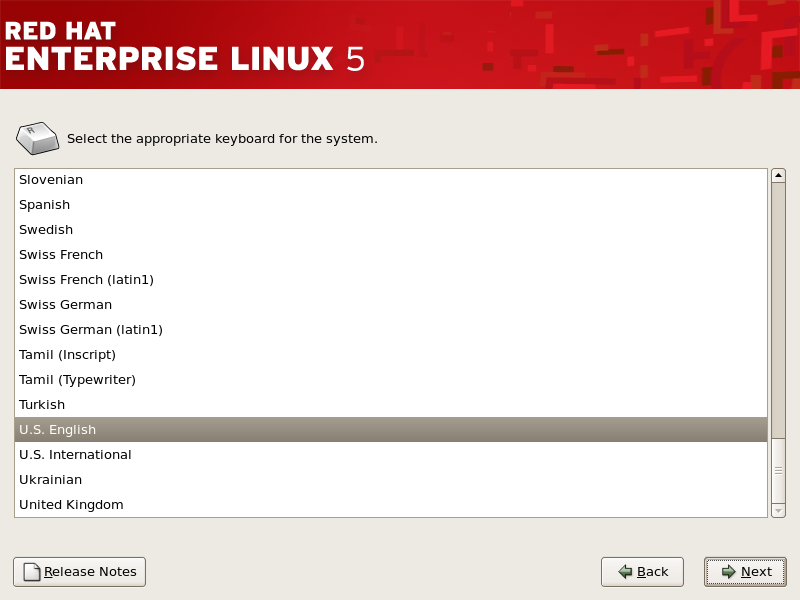
Figure 4.1. Keyboard selection during installation
4.1. Configuring the keyboard after installation
system-config-keyboard from a terminal. This displays a list of supported keyboard from which you can select the appropriate keyboard for your system. The figure below illustrates the Keyboard Selection utility.

Figure 4.2. Keyboard selection
Chapter 5. Red Hat Enterprise Linux 5 System Documentation
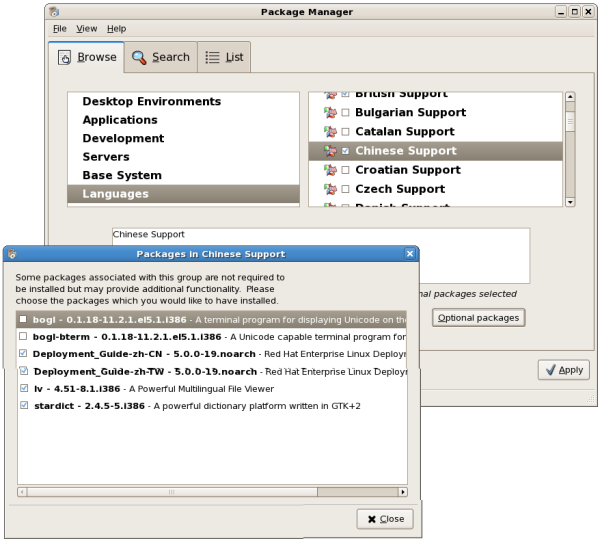
Figure 5.1. Additional Packages - Documentation
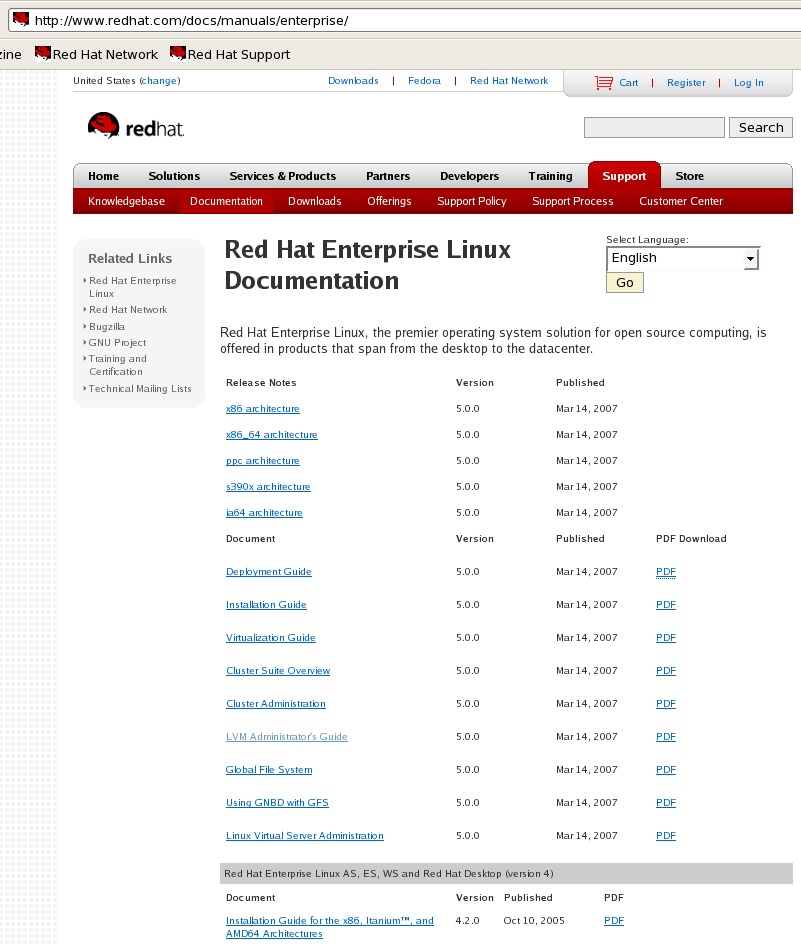
Figure 5.2. Red Hat Documentation - Products
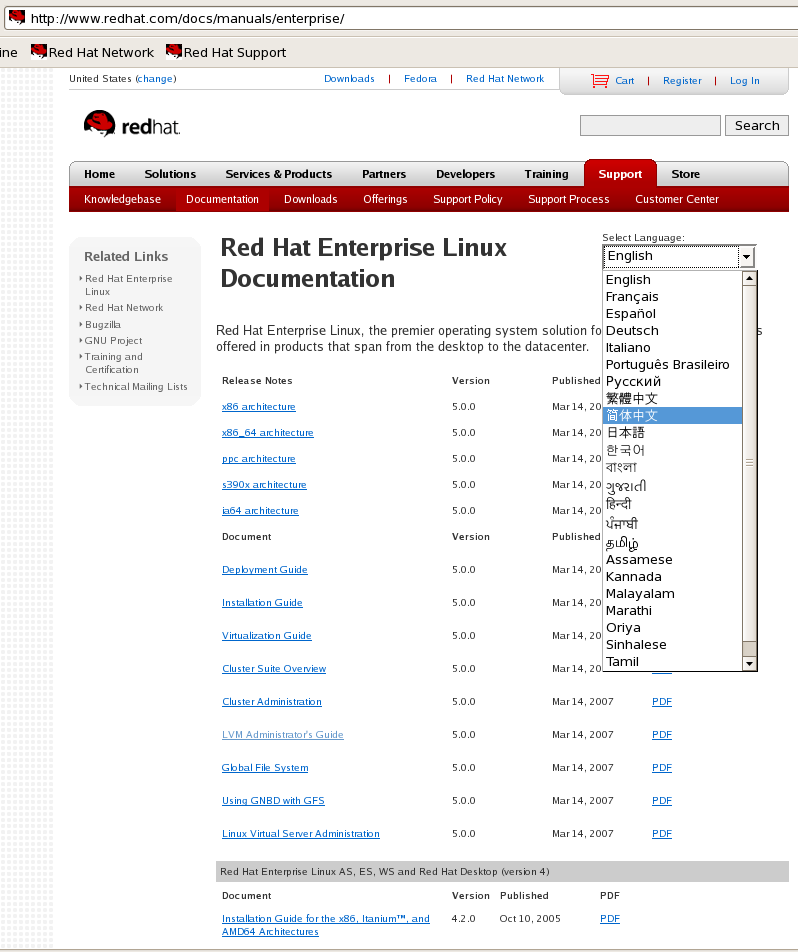
Figure 5.3. Red Hat Documentation - Languages
Chapter 6. Fonts
Important

Figure 6.1. Fonts Missing
Fontconfig and the core X Fonts system. The newer Fontconfig font subsystem simplifies font management and provides advanced display features, such as anti-aliasing. This system is used automatically for modern applications developed using the (Qt 3) or (GTK+ 2) graphical toolkits. For backward compatibility with older legacy X applications, Red Hat Enterprise Linux includes the original font subsystem, called the Core X Font subsystem. This system is provided through the X Font Server (xfs). The xfs service manages the look and scalability of older fonts within some X applications. Legacy fonts will be discussed later in this chapter.
xfs service is configured to run by default in runlevels 2, 3, 4 and 5 and can be managed using initscript utilities such as chkconfig and the Services Configuration Tool (system-config-services). The X Window System requires the xfs service in order to run.
6.1. Adding new fonts for a user
~/.fonts/ directory in the user's home directory. Use the fc-cache command to update the font information cache, as in the following example:
fc-cache ~/.fonts/fc-cache can be obtained from the fc-cache man page:
man fc-cache- Double-click on the "Computer" icon on your desktop.
- In the "File" menu, choose "Open Location..."
- Type in:
fonts:// - When the fonts window appears, drag and drop the fonts to be installed into this window.
6.2. Adding new fonts for all users
/usr/share/fonts/ for example /usr/share/fonts/custom. Copy the fonts you wish to add into the directory you created and run:
fc-cache -f /usr/share/fonts/6.3. Working with legacy fonts
FontPath directive within the Files section of the /etc/X11/xorg.conf configuration file.
xfs server on a specified port to acquire font information. For this reason, the xfs service must be running for X to start.
6.3.1. Adding Fonts to xfs
xfs), follow these steps:
- If it does not already exist, create a directory called
/usr/share/fonts/local/using the following command as root:mkdir /usr/share/fonts/local/If creating the/usr/share/fonts/local/directory is necessary, it must be added to thexfspath using the following command as root:chkfontpath --add /usr/share/fonts/local/ - Copy the new font file into the
/usr/share/fonts/local/directory - Update the font information by issuing the following command as root:
ttmkfdir -d /usr/share/fonts/local/ -o /usr/share/fonts/local/fonts.scale - Reload the
xfsfont server configuration file by issuing the following command as root:service xfs reload
Chapter 7. Smart Common Input Method
| Package | Description |
|---|---|
| scim | Smart Common Input Method platform. |
| scim-anthy | Engine for anthy to support Japanese character input. |
| scim-bridge | scim-bridge client. |
| scim-bridge-gtk | Provides GTK input method for the SCIM bridge. This package prevents possible binary conflicts with third-party applications linked against older versions of libstdc++ and is highly recommended. |
| scim-chewing | Provides Traditional Chinese input. |
| scim-hangul | Provides Korean Input method engine. |
| scim-libs | SCIM libraries and GTK input method module. |
| scim-m17n | SCIM IMEngine for m17n-lib allowing input of many languages including Indic using the input table maps from m17n-db. |
| scim-pinyin | Simplified Chinese Smart Pinyin IMEngine for SCIM. |
| scim-qtimm | Provides an input method module for Qt and is also recommended. |
| scim-sinhala | Provides Sinhala Trans input method. |
| scim-tables | Contains the Generic Table IMEngine. |
| scim-tables-additional | Miscellaneous SCIM tables. |
| scim-tables-chinese | Contains SCIM tables for Chinese input. |
m17n-db-<language>. Where <language> represents your language such as Hindi or Telugu among others. Installing your language using the package manager usually will install the required input table and SCIM packages. If you require more input methods install the required SCIM packages according to your preferences. You can add the SCIM tables by running the Package Manager from the menu panel by clicking => or typing pirut from a terminal.

Figure 7.1. SCIM Panel
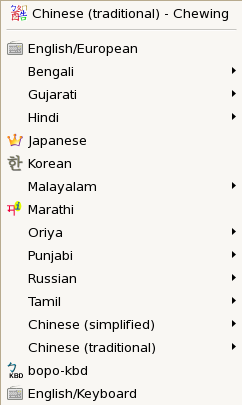
Figure 7.2. SCIM language menu
7.1. Configuring SCIM
You can configure the front end setup for SCIM in the Global Setup under the FrontEnd menu item as illustrated below. Here you can configure the keyboard layout and some hotkeys. The keyboard layout configuration specifies how SCIM maps some IMEngines to your keyboard layout. Select your respective keyboard's layout from the 'Keyboard Layout' section in the window. From Figure 7.3, “SCIM FrontEnd Global Setup” below, the selected keyboard layout is 'English (US)'.
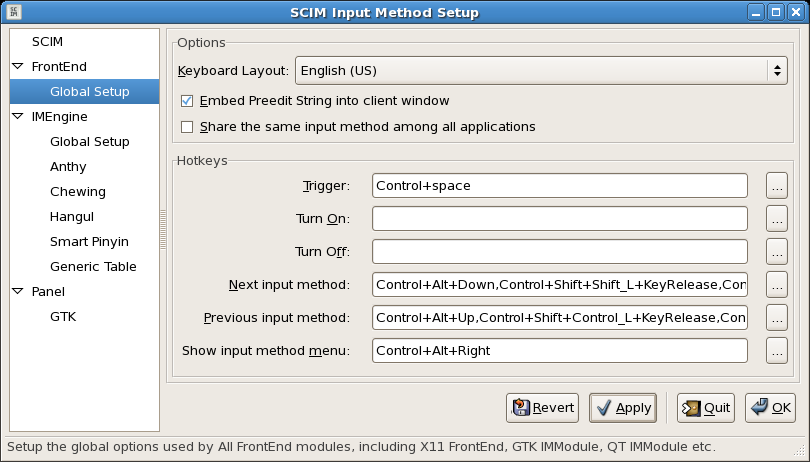
Figure 7.3. SCIM FrontEnd Global Setup
In the SCIM window under the IMEngine list select the Global Setup option as illustrated below.

Figure 7.4. SCIM IMEngine Global Setup
Some customizable input methods may be listed under IMEngine as illustrated in Figure 7.4, “SCIM IMEngine Global Setup”. Selecting an input method from the list will display the setup options available. Please note that the setup options vary from one input method to another.
Chapter 8. Writing Asian and Indic Languages
8.1. How to write in Japanese
- Start the application you wish to write in and press the CTRL and SPACE keys to start or stop SCIM. If using a Japanese keyboard, you can also start and stop SCIM by pressing the Zenkaku-Hankaku key. When started a SCIM tool bar will be displayed on the right corner of your screen as illustrated below.

Figure 8.1. SCIM Toolbar - Anthy
- If Anthy is not displayed, click on the displayed input method and select Japanese from the list of languages displayed. If Japanese is not listed, this is an indication that you have not added Japanese language support in your system. For more information on adding language support, please read Section 2.2, “Adding language support after installation”.On selecting Japanese as your input language, you can start typing. You can press the SPACE key to start Kanji conversion. If you press the SPACE key a second time, a look up window will be displayed as you type your phrases with suggestions which you can select from. To navigate through the list of candidate phrases, you may use the UP and DOWN arrow keys or the SPACE bar. Use the RETURN key to commit your selection to the document.The input mode button allows you to select your input mode. If using a Japanese keyboard, you can convert between Hiragana and Katanaka by pressing the Hiragana-Katakana key. You can also convert input to Hiragana by pressing the F6 key. To convert to Katanaka press the F7 key. Other input modes available are Half Width Katanaka, Latin and Wide Latin. You can switch to Half-Width Katakana using the F8 key and to Wide Latin using the F9 key. The figure below illustrates the input mode options.
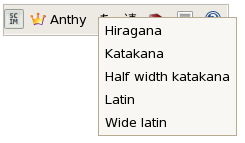
Figure 8.2. Anthy Input Mode
You can also set the conversion mode for your typing to Multi Segment and Single Segment. You can also set your phrases to be converted as you type in either Multi or Single Segments. The figure below illustrates the conversion mode options.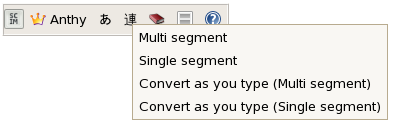
Figure 8.3. Anthy Conversion Mode
If you wish to add a word to the dictionary, you can do so by clicking on the dictionary icon on the SCIM toolbar. The dictionary tool allows you to add, edit or remove dictionary words. The figure below illustrates the dictionary options available. On clicking the preferred option, you may be required to select your input method by pressing CTRL and SPACE keys and selecting your input method as the dictionary icon executes an application calledkasumiwhich you can also execute from a terminal.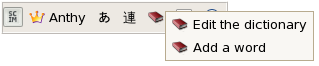
Figure 8.4. Anthy Dictionary
For more shortcuts and descriptions of the input method options, click on the help icon on the SCIM toolbar.
8.2. How to write in Chinese
8.2.1. Writing in Simplified Chinese with Smart Pinyin

Figure 8.5. SCIM Toolbar - Smart Pinyin
8.2.2. Writing in Traditional Chinese with Chewing

Figure 8.6. SCIM Toolbar - Chewing
8.3. How to write in Korean
- Start the application you wish to write in and press CTRL and SPACE keys simultaneously to start or stop SCIM. When started, the SCIM tool bar will be displayed on the right corner of your screen.
- Using your mouse, click on the displayed input method if 'Hangul' is not displayed and select Korean from the list of languages displayed. The scim toolbar will display 'Hangul' when Korean is selected as illustrated below. You can then start typing.

Figure 8.7. SCIM Toolbar - Hangul
- You can also switch between Latin (abc..) and Hangul input by clicking on the input mode button as illustrated below.

Figure 8.8. Hangul Input Mode
- The input layout button allows you to select your preferred input layout.
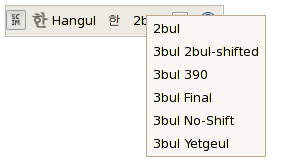
Figure 8.9. Hangul Input Layout
You can use the F9 key to convert input to Hanja characters. Pressing on the SCIM Help icon in the toolbar displays a summary of the shortcuts and their usage.
8.4. How to write in Indic Languages
- Inscript - This keymap is defined according to the Government standards.
- Phonetic - A phonetic keymap has keys mapped according to the sound of the alphabet. For example, for Hindi, "क" is mapped to "k"
- Itrans - An Itrans keymap is similar to phonetic - but has all the combined half characters (halants) mapped separately. There are no halants in Itrans.
- Typewriter - A keymap which functions like an actual typewriter
- Language specific - Popular keymaps from the community - KGP for Kannada, Tamil99 for Tamil, etc.
- Start the application you wish to write in and press CTRL and SPACE keys simultaneously to start SCIM. A SCIM toolbar will be displayed on the right corner of your screen from which you can select your desired language as illustrated in Figure 8.10, “SCIM Toolbar - Indic”. Please note that your default language may vary depending on your language settings. To stop SCIM, press the CTRL and SPACE keys simultaneously again.

Figure 8.10. SCIM Toolbar - Indic
- To change your language, click on the displayed language or keymap and select your language and type of keymap from the list of languages displayed as illustrated in figure Figure 7.2, “SCIM language menu”. You can now start typing in your selected language. Please note that your language menu may vary depending on your language settings.
- To access help for a particular keymap, select the keymap and click on the Help icon on the SCIM toolbar. This will pop-up a dialog box, displaying the help associated with the current keymap.
Chapter 9. Advanced Topics
9.1. Using the iconv tool
--output option. When doing conversions it is always a good idea to backup ones original files first.
iconv tool.
- List character-set encoding names:
iconv --list - Convert ISO8859-1 (legacy Western European) content to utf-8In the above example, the oldfile is encoded in ISO8859-1, while the "newfile" will be encoded in UTF-8.
iconv -f ISO_8859-1 -t UTF-8 oldfile > newfile - Similarly to convert EUCJP content to UTF-8
iconv -f EUCJP -t UTF-8 oldfile > newfile
9.2. Using the convmv tool
convmv package to use this tool. The following are examples of options available using the convmv tool.
- List character-set encoding names:
convmv --l
convmv runs in test mode by default, one needs to use the --notest option for the changes to be actually effected.
- Convert ISO8859-1 (legacy Western European) filenames in directory DIR to UTF-8
convmv -f iso-8859-1 -t utf8 DIR - Similarly, convert EUCJP filenames in DIR to UTF-8
convmv -f euc-jp -t utf8 DIR
Chapter 10. Language support in shipped applications
10.1. Language support in Firefox
10.2. Language support in Evolution
10.3. Language support in gedit
gedit is the official text editor used in the GNOME desktop. gedit also provides support for syntax highlighting for various programming languages including C, C++, Java, HTML, XML, Python, Perl among others.
gedit including latest updates can be obtained on http://www.gedit.org.
Appendix A. Keyboard layouts
A.1. Indic Languages

Figure A.1. Assamese Inscript Layout.
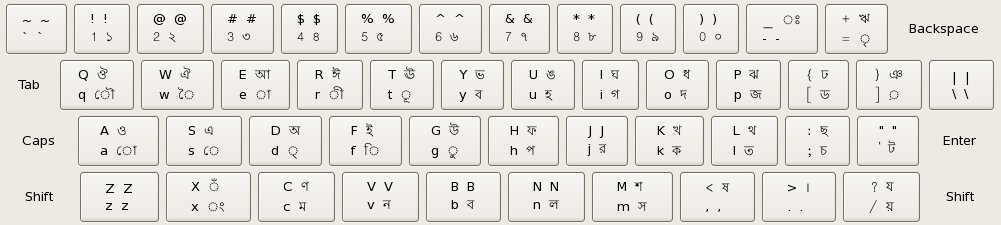
Figure A.2. Bengali Inscript Layout.

Figure A.3. Gujarati Inscript Layout.
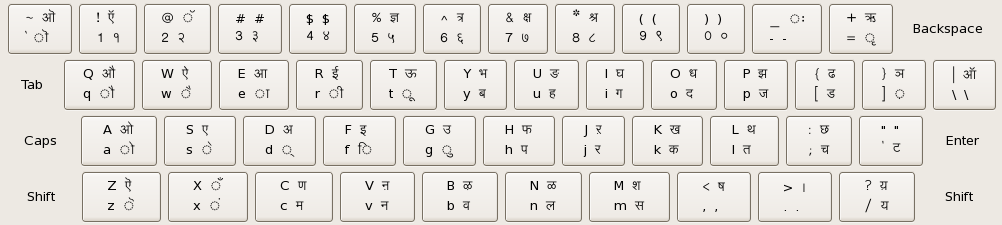
Figure A.4. Hindi Inscript Layout.

Figure A.5. Kannada Inscript Layout.

Figure A.6. Malayalam Inscript Layout.
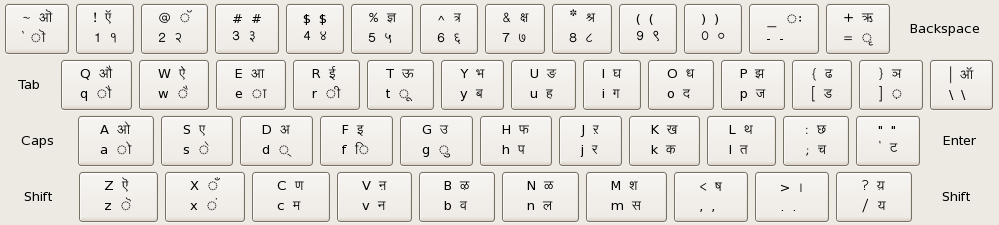
Figure A.7. Marathi Inscript Layout.

Figure A.8. Oriya Inscript Layout.
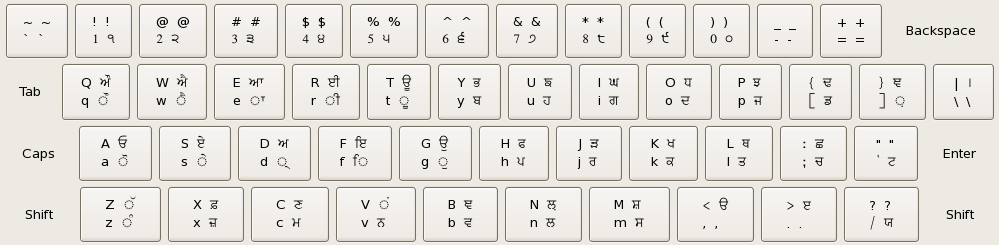
Figure A.9. Punjabi Inscript Layout.

Figure A.10. Telugu Inscript Layout.