Virtualization Guide
Virtualization Documentation
Abstract
Preface
1. About this book
1.1. Overview
- Requirements and Limitations
- Installation
- Configuration
- Administration
- Storage
- Reference
- Tips and Tricks
- Troubleshooting
2. What is Virtualization?
3. Types of Virtualization
3.1. Full Virtualization
3.2. Para-Virtualization
3.3. Para-virtualized drivers
4. How CIOs should think about virtualization
In essence, virtualization increases flexibility by decoupling an operating system and the services and applications supported by that system from a specific physical hardware platform. It allows the establishment of multiple virtual environments on a shared hardware platform.
Virtualization can also be used to lower costs. One obvious benefit comes from the consolidation of servers into a smaller set of more powerful hardware platforms running a collection of virtual environments. Not only can costs be reduced by reducing the amount of hardware and reducing the amount of unused capacity, but application performance can actually be improved since the virtual guests execute on more powerful hardware.
Regardless of the specific needs of your enterprise, you should be investigating virtualization as part of your system and application portfolio as the technology is likely to become pervasive. We expect operating system vendors to include virtualization as a standard component, hardware vendors to build virtual capabilities into their platforms, and virtualization vendors to expand the scope of their offerings.
Part I. Requirements and Limitations for Virtualization with Red Hat Enterprise Linux
System requirements, support restrictions and limitations
Chapter 1. System requirements
Minimum system requirements
- 6GB free disk space.
- 2GB of RAM.
Recommended system requirements
- 6GB plus the required disk space recommended by the guest operating system per guest. For most operating systems more than 6GB of disk space is recommended.
- One processor core or thread for each virtualized CPU and one for the hypervisor.
- 2GB of RAM plus additional RAM for guests.
Note
Para-virtualized guests require a Red Hat Enterprise Linux 5 installation tree available over the network using the NFS, FTP or HTTP protocols.
Full virtualization with the Xen Hypervisor requires:
- an Intel processor with the Intel VT extensions, or
- an AMD processor with the AMD-V extensions, or
- an Intel Itanium processor.
The KVM hypervisor requires:
- an Intel processor with the Intel VT and the Intel 64 extensions, or
- an AMD processor with the AMD-V and the AMD64 extensions.
The supported guest storage methods are:
- Files on local storage
- Physical disk partitions
- Locally connected physical LUNs
- LVM partitions
- iSCSI and Fibre Channel based LUNs
Important
/var/lib/libvirt/images/ directory by default. If you choose to use a different directory you must label the new directory according to SELinux policy. See Section 19.2, “SELinux and virtualization” for details.
Chapter 2. Xen restrictions and support
- For host systems: http://www.redhat.com/products/enterprise-linux/server/compare.html
Note
Note
yum for more information.
Chapter 3. KVM restrictions and support
- For host systems: http://www.redhat.com/products/enterprise-linux/server/compare.html
Chapter 4. Hyper-V restrictions and support
4.1. Hyper-V drivers
- Hyper-V vmbus driver (hv_vmbus) - Provides the infrastructure for other Hyper-V drivers to communicate with the hypervisor.
- Utility driver (hv_utils) - Provides Hyper-V integration services such as shutdown, time synchronization, heartbeat and Key-Value Pair Exchange.
- Network driver (hv_netvsc) - Provides network performance improvements.
- Storage driver (hv_storvsc) - Increases performance when accessing storage (IDE and SCSI) devices.
- Mouse driver (hid_hyperv) - Improves user experience by allowing mouse focus changes for a virtualized guest.
- Clocksource driver - This driver provides a stable clock source for Red Hat Enterprise Linux 5.11 running within the Hyper-V platform.
Note
Chapter 5. Virtualization limitations
5.1. General limitations for virtualization
There is no support for converting Xen-based guests to KVM or KVM-based guests to Xen.
See the Red Hat Enterprise Linux Release Notes at https://access.redhat.com/site/documentation/ for your version. The Release Notes cover the present new features, known issues and limitations as they are updated or discovered.
You should test for the maximum anticipated system and network load before deploying heavy I/O applications such as database servers. Load testing and planning are important as virtualization performance can suffer under high I/O.
5.2. KVM limitations
- Constant TSC bit
- Systems without a Constant Time Stamp Counter require additional configuration. See Chapter 17, KVM guest timing management to determine whether you have a Constant Time Stamp Counter and what additional configuration may be required.
- Memory overcommit
- KVM supports memory overcommit and can store the memory of guests in swap space. A guest will run slower if it is swapped frequently. When Kernel SamePage Merging (KSM) is used, make sure that the swap size is equivalent to the size of the overcommit ratio.
- CPU overcommit
- No support exists for having more than 10 virtual CPUs per physical processor core. A CPU overcommit configuration exceeding this limitation is unsupported and can cause problems with some guests.Overcommitting CPUs has some risk and can lead to instability. See Section 33.4, “Overcommitting Resources” for tips and recommendations on overcommitting CPUs.
- Virtualized SCSI devices
- SCSI emulation is presently not supported. Virtualized SCSI devices are disabled in KVM.
- Virtualized IDE devices
- KVM is limited to a maximum of four virtualized (emulated) IDE devices per guest.
- Para-virtualized devices
- Para-virtualized devices, which use the
virtiodrivers, are PCI devices. Presently, guests are limited to a maximum of 32 PCI devices. Some PCI devices are critical for the guest to run and these devices cannot be removed. The default, required devices are:- the host bridge,
- the ISA bridge and usb bridge (the usb and ISA bridges are the same device),
- the graphics card (using either the Cirrus or qxl driver), and
- the memory balloon device.
Hence, of the 32 available PCI devices for a guest, 4 are not removable. This means there are 28 PCI slots available for additional devices per guest. Every para-virtualized network or block device uses one slot. Each guest can use up to 28 additional devices made up of any combination of para-virtualized network, para-virtualized disk devices, or other PCI devices using VT-d. - Migration limitations
- Live migration is only possible with CPUs from the same vendor (that is, Intel to Intel or AMD to AMD only).The No eXecution (NX) bit must be set to on or off for both CPUs for live migration.See Chapter 21, Xen live migration and Chapter 22, KVM live migration for more details on live migration.
- Storage limitations
- The host should not use disk labels to identify file systems in the
/etc/fstabfile, theinitrdfile or in the kernel command line. A security weakness exists if less privileged users or guests have write access to entire partitions or LVM volumes.Guests should not be given write access to whole disks or block devices (for example,/dev/sdb). Guests with access to block devices may be able to access other block devices on the system or modify volume labels which can be used to compromise the host system. Instead, you should use partitions (for example,/dev/sdb1) or LVM volumes.
5.3. Xen limitations
Note
Xen host (dom0) limitations
- A limit of 254 para-virtualized block devices per host exists. The total number of block devices attached to guests cannot exceed 254.
Note
phy devices it can have if it has sufficient resources.
Xen Para-virtualization limitations
- For x86 guests, a maximum of 16GB memory per guest.
- For x86_64 guests, a maximum of 168GB memory per guest.
- A maximum of 254 devices per guest.
- A maximum of 15 network devices per guest.
Xen full virtualization limitations
- For x86 guests, a maximum of 16GB memory per guest.
- A maximum of four virtualized (emulated) IDE devices per guest.Devices using the para-virtualized drivers for fully-virtualized guests do not have this limitation.
- Virtualized (emulated) IDE devices are limited by the total number of loopback devices supported by the system. The default number of available loopback devices on Red Hat Enterprise Linux 5.11 is 8. That is, by default, all guests on the system can each have no more than 8 virtualized (emulated) IDE devices.For more information on loopback devices, their creation and use, see the Red Hat Knowledge Solution 1721.
Note
The number of available loopback devices can be raised by modifying the kernel limit.In the/etc/modprobe.conffile, add the following line:options loop max_loop=64
options loop max_loop=64Copy to Clipboard Copied! Toggle word wrap Toggle overflow Reboot the machine or run the following commands to update the kernel with this new limit:rmmod loop modprobe loop
# rmmod loop # modprobe loopCopy to Clipboard Copied! Toggle word wrap Toggle overflow - A limit of 254 para-virtualized block devices per host. The total number of block devices (using the tap:aio driver) attached to guests cannot exceed 254 devices.
- A maximum of 254 block devices using the para-virtualized drivers per guest.
- A maximum of 15 network devices per guest.
- A maximum of 15 virtualized SCSI devices per guest.
PCI passthrough limitations
- PCI passthrough (attaching PCI devices to guests) is presently only supported on the following architectures:
- 32 bit (x86) systems.
- Intel 64 systems.
- Intel Itanium 2 systems.
5.4. Application limitations
- kdump server
- netdump server
Part II. Installation
Virtualization installation topics
Chapter 6. Installing the virtualization packages
yum command.
6.1. Installing Xen with a new Red Hat Enterprise Linux installation
Note
- Start an interactive Red Hat Enterprise Linux installation from the Red Hat Enterprise Linux Installation CD-ROM, DVD or PXE.
- You must enter a valid installation number when prompted to receive access to the virtualization packages. Installation numbers can be obtained from Red Hat Customer Service.
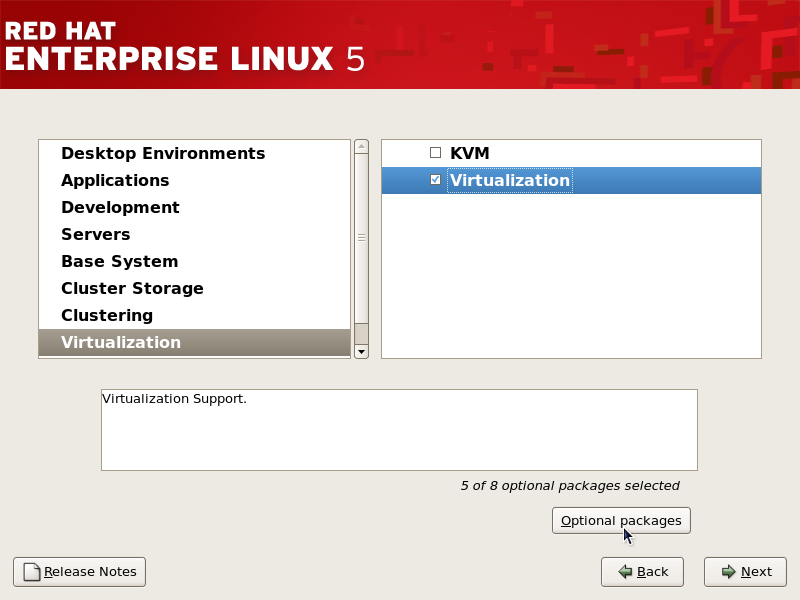
- Complete all steps until you see the package selection step.Select the Virtualization package group and the Customize Now radio button.
- Select the Virtualization package group. The Virtualization package group selects the Xen hypervisor,
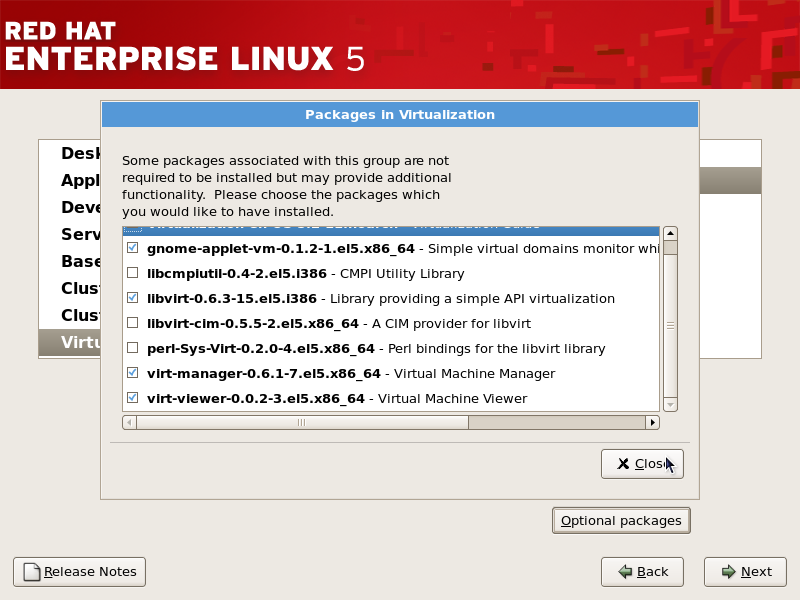
virt-manager,libvirtandvirt-viewerand all dependencies for installation. Customize the packages (if required)
Customize the Virtualization group if you require other virtualization packages.Press the Close button then the Forward button to continue the installation.
Important
This section describes how to use a Kickstart file to install Red Hat Enterprise Linux with the Xen hypervisor packages. Kickstart files allow for large, automated installations without a user manually installing each individual system. The steps in this section will assist you in creating and using a Kickstart file to install Red Hat Enterprise Linux with the virtualization packages.
%packages section of your Kickstart file, append the following package group:
%packages @xen
%packages
@xen
Note
xen-ia64-guest-firmware
xen-ia64-guest-firmware
6.2. Installing Xen packages on an existing Red Hat Enterprise Linux system
Your machines must be registered on your Red Hat account to receive packages and updates. To register an unregistered installation of Red Hat Enterprise Linux, run the subscription-manager register command and follow the prompts.
yum
To use virtualization on Red Hat Enterprise Linux you need the xen and kernel-xen packages. The xen package contains the hypervisor and basic virtualization tools. The kernel-xen package contains a modified Linux kernel which runs as a virtual machine guest on the hypervisor.
xen and kernel-xen packages, run:
yum install xen kernel-xen
# yum install xen kernel-xen
Recommended virtualization packages:
python-virtinst- Provides the
virt-installcommand for creating virtual machines. libvirtlibvirtis an API library for interacting with hypervisors.libvirtuses thexmvirtualization framework and thevirshcommand line tool to manage and control virtual machines.libvirt-python- The libvirt-python package contains a module that permits applications written in the Python programming language to use the interface supplied by the
libvirtAPI. virt-managervirt-manager, also known as Virtual Machine Manager, provides a graphical tool for administering virtual machines. It useslibvirtlibrary as the management API.
yum install virt-manager libvirt libvirt-python python-virtinst
# yum install virt-manager libvirt libvirt-python python-virtinst
6.3. Installing KVM with a new Red Hat Enterprise Linux installation
Note
Important
- Start an interactive Red Hat Enterprise Linux installation from the Red Hat Enterprise Linux Installation CD-ROM, DVD or PXE.
- You must enter a valid installation number when prompted to receive access to the virtualization and other Advanced Platform packages.
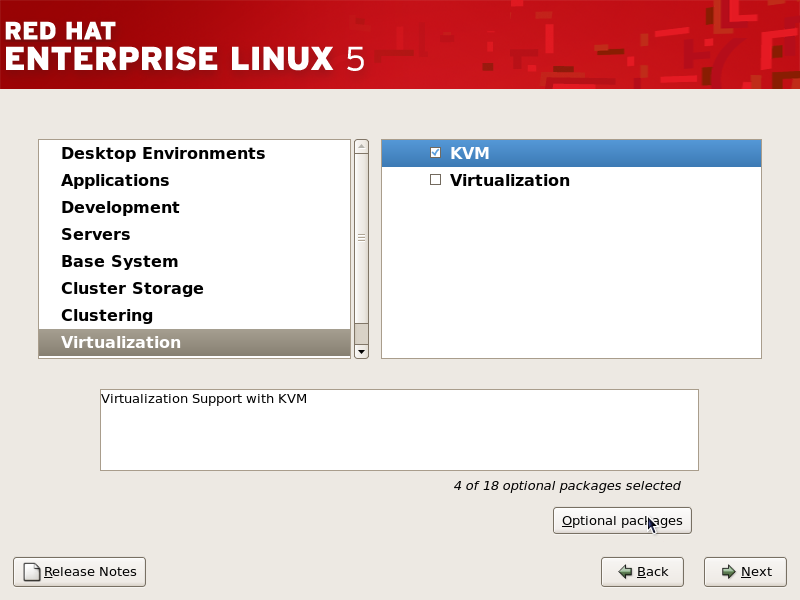
- Complete all steps up to the package selection step.Select the Virtualization package group and the Customize Now radio button.
- Select the KVM package group. Deselect the Virtualization package group. This selects the KVM hypervisor,
virt-manager,libvirtandvirt-viewerfor installation. Customize the packages (if required)
Customize the Virtualization group if you require other virtualization packages.Press the Close button then the Forward button to continue the installation.
Important
This section describes how to use a Kickstart file to install Red Hat Enterprise Linux with the KVM hypervisor packages. Kickstart files allow for large, automated installations without a user manually installing each individual system. The steps in this section will assist you in creating and using a Kickstart file to install Red Hat Enterprise Linux with the virtualization packages.
%packages section of your Kickstart file, append the following package group:
%packages @kvm
%packages
@kvm
6.4. Installing KVM packages on an existing Red Hat Enterprise Linux system
This section describes how to enable entitlements in your Red Hat account for the virtualization packages. You need these entitlements enabled to install and update the virtualization packages on Red Hat Enterprise Linux. You require a valid Red Hat account in order to install virtualization packages on Red Hat Enterprise Linux.
yum
To use virtualization on Red Hat Enterprise Linux you require the kvm package. The kvm package contains the KVM kernel module providing the KVM hypervisor on the default Red Hat Enterprise Linux kernel.
kvm package, run:
yum install kvm
# yum install kvm
Recommended virtualization packages:
python-virtinst- Provides the
virt-installcommand for creating virtual machines. libvirtlibvirtis an API library for interacting with hypervisors.libvirtuses thexmvirtualization framework and thevirshcommand line tool to manage and control virtual machines.libvirt-python- The libvirt-python package contains a module that permits applications written in the Python programming language to use the interface supplied by the
libvirtAPI. virt-managervirt-manager, also known as Virtual Machine Manager, provides a graphical tool for administering virtual machines. It useslibvirtlibrary as the management API.
yum install virt-manager libvirt libvirt-python python-virtinst
# yum install virt-manager libvirt libvirt-python python-virtinst
Chapter 7. Guest installation overview
virt-install. Both methods are covered by this chapter.
7.1. Creating guests with virt-install
virt-install command to create guests from the command line. virt-install is used either interactively or as part of a script to automate the creation of virtual machines. Using virt-install with Kickstart files allows for unattended installation of virtual machines.
virt-install tool provides a number of options one can pass on the command line. To see a complete list of options run:
virt-install --help
$ virt-install --help
virt-install man page also documents each command option and important variables.
qemu-img is a related command which may be used before virt-install to configure storage options.
--vnc option which opens a graphical window for the guest's installation.
Example 7.1. Using virt-install with KVM to create a Red Hat Enterprise Linux 3 guest
rhel3support, from a CD-ROM, with virtual networking and with a 5 GB file-based block device image. This example uses the KVM hypervisor.
Example 7.2. Using virt-install to create a fedora 11 guest
virt-install --name fedora11 --ram 512 --file=/var/lib/libvirt/images/fedora11.img \ --file-size=3 --vnc --cdrom=/var/lib/libvirt/images/fedora11.iso
# virt-install --name fedora11 --ram 512 --file=/var/lib/libvirt/images/fedora11.img \
--file-size=3 --vnc --cdrom=/var/lib/libvirt/images/fedora11.iso
7.2. Creating guests with virt-manager
virt-manager, also known as Virtual Machine Manager, is a graphical tool for creating and managing guests.
Procedure 7.1. Creating a guest with virt-manager
Open virt-manager
Startvirt-manager. Launch the application from the menu and submenu. Alternatively, run thevirt-managercommand as root.Optional: Open a remote hypervisor
Open the File -> Add Connection. The dialog box below appears. Select a hypervisor and click the button:Create a new guest
The virt-manager window allows you to create a new virtual machine. Click the button to create a new guest. This opens the wizard shown in the screenshot.New guest wizard
The Create a new virtual machine window provides a summary of the information you must provide in order to create a virtual machine:Review the information for your installation and click the button.Name the virtual machine
Provide a name for your guest. Punctuation and whitespace characters are not permitted in versions before Red Hat Enterprise Linux 5.5. Red Hat Enterprise Linux 5.5 adds support for '_', '.' and '-' characters.Press to continue.Choose virtualization method
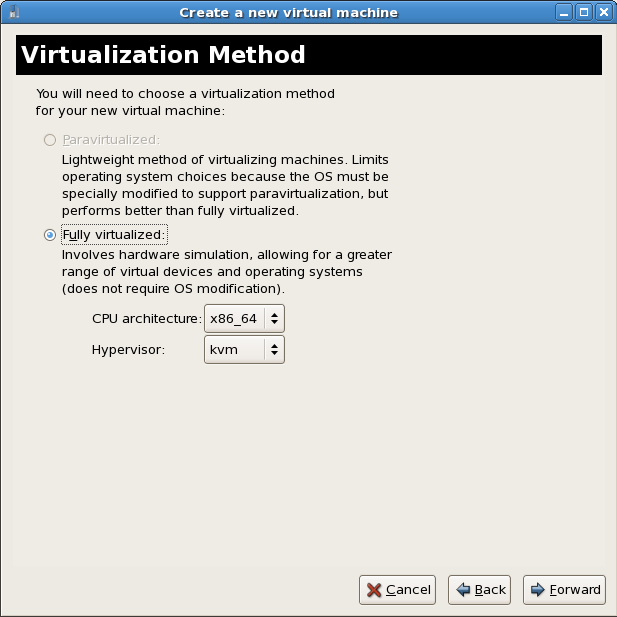
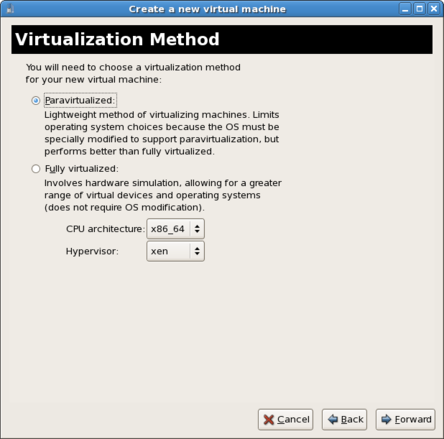
The Choosing a virtualization method window appears. Choose between Para-virtualized or Fully virtualized.Full virtualization requires a system with Intel® VT or AMD-V processor. If the virtualization extensions are not present the fully virtualized radio button or the Enable kernel/hardware acceleration will not be selectable. The Para-virtualized option will be grayed out ifkernel-xenis not the kernel running presently.If you connected to a KVM hypervisor, only full virtualization is available.Choose the virtualization type and click the button.Select the installation method
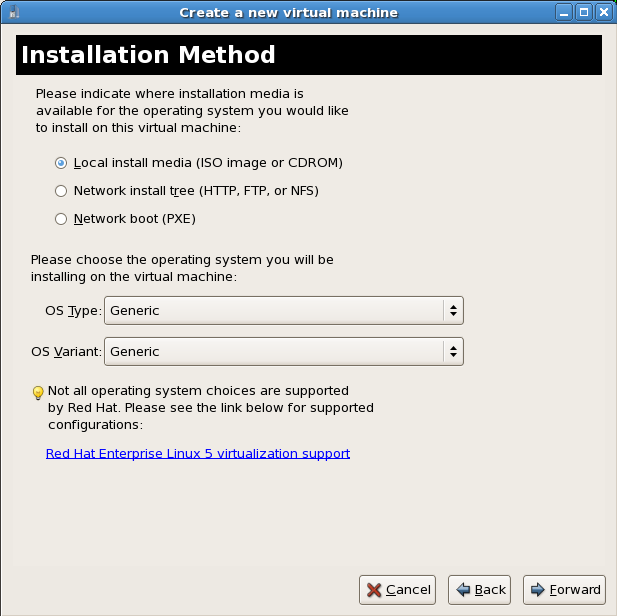
The Installation Method window asks for the type of installation you selected.Guests can be installed using one of the following methods:- Local media installation
- This method uses a CD-ROM or DVD or an image of an installation CD-ROM or DVD (an
.isofile). - Network installation tree
- This method uses a mirrored Red Hat Enterprise Linux installation tree to install guests. The installation tree must be accessible using one of the following network protocols:
HTTP,FTPorNFS.The network services and files can be hosted using network services on the host or another mirror. - Network boot
- This method uses a Preboot eXecution Environment (PXE) server to install the guest. Setting up a PXE server is covered in the Red Hat Enterprise Linux Deployment Guide. Using this method requires a guest with a routable IP address or shared network device. See Chapter 10, Network Configuration for information on the required networking configuration for PXE installation.
Set the OS type and OS variant.Choose the installation method and click Forward to proceed.Important
Para-virtualized installation must be installed with a network installation tree. The installation tree must be accessible using one of the following network protocols:HTTP,FTPorNFS. The installation media URL must contain a Red Hat Enterprise Linux installation tree. This tree is hosted usingNFS,FTPorHTTP.Installation media selection
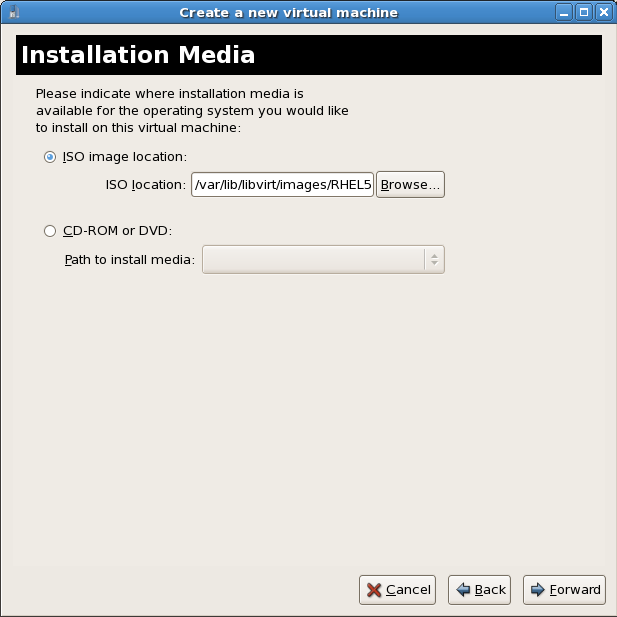
This window is dependent on what was selected in the previous step.ISO image or physical media installation
If Local install media was selected in the previous step this screen is called Install Media.Select the location of an ISO image or select a DVD or CD-ROM from the dropdown list.Click the button to proceed.Network install tree installation
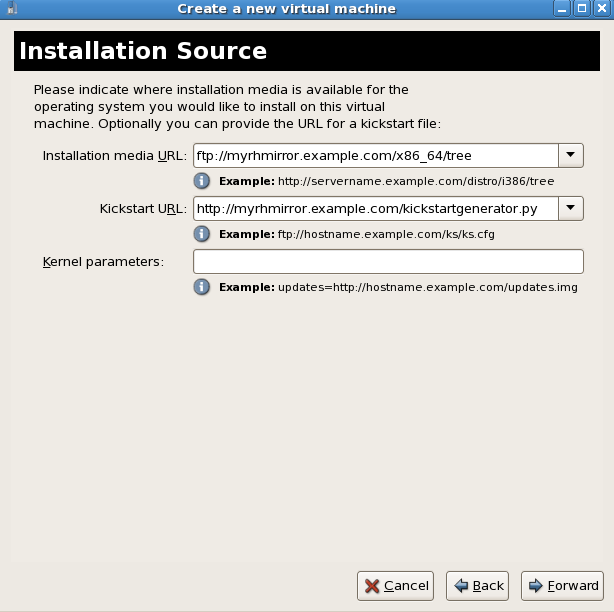
If Network install tree was selected in the previous step this screen is called Installation Source.Network installation requires the address of a mirror of a Linux installation tree usingNFS,FTPorHTTP. Optionally, a kickstart file can be specified to automated the installation. Kernel parameters can also be specified if required.Click the button to proceed.Network boot (PXE)
PXE installation does not have an additional step.
Storage setup
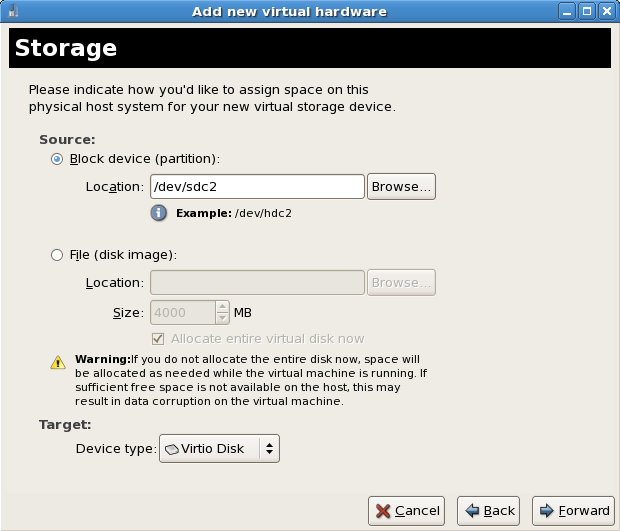
The Storage window displays. Choose a disk partition, LUN or create a file-based image for the guest storage.All image files are stored in the/var/lib/libvirt/images/directory by default. In the default configuration, other directory locations for file-based images are prohibited by SELinux. If you use a different directory you must label the new directory according to SELinux policy. See Section 19.2, “SELinux and virtualization” for details.Your guest storage image should be larger than the size of the installation, any additional packages and applications, and the size of the guests swap file. The installation process will choose the size of the guest's swap based on size of the RAM allocated to the guest.Allocate extra space if the guest needs additional space for applications or other data. For example, web servers require additional space for log files.Choose the appropriate size for the guest on your selected storage type and click the button.Note
It is recommend that you use the default directory for virtual machine images,/var/lib/libvirt/images/. If you are using a different location (such as/images/in this example) make sure it is labeled according to SELinux policy before you continue with the installation. See Section 19.2, “SELinux and virtualization” for details.Network setup
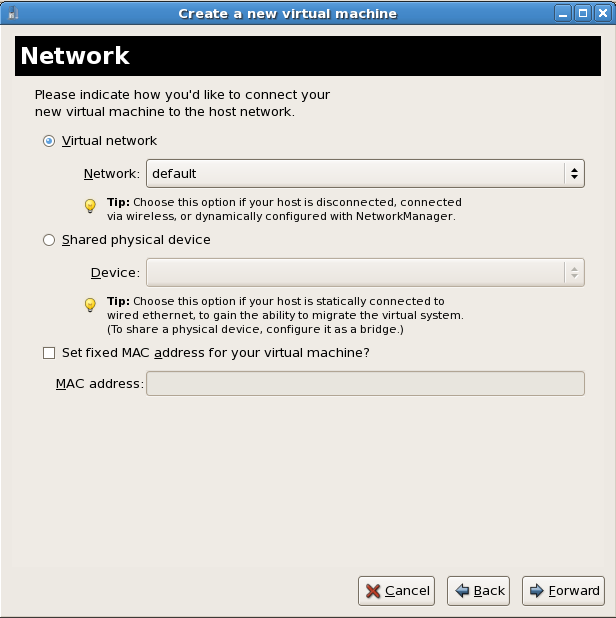
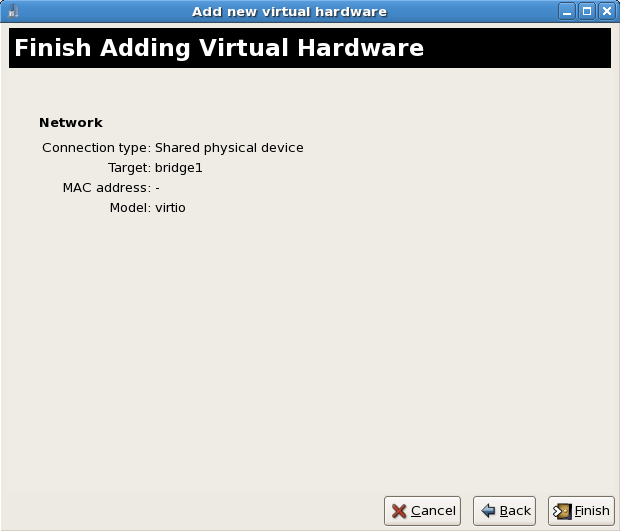
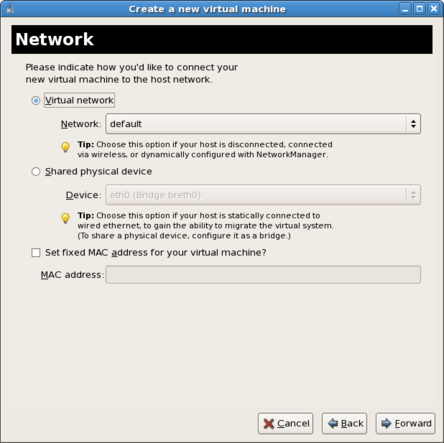
Select either Virtual network or Shared physical device.The virtual network option uses Network Address Translation (NAT) to share the default network device with the guest. Use the virtual network option for wireless networks.The shared physical device option uses a network bond to give the guest full access to a network device. Press to continue.Memory and CPU allocation
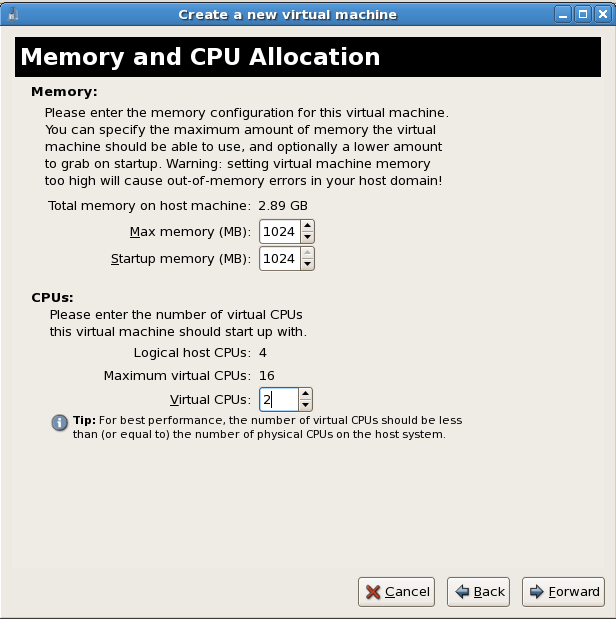
The Memory and CPU Allocation window displays. Choose appropriate values for the virtualized CPUs and RAM allocation. These values affect the host's and guest's performance.Guests require sufficient physical memory (RAM) to run efficiently and effectively. Choose a memory value which suits your guest operating system and application requirements. Most operating system require at least 512MB of RAM to work responsively. Remember, guests use physical RAM. Running too many guests or leaving insufficient memory for the host system results in significant usage of virtual memory. Virtual memory is significantly slower causing degraded system performance and responsiveness. Ensure to allocate sufficient memory for all guests and the host to operate effectively.Assign sufficient virtual CPUs for the guest. If the guest runs a multithreaded application, assign the number of virtualized CPUs the guest will require to run efficiently. Do not assign more virtual CPUs than there are physical processors or threads available on the host system. It is possible to over allocate virtual processors, however, over allocating has a significant, negative effect on guest and host performance due to processor context switching overheads.Press to continue.Verify and start guest installation
The Finish Virtual Machine Creation window presents a summary of all configuration information you entered. Review the information presented and use the button to make changes, if necessary. Once you are satisfied click the button and to start the installation process.A VNC window opens showing the start of the guest operating system installation process.
virt-manager. Chapter 8, Guest operating system installation procedures contains step-by-step instructions to installing a variety of common operating systems.
7.3. Installing guests with PXE
Create a new bridge
- Create a new network script file in the
/etc/sysconfig/network-scripts/directory. This example creates a file namedifcfg-installationwhich makes a bridge namedinstallation.Copy to Clipboard Copied! Toggle word wrap Toggle overflow Warning
The line,TYPE=Bridge, is case-sensitive. It must have uppercase 'B' and lower case 'ridge'.Important
Prior to the release of Red Hat Enterprise Linux 5.9, a segmentation fault can occur when the bridge name contains only uppercase characters. Please upgrade to 5.9 or newer if uppercase names are required. - Start the new bridge by restarting the network service. The
ifup installationcommand can start the individual bridge but it is safer to test the entire network restarts properly.service network restart
# service network restartCopy to Clipboard Copied! Toggle word wrap Toggle overflow - There are no interfaces added to the new bridge yet. Use the
brctl showcommand to view details about network bridges on the system.brctl show bridge name bridge id STP enabled interfaces installation 8000.000000000000 no virbr0 8000.000000000000 yes
# brctl show bridge name bridge id STP enabled interfaces installation 8000.000000000000 no virbr0 8000.000000000000 yesCopy to Clipboard Copied! Toggle word wrap Toggle overflow Thevirbr0bridge is the default bridge used bylibvirtfor Network Address Translation (NAT) on the default Ethernet device.
Add an interface to the new bridge
Edit the configuration file for the interface. Add theBRIDGEparameter to the configuration file with the name of the bridge created in the previous steps.Copy to Clipboard Copied! Toggle word wrap Toggle overflow After editing the configuration file, restart networking or reboot.service network restart
# service network restartCopy to Clipboard Copied! Toggle word wrap Toggle overflow Verify the interface is attached with thebrctl showcommand:brctl show bridge name bridge id STP enabled interfaces installation 8000.001320f76e8e no eth1 virbr0 8000.000000000000 yes
# brctl show bridge name bridge id STP enabled interfaces installation 8000.001320f76e8e no eth1 virbr0 8000.000000000000 yesCopy to Clipboard Copied! Toggle word wrap Toggle overflow Security configuration
Configureiptablesto allow all traffic to be forwarded across the bridge.iptables -I FORWARD -m physdev --physdev-is-bridged -j ACCEPT service iptables save service iptables restart
# iptables -I FORWARD -m physdev --physdev-is-bridged -j ACCEPT # service iptables save # service iptables restartCopy to Clipboard Copied! Toggle word wrap Toggle overflow Note
Alternatively, prevent bridged traffic from being processed byiptablesrules. In/etc/sysctl.confappend the following lines:net.bridge.bridge-nf-call-ip6tables = 0 net.bridge.bridge-nf-call-iptables = 0 net.bridge.bridge-nf-call-arptables = 0
net.bridge.bridge-nf-call-ip6tables = 0 net.bridge.bridge-nf-call-iptables = 0 net.bridge.bridge-nf-call-arptables = 0Copy to Clipboard Copied! Toggle word wrap Toggle overflow Reload the kernel parameters configured withsysctl.sysctl -p /etc/sysctl.conf
# sysctl -p /etc/sysctl.confCopy to Clipboard Copied! Toggle word wrap Toggle overflow Restart libvirt before the installation
Restart thelibvirtdaemon.service libvirtd restart
# service libvirtd restartCopy to Clipboard Copied! Toggle word wrap Toggle overflow
For virt-install append the --network=bridge:installation installation parameter where installation is the name of your bridge. For PXE installations use the --pxe parameter.
Example 7.3. PXE installation with virt-install
The steps below are the steps that vary from the standard virt-manager installation procedures. For the standard installations rsee Chapter 8, Guest operating system installation procedures.
Select PXE
Select PXE as the installation method.Select the bridge
Select Shared physical device and select the bridge created in the previous procedure.Start the installation
The installation is ready to start.
Chapter 8. Guest operating system installation procedures
Important
virsh update-device Guest1 ~/Guest1.xml (substituting your guest's name and XML file), and select OK to continue past this step.
8.1. Installing Red Hat Enterprise Linux 5 as a para-virtualized guest
kernel-xen kernel.
Important
virt-manager, see Section 7.2, “Creating guests with virt-manager”.
virt-install tool. The --vnc option shows the graphical installation. The name of the guest in the example is rhel5PV, the disk image file is rhel5PV.dsk and a local mirror of the Red Hat Enterprise Linux 5 installation tree is ftp://10.1.1.1/trees/RHEL5-B2-Server-i386/. Replace those values with values accurate for your system and network.
virt-install -n rhel5PV -r 500 \ -f /var/lib/libvirt/images/rhel5PV.dsk -s 3 --vnc -p \ -l ftp://10.1.1.1/trees/RHEL5-B2-Server-i386/
# virt-install -n rhel5PV -r 500 \
-f /var/lib/libvirt/images/rhel5PV.dsk -s 3 --vnc -p \
-l ftp://10.1.1.1/trees/RHEL5-B2-Server-i386/Note
Procedure 8.1. Para-virtualized Red Hat Enterprise Linux guest installation procedure
- Select the language and click .
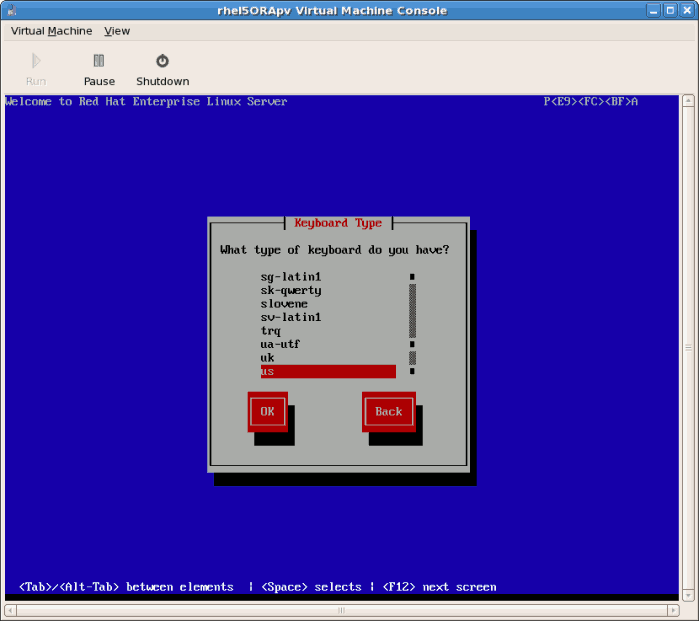
- Select the keyboard layout and click .
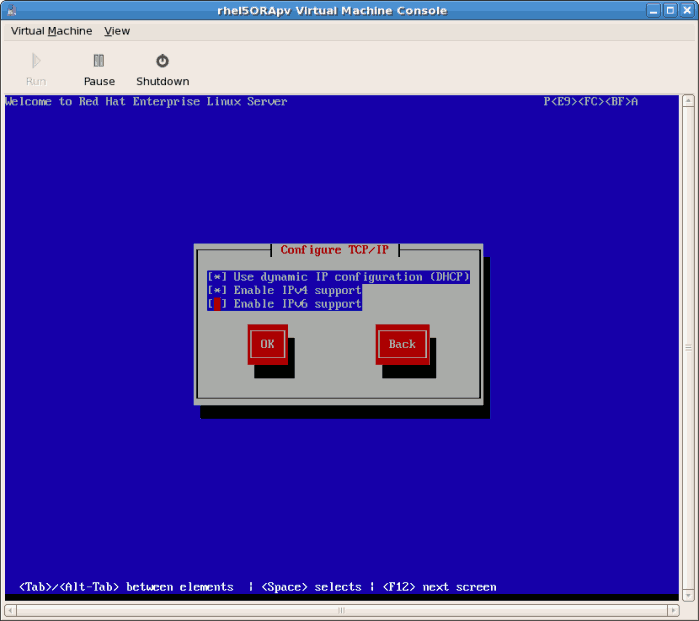
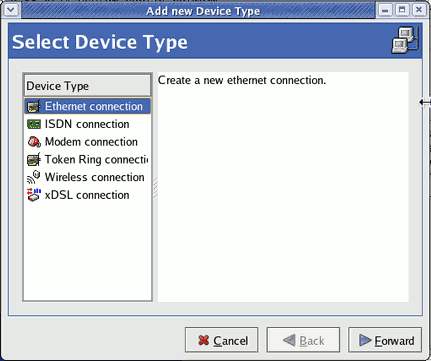
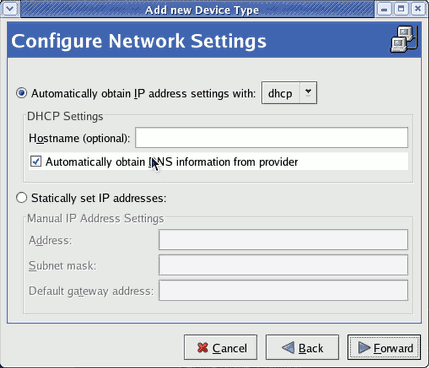
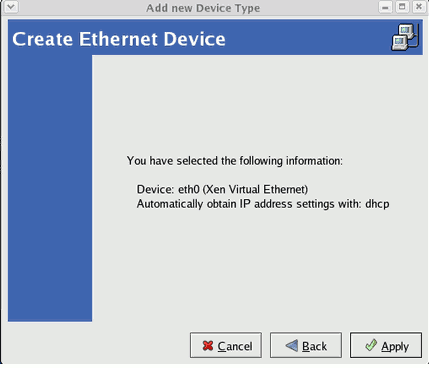
- Assign the guest's network address. Choose to use
DHCP(as shown below) or a static IP address: - If you select DHCP the installation process will now attempt to acquire an IP address:
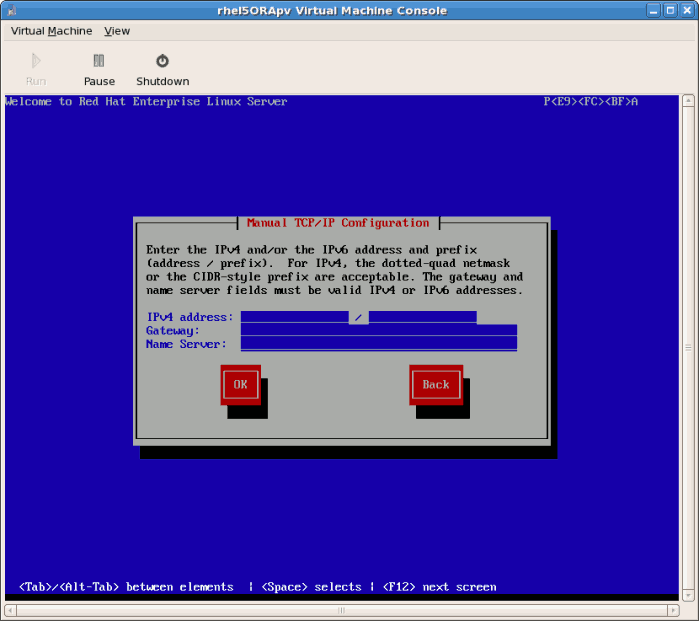
- If you chose a static IP address for your guest this prompt appears. Enter the details on the guest's networking configuration:
- Enter a valid IP address. Ensure the IP address you enter can reach the server with the installation tree.
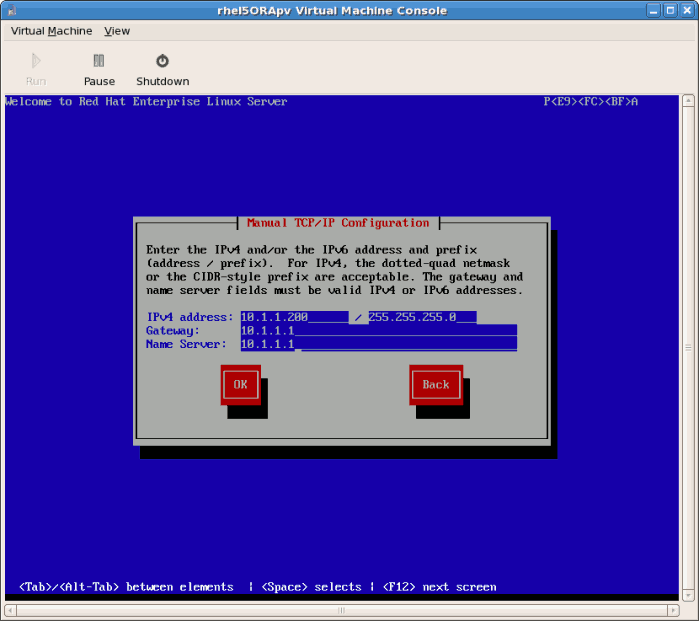
- Enter a valid Subnet mask, default gateway and name server address.
Select the language and click . - This is an example of a static IP address configuration:
- The installation process now retrieves the files it needs from the server:
Procedure 8.2. The graphical installation process
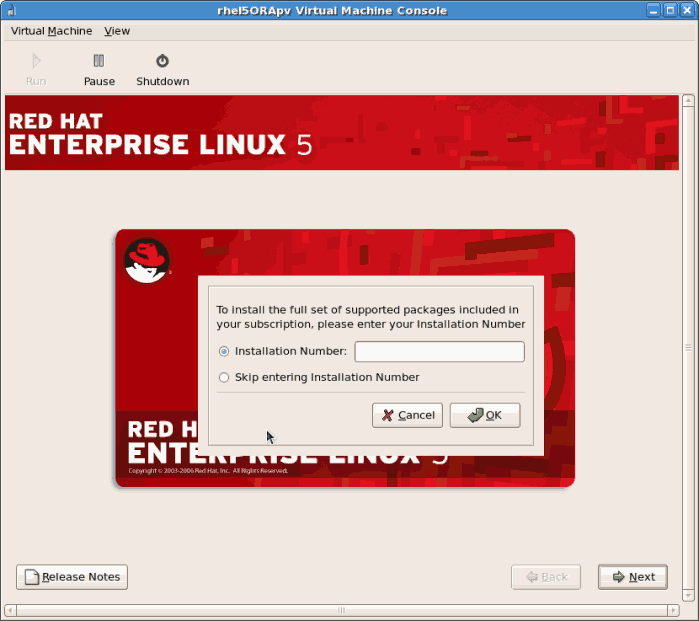
- Enter a valid registration code. If you have a valid Red Hat subscription key please enter in the
Installation Numberfield:Note
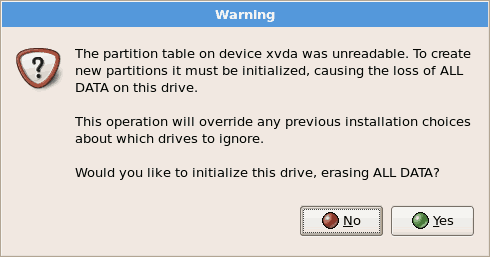
If you skip the registration step, confirm your Red Hat account details after the installation with therhn_registercommand. Therhn_registercommand requires root access. - The installation prompts you to confirm erasure of all data on the storage you selected for the installation:Click to continue.
- Review the storage configuration and partition layout. You can chose to select the advanced storage configuration if you want to use iSCSI for the guest's storage.Make your selections then click .
- Confirm the selected storage for the installation.Click to continue.
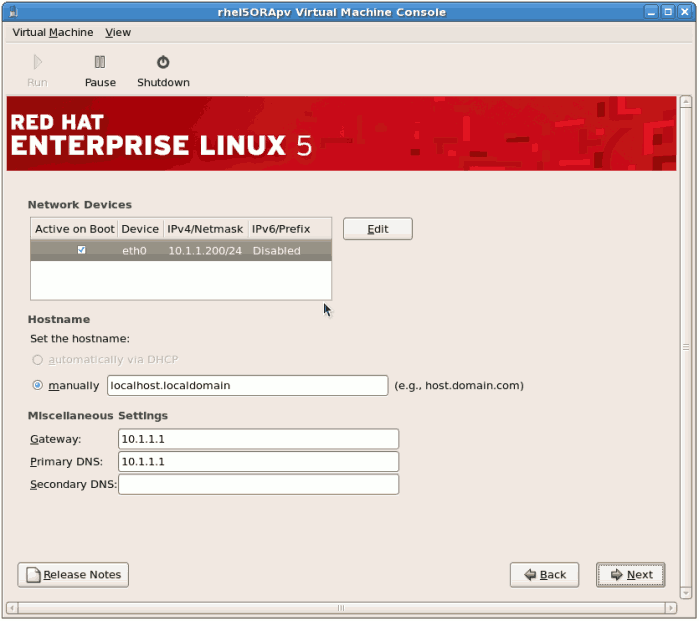
- Configure networking and hostname settings. These settings are populated with the data entered earlier in the installation process. Change these settings if necessary.Click to continue.
- Select the appropriate time zone for your environment.
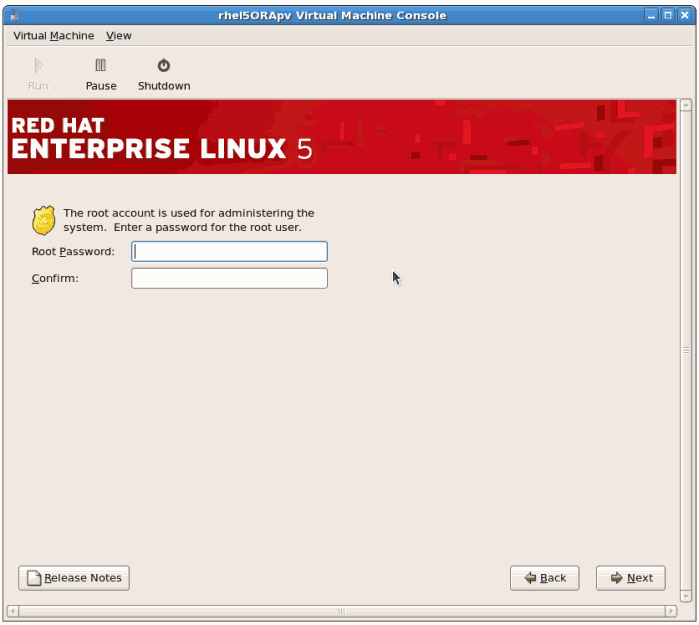
- Enter the root password for the guest.Click to continue.
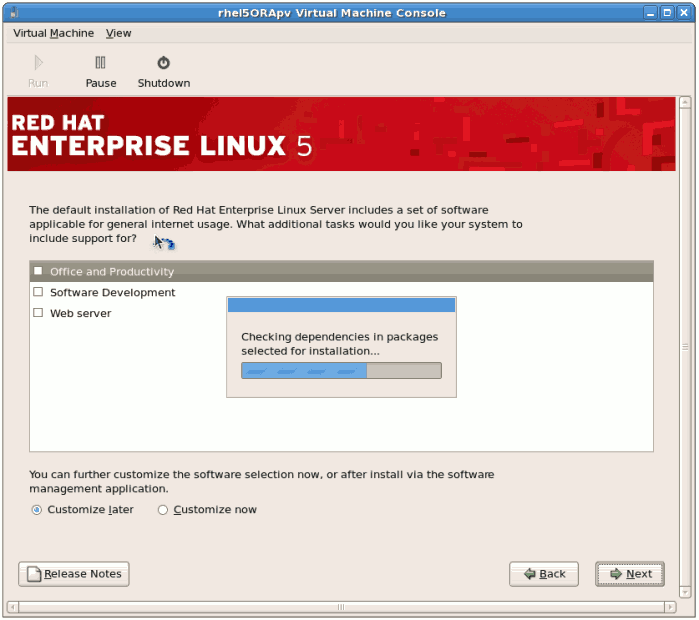
- Select the software packages to install. Select the button. You must install the kernel-xen package in the System directory. The kernel-xen package is required for para-virtualization.Click .
- Dependencies and space requirements are calculated.
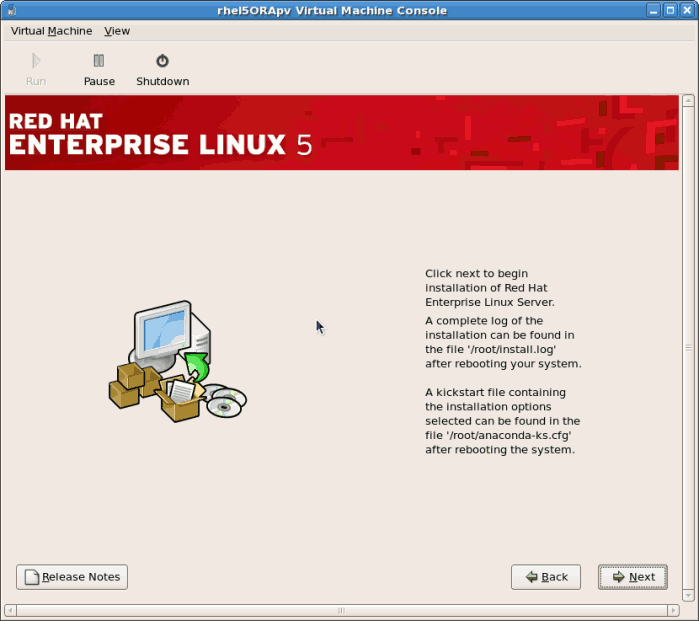
- After the installation dependencies and space requirements have been verified click to start the actual installation.
- All of the selected software packages are installed automatically.
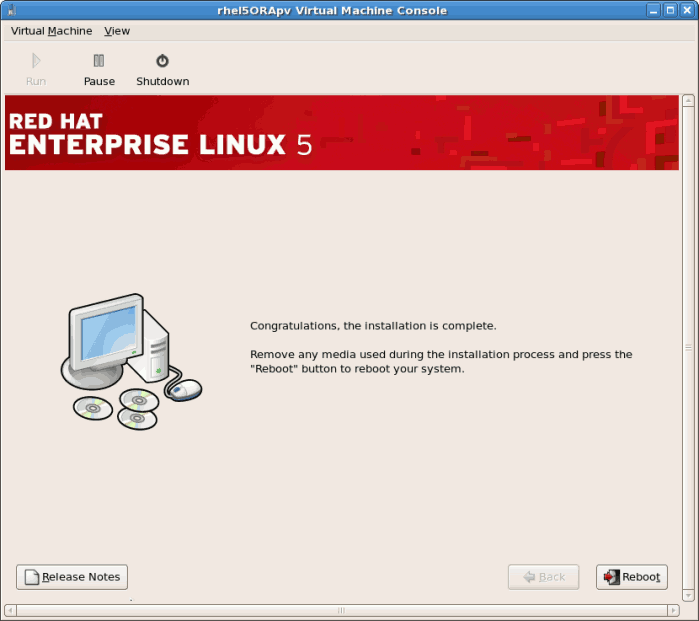
- After the installation has finished reboot your guest:
- The guest will not reboot, instead it will shutdown..
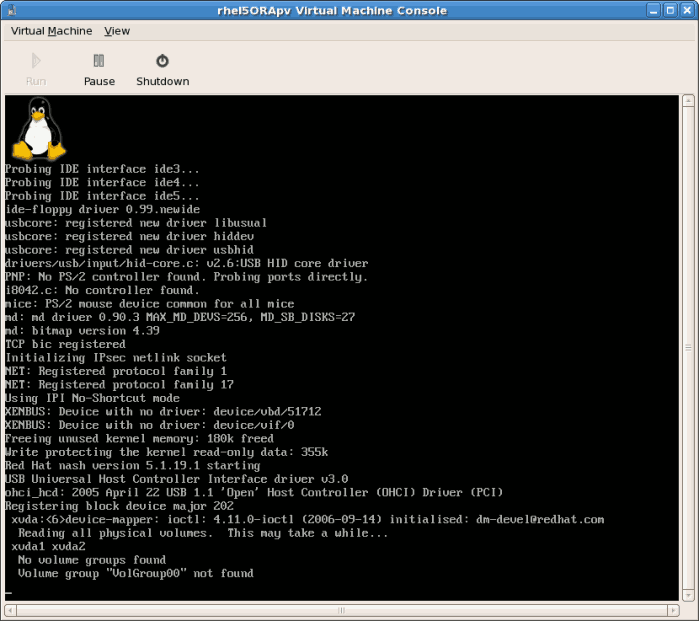
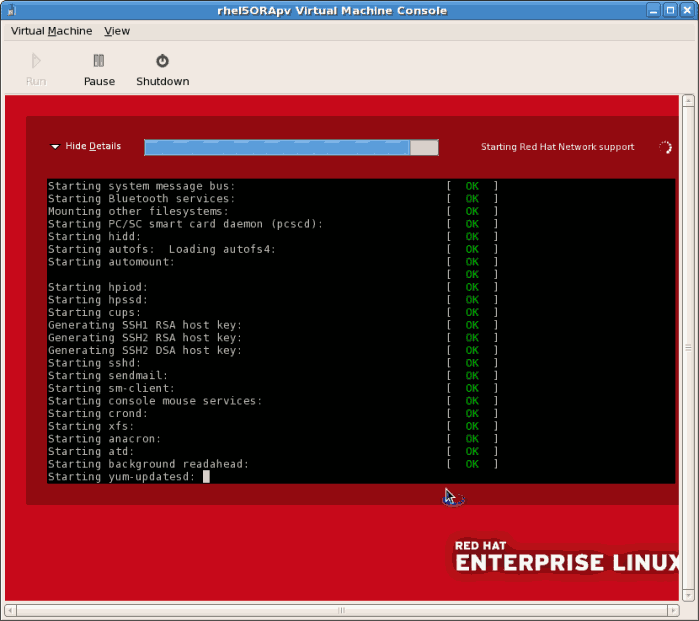
- Boot the guest. The guest's name was chosen when you used the
virt-installin Section 8.1, “Installing Red Hat Enterprise Linux 5 as a para-virtualized guest”. If you used the default example the name is rhel5PV.Usevirshto reboot the guest:virsh reboot rhel5PV
# virsh reboot rhel5PVCopy to Clipboard Copied! Toggle word wrap Toggle overflow Alternatively, openvirt-manager, select the name of your guest, click , then click .A VNC window displaying the guest's boot processes now opens. - Booting the guest starts the First Boot configuration screen. This wizard prompts you for some basic configuration choices for your guest.
- Read and agree to the license agreement.Click on the license agreement windows.
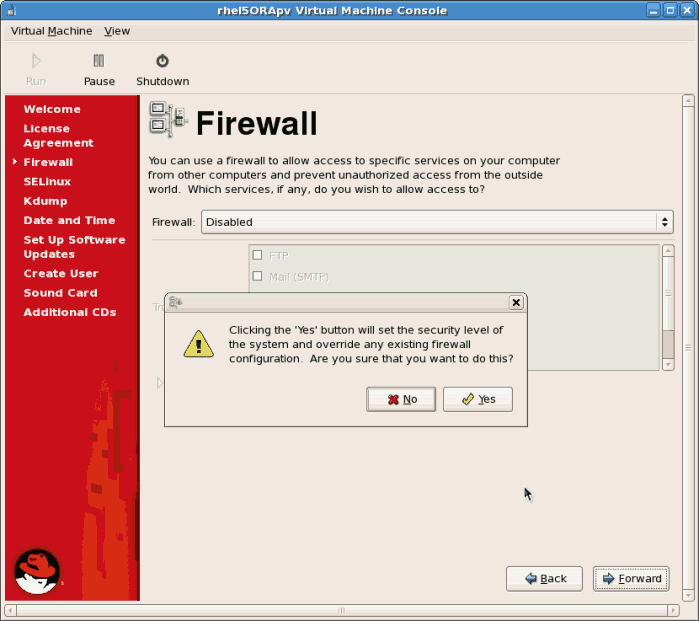
- Configure the firewall.Click to continue.
- If you disable the firewall you will be prompted to confirm your choice. Click to confirm and continue. It is not recommended to disable your firewall.
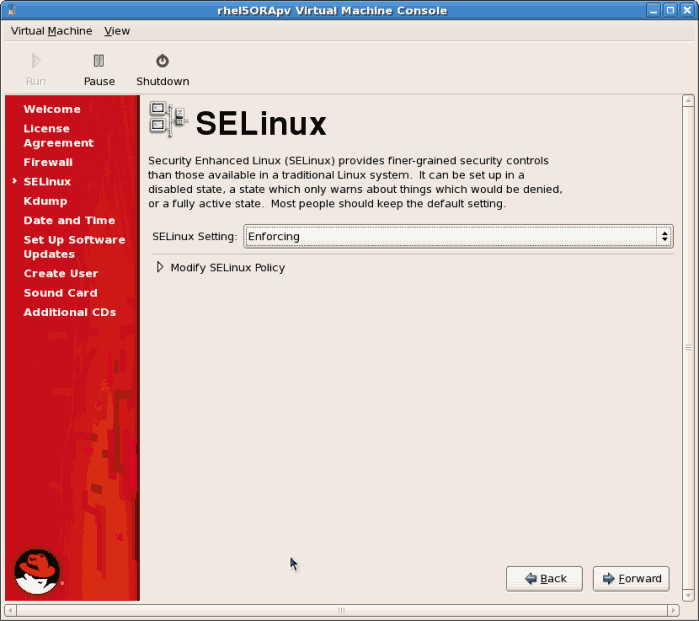
- Configure SELinux. It is strongly recommended you run SELinux in enforcing mode. You can choose to either run SELinux in permissive mode or completely disable it.Click to continue.
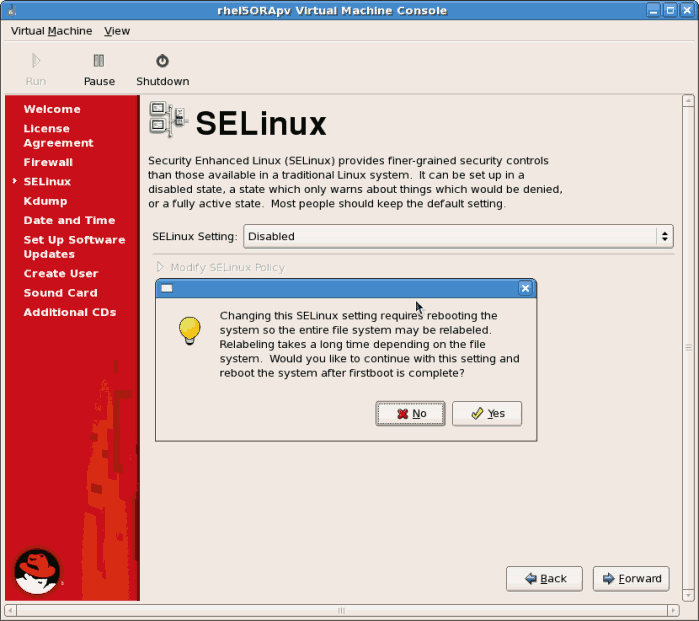
- If you choose to disable SELinux this warning displays. Click to disable SELinux.
- Disable
kdump. The use ofkdumpis unsupported on para-virtualized guests.Click to continue. - Confirm time and date are set correctly for your guest. If you install a para-virtualized guest time and date should synchronize with the hypervisor.If the users sets the time or date during the installation it is ignored and the hypervisor's time is used.Click to continue.
- Set up software updates. If you have a Red Hat account or want to trial one use the screen below to register your newly installed guest.Click to continue.
- Confirm your choices for RHN.
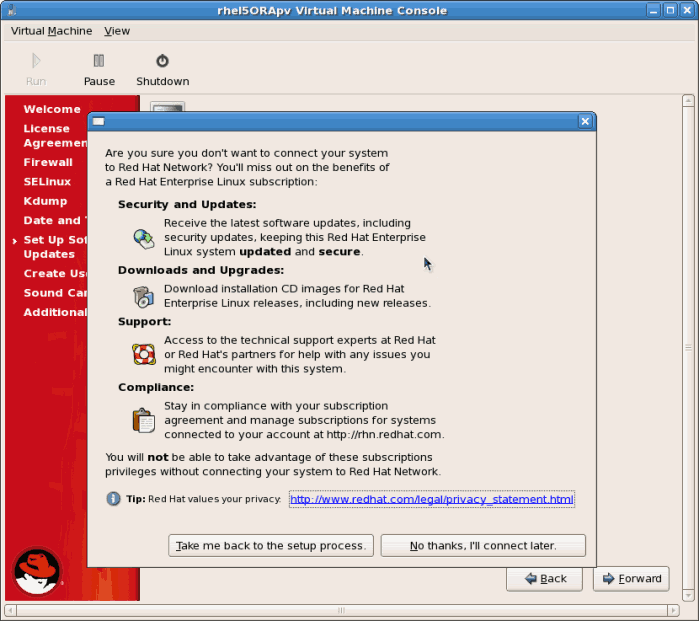
- You may see an additional screen if you did not configure RHN access. If RHN access is not enabled, you will not receive software updates.Click the button.
- Create a non root user account. It is advised to create a non root user for normal usage and enhanced security. Enter the Username, Name and password.Click the button.
- If a sound device is detected and you require sound, calibrate it. Complete the process and click .
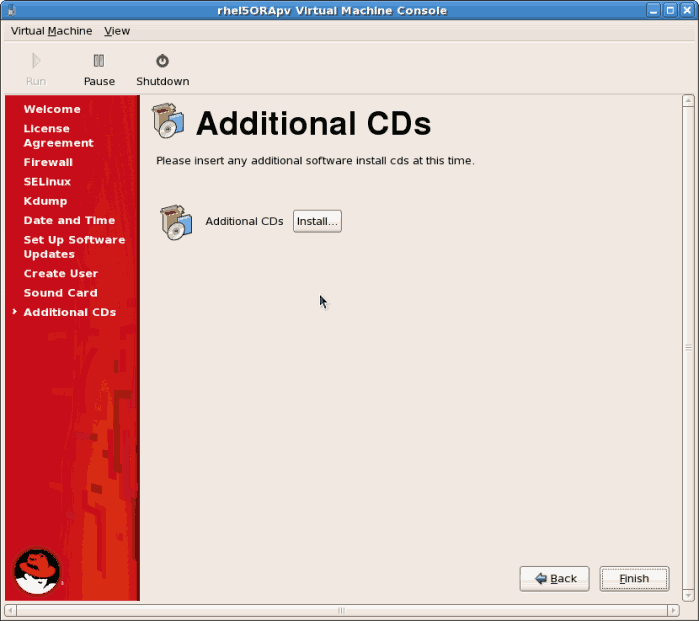
- You can install additional packages from a CD or another repository using this screen. It is often more efficient to not install any additional software at this point but add packages later using the
yumcommand or RHN. Click . - The guest now configure any settings you changed and continues the boot process.
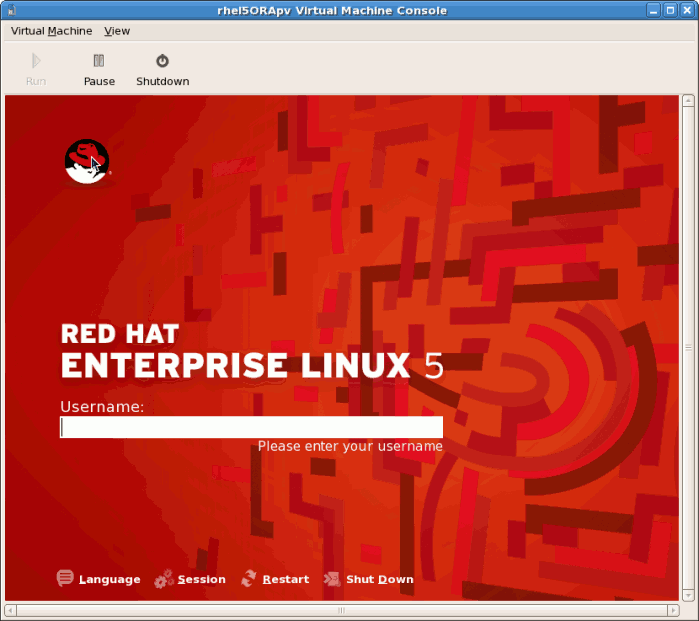
- The Red Hat Enterprise Linux 5 login screen displays. Log in using the username created in the previous steps.
- You have now successfully installed a para-virtualized Red Hat Enterprise Linux guest.
8.2. Installing Red Hat Enterprise Linux as a fully virtualized guest
Procedure 8.3. Creating a fully virtualized Red Hat Enterprise Linux 5 guest with virt-manager
Open virt-manager
Startvirt-manager. Launch the application from the menu and submenu. Alternatively, run thevirt-managercommand as root.Select the hypervisor
Select the hypervisor. If installed, select Xen or KVM. For this example, select KVM. Note that presently KVM is namedqemu.Connect to a hypervisor if you have not already done so. Open the File menu and select the Add Connection... option. See Section 27.1, “The Add Connection window”.Once a hypervisor connection is selected the New button becomes available. Press the New button.Start the new virtual machine wizard
Pressing the New button starts the virtual machine creation wizard. Press to continue.Name the virtual machine
Provide a name for your guest. Punctuation and whitespace characters are not permitted in versions before Red Hat Enterprise Linux 5.5. Red Hat Enterprise Linux 5.5 adds support for '_', '.' and '-' characters. Press to continue.Choose a virtualization method
Choose the virtualization method for the guest. Note you can only select an installed virtualization method. If you selected KVM or Xen earlier (Step 4) you must use the hypervisor you selected. This example uses the KVM hypervisor. Press to continue.Select the installation method
Red Hat Enterprise Linux can be installed using one of the following methods:- local install media, either an ISO image or physical optical media.
- Select Network install tree if you have the installation tree for Red Hat Enterprise Linux hosted somewhere on your network via HTTP, FTP or NFS.
- PXE can be used if you have a PXE server configured for booting Red Hat Enterprise Linux installation media. Configuring a sever to PXE boot a Red Hat Enterprise Linux installation is not covered by this guide. However, most of the installation steps are the same after the media boots.
Set OS Type to Linux and OS Variant to Red Hat Enterprise Linux 5 as shown in the screenshot. Press to continue.Locate installation media
Select ISO image location or CD-ROM or DVD device. This example uses an ISO file image of the Red Hat Enterprise Linux installation DVD.- Press the button.
- Search to the location of the ISO file and select the ISO image. Press to confirm your selection.
- The file is selected and ready to install. Press to continue.
Warning
For ISO image files and guest storage images the recommended directory is/var/lib/libvirt/images/. Any other location may require additional configuration for SELinux, see Section 19.2, “SELinux and virtualization” for details.Storage setup
Assign a physical storage device (Block device) or a file-based image (File). File-based images must be stored in the/var/lib/libvirt/images/directory. Assign sufficient space for your guest and any applications the guest requires. Press to continue.Note
Live and offline migrations require guests to be installed on shared network storage. For information on setting up shared storage for guests see Part V, “Virtualization Storage Topics”.Network setup
Select either Virtual network or Shared physical device.The virtual network option uses Network Address Translation (NAT) to share the default network device with the guest. Use the virtual network option for wireless networks.The shared physical device option uses a network bond to give the guest full access to a network device. Press to continue.Memory and CPU allocation
The Memory and CPU Allocation window displays. Choose appropriate values for the virtualized CPUs and RAM allocation. These values affect the host's and guest's performance.Guests require sufficient physical memory (RAM) to run efficiently and effectively. Choose a memory value which suits your guest operating system and application requirements. Remember, guests use physical RAM. Running too many guests or leaving insufficient memory for the host system results in significant usage of virtual memory and swapping. Virtual memory is significantly slower which causes degraded system performance and responsiveness. Ensure you allocate sufficient memory for all guests and the host to operate effectively.Assign sufficient virtual CPUs for the guest. If the guest runs a multithreaded application, assign the number of virtualized CPUs the guest will require to run efficiently. Do not assign more virtual CPUs than there are physical processors (or hyper-threads) available on the host system. It is possible to over allocate virtual processors, however, over allocating has a significant, negative effect on guest and host performance due to processor context switching overheads.Press to continue.Verify and start guest installation
Verify the configuration. Press to start the guest installation procedure.Installing Red Hat Enterprise Linux
Complete the Red Hat Enterprise Linux 5 installation sequence. The installation sequence is covered by the Installation Guide, see Red Hat Documentation for the Red Hat Enterprise Linux Installation Guide.
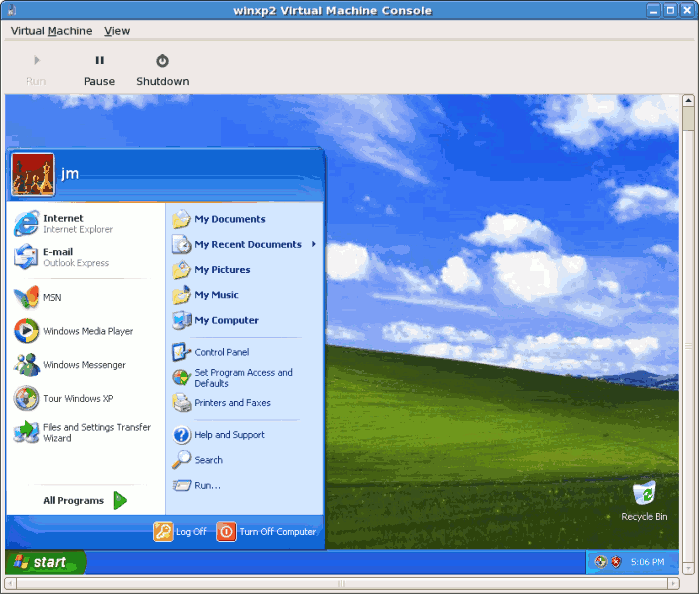
8.3. Installing Windows XP as a fully virtualized guest
Important
Starting virt-manager
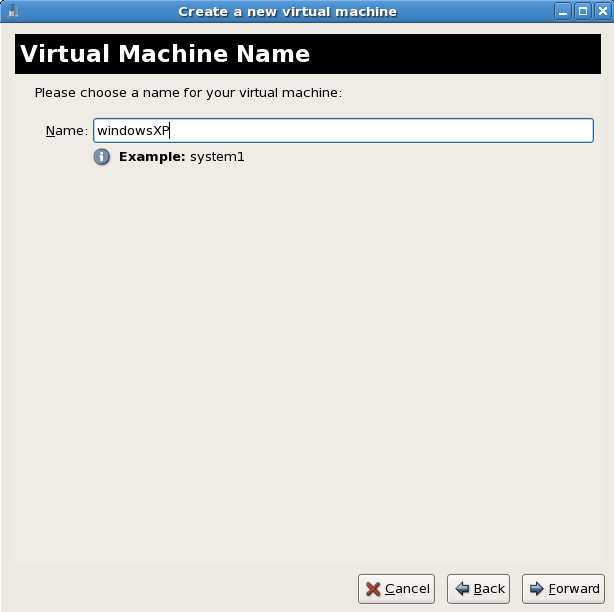
Open . Open a connection to a host (click ). Click the button to create a new virtual machine.Naming your virtual system
Enter the System Name and click the button.Choosing a virtualization method
If you selected KVM or Xen earlier (step Step 1 ) you must use the hypervisor you selected. This example uses the KVM hypervisor.Windows can only be installed using full virtualization.Choosing an installation method
This screen enables you to specify the installation method and the type of operating system.Select Windows from the OS Type list and Microsoft Windows XP from the OS Variant list.Installing guests with PXE is supported in Red Hat Enterprise Linux 5.2. PXE installation is not covered by this chapter.Warning
For ISO image files and guest storage images it is recommended to use the/var/lib/libvirt/images/directory. Any other location will require additional configuration for SELinux, see Section 19.2, “SELinux and virtualization” for details.Press to continue.Choose installation image
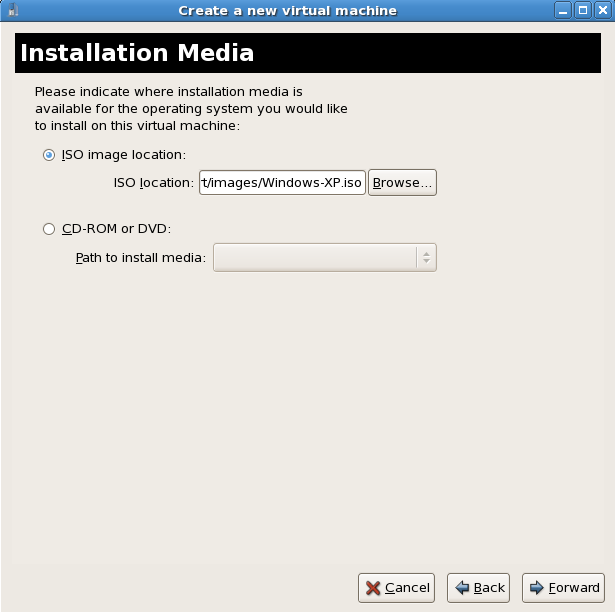
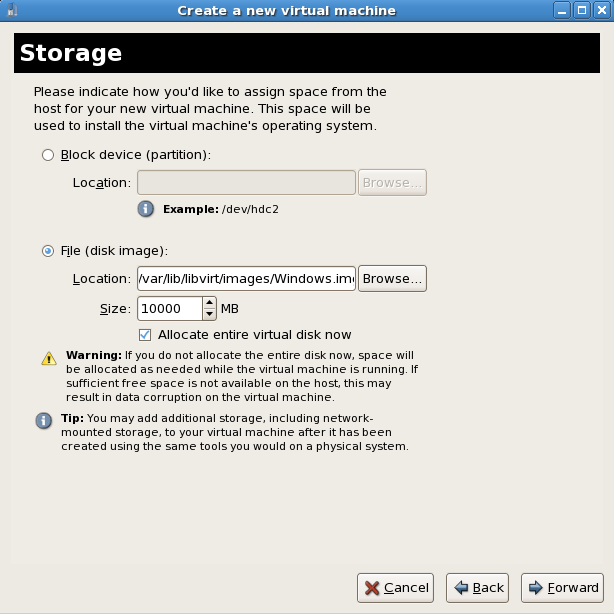
Choose the installation image or CD-ROM. For CD-ROM or DVD installation select the device with the Windows installation disc in it. If you chose ISO Image Location enter the path to a Windows installation .iso image.Press to continue.- The Storage window displays. Choose a disk partition, LUN or create a file-based image for the guest's storage.All image files are stored in the
/var/lib/libvirt/images/directory by default. In the default configuration, other directory locations for file-based images are prohibited by SELinux. If you use a different directory you must label the new directory according to SELinux policy. See Section 19.2, “SELinux and virtualization” for details.Allocate extra space if the guest needs additional space for applications or other data. For example, web servers require additional space for log files.Choose the appropriate size for the guest on your selected storage type and click the button.Note
It is recommend that you use the default directory for virtual machine images,/var/lib/libvirt/images/. If you are using a different location (such as/images/in this example) make sure it is added to your SELinux policy and relabeled before you continue with the installation (later in the document you will find information on how to modify your SELinux policy) Network setup
Select either Virtual network or Shared physical device.The virtual network option uses Network Address Translation (NAT) to share the default network device with the guest. Use the virtual network option for wireless networks.The shared physical device option uses a network bond to give the guest full access to a network device. Press to continue.- The Memory and CPU Allocation window displays. Choose appropriate values for the virtualized CPUs and RAM allocation. These values affect the host's and guest's performance.Guests require sufficient physical memory (RAM) to run efficiently and effectively. Choose a memory value which suits your guest operating system and application requirements. Most operating system require at least 512MB of RAM to work responsively. Remember, guests use physical RAM. Running too many guests or leaving insufficient memory for the host system results in significant usage of virtual memory and swapping. Virtual memory is significantly slower causing degraded system performance and responsiveness. Ensure to allocate sufficient memory for all guests and the host to operate effectively.Assign sufficient virtual CPUs for the guest. If the guest runs a multithreaded application, assign the number of virtualized CPUs the guest will require to run efficiently. Do not assign more virtual CPUs than there are physical processors (or hyper-threads) available on the host system. It is possible to over allocate virtual processors, however, over allocating has a significant, negative effect on guest and host performance due to processor context switching overheads.
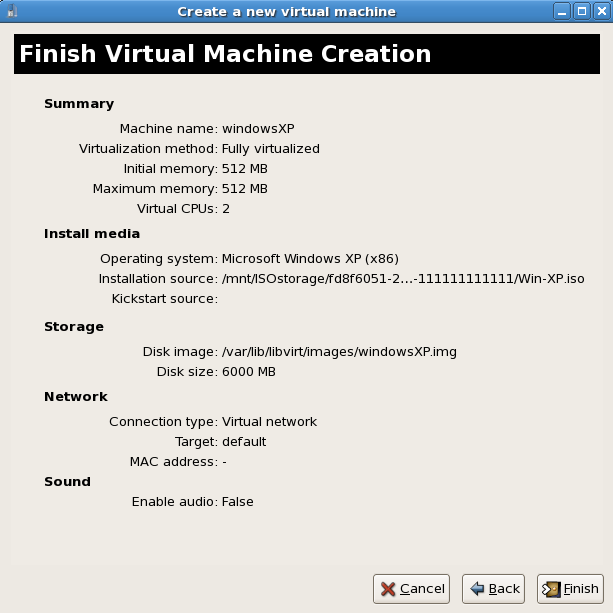
- Before the installation continues you will see the summary screen. Press to proceed to the guest installation:
- You must make a hardware selection so open a console window quickly after the installation starts. Click then switch to the virt-manager summary window and select your newly started Windows guest. Double click on the system name and the console window opens. Quickly and repeatedly press F5 to select a new
HAL, once you get the dialog box in the Windows install select the 'Generic i486 Platform' tab. Scroll through selections with the Up and Down arrows. - The installation continues with the standard Windows installation.
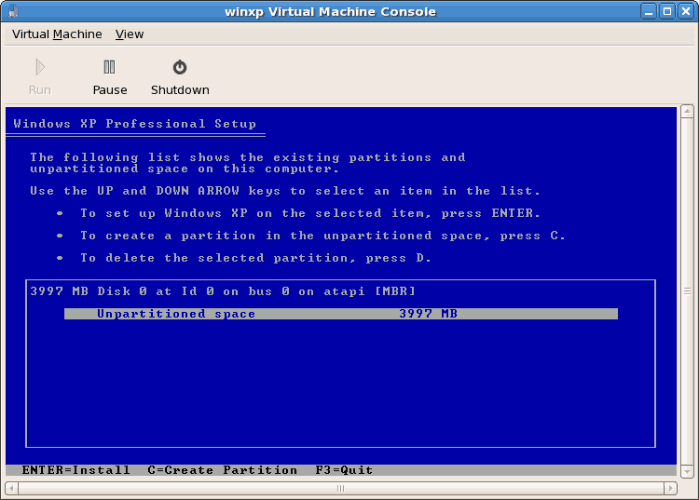
- Partition the hard drive when prompted.
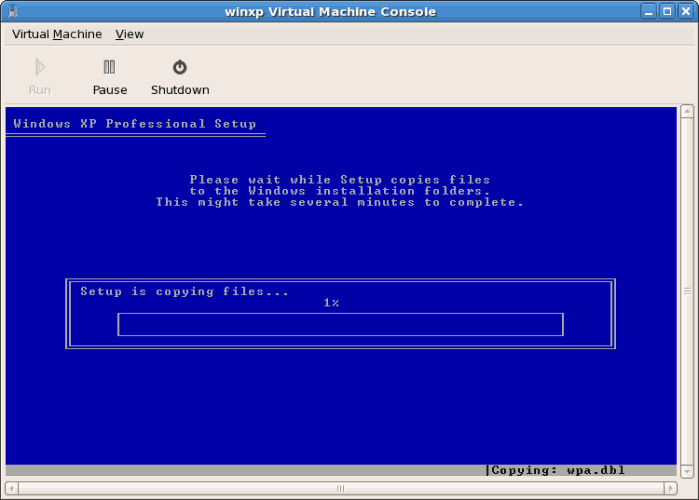
- After the drive is formatted, Windows starts copying the files to the hard drive.
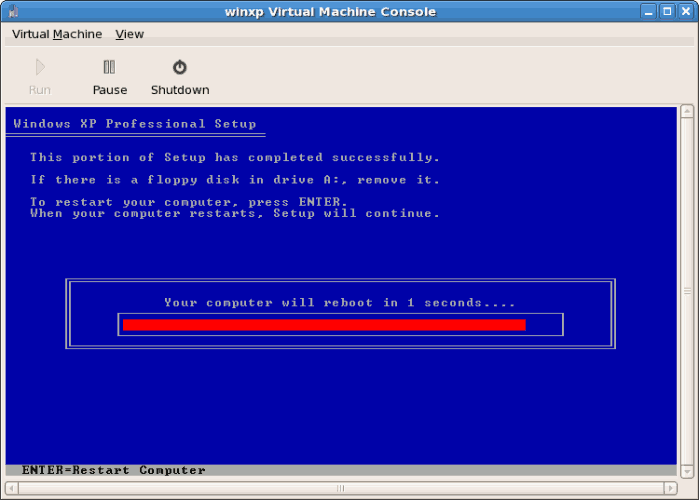
- The files are copied to the storage device, Windows now reboots.
- Restart your Windows guest:
virsh start WindowsGuest
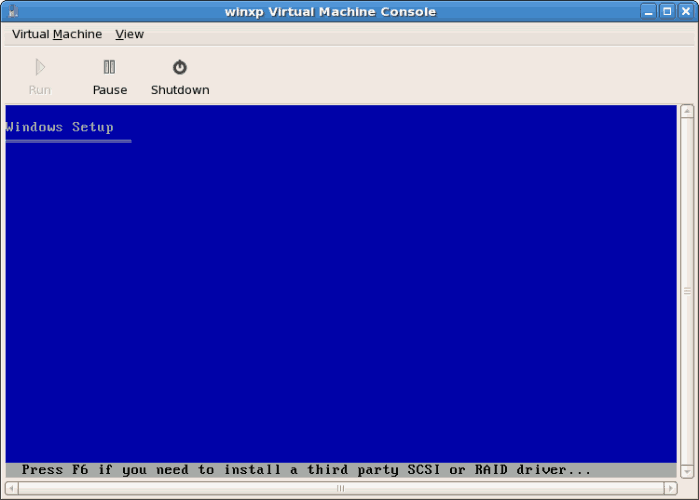
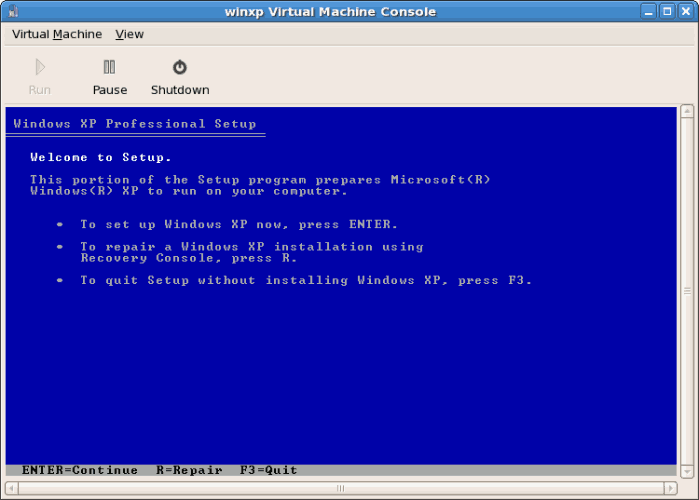
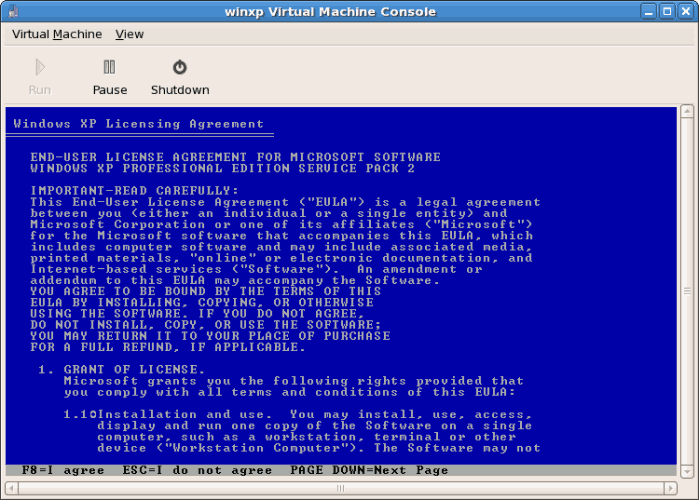
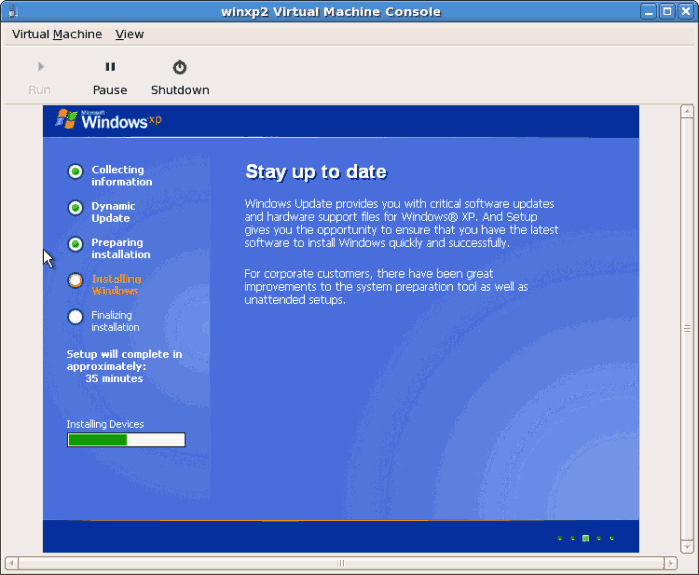
# virsh start WindowsGuestCopy to Clipboard Copied! Toggle word wrap Toggle overflow Where WindowsGuest is the name of your virtual machine. - When the console window opens, you will see the setup phase of the Windows installation.
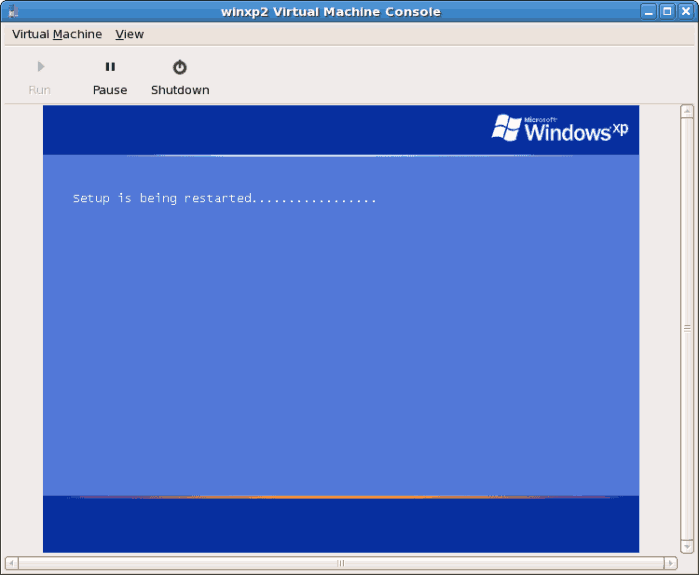
- If your installation seems to get stuck during the setup phase, restart the guest with
virsh reboot WindowsGuestName. When you restart the virtual machine, theSetup is being restartedmessage displays: - After setup has finished you will see the Windows boot screen:
- Now you can continue with the standard setup of your Windows installation:
- The setup process is complete.
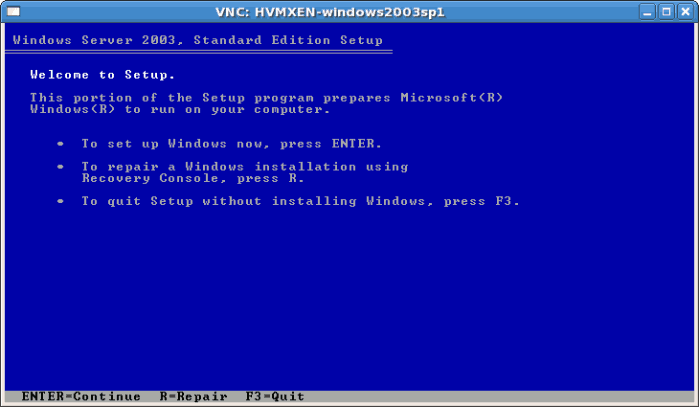
8.4. Installing Windows Server 2003 as a fully virtualized guest
virt-install command. virt-install can be used instead of virt-manager This process is similar to the Windows XP installation covered in Section 8.3, “Installing Windows XP as a fully virtualized guest”.
Note
- Using
virt-installfor installing Windows Server 2003 as the console for the Windows guest opens thevirt-viewerwindow promptly. The examples below installs a Windows Server 2003 guest with thevirt-installcommand.Xen virt-install
Copy to Clipboard Copied! Toggle word wrap Toggle overflow KVM virt-install
Copy to Clipboard Copied! Toggle word wrap Toggle overflow
- Once the guest boots into the installation you must quickly press F5. If you do not press F5 at the right time you will need to restart the installation. Pressing F5 allows you to select different HAL or Computer Type. Choose
Standard PCas the Computer Type. Changing the Computer Type is required for Windows Server 2003 guests. - Complete the rest of the installation.
- Windows Server 2003 is now installed as a fully guest.
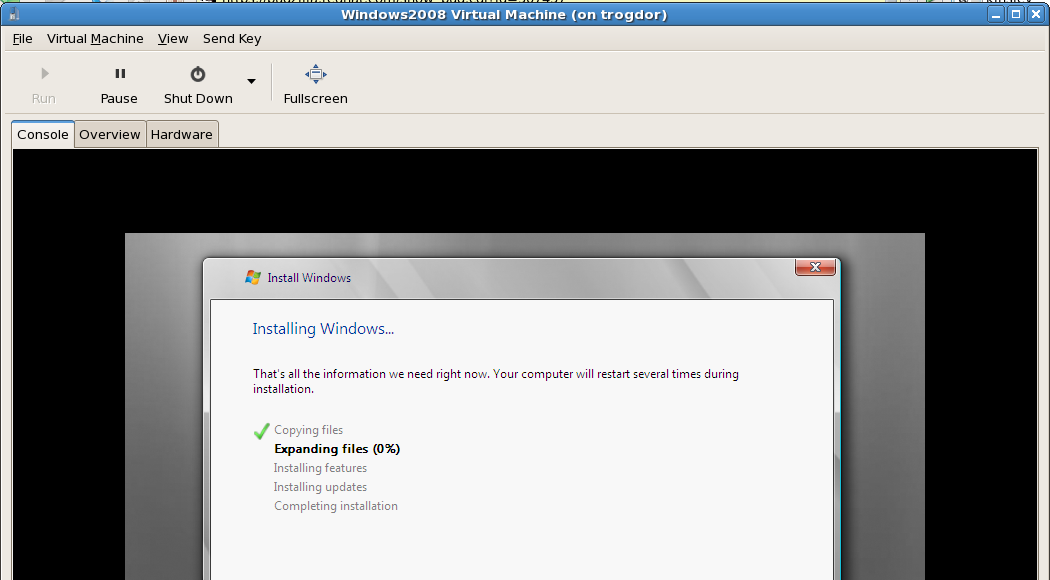
8.5. Installing Windows Server 2008 as a fully virtualized guest
Procedure 8.4. Installing Windows Server 2008 with virt-manager
Open virt-manager
Startvirt-manager. Launch the application from the menu and submenu. Alternatively, run thevirt-managercommand as root.Select the hypervisor
Select the hypervisor. If installed, select Xen or KVM. For this example, select KVM. Note that presently KVM is namedqemu.Once the option is selected the New button becomes available. Press the New button.Start the new virtual machine wizard
Pressing the New button starts the virtual machine creation wizard. Press to continue.Name the virtual machine
Provide a name for your guest. Punctuation and whitespace characters are not permitted in versions before Red Hat Enterprise Linux 5.5. Red Hat Enterprise Linux 5.5 adds support for '_', '.' and '-' characters. Press to continue.Choose a virtualization method
Choose the virtualization method for the guest. Note you can only select an installed virtualization method. If you selected KVM or Xen earlier (step 2) you must use the hypervisor you selected. This example uses the KVM hypervisor. Press to continue.Select the installation method
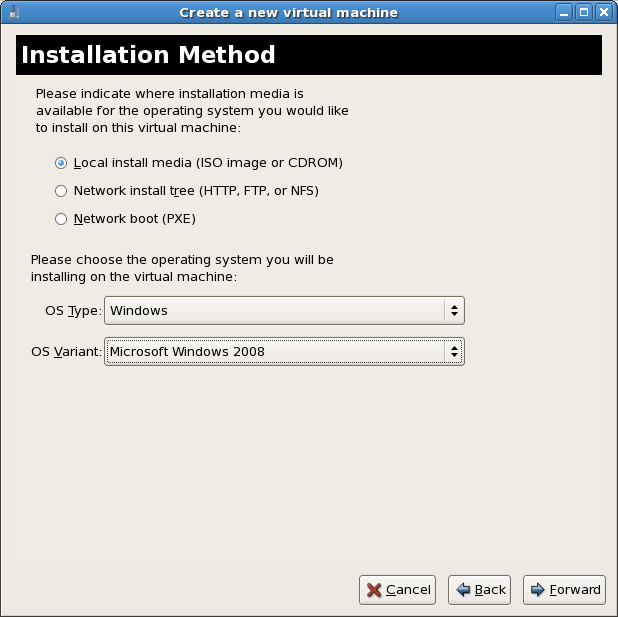
For all versions of Windows you must use local install media, either an ISO image or physical optical media.PXE may be used if you have a PXE server configured for Windows network installation. PXE Windows installation is not covered by this guide.Set OS Type to Windows and OS Variant to Microsoft Windows 2008 as shown in the screenshot. Press to continue.Locate installation media
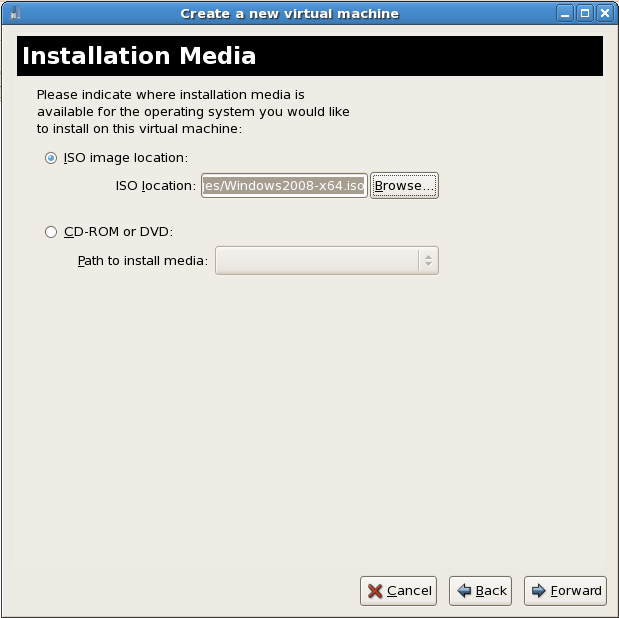
Select ISO image location or CD-ROM or DVD device. This example uses an ISO file image of the Windows Server 2008 installation CD.- Press the button.
- Search to the location of the ISO file and select it. Press to confirm your selection.
- The file is selected and ready to install. Press to continue.
Warning
For ISO image files and guest storage images, the recommended directory to use is the/var/lib/libvirt/images/directory. Any other location may require additional configuration for SELinux, see Section 19.2, “SELinux and virtualization” for details.Storage setup
Assign a physical storage device (Block device) or a file-based image (File). File-based images must be stored in the/var/lib/libvirt/images/directory. Assign sufficient space for your guest and any applications the guest requires. Press to continue.Network setup
Select either Virtual network or Shared physical device.The virtual network option uses Network Address Translation (NAT) to share the default network device with the guest. Use the virtual network option for wireless networks.The shared physical device option uses a network bond to give the guest full access to a network device. Press to continue.Memory and CPU allocation
The Memory and CPU Allocation window displays. Choose appropriate values for the virtualized CPUs and RAM allocation. These values affect the host's and guest's performance.Guests require sufficient physical memory (RAM) to run efficiently and effectively. Choose a memory value which suits your guest operating system and application requirements. Remember, guests use physical RAM. Running too many guests or leaving insufficient memory for the host system results in significant usage of virtual memory and swapping. Virtual memory is significantly slower which causes degraded system performance and responsiveness. Ensure you allocate sufficient memory for all guests and the host to operate effectively.Assign sufficient virtual CPUs for the guest. If the guest runs a multithreaded application, assign the number of virtualized CPUs the guest will require to run efficiently. Do not assign more virtual CPUs than there are physical processors (or hyper-threads) available on the host system. It is possible to over allocate virtual processors, however, over allocating has a significant, negative effect on guest and host performance due to processor context switching overheads.Press to continue.Verify and start guest installation
Verify the configuration. Press to start the guest installation procedure.Installing Windows
Complete the Windows Server 2008 installation sequence. The installation sequence is not covered by this guide, see Microsoft's documentation for information on installing Windows.
Part III. Configuration
Configuring Virtualization in Red Hat Enterprise Linux
Chapter 9. Virtualized storage devices
Important
/dev/xvd[a to z][1 to 15]Example:/dev/xvdb13/dev/xvd[a to i][a to z][1 to 15]Example:/dev/xvdbz13/dev/sd[a to p][1 to 15]Example:/dev/sda1/dev/hd[a to t][1 to 63]Example:/dev/hdd3
9.1. Creating a virtualized floppy disk controller
dd command. Replace /dev/fd0 with the name of a floppy device and name the disk image appropriately.
dd if=/dev/fd0 of=/tmp/legacydrivers.img
# dd if=/dev/fd0 of=/tmp/legacydrivers.img
Note
virt-manager running a fully virtualized Red Hat Enterprise Linux installation with an image located in /var/lib/libvirt/images/rhel5FV.img. The Xen hypervisor is used in the example.
- Create the XML configuration file for your guest image using the
virshcommand on a running guest.virsh dumpxml rhel5FV > rhel5FV.xml
# virsh dumpxml rhel5FV > rhel5FV.xmlCopy to Clipboard Copied! Toggle word wrap Toggle overflow This saves the configuration settings as an XML file which can be edited to customize the operations and devices used by the guest. For more information on using the virsh XML configuration files, see Chapter 34, Creating custom libvirt scripts. - Create a floppy disk image for the guest.
dd if=/dev/zero of=/var/lib/libvirt/images/rhel5FV-floppy.img bs=512 count=2880
# dd if=/dev/zero of=/var/lib/libvirt/images/rhel5FV-floppy.img bs=512 count=2880Copy to Clipboard Copied! Toggle word wrap Toggle overflow - Add the content below, changing where appropriate, to your guest's configuration XML file. This example is an emulated floppy device using a file-based image.
<disk type='file' device='floppy'> <source file='/var/lib/libvirt/images/rhel5FV-floppy.img'/> <target dev='fda'/> </disk>
<disk type='file' device='floppy'> <source file='/var/lib/libvirt/images/rhel5FV-floppy.img'/> <target dev='fda'/> </disk>Copy to Clipboard Copied! Toggle word wrap Toggle overflow - Force the guest to stop. To shut down the guest gracefully, use the
virsh shutdowncommand instead.virsh destroy rhel5FV
# virsh destroy rhel5FVCopy to Clipboard Copied! Toggle word wrap Toggle overflow - Restart the guest using the XML configuration file.
virsh create rhel5FV.xml
# virsh create rhel5FV.xmlCopy to Clipboard Copied! Toggle word wrap Toggle overflow
9.2. Adding storage devices to guests
- local hard drive partitions,
- logical volumes,
- Fibre Channel or iSCSI directly connected to the host.
- File containers residing in a file system on the host.
- NFS file systems mounted directly by the virtual machine.
- iSCSI storage directly accessed by the guest.
- Cluster File Systems (GFS).
File-based storage or file-based containers are files on the hosts file system which act as virtualized hard drives for virtual machines. To add a file-based container perform the following steps:
- Create an empty container file or using an existing file container (such as an ISO file).
- Create a sparse file using the
ddcommand. Sparse files are not recommended due to data integrity and performance issues. Sparse files are created much faster and can used for testing but should not be used in production environments.dd if=/dev/zero of=/var/lib/libvirt/images/FileName.img bs=1M seek=4096 count=0
# dd if=/dev/zero of=/var/lib/libvirt/images/FileName.img bs=1M seek=4096 count=0Copy to Clipboard Copied! Toggle word wrap Toggle overflow - Non-sparse, pre-allocated files are recommended for file-based storage images. Create a non-sparse file, execute:
dd if=/dev/zero of=/var/lib/libvirt/images/FileName.img bs=1M count=4096
# dd if=/dev/zero of=/var/lib/libvirt/images/FileName.img bs=1M count=4096Copy to Clipboard Copied! Toggle word wrap Toggle overflow
Both commands create a 4GB file which can be used as additional storage for a virtual machine. - Dump the configuration for the guest. In this example the guest is called Guest1 and the file is saved in the users home directory.
virsh dumpxml Guest1 > ~/Guest1.xml
# virsh dumpxml Guest1 > ~/Guest1.xmlCopy to Clipboard Copied! Toggle word wrap Toggle overflow - Open the configuration file (Guest1.xml in this example) in a text editor. Find the
<disk>elements, these elements describe storage devices. The following is an example disk element:Copy to Clipboard Copied! Toggle word wrap Toggle overflow - Add the additional storage by duplicating or writing a new
<disk>element. Ensure you specify a device name for the virtual block device attributes. These attributes must be unique for each guest configuration file. The following example is a configuration file section which contains an additional file-based storage container namedFileName.img.Copy to Clipboard Copied! Toggle word wrap Toggle overflow - Restart the guest from the updated configuration file.
virsh create Guest1.xml
# virsh create Guest1.xmlCopy to Clipboard Copied! Toggle word wrap Toggle overflow - The following steps are Linux guest specific. Other operating systems handle new storage devices in different ways. For other systems, see your operating system's documentation.The guest now uses the file
FileName.imgas the device called/dev/sdb. This device requires formatting from the guest. On the guest, partition the device into one primary partition for the entire device then format the device.- Press
nfor a new partition.fdisk /dev/sdb Command (m for help):
# fdisk /dev/sdb Command (m for help):Copy to Clipboard Copied! Toggle word wrap Toggle overflow - Press
pfor a primary partition.Command action e extended p primary partition (1-4)
Command action e extended p primary partition (1-4)Copy to Clipboard Copied! Toggle word wrap Toggle overflow - Choose an available partition number. In this example the first partition is chosen by entering
1.Partition number (1-4): 1
Partition number (1-4): 1Copy to Clipboard Copied! Toggle word wrap Toggle overflow - Enter the default first cylinder by pressing
Enter.First cylinder (1-400, default 1):
First cylinder (1-400, default 1):Copy to Clipboard Copied! Toggle word wrap Toggle overflow - Select the size of the partition. In this example the entire disk is allocated by pressing
Enter.Last cylinder or +size or +sizeM or +sizeK (2-400, default 400):
Last cylinder or +size or +sizeM or +sizeK (2-400, default 400):Copy to Clipboard Copied! Toggle word wrap Toggle overflow - Set the type of partition by pressing
t.Command (m for help): t
Command (m for help): tCopy to Clipboard Copied! Toggle word wrap Toggle overflow - Choose the partition you created in the previous steps. In this example, the partition number is
1.Partition number (1-4): 1
Partition number (1-4): 1Copy to Clipboard Copied! Toggle word wrap Toggle overflow - Enter
83for a linux partition.Hex code (type L to list codes): 83
Hex code (type L to list codes): 83Copy to Clipboard Copied! Toggle word wrap Toggle overflow - write changes to disk and quit.
Command (m for help): w Command (m for help): q
Command (m for help): w Command (m for help): qCopy to Clipboard Copied! Toggle word wrap Toggle overflow - Format the new partition with the
ext3file system.mke2fs -j /dev/sdb1
# mke2fs -j /dev/sdb1Copy to Clipboard Copied! Toggle word wrap Toggle overflow
- Mount the disk on the guest.
mount /dev/sdb1 /myfiles
# mount /dev/sdb1 /myfilesCopy to Clipboard Copied! Toggle word wrap Toggle overflow
System administrators use additional hard drives for to provide more storage space or to separate system data from user data. This procedure, Procedure 9.1, “Adding physical block devices to virtual machines”, describes how to add a hard drive on the host to a guest.
Warning
fstab file, the initrd file or used by the kernel command line. If less privileged users, especially virtual machines, have write access to whole partitions or LVM volumes the host system could be compromised.
/dev/sdb). Virtual machines with access to block devices may be able to access other block devices on the system or modify volume labels which can be used to compromise the host system. Use partitions (for example, /dev/sdb1) or LVM volumes to prevent this issue.
Procedure 9.1. Adding physical block devices to virtual machines
- Physically attach the hard disk device to the host. Configure the host if the drive is not accessible by default.
- Configure the device with
multipathand persistence on the host if required. - Use the
virsh attachcommand. Replace: myguest with your guest's name,/dev/sdb1with the device to add, and sdc with the location for the device on the guest. The sdc must be an unused device name. Use the sd* notation for Windows guests as well, the guest will recognize the device correctly.Append the--type cdromparameter to the command for CD-ROM or DVD devices.Append the--type floppyparameter to the command for floppy devices.virsh attach-disk myguest /dev/sdb1 sdc --driver tap --mode readonly
# virsh attach-disk myguest /dev/sdb1 sdc --driver tap --mode readonlyCopy to Clipboard Copied! Toggle word wrap Toggle overflow - The guest now has a new hard disk device called
/dev/sdbon Linux orD: drive, or similar, on Windows. This device may require formatting.
9.3. Configuring persistent storage in Red Hat Enterprise Linux 5
multipath must use Single path configuration. Systems running multipath can use Multiple path configuration.
This procedure implements LUN device persistence using udev. Only use this procedure for hosts which are not using multipath.
- Edit the
/etc/scsi_id.configfile.- Ensure the
options=-bis line commented out.options=-b
# options=-bCopy to Clipboard Copied! Toggle word wrap Toggle overflow - Add the following line:
options=-g
options=-gCopy to Clipboard Copied! Toggle word wrap Toggle overflow This option configuresudevto assume all attached SCSI devices return a UUID.
- To display the UUID for a given device run the
scsi_id -g -s /block/sd*command. For example:scsi_id -g -s /block/sd* 3600a0b800013275100000015427b625e
# scsi_id -g -s /block/sd* 3600a0b800013275100000015427b625eCopy to Clipboard Copied! Toggle word wrap Toggle overflow The output may vary from the example above. The output displays the UUID of the device/dev/sdc. - Verify the UUID output by the
scsi_id -g -s /block/sd*command is identical from computer which accesses the device. - Create a rule to name the device. Create a file named
20-names.rulesin the/etc/udev/rules.ddirectory. Add new rules to this file. All rules are added to the same file using the same format. Rules follow this format:KERNEL=="sd[a-z]", BUS=="scsi", PROGRAM="/sbin/scsi_id -g -s /block/%k", RESULT="UUID", NAME="devicename"
KERNEL=="sd[a-z]", BUS=="scsi", PROGRAM="/sbin/scsi_id -g -s /block/%k", RESULT="UUID", NAME="devicename"Copy to Clipboard Copied! Toggle word wrap Toggle overflow Replace UUID and devicename with the UUID retrieved above, and a name for the device. This is a rule for the example above:KERNEL="sd*", BUS="scsi", PROGRAM="/sbin/scsi_id -g -s", RESULT="3600a0b800013275100000015427b625e", NAME="rack4row16"
KERNEL="sd*", BUS="scsi", PROGRAM="/sbin/scsi_id -g -s", RESULT="3600a0b800013275100000015427b625e", NAME="rack4row16"Copy to Clipboard Copied! Toggle word wrap Toggle overflow Theudevdaemon now searches all devices named/dev/sd*for the UUID in the rule. Once a matching device is connected to the system the device is assigned the name from the rule. In the a device with a UUID of 3600a0b800013275100000015427b625e would appear as/dev/rack4row16. - Append this line to
/etc/rc.local:/sbin/start_udev
/sbin/start_udevCopy to Clipboard Copied! Toggle word wrap Toggle overflow - Copy the changes in the
/etc/scsi_id.config,/etc/udev/rules.d/20-names.rules, and/etc/rc.localfiles to all relevant hosts./sbin/start_udev
/sbin/start_udevCopy to Clipboard Copied! Toggle word wrap Toggle overflow
The multipath package is used for systems with more than one physical path from the computer to storage devices. multipath provides fault tolerance, fail-over and enhanced performance for network storage devices attached to Red Hat Enterprise Linux systems.
multipath environment requires defined alias names for your multipath devices. Each storage device has a UUID which acts as a key for the aliased names. Identify a device's UUID using the scsi_id command.
scsi_id -g -s /block/sdc
# scsi_id -g -s /block/sdc
/dev/mpath directory. In the example below 4 devices are defined in /etc/multipath.conf:
/dev/mpath/oramp1, /dev/mpath/oramp2, /dev/mpath/oramp3 and /dev/mpath/oramp4. Once entered, the mapping of the devices' WWID to their new names are now persistent after rebooting.
9.4. Add a virtualized CD-ROM or DVD device to a guest
virsh with the attach-disk parameter.
virsh attach-disk [domain-id] [source] [target] --driver file --type cdrom --mode readonly
# virsh attach-disk [domain-id] [source] [target] --driver file --type cdrom --mode readonly/dev directory.
Chapter 10. Network Configuration
10.1. Network Address Translation (NAT) with libvirt
Every standard libvirt installation provides NAT based connectivity to virtual machines out of the box. This is the so called 'default virtual network'. Verify that it is available with the virsh net-list --all command.
virsh net-list --all Name State Autostart ----------------------------------------- default active yes
# virsh net-list --all
Name State Autostart
-----------------------------------------
default active yes
virsh net-define /usr/share/libvirt/networks/default.xml
# virsh net-define /usr/share/libvirt/networks/default.xml
/usr/share/libvirt/networks/default.xml
virsh net-autostart default Network default marked as autostarted
# virsh net-autostart default
Network default marked as autostarted
virsh net-start default Network default started
# virsh net-start default
Network default started
libvirt default network is running, you will see an isolated bridge device. This device does not have any physical interfaces added, since it uses NAT and IP forwarding to connect to outside world. Do not add new interfaces.
brctl show bridge name bridge id STP enabled interfaces virbr0 8000.000000000000 yes
# brctl show
bridge name bridge id STP enabled interfaces
virbr0 8000.000000000000 yes
libvirt adds iptables rules which allow traffic to and from guests attached to the virbr0 device in the INPUT, FORWARD, OUTPUT and POSTROUTING chains. libvirt then attempts to enable the ip_forward parameter. Some other applications may disable ip_forward, so the best option is to add the following to /etc/sysctl.conf:
net.ipv4.ip_forward = 1
net.ipv4.ip_forward = 1
Once the host configuration is complete, a guest can be connected to the virtual network based on its name. To connect a guest to the 'default' virtual network, the following XML can be used in the guest:
<interface type='network'> <source network='default'/> </interface>
<interface type='network'>
<source network='default'/>
</interface>
Note
<interface type='network'> <source network='default'/> <mac address='00:16:3e:1a:b3:4a'/> </interface>
<interface type='network'>
<source network='default'/>
<mac address='00:16:3e:1a:b3:4a'/>
</interface>
10.2. Bridged networking with libvirt
If your system was using a Xen bridge, it is recommended to disable the default Xen network bridge by editing /etc/xen/xend-config.sxp and changing the line:
(network-script network-bridge)
(network-script network-bridge)
(network-script /bin/true)
(network-script /bin/true)
NetworkManager does not support bridging. Running NetworkManager will overwrite any manual bridge configuration. Because of this, NetworkManager should be disabled in order to use networking via the network scripts (located in the /etc/sysconfig/network-scripts/ directory):
chkconfig NetworkManager off chkconfig network on service NetworkManager stop service network start
# chkconfig NetworkManager off
# chkconfig network on
# service NetworkManager stop
# service network start
Note
NM_CONTROLLED=no" to the ifcfg-* scripts used in the examples. If you do not either set this parameter or disable NetworkManager entirely, any bridge configuration will be overwritten and lost when NetworkManager next starts.
Create or edit the following two network configuration files. This step can be repeated (with different names) for additional network bridges.
/etc/sysconfig/network-scripts directory:
cd /etc/sysconfig/network-scripts
# cd /etc/sysconfig/network-scripts
ifcfg-eth0 defines the physical network interface which is set as part of a bridge:
Note
MTU variable to the end of the configuration file.
MTU=9000
MTU=9000
/etc/sysconfig/network-scripts directory called ifcfg-br0 or similar. The br0 is the name of the bridge; this name can be anything as long as the name of the file is the same as the DEVICE parameter.
Note
ifcfg-br0 file). Network access will not function as expected if IP address details are configured on the physical interface that twehe bridge is connected to.
Warning
TYPE=Bridge, is case-sensitive. It must have uppercase 'B' and lower case 'ridge'.
service network restart
# service network restart
iptables to allow all traffic to be forwarded across the bridge.
iptables -I FORWARD -m physdev --physdev-is-bridged -j ACCEPT service iptables save service iptables restart
# iptables -I FORWARD -m physdev --physdev-is-bridged -j ACCEPT
# service iptables save
# service iptables restart
Note
iptables rules. In /etc/sysctl.conf append the following lines:
net.bridge.bridge-nf-call-ip6tables = 0 net.bridge.bridge-nf-call-iptables = 0 net.bridge.bridge-nf-call-arptables = 0
net.bridge.bridge-nf-call-ip6tables = 0
net.bridge.bridge-nf-call-iptables = 0
net.bridge.bridge-nf-call-arptables = 0
sysctl.
sysctl -p /etc/sysctl.conf
# sysctl -p /etc/sysctl.conf
libvirt daemon.
service libvirtd reload
# service libvirtd reload
brctl show bridge name bridge id STP enabled interfaces virbr0 8000.000000000000 yes br0 8000.000e0cb30550 no eth0
# brctl show
bridge name bridge id STP enabled interfaces
virbr0 8000.000000000000 yes
br0 8000.000e0cb30550 no eth0
virbr0 bridge. Do not attempt to attach a physical device to virbr0. The virbr0 bridge is only for Network Address Translation (NAT) connectivity.
Chapter 11. Pre-Red Hat Enterprise Linux 5.4 Xen networking
virsh (Chapter 26, Managing guests with virsh) and virt-manager (Chapter 27, Managing guests with the Virtual Machine Manager (virt-manager)). Those chapters provide a detailed description of the networking configuration tasks using both tools.
Note
11.1. Configuring multiple guest network bridges to use multiple Ethernet cards
- Configure another network interface using either the
system-config-networkapplication. Alternatively, create a new configuration file namedifcfg-ethXin the/etc/sysconfig/network-scripts/directory whereXis any number not already in use. Below is an example configuration file for a second network interface calledeth1:Copy to Clipboard Copied! Toggle word wrap Toggle overflow - Copy the file
/etc/xen/scripts/network-bridgeto/etc/xen/scripts/network-bridge.xen. - Comment out any existing network scripts in
/etc/xen/xend-config.sxpand add the line(network-xen-multi-bridge).A typicalxend-config.sxpfile should have the following line. Comment this line out. Use the # symbol to comment out lines.network-script network-bridge
network-script network-bridgeCopy to Clipboard Copied! Toggle word wrap Toggle overflow Below is the commented out line and the new line, containing thenetwork-xen-multi-bridgeparameter to enable multiple network bridges:#network-script network-bridge network-script network-xen-multi-bridge
#network-script network-bridge network-script network-xen-multi-bridgeCopy to Clipboard Copied! Toggle word wrap Toggle overflow - Create a script to create multiple network bridges. This example creates a script called
network-xen-multi-bridge.shin the/etc/xen/scripts/directory. The following example script will create two Xen network bridges (xenbr0andxenbr1); one will be attached toeth1and the other one toeth0. To create additional bridges, follow the example in the script and copy and paste the lines as required:Copy to Clipboard Copied! Toggle word wrap Toggle overflow - Make the script executable.
chmod +x /etc/xen/scripts/network-xen-multi-bridge.sh
# chmod +x /etc/xen/scripts/network-xen-multi-bridge.shCopy to Clipboard Copied! Toggle word wrap Toggle overflow - Restart networking or restart the system to activate the bridges.
service network restart
# service network restartCopy to Clipboard Copied! Toggle word wrap Toggle overflow
11.2. Red Hat Enterprise Linux 5.0 laptop network configuration
Important
virt-manager. NetworkManager works with virtual network devices by default in Red Hat Enterprise Linux 5.1 and newer.
xm configuration files, virtual network devices are labeled "vif".
ifup or ifdown calls to the network interface it is using. In addition wireless network cards do not work well in a virtualization environment due to Xen's (default) bridged network usage.
- You will be configuring a 'dummy' network interface which will be used by Xen. In this example the interface is called
dummy0. This will also allow you to use a hidden IP address space for your guests. - You will need to use static IP address as DHCP will not listen on the dummy interface for DHCP requests. You can compile your own version of DHCP to listen on dummy interfaces, however you may want to look into using dnsmasq for DNS, DHCP and tftpboot services in a Xen environment. Setup and configuration are explained further down in this section/chapter.
- You can also configure NAT and IP masquerading in order to enable access to the network from your guests.
Perform the following configuration steps on your host:
- Create a
dummy0network interface and assign it a static IP address. In our example I selected 10.1.1.1 to avoid routing problems in our environment. To enable dummy device support add the following lines to/etc/modprobe.conf:alias dummy0 dummy options dummy numdummies=1
alias dummy0 dummy options dummy numdummies=1Copy to Clipboard Copied! Toggle word wrap Toggle overflow - To configure networking for
dummy0, edit or create/etc/sysconfig/network-scripts/ifcfg-dummy0:Copy to Clipboard Copied! Toggle word wrap Toggle overflow - Bind
xenbr0todummy0, so you can use networking even when not connected to a physical network. Edit/etc/xen/xend-config.sxpto include thenetdev=dummy0entry:(network-script 'network-bridge bridge=xenbr0 netdev=dummy0')
(network-script 'network-bridge bridge=xenbr0 netdev=dummy0')Copy to Clipboard Copied! Toggle word wrap Toggle overflow - Open
/etc/sysconfig/networkin the guest and modify the default gateway to point todummy0. If you are using a static IP, set the guest's IP address to exist on the same subnet asdummy0.Copy to Clipboard Copied! Toggle word wrap Toggle overflow - Setting up NAT in the host will allow the guests access Internet, including with wireless, solving the Xen and wireless card issues. The script below will enable NAT based on the interface currently used for your network connection.
Network address translation (NAT) allows multiple network address to connect through a single IP address by intercepting packets and passing them to the private IP addresses. You can copy the following script to /etc/init.d/xenLaptopNAT and create a soft link to /etc/rc3.d/S99xenLaptopNAT. This automatically starts NAT at boot time.
Note
One of the challenges in running virtualization on a laptop (or any other computer which is not connected by a single or stable network connection) is the change in network interfaces and availability. Using a dummy network interface helps to build a more stable environment but it also brings up new challenges in providing DHCP, DNS and tftpboot services to your guest virtual machines. The default DHCP daemon shipped with Red Hat Enterprise Linux and Fedora Core will not listen on dummy interfaces, and your DNS forwarded information may change as you connect to different networks and VPNs.
dnsmasq, which can provide all of the above services in a single package, and also allows you to configure services to be available only to requests from your dummy interface. Below is a short write up on how to configure dnsmasq on a laptop running virtualization:
- Get the latest version of
dnsmasqfrom here. - Documentation for
dnsmasqcan be found here. - Copy the other files referenced below from http://et.redhat.com/~jmh/tools/xen/ and grab the file
dnsmasq.tgz. The tar archive includes the following files:nm-dnsmasqcan be used as a dispatcher script for NetworkManager. It will be run every time NetworkManager detects a change in connectivity and force a restart or reload ofdnsmasq. It should be copied to/etc/NetworkManager/dispatcher.d/nm-dnsmasqxenDNSmasqcan be used as the main startup or shutdown script for/etc/init.d/xenDNSmasqdnsmasq.confis a sample configuration file for/etc/dnsmasq.confdnsmasqis the binary image for/usr/local/sbin/dnsmasq
- Once you have unpacked and built
dnsmasq(the default installation will be the binary into/usr/local/sbin/dnsmasq) you need to edit yourdnsmasqconfiguration file. The file is located in/etc/dnsmaqs.conf. - Edit the configuration to suit your local needs and requirements. The following parameters are likely the ones you want to modify:
- The
interfaceparameter allowsdnsmasqto listen forDHCPandDNSrequests only on specified interfaces (such as dummy interfaces). Note thatdnsmasqcannot listen to public interfaces as well as the local loopback interface simultaneously. Add anotherinterfaceline for more than one interface.interface=dummy0is an example which listens on thedummy0interface. - Modify
dhcp-rangeto enable the integratedDHCPserver. You will need to supply the range of addresses available for lease and optionally a lease time. If you have more than one network, you will need to repeat this for each network on which you want to supplyDHCPservice. An example would be (for network 10.1.1.* and a lease time of 12 hours):dhcp-range=10.1.1.10,10.1.1.50,255.255.255.0,12h - Modify
dhcp-optionto override the default route supplied bydnsmasq, which assumes the router is the same machine as the one runningdnsmasq. An example would bedhcp-option=3,10.1.1.1
- After configuring
dnsmasqyou can copy the script below asxenDNSmasqto/etc/init.d - If you want to automatically start
dnsmasqduring system boot, you should register it usingchkconfig(8):chkconfig --add xenDNSmasq
chkconfig --add xenDNSmasqCopy to Clipboard Copied! Toggle word wrap Toggle overflow Enable it for automatic startup:chkconfig --levels 345 xenDNSmasq on
chkconfig --levels 345 xenDNSmasq onCopy to Clipboard Copied! Toggle word wrap Toggle overflow - To configure
dnsmasqto restart every time NetworkManager detects a change in connectivity you can use the supplied scriptnm-dnsmasq.- Copy the
nm-dnsmasqscript to/etc/NetworkManager/dispatcher.d/ - The NetworkManager dispatcher will execute the script (in alphabetical order if you have other scripts in the same directory) every time there is a change in connectivity.
dnsmasqwill also detect changes in your/etc/resolv.confand automatically reload them (if you start up a VPN session, for example).- Both the
nm-dnsmasqandxenDNSmasqscript will also set up NAT if you have your guests on a hidden network to allow them access to the public network.
Chapter 12. Xen Para-virtualized Drivers
Note
- Red Hat Enterprise Linux 3
- Red Hat Enterprise Linux 4
- Red Hat Enterprise Linux 5
- Red Hat Enterprise Linux 6
Note
- 32 bit guests.
- 64 bit guests.
- a mixture of 32 bit and 64 bit guests.
12.1. System requirements
Before you install the para-virtualized drivers the following requirements (listed below) must be met.
Important
pv-on-hvm module, in the default kernel package. That means the para-virtualized drivers are available for Red Hat Enterprise Linux 4.7 and newer or 5.3 and newer guests.
Note
xen_pv_hvm=enable kernel boot parameter is no longer required for these guests.
- Red Hat Enterprise Linux 5.1 or newer.
- Red Hat Enterprise Linux 5.1 or newer.
- Red Hat Enterprise Linux 4 Update 6 or newer.
- Red Hat Enterprise Linux 3 Update 9 or newer.
kmod-xenpv.
kmod-xenpv,modules-init-tools(for versions prior to Red Hat Enterprise Linux 4.6z you requiremodules-init-tools-3.1-0.pre5.3.4.el4_6.1or greater), andmodversions.
kmod-xenpv.
/lib file system.
12.2. Para-virtualization Restrictions and Support
Support for para-virtualized drivers is available for the following operating systems and versions:
- Red Hat Enterprise Linux 5.1 and newer.
- Red Hat Enterprise Linux 4 Update 6 and newer.
- Red Hat Enterprise Linux 3 Update 9 and newer.
rpm -q --queryformat '%{NAME}-%{VERSION}-%{RELEASE}.%{ARCH}\n' kernel
# rpm -q --queryformat '%{NAME}-%{VERSION}-%{RELEASE}.%{ARCH}\n' kernel
| Kernel Architecture | Red Hat Enterprise Linux 3 | Red Hat Enterprise Linux 4 | Red Hat Enterprise Linux 5 |
|---|---|---|---|
| athlon | Supported (AMD) | ||
| athlon-SMP | Supported (AMD) | ||
| i32e | Supported (Intel) | ||
| i686 | Supported (Intel) | Supported | Supported |
| i686-PAE | Supported | ||
| i686-SMP | Supported (Intel) | Supported | |
| i686-HUGEMEM | Supported (Intel) | Supported | |
| x86_64 | Supported (AMD) | Supported | Supported |
| x86_64-SMP | Supported (AMD) | Supported | |
| x86_64-LARGESMP | Supported | ||
| Itanium (IA64) | Supported |
Important
Note
# rpm -q --queryformat '%{NAME}-%{VERSION}-%{RELEASE}.%{ARCH}\n' kernel
kernel-PAE-2.6.18-53.1.4.el5.i686
Para-virtualized device drivers can be installed after successfully installing a guest operating system. You will need a functioning host and guest before you can install these drivers.
Note
GRUB), or a disk that contains the kernel initrd images. Any disk which contains the /boot directory or partition cannot use the para-virtualized block device drivers.
For Red Hat Enterprise Linux 3 based guest operating systems you must use the processor specific kernel and para-virtualized driver RPMs as seen in the tables below. If you fail to install the matching para-virtualized driver package, loading of the xen-pci-platform module will fail.
| Guest kernel type | Required host kernel type |
|---|---|
| ia32e (UP and SMP) | x86_64 |
| i686 | i686 |
| i686-SMP | i686 |
| i686-HUGEMEM | i686 |
| Guest kernel type | Required host kernel type |
|---|---|
| athlon | i686 |
| athlon-SMP | i686 |
| x86_64 | x86_64 |
| x86_64-SMP | x86_64 |
12.3. Installing the Para-virtualized Drivers
Important
Note
MBR and the boot loader (GRUB), and for the /boot partition. This partition can be very small, as it only needs to have enough capacity to hold the /boot partition.
/, /usr) or logical volumes.
/boot partition will use the virtualized block device drivers.
12.3.1. Common installation steps
- Copy the RPMs for your hardware architecture to a suitable location in your guest operating system. Your home directory is sufficient. If you do not know which RPM you require verify against the table at Section 12.2, “Para-virtualization Restrictions and Support”.
- Use the
rpmcommand or theyumcommand to install the packages. Therpmutility will install the following four new kernel modules into/lib/modules/[%kversion][%kvariant]/extra/xenpv/%release:- the PCI infrastructure module,
xen_platform_pci.ko, - the ballooning module,
xen_balloon.ko, - the virtual block device module,
xen_vbd.ko, - and the virtual network device module,
xen_vnif.ko.
- If the guest operating does not support automatically loading the para-virtualized drivers (for example, Red Hat Enterprise Linux 3) perform the required post-install steps to copy the drivers into the operating system specific locations.
- Shut down your guest operating system.
- Reconfigure the guest operating system's configuration file on the host to use the installed para-virtualized drivers.
- Remove the “type=ioemu” entry for the network device.
- Add any additional disk partitions, volumes or LUNs to the guest so that they can be accessed via the para-virtualized (
xen-vbd) disk driver. - For each physical device, LUN, partition or volume you want to use the para-virtualized drivers you must edit the disk entry for that device in the libvirt configuration file.
- A typical disk entry resembles the following:
Copy to Clipboard Copied! Toggle word wrap Toggle overflow Modify each disk entry, as desired, to use the para-virtualized by changing the driver elements as shown below.Copy to Clipboard Copied! Toggle word wrap Toggle overflow - Add any additional storage entities you want to use for the para-virtualized block device driver.
- Restart your guest:
xm start YourGuestName
# xm start YourGuestNameCopy to Clipboard Copied! Toggle word wrap Toggle overflow Where YourGuestName is the name of the configuration file or the guest operating system's name as defined in its configuration file in the name = "os_name" parameter. - Reconfigure the guest network.
12.3.2. Installation and Configuration of Para-virtualized Drivers on Red Hat Enterprise Linux 3
Note
The list below covers the steps to install a Red Hat Enterprise Linux 3 guest with para-virtualized drivers.
- Install the latest kernel version. The para-virtualized drivers require at least Red Hat Enterprise Linux 3.9 kernel version
kernel-2.4.21-60.ELfor all the required headers. - Copy the
kmod-xenpvrpm for your hardware architecture and kernel variant to your guest operating system. - Use the
rpmutility to install the RPM packages. Ensure you have correctly identified which package you need for your guest operating system variant and architecture.rpm -ivh kmod-xenpv*
[root@rhel3]# rpm -ivh kmod-xenpv*Copy to Clipboard Copied! Toggle word wrap Toggle overflow - Use the commands below load the para-virtualized driver modules. %kvariant is the kernel variant the para-virtualized drivers have been build against and %release corresponds to the release version of the para-virtualized drivers.
Copy to Clipboard Copied! Toggle word wrap Toggle overflow Note
Warnings will be generated byinsmodwhen installing the binary driver modules due to Red Hat Enterprise Linux 3 having MODVERSIONS enabled. These warnings can be ignored. - Verify
/etc/modules.confand make sure you have an alias foreth0like the one below. If you are planning to configure multiple interfaces add an additional line for each interface.alias eth0 xen-vnif
alias eth0 xen-vnifCopy to Clipboard Copied! Toggle word wrap Toggle overflow Edit/etc/rc.localand add the line:insmod /lib/modules/'uname -r'/extra/xenpv/%release/xen-vbd.o
insmod /lib/modules/'uname -r'/extra/xenpv/%release/xen-vbd.oCopy to Clipboard Copied! Toggle word wrap Toggle overflow Note
Substitute “%release” with the actual release version (for example 0.1-5.el) for the para-virtualized drivers. If you update the para-virtualized driver RPM package make sure you update the release version to the appropriate version. - Shutdown the virtual machine (use “
#shutdown -h now” inside the guest). - Edit the guest configuration file in
/etc/xen/YourGuestNamewith a text editor, performing the following changes:- Remove the “
type=ioemu” entry from the “vif=” entry. - Add any additional disk partitions, volumes or LUNs to the guest so that they can be accessed via the para-virtualized (
xen-vbd) disk driver. - For each physical device, LUN, partition or volume you want to use the para-virtualized drivers you must edit the disk entry for that device in the libvirt configuration file.
- A typical disk entry resembles the following:
Copy to Clipboard Copied! Toggle word wrap Toggle overflow Modify each disk entry, as desired, to use the para-virtualized by changing the driver elements as shown below.Copy to Clipboard Copied! Toggle word wrap Toggle overflow - Once complete, save the modified configuration file and restart the guest.
- Boot the virtual machine:
xm start YourGuestName
# xm start YourGuestNameCopy to Clipboard Copied! Toggle word wrap Toggle overflow Where YourGuestName is the name of the configuration file or the guest operating system's name as defined in its configuration file in the name = "os_name" parameter.
Warning
weak-modules and modversions support is not provided in Red Hat Enterprise Linux 3. To insert the module execute the command below.
insmod xen_vbd.ko
xen-vbd. The steps below will cover how to create and register para-virtualized block devices.
mknod /dev/xvdc b $major 16 mknod /dev/xvdc1 b $major 17
# mknod /dev/xvdc b $major 16
# mknod /dev/xvdc1 b $major 17
mknod /dev/xvdd b $major 32 mknod /dev/xvdd1 b $major 33
# mknod /dev/xvdd b $major 32
# mknod /dev/xvdd1 b $major 33
xvdb” is available to the system.
- Create directories to mount the block device image in.
mkdir /mnt/pvdisk_p1 mkdir /mnt/pvdisk_p2
[root@rhel3]# mkdir /mnt/pvdisk_p1 [root@rhel3]# mkdir /mnt/pvdisk_p2Copy to Clipboard Copied! Toggle word wrap Toggle overflow - Mount the devices to the new folders.
mount /dev/xvdb1 /mnt/pvdisk_p1 mount /dev/xvdb2 /mnt/pvdisk_p2
[root@rhel3]# mount /dev/xvdb1 /mnt/pvdisk_p1 [root@rhel3]# mount /dev/xvdb2 /mnt/pvdisk_p2Copy to Clipboard Copied! Toggle word wrap Toggle overflow - Verify the devices are mounted correctly.
df /mnt/pvdisk_p1 Filesystem 1K-blocks Used Available Use% Mounted on /dev/xvdb1 32000 15 31985 1% /mnt/pvdisk_p1
[root@rhel3]# df /mnt/pvdisk_p1 Filesystem 1K-blocks Used Available Use% Mounted on /dev/xvdb1 32000 15 31985 1% /mnt/pvdisk_p1Copy to Clipboard Copied! Toggle word wrap Toggle overflow - Update the
/etc/fstabfile inside the guest to mount the devices during the boot sequence. Add the following lines:/dev/xvdb1 /mnt/pvdisk_p1 ext3 defaults 1 2 /dev/xvdb2 /mnt/pvdisk_p2 ext3 defaults 1 2
/dev/xvdb1 /mnt/pvdisk_p1 ext3 defaults 1 2 /dev/xvdb2 /mnt/pvdisk_p2 ext3 defaults 1 2Copy to Clipboard Copied! Toggle word wrap Toggle overflow
Note
dom0), the "noapic" parameter should be added to the kernel boot line in your virtual guest's /boot/grub/grub.conf entry as seen below. Keep in mind your architecture and kernel version may be different.
kernel /vmlinuz-2.6.9-67.EL ro root=/dev/VolGroup00/rhel4_x86_64 rhgb noapic
Important
12.3.3. Installation and Configuration of Para-virtualized Drivers on Red Hat Enterprise Linux 4
Note
The list below covers the steps to install a Red Hat Enterprise Linux 4 guest with para-virtualized drivers.
- Copy the
kmod-xenpv,modules-init-toolsandmodversionsRPMs for your hardware architecture and kernel variant to your guest operating system. - Use the
rpmutility to install the RPM packages. Make sure you have correctly identified which package you need for your guest operating system variant and architecture. An updated module-init-tools is required for this package, it is available with the Red Hat Enterprise Linux 4-6-z kernel or newer.rpm -ivh modversions rpm -Uvh module-init-tools rpm -ivh kmod-xenpv*
[root@rhel4]# rpm -ivh modversions [root@rhel4]# rpm -Uvh module-init-tools [root@rhel4]# rpm -ivh kmod-xenpv*Copy to Clipboard Copied! Toggle word wrap Toggle overflow Note
There are different packages for UP, SMP, Hugemem and architectures so make sure you have the right RPMs for your kernel. - Execute
cat /etc/modprobe.confto verify you have an alias foreth0like the one below. If you are planning to configure multiple interfaces add an additional line for each interface. If it does not look like the entry below change it.alias eth0 xen-vnif
alias eth0 xen-vnifCopy to Clipboard Copied! Toggle word wrap Toggle overflow - Shutdown the virtual machine (use “
#shutdown -h now” inside the guest). - Edit the guest configuration file in
/etc/xen/YourGuestsNamein the following ways:- Remove the “
type=ioemu” entry from the “vif=” entry. - Add any additional disk partitions, volumes or LUNs to the guest so that they can be accessed via the para-virtualized (
xen-vbd) disk driver. - For each additional physical device, LUN, partition or volume add an entry similar to the one shown below to the “
disk=” section in the guest configuration file. The original “disk=” entry might also look like the entry below.disk = [ "file:/var/lib/libvirt/images/rhel4_64_fv.dsk,hda,w"]
disk = [ "file:/var/lib/libvirt/images/rhel4_64_fv.dsk,hda,w"]Copy to Clipboard Copied! Toggle word wrap Toggle overflow - Once you have added additional physical devices, LUNs, partitions or volumes; the para-virtualized driver entry in your XML configuration file should resemble the entry shown below.
disk = [ "file:/var/lib/libvirt/images/rhel3_64_fv.dsk,hda,w", "tap:aio:/var/lib/libvirt/images/UserStorage.dsk,xvda,w" ]
disk = [ "file:/var/lib/libvirt/images/rhel3_64_fv.dsk,hda,w", "tap:aio:/var/lib/libvirt/images/UserStorage.dsk,xvda,w" ]Copy to Clipboard Copied! Toggle word wrap Toggle overflow Note
Use “tap:aio” for the para-virtualized device if a file-based image is used.
- Boot the virtual machine using the
virshcommand:virsh start YourGuestName
# virsh start YourGuestNameCopy to Clipboard Copied! Toggle word wrap Toggle overflow
kudzu will ask you to "Keep or Delete the Realtek Network device" and "Configure the xen-bridge device". You should configure the xen-bridge and delete the Realtek network device.
Note
dom0), the "noapic" parameter should be added to the kernel boot line in your virtual guest's /boot/grub/grub.conf entry as seen below. Keep in mind your architecture and kernel version may be different.
kernel /vmlinuz-2.6.9-67.EL ro root=/dev/VolGroup00/rhel4_x86_64 rhgb noapic
xvdb” is available to the system.
- Create directories to mount the block device image in.
mkdir /mnt/pvdisk_p1 mkdir /mnt/pvdisk_p2
[root@rhel4]# mkdir /mnt/pvdisk_p1 [root@rhel4]# mkdir /mnt/pvdisk_p2Copy to Clipboard Copied! Toggle word wrap Toggle overflow - Mount the devices to the new folders.
mount /dev/xvdb1 /mnt/pvdisk_p1 mount /dev/xvdb2 /mnt/pvdisk_p2
[root@rhel4]# mount /dev/xvdb1 /mnt/pvdisk_p1 [root@rhel4]# mount /dev/xvdb2 /mnt/pvdisk_p2Copy to Clipboard Copied! Toggle word wrap Toggle overflow - Verify the devices are mounted correctly.
df /mnt/pvdisk_p1 Filesystem 1K-blocks Used Available Use% Mounted on /dev/xvdb1 32000 15 31985 1% /mnt/pvdisk_p1
[root@rhel4]# df /mnt/pvdisk_p1 Filesystem 1K-blocks Used Available Use% Mounted on /dev/xvdb1 32000 15 31985 1% /mnt/pvdisk_p1Copy to Clipboard Copied! Toggle word wrap Toggle overflow - Update the
/etc/fstabfile inside the guest to mount the devices during the boot sequence. Add the following lines:/dev/xvdb1 /mnt/pvdisk_p1 ext3 defaults 1 2 /dev/xvdb2 /mnt/pvdisk_p2 ext3 defaults 1 2
/dev/xvdb1 /mnt/pvdisk_p1 ext3 defaults 1 2 /dev/xvdb2 /mnt/pvdisk_p2 ext3 defaults 1 2Copy to Clipboard Copied! Toggle word wrap Toggle overflow
Note
Important
Note
xen-vbd driver may not automatically load. Execute the following command on the guest, substituting %release with the correct release version for the para-virtualized drivers.
# insmod /lib/modules/'uname -r'/weak-updates/xenpv/%release/xen_vbd.ko
12.3.4. Xen Para-virtualized Drivers on Red Hat Enterprise Linux 5
Note
Procedure 12.1. Enable para-virtualized drivers for a Red Hat Enterprise Linux Guest
- Shutdown the virtual machine (use “
#shutdown -h now” inside the guest). - Edit the guest configuration file in
/etc/xen/<Your GuestsName>in the following ways:- Remove the “
type=ioemu” entry from the “vif=” entry. - Add any additional disk partitions, volumes or LUNs to the guest so that they can be accessed via the para-virtualized (
xen-vbd) disk driver. - For each additional physical device, LUN, partition or volume add an entry similar to the one shown below to the “
disk=” section in the guest configuration file. The original “disk=” entry might also look like the entry below.disk = [ "file:/var/lib/libvirt/images/rhel4_64_fv.dsk,hda,w"]
disk = [ "file:/var/lib/libvirt/images/rhel4_64_fv.dsk,hda,w"]Copy to Clipboard Copied! Toggle word wrap Toggle overflow - Once you have added additional physical devices, LUNs, partitions or volumes; the para-virtualized driver entry in your XML configuration file should resemble the entry shown below.
disk = [ "file:/var/lib/libvirt/images/rhel3_64_fv.dsk,hda,w", "tap:aio:/var/lib/libvirt/images/UserStorage.dsk,xvda,w" ]
disk = [ "file:/var/lib/libvirt/images/rhel3_64_fv.dsk,hda,w", "tap:aio:/var/lib/libvirt/images/UserStorage.dsk,xvda,w" ]Copy to Clipboard Copied! Toggle word wrap Toggle overflow Note
Use “tap:aio” for the para-virtualized device if a file-based image is used.
- Boot the virtual machine using the
virshcommand:virsh start YourGuestName
# virsh start YourGuestNameCopy to Clipboard Copied! Toggle word wrap Toggle overflow
ifconfig eth0
[root@rhel5]# ifconfig eth0
xvdb” is available to the system.
- Create directories to mount the block device image in.
mkdir /mnt/pvdisk_p1 mkdir /mnt/pvdisk_p2
[root@rhel5]# mkdir /mnt/pvdisk_p1 [root@rhel5]# mkdir /mnt/pvdisk_p2Copy to Clipboard Copied! Toggle word wrap Toggle overflow - Mount the devices to the new folders.
mount /dev/xvdb1 /mnt/pvdisk_p1 mount /dev/xvdb2 /mnt/pvdisk_p2
[root@rhel5]# mount /dev/xvdb1 /mnt/pvdisk_p1 [root@rhel5]# mount /dev/xvdb2 /mnt/pvdisk_p2Copy to Clipboard Copied! Toggle word wrap Toggle overflow - Verify the devices are mounted correctly.
df /mnt/pvdisk_p1 Filesystem 1K-blocks Used Available Use% Mounted on /dev/xvdb1 32000 15 31985 1% /mnt/pvdisk_p1
[root@rhel5]# df /mnt/pvdisk_p1 Filesystem 1K-blocks Used Available Use% Mounted on /dev/xvdb1 32000 15 31985 1% /mnt/pvdisk_p1Copy to Clipboard Copied! Toggle word wrap Toggle overflow - Update the
/etc/fstabfile inside the guest to mount the devices during the boot sequence. Add the following lines:/dev/xvdb1 /mnt/pvdisk_p1 ext3 defaults 1 2 /dev/xvdb2 /mnt/pvdisk_p2 ext3 defaults 1 2
/dev/xvdb1 /mnt/pvdisk_p1 ext3 defaults 1 2 /dev/xvdb2 /mnt/pvdisk_p2 ext3 defaults 1 2Copy to Clipboard Copied! Toggle word wrap Toggle overflow
Note
dom0), the "noapic" parameter should be added to the kernel boot line in your virtual guest's /boot/grub/grub.conf entry as seen below. Keep in mind your architecture and kernel version may be different.
kernel /vmlinuz-2.6.9-67.EL ro root=/dev/VolGroup00/rhel4_x86_64 rhgb noapic
Sometimes, activating the para-virtualized drivers does not delete the old virtualized network interfaces. To remove these interfaces from guests use the following procedure.
- Add the following lines to the
/etc/modprobe.d/blacklistfile. Blacklist8139cpand8139toofor the RealTek 8139 ande1000for the virtualized Intel e1000 NIC.8139cp 8139too e1000
8139cp 8139too e1000Copy to Clipboard Copied! Toggle word wrap Toggle overflow - Remove the old network scripts from the
/etc/sysconfig/network-scriptsdirectory. - Reboot the guest. The default network interface should now use the para-virtualized drivers.
12.3.5. Xen Para-virtualized Drivers on Red Hat Enterprise Linux 6
xen_emul_unplug=never
xen_emul_unplug=never
12.4. Para-virtualized Network Driver Configuration
- In
virt-manageropen the console window for the guest and log in asroot. - On Red Hat Enterprise Linux 4 verify the file
/etc/modprobe.confcontains the line “alias eth0 xen-vnif”.cat /etc/modprobe.conf alias eth0 xen-vnif
# cat /etc/modprobe.conf alias eth0 xen-vnifCopy to Clipboard Copied! Toggle word wrap Toggle overflow - To display the present settings for
eth0execute “# ifconfig eth0”. If you receive an error about the device not existing you should load the modules manually as outlined in Section 37.4, “Manually loading the para-virtualized drivers”.Copy to Clipboard Copied! Toggle word wrap Toggle overflow - Start the network configuration utility(NetworkManager) with the command “
# system-config-network”. Click on the “” button to start the network card configuration. - Select the '' entry and click ''.Configure the network settings as required.
- Complete the configuration by pressing the '' button.
- Press the '' button to apply the new settings and restart the network.
- You should now see the new network interface with an IP address assigned.
Copy to Clipboard Copied! Toggle word wrap Toggle overflow
12.5. Additional Para-virtualized Hardware Configuration
12.5.1. Virtualized Network Interfaces
/etc/xen/YourGuestName replacing YourGuestName with the name of your guest.
vif = [ "mac=00:16:3e:2e:c5:a9,bridge=xenbr0" ]
vif = [ "mac=00:16:3e:2e:c5:a9,bridge=xenbr0" ]
vif=” section of the configuration file similar to the one seen below.
vif = [ "mac=00:16:3e:2e:c5:a9,bridge=xenbr0",
"mac=00:16:3e:2f:d5:a9,bridge=xenbr0" ]
vif = [ "mac=00:16:3e:2e:c5:a9,bridge=xenbr0",
"mac=00:16:3e:2f:d5:a9,bridge=xenbr0" ]
echo 'import virtinst.util ; print virtinst.util.randomMAC()' | python
# echo 'import virtinst.util ; print virtinst.util.randomMAC()' | python
/etc/modules.conf in Red Hat Enterprise Linux 3 or /etc/modprobe.conf in Red Hat Enterprise Linux 4 and Red Hat Enterprise Linux 5. Add a new alias for each new interface you added.
alias eth1 xen-vnif
alias eth1 xen-vnif
ifconfig eth1
# ifconfig eth1
redhat-config-network on Red Hat Enterprise Linux 3 or system-config-network on Red Hat Enterprise Linux 4 and Red Hat Enterprise Linux 5.
12.5.2. Virtual Storage Devices
/etc/xen/YourGuestName replacing YourGuestName with the name of your guest. The original entry may look like the one below.
disk = [ "file:/var/lib/libvirt/images/rhel5_64_fv.dsk,hda,w"]
disk = [ "file:/var/lib/libvirt/images/rhel5_64_fv.dsk,hda,w"]
disk=” parameter in the configuration file. Storage entities which use the para-virtualized driver resemble the entry below. The “tap:aio” parameter instructs the hypervisor to use the para-virtualized driver.
disk = [ "file:/var/lib/libvirt/images/rhel5_64_fv.dsk,hda,w",
"tap:aio:/var/lib/libvirt/images/UserStorage1.dsk,xvda,w" ]
disk = [ "file:/var/lib/libvirt/images/rhel5_64_fv.dsk,hda,w",
"tap:aio:/var/lib/libvirt/images/UserStorage1.dsk,xvda,w" ]
disk=” section as a comma separated list.
Note
xvd' device, that is for your second storage entity it would be 'xvdb' instead of 'xvda'.
disk = [ "file:/var/lib/libvirt/images/rhel5_64_fv.dsk,hda,w",
"tap:aio:/var/lib/libvirt/images/UserStorage1.dsk,xvda,w",
"tap:aio:/var/lib/libvirt/images/UserStorage2.dsk,xvdb,w" ]
disk = [ "file:/var/lib/libvirt/images/rhel5_64_fv.dsk,hda,w",
"tap:aio:/var/lib/libvirt/images/UserStorage1.dsk,xvda,w",
"tap:aio:/var/lib/libvirt/images/UserStorage2.dsk,xvdb,w" ]
xvdb” is available to the system.
/etc/fstab inside the guest to mount the devices and partitions at boot time.
Chapter 13. KVM Para-virtualized Drivers
- Red Hat Enterprise Linux 4.8 and newer
- Red Hat Enterprise Linux 5.3 and newer
- Red Hat Enterprise Linux 6.
Important
- Windows XP (32-bit only)
- Windows Server 2003 (32-bit and 64-bit versions)
- Windows Server 2008 (32-bit and 64-bit versions)
- Windows 7 (32-bit and 64-bit versions)
13.1. Installing the KVM Windows para-virtualized drivers
- hosting the installation files on a network accessible to the guest,
- using a virtualized CD-ROM device of the driver installation disk .iso file, or
- using a virtualized floppy device to install the drivers during boot time (for Windows guests).
Download the drivers
The virtio-win package contains the para-virtualized block and network drivers for all supported Windows guests.If the Red Hat Enterprise Linux Supplementary channel entitlements are not enabled for the system, the download will not be available. Enable the Red Hat Enterprise Linux Supplementary channel to access the virtio-win package.Download the virtio-win package with theyumcommand.yum install virtio-win
# yum install virtio-winCopy to Clipboard Copied! Toggle word wrap Toggle overflow The drivers are also available on the Red Hat Enterprise Linux Supplementary disc or from Microsoft (windowsservercatalog.com). Note that the Red Hat Enterprise Virtualization Hypervisor and Red Hat Enterprise Linux are created on the same code base so the drivers for the same version (for example, 5.5) are supported for both environments.The virtio-win package installs a CD-ROM image,virtio-win.iso, in the/usr/share/virtio-win/directory.Install the para-virtualized drivers
It is recommended to install the drivers on the guest before attaching or modifying a device to use the para-virtualized drivers.For block devices storing root file systems or other block devices required for booting the guest, the drivers must be installed before the device is modified. If the drivers are not installed on the guest and the driver is set to the virtio driver the guest will not boot.
This procedure covers installing the para-virtualized drivers with a virtualized CD-ROM after Windows is installed.
virt-manager to mount a CD-ROM image for a Windows guest” to add a CD-ROM image with virt-manager and then install the drivers.
Procedure 13.1. Using virt-manager to mount a CD-ROM image for a Windows guest
Open virt-manager and the guest
Openvirt-manager, select your guest from the list by double clicking the guest name.Open the hardware tab
Click the button in the Hardware tab.Select the device type
This opens a wizard for adding the new device. Select Storage from the dropdown menu.Click the button to proceed.Select the ISO file
Choose the File (disk image) option and set the file location of the para-virtualized drivers .iso image file. The location file is named/usr/share/virtio-win/virtio-win.iso.If the drivers are stored on a physical CD-ROM, use the Normal Disk Partition option.Disc assigned
The disk has been assigned and is available for the guest once the guest is started. Click to close the wizard or back if you made a mistake.Reboot
Reboot or start the guest to add the new device. Virtualized IDE devices require a restart before they can be recognized by guests.
Procedure 13.2. Windows installation
Open My Computer
On the Windows guest, open My Computer and select the CD-ROM drive.Select the correct installation files
There are four files available on the disc. Select the drivers you require for your guest's architecture:- the para-virtualized block device driver (
RHEV-Block.msifor 32-bit guests orRHEV-Block64.msifor 64-bit guests), - the para-virtualized network device driver (
RHEV-Network.msifor 32-bit guests orRHEV-Block64.msifor 64-bit guests), - or both the block and network device drivers.
Double click the installation files to install the drivers.Install the block device driver
Start the block device driver installation
Double clickRHEV-Block.msiorRHEV-Block64.msi.Press to continue.Confirm the exception
Windows may prompt for a security exception.Press if it is correct.Finish
Press to complete the installation.
Install the network device driver
Start the network device driver installation
Double clickRHEV-Network.msiorRHEV-Network64.msi.Press to continue.Performance setting
This screen configures advanced TCP settings for the network driver. TCP timestamps and TCP window scaling can be enabled or disabled. The default is, 1, for window scaling to be enabled.TCP window scaling is covered by IETF RFC 1323. The RFC defines a method of increasing the receive window size to a size greater than the default maximum of 65,535 bytes up to a new maximum of 1 gigabyte (1,073,741,824 bytes). TCP window scaling allows networks to transfer at closer to theoretical network bandwidth limits. Larger receive windows may not be supported by some networking hardware or operating systems.TCP timestamps are also defined by IETF RFC 1323. TCP timestamps are used to better calculate Return Travel Time estimates by embedding timing information is embedded in packets. TCP timestamps help the system to adapt to changing traffic levels and avoid congestion issues on busy networks.Value Action 0 Disable TCP timestamps and window scaling. 1 Enable TCP window scaling. 2 Enable TCP timestamps. 3 Enable TCP timestamps and window scaling. Press to continue.Confirm the exception
Windows may prompt for a security exception.Press if it is correct.Finish
Press to complete the installation.
Reboot
Reboot the guest to complete the driver installation.
13.2. Installing drivers with a virtualized floppy disk
- Upon installing the Windows VM for the first time using the run-once menu attach
viostor.vfdas a floppyWindows Server 2003
When windows prompts to press F6 for third party drivers, do so and follow the onscreen instructions.Windows Server 2008
When the installer prompts you for the driver, click on Load Driver, point the installer to drive A: and pick the driver that suits your guest operating system and architecture.
13.3. Using KVM para-virtualized drivers for existing devices
virtio driver instead of virtualized IDE driver. This example edits libvirt configuration files. Alternatively, virt-manager, virsh attach-disk or virsh attach-interface can add a new device using the para-virtualized drivers Section 13.4, “Using KVM para-virtualized drivers for new devices”.
- Below is a file-based block device using the virtualized IDE driver. This is a typical entry for a guest not using the para-virtualized drivers.
<disk type='file' device='disk'> <source file='/var/lib/libvirt/images/disk1.img'/> <target dev='vda' bus='ide'/> </disk>
<disk type='file' device='disk'> <source file='/var/lib/libvirt/images/disk1.img'/> <target dev='vda' bus='ide'/> </disk>Copy to Clipboard Copied! Toggle word wrap Toggle overflow - Change the entry to use the para-virtualized device by modifying the bus= entry to
virtio.<disk type='file' device='disk'> <source file='/var/lib/libvirt/images/disk1.img'/> <target dev='vda' bus='virtio'/> </disk>
<disk type='file' device='disk'> <source file='/var/lib/libvirt/images/disk1.img'/> <target dev='vda' bus='virtio'/> </disk>Copy to Clipboard Copied! Toggle word wrap Toggle overflow
13.4. Using KVM para-virtualized drivers for new devices
virt-manager.
virsh attach-disk or virsh attach-interface commands can be used to attach devices using the para-virtualized drivers.
Important
- Open the guest by double clicking on the name of the guest in
virt-manager. - Open the Hardware tab.
- Press the Add Hardware button.
- In the Adding Virtual Hardware tab select Storage or Network for the type of device.
- New disk devicesSelect the storage device or file-based image. Select Virtio Disk as the Device type and press Forward.
- New network devicesSelect Virtual network or Shared physical device. Select virtio as the Device type and press Forward.
- Press Finish to save the device.
- Reboot the guest. The device may not be recognized until the Windows guest restarts.
Chapter 14. Installing Red Hat Enterprise Linux 6 as a Xen guest on Red Hat Enterprise Linux 5
14.1. Installing Red Hat Enterprise Linux 6 as a Xen para-virtualized guest on Red Hat Enterprise Linux 5
Important
14.1.1. Using virt-install
virt-install command. For instructions on virt-manager, see the procedure in Section 14.1.2, “Using virt-manager”.
virt-install tool. This method installs Red Hat Enterprise Linux 6 from a remote server hosting the network installation tree. The installation instructions presented in this section are similar to installing from the minimal installation live CD-ROM.
Procedure 14.1. Creating a Xen para-virtualized Red Hat Enterprise Linux 6 guest with virt-install
Create the guest with the
virt-installcommandIn this example, the name of the guest is rhel6pv-64, the disk image file is rhel6pv-64.img and a local mirror of the Red Hat Enterprise Linux 6 installation tree is http://example.com/installation_tree/RHEL6-x86/.Replace these values with values for your system and network, and use the following commands to create the guest:virt-install --name=rhel6pv-64 \ --disk path=/var/lib/xen/images/rhel6pv-64.img,size=6,sparse=false \ --graphics spice --paravirt --vcpus=2 --ram=2048 \ --location=http://example.com/installation_tree/RHEL6-x86/
# virt-install --name=rhel6pv-64 \ --disk path=/var/lib/xen/images/rhel6pv-64.img,size=6,sparse=false \ --graphics spice --paravirt --vcpus=2 --ram=2048 \ --location=http://example.com/installation_tree/RHEL6-x86/Copy to Clipboard Copied! Toggle word wrap Toggle overflow Note
Red Hat Enterprise Linux can be installed without a graphical interface or manual input. Use a Kickstart file to automate the installation process. This example extends the previous example with a Kickstart file, located athttp://example.com/kickstart/ks.cfg, to fully automate the installation.virt-install --name=rhel6pv-64 \ --disk path=/var/lib/xen/images/rhel6pv-64.img,size=6,sparse=false \ --graphics spice --paravirt --vcpus=2 --ram=2048 \ --location=http://example.com/installation_tree/RHEL6-x86/ \ -x "ks=http://example.com/kickstart/ks.cfg"
# virt-install --name=rhel6pv-64 \ --disk path=/var/lib/xen/images/rhel6pv-64.img,size=6,sparse=false \ --graphics spice --paravirt --vcpus=2 --ram=2048 \ --location=http://example.com/installation_tree/RHEL6-x86/ \ -x "ks=http://example.com/kickstart/ks.cfg"Copy to Clipboard Copied! Toggle word wrap Toggle overflow The graphical console opens showing the initial boot phase of the guest.Install Red Hat Enterprise Linux 6
After your guest has completed its initial boot, the standard installation process for Red Hat Enterprise Linux 6 starts.See the Red Hat Enterprise Linux 6 Installation Guide for more information on installing Red Hat Enterprise Linux 6.
14.1.2. Using virt-manager
Procedure 14.2. Creating a Xen virtualized Red Hat Enterprise Linux 6 guest with virt-manager
Open virt-manager
Startvirt-manager. Launch the application from the menu and submenu. Alternatively, run thevirt-managercommand as root.Select the hypervisor
Select the Xen hypervisor connection. Note that presently the KVM hypervisor is namedqemu.If you have not already done so, connect to a hypervisor. Open the File menu and select the Add Connection... option. See the Red Hat Enterprise Linux Virtualization Administration Guide for further details about adding a remote connection.Start the new virtual machine wizard
Once a hypervisor connection is selected the New button becomes available. Clicking the New button starts the virtual machine creation wizard, which explains the steps that follow.Figure 14.1. The virtual machine creation wizard
Click to continue.Name the virtual machine
Provide a name for your virtualized guest. The following punctuation and whitespace characters are permitted: '_', '.' and '-' characters.Figure 14.2. The virtual machine creation wizard
Click to continue.Select the virtualization method
Select the appropriate virtualization method. The following example uses Para-virtualization.Figure 14.3. The virtual machine creation wizard
Click to continue.Select the installation method and type
Select the appropriate installation method. In this example, use the Network install tree method.Set the OS Type and OS Variant. In this case, we set OS Type to Linux and OS Variant to Red Hat Enterprise Linux 6.Figure 14.4. The virtual machine creation wizard
Click to continue.Locate installation media
Enter the location of the installation tree.Figure 14.5. The virtual machine creation wizard
Click to continue.Storage setup
Important
Xen file-based images should be stored in the/var/lib/xen/images/directory. Any other location may require additional configuration for SELinux. See the Red Hat Enterprise Linux 6 Virtualization Administration Guide for more information on configuring SELinux.Assign a physical storage device (Block device) or a file-based image (File). Assign sufficient space for your virtualized guest and any applications the guest requires.Figure 14.6. The virtual machine creation wizard
Click to continue.Note
Live and offline migrations require guests to be installed on shared network storage. For information on setting up shared storage for guests, see the Red Hat Enterprise Linux 6 Virtualization Administration Guide chapter on Storage Pools.Network setup
Select either Virtual network or Shared physical device.The virtual network option uses Network Address Translation (NAT) to share the default network device with the virtualized guest.The shared physical device option uses a network bridge to give the virtualized guest full access to a network device.Figure 14.7. The virtual machine creation wizard
Click to continue.Memory and CPU allocation
The Memory and CPU Allocation window displays. Choose appropriate values for the virtualized CPUs and RAM allocation. These values affect the host's and guest's performance.Virtualized guests require sufficient physical memory (RAM) to run efficiently and effectively. Choose a memory value which suits your guest operating system and application requirements. Remember, Xen guests use physical RAM. Running too many guests or leaving insufficient memory for the host system results in significant usage of virtual memory and swapping. Virtual memory is significantly slower which causes degraded system performance and responsiveness. Ensure that you allocate sufficient memory for all guests and the host to operate effectively.Assign sufficient virtual CPUs for the virtualized guest. If the guest runs a multithreaded application, assign the number of virtualized CPUs the guest will require to run efficiently. Do not assign more virtual CPUs than there are physical processors (or hyper-threads) available on the host system. It is possible to over-allocate virtual processors, however, over-allocating vCPUs has a significant, negative effect on Xen guest and host performance.Figure 14.8. The virtual machine creation wizard
Click to continue.Verify and start guest installation
Verify the configuration.Figure 14.9. The virtual machine creation wizard
Click to start the guest installation procedure.Installing Red Hat Enterprise Linux
Complete the Red Hat Enterprise Linux installation sequence. See the Red Hat Enterprise Linux 6 Installation Guide for detailed installation instructions.
14.2. Installing Red Hat Enterprise Linux 6 as a Xen fully virtualized guest on Red Hat Enterprise Linux 5
Chapter 15. PCI passthrough
Procedure 15.1. Preparing an Intel system for PCI passthrough
Enable the Intel VT-d extensions
The Intel VT-d extensions provides hardware support for directly assigning a physical devices to guest. The main benefit of the feature is to improve the performance as native for device access.The VT-d extensions are required for PCI passthrough with Red Hat Enterprise Linux. The extensions must be enabled in the BIOS. Some system manufacturers disable these extensions by default.These extensions are often called various terms in BIOS which differ from manufacturer to manufacturer. Consult your system manufacturer's documentation.Activate Intel VT-d in the kernel
Activate Intel VT-d in the kernel by appending theintel_iommu=onparameter to the kernel line of the kernel line in the/boot/grub/grub.conffile.The example below is a modifiedgrub.conffile with Intel VT-d activated.Copy to Clipboard Copied! Toggle word wrap Toggle overflow Ready to use
Reboot the system to enable the changes. Your system is now PCI passthrough capable.
Procedure 15.2. Preparing an AMD system for PCI passthrough
Enable AMD IOMMU extensions
The AMD IOMMU extensions are required for PCI passthrough with Red Hat Enterprise Linux. The extensions must be enabled in the BIOS. Some system manufacturers disable these extensions by default.
Important
iommu=on parameter to the hypervisor command line. Modify the /boot/grub/grub.conf file as follows to enable PCI passthrough:
15.1. Adding a PCI device with virsh
Important
pci_8086_3a6c, and a fully virtualized guest named win2k3.
Identify the device
Identify the PCI device designated for passthrough to the guest. Thevirsh nodedev-listcommand lists all devices attached to the system. The--treeoption is useful for identifying devices attached to the PCI device (for example, disk controllers and USB controllers).virsh nodedev-list --tree
# virsh nodedev-list --treeCopy to Clipboard Copied! Toggle word wrap Toggle overflow For a list of only PCI devices, run the following command:virsh nodedev-list | grep pci
# virsh nodedev-list | grep pciCopy to Clipboard Copied! Toggle word wrap Toggle overflow Each PCI device is identified by a string in the following format (where 8086 is a variable that in this case represents Intel equipment, and **** is a four digit hexadecimal code specific to each device):pci_8086_****
pci_8086_****Copy to Clipboard Copied! Toggle word wrap Toggle overflow Note
Comparinglspcioutput tolspci -n(which turns off name resolution) output can assist in deriving which device has which device identifier code.Record the PCI device number; the number is needed in other steps.- Information on the domain, bus and function are available from output of the
virsh nodedev-dumpxmlcommand:Copy to Clipboard Copied! Toggle word wrap Toggle overflow - Detach the device from the system. Attached devices cannot be used and may cause various errors if connected to a guest without detaching first.
virsh nodedev-dettach pci_8086_3a6c Device pci_8086_3a6c dettached
# virsh nodedev-dettach pci_8086_3a6c Device pci_8086_3a6c dettachedCopy to Clipboard Copied! Toggle word wrap Toggle overflow - Convert slot and function values to hexadecimal values (from decimal) to get the PCI bus addresses. Append "0x" to the beginning of the output to tell the computer that the value is a hexadecimal number.For example, if bus = 0, slot = 26 and function = 7 run the following:
Copy to Clipboard Copied! Toggle word wrap Toggle overflow The values to use:bus='0x00' slot='0x1a' function='0x7'
bus='0x00' slot='0x1a' function='0x7'Copy to Clipboard Copied! Toggle word wrap Toggle overflow - Run
virsh edit(or virsh attach device) and add a device entry in the<devices>section to attach the PCI device to the guest. Only run this command on offline guests. Red Hat Enterprise Linux does not support hotplugging PCI devices at this time.Copy to Clipboard Copied! Toggle word wrap Toggle overflow - Once the guest system is configured to use the PCI address, we need to tell the host system to stop using it. The
ehcidriver is loaded by default for the USB PCI controller.readlink /sys/bus/pci/devices/0000\:00\:1d.7/driver ../../../bus/pci/drivers/ehci_hcd
$ readlink /sys/bus/pci/devices/0000\:00\:1d.7/driver ../../../bus/pci/drivers/ehci_hcdCopy to Clipboard Copied! Toggle word wrap Toggle overflow - Detach the device:
virsh nodedev-dettach pci_8086_3a6c
$ virsh nodedev-dettach pci_8086_3a6cCopy to Clipboard Copied! Toggle word wrap Toggle overflow - Verify it is now under the control of pci_stub:
readlink /sys/bus/pci/devices/0000\:00\:1d.7/driver ../../../bus/pci/drivers/pci-stub
$ readlink /sys/bus/pci/devices/0000\:00\:1d.7/driver ../../../bus/pci/drivers/pci-stubCopy to Clipboard Copied! Toggle word wrap Toggle overflow - Set a sebool to allow the management of the PCI device from the guest:
setsebool -P virt_use_sysfs 1
# setsebool -P virt_use_sysfs 1Copy to Clipboard Copied! Toggle word wrap Toggle overflow - Start the guest system :
virsh start win2k3
# virsh start win2k3Copy to Clipboard Copied! Toggle word wrap Toggle overflow
15.2. Adding a PCI device with virt-manager
virt-manager tool. The following procedure adds a 2 port USB controller to a guest.
Identify the device
Identify the PCI device designated for passthrough to the guest. Thevirsh nodedev-listcommand lists all devices attached to the system. The--treeoption is useful for identifying devices attached to the PCI device (for example, disk controllers and USB controllers).virsh nodedev-list --tree
# virsh nodedev-list --treeCopy to Clipboard Copied! Toggle word wrap Toggle overflow For a list of only PCI devices, run the following command:virsh nodedev-list | grep pci
# virsh nodedev-list | grep pciCopy to Clipboard Copied! Toggle word wrap Toggle overflow Each PCI device is identified by a string in the following format (where 8086 is a variable that in this case represents Intel equipment, and **** is a four digit hexadecimal code specific to each device):pci_8086_****
pci_8086_****Copy to Clipboard Copied! Toggle word wrap Toggle overflow Note
Comparinglspcioutput tolspci -n(which turns off name resolution) output can assist in deriving which device has which device identifier code.Record the PCI device number; the number is needed in other steps.Detach the PCI device
Detach the device from the system.virsh nodedev-dettach pci_8086_3a6c Device pci_8086_3a6c dettached
# virsh nodedev-dettach pci_8086_3a6c Device pci_8086_3a6c dettachedCopy to Clipboard Copied! Toggle word wrap Toggle overflow Power off the guest
Power off the guest. Hotplugging PCI devices into guests is presently unsupported and may fail or crash.Open the hardware settings
Open the virtual machine and select the Hardware tab. Click the Add Hardware button to add a new device to the guest.Add the new device
Select Physical Host Device from the Hardware type list. The Physical Host Device represents PCI devices. Click Forward to continue.Select a PCI device
Select an unused PCI device. Note that selecting PCI devices presently in use on the host causes errors. In this example a PCI to USB interface device is used.Confirm the new device
Click the Finish button to confirm the device setup and add the device to the guest.
15.3. PCI passthrough with virt-install
--host-device parameter.
Identify the PCI device
Identify the PCI device designated for passthrough to the guest. Thevirsh nodedev-listcommand lists all devices attached to the system. The--treeoption is useful for identifying devices attached to the PCI device (for example, disk controllers and USB controllers).virsh nodedev-list --tree
# virsh nodedev-list --treeCopy to Clipboard Copied! Toggle word wrap Toggle overflow For a list of only PCI devices, run the following command:virsh nodedev-list | grep pci
# virsh nodedev-list | grep pciCopy to Clipboard Copied! Toggle word wrap Toggle overflow Each PCI device is identified by a string in the following format (where 8086 is a variable that in this case represents Intel equipment, and **** is a four digit hexadecimal code specific to each device):pci_8086_****
pci_8086_****Copy to Clipboard Copied! Toggle word wrap Toggle overflow Note
Comparinglspcioutput tolspci -n(which turns off name resolution) output can assist in deriving which device has which device identifier code.Add the device
Use the PCI identifier output from thevirsh nodedevcommand as the value for the--host-deviceparameter.Copy to Clipboard Copied! Toggle word wrap Toggle overflow Complete the installation
Complete the guest installation. The PCI device should be attached to the guest.
15.4. Removing a PCI passthrough device for host re-use
List all PCI devices
For a list of only PCI devices, run the following command:virsh nodedev-list | grep pci
# virsh nodedev-list | grep pciCopy to Clipboard Copied! Toggle word wrap Toggle overflow Each PCI device is identified by a string in the following format (where 8086 is a variable that in this case represents Intel equipment, and **** is a four digit hexadecimal code specific to each device):pci_8086_****
pci_8086_****Copy to Clipboard Copied! Toggle word wrap Toggle overflow Note
Comparinglspcioutput tolspci -n(which turns off name resolution) output can assist in deriving which device has which device identifier code.Remove and re-attach the device
After removing the device either from the guest XML file or virt-manager, run thevirsh nodedev-reattachcommand to return its use to the host, substituting your PCI device name that is designated for removal:virsh nodedev-reattach pci_8086_3a6c
# virsh nodedev-reattach pci_8086_3a6cCopy to Clipboard Copied! Toggle word wrap Toggle overflow
15.5. PCI passthrough for para-virtualized Xen guests on Red Hat Enterprise Linux
Warning
Any guest using PCI passthrough will no longer be available for save, restore, or migration capabilities, as it will be tied to a particular non-virtualized hardware configuration.
Procedure 15.3. Example: attaching a PCI device
- Given a network device which uses the bnx2 driver and has a PCI id of 0000:09:00.0, the following lines added to
/etc/modprobe.confhides the device from dom0. Either thebnx2module must be reloaded or the host must be restarted.install bnx2 /sbin/modprobe pciback; /sbin/modprobe --first-time --ignore-install bnx2 options pciback hide=(0000:09:00.0)
install bnx2 /sbin/modprobe pciback; /sbin/modprobe --first-time --ignore-install bnx2 options pciback hide=(0000:09:00.0)Copy to Clipboard Copied! Toggle word wrap Toggle overflow - Multiple PCI identifiers can be added to
/etc/modprobe.confto hide multiple devices.options pciback hide=(0000:09:00.0)(0000:0a:04.1)
options pciback hide=(0000:09:00.0)(0000:0a:04.1)Copy to Clipboard Copied! Toggle word wrap Toggle overflow - Use one of the following methods to add the passed-through device to the guest's configuration file:
virsh(Section 15.1, “Adding a PCI device with virsh” - Step 5);virt-manager(Section 15.2, “Adding a PCI device with virt-manager”); orvirt-install(Section 15.3, “PCI passthrough with virt-install”)
Warning
Note
acpiphp kernel module must be loaded in the guest to support dynamic addition and removal of PCI devices. This module enables the guest to receive insertion and removal notifications from qemu. To manually load this module, run the following command in the guest:
modprobe acpiphp
# modprobe acpiphpecho 'modprobe acpiphp' > /etc/sysconfig/modules/acpiphp.modules
# echo 'modprobe acpiphp' > /etc/sysconfig/modules/acpiphp.moduleschmod +x /etc/sysconfig/modules/acpiphp.modules
# chmod +x /etc/sysconfig/modules/acpiphp.moduleslsmod | grep acpiphp command. More information on persistent module loading in Red Hat Enterprise Linux 5 can be found in the Red Hat Enterprise Linux 5 Deployment Guide.
Chapter 16. SR-IOV
16.1. Introduction
- Physical Functions (PFs) are full PCIe devices that include the SR-IOV capabilities. Physical Functions are discovered, managed, and configured as normal PCI devices. Physical Functions configure and manage the SR-IOV functionality by assigning Virtual Functions.
- Virtual Functions (VFs) are simple PCIe functions that only process I/O. Each Virtual Function is derived from a Physical Function. The number of Virtual Functions a device may have is limited by the device hardware. A single Ethernet port, the Physical Device, may map to many Virtual Functions that can be shared to guests.
SR-IOV devices can share a single physical port with multiple guests.
Live migration is presently unsupported. As with PCI passthrough, identical device configurations are required for live (and offline) migrations. Without identical device configurations, guest's cannot access the passed-through devices after migrating.
16.2. Using SR-IOV
Important
/boot/grub/grub.conf file to enable SR-IOV. To enable SR-IOV with Xen for Intel systems append the pci_pt_e820_access=on parameter to the kernel.
Procedure 16.1. Attach an SR-IOV network device
Enable Intel VT-d in BIOS and in the kernel
Enable Intel VT-D in BIOS. See Procedure 15.1, “Preparing an Intel system for PCI passthrough” for more information on enabling Intel VT-d in BIOS and the kernel, or see your system manufacturer's documentation for specific instructions.Verify support
Verify if the PCI device with SR-IOV capabilities are detected. This example lists an Intel 82576 network interface card which supports SR-IOV. Use thelspcicommand to verify if the device was detected.lspci 03:00.0 Ethernet controller: Intel Corporation 82576 Gigabit Network Connection (rev 01) 03:00.1 Ethernet controller: Intel Corporation 82576 Gigabit Network Connection (rev 01)
# lspci 03:00.0 Ethernet controller: Intel Corporation 82576 Gigabit Network Connection (rev 01) 03:00.1 Ethernet controller: Intel Corporation 82576 Gigabit Network Connection (rev 01)Copy to Clipboard Copied! Toggle word wrap Toggle overflow Note
Note that the output has been modified to remove all other devices.Start the SR-IOV kernel modules
If the device is supported the driver kernel module should be loaded automatically by the kernel. Optional parameters can be passed to the module using themodprobecommand. The Intel 82576 network interface card uses theigbdriver kernel module.modprobe igb [<option>=<VAL1>,<VAL2>,] lsmod |grep igb igb 87592 0 dca 6708 1 igb
# modprobe igb [<option>=<VAL1>,<VAL2>,] # lsmod |grep igb igb 87592 0 dca 6708 1 igbCopy to Clipboard Copied! Toggle word wrap Toggle overflow Activate Virtual Functions
Themax_vfsparameter of theigbmodule allocates the maximum number of Virtual Functions. Themax_vfsparameter causes the driver to spawn, up to the value of the parameter in, Virtual Functions. For this particular card the valid range is0to7.Remove the module to change the variable.modprobe -r igb
# modprobe -r igbCopy to Clipboard Copied! Toggle word wrap Toggle overflow Restart the module with themax_vfsset to1or any number of Virtual Functions up to the maximum supported by your device.modprobe igb max_vfs=1
# modprobe igb max_vfs=1Copy to Clipboard Copied! Toggle word wrap Toggle overflow Inspect the new Virtual Functions
Using thelspcicommand, list the newly added Virtual Functions attached to the Intel 82576 network device.Copy to Clipboard Copied! Toggle word wrap Toggle overflow The identifier for the PCI device is found with the-nparameter of thelspcicommand.The Physical Function corresponds tolspci -n | grep 03:00.0 03:00.0 0200: 8086:10c9 (rev 01) lspci -n | grep 03:10.0 03:10.0 0200: 8086:10ca (rev 01)
# lspci -n | grep 03:00.0 03:00.0 0200: 8086:10c9 (rev 01) # lspci -n | grep 03:10.0 03:10.0 0200: 8086:10ca (rev 01)Copy to Clipboard Copied! Toggle word wrap Toggle overflow 8086:10c9and the Virtual Function to8086:10ca.Find the devices with virsh
The libvirt service must find the device to add a device to a guest. Use thevirsh nodedev-listcommand to list available host devices.Copy to Clipboard Copied! Toggle word wrap Toggle overflow The serial numbers for the Virtual Functions and Physical Functions should be in the list.Get advanced details
Thepci_8086_10c9is one of the Physical Functions andpci_8086_10ca_0is the first corresponding Virtual Function for that Physical Function. Use thevirsh nodedev-dumpxmlcommand to get advanced output for both devices.Copy to Clipboard Copied! Toggle word wrap Toggle overflow This example adds the Virtual Functionpci_8086_10ca_0to the guest in Step 8. Note thebus,slotandfunctionparameters of the Virtual Function, these are required for adding the device.Add the Virtual Function to the guest
- Shut down the guest.
- Use the output from the
virsh nodedev-dumpxml pci_8086_10ca_0command to calculate the values for the configuration file. Convert slot and function values to hexadecimal values (from decimal) to get the PCI bus addresses. Append "0x" to the beginning of the output to tell the computer that the value is a hexadecimal number.The example device has the following values: bus = 3, slot = 16 and function = 1. Use theprintfutility to convert decimal values to hexadecimal values.Copy to Clipboard Copied! Toggle word wrap Toggle overflow This example would use the following values in the configuration file:bus='0x03' slot='0x10' function='0x01'
bus='0x03' slot='0x10' function='0x01'Copy to Clipboard Copied! Toggle word wrap Toggle overflow - Open the XML configuration file with the
virsh editcommand. This example edits a guest named MyGuest.virsh edit MyGuest
# virsh edit MyGuestCopy to Clipboard Copied! Toggle word wrap Toggle overflow - The default text editor will open the libvirt configuration file for the guest. Add the new device to the
devicessection of the XML configuration file.Copy to Clipboard Copied! Toggle word wrap Toggle overflow - Save the configuration.
Restart
Restart the guest to complete the installation.virsh start MyGuest
# virsh start MyGuestCopy to Clipboard Copied! Toggle word wrap Toggle overflow
16.3. Troubleshooting SR-IOV
Start the configured vm , an error reported as follows:
Chapter 17. KVM guest timing management
- Clocks can fall out of synchronization with the actual time which invalidates sessions and affects networks.
- Guests with slower clocks may have issues migrating.
Important
ntpd service:
service ntpd start
# service ntpd start
chkconfig ntpd on
# chkconfig ntpd on
ntpd service should minimize the affects of clock skew in all cases.
Your CPU has a constant Time Stamp Counter if the constant_tsc flag is present. To determine if your CPU has the constant_tsc flag run the following command:
cat /proc/cpuinfo | grep constant_tsc
$ cat /proc/cpuinfo | grep constant_tsc
constant_tsc bit. If no output is given follow the instructions below.
Systems without constant time stamp counters require additional configuration. Power management features interfere with accurate time keeping and must be disabled for guests to accurately keep time with KVM.
Important
constant_tsc bit, disable all power management features (BZ#513138). Each system has several timers it uses to keep time. The TSC is not stable on the host, which is sometimes caused by cpufreq changes, deep C state, or migration to a host with a faster TSC. Deep C sleep states can stop the TSC. To prevent the kernel using deep C states append "processor.max_cstate=1" to the kernel boot options in the grub.conf file on the host:
term Red Hat Enterprise Linux Server (2.6.18-159.el5)
root (hd0,0)
kernel /vmlinuz-2.6.18-159.el5 ro root=/dev/VolGroup00/LogVol00 rhgb quiet processor.max_cstate=1
term Red Hat Enterprise Linux Server (2.6.18-159.el5)
root (hd0,0)
kernel /vmlinuz-2.6.18-159.el5 ro root=/dev/VolGroup00/LogVol00 rhgb quiet processor.max_cstate=1cpufreq (only necessary on hosts without the constant_tsc) by editing the /etc/sysconfig/cpuspeed configuration file and change the MIN_SPEED and MAX_SPEED variables to the highest frequency available. Valid limits can be found in the /sys/devices/system/cpu/cpu*/cpufreq/scaling_available_frequencies files.
For certain Red Hat Enterprise Linux guests, additional kernel parameters are required. These parameters can be set by appending them to the end of the /kernel line in the /boot/grub/grub.conf file of the guest.
| Red Hat Enterprise Linux | Additional guest kernel parameters |
|---|---|
| 5.4 AMD64/Intel 64 with the para-virtualized clock | Additional parameters are not required |
| 5.4 AMD64/Intel 64 without the para-virtualized clock | notsc lpj=n |
| 5.4 x86 with the para-virtualized clock | Additional parameters are not required |
| 5.4 x86 without the para-virtualized clock | clocksource=acpi_pm lpj=n |
| 5.3 AMD64/Intel 64 | notsc |
| 5.3 x86 | clocksource=acpi_pm |
| 4.8 AMD64/Intel 64 | notsc |
| 4.8 x86 | clock=pmtmr |
| 3.9 AMD64/Intel 64 | Additional parameters are not required |
| 3.9 x86 | Additional parameters are not required |
Warning
divider kernel parameter was previously recommended for Red Hat Enterprise Linux 4 and 5 guests that did not have high responsiveness requirements, or exist on systems with high guest density. It is no longer recommended for use with guests running Red Hat Enterprise Linux 4, or Red Hat Enterprise Linux 5 versions prior to version 5.8.
divider can improve throughput on Red Hat Enterprise Linux 5 versions equal to or later than 5.8 by lowering the frequency of timer interrupts. For example, if HZ=1000, and divider is set to 10 (that is, divider=10), the number of timer interrupts per period changes from the default value (1000) to 100 (the default value, 1000, divided by the divider value, 10).
divider parameter interacts with interrupt and tick recording. This bug is fixed as of Red Hat Enterprise Linux 5.8. However, the divider parameter can still cause kernel panic in guests using Red Hat Enterprise Linux 4, or Red Hat Enterprise Linux 5 versions prior to version 5.8.
divider parameter is therefore not useful for Red Hat Enterprise Linux 6, and Red Hat Enterprise Linux 6 guests are not affected by this bug.
Windows uses the both the Real-Time Clock (RTC) and the Time Stamp Counter (TSC). For Windows guests the Real-Time Clock can be used instead of the TSC for all time sources which resolves guest timing issues.
boot.ini file:
/use pmtimer
/use pmtimer
Windows supports both the Real-Time Clock (RTC) and the Time Stamp Counter (TSC). For some Windows guests, the RTC can be selected for use instead of the TSC for all of the guest's time sources. This can resolve some guest timing issues.
Note
boot.ini file is no longer used in Windows Vista and newer. As shown in this procedure, Windows Vista, Windows Server 2008 and Windows 7 use the Boot Configuration Data Editor (bcdedit.exe) application to modify this boot parameter.
Important
- Open the Windows guest.
- In the guest, open the menu of the menu. Right click on the Command Prompt application, and select Run as Administrator.
- Confirm any security exception, if prompted.
- Set the boot manager to use the RTC (platform clock) for the primary clock source. The system UUID (
{default}in the following example) should be changed if your system UUID is different than the default boot device.C:\Windows\system32>bcdedit /set {default} USEPLATFORMCLOCK on The operation completed successfullyC:\Windows\system32>bcdedit /set {default} USEPLATFORMCLOCK on The operation completed successfullyCopy to Clipboard Copied! Toggle word wrap Toggle overflow
Part IV. Administration
Administering virtualized systems
Chapter 18. Server best practices
- Run SELinux in enforcing mode. You can do this by executing the command below.
setenforce 1
# setenforce 1Copy to Clipboard Copied! Toggle word wrap Toggle overflow - Remove or disable any unnecessary services such as
AutoFS,NFS,FTP,HTTP,NIS,telnetd,sendmailand so on. - Only add the minimum number of user accounts needed for platform management on the server and remove unnecessary user accounts.
- Avoid running any unessential applications on your host. Running applications on the host may impact virtual machine performance and can affect server stability. Any application which may crash the server will also cause all virtual machines on the server to go down.
- Use a central location for virtual machine installations and images. Virtual machine images should be stored under
/var/lib/libvirt/images/. If you are using a different directory for your virtual machine images make sure you add the directory to your SELinux policy and relabel it before starting the installation. - Installation sources, trees, and images should be stored in a central location, usually the location of your
vsftpdserver.
Chapter 19. Security for virtualization
- Run only necessary services on hosts. The fewer processes and services running on the host, the higher the level of security and performance.
- Enable Security-Enhanced Linux (SELinux) on the hypervisor. Read Section 19.2, “SELinux and virtualization” for more information on using SELinux and virtualization.
- Use a firewall to restrict traffic to dom0. You can setup a firewall with default-reject rules that will help secure attacks on dom0. It is also important to limit network facing services.
- Do not allow normal users to access dom0. If you do permit normal users dom0 access, you run the risk of rendering dom0 vulnerable. Remember, dom0 is privileged, and granting unprivileged accounts may compromise the level of security.
19.1. Storage security issues
fstab file, the initrd file or used by the kernel command line. If less privileged users, especially guests, have write access to whole partitions or LVM volumes.
/dev/sdb). Use partitions (for example, /dev/sdb1) or LVM volumes.
19.2. SELinux and virtualization
virt_image_t label applied to them. The /var/lib/libvirt/images directory has this label applied to it and its contents by default. This does not mean that images must be stored in this directory; images can be stored anywhere, provided they are labeled with virt_image_t.
The following section is an example of adding a logical volume to a guest with SELinux enabled. These instructions also work for hard drive partitions.
Procedure 19.1. Creating and mounting a logical volume on a guest with SELinux enabled
- Create a logical volume. This example creates a 5 gigabyte logical volume named
NewVolumeNameon the volume group namedvolumegroup.lvcreate -n NewVolumeName -L 5G volumegroup
# lvcreate -n NewVolumeName -L 5G volumegroupCopy to Clipboard Copied! Toggle word wrap Toggle overflow - Format the
NewVolumeNamelogical volume with a file system that supports extended attributes, such as ext3.mke2fs -j /dev/volumegroup/NewVolumeName
# mke2fs -j /dev/volumegroup/NewVolumeNameCopy to Clipboard Copied! Toggle word wrap Toggle overflow - Create a new directory for mounting the new logical volume. This directory can be anywhere on your file system. It is advised not to put it in important system directories (
/etc,/var,/sys) or in home directories (/homeor/root). This example uses a directory called/virtstoragemkdir /virtstorage
# mkdir /virtstorageCopy to Clipboard Copied! Toggle word wrap Toggle overflow - Mount the logical volume.
mount /dev/volumegroup/NewVolumeName /virtstorage
# mount /dev/volumegroup/NewVolumeName /virtstorageCopy to Clipboard Copied! Toggle word wrap Toggle overflow - Set the correct SELinux type for a Xen folder.
semanage fcontext -a -t xen_image_t "/virtstorage(/.*)?"
semanage fcontext -a -t xen_image_t "/virtstorage(/.*)?"Copy to Clipboard Copied! Toggle word wrap Toggle overflow Alternatively, set the correct SELinux type for a KVM folder.semanage fcontext -a -t virt_image_t "/virtstorage(/.*)?"
semanage fcontext -a -t virt_image_t "/virtstorage(/.*)?"Copy to Clipboard Copied! Toggle word wrap Toggle overflow If the targeted policy is used (targeted is the default policy) the command appends a line to the/etc/selinux/targeted/contexts/files/file_contexts.localfile which makes the change persistent. The appended line may resemble this:/virtstorage(/.*)? system_u:object_r:xen_image_t:s0
/virtstorage(/.*)? system_u:object_r:xen_image_t:s0Copy to Clipboard Copied! Toggle word wrap Toggle overflow - Label the device node (for example,
/dev/volumegroup/NewVolumeNamewith the correct label:semanage fcontext -a -t xen_image_t /dev/volumegroup/NewVolumeName restorecon /dev/volumegroup/NewVolumeName
# semanage fcontext -a -t xen_image_t /dev/volumegroup/NewVolumeName # restorecon /dev/volumegroup/NewVolumeNameCopy to Clipboard Copied! Toggle word wrap Toggle overflow
19.3. SELinux
semanage fcontext -a -t xen_image_t -f -b /dev/sda2 restorecon /dev/sda2
# semanage fcontext -a -t xen_image_t -f -b /dev/sda2
# restorecon /dev/sda2
xend_disable_t can set the xend to unconfined mode after restarting the daemon. It is better to disable protection for a single daemon than the whole system. It is advisable that you should not re-label directories as xen_image_t that you will use elsewhere.
There are several SELinux booleans which affect KVM. These booleans are listed below for your convenience.
| SELinux Boolean | Description |
|---|---|
| allow_unconfined_qemu_transition | Default: off. This boolean controls whether KVM guests can be transitioned to unconfined users. |
| qemu_full_network | Default: on. This boolean controls full network access to KVM guests. |
| qemu_use_cifs | Default: on. This boolean controls KVM's access to CIFS or Samba file systems. |
| qemu_use_comm | Default: off. This boolean controls whether KVM can access serial or parallel communications ports. |
| qemu_use_nfs | Default: on. This boolean controls KVM's access to NFS file systems. |
| qemu_use_usb | Default: on. This boolean allows KVM to access USB devices. |
19.4. Virtualization firewall information
Note
- ICMP requests must be accepted. ICMP packets are used for network testing. You cannot ping guests if ICMP packets are blocked.
- Port 22 should be open for SSH access and the initial installation.
- Ports 80 or 443 (depending on the security settings on the RHEV Manager) are used by the vdsm-reg service to communicate information about the host.
- Ports 5634 to 6166 are used for guest console access with the SPICE protocol.
- Port 8002 is used by Xen for live migration.
- Ports 49152 to 49216 are used for migrations with KVM. Migration may use any port in this range depending on the number of concurrent migrations occurring.
- Enabling IP forwarding (
net.ipv4.ip_forward = 1) is required for virtual bridge devices. Note that installing libvirt enables this variable so it will be enabled when the virtualization packages are installed unless it was manually disabled.
Note
Chapter 20. Managing guests with xend
/etc/xen/xend-config.sxp. Here are the parameters you can enable or disable in the xend-config.sxp configuration file:
| Item | Description |
|---|---|
|
(console-limit)
|
Determines the console server's memory buffer limit and assigns that limit on a per domain basis.
|
|
(min-mem)
|
Determines the minimum number of megabytes that is reserved for domain0 (if you enter 0, the value does not change).
|
|
(dom0-cpus)
|
Determines the number of CPUs in use by domain0 (at least 1 CPU is assigned by default).
|
|
(enable-dump)
|
If this is enabled, when a crash occurs Xen creates a dump file (the default is 0).
|
|
(external-migration-tool)
|
Determines the script or application that handles external device migration. The scripts must reside in the
/etc/xen/scripts/external-device-migrate directory.
|
|
(logfile)
|
Determines the location of the log file (default is
/var/log/xend.log).
|
|
(loglevel)
|
Filters out the log mode values: DEBUG, INFO, WARNING, ERROR, or CRITICAL (default is DEBUG).
|
|
(network-script)
|
Determines the script that enables the networking environment. The scripts must reside in the
/etc/xen/scripts/ directory.
|
|
(xend-http-server)
|
Enables the http stream packet management server (the default is no).
|
|
(xend-unix-server)
|
Enables the UNIX domain socket server. The socket server is a communications endpoint that handles low level network connections and accepts or rejects incoming connections. The default value is set to yes.
|
|
(xend-relocation-server)
|
Enables the relocation server for cross-machine migrations (the default is no).
|
|
(xend-unix-path)
|
Determines the location where the
xend-unix-server command outputs data (default is /var/lib/xend/xend-socket)
|
|
(xend-port)
|
Determines the port that the http management server uses (the default is 8000).
|
|
(xend-relocation-port)
|
Determines the port that the relocation server uses (the default is 8002).
|
|
(xend-relocation-address)
|
Determines the host addresses allowed for migration. The default value is the value of
xend-address.
|
|
(xend-address)
|
Determines the address that the domain socket server binds to. The default value allows all connections.
|
service xend start
service xend start
service xend stop
service xend stop
service xend restart
service xend restart
service xend status
service xend status
Note
chkconfig command to add the xend to the initscript.
chkconfig --level 345 xend
xend will now start in runlevels 3, 4 and 5.
Chapter 21. Xen live migration
- Offline migration suspends the guest on the original host, transfers it to the destination host and then resumes it once the guest is fully transferred. Offline migration uses the
virsh migratecommand.virsh migrate GuestName libvirtURI
# virsh migrate GuestName libvirtURICopy to Clipboard Copied! Toggle word wrap Toggle overflow - A live migration keeps the guest running on the source host and begins moving the memory without stopping the guest. All modified memory pages are monitored for changes and sent to the destination while the image is sent. The memory is updated with the changed pages. The process continues until the amount of pause time allowed for the guest equals the predicted time for the final few pages to be transfer. The Xen hypervisor estimates the time remaining and attempts to transfer the maximum amount of page files from the source to the destination until Xen predicts the amount of remaining pages can be transferred during a very brief time while the guest is paused. The registers are loaded on the new host and the guest is then resumed on the destination host. If the guest cannot be merged (which happens when guests are under extreme loads) the guest is paused and then an offline migration is started instead.Live migration uses the
--liveoption for thevirsh migratecommand.virsh migrate--live GuestName libvirtURI
# virsh migrate--live GuestName libvirtURICopy to Clipboard Copied! Toggle word wrap Toggle overflow
Important
/etc/xen/xend-config.sxp configuration file. By default, migration is disabled as migration can be a potential security hazard if incorrectly configured. Opening the migration port can allow an unauthorized host to initiate a migration or connect to the migration ports. Authentication and authorization are not configured for migration requests and the only control mechanism is based on hostnames and IP addresses. Special care should be taken to ensure the migration port is not accessible to unauthorized hosts.
Important
Modify the following entries in /etc/xen/xend-config.sxp to enable migration. Modify the values, when necessary, and remove the comments (the # symbol) preceding the following parameters:
(xend-relocation-server yes)- The default value, which disables migration, is
no. Change the value ofxend-relocation-servertoyesto enable migration. (xend-relocation-port 8002)- The parameter,
(xend-relocation-port), specifies the portxendshould use for the relocation interface, ifxend-relocation-serveris set toyesThe default value of this variable should work for most installations. If you change the value make sure you are using an unused port on the relocation server.The port set by thexend-relocation-portparameter must be open on both systems. (xend-relocation-address '')(xend-relocation-address)is the address thexendlistens for migration commands on therelocation-socketconnection ifxend-relocation-serveris set.The default is to listen on all active interfaces. The(xend-relocation-address)parameter restricts the migration server to only listen to a specific interface. The default value in/etc/xen/xend-config.sxpis an empty string(''). This value should be replaced with a single, valid IP address. For example:(xend-relocation-address '10.0.0.1')
(xend-relocation-address '10.0.0.1')Copy to Clipboard Copied! Toggle word wrap Toggle overflow (xend-relocation-hosts-allow '')- The
(xend-relocation-hosts-allow 'hosts')parameter controls which hostnames can communicate on the relocation port.Unless you are using SSH or TLS, the guest's virtual memory is transferred in raw form without encryption of the communication. Modify thexend-relocation-hosts-allowoption to restrict access to the migration server.If the value is empty, as denoted in the example above by an empty string surrounded by single quotes, then all connections are allowed. This assumes the connection arrives on a port and interface which the relocation server listens on, see alsoxend-relocation-portandxend-relocation-address.Otherwise, the(xend-relocation-hosts-allow)parameter should be a sequence of regular expressions separated by spaces. Any host with a fully-qualified domain name or an IP address which matches one of these regular expressions will be accepted.An example of a(xend-relocation-hosts-allow)attribute:(xend-relocation-hosts-allow '^localhost$ ^localhost\\.localdomain$')
(xend-relocation-hosts-allow '^localhost$ ^localhost\\.localdomain$')Copy to Clipboard Copied! Toggle word wrap Toggle overflow
service xend restart
# service xend restart
21.1. A live migration example
et-virt07 and et-virt08), both of them are using eth1 as their default network interface hence they are using xenbr1 as their Xen networking bridge. We are using a locally attached SCSI disk (/dev/sdb) on et-virt07 for shared storage using NFS.
Create and mount the directory used for the migration:
mkdir /var/lib/libvirt/images mount /dev/sdb /var/lib/libvirt/images
# mkdir /var/lib/libvirt/images
# mount /dev/sdb /var/lib/libvirt/images
Warning
/var/lib/libvirt/images/ make sure you only export /var/lib/libvirt/images/ and not/var/lib/xen/ as this directory is used by the xend daemon and other tools. Sharing /var/lib/xen/ will cause unpredictable behavior.
cat /etc/exports /var/lib/libvirt/images *(rw,async,no_root_squash)
# cat /etc/exports
/var/lib/libvirt/images *(rw,async,no_root_squash)
showmount -e et-virt07 Export list for et-virt07: /var/lib/libvirt/images *
# showmount -e et-virt07
Export list for et-virt07:
/var/lib/libvirt/images *
The install command in the example used for installing the guest:
virt-install -p -f /var/lib/libvirt/images/testvm1.dsk -s 5 -n\ testvm1 --vnc -r 1024 -l http://example.com/RHEL5-tree\ Server/x86-64/os/ -b xenbr1
# virt-install -p -f /var/lib/libvirt/images/testvm1.dsk -s 5 -n\
testvm1 --vnc -r 1024 -l http://example.com/RHEL5-tree\
Server/x86-64/os/ -b xenbr1
Make sure the virtualized network bridges are configured correctly and have the same name on both hosts:
brctl show bridge name bridge id STP enabled interfaces xenbr1 8000.feffffffffff no peth1 vif0.1
[et-virt08 ~]# brctl show
bridge name bridge id STP enabled interfaces
xenbr1 8000.feffffffffff no peth1
vif0.1
brctl show bridge name bridge id STP enabled interfaces xenbr1 8000.feffffffffff no peth1 vif0.1
[et-virt07 ~]# brctl show
bridge name bridge id STP enabled interfaces
xenbr1 8000.feffffffffff no peth1
vif0.1
lsof -i :8002 COMMAND PID USER FD TYPE DEVICE SIZE NODE NAME python 3445 root 14u IPv4 10223 TCP *:teradataordbms (LISTEN)
[et-virt07 ~]# lsof -i :8002
COMMAND PID USER FD TYPE DEVICE SIZE NODE NAME
python 3445 root 14u IPv4 10223 TCP *:teradataordbms (LISTEN)
lsof -i :8002 COMMAND PID USER FD TYPE DEVICE SIZE NODE NAME python 3252 root 14u IPv4 10901 TCP *:teradataordbms (LISTEN)
[et-virt08 ~]# lsof -i :8002
COMMAND PID USER FD TYPE DEVICE SIZE NODE NAME
python 3252 root 14u IPv4 10901 TCP *:teradataordbms (LISTEN)
/var/lib/libvirt/images directory is available and mounted with networked storage on both hosts. Shared, networked storage is required for migrations.
df /var/lib/libvirt/images Filesystem 1K-blocks Used Available Use% Mounted on et-virt07:/var/lib/libvirt/images 70562400 2379712 64598336 4% /var/lib/libvirt/images
[et-virt08 ~]# df /var/lib/libvirt/images
Filesystem 1K-blocks Used Available Use% Mounted on
et-virt07:/var/lib/libvirt/images 70562400 2379712 64598336 4% /var/lib/libvirt/images
file /var/lib/libvirt/images/testvm1.dsk /var/lib/libvirt/images/testvm1.dsk: x86 boot sector; partition 1: ID=0x83, active, starthead 1, startsector 63, 208782 sectors; partition 2: ID=0x8e, starthead 0, startsector 208845, 10265535 sectors, code offset 0x48
[et-virt08 ~]# file /var/lib/libvirt/images/testvm1.dsk
/var/lib/libvirt/images/testvm1.dsk: x86 boot sector; partition 1: ID=0x83,
active, starthead 1, startsector 63, 208782 sectors; partition 2: ID=0x8e,
starthead 0, startsector 208845, 10265535 sectors, code offset 0x48
touch /var/lib/libvirt/images/foo rm -f /var/lib/libvirt/images/foo
[et-virt08 ~]# touch /var/lib/libvirt/images/foo
[et-virt08 ~]# rm -f /var/lib/libvirt/images/foo
Start the virtual machine (if the virtual machine is not on):
virsh list Id Name State ---------------------------------- Domain-0 running
[et-virt07 ~]# virsh list
Id Name State
----------------------------------
Domain-0 running
virsh start testvm1 Domain testvm1 started
[et-virt07 ~]# virsh start testvm1
Domain testvm1 started
time virsh save testvm1 testvm1.sav real 0m15.744s user 0m0.188s sys 0m0.044s
[et-virt07 images]# time virsh save testvm1 testvm1.sav
real 0m15.744s
user 0m0.188s
sys 0m0.044s
ls -lrt testvm1.sav -rwxr-xr-x 1 root root 1075657716 Jan 12 06:46 testvm1.sav
[et-virt07 images]# ls -lrt testvm1.sav
-rwxr-xr-x 1 root root 1075657716 Jan 12 06:46 testvm1.sav
virsh list Id Name State ---------------------------------- Domain-0 running
[et-virt07 images]# virsh list
Id Name State
----------------------------------
Domain-0 running
virsh restore testvm1.sav
[et-virt07 images]# virsh restore testvm1.sav
domain-id from et-virt08 to et-virt07. The hostname you are migrating to and <domain-id> must be replaced with valid values. This example uses the et-virt08 host which must have SSH access to et-virt07
xm migrate --live testvm1 et-virt07
[et-virt08 ~]# xm migrate --live testvm1 et-virt07
et-virt08
virsh list Id Name State ---------------------------------- Domain-0 running
[et-virt08 ~]# virsh list
Id Name State
----------------------------------
Domain-0 running
et-virt07:
Create the following script inside the virtual machine to log date and hostname during the migration. This script performs I/O tasks on the guest's file system.
et-virt07:
et-virt07. You can add the time command to see how long the migration takes:
xm migrate --live testvm1 et-virt07
[et-virt08 ~]# xm migrate --live testvm1 et-virt07
et-virt08:
virsh list Id Name State ---------------------------------- Domain-0 running
[et-virt08 ~]# virsh list
Id Name State
----------------------------------
Domain-0 running
et-virt07:
et-virt07 to et-virt08. Initiate a migration from et-virt07 to et-virt08:
xm migrate --live testvm1 et-virt08
[et-virt07 images]# xm migrate --live testvm1 et-virt08
virsh list Id Name State ---------------------------------- Domain-0 running
[et-virt07 images]# virsh list
Id Name State
----------------------------------
Domain-0 running
et-virt07 verify on et-virt08 that the virtual machine has started:
time virsh migrate --live testvm1 et-virt07 real 0m10.378s user 0m0.068s sys 0m0.052s
[et-virt08 ~]# time virsh migrate --live testvm1 et-virt07
real 0m10.378s
user 0m0.068s
sys 0m0.052s
21.2. Configuring guest live migration
xm migrate command). Live migration can be done from the same command. However there are some additional modifications that you must do to the xend-config configuration file. This example identifies the entries that you must modify to ensure a successful migration:
(xend-relocation-server yes)- The default for this parameter is 'no', which keeps the relocation/migration server deactivated (unless on a trusted network) and the domain virtual memory is exchanged in raw form without encryption.
(xend-relocation-port 8002)- This parameter sets the port that
xenduses for migration. Use this value unless your network environment requires a custom value. Remove the comment symbol to enable it. (xend-relocation-address )- This parameter is the address that listens for relocation socket connections, after you enable the
xend-relocation-server. The Xen hypervisor only listens for migration network traffic on the specified interface. (xend-relocation-hosts-allow )- This parameter controls the host that communicates with the relocation port. If the value is empty, then all incoming connections are allowed. You must change this to a space-separated sequences of regular expressions, for example:
(xend-relocation-hosts-allow- '^localhost\\.localdomain$' )>
(xend-relocation-hosts-allow- '^localhost\\.localdomain$' )>Copy to Clipboard Copied! Toggle word wrap Toggle overflow Accepted values included fully-qualified domain names, IP addresses or space separated regular expressions.
Chapter 22. KVM live migration
- Load balancing - guests can be moved to hosts with lower usage when a host becomes overloaded.
- Hardware failover - when hardware devices on the host start to fail, guests can be safely relocated so the host can be powered down and repaired.
- Energy saving - guests can be redistributed to other hosts and host systems powered off to save energy and cut costs in low usage periods.
- Geographic migration - guests can be moved to another location for lower latency or in serious circumstances.
22.1. Live migration requirements
Migration requirements
- A guest installed on shared networked storage using one of the following protocols:
- Fibre Channel
- iSCSI
- NFS
- GFS2
- Two or more Red Hat Enterprise Linux systems of the same version with the same updates.
- Both system must have the appropriate ports open.
- Both systems must have identical network configurations. All bridging and network configurations must be exactly the same on both hosts.
- Shared storage must mount at the same location on source and destination systems. The mounted directory name must be identical.
Configure shared storage and install a guest on the shared storage. For shared storage instructions, see Part V, “Virtualization Storage Topics”.
22.3. Live KVM migration with virsh
virsh command. The migrate command accepts parameters in the following format:
virsh migrate --live GuestName DestinationURL
# virsh migrate --live GuestName DestinationURLGuestName parameter represents the name of the guest which you want to migrate.
DestinationURL parameter is the URL or hostname of the destination system. The destination system must run the same version of Red Hat Enterprise Linux, be using the same hypervisor and have libvirt running.
This example migrates from test1.example.com to test2.example.com. Change the host names for your environment. This example migrates a virtual machine named RHEL4test.
Verify the guest is running
From the source system,test1.example.com, verifyRHEL4testis running:virsh list Id Name State ---------------------------------- 10 RHEL4 running
[root@test1 ~]# virsh list Id Name State ---------------------------------- 10 RHEL4 runningCopy to Clipboard Copied! Toggle word wrap Toggle overflow Migrate the guest
Execute the following command to live migrate the guest to the destination,test2.example.com. Append/systemto the end of the destination URL to tell libvirt that you need full access.virsh migrate --live RHEL4test qemu+ssh://test2.example.com/system
# virsh migrate --live RHEL4test qemu+ssh://test2.example.com/systemCopy to Clipboard Copied! Toggle word wrap Toggle overflow Once the command is entered you will be prompted for the root password of the destination system.Wait
The migration may take some time depending on load and the size of the guest.virshonly reports errors. The guest continues to run on the source host until fully migrated.Verify the guest has arrived at the destination host
From the destination system,test2.example.com, verifyRHEL4testis running:virsh list Id Name State ---------------------------------- 10 RHEL4 running
[root@test2 ~]# virsh list Id Name State ---------------------------------- 10 RHEL4 runningCopy to Clipboard Copied! Toggle word wrap Toggle overflow
Note
22.4. Migrating with virt-manager
virt-manager.
- Connect to the source and target hosts. On the menu, click , the Add Connection window appears.Enter the following details:
- Hypervisor: Select .
- Connection: Select the connection type.
- Hostname: Enter the hostname.
Click .The Virtual Machine Manager displays a list of connected hosts. - Add a storage pool with the same NFS to the source and target hosts.On the menu, click , the Host Details window appears.Click the tab.
- Add a new storage pool. In the lower left corner of the window, click the button. The Add a New Storage Pool window appears.Enter the following details:
- Name: Enter the name of the storage pool.
- Type: Select .
Click . - Enter the following details:
- Format: Select the storage type. This must be NFS or iSCSI for live migrations.
- Host Name: Enter the IP address or fully-qualified domain name of the storage server.
Click . - Create a new volume in the shared storage pool, click .
- Enter the details, then click .
- Create a virtual machine with the new volume, then run the virtual machine.The Virtual Machine window appears.
- In the Virtual Machine Manager window, right-click on the virtual machine, select , then click the migration location.
- Click to confirm migration.The Virtual Machine Manager displays the virtual machine in its new location.The VNC connection displays the remote host's address in its title bar.
Chapter 23. Remote management of guests
ssh or TLS and SSL.
23.1. Remote management with SSH
libvirt management connection securely tunneled over an SSH connection to manage the remote machines. All the authentication is done using SSH public key cryptography and passwords or passphrases gathered by your local SSH agent. In addition the VNC console for each guest virtual machine is tunneled over SSH.
- you require root log in access to the remote machine for managing virtual machines,
- the initial connection setup process may be slow,
- there is no standard or trivial way to revoke a user's key on all hosts or guests, and
- ssh does not scale well with larger numbers of remote machines.
virt-manager The following instructions assume you are starting from scratch and do not already have SSH keys set up. If you have SSH keys set up and copied to the other systems you can skip this procedure.
Important
virt-manager must run as the user who owns the keys to connect to the remote host. That means, if the remote systems are managed by a non-root user virt-manager must be run in unprivileged mode. If the remote systems are managed by the local root user then the SSH keys must be own and created by root.
virt-manager.
Optional: Changing user
Change user, if required. This example uses the local root user for remotely managing the other hosts and the local host.su -
$ su -Copy to Clipboard Copied! Toggle word wrap Toggle overflow Generating the SSH key pair
Generate a public key pair on the machinevirt-manageris used. This example uses the default key location, in the~/.ssh/directory.ssh-keygen -t rsa
$ ssh-keygen -t rsaCopy to Clipboard Copied! Toggle word wrap Toggle overflow Coping the keys to the remote hosts
Remote login without a password, or with a passphrase, requires an SSH key to be distributed to the systems being managed. Use the ssh-copy-id command to copy the key to root user at the system address provided (in the example,root@example.com).ssh-copy-id -i ~/.ssh/id_rsa.pub root@example.com root@example.com's password: Now try logging into the machine, with "ssh 'root@example.com'", and check in: .ssh/authorized_keys to make sure we haven't added extra keys that you weren't expecting
# ssh-copy-id -i ~/.ssh/id_rsa.pub root@example.com root@example.com's password: Now try logging into the machine, with "ssh 'root@example.com'", and check in: .ssh/authorized_keys to make sure we haven't added extra keys that you weren't expectingCopy to Clipboard Copied! Toggle word wrap Toggle overflow Repeat for other systems, as required.Optional: Add the passphrase to the ssh-agent
Add the passphrase for the SSH key to thessh-agent, if required. On the local host, use the following command to add the passphrase (if there was one) to enable password-less login.ssh-add ~/.ssh/id_rsa.pub
# ssh-add ~/.ssh/id_rsa.pubCopy to Clipboard Copied! Toggle word wrap Toggle overflow
libvirt daemon (libvirtd)
The libvirt daemon provide an interface for managing virtual machines. You must have the libvirtd daemon installed and running on every remote host that needs managing.
ssh root@somehost chkconfig libvirtd on service libvirtd start
$ ssh root@somehost
# chkconfig libvirtd on
# service libvirtd start
libvirtd and SSH are configured you should be able to remotely access and manage your virtual machines. You should also be able to access your guests with VNC at this point.
Remote hosts can be managed with the virt-manager GUI tool. SSH keys must belong to the user executing virt-manager for password-less login to work.
- Start virt-manager.
- Open the -> menu.
- Input values for the hypervisor type, the connection, Connection->Remote tunnel over SSH, and enter the desired hostname, then click connection.
23.2. Remote management over TLS and SSL
libvirt management connection opens a TCP port for incoming connections, which is securely encrypted and authenticated based on x509 certificates. In addition the VNC console for each guest virtual machine will be setup to use TLS with x509 certificate authentication.
The following short guide assuming you are starting from scratch and you do not have any TLS/SSL certificate knowledge. If you are lucky enough to have a certificate management server you can probably skip the first steps.
-
libvirtserver setup - For more information on creating certificates, see the libvirt website, http://libvirt.org/remote.html.
- Xen VNC Server
- The Xen VNC server can have TLS enabled by editing the configuration file,
/etc/xen/xend-config.sxp. Remove the commenting on the(vnc-tls 1)configuration parameter in the configuration file.The/etc/xen/vncdirectory needs the following 3 files:This provides encryption of the data channel. It might be appropriate to require that clients present their own x509 certificate as a form of authentication. To enable this remove the commenting on theca-cert.pem- The CA certificateserver-cert.pem- The Server certificate signed by the CAserver-key.pem- The server private key
(vnc-x509-verify 1)parameter. -
virt-managerandvirshclient setup - The setup for clients is slightly inconsistent at this time. To enable the
libvirtmanagement API over TLS, the CA and client certificates must be placed in/etc/pki. For details on this consult http://libvirt.org/remote.htmlIn thevirt-manageruser interface, use the '' transport mechanism option when connecting to a host.Forvirsh, the URI has the following format:qemu://hostname.guestname/systemfor KVM.xen://hostname.guestname/for Xen.
$HOME/.pki, that is the following three files:
- CA or
ca-cert.pem- The CA certificate. libvirt-vncorclientcert.pem- The client certificate signed by the CA.libvirt-vncorclientkey.pem- The client private key.
23.3. Transport modes
libvirt supports the following transport modes:
Transport Layer Security TLS 1.0 (SSL 3.1) authenticated and encrypted TCP/IP socket, usually listening on a public port number. To use this you will need to generate client and server certificates. The standard port is 16514.
Unix domain sockets are only accessible on the local machine. Sockets are not encrypted, and use UNIX permissions or SELinux for authentication. The standard socket names are /var/run/libvirt/libvirt-sock and /var/run/libvirt/libvirt-sock-ro (for read-only connections).
Transported over a Secure Shell protocol (SSH) connection. Requires Netcat (the nc package) installed. The libvirt daemon (libvirtd) must be running on the remote machine. Port 22 must be open for SSH access. You should use some sort of ssh key management (for example, the ssh-agent utility) or you will be prompted for a password.
The ext parameter is used for any external program which can make a connection to the remote machine by means outside the scope of libvirt. This parameter is unsupported.
Unencrypted TCP/IP socket. Not recommended for production use, this is normally disabled, but an administrator can enable it for testing or use over a trusted network. The default port is 16509.
A Uniform Resource Identifier (URI) is used by virsh and libvirt to connect to a remote host. URIs can also be used with the --connect parameter for the virsh command to execute single commands or migrations on remote hosts.
driver[+transport]://[username@][hostname][:port]/[path][?extraparameters]
driver[+transport]://[username@][hostname][:port]/[path][?extraparameters]
Examples of remote management parameters
- Connect to a remote Xen hypervisor on the host named
towada, using SSH transport and the SSH usernameccurran.xen+ssh://ccurran@towada/
xen+ssh://ccurran@towada/Copy to Clipboard Copied! Toggle word wrap Toggle overflow - Connect to a remote Xen hypervisor on the host named
towadausing TLS.xen://towada/
xen://towada/Copy to Clipboard Copied! Toggle word wrap Toggle overflow - Connect to a remote Xen hypervisor on host
towadausing TLS. Theno_verify=1tells libvirt not to verify the server's certificate.xen://towada/?no_verify=1
xen://towada/?no_verify=1Copy to Clipboard Copied! Toggle word wrap Toggle overflow - Connect to a remote KVM hypervisor on host
towadausing SSH.qemu+ssh://towada/system
qemu+ssh://towada/systemCopy to Clipboard Copied! Toggle word wrap Toggle overflow
Testing examples
- Connect to the local KVM hypervisor with a non-standard UNIX socket. The full path to the Unix socket is supplied explicitly in this case.
qemu+unix:///system?socket=/opt/libvirt/run/libvirt/libvirt-sock
qemu+unix:///system?socket=/opt/libvirt/run/libvirt/libvirt-sockCopy to Clipboard Copied! Toggle word wrap Toggle overflow - Connect to the libvirt daemon with an unencrypted TCP/IP connection to the server with the IP address 10.1.1.10 on port 5000. This uses the test driver with default settings.
test+tcp://10.1.1.10:5000/default
test+tcp://10.1.1.10:5000/defaultCopy to Clipboard Copied! Toggle word wrap Toggle overflow
Extra parameters can be appended to remote URIs. The table below Table 23.1, “Extra URI parameters” covers the recognized parameters. All other parameters are ignored. Note that parameter values must be URI-escaped (that is, a question mark (?) is appended before the parameter and special characters are converted into the URI format).
| Name | Transport mode | Description | Example usage |
|---|---|---|---|
| name | all modes | The name passed to the remote virConnectOpen function. The name is normally formed by removing transport, hostname, port number, username and extra parameters from the remote URI, but in certain very complex cases it may be better to supply the name explicitly. | name=qemu:///system |
| command | ssh and ext | The external command. For ext transport this is required. For ssh the default is ssh. The PATH is searched for the command. | command=/opt/openssh/bin/ssh |
| socket | unix and ssh | The path to the UNIX domain socket, which overrides the default. For ssh transport, this is passed to the remote netcat command (see netcat). | socket=/opt/libvirt/run/libvirt/libvirt-sock |
| netcat | ssh |
The
netcat command can be used to connect to remote systems. The default netcat parameter uses the nc command. For SSH transport, libvirt constructs an SSH command using the form below:
command -p port [-l username] hostname netcat -U socket
The
port, username and hostname parameters can be specified as part of the remote URI. The command, netcat and socket come from other extra parameters.
| netcat=/opt/netcat/bin/nc |
| no_verify | tls | If set to a non-zero value, this disables client checks of the server's certificate. Note that to disable server checks of the client's certificate or IP address you must change the libvirtd configuration. | no_verify=1 |
| no_tty | ssh | If set to a non-zero value, this stops ssh from asking for a password if it cannot log in to the remote machine automatically (for using ssh-agent or similar). Use this when you do not have access to a terminal - for example in graphical programs which use libvirt. | no_tty=1 |
Part VI. Virtualization Reference Guide
Virtualization commands, system tools, applications and additional systems reference
Chapter 25. Virtualization tools
- System Administration Tools
vmstatiostatlsoflsof -i :5900 xen-vncfb 10635 root 5u IPv4 218738 TCP grumble.boston.redhat.com:5900 (LISTEN)
# lsof -i :5900 xen-vncfb 10635 root 5u IPv4 218738 TCP grumble.boston.redhat.com:5900 (LISTEN)Copy to Clipboard Copied! Toggle word wrap Toggle overflow qemu-img
- Advanced Debugging Tools
systemTapcrashxen-gdbserversysrqsysrq tsysrq wsysrq c
- Networking
brtclCopy to Clipboard Copied! Toggle word wrap Toggle overflow brctl showmacs xenbr0 port no mac addr is local? aging timer 1 fe:ff:ff:ff:ff:ff yes 0.00
# brctl showmacs xenbr0 port no mac addr is local? aging timer 1 fe:ff:ff:ff:ff:ff yes 0.00Copy to Clipboard Copied! Toggle word wrap Toggle overflow Copy to Clipboard Copied! Toggle word wrap Toggle overflow ifconfigtcpdump
- KVM tools
pspstreetopkvmtracekvm_stat
- Xen tools
xentopxm dmesgxm log
Chapter 26. Managing guests with virsh
virsh is a command line interface tool for managing guests and the hypervisor.
virsh tool is built on the libvirt management API and operates as an alternative to the xm command and the graphical guest Manager (virt-manager). virsh can be used in read-only mode by unprivileged users. You can use virsh to execute scripts for the guest machines.
The following tables provide a quick reference for all virsh command line options.
| Command | Description |
|---|---|
help | Prints basic help information. |
list | Lists all guests. |
dumpxml | Outputs the XML configuration file for the guest. |
create | Creates a guest from an XML configuration file and starts the new guest. |
start | Starts an inactive guest. |
destroy | Forces a guest to stop. |
define | Outputs an XML configuration file for a guest. |
domid | Displays the guest's ID. |
domuuid | Displays the guest's UUID. |
dominfo | Displays guest information. |
domname | Displays the guest's name. |
domstate | Displays the state of a guest. |
quit | Quits the interactive terminal. |
reboot | Reboots a guest. |
restore | Restores a previously saved guest stored in a file. |
resume | Resumes a paused guest. |
save | Save the present state of a guest to a file. |
shutdown | Gracefully shuts down a guest. |
suspend | Pauses a guest. |
undefine | Deletes all files associated with a guest. |
migrate | Migrates a guest to another host. |
virsh command options manage guest and hypervisor resources:
| Command | Description |
|---|---|
setmem | Sets the allocated memory for a guest. |
setmaxmem | Sets maximum memory limit for the hypervisor. |
setvcpus | Changes number of virtual CPUs assigned to a guest. Note that this feature is unsupported in Red Hat Enterprise Linux 5. |
vcpuinfo | Displays virtual CPU information about a guest. |
vcpupin | Controls the virtual CPU affinity of a guest. |
domblkstat | Displays block device statistics for a running guest. |
domifstat | Displays network interface statistics for a running guest. |
attach-device | Attach a device to a guest, using a device definition in an XML file. |
attach-disk | Attaches a new disk device to a guest. |
attach-interface | Attaches a new network interface to a guest. |
detach-device | Detach a device from a guest, takes the same kind of XML descriptions as command attach-device. |
detach-disk | Detach a disk device from a guest. |
detach-interface | Detach a network interface from a guest. |
domxml-from-native | Convert from native guest configuration format to domain XML format. See the virsh man page for more details. |
domxml-to-native | Convert from domain XML format to native guest configuration format. See the virsh man page for more details. |
virsh options:
| Command | Description |
|---|---|
version | Displays the version of virsh |
nodeinfo | Outputs information about the hypervisor |
Connect to a hypervisor session with virsh:
virsh connect {hostname OR URL}
# virsh connect {hostname OR URL}<name> is the machine name of the hypervisor. To initiate a read-only connection, append the above command with -readonly.
Output a guest's XML configuration file with virsh:
virsh dumpxml {domain-id, domain-name or domain-uuid}
# virsh dumpxml {domain-id, domain-name or domain-uuid}stdout). You can save the data by piping the output to a file. An example of piping the output to a file called guest.xml:
virsh dumpxml GuestID > guest.xml
# virsh dumpxml GuestID > guest.xmlguest.xml can recreate the guest (see Editing a guest's configuration file. You can edit this XML configuration file to configure additional devices or to deploy additional guests. See Section 34.1, “Using XML configuration files with virsh” for more information on modifying files created with virsh dumpxml.
virsh dumpxml output:
Guests can be created from XML configuration files. You can copy existing XML from previously created guests or use the dumpxml option (see Creating a virtual machine XML dump (configuration file)). To create a guest with virsh from an XML file:
virsh create configuration_file.xml
# virsh create configuration_file.xml
Instead of using the dumpxml option (see Creating a virtual machine XML dump (configuration file)), guests can be edited either while they run or while they are offline. The virsh edit command provides this functionality. For example, to edit the guest named softwaretesting:
virsh edit softwaretesting
# virsh edit softwaretesting$EDITOR shell parameter (set to vi by default).
Suspend a guest with virsh:
virsh suspend {domain-id, domain-name or domain-uuid}
# virsh suspend {domain-id, domain-name or domain-uuid}resume (Resuming a guest) option.
Restore a suspended guest with virsh using the resume option:
virsh resume {domain-id, domain-name or domain-uuid}
# virsh resume {domain-id, domain-name or domain-uuid}suspend and resume operations.
Save the current state of a guest to a file using the virsh command:
virsh save {domain-name, domain-id or domain-uuid} filename
# virsh save {domain-name, domain-id or domain-uuid} filenamerestore (Restore a guest) option. Save is similar to pause, instead of just pausing a guest the present state of the guest is saved.
Restore a guest previously saved with the virsh save command (Save a guest) using virsh:
virsh restore filename
# virsh restore filename
Shut down a guest using the virsh command:
virsh shutdown {domain-id, domain-name or domain-uuid}
# virsh shutdown {domain-id, domain-name or domain-uuid}on_shutdown parameter in the guest's configuration file.
Reboot a guest using virsh command:
#virsh reboot {domain-id, domain-name or domain-uuid}
#virsh reboot {domain-id, domain-name or domain-uuid}on_reboot element in the guest's configuration file.
Force a guest to stop with the virsh command:
virsh destroy {domain-id, domain-name or domain-uuid}
# virsh destroy {domain-id, domain-name or domain-uuid}virsh destroy can corrupt guest file systems . Use the destroy option only when the guest is unresponsive. For para-virtualized guests, use the shutdown option(Shut down a guest) instead.
To get the domain ID of a guest:
virsh domid {domain-name or domain-uuid}
# virsh domid {domain-name or domain-uuid}To get the domain name of a guest:
virsh domname {domain-id or domain-uuid}
# virsh domname {domain-id or domain-uuid}To get the Universally Unique Identifier (UUID) for a guest:
virsh domuuid {domain-id or domain-name}
# virsh domuuid {domain-id or domain-name}virsh domuuid output:
virsh domuuid r5b2-mySQL01 4a4c59a7-ee3f-c781-96e4-288f2862f011
# virsh domuuid r5b2-mySQL01
4a4c59a7-ee3f-c781-96e4-288f2862f011
Using virsh with the guest's domain ID, domain name or UUID you can display information on the specified guest:
virsh dominfo {domain-id, domain-name or domain-uuid}
# virsh dominfo {domain-id, domain-name or domain-uuid}virsh dominfo output:
To display information about the host:
virsh nodeinfo
# virsh nodeinfo
virsh nodeinfo output:
To display the guest list and their current states with virsh:
virsh list
# virsh list
--inactive option to list inactive guests (that is, guests that have been defined but are not currently active), and
--all option lists all guests. For example:
virsh list is categorized as one of the six states (listed below).
- The
runningstate refers to guests which are currently active on a CPU. - Guests listed as
blockedare blocked, and are not running or runnable. This is caused by a guest waiting on I/O (a traditional wait state) or guests in a sleep mode. - The
pausedstate lists domains that are paused. This occurs if an administrator uses the pause button invirt-manager,xm pauseorvirsh suspend. When a guest is paused it consumes memory and other resources but it is ineligible for scheduling and CPU resources from the hypervisor. - The
shutdownstate is for guests in the process of shutting down. The guest is sent a shutdown signal and should be in the process of stopping its operations gracefully. This may not work with all guest operating systems; some operating systems do not respond to these signals. - Domains in the
dyingstate are in is in process of dying, which is a state where the domain has not completely shut-down or crashed. crashedguests have failed while running and are no longer running. This state can only occur if the guest has been configured not to restart on crash.
To display virtual CPU information from a guest with virsh:
virsh vcpuinfo {domain-id, domain-name or domain-uuid}
# virsh vcpuinfo {domain-id, domain-name or domain-uuid}virsh vcpuinfo output:
To configure the affinity of virtual CPUs with physical CPUs:
virsh vcpupin domain-id vcpu cpulist
# virsh vcpupin domain-id vcpu cpulistdomain-id parameter is the guest's ID number or name.
vcpu parameter denotes the number of virtualized CPUs allocated to the guest.The vcpu parameter must be provided.
cpulist parameter is a list of physical CPU identifier numbers separated by commas. The cpulist parameter determines which physical CPUs the VCPUs can run on.
To modify the number of CPUs assigned to a guest with virsh:
virsh setvcpus {domain-name, domain-id or domain-uuid} count
# virsh setvcpus {domain-name, domain-id or domain-uuid} countcount value cannot exceed the count above the amount specified when the guest was created.
Important
To modify a guest's memory allocation with virsh :
virsh setmem {domain-id or domain-name} count
# virsh setmem {domain-id or domain-name} count
Use virsh domblkstat to display block device statistics for a running guest.
virsh domblkstat GuestName block-device
# virsh domblkstat GuestName block-device
Use virsh domifstat to display network interface statistics for a running guest.
virsh domifstat GuestName interface-device
# virsh domifstat GuestName interface-device
A guest can be migrated to another host with virsh. Migrate domain to another host. Add --live for live migration. The migrate command accepts parameters in the following format:
virsh migrate --live GuestName DestinationURL
# virsh migrate --live GuestName DestinationURL--live parameter is optional. Add the --live parameter for live migrations.
GuestName parameter represents the name of the guest which you want to migrate.
DestinationURL parameter is the URL or hostname of the destination system. The destination system requires:
- the same version of Red Hat Enterprise Linux,
- the same hypervisor (KVM or Xen), and
- the
libvirtservice must be started.
This section covers managing virtual networks with the virsh command. To list virtual networks:
virsh net-list
# virsh net-list
virsh net-dumpxml NetworkName
# virsh net-dumpxml NetworkNamevirsh commands used in managing virtual networks are:
virsh net-autostart network-name— Autostart a network specified as network-name.virsh net-create XMLfile— generates and starts a new network using an existing XML file.virsh net-define XMLfile— generates a new network device from an existing XML file without starting it.virsh net-destroy network-name— destroy a network specified as network-name.virsh net-name networkUUID— convert a specified networkUUID to a network name.virsh net-uuid network-name— convert a specified network-name to a network UUID.virsh net-start nameOfInactiveNetwork— starts an inactive network.virsh net-undefine nameOfInactiveNetwork— removes the definition of an inactive network.
Chapter 27. Managing guests with the Virtual Machine Manager (virt-manager)
virt-manager) windows, dialog boxes, and various GUI controls.
virt-manager provides a graphical view of hypervisors and guest on your system and on remote machines. You can use virt-manager to define both para-virtualized and fully virtualized guests. virt-manager can perform virtualization management tasks, including:
- assigning memory,
- assigning virtual CPUs,
- monitoring operational performance,
- saving and restoring, pausing and resuming, and shutting down and starting guests,
- links to the textual and graphical consoles, and
- live and offline migrations.
27.1. The Add Connection window
Figure 27.1. Virtual Machine Manager connection window
27.2. The Virtual Machine Manager main window
Figure 27.2. Virtual Machine Manager main window
27.3. The guest Overview tab
virt-manager. The UUID field displays the globally unique identifier for the virtual machines.
Figure 27.3. The Overview tab
27.4. Virtual Machine graphical console
Figure 27.4. Graphical console window
Note
dom0)'s loopback address (127.0.0.1). This ensures only those with shell privileges on the host can access virt-manager and the virtual machine through VNC.
virt-manager sticky key capability to send these sequences. To use this capability, you must press any modifier key (Ctrl or Alt) 3 times and the key you specify gets treated as active until the next non-modifier key is pressed. You can then send Ctrl-Alt-F11 to the guest by entering the key sequence 'Ctrl Ctrl Ctrl Alt+F1'.
Note
virt-manager, it is not possible to use this sticky key feature to send a Sysrq key combination to a guest.
27.5. Starting virt-manager
virt-manager session open the menu, then the menu and select (virt-manager).
virt-manager main window appears.
Figure 27.5. Starting virt-manager
virt-manager can be started remotely using ssh as demonstrated in the following command:
ssh -X host's address[remotehost]# virt-manager
ssh -X host's address[remotehost]# virt-manager
ssh to manage virtual machines and hosts is discussed further in Section 23.1, “Remote management with SSH”.
27.6. Restoring a saved machine
- From the File menu, select Restore a saved machine.
Figure 27.6. Restoring a virtual machine
- The Restore Virtual Machine main window appears.
- Navigate to correct directory and select the saved session file.
- Click Open.
Figure 27.7. A restored virtual machine manager session
27.7. Displaying guest details
- In the Virtual Machine Manager main window, highlight the virtual machine that you want to view.
Figure 27.8. Selecting a virtual machine to display
- From the Virtual Machine Manager Edit menu, select Machine Details (or click the Details button on the bottom of the Virtual Machine Manager main window).On the Virtual Machine window, click the Overview tab.The Overview tab summarizes CPU and memory usage for the guest you specified.
Figure 27.10. Displaying guest details overview
- On the Virtual Machine window, click the Hardwaretab.
Figure 27.11. Displaying guest hardware details
- On the Hardware tab, click on Processor to view or change the current processor allocation.
Figure 27.12. Processor allocation panel
- On the Hardware tab, click on Memory to view or change the current RAM memory allocation.
Figure 27.13. Displaying memory allocation
- On the Hardware tab, click on Disk to view or change the current hard disk configuration.
Figure 27.14. Displaying disk configuration
- On the Hardware tab, click on NIC to view or change the current network configuration.
Figure 27.15. Displaying network configuration
27.8. Status monitoring
virt-manager's preferences window.
- From the Edit menu, select Preferences.
Figure 27.16. Modifying guest preferences
The Preferences window appears. - From the Stats tab specify the time in seconds or stats polling options.
Figure 27.17. Configuring status monitoring
27.9. Displaying guest identifiers
- From the View menu, select the Domain ID check box.
Figure 27.18. Viewing guest IDs
- The Virtual Machine Manager lists the Domain IDs for all domains on your system.
Figure 27.19. Displaying domain IDs
27.10. Displaying a guest's status
- From the View menu, select the Status check box.
Figure 27.20. Selecting a virtual machine's status
- The Virtual Machine Manager lists the status of all virtual machines on your system.
Figure 27.21. Displaying a virtual machine's status
27.11. Displaying virtual CPUs
- From the View menu, select the Virtual CPUs check box.
Figure 27.22. Selecting the virtual CPUs option
- The Virtual Machine Manager lists the Virtual CPUs for all virtual machines on your system.
Figure 27.23. Displaying Virtual CPUs
27.12. Displaying CPU usage
- From the View menu, select the CPU Usage check box.
Figure 27.24. Selecting CPU usage
- The Virtual Machine Manager lists the percentage of CPU in use for all virtual machines on your system.
Figure 27.25. Displaying CPU usage
27.13. Displaying memory usage
- From the View menu, select the Memory Usage check box.
Figure 27.26. Selecting Memory Usage
- The Virtual Machine Manager lists the percentage of memory in use (in megabytes) for all virtual machines on your system.
Figure 27.27. Displaying memory usage
27.14. Managing a virtual network
- From the Edit menu, select Host Details.
Figure 27.28. Selecting a host's details
- This will open the menu. Click the Virtual Networks tab.
Figure 27.29. Virtual network configuration
- All available virtual networks are listed on the left-hand box of the menu. You can edit the configuration of a virtual network by selecting it from this box and editing as you see fit.
27.15. Creating a virtual network
- Open the Host Details menu (see Section 27.14, “Managing a virtual network”) and click the button.
Figure 27.30. Virtual network configuration
This will open the menu. Click to continue.Figure 27.31. Creating a new virtual network
- Enter an appropriate name for your virtual network and click .
Figure 27.32. Naming your virtual network
- Enter an IPv4 address space for your virtual network and click .
Figure 27.33. Choosing an IPv4 address space
- Define the DHCP range for your virtual network by specifying a Start and End range of IP addresses. Click to continue.
Figure 27.34. Selecting the
DHCPrange - Select how the virtual network should connect to the physical network.
Figure 27.35. Connecting to physical network
If you select Forwarding to physical network, choose whether the Destination should be NAT to any physical device or NAT to physical device eth0.Click to continue. - You are now ready to create the network. Check the configuration of your network and click .
Figure 27.36. Ready to create network
- The new virtual network is now available in the tab of the menu.
Figure 27.37. New virtual network is now available
Chapter 28. The xm command quick reference
xm command can manage the Xen hypervisor. Most operations can be performed with the libvirt tools, virt-manager application or the virsh command. The xm command does not have the error checking capacity of the libvirt tools and should not be used for tasks the libvirt tools support.
xm command do not work in Red Hat Enterprise Linux 5. The list below provides an overview of command options available and unavailable.
Warning
virsh or virt-manager instead of xm. The xm command does not handle error checking or configuration file errors very well and mistakes can lead to system instability or errors in virtual machines. Editing Xen configuration files manually is dangerous and should be avoided. Use this chapter at your own risk.
The following are basic and commonly used xm commands:
xm help [--long]: view available options and help text.- use the
xm listcommand to list active domains:xm list Name ID Mem(MiB) VCPUs State Time(s) Domain-0 0 520 2 r----- 1275.5 r5b2-mySQL01 13 500 1 -b---- 16.1
$ xm list Name ID Mem(MiB) VCPUs State Time(s) Domain-0 0 520 2 r----- 1275.5 r5b2-mySQL01 13 500 1 -b---- 16.1Copy to Clipboard Copied! Toggle word wrap Toggle overflow xm create [-c] DomainName/ID: start a virtual machine. If the -c option is used, the start up process will attach to the guest's console.xm console DomainName/ID: attach to a virtual machine's console.xm destroy DomainName/ID: terminates a virtual machine , similar to a power off.xm reboot DomainName/ID: reboot a virtual machine, runs through the normal system shut down and start up process.xm shutdown DomainName/ID: shut down a virtual machine, runs a normal system shut down procedure.xm pausexm unpausexm savexm restore [-p] DomainName/ID: resume the state, and the execution of the domain. If the -p option is used, the domain will not be unpaused after restoring it.xm migrate
Use the following xm commands to manage resources:
xm mem-set- use the
xm vcpu-listto list virtualized CPU affinities:Copy to Clipboard Copied! Toggle word wrap Toggle overflow xm vcpu-pinxm vcpu-set- use the
xm sched-creditcommand to display scheduler parameters for a given domain:xm sched-credit -d 0 {'cap': 0, 'weight': 256} xm sched-credit -d 13 {'cap': 25, 'weight': 256}$ xm sched-credit -d 0 {'cap': 0, 'weight': 256} $ xm sched-credit -d 13 {'cap': 25, 'weight': 256}Copy to Clipboard Copied! Toggle word wrap Toggle overflow
Use the following xm commands for monitoring and troubleshooting:
xm topxm dmesgxm infoxm log- use the
xm uptimeto display the uptime of guests and hosts:xm uptime Name ID Uptime Domain-0 0 3:42:18 r5b2-mySQL01 13 0:06:27
$ xm uptime Name ID Uptime Domain-0 0 3:42:18 r5b2-mySQL01 13 0:06:27Copy to Clipboard Copied! Toggle word wrap Toggle overflow xm sysrqxm dump-corexm renamexm domidxm domname
The xm vnet-list is currently unsupported.
Chapter 29. Configuring the Xen kernel boot parameters
/boot/grub/grub.conf) creates the list of operating systems the GRUB boot menu interface. When you install the kernel-xen RPM, a script adds the kernel-xen entry to the GRUB configuration file which boots kernel-xen by default. Edit the grub.conf file to modify the default kernel or to add additional kernel parameters.
initrd image, and Linux kernel. Since the kernel entry is on top of the other entries, the kernel loads into memory first. The boot loader sends, and receives, command line arguments to and from the hypervisor and Linux kernel. This example entry shows how you would restrict the Dom0 linux kernel memory to 800 MB.
mem
mem
com1=115200, 8n1
com1=115200, 8n1
dom0_mem
dom0_mem
dom0_max_vcpus
dom0_max_vcpus
acpi
acpi
noacpi
noacpi
Chapter 30. Configuring ELILO
/etc/elilo.conf, contains a list of global options and image stanzas. When you install the kernel-xen RPM, a post install script adds the appropriate image stanza to the elilo.conf.
Important
- Global options that affect the behavior of ELILO and all the entries. Typically there is no need to change these from the default values.
- Image stanzas that define a boot selection along with associated options.
image parameter indicates the following lines apply to a single boot selection. This stanza defines a hypervisor (vmm), initrd, and command line arguments (read-only, root and append) to the hypervisor and kernel. When ELILO is loaded during the boot sequence, the image is labeled linux.
read-only to the kernel command line option ro which causes the root file system to be mounted read-only until the initscripts mount the root drive as read-write. ELILO copies the "root" line to the kernel command line. These are merged with the "append" line to build a complete command line:
"-- root=/dev/VolGroup00/rhel5_2 ro rhgb quiet"
"-- root=/dev/VolGroup00/rhel5_2 ro rhgb quiet"
-- symbols delimit hypervisor and kernel arguments. The hypervisor arguments come first, then the -- delimiter, followed by the kernel arguments. The hypervisor does not usually have any arguments.
Note
--. An example of the hypervisor memory (mem) parameter and the quiet parameter for the kernel:
append="dom0_mem=2G -- quiet"
append="dom0_mem=2G -- quiet"
| Parameter | Description |
|---|---|
mem= | The mem parameter defines the hypervisor maximum RAM usage. Any additional RAM in the system is ignored. The parameter may be specified with a B, K, M or G suffix; representing bytes, kilobytes, megabytes and gigabytes respectively. If no suffix is specified the default unit is kilobytes. |
dom0_mem= | dom0_mem= sets the amount of RAM to allocate to dom0. The same suffixes are respected as for the mem parameter above. The default in Red Hat Enterprise Linux 5.2 on Itanium® is 4G. |
dom0_max_vcpus= | dom0_max_vcpus= sets the number of CPUs to allocate to the hypervisor. The default in Red Hat Enterprise Linux 5.2 on Itanium® is 4. |
com1=<baud>,DPS,<io_base>,<irq> | com1= sets the parameters for the first serial line. For example, com1=9600,8n1,0x408,5. The io_base and irq options can be omitted to leave them as the standard defaults. The baud parameter can be set as auto to indicate the boot loader setting should be preserved. The com1 parameter can be omitted if serial parameters are set as global options in ELILO or in the EFI configuration. |
com2=<baud>,DPS,<io_base>,<irq> | Set the parameters for the second serial line. Refer the description of the com1 parameter above. |
console=<specifier_list> | The console is a comma delimited preference list for the console options. Options include vga, com1 and com2. This setting should be omitted because the hypervisor attempts to inherit EFI console settings. |
rhgb quiet" so that kernel and initscript output are generated on the console. Note the double-dash remains so that the append line is correctly interpreted as hypervisor arguments.
Chapter 31. libvirt configuration reference
| Item | Description |
|---|---|
pae
|
Specifies the physical address extension configuration data.
|
apic
|
Specifies the advanced programmable interrupt controller configuration data.
|
memory
|
Specifies the memory size in megabytes.
|
vcpus
|
Specifies the numbers of virtual CPUs.
|
console
|
Specifies the port numbers to export the domain consoles to.
|
nic
|
Specifies the number of virtual network interfaces.
|
vif
|
Lists the randomly-assigned MAC addresses and bridges assigned to use for the domain's network addresses.
|
disk
|
Lists the block devices to export to the domain and exports physical devices to domain with read only access.
|
dhcp
|
Enables networking using DHCP.
|
netmask
|
Specifies the configured IP netmasks.
|
gateway
|
Specifies the configured IP gateways.
|
acpi
|
Specifies the advanced configuration power interface configuration data.
|
Chapter 32. Xen configuration files
libvirt configuration files for most tasks. Some users may need Xen configuration files which contain the following standard variables. Configuration items within these files must be enclosed in single quotes('). These configuration files reside in the /etc/xen directory.
xm create --help_config.
|
Parameter
|
Description
|
|---|---|
vncpasswd=NAME | Password for VNC console on HVM domain. |
vncviewer=no | yes | Spawn a vncviewer listening for a vnc server in the domain. The address of the vncviewer is passed to the domain on the kernel command line using VNC_SERVER=<host>:<port>. The port used by vnc is 5500 + DISPLAY. A display value with a free port is chosen if possible. Only valid when vnc=1. |
vncconsole=no | yes | Spawn a vncviewer process for the domain's graphical console. Only valid when vnc=1. |
name=NAME | Domain name. Must be unique. |
bootloader=FILE | Path to boot loader. |
bootargs=NAME | Arguments to pass to boot loader. |
bootentry=NAME | DEPRECATED. Entry to boot via boot loader. Use bootargs. |
kernel=FILE | Path to kernel image. |
ramdisk=FILE | Path to ramdisk. |
features=FEATURES | Features to enable in guest kernel |
builder=FUNCTION | Function to use to build the domain. |
memory=MEMORY | Domain memory in MB. |
maxmem=MEMORY | Maximum domain memory in MB. |
shadow_memory=MEMORY | Domain shadow memory in MB. |
cpu=CPU | CPU which hosts VCPU0. |
cpus=CPUS | CPUS to run the domain on. |
pae=PAE | Disable or enable PAE of HVM domain. |
acpi=ACPI | Disable or enable ACPI of HVM domain. |
apic=APIC | Disable or enable APIC of HVM domain. |
vcpus=VCPUs | The number of Virtual CPUS in domain. |
cpu_weight=WEIGHT | Set the new domain's cpu weight. WEIGHT is a float that controls the domain's share of the cpu. |
restart=onreboot | always | never | Deprecated. Use on_poweroff, on_reboot, and on_crash instead. Whether the domain should be restarted on exit. - onreboot: restart on exit with shutdown code reboot - always: always restart on exit, ignore exit code - never: never restart on exit, ignore exit code |
on_poweroff=destroy | restart | preserve | destroy | Behavior when a domain exits with reason 'poweroff'. - destroy: the domain is cleaned up as normal; - restart: a new domain is started in place of the old one; - preserve: no clean-up is done until the domain is manually destroyed (using xm destroy, for example); - rename-restart: the old domain is not cleaned up, but is renamed and a new domain started in its place. |
on_reboot=destroy | restart | preserve | destroy | Behavior when a domain exits with reason 'reboot'. - destroy: the domain is cleaned up as normal; - restart: a new domain is started in place of the old one; - preserve: no clean-up is done until the domain is manually destroyed (using xm destroy, for example); - rename-restart: the old domain is not cleaned up, but is renamed and a new domain started in its place. |
on_crash=destroy | restart | preserve | destroy | Behavior when a domain exits with reason 'crash'. - destroy: the domain is cleaned up as normal; - restart: a new domain is started in place of the old one; - preserve: no clean-up is done until the domain is manually destroyed (using xm destroy, for example); - rename-restart: the old domain is not cleaned up, but is renamed and a new domain started in its place. |
blkif=no | yes | Make the domain a block device backend. |
netif=no | yes | Make the domain a network interface backend. |
tpmif=no | yes | Make the domain a TPM interface backend. |
disk=phy:DEV,VDEV,MODE[,DOM] | Add a disk device to a domain. The physical device is DEV, which is exported to the domain as VDEV. The disk is read-only if MODE is r, read-write if MODE is w. If DOM is specified it defines the backend driver domain to use for the disk. The option may be repeated to add more than one disk. |
pci=BUS:DEV.FUNC | Add a PCI device to a domain, using given parameters (in hex). For example pci=c0:02.1a. The option may be repeated to add more than one pci device. |
ioports=FROM[-TO] | Add a legacy I/O range to a domain, using given params (in hex). For example ioports=02f8-02ff. The option may be repeated to add more than one i/o range. |
irq=IRQ | Add an IRQ (interrupt line) to a domain. For example irq=7. This option may be repeated to add more than one IRQ. |
usbport=PATH | Add a physical USB port to a domain, as specified by the path to that port. This option may be repeated to add more than one port. |
vfb=type={vnc,sdl}, vncunused=1, vncdisplay=N,
vnclisten=ADDR, display=DISPLAY,
xauthority=XAUTHORITY, vncpasswd=PASSWORD,
keymap=KEYMAP
| Make the domain a framebuffer backend. The backend type should be either sdl or vnc. For type=vnc, connect an external vncviewer. The server will listen on ADDR (default 127.0.0.1) on port N+5900. N defaults to the domain id. If vncunused=1, the server will try to find an arbitrary unused port above 5900. For type=sdl, a viewer will be started automatically using the given DISPLAY and XAUTHORITY, which default to the current user's ones. |
vif=type=TYPE, mac=MAC, bridge=BRIDGE, ip=IPADDR,
script=SCRIPT, backend=DOM, vifname=NAME
| Add a network interface with the given MAC address and bridge. The vif is configured by calling the given configuration script. If type is not specified, default is netfront not ioemu device. If mac is not specified a random MAC address is used. If not specified then the network backend chooses its own MAC address. If bridge is not specified the first bridge found is used. If script is not specified the default script is used. If backend is not specified the default backend driver domain is used. If vifname is not specified the backend virtual interface will have name vifD.N where D is the domain id and N is the interface id. This option may be repeated to add more than one vif. Specifying vifs will increase the number of interfaces as needed. |
vtpm=instance=INSTANCE,backend=DOM | Add a TPM interface. On the backend side use the given instance as virtual TPM instance. The given number is merely the preferred instance number. The hotplug script will determine which instance number will actually be assigned to the domain. The association between virtual machine and the TPM instance number can be found in /etc/xen/vtpm.db. Use the backend in the given domain. |
access_control=policy=POLICY,label=LABEL | Add a security label and the security policy reference that defines it. The local ssid reference is calculated when starting or resuming the domain. At this time, the policy is checked against the active policy as well. This way, migrating through the save or restore functions are covered and local labels are automatically created correctly on the system where a domain is started or resumed. |
nics=NUM | DEPRECATED. Use empty vif entries instead. Set the number of network interfaces. Use the vif option to define interface parameters, otherwise defaults are used. Specifying vifs will increase the number of interfaces as needed. |
root=DEVICE | Set the root= parameter on the kernel command line. Use a device, e.g. /dev/sda1, or /dev/nfs for NFS root. |
extra=ARGS | Set extra arguments to append to the kernel command line. |
ip=IPADDR | Set the kernel IP interface address. |
gateway=IPADDR | Set the kernel IP gateway. |
netmask=MASK | Set the kernel IP netmask. |
hostname=NAME | Set the kernel IP hostname. |
interface=INTF | Set the kernel IP interface name. |
dhcp=off|dhcp | Set the kernel dhcp option. |
nfs_server=IPADDR | Set the address of the NFS server for NFS root. |
nfs_root=PATH | Set the path of the root NFS directory. |
device_model=FILE | Path to device model program. |
fda=FILE | Path to fda |
fdb=FILE | Path to fdb |
serial=FILE | Path to serial or pty or vc |
localtime=no | yes | Is RTC set to localtime |
keymap=FILE | Set keyboard layout used |
usb=no | yes | Emulate USB devices |
usbdevice=NAME | Name of a USB device to add |
stdvga=no | yes | Use std vga or Cirrus Logic
graphics |
isa=no | yes | Simulate an ISA only system |
boot=a|b|c|d | Default boot device |
nographic=no | yes | Should device models use graphics? |
soundhw=audiodev | Should device models enable audio device? |
vnc | Should the device model use VNC? |
vncdisplay | VNC display to use |
vnclisten | Address for VNC server to listen on. |
vncunused | Try to find an unused port for the VNC server. Only valid when vnc=1. |
sdl | Should the device model use SDL? |
display=DISPLAY | X11 display to use |
xauthority=XAUTHORITY | X11 Authority to use |
uuid | xenstore UUID (universally unique identifier) to use. One will be randomly generated if this option is not set, just like MAC addresses for virtual network interfaces. This must be a unique value across the entire cluster. |
| Parser function | Valid arguments |
|---|---|
set_bool |
Accepted values:
|
set_float |
Accepts a floating point number with Python's float(). For example:
|
set_int |
Accepts an integer with Python's int().
|
set_value |
accepts any Python value.
|
append_value |
accepts any Python value, and appends it to the previous value which is stored in an array.
|
| Parameter | Parser function | Default value |
|---|---|---|
name | setter | default value |
vncpasswd | set_value | None |
vncviewer | set_bool | None |
vncconsole | set_bool | None |
name | set_value | None |
bootloader | set_value | None |
bootargs | set_value | None |
bootentry | set_value | None |
kernel | set_value | None |
ramdisk | set_value | '' |
features | set_value | '' |
builder | set_value | 'linux' |
memory | set_int | 128 |
maxmem | set_int | None |
shadow_memory | set_int | 0 |
cpu | set_int | None |
cpus | set_value | None |
pae | set_int | 0 |
acpi | set_int | 0 |
apic | set_int | 0 |
vcpus | set_int | 1 |
cpu_weight | set_float | None |
restart | set_value | None |
on_poweroff | set_value | None |
on_reboot | set_value | None |
on_crash | set_value | None |
blkif | set_bool | 0 |
netif | set_bool | 0 |
tpmif | append_value | 0 |
disk | append_value | [] |
pci | append_value | [] |
ioports | append_value | [] |
irq | append_value | [] |
usbport | append_value | [] |
vfb | append_value | [] |
vif | append_value | [] |
vtpm | append_value | [] |
access_control | append_value | [] |
nics | set_int | -1 |
root | set_value | '' |
extra | set_value | '' |
ip | set_value | '' |
gateway | set_value | '' |
netmask | set_value | '' |
hostname | set_value | '' |
interface | set_value | "eth0" |
dhcp | set_value | 'off' |
nfs_server | set_value | None |
nfs_root | set_value | None |
device_model | set_value | '' |
fda | set_value | '' |
fdb | set_value | '' |
serial | set_value | '' |
localtime | set_bool | 0 |
keymap | set_value | '' |
usb | set_bool | 0 |
usbdevice | set_value | '' |
stdvga | set_bool | 0 |
isa | set_bool | 0 |
boot | set_value | 'c' |
nographic | set_bool | 0 |
soundhw | set_value | '' |
vnc | set_value | None |
vncdisplay | set_value | None |
vnclisten | set_value | None |
vncunused | set_bool | 1 |
sdl | set_value | None |
display | set_value | None |
xauthority | set_value | None |
uuid | set_value | None |
Part VII. Tips and Tricks
Tips and Tricks to Enhance Productivity
Chapter 33. Tips and tricks
33.1. Automatically starting guests
virsh to set a guest, TestServer, to automatically start when the host boots.
virsh autostart TestServer Domain TestServer marked as autostarted
# virsh autostart TestServer
Domain TestServer marked as autostarted
--disable parameter
virsh autostart --disable TestServer Domain TestServer unmarked as autostarted
# virsh autostart --disable TestServer
Domain TestServer unmarked as autostarted
33.2. Changing between the KVM and Xen hypervisors
Important
Warning
33.2.1. Xen to KVM
Install the KVM package
Install the kvm package if you have not already done so.yum install kvm
# yum install kvmCopy to Clipboard Copied! Toggle word wrap Toggle overflow Verify which kernel is in use
The kernel-xen package may be installed. Use theunamecommand to determine which kernel is running:uname -r 2.6.18-159.el5xen
$ uname -r 2.6.18-159.el5xenCopy to Clipboard Copied! Toggle word wrap Toggle overflow The present kernel, "2.6.18-159.el5xen", is running on the system. If the default kernel, "2.6.18-159.el5", is running you can skip the substep.Changing the Xen kernel to the default kernel
Thegrub.conffile determines which kernel is booted. To change the default kernel edit the/boot/grub/grub.conffile as shown below.Copy to Clipboard Copied! Toggle word wrap Toggle overflow Notice the default=1 parameter. This is instructing the GRUB boot loader to boot the second entry, the Xen kernel. Change the default to0(or the number for the default kernel):Copy to Clipboard Copied! Toggle word wrap Toggle overflow
Reboot to load the new kernel
Reboot the system. The computer will restart with the default kernel. The KVM module should be automatically loaded with the kernel. Verify KVM is running:lsmod | grep kvm kvm_intel 85992 1 kvm 222368 2 ksm,kvm_intel
$ lsmod | grep kvm kvm_intel 85992 1 kvm 222368 2 ksm,kvm_intelCopy to Clipboard Copied! Toggle word wrap Toggle overflow Thekvmmodule and either thekvm_intelmodule or thekvm_amdmodule are present if everything worked.
33.2.2. KVM to Xen
Install the Xen packages
Install the kernel-xen and xen package if you have not already done so.yum install kernel-xen xen
# yum install kernel-xen xenCopy to Clipboard Copied! Toggle word wrap Toggle overflow The kernel-xen package may be installed but disabled.Verify which kernel is in use
Use theunamecommand to determine which kernel is running.uname -r 2.6.18-159.el5
$ uname -r 2.6.18-159.el5Copy to Clipboard Copied! Toggle word wrap Toggle overflow The present kernel, "2.6.18-159.el5", is running on the system. This is the default kernel. If the kernel hasxenon the end (for example,2.6.18-159.el5xen) then the Xen kernel is running and you can skip the substep.Changing the default kernel to the Xen kernel
Thegrub.conffile determines which kernel is booted. To change the default kernel edit the/boot/grub/grub.conffile as shown below.Copy to Clipboard Copied! Toggle word wrap Toggle overflow Notice the default=0 parameter. This is instructing the GRUB boot loader to boot the first entry, the default kernel. Change the default to1(or the number for the Xen kernel):Copy to Clipboard Copied! Toggle word wrap Toggle overflow
Reboot to load the new kernel
Reboot the system. The computer will restart with the Xen kernel. Verify with theunamecommand:uname -r 2.6.18-159.el5xen
$ uname -r 2.6.18-159.el5xenCopy to Clipboard Copied! Toggle word wrap Toggle overflow If the output hasxenon the end the Xen kernel is running.
33.3. Using qemu-img
qemu-img command line tool is used for formatting various file systems used by Xen and KVM. qemu-img should be used for formatting guest images, additional storage devices and network storage. qemu-img options and usages are listed below.
Create the new disk image filename of size size and format format.
qemu-img create [-6] [-e] [-b base_image] [-f format] filename [size]
# qemu-img create [-6] [-e] [-b base_image] [-f format] filename [size]
The convert option is used for converting a recognized format to another image format.
qemu-img convert [-c] [-e] [-f format] filename [-O output_format] output_filename
# qemu-img convert [-c] [-e] [-f format] filename [-O output_format] output_filenamefilename to disk image output_filename using format output_format. The disk image can be optionally encrypted with the -e option or compressed with the -c option.
qcow" supports encryption or compression. the compression is read-only. it means that if a compressed sector is rewritten, then it is rewritten as uncompressed data.
qcow or cow. The empty sectors are detected and suppressed from the destination image.
the info parameter displays information about a disk image. the format for the info option is as follows:
qemu-img info [-f format] filename
# qemu-img info [-f format] filename
The format of an image is usually guessed automatically. The following formats are supported:
-
raw - Raw disk image format (default). This format has the advantage of being simple and easily exportable to all other emulators. If your file system supports holes (for example in ext2 or ext3 on Linux or NTFS on Windows), then only the written sectors will reserve space. Use
qemu-img infoto know the real size used by the image orls -lson Unix/Linux. -
qcow2 - QEMU image format, the most versatile format. Use it to have smaller images (useful if your file system does not supports holes, for example: on Windows), optional AES encryption, zlib based compression and support of multiple VM snapshots.
-
qcow - Old QEMU image format. Only included for compatibility with older versions.
-
cow - User Mode Linux Copy On Write image format. The
cowformat is included only for compatibility with previous versions. It does not work with Windows. -
vmdk - VMware 3 and 4 compatible image format.
-
cloop - Linux Compressed Loop image, useful only to reuse directly compressed CD-ROM images present for example in the Knoppix CD-ROMs.
33.4. Overcommitting Resources
Important
Most operating systems and applications do not use 100% of the available RAM all the time. This behavior can be exploited with KVM to use more memory for guests than what is physically available.
Warning
(0.5 * RAM) + (overcommit ratio * RAM) = Recommended swap size
(0.5 * RAM) + (overcommit ratio * RAM) = Recommended swap size
The KVM hypervisor supports overcommitting virtualized CPUs. Virtualized CPUs can be overcommitted as far as load limits of guests allow. Use caution when overcommitting VCPUs as loads near 100% may cause dropped requests or unusable response times.
Important
33.5. Modifying /etc/grub.conf
/etc/grub.conf file to use the virtualization kernel. You must use the xen kernel to use the Xen hypervisor. Copy your existing xen kernel entry make sure you copy all of the important lines or your system will panic upon boot (initrd will have a length of '0'). If you require xen hypervisor specific values you must append them to the xen line of your grub entry.
grub.conf entry from a system running the kernel-xen package. The grub.conf on your system may vary. The important part in the example below is the section from the title line to the next new line.
Note
grub.conf could look very different if it has been manually edited before or copied from an example. Read Chapter 29, Configuring the Xen kernel boot parameters for more information on using virtualization and grub.
dom0_mem=256M to the xen line in your grub.conf. A modified version of the grub configuration file in the previous example:
33.6. Verifying virtualization extensions
Note
- Run the following command to verify the CPU virtualization extensions are available:
grep -E 'svm|vmx' /proc/cpuinfo
$ grep -E 'svm|vmx' /proc/cpuinfoCopy to Clipboard Copied! Toggle word wrap Toggle overflow - Analyze the output.
- The following output contains a
vmxentry indicating an Intel processor with the Intel VT extensions:flags : fpu tsc msr pae mce cx8 apic mtrr mca cmov pat pse36 clflush dts acpi mmx fxsr sse sse2 ss ht tm syscall lm constant_tsc pni monitor ds_cpl vmx est tm2 cx16 xtpr lahf_lm
flags : fpu tsc msr pae mce cx8 apic mtrr mca cmov pat pse36 clflush dts acpi mmx fxsr sse sse2 ss ht tm syscall lm constant_tsc pni monitor ds_cpl vmx est tm2 cx16 xtpr lahf_lmCopy to Clipboard Copied! Toggle word wrap Toggle overflow - The following output contains an
svmentry indicating an AMD processor with the AMD-V extensions:flags : fpu tsc msr pae mce cx8 apic mtrr mca cmov pat pse36 clflush mmx fxsr sse sse2 ht syscall nx mmxext fxsr_opt lm 3dnowext 3dnow pni cx16 lahf_lm cmp_legacy svm cr8legacy ts fid vid ttp tm stc
flags : fpu tsc msr pae mce cx8 apic mtrr mca cmov pat pse36 clflush mmx fxsr sse sse2 ht syscall nx mmxext fxsr_opt lm 3dnowext 3dnow pni cx16 lahf_lm cmp_legacy svm cr8legacy ts fid vid ttp tm stcCopy to Clipboard Copied! Toggle word wrap Toggle overflow
If any output is received, the processor has the hardware virtualization extensions. However in some circumstances manufacturers disable the virtualization extensions in BIOS.The "flags:" content may appear multiple times for each hyperthread, core or CPU on the system.The virtualization extensions may be disabled in the BIOS. If the extensions do not appear or full virtualization does not work, see Procedure 36.1, “Enabling virtualization extensions in BIOS”. For users of the KVM hypervisor
If the kvm package is installed. I As an additional check, verify that thekvmmodules are loaded in the kernel:lsmod | grep kvm
# lsmod | grep kvmCopy to Clipboard Copied! Toggle word wrap Toggle overflow If the output includeskvm_intelorkvm_amdthen thekvmhardware virtualization modules are loaded and your system meets requirements. sudo
Note
virsh command can output a full list of virtualization system capabilities. Run virsh capabilities as root to receive the complete list.
33.7. Accessing data from a guest disk image
kpartx tool, covered by this section, to mount the guest file system as a loop device which can then be accessed.
kpartx command creates device maps from partition tables. Each guest storage image has a partition table embedded in the file.
Warning
Procedure 33.1. Accessing guest image data
- Install the kpartx package.
yum install kpartx
# yum install kpartxCopy to Clipboard Copied! Toggle word wrap Toggle overflow - Use kpartx to list partition device mappings attached to a file-based storage image. This example uses a image file named guest1.img.
kpartx -l /var/lib/libvirt/images/guest1.img loop0p1 : 0 409600 /dev/loop0 63 loop0p2 : 0 10064717 /dev/loop0 409663
# kpartx -l /var/lib/libvirt/images/guest1.img loop0p1 : 0 409600 /dev/loop0 63 loop0p2 : 0 10064717 /dev/loop0 409663Copy to Clipboard Copied! Toggle word wrap Toggle overflow guest1 is a Linux guest. The first partition is the boot partition and the second partition is an EXT3 containing the root partition. - Add the partition mappings to the recognized devices in
/dev/mapper/.kpartx -a /var/lib/libvirt/images/guest1.img
# kpartx -a /var/lib/libvirt/images/guest1.imgCopy to Clipboard Copied! Toggle word wrap Toggle overflow - Test that the partition mapping worked. There should be new devices in the /dev/mapper/ directory
ls /dev/mapper/ loop0p1 loop0p2
# ls /dev/mapper/ loop0p1 loop0p2Copy to Clipboard Copied! Toggle word wrap Toggle overflow The mappings for the image are named in the formatloopXpY.
- Mount the loop device which to a directory. If required, create the directory. This example uses
/mnt/guest1for mounting the partition.mkdir /mnt/guest1 mount /dev/mapper/loop0p1 /mnt/guest1 -o loop,ro
# mkdir /mnt/guest1 # mount /dev/mapper/loop0p1 /mnt/guest1 -o loop,roCopy to Clipboard Copied! Toggle word wrap Toggle overflow - The files are now available for reading in the
/mnt/guest1directory. Read or copy the files. - Unmount the device so the guest image can be reused by the guest. If the device is mounted the guest cannot access the image and therefore cannot start.
umount /mnt/tmp
# umount /mnt/tmpCopy to Clipboard Copied! Toggle word wrap Toggle overflow - Disconnect the image file from the partition mappings.
kpartx -d /var/lib/libvirt/images/guest1.img
# kpartx -d /var/lib/libvirt/images/guest1.imgCopy to Clipboard Copied! Toggle word wrap Toggle overflow
Many Linux guests use Logical Volume Management (LVM) volumes. Additional steps are required to read data on LVM volumes on virtual storage images.
- Add the partition mappings for the guest1.img to the recognized devices in the
/dev/mapper/directory.kpartx -a /var/lib/libvirt/images/guest1.img
# kpartx -a /var/lib/libvirt/images/guest1.imgCopy to Clipboard Copied! Toggle word wrap Toggle overflow - In this example the LVM volumes are on a second partition. The volumes require a rescan with the
vgscancommand to find the new volume groups.vgscan Reading all physical volumes . This may take a while... Found volume group "VolGroup00" using metadata type lvm2
# vgscan Reading all physical volumes . This may take a while... Found volume group "VolGroup00" using metadata type lvm2Copy to Clipboard Copied! Toggle word wrap Toggle overflow - Activate the volume group on the partition (called
VolGroup00by default) with thevgchange -aycommand.vgchange -ay VolGroup00 2 logical volumes in volume group VolGroup00 now active.
# vgchange -ay VolGroup00 2 logical volumes in volume group VolGroup00 now active.Copy to Clipboard Copied! Toggle word wrap Toggle overflow - Use the
lvscommand to display information about the new volumes. The volume names (theLVcolumn) are required to mount the volumes.lvs LV VG Attr Lsize Origin Snap% Move Log Copy% LogVol00 VolGroup00 -wi-a- 5.06G LogVol01 VolGroup00 -wi-a- 800.00M
# lvs LV VG Attr Lsize Origin Snap% Move Log Copy% LogVol00 VolGroup00 -wi-a- 5.06G LogVol01 VolGroup00 -wi-a- 800.00MCopy to Clipboard Copied! Toggle word wrap Toggle overflow - Mount
/dev/VolGroup00/LogVol00in the/mnt/guestboot/directory.mount /dev/VolGroup00/LogVol00 /mnt/guestboot
# mount /dev/VolGroup00/LogVol00 /mnt/guestbootCopy to Clipboard Copied! Toggle word wrap Toggle overflow - The files are now available for reading in the
/mnt/guestbootdirectory. Read or copy the files. - Unmount the device so the guest image can be reused by the guest. If the device is mounted the guest cannot access the image and therefore cannot start.
umount /mnt/
# umount /mnt/Copy to Clipboard Copied! Toggle word wrap Toggle overflow - Disconnect the volume group VolGroup00
vgchange -an VolGroup00
# vgchange -an VolGroup00Copy to Clipboard Copied! Toggle word wrap Toggle overflow - Disconnect the image file from the partition mappings.
kpartx -d /var/lib/libvirt/images/guest1.img
# kpartx -d /var/lib/libvirt/images/guest1.imgCopy to Clipboard Copied! Toggle word wrap Toggle overflow
33.8. Setting KVM processor affinities
The first step in deciding what policy to apply is to determine the host’s memory and CPU topology. The virsh nodeinfo command provides information about how many sockets, cores and hyperthreads there are attached a host.
virsh capabilities to get additional output data on the CPU configuration.
Locking a guest to a particular NUMA node offers no benefit if that node does not have sufficient free memory for that guest. libvirt stores information on the free memory available on each node. Use the virsh freecell command to display the free memory on all NUMA nodes.
virsh freecell 0: 2203620 kB 1: 3354784 kB
# virsh freecell
0: 2203620 kB
1: 3354784 kB
Once you have determined which node to run the guest on, see the capabilities data (the output of the virsh capabilities command) about NUMA topology.
- Extract from the
virsh capabilitiesoutput.Copy to Clipboard Copied! Toggle word wrap Toggle overflow - Observe that the node 1,
<cell id='1'>, has physical CPUs 4 to 7. - The guest can be locked to a set of CPUs by appending the
cpusetattribute to the configuration file.- While the guest is offline, open the configuration file with
virsh edit. - Locate where the guest's virtual CPU count is specified. Find the
vcpuselement.<vcpus>4</vcpus>
<vcpus>4</vcpus>Copy to Clipboard Copied! Toggle word wrap Toggle overflow The guest in this example has four CPUs. - Add a
cpusetattribute with the CPU numbers for the relevant NUMA cell.<vcpus cpuset='4-7'>4</vcpus>
<vcpus cpuset='4-7'>4</vcpus>Copy to Clipboard Copied! Toggle word wrap Toggle overflow
- Save the configuration file and restart the guest.
The virt-install provisioning tool provides a simple way to automatically apply a 'best fit' NUMA policy when guests are created.
cpuset option for virt-install can use a CPU set of processors or the parameter auto. The auto parameter automatically determines the optimal CPU locking using the available NUMA data.
--cpuset=auto with the virt-install command when creating new guests.
There may be times where modifying CPU affinities on running guests is preferable to rebooting the guest. The virsh vcpuinfo and virsh vcpupin commands can perform CPU affinity changes on running guests.
virsh vcpuinfo command gives up to date information about where each virtual CPU is running.
virsh vcpuinfo output (the yyyyyyyy value of CPU Affinity) shows that the guest can presently run on any CPU.
virsh vcpupin guest1 0 4 virsh vcpupin guest1 1 5 virsh vcpupin guest1 2 6 virsh vcpupin guest1 3 7
# virsh vcpupin guest1 0 4
# virsh vcpupin guest1 1 5
# virsh vcpupin guest1 2 6
# virsh vcpupin guest1 3 7virsh vcpuinfo command confirms the change in affinity.
33.9. Generating a new unique MAC address
macgen.py. Now from that directory you can run the script using ./macgen.py and it will generate a new MAC address. A sample output would look like the following:
You can also use the built-in modules of python-virtinst to generate a new MAC address and UUID for use in a guest configuration file:
echo 'import virtinst.util ; print\ virtinst.util.uuidToString(virtinst.util.randomUUID())' | python echo 'import virtinst.util ; print virtinst.util.randomMAC()' | python
# echo 'import virtinst.util ; print\
virtinst.util.uuidToString(virtinst.util.randomUUID())' | python
# echo 'import virtinst.util ; print virtinst.util.randomMAC()' | python
33.10. Limit network bandwidth for a Xen guest
rate” parameter part of the VIF entries can throttle guests.
-
rate - The
rate=option can be added to theVIF=entry in a virtual machine configuration file to limit a virtual machine's network bandwidth or specify a specific time interval for a time window. - time window
- The time window is optional to the
rate=option:The default time window is 50ms.A smaller time window will provide less burst transmission, however, the replenishment rate and latency will increase.The default 50ms time window is a good balance between latency and throughput and in most cases will not require changing.
rate parameter values and uses.
-
rate=10Mb/s - Limit the outgoing network traffic from the guest to 10MB/s.
-
rate=250KB/s - Limit the outgoing network traffic from the guest to 250KB/s.
-
rate=10MB/s@50ms - Limit bandwidth to 10MB/s and provide the guest with a 50KB chunk every 50ms.
VIF entry would look like the following:
vif = [ 'rate=10MB/s , mac=00:16:3e:7a:55:1c, bridge=xenbr1']
vif = [ 'rate=10MB/s , mac=00:16:3e:7a:55:1c, bridge=xenbr1']
rate entry would limit the virtual machine's interface to 10MB/s for outgoing traffic
33.11. Configuring Xen processor affinities
virsh or virt-manager:
virsh see Configuring virtual CPU affinity for more information.
virt-manager see Section 27.11, “Displaying virtual CPUs ” for more information.
33.12. Modifying the Xen hypervisor
/boot/grub/grub.conf. Managing several or more hosts configuration files quickly becomes difficult. System administrators often prefer to use the 'cut and paste' method for editing multiple grub.conf files. If you do this, ensure you include all five lines in the Virtualization entry (or this will create system errors). Hypervisor specific values are all found on the 'xen' line. This example represents a correct grub.conf virtualization entry:
'dom0_mem=256M'. This example is the grub.conf with the hypervisor's memory entry modified.
33.13. Very Secure ftpd
vsftpd can provide access to installation trees for para-virtualized guests (for example, the Red Hat Enterprise Linux 5 repositories) or other data. If you have not installed vsftpd during the server installation you can grab the RPM package from your Server directory of your installation media and install it using the rpm -ivh vsftpd*.rpm (note that the RPM package must be in your current directory).
- To configure
vsftpd, edit/etc/passwdusingvipwand change the ftp user's home directory to the directory where you are going to keep the installation trees for your para-virtualized guests. An example entry for the FTP user would look like the following:ftp:x:14:50:FTP User:/xen/pub:/sbin/nologin
ftp:x:14:50:FTP User:/xen/pub:/sbin/nologinCopy to Clipboard Copied! Toggle word wrap Toggle overflow - Verify that
vsftpdis not enabled using thechkconfig --list vsftpd:chkconfig --list vsftpd vsftpd 0:off 1:off 2:off 3:off 4:off 5:off 6:off
$ chkconfig --list vsftpd vsftpd 0:off 1:off 2:off 3:off 4:off 5:off 6:offCopy to Clipboard Copied! Toggle word wrap Toggle overflow - Run the
chkconfig --levels 345 vsftpd onto start vsftpd automatically for run levels 3, 4 and 5. - Use the
chkconfig --list vsftpdcommand to verify thevsftpddaemon is enabled to start during system boot:chkconfig --list vsftpd vsftpd 0:off 1:off 2:off 3:on 4:on 5:on 6:off
$ chkconfig --list vsftpd vsftpd 0:off 1:off 2:off 3:on 4:on 5:on 6:offCopy to Clipboard Copied! Toggle word wrap Toggle overflow - use the
service vsftpd start vsftpdto start the vsftpd service:$service vsftpd start vsftpd Starting vsftpd for vsftpd: [ OK ]
$service vsftpd start vsftpd Starting vsftpd for vsftpd: [ OK ]Copy to Clipboard Copied! Toggle word wrap Toggle overflow
33.14. Configuring LUN Persistence
If your system is not using multipath, you can use udev to implement LUN persistence. Before implementing LUN persistence in your system, ensure that you acquire the proper UUIDs. Once you acquire these, you can configure LUN persistence by editing the scsi_id file that resides in the /etc directory. Once you have this file open in a text editor, you must comment out this line:
options=-b
# options=-b
options=-g
# options=-g
scsi_id command:
scsi_id -g -s /block/sdc *3600a0b80001327510000015427b625e*
# scsi_id -g -s /block/sdc
*3600a0b80001327510000015427b625e*
20-names.rules file in the /etc/udev/rules.d directory. The device naming rules follow this format:
KERNEL="sd*", BUS="scsi", PROGRAM="sbin/scsi_id", RESULT="UUID", NAME="devicename"
# KERNEL="sd*", BUS="scsi", PROGRAM="sbin/scsi_id", RESULT="UUID", NAME="devicename"
UUID and devicename with the above UUID retrieved entry. The rule should resemble the following:
KERNEL="sd*", BUS="scsi", PROGRAM="sbin/scsi_id", RESULT="3600a0b80001327510000015427b625e", NAME="mydevicename"
KERNEL="sd*", BUS="scsi", PROGRAM="sbin/scsi_id", RESULT="3600a0b80001327510000015427b625e", NAME="mydevicename"
/dev/sd* pattern to inspect the given UUID. When it finds a matching device, it creates a device node called /dev/devicename. For this example, the device node is /dev/mydevice . Finally, append the /etc/rc.local file with this line:
/sbin/start_udev
/sbin/start_udev
To implement LUN persistence in a multipath environment, you must define the alias names for the multipath devices. For this example, you must define four device aliases by editing the multipath.conf file that resides in the /etc/ directory:
/dev/mpath/oramp1, /dev/mpath/oramp2, /dev/mpath/oramp3, and dev/mpath/oramp4. The devices will reside in the /dev/mpath directory. These LUN names are persistent after reboots as it creates aliased names on the wwid for each of the LUNs.
33.15. Disable SMART disk monitoring for guests
/sbin/service smartd stop /sbin/chkconfig --del smartd
/sbin/service smartd stop
/sbin/chkconfig --del smartd
33.16. Cleaning up old Xen configuration files
/var/lib/xen, the usually named vmlinuz.****** and initrd.******. These files are the initrd and vmlinuz files from virtual machines which either failed to boot or failed for some other reason. These files are temporary files extracted from virtual machine's boot disk during the start up sequence. These files should be automatically removed after the virtual machine is shut down cleanly. Then you can safely delete old and stale copies from this directory.
33.17. Configuring a VNC Server
vino-preferences command.
- Edit the
~/.vnc/xstartupfile to start a GNOME session whenever vncserver is started. The first time you run the vncserver script it will ask you for a password you want to use for your VNC session. - A sample
xstartupfile:Copy to Clipboard Copied! Toggle word wrap Toggle overflow
33.18. Cloning guest configuration files
uuidgen command. Then for the vif entries you must define a unique MAC address for each guest (if you are copying a guest configuration from an existing guest, you can create a script to handle it). For the xen bridge information, if you move an existing guest configuration file to a new host, you must update the xenbr entry to match your local networking configuration. For the Device entries, you must modify the entries in the 'disk=' section to point to the correct guest image.
/etc/sysconfig/network file to match the new guest's hostname.
HWADDR address of the /etc/sysconfig/network-scripts/ifcfg-eth0 file to match the output from ifconfig eth0 file and if you use static IP addresses, you must modify the IPADDR entry.
33.19. Duplicating an existing guest and its configuration file
-
name - The name of your guest as it is known to the hypervisor and displayed in the management utilities. This entry should be unique on your system.
-
uuid - A unique handle for the guest, a new UUID can be regenerated using the
uuidgencommand. A sample UUID output:uuidgen a984a14f-4191-4d14-868e-329906b211e5
$ uuidgen a984a14f-4191-4d14-868e-329906b211e5Copy to Clipboard Copied! Toggle word wrap Toggle overflow -
vif - The MAC address must define a unique MAC address for each guest. This is automatically done if the standard tools are used. If you are copying a guest configuration from an existing guest you can use the script Section 33.9, “Generating a new unique MAC address”.
- If you are moving or duplicating an existing guest configuration file to a new host you have to make sure you adjust the
xenbrentry to correspond with your local networking configuration (you can obtain the bridge information using the commandbrctl showcommand). - Device entries, make sure you adjust the entries in the
disk=section to point to the correct guest image.
-
/etc/sysconfig/network - Modify the
HOSTNAMEentry to the guest's newhostname. -
/etc/sysconfig/network-scripts/ifcfg-eth0 - Modify the
HWADDRaddress to the output fromifconfig eth0 - Modify the
IPADDRentry if a static IP address is used.
Chapter 34. Creating custom libvirt scripts
libvirt.
libvirt.
34.1. Using XML configuration files with virsh
virsh can handle XML configuration files. You may want to use this to your advantage for scripting large deployments with special options. You can add devices defined in an XML file to a running para-virtualized guest. For example, to add a ISO file as hdc to a running guest create an XML file:
virsh attach-device to attach the ISO as hdc to a guest called "satellite" :
virsh attach-device satellite satelliteiso.xml
# virsh attach-device satellite satelliteiso.xml
Part VIII. Troubleshooting
Introduction to Troubleshooting and Problem Solving
Note
Note
Chapter 35. Troubleshooting Xen
- troubleshooting tools for Linux and virtualization.
- troubleshooting techniques for identifying problems.
- The location of log files and explanations of the information in logs.
35.1. Debugging and troubleshooting Xen
Useful commands and applications for troubleshooting
-
xentop xentopdisplays real-time information about a host system and the guest domains.-
xm - Using the
dmesgandlog
vmstatiostatlsof
iostat, mpstat and sar commands are all provided by the sysstat package.
XenOprofilesystemtapcrashsysrqsysrq tsysrq w
ifconfigtcpdumpThetcpdumpcommand 'sniffs' network packets.tcpdumpis useful for finding network abnormalities and problems with network authentication. There is a graphical version oftcpdumpnamedwireshark.brctlbrctlis a networking tool that inspects and configures the Ethernet bridge configuration in the Virtualization linux kernel. You must have root access before performing these example commands:Copy to Clipboard Copied! Toggle word wrap Toggle overflow
Server repositories Red Hat Enterprise Linux 5.
- strace is a command which traces system calls and events received and used by another process.
- vncviewer: connect to a VNC server running on your server or a virtual machine. Install vncviewer using the
yum install vnccommand. - vncserver: start a remote desktop on your server. Gives you the ability to run graphical user interfaces such as virt-manager via a remote session. Install vncserver using the
yum install vnc-servercommand.
35.2. Log files overview
- The Xen configuration directory is
/etc/xen/. This directory contains thexenddaemon and other virtual machine configuration files. The networking script files are found in thescriptsdirectory. - All Xen log files are stored in the
/var/log/xendirectory.
- The default directory for all file-based images is the
/var/lib/libvirt/imagesdirectory. - Xen kernel information is stored in the
/proc/xen/directory.
35.3. Log file descriptions
xend daemon and qemu-dm process, two utilities that write the multiple log files to the /var/log/xen/ directory:
xend.logis the log file that contains all the data collected by thexenddaemon, whether it is a normal system event, or an operator initiated action. All virtual machine operations (such as create, shutdown, destroy and so on) appear in this log. Thexend.logis usually the first place to look when you track down event or performance problems. It contains detailed entries and conditions of the error messages.xend-debug.logis the log file that contains records of event errors fromxendand the Virtualization subsystems (such as framebuffer, Python scripts, and so on).
xen-hotplug-logis the log file that contains data from hotplug events. If a device or a network script does not come online, the event appears here.qemu-dm.[PID].logis the log file created by theqemu-dmprocess for each fully virtualized guest. When using this log file, you must retrieve the givenqemu-dmprocess PID, by using thepscommand to examine process arguments to isolate theqemu-dmprocess on the virtual machine. Note that you must replace the [PID] symbol with the actual PIDqemu-dmprocess.
virt-manager.log file that resides in the /.virt-manager directory. Note that every time you start the Virtual Machine Manager, it overwrites the existing log file contents. Make sure to backup the virt-manager.log file, before you restart the Virtual Machine manager after a system error.
35.4. Important directory locations
- Guest images reside in the
/var/lib/libvirt/imagesdirectory by default.
- When you restart the
xenddaemon, it updates thexend-databasethat resides in the/var/lib/xen/xend-dbdirectory.
- Virtual machine dumps (that you perform with the
xm dump-corecommand) resides in the/var/lib/xen/dumpsdirectory.
- The
/etc/xendirectory contains the configuration files that you use to manage system resources. Thexenddaemon configuration file is/etc/xen/xend-config.sxp. This file can be edited to implement system-wide changes and configure the networking. However, manually editing files in the/etc/xen/folder is not advised.
- The
procfolders are another resource that allows you to gather system information. These proc entries reside in the/proc/xendirectory:
/proc/xen/capabilities
/proc/xen/balloon
/proc/xen/xenbus/
35.5. Troubleshooting with the logs
xend.log file contains the same basic information as when you run the xm log command. This log is found in the /var/log/ directory. Here is an example log entry for when you create a domain running a kernel:
xend-debug.log, is very useful to system administrators since it contains even more detailed information than xend.log . Here is the same error data for the same kernel domain creation problem:
ERROR: Will only load images built for Xen v3.0 ERROR: Actually saw: GUEST_OS=netbsd, GUEST_VER=2.0, XEN_VER=2.0; LOADER=generic, BSD_SYMTAB' ERROR: Error constructing guest OS
ERROR: Will only load images built for Xen v3.0
ERROR: Actually saw: GUEST_OS=netbsd, GUEST_VER=2.0, XEN_VER=2.0; LOADER=generic, BSD_SYMTAB'
ERROR: Error constructing guest OS
35.6. Troubleshooting with the serial console
grub.conf file to enable a 38400-bps serial console on com1 /dev/ttyS0:
sync_console can help determine a problem that causes hangs with asynchronous hypervisor console output, and the "pnpacpi=off" works around a problem that breaks input on the serial console. The parameters "console=ttyS0" and "console=tty" means that kernel errors get logged with on both the normal VGA console and on the serial console. Then you can install and set up ttywatch to capture the data on a remote host connected by a standard null-modem cable. For example, on the remote host you could type:
Note
ttywatch --name myhost --port /dev/ttyS0
ttywatch --name myhost --port /dev/ttyS0
/dev/ttyS0 into the file /var/log/ttywatch/myhost.log .
35.7. Para-virtualized guest console access
virsh console [guest name, ID or UUID]
# virsh console [guest name, ID or UUID]
virt-manager to display the virtual text console. In the guest console window, select Serial Console from the View menu.
35.8. Fully virtualized guest console access
grub.conf file, and include the 'console =ttyS0 console=tty0' parameter. This ensures that the kernel messages are sent to the virtual serial console (and the normal graphical console). To use the guest's serial console, you must edit the libvirt configuration file. On the host, access the serial console with the following command:
virsh console
# virsh console
virt-manager to display the virtual text console. In the guest console window, select Serial Console from the View menu.
35.9. Common Xen problems
xend service, nothing happens. Type virsh list and receive the following:
Error: Error connecting to xend: Connection refused. Is xend running?
Error: Error connecting to xend: Connection refused. Is xend running?
xend start manually and receive more errors:
kernel-xen kernel. To correct this, you must select the kernel-xen kernel at boot time (or set the kernel-xen kernel to the default in the grub.conf file).
35.10. Guest creation errors
"Invalid argument" error message. This usually means that the kernel image you are trying to boot is incompatible with the hypervisor. An example of this would be if you were attempting to run a non-PAE FC5 kernel on a PAE only FC6 hypervisor.
grub.conf default kernel switches right back to a bare-metal kernel instead of the Virtualization kernel.
/etc/sysconfig/kernel/ directory. You must ensure that kernel-xen parameter is set as the default option in your grub.conf file.
35.11. Troubleshooting with serial consoles
35.11.1. Serial console output for Xen
/boot/grub/grub.conf file by setting the appropriate serial device parameters.
com1, modify /boot/grub/grub.conf by inserting the lines com1=115200,8n1, console=tty0 and console=ttyS0,115200 where shown.
com2, modify /boot/grub/grub.conf by inserting the lines com2=115200,8n1 console=com2L, console=tty0 and console=ttyS0,115200 where shown.
com1, com2 and so on) you selected in the previous step.
com2 port, the parameter console=ttyS0 on the vmlinuz line us used. The behavior of every port being used as console=ttyS0 is not standard Linux behavior and is specific to the Xen environment.
35.11.2. Xen serial console output from para-virtualized guests
virsh console" or in the "Serial Console" window of virt-manager. Set up the virtual serial console using this procedure:
- Log in to your para-virtualized guest.
- Edit
/boot/grub/grub.confas follows:Red Hat Enterprise Linux 5 i386 Xen (2.6.18-92.el5xen) root (hd0, 0) kernel /boot/vmlinuz-2.6.18-92.el5xen ro root=LABEL=VG_i386 console=xvc0 initrd /boot/initrd-2.6.18-92.el5xen.img
Red Hat Enterprise Linux 5 i386 Xen (2.6.18-92.el5xen) root (hd0, 0) kernel /boot/vmlinuz-2.6.18-92.el5xen ro root=LABEL=VG_i386 console=xvc0 initrd /boot/initrd-2.6.18-92.el5xen.imgCopy to Clipboard Copied! Toggle word wrap Toggle overflow - Reboot the para-virtualized guest.
The Xen daemon(xend) can be configured to log the output from serial consoles of para-virtualized guests.
xend edit /etc/sysconfig/xend. Change the entry:
# Log all guest console output (cf xm console) #XENCONSOLED_LOG_GUESTS=no
# Log all guest console output (cf xm console)
#XENCONSOLED_LOG_GUESTS=no
# Log all guest console output (cf xm console) XENCONSOLED_LOG_GUESTS=yes
# Log all guest console output (cf xm console)
XENCONSOLED_LOG_GUESTS=yes
/var/log/xen/console file.
35.11.3. Serial console output from fully virtualized guests
virsh console" command.
- logging output with xend is unavailable.
- output data may be dropped or scrambled.
ttyS0 on Linux or COM1 on Windows.
/boot/grub/grub.conf file by inserting the line "console=tty0 console=ttys0,115200".
virsh console" command.
Important
/var/log/xen/console as they are for para-virtualized guests.
35.12. Xen configuration files
virt-manager or virt-install tools on Red Hat Enterprise Linux 5, the guests configuration files are created automatically in the /etc/xen directory.
Warning
serial="pty" is the default for the configuration file. This configuration file example is for a fully-virtualized guest:
Note
virsh dumpxml and virsh create (or virsh edit) to edit the libvirt configuration files (xml based) which have error checking and safety checks.
35.13. Interpreting Xen error messages
failed domain creation due to memory shortage, unable to balloon domain0
failed domain creation due to memory shortage, unable to balloon domain0
xend.log file for this error:
[2006-12-21] 20:33:31 xend 3198] DEBUG (balloon:133) Balloon: 558432 Kib free; 0 to scrub; need 1048576; retries: 20 [2006-12-21] 20:33:31 xend. XendDomainInfo 3198] ERROR (XendDomainInfo: 202 Domain construction failed
[2006-12-21] 20:33:31 xend 3198] DEBUG (balloon:133) Balloon: 558432 Kib free; 0 to scrub; need 1048576; retries: 20
[2006-12-21] 20:33:31 xend. XendDomainInfo 3198] ERROR (XendDomainInfo: 202
Domain construction failed
xm list domain0 command. If dom0 is not ballooned down, you can use the command virsh setmem dom0 NewMemSize to check memory.
wrong kernel image: non-PAE kernel on a PAE
wrong kernel image: non-PAE kernel on a PAE
Unable to open a connection to the Xen hypervisor or daemon
Unable to open a connection to the Xen hypervisor or daemon
/etc/hosts configuration file. Check the file and verify if the localhost entry is enabled. Here is an example of an incorrect localhost entry:
# Do not remove the following line, or various programs # that require network functionality will fail. localhost.localdomain localhost
# Do not remove the following line, or various programs
# that require network functionality will fail.
localhost.localdomain localhost
# Do not remove the following line, or various programs # that require network functionality will fail. 127.0.0.1 localhost.localdomain localhost localhost.localdomain. localhost
# Do not remove the following line, or various programs
# that require network functionality will fail.
127.0.0.1 localhost.localdomain localhost
localhost.localdomain. localhost
xen-xend.logfile ):
Bridge xenbr1 does not exist!
Bridge xenbr1 does not exist!
xend.log displays the following errors:
/etc/xen directory. For example, editing the guest mySQL01
vim /etc/xen/mySQL01
# vim /etc/xen/mySQL01vif entry. Assuming you are using xenbr0 as the default bridge, the proper entry should resemble the following:
vif = ['mac=00:16:3e:49:1d:11, bridge=xenbr0',]
# vif = ['mac=00:16:3e:49:1d:11, bridge=xenbr0',]
35.14. The layout of the log directories
-
/etc/xen/directory contains - configuration files used by the
xenddaemon. - the
scriptsdirectory which contains the scripts for Virtualization networking.
-
/var/log/xen/ - directory holding all Xen related log files.
-
/var/lib/libvirt/images/ - The default directory for virtual machine image files.
- If you are using a different directory for your virtual machine images make sure you add the directory to your SELinux policy and relabel it before starting the installation.
-
/proc/xen/ - The xen related information in the /proc file system.
Chapter 36. Troubleshooting
36.1. Identifying available storage and partitions
cat /proc/partitions" as seen below.
cat /proc/partitions major minor #blocks name 202 16 104857600 xvdb 3 0 8175688 hda
# cat /proc/partitions
major minor #blocks name
202 16 104857600 xvdb
3 0 8175688 hda
36.2. After rebooting Xen-based guests the console freezes
/etc/inittab file:
1:12345:respawn:/sbin/mingetty xvc0
1:12345:respawn:/sbin/mingetty xvc0
36.3. Virtualized Ethernet devices are not found by networking tools
Xen Virtual Ethernet networking card inside the guest operation system. Verify this by executing the following (for Red Hat Enterprise Linux 4 and Red Hat Enterprise Linux 5):
cat /etc/modprobe.conf
cat /etc/modprobe.conf
cat /etc/modules.conf
cat /etc/modules.conf
alias eth0 xen-vnif
alias eth0 xen-vnif
alias eth0 xen-vnif) for every para-virtualized interface for the guest.
36.4. Loop device errors
/etc/modprobe.conf. Edit /etc/modprobe.conf and add the following line to it:
options loop max_loop=64
options loop max_loop=64
phy: block device or tap:aio commands. To employ loop device backed guests for a full virtualized system, use the phy: device or file: file commands.
36.5. Failed domain creation caused by a memory shortage
dom0 has not ballooned down enough to provide space for a recently created or started guest. In your /var/log/xen/xend.log, an example error message indicating this has occurred:
[2006-11-21 20:33:31 xend 3198] DEBUG (balloon:133) Balloon: 558432 KiB free; 0 to scrub; need 1048576; retries: 20. [2006-11-21 20:33:52 xend.XendDomainInfo 3198] ERROR (XendDomainInfo:202) Domain construction failed
[2006-11-21 20:33:31 xend 3198] DEBUG (balloon:133) Balloon: 558432 KiB free;
0 to scrub; need 1048576; retries: 20.
[2006-11-21 20:33:52 xend.XendDomainInfo 3198] ERROR (XendDomainInfo:202) Domain construction failed
dom0 with the command “xm list Domain-0”. If dom0 is not ballooned down you can use the command “xm mem-set Domain-0 NewMemSize” where NewMemSize should be a smaller value.
36.6. Wrong kernel image error
kernel: /vmlinuz-2.6.18-1.2839.el5xen”.
/etc/grub.conf configuration file.
kernel-xen installed in your guest you can start your guest:
xm create -c GuestName
xm create -c GuestName
GuestName is the name of the guest. The previous command will present you with the GRUB boot loader screen and allow you to select the kernel to boot. You will have to choose the kernel-xen kernel to boot. Once the guest has completed the boot process you can log into the guest and edit /etc/grub.conf to change the default boot kernel to your kernel-xen. Change the line “default=X” (where X is a number starting at '0') to correspond to the entry with your kernel-xen line. The numbering starts at '0' so if your kernel-xen entry is the second entry you would enter '1' as the default,for example “default=1”.
36.7. Wrong kernel image error - non-PAE kernel on a PAE platform
- para-virtualized guests must match the architecture type of your hypervisor. To run a 32 bit PAE guest you must have a 32 bit PAE hypervisor.
- to run a 64 bit para-virtualized guest your Hypervisor must be a 64 bit version too.
- fully virtualized guests your hypervisor must be 32 bit or 64 bit for 32 bit guests. You can run a 32 bit (PAE and non-PAE) guest on a 32 bit or 64 bit hypervisor.
- to run a 64 bit fully virtualized guest your hypervisor must be 64 bit too.
36.8. Fully-virtualized 64 bit guest fails to boot
Your CPU does not support long mode. Use a 32 bit distribution. This problem is caused by a missing or incorrect pae setting. Ensure you have an entry “pae=1” in your guest's configuration file.
36.9. A missing localhost entry causes virt-manager to fail
virt-manager application may fail to launch and display an error such as “Unable to open a connection to the Xen hypervisor/daemon”. This is usually caused by a missing localhost entry in the /etc/hosts file. Verify that you indeed have a localhost entry and if it is missing from /etc/hosts and insert a new entry for localhost if it is not present. An incorrect /etc/hosts may resemble the following:
# Do not remove the following line, or various programs # that require network functionality will fail. localhost.localdomain localhost
# Do not remove the following line, or various programs
# that require network functionality will fail.
localhost.localdomain localhost
# Do not remove the following line, or various programs # that require network functionality will fail. 127.0.0.1 localhost.localdomain localhost localhost.localdomain localhost
# Do not remove the following line, or various programs
# that require network functionality will fail.
127.0.0.1 localhost.localdomain localhost
localhost.localdomain localhost
36.10. Microcode error during guest boot
Applying Intel CPU microcode update: FATAL: Module microcode not found. ERROR: Module microcode does not exist in /proc/modules
Applying Intel CPU microcode update: FATAL: Module microcode not found.
ERROR: Module microcode does not exist in /proc/modules
/sbin/service microcode_ctl stop /sbin/chkconfig --del microcode_ctl
/sbin/service microcode_ctl stop
/sbin/chkconfig --del microcode_ctl
36.11. Python depreciation warning messages when starting a virtual machine
xm create” will look in the current directory for a configuration file and then in /etc/xen
36.12. Enabling Intel VT and AMD-V virtualization hardware extensions in BIOS
Procedure 36.1. Enabling virtualization extensions in BIOS
- Reboot the computer and open the system's BIOS menu. This can usually be done by pressing the key, the F1 key or Alt and F4 keys depending on the system.
- Select Restore Defaults or Restore Optimized Defaults, and then select Save & Exit.
- Power off the machine and disconnect the power supply.
Enabling the virtualization extensions in BIOS
Note
Many of the steps below may vary depending on your motherboard, processor type, chipset and OEM. See your system's accompanying documentation for the correct information on configuring your system.- Power on the machine and open the BIOS (as per Step 1).
- Open the Processor submenu The processor settings menu may be hidden in the Chipset, Advanced CPU Configuration or Northbridge.
- Enable Intel Virtualization Technology (also known as Intel VT) or AMD-V depending on the brand of the processor. The virtualization extensions may be labeled Virtualization Extensions, Vanderpool or various other names depending on the OEM and system BIOS.
- Enable Intel VTd or AMD IOMMU, if the options are available. Intel VTd and AMD IOMMU are used for PCI passthrough.
- Select Save & Exit.
- Power off the machine and disconnect the power supply.
- Run
cat /proc/cpuinfo | grep vmx svm. If the command outputs, the virtualization extensions are now enabled. If there is no output your system may not have the virtualization extensions or the correct BIOS setting enabled.
36.13. KVM networking performance
- Shutdown the guest operating system.
- Edit the guest's configuration file with the
virshcommand (whereGUESTis the guest's name):virsh edit GUEST
# virsh edit GUESTCopy to Clipboard Copied! Toggle word wrap Toggle overflow Thevirsh editcommand uses the$EDITORshell variable to determine which editor to use. - Find the network interface section of the configuration. This section resembles the snippet below:
<interface type='network'> [output truncated] <model type='rtl8139' /> </interface>
<interface type='network'> [output truncated] <model type='rtl8139' /> </interface>Copy to Clipboard Copied! Toggle word wrap Toggle overflow - Change the type attribute of the model element from
'rtl8139'to'e1000'. This will change the driver from the rtl8139 driver to the e1000 driver.<interface type='network'> [output truncated] <model type='e1000' /> </interface>
<interface type='network'> [output truncated] <model type='e1000' /> </interface>Copy to Clipboard Copied! Toggle word wrap Toggle overflow - Save the changes and exit the text editor
- Restart the guest operating system.
- Create an XML template from an existing virtual machine:
virsh dumpxml GUEST > /tmp/guest.xml
# virsh dumpxml GUEST > /tmp/guest.xmlCopy to Clipboard Copied! Toggle word wrap Toggle overflow - Copy and edit the XML file and update the unique fields: virtual machine name, UUID, disk image, MAC address, and any other unique parameters. Note that you can delete the UUID and MAC address lines and virsh will generate a UUID and MAC address.
cp /tmp/guest.xml /tmp/new-guest.xml vi /tmp/new-guest.xml
# cp /tmp/guest.xml /tmp/new-guest.xml # vi /tmp/new-guest.xmlCopy to Clipboard Copied! Toggle word wrap Toggle overflow Add the model line in the network interface section:<interface type='network'> [output truncated] <model type='e1000' /> </interface>
<interface type='network'> [output truncated] <model type='e1000' /> </interface>Copy to Clipboard Copied! Toggle word wrap Toggle overflow - Create the new virtual machine:
virsh define /tmp/new-guest.xml virsh start new-guest
# virsh define /tmp/new-guest.xml # virsh start new-guestCopy to Clipboard Copied! Toggle word wrap Toggle overflow
Chapter 37. Troubleshooting the Xen para-virtualized drivers
37.1. Red Hat Enterprise Linux 5 Virtualization log file and directories
In Red Hat Enterprise Linux 5, the log file written by the xend daemon and the qemu-dm process are all kept in the following directories:
/var/log/xen/- directory holding all log file generated by the
xenddaemon and qemu-dm process. xend.log- This logfile is used by xend to log any events generate by either normal system events or operator initiated events.
- virtual machine operations such as create, shutdown, destroy etc are all logged in this logfile.
- Usually this logfile will be the first place to look at in the event of a problem. In many cases you will be able to identify the root cause by scanning the logfile and review the entries logged just prior to the actual error message.
xend-debug.log- Records error events from xend and its subsystems (from the framebuffer and Python scripts)
xen-hotplug.log- Logs events from hotplug events.
- Event notifications from devices not coming online or network bridges not online are logged in this file.
qemu-dm.PID.log- This file is created by the
qemu-dmprocess which is started for each fully virtualized guest. - The
PIDis replaced with thePIDof the process of the related qemu-dm process - You can retrieve the
PIDfor a givenqemu-dmprocess using thepscommand and in looking at the process arguments you can identify the virtual machine theqemu-dmprocess belongs to.
.virt-manager in the user's home directory whom ran virt-manager. This directory will usually be ~/.virt-manager/virt-manager.
Note
There are a few other directories and files which may be of interest when troubleshooting a Red Hat Enterprise Linux 5 Virtualization environment:
/var/lib/libvirt/images/- the standard directory for file-based guest images.
/var/lib/xen/xend-db/- directory that hold the xend database which is generated every time the daemon is restarted.
/etc/xen/- Stores a number of configuration files for the Xen hypervisor.
/etc/xen/xend-config.sxpis the main configuration for the xend daemon. Thexend-config.sxpfile enables or disables migration and other features not configured bylibvirt. Use thelibvirttools for all other features.
/var/lib/xen/dump/- Holds dumps generate by virtual machines or when using the
xm dump-corecommand. /proc/xen/- Stores
xen-kernelinformation in the following files:/proc/xen/capabilities/proc/xen/privcmd/proc/xen/balloon/proc/xen/xenbus/proc/xen/xsd_port/proc/xen/xsd_kva
37.2. Para-virtualized guest fail to load on a Red Hat Enterprise Linux 3 guest operating system
37.3. A warning message is displayed while installing the para-virtualized drivers on Red Hat Enterprise Linux 3
37.4. Manually loading the para-virtualized drivers
cd /lib/modules/`uname -r`/ find . -name 'xen_*.ko' -print
# cd /lib/modules/`uname -r`/
# find . -name 'xen_*.ko' -print
37.5. Verifying the para-virtualized drivers have successfully loaded
/var/log/messages
lsmod command to list the loaded para-virtualized drivers. It should output a list containing the xen_vnif, xen_vbd, xen_platform_pci and xen_balloon modules.
37.6. The system has limited throughput with para-virtualized drivers
type=ioemu' part of 'vif=' line in your guest's configuration file.
Appendix A. Additional resources
A.1. Online resources
- http://www.cl.cam.ac.uk/research/srg/netos/xen/ The project website of the Xen™ para-virtualization machine manager from which the Red Hat kernel-xen package is derived. The site maintains the upstream xen project binaries and source code and also contains information, architecture overviews, documentation, and related links regarding xen and its associated technologies.
- The Xen Community website
- http://www.libvirt.org/ is the official website for the
libvirtvirtualization API. - http://virt-manager.et.redhat.com/ is the project website for the Virtual Machine Manager (virt-manager), the graphical application for managing virtual machines.
- Open Virtualization Center
- Red Hat Documentation
- Virt Tools
- Virtualization technologies overview
- Red Hat Emerging Technologies group
A.2. Installed documentation
/usr/share/doc/xen-<version-number>/is the directory which contains information about the Xen para-virtualization hypervisor and associated management tools, including various example configurations, hardware-specific information, and the current Xen upstream user documentation.man virshand/usr/share/doc/libvirt-<version-number>— Contains sub commands and options for thevirshvirtual machine management utility as well as comprehensive information about thelibvirtvirtualization library API./usr/share/doc/gnome-applet-vm-<version-number>— Documentation for the GNOME graphical panel applet that monitors and manages locally-running virtual machines./usr/share/doc/libvirt-python-<version-number>— Provides details on the Python bindings for thelibvirtlibrary. Thelibvirt-pythonpackage allows python developers to create programs that interface with thelibvirtvirtualization management library./usr/share/doc/python-virtinst-<version-number>— Provides documentation on thevirt-installcommand that helps in starting installations of Fedora and Red Hat Enterprise Linux related distributions inside of virtual machines./usr/share/doc/virt-manager-<version-number>— Provides documentation on the Virtual Machine Manager, which provides a graphical tool for administering virtual machines.
Appendix B. Colophon
- Don Dutile contributed technical editing for the para-virtualized drivers section.
- Barry Donahue contributed technical editing for the para-virtualized drivers section.
- Rick Ring contributed technical editing for the Virtual Machine Manager Section.
- Michael Kearey contributed technical editing for the sections on using XML configuration files with virsh and virtualized floppy drives.
- Marco Grigull contributed technical editing for the software compatibility and performance section.
- Eugene Teo contributed technical editing for the Managing Guests with virsh section.
- Simplified Chinese
- Leah Wei Liu
- Traditional Chinese
- Chester Cheng
- Terry Chuang
- Japanese
- Kiyoto Hashida
- Korean
- Eun-ju Kim
- French
- Sam Friedmann
- German
- Hedda Peters
- Italian
- Francesco Valente
- Brazilian Portuguese
- Glaucia de Freitas
- Leticia de Lima
- Spanish
- Angela Garcia
- Gladys Guerrero
- Russian
- Yuliya Poyarkova

