Identity Management Guide
Managing Identity and Authorization Policies for Linux-Based Infrastructures
Abstract
Chapter 1. Introduction to Identity Management
1.1. IdM v. LDAP: A More Focused Type of Service
1.1.1. A Working Definition for Identity Management
- Create a Linux-based and Linux-controlled domain. Both IdM servers and IdM clients are Linux or Unix machines. While IdM can synchronize data with an Active Directory domain to allow integration with Windows servers, it is not an administrative tool for Windows machines and it does not support Windows clients. Identity Management is a management tool for Linux domains.
- Centralize identity management and identity policies.
- Build on existing, native Linux applications and protocols. While IdM has its own processes and configuration, its underlying technologies are familiar and trusted by Linux administrators and are well established on Linux systems.
1.1.2. Contrasting Identity Management with a Standard LDAP Directory
| 389 Directory Server | Identity Management | |
|---|---|---|
| Use | General purpose | Single domain, focused on identity management |
| Flexibility | Highly-customizable | Limitations to focus on identity and authentication |
| Schema | Default LDAP schema | Optimized, special schema for identity management |
| Directory Tree | Standard and flexible hierarchy | Flat tree with a fixed hierarchy |
| Authentication | LDAP | Kerberos or Kerberos and LDAP |
| Active Directory Synchronization | Bi-directional | Unidirectional, Active Directory to Identity Management |
| Password Policies | LDAP-based | Kerberos-based |
| User Tools | Java Console and standard LDAP utilities | Web-based UI and special Python command-line tools |
1.2. Bringing Linux Services Together
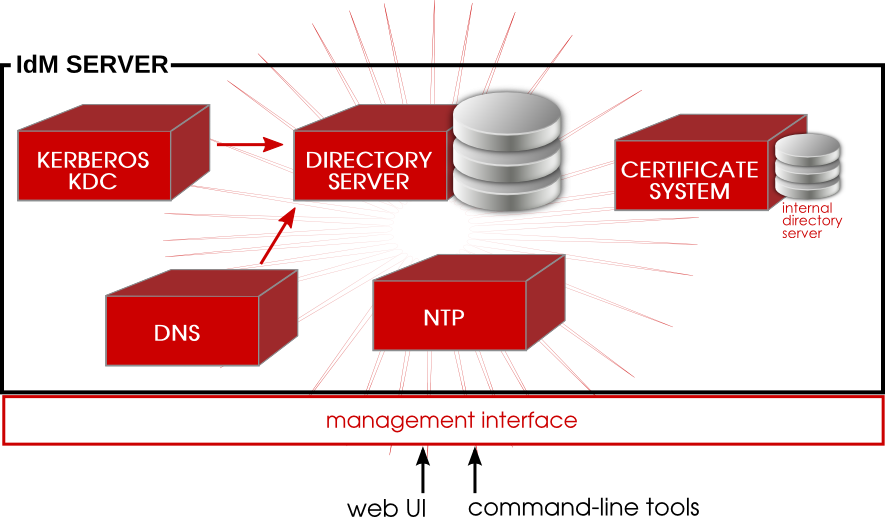
Figure 1.1. The IdM Server: Unifying Services
1.2.1. Authentication: Kerberos KDC
Note
1.2.2. Data Storage: 389 Directory Server
1.2.3. Authentication: Dogtag Certificate System
1.2.4. Server/Client Discovery: DNS
Note
1.2.5. Management: SSSD
true, false, and preserve values for the case_sensitive option. When the preserve value is enabled, the input matches regardless of the case, but the output is always the same case as on the server; SSSD preserves the case for the UID field as it is configured.
1.2.6. Management: NTP
1.3. Relationships Between Servers and Clients
1.3.1. About IdM Servers and Replicas
Note
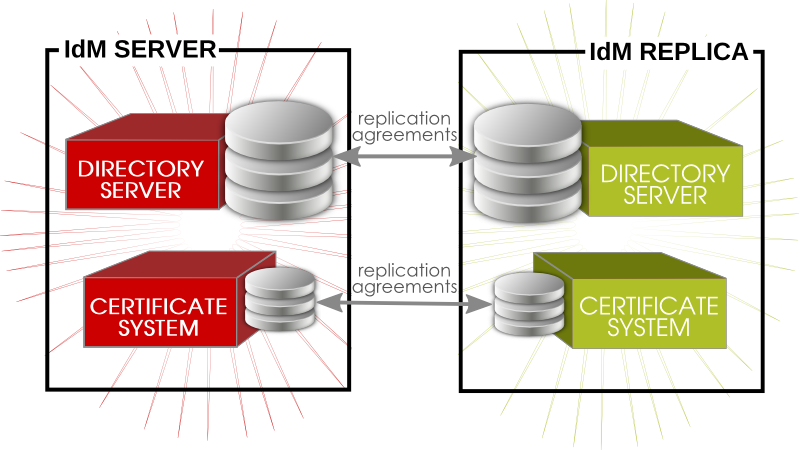
Figure 1.2. Server and Replica Interactions
Note
1.3.2. About IdM Clients

Figure 1.3. Server and Client Interactions
- Store IdM information when the machine is offline.
- Keep information active beyond its normal timeout period if the client cannot access the central server. The cache is persistent even after rebooting the machine.
- Reduce the round-trip time of requests by checking information locally before looking at the server.
- Identity information (about users, machines, and groups) is stored in the LDB database, which uses the same syntax as an LDAP directory. This identity information is originally stored in the IdM server's 389 Directory Server instance. Because this information changes frequently and is referenced frequently, it is important to be able to call the more current information quickly, which is possible using an LDB database on the client and the Directory Server on the server.
- Policy information is more static than identity information, and it can include configuration for SELinux or sudo. These policies are set globally on the server and then are propagated to the clients. On the client, the policy information is stored in the filesystem in XML files which can be downloaded and converted into a native file for whatever service is being managed.

Figure 1.4. Interactions Between IdM Services
- SSSD provides the user authentication for the machine and enforces host-based access control rules.
certmongermonitors and renews the certificates on the client. It can request new certificates for the services on the system, including virtual machines.
certmonger are configured to connect to the IdM server and the required Kerberos keytab and host certificates are created. (The host certificate is not used directly by IdM; it may be used by other services, such as a web server.)
Part I. Installing Identity Management; Servers and Services
Chapter 2. Prerequisites for Installation
2.1. Supported Server Platforms
- Red Hat Enterprise Linux 6 i386
- Red Hat Enterprise Linux 6 x86_64
2.2. Hardware Recommendations
- For 10,000 users and 100 groups, have at least 2GB of RAM and 1GB swap space.
- For 100,000 users and 50,000 groups, have at least 16GB of RAM and 4GB of swap space.
Note
2.3. Software Requirements
- Kerberos 1.10. This is installed as a dependency if it is not already installed.
- The bind and bind-dyndb-ldap packages for DNS. The bind package is installed as a dependency if it is not already available; however, the bind-dyndb-ldap package must be explicitly installed first or attempting to configure an IdM server with DNS support will fail.
Important
mod_nss module. You can ensure that by following these steps:
- Edit the
/etc/httpd/conf.d/nss.conffile and set theNSSProtocolparameter toTLSv1.0(for backward compatibility) andTLSv1.1.NSSProtocol TLSv1.0,TLSv1.1 - Restart the
httpdservice.# service httpd restart
2.4. System Prerequisites
2.4.1. DNS Records
ifconfig and dig.
- Obtain the hostname.
[root@server ~]# hostname server.example.com - Get the IP address. In this example, the returned IP address is
196.2.3.4.[root@server !]# ifconfig eth0 eth0 Link encap:Ethernet HWaddr 52:54:01:4C:E1:2C inet addr:196.2.3.4 Bcast:196.9.8.7 Mask:255.255.255.255 inet6 addr: 2620:52:0:102f:5054:1ff:fe4c:e12c/64 Scope:Global inet6 addr: fe80::5054:1ff:fe4c:e12c/64 Scope:Link ... - Verify that forward DNS is properly configured by using
digto query the hostname and check what IP address is returned. In this example, the expected IP address is196.2.3.4.[root@server ~]# dig server.example.com ; <<>> DiG 9.8.2rc1-RedHat-9.8.2-0.17.rc1.el6 <<>> server.example.com ;; global options: +cmd ;; Got answer: ;; ->>HEADER<<- opcode: QUERY, status: NOERROR, id: 56680 ;; flags: qr rd ra; QUERY: 1, ANSWER: 1, AUTHORITY: 7, ADDITIONAL: 12 ;; QUESTION SECTION: ;server.example.com. IN A ;; ANSWER SECTION: server.example.com. 2946 IN A 196.2.3.4 - Verify the reverse DNS configuration using
digwith the-t ptrto query the PTR records (reverse records) for the address. This is the IP address in reverse order, with.in-addr.arpa.appended to the address. This should resolve to the hostname,server.example.com.in this example.[root@server ~]# dig -t ptr 4.3.2.196.in-addr.arpa. ; <<>> DiG 9.8.2rc1-RedHat-9.8.2-0.17.rc1.el6 <<>> -t ptr 241.40.16.10.in-addr.arpa ;; global options: +cmd ;; Got answer: ;; ->>HEADER<<- opcode: QUERY, status: NOERROR, id: 57899 ;; flags: qr rd ra; QUERY: 1, ANSWER: 1, AUTHORITY: 7, ADDITIONAL: 10 ;; QUESTION SECTION: ;4.3.2.196.in-addr.arpa. IN PTR ;; ANSWER SECTION: 4.3.2.196.in-addr.arpa. 21600 IN PTR server.example.com.
Note
2.4.2. Hostname and IP Address Requirements
- The hostname must be a fully-qualified domain name. For example,
ipaserver.example.com.Important
This must be a valid DNS name, which means only numbers, alphabetic characters, and hyphens (-) are allowed. Other characters, like underscores, in the hostname will cause DNS failures. - The hostname must be all lower-case.
- The server's A record must be set and resolve to its public IP address.The fully-qualified domain name cannot resolve to the loopback address. It must resolve to the machine's public IP address, not to
127.0.0.1. The output of thehostnamecommand cannot belocalhostorlocalhost6.The A adn PTR records do not need to match for the server. - The server's hostname and IP address must be in its own
/etc/hostsfile. The fully-qualified domain name for the IdM server must be listed in thehostsfile before any aliases.Note
A misconfigured file can prevent the IdM command-line tools from functioning correctly and can prevent the IdM web interface from connecting to the IdM server.Additionally, the hostname cannot be part of the localhost entry.For example, this lists the IPv4 and IPv6 localhost entries for the host (properly), then the IdM server IP address and hostname as the first entry.127.0.0.1 localhost.localdomain localhost ::1 localhost6.localdomain6 localhost6 192.168.1.1 ipaserver.example.com ipaserver - It is recommended that a separate DNS domain be allocated for the IdM server to manage. While not required (clients from other domains can still be enrolled in the IdM domain), this is a convenience for overall DNS management.
2.4.3. Directory Server
2.4.4. System Files
2.4.5. System Ports
iptables utility to list the available ports or the nc, telnet, or nmap utilities to connect to a port or run a port scan.
[root@server ~]# iptables -A INPUT -p tcp --dport 389 -j ACCEPT| Service | Ports | Type |
|---|---|---|
| HTTP/HTTPS | 80, 443 | TCP |
| LDAP/LDAPS | 389, 636 | TCP |
| Kerberos | 88, 464 | TCP and UDP |
| DNS | 53 | TCP and UDP |
| NTP | 123 | UDP |
| Dogtag Certificate System - LDAP | 7389 | TCP |
2.4.6. NTP
--no-ntp option when the IdM server is configured to prevent an NTP server from being installed.
2.4.7. NSCD
nscd in an IdM deployment. The nscd service is extremely useful for reducing the load on the server, and for making clients more responsive, but there can be problems when a system is also using SSSD, which performs its own caching.
nscd caches authentication and identity information for all services that perform queries through nsswitch, including getent. Because nscd performs both positive and negative caching, if a request determines that a specific IdM user does not exist, it caches this as a negative response. Values stored in the cache remain until the cache expires, regardless of any changes that may occur on the server. The results of such caching is that new users and memberships may not be visible, and users and memberships that have been removed may still be visible.
nscd altogether. Alternatively, use a shorter cache time by resetting the time-to-live caching values in the /etc/nscd.conf file:
positive-time-to-live   group           3600
negative-time-to-live   group           60
positive-time-to-live   hosts           3600
negative-time-to-live   hosts           20
2.4.8. Networking
network service to manage the networking requirements in an IdM environment and disable the NetworkManager service.
- Boot the machine into single-user mode.
- Disable off the NetworkManager service in the start list and stop the NetworkManager service.
[root@server ~]# chkconfig NetworkManager off; service NetworkManager stop - If
NetworkManagerDispatcheris installed, ensure that it is stopped and disabled:[root@server ~]# chkconfig NetworkManagerDispatcher off; service NetworkManagerDispatcher stop - Then, make sure that the
networkservice is properly started.[root@server ~]# chkconfig network on; service network start - Ensure that static networking is correctly configured.
- Restart the system.
Chapter 3. Installing an IdM Server
3.1. Installing the IdM Server Packages
ipa-server. If the IdM server will also manage a DNS server, then it requires two additional packages to set up the DNS.
yum command:
[root@server ~]# yum install ipa-server bind bind-dyndb-ldapipa-server also installs a large number of dependencies, such as 389-ds-base for the LDAP service and krb5-server for the Kerberos service, along with IdM tools.
ipa-server-install command. The options for configuring the new server instance are described in Section 3.2, “About ipa-server-install”.
3.2. About ipa-server-install
ipa-server-install script. This script can accept user-defined settings for services, like DNS and Kerberos, that are used by the IdM instance, or it can supply predefined values for minimal input from the administrator.
- The network time daemon (ntpd)
- A 389 Directory Server instance
- A Kerberos key distribution center (KDC)
- Apache (httpd)
- An updated SELinux targeted policy
- The Active Directory WinSync plug-in
- A certificate authority
- Optional. A domain name service (DNS) server
ipa-server-install script.
Note
ipa-server-install can be run without any options, so that it prompts for the required information, it has numerous arguments which allow the configuration process to be easily scripted or to supply additional information which is not requested during an interactive installation.
ipa-server-install. The full list of options are in the ipa-server-install manpage. The ipa-server-install options are versatile enough to be customized to the specific deployment environment to install and configure different services as needed.
| Argument | Description |
|---|---|
| -a ipa_admin_password | The password for the IdM administrator. This is used for the admin user to authenticate to the Kerberos realm. |
| --hostname=hostname | The fully-qualified domain name of the IdM server machine.
Important
This must be a valid DNS name, which means only numbers, alphabetic characters, and hyphens (-) are allowed. Other characters, like underscores, in the hostname will cause DNS failures.
Additionally, the hostname must be all lower-case. No capital letters are allowed.
|
| -n domain_name | The name of the LDAP server domain to use for the IdM domain. This is usually based on the IdM server's hostname. |
| -p directory_manager_password | The password for the superuser, cn=Directory Manager, for the LDAP service. |
| -P kerberos_master_password | The password for the KDC administrator. This is randomly generated if no value is given. |
| -r realm_name | The name of the Kerberos realm to create for the IdM domain. |
| --subject=subject_DN | Sets the base element for the subject DN of the issued certificates. This defaults to O=realm. |
| --forwarder=forwarder | Gives a DNS forwarder to use with the DNS service. To specify more than one forwarder, use this option multiple times. |
| --no-forwarders | Uses root servers with the DNS service instead of forwarders. |
| --no-reverse | Does not create a reverse DNS zone when the DNS domain is set up. (If a reverse DNS zone is already configured, then that existing reverse DNS zone is used.) If this option is not used, then the default value is true, which assumes that reverse DNS should be configured by the installation script. |
| --setup-dns | Tells the installation script to set up a DNS service within the IdM domain. Using an integrated DNS service is optional, so if this option is not passed with the installation script, then no DNS is configured. |
| --idmax=number | Sets the upper bound for IDs which can be assigned by the IdM server. The default value is the ID start value plus 199999. |
| --idstart=number | Sets the lower bound (starting value) for IDs which can be assigned by the IdM server. The default value is randomly selected. |
| --ip-address | Specifies the IP address of the server. When added to ipa-server-install, this option only accepts IP addresses associated with the local interface. |
3.3. Example: Running the Script Interactively and Silently
3.3.1. Basic Interactive Installation
ipa-server-install script. This launches the script interactively, which prompts for the required information to set up a server, but without more advanced configuration like DNS and CA options.
- Run the
ipa-server-installscript.[root@server ~]# ipa-server-install - Enter the hostname. This is determined automatically using reverse DNS.
Server host name [ipaserver.example.com]: - Enter the domain name. This is determined automatically based on the hostname.
Please confirm the domain name [example.com]: - Enter the new Kerberos realm name. This is usually based on the domain name.
Please provide a realm name [EXAMPLE.COM]: - Enter the password for the Directory Server superuser,
cn=Directory Manager. There are password strength requirements for this password, including a minimum password length (eight characters).Directory Manager password: Password (confirm): - Enter the password for the IdM system user account,
admin. This user is created on the machine.IPA admin password: Password (confirm): - The script then reprints the hostname, IP address, and domain name. Confirm that the information is correct.
The IPA Master Server will be configured with Hostname: ipaserver.example.com IP address: 192.168.1.1 Domain name: example.com Realm name: EXAMPLE.COM Continue to configure the system with these values? [no]: yes - After that, the script configures all of the associated services for IdM, with task counts and progress bars.
Configuring NTP daemon (ntpd) [1/4]: stopping ntpd ... Done configuring NTP daemon (ntpd). Configuring directory server (dirsrv): Estimated time 1 minute [1/38]: creating directory server user .... Configuring certificate server (pki-tomcatd): Estimated time 3 minutes 30 seconds [1/20]: creating certificate server user ... Done configuring certificate server (pki-tomcatd). Configuring Kerberos KDC (krb5kdc): Estimated time 30 seconds [1/10]: adding sasl mappings to the directory ... Done configuring Kerberos KDC (krb5kdc). Configuring kadmin [1/2]: starting kadmin [2/2]: configuring kadmin to start on boot Done configuring kadmin. Configuring ipa_memcached [1/2]: starting ipa_memcached [2/2]: configuring ipa_memcached to start on boot Done configuring ipa_memcached. Configuring ipa-otpd [1/2]: starting ipa-otpd [2/2]: configuring ipa-otpd to start on boot Done configuring ipa-otpd. Configuring the web interface (httpd): Estimated time 1 minute [1/15]: disabling mod_ssl in httpd ... Done configuring the web interface (httpd). Applying LDAP updates Restarting the directory server Restarting the KDC Sample zone file for bind has been created in /tmp/sample.zone.pUfcGp.db Restarting the web server Setup complete - Restart the
SSHservice to retrieve the Kerberos principal and to refresh the name server switch (NSS) configuration file:[root@server ~]# service sshd restart - Authenticate to the Kerberos realm using the admin user's credentials to ensure that the user is properly configured and the Kerberos realm is accessible.
[root@server ~]# kinit admin Password for admin@EXAMPLE.COM: - Test the IdM configuration by running a command like
ipa user-find. For example:[root@server ~]# ipa user-find admin -------------- 1 user matched -------------- User login: admin Last name: Administrator Home directory: /home/admin Login shell: /bin/bash UID: 939000000 GID: 939000000 Account disabled: False Password: True Kerberos keys available: True ---------------------------- Number of entries returned 1 ----------------------------
3.3.2. Silent (Non-Interactive) Installation
- Passwords for the IdM administrative user and the Directory Server super user (Directory Manager)
- The server hostname
- The Kerberos realm name
- The DNS domain name
ipa-server-install, along with the -U to force it to run without requiring user interaction.
Example 3.1. Basic Installation without Interaction
[root@server ~]# ipa-server-install -a secret12 --hostname=ipaserver.example.com -r EXAMPLE.COM -p secret12 -n example.com -UTo accept the default shown in brackets, press the Enter key.
The IPA Master Server will be configured with
Hostname: ipaserver.example.com
IP address: 192.168.1.1
Domain name: example.com3.4. Examples: Installing with Different CA Configurations
- The Dogtag Certificate System can sign its own certificate. This means that the Dogtag Certificate System instance is a root CA. There are no higher CAs, and the root CA cna set its own certificate policies.This is the default configuration.
- The Dogtag Certificate System CA can be signed by an externally-hosted CA (such as Verisign). In that case, the external CA is the root CA, and the configured Dogtag Certificate System CA is subordinate to that root. This means that the certificates issued within the IdM domain are potentially subject to restrictions set by the root CA for attributes like the validity period.Referencing an external CA still uses a Dogtag Certificate System instance to issue all of the IdM domain certficates; the only difference is that the initial domain CA certificate is issued by a different CA.
certmonger) to manage IdM domain certificates.
Important
3.4.1. Installing with an Internal Root CA
ipa-server-install command is run.
[root@server ~]# ipa-server-install
... &< ...

The IPA Master Server will be configured with:
Hostname:      server.example.com
IP address:    10.1.1.1
Domain name:   example.com
Realm name:    EXAMPLE.COM

Continue to configure the system with these values? [no]: yes

The following operations may take some minutes to complete.
Please wait until the prompt is returned.

... &< ...

Configuring directory server for the CA (pkids): Estimated time 30 seconds
  [1/3]: creating directory server user
  [2/3]: creating directory server instance
  [3/3]: restarting directory server
Done configuring directory server for the CA (pkids).
Configuring certificate server (pki-cad): Estimated time 3 minutes 30 seconds
  [1/21]: creating certificate server user
...
Done configuring certificate server (pki-cad).

... &< ...
3.4.2. Installing Using an External CA
Important
Basic Constraint option be set to CA=TRUE or that the Key Usage Extension be set on the signing certificate to allow it to sign certificates.
Important
Example 3.2. Using an External CA
- Run the
ipa-server-installscript, using the--external-caoption.[root@server ~]# ipa-server-install -a secret12 -r EXAMPLE.COM -P password -p secret12 -n ipaserver.example.com --external-ca - The script sets up the NTP and Directory Server services as normal.
- The script completes the CA setup and returns information about where the certificate signing request (CSR) is located,
/root/ipa.csr. This request must be submitted to the external CA.Configuring certificate server: Estimated time 6 minutes [1/4]: creating certificate server user [2/4]: creating pki-ca instance [3/4]: restarting certificate server [4/4]: configuring certificate server instance The next step is to get /root/ipa.csr signed by your CA and re-run ipa-server-install. - Submit the request to the CA. The process differs for every service.It may be necessary to request the appropriate extensions for the certificate. The CA signing certificate generated for the Identity Management server must be a valid CA certificate. This requires either that the Basic Constraint be set to CA=true or that the Key Usage Extension be set on the signing certificate to allow it to sign certificates.
- Retrieve the issued certificate and the CA certificate chain for the issuing CA. Again, the process differs for every certificate service, but there is usually a download link on a web page or in the notification email that allows administrators to download all the required certificates. Be sure to get the full certificate chain for the CA, not just the CA certificate.
- Rerun
ipa-server-install, specifying the locations and names of the certificate and CA chain files. For example:[root@server ~]# ipa-server-install --external_cert_file=/tmp/servercert20110601.p12 --external_ca_file=/tmp/cacert.p12 - Complete the setup process and verify that everything is working as expected, as in Section 3.3.1, “Basic Interactive Installation”.
3.4.3. Installing without a CA
- An LDAP server certificate
- An Apache server certificate
- An LDAP server certificate
certmongeris not used to track certificates, so there is no expiration warning.- There is no way to renew certificates through Identity Management.
- The certificate management tools (
ipa cert-*) cannot be used to view or manage certificates. - All host certificates and any service certificates must be requested, generated, and uploaded manually. This also affects how host management tools like
ipa host-addfunction. - If a certificate is removed from an entry, it is not automatically revoked.
Important
Example 3.3. Installing Identity Management Without a CA
- LDAP server certificate
- --dirsrv_pkcs12, with the PKCS#12 certificate file for the LDAP server certificate
- --dirsrv_pin, with the password to access the PKCS#12 file
- Apache server certificate
- --http_pkcs12, with the PKCS#12 certificate file for the Apache server certificate
- --http_pin, with the password to access the PKCS#12 file
- Root CA certificate (to allow the Apache and LDAP server certificates to be trusted across the domain)
[root@server ~]# ipa-server-install --http_pkcs12 /tmp-http-server.p12 --http_pin secret1 --dirsrv_pkcs12 /tmp/ldap-server.p12 --dirsrv_pin secret2 ...3.5. Example: Configuring DNS Services within the IdM Domain
--setup-dns option.
Warning
3.5.1. DNS Notes
- Wildcards cannot be used when configuring DNS names. Only explicit DNS domain names are supported.
- The
rndcservice is not configured by the--setup-dnsoption. This service must be configured manually after the IdM server is configured.
3.5.2. Installing with an Integrated DNS
Example 3.4. Interactive DNS Setup
- Run the
ipa-server-installscript, using the--setup-dnsoption.[root@server ~]# ipa-server-install -a secret12 -r EXAMPLE.COM -P password -p secret12 -n ipaserver.example.com --setup-dns - The script configures the hostname and domain name as normal.
- The script then prompts for DNS forwarders. If forwarders will be used, enter yes, and then supply the list of DNS servers. If IdM will manage its own DNS service, then enter no.
Do you want to configure DNS forwarders? [yes]: no No DNS forwarders configured - The script sets up the NTP, Directory Server, Certificate System, Kerberos, and Apache services.
- Before completing the configuration, the script prompts to ask whether it should configure reverse DNS services. If you select yes, then it configures the
namedservice.Do you want to configure the reverse zone? [yes]: yes Configuring DNS (named) [1/11]: adding DNS container [2/11]: setting up our zone [3/11]: setting up reverse zone [4/11]: setting up our own record [5/11]: setting up records for other masters [6/11]: setting up CA record [7/11]: setting up kerberos principal [8/11]: setting up named.conf [9/11]: restarting named [10/11]: configuring named to start on boot [11/11]: changing resolv.conf to point to ourselves Done configuring DNS (named). ============================================================================== Setup complete - The
ipa-dns-installcommand (which is run with the install script when the--setup-dnsoption is used) does not automatically configure the system'srndcservice. This must be configured manually, after DNS is configured for IdM.- Create the
rndcconfiguration file and key.[root@server ~]# /usr/sbin/rndc-confgen -a [root@server ~]# /sbin/restorecon /etc/rndc.keyThis may require some user input to create entropy while the key is being created. - Change the owner and permissions of the
rndckey file.[root@server ~]# chown root:named /etc/rndc.key [root@server ~]# chmod 0640 /etc/rndc.key
- Verify that everything is working as expected, as in Section 3.3.1, “Basic Interactive Installation”.
--forwarder or --no-forwarders option and --no-reverse option.
Example 3.5. Setting up DNS Non-Interactively
--setup-dns option. To configure additional forwarders, use the --forwarder option; for multiple forwarders, use multiple invocations of --forwarder.
[root@server ~]# ipa-server-install ... --setup-dns --forwarder=1.2.3.0 --forwarder=1.2.255.0--no-forwarders option to indicate that only root servers will be used.
--no-reverse option; if a reverse DNS zone is already configured, then using the --no-reverse option means that existing reverse DNS zone is used.
[root@server ~]# ipa-server-install ... --setup-dns --no-reverseipa-dns-install command (which is run with the install script when the --setup-dns option is used) does not automatically configure the system's rndc service. This must be configured manually, after DNS is configured for IdM.
- Create the
rndcconfiguration file and key.[root@server ~]# /usr/sbin/rndc-confgen -a [root@server ~]# /sbin/restorecon /etc/rndc.keyThis may require some user input to create entropy while the key is being created. - Change the owner and permissions of the
rndckey file.[root@server ~]# chown root:named /etc/rndc.key [root@server ~]# chmod 0640 /etc/rndc.key
Chapter 4. Setting up IdM Replicas
4.1. Planning the Server/Replica Topologies
- Servers, which manage all of the services used by domain members
- Replicas, which are essentially copies of servers (and, once copied, are identical to servers)
- Clients, which belong to the Kerberos domains, receive certificates and tickets issued by the servers, and use other centralized services for authentication and authorization
ipa-replica-manage command.
Figure 4.1. Server and Replica Agreements
- No more than four replication agreements can be configured on a single server/replica.
- No more than 20 servers and replicas should be involved in a single Identity Management domain.
- Every server/replica should have a minimum of two replication agreements to ensure that there are no orphan servers or replicas cut out of the IdM domain if another server fails.
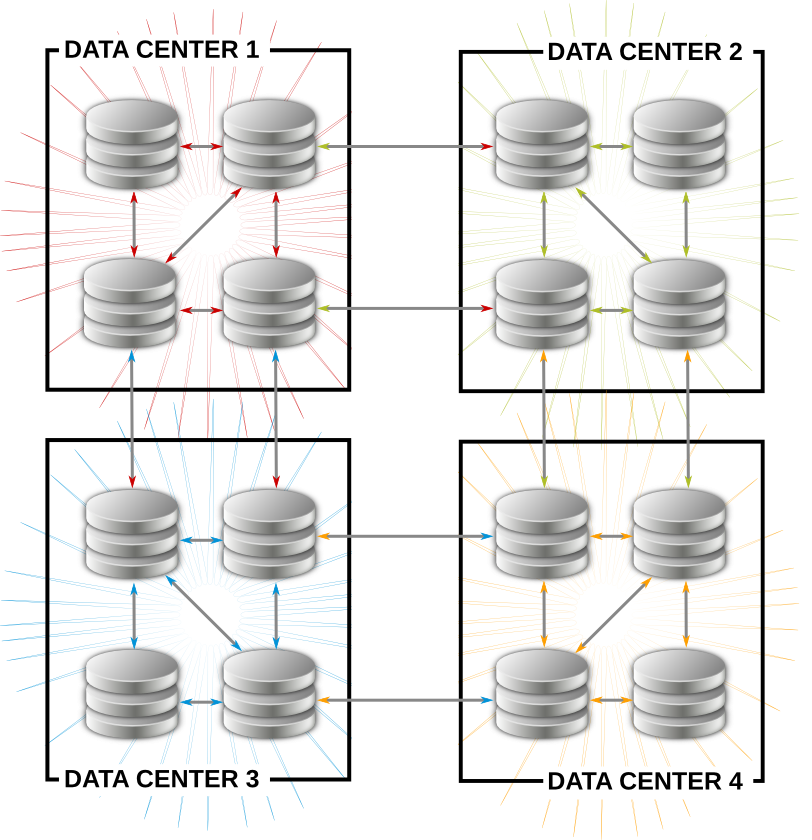
Figure 4.2. Example Topology
- Have at least one IdM server in each main office, data center, or locality. Preferably, have two IdM servers.
- Do not have more than four servers per data center.
- Rather than using a server or replica, small offices can use SSSD to cache credentials and use an off-site IdM server as its data backend.
4.2. Prerequisites for Installing a Replica Server
- Make sure that the machine meets all of the prerequisites listed in Chapter 2, Prerequisites for Installation.
- The replica and the master server must be running the same version of IdM.The replica essentially is a copy of a server, based off the existing server configuration. Therefore, the server and the replica (its copy) must be running the same version of Identity Management so that the configuration can be properly copied from the server to the replica.If the master server is running on Red Hat Enterprise Linux 6, IdM version 3.0, then the replica must also run on Red Hat Enterprise Linux 6 and use the IdM 3.0 packages.
Important
Creating a replica of a different version than the master is not supported. Attempting to create a replica using a different version fails when attempting to configure the 389 Directory Server instance. - Apart from the ports listed in Table 2.1, “IdM Ports”, installing a replica also requires
port 22to be free during the replica setup process. This port is required in order to use SSH to connect to the master server.Port 7389must be free if there is an existing Dogtag Certificate System or Red Hat Certificate System instance on the replica machine during and after the replica configuration. This port is used by the master IdM server to communicate with the replica.Note
Theipa-replica-installscript includes theipa-replica-conncheckutility that verifies the status of the required ports. You can also runipa-replica-conncheckseparately for troubleshooting purposes. For information on how to use the utility, see the ipa-replica-conncheck(1) man page. - The replica must use the same CA configuration as the server and must have the same root CA. For example, if the server is its own root CA (using Dogtag Certificate System), then that must be the root CA for the replica. If the server used an external CA to issue its certificates, than the replica must use that same external CA.
4.3. Installing the Replica Packages
ipa-server. If the replica will also host DNS services, then include the bind and bind-dyndb-ldap packages.
[root@server ~]# yum install ipa-server bind bind-dyndb-ldapImportant
ipa-server-install script.
4.4. Creating the Replica
- On the master server, create a replica information file. This contains realm and configuration information taken from the master server which will be used to configure the replica server.Run the
ipa-replica-prepareutility on the master IdM server. The utility requires the fully-qualified domain name of the replica machine.Using the--ip-addressoption automatically creates DNS entries for the replica, including the A and PTR records for the replica to the DNS.Important
Only pass the--ip-addressoption if the IdM server was configured with integrated DNS. Otherwise, there is no DNS record to update, and the attempt to create the replica fails when the DNS record operation fails.Note
Theipa-replica-preparescript does not validate the IP address or verify if the IP address of the replica is reachable by other servers.[root@server ~]# ipa-replica-prepare ipareplica.example.com --ip-address 192.168.1.2 Directory Manager (existing master) password: Preparing replica for ipareplica.example.com from ipaserver.example.com Creating SSL certificate for the Directory Server Creating SSL certificate for the dogtag Directory Server Saving dogtag Directory Server port Creating SSL certificate for the Web Server Exporting RA certificate Copying additional files Finalizing configuration Packaging replica information into /var/lib/ipa/replica-info-ipareplica.example.com.gpg Adding DNS records for ipareplica.example.com Using reverse zone 1.168.192.in-addr.arpa. The ipa-replica-prepare command was successfulThis must be a valid DNS name, which means only numbers, alphabetic characters, and hyphens (-) are allowed. Other characters, like underscores, in the hostname will cause DNS failures. Additionally, the hostname must be all lower-case. No capital letters are allowed.Each replica information file is created in the/var/lib/ipa/directory as a GPG-encrypted file. Each file is named specifically for the replica server for which it is intended, such asreplica-info-ipareplica.example.com.gpg.Note
A replica information file cannot be used to create multiple replicas. It can only be used for the specific replica and machine for which it was created.Warning
Replica information files contain sensitive information. Take appropriate steps to ensure that they are properly protected.For more options withipa-replica-prepare, see the ipa-replica-prepare(1) man page. - Copy the replica information file to the replica server:
[root@server ~]# scp /var/lib/ipa/replica-info-ipareplica.example.com.gpg root@ipaserver:/var/lib/ipa/ - On the replica server, run the replica installation script, referencing the replication information file. There are other options for setting up DNS, much like the server installation script. Additionally, there is an option to configure a CA for the replica; while CA's are installed by default for servers, they are optional for replicas.Some information about DNS forwarders is required. A list can be given of configured DNS forwarders using a
--forwarderoption for each one, or forwarder configuration can be skipped by specifying the--no-forwardersoption.For example:[root@ipareplica ~]# ipa-replica-install --setup-ca --setup-dns --no-forwarders /var/lib/ipa/replica-info-ipareplica.example.com.gpg Directory Manager (existing master) password: Warning: Hostname (ipareplica.example.com) not found in DNS Run connection check to master Check connection from replica to remote master 'ipareplica. example.com': Directory Service: Unsecure port (389): OK Directory Service: Secure port (636): OK Kerberos KDC: TCP (88): OK Kerberos Kpasswd: TCP (464): OK HTTP Server: Unsecure port (80): OK HTTP Server: Secure port (443): OK The following list of ports use UDP protocol and would need to be checked manually: Kerberos KDC: UDP (88): SKIPPED Kerberos Kpasswd: UDP (464): SKIPPED Connection from replica to master is OK. Start listening on required ports for remote master check Get credentials to log in to remote master admin@EXAMPLE.COM password: Execute check on remote master admin@example.com's password: Check connection from master to remote replica 'ipareplica. example.com': Directory Service: Unsecure port (389): OK Directory Service: Secure port (636): OK Kerberos KDC: TCP (88): OK Kerberos KDC: UDP (88): OK Kerberos Kpasswd: TCP (464): OK Kerberos Kpasswd: UDP (464): OK HTTP Server: Unsecure port (80): OK HTTP Server: Secure port (443): OK Connection from master to replica is OK. Connection check OKThe replica installation script runs a test to ensure that the replica file being installed matches the current hostname. If they do not match, the script returns a warning message and asks for confirmation. This could occur on a multi-homed machine, for example, where mismatched hostnames may not be an issue.Additional options for the replica installation script are listed in the ipa-replica-install(1) man page.Note
One of the optionsipa-replica-installaccepts is the--ip-addressoption. When added toipa-replica-install, this option only accepts IP addresses associated with the local interface. - Enter the Directory Manager password when prompted. The script then configures a Directory Server instance based on information in the replica information file and initiates a replication process to copy over data from the master server to the replica, a process called initialization.
- Verify that the proper DNS entries were created so that IdM clients can discover the new server. DNS entries are required for required domain services:
- _ldap._tcp
- _kerberos._tcp
- _kerberos._udp
- _kerberos-master._tcp
- _kerberos-master._udp
- _ntp._udp
If the initial IdM server was created with DNS enabled, then the replica is created with the proper DNS entries. For example:[root@ipareplica ~]# DOMAIN=example.com [root@ipareplica ~]# NAMESERVER=ipareplica [root@ipareplica ~]# for i in _ldap._tcp _kerberos._tcp _kerberos._udp _kerberos-master._tcp _kerberos-master._udp _ntp._udp; do echo ""; dig @${NAMESERVER} ${i}.${DOMAIN} srv +nocmd +noquestion +nocomments +nostats +noaa +noadditional +noauthority; done | egrep -v "^;" | egrep _ _ldap._tcp.example.com. 86400 IN SRV 0 100 389 ipaserver1.example.com. _ldap._tcp.example.com. 86400 IN SRV 0 100 389 ipaserver2.example.com. _kerberos._tcp.example.com. 86400 IN SRV 0 100 88 ipaserver1.example.com. ...8<...If the initial IdM server was created without DNS enabled, then each DNS entry, including both TCP and UDP entries for some services, should be added manually. For example:[root@ipareplica ~]# kinit admin [root@ipareplica ~]# ipa dnsrecord-add example.com _ldap._tcp --srv-rec="0 100 389 ipareplica.example.com." - Optional. Set up DNS services for the replica. These are not configured by the setup script, even if the master server uses DNS.Use the
ipa-dns-installcommand to install the DNS manually, then use theipa dnsrecord-addcommand to add the required DNS records. For example:[root@ipareplica ~]# ipa-dns-install [root@ipareplica ~]# ipa dnsrecord-add example.com @ --ns-rec ipareplica.example.com.Important
Use the fully-qualified domain name of the replica, including the final period (.), otherwise BIND will treat the hostname as relative to the domain.
4.5. Alternate Options for Creating a Replica
ipa-replica-prepare command or in the ipa-replica-install command.
4.5.1. Different DNS Settings
ipa-replica-prepare command can be used to configure DNS settings specific to the replica, meaning its IP address and reverse zone. For example:
[root@server ~]# ipa-replica-prepare ipareplica.example.com --ip-address=192.68.0.0 --no-reverse--setup-dns option, and then settings for forward and reverse zones. For example, to configure DNS services for the replica with no forwarders and using an existing reverse zone:
[root@server ~]# ipa-replica-install ipareplica.example.com --setup-dns --no-forwarders --no-reverse --no-host-dns ...ipa-replica-prepare and ipa-replica-install manpages.
4.5.2. Different CA Settings
--setup-ca option. The rest of the configuration is taken from the server's configuration.
[root@ipareplica ~]# ipa-replica-install ipareplica.example.com --setup-ca ...[root@ipareplica ~]# ipa-replica-install ipareplica.example.com --dirsrv_pkcs12=/tmp/dirsrv-cert.p12 --dirsrv_pin=secret1 --http_pkcs12=/tmp/http-cert.p12 --http_pin=secret2 ...4.5.3. Different Services
[root@server ~]# ipa-replica-install ... --no-ntp --no-ssh --no-sshd ...Chapter 5. Setting up Systems as IdM Clients
Note
Note
5.1. What Happens in Client Setup
- Retrieve the CA certificate for the IdM CA.
- Create a separate Kerberos configuration to test the provided credentials.This enables a Kerberos connection to the IdM XML-RPC server, necessary to join the IdM client to the IdM domain. This Kerberos configuration is ultimately discarded.Setting up the Kerberos configuration includes specifying the realm and domain details, and default ticket attributes. Forwardable tickets are configured by default, which facilitates connection to the administration interface from any operating system, and also provides for auditing of administration operations. For example, this is the Kerberos configuration for Red Hat Enterprise Linux systems:
[libdefaults] default_realm = EXAMPLE.COM dns_lookup_realm = false dns_lookup_kdc = false rdns = false forwardable = yes ticket_lifetime = 24h [realms] EXAMPLE.COM = { kdc = server.example.com:88 admin_server = server.example.com:749 } [domain_realm] .example.com = EXAMPLE.COM example.com = EXAMPLE.COM - Run the
ipa-joincommand to perform the actual join. - Obtain a service principal for the host service and installs it into
/etc/krb5.keytab. For example,host/ipa.example.com@EXAMPLE.COM. - Enable certmonger, retrieve an SSL server certificate, and install the certificate in
/etc/pki/nssdb. - Disable the nscd daemon.
- Configure SSSD or LDAP/KRB5, including NSS and PAM configuration files.
- Configure an OpenSSH server and client, as well as enabling the host to create DNS SSHFP records.
- Configure NTP.
5.2. System Ports
5.3. Configuring a Linux System as an IdM Client
- There must be a way to connect the client machine to the Kerberos domain, either by having an available Kerberos identity (such as the admin user) or by manually adding the client machine to the KDC on the server with a one-time password before beginning the enrollment process for the client machine.
- If there is an Active Directory server on the same network that serves DNS records, the Active Directory DNS records could prevent the client from automatically detecting the IdM server address. The
ipa-client-installscript retrieves the Active Directory DNS records instead of any records that were added for IdM.In this case, it is necessary to pass the IdM server address directly to theipa-client-installscript.
5.3.1. Installing the Client (Full Example)
- Install the client packages. These packages provide a simple way to configure the system as a client; they also install and configure SSSD.For a regular user system, this requires only the
ipa-clientpackage:[root@client ~]# yum install ipa-clientAn administrator machine requires theipa-admintoolspackage, as well:[root@client ~]# yum install ipa-client ipa-admintools - If the IdM server is configured as the DNS server and is in the same domain as the client, add the server's IP address as the first entry in the list of name servers in the client's
/etc/resolv.conffile.Note
If every machine in the domain will be an IdM client, then add the IdM server address to the DHCP configuration. - Run the client setup command.
[root@client ~]# ipa-client-install --enable-dns-updatesThe--enable-dns-updatesoption updates DNS with the client machine's IP address. This option should only be used if the IdM server was installed with integrated DNS or if the DNS server on the network accepts DNS entry updates with the GSS-TSIG protocol.Options foripa-client-installare listed in theipa-client-installmanpage. - If prompted, enter the domain name for the IdM DNS domain.
DNS discovery failed to determine your DNS domain Please provide the domain name of your IPA server (ex: example.com): example.com - If prompted, enter the fully-qualified domain name of the IdM server. Alternatively, use the
--serveroption with the client installation script to supply the fully-qualified domain name of the IdM server.DNS discovery failed to find the IPA Server Please provide your IPA server name (ex: ipa.example.com): server.example.comImportant
This must be a valid DNS name, which means only numbers, alphabetic characters, and hyphens (-) are allowed. Other characters, like underscores, in the hostname will cause DNS failures. - The client script then prompts for a Kerberos identity to use to contact and then join the Kerberos realm. When these credentials are supplied, then the client is able to join the IdM Kerberos domain and then complete the configuration:
Continue to configure the system with these values? [no]: y User authorized to enroll computers: admin Synchronizing time with KDC... Password for admin@EXAMPLE.COM: Successfully retrieved CA cert Subject: CN=Certificate Authority,O=EXAMPLE.COM Issuer: CN=Certificate Authority,O=EXAMPLE.COM Valid From: Tue Aug 13 09:29:07 2013 UTC Valid Until: Sat Aug 13 09:29:07 2033 UTC Enrolled in IPA realm EXAMPLE.COM Created /etc/ipa/default.conf New SSSD config will be created Configured /etc/sssd/sssd.conf Configured /etc/krb5.conf for IPA realm EXAMPLE.COM Failed to update DNS records. Adding SSH public key from /etc/ssh/ssh_host_rsa_key.pub Adding SSH public key from /etc/ssh/ssh_host_dsa_key.pub Could not update DNS SSHFP records. SSSD enabled Configured /etc/openldap/ldap.conf NTP enabled Configured /etc/ssh/ssh_config Configured /etc/ssh/sshd_config Client configuration complete. - Test that the client can connect successfully to the IdM domain and can perform basic tasks. For example, check that the IdM tools can be used to get user and group information:
[jsmith@client ~]$ id [jsmith@client ~]$ getent passwd admin [jsmith@client ~]$ getent group admins - If an NFS server is already configured, then set NFS on the client system to work with Kerberos.An NFS server must already be configured within the domain. This is covered in Section 18.2, “Configuring Automount”.
Note
To help troubleshoot potential NFS setup errors, enable debug information in the/etc/sysconfig/nfsfile.RPCGSSDARGS="-vvv" RPCSVCGSSDARGS="-vvv"- On an IdM server, add an NFS service principal for the NFS client.
[root@client ~]# kinit admin
[root@client ~]# ipa service-add nfs/ipaclient.example.com@EXAMPLE
Note
This must be run from a machine with the ipa-admintools package installed so that theipacommand is available. - On the IdM server, obtain a keytab for the NFS service principal.
[root@client ~]# ipa-getkeytab -s server.example.com -p nfs/ipaclient.example.com@EXAMPLE -k /tmp/krb5.keytab - Copy the keytab from the IdM server to the IdM client. For example:
[root@client ~]# scp /tmp/krb5.keytab root@client.example.com:/etc/krb5.keytab - Configure the
/etc/exportsfile on the NFS server./ipashare gss/krb5p(rw,no_root_squash,subtree_check,fsid=0) - Create the mount point.
[root@client ~]# mkdir /mnt/ipashare - On the client, mount the NFS share. Use the same
-o secsetting as is used in the/etc/exportsfile for the NFS server.[root@client ~]# mount -v -t nfs4 -o sec=krb5p nfs.example.com:/ /mnt/ipashare
5.3.2. Examples of Other Client Installation Options
ipa-client-install command which can be used to configure the client system in different ways, depending on the infrastructure requirements.
Example 5.1. Enabling DNS Updates
--enable-dns-updates option sets the System Security Services Daemon to update the DNS entries whenever the IP address for a client changes.
[root@client ~]# ipa-client-install --enable-dns-updatesExample 5.2. Specifying Domain Information
--domainfor the DNS domain name (which is only used if the IdM server is configured to host DNS services)--serverfor the IdM server to register with (which can be any server or replica in the topology)This must be a valid DNS name, which means only numbers, alphabetic characters, and hyphens (-) are allowed. Other characters, like underscores, in the hostname will cause DNS failures.--realmfor the Kerbero realm name and, optionally,-pfor a Kerberos principal name
[root@client ~]# ipa-client-install --domain EXAMPLE.COM --server server.example.com --realm EXAMPLE -p host/server.example.comExample 5.3. Setting a Specific IdM Server
--fixed-primary option.
[root@client ~]# ipa-client-install --fixed-primary server.example.comExample 5.4. Disabling System Authentication Tools
authconfig tool to set and update authentication clients and settings for a local system. Identity Management uses the System Security Services Daemon (SSSD) to store IdM server configuration and to retrieve policy information, users, passwords, and groups configured within the IdM domain.
authconfig or SSSD.
--noac option prevents any changes through authconfig. The --no-sssd option prevents IdM from using SSSD.
[root@client ~]# ipa-client-install --noac --no-sssd--preserve-sssd. While this allows the client to change the SSSD configuration file to configure the IdM domain, it saves the old SSSD configuration.
Example 5.5. Disabling Password Caching
--no-krb5-offline-passwords option can be used to prevent passwords from being cached in SSSD.
[root@client ~]# ipa-client-install --no-krb5-offline-passwords5.4. Manually Configuring a Linux Client
ipa-client-install command automatically configures services like Kerberos, SSSD, PAM, and NSS. However, if the ipa-client-install command cannot be used on a system for some reason, then the IdM client entries and the services can be configured manually.
5.4.1. Setting up an IdM Client (Full Procedure)
- Install SSSD, if it is not already installed.
- Optional. Install the IdM tools so that administrative tasks can be performed from the host.
[root@client ~]# yum install ipa-admintools - On an IdM server. Create a host entry for the client.
[jsmith@client ~]$ kinit admin
[jsmith@client ~]$ ipa host-add --force --ip-address=192.168.166.31 ipaclient.example.com
Creating hosts manually is covered in Section 5.4.2, “Other Examples of Adding a Host Entry”. - On an IdM server. Create keytabs for the client.
- Log in as IdM administrator.
[jsmith@client ~]$ kinit admin - Set the client host to be managed by the server.
[jsmith@client ~]$ ipa host-add-managedby --hosts=server.example.com ipaclient.example.com - Generate the keytab for the client.
[jsmith@client ~]$ ipa-getkeytab -s server.example.com -p host/ipaclient.example.com -k /tmp/ipaclient.keytab
- Copy the keytab to the client machine and rename it
/etc/krb5.keytab.Note
If there is an existing/etc/krb5.keytabthat should be preserved, the two files can be combined usingktutil. - Set the correct user permissions for the
/etc/krb5.keytabfile.[root@client ~]# chown root:root /etc/krb5.keytab [root@client ~]# chmod 0600 /etc/krb5.keytab - Set the SELinux contexts for the
/etc/krb5.keytabfile.[root@client ~]# chcon system_u:object_r:krb5_keytab_t:s0 /etc/krb5.keytab - Configure SSSD by editing the
/etc/sssd/sssd.conffile to point to the IdM domain.[root@client ~]# touch /etc/sssd/sssd.conf [root@client ~]# vim /etc/sssd/sssd.conf [sssd] config_file_version = 2 services = nss, pam domains = example.com [nss] [pam] [domain/example.com] cache_credentials = True krb5_store_password_if_offline = True ipa_domain = example.com id_provider = ipa auth_provider = ipa access_provider = ipa ipa_hostname = ipaclient.example.com chpass_provider = ipa ipa_server = server.example.com ldap_tls_cacert = /etc/ipa/ca.crt - Configure NSS to use SSSD for passwords, groups, users, and netgroups.
[root@client ~]# vim /etc/nsswitch.conf ... passwd: files sss shadow: files sss group: files sss ... netgroup: files sss ... - Configure the
/etc/krb5.conffile to point to the IdM KDC.[logging] default = FILE:/var/log/krb5libs.log kdc = FILE:/var/log/krb5kdc.log admin_server = FILE:/var/log/kadmind.log [libdefaults] default_realm = EXAMPLE.COM dns_lookup_realm = false dns_lookup_kdc = false rdns = false ticket_lifetime = 24h forwardable = yes allow_weak_crypto = true [realms] EXAMPLE.COM = { kdc = server.example.com:88 admin_server = server.example.com:749 default_domain = example.com } [domain_realm] .example.com = EXAMPLE.COM example.com = EXAMPLE.COM - Update the
/etc/pam.dconfiguration to use thepam_sss.somodules.- For
/etc/pam.d/fingerprint-auth:... account [default=bad success=ok user_unknown=ignore] pam_sss.so ... session optional pam_sss.so - For
/etc/pam.d/system-auth:... auth sufficient pam_sss.so use_first_pass ... account [default=bad success=ok user_unknown=ignore] pam_sss.so ... password sufficient pam_sss.so use_authtok ... session optional pam_sss.so - For
/etc/pam.d/password-auth:... auth sufficient pam_sss.so use_first_pass ... account [default=bad success=ok user_unknown=ignore] pam_sss.so ... password sufficient pam_sss.so use_authtok ... session optional pam_sss.so - Enrollment_with_Separation_of_DutiesFor
/etc/pam.d/smartcard-auth:... account [default=bad success=ok user_unknown=ignore] pam_sss.so ... session optional pam_sss.so
- Install the IdM server's CA certificate.
- Obtain the certificate from the server.
[root@ipaclient ~]# wget -O /etc/ipa/ca.crt http://ipa.example.com/ipa/config/ca.crt - Install the certificate in the system's NSS database.
[root@ipaclient ~]# certutil -A -d /etc/pki/nssdb -n "IPA CA" -t CT,C,C -a -i /etc/ipa/ca.crt
- Set up a host certificate for the host in IdM.
- Make sure
certmongeris running.[root@ipaclient ~]# service certmonger startNote
Configurechkconfigso that thecertmongerservice starts by default.[root@ipaclient ~]# chkconfig certmonger on - Use the
ipa-getcertcommand, which creates and manages the certificate throughcertmonger. The options are described more in Section B.1, “Requesting a Certificate with certmonger”.[root@ipaclient ~]# ipa-getcert request -d /etc/pki/nssdb -n Server-Cert -K HOST/ipaclient.example.com -N 'CN=ipaclient.example.com,O=EXAMPLE.COM'
If administrative tools were not installed on the client, then the certificate can be generated on an IdM server, copied over to the host, and installed usingcertutil. - Set up NFS to work with Kerberos.
Note
To help troubleshoot potential NFS setup errors, enable debug information in the/etc/sysconfig/nfsfile.RPCGSSDARGS="-vvv" RPCSVCGSSDARGS="-vvv"- On an IdM server, add an NFS service principal for the NFS client.
[root@ipaclient ~]# ipa service-add nfs/ipaclient.example.com@EXAMPLENote
This must be run from a machine with the ipa-admintools package installed so that theipacommand is available. - On the IdM server, obtain a keytab for the NFS service principal.
[root@ipaclient ~]# ipa-getkeytab -s server.example.com -p nfs/ipaclient.example.com@EXAMPLE -k /tmp/krb5.keytabNote
Some versions of the Linux NFS implementation have limited encryption type support. If the NFS server is hosted on a version older than Red Hat Enterprise Linux 6, use the-e des-cbc-crcoption to theipa-getkeytabcommand for any nfs/<FQDN> service keytabs to set up, both on the server and on all clients. This instructs the KDC to generate only DES keys.When using DES keys, all clients and servers that rely on this encryption type need to have theallow_weak_cryptooption enabled in the[libdefaults]section of the/etc/krb5.conffile. Without these configuration changes, NFS clients and servers are unable to authenticate to each other, and attempts to mount NFS filesystems may fail. The client'srpc.gssdand the server'srpc.svcgssddaemons may log errors indicating that DES encryption types are not permitted. - Copy the keytab from the IdM server to the NFS server. For example, if the IdM and NFS servers are on different machines:
[root@ipaclient ~]# scp /tmp/krb5.keytab root@nfs.example.com:/etc/krb5.keytab - Copy the keytab from the IdM server to the IdM client. For example:
[root@ipaclient ~]# scp /tmp/krb5.keytab root@client.example.com:/etc/krb5.keytab - Configure the
/etc/exportsfile on the NFS server./ipashare gss/krb5p(rw,no_root_squash,subtree_check,fsid=0) - On the client, mount the NFS share.
- Always specify the share as nfs_server:/ /mountpoint.
- Use the same
-o secsetting as is used in the/etc/exportsfile for the NFS server.
[root@client ~]# mount -v -t nfs4 -o sec=krb5p nfs.example.com:/ /mnt/ipashare
5.4.2. Other Examples of Adding a Host Entry
5.4.2.1. Adding Host Entries from the Web UI
- Open the Identity tab, and select the Hosts subtab.
- Click the Add link at the top of the hosts list.
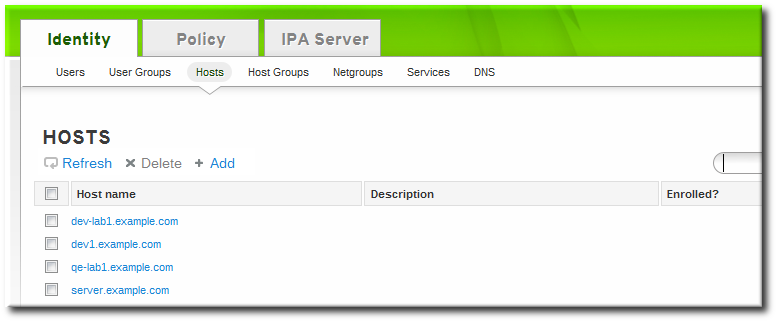
- Fill in the machine name and select the domain from the configured zones in the drop-down list. If the host has already been assigned a static IP address, then include that with the host entry so that the DNS entry is fully created.
 DNS zones can be created in IdM, which is described in Section 17.6.1, “Adding Forward DNS Zones”. If the IdM server does not manage the DNS server, the zone can be entered manually in the menu area, like a regular text field.
Note
Select the Force checkbox to add the host DNS record, even if the hostname cannot be resolved.This is useful for hosts which use DHCP and do not have a static IP address. This essentially creates a placeholder entry in the IdM DNS service. When the DNS service dynamically updates its records, the host's current IP address is detected and its DNS record is updated. - Click the Add and Edit button to go directly to the expanded entry page and fill in more attribute information. Information about the host hardware and physical location can be included with the host entry.

5.4.2.2. Adding Host Entries from the Command Line
host-add command. This commands adds the host entry to the IdM Directory Server. The full list of options with host-add are listed in the ipa host manpage. At its most basic, an add operation only requires the client hostname to add the client to the Kerberos realm and to create an entry in the IdM LDAP server:
$ ipa host-add client1.example.com--ip-address and --force options.
Example 5.6. Creating Host Entries with Static IP Addresses
$ ipa host-add --force --ip-address=192.168.166.31 client1.example.com--force. This essentially creates a placeholder entry in the IdM DNS service. When the DNS service dynamically updates its records, the host's current IP address is detected and its DNS record is updated.
Example 5.7. Creating Host Entries with DHCP
$ ipa host-add --force client1.example.comhost-del command. If the IdM domain uses DNS, then the --updatedns option also removes the associated records of any kind for the host from the DNS.
$ ipa host-del --updatedns client1.example.com5.5. Setting up a Linux Client Through Kickstart
- Create the host entry on the IdM server and set a temporary Kerberos password for the entry.When the
ipa-client-installscript is run normally (interactively), it prompts for authentication credentials to access the IdM domain. However, when the script is run automatically, the system has to have some way to access the IdM domain without using an existing IdM user; this is done by setting the host principal in the script and using a Kerberos password (configured for the host account) to access the IdM domain.For example:[jsmith@server ~]$ ipa host-add kickstart-server.example.com --password=secretThe password expires after the first authentication attempt. After enrollment completes, the host is authenticated using its keytab. - Include the ipa-client package with the other install packages.
%packages @ X Window System @ Desktop @ Sound and Video ipa-client ... - Create a post-install instruction that ensures SSH keys are generated before enrollment, runs the
ipa-client-installscript, passes all the required information to access and configure the IdM domain services, and specifies the pre-set password. Use the--unattendedoption to instruct the script to run non-interactively.%post --log=/root/ks-post.log # Generate SSH keys to ensure that ipa-client-install uploads them to the IdM server /usr/bin/ssh-keygen -q -t rsa -f /etc/ssh/ssh_host_rsa_key -C '' -N '' chmod 600 /etc/ssh/ssh_host_rsa_key chmod 644 /etc/ssh/ssh_host_rsa_key.pub /sbin/restorecon /etc/ssh/ssh_host_rsa_key.pub /usr/bin/ssh-keygen -q -t rsa1 -f /etc/ssh/ssh_host_key -C '' -N '' chmod 600 /etc/ssh/ssh_host_key chmod 644 /etc/ssh/ssh_host_key.pub /sbin/restorecon /etc/ssh/ssh_host_key.pub /usr/bin/ssh-keygen -q -t dsa -f /etc/ssh/ssh_host_dsa_key -C '' -N '' chmod 600 /etc/ssh/ssh_host_dsa_key chmod 644 /etc/ssh/ssh_host_dsa_key.pub /sbin/restorecon /etc/ssh/ssh_host_dsa_key.pub # Get the hostname to set as the host principal /bin/hostname > /tmp/hostname.txt # Run the client install script /usr/sbin/ipa-client-install --domain=EXAMPLEDOMAIN --enable-dns-updates --mkhomedir -w secret --realm=EXAMPLEREALM --server=server.example.com --unattendedNote
Red Hat recommends not to start thesshdservice prior to the kickstart enrollment. While startingsshdbefore enrolling the client generates the SSH keys automatically, using the above script is the preferred solution. - Run the kickstart script.
5.6. Performing a Two-Administrator Enrollment
ipa-client-install command. It is also possible to perform those steps separately; this allows for administrators to prepare machines and the IdM server configuration in advance of actually configuring the clients. This allows more flexible setup scenarios, including bulk deployments.
Note
ipa-client-install command and allowing it to create the host. However, that administrator may have the right to run the command after a host entry exists. In that case, one administrator can create the host entry manually, then the second administrator can complete the enrollment by running the ipa-client-install command.
- An administrator creates the host entry, as described in Section 5.4.2, “Other Examples of Adding a Host Entry”.
- The second administrator installs the IdM client packages on the machine, as in Section 5.3, “Configuring a Linux System as an IdM Client”.
- When the second administrator runs the setup script, he must pass his Kerberos password and username (principal) with the
ipa-client-installcommand. For example:$ ipa-client-install -w secret -p admin2 - The keytab is generated on the server and provisioned to the client machine, so that the client machine is not able to connect to the IdM domain. The keytab is saved with
root:rootownership and 0600 permissions.
5.7. Manually Unconfiguring Client Machines
--updatedns option, as when installing a client, to update the domain DNS configuration automatically.
[root@server ~]# ipa-client-install --uninstall --updatednsWarning
- On the client, remove the old hostname from the main keytab. This can be done by removing every principal in the realm or by removing specific principals. For example, to remove all principals:
[jsmith@client ~]$ ipa-rmkeytab -k /etc/krb5.keytab -r EXAMPLE.COMTo remove specific principals:[jsmith@client ~]$ ipa-rmkeytab -k /etc/krb5.keytab -p host/server.example.com@EXAMPLE.COM - On the client system, disable tracking in
certmongerfor every certificate. Each certificate must be removed from tracking individually.First, list every certificate being tracked, and extract the database and nickname for each certificate. The number of certificates depends on the configured services for the host.[jsmith@client ~]$ ipa-getcert listThen, disable tracking for each. For example:[jsmith@client ~]$ ipa-getcert stop-tracking -n "Server-Cert" -d /etc/httpd/alias - On the IdM server, remove the old host from the IdM DNS domain. While this is optional, it cleans up the old IdM entries associated with the system and allows it to be re-enrolled cleanly at a later time.
[jsmith@server ~]$ kinit admin [jsmith@server ~]$ ipa host-del server.example.com - If the system should be re-added to a new IdM domain — such as a virtual machine which was moved from one location to another — then the system can be rejoined to IdM using the
ipa-joincommand on the client system.[jsmith@client ~]$ ipa-join
Chapter 6. Upgrading Identity Management
6.1. Upgrade Notes
Important
mod_nss module. You can ensure that by following these steps:
- Edit the
/etc/httpd/conf.d/nss.conffile and set theNSSProtocolparameter toTLSv1.0(for backward compatibility) andTLSv1.1.NSSProtocol TLSv1.0,TLSv1.1 - Restart the
httpdservice.# service httpd restart
- The update process automatically updates all schema and LDAP configuration, Apache configuration, and other services configuration, and restarts all IdM-associated services.
- When a replica is created, it must be the same version as the master it is based on. This means that replicas should not be created on an older bersion of Identity Management while the servers are in the process of being upgraded. Wait until the upgrade process is completed, and then create new replicas.
- Schema changes are replicated between servers. So once one master server is updated, all servers and replicas will have the updated schema, even if their packages are not yet updated. This ensures that any new entries which use the new schema can still be replicated among all the servers in the IdM domain.The LDAP upgrade operation is logged in the upgrade log at
/var/log/ipaupgrade-log. If any LDAP errors occur, then they are recorded in that log. Once any errors are resolved, the LDAP update process can be manually initiated by running the updater script:[root@server ~]# ipa-ldap-updater --upgrade - Clients do not need to have new packages installed. The client packages used to configure a Red Hat Enterprise Linux system do not impact the enrollment of the client within the domain.
- Updating client packages could bring in updated packages for other dependencies, such as
certmongerwhich contain bug fixes, but this is not required to maintain client functionality or behavior within the IdM domain.
6.2. Upgrading Packages
[root@ipaserver ~]# yum updateyum on the master server:
[root@ipaserver ~]# yum update ipa-serverNote
6.3. Removing Browser Configuration for Ticket Delegation (For Upgrading from 6.2)
delegation-uris parameter to the about:config setup in Firefox:
network.negotiate-auth.delegation-uris .example.com
For browsers which have already been configured to use the Identity Management web UI, the delegation-uris setting can be cleared after upgrading to ipa-server-3.0.0 or ipa-client-3.0.0.
delegation-uris setting.
The browser configuration is defined in the configure.jar file. This JAR file is generated when the server is installed and it is not updated with other files when IdM is updated. Any browsers configured will still have the delegation-uris parameter set unnecessarily, even after the IdM server is upgraded. However, the configure.jar file can be updated.
preferences.html file in configure.jar sets the delegation-uris parameter. The updated preferences.html file can be added to configure.jar, and then configure.jar can be re-signed and re-deployed on the IdM servers.
Note
configure.jar file on the initial IdM server. This is the master server, and it is the only server which has a signing certificate. Then propagate the updated file to the other servers and replicas.
- Update the packages on the initial IdM master server (the first instance). This will bring in the 3.0 UI packages, including the
configure.jarfile. - Back up the existing
configure.jarfile.[root@ipaserver ~]# mv /usr/share/ipa/html/configure.jar /usr/share/ipa/html/configure.jar.old - Create a temporary working directory.
[root@ipaserver ~]# mkdir /tmp/sign - Copy the updated
preferences.htmlfile to the working directory.[root@ipaserver ~]# cp /usr/share/ipa/html/preferences.html /tmp/sign - Use the
signtoolcommand (one of the NSS utilities) to add the newpreferences.htmlfile and re-sign theconfigure.jarfile.[root@ipaserver ~]# signtool -d /etc/httpd/alias -k Signing-Cert -Z /usr/share/ipa/html/configure.jar -e ".html" -p `cat /etc/httpd/alias/pwdfile.txt` /tmp/signThe-eoption tells the tool to sign only files with a.htmlextension. The-Zoption creates a new JAR file. - Copy the regenerated
configure.jarfile to all other IdM servers and replicas.
6.4. Testing Before Upgrading the IdM Server (Recommended)
- Set up a replica based on one of the production servers, with the same version of IdM as is running in production, as described in Chapter 4, Setting up IdM Replicas. For this example, this is called Test Replica. Make sure that Test Replica can successfully connect to the production server and domain.
- After verifying that Test Replica has been successfully added to the production domain, disconnect Test Replica from the network.
- Remove the replication agreements for Test Replica from the original IdM server and from Test Replica.
- Reconnect Test Replica to the network.
- Upgrade the packages on Test Replica using
yumor whatever package update tool is appropriate for your system. For example:[root@ipareplica ~]# yum update ipa* - Test common things on Test Replica, like getting Kerberos credentials, opening the server UI, and running commands.
Chapter 7. Uninstalling IdM Servers and Replicas
--uninstall option to the ipa-server-install command:
[root@ipareplica ~]# ipa-server-install --uninstallChapter 8. The Basics of Managing the IdM Server and Services
8.1. Starting and Stopping the IdM Domain
service command. However, when multiple domain services need to be restarted (or the entire IdM server), then use the ipactl command, which always starts and stops services in the appropriate order.
ipactl command can start, stop, and restart services.
ipactl start | stop | restartchkconfig command sets what services to start automatically when the system restarts. The ipactl command can be used to start the domain services in the proper order, without having to configure each one individually in the chkconfig run order.
[root@server ~]# chkconfig ipactl on8.2. About the IdM Client Tools
ipa. This script is a parent or control script for associated subcommands; each subcommand relates to a specific entry type.
- The scripts allow management tasks to be automated and performed repeatedly in a consistent way without manual intervention.
- Entries can be added with all possible attributes configured (or a desired subset of attributes) in a single step. The web UI frequently requires two steps to fully configure an entry: the first to create the entry and the next to add optional attributes.
- The command-line scripts support adding additional attributes which may not be available in the UI or even custom attributes to entries, if the schema is configured.
8.2.1. The Structure of the ipa Command
ipa command is essentially a big plug-in container. It supports dozens of subcommands; these subcommands are actually plug-ins which manage specific types of objects in Identity Management.
ipa objectType-operation objectName --option=valueuser-add subcommand:
ipa user-add entryName optionsdnszone-add and dnsrecord-add all belong to the dns module or topic. All of the information for managing a specific area, with all of the supported commands and examples for each, are available by viewing the help for that topic:
ipa help topicNote
ipa help topics8.2.1.1. Adding, Editing, and Deleting Entries with ipa
$ ipa user-add jsmithadd operations, commands usually prompt for any required configuration attributes, which can be passed as command-line options or using --set/addattr options (Section 8.2.3, “Managing Entry Attributes with --setattr, --addattr, and --delattr”).
$ ipa user-add
First name: John
Last name: Smith
User login [jsmith]: jsmith
--------------------
Added user "jsmith"
--------------------
...*-mod commands, and then any new or edited attributes are listed as options after it.
$ ipa user-mod jsmith --title="Editor III"*-del command and the entry's name.
$ ipa user-del jsmith8.2.1.2. Finding and Displaying Entries with ipa
*-find command and an optional search criterion. The criterion is a string which can either be an exact match or a substring of any of the search attribute values. For example, this searches both for the exact match on the string smith (such as an sn value of Smith) and a substring search for values such as a username of jsmith or a longer surname, such as Smithson.
ipa user-find smith*-find command) have certain limits imposed as part of the server configuration, specifically how many entries are returned (size limits) and how long a search will run (time limits). This is covered in Section 9.11.3.1.2, “Setting IdM Search Limits”. Part of the server configuration is setting global defaults for size and time limits on searches. While these limits are always enforced in the web UI, they can be overridden with any *-find command with the --sizelimit and --timelimit options. For example, if the default time limit is 60 seconds and a search is going to take longer, the time limit can be increased to 120 seconds:
[jsmith@ipaserver ~]$ ipa user-find smith --timelimit=120--all option.
*-show command and the entry name. As with searches, only a subset of attributes is displayed with the entry unless the --all option is used.
8.2.1.3. Adding Members to Groups and Containers with ipa
*-add-member, although the command may specify an entry type, such as *-add-user.
*-remove-member or *-remove-type command.
8.2.2. Positional Elements in ipa Commands
ipa subcommands have only two elements: the name of the entry being modified (the object) and then any options available for the subcommand:
ipa command entryName --options=valuesautomount commands, for example. With automount, the location must be included whenever a new key or map is created.
ipa command parentEntryName childEntryName --childOptions=childValues8.2.3. Managing Entry Attributes with --setattr, --addattr, and --delattr
ipa command uses specified command-line arguments to set values. For example, adding a mail attribute to a user can be done with the --mail argument; enabling dynamic updates for a DNS zone can be done with the --allow-dynupdate option with zone commands; and a map key for an automount map is given in the --key option.
--setattr and --addattr options.
Important
--setattr or --addattr options.
--setattr=attribute=value--setattr option sets one value for the given attribute; any existing values are overwritten, even for multi-valued attributes.
--addattr option adds a new value for an attribute; for a multi-valued attribute, it adds the new value while preserving any existing values.
--setattr option and --addattr can be used multiple times in the same command invocation. For example:
$ ipa user-mod jsmith --addattr=mail=johnnys@me.com --addattr=mail=jsmith@example.com --setattr=description="backup IT manager for the east coast branch"--delattr option. For a single-valued attribute, this removes the attribute; for a multi-valued attribute, it removes only the specified value. For example:
$ ipa user-mod jsmith --delattr=mail=johnnys@me.comNote
$ ipa user-mod jsmith --addattr=mail=johnnys@me.com --delattr=mail=johnnys@me.com8.2.4. Using Special Characters with IdM Tools
8.2.5. Logging into the IdM Domain Before Running
ipa-server-install), the user must first authenticate to the IdM domain by obtaining a Kerberos ticket. This is done using kinit:
[jsmith@ipaserver ~]$ kinit admin8.3. Logging into IdM
kinit.
kinit issues the user a Kerberos ticket. This ticket is checked by any IdM or Kerberos-aware service, so that a user only needs to log in once to access all domain services. Domain services include the IdM web UI, mounted file shares, wikis, or any other application which uses IdM as its identity/authentication store.
8.3.1. Logging into IdM
kinit on a client within the IdM domain.
$ kinitkinit command must be run from a machine which has been configured as a client within the IdM domain, so that the client authenticates with the IdM KDC.
kinit logs into IdM as the currently logged-in user account. This user account must also be an IdM user for them to authenticate to the IdM Kerberos domain successfully. For example, if you are logged into the machine as user:
$ kinit
Password for user@EXAMPLE.COM:
Note
pam_krb5 is configured on the IdM client machine, then when a user logs into the machine, a ticket is created which can be used for machine services which require authentication, such as sudo.
8.3.2. Logging in When an IdM User Is Different Than the System User
kinit command again and specify the new user. For example:
$ kinit userName
Password for userName@EXAMPLE.COM:admin, is created to perform normal administrative activities. To authenticate as the admin user, use the name admin when running kinit:
$ kinit adminNote
8.3.3. Checking the Current Logged in User
klist command to verify the identity and the ticket granting ticket (TGT) from the server:
$ klist
Ticket cache: FILE:/tmp/krb5cc_500
Default principal: ipaUser@EXAMPLE.COM

Valid starting     Expires            Service principal
11/10/08 15:35:45  11/11/08 15:35:45  krbtgt/EXAMPLE.COM@EXAMPLE.COM

Kerberos 4 ticket cache: /tmp/tkt500
klist: You have no tickets cached
kinit have some limitation, one of them being that the current ticket is overwritten with any new invocation of kinit. Authenticating as User A and then authenticating as User B overwrites User A's ticket.
KRB5CCNAME environment variable. This variable keeps credential caches separate in different shells.
8.3.4. Caching User Kerberos Tickets
admin, added a new user, set the password, and then tried to authenticate as that user, the administrator's ticket is lost.
KRB5CCNAME, can be used.
8.4. Using the IdM Web UI
8.4.1. About the Web UI
| Main Menu Tab | Configuration Areas |
|---|---|
| Identity |
|
| Policy |
|
| IdM Server (access controls within Identity Management) |
|
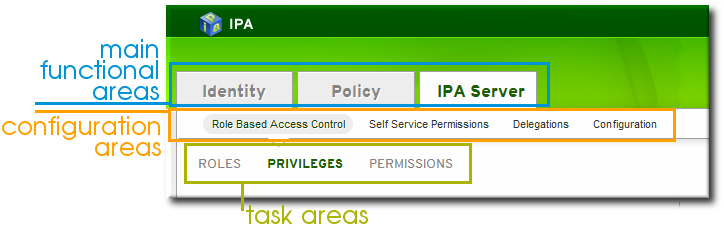
Figure 8.1. The Main Menu
8.4.2. Opening the IdM Web UI
- Get a valid Kerberos ticket using
kinit, as in Section 8.3, “Logging into IdM”. - Open the IdM URL. The full URL is
https://IPAserver-FQDN/ipa/ui, but this service is also accessed simply by openinghttps://IPAserver-FQDN. For example:https://server.example.com https://server.example.com/ipa/ui
8.4.3. Configuring the Browser
8.4.3.1. Configuring Firefox

Figure 8.2. Kerberos Authentication Error
- Click the follow these directions link.
- Click the link to import the CA certificate for the IdM server.
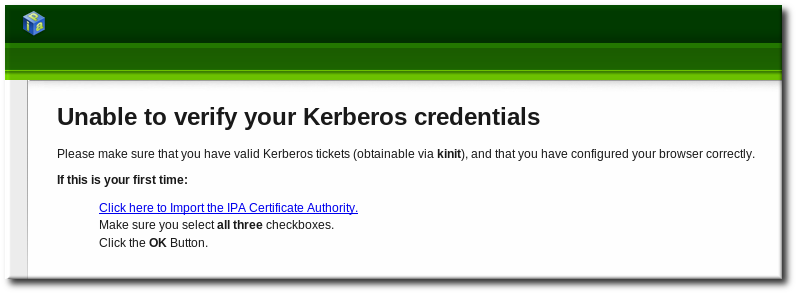
- Set the web site and software developer (first and last) trust bits for the CA certificate.

- Click the Configure Firefox button. This automatically fills out all the
negotiatesettings in the Firefox configuration to use the IdM domain settings. When the process is complete, a success box pops up saying that Firefox has been configured for single sign-on. From there, you are redirected to the IdM web UI.
- Start Firefox.
- Type
about:configin the address bar. - In the Search field, type
negotiateto filter out the Kerberos-related parameters. - On Red Hat Enterprise Linux, enter the domain name for the URI parameters, including the preceding period (.) and set the
gsslibparameter to true:network.negotiate-auth.trusted-uris .example.com network.negotiate-auth.using-native-gsslib trueOn Windows, set the trusted URIs and library path, and disable the built-in Microsoft Kerberos for authentication:network.negotiate-auth.trusted-uris .example.com network.auth.use-sspi false network.negotiate-auth.gsslib: C:\Program Files\MIT\Kerberos\bin\gssapi32.dllOn a 64-bit system, the library location is inC:\Program Files(x86)\MIT\Kerberos\bin\gssapi32.dll. - Open the web UI by going to the fully-qualified domain name of the IdM server such as
http://ipaserver.example.com. Make sure that you can open the web UI and that there are no Kerberos authentication errors. - Next, download the IdM server's CA certificate from
http://ipa.example.com/ipa/config/ca.crt. - In the Downloading Certificate window that appears, select the first (Trust this CA to identify web sites) and third (Trust this CA to identify software developers) check boxes.
8.4.3.2. Configuring Chrome
- Import CA Certificate
- Download the CA certificate from
http://my.ipa.server/ipa/config/ca.crt. Alternatively, if the host is also an IdM client, you can find the certificate in/etc/ipa/ca.crt. - Click the menu button with the
Customize and control Google Chrometooltip, which is by default in the top right-hand corner of Chrome, and click Settings.
- Click Show advanced settings to display more options, and then click the Manage certificates button located under the
HTTPS/SSLheading.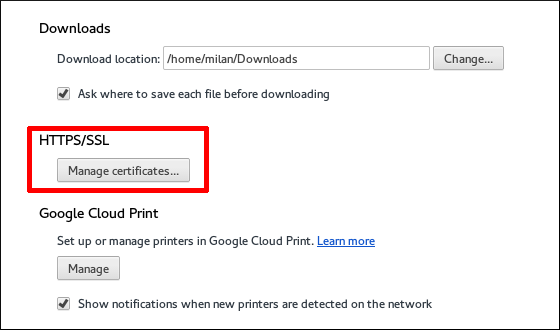
- In the Authorities tab, click the Import button at the bottom.
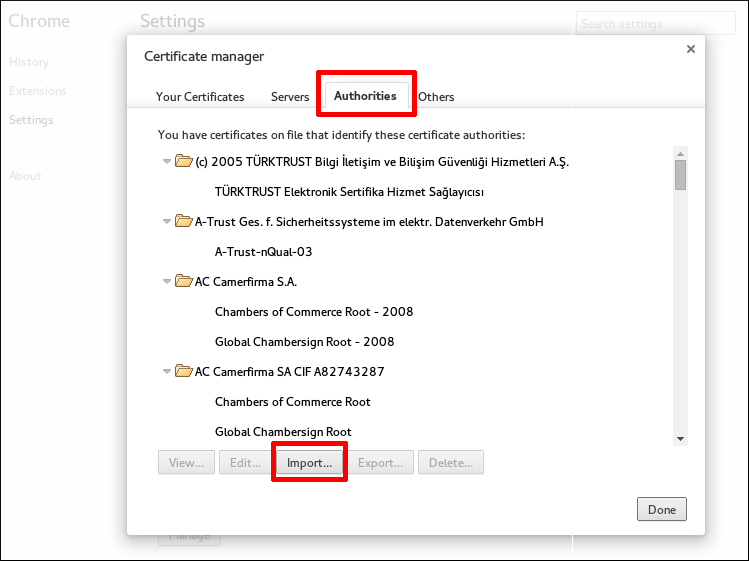
- Select the CA certificate file that you downloaded in the first step.
- Enable SPNEGO (Simple and Protected GSSAPI Negotiation Mechanism) to Use Kerberos Authentication in Chrome
- Make sure you have the necessary directory created by running
[root@client]# mkdir -p /etc/opt/chrome/policies/managed/ - Create a new
/etc/opt/chrome/policies/managed/mydomain.jsonfile with write privileges limited to the system administrator or root, and include the following line:{ "AuthServerWhitelist": "*.example.com" }You can do this by running[root@server]# echo '{ "AuthServerWhitelist": "*.example.com" }' > /etc/opt/chrome/policies/managed/mydomain.json
8.4.4. Using a Browser on Another System
kinit, and then the user can authenticate against the IdM server domain.
- Copy the
/etc/krb5.conffile from the IdM server.# scp /etc/krb5.conf root@externalmachine.example.com:/etc/krb5_ipa.confWarning
Do not overwrite the existingkrb5.conffile. - On the external machine, set the terminal session to use the copied IdM Kerberos configuration file:
$ export KRB5_CONFIG=/etc/krb5_ipa.conf - Configure Firefox on the external machine as in Section 8.4.3, “Configuring the Browser”.
8.4.5. Logging in with Simple Username/Password Credentials
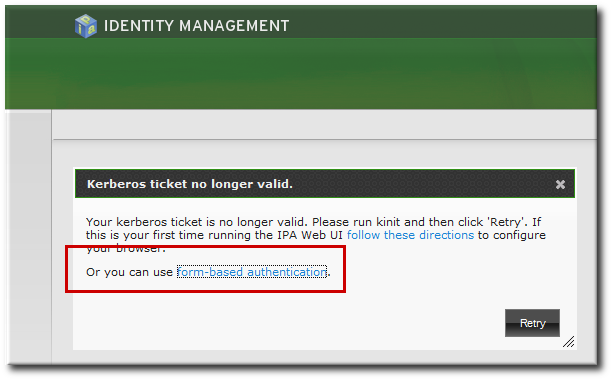
Figure 8.3. IdM Form-Based Login Option
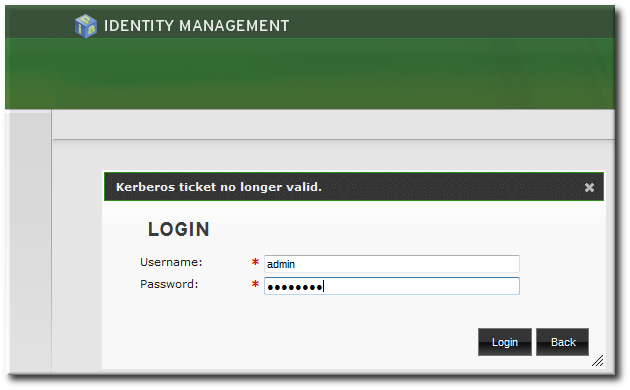
Figure 8.4. IdM Password Prompt
8.4.6. Using the UI with Proxy Servers
8.5. Configuring an IdM Server to Run in a TLS 1.2 Environment
/etc/ipa/default.conf configuration file.
Chapter 9. Identity: Managing Users and User Groups
9.1. Setting up User Home Directories
9.1.1. About Home Directories
- The default prefix for users' home directories is
/home. - IdM does not automatically create home directories when users log in. Automatically creating home directories requires either the
pam_oddjob_mkhomedirmodule or thepam_mkhomedirmodule. This module can be configured as part of client installation or after installation, as described in Section 9.1.2, “Enabling the PAM Home Directory Module”.The home directory process for IdM first attempts to use thepam_oddjob_mkhomedirmodule because this requires fewer user privileges and access to create the home directories, as well as integrating smoothly with SELinux. If this module is not available, then the process falls back to thepam_mkhomedirmodule.Note
On Red Hat Enterprise Linux 5 clients, the client installation script uses thepam_mkhomedirmodule even if thepam_oddjob_mkhomedirmodule is available. To use thepam_oddjob_mkhomedirmodule on Red Hat Enterprise Linux 5, edit the PAM configuration manually. - It is possible to use an NFS file server that provides
/homethat can be made available to all machines in the domain and then automounted on the IdM server.There are potential issues when using NFS, such as security issues related to granting root access to the NFS user, performance issues with loading the entire/hometree, and network performance issues for using remote servers for home directories. There are some general guidelines for using NFS with Identity Management:- Use automount to mount only the user's home directory and only when the user logs in, rather than loading the entire
/hometree. - Use a remote user who has limited permissions to create home directories and mount the share on the IdM server as that user. Since the IdM server runs as an
httpdprocess, it is possible to usesudoor a similar program to grant limited access to the IdM server to create home directories on the NFS server. - Use a mechanism, such as the
pam_oddjob_mkhomedirmodule, to create the home directory as that user.
Using automounts for home directories is described in Section 9.1.3, “Manually Mounting Home Directories”. - If a suitable directory and mechanism are not available to create home directories, users may not be able to log in.
9.1.2. Enabling the PAM Home Directory Module
pam_oddjob_mkhomedir module or the pam_mkhomedir module. Because it requires fewer permissions and works well with SELinux, IdM preferentially uses the pam_oddjob_mkhomedir module. If that module is not installed, then it falls back to the pam_mkhomedir module.
Note
pam_oddjob_mkhomedir module or pam_mkhomedir module. This is because the *_mkhomedir module may try to create home directories even when the shared storage is not available. If the module is unable to create the home directory, then users can be blocked from logging into the IdM domain.
pam_oddjob_mkhomedir (or pam_mkhomedir) module:
- The
--mkhomediroption can be used with theipa-client-installcommand. While this is possible for clients, this option is not available to servers when they are set up. - The
pam_oddjob_mkhomedirmodule can be enabled using the system'sauthconfigcommand. For example:authconfig --enablemkhomedir --updateThis option can be used for both server and client machines post-installation.
Note
pam_mkhomedir module even if the pam_oddjob_mkhomedir module is available. To use the pam_oddjob_mkhomedir module on Red Hat Enterprise Linux 5, edit the PAM configuration manually.
9.1.3. Manually Mounting Home Directories
automount.
- Create a new location for the user directory maps:
[bjensen@server ~]$ ipa automountlocation-add userdirs Location: userdirs - Add a direct map to the new location's
auto.directfile. In this example, the mount point is/share:[bjensen@server ~]$ ipa automountkey-add userdirs auto.direct --key=/share --info="-ro,soft, ipaserver.example.com:/home/share" Key: /share Mount information: -ro,soft, ipaserver.example.com:/home/share
9.2. Managing User Entries
9.2.1. About Username Formats
[a-zA-Z0-9_.][a-zA-Z0-9_.-]{0,252}[a-zA-Z0-9_.$-]?Note
Note
9.2.2. Adding Users
9.2.2.1. From the Web UI
- Open the Identity tab, and select the Users subtab.
- Click the Add link at the top of the users list.
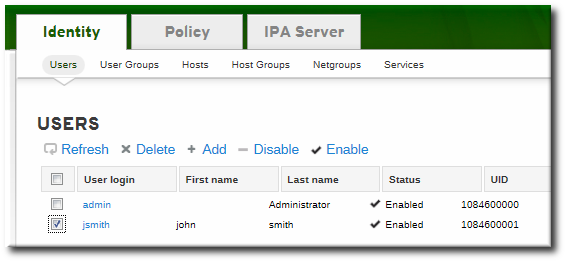
- Fill in the user's first and last names. The user login (UID) is automatically generated based on the user's full name, but this can be set manually by clicking the Optional field link.
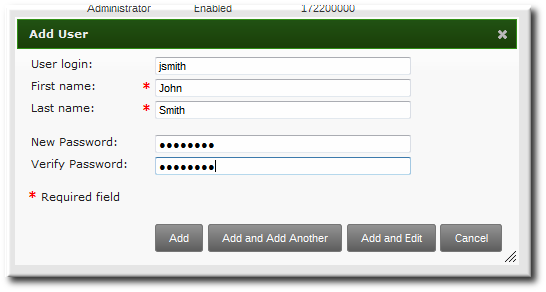
Note
Usernames are case insensitive when they are created, meaning that case is ignored. Username are automatically normalized to be all lower case, even if the user is created with mixed case or upper case letters. - Click the Add and Edit button to go directly to the expanded entry page and fill in more attribute information, as in Section 9.2.3.1, “From the Web UI”. The user entry is created with some basic information already filled in, based on the given user information and the user entry template.
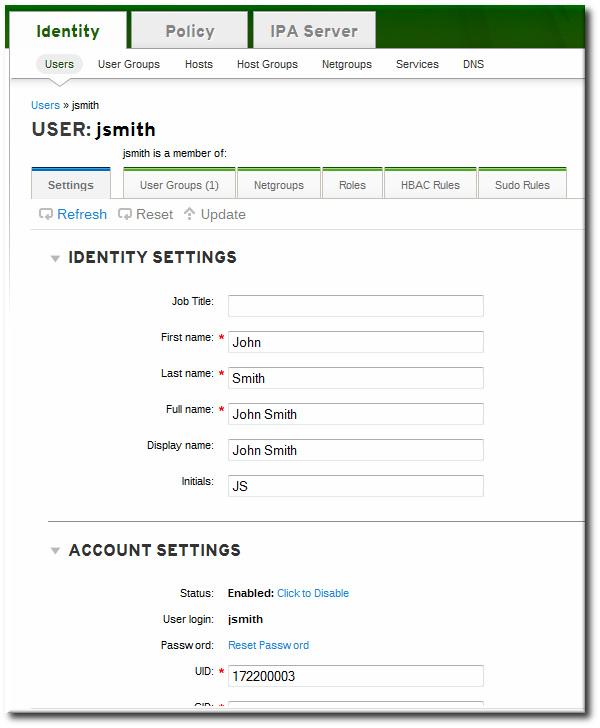
9.2.2.2. From the Command Line
user-add command. Attributes (listed in Table 9.2, “Default Identity Management User Attributes”) can be added to the entry with specific values or the command can be run with no arguments.
[bjensen@server ~]$ ipa user-add [username] [attributes][bjensen@server ~]$ ipa user-add
First name: John
Last name: Smith
User login [jsmith]: jsmith
--------------------
Added user "jsmith"
--------------------
User login: jsmith
First name: John
Last name: Smith
Full name: John Smith
Display name: John Smith
Initials: JS
Home directory: /home/jsmith
GECOS: John Smith
Login shell: /bin/sh
Kerberos principal: jsmith@EXAMPLE.COM
Email address: jsmith@example.com
UID: 882600007
GID: 882600007
Password: False
Member of groups: ipausers
Kerberos keys available: False[bjensen@server ~]$ ipa user-add jsmith --first=John --last=Smith --manager=bjensen --email=johnls@example.com --homedir=/home/work/johns --passwordNote
Important
uidNumber is unique. It will allow duplicate IDs; this is expected (though discouraged) behavior for POSIX entries.
ipa user-find --all.
9.2.3. Editing Users
9.2.3.1. From the Web UI
- Open the Identity tab, and select the Users subtab.
- Click the name of the user to edit.
- There are a number of different types of attributes that can be edited for the user. All of the default attributes are listed in Table 9.2, “Default Identity Management User Attributes”. Most of the attributes in the Identity Settings and Account Settings areas have default values filled in for them, based on the user information or on the user entry template.

- Edit the fields or, if necessary, click the Add link by an attribute to create the attribute on the entry.
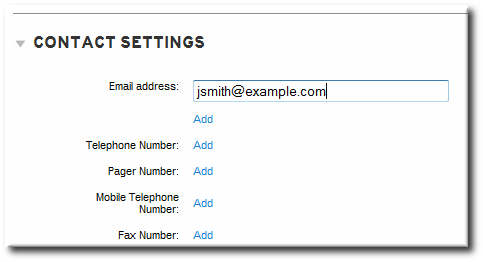
- When the edits are done, click the Update link at the top of the page.
9.2.3.2. From the Command Line
user-mod command edits user accounts by adding or changing attributes. At its most basic, the user-mod specifies the user account by login ID, the attribute to edit, and the new value:
[bjensen@server ~]$ ipa user-mod loginID --attributeName=newValue[bjensen@server ~]$ ipa user-mod jsmith --title="Editor III"--addattr option.
--setattr. However, using --addattr will add a new attribute; for a multi-valued attribute, it adds the new value in addition to any existing values.
Example 9.1. Multiple Mail Attributes
[bjensen@server ~]$ ipa user-add jsmith --first=John --last=Smith --email=johnls@example.com[bjensen@server ~]$ ipa user-mod jsmith --addattr=mail=johnnys@me.com[bjensen@server ~]$ ipa user-find jsmith --all
--------------
1 user matched
--------------
dn: uid=jsmith,cn=users,cn=accounts,dc=example,dc=com
User login: jsmith
.....
Email address: jsmith@example.com, jsmith@new.com--addattr option twice:
[bjensen@server ~]$ ipa user-add jsmith --first=John --last=Smith --email=johnls@example.com --addattr=mail=johnnys@me.com --addattr=mail=admin@example.com9.2.4. Deleting Users
Note
9.2.4.1. With the Web UI
- Open the Identity tab, and select the Users subtab.
- Select the checkboxes by the names of the users to delete.
- Click the Delete link at the top of the task area.
- When prompted, confirm the delete action.

9.2.4.2. From the Command Line
user-del command and then the user login. For example, a single user:
[bjensen@server ~]$ ipa user-del jsmith[bjensen@server ~]$ ipa user-del jsmith bjensen mreynolds cdickens--continue option to force the command to continue regardless of errors. A summary of the successful and failed operations is printed to stdout when the command completes. If --continue is not used, then the command proceeds with deleting users until it encounters an error, and then it exits.
9.3. Managing Public SSH Keys for Users
authorized_keys file. Any time that the user attempts to access the resource again, the machine simply checks its authorized_keys file and then grants access automatically to approved users.
- SSH keys have to be distributed manually and separately to all machines in an environment.
- Administrators have to approve user keys to add them to the configuration, but it is difficult to verify either the user or key issuer properly, which can create security problems.
9.3.1. About the SSH Key Format
id_rsa.pub, a key entry is identified by its type, then the key itself, and then an additional comment or identifier. For example, for an RSA key associated with a specific hostname:
"ssh-rsa ABCD1234...== ipaclient.example.com"9.3.2. Uploading User SSH Keys Through the Web UI
- Generate a user key. For example, using the OpenSSH tools:
[jsmith@server ~]$ ssh-keygen -t rsa -C jsmith@example.com Generating public/private rsa key pair. Enter file in which to save the key (/home/jsmith/.ssh/id_rsa): Created directory '/home/jsmith/.ssh'. Enter passphrase (empty for no passphrase): Enter same passphrase again: Your identification has been saved in /home/jsmith/.ssh/id_rsa. Your public key has been saved in /home/jsmith/.ssh/id_rsa.pub. The key fingerprint is: a5:fd:ac:d3:9b:39:29:d0:ab:0e:9a:44:d1:78:9c:f2 jsmith@example.com The key's randomart image is: +--[ RSA 2048]----+ | | | + . | | + = . | | = + | | . E S.. | | . . .o | | . . . oo. | | . o . +.+o | | o .o..o+o | +-----------------+ - Copy the public key from the key file. The full key entry has the form type key== comment. Only the key== is required, but the entire entry can be stored.
[jsmith@server ~]$ cat /home/jsmith/.ssh/id_rsa.pub ssh-rsa AAAAB3NzaC1yc2E...tJG1PK2Mq++wQ== jsmith@example.com - Open the Identity tab, and select the Users subtab.
- Click the name of the user to edit.
- In the Account Settings area of the Settings tab, click the SSH public keys: Add link.
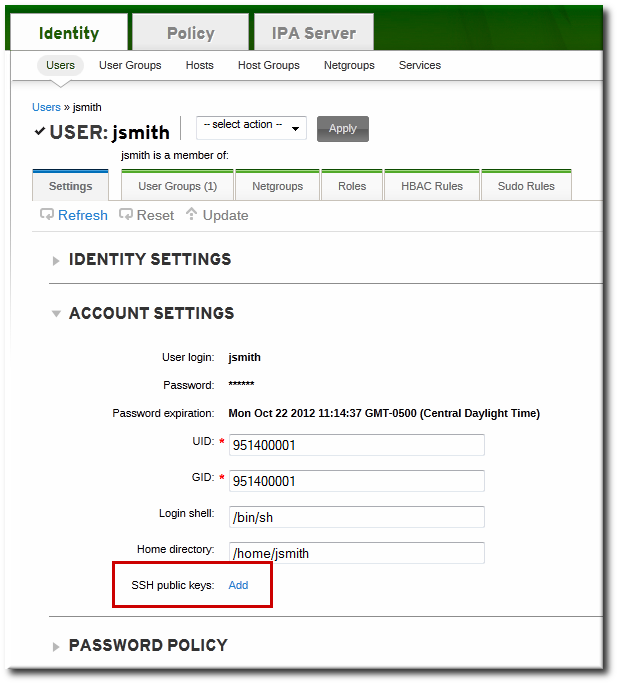
- Click the Add link by the SSH public keys field.

- Paste in the public key for the user, and click the button.
 The SSH public keys field now shows New: key set. Clicking the Show/Set key link opens the submitted key.
 - To upload multiple keys, click the Add link below the list of public keys, and upload the other keys.
- When all the keys have been submitted, click the Update link at the top of the user's page to save the changes.
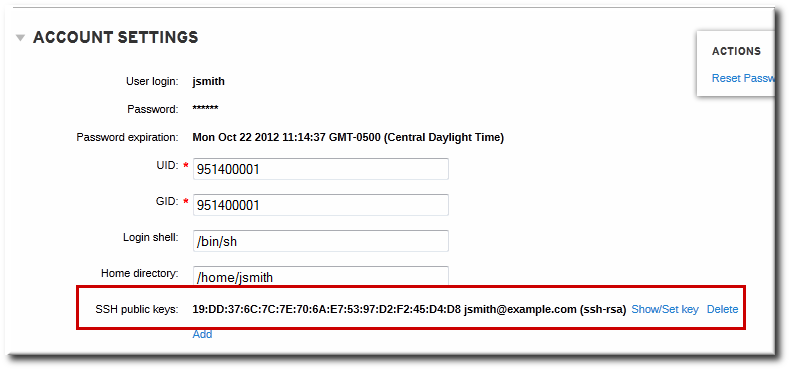
Figure 9.1. Saved Public Key
9.3.3. Uploading User SSH Keys Through the Command Line
--sshpubkey option uploads the 64 bit-encoded public key to the user entry. For example:
[jsmith@server ~]$ ipa user-mod jsmith --sshpubkey="ssh-rsa 12345abcde= ipaclient.example.com"--sshpubkey option:
--sshpubkey="12345abcde==,key2==,key3=="9.3.4. Deleting User Keys
- Open the Identity tab, and select the Users subtab.
- Click the name of the user to edit.
- Open the Account Settings area of the Settings tab.
- Click the Delete link by the fingerprint of the key to remove.
- Click the Update link at the top of the user's page to save the changes.
ipa user-mod with the --sshpubkey= set to a blank value; this removes all public keys for the user. For example:
[jsmith@server ~]$ kinit admin
[jsmith@server ~]$ ipa user-mod --sshpubkey= jsmith
9.4. Changing Passwords
- Regular, non-administrative users can change only their personal passwords, and all passwords are constrained by the IdM password policies.This allows administrators to create intro passwords or to reset passwords easily, while still keeping the final password confidential. Since any password sent by an administrator to the user is temporary, there is little security risk.
- Changing a password as the IdM admin user overrides any IdM password policies, but the password expires immediately. This requires the user to change the password at the next login. Similarly, any user who has password change rights can change a password and no password policies are applied, but the other user must reset the password at the next login.
- Changing a password as the LDAP Directory Manager user, using LDAP tools, overrides any IdM password policies.
9.4.1. From the Web UI
- Open the Identity tab, and select the Users subtab.
- Click the name of the user for whom to reset the password. All users can change their own password; only administrators or users with delegated permissions can change other user's passwords.
- Scroll to the Account Settings area.
- Click the Reset Password link.

- In the pop-up box, enter and confirm the new password.

9.4.2. From the Command Line
user-mod command, as with other user account changes.
[bjensen@ipaserver ~]$ kinit admin
[bjensen@ipaserver ~]$ ipa user-mod jsmith --password
9.5. Enabling and Disabling User Accounts
Note
9.5.1. From the Web UI
Figure 9.2. Disable/Enable Options at the Top of the Users List
- Open the Identity tab, and select the Users subtab.
- Click the name of the user to deactivate or activate.
- In the actions drop-down menu, select the Disable item.
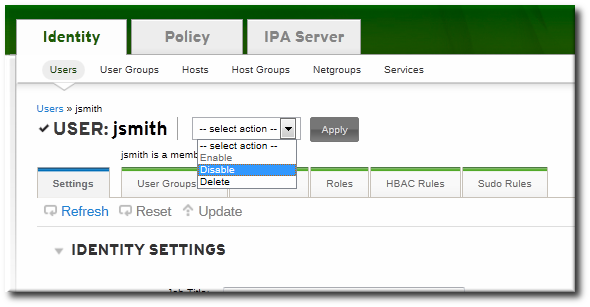
- Click the Accept button.
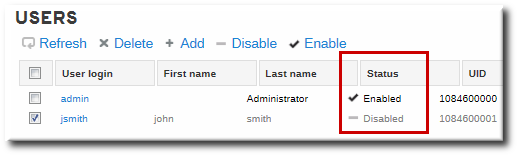
Figure 9.3. Disable Icon for User Status
9.5.2. From the Command Line
user-enable and user-disable commands. All that is required is the user login. For example:
[bjensen@server ~]$ ipa user-disable jsmith9.6. Unlocking User Accounts After Password Failures
user-unlock command. For example:
[bjensen@ipaserver ~]$ kinit admin
[bjensen@ipaserver ~]$ ipa user-unlock jsmith
9.7. Smart Cards
9.7.1. Smart Card and Smart Card Reader Support in Identity Management
/etc/pki/nssdb/ NSS database after the installation of these packages.
- Add the required PKCS #11 module manually using the
modutilutility. For example:[root@ipaclient ~]# modutil -dbdir /etc/pki/nssdb/ -add "My PKCS#11 module" -libfile libmypkcs11.so ... Module "My PKCS#11 Module" added to database.For detailed information on usingmodutil, see the modutil(1) man page. - Add all certificate authority (CA) certificates to the NSS database that are required to validate the certificate on the smart card. For example, to add the CA certificate in the
ca_certificate.pemfile to the NSS database:[root@ipaclient ~]# certutil -A -d /etc/pki/nssdb/ -n 'CA certificate' -t CT,C,C -a -i ca_certificate.pemFor detailed information on usingcertutil, see the certutil(1) man page.
9.7.2. Exporting a Certificate From a Smart Card
- Place the smart card into the reader.
- Run the following command to list the certificates on the smart card:
[user@ipaclient ~]$ certutil -L -d /etc/pki/nssdb/ -h all
Certificate Nickname         Trust Attributes
                             SSL,S/MIME,JAR/XPI

my_certificate               CT,C,C
In the output, locate the certificate to use for authentication, and note its nickname. - To extract the certificate in Base64 format to
user.crt, use the nickname from the previous step:[user@ipaclient ~]$ certutil -L -d /etc/pki/nssdb/ -n 'my_certificate' -r | base64 -w 0 > user.crtThebase64utility is part of the coreutils package.
9.7.3. Storing Smart Card Certificates for IdM Users
9.7.4. Smart Card Authentication on Identity Management Clients
- Local authentication
- Text console
- Graphical console, such as the Gnome Display Manager (GDM)
- Local authentication services, like
su, orsudo
- Remote authentication with
ssh - Certificates on a smart card are stored together with the PIN-protected SSH private key.
Note
ssh for smart card authentication. Other services, such as FTP, are not supported.
9.7.4.1. Configuring Smart Card Authentication on an IdM Client
- To enable smart card support, allow SSSD to prompt for password, one-time password (OTP), or the smart card PIN. To do this, modify the
authlines of the/etc/pam.d/password-authand/etc/pam.d/system-authPAM configuration files.- Remove the following lines of the default
/etc/pam.d/password-auth:auth required pam_env.so auth sufficient pam_unix.so nullok try_first_pass auth requisite pam_succeed_if.so uid >= 500 quiet auth sufficient pam_sss.so use_first_pass auth required pam_deny.soReplace them with these lines:auth required pam_env.so auth [default=1 success=ok] pam_localuser.so auth [success=done ignore=ignore default=die] pam_unix.so nullok try_first_pass auth requisite pam_succeed_if.so uid >= 500 quiet auth sufficient pam_sss.so forward_pass auth required pam_deny.so - Similarly, remove the following lines of the default
/etc/pam.d/system-auth:auth required pam_env.so auth sufficient pam_unix.so nullok try_first_pass auth requisite pam_succeed_if.so uid >= 500 quiet auth sufficient pam_sss.so use_first_pass auth required pam_deny.soReplace them with these lines:auth required pam_env.so auth [default=1 success=ok] pam_localuser.so auth [success=done ignore=ignore default=die] pam_unix.so nullok try_first_pass auth requisite pam_succeed_if.so uid >= 500 quiet auth sufficient pam_sss.so forward_pass auth required pam_deny.so
- Set the following option in your
/etc/sssd/sssd.conftotrue:[pam] pam_cert_auth=true - Restart SSSD:
[root@ipaclient ~]# systemctl restart sssd
9.7.4.2. SSH Log in Using a Smart Card
ssh when authenticating with a smart card, you have to additionally specify the following path to the smart card reader module. For example:
$ ssh -I /usr/lib/libmypkcs11.so -l user@example.com host.example.com
Enter PIN for 'Smart Card':
9.8. Managing User Private Groups
umask defaults only have to restrict user access, not group access.
9.8.1. Listing User Private Groups
--private option with the group-find command. For example:
[root@server ~]# ipa group-find --private
---------------
1 group matched
---------------
  Group name: jsmith
  Description: User private group for jsmith
  GID: 1084600001
----------------------------
Number of entries returned 1
----------------------------
9.8.2. Disabling Private Groups for a Specific User
--noprivate option.
ipausers) is a non-POSIX group and, therefore, does not have an associated GID. So that the add operation does not fail, it is necessary either to set an explicit user GID with the --gid option or to create a group with a GID and add the user to that group using an automembership rule (covered in Chapter 25, Policy: Defining Automatic Group Membership for Users and Hosts).
[jsmith@server ~]$ ipa user-add jsmith --first=John --last=Smith --noprivate --gid 100009.8.3. Disabling Private Groups Globally
ipa-managed-entries command.
- Use the
ipa-managed-entriescommand to list possible Managed Entries Plug-in definitions. By default, there are two, one for new users (UPG) and one for netgroups (NGP).[root@ipaserver ~]# ipa-managed-entries --list -p DMpassword Available Managed Entry Definitions: UPG Definition NGP Definition - Disable the desired Managed Entries Plug-in instance. For example:
[root@ipaserver ~]# ipa-managed-entries -e "UPG Definition" -p DMpassword disable Disabling Plugin - Restart the 389 Directory Server to load the new plug-in configuration.
[root@ipaserver ~]# service dirsrv restart
enable option.
9.9. Managing Unique UID and GID Number Assignments
9.9.1. About ID Number Ranges
uidNumber) and group IDs (gidNumber). A user and a group may have the same ID, but since the ID is set in different attributes, there is no conflict. Using the same ID number for both a user and a group also allows an administrator to configure user private groups, where a unique system group is created for each user and the ID number is the same for both the user and the group.
Important
uidNumber is unique. It will allow duplicate IDs; this is expected (though discouraged) behavior for POSIX entries. The same is true for group entries: a duplicate gidNumber can be manually assigned to the entry.
ipa user-find --all.
9.9.2. About ID Range Assignments During Installation
--idstart and --idmax options with ipa-server-install. These options are not required, so the setup script can assign random ranges during installation.
9.9.3. A Note on Conflicting ID Ranges
min_id and max_id options in the sssd.conf file. The default min_id value is 1. However, Red Hat recommends to set this value to 1000 in order to avoid conflicts with UID and GID numbers that are reserved for system use.
9.9.4. Adding New Ranges
dnaNextRange parameter. For example:
ldapmodify -x -D "cn=Directory Manager" -W -h server.example.com -p 389
Enter LDAP Password: *******
dn: cn=POSIX IDs,cn=Distributed Numeric Assignment Plugin,cn=plugins,cn=config
changetype: modify
add: dnaNextRange
dnaNextRange: 123400000-123500000
Note
9.9.5. Repairing Changed UID and GID Numbers
Important
[root@server ~]# sss_cache -u jsmith9.10. Managing User and Group Schema
| Description | Object Classes | |||||
|---|---|---|---|---|---|---|
| IdM object classes |
| |||||
| Person object classes |
| |||||
| Kerberos object classes |
| |||||
| Managed entries (template) object classes | mepOriginEntry |
| UI Field | Command-Line Option | Required, Optional, or Default[a] |
|---|---|---|
| User login | username | Required |
| First name | --first | Required |
| Last name | --last | Required |
| Full name | --cn | Optional |
| Display name | --displayname | Optional |
| Initials | --initials | Default |
| Home directory | --homedir | Default |
| GECOS field | --gecos | Default |
| Shell | --shell | Default |
| Kerberos principal | --principal | Default |
| Email address | Optional | |
| Password | --password [b] | Optional |
| User ID number[c] | --uid | Default |
| Group ID number[c] | --gidnumber | Default |
| Street address | --street | Optional |
| City | --city | Optional |
| State/Province | --state | Optional |
| Zip code | --postalcode | Optional |
| Telephone number | --phone | Optional |
| Mobile telephone number | --mobile | Optional |
| Pager number | --pager | Optional |
| Fax number | --fax | Optional |
| Organizational unit | --orgunit | Optional |
| Job title | --title | Optional |
| Manager | --manager | Optional |
| Car license | --carlicense | Optional |
| --noprivate | Optional | |
| SSH Keys | --sshpubkey | Optional |
| Additional attributes | --addattr | Optional |
[a]
Required attributes must be set for every entry. Optional attributes may be set, while default attributes are automatically added with a pre-defined value unless a specific value is given.
[b]
The script prompts for the new password, rather than accepting a value with the argument.
[c]
When a user is created without specifying a UID number, then the user account is automatically assigned an ID number that is next available in the server or replica range. (Number ranges are described more in Section 9.9, “Managing Unique UID and GID Number Assignments”.) This means that a user always has a unique number for its UID number and, if configured, for its private group.
If a number is manually assigned to a user entry, the server does not validate that the uidNumber is unique. It will allow duplicate IDs; this is expected (though discouraged) behavior for POSIX entries.
If two entries are assigned the same ID number, only the first entry is returned in a search for that ID number. However, both entries will be returned in searches for other attributes or with ipa user-find --all.
| ||
9.10.1. About Changing the Default User and Group Schema
- All of the object classes and their specified attributes must be known to the LDAP server.
- All default attributes that are configured for the entry must be supported by the configured object classes.
ipaobject object class. However, when the user or group schema is changed, the server does not check to make sure that this object class is included; if the object class is accidentally deleted, then future entry add operations will fail.
9.10.2. Applying Custom Object Classes to New User Entries
9.10.2.1. From the Web UI
- Add all of the custom schema elements to the 389 Directory Server instance used by Identity Management. Adding schema elements is described in the schema chapter of the Directory Server Administrator's Guide.
- Open the IPA Server tab.
- Select the Configuration subtab.
- Scroll to the User Options area.
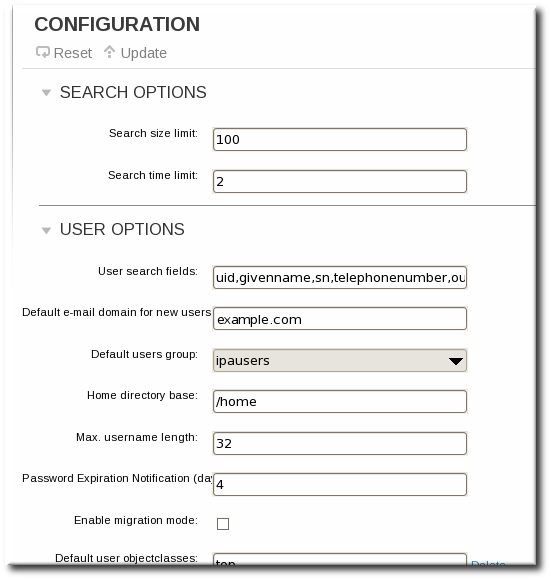
- At the bottom of the users area, click the Add link to add a new field for another object class.
Important
Always include the existing default object classes when the configuration is updated. Otherwise, the current settings will be overwritten. If any object classes required by Identity Management are not included, then subsequent attempts to add an entry will fail with object class violations.
- When the changes are complete, click the Update link at the top of the Configuration page.
9.10.2.2. From the Command Line
- Add all of the custom schema elements to the 389 Directory Server instance used by Identity Management. Adding schema elements is described in the schema chapter of the Directory Server Administrator's Guide.
- Add the new object class to the list of object classes added to entries. The option for user object classes is
--userobjectclasses.Important
Always include the existing default object classes when the configuration is updated. Otherwise, the current settings will be overwritten. If any object classes required by Identity Management are not included, then subsequent attempts to add an entry will fail with object class violations.For example:[bjensen@server ~]$ ipa config-mod --userobjectclasses=top,person,organizationalperson,inetorgperson,inetuser,posixaccount, krbprincipalaux,krbticketpolicyaux,ipaobject,ipasshuser,employeeinfo
9.10.3. Applying Custom Object Classes to New Group Entries
9.10.3.1. From the Web UI
- Add all of the custom schema elements to the 389 Directory Server instance used by Identity Management. Adding schema elements is described in the schema chapter of the Directory Server Administrator's Guide.
- Open the IPA Server tab.
- Select the Configuration subtab.
- Scroll to the Group Options area.
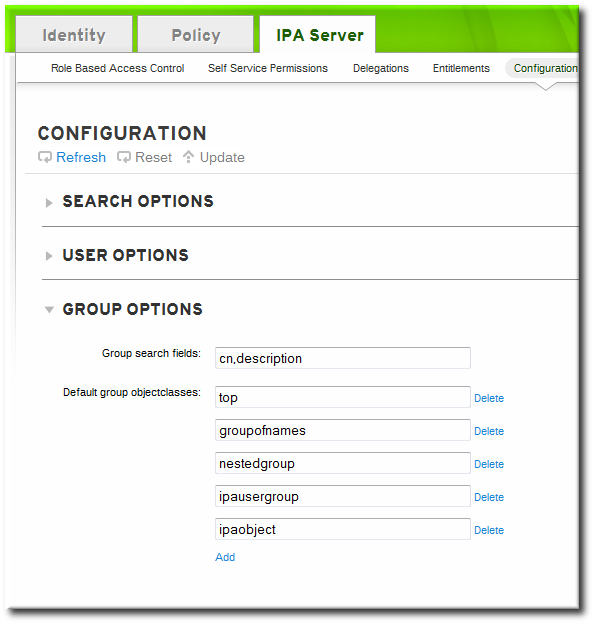
- Click the Add link to add a new field for another object class.
Important
Always include the existing default object classes when the configuration is updated. Otherwise, the current settings will be overwritten. If any object classes required by Identity Management are not included, then subsequent attempts to add an entry will fail with object class violations. - When the changes are complete, click the Update link at the top of the Configuration page.
9.10.3.2. From the Command Line
- Add all of the custom schema elements to the 389 Directory Server instance used by Identity Management. Adding schema elements is described in the schema chapter of the Directory Server Administrator's Guide.
- Add the new object class to the list of object classes added to entries. The option for group object classes is
--groupobjectclasses.Important
Always include the existing default object classes when the configuration is updated. Otherwise, the current settings will be overwritten. If any object classes required by Identity Management are not included, then subsequent attempts to add an entry will fail with object class violations.For example:[bjensen@server ~]$ ipa config-mod --groupobjectclasses=top,groupofnames,nestedgroup,ipausergroup,ipaobject,ipasshuser,employeegroup
9.10.4. Specifying Default User and Group Attributes
cn=ipaconfig,cn=etc,dc=example,dc=com.
ipa config-mod command.
| Field | Command-Line Option | Descriptions |
|---|---|---|
| Maximum username length | --maxusername | Sets the maximum number of characters for usernames. The default value is eight. |
| Root for home directories | --homedirectory | Sets the default directory to use for user home directories. The default value is /home. |
| Default shell | --defaultshell | Sets the default shell to use for users. The default value is /bin/sh. |
| Default user group | --defaultgroup | Sets the default group to which all newly created accounts are added. The default value is ipausers, which is automatically created during the IdM server installation process. |
| Default e-mail domain | --emaildomain | Sets the email domain to use to create email addresses based on the new accounts. The default is the IdM server domain. |
| Search time limit | --searchtimelimit | Sets the maximum amount of time, in seconds, to spend on a search before the server returns results. |
| Search size limit | --searchrecordslimit | Sets the maximum number of records to return in a search. |
| User search fields | --usersearch | Sets the fields in a user entry that can be used as a search string. Any attribute listed has an index kept for that attribute, so setting too many attributes could affect server performance. |
| Group search fields | --groupsearch | Sets the fields in a group entry that can be used as a search string. |
| Certificate subject base | Sets the base DN to use when creating subject DNs for client certificates. This is configured when the server is set up. | |
| Default user object classes | --userobjectclasses | Sets a list of object classes that are used to create IdM user accounts. |
| Default group object classes | --groupobjectclasses | Sets a list of object classes that are used to create IdM group accounts. |
| Password expiration notification | --pwdexpnotify | Sets how long, in days, before a password expires for the server to send a notification. |
| Password plug-in features | Sets the format of passwords that are allowed for users. |
9.10.4.1. Viewing Attributes from the Web UI
- Open the IPA Server tab.
- Select the Configuration subtab.
- The complete configuration entry is shown in three sections, one for all search limits, one for user templates, and one for group templates.

9.10.4.2. Viewing Attributes from the Command Line
config-show command shows the current configuration which applies to all new user accounts. By default, only the most common attributes are displayed; use the --all option to show the complete configuration.
[bjensen@server ~]$ kinit admin
[bjensen@server ~]$ ipa config-show --all
dn: cn=ipaConfig,cn=etc,dc=example,dc=com
Maximum username length: 32
Home directory base: /home
Default shell: /bin/sh
Default users group: ipausers
Default e-mail domain: example.com
Search time limit: 2
Search size limit: 100
User search fields: uid,givenname,sn,telephonenumber,ou,title
Group search fields: cn,description
Enable migration mode: FALSE
Certificate Subject base: O=EXAMPLE.COM
Default group objectclasses: top, groupofnames, nestedgroup, ipausergroup, ipaobject
Default user objectclasses: top, person, organizationalperson, inetorgperson, inetuser, posixaccount, krbprincipalaux, krbticketpolicyaux, ipaobject, ipasshuser
Password Expiration Notification (days): 4
Password plugin features: AllowNThash
SELinux user map order: guest_u:s0$xguest_u:s0$user_u:s0$staff_u:s0-s0:c0.c1023$unconfined_u:s0-s0:c0.c1023
Default SELinux user: unconfined_u:s0-s0:c0.c1023
Default PAC types: MS-PAC, nfs:NONE
cn: ipaConfig
objectclass: nsContainer, top, ipaGuiConfig, ipaConfigObject
9.11. Managing User Groups
- ipausers, which contains all users.
- admins, which contains administrative users. The initial
adminuser belongs to this group. - trusted admins, which contains administrative users used to manage Active Directory trusts.
- editors, which is a special group for users working through the web UI. This group allows users to edit other users' entries, though without all of the rights of the admin user.
Note
9.11.1. Types of Groups in IdM
- Internal groups (the default), where all members belong to the IdM domain.
- External groups, where some or all of the members exist in an identity store outside of the IdM domain. This can be a local system, an Active Directory domain, or a directory service.
posixgroup object class).
9.11.2. Group Object Classes
| Description | Object Classes | |||
|---|---|---|---|---|
| IdM object classes |
| |||
| Group object classes | groupofnames |
9.11.2.1. Creating User Groups
9.11.2.1.1. With the Web UI
- Open the Identity tab, and select the User Groups subtab.
- Click the Add link at the top of the groups list.
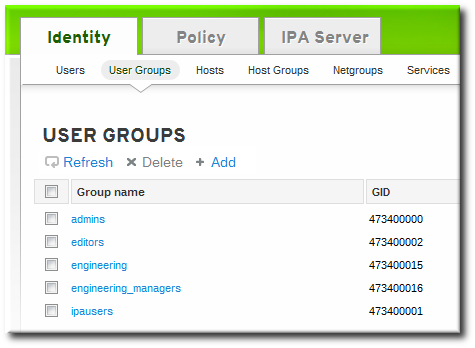
- Enter all of the information for the group.
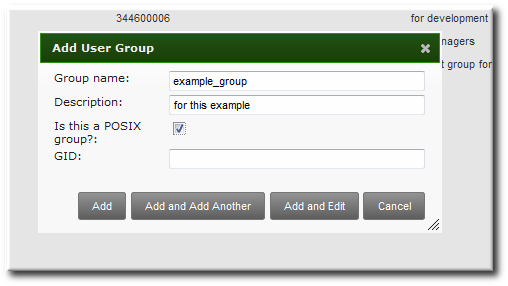
- A unique name. This is the identifier used for the group in the IdM domain, and it cannot be changed after it is created. The name cannot contain spaces, but other separators like an underscore (_) are allowed.
- A text description of the group.
- Whether the group is a POSIX group, which adds Linux-specific information to the entry. By default, all groups are POSIX groups unless they are explicitly configured not to be. Non-POSIX groups can be created for interoperability with Windows or Samba.
- Optionally, the GID number for the group. All POSIX groups require a GID number, but IdM automatically assigns the GID number.Setting a GID number is not necessary because of the risk of collisions. If a GID number is given manually, IdM will not override the specified GID number, even if it is not unique.
- Click the button to go immediately to the member selection page.
- Select the members, as described in Section 9.11.2.2.1, “With the Web UI (Group Page)”.
9.11.2.1.2. With the Command Line
group-add command. (This adds only the group; members are added separately.)
[bjensen@server ~]$ ipa group-add groupName --desc="description" [--nonposix]--nonposix. (By default, all groups are created as POSIX groups.) To enable interoperability with Windows users and groups and programs like Samba, it is possible to create non-POSIX groups by using the --nonposix option. This option tells the script not to add the posixGroup object class to the entry.
[bjensen@server ~]$ ipa group-add examplegroup --desc="for examples" --nonposix

----------------------
Added group "examplegroup"
----------------------
  Group name: examplegroup
  Description: for examples
GID: 855800010[bjensen@server ~]$ ipa group-add
Group name: engineering
Description: for engineers
-------------------------
Added group "engineering"
-------------------------
Group name: engineering
Description: for engineers
GID: 387115842
Important
gidNumber is unique. It will allow duplicate IDs; this is expected (though discouraged) behavior for POSIX entries.
ipa group-find --all.
Note
9.11.2.2. Adding Group Members
9.11.2.2.1. With the Web UI (Group Page)
Note
- Open the Identity tab, and select the User Groups subtab.
- Click the name of the group to which to add members.
- Click the Add link at the top of the task area.
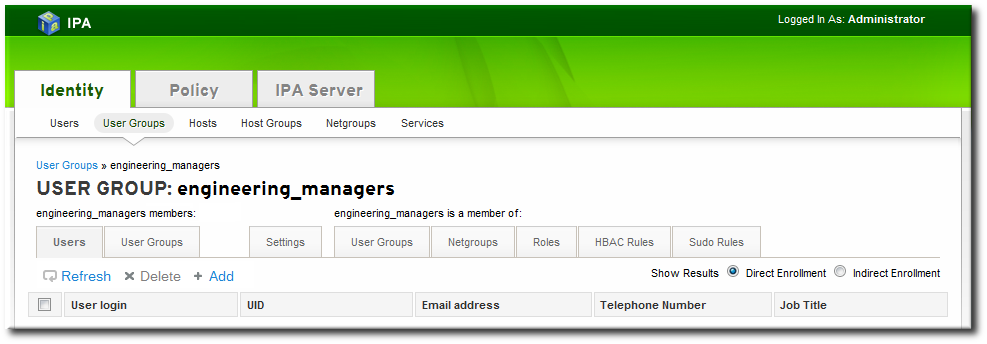
- Click the checkbox by the names of the users to add, and click the right arrows button, , to move the names to the selection box.

- Click the button.
9.11.2.2.2. With the Web UI (User's Page)
- Open the Identity tab, and select the Users subtab.
- Click the name of the user to edit.
- Open the User Groups tab on the user entry page.
- Click the Add link at the top of the task area.

- Click the checkbox by the names of the groups for the user to join, and click the right arrows button, , to move the groups to the selection box.

- Click the button.
9.11.2.2.3. With the Command Line
group-add-member command. This command can add both users as group members and other groups as group members.
group-add-member command requires only the group name and a comma-separated list of users to add:
[bjensen@server ~]$ ipa group-add-member groupName [--users=list] [--groups=list]engineering group:
[bjensen@server ~]$ ipa group-add-member engineering --users=jsmith,bjensen,mreynolds
  Group name: engineering
  Description: for engineers
  GID: 387115842
  Member users: jsmith,bjensen,mreynolds
-------------------------
Number of members added 3
-------------------------
[bjensen@server ~]$ ipa group-add-member engineering --groups=dev,qe1,dev2
  Group name: engineering
  Description: for engineers
  GID: 387115842
  Member groups: dev,qe1,dev2
  -------------------------
  Number of members added 3
  -------------------------
[bjensen@server ~]$ ipa group-show examplegroup
  Group name: examplegroup
  Description: for examples
  GID: 93200002
  Member users: jsmith,bjensen,mreynolds
  Member groups: californiausers
Indirect Member users: sbeckett,acalavicciNote
group-remove-member command.
[bjensen@server ~]$ ipa group-remove-member engineering --users=jsmith

  Group name: engineering
  Description: for engineers
  GID: 855800009
  Member users: bjensen,mreynolds
---------------------------
Number of members removed 1
---------------------------
9.11.2.2.4. Viewing Direct and Indirect Members of a Group
- Direct members, which are added explicitly to the group
- Indirect members, which are members of the group because they are members of another user group which is a member of the group
Figure 9.4. Indirect and Direct Members
9.11.2.3. Deleting User Groups
Warning
9.11.2.3.1. With the Web UI
- Open the Identity tab, and select the User Groups subtab.
- Select the checkbox by the name of the group to delete.
- Click the Delete link at the top of the task area.
- When prompted, confirm the delete action.
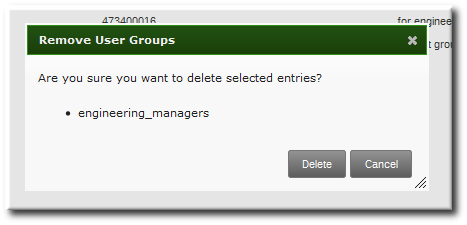
9.11.2.3.2. With the Command Line
group-del command to deletes the specified group. For example:
[bjensen@server ~]$ ipa group-del examplegroup9.11.3. Searching for Users and Groups
9.11.3.1. Setting Search Limits
9.11.3.1.1. Types of Search Limits and Where They Apply
- The search limit configuration for the IdM server. This is a setting for the IdM server itself, which is applied to all requests sent to the server from all IdM clients, the IdM CLI tools, and the IdM web UI for normal page display.By default, this limit is 100 entries.
- The time limit configuration for the IdM server. Much like the search size limit, the time limit sets a maximum amount of time that the IdM server, itself, waits for searches to run. Once it reaches that limit, the server stops the search and returns whatever entries were returned in that time.By default, this limit is two seconds.
- The page size limit. Although not strictly a search limit, the page size limit does limit how many entries are returned per page. The server returns the set of entries, up to the search limit, and then sorts and displays 20 entries per page. Paging results makes the results more understandable and more viewable.This is hard-coded to 20 for all searches.
- The LDAP search limit (--pkey option). All searches performed in the UI, and CLI searches which use the
--pkeyoption, override the search limit set in the IdM server configuration and use the search limit set in the underlying LDAP directory.By default, this limit is 2000 entries. It can be edited by editing the 389 Directory Server configuration.
9.11.3.1.2. Setting IdM Search Limits
Important
9.11.3.1.2.1. With the Web UI
- Open the IPA Server tab.
- Select the Configuration subtab.
- Scroll to the Search Options area.
- Change the search limit settings.
- Search size limit, the maximum number of records to return in a search.
- Search time limit, the maximum amount of time, in seconds, to spend on a search before the server returns results.
Note
Setting the time limit or size limit value to -1 means that there are no limits on searches. - When the changes are complete, click the Update link at the top of the Configuration page.
9.11.3.1.2.2. With the Command Line
config-mod command.
[bjensen@server ~]$ ipa config-mod --searchtimelimit=5 --searchrecordslimit=500

  Max. username length: 32
  Home directory base: /home
  Default shell: /bin/sh
  Default users group: ipausers
  Default e-mail domain for new users: example.com
  Search time limit: 5
  Search size limit: 50
  User search fields: uid,givenname,sn,telephonenumber,ou,title
  Group search fields: cn,description
  Enable migration mode: FALSE
  Certificate Subject base: O=EXAMPLE.COM
  Password Expiration Notification (days): 4
Note
9.11.3.1.3. Overriding the Search Defaults
*-find command run through the command line.
--sizelimit and --timelimit options set alternative size and time limits, respectively, for that specific command run. The limits can be higher or lower, depending on the kinds of results you need.
[jsmith@ipaserver ~]$ ipa user-find smith --timelimit=1209.11.3.2. Setting Search Attributes
9.11.3.2.1. Default Attributes Checked by Searches
| User Search Attributes | |
| First name | Last name |
| Login ID | Job title |
| Organizational unit | Phone number |
| Group Search Attributes | |
| Name | Description |
9.11.3.2.2. Changing User Search Attributes
9.11.3.2.2.1. From the Web UI
- Open the IPA Server tab.
- Select the Configuration subtab.
- Scroll to the User Options area.
- Add any additional search attributes, in a comma-separated list, in the User search fields field.
- When the changes are complete, click the Update link at the top of the Configuration page.
9.11.3.2.2.2. From the Command Line
--usersearch option to set the attributes for user searches.
[bjensen@server ~]$ ipa config-mod --usersearch=uid,givenname,sn,telephonenumber,ou,titleNote
9.11.3.2.3. Changing Group Search Attributes
9.11.3.2.3.1. From the Web UI
- Open the IPA Server tab.
- Select the Configuration subtab.
- Scroll to the Group Options area.
- Add any additional search attributes, in a comma-separated list, in the Group search fields field.
- When the changes are complete, click the Update link at the top of the Configuration page.
9.11.3.2.3.2. From the Command Line
--groupsearch options to set the attributes for group searches.
[bjensen@server ~]$ ipa config-mod --groupsearch=cn,descriptionNote
9.11.3.2.4. Limits on Attributes Returned in Search Results
9.11.3.3. Searching for Groups Based on Type
--private option, however, limits the search results to only private groups.
[root@server ~]# ipa group-find --private
---------------
1 group matched
---------------
  Group name: jsmith
  Description: User private group for jsmith
  GID: 1084600001
----------------------------
Number of entries returned 1
----------------------------jsmith belongs to:
[root@server ~]# ipa group-find --user=jsmith
---------------
1 group matched
---------------
  Group name: ipausers
  Description: Default group for all users
  Member users: jsmith
----------------------------
Number of entries returned 1
----------------------------jsmith does not belong to:
[root@server ~]# ipa group-find --no-user=jsmith
----------------
3 groups matched
----------------
  Group name: admins
  Description: Account administrators group
  GID: 1084600000
  Member users: admin

  Group name: editors
  Description: Limited admins who can edit other users
  GID: 1084600002

  Group name: trust admins
  Description: Trusts administrators group
  Member users: admin
----------------------------
Number of entries returned 3
----------------------------| Option | Criteria Description |
|---|---|
| --private | Displays only private groups. |
| --gid | Displays only the group which matches the complete, specified GID. |
| --group-name | Displays only groups with that name or part of their name. |
| --users, --no-users | Displays only groups which have the given users as members (or which do not include the given user). |
| --in-hbacrules, --not-inhbac-rules | Displays only groups which belong to a given host-based access control rule (or which do not belong to the rule, for the --not-in option). There are similar options to display (or not) groups which belong to a specified sudo rule and role. |
| --in-groups, --not-in-groups | Displays only groups which belong to another, specified group (or which do not belong to the group, for the --not-in option). There are similar options to display (or not) groups which belong to a specified netgroup. |
Chapter 10. Identity: Managing Hosts
- DNS entries and settings
- Machine authentication
- Hostname changes (which affect domain services)
10.1. About Hosts, Services, and Machine Identity and Authentication
- Service entries associated with the host
- The host and service principal
- Access control rules
- Machine information, such as its physical location and operating system
- DNS
- Kerberos
- Certificate management
- Joining the DNS domain (machine enrollment)
- Managing DNS entries and zones
- Managing machine authentication
- SSH keys. The SSH public key for the host is created and uploaded to the host entry. From there, the System Security Services Daemon (SSSD) uses IdM as an identity provider and can work in conjunction with OpenSSH and other services to reference the public keys located centrally in Identity Management. This is described in Section 10.4, “Managing Public SSH Keys for Hosts” and the Red Hat Enterprise Linux Deployment Guide.
- Key tables (or keytabs, a symmetric key resembling to some extent a user password) and machine certificates. Kerberos tickets are generated as part of the Kerberos services and policies defined by the server. Initially granting a Kerberos ticket, renewing the Kerberos credentials, and even destroying the Kerberos session are all handled by the IdM services. Managing Kerberos is covered in Chapter 20, Policy: Managing the Kerberos Domain.
- Machine certificates. In this case, the machine uses an SSL certificate that is issued by the IdM server's certificate authority and then stored in IdM's Directory Server. The certificate is then sent to the machine to present when it authenticates to the server. On the client, certificates are managed by a service called certmonger, which is described in Appendix B, Working with certmonger.
10.2. About Host Entry Configuration Properties
| UI Field | Command-Line Option | Description |
|---|---|---|
| Description | --desc=description | A description of the host. |
| Locality | --locality=locality | The geographic location of the host. |
| Location | --location=location | The physical location of the host, such as its data center rack. |
| Platform | --platform=string | The host hardware or architecture. |
| Operating system | --os=string | The operating system and version for the host. |
| MAC address | --macaddress=address | The MAC address for the host. This is a multi-valued attribute. The MAC address is used by the NIS plug-in to create a NIS ethers map for the host. |
| SSH public keys | --sshpubkey=string | The full SSH public key for the host. This is a multi-valued attribute, so multiple keys can be set. |
| Principal name (not editable) | --principalname=principal | The Kerberos principal name for the host. This defaults to the hostname during the client installation, unless a different principal is explicitly set in the -p. This can be changed using the command-line tools, but cannot be changed in the UI. |
| Set One-Time Password | --password=string | Sets a password for the host which can be used in bulk enrollment. |
| - | --random | Generates a random password to be used in bulk enrollment. |
| - | --certificate=string | A certificate blob for the host. |
| - | --updatedns | An attribute switch which sets whether the host can dynamically update its DNS entries if its IP address changes. |
10.3. Disabling and Re-enabling Host Entries
10.3.1. Disabling Host Entries
host-disable command.
[jsmith@ipaserver ~]$ kinit admin
[jsmith@ipaserver ~]$ ipa host-disable server.example.com
Important
10.3.2. Re-enabling Hosts
ipa-getkeytab command. The -s option sets which IdM server to request the keytab, -p gives the principal name, and -k gives the file to which to save the keytab.
[jsmith@ipaserver ~]$ ipa-getkeytab -s ipaserver.example.com -p host/server.example.com -k /etc/krb5.keytab -D fqdn=server.example.com,cn=computers,cn=accounts,dc=example,dc=com -w passwordipa-getkeytab command is run on an active IdM client or server, then it can be run without any LDAP credentials (-D and -w). The IdM user uses Kerberos credentials to authenticate to the domain. To run the command directly on the disabled host, then supply LDAP credentials to authenticate to the IdM server. The credentials should correspond to the host or service which is being re-enabled.
10.4. Managing Public SSH Keys for Hosts
known_hosts file. Any time that the remote machine attempts to access the target machine again, the target machine simply checks its known_hosts file and then grants access automatically to approved hosts.
- The
known_hostsfile stores host entries in a triplet of the host IP address, hostname, and key. This file can rapidly become out of date if the IP address changes (which is common in virtual environments and data centers) or if the key is updated. - SSH keys have to be distributed manually and separately to all machines in an environment.
- Administrators have to approve host keys to add them to the configuration, but it is difficult to verify either the host or key issuer properly, which can create security problems.
10.4.1. About the SSH Key Format
~/.ssh/known_hosts, a key entry is identified by the hostname and IP address of the server, its type, then lastly the key itself. For example:
host.example.com,1.2.3.4 ssh-rsa AAA...ZZZ=="ssh-rsa ABCD1234...== ipaclient.example.com"~/.ssh/known_hosts file needs to be reordered to match the format of a user key, type key== comment:
ssh-rsa AAA...ZZZ== host.example.com,1.2.3.410.4.2. About ipa-client-install and OpenSSH
ipa-client-install script, by default, configures an OpenSSH server and client on the IdM client machine. It also configures SSSD to perform host and user key caching. Essentially, simply configuring the client does all of the configuration necessary for the host to use SSSD, OpenSSH, and Identity Management for key caching and retrieval.
ssh service is first started.
Note
ipa-client-install, the client is created with two SSH keys, RSA and DSS.
--ssh-trust-dns, which can be run with ipa-client-install and automatically configures OpenSSH to trust the IdM DNS records, where the key fingerprints are stored.
--no-sshd option. This prevents the install script from configuring the OpenSSH server.
--no-dns-sshfp, prevents the host from creating DNS SSHFP records with its own DNS entries. This can be used with or without the --no-sshd option.
10.4.3. Uploading Host SSH Keys Through the Web UI
- The key for a host can probably be retrieved from a
~/.ssh/known_hosts. For example:server.example.com,1.2.3.4 ssh-rsa AAAAB3NzaC1yc2EAAAABIwAAAQEApvjBvSFSkTU0WQW4eOweeo0DZZ08F9Ud21xlLy6FOhzwpXFGIyxvXZ52+siHBHbbqGL5+14N7UvElruyslIHx9LYUR/pPKSMXCGyboLy5aTNl5OQ5EHwrhVnFDIKXkvp45945R7SKYCUtRumm0Iw6wq0XD4o+ILeVbV3wmcB1bXs36ZvC/M6riefn9PcJmh6vNCvIsbMY6S+FhkWUTTiOXJjUDYRLlwM273FfWhzHK+SSQXeBp/zIn1gFvJhSZMRi9HZpDoqxLbBB9QIdIw6U4MIjNmKsSI/ASpkFm2GuQ7ZK9KuMItY2AoCuIRmRAdF8iYNHBTXNfFurGogXwRDjQ==If necessary, generate a host key. When using the OpenSSH tools, make sure to use a blank passphrase and to save the key to a different location than the user's~/.ssh/directory, so it will not overwrite any existing keys.[jsmith@server ~]$ ssh-keygen -t rsa -C "server.example.com,1.2.3.4" Generating public/private rsa key pair. Enter file in which to save the key (/home/jsmith/.ssh/id_rsa): /home/jsmith/.ssh/host_keys Enter passphrase (empty for no passphrase): Enter same passphrase again: Your identification has been saved in /home/jsmith/.ssh/host_keys. Your public key has been saved in /home/jsmith/.ssh/host_keys.pub. The key fingerprint is: 4f:61:ee:2c:f7:d7:da:41:17:93:de:1d:19:ac:2e:c8 server.example.com The key's randomart image is: +--[ RSA 2048]----+ | .. | | .+| | o .* | | o . .. *| | S + . o+| | E . .. .| | . = . o | | o . ..o| | .....| +-----------------+ - Copy the public key from the key file. The full key entry has the form hostname,IP type key==. Only the key== is required, but the entire entry can be stored. To use all elements in the entry, rearrange the entry so it has the order type key== [hostname,IP]
[jsmith@server ~]$ cat /home/jsmith/.ssh/host_keys.pub ssh-rsa AAAAB3NzaC1yc2E...tJG1PK2Mq++wQ== server.example.com,1.2.3.4 - Open the Identity tab, and select the Hosts subtab.
- Click the name of the host to edit.
- In the Host Settings area of the Settings tab, click the SSH public keys: Add link.

- The UI opens a new link, New: key not set Show/Set key. Click the Show/Set key link.

- Paste in the public key for the host, and click the button.
 The SSH public keys field now shows New: key set. Clicking the Show/Set key link opens the submitted key.
 - To upload multiple keys, click the Add link below the list of public keys, and upload the other keys.
- When all the keys have been submitted, click the Update link at the top of the host's page to save the changes.
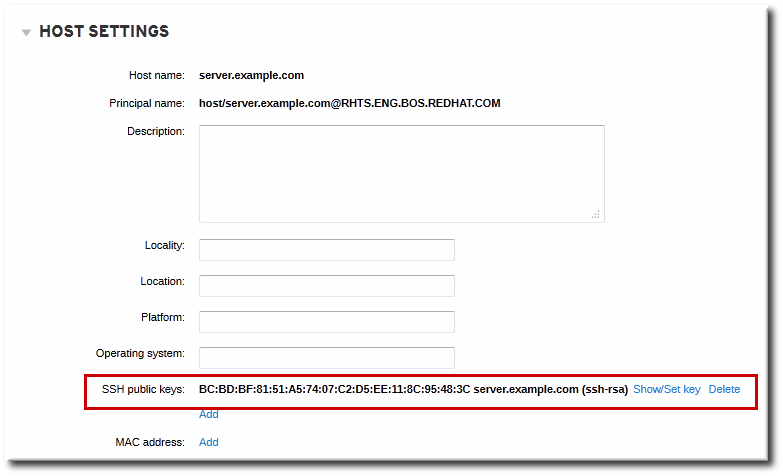
Figure 10.1. Saved Public Key
10.4.4. Adding Host Keys from the Command Line
host-add or by modifying the entry later.
Note
ipa-client-install command, unless the SSH service is explicitly disabled in the installation script.
- Run the
host-modcommand with the--sshpubkeyoption to upload the 64 bit-encoded public key to the host entry.Adding a host key also changes the DNS SSHFP entry for the host, so also use the--updatednsoption to update the host's DNS entry.For example:[jsmith@server ~]$ ipa host-mod --sshpubkey="ssh-rsa 12345abcde==" --updatedns host1.example.comWith a real key, the key is longer and usually ends with an equals sign (=).To upload multiple keys, pass a comma-separated list of keys with a single--sshpubkeyoption:--sshpubkey="12345abcde==,key2==,key3=="Note
A host can have multiple public keys. - After uploading the host keys, configure SSSD to use Identity Management as one of its identity domains and set up OpenSSH to use the SSSD tooling for managing host keys. This is covered in the Red Hat Enterprise Linux Deployment Guide.
10.4.5. Removing Host Keys
- Open the Identity tab, and select the Hosts subtab.
- Click the name of the host to edit.
- Open the Host Settings area of the Settings tab.
- Click the Delete link by the fingerprint of the key to remove.
- Click the Update link at the top of the host's page to save the changes.
ipa host-mod with the --sshpubkey= set to a blank value; this removes all public keys for the host. Also, use the --updatedns option to update the host's DNS entry. For example:
[jsmith@server ~]$ kinit admin
[jsmith@server ~]$ ipa host-mod --sshpubkey= --updatedns host1.example.com
10.5. Setting Ethers Information for a Host
ou=ethers subtree.
cn=server,ou=ethers,dc=example,dc=com- Add the MAC address attribute to a host entry. For example:
[jsmith@server ~]$ kinit admin [jsmith@server ~]$ ipa host-mod --macaddress=12:34:56:78:9A:BC server.example.com - Open the
nsswitch.conffile. - Add a line for the ethers service, and set it to use LDAP for its lookup.
ethers: ldap - Check that the ethers information is available for the client.
[root@server ~]# getnt ethers server.example.com
10.6. Renaming Machines and Reconfiguring IdM Client Configuration
- Identify which services are running on the machine. These need to be re-created when the machine is re-enrolled.
# ipa service-find server.example.comEach host has a default service which does not appear in the list of services. This service can be referred to as the "host service". The service principal for the host service ishost/<hostname>, such ashost/server.example.com. This principal can also be referred to as the host principal. - Identify all host groups to which the machine belongs.
[root@client ~]# kinit admin [root@client ~]# ipa hostgroup-find server.example.com - Identify which of the services have certificates associated with them. This can be done using the
ldapsearchcommand to check the entries in the IdM LDAP database directly:[root@client ~]# ldapsearch -x -b "cn=accounts,dc=example,dc=com" "(&(objectclass=ipaservice)(userCertificate=*))" krbPrincipalName -D "cn=directory manager" -w secret -h ipaserver.example.com -p 389 - For any service principals (in addition to the host principal), determine the location of the corresponding keytabs on
server.example.com. The keytab location is different for each service, and IdM does not store this information.Each service on the client system has a Kerberos principal in the form service_name/hostname@REALM, such asldap/server.example.com@EXAMPLE.COM. - Unenroll the client machine from the IdM domain:
[root@client ~]# ipa-client-install --uninstall - For each identified keytab other than
/etc/krb5.keytab, remove the old principals:[root@client ~]# ipa-rmkeytab -k /path/to/keytab -r EXAMPLE.COM - On an IdM server, as an IdM administrator, remove the host entry. This removes all services and revokes all certificates issued for that host:
[root@server ~]# kinit admin
[root@server ~]# ipa host-del server.example.com
At this point, the host is completely removed from IdM. - Rename the machine.
- Re-enroll the system with IdM:
[root@client ~]# ipa-client-installThis generates a host principal for with the new hostname in/etc/krb5.keytab. - On an IdM server, add a new keytab for every service:
[root@server ~]# ipa service-add serviceName/new-hostname - To generate certificates for services, use either
certmongeror the IdM administration tools. - Re-add the host to any applicable host groups.
10.7. Managing Host Groups
10.7.1. Creating Host Groups
10.7.1.1. Creating Host Groups from the Web UI
- Open the Identity tab, and select the Host Groups subtab.
- Click the Add link at the top of the groups list.

- Enter the name and a description for the group.

- Click the button to go immediately to the member selection page.
- Select the members, as described in Section 10.7.2.2, “Adding Host Group Members from the Web UI”.
10.7.1.2. Creating Host Groups from the Command Line
hostgroup-add command. (This adds only the group; members are added separately.)
$ ipa hostgroup-add groupName --desc="description"10.7.2. Adding Host Group Members
10.7.2.1. Showing and Changing Group Members
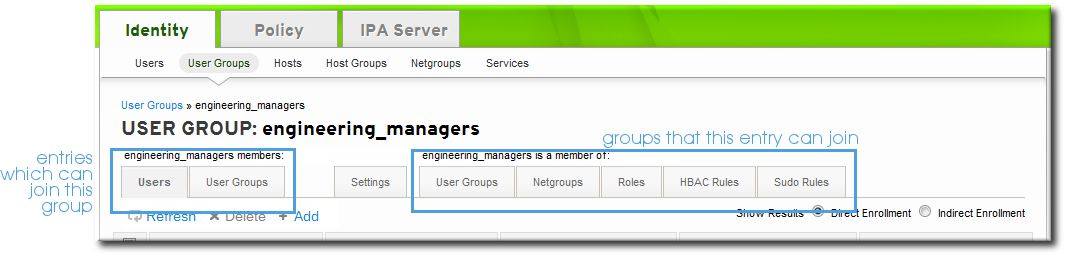
Figure 10.2. Member Of...
10.7.2.2. Adding Host Group Members from the Web UI
- Open the Identity tab, and select the Host Groups subtab.
- Click the name of the group to which to add members.
- Click the Add link at the top of the task area.
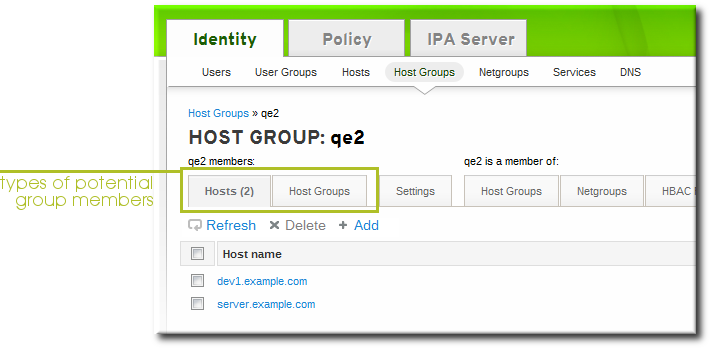
- Click the checkbox by the names of the hosts to add, and click the right arrows button, , to move the hosts to the selection box.

- Click the button.
10.7.2.3. Adding Host Group Members from the Command Line
hostgroup-add-member command. This command can add both hosts as group members and other groups as group members.
hostgroup-add-member command requires only the group name and a comma-separated list of hosts to add:
$ ipa hostgroup-add-member groupName [--hosts=list] [--hostgroups=list]caligroup group:
$ ipa hostgroup-add-member caligroup --hosts=ipaserver.example.com,client1.example.com,client2.example.com
  Group name: caligroup
  Description: for machines in california
  GID: 387115842
  Member hosts: ipaserver.example.com,client1.example.com,client2.example.com
-------------------------
Number of members added 3
-------------------------
$ ipa hostgroup-add-member caligroup --groups=mountainview,sandiego
  Group name: caligroup
  Description: for machines in california
  GID: 387115842
  Member groups: mountainview,sandiego
  -------------------------
  Number of members added 2
  -------------------------
Chapter 11. Identity: Managing Services
- DNS
- Kerberos
- Certificate management
11.1. Adding and Editing Service Entries and Keytabs
/etc/httpd/conf/ipa.keytab.
Note
ipa.keytab and that keytab file is deleted, the IdM web UI will stop working, because the original key would also be deleted.
ipa-getkeytab, you should avoid using /etc/krb5.keytab. This file should not contain service-specific keytabs; each service should have its keytab saved in a specific location and the access privileges (and possibly SELinux rules) should be configured so that only this service has access to the keytab.
11.1.1. Adding Services and Keytabs from the Web UI
- Open the Identity tab, and select the Services subtab.
- Click the Add link at the top of the services list.

- Select the service type from the drop-down menu, and give it a name.
- Select the hostname of the IdM host on which the service is running. The hostname is used to construct the full service principal name.
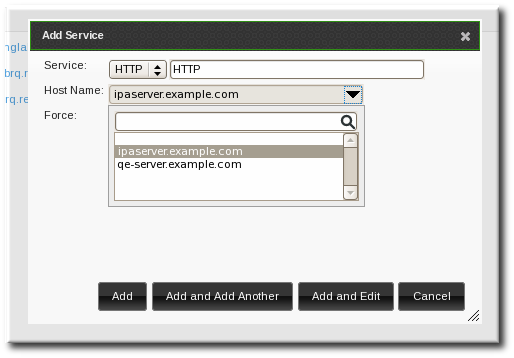
- Click the Add button to save the new service principal.
- Use the
ipa-getkeytabcommand to generate and assign the new keytab for the service principal.[root@ipaserver ~]# # ipa-getkeytab -s ipaserver.example.com -p HTTP/server.example.com -k /etc/httpd/conf/krb5.keytab -e aes256-cts- The realm name is optional. The IdM server automatically appends the Kerberos realm for which it is configured. You cannot specify a different realm.
- The hostname must resolve to a DNS A record for it to work with Kerberos. You can use the
--forceflag to force the creation of a principal should this prove necessary. - The
-eargument can include a comma-separated list of encryption types to include in the keytab. This supersedes any default encryption type.
Warning
Creating a new key resets the secret for the specified principal. This means that all other keytabs for that principal are rendered invalid.
11.1.2. Adding Services and Keytabs from the Command Line
- Create the service principal. The service is recognized through a name like service/FQDN:
# ipa service-add serviceName/hostnameFor example:$ ipa service-add HTTP/server.example.com ------------------------------------------------------- Added service "HTTP/server.example.com@EXAMPLE.COM" ------------------------------------------------------- Principal: HTTP/server.example.com@EXAMPLE.COM Managed by: ipaserver.example.com - Create the service keytab file using the
ipa-getkeytabcommand. This command is run on the client in the IdM domain. (Actually, it can be run on any IdM server or client, and then the keys copied to the appropriate machine. However, it is simplest to run the command on the machine with the service being created.)The command requires the Kerberos service principal (-p), the IdM server name (-s), the file to write (-k), and the encryption method (-e). Be sure to copy the keytab to the appropriate directory for the service.For example:# ipa-getkeytab -s server.example.com -p HTTP/server.example.com -k /etc/httpd/conf/krb5.keytab -e aes256-cts- The realm name is optional. The IdM server automatically appends the Kerberos realm for which it is configured. You cannot specify a different realm.
- The hostname must resolve to a DNS A record for it to work with Kerberos. You can use the
--forceflag to force the creation of a principal should this prove necessary. - The
-eargument can include a comma-separated list of encryption types to include in the keytab. This supersedes any default encryption type.
Warning
Theipa-getkeytabcommand resets the secret for the specified principal. This means that all other keytabs for that principal are rendered invalid.
11.2. Adding Services and Certificates for Services
11.2.1. Adding Services and Certificates from the Web UI
- Open the Identity tab, and select the Services subtab.
- Click the Add link at the top of the services list.
- Select the service type from the drop-down menu, and give it a name.
- Select the hostname of the IdM host on which the service is running. The hostname is used to construct the full service principal name.
- Click the Add and Edit button to go directly to the service entry page.
- Scroll to the bottom of the page, to the Service Certificate section.
- Click the New Certificate button to create the service certificate.

11.2.2. Adding Services and Certificates from the Command Line
- Create the service principal. The service is recognized through a name like service/FQDN:
[jsmith@ipaserver ~]$ kinit admin
[jsmith@ipaserver ~]$ ipa service-add serviceName/hostname
For example:$ ipa service-add HTTP/server.example.com ------------------------------------------------------- Added service "HTTP/server.example.com@EXAMPLE.COM" ------------------------------------------------------- Principal: HTTP/server.example.com@EXAMPLE.COM Managed by: ipaserver.example.com - Create a certificate for the service. Be sure to copy the keytab to the appropriate directory for the service.For example:
$ ipa cert-request --principal=HTTP/web.example.com example.csrNote
Use the--addoption to create the service automatically when requesting the certificate.Alternatively, use thegetcertcommand, which creates and manages the certificate throughcertmonger. The options are described more in Section B.1, “Requesting a Certificate with certmonger”.$ ipa-getcert request -d /etc/httpd/alias -n Server-Cert -K HTTP/client1.example.com -N 'CN=client1.example.com,O=EXAMPLE.COM'
11.3. Storing Certificates in NSS Databases
- Create the NSS databases.
$ certutil -N -d /path/to/database/dir - Request the certificate using
certutil, an NSS tool.$ certutil -R -s "CN=client1.example.com,O=EXAMPLE.COM" -d /path/to/database/dir -a > example.csr
11.4. Configuring Clustered Services
- Enroll all of the hosts in the cluster into the IdM domain.
- Create any service principals and generate the required keytabs.
- Collect any keytabs that have been set up for services on the host, including the host keytab at
/etc/krb5.keytab. - Use the
ktutilcommand to produce a single keytab file that contains the contents of all of the keytab files.- For each file, use the
rktcommand to read the keys from that file. - Use the
wktcommand to write all of the keys which have been read to a new keytab file.
- Replace the keytab files on each host with the newly-created combined keytab file.
- At this point, each host in this cluster can now impersonate any other host.
- Some services require additional configuration to accommodate cluster members which do not reset hostnames when taking over a failed service.
- For
sshd, setGSSAPIStrictAcceptorCheck noin/etc/ssh/sshd_config. - For
mod_auth_kerb, setKrbServiceName Anyin/etc/httpd/conf.d/auth_kerb.conf.
Note
11.5. Using the Same Service Principal for Multiple Services
- Retrieve a service principal using the
ipa-getkeytabcommand.# ipa-getkeytab -s kdc.example.com -p HTTP/server.example.com -k /etc/httpd/conf/krb5.keytab -e aes256-cts - Either direct multiple servers or services to use the same file, or copy the file to individual servers as required.
11.6. Disabling and Re-enabling Service Entries
11.6.1. Disabling Service Entries
service-disable command.
[jsmith@ipaserver ~]$ kinit admin
$ ipa service-disable http/server.example.com
Important
11.6.2. Re-enabling and Services
ipa-getkeytab command. The -s option sets which IdM server to request the keytab, -p gives the principal name, and -k gives the file to which to save the keytab.
[root@ipaserver ~]# ipa-getkeytab -s ipaserver.example.com -p HTTP/server.example.com -k /etc/httpd/conf/krb5.keytab -e aes256-ctsipa-getkeytab command is run on an active IdM client or server, then it can be run without any LDAP credentials (-D and -w). The IdM user uses Kerberos credentials to authenticate to the domain. To run the command directly on a disabled host, then supply LDAP credentials to authenticate to the IdM server. The credentials should correspond to the host or service which is being re-enabled.
Chapter 12. Identity: Delegating Access to Hosts and Services
managedby entry which lists what hosts or services can manage it. By default, a host can manage itself and all of its services. It is also possible to allow a host to manage other hosts, or services on other hosts, by updating the appropriate delegations or providing a suitable managedby entry.

Figure 12.1. Host and Service Delegation
Note
managedBy entry, it does not mean that the host has also been delegated management for all services on that host. Each delegation has to be performed independently.
12.1. Delegating Service Management
service-add-host command. There are two parts to delegating the service: specifying the principal and identifying the hosts (in a comma-separated list) with control:
# ipa service-add-host principal --hosts=hostnames# ipa service-add-host http/web.example.com --hosts=client1.example.com# kinit -kt /etc/krb5.keytab host/`hostname`
# ipa-getkeytab -s `hostname` -k /tmp/test.keytab -p http/web.example.com
Keytab successfully retrieved and stored in: /tmp/test.keytabcert-request command to create a service entry and load the certification information:
# ipa cert-request --add --principal=http/web.example.com web.csr
  Certificate: MIICETCCAXqgA...[snip]
  Subject: CN=web.example.com,O=EXAMPLE.COM
  Issuer: CN=EXAMPLE.COM Certificate Authority
  Not Before: Tue Feb 08 18:51:51 2011 UTC
  Not After: Mon Feb 08 18:51:51 2016 UTC
  Fingerprint (MD5): c1:46:8b:29:51:a6:4c:11:cd:81:cb:9d:7c:5e:84:d5
  Fingerprint (SHA1):
  01:43:bc:fa:b9:d8:30:35:ee:b6:54:dd:a4:e7:d2:11:b1:9d:bc:38
  Serial number: 1005
12.2. Delegating Host Management
host-add-managedby command. This creates a managedby entry. Once the managedby entry is created, then the host can retrieve a keytab for the host it has delegated authority over.
- Log in as the admin user.
# kinit admin - Add the
managedbyentry. For example, this delegates authority over client2 to client1.# ipa host-add-managedby client2.example.com --hosts=client1.example.com - Obtain a ticket as the host
client1and then retrieve a keytab forclient2:# kinit -kt /etc/krb5.keytab host/`hostname` # ipa-getkeytab -s `hostname` -k /tmp/client2.keytab -p host/client2.example.com Keytab successfully retrieved and stored in: /tmp/client2.keytab
12.3. Delegating Host or Service Management in the Web UI
- Open the Identity tab, and select the Hosts or Services subtab.
- Click the name of the host or service that you are going to grant delegated management to.
- Click the Hosts subtab on the far right of the host/service entry. This is the tab which lists hosts which can manage the selected host/service.
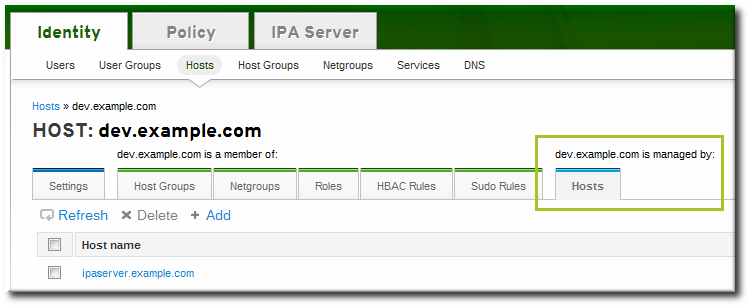
- Click the Add link at the top of the list.
- Click the checkbox by the names of the hosts to which to delegate management for the host/service. Click the right arrows button, , to move the hosts to the selection box.
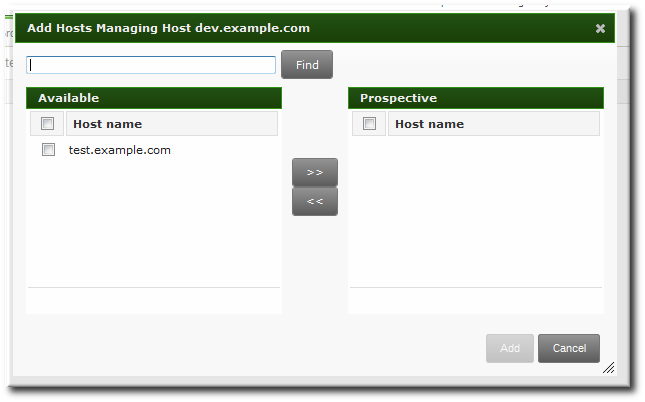
- Click the button to close the selection box and to save the delegation settings.
12.4. Accessing Delegated Services
host.
kinit, use the -k option to load a keytab and the -t option to specify the keytab.
# kinit -kt /etc/krb5.keytab host/ipa.example.com@EXAMPLE.COM# kinit -kt /etc/httpd/conf/krb5.keytab http/ipa.example.com@EXAMPLE.COMChapter 13. Identity: Integrating with NIS Domains and Netgroups
13.1. About NIS and Identity Management
nss_ldap or SSSD fetches the object using an encrypted LDAP connection.
host,user,domainhost.example.com,,nisdomain.example.com
-,jsmith,nisdomain.example.commemberUser parameter. Likewise, hosts can be either a single host or a host group; both are identified by the memberHost attribute.
dn: ipaUniqueID=d4453480-cc53-11dd-ad8b-0800200c9a66,cn=ng,cn=accounts,...
objectclass: top
objectclass: ipaAssociation
objectclass: ipaNISNetgroup
ipaUniqueID: d4453480-cc53-11dd-ad8b-0800200c9a66
cn: netgroup1
memberHost: fqdn=host1.example.com,cn=computers,cn=accounts,...
memberHost: cn=VirtGuests,cn=hostgroups,cn=accounts,...
memberUser: cn=jsmith,cn=users,cn=accounts,...
memberUser: cn=bjensen,cn=users,cn=accounts,...
memberUser: cn=Engineering,cn=groups,cn=accounts,...
nisDomainName: nisdomain.example.comnetgroup-* commands, which show the basic LDAP entry:
# ipa netgroup-show netgroup1
Netgroup name: netgroup1
Description: my netgroup
NIS domain name: nisdomain
Member User: jsmith
Member User: bjensen
Member User: Engineering
Member Host: host1.example.com
Member Host: VirtGuests13.2. Setting the NIS Port for Identity Management
Note
- Enable the NIS listener and compatibility plug-ins:
[root@ipaserver ~]# ipa-nis-manage enable [root@ipaserver ~]# ipa-compat-manage enable - Edit the plug-in configuration and add the port number as an argument. For example, to set the port to 514:
[root@ipaserver ~]# ldapmodify -x -D 'cn=directory manager' -w secret dn: cn=NIS Server,cn=plugins,cn=config changetype: modify add: nsslapd-pluginarg0 nsslapd-pluginarg0: 514 modifying entry "cn=NIS Server,cn=plugins,cn=config" - Restart the Directory Server to load the new plug-in configuration.
[root@ipaserver ~]# service dirsrv restart
13.3. Creating Netgroups
13.3.1. Adding Netgroups
13.3.1.1. With the Web UI
- Open the Identity tab, and select the Netgroups subtab.
- Click the Add link at the top of the netgroups list.

- Enter both a unique name and a description for the netgroup. Both the name and description are required.
 The group name is the identifier used for the netgroup in the IdM domain, and it cannot be changed after it is created. The name cannot contain spaces, but other separators like an underscore (_) are allowed.
 - Click the button to go immediately to the netgroup's edit pages.
- Optionally, set the NIS domain for the netgroup. This defaults to the IdM domain, but it can be changed.
- Click the Settings tab.
- Enter the name of the alternate NIS domain in the NIS domain name field.
 The NIS domain name field sets the domain that appears in the netgroup triple. It does not affect which NIS domain the Identity Management listener responds to.
- Add members, as described in Section 13.3.2.1, “With the Web UI”.
13.3.1.2. With the Command Line
netgroup-add command. This adds only the group; members are added separately. Two attributes are always required: the group name and the group description. If those attributes are not given as arguments, then the script prompts for them. There is also an option to set the NIS domain name to use for the group; this defaults to the IdM domain, but it can be set to something different, depending on the network configuration.
$ ipa netgroup-add --desc="description" [--nisdomain=domainName] groupName# ipa netgroup-add --desc="my new netgroup" example-netgroup
# ipa netgroup-add-member --hosts=ipa.example.com example-netgroup
# ypcat -d example.com -h ipa.example.com netgroup
(ipa.example.com,-,example.com)Note
--nisdomain option sets the domain that appears in the netgroup triple. It does not affect which NIS domain the Identity Management listener responds to.
13.3.2. Adding Netgroup Members
Note
13.3.2.1. With the Web UI
- Open the Identity tab, and select the Netgroups subtab.
- Click the name of the netgroup to which to add members.
- Select the tab for the type of netgroup member to add. Netgroups can have users, user groups, hosts, host groups, and other netgroups as members.
- Click the Add link at the top of the task area.

- Click the checkbox by the names of the users to add, and click the right arrows button, , to move the names to the selection box.

- Click the button.
13.3.2.2. With the Command Line
netgroup-add-member command. Users, groups, hosts, host groups, and other netgroups can all be added to the netgroup entry. The entry name of the NIS group being edited usually comes at the end of the command:
# ipa netgroup-add-member --users=users --groups=groups --hosts=hosts --hostgroups=hostGroups --netgroups=netgroups groupName# ipa netgroup-add-member --users=jsmith,bjensen --groups=ITadmin --hosts=host1.example.com,host2.example.com --hostgroups=EngDev --netgroups=nisgroup2 example-group13.4. Exposing Automount Maps to NIS Clients
cn=automount branch of the IdM directory tree.
ldapadd, and editing the directory directly. For example, this adds an automount map that is named auto.example in a location named default and for a server named nisserver:
[root@server ~]# ldapadd -h nisserver.example.com -x -D "cn=Directory Manager" -w secret

dn: nis-domain=example.com+nis-map=auto.example,cn=NIS Server,cn=plugins,cn=config
objectClass: extensibleObject
nis-domain: example.com
nis-map: auto.example
nis-filter: (objectclass=automount)
nis-key-format: %{automountKey}
nis-value-format: %{automountInformation}
nis-base: automountmapname=auto.example,cn=default,cn=automount,dc=example,dc=com13.5. Migrating from NIS to IdM
13.5.1. Preparing Netgroup Entries in IdM
Determine what applications are using the user information in the NIS server. While some clients (like sudo) require NIS netgroups, many clients can use Unix groups instead. If no netgroups are required, then simply create corresponding user accounts in IdM and delete the netgroups entirely. Otherwise, create the user entries in IdM and then create an IdM-managed netgroup and add those users as members. This is described in Section 13.3, “Creating Netgroups”.
Whenever a host group is created in IdM, a corresponding shadow NIS group is automatically created. These netgroups can then be managed using the ipa-host-net-manage command.
It may be necessary to have an exact conversion, with every NIS user and host having an exact corresponding entry in IdM. In that case, each entry can be created using the original NIS names:
- Create an entry for every user referenced in a netgroup.
- Create an entry for every host referenced in a netgroup.
- Create a netgroup with the same name as the original netgroup.
- Add the users and hosts as direct members of the netgroup. Alternatively, add the users and hosts into IdM groups or other netgroups, and then add those groups as members to the netgroup.
13.5.2. Enabling the NIS Listener in Identity Management
slapi-nis plug-in sets up a special NIS listener that receives incoming NIS requests and manages the NIS maps within the Directory Server. Identity Management uses three NIS maps:
- passwd
- group
- netgroup
slapi-nis plug-in is not enabled by default. To enable NIS for Identity Management:
- Obtain new Kerberos credentials as an IdM admin user.
[root@ipaserver ~]# kinit admin - Enable the NIS listener and compatibility plug-ins:
[root@ipaserver ~]# ipa-nis-manage enable [root@ipaserver ~]# ipa-compat-manage enable - Restart the DNS and Directory Server service:
[root@server ~]# service rpcbind restart
[root@server ~]# service dirsrv restart
13.5.3. Exporting and Importing the Existing NIS Data
ypcat and then looping through that output and creating the IdM entries with the corresponding ipa *-add commands. While this could be done manually, it is easiest to script it. These examples use a shell script.
13.5.3.1. Importing User Entries
/etc/passwd file contains all of the NIS user information. These entries can be used to create IdM user accounts with UID, GID, gecos, shell, home directory, and name attributes that mirror the NIS entries.
nis-user.sh:
#!/bin/sh
# 1 is the nis domain, 2 is the nis master server
ypcat -d $1 -h $2 passwd > /dev/shm/nis-map.passwd 2>&1

IFS=$'\n'
for line in $(cat /dev/shm/nis-map.passwd); do
        IFS=' '
        username=$(echo $line|cut -f1 -d:)
        # Not collecting encrypted password because we need cleartext password to create kerberos key
        uid=$(echo $line|cut -f3 -d:)
        gid=$(echo $line|cut -f4 -d:)
        gecos=$(echo $line|cut -f5 -d:)
        homedir=$(echo $line|cut -f6 -d:)
        shell=$(echo $line|cut -f7 -d:)

        # Now create this entry
        echo passw0rd1|ipa user-add $username --first=NIS --last=USER --password --gidnumber=$gid --uid=$uid --gecos=$gecos --homedir=$homedir --shell=$shell
        ipa user-show $username
done [root@nis-server ~]# kinit admin
[root@nis-server ~]# ./nis-user.sh nisdomain nis-master.example.comNote
13.5.3.2. Importing Group Entries
/etc/group file contains all of the NIS group information. These entries can be used to create IdM user group accounts with the GID, gecos, shell, home directory, and name attributes that mirror the NIS entries.
nis-group.sh:
#!/bin/sh
# 1 is the nis domain, 2 is the nis master server
ypcat -d $1 -h $2 group > /dev/shm/nis-map.group 2>&1

IFS=$'\n'
for line in $(cat /dev/shm/nis-map.group); do
        IFS=' '
        groupname=$(echo $line|cut -f1 -d:)
        # Not collecting encrypted password because we need cleartext password to create kerberos key
        gid=$(echo $line|cut -f3 -d:)
        members=$(echo $line|cut -f4 -d:)

        # Now create this entry
        ipa group-add $groupname --desc=NIS_GROUP_$groupname --gid=$gid
        if [ -n "$members" ]; then
                ipa group-add-member $groupname --users=$members
        fi
        ipa group-show $groupname
done [root@nis-server ~]# kinit admin
[root@nis-server ~]# ./nis-group.sh nisdomain nis-master.example.com13.5.3.3. Importing Host Entries
/etc/hosts file contains all of the NIS host information. These entries can be used to create IdM host accounts that mirror the NIS entries.
nis-hosts.sh:
#!/bin/sh
# 1 is the nis domain, 2 is the nis master server
ypcat -d $1 -h $2 hosts | egrep -v "localhost|127.0.0.1" > /dev/shm/nis-map.hosts 2>&1

IFS=$'\n'
for line in $(cat /dev/shm/nis-map.hosts); do
        IFS=' '
        ipaddress=$(echo $line|awk '{print $1}')
        hostname=$(echo $line|awk '{print $2}')
        master=$(ipa env xmlrpc_uri |tr -d '[:space:]'|cut -f3 -d:|cut -f3 -d/)
        domain=$(ipa env domain|tr -d '[:space:]'|cut -f2 -d:)
        if [ $(echo $hostname|grep "\." |wc -l) -eq 0 ]; then
                hostname=$(echo $hostname.$domain)
        fi
        zone=$(echo $hostname|cut -f2- -d.)
        if [ $(ipa dnszone-show $zone 2>/dev/null | wc -l) -eq 0 ]; then
                ipa dnszone-add --name-server=$master --admin-email=root.$master
        fi
        ptrzone=$(echo $ipaddress|awk -F. '{print $3 "." $2 "." $1 ".in-addr.arpa."}')
        if [ $(ipa dnszone-show $ptrzone 2>/dev/null|wc -l) -eq 0 ]; then
                ipa dnszone-add  $ptrzone --name-server=$master --admin-email=root.$master
        fi
        # Now create this entry
        ipa host-add $hostname --ip-address=$ipaddress
        ipa host-show $hostname
done[root@nis-server ~]# kinit admin
[root@nis-server ~]# ./nis-hosts.sh nisdomain nis-master.example.comNote
13.5.3.4. Importing Netgroup Entries
/etc/netgroup file contains all of the NIS netgroup information. These entries can be used to create IdM netgroup accounts that mirror the NIS entries.
nis-netgroup.sh:
#!/bin/sh
# 1 is the nis domain, 2 is the nis master server
ypcat -k -d $1 -h $2 netgroup > /dev/shm/nis-map.netgroup 2>&1
IFS=$'\n'
for line in $(cat /dev/shm/nis-map.netgroup); do
IFS=' '
netgroupname=$(echo $line|awk '{print $1}')
triples=$(echo $line|sed "s/^$netgroupname //")
echo "ipa netgroup-add $netgroupname --desc=NIS_NG_$netgroupname"
if [ $(echo $line|grep "(,"|wc -l) -gt 0 ]; then
echo "ipa netgroup-mod $netgroupname --hostcat=all"
fi
if [ $(echo $line|grep ",,"|wc -l) -gt 0 ]; then
echo "ipa netgroup-mod $netgroupname --usercat=all"
fi
for triple in $triples; do
triple=$(echo $triple|sed -e 's/-//g' -e 's/(//' -e 's/)//')
if [ $(echo $triple|grep ",.*,"|wc -l) -gt 0 ]; then
hostname=$(echo $triple|cut -f1 -d,)
username=$(echo $triple|cut -f2 -d,)
domain=$(echo $triple|cut -f3 -d,)
hosts=""; users=""; doms="";
[ -n "$hostname" ] && hosts="--hosts=$hostname"
[ -n "$username" ] && users="--users=$username"
[ -n "$domain" ] && doms="--nisdomain=$domain"
echo "ipa netgroup-add-member $hosts $users $doms"
else
netgroup=$triple
echo "ipa netgroup-add $netgroup --desc=NIS_NG_$netgroup"
fi
done
doneipa netgroup-add-member command always adds a host, user, and domain triple to the netgroup.
if [ $(echo $triple|grep ",.*,"|wc -l) -gt 0 ]; then
hostname=$(echo $triple|cut -f1 -d,)
username=$(echo $triple|cut -f2 -d,)
domain=$(echo $triple|cut -f3 -d,)
hosts=""; users=""; doms="";
[ -n "$hostname" ] && hosts="--hosts=$hostname"
[ -n "$username" ] && users="--users=$username"
[ -n "$domain" ] && doms="--nisdomain=$domain"
echo "ipa netgroup-add-member $hosts $users $doms" server,,domain the options with the member add command are --hosts=server --users="" --nisdomain=domain.
[root@nis-server ~]# kinit admin
[root@nis-server ~]# ./nis-hosts.sh nisdomain nis-master.example.com13.5.3.5. Importing Automount Maps
#!/bin/sh
# 1 is for the automount entry in ipa

ipa automountlocation-add $1

# 2 is the nis domain, 3 is the nis master server, 4 is the map name
ypcat -k -d $2 -h $3 $4 > /dev/shm/nis-map.$4 2>&1

ipa automountmap-add $1 $4

basedn=$(ipa env basedn|tr -d '[:space:]'|cut -f2 -d:)
cat > /tmp/amap.ldif <<EOF
dn: nis-domain=nisdomain.example.com+nis-map=$4,cn=NIS Server,cn=plugins,cn=config
objectClass: extensibleObject
nis-domain: $3
nis-map: $4
nis-base: automountmapname=$4,cn=nis,cn=automount,$basedn
nis-filter: (objectclass=*)
nis-key-format: %{automountKey}
nis-value-format: %{automountInformation}
EOF
ldapadd -x -h $3 -D "cn=directory manager" -w secret -f /tmp/amap.ldif

IFS=$'\n'
for line in $(cat /dev/shm/nis-map.$4); do
        IFS=" "
        key=$(echo "$line" | awk '{print $1}')
        info=$(echo "$line" | sed -e "s#^$key[ \t]*##")
        ipa automountkey-add nis $4 --key="$key" --info="$info"
done[root@nis-server ~]# kinit admin
[root@nis-server ~]# ./nis-hosts.sh location nisdomain nis-master.example.com map13.5.4. Setting Weak Password Encryption for NIS User Authentication to IdM
kinit fails with password failures.
passwordStorageScheme attribute using ldapmodify:
[root@server ~]# ldapmodify -D "cn=directory server" -w secret -p 389 -h ipaserver.example.com

dn: cn=config
changetype: modify
replace: passwordStorageScheme
passwordStorageScheme: crypt
Note
Chapter 14. Identity: Integrating with Active Directory Through Cross-forest Trust (Technology Preview)
Note
Cross-forest Trust As Technology Preview in Red Hat Enterprise Linux 6
Overview of Cross-forest Trust in Red Hat Enterprise Linux 6
- Establish a trust to a single AD forest.
- Allow access to IdM resources for users from the root domain of a trusted AD forest.
- Override default attributes of AD users, such as the login shell or home directory, in a centralized way. To achieve this, deploy ID views using IdM in Red Hat Enterprise Linux 7.
- Expose AD users and groups using the compatibility tree for legacy clients. To provide legacy clients with access to AD users and groups, use IdM in Red Hat Enterprise Linux 7.
Trusts vs Synchronization
Chapter 15. Identity: Integrating with Microsoft Active Directory Through Synchronization
15.1. Supported Windows Platforms
- Windows Server 2008 R2
- Windows Server 2012 R2
15.2. About Active Directory and Identity Management
- A synchronization operation runs every five minutes.
- Synchronization can only be configured with one Active Directory domain. Multiple domains are not supported.
- Synchronization can only be configured with one Active Directory domain controller.
- Only user information is synchronized.
- Both user attributes and passwords can be synchronized.
- While modifications are bi-directional (going both from Active Directory to IdM and from IdM to Active Directory), creating or adding accounts are only uni-directional, from Active Directory to Identity Management. New accounts created in Active Directory are synchronized over to IdM automatically. However, user accounts created in IdM must also be created in Active Directory before they will be synchronized.
- Account lock information is synchronized by default, so a user account which is disabled in one domain is disabled in the other.
- Password synchronization changes take effect immediately.
15.3. About Synchronized Attributes
Note
User Schema That Are the Same in Identity Management and Windows Servers
- cn[5]
- physicalDeliveryOfficeName
- description
- postOfficeBox
- destinationIndicator
- postalAddress
- facsimileTelephoneNumber
- postalCode
- givenname
- registeredAddress
- homePhone
- sn
- homePostalAddress
- st
- initials
- street
- l
- telephoneNumber
- mail
- teletexTerminalIdentifier
- mobile
- telexNumber
- o
- title
- ou
- usercertificate
- pager
- x121Address
| Identity Management | Active Directory |
|---|---|
| cn[a] | name |
| nsAccountLock | userAccountControl |
| ntUserDomainId | sAMAccountName |
| ntUserHomeDir | homeDirectory |
| ntUserScriptPath | scriptPath |
| ntUserLastLogon | lastLogon |
| ntUserLastLogoff | lastLogoff |
| ntUserAcctExpires | accountExpires |
| ntUserCodePage | codePage |
| ntUserLogonHours | logonHours |
| ntUserMaxStorage | maxStorage |
| ntUserProfile | profilePath |
| ntUserParms | userParameters |
| ntUserWorkstations | userWorkstations |
[a]
The cn is mapped directly (cn to cn) when syncing from Identity Management to Active Directory. When syncing from Active Directory cn is mapped from the name attribute in Active Directory to the cn attribute in Identity Management.
| |
15.3.1. User Schema Differences between Identity Management and Active Directory
15.3.1.1. Values for cn Attributes
cn attribute can be multi-valued, while in Active Directory this attribute must have only a single value. When the Identity Management cn attribute is synchronized, then, only one value is sent to the Active Directory peer.
cn value is added to an Active Directory entry and that value is not one of the values for cn in Identity Management, then all of the Identity Management cn values are overwritten with the single Active Directory value.
cn attribute as its naming attribute, where Identity Management uses uid. This means that there is the potential to rename the entry entirely (and accidentally) if the cn attribute is edited in the Identity Management. If that cn change is written over to the Active Directory entry, then the entry is renamed, and the new named entry is written back over to Identity Management.
15.3.1.2. Values for street and streetAddress
streetAddress for a user's postal address; this is the way that 389 Directory Server uses the street attribute. There are two important differences in the way that Active Directory and Identity Management use the streetAddress and street attributes, respectively:
- In 389 Directory Server,
streetAddressis an alias forstreet. Active Directory also has thestreetattribute, but it is a separate attribute that can hold an independent value, not an alias forstreetAddress. - Active Directory defines both
streetAddressandstreetas single-valued attributes, while 389 Directory Server definesstreetas a multi-valued attribute, as specified in RFC 4519.
streetAddress and street attributes, there are two rules to follow when setting address attributes in Active Directory and Identity Management:
- The synchronization process maps
streetAddressin the Active Directory entry tostreetin Identity Management. To avoid conflicts, thestreetattribute should not be used in Active Directory. - Only one Identity Management
streetattribute value is synced to Active Directory. If thestreetAddressattribute is changed in Active Directory and the new value does not already exist in Identity Management, then allstreetattribute values in Identity Management are replaced with the new, single Active Directory value.
15.3.1.3. Constraints on the initials Attribute
initials attribute, Active Directory imposes a maximum length constraint of six characters, but 389 Directory Server does not have a length limit. If an initials attribute longer than six characters is added to Identity Management, the value is trimmed when it is synchronized with the Active Directory entry.
15.3.1.4. Requiring the surname (sn) Attribute
person entries to be created without a surname attribute. However, RFC 4519 defines the person object class as requiring a surname attribute, and this is the definition used in Directory Server.
person entry is created without a surname attribute, that entry will not be synced over to IdM since it fails with an object class violation.
15.3.2. Active Directory Entries and RFC 2307 Attributes
uidNumber and gidNumber attributes. This allows Windows user entries to follow the specifications for those attributes in RFC 2307.
uidNumber and gidNumber attributes are not actually used as the uidNumber and gidNumber attributes for the Identity Management entry. The Identity Management uidNumber and gidNumber attributes are generated when the Windows user is synced over.
Note
uidNumber and gidNumber attributes defined and used in Identity Management are not the same uidNumber and gidNumber attributes defined and used in the Active Directory entry, and the numbers are not related.
15.4. Setting up Active Directory for Synchronization
15.4.1. Creating an Active Directory User for Sync
- Grant the sync user account Replicating directory changes rights to the synchronized Active Directory subtree. Replicator rights are required for the sync user to perform synchronization operations.Replicator rights are described in http://support.microsoft.com/kb/303972.
- Add the sync user as a member of the Account Operator and Enterprise Read-Only Domain controller groups. It is not necessary for the user to belong to the full Domain Admin group.
15.4.2. Setting up an Active Directory Certificate Authority
15.5. Managing Synchronization Agreements
15.5.1. Trusting the Active Directory and IdM CA Certificates
- On the Active Directory server, download the IdM server's CA certificate from
http://ipa.example.com/ipa/config/ca.crt. - Install the IdM CA certificate in the Active Directory certificate database. This can be done using the Microsoft Management Console or the certutil utility. For example:
certutil -installcert -v -config "ipaserver.example.com\Example Domain CA" c:\path\to\ca.crtFor more details, see the Active Directory documentation. - Export the Active Directory CA certificate.
- In My Network Places, open the CA distribution point.
- Double-click the security certificate file (
.crtfile) to display the Certificate dialog box. - On the Details tab, click to start the Certificate Export Wizard.
- Click , and then select Base-64 encoded X.509 (.CER).

- Specify a suitable directory and file name for the exported file. Click to export the certificate, and then click .
- Copy the Active Directory certificate over to the IdM server machine.
- Download the IdM server's CA certificate from
http://ipa.example.com/ipa/config/ca.crt. - Copy both the Active Directory CA certificate and the IdM CA certificate into the
/etc/openldap/cacerts/directory. - Update the hash symlinks for the certificates.
cacertdir_rehash /etc/openldap/cacerts/ - Edit the
/etc/openldap/ldap.conffile, and add the information to point to and use the certificates in the/etc/openldap/cacerts/directory.TLS_CACERTDIR /etc/openldap/cacerts/ TLS_REQCERT allow
15.5.2. Creating Synchronization Agreements
ipa-replica-manage connect command because it creates a connection to the Active Directory domain. The options to create the synchronization agreement are listed in Table 15.2, “Synchronization Agreement Options”.
- Make sure that the Active Directory and IdM servers trust each other's CA certificates, as in Section 15.5.1, “Trusting the Active Directory and IdM CA Certificates”.
- Remove any existing Kerberos credentials on the IdM server.
$ kdestroy - Use the
ipa-replica-managecommand to create a Windows synchronization agreement. This requires the--winsyncoption. If passwords will be synchronized as well as user accounts, then also use the--passsyncoption and set a password to use for Password Sync.The--binddnand--bindpwdoptions give the username and password of the system account on the Active Directory server that IdM will use to connect to the Active Directory server.$ ipa-replica-manage connect --winsync --binddn cn=administrator,cn=users,dc=example,dc=com --bindpw Windows-secret --passsync secretpwd --cacert /etc/openldap/cacerts/windows.cer adserver.example.com -v - When prompted, enter the Directory Manager password.
- Optional. Configure Password Synchronization, as in Section 15.6.2, “Setting up Password Synchronization”.
| Option | Description |
|---|---|
| --winsync | Identifies this as a synchronization agreement. |
| --binddn | Gives the full user DN of the synchronization identity. This is the user DN that the IdM LDAP server uses to bind to Active Directory. This user must exist in the Active Directory domain and must have replicator, read, search, and write permissions on the Active Directory subtree. |
| --bindpw | Gives the password for the sync user. |
| --passsync | Gives the password for the Windows user account which is involved in synchronization. |
| --cacert | Gives the full path and file name of the Active Directory CA certificate. This certificate is exported in Section 15.5.1, “Trusting the Active Directory and IdM CA Certificates”. |
| --win-subtree | Gives the DN of the Windows subtree containing the users to synchronize. The default value is cn=Users,$SUFFIX. |
| AD_server_name | Gives the hostname of the Active Directory domain controller. |
15.5.3. Changing the Behavior for Syncing User Account Attributes
ldapmodify command to modify the LDAP server entry directly.
ipaWinSyncAcctDisable attribute. (Changing this means that if an account is disabled in Active Directory, it is still active in IdM and vice versa.)
[jsmith@ipaserver ~]$ ldapmodify -x -D "cn=directory manager" -w password

dn: cn=ipa-winsync,cn=plugins,cn=config
changetype: modify
replace: ipaWinSyncAcctDisable
ipaWinSyncAcctDisable: none

modifying entry "cn=ipa-winsync,cn=plugins,cn=config"
| Parameter | Description | Possible Values |
|---|---|---|
| General User Account Parameters | ||
| ipaWinSyncNewEntryFilter | Sets the search filter to use to find the entry which contains the list of object classes to add to new user entries. | The default is (cn=ipaConfig). |
| ipaWinSyncNewUserOCAttr | Sets the attribute in the configuration entry which actually contains the list of object classes to add to new user entries. | The default is ipauserobjectclasses. |
| ipaWinSyncHomeDirAttr | Identifies which attribute in the entry contains the default location of the POSIX home directory. | The default is ipaHomesRootDir. |
| ipaWinSyncUserAttr | Sets an additional attribute with a specific value to add to Active Directory users when they are synced over from the Active Directory domain. If the attribute is multi-valued, then it can be set multiple times, and the sync process adds all of the values to the entry.
Note
This only sets the attribute value if the entry does not already have that attribute present. If the attribute is present, then the entry's value is used when the Active Directory entry is synced over.
| ipaWinSyncUserAttr: attributeName attributeValue |
| ipaWinSyncForceSync | Sets whether to check existing IdM users which match an existing Active Directory user should be automatically edited so they can be synchronized. If an IdM user account has a uid parameter which is identical to the samAccountName in an existing Active Directory user, then that account is not synced by default. This attribute tells the sync service to add the ntUser and ntUserDomainId to the IdM user entries automatically, which allows them to be synchronized. | true | false |
| User Account Lock Parameters | ||
| ipaWinSyncAcctDisable | Sets which way to synchronize account lockout attributes. It is possible to control which account lockout settings are in effect. For example, to_ad means that when account lockout attribute is set in IdM, its value is synced over to Active Directory and overrides the local Active Directory value. By default, account lockout attributes are synced from both domains. |
|
| ipaWinSyncInactivatedFilter | Sets the search filter to use to find the DN of the group used to hold inactivated (disabled) users. This does not need to be changed in most deployments. | The default is (&(cn=inactivated)(objectclass=groupOfNames)). |
| ipaWinSyncActivatedFilter | Sets the search filter to use to find the DN of the group used to hold active users. This does not need to be changed in most deployments. | The default is (&(cn=activated)(objectclass=groupOfNames)). |
| Group Parameters | ||
| ipaWinSyncDefaultGroupAttr | Sets the attribute in the new user account to reference to see what the default group for the user is. The group name in the entry is then used to find the gidNumber for the user account. | The default is ipaDefaultPrimaryGroup. |
| ipaWinSyncDefaultGroupFilter | Sets the search filter to map the group name to the POSIX gidNumber. | The default is (&(gidNumber=*)(objectclass=posixGroup)(cn=groupAttr_value)). |
| Realm Parameters | ||
| ipaWinSyncRealmAttr | Sets the attribute which contains the realm name in the realm entry. | The default is cn. |
| ipaWinSyncRealmFilter | Sets the search filter to use to find the entry which contains the IdM realm name. | The default is (objectclass=krbRealmContainer). |
15.5.4. Changing the Synchronized Windows Subtree
cn=users,cn=accounts,$SUFFIX, and for Active Directory, the default is CN=Users,$SUFFIX.
--win-subtree option. After the agreement is created, the Active Directory subtree can be changed by using the ldapmodify command to edit the nsds7WindowsReplicaSubtree value in the sync agreement entry.
- Get the name of the sync agreement, using
ldapsearch. This search returns only the values for thednandnsds7WindowsReplicaSubtreeattributes instead of the entire entry.[jsmith@ipaserver ~]$ ldapsearch -xLLL -D "cn=directory manager" -w password -p 389 -h ipaserver.example.com -b cn=config objectclass=nsdswindowsreplicationagreement dn nsds7WindowsReplicaSubtree dn: cn=meToWindowsBox.example.com,cn=replica,cn=dc\3Dexample\2Cdc\3Dcom,cn=mapping tree,cn=config nsds7WindowsReplicaSubtree: cn=users,dc=example,dc=com ... 8< ... - Modify the sync agreement
[jsmith@ipaserver ~]$ ldapmodify -x -D "cn=directory manager" -W -p 389 -h ipaserver.example.com <<EOF
 dn: cn=meToWindowsBox.example.com,cn=replica,cn=dc\3Dexample\2Cdc\3Dcom,cn=mapping tree,cn=config
 changetype: modify
 replace: nsds7WindowsReplicaSubtree
 nsds7WindowsReplicaSubtree: cn=alternateusers,dc=example,dc=com
 EOF

 modifying entry "cn=meToWindowsBox.example.com,cn=replica,cn=dc\3Dexample\2Cdc\3Dcom,cn=mapping tree,cn=config"
15.5.5. Configuring Uni-Directional Sync
oneWaySync parameter on the sync agreement. The possible values are fromWindows (for Active Directory to Identity Management sync) and toWindows (for Identity Management to Active Directory sync).
[jsmith@ipaserver ~]$ ldapmodify -x -D "cn=directory manager" -w password -p 389 -h ipaserver.example.com

dn: cn=windows.example.com,cn=replica,cn=dc\3Dexample\2Cdc\3Dcom,cn=mapping tree,cn=config
changetype: modify
add: oneWaySync
oneWaySync: fromWindows
Important
15.5.6. Deleting Synchronization Agreements
ipa-replica-manage disconnect command and then the hostname of the Active Directory server.
- Delete the sync agreement.
# ipa-replica-manage disconnect adserver.example.com - Remove the Active Directory CA certificate from the IdM server database:
# certutil -D -d /etc/dirsrv/slapd-EXAMPLE.COM/ -n "Imported CA"
15.5.7. Winsync Agreement Failures
One of the most common sync agreement failures is that the IdM server cannot connect to the Active Directory server:
"Update failed! Status: [81 - LDAP error: Can't contact LDAP server]
/etc/dirsrv/slapd-DOMAIN/ directory) with the name Imported CA. This can be checked using certutil:
$ certutil -L -d /etc/dirsrv/slapd-DOMAIN/

Certificate Nickname                                         Trust Attributes
SSL,S/MIME,JAR/XPI

CA certificate                                               CTu,u,Cu
Imported CA                                                  CT,,C
Server-Cert                                                  u,u,u
Imported CA CT,,C# certutil -d /etc/dirsrv/slapd-DOMAIN-NAME -D -n "Imported CA"For some entries in the user database, there may be an informational error message that the password is not being reset because the entry already exists:
"Windows PassSync entry exists, not resetting password"15.6. Managing Password Synchronization
Important
15.6.1. Setting up the Windows Server for Password Synchronization
- Active Directory must be running in SSL.
- The Password Sync Service must be installed on each Active Directory domain controller.
Note
- Make sure that the Active Directory password complexity policies are enabled so that the Password Sync service will run.
- Run
secpol.mscfrom the command line. - Select .
- Open , and then open .
- Enable the
Password must meet complexity requirementsoption and save.
- If SSL is not already enabled, set up SSL on the Active Directory server. Setting up LDAPS is explained in more detail in the Microsoft knowledgebase at http://support.microsoft.com/kb/321051.
- Install a certificate authority in the Windows Components section in Add/Remove Programs.
- Select the Enterprise Root CA option.
- Reboot the Active Directory server. If IIS web services are running, the CA certificate can be accessed by opening
http://servername/certsrv. - Set up the Active Directory server to use the SSL server certificate.
- Create a certificate request
.inf, using the fully-qualified domain name of the Active Directory as the certificate subject. For example:;----------------- request.inf ----------------- [Version] Signature="$Windows NT$ [NewRequest] Subject = "CN=ad.server.example.com, O=Engineering, L=Raleigh, S=North Carolina, C=US" KeySpec = 1 KeyLength = 2048 Exportable = TRUE MachineKeySet = TRUE SMIME = False PrivateKeyArchive = FALSE UserProtected = FALSE UseExistingKeySet = FALSE ProviderName = "Microsoft RSA SChannel Cryptographic Provider" ProviderType = 12 RequestType = PKCS10 KeyUsage = 0xa0 [EnhancedKeyUsageExtension] OID=1.3.6.1.5.5.7.3.1 ;-----------------------------------------------For more information on the.infrequest file, see the Microsoft documentation, such as http://technet.microsoft.com/en-us/library/cc783835.aspx. - Generate the certificate request.
certreq -new request.inf request.req - Submit the request to the Active Directory CA. For example:
certreq -submit request.req certnew.cerNote
If the command-line tool returns an error message, then use the Web browser to access the CA and submit the certificate request. If IIS is running, then the CA URL ishttp://servername/certsrv. - Accept the certificate request. For example:
certreq -accept certnew.cer - Make sure that the server certificate is present on the Active Directory server.In the menu, click , then click and .
- Import the CA certificate from Directory Server into Active Directory. Click Trusted Root CA, then Import, and browse for the Directory Server CA certificate.
- Reboot the domain controller.
15.6.2. Setting up Password Synchronization
- Download the
PassSync.msifile to the Active Directory machine.- Log into the Customer Portal.
- Click the Downloads tab.
- Click the Red Hat Enterprise Linux downloads button in the middle of the page.
- Filter the downloads by using a search term such as Directory Server, and then expand one of the Red Hat Enterprise Linux versions.
- Click the Directory Server link.
- On the Directory Server page, download the appropriate version of the WinSync Installer. This is the Password Sync MSI file (
RedHat-PassSync-1.1.5-arch.msi).
Note
Regardless of the Red Hat Enterprise Linux architecture, there are two PassSync packages available, one for 32-bit Windows servers and one for 64-bit. Make sure to select the appropriate packages for your Windows platform. - Double-click the Password Sync MSI file to install it.
- The Password Sync Setup window appears. Hit Next to begin installing.
- Fill in the information to establish the connection to the IdM server.
- The IdM server connection information, including the hostname and secure port number.
- The username of the system user which Active Directory uses to connect to the IdM machine. This account is configured automatically when sync is configured on the IdM server. The default account is
uid=passsync,cn=sysaccounts,cn=etc,dc=example,dc=com. - The password set in the
--passsyncoption when the sync agreement was created. - The search base for the people subtree on the IdM server. The Active Directory server connects to the IdM server similar to an
ldapsearchor replication operation, so it has to know where in the IdM subtree to look for user accounts. The user subtree iscn=users,cn=accounts,dc=example,dc=com. - The certificate token is not used at this time, so that field should be left blank.
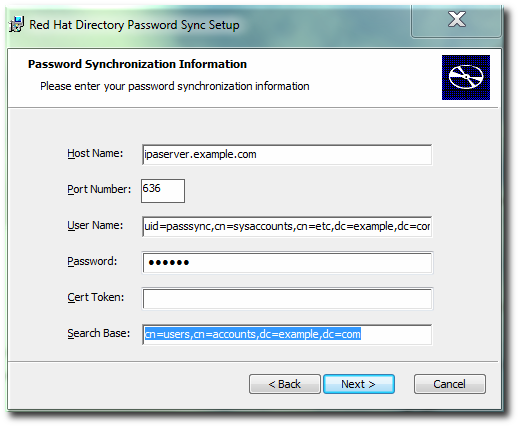 Hit , then to install Password Sync.
 - Import the IdM server's CA certificate into the Active Directory certificate store.
- Download the IdM server's CA certificate from
http://ipa.example.com/ipa/config/ca.crt. - Copy the IdM CA certificate to the Active Directory server.
- Open the command prompt, using
Run as Administrator. - Install the IdM CA certificate in the Password Sync database. For example:
cd "C:\Program Files\Red Hat Directory Password Synchronization"

certutil.exe -d . -A -n "IPASERVER.EXAMPLE.COM IPA CA" -t CT,, -a -i ipaca.crt
cd "C:\Program Files\389 Directory Password Synchronization" certutil.exe -d . -A -n "IPASERVER.EXAMPLE.COM IPA CA" -t CT,, -a -i ipaca.crt
- Reboot the Windows machine to start Password Sync.
Note
The Windows machine must be rebooted. Without the rebooting,PasswordHook.dllis not enabled, and password synchronization will not function.
.msi.
15.6.3. Allowing Users to Change Other Users' Passwords Cleanly
passSyncManagersDNs attribute lists administrator accounts which are allowed to perform password change operations and which will not then require a password reset.
Important
cn=ipa_pwd_extop,cn=plugins,cn=config, and add the passSyncManagersDNs attribute with the name of the user. This attribute is multi-valued. For example:
$ ldapmodify -x -D "cn=Directory Manager" -w secret -h ldap.example.com -p 389

dn: cn=ipa_pwd_extop,cn=plugins,cn=config
changetype: modify
add: passSyncManagersDNs
passSyncManagersDNs: uid=admin,cn=users,cn=accounts,dc=example,dc=com
Warning
cn is treated differently than other synced attributes. It is mapped directly (cn to cn) when syncing from Identity Management to Active Directory. When syncing from Active Directory to Identity Management, however, cn is mapped from the name attribute on Windows to the cn attribute in Identity Management.
Chapter 16. Identity: ID Views and Migrating Existing Environments to Trust
Important
ipa-adtrust-install command on the IdM server, the Default Trust View is created. The Default Trust View is always applied to Active Directory users and groups, which allows the administrator to define POSIX attributes for AD users and groups regardless of how AD itself defined them. If you add a host-specific ID view that overrides the AD users or groups, the attributes from the host-specific ID view are applied on top of the Default Trust View. While the new ID view overrides the Default Trust View, the default view itself cannot be deleted. If no specific ID view is applied to a client, the Default Trust View always applies.
Note
ipa-adtrust-install is not run, you can still use the ID Views feature in a pure IdM environment to manage ID views and overrides for IdM users.
Note
- Store POSIX attributes and SSH keys for AD users
- Define POSIX attributes or SSH keys and SSH login information for AD users, and let them be applied when an AD user authenticates to clients running SSSD with ID Views support or when the AD user authenticates using a compat LDAP tree, which offers a simplified LDAP tree with user and group data for legacy clients.This capability is useful for migration from a synchronization-based solution or in a situation when a Linux administrator would like to manually define POSIX attributes for AD users but the AD policy does not allow it.
- Migrate from a synchronization-based to a trust-based integration
- Configure the POSIX attributes for users that are in a synchronization-based environment by creating an ID view override specifying previously used UID or other tools. Then move the users back to AD.
- Perform per-host group override of the IdM user POSIX attributes
- NIS-based infrastructure that is being migrated to an IdM integration with AD still often requires that the original POSIX data remain unchanged on some NIS domains or the company policies might prevent setting the original POSIX data in AD directly. In these situations, you can use ID Views to configure the POSIX data directly on the Identity Management server.
- Set different POSIX attributes or SSH keys for different environments
- Set different POSIX attributes or different user SSH public keys for different production environments – such as development, testing, or production – depending on the corresponding host groups.
16.1. User Overrides and Group Overrides
Note
uid: user login nameuidNumber: user UID numbergidNumber: user GID numberloginShell: user login shellgecos: user GECOS entryhomeDirectory: user home directoryipaSshPubkey: user SSH public key or keys
cn: group namegidNumber: group GID number
Note
16.2. Managing ID Views on the Server Side
Important
16.3. ID Views on the Client Side
Important
Note
16.4. Migrating from the Synchronization-Based to the Trust-Based Solution
Chapter 17. Identity: Managing DNS
17.1. About DNS in IdM
dn: idnsname=client1,idnsname=example.com,cn=dns,dc=example,dc=com
idnsname: client1
arecord: 10.0.0.1
arecord: 10.0.0.2
arecord: 10.0.0.3
aaaarecord: fc00::1
objectclass: top
objectclass: idnsrecord/usr/share/ipa/60basev2.ldif schema file[6].
bind-dyndb-ldap plug-in. When Identity Management is configured to manage DNS, IdM creates a dynamic-db configuration section in the /etc/named.conf file for the BIND service. This configures the bind-dyndb-ldap plug-in for the BIND (named) service.
named service. The configuration can be changed to adapt the behavior of the plug-in and, therefore, the LDAP-BIND interactions.
17.2. Using IdM and DNS Service Discovery with an Existing DNS Configuration
Sample zone file for bind has been created in /tmp/sample.zone.F_uMf4.db
Example 17.1. Default IdM DNS File
; ldap servers
_ldap._tcp              IN SRV 0 100 389        ipaserver.example.com.

;kerberos realm
_kerberos               IN TXT EXAMPLE.COM

; kerberos servers
_kerberos._tcp          IN SRV 0 100 88         ipaserver.example.com.
_kerberos._udp          IN SRV 0 100 88         ipaserver.example.com.
_kerberos-master._tcp   IN SRV 0 100 88         ipaserver.example.com.
_kerberos-master._udp   IN SRV 0 100 88         ipaserver.example.com.
_kpasswd._tcp           IN SRV 0 100 464        ipaserver.example.com.
_kpasswd._udp           IN SRV 0 100 464        ipaserver.example.com.
Note
17.3. DNS Notes
- Wildcards cannot be used when configuring DNS names. Only explicit DNS domain names are supported.
- The
rndcservice is not configured by the--setup-dnsoption. This service must be configured manually after the IdM server is configured.
17.4. Adding or Updating DNS Services After Installation
--setup-dns option. If DNS is not configured then, it can be configured later using the ipa-dns-install command.
ipa-dns-install command also updates the DNS services on the IdM server.
[root@server ~]# ipa-dns-install -p secret --ip-address=1.2.34.56 --no-forwarders-pgives the password for the Directory Manager user in the 389 Directory Server. All of the DNS entries are stored in the LDAP directory, so this directory must be accessed to add the DNS configuration.--ip-addressgives the IP address for the master DNS server.--no-forwardersmeans that there are no forwarders used with the DNS service, only root servers. Alternatively, use the--forwarderoption to define a forward to use; to specify multiple forwarders, use the--forwarderoption multiple times.- Reverse DNS is configured automatically. It is possible to disable reverse DNS by using the
--no-reverseoption.If an existing reverse DNS zone is already configured, using the--no-reverseoption uses the existing reverse zone rather than creating a new reverse zone. - The IdM server, unless it is explicitly disabled, leaves a persistent search open with its Directory Server and capture any new zone changes immediately.
17.5. Setting up the rndc Service
ipa-dns-install command does not automatically configure the system's rndc service. This must be configured manually, after DNS is configured for IdM.
- Create the
rndcconfiguration file and key.[root@server ~]# /usr/sbin/rndc-confgen -a [root@server ~]# /sbin/restorecon /etc/rndc.confThis may require some user input to create entropy while the key is being created. - Change the owner and permissions of the
rndckey file.[root@server ~]# chown root:named /etc/rndc.key [root@server ~]# chmod 0640 /etc/rndc.key
17.6. Managing DNS Zone Entries
17.6.1. Adding Forward DNS Zones
17.6.1.1. From the Web UI
- Open the Identity tab, and select the DNS subtab.
- Click the Add link at the top of the list of DNS zones.
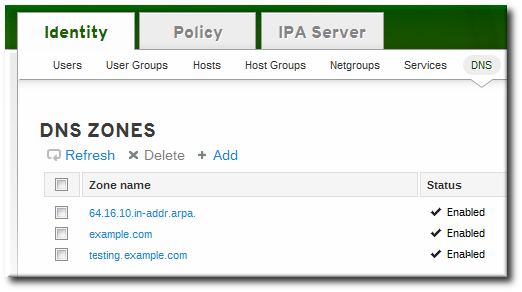
- Fill in the information about the new DNS zone. The Zone Name is required; this is the actual domain name. The other information about the administrator email and the authoritative name server are optional.
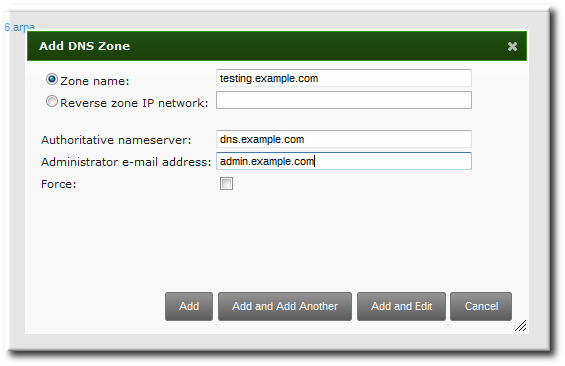
Note
If an email is given for the administrator, then replace the at symbol (@) with a period (.) to maintain compatibility with the zone file. - Click the Add and Edit button to go directly to the DNS zone page. In the Settings tab, it is possible to reset the default zone configuration to enable dynamic binds (Section 17.6.5.1, “Enabling Dynamic DNS Updates in the Web UI”) or change other default records information (Section 17.6.2.2, “Editing the Zone Configuration in the Web UI”). It is also possible to begin adding new DNS resource records (Section 17.7.1.1, “Adding DNS Resource Records from the Web UI”) in the DNS Resource Records tab.
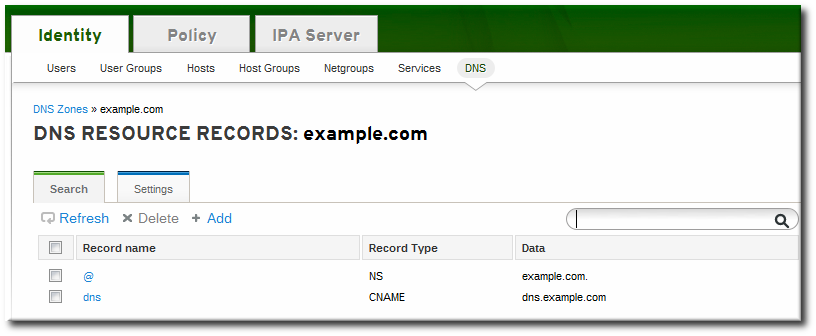
17.6.1.2. From the Command Line
ipa dnszone-add command adds a new zone to the DNS domain. At a minimum, this requires the name of the new subdomain:
$ ipa dnszone-add domainNameipa dnszone-add command.
- Add the new zone. For example:
[root@server ~]# ipa dnszone-add newserver.example.com --admin-email=admin@example.com --minimum=3000 --dynamic-update - Reload the name service.
[root@server ~]# rndc reloadNote
To make new resource records immediately resolvable without restarting the name service, enable persistent searches with thenamedservice or configure the BIND service to poll the Directory Server automatically for zone changes. See Section 17.8.2, “Disabling Persistent Searches”.
17.6.2. Adding Additional Configuration for DNS Zones
Example 17.2. Default DNS Zone Entry Settings
[root@server ~]# ipa dnszone-show server.example.com
Zone name: server.example.com
Authoritative nameserver: dns.example.com
Administrator e-mail address: admin.example.com.
SOA serial: 1377691702
SOA refresh: 3600
SOA retry: 900
SOA expire: 1209600
SOA minimum: 3000
Active zone: TRUE
Allow query: any;
Allow transfer: none;
17.6.2.1. DNS Zone Configuration Attributes
| Attribute | Command-Line Option | Description |
|---|---|---|
| Zone name | --name | Sets the name of the zone. |
| Authoritative nameserver | --name-server | Sets the fully-qualified domain name of the DNS name server. |
| Administrator e-mail address | --admin-email | Sets the email address to use for the zone administrator. This defaults to the root account on the host. |
| SOA serial | --serial | Sets a version number for the SOA record file. |
| SOA refresh | --refresh | Sets the interval, in seconds, for a secondary DNS server to wait before requesting updates from the primary DNS server. |
| SOA retry | --retry | Sets the time, in seconds, to wait before retrying a failed refresh operation. |
| SOA expire | --expire | Sets the time, in seconds, that a secondary DNS server will try to perform a refresh update before ending the operation attempt. |
| SOA minimum | --minimum | Sets the minimum amount of time, in seconds, that data are kept in cache. |
| SOA time to live | --ttl | Sets the maximum time, in seconds, that information is kept in the data cache. |
| SOA class | --class | Sets the type of record. This is almost always IN, which stands for Internet. |
| BIND update policy | --update-policy | Sets the permissions allowed to clients in the DNS zone. |
| Dynamic update | --dynamic-update=TRUE|FALSE | Enables dynamic updates to DNS records for clients.
Important
If this is set to false, IdM client machines will not be able to add or update their IP address. See Section 17.6.5, “Enabling Dynamic DNS Updates” for more information.
|
| Name server | --ip-address | Adds the DNS name server by its IP address. |
| Allow transfer | --allow-transfer=string | Gives a semi-colon-separated list of IP addresses or network names which are allowed to transfer the given zone. |
| Allow query | --allow-query | Gives a semi-colon-separated list of IP addresses or network names which are allowed to issue DNS queries. |
| Allow PTR sync | --allow-sync-ptr=1|0 | Sets whether A or AAAA records (forward records) for the zone will be automatically synchronized with the PTR (reverse) records. |
| Zone forwarders | --forwarder=string | Specifies a forwarder specifically configured for the DNS zone. This is separate from any global forwarders used in the IdM domain.
To specificy multiple forwarders, use the option multiple times.
|
| Forward policy | --forward-policy=only|first | Sets whether the zone will only forward requests to configured the DNS name servers (a forward-only zone) or whether it will check the forwarders first for DNS records and then check its own local records. |
17.6.2.2. Editing the Zone Configuration in the Web UI
- Open the Identity tab, and select the DNS subtab.
- Click the name of the DNS zone to edit.
- Open the Settings tab.
- Change any of the DNS zone settings. The full list of attributes is described in Table 17.1, “Zone Attributes”. There are some common attributes to change:
- Authoritative name server, the fully-qualified domain name of the DNS name server.
- Dynamic update, to enable dynamic updates to DNS records for clients.
- SOA refresh, the interval, in seconds, for a secondary DNS server to wait before requesting updates from the primary DNS server.

- Click the Update link at the top of the settings page.
17.6.2.3. Editing the Zone Configuration in the Command Line
dnszone-add command. Likewise, attributes can be added or modified in the zone entry by passing the same attribute options with the dnszone-mod command. These are listed in Table 17.1, “Zone Attributes”.
dnszone-mod command adds the attribute. If the attribute exists, then it overwrites the current value with the specified value.
[jsmith@server ~]$ kinit admin
[jsmith@server ~]$ ipa dnszone-mod server.example.com --ttl=1800

Zone name: server.example.com
Authoritative nameserver: dns.example.com
Administrator e-mail address: admin.example.com.
SOA serial: 1377691702
SOA refresh: 3600
SOA retry: 900
SOA expire: 1209600
SOA minimum: 3000
SOA time to live: 1800
Active zone: TRUE
Allow query: any;
Allow transfer: none;
17.6.3. Adding Reverse DNS Zones
- By zone name, in the format reverse_ip_address
.in-addr.arpa. - By network address, in the format network_ip_address/subnet_mask_bit_count
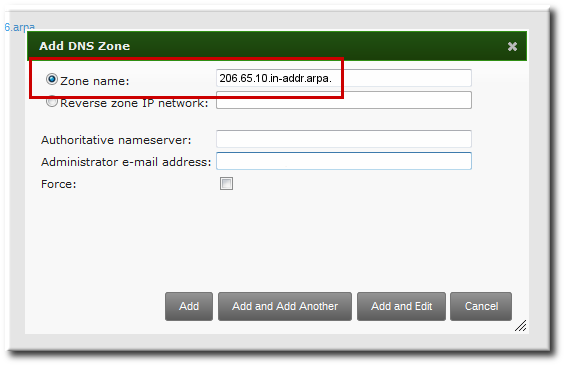
Figure 17.1. Creating a Reverse Zone by Name
[bjensen@server ~]$ kinit
[bjensen@server]$ ipa dnszone-add 206.65.10.in-addr.arpa.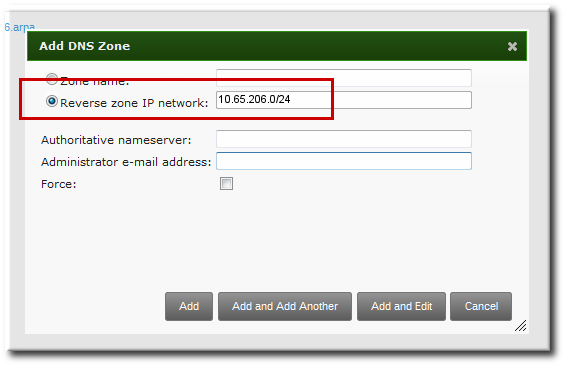
Figure 17.2. Creating a Reverse Zone by IP Network
[bjensen@server ~]$ kinit
[bjensen@server]$ ipa dnszone-add 10.65.206.0/24
17.6.4. Enabling and Disabling Zones
17.6.4.1. Disabling Zones in the Web UI
- Open the Identity tab, and select the DNS subtab.
- Click the name of the DNS zone to edit.
- Open the Settings tab.
- Scroll down to the Active zone field. To disable the zone, set the value to Disabled.

- Click the Update link at the top of the settings page.
17.6.4.2. Disabling Zones in the Command Line
dnszone-disable command.
[jsmith@server ~]$ kinit admin
[jsmith@server ~]$ ipa dnszone-disable server.example.com
-----------------------------------------
Disabled DNS zone "server.example.com"
-----------------------------------------dnszone-enable command.
17.6.5. Enabling Dynamic DNS Updates
ipa-client-install script to join a client to the domain because it cannot add a DNS record pointing to the new client.
17.6.5.1. Enabling Dynamic DNS Updates in the Web UI
- Open the Identity tab, and select the DNS subtab.
- Click the name of the DNS zone to edit.
- Open the Settings tab.
- Scroll down to the Dynamic update field, and set the value to True.
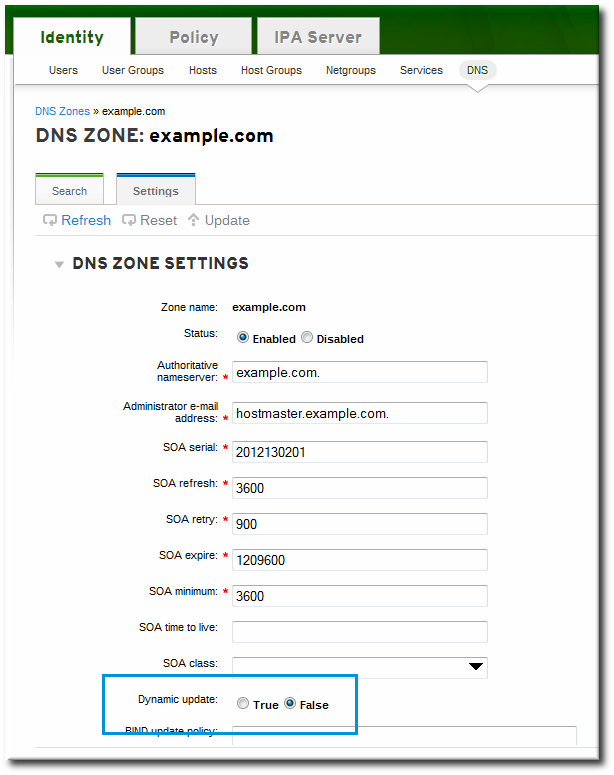
- Click the Update link at the top of the settings page.
17.6.5.2. Enabling Dynamic DNS Updates in the Command Line
--dynamic-update option.
$ ipa dnszone-mod server.example.com --dynamic-update=TRUE17.6.6. Configuring Forwarders and Forward Policy
- A list of global forwarders which are used by all zones in IdM
- A list of forwarders which are used by a single, specific zone (as part of the zone configuration)
- A policy which defines how the zone sends requests to the forwarders
17.6.6.1. Configuring Forwarders in the UI
- To add a forwarder, fill in the field or click Add to add a new IP address to the forwarder list.
- By default, the zone uses the forwarders only for servicing name resolution requests; this is called a forward-only zone. A forward-only zone does not check its own name records. Only the forwarder server records are checked. If the record does not exist on the configured forwarders, then the zone returns a negative response to the client. Alternatively, the zone can check the forwarder records first, and then fallback on its own resource records. This has a first policy.
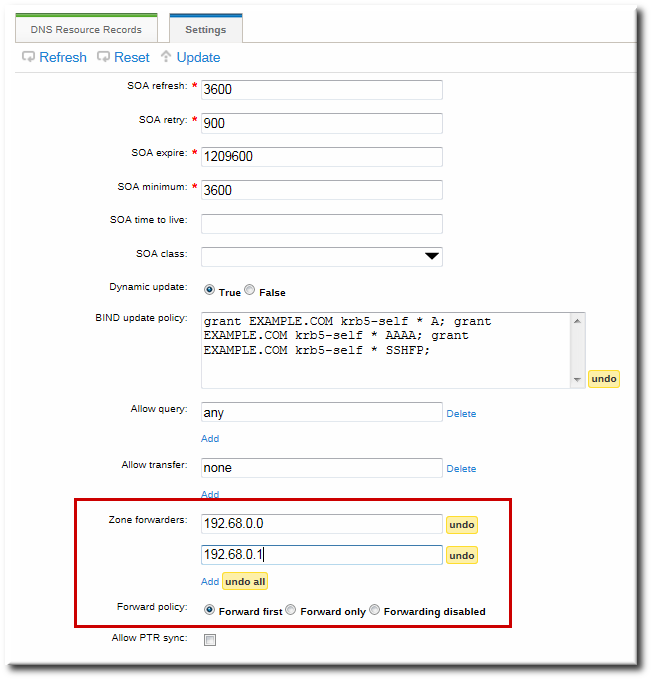
Figure 17.3. Forwarders in the DNS Zone Configuration
17.6.6.2. Configuring Forwarders in the Command Line
dnszone-mod command to update the zone settings. This can be used to set the list of DNS forwarders and the forwarding policy, as in the UI.
dnsconfig command can be used to set a global list of forwarders for all zones by editing the DNS configuration files.
Example 17.3. Configuring Global Forwarders
setup-dns option or when the ipa-dns-install script is used.
dnsconfig-mod command. For example:
[jsmith@server ~]$ ipa dnsconfig-mod --forwarder=0.9.8.7
  Global forwarders: 0.9.8.7
Example 17.4. Configuring Zone Forwarders
--forwarder option can be used multiple times to create a list of forwarders to use with the zone.
[jsmith@server ~]$ ipa dnszone-mod --forwarder=192.0.2.0 --forwarder=198.51.100.0 example.com

  Zone name: example.com
...
  Zone forwarders: 192.0.2.0, 198.51.100.0
Note
Example 17.5. Configuring Forwarder Policy for a Zone
--forward-policy option, using a policy of either only or first. For example:
[jsmith@server ~]$ ipa dnszone-mod --forward-policy=only example.com

  Zone name: example.com
...
  Zone forwarders: 1.2.3.4;5.6.7.8
  Forward policy: only
17.6.7. Enabling Zone Transfers
17.6.7.1. Enabling Zone Transfers in the UI
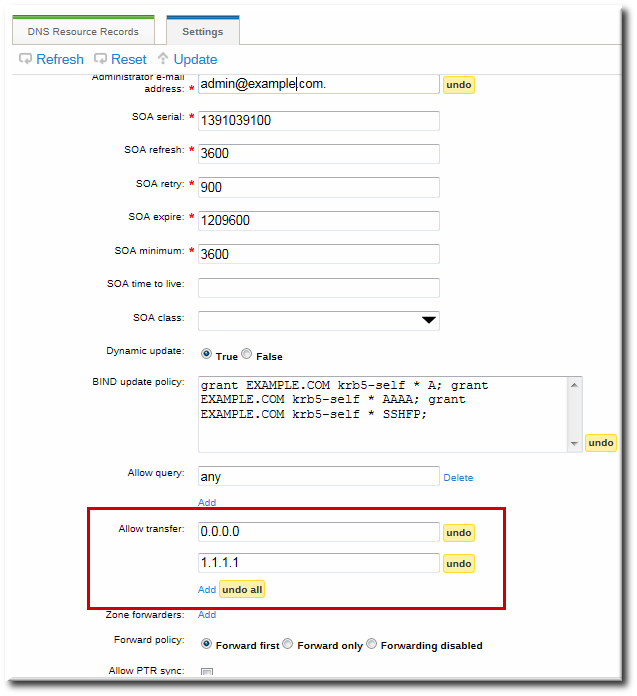
Figure 17.4. DNS Zone Transfer Settings
17.6.7.2. Enabling Zone Transfers in the Command Line
--allow-transfer option to set a list of name servers to which the zone records can be transferred.
[jsmith@server ~]$ ipa dnszone-mod --allow-transfer="0.0.0.0;1.2.3.4;5.6.7.8" example-zoneany, which the zone to be transferred anywhere in the DNS domain.
bind service, IdM DNS zones can be transferred, by name, by clients like dig:
[root@server ~]# dig @ipa-server zone_name AXFR17.6.8. Defining DNS Queries
--allow-query option to set a list of clients which are allowed to issue queries.
[jsmith@server ~]$ ipa dnszone-mod --allow-query=0.0.0.0;1.2.3.4;5.6.7.8 example-zoneany, which allows the zone to be queried by any client.
17.6.9. Synchronizing Forward and Reverse Zone Entries
- Both forward and reverse zones must be managed by the IdM server.
- Both zones must have dynamic updates enabled.Enabling dynamic updates is covered in Section 17.6.5, “Enabling Dynamic DNS Updates”.
- The PTR record will be updated only if the name of the requesting client matches the name in the PTR record.
Important
Warning
17.6.9.1. Configuring Zone Entry Sync in the UI
Note
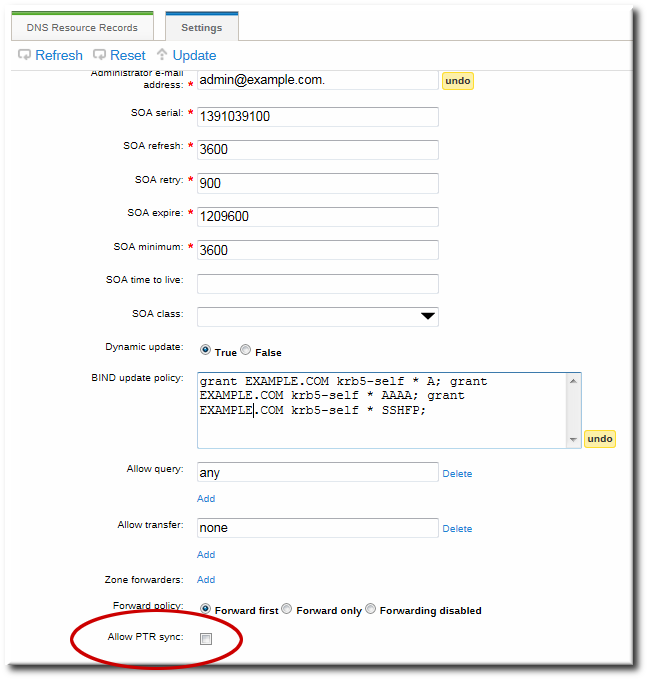
Figure 17.5. DNS Zone Sync Settings
17.6.9.2. Configuring Zone Entry Sync in the Command Line
--allow-sync-ptr option to 1. This can be done when the zone is created or when it is edited.
Note
[jsmith@server ~]$ ipa dnszone-mod --allow-sync-ptr=1 example-zone0, which disables synchronization and has better server performance.
17.6.10. Setting DNS Access Policies
update-policy statement in the /etc/named.conf file, which defines the DNS access rule.
Important
17.6.10.1. Setting DNS Access Policies in the UI
grant|deny zoneName policyName recordName recordType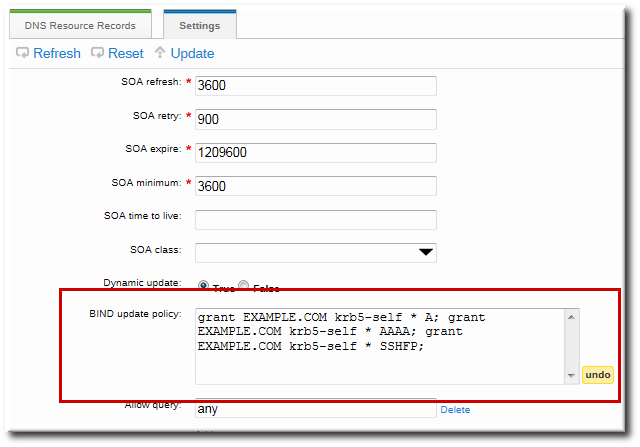
Figure 17.6. DNS Update Policy Settings
17.6.10.2. Setting DNS Access Policies in the Command Line
--update-policy option, with the access control rule in a statement after it.
--update-policy "grant|deny zoneName policyName recordName recordType"- zoneName is the IdM DNS zone to which to apply the rule.
- policyName is the name to use for the BIND rule.
- recordName sets the resource records to which to apply the rule. Using an asterisk (*) is used for self rules.
- recordType is the record type the rule applies to. Update access rules are applied individually for each record type, even within the same DNS zone entry.The full list of supported record types is in Table 17.2, “DNS Record Types”.
EXAMPLE.COM zone the ability to edit its own A and AAAA resource record entries:
$ ipa dnszone-mod example.com --update-policy="grant EXAMPLE.COM krb5-self * A; grant EXAMPLE.COM krb5-self * AAAA;"17.7. Managing DNS Record Entries
17.7.1. Adding Records to DNS Zones
| A | CERT | KX | NS | SIG |
| AAAA | CNAME | LOC | NSEC | SRV |
| A6 | DNAME | MX | PTR | SSHFP |
| AFSDB | DS | NAPTR | RRSIG | TXT |
17.7.1.1. Adding DNS Resource Records from the Web UI
Note
named service or configure the BIND service to poll the Directory Server automatically for zone changes. See Section 17.8.2, “Disabling Persistent Searches”.
- Open the Identity tab, and select the DNS subtab.
- Click the name of the DNS zone to which to add records.
- In the DNS Resource Records tab, click the Add link.
- Select the type of record to create in the Record Type drop-down menu. The required data is different, depending on the record type. For example, a CNAME record requires a hostname. The data field name updates automatically to indicate what kind of information to supply.
 Although IdM supports many different record types, there are four frequent record types that are used:
- A. This is a basic map for a hostname and an ordinary IPv4 address. The Record Name is a hostname, such as www. The IP Address value is a standard IPv4 address, such as 192.168.1.2.More information about A records is in RFC 1035.
- AAAA. This is a basic map for a hostname and an IPv6 address. The Record Name is a hostname, such as www. The IP Address value is a standard hexadecimal IPv6 address, such as fe80::20c:29ff:fe02:a1b3.More information about AAAA records is in RFC 3596.
- SRV. Service (SRV) resource records map service names to the DNS name of the server that is providing that particular service. The Record Name has the format _service._protocol, such as _ldap._tcp. There are individual fields to set the priority, weight, port number, and hostname for the target service.More information about SRV records is in RFC 2782.
- PTR. A pointer record type (PTR) record adds a reverse DNS record, which maps an IP address to a domain name. In this case, the Record Name is the record ID number for the DNS entry of the resource and the Hostname value is the hostname with a terminal period, such as server.example.com..More information about PTR records is in RFC 1035.
- Click the button to save the new resource record.
17.7.1.2. Adding DNS Resource Records from the Command Line
ipa dnsrecord-add, is used to add resource records of any type, but the options for the script and the required data are different, based on the resource record type.
17.7.1.2.1. About the Commands to Add DNS Records
ipa dnsrecord-add command adds records to DNS zones, based on the type. Adding a record has the same basic command format:
$ ipa dnsrecord-add zoneName recordName --recordType-option=dataipa dnsrecord-add help and manpages.
Note
ipa dnsrecord-add command only creates forward entries, not reverse entries.
| General Record Options | |
|---|---|
| Option | Description |
| --ttl=number | Sets the time to live for the record. |
| --class=IN | CS | CH | HS | Sets the class of the record. This is usually IN, for Internet protocol. |
| --structured | Parses the raw DNS records and returns them in a structured format. |
| "A" Record Options | |
|---|---|
| Option | Description |
| --a-rec=ARECORD | Passes a comma-separated list of A records. |
| --a-ip-address=string | Gives the IP address for the record. |
| "AAAA" Record Options | |
|---|---|
| Option | Description |
| --aaaa-rec=AAAARECORD | Passes a comma-separated list of AAAA (IPv6) records. |
| --aaaa-ip-address=string | Gives the IPv6 address for the record. |
| "PTR" Record Options | |
|---|---|
| Option | Description |
| --ptr-rec=PTRRECORD | Passes a comma-separated list of PTR records. |
| --ptr-hostname=string | Gives the hostname for the record. |
| "SRV" Record Options | |
|---|---|
| Option | Description |
| --srv-rec=SRVRECORD | Passes a comma-separated list of SRV records. |
| --srv-priority=number | Sets the priority of the record. There can be multiple SRV records for a service type. The priority (0 - 65535) sets the rank of the record; the lower the number, the higher the priority. A service has to use the record with the highest priority first. |
| --srv-weight=number | Sets the weight of the record. This helps determine the order of SRV records with the same priority. The set weights should add up to 100, representing the probability (in percentages) that a particular record is used. |
| --srv-port=number | Gives the port for the service on the target host. |
| --srv-target=string | Gives the domain name of the target host. This can be a single period (.) if the service is not available in the domain. |
17.7.1.2.2. Examples of Adding DNS Resource Records
Note
named service or configure the BIND service to poll the Directory Server automatically for zone changes. See Section 17.8.2, “Disabling Persistent Searches”.
Example 17.6. IPv4 Record
$ ipa dnsrecord-add example.com www --a-rec 10.64.14.165www.example.com with the IP address 10.64.14.165.
Example 17.7. Modifying IPv4 Record
--a-record. However, when modifying an A record, the --a-record option shows the old value for the A record. The new value is set with the --ip-address option.
$ ipa dnsrecord-mod example.com www --a-rec 10.1.1.1 --ip-address 10.1.1.2Example 17.8. IPv6 Record
$ ipa dnsrecord-add example.com www --aaaa-rec fe80::20c:29ff:fe02:a1b3www.example.com with the IP address fe80::20c:29ff:fe02:a1b3. More information about AAAA records is in RFC 3596.
Example 17.9. SRV Record
[root@server ~]# ipa dnsrecord-add server.example.com _ldap._tcp --srv-rec="0 51 389 server1.example.com."
[root@server ~]# ipa dnsrecord-add server.example.com _ldap._tcp --srv-rec="1 49 389 server2.example.com."Example 17.10. PTR Record
in-addr.arpa. domain. The reverse address, in human-readable form, is the exact reverse of the regular IP address, with the in-addr.arpa. domain appended to it. For example, for the network address 192.0.2.0/24, the reverse zone is 2.0.192.in-addr.arpa.
$ ipa dnsrecord-add reverseZone recordName --ptr-rec FQDN1.0.192.in-addr.arpa. reverse zone for the host server2.example.com with the IP address 192.0.1.2:
$ ipa dnsrecord-add 1.0.192.in-addr.arpa. 2 --ptr-rec server2.example.com.0.0.0.0.0.0.0.0.8.b.d.0.1.0.0.2.ip6.arpa. IPv6 reverse zone for the host server2.example.com with the IP address 2001:DB8::1111:
$ ipa dnsrecord-add 0.0.0.0.0.0.0.0.8.b.d.0.1.0.0.2.ip6.arpa. 1.1.1.0.0.0.0.0.0.0.0.0.0.0.0 --ptr-rec server2.example.com.17.7.2. Deleting Records from DNS Zones
17.7.2.1. Deleting Records with the Web UI
- Open the Identity tab, and select the DNS subtab.
- Click the name of the DNS zone.
- In the DNS Resource Records tab, click the name of the resource record.
- Click the checkbox by the name of the record type to delete, and then click the active Delete link at the top of the list.
 This deletes only that record type while leaving the other configuration intact.
- Open the Identity tab, and select the DNS subtab.
- Click the name of the DNS zone.
- In the DNS Resource Records tab, select the checkbox by the name of the resource record to delete. This deletes the entire record.
- Click the Delete link at the top of the zone records page.
17.7.2.2. Deleting Records with the Command Line
ipa dnsrecord-del command. As with adding records, records are deleted using an option that specifies the type of record (--recordType-rec) and the record value.
$ ipa dnsrecord-del example.com www --a-rec 10.64.14.213ipa dnsrecord-del command without any options, the command prompts for information about the record to delete.
--del-all option removes all associated records for the zone.
17.8. Configuring the bind-dyndb-ldap Plug-in
bind-dyndb-ldap system plug-in contains a DNS record cache for zones and a history of successful DNS resolutions. Maintaining the cache improves lookup performance in the Directory Server because it is not necessary to query the directory services every time there is a new DNS request.
Example 17.11. Default dynamic-db Configuration
dynamic-db "ipa" {
        library "ldap.so";
        arg "uri ldapi://%2fvar%2frun%2fslapd-EXAMPLE.socket";
        arg "base cn=dns,dc=example,dc=com";
        arg "fake_mname server.example.com.";
        arg "auth_method sasl";
        arg "sasl_mech GSSAPI";
        arg "sasl_user DNS/server.example.com";
        arg "zone_refresh 0";
        arg "psearch yes";
        arg "serial_autoincrement 1";
};dynamic-db "ipa" entry.
arg "argument value";Note
# rndc reload| Parameter | Description | Default Value |
|---|---|---|
| cache_ttl | Checks the DNS configuration in the Directory Server for new zones. | 120 (seconds); this is defined in the bind-dyndb-ldap plug-in. |
| zone_refresh | Checks frequency, in seconds, that the server checks the DNS configuration in the Directory Server for new zones. | 0 (disabled) |
| psearch | Enables persistent searches for the Directory Server so the BIND service immediately receives an update notification when a new DNS zone is added. | yes |
17.8.1. Changing the DNS Cache Setting
cache_ttl parameter.
dynamic-db "ipa" {
...
    arg "cache_ttl 1800";
};
17.8.2. Disabling Persistent Searches
bind-dyndb-ldap plug-in. The plug-in resolves only zones which were configured and enabled in the Directory Server when the name server started. When the name service restarts, the plug-in reloads its configuration and identifies any new zones or any new resource records.
bind-dyndb-ldap plug-in pulls zone and resource record information from the IdM LDAP directory, and it is possible to pull information from that directory apart from simply restarting the plug-in. The bind-dyndb-ldap plug-in searches for zone changes actively by keeping a persistent connection open to the Directory Server and immediately catching any changes.
Note
psearch argument:
dynamic-db "ipa" {
...
        arg "psearch no";
	};
17.9. Changing Recursive Queries Against Forwarders
ipa-client-install script sets a configuration statement in the /etc/named.conf file that allows name resolution against hosts that are outside the IdM DNS domain. (This requires that the IdM server be set up with DNS configured and with forwarders configured.) What this means is that any host is permitted to issue recursive queries against configured forwarders.
/etc/named.conf file to allow these recursive queries.
        forward first;
        forwarders { 10.16.36.29; };
allow-recursion { any; };allow-recursion statement.
- Open the
/etc/named.conffile. - Reset the
allow-recursionstatement. This is set toanyby default, which allows all hosts to resolve names against all forwarders.forward first; forwarders { 10.16.36.29; }; allow-recursion { any; }; - Restart the
namedservice.service named restart
17.10. Resolving Hostnames in the IdM Domain
dns-resolve command. If the record exists and is properly formatted in the DNS configuration, then the command returns the DNS record. If not, the command returns an error, that the hostname is not recognized within the DNS service.
$ipa dns-resolve server1.example.com/usr/share/ipa/updates directory.
Chapter 18. Policy: Using Automount
18.1. About Automount and IdM
auto.master file in the /etc/ directory. There can be multiple auto.master configuration files in separate server locations, if necessary.
autofs is configured on a server and that server is a client in an IdM domain, then all of the configuration information for automount is stored in the IdM directory. Rather than being stored in separate text files, the autofs configuration — maps, locations, and keys — are stored as LDAP entries. For example, the default map file, auto.master, is stored as:
dn: automountmapname=auto.master,cn=default,cn=automount,dc=example,dc=com
objectClass: automountMap
objectClass: top
automountMapName: auto.master
Important
cn=automount,dc=example,dc=com, and each map and each key are stored beneath that location.
- Locations, using
ipa automountlocation*commands - Both direct and indirect maps, using
ipa automountmap*commands - Keys, using
ipa automountkey*commands
18.2. Configuring Automount
Note
/home directory can be mounted from the command line successfully before changing the automount configuration. Making sure that NFS is already working properly makes it easier to troubleshoot any potential IdM automount configuration errors later.
18.2.1. Configuring NFS Automatically
ipa-client-automount command automatically configures the NFS configuration files (/etc/sysconfig/nfs and /etc/idmapd.conf). It also configures SSSD to manage the credentials for NFS.
ipa-client-automount command is run without any options, then it runs a DNS discovery scan to identify an available IdM server and creates a default location called default.
[root@server ~]# ipa-client-automount
Searching for IPA server...
IPA server: DNS discovery
Location: default
Continue to configure the system with these values? [no]: yes
Configured /etc/nsswitch.conf
Configured /etc/sysconfig/nfs
Configured /etc/idmapd.conf
Started rpcidmapd
Started rpcgssd
Restarting sssd, waiting for it to become available.
Started autofs[root@server ~]# ipa-client-automount --server=ipaserver.example.com --location=raleighipa-client-automount command configures SSSD to cache automount maps, in case the external IdM store is ever inaccessible. Configuring SSSD does two things:
- It adds service configuration information to the SSSD configuration. The IdM domain entry is given settings for the autofs provider and the mount location.
autofs_provider = ipa
ipa_automount_location = default
And NFS is added to the list of supported services (services = nss,pam,autofs...) and given a blank configuration entry ([autofs]). - The Name Service Switch (NSS) service informtion is updated to checl SSSD first for automount information, and then the local files.
automount: sss files
ipa-client-automount command can be run with the --no-sssd option, which changes all of the required NFS configuration files, but does not change the SSSD configuration.
[root@server ~]# ipa-client-automount --no-sssd- The command updates
/etc/sysconfig/autofsinstead of/etc/sysconfig/nfs. - The command configures
/etc/autofs_ldap_auth.confwith the IdM LDAP configuration. - The command configures
/etc/nsswitch.confto use the LDAP services for automount maps.
Note
ipa-client-automount command can only be run once. If there is an error in the configuration, than the configuration files need to be edited manually.
18.2.2. Configuring autofs Manually to Use SSSD and Identity Management
- Edit the
/etc/sysconfig/autofsfile to specify the schema attributes that autofs searches for:# # Other common LDAP naming # MAP_OBJECT_CLASS="automountMap" ENTRY_OBJECT_CLASS="automount" MAP_ATTRIBUTE="automountMapName" ENTRY_ATTRIBUTE="automountKey" VALUE_ATTRIBUTE="automountInformation" - Specify the LDAP configuration. There are two ways to do this. The simplest is to let the automount service discover the LDAP server and locations on its own:
LDAP_URI="ldap:///dc=example,dc=com"Alternatively, explicitly set which LDAP server to use and the base DN for LDAP searches:LDAP_URI="ldap://ipa.example.com" SEARCH_BASE="cn=location,cn=automount,dc=example,dc=com"Note
The default value for location isdefault. If additional locations are added (Section 18.4, “Configuring Locations”), then the client can be pointed to use those locations, instead. - Edit the
/etc/autofs_ldap_auth.conffile so that autofs allows client authentication with the IdM LDAP server.- Change
authrequiredto yes. - Set the principal to the Kerberos host principal for the NFS client server, host/fqdn@REALM. The principal name is used to connect to the IdM directory as part of GSS client authentication.
<autofs_ldap_sasl_conf
     usetls="no"
     tlsrequired="no"
     authrequired="yes"
     authtype="GSSAPI"
     clientprinc="host/server.example.com@EXAMPLE.COM"
     />
If necessary, runklist -kto get the exact host principal information. - Configure autofs as one of the services which SSSD manages.
- Open the SSSD configuration file.
[root@server ~]# vim /etc/sssd/sssd.conf - Add the autofs service to the list of services handled by SSSD.
[sssd] services = nss,pam,autofs - Create a new
[autofs]section. This can be left blank; the default settings for an autofs service work with most infrastructures.[nss] [pam] [sudo] [autofs] [ssh] [pac] - Optionally, set a search base for the autofs entries. By default, this is the LDAP search base, but a subtree can be specified in the
ldap_autofs_search_baseparameter.[domain/EXAMPLE] ... ldap_search_base = "dc=example,dc=com" ldap_autofs_search_base = "ou=automount,dc=example,dc=com"
- Restart SSSD:
[root@server ~]# service sssd restart - Check the
/etc/nsswitch.conffile, so that SSSD is listed as a source for automount configuration:automount: sss files - Restart autofs:
[root@server ~]# service autofs restart - Test the configuration by listing a user's
/homedirectory:[root@server ~]# ls /home/userNameIf this does not mount the remote file system, check the/var/log/messagesfile for errors. If necessary, increase the debug level in the/etc/sysconfig/autofsfile by setting theLOGGINGparameter todebug.
Note
automount -f -d18.2.3. Configuring Automount on Solaris
Note
- If the NFS server is running on Red Hat Enterprise Linux, specify on the Solaris machine that NFSv3 is the maximum supported version. Edit the
/etc/default/nfsfile and set the following parameter:NFS_CLIENT_VERSMAX=3 - Use the
ldapclientcommand to configure the host to use LDAP:ldapclient -v manual -a authenticationMethod=none -a defaultSearchBase=dc=example,dc=com -a defaultServerList=ipa.example.com -a serviceSearchDescriptor=passwd:cn=users,cn=accounts,dc=example,dc=com -a serviceSearchDescriptor=group:cn=groups,cn=compat,dc=example,dc=com -a serviceSearchDescriptor=auto_master:automountMapName=auto.master,cn=location,cn=automount,dc=example,dc=com?one -a serviceSearchDescriptor=auto_home:automountMapName=auto_home,cn=location,cn=automount,dc=example,dc=com?one -a objectClassMap=shadow:shadowAccount=posixAccount -a searchTimelimit=15 -a bindTimeLimit=5 - Enable
automount:# svcadm enable svc:/system/filesystem/autofs - Test the configuration.
- Check the LDAP configuration:
# ldapclient -l auto_master dn: automountkey=/home,automountmapname=auto.master,cn=location,cn=automount,dc=example,dc=com objectClass: automount objectClass: top automountKey: /home automountInformation: auto.home - List a user's
/homedirectory:# ls /home/userName
18.3. Setting up a Kerberized NFS Server
18.3.1. Setting up a Kerberized NFS Server
- Obtain a Kerberos ticket before running IdM utilites.
[user@server ~]$ kinit admin - If the NFS host machine has not been added as a client to the IdM domain, then create the host entry in GUI as described in Section 5.4.2, “Other Examples of Adding a Host Entry”, or run a command such as:
[user@server ~]$ ipa host-add --ip-address 192.0.2.10 nfs-server.example.org - Create the NFS service entry in the IdM domain, for example:
[user@server ~]$ ipa service-add nfs/nfs-server.example.comFor more information, see Section 11.1, “Adding and Editing Service Entries and Keytabs”. - Generate an NFS service keytab for the NFS server using the
ipa-getkeytabcommand.The NFS server may be on a Red Hat Enterprise Linux machine in the IdM domain or a different Unix machine. For a Red Hat Enterprise Linux machine, theipa-getkeytabcommand can be run on the NFS server machine. Otherwise, theipa-getkeytabcommand should be run on a Red Hat Enterprise Linux machine in the IdM domain and then copied over to the NFS server.Ifipa-getkeytabcommand is run on the NFS server, then save the keys directly to the host keytab. For example:[user@server ~]$ ipa-getkeytab -s server.example.com -p nfs/nfs-server.example.com -k /etc/krb5.keytabFor a Red Hat Enterprise Linux machine, that's all you need to do.When generating keys to copy over to another system, then generate the key but do not save it in the host keytab. The key must be added separately to the keytab after it is copied to the NFS server:- Save the keytab to a temporary file. For example:
[user@server ~]$ ipa-getkeytab -s server.example.com -p nfs/nfs-server.example.com -k /root/nfs-server.keytab - Copy the keytabs over to the NFS server.
- Set the file permissions to
0700. - Add the service key to the keytab file.
[root@nfs-server ~]# ( echo rkt /root/nfs-server.keytab; echo wkt /etc/krb5.keytab ) | ktutil
Note
To verify that the NFS service has been properly configured in IdM with its keytab, check the service entry by using the following command:[user@server ~]$ ipa service-show nfs/ipaclient2.example.com Principal: NFS/ipaclient2.example.com@EXAMPLE.COM Keytab: True - Install the NFS packages. For example:
[root@nfs-server ~]# yum install nfs-utils - Configure weak crypto support. This is required for every NFS client if any client (such as a Red Hat Enterprise Linux 5 client) in the domain uses older encryption options such as DES.
- Edit the
krb5.conffile to include the following line to enable weak crypto:allow_weak_crypto = true - Update the IdM server Kerberos configuration to support the DES encryption type.
[user@ipaserver ~]$ ldapmodify -x -D "cn=directory manager" -w password -h ipaserver.example.com -p 389

dn: cn=EXAMPLEREALM,cn=kerberos,dc=example,dc=com
changetype: modify
add: krbSupportedEncSaltTypes
krbSupportedEncSaltTypes: des-cbc-crc:normal
-
add: krbSupportedEncSaltTypes
krbSupportedEncSaltTypes: des-cbc-crc:special
-
add: krbDefaultEncSaltTypes
krbDefaultEncSaltTypes: des-cbc-crc:special
- Run the
ipa-client-automountcommand to configure the NFS settings.By default, this enables secure NFS in the/etc/sysconfig/nfsfile and sets the IdM DNS domain in theDomainparameter in the/etc/idmapd.conffile.Note
If the server is not member of the IdM domain (does not have the ipa-client package installed), this step needs to be done manually. See the NFS configuration section in the Storage Administration Guide for details. - Edit the
/etc/exportsfile and add the Kerberos information:/export *(rw,sec=krb5:krb5i:krb5p) - Restart the NFS server and related services.
[root@nfs-server ~]# service nfs restart [root@nfs-server ~]# service rpcsvcgssd restart - To configure the NFS server as an NFS client, see Section 18.3.2, “Setting up a Kerberized NFS Client”.
18.3.2. Setting up a Kerberized NFS Client
- Obtain a Kerberos ticket before running IdM tools.
[user@server ~]$ kinit admin - If the NFS client is not enrolled as a client in the IdM domain, then set up the required host entries in GUI as described in Section 5.4.2, “Other Examples of Adding a Host Entry”, or run a command such as:.
[user@server ~]$ ipa host-add --ip-address 192.0.2.20 nfs-client.example.org - Generate an NFS service keytab for the NFS client using the
ipa-getkeytabutility.The NFS client may be on a Red Hat Enterprise Linux machine in the IdM domain or a different Unix machine. For a Red Hat Enterprise Linux machine, theipa-getkeytabcommand can be run on the NFS client machine. Otherwise, theipa-getkeytabcommand should be run on a Red Hat Enterprise Linux machine in the IdM domain and then copied over to the NFS client.Ifipa-getkeytabcommand is run on the NFS client, then save the keys directly to the host keytab. For example:[user@server ~]$ ipa-getkeytab -k /etc/krb5.keytab -s ipa-server.example.org -p nfs/nfs-client-server.example.com@EXAMPLE.COMFor a Red Hat Enterprise Linux machine, that's all you need to do.When generating keys to copy over to another system, then generate the key but do not save it in the host keytab. The key must be added separately to the keytab after it is copied to the NFS server:- Save the keytab to a temporary file. For example:
[user@server ~]$ ipa-getkeytab -s ipa-server.example.org -p host/nfs-client-server.example.com@EXAMPLE.COM -k /root/nfs-client.keytab - Copy the keytabs over to the NFS client.
- Set the file permissions to
0700. - Add the service key to the keytab file.
[root@nfs-client-server ~]# ( echo rkt /root/nfs-client.keytab; echo wkt /etc/krb5.keytab ) | ktutil
- Run the
ipa-client-automountcommand to configure the NFS settings.By default, this enables secure NFS in the/etc/sysconfig/nfsfile and sets the IdM DNS domain in theDomainparameter in the/etc/idmapd.conffile.Note
If the client is not member of the IdM domain (does not have the ipa-client package installed), this step needs to be done manually. See the NFS configuration section in the Storage Administration Guide for details. - Start the GSS daemon.
[root@nfs-client-server ~]# service rpcgssd start [root@nfs-client-server ~]# service rpcbind start [root@nfs-client-server ~]# service rpcidmapd start - Mount the directory.
[root@nfs-client-server ~]# echo "$NFSSERVER:/this /mnt/this nfs4 sec=krb5i,rw,proto=tcp,port=2049"  >>/etc/fstab
[root@nfs-client-server ~]# mount -av
18.4. Configuring Locations
auto.master, and a location can store multiple maps. The location entry only works as a container for map entries; it is not an automount configuration in and of itself.
Important
18.4.1. Configuring Locations through the Web UI
- Click the Policy tab.
- Click the Automount subtab.
- Click the Add link at the top of the list of automount locations.
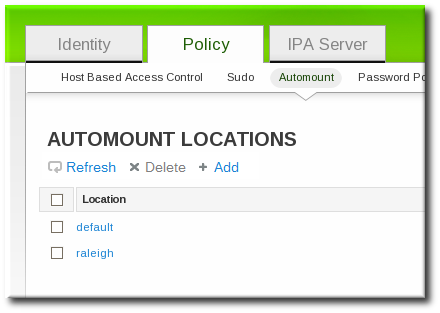
- Enter the name for the new location.
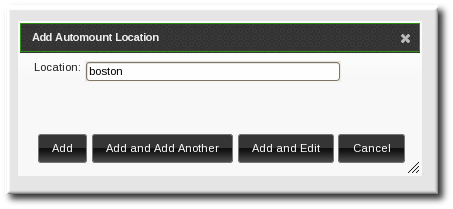
- Click the button to go to the map configuration for the new location. Create maps, as described in Section 18.5.1.1, “Configuring Direct Maps from the Web UI” and Section 18.5.2.1, “Configuring Indirect Maps from the Web UI”.
18.4.2. Configuring Locations through the Command Line
automountlocation-add and give the location name.
$ ipa automountlocation-add location$ ipa automountlocation-add raleigh
----------------------------------
Added automount location "raleigh"
----------------------------------
Location: raleighauto.master and auto.direct. auto.master is the root map for all automount maps for the location. auto.direct is the default map for direct mounts and is mounted on /-.
automountlocation-tofiles command:
$ ipa automountlocation-tofiles raleigh
/etc/auto.master:
/-      /etc/auto.direct
---------------------------
/etc/auto.direct:
18.5. Configuring Maps
Note
Important
18.5.1. Configuring Direct Maps
---------------------------
/etc/auto.direct:
/shared/man server.example.com:/shared/man
18.5.1.1. Configuring Direct Maps from the Web UI
- Click the Policy tab.
- Click the Automount subtab.
- Click name of the automount location to which to add the map.
- In the Automount Maps tab, click the + Add link to create a new map.

- In pop-up window, select the Direct radio button and enter the name of the new map.

- In the Automount Keys tab, click the + Add link to create a new key for the map.

- Enter the mount point. The key defines the actual mount point in the key name. The Info field sets the network location of the directory, as well as any
mountoptions to use.
- Click the button to save the new key.
18.5.1.2. Configuring Direct Maps from the Command Line
auto.direct item. The simplest configuration is to define a direct mapping by adding an automount key the existing direct map entry. It is also possible to create different direct map entries.
auto.direct file. The --key option identifies the mount point, and --info gives the network location of the directory, as well as any mount options to use. For example:
$ ipa automountkey-add raleigh auto.direct --key=/share --info="ro,soft,ipaserver.example.com:/home/share"
  Key: /share
Mount information: ro,soft,ipaserver.example.com:/home/shareldapclient command to add the LDAP entry directly:
ldapclient -a serviceSearchDescriptor=auto_direct:automountMapName=auto.direct,cn=location,cn=automount,dc=example,dc=com?one18.5.2. Configuring Indirect Maps
/docs and the key is man, then the map is /docs/man.
18.5.2.1. Configuring Indirect Maps from the Web UI
- Click the Policy tab.
- Click the Automount subtab.
- Click name of the automount location to which to add the map.
- In the Automount Maps tab, click the + Add link to create a new map.
- In pop-up window, select the Indirect radio button and enter the required information for the indirect map:

- The name of the new map
- The mount point. The Mount field sets the base directory to use for all the indirect map keys.
- Optionally, a parent map. The default parent is
auto.master, but if another map exists which should be used, that can be specified in the Parent Map field.
- Click the button to save the new key.
18.5.2.2. Configuring Indirect Maps from the Command Line
---------------------------
/etc/auto.share:
man     ipa.example.com:/docs/man
---------------------------- Create an indirect map to set the base entry using the
automountmap-add-indirectcommand. The--mountoption sets the base directory to use for all the indirect map keys. The default parent entry isauto.master, but if another map exists which should be used, that can be specified using the--parentmapoption.For example:$ ipa automountmap-add-indirect location mapName --mount=directory [--parentmap=mapName]$ ipa automountmap-add-indirect raleigh auto.share --mount=/share -------------------------------- Added automount map "auto.share" -------------------------------- - Add the indirect key for the mount location:
$ ipa automountkey-add raleigh auto.share --key=docs --info="ipa.example.com:/export/docs" ------------------------- Added automount key "docs" ------------------------- Key: docs Mount information: ipa.example.com:/export/docs - To verify the configuration, check the location file list using
automountlocation-tofiles:$ ipa automountlocation-tofiles raleigh /etc/auto.master: /- /etc/auto.direct /share /etc/auto.share --------------------------- /etc/auto.direct: --------------------------- /etc/auto.share: man ipa.example.com:/export/docs
ldapclient command to add the LDAP entry directly:
ldapclient -a serviceSearchDescriptor=auto_share:automountMapName=auto.share,cn=location,cn=automount,dc=example,dc=com?one18.5.3. Importing Automount Maps
ipa automountlocation-import location map_file [--continuous]--continuous option tells the automountlocation-import command to continue through the map file, even if the command encounters errors.
$ ipa automountlocation-import raleigh /etc/custom.mapChapter 19. Policy: Defining Password Policies
Note
19.1. About Password Policies and Policy Attributes
- Strength or complexity requirements
- History
- Account lockout
| Configuration Property | Command-Line Option | Description |
|---|---|---|
| Options for both the UI and CLI | ||
| Minimum Password Lifetime | --minlife | Sets the minimum period of time, in hours, that a user's password must be in effect before the user can change it. This can prevent a user from changing a password and then immediately changing it to the original value. The default value is one hour. |
| Maximum Password Lifetime | --maxlife | Sets the maximum period of time, in days, that a user's password can be in effect before it must be changed. The default value is 90 days. |
| Minimum Number of Character Classes | --minclasses | Sets the minimum number of different classes, or types, of character that must exist in a password before it is considered valid. For example, setting this value to 3 requires that any password must have characters from at least three categories in order to be approved. The default value is zero (0), meaning there are no required classes.
There are six character classes:
|
| Minimum Length of Password | --minlength | Sets the minimum number of characters for a password. The default value is eight characters. |
| Password History | --history | Sets the number of previous passwords that are stored and which a user is prevented from using. For example, if this is set to ten, IdM prevents a user from reusing any of their previous ten passwords. The default value is zero (0), which disables password history.
Note
Even with the password history set to zero, users cannot reuse a current password.
|
| Options for the CLI only | ||
| Priority | --priority | Sets the priority which determines which policy is in effect. The lower the number, the higher priority.
Although this priority is required when the policy is first created in the UI, it cannot be reset in the UI. It can only be reset using the CLI.
|
| Maximum Consecutive Failures | --maxfail | Specifies the maximum number of consecutive failures to input the correct password before the user's account is locked. |
| Fail Interval | --failinterval | Specifies the period (in seconds) after which the failure count will be reset. |
| Lockout Time | --lockouttime | Specifies the period (in seconds) for which a lockout is enforced. |
19.2. Viewing Password Policies
pwpolicy-show command. The CLI can also display the password policy in effect for a user.
19.2.1. Viewing the Global Password Policy
| Attribute | Value |
|---|---|
| Max lifetime | 90 (days) |
| Min lifetime | 1 (hour) |
| History size | 0 (unset) |
| Character classes | 0 (unset) |
| Min length | 8 |
| Max failures | 6 |
| Failure reset interval | 60 |
| Lockout duration | 600 |
19.2.1.1. With the Web UI
- Click the Policy tab, and then click the Password Policies subtab.
- All of the policies in the UI are listed by group. The global password policy is defined by the global_policy group. Click the group link.

- The global policy is displayed.

19.2.1.2. With the Command Line
pwpolicy-show command with no arguments:
[root@server ~]# kinit admin
[root@server ~]# ipa pwpolicy-show

  Group: global_policy
  Max lifetime (days): 90
  Min lifetime (hours): 1
  History size: 0
  Character classes: 0
  Min length: 8
  Max failures: 6
  Failure reset interval: 60
  Lockout duration: 600
19.2.2. Viewing Group-Level Password Policies
19.2.2.1. With the Web UI
- Click the Policy tab, and then click the Password Policies subtab.
- All of the policies in the UI are listed by group. Click the name of the group which is assigned the policy.
- The group policy is displayed.

19.2.2.2. With the Command Line
[root@server ~]# kinit admin
[root@server ~]# ipa pwpolicy-show ipausers
Group: ipausers
Max lifetime (days): 120
Min lifetime (hours): 10
Min length: 10
Priority: 50
19.2.3. Viewing the Password Policy in Effect for a User
pwpolicy-show command can be run for a specific user. The results also show which group policy is in effect for that user.
[root@server ~]# kinit admin
[root@server ~]# ipa pwpolicy-show --user=jsmith
  Group: global_policy
  Max lifetime (days): 90
  Min lifetime (hours): 1
  History size: 0
  Character classes: 0
  Min length: 8
  Max failures: 6
  Failure reset interval: 60
  Lockout duration: 600
19.3. Creating and Editing Password Policies
Note
Note
19.3.1. Creating Password Policies in the Web UI
- Click the Policy tab, and then click the Password Policies subtab.
- All of the policies in the UI are listed by group. The global password policy is defined by the global_policy group. Click the group link.
- Click the Add link at the top.
- In the pop-up box, select the group for which to create the password policy.
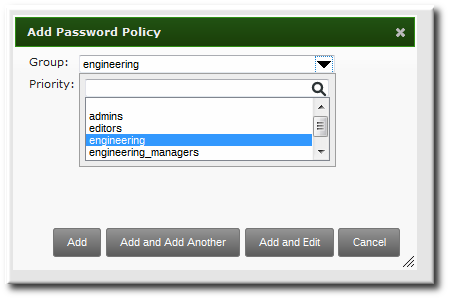
- Set the priority of the policy. The higher the number, the lower the priority. Conversely, the highest priority policy has the lowest number.Only one password policy is in effect for a user, and that is the highest priority policy.

Note
The priority cannot be changed in the UI once the policy is created. - Click the button so that the policy form immediately opens.
- Set the policy fields. Leaving a field blank means that attribute is not added the password policy configuration.
- Max lifetime sets the maximum amount of time, in days, that a password is valid before a user must reset it.
- Min lifetime sets the minimum amount of time, in hours, that a password must remain in effect before a user is permitted to change it. This prevents a user from attempting to change a password back immediately to an older password or from cycling through the password history.
- History size sets how many previous passwords are stored. A user cannot re-use a password that is still in the password history.
- Character classes sets the number of different categories of character that must be used in the password. This does not set which classes must be used; it sets the number of different (unspecified) classes which must be used in a password. For example, a character class can be a number, special character, or capital; the complete list of categories is in Table 19.1, “Password Policy Settings”. This is part of setting the complexity requirements.
- Min length sets how many characters must be in a password. This is part of setting the complexity requirements.
19.3.2. Creating Password Policies with the Command Line
pwpolicy-add command.
[root@server ~]# kinit admin
[root@server ~]# ipa pwpolicy-add groupName --attribute-value[root@server ~]# kinit admin
[root@server ~]# ipa pwpolicy-add exampleGroup --minlife=7 --maxlife=49 --history= --priority=1
Group: exampleGroup
Max lifetime (days): 49
Min lifetime (hours): 7
Priority: 1
Note
19.3.3. Editing Password Policies with the Command Line
*-mod command, pwpolicy-mod, and then the policy name. However, there is one difference with editing password policies: there is a global policy which always exists. Editing a group-level password policy is slightly different than editing the global password policy.
*-mod commands. It uses the pwpolicy-mod command, the name of the policy entry, and the attributes to change. For example:
[jsmith@ipaserver ~]$ ipa pwpolicy-mod exampleGroup --lockouttime=300 --history=5 --minlength=8pwpolicy-mod command with the attributes to change, but without specifying a password policy name. For example:
[jsmith@ipaserver ~]$ ipa pwpolicy-mod --lockouttime=300 --history=5 --minlength=819.4. Managing Password Expiration Limits
- The maximum lifetime setting given in the password policy (
--maxlife) - The actual date that the password for a given user expires (
krbPasswordExpiration)
krbPasswordExpiration attribute value for the user. This can only be done using ldapmodify. For example, for a single user:
[bjensen@ipaserver ~]$ ldapmodify -D "cn=Directory Manager" -w secret -h ipaserver.example.com -p 389 -vv

dn: uid=jsmith,cn=users,cn=accounts,dc=example,dc=com
changetype: modify
replace: krbpasswordexpiration
krbpasswordexpiration: 20140202203734Z
--f option with the ldamodify command.
Note
19.5. Changing the Priority of Group Password Policies
--priority option.
[root@server ~]# kinit admin
[root@server ~]# ipa pwpolicy-mod examplegroup --priority=1019.6. Setting Account Lockout Policies
Note
ipa user-unlock. Refer to Section 9.6, “Unlocking User Accounts After Password Failures”.
19.6.1. In the UI
- Click the Policy tab, and then click the Password Policies subtab.
- Click the name of the policy to edit.
- Set the account lockout attribute values.
 There are three parts to the account lockout policy:
- The number of failed login attempts before the account is locked (Max Failures).
- The time after a failed login attempt before the counter resets (Failure reset interval). Since mistakes do happen honestly, the count of failed attempts is not kept forever; it naturally lapses after a certain amount of time. This is in seconds.
- How long an account is locked after the max number of failures is reached (Lockout duration). This is in seconds.
19.6.2. In the CLI
- The number of failed login attempts before the account is locked (
--maxfail). - How long an account is locked after the max number of failures is reached (
--lockouttime). This is in seconds. - The time after a failed login attempt before the counter resets (
--failinterval). Since mistakes do happen honestly, the count of failed attempts is not kept forever; it naturally lapses after a certain amount of time. This is in seconds.
pwpolicy-add or added later using pwpolicy-mod. For example:
[jsmith@ipaserver ~]$ kinit admin
[jsmith@ipaserver ~]$ ipa pwpolicy-mod examplegroup --maxfail=4 --lockouttime=600 --failinterval=30
19.7. Enabling a Password Change Dialog
- Open the
/etc/ssh/sshd_configfile. - Set
ChallengeResponseAuthenticationtoyes.
Chapter 20. Policy: Managing the Kerberos Domain
Important
kadmin or kadmin.local to manage IdM Kerberos settings.
20.1. About Kerberos
Note
/etc/krb5.keytab file. This host principal is stored within the host record so that local service commands cannot be used with this principal. This prepares the client to function in the IdM realm.
20.1.1. About Principal Names
identifier@REALMservice/FQDN@REALMhost, ldap, http, and dns. Not all services have obvious principal identifiers; the sshd daemon, for example, uses the host service principal.
/etc/krb5.keytab.
www.example.com		CNAME		web-01.example.com
web-01.example.com A 192.0.2.145$ ssh www.example.comweb-01.example.com@EXAMPLE.COM, so the host principal must be host/web-01.example.com@EXAMPLE.COM.
20.1.2. About Protecting Keytabs
/etc/httpd/conf/ipa.keytab) to apache and the mode to 0600.
20.2. Setting Kerberos Ticket Policies
20.2.1. Setting Global Ticket Policies
20.2.1.1. From the Web UI
- Click the Policy tab, and then click the Kerberos Ticket Policy subtab.
- Change the ticket lifetime policies.

- Max renew sets the period after a ticket expires that it can be renewed.
- Max life sets the active period (lifetime) of a Kerberos ticket.
- Click the Update link at the top of the policy page.
- Restart the KDC.
# service krb5kdc restartImportant
Any change to the global Kerberos ticket policy requires a restart of the KDC for the changes to take effect.
20.2.1.2. From the Command Line
ipa krbtpolicy-mod command modifies the policy, while the ipa krbtpolicy-reset command resets the policy to the default values.
# ipa krbtpolicy-mod --maxlife=3600 --maxrenew=18000
  Max life: 3600
  Max renew: 18000
Important
# service krb5kdc restart20.2.2. Setting User-Level Ticket Policies
# ipa krbtpolicy-mod jsmith --maxlife=3600
  Max life: 3600
Important
kinit), without having to restart the KDC service.
20.3. Refreshing Kerberos Tickets
ipa-getkeytab command.
Note
ipa-getkeytab command does not delete the old keytab in case it already exists in the file.
- Find all keytabs issued before the requisite date. For example, this looks for any principals created between midnight on January 1, 2010, and 11:59 PM on December 31, 2010:
# ldapsearch -x -b "cn=computers,cn=accounts,dc=example,dc=com" "(&(krblastpwdchange>=20100101000000)(krblastpwdchange<=20101231235959))" dn krbprincipalname # ldapsearch -x -b "cn=services,cn=accounts,dc=example,dc=com" "(&(krblastpwdchange>=20100101000000)(krblastpwdchange<=20101231235959))" dn krbprincipalname- Host (machine) principals are stored under the
cn=computers,cn=accounts,dc=example,dc=comsubtree. - Service principals are stored under the
cn=services,cn=accounts,dc=example,dc=comsubtree. - Filter by the last change date (
krblastpwdchange). - Limit the search result information to only the entry name and principal by specifying the
dn krbprincipalnameattributes.
Dates are expressed in YYYYMMDD format, and times in HHMMSS format (GMT). - Retrieve a new keytab for the principal using the
ipa-getkeytabcommand. This requires the location of the original keytab for the service or host (-k), the principal (-p), and the IdM server hostname (-s).For example, this refreshes the host principal with a keytab in the default location of/etc/krb5.keytab:# ipa-getkeytab -p host/client.example.com@EXAMPLE.COM -s ipa.example.com -k /etc/krb5.keytabThis refreshes the keytab for the Apache service, with a keytab in the default location of/etc/httpd/conf/ipa.keytab:# ipa-getkeytab -p HTTP/client.example.com@EXAMPLE.COM -s ipa.example.com -k /etc/httpd/conf/ipa.keytab - Regenerate the keytab using
ipa-getkeytabfor every service.
klist command displays the new key version number for the refreshed keytab. The original keytab still exists in the database, and it is listed with the previous KVNO.
# klist -kt /etc/krb5.keytab
Keytab: WRFILE:/etc/krb5.keytab
KVNO Timestamp         Principal
---- ----------------- --------------------------------------------------------
   1 06/09/10 11:23:01 host/client.example.com@EXAMPLE.COM(aes256-cts-hmac-sha1-96)
   2 06/09/11 05:58:47 host/client.example.com@EXAMPLE.COM(aes256-cts-hmac-sha1-96)
   1 03/09/11 13:57:16 krbtgt/EXAMPLE.COM@EXAMPLE.COM(aes256-cts-hmac-sha1-96)
   1 03/09/11 13:57:16 HTTP/ipa.example.com@EXAMPLE.COM(aes256-cts-hmac-sha1-96)
   1 03/09/11 13:57:16 ldap/ipa.example.com@EXAMPLE.COM(aes256-cts-hmac-sha1-96)
Important
ipa-getkeytab command to configure the keytab properly.
20.4. Caching Kerberos Passwords
ipa-client-install script. A configuration parameter is added to the /etc/sssd/sssd.conf file which specifically instructs SSSD to store those Kerberos passwords for the IdM domain:
[domain/example.com]
cache_credentials = True
ipa_domain = example.com
id_provider = ipa
auth_provider = ipa
access_provider = ipa
chpass_provider = ipa
ipa_server = _srv_, server.example.com
krb5_store_password_if_offline = true--no-krb5-offline-passwords option.
/etc/sssd/sssd.conf file and removing the krb5_store_password_if_offline line or changing its value to false.
[domain/example.com]
...
krb5_store_password_if_offline = false20.5. Removing Keytabs
ipa-rmkeytab command. To remove all principals on the host, specify the realm with the -r option:
# ipa-rmkeytab -r EXAMPLE.COM -k /etc/krb5.keytab-p option to specify the service principal:
# ipa-rmkeytab -p ldap/client.example.com -k /etc/krb5.keytabChapter 21. Policy: Using sudo
sudo policies across the IdM domain. The sudo policies apply to domain users and domain hosts.
21.1. About sudo and IPA
sudo utility allows a system administrator to delegate authority to specific users to run specific commands as root or another specified user. The utility provides an audit trail of the commands and their arguments, so access can be tracked.
21.1.1. General sudo Configuration in Identity Management
sudo utility uses a local configuration file, /etc/sudoers, which defines the commands and users with sudo access. While this file can be shared among machines, there is no native way to distribute sudo configuration files among machines.
sudo configuration, which makes it globally available to all domain hosts. Identity Management also has a specialized LDAP schema for sudo entries that allows a lot more flexible and simpler configuration. This schema adds two key features:
- The Identity Management schema supports host groups in addition to netgroups for
sudo, whilesudoonly supports netgroups.For every host group, Identity Management also creates a corresponding shadow netgroup. This allows IdM administrators to createsudorules that reference host groups, while the localsudocommand uses the corresponding netgroup. - Identity Management introduces the concept of a sudo command group. The group contains multiple commands, and the command group can be referenced in the
sudoconfiguration.
sudo does not support host groups and command groups, Identity Management translates the IdM sudo configuration into native sudo configuration when the sudo rules are created.
sudo information is not available anonymously over LDAP by default. Identity Management therefore defines a default sudo user, uid=sudo,cn=sysaccounts,cn=etc,$SUFFIX, which can be set in the LDAP/sudo configuration file, /etc/sudo-ldap.conf.
sudo and Identity Management support user groups as part of the sudo configuration. User groups can be either Unix or non-POSIX groups. Creating non-POSIX groups can result in some access issues because any users in the group inherit non-POSIX rights from the group. Having the choice between Unix and non-POSIX groups allows administrators the choice in group formatting and to avoid problems with inherited permissions or GID information.
21.1.2. sudo and Netgroups
sudo Configuration in Identity Management” mentions, the LDAP schema used for sudo entries in Identity Management supports host group-style groups in addition to netgroups. Really, Identity Management creates two groups, a visible host group and a shadow netgroup. sudo itself only supports NIS-style netgroups for group formats.
sudo uses NIS netgroups, it is not necessary to have a NIS server installed or a NIS client configured. When any group is created for sudo, the NIS object is created in the Directory Server instance, and then the information is retrieved by NSS_LDAP or by SSSD. The client (in this case, sudo) then extracts the required NIS information from the information provided by Identity Management's Directory Server. [7]
sudo configuration requires NIS-formatted netgroups. It does not require NIS.
sudo to work with host groups, use the nisdomainname command to set the NIS domain name to be used with the sudo rules. See Section 21.4, “Configuring Hosts to Use IdM sudo Policies” for details on using nisdomainname as well as setting other configuration features.
21.1.3. Supported sudo Clients
sudo client in IdM.
21.2. Setting up sudo Commands and Command Groups
sudo configuration, any command which will be governed by sudo access must be listed in the configuration. Identity Management adds an extra control measure with sudo command groups, which allow a group of commands to be defined and then applied to the sudo configuration as one.
sudo rule; simply adding a command does not automatically include it in a sudo rule.
21.2.1. Adding sudo Commands
21.2.1.1. Adding sudo Commands with the Web UI
- Click the Policy tab.
- Click the Sudo subtab, and then select the Sudo Commands link.
- Click the Add link at the top of the list of commands.
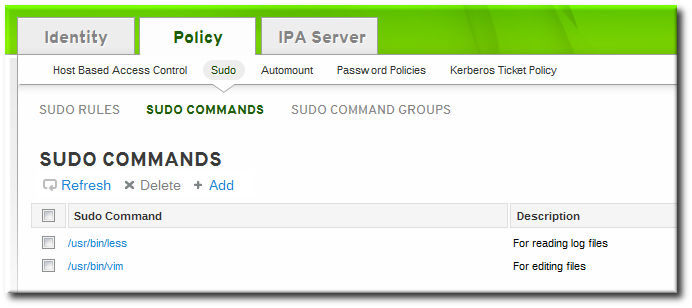
- Enter the full system path and name of the command and, optionally, a description.

- Click the Add and Edit button to go immediately to the settings pages for the command.
- In the Sudo Command Groups tab, click the Add button to add the sudo command to a command group.
- Click the checkbox by the groups for the command to join, and click the right arrows button, , to move the group to the selection box.
- Click the button.
21.2.1.2. Adding sudo Commands with the Command Line
sudocmd-add command. This requires the full, local path to the command executable and a description of the command:
$ ipa sudocmd-add --desc "description" /local/path/to/command$ ipa sudocmd-add --desc 'For reading log files' '/usr/bin/less'
----------------------------------
Added sudo command "/usr/bin/less"
----------------------------------
sudo Command: /usr/bin/less
Description: For reading log files21.2.2. Adding sudo Command Groups
21.2.2.1. Adding sudo Command Groups with the Web UI
- Click the Policy tab.
- Click the Sudo subtab, and then select the Sudo Command Groups link.
- Click the Add link at the top of the list of command groups.
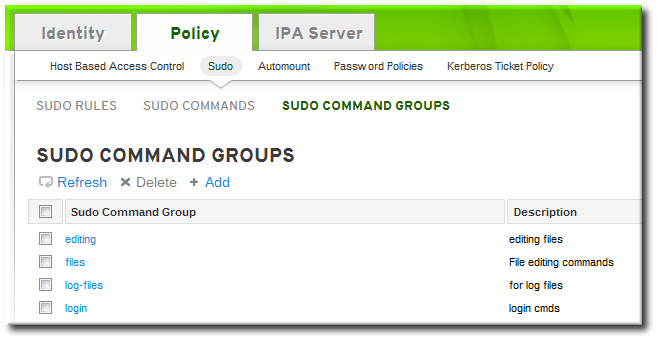
- Enter the name and description for the new command group.

- Click the Add and Edit button to go immediately to the settings pages for the group.
- In the Sudo Commands tab, click the Add button to add a sudo command to the group.

- In the Sudo Commands tab, click the Add button to add a sudo command to the group.
- Click the checkbox by the names of the commands to add, and click the right arrows button, , to move the command to the selection box.

- Click the button.
21.2.2.2. Adding sudo Command Groups with the Command Line
- Create the command group using the
sudocmdgroup-addcommand:$ ipa sudocmdgroup-add --desc 'File editing commands' files ----------------------------------- Added sudo command group "files" ----------------------------------- sudo Command Group: files Description: File editing commands - Create a command entry using the
sudocmd-addcommand:$ ipa sudocmd-add --desc 'For editing files' '/usr/bin/vim' ---------------------------------- Added sudo command "/usr/bin/vim" ---------------------------------- sudo Command: /usr/bin/vim Description: For editing files - Add the command, using its full directory location as its name, to the command group using the
sudocmdgroup-add-membercommand:$ ipa sudocmdgroup-add-member --sudocmds '/usr/bin/vim' files sudo Command Group: files Description: File editing commands Member sudo commands: /usr/bin/vim ------------------------- Number of members added 1 -------------------------
21.3. Defining sudo Rules
sudo rules are in a sense similar to access control rules: they define users who are granted access, the commands which are within the scope of the rule, and then the target hosts to which the rule applies. In IdM, additional information can be configured in the rule, such as sudoers options and run-as settings, but the basic elements always define who, what (services), and where (hosts).
21.3.1. About External Users
sudo rules define four elements: who can do what, where, and as whom. The who is the regular user, and the as whom is the system or other user identity which the user uses to perform tasks. Those tasks are system commands that can be run (or specifically not run) on a target machine.
sudo policy may realistically cover. For example, sudo rules could be used to grant root access to member of the IT group in IdM, and that root user is not a user in IdM. Or, for another example, administrators may want to block access to certain hosts that are on a network but are not part of the IdM domain.
sudo rules in Identity Management support the concept of external users — meaning, users which are stored and exist outside of the IdM configuration.
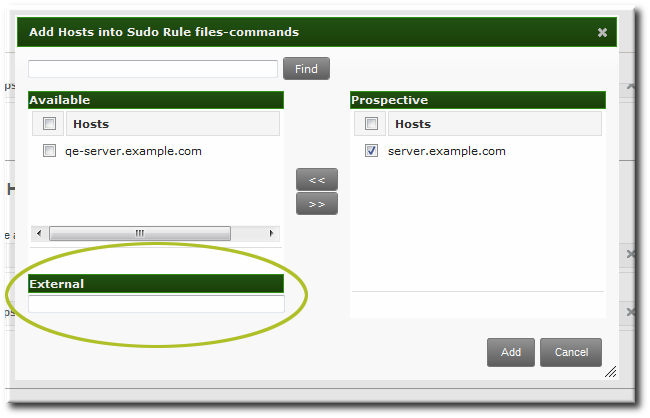
Figure 21.1. External Entities
sudo rule, the user and run-as settings can point to an external identity to be included and evaluated in the sudo rule.
21.3.2. About sudo Options Format
sudo rule can be configured to use any supported sudoers options. The complete list of options is in the sudoers man page.
sudo rule configuration in Identity Management does not allow the same formatting as the configuration in the /etc/sudoers file. Specifically, Identity Management does not allow whitespaces in the options parameter, whether it is set in the UI or the CLI.
/etc/sudoers file, it is permissible to list options in a comma-separated list with spaces between:
mail_badpass, mail_no_host, mail_no_perms, syslog = local2[jsmith@server ~]$ ipa sudorule-add-option readfiles
Sudo Option: mail_badpass
-----------------------------------------------------
Added option "mail_badpass" to Sudo rule "readfiles"
-----------------------------------------------------
[jsmith@server ~]$ ipa sudorule-add-option readfiles
Sudo Option: syslog=local2
-----------------------------------------------------
Added option "syslog=local2" to Sudo rule "readfiles"
-----------------------------------------------------
.../etc/sudoers file are not allowed in the Identity Management configuration.
env_keep = "COLORS DISPLAY EDITOR HOSTNAME HISTSIZE INPUTRC
            KDEDIR LESSSECURE LS_COLORS MAIL PATH PS1 PS2
            QTDIR USERNAME LANG LC_ADDRESS LC_CTYPE LC_COLLATE
            LC_IDENTIFICATION LC_MEASUREMENT LC_MESSAGES
            LC_MONETARY LC_NAME LC_NUMERIC LC_PAPER LC_TELEPHONE
            LC_TIME LC_ALL LANGUAGE LINGUAS _XKB_CHARSET
XAUTHORITY"[jsmith@server ~]$ ipa sudorule-add-option readfiles
Sudo Option: env_keep="COLORS DISPLAY EDITOR HOSTNAME HISTSIZE INPUTRC KDEDIR LESSSECURE LS_COLORS MAIL PATH PS1 PS2 ... XAUTHORITY"sudoers options in Identity Management, configure each one as a separate option setting, rather than all on one line.
21.3.3. Defining sudo Rules in the Web UI
- Click the Policy tab.
- Click the Sudo subtab, and then select the Sudo Rules link.
- Click the Add link at the top of the list of sudo rules.
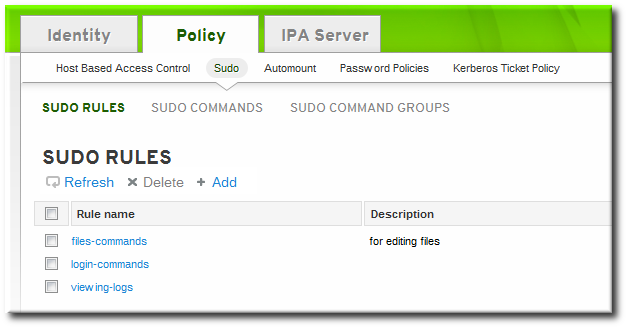
- Enter the name for the rule.
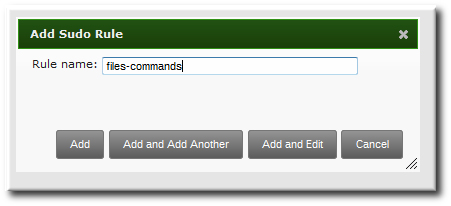
- Click the Add and Edit button to go immediately to set the configuration for the rule.There are a number of configuration areas for the rule. The most basic elements are set in the Who, Access This Host, and Run Commands areas; the others are optional and are used to refine the rule.
- Optional. In the Options area, add any
sudoersoptions. The complete list of options is in thesudoersman page.Note
As described in Section 21.3.2, “About sudo Options Format”, do not use options with whitespace in the values. Rather than adding a list of options in one line, add a single option setting for each desired option.- Click the + Add link at the right of the options list.

- Enter the
sudoersoption.
- Click .
- In the Who area, select the users or user groups to which the sudo rule is applied.
- Click the + Add link at the right of the users list.

- Click the checkbox by the users to add to the rule, and click the right arrows button, , to move the users to the selection box.

- Click .
It is possible to configure both IdM users and external system users (Section 21.3.1, “About External Users”). - In the Access This Host area, select the hosts on which the sudo rule is in effect.
- Click the + Add link at the right of the hosts list.

- Click the checkbox by the hosts to include with the rule, and click the right arrows button, , to move the hosts to the selection box.

- Click .
- In the Run Commands area, select the commands which are included in the sudo rule. The
sudorule can grant access or deny access to commands, and it can grant allow access to one command and also deny access to another.- In the Allow/Deny area, click the + Add link at the right of the commands list.

- Click the checkbox by the commands or command groups to include with the rule, and click the right arrows button, , to move the commands to the selection box.
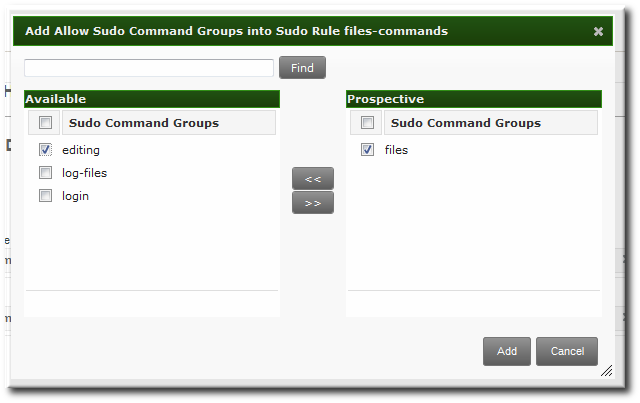
- Click .
- Optional. The sudo rule can be configured to run the given commands as a specific, non-root user.
- In the As Whom area, click the + Add link at the right of the users list.

- Click the checkbox by the users to run the command as, and click the right arrows button, , to move the users to the selection box.

- Click .
21.3.4. Defining sudo Rules in the Command Line
sudo rule command is:
$ ipa sudorule-add* options ruleNameExample 21.1. Creating Basic sudo Rules
sudo configuration is going to grant the right to one user for one command on one host.
[jsmith@server ~]$ kinit admin
[jsmith@server ~]$ ipa sudorule-add files-commands
-----------------------------------
Added sudo rule "files-commands"
-----------------------------------
  Rule name: files-commands
  Enabled: TRUE
--sudocmds, or a group of commands, using --sudocmdgroups.
[jsmith@server ~]$ ipa sudorule-add-allow-command --sudocmds "/usr/bin/vim" files-commands
  Rule name: files-commands
  Enabled: TRUE
  sudo Commands: /usr/bin/vim
-------------------------
Number of members added 1
-------------------------
[jsmith@server ~]$ ipa sudorule-add-host --host server.example.com files-commands
  Rule name: files-commands
  Enabled: TRUE
  Hosts: server.example.com
  sudo Commands: /usr/bin/vim
-------------------------
Number of members added 1
-------------------------sudo as defined in the rule; if no "run-as" user is given, then this user will run the sudo commands as root.
[jsmith@server ~]$ ipa sudorule-add-user --user jsmith files-commands
Rule name: files-commands
Enabled: TRUE
Users: jsmith
Hosts: server.example.com
sudo Commands: /usr/bin/vim"
-------------------------
Number of members added 1
-------------------------
Example 21.2. Allowing and Denying Commands
sudo rule can grant access or deny access to commands. For example, this rule would allow read access to files but prevent editing:
[jsmith@server ~]$ kinit admin
[jsmith@server ~]$ ipa sudorule-add-allow-command --sudocmds "/usr/bin/less" readfiles
[jsmith@server ~]$ ipa sudorule-add-allow-command --sudocmds "/usr/bin/tail" readfiles
[jsmith@server ~]$ ipa sudorule-add-deny-command --sudocmds "/usr/bin/vim" readfilesExample 21.3. Using sudoers Options
sudoers file has a lot of potential flags that can be set to control the behavior of sudo users, like requiring (or not requiring) passwords to offer a user to authenticate to sudo or using fully-qualified domain names in the sudoers file. The complete list of options is in the sudoers man page.
sudo rule using the sudorule-add-option command. When the command is run, it prompts for the option to add:
[jsmith@server ~]$ kinit admin
[jsmith@server ~]$ ipa sudorule-add-option readfiles
Sudo Option: !authenticate
-----------------------------------------------------
Added option "!authenticate" to Sudo rule "readfiles"
-----------------------------------------------------Note
Example 21.4. Running as Other Users
sudo rule also has the option of specifying a non-root user or group to run the commands as. The initial rule has the user or group specified using the --sudorule-add-runasuser or --sudorule-add-runasgroup command, respectively.
$ ipa sudorule-add-runasuser --users=jsmith readfiles
$ ipa sudorule-add-runasgroup --groups=ITadmins readfilessudorule-add-runasuser or sudorule-add-runasgroup command can only set specific users or groups. However, when editing a rule, it is possible to run sudo as all users or all groups by using the --runasusercat or --runasgroupcat option. For example:
$ ipa sudorule-mod --runasgroupcat=all ruleNameNote
--sudorule-add-runasuser and --sudorule-add-runasgroup commands do not support an all option, only specific user or group names. Specifying all users or all groups can only be used with options with the sudorule-mod command.
Example 21.5. Referencing External Users
sudo rule can be an IdM user, but there are many logical and useful rules where one of the referents is a system user. Similarly, a rule may need to grant or deny access to a host machine on the network which is not an IdM client.
sudo policy can refer to an external user — an identity created and stored outside of IdM (Section 21.3.1, “About External Users”).
sudo rule are:
- --externaluser
- --runasexternaluser
$ ipa sudorule-add-user --externaluser=ITAdmin readfiles
$ ipa sudorule-add-runasuser --runasexternaluser=root readfiles| Command | Description |
|---|---|
| sudorule-add | Add a sudo rule entry. |
| sudorule-add-user | Add a user or a user group to the sudo rule. This user (or every member of the group) is then entitled to sudo any of the commands in the rule. |
| sudorule-add-host | Add a target host for the rule. These are the hosts where the users are granted sudo permissions. |
| sudorule-add-runasgroup | Set a group to run the sudo commands as. This must be a specific user; to specify all users, modify the rule using sudo-rule. |
| sudorule-add-runasuser | Set a user to run the sudo commands as. This must be a specific user; to specify all users, modify the rule using sudo-rule. |
| sudorule-add-allow-command | Add a command that users in the rule have sudo permission to run. |
| sudorule-add-deny-command | Add a command that users in the rule are explicitly denied sudo permission to run. |
| sudorule-add-option | Add a sudoers flag to the sudo rule. |
| sudorule-disable | Temporarily deactivate a sudo rule entry. |
| sudorule-enable | Activate a previously suspended sudo rule. |
| sudorule-del | Remove a sudo rule entirely. |
Example 21.6. Adding and Modifying a New sudo Rule from the Command Line
sudo with any command on selected servers:
- Obtain a Kerberos ticket for the
adminuser or any other user allowed to managesudorules.$ kinit admin Password for admin@EXAMPLE.COM: - Add a new
sudorule to IdM.$ ipa sudorule-add new_sudo_rule --desc="Rule for user_group" --------------------------------- Added Sudo Rule "new_sudo_rule" --------------------------------- Rule name: new_sudo_rule Description: Rule for user_group Enabled: TRUE - Define the who: specify the group of users who will be entitled to use the
sudorule.$ ipa sudorule-add-user new_sudo_rule --groups=user_group Rule name: new_sudo_rule Description: Rule for user_group Enabled: TRUE User Groups: user_group ------------------------- Number of members added 1 ------------------------- - Define the where: specify the group of hosts where the users will be granted the
sudopermissions.$ ipa sudorule-add-host new_sudo_rule --hostgroups=host_group Rule name: new_sudo_rule Description: Rule for user_group Enabled: TRUE User Groups: user_group Host Groups: host_group ------------------------- Number of members added 1 ------------------------- - Define the what: to allow the users to run any
sudocommand, add theallcommand category to the rule.$ ipa sudorule-mod new_sudo_rule --cmdcat=all ------------------------------ Modified Sudo Rule "new_sudo_rule" ------------------------------ Rule name: new_sudo_rule Description: Rule for user_group Enabled: TRUE Command category: all User Groups: user_group Host Groups: host_group - To let the
sudocommands be executed as root, do not specify any run-as users or groups. - Add the
!authenticatesudoersoption to specify that the users will not be required to authenticate when using thesudocommand.$ ipa sudorule-add-option new_sudo_rule Sudo Option: !authenticate ----------------------------------------------------- Added option "!authenticate" to Sudo Rule "new_sudo_rule" ----------------------------------------------------- Rule name: new_sudo_rule Description: Rule for user_group Enabled: TRUE Command category: all User Groups: user_group Host Groups: host_group Sudo Option: !authenticate - Display the new
sudorule configuration to verify it is correct.$ ipa sudorule-show new_sudo_rule Rule name: new_sudo_rule Description: Rule for user_group Enabled: TRUE Command category: all User Groups: user_group Host Groups: host_group Sudo Option: !authenticate
21.3.5. Suspending and Removing sudo Rules
sudo rules can either be temporarily deactivated or entirely deleted from the web UI or from the command line. Suspended rules are removed from the ou=sudoers compat tree without a need for a server restart.
Suspending and Removing sudo Rules from the Web UI
sudo rules:
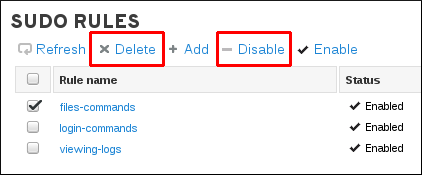
Figure 21.2. Suspending or Deleting a sudo Rule from the Web UI
Suspending and Removing sudo Rules from the Command Line
ipa sudorule-disable files-commandsipa sudorule-del files-commands21.4. Configuring Hosts to Use IdM sudo Policies
sudo policies is more complicated than simply creating the rules in IdM. Those rules need to be applied to every local machine, which means that each system in the IdM domain has to be configured to refer to IdM for its policies.
sudo policies to hosts using SSSD or LDAP. Red Hat strongly recommends to use the SSSD-based configuration.
21.4.1. Applying the sudo Policies to Hosts Using SSSD
- Set up the host and
sudoentries in IdM.- Set up the
sudocommands and command groups, as described in Section 21.2, “Setting up sudo Commands and Command Groups”. - Set up the
sudorules, as described in Section 21.3, “Defining sudo Rules”. - Optional. Set up a host group, as described in Section 10.7, “Managing Host Groups”.
- Optional. Create a user group and add the users, as described in Section 9.11.2.1, “Creating User Groups”.
- Configure every system in the IdM domain to use SSSD for
sudorules.Note
Only perform this step on systems based on Red Hat Enterprise Linux 6.5 and earlier. In Red Hat Enterprise Linux 6.6 and later, theipa-client-installutility configures SSSD as the data provider forsudoautomatically.- Configure
sudoto look to SSSD for thesudoersfile.vim /etc/nsswitch.conf sudoers: files sssLeaving thefilesoption in place allowssudoto check its local configuration before checking SSSD for the IdM configuration. - Add
sudoto the list of services managed by the local SSSD client.[root@server ~]# vim /etc/sssd/sssd.conf [sssd] config_file_version = 2 services = nss, pam, sudo domains = IPADOMAIN - Set a name for the NIS domain in the
sudoconfiguration.sudouses NIS-style netgroups, so the NIS domain name must be set in the system configuration forsudoto be able to find the host groups used in the IdMsudoconfiguration.- Set the NIS domain name to use with the
sudorules.[root@server ~]# nisdomainname example.com - Configure the system authentication settings to persist the NIS domain name. For example:
[root@server ~]# echo "NISDOMAIN=example.com.com" >> /etc/sysconfig/networkThis updates the/etc/sysconfig/networkand/etc/yp.conffiles with the NIS domain.
Note
Even thoughsudouses NIS-style netgroups, it is not necessary to have a NIS server installed. Netgroups require that a NIS domain be named in their configuration, sosudorequires that a NIS domain be named for netgroups. However, that NIS domain does not actually need to exist.
- Optionally, enable debugging in SSSD to show what LDAP settings it is using.
[domain/IPADOMAIN] debug_level = 6 ....The LDAP search base used by SSSD for operations is recorded in thesssd_DOMAINNAME.logfile.
21.4.2. Applying the sudo Policies to Hosts Using LDAP
Important
sudo Policies to Hosts Using SSSD”.
- Set up the host and sudo entries in IdM.
- Optional. Set up a host group, as described in Section 10.7, “Managing Host Groups”.
- Optional. Create a user group and add the users, as described in Section 9.11.2.1, “Creating User Groups”.
- Set up the
sudocommands and command groups, as described in Section 21.2, “Setting up sudo Commands and Command Groups”. - Set up the
sudorules, as described in Section 21.3, “Defining sudo Rules”.
- Set up a bind (authenticated) user by setting a password for the default IdM
sudouser. The user must be able to authenticate to the server; anonymous access is not supported forsudopolicies.Using LDAP tools, set the password for thesudouser,uid=sudo,cn=sysaccounts,cn=etc,dc=example,dc=com. For example:[jsmith@server ~]$ ldappasswd -Y GSSAPI -S -h ipaserver.example.com uid=sudo,cn=sysaccounts,cn=etc,dc=example,dc=com New password: Re-enter new password: Enter LDAP Password: - Configure every system in the IdM domain to use SSSD for sudo rules.
- Configure
sudoto look to LDAP for thesudoersfile.vim /etc/nsswitch.conf sudoers: files ldapLeaving thefilesoption in place allowssudoto check its local configuration before checking the LDAP-based IdM configuration. - Enable debug logging for
sudooperations in the/etc/ldap.conffile. If this file does not exist, it can be created.vim /etc/ldap.conf sudoers_debug: 1Note
Adding thesudoers_debugparameter helps with troubleshooting. Valid values for this parameter are 0, 1, and 2. Thesudodocumentation at http://www.gratisoft.us/sudo/readme_ldap.html has more information on debugging the process. - Edit the NSS/LDAP configuration file and add the following
sudo-related lines to the/etc/sudo-ldap.conffile:binddn uid=sudo,cn=sysaccounts,cn=etc,dc=example,dc=com bindpw sudo_password ssl start_tls tls_cacertfile /etc/ipa/ca.crt tls_checkpeer yes bind_timelimit 5 timelimit 15 uri ldap://ipaserver.example.com ldap://backup.example.com:3890 sudoers_base ou=SUDOers,dc=example,dc=comMultiple LDAP servers can be configured in a space-separated list, and other options (like SSL and non-standard ports) can be used with the LDAP URL. ThesudoLDAP configuration is covered in the sudooers.ldap(8) man page.Important
Theuridirective must give the fully-qualified domain name of the LDAP server, not an IP address. Otherwise,sudofails to connect to the LDAP server. - Optional. Enable debugging in SSSD to show what LDAP settings it is using.
[root@server ~]# vim /etc/sssd/sssd.conf [domain/LDAPDOMAIN] debug_level = 6 ....The LDAP search base used by SSSD for operations is recorded in thesssd_DOMAINNAME.logfile. - Set a name for the NIS domain in the
sudoconfiguration.sudouses NIS-style netgroups, so the NIS domain name must be set in the system configuration forsudoto be able to find the host groups used in the IdMsudoconfiguration.- Set the NIS domain name to use with the
sudorules.[root@server ~]# nisdomainname example.com - Configure the system authentication settings to persist the NIS domain name. For example:
[root@server ~]# echo "NISDOMAIN=example.com" >> /etc/sysconfig/networkThis updates the/etc/sysconfig/networkand/etc/yp.conffiles with the NIS domain.
Note
Even thoughsudouses NIS-style netgroups, it is not necessary to have a NIS server installed. Netgroups require that a NIS domain be named in their configuration, sosudorequires that a NIS domain be named for netgroups. However, that NIS domain does not actually need to exist.
Chapter 22. Policy: Configuring Host-Based Access Control
Note
22.1. About Host-Based Access Control

Figure 22.1. Host Groups and Host-Based Access Control
Note
allow all access control rule which allows access for every host within the domain to every host within the domain.
allow all rule, run ipa-server-install with the --no_hbac_allow option.
- Hosts, or target hosts, within the IdM domain.
- Services on the target hosts. Multiple services can be combined into service groups. The service group can be modified without having to edit the access control rule itself.
Note
all.
22.2. Creating Host-Based Access Control Entries for Services and Service Groups
22.2.1. Adding HBAC Services
22.2.1.1. Adding HBAC Services in the Web UI
- Click the Policy tab.
- Click the Host-Based Access Control subtab, and then select the HBAC Services link.
- Click the Add link at the top of the list of services.

- Enter the service name and a description.
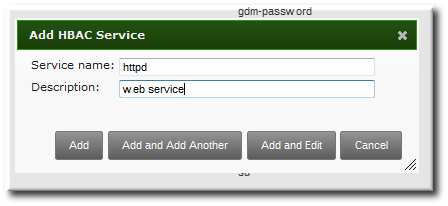
- Click the Add button to save the new service.
- If a service group already exists, then add the service to the desired group, as described in Section 22.2.2.1, “Adding Service Groups in the Web UI”.
22.2.1.2. Adding Services in the Command Line
hbacsvc-add command, specifying the service by the name that PAM uses to evaluate the service.
tftp service:
# ipa hbacsvc-add --desc="TFTP service" tftp
-------------------------
Added HBAC service "tftp"
-------------------------
Service name: tftp
Description: TFTP servicehbacsvcgroup-add-member command, as in Section 22.2.2.2, “Adding Service Groups in the Command Line”.
22.2.2. Adding Service Groups
22.2.2.1. Adding Service Groups in the Web UI
- Click the Policy tab.
- Click the Host-Based Access Control subtab, and then select the HBAC Service Groups link.
- Click the Add link at the top of the list of service groups.

- Enter the service group name and a description.
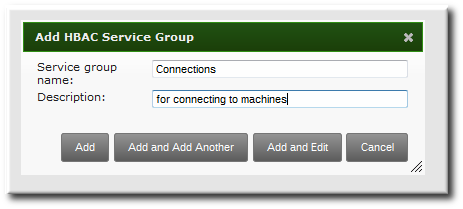
- Click the Add and Edit button to go immediately to the service group configuration page.
- At the top of the HBAC Services tab, click the Add link.
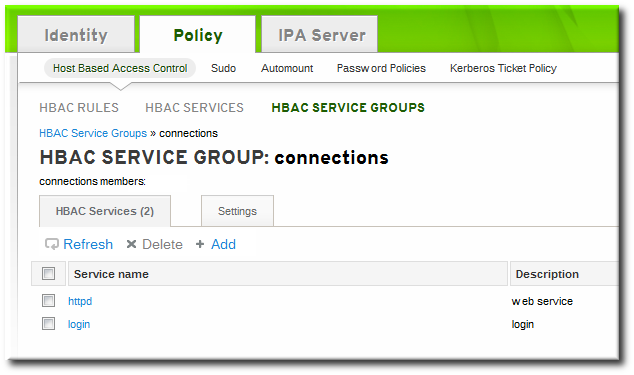
- Click the checkbox by the names of the services to add, and click the right arrows button, , to move the command to the selection box.

- Click the button to save the group membership.
22.2.2.2. Adding Service Groups in the Command Line
[jsmith@server ~]$ kinit admin
[jsmith@server ~]$ ipa hbacsvcgroup-add --desc="login services" login
--------------------------------
Added HBAC service group "login"
--------------------------------
Service group name: login
Description: login services
[jsmith@server ~]$ ipa hbacsvc-add --desc="SSHD service" sshd
-------------------------
Added HBAC service "sshd"
-------------------------
Service name: sshd
Description: SSHD service
[jsmith@server ~]$ ipa hbacsvcgroup-add-member --hbacsvcs=sshd login
Service group name: login
Description: login services
-------------------------
Number of members added 1
-------------------------Note
SUDO for sudo services and FTP for services which provide FTP access.
22.3. Defining Host-Based Access Control Rules
22.3.1. Setting Host-Based Access Control Rules in the Web UI
- Click the Policy tab.
- Click the Host-Based Access Control subtab, and then select the HBAC Rules link.
- Click the Add link at the top of the list of host-based access control rules.
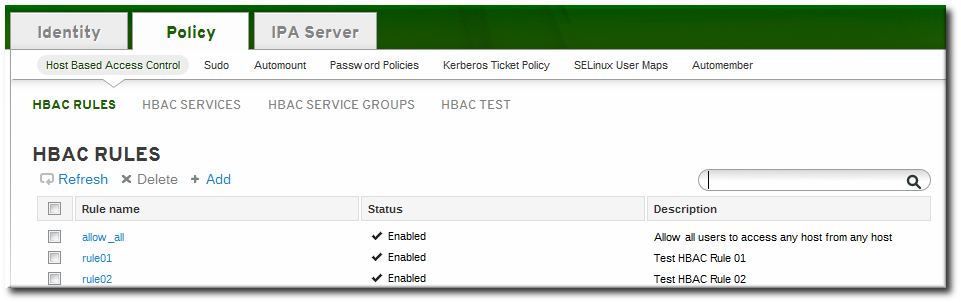
- Enter the name for the rule.

- Click the Add and Edit button to go immediately to set the configuration for the rule.There are a number of configuration areas for the rule. The three basic elements are who the rule applies to, what hosts allow access (the target), and, optionally, what services can be accessed.
- In the Who area, select the users or user groups to which the access control rule is applied.To apply the rule to all IdM users, select the Anyone radio button.To apply the rule to a specific set of users or user groups:
- Select the Specified Users and Groups radio button.
- Click the + Add link at the right of the users list.

- Click the checkbox by the users to add to the rule, and click the right arrows button, , to move the users to the selection box.

- Click .
- In the Accessing area, select the target hosts which can be accessed through this access control rule.To apply the rule to all IdM hosts, select the Any Host radio button.To apply the rule to a specific set of hosts or host groups:
- Select the Specified Hosts and Groups radio button.
- Click the + Add link at the right of the hosts list.

- Click the checkbox by the hosts to include with the rule, and click the right arrows button, , to move the hosts to the selection box.

- Click .
- In the Via Service area, select specific services on the target hosts which the users are allowed to use to access target machines.To apply the rule to all IdM hosts, select the Any Service radio button.To apply the rule to a specific set of hosts or host groups:
- Select the Specified Services and Groups radio button.
- Click the + Add link at the right of the commands list.

- Click the checkbox by the services or groups to include with the rule, and click the right arrows button, , to move the services to the selection box.
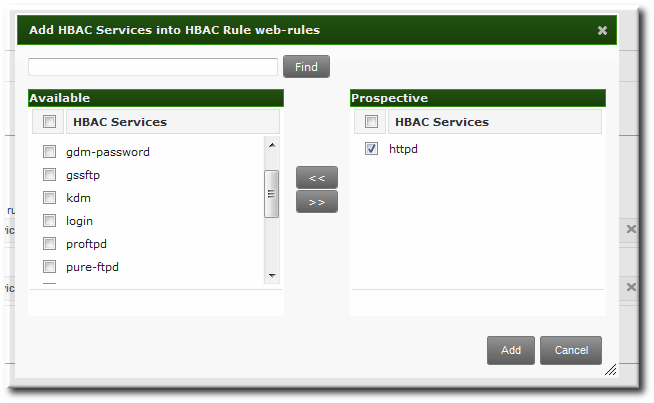
- Click .
22.3.2. Setting Host-Based Access Control Rules in the Command Line
hbacrule-* commands (listed in Table 22.1, “Host-Based Access Control Command and Options”). The first step is to create a container entry; from there, users, hosts, and services can be added to the access control entry.
$ ipa hbacrule-add* options ruleNameNote
--usercat=all.
Example 22.1. Granting All Access to One Host
$ ipa hbacrule-add --usercat=all allGroup
--------------------------
Added HBAC rule "allGroup"
--------------------------
Rule name: allGroup
User category: all
Enabled: TRUEhbacrule-add-host command:
$ ipa hbacrule-add-host --hosts=server.example.com allGroup
Rule name: allGroup
User category: all
Enabled: TRUE
Successful hosts/hostgroups:
member host: server.example.com
-------------------------
Number of members added 1
-------------------------
Example 22.2. Adding Control for a Single User to a Service
$ ipa hbacrule-add --hostcat=all sshd-jsmithhbacrule-add-user command:
$ ipa hbacrule-add-user --users=jsmith sshd-jsmithhbacsvc-add command.) This is the service that the user can use to connect to the machine.
$ ipa hbacrule-add-service --hbacsvcs=sshd sshd-jsmithExample 22.3. Adding a Service Group to the Rule
hbacrule-add-service command, only with the --hbacsvcgroups option that specifies the group name.
$ ipa hbacrule-add-service --hbacsvcgroups=login loginRule| Command | Description | Arguments | Source or Target Entry |
|---|---|---|---|
| hbacrule-add | Adds a new host-based access control rule. |
| |
| hbacrule-add-host | Adds a target host to the access control rule. A target host can be accessed by other servers and users in the domain. |
| Target |
| hbacrule-add-service | Adds a service type to the rule. |
| Target |
| hbacrule-add-user | Adds a user to the access control rule. The user is then able to access any allowed target host or service within the domain. |
| Source |
| hbacrule-disable | hbacrule-enable | Disables or enables a host-based access control rule. Rules can be disabled if their behavior needs to be evaluated (for troubleshooting or to test a new rule). | ruleName, which is the rule to disable or enable |
22.4. Testing Host-Based Access Control Rules
hbactest command can test different host-based access control scenarios to make sure that the rules are working as expected.
Note
hbactest command does not work with trusted Active Directory users. Active Directory user/group associations are determined dynamically, as a user logs in, and those data are not stored in the IdM LDAP directory. The hbactest command, then, is unable to resolve the group memberships to check how access control rules will be applied.
22.4.1. The Limits of Host-Based Access Control Configuration
- A new rule needs to be tested before it is implemented.
- There are problems with the existing rules, and the testing tool can identify what rule is behaving badly.
- A subset of existing rules can be tested to see how they are performing.
22.4.2. Test Scenarios for Host-Based Access Control (CLI-Based)
Note
hbactest command does not work with trusted Active Directory users. Active Directory user/group associations are determined dynamically, as a user logs in, and those data are not stored in the IdM LDAP directory. The hbactest command, then, is unable to resolve the group memberships to check how access control rules will be applied.
hbactest command tests configured host-based access control rules in very specific situations. A test run defines:
- The user to run the operation as to test the rule performance for that user (
--user). - Using the login client Y (
--service). - To target host Z (
--host). - The rule to test (
--rules); if this is not used, then all enabled rules are tested. - Optional The
hbactestreturns detailed information about which rules were matched, not matched, or invalid. This detailed rule output can be disabled using--nodetail, so the test simply runs and returns whether access was granted.
Note
hbactest script does not actually connect to the target host. Instead, it uses the rules within the IdM database to simulate how those rules would be applied in a specific situation as if an SSSD client were connecting to the IdM server.
Example 22.4. Testing All Active Rules
[jsmith@server ~]$ kinit admin
[jsmith@server ~]$ ipa hbactest --user=jsmith --host=target.example.com --service=ssh
--------------------
Access granted: True
--------------------
Matched rules: allow_all
Matched rules: sshd-jsmith
Matched rules: web-rules
Not matched rules: allGroupExample 22.5. Testing a Specific Rule
[jsmith@server ~]$ kinit admin
[jsmith@server ~]$ ipa hbactest --user=jsmith --host=target.example.com --service=ssh --rules=myrule
---------------------
Access granted: True
---------------------
notmatched: myruleExample 22.6. Testing Specific Rules Plus All Enabled
--rules option lists specific rules to test, but it may be useful to test the specified rules against all of the enabled rules in the domain. This can be done by adding the --enabled option, which includes the (unspecified) enabled rules along with the specified rules.
[jsmith@server ~]$ kinit admin
[jsmith@server ~]$ ipa hbactest --user=jsmith --host=target.example.com --service=ssh --rules=myrule --enabled
--------------------
Access granted: True
--------------------
matched: my-second-rule
notmatched: my-third-rule
matched: myrule
matched: allow_all--disabled option. With the --rules option, the specified rule plus all of the disabled rules are checked. With the --disabled option, all disabled rules are checked.
22.4.3. Testing Host-Based Access Control Rules in the UI
Note
hbactest command does not work with trusted Active Directory users. Active Directory user/group associations are determined dynamically, as a user logs in, and those data are not stored in the IdM LDAP directory. The hbactest command, then, is unable to resolve the group memberships to check how access control rules will be applied.
- The user to run the operation as to test the rule performance for that user (Who).
- To target host Z (Accessing).
- Using the login client Y (Via Service).
- The rule to test; if this is not used, then all enabled rules are tested (Rules).

Figure 22.2. The From Tab to Set up an HBAC Test
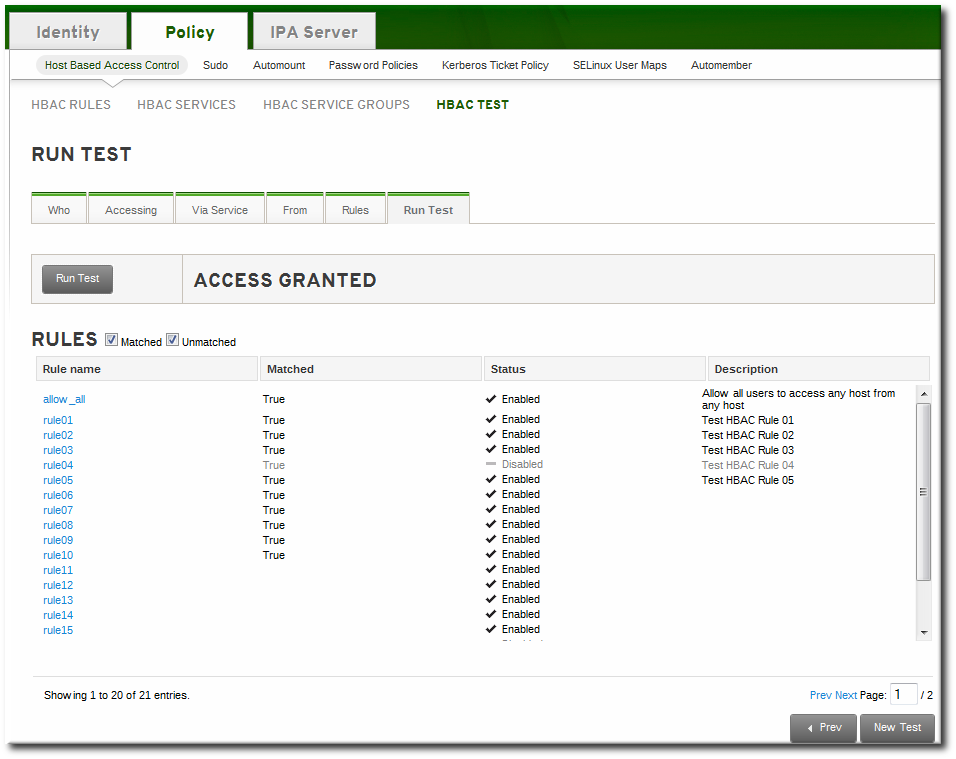
Figure 22.3. HBAC Test Results
Note
Chapter 23. Policy: Group Policy Object Access Control
Note
Warning
23.1. Configuring GPO-Based Access Control
/etc/sssd/sssd.conf file. The ad_gpo_access_control option specifies the mode in which the GPO-based access control runs. It can be set to the following values:
ad_gpo_access_control = permissive- The
permissivevalue specifies that GPO-based access control is evaluated but not enforced; asyslogmessage is recorded every time access would be denied. This is the default setting. ad_gpo_access_control = enforcing- The
enforcingvalue specifies that GPO-based access control is evaluated and enforced. ad_gpo_access_control = disabled- The
disabledvalue specifies that GPO-based access control is neither evaluated nor enforced.
Important
ad_gpo_access_control to enforcing mode, it is recommended to ensure that ad_gpo_access_control is set to permissive mode and examine the logs. By reviewing the syslog messages, you can test and adjust the current GPO settings as necessary before finally setting the enforcing mode.
sssd.conf file:
- The
ad_gpo_map_*options and thead_gpo_default_rightoption configure which PAM services are mapped to specific Windows logon rights. - The
ad_gpo_cache_timeoutoption specifies the interval during which subsequent access control requests can reuse the files stored in the cache, instead of retrieving them from the DC anew.
Chapter 24. Policy: Defining SELinux User Maps
24.1. About Identity Management, SELinux, and Mapping Users
Note
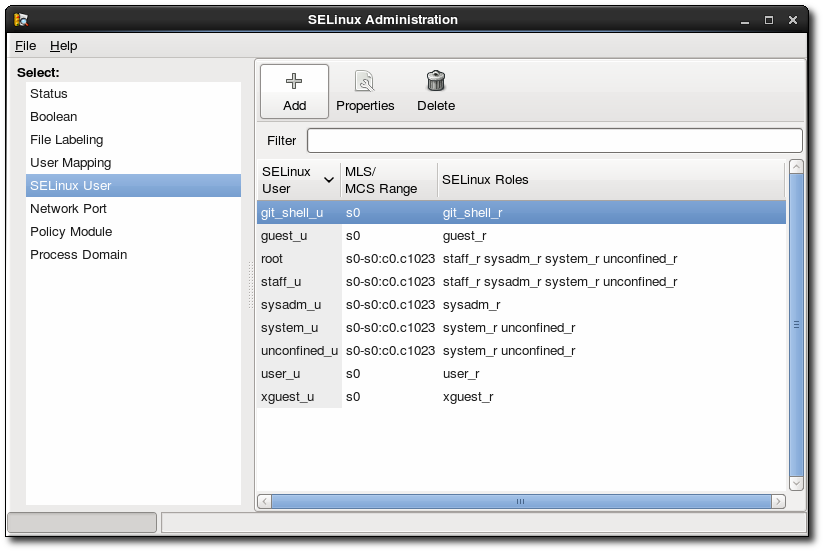
Figure 24.1. SELinux Users in the SELinux Manager
- Remote users can be granted appropriate SELinux user contexts based on their IdM group assignments. This also allows administrators to consistently apply the same policies to the same users without having to create local accounts or reconfigure SELinux.
- SELinux users are automatically updated as hosts are added to the IT environment or as users are added, removed, or changed, without having to edit local systems.
- SELinux policies can be planned and related to domain-wide security policies through settings like IdM host-based access control rules.
- Administrators gain environment-wide visibility and control over how users and systems are assigned in SELinux.
pam_selinux module. When a remote user attempts to log into a machine, SSSD checks its IdM identity provider to collect the user information, including any SELinux maps. The PAM module then processes the user and assigns it the appropriate SELinux user context.
- unconfined_u (also used as a default for IdM users)
- guest_u
- xguest_u
- user_u
- staff_u
Note
24.2. Configuring SELinux User Map Order and Defaults
SELinux_username:MLS[:MCS]Note
24.2.1. In the Web UI
- In the top menu, click the IPA Server main tab and the Configuration subtab.
- Scroll to the bottom of the list of server configuration areas, to SELINUX OPTIONS.
- Set the SELinux user configuration.There are two areas that can be edited: the prioritized list of SELinux users and the default SELinux user to use for unmapped IdM users.The SELinux user map order gives the list of SELinux users, defined on the local Linux system , which are available for configuring mapping rules. This is a prioritized list, from most to least confined. Each SELinux user has the format SELinux_user:MLS.The Default SELinux user field sets the SELinux user to use for unmapped IdM users.

- Click the Update link at the top of the page to save the changes.
24.2.2. In the CLI
[jsmith@server ~]$ ipa config-show
...
SELinux user map order: guest_u:s0$xguest_u:s0$user_u:s0$staff_u:s0-s0:c0.c1023$unconfined_u:s0-s0:c0.c1023
Default SELinux user: unconfined_u:s0-s0:c0.c1023config-mod command.
Example 24.1. List of SELinux Users
--ipaselinuxusermaporder option. This list sets a priority order, from most to least confined users.
SELinux_user:MLS:MCS[jsmith@server ~]$ ipa config-mod --ipaselinuxusermaporder="unconfined_u:s0-s0:c0.c1023$guest_u:s0$xguest_u:s0$user_u:s0-s0:c0.c1023$staff_u:s0-s0:c0.c1023"Note
Example 24.2. Default SELinux User
unconfined_u.
--ipaselinuxusermapdefault. For example:
[jsmith@server ~]$ ipa config-mod --ipaselinuxusermapdefault="guest_u:s0"24.3. Mapping SELinux Users and IdM Users
24.3.1. In the Web UI
- In the top menu, click the Policy main tab and the SELinux User Mappings subtab.
- In the list of mappings, click the button to create a new map.

- Enter the name for the map and the SELinux user exactly as it appears in the IdM server configuration. SElinux users have the format SELinux_username:MLS[:MCS].

- Click to add the IdM user information.
- To set a host-based access control rule, select the rule from the drop-down menu in the General area of the configuration. Using a host-based access control rule also introduces access controls on what hosts a remote user can use to access a target machine. Only one host-based access control rule can be assigned.
Note
The host-based access control rule must contain users and hosts, not just services. Alternatively, scroll down the Users and Hosts areas, and click the Add link to assign users, user groups, hosts, or host groups to the SELinux map.
 Select the users (or hosts or groups) on the left, click the right arrows button () to move them to the Prospective column, and click the button to add them to the rule.
Note
Either a host-based access control rule can be given or the users and hosts can be set manually. Both options cannot be used at the same time. - Click the Update link at the top to save the changes to the SELinux user map.
24.3.2. In the CLI
- The SELinux user (
--selinuxuser) - The user or user groups which are associated with the SELinux user (
--usersor--groups) - The host or host groups which are associated with the SELinux user (
--hostsor--hostgroups) - Alternatively, a host-based access control rule which specifies both hosts and users in it (
--hbacrule)
selinuxusermap-add command. Users and hosts can be added to a rule after it is created by using the selinuxusermap-add-user and selinuxusermap-add-host commands, respectively.
Example 24.3. Creating a New SELinux Map
--selinuxuser value must be the SELinux user name exactly as it appears in the IdM server configuration. SElinux users have the format SELinux_username:MLS[:MCS].
[jsmith@server ~]$ ipa selinuxusermap-add --users=jsmith,bjensen,jrockford --hosts=server.example.com,test.example.com --selinuxuser="xguest_u:s0" selinux1Example 24.4. Creating an SELinux Map with a Host-Based Access Control Rule
--hbacrule value identifies the host-based access control rule to use for mapping. Using a host-based access control rule introduces access controls on what hosts a remote user can use to access a target machine, along with applying SELinux contexts after the remote user has logged into the target machine.
[jsmith@server ~]$ ipa selinuxusermap-add --hbacrule=webserver --selinuxuser="xguest_u:s0" selinux1Example 24.5. Adding a User to an SELinux Map
selinuxusermap-add-user or selinuxusermap-add-host.
[jsmith@server ~]$ ipa selinuxusermap-add-user --users=jsmith selinux1selinuxusermap-mod command is used with the --hbacrule option, it adds the host-based access control rule or overwrites the previous one.
Example 24.6. Removing a User from an SELinux Map
selinuxusermap-remove-host or selinuxusermap-remove-user command. For example:
[jsmith@server ~]$ ipa selinuxusermap-remove-user --users=jsmith selinux1Chapter 25. Policy: Defining Automatic Group Membership for Users and Hosts
25.1. About Automembership
ipausers group. Even if custom groups are configured and all policy configuration is in place, users and hosts cannot take advantage of those policies until they are joined to groups. Of course, this can be done manually, but it is both more efficient and more consistent if group membership can be assigned automatically.
- Adding all hosts or all users to a single global group.
- Adding employees to specific groups based on their employee type, ID number, manager, or physical location.
- Dividing hosts based on their IP address or subnet.
Note
- What groups will be used in the Identity Management
- What specific groups different types of users and hosts need to belong to to perform their designated functions
- What delineating attributes can be used to filter users and hosts into the appropriate groups
25.2. Defining Automembership Rules (Basic Procedure)
25.2.1. From the Web UI
- Create the user group (Section 9.11.2.1, “Creating User Groups”) or host group (Section 10.7.1.1, “Creating Host Groups from the Web UI”).
- Open the Policy tab, and select the Automembers subtab.
- In the top of the Automembers area, select the type of autogroup to create, either USER GROUP RULES or HOST GROUP RULES.
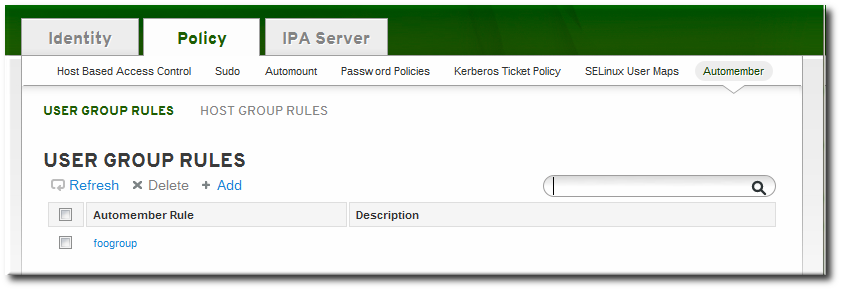
- In the drop-down menu, select the group for which to create the automember rule.

- Click the button.
- In the edit page for the rule, click the + Add by the type of condition to create to identify entries.
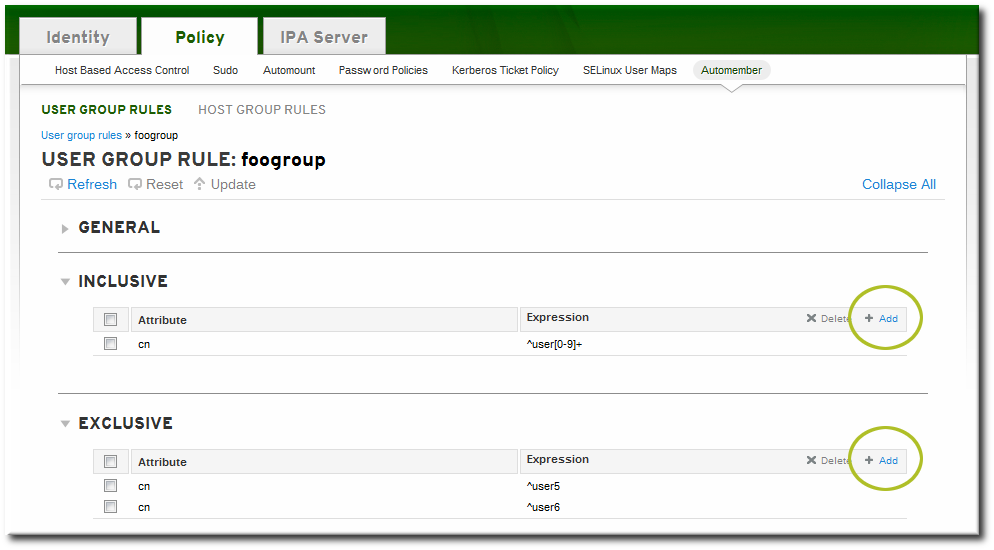
- Select the attribute to use as the basis for the search and then set the regular expression to use to match the attribute value.Conditions can look for entries either to include in the group or to explicitly exclude from the group. The format of a condition is a Perl-compatible regular expression (PCRE). For more information on PCRE patterns, see the pcresyntax(3) man page.
Note
Exclude conditions are evaluated first and take precedence over include conditions.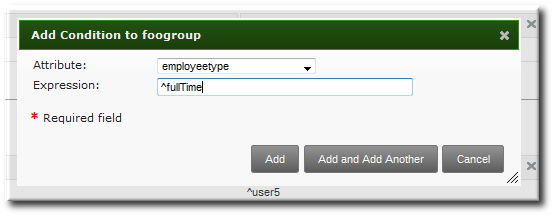
- Click to add another condition. A single rule can have multiple include and exclude conditions. When all conditions have been configured, click the Add button to save the last condition and close the dialog window.
25.2.2. From the CLI
- A command to target the group as an automember group,
automember-add - A command to add regular expression conditions to identify group members,
automember-add-condition
- Create the user group (Section 9.11.2.1.2, “With the Command Line”) or host group (Section 10.7.1.2, “Creating Host Groups from the Command Line”).
- Create the automember rule entry for the group. Use the
--typeto identify whether the target group is a user group (group) or a host group (hostgroup). This command has the format:ipa automember-add --type=group|hostgroup groupNameFor example:[jsmith@server ~]$ ipa automember-add --type=group exampleGroup - Create the conditions for the rule. To set multiple patterns, either give a comma-separated list of patterns in the
--inclusive-regex|--exclusive-regexoptions or run the command multiple times.This command has the format:ipa automember-add-condition --type=group|hostgroup --key=attribute --inclusive-regex=regex | --exclusive-regex=regex groupNameAs with the automember rule, the condition must specify the type of group (--type) and the name of the target group (groupName).The condition must also specify the attribute (the key) and any patterns for the attribute value. The--keyis the attribute name that is the focus of the condition. Then, there is a regular expression pattern to identify matching values; matching entries can either be included (--inclusive-regex) or excluded (--exclusive-regex) from the group. Exclusion rules take precedence.For example, to include all employees with Barbara Jensen as a manager, but excluding the temporary employees:[jsmith@server ~]$ ipa automember-add-condition --type=group --key=manager --inclusive-regex=^uid=bjensen$ exampleGroup [jsmith@server ~]$ ipa automember-add-condition --type=group --key=employeetype --exclusive-regex=^temp exampleGroupNote
The regular expression can match any part of the string. Using a caret (^) means that it must match at the beginning, and using a dollar sign ($) means that it must match at the end. Wrapping the pattern in ^ and $ means that the string as a whole must match.For more information on Perl-compatible regular expression (PCRE) patterns, see the pcresyntax(3) man page.
[jsmith@server ~]$ ipa automember-remove-condition --key=fqdn --type=hostgroup --inclusive-regex=^web[1-9]+\.example\.com webserversautomember-del command.
25.3. Examples of Using Automember Groups
Note
One common environment requirement is to have some sort of default group that users or hosts are added to. There are a couple of different ways to approach that.
- All entries can be added to a single, global group regardless of what other groups they are also added to.
- Entries can be added to specific automember groups. If the new entry does not match any autogroup, then it is added to a default or fallback group.
25.3.1. Setting an All Users/Hosts Rule
cn or fqdn) which all entries will contain.
.*. For example, to add all hosts to the same host group:
[jsmith@server ~]$ ipa automember-add-condition --type=hostgroup allhosts --inclusive-regex=.* --key=fqdn
--------------------------------
Added condition(s) to "allhosts"
--------------------------------
Automember Rule: allhosts
Inclusive Regex: fqdn=.*
----------------------------
Number of conditions added 1
----------------------------allhosts group:
[jsmith@server ~]$ ipa host-add test.example.com
-----------------------------
Added host "test.example.com"
-----------------------------
Host name: test.example.com
Principal name: host/test.example.com@EXAMPLE.COM
Password: False
Keytab: False
Managed by: test.example.com
[jsmith@server ~]$ ipa hostgroup-show allhosts
Host-group: allhosts
Description: Default hostgroup
Member hosts: test.example.com25.3.2. Defining Default Automembership Groups
automember-default-group-set. This sets the group name (--default-group) and group type(--type), similar to an automember rule, but there is no condition to match. By definition, default group members are unmatched entries.
[jsmith@server ~]$ ipa automember-default-group-set --default-group=ipaclients --type=hostgroup
[jsmith@server ~]$ ipa automember-default-group-set --default-group=ipausers --type=groupautomember-default-group-remove command. Since there is only one default group for a group type, it is only necessary to give the group type, not the group name:
[jsmith@server ~]$ ipa automember-default-group-remove --type=hostgroup25.3.3. Using Automembership Groups with Windows Users
ipausers group (which is the default group for all new users, apart from any automember group). However, when a Windows user is synced over from Active Directory, that user is not automatically added to the ipausers group.
ipausers group, as with users created in Identity Management, by using an automember group. Every Windows user is added with the ntUser object class; that object class can be used as an inclusive filter to identify new Windows users to add to the automember group.
ipausers group as an automember group:
[jsmith@server ~]$ ipa automember-add --type=group ipausersntUser object class as a condition to add users:
[jsmith@server ~]$ ipa automember-add-condition ipausers --key=objectclass --type=group --inclusive-regex=ntUserChapter 26. Policy: Restricting Domains for PAM services
pam_ldap were able to use a separate configuration file as a parameter for a PAM module. This chapter describes a similar feature for SSSD.
- pam_trusted_users (for
sssd.conf) - This option accepts a list of numerical UIDs or user names that are to be trusted by the SSSD daemon. The default value is the special keyword
all, which means all users are trusted. This is in line with the current behavior where any user can access any domain. - pam_public_domains (for
sssd.conf) - This option accepts a comma-separated list of SSSD domains accessible even for untrusted users. Two special keywords,
allandnone, are also available. The default value isnoneto make sure that when the administrator starts differentiating between trusted and untrusted domains, he or she is required to manually specify the domains that can be accessed by an untrusted client. - domains (for individual PAM module configuration)
- This option accepts a list of domains to which a PAM service will be restricted to authenticate against. The setting interacts with the
domains=option in the/etc/sssd/sssd.conffile, which specifies the list of domains in the order SSSD will query. The PAM module configuration cannot add to this list but can restrict it by specifying a shorter list.
Example 26.1. Sample PAM Module Configuration
/etc/pam.d/ configuration file has the following form:
module-type control-flag module-path argumentsopenldap domain and the pam_env module to set/unset environment variables is allowed for all users.
$ cat /etc/pam.d/sss_test
auth required pam_sss.so domains=openldap
account required pam_sss.so domains=openldap
session required pam_sss.so domains=openldap
password required pam_sss.so domains=openldap
/etc/sssd/sssd.conf can look like this:
[sssd]
domains = ipa, openldap # the list can be restricted by specific PAM module configuration
[pam]
pam_public_domains = ipa # all users are allowed to access the ipa domain
pam_trusted_users = root, sss_test # root and sss_test are allowed to run PAMChapter 27. Configuration: Defining Access Control for IdM Users
27.1. About Access Controls for IdM Entries
27.1.1. A Brief Look at Access Control Concepts
- Who can perform the operation. This is the entity who is being granted permission to do something; this is the actor. In LDAP access control models, this is called the bind rule because it defines who the user is (based on their bind information) and can optionally require other limits on the bind attempt, such as restricting attempts to a certain time of day or a certain machine.
- What can be accessed. This defines the entry which the actor is allowed to perform operations on. This is the target of the access control rule.
- What type of operation can be performed. The last part is determining what kinds of actions the user is allowed to perform. The most common operations are add, delete, write, read, and search. In Identity Management, all users are implicitly granted read and search rights to all entries in the IdM domain, with restrictions only for sensitive attributes like passwords and Kerberos keys. (Anonymous users are restricted from seeing security-related configuration, like
sudorules and host-based access control.)The only rights which can be granted are add, delete, and write — the permissions required to modify an entry.
27.1.2. Access Control Methods in Identity Management
- Self-service rules, which define what operations a user can perform on his own personal entry. The access control type only allows write permissions to attributes within the entry; it does not allow add or delete operations for the entry itself.
- Delegation rules, which allow a specific user group to perform write (edit) operations on specific attributes for users in another user group. Like self-service rules, this form of access control rule is limited to editing the values of specific attributes; it does not grant the ability to add or remove whole entries or control over unspecified attributes.
- Role-based access control, which creates special access control groups which are then granted much broader authority over all types of entities in the IdM domain. Roles can be granted edit, add, and delete rights, meaning they can be granted complete control over entire entries, not just selected attributes.Some roles are already created and available within Identity Management. Special roles can be created to manage any type of entry in specific ways, such as hosts, automount configuration, netgroups, DNS settings, and IdM configuration.
27.2. Defining Self-Service Settings
- A rule for editing some general attributes in the personal entry, including given name and surname, phone numbers, and addresses.
- A rule to edit personal passwords, including two Samba passwords, the Kerberos password, and the general user password.
- A rule to manage personal SSH keys.
27.2.1. Creating Self-Service Rules from the Web UI
- Open the IPA Server tab in the top menu, and select the Self Service Permissions subtab.
- Click the Add link at the top of the list of self-service ACIs.
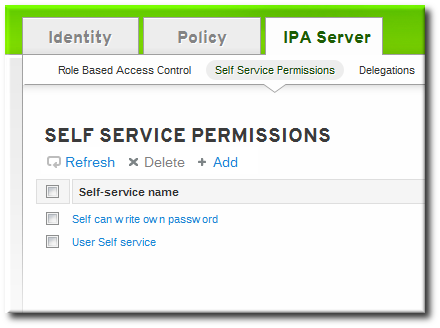
- Enter the name of the rule in the pop-up window. Spaces are allowed.

- Select the checkboxes by the attributes which this ACI will permit users to edit.
- Click the Add button to save the new self-service ACI.
27.2.2. Creating Self-Service Rules from the Command Line
selfservice-add command. There are two required options, --permissions to set whether the ACI grants write, add, or delete permission and --attrs to give the full list of attributes which this ACI grants permission to.
$ ipa selfservice-add "Users can manage their own name details" --permissions=write --attrs=givenname,displayname,title,initials
-----------------------------------------------------------
Added selfservice "Users can manage their own name details"
-----------------------------------------------------------
Self-service name: Users can manage their own name details
Permissions: write
Attributes: givenname, displayname, title, initials27.2.3. Editing Self-Service Rules
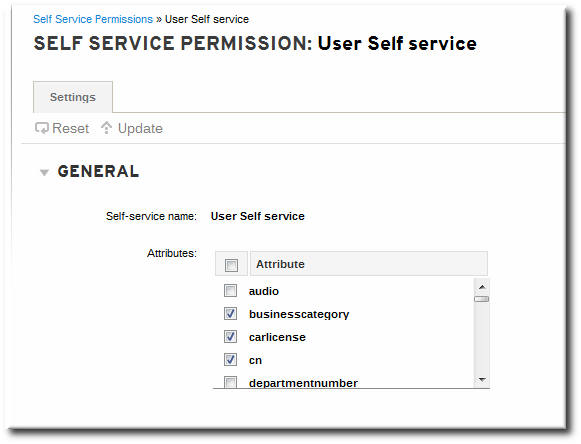
Figure 27.1. Self-Service Edit Page
ipa selfservice-mod command. The --attrs option overwrites whatever the previous list of supported attributes was, so always include the complete list of attributes along with any new attributes.
$ ipa selfservice-mod "Users can manage their own name details" --attrs=givenname,displayname,title,initials,surname
--------------------------------------------------------------
Modified selfservice "Users can manage their own name details"
--------------------------------------------------------------
Self-service name: Users can manage their own name details
Permissions: write
Attributes: givenname, displayname, title, initialsImportant
27.3. Delegating Permissions over Users
27.3.1. Delegating Access to User Groups in the Web UI
- Open the IPA Server tab in the top menu, and select the Delegations subtab.
- Click the Add link at the top of the list of delegation ACIs.

- Name the new delegation ACI.
- Set the permissions by selecting the checkboxes whether users will have the right to view the given attributes (read) and add or change the given attributes (write).Some users may have a need to see information, but should not be able to edit it.
- In the User group drop-down menu, select the group who is being granted permissions to the entries of users in the user group.

- In the Member user group drop-down menu, select the group whose entries can be edited by members of the delegation group.
- In the attributes box, select the checkboxes by the attributes to which the member user group is being granted permission.
- Click the Add button to save the new delegation ACI.
27.3.2. Delegating Access to User Groups in the Command Line
delegation-add command. There are three required arguments:
--group, the group who is being granted permissions to the entries of users in the user group.--membergroup, the group whose entries can be edited by members of the delegation group.--attrs, the attributes which users in the member group are allowed to edit.
$ ipa delegation-add "basic manager attrs" --attrs=manager,title,employeetype,employeenumber --group=engineering_managers --membergroup=engineering
--------------------------------------
Added delegation "basic manager attrs"
--------------------------------------
Delegation name: basic manager attrs
Permissions: write
Attributes: manager, title, employeetype, employeenumber
Member user group: engineering
User group: engineering_managersdelegation-mod command. The --attrs option overwrites whatever the previous list of supported attributes was, so always include the complete list of attributes along with any new attributes.
$ ipa delegation-mod "basic manager attrs" --attrs=manager,title,employeetype,employeenumber,displayname
-----------------------------------------
Modified delegation "basic manager attrs"
-----------------------------------------
Delegation name: basic manager attrs
Permissions: write
Attributes: manager, title, employeetype, employeenumber, displayname
Member user group: engineering
User group: engineering_managersImportant
27.4. Defining Role-Based Access Controls
- The permission. The permission defines a specific operation or set of operations (write, add, or delete) and the target entries within the IdM LDAP directory to which those operations apply. Permissions are building blocks; they can be assigned to multiple privileges as needed.
- The privileges available to a role. A privilege is essentially a group of permissions. Permissions are not applied directly to a role. Permissions are added to a privilege so that the privilege creates a coherent and complete picture of a set of access control rules. For example, a permission can be created to add, edit, and delete automount locations. Then that permission can be combined with another permission relating to managing FTP services, and they can be used to create a single privilege that relates to managing filesystems.
- The role. This is the list of IdM users who are able to perform the actions defined in the privileges.
27.4.1. Creating Roles
27.4.1.1. Creating Roles in the Web UI
- Open the IPA Server tab in the top menu, and select the Role Based Access Control subtab.
- Click the Add link at the top of the list of role-based ACIs.

- Enter the role name and a description.

- Click the button to save the new role and go to the configuration page.
- At the top of the Users tab, or in the Users Groups tab when adding groups, click the Add link.

- Select the users on the left and use the button to move them to the assigned box.

- Open the Privileges tab in the role configuration page.
- Click the Add link at the top of the list of privileges to add a new privilege.

- Select the privileges on the left and use the button to move them to the assigned box.

- Click the button to save.
27.4.1.2. Creating Roles in the Command Line
- Add the new role:
[root@server ~]# kinit admin [root@server ~]# ipa role-add --desc="User Administrator" useradmin ------------------------ Added role "useradmin" ------------------------ Role name: useradmin Description: User Administrator - Add the required privileges to the role:
[root@server ~]# ipa role-add-privilege --privileges="User Administrators" useradmin Role name: useradmin Description: User Administrator Privileges: user administrators ---------------------------- Number of privileges added 1 ---------------------------- - Add the required groups to the role. In this case, we are adding only a single group,
useradmin, which already exists.[root@server ~]# ipa role-add-member --groups=useradmins useradmin Role name: useradmin Description: User Administrator Member groups: useradmins Privileges: user administrators ------------------------- Number of members added 1 -------------------------
27.4.2. Creating New Permissions
27.4.2.1. Creating New Permissions from the Web UI
- Open the IPA Server tab in the top menu, and select the Role Based Access Control subtab.
- Select the Permissions task link.
- Click the Add link at the top of the list of permissions.

- Enter the name of the new permission.
- Select the checkboxes next to the allowed operations for this permission.

- Select the method to use to identify the target entries from the Target drop-down menu. There are four different methods:
- Type looks for an entry type like user, host, or service and then provides a list of all possible attributes for that entry type. The attributes which will be accessible through this ACI are selected from the list.
- Filter uses an LDAP filter to identify which entries the permission applies to.
- Subtree targets every entry beneath the specified subtree entry. All attributes within the matching entries can be modified.
- Target group specifies a user group, and all the user entries within that group are available through the ACI. All attributes within the matching entries can be modified.
- Fill in the required information to identify the target entries, depending on the selected type.
- For Filter, Subtree, and Target group targets, click the Add link to add attributes that are included in the permission. A single attribute is added at a time; to add multiple attributes, click the Add again to add another field.If no attributes are set for the permission then, by default, all attributes are excluded.
- Click the button to save the permission.
27.4.2.2. Creating New Permissions from the Command Line
permission-add command. All permissions require a list of attributes over which permission is granted (--attr), a list of allowed actions (--permissions), and the target entries for the ACI. There are four methods to identify the target entries:
- --type looks for an entry type like user, host, or service and then provides a list of all possible attributes for that entry type.
- --filter uses an LDAP filter to identify which entries the permission applies to.
- --subtree targets every entry beneath the specified subtree entry.
- --targetgroup specifies a user group, and all the user entries within that group are available through the ACI.
Example 27.1. Adding a Permission with a Filter
$ ipa permission-add "manage Windows groups" --filter="(!(objectclass=posixgroup))" --permissions=write --attrs=descriptionNote
permission-add command does not validate the given LDAP filter. Verify that the filter returns the expected results before configuring the permission.
Example 27.2. Adding a Permission for a Subtree
$ ipa permission-add "manage automount locations" --subtree="ldap://ldap.example.com:389/cn=automount,dc=example,dc=com" --permissions=write --attrs=automountmapname,automountkey,automountInformationExample 27.3. Adding a Permission Based on Object Type
- user
- group
- host
- service
- hostgroup
- netgroup
- dnsrecord
$ ipa permission-add "manage service" --permissions=all --type=service --attrs=krbprincipalkey,krbprincipalname,managedby--attrs) must exist and be allowed attributes for the given object type, or the permission operation fails with schema syntax errors.
27.4.3. Creating New Privileges
27.4.3.1. Creating New Privileges from the Web UI
- Open the IPA Server tab in the top menu, and select the Role Based Access Control subtab.
- Select the Privileges task link.
- Click the Add link at the top of the list of privileges.
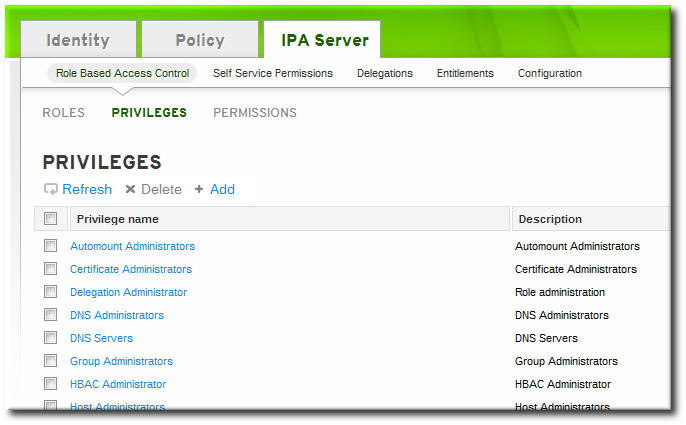
- Enter the name and a description of the privilege.

- Click the button to go to the privilege configuration page to add permissions.
- Select the Permissions tab.
- Click the Add link at the top of the list of permissions to add permission to the privilege.

- Click the checkbox by the names of the permissions to add, and click the right arrows button, , to move the permissions to the selection box.
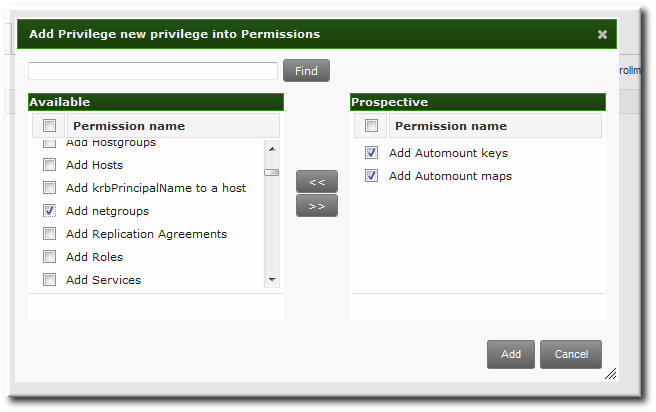
- Click the button.
27.4.3.2. Creating New Privileges from the Command Line
privilege-add command, and then permissions are added to the privilege group using the privilege-add-permission command.
- Create the privilege entry.
$ ipa privilege-add "managing filesystems" --desc="for filesystems" - Assign the desired permissions. For example:
$ ipa privilege-add-permission "managing filesystems" --permissions="managing automount","managing ftp services"
Chapter 28. Configuration: Configuring IdM Servers and Replicas
28.1. Identity Management Files and Logs
28.1.1. A Reference of IdM Server Configuration Files and Directories
| Directory or File | Description | ||
|---|---|---|---|
| Server Configuration | |||
| /etc/ipa/ | The main IdM configuration directory. | ||
| /etc/ipa/default.conf | The primary configuration file for IdM. | ||
| /etc/ipa/server.conf | An optional configuration file for IdM. This does not exist by default, but can be created to load custom configuration when the IdM server is started. | ||
| /etc/ipa/cli.conf | An optional configuration file for IdM command-line tools. This does not exist by default, but can be created to apply custom configuration when the ipa is used. | ||
| /etc/ipa/ca.crt | The CA certificate issued by the IdM server's CA. | ||
| ~/.ipa/ | A user-specific IdM directory that is created on the local system in the system user's home directory the first time the user runs an IdM command. | ||
| IdM Logs | |||
| ~/.ipa/log/cli.log | The log file for errors returned by XML-RPC calls and responses by the IdM command-line tools. This is created in the home directory for the system user who runs the tools, who may have a different name than the IdM user. | ||
| /var/log/ipaclient-install.log | The installation log for the client service. | ||
| /var/log/ipaserver-install.log | The installation log for the IdM server. | ||
| /etc/logrotate.d/ | The log rotation policies for DNS, SSSD, Apache, Tomcat, and Kerberos. | ||
| System Services | |||
| /etc/rc.d/init.d/ipa/ | The IdM server init script. | ||
| Web UI | |||
| /etc/ipa/html/ | A symlink directory in the main configuration directory for the HTML files used by the IdM web UI. | ||
| The configuration files used by the Apache host for the web UI application. | ||
| /etc/httpd/conf/ipa.keytab | The keytab file used by the web UI service. | ||
| /usr/share/ipa/ | The main directory for all of the HTML files, scripts, and stylesheets used by the web UI. | ||
| The configuration files used by the Apache host for the web UI application. | ||
| /usr/share/ipa/updates/ | Contains any updated files, schema, and other elements for Identity Management. | ||
| /usr/share/ipa/html/ | Contains the HTML files, JavaScript files, and stylesheets used by the web UI. | ||
| /usr/share/ipa/ipaclient/ | Contains the JavaScript files used to access Firefox's autoconfiguration feature and set up the Firefox browser to work in the IdM Kerberos realm. | ||
| /usr/share/ipa/migration/ | Contains HTML pages, stylesheets, and Python scripts used for running the IdM server in migration mode. | ||
| /usr/share/ipa/ui/ | Contains all of the scripts used by the UI to perform IdM operations. | ||
| /var/log/httpd/ | The log files for the Apache web server. | ||
| Kerberos | |||
| /etc/krb5.conf | The Kerberos service configuration file. | ||
| SSSD | |||
| /usr/share/sssd/sssd.api.d/sssd-ipa.conf | The configuration file used to identify the IdM server, IdM Directory Server, and other IdM services used by SSSD. | ||
| /var/log/sssd/ | The log files for SSSD. | ||
| 389 Directory Server | |||
| /var/lib/dirsrv/slapd-REALM_NAME/ | All of the schema, configuration, and database files associated with the Directory Server instance used by the IdM server. | ||
| /var/log/dirsrv/slapd-REALM_NAME/ | Log files associated with the Directory Server instance used by the IdM server. | ||
| Dogtag Certificate System | |||
| /etc/pki-ca/ | The main directory for the IdM CA instance. | ||
| /var/lib/pki-ca/conf/CS.cfg | The main configuration file for the IdM CA instance. | ||
| /var/lib/dirsrv/slapd-PKI-IPA/ | All of the schema, configuration, and database files associated with the Directory Server instance used by the IdM CA. | ||
| /var/log/dirsrv/slapd-PKI-IPA/ | Log files associated with the Directory Server instance used by the IdM CA. | ||
| Cache Files | |||
| /var/cache/ipa/ | Cache files for the IdM server and the IdM Kerberos password daemon. | ||
| System Backups | |||
| /var/lib/ipa/sysrestore/ | Contains backups of all of the system files and scripts that were reconfigured when the IdM server was installed. These include the original .conf files for NSS, Kerberos (both krb5.conf and kdc.conf), and NTP. | ||
| /var/lib/ipa-client/sysrestore/ | Contains backups of all of the system files and scripts that were reconfigured when the IdM client was installed. Commonly, this is the sssd.conf file for SSSD authentication services. | ||
28.1.2. IdM Domain Services and Log Rotation
logrotate service to handle log rotation and compression:
- named (DNS)
- httpd (Apache)
- tomcat6
- sssd
- krb5kdc (Kerberos domain controller)
logrotate defaults for the rotation schedule (weekly) and the archive of logs (four, for four weeks' worth of logs).
Example 28.1. Default httpd Log Rotation File
[root@server ~]# cat /etc/logrotate.d/httpd
/var/log/httpd/*log {
missingok
notifempty
sharedscripts
delaycompress
postrotate
/sbin/service httpd reload > /dev/null 2>/dev/null || true
endscript
}logrotate configuration or in the individual policies. The logrotate settings are covered in the logrotate manpage.
Warning
create rules. All of the services create a new log file with the same name, default owner, and default permissions as the previous log. For the named and tomcat6 logs, the create is set with explicit permissions and user/group ownership.
[root@server ~]# cat /etc/logrotate.d/named
/var/named/data/named.run {
missingok
create 0644 named named
postrotate
/sbin/service named reload 2> /dev/null > /dev/null || true
endscript
}28.1.3. About default.conf and Context Configuration Files
default.conf file. This configuration file is referenced when the IdM client and servers start and every time the ipa command is run to supply information as operations are performed.
default.conf file are simple attribute=value pairs. The attributes are case-insensitive and order-insensitive.
[global]
basedn=dc=example,dc=com
realm=EXAMPLE.COM
domain=example.com
xmlrpc_uri=https://server.example.com/ipa/xml
ldap_uri=ldapi://%2fvar%2frun%2fslapd-EXAMPLE-COM.socket
enable_ra=True
ra_plugin=dogtag
mode=productionserver.conf and cli.conf file can be created to create different options when the IdM server is started or when the ipa command is run, respectively. The IdM server checks the server.conf and cli.conf files first, and then checks the default.conf file.
/etc/ipa directory apply to all users for the system. Users can set individual overrides by creating default.conf, server.conf, or cli.conf files in their local IdM directory, ~/.ipa/. This optional file is merged with default.conf and used by the local IdM services.
28.1.4. Checking IdM Server Logs
| Service | Log File | Description | Additional Information | ||||
|---|---|---|---|---|---|---|---|
| IdM server | /var/log/ipaserver-install.log | Server installation log | |||||
| IdM server | ~/.ipa/log/cli.log | Command-line tool log | |||||
| IdM client | /var/log/ipaclient-install.log | Client installation log | |||||
| Apache server |
| These are standard access and error logs for Apache servers. Both the web UI and the XML-RPC command-line interface use Apache, so some IdM-specific messages will be recorded in the error log along with the Apache messages. | Apache log chapter | ||||
| Dogtag Certificate System | /var/log/pki-ca-install.log | The installation log for the IdM CA. | |||||
| Dogtag Certificate System |
| These logs mainly relate to certificate operations. In IdM, this is used for service principals, hosts, and other entities which use certificates. | Logging chapter | ||||
| 389 Directory Server |
| The access and error logs both contain detailed information about attempted access and operations for the domain Directory Server instance. The error log setting can be changed to provide very detailed output. | The access log is buffered, so the server only writes to the log every 30 seconds, by default. | ||||
| 389 Directory Server |
| This directory server instance is used by the IdM CA to store certificate information. Most operational data here will be related to server-replica interactions. | The access log is buffered, so the server only writes to the log every 30 seconds, by default. | ||||
| Kerberos | /var/log/krb5libs.log | This is the primary log file for Kerberos connections. | This location is configured in the krb5.conf file, so it could be different on some systems. | ||||
| Kerberos | /var/log/krb5kdc.log | This is the primary log file for the Kerberos KDC server. | This location is configured in the krb5.conf file, so it could be different on some systems. | ||||
| Kerberos | /var/log/kadmind.log | This is the primary log file for the Kerberos administration server. | This location is configured in the krb5.conf file, so it could be different on some systems. | ||||
| DNS | /var/log/messages | DNS error messages are included with other system messages. | DNS logging is not enabled by default. DNS logging is enabled by running the querylog command:
/var/log/messages file. To turn off logging, run the querylog command again. |
28.1.4.1. Enabling Server Debug Logging
server.conf file.
Note
default.conf configuration file affects all IdM components, not only the IdM server.
- Edit or create the
server.conffile.vim server.conf - Add the
debugline and set its value to true.[global] debug=True - Restart the Apache daemon to load the changes.
service httpd restart
28.1.4.2. Debugging Command-Line Operations
ipa command can return debug information by using the -v option. For example:
$ ipa -v user-show admin
ipa: INFO: trying https://ipaserver.example.com/ipa/xml
First name: John
Last name: Smythe
User login [jsmythe]:
ipa: INFO: Forwarding 'user_add' to server u'https://ipaserver.example.com/ipa/xml'
--------------------
Added user "jsmythe"
--------------------
User login: jsmythe
First name: John
Last name: Smythe
Full name: John Smythe
Display name: John Smythe
Initials: JS
Home directory: /home/jsmythe
GECOS field: John Smythe
Login shell: /bin/sh
Kerberos principal: jsmythe@EXAMPLE.COM
UID: 1966800003
GID: 1966800003
Keytab: False
Password: False
-vv, displays the XML-RPC exchange:
$ ipa -vv user-add
ipa: INFO: trying https://ipaserver.example.com/ipa/xml
First name: Jane
Last name: Russell
User login [jrussell]:
ipa: INFO: Forwarding 'user_add' to server u'https://ipaserver.example.com/ipa/xml'
send: u'POST /ipa/xml HTTP/1.0\r\nHost: ipaserver.example.com\r\nAccept-Language: en-us\r\nAuthorization: negotiate YIIFgQYJKoZIhvcSAQICAQBuggVwMIIFbKADAgEFoQMCAQ6iBwMFACAAAACjggGHYYIBgzCCAX+gAwIBBaEZGxdSSFRTLkVORy5CT1MuUkVESEFULkNPTaI5MDegAwIBA6EwMC4bBEhUVFAbJmRlbGwtcGUxODUwLTAxLnJodHMuZW5nLmJvcy5yZWRoYXQuY29to4IBIDCCARygAwIBEqEDAgECooIBDgSCAQpV2YEWv03X+SENdUBfOhMFGc3Fvnd51nELV0rIB1tfGVjpNlkuQxXKSfFKVD3vyAUqkii255T0mnXyTwayE93W1U4sOshetmG50zeU4KDmhuupzQZSCb5xB0KPU4HMDvP1UnDFJUGCk9tcqDJiYE+lJrEcz8H+Vxvvl+nP6yIdUQKqoEuNhJaLWIiT8ieAzk8zvmDlDzpFYtInGWe9D5ko1Bb7Npu0SEpdVJB2gnB5vszCIdLlzHM4JUqX8p21AZV0UYA6QZOWX9OXhqHdElKcuHCN2s9FBRoFYK83gf1voS7xSFlzZaFsEGHNmdA0qXbzREKGqUr8fmWmNvBGpDiR2ILQep09lL56JqSCA8owggPGoAMCARKiggO9BIIDuarbB67zjmBu9Ax2K+0klSD99pNv97h9yxol8c6NGLB4CmE8Mo39rL4MMXHeOS0OCbn+TD97XVGLu+cgkfVcuIG4PMMBoajuSnPmIf7qDvfa8IYDFlDDnRB7I//IXtCc/Z4rBbaxk0SMIRLrsKf5wha7aWtN1JbizBMQw+J0UlN8JjsWxu0Ls75hBtIDbPf3fva3vwBf7kTBChBsheewSAlck9qUglyNxAODgFVvRrXbfkw51Uo++9qHnhh+zFSWepfv7US7RYK0KxOKFd+uauY1ES+xlnMvK18ap2pcy0odBkKu1kwJDND0JXUdSY08MxK2zb/UGWrVEf6GIsBgu122UGiHp6C+0fEu+nRrvtORY65Bgi8E1vm55fbb/9dQWNcQheL9m6QJWPw0rgc+E5SO99ON6x3Vv2+Zk17EmbZXinPd2tDe7fJ9cS9o/z7Qjw8z8vvSzHL4GX7FKi2HJdBST3nEgOC8PqO46UnAJcA8pf1ZkwCK9xDWH+5PSph6WnvpRqugqf/6cq+3jk3MEjCrx+JBJ8QL6AgN3oEB4kvjZpAC+FfTkdX59VLDwfL/r0gMw3ZNk0nLLCLkiiYUMTEHZBzJw9kFbsX3LmS8qQQA6rQ2L782DYisElywfZ/0Sax8JO/G62Zvy7BHy7SQSGIvcdAOafeNyfxaWM1vTpvSh0GrnllYfs3FhZAKnVcLYrlPTapR23uLgRMv+0c9wAbwuUDfKgOOl5vAd1j55VUyapgDEzi/URsLdVdcF4zigt4KrTByCwU2/pI6FmEPqB2tsjM2A8JmqA+9Nt8bjaNdNwCOWE0dF50zeL9P8oodWGkbRZLk4DLIurpCW1d6IyTBhPQ5qZqHJWeoGiFa5y94zBpp27goMPmE0BskXT0JQmveYflOeKEMSzyiWPL2mwi7KEMtfgCpwTIGP2LRE/QxNvPGkwFfO+PDjZGVw+APKkMKqclVXxhtJA/2NmBrO1pZIIJ9R+41sR/QoACcXIUXJnhrTwwR1viKCB5Tec87gN+e0Cf0g+fmZuXNRscwJfhYQJYwJqdYzGtZW+h8jDWqa2EPcDwIQwyFAgXNQ/aMvh1yNTECpLEgrMhYmFAUDLQzI2BDnfbDftIs0rXjSC0oZn/Uaoqdr4F5syOrYAxH47bS6MW8CxyylreH8nT2qQXjenakLFHcNjt4M1nOc/igzNSeZ28qW9WSr4bCdkH+ra3BVpT/AF0WHWkxGF4vWr/iNHCjq8fLF+DsAEx0Zs696Rg0fWZy079A\r\nUser-Agent: xmlrpclib.py/1.0.1 (by www.pythonware.com)\r\nContent-Type: text/xml\r\nContent-Length: 1240\r\n\r\n'
send: "<?xml version='1.0' encoding='UTF-8'?>\n<methodCall>\n<methodName>user_add</methodName>\n<params>\n<param>\n<value><array><data>\n<value><string>jrussell</string></value>\n</data></array></value>\n</param>\n<param>\n<value><struct>\n<member>\n<name>all</name>\n<value><boolean>0</boolean></value>\n</member>\n<member>\n<name>displayname</name>\n<value><string>Jane Russell</string></value>\n</member>\n<member>\n<name>cn</name>\n<value><string>Jane Russell</string></value>\n</member>\n<member>\n<name>noprivate</name>\n<value><boolean>0</boolean></value>\n</member>\n<member>\n<name>uidnumber</name>\n<value><int>999</int></value>\n</member>\n<member>\n<name>raw</name>\n<value><boolean>0</boolean></value>\n</member>\n<member>\n<name>version</name>\n<value><string>2.11</string></value>\n</member>\n<member>\n<name>gecos</name>\n<value><string>Jane Russell</string></value>\n</member>\n<member>\n<name>sn</name>\n<value><string>Russell</string></value>\n</member>\n<member>\n<name>krbprincipalname</name>\n<value><string>jrussell@EXAMPLE.COM</string></value>\n</member>\n<member>\n<name>givenname</name>\n<value><string>Jane</string></value>\n</member>\n<member>\n<name>initials</name>\n<value><string>JR</string></value>\n</member>\n</struct></value>\n</param>\n</params>\n</methodCall>\n"
reply: 'HTTP/1.1 200 OK\r\n'
header: Date: Thu, 15 Sep 2011 00:50:39 GMT
header: Server: Apache/2.2.15 (Red Hat)
header: WWW-Authenticate: Negotiate YIGZBgkqhkiG9xIBAgICAG+BiTCBhqADAgEFoQMCAQ+iejB4oAMCARKicQRvVl5x6Zt9PbWNzvPEWkdu+3PTCq/ZVKjGHM+1zDBz81GL/f+/Pr75zTuveLYn9de0C3k27vz96fn2HQsy9qVH7sfqn0RWGQWzl+kDkuD6bJ/Dp/mpJvicW5gSkCSH6/UCNuE4I0xqwabLIz8MM/5o
header: Connection: close
header: Content-Type: text/xml; charset=utf-8
body: "<?xml version='1.0' encoding='UTF-8'?>\n<methodResponse>\n<params>\n<param>\n<value><struct>\n<member>\n<name>result</name>\n<value><struct>\n<member>\n<name>dn</name>\n<value><string>uid=jrussell,cn=users,cn=accounts,dc=example,dc=com</string></value>\n</member>\n<member>\n<name>has_keytab</name>\n<value><boolean>0</boolean></value>\n</member>\n<member>\n<name>displayname</name>\n<value><array><data>\n<value><string>Jane Russell</string></value>\n</data></array></value>\n</member>\n<member>\n<name>uid</name>\n<value><array><data>\n<value><string>jrussell</string></value>\n</data></array></value>\n</member>\n<member>\n<name>objectclass</name>\n<value><array><data>\n<value><string>top</string></value>\n<value><string>person</string></value>\n<value><string>organizationalperson</string></value>\n<value><string>inetorgperson</string></value>\n<value><string>inetuser</string></value>\n<value><string>posixaccount</string></value>\n<value><string>krbprincipalaux</string></value>\n<value><string>krbticketpolicyaux</string></value>\n<"
body: 'value><string>ipaobject</string></value>\n</data></array></value>\n</member>\n<member>\n<name>loginshell</name>\n<value><array><data>\n<value><string>/bin/sh</string></value>\n</data></array></value>\n</member>\n<member>\n<name>uidnumber</name>\n<value><array><data>\n<value><string>1966800004</string></value>\n</data></array></value>\n</member>\n<member>\n<name>initials</name>\n<value><array><data>\n<value><string>JR</string></value>\n</data></array></value>\n</member>\n<member>\n<name>gidnumber</name>\n<value><array><data>\n<value><string>1966800004</string></value>\n</data></array></value>\n</member>\n<member>\n<name>gecos</name>\n<value><array><data>\n<value><string>Jane Russell</string></value>\n</data></array></value>\n</member>\n<member>\n<name>sn</name>\n<value><array><data>\n<value><string>Russell</string></value>\n</data></array></value>\n</member>\n<member>\n<name>homedirectory</name>\n<value><array><data>\n<value><string>/home/jrussell</string></value>\n</data></array></value>\n</member>\n<member>\n<name>has_password</name>\n<value><boolean>0</'
body: 'boolean></value>\n</member>\n<member>\n<name>krbprincipalname</name>\n<value><array><data>\n<value><string>jrussell@EXAMPLE.COM</string></value>\n</data></array></value>\n</member>\n<member>\n<name>givenname</name>\n<value><array><data>\n<value><string>Jane</string></value>\n</data></array></value>\n</member>\n<member>\n<name>cn</name>\n<value><array><data>\n<value><string>Jane Russell</string></value>\n</data></array></value>\n</member>\n<member>\n<name>ipauniqueid</name>\n<value><array><data>\n<value><string>bba27e6e-df34-11e0-a5f4-001143d2c060</string></value>\n</data></array></value>\n</member>\n</struct></value>\n</member>\n<member>\n<name>value</name>\n<value><string>jrussell</string></value>\n</member>\n<member>\n<name>summary</name>\n<value><string>Added user "jrussell"</string></value>\n</member>\n</struct></value>\n</param>\n</params>\n</methodResponse>\n'
---------------------
Added user "jrussell"
---------------------
User login: jrussell
First name: Jane
Last name: Russell
Full name: Jane Russell
Display name: Jane Russell
Initials: JR
Home directory: /home/jrussell
GECOS field: Jane Russell
Login shell: /bin/sh
Kerberos principal: jrussell@EXAMPLE.COM
UID: 1966800004
GID: 1966800004
Keytab: False
Password: FalseImportant
-v and -vv options are global options and must be used before the subcommand when running ipa.
28.2. Managing Certificates and Certificate Authorities
Note
28.2.1. Renewing CA Certificates Issued by External CAs
certmonger utility and automatically renewed as they near expiration.
Warning
certutil NSS security utility. [8]
Note
- The external CA which issued the certificate must allow renewals.
- The CA's private key must not change.
- The new certificate should have the same subject name as the original certificate.
- The external CA may still have a copy of it,
- in the
/root/ipa.csrfile on the first-installed IdM server, - in the
ca.signing.certreqsection of the/etc/pki-ca/CS.cfgfile on the first-installed IdM server. This will need to be converted to the PEM format.
<REALM> IPA CA. We use EXAMPLE.COM IPA CA here. You can query the Apache database to find out the current nickname by running the following command:
# certutil -L -d /etc/httpd/alias28.2.1.1. The Renewal Procedure
Renew the Certificate
/root/ipa.crt file. We also assume that the /root/external-ca.pem file contains the external CA certificate chain in the PEM format. The renewal needs to be done on the IdM CA designated for managing renewals. One way to identify the first-installed IdM server is to see if the value for subsystem.select is New:
# grep subsystem.select /etc/pki-ca/CS.cfg
subsystem.select=Newrenew_ca_cert post-save command in the output of the getcert list command.
Number of certificates and requests being tracked: 8.
Request ID '20131125153455':
status: MONITORING
stuck: no
key pair storage: type=NSSDB,location='/var/lib/pki-ca/alias',nickname='auditSigningCert cert-pki-ca',token='NSS Certificate DB',pin='455536908955'
certificate: type=NSSDB,location='/var/lib/pki-ca/alias',nickname='auditSigningCert cert-pki-ca',token='NSS Certificate DB'
CA: dogtag-ipa-renew-agent
issuer: CN=Certificate Authority,O=EXAMPLE.COM
subject: CN=CA Audit,O=EXAMPLE.COM
expires: 2015-11-15 15:34:12 UTC
pre-save command: /usr/lib64/ipa/certmonger/stop_pkicad
post-save command: /usr/lib64/ipa/certmonger/renew_ca_cert "auditSigningCert cert-pki-ca"
track: yes
auto-renew: yes
...
Install the new CA certificate on your first-installed IdM server
- The CA needs to be shut down in order to update its certificate:
# service ipa stop - Update the CA certificate NSS database:
# certutil -A -d /var/lib/pki-ca/alias -n 'caSigningCert cert-pki-ca' -t CT,C,C -a -i /root/ipa.crt - Replace the value of
ca.signing.certin/etc/pki-ca/CS.cfg. This is the base64 value of the certificate. You can obtain this by removing the BEGIN/END blocks fromipa.crtand compressing it into a single line. - Update the Apache NSS database:
# certutil -A -d /etc/httpd/alias -n 'EXAMPLE.COM IPA CA' -t CT,C,C -a -i /root/ipa.crt - Update the LDAP server instances:
# certutil -A -d /etc/dirsrv/slapd-EXAMPLE-COM -n 'EXAMPLE.COM IPA CA' -t CT,C,C -a -i /root/ipa.crt # certutil -A -d /etc/dirsrv/slapd-PKI-IPA -n 'EXAMPLE.COM IPA CA' -t CT,C,C -a -i /root/ipa.crt - Update the CA certificate in the file system:
# cp /root/ipa.crt /etc/ipa/ca.crt # cat /root/ipa.crt /root/external-ca.pem >/etc/httpd/alias/cacert.asc # cp /etc/httpd/alias/cacert.asc /usr/share/ipa/html/ca.crt - Update the shared system database:
# certutil -A -d /etc/pki/nssdb -n 'IPA CA' -t CT,C,C -a -i /root/ipa.crt - Restart the service:
# service ipa start - Update the CA certificate in LDAP. First, convert the certificate to the DER format:
# openssl x509 -outform DER -in /root/ipa.crt -out /tmp/ipa.der - Add the certificate to LDAP:
# kinit admin # ldapmodify -Y GSSAPI SASL/GSSAPI authentication started SASL username: admin@EXAMPLE.COM SASL SSF: 56 SASL data security layer installed. dn: cn=CAcert,cn=ipa,cn=etc,dc=example,dc=com changetype: modify replace: cacertificate;binary cacertificate;binary:<file:///tmp/ipa.der
Install the new CA certificate on other IdM servers with a CA
- Copy the updated certificate to the machine and stop the service. Let's assume the file is
/root/ipa.crt.# service ipa stop - Update the Apache NSS database:
# certutil -A -d /var/lib/pki-ca/alias -n 'caSigningCert cert-pki-ca' -t CT,C,C -a -i /root/ipa.crt - Replace the value of
ca.signing.certin/etc/pki-ca/CS.cfg. This is the base64 value of the certificate. You can obtain this by removing the BEGIN/END blocks fromipa.crtand compressing it into a single line. - Update the Apache NSS database:
# certutil -A -d /etc/httpd/alias -n 'EXAMPLE.COM IPA CA' -t CT,C,C -a -i /root/ipa.crt - Update the LDAP server instances:
# certutil -A -d /etc/dirsrv/slapd-EXAMPLE-COM -n 'EXAMPLE.COM IPA CA' -t CT,C,C -a -i /root/ipa.crt # certutil -A -d /etc/dirsrv/slapd-PKI-IPA -n 'EXAMPLE.COM IPA CA' -t CT,C,C -a -i /root/ipa.crt - Update the CA certificate in the file system:
# cp /root/ipa.crt /etc/ipa/ca.crt # cat /root/ipa.crt /root/external-ca.pem >/etc/httpd/alias/cacert.asc # cp /etc/httpd/alias/cacert.asc /usr/share/ipa/html/ca.crt - Update the shared system database:
# certutil -A -d /etc/pki/nssdb -n 'IPA CA' -t CT,C,C -a -i /root/ipa.crt - Restart the service:
# service ipa start
Install the new CA certificate on other IdM masters without a CA
- Copy the updated certificate to the machine and stop the service. Let's assume the file is
/root/ipa.crt.# service ipa stop - Update the Apache NSS database:
# certutil -A -d /etc/httpd/alias -n 'EXAMPLE.COM IPA CA' -t CT,C,C -a -i /root/ipa.crt - Update the LDAP server instances:
# certutil -A -d /etc/dirsrv/slapd-EXAMPLE-COM -n 'EXAMPLE.COM IPA CA' -t CT,C,C -a -i /root/ipa.crt # certutil -A -d /etc/dirsrv/slapd-PKI-IPA -n 'EXAMPLE.COM IPA CA' -t CT,C,C -a -i /root/ipa.crt - Update the CA certificate in the file system:
# cp /root/ipa.crt /etc/ipa/ca.crt # cat /root/ipa.crt /root/external-ca.pem >/etc/httpd/alias/cacert.asc # cp /etc/httpd/alias/cacert.asc /usr/share/ipa/html/ca.crt - Update the shared system database:
# certutil -A -d /etc/pki/nssdb -n 'IPA CA' -t CT,C,C -a -i /root/ipa.crt - Restart the service:
# service ipa start
Install the new CA certificate on all IdM client machines
/tmp/ipa.crt.
# certutil -A -d /etc/pki/nssdb -n 'IPA CA' -t CT,C,C -a -i /tmp/ipa.crt
# cp /tmp/ipa.crt /etc/ipa/ca.crt28.2.2. Renewing CA Certificates Issued by the IdM CA
certmonger utility and automatically renewed as they near expiration.
Warning
28.2.2.1. The Renewal Procedure
Renew the Signing Certificate of your IdM CA and install the new CA certificate on your first-installed IdM server
- Ensure IPA is stopped:
# ipactl status # ipactl stop - Ensure
ntpdis not running:# service ntpd status # service ntpd stop - Start the Directory Server and ensure it is running:
# service dirsrv start # service dirsrv status - Start the Dogtag CA and ensure it is running:
# service pki-cad start # service pki-cad status - Enter the following command to attempt to renew the Dogtag CA signing certificate directly via the certmonger helper,
dogtag-ipa-renew-agent-submit:# /usr/libexec/certmonger/dogtag-ipa-renew-agent-submit -D 1 -T caCACert | tail -n 1 | xargs /usr/libexec/certmonger/dogtag-ipa-renew-agent-submit -d /etc/httpd/alias -n ipaCert -p /etc/httpd/alias/pwdfile.txt -v -S - Update the CA certificate NSS database:
# certutil -A -d /var/lib/pki-ca/alias -n 'caSigningCert cert-pki-ca' -t CT,C,C -a -i /root/ipa.crt - Replace the value of
ca.signing.certin/etc/pki-ca/CS.cfg. This is the base64 value of the certificate. You can obtain this by removing the BEGIN/END blocks fromipa.crtand compressing it into a single line. - Update the Apache NSS database:
# certutil -A -d /etc/httpd/alias -n 'EXAMPLE.COM IPA CA' -t CT,C,C -a -i /root/ipa.crt - Update the LDAP server instances:
# certutil -A -d /etc/dirsrv/slapd-EXAMPLE-COM -n 'EXAMPLE.COM IPA CA' -t CT,C,C -a -i /root/ipa.crt # certutil -A -d /etc/dirsrv/slapd-PKI-IPA -n 'EXAMPLE.COM IPA CA' -t CT,C,C -a -i /root/ipa.crt - Update the CA certificate in the file system:
# cp /root/ipa.crt /etc/ipa/ca.crt # cat /root/ipa.crt /root/external-ca.pem >/etc/httpd/alias/cacert.asc # cp /etc/httpd/alias/cacert.asc /usr/share/ipa/html/ca.crt - Update the shared system database:
# certutil -A -d /etc/pki/nssdb -n 'IPA CA' -t CT,C,C -a -i /root/ipa.crt - Restart the service:
# ipactl start - Update the CA certificate in LDAP. First, convert the certificate to the DER format:
# openssl x509 -outform DER -in /root/ipa.crt -out /tmp/ipa.der - Add the certificate to LDAP:
# kinit admin # ldapmodify -Y GSSAPI SASL/GSSAPI authentication started SASL username: admin@EXAMPLE.COM SASL SSF: 56 SASL data security layer installed. dn: cn=CAcert,cn=ipa,cn=etc,dc=example,dc=com changetype: modify replace: cacertificate;binary cacertificate;binary:<file:///tmp/ipa.der - Use
ipa-getcert listto list all requests tracked by certmonger:# ipa-getcert list - If the output shows that any of the subsystem certificates are already expired, use
ipa-getcert resubmiton each of them one by one to renew the certificates. For more details, see the Dealing with expiring IDM CA certificates on Red Hat Enterprise Linux 6 and 7 Knowledgebase solution.
Install the new CA certificate on other IdM servers with a CA
- Copy the updated certificate to the machine and stop the service. Let's assume the file is
/root/ipa.crt.# service ipa stop - Update the Apache NSS database:
# certutil -A -d /var/lib/pki-ca/alias -n 'caSigningCert cert-pki-ca' -t CT,C,C -a -i /root/ipa.crt - Replace the value of
ca.signing.certin/etc/pki-ca/CS.cfg. This is the base64 value of the certificate. You can obtain this by removing the BEGIN/END blocks fromipa.crtand compressing it into a single line. - Update the Apache NSS database:
# certutil -A -d /etc/httpd/alias -n 'EXAMPLE.COM IPA CA' -t CT,C,C -a -i /root/ipa.crt - Update the LDAP server instances:
# certutil -A -d /etc/dirsrv/slapd-EXAMPLE-COM -n 'EXAMPLE.COM IPA CA' -t CT,C,C -a -i /root/ipa.crt # certutil -A -d /etc/dirsrv/slapd-PKI-IPA -n 'EXAMPLE.COM IPA CA' -t CT,C,C -a -i /root/ipa.crt - Update the CA certificate in the file system:
# cp /root/ipa.crt /etc/ipa/ca.crt # cat /root/ipa.crt /root/external-ca.pem >/etc/httpd/alias/cacert.asc # cp /etc/httpd/alias/cacert.asc /usr/share/ipa/html/ca.crt - Update the shared system database:
# certutil -A -d /etc/pki/nssdb -n 'IPA CA' -t CT,C,C -a -i /root/ipa.crt - Restart the service:
# service ipa start
Install the new CA certificate on other IdM masters without a CA
- Copy the updated certificate to the machine and stop the service. Let's assume the file is
/root/ipa.crt.# service ipa stop - Update the Apache NSS database:
# certutil -A -d /etc/httpd/alias -n 'EXAMPLE.COM IPA CA' -t CT,C,C -a -i /root/ipa.crt - Update the LDAP server instances:
# certutil -A -d /etc/dirsrv/slapd-EXAMPLE-COM -n 'EXAMPLE.COM IPA CA' -t CT,C,C -a -i /root/ipa.crt # certutil -A -d /etc/dirsrv/slapd-PKI-IPA -n 'EXAMPLE.COM IPA CA' -t CT,C,C -a -i /root/ipa.crt - Update the CA certificate in the file system:
# cp /root/ipa.crt /etc/ipa/ca.crt # cat /root/ipa.crt /root/external-ca.pem >/etc/httpd/alias/cacert.asc # cp /etc/httpd/alias/cacert.asc /usr/share/ipa/html/ca.crt - Update the shared system database:
# certutil -A -d /etc/pki/nssdb -n 'IPA CA' -t CT,C,C -a -i /root/ipa.crt - Restart the service:
# service ipa start
Install the new CA certificate on all IdM client machines
/tmp/ipa.crt.
# certutil -A -d /etc/pki/nssdb -n 'IPA CA' -t CT,C,C -a -i /tmp/ipa.crt
# cp /tmp/ipa.crt /etc/ipa/ca.crt28.2.3. Configuring Alternate Certificate Authorities
Note
/usr/share/ipa/html/ca.crt. This allows users to download the correct certificate when they configure their browsers.
- Use the
ipa-server-certinstallcommand to install the certificate.# /usr/sbin/ipa-server-certinstall -d /path/to/pkcs12.p12 - To keep using browser autoconfiguration in Firefox, regenerate the
/usr/share/ipa/html/configure.jarfile.- Create a directory, and then create the new security databases in that directory.
# mkdir /tmp/signdb # certutil -N -d /tmp/signdb - Import the PKCS #12 file for the signing certificate into that directory.
# pk12util -i /path/to/pkcs12.p12 -d /tmp/signdb - Make a temporary signing directory, and copy the IdM JavaScript file to that directory.
# mkdir /tmp/sign # cp /usr/share/ipa/html/preferences.html /tmp/sign - Use the object signing certificate to sign the JavaScript file and to regenerate the
configure.jarfile.# signtool -d /tmp/signdb -k Signing_cert_nickname -Z /usr/share/ipa/html/configure.jar -e .html /tmp/sign
28.2.4. Changing Which Server Generates CRLs
ipa-replica-install.
Note
ipa-server-install) is almost always created to host certificate authority services[9]. These are the original CA services. When a replica is created (with ipa-replica-install), it is based on the configuration of an existing server. A replica can host CA services, but this is not required.
/var/lib/pki-ca/conf/CS.cfg), it has CRL generation enabled:
ca.crl.issuingPointId.enableCRLCache=true
ca.crl.issuingPointId.enableCRLUpdates=true
ca.listenToCloneModifications=falseca.crl.issuingPointId.enableCRLUpdates=false- Identify which server instance is the master CA server. Both CRL generation and renewal operations are handled by the same CA server. So, the master CA can be identified by having the
renew_ca_certcertificate being tracked bycertmonger.[root@server ~]# getcert list -d /var/lib/pki-ca/alias -n "subsystemCert cert-pki-ca" | grep post-save post-save command: /usr/lib64/ipa/certmonger/renew_ca_cert "subsystemCert cert-pki-ca" - On the original master CA, disable tracking for all of the original CA certificates.
[root@server ~]# getcert stop-tracking -d /var/lib/pki-ca/alias -n "auditSigningCert cert-pki-ca" Request "20131127184547" removed. [root@server ~]# getcert stop-tracking -d /var/lib/pki-ca/alias -n "ocspSigningCert cert-pki-ca" Request "20131127184548" removed. [root@server ~]# getcert stop-tracking -d /var/lib/pki-ca/alias -n "subsystemCert cert-pki-ca" Request "20131127184549" removed. [root@server ~]# getcert stop-tracking -d /etc/httpd/alias -n ipaCert Request "20131127184550" removed. - Reconfigure the original master CA to retrieve renewed certificates from a new master CA.
- Copy the renewal helper into the
certmongerdirectory, and set the appropriate permissions.[root@server ~]# cp /usr/share/ipa/ca_renewal /var/lib/certmonger/cas/ca_renewal [root@server ~]# chmod 0600 /var/lib/certmonger/cas/ca_renewal - Update the SELinux configuration.
[root@server ~]# /sbin/restorecon /var/lib/certmonger/cas/ca_renewal - Restart
certmonger.[root@server ~]# service certmonger restart - Check that the CA is listed to retrieve certificates. This is printed in the CA configuration.
[root@server ~]# getcert list-cas ... CA 'dogtag-ipa-retrieve-agent-submit': is-default: no ca-type: EXTERNAL helper-location: /usr/libexec/certmonger/dogtag-ipa-retrieve-agent-submit - Get the CA certificate database PIN.
[root@server ~]# grep internal= /var/lib/pki-ca/conf/password.conf - Configure
certmongertrack the certificates for external renewal. This requires the database PIN.[root@server ~]# getcert start-tracking -c dogtag-ipa-retrieve-agent-submit -d /var/lib/pki-ca/alias -n "auditSigningCert cert-pki-ca" -B /usr/lib64/ipa/certmonger/stop_pkicad -C '/usr/lib64/ipa/certmonger/restart_pkicad "auditSigningCert cert-pki-ca"' -T "auditSigningCert cert-pki-ca" -P database_pin New tracking request "20131127184743" added. [root@server ~]# getcert start-tracking -c dogtag-ipa-retrieve-agent-submit -d /var/lib/pki-ca/alias -n "ocspSigningCert cert-pki-ca" -B /usr/lib64/ipa/certmonger/stop_pkicad -C '/usr/lib64/ipa/certmonger/restart_pkicad "ocspSigningCert cert-pki-ca"' -T "ocspSigningCert cert-pki-ca" -P database_pin New tracking request "20131127184744" added. [root@server ~]# getcert start-tracking -c dogtag-ipa-retrieve-agent-submit -d /var/lib/pki-ca/alias -n "subsystemCert cert-pki-ca" -B /usr/lib64/ipa/certmonger/stop_pkicad -C '/usr/lib64/ipa/certmonger/restart_pkicad "subsystemCert cert-pki-ca"' -T "subsystemCert cert-pki-ca" -P database_pin New tracking request "20131127184745" added. [root@server ~]# getcert start-tracking -c dogtag-ipa-retrieve-agent-submit -d /etc/httpd/alias -n ipaCert -C /usr/lib64/ipa/certmonger/restart_httpd -T ipaCert -p /etc/httpd/alias/pwdfile.txt New tracking request "20131127184746" added.
- Stop CRL generation on the original master CA.
- Stop CA service:
[root@server ~]# service pki-cad stop - Open the CA configuration file.
[root@server ~]# vim /var/lib/pki-ca/conf/CS.cfg - Change the values of the
ca.crl.MasterCRL.enableCRLCacheandca.crl.MasterCRL.enableCRLUpdatesparameters tofalseto disable CRL generation.ca.crl.MasterCRL.enableCRLCache=false ca.crl.MasterCRL.enableCRLUpdates=false - Start CA service:
[root@server ~]# service pki-cad start
- Configure Apache to redirect CRL requests to the new master.
- Open the CA proxy configuration.
[root@server ~]# vim /etc/httpd/conf.d/ipa-pki-proxy.conf - Uncomment the
RewriteRuleon the last line:RewriteRule ^/ipa/crl/MasterCRL.bin https://server.example.com/ca/ee/ca/getCRL?op=getCRL&crlIssuingPoint=MasterCRL [L,R=301,NC] - Restart Apache:
[root@server ~]# service httpd restart
- Stop tracking the CA's certificates to change the renewal settings. As a clone, the CA was configured to retrieve its renewed certificates from the master; as the master CA, it will issue the renewed certificates.
[root@server ~]# getcert stop-tracking -d /var/lib/pki-ca/alias -n "auditSigningCert cert-pki-ca" Request "20131127163822" removed. [root@server ~]# getcert stop-tracking -d /var/lib/pki-ca/alias -n "ocspSigningCert cert-pki-ca" Request "20131127163823" removed. [root@server ~]# getcert stop-tracking -d /var/lib/pki-ca/alias -n "subsystemCert cert-pki-ca" Request "20131127163824" removed. [root@server ~]# getcert stop-tracking -d /etc/httpd/alias -n ipaCert Request "20131127164042" removed. - Get the PIN for the CA certificate database.
[root@server ~]# grep internal= /var/lib/pki-ca/conf/password.conf - Set up the certificates to be tracked in
certmongerusing the renewal agent profile.[root@server ~]# getcert start-tracking -c dogtag-ipa-renew-agent -d /var/lib/pki-ca/alias -n "auditSigningCert cert-pki-ca" -B /usr/lib64/ipa/certmonger/stop_pkicad -C '/usr/lib64/ipa/certmonger/renew_ca_cert "auditSigningCert cert-pki-ca"' -P database_pin New tracking request "20131127185430" added. [root@server ~]# getcert start-tracking -c dogtag-ipa-renew-agent -d /var/lib/pki-ca/alias -n "ocspSigningCert cert-pki-ca" -B /usr/lib64/ipa/certmonger/stop_pkicad -C '/usr/lib64/ipa/certmonger/renew_ca_cert "ocspSigningCert cert-pki-ca"' -P database_pin New tracking request "20131127185431" added. [root@server ~]# getcert start-tracking -c dogtag-ipa-renew-agent -d /var/lib/pki-ca/alias -n "subsystemCert cert-pki-ca" -B /usr/lib64/ipa/certmonger/stop_pkicad -C '/usr/lib64/ipa/certmonger/renew_ca_cert "subsystemCert cert-pki-ca"' -P database_pin New tracking request "20131127185432" added. [root@server ~]# getcert start-tracking -c dogtag-ipa-renew-agent -d /etc/httpd/alias -n ipaCert -C /usr/lib64/ipa/certmonger/renew_ra_cert -p /etc/httpd/alias/pwdfile.txt New tracking request "20131127185433" added. - Configure the new master CA to generate CRLs.
- Stop CA service:
[root@server ~]# service pki-cad stop - Open the CA configuration file.
[root@server ~]# vim /var/lib/pki-ca/conf/CS.cfg - Change the values of the
ca.crl.MasterCRL.enableCRLCacheandca.crl.MasterCRL.enableCRLUpdatesparameters totrueto enable CRL generation.ca.crl.MasterCRL.enableCRLCache=true ca.crl.MasterCRL.enableCRLUpdates=true - Start CA service:
[root@server ~]# service pki-cad start
- Configure Apache to disable redirect CRL requests. As a clone, all CRL requests were routed to the original master. As the new master, this instance will respond to CRL requests.
- Open the CA proxy configuration.
[root@server ~]# vim /etc/httpd/conf.d/ipa-pki-proxy.conf - Comment out the
RewriteRuleargument on the last line:#RewriteRule ^/ipa/crl/MasterCRL.bin https://server.example.com/ca/ee/ca/getCRL?op=getCRL&crlIssuingPoint=MasterCRL [L,R=301,NC] - Restart Apache:
[root@server ~]# service httpd restart
28.2.5. Configuring OCSP Responders
http://ipaserver.example.com:9180/ca/ocspNote
28.2.5.1. Using an OSCP Responder with SELinux
- Edit the SELinux policy to allow Apache servers using the mod_revocator module to connect to port 9180:
semodule -i revoker.pp - Generate a new SELinux policy to allow access based on the SELinux error logs for the mod_revocator connection attempt.
audit2allow -a -M revoker
28.2.5.2. Changing the CRL Update Interval
- Stop the CA server.
[root@server ~]# service pki-ca stop - Open the
CS.cfgfile.[root@server ~]# vim /var/lib/pki-ca/conf/CS.cfg - Change the
ca.crl.MasterCRL.autoUpdateIntervalto the new interval setting. - Restart the CA server.
[root@server ~]# service pki-ca start
28.2.5.3. Changing the OCSP Responder Location
- Open the certificate profile.
[root@server ~]# vim /var/lib/pki-ca/profiles/ca/caIPAserviceCert.cfg - Change the
policyset.serverCertSet.9.default.params.crlDistPointsPointName_0parameter to the DNS CNAME hostname. - Restart the CA server.
service pki-ca restart
crlDistPointsPointName_0 parameter set to the same hostname.
28.3. Disabling Anonymous Binds
nsslapd-allow-anonymous-access attribute.
- Change the
nsslapd-allow-anonymous-accessattribute torootdse.ldapmodify -x -D "cn=Directory Manager" -w secret -h server.example.com -p 389 Enter LDAP Password: dn: cn=config changetype: modify replace: nsslapd-allow-anonymous-access nsslapd-allow-anonymous-access: rootdseImportant
Anonymous access can be completely allowed (on) or completely blocked (off). However, completely blocking anonymous access also blocks external clients from checking the server configuration. LDAP and web clients are not necessarily domain clients, so they connect anonymously to read the root DSE file to get connection information.Therootdseallows access to the root DSE and server configuration without any access to the directory data. - Restart the 389 Directory Server instance to load the new setting.
service dirsrv restart
28.4. Changing Domain DNS Configuration
28.4.1. Setting DNS Entries for Multi-Homed Servers
ipaserver IN A 192.168.1.100
ipaserver IN A 192.168.1.101
ipaserver IN A 192.168.1.102
28.4.2. Setting up Additional Name Servers
/etc/resolv.conf only contains the IdM server itself when configuration is finished. If the local named service ever crashes, then the IdM server is unable to run and DNS services for the entire domain are no longer available.
/etc/resolv.conf file.
[root@server ~]# vim /etc/resolv.conf
search example.com
; the IdM server
nameserver 127.0.0.1
; backup DNS servers
nameserver 198.51.100.0
nameserver 192.0.2.0Note
/etc/resolv.conf file.
/etc/resolv.conf file is given in the resolv.conf manpage.
28.4.3. Changing Load Balancing for IdM Servers and Replicas
$ ipa dnsrecord-add server.example.com _ldap._tcp --srv-rec="0 100 389 server1.example.com."
$ ipa dnsrecord-add server.example.com _ldap._tcp --srv-rec="1 100 389 server2.example.com."28.5. Managing Replication Agreements Between IdM Servers
ipa-replica-manage command.
Figure 28.1. Server and Replica Agreements
28.5.1. Listing Replication Agreements
ipa-replica-manage command can list all of the servers and replicas in the replication topology, using the list command:
[root@server ~]# ipa-replica-manage list
srv1.example.com
srv2.example.com
srv3.example.com
srv4.example.com[root@server ~]# ipa-replica-manage list srv1.example.com
srv2.example.com
srv3.example.com28.5.2. Creating and Removing Replication Agreements
ipa-replica-manage connect server1 server2[root@server ~]# ipa-replica-manage connect srv2.example.com srv4.example.com[root@server ~]# ipa-replica-manage connect --cacert=/etc/ipa/ca.crt srv2.example.com srv4.example.comdisconnect command:
[root@server ~]# ipa-replica-manage disconnect srv2.example.com srv4.example.comdisconnect command removes that one replication agreement but leaves both the server/replica instances in the overall replication topology. To remove a server entirely from the IdM replication topology, with all its data, (and, functionally, removing it from the IdM domain as a server), use the del command:
[root@server ~]# ipa-replica-manage del srv2.example.com28.5.3. Forcing Replication
force-sync command. The server which receives the update is the local server; the server which sends the updates is specified in the --from option.
[root@server ~]# ipa-replica-manage force-sync --from srv1.example.com28.5.4. Reinitializing IdM Servers
re-initialize command. The target server being initialized is the local host. The server or replica from which to pull the data to initialize the local database is specified in the --from option:
[root@server ~]# ipa-replica-manage re-initialize --from srv1.example.com28.5.5. Resolving Replication Conflicts
Note
nsds5ReplConflict attribute. This makes it easy to search for entries with a conflict:
ldapsearch -x -D "cn=directory manager" -w password -b "dc=example,dc=com" "nsds5ReplConflict=*" \* nsds5ReplConflict28.5.5.1. Solving Naming Conflicts
nsuniqueid attribute as a naming attribute. For example:
nsuniqueid=0a950601-435311e0-86a2f5bd-3cd26022+uid=jsmith,cn=users,cn=accounts,dc=example,dc=com- Rename the entry using a different naming attribute, and keep the old RDN. For example:
ldapmodify -x -D "cn=directory manager" -w secret -h ipaserver.example.com -p 389 dn: nsuniqueid=66446001-1dd211b2+uid=jsmith,cn=users,cn=accounts,dc=example,dc=com changetype: modrdn newrdn: cn=TempValue deleteoldrdn: 0 - Remove the old RDN value of the naming attribute and the conflict marker attribute. For example:
ldapmodify -x -D "cn=directory manager" -w secret -h ipaserver.example.com -p 389 dn: cn=TempValue,cn=users,cn=accounts,dc=example,dc=com changetype: modify delete: uid uid: jsmith - delete: nsds5ReplConflict -Note
The unique identifier attributensuniqueidcannot be deleted. - Rename the entry with the intended attribute-value pair. For example:
ldapmodify -x -D "cn=directory manager" -w secret -h ipaserver.example.com -p 389 dn: cn=TempValue,dc=example,dc=com changetype: modrdn newrdn: uid=jsmith deleteoldrdn: 1Setting the value of thedeleteoldrdnattribute to1deletes the temporary attribute-value paircn=TempValue. To keep this attribute, set the value of thedeleteoldrdnattribute to0.
28.5.5.2. Solving Orphan Entry Conflicts
glue entry to avoid having orphaned entries in the directory.
glue and extensibleObject. Glue entries can be created in several ways:
- If the conflict resolution procedure finds a deleted entry with a matching unique identifier, the glue entry is a resurrection of that entry, with the addition of the
glueobject class and thensds5ReplConflictattribute.In such cases, either modify the glue entry to remove theglueobject class and thensds5ReplConflictattribute to keep the entry as a normal entry or delete the glue entry and its child entries. - The server creates a minimalistic entry with the
glueandextensibleObjectobject classes.
28.6. Removing a Replica
- On an IdM server, obtain a Kerberos ticket before running IdM tools.
[root@replica ~]# kinit admin - List all of the configured replication agreements for the IdM domain.
[root@replica ~]# ipa-replica-manage list Directory Manager password: ipaserver.example.com: master ipaserver2.example.com: master replica.example.com: master replica2.example.com: master - Removing the replica from the topology involves deleting all the agreements between the replica and the other servers in the IdM domain and all of the data about the replica in the domain configuration.
[root@replica ~]# ipa-replica-manage del replica.example.com - If the replica was configured with its own CA, then also use the
ipa-csreplica-managecommand to remove all of the replication agreements between the certificate databases for the replica.This is required if the replica itself was configured with a Dogtag Certificate System CA. It is not required if only the master server or other replicas were configured with a CA.[root@replica ~]# ipa-csreplica-manage del replica.example.com - On the replica, uninstall the replica packages.
[root@replica ~]# ipa-server-install --uninstall -U
28.7. Renaming a Server or Replica Host System
- Create a new replica, with a CA, with the new hostname or IP address. This is described in Chapter 4, Setting up IdM Replicas.
- Stop the original IdM server instance.
[root@oldserver ~]# ipactl stop - Verify that all other servers/replicas and clients are working as before.
- Uninstall the IdM server, as in Chapter 7, Uninstalling IdM Servers and Replicas
Chapter 29. Migrating from an LDAP Directory to IdM
29.1. An Overview of LDAP to IdM Migration
29.1.1. Planning the Client Configuration
Important
29.1.1.1. Initial Client Configuration (Pre-Migration)
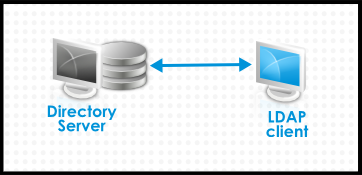
Figure 29.1. Basic LDAP Directory and Client Configuration
/etc/passwd or /etc/shadow. (In real life, the infrastructure may be more complex if a client uses LDAP for identity lookups and Kerberos for authentication or other configurations.)
29.1.1.2. Recommended Configuration for Red Hat Enterprise Linux Clients
pam_sss and nss_sss, respectively) which allow SSSD to be integrated very closely with Identity Management and leverage the full authentication and identity features in Identity Management. SSSD has a number of useful features, like caching identity information so that users can log in even if the connection is lost to the central server; these are described in the Red Hat Enterprise Linux Deployment Guide.
pam_ldap and nss_ldap), SSSD establishes relationships between identity and authentication information by defining domains. A domain in SSSD defines four backend functions: authentication, identity lookups, access, and password changes. The SSSD domain is then configured to use a provider to supply the information for any one (or all) of those four functions. An identity provider is always required in the domain configuration. The other three providers are optional; if an authentication, access, or password provider is not defined, then the identity provider is used for that function.
Note

Figure 29.2. Clients and SSSD with an IdM Backend
ipa-client-install script automatically configured SSSD to use IdM for all four of its backend services, so Red Hat Enterprise Linux clients are set up with the recommended configuration by default.
Note
ipa-client. Older versions of Red Hat Enterprise Linux can be configured as described in Section 29.1.1.3, “Alternative Supported Configuration”.
Note
ipa-client. Older versions of Red Hat Enterprise Linux can be configured as described in Section 29.1.1.3, “Alternative Supported Configuration”.
29.1.1.3. Alternative Supported Configuration
nss_ldap) and to IdM as if it were a regular Kerberos KDC (using pam_krb5).
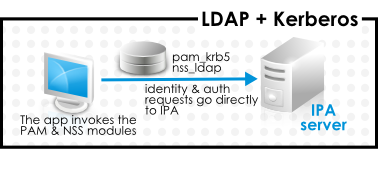
Figure 29.3. Clients and IdM with LDAP and Kerberos
nss_ldap and pam_krb5 to connect to the IdM server. For some maintenance situations and IT structures, a scenario that fits the lowest common denominator may be required, using LDAP for both identity and authentication (nss_ldap and pam_ldap). However, it is generally best practice to use the most secure configuration possible for a client (meaning SSSD and Kerberos or LDAP and Kerberos).
29.1.2. Planning Password Migration
Important
29.1.2.1. Method 1: Using Temporary Passwords and Requiring a Change
29.1.2.2. Method 2: Using the Migration Web Page
https://ipaserver.example.com/ipa/migration29.1.2.3. Method 3: Using SSSD (Recommended)
- A user tries to log into a machine with SSSD.
- SSSD attempts to perform Kerberos authentication against the IdM server.
- Even though the user exists in the system, the authentication will fail with the error key type is not supported because the Kerberos hashes do not yet exist.
- SSSD then performs a plaintext LDAP bind over a secure connection.
- IdM intercepts this bind request. If the user has a Kerberos principal but no Kerberos hashes, then the IdM identity provider generates the hashes and stores them in the user entry.
- If authentication is successful, SSSD disconnects from IdM and tries Kerberos authentication again. This time, the request succeeds because the hash exists in the entry.
29.1.2.4. Migrating Cleartext LDAP Passwords
Note
29.1.2.5. Automatically Resetting Passwords That Do Not Meet Requirements
kinit into the IdM domain.
[jsmith@server ~]$ kinit
Password for jsmith@EXAMPLE.COM:
Password expired. You must change it now.
Enter new password:
Enter it again:29.1.3. Migration Considerations and Requirements
29.1.3.1. LDAP Servers Supported for Migration
ipa migrate-ds, to perform the migration. This script has certain expectations about the structure of the LDAP directory and LDAP entries in order to work. Migration is supported only for LDAPv3-compliant directory services, which include several common directories:
- SunONE Directory Server
- Apache Directory Server
- OpenLDAP
Note
Note
29.1.3.2. Migration Environment Requirements
- A single LDAP directory domain is being migrated to one IdM realm. No consolidation is involved.
- User passwords are stored as a hash in the LDAP directory that the IdM Directory Server can support.
- The LDAP directory instance is both the identity store and the authentication method. Client machines are configured to use
pam_ldapornss_ldapto connect to the LDAP server. - Entries use only standard LDAP schema. Custom attributes will not be migrated to Identity Management.
29.1.3.3. Migration Tools
ipa migrate-ds, to drive the migration process so that LDAP directory data are properly formatted and imported cleanly into the IdM server.
29.1.3.4. Migration Sequence
- Deploy SSSD.
- Reconfigure clients to connect to the current LDAP server and then fail over to IdM.
- Install the IdM server.
- Migrate the user data using the IdM
ipa migrate-dsscript. This exports the data from the LDAP directory, formats for the IdM schema, and then imports it into IdM. - Take the LDAP server offline and allow clients to fail over to Identity Management transparently.
- Install the IdM server.
- Migrate the user data using the IdM
ipa migrate-dsscript. This exports the data from the LDAP directory, formats it for the IdM schema, and then imports it into IdM. - Optional. Deploy SSSD.
- Reconfigure clients to connect to IdM. It is not possible to simply replace the LDAP server. The IdM directory tree — and therefore user entry DNs — is different than the previous directory tree.While it is required that clients be reconfigured, clients do not need to be reconfigured immediately. Updated clients can point to the IdM server while other clients point to the old LDAP directory, allowing a reasonable testing and transition phase after the data are migrated.
Note
Do not run both an LDAP directory service and the IdM server for very long in parallel. This introduces the risk of user data being inconsistent between the two services.
29.2. Examples for Using migrate-ds
ipa migrate-ds command. At its simplest, the command takes the LDAP URL of the directory to migrate and exports the data based on common default settings.
ipa migrate-ds ldap://ldap.example.com:389migrate-ds commands identifies and exports data. This is useful if the original directory tree has a unique structure or if some entries or attributes within entries should be excluded from migration.
29.2.1. Migrating Specific Subtrees
ou=People subtree and group entries in the ou=Groups subtree. These subtrees are container entries for those different types of directory data. If no options are passed with the migrate-ds command, then the utility assumes that the given LDAP directory uses the ou=People and ou=Groups structure.
--user-container--group-container
Note
ou=Employees,dc=example,dc=com subtree can be migrated using --user-container=ou=Employees, but ou=Employees,ou=People,dc=example,dc=com cannot be migrated with that option because ou=Employees is not a direct child of the base DN.
[root@ipaserver ~]# ipa migrate-ds --user-container=ou=employees --group-container="ou=employee groups" ldap://ldap.example.com:389--base-dn. With this option, it is possible to change the target for container subtrees. For example:
[root@ipaserver ~]# ipa migrate-ds --user-container=ou=employees --base-dn="ou=people,dc=example,dc=com" ldap://ldap.example.com:389ou=Employees user subtree can be migrated from within the larger ou=People subtree without migrating every people-related subtree.
29.2.2. Specifically Including or Excluding Entries
migrate-ds script exports every user entry with the person object class and every group entry within the given user and group subtrees.
fullTimeEmployee object class:
[root@ipaserver ~]# ipa migrate-ds --user-objectclass=fullTimeEmployee ldap://ldap.example.com:389[root@ipaserver ~]# ipa migrate-ds --group-objectclass=groupOfNames,groupOfUniqueNames ldap://ldap.example.com:389[root@ipaserver ~]# ipa migrate-ds --exclude-groups="Golfers Group" --exclude-users=jsmith,bjensen ldap://ldap.example.com:389fullTimeEmployee object class, yet excludes three managers:
[root@ipaserver ~]# ipa migrate-ds --user-objectclass=fullTimeEmployee --exclude-users=jsmith,bjensen,mreynolds ldap://ldap.example.com:38929.2.3. Excluding Entry Attributes
userCertificate attribute.
migrate-ds by using any of several different options:
--user-ignore-objectclass--user-ignore-attribute--group-ignore-objectclass--group-ignore-attribute
userCertificate attribute and strongAuthenticationUser object class for users and the groupOfCertificates object class for groups:
[root@ipaserver ~]# ipa migrate-ds --user-ignore-attribute=userCertificate --user-ignore-objectclass=strongAuthenticationUser --group-ignore-objectclass=groupOfCertificates ldap://ldap.example.com:389Note
29.2.4. Setting the Schema to Use
[root@ipaserver ~]# ipa migrate-ds --schema=RFC2307 ldap://ldap.example.com:38929.3. Scenario 1: Using SSSD as Part of Migration
Important
- Set up SSSD. Using SSSD allows the required Kerberos keys and server certificates to be delivered to the clients.
- Install SSSD on every client machine:
# yum install sssd - Configure an LDAP identity provider in SSSD to use the existing Directory Server for all functions (authentication, identity lookups, access, and password changes). This ensures every client works properly with the existing directory service.
- Install Identity Management, including any custom LDAP directory schema[11], on a different machine from the existing LDAP directory.
- Enable the IdM server to allow migration:
# ipa config-mod --enable-migration=TRUE - Disable the compat plug-in.
# ipa-compat-manage disable - Restart the IdM Directory Server instance.
# service dirsrv restart - Run the IdM migration script,
ipa migrate-ds. At its most basic, this requires only the LDAP URL of the LDAP directory instance to migrate:# ipa migrate-ds ldap://ldap.example.com:389Simply passing the LDAP URL migrates all of the directory data using common default settings. The user and group data can be selectively migrated by specifying other options, as covered in Section 29.2, “Examples for Using migrate-ds”.Once the information is exported, the script adds all required IdM object classes and attributes and converts DNs in attributes to match the IdM directory tree. - Re-enable the compat plug-in.
# ipa-compat-manage enable - Restart the IdM Directory Server instance.
# service dirsrv restart - Move clients that have SSSD installed from the LDAP backend to the Identity Management backend and enroll them as client with IdM. This downloads the required keys and certificates.On Red Hat Enterprise Linux clients, this can be done using the
ipa-client-installcommand. For example:# ipa-client-install --enable-dns-updates - Have users log into a machine with SSSD and Identity Management backend. This generates the required Kerberos keys for the user.To monitor the user migration process, query the existing LDAP directory to see which user accounts have a password but do not yet have a Kerberos principal key.
$ ldapsearch -LL -x -D 'cn=Directory Manager' -w secret -b 'ou=people,dc=example,dc=com' '(&(!(krbprincipalkey=*))(userpassword=*))' uidNote
Include the quotes around the filter so that it is not interpreted by the shell. - Once users have been migrated over, configure non-SSSD clients to use the IdM domain, as required.
- When the migration of all clients and users is complete, decommission the LDAP directory.
29.4. Scenario 2: Migrating an LDAP Server Directly to Identity Management
Important
- Install the IdM server, including any custom LDAP directory schema[12], on a different machine from the existing LDAP directory.
- Disable the compat plug-in.
# ipa-compat-manage disable - Restart the IdM Directory Server instance.
# service dirsrv restart - Enable the IdM server to allow migration:
# ipa config-mod --enable-migration=TRUE - Run the IdM migration script,
ipa migrate-ds. At its most basic, this requires only the LDAP URL of the LDAP directory instance to migrate:# ipa migrate-ds ldap://ldap.example.com:389Simply passing the LDAP URL migrates all of the directory data using common default settings. The user and group data can be selectively migrated by specifying other options, as covered in Section 29.2, “Examples for Using migrate-ds”.Once the information is exported, the script adds all required IdM object classes and attributes and converts DNs in attributes to match the IdM directory tree. - Re-enable the compat plug-in.
# ipa-compat-manage enable - Restart the IdM Directory Server instance.
# service dirsrv restart - Update the client configuration to use PAM_LDAP and NSS_LDAP to connect to IdM instead of connecting to an LDAP directory, NIS, or local files.
- Optional. Set up SSSD. Using SSSD migrates user passwords without additional user interaction, as described in Section 29.1.2, “Planning Password Migration”.
- Install SSSD on every client machine:
# yum install sssd - Run the
ipa-client-installto configure SSSD and related services to use the IdM server for identity and Kerberos authentication.
- Instruct users to log into IdM using either SSSD client or the migration web page if SSSD is not available on the client. Both methods automatically migrate the user password into Identity Management.
https://ipaserver.example.com/ipa/migration - Optional. Reconfigure non-SSSD clients to use Kerberos authentication (
pam_krb5) instead of LDAP authentication (pam_ldap).Note
Use PAM_LDAP modules until all of the users have been migrated; then it is possible to use PAM_KRB5. - When the migration of all clients and users is complete, decommission the LDAP directory.
Appendix A. Troubleshooting Identity Management
A.1. Installation Issues
A.1.1. Server Installation
/var/log/ipaserver-install.log. The IdM logs, both for the server and for IdM-associated services, are covered in Section 28.1.4, “Checking IdM Server Logs”.
A.1.1.1. GSS Failures When Running IPA Commands
ipa-* command. For example:
ipa: ERROR: Kerberos error: ('Unspecified GSS failure. Minor code may provide more information', 851968)/('Decrypt integrity check failed', -1765328353)- DNS is not properly configured.
- Active Directory is in the same domain as the IdM server.
A.1.1.2. named Daemon Fails to Start
named service fails to start, this can indicate that there is a package conflict. Check the /var/log/messages file for error messages related to the named service and the ldap.so library:
ipaserver named[6886]: failed to dynamically load driver 'ldap.so': libldap-2.4.so.2: cannot open shared object file: No such file or directorynamed service from starting. To resolve this issue, remove the bind-chroot package and then restart the IdM server.
[root@server ~]# yum remove bind-chroot
# ipactl restartA.1.2. Replica Installation
A.1.2.1. Certificate System setup failed.
/var/log/pki-ca/debug, which may show error messages about being unable to find certain entries. For example:
[04/Feb/2016:22:29:03][http-9445-Processor25]: DatabasePanel
comparetAndWaitEntries ou=people,o=ipaca not found, let's wait[root@ipareplica ~]# ipa-server-install --uninstallA.1.2.2. There are SASL, GSS-API, and Kerberos errors in the 389 Directory Server logs when the replica starts.
slapd_ldap_sasl_interactive_bind - Error: could not perform interactive bind for id [] mech [GSSAPI]: error -2 (Local error) (SASL(-1): generic failure: GSSAPI Error: Unspecified GSS failure. Minor code may provide more information (Credentials cache file '/tmp/krb5cc_496' not found)) .../tmp/krb5cc_496 (where 496 is the 389 Directory Server user ID) and cannot find it.
set_krb5_creds - Could not get initial credentials for principal [ldap/ replica1.example.com] in keytab [WRFILE:/etc/dirsrv/ds.keytab]: -1765328324 (Generic error)bind resumed message.
A.1.2.3. The DNS forward record does not match the reverse address
ipa: DEBUG: approved_usage = SSLServer intended_usage = SSLServer
ipa: DEBUG: cert valid True for "CN=ipa-server2.example.com,O=EXAMPLE.COM"
ipa: DEBUG: handshake complete, peer = 192.168.17.37:9444
Certificate operation cannot be completed: Unable to communicate with CMS (Not Found)
...
ipa: DEBUG: Created connection context.ldap2_21534032
ipa: DEBUG: Destroyed connection context.ldap2_21534032
The DNS forward record ipa-server2.example.com. does not match the reverse address ipa-server2.example.orgA.1.3. Client Installations
ipa-client-install, the client installation log is located in /var/log/ipaclient-install.log. The IdM logs, both for the server and client and for IdM-associated services, are covered in Section 28.1.4, “Checking IdM Server Logs”.
A.1.3.1. The client can't resolve reverse hostnames when using an external DNS.
/etc/resolv.conf file or if there are other resources on the network with SRV records, like Active Directory.
Jun 30 11:11:48 server1 krb5kdc[1279](info): AS_REQ (4 etypes {18 17 16 23}) 192.168.60.135: NEEDED_PREAUTH: admin EXAMPLE COM for krbtgt/EXAMPLE COM EXAMPLE COM, Additional pre-authentication required
Jun 30 11:11:48 server1 krb5kdc[1279](info): AS_REQ (4 etypes {18 17 16 23}) 192.168.60.135: ISSUE: authtime 1309425108, etypes {rep=18 tkt=18 ses=18}, admin EXAMPLE COM for krbtgt/EXAMPLE COM EXAMPLE COM
Jun 30 11:11:49 server1 krb5kdc[1279](info): TGS_REQ (4 etypes {18 17 16 23}) 192.168.60.135: UNKNOWN_SERVER: authtime 0, admin EXAMPLE COM for HTTP/server1.wrong.example.com@EXAMPLE.COM, Server not found in Kerberos database- Edit the
/etc/resolv.conffile to remove the external DNS name server references. - Add reverse lookup records for each IdM server.
- Give the IdM client or domain a subnet and forward all requests for that subnet.
A.1.3.2. The client is not added to the DNS zone.
nsupdate command may fail to add the client to the DNS zone when ipa-client-install runs.
[jsmith@ipaserver ~]$ kinit admin
[jsmith@ipaserver ~]$ ipa dnsrecord-add ipaclient.example.com www --a-rec 1.2.3.4A.1.4. Uninstalling an IdM Client
ipa-client-install utility can be used to uninstall the client and remove it from the IdM domain. To remove the client, use the --uninstall option.
# ipa-client-install --uninstallNote
ipa-join command. This is called by ipa-client-install --uninstall as part of the uninstallation process. However, while the ipa-join option removes the client from the domain, it does not actually uninstall the client or properly remove all of the IdM-related configuration. Do not run ipa-join -u to attempt to uninstall the IdM client. The only way to uninstall a client completely is to use ipa-client-install --uninstall.
A.2. UI Connection Problems
- Close all browser windows.
- In a terminal, set the new log levels for Firefox:
export NSPR_LOG_MODULES=negotiateauth:5 export NSPR_LOG_FILE=/tmp/moz.logThis enables verbose logging and logs all information to/tmp/moz.log. - Restart the browser from the same terminal window.
| Error Log Message | Description and Fix |
|---|---|
| There are no Kerberos tickets. Run kinit. |
| This can occur when you have successfully obtained Kerberos tickets but are still unable to authenticate to the UI. This indicates that there is a problem with the Kerberos configuration. The first place to check is the [domain_realm] section in the /etc/krb5.conf file. Make sure that the IdM Kerberos domain entry is correct and matches the configuration in the Firefox negotiation parameters. For example:
|
| Nothing is in the log file. | It is possible that you are behind a proxy which is removing the HTTP headers required for negotiate authentication. Try to connect to the server using HTTPS instead, which allows the request to pass through unmodified. Then check the log file again. |
A.3. IdM Server Problems
A.3.1. There are SASL, GSS-API, and Kerberos errors in the 389 Directory Server logs when the replica starts.
slapd_ldap_sasl_interactive_bind - Error: could not perform interactive bind for id [] mech [GSSAPI]: error -2 (Local error) (SASL(-1): generic failure: GSSAPI Error: Unspecified GSS failure. Minor code may provide more information (Credentials cache file '/tmp/krb5cc_496' not found)) .../tmp/krb5cc_496 (where 496 is the 389 Directory Server user ID) and cannot find it.
set_krb5_creds - Could not get initial credentials for principal [ldap/ replica1.example.com] in keytab [WRFILE:/etc/dirsrv/ds.keytab]: -1765328324 (Generic error)bind resumed message.
A.4. Host Problems
A.4.1. Certificate Not Found/Serial Number Not Found Errors
Certificate operation cannot be completed: EXCEPTION (Certificate serial number 0x2d not found)A.4.2. Debugging Client Connection Problems
getent passwd admin).
/var/log/sssd/. There is a specific log file for the DNS domain, such as sssd_example.com.log. If there is not enough information in the logs at the default logging level, then increase the log level.
- Open the
sssd.conffile.vim /etc/sssd/sssd.conf - In the
[domain/example.com]section, setdebug_level.debug_level = 9 - Restart the
sssddaemon.service sssd restart - Check the
/var/log/sssd/sssd_example.com.logfile for the debug messages.
A.5. Kerberos Errors
kinit or a similar client. For information related to Kerberos, first check the Kerberos manpages, help files, and other resources.
Important
kadmin or kadmin.local to manage IdM Kerberos settings.
- For
kinitproblems or other Kerberos server problems, look at the KDC log in/var/log/krb5kdc.log. - For IdM-specific errors, look in
/var/log/httpd/error_log.
A.5.1. Problems making connections with SSH when using GSS-API
GSSAPITrustDNS directive and set the value to no.
# vim /etc/ssh/ssh_config
GSSAPITrustDNS noA.5.2. There are problems connecting to an NFS server after changing a keytab
A.6. SELinux Login Problems
/etc/selinux/policy_name/logins/login.
pam_selinux module may not be properly configured in the PAM stack. This is the module that reads the SELinux information and sets the user context. If the module is missing, then nothing processes the SELinux map and the user is defined a default context on the system.
Appendix B. Working with certmonger
certmonger daemon and its command-line clients simplify the process of generating public/private key pairs, creating certificate requests, and submitting requests to the CA for signing. As part of managing certificates, the certmonger daemon monitors certificates for expiration and can renew certificates that are about to expire. The certificates that certmonger monitors are tracked in files stored in a configurable directory. The default location is /var/lib/certmonger/requests.
certmonger uses the IdM getcert command to manage all certificates. As covered in Section 3.4, “Examples: Installing with Different CA Configurations”, an IdM server can be configured to use different types of certificate authorities. The most common (and recommended) configuration is to use a full CA server, but it is also possible to use a much more limited, self-signed CA. The exact getcert command used by certmonger to communicate with the IdM backend depends on which type of CA is used. The ipa-getcert command is used with a full CA, while the selfsign-getcert command is used with a self-signed CA.
Note
B.1. Requesting a Certificate with certmonger
certmonger uses the ipa-getcert command.
.pem) or in an NSS database, identified by the certificate nickname. When requesting a certificate, then, the request should identify the location where the certificate will be stored and the nickname of the certificate. For example:
# ipa-getcert request -d /etc/pki/nssdb -n Server-Cert/etc/pki/nssdb file is the global NSS database, and Server-Cert is the nickname of this certificate. The certificate nickname must be unique within this database.
-K option is required to specify the service principal. Otherwise, certmonger assumes the certificate is for a host. The -N option must specify the certificate subject DN, and the subject base DN must match the base DN for the IdM server, or the request is rejected.
$ ipa-getcert request -d /etc/httpd/alias -n Server-Cert -K HTTP/client1.example.com -N 'CN=client1.example.com,O=EXAMPLE.COM'Example B.1. Using certmonger for a Service
$ ipa-getcert request -r -f /etc/httpd/conf/ssl.crt/server.crt -k /etc/httpd/conf/ssl.key/server.key -N CN=`hostname --fqdn` -D `hostname` -U id-kp-serverAuthselfsign-getcert) and the desired configuration for the final certificate, as well as other settings. In Example B.1, “Using certmonger for a Service”, these are common options:
- The
-roption will automatically renew the certificate if the key pair already exists. This is used by default. - The
-foption stores the certificate in the given file. - The
-koption either stores the key in the given file or, if the key file already exists, uses the key in the file. - The
-Noption gives the subject name. - The
-Doption gives the DNS domain name. - The
-Uoption sets the extended key usage flag.
B.2. Storing Certificates in NSS Databases
certmonger uses plaintext files to store the key and the certificate, but these keys and certificates can also be stored in NSS databases. This is done using the -d option to set the security database location and -n to give the certificate nickname which is used for the certificate in the database. These options are used instead of the PEM files given in the -f and -k options.
# ipa-getcert request -d /export/alias -n ServerCert ...B.3. Tracking Certificates with certmonger
certmonger can manage the entire certificate lifecycle. Along with generating requests, certmonger can track a certificate and automatically renew it when it expires at the end of its validity period.
start-tracking command with the getcert command. The -I option creates the tracking entry, along with pointers to the key and certificate files, either in an NSS database (-d and -n) or in the PEM file (-f and -k). The -r option tells certmonger to renew the certificate.
# ipa-getcert start-tracking -I cert1-tracker -d /export/alias -n ServerCert -rNote
-r option can be passed with the request command, in Example B.1, “Using certmonger for a Service”. In that case, the requested certificate is automatically tracked and renewed by certmonger. Then, it is not necessary to configure tracking manually.
certmonger by using the stop-tracking command.
Index
A
- Active Directory
- schema differences between Identity Management, User Schema Differences between Identity Management and Active Directory
- attributes
- setting multi-valued, From the Command Line
B
- bind
- DNS and LDAP, About DNS in IdM
C
- certificates
- automatically renewed, Renewing CA Certificates Issued by External CAs, Renewing CA Certificates Issued by the IdM CA
- CA expiration, Renewing CA Certificates Issued by External CAs, Renewing CA Certificates Issued by the IdM CA
- updating CA, Renewing CA Certificates Issued by External CAs, Renewing CA Certificates Issued by the IdM CA
- chkconfig, Starting and Stopping the IdM Domain
- client
- troubleshooting
- installation, Client Installations
- uninstalling, Uninstalling an IdM Client
D
- DHCP, Adding Host Entries from the Command Line
- DNS
- adding zone records, Adding Records to DNS Zones
- adding zones, Adding Forward DNS Zones
- bind-dyndb-ldap and Directory Server, About DNS in IdM
- disabling zones, Enabling and Disabling Zones
- dynamic updates, Enabling Dynamic DNS Updates
- hosts with DHCP, Adding Host Entries from the Command Line
- PTR synchronization
- requirements, Synchronizing Forward and Reverse Zone Entries
- DNS zone records, Adding Records to DNS Zones
- deleting, Deleting Records from DNS Zones
- format for adding, About the Commands to Add DNS Records
- IPv4 example, Examples of Adding DNS Resource Records
- IPv6 example, Examples of Adding DNS Resource Records
- PTR example, Examples of Adding DNS Resource Records
- SRV example, Examples of Adding DNS Resource Records
- types of records, Adding Records to DNS Zones
G
- glue entries, Solving Orphan Entry Conflicts
H
- hosts
- creating
- with DHCP, Adding Host Entries from the Command Line
- disabling, Disabling and Re-enabling Host Entries
I
- installing clients
- disabling OpenSSH, About ipa-client-install and OpenSSH
K
- Kerberos, About Kerberos
- separate credentials cache, Caching User Kerberos Tickets
- SSSD password cache, Caching Kerberos Passwords
- ticket policies, Setting Kerberos Ticket Policies
- global, Setting Global Ticket Policies
- user-level, Setting User-Level Ticket Policies
L
- log rotation
- policies, IdM Domain Services and Log Rotation
- logging in
- SELinux problems, SELinux Login Problems
- separate credentials cache, Caching User Kerberos Tickets
- logrotate, IdM Domain Services and Log Rotation
N
- naming conflicts
- in replication, Solving Naming Conflicts
P
- password expiration, Managing Password Expiration Limits
- password policies
- expiration, Managing Password Expiration Limits
- policies
- log rotation, IdM Domain Services and Log Rotation
- port forwarding
- for the UI, Using the UI with Proxy Servers
- proxy servers
- for the UI, Using the UI with Proxy Servers
- PTR synchronization
- requirements, Synchronizing Forward and Reverse Zone Entries
R
- reboot, Starting and Stopping the IdM Domain
- replicas
- number in replication, About IdM Servers and Replicas
- replication
- size limits, About IdM Servers and Replicas
S
- schema
- differences between Identity Management and Active Directory, User Schema Differences between Identity Management and Active Directory
- cn, Values for cn Attributes
- initials, Constraints on the initials Attribute
- sn, Requiring the surname (sn) Attribute
- street and streetAddress, Values for street and streetAddress
- SELinux
- login problems, SELinux Login Problems
- servers
- number in replication, About IdM Servers and Replicas
- services
- disabling, Disabling and Re-enabling Service Entries
- SSH
- disabling at client install, About ipa-client-install and OpenSSH
- SSSD
- and Kerberos passwords, Caching Kerberos Passwords
- disabling cache, Caching Kerberos Passwords
- starting with chkconfig, Starting and Stopping the IdM Domain
T
- ticket policies, Setting Kerberos Ticket Policies
- troubleshooting
- client installation, Client Installations
- Kerberos, unknown server error, The client can't resolve reverse hostnames when using an external DNS.
- resolving hostnames on client, The client can't resolve reverse hostnames when using an external DNS.
- SELinux, SELinux Login Problems
U
- uninstalling
- clients, Uninstalling an IdM Client
- users
- multi-valued attributes, From the Command Line
- password expiration, Managing Password Expiration Limits
- separate credentials cache, Caching User Kerberos Tickets
W
- web UI
- port forwarding, Using the UI with Proxy Servers
- proxy servers, Using the UI with Proxy Servers
Z
- zone records, Adding Records to DNS Zones
- deleting, Deleting Records from DNS Zones
- format for adding, About the Commands to Add DNS Records
- IPv4 example, Examples of Adding DNS Resource Records
- IPv6 example, Examples of Adding DNS Resource Records
- PTR example, Examples of Adding DNS Resource Records
- SRV example, Examples of Adding DNS Resource Records
- types, Adding Records to DNS Zones
Appendix C. Revision History
| Revision History | |||
|---|---|---|---|
| Revision 6.7-4 | Mon Apr 10 2017 | ||
| |||
| Revision 6.7-3 | Wed Mar 8 2017 | ||
| |||
| Revision 6.7-2 | Wed May 4 2016 | ||
| |||
| Revision 6.7-1 | Thu Feb 18 2016 | ||
| |||
| Revision 6.7-0 | Tue Jul 14 2015 | ||
| |||
| Revision 6.6-2 | Tue Mar 31 2015 | ||
| |||
| Revision 6.6-1 | Fri Dec 19 2014 | ||
| |||
| Revision 6.6-0 | Fri Oct 10 2014 | ||
| |||
| Revision 6.5-5 | July 9, 2014 | ||
| |||
| Revision 6.5-4 | February 3, 2014 | ||
| |||
| Revision 6.5-1 | November 20, 2013 | ||
| |||
| Revision 6.4-3 | August 20, 2013 | ||
| |||
| Revision 6.4-1 | March 1, 2013 | ||
| |||
| Revision 6.3-1 | October 18, 2012 | ||
| |||
| Revision 6.2-8 | December 16, 2011 | ||
| |||
| Revision 6.2-7 | December 6, 2011 | ||
| |||