Virtualization Tuning and Optimization Guide
Optimizing your virtual environment
Abstract
Chapter 1. Introduction
1.1. About This Guide
- Virt-manager
- tuned
- Networking
- Memory
- Block I/O
- NUMA
- Performance Monitoring Tools
1.2. KVM Performance Architecture Overview
- When using KVM, guests run as a Linux process on the host.
- Virtual CPUs (vCPUs) are implemented as normal threads, handled by the Linux scheduler.
- Guests inherit features such as NUMA and Huge Pages from the kernel.
- Disk and network I/O settings in the host have a significant performance impact.
- Network traffic typically travels through a software-based bridge.
1.3. Performance Features and Improvements
- CPU/Kernel
- NUMA - Non-Uniform Memory Access. See Chapter 9, NUMA for details on NUMA.
- CFS - Completely Fair Scheduler. A modern class-focused scheduler.
- RCU - Read Copy Update. Better handling of shared thread data.
- Up to 160 virtual CPUs (vCPUs).
- Memory
- Huge Pages and other optimizations for memory-intensive environments. See Chapter 8, Memory for details.
- Networking
- vhost-net - a fast, kernel-based VirtIO solution.
- SR-IOV - for near-native networking performance levels.
- Block I/O
- AIO - Support for a thread to overlap other I/O operations.
- MSI - PCI bus device interrupt generation.
- Scatter Gather - An improved I/O mode for data buffer handling.
Note
Chapter 2. Performance Monitoring Tools
2.1. Introduction
2.2. perf kvm
perf command with the kvm option to collect guest operating system statistics from the host.
perf command. Run rpm -q perf to see if the perf package is installed. If it is not installed, and you want to install it to collect and analyze guest operating system statistics, run the following command as the root user:
yum install perf
perf kvm in the host, you must have access to the /proc/modules and /proc/kallsyms files from the guest. There are two methods to achieve this. Refer to the following procedure, Procedure 2.1, “Copying /proc files from guest to host” to transfer the files into the host and run reports on the files. Alternatively, refer to Procedure 2.2, “Alternative: using sshfs to directly access files” to directly mount the guest and access the files.
Procedure 2.1. Copying /proc files from guest to host
Important
scp) you will only copy files of zero length. This procedure describes how to first save the files in the guest to a temporary location (with the cat command), and then copy them to the host for use by perf kvm.
Log in to the guest and save files
Log in to the guest and save/proc/modulesand/proc/kallsymsto a temporary location,/tmp:# cat /proc/modules > /tmp/modules # cat /proc/kallsyms > /tmp/kallsymsCopy the temporary files to the host
Once you have logged off from the guest, run the following examplescpcommands to copy the saved files to the host. You should substitute your host name and TCP port if they are different:# scp root@GuestMachine:/tmp/kallsyms guest-kallsyms # scp root@GuestMachine:/tmp/modules guest-modulesYou now have two files from the guest (guest-kallsymsandguest-modules) on the host, ready for use byperf kvm.Recording and reporting events with perf kvm
Using the files obtained in the previous steps, recording and reporting of events in the guest, the host, or both is now possible.Run the following example command:# perf kvm --host --guest --guestkallsyms=guest-kallsyms \ --guestmodules=guest-modules record -a -o perf.dataNote
If both --host and --guest are used in the command, output will be stored inperf.data.kvm. If only --host is used, the file will be namedperf.data.host. Similarly, if only --guest is used, the file will be namedperf.data.guest.Pressing Ctrl-C stops recording.Reporting events
The following example command uses the file obtained by the recording process, and redirects the output into a new file,analyze.perf kvm --host --guest --guestmodules=guest-modules report -i perf.data.kvm \ --force > analyzeView the contents of theanalyzefile to examine the recorded events:# cat analyze # Events: 7K cycles # # Overhead Command Shared Object Symbol # ........ ............ ................. ......................... # 95.06% vi vi [.] 0x48287 0.61% init [kernel.kallsyms] [k] intel_idle 0.36% vi libc-2.12.so [.] _wordcopy_fwd_aligned 0.32% vi libc-2.12.so [.] __strlen_sse42 0.14% swapper [kernel.kallsyms] [k] intel_idle 0.13% init [kernel.kallsyms] [k] uhci_irq 0.11% perf [kernel.kallsyms] [k] generic_exec_single 0.11% init [kernel.kallsyms] [k] tg_shares_up 0.10% qemu-kvm [kernel.kallsyms] [k] tg_shares_up [output truncated...]
Procedure 2.2. Alternative: using sshfs to directly access files
Important
This is provided as an example only. You will need to substitute values according to your environment.# Get the PID of the qemu process for the guest: PID=`ps -eo pid,cmd | grep "qemu.*-name GuestMachine" \ | grep -v grep | awk '{print $1}'` # Create mount point and mount guest mkdir -p /tmp/guestmount/$PID sshfs -o allow_other,direct_io GuestMachine:/ /tmp/guestmount/$PID # Begin recording perf kvm --host --guest --guestmount=/tmp/guestmount \ record -a -o perf.data # Ctrl-C interrupts recording. Run report: perf kvm --host --guest --guestmount=/tmp/guestmount report \ -i perf.data # Unmount sshfs to the guest once finished: fusermount -u /tmp/guestmount
Chapter 3. Optimizing Virtualization Performance with virt-manager
3.1. Introduction
3.2. Operating System Details and Devices
3.2.1. Specifying Guest Virtual Machine Details
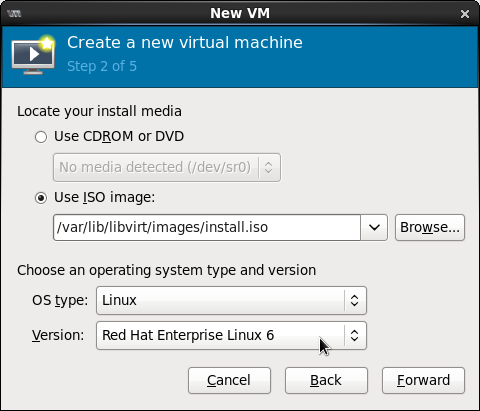
Figure 3.1. Provide the OS type and Version
3.2.2. Remove Unused Devices

Figure 3.2. Remove unused devices
3.3. CPU Performance Options
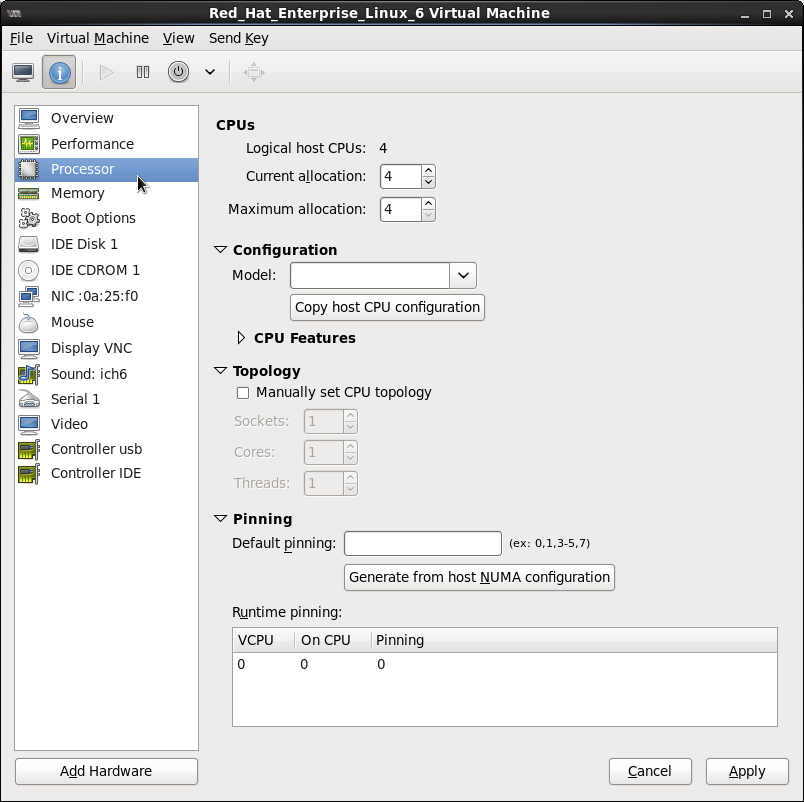
Figure 3.3. CPU Performance Options
3.3.1. Option: Available CPUs
Important

Figure 3.4. CPU overcommit
Important
3.3.2. Option: CPU Configuration

Figure 3.5. CPU Configuration Options
Note
Note
virsh capabilities command on your host machine to view the virtualization capabilities of your system, including CPU types and NUMA capabilities.
3.3.3. Option: CPU Topology

Figure 3.6. CPU Topology Options
Note
3.3.4. Option: CPU Pinning
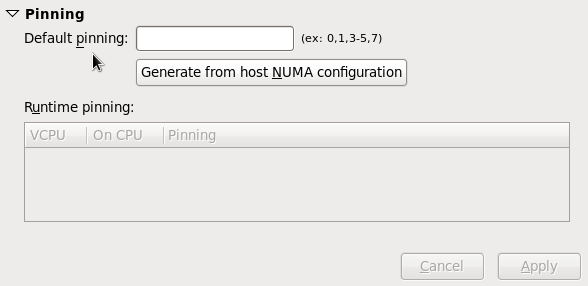
Figure 3.7. CPU Pinning
Warning
lscpu command to establish a 1:1 physical CPU to vCPU binding using virsh cpupin. Refer to Chapter 9, NUMA for more information on NUMA and CPU pinning.
3.4. Virtual Disk Performance Options
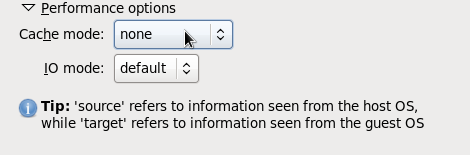
Figure 3.8. Virtual Disk Performance Options
Important
Chapter 4. tuned
4.1. Introduction
4.2. tuned and tuned-adm
virtual-guest- Based on the
enterprise-storageprofile,virtual-guestalso decreases the swappiness of virtual memory. This profile is available in Red Hat Enterprise Linux 6.3 and later, and is the recommended profile for guest machines. virtual-host- Based on the
enterprise-storageprofile,virtual-hostalso decreases the swappiness of virtual memory and enables more aggressive writeback of dirty pages. This profile is available in Red Hat Enterprise Linux 6.3 and later, and is the recommended profile for virtualization hosts, including both KVM and Red Hat Enterprise Virtualization hosts.
yum install tuned/etc/tuned.conf and activates the default profile.
service tuned startchkconfig tuned on# tuned-adm list
Available profiles:
- latency-performance
- sap
- virtual-guest
- laptop-battery-powersave
- virtual-host
- enterprise-storage
- desktop-powersave
- spindown-disk
- default
- throughput-performance
- laptop-ac-powersave
- server-powersave
Current active profile: defaulttuned-adm activetuned-adm profile profile_namevirtual-host profile, run:
tuned-adm profile virtual-hostNote
tuned.conf man page.
tuned-adm offNote
Chapter 5. Networking
5.1. Introduction
5.2. Network Tuning Tips
- Use multiple networks to avoid congestion on a single network. For example, have dedicated networks for management, backups and/or live migration.
- Usually, matching the default MTU (1500 bytes) in all components is sufficient. If you require larger messages, increasing the MTU value can reduce fragmentation. If you change the MTU, all devices in the path should have a matching MTU value.
- Use
arp_filterto prevent ARP Flux, an undesirable condition that can occur in both hosts and guests and is caused by the machine responding to ARP requests from more than one network interface:echo 1 > /proc/sys/net/ipv4/conf/all/arp_filteror edit/etc/sysctl.confto make this setting persistent.
Note
5.3. Virtio and vhost_net
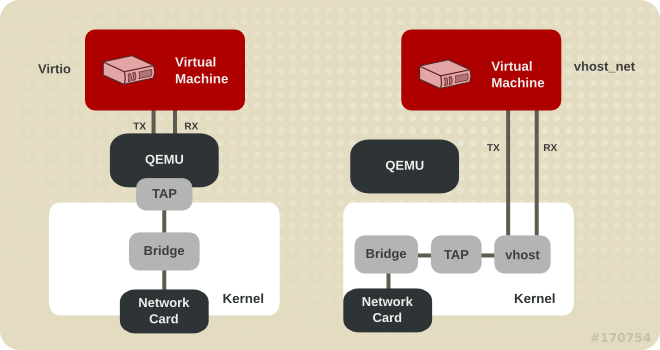
Figure 5.1. Virtio and vhost_net architectures
5.4. Device Assignment and SR-IOV
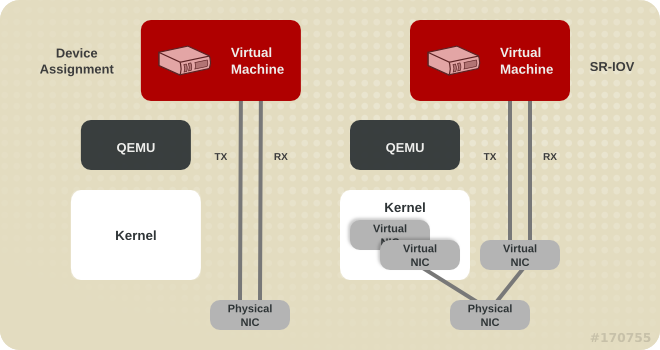
Figure 5.2. Device assignment and SR-IOV
Chapter 6. I/O Scheduling
6.1. I/O Scheduling
6.2. I/O Scheduling with Red Hat Enterprise Linux as a Virtualization Host
cfq scheduler is usually ideal. This scheduler performs well on nearly all workloads.
deadline scheduler. The deadline scheduler is also the scheduler used by the tuned profile virtual-host.
6.3. I/O Scheduling with Red Hat Enterprise Linux as a Virtualization Guest
- Red Hat Enterprise Linux guests often benefit greatly from the
noopscheduler. Thisnoopscheduler allows the host machine or hypervisor to optimize the input/output requests. Thenoopscheduler can combine small requests from the guest operating system into larger requests, before handing the I/O to the hypervisor. However,nooptries to use the fewest number of CPU cycles in the guest for I/O scheduling. The host/hypervisor has an overview of the requests of all guests and uses a separate strategy for handling I/O.Note
For Red Hat Enterprise Linux 7.2 and newer,virtio-blkalways usesnoopimplicitly. This is because it usesblk-mq. - Depending on the workload I/O and how storage devices are attached, schedulers like
deadlinecan be more advantageous. Performance testing is required to verify which scheduler is the best one to use in each situation.All scheduler tuning should be tested under normal operating conditions, as synthetic benchmarks typically do not accurately compare performance of systems using shared resources in virtual environments. - Guests using storage accessed by iSCSI, SR-IOV, or physical device passthrough should not use the
noopscheduler. These methods do not allow the host to optimize I/O requests to the underlying physical device.
deadline in the guest virtual machine.
6.4. Configuring the I/O Scheduler
6.4.1. Configuring the I/O Scheduler for Red Hat Enterprise Linux 5 and 6
elevator kernel parameter.
grub.conf stanza, the system is configured to use the noop scheduler. The example shown is for VMware ESX.
title Red Hat Enterprise Linux Server (2.6.18-8.el5)
root (hd0,0)
kernel /vmlinuz-2.6.18-8.el5 ro root=/dev/vg0/lv0 elevator=noop
initrd /initrd-2.6.18-8.el5.img
6.4.2. Configuring the I/O Scheduler for Red Hat Enterprise Linux 7
elevator to /etc/grub2.cfg, as in the following example:
# vi /etc/grub2.cfg

linux16 /vmlinuz-kernel-version root=/dev/mapper/vg0-lv0 ro  rd.lvm.lv=vg0/lv0 vconsole.keymap=us vconsole.font=latarcyrheb-sun16 rhgb quiet elevator=deadline
initrd16 /initramfs-kernel-version.img
Chapter 7. Block I/O
7.1. Introduction
7.2. Block I/O Tuning
virsh blkiotune command allows administrators to set or display a guest virtual machine's block I/O parameters manually in the <blkio> element in the guest XML configuration.
<blkio> parameters for a virtual machine:
# virsh blkiotune virtual_machine<blkio> parameters, refer to the following command and replace values according to your environment:
# virsh blkiotune virtual_machine [--weight number] [--device-weights string] [--config] [--live] [--current]weight- The I/O weight, within the range 100 to 1000.
device-weights- A single string listing one or more device/weight pairs, in the format of
/path/to/device,weight,/path/to/device,weight config- Add the
--config live- Add the
--liveNote
The--live current- Add the
--current
Note
# virsh help blkiotune for more information on using the virsh blkiotune command.
7.3. Caching
| Caching Option | Description |
|---|---|
| Cache=none | I/O from the guest is not cached on the host, but may be kept in a writeback disk cache. Use this option for guests with large I/O requirements. This option is generally the best choice, and is the only option to support migration. |
| Cache=writethrough | I/O from the guest is cached on the host but written through to the physical medium. This mode is slower and prone to scaling problems. Best used for small number of guests with lower I/O requirements. Suggested for guests that do not support a writeback cache (such as Red Hat Enterprise Linux 5.5 and earlier), where migration is not needed. |
| Cache=writeback | I/O from the guest is cached on the host. |
virsh edit to edit the cache setting inside the driver tag, specifying none, writeback, or writethrough. For example, to set the cache as writeback:
<disk type='file' device='disk'>
          <driver name='qemu' type='raw' cache='writeback'/>
7.4. I/O Mode
virt-install command, or on an existing guest by editing the guest XML configuration.
| Caching Option | Description |
|---|---|
| IO=native | The default for Red Hat Enterprise Virtualization environments. This mode uses kernel asynchronous I/O with direct I/O options. |
| IO=threads | Sets the I/O mode to host user-mode based threads. |
| IO=default | Sets the I/O mode to the kernel default. In Red Hat Enterprise Linux 6, the default is IO=threads. |
virsh edit to edit the io setting inside the driver tag, specifying native, threads, or default. For example, to set the I/O mode to threads:
<disk type='file' device='disk'>
          <driver name='qemu' type='raw' io='threads'/>
virt-install, add the io option to the --disk path parameter. For example, to configure io=threads during guest installation:
virt-install \
--disk path=/storage/images/$NAME.img,io=threads,opt2=val2...
....
Chapter 8. Memory
8.1. Introduction
8.2. Memory Tuning Tips
- Do not allocate more resources to guest than it will use.
- If possible, assign a guest to a single NUMA node, providing that resources are sufficient on that NUMA node. For more information on using NUMA, see Chapter 9, NUMA.
- When increasing the amount of memory a guest virtual machine can use while the guest is running, also referred to as hot plugging, the memory needs to be manually brought online on the guest by one of the following methods:
- Create a custom udev rule
- Create a file with a name that ends in the .rulessuffix in the
/etc/udev/rules.d/directory:# touch /etc/udev/rules.d/rulename.rules - Add the memory onlining to the created file:
# echo 'SUBSYSTEM=="memory", ACTION=="add", ATTR{state}=="offline", ATTR{state}="online"' > /etc/udev/rules.d/rulename.rules - Reload udev rules:
# udevadm control --reload
- Bring inactive memory online manually after each hot plug
# for mblock in /sys/devices/system/memory/memory*; do echo online > $mblock/state; done
8.3. Memory Tuning on Virtual Machines
8.3.1. Memory Monitoring Tools
topvmstatnumastat/proc/
Note
8.3.2. Memory Tuning with virsh
8.3.2.1. memtune
<memtune> element in the guest XML configuration allows administrators to configure guest virtual machine memory settings manually. If <memtune> is omitted, default memory settings apply.
<memtune> element in a virtual machine with the virsh memtune command, replacing values according to your environment:
virsh # memtune virtual_machine --parameter sizehard-limit- The maximum memory the virtual machine can use, in kibibytes (blocks of 1024 bytes).
Warning
Setting this limit too low can result in the virtual machine being killed by the kernel. soft-limit- The memory limit to enforce during memory contention, in kibibytes (blocks of 1024 bytes).
swap-hard-limit- The maximum memory plus swap the virtual machine can use, in kibibytes (blocks of 1024 bytes). The
swap-hard-limitvalue must be more than thehard-limitvalue. min-guarantee- The guaranteed minimum memory allocation for the virtual machine, in kibibytes (blocks of 1024 bytes).
Note
# virsh help memtune for more information on using the virsh # memtune command.
8.3.2.2. Memory Backing
<memoryBacking> element may contain several elements that influence how virtual memory pages are backed by host pages.
locked parameter.
locked prevents the host from swapping out memory pages belonging to the guest, which can cause latency. Add the following to the guest XML using the virsh edit command to lock the virtual memory pages in the host's memory:
<memoryBacking>
        <locked/>
</memoryBacking>
Important
locked, a hard_limit must be set in the <memtune> element to the maximum memory configured for the guest, plus any memory consumed by the process itself.
nosharepages prevents the host from merging the same memory used among guests. To instruct the hypervisor to disable share pages for a guest, add the following to the guest's XML using the virsh edit command:
<memoryBacking>
         <nosharepages/>
</memoryBacking>
8.3.3. Huge Pages and Transparent Huge Pages (THP)
8.3.3.1. Configuring Transparent Huge Pages
# cat /sys/kernel/mm/transparent_hugepage/enabled# echo always > /sys/kernel/mm/transparent_hugepage/enabled/sys/kernel/mm/transparent_hugepage/enabled to always.
# echo never > /sys/kernel/mm/transparent_hugepage/enabled8.3.3.2. Configuring Static Huge Pages
<memoryBacking>
	<hugepages/>
</memoryBacking>
cat /proc/sys/vm/nr_hugepagesProcedure 8.1. Setting huge pages
- View the current huge pages value:
# cat /proc/meminfo | grep Huge AnonHugePages: 2048 kB HugePages_Total: 0 HugePages_Free: 0 HugePages_Rsvd: 0 HugePages_Surp: 0 Hugepagesize: 2048 kB - Huge pages are set in increments of 2MB. To set the number of huge pages to 25000, use the following command:
echo 25000 > /proc/sys/vm/nr_hugepagesNote
To make the setting persistent, add the following lines to the/etc/sysctl.conffile on the guest machine, with X being the intended number of huge pages:# echo 'vm.nr_hugepages = X' >> /etc/sysctl.conf # sysctl -pAfterwards, addtransparent_hugepage=neverto the kernel boot parameters by appending it to the end of the/kernelline in the/etc/grub2.cfgfile on the guest. - Mount the huge pages:
# mount -t hugetlbfs hugetlbfs /dev/hugepages - Restart libvirtd, then restart the virtual machine:
# service libvirtd restart
Stopping libvirtd daemon:                                  [  OK ]
Starting libvirtd daemon:                                  [  OK ]
# virsh start virtual_machine - Verify the changes in
/proc/meminfo:# cat /proc/meminfo | grep Huge AnonHugePages: 0 kB HugePages_Total: 25000 HugePages_Free: 23425 HugePages_Rsvd: 0 HugePages_Surp: 0 Hugepagesize: 2048 kB
8.3.3.3. Enabling 1 GB huge pages for guests at boot or runtime
Procedure 8.2. Allocating 1 GB huge pages at boot time
- To allocate different sizes of huge pages at boot, use the following command, specifying the number of huge pages. This example allocates 4 1 GB huge pages and 1024 2 MB huge pages:
'default_hugepagesz=1G hugepagesz=1G hugepages=4 hugepagesz=2M hugepages=1024'Change this command line to specify a different number of huge pages to be allocated at boot.Note
The next two steps must also be completed the first time you allocate 1 GB huge pages at boot time. - Mount the 2 MB and 1 GB huge pages on the host:
# mkdir /dev/hugepages1G # mount -t hugetlbfs -o pagesize=1G none /dev/hugepages1G # mkdir /dev/hugepages2M # mount -t hugetlbfs -o pagesize=2M none /dev/hugepages2M - Restart libvirtd to enable the use of 1 GB huge pages on guests:
# service restart libvirtd
Procedure 8.3. Allocating 1 GB huge pages at runtime
- To allocate different sizes of huge pages at runtime, use the following command, replacing values for the number of huge pages, the NUMA node to allocate them from, and the huge page size:
# echo 4 > /sys/devices/system/node/node1/hugepages/hugepages-1048576kB/nr_hugepages
# echo 1024 > /sys/devices/system/node/node3/hugepages/hugepages-2048kB/nr_hugepages
This example command allocates 4 1 GB huge pages fromnode1and 1024 2MB huge pages fromnode3.These huge page settings can be changed at any time with the above command, depending on the amount of free memory on the host system.Note
The next two steps must also be completed the first time you allocate 1 GB huge pages at runtime. - Mount the 2 MB and 1 GB huge pages on the host:
# mkdir /dev/hugepages1G # mount -t hugetlbfs -o pagesize=1G none /dev/hugepages1G # mkdir /dev/hugepages2M # mount -t hugetlbfs -o pagesize=2M none /dev/hugepages2M - Restart libvirtd to enable the use of 1 GB huge pages on guests:
# systemctl restart libvirtd
8.4. Kernel Same-page Merging (KSM)
qemu-kvm process. Once the guest is running, the contents of the guest operating system image can be shared when guests are running the same operating system or applications. KSM allows KVM to request that these identical guest memory regions be shared.
Note
/sys/kernel/mm/ksm/merge_across_nodes tunable to 0 to avoid merging pages across NUMA nodes. This can be done with the virsh node-memory-tune --shm-merge-across-nodes 0 command. Kernel memory accounting statistics can eventually contradict each other after large amounts of cross-node merging. As such, numad can become confused after the KSM daemon merges large amounts of memory. If your system has a large amount of free memory, you may achieve higher performance by turning off and disabling the KSM daemon. Refer to Chapter 9, NUMA" for more information on NUMA.
Important
- The
ksmservice starts and stops the KSM kernel thread. - The
ksmtunedservice controls and tunes theksmservice, dynamically managing same-page merging.ksmtunedstarts theksmservice and stops theksmservice if memory sharing is not necessary. When new guests are created or destroyed,ksmtunedmust be instructed with theretuneparameter to run.
Note
8.4.1. The KSM Service
- The
ksmservice is included in the qemu-kvm package. - When the
ksmservice is not started, Kernel same-page merging (KSM) shares only 2000 pages. This default value provides limited memory-saving benefits. - When the
ksmservice is started, KSM will share up to half of the host system's main memory. Start theksmservice to enable KSM to share more memory.
# systemctl start ksm
Starting ksm: [ OK ]ksm service can be added to the default startup sequence. Make the ksm service persistent with the systemctl command.
# systemctl enable ksm8.4.2. The KSM Tuning Service
ksmtuned service fine-tunes the kernel same-page merging (KSM) configuration by looping and adjusting ksm. In addition, the ksmtuned service is notified by libvirt when a guest virtual machine is created or destroyed. The ksmtuned service has no options.
# systemctl start ksmtuned
Starting ksmtuned: [ OK ]ksmtuned service can be tuned with the retune parameter, which instructs ksmtuned to run tuning functions manually.
/etc/ksmtuned.conf file is the configuration file for the ksmtuned service. The file output below is the default ksmtuned.conf file:
# Configuration file for ksmtuned.
# How long ksmtuned should sleep between tuning adjustments
# KSM_MONITOR_INTERVAL=60

# Millisecond sleep between ksm scans for 16Gb server.
# Smaller servers sleep more, bigger sleep less.
# KSM_SLEEP_MSEC=10

# KSM_NPAGES_BOOST - is added to the `npages` value, when `free memory` is less than `thres`.
# KSM_NPAGES_BOOST=300

# KSM_NPAGES_DECAY - is the value given is subtracted to the `npages` value, when `free memory` is greater than `thres`.
# KSM_NPAGES_DECAY=-50

# KSM_NPAGES_MIN - is the lower limit for the `npages` value.
# KSM_NPAGES_MIN=64

# KSM_NPAGES_MAX - is the upper limit for the `npages` value.
# KSM_NPAGES_MAX=1250

# KSM_THRES_COEF - is the RAM percentage to be calculated in parameter `thres`.
# KSM_THRES_COEF=20

# KSM_THRES_CONST - If this is a low memory system, and the `thres` value is less than `KSM_THRES_CONST`, then reset `thres` value to `KSM_THRES_CONST` value.
# KSM_THRES_CONST=2048

# uncomment the following to enable ksmtuned debug information
# LOGFILE=/var/log/ksmtuned
# DEBUG=1
/etc/ksmtuned.conf file, npages sets how many pages ksm will scan before the ksmd daemon becomes inactive. This value will also be set in the /sys/kernel/mm/ksm/pages_to_scan file.
KSM_THRES_CONST value represents the amount of available memory used as a threshold to activate ksm. ksmd is activated if either of the following occurs:
- The amount of free memory drops below the threshold, set in
KSM_THRES_CONST. - The amount of committed memory plus the threshold,
KSM_THRES_CONST, exceeds the total amount of memory.
8.4.3. KSM Variables and Monitoring
/sys/kernel/mm/ksm/ directory. Files in this directory are updated by the kernel and are an accurate record of KSM usage and statistics.
/etc/ksmtuned.conf file, as noted above.
Files in /sys/kernel/mm/ksm/:
- full_scans
- Full scans run.
- merge_across_nodes
- Whether pages from different NUMA nodes can be merged.
- Total pages shared.
- pages_sharing
- Pages currently shared.
- pages_to_scan
- Pages not scanned.
- Pages no longer shared.
- pages_volatile
- Number of volatile pages.
- run
- Whether the KSM process is running.
- sleep_millisecs
- Sleep milliseconds.
virsh node-memory-tune command. For example, the following specifies the number of pages to scan before the shared memory service goes to sleep:
# virsh node-memory-tune --shm-pages-to-scan number/var/log/ksmtuned log file if the DEBUG=1 line is added to the /etc/ksmtuned.conf file. The log file location can be changed with the LOGFILE parameter. Changing the log file location is not advised and may require special configuration of SELinux settings.
8.4.4. Deactivating KSM
ksmtuned and the ksm services. However, this action does not persist after restarting. To deactivate KSM, run the following in a terminal as root:
# systemctl stop ksmtuned
Stopping ksmtuned:                                         [  OK  ]
# systemctl stop ksm
Stopping ksm:                                              [  OK  ]
ksmtuned and the ksm deactivates KSM, but this action does not persist after restarting. Persistently deactivate KSM with the systemctl commands:
# systemctl disable ksm
# systemctl disable ksmtuned# echo 2 >/sys/kernel/mm/ksm/run
khugepaged daemon can rebuild transparent hugepages on the KVM guest physical memory. Using # echo 0 >/sys/kernel/mm/ksm/run stops KSM, but does not unshare all the previously created KSM pages (this is the same as the # systemctl stop ksmtuned command).
Chapter 9. NUMA
9.1. Introduction
9.2. NUMA Memory Allocation Policies
Strict- Strict policy means that the allocation will fail if the memory cannot be allocated on the target node.Specifying a NUMA nodeset list without defining a memory mode attribute defaults to
strictmode. Interleave- Memory pages are allocated across nodes specified by a nodeset, but are allocated in a round-robin fashion.
Preferred- Memory is allocated from a single preferred memory node. If sufficient memory is not available, memory can be allocated from other nodes.
<memory mode> element of the domain XML file:
<numatune>
	<memory mode='preferred' nodeset='0'>
</numatune>
Important
strict mode and the guest does not have sufficient swap space, the kernel will kill some guest processes to retrieve additional memory. Red Hat recommends using preferred allocation and specifying a single nodeset (for example, nodeset='0') to prevent this situation.
9.3. libvirt NUMA Tuning
numastat tool to view per-NUMA-node memory statistics for processes and the operating system.
numastat tool shows four virtual machines with suboptimal memory alignment across NUMA nodes:
# numastat -c qemu-kvm

Per-node process memory usage (in MBs)
PID              Node 0 Node 1 Node 2 Node 3 Node 4 Node 5 Node 6 Node 7 Total
---------------  ------ ------ ------ ------ ------ ------ ------ ------ -----
51722 (qemu-kvm)     68     16    357   6936      2      3    147    598  8128
51747 (qemu-kvm)    245     11      5     18   5172   2532      1     92  8076
53736 (qemu-kvm)     62    432   1661    506   4851    136     22    445  8116
53773 (qemu-kvm)   1393      3      1      2     12      0      0   6702  8114
---------------  ------ ------ ------ ------ ------ ------ ------ ------ -----
Total 1769 463 2024 7462 10037 2672 169 7837 32434numad to align the guests' CPUs and memory resources automatically. However, it is highly recommended to configure guest resource alignment using libvirt instead: .
numastat -c qemu-kvm again. The following output shows successful resource alignment:
# numastat -c qemu-kvm

Per-node process memory usage (in MBs)
PID              Node 0 Node 1 Node 2 Node 3 Node 4 Node 5 Node 6 Node 7 Total
---------------  ------ ------ ------ ------ ------ ------ ------ ------ -----
51747 (qemu-kvm)      0      0      7      0   8072      0      1      0  8080
53736 (qemu-kvm)      0      0      7      0      0      0   8113      0  8120
53773 (qemu-kvm)      0      0      7      0      0      0      1   8110  8118
59065 (qemu-kvm)      0      0   8050      0      0      0      0      0  8051
---------------  ------ ------ ------ ------ ------ ------ ------ ------ -----
Total                 0      0   8072      0   8072      0   8114   8110 32368
Note
numastat with -c provides compact output; adding the -m option adds system-wide memory information on a per-node basis to the output. Refer to the numastat man page for more information.
9.3.1. NUMA vCPU Pinning
numatune can avoid NUMA misses. The performance impacts of NUMA misses are significant, generally starting at a 10% performance hit or higher. vCPU pinning and numatune should be configured together.
Note
Important
<vcpu cpuset='0-7'>8</vcpu>
	<cputune>
		<vcpupin vcpu='0' cpuset='0'/>
		<vcpupin vcpu='1' cpuset='1'/>
		<vcpupin vcpu='2' cpuset='2'/>
		<vcpupin vcpu='3' cpuset='3'/>
		<vcpupin vcpu='4' cpuset='4'/>
		<vcpupin vcpu='5' cpuset='5'/>
		<vcpupin vcpu='6' cpuset='6'/>
		<vcpupin vcpu='7' cpuset='7'/>
	</cputune>
<vcpu cpuset='0-7'>8</vcpu>
	<cputune>
		<vcpupin vcpu='0' cpuset='0'/>
		<vcpupin vcpu='1' cpuset='1'/>
		<vcpupin vcpu='2' cpuset='2'/>
		<vcpupin vcpu='3' cpuset='3'/>
		<vcpupin vcpu='4' cpuset='4'/>
		<vcpupin vcpu='6' cpuset='6'/>
		<vcpupin vcpu='7' cpuset='7'/>
	</cputune>
9.3.2. Domain Processes
<numatune>
	<memory mode='strict' placement='auto'/>
</numatune>
<numatune>
	<memory mode='strict' nodeset='0,2-3'/>
</numatune>
<vcpu placement='auto' current='8'>32</vcpu>
<vcpu placement='static' cpuset='0-10,ˆ5'>8</vcpu>
- The placement mode for <numatune> defaults to the same placement mode of <vcpu>, or to static if a <nodeset> is specified.
- Similarly, the placement mode for <vcpu> defaults to the same placement mode of <numatune>, or to static if <cpuset> is specified.
Note
9.3.3. Domain vCPU Threads
<cputune>
	<vcpupin vcpu="0" cpuset="1-4,ˆ2"/>
	<vcpupin vcpu="1" cpuset="0,1"/>
	<vcpupin vcpu="2" cpuset="2,3"/>
	<vcpupin vcpu="3" cpuset="0,4"/>
</cputune>
Note
4 available nodes (0-3)
Node 0:	CPUs 0 4, size 4000 MiB
Node 1: CPUs 1 5, size 3999 MiB
Node 2: CPUs 2 6, size 4001 MiB
Node 3: CPUs 0 4, size 4005 MiB
<cputune>
	<vcpupin vcpu="0" cpuset="1"/>
	<vcpupin vcpu="1" cpuset="5"/>
	<vcpupin vcpu="2" cpuset="2"/>
	<vcpupin vcpu="3" cpuset="6"/>
</cputune>
<numatune>
	<memory mode="strict" nodeset="1-2"/>
</numatune>
<cpu>
	<numa>
		<cell id="0" cpus="0-1" memory="3" unit="GiB"/>
		<cell id="1" cpus="2-3" memory="3" unit="GiB"/>
	</numa>
</cpu>
9.3.4. Using emulatorpin
<cputune>
	<emulatorpin cpuset="1-3"/>
</cputune>
9.3.5. Tuning vCPU Pinning with virsh
Important
virsh command will pin the vcpu thread (rhel6u4) which has an ID of 1 to the physical CPU 2:
% virsh vcpupin rhel6u4 1 2
virsh command. For example:
% virsh vcpupin rhel6u4
9.3.6. Tuning Domain Process CPU Pinning with virsh
Important
virsh vcpupin (as shown previously) and virsh emulatorpin for each guest. For example:
% virsh emulatorpin rhel6u4 3-4
9.3.7. Tuning Domain Process Memory Policy with virsh
% virsh numatune rhel6u4 --nodeset 0-10
9.4. NUMA-Aware Kernel SamePage Merging (KSM)
sysfs /sys/kernel/mm/ksm/merge_across_nodes parameter to control merging of pages across different NUMA nodes. By default, pages from all nodes can be merged together. When this parameter is set to zero, only pages from the same node are merged.
Important
<memoryBacking>
         <nosharepages/>
</memoryBacking>
<memoryBacking> element, see Section 8.3.2, “Memory Tuning with virsh”.
Appendix A. Revision History
| Revision History | |||
|---|---|---|---|
| Revision 1.0-23 | Mon March 10 2017 | ||
| |||
| Revision 1.0-19 | Mon May 02 2016 | ||
| |||
| Revision 1.0-18 | Tue Mar 01 2016 | ||
| |||
| Revision 1.0-17 | Thu Oct 08 2015 | ||
| |||
| Revision 1.0-16 | Wed July 15 2015 | ||
| |||