Image Builder Guide
Creating customized system images with Image Builder
Abstract
Chapter 1. Image Builder description
1.1. Introduction to Image Builder
composer-cli tool, or a graphical user interface in the RHEL 7 web console. See managing the web console for more information.
lorax-composer. You can interact with this service through two interfaces:
- CLI tool
composer-clifor running commands in the terminal. This method is recommended. - GUI plugin for the RHEL 7 web console.
1.2. Image Builder terminology
- Blueprints Blueprints define customized system images by listing packages and customizations that will be part of the system. Blueprints can be edited and they are versioned. When a system image is created from a blueprint, the image is associated with the blueprint in the Image Builder interface of the RHEL 7 web console.Blueprints are presented to the user as plain text in the Tom’s Obvious, Minimal Language (TOML) format.
- Compose Composes are individual builds of a system image, based on a particular version of a particular blueprint. Compose as a term refers to the system image, the logs from its creation, inputs, metadata, and the process itself.
- Customization Customizations are specifications for the system, which are not packages. This includes user accounts, groups, kernel, timezone, locale, firewall and ssh key.
1.3. Image Builder output formats
| Description | CLI name | file extension |
|---|---|---|
QEMU QCOW2 Image | qcow2 | .qcow2 |
Ext4 File System Image | 80 | .qcow2 |
Raw Partitioned Disk Image | partitioned-disk | .img |
Live Bootable ISO | live-iso | .iso |
TAR Archive | tar | .tar |
Amazon Machine Image Disk | ami | .ami |
VMware Virtual Machine Disk | vmdk | .vmdk |
Openstack | openstack | .qcow2 |
1.4. Image Builder system requirements
lorax tool underlying Image Builder performs a number of potentially insecure and unsafe actions while creating the system images. For this reason, use a virtual machine to run Image Builder.
| Parameter | Minimal Required Value |
|---|---|
System type | A dedicated virtual machine |
Processor | 2 cores |
Memory | 4 GiB |
Disk space | 20 GiB |
Access privileges | Administrator level (root) |
Network | Connectivity to Internet |
Note
Chapter 2. Installing Image Builder
2.1. Installing Image Builder in a virtual machine
Prerequisites
- Connect to the virtual machine.
- The virtual machine for Image Builder must be installed, subscribed, and running.
Procedure
- lorax-composer
- composer-cli
- cockpit-composer
- bash-completion
yum install lorax-composer composer-cli cockpit-composer bash-completion
# yum install lorax-composer composer-cli cockpit-composer bash-completionsystemctl enable lorax-composer.socket
# systemctl enable lorax-composer.socketsystemctl enable cockpit.socket
# systemctl enable cockpit.socketlorax-composer and cockpit services start automatically on first access.
firewall-cmd --add-service=cockpit && firewall-cmd --add-service=cockpit --permanent
# firewall-cmd --add-service=cockpit && firewall-cmd --add-service=cockpit --permanentcomposer-cli tool starts working immediately without reboot:
source /etc/bash_completion.d/composer-cli
$ source /etc/bash_completion.d/composer-cliChapter 3. Creating system images with Image Builder command-line interface
3.1. Image Builder command-line interface
composer-cli tool with suitable options and sub-commands.
composer-cli tool offers many sub-commands to examine the state of configured blueprints and composes.
composer-cli command as a non-root, the user must be in the weldr or root groups.
3.2. Creating an Image Builder blueprint with command-line interface
Procedure
name = "BLUEPRINT-NAME"
description = "LONGER BLUEPRINT DESCRIPTION TEXT"
version = "0.0.1"
name = "BLUEPRINT-NAME"
description = "LONGER BLUEPRINT DESCRIPTION TEXT"
version = "0.0.1"
BLUEPRINT-NAME and LONGER BLUEPRINT DESCRIPTION with a name and description for your blueprint.
0.0.1 with a version number according to the Semantic Versioning scheme.
[[packages]]
name = "package-name"
version = "package-version"
[[packages]]
name = "package-name"
version = "package-version"package-name with name of the package, such as httpd, gdb-doc, or coreutils.
package-version with a version to use. This field supports dnf version specifications:
- For a specific version, use the exact version number such as
7.30 - For latest available version, use the asterisk
* - For a latest minor version, use format such as
7.*.
[customizations.kernel]
append = "nosmt=force"
[customizations.kernel]
append = "nosmt=force"BLUEPRINT-NAME.toml and close the text editor.
composer-cli blueprints push BLUEPRINT-NAME.toml
# composer-cli blueprints push BLUEPRINT-NAME.tomlcomposer-cli blueprints list
# composer-cli blueprints listcomposer-cli blueprints depsolve BLUEPRINT-NAME
# composer-cli blueprints depsolve BLUEPRINT-NAME3.3. Editing an Image Builder blueprint with command-line interface
Procedure
composer-cli blueprints save BLUEPRINT-NAME
# composer-cli blueprints save BLUEPRINT-NAMEBLUEPRINT-NAME.toml file with a text editor of your choice and make your changes.
- Remove this line, if present:
packages = []
packages = []Copy to Clipboard Copied! Toggle word wrap Toggle overflow - Increase the version number. Remember that Image Builder blueprint versions must use the Semantic Versioning scheme. Note also that if you do not change the version, the patch component of version is increased automatically.
- Check if the contents are valid TOML specifications. See the TOML documentation for more information.
Note
composer-cli blueprints push BLUEPRINT-NAME.toml
# composer-cli blueprints push BLUEPRINT-NAME.toml.toml extension, while in other commands you use only the name of the blueprint.
composer-cli blueprints show BLUEPRINT-NAME
# composer-cli blueprints show BLUEPRINT-NAMEcomposer-cli blueprints depsolve BLUEPRINT-NAME
# composer-cli blueprints depsolve BLUEPRINT-NAME3.4. Creating a system image with Image Builder in the command-line interface
Prerequisites
- You have a blueprint prepared for the image.
Procedure
composer-cli compose start BLUEPRINT-NAME IMAGE-TYPE
# composer-cli compose start BLUEPRINT-NAME IMAGE-TYPEcomposer-cli compose types command.
composer-cli compose status
# composer-cli compose statuscomposer-cli compose image UUID
# composer-cli compose image UUID/var/lib/lorax/composer/results/UUID/.
composer-cli compose logs UUID command, or the metadata using the composer-cli compose metadata UUID command.
3.5. Basic Image Builder command-line commands
Blueprint manipulation
- List all available blueprints
composer-cli blueprints list
# composer-cli blueprints listCopy to Clipboard Copied! Toggle word wrap Toggle overflow - Show a blueprint contents in the TOML format
composer-cli blueprints show BLUEPRINT-NAME
# composer-cli blueprints show BLUEPRINT-NAMECopy to Clipboard Copied! Toggle word wrap Toggle overflow - Save (export) blueprint contents in the TOML format into a file BLUEPRINT-NAME.toml
composer-cli blueprints save BLUEPRINT-NAME
# composer-cli blueprints save BLUEPRINT-NAMECopy to Clipboard Copied! Toggle word wrap Toggle overflow - Remove a blueprint
composer-cli blueprints delete BLUEPRINT-NAME
# composer-cli blueprints delete BLUEPRINT-NAMECopy to Clipboard Copied! Toggle word wrap Toggle overflow - Push (import) a blueprint file in the TOML format into Image Builder
composer-cli blueprints push BLUEPRINT-NAME
# composer-cli blueprints push BLUEPRINT-NAMECopy to Clipboard Copied! Toggle word wrap Toggle overflow
Composing images from blueprints
- Start a compose
composer-cli compose start BLUEPRINT COMPOSE-TYPE
# composer-cli compose start BLUEPRINT COMPOSE-TYPECopy to Clipboard Copied! Toggle word wrap Toggle overflow Replace BLUEPRINT with name of the blueprint to build and COMPOSE-TYPE with the output image type.- List all composes
composer-cli compose list
# composer-cli compose listCopy to Clipboard Copied! Toggle word wrap Toggle overflow - Cancel a running compose
composer-cli compose cancel COMPOSE-UUID
# composer-cli compose cancel COMPOSE-UUIDCopy to Clipboard Copied! Toggle word wrap Toggle overflow - Delete a finished compose
composer-cli compose delete COMPOSE-UUID
# composer-cli compose delete COMPOSE-UUIDCopy to Clipboard Copied! Toggle word wrap Toggle overflow - Show detailed information about a compose
composer-cli compose info COMPOSE-UUID
# composer-cli compose info COMPOSE-UUIDCopy to Clipboard Copied! Toggle word wrap Toggle overflow - Download image file of a compose
composer-cli compose image COMPOSE-UUID
# composer-cli compose image COMPOSE-UUIDCopy to Clipboard Copied! Toggle word wrap Toggle overflow
Related information
- The
composer-cli(1)manual page provides a full list of the available sub-commands and options:man composer-cli
$ man composer-cliCopy to Clipboard Copied! Toggle word wrap Toggle overflow - The
composer-clitool provides help on the sub-commands and options:composer-cli compose list
# composer-cli compose listCopy to Clipboard Copied! Toggle word wrap Toggle overflow
3.6. Image Builder blueprint format
- The blueprint metadata
name = "BLUEPRINT-NAME"
description = "LONGER BLUEPRINT DESCRIPTION"
version = "VERSION"
modules = []
groups = []
name = "BLUEPRINT-NAME"
description = "LONGER BLUEPRINT DESCRIPTION"
version = "VERSION"
modules = []
groups = []
Copy to Clipboard Copied! Toggle word wrap Toggle overflow Replace BLUEPRINT-NAME and LONG FORM DESCRIPTION TEXT with a name and description for your blueprint.Replace VERSION with a version number according to the Semantic Versioning scheme.This part is present only once for the whole blueprint file.The entry modules describe the package names and matching version glob to be installed into the image and the entry group describe a group of packages to be installed into the image. If you do not add these items, the blueprint indentify them as an empyt lists.- Packages included in the image
[[packages]]
name = "package-name"
version = "package-version"
[[packages]]
name = "package-name"
version = "package-version"
Copy to Clipboard Copied! Toggle word wrap Toggle overflow Replacepackage-namewith name of the package, such as httpd, gdb-doc, or coreutils.Replacepackage-versionwith a version to use. This field supportsdnfversion specifications:- For a specific version, use the exact version number such as 7.30.
- For latest available version, use the asterisk *.
- For a latest minor version, use format such as 7.*.
Repeat this block for every package to be included.
3.7. Supported Image Customizations
Note
- Set the image host name
[customizations]
hostname = "baseimage"
[customizations]
hostname = "baseimage"
Copy to Clipboard Copied! Toggle word wrap Toggle overflow - User specifications for the resulting system image
Copy to Clipboard Copied! Toggle word wrap Toggle overflow
python3 -c 'import crypt,getpass;pw=getpass.getpass();print(crypt.crypt(pw) if (pw==getpass.getpass("Confirm: ")) else exit())'
$ python3 -c 'import crypt,getpass;pw=getpass.getpass();print(crypt.crypt(pw) if (pw==getpass.getpass("Confirm: ")) else exit())'Important
python3 package on your system. Use the following command to install the package:
yum install python3
# yum install python3- Group specifications for the resulting system image
[[customizations.group]]
name = "GROUP-NAME"
gid = NUMBER
[[customizations.group]]
name = "GROUP-NAME"
gid = NUMBER
Copy to Clipboard Copied! Toggle word wrap Toggle overflow Repeat this block for every group you want to include.- Set an existing user's ssh key
[[customizations.sshkey]]
user = "root"
key = "PUBLIC-SSH-KEY"
[[customizations.sshkey]]
user = "root"
key = "PUBLIC-SSH-KEY"
Copy to Clipboard Copied! Toggle word wrap Toggle overflow
Note
- Append a kernel boot parameter option to the defaults
[[customizations.kernel]]
append = "KERNEL-OPTION"
[[customizations.kernel]]
append = "KERNEL-OPTION"
Copy to Clipboard Copied! Toggle word wrap Toggle overflow
- Set the image host name
[customizations]
hostname = "BASE-IMAGE"
[customizations]
hostname = "BASE-IMAGE"
Copy to Clipboard Copied! Toggle word wrap Toggle overflow - Add a group for the resulting system image
[[customizations.group]]
name = "USER-NAME"
gid = NUMBER
[[customizations.group]]
name = "USER-NAME"
gid = NUMBER
Copy to Clipboard Copied! Toggle word wrap Toggle overflow Only the name is required and GID is optional.- Set the timezone and the Network Time Protocol (NTP) servers for the resulting system image
[customizations.timezone]
timezone = "TIMEZONE"
ntpservers = NTP-SERVER
[customizations.timezone]
timezone = "TIMEZONE"
ntpservers = NTP-SERVER
Copy to Clipboard Copied! Toggle word wrap Toggle overflow If you do not set a timezone, the system uses Universal Time, Coordinated (UTC) as default. Setting NTP servers is optional.- Set the locale settings for the resulting system image
[customizations.locale]
language = "[LANGUAGE]"
keyboard = "KEYBOARD"
[customizations.locale]
language = "[LANGUAGE]"
keyboard = "KEYBOARD"
Copy to Clipboard Copied! Toggle word wrap Toggle overflow Setting both language and keyboard options is mandatory. You can add multiple languages. The first language you add will be the primary language and the other languages will be secondary.- Set the firewall for the resulting system image
[customizations.firewall]
port = "[PORTS]"
[customizations.firewall]
port = "[PORTS]"
Copy to Clipboard Copied! Toggle word wrap Toggle overflow You can use the numeric ports, or theirs names from the `/etc/services` file to enable or disable lists.- Set which services to enable during the boot time
[customizations.services]
enabled = "[SERVICES]"
disabled = "[SERVICES]"
[customizations.services]
enabled = "[SERVICES]"
disabled = "[SERVICES]"
Copy to Clipboard Copied! Toggle word wrap Toggle overflow You can control which services to enable during the boot time. Some image types already have services enabled or disabled so that the image works correctly and this setup cannot be overridden.
Chapter 4. Creating system images with Image Builder web console interface
Note
4.1. Accessing Image Builder GUI in the RHEL 7 web console
Prerequisites
- You must have root access to the system.
Procedure
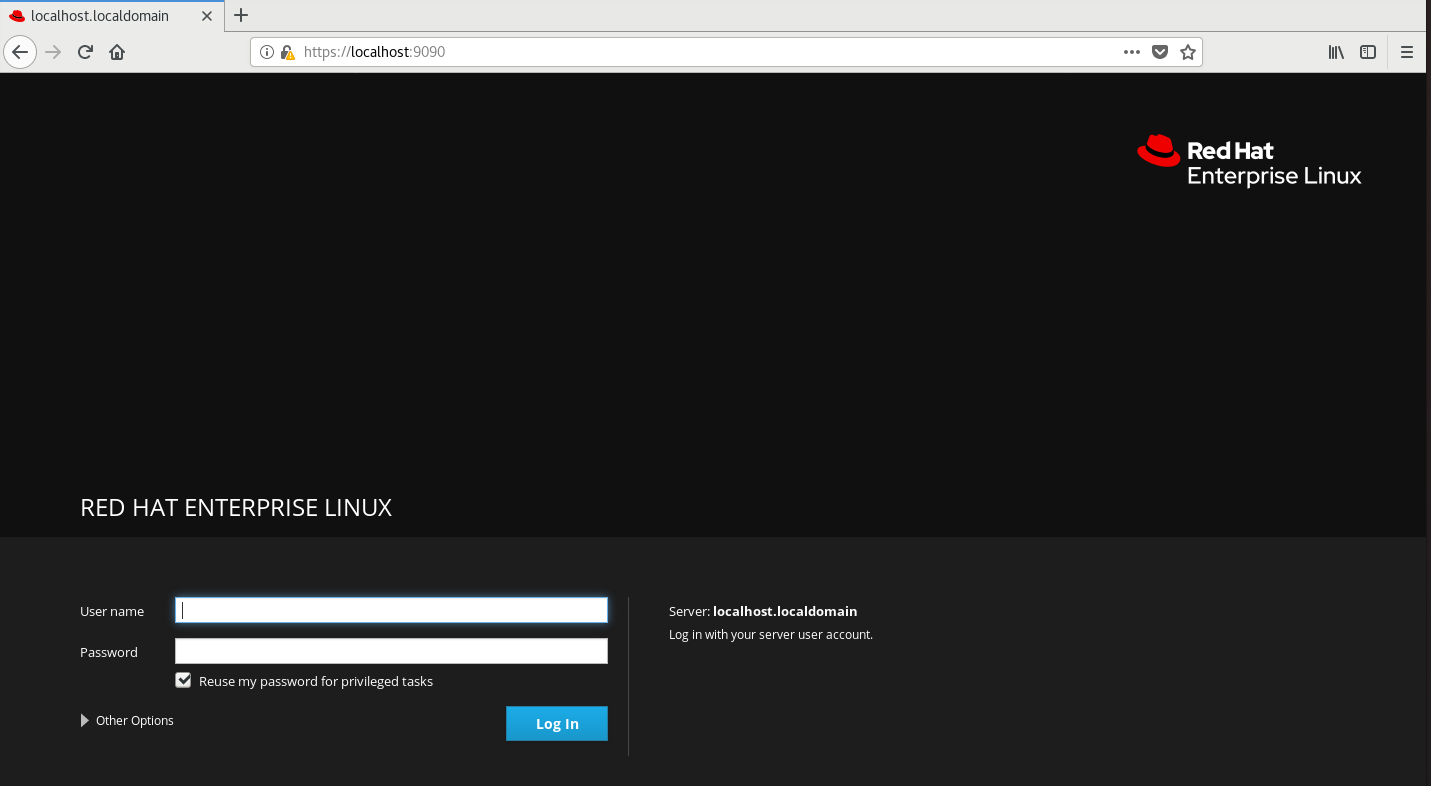
https://localhost:9090/ in a web browser on the system where Image Builder is installed.
Figure 4.1. Log into the web console
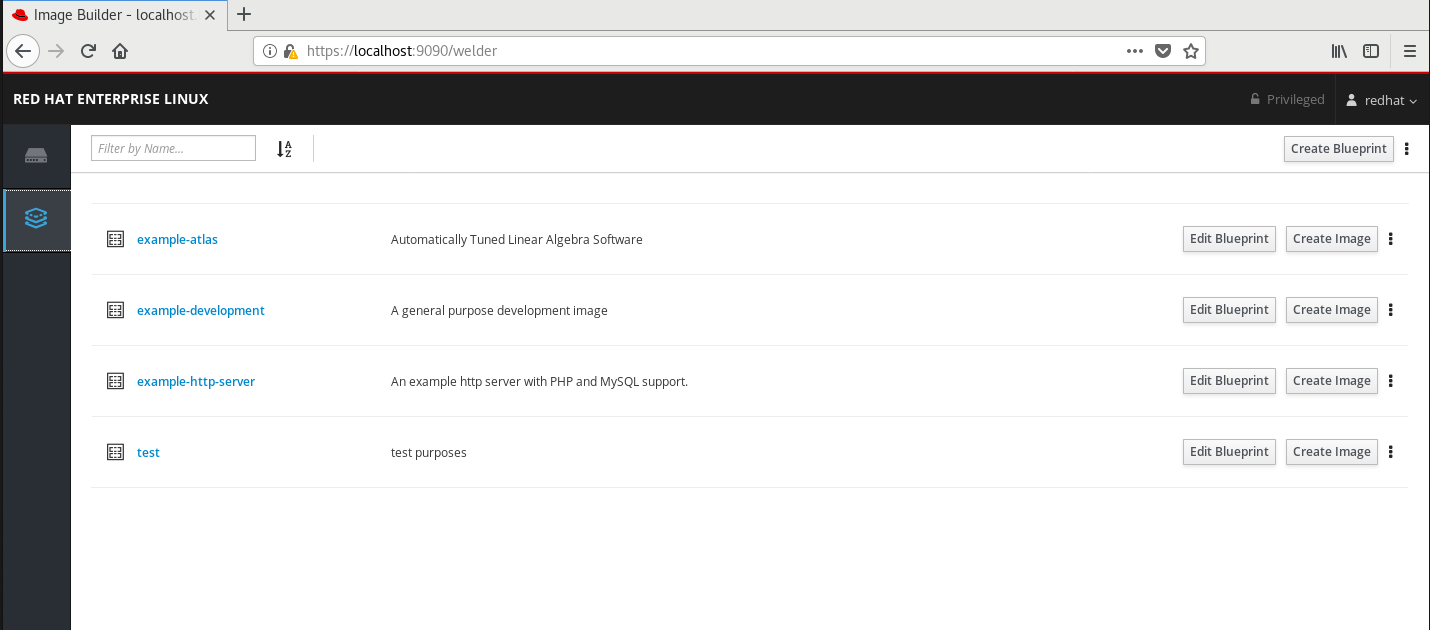
Figure 4.2. Image Builder on Web Console
Related information
- You will be able to create customized RHEL OS images using Image Builder scenario
4.2. Creating an Image Builder blueprint in the web console interface
Prerequisites
- You have opened the Image Builder interface of the RHEL 7 web console in a browser.
Procedure
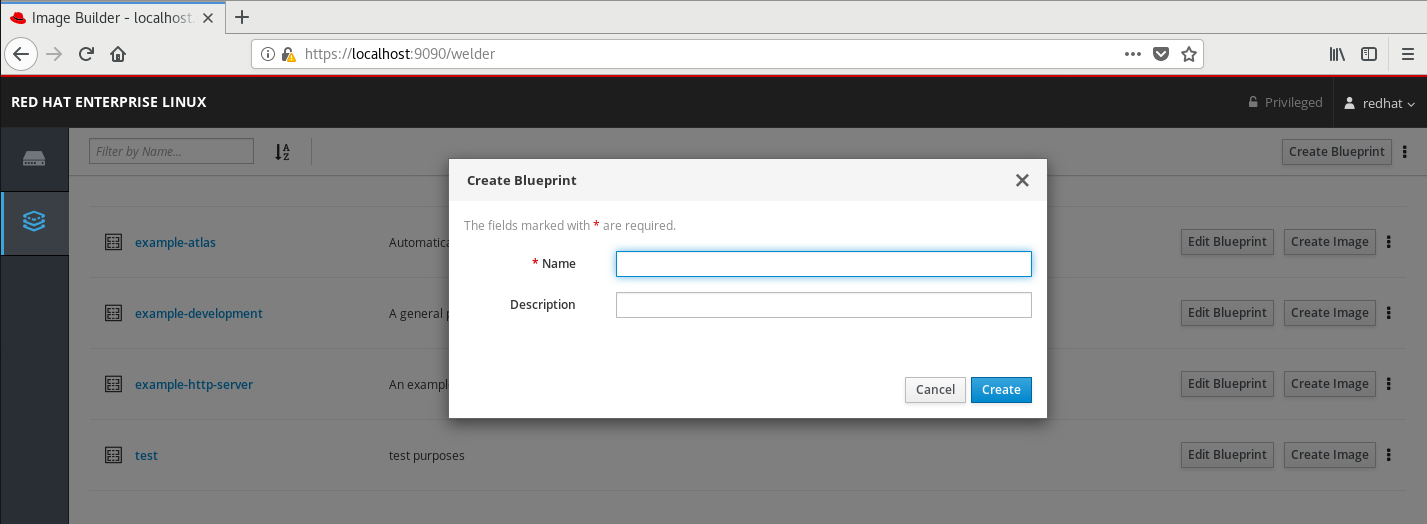
Figure 4.3. Creating a Blueprint
- i. On the left, enter all or part of the component name in the Available Components field and press Enter.
Figure 4.4. Searching for Available Componentes
The search is added to the list of filters under the text entry field, and the list of components below is reduced to these that match the search.If the list of components is too long, add further search terms in the same way. - ii. The list of components is paged. To move to other result pages, use the arrows and entry field above the component list.
- iii. Click on name of the component you intend to use to display its details. The right pane fills with details of the components, such as its version and dependencies.
- iv. Select the version you want to use in the Component Options box, with the Version Release dropdown.
- v. Click Add in the top left.
- vi. If you added a component by mistake, remove it by clicking the … button at the far right of its entry in the right pane, and select Remove in the menu.
Note
4.3. Editing an Image Builder blueprint in the web console interface
Prerequisites
- You have opened the Image Builder interface of the RHEL 7 web console in a browser.
- A blueprint exists.
Procedure
Remove in the menu.
- i. On the Blueprint Components search field, enter component name or a part of it into the field under the heading
Blueprint Componentsand press .The search is added to the list of filters under the text entry field, and the list of components below is reduced to these that match the search.If the list of components is too long, add further search terms in the same way. - ii. Click the button at the far right of the component entry, and select
Viewin the menu.A component details screen opens in the right pane. - iii. Select the desired version in the
Version Releasedrop-down menu and click in top right.The change is saved and the right pane returns to listing the blueprint components.
- i. On the left, enter component name or a part of it into the field under the heading Available Components and press Enter.The search is added to the list of filters under the text entry field, and the list of components below is reduced to these that match the search.If the list of components is too long, add further search terms in the same way.
- ii. The list of components is paged. To move to other result pages, use the arrows and entry field above the component list.
- iii. Click on the name of the component you intend to use to display its details. The right pane fills with details of the components, such as its version and dependencies.
- iv. Select the version you want to use in the
Component Optionsbox, with theVersion Releasedrop-down menu. - v. Click in the top right.
- vi. If you added a component by mistake, remove it by clicking the button at the far right of its entry in the right pane, and select
Removein the menu.
Note
- i. Click the Commit button in top right.A pop-up window with a summary of your changes appears.
- ii. Review your changes and confirm them by clicking Commit.A small pop-up on the right informs you of the saving progress and then result. A new version of the blueprint is created.
- iii. In the top left, click
Back to Blueprintsto exit the editing screen.The Image Builder view opens, listing existing blueprints.
4.4. Adding users and groups to an Image Builder blueprint in the web console interface
Prerequisites
- A blueprint must exist.
- A CLI text editor such as
vim,nano, oremacsmust be installed. To install them:yum install editor-name
# yum install editor-nameCopy to Clipboard Copied! Toggle word wrap Toggle overflow
Procedure
sudo bash
$ sudo bashcomposer-cli blueprints save BLUEPRINT-NAME
# composer-cli blueprints save BLUEPRINT-NAMEImportant
- i. For every user to be added, add this block to the file:
Copy to Clipboard Copied! Toggle word wrap Toggle overflow Replace PASSWORD-HASH with the actual password hash. To generate the hash, use a command such as this:python3 -c 'import crypt,getpass;pw=getpass.getpass();print(crypt.crypt(pw) if (pw==getpass.getpass("Confirm: ")) else exit())'$ python3 -c 'import crypt,getpass;pw=getpass.getpass();print(crypt.crypt(pw) if (pw==getpass.getpass("Confirm: ")) else exit())'Copy to Clipboard Copied! Toggle word wrap Toggle overflow Replace ssh-rsa (…) key-name with the actual public key.Replace the other placeholders with suitable values.Leave out any of the lines as needed, only the user name is required. - ii. For every user group to be added, add this block to the file:
[[customizations.group]]
name = "GROUP-NAME"
gid = NUMBER
[[customizations.group]]
name = "GROUP-NAME"
gid = NUMBER
Copy to Clipboard Copied! Toggle word wrap Toggle overflow iii. Increase the version number.iv. Save the file and close the editor. - 6. Import the blueprint back into Image Builder:
composer-cli blueprints push BLUEPRINT-NAME.toml
# composer-cli blueprints push BLUEPRINT-NAME.tomlCopy to Clipboard Copied! Toggle word wrap Toggle overflow Note that you must supply the file name including the.tomlextension, while in other commands you use only the name of the blueprint. - 7. To verify that the contents uploaded to Image Builder match your edits, list the contents of blueprint:
composer-cli blueprints show BLUEPRINT-NAME
# composer-cli blueprints show BLUEPRINT-NAMECopy to Clipboard Copied! Toggle word wrap Toggle overflow Check if the version matches what you put in the file and if your customizations are present.Important
The Image Builder plug-in for RHEL 7 web console does not show any information that could be used to verify that the changes have been applied, unless you edited also the packages included in the blueprint. - 8. Exit the privileged shell:
exit
# exitCopy to Clipboard Copied! Toggle word wrap Toggle overflow - 9. Open the Image Builder (Image builder) tab on the left and refresh the page, in all browsers and all tabs where it was opened.This prevents state cached in the loaded page from accidentally reverting your changes.
Additional information
4.5. Creating a system image with Image Builder in the web console interface
Prerequisites
- You have opened the Image Builder interface of the RHEL 7 web console in a browser.
- A blueprint exists.
Procedure
Important
Chapter 5. Deploying cloud images with Image Builder
5.1. Preparing AWS AMI images for upload
Prerequisites
- You must have an Access Key ID configured in the AWS IAM account manager.
- You must have a writable S3 bucket prepared.
Procedure
pip tool:
yum install python3 python3-pip
# yum install python3 python3-pippip3 install awscli
# pip3 install awscliaws configure AWS Access Key ID [None]: AWS Secret Access Key [None]: Default region name [None]: Default output format [None]:
$ aws configure AWS Access Key ID [None]: AWS Secret Access Key [None]: Default region name [None]: Default output format [None]:BUCKET=bucketname
$ BUCKET=bucketnameaws s3 mb s3://$BUCKET
$ aws s3 mb s3://$BUCKETvmimport S3 Role in IAM and grant it permissions to access S3, if you have not already done so:
printf '{ "Version": "2012-10-17", "Statement": [ { "Effect": "Allow", "Principal": { "Service": "vmie.amazonaws.com" }, "Action": "sts:AssumeRole", "Condition": { "StringEquals":{ "sts:Externalid": "vmimport" } } } ] }' > trust-policy.json $ printf '{ "Version":"2012-10-17", "Statement":[ { "Effect":"Allow", "Action":[ "s3:GetBucketLocation", "s3:GetObject", "s3:ListBucket" ], "Resource":[ "arn:aws:s3:::%s", "arn:aws:s3:::%s/*" ] }, { "Effect":"Allow", "Action":[ "ec2:ModifySnapshotAttribute", "ec2:CopySnapshot", "ec2:RegisterImage", "ec2:Describe*" ], "Resource":"*" } ] }' $BUCKET $BUCKET > role-policy.json $ aws iam create-role --role-name vmimport --assume-role-policy-document file://trust-policy.json $ aws iam put-role-policy --role-name vmimport --policy-name vmimport --policy-document file://role-policy.json
$ printf '{ "Version": "2012-10-17", "Statement": [ { "Effect": "Allow", "Principal": { "Service": "vmie.amazonaws.com" }, "Action": "sts:AssumeRole", "Condition": { "StringEquals":{ "sts:Externalid": "vmimport" } } } ] }' > trust-policy.json $ printf '{ "Version":"2012-10-17", "Statement":[ { "Effect":"Allow", "Action":[ "s3:GetBucketLocation", "s3:GetObject", "s3:ListBucket" ], "Resource":[ "arn:aws:s3:::%s", "arn:aws:s3:::%s/*" ] }, { "Effect":"Allow", "Action":[ "ec2:ModifySnapshotAttribute", "ec2:CopySnapshot", "ec2:RegisterImage", "ec2:Describe*" ], "Resource":"*" } ] }' $BUCKET $BUCKET > role-policy.json $ aws iam create-role --role-name vmimport --assume-role-policy-document file://trust-policy.json $ aws iam put-role-policy --role-name vmimport --policy-name vmimport --policy-document file://role-policy.json5.2. Uploading an AMI image to AWS
Prerequisites
- Your system must be set up for uploading AWS images.
- You must have an AWS image created by Image Builder. Use the
amioutput type in CLI or Amazon Machine Image Disk (.ami) in GUI when creating the image.
Procedure
$ AMI=8db1b463-91ee-4fd9-8065-938924398428-disk.ami
$ $ AMI=8db1b463-91ee-4fd9-8065-938924398428-disk.amiaws s3 cp $AMI s3://$BUCKET Completed 24.2 MiB/4.4 GiB (2.5 MiB/s) with 1 file(s) remaining ...
$ aws s3 cp $AMI s3://$BUCKET Completed 24.2 MiB/4.4 GiB (2.5 MiB/s) with 1 file(s) remaining ...A printf '{ "Description": "my-image", "Format": "raw", "UserBucket": { "S3Bucket": "%s", "S3Key": "%s" } }' $BUCKET $AMI > containers.json
$ A printf '{ "Description": "my-image", "Format": "raw", "UserBucket": { "S3Bucket": "%s", "S3Key": "%s" } }' $BUCKET $AMI > containers.jsonaws ec2 import-snapshot disk-container file://containers.json
$ aws ec2 import-snapshot disk-container file://containers.jsonaws ec2 describe-import-snapshot-tasks --filters Name=task-state,Values=active
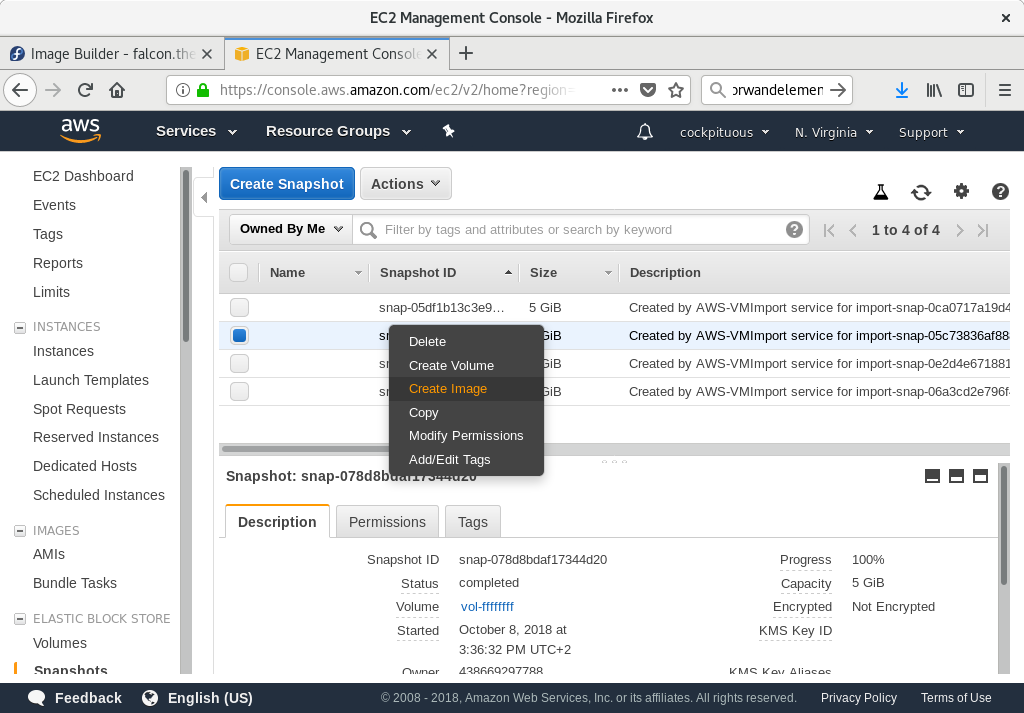
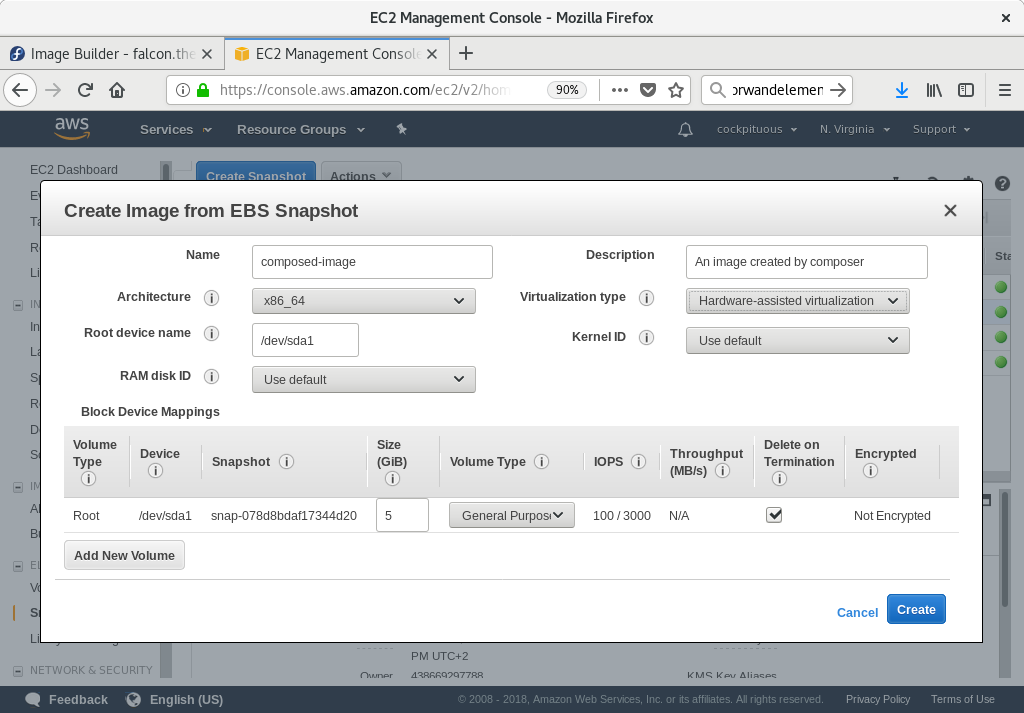
$ aws ec2 describe-import-snapshot-tasks --filters Name=task-state,Values=activeFigure 5.1. Create Image
Figure 5.2. Virtualization type
5.3. Uploading VMDK images to vSphere
Note
Prerequisites
- You must have an VMDK image created by Image Builder. Use the vmdk output type in CLI or VMware Virtual Machine Disk (.vmdk) in GUI when creating the image.
Procedure
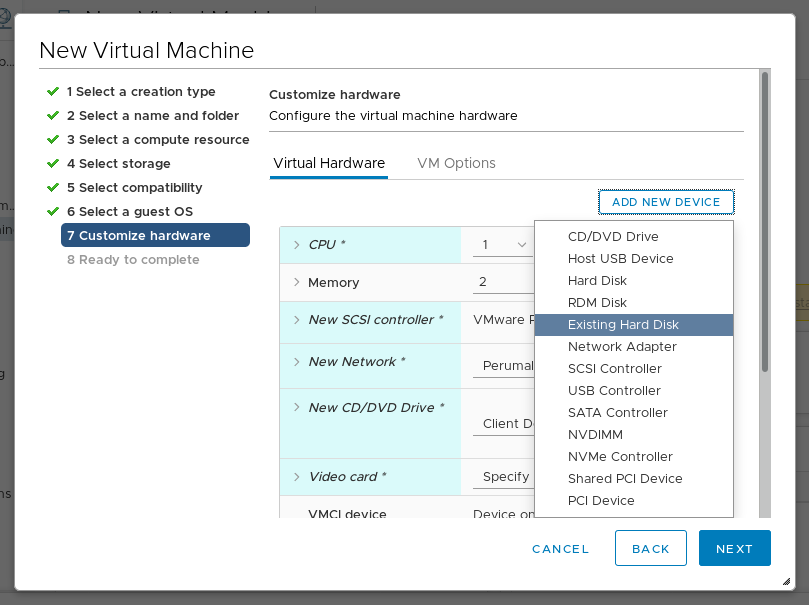
Figure 5.3. Virtualization type
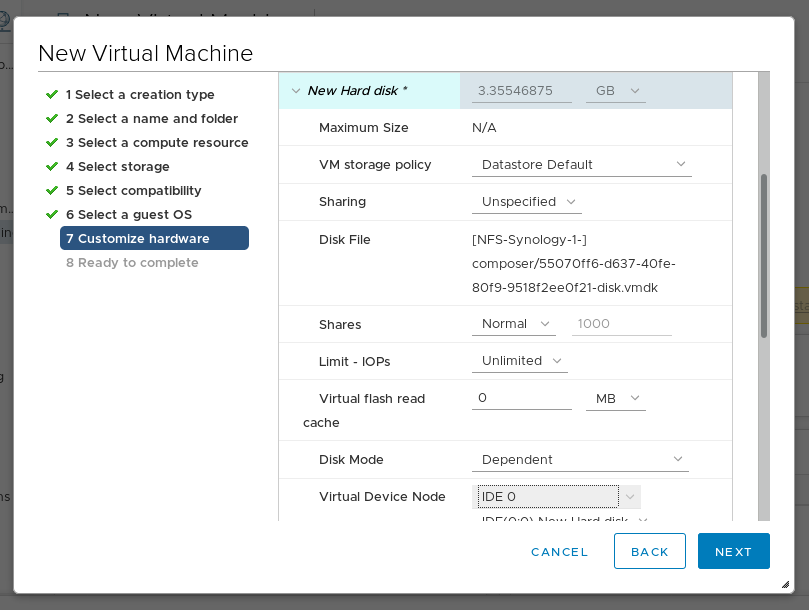
SCSI value results in an unbootable virtual machine.
Figure 5.4. Virtualization type
5.4. Uploading QCOW2 image to OpenStack
Prerequisites
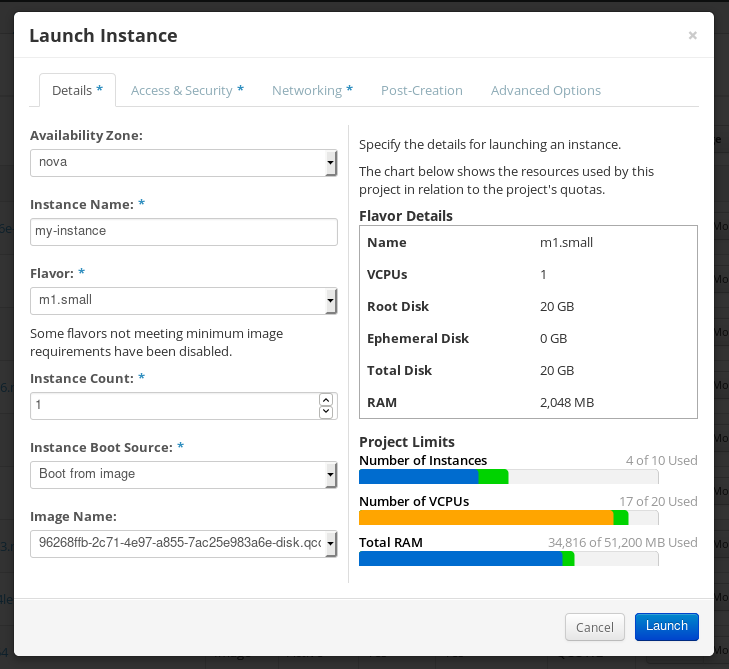
- You must have an OpenStack-specific image created by Image Builder. Use the openstack output type in CLI or OpenStack Image (.qcow2) in GUI when creating the image.
Warning
Procedure
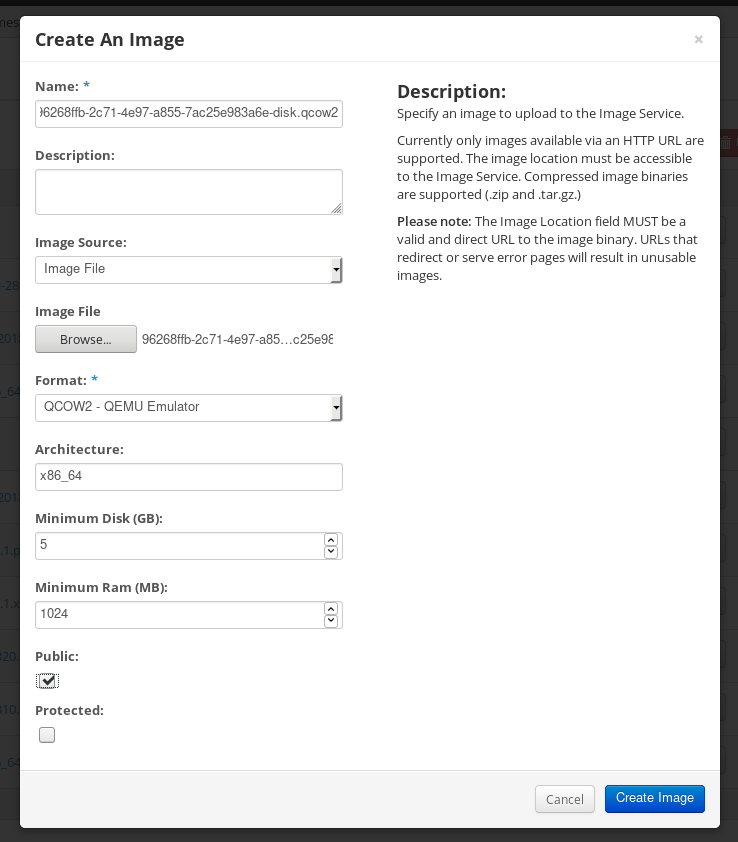
Figure 5.5. Virtualization type
Figure 5.6. Virtualization type
Appendix A. Revision History
| Revision History | |||
|---|---|---|---|
| Revision 1.1.0- | Tue Aug 06 2019 | ||
| Revision 1.0.0- | Thu Jul 11 2019 | ||
| |||
| Revision 0.0-0 | Sun Jun 2 2019 | ||
| |||
