Configuring and managing Identity Management
Logging in to IdM and managing services, users, hosts, groups, access control rules, and certificates.
Abstract
Providing feedback on Red Hat documentation
We are committed to providing high-quality documentation and value your feedback. To help us improve, you can submit suggestions or report errors through the Red Hat Jira tracking system.
Procedure
Log in to the Jira website.
If you do not have an account, select the option to create one.
- Click Create in the top navigation bar.
- Enter a descriptive title in the Summary field.
- Enter your suggestion for improvement in the Description field. Include links to the relevant parts of the documentation.
- Click Create at the bottom of the dialogue.
Chapter 1. Logging in to Identity Management from the command line
Identity Management (IdM) uses the Kerberos protocol to support single sign-on. Single sign-on means that the user enters the correct user name and password only once, and then accesses IdM services without the system prompting for the credentials again.
In IdM, the System Security Services Daemon (SSSD) automatically obtains a ticket-granting ticket (TGT) for a user after the user successfully logs in to the desktop environment on an IdM client machine with the corresponding Kerberos principal name. This means that after logging in, the user is not required to use the kinit utility to access IdM resources.
If you have cleared your Kerberos credential cache or your Kerberos TGT has expired, you need to request a Kerberos ticket manually to access IdM resources. The following sections present basic user operations when using Kerberos in IdM.
1.1. Using kinit to log in to IdM manually
Follow this procedure to use the kinit utility to authenticate to an Identity Management (IdM) environment manually. The kinit utility obtains and caches a Kerberos ticket-granting ticket (TGT) on behalf of an IdM user.
Only use this procedure if you have destroyed your initial Kerberos TGT or if it has expired. As an IdM user, when logging onto your local machine you are also automatically logging in to IdM. This means that after logging in, you are not required to use the kinit utility to access IdM resources.
Procedure
To log in under the user name of the user who is currently logged in on the local system, use kinit without specifying a user name. For example, if you are logged in as
<example_user>on the local system:[example_user@server ~]$ kinit Password for example_user@EXAMPLE.COM: [example_user@server ~]$If the user name of the local user does not match any user entry in IdM, the authentication attempt fails:
[example_user@server ~]$ kinit kinit: Client 'example_user@EXAMPLE.COM' not found in Kerberos database while getting initial credentialsTo use a Kerberos principal that does not correspond to your local user name, pass the required user name to the
kinitutility. For example, to log in as theadminuser:[example_user@server ~]$ kinit admin Password for admin@EXAMPLE.COM: [example_user@server ~]$
Requesting user tickets using kinit -kt KDB: user@EXAMPLE.COM is disabled. For more information, see the Why kinit -kt KDB: user@EXAMPLE.COM no longer work after CVE-2024-3183 solution.
Verification
To verify that the login was successful, use the klist utility to display the cached TGT. In the following example, the cache contains a ticket for the
example_userprincipal, which means that on this particular host, onlyexample_useris currently allowed to access IdM services:$ klist Ticket cache: KEYRING:persistent:0:0 Default principal: example_user@EXAMPLE.COM Valid starting Expires Service principal 11/10/2019 08:35:45 11/10/2019 18:35:45 krbtgt/EXAMPLE.COM@EXAMPLE.COM
1.2. Destroying a user’s active Kerberos ticket
Follow this procedure to clear the credentials cache that contains the user’s active Kerberos ticket.
Procedure
To destroy your Kerberos ticket:
[example_user@server ~]$ kdestroy
Verificiation
To check that the Kerberos ticket has been destroyed:
[example_user@server ~]$ klist klist: Credentials cache keyring 'persistent:0:0' not found
1.3. Configuring an external system for Kerberos authentication
Follow this procedure to configure an external system so that Identity Management (IdM) users can log in to IdM from the external system using their Kerberos credentials.
Enabling Kerberos authentication on external systems is especially useful when your infrastructure includes multiple realms or overlapping domains. It is also useful if the system has not been enrolled into any IdM domain through ipa-client-install.
To enable Kerberos authentication to IdM from a system that is not a member of the IdM domain, define an IdM-specific Kerberos configuration file on the external system.
Prerequisites
The
krb5-workstationpackage is installed on the external system.To find out whether the package is installed, use the following CLI command:
# yum list installed krb5-workstation Installed Packages krb5-workstation.x86_64 1.16.1-19.el8 @BaseOS
Procedure
Copy the
/etc/krb5.conffile from the IdM server to the external system. For example:# scp /etc/krb5.conf root@externalsystem.example.com:/etc/krb5_ipa.confWarningDo not overwrite the existing
krb5.conffile on the external system.On the external system, set the terminal session to use the copied IdM Kerberos configuration file:
$ export KRB5_CONFIG=/etc/krb5_ipa.confThe
KRB5_CONFIGvariable exists only temporarily until you log out. To prevent this loss, export the variable with a different file name.-
Copy the Kerberos configuration snippets from the
/etc/krb5.conf.d/directory to the external system.
Users on the external system can now use the kinit utility to authenticate against the IdM server.
Chapter 2. Viewing, starting and stopping the Identity Management services
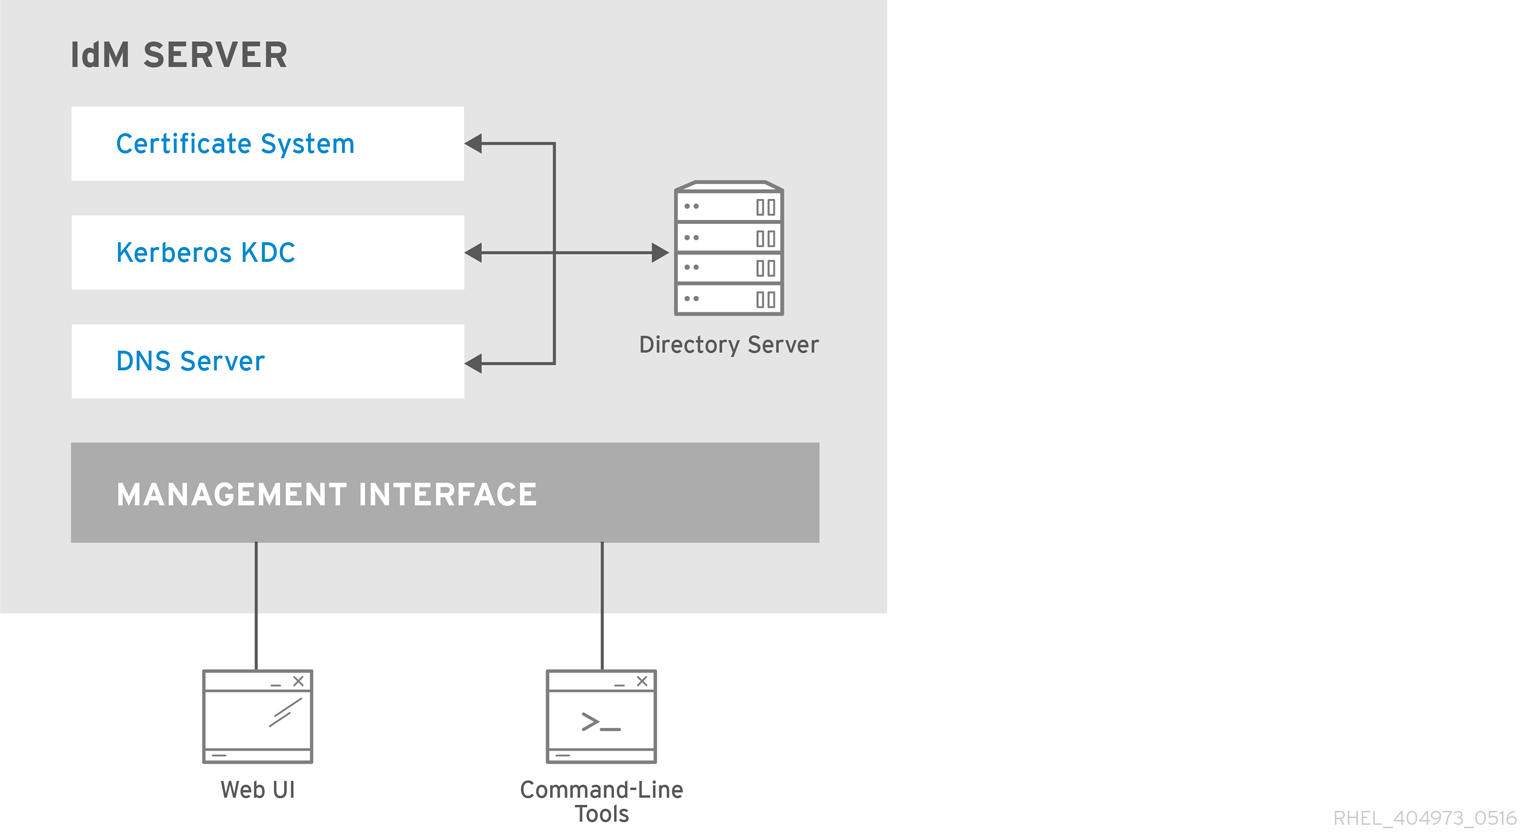
Identity Management (IdM) servers are Red Hat Enterprise Linux systems that work as domain controllers (DCs). A number of different services are running on IdM servers, most notably the Directory Server, Certificate Authority (CA), DNS, and Kerberos.
2.1. The IdM services
There are many different services that can be installed and run on the IdM servers and clients.
List of services hosted by IdM servers
Most of the following services are not strictly required to be installed on the IdM server. For example, you can install services such as a certificate authority (CA) or DNS server on an external server outside the IdM domain.
- Kerberos
-
the
krb5kdcandkadminservices
IdM uses the Kerberos protocol to support single sign-on. With Kerberos, users only need to present the correct username and password once and can access IdM services without the system prompting for credentials again.
Kerberos is divided into two parts:
-
The
krb5kdcservice is the Kerberos Authentication service and Key Distribution Center (KDC) daemon. -
The
kadminservice is the Kerberos database administration program.
For information about how to authenticate using Kerberos in IdM, see Logging in to Identity Management from the command line and Logging in to IdM in the Web UI: Using a Kerberos ticket.
- LDAP directory server
-
the
dirsrvservice
The IdM LDAP directory server instance stores all IdM information, such as information related to Kerberos, user accounts, host entries, services, policies, DNS, and others. The LDAP directory server instance is based on the same technology as Red Hat Directory Server. However, it is tuned to IdM-specific tasks.
- Certificate Authority
-
the
pki-tomcatdservice
The integrated certificate authority (CA) is based on the same technology as Red Hat Certificate System. pki is the command line for accessing Certificate System services.
You can also install the server without the integrated CA if you create and provide all required certificates independently.
For more information, see Planning your CA services.
- Domain Name System (DNS)
-
the
namedservice
IdM uses DNS for dynamic service discovery. The IdM client installation utility can use information from DNS to automatically configure the client machine. After the client is enrolled in the IdM domain, it uses DNS to locate IdM servers and services within the domain. The BIND (Berkeley Internet Name Domain) implementation of the DNS (Domain Name System) protocols in Red Hat Enterprise Linux includes the named DNS server.
For information, see Planning your DNS services and host names.
- Apache HTTP Server
-
the
httpdservice
The Apache HTTP web server provides the IdM Web UI, and also manages communication between the Certificate Authority and other IdM services.
- Samba / Winbind
-
smbandwinbindservices
Samba implements the Server Message Block (SMB) protocol, also known as the Common Internet File System (CIFS) protocol, in Red Hat Enterprise Linux. Via the smb service, the SMB protocol enables you to access resources on a server, such as file shares and shared printers. If you have configured a Trust with an Active Directory (AD) environment, the`Winbind` service manages communication between IdM servers and AD servers.
- One-time password (OTP) authentication
-
the
ipa-otpdservices
One-time passwords (OTP) are passwords that are generated by an authentication token for only one session, as part of two-factor authentication. OTP authentication is implemented in Red Hat Enterprise Linux via the ipa-otpd service.
For more information, see Logging in to the Identity Management Web UI using one time passwords.
- OpenDNSSEC
-
the
ipa-dnskeysyncdservice
OpenDNSSEC is a DNS manager that automates the process of keeping track of DNS security extensions (DNSSEC) keys and the signing of zones. The ipa-dnskeysyncd service manages synchronization between the IdM Directory Server and OpenDNSSEC.
DNSSEC is only available as Technology Preview in IdM.
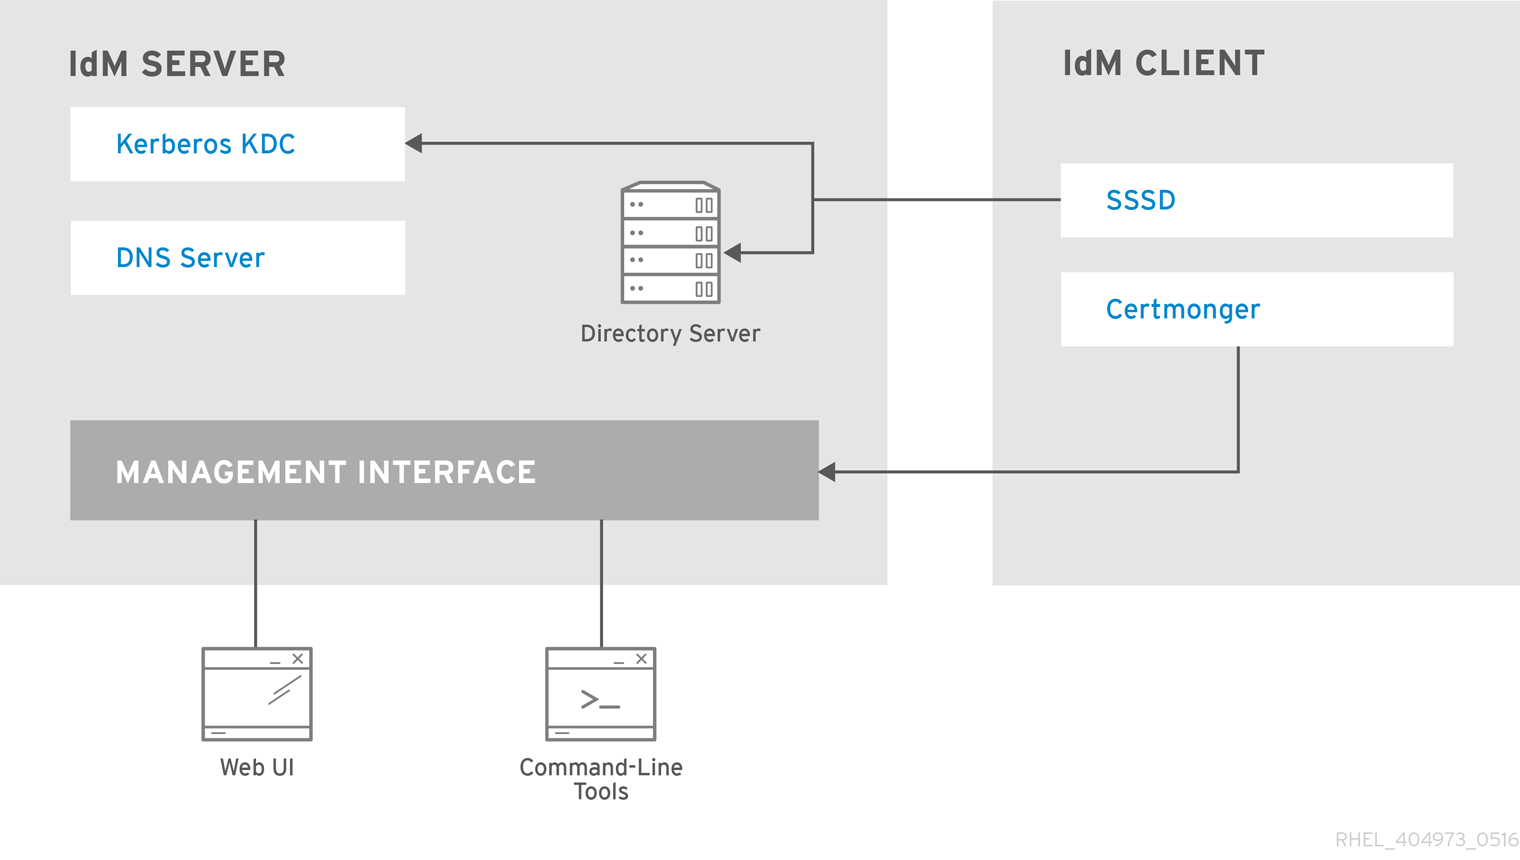
List of services hosted by IdM clients
-
System Security Services Daemon: the
sssdservice
The System Security Services Daemon (SSSD) is the client-side application that manages user authentication and caching credentials. Caching enables the local system to continue normal authentication operations if the IdM server becomes unavailable or if the client goes offline.
For more information, see Understanding SSSD and its benefits.
-
Certmonger: the
certmongerservice
The certmonger service monitors and renews the certificates on the client. It can request new certificates for the services on the system.
For more information, see Obtaining an IdM certificate for a service using certmonger.
2.2. Viewing the status of IdM services
To view the status of the IdM services that are configured on your IdM server, run the ipactl status command:
[root@server ~]# ipactl status
Directory Service: RUNNING
krb5kdc Service: RUNNING
kadmin Service: RUNNING
named Service: RUNNING
httpd Service: RUNNING
pki-tomcatd Service: RUNNING
smb Service: RUNNING
winbind Service: RUNNING
ipa-otpd Service: RUNNING
ipa-dnskeysyncd Service: RUNNING
ipa: INFO: The ipactl command was successful
The output of the ipactl status command on your server depends on your IdM configuration. For example, if an IdM deployment does not include a DNS server, the named service is not present in the list.
You cannot use the IdM web UI to view the status of all the IdM services running on a particular IdM server. Kerberized services running on different servers can be viewed in the Identity → Services tab of the IdM web UI.
2.3. Starting and stopping the entire Identity Management server
Use the ipa systemd service to stop, start, or restart the entire IdM server along with all the installed services. Using the systemctl utility to control the ipa systemd service ensures all services are stopped, started, or restarted in the appropriate order. The ipa systemd service also upgrades the RHEL IdM configuration before starting the IdM services, and it uses the proper SELinux contexts when administrating with IdM services. You do not need to have a valid Kerberos ticket to run the systemctl ipa commands.
ipa systemd service commands
To start the entire IdM server:
# systemctl start ipaTo stop the entire IdM server:
# systemctl stop ipaTo restart the entire IdM server:
# systemctl restart ipa
To show the status of all the services that make up IdM, use the ipactl utility:
# ipactl status-
Do not directly use the
ipactlutility to start, stop, or restart IdM services. Use thesystemctl ipacommands instead, which call theipactlutility in a predictable environment. -
You cannot use the IdM web UI to perform the
ipactlcommands.
2.4. Starting and stopping an individual Identity Management service
Changing IdM configuration files manually is generally not recommended. However, certain situations require that an administrator performs a manual configuration of specific services. In such situations, use the systemctl utility to stop, start, or restart an individual IdM service.
For example, use systemctl after customizing the Directory Server behavior, without modifying the other IdM services:
# systemctl restart dirsrv@REALM-NAME.service
Also, when initially deploying an IdM trust with Active Directory, modify the /etc/sssd/sssd.conf file, adding:
- Specific parameters to tune the timeout configuration options in an environment where remote servers have a high latency
- Specific parameters to tune the Active Directory site affinity
- Overrides for certain configuration options that are not provided by the global IdM settings
To apply the changes you have made in the /etc/sssd/sssd.conf file:
# systemctl restart sssd.service
Running systemctl restart sssd.service is required because the System Security Services Daemon (SSSD) does not automatically re-read or re-apply its configuration.
Note that for changes that affect IdM identity ranges, a complete server reboot is recommended.
To restart multiple IdM domain services, always use systemctl restart ipa. Because of dependencies between the services installed with the IdM server, the order in which they are started and stopped is critical. The ipa systemd service ensures that the services are started and stopped in the appropriate order.
Useful systemctl commands
To start a particular IdM service:
# systemctl start name.serviceTo stop a particular IdM service:
# systemctl stop name.serviceTo restart a particular IdM service:
# systemctl restart name.serviceTo view the status of a particular IdM service:
# systemctl status name.service
You cannot use the IdM web UI to start or stop the individual services running on IdM servers. You can only use the web UI to modify the settings of a Kerberized service by navigating to Identity → Services and selecting the service.
2.5. Methods for displaying IdM software version
You can display the IdM version number with:
- The IdM WebUI
-
ipacommands -
rpmcommands
- Displaying version through the WebUI
In the IdM WebUI, the software version can be displayed by choosing
Aboutfrom the username menu at the upper-right.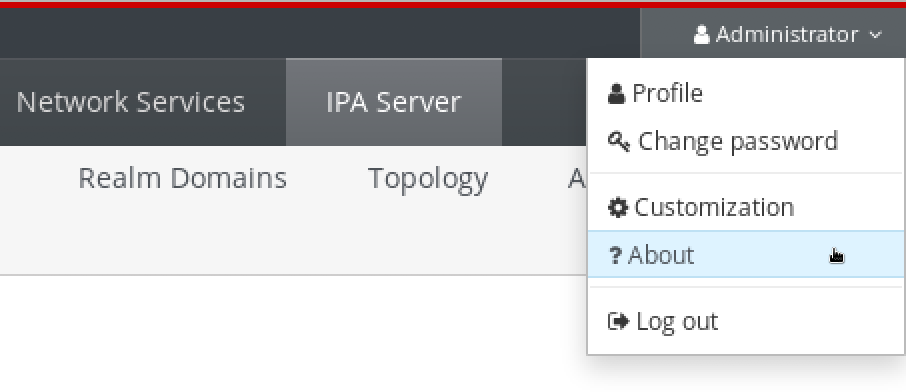
- Displaying version with
ipacommands From the command line, use the
ipa --versioncommand.[root@server ~]# ipa --version VERSION: 4.8.0, API_VERSION: 2.233- Displaying version with
rpmcommands If IdM services are not operating properly, you can use the
rpmutility to determine the version number of theipa-serverpackage that is currently installed.[root@server ~]# rpm -q ipa-server ipa-server-4.8.0-11.module+el8.1.0+4247+9f3fd721.x86_64
Chapter 3. Introduction to the IdM command-line utilities
Learn more about the basics of using the Identity Management (IdM) command-line utilities.
Prerequisites
Installed and accessible IdM server.
For details, see Installing Identity Management.
To use the IPA command-line interface, authenticate to IdM with a valid Kerberos ticket.
For details about obtaining a valid Kerberos ticket, see Logging in to Identity Management from the command line.
3.1. What is the IPA command-line interface
The IPA command-line interface (CLI) is the basic command-line interface for Identity Management (IdM) administration.
It supports a lot of subcommands for managing IdM, such as the ipa user-add command to add a new user.
IPA CLI allows you to:
- Add, manage, or remove users, groups, hosts and other objects in the network.
- Manage certificates.
- Search entries.
- Display and list objects.
- Set access rights.
- Get help with the correct command syntax.
3.2. What is the IPA help
The IPA help is a built-in documentation system for the IdM server.
The IPA command-line interface (CLI) generates available help topics from loaded IdM plugin modules. To use the IPA help utility, you must:
- Have an IdM server installed and running.
- Be authenticated with a valid Kerberos ticket.
Entering the ipa help command without options displays information about basic help usage and the most common command examples.
You can use the following options for different ipa help use cases:
$ ipa help [TOPIC | COMMAND | topics | commands]-
[]— Brackets mean that all parameters are optional and you can write justipa helpand the command will be executed. |— The pipe character means or. Therefore, you can specify aTOPIC, aCOMMAND, ortopics, orcommands, with the basicipa helpcommand:-
topics— You can run the commandipa help topicsto display a list of topics that are covered by the IPA help, such asuser,cert,serverand many others. -
TOPIC— The TOPIC with capital letters is a variable. Therefore, you can specify a particular topic, for example,ipa help user. -
commands— You can enter the commandipa help commandsto display a list of commands which are covered by the IPA help, for example,user-add,ca-enable,server-showand many others. -
COMMAND— The COMMAND with capital letters is a variable. Therefore, you can specify a particular command, for example,ipa help user-add.
-
3.3. Using IPA help topics
The following procedure describes how to use the IPA help on the command line.
Procedure
- Open a terminal and connect to the IdM server.
Enter
ipa help topicsto display a list of topics covered by help.$ ipa help topicsSelect one of the topics and create a command according to the following pattern:
ipa help [topic_name]. Instead of thetopic_namestring, add one of the topics you listed in the previous step.In the example, we use the following topic:
user$ ipa help user(Optional) If the IPA help output is too long and you cannot see the whole text, use the following syntax:
$ ipa help user | lessYou can then scroll down and read the whole help.
The IPA CLI displays a help page for the user topic. After reading the overview, you can see many examples with patterns for working with topic commands.
3.4. Using IPA help commands
The following procedure describes how to create IPA help commands on the command line.
Procedure
- Open a terminal and connect to the IdM server.
Enter
ipa help commandsto display a list of commands covered by help.$ ipa help commandsSelect one of the commands and create a help command according to the following pattern:
ipa help <COMMAND>. Instead of the<COMMAND>string, add one of the commands you listed in the previous step.$ ipa help user-add
3.5. Structure of IPA commands
The IPA CLI distinguishes the following types of commands:
- Built-in commands — Built-in commands are all available in the IdM server.
- Plug-in provided commands
The structure of IPA commands allows you to manage various types of objects. For example:
- Users
- Hosts
- DNS records
- Certificates
and many others.
For most of these objects, the IPA CLI includes commands to:
-
Add (
add) -
Modify (
mod) -
Delete (
del) -
Search (
find) -
Display (
show)
Commands have the following structure:
ipa user-add, ipa user-mod, ipa user-del, ipa user-find, ipa user-show
ipa host-add, ipa host-mod, ipa host-del, ipa host-find, ipa host-show
ipa dnsrecord-add, ipa dnsrecord-mod, ipa dnsrecord-del, ipa dnsrecord-find, ipa dnrecord-show
You can create a user with the ipa user-add [options], where [options] are optional. If you use just the ipa user-add command, the script asks you for details one by one.
Note that the [options] --raw and --structured are mutually exclusive and should not be run together.
To change an existing object, you need to define the object, therefore the command also includes an object: ipa user-mod USER_NAME [options].
3.6. How to supply a list of values to the IdM utilities
Identity Management (IdM) stores values for multi-valued attributes in lists.
IdM supports the following methods of supplying multi-valued lists:
Using the same command-line argument multiple times within the same command invocation:
$ ipa permission-add --right=read --permissions=write --permissions=delete ...Alternatively, you can enclose the list in curly braces, in which case the shell performs the expansion:
$ ipa permission-add --right={read,write,delete} ...
The examples above show a command permission-add which adds permissions to an object. The object is not mentioned in the example. Instead of … you need to add the object for which you want to add permissions.
When you update such multi-valued attributes from the command line, IdM completely overwrites the previous list of values with a new list. Therefore, when updating a multi-valued attribute, you must specify the whole new list, not just a single value you want to add.
For example, in the command above, the list of permissions includes reading, writing and deleting. When you decide to update the list with the permission-mod command, you must add all values, otherwise those not mentioned will be deleted.
Example 1: — The ipa permission-mod command updates all previously added permissions.
$ ipa permission-mod --right=read --right=write --right=delete ...or
$ ipa permission-mod --right={read,write,delete} ...
Example 2 — The ipa permission-mod command deletes the --right=delete argument because it is not included in the command:
$ ipa permission-mod --right=read --right=write ...or
$ ipa permission-mod --right={read,write} ...3.7. How to use special characters with the IdM utilities
When passing command-line arguments that include special characters to the ipa commands, escape these characters with a backslash (\). For example, common special characters include angle brackets (< and >), ampersand (&), asterisk (*), or vertical bar (|).
For example, to escape an asterisk (*):
$ ipa certprofile-show certificate_profile --out=exported\*profile.cfgCommands containing unescaped special characters do not work as expected because the shell cannot properly parse such characters.
Chapter 4. Searching Identity Management entries from the command line
The following sections describe how to use IPA commands, which helps you to find or show objects.
4.1. Overview of listing IdM entries
You can use the ipa *-find commands to help you to search for particular types of IdM entries.
To list all the find commands, use the following ipa help command:
$ ipa help commands | grep findYou may need to check if a particular user is included in the IdM database. You can then list all users with the following command:
$ ipa user-findTo list user groups whose specified attributes contain a keyword:
$ ipa group-find keyword
For example the ipa group-find admin command lists all groups whose names or descriptions include string admin:
----------------
3 groups matched
----------------
Group name: admins
Description: Account administrators group
GID: 427200002
Group name: editors
Description: Limited admins who can edit other users
GID: 427200002
Group name: trust admins
Description: Trusts administrators groupWhen searching user groups, you can also limit the search results to groups that contain a particular user:
$ ipa group-find --user=user_nameTo search for groups that do not contain a particular user:
$ ipa group-find --no-user=user_name4.2. Showing details for a particular entry
Use the ipa *-show command to display details about a particular IdM entry.
Procedure
To display details about a host named server.example.com:
$ ipa host-show server.example.com Host name: server.example.com Principal name: host/server.example.com@EXAMPLE.COM ...
4.3. Adjusting the search size and time limit
Some queries, such as requesting a list of IdM users, can return a very large number of entries. By tuning these search operations, you can improve the overall server performance when running the ipa *-find commands, such as ipa user-find, and when displaying corresponding lists in the Web UI.
- Search size limit
Defines the maximum number of entries returned for a request sent to the server from a client’s CLI or from a browser accessing the IdM Web UI.
Default: 100 entries.
- Search time limit
Defines the maximum time (in seconds) that the server waits for searches to run. Once the search reaches this limit, the server stops the search and returns the entries discovered in that time.
Default: 2 seconds.
If you set the values to -1, IdM will not apply any limits when searching.
Setting search size or time limits too high can negatively affect server performance.
4.3.1. Adjusting the search size and time limit in the command line
You can adjust the search size and time limits globally or for a specific entry to optimize search performance and responsiveness.
Procedure
To display current search time and size limits in CLI, use the
ipa config-showcommand:$ ipa config-show Search time limit: 2 Search size limit: 100To adjust the limits globally for all queries, use the
ipa config-modcommand and add the--searchrecordslimitand--searchtimelimitoptions. For example:$ ipa config-mod --searchrecordslimit=500 --searchtimelimit=5To temporarily adjust the limits only for a specific query, add the
--sizelimitor--timelimitoptions to the command. For example:$ ipa user-find --sizelimit=200 --timelimit=120
4.3.2. Adjusting the search size and time limit in the Web UI
You can adjust global search size and time limits using the IdM Web UI to optimize search performance and responsiveness.
Procedure
- Log in to the IdM Web UI.
- Click IPA Server.
- On the IPA Server tab, click Configuration.
Set the required values in the Search Options area.
Default values are:
- Search size limit: 100 entries
- Search time limit: 2 seconds
- Click Save at the top of the page.
Chapter 5. Accessing the IdM Web UI in a web browser
The IdM (Identity Management) Web UI is a web application for IdM administration, a graphical alternative to the IdM command-line interface (CLI).
5.1. What is the IdM Web UI
The IdM (Identity Management) Web UI is a web application for IdM administration. You can access the IdM Web UI as:
- IdM users: A limited set of operations depending on permissions granted to the user in the IdM server. Basically, active IdM users can log in to the IdM server and configure their own account. They cannot change settings of other users or the IdM server settings.
- Administrators: Full access rights to the IdM server.
- Active Directory users: A set of operations depending on permissions granted to the user. Active Directory users can now be administrators for Identity Management. For details, see Enabling AD users to administer IdM.
5.2. Web browsers supported for accessing the Web UI
Identity Management (IdM) supports the following browsers for connecting to the Web UI:
- Mozilla Firefox 38 and later
- Google Chrome 46 and later
You might experience problems accessing the IdM Web UI with a smart card if your browser attempts to use TLS v1.3:
[ssl:error] [pid 125757:tid 140436077168384] [client 999.999.999.999:99999] AH: verify client post handshake
[ssl:error] [pid 125757:tid 140436077168384] [client 999.999.999.999:99999] AH10158: cannot perform post-handshake authentication
[ssl:error] [pid 125757:tid 140436077168384] SSL Library Error: error:14268117:SSL routines:SSL_verify_client_post_handshake:extension not receivedThis is because the most recent versions of browsers do not have TLS Post-Handshake Authentication (PHA) enabled by default, or they do not support PHA. PHA is necessary to require a TLS client certificate for only a part of a web site, such as when accessing the IdM Web UI with smart card authentication.
To resolve this issue for Mozilla Firefox 68 and later, enable TLS PHA:
-
Enter
about:configin the address bar to access the Mozilla Firefox preferences menu. -
Enter
security.tls.enable_post_handshake_authin the search bar. - Click the toggle button to set the parameter to true.
To resolve this issue for Chrome, which currently does not support PHA, disable TLS v1.3:
-
Open the
/etc/httpd/conf.d/ssl.confconfiguration file. Add
-TLSv1.3to theSSLProtocoloption:SSLProtocol all -TLSv1 -TLSv1.1 -TLSv1.3Restart the
httpdservice:service httpd restart
Note that IdM manages the ssl.conf file and might overwrite its contents during package updates. Verify custom settings after updating IdM packages.
5.3. Accessing the Web UI
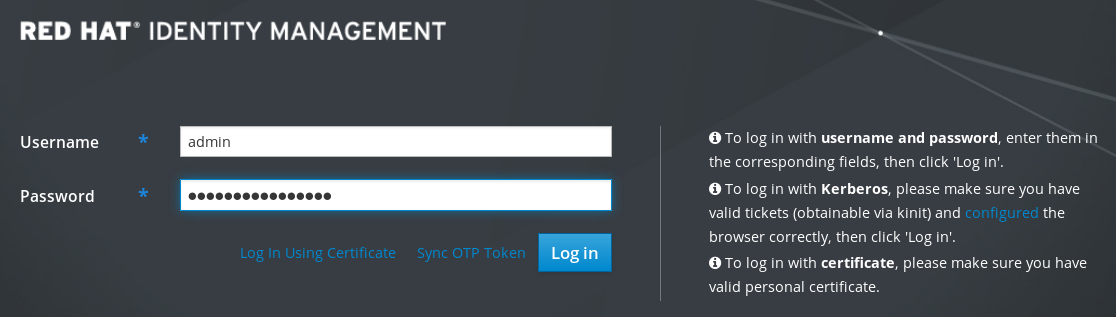
The following procedure describes the first logging in to the IdM (Identity Management) Web UI with a password.
After the first login you can configure your IdM server to authenticate with:
Kerberos ticket
For details, see Kerberos authentication in Identity Management.
Smart card
For details, see Configuring the IdM server for smart card authentication.
One time password (OTP) — this can be combined with password and Kerberos authentication.
For details, see One time password (OTP) authentication in Identity Management.
Procedure
Type an IdM server URL into the browser address bar. The name will look similarly to the following example:
https://server.example.comYou just need to change
server.example.comwith a DNS name of your IdM server.This opens the IdM Web UI login screen in your browser.
- If the server does not respond or the login screen does not open, check the DNS settings on the IdM server to which you are connecting.
If you use a self-signed certificate, the browser issues a warning. Check the certificate and accept the security exception to proceed with the login.
To avoid security exceptions, install a certificate signed by a certificate authority.
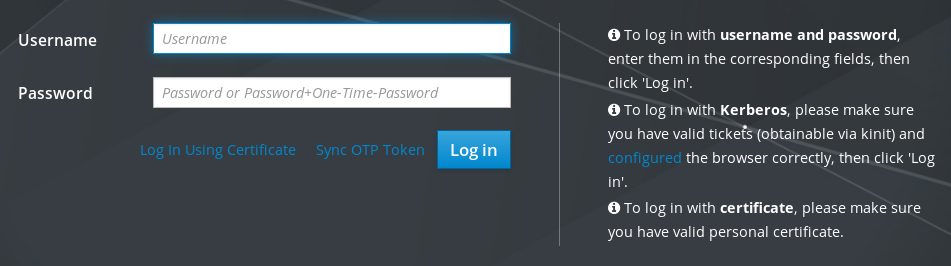
On the Web UI login screen, enter the administrator account credentials you added during the IdM server installation.
For details, see Installing an Identity Management server: With integrated DNS, with an integrated CA.
You can enter your personal account credentials as well if they are already entered in the IdM server.
- Click .
After the successful login, you can start configuring the IdM server.
Chapter 6. Logging in to IdM in the Web UI: Using a Kerberos ticket
Learn more about how to configure your environment to enable Kerberos login to the IdM Web UI and accessing IdM using Kerberos authentication.
Prerequisites
Installed IdM server in your network environment
For details, see Installing Identity Management in Red Hat Enterprise Linux 8
6.1. Kerberos authentication in Identity Management
Identity Management (IdM) uses the Kerberos protocol to support single sign-on. Single sign-on authentication allows you to provide the correct user name and password only once, and you can then access Identity Management services without the system prompting for credentials again.
The IdM server provides Kerberos authentication immediately after the installation if the DNS and certificate settings have been configured properly. For details, see Installing Identity Management.
To use Kerberos authentication on hosts, install:
The IdM client:
For details, see Preparing the system for Identity Management client installation.
-
The
krb5confpackage.
6.2. Using kinit to log in to IdM manually
Follow this procedure to use the kinit utility to authenticate to an Identity Management (IdM) environment manually. The kinit utility obtains and caches a Kerberos ticket-granting ticket (TGT) on behalf of an IdM user.
Only use this procedure if you have destroyed your initial Kerberos TGT or if it has expired. As an IdM user, when logging onto your local machine you are also automatically logging in to IdM. This means that after logging in, you are not required to use the kinit utility to access IdM resources.
Procedure
To log in under the user name of the user who is currently logged in on the local system, use kinit without specifying a user name. For example, if you are logged in as
<example_user>on the local system:[example_user@server ~]$ kinit Password for example_user@EXAMPLE.COM: [example_user@server ~]$If the user name of the local user does not match any user entry in IdM, the authentication attempt fails:
[example_user@server ~]$ kinit kinit: Client 'example_user@EXAMPLE.COM' not found in Kerberos database while getting initial credentialsTo use a Kerberos principal that does not correspond to your local user name, pass the required user name to the
kinitutility. For example, to log in as theadminuser:[example_user@server ~]$ kinit admin Password for admin@EXAMPLE.COM: [example_user@server ~]$
Requesting user tickets using kinit -kt KDB: user@EXAMPLE.COM is disabled. For more information, see the Why kinit -kt KDB: user@EXAMPLE.COM no longer work after CVE-2024-3183 solution.
Verification
To verify that the login was successful, use the klist utility to display the cached TGT. In the following example, the cache contains a ticket for the
example_userprincipal, which means that on this particular host, onlyexample_useris currently allowed to access IdM services:$ klist Ticket cache: KEYRING:persistent:0:0 Default principal: example_user@EXAMPLE.COM Valid starting Expires Service principal 11/10/2019 08:35:45 11/10/2019 18:35:45 krbtgt/EXAMPLE.COM@EXAMPLE.COM
6.3. Configuring the browser for Kerberos authentication
To enable authentication with a Kerberos ticket, you may need to change your browser configuration.
The following steps help you to support Kerberos negotiation for accessing the IdM domain.
Each browser supports Kerberos in a different way and needs a different configuration. The IdM Web UI includes guidelines for the following browsers:
- Firefox
- Chrome
Procedure
- Open the IdM Web UI login dialog in your web browser.
Click the link for the browser configuration on the Web UI login screen.
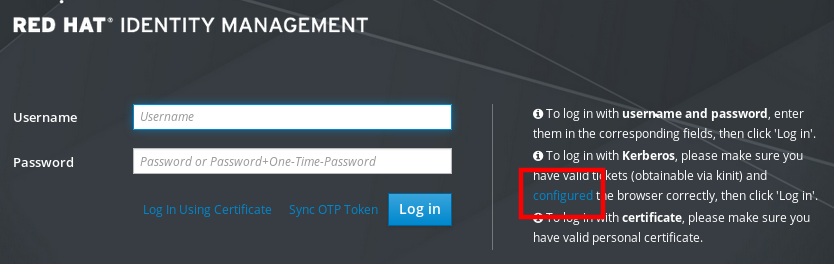
Follow the steps on the configuration page.

After the setup, go back to the IdM Web UI and click Log in.
6.4. Logging in to the web UI using a Kerberos ticket
Follow this procedure to log in to the IdM Web UI using a Kerberos ticket-granting ticket (TGT).
The TGT expires at a predefined time. The default time interval is 24 hours and you can change it in the IdM Web UI.
After the time interval expires, you need to renew the ticket:
-
Using the
kinitcommand. - Using IdM login credentials in the Web UI login dialog.
Procedure
Open the IdM Web UI.
If Kerberos authentication works correctly and you have a valid ticket, you will be automatically authenticated and the Web UI opens.
If the ticket is expired, it is necessary to authenticate yourself with credentials first. However, next time the IdM Web UI will open automatically without opening the login dialog.
If you see an error message
Authentication with Kerberos failed, verify that your browser is configured for Kerberos authentication. See Configuring the browser for Kerberos authentication.
6.5. Configuring an external system for Kerberos authentication
Follow this procedure to configure an external system so that Identity Management (IdM) users can log in to IdM from the external system using their Kerberos credentials.
Enabling Kerberos authentication on external systems is especially useful when your infrastructure includes multiple realms or overlapping domains. It is also useful if the system has not been enrolled into any IdM domain through ipa-client-install.
To enable Kerberos authentication to IdM from a system that is not a member of the IdM domain, define an IdM-specific Kerberos configuration file on the external system.
Prerequisites
The
krb5-workstationpackage is installed on the external system.To find out whether the package is installed, use the following CLI command:
# yum list installed krb5-workstation Installed Packages krb5-workstation.x86_64 1.16.1-19.el8 @BaseOS
Procedure
Copy the
/etc/krb5.conffile from the IdM server to the external system. For example:# scp /etc/krb5.conf root@externalsystem.example.com:/etc/krb5_ipa.confWarningDo not overwrite the existing
krb5.conffile on the external system.On the external system, set the terminal session to use the copied IdM Kerberos configuration file:
$ export KRB5_CONFIG=/etc/krb5_ipa.confThe
KRB5_CONFIGvariable exists only temporarily until you log out. To prevent this loss, export the variable with a different file name.-
Copy the Kerberos configuration snippets from the
/etc/krb5.conf.d/directory to the external system. - Configure the browser on the external system, as described in Configuring the browser for Kerberos authentication.
Users on the external system can now use the kinit utility to authenticate against the IdM server.
6.6. Enabling Web UI login for Active Directory users
To enable Web UI login for Active Directory users, define an ID override for each Active Directory user in the Default Trust View.
Procedure
To define an ID override for
ad_user@ad.example.com:[admin@server ~]$ ipa idoverrideuser-add 'Default Trust View' ad_user@ad.example.com
Chapter 7. Logging in to the Identity Management Web UI using one time passwords
Access to IdM Web UI can be secured using several methods. The basic one is password authentication.
To increase the security of password authentication, you can add a second step and require automatically generated one-time passwords (OTPs). The most common usage is to combine password connected with the user account and a time limited one time password generated by a hardware or software token.
The following sections help you to:
- Understand how the OTP authentication works in IdM.
- Configure OTP authentication on the IdM server.
- Configure a RADIUS server for OTP validation in IdM.
- Create OTP tokens and synchronize them with the FreeOTP app in your phone.
- Authenticate to the IdM Web UI with the combination of user password and one time password.
- Re-synchronize tokens in the Web UI.
- Retrieve an IdM ticket-granting ticket as an OTP or RADIUS user
- Enforce OTP usage for all LDAP clients
Prerequisites
7.1. One time password (OTP) authentication in Identity Management
One-time passwords bring an additional step to your authentication security. The authentication uses your password and an automatically generated one time password.
To generate one time passwords, you can use a hardware or software token. IdM supports both software and hardware tokens.
Identity Management supports the following standard OTP mechanisms:
- The HMAC-Based One-Time Password (HOTP) algorithm is based on a counter. HMAC stands for Hashed Message Authentication Code.
- The Time-Based One-Time Password (TOTP) algorithm is an extension of HOTP to support time-based moving factor.
IdM does not support OTP logins for Active Directory trust users.
The following security and other limitations currently relate to the OTP support in IdM:
- The most important security limitation is the potential vulnerability to replay attacks across the system. Replication is asynchronous, and an OTP code can therefore be reused during the replication period. A user might be able to log on to two servers at the same time. However, this vulnerability is usually difficult to exploit due to comprehensive encryption.
-
It is not possible to obtain a ticket-granting ticket (TGT) using a client that does not support OTP authentication. This might affect certain use cases, such as authentication using the
mod_auth_kerbmodule or the Generic Security Services API (GSSAPI).
7.1.1. Available OTP authentication methods
When enabling OTP authentication, you can choose from the following authentication methods:
- Two-factor authentication (password + OTP)
- With this method, the user is always required to enter both a standard password and an OTP code.
- Password
- With this method, the user still has the option to authenticate using a standard password only.
- RADIUS proxy server authentication
- For information on configuring a RADIUS server for OTP validation in IdM, see Configuring a RADIUS server for OTP validation in IdM
- Global and user-specific authentication methods
You can configure these authentication methods either globally or for individual users:
- By default, user-specific authentication method settings take precedence over global settings. If no authentication method is set for a user, the globally-defined methods apply.
- You can disable per-user authentication method settings for any user. This ensures IdM ignores the per-user settings and always applies the global settings for the user.
- Combining multiple authentication methods
If you configure multiple authentication methods, any one of them will be sufficient to successfully authenticate the user. For example:
If you configure both two-factor and password authentication, the user must provide the password (first factor), but providing the OTP (second factor) is optional when using the command line:
First Factor: Second Factor (optional):- In the web UI, the user must still provide both factors.
However, a minor exception exists when RADIUS and another authentication method are configured:
- Kerberos always uses RADIUS, but LDAP does not. LDAP only recognizes the password and two-factor authentication methods.
- If you use an external two-factor authentication provider, use Kerberos from your applications. If you want to let users authenticate with a password only, use LDAP. It is recommended that the applications use Apache modules and SSSD, which allows configuring either Kerberos or LDAP.
7.1.2. GNOME Keyring service support
IdM integrates OTP authentication with the GNOME Keyring service. Note that GNOME Keyring integration requires the user to enter the first and second factors separately:
First factor: static_password
Second factor: one-time_password7.1.3. Offline authentication with OTP
IdM supports offline OTP authentication. However, to be able to log in offline, the user must first authenticate when the system is online by entering the static password and OTP separately:
First factor: static_password
Second factor: one-time_passwordIf the user enters both passwords separately like this when logging in online, the user can subsequently authenticate even if the central authentication server is unavailable. Note that IdM only prompts for the first-factor traditional static password when the user authenticates offline.
IdM also supports entering both the static password and OTP together in one string in the First factor prompt. However, this method is not compatible with offline OTP authentication. If the user enters both factors in a single prompt, IdM must contact the central authentication server to validate the credentials, which requires the system to be online.
If you use OTP authentication on devices that also operate offline, such as laptops, Red Hat recommends to enter the static password and OTP separately to make sure offline authentication is available. Otherwise, IdM does not allow you to log in after the system goes offline.
If you want to benefit from OTP offline authentication, apart from entering the static and OTP passwords separately, also make sure to meet the following conditions:
-
The
cache_credentialsoption in the/etc/sssd/sssd.conffile is set toTrue, which enables caching the first factor password. -
The first-factor static password meets the password length requirement defined in the
cache_credentials_minimal_first_factor_lengthoption set in/etc/sssd/sssd.conf. The default minimal length is 8 characters. For more information about the option, see thesssd.conf(5)man page.
Even if the krb5_store_password_if_offline option is set to true in the /etc/sssd/sssd.conf file, SSSD does not attempt to refresh the Kerberos ticket-granting ticket (TGT) when the system returns to an online state. This is because the one-time password (OTP) may already be invalid at that point. To obtain a new TGT in this situation, the user must re-authenticate using both factors.
7.2. Enabling the one-time password in the Web UI
Identity Management (IdM) administrators can enable two-factor authentication (2FA) for IdM users either globally or individually. The user enters the one-time password (OTP) after their regular password on the command line or in the dedicated field in the Web UI login dialog, with no space between these passwords.
Enabling 2FA is not the same as enforcing it. If you use logins based on LDAP-binds, IdM users can still authenticate by entering a password only. However, if you use krb5-based logins, the 2FA is enforced.
Note that there is an option to enforce 2FA for LDAP-binds by enforcing OTP usage for all LDAP clients. For more information, see Enforcing OTP usage for all LDAP clients.
Complete this procedure to use the IdM Web UI to enable 2FA for the individual example.user IdM user.
Prerequisites
- Administrator privileges
Procedure
-
Log in to the IdM Web UI with IdM
adminprivileges. Open the Identity → Users → Active users tab.

- Select example.user to open the user settings.
- In the User authentication types, select Two factor authentication (password + OTP).
- Click Save.
At this point, the OTP authentication is enabled for the IdM user.
Now you or example.user must assign a new token ID to the example.user account.
7.3. Configuring a RADIUS server for OTP validation in IdM
To enable the migration of a large deployment from a proprietary one-time password (OTP) solution to the Identity Management (IdM)-native OTP solution, IdM offers a way to offload OTP validation to a third-party RADIUS server for a subset of users. The administrator creates a set of RADIUS proxies where each proxy can only reference a single RADIUS server. If more than one server needs to be addressed, it is recommended to create a virtual IP solution that points to multiple RADIUS servers.
Such a solution must be built outside of RHEL IdM with the help of the keepalived daemon, for example. The administrator then assigns one of these proxy sets to a user. As long as the user has a RADIUS proxy set assigned, IdM bypasses all other authentication mechanisms.
IdM does not provide any token management or synchronization support for tokens in the third-party system.
Complete the procedure to configure a RADIUS server for OTP validation and to add a user to the proxy server:
Prerequisites
- The radius user authentication method is enabled. See Enabling the one-time password in the Web UI for details.
Procedure
Add a RADIUS proxy:
$ ipa radiusproxy-add proxy_name --secret secretThe command prompts you for inserting the required information.
The configuration of the RADIUS proxy requires the use of a common secret between the client and the server to wrap credentials. Specify this secret in the
--secretparameter.Assign a user to the added proxy:
ipa user-mod radiususer --radius=proxy_nameIf required, configure the user name to be sent to RADIUS:
ipa user-mod radiususer --radius-username=radius_user
As a result, the RADIUS proxy server starts to process the user OTP authentication.
When the user is ready to be migrated to the IdM native OTP system, you can simply remove the RADIUS proxy assignment for the user.
7.3.1. Changing the timeout value of a KDC when running a RADIUS server in a slow network
In certain situations, such as running a RADIUS proxy in a slow network, the Identity Management (IdM) Kerberos Distribution Center (KDC) closes the connection before the RADIUS server responds because the connection timed out while waiting for the user to enter the token.
To change the timeout settings of the KDC:
Change the value of the
timeoutparameter in the[otp]section in the/var/kerberos/krb5kdc/kdc.conffile. For example, to set the timeout to120seconds:[otp] DEFAULT = { timeout = 120 ... }Restart the
krb5kdcservice:# systemctl restart krb5kdc
7.4. Adding OTP tokens in the Web UI
The following section helps you to add a token to the IdM Web UI and to your software token generator.
Prerequisites
- Active user account on the IdM server.
- Administrator has enabled OTP for the particular user account in the IdM Web UI.
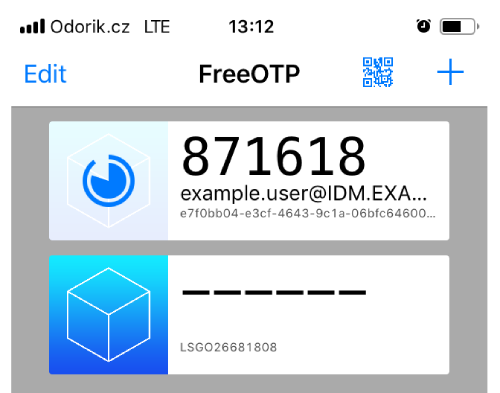
- A software device generating OTP tokens, for example FreeOTP.
Procedure
- Log in to the IdM Web UI with your user name and password.
- To create the token in your mobile phone, open the Authentication → OTP Tokens tab.
Click Add.
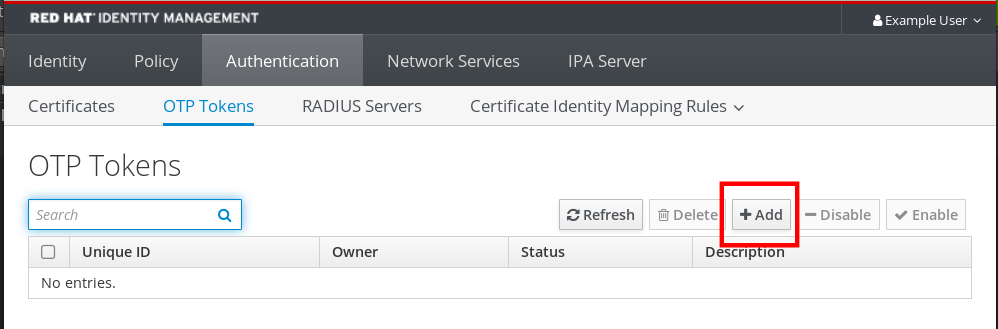
In the Add OTP token dialog box, leave everything unfilled and click Add.
At this stage, the IdM server creates a token with default parameters at the server and opens a page with a QR code.
- Copy the QR code into your mobile phone.
- Click OK to close the QR code.
Now you can generate one time passwords and log in with them to the IdM Web UI.
7.5. Logging into the Web UI with a one time password
Follow this procedure to login for the first time into the IdM Web UI using a one time password (OTP).
Prerequisites
OTP configuration enabled on the Identity Management server for the user account you are using for the OTP authentication. Administrators as well as users themselves can enable OTP.
To enable the OTP configuration, see Enabling the one time password in the Web UI.
- A hardware or software device generating OTP tokens configured.
Procedure
- In the Identity Management login screen, enter your user name or a user name of the IdM server administrator account.
- Add the password for the user name entered above.
- Generate a one time password on your device.
- Enter the one time password right after the password without a space.
Click Log in.
If the authentication fails, synchronize OTP tokens.
If your CA uses a self-signed certificate, the browser issues a warning. Check the certificate and accept the security exception to proceed with the login.
If the IdM Web UI does not open, verify the DNS configuration of your Identity Management server.
After a successful login, the IdM Web UI opens.
7.6. Synchronizing OTP tokens using the Web UI
If the login with OTP (One Time Password) fails, OTP tokens are not synchronized correctly.
The following text describes token re-synchronization.
Prerequisites
- A device generating OTP tokens.
Procedure
On the IdM Web UI login screen, click Sync OTP Token.

- In the login screen, enter your username and the Identity Management password.
- Generate one time password and enter it in the First OTP field.
- Generate another one time password and enter it in the Second OTP field.
Optional: Enter the token ID.
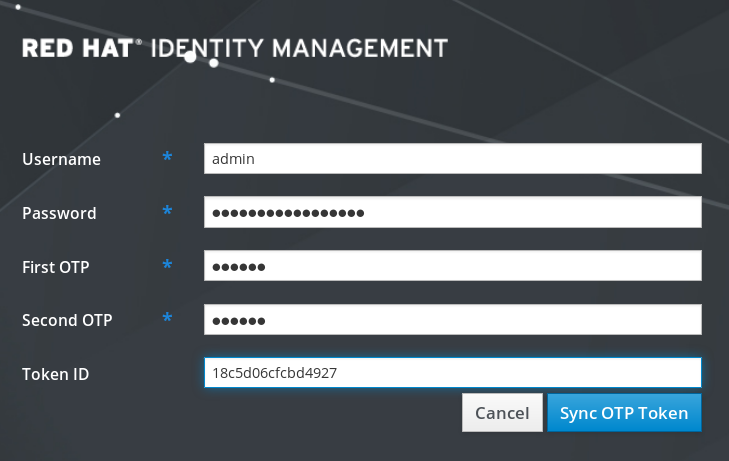
- Click Sync OTP Token.
After a successful synchronization, you can log in to the IdM server.
7.7. Changing expired passwords
Administrators of Identity Management can enforce changing your password at the next login. In this case, you cannot successfully log in to the IdM Web UI until you change the password.
Password expiration can happen during your first login to the Web UI.
If the expiration password dialog appears, follow the instructions in the procedure.
Prerequisites
- Active account on the IdM server.
Procedure
- In the password expiration login screen, enter the user name.
- Add the password for the user name entered above.
- In the OTP field, generate a one time password, if you use one time password authentication.
- Enter the new password twice for verification.
Click Reset Password.

After a successful password change, the usual login dialog displays. Log in with the new password.
7.8. Retrieving an IdM ticket-granting ticket as an OTP or RADIUS user
To retrieve a Kerberos ticket-granting ticket (TGT) as an OTP user, request an anonymous Kerberos ticket and enable Flexible Authentication via Secure Tunneling (FAST) channel to provide a secure connection between the Kerberos client and Kerberos Distribution Center (KDC).
Prerequisites
- Your IdM client and IdM servers use RHEL 8.7 or later.
- Your IdM client and IdM servers use SSSD 2.7.0 or later.
- You have enabled OTP for the required user account.
Procedure
Initialize the credentials cache by running the following command:
[root@client ~]# kinit -n @IDM.EXAMPLE.COM -c FILE:armor.ccacheNote that this command creates the
armor.ccachefile that you need to point to whenever you request a new Kerberos ticket.Request a Kerberos ticket by running the command:
[root@client ~]# kinit -T FILE:armor.ccache <username>@IDM.EXAMPLE.COM Enter your OTP Token Value.
Verification
Display your Kerberos ticket information:
[root@client ~]# klist -C Ticket cache: KCM:0:58420 Default principal: <username>@IDM.EXAMPLE.COM Valid starting Expires Service principal 05/09/22 07:48:23 05/10/22 07:03:07 krbtgt/IDM.EXAMPLE.COM@IDM.EXAMPLE.COM config: fast_avail(krbtgt/IDM.EXAMPLE.COM@IDM.EXAMPLE.COM) = yes 08/17/2022 20:22:45 08/18/2022 20:22:43 krbtgt/IDM.EXAMPLE.COM@IDM.EXAMPLE.COM config: pa_type(krbtgt/IDM.EXAMPLE.COM@IDM.EXAMPLE.COM) = 141The
pa_type = 141indicates OTP/RADIUS authentication.
7.9. Enforcing OTP usage for all LDAP clients
In RHEL IdM, you can set the default behavior for LDAP server authentication of user accounts with two-factor (OTP) authentication configured. If OTP is enforced, LDAP clients cannot authenticate against an LDAP server using single-factor authentication (a password) for users that have associated OTP tokens. RHEL IdM already enforces this method through the Kerberos backend by using a special LDAP control with OID 2.16.840.1.113730.3.8.10.7 without any data.
Procedure
To enforce OTP usage for all LDAP clients, use the following command:
$ ipa config-mod --addattr ipaconfigstring=EnforceLDAPOTPTo change back to the previous OTP behavior for all LDAP clients, use the following command:
$ ipa config-mod --delattr ipaconfigstring=EnforceLDAPOTP
Chapter 8. Troubleshooting authentication with SSSD in IdM
Authentication in an Identity Management (IdM) environment involves many components:
On the IdM client:
- The SSSD service.
- The Name Services Switch (NSS).
- Pluggable Authentication Modules (PAM).
On the IdM server:
- The SSSD service.
- The IdM Directory Server.
- The IdM Kerberos Key Distribution Center (KDC).
If you are authenticating as an Active Directory (AD) user:
- The Directory Server on an AD Domain Controller.
- The Kerberos server on an AD Domain Controller.
To authenticate users, you must be able to perform the following functions with the SSSD service:
- Retrieve user information from the authentication server.
- Prompt the user for their credentials, pass those credentials to the authentication server, and process the outcome.
Troubleshooting involves understanding how information flows between the SSSD service and the servers that store user information. This helps you to identify where the issue occurs and narrow down potential causes.
8.1. Data flow when retrieving IdM user information with SSSD
The following diagram is a simplification of the information flow between an IdM client and an IdM server during a request for IdM user information with the command getent passwd <idm_user_name>.
Information flow between an IdM client and server for user information retrieval using getent passwd

-
The
getentcommand triggers thegetpwnamcall from thelibclibrary. -
The
libclibrary references the/etc/nsswitch.confconfiguration file to check which service is responsible for providing user information, and discovers the entrysssfor the SSSD service. -
The
libclibrary opens thenss_sssmodule. -
The nss_sss module checks the memory-mapped cache for the user information. If the data is present in the cache, the
nss_sssmodule returns it. -
If the user information is not in the memory-mapped cache, the request is passed to the SSSD
sssd_nssresponder process. -
The SSSD service checks its cache. If the data is present in the cache and valid, the
sssd_nssresponder reads the data from the cache and returns it to the application. -
If the data is not present in the cache or it is expired, the
sssd_nssresponder queries the appropriate back-end process and waits for a reply. The SSSD service uses the IPA backend in an IdM environment, enabled by the settingid_provider=ipain thesssd.confconfiguration file. -
The
sssd_beback-end process connects to the IdM server and requests the information from the IdM LDAP Directory Server. - The SSSD back-end on the IdM server responds to the SSSD back-end process on the IdM client.
- The SSSD back-end on the client stores the resulting data in the SSSD cache and alerts the responder process that the cache has been updated.
-
The
sssd_nssfront-end responder process retrieves the information from the SSSD cache. -
The
sssd_nssresponder sends the user information to thenss_sssresponder, completing the request. -
The
libclibrary returns the user information to the application that requested it.
8.2. Data flow when retrieving AD user information with SSSD
If you have established a cross-forest trust between your IdM environment and an Active Directory (AD) domain, the information flow when retrieving AD user information about an IdM client is very similar to the information flow when retrieving IdM user information, with the additional step of contacting the AD user database.
The following diagram is a simplification of the information flow when a user requests information about an AD user with the command getent passwd <user_name@ad.example.com>. This diagram does not include the internal details discussed in the Data flow when retrieving IdM user information with SSSD section. It focuses on the communication between the SSSD service on an IdM client, the SSSD service on an IdM server, and the LDAP database on an AD Domain Controller.
Information flow for retrieval of AD user information between an IdM client, IdM server, and AD Domain controller

- The IdM client looks to its local SSSD cache for AD user information.
-
If the IdM client does not have the user information, or the information is stale, the SSSD service on the client contacts the
extdom_extopplugin on the IdM server to perform an LDAP extended operation and requests the information. - The SSSD service on the IdM server looks for the AD user information in its local cache.
- If the IdM server does not have the user information in its SSSD cache, or its information is stale, it performs an LDAP search to request the user information from an AD Domain Controller.
- The SSSD service on the IdM server receives the AD user information from the AD domain controller and stores it in its cache.
-
The
extdom_extopplugin receives the information from the SSSD service on the IdM server, which completes the LDAP extended operation. - The SSSD service on the IdM client receives the AD user information from the LDAP extended operation.
- The IdM client stores the AD user information in its SSSD cache and returns the information to the application that requested it.
8.3. Data flow when authenticating as a user with SSSD in IdM
Authenticating as a user on an IdM server or client involves the following components:
-
The service that initiates the authentication request, such as the
sshdservice. - The Pluggable Authentication Module (PAM) library and its modules.
- The SSSD service, its responders, and back-ends.
- A smart card reader, if smart card authentication is configured.
The authentication server:
- IdM users are authenticated against an IdM Kerberos Key Distribution Center (KDC).
- Active Directory (AD) users are authenticated against an AD Domain Controller (DC).
The following diagram is a simplification of the information flow when a user needs to authenticate during an attempt to log in locally to a host via the SSH service on the command line.
Information flow between an IdM client and an IdM server or AD Domain Controller during an authentication attempt
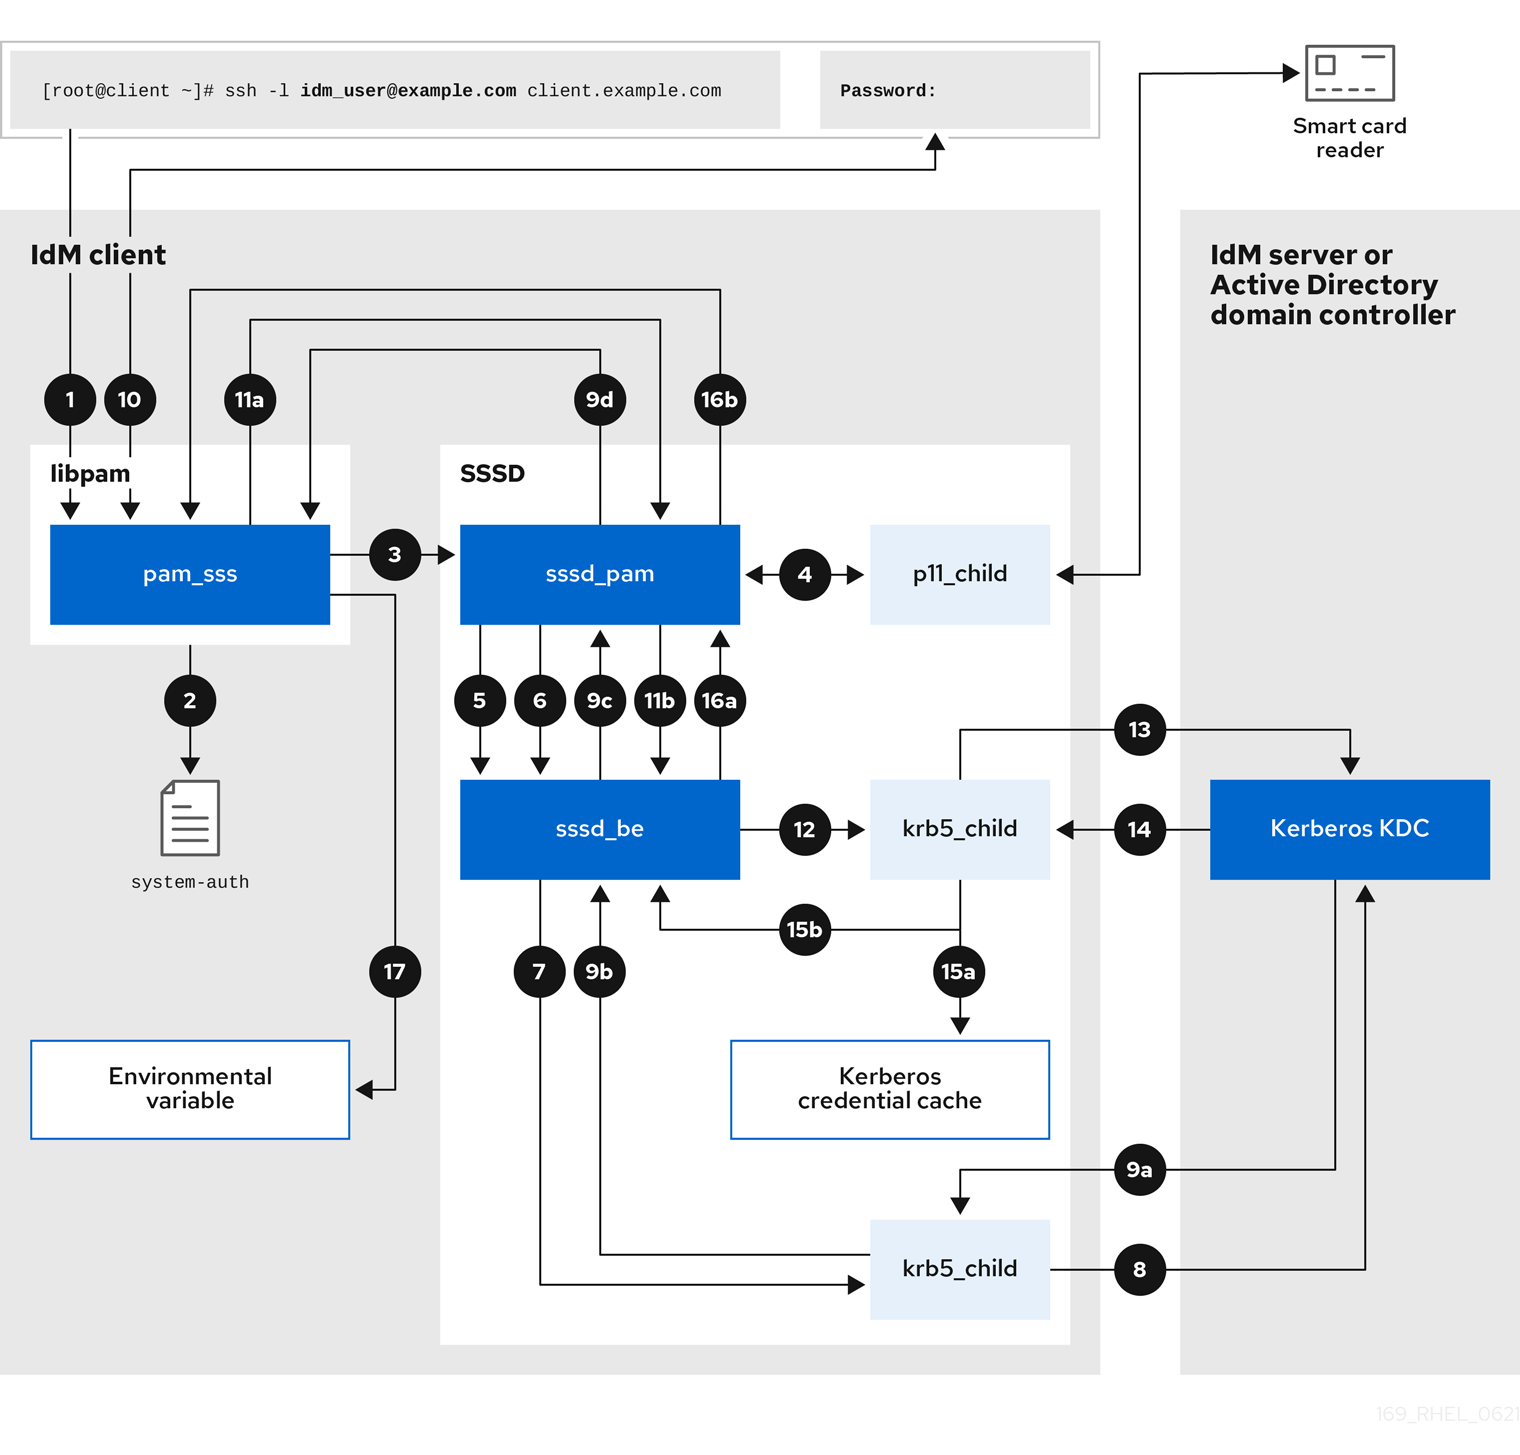
-
The authentication attempt with the
sshcommand triggers thelibpamlibrary. The
libpamlibrary references the PAM file in the/etc/pam.d/directory that corresponds to the service requesting the authentication attempt. In this example involving authenticating via the SSH service on the local host, thelibpamlibrary checks the/etc/pam.d/system-authconfiguration file and discovers thepam_sss.soentry for the SSSD PAM:auth sufficient pam_sss.so-
To determine which authentication methods are available, the
libpamlibrary opens thepam_sssmodule and sends anSSS_PAM_PREAUTHrequest to thesssd_pamPAM responder of the SSSD service. -
If smart card authentication is configured, the SSSD service spawns a temporary
p11_childprocess to check for a smart card and retrieve certificates from it. -
If smart card authentication is configured for the user, the
sssd_pamresponder attempts to match the certificate from the smart card with the user. Thesssd_pamresponder also performs a search for the groups that the user belongs to, since group membership might affect access control. -
The
sssd_pamresponder sends anSSS_PAM_PREAUTHrequest to thesssd_beback-end responder to see which authentication methods the server supports, such as passwords or 2-factor authentication. In an IdM environment, where the SSSD service uses the IPA responder, the default authentication method is Kerberos. For this example, the user authenticates with a simple Kerberos password. -
The
sssd_beresponder spawns a temporarykrb5_childprocess. -
The
krb5_childprocess contacts the KDC on the IdM server and checks for available authentication methods. The KDC responds to the request:
-
The
krb5_childprocess evaluates the reply and sends the results back to thesssd_bebackend process. -
The
sssd_bebackend process receives the result. -
The
sssd_pamresponder receives the result. -
The
pam_sssmodule receives the result.
-
The
-
If password authentication is configured for the user, the
pam_sssmodule prompts the user for their password. If smart card authentication is configured, thepam_sssmodule prompts the user for their smart card PIN. The module sends an
SSS_PAM_AUTHENTICATErequest with the user name and password, which travels to:-
The
sssd_pamresponder. -
The
sssd_beback-end process.
-
The
-
The
sssd_beprocess spawns a temporarykrb5_childprocess to contact the KDC. -
The
krb5_childprocess attempts to retrieve a Kerberos Ticket Granting Ticket (TGT) from the KDC with the user name and password the user provided. -
The
krb5_childprocess receives the result of the authentication attempt. The
krb5_childprocess:- Stores the TGT in a credential cache.
-
Returns the authentication result to the
sssd_beback-end process.
The authentication result travels from the
sssd_beprocess to:-
The
sssd_pamresponder. -
The
pam_sssmodule.
-
The
-
The
pam_sssmodule sets an environment variable with the location of the user’s TGT so other applications can reference it.
8.4. Narrowing the scope of authentication issues
To successfully authenticate a user, you must be able to retrieve user information with the SSSD service from the database that stores user information. The following procedure describes steps to test different components of the authentication process so you can narrow the scope of authentication issues when a user is unable to log in.
Procedure
Verify that the SSSD service and its processes are running.
[root@client ~]# pstree -a | grep sssd |-sssd -i --logger=files | |-sssd_be --domain implicit_files --uid 0 --gid 0 --logger=files | |-sssd_be --domain <domain_name> --uid 0 --gid 0 --logger=files | |-sssd_ifp --uid 0 --gid 0 --logger=files | |-sssd_nss --uid 0 --gid 0 --logger=files | |-sssd_pac --uid 0 --gid 0 --logger=files | |-sssd_pam --uid 0 --gid 0 --logger=files | |-sssd_ssh --uid 0 --gid 0 --logger=files | `-sssd_sudo --uid 0 --gid 0 --logger=files |-sssd_kcm --uid 0 --gid 0 --logger=filesVerify that the client can contact the user database server via the IP address.
[user@client ~]$ ping <IP_address_of_the_database_server>If this step fails, check that your network and firewall settings allow direct communication between IdM clients and servers. See Using and configuring firewalld.
Verify that the client can discover and contact the IdM LDAP server (for IdM users) or AD domain controller (for AD users) via the fully qualified host name.
[user@client ~]$ dig -t SRV ldap._tcp.<domain>@<server_name> [user@client ~]$ ping <fully_qualified_host_name_of_the_server>If this step fails, check your Dynamic Name Service (DNS) settings, including the
/etc/resolv.conffile. See Configuring the order of DNS servers.NoteBy default, the SSSD service attempts to automatically discover LDAP servers and AD DCs through DNS service (SRV) records. To restrict SSSD to specific servers, define them in the
sssd.confconfiguration file using the following options:-
ipa_server = <fully_qualified_host_name_of_the_server> -
ad_server = <fully_qualified_host_name_of_the_server> -
ldap_uri = <fully_qualified_host_name_of_the_server>
If you use these options, verify you can contact the servers listed in them.
-
Verify that the client can authenticate to the LDAP server and retrieve user information with
ldapsearchcommands.If your LDAP server is an IdM server, like
server.example.com, retrieve a Kerberos ticket for the host and perform the database search authenticating with the host Kerberos principal:[user@client ~]$ kinit -k 'host/client.example.com@EXAMPLE.COM' [user@client ~]$ ldapsearch -LLL -Y GSSAPI -h server.example.com -b “dc=example,dc=com" uid=<idm_user>If your LDAP server is an Active Directory (AD) Domain Controller (DC), like
server.ad.example.com, retrieve a Kerberos ticket for the host and perform the database search authenticating with the host Kerberos principal:[user@client ~]$ kinit -k 'CLIENT$@AD.EXAMPLE.COM' [user@client ~]$ ldapsearch -LLL -Y GSSAPI -h server.ad.example.com -b “dc=example,dc=com" sAMAccountname=<idm_user>If your LDAP server is a plain LDAP server, and you have set the
ldap_default_bind_dnandldap_default_authtokoptions in thesssd.conffile, authenticate as the sameldap_default_bind_dnaccount:[user@client ~]$ ldapsearch -xLLL -D "cn=ldap_default_bind_dn_value" -W -h ldapserver.example.com -b “dc=example,dc=com" uid=<idm_user>
If this step fails, verify that your database settings allow your host to search the LDAP server.
Since the SSSD service uses Kerberos encryption, verify you can obtain a Kerberos ticket as the user that is unable to log in.
If your LDAP server is an IdM server:
[user@client ~]$ kinit <idm_user>If LDAP server database is an AD server:
[user@client ~]$ kinit <ad_user@AD.EXAMPLE.COM>
If this step fails, verify that your Kerberos server is operating properly, all servers have their times synchronized, and that the user account is not locked.
Verify you can retrieve user information about the command line.
[user@client ~]$ getent passwd <idm_user> [user@client ~]$ id <idm_user>If this step fails, verify that the SSSD service on the client can receive information from the user database:
-
Review errors in the
/var/log/messageslog file. - Enable detailed logging in the SSSD service, collect debugging logs, and review the logs for indications to the source of the issue.
- Optional: Open a Red Hat Technical Support case and provide the troubleshooting information you have gathered.
-
Review errors in the
If you have
sudoprivileges on the host, use thesssctlutility to verify the user is allowed to log in.[user@client ~]$ sudo sssctl user-checks -a auth -s ssh <idm_user>If this step fails, verify your authorization settings, such as your PAM configuration, IdM HBAC rules, and IdM RBAC rules:
-
Ensure that the user’s UID is equal to or higher than
UID_MIN, which is defined in the/etc/login.defsfile. -
Review authorization errors in the
/var/log/secureand/var/log/messageslog files. - Enable detailed logging in the SSSD service, collect debugging logs, and review the logs for indications to the source of the issue.
- Optional: Open a Red Hat Technical Support case and provide the troubleshooting information you have gathered.
-
Ensure that the user’s UID is equal to or higher than
8.5. SSSD log files and logging levels
Each SSSD service logs into its own log file in the /var/log/sssd/ directory. For an IdM server in the example.com IdM domain, its log files might look like this:
[root@server ~]# ls -l /var/log/sssd/
total 620
-rw-------. 1 root root 0 Mar 29 09:21 krb5_child.log
-rw-------. 1 root root 14324 Mar 29 09:50 ldap_child.log
-rw-------. 1 root root 212870 Mar 29 09:50 sssd_example.com.log
-rw-------. 1 root root 0 Mar 29 09:21 sssd_ifp.log
-rw-------. 1 root root 0 Mar 29 09:21 sssd_implicit_files.log
-rw-------. 1 root root 0 Mar 29 09:21 sssd.log
-rw-------. 1 root root 219873 Mar 29 10:03 sssd_nss.log
-rw-------. 1 root root 0 Mar 29 09:21 sssd_pac.log
-rw-------. 1 root root 13105 Mar 29 09:21 sssd_pam.log
-rw-------. 1 root root 9390 Mar 29 09:21 sssd_ssh.log
-rw-------. 1 root root 0 Mar 29 09:21 sssd_sudo.logSSSD log file purposes
krb5_child.log- Log file for the short-lived helper process involved in Kerberos authentication.
ldap_child.log- Log file for the short-lived helper process involved in getting a Kerberos ticket for the communication with the LDAP server.
sssd_<domain_name>.logFor each domain section in the
sssd.conffile, the SSSD service logs information about communication with the LDAP server to a separate log file. For example, in an environment with an IdM domain namedexample.com, the SSSD service logs its information in a file namedsssd_example.com.log. If a host is directly integrated with an AD domain namedad.example.com, information is logged to a file namedsssd_ad.example.com.log.NoteIf you have an IdM environment and a cross-forest trust with an AD domain, information about the AD domain is still logged to the log file for the IdM domain.
Similarly, if a host is directly integrated to an AD domain, information about any child domains is written in the log file for the primary domain.
selinux_child.log- Log file for the short-lived helper process that retrieves and sets SELinux information.
sssd.log- Log file for SSSD monitoring and communicating with its responder and backend processes.
sssd_ifp.log- Log file for the InfoPipe responder, which provides a public D-Bus interface accessible over the system bus.
sssd_nss.log- Log file for the Name Services Switch (NSS) responder that retrieves user and group information.
sssd_pac.log- Log file for the Microsoft Privilege Attribute Certificate (PAC) responder, which collects the PAC from AD Kerberos tickets and derives information about AD users from the PAC, which avoids requesting it directly from AD.
sssd_pam.log- Log file for the Pluggable Authentication Module (PAM) responder.
sssd_ssh.log- Log file for the SSH responder process.
SSSD logging levels
Setting a debug level also enables all debug levels below it. For example, setting the debug level at 6 also enables debug levels 0 through 5.
| Level | Description |
|---|---|
| 0 | Fatal failures. Errors that prevent the SSSD service from starting up or cause it to terminate. This is the default debug log level for RHEL 8.3 and earlier. |
| 1 | Critical failures. Errors that do not terminate the SSSD service, but at least one major feature is not working properly. |
| 2 | Serious failures. Errors announcing that a particular request or operation has failed. This is the default debug log level for RHEL 8.4 and later. |
| 3 | Minor failures. Errors that cause the operation failures captured at level 2. |
| 4 | Configuration settings. |
| 5 | Function data. |
| 6 | Trace messages for operation functions. |
| 7 | Trace messages for internal control functions. |
| 8 | Contents of function-internal variables. |
| 9 | Extremely low-level tracing information. |
8.6. Enabling detailed logging for SSSD in the sssd.conf file
By default, the SSSD service in RHEL 8.4 and later only logs serious failures (debug level 2), but it does not log at the level of detail necessary to troubleshoot authentication issues.
To enable detailed logging persistently across SSSD service restarts, add the option debug_level=<integer> in each section of the /etc/sssd/sssd.conf configuration file, where the <integer> value is a number between 0 and 9. Debug levels up to 3 log larger failures, and levels 8 and higher provide a large number of detailed log messages. Level 6 is a good starting point for debugging authentication issues.
Prerequisites
-
You need the root password to edit the
sssd.confconfiguration file and restart the SSSD service.
Procedure
-
Open the
/etc/sssd/sssd.conffile in a text editor. Add the
debug_leveloption to every section of the file, and set the debug level to the verbosity of your choice.[domain/<domain_name>] debug_level = 6 id_provider = ipa ... [sssd] debug_level = 6 services = nss, pam, ifp, ssh, sudo domains = <domain_name> [nss] debug_level = 6 [pam] debug_level = 6 [sudo] debug_level = 6 [ssh] debug_level = 6 [pac] debug_level = 6 [ifp] debug_level = 6-
Save and close the
sssd.conffile. Restart the SSSD service to load the new configuration settings.
[root@server ~]# systemctl restart sssd
8.7. Enabling detailed logging for SSSD with the sssctl command
By default, the SSSD service in RHEL 8.4 and later only logs serious failures (debug level 2), but it does not log at the level of detail necessary to troubleshoot authentication issues.
You can change the debug level of the SSSD service on the command line with the sssctl debug-level <integer> command, where the <integer> value is a number between 0 and 9. Debug levels up to 3 log larger failures, and levels 8 and higher provide a large number of detailed log messages. Level 6 is a good starting point for debugging authentication issues.
Prerequisites
-
You need the root password to run the
sssctlcommand.
Procedure
Use the
sssctl debug-levelcommand to set the debug level to your desired verbosity. For example:[root@server ~]# sssctl debug-level 6
8.8. Gathering debugging logs from the SSSD service to troubleshoot authentication issues with an IdM server
If you experience issues when attempting to authenticate as an IdM user to an IdM server, enable detailed debug logging in the SSSD service on the server and gather logs of an attempt to retrieve information about the user.
Prerequisites
-
You have
rootpermissions.
Procedure
Enable detailed SSSD debug logging on the IdM server.
[root@server ~]# sssctl debug-level 6Invalidate objects in the SSSD cache for the user that is experiencing authentication issues, so you do not bypass the LDAP server and retrieve information SSSD has already cached.
[root@server ~]# sssctl cache-expire -u <idm_user>Minimize the troubleshooting dataset by removing older SSSD logs.
[root@server ~]# sssctl logs-removeAttempt to switch to the user experiencing authentication problems, while gathering timestamps before and after the attempt. These timestamps further narrow the scope of the dataset.
[root@server sssd]# date; su <idm_user>; date Mon Mar 29 15:33:48 EDT 2021 su: user idm_user does not exist Mon Mar 29 15:33:49 EDT 2021Optional: Lower the debug level if you do not wish to continue gathering detailed SSSD logs.
[root@server ~]# sssctl debug-level 2Review SSSD logs for information about the failed request. For example, reviewing the
/var/log/sssd/sssd_example.com.logfile shows that the SSSD service did not find the user in thecn=accounts,dc=example,dc=comLDAP subtree. This might indicate that the user does not exist, or exists in another location.(Mon Mar 29 15:33:48 2021) [sssd[be[example.com]]] [dp_get_account_info_send] (0x0200): Got request for [0x1][BE_REQ_USER][name=idm_user@example.com] ... (Mon Mar 29 15:33:48 2021) [sssd[be[example.com]]] [sdap_get_generic_ext_step] (0x0400): calling ldap_search_ext with [(&(uid=idm_user)(objectclass=posixAccount)(uid=)(&(uidNumber=)(!(uidNumber=0))))][cn=accounts,dc=example,dc=com]. (Mon Mar 29 15:33:48 2021) [sssd[be[example.com]]] [sdap_get_generic_op_finished] (0x0400): Search result: Success(0), no errmsg set (Mon Mar 29 15:33:48 2021) [sssd[be[example.com]]] [sdap_search_user_process] (0x0400): Search for users, returned 0 results. (Mon Mar 29 15:33:48 2021) [sssd[be[example.com]]] [sysdb_search_by_name] (0x0400): No such entry (Mon Mar 29 15:33:48 2021) [sssd[be[example.com]]] [sysdb_delete_user] (0x0400): Error: 2 (No such file or directory) (Mon Mar 29 15:33:48 2021) [sssd[be[example.com]]] [sysdb_search_by_name] (0x0400): No such entry (Mon Mar 29 15:33:49 2021) [sssd[be[example.com]]] [ipa_id_get_account_info_orig_done] (0x0080): Object not found, ending requestIf you are unable to determine the cause of the authentication issue:
Collect the SSSD logs you recently generated.
[root@server ~]# sssctl logs-fetch sssd-logs-Mar29.tarOpen a Red Hat Technical Support case and provide:
-
The SSSD logs:
sssd-logs-Mar29.tar The console output, including the time stamps and user name, of the request that corresponds to the logs:
[root@server sssd]# date; id <idm_user>; date Mon Mar 29 15:33:48 EDT 2021 id: 'idm_user': no such user Mon Mar 29 15:33:49 EDT 2021
-
The SSSD logs:
8.9. Gathering debugging logs from the SSSD service to troubleshoot authentication issues with an IdM client
If you experience issues when attempting to authenticate as an IdM user to an IdM client, verify that you can retrieve user information about the IdM server. If you cannot retrieve the user information about an IdM server, you will not be able to retrieve it on an IdM client (which retrieves information from the IdM server).
After you have confirmed that authentication issues do not originate from the IdM server, gather SSSD debugging logs from both the IdM server and IdM client.
Prerequisites
- The user only has authentication issues on IdM clients, not IdM servers.
-
You need the root password to run the
sssctlcommand and restart the SSSD service.
Procedure
-
On the client: Open the
/etc/sssd/sssd.conffile in a text editor. On the client: Add the
ipa_serveroption to the[domain]section of the file and set it to an IdM server using its fully qualified domain name (FQDN). This avoids the IdM client autodiscovering other IdM servers, thus limiting this test to just one client and one server.[domain/<idm_domain_name>] ipa_server = <idm_server_fqdn> ...-
On the client: Save and close the
sssd.conffile. On the client: Restart the SSSD service to load the configuration changes.
[root@client ~]# systemctl restart sssdOn the server and client: Enable detailed SSSD debug logging.
[root@server ~]# sssctl debug-level 6[root@client ~]# sssctl debug-level 6On the server and client: Invalidate objects in the SSSD cache for the user experiencing authentication issues, so you do not bypass the LDAP database and retrieve information SSSD has already cached.
[root@server ~]# sssctl cache-expire -u <idm_user>[root@client ~]# sssctl cache-expire -u <idm_user>On the server and client: Minimize the troubleshooting dataset by removing older SSSD logs.
[root@server ~]# sssctl logs-remove[root@server ~]# sssctl logs-removeOn the client: Attempt to switch to the user experiencing authentication problems while gathering timestamps before and after the attempt. These timestamps further narrow the scope of the dataset.
[root@client sssd]# date; su <idm_user>; date Mon Mar 29 16:20:13 EDT 2021 su: user idm_user does not exist Mon Mar 29 16:20:14 EDT 2021Optional: On the server and client: Lower the debug level if you do not wish to continue gathering detailed SSSD logs.
[root@server ~]# sssctl debug-level 0[root@client ~]# sssctl debug-level 0On the server and client: Review SSSD logs for information about the failed request.
- Review the request from the client in the client logs.
- Review the request from the client in the server logs.
- Review the result of the request in the server logs.
- Review the outcome of the client receiving the results of the request from the server.
If you are unable to determine the cause of the authentication issue:
Collect the SSSD logs you recently generated on the IdM server and IdM client. Label them according to their hostname or role.
[root@server ~]# sssctl logs-fetch sssd-logs-server-Mar29.tar[root@client ~]# sssctl logs-fetch sssd-logs-client-Mar29.tarOpen a Red Hat Technical Support case and provide:
The SSSD debug logs:
-
sssd-logs-server-Mar29.tarfrom the server -
sssd-logs-client-Mar29.tarfrom the client
-
The console output, including the time stamps and user name, of the request that corresponds to the logs:
[root@client sssd]# date; su <idm_user>; date Mon Mar 29 16:20:13 EDT 2021 su: user idm_user does not exist Mon Mar 29 16:20:14 EDT 2021
8.10. Tracking client requests in the SSSD backend
SSSD processes requests asynchronously and adds messages from different requests to the same log file. To track client request in the back-end logs, you can use the unique request identifier RID#<integer> and client ID `[CID #<integer>]. These identifiers help isolate logs to follow an individual request from start to finish across log files from multiple SSSD components.
Prerequisites
- You have enabled debug logging and a request has been submitted from an IdM client.
-
You have
rootprivileges.
Procedure
To review your SSSD log file, open the log file
/var/log/sssd/sssd_<domain_name>.logusing thelessutility. For example:[root@server ~]# less /var/log/sssd/sssd_example.com.logReview the SSSD logs for information about the client request.
(2021-07-26 18:26:37): [be[testidm.com]] [dp_req_destructor] (0x0400): [RID#3] Number of active DP request: 0 (2021-07-26 18:26:37): [be[testidm.com]] [dp_req_reply_std] (0x1000): [RID#3] DP Request AccountDomain #3: Returning [Internal Error]: 3,1432158301,GetAccountDomain() not supported (2021-07-26 18:26:37): [be[testidm.com]] [dp_attach_req] (0x0400): [RID#4] DP Request Account #4: REQ_TRACE: New request. [sssd.nss CID #1] Flags [0x0001]. (2021-07-26 18:26:37): [be[testidm.com]] [dp_attach_req] (0x0400): [RID#4] Number of active DP request: 1This sample output from an SSSD log file shows the unique identifiers
RID#3andRID#4for two different requests.
However, a single client request to the SSSD client interface often triggers multiple requests in the backend and as a result it is not a 1-to-1 correlation between client request and requests in the backend. Though the multiple requests in the backend have different RID numbers, each initial backend request includes the unique client ID so an administrator can track the multiple RID numbers to the single client request.
The following example shows one client request [sssd.nss CID #1] and the multiple requests generated in the backend, [RID#5] to [RID#13]:
(2021-10-29 13:24:16): [be[ad.vm]] [dp_attach_req] (0x0400): [RID#5] DP Request [Account #5]: REQ_TRACE: New request. [sssd.nss CID #1] Flags [0x0001].
(2021-10-29 13:24:16): [be[ad.vm]] [dp_attach_req] (0x0400): [RID#6] DP Request [AccountDomain #6]: REQ_TRACE: New request. [sssd.nss CID #1] Flags [0x0001].
(2021-10-29 13:24:16): [be[ad.vm]] [dp_attach_req] (0x0400): [RID#7] DP Request [Account #7]: REQ_TRACE: New request. [sssd.nss CID #1] Flags [0x0001].
(2021-10-29 13:24:17): [be[ad.vm]] [dp_attach_req] (0x0400): [RID#8] DP Request [Initgroups #8]: REQ_TRACE: New request. [sssd.nss CID #1] Flags [0x0001].
(2021-10-29 13:24:17): [be[ad.vm]] [dp_attach_req] (0x0400): [RID#9] DP Request [Account #9]: REQ_TRACE: New request. [sssd.nss CID #1] Flags [0x0001].
(2021-10-29 13:24:17): [be[ad.vm]] [dp_attach_req] (0x0400): [RID#10] DP Request [Account #10]: REQ_TRACE: New request. [sssd.nss CID #1] Flags [0x0001].
(2021-10-29 13:24:17): [be[ad.vm]] [dp_attach_req] (0x0400): [RID#11] DP Request [Account #11]: REQ_TRACE: New request. [sssd.nss CID #1] Flags [0x0001].
(2021-10-29 13:24:17): [be[ad.vm]] [dp_attach_req] (0x0400): [RID#12] DP Request [Account #12]: REQ_TRACE: New request. [sssd.nss CID #1] Flags [0x0001].
(2021-10-29 13:24:17): [be[ad.vm]] [dp_attach_req] (0x0400): [RID#13] DP Request [Account #13]: REQ_TRACE: New request. [sssd.nss CID #1] Flags [0x0001].8.11. Tracking client requests using the log analyzer tool
The System Security Services Daemon (SSSD) includes a log parsing tool that you can use to track requests from start to finish across log files from multiple SSSD components.
8.11.1. How the log analyzer tool works
Using the log parsing tool, you can track SSSD requests from start to finish across log files from multiple SSSD components. You run the analyzer tool using the sssctl analyze command.
The log analyzer tool helps you to troubleshoot NSS and PAM issues in SSSD and more easily review SSSD debug logs. You can extract and print SSSD logs related only to certain client requests across SSSD processes.
SSSD tracks user and group identity information (id, getent) separately from user authentication (su, ssh) information. The client ID (CID) in the NSS responder is independent of the CID in the PAM responder and you see overlapping numbers when analyzing NSS and PAM requests. Use the --pam option with the sssctl analyze command to review PAM requests.
Requests returned from the SSSD memory cache are not logged and cannot be tracked by the log analyzer tool.
8.11.2. Running the log analyzer tool
Use the log analyzer tool to track and analyze client requests in SSSD.
Prerequisites
-
You must set
debug_levelto at least 7 in the[$responder]section, and[domain/$domain]section of the/etc/sssd/sssd.conffile to enable log parsing functionality. -
Logs to analyze must be from a compatible version of SSSD built with
libteventchain ID support, that is SSSD in RHEL 8.5 and later.
Procedure
Run the log analyzer tool in
listmode to determine the client ID of the request you are tracking, adding the-voption to display verbose output:# sssctl analyze request list -vA verbose list of recent client requests made to SSSD is displayed.
NoteIf analyzing PAM requests, run the
sssctl analyze request listcommand with the--pamoption.Run the log analyzer tool with the
show [unique client ID]option to display logs pertaining to the specified client ID number:# sssctl analyze request show 20If required, you can run the log analyzer tool against log files, for example:
# sssctl analyze --logdir=/tmp/var/log/sssd request list
8.12. Additional resources
- General SSSD Debugging Procedures (Red Hat Knowledgebase)
Chapter 9. Preparing your environment for managing IdM using Ansible playbooks
As a system administrator managing Identity Management (IdM), when working with Red Hat Ansible Engine, it is good practice to do the following:
- Keep a subdirectory dedicated to Ansible playbooks in your home directory, for example ~/MyPlaybooks.
-
Copy and adapt sample Ansible playbooks from the
/usr/share/doc/ansible-freeipa/*and/usr/share/doc/rhel-system-roles/*directories and subdirectories into your ~/MyPlaybooks directory. - Include your inventory file in your ~/MyPlaybooks directory.
Using this practice, you can find all your playbooks in one place.
You can run your ansible-freeipa playbooks without invoking root privileges on the managed nodes. Exceptions include playbooks that use the ipaserver, ipareplica, ipaclient, ipasmartcard_server, ipasmartcard_client and ipabackup ansible-freeipa roles. These roles require privileged access to directories and the dnf software package manager.
The playbooks in the Red Hat Enterprise Linux IdM documentation assume the following security configuration:
-
The IdM
adminis your remote Ansible user on the managed nodes. -
You store the IdM
adminpassword encrypted in an Ansible vault. - You have placed the password that protects the Ansible vault in a password file.
- You block access to the vault password file to everyone except your local ansible user.
- You regularly remove and re-create the vault password file.
Consider also alternative security configurations.
9.1. Preparing a control node and managed nodes for managing IdM using Ansible playbooks
Follow this procedure to create the ~/MyPlaybooks directory and configure it so that you can use it to store and run Ansible playbooks.
Prerequisites
- You have installed an IdM server on your managed nodes, server.idm.example.com and replica.idm.example.com.
- You have configured DNS and networking so you can log in to the managed nodes, server.idm.example.com and replica.idm.example.com, directly from the control node.
-
You know the IdM
adminpassword.
Procedure
Change into the ~/MyPlaybooks/ directory:
$ cd ~/MyPlaybooksCreate the ~/MyPlaybooks/ansible.cfg file with the following content:
[defaults] inventory = /home/your_username/MyPlaybooks/inventory remote_user = adminCreate the ~/MyPlaybooks/inventory file with the following content:
[eu] server.idm.example.com [us] replica.idm.example.com [ipaserver:children] eu usThis configuration defines two host groups, eu and us, for hosts in these locations. Additionally, this configuration defines the ipaserver host group, which contains all hosts from the eu and us groups.
Optional: Create an SSH public and private key. To simplify access in your test environment, do not set a password on the private key:
$ ssh-keygenCopy the SSH public key to the IdM
adminaccount on each managed node:$ ssh-copy-id admin@server.idm.example.com $ ssh-copy-id admin@replica.idm.example.comThese commands require that you enter the IdM
adminpassword.Create a password_file file that contains the vault password:
redhatChange the permissions to modify the file:
$ chmod 0600 password_fileCreate a secret.yml Ansible vault to store the IdM
adminpassword:Configure password_file to store the vault password:
$ ansible-vault create --vault-password-file=password_file secret.ymlWhen prompted, enter the content of the secret.yml file:
ipaadmin_password: Secret123
To use the encrypted ipaadmin_password in a playbook, you must use the vars_file directive. For example, a simple playbook to delete an IdM user can look as follows:
---
- name: Playbook to handle users
hosts: ipaserver
vars_files:
- /home/user_name/MyPlaybooks/secret.yml
tasks:
- name: Delete user robot
ipauser:
ipaadmin_password: "{{ ipaadmin_password }}"
name: robot
state: absent
When executing a playbook, instruct Ansible use the vault password to decrypt ipaadmin_password by adding the --vault-password-file=password_file option. For example:
ansible-playbook -i inventory --vault-password-file=password_file del-user.ymlFor security reasons, remove the vault password file at the end of each session, and repeat steps 6-8 at the start of each new session.
9.2. Different methods to provide the credentials required for ansible-freeipa playbooks
There are advantages and disadvantages in the different methods for providing the credentials required for running playbooks that use ansible-freeipa roles and modules.
Storing passwords in plain text in a playbook
Benefits:
- Not being prompted all the time you run the playbook.
- Easy to implement.
Drawbacks:
- Everyone with access to the file can read the password. Setting wrong permissions and sharing the file, for example in an internal or external repository, can compromise security.
- High maintenance work: if the password is changed, it needs to be changed in all playbooks.
Entering passwords interactively when you execute a playbook
Benefits:
- No-one can steal the password as it is not stored anywhere.
- You can update the password easily.
- Easy to implement.
Drawbacks:
- If you are using Ansible playbooks in scripts, the requirement to enter the password interactively can be inconvenient.
Storing passwords in an Ansible vault and the vault password in a file:
Benefits:
- The user password is stored encrypted.
- You can update the user password easily, by creating a new Ansible vault.
-
You can update the password file that protects the ansible vault easily, by using the
ansible-vault rekey --new-vault-password-file=NEW_VAULT_PASSWORD_FILE secret.ymlcommand. - If you are using Ansible playbooks in scripts, it is convenient not to have to enter the password protecting the Ansible vault interactively.
Drawbacks:
- It is vital that the file that contains the sensitive plain text password be protected through file permissions and other security measures.
Storing passwords in an Ansible vault and entering the vault password interactively
Benefits:
- The user password is stored encrypted.
- No-one can steal the vault password as it is not stored anywhere.
- You can update the user password easily, by creating a new Ansible vault.
-
You can update the vault password easily too, by using the
ansible-vault rekey file_namecommand.
Drawbacks:
- If you are using Ansible playbooks in scripts, the need to enter the vault password interactively can be inconvenient.
Chapter 10. Configuring global IdM settings using Ansible playbooks
Using the Ansible config module, you can retrieve and set global configuration parameters for Identity Management (IdM).
- Retrieving IdM configuration using an Ansible playbook
- Configuring the IdM CA renewal server using an Ansible playbook
- Configuring the default shell for IdM users using an Ansible playbook
- Configuring a NETBIOS name for an IdM domain by using Ansible
- Ensuring that IdM users and groups have SIDs by using Ansible
10.1. Retrieving IdM configuration using an Ansible playbook
The following procedure describes how you can use an Ansible playbook to retrieve information about the current global IdM configuration.
Prerequisites
On the control node:
- You are using Ansible version 2.13 or later.
-
You have installed the
ansible-freeipapackage. - The example assumes that in the ~/MyPlaybooks/ directory, you have created an Ansible inventory file with the fully-qualified domain name (FQDN) of the IdM server.
-
The example assumes that the secret.yml Ansible vault stores your
ipaadmin_password.
-
The target node, that is the node on which the
ansible-freeipamodule is executed, is part of the IdM domain as an IdM client, server or replica.
Procedure
Open the
/usr/share/doc/ansible-freeipa/playbooks/config/retrieve-config.ymlAnsible playbook file for editing:--- - name: Playbook to handle global IdM configuration hosts: ipaserver become: no gather_facts: no vars_files: - /home/user_name/MyPlaybooks/secret.yml tasks: - name: Query IPA global configuration ipaconfig: ipaadmin_password: "{{ ipaadmin_password }}" register: serverconfig - debug: msg: "{{ serverconfig }}"Adapt the file by changing the following:
- The password of IdM administrator.
- Other values, if necessary.
- Save the file.
Run the Ansible playbook. Specify the playbook file, the file storing the password protecting the secret.yml file, and the inventory file:
$ ansible-playbook --vault-password-file=password_file -v -i path_to_inventory_directory/inventory.file /usr/share/doc/ansible-freeipa/playbooks/config/retrieve-config.yml [...] TASK [debug] ok: [server.idm.example.com] => { "msg": { "ansible_facts": { "discovered_interpreter_ }, "changed": false, "config": { "ca_renewal_master_server": "server.idm.example.com", "configstring": [ "AllowNThash", "KDC:Disable Last Success" ], "defaultgroup": "ipausers", "defaultshell": "/bin/bash", "emaildomain": "idm.example.com", "enable_migration": false, "groupsearch": [ "cn", "description" ], "homedirectory": "/home", "maxhostname": "64", "maxusername": "64", "pac_type": [ "MS-PAC", "nfs:NONE" ], "pwdexpnotify": "4", "searchrecordslimit": "100", "searchtimelimit": "2", "selinuxusermapdefault": "unconfined_u:s0-s0:c0.c1023", "selinuxusermaporder": [ "guest_u:s0$xguest_u:s0$user_ ], "usersearch": [ "uid", "givenname", "sn", "telephonenumber", "ou", "title" ] }, "failed": false } }
10.2. Configuring the IdM CA renewal server using an Ansible playbook
In an Identity Management (IdM) deployment that uses an embedded certificate authority (CA), the CA renewal server maintains and renews IdM system certificates. It ensures robust IdM deployments.
For more details on the role of the IdM CA renewal server, see Using IdM CA renewal server.
The following procedure describes how you can use an Ansible playbook to configure the IdM CA renewal server.
Prerequisites
On the control node:
- You are using Ansible version 2.13 or later.
-
You have installed the
ansible-freeipapackage. - The example assumes that in the ~/MyPlaybooks/ directory, you have created an Ansible inventory file with the fully-qualified domain name (FQDN) of the IdM server.
-
The example assumes that the secret.yml Ansible vault stores your
ipaadmin_password.
-
The target node, that is the node on which the
ansible-freeipamodule is executed, is part of the IdM domain as an IdM client, server or replica.
Procedure
Optional: Identify the current IdM CA renewal server:
$ ipa config-show | grep 'CA renewal' IPA CA renewal master: server.idm.example.comCreate an inventory file, for example
inventory.file, and defineipaserverin it:[ipaserver] server.idm.example.comOpen the
/usr/share/doc/ansible-freeipa/playbooks/config/set-ca-renewal-master-server.ymlAnsible playbook file for editing:--- - name: Playbook to handle global DNS configuration hosts: ipaserver become: no gather_facts: no vars_files: - /home/user_name/MyPlaybooks/secret.yml tasks: - name: set ca_renewal_master_server ipaconfig: ipaadmin_password: "{{ ipaadmin_password }}" ca_renewal_master_server: carenewal.idm.example.comAdapt the file by changing:
-
The password of IdM administrator set by the
ipaadmin_passwordvariable. -
The name of the CA renewal server set by the
ca_renewal_master_servervariable.
-
The password of IdM administrator set by the
- Save the file.
Run the Ansible playbook. Specify the playbook file, the file storing the password protecting the secret.yml file, and the inventory file:
$ ansible-playbook --vault-password-file=password_file -v -i path_to_inventory_directory/inventory.file /usr/share/doc/ansible-freeipa/playbooks/config/set-ca-renewal-master-server.yml
Verification
You can verify that the CA renewal server has been changed:
Log into
ipaserveras IdM administrator:$ ssh admin@server.idm.example.com Password: [admin@server /]$Request the identity of the IdM CA renewal server:
$ ipa config-show | grep ‘CA renewal’ IPA CA renewal master: carenewal.idm.example.comThe output shows the carenewal.idm.example.com server is the new CA renewal server.
10.3. Configuring the default shell for IdM users using an Ansible playbook
The shell is a program that accepts and interprets commands. Several shells are available in Red Hat Enterprise Linux (RHEL), such as bash, sh, ksh, zsh, fish, and others. Bash, or /bin/bash, is a popular shell on most Linux systems, and it is normally the default shell for user accounts on RHEL.
The following procedure describes how you can use an Ansible playbook to configure sh, an alternative shell, as the default shell for IdM users.
Prerequisites
On the control node:
- You are using Ansible version 2.13 or later.
-
You have installed the
ansible-freeipapackage. - The example assumes that in the ~/MyPlaybooks/ directory, you have created an Ansible inventory file with the fully-qualified domain name (FQDN) of the IdM server.
-
The example assumes that the secret.yml Ansible vault stores your
ipaadmin_password.
-
The target node, that is the node on which the
ansible-freeipamodule is executed, is part of the IdM domain as an IdM client, server or replica.
Procedure
-
Optional: Use the
retrieve-config.ymlAnsible playbook to identify the current shell for IdM users. See Retrieving IdM configuration using an Ansible playbook for details. Create an inventory file, for example
inventory.file, and defineipaserverin it:[ipaserver] server.idm.example.comOpen the
/usr/share/doc/ansible-freeipa/playbooks/config/ensure-config-options-are-set.ymlAnsible playbook file for editing:--- - name: Playbook to ensure some config options are set hosts: ipaserver vars_files: - /home/user_name/MyPlaybooks/secret.yml tasks: # Set defaultlogin and maxusername - ipaconfig: ipaadmin_password: "{{ ipaadmin_password }}" defaultshell: /bin/bash maxusername: 64Adapt the file by changing the following:
-
The password of IdM administrator set by the
ipaadmin_passwordvariable. -
The default shell of the IdM users set by the
defaultshellvariable into/bin/sh.
-
The password of IdM administrator set by the
- Save the file.
Run the Ansible playbook. Specify the playbook file, the file storing the password protecting the secret.yml file, and the inventory file:
$ ansible-playbook --vault-password-file=password_file -v -i path_to_inventory_directory/inventory.file /usr/share/doc/ansible-freeipa/playbooks/config/ensure-config-options-are-set.yml
Verification
You can verify that the default user shell has been changed by starting a new session in IdM:
Log into
ipaserveras IdM administrator:$ ssh admin@server.idm.example.com Password: [admin@server /]$Display the current shell:
[admin@server /]$ echo "$SHELL" /bin/shThe logged-in user is using the
shshell.
10.4. Configuring a NetBIOS name for an IdM domain by using Ansible
The NetBIOS name is used for Microsoft Windows' (SMB) type of sharing and messaging. You can use NetBIOS names to map a drive or connect to a printer.
Follow this procedure to use an Ansible playbook to configure a NetBIOS name for your Identity Management (IdM) domain.
Prerequisites
You have configured your Ansible control node to meet the following requirements:
- You are using Ansible version 2.13 or later.
-
The
ansible-freeipapackage is installed.
Assumptions
- The example assumes that in the ~/MyPlaybooks/ directory, you have created an Ansible inventory file with the fully-qualified domain name (FQDN) of the IdM server.
-
The example assumes that the secret.yml Ansible vault stores your
ipaadmin_passwordand that you know the vault file password.
Procedure
Navigate to your ~/MyPlaybooks/ directory:
$ cd ~/MyPlaybooks/- Create a netbios-domain-name-present.yml Ansible playbook file.
Add the following content to the file:
--- - name: Playbook to change IdM domain netbios name hosts: ipaserver become: no gather_facts: no vars_files: - /home/user_name/MyPlaybooks/secret.yml tasks: - name: Set IdM domain netbios name ipaconfig: ipaadmin_password: "{{ ipaadmin_password }}" netbios_name: IPADOM- Save the file.
Run the Ansible playbook. Specify the playbook file, the file storing the password protecting the secret.yml file, and the inventory file:
$ ansible-playbook --vault-password-file=password_file -v -i inventory netbios-domain-name-present.ymlWhen prompted, provide the vault file password.
10.5. Ensuring that IdM users and groups have SIDs by using Ansible
The Identity Management (IdM) server can assign unique security identifiers (SIDs) to IdM users and groups internally, based on the data from the ID ranges of the local domain. The SIDs are stored in the user and group objects.
The goal of ensuring that IdM users and groups have SIDs is to allow the generation of the Privileged Attribute Certificate (PAC), which is the first step towards IdM-IdM trusts. If IdM users and groups have SIDs, IdM is able to issue Kerberos tickets with PAC data.
Follow this procedure to achieve the following goals:
- Generate SIDs for already existing IdM users and user groups.
- Enable the generation of SIDs for IdM new users and groups.
Prerequisites
You have configured your Ansible control node to meet the following requirements:
- You are using Ansible version 2.13 or later.
-
The
ansible-freeipapackage is installed.
Assumptions
- The example assumes that in the ~/MyPlaybooks/ directory, you have created an Ansible inventory file with the fully-qualified domain name (FQDN) of the IdM server.
-
The example assumes that the secret.yml Ansible vault stores your
ipaadmin_passwordand that you know the vault file password.
Procedure
Navigate to your ~/MyPlaybooks/ directory:
$ cd ~/MyPlaybooks/- Create a sids-for-users-and-groups-present.yml Ansible playbook file.
Add the following content to the file:
--- - name: Playbook to ensure SIDs are enabled and users and groups have SIDs hosts: ipaserver become: no gather_facts: no vars_files: - /home/user_name/MyPlaybooks/secret.yml tasks: - name: Enable SID and generate users and groups SIDS ipaconfig: ipaadmin_password: "{{ ipaadmin_password }}" enable_sid: true add_sids: trueThe
enable_sidvariable enables SID generation for future IdM users and groups. Theadd_sidsvariable generates SIDs for existing IdM users and groups.NoteWhen using
add_sids: true, you must also set theenable_sidvariable totrue.- Save the file.
Run the Ansible playbook. Specify the playbook file, the file storing the password protecting the secret.yml file, and the inventory file:
$ ansible-playbook --vault-password-file=password_file -v -i inventory sids-for-users-and-groups-present.ymlWhen prompted, provide the vault file password.
Chapter 11. Managing user accounts using the command line
There are several stages in the user life cycle in IdM (Identity Management), including the following:
- Create user accounts
- Activate stage user accounts
- Preserve user accounts
- Delete active, stage, or preserved user accounts
- Restore preserved user accounts
11.1. User life cycle
Identity Management (IdM) supports three user account states:
- Stage users are not allowed to authenticate. This is an initial state. Some of the user account properties required for active users cannot be set, for example, group membership.
- Active users are allowed to authenticate. All required user account properties must be set in this state.
- Preserved users are former active users that are considered inactive and cannot authenticate to IdM. Preserved users retain most of the account properties they had as active users, but they are not part of any user groups.
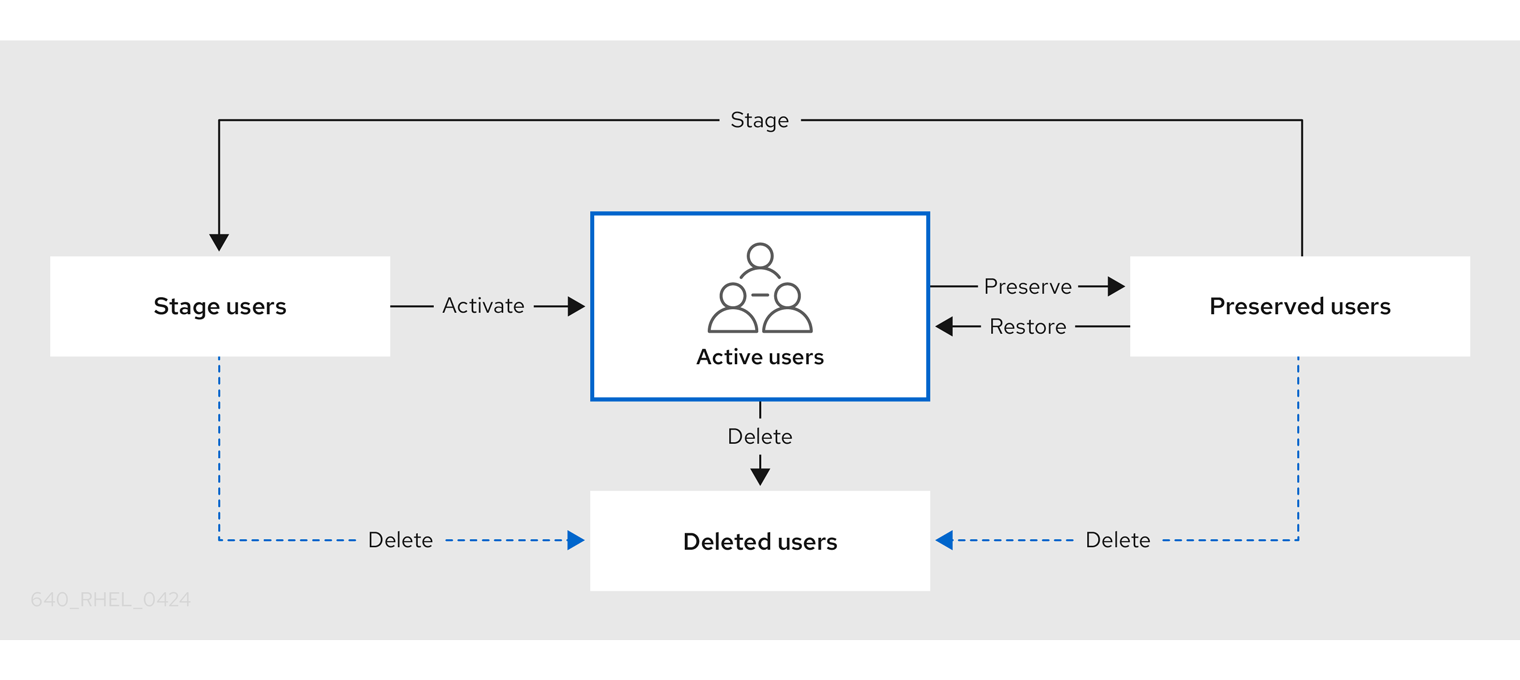
You can delete user entries permanently from the IdM database.
Deleted user accounts cannot be restored. When you delete a user account, all the information associated with the account is permanently lost.
A new administrator can only be created by a user with administrator rights, such as the default admin user. If you accidentally delete all administrator accounts, the Directory Manager must create a new administrator manually in the Directory Server.
Do not delete the admin user. As admin is a pre-defined user required by IdM, this operation causes problems with certain commands. If you want to define and use an alternative admin user, disable the pre-defined admin user with ipa user-disable admin after you granted admin permissions to at least one different user.
Do not add local users to IdM. The Name Service Switch (NSS) always resolves IdM users and groups before resolving local users and groups. This means that, for example, IdM group membership does not work for local users.
11.2. Adding users using the command line
You can add users as:
- Active — user accounts which can be actively used by their users.
- Stage — users cannot use these accounts. Create stage users if you want to prepare new user accounts. When users are ready to use their accounts, then you can activate them.
The following procedure describes adding active users to the IdM server with the ipa user-add command.
Similarly, you can create stage user accounts with the ipa stageuser-add command.
IdM automatically assigns a unique user ID (UID) to new user accounts. You can assign a UID manually by using the --uid=INT option with the ipa user-add command, but the server does not validate whether the UID number is unique. Consequently, multiple user entries might have the same UID number. A similar problem can occur with user private group IDs (GIDs) if you assign a GID to a user account manually by using the --gidnumber=INT option. To check if you have multiple user entries with the same ID, enter ipa user-find --uid=<uid> or ipa user-find --gidnumber=<gidnumber>.
Red Hat recommends you do not have multiple entries with the same UIDs or GIDs. If you have objects with duplicate IDs, security identifiers (SIDs) are not generated correctly. SIDs are crucial for trusts between IdM and Active Directory and for Kerberos authentication to work correctly.
Prerequisites
- Administrator privileges for managing IdM or User Administrator role.
- Obtained a Kerberos ticket. For details, see Using kinit to log in to IdM manually.
Procedure
- Open terminal and connect to the IdM server.
Add user login, user’s first name, last name and optionally, you can also add their email address.
$ ipa user-add user_login --first=first_name --last=last_name --email=email_addressIdM supports user names that can be described by the following regular expression:
[a-zA-Z0-9_.][a-zA-Z0-9_.-]{0,252}[a-zA-Z0-9_.$-]?NoteUser names ending with the trailing dollar sign ($) are supported to enable Samba 3.x machine support.
If you add a user name containing uppercase characters, IdM automatically converts the name to lowercase when saving it. Therefore, IdM always requires to enter user names in lowercase when logging in. Additionally, it is not possible to add user names which differ only in letter casing, such as user and User.
The default maximum length for user names is 32 characters. To change it, use the
ipa config-mod --maxusernamecommand. For example, to increase the maximum user name length to 64 characters:$ ipa config-mod --maxusername=64 Maximum username length: 64 ...The
ipa user-addcommand includes a lot of parameters. To list them all, use the ipa help command:$ ipa help user-addFor details about
ipa helpcommand, see What is the IPA help.
You can verify if the new user account is successfully created by listing all IdM user accounts:
$ ipa user-findThis command lists all user accounts with details.
11.3. Activating users using the command line
To activate a user account by moving it from stage to active, use the ipa stageuser-activate command.
Prerequisites
- Administrator privileges for managing IdM or User Administrator role.
- Obtained a Kerberos ticket. For details, see Using kinit to log in to IdM manually.
Procedure
- Open terminal and connect to the IdM server.
Activate the user account with the following command:
$ ipa stageuser-activate user_login ------------------------- Stage user user_login activated ------------------------- ...
You can verify if the new user account is successfully created by listing all IdM user accounts:
$ ipa user-findThis command lists all user accounts with details.
11.4. Preserving users using the command line
You can preserve a user account if you want to remove it, but keep the option to restore it later. To preserve a user account, use the --preserve option with the ipa user-del or ipa stageuser-del commands.
Prerequisites
- Administrator privileges for managing IdM or User Administrator role.
- Obtained a Kerberos ticket. For details, see Using kinit to log in to IdM manually.
Procedure
- Open terminal and connect to the IdM server.
Preserve the user account with the following command:
$ ipa user-del --preserve user_login -------------------- Deleted user "user_login" --------------------NoteDespite the output saying the user account was deleted, it has been preserved.
11.5. Deleting users using the command line
IdM (Identity Management) enables you to delete users permanently. You can delete:
-
Active users with the following command:
ipa user-del -
Stage users with the following command:
ipa stageuser-del -
Preserved users with the following command:
ipa user-del
When deleting multiple users, use the --continue option to force the command to continue regardless of errors. A summary of the successful and failed operations is printed to the stdout standard output stream when the command completes.
$ ipa user-del --continue user1 user2 user3
If you do not use --continue, the command proceeds with deleting users until it encounters an error, after which it stops and exits.
Prerequisites
- Administrator privileges for managing IdM or User Administrator role.
- Obtained a Kerberos ticket. For details, see Using kinit to log in to IdM manually.
Procedure
- Open terminal and connect to the IdM server.
Delete the user account with the following command:
$ ipa user-del user_login -------------------- Deleted user "user_login" --------------------
The user account has been permanently deleted from IdM.
11.6. Restoring users using the command line
You can restore a preserved users to:
-
Active users:
ipa user-undel -
Stage users:
ipa user-stage
Restoring a user account does not restore all of the account’s previous attributes. For example, the user’s password is not restored and must be set again.
Prerequisites
- Administrator privileges for managing IdM or User Administrator role.
- Obtained a Kerberos ticket. For details, see Using kinit to log in to IdM manually.
Procedure
- Open terminal and connect to the IdM server.
Activate the user account with the following command:
$ ipa user-undel user_login ------------------------------ Undeleted user account "user_login" ------------------------------Alternatively, you can restore user accounts as staged:
$ ipa user-stage user_login ------------------------------ Staged user account "user_login" ------------------------------
Verification
You can verify if the new user account is successfully created by listing all IdM user accounts:
$ ipa user-findThis command lists all user accounts with details.
Chapter 12. Managing user accounts using the IdM Web UI
Identity Management (IdM) provides several stages that can help you to manage various user life cycle situations:
- Creating a user account
Creating a stage user account before an employee starts their career in your company and be prepared in advance for the day when the employee appears in the office and want to activate the account.
You can omit this step and create the active user account directly. The procedure is similar to creating a stage user account.
- Activating a user account
- Activating the account the first working day of the employee.
- Disabling a user account
- If the user go to a parental leave for couple of months, you will need to disable the account temporarily.
- Enabling a user account
- When the user returns, you will need to re-enable the account.
- Preserving a user account
- If the user wants to leave the company, you will need to delete the account with a possibility to restore it because people can return to the company after some time.
- Restoring a user account
- Two years later, the user is back and you need to restore the preserved account.
- Deleting a user account
- If the employee is dismissed, delete the account without a backup.
12.1. User life cycle
Identity Management (IdM) supports three user account states:
- Stage users are not allowed to authenticate. This is an initial state. Some of the user account properties required for active users cannot be set, for example, group membership.
- Active users are allowed to authenticate. All required user account properties must be set in this state.
- Preserved users are former active users that are considered inactive and cannot authenticate to IdM. Preserved users retain most of the account properties they had as active users, but they are not part of any user groups.
You can delete user entries permanently from the IdM database.
Deleted user accounts cannot be restored. When you delete a user account, all the information associated with the account is permanently lost.
A new administrator can only be created by a user with administrator rights, such as the default admin user. If you accidentally delete all administrator accounts, the Directory Manager must create a new administrator manually in the Directory Server.
Do not delete the admin user. As admin is a pre-defined user required by IdM, this operation causes problems with certain commands. If you want to define and use an alternative admin user, disable the pre-defined admin user with ipa user-disable admin after you granted admin permissions to at least one different user.
Do not add local users to IdM. The Name Service Switch (NSS) always resolves IdM users and groups before resolving local users and groups. This means that, for example, IdM group membership does not work for local users.
12.2. Adding users in the Web UI
Usually, you need to create a new user account before a new employee starts to work. Such a stage account is not accessible and you need to activate it later.
Prerequisites
- Administrator privileges for managing IdM or User Administrator role.
Procedure
Log in to the IdM Web UI.
For details, see Accessing the IdM Web UI in a web browser.
Go to Users → Stage Users tab.
Alternatively, you can add the user account in the Users → Active users, however, you cannot add user groups to the account.
- Click the + Add icon.
Optional: In the User login field, add a login name.
If you leave it empty, the IdM server creates the login name in the following pattern: The first letter of the first name and the surname. The whole login name can have up to 32 characters.
- Enter First name and Last name of the new user.
Optional: In the GID drop down menu, select groups in which the user should be included.
Note that this option is only available on the Active Users dialog box.
- Optional: In the Password and Verify password fields, enter your password and confirm it, ensuring they both match.
- Click the Add button.
At this point, you can see the user account in the Stage Users or Active Users table.
If you click on the user name, you can edit advanced settings, such as adding a phone number, address, or occupation.
IdM automatically assigns a unique user ID (UID) to new user accounts. You can assign a UID manually, or even modify an already existing UID. However, the server does not validate whether the new UID number is unique. Consequently, multiple user entries might have the same UID number assigned. A similar problem can occur with user private group IDs (GIDs) if you assign GIDs to user accounts manually. You can use the ipa user-find --uid=<uid> or ipa user-find --gidnumber=<gidnumber> commands on the IdM CLI to check if you have multiple user entries with the same ID.
You should not have multiple entries with the same UIDs or GIDs. If you have objects with duplicate IDs, security identifiers (SIDs) are not generated correctly. SIDs are crucial for trusts between IdM and Active Directory and for Kerberos authentication to work correctly.
12.3. Activating stage users in the IdM Web UI
You must follow this procedure to activate a stage user account, before the user can log in to IdM and before the user can be added to an IdM group.
Prerequisites
- Administrator privileges for managing the IdM Web UI or User Administrator role.
- At least one staged user account in IdM.
Procedure
Log in to the IdM Web UI.
For details, see Accessing the IdM Web UI in a web browser.
- Go to Users → Stage users tab.
- Click the checkbox of the user account you want to activate.
- Click on the Activate button.
- Click OK on the Confirmation dialog box.
If the activation is successful, the IdM Web UI displays a green confirmation that the user has been activated and the user account has been moved to Active users. The account is active and the user can authenticate to the IdM domain and IdM Web UI. The user is prompted to change their password on the first login.
Additionally, at this stage, you can add the active user account to user groups.
12.4. Disabling user accounts in the Web UI
You can disable active user accounts. Disabling a user account deactivates the account, therefore, user accounts cannot be used to authenticate and using IdM services, such as Kerberos, or perform any tasks.
Disabled user accounts still exist within IdM and all of the associated information remains unchanged. Unlike preserved user accounts, disabled user accounts remain in the active state and can be a member of user groups.
After disabling a user account, any existing connections remain valid until the user’s Kerberos TGT and other tickets expire. After the ticket expires, the user will not be able to renew it.
Prerequisites
- Administrator privileges for managing the IdM Web UI or User Administrator role.
Procedure
Log in to the IdM Web UI.
For details, see Accessing the IdM Web UI in a web browser.
- Go to Users → Active users tab.
- Click the checkbox of the user accounts you want to disable.
- Click the Disable button.
- Click the OK button on the Confirmation dialog box.
If the accounts are disabled successfully, you can verify this in the Status column in the Active users table.
12.5. Enabling user accounts in the Web UI
With IdM you can enable disabled active user accounts. Enabling a user account activates the disabled account.
Prerequisites
- Administrator privileges for managing the IdM Web UI or User Administrator role.
Procedure
- Log in to the IdM Web UI.
- Go to Users → Active users tab.
- Click the checkbox of the user accounts you want to enable.
- Click the Enable button.
- Click the OK button on the Confirmation dialog box.
If the change is successful, you can verify this in the Status column in the Active Users table.
12.6. Preserving active users in the IdM Web UI
Preserving user accounts enables you to remove accounts from the Active users tab, yet keeping these accounts in IdM.
Preserve a user account if an employee leaves the company. If you want to disable user accounts for a couple of weeks or months (parental leave, for example), disable the account. For details, see Disabling user accounts in the Web UI. The preserved accounts are not active and users cannot use them to access your internal network, however, the account stays in the database with all the data.
You can move the restored accounts back to the active mode.
Prerequisites
- Administrator privileges for managing the IdM (Identity Management) Web UI or User Administrator role.
Procedure
Log in to the IdM Web UI.
For details, see Accessing the IdM Web UI in a web browser.
- Go to Users → Active users tab.
- Click the checkbox of the user accounts you want to preserve.
- Click the Delete button.
- On the Remove users dialog box, click preserve.
- Click the Delete button.
The user account is moved to Preserved users.
If you need to restore preserved users, see the Restoring users in the IdM Web UI.
12.7. Restoring users in the IdM Web UI
IdM (Identity Management) enables you to restore preserved user accounts back to the active state. You can restore a preserved user to an active user or a stage user.
Prerequisites
- Administrator privileges for managing the IdM Web UI or User Administrator role.
Procedure
Log in to the IdM Web UI.
For details, see Accessing the IdM Web UI in a web browser.
- Go to Users → Preserved users tab.
- Click the checkbox at the user accounts you want to restore.
- Click the Restore button.
- On the Confirmation dialog box, click the OK button.
The IdM Web UI displays a green confirmation and moves the user accounts to the Active users tab.
12.8. Deleting users in the IdM Web UI
Deleting users is an irreversible operation, causing the user accounts to be permanently deleted from the IdM database, including group memberships and passwords. Any external configuration for the user, such as the system account and home directory, is not deleted, but is no longer accessible through IdM.
You can delete:
Active users — the IdM Web UI offers you with the options:
- Preserving users temporarily. For details, see the Preserving active users in the IdM Web UI.
- Deleting users permanently.
- Stage users — you can just delete stage users permanently.
- Preserved users — you can delete preserved users permanently.
The following procedure describes deleting active users. Similarly, you can delete user accounts on:
- The Stage users tab
- The Preserved users tab
Prerequisites
- Administrator privileges for managing the IdM Web UI or User Administrator role.
Procedure
Log in to the IdM Web UI.
For details, see Accessing the IdM Web UI in a web browser.
Go to Users → Active users tab.
Alternatively, you can delete the user account in the Users → Stage users or Users → Preserved users.
- Click the Delete icon.
- On the Remove users dialog box, click delete.
- Click the Delete button.
The users accounts are permanently deleted from IdM.
Chapter 13. Managing user accounts using Ansible playbooks
You can manage users in IdM using Ansible playbooks. After presenting the user life cycle, learn how to use Ansible playbooks to ensure the presence or absence of users listed directly directly in the YML file.
13.1. User life cycle
Identity Management (IdM) supports three user account states:
- Stage users are not allowed to authenticate. This is an initial state. Some of the user account properties required for active users cannot be set, for example, group membership.
- Active users are allowed to authenticate. All required user account properties must be set in this state.
- Preserved users are former active users that are considered inactive and cannot authenticate to IdM. Preserved users retain most of the account properties they had as active users, but they are not part of any user groups.
You can delete user entries permanently from the IdM database.
Deleted user accounts cannot be restored. When you delete a user account, all the information associated with the account is permanently lost.
A new administrator can only be created by a user with administrator rights, such as the default admin user. If you accidentally delete all administrator accounts, the Directory Manager must create a new administrator manually in the Directory Server.
Do not delete the admin user. As admin is a pre-defined user required by IdM, this operation causes problems with certain commands. If you want to define and use an alternative admin user, disable the pre-defined admin user with ipa user-disable admin after you granted admin permissions to at least one different user.
Do not add local users to IdM. The Name Service Switch (NSS) always resolves IdM users and groups before resolving local users and groups. This means that, for example, IdM group membership does not work for local users.
13.2. Ensuring the presence of an IdM user using an Ansible playbook
The following procedure describes ensuring the presence of a user in IdM using an Ansible playbook.
Prerequisites
On the control node:
- You are using Ansible version 2.13 or later.
-
You have installed the
ansible-freeipapackage. - The example assumes that in the ~/MyPlaybooks/ directory, you have created an Ansible inventory file with the fully-qualified domain name (FQDN) of the IdM server.
-
The example assumes that the secret.yml Ansible vault stores your
ipaadmin_password.
-
The target node, that is the node on which the
ansible-freeipamodule is executed, is part of the IdM domain as an IdM client, server or replica.
Procedure
Create an inventory file, for example
inventory.file, and defineipaserverin it:[ipaserver] server.idm.example.comCreate an Ansible playbook file with the data of the user whose presence in IdM you want to ensure. To simplify this step, you can copy and modify the example in the
/usr/share/doc/ansible-freeipa/playbooks/user/add-user.ymlfile. For example, to create user named idm_user and add Password123 as the user password:--- - name: Playbook to handle users hosts: ipaserver vars_files: - /home/user_name/MyPlaybooks/secret.yml tasks: - name: Create user idm_user ipauser: ipaadmin_password: "{{ ipaadmin_password }}" name: idm_user first: Alice last: Acme uid: 1000111 gid: 10011 phone: "+555123457" email: idm_user@acme.com passwordexpiration: "2023-01-19 23:59:59" password: "Password123" update_password: on_createYou must use the following options to add a user:
- name: the login name
- first: the first name string
- last: the last name string
For the full list of available user options, see the
/usr/share/doc/ansible-freeipa/README-user.mdMarkdown file.NoteIf you use the
update_password: on_createoption, Ansible only creates the user password when it creates the user. If the user is already created with a password, Ansible does not generate a new password.Run the playbook:
$ ansible-playbook --vault-password-file=password_file -v -i path_to_inventory_directory/inventory.file path_to_playbooks_directory/add-IdM-user.yml
Verification
You can verify if the new user account exists in IdM by using the
ipa user-showcommand:Log into
ipaserveras admin:$ ssh admin@server.idm.example.com Password: [admin@server /]$Request a Kerberos ticket for admin:
$ kinit admin Password for admin@IDM.EXAMPLE.COM:Request information about idm_user:
$ ipa user-show idm_user User login: idm_user First name: Alice Last name: Acme ....
The user named idm_user is present in IdM.
13.3. Ensuring the presence of multiple IdM users using Ansible playbooks
The following procedure describes ensuring the presence of multiple users in IdM using an Ansible playbook.
Prerequisites
On the control node:
- You are using Ansible version 2.13 or later.
-
You have installed the
ansible-freeipapackage. - The example assumes that in the ~/MyPlaybooks/ directory, you have created an Ansible inventory file with the fully-qualified domain name (FQDN) of the IdM server.
-
The example assumes that the secret.yml Ansible vault stores your
ipaadmin_password.
-
The target node, that is the node on which the
ansible-freeipamodule is executed, is part of the IdM domain as an IdM client, server or replica.
Procedure
Create an inventory file, for example
inventory.file, and defineipaserverin it:[ipaserver] server.idm.example.comCreate an Ansible playbook file with the data of the users whose presence you want to ensure in IdM. To simplify this step, you can copy and modify the example in the
/usr/share/doc/ansible-freeipa/playbooks/user/ensure-users-present.ymlfile. For example, to create users idm_user_1, idm_user_2, and idm_user_3, and add Password123 as the password of idm_user_1:--- - name: Playbook to handle users hosts: ipaserver vars_files: - /home/user_name/MyPlaybooks/secret.yml tasks: - name: Create user idm_users ipauser: ipaadmin_password: "{{ ipaadmin_password }}" users: - name: idm_user_1 first: Alice last: Acme uid: 10001 gid: 10011 phone: "+555123457" email: idm_user@acme.com passwordexpiration: "2023-01-19 23:59:59" password: "Password123" - name: idm_user_2 first: Bob last: Acme uid: 100011 gid: 10011 - name: idm_user_3 first: Eve last: Acme uid: 1000111 gid: 10011NoteIf you do not specify the update_password: on_create option, Ansible resets the user password every time the playbook is run: if the user has changed the password since the last time the playbook was run, Ansible resets password.
Run the playbook:
$ ansible-playbook --vault-password-file=password_file -v -i path_to_inventory_directory/inventory.file path_to_playbooks_directory/add-users.yml
Verification
You can verify if the user account exists in IdM by using the
ipa user-showcommand:Log into
ipaserveras administrator:$ ssh administrator@server.idm.example.com Password: [admin@server /]$Display information about idm_user_1:
$ ipa user-show idm_user_1 User login: idm_user_1 First name: Alice Last name: Acme Password: True ....
The user named idm_user_1 is present in IdM.
13.4. Ensuring the presence of multiple IdM users from a JSON file using Ansible playbooks
The following procedure describes how you can ensure the presence of multiple users in IdM using an Ansible playbook. The users are stored in a JSON file.
Prerequisites
On the control node:
- You are using Ansible version 2.13 or later.
-
You have installed the
ansible-freeipapackage. - The example assumes that in the ~/MyPlaybooks/ directory, you have created an Ansible inventory file with the fully-qualified domain name (FQDN) of the IdM server.
-
The example assumes that the secret.yml Ansible vault stores your
ipaadmin_password.
-
The target node, that is the node on which the
ansible-freeipamodule is executed, is part of the IdM domain as an IdM client, server or replica.
Procedure
Create an inventory file, for example
inventory.file, and defineipaserverin it:[ipaserver] server.idm.example.com-
Create an Ansible playbook file with the necessary tasks. Reference the
JSONfile with the data of the users whose presence you want to ensure. To simplify this step, you can copy and modify the example in the/usr/share/doc/ansible-freeipa/README-user.mdfile:
---
- name: Ensure users' presence
hosts: ipaserver
vars_files:
- /home/user_name/MyPlaybooks/secret.yml
tasks:
- name: Include users_present.json
include_vars:
file: users_present.json
- name: Users present
ipauser:
ipaadmin_password: "{{ ipaadmin_password }}"
users: "{{ users }}"Create the
users.jsonfile, and add the IdM users into it. To simplify this step, you can copy and modify the example in the/usr/share/doc/ansible-freeipa/README-user.mdfile. For example, to create users idm_user_1, idm_user_2, and idm_user_3, and add Password123 as the password of idm_user_1:{ "users": [ { "name": "idm_user_1", "first": "First 1", "last": "Last 1", "password": "Password123" }, { "name": "idm_user_2", "first": "First 2", "last": "Last 2" }, { "name": "idm_user_3", "first": "First 3", "last": "Last 3" } ] }Run the Ansible playbook. Specify the playbook file, the file storing the password protecting the secret.yml file, and the inventory file:
$ ansible-playbook --vault-password-file=password_file -v -i path_to_inventory_directory/inventory.file path_to_playbooks_directory/ensure-users-present-jsonfile.yml
Verification
You can verify if the user accounts are present in IdM using the
ipa user-showcommand:Log into
ipaserveras administrator:$ ssh administrator@server.idm.example.com Password: [admin@server /]$Display information about idm_user_1:
$ ipa user-show idm_user_1 User login: idm_user_1 First name: Alice Last name: Acme Password: True ....
The user named idm_user_1 is present in IdM.
13.5. Ensuring the absence of users using Ansible playbooks
The following procedure describes how you can use an Ansible playbook to ensure that specific users are absent from IdM.
Prerequisites
On the control node:
- You are using Ansible version 2.13 or later.
-
You have installed the
ansible-freeipapackage. - The example assumes that in the ~/MyPlaybooks/ directory, you have created an Ansible inventory file with the fully-qualified domain name (FQDN) of the IdM server.
-
The example assumes that the secret.yml Ansible vault stores your
ipaadmin_password.
-
The target node, that is the node on which the
ansible-freeipamodule is executed, is part of the IdM domain as an IdM client, server or replica.
Procedure
Create an inventory file, for example
inventory.file, and defineipaserverin it:[ipaserver] server.idm.example.comCreate an Ansible playbook file with the users whose absence from IdM you want to ensure. To simplify this step, you can copy and modify the example in the
/usr/share/doc/ansible-freeipa/playbooks/user/ensure-users-present.ymlfile. For example, to delete users idm_user_1, idm_user_2, and idm_user_3:--- - name: Playbook to handle users hosts: ipaserver vars_files: - /home/user_name/MyPlaybooks/secret.yml tasks: - name: Delete users idm_user_1, idm_user_2, idm_user_3 ipauser: ipaadmin_password: "{{ ipaadmin_password }}" users: - name: idm_user_1 - name: idm_user_2 - name: idm_user_3 state: absentRun the Ansible playbook. Specify the playbook file, the file storing the password protecting the secret.yml file, and the inventory file:
$ ansible-playbook --vault-password-file=password_file -v -i path_to_inventory_directory/inventory.file path_to_playbooks_directory/delete-users.yml
Verification
You can verify that the user accounts do not exist in IdM by using the ipa user-show command:
Log into
ipaserveras administrator:$ ssh administrator@server.idm.example.com Password: [admin@server /]$Request information about idm_user_1:
$ ipa user-show idm_user_1 ipa: ERROR: idm_user_1: user not foundThe user named idm_user_1 does not exist in IdM.
Chapter 14. Managing user groups in IdM CLI
Learn about user groups management using the IdM CLI. A user group is a set of users with common privileges, password policies, and other characteristics.
A user group in Identity Management (IdM) can include:
- IdM users
- other IdM user groups
- external users, which are users that exist outside of IdM
14.1. The different group types in IdM
IdM supports the following types of groups:
- POSIX groups (the default)
POSIX groups support Linux POSIX attributes for their members. Note that groups that interact with Active Directory cannot use POSIX attributes.
POSIX attributes identify users as separate entities. Examples of POSIX attributes relevant to users include
uidNumber, a user number (UID), andgidNumber, a group number (GID).- Non-POSIX groups
Non-POSIX groups do not support POSIX attributes. For example, these groups do not have a GID defined.
All members of this type of group must belong to the IdM domain.
- External groups
Use external groups to add group members that exist in an identity store outside of the IdM domain, such as:
- A local system
- An Active Directory domain
- A directory service
External groups do not support POSIX attributes. For example, these groups do not have a GID defined.
| Group name | Default group members |
|---|---|
|
| All IdM users |
|
|
Users with administrative privileges, including the default |
|
| This is a legacy group that no longer has any special privileges |
|
| Users with privileges to manage the Active Directory trusts |
When you add a user to a user group, the user gains the privileges and policies associated with the group. For example, to grant administrative privileges to a user, add the user to the admins group.
Do not delete the admins group. As admins is a pre-defined group required by IdM, this operation causes problems with certain commands.
In addition, IdM creates user private groups by default whenever a new user is created in IdM. For more information about private groups, see Adding users without a private group.
14.2. Direct and indirect group members
User group attributes in IdM apply to both direct and indirect members: when group B is a member of group A, all users in group B are considered indirect members of group A.
For example, in the following diagram:
- User 1 and User 2 are direct members of group A.
- User 3, User 4, and User 5 are indirect members of group A.
Figure 14.1. Direct and Indirect Group Membership
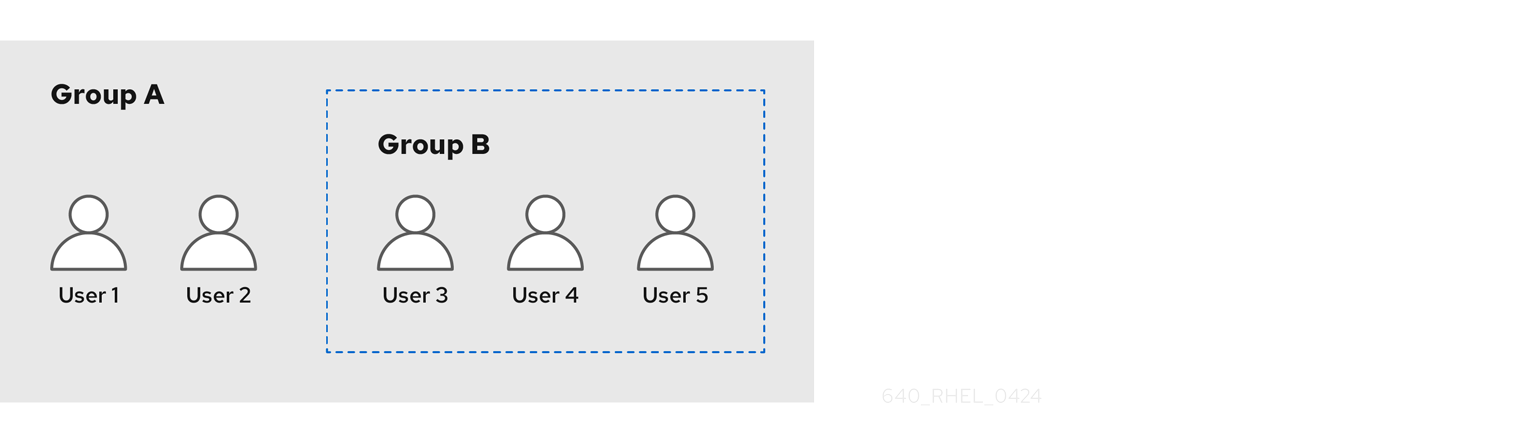
If you set a password policy for user group A, the policy also applies to all users in user group B.
14.3. Adding a user group using IdM CLI
Follow this procedure to add a user group using the IdM CLI.
Prerequisites
- You must be logged in as the administrator. For details, see Using kinit to log in to IdM manually.
Procedure
Add a user group by using the
ipa group-add group_namecommand. For example, to creategroup_a:$ ipa group-add group_a --------------------- Added group "group_a" --------------------- Group name: group_a GID: 1133400009
By default, ipa group-add adds a POSIX user group. To specify a different group type, add options to ipa group-add:
-
--nonposixto create a non-POSIX group -
--externalto create an external group
For details on group types, see The different group types in IdM.
You can specify a custom GID when adding a user group by using the --gid=custom_GID option. If you do this, be careful to avoid ID conflicts. If you do not specify a custom GID, IdM automatically assigns a GID from the available ID range.
14.4. Searching for user groups using IdM CLI
Follow this procedure to search for existing user groups using the IdM CLI.
Procedure
Display all user groups by using the
ipa group-findcommand. To specify a group type, add options toipa group-find:-
Display all POSIX groups using the
ipa group-find --posixcommand. -
Display all non-POSIX groups using the
ipa group-find --nonposixcommand. -
Display all external groups using the
ipa group-find --externalcommand.
-
Display all POSIX groups using the
For more information about different group types, see The different group types in IdM.
14.5. Deleting a user group using IdM CLI
Follow this procedure to delete a user group using IdM CLI. Note that deleting a group does not delete the group members from IdM.
Prerequisites
- You must be logged in as the administrator. For details, see Using kinit to log in to IdM manually.
Procedure
Delete a user group by using the
ipa group-del group_namecommand. For example, to delete group_a:$ ipa group-del group_a -------------------------- Deleted group "group_a" --------------------------
14.6. Adding a member to a user group using IdM CLI
You can add both users and user groups as members of a user group. For more information, see The different group types in IdM and Direct and indirect group members. Follow this procedure to add a member to a user group by using the IdM CLI.
Prerequisites
- You must be logged in as the administrator. For details, see Using kinit to log in to IdM manually.
Procedure
Add a member to a user group by using the
ipa group-add-membercommand.Specify the type of member using these options:
-
--usersadds an IdM user -
--externaladds a user that exists outside the IdM domain, in the format ofDOMAIN\user_nameoruser_name@domain -
--groupsadds an IdM user group
For example, to add group_b as a member of group_a:
$ ipa group-add-member group_a --groups=group_b Group name: group_a GID: 1133400009 Member users: user_a Member groups: group_b Indirect Member users: user_b ------------------------- Number of members added 1 -------------------------Members of group_b are now indirect members of group_a.
-
When adding a group as a member of another group, do not create recursive groups. For example, if Group A is a member of Group B, do not add Group B as a member of Group A. Recursive groups can cause unpredictable behavior.
After you add a member to a user group, the update may take some time to spread to all clients in your Identity Management environment. This is because when any given host resolves users, groups and netgroups, the System Security Services Daemon (SSSD) first looks into its cache and performs server lookups only for missing or expired records.
14.7. Adding users without a user private group
By default, IdM creates user private groups (UPGs) whenever a new user is created in IdM. UPGs are a specific group type:
- The UPG has the same name as the newly created user.
- The user is the only member of the UPG. The UPG cannot contain any other members.
- The GID of the private group matches the UID of the user.
However, it is possible to add users without creating a UPG.
14.7.1. Users without a user private group
If a NIS group or another system group already uses the GID that would be assigned to a user private group, it is necessary to avoid creating a UPG.
You can do this in two ways:
- Add a new user without a UPG, without disabling private groups globally. See Adding a user without a user private group when private groups are globally enabled.
- Disable UPGs globally for all users, then add a new user. See Disabling user private groups globally for all users and Adding a user when user private groups are globally disabled.
In both cases, IdM will require specifying a GID when adding new users, otherwise the operation will fail. This is because IdM requires a GID for the new user, but the default user group ipausers is a non-POSIX group and therefore does not have an associated GID. The GID you specify does not have to correspond to an already existing group.
Specifying the GID does not create a new group. It only sets the GID attribute for the new user, because the attribute is required by IdM.
14.7.2. Adding a user without a user private group when private groups are globally enabled
You can add a user without creating a user private group (UPG) even when UPGs are enabled on the system. This requires manually setting a GID for the new user. For details on why this is needed, see Users without a user private group.
Procedure
To prevent IdM from creating a UPG, add the
--noprivateoption to theipa user-addcommand.Note that for the command to succeed, you must specify a custom GID. For example, to add a new user with GID 10000:
$ ipa user-add jsmith --first=John --last=Smith --noprivate --gid 10000
14.7.3. Disabling user private groups globally for all users
You can disable user private groups (UPGs) globally. This prevents the creation of UPGs for all new users. Existing users are unaffected by this change.
Procedure
Obtain administrator privileges:
$ kinit adminIdM uses the Directory Server Managed Entries Plug-in to manage UPGs. List the instances of the plug-in:
$ ipa-managed-entries --listTo ensure IdM does not create UPGs, disable the plug-in instance responsible for managing user private groups:
$ ipa-managed-entries -e "UPG Definition" disable Disabling PluginTo re-enable the
UPG Definitioninstance later, use theipa-managed-entries -e "UPG Definition" enablecommand.Restart Directory Server to load the new configuration.
$ sudo systemctl restart dirsrv.targetTo add a user after UPGs have been disabled, you need to specify a GID. For more information, see Adding a user when user private groups are globally disabled
Verification
To check if UPGs are globally disabled, use the disable command again:
$ ipa-managed-entries -e "UPG Definition" disable Plugin already disabled
14.7.4. Adding a user when user private groups are globally disabled
When user private groups (UPGs) are disabled globally, IdM does not assign a GID to a new user automatically. To successfully add a user, you must assign a GID manually or by using an automember rule. For details on why this is required, see Users without a user private group.
Prerequisites
- UPGs must be disabled globally for all users. For more information, see Disabling user private groups globally for all users
Procedure
To make sure adding a new user succeeds when creating UPGs is disabled, choose one of the following:
Specify a custom GID when adding a new user. The GID does not have to correspond to an already existing user group.
For example, when adding a user from the command line, add the
--gidoption to theipa user-addcommand.- Use an automember rule to add the user to an existing group with a GID.
14.8. Adding users or groups as member managers to an IdM user group using the IdM CLI
Follow this procedure to add users or groups as member managers to an IdM user group using the IdM CLI. Member managers can add users or groups to IdM user groups but cannot change the attributes of a group.
Prerequisites
- You must be logged in as the administrator. For details, see Using kinit to log in to IdM manually.
- You must have the name of the user or group you are adding as member managers and the name of the group you want them to manage.
Procedure
Add a user as a member manager to an IdM user group by using the
ipa group-add-member-managercommand.For example, to add the user
testas a member manager ofgroup_a:$ ipa group-add-member-manager group_a --users=test Group name: group_a GID: 1133400009 Membership managed by users: test ------------------------- Number of members added 1 -------------------------User
testcan now manage members ofgroup_a.Add a group as a member manager to an IdM user group by using the
ipa group-add-member-managercommand.For example, to add the group
group_adminsas a member manager ofgroup_a:$ ipa group-add-member-manager group_a --groups=group_admins Group name: group_a GID: 1133400009 Membership managed by groups: group_admins Membership managed by users: test ------------------------- Number of members added 1 -------------------------Group
group_adminscan now manage members ofgroup_a.
After you add a member manager to a user group, the update may take some time to spread to all clients in your Identity Management environment.
Verification
Using the
ipa group-showcommand to verify the user and group were added as member managers.$ ipa group-show group_a Group name: group_a GID: 1133400009 Membership managed by groups: group_admins Membership managed by users: test
14.9. Viewing group members using IdM CLI
Follow this procedure to view members of a group using IdM CLI. You can view both direct and indirect group members. For more information, see Direct and indirect group members.
Procedure
To list members of a group, use the
ipa group-show group_namecommand. For example:$ ipa group-show group_a ... Member users: user_a Member groups: group_b Indirect Member users: user_bNoteThe list of indirect members does not include external users from trusted Active Directory domains. The Active Directory trust user objects are not visible in the Identity Management interface because they do not exist as LDAP objects within Identity Management.
14.10. Removing a member from a user group using IdM CLI
Follow this procedure to remove a member from a user group using IdM CLI.
Prerequisites
- You must be logged in as the administrator. For details, see Using kinit to log in to IdM manually.
Procedure
-
Optional: Use the
ipa group-showcommand to confirm that the group includes the member you want to remove. Remove a member from a user group by using the
ipa group-remove-membercommand.Specify members to remove using these options:
-
--usersremoves an IdM user -
--externalremoves a user that exists outside the IdM domain, in the format ofDOMAIN\user_nameoruser_name@domain -
--groupsremoves an IdM user group
For example, to remove user1, user2, and group1 from a group called group_name:
$ ipa group-remove-member group_name --users=user1 --users=user2 --groups=group1-
14.11. Removing users or groups as member managers from an IdM user group using the IdM CLI
Follow this procedure to remove users or groups as member managers from an IdM user group using the IdM CLI. Member managers can remove users or groups from IdM user groups but cannot change the attributes of a group.
Prerequisites
- You must be logged in as the administrator. For details, see Using kinit to log in to IdM manually.
- You must have the name of the existing member manager user or group you are removing and the name of the group they are managing.
Procedure
Remove a user as a member manager of an IdM user group by using the
ipa group-remove-member-managercommand.For example, to remove the user
testas a member manager ofgroup_a:$ ipa group-remove-member-manager group_a --users=test Group name: group_a GID: 1133400009 Membership managed by groups: group_admins --------------------------- Number of members removed 1 ---------------------------User
testcan no longer manage members ofgroup_a.Remove a group as a member manager of an IdM user group by using the
ipa group-remove-member-managercommand.For example, to remove the group
group_adminsas a member manager ofgroup_a:$ ipa group-remove-member-manager group_a --groups=group_admins Group name: group_a GID: 1133400009 --------------------------- Number of members removed 1 ---------------------------Group
group_adminscan no longer manage members ofgroup_a.
After you remove a member manager from a user group, the update may take some time to spread to all clients in your Identity Management environment.
Verification
Using the
ipa group-showcommand to verify the user and group were removed as member managers.$ ipa group-show group_a Group name: group_a GID: 1133400009
14.12. Enabling group merging for local and remote groups in IdM
Groups are either centrally managed, provided by a domain such as Identity Management (IdM) or Active Directory (AD), or they are managed on a local system in the etc/group file. In most cases, users rely on a centrally managed store. However, in some cases software still relies on membership in known groups for managing access control.
If you want to manage groups from a domain controller and from the local etc/group file, you can enable group merging. You can configure your nsswitch.conf file to check both the local files and the remote service. If a group appears in both, the list of member users is combined and returned in a single response.
The steps below describe how to enable group merging for a user, idmuser.
In RHEL 9.6 or later, if you are using the authselect utility, you no longer need to manually edit nssswitch.conf to enable group merging. It is now integrated into authselect profiles, eliminating the need for manual changes.
Procedure
Add
[SUCCESS=merge]to the/etc/nsswitch.conffile:# Allow initgroups to default to the setting for group. initgroups: sss [SUCCESS=merge] filesAdd the idmuser to IdM:
# ipa user-add idmuser First name: idm Last name: user --------------------- Added user "idmuser" --------------------- User login: idmuser First name: idm Last name: user Full name: idm user Display name: idm user Initials: tu Home directory: /home/idmuser GECOS: idm user Login shell: /bin/sh Principal name: idmuser@IPA.TEST Principal alias: idmuser@IPA.TEST Email address: idmuser@ipa.test UID: 19000024 GID: 19000024 Password: False Member of groups: ipausers Kerberos keys available: FalseVerify the GID of the local
audiogroup.$ getent group audio --------------------- audio:x:63Add the group
audioto IdM:$ ipa group-add audio --gid 63 ------------------- Added group "audio" ------------------- Group name: audio GID: 63NoteThe GID you define when adding the
audiogroup to IdM must be the same as the GID of the localaudiogroup.Add idmuser user to the IdM
audiogroup:$ ipa group-add-member audio --users=idmuser Group name: audio GID: 63 Member users: idmuser ------------------------- Number of members added 1 -------------------------
Verification
- Log in as the idmuser.
Verify the idmuser has the local group in their session:
$ id idmuser uid=1867800003(idmuser) gid=1867800003(idmuser) groups=1867800003(idmuser),63(audio),10(wheel)
14.13. Using Ansible to give a user ID override access to the local sound card on an IdM client
You can use the ansible-freeipa group and idoverrideuser modules to make Identity Management (IdM) or Active Directory (AD) users members of the local audio group on an IdM client. This grants the IdM or AD users privileged access to the sound card on the host.
The procedure uses the example of the Default Trust View ID view to which the aduser@addomain.com ID override is added in the first playbook task. In the next playbook task, an audio group is created in IdM with the GID of 63, which corresponds to the GID of local audio groups on RHEL hosts. At the same time, the aduser@addomain.com ID override is added to the IdM audio group as a member.
Prerequisites
-
You have
rootaccess to the IdM client on which you want to perform the first part of the procedure. In the example, this is client.idm.example.com. You have configured your Ansible control node to meet the following requirements:
- You are using Ansible version 2.13 or later.
-
You have installed the
ansible-freeipapackage on the Ansible controller. - You are using RHEL 8.10 or later.
- The example assumes that in the ~/MyPlaybooks/ directory, you have created an Ansible inventory file with the fully-qualified domain name (FQDN) of the IdM server.
-
The example assumes that the secret.yml Ansible vault stores your
ipaadmin_password.
-
The AD forest is in trust with IdM. In the example, the name of the AD domain is addomain.com and the fully-qualified domain name (FQDN) of the AD user whose presence in the local
audiogroup is being ensured is aduser@addomain.com. -
The target node, that is the node on which the
ansible-freeipamodule is executed, is part of the IdM domain as an IdM client, server or replica.
Procedure
On client.idm.example.com, add
[SUCCESS=merge]to the/etc/nsswitch.conffile:[...] # Allow initgroups to default to the setting for group. initgroups: sss [SUCCESS=merge] filesIdentify the GID of the local
audiogroup:$ getent group audio --------------------- audio:x:63On your Ansible control node, create an add-aduser-to-audio-group.yml playbook with a task to add the aduser@addomain.com user override to the Default Trust View:
--- - name: Playbook to manage idoverrideuser hosts: ipaserver become: false tasks: - name: Add aduser@addomain.com user to the Default Trust View ipaidoverrideuser: ipaadmin_password: "{{ ipaadmin_password }}" idview: "Default Trust View" anchor: aduser@addomain.comUse another playbook task in the same playbook to add the group audio to IdM with the
GIDof 63. Add the aduser idoverrideuser to the group:- name: Add the audio group with the aduser member and GID of 63 ipagroup: ipaadmin_password: "{{ ipaadmin_password }}" name: audio idoverrideuser: - aduser@addomain.com gidnumber: 63- Save the file.
Run the Ansible playbook. Specify the playbook file, the file storing the password protecting the secret.yml file, and the inventory file:
$ ansible-playbook --vault-password-file=password_file -v -i inventory add-aduser-to-audio-group.yml
Verification
Log in to the IdM client as the AD user:
$ ssh aduser@addomain.com@client.idm.example.comVerify the group membership of the AD user:
$ id aduser@addomain.com uid=702801456(aduser@addomain.com) gid=63(audio) groups=63(audio)
Chapter 15. Managing user groups in IdM Web UI
This chapter introduces user groups management using the IdM web UI.
A user group is a set of users with common privileges, password policies, and other characteristics.
A user group in Identity Management (IdM) can include:
- IdM users
- other IdM user groups
- external users, which are users that exist outside of IdM
15.1. The different group types in IdM
IdM supports the following types of groups:
- POSIX groups (the default)
POSIX groups support Linux POSIX attributes for their members. Note that groups that interact with Active Directory cannot use POSIX attributes.
POSIX attributes identify users as separate entities. Examples of POSIX attributes relevant to users include
uidNumber, a user number (UID), andgidNumber, a group number (GID).- Non-POSIX groups
Non-POSIX groups do not support POSIX attributes. For example, these groups do not have a GID defined.
All members of this type of group must belong to the IdM domain.
- External groups
Use external groups to add group members that exist in an identity store outside of the IdM domain, such as:
- A local system
- An Active Directory domain
- A directory service
External groups do not support POSIX attributes. For example, these groups do not have a GID defined.
| Group name | Default group members |
|---|---|
|
| All IdM users |
|
|
Users with administrative privileges, including the default |
|
| This is a legacy group that no longer has any special privileges |
|
| Users with privileges to manage the Active Directory trusts |
When you add a user to a user group, the user gains the privileges and policies associated with the group. For example, to grant administrative privileges to a user, add the user to the admins group.
Do not delete the admins group. As admins is a pre-defined group required by IdM, this operation causes problems with certain commands.
In addition, IdM creates user private groups by default whenever a new user is created in IdM. For more information about private groups, see Adding users without a private group.
15.2. Direct and indirect group members
User group attributes in IdM apply to both direct and indirect members: when group B is a member of group A, all users in group B are considered indirect members of group A.
For example, in the following diagram:
- User 1 and User 2 are direct members of group A.
- User 3, User 4, and User 5 are indirect members of group A.
Figure 15.1. Direct and Indirect Group Membership
If you set a password policy for user group A, the policy also applies to all users in user group B.
15.3. Adding a user group using IdM Web UI
Follow this procedure to add a user group using the IdM Web UI.
Prerequisites
- You are logged in to the IdM Web UI.
Procedure
- Click Identity → Groups, and select User Groups in the left sidebar.
- Click Add to start adding the group.
Fill out the information about the group. For more information about user group types, see The different group types in IdM.
You can specify a custom GID for the group. If you do this, be careful to avoid ID conflicts. If you do not specify a custom GID, IdM automatically assigns a GID from the available ID range.
- Click Add to confirm.
15.4. Deleting a user group using IdM Web UI
Follow this procedure to delete a user group using the IdM Web UI. Note that deleting a group does not delete the group members from IdM.
Prerequisites
- You are logged in to the IdM Web UI.
Procedure
- Click Identity → Groups and select User Groups.
- Select the group to delete.
- Click Delete.
- Click Delete to confirm.
15.5. Adding a member to a user group using IdM Web UI
You can add both users and user groups as members of a user group. For more information, see The different group types in IdM and Direct and indirect group members.
Prerequisites
- You are logged in to the IdM Web UI.
Procedure
- Click Identity → Groups and select User Groups in the left sidebar.
- Click the name of the group.
- Select the type of group member you want to add: Users, User Groups, or External.
- Click Add.
- Select the checkbox next to one or more members you want to add.
- Click the right arrow to move the selected members to the group.
- Click Add to confirm.
15.6. Adding users or groups as member managers to an IdM user group using the Web UI
Follow this procedure to add users or groups as member managers to an IdM user group using the Web UI. Member managers can add users or groups to IdM user groups but cannot change the attributes of a group.
Prerequisites
- You are logged in to the IdM Web UI.
- You must have the name of the user or group you are adding as member managers and the name of the group you want them to manage.
Procedure
- Click Identity → Groups and select User Groups in the left sidebar.
- Click the name of the group.
- Select the type of group member manager you want to add: Users or User Groups.
- Click Add.
- Select the checkbox next to one or more members you want to add.
- Click the right arrow to move the selected members to the group.
- Click Add to confirm.
After you add a member manager to a user group, the update may take some time to spread to all clients in your Identity Management environment.
Verification
Verify the newly added user or user group has been added to the member manager list of users or user groups:

15.7. Viewing group members using IdM Web UI
Follow this procedure to view members of a group using the IdM Web UI. You can view both direct and indirect group members. For more information, see Direct and indirect group members.
Prerequisites
- You are logged in to the IdM Web UI.
Procedure
- Select Identity → Groups.
- Select User Groups in the left sidebar.
- Click the name of the group you want to view.
- Switch between Direct Membership and Indirect Membership.
15.8. Removing a member from a user group using IdM Web UI
Follow this procedure to remove a member from a user group using the IdM Web UI.
Prerequisites
- You are logged in to the IdM Web UI.
Procedure
- Click Identity → Groups and select User Groups in the left sidebar.
- Click the name of the group.
- Select the type of group member you want to remove: Users, User Groups, or External.
- Select the checkbox next to the member you want to remove.
- Click Delete.
- Click Delete to confirm.
15.9. Removing users or groups as member managers from an IdM user group using the Web UI
Follow this procedure to remove users or groups as member managers from an IdM user group using the Web UI. Member managers can remove users or groups from IdM user groups but cannot change the attributes of a group.
Prerequisites
- You are logged in to the IdM Web UI.
- You must have the name of the existing member manager user or group you are removing and the name of the group they are managing.
Procedure
- Click Identity → Groups and select User Groups in the left sidebar.
- Click the name of the group.
- Select the type of member manager you want to remove: Users or User Groups.
- Select the checkbox next to the member manager you want to remove.
- Click Delete.
- Click Delete to confirm.
After you remove a member manager from a user group, the update may take some time to spread to all clients in your Identity Management environment.
Verification
Verify the user or user group has been removed from the member manager list of users or user groups:

Chapter 16. Managing user groups using Ansible playbooks
This section introduces user group management using Ansible playbooks.
A user group is a set of users with common privileges, password policies, and other characteristics.
A user group in Identity Management (IdM) can include:
- IdM users
- other IdM user groups
- external users, which are users that exist outside of IdM
16.1. The different group types in IdM
IdM supports the following types of groups:
- POSIX groups (the default)
POSIX groups support Linux POSIX attributes for their members. Note that groups that interact with Active Directory cannot use POSIX attributes.
POSIX attributes identify users as separate entities. Examples of POSIX attributes relevant to users include
uidNumber, a user number (UID), andgidNumber, a group number (GID).- Non-POSIX groups
Non-POSIX groups do not support POSIX attributes. For example, these groups do not have a GID defined.
All members of this type of group must belong to the IdM domain.
- External groups
Use external groups to add group members that exist in an identity store outside of the IdM domain, such as:
- A local system
- An Active Directory domain
- A directory service
External groups do not support POSIX attributes. For example, these groups do not have a GID defined.
| Group name | Default group members |
|---|---|
|
| All IdM users |
|
|
Users with administrative privileges, including the default |
|
| This is a legacy group that no longer has any special privileges |
|
| Users with privileges to manage the Active Directory trusts |
When you add a user to a user group, the user gains the privileges and policies associated with the group. For example, to grant administrative privileges to a user, add the user to the admins group.
Do not delete the admins group. As admins is a pre-defined group required by IdM, this operation causes problems with certain commands.
In addition, IdM creates user private groups by default whenever a new user is created in IdM. For more information about private groups, see Adding users without a private group.
16.2. Direct and indirect group members
User group attributes in IdM apply to both direct and indirect members: when group B is a member of group A, all users in group B are considered indirect members of group A.
For example, in the following diagram:
- User 1 and User 2 are direct members of group A.
- User 3, User 4, and User 5 are indirect members of group A.
Figure 16.1. Direct and Indirect Group Membership
If you set a password policy for user group A, the policy also applies to all users in user group B.
16.3. Ensuring the presence of IdM groups and group members using Ansible playbooks
The following procedure describes ensuring the presence of IdM groups and group members - both users and user groups - using an Ansible playbook.
Prerequisites
- You know the IdM administrator password.
You have configured your Ansible control node to meet the following requirements:
- You are using Ansible version 2.13 or later.
-
You have installed the
ansible-freeipapackage. - The example assumes that in the ~/MyPlaybooks/ directory, you have created an Ansible inventory file with the fully-qualified domain name (FQDN) of the IdM server.
-
The example assumes that the secret.yml Ansible vault stores your
ipaadmin_password.
-
The target node, that is the node on which the
ansible-freeipamodule is executed, is part of the IdM domain as an IdM client, server or replica. - The users you want to reference in your Ansible playbook exist in IdM. For details on ensuring the presence of users using Ansible, see Managing user accounts using Ansible playbooks.
Procedure
Create an inventory file, for example
inventory.file, and defineipaserverin it:[ipaserver] server.idm.example.comCreate an Ansible playbook file with the necessary user and group information:
--- - name: Playbook to handle groups hosts: ipaserver vars_files: - /home/user_name/MyPlaybooks/secret.yml tasks: - name: Create group ops with gid 1234 ipagroup: ipaadmin_password: "{{ ipaadmin_password }}" name: ops gidnumber: 1234 - name: Create group sysops ipagroup: ipaadmin_password: "{{ ipaadmin_password }}" name: sysops user: - idm_user - name: Create group appops ipagroup: ipaadmin_password: "{{ ipaadmin_password }}" name: appops - name: Add group members sysops and appops to group ops ipagroup: ipaadmin_password: "{{ ipaadmin_password }}" name: ops group: - sysops - appopsRun the playbook:
$ ansible-playbook --vault-password-file=password_file -v -i path_to_inventory_directory/inventory.file path_to_playbooks_directory/add-group-members.yml
Verification
You can verify if the ops group contains sysops and appops as direct members and idm_user as an indirect member by using the ipa group-show command:
Log into
ipaserveras administrator:$ ssh admin@server.idm.example.com Password: [admin@server /]$Display information about ops:
ipaserver]$ ipa group-show ops Group name: ops GID: 1234 Member groups: sysops, appops Indirect Member users: idm_userThe appops and sysops groups - the latter including the idm_user user - exist in IdM.
16.4. Using Ansible to add multiple IdM groups in a single task
You can use the ansible-freeipa ipagroup module to add, modify, and delete multiple Identity Management (IdM) user groups with a single Ansible task. For that, use the groups option of the ipagroup module.
Using the groups option, you can also specify multiple group variables that only apply to a particular group. Define this group by the name variable, which is the only mandatory variable for the groups option.
Complete this procedure to ensure the presence of the sysops and the appops groups in IdM in a single task. Define the sysops group as a nonposix group and the appops group as an external group.
Prerequisites
On the control node:
- You are using Ansible version 2.13 or later.
-
You have installed the
ansible-freeipapackage. - You have created an Ansible inventory file with the fully-qualified domain name (FQDN) of the IdM server in the ~/MyPlaybooks/ directory.
- You are using RHEL 8.9 and later.
-
You have stored your
ipaadmin_passwordin the secret.yml Ansible vault.
Procedure
Create your Ansible playbook file add-nonposix-and-external-groups.yml with the following content:
--- - name: Playbook to add nonposix and external groups hosts: ipaserver vars_files: - /home/user_name/MyPlaybooks/secret.yml tasks: - name: Add nonposix group sysops and external group appops ipagroup: ipaadmin_password: "{{ ipaadmin_password }}" groups: - name: sysops nonposix: true - name: appops external: trueRun the playbook:
$ ansible-playbook --vault-password-file=password_file -v -i <path_to_inventory_directory>/hosts <path_to_playbooks_directory>/add-nonposix-and-external-groups.yml
16.5. Using Ansible to enable AD users to administer IdM
You can use the ansible-freeipa idoverrideuser and group modules to create a user ID override for an Active Directory (AD) user from a trusted AD domain and give that user rights identical to those of an IdM user. The procedure uses the example of the Default Trust View ID view to which the ad_user@ad.example.com ID override of a user stored in AD is added in the first playbook task. In the next playbook task, the ad_user@ad.example.com ID override is added to the IdM admins group as a member. As a result, an AD administrator can administer IdM without having two different accounts and passwords.
Prerequisites
-
You know the IdM
adminpassword. - You have installed a trust with AD.
- The group to which you are adding the user ID override already exists in IdM.
-
You are using the 4.8.7 version of IdM or later. To view the version of IdM you have installed on your server, enter
ipa --version. You have configured your Ansible control node to meet the following requirements:
- You are using Ansible version 2.13 or later.
- You are using RHEL 8.10 or later.
-
You have installed the
ansible-freeipapackage. - The example assumes that in the ~/MyPlaybooks/ directory, you have created an Ansible inventory file with the fully-qualified domain name (FQDN) of the IdM server.
-
The example assumes that the secret.yml Ansible vault stores your
ipaadmin_password.
- The AD forest is in trust with IdM. In the example, the name of the AD domain is ad.example.com and the fully-qualified domain name (FQDN) of the AD administrator is ad_user@ad.example.com.
-
The
ipaserverhost in the inventory file is configured as a trust controller or a trust agent. -
The target node, that is the node on which the
ansible-freeipamodule is executed, is part of the IdM domain as an IdM client, server or replica.
Procedure
Navigate to your ~/MyPlaybooks/ directory:
$ cd ~/MyPlaybooks/Create an enable-ad-admin-to-administer-idm.yml playbook with a task to add the ad_user@ad.example.com user override to the Default Trust View:
--- - name: Enable AD administrator to act as a FreeIPA admin hosts: ipaserver become: false gather_facts: false tasks: - name: Ensure idoverride for ad_user@ad.example.com in 'Default Trust View' ipaidoverrideuser: ipaadmin_password: "{{ ipaadmin_password }}" idview: "Default Trust View" anchor: ad_user@ad.example.comIn the example:
- ad_user@ad.example.com is the user ID override of an AD user that is stored in the AD domain with which a trust has been established.
Use another playbook task in the same playbook to add the AD administrator user ID override to the
adminsgroup:- name: Add the AD administrator to `admins` group ipagroup: ipaadmin_password: "{{ ipaadmin_password }}" name: admins idoverrideuser: - ad_user@ad.example.comIn the example:
-
adminsis the name of the IdM POSIX group to which you are adding the ad_user@ad.example.com ID override. Members of this group have full administrator privileges.
-
- Save the file.
Run the Ansible playbook. Specify the playbook file, the file storing the password protecting the secret.yml file, and the inventory file:
$ ansible-playbook --vault-password-file=password_file -v -i inventory enable-ad-admin-to-administer-idm.yml
16.6. Ensuring the presence of member managers in IdM user groups using Ansible playbooks
The following procedure describes ensuring the presence of IdM member managers - both users and user groups - using an Ansible playbook.
Prerequisites
On the control node:
- You are using Ansible version 2.13 or later.
-
You have installed the
ansible-freeipapackage. - The example assumes that in the ~/MyPlaybooks/ directory, you have created an Ansible inventory file with the fully-qualified domain name (FQDN) of the IdM server.
-
The example assumes that the secret.yml Ansible vault stores your
ipaadmin_password.
-
The target node, that is the node on which the
ansible-freeipamodule is executed, is part of the IdM domain as an IdM client, server or replica. - You must have the name of the user or group you are adding as member managers and the name of the group you want them to manage.
Procedure
Create an inventory file, for example
inventory.file, and defineipaserverin it:[ipaserver] server.idm.example.comCreate an Ansible playbook file with the necessary user and group member management information:
--- - name: Playbook to handle membership management hosts: ipaserver vars_files: - /home/user_name/MyPlaybooks/secret.yml tasks: - name: Ensure user test is present for group_a ipagroup: ipaadmin_password: "{{ ipaadmin_password }}" name: group_a membermanager_user: test - name: Ensure group_admins is present for group_a ipagroup: ipaadmin_password: "{{ ipaadmin_password }}" name: group_a membermanager_group: group_adminsRun the playbook:
$ ansible-playbook --vault-password-file=password_file -v -i path_to_inventory_directory/inventory.file path_to_playbooks_directory/add-member-managers-user-groups.yml
Verification
You can verify if the group_a group contains test as a member manager and group_admins is a member manager of group_a by using the ipa group-show command:
Log into
ipaserveras administrator:$ ssh admin@server.idm.example.com Password: [admin@server /]$Display information about managergroup1:
ipaserver]$ ipa group-show group_a Group name: group_a GID: 1133400009 Membership managed by groups: group_admins Membership managed by users: test
16.7. Ensuring the absence of member managers in IdM user groups using Ansible playbooks
The following procedure describes ensuring the absence of IdM member managers - both users and user groups - using an Ansible playbook.
Prerequisites
On the control node:
- You are using Ansible version 2.13 or later.
-
You have installed the
ansible-freeipapackage. - The example assumes that in the ~/MyPlaybooks/ directory, you have created an Ansible inventory file with the fully-qualified domain name (FQDN) of the IdM server.
-
The example assumes that the secret.yml Ansible vault stores your
ipaadmin_password.
-
The target node, that is the node on which the
ansible-freeipamodule is executed, is part of the IdM domain as an IdM client, server or replica. - You must have the name of the existing member manager user or group you are removing and the name of the group they are managing.
Procedure
Create an inventory file, for example
inventory.file, and defineipaserverin it:[ipaserver] server.idm.example.comCreate an Ansible playbook file with the necessary user and group member management information:
--- - name: Playbook to handle membership management hosts: ipaserver vars_files: - /home/user_name/MyPlaybooks/secret.yml tasks: - name: Ensure member manager user and group members are absent for group_a ipagroup: ipaadmin_password: "{{ ipaadmin_password }}" name: group_a membermanager_user: test membermanager_group: group_admins action: member state: absentRun the playbook:
$ ansible-playbook --vault-password-file=password_file -v -i path_to_inventory_directory/inventory.file path_to_playbooks_directory/ensure-member-managers-are-absent.yml
Verification
You can verify if the group_a group does not contain test as a member manager and group_admins as a member manager of group_a by using the ipa group-show command:
Log into
ipaserveras administrator:$ ssh admin@server.idm.example.com Password: [admin@server /]$Display information about group_a:
ipaserver]$ ipa group-show group_a Group name: group_a GID: 1133400009
Chapter 17. Automating group membership using IdM CLI
Using automatic group membership allows you to assign users and hosts to groups automatically based on their attributes. For example, you can:
- Divide employees' user entries into groups based on the employees' manager, location, or any other attribute.
- Divide hosts based on their class, location, or any other attribute.
- Add all users or all hosts to a single global group.
17.1. Benefits of automatic group membership
Using automatic membership for users allows you to:
Reduce the overhead of manually managing group memberships
You no longer have to assign every user and host to groups manually.
Improve consistency in user and host management
Users and hosts are assigned to groups based on strictly defined and automatically evaluated criteria.
Simplify the management of group-based settings
Various settings are defined for groups and then applied to individual group members, for example
sudorules, automount, or access control. Adding users and hosts to groups automatically makes managing these settings easier.
17.2. Automember rules
When configuring automatic group membership, the administrator defines automember rules. An automember rule applies to a specific user or host target group. It cannot apply to more than one group at a time.
After creating a rule, the administrator adds conditions to it. These specify which users or hosts get included or excluded from the target group:
Inclusive conditions
When a user or host entry meets an inclusive condition, it will be included in the target group.
Exclusive conditions
When a user or host entry meets an exclusive condition, it will not be included in the target group.
The conditions are specified as regular expressions in the Perl-compatible regular expressions (PCRE) format. For more information about PCRE, see the pcresyntax(3) man page on your system.
IdM evaluates exclusive conditions before inclusive conditions. In case of a conflict, exclusive conditions take precedence over inclusive conditions.
An automember rule applies to every entry created in the future. These entries will be automatically added to the specified target group. If an entry meets the conditions specified in multiple automember rules, it will be added to all the corresponding groups.
Existing entries are not affected by the new rule. If you want to change existing entries, see Applying automember rules to existing entries using IdM CLI.
17.3. Adding an automember rule using IdM CLI
Follow this procedure to add an automember rule using the IdM CLI. For information about automember rules, see Automember rules.
After adding an automember rule, you can add conditions to it using the procedure described in Adding a condition to an automember rule.
Existing entries are not affected by the new rule. If you want to change existing entries, see Applying automember rules to existing entries using IdM CLI.
Prerequisites
- You must be logged in as the administrator. For details, see Using kinit to log in to IdM manually.
- The target group of the new rule must exist in IdM.
Procedure
-
Enter the
ipa automember-addcommand to add an automember rule. When prompted, specify:
- Automember rule. This is the target group name.
- Grouping Type. This specifies whether the rule targets a user group or a host group. To target a user group, enter group. To target a host group, enter hostgroup.
For example, to add an automember rule for a user group named user_group:
$ ipa automember-add Automember Rule: user_group Grouping Type: group -------------------------------- Added automember rule "user_group" -------------------------------- Automember Rule: user_group
Verification
- You can display existing automember rules and conditions in IdM using Viewing existing automember rules using IdM CLI.
17.4. Adding a condition to an automember rule using IdM CLI
After configuring automember rules, you can then add a condition to that automember rule using the IdM CLI. For information about automember rules, see Automember rules.
Prerequisites
- You must be logged in as the administrator. For details, see Using kinit to log in to IdM manually.
- The target rule must exist in IdM. For details, see Adding an automember rule using IdM CLI.
Procedure
-
Define one or more inclusive or exclusive conditions using the
ipa automember-add-conditioncommand. When prompted, specify:
- Automember rule. This is the target rule name. See Automember rules for details.
- Attribute Key. This specifies the entry attribute to which the filter will apply. For example, uid for users.
- Grouping Type. This specifies whether the rule targets a user group or a host group. To target a user group, enter group. To target a host group, enter hostgroup.
- Inclusive regex and Exclusive regex. These specify one or more conditions as regular expressions. If you only want to specify one condition, press Enter when prompted for the other.
For example, the following condition targets all users with any value (.*) in their user login attribute (uid).
$ ipa automember-add-condition Automember Rule: user_group Attribute Key: uid Grouping Type: group [Inclusive Regex]: .* [Exclusive Regex]: ---------------------------------- Added condition(s) to "user_group" ---------------------------------- Automember Rule: user_group Inclusive Regex: uid=.* ---------------------------- Number of conditions added 1 ----------------------------As another example, you can use an automembership rule to target all Windows users synchronized from Active Directory (AD). To achieve this, create a condition that that targets all users with ntUser in their objectClass attribute, which is shared by all AD users:
$ ipa automember-add-condition Automember Rule: ad_users Attribute Key: objectclass Grouping Type: group [Inclusive Regex]: ntUser [Exclusive Regex]: ------------------------------------- Added condition(s) to "ad_users" ------------------------------------- Automember Rule: ad_users Inclusive Regex: objectclass=ntUser ---------------------------- Number of conditions added 1 ----------------------------
Verification
- You can display existing automember rules and conditions in IdM using Viewing existing automember rules using IdM CLI.
17.5. Viewing existing automember rules using IdM CLI
Follow this procedure to view existing automember rules using the IdM CLI.
Prerequisites
- You must be logged in as the administrator. For details, see Using kinit to log in to IdM manually.
Procedure
-
Enter the
ipa automember-findcommand. When prompted, specify the Grouping type:
- To target a user group, enter group.
To target a host group, enter hostgroup.
For example:
$ ipa automember-find Grouping Type: group --------------- 1 rules matched --------------- Automember Rule: user_group Inclusive Regex: uid=.* ---------------------------- Number of entries returned 1 ----------------------------
17.6. Deleting an automember rule using IdM CLI
Follow this procedure to delete an automember rule using the IdM CLI.
Deleting an automember rule also deletes all conditions associated with the rule. To remove only specific conditions from a rule, see Removing a condition from an automember rule using IdM CLI.
Prerequisites
- You must be logged in as the administrator. For details, see Using kinit to log in to IdM manually.
Procedure
-
Enter the
ipa automember-delcommand. When prompted, specify:
- Automember rule. This is the rule you want to delete.
- Grouping rule. This specifies whether the rule you want to delete is for a user group or a host group. Enter group or hostgroup.
17.7. Removing a condition from an automember rule using IdM CLI
Follow this procedure to remove a specific condition from an automember rule.
Prerequisites
- You must be logged in as the administrator. For details, see Using kinit to log in to IdM manually.
Procedure
-
Enter the
ipa automember-remove-conditioncommand. When prompted, specify:
- Automember rule. This is the name of the rule from which you want to remove a condition.
- Attribute Key. This is the target entry attribute. For example, uid for users.
- Grouping Type. This specifies whether the condition you want to delete is for a user group or a host group. Enter group or hostgroup.
Inclusive regex and Exclusive regex. These specify the conditions you want to remove. If you only want to specify one condition, press Enter when prompted for the other.
For example:
$ ipa automember-remove-condition Automember Rule: user_group Attribute Key: uid Grouping Type: group [Inclusive Regex]: .* [Exclusive Regex]: ----------------------------------- Removed condition(s) from "user_group" ----------------------------------- Automember Rule: user_group ------------------------------ Number of conditions removed 1 ------------------------------
17.8. Applying automember rules to existing entries using IdM CLI
Automember rules apply automatically to user and host entries created after the rules were added. They are not applied retroactively to entries that existed before the rules were added.
To apply automember rules to previously added entries, you have to manually rebuild automatic membership. Rebuilding automatic membership re-evaluates all existing automember rules and applies them either to all user or hosts entries, or to specific entries.
Rebuilding automatic membership does not remove user or host entries from groups, even if the entries no longer match the group’s inclusive conditions. To remove them manually, see Removing a member from a user group using IdM CLI or Removing IdM host group members using the CLI.
Prerequisites
- You must be logged in as the administrator. For details, see link: Using kinit to log in to IdM manually.
Procedure
To rebuild automatic membership, enter the
ipa automember-rebuildcommand. Use the following options to specify the entries to target:To rebuild automatic membership for all users, use the
--type=groupoption:$ ipa automember-rebuild --type=group -------------------------------------------------------- Automember rebuild task finished. Processed (9) entries. ---------------------------------------------------------
To rebuild automatic membership for all hosts, use the
--type=hostgroupoption. To rebuild automatic membership for a specified user or users, use the
--users=target_useroption:$ ipa automember-rebuild --users=target_user1 --users=target_user2 -------------------------------------------------------- Automember rebuild task finished. Processed (2) entries. ---------------------------------------------------------
To rebuild automatic membership for a specified host or hosts, use the
--hosts=client.idm.example.comoption.
17.9. Configuring a default automember group using IdM CLI
When you configure a default automember group, new user or host entries that do not match any automember rule are automatically added to this default group.
Prerequisites
- You must be logged in as the administrator. For details, see Using kinit to log in to IdM manually.
- The target group you want to set as default exists in IdM.
Procedure
-
Enter the
ipa automember-default-group-setcommand to configure a default automember group. When prompted, specify:
- Default (fallback) Group, which specifies the target group name.
Grouping Type, which specifies whether the target is a user group or a host group. To target a user group, enter group. To target a host group, enter hostgroup.
For example:
$ ipa automember-default-group-set Default (fallback) Group: default_user_group Grouping Type: group --------------------------------------------------- Set default (fallback) group for automember "default_user_group" --------------------------------------------------- Default (fallback) Group: cn=default_user_group,cn=groups,cn=accounts,dc=example,dc=com
NoteTo remove the current default automember group, enter the
ipa automember-default-group-removecommand.
Verification
To verify that the group is set correctly, enter the
ipa automember-default-group-showcommand. The command displays the current default automember group. For example:$ ipa automember-default-group-show Grouping Type: group Default (fallback) Group: cn=default_user_group,cn=groups,cn=accounts,dc=example,dc=com
Chapter 18. Automating group membership using IdM Web UI
Using automatic group membership enables you to assign users and hosts to groups automatically based on their attributes. For example, you can:
- Divide employees' user entries into groups based on the employees' manager, location, or any other attribute.
- Divide hosts based on their class, location, or any other attribute.
- Add all users or all hosts to a single global group.
18.1. Benefits of automatic group membership
Using automatic membership for users allows you to:
Reduce the overhead of manually managing group memberships
You no longer have to assign every user and host to groups manually.
Improve consistency in user and host management
Users and hosts are assigned to groups based on strictly defined and automatically evaluated criteria.
Simplify the management of group-based settings
Various settings are defined for groups and then applied to individual group members, for example
sudorules, automount, or access control. Adding users and hosts to groups automatically makes managing these settings easier.
18.2. Automember rules
When configuring automatic group membership, the administrator defines automember rules. An automember rule applies to a specific user or host target group. It cannot apply to more than one group at a time.
After creating a rule, the administrator adds conditions to it. These specify which users or hosts get included or excluded from the target group:
Inclusive conditions
When a user or host entry meets an inclusive condition, it will be included in the target group.
Exclusive conditions
When a user or host entry meets an exclusive condition, it will not be included in the target group.
The conditions are specified as regular expressions in the Perl-compatible regular expressions (PCRE) format. For more information about PCRE, see the pcresyntax(3) man page on your system.
IdM evaluates exclusive conditions before inclusive conditions. In case of a conflict, exclusive conditions take precedence over inclusive conditions.
An automember rule applies to every entry created in the future. These entries will be automatically added to the specified target group. If an entry meets the conditions specified in multiple automember rules, it will be added to all the corresponding groups.
Existing entries are not affected by the new rule. If you want to change existing entries, see Applying automember rules to existing entries using IdM Web UI.
18.3. Adding an automember rule using IdM Web UI
Follow this procedure to add an automember rule using the IdM Web UI. For information about automember rules, see Automember rules.
Existing entries are not affected by the new rule. If you want to change existing entries, see Applying automember rules to existing entries using IdM Web UI.
Prerequisites
- You are logged in to the IdM Web UI.
-
You must be a member of the
adminsgroup. - The target group of the new rule exists in IdM.
Procedure
- Click Identity → Automember, and select either User group rules or Host group rules.
- Click Add.
- In the Automember rule field, select the group to which the rule will apply. This is the target group name.
- Click Add to confirm.
- Optional: You can add conditions to the new rule using the procedure described in Adding a condition to an automember rule using IdM Web UI.
18.4. Adding a condition to an automember rule using IdM Web UI
After configuring automember rules, you can then add a condition to that automember rule using the IdM Web UI. For information about automember rules, see Automember rules.
Prerequisites
- You are logged in to the IdM Web UI.
-
You must be a member of the
adminsgroup. - The target rule exists in IdM.
Procedure
- Click Identity → Automember, and select either User group rules or Host group rules.
- Click on the rule to which you want to add a condition.
- In the Inclusive or Exclusive sections, click Add.
- In the Attribute field, select the required attribute, for example uid.
- In the Expression field, define a regular expression.
Click Add.
For example, the following condition targets all users with any value (.*) in their user ID (uid) attribute.
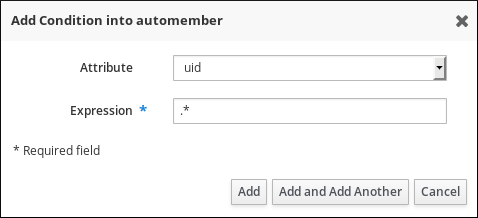
18.5. Viewing existing automember rules and conditions using IdM Web UI
Follow this procedure to view existing automember rules and conditions using the IdM Web UI.
Prerequisites
- You are logged in to the IdM Web UI.
-
You must be a member of the
adminsgroup.
Procedure
- Click Identity → Automember, and select either User group rules or Host group rules to view the respective automember rules.
- Optional: Click on a rule to see the conditions for that rule in the Inclusive or Exclusive sections.
18.6. Deleting an automember rule using IdM Web UI
Follow this procedure to delete an automember rule using the IdM Web UI.
Deleting an automember rule also deletes all conditions associated with the rule. To remove only specific conditions from a rule, see Removing a condition from an automember rule using IdM Web UI.
Prerequisites
- You are logged in to the IdM Web UI.
-
You must be a member of the
adminsgroup.
Procedure
- Click Identity → Automember, and select either User group rules or Host group rules to view the respective automember rules.
- Select the checkbox next to the rule you want to remove.
- Click Delete.
- Click Delete to confirm.
18.7. Removing a condition from an automember rule using IdM Web UI
Follow this procedure to remove a specific condition from an automember rule using the IdM Web UI.
Prerequisites
- You are logged in to the IdM Web UI.
-
You must be a member of the
adminsgroup.
Procedure
- Click Identity → Automember, and select either User group rules or Host group rules to view the respective automember rules.
- Click on a rule to see the conditions for that rule in the Inclusive or Exclusive sections.
- Select the checkbox next to the conditions you want to remove.
- Click Delete.
- Click Delete to confirm.
18.8. Applying automember rules to existing entries using IdM Web UI
Automember rules apply automatically to user and host entries created after the rules were added. They are not applied retroactively to entries that existed before the rules were added.
To apply automember rules to previously added entries, you have to manually rebuild automatic membership. Rebuilding automatic membership re-evaluates all existing automember rules and applies them either to all user or hosts entries, or to specific entries.
Rebuilding automatic membership does not remove user or host entries from groups, even if the entries no longer match the group’s inclusive conditions. To remove them manually, see Removing a member from a user group using IdM Web UI or Removing host group members in the IdM Web UI.
18.8.1. Rebuilding automatic membership for all users or hosts
Follow this procedure to rebuild automatic membership for all user or host entries.
Prerequisites
- You are logged in to the IdM Web UI.
-
You must be a member of the
adminsgroup.
Procedure
- Select Identity → Users or Hosts.
Click Actions → Rebuild auto membership.
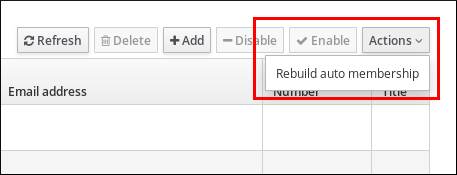
18.8.2. Rebuilding automatic membership for a single user or host only
Follow this procedure to rebuild automatic membership for a specific user or host entry.
Prerequisites
- You are logged in to the IdM Web UI.
-
You must be a member of the
adminsgroup.
Procedure
- Select Identity → Users or Hosts.
- Click on the required user or host name.
Click Actions → Rebuild auto membership.
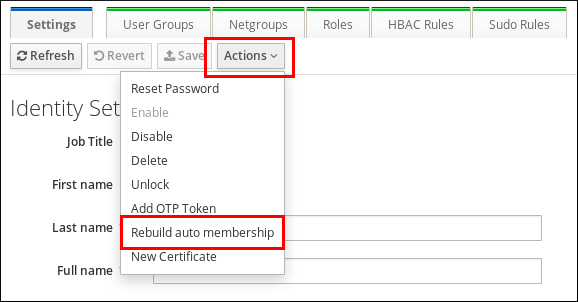
18.9. Configuring a default user group using IdM Web UI
When you configure a default user group, new user entries that do not match any automember rule are automatically added to this default group.
Prerequisites
- You are logged in to the IdM Web UI.
-
You must be a member of the
adminsgroup. - The target user group you want to set as default exists in IdM.
Procedure
- Click Identity → Automember, and select User group rules.
- In the Default user group field, select the group you want to set as the default user group.
18.10. Configuring a default host group using IdM Web UI
When you configure a default host group, new host entries that do not match any automember rule are automatically added to this default group.
Prerequisites
- You are logged in to the IdM Web UI.
-
You must be a member of the
adminsgroup. - The target host group you want to set as default exists in IdM.
Procedure
- Click Identity → Automember, and select Host group rules.
- In the Default host group field, select the group you want to set as the default host group.
Chapter 19. Using Ansible to automate group membership in IdM
Using automatic group membership, you can assign users and hosts user groups and host groups automatically, based on their attributes. For example, you can:
-
Divide employees' user entries into groups based on the employees' manager, location, position or any other attribute. You can list all attributes by entering
ipa user-add --helpon the command-line. -
Divide hosts into groups based on their class, location, or any other attribute. You can list all attributes by entering
ipa host-add --helpon the command-line. - Add all users or all hosts to a single global group.
You can use Red Hat Ansible Engine to automate the management of automatic group membership in Identity Management (IdM).
19.1. Preparing your Ansible control node for managing IdM
As a system administrator managing Identity Management (IdM), when working with Red Hat Ansible Engine, it is good practice to do the following:
- Create a subdirectory dedicated to Ansible playbooks in your home directory, for example ~/MyPlaybooks.
-
Copy and adapt sample Ansible playbooks from the
/usr/share/doc/ansible-freeipa/*and/usr/share/doc/rhel-system-roles/*directories and subdirectories into your ~/MyPlaybooks directory. - Include your inventory file in your ~/MyPlaybooks directory.
By following this practice, you can find all your playbooks in one place and you can run your playbooks without invoking root privileges.
You only need root privileges on the managed nodes to execute the ipaserver, ipareplica, ipaclient, ipabackup, ipasmartcard_server and ipasmartcard_client ansible-freeipa roles. These roles require privileged access to directories and the dnf software package manager.
Follow this procedure to create the ~/MyPlaybooks directory and configure it so that you can use it to store and run Ansible playbooks.
Prerequisites
- You have installed an IdM server on your managed nodes, server.idm.example.com and replica.idm.example.com.
- You have configured DNS and networking so you can log in to the managed nodes, server.idm.example.com and replica.idm.example.com, directly from the control node.
-
You know the IdM
adminpassword.
Procedure
Create a directory for your Ansible configuration and playbooks in your home directory:
$ mkdir ~/MyPlaybooks/Change into the ~/MyPlaybooks/ directory:
$ cd ~/MyPlaybooksCreate the ~/MyPlaybooks/ansible.cfg file with the following content:
[defaults] inventory = /home/your_username/MyPlaybooks/inventory [privilege_escalation] become=TrueCreate the ~/MyPlaybooks/inventory file with the following content:
[ipaserver] server.idm.example.com [ipareplicas] replica1.idm.example.com replica2.idm.example.com [ipacluster:children] ipaserver ipareplicas [ipacluster:vars] ipaadmin_password=SomeADMINpassword [ipaclients] ipaclient1.example.com ipaclient2.example.com [ipaclients:vars] ipaadmin_password=SomeADMINpasswordThis configuration defines two host groups, eu and us, for hosts in these locations. Additionally, this configuration defines the ipaserver host group, which contains all hosts from the eu and us groups.
Optional: Create an SSH public and private key. To simplify access in your test environment, do not set a password on the private key:
$ ssh-keygenCopy the SSH public key to the IdM
adminaccount on each managed node:$ ssh-copy-id admin@server.idm.example.com $ ssh-copy-id admin@replica.idm.example.comYou must enter the IdM
adminpassword when you enter these commands.
19.2. Using Ansible to ensure that an automember rule for an IdM user group is present
The following procedure describes how to use an Ansible playbook to ensure an automember rule for an Identity Management (IdM) group exists. In the example, the presence of an automember rule is ensured for the testing_group user group.
Prerequisites
-
You know the IdM
adminpassword. - The testing_group user group exists in IdM.
You have configured your Ansible control node to meet the following requirements:
- You are using Ansible version 2.13 or later.
-
You have installed the
ansible-freeipapackage. - The example assumes that in the ~/MyPlaybooks/ directory, you have created an Ansible inventory file with the fully-qualified domain name (FQDN) of the IdM server.
-
The example assumes that the secret.yml Ansible vault stores your
ipaadmin_password.
-
The target node, that is the node on which the
ansible-freeipamodule is executed, is part of the IdM domain as an IdM client, server or replica.
Procedure
Navigate to your ~/MyPlaybooks/ directory:
$ cd ~/MyPlaybooks/Copy the
automember-group-present.ymlAnsible playbook file located in the/usr/share/doc/ansible-freeipa/playbooks/automember/directory:$ cp /usr/share/doc/ansible-freeipa/playbooks/automember/automember-group-present.yml automember-group-present-copy.yml-
Open the
automember-group-present-copy.ymlfile for editing. Adapt the file by setting the following variables in the
ipaautomembertask section:-
Set the
ipaadmin_passwordvariable to the password of the IdMadmin. -
Set the
namevariable to testing_group. -
Set the
automember_typevariable to group. -
Ensure that the
statevariable is set topresent.
This is the modified Ansible playbook file for the current example:
--- - name: Automember group present example hosts: ipaserver vars_files: - /home/user_name/MyPlaybooks/secret.yml tasks: - name: Ensure group automember rule admins is present ipaautomember: ipaadmin_password: "{{ ipaadmin_password }}" name: testing_group automember_type: group state: present-
Set the
- Save the file.
Run the Ansible playbook. Specify the playbook file, the file storing the password protecting the secret.yml file, and the inventory file:
$ ansible-playbook --vault-password-file=password_file -v -i inventory automember-group-present-copy.yml
19.3. Using Ansible to ensure that a specified condition is present in an IdM user group automember rule
The following procedure describes how to use an Ansible playbook to ensure that a specified condition exists in an automember rule for an Identity Management (IdM) group. In the example, the presence of a UID-related condition in the automember rule is ensured for the testing_group group. By specifying the .* condition, you ensure that all future IdM users automatically become members of the testing_group.
Prerequisites
-
You know the IdM
adminpassword. - The testing_group user group and automember user group rule exist in IdM.
You have configured your Ansible control node to meet the following requirements:
- You are using Ansible version 2.13 or later.
-
You have installed the
ansible-freeipapackage. - The example assumes that in the ~/MyPlaybooks/ directory, you have created an Ansible inventory file with the fully-qualified domain name (FQDN) of the IdM server.
-
The example assumes that the secret.yml Ansible vault stores your
ipaadmin_password.
-
The target node, that is the node on which the
ansible-freeipamodule is executed, is part of the IdM domain as an IdM client, server or replica.
Procedure
Navigate to your ~/MyPlaybooks/ directory:
$ cd ~/MyPlaybooks/Copy the
automember-hostgroup-rule-present.ymlAnsible playbook file located in the/usr/share/doc/ansible-freeipa/playbooks/automember/directory and name it, for example, automember-usergroup-rule-present.yml:$ cp /usr/share/doc/ansible-freeipa/playbooks/automember/automember-hostgroup-rule-present.yml automember-usergroup-rule-present.yml-
Open the
automember-usergroup-rule-present.ymlfile for editing. Adapt the file by modifying the following parameters:
- Rename the playbook to correspond to your use case, for example: Automember user group rule member present.
- Rename the task to correspond to your use case, for example: Ensure an automember condition for a user group is present.
Set the following variables in the
ipaautomembertask section:-
Set the
ipaadmin_passwordvariable to the password of the IdMadmin. -
Set the
namevariable to testing_group. -
Set the
automember_typevariable togroup. -
Ensure that the
statevariable is set topresent. -
Ensure that the
actionvariable is set tomember. -
Set the
inclusivekeyvariable toUID. -
Set the
inclusiveexpressionvariable to .*
-
Set the
This is the modified Ansible playbook file for the current example:
--- - name: Automember user group rule member present hosts: ipaserver vars_files: - /home/user_name/MyPlaybooks/secret.yml tasks: - name: Ensure an automember condition for a user group is present ipaautomember: ipaadmin_password: "{{ ipaadmin_password }}" name: testing_group automember_type: group state: present action: member inclusive: - key: UID expression: .*- Save the file.
Run the Ansible playbook. Specify the playbook file, the file storing the password protecting the secret.yml file, and the inventory file:
$ ansible-playbook --vault-password-file=password_file -v -i inventory automember-usergroup-rule-present.yml
Verification
Log in as an IdM administrator.
$ kinit adminAdd a user, for example:
$ ipa user-add user101 --first user --last 101 ----------------------- Added user "user101" ----------------------- User login: user101 First name: user Last name: 101 ... Member of groups: ipausers, testing_group ...
19.4. Using Ansible to ensure that a condition is absent from an IdM user group automember rule
The following procedure describes how to use an Ansible playbook to ensure a condition is absent from an automember rule for an Identity Management (IdM) group. In the example, the absence of a condition in the automember rule is ensured that specifies that users whose initials are dp should be included. The automember rule is applied to the testing_group group. By applying the condition, you ensure that no future IdM user whose initials are dp becomes a member of the testing_group.
Prerequisites
-
You know the IdM
adminpassword. - The testing_group user group and automember user group rule exist in IdM.
You have configured your Ansible control node to meet the following requirements:
- You are using Ansible version 2.13 or later.
-
You have installed the
ansible-freeipapackage. - The example assumes that in the ~/MyPlaybooks/ directory, you have created an Ansible inventory file with the fully-qualified domain name (FQDN) of the IdM server.
-
The example assumes that the secret.yml Ansible vault stores your
ipaadmin_password.
-
The target node, that is the node on which the
ansible-freeipamodule is executed, is part of the IdM domain as an IdM client, server or replica.
Procedure
Navigate to your ~/MyPlaybooks/ directory:
$ cd ~/MyPlaybooks/Copy the
automember-hostgroup-rule-absent.ymlAnsible playbook file located in the/usr/share/doc/ansible-freeipa/playbooks/automember/directory and name it, for example, automember-usergroup-rule-absent.yml:$ cp /usr/share/doc/ansible-freeipa/playbooks/automember/automember-hostgroup-rule-absent.yml automember-usergroup-rule-absent.yml-
Open the
automember-usergroup-rule-absent.ymlfile for editing. Adapt the file by modifying the following parameters:
- Rename the playbook to correspond to your use case, for example: Automember user group rule member absent.
- Rename the task to correspond to your use case, for example: Ensure an automember condition for a user group is absent.
Set the following variables in the
ipaautomembertask section:-
Set the
ipaadmin_passwordvariable to the password of the IdMadmin. -
Set the
namevariable to testing_group. -
Set the
automember_typevariable to group. -
Ensure that the
statevariable is set toabsent. -
Ensure that the
actionvariable is set tomember. -
Set the
inclusivekeyvariable toinitials. -
Set the
inclusiveexpressionvariable to dp.
-
Set the
This is the modified Ansible playbook file for the current example:
--- - name: Automember user group rule member absent hosts: ipaserver vars_files: - /home/user_name/MyPlaybooks/secret.yml tasks: - name: Ensure an automember condition for a user group is absent ipaautomember: ipaadmin_password: "{{ ipaadmin_password }}" name: testing_group automember_type: group state: absent action: member inclusive: - key: initials expression: dp- Save the file.
Run the Ansible playbook. Specify the playbook file, the file storing the password protecting the secret.yml file, and the inventory file:
$ ansible-playbook --vault-password-file=password_file -v -i inventory automember-usergroup-rule-absent.yml
Verification
Log in as an IdM administrator.
$ kinit adminView the automember group:
$ ipa automember-show --type=group testing_group Automember Rule: testing_group
The absence of an Inclusive Regex: initials=dp entry in the output confirms that the testing_group automember rule does not contain the condition specified.
19.5. Using Ansible to ensure that an automember rule for an IdM user group is absent
The following procedure describes how to use an Ansible playbook to ensure an automember rule is absent for an Identity Management (IdM) group. In the example, the absence of an automember rule is ensured for the testing_group group.
Deleting an automember rule also deletes all conditions associated with the rule. To remove only specific conditions from a rule, see Using Ansible to ensure that a condition is absent in an IdM user group automember rule.
Prerequisites
On the control node:
- You are using Ansible version 2.13 or later.
-
You have installed the
ansible-freeipapackage. - The example assumes that in the ~/MyPlaybooks/ directory, you have created an Ansible inventory file with the fully-qualified domain name (FQDN) of the IdM server.
-
The example assumes that the secret.yml Ansible vault stores your
ipaadmin_password.
-
The target node, that is the node on which the
ansible-freeipamodule is executed, is part of the IdM domain as an IdM client, server or replica.
Procedure
Navigate to your ~/MyPlaybooks/ directory:
$ cd ~/MyPlaybooks/Copy the
automember-group-absent.ymlAnsible playbook file located in the/usr/share/doc/ansible-freeipa/playbooks/automember/directory:$ cp /usr/share/doc/ansible-freeipa/playbooks/automember/automember-group-absent.yml automember-group-absent-copy.yml-
Open the
automember-group-absent-copy.ymlfile for editing. Adapt the file by setting the following variables in the
ipaautomembertask section:-
Set the
ipaadmin_passwordvariable to the password of the IdMadmin. -
Set the
namevariable to testing_group. -
Set the
automember_typevariable to group. -
Ensure that the
statevariable is set toabsent.
This is the modified Ansible playbook file for the current example:
--- - name: Automember group absent example hosts: ipaserver vars_files: - /home/user_name/MyPlaybooks/secret.yml tasks: - name: Ensure group automember rule admins is absent ipaautomember: ipaadmin_password: "{{ ipaadmin_password }}" name: testing_group automember_type: group state: absent-
Set the
- Save the file.
Run the Ansible playbook. Specify the playbook file, the file storing the password protecting the secret.yml file, and the inventory file:
$ ansible-playbook --vault-password-file=password_file -v -i inventory automember-group-absent.yml
19.6. Using Ansible to ensure that a condition is present in an IdM host group automember rule
Follow this procedure to use Ansible to ensure that a condition is present in an IdM host group automember rule. The example describes how to ensure that hosts with the FQDN of .*.idm.example.com are members of the primary_dns_domain_hosts host group and hosts whose FQDN is .*.example.org are not members of the primary_dns_domain_hosts host group.
Prerequisites
-
You know the IdM
adminpassword. - The primary_dns_domain_hosts host group and automember host group rule exist in IdM.
You have configured your Ansible control node to meet the following requirements:
- You are using Ansible version 2.13 or later.
-
You have installed the
ansible-freeipapackage. - The example assumes that in the ~/MyPlaybooks/ directory, you have created an Ansible inventory file with the fully-qualified domain name (FQDN) of the IdM server.
-
The example assumes that the secret.yml Ansible vault stores your
ipaadmin_password.
-
The target node, that is the node on which the
ansible-freeipamodule is executed, is part of the IdM domain as an IdM client, server or replica.
Procedure
Navigate to your ~/MyPlaybooks/ directory:
$ cd ~/MyPlaybooks/Copy the
automember-hostgroup-rule-present.ymlAnsible playbook file located in the/usr/share/doc/ansible-freeipa/playbooks/automember/directory:$ cp /usr/share/doc/ansible-freeipa/playbooks/automember/automember-hostgroup-rule-present.yml automember-hostgroup-rule-present-copy.yml-
Open the
automember-hostgroup-rule-present-copy.ymlfile for editing. Adapt the file by setting the following variables in the
ipaautomembertask section:-
Set the
ipaadmin_passwordvariable to the password of the IdMadmin. -
Set the
namevariable to primary_dns_domain_hosts. -
Set the
automember_typevariable to hostgroup. -
Ensure that the
statevariable is set topresent. -
Ensure that the
actionvariable is set tomember. -
Ensure that the
inclusivekeyvariable is set tofqdn. -
Set the corresponding
inclusiveexpressionvariable to .*.idm.example.com. -
Set the
exclusivekeyvariable tofqdn. -
Set the corresponding
exclusiveexpressionvariable to .*.example.org.
This is the modified Ansible playbook file for the current example:
--- - name: Automember user group rule member present hosts: ipaserver vars_files: - /home/user_name/MyPlaybooks/secret.yml tasks: - name: Ensure an automember condition for a user group is present ipaautomember: ipaadmin_password: "{{ ipaadmin_password }}" name: primary_dns_domain_hosts automember_type: hostgroup state: present action: member inclusive: - key: fqdn expression: .*.idm.example.com exclusive: - key: fqdn expression: .*.example.org-
Set the
- Save the file.
Run the Ansible playbook. Specify the playbook file, the file storing the password protecting the secret.yml file, and the inventory file:
$ ansible-playbook --vault-password-file=password_file -v -i inventory automember-hostgroup-rule-present-copy.yml
Chapter 20. Modifying user and group attributes in IdM
In Identity Management (IdM), information is stored as LDAP attributes. When you create a user entry in IdM, the entry is automatically assigned certain LDAP object classes. These object classes define what attributes are available to the user entry. For more information about the default user objects classes and how they are organized, see the table below.
| Object classes | Description |
|---|---|
| ipaobject, ipasshuser | IdM object classes |
| person, organizationalperson, inetorgperson, inetuser, posixAccount | Person object classes |
| krbprincipalaux, krbticketpolicyaux | Kerberos object classes |
| mepOriginEntry | Managed entries (template) object classes |
As an administrator, you can modify the list of user object classes as well as the format of the attributes. For example, you can specify how many characters are allowed in a user name.
The way that user and group object classes and attributes are organized in IdM is called the IdM user and group schema.
20.1. The default IdM user attributes
A user entry contains attributes. The values of certain attributes are set automatically, based on defaults, unless you set a specific value yourself. For other attributes, you have to set the values manually. Certain attributes, such as First name, require a value, whereas others, such as Street address, do not. As an administrator, you can configure the values generated or used by the default attributes. For more information, see the Default IdM user attributes table below.
| Web UI field | Command-line option | Required, optional, or default |
|---|---|---|
| User login | username | Required |
| First name | --first | Required |
| Last name | --last | Required |
| Full name | --cn | Optional |
| Display name | --displayname | Optional |
| Initials | --initials | Default |
| Home directory | --homedir | Default |
| GECOS field | --gecos | Default |
| Shell | --shell | Default |
| Kerberos principal | --principal | Default |
| Email address | | Optional |
| Password | --password | Optional. Note that the script prompts for a new password, rather than accepting a value with the argument. |
| User ID number | --uid | Default |
| Group ID number | --gidnumber | Default |
| Street address | --street | Optional |
| City | --city | Optional |
| State/Province | --state | Optional |
| Zip code | --postalcode | Optional |
| Telephone number | --phone | Optional |
| Mobile telephone number | --mobile | Optional |
| Pager number | --pager | Optional |
| Fax number | --fax | Optional |
| Organizational unit | --orgunit | Optional |
| Job title | --title | Optional |
| Manager | --manager | Optional |
| Car license | --carlicense | Optional |
| --noprivate | Optional | |
| SSH Keys | --sshpubkey | Optional |
| Additional attributes | --addattr | Optional |
| Department Number | --departmentnumber | Optional |
| Employee Number | --employeenumber | Optional |
| Employee Type | --employeetype | Optional |
| Preferred Language | --preferredlanguage | Optional |
You can also add any attributes available in the Default IdM user object classes, even if no Web UI or command-line argument for that attribute exists.
20.2. Considerations in changing the default user and group schema
User and group accounts are created with a predefined set of LDAP object classes applied to them. While the standard IdM-specific LDAP object classes and attributes cover most deployment scenarios, you can create custom object classes with custom attributes for user and group entries.
When you modify object classes, IdM provides the following validation:
- All of the object classes and their specified attributes must be known to the LDAP server.
- All default attributes that are configured for the entry must be supported by the configured object classes.
The IdM schema validation has limitations and the IdM server does not check that the defined user or group object classes contain all of the required object classes for IdM entries. For example, all IdM entries require the ipaobject object class. However, if the user or group schema is changed, the server does not check if this object class is included. If the object class is accidentally deleted and you then try to add a new user, the attempt fails.
All object class changes are atomic, not incremental. You must define the entire list of default object classes every time a change occurs. For example, you may decide to create a custom object class to store employee information such as birthdays and employment start dates. In this scenario, you cannot simply add the custom object class to the list. Instead, you must set the entire list of current default object classes plus the new object class. If you do not include the existing default object classes when you update the configuration, the current settings are overwritten. This causes serious performance problems.
After you modify the list of default object classes, new user and group entries contain the custom object classes but any old entries are not modified.
20.3. Modifying user object classes in the IdM Web UI
This procedure describes how you can use the IdM Web UI to modify object classes for future Identity Management (IdM) user entries. As a result, these entries will have different attributes than the current user entries do.
Prerequisites
- You are logged in as the IdM administrator.
Procedure
-
Open the
IPA Servertab. -
Select the
Configurationsubtab. Scroll to the
User Optionsarea.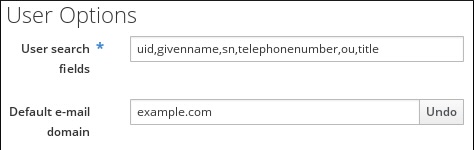
Keep all the object classes listed in the Default IdM user object classes table.
ImportantIf any object classes required by IdM are not included, then subsequent attempts to add a user entry will fail with object class violations.
At the bottom of the users area, click
Addfor a new field to appear.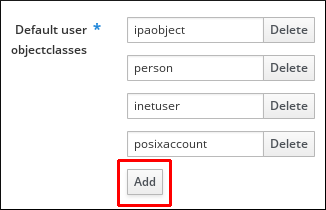
- Enter the name of the user object class you want to add.
-
Click
Saveat the top of theConfigurationpage.
20.4. Modifying user object classes in the IdM CLI
This procedure describes how you can use the Identity Management (IdM) CLI to modify user object classes for future IdM user entries. As a result, these entries will have different attributes than the current user entries do.
Prerequisites
You have enabled the
brace expansionfeature:# set -o braceexpand- You are logged in as the IdM administrator.
Procedure
Use the
ipa config-modcommand to modify the current schema. For example, to addtopandmailRecipientobject classes to the future user entries:[bjensen@server ~]$ ipa config-mod --userobjectclasses={person,organizationalperson,inetorgperson,inetuser,posixaccount,krbprincipalaux,krbticketpolicyaux,ipaobject,ipasshuser,mepOriginEntry,top,mailRecipient}The command adds all the ten user object classes that are native to IdM as well as the two new ones,
topandmailRecipient.ImportantThe information passed with the
config-modcommand overwrites the previous values. If any user object classes required by IdM are not included, then subsequent attempts to add a user entry will fail with object class violations.
Alternatively, you can add a user object class by using the ipa config-mod --addattr ipauserobjectclasses=<user object class> command. In this way, you do not risk forgetting a native IdM class in the list. For example, to add the mailRecipient user object class without overwriting the current configuration, enter ipa config-mod --addattr ipauserobjectclasses=mailRecipient. Analogously, to remove only the mailRecipient object class, enter ipa config-mod --delattr ipauserobjectclasses=mailRecipient.
20.5. Modifying group object classes in the IdM Web UI
Identity Management (IdM) has the following default group object classes:
- top
- groupofnames
- nestedgroup
- ipausergroup
- ipaobject
This procedure describes how you can use the IdM Web UI to add additional group object classes for future Identity Management (IdM) user group entries. As a result, these entries will have different attributes than the current the group entries do.
Prerequisites
- You are logged in as the IdM administrator.
Procedure
-
Open the
IPA Servertab. -
Select the
Configurationsubtab. -
Locate the
Group Optionsarea. Keep the default IdM group object classes.
ImportantIf any group object classes required by IdM are not included, then subsequent attempts to add a group entry will fail with object class violations.
Click
Addfor a new field to appear.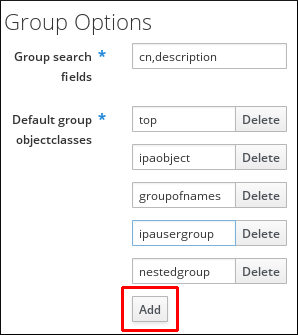
- Enter the name of the group object class you want to add.
-
Click
Saveat the top of theConfigurationpage.
20.6. Modifying group object classes in the IdM CLI
Identity Management (IdM) has the following default group object classes:
- top
- groupofnames
- nestedgroup
- ipausergroup
- ipaobject
This procedure describes how you can use the IdM Web UI to add additional group object classes for future Identity Management (IdM) user group entries. As a result, these entries will have different attributes than the current the group entries do.
Prerequisites
You have enabled the
brace expansionfeature:# set -o braceexpand- You are logged in as the IdM administrator.
Procedure
Use the
ipa config-modcommand to modify the current schema. For example, to addipasshuserandemployeegroup object classes to the future user entries:[bjensen@server ~]$ ipa config-mod --groupobjectclasses={top,groupofnames,nestedgroup,ipausergroup,ipaobject,ipasshuser,employeegroup}The command adds all the default group object classes as well as the two new ones,
ipasshuserandemployeegroup.ImportantIf any group object classes required by IdM are not included, then subsequent attempts to add a group entry will fail with object class violations.
NoteInstead of the comma-separated list inside curly braces with no spaces allowed that is used in the example above, you can use the
--groupobjectclassesargument repeatedly.
20.7. Default user and group attributes in IdM
Identity Management (IdM) uses a template when it creates new entries.
The template for users is more specific than the template for groups. IdM uses default values for several core attributes for IdM user accounts. These defaults can define actual values for user account attributes, such as the home directory location, or they can define the formats of attribute values, such as the user name length. The template also defines the object classes assigned to users.
For groups, the template only defines the assigned object classes.
In the IdM LDAP directory, these default definitions are all contained in a single configuration entry for the IdM server, cn=ipaconfig,cn=etc,dc=example,dc=com.
You can modify the configuration of default user parameters in IdM by using the ipa config-mod command. The table below summarizes some of the key parameters, the command-line options that you can use with ipa config-mod to modify them, and the parameter descriptions.
| Web UI field | Command-line option | Description |
|---|---|---|
| Maximum user name length | --maxusername` | Sets the maximum number of characters for user names. Default: 32. |
| Root for home directories |
|
Sets the default directory for user home directories. Default: |
| Default shell |
|
Sets the default shell for users. Default: |
| Default user group |
|
Sets the default group for newly created accounts. Default: |
| Default e-mail domain |
| Sets the email domain for creating addresses based on user accounts. Default: server domain. |
| Search time limit |
| Sets the maximum time in seconds for a search before returning results. |
| Search size limit |
| Sets the maximum number of records to return in a search. |
| User search fields |
| Defines searchable fields in user entries, impacting server performance if too many attributes are set. |
| Group search fields |
| Defines searchable fields in group entries. |
| Certificate subject base | Sets the base DN for creating subject DNs for client certificates during setup. | |
| Default user object classes |
| Defines object classes for creating user accounts. Must provide a complete list as it overwrites the existing one. |
| Default group object classes |
| Defines object classes for creating group accounts. Must provide a complete list. |
| Password expiration notification |
| Defines the number of days before a password expires for sending a notification. |
| Password plug-in features | Sets the format of allowable passwords for users. |
20.8. Viewing and modifying user and group configuration in the IdM Web UI
You can view and modify the configuration of the default user and group attributes in the Identity Management (IdM) Web UI.
Prerequisites
-
You are logged in as IdM
admin.
Procedure
-
Open the
IPA Servertab. -
Select the
Configurationsubtab. The
User Optionssection has multiple fields you can review and edit.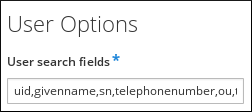
-
For example, to change the default shell for future IdM users from
/bin/shto/bin/bash, locate theDefault shellfield, and replace/bin/shwith/bin/bash. In the
Group Optionssection, you can only review and edit theGroup search fieldsfield.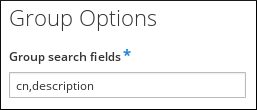
Click the
Savebutton at the top of the screen.The newly saved configuration will be applied to future IdM user and group accounts. The current accounts remain unchanged.
20.9. Viewing and modifying user and group configuration in the IdM CLI
You can view and modify the configuration of the current or default user and group attributes in the Identity Management (IdM) CLI.
Prerequisites
-
You have the IdM
admincredentials.
Procedure
The
ipa config-showcommand displays the most common attribute settings. Use the--alloption for a complete list:[bjensen@server ~]$ ipa config-show --all dn: cn=ipaConfig,cn=etc,dc=example,dc=com Maximum username length: 32 Home directory base: /home Default shell: /bin/sh Default users group: ipausers Default e-mail domain: example.com Search time limit: 2 Search size limit: 100 User search fields: uid,givenname,sn,telephonenumber,ou,title Group search fields: cn,description Enable migration mode: FALSE Certificate Subject base: O=EXAMPLE.COM Default group objectclasses: top, groupofnames, nestedgroup, ipausergroup, ipaobject Default user objectclasses: top, person, organizationalperson, inetorgperson, inetuser, posixaccount, krbprincipalaux, krbticketpolicyaux, ipaobject, ipasshuser Password Expiration Notification (days): 4 Password plugin features: AllowNThash SELinux user map order: guest_u:s0$xguest_u:s0$user_u:s0$staff_u:s0-s0:c0.c1023$unconfined_u:s0-s0:c0.c1023 Default SELinux user: unconfined_u:s0-s0:c0.c1023 Default PAC types: MS-PAC, nfs:NONE cn: ipaConfig objectclass: nsContainer, top, ipaGuiConfig, ipaConfigObjectUse the
ipa config-modcommand to modify an attribute. For example, to change the default shell for future IdM users from/bin/shto/bin/bash, enter:[bjensen@server ~]$ ipa config-mod --defaultshell "/bin/bash"For more
ipa config-modoptions, see the Default user parameters table.The new configuration will be applied to future IdM user and group accounts. The current accounts remain unchanged.
Chapter 21. Access control in IdM
Access control defines the rights or permissions users have been granted to perform operations on other users or objects, such as hosts or services. Identity Management (IdM) provides several access control areas to make it clear what kind of access is being granted and to whom it is granted. As part of this, IdM draws a distinction between access control to resources within the domain and access control to the IdM configuration itself.
This chapter outlines the different internal access control mechanisms that are available for IdM users both to the resources within the domain and to the IdM configuration itself.
21.1. Access control instructions in IdM
The Identity Management (IdM) access control structure is based on the 389 Directory Server access control. By using access control instructions (ACIs), you can grant or deny specific IdM users access over other entries. All entries, including IdM users, are stored in LDAP.
An ACI has three parts:
- Actor
- The entity that is being granted permission to do something. In LDAP access control models, you can, for example, specify that the ACI rule is applied only when a user binds to the directory using their distinguished name (DN). Such a specification is called the bind rule: it defines who the user is and can optionally require other limits on the bind attempt, such as restricting attempts to a certain time of day or a certain machine.
- Target
- The entry that the actor is allowed to perform operations on.
- Operation type
- Determines what kinds of actions the actor is allowed to perform. The most common operations are add, delete, write, read, and search. In IdM, the read and search rights of a non-administrative user are limited, and even more so in the IdM Web UI than the IdM CLI.
When an LDAP operation is attempted, the following occurs:
- The IdM client sends user credentials to an IdM server as part of the bind operation.
- The IdM server DS checks the user credentials.
- The IdM server DS checks the user account to see if the user has a permission to perform the requested operation.
21.2. Access control methods in IdM
Identity Management (IdM) divides access control methods into the following categories:
- Self-service rules
- Define what operations a user can perform on the user’s own personal entry. This access control type only allows write permissions to specific attributes within the user entry. Users can update the values of specific attributes but cannot add or delete the attributes as such.
- Delegation rules
- By using a delegation rule, you can allow a specific user group to perform write, that is edit, operations on specific attributes of users in another user group. Similarly to self-service rules, this form of access control rule is limited to editing the values of specific attributes. It does not grant the ability to add or remove whole entries or control over unspecified attributes.
- Role-based access control
Creates special access control groups that are then granted much broader authority over all types of entities in the IdM domain. Roles can be granted edit, add, and delete rights, meaning they can be granted complete control over entire entries, not just selected attributes.
Certain roles are already available in IdM by default, for example
Enrollment Administrator,IT Security Specialist, andIT Specialist. You can create additional roles to manage any types of entries, such as hosts, automount configuration, netgroups, DNS settings, and IdM configuration.
Chapter 22. Managing self-service rules in IdM using the CLI
Learn about self-service rules in Identity Management (IdM) and how to create and edit self-service access rules on the command line (CLI).
22.1. Self-service access control in IdM
Self-service access control rules define which operations an Identity Management (IdM) entity can perform on its IdM Directory Server entry: for example, IdM users have the ability to update their own passwords.
This method of control allows an authenticated IdM entity to edit specific attributes within its LDAP entry, but does not allow add or delete operations on the entire entry.
Be careful when working with self-service access control rules: configuring access control rules improperly can inadvertently elevate an entity’s privileges.
22.2. Creating self-service rules using the CLI
Follow this procedure to create self-service access rules in IdM using the command line (CLI).
Prerequisites
- Administrator privileges for managing IdM or the User Administrator role.
- An active Kerberos ticket. For details, see Using kinit to log in to IdM manually.
Procedure
To add a self-service rule, use the
ipa selfservice-addcommand and specify the following two options:--permissions- sets the read and write permissions the Access Control Instruction (ACI) grants.
--attrs- sets the complete list of attributes to which this ACI grants permission.
For example, to create a self-service rule allowing users to modify their own name details:
$ ipa selfservice-add "Users can manage their own name details" --permissions=write --attrs=givenname --attrs=displayname --attrs=title --attrs=initials
-----------------------------------------------------------
Added selfservice "Users can manage their own name details"
-----------------------------------------------------------
Self-service name: Users can manage their own name details
Permissions: write
Attributes: givenname, displayname, title, initials22.3. Editing self-service rules using the CLI
Follow this procedure to edit self-service access rules in IdM using the command line (CLI).
Prerequisites
- Administrator privileges for managing IdM or the User Administrator role.
- An active Kerberos ticket. For details, see Using kinit to log in to IdM manually.
Procedure
-
Optional: Display existing self-service rules with the
ipa selfservice-findcommand. -
Optional: Display details for the self-service rule you want to modify with the
ipa selfservice-showcommand. -
Use the
ipa selfservice-modcommand to edit a self-service rule.
For example:
$ ipa selfservice-mod "Users can manage their own name details" --attrs=givenname --attrs=displayname --attrs=title --attrs=initials --attrs=surname
--------------------------------------------------------------
Modified selfservice "Users can manage their own name details"
--------------------------------------------------------------
Self-service name: Users can manage their own name details
Permissions: write
Attributes: givenname, displayname, title, initials
Using the ipa selfservice-mod command overwrites the previously defined permissions and attributes, so always include the complete list of existing permissions and attributes along with any new ones you want to define.
Verification
-
Use the
ipa selfservice-showcommand to display the self-service rule you edited.
$ ipa selfservice-show "Users can manage their own name details"
--------------------------------------------------------------
Self-service name: Users can manage their own name details
Permissions: write
Attributes: givenname, displayname, title, initials22.4. Deleting self-service rules using the CLI
Follow this procedure to delete self-service access rules in IdM using the command line (CLI).
Prerequisites
- Administrator privileges for managing IdM or the User Administrator role.
- An active Kerberos ticket. For details, see Using kinit to log in to IdM manually.
Procedure
-
Use the
ipa selfservice-delcommand to delete a self-service rule.
For example:
$ ipa selfservice-del "Users can manage their own name details"
-----------------------------------------------------------
Deleted selfservice "Users can manage their own name details"
-----------------------------------------------------------Verification
-
Use the
ipa selfservice-findcommand to display all self-service rules. The rule you just deleted should be missing.
Chapter 23. Managing self-service rules using the IdM Web UI
Learn about self-service rules in Identity Management (IdM) and how to create and edit self-service access rules in the web interface (IdM Web UI).
23.1. Self-service access control in IdM
Self-service access control rules define which operations an Identity Management (IdM) entity can perform on its IdM Directory Server entry: for example, IdM users have the ability to update their own passwords.
This method of control allows an authenticated IdM entity to edit specific attributes within its LDAP entry, but does not allow add or delete operations on the entire entry.
Be careful when working with self-service access control rules: configuring access control rules improperly can inadvertently elevate an entity’s privileges.
23.2. Creating self-service rules using the IdM Web UI
Follow this procedure to create self-service access rules in IdM using the web interface (IdM Web UI).
Prerequisites
- Administrator privileges for managing IdM or the User Administrator role.
- You are logged-in to the IdM Web UI. For details, see Accessing the IdM Web UI in a web browser.
Procedure
- Open the IPA Server>Role-Based Access Control menu and select Self Service Permissions.
- Click Add at the upper-right of the list of the self-service access rules.
- On the Add Self Service Permission window, enter the name of the new self-service rule in the Self-service name field. Spaces are allowed.
- Select the checkboxes next to the attributes you want users to be able to edit.
Optional: If an attribute you want to provide access to is not listed, you can add a listing for it:
- Click the Add button.
- On the Add Custom Attribute window, enter the attribute name in the Attribute text field.
- Click the OK button to add the attribute.
- Verify that the new attribute is selected.
Click the Add button at the bottom of the form to save the new self-service rule.
Alternatively, you can save and continue editing the self-service rule by clicking the Add and Edit button, or save and add further rules by clicking the Add and Add another button.
23.3. Editing self-service rules using the IdM Web UI
Follow this procedure to edit self-service access rules in IdM using the web interface (IdM Web UI).
Prerequisites
- Administrator privileges for managing IdM or the User Administrator role.
- You are logged-in to the IdM Web UI. For details, see Accessing the IdM Web UI in a web browser.
Procedure
- Open the IPA Server>Role-Based Access Control menu and select Self Service Permissions.
- Click on the name of the self-service rule you want to modify.
- The edit page only allows you to edit the list of attributes to you want to add or remove to the self-service rule. Select or deselect the appropriate checkboxes.
- Click the Save button to save your changes to the self-service rule.
23.4. Deleting self-service rules using the IdM Web UI
Follow this procedure to delete self-service access rules in IdM using the web interface (IdM Web UI).
Prerequisites
- Administrator privileges for managing IdM or the User Administrator role.
- You are logged-in to the IdM Web UI. For details, see Accessing the IdM Web UI in a web browser.
Procedure
- Open the IPA Server>Role-Based Access Control menu and select Self Service Permissions.
- Select the checkbox next to the rule you want to delete, then click on the Delete button on the right of the list.
- A dialog opens, click on Delete to confirm.
Chapter 24. Using Ansible playbooks to manage self-service rules in IdM
Learn about self-service rules in Identity Management (IdM) and how to create and edit self-service access rules using Ansible playbooks. With self-service access control rules, an IdM entity can perform specified operations on its IdM Directory Server entry.
24.1. Self-service access control in IdM
Self-service access control rules define which operations an Identity Management (IdM) entity can perform on its IdM Directory Server entry: for example, IdM users have the ability to update their own passwords.
This method of control allows an authenticated IdM entity to edit specific attributes within its LDAP entry, but does not allow add or delete operations on the entire entry.
Be careful when working with self-service access control rules: configuring access control rules improperly can inadvertently elevate an entity’s privileges.
24.2. Using Ansible to ensure that a self-service rule is present
The following procedure describes how to use an Ansible playbook to define self-service rules and ensure their presence on an Identity Management (IdM) server. In this example, the new Users can manage their own name details rule grants users the ability to change their own givenname, displayname, title and initials attributes. This allows them to, for example, change their display name or initials if they want to.
Prerequisites
On the control node:
- You are using Ansible version 2.13 or later.
-
You have installed the
ansible-freeipapackage. - The example assumes that in the ~/MyPlaybooks/ directory, you have created an Ansible inventory file with the fully-qualified domain name (FQDN) of the IdM server.
-
The example assumes that the secret.yml Ansible vault stores your
ipaadmin_password.
-
The target node, that is the node on which the
ansible-freeipamodule is executed, is part of the IdM domain as an IdM client, server or replica.
Procedure
Navigate to the ~/MyPlaybooks/ directory:
$ cd ~/MyPlaybooks/Make a copy of the
selfservice-present.ymlfile located in the/usr/share/doc/ansible-freeipa/playbooks/selfservice/directory:$ cp /usr/share/doc/ansible-freeipa/playbooks/selfservice/selfservice-present.yml selfservice-present-copy.yml-
Open the
selfservice-present-copy.ymlAnsible playbook file for editing. Adapt the file by setting the following variables in the
ipaselfservicetask section:-
Set the
ipaadmin_passwordvariable to the password of the IdM administrator. -
Set the
namevariable to the name of the new self-service rule. -
Set the
permissionvariable to a comma-separated list of permissions to grant:readandwrite. -
Set the
attributevariable to a list of attributes that users can manage themselves:givenname,displayname,title, andinitials.
This is the modified Ansible playbook file for the current example:
--- - name: Self-service present hosts: ipaserver vars_files: - /home/user_name/MyPlaybooks/secret.yml tasks: - name: Ensure self-service rule "Users can manage their own name details" is present ipaselfservice: ipaadmin_password: "{{ ipaadmin_password }}" name: "Users can manage their own name details" permission: read, write attribute: - givenname - displayname - title - initials-
Set the
- Save the file.
Run the Ansible playbook. Specify the playbook file, the file storing the password protecting the secret.yml file, and the inventory file:
$ ansible-playbook --vault-password-file=password_file -v -i inventory selfservice-present-copy.yml
24.3. Using Ansible to ensure that a self-service rule is absent
The following procedure describes how to use an Ansible playbook to ensure a specified self-service rule is absent from your IdM configuration. The example below describes how to make sure the Users can manage their own name details self-service rule does not exist in IdM. This will ensure that users cannot, for example, change their own display name or initials.
Prerequisites
On the control node:
- You are using Ansible version 2.13 or later.
-
You have installed the
ansible-freeipapackage. - The example assumes that in the ~/MyPlaybooks/ directory, you have created an Ansible inventory file with the fully-qualified domain name (FQDN) of the IdM server.
-
The example assumes that the secret.yml Ansible vault stores your
ipaadmin_password.
-
The target node, that is the node on which the
ansible-freeipamodule is executed, is part of the IdM domain as an IdM client, server or replica.
Procedure
Navigate to the ~/MyPlaybooks/ directory:
$ cd ~/MyPlaybooks/Make a copy of the
selfservice-absent.ymlfile located in the/usr/share/doc/ansible-freeipa/playbooks/selfservice/directory:$ cp /usr/share/doc/ansible-freeipa/playbooks/selfservice/selfservice-absent.yml selfservice-absent-copy.yml-
Open the
selfservice-absent-copy.ymlAnsible playbook file for editing. Adapt the file by setting the following variables in the
ipaselfservicetask section:-
Set the
ipaadmin_passwordvariable to the password of the IdM administrator. -
Set the
namevariable to the name of the self-service rule. -
Set the
statevariable toabsent.
This is the modified Ansible playbook file for the current example:
--- - name: Self-service absent hosts: ipaserver vars_files: - /home/user_name/MyPlaybooks/secret.yml tasks: - name: Ensure self-service rule "Users can manage their own name details" is absent ipaselfservice: ipaadmin_password: "{{ ipaadmin_password }}" name: "Users can manage their own name details" state: absent-
Set the
- Save the file.
Run the Ansible playbook. Specify the playbook file, the file storing the password protecting the secret.yml file, and the inventory file:
$ ansible-playbook --vault-password-file=password_file -v -i inventory selfservice-absent-copy.yml
24.4. Using Ansible to ensure that a self-service rule has specific attributes
The following procedure describes how to use an Ansible playbook to ensure that an already existing self-service rule has specific settings. In the example, you ensure the Users can manage their own name details self-service rule also has the surname member attribute.
Prerequisites
On the control node:
- You are using Ansible version 2.13 or later.
-
You have installed the
ansible-freeipapackage. - The example assumes that in the ~/MyPlaybooks/ directory, you have created an Ansible inventory file with the fully-qualified domain name (FQDN) of the IdM server.
-
The example assumes that the secret.yml Ansible vault stores your
ipaadmin_password.
-
The target node, that is the node on which the
ansible-freeipamodule is executed, is part of the IdM domain as an IdM client, server or replica. - The Users can manage their own name details self-service rule exists in IdM.
Procedure
Navigate to the ~/MyPlaybooks/ directory:
$ cd ~/MyPlaybooks/Make a copy of the
selfservice-member-present.ymlfile located in the/usr/share/doc/ansible-freeipa/playbooks/selfservice/directory:$ cp /usr/share/doc/ansible-freeipa/playbooks/selfservice/selfservice-member-present.yml selfservice-member-present-copy.yml-
Open the
selfservice-member-present-copy.ymlAnsible playbook file for editing. Adapt the file by setting the following variables in the
ipaselfservicetask section:-
Set the
ipaadmin_passwordvariable to the password of the IdM administrator. -
Set the
namevariable to the name of the self-service rule to modify. -
Set the
attributevariable tosurname. -
Set the
actionvariable tomember.
This is the modified Ansible playbook file for the current example:
--- - name: Self-service member present hosts: ipaserver vars_files: - /home/user_name/MyPlaybooks/secret.yml tasks: - name: Ensure selfservice "Users can manage their own name details" member attribute surname is present ipaselfservice: ipaadmin_password: "{{ ipaadmin_password }}" name: "Users can manage their own name details" attribute: - surname action: member-
Set the
- Save the file.
Run the Ansible playbook. Specify the playbook file, the file storing the password protecting the secret.yml file, and the inventory file:
$ ansible-playbook --vault-password-file=password_file -v -i inventory selfservice-member-present-copy.yml
24.5. Using Ansible to ensure that a self-service rule does not have specific attributes
The following procedure describes how to use an Ansible playbook to ensure that a self-service rule does not have specific settings. You can use this playbook to make sure a self-service rule does not grant undesired access. In the example, you ensure the Users can manage their own name details self-service rule does not have the givenname and surname member attributes.
Prerequisites
On the control node:
- You are using Ansible version 2.13 or later.
-
You have installed the
ansible-freeipapackage. - The example assumes that in the ~/MyPlaybooks/ directory, you have created an Ansible inventory file with the fully-qualified domain name (FQDN) of the IdM server.
-
The example assumes that the secret.yml Ansible vault stores your
ipaadmin_password.
-
The target node, that is the node on which the
ansible-freeipamodule is executed, is part of the IdM domain as an IdM client, server or replica. - The Users can manage their own name details self-service rule exists in IdM.
Procedure
Navigate to the ~/MyPlaybooks/ directory:
$ cd ~/MyPlaybooks/Make a copy of the
selfservice-member-absent.ymlfile located in the/usr/share/doc/ansible-freeipa/playbooks/selfservice/directory:$ cp /usr/share/doc/ansible-freeipa/playbooks/selfservice/selfservice-member-absent.yml selfservice-member-absent-copy.yml-
Open the
selfservice-member-absent-copy.ymlAnsible playbook file for editing. Adapt the file by setting the following variables in the
ipaselfservicetask section:-
Set the
ipaadmin_passwordvariable to the password of the IdM administrator. -
Set the
namevariable to the name of the self-service rule you want to modify. -
Set the
attributevariable togivennameandsurname. -
Set the
actionvariable tomember. -
Set the
statevariable toabsent.
This is the modified Ansible playbook file for the current example:
--- - name: Self-service member absent hosts: ipaserver vars_files: - /home/user_name/MyPlaybooks/secret.yml tasks: - name: Ensure selfservice "Users can manage their own name details" member attributes givenname and surname are absent ipaselfservice: ipaadmin_password: "{{ ipaadmin_password }}" name: "Users can manage their own name details" attribute: - givenname - surname action: member state: absent-
Set the
- Save the file.
Run the Ansible playbook. Specify the playbook file, the file storing the password protecting the secret.yml file, and the inventory file:
$ ansible-playbook --vault-password-file=password_file -v -i inventory selfservice-member-absent-copy.yml
Chapter 25. Delegating permissions to user groups to manage users using IdM CLI
Delegation is one of the access control methods in IdM, along with self-service rules and role-based access control (RBAC). You can use delegation to assign permissions to one group of users to manage entries for another group of users.
25.1. Delegation rules
You can delegate permissions to user groups to manage users by creating delegation rules.
Delegation rules allow a specific user group to perform write (edit) operations on specific attributes for users in another user group. This form of access control rule is limited to editing the values of a subset of attributes you specify in a delegation rule; it does not grant the ability to add or remove whole entries or control over unspecified attributes.
Delegation rules grant permissions to existing user groups in IdM. You can use delegation to, for example, allow the managers user group to manage selected attributes of users in the employees user group.
25.2. Creating a delegation rule using IdM CLI
Follow this procedure to create a delegation rule using the IdM CLI.
Prerequisites
-
You are logged in as a member of the
adminsgroup.
Procedure
Enter the
ipa delegation-addcommand. Specify the following options:-
--group: the group who is being granted permissions to the entries of users in the user group. -
--membergroup: the group whose entries can be edited by members of the delegation group. -
--permissions: whether users will have the right to view the given attributes (read) and add or change the given attributes (write). If you do not specify permissions, only the write permission will be added. -
--attrs: the attributes which users in the member group are allowed to view or edit.
For example:
-
$ ipa delegation-add "basic manager attributes" --permissions=read --permissions=write --attrs=businesscategory --attrs=departmentnumber --attrs=employeetype --attrs=employeenumber --group=managers --membergroup=employees
-------------------------------------------
Added delegation "basic manager attributes"
-------------------------------------------
Delegation name: basic manager attributes
Permissions: read, write
Attributes: businesscategory, departmentnumber, employeetype, employeenumber
Member user group: employees
User group: managers25.3. Viewing existing delegation rules using IdM CLI
Follow this procedure to view existing delegation rules using the IdM CLI.
Prerequisites
-
You are logged in as a member of the
adminsgroup.
Procedure
-
Enter the
ipa delegation-findcommand:
$ ipa delegation-find
--------------------
1 delegation matched
--------------------
Delegation name: basic manager attributes
Permissions: read, write
Attributes: businesscategory, departmentnumber, employeenumber, employeetype
Member user group: employees
User group: managers
----------------------------
Number of entries returned 1
----------------------------25.4. Modifying a delegation rule using IdM CLI
Follow this procedure to modify an existing delegation rule using the IdM CLI.
The --attrs option overwrites whatever the previous list of supported attributes was, so always include the complete list of attributes along with any new attributes. This also applies to the --permissions option.
Prerequisites
-
You are logged in as a member of the
adminsgroup.
Procedure
Enter the
ipa delegation-modcommand with the desired changes. For example, to add thedisplaynameattribute to thebasic manager attributesexample rule:$ ipa delegation-mod "basic manager attributes" --attrs=businesscategory --attrs=departmentnumber --attrs=employeetype --attrs=employeenumber --attrs=displayname ---------------------------------------------- Modified delegation "basic manager attributes" ---------------------------------------------- Delegation name: basic manager attributes Permissions: read, write Attributes: businesscategory, departmentnumber, employeetype, employeenumber, displayname Member user group: employees User group: managers
25.5. Deleting a delegation rule using IdM CLI
Follow this procedure to delete an existing delegation rule using the IdM CLI.
Prerequisites
-
You are logged in as a member of the
adminsgroup.
Procedure
-
Enter the
ipa delegation-delcommand. When prompted, enter the name of the delegation rule you want to delete:
$ ipa delegation-del Delegation name: basic manager attributes --------------------------------------------- Deleted delegation "basic manager attributes" ---------------------------------------------
Chapter 26. Delegating permissions to user groups to manage users using IdM WebUI
Delegation is one of the access control methods in IdM, along with self-service rules and role-based access control (RBAC). You can use delegation to assign permissions to one group of users to manage entries for another group of users.
26.1. Delegation rules
You can delegate permissions to user groups to manage users by creating delegation rules.
Delegation rules allow a specific user group to perform write (edit) operations on specific attributes for users in another user group. This form of access control rule is limited to editing the values of a subset of attributes you specify in a delegation rule; it does not grant the ability to add or remove whole entries or control over unspecified attributes.
Delegation rules grant permissions to existing user groups in IdM. You can use delegation to, for example, allow the managers user group to manage selected attributes of users in the employees user group.
26.2. Creating a delegation rule using IdM WebUI
Follow this procedure to create a delegation rule using the IdM WebUI.
Prerequisites
-
You are logged in to the IdM Web UI as a member of the
adminsgroup.
Procedure
- From the IPA Server>Role-Based Access Control menu, click Delegations.
- Click Add.
On the Add delegation window, do the following:
- Name the new delegation rule.
- Set the permissions by selecting the checkboxes that indicate whether users will have the right to view the given attributes (read) and add or change the given attributes (write).
- From the User group drop-down menu, select the group who is being granted permissions to view or edit the entries of users in the member group.
- On the Member user group drop-down menu, select the group whose entries can be edited by members of the delegation group.
- In the attributes box, select the checkboxes by the attributes to which you want to grant permissions.
- Click the Add button to save the new delegation rule.
26.3. Viewing existing delegation rules using IdM WebUI
Follow this procedure to view existing delegation rules using the IdM WebUI.
Prerequisites
-
You are logged in to the IdM Web UI as a member of the
adminsgroup.
Procedure
From the IPA Server>Role-Based Access Control menu, click Delegations.
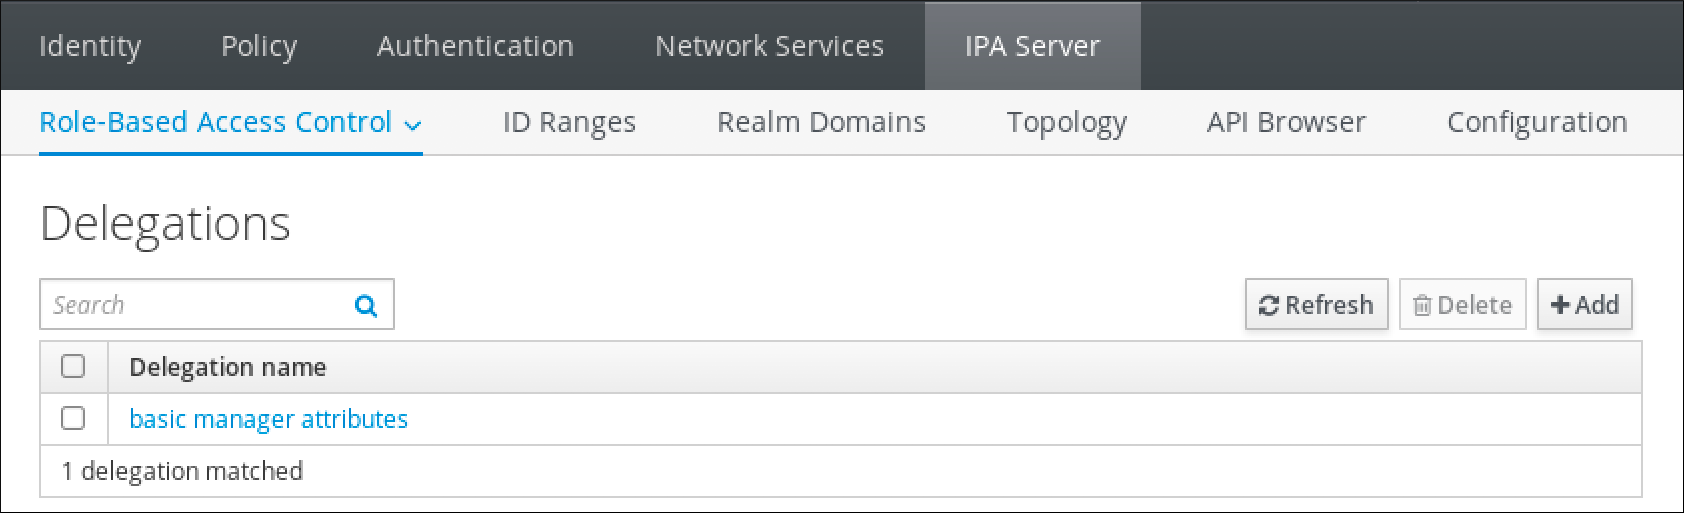
26.4. Modifying a delegation rule using IdM WebUI
Follow this procedure to modify an existing delegation rule using the IdM WebUI.
Prerequisites
-
You are logged in to the IdM Web UI as a member of the
adminsgroup.
Procedure
- From the IPA Server>Role-Based Access Control menu, click Delegations.
- Click the rule you want to modify.
Make the desired changes:
- Change the name of the rule.
- Change granted permissions by selecting the checkboxes that indicate whether users will have the right to view the given attributes (read) and add or change the given attributes (write).
- In the User group drop-down menu, select the group who is being granted permissions to view or edit the entries of users in the member group.
- In the Member user group drop-down menu, select the group whose entries can be edited by members of the delegation group.
- In the attributes box, select the checkboxes by the attributes to which you want to grant permissions. To remove permissions to an attribute, uncheck the relevant checkbox.
- Click the Save button to save the changes.
26.5. Deleting a delegation rule using IdM WebUI
Follow this procedure to delete an existing delegation rule using the IdM WebUI.
Prerequisites
-
You are logged in to the IdM Web UI as a member of the
adminsgroup.
Procedure
- From the IPA Server>Role-Based Access Control menu, click Delegations.
- Select the checkbox next to the rule you want to remove.
- Click Delete.
- Click Delete to confirm.
Chapter 27. Delegating permissions to user groups to manage users using Ansible playbooks
Delegation is one of the access control methods in IdM, along with self-service rules and role-based access control (RBAC). You can use delegation to assign permissions to one group of users to manage entries for another group of users.
27.1. Delegation rules
You can delegate permissions to user groups to manage users by creating delegation rules.
Delegation rules allow a specific user group to perform write (edit) operations on specific attributes for users in another user group. This form of access control rule is limited to editing the values of a subset of attributes you specify in a delegation rule; it does not grant the ability to add or remove whole entries or control over unspecified attributes.
Delegation rules grant permissions to existing user groups in IdM. You can use delegation to, for example, allow the managers user group to manage selected attributes of users in the employees user group.
27.2. Creating an Ansible inventory file for IdM
When working with Ansible, it is good practice to create, in your home directory, a subdirectory dedicated to Ansible playbooks that you copy and adapt from the /usr/share/doc/ansible-freeipa/* and /usr/share/doc/rhel-system-roles/* subdirectories. This practice has the following advantages:
- You can find all your playbooks in one place.
-
You can run your playbooks without invoking
rootprivileges.
Procedure
Create a directory for your Ansible configuration and playbooks in your home directory:
$ mkdir ~/MyPlaybooks/Change into the ~/MyPlaybooks/ directory:
$ cd ~/MyPlaybooksCreate the ~/MyPlaybooks/ansible.cfg file with the following content:
[defaults] inventory = /home/<username>/MyPlaybooks/inventory [privilege_escalation] become=TrueCreate the ~/MyPlaybooks/inventory file with the following content:
[eu] server.idm.example.com [us] replica.idm.example.com [ipaserver:children] eu usThis configuration defines two host groups, eu and us, for hosts in these locations. Additionally, this configuration defines the ipaserver host group, which contains all hosts from the eu and us groups.
27.3. Using Ansible to ensure that a delegation rule is present
The following procedure describes how to use an Ansible playbook to define privileges for a new IdM delegation rule and ensure its presence. In the example, the new basic manager attributes delegation rule grants the managers group the ability to read and write the following attributes for members of the employees group:
-
businesscategory -
departmentnumber -
employeenumber -
employeetype
Prerequisites
On the control node:
- You are using Ansible version 2.13 or later.
-
You have installed the
ansible-freeipapackage. - The example assumes that in the ~/MyPlaybooks/ directory, you have created an Ansible inventory file with the fully-qualified domain name (FQDN) of the IdM server.
-
The example assumes that the secret.yml Ansible vault stores your
ipaadmin_password.
-
The target node, that is the node on which the
ansible-freeipamodule is executed, is part of the IdM domain as an IdM client, server or replica.
Procedure
Navigate to the ~/MyPlaybooks/ directory:
$ cd ~/MyPlaybooks/Make a copy of the
delegation-present.ymlfile located in the/usr/share/doc/ansible-freeipa/playbooks/delegation/directory:$ cp /usr/share/doc/ansible-freeipa/playbooks/delegation/delegation-present.yml delegation-present-copy.yml-
Open the
delegation-present-copy.ymlAnsible playbook file for editing. Adapt the file by setting the following variables in the
ipadelegationtask section:-
Set the
ipaadmin_passwordvariable to the password of the IdM administrator. -
Set the
namevariable to the name of the new delegation rule. -
Set the
permissionvariable to a comma-separated list of permissions to grant:readandwrite. -
Set the
attributevariable to a list of attributes the delegated user group can manage:businesscategory,departmentnumber,employeenumber, andemployeetype. -
Set the
groupvariable to the name of the group that is being given access to view or modify attributes. -
Set the
membergroupvariable to the name of the group whose attributes can be viewed or modified.
This is the modified Ansible playbook file for the current example:
--- - name: Playbook to manage a delegation rule hosts: ipaserver vars_files: - /home/user_name/MyPlaybooks/secret.yml tasks: - name: Ensure delegation "basic manager attributes" is present ipadelegation: ipaadmin_password: "{{ ipaadmin_password }}" name: "basic manager attributes" permission: read, write attribute: - businesscategory - departmentnumber - employeenumber - employeetype group: managers membergroup: employees-
Set the
- Save the file.
Run the Ansible playbook. Specify the playbook file, the file storing the password protecting the secret.yml file, and the inventory file:
$ ansible-playbook --vault-password-file=password_file -v -i ~/MyPlaybooks/inventory delegation-present-copy.yml
27.4. Using Ansible to ensure that a delegation rule is absent
The following procedure describes how to use an Ansible playbook to ensure a specified delegation rule is absent from your IdM configuration. The example below describes how to make sure the custom basic manager attributes delegation rule does not exist in IdM.
Prerequisites
On the control node:
- You are using Ansible version 2.13 or later.
-
You have installed the
ansible-freeipapackage. - The example assumes that in the ~/MyPlaybooks/ directory, you have created an Ansible inventory file with the fully-qualified domain name (FQDN) of the IdM server.
-
The example assumes that the secret.yml Ansible vault stores your
ipaadmin_password.
-
The target node, that is the node on which the
ansible-freeipamodule is executed, is part of the IdM domain as an IdM client, server or replica.
Procedure
Navigate to the ~/MyPlaybooks/ directory:
$ cd ~/MyPlaybooks>/Make a copy of the
delegation-absent.ymlfile located in the/usr/share/doc/ansible-freeipa/playbooks/delegation/directory:$ cp /usr/share/doc/ansible-freeipa/playbooks/delegation/delegation-present.yml delegation-absent-copy.yml-
Open the
delegation-absent-copy.ymlAnsible playbook file for editing. Adapt the file by setting the following variables in the
ipadelegationtask section:-
Set the
ipaadmin_passwordvariable to the password of the IdM administrator. -
Set the
namevariable to the name of the delegation rule. -
Set the
statevariable toabsent.
This is the modified Ansible playbook file for the current example:
--- - name: Delegation absent hosts: ipaserver vars_files: - /home/user_name/MyPlaybooks/secret.yml tasks: - name: Ensure delegation "basic manager attributes" is absent ipadelegation: ipaadmin_password: "{{ ipaadmin_password }}" name: "basic manager attributes" state: absent-
Set the
- Save the file.
Run the Ansible playbook. Specify the playbook file, the file storing the password protecting the secret.yml file, and the inventory file:
$ ansible-playbook --vault-password-file=password_file -v -i ~/MyPlaybooks/inventory delegation-absent-copy.yml
27.5. Using Ansible to ensure that a delegation rule has specific attributes
The following procedure describes how to use an Ansible playbook to ensure that a delegation rule has specific settings. You can use this playbook to modify a delegation role you have previously created. In the example, you ensure the basic manager attributes delegation rule only has the departmentnumber member attribute.
Prerequisites
On the control node:
- You are using Ansible version 2.13 or later.
-
You have installed the
ansible-freeipapackage. - The example assumes that in the ~/MyPlaybooks/ directory, you have created an Ansible inventory file with the fully-qualified domain name (FQDN) of the IdM server.
-
The example assumes that the secret.yml Ansible vault stores your
ipaadmin_password.
-
The target node, that is the node on which the
ansible-freeipamodule is executed, is part of the IdM domain as an IdM client, server or replica. - The basic manager attributes delegation rule exists in IdM.
Procedure
Navigate to the ~/MyPlaybooks/ directory:
$ cd ~/MyPlaybooks/Make a copy of the
delegation-member-present.ymlfile located in the/usr/share/doc/ansible-freeipa/playbooks/delegation/directory:$ cp /usr/share/doc/ansible-freeipa/playbooks/delegation/delegation-member-present.yml delegation-member-present-copy.yml-
Open the
delegation-member-present-copy.ymlAnsible playbook file for editing. Adapt the file by setting the following variables in the
ipadelegationtask section:-
Set the
ipaadmin_passwordvariable to the password of the IdM administrator. -
Set the
namevariable to the name of the delegation rule to modify. -
Set the
attributevariable todepartmentnumber. -
Set the
actionvariable tomember.
This is the modified Ansible playbook file for the current example:
--- - name: Delegation member present hosts: ipaserver vars_files: - /home/user_name/MyPlaybooks/secret.yml tasks: - name: Ensure delegation "basic manager attributes" member attribute departmentnumber is present ipadelegation: ipaadmin_password: "{{ ipaadmin_password }}" name: "basic manager attributes" attribute: - departmentnumber action: member-
Set the
- Save the file.
Run the Ansible playbook. Specify the playbook file, the file storing the password protecting the secret.yml file, and the inventory file:
$ ansible-playbook --vault-password-file=password_file -v -i ~/MyPlaybooks/inventory delegation-member-present-copy.yml
27.6. Using Ansible to ensure that a delegation rule does not have specific attributes
The following procedure describes how to use an Ansible playbook to ensure that a delegation rule does not have specific settings. You can use this playbook to make sure a delegation role does not grant undesired access. In the example, you ensure the basic manager attributes delegation rule does not have the employeenumber and employeetype member attributes.
Prerequisites
On the control node:
- You are using Ansible version 2.13 or later.
-
You have installed the
ansible-freeipapackage. - The example assumes that in the ~/MyPlaybooks/ directory, you have created an Ansible inventory file with the fully-qualified domain name (FQDN) of the IdM server.
-
The example assumes that the secret.yml Ansible vault stores your
ipaadmin_password.
-
The target node, that is the node on which the
ansible-freeipamodule is executed, is part of the IdM domain as an IdM client, server or replica. - The basic manager attributes delegation rule exists in IdM.
Procedure
Navigate to the ~/MyPlaybooks/ directory:
$ cd ~/MyPlaybooks/Make a copy of the
delegation-member-absent.ymlfile located in the/usr/share/doc/ansible-freeipa/playbooks/delegation/directory:$ cp /usr/share/doc/ansible-freeipa/playbooks/delegation/delegation-member-absent.yml delegation-member-absent-copy.yml-
Open the
delegation-member-absent-copy.ymlAnsible playbook file for editing. Adapt the file by setting the following variables in the
ipadelegationtask section:-
Set the
ipaadmin_passwordvariable to the password of the IdM administrator. -
Set the
namevariable to the name of the delegation rule to modify. -
Set the
attributevariable toemployeenumberandemployeetype. -
Set the
actionvariable tomember. -
Set the
statevariable toabsent.
This is the modified Ansible playbook file for the current example:
--- - name: Delegation member absent hosts: ipaserver vars_files: - /home/user_name/MyPlaybooks/secret.yml tasks: - name: Ensure delegation "basic manager attributes" member attributes employeenumber and employeetype are absent ipadelegation: ipaadmin_password: "{{ ipaadmin_password }}" name: "basic manager attributes" attribute: - employeenumber - employeetype action: member state: absent-
Set the
- Save the file.
Run the Ansible playbook. Specify the playbook file, the file storing the password protecting the secret.yml file, and the inventory file:
$ ansible-playbook --vault-password-file=password_file -v -i ~/MyPlaybooks/inventory delegation-member-absent-copy.yml
Chapter 28. Managing role-based access controls in IdM using the CLI
Learn more about role-based access control (RBAC) in Identity Management (IdM). RBAC is a security feature that restricts access to authorized users. You can define roles with specific permissions and then assign those roles to users.
28.1. Role-based access control in IdM
Role-based access control (RBAC) in IdM grants a very different kind of authority to users compared to self-service and delegation access controls.
Role-based access control is composed of three parts:
- Permissions grant the right to perform a specific task such as adding or deleting users, modifying a group, and enabling read-access.
- Privileges combine permissions, for example all the permissions needed to add a new user.
- Roles grant a set of privileges to users, user groups, hosts or host groups.
28.1.1. Permissions in IdM
Permissions are the lowest level unit of role-based access control, they define operations together with the LDAP entries to which those operations apply. Comparable to building blocks, permissions can be assigned to as many privileges as needed.
One or more rights define what operations are allowed:
-
write -
read -
search -
compare -
add -
delete -
all
These operations apply to three basic targets:
-
subtree: a domain name (DN); the subtree under this DN -
target filter: an LDAP filter -
target: DN with possible wildcards to specify entries
Additionally, the following convenience options set the corresponding attribute(s):
-
type: a type of object (user, group, etc); setssubtreeandtarget filter memberof: members of a group; sets atarget filterNoteSetting the
memberofattribute permission is not applied if the target LDAP entry does not contain any reference to group membership.-
targetgroup: grants access to modify a specific group (such as granting the rights to manage group membership); sets atarget
With IdM permissions, you can control which users have access to which objects and even which attributes of these objects. IdM enables you to allow or block individual attributes or change the entire visibility of a specific IdM function, such as users, groups, or sudo, to all anonymous users, all authenticated users, or just a certain group of privileged users.
For example, the flexibility of this approach to permissions is useful for an administrator who wants to limit access of users or groups only to the specific sections these users or groups need to access and to make the other sections completely hidden to them.
A permission cannot contain other permissions.
28.1.2. Default managed permissions
Managed permissions are permissions that come by default with IdM. They behave like other permissions created by the user, with the following differences:
- You cannot delete them or modify their name, location, and target attributes.
They have three sets of attributes:
- Default attributes, the user cannot modify them, as they are managed by IdM
- Included attributes, which are additional attributes added by the user
- Excluded attributes, which are attributes removed by the user
A managed permission applies to all attributes that appear in the default and included attribute sets but not in the excluded set.
While you cannot delete a managed permission, setting its bind type to permission and removing the managed permission from all privileges effectively disables it.
Names of all managed permissions start with System:, for example System: Add Sudo rule or System: Modify Services. Earlier versions of IdM used a different scheme for default permissions. For example, the user could not delete them and was only able to assign them to privileges. Most of these default permissions have been turned into managed permissions, however, the following permissions still use the previous scheme:
- Add Automember Rebuild Membership Task
- Add Configuration Sub-Entries
- Add Replication Agreements
- Certificate Remove Hold
- Get Certificates status from the CA
- Read DNA Range
- Modify DNA Range
- Read PassSync Managers Configuration
- Modify PassSync Managers Configuration
- Read Replication Agreements
- Modify Replication Agreements
- Remove Replication Agreements
- Read LDBM Database Configuration
- Request Certificate
- Request Certificate ignoring CA ACLs
- Request Certificates from a different host
- Retrieve Certificates from the CA
- Revoke Certificate
- Write IPA Configuration
If you attempt to modify a managed permission from the command line, the system does not allow you to change the attributes that you cannot modify, the command fails. If you attempt to modify a managed permission from the Web UI, the attributes that you cannot modify are disabled.
28.1.3. Privileges in IdM
A privilege is a group of permissions applicable to a role. While a permission provides the rights to do a single operation, there are certain IdM tasks that require multiple permissions to succeed. Therefore, a privilege combines the different permissions required to perform a specific task.
For example, setting up an account for a new IdM user requires the following permissions:
- Creating a new user entry
- Resetting a user password
- Adding the new user to the default IPA users group
Combining these three low-level tasks into a higher level task in the form of a custom privilege named, for example, Add User makes it easier for a system administrator to manage roles. IdM already contains several default privileges. Apart from users and user groups, privileges are also assigned to hosts and host groups, as well as network services. This practice permits a fine-grained control of operations by a set of users on a set of hosts using specific network services.
A privilege may not contain other privileges.
28.1.4. Roles in IdM
A role is a list of privileges that users specified for the role possess.
In effect, permissions grant the ability to perform given low-level tasks (such as creating a user entry and adding an entry to a group), privileges combine one or more of these permissions needed for a higher-level task (such as creating a new user in a given group). Roles gather privileges together as needed: for example, a User Administrator role would be able to add, modify, and delete users.
Roles are used to classify permitted actions. They are not used as a tool to implement privilege separation or to protect from privilege escalation.
Roles cannot contain other roles.
28.1.5. Predefined roles in Identity Management
Red Hat Enterprise Linux Identity Management provides the following range of pre-defined roles:
| Role | Privilege | Description |
|---|---|---|
| Enrollment Administrator | Host Enrollment | Responsible for client, or host, enrollment |
| helpdesk | Modify Users and Reset passwords, Modify Group membership | Responsible for performing simple user administration tasks |
| IT Security Specialist | Netgroups Administrators, HBAC Administrator, Sudo Administrator | Responsible for managing security policy such as host-based access controls, sudo rules |
| IT Specialist | Host Administrators, Host Group Administrators, Service Administrators, Automount Administrators | Responsible for managing hosts |
| Security Architect | Delegation Administrator, Replication Administrators, Write IPA Configuration, Password Policy Administrator | Responsible for managing the Identity Management environment, creating trusts, creating replication agreements |
| User Administrator | User Administrators, Group Administrators, Stage User Administrators | Responsible for creating users and groups |
28.2. Managing IdM permissions in the CLI
Follow this procedure to manage Identity Management (IdM) permissions using the command line (CLI).
Prerequisites
- Administrator privileges for managing IdM or the User Administrator role.
- An active Kerberos ticket. For details, see Using kinit to log in to IdM manually.
Procedure
Create new permission entries with the
ipa permission-addcommand. For example, to add a permission named dns admin:$ ipa permission-add "dns admin"Specify the properties of the permission with the following options:
--bindtypespecifies the bind rule type. This option accepts theall,anonymous, andpermissionarguments. Thepermissionbindtype means that only the users who are granted this permission via a role can exercise it.For example:
$ ipa permission-add "dns admin" --bindtype=allIf you do not specify
--bindtype, thenpermissionis the default value.NoteIt is not possible to add permissions with a non-default bind rule type to privileges. You also cannot set a permission that is already present in a privilege to a non-default bind rule type.
--rightlists the rights granted by the permission, it replaces the deprecated--permissionsoption. The available values areadd,delete,read,search,compare,write,all.You can set multiple attributes by using multiple
--rightoptions or with a comma-separated list inside curly braces. For example:$ ipa permission-add "dns admin" --right=read --right=write $ ipa permission-add "dns admin" --right={read,write}Noteaddanddeleteare entry-level operations (for example, deleting a user, adding a group, and so on) whileread,search,compareandwriteare more attribute-level: you can write touserCertificatebut not readuserPassword.--attrsgives the list of attributes over which the permission is granted.You can set multiple attributes by using multiple
--attrsoptions or by listing the options in a comma-separated list inside curly braces. For example:$ ipa permission-add "dns admin" --attrs=description --attrs=automountKey $ ipa permission-add "dns admin" --attrs={description,automountKey}The attributes provided with
--attrsmust exist and be allowed attributes for the given object type, otherwise the command fails with schema syntax errors.--typedefines the entry object type to which the permission applies, such as user, host, or service. Each type has its own set of allowed attributes.
For example:$ ipa permission-add "manage service" --right=all --type=service --attrs=krbprincipalkey --attrs=krbprincipalname --attrs=managedby--subtreegives a subtree entry; the filter then targets every entry beneath this subtree entry. Provide an existing subtree entry;--subtreedoes not accept wildcards or non-existent domain names (DNs). Include a DN within the directory.Because IdM uses a simplified, flat directory tree structure,
--subtreecan be used to target some types of entries, like automount locations, which are containers or parent entries for other configuration. For example:$ ipa permission-add "manage automount locations" --subtree="ldap://ldap.example.com:389/cn=automount,dc=example,dc=com" --right=write --attrs=automountmapname --attrs=automountkey --attrs=automountInformationNoteThe
--typeand--subtreeoptions are mutually exclusive: you can see the inclusion of filters for--typeas a simplification of--subtree, intending to make life easier for an admin.--filteruses an LDAP filter to identify which entries the permission applies to.IdM automatically checks the validity of the given filter. The filter can be any valid LDAP filter, for example:
$ ipa permission-add "manage Windows groups" --filter="(!(objectclass=posixgroup))" --right=write --attrs=description--memberofsets the target filter to members of the given group after checking that the group exists. For example, to let the users with this permission modify the login shell of members of the engineers group:$ ipa permission-add ManageShell --right="write" --type=user --attr=loginshell --memberof=engineersNoteSetting the
memberofattribute permission is not applied if the target LDAP entry does not contain any reference to group membership.--targetgroupsets target to the specified user group after checking that the group exists. For example, to let those with the permission write the member attribute in the engineers group (so they can add or remove members):$ ipa permission-add ManageMembers --right="write" --subtree=cn=groups,cn=accounts,dc=example,dc=test --attr=member --targetgroup=engineersOptionally, you can specify a target domain name (DN):
-
--targetspecifies the DN to apply the permission to. Wildcards are accepted. -
--targettospecifies the DN subtree where an entry can be moved to. -
--targetfromspecifies the DN subtree from where an entry can be moved.
-
28.3. Command options for existing permissions
Use the following variants to modify existing permissions as needed:
-
To edit existing permissions, use the
ipa permission-modcommand. You can use the same command options as for adding permissions. -
To find existing permissions, use the
ipa permission-findcommand. You can use the same command options as for adding permissions. To view a specific permission, use the
ipa permission-showcommand.The
--rawargument shows the raw 389-ds ACI that is generated. For example:$ ipa permission-show <permission> --raw-
The
ipa permission-delcommand deletes a permission completely.
28.4. Managing IdM privileges in the CLI
Follow this procedure to manage Identity Management (IdM) privileges using the command line (CLI).
Prerequisites
- Administrator privileges for managing IdM or the User Administrator role.
- An active Kerberos ticket. For details, see link: Using kinit to log in to IdM manually.
- Existing permissions. For details about permissions, see Managing IdM permissions in the CLI.
Procedure
Add privilege entries using the
ipa privilege-addcommandFor example, to add a privilege named managing filesystems with a description:
$ ipa privilege-add "managing filesystems" --desc="for filesystems"Assign the required permissions to the privilege group with the
privilege-add-permissioncommandFor example, to add the permissions named managing automount and managing ftp services to the managing filesystems privilege:
$ ipa privilege-add-permission "managing filesystems" --permissions="managing automount" --permissions="managing ftp services"
28.5. Command options for existing privileges
Use the following variants to modify existing privileges as needed:
-
To modify existing privileges, use the
ipa privilege-modcommand. -
To find existing privileges, use the
ipa privilege-findcommand. -
To view a specific privilege, use the
ipa privilege-showcommand. -
The
ipa privilege-remove-permissioncommand removes one or more permissions from a privilege. -
The
ipa privilege-delcommand deletes a privilege completely.
28.6. Managing IdM roles in the CLI
Follow this procedure to manage Identity Management (IdM) roles using the command line (CLI).
Prerequisites
- Administrator privileges for managing IdM or the User Administrator role.
- An active Kerberos ticket. For details, see Using kinit to log in to IdM manually.
- Existing privileges. For details about privileges, see Managing IdM privileges in the CLI.
Procedure
Add new role entries using the
ipa role-addcommand:$ ipa role-add --desc="User Administrator" useradmin ------------------------ Added role "useradmin" ------------------------ Role name: useradmin Description: User AdministratorAdd the required privileges to the role using the
ipa role-add-privilegecommand:$ ipa role-add-privilege --privileges="user administrators" useradmin Role name: useradmin Description: User Administrator Privileges: user administrators ---------------------------- Number of privileges added 1 ----------------------------Add the required members to the role using the
ipa role-add-membercommand. Allowed member types are: users, groups, hosts and hostgroups.
For example, to add the group named useradmins to the previously created useradmin role:$ ipa role-add-member --groups=useradmins useradmin Role name: useradmin Description: User Administrator Member groups: useradmins Privileges: user administrators ------------------------- Number of members added 1 -------------------------
28.7. Command options for existing roles
Use the following variants to modify existing roles as needed:
-
To modify existing roles, use the
ipa role-modcommand. -
To find existing roles, use the
ipa role-findcommand. -
To view a specific role, use the
ipa role-showcommand. -
To remove a member from the role, use the
ipa role-remove-membercommand. -
The
ipa role-remove-privilegecommand removes one or more privileges from a role. -
The
ipa role-delcommand deletes a role completely.
Chapter 29. Managing role-based access controls using the IdM Web UI
Learn more about role-based access control (RBAC) in Identity Management (IdM). RBAC is a security feature that restricts access to authorized users. You can define roles with specific permissions and then assign those roles to users.
29.1. Role-based access control in IdM
Role-based access control (RBAC) in IdM grants a very different kind of authority to users compared to self-service and delegation access controls.
Role-based access control is composed of three parts:
- Permissions grant the right to perform a specific task such as adding or deleting users, modifying a group, and enabling read-access.
- Privileges combine permissions, for example all the permissions needed to add a new user.
- Roles grant a set of privileges to users, user groups, hosts or host groups.
29.1.1. Permissions in IdM
Permissions are the lowest level unit of role-based access control, they define operations together with the LDAP entries to which those operations apply. Comparable to building blocks, permissions can be assigned to as many privileges as needed.
One or more rights define what operations are allowed:
-
write -
read -
search -
compare -
add -
delete -
all
These operations apply to three basic targets:
-
subtree: a domain name (DN); the subtree under this DN -
target filter: an LDAP filter -
target: DN with possible wildcards to specify entries
Additionally, the following convenience options set the corresponding attribute(s):
-
type: a type of object (user, group, etc); setssubtreeandtarget filter memberof: members of a group; sets atarget filterNoteSetting the
memberofattribute permission is not applied if the target LDAP entry does not contain any reference to group membership.-
targetgroup: grants access to modify a specific group (such as granting the rights to manage group membership); sets atarget
With IdM permissions, you can control which users have access to which objects and even which attributes of these objects. IdM enables you to allow or block individual attributes or change the entire visibility of a specific IdM function, such as users, groups, or sudo, to all anonymous users, all authenticated users, or just a certain group of privileged users.
For example, the flexibility of this approach to permissions is useful for an administrator who wants to limit access of users or groups only to the specific sections these users or groups need to access and to make the other sections completely hidden to them.
A permission cannot contain other permissions.
29.1.2. Default managed permissions
Managed permissions are permissions that come by default with IdM. They behave like other permissions created by the user, with the following differences:
- You cannot delete them or modify their name, location, and target attributes.
They have three sets of attributes:
- Default attributes, the user cannot modify them, as they are managed by IdM
- Included attributes, which are additional attributes added by the user
- Excluded attributes, which are attributes removed by the user
A managed permission applies to all attributes that appear in the default and included attribute sets but not in the excluded set.
While you cannot delete a managed permission, setting its bind type to permission and removing the managed permission from all privileges effectively disables it.
Names of all managed permissions start with System:, for example System: Add Sudo rule or System: Modify Services. Earlier versions of IdM used a different scheme for default permissions. For example, the user could not delete them and was only able to assign them to privileges. Most of these default permissions have been turned into managed permissions, however, the following permissions still use the previous scheme:
- Add Automember Rebuild Membership Task
- Add Configuration Sub-Entries
- Add Replication Agreements
- Certificate Remove Hold
- Get Certificates status from the CA
- Read DNA Range
- Modify DNA Range
- Read PassSync Managers Configuration
- Modify PassSync Managers Configuration
- Read Replication Agreements
- Modify Replication Agreements
- Remove Replication Agreements
- Read LDBM Database Configuration
- Request Certificate
- Request Certificate ignoring CA ACLs
- Request Certificates from a different host
- Retrieve Certificates from the CA
- Revoke Certificate
- Write IPA Configuration
If you attempt to modify a managed permission from the command line, the system does not allow you to change the attributes that you cannot modify, the command fails. If you attempt to modify a managed permission from the Web UI, the attributes that you cannot modify are disabled.
29.1.3. Privileges in IdM
A privilege is a group of permissions applicable to a role. While a permission provides the rights to do a single operation, there are certain IdM tasks that require multiple permissions to succeed. Therefore, a privilege combines the different permissions required to perform a specific task.
For example, setting up an account for a new IdM user requires the following permissions:
- Creating a new user entry
- Resetting a user password
- Adding the new user to the default IPA users group
Combining these three low-level tasks into a higher level task in the form of a custom privilege named, for example, Add User makes it easier for a system administrator to manage roles. IdM already contains several default privileges. Apart from users and user groups, privileges are also assigned to hosts and host groups, as well as network services. This practice permits a fine-grained control of operations by a set of users on a set of hosts using specific network services.
A privilege may not contain other privileges.
29.1.4. Roles in IdM
A role is a list of privileges that users specified for the role possess.
In effect, permissions grant the ability to perform given low-level tasks (such as creating a user entry and adding an entry to a group), privileges combine one or more of these permissions needed for a higher-level task (such as creating a new user in a given group). Roles gather privileges together as needed: for example, a User Administrator role would be able to add, modify, and delete users.
Roles are used to classify permitted actions. They are not used as a tool to implement privilege separation or to protect from privilege escalation.
Roles cannot contain other roles.
29.1.5. Predefined roles in Identity Management
Red Hat Enterprise Linux Identity Management provides the following range of pre-defined roles:
| Role | Privilege | Description |
|---|---|---|
| Enrollment Administrator | Host Enrollment | Responsible for client, or host, enrollment |
| helpdesk | Modify Users and Reset passwords, Modify Group membership | Responsible for performing simple user administration tasks |
| IT Security Specialist | Netgroups Administrators, HBAC Administrator, Sudo Administrator | Responsible for managing security policy such as host-based access controls, sudo rules |
| IT Specialist | Host Administrators, Host Group Administrators, Service Administrators, Automount Administrators | Responsible for managing hosts |
| Security Architect | Delegation Administrator, Replication Administrators, Write IPA Configuration, Password Policy Administrator | Responsible for managing the Identity Management environment, creating trusts, creating replication agreements |
| User Administrator | User Administrators, Group Administrators, Stage User Administrators | Responsible for creating users and groups |
29.2. Managing permissions in the IdM Web UI
Follow this procedure to manage permissions in Identity Management (IdM) using the web interface (IdM Web UI).
Prerequisites
- Administrator privileges for managing IdM or the User Administrator role.
- You are logged-in to the IdM Web UI. For details, see Accessing the IdM Web UI in a web browser.
Procedure
- To add a new permission, open the IPA Server>Role-Based Access Control submenu and select Permissions:
- The list of permissions opens: Click the Add button at the top of the list of the permissions:
- The Add Permission form opens. Specify the name of the new permission and define its properties.
Select the appropriate bind rule type:
- permission is the default permission type, granting access through privileges and roles
- all specifies that the permission applies to all authenticated users
anonymous specifies that the permission applies to all users, including unauthenticated users
NoteIt is not possible to add permissions with a non-default bind rule type to privileges. You also cannot set a permission that is already present in a privilege to a non-default bind rule type.
- Choose the rights to grant with this permission in Granted rights.
Define the method to identify the target entries for the permission:
- Type specifies an entry type, such as user, host, or service. If you choose a value for the Type setting, a list of all possible attributes which will be accessible through this ACI for that entry type appears under Effective Attributes. Defining Type sets Subtree and Target DN to one of the predefined values.
-
Subtree (required) specifies a subtree entry; every entry beneath this subtree entry is then targeted. Provide an existing subtree entry, as Subtree does not accept wildcards or non-existent domain names (DNs). For example:
cn=automount,dc=example,dc=com Extra target filter uses an LDAP filter to identify which entries the permission applies to. The filter can be any valid LDAP filter, for example:
(!(objectclass=posixgroup))IdM automatically checks the validity of the given filter. If you enter an invalid filter, IdM warns you about this when you attempt to save the permission.
-
Target DN specifies the domain name (DN) and accepts wildcards. For example:
uid=*,cn=users,cn=accounts,dc=com Member of group sets the target filter to members of the given group. After you specify the filter settings and click Add, IdM validates the filter. If all the permission settings are correct, IdM will perform the search. If some of the permissions settings are incorrect, IdM will display a message informing you about which setting is set incorrectly.
NoteSetting the
memberofattribute permission is not applied if the target LDAP entry does not contain any reference to group membership.
Add attributes to the permission:
- If you set Type, choose the Effective attributes from the list of available ACI attributes.
If you did not use Type, add the attributes manually by writing them into the Effective attributes field. Add a single attribute at a time; to add multiple attributes, click Add to add another input field.
ImportantIf you do not set any attributes for the permission, then the permissions includes all attributes by default.
Finish adding the permissions with the Add buttons at the bottom of the form:
- Click the Add button to save the permission and go back to the list of permissions.
- To save the permission and continue adding additional permissions in the same form, click the Add and Add another button.
- The Add and Edit button enables you to save and continue editing the newly created permission.
- Optional: You can also edit the properties of an existing permission by clicking its name from the list of permissions to display the Permission settings page.
Optional: If you need to remove an existing permission, select the checkbox next to its name in the list and click the Delete button to display The Remove permissions dialog. Click Delete.
NoteOperations on default managed permissions are restricted: the attributes you cannot modify are disabled in the IdM Web UI and you cannot delete the managed permissions completely.
However, you can effectively disable a managed permission that has a bind type set to permission, by removing the managed permission from all privileges.
For example, the following shows how to configure the permission write on the member attribute in the engineers group (so they can add or remove members):
+

29.3. Managing privileges in the IdM WebUI
Follow this procedure to manage privileges in IdM using the web interface (IdM Web UI).
Prerequisites
- Administrator privileges for managing IdM or the User Administrator role.
- You are logged-in to the IdM Web UI. For details, see Accessing the IdM Web UI in a web browser.
- Existing permissions. For details about permissions, see Managing permissions in the IdM Web UI.
Procedure
- To add a new privilege, open the IPA Server>Role-Based Access Control submenu and select Privileges:
- The list of privileges opens. Click the Add button at the top of the list of privileges.
- The Add Privilege form opens. Enter the name and a description of the privilege.
- Click the Add and Edit button to save the new privilege and continue to the privilege configuration page to add permissions.
- Click the Permissions tab to display a list of permissions included in the selected privilege. Click the Add button at the top of the list to add permissions to the privilege:
- Select the checkbox next to the name of each permission to add, and use the > button to move the permissions to the Prospective column.
- Confirm by clicking the Add button.
- Optional: If you need to remove permissions, select the checkbox next to the relevant permissions and click the Delete button to display the Remove privileges from permissions dialog. Click Delete.
- Optional: If you need to delete an existing privilege, select the checkbox next to its name in the list and click the Delete button to open the Remove privileges dialog. Click Delete.
29.4. Managing roles in the IdM Web UI
Follow this procedure to manage roles in Identity Management (IdM) using the web interface (IdM Web UI).
Prerequisites
- Administrator privileges for managing IdM or the User Administrator role.
- You are logged-in to the IdM Web UI. For details, see Accessing the IdM Web UI in a web browser.
- Existing privileges. For details about privileges, see Managing privileges in the IdM Web UI.
Procedure
- To add a new role, open the IPA Server>Role-Based Access Control submenu and select Roles:
- The list of roles opens. Click the Add button at the top of the list of roles.
- The Add Role form opens. Enter the role name and a description:
- Click the Add and Edit button to save the new role and continue to the role configuration page to add privileges and users.
- Add members using the Users, Users Groups, Hosts, Host Groups or Services tabs, by clicking the Add button on top of the relevant list(s).
- In the window that opens, select the members on the left and use the > button to move them to the Prospective column.
- Select the Privileges tab and click Add.
- Select the privileges on the left and use the > button to move them to the Prospective column.
- Click the Add button to save.
- Optional: If you need to remove privileges or members from a role, select the checkbox next to the name of the entity you want to remove and click the Delete button. A dialog opens. Click Delete.
- Optional: If you need to remove an existing role, select the checkbox next to its name in the list and click the Delete button to display the Remove roles dialog. Click Delete.
Chapter 30. Using Ansible playbooks to manage role-based access control in IdM
Role-based access control (RBAC) is a policy-neutral access-control mechanism defined around roles and privileges. The components of RBAC in Identity Management (IdM) are roles, privileges and permissions:
- Permissions grant the right to perform a specific task such as adding or deleting users, modifying a group, and enabling read-access.
- Privileges combine permissions, for example all the permissions needed to add a new user.
- Roles grant a set of privileges to users, user groups, hosts or host groups.
Especially in large companies, using RBAC can help create a hierarchical system of administrators with their individual areas of responsibility.
Learn about operations you can perform when managing RBAC using Ansible playbooks.
30.1. Permissions in IdM
Permissions are the lowest level unit of role-based access control, they define operations together with the LDAP entries to which those operations apply. Comparable to building blocks, permissions can be assigned to as many privileges as needed.
One or more rights define what operations are allowed:
-
write -
read -
search -
compare -
add -
delete -
all
These operations apply to three basic targets:
-
subtree: a domain name (DN); the subtree under this DN -
target filter: an LDAP filter -
target: DN with possible wildcards to specify entries
Additionally, the following convenience options set the corresponding attribute(s):
-
type: a type of object (user, group, etc); setssubtreeandtarget filter memberof: members of a group; sets atarget filterNoteSetting the
memberofattribute permission is not applied if the target LDAP entry does not contain any reference to group membership.-
targetgroup: grants access to modify a specific group (such as granting the rights to manage group membership); sets atarget
With IdM permissions, you can control which users have access to which objects and even which attributes of these objects. IdM enables you to allow or block individual attributes or change the entire visibility of a specific IdM function, such as users, groups, or sudo, to all anonymous users, all authenticated users, or just a certain group of privileged users.
For example, the flexibility of this approach to permissions is useful for an administrator who wants to limit access of users or groups only to the specific sections these users or groups need to access and to make the other sections completely hidden to them.
A permission cannot contain other permissions.
30.2. Default managed permissions
Managed permissions are permissions that come by default with IdM. They behave like other permissions created by the user, with the following differences:
- You cannot delete them or modify their name, location, and target attributes.
They have three sets of attributes:
- Default attributes, the user cannot modify them, as they are managed by IdM
- Included attributes, which are additional attributes added by the user
- Excluded attributes, which are attributes removed by the user
A managed permission applies to all attributes that appear in the default and included attribute sets but not in the excluded set.
While you cannot delete a managed permission, setting its bind type to permission and removing the managed permission from all privileges effectively disables it.
Names of all managed permissions start with System:, for example System: Add Sudo rule or System: Modify Services. Earlier versions of IdM used a different scheme for default permissions. For example, the user could not delete them and was only able to assign them to privileges. Most of these default permissions have been turned into managed permissions, however, the following permissions still use the previous scheme:
- Add Automember Rebuild Membership Task
- Add Configuration Sub-Entries
- Add Replication Agreements
- Certificate Remove Hold
- Get Certificates status from the CA
- Read DNA Range
- Modify DNA Range
- Read PassSync Managers Configuration
- Modify PassSync Managers Configuration
- Read Replication Agreements
- Modify Replication Agreements
- Remove Replication Agreements
- Read LDBM Database Configuration
- Request Certificate
- Request Certificate ignoring CA ACLs
- Request Certificates from a different host
- Retrieve Certificates from the CA
- Revoke Certificate
- Write IPA Configuration
If you attempt to modify a managed permission from the command line, the system does not allow you to change the attributes that you cannot modify, the command fails. If you attempt to modify a managed permission from the Web UI, the attributes that you cannot modify are disabled.
30.3. Privileges in IdM
A privilege is a group of permissions applicable to a role. While a permission provides the rights to do a single operation, there are certain IdM tasks that require multiple permissions to succeed. Therefore, a privilege combines the different permissions required to perform a specific task.
For example, setting up an account for a new IdM user requires the following permissions:
- Creating a new user entry
- Resetting a user password
- Adding the new user to the default IPA users group
Combining these three low-level tasks into a higher level task in the form of a custom privilege named, for example, Add User makes it easier for a system administrator to manage roles. IdM already contains several default privileges. Apart from users and user groups, privileges are also assigned to hosts and host groups, as well as network services. This practice permits a fine-grained control of operations by a set of users on a set of hosts using specific network services.
A privilege may not contain other privileges.
30.4. Roles in IdM
A role is a list of privileges that users specified for the role possess.
In effect, permissions grant the ability to perform given low-level tasks (such as creating a user entry and adding an entry to a group), privileges combine one or more of these permissions needed for a higher-level task (such as creating a new user in a given group). Roles gather privileges together as needed: for example, a User Administrator role would be able to add, modify, and delete users.
Roles are used to classify permitted actions. They are not used as a tool to implement privilege separation or to protect from privilege escalation.
Roles cannot contain other roles.
30.5. Predefined roles in Identity Management
Red Hat Enterprise Linux Identity Management provides the following range of pre-defined roles:
| Role | Privilege | Description |
|---|---|---|
| Enrollment Administrator | Host Enrollment | Responsible for client, or host, enrollment |
| helpdesk | Modify Users and Reset passwords, Modify Group membership | Responsible for performing simple user administration tasks |
| IT Security Specialist | Netgroups Administrators, HBAC Administrator, Sudo Administrator | Responsible for managing security policy such as host-based access controls, sudo rules |
| IT Specialist | Host Administrators, Host Group Administrators, Service Administrators, Automount Administrators | Responsible for managing hosts |
| Security Architect | Delegation Administrator, Replication Administrators, Write IPA Configuration, Password Policy Administrator | Responsible for managing the Identity Management environment, creating trusts, creating replication agreements |
| User Administrator | User Administrators, Group Administrators, Stage User Administrators | Responsible for creating users and groups |
30.6. Using Ansible to ensure an IdM RBAC role with privileges is present
To exercise more granular control over role-based access (RBAC) to resources in Identity Management (IdM) than the default roles provide, create a custom role.
The following procedure describes how to use an Ansible playbook to define privileges for a new IdM custom role and ensure its presence. In the example, the new user_and_host_administrator role contains a unique combination of the following privileges that are present in IdM by default:
-
Group Administrators -
User Administrators -
Stage User Administrators -
Group Administrators
Prerequisites
On the control node:
- You are using Ansible version 2.13 or later.
-
You have installed the
ansible-freeipapackage. - The example assumes that in the ~/MyPlaybooks/ directory, you have created an Ansible inventory file with the fully-qualified domain name (FQDN) of the IdM server.
-
The example assumes that the secret.yml Ansible vault stores your
ipaadmin_password.
-
The target node, that is the node on which the
ansible-freeipamodule is executed, is part of the IdM domain as an IdM client, server or replica.
Procedure
Navigate to the ~/<MyPlaybooks>/ directory:
$ cd ~/<MyPlaybooks>/Make a copy of the
role-member-user-present.ymlfile located in the/usr/share/doc/ansible-freeipa/playbooks/role/directory:$ cp /usr/share/doc/ansible-freeipa/playbooks/role/role-member-user-present.yml role-member-user-present-copy.yml-
Open the
role-member-user-present-copy.ymlAnsible playbook file for editing. Adapt the file by setting the following variables in the
iparoletask section:-
Set the
ipaadmin_passwordvariable to the password of the IdM administrator. -
Set the
namevariable to the name of the new role. -
Set the
privilegelist to the names of the IdM privileges that you want to include in the new role. -
Optionally, set the
uservariable to the name of the user to whom you want to grant the new role. -
Optionally, set the
groupvariable to the name of the group to which you want to grant the new role.
This is the modified Ansible playbook file for the current example:
--- - name: Playbook to manage IPA role with members. hosts: ipaserver become: true gather_facts: no vars_files: - /home/user_name/MyPlaybooks/secret.yml tasks: - iparole: ipaadmin_password: "{{ ipaadmin_password }}" name: user_and_host_administrator user: idm_user01 group: idm_group01 privilege: - Group Administrators - User Administrators - Stage User Administrators - Group Administrators-
Set the
- Save the file.
Run the Ansible playbook. Specify the playbook file, the file storing the password protecting the secret.yml file, and the inventory file:
$ ansible-playbook --vault-password-file=password_file -v -i ~/<MyPlaybooks>/inventory role-member-user-present-copy.yml
30.7. Using Ansible to ensure an IdM RBAC role is absent
As a system administrator managing role-based access control (RBAC) in Identity Management (IdM), you may want to ensure the absence of an obsolete role so that no administrator assigns it to any user accidentally.
The following procedure describes how to use an Ansible playbook to ensure a role is absent. The example below describes how to make sure the custom user_and_host_administrator role does not exist in IdM.
Prerequisites
On the control node:
- You are using Ansible version 2.13 or later.
-
You have installed the
ansible-freeipapackage. - The example assumes that in the ~/MyPlaybooks/ directory, you have created an Ansible inventory file with the fully-qualified domain name (FQDN) of the IdM server.
-
The example assumes that the secret.yml Ansible vault stores your
ipaadmin_password.
-
The target node, that is the node on which the
ansible-freeipamodule is executed, is part of the IdM domain as an IdM client, server or replica.
Procedure
Navigate to the ~/<MyPlaybooks>/ directory:
$ cd ~/<MyPlaybooks>/Make a copy of the
role-is-absent.ymlfile located in the/usr/share/doc/ansible-freeipa/playbooks/role/directory:$ cp /usr/share/doc/ansible-freeipa/playbooks/role/role-is-absent.yml role-is-absent-copy.yml-
Open the
role-is-absent-copy.ymlAnsible playbook file for editing. Adapt the file by setting the following variables in the
iparoletask section:-
Set the
ipaadmin_passwordvariable to the password of the IdM administrator. -
Set the
namevariable to the name of the role. -
Ensure that the
statevariable is set toabsent.
This is the modified Ansible playbook file for the current example:
--- - name: Playbook to manage IPA role with members. hosts: ipaserver become: true gather_facts: no vars_files: - /home/user_name/MyPlaybooks/secret.yml tasks: - iparole: ipaadmin_password: "{{ ipaadmin_password }}" name: user_and_host_administrator state: absent-
Set the
- Save the file.
Run the Ansible playbook. Specify the playbook file, the file storing the password protecting the secret.yml file, and the inventory file:
$ ansible-playbook --vault-password-file=password_file -v -i ~/<MyPlaybooks>/inventory role-is-absent-copy.yml
30.8. Using Ansible to ensure that a group of users is assigned to an IdM RBAC role
As a system administrator managing role-based access control (RBAC) in Identity Management (IdM), you may want to assign a role to a specific group of users, for example junior administrators.
The following example describes how to use an Ansible playbook to ensure the built-in IdM RBAC helpdesk role is assigned to junior_sysadmins.
Prerequisites
On the control node:
- You are using Ansible version 2.13 or later.
-
You have installed the
ansible-freeipapackage. - The example assumes that in the ~/MyPlaybooks/ directory, you have created an Ansible inventory file with the fully-qualified domain name (FQDN) of the IdM server.
-
The example assumes that the secret.yml Ansible vault stores your
ipaadmin_password.
-
The target node, that is the node on which the
ansible-freeipamodule is executed, is part of the IdM domain as an IdM client, server or replica.
Procedure
Navigate to the ~/<MyPlaybooks>/ directory:
$ cd ~/<MyPlaybooks>/Make a copy of the
role-member-group-present.ymlfile located in the/usr/share/doc/ansible-freeipa/playbooks/role/directory:$ cp /usr/share/doc/ansible-freeipa/playbooks/role/role-member-group-present.yml role-member-group-present-copy.yml-
Open the
role-member-group-present-copy.ymlAnsible playbook file for editing. Adapt the file by setting the following variables in the
iparoletask section:-
Set the
ipaadmin_passwordvariable to the password of the IdM administrator. -
Set the
namevariable to the name of the role you want to assign. -
Set the
groupvariable to the name of the group. -
Set the
actionvariable tomember.
This is the modified Ansible playbook file for the current example:
--- - name: Playbook to manage IPA role with members. hosts: ipaserver become: true gather_facts: no vars_files: - /home/user_name/MyPlaybooks/secret.yml tasks: - iparole: ipaadmin_password: "{{ ipaadmin_password }}" name: helpdesk group: junior_sysadmins action: member-
Set the
- Save the file.
Run the Ansible playbook. Specify the playbook file, the file storing the password protecting the secret.yml file, and the inventory file:
$ ansible-playbook --vault-password-file=password_file -v -i ~/<MyPlaybooks>/inventory role-member-group-present-copy.yml
30.9. Using Ansible to ensure that specific users are not assigned to an IdM RBAC role
As a system administrator managing role-based access control (RBAC) in Identity Management (IdM), you may want to ensure that an RBAC role is not assigned to specific users after they have, for example, moved to different positions within the company.
The following procedure describes how to use an Ansible playbook to ensure that the users named user_01 and user_02 are not assigned to the helpdesk role.
Prerequisites
On the control node:
- You are using Ansible version 2.13 or later.
-
You have installed the
ansible-freeipapackage. - The example assumes that in the ~/MyPlaybooks/ directory, you have created an Ansible inventory file with the fully-qualified domain name (FQDN) of the IdM server.
-
The example assumes that the secret.yml Ansible vault stores your
ipaadmin_password.
-
The target node, that is the node on which the
ansible-freeipamodule is executed, is part of the IdM domain as an IdM client, server or replica.
Procedure
Navigate to the ~/<MyPlaybooks>/ directory:
$ cd ~/<MyPlaybooks>/Make a copy of the
role-member-user-absent.ymlfile located in the/usr/share/doc/ansible-freeipa/playbooks/role/directory:$ cp /usr/share/doc/ansible-freeipa/playbooks/role/role-member-user-absent.yml role-member-user-absent-copy.yml-
Open the
role-member-user-absent-copy.ymlAnsible playbook file for editing. Adapt the file by setting the following variables in the
iparoletask section:-
Set the
ipaadmin_passwordvariable to the password of the IdM administrator. -
Set the
namevariable to the name of the role you want to assign. -
Set the
userlist to the names of the users. -
Set the
actionvariable tomember. -
Set the
statevariable toabsent.
This is the modified Ansible playbook file for the current example:
--- - name: Playbook to manage IPA role with members. hosts: ipaserver become: true gather_facts: no vars_files: - /home/user_name/MyPlaybooks/secret.yml tasks: - iparole: ipaadmin_password: "{{ ipaadmin_password }}" name: helpdesk user - user_01 - user_02 action: member state: absent-
Set the
- Save the file.
Run the Ansible playbook. Specify the playbook file, the file storing the password protecting the secret.yml file, and the inventory file:
$ ansible-playbook --vault-password-file=password_file -v -i ~/<MyPlaybooks>/inventory role-member-user-absent-copy.yml
30.10. Using Ansible to ensure a service is a member of an IdM RBAC role
As a system administrator managing role-based access control (RBAC) in Identity Management (IdM), you may want to ensure that a specific service that is enrolled into IdM is a member of a particular role. The following example describes how to ensure that the custom web_administrator role can manage the HTTP service that is running on the client01.idm.example.com server.
Prerequisites
On the control node:
- You are using Ansible version 2.13 or later.
-
You have installed the
ansible-freeipapackage. - The example assumes that in the ~/MyPlaybooks/ directory, you have created an Ansible inventory file with the fully-qualified domain name (FQDN) of the IdM server.
-
The example assumes that the secret.yml Ansible vault stores your
ipaadmin_password.
-
The target node, that is the node on which the
ansible-freeipamodule is executed, is part of the IdM domain as an IdM client, server or replica. - The web_administrator role exists in IdM.
- The HTTP/client01.idm.example.com@IDM.EXAMPLE.COM service exists in IdM.
Procedure
Navigate to the ~/<MyPlaybooks>/ directory:
$ cd ~/<MyPlaybooks>/Make a copy of the
role-member-service-present.ymlfile located in the/usr/share/doc/ansible-freeipa/playbooks/role/directory:$ cp /usr/share/doc/ansible-freeipa/playbooks/role/role-member-service-present-absent.yml role-member-service-present-copy.yml-
Open the
role-member-service-present-copy.ymlAnsible playbook file for editing. Adapt the file by setting the following variables in the
iparoletask section:-
Set the
ipaadmin_passwordvariable to the password of the IdM administrator. -
Set the
namevariable to the name of the role you want to assign. -
Set the
servicelist to the name of the service. -
Set the
actionvariable tomember.
This is the modified Ansible playbook file for the current example:
--- - name: Playbook to manage IPA role with members. hosts: ipaserver become: true gather_facts: no vars_files: - /home/user_name/MyPlaybooks/secret.yml tasks: - iparole: ipaadmin_password: "{{ ipaadmin_password }}" name: web_administrator service: - HTTP/client01.idm.example.com action: member-
Set the
- Save the file.
Run the Ansible playbook. Specify the playbook file, the file storing the password protecting the secret.yml file, and the inventory file:
$ ansible-playbook --vault-password-file=password_file -v -i ~/<MyPlaybooks>/inventory role-member-service-present-copy.yml
30.11. Using Ansible to ensure a host is a member of an IdM RBAC role
As a system administrator managing role-based access control in Identity Management (IdM), you may want to ensure that a specific host or host group is associated with a specific role. The following example describes how to ensure that the custom web_administrator role can manage the client01.idm.example.com IdM host on which the HTTP service is running.
Prerequisites
On the control node:
- You are using Ansible version 2.13 or later.
-
You have installed the
ansible-freeipapackage. - The example assumes that in the ~/MyPlaybooks/ directory, you have created an Ansible inventory file with the fully-qualified domain name (FQDN) of the IdM server.
-
The example assumes that the secret.yml Ansible vault stores your
ipaadmin_password.
-
The target node, that is the node on which the
ansible-freeipamodule is executed, is part of the IdM domain as an IdM client, server or replica. - The web_administrator role exists in IdM.
- The client01.idm.example.com host exists in IdM.
Procedure
Navigate to the ~/<MyPlaybooks>/ directory:
$ cd ~/<MyPlaybooks>/Make a copy of the
role-member-host-present.ymlfile located in the/usr/share/doc/ansible-freeipa/playbooks/role/directory:$ cp /usr/share/doc/ansible-freeipa/playbooks/role/role-member-host-present.yml role-member-host-present-copy.yml-
Open the
role-member-host-present-copy.ymlAnsible playbook file for editing. Adapt the file by setting the following variables in the
iparoletask section:-
Set the
ipaadmin_passwordvariable to the password of the IdM administrator. -
Set the
namevariable to the name of the role you want to assign. -
Set the
hostlist to the name of the host.
This is the modified Ansible playbook file for the current example:
--- - name: Playbook to manage IPA role with members. hosts: ipaserver become: true gather_facts: no vars_files: - /home/user_name/MyPlaybooks/secret.yml tasks: - iparole: ipaadmin_password: "{{ ipaadmin_password }}" name: web_administrator host: - client01.idm.example.com action: member-
Set the
- Save the file.
Run the Ansible playbook. Specify the playbook file, the file storing the password protecting the secret.yml file, and the inventory file:
$ ansible-playbook --vault-password-file=password_file -v -i ~/<MyPlaybooks>/inventory role-member-host-present-copy.yml
30.12. Using Ansible to ensure a host group is a member of an IdM RBAC role
As a system administrator managing role-based access control in Identity Management (IdM), you may want to ensure that a specific host or host group is associated with a specific role. The following example describes how to ensure that the custom web_administrator role can manage the web_servers group of IdM hosts on which the HTTP service is running.
Prerequisites
On the control node:
- You are using Ansible version 2.13 or later.
-
You have installed the
ansible-freeipapackage. - The example assumes that in the ~/MyPlaybooks/ directory, you have created an Ansible inventory file with the fully-qualified domain name (FQDN) of the IdM server.
-
The example assumes that the secret.yml Ansible vault stores your
ipaadmin_password.
-
The target node, that is the node on which the
ansible-freeipamodule is executed, is part of the IdM domain as an IdM client, server or replica. - The web_administrator role exists in IdM.
- The web_servers host group exists in IdM.
Procedure
Navigate to the ~/<MyPlaybooks>/ directory:
$ cd ~/<MyPlaybooks>/Make a copy of the
role-member-hostgroup-present.ymlfile located in the/usr/share/doc/ansible-freeipa/playbooks/role/directory:$ cp /usr/share/doc/ansible-freeipa/playbooks/role/role-member-hostgroup-present.yml role-member-hostgroup-present-copy.yml-
Open the
role-member-hostgroup-present-copy.ymlAnsible playbook file for editing. Adapt the file by setting the following variables in the
iparoletask section:-
Set the
ipaadmin_passwordvariable to the password of the IdM administrator. -
Set the
namevariable to the name of the role you want to assign. -
Set the
hostgrouplist to the name of the hostgroup.
This is the modified Ansible playbook file for the current example:
--- - name: Playbook to manage IPA role with members. hosts: ipaserver become: true gather_facts: no vars_files: - /home/user_name/MyPlaybooks/secret.yml tasks: - iparole: ipaadmin_password: "{{ ipaadmin_password }}" name: web_administrator hostgroup: - web_servers action: member-
Set the
- Save the file.
Run the Ansible playbook. Specify the playbook file, the file storing the password protecting the secret.yml file, and the inventory file:
$ ansible-playbook --vault-password-file=password_file -v -i ~/<MyPlaybooks>/inventory role-member-hostgroup-present-copy.yml
Chapter 31. Using Ansible playbooks to manage RBAC privileges
Role-based access control (RBAC) is a policy-neutral access-control mechanism defined around roles, privileges, and permissions. Especially in large companies, using RBAC can help create a hierarchical system of administrators with their individual areas of responsibility.
Learn how to use Ansible playbooks to manage RBAC privileges in Identity Management (IdM).
Prerequisites
- You understand the concepts and principles of RBAC.
31.1. Using Ansible to ensure a custom IdM RBAC privilege is present
To have a fully-functioning custom privilege in Identity Management (IdM) role-based access control (RBAC), you need to proceed in stages:
- Create a privilege with no permissions attached.
- Add permissions of your choice to the privilege.
The following procedure describes how to create an empty privilege using an Ansible playbook so that you can later add permissions to it. The example describes how to create a privilege named full_host_administration that is meant to combine all IdM permissions related to host administration.
Prerequisites
On the control node:
- You are using Ansible version 2.13 or later.
-
You have installed the
ansible-freeipapackage. - The example assumes that in the ~/MyPlaybooks/ directory, you have created an Ansible inventory file with the fully-qualified domain name (FQDN) of the IdM server.
-
The example assumes that the secret.yml Ansible vault stores your
ipaadmin_password.
-
The target node, that is the node on which the
ansible-freeipamodule is executed, is part of the IdM domain as an IdM client, server or replica.
Procedure
Navigate to the ~/MyPlaybooks/ directory:
$ cd ~/MyPlaybooks/Make a copy of the
privilege-present.ymlfile located in the/usr/share/doc/ansible-freeipa/playbooks/privilege/directory:$ cp /usr/share/doc/ansible-freeipa/playbooks/privilege/privilege-present.yml privilege-present-copy.yml-
Open the
privilege-present-copy.ymlAnsible playbook file for editing. Adapt the file by setting the following variables in the
ipaprivilegetask section:-
Set the
ipaadmin_passwordvariable to the password of the IdM administrator. -
Set the
namevariable to the name of the new privilege, full_host_administration. -
Optionally, describe the privilege using the
descriptionvariable.
This is the modified Ansible playbook file for the current example:
--- - name: Privilege present example hosts: ipaserver vars_files: - /home/user_name/MyPlaybooks/secret.yml tasks: - name: Ensure privilege full_host_administration is present ipaprivilege: ipaadmin_password: "{{ ipaadmin_password }}" name: full_host_administration description: This privilege combines all IdM permissions related to host administration-
Set the
- Save the file.
Run the Ansible playbook. Specify the playbook file, the file storing the password protecting the secret.yml file, and the inventory file:
$ ansible-playbook --vault-password-file=password_file -v -i inventory privilege-present-copy.yml
31.2. Using Ansible to ensure member permissions are present in a custom IdM RBAC privilege
To have a fully-functioning custom privilege in Identity Management (IdM) role-based access control (RBAC), you need to proceed in stages:
- Create a privilege with no permissions attached.
- Add permissions of your choice to the privilege.
The following procedure describes how to use an Ansible playbook to add permissions to a privilege created in the previous step. The example describes how to add all IdM permissions related to host administration to a privilege named full_host_administration. By default, the permissions are distributed between the Host Enrollment, Host Administrators and Host Group Administrator privileges.
Prerequisites
On the control node:
- You are using Ansible version 2.13 or later.
-
You have installed the
ansible-freeipapackage. - The example assumes that in the ~/MyPlaybooks/ directory, you have created an Ansible inventory file with the fully-qualified domain name (FQDN) of the IdM server.
-
The example assumes that the secret.yml Ansible vault stores your
ipaadmin_password.
-
The target node, that is the node on which the
ansible-freeipamodule is executed, is part of the IdM domain as an IdM client, server or replica. - The full_host_administration privilege exists. For information about how to create a privilege using Ansible, see Using Ansible to ensure a custom IdM RBAC privilege is present.
Procedure
Navigate to the ~/MyPlaybooks/ directory:
$ cd ~/MyPlaybooks/Make a copy of the
privilege-member-present.ymlfile located in the/usr/share/doc/ansible-freeipa/playbooks/privilege/directory:$ cp /usr/share/doc/ansible-freeipa/playbooks/privilege/privilege-member-present.yml privilege-member-present-copy.yml-
Open the
privilege-member-present-copy.ymlAnsible playbook file for editing. Adapt the file by setting the following variables in the
ipaprivilegetask section:-
Adapt the
nameof the task to correspond to your use case. -
Set the
ipaadmin_passwordvariable to the password of the IdM administrator. -
Set the
namevariable to the name of the privilege. -
Set the
permissionlist to the names of the permissions that you want to include in the privilege. -
Make sure that the
actionvariable is set tomember.
This is the modified Ansible playbook file for the current example:
--- - name: Privilege member present example hosts: ipaserver vars_files: - /home/user_name/MyPlaybooks/secret.yml tasks: - name: Ensure that permissions are present for the "full_host_administration" privilege ipaprivilege: ipaadmin_password: "{{ ipaadmin_password }}" name: full_host_administration permission: - "System: Add krbPrincipalName to a Host" - "System: Enroll a Host" - "System: Manage Host Certificates" - "System: Manage Host Enrollment Password" - "System: Manage Host Keytab" - "System: Manage Host Principals" - "Retrieve Certificates from the CA" - "Revoke Certificate" - "System: Add Hosts" - "System: Add krbPrincipalName to a Host" - "System: Enroll a Host" - "System: Manage Host Certificates" - "System: Manage Host Enrollment Password" - "System: Manage Host Keytab" - "System: Manage Host Keytab Permissions" - "System: Manage Host Principals" - "System: Manage Host SSH Public Keys" - "System: Manage Service Keytab" - "System: Manage Service Keytab Permissions" - "System: Modify Hosts" - "System: Remove Hosts" - "System: Add Hostgroups" - "System: Modify Hostgroup Membership" - "System: Modify Hostgroups" - "System: Remove Hostgroups"-
Adapt the
- Save the file.
Run the Ansible playbook. Specify the playbook file, the file storing the password protecting the secret.yml file, and the inventory file:
$ ansible-playbook --vault-password-file=password_file -v -i inventory privilege-member-present-copy.yml
31.3. Using Ansible to ensure an IdM RBAC privilege does not include a permission
As a system administrator of Identity Management (IdM), you can customize the IdM role-based access control.
The following procedure describes how to use an Ansible playbook to remove a permission from a privilege. The example describes how to remove the Request Certificates ignoring CA ACLs permission from the default Certificate Administrators privilege because, for example, the administrator considers it a security risk.
Prerequisites
On the control node:
- You are using Ansible version 2.13 or later.
-
You have installed the
ansible-freeipapackage. - The example assumes that in the ~/MyPlaybooks/ directory, you have created an Ansible inventory file with the fully-qualified domain name (FQDN) of the IdM server.
-
The example assumes that the secret.yml Ansible vault stores your
ipaadmin_password.
-
The target node, that is the node on which the
ansible-freeipamodule is executed, is part of the IdM domain as an IdM client, server or replica.
Procedure
Navigate to the ~/MyPlaybooks/ directory:
$ cd ~/MyPlaybooks/Make a copy of the
privilege-member-present.ymlfile located in the/usr/share/doc/ansible-freeipa/playbooks/privilege/directory:$ cp /usr/share/doc/ansible-freeipa/playbooks/privilege/privilege-member-absent.yml privilege-member-absent-copy.yml-
Open the
privilege-member-absent-copy.ymlAnsible playbook file for editing. Adapt the file by setting the following variables in the
ipaprivilegetask section:-
Adapt the
nameof the task to correspond to your use case. -
Set the
ipaadmin_passwordvariable to the password of the IdM administrator. -
Set the
namevariable to the name of the privilege. -
Set the
permissionlist to the names of the permissions that you want to remove from the privilege. -
Make sure that the
actionvariable is set tomember. -
Make sure that the
statevariable is set toabsent.
This is the modified Ansible playbook file for the current example:
--- - name: Privilege absent example hosts: ipaserver vars_files: - /home/user_name/MyPlaybooks/secret.yml tasks: - name: Ensure that the "Request Certificate ignoring CA ACLs" permission is absent from the "Certificate Administrators" privilege ipaprivilege: ipaadmin_password: "{{ ipaadmin_password }}" name: Certificate Administrators permission: - "Request Certificate ignoring CA ACLs" action: member state: absent-
Adapt the
- Save the file.
Run the Ansible playbook. Specify the playbook file, the file storing the password protecting the secret.yml file, and the inventory file:
$ ansible-playbook --vault-password-file=password_file -v -i inventory privilege-member-absent-copy.yml
31.4. Using Ansible to rename a custom IdM RBAC privilege
As a system administrator of Identity Management (IdM), you can customize the IdM role-based access control.
The following procedure describes how to rename a privilege because, for example, you have removed a few permissions from it. As a result, the name of the privilege is no longer accurate. In the example, the administrator renames a full_host_administration privilege to limited_host_administration.
Prerequisites
On the control node:
- You are using Ansible version 2.13 or later.
-
You have installed the
ansible-freeipapackage. - The example assumes that in the ~/MyPlaybooks/ directory, you have created an Ansible inventory file with the fully-qualified domain name (FQDN) of the IdM server.
-
The example assumes that the secret.yml Ansible vault stores your
ipaadmin_password.
-
The target node, that is the node on which the
ansible-freeipamodule is executed, is part of the IdM domain as an IdM client, server or replica. - The full_host_administration privilege exists. For more information about how to add a privilege, see Using Ansible to ensure a custom IdM RBAC privilege is present.
Procedure
Navigate to the ~/MyPlaybooks/ directory:
$ cd ~/MyPlaybooks/Make a copy of the
privilege-present.ymlfile located in the/usr/share/doc/ansible-freeipa/playbooks/privilege/directory:$ cp /usr/share/doc/ansible-freeipa/playbooks/privilege/privilege-present.yml rename-privilege.yml-
Open the
rename-privilege.ymlAnsible playbook file for editing. Adapt the file by setting the following variables in the
ipaprivilegetask section:-
Set the
ipaadmin_passwordvariable to the password of the IdM administrator. -
Set the
namevariable to the current name of the privilege. -
Add the
renamevariable and set it to the new name of the privilege. -
Add the
statevariable and set it torenamed.
-
Set the
Rename the playbook itself, for example:
--- - name: Rename a privilege hosts: ipaserverRename the task in the playbook, for example:
[...] tasks: - name: Ensure the full_host_administration privilege is renamed to limited_host_administration ipaprivilege: [...]This is the modified Ansible playbook file for the current example:
--- - name: Rename a privilege hosts: ipaserver vars_files: - /home/user_name/MyPlaybooks/secret.yml tasks: - name: Ensure the full_host_administration privilege is renamed to limited_host_administration ipaprivilege: ipaadmin_password: "{{ ipaadmin_password }}" name: full_host_administration rename: limited_host_administration state: renamed- Save the file.
Run the Ansible playbook. Specify the playbook file, the file storing the password protecting the secret.yml file, and the inventory file:
$ ansible-playbook --vault-password-file=password_file -v -i inventory rename-privilege.yml
31.5. Using Ansible to ensure an IdM RBAC privilege is absent
As a system administrator of Identity Management (IdM), you can customize the IdM role-based access control. The following procedure describes how to use an Ansible playbook to ensure that an RBAC privilege is absent. The example describes how to ensure that the CA administrator privilege is absent. As a result of the procedure, the admin administrator becomes the only user capable of managing certificate authorities in IdM.
Prerequisites
On the control node:
- You are using Ansible version 2.13 or later.
-
You have installed the
ansible-freeipapackage. - The example assumes that in the ~/MyPlaybooks/ directory, you have created an Ansible inventory file with the fully-qualified domain name (FQDN) of the IdM server.
-
The example assumes that the secret.yml Ansible vault stores your
ipaadmin_password.
-
The target node, that is the node on which the
ansible-freeipamodule is executed, is part of the IdM domain as an IdM client, server or replica.
Procedure
Navigate to the ~/MyPlaybooks/ directory:
$ cd ~/MyPlaybooks/Make a copy of the
privilege-absent.ymlfile located in the/usr/share/doc/ansible-freeipa/playbooks/privilege/directory:$ cp /usr/share/doc/ansible-freeipa/playbooks/privilege/privilege-absent.yml privilege-absent-copy.yml-
Open the
privilege-absent-copy.ymlAnsible playbook file for editing. Adapt the file by setting the following variables in the
ipaprivilegetask section:-
Set the
ipaadmin_passwordvariable to the password of the IdM administrator. -
Set the
namevariable to the name of the privilege you want to remove. -
Make sure that the
statevariable is set it toabsent.
-
Set the
Rename the task in the playbook, for example:
[...] tasks: - name: Ensure privilege "CA administrator" is absent ipaprivilege: [...]This is the modified Ansible playbook file for the current example:
--- - name: Privilege absent example hosts: ipaserver vars_files: - /home/user_name/MyPlaybooks/secret.yml tasks: - name: Ensure privilege "CA administrator" is absent ipaprivilege: ipaadmin_password: "{{ ipaadmin_password }}" name: CA administrator state: absent- Save the file.
Run the Ansible playbook. Specify the playbook file, the file storing the password protecting the secret.yml file, and the inventory file:
$ ansible-playbook --vault-password-file=password_file -v -i inventory privilege-absent-copy.yml
Chapter 32. Using Ansible playbooks to manage RBAC permissions in IdM
Role-based access control (RBAC) is a policy-neutral access control mechanism defined around roles, privileges, and permissions. Especially in large companies, using RBAC can help create a hierarchical system of administrators with their individual areas of responsibility.
Learn about operations you can perform when managing RBAC permissions in Identity Management (IdM) using Ansible playbooks:
Prerequisites
- You understand the concepts and principles of RBAC.
32.1. Using Ansible to ensure an RBAC permission is present
As a system administrator of Identity Management (IdM), you can customize the IdM role-based access control (RBAC).
The following procedure describes how to use an Ansible playbook to ensure a permission is present in IdM so that it can be added to a privilege. The example describes how to ensure the following target state:
-
The
MyPermissionpermission exists. -
The
MyPermissionpermission can only be applied to hosts. A user granted a privilege that contains the permission can do all of the following possible operations on an entry:
- Write
- Read
- Search
- Compare
- Add
- Delete
Prerequisites
On the control node:
- You are using Ansible version 2.13 or later.
-
You have installed the
ansible-freeipapackage. - The example assumes that in the ~/MyPlaybooks/ directory, you have created an Ansible inventory file with the fully-qualified domain name (FQDN) of the IdM server.
-
The example assumes that the secret.yml Ansible vault stores your
ipaadmin_password.
-
The target node, that is the node on which the
ansible-freeipamodule is executed, is part of the IdM domain as an IdM client, server or replica.
Procedure
Navigate to the ~/MyPlaybooks/ directory:
$ cd ~/MyPlaybooks/Make a copy of the
permission-present.ymlfile located in the/usr/share/doc/ansible-freeipa/playbooks/permission/directory:$ cp /usr/share/doc/ansible-freeipa/playbooks/permission/permission-present.yml permission-present-copy.yml-
Open the
permission-present-copy.ymlAnsible playbook file for editing. Adapt the file by setting the following variables in the
ipapermissiontask section:-
Adapt the
nameof the task to correspond to your use case. -
Set the
ipaadmin_passwordvariable to the password of the IdM administrator. -
Set the
namevariable to the name of the permission. -
Set the
object_typevariable tohost. -
Set the
rightvariable toall.
This is the modified Ansible playbook file for the current example:
--- - name: Permission present example hosts: ipaserver vars_files: - /home/user_name/MyPlaybooks/secret.yml tasks: - name: Ensure that the "MyPermission" permission is present ipapermission: ipaadmin_password: "{{ ipaadmin_password }}" name: MyPermission object_type: host right: all-
Adapt the
- Save the file.
Run the Ansible playbook. Specify the playbook file, the file storing the password protecting the secret.yml file, and the inventory file:
$ ansible-playbook --vault-password-file=password_file -v -i inventory permission-present-copy.yml
32.2. Using Ansible to ensure an RBAC permission with an attribute is present
As a system administrator of Identity Management (IdM), you can customize the IdM role-based access control (RBAC).
The following procedure describes how to use an Ansible playbook to ensure a permission is present in IdM so that it can be added to a privilege. The example describes how to ensure the following target state:
- The MyPermission permission exists.
- The MyPermission permission can only be used to add hosts.
A user granted a privilege that contains the permission can do all of the following possible operations on a host entry:
- Write
- Read
- Search
- Compare
- Add
- Delete
-
The host entries created by a user that is granted a privilege that contains the MyPermission permission can have a
descriptionvalue.
The type of attribute that you can specify when creating or modifying a permission is not constrained by the IdM LDAP schema. However, specifying, for example, attrs: car_licence if the object_type is host later results in the ipa: ERROR: attribute "car-license" not allowed error message when you try to exercise the permission and add a specific car licence value to a host.
Prerequisites
On the control node:
- You are using Ansible version 2.13 or later.
-
You have installed the
ansible-freeipapackage. - The example assumes that in the ~/MyPlaybooks/ directory, you have created an Ansible inventory file with the fully-qualified domain name (FQDN) of the IdM server.
-
The example assumes that the secret.yml Ansible vault stores your
ipaadmin_password.
-
The target node, that is the node on which the
ansible-freeipamodule is executed, is part of the IdM domain as an IdM client, server or replica.
Procedure
Navigate to the ~/MyPlaybooks/ directory:
$ cd ~/MyPlaybooks/Make a copy of the
permission-present.ymlfile located in the/usr/share/doc/ansible-freeipa/playbooks/permission/directory:$ cp /usr/share/doc/ansible-freeipa/playbooks/permission/permission-present.yml permission-present-with-attribute.yml-
Open the
permission-present-with-attribute.ymlAnsible playbook file for editing. Adapt the file by setting the following variables in the
ipapermissiontask section:-
Adapt the
nameof the task to correspond to your use case. -
Set the
ipaadmin_passwordvariable to the password of the IdM administrator. -
Set the
namevariable to the name of the permission. -
Set the
object_typevariable tohost. -
Set the
rightvariable toall. -
Set the
attrsvariable todescription.
This is the modified Ansible playbook file for the current example:
--- - name: Permission present example hosts: ipaserver vars_files: - /home/user_name/MyPlaybooks/secret.yml tasks: - name: Ensure that the "MyPermission" permission is present with an attribute ipapermission: ipaadmin_password: "{{ ipaadmin_password }}" name: MyPermission object_type: host right: all attrs: description-
Adapt the
- Save the file.
Run the Ansible playbook. Specify the playbook file, the file storing the password protecting the secret.yml file, and the inventory file:
$ ansible-playbook --vault-password-file=password_file -v -i inventory permission-present-with-attribute.yml
32.3. Using Ansible to ensure an RBAC permission is absent
As a system administrator of Identity Management (IdM), you can customize the IdM role-based access control (RBAC).
The following procedure describes how to use an Ansible playbook to ensure a permission is absent in IdM so that it cannot be added to a privilege.
Prerequisites
On the control node:
- You are using Ansible version 2.13 or later.
-
You have installed the
ansible-freeipapackage. - The example assumes that in the ~/MyPlaybooks/ directory, you have created an Ansible inventory file with the fully-qualified domain name (FQDN) of the IdM server.
-
The example assumes that the secret.yml Ansible vault stores your
ipaadmin_password.
-
The target node, that is the node on which the
ansible-freeipamodule is executed, is part of the IdM domain as an IdM client, server or replica.
Procedure
Navigate to the ~/MyPlaybooks/ directory:
$ cd ~/MyPlaybooks/Make a copy of the
permission-absent.ymlfile located in the/usr/share/doc/ansible-freeipa/playbooks/permission/directory:$ cp /usr/share/doc/ansible-freeipa/playbooks/permission/permission-absent.yml permission-absent-copy.yml-
Open the
permission-absent-copy.ymlAnsible playbook file for editing. Adapt the file by setting the following variables in the
ipapermissiontask section:-
Adapt the
nameof the task to correspond to your use case. -
Set the
ipaadmin_passwordvariable to the password of the IdM administrator. -
Set the
namevariable to the name of the permission.
This is the modified Ansible playbook file for the current example:
--- - name: Permission absent example hosts: ipaserver vars_files: - /home/user_name/MyPlaybooks/secret.yml tasks: - name: Ensure that the "MyPermission" permission is absent ipapermission: ipaadmin_password: "{{ ipaadmin_password }}" name: MyPermission state: absent-
Adapt the
- Save the file.
Run the Ansible playbook. Specify the playbook file, the file storing the password protecting the secret.yml file, and the inventory file:
$ ansible-playbook --vault-password-file=password_file -v -i inventory permission-absent-copy.yml
32.4. Using Ansible to ensure an attribute is a member of an IdM RBAC permission
As a system administrator of Identity Management (IdM), you can customize the IdM role-based access control (RBAC).
The following procedure describes how to use an Ansible playbook to ensure that an attribute is a member of an RBAC permission in IdM. As a result, a user with the permission can create entries that have the attribute.
The example describes how to ensure that the host entries created by a user with a privilege that contains the MyPermission permission can have gecos and description values.
The type of attribute that you can specify when creating or modifying a permission is not constrained by the IdM LDAP schema. However, specifying, for example, attrs: car_licence if the object_type is host later results in the ipa: ERROR: attribute "car-license" not allowed error message when you try to exercise the permission and add a specific car licence value to a host.
Prerequisites
On the control node:
- You are using Ansible version 2.13 or later.
-
You have installed the
ansible-freeipapackage. - The example assumes that in the ~/MyPlaybooks/ directory, you have created an Ansible inventory file with the fully-qualified domain name (FQDN) of the IdM server.
-
The example assumes that the secret.yml Ansible vault stores your
ipaadmin_password.
-
The target node, that is the node on which the
ansible-freeipamodule is executed, is part of the IdM domain as an IdM client, server or replica. - The MyPermission permission exists.
Procedure
Navigate to the ~/MyPlaybooks/ directory:
$ cd ~/MyPlaybooks/Make a copy of the
permission-member-present.ymlfile located in the/usr/share/doc/ansible-freeipa/playbooks/permission/directory:$ cp /usr/share/doc/ansible-freeipa/playbooks/permission/permission-member-present.yml permission-member-present-copy.yml-
Open the
permission-member-present-copy.ymlAnsible playbook file for editing. Adapt the file by setting the following variables in the
ipapermissiontask section:-
Adapt the
nameof the task to correspond to your use case. -
Set the
ipaadmin_passwordvariable to the password of the IdM administrator. -
Set the
namevariable to the name of the permission. -
Set the
attrslist to thedescriptionandgecosvariables. -
Make sure the
actionvariable is set tomember.
This is the modified Ansible playbook file for the current example:
--- - name: Permission member present example hosts: ipaserver vars_files: - /home/user_name/MyPlaybooks/secret.yml tasks: - name: Ensure that the "gecos" and "description" attributes are present in "MyPermission" ipapermission: ipaadmin_password: "{{ ipaadmin_password }}" name: MyPermission attrs: - description - gecos action: member-
Adapt the
- Save the file.
Run the Ansible playbook. Specify the playbook file, the file storing the password protecting the secret.yml file, and the inventory file:
$ ansible-playbook --vault-password-file=password_file -v -i inventory permission-member-present-copy.yml
32.5. Using Ansible to ensure an attribute is not a member of an IdM RBAC permission
As a system administrator of Identity Management (IdM), you can customize the IdM role-based access control (RBAC).
The following procedure describes how to use an Ansible playbook to ensure that an attribute is not a member of an RBAC permission in IdM. As a result, when a user with the permission creates an entry in IdM LDAP, that entry cannot have a value associated with the attribute.
The example describes how to ensure the following target state:
- The MyPermission permission exists.
-
The host entries created by a user with a privilege that contains the MyPermission permission cannot have the
descriptionattribute.
Prerequisites
On the control node:
- You are using Ansible version 2.13 or later.
-
You have installed the
ansible-freeipapackage. - The example assumes that in the ~/MyPlaybooks/ directory, you have created an Ansible inventory file with the fully-qualified domain name (FQDN) of the IdM server.
-
The example assumes that the secret.yml Ansible vault stores your
ipaadmin_password.
-
The target node, that is the node on which the
ansible-freeipamodule is executed, is part of the IdM domain as an IdM client, server or replica. - The MyPermission permission exists.
Procedure
Navigate to the ~/MyPlaybooks/ directory:
$ cd ~/MyPlaybooks/Make a copy of the
permission-member-absent.ymlfile located in the/usr/share/doc/ansible-freeipa/playbooks/permission/directory:$ cp /usr/share/doc/ansible-freeipa/playbooks/permission/permission-member-absent.yml permission-member-absent-copy.yml-
Open the
permission-member-absent-copy.ymlAnsible playbook file for editing. Adapt the file by setting the following variables in the
ipapermissiontask section:-
Adapt the
nameof the task to correspond to your use case. -
Set the
ipaadmin_passwordvariable to the password of the IdM administrator. -
Set the
namevariable to the name of the permission. -
Set the
attrsvariable todescription. -
Set the
actionvariable tomember. -
Make sure the
statevariable is set toabsent
This is the modified Ansible playbook file for the current example:
--- - name: Permission absent example hosts: ipaserver vars_files: - /home/user_name/MyPlaybooks/secret.yml tasks: - name: Ensure that an attribute is not a member of "MyPermission" ipapermission: ipaadmin_password: "{{ ipaadmin_password }}" name: MyPermission attrs: description action: member state: absent-
Adapt the
- Save the file.
Run the Ansible playbook. Specify the playbook file, the file storing the password protecting the secret.yml file, and the inventory file:
$ ansible-playbook --vault-password-file=password_file -v -i inventory permission-member-absent-copy.yml
32.6. Using Ansible to rename an IdM RBAC permission
As a system administrator of Identity Management (IdM), you can customize the IdM role-based access control.
The following procedure describes how to use an Ansible playbook to rename a permission. The example describes how to rename MyPermission to MyNewPermission.
Prerequisites
On the control node:
- You are using Ansible version 2.13 or later.
-
You have installed the
ansible-freeipapackage. - The example assumes that in the ~/MyPlaybooks/ directory, you have created an Ansible inventory file with the fully-qualified domain name (FQDN) of the IdM server.
-
The example assumes that the secret.yml Ansible vault stores your
ipaadmin_password.
-
The target node, that is the node on which the
ansible-freeipamodule is executed, is part of the IdM domain as an IdM client, server or replica. - The MyPermission exists in IdM.
- The MyNewPermission does not exist in IdM.
Procedure
Navigate to the ~/MyPlaybooks/ directory:
$ cd ~/MyPlaybooks/Make a copy of the
permission-renamed.ymlfile located in the/usr/share/doc/ansible-freeipa/playbooks/permission/directory:$ cp /usr/share/doc/ansible-freeipa/playbooks/permission/permission-renamed.yml permission-renamed-copy.yml-
Open the
permission-renamed-copy.ymlAnsible playbook file for editing. Adapt the file by setting the following variables in the
ipapermissiontask section:-
Adapt the
nameof the task to correspond to your use case. -
Set the
ipaadmin_passwordvariable to the password of the IdM administrator. -
Set the
namevariable to the name of the permission.
This is the modified Ansible playbook file for the current example:
--- - name: Permission present example hosts: ipaserver vars_files: - /home/user_name/MyPlaybooks/secret.yml tasks: - name: Rename the "MyPermission" permission ipapermission: ipaadmin_password: "{{ ipaadmin_password }}" name: MyPermission rename: MyNewPermission state: renamed-
Adapt the
- Save the file.
Run the Ansible playbook. Specify the playbook file, the file storing the password protecting the secret.yml file, and the inventory file:
$ ansible-playbook --vault-password-file=password_file -v -i inventory permission-renamed-copy.yml
Chapter 33. Managing user passwords in IdM
33.1. Who can change IdM user passwords and how
Regular users without the permission to change other users' passwords can change only their own personal password. The new password must meet the IdM password policies applicable to the groups of which the user is a member. For details on configuring password policies, see Defining IdM password policies.
Administrators and users with password change rights can set initial passwords for new users and reset passwords for existing users. These passwords:
- Do not have to meet the IdM password policies.
- Expire after the first successful login. When this happens, IdM prompts the user to change the expired password immediately. To disable this behavior, see Enabling password reset in IdM without prompting the user for a password change at the next login.
Note that the LDAP Directory Manager (DM) user can change user passwords using LDAP tools. A new password can override any IdM password policies. Passwords set by DM do not expire after the first login.
33.2. Changing your user password in the IdM Web UI
As an Identity Management (IdM) user, you can change your user password in the IdM Web UI.
Prerequisites
- Your password has not expired.
Procedure
- Log in to the IdM Web UI.
- In the upper right corner, click the name of the user who is logged into the IdM Web UI.
- Select Change password.
- Enter the current password.
- Enter the new password in the New Password field.
- Confirm the new password by entering it in the Verify Password field.
- Click Reset Password.
Alternatively, you can go directly to https://<server.idm.example.com>/ipa/ui/reset_password.html, and change your password there.
33.3. Resetting another user’s password in the IdM Web UI
As an administrative user of Identity Management (IdM), you can change passwords for other users in the IdM Web UI.
Prerequisites
- You are logged in to the IdM Web UI as an administrative user.
Procedure
- Select Identity>Users.
- Click the name of the user to edit.
- Click Actions and select Reset password.
- Enter the new password in the New Password field.
- Confirm the new password by entering it in the Verify Password field.
- Click Reset Password.
33.4. Resetting the Directory Manager user password
If you lose the Identity Management (IdM) Directory Manager password, you can reset it.
Prerequisites
-
You have
rootaccess to an IdM server.
Procedure
Generate a new password hash by using the
pwdhashcommand. For example:# pwdhash -D /etc/dirsrv/slapd-IDM-EXAMPLE-COM password {PBKDF2_SHA256}AAAgABU0bKhyjY53NcxY33ueoPjOUWtl4iyYN5uW...By specifying the path to the Directory Server configuration, you automatically use the password storage scheme set in the
nsslapd-rootpwstorageschemeattribute to encrypt the new password.On every IdM server in your topology, execute the following steps:
Stop all IdM services installed on the server:
# ipactl stopEdit the
/etc/dirsrv/IDM-EXAMPLE-COM/dse.ldiffile and set thensslapd-rootpwattribute to the value generated by thepwdhashcommand:nsslapd-rootpw: {PBKDF2_SHA256}AAAgABU0bKhyjY53NcxY33ueoPjOUWtl4iyYN5uW...- Start all IdM services installed on the server:
# ipactl start
33.5. Changing your user password or resetting another user’s password in IdM CLI
You can change your user password using the Identity Management (IdM) command-line interface (CLI). If you are an administrative user, you can use the CLI to reset another user’s password.
Prerequisites
- You have obtained a ticket-granting ticket (TGT) for an IdM user.
- If you are resetting another user’s password, you must have obtained a TGT for an administrative user in IdM.
Procedure
Enter the
ipa user-modcommand with the name of the user and the--passwordoption. The command will prompt you for the new password.$ ipa user-mod idm_user --password Password: Enter Password again to verify: -------------------- Modified user "idm_user" -------------------- ...
Note that you can also use the ipa passwd idm_user command instead of ipa user-mod.
33.6. Additional commands for changing user passwords
You can also change the password for an IdM user using the following commands:
| Command | Description | Limitations |
|---|---|---|
|
|
A user can change their own password using PAM service facilities and the | The system must be enrolled in IdM and SSSD must be configured. |
|
| A user can change their own password directly via the Kerberos protocol | The user must have a valid Kerberos ticket (TGT); does not require system enrollment. |
|
| An administrator or user can change a password through the IdM API |
Requires an active Kerberos ticket and the |
|
| An administrator or user can change a password directly via LDAP | Requires LDAP credentials (Bind DN) and direct network access to the Directory Server. |
33.7. Enabling password reset in IdM without prompting the user for a password change at the next login
By default, when an administrator resets another user’s password, the password expires after the first successful login.
As IdM Directory Manager, you can specify the following privileges for individual IdM administrators:
- They can perform password change operations without requiring users to change their passwords subsequently on their first login.
- They can bypass the password policy so that no strength or history enforcement is applied.
Bypassing the password policy can be a security threat. Exercise caution when selecting users to whom you grant these additional privileges.
Prerequisites
- You know the Directory Manager password.
Procedure
On every Identity Management (IdM) server in the domain, make the following changes:
Enter the
ldapmodifycommand to modify LDAP entries. Specify the name of the IdM server and the 389 port and press Enter:$ ldapmodify -x -D "cn=Directory Manager" -W -h server.idm.example.com -p 389 Enter LDAP Password:- Enter the Directory Manager password.
Enter the distinguished name for the
ipa_pwd_extoppassword synchronization entry and press Enter:dn: cn=ipa_pwd_extop,cn=plugins,cn=configSpecify the
modifytype of change and press Enter:changetype: modifySpecify what type of modification you want LDAP to execute and to which attribute. Press Enter:
add: passSyncManagersDNsSpecify the administrative user accounts in the
passSyncManagersDNsattribute. The attribute is multi-valued. For example, to grant theadminuser the password resetting powers of Directory Manager:passSyncManagersDNs: \ uid=admin,cn=users,cn=accounts,dc=example,dc=com- Press Enter twice to stop editing the entry.
The admin user, listed under passSyncManagerDNs, now has the additional privileges.
33.8. Checking if an IdM user’s account is locked
As an Identity Management (IdM) administrator, you can check if an IdM user’s account is locked. For that, you must compare a user’s maximum allowed number of failed login attempts with the number of the user’s actual failed logins.
Prerequisites
- You have obtained the ticket-granting ticket (TGT) of an administrative user in IdM.
Procedure
Display the status of the user account to see the number of failed logins:
$ ipa user-status example_user ----------------------- Account disabled: False ----------------------- Server: idm.example.com Failed logins: 8 Last successful authentication: N/A Last failed authentication: 20220229080317Z Time now: 2022-02-29T08:04:46Z ---------------------------- Number of entries returned 1 ----------------------------Display the number of allowed login attempts for a particular user:
$ ipa pwpolicy-show --user example_user Group: global_policy Max lifetime (days): 90 Min lifetime (hours): 1 History size: 0 Character classes: 0 Min length: 8 Max failures: 6 Failure reset interval: 60 Lockout duration: 600 Grace login limit: -1-
Compare the number of failed logins as displayed in the output of the
ipa user-statuscommand with the Max failures number displayed in the output of theipa pwpolicy-showcommand. If the number of failed logins equals that of maximum allowed login attempts, the user account is locked.
33.9. Unlocking user accounts after password failures in IdM
If a user attempts to log in using an incorrect password a certain number of times, Identity Management (IdM) locks the user account, which prevents the user from logging in. For security reasons, IdM does not display any warning message that the user account has been locked. Instead, the CLI prompt might continue asking the user for a password again and again.
IdM automatically unlocks the user account after a specified amount of time has passed. Alternatively, you can unlock the user account manually with the following procedure.
Prerequisites
- You have obtained the ticket-granting ticket of an IdM administrative user.
Procedure
To unlock a user account, use the
ipa user-unlockcommand.$ ipa user-unlock idm_user ----------------------- Unlocked account "idm_user" -----------------------After this, the user can log in again.
33.10. Enabling the tracking of last successful Kerberos authentication for users in IdM
For performance reasons, Identity Management (IdM) running in Red Hat Enterprise Linux 8 does not store the time stamp of the last successful Kerberos authentication of a user. As a consequence, certain commands, such as ipa user-status, do not display the time stamp.
Prerequisites
- You have obtained the ticket-granting ticket (TGT) of an administrative user in IdM.
-
You have
rootaccess to the IdM server on which you are executing the procedure.
Procedure
Display the currently enabled password plug-in features:
# ipa config-show | grep "Password plugin features" Password plugin features: AllowNThash, KDC:Disable Last SuccessThe output shows that the
KDC:Disable Last Successplug-in is enabled. The plug-in hides the last successful Kerberos authentication attempt from being visible in the ipa user-status output.Add the
--ipaconfigstring=featureparameter for every feature to theipa config-modcommand that is currently enabled, except forKDC:Disable Last Success:# ipa config-mod --ipaconfigstring='AllowNThash'This command enables only the
AllowNThashplug-in. To enable multiple features, specify the--ipaconfigstring=featureparameter separately for each feature.Restart IdM:
# ipactl restart
Chapter 34. Defining IdM password policies
Password policies help to reduce the risk of someone discovering and misusing a user’s password. You can add Identity Management (IdM) password policies in the IdM WebUI or the CLI. Additionally, you can add a new password policy in IdM using an Ansible playbook.
34.1. What is a password policy
A password policy is a set of rules that passwords must meet. For example, a password policy can define the minimum password length and the maximum password lifetime. All users affected by this policy are required to set a sufficiently long password and change it frequently enough to meet the specified conditions. In this way, password policies help reduce the risk of someone discovering and misusing a user’s password.
34.2. Password policies in IdM
Passwords are the most common way for Identity Management (IdM) users to authenticate to the IdM Kerberos domain. Password policies define the requirements that these IdM user passwords must meet. The IdM password policy is set in the underlying LDAP directory, but the Kerberos Key Distribution Center (KDC) enforces the password policy.
Password policy attributes lists the attributes you can use to define a password policy in IdM.
| Attribute | Explanation | Example |
|---|---|---|
| Max lifetime | The maximum amount of time in days that a password is valid before a user must reset it. The default value is 90 days. Note that if the attribute is set to 0, the password never expires. | Max lifetime = 180 User passwords are valid only for 180 days. After that, IdM prompts users to change them. |
| Min lifetime | The minimum amount of time in hours that must pass between two password change operations. | Min lifetime = 1 After users change their passwords, they must wait at least 1 hour before changing them again. |
| History size | The number of previous passwords that are stored. A user cannot reuse a password from their password history but can reuse old passwords that are not stored. | History size = 0 In this case, the password history is empty and users can reuse any of their previous passwords. |
| Character classes | The number of different character classes the user must use in the password. The character classes are: * Uppercase characters * Lowercase characters * Digits * Special characters, such as comma (,), period (.), asterisk (*) * Other UTF-8 characters Using a character three or more times in a row decreases the character class by one. For example:
*
* | Character classes = 0
The default number of classes required is 0. To configure the number, run the See also the Important note below this table. |
| Min length | The minimum number of characters in a password. If any of the additional password policy options are set, then the minimum length of passwords is 6 characters. | Min length = 8 Users cannot use passwords shorter than 8 characters. |
| Max failures | The maximum number of failed login attempts before IdM locks the user account. | Max failures = 6 IdM locks the user account when the user enters a wrong password 7 times in a row. |
| Failure reset interval | The amount of time in seconds after which IdM resets the current number of failed login attempts. | Failure reset interval = 60
If the user waits for more than 1 minute after the number of failed login attempts defined in |
| Lockout duration |
The amount of time in seconds that the user account is locked after the number of failed login attempts defined in | Lockout duration = 600 Users with locked accounts are unable to log in for 10 minutes. |
Use the English alphabet and common symbols for the character classes requirement if you have a diverse set of hardware that may not have access to international characters and symbols. For more information about character class policies in passwords, see the Red Hat Knowledgebase solution What characters are valid in a password?.
34.3. Password policy priorities in IdM
Password policies help reduce the risk of someone discovering and misusing a user’s password. The default password policy is the global password policy. You can also create additional group password policies. The global policy rules apply to all users without a group password policy. Group password policies apply to all members of the corresponding user group.
Note that only one password policy can be in effect at a time for any user. If a user has multiple password policies assigned, one of them takes precedence based on priority according to the following rules:
-
Every group password policy has a priority set. The lower the value, the higher the policy’s priority. The lowest supported value is
0. - If multiple password policies are applicable to a user, the policy with the lowest priority value takes precedence. All rules defined in other policies are ignored.
- The password policy with the lowest priority value applies to all password policy attributes, even the attributes that are not defined in the policy.
The global password policy does not have a priority value set. It serves as a fallback policy when no group policy is set for a user. The global policy can never take precedence over a group policy.
You can use the ipa pwpolicy-show --user=user_name command to check which policy is currently in effect for a particular user.
34.4. Ensuring the presence of a password policy in IdM using an Ansible playbook
Follow this procedure to ensure the presence of a password policy in Identity Management (IdM) using an Ansible playbook.
In the default global_policy password policy in IdM, the number of different character classes in the password is set to 0. The history size is also set to 0.
Complete this procedure to enforce a stronger password policy for an IdM group using an Ansible playbook.
You cannot define a password policy for an individual user.
Prerequisites
You have configured your Ansible control node to meet the following requirements:
- You are using Ansible version 2.13 or later.
-
You have installed the
ansible-freeipapackage. - The example assumes that in the ~/MyPlaybooks/ directory, you have created an Ansible inventory file with the fully-qualified domain name (FQDN) of the IdM server.
-
The example assumes that the secret.yml Ansible vault stores your
ipaadmin_password.
-
The target node, that is the node on which the
ansible-freeipamodule is executed, is part of the IdM domain as an IdM client, server or replica. - You know the IdM administrator password.
- The group for which you are ensuring the presence of a password policy exists in IdM.
Procedure
Create an inventory file, for example
inventory.file, and define theFQDNof your IdM server in the[ipaserver]section:[ipaserver] server.idm.example.comCreate your Ansible playbook file that defines the password policy whose presence you want to ensure. To simplify this step, copy and modify the example in the
/usr/share/doc/ansible-freeipa/playbooks/pwpolicy/pwpolicy_present.ymlfile:--- - name: Tests hosts: ipaserver vars_files: - /home/user_name/MyPlaybooks/secret.yml tasks: - name: Ensure presence of pwpolicy for group ops ipapwpolicy: ipaadmin_password: "{{ ipaadmin_password }}" name: ops minlife: 7 maxlife: 49 history: 5 priority: 1 lockouttime: 300 minlength: 8 minclasses: 4 maxfail: 3 failinterval: 5For details on what the individual variables mean, see Password policy attributes.
Run the playbook:
$ ansible-playbook --vault-password-file=password_file -v -i path_to_inventory_directory/inventory.file path_to_playbooks_directory_/new_pwpolicy_present.yml
You have successfully used an Ansible playbook to ensure that a password policy for the ops group is present in IdM.
The priority of the ops password policy is set to 1, whereas the global_policy password policy has no priority set. For this reason, the ops policy automatically supersedes global_policy for the ops group and is enforced immediately.
global_policy serves as a fallback policy when no group policy is set for a user, and it can never take precedence over a group policy.
34.5. Adding a new password policy in IdM using the WebUI or the CLI
Password policies help reduce the risk of someone discovering and misusing a user’s password. The default password policy is the global password policy. You can also create additional group password policies.
34.5.1. Adding a new password policy in the IdM WebUI
Password policies help reduce the risk of someone discovering and misusing a user’s password. The default password policy is the global password policy. You can also create additional group password policies.
Prerequisites
- A user group to which the policy applies.
- A priority assigned to the policy
Procedure
Log in to the IdM Web UI.
For details, see Accessing the IdM Web UI in a web browser.
- Select Policy>Password Policies.
- Click Add.
- Define the user group and priority.
- Click Add to confirm.
To configure the attributes of the new password policy, see Password policies in IdM.
34.5.2. Adding a new password policy in the IdM CLI
Password policies help reduce the risk of someone discovering and misusing a user’s password. The default password policy is the global password policy. You can also create additional group password policies.
Prerequisites
- A user group to which the policy applies.
- A priority assigned to the policy
Procedure
- Open terminal and connect to the IdM server.
Use the ipa pwpolicy-add command. Specify the user group and priority:
$ ipa pwpolicy-add Group: group_name Priority: priority_levelOptional: Use the ipa pwpolicy-find command to verify that the policy has been successfully added:
$ ipa pwpolicy-find
To configure the attributes of the new password policy, see Password policies in IdM.
34.6. Additional password policy options in IdM
As an Identity Management (IdM) administrator, you can strengthen the default password requirements by enabling additional password policy options based on the libpwquality feature set. The additional password policy options include the following:
--maxrepeat- Specifies the maximum acceptable number of same consecutive characters in the new password.
--maxsequence- Specifies the maximum length of monotonic character sequences in the new password. Examples of such a sequence are 12345 or fedcb. Most such passwords will not pass the simplicity check.
--dictcheck-
If nonzero, checks whether the password, with possible modifications, matches a word in a dictionary. Currently
libpwqualityperforms the dictionary check using thecrackliblibrary. --usercheck- If nonzero, checks whether the password, with possible modifications, contains the user name in some form. It is not performed for user names shorter than 3 characters.
You cannot apply the additional password policy options to existing passwords. If you apply any of the additional options, IdM automatically sets the --minlength option, the minimum number of characters in a password, to 6 characters.
In a mixed environment with RHEL 7 and RHEL 8 servers, you can enforce the additional password policy settings only on servers running on RHEL 8.4 and later. If a user is logged in to an IdM client and the IdM client is communicating with an IdM server running on RHEL 8.3 or earlier, then the new password policy requirements set by the system administrator are not applied. To ensure consistent behavior, upgrade or update all servers to RHEL 8.4 and later.
34.7. Applying additional password policy options to an IdM group
Follow this procedure to apply additional password policy options in Identity Management (IdM). The example describes how to strengthen the password policy for the managers group by making sure that the new passwords do not contain the users' respective user names and that the passwords contain no more than two identical characters in succession.
Prerequisites
- You are logged in as an IdM administrator.
- The managers group exists in IdM.
- The managers password policy exists in IdM.
Procedure
Apply the user name check to all new passwords suggested by the users in the managers group:
$ ipa pwpolicy-mod --usercheck=True managersNoteIf you do not specify the name of the password policy, the default
global_policyis modified.Set the maximum number of identical consecutive characters to 2 in the managers password policy:
$ ipa pwpolicy-mod --maxrepeat=2 managersA password now will not be accepted if it contains more than 2 identical consecutive characters. For example, the eR873mUi111YJQ combination is unacceptable because it contains three 1s in succession.
Verification
Add a test user named test_user:
$ ipa user-add test_user First name: test Last name: user ---------------------------- Added user "test_user" ----------------------------Add the test user to the managers group:
- In the IdM Web UI, click Identity>Groups>User Groups.
- Click the managers group name.
- Click Add.
- On the Add users into user group 'managers' page, check test_user.
- Click the > arrow to move the user to the Prospective column.
- Click Add.
Reset the password for the test user:
- Go to Identity>Users.
- Click test_user.
- From the Actions menu, click Reset Password.
- Enter a temporary password for the user.
Try to obtain a Kerberos ticket-granting ticket (TGT) for the test_user:
On the command line, run the following command:
$ kinit test_user- Enter the temporary password.
The system informs you that you must change your password. Enter a password that contains the user name of test_user:
Password expired. You must change it now. Enter new password: Enter it again: Password change rejected: Password not changed. Unspecified password quality failure while trying to change password. Please try again.The system informs you that the entered password was rejected. Enter a password that contains three or more identical characters in succession:
Password change rejected: Password not changed. Unspecified password quality failure while trying to change password. Please try again. Enter new password: Enter it again:The system informs you that the entered password was rejected. Enter a password that meets the criteria of the managers password policy:
Password change rejected: Password not changed. Unspecified password quality failure while trying to change password. Please try again. Enter new password: Enter it again:
View the obtained TGT:
$ klist Ticket cache: KCM:0:33945 Default principal: test_user@IDM.EXAMPLE.COM Valid starting Expires Service principal 07/07/2021 12:44:44 07/08/2021 12:44:44 krbtgt@IDM.EXAMPLE.COM@IDM.EXAMPLE.COM
The managers password policy now works correctly for users in the managers group.
34.8. Using an Ansible playbook to apply additional password policy options to an IdM group
You can use an Ansible playbook to apply additional password policy options to strengthen the password policy requirements for a specific IdM group. You can use the maxrepeat, maxsequence, dictcheck and usercheck password policy options for this purpose. The example describes how to set the following requirements for the managers group:
- A users new password does not contain the users respective user name.
- The password contains no more than two identical characters in succession.
- Any monotonic character sequences in the passwords are not longer than 3 characters. This means that the system does not accept a password with a sequence such as 1234 or abcd.
Prerequisites
You have configured your Ansible control node to meet the following requirements:
- You are using Ansible version 2.13 or later.
-
You have installed the
ansible-freeipapackage on the Ansible controller. - You have created an Ansible inventory file with the fully-qualified domain name (FQDN) of the IdM server in the ~/MyPlaybooks/ directory.
-
You have stored your
ipaadmin_passwordin the secret.yml Ansible vault.
- The group for which you are ensuring the presence of a password policy exists in IdM.
Procedure
Create your Ansible playbook file manager_pwpolicy_present.yml that defines the password policy whose presence you want to ensure. To simplify this step, copy and modify the following example:
--- - name: Tests hosts: ipaserver vars_files: - /home/user_name/MyPlaybooks/secret.yml tasks: - name: Ensure presence of usercheck and maxrepeat pwpolicy for group managers ipapwpolicy: ipaadmin_password: "{{ ipaadmin_password }}" name: managers usercheck: True maxrepeat: 2 maxsequence: 3Run the playbook:
$ ansible-playbook --vault-password-file=password_file -v -i path_to_inventory_directory/inventory.file path_to_playbooks_directory_/manager_pwpolicy_present.yml
Verification
Add a test user named test_user:
$ ipa user-add test_user First name: test Last name: user ---------------------------- Added user "test_user" ----------------------------Add the test user to the managers group:
- In the IdM Web UI, click Identity>Groups>User Groups.
- Click managers.
- Click Add.
- On the Add users into user group 'managers' page, check test_user.
- Click the > arrow to move the user to the Prospective column.
- Click Add.
Reset the password for the test user:
- Go to Identity>Users.
- Click test_user.
- From the Actions menu, click Reset Password.
- Enter a temporary password for the user.
Try to obtain a Kerberos ticket-granting ticket (TGT) for the test_user:
On the command line, enter the following command:
$ kinit test_user- Enter the temporary password.
The system informs you that you must change your password. Enter a password that contains the user name of test_user:
Password expired. You must change it now. Enter new password: Enter it again: Password change rejected: Password not changed. Unspecified password quality failure while trying to change password. Please try again.The system informs you that the entered password was rejected. Enter a password that contains three or more identical characters in succession:
Password change rejected: Password not changed. Unspecified password quality failure while trying to change password. Please try again. Enter new password: Enter it again:The system informs you that the entered password was rejected. Enter a password that contains a monotonic character sequence longer than 3 characters. Examples of such sequences include 1234 and fedc:
Password change rejected: Password not changed. Unspecified password quality failure while trying to change password. Please try again. Enter new password: Enter it again:The system informs you that the entered password was rejected. Enter a password that meets the criteria of the managers password policy:
Password change rejected: Password not changed. Unspecified password quality failure while trying to change password. Please try again. Enter new password: Enter it again:
Verify that you have obtained a TGT, which is only possible after having entered a valid password:
$ klist Ticket cache: KCM:0:33945 Default principal: test_user@IDM.EXAMPLE.COM Valid starting Expires Service principal 07/07/2021 12:44:44 07/08/2021 12:44:44 krbtgt@IDM.EXAMPLE.COM@IDM.EXAMPLE.COM
Chapter 35. Managing expiring password notifications
You can use the Expiring Password Notification (EPN) tool, provided by the ipa-client-epn package, to build a list of Identity Management (IdM) users whose passwords are expiring in a configured amount of time. To install, configure, and use the EPN tool, refer to the relevant sections.
35.1. What is the Expiring Password Notification tool
The Expiring Password Notification (EPN) tool is a standalone tool you can use to build a list of Identity Management (IdM) users whose passwords are expiring in a configured amount of time.
IdM administrators can use EPN to:
- Display a list of affected users in JSON format, which is created when run in dry-run mode.
- Calculate how many emails will be sent for a given day or date range.
- Send password expiration email notifications to users.
-
Configure the
ipa-epn.timerto run the EPN tool daily and send an email to users whose passwords are expiring within the defined future date ranges. - Customize the email notification to send to users.
If a user account is disabled, no email notifications are sent if the password is going to expire.
35.2. Installing the Expiring Password Notification tool
Follow this procedure to install the Expiring Password Notification (EPN) tool.
Prerequisites
- Install the EPN tool on either an Identity Management (IdM) replica or an IdM client with a local Postfix SMTP server configured as a smart host.
Procedure
Install the EPN tool:
# yum install ipa-client-epn
35.3. Running the EPN tool to send emails to users whose passwords are expiring
You can use the Expiring Password Notification (EPN) tool to send emails to Identity Management (IdM) users whose passwords are expiring. You can choose one of the following methods:
-
Update the
epn.confconfiguration file and enable the ipa-epn.timer tool. -
Update the
epn.confconfiguration file and run the EPN tool directly on the command line.
The EPN tool is stateless. If the EPN tool fails to email any of the users whose passwords are expiring on a given day, the EPN tool does not save a list of those users.
Prerequisites
-
The
ipa-client-epnpackage is installed. See Installing the Expiring Password Notification tool. -
Customize the
ipa-epnemail template if required. See Modifying the Expiring Password Notification email template.
Procedure
Open the
epn.confconfiguration file.# vi /etc/ipa/epn.confUpdate the
notify_ttlsoption as required. The default is to notify users whose passwords are expiring in 28, 14, 7, 3, and 1 day(s).notify_ttls = 28, 14, 7, 3, 1NoteYou must also activate the
ipa-epn.timertool to ensure that emails are sent.Configure your SMTP server and port:
smtp_server = localhost smtp_port = 25Specify the email address from which the email expiration notification is sent. Any unsuccessfully delivered emails are returned to this address.
mail_from = admin-email@example.comOptional: If you want to use an encrypted channel of communication, specify the credentials to be used:
Specify the path to a single file in PEM format containing the certificate to be used by EPN to authenticate with the SMTP server:
smtp_client_cert = /etc/pki/tls/certs/client.pemNoteEPN is an SMTP client. The purpose of the certificate is client authentication, not secure SMTP delivery.
You can specify the path to a file that contains the private key. If not specified, the private key is taken from the certificate file.
smtp_client_key = /etc/pki/tls/certs/client.keyIf the private key is encrypted, specify the password for decrypting it.
smtp_client_key_pass = Secret123!
-
Save the
/etc/ipa/epn.conffile. Run the EPN tool in dry-run mode to generate a list of the users to whom the password expiration email notification would be sent if you run the tool without the
--dry-runoption.ipa-epn --dry-run [ { "uid": "user5", "cn": "user 5", "krbpasswordexpiration": "2020-04-17 15:51:53", "mail": "['user5@ipa.test']" } ] [ { "uid": "user6", "cn": "user 6", "krbpasswordexpiration": "2020-12-17 15:51:53", "mail": "['user5@ipa.test']" } ] The IPA-EPN command was successfulNoteIf the list of users returned is very large and you run the tool without the
--dry-runoption, this might cause an issue with your email server.Run the EPN tool without the
--dry-runoption to send expiration emails to the list of all the users returned when you ran the EPN tool in dry-run mode:ipa-epn [ { "uid": "user5", "cn": "user 5", "krbpasswordexpiration": "2020-10-01 15:51:53", "mail": "['user5@ipa.test']" } ] [ { "uid": "user6", "cn": "user 6", "krbpasswordexpiration": "2020-12-17 15:51:53", "mail": "['user5@ipa.test']" } ] The IPA-EPN command was successfulYou can add EPN to any monitoring system and invoke it with the
--from-nbdaysand--to-nbdaysoptions to determine how many users passwords are going to expire within a specific time frame:# ipa-epn --from-nbdays 8 --to-nbdays 12NoteIf you invoke the EPN tool with the
--from-nbdaysand--to-nbdaysoptions, it is automatically executed in dry-run mode.
Verification
- Run the EPN tool and verify an email notification is sent.
35.4. Enabling the ipa-epn.timer to send an email to all users whose passwords are expiring
Follow this procedure to use ipa-epn.timer to run the Expiring Password Notification (EPN) tool to send emails to users whose passwords are expiring. The ipa-epn.timer parses the epn.conf file and sends an email to users whose passwords are expiring within the defined future date ranges configured in that file.
Prerequisites
-
The
ipa-client-epnpackage is installed. See Installing the Expiring Password Notification tool -
Customize the
ipa-epnemail template if required. See Modifying the Expiring Password Notification email template
Procedure
Start the
ipa-epn.timer:systemctl start ipa-epn.timer
Once you start the timer, by default, the EPN tool is run every day at 1 a.m.
35.5. Modifying the Expiring Password Notification email template
Follow this procedure to customize the Expiring Password Notification (EPN) email message template.
Prerequisites
-
The
ipa-client-epnpackage is installed.
Procedure
Open the EPN message template:
# vi /etc/ipa/epn/expire_msg.templateUpdate the template text as required.
Hi {{ fullname }}, Your password will expire on {{ expiration }}. Please change it as soon as possible.You can use the following variables in the template.
- User ID: uid
- Full name: fullname
- First name: first
- Last name: last
- Password expiration date: expiration
- Save the message template file.
Verification
- Run the EPN tool and verify the email notification contains the updated text.
Chapter 36. Using an ID view to override a user attribute value on an IdM client
If an Identity Management (IdM) user want to override some of their user or group attributes stored in the IdM LDAP server, for example the login name, home directory, certificate used for authentication, or SSH keys, you as IdM administrator can redefine these values on specific IdM clients by using IdM ID views. For example, you can specify a different home directory for a user on the IdM client that the user most commonly uses for logging in to IdM.
Learn how to redefine a POSIX attribute value associated with an IdM user on a host enrolled into IdM as a client.
36.1. ID views
An ID view in Identity Management (IdM) is an IdM client-side view specifying the following information:
- New values for centrally defined POSIX user or group attributes
- The client host or hosts on which the new values apply.
An ID view contains one or more overrides. An override is a specific replacement of a centrally defined POSIX attribute value.
You can only define an ID view for an IdM client centrally on IdM servers. You cannot configure client-side overrides for an IdM client locally.
For example, you can use ID views to achieve the following goals:
-
Define different attribute values for different environments. For example, you can allow the IdM administrator or another IdM user to have different home directories on different IdM clients: you can configure
/home/encrypted/usernameto be this user’s home directory on one IdM client and/dropbox/usernameon another client. Using ID views in this situation is convenient as alternatively, for example, changingfallback_homedir,override_homediror other home directory variables in the client’s/etc/sssd/sssd.conffile would affect all users. See Adding an ID view to override an IdM user home directory on an IdM client for an example procedure. - Replace a previously generated attribute value with a different value, such as overriding a user’s UID. This ability can be useful when you want to achieve a system-wide change that would otherwise be difficult to do on the LDAP side, for example make 1009 the UID of an IdM user. IdM ID ranges, which are used to generate an IdM user UID, never start as low as 1000 or even 10000. If a reason exists for an IdM user to impersonate a local user with UID 1009 on all IdM clients, you can use ID views to override the UID of this IdM user that was generated when the user was created in IdM.
You can only apply ID views to IdM clients, not to IdM servers.
36.2. Potential negative impact of ID views on SSSD performance
When you define an ID view, IdM places the desired override value in the IdM server’s System Security Services Daemon (SSSD) cache. The SSSD running on an IdM client then retrieves the override value from the server cache.
Applying an ID view can have a negative impact on System Security Services Daemon (SSSD) performance, because certain optimizations and ID views cannot run at the same time. For example, ID views prevent SSSD from optimizing the process of looking up groups on the server:
- With ID views, SSSD must check every member on the returned list of group member names if the group name is overridden.
- Without ID views, SSSD can only collect the user names from the member attribute of the group object.
This negative effect becomes most apparent when the SSSD cache is empty or after you clear the cache, which makes all entries invalid.
36.3. Attributes an ID view can override
ID views consist of user and group ID overrides. The overrides define the new POSIX attribute values.
User and group ID overrides can define new values for the following POSIX attributes:
- User attributes
-
Login name (
uid) -
GECOS entry (
gecos) -
UID number (
uidNumber) -
GID number (
gidNumber) -
Login shell (
loginShell) -
Home directory (
homeDirectory) -
SSH public keys (
ipaSshPubkey) -
Certificate (
userCertificate)
-
Login name (
- Group attributes
-
Group name (
cn) -
Group GID number (
gidNumber)
-
Group name (
36.4. Getting help for ID view commands
You can get help for commands involving Identity Management (IdM) ID views on the IdM command-line interface (CLI).
Prerequisites
- You have obtained a Kerberos ticket for an IdM user.
Procedure
To display all commands used to manage ID views and overrides:
$ ipa help idviews ID Views Manage ID Views IPA allows to override certain properties of users and groups[...] [...] Topic commands: idoverridegroup-add Add a new Group ID override idoverridegroup-del Delete a Group ID override [...]To display detailed help for a particular command, add the
--helpoption to the command:$ ipa idview-add --help Usage: ipa [global-options] idview-add NAME [options] Add a new ID View. Options: -h, --help show this help message and exit --desc=STR Description [...]
36.5. Using an ID view to override the login name of an IdM user on a specific host
Follow this procedure to create an ID view for a specific IdM client that overrides a POSIX attribute value associated with a specific IdM user. The procedure uses the example of an ID view that enables an IdM user named idm_user to log in to an IdM client named host1 using the user_1234 login name.
Prerequisites
- You are logged in as IdM administrator.
Procedure
Create a new ID view. For example, to create an ID view named
example_for_host1:$ ipa idview-add example_for_host1 --------------------------- Added ID View "example_for_host1" --------------------------- ID View Name: example_for_host1Add a user override to the example_for_host1 ID view. To override the user login:
-
Enter the
ipa idoverrideuser-addcommand - Add the name of the ID view
- Add the user name, also called the anchor
Add the
--loginoption:$ ipa idoverrideuser-add example_for_host1 idm_user --login=user_1234 ----------------------------- Added User ID override "idm_user" ----------------------------- Anchor to override: idm_user User login: user_1234For a list of the available options, run ipa idoverrideuser-add --help.
NoteThe
ipa idoverrideuser-add --certificatecommand replaces all existing certificates for the account in the specified ID view. To append an additional certificate, use theipa idoverrideuser-add-certcommand instead:$ ipa idoverrideuser-add-cert example_for_host1 user --certificate="MIIEATCC..."
-
Enter the
-
Optional: Using the
ipa idoverrideuser-modcommand, you can specify new attribute values for an existing user override. Apply
example_for_host1to thehost1.idm.example.comhost:$ ipa idview-apply example_for_host1 --hosts=host1.idm.example.com ----------------------------- Applied ID View "example_for_host1" ----------------------------- hosts: host1.idm.example.com --------------------------------------------- Number of hosts the ID View was applied to: 1 ---------------------------------------------NoteThe
ipa idview-applycommand also accepts the--hostgroupsoption. The option applies the ID view to hosts that belong to the specified host group, but does not associate the ID view with the host group itself. Instead, the--hostgroupsoption expands the members of the specified host group and applies the--hostsoption individually to every one of them.This means that if a host is added to the host group in the future, the ID view does not apply to the new host.
To apply the new configuration to the host1.idm.example.com system immediately:
SSH to the system as root:
$ ssh root@host1 Password:Clear the SSSD cache:
root@host1 ~]# sss_cache -E- Restart the SSSD daemon:
root@host1 ~]# systemctl restart sssd
Verification
If you have the credentials of user_1234, you can use them to log in to IdM on host1:
SSH to host1 using user_1234 as the login name:
[root@r8server ~]# ssh user_1234@host1.idm.example.com Password: Last login: Sun Jun 21 22:34:25 2020 from 192.168.122.229 [user_1234@host1 ~]$Display the working directory:
[user_1234@host1 ~]$ pwd /home/idm_user/
Alternatively, if you have root credentials on host1, you can use them to check the output of the
idcommand for idm_user and user_1234:[root@host1 ~]# id idm_user uid=779800003(user_1234) gid=779800003(idm_user) groups=779800003(idm_user) [root@host1 ~]# user_1234 uid=779800003(user_1234) gid=779800003(idm_user) groups=779800003(idm_user)
36.6. Modifying an IdM ID view
An ID view in Identity Management (IdM) overrides a POSIX attribute value associated with a specific IdM user. Follow this procedure to modify an existing ID view. Specifically, it describes how to modify an ID view to enable the user named idm_user to use the /home/user_1234/ directory as the user home directory instead of /home/idm_user/ on the host1.idm.example.com IdM client.
Prerequisites
- You have root access to host1.idm.example.com.
- You are logged in as a user with the required privileges, for example admin.
- You have an ID view configured for idm_user that applies to the host1 IdM client.
Procedure
As root, create the directory that you want idm_user to use on host1.idm.example.com as the user home directory:
[root@host1 /]# mkdir /home/user_1234/Change the ownership of the directory:
[root@host1 /]# chown idm_user:idm_user /home/user_1234/Display the ID view, including the hosts to which the ID view is currently applied. To display the ID view named
example_for_host1:$ ipa idview-show example_for_host1 --all dn: cn=example_for_host1,cn=views,cn=accounts,dc=idm,dc=example,dc=com ID View Name: example_for_host1 User object override: idm_user Hosts the view applies to: host1.idm.example.com objectclass: ipaIDView, top, nsContainerThe output shows that the ID view currently applies to host1.idm.example.com.
Modify the user override of the example_for_host1 ID view. To override the user home directory:
-
Enter the
ipa idoverrideuser-addcommand - Add the name of the ID view
- Add the user name, also called the anchor
Add the
--homediroption:$ ipa idoverrideuser-mod example_for_host1 idm_user --homedir=/home/user_1234 ----------------------------- Modified a User ID override "idm_user" ----------------------------- Anchor to override: idm_user User login: user_1234 Home directory: /home/user_1234/
For a list of the available options, run
ipa idoverrideuser-mod --help.-
Enter the
To apply the new configuration to the host1.idm.example.com system immediately:
SSH to the system as root:
$ ssh root@host1 Password:Clear the SSSD cache:
root@host1 ~]# sss_cache -E- Restart the SSSD daemon:
root@host1 ~]# systemctl restart sssd
Verification
SSHto host1 as idm_user:[root@r8server ~]# ssh idm_user@host1.idm.example.com Password: Last login: Sun Jun 21 22:34:25 2020 from 192.168.122.229 [user_1234@host1 ~]$Print the working directory:
[user_1234@host1 ~]$ pwd /home/user_1234/
36.7. Adding an ID view to override an IdM user home directory on an IdM client
An ID view in Identity Management (IdM) overrides a POSIX attribute value associated with a specific IdM user. Follow this procedure to create an ID view that applies to idm_user on an IdM client named host1 to enable the user to use the /home/user_1234/ directory as the user home directory instead of /home/idm_user/.
Prerequisites
- You have root access to host1.idm.example.com.
- You are logged in as a user with the required privileges, for example admin.
Procedure
As root, create the directory that you want idm_user to use on host1.idm.example.com as the user home directory:
[root@host1 /]# mkdir /home/user_1234/Change the ownership of the directory:
[root@host1 /]# chown idm_user:idm_user /home/user_1234/Create an ID view. For example, to create an ID view named example_for_host1:
$ ipa idview-add example_for_host1 --------------------------- Added ID View "example_for_host1" --------------------------- ID View Name: example_for_host1Add a user override to the example_for_host1 ID view. To override the user home directory:
-
Enter the
ipa idoverrideuser-addcommand - Add the name of the ID view
- Add the user name, also called the anchor
-
Add the
--homediroption:
$ ipa idoverrideuser-add example_for_host1 idm_user --homedir=/home/user_1234 ----------------------------- Added User ID override "idm_user" ----------------------------- Anchor to override: idm_user Home directory: /home/user_1234/-
Enter the
Apply
example_for_host1to thehost1.idm.example.comhost:$ ipa idview-apply example_for_host1 --hosts=host1.idm.example.com ----------------------------- Applied ID View "example_for_host1" ----------------------------- hosts: host1.idm.example.com --------------------------------------------- Number of hosts the ID View was applied to: 1 ---------------------------------------------NoteThe
ipa idview-applycommand also accepts the--hostgroupsoption. The option applies the ID view to hosts that belong to the specified host group, but does not associate the ID view with the host group itself. Instead, the--hostgroupsoption expands the members of the specified host group and applies the--hostsoption individually to every one of them.This means that if a host is added to the host group in the future, the ID view does not apply to the new host.
To apply the new configuration to the host1.idm.example.com system immediately:
SSH to the system as root:
$ ssh root@host1 Password:Clear the SSSD cache:
root@host1 ~]# sss_cache -E- Restart the SSSD daemon:
root@host1 ~]# systemctl restart sssd
Verification
SSHto host1 as idm_user:[root@r8server ~]# ssh idm_user@host1.idm.example.com Password: Activate the web console with: systemctl enable --now cockpit.socket Last login: Sun Jun 21 22:34:25 2020 from 192.168.122.229 [idm_user@host1 /]$Print the working directory:
[idm_user@host1 /]$ pwd /home/user_1234/
36.8. Applying an ID view to an IdM host group
The ipa idview-apply command accepts the --hostgroups option. However, the option acts as a one-time operation that applies the ID view to hosts that currently belong to the specified host group, but does not dynamically associate the ID view with the host group itself. The --hostgroups option expands the members of the specified host group and applies the --hosts option individually to every one of them.
If you add a new host to the host group later, you must apply the ID view to the new host manually, using the ipa idview-apply command with the --hosts option.
Similarly, if you remove a host from a host group, the ID view is still assigned to the host after the removal. To unapply the ID view from the removed host, you must run the ipa idview-unapply id_view_name --hosts=name_of_the_removed_host command.
Follow this procedure to achieve the following goals:
- How to create a host group and add hosts to it.
- How to apply an ID view to the host group.
- How to add a new host to the host group and apply the ID view to the new host.
Prerequisites
- Ensure that the ID view you want to apply to the host group exists in IdM. For example, to create an ID view to override an IdM user login name on a specific IdM client, see Using an ID view to override the login name of an IdM user on a specific host.
Procedure
Create a host group and add hosts to it:
Create a host group. For example, to create a host group named baltimore:
[root@server ~]# ipa hostgroup-add --desc="Baltimore hosts" baltimore --------------------------- Added hostgroup "baltimore" --------------------------- Host-group: baltimore Description: Baltimore hostsAdd hosts to the host group. For example, to add the host102 and host103 to the baltimore host group:
[root@server ~]# ipa hostgroup-add-member --hosts={host102,host103} baltimore Host-group: baltimore Description: Baltimore hosts Member hosts: host102.idm.example.com, host103.idm.example.com ------------------------- Number of members added 2 -------------------------
Apply an ID view to the hosts in the host group. For example, to apply the example_for_host1 ID view to the baltimore host group:
[root@server ~]# ipa idview-apply --hostgroups=baltimore ID View Name: example_for_host1 ----------------------------------------- Applied ID View "example_for_host1" ----------------------------------------- hosts: host102.idm.example.com, host103.idm.example.com --------------------------------------------- Number of hosts the ID View was applied to: 2 ---------------------------------------------Add a new host to the host group and apply the ID view to the new host:
Add a new host to the host group. For example, to add the somehost.idm.example.com host to the baltimore host group:
[root@server ~]# ipa hostgroup-add-member --hosts=somehost.idm.example.com baltimore Host-group: baltimore Description: Baltimore hosts Member hosts: host102.idm.example.com, host103.idm.example.com,somehost.idm.example.com ------------------------- Number of members added 1 -------------------------Optional: Display the ID view information. For example, to display the details about the example_for_host1 ID view:
[root@server ~]# ipa idview-show example_for_host1 --all dn: cn=example_for_host1,cn=views,cn=accounts,dc=idm,dc=example,dc=com ID View Name: example_for_host1 [...] Hosts the view applies to: host102.idm.example.com, host103.idm.example.com objectclass: ipaIDView, top, nsContainerThe output shows that the ID view is not applied to somehost.idm.example.com, the newly-added host in the baltimore host group.
Apply the ID view to the new host. For example, to apply the example_for_host1 ID view to somehost.idm.example.com:
[root@server ~]# ipa idview-apply --host=somehost.idm.example.com ID View Name: example_for_host1 ----------------------------------------- Applied ID View "example_for_host1" ----------------------------------------- hosts: somehost.idm.example.com --------------------------------------------- Number of hosts the ID View was applied to: 1 ---------------------------------------------
Verification
Display the ID view information again:
[root@server ~]# ipa idview-show example_for_host1 --all dn: cn=example_for_host1,cn=views,cn=accounts,dc=idm,dc=example,dc=com ID View Name: example_for_host1 [...] Hosts the view applies to: host102.idm.example.com, host103.idm.example.com, somehost.idm.example.com objectclass: ipaIDView, top, nsContainerThe output shows that ID view is now applied to somehost.idm.example.com, the newly-added host in the baltimore host group.
36.9. Using Ansible to override the login name and home directory of an IdM user on a specific host
Complete this procedure to use the idoverrideuser ansible-freeipa module to create an ID view for a specific Identity Management (IdM) client that overrides a POSIX attribute value associated with a specific IdM user. The procedure uses the example of an ID view that enables an IdM user named idm_user to log in to an IdM client named host1.idm.example.com by using the user_1234 login name. Additionally, the ID view modifies the home directory of idm_user so that after logging in to host1, the user home directory is /home/user_1234/.
Prerequisites
On the control node:
- You are using Ansible version 2.13 or later.
-
You have installed the
ansible-freeipapackage. - You have created an Ansible inventory file with the fully-qualified domain name (FQDN) of the IdM server in the ~/MyPlaybooks/ directory.
- You are using RHEL 8.10 or later.
-
You have stored your
ipaadmin_passwordin the secret.yml Ansible vault.
-
The target node, that is the node on which the
ansible-freeipamodule is executed, is part of the IdM domain as an IdM client, server or replica.
Procedure
Create your Ansible playbook file add-idoverrideuser-with-name-and-homedir.yml with the following content:
--- - name: Playbook to manage idoverrideuser hosts: ipaserver become: false gather_facts: false vars_files: - /home/user_name/MyPlaybooks/secret.yml tasks: - name: Ensure idview_for_host1 is present idview: ipaadmin_password: "{{ ipaadmin_password }}" name: idview_for_host1 - name: Ensure idview_for_host1 is applied to host1.idm.example.com idview: ipaadmin_password: "{{ ipaadmin_password }}" name: idview_for_host1 host: host1.idm.example.com action: member - name: Ensure idm_user is present in idview_for_host1 with homedir /home/user_1234 and name user_1234 ipaidoverrideuser: ipaadmin_password: "{{ ipaadmin_password }}" idview: idview_for_host1 anchor: idm_user name: user_1234 homedir: /home/user_1234Run the playbook. Specify the playbook file, the file storing the password protecting the secret.yml file, and the inventory file::
$ ansible-playbook --vault-password-file=password_file -v -i <path_to_inventory_directory>/inventory <path_to_playbooks_directory>/add-idoverrideuser-with-name-and-homedir.ymlOptional: If you have
rootcredentials, you can apply the new configuration to the host1.idm.example.com system immediately:SSH to the system as
root:$ ssh root@host1 Password:Clear the SSSD cache:
root@host1 ~]# sss_cache -ERestart the SSSD daemon:
root@host1 ~]# systemctl restart sssd
Verification
SSHto host1 as idm_user:[root@r8server ~]# ssh idm_user@host1.idm.example.com Password: Last login: Sun Jun 21 22:34:25 2020 from 192.168.122.229 [user_1234@host1 ~]$Print the working directory:
[user_1234@host1 ~]$ pwd /home/user_1234/
36.10. Using Ansible to configure an ID view that enables an SSH key login on an IdM client
Complete this procedure to use the idoverrideuser ansible-freeipa module to ensure that an IdM user can use a specific SSH key to log in to a specific IdM client. The procedure uses the example of an ID view that enables an IdM user named idm_user to log in to an IdM client named host1.idm.example.com with an SSH key.
This ID view can be used to enhance a specific HBAC rule.
Prerequisites
On the control node:
- You are using Ansible version 2.13 or later.
-
You have installed the
ansible-freeipapackage. - You have created an Ansible inventory file with the fully-qualified domain name (FQDN) of the IdM server in the ~/MyPlaybooks/ directory.
- You are using RHEL 8.10 or later.
-
You have stored your
ipaadmin_passwordin the secret.yml Ansible vault.
- You have access to the idm_user’s SSH public key.
- The idview_for_host1 ID view exists.
-
The target node, that is the node on which the
ansible-freeipamodule is executed, is part of the IdM domain as an IdM client, server or replica.
Procedure
Create your Ansible playbook file ensure-idoverrideuser-can-login-with-sshkey.yml with the following content:
--- - name: Playbook to manage idoverrideuser hosts: ipaserver become: false gather_facts: false vars_files: - /home/user_name/MyPlaybooks/secret.yml tasks: - name: Ensure test user idm_user is present in idview idview_for_host1 with sshpubkey ipaidoverrideuser: ipaadmin_password: "{{ ipaadmin_password }}" idview: idview_for_host1 anchor: idm_user sshpubkey: - ssh-rsa AAAAB3NzaC1yc2EAAADAQABAAABgQCqmVDpEX5gnSjKuv97Ay ... - name: Ensure idview_for_host1 is applied to host1.idm.example.com ipaidview: ipaadmin_password: "{{ ipaadmin_password }}" name: idview_for_host1 host: host1.idm.example.com action: memberRun the playbook. Specify the playbook file, the file storing the password protecting the secret.yml file, and the inventory file:
$ ansible-playbook --vault-password-file=password_file -v -i <path_to_inventory_directory>/inventory <path_to_playbooks_directory>/ensure-idoverrideuser-can-login-with-sshkey.ymlOptional: If you have
rootcredentials, you can apply the new configuration to the host1.idm.example.com system immediately:SSH to the system as
root:$ ssh root@host1 Password:Clear the SSSD cache:
root@host1 ~]# sss_cache -ERestart the SSSD daemon:
root@host1 ~]# systemctl restart sssd
Verification
Use the public key to
SSHto host1:[root@r8server ~]# ssh -i ~/.ssh/id_rsa.pub idm_user@host1.idm.example.com Last login: Sun Jun 21 22:34:25 2023 from 192.168.122.229 [idm_user@host1 ~]$
The output confirms that you have logged in successfully.
36.11. Using Ansible to give a user ID override access to the local sound card on an IdM client
You can use the ansible-freeipa group and idoverrideuser modules to make Identity Management (IdM) or Active Directory (AD) users members of the local audio group on an IdM client. This grants the IdM or AD users privileged access to the sound card on the host.
The procedure uses the example of the Default Trust View ID view to which the aduser@addomain.com ID override is added in the first playbook task. In the next playbook task, an audio group is created in IdM with the GID of 63, which corresponds to the GID of local audio groups on RHEL hosts. At the same time, the aduser@addomain.com ID override is added to the IdM audio group as a member.
Prerequisites
-
You have
rootaccess to the IdM client on which you want to perform the first part of the procedure. In the example, this is client.idm.example.com. You have configured your Ansible control node to meet the following requirements:
- You are using Ansible version 2.13 or later.
-
You have installed the
ansible-freeipapackage on the Ansible controller. - You are using RHEL 8.10 or later.
- The example assumes that in the ~/MyPlaybooks/ directory, you have created an Ansible inventory file with the fully-qualified domain name (FQDN) of the IdM server.
-
The example assumes that the secret.yml Ansible vault stores your
ipaadmin_password.
-
The AD forest is in trust with IdM. In the example, the name of the AD domain is addomain.com and the fully-qualified domain name (FQDN) of the AD user whose presence in the local
audiogroup is being ensured is aduser@addomain.com. -
The target node, that is the node on which the
ansible-freeipamodule is executed, is part of the IdM domain as an IdM client, server or replica.
Procedure
On client.idm.example.com, add
[SUCCESS=merge]to the/etc/nsswitch.conffile:[...] # Allow initgroups to default to the setting for group. initgroups: sss [SUCCESS=merge] filesIdentify the GID of the local
audiogroup:$ getent group audio --------------------- audio:x:63On your Ansible control node, create an add-aduser-to-audio-group.yml playbook with a task to add the aduser@addomain.com user override to the Default Trust View:
--- - name: Playbook to manage idoverrideuser hosts: ipaserver become: false tasks: - name: Add aduser@addomain.com user to the Default Trust View ipaidoverrideuser: ipaadmin_password: "{{ ipaadmin_password }}" idview: "Default Trust View" anchor: aduser@addomain.comUse another playbook task in the same playbook to add the group audio to IdM with the
GIDof 63. Add the aduser idoverrideuser to the group:- name: Add the audio group with the aduser member and GID of 63 ipagroup: ipaadmin_password: "{{ ipaadmin_password }}" name: audio idoverrideuser: - aduser@addomain.com gidnumber: 63- Save the file.
Run the Ansible playbook. Specify the playbook file, the file storing the password protecting the secret.yml file, and the inventory file:
$ ansible-playbook --vault-password-file=password_file -v -i inventory add-aduser-to-audio-group.yml
Verification
Log in to the IdM client as the AD user:
$ ssh aduser@addomain.com@client.idm.example.comVerify the group membership of the AD user:
$ id aduser@addomain.com uid=702801456(aduser@addomain.com) gid=63(audio) groups=63(audio)
36.12. Using Ansible to ensure an IdM user is present in an ID view with a specific UID
If you are working in a lab where you have our own computer but your /home/ directory is in a shared drive exported by a server, you can have two users:
- One that is system-wide user, stored centrally in Identity Management (IdM).
- One whose account is local, that is stored on the system in question.
If you need to have full access to your files whether you are logged in as an IdM user or as a local user, you can do so by giving both users the same UID.
Complete this procedure to use the ansible-freeipa idoverrideuser module to:
- Apply an ID view to host01 named idview_for_host01.
-
Ensure, in idview_for_host01, the presence of a user ID override for idm_user with the
UIDof 20001.
Prerequisites
You have configured your Ansible control node to meet the following requirements:
- You are using Ansible version 2.13 or later.
-
You have installed the
ansible-freeipapackage on the Ansible controller. - You are using RHEL 8.10 or later.
- The example assumes that in the ~/MyPlaybooks/ directory, you have created an Ansible inventory file with the fully-qualified domain name (FQDN) of the IdM server.
-
The example assumes that the secret.yml Ansible vault stores your
ipaadmin_password.
- The idview_for_host1 ID view exists.
Procedure
On your Ansible control node, create an ensure-idmuser-and-local-user-have-access-to-same-files.yml playbook with the following content:
--- - name: Ensure both local user and IdM user have access to same files hosts: ipaserver become: false gather_facts: false tasks: - name: Ensure idview_for_host1 is applied to host1.idm.example.com ipaidview: ipaadmin_password: "{{ ipaadmin_password }}" name: idview_for_host01 host: host1.idm.example.com - name: Ensure idmuser is present in idview_for_host01 with the UID of 20001 ipaidoverrideuser: ipaadmin_password: "{{ ipaadmin_password }}" idview: idview_for_host01 anchor: idm_user UID: 20001- Save the file.
Run the playbook. Specify the playbook file, the file storing the password protecting the secret.yml file, and the inventory file:
$ ansible-playbook --vault-password-file=password_file -v -i inventory ensure-idmuser-and-local-user-have-access-to-same-files.yml
36.13. Using Ansible to ensure an IdM user can log in to an IdM client with two certificates
If you want an Identity Management (IdM) user that normally logs in to IdM with a password to authenticate to a specific IdM client by using a smart card only, you can create an ID view that requires certification for the user on that client.
Complete this procedure to use the ansible-freeipa idoverrideuser module to:
- Apply an ID view to host01 named idview_for_host01.
- Ensure, in idview_for_host01, the presence of a user ID override for idm_user with two certificates.
Prerequisites
You have configured your Ansible control node to meet the following requirements:
- You are using Ansible version 2.13 or later.
-
You have installed the
ansible-freeipapackage on the Ansible controller. - You are using RHEL 8.10 or later.
- The example assumes that in the ~/MyPlaybooks/ directory, you have created an Ansible inventory file with the fully-qualified domain name (FQDN) of the IdM server.
-
The example assumes that the secret.yml Ansible vault stores your
ipaadmin_password. - The example assumes that cert1.b64 and cert2.b64 certificates are located in the same directory in which you are executing the playbook.
- The idview_for_host01 ID view exists.
Procedure
On your Ansible control node, create an ensure-idmuser-present-in-idview-with-certificates.yml playbook with the following content:
--- - name: Ensure both local user and IdM user have access to same files hosts: ipaserver become: false gather_facts: false tasks: - name: Ensure idview_for_host1 is applied to host01.idm.example.com ipaidview: ipaadmin_password: "{{ ipaadmin_password }}" name: idview_for_host01 host: host01.idm.example.com - name: Ensure an IdM user is present in ID view with two certificates ipaidoverrideuser: ipaadmin_password: "{{ ipaadmin_password }}" idview: idview_for_host01 anchor: idm_user certificate: - "{{ lookup('file', 'cert1.b64', rstrip=False) }}" - "{{ lookup('file', 'cert2.b64', rstrip=False) }}"The
rstrip=Falsedirective causes the white space not to be removed from the end of the looked-up file.- Save the file.
Run the playbook. Specify the playbook file, the file storing the password protecting the secret.yml file, and the inventory file:
$ ansible-playbook --vault-password-file=password_file -v -i inventory ensure-idmuser-present-in-idview-with-certificates.yml
36.14. Using Ansible to give an IdM group access to the sound card on an IdM client
You can use the ansible-freeipa idview and idoverridegroup modules to make Identity Management (IdM) or Active Directory (AD) users members of the local audio group on an IdM client. This grants the IdM or AD users privileged access to the sound card on the host.
The procedure uses the example of the idview_for_host01 ID view to which the audio group ID override is added with the GID` of 63, which corresponds to the GID of local audio groups on RHEL hosts. The idview_for_host01 ID view is applied to an IdM client named host01.idm.example.com.
Prerequisites
You have configured your Ansible control node to meet the following requirements:
- You are using Ansible version 2.13 or later.
-
You have installed the
ansible-freeipapackage on the Ansible controller. - You are using RHEL 8.10 or later.
- The example assumes that in the ~/MyPlaybooks/ directory, you have created an Ansible inventory file with the fully-qualified domain name (FQDN) of the IdM server.
-
The example assumes that the secret.yml Ansible vault stores your
ipaadmin_password.
Procedure
Optional: Identify the GID of the local
audiogroup on a RHEL host:$ getent group audio --------------------- audio:x:63On your Ansible control node, create an give-idm-group-access-to-sound-card-on-idm-client.yml playbook with the following tasks:
--- - name: Playbook to give IdM group access to sound card on IdM client hosts: ipaserver become: false tasks: - name: Ensure the audio group exists in IdM ipagroup: ipaadmin_password: "{{ ipaadmin_password }}" name: audio - name: Ensure idview_for_host01 exists and is applied to host01.idm.example.com ipaidview: ipaadmin_password: "{{ ipaadmin_password }}" name: idview_for_host01 host: host01.idm.example.com - name: Add an override for the IdM audio group with GID 63 to idview_for_host01 ipaidoverridegroup: ipaadmin_password: "{{ ipaadmin_password }}" idview: idview_for_host01 anchor: audio GID: 63- Save the file.
Run the Ansible playbook. Specify the playbook file, the file storing the password protecting the secret.yml file, and the inventory file:
$ ansible-playbook --vault-password-file=password_file -v -i inventory give-idm-group-access-to-sound-card-on-idm-client.yml
Verification
On an IdM client, obtain IdM administrator’s credentials:
$ kinit admin Password:Create a test IdM user:
$ ipa user-add testuser --first test --last user --password User login [tuser]: Password: Enter Password again to verify: ------------------ Added user "tuser" ------------------Add the user to the IdM audio group:
$ ipa group-add-member --tuser audioLog in to host01.idm.example.com as tuser:
$ ssh tuser@host01.idm.example.comVerify the group membership of the user:
$ id tuser uid=702801456(tuser) gid=63(audio) groups=63(audio)
36.15. Migrating NIS domains to Identity Management
You can use ID views to set host specific UIDs and GIDs for existing hosts to prevent changing permissions for files and directories when migrating NIS domains into IdM.
Prerequisites
-
You authenticated yourself as an admin using the
kinit admincommand.
Procedure
Add users and groups in the IdM domain.
-
Create users using the
ipa user-addcommand. For more information see: Adding users to IdM. -
Create groups using the
ipa group-addcommand. For more information see: Adding groups to IdM.
-
Create users using the
Override IDs IdM generated during the user creation:
-
Create a new ID view using
ipa idview-addcommand. For more information see: Getting help for ID view commands. -
Add ID overrides for the users and groups to the ID view using
ipa idoverrideuser-addandidoverridegroup-addrespectively.
-
Create a new ID view using
-
Assign the ID view to the specific hosts using
ipa idview-applycommand. - Decommission the NIS domains.
Verification
To check if all users and groups were added to the ID view correctly, use the
ipa idview-showcommand.$ ipa idview-show example-view ID View Name: example-view User object overrides: example-user1 Group object overrides: example-group
Chapter 37. Using ID views for Active Directory users
You can use ID views to specify new values for the POSIX attributes of your Active Directory (AD) users in an IdM-AD Trust environment.
By default, IdM applies the Default Trust View to all AD users. You can configure additional ID views on individual IdM clients to further adjust which POSIX attributes specific users receive.
37.1. How the Default Trust View works
The Default Trust View is the default ID view that is always applied to AD users and groups in trust-based setups. It is created automatically when you establish the trust using the ipa-adtrust-install command and cannot be deleted.
The Default Trust View only accepts overrides for AD users and groups, not for IdM users and groups.
Using the Default Trust View, you can define custom POSIX attributes for AD users and groups, thus overriding the values defined in AD.
| Values in AD | Default Trust View | Result | |
|---|---|---|---|
| Login | ad_user | ad_user | ad_user |
| UID | 111 | 222 | 222 |
| GID | 111 | (no value) | 111 |
You can also configure additional ID Views to override the Default Trust View on IdM clients. IdM applies the values from the host-specific ID view on top of the Default Trust View:
- If an attribute is defined in the host-specific ID view, IdM applies the value from this ID view.
- If an attribute is not defined in the host-specific ID view, IdM applies the value from the Default Trust View.
| Values in AD | Default Trust View | Host-specific ID view | Result | |
|---|---|---|---|---|
| Login | ad_user | ad_user | (no value) | ad_user |
| UID | 111 | 222 | 333 | 333 |
| GID | 111 | (no value) | 333 | 333 |
You can only apply host-specific ID views to override the Default Trust View on IdM clients. IdM servers and replicas always apply the values from the Default Trust View.
37.2. Defining global attributes for an AD user by modifying the Default Trust View
If you want to override a POSIX attribute for an Active Directory (AD) user throughout your entire IdM deployment, modify the entry for that user in the Default Trust View. This procedure sets the GID for the AD user ad_user@ad.example.com to 732000006.
Prerequisites
- You have authenticated as an IdM administrator.
- A group must exist with the GID or you must set the GID in an ID override for a group.
Procedure
As an IdM administrator, create an ID override for the AD user in the Default Trust View that changes the GID number to 732000006:
# ipa idoverrideuser-add 'Default Trust View' ad_user@ad.example.com --gidnumber=732000006Clear the entry for the
ad_user@ad.example.comuser from the SSSD cache on all IdM servers and clients. This removes stale data and allows the new override value to apply.# sssctl cache-expire -u ad_user@ad.example.com
Verification
Retrieve information for the
ad_user@ad.example.comuser to verify the GID reflects the updated value.# id ad_user@ad.example.com uid=702801456(ad_user@ad.example.com) gid=732000006(ad_admins) groups=732000006(ad_admins),702800513(domain users@ad.example.com)
37.3. Overriding Default Trust View attributes for an AD user on an IdM client with an ID view
You might want to override some POSIX attributes from the Default Trust View for an Active Directory (AD) user. For example, you might need to give an AD user a different GID on one particular IdM client. You can use an ID view to override a value from the Default Trust View for an AD user and apply it to a single host. This procedure explains how to set the GID for the ad_user@ad.example.com AD user on the host1.idm.example.com IdM client to 732001337.
Prerequisites
-
You have root access to the
host1.idm.example.comIdM client. -
You are logged in as a user with the required privileges, for example the
adminuser.
Procedure
Create an ID view. For example, to create an ID view named example_for_host1:
$ ipa idview-add example_for_host1 --------------------------- Added ID View "example_for_host1" --------------------------- ID View Name: example_for_host1Add a user override to the example_for_host1 ID view. To override the user’s GID:
-
Enter the
ipa idoverrideuser-addcommand - Add the name of the ID view
- Add the user name, also called the anchor
-
Add the
--gidnumber=option:
$ ipa idoverrideuser-add example_for_host1 ad_user@ad.example.com --gidnumber=732001337 ----------------------------- Added User ID override "ad_user@ad.example.com" ----------------------------- Anchor to override: ad_user@ad.example.com GID: 732001337-
Enter the
Apply
example_for_host1to thehost1.idm.example.comIdM client:$ ipa idview-apply example_for_host1 --hosts=host1.idm.example.com ----------------------------- Applied ID View "example_for_host1" ----------------------------- hosts: host1.idm.example.com --------------------------------------------- Number of hosts the ID View was applied to: 1 ---------------------------------------------NoteThe
ipa idview-applycommand also accepts the--hostgroupsoption. The option applies the ID view to hosts that belong to the specified host group, but does not associate the ID view with the host group itself. Instead, the--hostgroupsoption expands the members of the specified host group and applies the--hostsoption individually to every one of them.This means that if a host is added to the host group in the future, the ID view does not apply to the new host.
Clear the entry for the
ad_user@ad.example.comuser from the SSSD cache on thehost1.idm.example.comIdM client. This removes stale data and allows the new override value to apply.[root@host1 ~]# sssctl cache-expire -u ad_user@ad.example.com
Verification
SSHto host1 as ad_user@ad.example.com:[root@r8server ~]# ssh ad_user@ad.example.com@host1.idm.example.comRetrieve information for the
ad_user@ad.example.comuser to verify the GID reflects the updated value.[ad_user@ad.example.com@host1 ~]$ id ad_user@ad.example.com uid=702801456(ad_user@ad.example.com) gid=732001337(admins2) groups=732001337(admins2),702800513(domain users@ad.example.com)
37.4. Applying an ID view to an IdM host group
The ipa idview-apply command accepts the --hostgroups option. However, the option acts as a one-time operation that applies the ID view to hosts that currently belong to the specified host group, but does not dynamically associate the ID view with the host group itself. The --hostgroups option expands the members of the specified host group and applies the --hosts option individually to every one of them.
If you add a new host to the host group later, you must apply the ID view to the new host manually, using the ipa idview-apply command with the --hosts option.
Similarly, if you remove a host from a host group, the ID view is still assigned to the host after the removal. To unapply the ID view from the removed host, you must run the ipa idview-unapply id_view_name --hosts=name_of_the_removed_host command.
Follow this procedure to achieve the following goals:
- How to create a host group and add hosts to it.
- How to apply an ID view to the host group.
- How to add a new host to the host group and apply the ID view to the new host.
Prerequisites
- Ensure that the ID view you want to apply to the host group exists in IdM. For example, to create an ID view to override an IdM user login name on a specific IdM client, see Using an ID view to override the login name of an IdM user on a specific host.
Procedure
Create a host group and add hosts to it:
Create a host group. For example, to create a host group named baltimore:
[root@server ~]# ipa hostgroup-add --desc="Baltimore hosts" baltimore --------------------------- Added hostgroup "baltimore" --------------------------- Host-group: baltimore Description: Baltimore hostsAdd hosts to the host group. For example, to add the host102 and host103 to the baltimore host group:
[root@server ~]# ipa hostgroup-add-member --hosts={host102,host103} baltimore Host-group: baltimore Description: Baltimore hosts Member hosts: host102.idm.example.com, host103.idm.example.com ------------------------- Number of members added 2 -------------------------
Apply an ID view to the hosts in the host group. For example, to apply the example_for_host1 ID view to the baltimore host group:
[root@server ~]# ipa idview-apply --hostgroups=baltimore ID View Name: example_for_host1 ----------------------------------------- Applied ID View "example_for_host1" ----------------------------------------- hosts: host102.idm.example.com, host103.idm.example.com --------------------------------------------- Number of hosts the ID View was applied to: 2 ---------------------------------------------Add a new host to the host group and apply the ID view to the new host:
Add a new host to the host group. For example, to add the somehost.idm.example.com host to the baltimore host group:
[root@server ~]# ipa hostgroup-add-member --hosts=somehost.idm.example.com baltimore Host-group: baltimore Description: Baltimore hosts Member hosts: host102.idm.example.com, host103.idm.example.com,somehost.idm.example.com ------------------------- Number of members added 1 -------------------------Optional: Display the ID view information. For example, to display the details about the example_for_host1 ID view:
[root@server ~]# ipa idview-show example_for_host1 --all dn: cn=example_for_host1,cn=views,cn=accounts,dc=idm,dc=example,dc=com ID View Name: example_for_host1 [...] Hosts the view applies to: host102.idm.example.com, host103.idm.example.com objectclass: ipaIDView, top, nsContainerThe output shows that the ID view is not applied to somehost.idm.example.com, the newly-added host in the baltimore host group.
Apply the ID view to the new host. For example, to apply the example_for_host1 ID view to somehost.idm.example.com:
[root@server ~]# ipa idview-apply --host=somehost.idm.example.com ID View Name: example_for_host1 ----------------------------------------- Applied ID View "example_for_host1" ----------------------------------------- hosts: somehost.idm.example.com --------------------------------------------- Number of hosts the ID View was applied to: 1 ---------------------------------------------
Verification
Display the ID view information again:
[root@server ~]# ipa idview-show example_for_host1 --all dn: cn=example_for_host1,cn=views,cn=accounts,dc=idm,dc=example,dc=com ID View Name: example_for_host1 [...] Hosts the view applies to: host102.idm.example.com, host103.idm.example.com, somehost.idm.example.com objectclass: ipaIDView, top, nsContainerThe output shows that ID view is now applied to somehost.idm.example.com, the newly-added host in the baltimore host group.
Chapter 38. Adjusting ID ranges manually
An IdM server generates unique user ID (UID) and group ID (GID) numbers. By creating and assigning different ID ranges to replicas, it also ensures that they never generate the same ID numbers. By default, this process is automatic. However, you can manually adjust the IdM ID range during the IdM server installation, or manually define a replica’s DNA ID range.
38.1. ID ranges
ID numbers are divided into ID ranges. Keeping separate numeric ranges for individual servers and replicas eliminates the chance that an ID number issued for an entry is already used by another entry on another server or replica.
Note that there are two distinct types of ID ranges:
- The IdM ID range, which is assigned during the installation of the first server. This range cannot be modified after it is created. However, you can create a new IdM ID range in addition to the original one. For more information, see Automatic ID ranges assignment and Adding a new IdM ID range.
The Distributed Numeric Assignment (DNA) ID ranges, which can be modified by the user. These have to fit within an existing IdM ID range. For more information, see Assigning DNA ID ranges manually.
Replicas can also have a next DNA ID range assigned. A replica uses its next range when it runs out of IDs in its current range. Next ranges are not assigned automatically when a replica is deleted and you must assign them manually.
The ranges are updated and shared between the server and replicas by the DNA plug-in, as part of the back end 389 Directory Server instance for the domain.
The DNA range definition is set by two attributes:
- The server’s next available number: the low end of the DNA range
- The range size: the number of ID’s in the DNA range
The initial bottom range is set during the plug-in instance configuration. After that, the plug-in updates the bottom value. Breaking the available numbers into ranges allows the servers to continually assign numbers without overlapping with each other.
38.2. Automatic ID ranges assignment
IdM ID ranges
By default, a local domain IdM ID range (ipa-local) is automatically assigned during the IdM server installation. The ipa-server-install command randomly selects and assigns a range of 200,000 IDs from a total of 10,000 possible ranges. Selecting a random range in this way significantly reduces the probability of conflicting IDs in case you decide to merge two separate IdM domains in the future.
Avoid modifying this IdM ID range after it is created. You can manually adjust the Distributed Numeric Assignment (DNA) ID ranges, using the commands described in Assigning DNA ID ranges manually. A DNA range matching the IdM ID range is automatically created during installation.
DNA ID ranges
If you have a single IdM server installed, it controls the whole DNA ID range. When you install a new replica and the replica requests its own DNA ID range, the initial ID range for the server splits and is distributed between the server and replica: the replica receives half of the remaining DNA ID range that is available on the initial server. The server and replica then use their respective portions of the original ID range for new user or group entries. Also, if the replica is close to depleting its allocated ID range and fewer than 100 IDs remain, the replica contacts the other available servers to request a new DNA ID range.
When you install a replica, it does not immediately receive an ID range. A replica receives an ID range the first time the DNA plug-in is used, for example when you first add a user.
If the initial server stops functioning before the replica requests a DNA ID range from it, the replica is unable to contact the server to request the ID range. Attempting to add a new user on the replica then fails. In such situations, you can find out what ID range is assigned to the disabled server, and assign an ID range to the replica manually.
38.3. Assigning the IdM ID range manually during server installation
You can override the default behavior and set an IdM ID range manually instead of having it assigned randomly.
Do not set ID ranges that include UID values of 1000 and lower; these values are reserved for system use. Also, do not set an ID range that would include the 0 value; the SSSD service does not handle the 0 ID value.
Procedure
You can define the IdM ID range manually during server installation by using the following two options with
ipa-server-install:-
--idstartgives the starting value for UID and GID numbers. -
--idmaxgives the maximum UID and GID number; by default, the value is the--idstartstarting value plus 199,999.
-
Verification
To check if the ID range was assigned correctly, you can display the assigned IdM ID range by using the
ipa idrange-findcommand:# ipa idrange-find --------------- 1 range matched --------------- Range name: IDM.EXAMPLE.COM_id_range First Posix ID of the range: 882200000 Number of IDs in the range: 200000 Range type: local domain range ---------------------------- Number of entries returned 1 ----------------------------
38.4. Adding a new IdM ID range
In some cases, you may want to create a new IdM ID range in addition to the original one; for example, when a replica has run out of IDs and the original IdM ID range is depleted.
Adding a new IdM ID range does not create new DNA ID ranges automatically. You must assign new DNA ID ranges to replicas manually as needed. For more information about how to do this, see assigning DNA ID ranges manually.
Procedure
To create a new IdM ID range, use the
ipa idrange-addcommand. You must specify the new range name, the first ID number of the range, the range size, and the first RID number of the primary and secondary RID range:# ipa idrange-add IDM.EXAMPLE.COM_new_range --base-id 5000 --range-size 1000 --rid-base 300000 --secondary-rid-base 1300000 ipa: WARNING: Service dirsrv@IDM-EXAMPLE-COM.service requires restart on IPA server <all IPA servers> to apply configuration changes. ------------------------------------------ Added ID range "IDM.EXAMPLE.COM_new_range" ------------------------------------------ Range name: IDM.EXAMPLE.COM_new_range First Posix ID of the range: 5000 Number of IDs in the range: 1000 First RID of the corresponding RID range: 300000 First RID of the secondary RID range: 1300000 Range type: local domain rangeRestart the Directory Server service on all IdM servers in the deployment:
# systemctl restart dirsrv@IDM-EXAMPLE-COM.serviceThis ensures that when you create users with UIDs from the new range, they have security identifiers (SIDs) assigned.
Optional: Update the ID range immediately:
Clear the System Security Services Daemon (SSSD) cache:
# sss_cache -ERestart the SSSD daemon:
# systemctl restart sssdNoteIf you do not clear the SSSD cache and restart the service, SSSD only detects the new ID range when it updates the domain list and other configuration data stored on the IdM server.
Verification
You can check if the new range is set correctly by using the
ipa idrange-findcommand:# ipa idrange-find ---------------- 2 ranges matched ---------------- Range name: IDM.EXAMPLE.COM_id_range First Posix ID of the range: 882200000 Number of IDs in the range: 200000 Range type: local domain range Range name: IDM.EXAMPLE.COM_new_range First Posix ID of the range: 5000 Number of IDs in the range: 1000 First RID of the corresponding RID range: 300000 First RID of the secondary RID range: 1300000 Range type: local domain range ---------------------------- Number of entries returned 2 ----------------------------
38.5. The role of security and relative identifiers in IdM ID ranges
An Identity Management (IdM) ID range is defined by several parameters:
- The range name
- The first POSIX ID of the range
- The range size: the number of IDs in the range
- The first relative identifier (RID) of the corresponding RID range
- The first RID of the secondary RID range
You can view these values by using the ipa idrange-show command:
$ ipa idrange-show IDM.EXAMPLE.COM_id_range
Range name: IDM.EXAMPLE.COM_id_range
First Posix ID of the range: 196600000
Number of IDs in the range: 200000
First RID of the corresponding RID range: 1000
First RID of the secondary RID range: 1000000
Range type: local domain rangeSecurity identifiers
The data from the ID ranges of the local domain are used by the IdM server internally to assign unique security identifiers (SIDs) to IdM users and groups. The SIDs are stored in the user and group objects. A user’s SID consists of the following:
- The domain SID
- The user’s relative identifier (RID), which is a four-digit 32-bit value appended to the domain SID
For example, if the domain SID is S-1-5-21-123-456-789 and the RID of a user from this domain is 1008, then the user has the SID of S-1-5-21-123-456-789-1008.
Relative identifiers
The RID itself is computed in the following way:
Subtract the first POSIX ID of the range from the user’s POSIX UID, and add the first RID of the corresponding RID range to the result. For example, if the UID of idmuser is 196600008, the first POSIX ID is 196600000, and the first RID is 1000, then idmuser's RID is 1008.
The algorithm computing the user’s RID checks if a given POSIX ID falls into the ID range allocated before it computes a corresponding RID. For example, if the first ID is 196600000 and the range size is 200000, then the POSIX ID of 1600000 is outside of the ID range and the algorithm does not compute a RID for it.
Secondary relative identifiers
In IdM, a POSIX UID can be identical to a POSIX GID. This means that if idmuser already exists with the UID of 196600008, you can still create a new idmgroup group with the GID of 196600008.
However, a SID can define only one object, a user or a group. The SID of S-1-5-21-123-456-789-1008 that has already been created for idmuser cannot be shared with idmgroup. An alternative SID must be generated for idmgroup.
IdM uses a secondary relative identifier, or secondary RID, to avoid conflicting SIDs. This secondary RID consists of the following:
- The secondary RID base
- A range size; by default identical with the base range size
In the example above, the secondary RID base is set to 1000000. To compute the RID for the newly created idmgroup: subtract the first POSIX ID of the range from the user’s POSIX UID, and add the first RID of the secondary RID range to the result. idmgroup is therefore assigned the RID of 1000008. Consequently, the SID of idmgroup is S-1-5-21-123-456-789-1000008.
IdM uses the secondary RID to compute a SID only if a user or a group object was previously created with a manually set POSIX ID. Otherwise, automatic assignment prevents assigning the same ID twice.
38.6. Detecting and fixing ID range issues automatically
Kerberos in Identity Management (IdM) uses the Privilege Attribute Certificate (PAC) for authorization. For this to function correctly, users and groups must have a Security Identifier (SID) assigned. SIDs can only be generated for entities that are within a valid ipa-local ID range.
If users or groups are created outside of a defined ipa-local range, or if an existing range is misconfigured, the SID generation task can fail. This can prevent users from authenticating and obtaining Kerberos tickets.
You can use the ipa-idrange-fix command-line tool to analyze and repair these inconsistencies. The tool identifies users and groups outside of valid ranges, proposes the creation of new ranges to cover them, and applies the changes upon confirmation.
Prerequisites
You have
rootaccess to the IdM server where you will run the tool.ImportantRed Hat strongly recommends creating a full backup of the system before you apply any changes suggested by the
ipa-idrange-fixtool.- The server is running RHEL 8.10 or newer.
Procedure
Run
ipa-idrange-fixto analyze the current ID ranges. You can customize this by using various options, such as:# ipa-idrange-fix --rangegap 300000 --minrange 20 --ridoffset 200000-
--rangegap <value>: Specifies the maximum gap between IDs to be included in a single proposed range. The default is200000. -
--minrange <value>: Sets the minimum number of IDs required to form a valid new range. Any group of IDs smaller than this will be listed as outliers for manual resolution. The default is10. --ridoffset <value>: Sets an offset for new RID bases to allow for future expansion of existing ranges. The default is100000.NoteBy default, the
ipa-idrange-fixtool ignores users and groups with IDs below 1000, as these are typically reserved for system accounts. To include these entities in the analysis, which is not recommended, use the--allowunder1000option.
-
The tool displays proposed changes, such as creating new ID ranges. Review the proposed changes carefully.
Noteipa-idrange-fixdoes not create new SIDs for users and groups who do not have them. To create missing SIDs, see Enabling Security Identifiers (SIDs) in IdM.Enter
yesto apply the changes.ImportantDo not run
ipa-idrange-fixwith the--unattendedoption unless you are certain you want to automatically apply all proposed changes.
Verification
Review the log file to see the applied changes:
# cat /var/log/ipa/ipa-idrange-fix.logUse the
ipa idrange-find --allcommand to verify that the new ID ranges have been created correctly:# ipa idrange-find --all ---------------- 2 ranges matched ---------------- dn: cn=IDM.EXAMPLE.COM_id_range,cn=ranges,cn=accounts,dc=example,dc=com Range name: IDM.EXAMPLE.COM_id_range First Posix ID of the range: 882200000 Number of IDs in the range: 200000 First RID of the corresponding RID range: 1000 First RID of the secondary RID range: 1000000 Range type: local domain range ipaUniqueID: 569bf864-9d45-11ea-bea3-525400f6f085 objectclass: ipaIdRange, top dn: cn=IDM.EXAMPLE.COM_new_id_range,cn=ranges,cn=accounts,dc=example,dc=com Range name: IDM.EXAMPLE.COM_new_id_range First Posix ID of the range: 12000000 Number of IDs in the range: 200000 First RID of the corresponding RID range: 10000 First RID of the secondary RID range: 20000000 Range type: local domain range ipaUniqueID: 7a2b3c4d-e5f6-7890-a1b2-c3d4e5f67890 objectclass: ipaIdRange, top ---------------------------- Number of entries returned 2 ----------------------------
38.7. Using Ansible to add a new local IdM ID range
In some cases, you may want to create a new Identity Management (IdM) ID range in addition to the original one; for example, when a replica has run out of IDs and the original IdM ID range is depleted. The following example describes how to create a new IdM ID range by using an Ansible playbook.
Adding a new IdM ID range does not create new DNA ID ranges automatically. You need to assign new DNA ID ranges manually as needed. For more information about how to do this, see Assigning DNA ID ranges manually.
Prerequisites
On the control node:
- You are using Ansible version 2.13 or later.
-
You have installed the
ansible-freeipapackage. - The example assumes that in the ~/MyPlaybooks/ directory, you have created an Ansible inventory file with the fully-qualified domain name (FQDN) of the IdM server.
-
The example assumes that the secret.yml Ansible vault stores your
ipaadmin_password.
-
The target node, that is the node on which the
ansible-freeipamodule is executed, is part of the IdM domain as an IdM client, server or replica.
Procedure
Navigate to your ~/MyPlaybooks/ directory:
$ cd ~/MyPlaybooks/Create the
idrange-present.ymlplaybook with the following content:--- - name: Playbook to manage idrange hosts: ipaserver become: no vars_files: - /home/user_name/MyPlaybooks/secret.yml tasks: - name: Ensure local idrange is present ipaidrange: ipaadmin_password: "{{ ipaadmin_password }}" name: new_id_range base_id: 12000000 range_size: 200000 rid_base: 1000000 secondary_rid_base: 200000000- Save the file.
Run the Ansible playbook. Specify the playbook file, the file storing the password protecting the secret.yml file, and the inventory file:
$ ansible-playbook --vault-password-file=password_file -v -i inventory idrange-present.ymlSSHtoipaserverand restart the Directory Server:# systemctl restart dirsrv@IDM.EXAMPLE.COM.serviceThis ensures that when you create users with UIDs from the new range, they have security identifiers (SIDs) assigned.
Optional: Update the ID range immediately:
On
ipaserver, clear the System Security Services Daemon (SSSD) cache:# sss_cache -EOn
ipaserver, restart the SSSD daemon:# systemctl restart sssdNoteIf you do not clear the SSSD cache and restart the service, SSSD only detects the new ID range when it updates the domain list and other configuration data stored on the IdM server.
Verification
-
You can check if the new range is set correctly by using the
ipa idrange-findcommand:
# ipa idrange-find
----------------
2 ranges matched
----------------
Range name: IDM.EXAMPLE.COM_id_range
First Posix ID of the range: 882200000
Number of IDs in the range: 200000
Range type: local domain range
Range name: IDM.EXAMPLE.COM_new_id_range
First Posix ID of the range: 12000000
Number of IDs in the range: 200000
Range type: local domain range
----------------------------
Number of entries returned 2
----------------------------38.8. Removing an ID range after removing a trust to AD
If you have removed a trust between your IdM and Active Directory (AD) environments, you might want to remove the ID range associated with it.
IDs allocated to ID ranges associated with trusted domains might still be used for ownership of files and directories on systems enrolled into IdM.
If you remove the ID range that corresponds to an AD trust that you have removed, you will not be able to resolve the ownership of any files and directories owned by AD users.
Prerequisites
- You have removed a trust to an AD environment.
Procedure
Display all the ID ranges that are currently in use:
[root@server ~]# ipa idrange-find-
Identify the name of the ID range associated with the trust you have removed. The first part of the name of the ID range is the name of the trust, for example
AD.EXAMPLE.COM_id_range. Remove the range:
[root@server ~]# ipa idrange-del AD.EXAMPLE.COM_id_rangeRestart the SSSD service to remove references to the ID range you have removed.
[root@server ~]# systemctl restart sssd
38.9. Displaying currently assigned DNA ID ranges
You can display both the currently active Distributed Numeric Assignment (DNA) ID range on a server, as well as its next DNA range if it has one assigned.
Procedure
To display which DNA ID ranges are configured for the servers in the topology, use the following commands:
ipa-replica-manage dnarange-showdisplays the current DNA ID range that is set on all servers or, if you specify a server, only on the specified server, for example:# ipa-replica-manage dnarange-show serverA.example.com: 1001-1500 serverB.example.com: 1501-2000 serverC.example.com: No range set # ipa-replica-manage dnarange-show serverA.example.com serverA.example.com: 1001-1500ipa-replica-manage dnanextrange-showdisplays the next DNA ID range currently set on all servers or, if you specify a server, only on the specified server, for example:# ipa-replica-manage dnanextrange-show serverA.example.com: 2001-2500 serverB.example.com: No on-deck range set serverC.example.com: No on-deck range set # ipa-replica-manage dnanextrange-show serverA.example.com serverA.example.com: 2001-2500
38.10. Manual ID range assignment
In certain situations, it is necessary to manually assign a Distributed Numeric Assignment (DNA) ID range, for example when:
A replica has run out of IDs and the IdM ID range is depleted
A replica has exhausted the DNA ID range that was assigned to it, and requesting additional IDs failed because no more free IDs are available in the IdM range.
To solve this situation, extend the DNA ID range assigned to the replica. You can do this in two ways:
- Shorten the DNA ID range assigned to a different replica, then assign the newly available values to the depleted replica.
Create a new IdM ID range, then set a new DNA ID range for the replica within this created IdM range.
For information about how to create a new IdM ID range, see Adding a new IdM ID range.
A replica stopped functioning
A replica’s DNA ID range is not automatically retrieved when the replica stops functioning and must be deleted, which means the DNA ID range previously assigned to the replica becomes unavailable. You want to recover the DNA ID range and make it available for other replicas.
To do this, find out what the ID range values are, before manually assigning that range to a different server. Also, to avoid duplicate UIDs or GIDs, make sure that no ID value from the recovered range was previously assigned to a user or group; you can do this by examining the UIDs and GIDs of existing users and groups.
You can manually assign a DNA ID range to a replica using the commands in Assigning DNA ID ranges manually.
If you assign a new DNA ID range, the UIDs of the already existing entries on the server or replica stay the same. This does not pose a problem because even if you change the current DNA ID range, IdM keeps a record of what ranges were assigned in the past.
38.11. Assigning DNA ID ranges manually
In some cases, you may need to manually assign Distributed Numeric Assignment (DNA) ID ranges to existing replicas, for example to reassign a DNA ID range assigned to a non-functioning replica. For more information, see Manual ID range assignment.
When adjusting a DNA ID range manually, make sure that the newly adjusted range is included in the IdM ID range; you can check this using the ipa idrange-find command. Otherwise, the command fails.
Be careful not to create overlapping ID ranges. If any of the ID ranges you assign to servers or replicas overlap, it could result in two different servers assigning the same ID value to different entries.
Prerequisites
- Optional: If you are recovering a DNA ID range from a non-functioning replica, first find the ID range using the commands described in Displaying currently assigned DNA ID ranges.
Procedure
To define the current DNA ID range for a specified server, use
ipa-replica-manage dnarange-set:# ipa-replica-manage dnarange-set serverA.example.com 1250-1499To define the next DNA ID range for a specified server, use
ipa-replica-manage dnanextrange-set:# ipa-replica-manage dnanextrange-set serverB.example.com 1500-5000
Verification
- You can check that the new DNA ranges are set correctly by using the commands described in Displaying the currently assigned DNA ID ranges.
Chapter 39. Managing subID ranges manually
In a containerized environment, sometimes an IdM user needs to assign subID ranges manually. The following instructions describe how to manage the subID ranges.
39.1. Generating subID ranges using IdM CLI
As an Identity Management (IdM) administrator, you can generate a subID range and assign it to IdM users.
Prerequisites
- The IdM users exist.
-
You have obtained an IdM
adminticket-granting ticket (TGT). See Using kinit to log in to IdM manually for more details. -
You have
rootaccess to the IdM host where you are executing the procedure.
Procedure
Optional: Check for existing subID ranges:
# ipa subid-findIf a subID range does not exist, select one of the following options:
Generate and assign a subID range to an IdM user:
# ipa subid-generate --owner=idmuser Added subordinate id "359dfcef-6b76-4911-bd37-bb5b66b8c418" Unique ID: 359dfcef-6b76-4911-bd37-bb5b66b8c418 Description: auto-assigned subid Owner: idmuser SubUID range start: 2147483648 SubUID range size: 65536 SubGID range start: 2147483648 SubGID range size: 65536Generate and assign subID ranges to all IdM users:
# /usr/libexec/ipa/ipa-subids --all-users Found 2 user(s) without subordinate ids Processing user 'user4' (1/2) Processing user 'user5' (2/2) Updated 2 user(s) The ipa-subids command was successful
Optional: Assign subID ranges to new IdM users by default:
# ipa config-mod --user-default-subid=True
Verification
Verify that the user has a subID range assigned:
# ipa subid-find --owner=idmuser 1 subordinate id matched Unique ID: 359dfcef-6b76-4911-bd37-bb5b66b8c418 Owner: idmuser SubUID range start: 2147483648 SubUID range size: 65536 SubGID range start: 2147483648 SubGID range size: 65536 Number of entries returned 1
39.2. Generating subID ranges using IdM WebUI interface
As an Identity Management (IdM) administrator, you can generate a subID range and assign it to a user in the IdM WebUI interface.
Prerequisites
- The IdM user exists.
-
You have obtained an IdM
adminKerberos ticket (TGT). See Logging in to IdM in the Web UI: Using a Kerberos ticket for more details. -
You have
rootaccess to the IdM host where you are executing the procedure.
Procedure
- In the IdM WebUI interface expand the Subordinate IDs tab and choose the Subordinate IDs option.
- When the Subordinate IDs interface appears, click the Add button in the upper-right corner of the interface. The Add subid window appears.
- In the Add subid window choose an owner, that is the user to whom you want to assign a subID range.
- Click the Add button.
Verification
- View the table under the Subordinate IDs tab. A new record shows in the table. The owner is the user to whom you assigned the subID range.
39.3. Viewing subID information about IdM users by using IdM CLI
As an Identity Management (IdM) user, you can search for IdM user subID ranges and view the related information.
Prerequisites
- You have configured a subID range on the IdM client. For more information, see Generating subID ranges using IdM CLI.
- You have obtained an IdM user ticket-granting ticket (TGT). See Using kinit to log in to IdM manually for more details.
Procedure
To view the details about a subID range:
If you know the unique ID hash of the Identity Management (IdM) user that is the owner of the range:
$ ipa subid-show 359dfcef-6b76-4911-bd37-bb5b66b8c418 Unique ID: 359dfcef-6b76-4911-bd37-bb5b66b8c418 Owner: idmuser SubUID range start: 2147483648 SubUID range size: 65536 SubGID range start: 2147483648 SubGID range size: 65536If you know a specific subID from that range:
$ ipa subid-match --subuid=2147483670 1 subordinate id matched Unique ID: 359dfcef-6b76-4911-bd37-bb5b66b8c418 Owner: uid=idmuser SubUID range start: 2147483648 SubUID range size: 65536 SubGID range start: 2147483648 SubGID range size: 65536 Number of entries returned 1
39.4. Listing subID ranges using the getsubid command
As a system administrator, you can use the command line to list the subID ranges of Identity Management (IdM) or local users.
Prerequisites
- The idmuser user exists in IdM.
-
The
shadow-utils-subidpackage is installed. -
You can edit the
/etc/nsswitch.conffile.
Procedure
Open the
/etc/nsswitch.conffile and configure theshadow-utilsutility to use IdM subID ranges by setting thesubidvariable to thesssvalue:[...] subid: sssNoteYou can provide only one value for the
subidfield. Setting thesubidfield to thefilevalue or no value instead ofsssconfigures theshadow-utilsutility to use the subID ranges from the/etc/subuidand/etc/subgidfiles.List the subID range for an IdM user:
$ getsubids idmuser 0: idmuser 2147483648 65536The first value, 2147483648, indicates the subID range start. The second value, 65536, indicates the size of the range.
Chapter 40. Using Ansible to manage the replication topology in IdM
You can maintain multiple Identity Management (IdM) servers and let them replicate each other for redundancy purposes to mitigate or prevent server loss. For example, if one server fails, the other servers keep providing services to the domain. You can also recover the lost server by creating a new replica based on one of the remaining servers.
Data stored on an IdM server is replicated based on replication agreements: when two servers have a replication agreement configured, they share their data. The data that is replicated is stored in the topology suffixes. When two replicas have a replication agreement between their suffixes, the suffixes form a topology segment.
This chapter describes how to use Ansible to manage IdM replication agreements, topology segments, and topology suffixes.
40.1. Using Ansible to ensure a replication agreement exists in IdM
Data stored on an Identity Management (IdM) server is replicated based on replication agreements: when two servers have a replication agreement configured, they share their data. Replication agreements are always bilateral: the data is replicated from the first replica to the other one as well as from the other replica to the first one.
Follow this procedure to use an Ansible playbook to ensure that a replication agreement of the domain type exists between server.idm.example.com and replica.idm.example.com.
Prerequisites
- Ensure that you understand the recommendations for designing your IdM topology listed in Guidelines for connecting IdM replicas in a topology.
You have configured your Ansible control node to meet the following requirements:
- You are using Ansible version 2.13 or later.
-
You have installed the
ansible-freeipapackage. - The example assumes that in the ~/MyPlaybooks/ directory, you have created an Ansible inventory file with the fully-qualified domain name (FQDN) of the IdM server.
-
The example assumes that the secret.yml Ansible vault stores your
ipaadmin_passwordand that you have access to a file that stores the password protecting the secret.yml file.
-
The target node, that is the node on which the
ansible-freeipamodule is executed, is part of the IdM domain as an IdM client, server or replica.
Procedure
Navigate to your ~/MyPlaybooks/ directory:
$ cd ~/MyPlaybooks/Copy the
add-topologysegment.ymlAnsible playbook file provided by theansible-freeipapackage:$ cp /usr/share/doc/ansible-freeipa/playbooks/topology/add-topologysegment.yml add-topologysegment-copy.yml-
Open the
add-topologysegment-copy.ymlfile for editing. Adapt the file by setting the following variables in the
ipatopologysegmenttask section:-
Indicate that the value of the
ipaadmin_passwordvariable is defined in the secret.yml Ansible vault file. -
Set the
suffixvariable to eitherdomainorca, depending on what type of segment you want to add. -
Set the
leftvariable to the name of the IdM server that you want to be the left node of the replication agreement. -
Set the
rightvariable to the name of the IdM server that you want to be the right node of the replication agreement. -
Ensure that the
statevariable is set topresent.
This is the modified Ansible playbook file for the current example:
--- - name: Playbook to handle topologysegment hosts: ipaserver vars_files: - /home/user_name/MyPlaybooks/secret.yml tasks: - name: Add topology segment ipatopologysegment: ipaadmin_password: "{{ ipaadmin_password }}" suffix: domain left: server.idm.example.com right: replica.idm.example.com state: present-
Indicate that the value of the
- Save the file.
Run the Ansible playbook. Specify the playbook file, the file storing the password protecting the secret.yml file, and the inventory file:
$ ansible-playbook --vault-password-file=password_file -v -i inventory add-topologysegment-copy.yml
40.2. Using Ansible to ensure replication agreements exist between multiple IdM replicas
Data stored on an Identity Management (IdM) server is replicated based on replication agreements: when two servers have a replication agreement configured, they share their data. Replication agreements are always bilateral: the data is replicated from the first replica to the other one as well as from the other replica to the first one.
Follow this procedure to ensure replication agreements exist between multiple pairs of replicas in IdM.
Prerequisites
- Ensure that you understand the recommendations for designing your IdM topology listed in Connecting the replicas in a topology.
You have configured your Ansible control node to meet the following requirements:
- You are using Ansible version 2.13 or later.
-
You have installed the
ansible-freeipapackage. - The example assumes that in the ~/MyPlaybooks/ directory, you have created an Ansible inventory file with the fully-qualified domain name (FQDN) of the IdM server.
-
The example assumes that the secret.yml Ansible vault stores your
ipaadmin_passwordand that you have access to a file that stores the password protecting the secret.yml file.
-
The target node, that is the node on which the
ansible-freeipamodule is executed, is part of the IdM domain as an IdM client, server or replica.
Procedure
Navigate to your ~/MyPlaybooks/ directory:
$ cd ~/MyPlaybooks/Copy the
add-topologysegments.ymlAnsible playbook file provided by theansible-freeipapackage:$ cp /usr/share/doc/ansible-freeipa/playbooks/topology/add-topologysegments.yml add-topologysegments-copy.yml-
Open the
add-topologysegments-copy.ymlfile for editing. Adapt the file by setting the following variables in the
varssection:-
Indicate that the value of the
ipaadmin_passwordvariable is defined in the secret.yml Ansible vault file. For every topology segment, add a line in the
ipatopology_segmentssection and set the following variables:-
Set the
suffixvariable to eitherdomainorca, depending on what type of segment you want to add. -
Set the
leftvariable to the name of the IdM server that you want to be the left node of the replication agreement. -
Set the
rightvariable to the name of the IdM server that you want to be the right node of the replication agreement.
-
Set the
-
Indicate that the value of the
In the
taskssection of theadd-topologysegments-copy.ymlfile, ensure that thestatevariable is set topresent.This is the modified Ansible playbook file for the current example:
--- - name: Add topology segments hosts: ipaserver gather_facts: false vars: ipaadmin_password: "{{ ipaadmin_password }}" ipatopology_segments: - {suffix: domain, left: replica1.idm.example.com , right: replica2.idm.example.com } - {suffix: domain, left: replica2.idm.example.com , right: replica3.idm.example.com } - {suffix: domain, left: replica3.idm.example.com , right: replica4.idm.example.com } - {suffix: domain+ca, left: replica4.idm.example.com , right: replica1.idm.example.com } vars_files: - /home/user_name/MyPlaybooks/secret.yml tasks: - name: Add topology segment ipatopologysegment: ipaadmin_password: "{{ ipaadmin_password }}" suffix: "{{ item.suffix }}" name: "{{ item.name | default(omit) }}" left: "{{ item.left }}" right: "{{ item.right }}" state: present loop: "{{ ipatopology_segments | default([]) }}"- Save the file.
Run the Ansible playbook. Specify the playbook file, the file storing the password protecting the secret.yml file, and the inventory file:
$ ansible-playbook --vault-password-file=password_file -v -i inventory add-topologysegments-copy.yml
40.3. Using Ansible to check if a replication agreement exists between two replicas
Data stored on an Identity Management (IdM) server is replicated based on replication agreements: when two servers have a replication agreement configured, they share their data. Replication agreements are always bilateral: the data is replicated from the first replica to the other one as well as from the other replica to the first one.
Follow this procedure to verify that replication agreements exist between multiple pairs of replicas in IdM. In contrast to Using Ansible to ensure a replication agreement exists in IdM, this procedure does not modify the existing configuration.
Prerequisites
- Ensure that you understand the recommendations for designing your Identity Management (IdM) topology listed in Connecting the replicas in a topology.
You have configured your Ansible control node to meet the following requirements:
- You are using Ansible version 2.13 or later.
-
You have installed the
ansible-freeipapackage. - The example assumes that in the ~/MyPlaybooks/ directory, you have created an Ansible inventory file with the fully-qualified domain name (FQDN) of the IdM server.
-
The example assumes that the secret.yml Ansible vault stores your
ipaadmin_passwordand that you have access to a file that stores the password protecting the secret.yml file.
-
The target node, that is the node on which the
ansible-freeipamodule is executed, is part of the IdM domain as an IdM client, server or replica.
Procedure
Navigate to your ~/MyPlaybooks/ directory:
$ cd ~/MyPlaybooks/Copy the
check-topologysegments.ymlAnsible playbook file provided by theansible-freeipapackage:$ cp /usr/share/doc/ansible-freeipa/playbooks/topology/check-topologysegments.yml check-topologysegments-copy.yml-
Open the
check-topologysegments-copy.ymlfile for editing. Adapt the file by setting the following variables in the
varssection:-
Indicate that the value of the
ipaadmin_passwordvariable is defined in the secret.yml Ansible vault file. For every topology segment, add a line in the
ipatopology_segmentssection and set the following variables:-
Set the
suffixvariable to eitherdomainorca, depending on the type of segment you are adding. -
Set the
leftvariable to the name of the IdM server that you want to be the left node of the replication agreement. -
Set the
rightvariable to the name of the IdM server that you want to be the right node of the replication agreement.
-
Set the
-
Indicate that the value of the
In the
taskssection of thecheck-topologysegments-copy.ymlfile, ensure that thestatevariable is set topresent.This is the modified Ansible playbook file for the current example:
--- - name: Add topology segments hosts: ipaserver gather_facts: false vars: ipaadmin_password: "{{ ipaadmin_password }}" ipatopology_segments: - {suffix: domain, left: replica1.idm.example.com, right: replica2.idm.example.com } - {suffix: domain, left: replica2.idm.example.com , right: replica3.idm.example.com } - {suffix: domain, left: replica3.idm.example.com , right: replica4.idm.example.com } - {suffix: domain+ca, left: replica4.idm.example.com , right: replica1.idm.example.com } vars_files: - /home/user_name/MyPlaybooks/secret.yml tasks: - name: Check topology segment ipatopologysegment: ipaadmin_password: "{{ ipaadmin_password }}" suffix: "{{ item.suffix }}" name: "{{ item.name | default(omit) }}" left: "{{ item.left }}" right: "{{ item.right }}" state: checked loop: "{{ ipatopology_segments | default([]) }}"- Save the file.
Run the Ansible playbook. Specify the playbook file, the file storing the password protecting the secret.yml file, and the inventory file:
$ ansible-playbook --vault-password-file=password_file -v -i inventory check-topologysegments-copy.yml
40.4. Using Ansible to verify that a topology suffix exists in IdM
In the context of replication agreements in Identity Management (IdM), topology suffixes store the data that is replicated. IdM supports two types of topology suffixes: domain and ca. Each suffix represents a separate back end, a separate replication topology. When a replication agreement is configured, it joins two topology suffixes of the same type on two different servers.
The domain suffix contains all domain-related data, such as data about users, groups, and policies. The ca suffix contains data for the Certificate System component. It is only present on servers with a certificate authority (CA) installed.
Follow this procedure to use an Ansible playbook to ensure that a topology suffix exists in IdM. The example describes how to ensure that the domain suffix exists in IdM.
Prerequisites
You have configured your Ansible control node to meet the following requirements:
- You are using Ansible version 2.13 or later.
-
You have installed the
ansible-freeipapackage. - The example assumes that in the ~/MyPlaybooks/ directory, you have created an Ansible inventory file with the fully-qualified domain name (FQDN) of the IdM server.
-
The example assumes that the secret.yml Ansible vault stores your
ipaadmin_passwordand that you have access to a file that stores the password protecting the secret.yml file.
-
The target node, that is the node on which the
ansible-freeipamodule is executed, is part of the IdM domain as an IdM client, server or replica.
Procedure
Navigate to your ~/MyPlaybooks/ directory:
$ cd ~/MyPlaybooks/Copy the
verify-topologysuffix.ymlAnsible playbook file provided by theansible-freeipapackage:$ cp /usr/share/doc/ansible-freeipa/playbooks/topology/ verify-topologysuffix.yml verify-topologysuffix-copy.yml-
Open the
verify-topologysuffix-copy.ymlAnsible playbook file for editing. Adapt the file by setting the following variables in the
ipatopologysuffixsection:-
Indicate that the value of the
ipaadmin_passwordvariable is defined in the secret.yml Ansible vault file. -
Set the
suffixvariable todomain. If you are verifying the presence of thecasuffix, set the variable toca. -
Ensure that the
statevariable is set toverified. No other option is possible.
This is the modified Ansible playbook file for the current example:
--- - name: Playbook to handle topologysuffix hosts: ipaserver vars_files: - /home/user_name/MyPlaybooks/secret.yml tasks: - name: Verify topology suffix ipatopologysuffix: ipaadmin_password: "{{ ipaadmin_password }}" suffix: domain state: verified-
Indicate that the value of the
- Save the file.
Run the Ansible playbook. Specify the playbook file, the file storing the password protecting the secret.yml file, and the inventory file:
$ ansible-playbook --vault-password-file=password_file -v -i inventory verify-topologysuffix-copy.yml
40.5. Using Ansible to reinitialize an IdM replica
If a replica has been offline for a long period of time or its database has been corrupted, you can reinitialize it. Reinitialization refreshes the replica with an updated set of data. Reinitialization can, for example, be used if an authoritative restore from backup is required.
In contrast to replication updates, during which replicas only send changed entries to each other, reinitialization refreshes the whole database.
The local host on which you run the command is the reinitialized replica. To specify the replica from which the data is obtained, use the direction option.
Follow this procedure to use an Ansible playbook to reinitialize the domain data on replica.idm.example.com from server.idm.example.com.
Prerequisites
You have configured your Ansible control node to meet the following requirements:
- You are using Ansible version 2.13 or later.
-
You have installed the
ansible-freeipapackage. - The example assumes that in the ~/MyPlaybooks/ directory, you have created an Ansible inventory file with the fully-qualified domain name (FQDN) of the IdM server.
-
The example assumes that the secret.yml Ansible vault stores your
ipaadmin_passwordand that you have access to a file that stores the password protecting the secret.yml file.
-
The target node, that is the node on which the
ansible-freeipamodule is executed, is part of the IdM domain as an IdM client, server or replica.
Procedure
Navigate to your ~/MyPlaybooks/ directory:
$ cd ~/MyPlaybooks/Copy the
reinitialize-topologysegment.ymlAnsible playbook file provided by theansible-freeipapackage:$ cp /usr/share/doc/ansible-freeipa/playbooks/topology/reinitialize-topologysegment.yml reinitialize-topologysegment-copy.yml-
Open the
reinitialize-topologysegment-copy.ymlfile for editing. Adapt the file by setting the following variables in the
ipatopologysegmentsection:-
Indicate that the value of the
ipaadmin_passwordvariable is defined in the secret.yml Ansible vault file. -
Set the
suffixvariable todomain. If you are reinitializing thecadata, set the variable toca. -
Set the
leftvariable to the left node of the replication agreement. -
Set the
rightvariable to the right node of the replication agreement. -
Set the
directionvariable to the direction of the reinitializing data. Theleft-to-rightdirection means that data flows from the left node to the right node. Ensure that the
statevariable is set toreinitialized.This is the modified Ansible playbook file for the current example:
--- - name: Playbook to handle topologysegment hosts: ipaserver vars_files: - /home/user_name/MyPlaybooks/secret.yml tasks: - name: Reinitialize topology segment ipatopologysegment: ipaadmin_password: "{{ ipaadmin_password }}" suffix: domain left: server.idm.example.com right: replica.idm.example.com direction: left-to-right state: reinitialized
-
Indicate that the value of the
- Save the file.
Run the Ansible playbook. Specify the playbook file, the file storing the password protecting the secret.yml file, and the inventory file:
$ ansible-playbook --vault-password-file=password_file -v -i inventory reinitialize-topologysegment-copy.yml
40.6. Using Ansible to ensure a replication agreement is absent in IdM
Data stored on an Identity Management (IdM) server is replicated based on replication agreements: when two servers have a replication agreement configured, they share their data. Replication agreements are always bilateral: the data is replicated from the first replica to the other one as well as from the other replica to the first one.
Follow this procedure to ensure a replication agreement between two replicas does not exist in IdM. The example describes how to ensure a replication agreement of the domain type does not exist between the replica01.idm.example.com and replica02.idm.example.com IdM servers.
Prerequisites
- You understand the recommendations for designing your IdM topology listed in Connecting the replicas in a topology.
You have configured your Ansible control node to meet the following requirements:
- You are using Ansible version 2.13 or later.
-
You have installed the
ansible-freeipapackage. - The example assumes that in the ~/MyPlaybooks/ directory, you have created an Ansible inventory file with the fully-qualified domain name (FQDN) of the IdM server.
-
The example assumes that the secret.yml Ansible vault stores your
ipaadmin_passwordand that you have access to a file that stores the password protecting the secret.yml file.
-
The target node, that is the node on which the
ansible-freeipamodule is executed, is part of the IdM domain as an IdM client, server or replica.
Procedure
Navigate to your ~/MyPlaybooks/ directory:
$ cd ~/MyPlaybooks/Copy the
delete-topologysegment.ymlAnsible playbook file provided by theansible-freeipapackage:$ cp /usr/share/doc/ansible-freeipa/playbooks/topology/delete-topologysegment.yml delete-topologysegment-copy.yml-
Open the
delete-topologysegment-copy.ymlfile for editing. Adapt the file by setting the following variables in the
ipatopologysegmenttask section:-
Indicate that the value of the
ipaadmin_passwordvariable is defined in the secret.yml Ansible vault file. -
Set the
suffixvariable todomain. Alternatively, if you are ensuring that thecadata are not replicated between the left and right nodes, set the variable toca. -
Set the
leftvariable to the name of the IdM server that is the left node of the replication agreement. -
Set the
rightvariable to the name of the IdM server that is the right node of the replication agreement. -
Ensure that the
statevariable is set toabsent.
This is the modified Ansible playbook file for the current example:
--- - name: Playbook to handle topologysegment hosts: ipaserver vars_files: - /home/user_name/MyPlaybooks/secret.yml tasks: - name: Delete topology segment ipatopologysegment: ipaadmin_password: "{{ ipaadmin_password }}" suffix: domain left: replica01.idm.example.com right: replica02.idm.example.com: state: absent-
Indicate that the value of the
- Save the file.
Run the Ansible playbook. Specify the playbook file, the file storing the password protecting the secret.yml file, and the inventory file:
$ ansible-playbook --vault-password-file=password_file -v -i inventory delete-topologysegment-copy.yml
Chapter 41. Configuring IdM for external provisioning of users
As a system administrator, you can configure Identity Management (IdM) to support the provisioning of users by an external solution for managing identities.
Rather than use the ipa utility, the administrator of the external provisioning system can access the IdM LDAP using the ldapmodify utility. The administrator can add individual stage users from the CLI using ldapmodify or using an LDIF file.
The assumption is that you, as an IdM administrator, fully trust your external provisioning system to only add validated users. However, at the same time you do not want to assign the administrators of the external provisioning system the IdM role of User Administrator to enable them to add new active users directly.
You can configure a script to automatically move the staged users created by the external provisioning system to active users automatically.
41.1. Preparing IdM accounts for automatic activation of stage user accounts
This procedure shows how to configure two IdM user accounts to be used by an external provisioning system. By adding the accounts to a group with an appropriate password policy, you enable the external provisioning system to manage user provisioning in IdM. In the following, the user account to be used by the external system to add stage users is named provisionator. The user account to be used to automatically activate the stage users is named activator.
Prerequisites
- The host on which you perform the procedure is enrolled into IdM.
Procedure
Log in as IdM administrator:
$ kinit adminCreate a user named provisionator with the privileges to add stage users.
Add the provisionator user account:
$ ipa user-add provisionator --first=provisioning --last=account --passwordGrant the provisionator user the required privileges.
Create a custom role,
System Provisioning, to manage adding stage users:$ ipa role-add --desc "Responsible for provisioning stage users" "System Provisioning"Add the
Stage User Provisioningprivilege to the role. This privilege provides the ability to add stage users:$ ipa role-add-privilege "System Provisioning" --privileges="Stage User Provisioning"Add the provisionator user to the role:
$ ipa role-add-member --users=provisionator "System Provisioning"Verify that the provisionator exists in IdM:
$ ipa user-find provisionator --all --raw -------------- 1 user matched -------------- dn: uid=provisionator,cn=users,cn=accounts,dc=idm,dc=example,dc=com uid: provisionator [...]
Create a user, activator, with the privileges to manage user accounts.
Add the activator user account:
$ ipa user-add activator --first=activation --last=account --passwordGrant the activator user the required privileges by adding the user to the default
User Administratorrole:$ ipa role-add-member --users=activator "User Administrator"
Create a user group for application accounts:
$ ipa group-add application-accountsUpdate the password policy for the group. The following policy prevents password expiration and lockout for the account but compensates the potential risks by requiring complex passwords:
$ ipa pwpolicy-add application-accounts --maxlife=10000 --minlife=0 --history=0 --minclasses=4 --minlength=8 --priority=1 --maxfail=0 --failinterval=1 --lockouttime=0Optional: Verify that the password policy exists in IdM:
$ ipa pwpolicy-show application-accounts Group: application-accounts Max lifetime (days): 10000 Min lifetime (hours): 0 History size: 0 [...]Add the provisioning and activation accounts to the group for application accounts:
$ ipa group-add-member application-accounts --users={provisionator,activator}Change the passwords for the user accounts:
$ kpasswd provisionator $ kpasswd activatorChanging the passwords is necessary because new IdM users passwords expire immediately.
41.2. Configuring automatic activation of IdM stage user accounts
You can create a script to activate stage users. The system runs the script automatically at specified time intervals. This ensures that new user accounts are automatically activated and available for use shortly after they are created.
It is assumed that the owner of the external provisioning system has already validated the users and that they do not require additional validation on the IdM side before the script adds them to IdM.
It is sufficient to enable the activation process on only one of your IdM servers.
Prerequisites
- The provisionator and activator accounts exist in IdM. For details, see Preparing IdM accounts for automatic activation of stage user accounts.
- You have root privileges on the IdM server on which you are running the procedure.
- You are logged in as IdM administrator.
- You trust your external provisioning system.
Procedure
Generate a keytab file for the activation account:
# ipa-getkeytab -s server.idm.example.com -p "activator" -k /etc/krb5.ipa-activation.keytabIf you want to enable the activation process on more than one IdM server, generate the keytab file on one server only. Then copy the keytab file to the other servers.
Create a script,
/usr/local/sbin/ipa-activate-all, with the following contents to activate all users:#!/bin/bash kinit -k -i activator ipa stageuser-find --all --raw | grep " uid:" | cut -d ":" -f 2 | while read uid; do ipa stageuser-activate ${uid}; doneEdit the permissions and ownership of the
ipa-activate-allscript to make it executable:# chmod 755 /usr/local/sbin/ipa-activate-all # chown root:root /usr/local/sbin/ipa-activate-allCreate a systemd unit file,
/etc/systemd/system/ipa-activate-all.service, with the following contents:[Unit] Description=Scan IdM every minute for any stage users that must be activated [Service] Environment=KRB5_CLIENT_KTNAME=/etc/krb5.ipa-activation.keytab Environment=KRB5CCNAME=FILE:/tmp/krb5cc_ipa-activate-all ExecStart=/usr/local/sbin/ipa-activate-allCreate a systemd timer,
/etc/systemd/system/ipa-activate-all.timer, with the following contents:[Unit] Description=Scan IdM every minute for any stage users that must be activated [Timer] OnBootSec=15min OnUnitActiveSec=1min [Install] WantedBy=multi-user.targetReload the new configuration:
# systemctl daemon-reloadEnable
ipa-activate-all.timer:# systemctl enable ipa-activate-all.timerStart
ipa-activate-all.timer:# systemctl start ipa-activate-all.timerOptional: Verify that the
ipa-activate-all.timerdaemon is running:# systemctl status ipa-activate-all.timer ● ipa-activate-all.timer - Scan IdM every minute for any stage users that must be activated Loaded: loaded (/etc/systemd/system/ipa-activate-all.timer; enabled; vendor preset: disabled) Active: active (waiting) since Wed 2020-06-10 16:34:55 CEST; 15s ago Trigger: Wed 2020-06-10 16:35:55 CEST; 44s left Jun 10 16:34:55 server.idm.example.com systemd[1]: Started Scan IdM every minute for any stage users that must be activated.
41.3. Adding an IdM stage user defined in an LDIF file
Follow this procedure to access IdM LDAP and use an LDIF file to add stage users. While the example below shows adding one single user, multiple users can be added in one file in bulk mode.
Prerequisites
- IdM administrator has created the provisionator account and a password for it. For details, see Preparing IdM accounts for automatic activation of stage user accounts.
- You as the external administrator know the password of the provisionator account.
- You can SSH to the IdM server from your LDAP server.
You are able to supply the minimal set of attributes that an IdM stage user must have to allow the correct processing of the user life cycle, namely:
-
The
distinguished name(dn) -
The
common name(cn) -
The
last name(sn) -
The
uid
-
The
Procedure
On the external server, create an LDIF file that contains information about the new user:
dn: uid=stageidmuser,cn=staged users,cn=accounts,cn=provisioning,dc=idm,dc=example,dc=com changetype: add objectClass: top objectClass: inetorgperson uid: stageidmuser sn: surname givenName: first_name cn: full_nameTransfer the LDIF file from the external server to the IdM server:
$ scp add-stageidmuser.ldif provisionator@server.idm.example.com:/provisionator/ Password: add-stageidmuser.ldif 100% 364 217.6KB/s 00:00Use the
SSHprotocol to connect to the IdM server as provisionator:$ ssh provisionator@server.idm.example.com Password: [provisionator@server ~]$On the IdM server, obtain the Kerberos ticket-granting ticket (TGT) for the provisionator account:
[provisionator@server ~]$ kinit provisionatorEnter the
ldapaddcommand with the -f option and the name of the LDIF file. Specify the name of the IdM server and the port number:~]$ ldapadd -h server.idm.example.com -p 389 -f add-stageidmuser.ldif SASL/GSSAPI authentication started SASL username: provisionator@IDM.EXAMPLE.COM SASL SSF: 256 SASL data security layer installed. adding the entry "uid=stageidmuser,cn=staged users,cn=accounts,cn=provisioning,dc=idm,dc=example,dc=com"
41.4. Adding an IdM stage user directly from the CLI using ldapmodify
Follow this procedure to access access Identity Management (IdM) LDAP and use the ldapmodify utility to add a stage user.
Prerequisites
- The IdM administrator has created the provisionator account and a password for it. For details, see Preparing IdM accounts for automatic activation of stage user accounts.
- You as the external administrator know the password of the provisionator account.
- You can SSH to the IdM server from your LDAP server.
You are able to supply the minimal set of attributes that an IdM stage user must have to allow the correct processing of the user life cycle, namely:
-
The
distinguished name(dn) -
The
common name(cn) -
The
last name(sn) -
The
uid
-
The
Procedure
Use the
SSHprotocol to connect to the IdM server using your IdM identity and credentials:$ ssh provisionator@server.idm.example.com Password: [provisionator@server ~]$Obtain the TGT of the provisionator account, an IdM user with a role to add new stage users:
$ kinit provisionatorEnter the
ldapmodifycommand and specify Generic Security Services API (GSSAPI) as the Simple Authentication and Security Layer (SASL) mechanism to use for authentication. Specify the name of the IdM server and the port:# ldapmodify -h server.idm.example.com -p 389 -Y GSSAPI SASL/GSSAPI authentication started SASL username: provisionator@IDM.EXAMPLE.COM SASL SSF: 56 SASL data security layer installed.Enter the
dnof the user you are adding:dn: uid=stageuser,cn=staged users,cn=accounts,cn=provisioning,dc=idm,dc=example,dc=comEnter add as the type of change you are performing:
changetype: addSpecify the LDAP object class categories required to allow the correct processing of the user life cycle:
objectClass: top objectClass: inetorgpersonYou can specify additional object classes.
Enter the
uidof the user:uid: stageuserEnter the
cnof the user:cn: Babs JensenEnter the last name of the user:
sn: JensenPress
Enteragain to confirm that this is the end of the entry:[Enter] adding new entry "uid=stageuser,cn=staged users,cn=accounts,cn=provisioning,dc=idm,dc=example,dc=com"- Exit the connection using Ctrl + C.
Verification
Verify the contents of the stage entry to make sure your provisioning system added all required POSIX attributes and the stage entry is ready to be activated.
To display the new stage user’s LDAP attributes, enter the
ipa stageuser-show --all --rawcommand:$ ipa stageuser-show stageuser --all --raw dn: uid=stageuser,cn=staged users,cn=accounts,cn=provisioning,dc=idm,dc=example,dc=com uid: stageuser sn: Jensen cn: Babs Jensen has_password: FALSE has_keytab: FALSE nsaccountlock: TRUE objectClass: top objectClass: inetorgperson objectClass: organizationalPerson objectClass: personNote that the user is explicitly disabled by the
nsaccountlockattribute.
Chapter 42. Using ldapmodify to manage IdM users externally
As an IdM administrators you can use the ipa commands to manage your directory content. Alternatively, you can use the ldapmodify command to achieve similar goals. You can use this command interactively and provide all the data directly in the command line. You also can provide data in the file in the LDAP Data Interchange Format (LDIF) to ldapmodify command.
42.1. Templates for managing IdM user accounts externally
The following templates can be used for various user management operations in IdM. The templates show which attributes you must modify using ldapmodify to achieve the following goals:
- Adding a new stage user
- Modifying a user’s attribute
- Enabling a user
- Disabling a user
- Preserving a user
The templates are formatted in the LDAP Data Interchange Format (LDIF). LDIF is a standard plain text data interchange format for representing LDAP directory content and update requests.
Using the templates, you can configure the LDAP provider of your provisioning system to manage IdM user accounts.
For detailed example procedures, see the following sections:
Templates for adding a new stage user
A template for adding a user with UID and GID assigned automatically. The distinguished name (DN) of the created entry must start with
uid=user_login:dn: uid=user_login,cn=staged users,cn=accounts,cn=provisioning,dc=idm,dc=example,dc=com changetype: add objectClass: top objectClass: inetorgperson uid: user_login sn: surname givenName: first_name cn: full_nameA template for adding a user with UID and GID assigned statically:
dn: uid=user_login,cn=staged users,cn=accounts,cn=provisioning,dc=idm,dc=example,dc=com changetype: add objectClass: top objectClass: person objectClass: inetorgperson objectClass: organizationalperson objectClass: posixaccount uid: user_login uidNumber: UID_number gidNumber: GID_number sn: surname givenName: first_name cn: full_name homeDirectory: /home/user_loginYou are not required to specify any IdM object classes when adding stage users. IdM adds these classes automatically after the users are activated.
Templates for modifying existing users
Modifying a user’s attribute:
dn: distinguished_name changetype: modify replace: attribute_to_modify attribute_to_modify: new_valueDisabling a user:
dn: distinguished_name changetype: modify replace: nsAccountLock nsAccountLock: TRUEEnabling a user:
dn: distinguished_name changetype: modify replace: nsAccountLock nsAccountLock: FALSEUpdating the
nssAccountLockattribute has no effect on stage and preserved users. Even though the update operation completes successfully, the attribute value remainsnssAccountLock: TRUE.Preserving a user:
dn: distinguished_name changetype: modrdn newrdn: uid=user_login deleteoldrdn: 0 newsuperior: cn=deleted users,cn=accounts,cn=provisioning,dc=idm,dc=example,dc=com
Before modifying a user, obtain the user’s distinguished name (DN) by searching using the user’s login. In the following example, the user_allowed_to_modify_user_entries user is a user allowed to modify user and group information, for example activator or IdM administrator. The password in the example is this user’s password:
[...]
# ldapsearch -LLL -x -D "uid=user_allowed_to_modify_user_entries,cn=users,cn=accounts,dc=idm,dc=example,dc=com" -w "Secret123" -H ldap://r8server.idm.example.com -b "cn=users,cn=accounts,dc=idm,dc=example,dc=com" uid=test_user
dn: uid=test_user,cn=users,cn=accounts,dc=idm,dc=example,dc=com
memberOf: cn=ipausers,cn=groups,cn=accounts,dc=idm,dc=example,dc=com42.2. Templates for managing IdM group accounts externally
The following templates can be used for various user group management operations in IdM. The templates show which attributes you must modify using ldapmodify to achieve the following aims:
- Creating a new group
- Deleting an existing group
- Adding a member to a group
- Removing a member from a group
The templates are formatted in the LDAP Data Interchange Format (LDIF). LDIF is a standard plain text data interchange format for representing LDAP directory content and update requests.
Using the templates, you can configure the LDAP provider of your provisioning system to manage IdM group accounts.
Creating a new group
dn: cn=group_name,cn=groups,cn=accounts,dc=idm,dc=example,dc=com
changetype: add
objectClass: top
objectClass: ipaobject
objectClass: ipausergroup
objectClass: groupofnames
objectClass: nestedgroup
objectClass: posixgroup
uid: group_name
cn: group_name
gidNumber: GID_numberModifying groups
Deleting an existing group:
dn: group_distinguished_name changetype: deleteAdding a member to a group:
dn: group_distinguished_name changetype: modify add: member member: uid=user_login,cn=users,cn=accounts,dc=idm,dc=example,dc=comDo not add stage or preserved users to groups. Even though the update operation completes successfully, the users will not be updated as members of the group. Only active users can belong to groups.
Removing a member from a group:
dn: distinguished_name changetype: modify delete: member member: uid=user_login,cn=users,cn=accounts,dc=idm,dc=example,dc=com
Before modifying a group, obtain the group’s distinguished name (DN) by searching using the group’s name.
# ldapsearch -YGSSAPI -H ldap://server.idm.example.com -b "cn=groups,cn=accounts,dc=idm,dc=example,dc=com" "cn=group_name"
dn: cn=group_name,cn=groups,cn=accounts,dc=idm,dc=example,dc=com
ipaNTSecurityIdentifier: S-1-5-21-1650388524-2605035987-2578146103-11017
cn: testgroup
objectClass: top
objectClass: groupofnames
objectClass: nestedgroup
objectClass: ipausergroup
objectClass: ipaobject
objectClass: posixgroup
objectClass: ipantgroupattrs
ipaUniqueID: 569bf864-9d45-11ea-bea3-525400f6f085
gidNumber: 199701001742.3. Using ldapmodify command interactively
You can modify Lightweight Directory Access Protocol (LDAP) entries in the interactive mode.
Procedure
In a command line, enter the LDAP Data Interchange Format (LDIF) statement after the
ldapmodifycommand.Example 42.1. Changing the telephone number for a testuser
# ldapmodify -Y GSSAPI -H ldap://server.example.com dn: uid=testuser,cn=users,cn=accounts,dc=example,dc=com changetype: modify replace: telephoneNumber telephonenumber: 88888888Note that you need to obtain a Kerberos ticket for using
-Yoption.-
Press
Ctlr+Dto exit the interactive mode. Alternatively, provide an LDIF file after
ldapmodifycommand:Example 42.2. The
ldapmodifycommand reads modification data from an LDIF file# ldapmodify -Y GSSAPI -H ldap://server.example.com -f ~/example.ldif
42.4. Preserving an IdM user with ldapmodify
You can use ldapmodify to preserve an IdM user; that is, how to deactivate a user account after the employee has left the company.
Prerequisites
- You can authenticate as an IdM user with a role to preserve users.
Procedure
Log in as an IdM user with a role to preserve users:
$ kinit adminEnter the
ldapmodifycommand and specify the Generic Security Services API (GSSAPI) as the Simple Authentication and Security Layer (SASL) mechanism to be used for authentication:# ldapmodify -Y GSSAPI SASL/GSSAPI authentication started SASL username: admin@IDM.EXAMPLE.COM SASL SSF: 256 SASL data security layer installed.Enter the
dnof the user you want to preserve:dn: uid=user1,cn=users,cn=accounts,dc=idm,dc=example,dc=comEnter modrdn as the type of change you want to perform:
changetype: modrdnSpecify the newrdn for the user:
newrdn: uid=user1Indicate that you want to preserve the user:
deleteoldrdn: 0Specify the new superior DN:
newsuperior: cn=deleted users,cn=accounts,cn=provisioning,dc=idm,dc=example,dc=comPreserving a user moves the entry to a new location in the directory information tree (DIT). For this reason, you must specify the DN of the new parent entry as the new superior DN.
Press
Enteragain to confirm that this is the end of the entry:[Enter] modifying rdn of entry "uid=user1,cn=users,cn=accounts,dc=idm,dc=example,dc=com"- Exit the connection using Ctrl + C.
Verification
Verify that the user has been preserved by listing all preserved users:
$ ipa user-find --preserved=true -------------- 1 user matched -------------- User login: user1 First name: First 1 Last name: Last 1 Home directory: /home/user1 Login shell: /bin/sh Principal name: user1@IDM.EXAMPLE.COM Principal alias: user1@IDM.EXAMPLE.COM Email address: user1@idm.example.com UID: 1997010003 GID: 1997010003 Account disabled: True Preserved user: True ---------------------------- Number of entries returned 1 ----------------------------
Chapter 43. Managing Hosts in IdM CLI
Learn about hosts and host entries in Identity Management (IdM), and the operations performed when managing hosts and host entries in IdM CLI.
43.1. Hosts in IdM
Identity Management (IdM) manages these identities:
- Users
- Services
- Hosts
A host represents a machine. As an IdM identity, a host has an entry in the IdM LDAP, that is the 389 Directory Server instance of the IdM server.
The host entry in IdM LDAP is used to establish relationships between other hosts and even services within the domain. These relationships are part of delegating authorization and control to hosts within the domain. Any host can be used in host-based access control (HBAC) rules.
IdM domain establishes a commonality between machines, with common identity information, common policies, and shared services. Any machine that belongs to a domain functions as a client of the domain, which means it uses the services that the domain provides. IdM domain provides three main services specifically for machines:
- DNS
- Kerberos
- Certificate management
Hosts in IdM are closely connected with the services running on them:
- Service entries are associated with a host.
- A host stores both the host and the service Kerberos principals.
43.2. Host enrollment
This section describes enrolling hosts as IdM clients and what happens during and after the enrollment. The section compares the enrollment of IdM hosts and IdM users. The section also outlines alternative types of authentication available to hosts.
Enrolling a host consists of:
-
Creating a host entry in IdM LDAP: possibly using the
ipa host-addcommand in IdM CLI, or the equivalent IdM Web UI operation. - Configuring IdM services on the host, for example the System Security Services Daemon (SSSD), Kerberos, and certmonger, and joining the host to the IdM domain.
The two actions can be performed separately or together.
If performed separately, they allow for dividing the two tasks between two users with different levels of privilege. This is useful for bulk deployments.
The ipa-client-install command can perform the two actions together. The command creates a host entry in IdM LDAP if that entry does not exist yet, and configures both the Kerberos and SSSD services for the host. The command brings the host within the IdM domain and allows it to identify the IdM server it will connect to. If the host belongs to a DNS zone managed by IdM, ipa-client-install adds DNS records for the host too. The command must be run on the client.
43.3. User privileges required for host enrollment
The host enrollment operation requires authentication to prevent an unprivileged user from adding unwanted machines to the IdM domain. The privileges required depend on several factors, for example:
-
If a host entry is created separately from running
ipa-client-install - If a one-time password (OTP) is used for enrollment
User privileges for optionally manually creating a host entry in IdM LDAP
The user privilege required for creating a host entry in IdM LDAP using the ipa host-add CLI command or the IdM Web UI is Host Administrators. The Host Administrators privilege can be obtained through the IT Specialist role.
User privileges for joining the client to the IdM domain
Hosts are configured as IdM clients during the execution of the ipa-client-install command. The level of credentials required for executing the ipa-client-install command depends on which of the following enrolling scenarios you find yourself in:
-
The host entry in IdM LDAP does not exist. For this scenario, you need a full administrator’s credentials or the
Host Administratorsrole. A full administrator is a member of theadminsgroup. TheHost Administratorsrole provides privileges to add hosts and enroll hosts. For details about this scenario, see Installing a client using user credentials: interactive installation. -
The host entry in IdM LDAP exists. For this scenario, you need a limited administrator’s credentials to execute
ipa-client-installsuccessfully. The limited administrator in this case has theEnrollment Administratorrole, which provides theHost Enrollmentprivilege. For details, Installing a client using user credentials: interactive installation. -
The host entry in IdM LDAP exists, and an OTP has been generated for the host by a full or limited administrator. For this scenario, you can install an IdM client as an ordinary user if you run the
ipa-client-installcommand with the--passwordoption, supplying the correct OTP. For details, see Installing a client by using a one-time password: Interactive installation.
After enrollment, IdM hosts authenticate every new session to be able to access IdM resources. Machine authentication is required for the IdM server to trust the machine and to accept IdM connections from the client software installed on that machine. After authenticating the client, the IdM server can respond to its requests.
43.4. Enrollment and authentication of IdM hosts and users: comparison
There are many similarities between users and hosts in IdM, some of which can be observed during the enrollment stage as well as those that concern authentication during the deployment stage.
The enrollment stage (User and host enrollment):
-
An administrator can create an LDAP entry for both a user and a host before the user or host actually join IdM: for the stage user, the command is
ipa stageuser-add; for the host, the command isipa host-add.
-
An administrator can create an LDAP entry for both a user and a host before the user or host actually join IdM: for the stage user, the command is
-
A file containing a key table or, abbreviated, keytab, a symmetric key resembling to some extent a user password, is created during the execution of the
ipa-client-installcommand on the host, resulting in the host joining the IdM realm. Analogically, a user is asked to create a password when they activate their account, therefore joining the IdM realm. While the user password is the default authentication method for a user, the keytab is the default authentication method for a host. The keytab is stored in a file on the host.
Expand Table 43.1. User and host enrollment Action
User
Host
Pre-enrollment
$ ipa stageuser-add user_name [--password]
$ ipa host-add host_name [--random]
Activating the account
$ ipa stageuser-activate user_name
$ ipa-client install [--password] (must be run on the host itself)
- The deployment stage (User and host session authentication):
- When a user starts a new session, the user authenticates using a password; similarly, every time it is switched on, the host authenticates by presenting its keytab file. The System Security Services Daemon (SSSD) manages this process in the background.
- If the authentication is successful, the user or host obtains a Kerberos ticket granting ticket (TGT).
The TGT is then used to obtain specific tickets for specific services.
Expand Table 43.2. User and host session authentication User
Host
Default means of authentication
Password
Keytabs
Starting a session (ordinary user)
$ kinit user_name
[switch on the host]
The result of successful authentication
TGT to be used to obtain access to specific services
TGT to be used to obtain access to specific services
TGTs and other Kerberos tickets are generated as part of the Kerberos services and policies defined by the server. The initial granting of a Kerberos ticket, the renewing of the Kerberos credentials, and even the destroying of the Kerberos session are all handled automatically by the IdM services.
Alternative authentication options for IdM hosts
Apart from keytabs, IdM supports two other types of machine authentication:
- SSH keys. The SSH public key for the host is created and uploaded to the host entry. From there, the System Security Services Daemon (SSSD) uses IdM as an identity provider and can work in conjunction with OpenSSH and other services to reference the public keys located centrally in IdM.
- Machine certificates. In this case, the machine uses an SSL certificate that is issued by the IdM server’s certificate authority and then stored in IdM’s Directory Server. The certificate is then sent to the machine to present when it authenticates to the server. On the client, certificates are managed by a service called certmonger.
43.5. Host Operations
The most common operations related to host enrollment and enablement, and the prerequisites, the context, and the consequences of performing those operations are outlined in the following sections.
| Action | What are the prerequisites of the action? | When does it make sense to run the command? | How is the action performed by a system administrator? What command(s) does he run? |
|---|---|---|---|
|
| see Preparing the system for Identity Management client installation in Installing Identity Management | When you want the host to join the IdM realm. |
Enrolling machines as clients in the IdM domain is a two-part process. A host entry is created for the client (and stored in the 389 Directory Server instance) when the |
|
| The host must have an entry in IdM. The host needs to have an active keytab. | When you want to remove the host from the IdM realm temporarily, perhaps for maintenance purposes. |
|
|
| The host must have an entry in IdM. | When you want the temporarily disabled host to become active again. |
|
|
| The host must have en entry in IdM. | When the original host has been lost but you have installed a host with the same host name. |
|
|
| The host must have an entry in IdM. | When you want to remove the host from the IdM realm permanently. |
|
| Action | On which machine can the administrator run the command(s)? | What happens when the action is performed? What are the consequences for the host’s functioning in IdM? What limitations are introduced/removed? |
|---|---|---|
|
|
In the case of a two-step enrollment: | By default this configures SSSD to connect to an IdM server for authentication and authorization. Optionally one can instead configure the Pluggable Authentication Module (PAM) and the Name Switching Service (NSS) to work with an IdM server over Kerberos and LDAP. |
|
| Any machine in IdM, even the host itself | The host’s Kerberos key and SSL certificate are invalidated, and all services running on the host are disabled. |
|
| Any machine in IdM. If run on the disabled host, LDAP credentials need to be supplied. | The host’s Kerberos key and the SSL certificate are made valid again, and all IdM services running on the host are re-enabled. |
|
| The host to be re-enrolled. LDAP credentials need to be supplied. | A new Kerberos key is generated for the host, replacing the previous one. |
|
| The host to be un-enrolled. |
The command unconfigures IdM and attempts to return the machine to its previous state. Part of this process is to unenroll the host from the IdM server. Unenrollment consists of disabling the principal key on the IdM server. The machine principal in |
43.6. Host entry in IdM LDAP
An Identity Management (IdM) host entry contains information about the host and what attributes it can contain.
An LDAP host entry contains all relevant information about the client within IdM:
- Service entries associated with the host
- The host and service principal
- Access control rules
- Machine information, such as its physical location and operating system
Note that the IdM Web UI Identity → Hosts tab does not show all the information about a particular host stored in the IdM LDAP.
Host entry configuration properties
A host entry can contain information about the host that is outside its system configuration, such as its physical location, MAC address, keys, and certificates.
This information can be set when the host entry is created if it is created manually. Alternatively, most of this information can be added to the host entry after the host is enrolled in the domain.
| UI Field | Command-Line Option | Description |
|---|---|---|
| Description |
| A description of the host. |
| Locality |
| The geographic location of the host. |
| Location |
| The physical location of the host, such as its data center rack. |
| Platform |
| The host hardware or architecture. |
| Operating system |
| The operating system and version for the host. |
| MAC address |
|
The MAC address for the host. This is a multi-valued attribute. The MAC address is used by the NIS plug-in to create a NIS |
| SSH public keys |
| The full SSH public key for the host. This is a multi-valued attribute, so multiple keys can be set. |
| Principal name (not editable) |
|
The Kerberos principal name for the host. This defaults to the host name during the client installation, unless a different principal is explicitly set in the |
| Set One-Time Password |
| This option sets a password for the host which can be used in bulk enrollment. |
| - |
| This option generates a random password to be used in bulk enrollment. |
| - |
| A certificate blob for the host. |
| - |
| This sets whether the host can dynamically update its DNS entries if its IP address changes. |
43.7. Adding IdM host entries from IdM CLI
Follow this procedure to add host entries in Identity Management (IdM) using the command line (CLI).
Host entries are created using the host-add command. This commands adds the host entry to the IdM Directory Server. Consult the ipa host manpage by typing ipa help host in your CLI to get the full list of options available with host-add.
There are a few different scenarios when adding a host to IdM:
At its most basic, specify only the client host name to add the client to the Kerberos realm and to create an entry in the IdM LDAP server:
$ ipa host-add client1.example.comIf the IdM server is configured to manage DNS, add the host to the DNS resource records using the
--ip-addressoption to create a host entry with static IP address.$ ipa host-add --ip-address=192.168.166.31 client1.example.comIf the host to be added does not have a static IP address or if the IP address is not known at the time the client is configured, use the
--forceoption with theipa host-addcommand to create a host entry with DHCP.$ ipa host-add --force client1.example.comFor example, laptops may be preconfigured as IdM clients, but they do not have IP addresses at the time they are configured. Using
--forceessentially creates a placeholder entry in the IdM DNS service. When the DNS service dynamically updates its records, the host’s current IP address is detected and its DNS record is updated.
43.8. Deleting host entries from IdM CLI
Use the host-del command to delete host records. If your IdM domain has integrated DNS, use the --updatedns option to remove the associated records of any kind for the host from the DNS:
$ ipa host-del --updatedns client1.example.com43.9. Disabling and Re-enabling Host Entries
This section describes how to disable and re-enable hosts in Identity Management (IdM).
43.9.1. Disabling Hosts
Complete this procedure to disable a host entry in IdM.
Domain services, hosts, and users can access an active host. There can be situations when it is necessary to remove an active host temporarily, for maintenance reasons, for example. Deleting the host in such situations is not desired as it removes the host entry and all the associated configuration permanently. Instead, choose the option of disabling the host.
Disabling a host prevents domain users from accessing it without permanently removing it from the domain.
Procedure
Disable a host using the
host-disablecommand. Disabling a host kills the host’s current, active keytabs. For example:$ kinit admin $ ipa host-disable client.example.com
As a result of disabling a host, the host becomes unavailable to all IdM users, hosts and services.
Disabling a host entry not only disables that host. It disables every configured service on that host as well.
43.9.2. Re-enabling Hosts
Follow this procedure to re-enable a disabled IdM host.
Disabling a host killed its active keytabs, which removed the host from the IdM domain without otherwise touching its configuration entry.
Procedure
To re-enable a host, use the
ipa-getkeytabcommand, adding:-
the
-soption to specify which IdM server to request the keytab from -
the
-poption to specify the principal name -
the
-koption to specify the file to which to save the keytab.
-
the
For example, to request a new host keytab from server.example.com for client.example.com, and store the keytab in the /etc/krb5.keytab file:
$ ipa-getkeytab -s server.example.com -p host/client.example.com -k /etc/krb5.keytab -D "cn=directory manager" -w password
You can also use the administrator’s credentials, specifying -D "uid=admin,cn=users,cn=accounts,dc=example,dc=com". It is important that the credentials correspond to a user allowed to create the keytab for the host.
If the ipa-getkeytab command is run on an active IdM client or server, then it can be run without any LDAP credentials (-D and -w) if the user has a TGT obtained using, for example, kinit admin. To run the command directly on the disabled host, supply LDAP credentials to authenticate to the IdM server.
43.10. Delegating access to hosts and services
By delegating access to hosts and services within an IdM domain, you can retrieve keytabs and certificates for another host or service.
Each host and service has a managedby entry that lists what hosts and services can manage it. By default, a host can manage itself and all of its services. You can configure a host to manage other hosts, or services on other hosts within the IdM domain.
When you delegate authority of a host to another host through a managedby entry, it does not automatically grant management rights for all services on that host. You must perform each delegation independently.
Host and service delegation
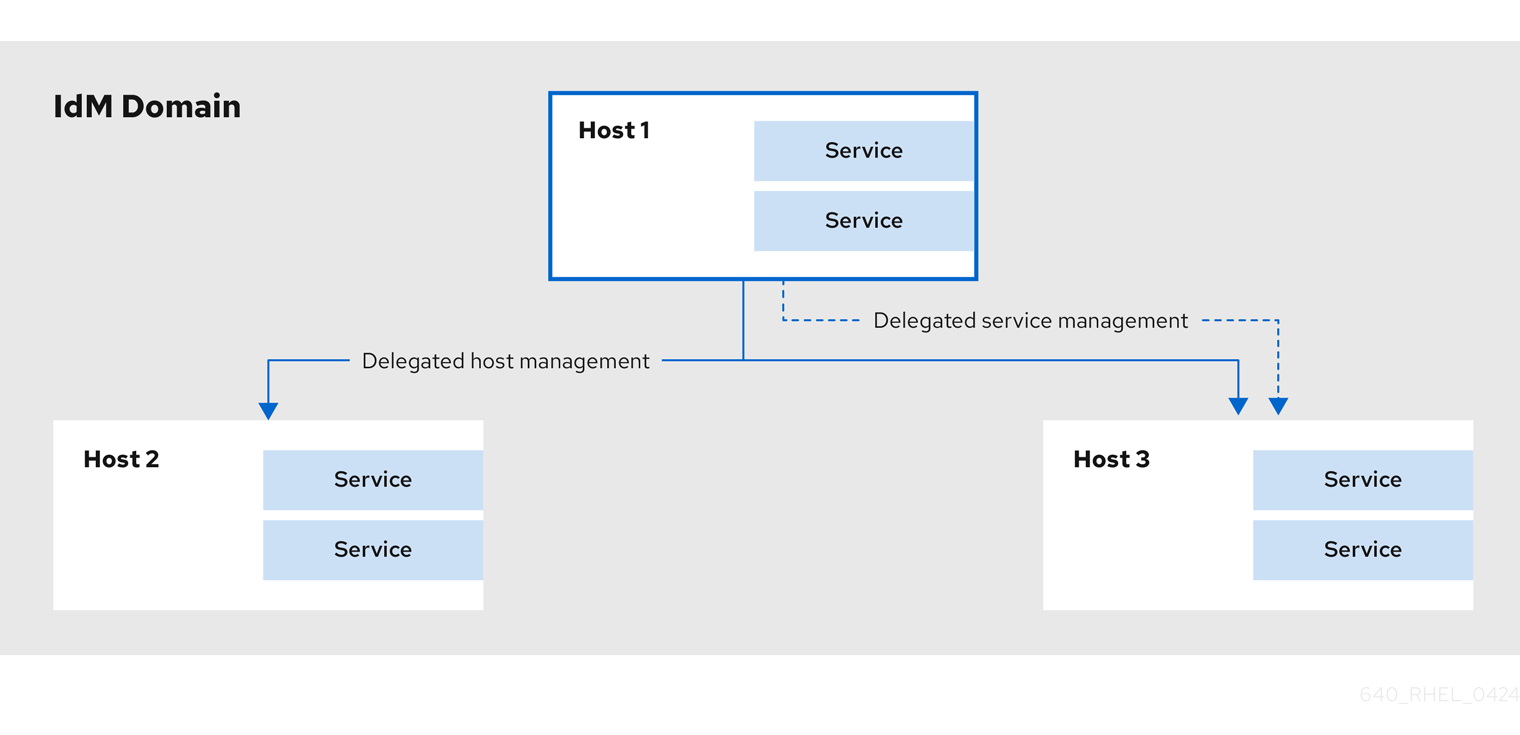
43.10.1. Delegating service management
You can delegate permissions to a host to manage a service on another host within the domain.
When you delegate permissions to a host to manage another host, it does not automatically include permissions to manage its services. You must delegate service management independently.
Procedure
Delegate the management of a service to a specific host by using the
service-add-hostcommand:ipa service-add-host principal --hosts=<hostname>You must specify the service principal using the
principalargument and the hosts with control using the--hostsoption.For example:
[root@server ~]# ipa service-add HTTP/web.example.com [root@server ~]# ipa service-add-host HTTP/web.example.com --hosts=client1.example.comOnce the host is delegated authority, the host principal can be used to manage the service:
[root@client1 ~]# kinit -kt /etc/krb5.keytab host/client1.example.com [root@client1 ~]# ipa-getkeytab -s server.example.com -k /tmp/test.keytab -p HTTP/web.example.com Keytab successfully retrieved and stored in: /tmp/test.keytabTo generate a certificate for the delegated service, create a certificate request on the host with the delegated authority:
[root@client1]# kinit -kt /etc/krb5.keytab host/client1.example.com [root@client1]# openssl req -newkey rsa:2048 -subj '/CN=web.example.com/O=EXAMPLE.COM' -keyout /etc/pki/tls/web.key -out /tmp/web.csr -nodes Generating a 2048 bit RSA private key .............................................................+++ ............................................................................................+++ Writing new private key to '/etc/pki/tls/private/web.key'Use the
cert-requestutility to submit the certificate request and load the certification information:[root@client1]# ipa cert-request --principal=HTTP/web.example.com web.csr Certificate: MIICETCCAXqgA...[snip] Subject: CN=web.example.com,O=EXAMPLE.COM Issuer: CN=EXAMPLE.COM Certificate Authority Not Before: Tue Feb 08 18:51:51 2011 UTC Not After: Mon Feb 08 18:51:51 2016 UTC Serial number: 1005
43.10.2. Delegating host management
You can delegate authority for a host to manage another host by using the host-add-managedby utility. This creates a managedby entry. After the managedby entry is created, the managing host can retrieve a keytab for the host it manages.
Procedure
Log in as the admin user:
[root@server ~]# kinit adminAdd the
managedbyentry. For example, this delegates authority over client2 to client1:[root@server ~]# ipa host-add-managedby client2.example.com --hosts=client1.example.comObtain a ticket as the host client1:
[root@client1 ~]# kinit -kt /etc/krb5.keytab host/client1.example.comRetrieve a keytab for client2:
[root@client1 ~]# ipa-getkeytab -s server.example.com -k /tmp/client2.keytab -p host/client2.example.com Keytab successfully retrieved and stored in: /tmp/client2.keytab
43.10.3. Accessing delegated services
When a client has delegated authority, it can obtain a keytab for the principal on the local machine for both services and hosts.
With the kinit command, use the -k option to load a keytab and the -t option to specify the keytab. The principal format is <principal>/hostname@REALM. For a service, replace <principal> with the service name, for example HTTP. For a host, use host as the principal.
Procedure
To access a host:
[root@server ~]# kinit -kt /etc/krb5.keytab host/ipa.example.com@EXAMPLE.COMTo access a service:
[root@server ~]# kinit -kt /etc/httpd/conf/krb5.keytab HTTP/ipa.example.com@EXAMPLE.COM
43.11. Additional resources
Chapter 44. Adding host entries from IdM Web UI
This chapter introduces hosts in Identity Management (IdM) and the operation of adding a host entry in the IdM Web UI.
44.1. Hosts in IdM
Identity Management (IdM) manages these identities:
- Users
- Services
- Hosts
A host represents a machine. As an IdM identity, a host has an entry in the IdM LDAP, that is the 389 Directory Server instance of the IdM server.
The host entry in IdM LDAP is used to establish relationships between other hosts and even services within the domain. These relationships are part of delegating authorization and control to hosts within the domain. Any host can be used in host-based access control (HBAC) rules.
IdM domain establishes a commonality between machines, with common identity information, common policies, and shared services. Any machine that belongs to a domain functions as a client of the domain, which means it uses the services that the domain provides. IdM domain provides three main services specifically for machines:
- DNS
- Kerberos
- Certificate management
Hosts in IdM are closely connected with the services running on them:
- Service entries are associated with a host.
- A host stores both the host and the service Kerberos principals.
44.2. Host enrollment
This section describes enrolling hosts as IdM clients and what happens during and after the enrollment. The section compares the enrollment of IdM hosts and IdM users. The section also outlines alternative types of authentication available to hosts.
Enrolling a host consists of:
-
Creating a host entry in IdM LDAP: possibly using the
ipa host-addcommand in IdM CLI, or the equivalent IdM Web UI operation. - Configuring IdM services on the host, for example the System Security Services Daemon (SSSD), Kerberos, and certmonger, and joining the host to the IdM domain.
The two actions can be performed separately or together.
If performed separately, they allow for dividing the two tasks between two users with different levels of privilege. This is useful for bulk deployments.
The ipa-client-install command can perform the two actions together. The command creates a host entry in IdM LDAP if that entry does not exist yet, and configures both the Kerberos and SSSD services for the host. The command brings the host within the IdM domain and allows it to identify the IdM server it will connect to. If the host belongs to a DNS zone managed by IdM, ipa-client-install adds DNS records for the host too. The command must be run on the client.
44.3. User privileges required for host enrollment
The host enrollment operation requires authentication to prevent an unprivileged user from adding unwanted machines to the IdM domain. The privileges required depend on several factors, for example:
-
If a host entry is created separately from running
ipa-client-install - If a one-time password (OTP) is used for enrollment
User privileges for optionally manually creating a host entry in IdM LDAP
The user privilege required for creating a host entry in IdM LDAP using the ipa host-add CLI command or the IdM Web UI is Host Administrators. The Host Administrators privilege can be obtained through the IT Specialist role.
User privileges for joining the client to the IdM domain
Hosts are configured as IdM clients during the execution of the ipa-client-install command. The level of credentials required for executing the ipa-client-install command depends on which of the following enrolling scenarios you find yourself in:
-
The host entry in IdM LDAP does not exist. For this scenario, you need a full administrator’s credentials or the
Host Administratorsrole. A full administrator is a member of theadminsgroup. TheHost Administratorsrole provides privileges to add hosts and enroll hosts. For details about this scenario, see Installing a client using user credentials: interactive installation. -
The host entry in IdM LDAP exists. For this scenario, you need a limited administrator’s credentials to execute
ipa-client-installsuccessfully. The limited administrator in this case has theEnrollment Administratorrole, which provides theHost Enrollmentprivilege. For details, Installing a client using user credentials: interactive installation. -
The host entry in IdM LDAP exists, and an OTP has been generated for the host by a full or limited administrator. For this scenario, you can install an IdM client as an ordinary user if you run the
ipa-client-installcommand with the--passwordoption, supplying the correct OTP. For details, see Installing a client by using a one-time password: Interactive installation.
After enrollment, IdM hosts authenticate every new session to be able to access IdM resources. Machine authentication is required for the IdM server to trust the machine and to accept IdM connections from the client software installed on that machine. After authenticating the client, the IdM server can respond to its requests.
44.4. Enrollment and authentication of IdM hosts and users: comparison
There are many similarities between users and hosts in IdM, some of which can be observed during the enrollment stage as well as those that concern authentication during the deployment stage.
The enrollment stage (User and host enrollment):
-
An administrator can create an LDAP entry for both a user and a host before the user or host actually join IdM: for the stage user, the command is
ipa stageuser-add; for the host, the command isipa host-add.
-
An administrator can create an LDAP entry for both a user and a host before the user or host actually join IdM: for the stage user, the command is
-
A file containing a key table or, abbreviated, keytab, a symmetric key resembling to some extent a user password, is created during the execution of the
ipa-client-installcommand on the host, resulting in the host joining the IdM realm. Analogically, a user is asked to create a password when they activate their account, therefore joining the IdM realm. While the user password is the default authentication method for a user, the keytab is the default authentication method for a host. The keytab is stored in a file on the host.
Expand Table 44.1. User and host enrollment Action
User
Host
Pre-enrollment
$ ipa stageuser-add user_name [--password]
$ ipa host-add host_name [--random]
Activating the account
$ ipa stageuser-activate user_name
$ ipa-client install [--password] (must be run on the host itself)
- The deployment stage (User and host session authentication):
- When a user starts a new session, the user authenticates using a password; similarly, every time it is switched on, the host authenticates by presenting its keytab file. The System Security Services Daemon (SSSD) manages this process in the background.
- If the authentication is successful, the user or host obtains a Kerberos ticket granting ticket (TGT).
The TGT is then used to obtain specific tickets for specific services.
Expand Table 44.2. User and host session authentication User
Host
Default means of authentication
Password
Keytabs
Starting a session (ordinary user)
$ kinit user_name
[switch on the host]
The result of successful authentication
TGT to be used to obtain access to specific services
TGT to be used to obtain access to specific services
TGTs and other Kerberos tickets are generated as part of the Kerberos services and policies defined by the server. The initial granting of a Kerberos ticket, the renewing of the Kerberos credentials, and even the destroying of the Kerberos session are all handled automatically by the IdM services.
Alternative authentication options for IdM hosts
Apart from keytabs, IdM supports two other types of machine authentication:
- SSH keys. The SSH public key for the host is created and uploaded to the host entry. From there, the System Security Services Daemon (SSSD) uses IdM as an identity provider and can work in conjunction with OpenSSH and other services to reference the public keys located centrally in IdM.
- Machine certificates. In this case, the machine uses an SSL certificate that is issued by the IdM server’s certificate authority and then stored in IdM’s Directory Server. The certificate is then sent to the machine to present when it authenticates to the server. On the client, certificates are managed by a service called certmonger.
44.5. Host entry in IdM LDAP
An Identity Management (IdM) host entry contains information about the host and what attributes it can contain.
An LDAP host entry contains all relevant information about the client within IdM:
- Service entries associated with the host
- The host and service principal
- Access control rules
- Machine information, such as its physical location and operating system
Note that the IdM Web UI Identity → Hosts tab does not show all the information about a particular host stored in the IdM LDAP.
Host entry configuration properties
A host entry can contain information about the host that is outside its system configuration, such as its physical location, MAC address, keys, and certificates.
This information can be set when the host entry is created if it is created manually. Alternatively, most of this information can be added to the host entry after the host is enrolled in the domain.
| UI Field | Command-Line Option | Description |
|---|---|---|
| Description |
| A description of the host. |
| Locality |
| The geographic location of the host. |
| Location |
| The physical location of the host, such as its data center rack. |
| Platform |
| The host hardware or architecture. |
| Operating system |
| The operating system and version for the host. |
| MAC address |
|
The MAC address for the host. This is a multi-valued attribute. The MAC address is used by the NIS plug-in to create a NIS |
| SSH public keys |
| The full SSH public key for the host. This is a multi-valued attribute, so multiple keys can be set. |
| Principal name (not editable) |
|
The Kerberos principal name for the host. This defaults to the host name during the client installation, unless a different principal is explicitly set in the |
| Set One-Time Password |
| This option sets a password for the host which can be used in bulk enrollment. |
| - |
| This option generates a random password to be used in bulk enrollment. |
| - |
| A certificate blob for the host. |
| - |
| This sets whether the host can dynamically update its DNS entries if its IP address changes. |
44.6. Adding host entries from the Web UI
- Open the Identity tab, and select the Hosts subtab.
- Click Add at the top of the hosts list.
Enter the machine name and select the domain from the configured zones in the drop-down list. If the host has already been assigned a static IP address, then include that with the host entry so that the DNS entry is fully created.
The
Classfield has no specific purpose at the moment.Figure 44.1. Add Host Wizard

DNS zones can be created in IdM. If the IdM server does not manage the DNS server, the zone can be entered manually in the menu area, like a regular text field.
NoteSelect the Force checkbox if you want to skip checking whether the host is resolvable via DNS.
- Click the Add and Edit button to go directly to the expanded entry page and enter more attribute information. Information about the host hardware and physical location can be included with the host entry.
Chapter 45. Managing hosts using Ansible playbooks
Ansible is an automation tool used to configure systems, deploy software, and perform rolling updates. Ansible includes support for Identity Management (IdM), and you can use Ansible modules to automate host management.
45.1. Ensuring the presence of an IdM host entry with FQDN using Ansible playbooks
Follow this procedure to ensure the presence of host entries in Identity Management (IdM) using Ansible playbooks. The host entries are only defined by their fully-qualified domain names (FQDNs).
Specifying the FQDN name of the host is enough if at least one of the following conditions applies:
- The IdM server is not configured to manage DNS.
-
The host does not have a static IP address or the IP address is not known at the time the host is configured. Adding a host defined only by an
FQDNessentially creates a placeholder entry in the IdM DNS service. For example, laptops may be preconfigured as IdM clients, but they do not have IP addresses at the time they are configured. When the DNS service dynamically updates its records, the host’s current IP address is detected and its DNS record is updated.
Without Ansible, host entries are created in IdM using the ipa host-add command. The result of adding a host to IdM is the state of the host being present in IdM. Because of the Ansible reliance on idempotence, to add a host to IdM using Ansible, you must create a playbook in which you define the state of the host as present: state: present.
Prerequisites
- You know the IdM administrator password.
You have configured your Ansible control node to meet the following requirements:
- You are using Ansible version 2.13 or later.
-
You have installed the
ansible-freeipapackage. - The example assumes that in the ~/MyPlaybooks/ directory, you have created an Ansible inventory file with the fully-qualified domain name (FQDN) of the IdM server.
-
The example assumes that the secret.yml Ansible vault stores your
ipaadmin_password.
-
The target node, that is the node on which the
ansible-freeipamodule is executed, is part of the IdM domain as an IdM client, server or replica.
Procedure
Create an inventory file, for example
inventory.file, and defineipaserverin it:[ipaserver] server.idm.example.comCreate an Ansible playbook file with the
FQDNof the host whose presence in IdM you want to ensure. To simplify this step, you can copy and modify the example in the/usr/share/doc/ansible-freeipa/playbooks/host/add-host.ymlfile:--- - name: Host present hosts: ipaserver vars_files: - /home/user_name/MyPlaybooks/secret.yml tasks: - name: Host host01.idm.example.com present ipahost: ipaadmin_password: "{{ ipaadmin_password }}" name: host01.idm.example.com state: present force: trueRun the playbook:
$ ansible-playbook --vault-password-file=password_file -v -i path_to_inventory_directory/inventory.file path_to_playbooks_directory/ensure-host-is-present.yml
The procedure results in a host entry in the IdM LDAP server being created but not in enrolling the host into the IdM Kerberos realm. For that, you must deploy the host as an IdM client. For details, see Installing an Identity Management client using an Ansible playbook.
Verification
Log in to your IdM server as admin:
$ ssh admin@server.idm.example.com Password:Enter the
ipa host-showcommand and specify the name of the host:$ ipa host-show host01.idm.example.com Host name: host01.idm.example.com Principal name: host/host01.idm.example.com@IDM.EXAMPLE.COM Principal alias: host/host01.idm.example.com@IDM.EXAMPLE.COM Password: False Keytab: False Managed by: host01.idm.example.com
The output confirms that host01.idm.example.com exists in IdM.
45.2. Ensuring the presence of an IdM host entry with DNS information using Ansible playbooks
Follow this procedure to ensure the presence of host entries in Identity Management (IdM) using Ansible playbooks. The host entries are defined by their fully-qualified domain names (FQDNs) and their IP addresses.
Without Ansible, host entries are created in IdM using the ipa host-add command. The result of adding a host to IdM is the state of the host being present in IdM. Because of the Ansible reliance on idempotence, to add a host to IdM using Ansible, you must create a playbook in which you define the state of the host as present: state: present.
Prerequisites
- You know the IdM administrator password.
You have configured your Ansible control node to meet the following requirements:
- You are using Ansible version 2.13 or later.
-
You have installed the
ansible-freeipapackage. - The example assumes that in the ~/MyPlaybooks/ directory, you have created an Ansible inventory file with the fully-qualified domain name (FQDN) of the IdM server.
-
The example assumes that the secret.yml Ansible vault stores your
ipaadmin_password.
-
The target node, that is the node on which the
ansible-freeipamodule is executed, is part of the IdM domain as an IdM client, server or replica.
Procedure
Create an inventory file, for example
inventory.file, and defineipaserverin it:[ipaserver] server.idm.example.comCreate an Ansible playbook file with the
fully-qualified domain name(FQDN) of the host whose presence in IdM you want to ensure. In addition, if the IdM server is configured to manage DNS and you know the IP address of the host, specify a value for theip_addressparameter. The IP address is necessary for the host to exist in the DNS resource records. To simplify this step, you can copy and modify the example in the/usr/share/doc/ansible-freeipa/playbooks/host/host-present.ymlfile. You can also include other, additional information:--- - name: Host present hosts: ipaserver vars_files: - /home/user_name/MyPlaybooks/secret.yml tasks: - name: Ensure host01.idm.example.com is present ipahost: ipaadmin_password: "{{ ipaadmin_password }}" name: host01.idm.example.com description: Example host ip_address: 192.168.0.123 locality: Lab ns_host_location: Lab ns_os_version: RHEL 7 ns_hardware_platform: Lenovo T61 mac_address: - "08:00:27:E3:B1:2D" - "52:54:00:BD:97:1E" state: presentRun the playbook:
$ ansible-playbook --vault-password-file=password_file -v -i path_to_inventory_directory/inventory.file path_to_playbooks_directory/ensure-host-is-present.yml
The procedure results in a host entry in the IdM LDAP server being created but not in enrolling the host into the IdM Kerberos realm. For that, you must deploy the host as an IdM client. For details, see Installing an Identity Management client using an Ansible playbook.
Verification
Log in to your IdM server as admin:
$ ssh admin@server.idm.example.com Password:Enter the
ipa host-showcommand and specify the name of the host:$ ipa host-show host01.idm.example.com Host name: host01.idm.example.com Description: Example host Locality: Lab Location: Lab Platform: Lenovo T61 Operating system: RHEL 7 Principal name: host/host01.idm.example.com@IDM.EXAMPLE.COM Principal alias: host/host01.idm.example.com@IDM.EXAMPLE.COM MAC address: 08:00:27:E3:B1:2D, 52:54:00:BD:97:1E Password: False Keytab: False Managed by: host01.idm.example.com
The output confirms host01.idm.example.com exists in IdM.
45.3. Ensuring the presence of multiple IdM host entries with random passwords using Ansible playbooks
The ipahost module allows the system administrator to ensure the presence or absence of multiple host entries in IdM using just one Ansible task. Follow this procedure to ensure the presence of multiple host entries that are only defined by their fully-qualified domain names (FQDNs). Running the Ansible playbook generates random passwords for the hosts.
Without Ansible, host entries are created in IdM using the ipa host-add command. The result of adding a host to IdM is the state of the host being present in IdM. Because of the Ansible reliance on idempotence, to add a host to IdM using Ansible, you must create a playbook in which you define the state of the host as present: state: present.
Prerequisites
- You know the IdM administrator password.
You have configured your Ansible control node to meet the following requirements:
- You are using Ansible version 2.13 or later.
-
You have installed the
ansible-freeipapackage. - The example assumes that in the ~/MyPlaybooks/ directory, you have created an Ansible inventory file with the fully-qualified domain name (FQDN) of the IdM server.
-
The example assumes that the secret.yml Ansible vault stores your
ipaadmin_password.
-
The target node, that is the node on which the
ansible-freeipamodule is executed, is part of the IdM domain as an IdM client, server or replica.
Procedure
Create an inventory file, for example
inventory.file, and defineipaserverin it:[ipaserver] server.idm.example.comCreate an Ansible playbook file with the
fully-qualified domain name(FQDN) of the hosts whose presence in IdM you want to ensure. To make the Ansible playbook generate a random password for each host even when the host already exists in IdM andupdate_passwordis limited toon_create, add therandom: trueandforce: trueoptions. To simplify this step, you can copy and modify the example from the/usr/share/doc/ansible-freeipa/README-host.mdMarkdown file:--- - name: Ensure hosts with random password hosts: ipaserver vars_files: - /home/user_name/MyPlaybooks/secret.yml tasks: - name: Hosts host01.idm.example.com and host02.idm.example.com present with random passwords ipahost: ipaadmin_password: "{{ ipaadmin_password }}" hosts: - name: host01.idm.example.com random: true force: true - name: host02.idm.example.com random: true force: true register: ipahostRun the playbook:
$ ansible-playbook --vault-password-file=password_file -v -i path_to_inventory_directory/inventory.file path_to_playbooks_directory/ensure-hosts-are-present.yml [...] TASK [Hosts host01.idm.example.com and host02.idm.example.com present with random passwords] changed: [r8server.idm.example.com] => {"changed": true, "host": {"host01.idm.example.com": {"randompassword": "0HoIRvjUdH0Ycbf6uYdWTxH"}, "host02.idm.example.com": {"randompassword": "5VdLgrf3wvojmACdHC3uA3s"}}}
To deploy the hosts as IdM clients using random, one-time passwords (OTPs), see Authorization options for IdM client enrollment using an Ansible playbook or Installing a client by using a one-time password: Interactive installation.
Verification
Log in to your IdM server as admin:
$ ssh admin@server.idm.example.com Password:Enter the
ipa host-showcommand and specify the name of one of the hosts:$ ipa host-show host01.idm.example.com Host name: host01.idm.example.com Password: True Keytab: False Managed by: host01.idm.example.com
The output confirms host01.idm.example.com exists in IdM with a random password.
45.4. Ensuring the presence of an IdM host entry with multiple IP addresses using Ansible playbooks
Follow this procedure to ensure the presence of a host entry in Identity Management (IdM) using Ansible playbooks. The host entry is defined by its fully-qualified domain name (FQDN) and its multiple IP addresses.
In contrast to the ipa host utility, the Ansible ipahost module can ensure the presence or absence of several IPv4 and IPv6 addresses for a host. The ipa host-mod command cannot handle IP addresses.
Prerequisites
- You know the IdM administrator password.
You have configured your Ansible control node to meet the following requirements:
- You are using Ansible version 2.13 or later.
-
You have installed the
ansible-freeipapackage. - The example assumes that in the ~/MyPlaybooks/ directory, you have created an Ansible inventory file with the fully-qualified domain name (FQDN) of the IdM server.
-
The example assumes that the secret.yml Ansible vault stores your
ipaadmin_password.
-
The target node, that is the node on which the
ansible-freeipamodule is executed, is part of the IdM domain as an IdM client, server or replica.
Procedure
Create an inventory file, for example
inventory.file, and defineipaserverin it:[ipaserver] server.idm.example.comCreate an Ansible playbook file. Specify, as the
nameof theipahostvariable, thefully-qualified domain name(FQDN) of the host whose presence in IdM you want to ensure. Specify each of the multiple IPv4 and IPv6ip_addressvalues on a separate line by using the ip_address syntax. To simplify this step, you can copy and modify the example in the/usr/share/doc/ansible-freeipa/playbooks/host/host-member-ipaddresses-present.ymlfile. You can also include additional information:--- - name: Host member IP addresses present hosts: ipaserver vars_files: - /home/user_name/MyPlaybooks/secret.yml tasks: - name: Ensure host101.example.com IP addresses present ipahost: ipaadmin_password: "{{ ipaadmin_password }}" name: host01.idm.example.com ip_address: - 192.168.0.123 - fe80::20c:29ff:fe02:a1b3 - 192.168.0.124 - fe80::20c:29ff:fe02:a1b4 force: trueRun the playbook:
$ ansible-playbook --vault-password-file=password_file -v -i path_to_inventory_directory/inventory.file path_to_playbooks_directory/ensure-host-with-multiple-IP-addreses-is-present.yml
The procedure creates a host entry in the IdM LDAP server but does not enroll the host into the IdM Kerberos realm. For that, you must deploy the host as an IdM client. For details, see Installing an Identity Management client using an Ansible playbook.
Verification
Log in to your IdM server as admin:
$ ssh admin@server.idm.example.com Password:Enter the
ipa host-showcommand and specify the name of the host:$ ipa host-show host01.idm.example.com Principal name: host/host01.idm.example.com@IDM.EXAMPLE.COM Principal alias: host/host01.idm.example.com@IDM.EXAMPLE.COM Password: False Keytab: False Managed by: host01.idm.example.comThe output confirms that host01.idm.example.com exists in IdM.
To verify that the multiple IP addresses of the host exist in the IdM DNS records, enter the
ipa dnsrecord-showcommand and specify the following information:- The name of the IdM domain
The name of the host
$ ipa dnsrecord-show idm.example.com host01 [...] Record name: host01 A record: 192.168.0.123, 192.168.0.124 AAAA record: fe80::20c:29ff:fe02:a1b3, fe80::20c:29ff:fe02:a1b4The output confirms that all the IPv4 and IPv6 addresses specified in the playbook are correctly associated with the host01.idm.example.com host entry.
45.5. Ensuring the absence of an IdM host entry using Ansible playbooks
Follow this procedure to ensure the absence of host entries in Identity Management (IdM) using Ansible playbooks.
Prerequisites
- IdM administrator credentials
Procedure
Create an inventory file, for example
inventory.file, and defineipaserverin it:[ipaserver] server.idm.example.comCreate an Ansible playbook file with the
fully-qualified domain name(FQDN) of the host whose absence from IdM you want to ensure. If your IdM domain has integrated DNS, use theupdatedns: trueoption to remove the associated records of any kind for the host from the DNS.To simplify this step, you can copy and modify the example in the
/usr/share/doc/ansible-freeipa/playbooks/host/delete-host.ymlfile:--- - name: Host absent hosts: ipaserver vars_files: - /home/user_name/MyPlaybooks/secret.yml tasks: - name: Host host01.idm.example.com absent ipahost: ipaadmin_password: "{{ ipaadmin_password }}" name: host01.idm.example.com updatedns: true state: absentRun the playbook:
$ ansible-playbook --vault-password-file=password_file -v -i path_to_inventory_directory/inventory.file path_to_playbooks_directory/ensure-host-absent.yml
The procedure results in:
- The host not being present in the IdM Kerberos realm.
- The host entry not being present in the IdM LDAP server.
To remove the specific IdM configuration of system services, such as System Security Services Daemon (SSSD), from the client host itself, you must run the ipa-client-install --uninstall command on the client. For details, see Uninstalling an IdM client.
Verification
Log into
ipaserveras admin:$ ssh admin@server.idm.example.com Password: [admin@server /]$Display information about host01.idm.example.com:
$ ipa host-show host01.idm.example.com ipa: ERROR: host01.idm.example.com: host not foundThe output confirms that the host does not exist in IdM.
Chapter 46. Managing host groups using the IdM CLI
Learn more about how to manage host groups and their members on the command line (CLI) by using the following operations:
- Viewing host groups and their members
- Creating host groups
- Deleting host groups
- Adding host group members
- Removing host group members
- Adding host group member managers
- Removing host group member managers
46.1. Host groups in IdM
IdM host groups can be used to centralize control over important management tasks, particularly access control.
Definition of host groups
A host group is an entity that contains a set of IdM hosts with common access control rules and other characteristics. For example, you can define host groups based on company departments, physical locations, or access control requirements.
A host group in IdM can include:
- IdM servers and clients
- Other IdM host groups
Host groups created by default
By default, the IdM server creates the host group ipaservers for all IdM server hosts.
Direct and indirect group members
Group attributes in IdM apply to both direct and indirect members: when host group B is a member of host group A, all members of host group B are considered indirect members of host group A.
46.2. Viewing IdM host groups using the CLI
Follow this procedure to view IdM host groups using the command line (CLI).
Prerequisites
- Administrator privileges for managing IdM or User Administrator role.
- An active Kerberos ticket. For details, see Using kinit to log in to IdM manually.
Procedure
Find all host groups using the
ipa hostgroup-findcommand.$ ipa hostgroup-find ------------------- 1 hostgroup matched ------------------- Host-group: ipaservers Description: IPA server hosts ---------------------------- Number of entries returned 1 ----------------------------To display all attributes of a host group, add the
--alloption. For example:$ ipa hostgroup-find --all ------------------- 1 hostgroup matched ------------------- dn: cn=ipaservers,cn=hostgroups,cn=accounts,dc=idm,dc=local Host-group: ipaservers Description: IPA server hosts Member hosts: xxx.xxx.xxx.xxx ipauniqueid: xxxxxxxx-xxxx-xxxx-xxxx-xxxxxxxxxxxx objectclass: top, groupOfNames, nestedGroup, ipaobject, ipahostgroup ---------------------------- Number of entries returned 1 ----------------------------
46.3. Creating IdM host groups using the CLI
Follow this procedure to create IdM host groups using the command line (CLI).
Prerequisites
- Administrator privileges for managing IdM or User Administrator role.
- An active Kerberos ticket. For details, see Using kinit to log in to IdM manually.
Procedure
Add a host group using the
ipa hostgroup-addcommand.For example, to create an IdM host group named group_name and give it a description:
$ ipa hostgroup-add --desc 'My new host group' group_name --------------------- Added hostgroup "group_name" --------------------- Host-group: group_name Description: My new host group ---------------------
46.4. Deleting IdM host groups using the CLI
Follow this procedure to delete IdM host groups using the command line (CLI).
Prerequisites
- Administrator privileges for managing IdM or User Administrator role.
- An active Kerberos ticket. For details, see Using kinit to log in to IdM manually.
Procedure
Delete a host group using the
ipa hostgroup-delcommand.For example, to delete the IdM host group named group_name:
$ ipa hostgroup-del group_name -------------------------- Deleted hostgroup "group_name" --------------------------
Removing a group does not delete the group members from IdM.
46.5. Adding IdM host group members using the CLI
You can add hosts as well as host groups as members to an IdM host group using a single command.
Prerequisites
- Administrator privileges for managing IdM or User Administrator role.
- An active Kerberos ticket. For details, see Using kinit to log in to IdM manually.
-
Optional: Use the
ipa hostgroup-findcommand to find hosts and host groups.
Procedure
To add a member to a host group, use the
ipa hostgroup-add-membercommand and provide the relevant information. You can specify the type of member to add using these options:Use the
--hostsoption to add one or more hosts to an IdM host group.For example, to add the host named example_member to the group named group_name:
$ ipa hostgroup-add-member group_name --hosts example_member Host-group: group_name Description: My host group Member hosts: example_member ------------------------- Number of members added 1 -------------------------Use the
--hostgroupsoption to add one or more host groups to an IdM host group.For example, to add the host group named nested_group to the group named group_name:
$ ipa hostgroup-add-member group_name --hostgroups nested_group Host-group: group_name Description: My host group Member host-groups: nested_group ------------------------- Number of members added 1 -------------------------You can add multiple hosts and multiple host groups to an IdM host group in one single command using the following syntax:
$ ipa hostgroup-add-member group_name --hosts={host1,host2} --hostgroups={group1,group2}
When adding a host group as a member of another host group, do not create recursive groups. For example, if Group A is a member of Group B, do not add Group B as a member of Group A. Recursive groups can cause unpredictable behavior.
46.6. Removing IdM host group members using the CLI
You can remove hosts as well as host groups from an IdM host group using a single command.
Prerequisites
- Administrator privileges for managing IdM or User Administrator role.
- An active Kerberos ticket. For details, see Using kinit to log in to IdM manually.
-
Optional. Use the
ipa hostgroup-findcommand to confirm that the group includes the member you want to remove.
Procedure
To remove a host group member, use the
ipa hostgroup-remove-membercommand and provide the relevant information. You can specify the type of member to remove using these options:Use the
--hostsoption to remove one or more hosts from an IdM host group.For example, to remove the host named example_member from the group named group_name:
$ ipa hostgroup-remove-member group_name --hosts example_member Host-group: group_name Description: My host group ------------------------- Number of members removed 1 -------------------------Use the
--hostgroupsoption to remove one or more host groups from an IdM host group.For example, to remove the host group named nested_group from the group named group_name:
$ ipa hostgroup-remove-member group_name --hostgroups example_member Host-group: group_name Description: My host group ------------------------- Number of members removed 1 -------------------------NoteRemoving a group does not delete the group members from IdM.
You can remove multiple hosts and multiple host groups from an IdM host group in one single command using the following syntax:
$ ipa hostgroup-remove-member group_name --hosts={host1,host2} --hostgroups={group1,group2}
46.7. Adding IdM host group member managers using the CLI
You can add hosts as well as host groups as member managers to an IdM host group using a single command. Member managers can add hosts or host groups to IdM host groups but cannot change the attributes of a host group.
Prerequisites
- Administrator privileges for managing IdM or User Administrator role.
- An active Kerberos ticket. For details, see Using kinit to log in to IdM manually.
- You must have the name of the host or host group you are adding as member managers and the name of the host group you want them to manage.
Procedure
-
Optional: Use the
ipa hostgroup-findcommand to find hosts and host groups. To add a member manager to a host group, use the
ipa hostgroup-add-member-manager.For example, to add the user named example_member as a member manager to the group named group_name:
$ ipa hostgroup-add-member-manager group_name --user example_member Host-group: group_name Member hosts: server.idm.example.com Member host-groups: project_admins Member of netgroups: group_name Membership managed by users: example_member ------------------------- Number of members added 1 -------------------------Use the
--groupsoption to add one or more host groups as a member manager to an IdM host group.For example, to add the host group named admin_group as a member manager to the group named group_name:
$ ipa hostgroup-add-member-manager group_name --groups admin_group Host-group: group_name Member hosts: server.idm.example.com Member host-groups: project_admins Member of netgroups: group_name Membership managed by groups: admin_group Membership managed by users: example_member ------------------------- Number of members added 1 -------------------------
After you add a member manager to a host group, the update may take some time to spread to all clients in your Identity Management environment.
Verification
Using the
ipa group-showcommand to verify the host user and host group were added as member managers.$ ipa hostgroup-show group_name Host-group: group_name Member hosts: server.idm.example.com Member host-groups: project_admins Membership managed by groups: admin_group Membership managed by users: example_member
46.8. Removing IdM host group member managers using the CLI
You can remove hosts as well as host groups as member managers from an IdM host group using a single command. Member managers can remove hosts group member managers from IdM host groups but cannot change the attributes of a host group.
Prerequisites
- Administrator privileges for managing IdM or User Administrator role.
- An active Kerberos ticket. For details, see Using kinit to log in to IdM manually.
- You must have the name of the existing member manager host group you are removing and the name of the host group they are managing.
Procedure
-
Optional: Use the
ipa hostgroup-findcommand to find hosts and host groups. To remove a member manager from a host group, use the
ipa hostgroup-remove-member-managercommand.For example, to remove the user named example_member as a member manager from the group named group_name:
$ ipa hostgroup-remove-member-manager group_name --user example_member Host-group: group_name Member hosts: server.idm.example.com Member host-groups: project_admins Member of netgroups: group_name Membership managed by groups: nested_group --------------------------- Number of members removed 1 ---------------------------Use the
--groupsoption to remove one or more host groups as a member manager from an IdM host group.For example, to remove the host group named nested_group as a member manager from the group named group_name:
$ ipa hostgroup-remove-member-manager group_name --groups nested_group Host-group: group_name Member hosts: server.idm.example.com Member host-groups: project_admins Member of netgroups: group_name --------------------------- Number of members removed 1 ---------------------------
After you remove a member manager from a host group, the update may take some time to spread to all clients in your Identity Management environment.
Verification
Use the
ipa group-showcommand to verify that the host user and host group were removed as member managers.$ ipa hostgroup-show group_name Host-group: group_name Member hosts: server.idm.example.com Member host-groups: project_admins
Chapter 47. Managing host groups using the IdM Web UI
Learn more about how to manage host groups and their members in the Web interface (Web UI) by using the following operations:
- Viewing host groups and their members
- Creating host groups
- Deleting host groups
- Adding host group members
- Removing host group members
- Adding host group member managers
- Removing host group member managers
47.1. Host groups in IdM
IdM host groups can be used to centralize control over important management tasks, particularly access control.
Definition of host groups
A host group is an entity that contains a set of IdM hosts with common access control rules and other characteristics. For example, you can define host groups based on company departments, physical locations, or access control requirements.
A host group in IdM can include:
- IdM servers and clients
- Other IdM host groups
Host groups created by default
By default, the IdM server creates the host group ipaservers for all IdM server hosts.
Direct and indirect group members
Group attributes in IdM apply to both direct and indirect members: when host group B is a member of host group A, all members of host group B are considered indirect members of host group A.
47.2. Viewing host groups in the IdM Web UI
Follow this procedure to view IdM host groups using the Web interface (Web UI).
Prerequisites
- Administrator privileges for managing IdM or User Administrator role.
- You are logged-in to the IdM Web UI. For details, see Accessing the IdM Web UI in a web browser.
Procedure
- Click Identity>Groups, and select the Host Groups tab. The Host Groups page lists the existing host groups and their descriptions. You can also search for a specific host group.
- Click on a group in the list to display the hosts that belong to this group. You can limit results to direct or indirect members.
- Select the Host Groups tab to display the host groups that belong to this group (nested host groups). You can limit results to direct or indirect members.
47.3. Creating host groups in the IdM Web UI
Follow this procedure to create IdM host groups using the Web interface (Web UI).
Prerequisites
- Administrator privileges for managing IdM or User Administrator role.
- You are logged-in to the IdM Web UI. For details, see Accessing the IdM Web UI in a web browser.
Procedure
- Click Identity → Groups, and select the Host Groups tab.
- Click Add. The Add host group dialog appears.
- Provide the information about the group: name (required) and description (optional).
- Click Add to confirm.
47.4. Deleting host groups in the IdM Web UI
Follow this procedure to delete IdM host groups using the Web interface (Web UI).
Prerequisites
- Administrator privileges for managing IdM or User Administrator role.
- You are logged-in to the IdM Web UI. For details, see Accessing the IdM Web UI in a web browser.
Procedure
- Click Identity>Groups and select the Host Groups tab.
- Select the IdM host group to remove, and click Delete. A confirmation dialog appears.
- Click Delete to confirm
Removing a host group does not delete the group members from IdM.
47.5. Adding host group members in the IdM Web UI
Follow this procedure to add host group members in IdM using the web interface (Web UI).
Prerequisites
- Administrator privileges for managing IdM or User Administrator role.
- You are logged-in to the IdM Web UI. For details, see Accessing the IdM Web UI in a web browser.
Procedure
- Click Identity → Groups and select the Host Groups tab.
- Click the name of the group to which you want to add members.
- Click the tab Hosts or Host groups depending on the type of members you want to add. The corresponding dialog appears.
- Select the hosts or host groups to add, and click the > arrow button to move them to the Prospective column.
- Click Add to confirm.
47.6. Removing host group members in the IdM Web UI
Follow this procedure to remove host group members in IdM using the web interface (Web UI).
Prerequisites
- Administrator privileges for managing IdM or User Administrator role.
- You are logged-in to the IdM Web UI. For details, see Accessing the IdM Web UI in a web browser.
Procedure
- Click Identity → Groups and select the Host Groups tab.
- Click the name of the group from which you want to remove members.
- Click the tab Hosts or Host groups depending on the type of members you want to remove.
- Select the checkbox next to the member you want to remove.
- Click Delete. A confirmation dialog appears.
- Click Delete to confirm. The selected members are deleted.
47.7. Adding IdM host group member managers using the Web UI
Follow this procedure to add users or user groups as host group member managers in IdM using the web interface (Web UI). Member managers can add hosts group member managers to IdM host groups but cannot change the attributes of a host group.
Prerequisites
- Administrator privileges for managing IdM or User Administrator role.
- You are logged-in to the IdM Web UI. For details, see Accessing the IdM Web UI in a web browser.
- You must have the name of the host group you are adding as member managers and the name of the host group you want them to manage.
Procedure
- Click Identity>Groups and select the Host Groups tab.
- Click the name of the group to which you want to add member managers.
- Click the member managers tab User Groups or Users depending on the type of member managers you want to add. The corresponding dialog appears.
- Click Add.
- Select the users or user groups to add, and click the > arrow button to move them to the Prospective column.
- Click Add to confirm.
After you add a member manager to a host group, the update may take some time to spread to all clients in your Identity Management environment.
Verification
On the Host Group dialog, verify the user group or user has been added to the member managers list of groups or users.
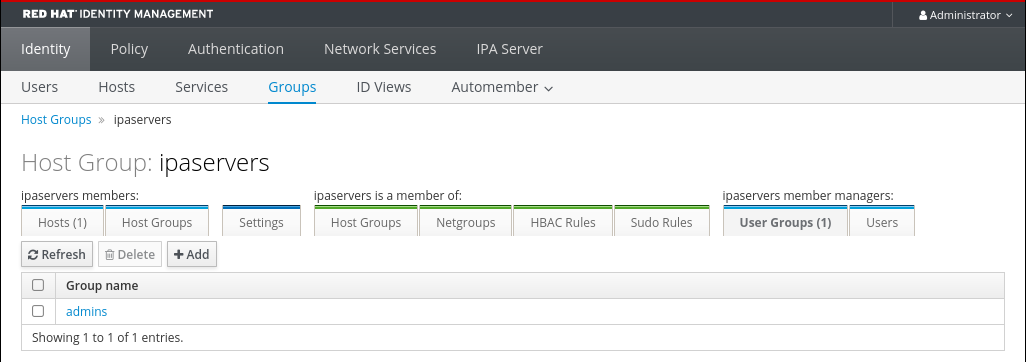
47.8. Removing IdM host group member managers using the Web UI
Follow this procedure to remove users or user groups as host group member managers in IdM using the web interface (Web UI). Member managers can remove hosts group member managers from IdM host groups but cannot change the attributes of a host group.
Prerequisites
- Administrator privileges for managing IdM or User Administrator role.
- You are logged-in to the IdM Web UI. For details, see Accessing the IdM Web UI in a web browser.
- You must have the name of the existing member manager host group you are removing and the name of the host group they are managing.
Procedure
- Click Identity>Groups and select the Host Groups tab.
- Click the name of the group from which you want to remove member managers.
- Click the member managers tab User Groups or Users depending on the type of member managers you want to remove. The corresponding dialog appears.
- Select the user or user groups to remove and click Delete.
- Click Delete to confirm.
After you remove a member manager from a host group, the update may take some time to spread to all clients in your Identity Management environment.
Verification
On the Host Group dialog, verify the user group or user has been removed from the member managers list of groups or users.
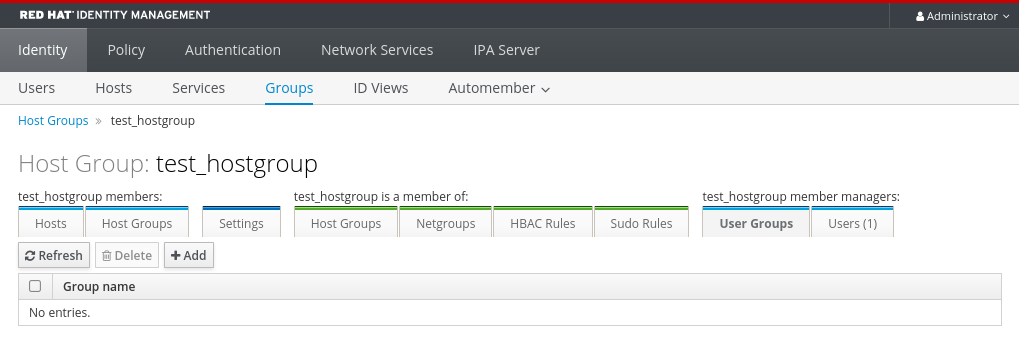
Chapter 48. Managing host groups using Ansible playbooks
Learn more about host groups in Identity Management (IdM) and using Ansible to perform operations involving host groups in Identity Management (IdM).
48.1. Host groups in IdM
IdM host groups can be used to centralize control over important management tasks, particularly access control.
Definition of host groups
A host group is an entity that contains a set of IdM hosts with common access control rules and other characteristics. For example, you can define host groups based on company departments, physical locations, or access control requirements.
A host group in IdM can include:
- IdM servers and clients
- Other IdM host groups
Host groups created by default
By default, the IdM server creates the host group ipaservers for all IdM server hosts.
Direct and indirect group members
Group attributes in IdM apply to both direct and indirect members: when host group B is a member of host group A, all members of host group B are considered indirect members of host group A.
48.2. Ensuring the presence of IdM host groups using Ansible playbooks
Follow this procedure to ensure the presence of host groups in Identity Management (IdM) using Ansible playbooks.
Without Ansible, host group entries are created in IdM using the ipa hostgroup-add command. The result of adding a host group to IdM is the state of the host group being present in IdM. Because of the Ansible reliance on idempotence, to add a host group to IdM using Ansible, you must create a playbook in which you define the state of the host group as present: state: present.
Prerequisites
- You know the IdM administrator password.
You have configured your Ansible control node to meet the following requirements:
- You are using Ansible version 2.13 or later.
-
You have installed the
ansible-freeipapackage. - The example assumes that in the ~/MyPlaybooks/ directory, you have created an Ansible inventory file with the fully-qualified domain name (FQDN) of the IdM server.
-
The example assumes that the secret.yml Ansible vault stores your
ipaadmin_password.
-
The target node, that is the node on which the
ansible-freeipamodule is executed, is part of the IdM domain as an IdM client, server or replica.
Procedure
Create an inventory file, for example
inventory.file, and defineipaserverin it with the list of IdM servers to target:[ipaserver] server.idm.example.comCreate an Ansible playbook file with the necessary host group information. For example, to ensure the presence of a host group named databases, specify
name: databasesin the- ipahostgrouptask. To simplify this step, you can copy and modify the example in the/usr/share/doc/ansible-freeipa/playbooks/user/ensure-hostgroup-is-present.ymlfile.--- - name: Playbook to handle hostgroups hosts: ipaserver vars_files: - /home/user_name/MyPlaybooks/secret.yml tasks: # Ensure host-group databases is present - ipahostgroup: ipaadmin_password: "{{ ipaadmin_password }}" name: databases state: presentIn the playbook, state: present signifies a request to add the host group to IdM unless it already exists there.
Run the playbook:
$ ansible-playbook --vault-password-file=password_file -v -i path_to_inventory_directory/inventory.file path_to_playbooks_directory/ensure-hostgroup-is-present.yml
Verification
Log into
ipaserveras admin:$ ssh admin@server.idm.example.com Password: [admin@server /]$Request a Kerberos ticket for admin:
$ kinit admin Password for admin@IDM.EXAMPLE.COM:Display information about the host group whose presence in IdM you wanted to ensure:
$ ipa hostgroup-show databases Host-group: databasesThe databases host group exists in IdM.
48.3. Ensuring the presence of hosts in IdM host groups using Ansible playbooks
Follow this procedure to ensure the presence of hosts in host groups in Identity Management (IdM) using Ansible playbooks.
Prerequisites
- You know the IdM administrator password.
You have configured your Ansible control node to meet the following requirements:
- You are using Ansible version 2.13 or later.
-
You have installed the
ansible-freeipapackage. - The example assumes that in the ~/MyPlaybooks/ directory, you have created an Ansible inventory file with the fully-qualified domain name (FQDN) of the IdM server.
-
The example assumes that the secret.yml Ansible vault stores your
ipaadmin_password.
-
The target node, that is the node on which the
ansible-freeipamodule is executed, is part of the IdM domain as an IdM client, server or replica. - The hosts you want to reference in your Ansible playbook exist in IdM. For details, see Ensuring the presence of an IdM host entry using Ansible playbooks.
- The host groups you reference from the Ansible playbook file have been added to IdM. For details, see Ensuring the presence of IdM host groups using Ansible playbooks.
Procedure
Create an inventory file, for example
inventory.file, and defineipaserverin it with the list of IdM servers to target:[ipaserver] server.idm.example.comCreate an Ansible playbook file with the necessary host information. Specify the name of the host group using the
nameparameter of theipahostgroupvariable. Specify the name of the host with thehostparameter of theipahostgroupvariable. To simplify this step, you can copy and modify the examples in the/usr/share/doc/ansible-freeipa/playbooks/hostgroup/ensure-hosts-and-hostgroups-are-present-in-hostgroup.ymlfile:--- - name: Playbook to handle hostgroups hosts: ipaserver vars_files: - /home/user_name/MyPlaybooks/secret.yml tasks: # Ensure host-group databases is present - ipahostgroup: ipaadmin_password: "{{ ipaadmin_password }}" name: databases host: - db.idm.example.com action: memberThis playbook adds the db.idm.example.com host to the databases host group. The
action: memberline indicates that when the playbook is run, no attempt is made to add the databases group itself. Instead, only an attempt is made to add db.idm.example.com to databases.Run the playbook:
$ ansible-playbook --vault-password-file=password_file -v -i path_to_inventory_directory/inventory.file path_to_playbooks_directory/ensure-hosts-or-hostgroups-are-present-in-hostgroup.yml
Verification
Log into
ipaserveras admin:$ ssh admin@server.idm.example.com Password: [admin@server /]$Request a Kerberos ticket for admin:
$ kinit admin Password for admin@IDM.EXAMPLE.COM:Display information about a host group to see which hosts are present in it:
$ ipa hostgroup-show databases Host-group: databases Member hosts: db.idm.example.comThe db.idm.example.com host is present as a member of the databases host group.
48.4. Nesting IdM host groups using Ansible playbooks
Follow this procedure to ensure the presence of nested host groups in Identity Management (IdM) host groups using Ansible playbooks.
Prerequisites
- You know the IdM administrator password.
You have configured your Ansible control node to meet the following requirements:
- You are using Ansible version 2.13 or later.
-
You have installed the
ansible-freeipapackage. - The example assumes that in the ~/MyPlaybooks/ directory, you have created an Ansible inventory file with the fully-qualified domain name (FQDN) of the IdM server.
-
The example assumes that the secret.yml Ansible vault stores your
ipaadmin_password.
-
The target node, that is the node on which the
ansible-freeipamodule is executed, is part of the IdM domain as an IdM client, server or replica. - The host groups you reference from the Ansible playbook file exist in IdM. For details, see Ensuring the presence of IdM host groups using Ansible playbooks.
Procedure
Create an inventory file, for example
inventory.file, and defineipaserverin it with the list of IdM servers to target:[ipaserver] server.idm.example.comCreate an Ansible playbook file with the necessary host group information. To ensure that a nested host group A exists in a host group B: in the Ansible playbook, specify, among the
- ipahostgroupvariables, the name of the host group B using thenamevariable. Specify the name of the nested hostgroup A with thehostgroupvariable. To simplify this step, you can copy and modify the examples in the/usr/share/doc/ansible-freeipa/playbooks/hostgroup/ensure-hosts-and-hostgroups-are-present-in-hostgroup.ymlfile:--- - name: Playbook to handle hostgroups hosts: ipaserver vars_files: - /home/user_name/MyPlaybooks/secret.yml tasks: # Ensure hosts and hostgroups are present in existing databases hostgroup - ipahostgroup: ipaadmin_password: "{{ ipaadmin_password }}" name: databases hostgroup: - mysql-server - oracle-server action: memberThis Ansible playbook ensures the presence of the myqsl-server and oracle-server host groups in the databases host group. The
action: memberline indicates that when the playbook is run, no attempt is made to add the databases group itself to IdM.Run the playbook:
$ ansible-playbook --vault-password-file=password_file -v -i path_to_inventory_directory/inventory.file path_to_playbooks_directory/ensure-hosts-or-hostgroups-are-present-in-hostgroup.yml
Verification
Log into
ipaserveras admin:$ ssh admin@server.idm.example.com Password: [admin@server /]$Request a Kerberos ticket for admin:
$ kinit admin Password for admin@IDM.EXAMPLE.COM:Display information about the host group in which nested host groups are present:
$ ipa hostgroup-show databases Host-group: databases Member hosts: db.idm.example.com Member host-groups: mysql-server, oracle-serverThe mysql-server and oracle-server host groups exist in the databases host group.
48.5. Ensuring the presence of member managers in IDM host groups using Ansible Playbooks
The following procedure describes ensuring the presence of member managers in IdM hosts and host groups using an Ansible playbook.
Prerequisites
On the control node:
- You are using Ansible version 2.13 or later.
-
You have installed the
ansible-freeipapackage. - The example assumes that in the ~/MyPlaybooks/ directory, you have created an Ansible inventory file with the fully-qualified domain name (FQDN) of the IdM server.
-
The example assumes that the secret.yml Ansible vault stores your
ipaadmin_password.
-
The target node, that is the node on which the
ansible-freeipamodule is executed, is part of the IdM domain as an IdM client, server or replica. - You must have the name of the host or host group you are adding as member managers and the name of the host group you want them to manage.
Procedure
Create an inventory file, for example
inventory.file, and defineipaserverin it:[ipaserver] server.idm.example.comCreate an Ansible playbook file with the necessary host and host group member management information:
--- - name: Playbook to handle host group membership management hosts: ipaserver vars_files: - /home/user_name/MyPlaybooks/secret.yml tasks: - name: Ensure member manager user example_member is present for group_name ipahostgroup: ipaadmin_password: "{{ ipaadmin_password }}" name: group_name membermanager_user: example_member - name: Ensure member manager group project_admins is present for group_name ipahostgroup: ipaadmin_password: "{{ ipaadmin_password }}" name: group_name membermanager_group: project_adminsRun the playbook:
$ ansible-playbook --vault-password-file=password_file -v -i path_to_inventory_directory/inventory.file path_to_playbooks_directory/add-member-managers-host-groups.yml
Verification
You can verify if the group_name group contains example_member and project_admins as member managers by using the ipa group-show command:
Log into
ipaserveras administrator:$ ssh admin@server.idm.example.com Password: [admin@server /]$Display information about testhostgroup:
ipaserver]$ ipa hostgroup-show group_name Host-group: group_name Member hosts: server.idm.example.com Member host-groups: testhostgroup2 Membership managed by groups: project_admins Membership managed by users: example_member
48.6. Ensuring the absence of hosts from IdM host groups using Ansible playbooks
Follow this procedure to ensure the absence of hosts from host groups in Identity Management (IdM) using Ansible playbooks.
Prerequisites
- You know the IdM administrator password.
You have configured your Ansible control node to meet the following requirements:
- You are using Ansible version 2.13 or later.
-
You have installed the
ansible-freeipapackage. - The example assumes that in the ~/MyPlaybooks/ directory, you have created an Ansible inventory file with the fully-qualified domain name (FQDN) of the IdM server.
-
The example assumes that the secret.yml Ansible vault stores your
ipaadmin_password.
-
The target node, that is the node on which the
ansible-freeipamodule is executed, is part of the IdM domain as an IdM client, server or replica. - The hosts you want to reference in your Ansible playbook exist in IdM. For details, see Ensuring the presence of an IdM host entry using Ansible playbooks.
- The host groups you reference from the Ansible playbook file exist in IdM. For details, see Ensuring the presence of IdM host groups using Ansible playbooks.
Procedure
Create an inventory file, for example
inventory.file, and defineipaserverin it with the list of IdM servers to target:[ipaserver] server.idm.example.comCreate an Ansible playbook file with the necessary host and host group information. Specify the name of the host group using the
nameparameter of theipahostgroupvariable. Specify the name of the host whose absence from the host group you want to ensure using thehostparameter of theipahostgroupvariable. To simplify this step, you can copy and modify the examples in the/usr/share/doc/ansible-freeipa/playbooks/hostgroup/ensure-hosts-and-hostgroups-are-absent-in-hostgroup.ymlfile:--- - name: Playbook to handle hostgroups hosts: ipaserver vars_files: - /home/user_name/MyPlaybooks/secret.yml tasks: # Ensure host-group databases is absent - ipahostgroup: ipaadmin_password: "{{ ipaadmin_password }}" name: databases host: - db.idm.example.com action: member state: absentThis playbook ensures the absence of the db.idm.example.com host from the databases host group. The action: member line indicates that when the playbook is run, no attempt is made to remove the databases group itself.
Run the playbook:
$ ansible-playbook --vault-password-file=password_file -v -i path_to_inventory_directory/inventory.file path_to_playbooks_directory/ensure-hosts-or-hostgroups-are-absent-in-hostgroup.yml
Verification
Log into
ipaserveras admin:$ ssh admin@server.idm.example.com Password: [admin@server /]$Request a Kerberos ticket for admin:
$ kinit admin Password for admin@IDM.EXAMPLE.COM:Display information about the host group and the hosts it contains:
$ ipa hostgroup-show databases Host-group: databases Member host-groups: mysql-server, oracle-serverThe db.idm.example.com host does not exist in the databases host group.
48.7. Ensuring the absence of nested host groups from IdM host groups using Ansible playbooks
Follow this procedure to ensure the absence of nested host groups from outer host groups in Identity Management (IdM) using Ansible playbooks.
Prerequisites
- You know the IdM administrator password.
You have configured your Ansible control node to meet the following requirements:
- You are using Ansible version 2.13 or later.
-
You have installed the
ansible-freeipapackage. - The example assumes that in the ~/MyPlaybooks/ directory, you have created an Ansible inventory file with the fully-qualified domain name (FQDN) of the IdM server.
-
The example assumes that the secret.yml Ansible vault stores your
ipaadmin_password.
-
The target node, that is the node on which the
ansible-freeipamodule is executed, is part of the IdM domain as an IdM client, server or replica. - The host groups you reference from the Ansible playbook file exist in IdM. For details, see Ensuring the presence of IdM host groups using Ansible playbooks.
Procedure
Create an inventory file, for example
inventory.file, and defineipaserverin it with the list of IdM servers to target:[ipaserver] server.idm.example.comCreate an Ansible playbook file with the necessary host group information. Specify, among the
- ipahostgroupvariables, the name of the outer host group using thenamevariable. Specify the name of the nested hostgroup with thehostgroupvariable. To simplify this step, you can copy and modify the examples in the/usr/share/doc/ansible-freeipa/playbooks/hostgroup/ensure-hosts-and-hostgroups-are-absent-in-hostgroup.ymlfile:--- - name: Playbook to handle hostgroups hosts: ipaserver vars_files: - /home/user_name/MyPlaybooks/secret.yml tasks: # Ensure hosts and hostgroups are absent in existing databases hostgroup - ipahostgroup: ipaadmin_password: "{{ ipaadmin_password }}" name: databases hostgroup: - mysql-server - oracle-server action: member state: absentThis playbook makes sure that the mysql-server and oracle-server host groups are absent from the databases host group. The
action: memberline indicates that when the playbook is run, no attempt is made to ensure the databases group itself is deleted from IdM.Run the playbook:
$ ansible-playbook --vault-password-file=password_file -v -i path_to_inventory_directory/inventory.file path_to_playbooks_directory/ensure-hosts-or-hostgroups-are-absent-in-hostgroup.yml
Verification
Log into
ipaserveras admin:$ ssh admin@server.idm.example.com Password: [admin@server /]$Request a Kerberos ticket for admin:
$ kinit admin Password for admin@IDM.EXAMPLE.COM:Display information about the host group from which nested host groups should be absent:
$ ipa hostgroup-show databases Host-group: databasesThe output confirms that the mysql-server and oracle-server nested host groups are absent from the outer databases host group.
48.8. Ensuring the absence of IdM host groups using Ansible playbooks
Follow this procedure to ensure the absence of host groups in Identity Management (IdM) using Ansible playbooks.
Without Ansible, host group entries are removed from IdM using the ipa hostgroup-del command. The result of removing a host group from IdM is the state of the host group being absent from IdM. Because of the Ansible reliance on idempotence, to remove a host group from IdM using Ansible, you must create a playbook in which you define the state of the host group as absent: state: absent.
Prerequisites
- You know the IdM administrator password.
You have configured your Ansible control node to meet the following requirements:
- You are using Ansible version 2.13 or later.
-
You have installed the
ansible-freeipapackage. - The example assumes that in the ~/MyPlaybooks/ directory, you have created an Ansible inventory file with the fully-qualified domain name (FQDN) of the IdM server.
-
The example assumes that the secret.yml Ansible vault stores your
ipaadmin_password.
-
The target node, that is the node on which the
ansible-freeipamodule is executed, is part of the IdM domain as an IdM client, server or replica.
Procedure
Create an inventory file, for example
inventory.file, and defineipaserverin it with the list of IdM servers to target:[ipaserver] server.idm.example.comCreate an Ansible playbook file with the necessary host group information. To simplify this step, you can copy and modify the example in the
/usr/share/doc/ansible-freeipa/playbooks/user/ensure-hostgroup-is-absent.ymlfile.--- - name: Playbook to handle hostgroups hosts: ipaserver vars_files: - /home/user_name/MyPlaybooks/secret.yml tasks: - Ensure host-group databases is absent ipahostgroup: ipaadmin_password: "{{ ipaadmin_password }}" name: databases state: absentThis playbook ensures the absence of the databases host group from IdM. The
state: absentmeans a request to delete the host group from IdM unless it is already deleted.Run the playbook:
$ ansible-playbook --vault-password-file=password_file -v -i path_to_inventory_directory/inventory.file path_to_playbooks_directory/ensure-hostgroup-is-absent.yml
Verification
Log into
ipaserveras admin:$ ssh admin@server.idm.example.com Password: [admin@server /]$Request a Kerberos ticket for admin:
$ kinit admin Password for admin@IDM.EXAMPLE.COM:Display information about the host group whose absence you ensured:
$ ipa hostgroup-show databases ipa: ERROR: databases: host group not foundThe databases host group does not exist in IdM.
48.9. Ensuring the absence of member managers from IdM host groups using Ansible playbooks
The following procedure describes ensuring the absence of member managers in IdM hosts and host groups using an Ansible playbook.
Prerequisites
On the control node:
- You are using Ansible version 2.13 or later.
-
You have installed the
ansible-freeipapackage. - The example assumes that in the ~/MyPlaybooks/ directory, you have created an Ansible inventory file with the fully-qualified domain name (FQDN) of the IdM server.
-
The example assumes that the secret.yml Ansible vault stores your
ipaadmin_password.
-
The target node, that is the node on which the
ansible-freeipamodule is executed, is part of the IdM domain as an IdM client, server or replica. - You must have the name of the user or user group you are removing as member managers and the name of the host group they are managing.
Procedure
Create an inventory file, for example
inventory.file, and defineipaserverin it:[ipaserver] server.idm.example.comCreate an Ansible playbook file with the necessary host and host group member management information:
--- - name: Playbook to handle host group membership management hosts: ipaserver vars_files: - /home/user_name/MyPlaybooks/secret.yml tasks: - name: Ensure member manager host and host group members are absent for group_name ipahostgroup: ipaadmin_password: "{{ ipaadmin_password }}" name: group_name membermanager_user: example_member membermanager_group: project_admins action: member state: absentRun the playbook:
$ ansible-playbook --vault-password-file=password_file -v -i path_to_inventory_directory/inventory.file path_to_playbooks_directory/ensure-member-managers-host-groups-are-absent.yml
Verification
You can verify if the group_name group does not contain example_member or project_admins as member managers by using the ipa group-show command:
Log into
ipaserveras administrator:$ ssh admin@server.idm.example.com Password: [admin@server /]$Display information about testhostgroup:
ipaserver]$ ipa hostgroup-show group_name Host-group: group_name Member hosts: server.idm.example.com Member host-groups: testhostgroup2
Chapter 49. Managing Kerberos principal aliases for users, hosts, and services
When you create a new user, host, or service, a Kerberos principal in the following format is automatically added:
- user_name@REALM
- host/host_name@REALM
- service_name/host_name@REALM
Administrators can enable users, hosts, or services to authenticate against Kerberos applications using an alias. This is beneficial in the following scenarios:
- The user name changed and the user wants to log in using both the previous and new user name.
- The user needs to log in using the email address even if the IdM Kerberos realm differs from the email domain.
Note that if you rename a user, the object keeps the aliases and the previous canonical principal name.
49.1. Adding a Kerberos principal alias
You can associate alias names with existing Kerberos principals in an Identity Management (IdM) environment. This enhances security and simplifies authentication processes within the IdM domain.
Procedure
To add the alias name
useraliasto the accountuser, enter:# ipa user-add-principal <user> <useralias> -------------------------------- Added new aliases to user "user" -------------------------------- User login: user Principal alias: user@IDM.EXAMPLE.COM, useralias@IDM.EXAMPLE.COMTo add an alias to a host or service, use the
ipa host-add-principaloripa service-add-principalcommand respectively instead.If you use an alias name to authenticate, use the
-Coption with thekinitcommand:# kinit -C <useralias> Password for <user>@IDM.EXAMPLE.COM:
49.2. Removing a Kerberos principal alias
You can remove alias names associated with Kerberos principals in their Identity Management (IdM) environment.
Procedure
To remove the alias
useraliasfrom the accountuser, enter:# ipa user-remove-principal <user> <useralias> -------------------------------- Removed aliases from user "user" -------------------------------- User login: user Principal alias: user@IDM.EXAMPLE.COMTo remove an alias from a host or service, use the
ipa host-remove-principaloripa service-remove-principalcommand respectively instead.Note that you cannot remove the canonical principal name:
# ipa user-show <user> User login: user ... Principal name: user@IDM.EXAMPLE.COM ... # ipa user-remove-principal user user ipa: ERROR: invalid 'krbprincipalname': at least one value equal to the canonical principal name must be present
49.3. Adding a Kerberos enterprise principal alias
You can associate enterprise principal alias names with existing Kerberos enterprise principals in an Identity Management (IdM) environment. Enterprise principal aliases can use any domain suffix except for user principal name (UPN) suffixes, NetBIOS names, or domain names of trusted Active Directory forest domains.
Procedure
To add the enterprise principal alias
user@example.comto theuseraccount:# ipa user-add-principal <user> <user\\@example.com> -------------------------------- Added new aliases to user "user" -------------------------------- User login: user Principal alias: user@IDM.EXAMPLE.COM, user\@example.com@IDM.EXAMPLE.COMTo add an enterprise alias to a host or service, use the
ipa host-add-principaloripa service-add-principalcommand respectively instead.NoteWhen adding or removing enterprise principal aliases, escape the @ symbol using two backslashes (\\). Otherwise, the shell interprets the @ symbol as part of the Kerberos realm name and leads to the following error:
ipa: ERROR: The realm for the principal does not match the realm for this IPA server.If you use an enterprise principal name to authenticate, use the
-Eoption with thekinitcommand:# kinit -E <user@example.com> Password for user\@example.com@IDM.EXAMPLE.COM:
49.4. Removing a Kerberos enterprise principal alias
You can remove enterprise principal alias names associated with Kerberos enterprise principals in their Identity Management (IdM) environment.
Procedure
To remove the enterprise principal alias
user@example.comfrom the accountuser, enter:# ipa user-remove-principal <user> <user\\@example.com> -------------------------------- Removed aliases from user "user" -------------------------------- User login: user Principal alias: user@IDM.EXAMPLE.COMTo remove an alias from a host or service, use the
ipa host-remove-principaloripa service-remove-principalcommand respectively instead.NoteWhen adding or removing enterprise principal aliases, escape the @ symbol using two backslashes (\\). Otherwise, the shell interprets the @ symbol as part of the Kerberos realm name and leads to the following error:
ipa: ERROR: The realm for the principal does not match the realm for this IPA server
Chapter 50. Managing Kerberos flags
Kerberos flags are crucial for specifying authentication mechanisms, authorization levels, and security protocols within a Kerberos-enabled network environment. With Kerberos flags, you can ensure secure access control, protect against unauthorized access, and improve interoperability between different Kerberos implementations.
50.1. Kerberos flags for services and hosts
You can use various Kerberos flags to define specific aspects of the Kerberos ticket behavior. You can add these flags to service and host Kerberos principals.
Principals in Identity Management (IdM) accept the following Kerberos flags:
OK_AS_DELEGATEUse this flag to specify Kerberos tickets trusted for delegation.
Active directory (AD) clients check the
OK_AS_DELEGATEflag on the Kerberos ticket to determine whether a user credentials can be forwarded or delegated to a specific server. AD forwards the ticket-granting ticket (TGT) only to services or hosts withOK_AS_DELEGATEconfigured. With this flag, system security services daemon (SSSD) can add the AD user TGT to the default Kerberos credentials cache on the IdM client machine.REQUIRES_PRE_AUTHUse this flag to specify that only pre-authenticated tickets are allowed to authenticate to a principal.
With the
REQUIRES_PRE_AUTHflag set, the key distribution center (KDC) requires additional authentication: the KDC issues the TGT for the principal withREQUIRES_PRE_AUTHonly if the TGT has been pre-authenticated.You can clear
REQUIRES_PRE_AUTHto disable pre-authentication for selected services or hosts. This lowers the load on the KDC, however slightly increases the possibility of a brute-force attack on a long-term key to succeed.OK_TO_AUTH_AS_DELEGATEUse the
OK_TO_AUTH_AS_DELEGATEflag to specify that the service is allowed to obtain a Kerberos ticket on behalf of a user. Note, that for obtaining other tickets on behalf of the user, the service needs theOK_AS_DELEGATEflag and a corresponding policy decision allowed on the key distribution center side.
50.2. Setting Kerberos flags from the Web UI
You can set a Kerberos flags by using the IdM Web UI. The following procedure sets the Kerberos flag to a principal.
Procedure
Select → in the menu.
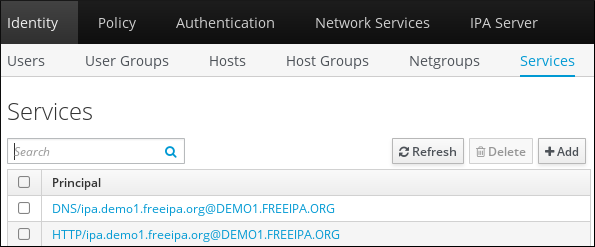
- Click on the service to which you want to add the flags.
Check the option that you want to set:
-
To set the
OK_AS_DELEGATEflag, check Trusted for delegation. -
To set the
REQUIRES_PRE_AUTHflag, check Requires pre-authentication. -
To set the
OK_TO_AUTH_AS_DELEGATEflag, check Trusted to authenticate as user.
-
To set the
50.3. Setting and removing Kerberos flags from the command line
You can add or remove a Kerberos flag by using the command line. The ipa service-mod command uses the following command options for the flags:
-
--ok-as-delegateforOK_AS_DELEGATE -
--requires-pre-authforREQUIRES_PRE_AUTH -
--ok-to-auth-as-delegateforOK_TO_AUTH_AS_DELEGATE
By setting an option value to 1, you enable a flag for a principle. By setting an option value to 0, you disable the flag.
The following procedure enables and disables the OK_AS_DELEGATE flag for the service/ipa.example.com@example.com principal.
Procedure
To add the
OK_AS_DELEGATEflag for theservice/ipa.example.com@example.comprinciple, run:$ ipa service-mod service/ipa.example.com@EXAMPLE.COM --ok-as-delegate=1To remove the
OK_AS_DELEGATEflag from theservice/ipa.example.com@example.comprinciple, run:$ ipa service-mod service/ipa.example.com@EXAMPLE.COM --ok-as-delegate=0
50.4. Displaying Kerberos flags from the command line
You can display Kerberos flag setting by using the command line. The following procedure displays the OK_AS_DELEGATE flag for the demo/ipa.example.com@EXAMPLE.COM principal.
Procedure
To find out if OK_AS_DELEGATE is set for a principal:
Run the
kvnoutility:$ kvno demo/ipa.example.com@EXAMPLE.COMTo display the flag setting, run the
klist -fcommand. The0character means that theOK_AS_DELEGATEflag is disabled:$ klist -f Ticket cache: KEYRING:persistent:0:0 Default principal: admin@EXAMPLE.COM Valid starting Expires Service principal 02/19/2024 09:59:02 02/20/2024 08:21:33 demo/ipa/example.com@EXAMPLE.COM Flags: FATO
Chapter 51. Strengthening Kerberos security with PAC information
You can use Identity Management (IdM) with Privilege Attribute Certificate (PAC) information by default since RHEL 8.5. You can also enable Security Identifiers (SIDs) in IdM deployments that were installed before RHEL 8.5.
51.1. Privilege Attribute Certificate (PAC) use in IdM
To increase security, RHEL Identity Management (IdM) now issues Kerberos tickets with Privilege Attribute Certificate (PAC) information by default in new deployments. A PAC has rich information about a Kerberos principal, including its Security Identifier (SID), group memberships, and home directory information.
SIDs, which Microsoft Active Directory (AD) uses by default, are globally unique identifiers that are never reused. SIDs express multiple namespaces: each domain has a SID, which is a prefix in the SID of each object.
Starting from RHEL 8.5, when you install an IdM server or replica, the installation script generates SIDs for users and groups by default. This allows IdM to work with PAC data. If you installed IdM before RHEL 8.5, and you have not configured a trust with an AD domain, you may not have generated SIDs for your IdM objects. For more information about generating SIDs for your IdM objects, see Enabling Security Identifiers (SIDs) in IdM.
By evaluating PAC information in Kerberos tickets, you can control resource access with much greater detail. For example, the Administrator account in one domain has a uniquely different SID than the Administrator account in any other domain. In an IdM environment with a trust to an AD domain, you can set access controls based on globally unique SIDs rather than simple user names or UIDs that might repeat in different locations, such as every Linux root account having a UID of 0.
51.2. Enabling Security Identifiers (SIDs) in IdM
If you installed IdM before RHEL 8.5, and you have not configured a trust with an AD domain, you might not have generated Security Identifiers (SIDs) for your IdM objects. This is because, before, the only way to generate SIDs was to run the ipa-adtrust-install command to add the Trust Controller role to an IdM server.
As of RHEL 8.6, Kerberos in IdM requires that your IdM objects have SIDs, which are necessary for security based on Privilege Access Certificate (PAC) information.
Prerequisites
- You installed IdM before RHEL 8.5.
-
You have not run the
ipa-sidgentask, which is part of configuring a trust with an Active Directory domain. - You can authenticate as the IdM admin account.
Procedure
Enable SID usage and trigger the
SIDgentask to generate SIDs for existing users and groups. This task might be resource-intensive:[root@server ~]# ipa config-mod --enable-sid --add-sids
Verification
Verify that the IdM
adminuser account entry has anipantsecurityidentifierattribute with a SID that ends with-500, the SID reserved for the domain administrator:[root@server ~]# ipa user-show admin --all | grep ipantsecurityidentifier ipantsecurityidentifier: S-1-5-21-2633809701-976279387-419745629-500
Chapter 52. Managing Kerberos ticket policies
Kerberos ticket policies in Identity Management (IdM) set restrictions on Kerberos ticket access, duration, and renewal. You can configure Kerberos ticket policies for the Key Distribution Center (KDC) running on your IdM server.
52.1. The role of the IdM KDC
Identity Management’s authentication mechanisms use the Kerberos infrastructure established by the Key Distribution Center (KDC). The KDC is the trusted authority that stores credential information and ensures the authenticity of data originating from entities within the IdM network.
Each IdM user, service, and host acts as a Kerberos client and is identified by a unique Kerberos principal:
-
For users:
identifier@REALM, such asadmin@EXAMPLE.COM -
For services:
service/fully-qualified-hostname@REALM, such ashttp/server.example.com@EXAMPLE.COM -
For hosts:
host/fully-qualified-hostname@REALM, such ashost/client.example.com@EXAMPLE.COM
The following image is a simplification of the communication between a Kerberos client, the KDC, and a Kerberized application that the client wants to communicate with.
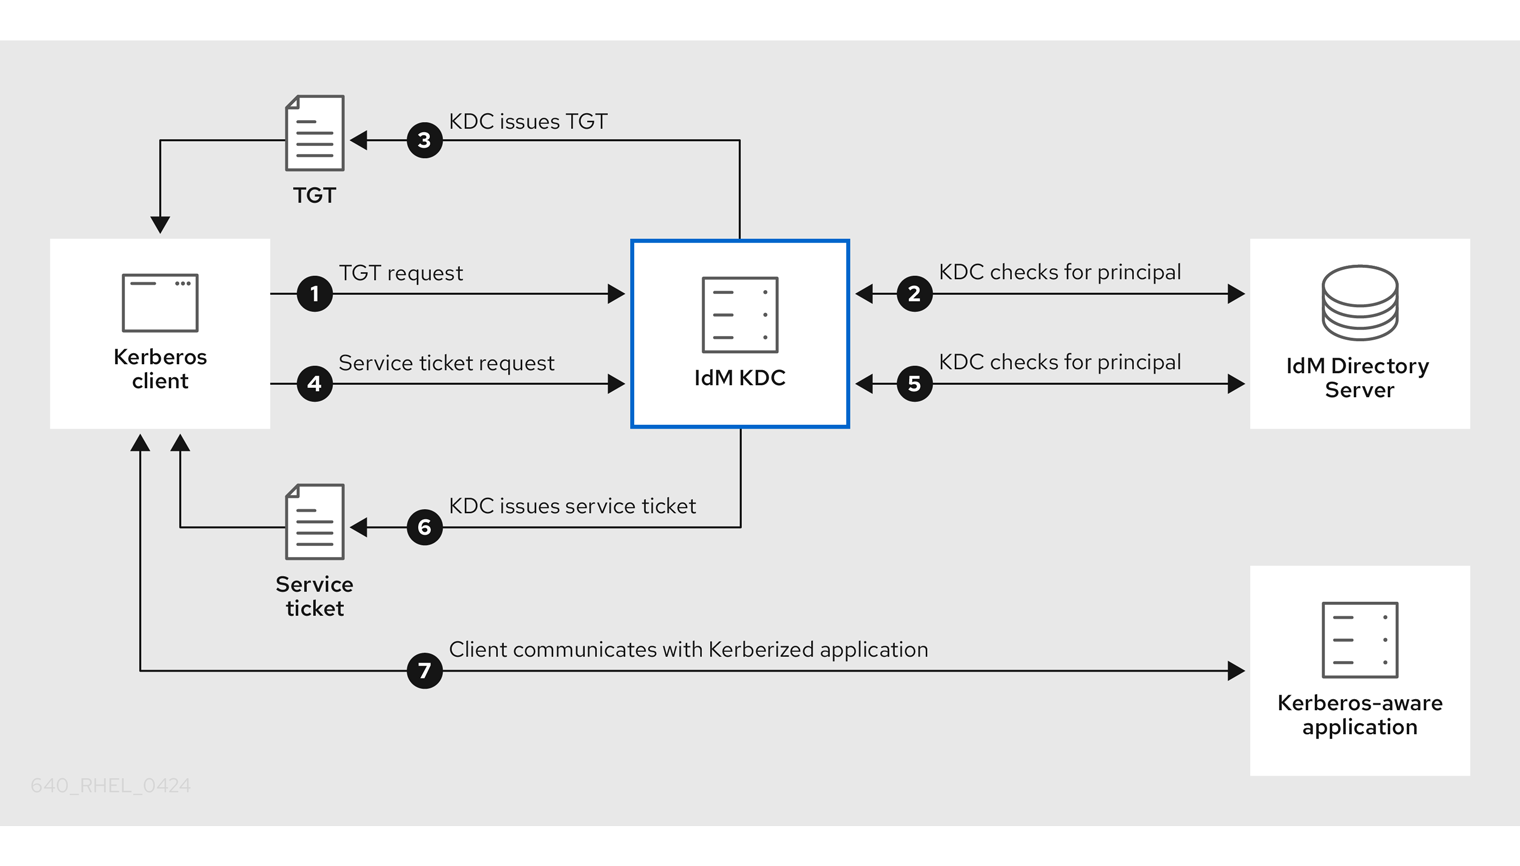
-
A Kerberos client identifies itself to the KDC by authenticating as a Kerberos principal. For example, an IdM user performs
kinit usernameand provides their password. - The KDC checks for the principal in its database, authenticates the client, and evaluates Kerberos ticket policies to determine whether to grant the request.
- The KDC issues the client a ticket-granting ticket (TGT) with a lifecycle and authentication indicators according to the appropriate ticket policy.
- With the TGT, the client requests a service ticket from the KDC to communicate with a Kerberized service on a target host.
- The KDC checks if the client’s TGT is still valid, and evaluates the service ticket request against ticket policies.
- The KDC issues the client a service ticket.
- With the service ticket, the client can initiate encrypted communication with the service on the target host.
52.2. IdM Kerberos ticket policy types
IdM Kerberos ticket policies implement the following ticket policy types:
- Connection policy
To protect Kerberized services with different levels of security, you can define connection policies to enforce rules based on which pre-authentication mechanism a client used to retrieve a ticket-granting ticket (TGT).
For example, you can require smart card authentication to connect to
client1.example.com, and require two-factor authentication to access thetestserviceapplication onclient2.example.com.To enforce connection policies, associate authentication indicators with services. Only clients that have the required authentication indicators in their service ticket requests are able to access those services. For more information, see Kerberos authentication indicators.
- Ticket lifecycle policy
Each Kerberos ticket has a lifetime and a potential renewal age: you can renew a ticket before it reaches its maximum lifetime, but not after it exceeds its maximum renewal age.
The default global ticket lifetime is one day (86400 seconds) and the default global maximum renewal age is one week (604800 seconds). To adjust these global values, see Configuring the global ticket lifecycle policy.
You can also define your own ticket lifecycle policies:
- To configure different global ticket lifecycle values for each authentication indicator, see Configuring global ticket policies per authentication indicator.
- To define ticket lifecycle values for a single user that apply regardless of the authentication method used, see Configuring the default ticket policy for a user.
- To define individual ticket lifecycle values for each authentication indicator that only apply to a single user, see Configuring individual authentication indicator ticket policies for a user.
52.3. Kerberos authentication indicators
The Kerberos Key Distribution Center (KDC) attaches authentication indicators to a ticket-granting ticket (TGT) based on which pre-authentication mechanism the client used to prove its identity:
otp- two-factor authentication (password + One-Time Password)
radius- RADIUS authentication (commonly for 802.1x authentication)
pkinit- PKINIT, smart card, or certificate authentication
hardened- hardened passwords (SPAKE or FAST)[1]
The KDC then attaches the authentication indicators from the TGT to any service ticket requests that stem from it. The KDC enforces policies such as service access control, maximum ticket lifetime, and maximum renewable age based on the authentication indicators.
Authentication indicators and IdM services
If you associate a service or a host with an authentication indicator, only clients that used the corresponding authentication mechanism to obtain a TGT will be able to access it. The KDC, not the application or service, checks for authentication indicators in service ticket requests, and grants or denies requests based on Kerberos connection policies.
If a service or a host has no authentication indicators assigned to it, it will accept tickets authenticated by any mechanism.
52.4. Enforcing authentication indicators for an IdM service
The authentication mechanisms supported by Identity Management (IdM) vary in their authentication strength. For example, obtaining the initial Kerberos ticket-granting ticket (TGT) using a one-time password (OTP) in combination with a standard password is considered more secure than authentication using only a standard password.
By associating authentication indicators with a particular IdM service, you can, as an IdM administrator, configure the service so that only users who used those specific pre-authentication mechanisms to obtain their initial ticket-granting ticket (TGT) will be able to access the service.
In this way, you can configure different IdM services so that:
- Only users who used a stronger authentication method to obtain their initial TGT, such as a one-time password (OTP), can access services critical to security, such as a VPN.
- Users who used simpler authentication methods to obtain their initial TGT, such as a password, can only access non-critical services, such as local logins.
Figure 52.1. Example of authenticating using different technologies
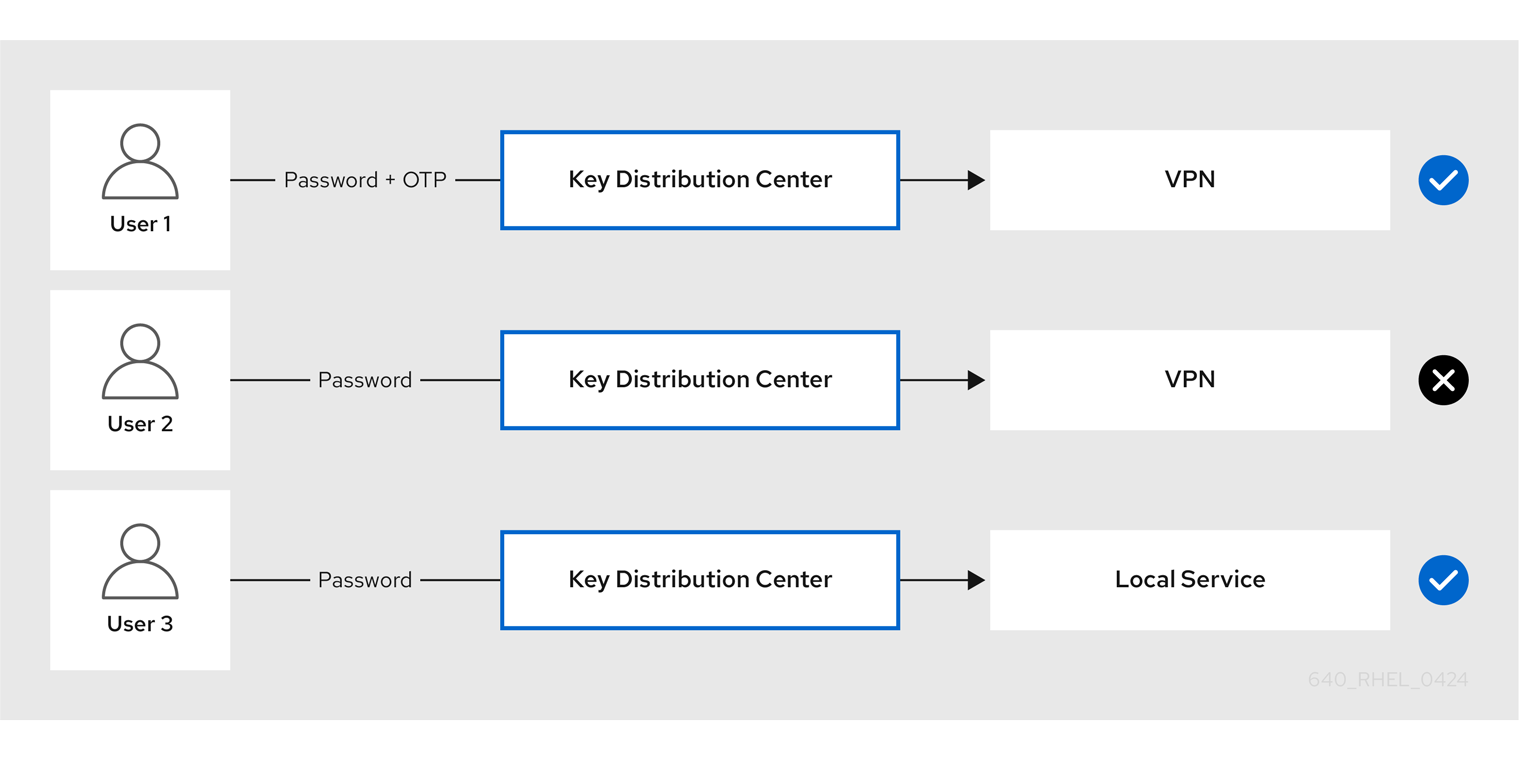
This procedure describes creating an IdM service and configuring it to require particular Kerberos authentication indicators from incoming service ticket requests.
52.4.1. Creating an IdM service entry and its Kerberos keytab
Adding an IdM service entry to IdM for a service running on an IdM host creates a corresponding Kerberos principal, and allows the service to request an SSL certificate, a Kerberos keytab, or both.
The following procedure describes creating an IdM service entry and generating an associated Kerberos keytab for encrypting communication with that service.
Prerequisites
- Your service can store a Kerberos principal, an SSL certificate, or both.
Procedure
Add an IdM service with the
ipa service-addcommand to create a Kerberos principal associated with it. For example, to create the IdM service entry for thetestserviceapplication that runs on hostclient.example.com:[root@client ~]# ipa service-add testservice/client.example.com ------------------------------------------------------------- Modified service "testservice/client.example.com@EXAMPLE.COM" ------------------------------------------------------------- Principal name: testservice/client.example.com@EXAMPLE.COM Principal alias: testservice/client.example.com@EXAMPLE.COM Managed by: client.example.comGenerate and store a Kerberos keytab for the service on the client.
[root@client ~]# ipa-getkeytab -k /etc/testservice.keytab -p testservice/client.example.com Keytab successfully retrieved and stored in: /etc/testservice.keytab
Verification
Display information about an IdM service with the
ipa service-showcommand.[root@server ~]# ipa service-show testservice/client.example.com Principal name: testservice/client.example.com@EXAMPLE.COM Principal alias: testservice/client.example.com@EXAMPLE.COM Keytab: True Managed by: client.example.comDisplay the contents of the service’s Kerberos keytab with the
klistcommand.[root@server etc]# klist -ekt /etc/testservice.keytab Keytab name: FILE:/etc/testservice.keytab KVNO Timestamp Principal ---- ------------------- ------------------------------------------------------ 2 04/01/2020 17:52:55 testservice/client.example.com@EXAMPLE.COM (aes256-cts-hmac-sha1-96) 2 04/01/2020 17:52:55 testservice/client.example.com@EXAMPLE.COM (aes128-cts-hmac-sha1-96) 2 04/01/2020 17:52:55 testservice/client.example.com@EXAMPLE.COM (camellia128-cts-cmac) 2 04/01/2020 17:52:55 testservice/client.example.com@EXAMPLE.COM (camellia256-cts-cmac)
52.4.2. Associating authentication indicators with an IdM service using IdM CLI
As an Identity Management (IdM) administrator, you can configure a host or a service to require that a service ticket presented by the client application contains a specific authentication indicator. For example, you can ensure that only users who used a valid IdM two-factor authentication token with their password when obtaining a Kerberos ticket-granting ticket (TGT) will be able to access that host or service.
Follow this procedure to configure a service to require particular Kerberos authentication indicators from incoming service ticket requests.
Prerequisites
- You have created an IdM service entry for a service that runs on an IdM host. See Creating an IdM service entry and its Kerberos keytab.
- You have obtained the ticket-granting ticket of an administrative user in IdM.
Do not assign authentication indicators to internal IdM services. The following IdM services cannot perform the interactive authentication steps required by PKINIT and multi-factor authentication methods:
host/server.example.com@EXAMPLE.COM
HTTP/server.example.com@EXAMPLE.COM
ldap/server.example.com@EXAMPLE.COM
DNS/server.example.com@EXAMPLE.COM
cifs/server.example.com@EXAMPLE.COMProcedure
Use the
ipa service-modcommand to specify one or more required authentication indicators for a service, identified with the--auth-indargument.Expand Authentication method --auth-indvalueTwo-factor authentication
otpRADIUS authentication
radiusPKINIT, smart card, or certificate authentication
pkinitHardened passwords (SPAKE or FAST)
hardenedFor example, to require that a user was authenticated with smart card or OTP authentication to retrieve a service ticket for the
testserviceprincipal on hostclient.example.com:[root@server ~]# ipa service-mod testservice/client.example.com@EXAMPLE.COM --auth-ind otp --auth-ind pkinit ------------------------------------------------------------- Modified service "testservice/client.example.com@EXAMPLE.COM" ------------------------------------------------------------- Principal name: testservice/client.example.com@EXAMPLE.COM Principal alias: testservice/client.example.com@EXAMPLE.COM Authentication Indicators: otp, pkinit Managed by: client.example.comTo remove all authentication indicators from a service, provide an empty list of indicators:
[root@server ~]# ipa service-mod testservice/client.example.com@EXAMPLE.COM --auth-ind '' ------------------------------------------------------ Modified service "testservice/client.example.com@EXAMPLE.COM" ------------------------------------------------------ Principal name: testservice/client.example.com@EXAMPLE.COM Principal alias: testservice/client.example.com@EXAMPLE.COM Managed by: client.example.com
Verification
Display information about an IdM service, including the authentication indicators it requires, with the
ipa service-showcommand.[root@server ~]# ipa service-show testservice/client.example.com Principal name: testservice/client.example.com@EXAMPLE.COM Principal alias: testservice/client.example.com@EXAMPLE.COM Authentication Indicators: otp, pkinit Keytab: True Managed by: client.example.com
52.4.3. Associating authentication indicators with an IdM service using IdM Web UI
As an Identity Management (IdM) administrator, you can configure a host or a service to require a service ticket presented by the client application to contain a specific authentication indicator. For example, you can ensure that only users who used a valid IdM two-factor authentication token with their password when obtaining a Kerberos ticket-granting ticket (TGT) will be able to access that host or service.
Follow this procedure to use the IdM Web UI to configure a host or service to require particular Kerberos authentication indicators from incoming ticket requests.
Prerequisites
- You have logged in to the IdM Web UI as an administrative user.
Procedure
- Select → or → .
- Click the name of the required host or service.
Under
Authentication indicators, select the required authentication method.-
For example, selecting
OTPensures that only users who used a valid IdM two-factor authentication token with their password when obtaining a Kerberos TGT will be able to access the host or service. -
If you select both
OTPandRADIUS, then both users that used a valid IdM two-factor authentication token with their password when obtaining a Kerberos TGT and users that used the RADIUS server for obtaining their Kerberos TGT will be allowed access.
-
For example, selecting
- Click at the top of the page.
52.4.4. Retrieving a Kerberos service ticket for an IdM service
The following procedure describes retrieving a Kerberos service ticket for an IdM service. You can use this procedure to test Kerberos ticket policies, such as enforcing that certain Kerberos authentication indicators are present in a ticket-granting ticket (TGT).
Prerequisites
- If the service you are working with is not an internal IdM service, you have created a corresponding IdM service entry for it. See Creating an IdM service entry and its Kerberos keytab.
- You have a Kerberos ticket-granting ticket (TGT).
Procedure
Use the
kvnocommand with the-Soption to retrieve a service ticket, and specify the name of the IdM service and the fully-qualified domain name of the host that manages it.[root@server ~]# kvno -S testservice client.example.com testservice/client.example.com@EXAMPLE.COM: kvno = 1
If you need to access an IdM service and your current ticket-granting ticket (TGT) does not possess the required Kerberos authentication indicators associated with it, clear your current Kerberos credentials cache with the kdestroy command and retrieve a new TGT:
[root@server ~]# kdestroy
For example, if you initially retrieved a TGT by authenticating with a password, and you need to access an IdM service that has the pkinit authentication indicator associated with it, destroy your current credentials cache and re-authenticate with a smart card. See Kerberos authentication indicators.
Verification
Use the
klistcommand to verify that the service ticket is in the default Kerberos credentials cache.[root@server etc]# klist_ Ticket cache: KCM:1000 Default principal: admin@EXAMPLE.COM Valid starting Expires Service principal 04/01/2020 12:52:42 04/02/2020 12:52:39 krbtgt/EXAMPLE.COM@EXAMPLE.COM 04/01/2020 12:54:07 04/02/2020 12:52:39 testservice/client.example.com@EXAMPLE.COM
52.5. Configuring the global ticket lifecycle policy
The global ticket policy applies to all service tickets and to users that do not have any per-user ticket policies defined.
The following procedure describes adjusting the maximum ticket lifetime and maximum ticket renewal age for the global Kerberos ticket policy using the ipa krbtpolicy-mod command.
While using the ipa krbtpolicy-mod command, specify at least one of the following arguments:
-
--maxlifefor the maximum ticket lifetime in seconds -
--maxrenewfor the maximum renewable age in seconds
Procedure
To modify the global ticket policy:
[root@server ~]# ipa krbtpolicy-mod --maxlife=$((8*60*60)) --maxrenew=$((24*60*60)) Max life: 28800 Max renew: 86400In this example, the maximum lifetime is set to eight hours (8 * 60 minutes * 60 seconds) and the maximum renewal age is set to one day (24 * 60 minutes * 60 seconds).
Optional: To reset the global Kerberos ticket policy to the default installation values:
[root@server ~]# ipa krbtpolicy-reset Max life: 86400 Max renew: 604800
Verification
Display the global ticket policy:
[root@server ~]# ipa krbtpolicy-show Max life: 28800 Max renew: 86640
52.6. Configuring global ticket policies per authentication indicator
Follow this procedure to adjust the global maximum ticket lifetime and maximum renewable age for each authentication indicator. These settings apply to users that do not have per-user ticket policies defined.
Use the ipa krbtpolicy-mod command to specify the global maximum lifetime or maximum renewable age for Kerberos tickets depending on the authentication indicators attached to them.
Procedure
For example, to set the global two-factor ticket lifetime and renewal age values to one week, and the global smart card ticket lifetime and renewal age values to two weeks:
[root@server ~]# ipa krbtpolicy-mod --otp-maxlife=604800 --otp-maxrenew=604800 --pkinit-maxlife=172800 --pkinit-maxrenew=172800
Verification
Display the global ticket policy:
[root@server ~]# ipa krbtpolicy-show Max life: 86400 OTP max life: 604800 PKINIT max life: 172800 Max renew: 604800 OTP max renew: 604800 PKINIT max renew: 172800Notice that the OTP and PKINIT values are different from the global default
Max lifeandMax renewvalues.
52.7. Configuring the default ticket policy for a user
You can define a unique Kerberos ticket policy that only applies to a single user. These per-user settings override the global ticket policy, for all authentication indicators.
Use the ipa krbtpolicy-mod username command, and specify at least one of the following arguments:
-
--maxlifefor the maximum ticket lifetime in seconds -
--maxrenewfor the maximum renewable age in seconds
Procedure
For example, to set the IdM
adminuser’s maximum ticket lifetime to two days and maximum renewal age to two weeks:[root@server ~]# ipa krbtpolicy-mod admin --maxlife=172800 --maxrenew=1209600 Max life: 172800 Max renew: 1209600Optional: To reset the ticket policy for a user:
[root@server ~]# ipa krbtpolicy-reset admin
Verification
Display the effective Kerberos ticket policy that applies to a user:
[root@server ~]# ipa krbtpolicy-show admin Max life: 172800 Max renew: 1209600
52.8. Configuring individual authentication indicator ticket policies for a user
As an administrator, you can define Kerberos ticket policies for a user that differ per authentication indicator. For example, you can configure a policy to allow the IdM admin user to renew a ticket for two days if it was obtained with OTP authentication, and a week if it was obtained with smart card authentication.
These per-authentication indicator settings will override the user’s default ticket policy, the global default ticket policy, and any global authentication indicator ticket policy.
Use the ipa krbtpolicy-mod username command to set custom maximum lifetime and maximum renewable age values for a user’s Kerberos tickets depending on the authentication indicators attached to them.
Procedure
For example, to allow the IdM
adminuser to renew a Kerberos ticket for two days if it was obtained with One-Time Password authentication, set the--otp-maxrenewoption:[root@server ~]# ipa krbtpolicy-mod admin --otp-maxrenew=$((2*24*60*60)) OTP max renew: 172800Optional: To reset the ticket policy for a user:
[root@server ~]# ipa krbtpolicy-reset username
Verification
Display the effective Kerberos ticket policy that applies to a user:
[root@server ~]# ipa krbtpolicy-show admin Max life: 28800 Max renew: 86640
52.9. Authentication indicator options for the krbtpolicy-mod command
Specify values for authentication indicators with the following arguments.
| Authentication indicator | Argument for maximum lifetime | Argument for maximum renewal age |
|---|---|---|
|
|
|
|
|
|
|
|
|
|
|
|
|
|
|
|
Chapter 53. Kerberos PKINIT authentication in IdM
Public Key Cryptography for Initial Authentication in Kerberos (PKINIT) is a preauthentication mechanism for Kerberos. The Identity Management (IdM) server includes a mechanism for Kerberos PKINIT authentication.
53.1. Default PKINIT configuration
The default PKINIT configuration on your IdM servers depends on the certificate authority (CA) configuration.
| CA configuration | PKINIT configuration |
|---|---|
| Without a CA, no external PKINIT certificate provided | Local PKINIT: IdM only uses PKINIT for internal purposes on servers. |
| Without a CA, external PKINIT certificate provided to IdM | IdM configures PKINIT by using the external Kerberos key distribution center (KDC) certificate and CA certificate. |
| With an Integrated CA | IdM configures PKINIT by using the certificate signed by the IdM CA. |
53.2. Displaying the current PKINIT configuration
IdM provides multiple commands you can use to query the PKINIT configuration in your domain.
Procedure
To determine the PKINIT status in your domain, use the
ipa pkinit-statuscommand:$ ipa pkinit-status Server name: server1.example.com PKINIT status: enabled [...output truncated...] Server name: server2.example.com PKINIT status: disabled [...output truncated...]The command displays the PKINIT configuration status as
enabledordisabled:-
enabled: PKINIT is configured using a certificate signed by the integrated IdM CA or an external PKINIT certificate. -
disabled: IdM only uses PKINIT for internal purposes on IdM servers.
-
To list the IdM servers with active Kerberos key distribution centers (KDCs) that support PKINIT for IdM clients, use the
ipa config-showcommand on any server:$ ipa config-show Maximum username length: 32 Home directory base: /home Default shell: /bin/sh Default users group: ipausers [...output truncated...] IPA masters capable of PKINIT: server1.example.com [...output truncated...]
53.3. Configuring PKINIT in IdM
If your IdM servers are running with PKINIT disabled, use these steps to enable it. For example, a server is running with PKINIT disabled if you passed the --no-pkinit option with the ipa-server-install or ipa-replica-install utilities.
Prerequisites
- Ensure that all IdM servers with a certificate authority (CA) installed are running on the same domain level.
Procedure
Check if PKINIT is enabled on the server:
# kinit admin Password for admin@IDM.EXAMPLE.COM: # ipa pkinit-status --server=server.idm.example.com 1 server matched ---------------- Server name: server.idm.example.com PKINIT status:enabled ---------------------------- Number of entries returned 1 ----------------------------If PKINIT is disabled, you will see the following output:
# ipa pkinit-status --server server.idm.example.com ----------------- 0 servers matched ----------------- ---------------------------- Number of entries returned 0 ----------------------------You can also use the command to find all the servers where PKINIT is enabled if you omit the
--server <server_fqdn>parameter.If you are using IdM without CA:
On the IdM server, install the CA certificate that signed the Kerberos key distribution center (KDC) certificate:
# ipa-cacert-manage install -t CT,C,C ca.pemTo update all IPA hosts, repeat the
ipa-certupdatecommand on all replicas and clients:# ipa-certupdateCheck if the CA certificate has already been added using the
ipa-cacert-manage listcommand. For example:# ipa-cacert-manage list CN=CA,O=Example Organization The ipa-cacert-manage command was successfulUse the
ipa-server-certinstallutility to install an external KDC certificate. The KDC certificate must meet the following conditions:-
It is issued with the common name
CN=fully_qualified_domain_name,certificate_subject_base. -
It includes the Kerberos principal
krbtgt/REALM_NAME@REALM_NAME. It contains the Object Identifier (OID) for KDC authentication:
1.3.6.1.5.2.3.5.# ipa-server-certinstall --kdc kdc.pem kdc.key # systemctl restart krb5kdc.service
-
It is issued with the common name
See your PKINIT status:
# ipa pkinit-status Server name: server1.example.com PKINIT status: enabled [...output truncated...] Server name: server2.example.com PKINIT status: disabled [...output truncated...]
If you are using IdM with a CA certificate, enable PKINIT as follows:
# ipa-pkinit-manage enable Configuring Kerberos KDC (krb5kdc) [1/1]: installing X509 Certificate for PKINIT Done configuring Kerberos KDC (krb5kdc). The ipa-pkinit-manage command was successfulIf you are using an IdM CA, the command requests a PKINIT KDC certificate from the CA.
Chapter 54. Maintaining IdM Kerberos keytab files
Learn more about what Kerberos keytab files are and how Identity Management (IdM) uses them to allow services to authenticate securely with Kerberos.
You can use this information to understand why you should protect these sensitive files, and to troubleshoot communication issues between IdM services.
54.1. How Identity Management uses Kerberos keytab files
A Kerberos keytab is a file containing Kerberos principals and their corresponding encryption keys. Hosts, services, users, and scripts can use keytabs to authenticate to the Kerberos Key Distribution Center (KDC) securely, without requiring human interaction.
Every IdM service on an IdM server has a unique Kerberos principal stored in the Kerberos database. For example, if IdM servers east.idm.example.com and west.idm.example.com provide DNS services, IdM creates 2 unique DNS Kerberos principals to identify these services, which follow the naming convention <service>/host.domain.com@REALM.COM:
-
DNS/east.idm.example.com@IDM.EXAMPLE.COM -
DNS/west.idm.example.com@IDM.EXAMPLE.COM
IdM creates a keytab on the server for each of these services to store a local copy of the Kerberos keys, along with their Key Version Numbers (KVNO). For example, the default keytab file /etc/krb5.keytab stores the host principal, which represents that machine in the Kerberos realm and is used for login authentication. The KDC generates encryption keys for the different encryption algorithms it supports, such as aes256-cts-hmac-sha1-96 and aes128-cts-hmac-sha1-96.
You can display the contents of a keytab file with the klist command:
[root@idmserver ~]# klist -ekt /etc/krb5.keytab
Keytab name: FILE:/etc/krb5.keytab
KVNO Timestamp Principal
---- ------------------- ------------------------------------------------------
2 02/24/2022 20:28:09 host/idmserver.idm.example.com@IDM.EXAMPLE.COM (aes256-cts-hmac-sha1-96)
2 02/24/2022 20:28:09 host/idmserver.idm.example.com@IDM.EXAMPLE.COM (aes128-cts-hmac-sha1-96)
2 02/24/2022 20:28:09 host/idmserver.idm.example.com@IDM.EXAMPLE.COM (camellia128-cts-cmac)
2 02/24/2022 20:28:09 host/idmserver.idm.example.com@IDM.EXAMPLE.COM (camellia256-cts-cmac)54.2. Verifying that Kerberos keytab files are in sync with the IdM database
When you change a Kerberos password, IdM automatically generates a new corresponding Kerberos key and increments its Key Version Number (KVNO). If a Kerberos keytab is not updated with the new key and KVNO, any services that depend on that keytab to retrieve a valid key might not be able to authenticate to the Kerberos Key Distribution Center (KDC).
If one of your IdM services cannot communicate with another service, use the following procedure to verify that your Kerberos keytab files are in sync with the keys stored in the IdM database. If they are out of sync, retrieve a Kerberos keytab with an updated key and KVNO. This example compares and retrieves an updated DNS principal for an IdM server.
Prerequisites
- You must authenticate as the IdM admin account to retrieve keytab files
-
You must authenticate as the
rootaccount to modify keytab files owned by other users
Procedure
Display the KVNO of the principals in the keytab you are verifying. In the following example, the
/etc/named.keytabfile has the key for theDNS/server1.idm.example.com@EXAMPLE.COMprincipal with a KVNO of 2.[root@server1 ~]# klist -ekt /etc/named.keytab Keytab name: FILE:/etc/named.keytab KVNO Timestamp Principal ---- ------------------- ------------------------------------------------------ 2 11/26/2021 13:51:11 DNS/server1.idm.example.com@EXAMPLE.COM (aes256-cts-hmac-sha1-96) 2 11/26/2021 13:51:11 DNS/server1.idm.example.com@EXAMPLE.COM (aes128-cts-hmac-sha1-96) 2 11/26/2021 13:51:11 DNS/server1.idm.example.com@EXAMPLE.COM (camellia128-cts-cmac) 2 11/26/2021 13:51:11 DNS/server1.idm.example.com@EXAMPLE.COM (camellia256-cts-cmac)Display the KVNO of the principal stored in the IdM database. In this example, the KVNO of the key in the IdM database does not match the KVNO in the keytab.
[root@server1 ~]# kvno DNS/server1.idm.example.com@EXAMPLE.COM DNS/server1.idm.example.com@EXAMPLE.COM: kvno = 3Authenticate as the IdM admin account.
[root@server1 ~]# kinit admin Password for admin@IDM.EXAMPLE.COM:Retrieve an updated Kerberos key for the principal and store it in its keytab. Perform this step as the
rootuser so you can modify the/etc/named.keytabfile, which is owned by thenameduser.[root@server1 ~]# ipa-getkeytab -s server1.idm.example.com -p DNS/server1.idm.example.com -k /etc/named.keytab
Verification
Display the updated KVNO of the principal in the keytab.
[root@server1 ~]# klist -ekt /etc/named.keytab Keytab name: FILE:/etc/named.keytab KVNO Timestamp Principal ---- ------------------- ------------------------------------------------------ 4 08/17/2022 14:42:11 DNS/server1.idm.example.com@EXAMPLE.COM (aes256-cts-hmac-sha1-96) 4 08/17/2022 14:42:11 DNS/server1.idm.example.com@EXAMPLE.COM (aes128-cts-hmac-sha1-96) 4 08/17/2022 14:42:11 DNS/server1.idm.example.com@EXAMPLE.COM (camellia128-cts-cmac) 4 08/17/2022 14:42:11 DNS/server1.idm.example.com@EXAMPLE.COM (camellia256-cts-cmac)Display the KVNO of the principal stored in the IdM database and ensure it matches the KVNO from the keytab.
[root@server1 ~]# kvno DNS/server1.idm.example.com@EXAMPLE.COM DNS/server1.idm.example.com@EXAMPLE.COM: kvno = 4
54.3. List of IdM Kerberos keytab files and their contents
The following table displays the location, contents, and purpose of the IdM Kerberos keytab files.
| Keytab location | Contents | Purpose |
|---|---|---|
|
|
|
Verifying user credentials when logging in, used by NFS if there is no |
|
|
| Authenticating users to the IdM database, securely replicating database contents between IdM replicas |
|
|
| Authenticating to the Apache server |
|
|
| Securely updating DNS records |
|
|
| Keeping OpenDNSSEC synchronized with LDAP |
|
|
| Communicating with the Certificate Authority (CA) |
|
|
| Communicating with the Samba service |
|
|
Active Directory (AD) domain controller (DCs) principals in the form | Communicating with AD DCs through an IdM-AD Trust |
54.4. Viewing the encryption type of your IdM master key
As an Identity Management (IdM) administrator, you can view the encryption type of your IdM master key, which is the key that the IdM Kerberos Distribution Center (KDC) uses to encrypt all other principals when storing them at rest. Knowing the encryption type helps you determine your deployment’s compatibility with FIPS standards.
As of RHEL 8.7, the encryption type is aes256-cts-hmac-sha384-192. This encryption type is compatible with the default RHEL 9 FIPS cryptographic policy aiming to comply with FIPS 140-3.
The encryption types used on previous RHEL versions are not compatible with RHEL 9 systems that adhere to FIPS 140-3 standards. To make RHEL 9 systems compatible with a RHEL 8 FIPS 140-2 deployment, see the AD Domain Users unable to login in to the FIPS-compliant environment KCS solution.
Prerequisites
-
You have
rootaccess to any of the RHEL 8 replicas in the IdM deployment.
Procedure
On the replica, view the encryption type on the command line:
# kadmin.local getprinc K/M | grep -E '^Key:' Key: vno 1, aes256-cts-hmac-sha1-96The
aes256-cts-hmac-sha1-96key in the output indicates that the IdM deployment was installed on a server that was running RHEL 8.6 or earlier. The presence of aaes256-cts-hmac-sha384-192key in the output would indicate that the IdM deployment was installed on a server that was running RHEL 8.7 or later.
Chapter 55. Using the KDC Proxy in IdM
Some administrators might choose to make the default Kerberos ports inaccessible in their deployment. To allow users, hosts, and services to obtain Kerberos credentials, you can use the HTTPS service as a proxy that communicates with Kerberos via the HTTPS port 443.
In Identity Management (IdM), the Kerberos Key Distribution Center Proxy (KKDCP) provides this functionality.
On an IdM server, KKDCP is enabled by default and available at https://server.idm.example.com/KdcProxy. On an IdM client, you must change its Kerberos configuration to access the KKDCP.
55.1. Configuring an IdM client to use KKDCP
As an Identity Management (IdM) system administrator, you can configure an IdM client to use the Kerberos Key Distribution Center Proxy (KKDCP) on an IdM server. This is useful if the default Kerberos ports are not accessible on the IdM server and the HTTPS port 443 is the only way of accessing the Kerberos service.
Prerequisites
-
You have
rootaccess to the IdM client.
Procedure
-
Open the
/etc/krb5.conffile for editing. In the
[realms]section, enter the URL of the KKDCP for thekdc,admin_server, andkpasswd_serveroptions:[realms] EXAMPLE.COM = { kdc = https://kdc.example.com/KdcProxy admin_server = https://kdc.example.com/KdcProxy kpasswd_server = https://kdc.example.com/KdcProxy default_domain = example.com }For redundancy, you can add the parameters
kdc,admin_server, andkpasswd_servermultiple times to indicate different KKDCP servers.Restart the
sssdservice to make the changes take effect:~]# systemctl restart sssd
55.2. Verifying that KKDCP is enabled on an IdM server
On an Identity Management (IdM) server, the Kerberos Key Distribution Center Proxy (KKDCP) is automatically enabled each time the Apache web server starts if the attribute and value pair ipaConfigString=kdcProxyEnabled exists in the directory. In this situation, the symbolic link /etc/httpd/conf.d/ipa-kdc-proxy.conf is created.
You can verify if the KKDCP is enabled on the IdM server, even as an unprivileged user.
Procedure
- Check that the symbolic link exists:
$ ls -l /etc/httpd/conf.d/ipa-kdc-proxy.conf
lrwxrwxrwx. 1 root root 36 Jun 21 2020 /etc/httpd/conf.d/ipa-kdc-proxy.conf -> /etc/ipa/kdcproxy/ipa-kdc-proxy.confThe output confirms that KKDCP is enabled.
55.3. Disabling KKDCP on an IdM server
As an Identity Management (IdM) system administrator, you can disable the Kerberos Key Distribution Center Proxy (KKDCP) on an IdM server.
Prerequisites
-
You have
rootaccess to the IdM server.
Procedure
Remove the
ipaConfigString=kdcProxyEnabledattribute and value pair from the directory:# ipa-ldap-updater /usr/share/ipa/kdcproxy-disable.uldif Update complete The ipa-ldap-updater command was successfulRestart the
httpdservice:# systemctl restart httpd.service
KKDCP is now disabled on the current IdM server.
Verification
Verify that the symbolic link does not exist:
$ ls -l /etc/httpd/conf.d/ipa-kdc-proxy.conf ls: cannot access '/etc/httpd/conf.d/ipa-kdc-proxy.conf': No such file or directory
55.4. Re-enabling KKDCP on an IdM server
On an IdM server, the Kerberos Key Distribution Center Proxy (KKDCP) is enabled by default and available at https://server.idm.example.com/KdcProxy.
If KKDCP has been disabled on a server, you can re-enable it.
Prerequisites
-
You have
rootaccess to the IdM server.
Procedure
Add the
ipaConfigString=kdcProxyEnabledattribute and value pair to the directory:# ipa-ldap-updater /usr/share/ipa/kdcproxy-enable.uldif Update complete The ipa-ldap-updater command was successfulRestart the
httpdservice:# systemctl restart httpd.service
KKDCP is now enabled on the current IdM server.
Verification
Verify that the symbolic link exists:
$ ls -l /etc/httpd/conf.d/ipa-kdc-proxy.conf lrwxrwxrwx. 1 root root 36 Jun 21 2020 /etc/httpd/conf.d/ipa-kdc-proxy.conf -> /etc/ipa/kdcproxy/ipa-kdc-proxy.conf
55.5. Configuring the KKDCP server I
With the following configuration, you can enable TCP to be used as the transport protocol between the IdM KKDCP and the Active Directory (AD) realm, where multiple Kerberos servers are used.
Prerequisites
-
You have
rootaccess.
Procedure
Set the
use_dnsparameter in the[global]section of the/etc/ipa/kdcproxy/kdcproxy.conffile to false.[global] use_dns = falsePut the proxied realm information into the
/etc/ipa/kdcproxy/kdcproxy.conffile. For example, for the [AD.EXAMPLE.COM] realm with proxy list the realm configuration parameters as follows:[AD.EXAMPLE.COM] kerberos = kerberos+tcp://1.2.3.4:88 kerberos+tcp://5.6.7.8:88 kpasswd = kpasswd+tcp://1.2.3.4:464 kpasswd+tcp://5.6.7.8:464ImportantThe realm configuration parameters must list multiple servers separated by a space, as opposed to
/etc/krb5.confandkdc.conf, in which certain options may be specified multiple times.Restart Identity Management (IdM) services:
# ipactl restart
55.6. Configuring the KKDCP server II
The following server configuration relies on the DNS service records to find Active Directory (AD) servers to communicate with.
Prerequisites
-
You have
rootaccess.
Procedure
In the
/etc/ipa/kdcproxy/kdcproxy.conffile, the[global]section, set theuse_dnsparameter to true.[global] configs = mit use_dns = trueThe
configsparameter allows you to load other configuration modules. In this case, the configuration is read from the MITlibkrb5library.Optional: In case you do not want to use DNS service records, add explicit AD servers to the
[realms]section of the/etc/krb5.conffile. If the realm with proxy is, for example, AD.EXAMPLE.COM, you add:[realms] AD.EXAMPLE.COM = { kdc = ad-server.ad.example.com kpasswd_server = ad-server.ad.example.com }Restart Identity Management (IdM) services:
# ipactl restart
Chapter 56. Granting sudo access to an IdM user on an IdM client
Learn more about granting sudo access to users in Identity Management.
56.1. Sudo access on an IdM client
System administrators can grant sudo access to allow non-root users to execute administrative commands that are normally reserved for the root user. Consequently, when users need to perform an administrative command normally reserved for the root user, they precede that command with sudo. After entering their password, the command is executed as if they were the root user. To execute a sudo command as another user or group, such as a database service account, you can configure a RunAs alias for a sudo rule.
If a Red Hat Enterprise Linux (RHEL) 8 host is enrolled as an Identity Management (IdM) client, you can specify sudo rules defining which IdM users can perform which commands on the host in the following ways:
-
Locally in the
/etc/sudoersfile - Centrally in IdM
You can create a central sudo rule for an IdM client using the command line (CLI) and the IdM Web UI.
In RHEL 8.4 and later, you can also configure password-less authentication for sudo using the Generic Security Service Application Programming Interface (GSSAPI), the native way for UNIX-based operating systems to access and authenticate Kerberos services. You can use the pam_sss_gss.so Pluggable Authentication Module (PAM) to invoke GSSAPI authentication via the SSSD service, allowing users to authenticate to the sudo command with a valid Kerberos ticket.
56.2. Granting sudo access to an IdM user on an IdM client using the CLI
In Identity Management (IdM), you can grant sudo access for a specific command to an IdM user account on a specific IdM host. First, add a sudo command and then create a sudo rule for one or more commands.
For example, complete this procedure to create the idm_user_reboot sudo rule to grant the idm_user account the permission to run the /usr/sbin/reboot command on the idmclient machine.
Prerequisites
- You are logged in as IdM administrator.
- You have created a user account for idm_user in IdM and unlocked the account by creating a password for the user. For details on adding a new IdM user using the CLI, see Adding users using the command line.
-
No local idm_user account is present on the idmclient host. The idm_user user is not listed in the local
/etc/passwdfile.
Procedure
Retrieve a Kerberos ticket as the IdM
admin.[root@idmclient ~]# kinit adminAdd the
/usr/sbin/rebootcommand to the IdM database ofsudocommands:[root@idmclient ~]# ipa sudocmd-add /usr/sbin/reboot ------------------------------------- Added Sudo Command "/usr/sbin/reboot" ------------------------------------- Sudo Command: /usr/sbin/rebootCreate a
sudorule named idm_user_reboot:[root@idmclient ~]# ipa sudorule-add idm_user_reboot --------------------------------- Added Sudo Rule "idm_user_reboot" --------------------------------- Rule name: idm_user_reboot Enabled: TRUEAdd the
/usr/sbin/rebootcommand to the idm_user_reboot rule:[root@idmclient ~]# ipa sudorule-add-allow-command idm_user_reboot --sudocmds '/usr/sbin/reboot' Rule name: idm_user_reboot Enabled: TRUE Sudo Allow Commands: /usr/sbin/reboot ------------------------- Number of members added 1 -------------------------Apply the idm_user_reboot rule to the IdM idmclient host:
[root@idmclient ~]# ipa sudorule-add-host idm_user_reboot --hosts idmclient.idm.example.com Rule name: idm_user_reboot Enabled: TRUE Hosts: idmclient.idm.example.com Sudo Allow Commands: /usr/sbin/reboot ------------------------- Number of members added 1 -------------------------Add the idm_user account to the idm_user_reboot rule:
[root@idmclient ~]# ipa sudorule-add-user idm_user_reboot --users idm_user Rule name: idm_user_reboot Enabled: TRUE Users: idm_user Hosts: idmclient.idm.example.com Sudo Allow Commands: /usr/sbin/reboot ------------------------- Number of members added 1 -------------------------Optional: Define the validity of the idm_user_reboot rule:
To define the time at which a
sudorule starts to be valid, use theipa sudorule-mod sudo_rule_namecommand with the--setattr sudonotbefore=DATEoption. The DATE value must follow the yyyymmddHHMMSSZ format, with seconds specified explicitly. For example, to set the start of the validity of the idm_user_reboot rule to 31 December 2025 12:34:00, enter:[root@idmclient ~]# ipa sudorule-mod idm_user_reboot --setattr sudonotbefore=20251231123400ZTo define the time at which a sudo rule stops being valid, use the
--setattr sudonotafter=DATEoption. For example, to set the end of the idm_user_reboot rule validity to 31 December 2026 12:34:00, enter:[root@idmclient ~]# ipa sudorule-mod idm_user_reboot --setattr sudonotafter=20261231123400Z
Propagating the changes from the server to the client can take a few minutes.
Verification
- Log in to the idmclient host as the idm_user account.
Display which
sudorules the idm_user account is allowed to perform.[idm_user@idmclient ~]$ sudo -l Matching Defaults entries for idm_user on idmclient: !visiblepw, always_set_home, match_group_by_gid, always_query_group_plugin, env_reset, env_keep="COLORS DISPLAY HOSTNAME HISTSIZE KDEDIR LS_COLORS", env_keep+="MAIL PS1 PS2 QTDIR USERNAME LANG LC_ADDRESS LC_CTYPE", env_keep+="LC_COLLATE LC_IDENTIFICATION LC_MEASUREMENT LC_MESSAGES", env_keep+="LC_MONETARY LC_NAME LC_NUMERIC LC_PAPER LC_TELEPHONE", env_keep+="LC_TIME LC_ALL LANGUAGE LINGUAS _XKB_CHARSET XAUTHORITY KRB5CCNAME", secure_path=/sbin\:/bin\:/usr/sbin\:/usr/bin User idm_user may run the following commands on idmclient: (root) /usr/sbin/rebootReboot the machine using
sudo. Enter the password for idm_user when prompted:[idm_user@idmclient ~]$ sudo /usr/sbin/reboot [sudo] password for idm_user:
56.3. Granting sudo access to an AD user on an IdM client using the CLI
Identity Management (IdM) system administrators can use IdM user groups to set access permissions, host-based access control, sudo rules, and other controls on IdM users. IdM user groups grant and restrict access to IdM domain resources.
You can add both Active Directory (AD) users and AD groups to IdM user groups. To do that:
- Add the AD users or groups to a non-POSIX external IdM group.
- Add the non-POSIX external IdM group to an IdM POSIX group.
You can then manage the privileges of the AD users by managing the privileges of the POSIX group. For example, you can grant sudo access for a specific command to an IdM POSIX user group on a specific IdM host.
It is also possible to add AD user groups as members to IdM external groups. This might make it easier to define policies for Windows users, by keeping the user and group management within the single AD realm.
Do not use ID overrides of AD users for SUDO rules in IdM. ID overrides of AD users represent only POSIX attributes of AD users, not AD users themselves.
You can add ID overrides as group members. However, you can only use this functionality to manage IdM resources in the IdM API. The possibility to add ID overrides as group members is not extended to POSIX environments and you therefore cannot use it for membership in sudo or host-based access control (HBAC) rules.
Follow this procedure to create the ad_users_reboot sudo rule to grant the administrator@ad-domain.com AD user the permission to run the /usr/sbin/reboot command on the idmclient IdM host, which is normally reserved for the root user. administrator@ad-domain.com is a member of the ad_users_external non-POSIX group, which is, in turn, a member of the ad_users POSIX group.
Prerequisites
-
You have obtained the IdM
adminKerberos ticket-granting ticket (TGT). - A cross-forest trust exists between the IdM domain and the ad-domain.com AD domain.
-
No local administrator account is present on the idmclient host: the administrator user is not listed in the local
/etc/passwdfile.
Procedure
Create the ad_users group that contains the ad_users_external group with the administrator@ad-domain member:
- Optional: Create or select a corresponding group in the AD domain to use to manage AD users in the IdM realm. You can use multiple AD groups and add them to different groups on the IdM side.
Create the ad_users_external group and indicate that it contains members from outside the IdM domain by adding the
--externaloption:[root@ipaserver ~]# ipa group-add --desc='AD users external map' ad_users_external --external ------------------------------- Added group "ad_users_external" ------------------------------- Group name: ad_users_external Description: AD users external mapNoteEnsure that the external group that you specify here is an AD security group with a
globaloruniversalgroup scope as defined in the Active Directory security groups document. For example, the Domain users or Domain admins AD security groups cannot be used because their group scope isdomain local.Create the ad_users group:
[root@ipaserver ~]# ipa group-add --desc='AD users' ad_users ---------------------- Added group "ad_users" ---------------------- Group name: ad_users Description: AD users GID: 129600004Add the administrator@ad-domain.com AD user to ad_users_external as an external member:
[root@ipaserver ~]# ipa group-add-member ad_users_external --external "administrator@ad-domain.com" [member user]: [member group]: Group name: ad_users_external Description: AD users external map External member: S-1-5-21-3655990580-1375374850-1633065477-513 ------------------------- Number of members added 1 -------------------------The AD user must be identified by a fully-qualified name, such as
DOMAIN\user_nameoruser_name@DOMAIN. The AD identity is then mapped to the AD SID for the user. The same applies to adding AD groups.Add ad_users_external to ad_users as a member:
[root@ipaserver ~]# ipa group-add-member ad_users --groups ad_users_external Group name: ad_users Description: AD users GID: 129600004 Member groups: ad_users_external ------------------------- Number of members added 1 -------------------------
Grant the members of ad_users the permission to run
/usr/sbin/rebooton the idmclient host:Add the
/usr/sbin/rebootcommand to the IdM database ofsudocommands:[root@idmclient ~]# ipa sudocmd-add /usr/sbin/reboot ------------------------------------- Added Sudo Command "/usr/sbin/reboot" ------------------------------------- Sudo Command: /usr/sbin/rebootCreate a
sudorule named ad_users_reboot:[root@idmclient ~]# ipa sudorule-add ad_users_reboot --------------------------------- Added Sudo Rule "ad_users_reboot" --------------------------------- Rule name: ad_users_reboot Enabled: TrueAdd the
/usr/sbin/rebootcommand to the ad_users_reboot rule:[root@idmclient ~]# ipa sudorule-add-allow-command ad_users_reboot --sudocmds '/usr/sbin/reboot' Rule name: ad_users_reboot Enabled: True Sudo Allow Commands: /usr/sbin/reboot ------------------------- Number of members added 1 -------------------------Apply the ad_users_reboot rule to the IdM idmclient host:
[root@idmclient ~]# ipa sudorule-add-host ad_users_reboot --hosts idmclient.idm.example.com Rule name: ad_users_reboot Enabled: True Hosts: idmclient.idm.example.com Sudo Allow Commands: /usr/sbin/reboot ------------------------- Number of members added 1 -------------------------Add the
ad_usersgroup to the ad_users_reboot rule:[root@idmclient ~]# ipa sudorule-add-user ad_users_reboot --groups ad_users Rule name: ad_users_reboot Enabled: TRUE User Groups: ad_users Hosts: idmclient.idm.example.com Sudo Allow Commands: /usr/sbin/reboot ------------------------- Number of members added 1 -------------------------
Propagating the changes from the server to the client can take a few minutes.
Verification
Log in to the idmclient host as administrator@ad-domain.com, an indirect member of the
ad_usersgroup:$ ssh administrator@ad-domain.com@ipaclient Password:Optional: Display the
sudocommands thatadministrator@ad-domain.comis allowed to execute:[administrator@ad-domain.com@idmclient ~]$ sudo -l Matching Defaults entries for administrator@ad-domain.com on idmclient: !visiblepw, always_set_home, match_group_by_gid, always_query_group_plugin, env_reset, env_keep="COLORS DISPLAY HOSTNAME HISTSIZE KDEDIR LS_COLORS", env_keep+="MAIL PS1 PS2 QTDIR USERNAME LANG LC_ADDRESS LC_CTYPE", env_keep+="LC_COLLATE LC_IDENTIFICATION LC_MEASUREMENT LC_MESSAGES", env_keep+="LC_MONETARY LC_NAME LC_NUMERIC LC_PAPER LC_TELEPHONE", env_keep+="LC_TIME LC_ALL LANGUAGE LINGUAS _XKB_CHARSET XAUTHORITY KRB5CCNAME", secure_path=/sbin\:/bin\:/usr/sbin\:/usr/bin User administrator@ad-domain.com may run the following commands on idmclient: (root) /usr/sbin/rebootReboot the machine using
sudo. Enter the password foradministrator@ad-domain.comwhen prompted:[administrator@ad-domain.com@idmclient ~]$ sudo /usr/sbin/reboot [sudo] password for administrator@ad-domain.com:
56.4. Granting sudo access to an IdM user on an IdM client using the IdM Web UI
In Identity Management (IdM), you can grant sudo access for a specific command to an IdM user account on a specific IdM host. First, add a sudo command and then create a sudo rule for one or more commands.
Complete this procedure to create the idm_user_reboot sudo rule to grant the idm_user account the permission to run the /usr/sbin/reboot command on the idmclient machine.
Prerequisites
- You are logged in as IdM administrator.
-
You have created a user account for
idm_userin IdM and unlocked the account by creating a password for the user. For details on adding a new IdM user using the command line, see Adding users using the command line. -
No local
idm_useraccount is present on theidmclienthost. Theidm_useruser is not listed in the local/etc/passwdfile.
Procedure
Add the
/usr/sbin/rebootcommand to the IdM database ofsudocommands:- Navigate to Policy>Sudo>Sudo Commands.
- Click Add in the upper right corner to open the Add sudo command dialog box.
-
Enter the command you want the user to be able to perform using
sudo:/usr/sbin/reboot. - Click Add.
Use the new
sudocommand entry to create a sudo rule to allow idm_user to reboot the idmclient machine:- Navigate to Policy>Sudo>Sudo rules.
- Click Add in the upper right corner to open the Add sudo rule dialog box.
-
Enter the name of the
sudorule: idm_user_reboot. - Click Add and Edit.
Specify the user:
- In the Who section, check the Specified Users and Groups radio button.
- In the Users section, click Add to open the Add users into sudo rule "idm_user_reboot" dialog box.
- In the Available column, check the idm_user checkbox, and click the arrow to move it to the Prospective column.
- Click Add.
Specify the host:
- In the Access this host section, check the Specified Hosts and Groups radio button.
- In the Hosts section, click Add to open the Add hosts into sudo rule "idm_user_reboot" dialog box.
- In Available column, check the idmclient.idm.example.com checkbox, and click the arrow to move it to the Prospective column.
- Click Add.
Specify the commands:
- In the Run Commands section, check the Specified Commands and Groups radio button.
- In the Sudo Allow Commands section, click Add to open the Add allow sudo commands into sudo rule "idm_user_reboot" dialog box.
-
In the Available column, check the
/usr/sbin/rebootcheckbox, and click the arrow to move it to the Prospective column. - Click Add to return to the idm_sudo_reboot page.
- Click Save in the top left corner.
The new rule is enabled by default.
Propagating the changes from the server to the client can take a few minutes.
Verification
-
Log in to
idmclientasidm_user. Reboot the machine using
sudo. Enter the password foridm_userwhen prompted:$ sudo /usr/sbin/reboot [sudo] password for idm_user:
If the sudo rule is configured correctly, the machine reboots.
56.5. Creating a sudo rule on the CLI that runs a command as a service account on an IdM client
In IdM, you can configure a sudo rule with a RunAs alias to run a sudo command as another user or group. For example, you might have an IdM client that hosts a database application, and you need to run commands as the local service account that corresponds to that application.
Use this example to create a sudo rule on the command line called run_third-party-app_report to allow the idm_user account to run the /opt/third-party-app/bin/report command as the thirdpartyapp service account on the idmclient host.
Prerequisites
- You are logged in as IdM administrator.
-
You have created a user account for
idm_userin IdM and unlocked the account by creating a password for the user. For details on adding a new IdM user using the CLI, see Adding users using the command line. -
No local
idm_useraccount is present on theidmclienthost. Theidm_useruser is not listed in the local/etc/passwdfile. -
You have a custom application named
third-party-appinstalled on theidmclienthost. -
The
reportcommand for thethird-party-appapplication is installed in the/opt/third-party-app/bin/reportdirectory. -
You have created a local service account named
thirdpartyappto execute commands for thethird-party-appapplication.
Procedure
Retrieve a Kerberos ticket as the IdM
admin.[root@idmclient ~]# kinit adminAdd the
/opt/third-party-app/bin/reportcommand to the IdM database ofsudocommands:[root@idmclient ~]# ipa sudocmd-add /opt/third-party-app/bin/report ---------------------------------------------------- Added Sudo Command "/opt/third-party-app/bin/report" ---------------------------------------------------- Sudo Command: /opt/third-party-app/bin/reportCreate a
sudorule namedrun_third-party-app_report:[root@idmclient ~]# ipa sudorule-add run_third-party-app_report -------------------------------------------- Added Sudo Rule "run_third-party-app_report" -------------------------------------------- Rule name: run_third-party-app_report Enabled: TRUEUse the
--users=<user>option to specify the RunAs user for thesudorule-add-runasusercommand:[root@idmclient ~]# ipa sudorule-add-runasuser run_third-party-app_report --users=thirdpartyapp Rule name: run_third-party-app_report Enabled: TRUE RunAs External User: thirdpartyapp ------------------------- Number of members added 1 -------------------------The user (or group specified with the
--groups=*option) can be external to IdM, such as a local service account or an Active Directory user. Do not add a%prefix for group names.Add the
/opt/third-party-app/bin/reportcommand to therun_third-party-app_reportrule:[root@idmclient ~]# ipa sudorule-add-allow-command run_third-party-app_report --sudocmds '/opt/third-party-app/bin/report' Rule name: run_third-party-app_report Enabled: TRUE Sudo Allow Commands: /opt/third-party-app/bin/report RunAs External User: thirdpartyapp ------------------------- Number of members added 1 -------------------------Apply the
run_third-party-app_reportrule to the IdMidmclienthost:[root@idmclient ~]# ipa sudorule-add-host run_third-party-app_report --hosts idmclient.idm.example.com Rule name: run_third-party-app_report Enabled: TRUE Hosts: idmclient.idm.example.com Sudo Allow Commands: /opt/third-party-app/bin/report RunAs External User: thirdpartyapp ------------------------- Number of members added 1 -------------------------Add the
idm_useraccount to therun_third-party-app_reportrule:[root@idmclient ~]# ipa sudorule-add-user run_third-party-app_report --users idm_user Rule name: run_third-party-app_report Enabled: TRUE Users: idm_user Hosts: idmclient.idm.example.com Sudo Allow Commands: /opt/third-party-app/bin/report RunAs External User: thirdpartyapp ------------------------- Number of members added 1
Propagating the changes from the server to the client can take a few minutes.
Verification
-
Log in to the
idmclienthost as theidm_useraccount. Test the new sudo rule:
Display which
sudorules theidm_useraccount is allowed to perform.[idm_user@idmclient ~]$ sudo -l Matching Defaults entries for idm_user@idm.example.com on idmclient: !visiblepw, always_set_home, match_group_by_gid, always_query_group_plugin, env_reset, env_keep="COLORS DISPLAY HOSTNAME HISTSIZE KDEDIR LS_COLORS", env_keep+="MAIL PS1 PS2 QTDIR USERNAME LANG LC_ADDRESS LC_CTYPE", env_keep+="LC_COLLATE LC_IDENTIFICATION LC_MEASUREMENT LC_MESSAGES", env_keep+="LC_MONETARY LC_NAME LC_NUMERIC LC_PAPER LC_TELEPHONE", env_keep+="LC_TIME LC_ALL LANGUAGE LINGUAS _XKB_CHARSET XAUTHORITY KRB5CCNAME", secure_path=/sbin\:/bin\:/usr/sbin\:/usr/bin User idm_user@idm.example.com may run the following commands on idmclient: (thirdpartyapp) /opt/third-party-app/bin/reportRun the
reportcommand as thethirdpartyappservice account.[idm_user@idmclient ~]$ sudo -u thirdpartyapp /opt/third-party-app/bin/report [sudo] password for idm_user@idm.example.com: Executing report... Report successful.
56.6. Creating a sudo rule in the IdM WebUI that runs a command as a service account on an IdM client
In IdM, you can configure a sudo rule with a RunAs alias to run a sudo command as another user or group. For example, you might have an IdM client that hosts a database application, and you need to run commands as the local service account that corresponds to that application.
Use this example to create a sudo rule in the IdM WebUI called run_third-party-app_report to allow the idm_user account to run the /opt/third-party-app/bin/report command as the thirdpartyapp service account on the idmclient host.
Prerequisites
- You are logged in as IdM administrator.
-
You have created a user account for
idm_userin IdM and unlocked the account by creating a password for the user. For details on adding a new IdM user using the CLI, see Adding users using the command line. -
No local
idm_useraccount is present on theidmclienthost. Theidm_useruser is not listed in the local/etc/passwdfile. -
You have a custom application named
third-party-appinstalled on theidmclienthost. -
The
reportcommand for thethird-party-appapplication is installed in the/opt/third-party-app/bin/reportdirectory. -
You have created a local service account named
thirdpartyappto execute commands for thethird-party-appapplication.
Procedure
Add the
/opt/third-party-app/bin/reportcommand to the IdM database ofsudocommands:- Navigate to Policy>Sudo>Sudo Commands.
- Click Add in the upper right corner to open the Add sudo command dialog box.
-
Enter the command:
/opt/third-party-app/bin/report. - Click Add.
Use the new
sudocommand entry to create the newsudorule:- Navigate to Policy → Sudo → Sudo rules.
- Click Add in the upper right corner to open the Add sudo rule dialog box.
-
Enter the name of the
sudorule: run_third-party-app_report. - Click Add and Edit.
Specify the user:
- In the Who section, check the Specified Users and Groups radio button.
- In the User section, click Add to open the Add users into sudo rule "run_third-party-app_report" dialog box.
- In the Available column, check the idm_user checkbox, and move it to the Prospective column.
- Click Add.
Specify the host:
- In the Access this host section, check the Specified Hosts and Groups radio button.
- In the Hosts section, click Add to open the Add hosts into sudo rule "run_third-party-app_report" dialog box.
- In the Available column, check the idmclient.idm.example.com checkbox, and move it to the Prospective column.
- Click Add.
Specify the commands:
- In the Run Commands section, check the Specified Commands and Groups radio button.
- In the Sudo Allow Commands section, click Add to open the Add allow sudo commands into sudo rule "run_third-party-app_report" dialog box.
-
In the Available column, check the
/opt/third-party-app/bin/reportcheckbox, and move it to the Prospective column. - Click Add to return to the run_third-party-app_report page.
Specify the RunAs user:
- In the As Whom section, check the Specified Users and Groups radio button.
- In the RunAs Users section, click Add to open the Add RunAs users into sudo rule "run_third-party-app_report" dialog box.
-
Enter the
thirdpartyappservice account in the External box and move it to the Prospective column. - Click Add to return to the run_third-party-app_report page.
- Click Save in the top left corner.
The new rule is enabled by default.
Propagating the changes from the server to the client can take a few minutes.
Verification
-
Log in to the
idmclienthost as theidm_useraccount. Test the new sudo rule:
Display which
sudorules theidm_useraccount is allowed to perform.[idm_user@idmclient ~]$ sudo -l Matching Defaults entries for idm_user@idm.example.com on idmclient: !visiblepw, always_set_home, match_group_by_gid, always_query_group_plugin, env_reset, env_keep="COLORS DISPLAY HOSTNAME HISTSIZE KDEDIR LS_COLORS", env_keep+="MAIL PS1 PS2 QTDIR USERNAME LANG LC_ADDRESS LC_CTYPE", env_keep+="LC_COLLATE LC_IDENTIFICATION LC_MEASUREMENT LC_MESSAGES", env_keep+="LC_MONETARY LC_NAME LC_NUMERIC LC_PAPER LC_TELEPHONE", env_keep+="LC_TIME LC_ALL LANGUAGE LINGUAS _XKB_CHARSET XAUTHORITY KRB5CCNAME", secure_path=/sbin\:/bin\:/usr/sbin\:/usr/bin User idm_user@idm.example.com may run the following commands on idmclient: (thirdpartyapp) /opt/third-party-app/bin/reportRun the
reportcommand as thethirdpartyappservice account.[idm_user@idmclient ~]$ sudo -u thirdpartyapp /opt/third-party-app/bin/report [sudo] password for idm_user@idm.example.com: Executing report... Report successful.
56.7. Enabling GSSAPI authentication for sudo on an IdM client
Enable Generic Security Service Application Program Interface (GSSAPI) authentication on an IdM client for the sudo and sudo -i commands via the pam_sss_gss.so PAM module. With this configuration, IdM users can authenticate to the sudo command with their Kerberos ticket.
Prerequisites
-
You have created a
sudorule for an IdM user that applies to an IdM host. For this example, you have created theidm_user_rebootsudorule to grant theidm_useraccount the permission to run the/usr/sbin/rebootcommand on theidmclienthost. -
The
idmclienthost is running RHEL 8.4 or later. -
You need
rootprivileges to modify the/etc/sssd/sssd.conffile and PAM files in the/etc/pam.d/directory.
Procedure
-
Open the
/etc/sssd/sssd.confconfiguration file. Add the following entry to the
[domain/<domain_name>]section.[domain/<domain_name>] pam_gssapi_services = sudo, sudo-i-
Save and close the
/etc/sssd/sssd.conffile. Restart the SSSD service to load the configuration changes.
[root@idmclient ~]# systemctl restart sssdOn RHEL 8.8 or later:
Optional: Determine if you have selected the
sssdauthselectprofile:# authselect current Profile ID: sssdIf the
sssdauthselectprofile is selected, enable GSSAPI authentication:# authselect enable-feature with-gssapiIf the
sssdauthselectprofile is not selected, select it and enable GSSAPI authentication:# authselect select sssd with-gssapi
On RHEL 8.7 or earlier:
-
Open the
/etc/pam.d/sudoPAM configuration file. Add the following entry as the first line of the
authsection in the/etc/pam.d/sudofile.#%PAM-1.0 auth sufficient pam_sss_gss.so auth include system-auth account include system-auth password include system-auth session include system-auth-
Save and close the
/etc/pam.d/sudofile.
-
Open the
Verification
Log into the host as the
idm_useraccount.[root@idm-client ~]# ssh -l idm_user@idm.example.com localhost idm_user@idm.example.com's password:Verify that you have a ticket-granting ticket as the
idm_useraccount.[idmuser@idmclient ~]$ klist Ticket cache: KCM:1366201107 Default principal: idm_user@IDM.EXAMPLE.COM Valid starting Expires Service principal 01/08/2021 09:11:48 01/08/2021 19:11:48 krbtgt/IDM.EXAMPLE.COM@IDM.EXAMPLE.COM renew until 01/15/2021 09:11:44Optional: If you do not have Kerberos credentials for the
idm_useraccount, delete your current Kerberos credentials and request the correct ones.[idm_user@idmclient ~]$ kdestroy -A [idm_user@idmclient ~]$ kinit idm_user@IDM.EXAMPLE.COM Password for idm_user@idm.example.com:Reboot the machine using
sudo, without specifying a password.[idm_user@idmclient ~]$ sudo /usr/sbin/reboot
56.8. Enabling GSSAPI authentication and enforcing Kerberos authentication indicators for sudo on an IdM client
You can enable Generic Security Service Application Program Interface (GSSAPI) authentication on an Identity Management (IdM) client for PAM-enabled services such as sudo and sudo -i via the pam_sss_gss.so PAM module. Additionally, you can enable only users who have logged in with a smart card to authenticate to those services with their Kerberos ticket.
You can use this procedure as a template to configure GSSAPI authentication with SSSD for other PAM-aware services, and further restrict access to only those users that have a specific authentication indicator attached to their Kerberos ticket.
However, using authentication indicators to restrict access has currently two limitations:
- Only deployments based on MIT Kerberos support authentication indicators. These deployments include, for example, RHEL IdM, FreeIPA in Fedora, and Samba AD DC in Fedora.
- Authentication indicators are removed from Kerberos tickets at the realm boundary.
Therefore, if you, for example, want to restrict sudo access by using pam_gssapi_indicators_map = sudo:pkinit, you can only apply this restriction to users stored in IdM LDAP. Tickets issued to users stored elsewhere, such as those stored in Active Directory, currently cannot satisfy the pam_gssapi_indicators_map = sudo:pkinit condition.
Prerequisites
-
You have created a
sudorule for an IdM user that applies to an IdM host. For this example, you have created theidm_user_rebootsudorule to grant theidm_useraccount the permission to run the/usr/sbin/rebootcommand on theidmclienthost. -
You have configured smart card authentication for the
idmclienthost. -
The
idmclienthost is running RHEL 8.4 or later. -
You need
rootprivileges to modify the/etc/sssd/sssd.conffile and PAM files in the/etc/pam.d/directory.
Procedure
-
Open the
/etc/sssd/sssd.confconfiguration file. Add the following entries to the
[domain/<idm_domain_name>]section.[domain/<idm_domain_name>] pam_gssapi_services = sudo, sudo-i pam_gssapi_indicators_map = sudo:pkinit, sudo-i:pkinit-
Save and close the
/etc/sssd/sssd.conffile. Restart the SSSD service to load the configuration changes.
[root@idmclient ~]# systemctl restart sssdOn RHEL 8.8 or later:
Determine if you have selected the
sssdauthselectprofile:# authselect current Profile ID: sssdOptional: Select the
sssdauthselectprofile:# authselect select sssdEnable GSSAPI authentication:
# authselect enable-feature with-gssapiConfigure the system to authenticate only users with smart cards:
# authselect with-smartcard-required
On RHEL 8.7 or earlier:
-
Open the
/etc/pam.d/sudoPAM configuration file. Add the following entry as the first line of the
authsection in the/etc/pam.d/sudofile.#%PAM-1.0 auth sufficient pam_sss_gss.so auth include system-auth account include system-auth password include system-auth session include system-auth-
Save and close the
/etc/pam.d/sudofile. -
Open the
/etc/pam.d/sudo-iPAM configuration file. Add the following entry as the first line of the
authsection in the/etc/pam.d/sudo-ifile.#%PAM-1.0 auth sufficient pam_sss_gss.so auth include sudo account include sudo password include sudo session optional pam_keyinit.so force revoke session include sudo-
Save and close the
/etc/pam.d/sudo-ifile.
-
Open the
Verification
Log into the host as the
idm_useraccount and authenticate with a smart card.[root@idmclient ~]# ssh -l idm_user@idm.example.com localhost PIN for smart_cardVerify that you have a ticket-granting ticket as the smart card user.
[idm_user@idmclient ~]$ klist Ticket cache: KEYRING:persistent:1358900015:krb_cache_TObtNMd Default principal: idm_user@IDM.EXAMPLE.COM Valid starting Expires Service principal 02/15/2021 16:29:48 02/16/2021 02:29:48 krbtgt/IDM.EXAMPLE.COM@IDM.EXAMPLE.COM renew until 02/22/2021 16:29:44Display which
sudorules theidm_useraccount is allowed to perform.[idm_user@idmclient ~]$ sudo -l Matching Defaults entries for idmuser on idmclient: !visiblepw, always_set_home, match_group_by_gid, always_query_group_plugin, env_reset, env_keep="COLORS DISPLAY HOSTNAME HISTSIZE KDEDIR LS_COLORS", env_keep+="MAIL PS1 PS2 QTDIR USERNAME LANG LC_ADDRESS LC_CTYPE", env_keep+="LC_COLLATE LC_IDENTIFICATION LC_MEASUREMENT LC_MESSAGES", env_keep+="LC_MONETARY LC_NAME LC_NUMERIC LC_PAPER LC_TELEPHONE", env_keep+="LC_TIME LC_ALL LANGUAGE LINGUAS _XKB_CHARSET XAUTHORITY KRB5CCNAME", secure_path=/sbin\:/bin\:/usr/sbin\:/usr/bin User idm_user may run the following commands on idmclient: (root) /usr/sbin/rebootReboot the machine using
sudo, without specifying a password.[idm_user@idmclient ~]$ sudo /usr/sbin/reboot
56.9. SSSD options controlling GSSAPI authentication for PAM services
You can use the following options for the /etc/sssd/sssd.conf configuration file to adjust the GSSAPI configuration within the SSSD service.
- pam_gssapi_services
-
GSSAPI authentication with SSSD is disabled by default. You can use this option to specify a comma-separated list of PAM services that are allowed to try GSSAPI authentication using the
pam_sss_gss.soPAM module. To explicitly disable GSSAPI authentication, set this option to-. - pam_gssapi_indicators_map
This option only applies to Identity Management (IdM) domains. Use this option to list Kerberos authentication indicators that are required to grant PAM access to a service. Pairs must be in the format
<PAM_service>:_<required_authentication_indicator>_.Valid authentication indicators are:
-
otpfor two-factor authentication -
radiusfor RADIUS authentication -
pkinitfor PKINIT, smart card, or certificate authentication -
hardenedfor hardened passwords
-
- pam_gssapi_check_upn
-
This option is enabled and set to
trueby default. If this option is enabled, the SSSD service requires that the user name matches the Kerberos credentials. Iffalse, thepam_sss_gss.soPAM module authenticates every user that is able to obtain the required service ticket.
Examples
The following options enable Kerberos authentication for the sudo and sudo-i services, requires that sudo users authenticated with a one-time password, and user names must match the Kerberos principal. Because these settings are in the [pam] section, they apply to all domains:
[pam]
pam_gssapi_services = sudo, sudo-i
pam_gssapi_indicators_map = sudo:otp
pam_gssapi_check_upn = true
You can also set these options in individual [domain] sections to overwrite any global values in the [pam] section. The following options apply different GSSAPI settings to each domain:
- For the
idm.example.comdomain -
Enable GSSAPI authentication for the
sudoandsudo -iservices. -
Require certificate or smart card authentication authenticators for the
sudocommand. -
Require one-time password authentication authenticators for the
sudo -icommand. - Enforce matching user names and Kerberos principals.
-
Enable GSSAPI authentication for the
- For the
ad.example.comdomain -
Enable GSSAPI authentication only for the
sudoservice. - Do not enforce matching user names and principals.
-
Enable GSSAPI authentication only for the
[domain/idm.example.com]
pam_gssapi_services = sudo, sudo-i
pam_gssapi_indicators_map = sudo:pkinit, sudo-i:otp
pam_gssapi_check_upn = true
...
[domain/ad.example.com]
pam_gssapi_services = sudo
pam_gssapi_check_upn = false
...56.10. Troubleshooting GSSAPI authentication for sudo
If you are unable to authenticate to the sudo service with a Kerberos ticket from IdM, use the following scenarios to troubleshoot your configuration.
Prerequisites
-
You have enabled GSSAPI authentication for the
sudoservice. See Enabling GSSAPI authentication for sudo on an IdM client. -
You need
rootprivileges to modify the/etc/sssd/sssd.conffile and PAM files in the/etc/pam.d/directory.
Procedure
If you see the following error, the Kerberos service might not able to resolve the correct realm for the service ticket based on the host name:
Server not found in Kerberos databaseIn this situation, add the hostname directly to
[domain_realm]section in the/etc/krb5.confKerberos configuration file:[idm-user@idm-client ~]$ cat /etc/krb5.conf ... [domain_realm] .example.com = EXAMPLE.COM example.com = EXAMPLE.COM server.example.com = EXAMPLE.COMIf you see the following error, you do not have any Kerberos credentials:
No Kerberos credentials availableIn this situation, retrieve Kerberos credentials with the
kinitutility or authenticate with SSSD:[idm-user@idm-client ~]$ kinit idm-user@IDM.EXAMPLE.COM Password for idm-user@idm.example.com:If you see either of the following errors in the
/var/log/sssd/sssd_pam.loglog file, the Kerberos credentials do not match the username of the user currently logged in:User with UPN [<UPN>] was not found. UPN [<UPN>] does not match target user [<username>].In this situation, verify that you authenticated with SSSD, or consider disabling the
pam_gssapi_check_upnoption in the/etc/sssd/sssd.conffile:[idm-user@idm-client ~]$ cat /etc/sssd/sssd.conf ... pam_gssapi_check_upn = falseFor additional troubleshooting, you can enable debugging output for the
pam_sss_gss.soPAM module.Add the
debugoption at the end of allpam_sss_gss.soentries in PAM files, such as/etc/pam.d/sudoand/etc/pam.d/sudo-i:[root@idm-client ~]# cat /etc/pam.d/sudo #%PAM-1.0 auth sufficient pam_sss_gss.so debug auth include system-auth account include system-auth password include system-auth session include system-auth[root@idm-client ~]# cat /etc/pam.d/sudo-i #%PAM-1.0 auth sufficient pam_sss_gss.so debug auth include sudo account include sudo password include sudo session optional pam_keyinit.so force revoke session include sudoTry to authenticate with the
pam_sss_gss.somodule and review the console output. In this example, the user did not have any Kerberos credentials.[idm-user@idm-client ~]$ sudo ls -l /etc/sssd/sssd.conf pam_sss_gss: Initializing GSSAPI authentication with SSSD pam_sss_gss: Switching euid from 0 to 1366201107 pam_sss_gss: Trying to establish security context pam_sss_gss: SSSD User name: idm-user@idm.example.com pam_sss_gss: User domain: idm.example.com pam_sss_gss: User principal: pam_sss_gss: Target name: host@idm.example.com pam_sss_gss: Using ccache: KCM: pam_sss_gss: Acquiring credentials, principal name will be derived pam_sss_gss: Unable to read credentials from [KCM:] [maj:0xd0000, min:0x96c73ac3] pam_sss_gss: GSSAPI: Unspecified GSS failure. Minor code may provide more information pam_sss_gss: GSSAPI: No credentials cache found pam_sss_gss: Switching euid from 1366200907 to 0 pam_sss_gss: System error [5]: Input/output error
56.11. Using an Ansible playbook to ensure sudo access for an IdM user on an IdM client
In Identity Management (IdM), you can ensure sudo access to a specific command is granted to an IdM user account on a specific IdM host.
Complete this procedure to ensure a sudo rule named idm_user_reboot exists. The rule grants idm_user the permission to run the /usr/sbin/reboot command on the idmclient machine.
Prerequisites
You have configured your Ansible control node to meet the following requirements:
- You are using Ansible version 2.13 or later.
-
You have installed the
ansible-freeipapackage. - The example assumes that in the ~/MyPlaybooks/ directory, you have created an Ansible inventory file with the fully-qualified domain name (FQDN) of the IdM server.
-
The example assumes that the secret.yml Ansible vault stores your
ipaadmin_password.
-
The target node, that is the node on which the
ansible-freeipamodule is executed, is part of the IdM domain as an IdM client, server or replica. - You have ensured the presence of a user account for idm_user in IdM and unlocked the account by creating a password for the user. For details on adding a new IdM user using the command line, see link: Adding users using the command line.
-
No local idm_user account exists on idmclient. The idm_user user is not listed in the
/etc/passwdfile on idmclient.
Procedure
Create an inventory file, for example
inventory.file, and defineipaserversin it:[ipaservers] server.idm.example.comAdd one or more
sudocommands:Create an
ensure-reboot-sudocmd-is-present.ymlAnsible playbook that ensures the presence of the/usr/sbin/rebootcommand in the IdM database ofsudocommands. To simplify this step, you can copy and modify the example in the/usr/share/doc/ansible-freeipa/playbooks/sudocmd/ensure-sudocmd-is-present.ymlfile:--- - name: Playbook to manage sudo command hosts: ipaserver vars_files: - /home/user_name/MyPlaybooks/secret.yml tasks: # Ensure sudo command is present - ipasudocmd: ipaadmin_password: "{{ ipaadmin_password }}" name: /usr/sbin/reboot state: presentRun the playbook:
$ ansible-playbook --vault-password-file=password_file -v -i path_to_inventory_directory/inventory.file path_to_playbooks_directory/ensure-reboot-sudocmd-is-present.yml
Create a
sudorule that references the commands:Create an
ensure-sudorule-for-idmuser-on-idmclient-is-present.ymlAnsible playbook that uses thesudocommand entry to ensure the presence of a sudo rule. The sudo rule allows idm_user to reboot the idmclient machine. To simplify this step, you can copy and modify the example in the/usr/share/doc/ansible-freeipa/playbooks/sudorule/ensure-sudorule-is-present.ymlfile:--- - name: Tests hosts: ipaserver vars_files: - /home/user_name/MyPlaybooks/secret.yml tasks: # Ensure a sudorule is present granting idm_user the permission to run /usr/sbin/reboot on idmclient - ipasudorule: ipaadmin_password: "{{ ipaadmin_password }}" name: idm_user_reboot description: A test sudo rule. allow_sudocmd: /usr/sbin/reboot host: idmclient.idm.example.com user: idm_user state: presentRun the playbook:
$ ansible-playbook -v -i path_to_inventory_directory/inventory.file path_to_playbooks_directory/ensure-sudorule-for-idmuser-on-idmclient-is-present.yml
Verification
Test that the sudo rule whose presence you have ensured on the IdM server works on idmclient by verifying that idm_user can reboot idmclient using sudo. Note that it can take a few minutes for the changes made on the server to take effect on the client.
- Log in to idmclient as idm_user.
Reboot the machine using
sudo. Enter the password for idm_user when prompted:$ sudo /usr/sbin/reboot [sudo] password for idm_user:
If sudo is configured correctly, the machine reboots.
Chapter 57. Configuring host-based access control rules
You can use host-based access control (HBAC) rules to manage access control in your Identity Management (IdM) domain. HBAC rules define which users or user groups can access specified hosts or host groups by using which services or services in a service group. For example, you can use HBAC rules to achieve the following goals:
- Limit access to a specified system in your domain to members of a specific user group.
- Allow only a specific service to be used to access the systems in your domain.
By default, IdM is configured with a default HBAC rule named allow_all, which allows universal access to every host for every user via every relevant service in the entire IdM domain.
You can fine-tune access to different hosts by replacing the default allow_all rule with your own set of HBAC rules. For centralized and simplified access control management, you can apply HBAC rules to user groups, host groups, or service groups instead of individual users, hosts, or services.
57.1. Configuring HBAC rules in an IdM domain using the WebUI
To configure your domain for host-based access control, complete the following steps:
- Create HBAC rules in the IdM WebUI.
- Test the new HBAC rules.
-
Disable the default
allow_allHBAC rule].
Do not disable the allow_all rule before creating your custom HBAC rules as if you do so, no users will be able to access any hosts.
57.1.1. Creating HBAC rules in the IdM WebUI
To configure your domain for host-based access control using the IdM WebUI, follow the steps below. For the purposes of this example, the procedure shows you how to grant a single user, sysadmin access to all systems in the domain using any service.
IdM stores the primary group of a user as a numerical value of the gidNumber attribute instead of a link to an IdM group object. For this reason, an HBAC rule can only reference a user’s supplementary groups and not its primary group.
Prerequisites
- User sysadmin exists in IdM.
Procedure
- Select Policy>Host-Based Access Control>HBAC Rules.
- Click to start adding a new rule.
- Enter a name for the rule, and click to open the HBAC rule configuration page.
- In the Who area, select Specified Users and Groups. Then click to add the users or groups.
- Select the sysadmin user from the list of the Available users and click to move to the list of Prospective users and click .
- In the Accessing area, select Any Host to apply the HBAC rule to all hosts.
In the Via Service area, select Any Service to apply the HBAC rule to all services.
NoteOnly the most common services and service groups are configured for HBAC rules by default.
- To display the list of services that are currently available, select Policy>Host-Based Access Control>HBAC Services.
- To display the list of service groups that are currently available, select Policy>Host-Based Access Control>HBAC Service Groups.
To add more services and service groups, see Adding HBAC Service Entries for Custom HBAC Services and Adding HBAC Service Groups.
- To save any changes you make on the HBAC rule configuration page, click at the top of the page.
57.1.2. Testing HBAC rules in the IdM WebUI
IdM allows you to test your HBAC configuration in various situations using simulated scenarios. Performing these simulated tests, you can discover misconfiguration problems or security risks before deploying HBAC rules in production.
Always test custom HBAC rules before you start using them in production.
Note that IdM does not test the effect of HBAC rules on trusted Active Directory (AD) users. Because the IdM LDAP directory does not store the AD data, IdM cannot resolve group membership of AD users when simulating HBAC scenarios.
Procedure
- Select Policy>Host-Based Access Control>HBAC Test.
- On the Who window, specify the user under whose identity you want to perform the test, and click .
- On the Accessing window, specify the host that the user will attempt to access, and click .
- On the Via Service window, specify the service that the user will attempt to use, and click .
On the Rules window, select the HBAC rules you want to test, and click . If you do not select any rule, all rules are tested.
Select Include Enabled to run the test on all rules whose status is Enabled. Select Include Disabled to run the test on all rules whose status is Disabled. To view and change the status of HBAC rules, select Policy>Host-Based Access Control>HBAC Rules.
ImportantIf the test runs on multiple rules, it passes successfully if at least one of the selected rules allows access.
- On the Run Test window, click .
Review the test results:
- If you see ACCESS DENIED, the user is not granted access in the test.
- If you see ACCESS GRANTED, the user is able to access the host successfully.
By default, IdM lists all the tested HBAC rules when displaying the test results.
- Select Matched to display the rules that allowed successful access.
- Select Unmatched to display the rules that prevented access.
57.1.3. Disabling HBAC rules in the IdM WebUI
You can disable an HBAC rule but it only deactivates the rule and does not delete it. If you disable an HBAC rule, you can re-enable it later.
Disabling HBAC rules is useful when you are configuring custom HBAC rules for the first time. To ensure that your new configuration is not overridden by the default allow_all HBAC rule, you must disable allow_all.
Procedure
- Select Policy>Host-Based Access Control>HBAC Rules.
- Select the HBAC rule you want to disable.
- Click .
- Click to confirm you want to disable the selected HBAC rule.
57.2. Configuring HBAC rules in an IdM domain using the CLI
To configure your domain for host-based access control, complete the following steps:
- Create HBAC rules in the IdM CLI.
- Test the new HBAC rules.
-
Disable the default
allow_allHBAC rule.
Do not disable the allow_all rule before creating your custom HBAC rules. If you disable it before creating your custom rules, access to all hosts for all users will be denied.
57.2.1. Creating HBAC rules in the IdM CLI
To configure your domain for host-based access control using the IdM CLI, follow the steps below. For the purposes of this example, the procedure shows you how to grant a single user, sysadmin, access to all systems in the domain using any service.
IdM stores the primary group of a user as a numerical value of the gidNumber attribute instead of a link to an IdM group object. For this reason, an HBAC rule can only reference a user’s supplementary groups and not its primary group.
Prerequisites
- User sysadmin exists in IdM.
Procedure
Use the
ipa hbacrule-addcommand to add the rule.$ ipa hbacrule-add Rule name: rule_name --------------------------- Added HBAC rule "rule_name" --------------------------- Rule name: rule_name Enabled: TRUETo apply the HBAC rule to the sysadmin user only, use the
ipa hbacrule-add-usercommand.$ ipa hbacrule-add-user --users=sysadmin Rule name: rule_name Rule name: rule_name Enabled: True Users: sysadmin ------------------------- Number of members added 1 -------------------------NoteTo apply a HBAC rule to all users, use the
ipa hbacrule-modcommand and specify the all user category--usercat=all. Note that if the HBAC rule is associated with individual users or groups,ipa hbacrule-mod --usercat=allfails. In this situation, remove the users and groups using theipa hbacrule-remove-usercommand.Specify the target hosts. To apply the HBAC rule to all hosts, use the
ipa hbacrule-modcommand and specify the all host category:$ ipa hbacrule-mod rule_name --hostcat=all ------------------------------ Modified HBAC rule "rule_name" ------------------------------ Rule name: rule_name Host category: all Enabled: TRUE Users: sysadminNoteIf the HBAC rule is associated with individual hosts or groups,
ipa hbacrule-mod --hostcat=allfails. In this situation, remove the hosts and groups using theipa hbacrule-remove-hostcommand.Specify the target HBAC services. To apply the HBAC rule to all services, use the
ipa hbacrule-modcommand and specify the all service category:$ ipa hbacrule-mod rule_name --servicecat=all ------------------------------ Modified HBAC rule "rule_name" ------------------------------ Rule name: rule_name Host category: all Service category: all Enabled: True Users: sysadmin
If the HBAC rule is associated with individual services or groups, ipa hbacrule-mod --servicecat=all fails. In this situation, remove the services and groups using the ipa hbacrule-remove-service command.
Verification
Verify that the HBAC rule has been added correctly.
-
Use the
ipa hbacrule-findcommand to verify that the HBAC rule exists in IdM. -
Use the
ipa hbacrule-showcommand to verify the properties of the HBAC rule.
-
Use the
57.2.2. Testing HBAC rules in the IdM CLI
IdM allows you to test your HBAC configuration in various situations using simulated scenarios. Performing these simulated tests, you can discover misconfiguration problems or security risks before deploying HBAC rules in production.
Always test custom HBAC rules before you start using them in production.
Note that IdM does not test the effect of HBAC rules on trusted Active Directory (AD) users. Because the IdM LDAP directory does not store the AD data, IdM cannot resolve group membership of AD users when simulating HBAC scenarios.
Procedure
Use the
ipa hbactestcommand to test your HBAC rule. You have the option to test a single HBAC rule or multiple HBAC rules.To test a single HBAC rule:
$ ipa hbactest --user=sysadmin --host=server.idm.example.com --service=sudo --rules=rule_name --------------------- Access granted: True --------------------- Matched rules: rule_nameTo test multiple HBAC rules:
Add a second rule only allowing the sysadmin to use
sshon all hosts:$ ipa hbacrule-add --hostcat=all rule2_name $ ipa hbacrule-add-user --users sysadmin rule2_name $ ipa hbacrule-add-service --hbacsvcs=sshd rule2_name Rule name: rule2_name Host category: all Enabled: True Users: admin HBAC Services: sshd ------------------------- Number of members added 1 -------------------------Test multiple HBAC rules by running the following command:
$ ipa hbactest --user=sysadmin --host=server.idm.example.com --service=sudo --rules=rule_name --rules=rule2_name -------------------- Access granted: True -------------------- Matched rules: rule_name Not matched rules: rule2_nameIn the output, Matched rules list the rules that allowed successful access while Not matched rules list the rules that prevented access. Note that if you do not specify the
--rulesoption, all rules are applied. Using--rulesis useful to independently test each rule.
57.2.3. Disabling HBAC rules in the IdM CLI
You can disable an HBAC rule but it only deactivates the rule and does not delete it. If you disable an HBAC rule, you can re-enable it later.
Disabling HBAC rules is useful when you are configuring custom HBAC rules for the first time. To ensure that your new configuration is not overridden by the default allow_all HBAC rule, you must disable allow_all.
Procedure
Use the
ipa hbacrule-disablecommand. For example, to disable theallow_allrule:$ ipa hbacrule-disable allow_all ------------------------------ Disabled HBAC rule "allow_all" ------------------------------
57.3. Adding HBAC service entries for custom HBAC services
The most common services and service groups are configured for HBAC rules by default, but you can also configure any other pluggable authentication module (PAM) service as an HBAC service. This allows you to define custom PAM services in an HBAC rule. These PAM services files are in the etc/pam.d directory on RHEL systems.
Adding a service as an HBAC service is not the same as adding a service to the domain. Adding a service to the domain makes it available to other resources in the domain, but it does not allow you to use the service in HBAC rules.
57.3.1. Adding HBAC service entries for custom HBAC services in the IdM WebUI
To add a custom HBAC service entry, follow the steps described below.
Procedure
- Select Policy>Host-Based Access Control>HBAC Services.
- Click to add an HBAC service entry.
- Enter a name for the service, and click .
57.3.2. Adding HBAC service entries for custom HBAC services in the IdM CLI
To add a custom HBAC service entry, follow the steps described below.
Procedure
Use the
ipa hbacsvc-addcommand. For example, to add an entry for thetftpservice:$ ipa hbacsvc-add tftp ------------------------- Added HBAC service "tftp" ------------------------- Service name: tftp
57.4. Adding HBAC service groups
HBAC service groups can simplify HBAC rules management. For example, instead of adding individual services to an HBAC rule, you can add a whole service group.
57.4.1. Adding HBAC service groups in the IdM WebUI
To add an HBAC service group in the IdM WebUI, follow the steps outlined below.
Procedure
- Select Policy>Host-Based Access Control>HBAC Service Groups.
- Click to add an HBAC service group.
- Enter a name for the service group, and click .
- On the service group configuration page, click to add an HBAC service as a member of the group.
57.4.2. Adding HBAC service groups in the IdM CLI
To add an HBAC service group in the IdM CLI, follow the steps outlined below.
Procedure
Use the
ipa hbacsvcgroup-addcommand in your terminal to add an HBAC service group. For example, to add a group named login:$ ipa hbacsvcgroup-add Service group name: login -------------------------------- Added HBAC service group "login" -------------------------------- Service group name: loginUse the
ipa hbacsvcgroup-add-membercommand to add an HBAC service as a member of the group. For example, to add thesshdservice to the login group:$ ipa hbacsvcgroup-add-member Service group name: login [member HBAC service]: sshd Service group name: login Member HBAC service: sshd ------------------------- Number of members added 1 -------------------------
Chapter 58. Ensuring the presence of host-based access control rules in IdM using Ansible playbooks
Ansible is an automation tool used to configure systems, deploy software, and perform rolling updates. It includes support for Identity Management (IdM).
Learn more about Identity Management (IdM) host-based access policies and how to define them using Ansible.
58.1. Host-based access control rules in IdM
Host-based access control (HBAC) rules define which users or user groups can access which hosts or host groups by using which services or services in a service group. As a system administrator, you can use HBAC rules to achieve the following goals:
- Limit access to a specified system in your domain to members of a specific user group.
- Allow only a specific service to be used to access systems in your domain.
By default, IdM is configured with a default HBAC rule named allow_all, which means universal access to every host for every user via every relevant service in the entire IdM domain.
You can fine-tune access to different hosts by replacing the default allow_all rule with your own set of HBAC rules. For centralized and simplified access control management, you can apply HBAC rules to user groups, host groups, or service groups instead of individual users, hosts, or services.
58.2. Ensuring the presence of an HBAC rule in IdM using an Ansible playbook
Follow this procedure to ensure the presence of a host-based access control (HBAC) rule in Identity Management (IdM) using an Ansible playbook.
Prerequisites
You have configured your Ansible control node to meet the following requirements:
- You are using Ansible version 2.13 or later.
-
You have installed the
ansible-freeipapackage. - The example assumes that in the ~/MyPlaybooks/ directory, you have created an Ansible inventory file with the fully-qualified domain name (FQDN) of the IdM server.
-
The example assumes that the secret.yml Ansible vault stores your
ipaadmin_password.
-
The target node, that is the node on which the
ansible-freeipamodule is executed, is part of the IdM domain as an IdM client, server or replica. - The users and user groups you want to use for your HBAC rule exist in IdM. See Managing user accounts using Ansible playbooks and Ensuring the presence of IdM groups and group members using Ansible playbooks for details.
- The hosts and host groups to which you want to apply your HBAC rule exist in IdM. See Managing hosts using Ansible playbooks and Managing host groups using Ansible playbooks for details.
Procedure
Create an inventory file, for example
inventory.file, and defineipaserverin it:[ipaserver] server.idm.example.comCreate your Ansible playbook file that defines the HBAC policy whose presence you want to ensure. To simplify this step, you can copy and modify the example in the
/usr/share/doc/ansible-freeipa/playbooks/hbacrule/ensure-hbacrule-allhosts-present.ymlfile:--- - name: Playbook to handle hbacrules hosts: ipaserver vars_files: - /home/user_name/MyPlaybooks/secret.yml tasks: # Ensure idm_user can access client.idm.example.com via the sshd service - ipahbacrule: ipaadmin_password: "{{ ipaadmin_password }}" name: login user: idm_user host: client.idm.example.com hbacsvc: - sshd state: presentRun the playbook:
$ ansible-playbook --vault-password-file=password_file -v -i path_to_inventory_directory/inventory.file path_to_playbooks_directory/ensure-new-hbacrule-present.yml
Verification
- Log in to the IdM Web UI as administrator.
- Navigate to Policy → Host-Based-Access-Control → HBAC Test.
- In the Who tab, select idm_user.
- In the Accessing tab, select client.idm.example.com.
- In the Via service tab, select sshd.
- In the Rules tab, select login.
- In the Run test tab, click the Run test button. If you see ACCESS GRANTED, the HBAC rule is implemented successfully.
Chapter 59. Defining SELinux user maps
Learn how SELinux user maps work in IdM, how to configure Security-Enhanced Linux (SELinux) user map order and defaults, and how to map Identity Management (IdM) users to SELinux users by using the Web UI or the IdM CLI.
59.1. SELinux contexts and Identity Management
Learn how Security-Enhanced Linux (SELinux) contexts and policy stay on each host while Identity Management (IdM) maps domain users to SELinux user strings at login.
SELinux provides kernel-level mandatory access control (MAC) to govern how processes interact with system resources. Based on the expected behavior of processes and their security implications, administrators and policy writers define security contexts. These are labels assigned to every subject, such as processes, and object, such as files, sockets, and hardware on the system.
While the kernel only sees subjects (processes) and objects (files or sockets), the chain of security begins with the human identity. When a user logs in via IdM, their network account is mapped to a specific SELinux user. This mapping acts as a bridge: it ensures that every process started by that human inherits a specific security context.
Consequently, a human does not just have access to a file; instead, the human’s identity determines their SELinux label, and that label dictates exactly which resources their processes can access. By assigning different contexts to different groups of people, such as administrators, developers, or guests, organisations can ensure that even if a human’s session is compromised, the blast radius of a security breach is effectively minimized.
IdM does not create or modify SELinux contexts or policy on client systems. Instead, IdM uses strings that can match contexts already present on target hosts as the basis for mapping IdM users in the domain to SELinux users on a system.
If you create an SELinux user map in IdM, you do not modify the SELinux policy on your hosts:
-
IdM does not apply new security rules on your hosts. The SELinux policy stays local. The rules that define what
staff_ucan do compared touser_uare stored on the individual Linux host, not in the central IdM database. The system maps the IdM user to an SELinux user string, such as
staff_u. When the user logs in to a target host, the host evaluates this string against its local SELinux policy:- If the string matches a local SELinux user, the host applies the corresponding restrictions.
- If the string does not match a local SELinux user, the host applies the default SELinux context.
Each SELinux user is associated with one or more SELinux roles. The role is assigned both a multilayer security (MLS) context and a multi-category security (MCS) context. The MLS and MCS contexts confine users so that they can access only certain processes, files, and operations on the system.
The following list maps SELinux users that are available on a system to their allowed roles:
Labelling MLS/ MLS/
SELinux User Prefix MCS Level MCS Range SELinux Roles
guest_u user s0 s0 guest_r
root user s0 s0-s0:c0.c1023 staff_r sysadm_r system_r unconfined_r
staff_u user s0 s0-s0:c0.c1023 staff_r sysadm_r system_r unconfined_r
sysadm_u user s0 s0-s0:c0.c1023 sysadm_r
system_u user s0 s0-s0:c0.c1023 system_r unconfined_r
unconfined_u user s0 s0-s0:c0.c1023 system_r unconfined_r
user_u user s0 s0 user_r
xguest_u user s0 s0 xguest_r
SELinux user maps work with the System Security Services Daemon (SSSD) and the pam_selinux PAM module. When a remote user logs in to a machine, SSSD queries its IdM identity provider for user information, including any SELinux maps. The PAM module then assigns the appropriate SELinux user context. SSSD caching allows the mapping to work while offline.
59.2. Benefits of mapping IdM users to SELinux users
Learn how mapping Identity Management (IdM) users to SELinux users centralizes SELinux context assignment and ties it to identity, host, and host-based access policy in the IdM domain.
SELinux users and policies operate at the system level, not the network level. SELinux users are configured independently on each system. While that is acceptable in many environments because SELinux defines common system users and SELinux-aware services define their own policies, it can be problematic when remote users and systems access local resources. Remote users and services might receive a default SELinux context that does not match their intended identity or role.
IdM solves this problem by integrating an identity domain with local SELinux services. IdM can map IdM users to configured SELinux users per host, per host group, or based on a host-based access control (HBAC) rule. Specifically, mapping SELinux and IdM users improves user administration as follows:
- Remote users can receive appropriate SELinux user contexts based on their IdM group assignments. Administrators can apply the same policies consistently without creating local accounts or reconfiguring SELinux on each host.
- The SELinux context associated with a user is centralized in IdM.
- SELinux user context assignment can follow the same policy decisions you already manage in IdM, such as which users are allowed to access which hosts through HBAC rules.
- Administrators can review and change SELinux user map configuration in one place, including which IdM users, groups, hosts, and host groups are assigned to each SELinux user map.
An SELinux user map links an IdM user to a specific SELinux user on a per-host basis. This allows administrators to assign different security contexts to the same person depending on which system they access.
59.3. SELinux user types in IdM
Learn how Identity Management (IdM) maintains a central list of SELinux user strings with MLS and MCS ranges that you attach to maps and assign at login.
The core of an SELinux user map is the SELinux user. Each map is associated with an SELinux user. The SELinux users available for mapping are configured centrally in IdM. By default, these include:
-
unconfined_u(also used as a default for IdM users) -
guest_u -
xguest_u -
user_u -
staff_u
You can change this default list: any native SELinux user can be added or removed from the central IdM SELinux user list.
In the IdM server configuration, each SELinux user is configured with its user name and its MLS and MCS range, in the form SELinux_user:MLS[:MCS]. The IdM server uses this format when configuring maps.
59.4. HBAC rules and SELinux user maps in IdM
HBAC rules integrate with SELinux user maps in Identity Management (IdM) so that the same user and host membership controls both access and SELinux context assignment.
You can associate SELinux mapping rules with HBAC rules to simplify administration and avoid duplicating membership in separate map and HBAC definitions. As long as the HBAC rule defines a user and a host, you can use it for an SELinux user map. Linking an SELinux user map to an HBAC rule ensures that the same user and host membership drives both access enforcement and SELinux context assignment.
If an HBAC rule is associated with an SELinux user map, you cannot delete the host-based access control rule until you remove it from the SELinux user map configuration.
The IdM SELinux configuration is flexible. In addition to using HBAC rules, you can assign IdM users and hosts to an SELinux user map explicitly. You can also assign user groups or host groups to SELinux maps.
59.5. SELinux user map order and default SELinux user
Learn about how to configure the SELinux user map order and the default SELinux user on the IdM server so that unmapped domain users still receive a valid context and so that the server ranks SELinux users from most confined to least confined.
These settings do not replace individual user maps. They define the global list and fallback only.
The SELinux user map order is a list of SELinux users ranked from most confined to least confined. It is part of the IdM server configuration. An SELinux user map associates an SELinux user on a client with an Identity Management (IdM) user.
Each SELinux user entry uses this format:
SELinux_user:MLS[:MCS]
Separate individual user entries with a dollar sign ($).
Because IdM user entries do not require an SELinux map, many entries might be unmapped. The IdM server configuration defines a default SELinux user—one of the users from the full SELinux map list—for unmapped IdM user entries so that those users still receive a valid SELinux context. The default SELinux user for unmapped IdM user entries is unconfined_u, which is consistent with the default SELinux user for system users on Red Hat Enterprise Linux.
Do not use unconfined_u as the default IdM SELinux user in production. Because unconfined_u is subject to only minimal SELinux restrictions, it effectively removes most of the protections SELinux provides. Set the default to a more confined user, such as guest_u, before deploying.
59.6. Configuring SELinux user map order and defaults in the IdM Web UI
Use the Identity Management (IdM) Web UI to set the SELinux user map order, the default SELinux user for unmapped IdM entries, and which SELinux users are available for mapping on the IdM server. This controls how strictly unmapped users are confined and which strings maps may use.
Prerequisites
- You are logged in to the IdM Web UI as an administrator.
Procedure
- Go to IPA Server → Configuration.
- Scroll down to the SELINUX OPTIONS section.
Edit the SELinux user configuration: SELinux user map order, Default SELinux user, or both, as needed.

- Click Update at the top of the page to save your changes.
59.7. Configuring SELinux user map order and defaults by using the IdM CLI
Use the Identity Management (IdM) CLI to set the SELinux user map order, the default SELinux user for unmapped IdM entries, and which SELinux users are available for mapping in IdM. This controls how strictly unmapped users are confined and which strings maps may use.
Prerequisites
- You have administrative credentials to access the IdM CLI.
Procedure
Optional: View the SELinux users configured on the IdM server and available for mapping:
[user1@server ~]$ ipa config-showExample output (excerpt):
... SELinux user map order: guest_u:s0$xguest_u:s0$user_u:s0$staff_u:s0-s0:c0.c1023$unconfined_u:s0-s0:c0.c1023 Default SELinux user: unconfined_u:s0-s0:c0.c1023The list shows available SELinux users from the most confined to the least confined, separated by
$.To change the list of SELinux users and their order, run
ipa config-modwith the--ipaselinuxusermaporderoption. List SELinux users from most confined to least confined, separated by$. The following example adds thesysadm_uuser to the SELinux user map order:[user1@server ~]$ ipa config-mod --ipaselinuxusermaporder="guest_u:s0$xguest_u:s0$user_u:s0$staff_u:s0-s0:c0.c1023$sysadm_u:s0-s0:c0.c1023$unconfined_u:s0-s0:c0.c1023"NoteThe default SELinux user used for unmapped entries must appear in the user map list or the modification fails. If you change the default, it must be a user that is already in the SELinux map list, or you must update the map list first.
To change the default SELinux user for IdM users that do not have a specific map, run
ipa config-modwith--ipaselinuxusermapdefault.[user1@server ~]$ ipa config-mod --ipaselinuxusermapdefault="guest_u:s0"
59.8. Mapping SELinux users and IdM users in the IdM Web UI
Create or edit SELinux user maps in the Identity Management (IdM) Web UI to associate an SELinux user context on IdM clients with IdM users, groups, hosts, host groups, or with a single host-based access control (HBAC) rule.
59.8.1. Prerequisites
- You are logged in to the IdM Web UI as an administrator.
59.8.2. Displaying SELinux user maps in the IdM Web UI
An SELinux user map associates an SELinux user string with IdM users and hosts, or with a host-based access control (HBAC) rule that already defines users and hosts. Use the IdM Web UI to review which maps exist in the domain and to open a map to inspect its settings.
Procedure
In the IdM Web UI, go to Policy → SELinux User Mappings.
The page lists the SELinux user maps that are defined in the domain.

- Optional: To inspect the configuration of a map, click its name in the list. The map details show the General, Users, and Hosts settings that apply to that map.
59.8.3. Creating SELinux user maps in the IdM Web UI
You can create a new SELinux user map by using the Add workflow in the IdM Web UI. Either assign a host-based access control (HBAC) rule to the map, or assign IdM users and hosts manually. You cannot combine both approaches on the same map.
Procedure
- In the IdM Web UI, go to Policy → SELinux User Mappings.
In the list of mappings, click Add to create a map.
Enter the map name and the SELinux user. The SELinux user string must match the IdM server configuration exactly, in the form
SELinux_user:MLS[:MCS].
- Click Add and Edit to add IdM user information.
Use either an HBAC rule or assign users and hosts manually:
To use a host-based access control rule, choose the rule in the drop-down list in the General section. Using a host-based access control rule also applies that rule’s access controls for which hosts a remote user may use to reach a target machine.
NoteOnly one host-based access control rule can be assigned. The host-based access control rule must include users and hosts, not only services.

To assign users, user groups, hosts, or host groups directly to the SELinux map:
In the Users and Hosts sections, click Add.

In the left column, choose the users, hosts, or groups that you want to add, use the >> control to move them to the Prospective column, and click Add to add them to the map.

- Click Update at the top to save the SELinux user map.
59.8.4. Modifying SELinux user maps in the IdM Web UI
If an SELinux user map exists, you can change its HBAC association, add or remove IdM users and hosts that are assigned to it, or delete the map from the IdM Web UI.
Procedure
- In the IdM Web UI, go to Policy → SELinux User Mappings.
- Click the name of the map that you want to change.
Select one of the following actions based on your needs:
In the General section, change the host-based access control (HBAC) rule in the drop-down list.
NoteIf you assign a new HBAC rule to an existing map, the new HBAC association replaces the previous map configuration for that setting.
To add IdM users, user groups, hosts, or host groups to the map:
- Go to the Users or Hosts section.
Click Add.
- In the left column, choose the entries that you want to add and use the >> control to move them to the Prospective column.
Click Add.
To remove an assigned user, user group, host, or host group:
- Select the entry in the Users or Hosts section.
- Use the control that removes the assignment (for example, Delete).
- Click Update at the top to save your changes.
- To delete the SELinux user map entirely, use the Delete action for the map in the SELinux User Mappings list.
59.9. Mapping SELinux users and IdM users in the IdM CLI
Create or edit SELinux user maps in the Identity Management (IdM) CLI to associate an SELinux user context on IdM clients with IdM users, groups, hosts, host groups, or with a single host-based access control (HBAC) rule.
59.9.1. Prerequisites
- You have administrative credentials to access the IdM CLI.
59.9.2. Displaying SELinux user maps by using the IdM CLI
An SELinux user map associates an SELinux user string with IdM users and hosts, or with a host-based access control (HBAC) rule that already defines users and hosts. When you use the IdM CLI, you refer to those pieces with options such as --selinuxuser, --users, --groups, --hosts, --hostgroups, and --hbacrule. Use the following steps to list SELinux user maps in the domain and to show the details of one map.
Procedure
To list all SELinux user maps in the domain:
[user1@server ~]$ ipa selinuxusermap-findTo display a specific map, run
ipa selinuxusermap-showand pass the map name. Replaceselinux1with the name of your map.[user1@server ~]$ ipa selinuxusermap-show selinux1
59.9.3. Creating SELinux user maps by using the IdM CLI
You can create a new SELinux user map in two ways: run ipa selinuxusermap-add and then attach IdM users and hosts with ipa selinuxusermap-add-user and ipa selinuxusermap-add-host, or create the map in one step by referencing an host-based access control (HBAC) rule with --hbacrule. The --selinuxuser value must match the SELinux user string in the IdM server configuration, in the form SELinux_user:MLS[:MCS]. If you use explicit users and hosts, you must add both users or groups and hosts or host groups for the mapping to be valid. You can repeat CLI options or pass a comma-separated list in braces, for example --option={val1,val2,val3}.
Procedure
To create a new map and assign users and hosts with separate commands:
Create the map record first. Replace
<selinux1>with your map name:[user1@server ~]$ ipa selinuxusermap-add --selinuxuser="xguest_u:s0" <selinux1>Add IdM users to the map.
[user1@server ~]$ ipa selinuxusermap-add-user --users=user1 --users=user2 --users=user3 selinux1Add client hosts to the map.
[user1@server ~]$ ipa selinuxusermap-add-host --hosts=server.example.com --hosts=test.example.com selinux1
Alternatively, to create a map that references an HBAC rule:
The
--hbacruleoption names the HBAC rule to use. Using a rule applies that rule’s access controls for which hosts a remote user may use to access a target host, in addition to applying SELinux contexts after login. The rule must specify users and hosts so that the SELinux map can form the SELinux user, IdM user, and host relationship. Only one HBAC rule can be specified.[user1@server ~]$ ipa selinuxusermap-add --hbacrule=webserver --selinuxuser="xguest_u:s0" selinux1
59.9.4. Modifying SELinux user maps by using the IdM CLI
If an SELinux user map exists, you can add or remove IdM users and hosts that are assigned to it, change its HBAC association, or delete the map entirely.
Procedure
To add IdM users to an existing map:
[user1@server ~]$ ipa selinuxusermap-add-user --users=user1 selinux1NoteIf you run
ipa selinuxusermap-modwith--hbacruleon an existing map, the new HBAC association replaces the previous map configuration for that setting.To add client hosts to an existing map:
[user1@server ~]$ ipa selinuxusermap-add-host --hosts=server.example.com selinux1To remove an IdM user from a map:
[user1@server ~]$ ipa selinuxusermap-remove-user --users=user2 selinux1To remove a client host from a map:
[user1@server ~]$ ipa selinuxusermap-remove-host --hosts=server.example.com selinux1To delete an SELinux user map entirely:
[user1@server ~]$ ipa selinuxusermap-del selinux1
Chapter 60. Managing replication topology
You can manage replication between servers in an Identity Management (IdM) domain. When you create a replica, Identity Management (IdM) creates a replication agreement between the initial server and the replica. The data that is replicated is then stored in topology suffixes and when two replicas have a replication agreement between their suffixes, the suffixes form a topology segment.
60.1. Replication agreements between IdM replicas
When an administrator creates a replica based on an existing server, Identity Management (IdM) creates a replication agreement between the initial server and the replica. The replication agreement ensures that the data and configuration is continuously replicated between the two servers.
IdM uses multiple read/write replica replication. In this configuration, all replicas joined in a replication agreement receive and provide updates, and are therefore considered suppliers and consumers. Replication agreements are always bilateral.
Figure 60.1. Server and replica agreements

IdM uses two types of replication agreements:
- Domain replication agreements replicate the identity information.
- Certificate replication agreements replicate the certificate information.
Both replication channels are independent. Two servers can have one or both types of replication agreements configured between them. For example, when server A and server B have only domain replication agreement configured, only identity information is replicated between them, not the certificate information.
60.2. Topology suffixes
Topology suffixes store the data that is replicated. IdM supports two types of topology suffixes: domain and ca. Each suffix represents a separate server, a separate replication topology.
When a replication agreement is configured, it joins two topology suffixes of the same type on two different servers.
- The
domainsuffix: dc=example,dc=com The
domainsuffix contains all domain-related data.When two replicas have a replication agreement between their
domainsuffixes, they share directory data, such as users, groups, and policies.- The
casuffix: o=ipaca The
casuffix contains data for the Certificate System component. It is only present on servers with a certificate authority (CA) installed.When two replicas have a replication agreement between their
casuffixes, they share certificate data.
Figure 60.2. Topology suffixes

An initial topology replication agreement is set up between two servers by the ipa-replica-install script when installing a new replica.
60.3. Topology segments
When two replicas have a replication agreement between their suffixes, the suffixes form a topology segment. Each topology segment consists of a left node and a right node. The nodes represent the servers joined in the replication agreement.
Topology segments in IdM are always bidirectional. Each segment represents two replication agreements: from server A to server B, and from server B to server A. The data is therefore replicated in both directions.
Figure 60.3. Topology segments
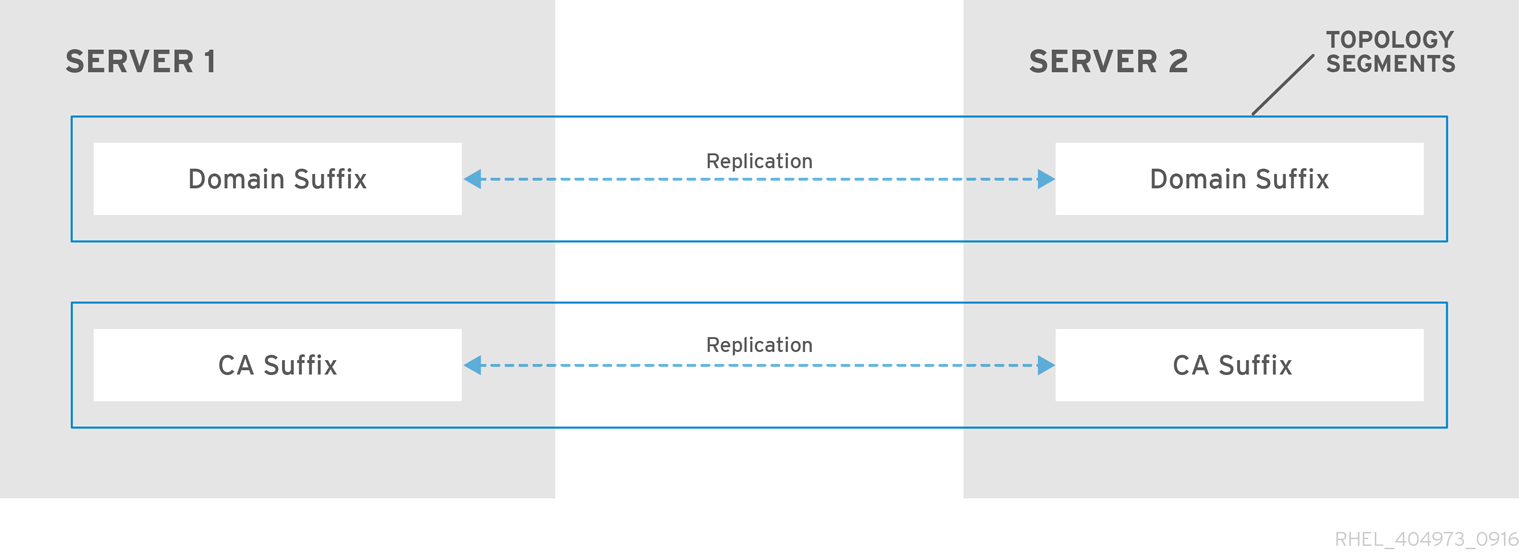
60.4. Viewing and modifying the visual representation of the replication topology using the WebUI
Using the Web UI, you can view, manipulate, and transform the representation of the replication topology. The topology graph in the web UI shows the relationships between the servers in the domain. You can move individual topology nodes by holding and dragging the mouse.
Interpreting the topology graph
Servers joined in a domain replication agreement are connected by an orange arrow. Servers joined in a CA replication agreement are connected by a blue arrow.
- Topology graph example: recommended topology
The recommended topology example below shows one of the possible recommended topologies for four servers: each server is connected to at least two other servers, and more than one server is a CA server.
Figure 60.4. Recommended topology example
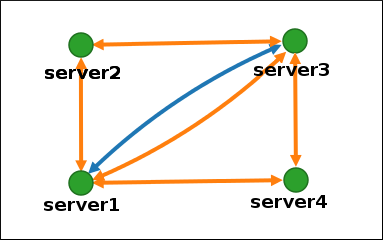
- Topology graph example: discouraged topology
In the discouraged topology example below,
server1is a single point of failure. All the other servers have replication agreements with this server, but not with any of the other servers. Therefore, ifserver1fails, all the other servers will become isolated.Avoid creating topologies like this.
Figure 60.5. Discouraged topology example: Single Point of Failure
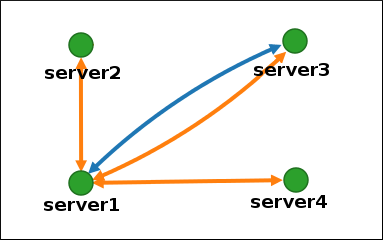
Prerequisites
- You are logged in as an IdM administrator.
Procedure
- Select → → .
Make changes to the topology:
You can move the topology graph nodes using the left mouse button:
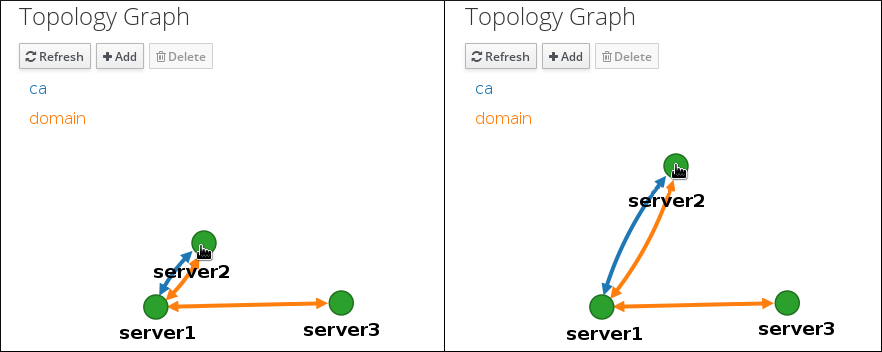
You can zoom in and zoom out the topology graph using the mouse wheel:
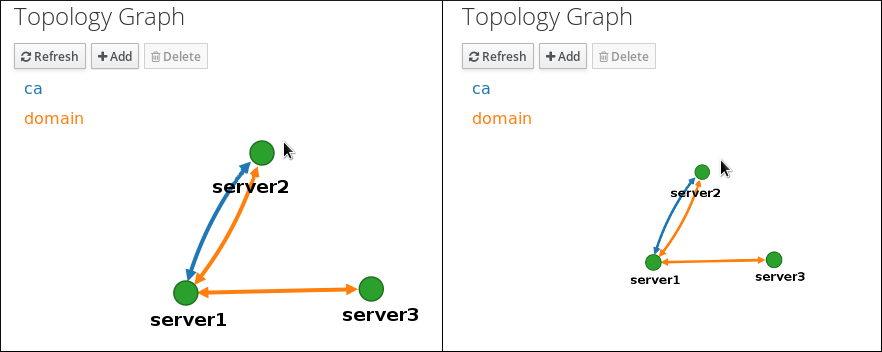
You can move the canvas of the topology graph by holding the left mouse button:

- If you make any changes to the topology that are not immediately reflected in the graph, click .
60.5. Viewing topology suffixes using the CLI
In a replication agreement, topology suffixes store the data that is replicated. You can view topology suffixes using the CLI.
Procedure
Enter the
ipa topologysuffix-findcommand to display a list of topology suffixes:$ ipa topologysuffix-find --------------------------- 2 topology suffixes matched --------------------------- Suffix name: ca Managed LDAP suffix DN: o=ipaca Suffix name: domain Managed LDAP suffix DN: dc=example,dc=com ---------------------------- Number of entries returned 2 ----------------------------
60.6. Viewing topology segments using the CLI
In a replication agreement, when two replicas have a replication agreement between their suffixes, the suffixes form a topology segments. You can view topology segments using the CLI.
Procedure
Enter the
ipa topologysegment-findcommand to show the current topology segments configured for the domain or CA suffixes. For example, for the domain suffix:$ ipa topologysegment-find Suffix name: domain ----------------- 1 segment matched ----------------- Segment name: server1.example.com-to-server2.example.com Left node: server1.example.com Right node: server2.example.com Connectivity: both ---------------------------- Number of entries returned 1 ----------------------------In this example, domain-related data is only replicated between two servers:
server1.example.comandserver2.example.com.Optional: To display details for a particular segment only, enter the
ipa topologysegment-showcommand:$ ipa topologysegment-show Suffix name: domain Segment name: server1.example.com-to-server2.example.com Segment name: server1.example.com-to-server2.example.com Left node: server1.example.com Right node: server2.example.com Connectivity: both
60.7. Setting up replication between two servers using the Web UI
Using the Identity Management (IdM) Web UI, you can choose two servers and create a new replication agreement between them.
Prerequisites
- You are logged in as an IdM administrator.
Procedure
In the topology graph, hover your mouse over one of the server nodes.
Figure 60.6. Domain or CA options

-
Click on the
domainor thecapart of the circle depending on what type of topology segment you want to create. A new arrow representing the new replication agreement appears under your mouse pointer. Move your mouse to the other server node, and click on it.
Figure 60.7. Creating a new segment

-
In the
Add topology segmentwindow, click to confirm the properties of the new segment.
The new topology segment between the two servers joins them in a replication agreement. The topology graph now shows the updated replication topology:
Figure 60.8. New segment created

60.8. Stopping replication between two servers using the Web UI
Using the Identity Management (IdM) Web UI, you can remove a replication agreement from servers.
Prerequisites
- You are logged in as an IdM administrator.
Procedure
Click on an arrow representing the replication agreement you want to remove. This highlights the arrow.
Figure 60.9. Topology segment highlighted
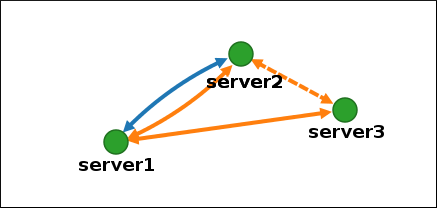
- Click .
In the
Confirmationwindow, click .IdM removes the topology segment between the two servers, which deletes their replication agreement. The topology graph now shows the updated replication topology:
Figure 60.10. Topology segment deleted
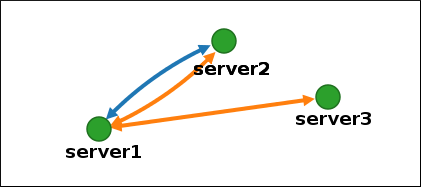
60.9. Setting up replication between two servers using the CLI
You can configure replication agreements between two servers using the ipa topologysegment-add command.
Prerequisites
- You have the IdM administrator credentials.
Procedure
Create a topology segment for the two servers. When prompted, provide:
-
The required topology suffix:
domainorca - The left node and the right node, representing the two servers
Optional: A custom name for the segment
For example:
$ ipa topologysegment-add Suffix name: domain Left node: server1.example.com Right node: server2.example.com Segment name [server1.example.com-to-server2.example.com]: new_segment --------------------------- Added segment "new_segment" --------------------------- Segment name: new_segment Left node: server1.example.com Right node: server2.example.com Connectivity: bothAdding the new segment joins the servers in a replication agreement.
-
The required topology suffix:
Verification
Verify that the new segment is configured:
$ ipa topologysegment-show Suffix name: domain Segment name: new_segment Segment name: new_segment Left node: server1.example.com Right node: server2.example.com Connectivity: both
60.10. Stopping replication between two servers using the CLI
You can terminate replication agreements from command line using the ipa topology segment-del command.
Prerequisites
- You have the IdM administrator credentials.
Procedure
Optional: If you do not know the name of the specific replication segment that you want to remove, display all segments available. Use the
ipa topologysegment-findcommand. When prompted, provide the required topology suffix:domainorca. For example:$ ipa topologysegment-find Suffix name: domain ------------------ 8 segments matched ------------------ Segment name: new_segment Left node: server1.example.com Right node: server2.example.com Connectivity: both ... ---------------------------- Number of entries returned 8 ----------------------------Locate the required segment in the output.
Remove the topology segment joining the two servers:
$ ipa topologysegment-del Suffix name: domain Segment name: new_segment ----------------------------- Deleted segment "new_segment" -----------------------------Deleting the segment removes the replication agreement.
Verification
Verify that the segment is no longer listed:
$ ipa topologysegment-find Suffix name: domain ------------------ 7 segments matched ------------------ Segment name: server2.example.com-to-server3.example.com Left node: server2.example.com Right node: server3.example.com Connectivity: both ... ---------------------------- Number of entries returned 7 ----------------------------
60.11. Removing server from topology using the Web UI
You can use Identity Management (IdM) web interface to remove a server from the topology. This action does not uninstall the server components from the host.
Prerequisites
- You are logged in as an IdM administrator.
- The server you want to remove is not the only server connecting other servers with the rest of the topology; this would cause the other servers to become isolated, which is not allowed.
- The server you want to remove is not your last CA or DNS server.
Removing a server is an irreversible action. If you remove a server, the only way to introduce it back into the topology is to install a new replica on the machine.
Procedure
- Select → → .
Click on the name of the server you want to delete.
Figure 60.11. Selecting a server
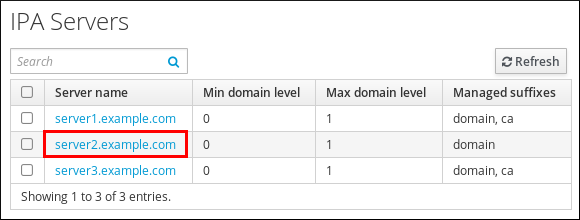
- Click .
Additional resources
60.12. Removing server from topology using the CLI
You can use the command line to remove an Identity Management (IdM) server from the topology.
Prerequisites
- You have the IdM administrator credentials.
- The server you want to remove is not the only server connecting other servers with the rest of the topology; this would cause the other servers to become isolated, which is not allowed.
- The server you want to remove is not your last CA or DNS server.
Removing a server is an irreversible action. If you remove a server, the only way to introduce it back into the topology is to install a new replica on the machine.
Procedure
To remove server1.example.com:
On another server, run the
ipa server-delcommand to removeserver1.example.com. The command removes all topology segments pointing to the server:[user@server2 ~]$ ipa server-del Server name: server1.example.com Removing server1.example.com from replication topology, please wait... ---------------------------------------------------------- Deleted IPA server "server1.example.com" ----------------------------------------------------------Optional: On
server1.example.com, run theipa server-install --uninstallcommand to uninstall the server components from the machine.[root@server1 ~]# ipa server-install --uninstall
60.13. Removing obsolete RUV records
If you remove a server from the IdM topology without properly removing its replication agreements, obsolete replica update vector (RUV) records will remain on one or more remaining servers in the topology. This can happen, for example, due to automation. These servers will then expect to receive updates from the now removed server. In this case, you need to clean the obsolete RUV records from the remaining servers.
Prerequisites
- You have the IdM administrator credentials.
- You know which replicas are corrupted or have been improperly removed.
Procedure
List the details about RUVs using the
ipa-replica-manage list-ruvcommand. The command displays the replica IDs:$ ipa-replica-manage list-ruv server1.example.com:389: 6 server2.example.com:389: 5 server3.example.com:389: 4 server4.example.com:389: 12ImportantThe
ipa-replica-manage list-ruvcommand lists ALL replicas in the topology, not only the malfunctioning or improperly removed ones.Remove obsolete RUVs associated with a specified replica using the
ipa-replica-manage clean-ruvcommand. Repeat the command for every replica ID with obsolete RUVs. For example, if you knowserver1.example.comandserver2.example.comare the malfunctioning or improperly removed replicas:ipa-replica-manage clean-ruv 6 ipa-replica-manage clean-ruv 5
Proceed with extreme caution when using ipa-replica-manage clean-ruv. Running the command against a valid replica ID will corrupt all the data associated with that replica in the replication database.
If this happens, re-initialize the replica from another replica using $ ipa-replica-manage re-initialize --from server1.example.com.
Verification
-
Run
ipa-replica-manage list-ruvagain. If the command no longer displays any corrupt RUVs, the records have been successfully cleaned. If the command still displays corrupt RUVs, clear them manually using this task:
dn: cn=clean replica_ID, cn=cleanallruv, cn=tasks, cn=config objectclass: extensibleObject replica-base-dn: dc=example,dc=com replica-id: replica_ID replica-force-cleaning: no cn: clean replica_ID
60.14. Viewing available server roles in the IdM topology using the IdM Web UI
Based on the services installed on an IdM server, it can perform various server roles. For example:
- CA server
- DNS server
- Key recovery authority (KRA) server.
Procedure
For a complete list of the supported server roles, see → → .
Note-
Role status
absentmeans that no server in the topology is performing the role. -
Role status
enabledmeans that one or more servers in the topology are performing the role.
Figure 60.12. Server roles in the web UI
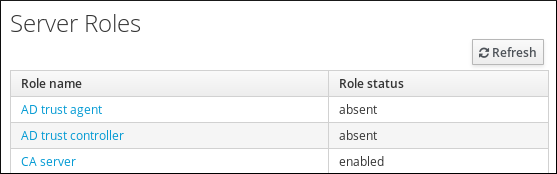
-
Role status
60.15. Viewing available server roles in the IdM topology using the IdM CLI
Based on the services installed on an IdM server, it can perform various server roles. For example:
- CA server
- DNS server
- Key recovery authority (KRA) server.
Procedure
To display all CA servers in the topology and the current CA renewal server:
$ ipa config-show ... IPA masters: server1.example.com, server2.example.com, server3.example.com IPA CA servers: server1.example.com, server2.example.com IPA CA renewal master: server1.example.comAlternatively, to display a list of roles enabled on a particular server, for example server.example.com:
$ ipa server-show Server name: server.example.com ... Enabled server roles: CA server, DNS server, KRA serverAlternatively, use the
ipa server-find --servrolecommand to search for all servers with a particular server role enabled. For example, to search for all CA servers:$ ipa server-find --servrole "CA server" --------------------- 2 IPA servers matched --------------------- Server name: server1.example.com ... Server name: server2.example.com ... ---------------------------- Number of entries returned 2 ----------------------------
60.16. Promoting a replica to a CA renewal server and CRL publisher server
If your IdM deployment uses an embedded certificate authority (CA), one of the IdM CA servers acts as the CA renewal server, a server that manages the renewal of CA subsystem certificates. One of the IdM CA servers also acts as the IdM CRL publisher server, a server that generates certificate revocation lists.
By default, the CA renewal server and CRL publisher server roles are installed on the first server on which the system administrator installed the CA role using the ipa-server-install or ipa-ca-install command. You can, however, transfer either of the two roles to any other IdM server on which the CA role is enabled.
Prerequisites
- You have the IdM administrator credentials.
Chapter 61. Public key certificates in Identity Management
X.509 public key certificates are used to authenticate users, hosts and services in Identity Management (IdM). In addition to authentication, X.509 certificates also enable digital signing and encryption to provide privacy, integrity and non-repudiation.
A certificate contains the following information:
- The subject that the certificate authenticates.
- The issuer, that is the CA that has signed the certificate.
- The start and end date of the validity of the certificate.
- The valid uses of the certificate.
- The public key of the subject.
A message encrypted by the public key can only be decrypted by a corresponding private key. While a certificate and the public key it includes can be made publicly available, the user, host or service must keep their private key secret.
61.1. Certificate authorities in IdM
Certificate authorities operate in a hierarchy of trust. In an IdM environment with an internal Certificate Authority (CA), all the IdM hosts, users and services trust certificates that have been signed by the CA. Apart from this root CA, IdM supports sub-CAs to which the root CA has granted the ability to sign certificates in their turn. Frequently, the certificates that such sub-CAs are able to sign are certificates of a specific kind, for example VPN certificates. Finally, IdM supports using external CAs. The table below presents the specifics of using the individual types of CA in IdM.
| Name of CA | Description | Use | Useful links |
|---|---|---|---|
|
The | An integrated CA based on the Dogtag upstream project | Integrated CAs can create, revoke, and issue certificates for users, hosts, and services. | Using the ipa CA to request a new user certificate and exporting it to the client |
| IdM sub-CAs |
An integrated CA that is subordinate to the |
IdM sub-CAs are CAs to which the | Restricting an application to trust only a subset of certificates |
| External CAs | An external CA is a CA other than the integrated IdM CA or its sub-CAs. | Using IdM tools, you add certificates issued by these CAs to users, services, or hosts as well as remove them. | Managing externally signed certificates for IdM users, hosts, and services |
From the certificate point of view, there is no difference between being signed by a self-signed IdM CA and being signed externally.
The role of the CA includes the following purposes:
- It issues digital certificates.
- By signing a certificate, it certifies that the subject named in the certificate owns a public key. The subject can be a user, host or service.
- It can revoke certificates, and provides revocation status via Certificate Revocation Lists (CRLs) and Online Certificate Status Protocol (OCSP).
61.2. Comparison of certificates and Kerberos
Certificates perform a similar function to that performed by Kerberos tickets. Kerberos is a computer network authentication protocol that works on the basis of tickets to allow nodes communicating over a non-secure network to prove their identity to one another in a secure manner. The following table shows a comparison of Kerberos and X.509 certificates:
| Characteristic | Kerberos | X.509 |
|
| Yes | Yes |
|
| Optional | Yes |
|
| Optional | Yes |
|
| Symmetrical | Asymmetrical |
|
| Short (1 day) | Long(2 years) |
By default, Kerberos in Identity Management only ensures the identity of the communicating parties.
61.3. The pros and cons of using certificates to authenticate users in IdM
The advantages of using certificates to authenticate users in IdM include the following points:
- A PIN that protects the private key on a smart card is typically less complex and easier to remember than a regular password.
- Depending on the device, a private key stored on a smart card cannot be exported. This provides additional security.
- Smart cards can make logout automatic: IdM can be configured to log out users when they remove the smart card from the reader.
- Stealing the private key requires actual physical access to a smart card, making smart cards secure against hacking attacks.
- Smart card authentication is an example of two-factor authentication: it requires both something you have (the card) and something you know (the PIN).
- Smart cards are more flexible than passwords because they provide the keys that can be used for other purposes, such as encrypting email.
- Using smart cards use on shared machines that are IdM clients does not typically pose additional configuration problems for system administrators. In fact, smart card authentication is an ideal choice for shared machines.
The disadvantages of using certificates to authenticate users in IdM include the following points:
- Users might lose or forget to bring their smart card or certificate and be effectively locked out.
- Mistyping a PIN multiple times might result in a card becoming locked.
- There is generally an intermediate step between request and authorization by some sort of security officer or approver. In IdM, the security officer or administrator must run the ipa cert-request command.
- Smart cards and readers tend to be vendor and driver specific: although a lot of readers can be used for different cards, a smart card of a specific vendor might not work in the reader of another vendor or in the type of a reader for which it was not designed.
- Certificates and smart cards have a steep learning curve for administrators.
Chapter 62. Converting certificate formats to work with IdM
This user story describes how to make sure that you as an IdM system administrator are using the correct format of a certificate with specific IdM commands. This is useful, for example, in the following situations:
- You are loading an external certificate into a user profile. For details, see Converting an external certificate to load into an IdM user account.
- You are using an external CA certificate when configuring the IdM server for smart card authentication or configuring the IdM client for smart card authentication so that users can authenticate to IdM using smart cards with certificates on them that have been issued by the external certificate authority.
- You are exporting a certificate from an NSS database into a pkcs #12 format that includes both the certificate and the private key. For details, see Exporting a certificate and private key from an NSS database into a PKCS #12 file.
62.1. Certificate formats and encodings in IdM
Certificate authentication including smart card authentication in IdM proceeds by comparing the certificate that the user presents with the certificate, or certificate data, that are stored in the user’s IdM profile.
System configuration
What is stored in the IdM profile is only the certificate, not the corresponding private key. During authentication, the user must also show that he is in possession of the corresponding private key. The user does that by either presenting a PKCS #12 file that contains both the certificate and the private key or by presenting two files: one that contains the certificate and the other containing the private key.
Therefore, processes such as loading a certificate into a user profile only accept certificate files that do not contain the private key.
Similarly, when a system administrator provides you with an external CA certificate, he will provide only the public data: the certificate without the private key. The ipa-advise utility for configuring the IdM server or the IdM client for smart card authentication expects the input file to contain the certificate of the external CA but not the private key.
Certificate encodings
There are two common certificate encodings: Privacy-enhanced Electronic Mail (PEM) and Distinguished Encoding Rules (DER). The base64 format is almost identical to the PEM format but it does not contain the -----BEGIN CERTIFICATE-----/-----END CERTIFICATE----- header and footer.
A certificate that has been encoded using DER is a binary X509 digital certificate file. As a binary file, the certificate is not human-readable. DER files sometimes use the .der filename extension, but files with the .crt and .cer filename extensions also sometimes contain DER certificates. DER files containing keys can be named .key.
A certificate that has been encoded using PEM Base64 is a human-readable file. The file contains ASCII (Base64) armored data prefixed with a “-----BEGIN …" line. PEM files sometimes use the .pem filename extension, but files with the .crt and .cer filename extensions also sometimes contain PEM certificates. PEM files containing keys can be named .key.
Different ipa commands have different limitations regarding the types of certificates that they accept. For example, the ipa user-add-cert command only accepts certificates encoded in the base64 format but ipa-server-certinstall accepts PEM, DER, PKCS #7, PKCS #8 and PKCS #12 certificates.
| Encoding format | Human-readable | Common filename extensions | Sample IdM commands accepting the encoding format |
|---|---|---|---|
| PEM/base64 | Yes | .pem, .crt, .cer | ipa user-add-cert, ipa-server-certinstall, … |
| DER | No | .der, .crt, .cer | ipa-server-certinstall, … |
Certificate-related commands and formats in IdM lists further ipa commands with the certificate formats that the commands accept.
User authentication
When using the web UI to access IdM, the user proves that he is in possession of the private key corresponding to the certificate by having both stored in the browser’s database.
When using the CLI to access IdM, the user proves that he is in possession of the private key corresponding to the certificate by one of the following methods:
The user adds, as the value of the
X509_user_identityparameter of thekinit -Xcommand, the path to the smart card module that is connected to the smart card that contains both the certificate and the key:$ kinit -X X509_user_identity='PKCS11:opensc-pkcs11.so' idm_userThe user adds two files as the values of the
X509_user_identityparameter of thekinit -Xcommand, one containing the certificate and the other the private key:$ kinit -X X509_user_identity='FILE:`/path/to/cert.pem,/path/to/cert.key`' idm_user
Useful certificate commands
To view the certificate data, such as the subject and the issuer:
$ openssl x509 -noout -text -in ca.pemTo compare in which lines two certificates differ:
$ diff cert1.crt cert2.crtTo compare in which lines two certificates differ with the output displayed in two columns:
$ diff cert1.crt cert2.crt -y62.2. Converting an external certificate to load into an IdM user account
This section describes how to make sure that an external certificate is correctly encoded and formatted before adding it to a user entry.
62.2.1. Prerequisites
-
If your certificate was issued by an Active Directory certificate authority and uses the
PEMencoding, make sure that thePEMfile has been converted into theUNIXformat. To convert a file, use thedos2unixutility provided by the eponymous package.
62.2.2. Converting an external certificate in the IdM CLI and loading it into an IdM user account
The IdM CLI only accepts a PEM certificate from which the first and last lines (-----BEGIN CERTIFICATE----- and -----END CERTIFICATE-----) have been removed.
Follow this procedure to convert an external certificate to PEM format and add it to an IdM user account using the IdM CLI.
Procedure
Convert the certificate to the
PEMformat:If your certificate is in the
DERformat:$ openssl x509 -in cert.crt -inform der -outform pem -out cert.pemIf your file is in the
PKCS #12format, whose common filename extensions are.pfxand.p12, and contains a certificate, a private key, and possibly other data, extract the certificate using theopenssl pkcs12utility. When prompted, enter the password protecting the private key stored in the file:$ openssl pkcs12 -in cert_and_key.p12 -clcerts -nokeys -out cert.pem Enter Import Password:
Obtain the administrator’s credentials:
$ kinit adminAdd the certificate to the user account using the
IdM CLIfollowing one of the following methods:Remove the first and last lines (-----BEGIN CERTIFICATE----- and -----END CERTIFICATE-----) of the
PEMfile using thesedutility before adding the string to theipa user-add-certcommand:$ ipa user-add-cert some_user --certificate="$(sed -e '/BEGIN CERTIFICATE/d;/END CERTIFICATE/d' cert.pem)"Copy and paste the contents of the certificate file without the first and last lines (-----BEGIN CERTIFICATE----- and -----END CERTIFICATE-----) into the
ipa user-add-certcommand:$ ipa user-add-cert some_user --certificate=MIIDlzCCAn+gAwIBAgIBATANBgkqhki...NoteYou cannot pass a
PEMfile containing the certificate as input to theipa user-add-certcommand directly, without first removing the first and last lines (-----BEGIN CERTIFICATE----- and -----END CERTIFICATE-----):$ ipa user-add-cert some_user --cert=some_user_cert.pemThis command results in the "ipa: ERROR: Base64 decoding failed: Incorrect padding" error message.
To check if the certificate was accepted by the system:
[idm_user@r8server]$ ipa user-show some_user
62.2.3. Converting an external certificate in the IdM web UI for loading into an IdM user account
Follow this procedure to convert an external certificate to PEM format and add it to an IdM user account in the IdM web UI.
Procedure
Using the
CLI, convert the certificate to thePEMformat:If your certificate is in the
DERformat:$ openssl x509 -in cert.crt -inform der -outform pem -out cert.pemIf your file is in the
PKCS #12format, whose common filename extensions are.pfxand.p12, and contains a certificate, a private key, and possibly other data, extract the certificate using theopenssl pkcs12utility. When prompted, enter the password protecting the private key stored in the file:$ openssl pkcs12 -in cert_and_key.p12 -clcerts -nokeys -out cert.pem Enter Import Password:
-
Open the certificate in an editor and copy the contents. You can include the "-----BEGIN CERTIFICATE-----" and "-----END CERTIFICATE-----" header and footer lines but you do not have to, as both the
PEMandbase64formats are accepted by the IdM web UI. - In the IdM web UI, log in as security officer.
-
Go to
Identity→Users→some_user. -
Click
Addnext toCertificates. - Paste the PEM-formatted contents of the certificate into the window that opens.
-
Click
Add.
If the certificate was accepted by the system, you can see it listed among the Certificates in the user profile.
62.3. Preparing to load a certificate into the browser
Before importing a user certificate into the browser, make sure that the certificate and the corresponding private key are in a PKCS #12 format. There are two common situations requiring extra preparatory work:
- The certificate is located in an NSS database. For details how to proceed in this situation, see Exporting a certificate and private key from an NSS database into a PKCS #12 file.
-
The certificate and the private key are in two separate
PEMfiles. For details how to proceed in this situation, see Combining certificate and private key PEM files into a PKCS #12 file.
Afterwards, to import both the CA certificate in the PEM format and the user certificate in the PKCS #12 format into the browser, follow the procedures in Configuring a browser to enable certificate authentication and Authenticating to the Identity Management Web UI with a Certificate as an Identity Management User.
62.3.1. Exporting a certificate and private key from an NSS database into a PKCS #12 file
Procedure
Use the
pk12utilcommand to export the certificate from the NSS database to thePKCS12format. For example, to export the certificate with thesome_usernickname from the NSS database stored in the~/certdbdirectory into the~/some_user.p12file:$ pk12util -d ~/certdb -o ~/some_user.p12 -n some_user Enter Password or Pin for "NSS Certificate DB": Enter password for PKCS12 file: Re-enter password: pk12util: PKCS12 EXPORT SUCCESSFULSet appropriate permissions for the
.p12file:# chmod 600 ~/some_user.p12Because the
PKCS #12file also contains the private key, it must be protected to prevent other users from using the file. Otherwise, they would be able to impersonate the user.
62.3.2. Combining certificate and private key PEM files into a PKCS #12 file
Follow this procedure to combine a certificate and the corresponding key stored in separate PEM files into a PKCS #12 file.
Procedure
To combine a certificate stored in
certfile.cerand a key stored incertfile.keyinto acertfile.p12file that contains both the certificate and the key:$ openssl pkcs12 -export -in certfile.cer -inkey certfile.key -out certfile.p12
62.4. Certificate-related commands and formats in IdM
The following table displays certificate-related commands in IdM with acceptable formats.
| Command | Acceptable formats | Notes |
|---|---|---|
|
| base64 PEM certificate | |
|
| PEM and DER certificate; PKCS#7 certificate chain; PKCS#8 and raw private key; PKCS#12 certificate and private key | |
|
| DER; PEM; PKCS#7 | |
|
| PEM and DER certificate; PKCS#7 certificate chain | |
|
| PEM and DER certificate; PKCS#7 certificate chain | |
|
| N/A |
Creates the PEM-encoded |
|
| N/A |
Creates the PEM-encoded |
|
| N/A |
Creates the |
|
| N/A |
Creates the |
Chapter 63. Managing certificates for users, hosts, and services using the integrated IdM CA
This chapter covers managing certificates in Identity Management (IdM) using the integrated CA, the ipa CA, and its sub-CAs.
63.1. Requesting new certificates for a user, host, or service using IdM Web UI
Follow this procedure to use the Identity Management (IdM) Web UI to request a new certificate for any IdM entity from the integrated IdM certificate authorities (CAs): the ipa CA or any of its sub-CAs.
IdM entities include:
- Users
- Hosts
- Services
Services typically run on dedicated service nodes on which the private keys are stored. Copying a service’s private key to the IdM server is considered insecure. Therefore, when requesting a certificate for a service, create the certificate signing request (CSR) on the service node.
Prerequisites
- Your IdM deployment contains an integrated CA.
- You are logged into the IdM Web UI as the IdM administrator.
Procedure
-
Under the
Identitytab, select theUsers,Hosts, orServicessubtab. Click the name of the user, host, or service to open its configuration page.
Figure 63.1. List of Hosts
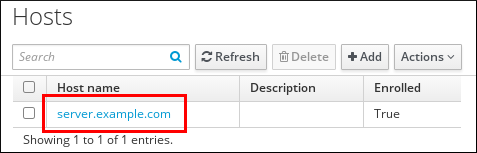
- Click → .
- Optional: Select the issuing CA and profile ID.
-
Follow the instructions for using the
certutilcommand-line (CLI) utility on the screen. - Click .
63.2. Requesting new certificates for a user, host, or service from IdM CA using certutil
You can use the certutil utility to request a certificate for an Identity Management (IdM) user, host or service in standard IdM situations. To ensure that a host or service Kerberos alias can use a certificate, use the openssl utility to request a certificate instead.
Follow this procedure to request a certificate for an IdM user, host, or service from ipa, the IdM certificate authority (CA), using certutil.
Services typically run on dedicated service nodes on which the private keys are stored. Copying a service’s private key to the IdM server is considered insecure. Therefore, when requesting a certificate for a service, create the certificate signing request (CSR) on the service node.
Prerequisites
- Your IdM deployment contains an integrated CA.
- You are logged into the IdM command-line interface (CLI) as the IdM administrator.
Procedure
Create a temporary directory for the certificate database:
# mkdir ~/certdb/Create a new temporary certificate database, for example:
# certutil -N -d ~/certdb/Create the CSR and redirect the output to a file. For example, to create a CSR for a 4096 bit certificate and to set the subject to CN=server.example.com,O=EXAMPLE.COM:
# certutil -R -d ~/certdb/ -a -g 4096 -s "CN=server.example.com,O=EXAMPLE.COM" -8 server.example.com > certificate_request.csrSubmit the certificate request file to the CA running on the IdM server. Specify the Kerberos principal to associate with the newly-issued certificate:
# ipa cert-request certificate_request.csr --principal=host/server.example.comThe
ipa cert-requestcommand in IdM uses the following defaults:The
caIPAserviceCertcertificate profileTo select a custom profile, use the
--profile-idoption.The integrated IdM root CA,
ipaTo select a sub-CA, use the
--caoption.
63.3. Requesting new certificates for a user, host, or service from IdM CA using openssl
You can use the openssl utility to request a certificate for an Identity Management (IdM) host or service if you want to ensure that the Kerberos alias of the host or service can use the certificate. In standard situations, consider requesting a new certificate using the certutil utility instead.
Follow this procedure to request a certificate for an IdM host, or service from ipa, the IdM certificate authority, using openssl.
Services typically run on dedicated service nodes on which the private keys are stored. Copying a service’s private key to the IdM server is considered insecure. Therefore, when requesting a certificate for a service, create the certificate signing request (CSR) on the service node.
Prerequisites
- Your IdM deployment contains an integrated CA.
- You are logged into the IdM command-line interface (CLI) as the IdM administrator.
Procedure
- Create one or more aliases for your Kerberos principal test/server.example.com. For example, test1/server.example.com and test2/server.example.com.
In the CSR, add a subjectAltName for dnsName (server.example.com) and otherName (test2/server.example.com). To do this, configure the
openssl.cnffile to include the following line specifying the UPN otherName and subjectAltName:otherName=1.3.6.1.4.1.311.20.2.3;UTF8:test2/server.example.com@EXAMPLE.COM DNS.1 = server.example.comCreate a certificate request using
openssl:openssl req -new -newkey rsa:2048 -keyout test2service.key -sha256 -nodes -out certificate_request.csr -config openssl.cnfSubmit the certificate request file to the CA running on the IdM server. Specify the Kerberos principal to associate with the newly-issued certificate:
# ipa cert-request certificate_request.csr --principal=host/server.example.comThe
ipa cert-requestcommand in IdM uses the following defaults:The
caIPAserviceCertcertificate profileTo select a custom profile, use the
--profile-idoption.The integrated IdM root CA,
ipaTo select a sub-CA, use the
--caoption.
Chapter 64. Managing IdM certificates using Ansible
You can use the ansible-freeipa ipacert module to request, revoke, and retrieve SSL certificates for Identity Management (IdM) users, hosts and services. You can also restore a certificate that has been put on hold.
64.1. Using Ansible to request SSL certificates for IdM hosts, services and users
You can use the ansible-freeipa ipacert module to request SSL certificates for Identity Management (IdM) users, hosts and services. They can then use these certificates to authenticate to IdM.
Complete this procedure to request a certificate for an HTTP server from an IdM certificate authority (CA) using an Ansible playbook.
Prerequisites
On the control node:
- You are using Ansible version 2.13 or later.
-
You have installed the
ansible-freeipapackage. - You have created an Ansible inventory file with the fully-qualified domain name (FQDN) of the IdM server in the ~/MyPlaybooks/ directory.
-
You have stored your
ipaadmin_passwordin the secret.yml Ansible vault.
- Your IdM deployment has an integrated CA.
Procedure
Generate a certificate-signing request (CSR) for your user, host or service. For example, to use the
opensslutility to generate a CSR for theHTTPservice running on client.idm.example.com, enter:# openssl req -new -newkey rsa:2048 -days 365 -nodes -keyout new.key -out new.csr -subj '/CN=client.idm.example.com,O=IDM.EXAMPLE.COM'As a result, the CSR is stored in new.csr.
Create your Ansible playbook file request-certificate.yml with the following content:
--- - name: Playbook to request a certificate hosts: ipaserver vars_files: - /home/user_name/MyPlaybooks/secret.yml tasks: - name: Request a certificate for a web server ipacert: ipaadmin_password: "{{ ipaadmin_password }}" state: requested csr: | -----BEGIN CERTIFICATE REQUEST----- MIGYMEwCAQAwGTEXMBUGA1UEAwwOZnJlZWlwYSBydWxlcyEwKjAFBgMrZXADIQBs HlqIr4b/XNK+K8QLJKIzfvuNK0buBhLz3LAzY7QDEqAAMAUGAytlcANBAF4oSCbA 5aIPukCidnZJdr491G4LBE+URecYXsPknwYb+V+ONnf5ycZHyaFv+jkUBFGFeDgU SYaXm/gF8cDYjQI= -----END CERTIFICATE REQUEST----- principal: HTTP/client.idm.example.com register: certReplace the certificate request with the CSR from new.csr.
Request the certificate:
$ ansible-playbook --vault-password-file=password_file -v -i <path_to_inventory_directory>/hosts <path_to_playbooks_directory>/request-certificate.yml
64.2. Using Ansible to revoke SSL certificates for IdM hosts, services and users
You can use the ansible-freeipa ipacert module to revoke SSL certificates used by Identity Management (IdM) users, hosts and services to authenticate to IdM.
Complete this procedure to revoke a certificate for an HTTP server using an Ansible playbook. The reason for revoking the certificate is “keyCompromise".
Prerequisites
On the control node:
- You are using Ansible version 2.13 or later.
-
You have installed the
ansible-freeipapackage. - You have created an Ansible inventory file with the fully-qualified domain name (FQDN) of the IdM server in the ~/MyPlaybooks/ directory.
-
You have stored your
ipaadmin_passwordin the secret.yml Ansible vault. -
You have obtained the serial number of the certificate, for example by entering the
openssl x509 -noout -text -in <path_to_certificate>command. In this example, the serial number of the certificate is 123456789.
- Your IdM deployment has an integrated CA.
Procedure
Create your Ansible playbook file revoke-certificate.yml with the following content:
--- - name: Playbook to revoke a certificate hosts: ipaserver vars_files: - /home/user_name/MyPlaybooks/secret.yml tasks: - name: Revoke a certificate for a web server ipacert: ipaadmin_password: "{{ ipaadmin_password }}" serial_number: 123456789 revocation_reason: "keyCompromise" state: revokedRevoke the certificate:
$ ansible-playbook --vault-password-file=password_file -v -i <path_to_inventory_directory>/hosts <path_to_playbooks_directory>/revoke-certificate.yml
64.3. Using Ansible to restore SSL certificates for IdM users, hosts, and services
You can use the ansible-freeipa ipacert module to restore a revoked SSL certificate previously used by an Identity Management (IdM) user, host or a service to authenticate to IdM.
You can only restore a certificate that was put on hold. You may have put it on hold because, for example, you were not sure if the private key had been lost. However, now you have recovered the key and as you are certain that no-one has accessed it in the meantime, you want to reinstate the certificate.
Complete this procedure to use an Ansible playbook to release a certificate for a service enrolled into IdM from hold. This example describes how to release a certificate for an HTTP service from hold.
Prerequisites
On the control node:
- You are using Ansible version 2.13 or later.
-
You have installed the
ansible-freeipapackage. - You have created an Ansible inventory file with the fully-qualified domain name (FQDN) of the IdM server in the ~/MyPlaybooks/ directory.
-
You have stored your
ipaadmin_passwordin the secret.yml Ansible vault.
- Your IdM deployment has an integrated CA.
-
You have obtained the serial number of the certificate, for example by entering the
openssl x509 -noout -text -in path/to/certificatecommand. In this example, the certificate serial number is 123456789.
Procedure
Create your Ansible playbook file restore-certificate.yml with the following content:
--- - name: Playbook to restore a certificate hosts: ipaserver vars_files: - /home/user_name/MyPlaybooks/secret.yml tasks: - name: Restore a certificate for a web service ipacert: ipaadmin_password: "{{ ipaadmin_password }}" serial_number: 123456789 state: releasedRun the playbook:
$ ansible-playbook --vault-password-file=password_file -v -i <path_to_inventory_directory>/hosts <path_to_playbooks_directory>/restore-certificate.yml
64.4. Using Ansible to retrieve SSL certificates for IdM users, hosts, and services
You can use the ansible-freeipa ipacert module to retrieve an SSL certificate issued for an Identity Management (IdM) user, host or a service, and store it in a file on the managed node.
Prerequisites
On the control node:
- You are using Ansible version 2.13 or later.
-
You have installed the
ansible-freeipapackage. - You have created an Ansible inventory file with the fully-qualified domain name (FQDN) of the IdM server in the ~/MyPlaybooks/ directory.
-
You have stored your
ipaadmin_passwordin the secret.yml Ansible vault.
-
You have obtained the serial number of the certificate, for example by entering the
openssl x509 -noout -text -in <path_to_certificate>command. In this example, the serial number of the certificate is 123456789, and the file in which you store the retrieved certificate is cert.pem.
Procedure
Create your Ansible playbook file retrieve-certificate.yml with the following content:
--- - name: Playbook to retrieve a certificate and store it locally on the managed node hosts: ipaserver vars_files: - /home/user_name/MyPlaybooks/secret.yml tasks: - name: Retrieve a certificate and save it to file 'cert.pem' ipacert: ipaadmin_password: "{{ ipaadmin_password }}" serial_number: 123456789 certificate_out: cert.pem state: retrievedRetrieve the certificate:
$ ansible-playbook --vault-password-file=password_file -v -i <path_to_inventory_directory>/hosts <path_to_playbooks_directory>/retrieve-certificate.yml
Chapter 65. Managing externally signed certificates for IdM users, hosts, and services
This chapter describes how to use the Identity Management (IdM) command-line interface (CLI) and the IdM Web UI to add or remove user, host, or service certificates that were issued by an external certificate authority (CA).
65.1. Adding a certificate issued by an external CA to an IdM user, host, or service by using the IdM CLI
As an Identity Management (IdM) administrator, you can add an externally signed certificate to the account of an IdM user, host, or service by using the Identity Management (IdM) CLI.
Prerequisites
- You have obtained the ticket-granting ticket of an administrative user.
Procedure
To add a certificate to an IdM user, enter:
$ ipa user-add-cert user --certificate=MIQTPrajQAwg...The command requires you to specify the following information:
- The name of the user
- The Base64-encoded DER certificate
Instead of copying and pasting the certificate contents into the command line, you can convert the certificate to the DER format and then re-encode it to Base64. For example, to add the user_cert.pem certificate to user, enter:
$ ipa user-add-cert user --certificate="$(openssl x509 -outform der -in user_cert.pem | base64 -w 0)"
You can run the ipa user-add-cert command interactively by executing it without adding any options.
To add a certificate to an IdM host, enter:
-
ipa host-add-cert
To add a certificate to an IdM service, enter:
-
ipa service-add-cert
Additional resources
65.2. Adding a certificate issued by an external CA to an IdM user, host, or service by using the IdM Web UI
As an Identity Management (IdM) administrator, you can add an externally signed certificate to the account of an IdM user, host, or service by using the Identity Management (IdM) Web UI.
Prerequisites
- You are logged in to the Identity Management (IdM) Web UI as an administrative user.
Procedure
-
Open the
Identitytab, and select theUsers,Hosts, orServicessubtab. - Click the name of the user, host, or service to open its configuration page.
Click next to the
Certificatesentry.Figure 65.1. Adding a certificate to a user account
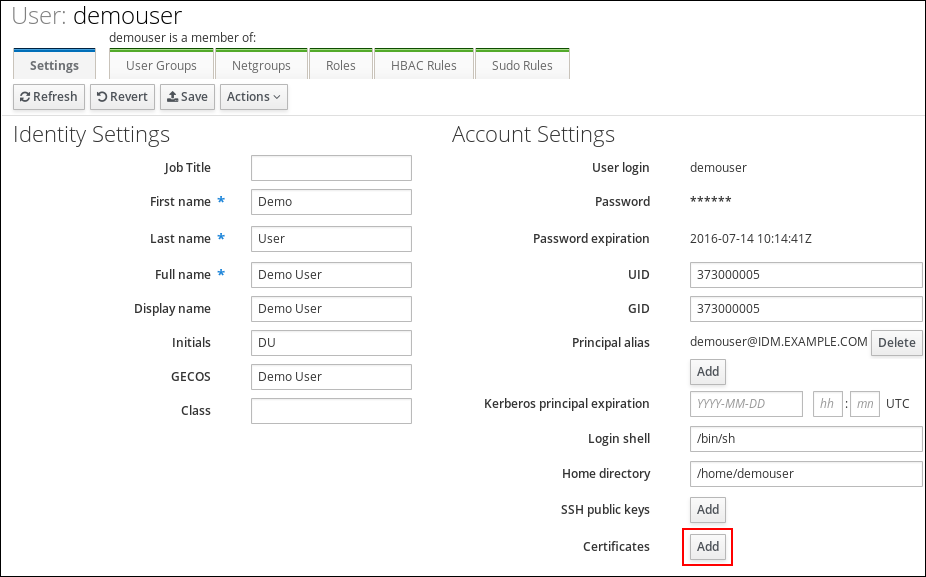
- Paste the certificate in Base64 or PEM encoded format into the text field, and click .
- Click to store the changes.
65.3. Removing a certificate issued by an external CA from an IdM user, host, or service account by using the IdM CLI
As an Identity Management (IdM) administrator, you can remove an externally signed certificate from the account of an IdM user, host, or service by using the Identity Management (IdM) CLI .
Prerequisites
- You have obtained the ticket-granting ticket of an administrative user.
Procedure
To remove a certificate from an IdM user, enter:
$ ipa user-remove-cert user --certificate=MIQTPrajQAwg...The command requires you to specify the following information:
- The name of the user
- The Base64-encoded DER certificate
Instead of copying and pasting the certificate contents into the command line, you can convert the certificate to the DER format and then re-encode it to Base64. For example, to remove the user_cert.pem certificate from user, enter:
$ ipa user-remove-cert user --certificate="$(openssl x509 -outform der -in user_cert.pem | base64 -w 0)"
You can run the ipa user-remove-cert command interactively by executing it without adding any options.
To remove a certificate from an IdM host, enter:
-
ipa host-remove-cert
To remove a certificate from an IdM service, enter:
-
ipa service-remove-cert
Additional resources
65.4. Removing a certificate issued by an external CA from an IdM user, host, or service account by using the IdM Web UI
As an Identity Management (IdM) administrator, you can remove an externally signed certificate from the account of an IdM user, host, or service by using the Identity Management (IdM) Web UI.
Prerequisites
- You are logged in to the Identity Management (IdM) Web UI as an administrative user.
Procedure
-
Open the
Identitytab, and select theUsers,Hosts, orServicessubtab. - Click the name of the user, host, or service to open its configuration page.
- Click the next to the certificate to delete, and select .
- Click to store the changes.
Chapter 66. Creating and managing certificate profiles in Identity Management
Certificate profiles are used by the Certificate Authority (CA) when signing certificates to determine if a certificate signing request (CSR) is acceptable, and if so what features and extensions are present on the certificate. A certificate profile is associated with issuing a particular type of certificate. By combining certificate profiles and CA access control lists (ACLs), you can define and control access to custom certificate profiles.
In describing how to create certificate profiles, the procedures use S/MIME certificates as an example. Some email programs support digitally signed and encrypted email using the Secure Multipurpose Internet Mail Extension (S/MIME) protocol. Using S/MIME to sign or encrypt email messages requires the sender of the message to have an S/MIME certificate.
66.1. What is a certificate profile?
You can use certificate profiles to determine the content of certificates, as well as constraints for issuing the certificates, such as the following:
- The signing algorithm to use to encipher the certificate signing request.
- The default validity of the certificate.
- The revocation reasons that can be used to revoke a certificate.
- If the common name of the principal is copied to the subject alternative name field.
- The features and extensions that should be present on the certificate.
A single certificate profile is associated with issuing a particular type of certificate. You can define different certificate profiles for users, services, and hosts in IdM. IdM includes the following certificate profiles by default:
-
caIPAserviceCert -
IECUserRoles -
KDCs_PKINIT_Certs(used internally)
In addition, you can create and import custom profiles, which allow you to issue certificates for specific purposes. For example, you can restrict the use of a particular profile to only one user or one group, preventing other users and groups from using that profile to issue a certificate for authentication. To create custom certificate profiles, use the ipa certprofile command.
66.2. Creating a certificate profile
Follow this procedure to create a certificate profile through the command line by creating a profile configuration file for requesting S/MIME certificates.
Procedure
Create a custom profile by copying an existing default profile:
$ ipa certprofile-show --out smime.cfg caIPAserviceCert ------------------------------------------------ Profile configuration stored in file 'smime.cfg' ------------------------------------------------ Profile ID: caIPAserviceCert Profile description: Standard profile for network services Store issued certificates: TRUEOpen the newly created profile configuration file in a text editor.
$ vi smime.cfgChange the
Profile IDto a name that reflects the usage of the profile, for examplesmime.NoteWhen you are importing a newly created profile, the
profileIdfield, if present, must match the ID specified on the command line.Update the Extended Key Usage configuration. The default Extended Key Usage extension configuration is for TLS server and client authentication. For example for S/MIME, the Extended Key Usage must be configured for email protection:
policyset.serverCertSet.7.default.params.exKeyUsageOIDs=1.3.6.1.5.5.7.3.4Import the new profile:
$ ipa certprofile-import smime --file smime.cfg \ --desc "S/MIME certificates" --store TRUE ------------------------ Imported profile "smime" ------------------------ Profile ID: smime Profile description: S/MIME certificates Store issued certificates: TRUE
Verification
Verify the new certificate profile has been imported:
$ ipa certprofile-find ------------------ 4 profiles matched ------------------ Profile ID: caIPAserviceCert Profile description: Standard profile for network services Store issued certificates: TRUE Profile ID: IECUserRoles Profile description: User profile that includes IECUserRoles extension from request Store issued certificates: TRUE Profile ID: KDCs_PKINIT_Certs Profile description: Profile for PKINIT support by KDCs Store issued certificates: TRUE Profile ID: smime Profile description: S/MIME certificates Store issued certificates: TRUE ---------------------------- Number of entries returned 4 ----------------------------
66.3. What is a CA access control list?
Certificate Authority access control list (CA ACL) rules define which profiles can be used to issue certificates to which principals. You can use CA ACLs to do this, for example:
- Determine which user, host, or service can be issued a certificate with a particular profile
- Determine which IdM certificate authority or sub-CA is permitted to issue the certificate
For example, using CA ACLs, you can restrict use of a profile intended for employees working from an office located in London only to users that are members of the London office-related IdM user group.
The ipa caacl utility for management of CA ACL rules allows privileged users to add, display, modify, or delete a specified CA ACL.
66.4. Defining a CA ACL to control access to certificate profiles
Follow this procedure to use the caacl utility to define a CA Access Control List (ACL) rule to allow users in a group access to a custom certificate profile. In this case, the procedure describes how to create an S/MIME user’s group and a CA ACL to allow users in that group access to the smime certificate profile.
Prerequisites
- Make sure that you have obtained IdM administrator’s credentials.
Procedure
Create a new group for the users of the certificate profile:
$ ipa group-add smime_users_group --------------------------------- Added group "smime users group" --------------------------------- Group name: smime_users_group GID: 75400001Create a new user to add to the
smime_user_groupgroup:$ ipa user-add smime_user First name: smime Last name: user ---------------------- Added user "smime_user" ---------------------- User login: smime_user First name: smime Last name: user Full name: smime user Display name: smime user Initials: TU Home directory: /home/smime_user GECOS: smime user Login shell: /bin/sh Principal name: smime_user@IDM.EXAMPLE.COM Principal alias: smime_user@IDM.EXAMPLE.COM Email address: smime_user@idm.example.com UID: 1505000004 GID: 1505000004 Password: False Member of groups: ipausers Kerberos keys available: FalseAdd the
smime_userto thesmime_users_groupgroup:$ ipa group-add-member smime_users_group --users=smime_user Group name: smime_users_group GID: 1505000003 Member users: smime_user ------------------------- Number of members added 1 -------------------------Create the CA ACL to allow users in the group to access the certificate profile:
$ ipa caacl-add smime_acl ------------------------ Added CA ACL "smime_acl" ------------------------ ACL name: smime_acl Enabled: TRUEAdd the user group to the CA ACL:
$ ipa caacl-add-user smime_acl --group smime_users_group ACL name: smime_acl Enabled: TRUE User Groups: smime_users_group ------------------------- Number of members added 1 -------------------------Add the certificate profile to the CA ACL:
$ ipa caacl-add-profile smime_acl --certprofile smime ACL name: smime_acl Enabled: TRUE Profiles: smime User Groups: smime_users_group ------------------------- Number of members added 1 -------------------------
Verification
View the details of the CA ACL you created:
$ ipa caacl-show smime_acl ACL name: smime_acl Enabled: TRUE Profiles: smime User Groups: smime_users_group ...
66.5. Using certificate profiles and CA ACLs to issue certificates
You can request certificates using a certificate profile when permitted by the Certificate Authority access control lists (CA ACLs). Follow this procedure to request an S/MIME certificate for a user using a custom certificate profile which has been granted access through a CA ACL.
Prerequisites
- Your certificate profile has been created.
- An CA ACL has been created which permits the user to use the required certificate profile to request a certificate.
You can bypass the CA ACL check if the user performing the cert-request command:
-
Is the
adminuser. -
Has the
Request Certificate ignoring CA ACLspermission.
Procedure
Generate a certificate request for the user. For example, using OpenSSL:
$ openssl req -new -newkey rsa:2048 -days 365 -nodes -keyout private.key -out cert.csr -subj '/CN=smime_user'Request a new certificate for the user from the IdM CA:
$ ipa cert-request cert.csr --principal=smime_user --profile-id=smimeOptional: Pass the --ca sub-CA_name option to the command to request the certificate from a sub-CA instead of the root CA.
Verification
Verify the newly-issued certificate is assigned to the user:
$ ipa user-show user User login: user ... Certificate: MIICfzCCAWcCAQA... ...
66.6. Modifying a certificate profile
Follow this procedure to modify certificate profiles directly through the command line using the ipa certprofile-mod command.
Procedure
Determine the certificate profile ID for the certificate profile you are modifying. To display all certificate profiles currently stored in IdM:
# ipa certprofile-find ------------------ 4 profiles matched ------------------ Profile ID: caIPAserviceCert Profile description: Standard profile for network services Store issued certificates: TRUE Profile ID: IECUserRoles ... Profile ID: smime Profile description: S/MIME certificates Store issued certificates: TRUE -------------------------- Number of entries returned --------------------------Modify the certificate profile description. For example, if you created a custom certificate profile for S/MIME certificates using an existing profile, change the description in line with the new usage:
# ipa certprofile-mod smime --desc "New certificate profile description" ------------------------------------ Modified Certificate Profile "smime" ------------------------------------ Profile ID: smime Profile description: New certificate profile description Store issued certificates: TRUEOpen your customer certificate profile file in a text editor and modify to suit your requirements:
# vi smime.cfgFor details on the options which can be configured in the certificate profile configuration file, see Certificate profile configuration parameters.
Update the existing certificate profile configuration file:
# ipa certprofile-mod _profile_ID_ --file=smime.cfg
Verification
Verify the certificate profile has been updated:
$ ipa certprofile-show smime Profile ID: smime Profile description: New certificate profile description Store issued certificates: TRUE
66.7. Certificate profile configuration parameters
Certificate profile configuration parameters are stored in a profile_name.cfg file in the CA profile directory, /var/lib/pki/pki-tomcat/ca/profiles/ca. All of the parameters for a profile - defaults, inputs, outputs, and constraints - are configured within a single policy set. A policy set for a certificate profile has the name policyset.policyName.policyNumber. For example, for policy set serverCertSet:
policyset.list=serverCertSet
policyset.serverCertSet.list=1,2,3,4,5,6,7,8
policyset.serverCertSet.1.constraint.class_id=subjectNameConstraintImpl
policyset.serverCertSet.1.constraint.name=Subject Name Constraint
policyset.serverCertSet.1.constraint.params.pattern=CN=[^,]+,.+
policyset.serverCertSet.1.constraint.params.accept=true
policyset.serverCertSet.1.default.class_id=subjectNameDefaultImpl
policyset.serverCertSet.1.default.name=Subject Name Default
policyset.serverCertSet.1.default.params.name=CN=$request.req_subject_name.cn$, OU=pki-ipa, O=IPA
policyset.serverCertSet.2.constraint.class_id=validityConstraintImpl
policyset.serverCertSet.2.constraint.name=Validity Constraint
policyset.serverCertSet.2.constraint.params.range=740
policyset.serverCertSet.2.constraint.params.notBeforeCheck=false
policyset.serverCertSet.2.constraint.params.notAfterCheck=false
policyset.serverCertSet.2.default.class_id=validityDefaultImpl
policyset.serverCertSet.2.default.name=Validity Default
policyset.serverCertSet.2.default.params.range=731
policyset.serverCertSet.2.default.params.startTime=0Each policy set contains a list of policies configured for the certificate profile by policy ID number in the order in which they should be evaluated. The server evaluates each policy set for each request it receives. When a single certificate request is received, one set is evaluated, and any other sets in the profile are ignored. When dual key pairs are issued, the first policy set is evaluated for the first certificate request, and the second set is evaluated for the second certificate request. You do not need more than one policy set when issuing single certificates or more than two sets when issuing dual key pairs.
| Parameter | Description |
|---|---|
| desc |
A free text description of the certificate profile, which is shown on the end-entities page. For example, |
| enable |
Enables the profile so it is accessible through the end-entities page. For example, |
| auth.instance_id |
Sets the authentication manager plug-in to use to authenticate the certificate request. For automatic enrollment, the CA issues a certificate immediately if the authentication is successful. If authentication fails or there is no authentication plug-in specified, the request is queued to be manually approved by an agent. For example, |
| authz.acl |
Specifies the authorization constraint. This is predominantly used to set the group evaluation Access Control List (ACL). For example, the
In directory-based user certificate renewal, this option is used to ensure that the original requester and the currently-authenticated user are the same. An entity must authenticate (bind or, essentially, log into the system) before authorization can be evaluated. |
| name |
The name of the certificate profile. For example, |
| input.list |
Lists the allowed inputs for the certificate profile by name. For example, |
| input.input_id.class_id |
Indicates the java class name for the input by input ID (the name of the input listed in input.list). For example, |
| output.list |
Lists the possible output formats for the certificate profile by name. For example, |
| output.output_id.class_id |
Specifies the java class name for the output format named in output.list. For example, |
| policyset.list |
Lists the configured certificate profile rules. For dual certificates, one set of rules applies to the signing key and the other to the encryption key. Single certificates use only one set of certificate profile rules. For example, |
| policyset.policyset_id.list |
Lists the policies within the policy set configured for the certificate profile by policy ID number in the order in which they should be evaluated. For example, |
| policyset.policyset_id.policy_number.constraint.class_id | Indicates the java class name of the constraint plug-in set for the default configured in the profile rule. For example, policyset.serverCertSet.1.constraint.class_id=subjectNameConstraintImpl. |
| policyset.policyset_id.policy_number.constraint.name | Gives the user-defined name of the constraint. For example, policyset.serverCertSet.1.constraint.name=Subject Name Constraint. |
| policyset.policyset_id.policy_number.constraint.params.attribute | Specifies a value for an allowed attribute for the constraint. The possible attributes vary depending on the type of constraint. For example, policyset.serverCertSet.1.constraint.params.pattern=CN=.*. |
| policyset.policyset_id.policy_number.default.class_id | Gives the java class name for the default set in the profile rule. For example, policyset.serverCertSet.1.default.class_id=userSubjectNameDefaultImpl |
| policyset.policyset_id.policy_number.default.name | Gives the user-defined name of the default. For example, policyset.serverCertSet.1.default.name=Subject Name Default |
| policyset.policyset_id.policy_number.default.params.attribute | Specifies a value for an allowed attribute for the default. The possible attributes vary depending on the type of default. For example, policyset.serverCertSet.1.default.params.name=CN=(Name)$request.requestor_name$. |
Chapter 67. Managing the validity of certificates in IdM
In Identity Management (IdM), you can manage the validity of both already existing certificates and certificates you want to issue in the future, but the methods are different.
67.1. Managing the validity of an existing certificate that was issued by IdM CA
In IdM, the following methods of viewing the expiry date of a certificate are available:
You can manage the validity of an already existing certificate that was issued by IdM CA in the following ways:
Renew a certificate by requesting a new certificate using either the original certificate signing request (CSR) or a new CSR generated from the private key. You can request a new certificate using the following utilities:
- certmonger
-
You can use
certmongerto request a service certificate. Before the certificate is due to expire,certmongerwill automatically renew the certificate, thereby ensuring a continuing validity of the service certificate. For details, see Obtaining an IdM certificate for a service using certmonger; - certutil
-
You can use
certutilto renew user, host, and service certificates. For details on requesting a user certificate, see Requesting a new user certificate and exporting it to the client; - openssl
-
You can use
opensslto renew user, host, and service certificates.
Revoke a certificate. For details, see:
Restore a certificate if it has been temporarily revoked. For details, see:
67.2. Managing the validity of future certificates issued by IdM CA
To manage the validity of future certificates issued by IdM CA, modify, import, or create a certificate profile. For details, see Creating and managing certificate profiles in Identity Management.
67.3. Viewing the expiry date of a certificate in IdM WebUI
You can use IdM WebUI to view the expiry date of all the certificates that have been issued by IdM CA.
Prerequisites
- Ensure that you have obtained the administrator’s credentials.
Procedure
-
In the
Authenticationmenu, clickCertificates>Certificates. Click the serial number of the certificate to open the certificate information page.
Figure 67.1. List of Certificates
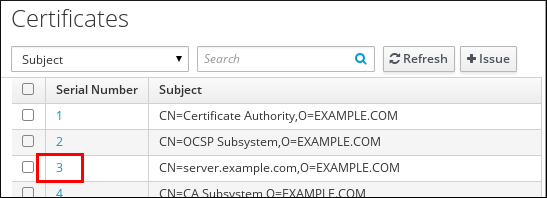
-
In the certificate information page, locate the
Expires Oninformation.
67.4. Viewing the expiry date of a certificate in the CLI
You can use the command line (CLI) to view the expiry date of a certificate.
Procedure
Use the
opensslutility to open the file in a human-readable format:$ openssl x509 -noout -text -in ca.pem Certificate: Data: Version: 3 (0x2) Serial Number: 1 (0x1) Signature Algorithm: sha256WithRSAEncryption Issuer: O = IDM.EXAMPLE.COM, CN = Certificate Authority Validity Not Before: Oct 30 19:39:14 2017 GMT Not After : Oct 30 19:39:14 2037 GMT
67.5. Revoking certificates with the integrated IdM CAs
67.5.1. Certificate revocation reasons
A revoked certificate is invalid and cannot be used for authentication. All revocations are permanent, except for reason 6: Certificate Hold.
The default revocation reason is 0: unspecified.
| ID | Reason | Explanation |
|---|---|---|
| 0 | Unspecified | |
| 1 | Key Compromised | The key that issued the certificate is no longer trusted. Possible causes: lost token, improperly accessed file. |
| 2 | CA Compromised | The CA that issued the certificate is no longer trusted. |
| 3 | Affiliation Changed | Possible causes: * A person has left the company or moved to another department. * A host or service is being retired. |
| 4 | Superseded | A newer certificate has replaced the current certificate. |
| 5 | Cessation of Operation | The host or service is being decommissioned. |
| 6 | Certificate Hold | The certificate is temporarily revoked. You can restore the certificate later. |
| 8 | Remove from CRL | The certificate is not included in the certificate revocation list (CRL). |
| 9 | Privilege Withdrawn | The user, host, or service is no longer permitted to use the certificate. |
| 10 | Attribute Authority (AA) Compromise | The AA certificate is no longer trusted. |
67.5.2. Revoking certificates with the integrated IdM CAs using IdM WebUI
If you know you have lost the private key for your certificate, you must revoke the certificate to prevent its abuse. Complete this procedure to use the IdM WebUI to revoke a certificate issued by the IdM CA.
Procedure
-
Click
Authentication>Certificates>Certificates. Click the serial number of the certificate to open the certificate information page.
Figure 67.2. List of Certificates
- In the certificate information page, click → .
- Select the reason for revoking and click . See Certificate revocation reasons for details.
67.5.3. Revoking certificates with the integrated IdM CAs using IdM CLI
If you know you have lost the private key for your certificate, you must revoke the certificate to prevent its abuse. Complete this procedure to use the IdM CLI to revoke a certificate issued by the IdM CA.
Procedure
Use the
ipa cert-revokecommand, and specify:- the certificate serial number
- the ID number for the revocation reason; see Certificate revocation reasons for details
For example, to revoke the certificate with serial number 1032 because of reason 1: Key Compromised, enter:
$ ipa cert-revoke 1032 --revocation-reason=1For details on requesting a new certificate, see the following documentation:
67.6. Restoring certificates with the integrated IdM CAs
If you have revoked a certificate because of reason 6: Certificate Hold, you can restore it again if the private key for the certificate has not been compromised. To restore a certificate, use one of the following procedures:
67.6.1. Restoring certificates with the integrated IdM CAs using IdM WebUI
Complete this procedure to use the IdM WebUI to restore an IdM certificate that has been revoked because of Reason 6: Certificate Hold.
Procedure
-
In the
Authenticationmenu, clickCertificates>Certificates. Click the serial number of the certificate to open the certificate information page.
Figure 67.3. List of Certificates
- In the certificate information page, click → .
67.6.2. Restoring certificates with the integrated IdM CAs using IdM CLI
Complete this procedure to use the IdM CLI to restore an IdM certificate that has been revoked because of Reason 6: Certificate Hold.
Procedure
Use the
ipa cert-remove-holdcommand and specify the certificate serial number. For example:$ ipa cert-remove-hold 1032
Chapter 68. Configuring Identity Management for smart card authentication
Identity Management (IdM) supports smart card authentication with:
- User certificates issued by the IdM certificate authority
- User certificates issued by an external certificate authority
You can configure smart card authentication in IdM for both types of certificates. In this scenario, the rootca.pem CA certificate is the file containing the certificate of a trusted external certificate authority.
Currently, IdM does not support importing multiple CAs that share the same Subject Distinguished Name (DN) but are cryptographically different.
68.1. Configuring the IdM server for smart card authentication
This procedure covers how to enable smart card authentication for users whose certificates have been issued by the certificate authority (CA) of the <EXAMPLE.ORG> domain that your Identity Management (IdM) CA trusts.
Prerequisites
- You have root access to the IdM server.
You have the root CA certificate and all the intermediate CA certificates:
- The certificate of the root CA that has either issued the certificate for the <EXAMPLE.ORG> CA directly, or through one or more of its sub-CAs. You can download the certificate chain from a web page whose certificate has been issued by the authority. For details, see Steps 1 - 4a in Configuring a browser to enable certificate authentication.
-
The IdM CA certificate. You can obtain the CA certificate from the
/etc/ipa/ca.crtfile on the IdM server on which an IdM CA instance is running. - The certificates of all of the intermediate CAs; that is, intermediate between the <EXAMPLE.ORG> CA and the IdM CA.
Procedure
Create a directory in which you will do the configuration:
[root@server]# mkdir ~/SmartCard/Navigate to the directory:
[root@server]# cd ~/SmartCard/Obtain the relevant CA certificates stored in files in PEM format. If your CA certificate is stored in a file of a different format, such as DER, convert it to PEM format. The IdM Certificate Authority certificate is in PEM format and is located in the
/etc/ipa/ca.crtfile.Convert a DER file to a PEM file:
# openssl x509 -in <filename>.der -inform DER -out <filename>.pem -outform PEMFor convenience, copy the certificates to the directory in which you want to do the configuration:
[root@server SmartCard]# cp /tmp/rootca.pem ~/SmartCard/ [root@server SmartCard]# cp /tmp/subca.pem ~/SmartCard/ [root@server SmartCard]# cp /tmp/issuingca.pem ~/SmartCard/Optional: If you use certificates of external certificate authorities, use the
openssl x509utility to view the contents of the files in thePEMformat to check that theIssuerandSubjectvalues are correct:[root@server SmartCard]# openssl x509 -noout -text -in rootca.pem | moreGenerate a configuration script with the in-built
ipa-adviseutility, using the administrator’s privileges:[root@server SmartCard]# kinit admin [root@server SmartCard]# ipa-advise config-server-for-smart-card-auth > config-server-for-smart-card-auth.shThe
config-server-for-smart-card-auth.shscript performs the following actions:- It configures the IdM Apache HTTP Server.
- It enables Public Key Cryptography for Initial Authentication in Kerberos (PKINIT) on the Key Distribution Center (KDC).
- It configures the IdM Web UI to accept smart card authorization requests.
Execute the script, adding the PEM files containing the root CA and sub CA certificates as arguments:
[root@server SmartCard]# chmod +x config-server-for-smart-card-auth.sh [root@server SmartCard]# ./config-server-for-smart-card-auth.sh rootca.pem subca.pem issuingca.pem Ticket cache:KEYRING:persistent:0:0 Default principal: admin@IDM.EXAMPLE.COM [...] Systemwide CA database updated. The ipa-certupdate command was successfulNoteEnsure that you add the root CA’s certificate as an argument before any sub CA certificates and that the CA or sub CA certificates have not expired.
Optional: If the certificate authority that issued the user certificate does not provide any Online Certificate Status Protocol (OCSP) responder, you may need to disable OCSP check for authentication to the IdM Web UI:
Set the
SSLOCSPEnableparameter tooffin the/etc/httpd/conf.d/ssl.conffile:SSLOCSPEnable offRestart the Apache daemon (httpd) for the changes to take effect immediately:
[root@server SmartCard]# systemctl restart httpd
WarningDo not disable the OCSP check if you only use user certificates issued by the IdM CA. OCSP responders are part of IdM.
For instructions on how to keep the OCSP check enabled, and yet prevent a user certificate from being rejected by the IdM server if it does not contain the information about the location at which the CA that issued the user certificate listens for OCSP service requests, see the
SSLOCSPDefaultResponderdirective in Apache mod_ssl configuration options.
The server is now configured for smart card authentication.
To enable smart card authentication in the whole topology, run the procedure on each IdM server.
68.2. Using Ansible to configure the IdM server for smart card authentication
In this procedure, you use Ansible to enable smart card authentication for users whose certificates have been issued by the certificate authority (CA) of the <EXAMPLE.ORG> domain that your Identity Management (IdM) CA trusts.
Prerequisites
-
You have
rootaccess to the IdM server. -
You know the IdM
adminpassword. You have the root CA certificate, the IdM CA certificate, and all the intermediate CA certificates:
- The certificate of the root CA that has either issued the certificate for the <EXAMPLE.ORG> CA directly, or through one or more of its sub-CAs. You can download the certificate chain from a web page whose certificate has been issued by the authority. For details, see Step 4 in Configuring a browser to enable certificate authentication.
-
The IdM CA certificate. You can obtain the CA certificate from the
/etc/ipa/ca.crtfile on any IdM CA server. - The certificates of all of the CAs that are intermediate between the <EXAMPLE.ORG> CA and the IdM CA.
You have configured your Ansible control node to meet the following requirements:
- You are using Ansible version 2.13 or later.
-
You have installed the
ansible-freeipapackage. - The example assumes that in the ~/MyPlaybooks/ directory, you have created an Ansible inventory file with the fully-qualified domain name (FQDN) of the IdM server.
-
The example assumes that the secret.yml Ansible vault stores your
ipaadmin_password.
-
The target node, that is the node on which the
ansible-freeipamodule is executed, is part of the IdM domain as an IdM client, server or replica.
Procedure
If your CA certificates are stored in files of a different format, such as
DER, convert them toPEMformat:# openssl x509 -in <filename>.der -inform DER -out <filename>.pem -outform PEMThe IdM Certificate Authority certificate is in
PEMformat and is located in the/etc/ipa/ca.crtfile.Optional: Use the
openssl x509utility to view the contents of the files in thePEMformat to check that theIssuerandSubjectvalues are correct:# openssl x509 -noout -text -in root-ca.pem | moreNavigate to your ~/MyPlaybooks/ directory:
$ cd ~/MyPlaybooks/Create a subdirectory dedicated to the CA certificates:
$ mkdir SmartCard/For convenience, copy all the required certificates to the ~/MyPlaybooks/SmartCard/ directory:
# cp /tmp/root-ca.pem ~/MyPlaybooks/SmartCard/ # cp /tmp/intermediate-ca.pem ~/MyPlaybooks/SmartCard/ # cp /etc/ipa/ca.crt ~/MyPlaybooks/SmartCard/ipa-ca.crtIn your Ansible inventory file, specify the following:
- The IdM servers that you want to configure for smart card authentication.
- The IdM administrator password.
The paths to the certificates of the CAs in the following order:
- The root CA certificate file
- The intermediate CA certificates files
- The IdM CA certificate file
The file can look as follows:
[ipaserver] ipaserver.idm.example.com [ipareplicas] ipareplica1.idm.example.com ipareplica2.idm.example.com [ipacluster:children] ipaserver ipareplicas [ipacluster:vars] ipaadmin_password= "{{ ipaadmin_password }}" ipasmartcard_server_ca_certs=/home/<user_name>/MyPlaybooks/SmartCard/root-ca.pem,/home/<user_name>/MyPlaybooks/SmartCard/intermediate-ca.pem,/home/<user_name>/MyPlaybooks/SmartCard/ipa-ca.crtCreate an
install-smartcard-server.ymlplaybook with the following content:--- - name: Playbook to set up smart card authentication for an IdM server hosts: ipaserver become: true roles: - role: ipasmartcard_server state: present- Save the file.
Run the Ansible playbook. Specify the playbook file, the file storing the password protecting the secret.yml file, and the inventory file:
$ ansible-playbook --vault-password-file=password_file -v -i inventory install-smartcard-server.ymlThe
ipasmartcard_serverAnsible role performs the following actions:- It configures the IdM Apache HTTP Server.
- It enables Public Key Cryptography for Initial Authentication in Kerberos (PKINIT) on the Key Distribution Center (KDC).
- It configures the IdM Web UI to accept smart card authorization requests.
Optional: If the certificate authority that issued the user certificate does not provide any Online Certificate Status Protocol (OCSP) responder, you may need to disable OCSP check for authentication to the IdM Web UI:
Connect to the IdM server as
root:ssh root@ipaserver.idm.example.comSet the
SSLOCSPEnableparameter tooffin the/etc/httpd/conf.d/ssl.conffile:SSLOCSPEnable offRestart the Apache daemon (httpd) for the changes to take effect immediately:
# systemctl restart httpd
WarningDo not disable the OCSP check if you only use user certificates issued by the IdM CA. OCSP responders are part of IdM.
For instructions on how to keep the OCSP check enabled, and yet prevent a user certificate from being rejected by the IdM server if it does not contain the information about the location at which the CA that issued the user certificate listens for OCSP service requests, see the
SSLOCSPDefaultResponderdirective in Apache mod_ssl configuration options.
The server listed in the inventory file is now configured for smart card authentication.
To enable smart card authentication in the whole topology, set the hosts variable in the Ansible playbook to ipacluster:
---
- name: Playbook to setup smartcard for IPA server and replicas
hosts: ipacluster
[...]68.3. Configuring the IdM client for smart card authentication
You can configure IdM clients for smart card authentication. The procedure needs to be run on each IdM system, a client or a server, to which you want to connect while using a smart card for authentication. For example, to enable an ssh connection from host A to host B, the script needs to be run on host B.
As an administrator, run this procedure to enable smart card authentication using
The
sshprotocolFor details see Configuring SSH access using smart card authentication.
- The console login
- The GNOME Display Manager (GDM)
-
The
sucommand
This procedure is not required for authenticating to the IdM Web UI. Authenticating to the IdM Web UI involves two hosts, neither of which needs to be an IdM client:
- The machine on which the browser is running. The machine can be outside of the IdM domain.
-
The IdM server on which
httpdis running.
The following procedure assumes that you are configuring smart card authentication on an IdM client, not an IdM server. For this reason you need two computers: an IdM server to generate the configuration script, and the IdM client on which to run the script.
Prerequisites
- Your IdM server has been configured for smart card authentication, as described in Configuring the IdM server for smart card authentication.
- You have root access to the IdM server and the IdM client.
- You have the root CA certificate and all the intermediate CA certificates.
-
You installed the IdM client with the
--mkhomediroption to ensure remote users can log in successfully. If you do not create a home directory, the default login location is the root of the directory structure,/.
Procedure
On an IdM server, generate a configuration script with
ipa-adviseusing the administrator’s privileges:[root@server SmartCard]# kinit admin [root@server SmartCard]# ipa-advise config-client-for-smart-card-auth > config-client-for-smart-card-auth.shThe
config-client-for-smart-card-auth.shscript performs the following actions:- It configures the smart card daemon.
- It sets the system-wide truststore.
- It configures the System Security Services Daemon (SSSD) to allow users to authenticate with either their user name and password or with their smart card. For more details on SSSD profile options for smart card authentication, see Smart card authentication options in RHEL.
From the IdM server, copy the script to a directory of your choice on the IdM client machine:
[root@server SmartCard]# scp config-client-for-smart-card-auth.sh root@client.idm.example.com:/root/SmartCard/ Password: config-client-for-smart-card-auth.sh 100% 2419 3.5MB/s 00:00From the IdM server, copy the CA certificate files in PEM format for convenience to the same directory on the IdM client machine as used in the previous step:
[root@server SmartCard]# scp {rootca.pem,subca.pem,issuingca.pem} root@client.idm.example.com:/root/SmartCard/ Password: rootca.pem 100% 1237 9.6KB/s 00:00 subca.pem 100% 2514 19.6KB/s 00:00 issuingca.pem 100% 2514 19.6KB/s 00:00On the client machine, execute the script, adding the PEM files containing the CA certificates as arguments:
[root@client SmartCard]# kinit admin [root@client SmartCard]# chmod +x config-client-for-smart-card-auth.sh [root@client SmartCard]# ./config-client-for-smart-card-auth.sh rootca.pem subca.pem issuingca.pem Ticket cache:KEYRING:persistent:0:0 Default principal: admin@IDM.EXAMPLE.COM [...] Systemwide CA database updated. The ipa-certupdate command was successfulNoteEnsure that you add the root CA’s certificate as an argument before any sub CA certificates and that the CA or sub CA certificates have not expired.
The client is now configured for smart card authentication.
68.4. Using Ansible to configure IdM clients for smart card authentication
Follow this procedure to use the ansible-freeipa ipasmartcard_client module to configure specific Identity Management (IdM) clients to permit IdM users to authenticate with a smart card. Run this procedure to enable smart card authentication for IdM users that use any of the following to access IdM:
The
sshprotocolFor details see Configuring SSH access using smart card authentication.
- The console login
- The GNOME Display Manager (GDM)
-
The
sucommand
This procedure is not required for authenticating to the IdM Web UI. Authenticating to the IdM Web UI involves two hosts, neither of which needs to be an IdM client:
- The machine on which the browser is running. The machine can be outside of the IdM domain.
-
The IdM server on which
httpdis running.
Prerequisites
- Your IdM server has been configured for smart card authentication, as described in Using Ansible to configure the IdM server for smart card authentication.
- You have root access to the IdM server and the IdM client.
- You have the root CA certificate, the IdM CA certificate, and all the intermediate CA certificates.
You have configured your Ansible control node to meet the following requirements:
- You are using Ansible version 2.13 or later.
-
You have installed the
ansible-freeipapackage. - The example assumes that in the ~/MyPlaybooks/ directory, you have created an Ansible inventory file with the fully-qualified domain name (FQDN) of the IdM server.
-
The example assumes that the secret.yml Ansible vault stores your
ipaadmin_password.
-
The target node, that is the node on which the
ansible-freeipamodule is executed, is part of the IdM domain as an IdM client, server or replica.
Procedure
If your CA certificates are stored in files of a different format, such as
DER, convert them toPEMformat:# openssl x509 -in <filename>.der -inform DER -out <filename>.pem -outform PEMThe IdM CA certificate is in
PEMformat and is located in the/etc/ipa/ca.crtfile.Optional: Use the
openssl x509utility to view the contents of the files in thePEMformat to check that theIssuerandSubjectvalues are correct:# openssl x509 -noout -text -in root-ca.pem | moreOn your Ansible control node, navigate to your ~/MyPlaybooks/ directory:
$ cd ~/MyPlaybooks/Create a subdirectory dedicated to the CA certificates:
$ mkdir SmartCard/For convenience, copy all the required certificates to the ~/MyPlaybooks/SmartCard/ directory, for example:
# cp /tmp/root-ca.pem ~/MyPlaybooks/SmartCard/ # cp /tmp/intermediate-ca.pem ~/MyPlaybooks/SmartCard/ # cp /etc/ipa/ca.crt ~/MyPlaybooks/SmartCard/ipa-ca.crtIn your Ansible inventory file, specify the following:
- The IdM clients that you want to configure for smart card authentication.
- The IdM administrator password.
The paths to the certificates of the CAs in the following order:
- The root CA certificate file
- The intermediate CA certificates files
- The IdM CA certificate file
The file can look as follows:
[ipaclients] ipaclient1.example.com ipaclient2.example.com [ipaclients:vars] ipaadmin_password=SomeADMINpassword ipasmartcard_client_ca_certs=/home/<user_name>/MyPlaybooks/SmartCard/root-ca.pem,/home/<user_name>/MyPlaybooks/SmartCard/intermediate-ca.pem,/home/<user_name>/MyPlaybooks/SmartCard/ipa-ca.crtCreate an
install-smartcard-clients.ymlplaybook with the following content:--- - name: Playbook to set up smart card authentication for an IdM client hosts: ipaclients become: true roles: - role: ipasmartcard_client state: present- Save the file.
Run the Ansible playbook. Specify the playbook and inventory files:
$ ansible-playbook --vault-password-file=password_file -v -i inventory install-smartcard-clients.ymlThe
ipasmartcard_clientAnsible role performs the following actions:- It configures the smart card daemon.
- It sets the system-wide truststore.
- It configures the System Security Services Daemon (SSSD) to allow users to authenticate with either their user name and password or their smart card. For more details on SSSD profile options for smart card authentication, see Smart card authentication options in RHEL.
The clients listed in the ipaclients section of the inventory file are now configured for smart card authentication.
If you have installed the IdM clients with the --mkhomedir option, remote users will be able to log in to their home directories. Otherwise, the default login location is the root of the directory structure, /.
68.5. Adding a certificate to a user entry in the IdM Web UI
You can add an external certificate to a user entry in IdM Web UI.
Instead of uploading the whole certificate, it is also possible to upload certificate mapping data to a user entry in IdM. User entries containing either full certificates or certificate mapping data can be used in conjunction with corresponding certificate mapping rules to facilitate the configuration of smart card authentication for system administrators. For details, see
Certificate mapping rules for configuring authentication.
If the user’s certificate has been issued by the IdM Certificate Authority, the certificate is already stored in the user entry, and you do not need to follow this procedure.
Prerequisites
- You have the certificate that you want to add to the user entry at your disposal.
Procedure
- Log into the IdM Web UI as an administrator if you want to add a certificate to another user. For adding a certificate to your own profile, you do not need the administrator’s credentials.
-
Navigate to
Users→Active users→sc_user. -
Find the
Certificateoption and clickAdd. On the command line, display the certificate in the
PEMformat using thecatutility or a text editor:[user@client SmartCard]$ cat testuser.crt- Copy and paste the certificate from the CLI into the window that has opened in the Web UI.
-
Click
Add.
The sc_user entry now contains an external certificate.
68.6. Adding a certificate to a user entry in the IdM CLI
You can add an external certificate to a user entry in IdM CLI.
Instead of uploading the whole certificate, it is also possible to upload certificate mapping data to a user entry in IdM. User entries containing either full certificates or certificate mapping data can be used in conjunction with corresponding certificate mapping rules to facilitate the configuration of smart card authentication for system administrators. For details, see Certificate mapping rules for configuring authentication.
If the user’s certificate has been issued by the IdM Certificate Authority, the certificate is already stored in the user entry, and you do not need to follow this procedure.
Prerequisites
- You have the certificate that you want to add to the user entry at your disposal.
Procedure
Log into the IdM CLI as an administrator if you want to add a certificate to another user:
[user@client SmartCard]$ kinit adminFor adding a certificate to your own profile, you do not need the administrator’s credentials.
[user@client SmartCard]$ kinit <smartcard_user>Create an environment variable containing the certificate with the header and footer removed and concatenated into a single line, which is the format expected by the
ipa user-add-certcommand:[user@client SmartCard]$ export CERT=`openssl x509 -outform der -in testuser.crt | base64 -w0 -`Note that certificate in the
testuser.crtfile must be in thePEMformat.Add the certificate to the profile of <smartcard_user> using the
ipa user-add-certcommand:[user@client SmartCard]$ ipa user-add-cert <smartcard_user> --certificate=$CERT
The <smartcard_user> entry now contains an external certificate.
68.7. Installing tools for managing and using smart cards
Before you can configure your smart card, you must install the corresponding tools that can generate certificates and start the pscd service.
Prerequisites
-
You have
rootpermissions.
Procedure
Install the
openscandgnutls-utilspackages:# yum -y install opensc gnutls-utilsStart the
pcscdservice.# systemctl start pcscd
Verification
Verify that the
pcscdservice is up and running:# systemctl status pcscd
68.8. Preparing your smart card and uploading your certificates and keys to your smart card
Follow this procedure to configure your smart card with the pkcs15-init tool, which helps you to configure:
- Erasing your smart card
- Setting new PINs and optional PIN Unblocking Keys (PUKs)
- Creating a new slot on the smart card
- Storing the certificate, private key, and public key in the slot
- If required, locking the smart card settings as certain smart cards require this type of finalization
The pkcs15-init tool may not work with all smart cards. You must use the tools that work with the smart card you are using.
Prerequisites
The
openscpackage, which includes thepkcs15-inittool, is installed.For more details, see Installing tools for managing and using smart cards.
- The card is inserted in the reader and connected to the computer.
-
You have a private key, a public key, and a certificate to store on the smart card. In this procedure,
testuser.key,testuserpublic.key, andtestuser.crtare the names used for the private key, public key, and the certificate. - You have your current smart card user PIN and Security Officer PIN (SO-PIN).
Procedure
Erase your smart card and authenticate yourself with your PIN:
$ pkcs15-init --erase-card --use-default-transport-keys Using reader with a card: Reader name PIN [Security Officer PIN] required. Please enter PIN [Security Officer PIN]:The card has been erased.
Initialize your smart card, set your user PIN and PUK, and your Security Officer PIN and PUK:
$ pkcs15-init --create-pkcs15 --use-default-transport-keys \ --pin 963214 --puk 321478 --so-pin 65498714 --so-puk 784123 Using reader with a card: Reader nameThe
pcks15-inittool creates a new slot on the smart card.Set a label and the authentication ID for the slot:
$ pkcs15-init --store-pin --label testuser \ --auth-id 01 --so-pin 65498714 --pin 963214 --puk 321478 Using reader with a card: Reader nameThe label is set to a human-readable value, in this case,
testuser. Theauth-idmust be two hexadecimal values, in this case it is set to01.Store and label the private key in the new slot on the smart card:
$ pkcs15-init --store-private-key testuser.key --label testuser_key \ --auth-id 01 --id 01 --pin 963214 Using reader with a card: Reader nameNoteThe value you specify for
--idmust be the same when storing your private key and storing your certificate in the next step. Specifying your own value for--idis recommended as otherwise a more complicated value is calculated by the tool.Store and label the certificate in the new slot on the smart card:
$ pkcs15-init --store-certificate testuser.crt --label testuser_crt \ --auth-id 01 --id 01 --format pem --pin 963214 Using reader with a card: Reader nameOptional: Store and label the public key in the new slot on the smart card:
$ pkcs15-init --store-public-key testuserpublic.key \ --label testuserpublic_key --auth-id 01 --id 01 --pin 963214 Using reader with a card: Reader nameNoteIf the public key corresponds to a private key or certificate, specify the same ID as the ID of the private key or certificate.
Optional: Certain smart cards require you to finalize the card by locking the settings:
$ pkcs15-init -FAt this stage, your smart card contains the certificate, private key, and public key in the newly created slot. You have also created your user PIN and PUK and the Security Officer PIN and PUK.
68.9. Logging in to IdM with smart cards
You can use smart cards for logging in to the IdM Web UI.
Prerequisites
- The web browser is configured for using smart card authentication.
- The IdM server is configured for smart card authentication.
- The certificate installed on your smart card is either issued by the IdM server or has been added to the user entry in IdM.
- You know the PIN required to unlock the smart card.
- The smart card has been inserted into the reader.
Procedure
- Open the IdM Web UI in the browser.
- Click Log In Using Certificate.
If the Password Required dialog box opens, add the PIN to unlock the smart card and click the OK button.
The User Identification Request dialog box opens.
If the smart card contains more than one certificate, select the certificate you want to use for authentication in the drop down list below Choose a certificate to present as identification.
- Click the OK button.
Now you are successfully logged in to the IdM Web UI.
68.10. Logging in to GDM using smart card authentication on an IdM client
The GNOME Desktop Manager (GDM) requires authentication. You can use your password; however, you can also use a smart card for authentication.
Follow this procedure to use smart card authentication to access GDM.
Prerequisites
- The system has been configured for smart card authentication. For details, see Configuring the IdM client for smart card authentication.
- The smart card contains your certificate and private key.
- The user account is a member of the IdM domain.
The certificate on the smart card maps to the user entry through:
- Assigning the certificate to a particular user entry. For details, see, Adding a certificate to a user entry in the IdM Web UI or Adding a certificate to a user entry in the IdM CLI.
- The certificate mapping data being applied to the account. For details, see Certificate mapping rules for configuring authentication on smart cards.
Procedure
- Insert the smart card in the reader.
- Enter the smart card PIN.
- Click Sign In.
You are successfully logged in to the RHEL system and you have a TGT provided by the IdM server.
Verification
In the Terminal window, enter
klistand check the result:$ klist Ticket cache: KEYRING:persistent:1358900015:krb_cache_TObtNMd Default principal: example.user@REDHAT.COM Valid starting Expires Service principal 04/20/2020 13:58:24 04/20/2020 23:58:24 krbtgt/EXAMPLE.COM@EXAMPLE.COM renew until 04/27/2020 08:58:15
68.11. Using smart card authentication with the su command
Changing to a different user requires authentication. You can use a password or a certificate. Follow this procedure to use your smart card with the su command. It means that after entering the su command, you are prompted for the smart card PIN.
Prerequisites
Your IdM server and client have been configured for smart card authentication.
- The smart card contains your certificate and private key. See Storing a certificate on a smart card
- The card is inserted in the reader and connected to the computer.
Procedure
In a terminal window, change to a different user with the
sucommand:$ su - <user_name> PIN for smart_cardIf the configuration is correct, you are prompted to enter the smart card PIN.
Chapter 69. Configuring certificates issued by ADCS for smart card authentication in IdM
To configure smart card authentication in IdM for users whose certificates are issued by Active Directory (AD) certificate services:
- Your deployment is based on cross-forest trust between Identity Management (IdM) and Active Directory (AD).
- You want to allow smart card authentication for users whose accounts are stored in AD.
- Certificates are created and stored in Active Directory Certificate Services (ADCS).
Prerequisites
Identity Management (IdM) and Active Directory (AD) trust is installed
For details, see Installing trust between IdM and AD.
- Active Directory Certificate Services (ADCS) is installed and certificates for users are generated
69.1. Windows Server settings required for trust configuration and certificate usage
You must configure the following on the Windows Server:
- Active Directory Certificate Services (ADCS) is installed
- Certificate Authority is created
- Optional: If you are using Certificate Authority Web Enrollment, the Internet Information Services (IIS) must be configured
The exported certificate must fulfill the following criteria:
-
Key must have
2048bits or more - Include a private key
You will need a certificate in the following format: Personal Information Exchange —
PKCS #12(.PFX)- Enable certificate privacy
69.2. Copying certificates from Active Directory using sftp
To be able to use smart card authentication, you need to copy the following certificate files:
-
A root CA certificate in the
CERformat:adcs-winserver-ca.ceron your IdM server. -
A user certificate with a private key in the
PFXformat:aduser1.pfxon an IdM client.
This procedure expects SSH access is allowed. If SSH is unavailable the user must copy the file from the AD Server to the IdM server and client.
Procedure
Connect from the IdM server and copy the
adcs-winserver-ca.cerroot certificate to the IdM server:root@idmserver ~]# sftp Administrator@winserver.ad.example.com Administrator@winserver.ad.example.com's password: Connected to Administrator@winserver.ad.example.com. sftp> cd <Path to certificates> sftp> ls adcs-winserver-ca.cer aduser1.pfx sftp> sftp> get adcs-winserver-ca.cer Fetching <Path to certificates>/adcs-winserver-ca.cer to adcs-winserver-ca.cer <Path to certificates>/adcs-winserver-ca.cer 100% 1254 15KB/s 00:00 sftp quitConnect from the IdM client and copy the
aduser1.pfxuser certificate to the client:[root@client1 ~]# sftp Administrator@winserver.ad.example.com Administrator@winserver.ad.example.com's password: Connected to Administrator@winserver.ad.example.com. sftp> cd /<Path to certificates> sftp> get aduser1.pfx Fetching <Path to certificates>/aduser1.pfx to aduser1.pfx <Path to certificates>/aduser1.pfx 100% 1254 15KB/s 00:00 sftp quit
Now the CA certificate is stored in the IdM server and the user certificates is stored on the client machine.
69.3. Configuring the IdM server and clients for smart card authentication using ADCS certificates
You must configure the IdM (Identity Management) server and clients to be able to use smart card authentication in the IdM environment. IdM includes the ipa-advise scripts which makes all necessary changes:
- Install necessary packages
- Configure IdM server and clients
- Copy the CA certificates into the expected locations
You can run ipa-advise on your IdM server.
Follow this procedure to configure your server and clients for smart card authentication:
-
On an IdM server: Preparing the
ipa-advisescript to configure your IdM server for smart card authentication. -
On an IdM server: Preparing the
ipa-advisescript to configure your IdM client for smart card authentication. -
On an IdM server: Applying the the
ipa-adviseserver script on the IdM server using the AD certificate. - Moving the client script to the IdM client machine.
-
On an IdM client: Applying the the
ipa-adviseclient script on the IdM client using the AD certificate.
Prerequisites
- The certificate has been copied to the IdM server.
- Obtain the Kerberos ticket.
- Log in as a user with administration rights.
Procedure
On the IdM server, use the
ipa-advisescript for configuring a client:[root@idmserver ~]# ipa-advise config-client-for-smart-card-auth > sc_client.shOn the IdM server, use the
ipa-advisescript for configuring a server:[root@idmserver ~]# ipa-advise config-server-for-smart-card-auth > sc_server.shOn the IdM server, execute the script:
[root@idmserver ~]# sh -x sc_server.sh adcs-winserver-ca.cer- It configures the IdM Apache HTTP Server.
- It enables Public Key Cryptography for Initial Authentication in Kerberos (PKINIT) on the Key Distribution Center (KDC).
- It configures the IdM Web UI to accept smart card authorization requests.
Copy the
sc_client.shscript to the client system:[root@idmserver ~]# scp sc_client.sh root@client1.idm.example.com:/root Password: sc_client.sh 100% 2857 1.6MB/s 00:00Copy the Windows certificate to the client system:
[root@idmserver ~]# scp adcs-winserver-ca.cer root@client1.idm.example.com:/root Password: adcs-winserver-ca.cer 100% 1254 952.0KB/s 00:00On the client system, run the client script:
[root@idmclient1 ~]# sh -x sc_client.sh adcs-winserver-ca.cer
The CA certificate is now installed in the correct format on the IdM server and client systems. The next step is to copy the user certificates onto the smart card itself.
69.4. Converting the PFX file
Before you store the PFX (PKCS#12) file into the smart card, you must:
- Convert the file to the PEM format
- Extract the private key and the certificate to two different files
Prerequisites
- The PFX file is copied into the IdM client machine.
Procedure
On the IdM client, convert the file into the PEM format:
[root@idmclient1 ~]# openssl pkcs12 -in aduser1.pfx -out aduser1_cert_only.pem -clcerts -nodes Enter Import Password:Extract the key into the separate file:
[root@idmclient1 ~]# openssl pkcs12 -in adduser1.pfx -nocerts -out adduser1.pem > aduser1.keyExtract the public certificate into the separate file:
[root@idmclient1 ~]# openssl pkcs12 -in adduser1.pfx -clcerts -nokeys -out aduser1_cert_only.pem > aduser1.crt
At this point, you can store the aduser1.key and aduser1.crt into the smart card.
69.5. Installing tools for managing and using smart cards
Before you can configure your smart card, you must install the corresponding tools that can generate certificates and start the pscd service.
Prerequisites
-
You have
rootpermissions.
Procedure
Install the
openscandgnutls-utilspackages:# yum -y install opensc gnutls-utilsStart the
pcscdservice.# systemctl start pcscd
Verification
Verify that the
pcscdservice is up and running:# systemctl status pcscd
69.6. Preparing your smart card and uploading your certificates and keys to your smart card
Follow this procedure to configure your smart card with the pkcs15-init tool, which helps you to configure:
- Erasing your smart card
- Setting new PINs and optional PIN Unblocking Keys (PUKs)
- Creating a new slot on the smart card
- Storing the certificate, private key, and public key in the slot
- If required, locking the smart card settings as certain smart cards require this type of finalization
The pkcs15-init tool may not work with all smart cards. You must use the tools that work with the smart card you are using.
Prerequisites
The
openscpackage, which includes thepkcs15-inittool, is installed.For more details, see Installing tools for managing and using smart cards.
- The card is inserted in the reader and connected to the computer.
-
You have a private key, a public key, and a certificate to store on the smart card. In this procedure,
testuser.key,testuserpublic.key, andtestuser.crtare the names used for the private key, public key, and the certificate. - You have your current smart card user PIN and Security Officer PIN (SO-PIN).
Procedure
Erase your smart card and authenticate yourself with your PIN:
$ pkcs15-init --erase-card --use-default-transport-keys Using reader with a card: Reader name PIN [Security Officer PIN] required. Please enter PIN [Security Officer PIN]:The card has been erased.
Initialize your smart card, set your user PIN and PUK, and your Security Officer PIN and PUK:
$ pkcs15-init --create-pkcs15 --use-default-transport-keys \ --pin 963214 --puk 321478 --so-pin 65498714 --so-puk 784123 Using reader with a card: Reader nameThe
pcks15-inittool creates a new slot on the smart card.Set a label and the authentication ID for the slot:
$ pkcs15-init --store-pin --label testuser \ --auth-id 01 --so-pin 65498714 --pin 963214 --puk 321478 Using reader with a card: Reader nameThe label is set to a human-readable value, in this case,
testuser. Theauth-idmust be two hexadecimal values, in this case it is set to01.Store and label the private key in the new slot on the smart card:
$ pkcs15-init --store-private-key testuser.key --label testuser_key \ --auth-id 01 --id 01 --pin 963214 Using reader with a card: Reader nameNoteThe value you specify for
--idmust be the same when storing your private key and storing your certificate in the next step. Specifying your own value for--idis recommended as otherwise a more complicated value is calculated by the tool.Store and label the certificate in the new slot on the smart card:
$ pkcs15-init --store-certificate testuser.crt --label testuser_crt \ --auth-id 01 --id 01 --format pem --pin 963214 Using reader with a card: Reader nameOptional: Store and label the public key in the new slot on the smart card:
$ pkcs15-init --store-public-key testuserpublic.key \ --label testuserpublic_key --auth-id 01 --id 01 --pin 963214 Using reader with a card: Reader nameNoteIf the public key corresponds to a private key or certificate, specify the same ID as the ID of the private key or certificate.
Optional: Certain smart cards require you to finalize the card by locking the settings:
$ pkcs15-init -FAt this stage, your smart card contains the certificate, private key, and public key in the newly created slot. You have also created your user PIN and PUK and the Security Officer PIN and PUK.
69.7. Configuring timeouts in sssd.conf
Authentication with a smart card certificate might take longer than the default timeouts used by SSSD. Time out expiration can be caused by:
- A slow reader
- Forwarding from a physical device into a virtual environment
- Too many certificates stored on the smart card
- Slow response from the OCSP (Online Certificate Status Protocol) responder if OCSP is used to verify the certificates
In this case you can prolong the following timeouts in the sssd.conf file, for example, to 60 seconds:
-
p11_child_timeout -
krb5_auth_timeout
Prerequisites
- You must be logged in as root.
Procedure
Open the
sssd.conffile:[root@idmclient1 ~]# vim /etc/sssd/sssd.confChange the value of
p11_child_timeout:[pam] p11_child_timeout = 60Change the value of
krb5_auth_timeout:[domain/IDM.EXAMPLE.COM] krb5_auth_timeout = 60- Save the settings.
Now, the interaction with the smart card is allowed to run for 1 minute (60 seconds) before authentication fails with a timeout.
69.8. Creating certificate mapping rules for smart card authentication
If you want to use one certificate for a user who has accounts in AD (Active Directory) and in IdM (Identity Management), you can create a certificate mapping rule on the IdM server.
After creating such a rule, the user is able to authenticate with their smart card in both domains.
For details about certificate mapping rules, see Certificate mapping rules for configuring authentication.
Chapter 70. Configuring certificate mapping rules in Identity Management
Certificate mapping rules are a convenient way of allowing users to authenticate using certificates in scenarios when the Identity Management (IdM) administrator does not have access to certain users' certificates. This is typically because the certificates have been issued by an external certificate authority.
70.1. Certificate mapping rules for configuring authentication
You might need to configure certificate mapping rules in the following scenarios:
- Certificates have been issued by the Certificate System of the Active Directory (AD) with which the IdM domain is in a trust relationship.
- Certificates have been issued by an external certificate authority.
- The IdM environment is large with many users using smart cards. In this case, adding full certificates can be complicated. The subject and issuer are predictable in most scenarios and therefore easier to add ahead of time than the full certificate.
As a system administrator, you can create a certificate mapping rule and add certificate mapping data to a user entry even before a certificate is issued to a particular user. Once the certificate is issued, the user can log in using the certificate even though the full certificate has not yet been uploaded to the user entry.
In addition, as certificates are renewed at regular intervals, certificate mapping rules reduce administrative overhead. When a user’s certificate is renewed, the administrator does not have to update the user entry. For example, if the mapping is based on the Subject and Issuer values, and if the new certificate has the same subject and issuer as the old one, the mapping still applies. If, in contrast, the full certificate was used, then the administrator would have to upload the new certificate to the user entry to replace the old one.
To set up certificate mapping:
- An administrator has to load the certificate mapping data or the full certificate into a user account.
- An administrator has to create a certificate mapping rule to allow successful logging into IdM for a user whose account contains a certificate mapping data entry that matches the information on the certificate.
Once the certificate mapping rules have been created, when the end-user presents the certificate, stored either on a filesystem or a smart card, authentication is successful.
The Key Distribution Center (KDC) has a cache for certificate mapping rules. The cache is populated on the first certauth request and it has a hard-coded timeout of 300 seconds. KDC will not see any changes to certificate mapping rules unless it is restarted or the cache expires.
Your certificate mapping rules can depend on the use case for which you are using the certificate. For example, if you are using SSH with certificates, you must have the full certificate to extract the public key from the certificate.
70.2. Components of an identity mapping rule in IdM
You configure different components when creating an identity mapping rule in IdM. Each component has a default value that you can override. You can define the components in either the web UI or the CLI. In the CLI, the identity mapping rule is created using the ipa certmaprule-add command.
- Mapping rule
The mapping rule component associates (or maps) a certificate with one or more user accounts. The rule defines an LDAP search filter that associates a certificate with the intended user account.
Certificates issued by different certificate authorities (CAs) might have different properties and might be used in different domains. Therefore, IdM does not apply mapping rules unconditionally, but only to the appropriate certificates. The appropriate certificates are defined using matching rules.
Note that if you leave the mapping rule option empty, the certificates are searched in the
userCertificateattribute as a DER encoded binary file.Define the mapping rule in the CLI using the
--mapruleoption.- Matching rule
The matching rule component selects a certificate to which you want to apply the mapping rule. The default matching rule matches certificates with the
digitalSignature keyusage andclientAuth extended keyusage.For the matching, the subject name, which is stored in
DERencodedASN.1, is converted into a string according to RFC 4514. This means the most specific name component comes first.Define the matching rule in the CLI using the
--matchruleoption.For example,
ipa certmaprule-modwith matching rule:<ISSUER>C=US,O=EXAMPLE.COM,CN=Global CA1does not work for certificate withissuer=C=US,O=EXAMPLE.COM,CN=Global CA1.The correct syntax for matching rule should be
<ISSUER>CN=Global CA1,O=EXAMPLE.COM,C=US, in which the most specific componentCNandOcome beforeC, for example:# ipa certmaprule-mod "Certificate mapping match" --matchrule '<ISSUER>CN=Global CA1,O=EXAMPLE.COM,C=US' ---------------------------------------------------------------------- Modified Certificate Identity Mapping Rule "Certificate mapping match" ---------------------------------------------------------------------- Rule name: Certificate mapping match Mapping rule: (ipacertmapdata=X509:<I>{issuer_dn!nss_x500}<S>{subject_dn!nss_x500}) Matching rule: <ISSUER>CN=Global CA1,O=EXAMPLE.COM,C=US Priority: 1 Enabled: True- Domain list
The domain list specifies the identity domains in which you want IdM to search the users when processing identity mapping rules. If you leave the option unspecified, IdM searches the users only in the local domain to which the IdM client belongs.
Define the domain in the CLI using the
--domainoption.- Priority
When multiple rules are applicable to a certificate, the rule with the highest priority takes precedence. All other rules are ignored.
- The lower the numerical value, the higher the priority of the identity mapping rule. For example, a rule with a priority 1 has higher priority than a rule with a priority 2.
- If a rule has no priority value defined, it has the lowest priority.
Define the mapping rule priority in the CLI using the
--priorityoption.
Certificate mapping rule example
To define, using the CLI, a certificate mapping rule called simple_rule that allows authentication for a certificate issued by the Smart Card CA of the EXAMPLE.ORG organization if the Subject on that certificate matches a certmapdata entry in a user account in IdM:
# ipa certmaprule-add simple_rule --matchrule '<ISSUER>CN=Smart Card CA,O=EXAMPLE.ORG' --maprule '(ipacertmapdata=X509:<I>{issuer_dn!nss_x500}<S>{subject_dn!nss_x500})'70.3. Obtaining data from a certificate for use in a matching rule
This procedure describes how to obtain data from a certificate so that you can copy and paste it into the matching rule of a certificate mapping rule. To get data required by a matching rule, use the sssctl cert-show or sssctl cert-eval-rule commands.
Prerequisites
- You have the user certificate in PEM format.
Procedure
Create a variable pointing to your certificate that also ensures it is correctly encoded so you can retrieve the required data.
# CERT=$(openssl x509 -in /path/to/certificate -outform der|base64 -w0)Use the
sssctl cert-eval-ruleto determine the matching data. In the following example the certificate serial number is used.# sssctl cert-eval-rule $CERT --match='<ISSUER>CN=adcs19-WIN1-CA,DC=AD,DC=EXAMPLE,DC=COM' --map='LDAPU1:(altSecurityIdentities=X509:<I>{issuer_dn!ad_x500}<SR>{serial_number!hex_ur})' Certificate matches rule. Mapping filter: (altSecurityIdentities=X509:<I>DC=com,DC=example,DC=ad,CN=adcs19-WIN1-CA<SR>0F0000000000DB8852DD7B246C9C0F0000003B)In this case, add everything after
altSecurityIdentities=to thealtSecurityIdentitiesattribute in AD for the user. If using SKI mapping, use--map='LDAPU1:(altSecurityIdentities=X509:<SKI>{subject_key_id!hex_u})'.Optional: To create a new mapping rule in the CLI based on a matching rule which specifies that the certificate issuer must match
adcs19-WIN1-CAof thead.example.comdomain and the serial number of the certificate must match thealtSecurityIdentitiesentry in a user account:# ipa certmaprule-add simple_rule --matchrule '<ISSUER>CN=adcs19-WIN1-CA,DC=AD,DC=EXAMPLE,DC=COM' --maprule 'LDAPU1:(altSecurityIdentities=X509:<I>{issuer_dn!ad_x500}<SR>{serial_number!hex_ur})'
70.4. Configuring certificate mapping for users stored in IdM
To enable certificate mapping in IdM if the user for whom certificate authentication is being configured is stored in IdM, a system administrator must complete the following tasks:
- Set up a certificate mapping rule so that IdM users with certificates that match the conditions specified in the mapping rule and in their certificate mapping data entries can authenticate to IdM.
- Enter certificate mapping data to an IdM user entry so that the user can authenticate using multiple certificates provided that they all contain the values specified in the certificate mapping data entry.
Prerequisites
- The user has an account in IdM.
- The administrator has either the whole certificate or the certificate mapping data to add to the user entry.
70.4.1. Adding a certificate mapping rule in the IdM web UI
- Log in to the IdM web UI as an administrator.
-
Navigate to
Authentication→Certificate Identity Mapping Rules→Certificate Identity Mapping Rules. Click
Add.Figure 70.1. Adding a new certificate mapping rule in the IdM web UI

- Enter the rule name.
Enter the mapping rule. For example, to make IdM search for the
IssuerandSubjectentries in any certificate presented to them, and base its decision to authenticate or not on the information found in these two entries of the presented certificate:(ipacertmapdata=X509:<I>{issuer_dn!nss_x500}<S>{subject_dn!nss_x500})Enter the matching rule. For example, to only allow certificates issued by the
Smart Card CAof theEXAMPLE.ORGorganization to authenticate users to IdM:<ISSUER>CN=Smart Card CA,O=EXAMPLE.ORGFigure 70.2. Entering the details for a certificate mapping rule in the IdM web UI
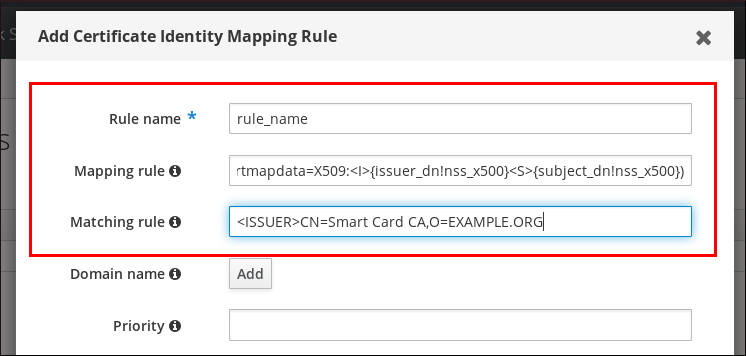
-
Click
Addat the bottom of the dialog box to add the rule and close the box. The System Security Services Daemon (SSSD) periodically re-reads the certificate mapping rules. To force the newly-created rule to be loaded immediately, restart SSSD:
# systemctl restart sssd
Now you have a certificate mapping rule set up that compares the type of data specified in the mapping rule that it finds on a smart card certificate with the certificate mapping data in your IdM user entries. Once it finds a match, it authenticates the matching user.
70.4.2. Adding a certificate mapping rule in the IdM CLI
Obtain the administrator’s credentials:
# kinit adminEnter the mapping rule and the matching rule the mapping rule is based on. For example, to make IdM search for the
IssuerandSubjectentries in any certificate presented, and base its decision to authenticate or not on the information found in these two entries of the presented certificate, recognizing only certificates issued by theSmart Card CAof theEXAMPLE.ORGorganization:# ipa certmaprule-add rule_name --matchrule '<ISSUER>CN=Smart Card CA,O=EXAMPLE.ORG' --maprule '(ipacertmapdata=X509:<I>{issuer_dn!nss_x500}<S>{subject_dn!nss_x500})' ------------------------------------------------------- Added Certificate Identity Mapping Rule "rule_name" ------------------------------------------------------- Rule name: rule_name Mapping rule: (ipacertmapdata=X509:<I>{issuer_dn!nss_x500}<S>{subject_dn!nss_x500}) Matching rule: <ISSUER>CN=Smart Card CA,O=EXAMPLE.ORG Enabled: TRUEThe System Security Services Daemon (SSSD) periodically re-reads the certificate mapping rules. To force the newly-created rule to be loaded immediately, restart SSSD:
# systemctl restart sssd
Now you have a certificate mapping rule set up that compares the type of data specified in the mapping rule that it finds on a smart card certificate with the certificate mapping data in your IdM user entries. Once it finds a match, it authenticates the matching user.
70.4.3. Adding certificate mapping data to a user entry in the IdM web UI
- Log into the IdM web UI as an administrator.
-
Navigate to
Users→Active users→idm_user. -
Find the
Certificate mapping dataoption and clickAdd. Choose one of the following options:
If you have the certificate of
idm_user:On the command line, display the certificate using the
catutility or a text editor:[root@server ~]# cat idm_user_certificate.pem -----BEGIN CERTIFICATE----- MIIFFTCCA/2gAwIBAgIBEjANBgkqhkiG9w0BAQsFADA6MRgwFgYDVQQKDA9JRE0u RVhBTVBMRS5DT00xHjAcBgNVBAMMFUNlcnRpZmljYXRlIEF1dGhvcml0eTAeFw0x ODA5MDIxODE1MzlaFw0yMDA5MDIxODE1MzlaMCwxGDAWBgNVBAoMD0lETS5FWEFN [...output truncated...]- Copy the certificate.
In the IdM web UI, click
Addnext toCertificateand paste the certificate into the window that opens up.Figure 70.3. Adding a user’s certificate mapping data: certificate
-
If you do not have the certificate of
idm_userat your disposal but know theIssuerand theSubjectof the certificate, check the radio button ofIssuer and subjectand enter the values in the two respective boxes.
Figure 70.4. Adding a user’s certificate mapping data: issuer and subject
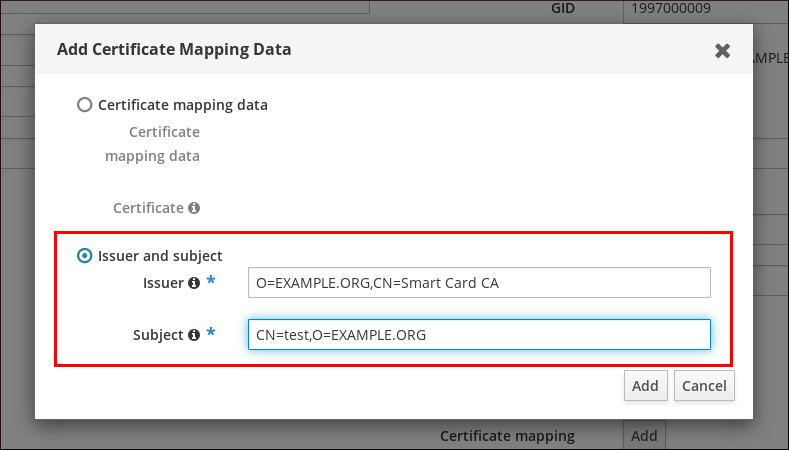
-
If you do not have the certificate of
-
Click
Add.
Verification
If you have access to the whole certificate in the .pem format, verify that the user and certificate are linked:
Use the
sss_cacheutility to invalidate the record ofidm_userin the SSSD cache and force a reload of theidm_userinformation:# sss_cache -u idm_userRun the
ipa certmap-matchcommand with the name of the file containing the certificate of the IdM user:# ipa certmap-match idm_user_cert.pem -------------- 1 user matched -------------- Domain: IDM.EXAMPLE.COM User logins: idm_user ---------------------------- Number of entries returned 1 ----------------------------The output confirms that now you have certificate mapping data added to
idm_userand that a corresponding mapping rule exists. This means that you can use any certificate that matches the defined certificate mapping data to authenticate asidm_user.
70.4.4. Adding certificate mapping data to a user entry in the IdM CLI
Obtain the administrator’s credentials:
# kinit adminChoose one of the following options:
-
If you have the certificate of
idm_user, add the certificate to the user account using theipa user-add-certcommand:
# CERT=$(openssl x509 -in idm_user_cert.pem -outform der|base64 -w0) # ipa user-add-certmapdata idm_user --certificate $CERTIf you do not have the certificate of
idm_userbut know theIssuerand theSubjectof the user’s certificate:# ipa user-add-certmapdata idm_user --subject "O=EXAMPLE.ORG,CN=test" --issuer "CN=Smart Card CA,O=EXAMPLE.ORG" -------------------------------------------- Added certificate mappings to user "idm_user" -------------------------------------------- User login: idm_user Certificate mapping data: X509:<I>O=EXAMPLE.ORG,CN=Smart Card CA<S>CN=test,O=EXAMPLE.ORG
-
If you have the certificate of
Verification
If you have access to the whole certificate in the .pem format, verify that the user and certificate are linked:
Use the
sss_cacheutility to invalidate the record ofidm_userin the SSSD cache and force a reload of theidm_userinformation:# sss_cache -u idm_userRun the
ipa certmap-matchcommand with the name of the file containing the certificate of the IdM user:# ipa certmap-match idm_user_cert.pem -------------- 1 user matched -------------- Domain: IDM.EXAMPLE.COM User logins: idm_user ---------------------------- Number of entries returned 1 ----------------------------The output confirms that now you have certificate mapping data added to
idm_userand that a corresponding mapping rule exists. This means that you can use any certificate that matches the defined certificate mapping data to authenticate asidm_user.
70.5. Certificate mapping rules for trusts with Active Directory domains
Different certificate mapping use cases are possible if an IdM deployment is in a trust relationship with an Active Directory (AD) domain.
Depending on the AD configuration, the following scenarios are possible:
- If the certificate is issued by AD Certificate System but the user and the certificate are stored in IdM, the mapping and the whole processing of the authentication request takes place on the IdM side. For details of configuring this scenario, see Configuring certificate mapping for users stored in IdM
If the user is stored in AD, the processing of the authentication request takes place in AD. There are three different subcases:
- The AD user entry contains the whole certificate. For details on how to configure IdM in this scenario, see Configuring certificate mapping for users whose AD user entry contains the whole certificate.
-
AD is configured to map user certificates to user accounts. In this case, the AD user entry does not contain the whole certificate but instead contains an attribute called
altSecurityIdentities. For details how to configure IdM in this scenario, see Configuring certificate mapping if AD is configured to map user certificates to user accounts. The AD user entry contains neither the whole certificate nor the mapping data. In this case, there are two options:
- If the user certificate is issued by AD Certificate System, the certificate either contains the user principal name as the Subject Alternative Name (SAN) or, if the latest updates are applied to AD, the SID of the user in the SID extension of the certificate. Both of these can be used to map the certificate to the user.
-
If the user certificate is on a smart card, to enable SSH with smart cards, SSSD must derive the public SSH key from the certificate and therefore the full certificate is required. The only solution is to use the
ipa idoverrideuser-addcommand to add the whole certificate to the AD user’s ID override in IdM. For details, see Configuring certificate mapping if AD user entry contains no certificate or mapping data.
AD domain administrators can manually map certificates to a user in AD using the altSecurityIdentities attribute. There are six supported values for this attribute, though three mappings are considered insecure. As part of May 10,2022 security update, once it is installed, all devices are in compatibility mode and if a certificate is weakly mapped to a user, authentication occurs as expected. However, warning messages are logged identifying any certificates that are not compatible with full enforcement mode. As of November 14, 2023 or later, all devices will be updated to full enforcement mode and if a certificate fails the strong mapping criteria, authentication will be denied.
For example, when an AD user requests an IdM Kerberos ticket with a certificate (PKINIT), AD needs to map the certificate to a user internally and uses the new mapping rules for this. However in IdM, the previous rules continue to work if IdM is used to map a certificate to a user on an IdM client, .
IdM supports the new mapping templates, making it easier for an AD administrator to use the new rules and not maintain both. IdM now supports the new mapping templates added to Active Directory to include:
- Serial Number: LDAPU1:(altSecurityIdentities=X509:<I>{issuer_dn!ad_x500}<SR>{serial_number!hex_ur})
- Subject Key Id: LDAPU1:(altSecurityIdentities=X509:<SKI>{subject_key_id!hex_u})
- User SID: LDAPU1:(objectsid={sid})
If you do not want to reissue certificates with the new SID extension, you can create a manual mapping by adding the appropriate mapping string to a user’s altSecurityIdentities attribute in AD.
70.6. Configuring certificate mapping for users whose AD user entry contains the whole certificate
This user story describes the steps necessary for enabling certificate mapping in IdM if the IdM deployment is in trust with Active Directory (AD), the user is stored in AD and the user entry in AD contains the whole certificate.
Prerequisites
- The user does not have an account in IdM.
- The user has an account in AD which contains a certificate.
- The IdM administrator has access to data on which the IdM certificate mapping rule can be based.
To ensure PKINIT works for a user, one of the following conditions must apply:
- The certificate in the user entry includes the user principal name or the SID extension for the user.
-
The user entry in AD has a suitable entry in the
altSecurityIdentitiesattribute.
70.6.1. Adding a certificate mapping rule in the IdM web UI
- Log into the IdM web UI as an administrator.
-
Navigate to
Authentication→Certificate Identity Mapping Rules→Certificate Identity Mapping Rules. Click
Add.Figure 70.5. Adding a new certificate mapping rule in the IdM web UI
- Enter the rule name.
Enter the mapping rule. To have the whole certificate that is presented to IdM for authentication compared to what is available in AD:
(userCertificate;binary={cert!bin})NoteIf mapping using the full certificate, if you renew the certificate, you must ensure that you add the new certificate to the AD user object.
Enter the matching rule. For example, to only allow certificates issued by the
AD-ROOT-CAof theAD.EXAMPLE.COMdomain to authenticate:<ISSUER>CN=AD-ROOT-CA,DC=ad,DC=example,DC=comFigure 70.6. Certificate mapping rule for a user with a certificate stored in AD
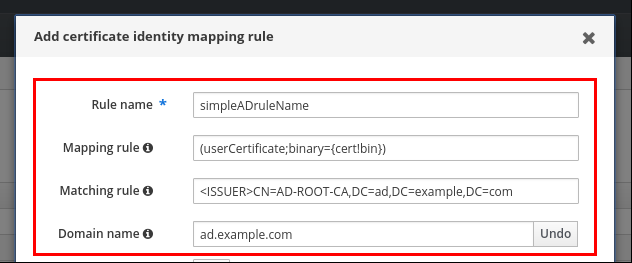
-
Click
Add. The System Security Services Daemon (SSSD) periodically re-reads the certificate mapping rules. To force the newly-created rule to be loaded immediately, restart SSSD in the CLI::
# systemctl restart sssd
70.6.2. Adding a certificate mapping rule in the IdM CLI
Obtain the administrator’s credentials:
# kinit adminEnter the mapping rule and the matching rule the mapping rule is based on. To have the whole certificate that is presented for authentication compared to what is available in AD, only allowing certificates issued by the
AD-ROOT-CAof theAD.EXAMPLE.COMdomain to authenticate:# ipa certmaprule-add simpleADrule --matchrule '<ISSUER>CN=AD-ROOT-CA,DC=ad,DC=example,DC=com' --maprule '(userCertificate;binary={cert!bin})' --domain ad.example.com ------------------------------------------------------- Added Certificate Identity Mapping Rule "simpleADrule" ------------------------------------------------------- Rule name: simpleADrule Mapping rule: (userCertificate;binary={cert!bin}) Matching rule: <ISSUER>CN=AD-ROOT-CA,DC=ad,DC=example,DC=com Domain name: ad.example.com Enabled: TRUENoteIf mapping using the full certificate, if you renew the certificate, you must ensure that you add the new certificate to the AD user object.
The System Security Services Daemon (SSSD) periodically re-reads the certificate mapping rules. To force the newly-created rule to be loaded immediately, restart SSSD:
# systemctl restart sssd
70.7. Configuring certificate mapping if AD is configured to map user certificates to user accounts
This user story describes the steps necessary for enabling certificate mapping in IdM if the IdM deployment is in trust with Active Directory (AD), the user is stored in AD, and the user entry in AD contains certificate mapping data.
Prerequisites
- The user does not have an account in IdM.
-
The user has an account in AD which contains the
altSecurityIdentitiesattribute, the AD equivalent of the IdMcertmapdataattribute. - The IdM administrator has access to data on which the IdM certificate mapping rule can be based.
70.7.1. Adding a certificate mapping rule in the IdM web UI
- Log into the IdM web UI as an administrator.
-
Navigate to
Authentication→Certificate Identity Mapping Rules→Certificate Identity Mapping Rules. Click
Add.Figure 70.7. Adding a new certificate mapping rule in the IdM web UI
- Enter the rule name.
Enter the mapping rule. For example, to make AD DC search for the
IssuerandSubjectentries in any certificate presented, and base its decision to authenticate or not on the information found in these two entries of the presented certificate:(altSecurityIdentities=X509:<I>{issuer_dn!ad_x500}<S>{subject_dn!ad_x500})Enter the matching rule. For example, to only allow certificates issued by the
AD-ROOT-CAof theAD.EXAMPLE.COMdomain to authenticate users to IdM:<ISSUER>CN=AD-ROOT-CA,DC=ad,DC=example,DC=comEnter the domain:
ad.example.comFigure 70.8. Certificate mapping rule if AD is configured for mapping

-
Click
Add. The System Security Services Daemon (SSSD) periodically re-reads the certificate mapping rules. To force the newly-created rule to be loaded immediately, restart SSSD in the CLI::
# systemctl restart sssd
70.7.2. Adding a certificate mapping rule in the IdM CLI
Obtain the administrator’s credentials:
# kinit adminEnter the mapping rule and the matching rule the mapping rule is based on. For example, to make AD search for the
IssuerandSubjectentries in any certificate presented, and only allow certificates issued by theAD-ROOT-CAof theAD.EXAMPLE.COMdomain:# ipa certmaprule-add ad_configured_for_mapping_rule --matchrule '<ISSUER>CN=AD-ROOT-CA,DC=ad,DC=example,DC=com' --maprule '(altSecurityIdentities=X509:<I>{issuer_dn!ad_x500}<S>{subject_dn!ad_x500})' --domain=ad.example.com ------------------------------------------------------- Added Certificate Identity Mapping Rule "ad_configured_for_mapping_rule" ------------------------------------------------------- Rule name: ad_configured_for_mapping_rule Mapping rule: (altSecurityIdentities=X509:<I>{issuer_dn!ad_x500}<S>{subject_dn!ad_x500}) Matching rule: <ISSUER>CN=AD-ROOT-CA,DC=ad,DC=example,DC=com Domain name: ad.example.com Enabled: TRUEThe System Security Services Daemon (SSSD) periodically re-reads the certificate mapping rules. To force the newly-created rule to be loaded immediately, restart SSSD:
# systemctl restart sssd
70.7.3. Checking certificate mapping data on the AD side
The altSecurityIdentities attribute is the Active Directory (AD) equivalent of certmapdata user attribute in IdM. When configuring certificate mapping in IdM in the scenario when a trusted AD domain is configured to map user certificates to user accounts, the IdM system administrator needs to check that the altSecurityIdentities attribute is set correctly in the user entries in AD.
Prerequisites
- The user account must have user administration access.
Procedure
To check that AD contains the right information for the user stored in AD, use the
ldapsearchcommand. For example, enter the command below to check with theadserver.ad.example.comserver that the following conditions apply:-
The
altSecurityIdentitiesattribute is set in the user entry ofad_user. The matchrule stipulates that the following conditions apply:
-
The certificate that
ad_useruses to authenticate to AD was issued byAD-ROOT-CAof thead.example.comdomain. -
The subject is
<S>DC=com,DC=example,DC=ad,CN=Users,CN=ad_user:
-
The certificate that
$ ldapsearch -o ldif-wrap=no -LLL -h adserver.ad.example.com \ -p 389 -D cn=Administrator,cn=users,dc=ad,dc=example,dc=com \ -W -b cn=users,dc=ad,dc=example,dc=com "(cn=ad_user)" \ altSecurityIdentities Enter LDAP Password: dn: CN=ad_user,CN=Users,DC=ad,DC=example,DC=com altSecurityIdentities: X509:<I>DC=com,DC=example,DC=ad,CN=AD-ROOT-CA<S>DC=com,DC=example,DC=ad,CN=Users,CN=ad_user-
The
70.8. Configuring certificate mapping if AD user entry contains no certificate or mapping data
This user story describes the steps necessary for enabling certificate mapping in IdM if the IdM deployment is in trust with Active Directory (AD), the user is stored in AD and the user entry in AD contains neither the whole certificate nor certificate mapping data.
Prerequisites
- The user does not have an account in IdM.
-
The user has an account in AD which contains neither the whole certificate nor the
altSecurityIdentitiesattribute, the AD equivalent of the IdMcertmapdataattribute. The IdM administrator has done one of the following:
-
Added the whole AD user certificate to the AD user’s
user ID overridein IdM. - Created a certificate mapping rule that maps to an alternative field in the certificate, such as Subject Alternative Name or the SID of the user.
-
Added the whole AD user certificate to the AD user’s
70.8.1. Adding a certificate mapping rule in the IdM web UI
- Log into the IdM web UI as an administrator.
-
Navigate to
Authentication→Certificate Identity Mapping Rules→Certificate Identity Mapping Rules. Click
Add.Figure 70.9. Adding a new certificate mapping rule in the IdM web UI
- Enter the rule name.
Enter the mapping rule. To have the whole certificate that is presented to IdM for authentication compared to the certificate stored in the user ID override entry of the AD user entry in IdM:
(userCertificate;binary={cert!bin})NoteAs the certificate also contains the user principal name as the SAN, or with the latest updates, the SID of the user in the SID extension of the certificate, you can also use these fields to map the certificate to the user. For example, if using the SID of the user, replace this mapping rule with
LDAPU1:(objectsid={sid}). For more information on certificate mapping, see thesss-certmapman page on your system.Enter the matching rule. For example, to only allow certificates issued by the
AD-ROOT-CAof theAD.EXAMPLE.COMdomain to authenticate:<ISSUER>CN=AD-ROOT-CA,DC=ad,DC=example,DC=comEnter the domain name. For example, to search for users in the
ad.example.comdomain:Figure 70.10. Certificate mapping rule for a user with no certificate or mapping data stored in AD
-
Click
Add. The System Security Services Daemon (SSSD) periodically re-reads the certificate mapping rules. To force the newly-created rule to be loaded immediately, restart SSSD in the CLI:
# systemctl restart sssd
70.8.2. Adding a certificate mapping rule in the IdM CLI
Obtain the administrator’s credentials:
# kinit adminEnter the mapping rule and the matching rule the mapping rule is based on. To have the whole certificate that is presented for authentication compared to the certificate stored in the user ID override entry of the AD user entry in IdM, only allowing certificates issued by the
AD-ROOT-CAof theAD.EXAMPLE.COMdomain to authenticate:# ipa certmaprule-add simpleADrule --matchrule '<ISSUER>CN=AD-ROOT-CA,DC=ad,DC=example,DC=com' --maprule '(userCertificate;binary={cert!bin})' --domain ad.example.com ------------------------------------------------------- Added Certificate Identity Mapping Rule "simpleADrule" ------------------------------------------------------- Rule name: simpleADrule Mapping rule: (userCertificate;binary={cert!bin}) Matching rule: <ISSUER>CN=AD-ROOT-CA,DC=ad,DC=example,DC=com Domain name: ad.example.com Enabled: TRUENoteAs the certificate also contains the user principal name as the SAN, or with the latest updates, the SID of the user in the SID extension of the certificate, you can also use these fields to map the certificate to the user. For example, if using the SID of the user, replace this mapping rule with
LDAPU1:(objectsid={sid}). For more information on certificate mapping, see thesss-certmapman page on your system.The System Security Services Daemon (SSSD) periodically re-reads the certificate mapping rules. To force the newly-created rule to be loaded immediately, restart SSSD:
# systemctl restart sssd
70.8.3. Adding a certificate to an AD user’s ID override in the IdM web UI
-
Navigate to
Identity→ID Views→Default Trust View. Click
Add.Figure 70.11. Adding a new user ID override in the IdM web UI

-
In the
User to overridefield, enterad_user@ad.example.com. Copy and paste the certificate of
ad_userinto theCertificatefield.Figure 70.12. Configuring the User ID override for an AD user
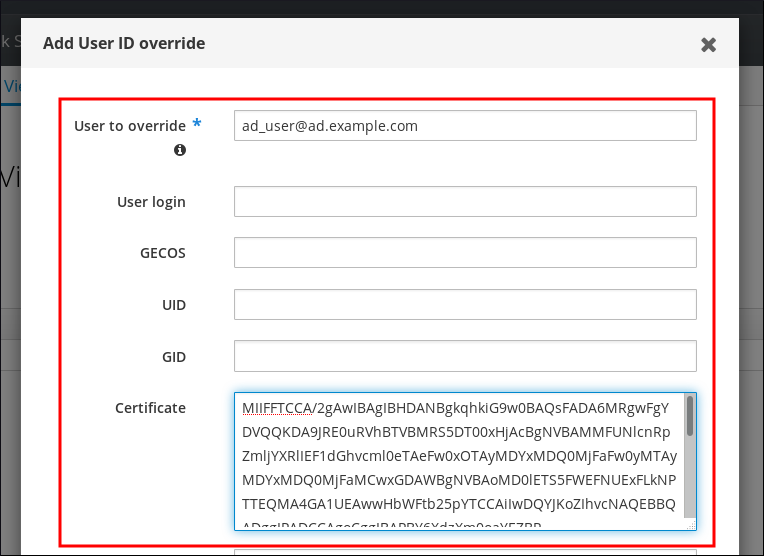
-
Click
Add.
Verification
Verify that the user and certificate are linked:
Use the
sss_cacheutility to invalidate the record ofad_user@ad.example.comin the SSSD cache and force a reload of thead_user@ad.example.cominformation:# sss_cache -u ad_user@ad.example.comRun the
ipa certmap-matchcommand with the name of the file containing the certificate of the AD user:# ipa certmap-match ad_user_cert.pem -------------- 1 user matched -------------- Domain: AD.EXAMPLE.COM User logins: ad_user@ad.example.com ---------------------------- Number of entries returned 1 ----------------------------
The output confirms that you have certificate mapping data added to ad_user@ad.example.com and that a corresponding mapping rule defined in Adding a certificate mapping rule if the AD user entry contains no certificate or mapping data exists. This means that you can use any certificate that matches the defined certificate mapping data to authenticate as ad_user@ad.example.com.
70.8.4. Adding a certificate to an AD user’s ID override in the IdM CLI
Obtain the administrator’s credentials:
# kinit adminStore the certificate blob in a new variable called
CERT:# CERT=$(openssl x509 -in /path/to/certificate -outform der|base64 -w0)Add the certificate of
ad_user@ad.example.comto the user account using theipa idoverrideuser-add-certcommand:# ipa idoverrideuser-add-cert ad_user@ad.example.com --certificate $CERT
Verification
Verify that the user and certificate are linked:
Use the
sss_cacheutility to invalidate the record ofad_user@ad.example.comin the SSSD cache and force a reload of thead_user@ad.example.cominformation:# sss_cache -u ad_user@ad.example.comRun the
ipa certmap-matchcommand with the name of the file containing the certificate of the AD user:# ipa certmap-match ad_user_cert.pem -------------- 1 user matched -------------- Domain: AD.EXAMPLE.COM User logins: ad_user@ad.example.com ---------------------------- Number of entries returned 1 ----------------------------
The output confirms that you have certificate mapping data added to ad_user@ad.example.com and that a corresponding mapping rule defined in Adding a certificate mapping rule if the AD user entry contains no certificate or mapping data exists. This means that you can use any certificate that matches the defined certificate mapping data to authenticate as ad_user@ad.example.com.
70.9. Combining several identity mapping rules into one
To combine several identity mapping rules into one combined rule, use the | (or) character to precede the individual mapping rules, and separate them using () brackets, for example:
Certificate mapping filter example 1
$ ipa certmaprule-add ad_cert_for_ipa_and_ad_users \
--maprule='(|(ipacertmapdata=X509:<I>{issuer_dn!nss_x500}<S>{subject_dn!nss_x500})(altSecurityIdentities=X509:<I>{issuer_dn!ad_x500}<S>{subject_dn!ad_x500}))' \
--matchrule='<ISSUER>CN=AD-ROOT-CA,DC=ad,DC=example,DC=com' \
--domain=ad.example.com
In the above example, the filter definition in the --maprule option includes these criteria:
-
ipacertmapdata=X509:<I>{issuer_dn!nss_x500}<S>{subject_dn!nss_x500}is a filter that links the subject and issuer from a smart card certificate to the value of theipacertmapdataattribute in an IdM user account, as described in Adding a certificate mapping rule in IdM -
altSecurityIdentities=X509:<I>{issuer_dn!ad_x500}<S>{subject_dn!ad_x500}is a filter that links the subject and issuer from a smart card certificate to the value of thealtSecurityIdentitiesattribute in an AD user account, as described in Adding a certificate mapping rule if the trusted AD domain is configured to map user certificates -
The addition of the
--domain=ad.example.comoption means that users mapped to a given certificate are not only searched in the localidm.example.comdomain but also in thead.example.comdomain
The filter definition in the --maprule option accepts the logical operator | (or), so that you can specify multiple criteria. In this case, the rule maps all user accounts that meet at least one of the criteria.
Certificate mapping filter example 2
$ ipa certmaprule-add ipa_cert_for_ad_users \
--maprule='(|(userCertificate;binary={cert!bin})(ipacertmapdata=X509:<I>{issuer_dn!nss_x500}<S>{subject_dn!nss_x500})(altSecurityIdentities=X509:<I>{issuer_dn!ad_x500}<S>{subject_dn!ad_x500}))' \
--matchrule='<ISSUER>CN=Certificate Authority,O=REALM.EXAMPLE.COM' \
--domain=idm.example.com --domain=ad.example.com
In the above example, the filter definition in the --maprule option includes these criteria:
-
userCertificate;binary={cert!bin}is a filter that returns user entries that include the whole certificate. For AD users, creating this type of filter is described in detail in Adding a certificate mapping rule if the AD user entry contains no certificate or mapping data. -
ipacertmapdata=X509:<I>{issuer_dn!nss_x500}<S>{subject_dn!nss_x500}is a filter that links the subject and issuer from a smart card certificate to the value of theipacertmapdataattribute in an IdM user account, as described in Adding a certificate mapping rule in IdM. -
altSecurityIdentities=X509:<I>{issuer_dn!ad_x500}<S>{subject_dn!ad_x500}is a filter that links the subject and issuer from a smart card certificate to the value of thealtSecurityIdentitiesattribute in an AD user account, as described in Adding a certificate mapping rule if the trusted AD domain is configured to map user certificates.
The filter definition in the --maprule option accepts the logical operator | (or), so that you can specify multiple criteria. In this case, the rule maps all user accounts that meet at least one of the criteria.
Chapter 71. Configuring authentication with a certificate stored on the desktop of an IdM client
By configuring Identity Management (IdM), IdM system administrators can enable users to authenticate to the IdM web UI and command-line interface (CLI) using a certificate that a Certificate Authority (CA) has issued to the users. The certificate is stored on the desktop of an IdM client.
The web browser can run on a system that is not part of the IdM domain.
Note the following while configuring authentication with a certificate:
- you can skip Requesting a new user certificate and exporting it to the client if the user you want to authenticate using a certificate already has a certificate;
- you can skip Making sure the certificate and user are linked together if the user’s certificate has been issued by the IdM CA.
Only Identity Management users can log into the web UI using a certificate. Active Directory users can log in with their user name and password.
71.1. Configuring the Identity Management Server for Certificate Authentication in the Web UI
As an Identity Management (IdM) administrator, you can allow users to use certificates to authenticate to your IdM environment.
Procedure
As the Identity Management administrator:
On an Identity Management server, obtain administrator privileges and create a shell script to configure the server.
Run the
ipa-advise config-server-for-smart-card-authcommand, and save its output to a file, for exampleserver_certificate_script.sh:# kinit admin # ipa-advise config-server-for-smart-card-auth > server_certificate_script.shAdd execute permissions to the file using the
chmodutility:# chmod +x server_certificate_script.sh
On all the servers in the Identity Management domain, run the
server_certificate_script.shscriptwith the path of the IdM Certificate Authority certificate,
/etc/ipa/ca.crt, as input if the IdM CA is the only certificate authority that has issued the certificates of the users you want to enable certificate authentication for:# ./server_certificate_script.sh /etc/ipa/ca.crtwith the paths leading to the relevant CA certificates as input if different external CAs signed the certificates of the users who you want to enable certificate authentication for:
# ./server_certificate_script.sh /tmp/ca1.pem /tmp/ca2.pem
Do not forget to run the script on each new replica that you add to the system in the future if you want to have certificate authentication for users enabled in the whole topology.
71.2. Requesting a new user certificate and exporting it to the client
As an Identity Management (IdM) administrator, you can create certificates for users in your IdM environment and export them to the IdM clients on which you want to enable certificate authentication for users.
You do not need to follow this procedure if the user you want to authenticate using a certificate already has a certificate.
Procedure
Optional: Create a new directory, for example
~/certdb/, and make it a temporary certificate database. When asked, create an NSS Certificate DB password to encrypt the keys to the certificate to be generated in a subsequent step:# mkdir ~/certdb/ # certutil -N -d ~/certdb/ Enter a password which will be used to encrypt your keys. The password should be at least 8 characters long, and should contain at least one non-alphabetic character. Enter new password: Re-enter password:Create the certificate signing request (CSR) and redirect the output to a file. For example, to create a CSR with the name
certificate_request.csrfor a4096bit certificate for theidm_useruser in theIDM.EXAMPLE.COMrealm, setting the nickname of the certificate private keys toidm_userfor easy findability, and setting the subject toCN=idm_user,O=IDM.EXAMPLE.COM:# certutil -R -d ~/certdb/ -a -g 4096 -n idm_user -s "CN=idm_user,O=IDM.EXAMPLE.COM" > certificate_request.csrWhen prompted, enter the same password that you entered when using
certutilto create the temporary database. Then continue typing randomly until told to stop:Enter Password or Pin for "NSS Certificate DB": A random seed must be generated that will be used in the creation of your key. One of the easiest ways to create a random seed is to use the timing of keystrokes on a keyboard. To begin, type keys on the keyboard until this progress meter is full. DO NOT USE THE AUTOREPEAT FUNCTION ON YOUR KEYBOARD! Continue typing until the progress meter is full:Submit the certificate request file to the server. Specify the Kerberos principal to associate with the newly-issued certificate, the output file to store the certificate, and optionally the certificate profile. For example, to obtain a certificate of the
IECUserRolesprofile, a profile with added user roles extension, for theidm_user@IDM.EXAMPLE.COMprincipal, and save it in the~/idm_user.pemfile:# ipa cert-request certificate_request.csr --principal=idm_user@IDM.EXAMPLE.COM --profile-id=IECUserRoles --certificate-out=~/idm_user.pemAdd the certificate to the NSS database. Use the
-noption to set the same nickname that you used when creating the CSR previously so that the certificate matches the private key in the NSS database. The-toption sets the trust level. For details, see the certutil(1) man page. The-ioption specifies the input certificate file. For example, to add to the NSS database a certificate with theidm_usernickname that is stored in the~/idm_user.pemfile in the~/certdb/database:# certutil -A -d ~/certdb/ -n idm_user -t "P,," -i ~/idm_user.pemVerify that the key in the NSS database does not show
(orphan)as its nickname. For example, to verify that the certificate stored in the~/certdb/database is not orphaned:# certutil -K -d ~/certdb/ < 0> rsa 5ad14d41463b87a095b1896cf0068ccc467df395 NSS Certificate DB:idm_userUse the
pk12utilcommand to export the certificate from the NSS database to the PKCS12 format. For example, to export the certificate with theidm_usernickname from the/root/certdbNSS database into the~/idm_user.p12file:# pk12util -d ~/certdb -o ~/idm_user.p12 -n idm_user Enter Password or Pin for "NSS Certificate DB": Enter password for PKCS12 file: Re-enter password: pk12util: PKCS12 EXPORT SUCCESSFULTransfer the certificate to the host on which you want the certificate authentication for
idm_userto be enabled:# scp ~/idm_user.p12 idm_user@client.idm.example.com:/home/idm_user/On the host to which the certificate has been transferred, make the directory in which the .pkcs12 file is stored inaccessible to the 'other' group for security reasons:
# chmod o-rwx /home/idm_user/For security reasons, remove the temporary NSS database and the .pkcs12 file from the server:
# rm ~/certdb/ # rm ~/idm_user.p12
71.3. Making sure the certificate and user are linked together
You do not need to follow this procedure if the user’s certificate has been issued by the IdM CA.
For certificate authentication to work, you need to make sure that the certificate is linked to the user that will use it to authenticate to Identity Management (IdM).
- If the certificate is provided by a Certificate Authority that is not part of your Identity Management environment, link the user and the certificate following the procedure described in Linking User Accounts to Certificates.
- If the certificate is provided by Identity Management CA, the certificate is already automatically added in the user entry and you do not have to link the certificate to the user account. For details on creating a new certificate in IdM, see Requesting a new user certificate and exporting it to the client.
71.4. Configuring a browser to enable certificate authentication
To be able to authenticate with a certificate when using the WebUI to log into Identity Management (IdM), you need to import the user and the relevant certificate authority (CA) certificates into the Mozilla Firefox or Google Chrome browser. The host itself on which the browser is running does not have to be part of the IdM domain.
IdM supports the following browsers for connecting to the WebUI:
- Mozilla Firefox 38 and later
- Google Chrome 46 and later
The following procedure shows how to configure the Mozilla Firefox 57.0.1 browser.
Prerequisites
- You have the user certificate that you want to import to the browser at your disposal in the PKCS#12 format.
Procedure
Open Firefox, then navigate to
Preferences→Privacy & Security.Figure 71.1. Privacy and Security section in Preferences
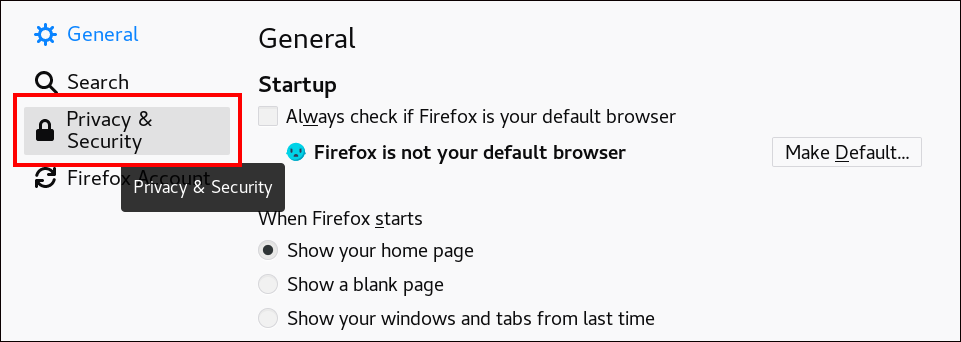
Click .
Figure 71.2. View Certificates in Privacy and Security
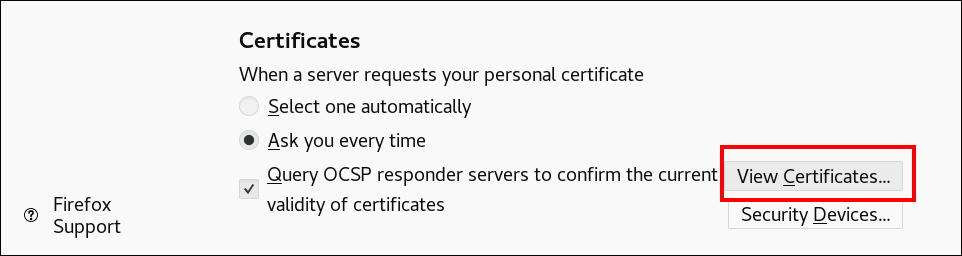
-
In the
Your Certificatestab, click . Locate and open the certificate of the user in the PKCS12 format, then click and . Make sure that the Identity Management Certificate Authority is recognized by Firefox as a trusted authority:
Save the IdM CA certificate locally:
Navigate to the IdM web UI by writing the name of your IdM server in the Firefox address bar. Click
Advancedon the Insecure Connection warning page.Figure 71.3. Insecure Connection
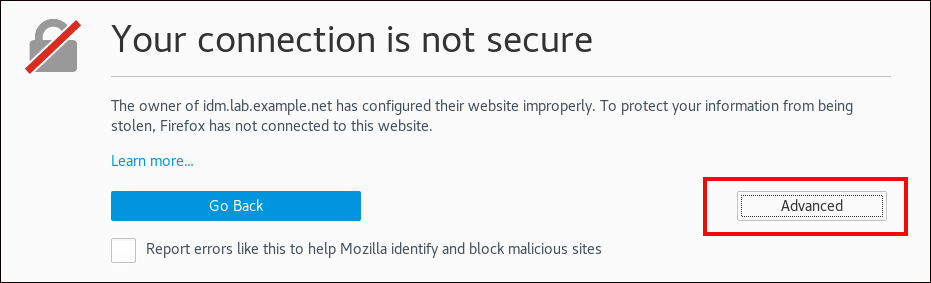
Add Exception. ClickView.Figure 71.4. View the Details of a Certificate
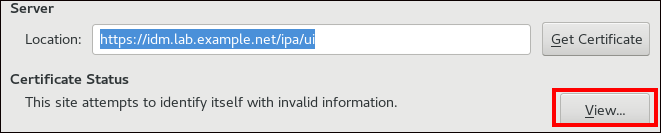
In the
Detailstab, highlight theCertificate Authorityfields.Figure 71.5. Exporting the CA Certificate

-
Click . Save the CA certificate, for example as the
CertificateAuthority.crtfile, then click , and .
Import the IdM CA certificate to Firefox as a trusted certificate authority certificate:
Open Firefox, navigate to Preferences and click .
Figure 71.6. Privacy and Security section in Preferences
Click .
Figure 71.7. View Certificates in Privacy and Security
-
In the
Authoritiestab, click . Locate and open the CA certificate that you saved in the previous step in theCertificateAuthority.crtfile. Trust the certificate to identify websites, then click and .
- Continue to Authenticating to the Identity Management Web UI with a Certificate as an Identity Management User.
71.5. Authenticating to the Identity Management Web UI with a Certificate as an Identity Management User
Follow this procedure to authenticate as a user to the Identity Management (IdM) web UI using a certificate stored on the desktop of an Identity Management client.
Procedure
-
In the browser, navigate to the Identity Management web UI at, for example,
https://server.idm.example.com/ipa/ui. Click .
Figure 71.8. in the Identity Management web UI
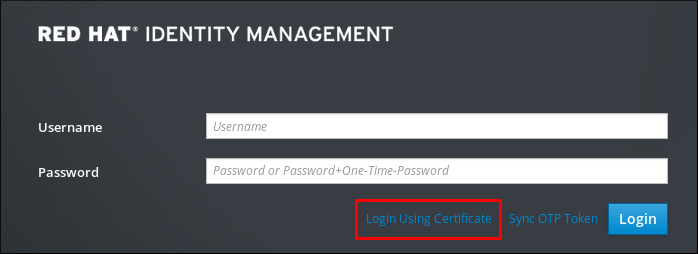
- The user’s certificate should already be selected. Uncheck , then click .
You are now authenticated as the user who corresponds to the certificate.
71.6. Configuring an IdM client to enable authenticating to the CLI using a certificate
To make certificate authentication work for an IdM user in the Command Line Interface (CLI) of your IdM client, import the IdM user’s certificate and the private key to the IdM client. For details on creating and transferring the user certificate, see Requesting a new user certificate and exporting it to the client.
Procedure
Log into the IdM client and have the .p12 file containing the user’s certificate and the private key ready. To obtain and cache the Kerberos ticket granting ticket (TGT), run the
kinitcommand with the user’s principal, using the-Xoption with theX509_username:/path/to/file.p12attribute to specify where to find the user’s X509 identity information. For example, to obtain the TGT foridm_userusing the user’s identity information stored in the~/idm_user.p12file:$ kinit -X X509_idm_user='PKCS12:~/idm_user.p12' idm_userNoteThe command also supports the .pem file format: kinit -X X509_username='FILE:/path/to/cert.pem,/path/to/key' user_principal
Chapter 72. Using IdM CA renewal server
72.1. Explanation of IdM CA renewal server
In an Identity Management (IdM) deployment that uses an embedded certificate authority (CA), the CA renewal server maintains and renews IdM system certificates. It ensures robust IdM deployments.
IdM system certificates include:
-
IdM CAcertificate -
OCSPsigning certificate -
IdM CA subsystemcertificates -
IdM CA audit signingcertificate -
IdM renewal agent(RA) certificate -
KRAtransport and storage certificates
What characterizes system certificates is that their keys are shared by all CA replicas. In contrast, the IdM service certificates (for example, LDAP, HTTP and PKINIT certificates), have different keypairs and subject names on different IdM CA servers.
In IdM topology, by default, the first IdM CA server is the CA renewal server.
In upstream documentation, the IdM CA is called Dogtag.
The role of the CA renewal server
The IdM CA, IdM CA subsystem, and IdM RA certificates are crucial for IdM deployment. Each certificate is stored in an NSS database in the /etc/pki/pki-tomcat/ directory and also as an LDAP database entry. The certificate stored in LDAP must match the certificate stored in the NSS database. If they do not match, authentication failures occur between the IdM framework and IdM CA, and between IdM CA and LDAP.
All IdM CA replicas have tracking requests for every system certificate. If an IdM deployment with integrated CA does not contain a CA renewal server, each IdM CA server requests the renewal of system certificates independently. This results in different CA replicas having various system certificates and authentication failures occurring.
Appointing one CA replica as the renewal server allows the system certificates to be renewed exactly once, when required, and thus prevents authentication failures.
The role of the certmonger service on CA replicas
The certmonger service running on all IdM CA replicas uses the dogtag-ipa-ca-renew-agent renewal helper to keep track of IdM system certificates. The renewal helper program reads the CA renewal server configuration. On each CA replica that is not the CA renewal server, the renewal helper retrieves the latest system certificates from the ca_renewal LDAP entries. Due to non-determinism in when exactly certmonger renewal attempts occur, the dogtag-ipa-ca-renew-agent helper sometimes attempts to update a system certificate before the CA renewal server has actually renewed the certificate. If this happens, the old, soon-to-expire certificate is returned to the certmonger service on the CA replica. The certmonger service, realizing it is the same certificate that is already stored in its database, keeps attempting to renew the certificate with some delay between individual attempts until it can retrieve the updated certificate from the CA renewal server.
The correct functioning of IdM CA renewal server
An IdM deployment with an embedded CA is an IdM deployment that was installed with an IdM CA - or whose IdM CA server was installed later. An IdM deployment with an embedded CA must at all times have exactly one CA replica configured as the renewal server. The renewal server must be online and fully functional, and must replicate properly with the other servers.
If the current CA renewal server is being deleted using the ipa server-del, ipa-replica-manage del, ipa-csreplica-manage del or ipa-server-install --uninstall commands, another CA replica is automatically assigned as the CA renewal server. This policy ensures that the renewal server configuration remains valid.
This policy does not cover the following situations:
Offline renewal server
If the renewal server is offline for an extended duration, it may miss a renewal window. In this situation, all nonrenewal CA servers keep reinstalling the current system certificates until the certificates expire. When this occurs, the IdM deployment is disrupted because even one expired certificate can cause renewal failures for other certificates.
To prevent this situation: if your current renewal server is offline and unavailable for an extended period of time, consider assigning a new CA renewal server manually.
Replication problems
If replication problems exist between the renewal server and other CA replicas, renewal might succeed, but the other CA replicas might not be able to retrieve the updated certificates before they expire.
To prevent this situation, make sure that your replication agreements are working correctly. For details, see general or specific replication troubleshooting guidelines in the RHEL 7 Linux Domain Identity, Authentication, and Policy Guide.
72.2. Changing and resetting IdM CA renewal server
When a certificate authority (CA) renewal server is being decommissioned, Identity Management (IdM) automatically selects a new CA renewal server from the list of IdM CA servers. The system administrator cannot influence the selection.
To be able to select the new IdM CA renewal server, the system administrator must perform the replacement manually. Choose the new CA renewal server before starting the process of decommissioning the current renewal server.
If the current CA renewal server configuration is invalid, reset the IdM CA renewal server.
Complete this procedure to change or reset the CA renewal server.
Prerequisites
You have the IdM administrator credentials:
~]$ kinit admin Password for admin@IDM.EXAMPLE.COM:
Procedure
Optional: To find out which IdM servers in the deployment have the CA role necessary to be eligible to become the new CA renewal server:
~]$ ipa server-role-find --role 'CA server' ---------------------- 2 server roles matched ---------------------- Server name: server.idm.example.com Role name: CA server Role status: enabled Server name: replica.idm.example.com Role name: CA server Role status: enabled ---------------------------- Number of entries returned 2 ----------------------------There are two CA servers in the deployment.
Optional: To find out which CA server is the current CA renewal server, enter:
~]$ ipa config-show | grep 'CA renewal' IPA CA renewal master: server.idm.example.comThe current renewal server is
server.idm.example.com.To change the renewal server configuration, use the
ipa config-modutility with the--ca-renewal-master-serveroption:~]$ ipa config-mod --ca-renewal-master-server replica.idm.example.com | grep 'CA renewal' IPA CA renewal master: replica.idm.example.comImportantYou can also switch to a new CA renewal server using:
-
The
ipa-cacert-manage --renewcommand. This command both renews the CA certificate and makes the CA server on which you execute the command the new CA renewal server. The
ipa-cert-fixcommand. This command recovers the deployment when expired certificates are causing failures. It also makes the CA server on which you execute the command the new CA renewal server.For details, see Renewing expired system certificates when IdM is offline.
-
The
Chapter 73. Managing externally-signed CA certificates
Identity Management (IdM) provides different types of certificate authority (CA) configurations. You can choose to install IdM with an integrated CA or with an external CA. You must specify the type of CA you are using during the installation. However, once installed you can move from an externally-signed CA to a self-signed CA and vice versa. Additionally, while a self-signed CA is automatically renewed, you must ensure that you renew your externally-signed CA certificate. Refer to the relevant sections as required to manage your externally-signed CA certificates.
73.1. Switching from an externally-signed to a self-signed CA in IdM
Complete this procedure to switch from an externally-signed to a self-signed certificate of the Identity Management (IdM) certificate authority (CA). With a self-signed CA, the renewal of the CA certificate is managed automatically: a system administrator does not need to submit a certificate signing request (CSR) to an external authority.
Switching from an externally-signed to a self-signed CA replaces only the CA certificate. The certificates signed by the previous CA are still valid and still in use. For example, the certificate chain for the LDAP certificate remains unchanged even after you have moved to a self-signed CA:
external_CA certificate > IdM CA certificate > LDAP certificatePrerequisites
-
You have
rootaccess to the IdM CA renewal server and all IdM clients and servers.
Procedure
On the IdM CA renewal server, renew the CA certificate as self-signed:
# ipa-cacert-manage renew --self-signed Renewing CA certificate, please wait CA certificate successfully renewed The ipa-cacert-manage command was successfulSSHto all the remaining IdM servers and clients asroot. For example:# ssh root@idmclient01.idm.example.comOn the IdM client, update the local IdM certificate databases with the certificates from the server:
[idmclient01 ~]# ipa-certupdate Systemwide CA database updated. Systemwide CA database updated. The ipa-certupdate command was successful
Verification
To check if your update has been successful and the new CA certificate has been added to the
/etc/ipa/ca.crtfile:[idmclient01 ~]$ openssl crl2pkcs7 -nocrl -certfile /etc/ipa/ca.crt | openssl pkcs7 -print_certs -text -noout [...] Certificate: Data: Version: 3 (0x2) Serial Number: 39 (0x27) Signature Algorithm: sha256WithRSAEncryption Issuer: O=IDM.EXAMPLE.COM, CN=Certificate Authority Validity Not Before: Jul 1 16:32:45 2019 GMT Not After : Jul 1 16:32:45 2039 GMT Subject: O=IDM.EXAMPLE.COM, CN=Certificate Authority [...]The output shows that the update has been successful as the new CA certificate is listed with the older CA certificates.
73.2. Switching from a self-signed to an externally-signed CA in IdM
You can switch from a self-signed CA to an externally-signed CA in IdM. Once you switch to an externally-signed CA in IdM, your IdM CA server becomes a subCA of the external CA. Also, the renewal of the CA certificate is not managed automatically and a system administrator must submit a certificate signing request (CSR) to the external authority.
To switch to an externally-signed CA, a CSR must be signed by the external CA. Follow the steps in Renewing the IdM CA renewal server certificate using an external CA to switch to a self-signed CA in IdM.
73.3. Renewing the IdM CA renewal server certificate using an external CA
Follow this procedure to renew the Identity Management (IdM) certificate authority (CA) certificate using an external CA to sign the certificate signing request (CSR). In this configuration, your IdM CA server is a subCA of the external CA. The external CA can, but does not have to, be an Active Directory Certificate Server (AD CS).
If the external certificate authority is AD CS, you can specify the template you want for the IdM CA certificate in the CSR. A certificate template defines the policies and rules that a CA uses when a certificate request is received. Certificate templates in AD correspond to certificate profiles in IdM.
You can define a specific AD CS template by its Object Identifier (OID). OIDs are unique numeric values issued by various issuing authorities to uniquely identify data elements, syntaxes, and other parts of distributed applications.
Alternatively, you can define a specific AD CS template by its name. For example, the name of the default profile used in a CSR submitted by an IdM CA to an AD CS is subCA.
To define a profile by specifying its OID or name in the CSR, use the external-ca-profile option. For details, see the ipa-cacert-manage man page on your system.
Apart from using a ready-made certificate template, you can also create a custom certificate template in the AD CS, and use it in the CSR.
Prerequisites
- You have root access to the IdM CA renewal server.
Procedure
Complete this procedure to renew the certificate of the IdM CA with external signing, regardless of whether current CA certificate is self-signed or externally-signed.
Create a CSR to be submitted to the external CA:
If the external CA is an AD CS, use the
--external-ca-type=ms-csoption. If you want a different template than the defaultsubCAtemplate, specify it using the--external-ca-profileoption:~]# ipa-cacert-manage renew --external-ca --external-ca-type=ms-cs [--external-ca-profile=PROFILE] Exporting CA certificate signing request, please wait The next step is to get /var/lib/ipa/ca.csr signed by your CA and re-run ipa-cacert-manage as: ipa-cacert-manage renew --external-cert-file=/path/to/signed_certificate --external-cert-file=/path/to/external_ca_certificate The ipa-cacert-manage command was successfulIf the external CA is not an AD CS:
~]# ipa-cacert-manage renew --external-ca Exporting CA certificate signing request, please wait The next step is to get /var/lib/ipa/ca.csr signed by your CA and re-run ipa-cacert-manage as: ipa-cacert-manage renew --external-cert-file=/path/to/signed_certificate --external-cert-file=/path/to/external_ca_certificate The ipa-cacert-manage command was successfulThe output shows that a CSR has been created and is stored in the
/var/lib/ipa/ca.csrfile.
-
Submit the CSR located in
/var/lib/ipa/ca.csrto the external CA. The process differs depending on the service to be used as the external CA. Retrieve the issued certificate and the CA certificate chain for the issuing CA in a base 64-encoded blob, which is:
- A PEM file if the external CA is not an AD CS.
A Base_64 certificate if the external CA is an AD CS.
The process differs for every certificate service. Usually, a download link on a web page or in the notification email allows the administrator to download all the required certificates.
If the external CA is an AD CS and you have submitted the CSR with a known template through the Microsoft Windows Certification Authority management window, the AD CS issues the certificate immediately and the Save Certificate dialog appears in the AD CS web interface, asking where to save the issued certificate.
Run the
ipa-cacert-manage renewcommand again, adding all the CA certificate files required to supply a full certificate chain. Specify as many files as you need, using the--external-cert-fileoption multiple times:~]# ipa-cacert-manage renew --external-cert-file=/path/to/signed_certificate --external-cert-file=/path/to/external_ca_certificate_1 --external-cert-file=/path/to/external_ca_certificate_2On all the IdM servers and clients, update the local IdM certificate databases with the certificates from the server:
[client ~]$ ipa-certupdate Systemwide CA database updated. Systemwide CA database updated. The ipa-certupdate command was successful
Verification
To check if your update has been successful and the new CA certificate has been added to the
/etc/ipa/ca.crtfile:[client ~]$ openssl crl2pkcs7 -nocrl -certfile /etc/ipa/ca.crt | openssl pkcs7 -print_certs -text -noout [...] Certificate: Data: Version: 3 (0x2) Serial Number: 39 (0x27) Signature Algorithm: sha256WithRSAEncryption Issuer: O=IDM.EXAMPLE.COM, CN=Certificate Authority Validity Not Before: Jul 1 16:32:45 2019 GMT Not After : Jul 1 16:32:45 2039 GMT Subject: O=IDM.EXAMPLE.COM, CN=Certificate Authority [...]The output shows that the update has been successful as the new CA certificate is listed with the older CA certificates.
73.4. Updating the external CA public certificate in IdM
Updating the external CA public certificate ensures the IdM topology recognizes a renewed root authority. Distributing the new certificate chain across all servers and clients maintains trust and prevents authentication failures throughout the environment.
In this configuration, your IdM CA renewal server is a subCA of the external CA. When the external CA is renewed, for example, if it reached its expiration date, you must update its certificate in your IdM topology.
Prerequisites
- Run this in a test environment with multiple servers and clients to ensure the order of operations and timing is correct.
-
Ensure that you have the newly renewed external CA public certificate and all the certificates composing its chain in separate
.crtfiles.
Procedure
Install the new external CA certificate and the complete CA certificate chain of the external CA as additional CA certificates to IdM. The system accepts certificate files in PEM, DER, PKCS#7, PKCS#8, raw private keys and PKCS#12 formats.
On one of the IdM servers in your topology, add the renewed external CA certificate and certificate chain from the
.crtfile to IdM:# ipa-cacert-manage install /path/to/ca.crtThe CA certificate is installed into LDAP storage,
cn=certificates,cn=ipa,cn=etc,dc=realm,dc=name.Install the rest of the certificate chain as additional CA certificates into IdM. Because the
ipa-cacert-manage installcommand reads only the first certificate in a file, you must install the full CA chain one certificate at a time. For example, if the chain includes two certificates, save each one in a separate file and runipa-cacert-manage installindividually for each file:# ipa-cacert-manage install /path/to/intermediate-ca.crt# ipa-cacert-manage install /path/to/root-ca.crt
Update all other IdM servers in your topology by running
ipa-certupdateto sync local NSS databases and/etc/ipa/ca.crtwith LDAP:# ipa-certupdateAfter updating the IdM servers, update the external CA certificate on all IdM clients.
# ipa-certupdateRetrieves all data from IdM LDAP storage and puts it in the main certificate chain in
/etc/ipa/ca.crt.
Verification
To check if your update has been successful and the new external CA certificate has been added to the
/etc/ipa/ca.crtfile:[client ~]$ openssl crl2pkcs7 -nocrl -certfile /etc/ipa/ca.crt | openssl pkcs7 -print_certs -text -noout[...] Certificate: Data: Version: 3 (0x2) Serial Number: 39 (0x27) Signature Algorithm: sha256WithRSAEncryption Issuer: O=IDM.EXAMPLE.COM, CN=Certificate Authority Validity Not Before: Jul 1 16:32:45 2019 GMT Not After : Jul 1 16:32:45 2039 GMT Subject: O=IDM.EXAMPLE.COM, CN=Certificate Authority [...]The output shows that the update has been successful as the new CA certificate is listed with the older CA certificates.
Chapter 74. Renewing expired system certificates when IdM is offline
If a system certificate has expired, Identity Management (IdM) fails to start. IdM supports renewing system certificates even in this situation by using the ipa-cert-fix tool.
Prerequisites
- IdM is installed only on Red Hat Enterprise Linux 8.1 or later.
-
Ensure that the LDAP service is running by entering the
ipactl start --ignore-service-failurescommand on the host.
74.1. Renewing expired system certificates on a CA renewal server
Follow this procedure to apply the ipa-cert-fix tool on expired IdM certificates.
If you run the ipa-cert-fix tool on a CA (Certificate Authority) host that is not the CA renewal server, and the utility renews shared certificates, that host automatically becomes the new CA renewal server in the domain. There must always be only one CA renewal server in the domain to avoid inconsistencies.
Prerequisites
- You must be logged in to the server as the administrator.
Procedure
-
Optional: Backup the system. This is heavily recommended, as
ipa-cert-fixmakes irreversible changes tonssdbs. Becauseipa-cert-fixalso makes changes to the LDAP, it is recommended to backup the entire cluster as well. Start the
ipa-cert-fixtool to analyze the system and list expired certificates that require renewal:# ipa-cert-fix ... The following certificates will be renewed: Dogtag sslserver certificate: Subject: CN=ca1.example.com,O=EXAMPLE.COM 201905222205 Serial: 13 Expires: 2019-05-12 05:55:47 ... Enter "yes" to proceed:Enter
yesto start the renewal process:Enter "yes" to proceed: true Proceeding. Renewed Dogtag sslserver certificate: Subject: CN=ca1.example.com,O=EXAMPLE.COM 201905222205 Serial: 268369925 Expires: 2021-08-14 02:19:33 ... Becoming renewal master. The ipa-cert-fix command was successfulIt can take up to one minute before
ipa-cert-fixrenews all expired certificates.
Verification
Verify that all services are now running:
# ipactl status Directory Service: RUNNING krb5kdc Service: RUNNING kadmin Service: RUNNING httpd Service: RUNNING ipa-custodia Service: RUNNING pki-tomcatd Service: RUNNING ipa-otpd Service: RUNNING ipa: INFO: The ipactl command was successful
At this point, certificates have been renewed and services are running. The next step is to check other servers in the IdM domain.
-
After ensuring that LDAP replication is working across the topology, first run
ipa-cert-fixon one CA server, according to the above procedure. -
Before you run
ipa-cert-fixon another CA server, trigger Certmonger renewals for shared certificates viagetcert-resubmit(on the other CA server), to avoid unnecessary renewal of shared certificates.
74.2. Verifying other IdM servers in the IdM domain after renewal
After the renewing the CA renewal server’s certificates with the ipa-cert-fix tool, you must:
- Restart all other Identity Management (IdM) servers in the domain.
- Check if certmonger renewed certificates.
-
If there are other Certificate Authority (CA) replicas with expired system certificates, renew those certificates with the
ipa-cert-fixtool as well.
Prerequisites
- You must be logged in to the server as the administrator.
Procedure
Restart IdM with the
--forceparameter:# ipactl restart --forceWith the
--forceparameter, theipactlutility ignores individual service startup failures. For example, if the server is also a CA with expired certificates, thepki-tomcatservice fails to start. This is expected and ignored because of using the--forceparameter.After the restart, verify that the
certmongerservice renewed the certificates (certificate status says MONITORING):# getcert list | egrep '^Request|status:|subject:' Request ID '20190522120745': status: MONITORING subject: CN=IPA RA,O=EXAMPLE.COM 201905222205 Request ID '20190522120834': status: MONITORING subject: CN=Certificate Authority,O=EXAMPLE.COM 201905222205 ...It can take some time before
certmongerrenews the shared certificates on the replica.If the server is also a CA, the previous command reports
CA_UNREACHABLEfor the certificate thepki-tomcatservice uses:Request ID '20190522120835': status: CA_UNREACHABLE subject: CN=ca2.example.com,O=EXAMPLE.COM 201905222205 ...To renew this certificate, use the
ipa-cert-fixutility:# ipa-cert-fix Dogtag sslserver certificate: Subject: CN=ca2.example.com,O=EXAMPLE.COM Serial: 3 Expires: 2019-05-11 12:07:11 Enter "yes" to proceed: true Proceeding. Renewed Dogtag sslserver certificate: Subject: CN=ca2.example.com,O=EXAMPLE.COM 201905222205 Serial: 15 Expires: 2019-08-14 04:25:05 The ipa-cert-fix command was successful
Chapter 75. Replacing the web server and LDAP server certificates if they have not yet expired on an IdM replica
As an Identity Management (IdM) system administrator, you can manually replace the certificates used by the web (or httpd) and LDAP (or Directory) services running on an IdM server. This might be necessary if the certificates are nearing expiration and either the certmonger utility is not configured for automatic renewal, or the certificates are signed by an external certificate authority (CA).
The example describes how to install the certificates for the services running on the server.idm.example.com IdM server. You obtain the certificates from an external CA.
The httpd and LDAP service certificates have different key pairs and subject names on different IdM servers and so you must renew the certificates on each IdM server individually.
Prerequisites
-
On at least one other IdM replica in the topology with which the IdM server has a replication agreement, the web and LDAP certificates are still valid. This is a prerequisite for the
ipa-server-certinstallcommand, which requires aTLSconnection to communicate with other IdM replicas. If the certificates are invalid, the connection cannot be established, and the command fails. In that case, see Replacing the web server and LDAP server certificates if they have expired in the whole IdM deployment. -
You have
rootaccess to the IdM server. -
You know the
Directory Managerpassword. -
If the new
httpd/LDAP certificate is going to be signed by a different external CA than the old one, you have access to the files storing the CA certificate chain of the external CA. The new external CA certificate cannot have the same subject as the old one if it uses a different key.
Procedure
If the new
httpd/LDAP certificate is going to be signed by a different CA than the old one, install the new external CA certificate and the whole CA certificate chain of the external CA as additional CA certificates to IdM. The files storing the certificates are accepted in PEM and DER certificate, PKCS#7 certificate chain, PKCS#8 and raw private key and PKCS#12 formats.Install the CA certificate:
# ipa-cacert-manage install /path/to/ca.crtImportantAttempting to install a CA certificate with an identical subject but a different private key fails with the message
subject public key info mismatch, as IdM prohibits duplicate subjects.Install the rest of the certificate chain as additional CA certificates into IdM. Because the
ipa-cacert-manage installcommand reads only the first certificate in a file, you must install the full CA chain one certificate at a time. For example, if the chain includes two certificates, save each one in a separate file and runipa-cacert-manage installindividually for each file:# ipa-cacert-manage install /path/to/intermediate-ca.crt# ipa-cacert-manage install /path/to/root-ca.crtUpdate the local IdM certificate databases with certificates from the certificate chain:
# ipa-certupdate
Generate a private key and a certificate signing request (CSR) using the
OpenSSLutility:$ openssl req -new -newkey rsa:4096 -days 365 -nodes -keyout new.key -out new.csr -addext "subjectAltName = DNS:server.idm.example.com" -subj '/CN=server.idm.example.com,O=IDM.EXAMPLE.COM'Submit the CSR to the external CA. The process differs depending on the service to be used as the external CA. After the CA signs the certificate, import the certificate to the IdM server.
On the IdM server, replace the Apache web server’s old private key and certificate with the new key and the newly-signed certificate:
# ipa-server-certinstall -w --pin=password new.key new.crtIn the command above:
-
The
-woption specifies that you are installing a certificate into the web server. -
The
--pinoption specifies the password protecting the private key.
-
The
-
When prompted, enter the
Directory Managerpassword. Replace the LDAP server’s old private key and certificate with the new key and the newly-signed certificate:
# ipa-server-certinstall -d --pin=password new.key new.certIn the command above:
-
The
-doption specifies that you are installing a certificate into the LDAP server. -
The
--pinoption specifies the password protecting the private key.
-
The
-
When prompted, enter the
Directory Managerpassword. Restart the
httpdservice:# systemctl restart httpd.serviceRestart the
Directoryservice:# systemctl restart dirsrv@IDM.EXAMPLE.COM.serviceIf a subCA has been removed or replaced on the servers, update the clients:
# ipa-certupdate
Chapter 76. Replacing the web server and LDAP server certificates if they have expired in the whole IdM deployment
Identity Management (IdM) uses the following service certificates:
-
The LDAP (or
Directory) server certificate -
The web (or
httpd) server certificate - The PKINIT certificate
In an IdM deployment without an integrated certificate authority (CA), the certmonger service does not, by default, track IdM service certificates or provide expiration warnings. If the IdM system administrator does not manually configure certificate tracking or set up notifications, the certificates may expire without notice.
Follow this procedure to manually replace expired certificates for the httpd and LDAP services running on the server.idm.example.com IdM server with a valid certificate chain.
The httpd and LDAP service certificates have different key pairs and subject names on different IdM servers. Therefore, you must renew the certificates on each IdM server individually.
Prerequisites
- The HTTP and LDAP certificates have expired on all IdM replicas in the topology. If not, see Replacing the web server and LDAP server certificates if they have not yet expired on an IdM replica.
-
You have
rootaccess to the IdM server and replicas. -
You know the
Directory Managerpassword. You have created backups of the following directories and files:
-
/etc/dirsrv/slapd-IDM-EXAMPLE-COM/ -
/etc/httpd/alias -
/var/lib/certmonger -
/var/lib/ipa/certs/
-
-
If the new
httpd/LDAP certificate is going to be signed by a different external CA than the old one, or if the already installed CA certificate is no longer valid, you have access to the files storing the CA certificate chain of the external CA. The new external CA certificate cannot have the same subject as the old one if it uses a different key.
Procedure
-
Optional: Perform a backup of
/var/lib/ipa/privateand/var/lib/ipa/passwds. If you are not using the same certificate authority (CA) to sign the new certificates, or if the already installed CA certificate is no longer valid, update the information about the external CA in your local database with files that contain a valid CA certificate chain of the external CA. The files are accepted in PEM and DER certificate, PKCS#7 certificate chain, PKCS#8 and raw private key and PKCS#12 formats.
Install the CA certificate:
# ipa-cacert-manage install /path/to/ca.crtImportantAttempting to install a CA certificate with an identical subject but a different private key fails with the message
subject public key info mismatch, as IdM prohibits duplicate subjects.Install the rest of the certificate chain as additional CA certificates into IdM. Because the
ipa-cacert-manage installcommand reads only the first certificate in a file, you must install the full CA chain one certificate at a time. For example, if the chain includes two certificates, save each one in a separate file and runipa-cacert-manage installindividually for each file:# ipa-cacert-manage install /path/to/intermediate-ca.crt# ipa-cacert-manage install /path/to/root-ca.crtUpdate the local IdM certificate databases with certificates from the certificate chain:
# ipa-certupdate
Request the certificates for
httpdand LDAP:Create a certificate signing request (CSR) for the Apache web server running on your IdM instances to your third party CA using the
OpenSSLutility.The creation of a new private key is optional. If you still have the original private key, you can use the
-inoption with theopenssl reqcommand to specify the input file name to read the request from:$ openssl req -new -nodes -in /var/lib/ipa/private/httpd.key -out /tmp/http.csr -addext 'subjectAltName = DNS:_server.idm.example.com_, otherName:1.3.6.1.4.1.311.20.2.3;UTF8:HTTP/server.idm.example.com@IDM.EXAMPLE.COM' -subj '/O=IDM.EXAMPLE.COM/CN=server.idm.example.com'If you want to create a new key:
$ openssl req -new -newkey rsa:2048 -nodes -keyout /var/lib/ipa/private/httpd.key -out /tmp/http.csr -addext 'subjectAltName = DNS:server.idm.example.com, otherName:1.3.6.1.4.1.311.20.2.3;UTF8:HTTP/server.idm.example.com@IDM.EXAMPLE.COM' -subj '/O=IDM.EXAMPLE.COM/CN=server.idm.example.com'
Create a certificate signing request (CSR) for the LDAP server running on your IdM instances to your third party CA using the
OpenSSLutility:$ openssl req -new -newkey rsa:2048 -nodes -keyout ~/ldap.key -out /tmp/ldap.csr -addext 'subjectAltName = DNS:server.idm.example.com, otherName:1.3.6.1.4.1.311.20.2.3;UTF8:ldap/server.idm.example.com@IDM.EXAMPLE.COM' -subj '/O=IDM.EXAMPLE.COM/CN=server.idm.example.com'-
Submit the CSRs, /tmp/http.csr and tmp/ldap.csr, to the external CA, and obtain a certificate for
httpdand a certificate for LDAP. The process differs depending on the service to be used as the external CA.
Install the certificate for
httpd:# cp /path/to/httpd.crt /var/lib/ipa/certs/Install the LDAP certificate into an NSS database:
Optional: List the available certificates:
# certutil -d /etc/dirsrv/slapd-IDM-EXAMPLE-COM/ -L Certificate Nickname Trust Attributes SSL,S/MIME,JAR/XPI Server-Cert u,u,uThe default certificate nickname is Server-Cert, but it is possible that a different name was applied.
Remove the old invalid certificate from the NSS database (
NSSDB) by using the certificate nickname from the previous step:# certutil -D -d /etc/dirsrv/slapd-IDM-EXAMPLE-COM/ -n 'Server-Cert' -f /etc/dirsrv/slapd-IDM-EXAMPLE-COM/pwdfile.txtCreate a PKCS12 file to ease the import process into
NSSDB:# openssl pkcs12 -export -in ldap.crt -inkey ldap.key -out ldap.p12 -name Server-CertInstall the created PKCS#12 file into the
NSSDB:# pk12util -i ldap.p12 -d /etc/dirsrv/slapd-IDM-EXAMPLE-COM/ -k /etc/dirsrv/slapd-IDM-EXAMPLE-COM/pwdfile.txtCheck that the new certificate has been successfully imported:
# certutil -L -d /etc/dirsrv/slapd-IDM-EXAMPLE-COM/
Restart the
httpdservice:# systemctl restart httpd.serviceRestart the
Directoryservice:# systemctl restart dirsrv@IDM-EXAMPLE-COM.service-
Perform all the previous steps on all your IdM replicas. This is a prerequisite for establishing
TLSconnections between the replicas. Enroll the new certificates to LDAP storage:
Replace the Apache web server’s old private key and certificate with the new key and the newly-signed certificate:
# ipa-server-certinstall -w --pin=password /var/lib/ipa/private/httpd.key /var/lib/ipa/certs/httpd.crtIn the command above:
-
The
-woption specifies that you are installing a certificate into the web server. -
The
--pinoption specifies the password protecting the private key.
-
The
-
When prompted, enter the
Directory Managerpassword. Replace the LDAP server’s old private key and certificate with the new key and the newly-signed certificate:
# ipa-server-certinstall -d --pin=password /etc/dirsrv/slapd-IDM-EXAMPLE-COM/ldap.key /path/to/ldap.crtIn the command above:
-
The
-doption specifies that you are installing a certificate into the LDAP server. -
The
--pinoption specifies the password protecting the private key.
-
The
-
When prompted, enter the
Directory Managerpassword. Restart the
httpdservice:# systemctl restart httpd.serviceRestart the
Directoryservice:# systemctl restart dirsrv@IDM-EXAMPLE-COM.service
- Execute the commands from the previous step on all the other affected replicas.
Chapter 77. Generating CRL on the IdM CA server
If your IdM deployment uses an embedded certificate authority (CA), you may need to move the generating of the Certificate Revocation List (CRL) from one Identity Management (IdM) server to another. It can be necessary, for example, when you want to migrate the server to another system.
Only configure one server to generate the CRL. The IdM server that performs the CRL publisher role is usually the same server that performs the CA renewal server role, but this is not mandatory. Before you decommission the CRL publisher server, select and configure another server to perform the CRL publisher server role.
77.1. Stopping CRL generation on an IdM server
To stop generating the Certificate Revocation List (CRL) on the IdM CRL publisher server, use the ipa-crlgen-manage command. Before you disable the generation, verify that the server really generates CRL. You can then disable it.
Prerequisites
- Identity Management (IdM) server is installed on the RHEL 8.1 system or newer.
- You must be logged in as root.
Procedure
Check if your server is generating the CRL:
[root@server ~]# ipa-crlgen-manage status CRL generation: enabled Last CRL update: 2019-10-31 12:00:00 Last CRL Number: 6 The ipa-crlgen-manage command was successfulStop generating the CRL on the server:
[root@server ~]# ipa-crlgen-manage disable Stopping pki-tomcatd Editing /var/lib/pki/pki-tomcat/conf/ca/CS.cfg Starting pki-tomcatd Editing /etc/httpd/conf.d/ipa-pki-proxy.conf Restarting httpd CRL generation disabled on the local host. Please make sure to configure CRL generation on another master with ipa-crlgen-manage enable. The ipa-crlgen-manage command was successfulCheck if the server stopped generating CRL:
[root@server ~]# ipa-crlgen-manage status
The server stopped generating the CRL. The next step is to enable CRL generation on the IdM replica.
77.2. Starting CRL generation on an IdM replica server
You can start generating the Certificate Revocation List (CRL) on an IdM CA server with the ipa-crlgen-manage command.
Prerequisites
- Identity Management (IdM) server is installed on the RHEL 8.1 system or newer.
- The RHEL system must be an IdM Certificate Authority server.
- You must be logged in as root.
Procedure
Start generating the CRL:
[root@replica1 ~]# ipa-crlgen-manage enable Stopping pki-tomcatd Editing /var/lib/pki/pki-tomcat/conf/ca/CS.cfg Starting pki-tomcatd Editing /etc/httpd/conf.d/ipa-pki-proxy.conf Restarting httpd Forcing CRL update CRL generation enabled on the local host. Please make sure to have only a single CRL generation master. The ipa-crlgen-manage command was successfulCheck if the CRL is generated:
[root@replica1 ~]# ipa-crlgen-manage status CRL generation: enabled Last CRL update: 2019-10-31 12:10:00 Last CRL Number: 7 The ipa-crlgen-manage command was successful
77.3. Changing the CRL update interval
The Certificate Revocation List (CRL) file is automatically generated by the Identity Management Certificate Authority (Idm CA) every four hours by default. You can change this interval with the following procedure.
Procedure
Stop the CRL generation server:
# systemctl stop pki-tomcatd@pki-tomcat.serviceOpen the
/var/lib/pki/pki-tomcat/conf/ca/CS.cfgfile, and change theca.crl.MasterCRL.autoUpdateIntervalvalue to the new interval setting. For example, to generate the CRL every 60 minutes:ca.crl.MasterCRL.autoUpdateInterval=60NoteIf you update the
ca.crl.MasterCRL.autoUpdateIntervalparameter, the change will become effective after the next already scheduled CRL update.Start the CRL generation server:
# systemctl start pki-tomcatd@pki-tomcat.service
Chapter 78. Decommissioning a server that performs the CA renewal server and CRL publisher roles
You might have one server performing both the Certificate Authority (CA) renewal server role and the Certificate Revocation List (CRL) publisher role. If you need to take this server offline or decommission it, select and configure another CA server to perform these roles.
In this example, the host server.idm.example.com, which fulfills the CA renewal server and CRL publisher roles, must be decommissioned. This procedure transfers the CA renewal server and CRL publisher roles to the host replica.idm.example.com and removes server.idm.example.com from the IdM environment.
You do not need to configure the same server to perform both CA renewal server and CRL publisher roles.
Prerequisites
- You have the IdM administrator credentials.
- You have the root password for the server you are decommissioning.
- You have at least two CA replicas in your IdM environment.
Procedure
Obtain the IdM administrator credentials:
[user@server ~]$ kinit admin Password for admin@IDM.EXAMPLE.COM:Optional: If you are not sure which servers perform the CA renewal server and CRL publisher roles:
Display the current CA renewal server. You can run the following command from any IdM server:
[user@server ~]$ ipa config-show | grep 'CA renewal' IPA CA renewal master: server.idm.example.comTest if a host is the current CRL publisher.
[user@server ~]$ ipa-crlgen-manage status CRL generation: enabled Last CRL update: 2019-10-31 12:00:00 Last CRL Number: 6 The ipa-crlgen-manage command was successfulA CA server that does not generate the CRL displays
CRL generation: disabled.[user@replica ~]$ ipa-crlgen-manage status CRL generation: disabled The ipa-crlgen-manage command was successfulContinue entering this command on CA servers until you find the CRL publisher server.
Display all other CA servers you can promote to fulfill these roles. This environment has two CA servers.
[user@server ~]$ ipa server-role-find --role 'CA server' ---------------------- 2 server roles matched ---------------------- Server name: server.idm.example.com Role name: CA server Role status: enabled Server name: replica.idm.example.com Role name: CA server Role status: enabled ---------------------------- Number of entries returned 2 ----------------------------
Set
replica.idm.example.comas the CA renewal server.[user@server ~]$ ipa config-mod --ca-renewal-master-server replica.idm.example.comOn
server.idm.example.com:Disable the certificate updater task:
[root@server ~]# pki-server ca-config-set ca.certStatusUpdateInterval 0Restart IdM services:
[root@server ~]# ipactl restart
On
replica.idm.example.com:Enable the certificate updater task:
[root@replica ~]# pki-server ca-config-unset ca.certStatusUpdateIntervalRestart IdM services:
[root@replica ~]# ipactl restart
On
server.idm.example.com, stop generating the CRL.[user@server ~]$ ipa-crlgen-manage disable Stopping pki-tomcatd Editing /var/lib/pki/pki-tomcat/conf/ca/CS.cfg Starting pki-tomcatd Editing /etc/httpd/conf.d/ipa-pki-proxy.conf Restarting httpd CRL generation disabled on the local host. Please make sure to configure CRL generation on another master with ipa-crlgen-manage enable. The ipa-crlgen-manage command was successfulOn
replica.idm.example.com, start generating the CRL.[user@replica ~]$ ipa-crlgen-manage enable Stopping pki-tomcatd Editing /var/lib/pki/pki-tomcat/conf/ca/CS.cfg Starting pki-tomcatd Editing /etc/httpd/conf.d/ipa-pki-proxy.conf Restarting httpd Forcing CRL update CRL generation enabled on the local host. Please make sure to have only a single CRL generation master. The ipa-crlgen-manage command was successfulStop IdM services on
server.idm.example.com:[root@server ~]# ipactl stopOn
replica.idm.example.com, deleteserver.idm.example.comfrom the IdM environment.[user@replica ~]$ ipa server-del server.idm.example.comOn
server.idm.example.com, use theipa-server-install --uninstallcommand as the root account:[root@server ~]# ipa-server-install --uninstall ... Are you sure you want to continue with the uninstall procedure? [no]: yes
Verification
Display the current CA renewal server.
[user@replica ~]$ ipa config-show | grep 'CA renewal' IPA CA renewal master: replica.idm.example.comConfirm that the
replica.idm.example.comhost is generating the CRL.[user@replica ~]$ ipa-crlgen-manage status CRL generation: enabled Last CRL update: 2019-10-31 12:10:00 Last CRL Number: 7 The ipa-crlgen-manage command was successful
Chapter 79. Obtaining an IdM certificate for a service using certmonger
79.1. Certmonger overview
When Identity Management (IdM) is installed with an integrated IdM Certificate Authority (CA), it uses the certmonger service to track and renew system and service certificates. When the certificate is reaching its expiration date, certmonger manages the renewal process by:
- Regenerating a certificate-signing request (CSR) using the options provided in the original request.
-
Submitting the CSR to the IdM CA using the IdM API
cert-requestcommand. - Receiving the certificate from the IdM CA.
- Executing a pre-save command if specified by the original request.
-
Installing the new certificate in the location specified in the renewal request: either in an
NSSdatabase or in a file. -
Executing a post-save command if specified by the original request. For example, the post-save command can instruct
certmongerto restart a relevant service, so that the service picks up the new certificate.
Types of certificates certmonger tracks
Certificates can be divided into system and service certificates.
Unlike service certificates (for example, for HTTP, LDAP and PKINIT), which have different keypairs and subject names on different servers, IdM system certificates and their keys are shared by all CA replicas. The IdM system certificates include:
-
IdM CAcertificate -
OCSPsigning certificate -
IdM CA subsystemcertificates -
IdM CA audit signingcertificate -
IdM renewal agent(RA) certificate -
KRAtransport and storage certificates
The certmonger service tracks the IdM system and service certificates that were requested during the installation of IdM environment with an integrated CA. Certmonger also tracks certificates that have been requested manually by the system administrator for other services running on the IdM host. Certmonger does not track external CA certificates or user certificates.
Certmonger components
The certmonger service consists of two main components:
-
The
certmonger daemon, which is the engine tracking the list of certificates and launching renewal commands -
The
getcertutility for the command line (CLI), which allows the system administrator to actively send commands to thecertmongerdaemon.
More specifically, the system administrator can use the getcert utility to:
79.2. Obtaining an IdM certificate for a service using certmonger
To ensure that communication between browsers and the web service running on your Identity Management (IdM) client is secure and encrypted, use a TLS certificate. Obtain the TLS certificate for your web service from the IdM Certificate Authority (CA).
Follow this procedure to use certmonger to obtain an IdM certificate for a service (HTTP/my_company.idm.example.com@IDM.EXAMPLE.COM) running on an IdM client.
Using certmonger to request the certificate automatically means that certmonger manages and renews the certificate when it is due for a renewal.
For a visual representation of what happens when certmonger requests a service certificate, see Communication flow for certmonger requesting a service certificate.
Prerequisites
- The web server is enrolled as an IdM client.
- You have root access to the IdM client on which you are running the procedure.
- The service for which you are requesting a certificate does not have to pre-exist in IdM.
Procedure
On the
my_company.idm.example.comIdM client on which theHTTPservice is running, request a certificate for the service corresponding to theHTTP/my_company.idm.example.com@IDM.EXAMPLE.COMprincipal, and specify that-
The certificate is to be stored in the local
/etc/pki/tls/certs/httpd.pemfile -
The private key is to be stored in the local
/etc/pki/tls/private/httpd.keyfile That an extensionRequest for a
SubjectAltNamebe added to the signing request with the DNS name ofmy_company.idm.example.com:# ipa-getcert request -K HTTP/my_company.idm.example.com -k /etc/pki/tls/private/httpd.key -f /etc/pki/tls/certs/httpd.pem -g 2048 -D my_company.idm.example.com -C "systemctl restart httpd" New signing request "20190604065735" added.In the command above:
-
The
ipa-getcert requestcommand specifies that the certificate is to be obtained from the IdM CA. Theipa-getcert requestcommand is a shortcut forgetcert request -c IPA. -
The
-goption specifies the size of key to be generated if one is not already in place. -
The
-Doption specifies theSubjectAltNameDNS value to be added to the request. -
The
-Coption instructscertmongerto restart thehttpdservice after obtaining the certificate.
-
To specify that the certificate be issued with a particular profile, use the
-Toption. -
To request a certificate using the named issuer from the specified CA, use the
-X ISSUERoption.
NoteRHEL 8 uses a different SSL module in Apache than the one used in RHEL 7. The SSL module relies on OpenSSL rather than NSS. For this reason, in RHEL 8 you cannot use an NSS database to store the
HTTPScertificate and the private key.-
The
-
The certificate is to be stored in the local
Optional: To check the status of your request:
# ipa-getcert list -f /etc/pki/tls/certs/httpd.pem Number of certificates and requests being tracked: 3. Request ID '20190604065735': status: MONITORING stuck: no key pair storage: type=FILE,location='/etc/pki/tls/private/httpd.key' certificate: type=FILE,location='/etc/pki/tls/certs/httpd.crt' CA: IPA [...]The output shows that the request is in the
MONITORINGstatus, which means that a certificate has been obtained. The locations of the key pair and the certificate are those requested.
79.3. Communication flow for certmonger requesting a service certificate
These diagrams show the stages of what happens when certmonger requests a service certificate from Identity Management (IdM) certificate authority (CA) server. The sequence consists of these diagrams:
Unencrypted communication shows the initial situation: without an HTTPS certificate, the communication between the web server and the browser is unencrypted.
Figure 79.1. Unencrypted communication
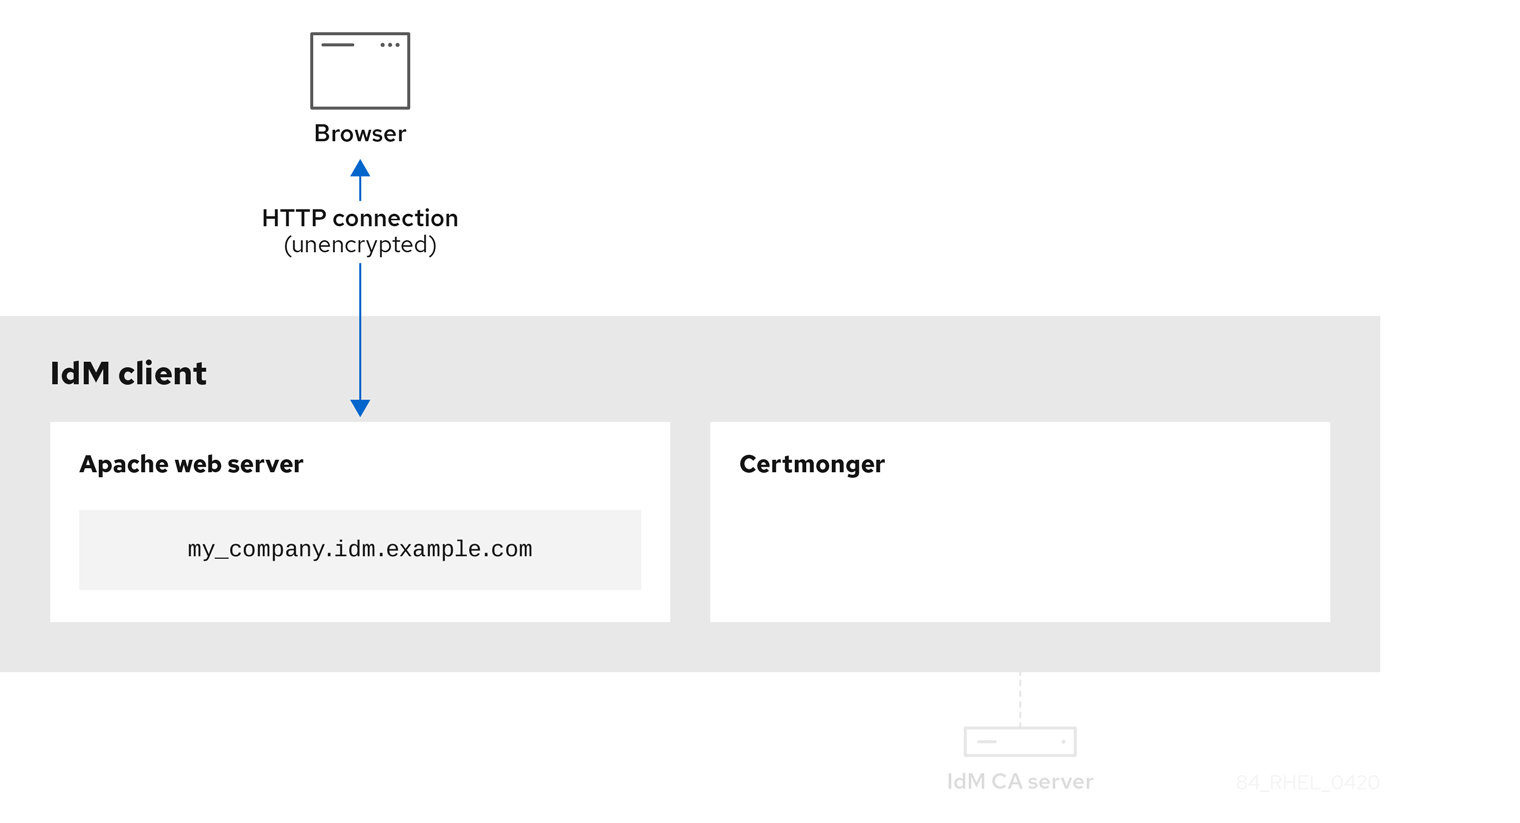
Certmonger requesting a service certificate shows the system administrator using certmonger to manually request an HTTPS certificate for the Apache web server. Note that when requesting a web server certificate, certmonger does not communicate directly with the CA. It proxies through IdM.
Figure 79.2. Certmonger requesting a service certificate
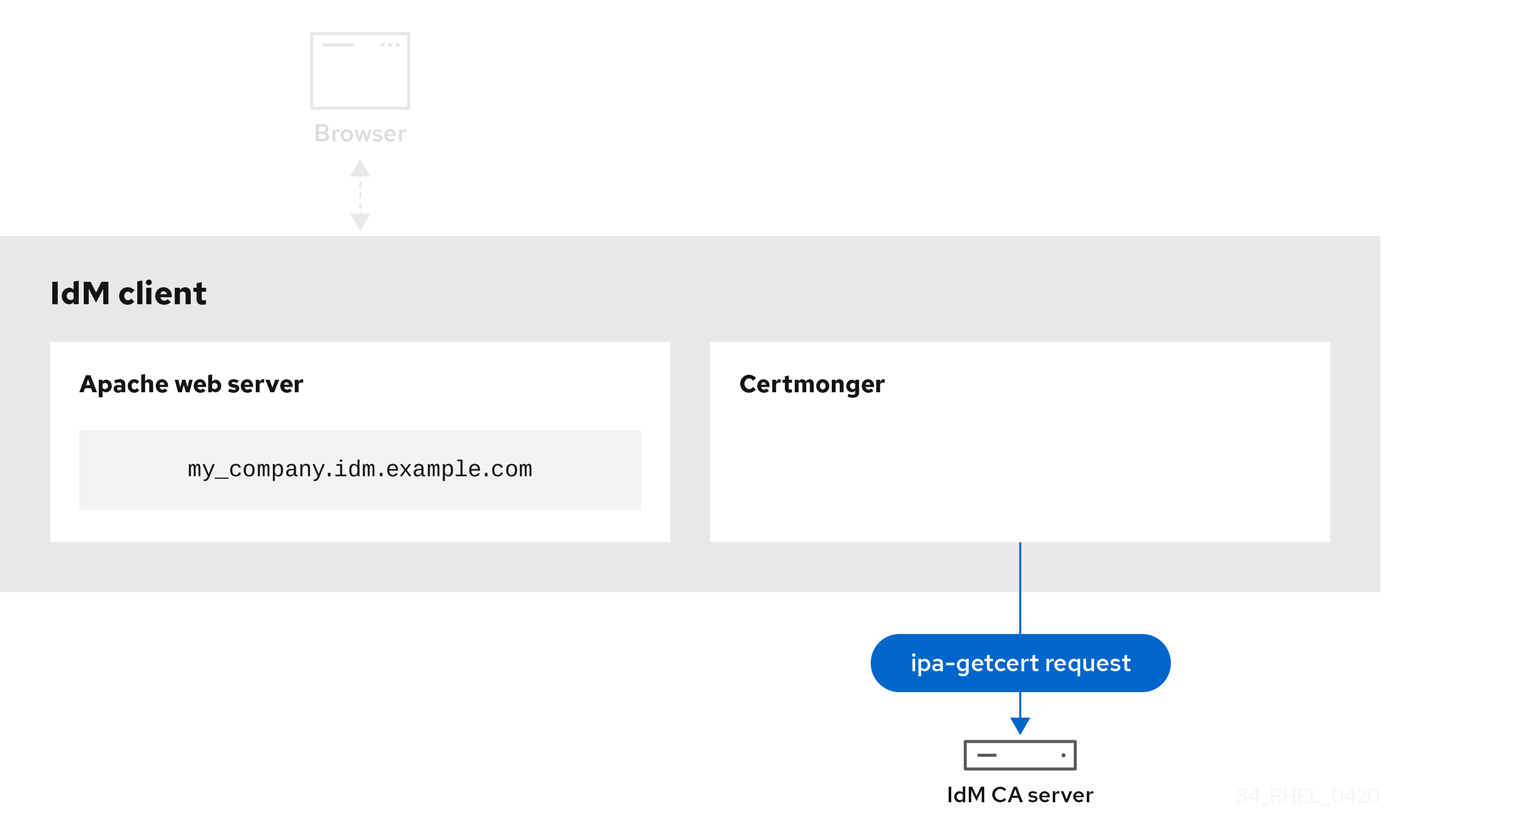
IdM CA issuing the service certificate shows an IdM CA issuing an HTTPS certificate for the web server.
Figure 79.3. IdM CA issuing the service certificate

Certmonger applying the service certificate shows certmonger placing the HTTPS certificate in appropriate locations on the IdM client and, if instructed to do so, restarting the httpd service. The Apache server subsequently uses the HTTPS certificate to encrypt the traffic between itself and the browser.
Figure 79.4. Certmonger applying the service certificate
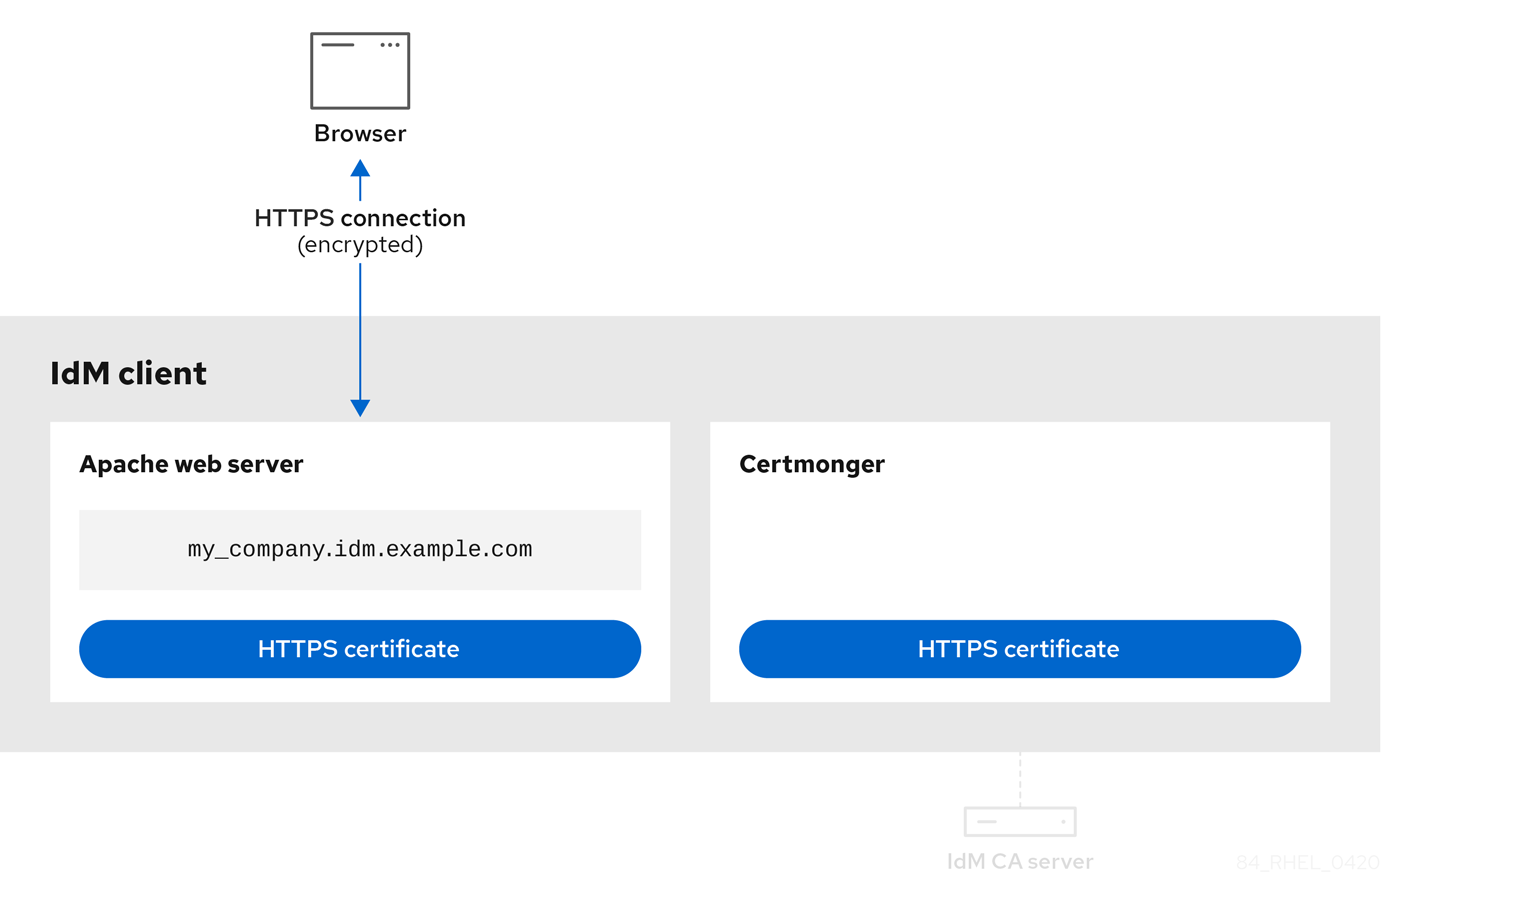
Certmonger requesting a new certificate when the old one is nearing expiration shows certmonger automatically requesting a renewal of the service certificate from the IdM CA before the expiration of the certificate. The IdM CA issues a new certificate.
Figure 79.5. Certmonger requesting a new certificate when the old one is nearing expiration

79.4. Viewing the details of a certificate request tracked by certmonger
The certmonger service monitors certificate requests. When a request for a certificate is successfully signed, it results in a certificate. Certmonger manages certificate requests including the resulting certificates. Follow this procedure to view the details of a particular certificate request managed by certmonger.
Procedure
If you know how to specify the certificate request, list the details of only that particular certificate request. You can, for example, specify:
- The request ID
- The location of the certificate
The certificate nickname
For example, to view the details of the certificate whose request ID is 20190408143846, using the
-voption to view all the details of errors in case your request for a certificate was unsuccessful:# getcert list -i 20190408143846 -v Number of certificates and requests being tracked: 16. Request ID '20190408143846': status: MONITORING stuck: no key pair storage: type=NSSDB,location='/etc/dirsrv/slapd-IDM-EXAMPLE-COM',nickname='Server-Cert',token='NSS Certificate DB',pinfile='/etc/dirsrv/slapd-IDM-EXAMPLE-COM/pwdfile.txt' certificate: type=NSSDB,location='/etc/dirsrv/slapd-IDM-EXAMPLE-COM',nickname='Server-Cert',token='NSS Certificate DB' CA: IPA issuer: CN=Certificate Authority,O=IDM.EXAMPLE.COM subject: CN=r8server.idm.example.com,O=IDM.EXAMPLE.COM expires: 2021-04-08 16:38:47 CEST dns: r8server.idm.example.com principal name: ldap/server.idm.example.com@IDM.EXAMPLE.COM key usage: digitalSignature,nonRepudiation,keyEncipherment,dataEncipherment eku: id-kp-serverAuth,id-kp-clientAuth pre-save command: post-save command: /usr/libexec/ipa/certmonger/restart_dirsrv IDM-EXAMPLE-COM track: true auto-renew: true
The output displays several pieces of information about the certificate, for example:
-
the certificate location; in the example above, it is the NSS database in the
/etc/dirsrv/slapd-IDM-EXAMPLE-COMdirectory -
the certificate nickname; in the example above, it is
Server-Cert -
the file storing the pin; in the example above, it is
/etc/dirsrv/slapd-IDM-EXAMPLE-COM/pwdfile.txt -
the Certificate Authority (CA) that will be used to renew the certificate; in the example above, it is the
IPACA -
the expiration date; in the example above, it is
2021-04-08 16:38:47 CEST -
the status of the certificate; in the example above, the
MONITORINGstatus means that the certificate is valid and it is being tracked -
the post-save command; in the example above, it is the restart of the
LDAPservice
If you do not know how to specify the certificate request, list the details of all the certificates that
certmongeris monitoring or attempting to obtain:# getcert list
79.5. Starting and stopping certificate tracking
Follow this procedure to use the getcert stop-tracking and getcert start-tracking commands to monitor certificates. The two commands are provided by the certmonger service. Enabling certificate tracking is especially useful if you have imported a certificate issued by the Identity Management (IdM) certificate authority (CA) onto the machine from a different IdM client. Enabling certificate tracking can also be the final step of the following provisioning scenario:
- On the IdM server, you create a certificate for a system that does not exist yet.
- You create the new system.
- You enroll the new system as an IdM client.
- You import the certificate and the key from the IdM server on to the IdM client.
-
You start tracking the certificate using
certmongerto ensure that it gets renewed when it is due to expire.
Procedure
To disable the monitoring of a certificate with the Request ID of 20190408143846:
# getcert stop-tracking -i 20190408143846For more options, see the
getcert stop-trackingman page on your system.To enable the monitoring of a certificate stored in the
/tmp/some_cert.crtfile, whose private key is stored in the/tmp/some_key.keyfile:# getcert start-tracking -c IPA -f /tmp/some_cert.crt -k /tmp/some_key.keyCertmongercannot automatically identify the CA type that issued the certificate. For this reason, add the-coption with theIPAvalue to thegetcert start-trackingcommand if the certificate was issued by the IdM CA. Omitting to add the-coption results incertmongerentering the NEED_CA state.For more options, see the
getcert start-trackingman page on your system.
The two commands do not manipulate the certificate. For example, getcert stop-tracking does not delete the certificate or remove it from the NSS database or from the filesystem but simply removes the certificate from the list of monitored certificates. Similarly, getcert start-tracking only adds a certificate to the list of monitored certificates.
79.6. Renewing a certificate manually
When a certificate is near its expiration date, the certmonger daemon automatically issues a renewal command using the certificate authority (CA) helper, obtains a renewed certificate and replaces the previous certificate with the new one.
You can also manually renew a certificate in advance by using the getcert resubmit command. This way, you can update the information the certificate contains, for example, by adding a Subject Alternative Name (SAN).
Follow this procedure to renew a certificate manually.
Procedure
To renew a certificate with the Request ID of 20190408143846:
# getcert resubmit -i 20190408143846To obtain the Request ID for a specific certificate, use the
getcert listcommand. For details, see thegetcert listman page on your system.
79.7. Making certmonger resume tracking of IdM certificates on a CA replica
You can make certmonger resume the tracking of Identity Management (IdM) system certificates that are crucial for an IdM deployment with an integrated certificate authority after the tracking of certificates was interrupted. The interruption may have been caused by the IdM host being unenrolled from IdM during the renewal of the system certificates or by replication topology not working properly. The procedure also shows how to make certmonger resume the tracking of the IdM service certificates, namely the HTTP, LDAP and PKINIT certificates.
Prerequisites
- The host on which you want to resume tracking system certificates is an IdM server that is also an IdM certificate authority (CA) but not the IdM CA renewal server.
Procedure
Get the PIN for the subsystem CA certificates:
# export NSSDB_PIN=$(sed -n 's/^internal=//p' /var/lib/pki/pki-tomcat/conf/password.conf)Add tracking for the
Issuing CA,Audit,OSCP,SubsystemandTomcat servercertificates:# getcert start-tracking -d /etc/pki/pki-tomcat/alias -n "caSigningCert cert-pki-ca" -c 'dogtag-ipa-ca-renew-agent' -P $NSSDB_PIN -B /usr/libexec/ipa/certmonger/stop_pkicad -C '/usr/libexec/ipa/certmonger/renew_ca_cert "caSigningCert cert-pki-ca"' -T caCACert # getcert start-tracking -d /etc/pki/pki-tomcat/alias -n "auditSigningCert cert-pki-ca" -c 'dogtag-ipa-ca-renew-agent' -P $NSSDB_PIN -B /usr/libexec/ipa/certmonger/stop_pkicad -C '/usr/libexec/ipa/certmonger/renew_ca_cert "auditSigningCert cert-pki-ca"' -T caSignedLogCert # getcert start-tracking -d /etc/pki/pki-tomcat/alias -n "ocspSigningCert cert-pki-ca" -c 'dogtag-ipa-ca-renew-agent' -P $NSSDB_PIN -B /usr/libexec/ipa/certmonger/stop_pkicad -C '/usr/libexec/ipa/certmonger/renew_ca_cert "ocspSigningCert cert-pki-ca"' -T caOCSPCert # getcert start-tracking -d /etc/pki/pki-tomcat/alias -n "subsystemCert cert-pki-ca" -c 'dogtag-ipa-ca-renew-agent' -P $NSSDB_PIN -B /usr/libexec/ipa/certmonger/stop_pkicad -C '/usr/libexec/ipa/certmonger/renew_ca_cert "subsystemCert cert-pki-ca"' -T caSubsystemCert # getcert start-tracking -d /etc/pki/pki-tomcat/alias -n "Server-Cert cert-pki-ca" -c 'dogtag-ipa-ca-renew-agent' -P $NSSDB_PIN -B /usr/libexec/ipa/certmonger/stop_pkicad -C '/usr/libexec/ipa/certmonger/renew_ca_cert "Server-Cert cert-pki-ca"' -T caServerCertAdd tracking for the remaining IdM certificates, the
HTTP,LDAP,IPA renewal agentandPKINITcertificates:# getcert start-tracking -f /var/lib/ipa/certs/httpd.crt -k /var/lib/ipa/private/httpd.key -p /var/lib/ipa/passwds/idm.example.com-443-RSA -c IPA -C /usr/libexec/ipa/certmonger/restart_httpd -T caIPAserviceCert # getcert start-tracking -d /etc/dirsrv/slapd-IDM-EXAMPLE-COM -n "Server-Cert" -c IPA -p /etc/dirsrv/slapd-IDM-EXAMPLE-COM/pwdfile.txt -C '/usr/libexec/ipa/certmonger/restart_dirsrv "IDM-EXAMPLE-COM"' -T caIPAserviceCert # getcert start-tracking -f /var/lib/ipa/ra-agent.pem -k /var/lib/ipa/ra-agent.key -c dogtag-ipa-ca-renew-agent -B /usr/libexec/ipa/certmonger/renew_ra_cert_pre -C /usr/libexec/ipa/certmonger/renew_ra_cert -T caSubsystemCert # getcert start-tracking -f /var/kerberos/krb5kdc/kdc.crt -k /var/kerberos/krb5kdc/kdc.key -c dogtag-ipa-ca-renew-agent -B /usr/libexec/ipa/certmonger/renew_ra_cert_pre -C /usr/libexec/ipa/certmonger/renew_kdc_cert -T KDCs_PKINIT_CertsRestart
certmonger:# systemctl restart certmongerWait for one minute after
certmongerhas started and then check the statuses of the new certificates:# getcert list
Note the following:
- If your IdM system certificates have all expired, see the Red Hat Knowledgebase solution How do I manually renew Identity Management (IPA) certificates on RHEL7/RHEL 8 after they have expired? to manually renew IdM system certificates on the IdM CA server that is also the CA renewal server and the CRL publisher server.
- Follow the procedure described in the Red Hat Knowledgebase solution How do I manually renew Identity Management (IPA) certificates on RHEL7 after they have expired? to manually renew IdM system certificates on all the other CA servers in the topology.
79.8. Using SCEP with certmonger
The Simple Certificate Enrollment Protocol (SCEP) is a certificate management protocol that you can use across different devices and operating systems. If you are using a SCEP server as an external certificate authority (CA) in your environment, you can use certmonger to obtain a certificate for an Identity Management (IdM) client.
79.8.1. SCEP overview
The Simple Certificate Enrollment Protocol (SCEP) is a certificate management protocol that you can use across different devices and operating systems. You can use a SCEP server as an external certificate authority (CA).
You can configure an Identity Management (IdM) client to request and retrieve a certificate over HTTP directly from the CA SCEP service. This process is secured by a shared secret that is usually valid only for a limited time.
On the client side, SCEP requires you to provide the following components:
- SCEP URL: the URL of the CA SCEP interface.
-
SCEP shared secret: a
challengePasswordPIN shared between the CA and the SCEP client, used to obtain the certificate.
The client then retrieves the CA certificate chain over SCEP and sends a certificate signing request to the CA.
When configuring SCEP with certmonger, you create a new CA configuration profile that specifies the issued certificate parameters.
79.8.2. Requesting an IdM CA-signed certificate through SCEP
The following example adds a SCEP_example SCEP CA configuration to certmonger and requests a new certificate on the client.idm.example.com IdM client. certmonger supports both the NSS certificate database format and file-based (PEM) formats, such as OpenSSL.
Prerequisites
- You know the SCEP URL.
-
You have the
challengePasswordPIN shared secret.
Procedure
Add the CA configuration to
certmonger:[root@client.idm.example.com ~]# getcert add-scep-ca -c SCEP_example -u SCEP_URL-
-c: Mandatory nickname for the CA configuration. The same value can later be used with othergetcertcommands. -u: URL of the server’s SCEP interface.ImportantWhen using an HTTPS URL, you must also specify the location of the PEM-formatted copy of the SCEP server CA certificate using the
-Roption.
-
Verify that the CA configuration has been successfully added:
[root@client.idm.example.com ~]# getcert list-cas -c SCEP_example CA 'SCEP_example': is-default: no ca-type: EXTERNAL helper-location: /usr/libexec/certmonger/scep-submit -u http://SCEP_server_enrollment_interface_URL SCEP CA certificate thumbprint (MD5): A67C2D4B 771AC186 FCCA654A 5E55AAF7 SCEP CA certificate thumbprint (SHA1): FBFF096C 6455E8E9 BD55F4A5 5787C43F 1F512279If the configuration was successfully added, certmonger retrieves the CA chain from the remote CA. The CA chain then appears as thumbprints in the command output. When accessing the server over unencrypted HTTP, manually compare the thumbprints with the ones displayed at the SCEP server to prevent a man-in-the-middle attack.
Request a certificate from the CA:
If you are using NSS:
[root@client.idm.example.com ~]# getcert request -I Example_Task -c SCEP_example -d /etc/pki/nssdb -n ExampleCert -N cn="client.idm.example.com" -L one-time_PIN -D client.idm.example.comYou can use the options to specify the following parameters of the certificate request:
-
-I: Optional: Name of the task: the tracking ID for the request. The same value can later be used with thegetcert listcommand. -
-c: CA configuration to submit the request to. -
-d: Directory with the NSS database to store the certificate and key. -
-n: Nickname of the certificate, used in the NSS database. -
-N: Subject name in the CSR. -
-L: Time-limited one-timechallengePasswordPIN issued by the CA. -
-D: Subject Alternative Name for the certificate, usually the same as the host name.
-
If you are using OpenSSL:
[root@client.idm.example.com ~]# getcert request -I Example_Task -c SCEP_example -f /etc/pki/tls/certs/server.crt -k /etc/pki/tls/private/private.key -N cn="client.idm.example.com" -L one-time_PIN -D client.idm.example.comYou can use the options to specify the following parameters of the certificate request:
-
-I: Optional: Name of the task: the tracking ID for the request. The same value can later be used with thegetcert listcommand. -
-c: CA configuration to submit the request to. -
-f: Storage path to the certificate. -
-k: Storage path to the key. -
-N: Subject name in the CSR. -
-L: Time-limited one-timechallengePasswordPIN issued by the CA. -
-D: Subject Alternative Name for the certificate, usually the same as the host name.
-
Verification
Verify that a certificate was issued and correctly stored in the local database:
If you used NSS, enter:
[root@client.idm.example.com ~]# getcert list -I Example_Task Request ID 'Example_Task': status: MONITORING stuck: no key pair storage: type=NSSDB,location='/etc/pki/nssdb',nickname='ExampleCert',token='NSS Certificate DB' certificate: type=NSSDB,location='/etc/pki/nssdb',nickname='ExampleCert',token='NSS Certificate DB' signing request thumbprint (MD5): 503A8EDD DE2BE17E 5BAA3A57 D68C9C1B signing request thumbprint (SHA1): B411ECE4 D45B883A 75A6F14D 7E3037F1 D53625F4 CA: IPA issuer: CN=Certificate Authority,O=EXAMPLE.COM subject: CN=client.idm.example.com,O=EXAMPLE.COM expires: 2018-05-06 10:28:06 UTC key usage: digitalSignature,keyEncipherment eku: iso.org.dod.internet.security.mechanisms.8.2.2 certificate template/profile: IPSECIntermediateOffline pre-save command: post-save command: track: true auto-renew: trueIf you used OpenSSL, enter:
[root@client.idm.example.com ~]# getcert list -I Example_Task Request ID 'Example_Task': status: MONITORING stuck: no key pair storage: type=FILE,location='/etc/pki/tls/private/private.key' certificate: type=FILE,location='/etc/pki/tls/certs/server.crt' CA: IPA issuer: CN=Certificate Authority,O=EXAMPLE.COM subject: CN=client.idm.example.com,O=EXAMPLE.COM expires: 2018-05-06 10:28:06 UTC eku: id-kp-serverAuth,id-kp-clientAuth pre-save command: post-save command: track: true auto-renew: trueThe status MONITORING signifies a successful retrieval of the issued certificate. The
getcert-list(1)man page lists other possible states and their meanings.
79.8.3. Automatically renewing AD SCEP certificates with certmonger
When certmonger sends a SCEP certificate renewal request, this request is signed using the existing certificate private key. However, renewal requests sent by certmonger by default also include the challengePassword PIN that was used to originally obtain the certificates.
An Active Directory (AD) Network Device Enrollment Service (NDES) server that works as the SCEP server automatically rejects any requests for renewal that contain the original challengePassword PIN. Consequently, the renewal fails.
For renewal with AD to work, you need to configure certmonger to send the signed renewal requests without the challengePassword PIN. You also need to configure the AD server so that it does not compare the subject name at renewal.
There may be SCEP servers other than AD that also refuse requests containing the challengePassword. In those cases, you may also need to change the certmonger configuration in this way.
Prerequisites
- The RHEL server has to be running RHEL 8.6 or newer.
Procedure
-
Open
regediton the AD server. -
In the HKEY_LOCAL_MACHINE\SOFTWARE\Microsoft\Cryptography\MSCEP subkey, add a new 32-bit REG_DWORD entry
DisableRenewalSubjectNameMatchand set its value to1. On the server where
certmongeris running, open the/etc/certmonger/certmonger.conffile and add the following section:[scep] challenge_password_otp = yesRestart certmonger:
# systemctl restart certmonger
Chapter 80. Requesting certificates from a CA and creating self-signed certificates by using RHEL system roles
Many services, such as web servers, use TLS to encrypt connections with clients. By using the certificate RHEL system role, you can automate the generation of private keys on managed nodes. Additionally, the role configures the certmonger service to request a certificate from a CA.
For testing purposes, you can use the certificate role to create self-signed certificates instead of requesting a signed certificate from a CA.
80.1. Requesting a new certificate from an IdM CA by using the certificate RHEL system role
By using the certificate RHEL system role, you can automate the process of creating a private key and letting the certmonger service request a certificate from the Identity Management in Red Hat Enterprise Linux certificate authority (CA).
Prerequisites
- You have prepared the control node and the managed nodes.
-
The account you use to connect to the managed nodes has
sudopermissions for these nodes. - The managed node is a member of an IdM domain and the domain uses the IdM-integrated CA.
Procedure
Create a playbook file, for example,
~/playbook.yml, with the following content:--- - name: Create certificates hosts: managed-node-01.example.com tasks: - name: Create a self-signed certificate ansible.builtin.include_role: name: redhat.rhel_system_roles.certificate vars: certificate_requests: - name: web-server ca: ipa dns: www.example.com principal: HTTP/www.example.com@EXAMPLE.COM run_before: systemctl stop httpd.service run_after: systemctl start httpd.serviceThe settings specified in the example playbook include the following:
name: <path_or_file_name>Defines the name or path of the generated private key and certificate file:
-
If you set the variable to
web-server, the role stores the private key in the/etc/pki/tls/private/web-server.keyand the certificate in the/etc/pki/tls/certs/web-server.crtfiles. If you set the variable to a path, such as
/tmp/web-server, the role stores the private key in the/tmp/web-server.keyand the certificate in the/tmp/web-server.crtfiles.Note that the directory you use must have the
cert_tSELinux context set. You can use theselinuxRHEL system role to manage SELinux contexts.
-
If you set the variable to
ca: ipa- Defines that the role requests the certificate from an IdM CA.
dns: <hostname_or_list_of_hostnames>-
Sets the hostnames that the Subject Alternative Names (SAN) field in the issued certificate contains. You can use a wildcard (
*) or specify multiple names in YAML list format. principal: <kerberos_principal>- Optional: Sets the Kerberos principal that should be included in the certificate.
run_before: <command>-
Optional: Defines a command that
certmongershould execute before requesting the certificate from the CA. run_after: <command>-
Optional: Defines a command that
certmongershould execute after it received the issued certificate from the CA.
For details about all variables used in the playbook, see the
/usr/share/ansible/roles/rhel-system-roles.certificate/README.mdfile on the control node.Validate the playbook syntax:
$ ansible-playbook --syntax-check ~/playbook.ymlNote that this command only validates the syntax and does not protect against a wrong but valid configuration.
Run the playbook:
$ ansible-playbook ~/playbook.yml
Verification
List the certificates that the
certmongerservice manages:# ansible managed-node-01.example.com -m command -a 'getcert list' ... Number of certificates and requests being tracked: 1. Request ID '20240918142211': status: MONITORING stuck: no key pair storage: type=FILE,location='/etc/pki/tls/private/web-server.key' certificate: type=FILE,location='/etc/pki/tls/certs/web-server.crt' CA: IPA issuer: CN=Certificate Authority,O=EXAMPLE.COM subject: CN=www.example.com issued: 2024-09-18 16:22:11 CEST expires: 2025-09-18 16:22:10 CEST dns: www.example.com key usage: digitalSignature,keyEncipherment eku: id-kp-serverAuth,id-kp-clientAuth pre-save command: systemctl stop httpd.service post-save command: systemctl start httpd.service track: yes auto-renew: yes
80.2. Requesting a new self-signed certificate by using the certificate RHEL system role
If you require a TLS certificate for a test environment, you can use a self-signed certificate. By using the certificate RHEL system role, you can automate the process of creating a private key and letting the certmonger service create a self-signed certificate.
Prerequisites
- You have prepared the control node and the managed nodes.
-
The account you use to connect to the managed nodes has
sudopermissions for these nodes.
Procedure
Create a playbook file, for example,
~/playbook.yml, with the following content:--- - name: Create certificates hosts: managed-node-01.example.com tasks: - name: Create a self-signed certificate ansible.builtin.include_role: name: redhat.rhel_system_roles.certificate vars: certificate_requests: - name: web-server ca: self-sign dns: test.example.comThe settings specified in the example playbook include the following:
name: <path_or_file_name>Defines the name or path of the generated private key and certificate file:
-
If you set the variable to
web-server, the role stores the private key in the/etc/pki/tls/private/web-server.keyand the certificate in the/etc/pki/tls/certs/web-server.crtfiles. If you set the variable to a path, such as
/tmp/web-server, the role stores the private key in the/tmp/web-server.keyand the certificate in the/tmp/web-server.crtfiles.Note that the directory you use must have the
cert_tSELinux context set. You can use theselinuxRHEL system role to manage SELinux contexts.
-
If you set the variable to
ca: self-sign- Defines that the role created a self-signed certificate.
dns: <hostname_or_list_of_hostnames>-
Sets the hostnames that the Subject Alternative Names (SAN) field in the issued certificate contains. You can use a wildcard (
*) or specify multiple names in YAML list format.
For details about all variables used in the playbook, see the
/usr/share/ansible/roles/rhel-system-roles.certificate/README.mdfile on the control node.Validate the playbook syntax:
$ ansible-playbook --syntax-check ~/playbook.ymlNote that this command only validates the syntax and does not protect against a wrong but valid configuration.
Run the playbook:
$ ansible-playbook ~/playbook.yml
Verification
List the certificates that the
certmongerservice manages:# ansible managed-node-01.example.com -m command -a 'getcert list' ... Number of certificates and requests being tracked: 1. Request ID '20240918133610': status: MONITORING stuck: no key pair storage: type=FILE,location='/etc/pki/tls/private/web-server.key' certificate: type=FILE,location='/etc/pki/tls/certs/web-server.crt' CA: local issuer: CN=c32b16d7-5b1a4c5a-a953a711-c3ca58fb,CN=Local Signing Authority subject: CN=test.example.com issued: 2024-09-18 15:36:10 CEST expires: 2025-09-18 15:36:09 CEST dns: test.example.com key usage: digitalSignature,keyEncipherment eku: id-kp-serverAuth,id-kp-clientAuth pre-save command: post-save command: track: yes auto-renew: yes
Chapter 81. Restricting an application to trust only a subset of certificates
If your Identity Management (IdM) installation is configured with the integrated Certificate System (CS) certificate authority (CA), you are able to create lightweight sub-CAs. All sub-CAs you create are subordinated to the primary CA of the certificate system, the ipa CA.
A lightweight sub-CA in this context means a sub-CA issuing certificates for a specific purpose. For example, a lightweight sub-CA enables you to configure a service, such as a virtual private network (VPN) gateway and a web browser, to accept only certificates issued by sub-CA A. By configuring other services to accept certificates only issued by sub-CA B, you prevent them from accepting certificates issued by sub-CA A, the primary CA, that is the ipa CA, and any intermediate sub-CA between the two.
If you revoke the intermediate certificate of a sub-CA, all certificates issued by this sub-CA are automatically considered invalid by correctly configured clients. All the other certificates issued directly by the root CA, ipa, or another sub-CA, remain valid.
This section uses the example of the Apache web server to illustrate how to restrict an application to trust only a subset of certificates. Complete this section to restrict the web server running on your IdM client to use a certificate issued by the webserver-ca IdM sub-CA, and to require the users to authenticate to the web server using user certificates issued by the webclient-ca IdM sub-CA.
The steps you need to take are:
- Create an IdM sub-CA
- Download the sub-CA certificate from IdM WebUI
- Create a CA ACL specifying the correct combination of users, services and CAs, and the certificate profile used
- Request a certificate for the web service running on an IdM client from the IdM sub-CA
- Set up a single-instance Apache HTTP Server
- Add TLS encryption to the Apache HTTP Server
- Set the supported TLS protocol versions on an Apache HTTP Server
- Set the supported ciphers on the Apache HTTP Server
- Configure TLS client certificate authentication on the web server
- Request a certificate for the user from the IdM sub-CA and export it to the client
- Import the user certificate into the browser and configure the browser to trust the sub-CA certificate
81.1. Managing lightweight sub-CAs
This section describes how to manage lightweight subordinate certificate authorities (sub-CAs). All sub-CAs you create are subordinated to the primary CA of the certificate system, the ipa CA. You can also disable and delete sub-CAs.
-
If you delete a sub-CA, revocation checking for that sub-CA will no longer work. Only delete a sub-CA when there are no more certificates that were issued by that sub-CA whose
notAfterexpiration time is in the future. - You should only disable sub-CAs while there are still non-expired certificates that were issued by that sub-CA. If all certificates that were issued by a sub-CA have expired, you can delete that sub-CA.
- You cannot disable or delete the IdM CA.
81.1.1. Creating a sub-CA from the IdM WebUI
Follow this procedure to use the IdM WebUI to create new sub-CAs named webserver-ca and webclient-ca.
Prerequisites
- You are logged in as the administrator.
Procedure
- In the Authentication menu, click Certificates.
- Select Certificate Authorities and click Add.
- Enter the name of the webserver-ca sub-CA. Enter the Subject DN, for example CN=WEBSERVER,O=IDM.EXAMPLE.COM, in the Subject DN field. Note that the Subject DN must be unique in the IdM CA infrastructure.
- Enter the name of the webclient-ca sub-CA. Enter the Subject DN CN=WEBCLIENT,O=IDM.EXAMPLE.COM in the Subject DN field.
On the command line, run the
ipa-certupdatecommand to create a certmonger tracking request for the webserver-ca and webclient-ca sub-CA certificates:[root@ipaserver ~]# ipa-certupdateImportantForgetting to run the
ipa-certupdatecommand after creating a sub-CA means that if the sub-CA certificate expires, end-entity certificates issued by the sub-CA are considered invalid even if the end-entity certificate has not expired.
Verification
Verify that the signing certificate of the new sub-CA has been added to the IdM database:
[root@ipaserver ~]# certutil -d /etc/pki/pki-tomcat/alias/ -L Certificate Nickname Trust Attributes SSL,S/MIME,JAR/XPI caSigningCert cert-pki-ca CTu,Cu,Cu Server-Cert cert-pki-ca u,u,u auditSigningCert cert-pki-ca u,u,Pu caSigningCert cert-pki-ca ba83f324-5e50-4114-b109-acca05d6f1dc u,u,u ocspSigningCert cert-pki-ca u,u,u subsystemCert cert-pki-ca u,u,uNoteThe new sub-CA certificate is automatically transferred to all the replicas that have a certificate system instance installed.
81.1.2. Deleting a sub-CA from the IdM WebUI
Follow this procedure to delete lightweight sub-CAs in the IdM WebUI.
-
If you delete a sub-CA, revocation checking for that sub-CA will no longer work. Only delete a sub-CA when there are no more certificates that were issued by that sub-CA whose
notAfterexpiration time is in the future. - You should only disable sub-CAs while there are still non-expired certificates that were issued by that sub-CA. If all certificates that were issued by a sub-CA have expired, you can delete that sub-CA.
- You cannot disable or delete the IdM CA.
Prerequisites
- You are logged in as the administrator.
- You have disabled the sub-CA in the IdM CLI. See Disabling a sub-CA from the IdM CLI
Procedure
-
In the IdM WebUI, open the
Authenticationtab, and select theCertificatessubtab. -
Select
Certificate Authorities. Select the sub-CA to remove and click
Delete.Figure 81.1. Deleting a sub-CA in the IdM Web UI

-
Click
Deleteto confirm.
81.1.3. Creating a sub-CA from the IdM CLI
Follow this procedure to use the IdM CLI to create new sub-CAs named webserver-ca and webclient-ca.
Prerequisites
- You are logged in as the administrator to an IdM server that is a CA server.
Procedure
Enter the
ipa ca-addcommand, and specify the name of the webserver-ca sub-CA and its Subject Distinguished Name (DN):[root@ipaserver ~]# ipa ca-add webserver-ca --subject="CN=WEBSERVER,O=IDM.EXAMPLE.COM" ------------------- Created CA "webserver-ca" ------------------- Name: webserver-ca Authority ID: ba83f324-5e50-4114-b109-acca05d6f1dc Subject DN: CN=WEBSERVER,O=IDM.EXAMPLE.COM Issuer DN: CN=Certificate Authority,O=IDM.EXAMPLE.COM- Name
- Name of the CA.
- Authority ID
- Automatically created, individual ID for the CA.
- Subject DN
- Subject Distinguished Name (DN). The Subject DN must be unique in the IdM CA infrastructure.
- Issuer DN
- Parent CA that issued the sub-CA certificate. All sub-CAs are created as a child of the IdM root CA.
Create the webclient-ca sub-CA for issuing certificates to web clients:
[root@ipaserver ~]# ipa ca-add webclient-ca --subject="CN=WEBCLIENT,O=IDM.EXAMPLE.COM" ------------------- Created CA "webclient-ca" ------------------- Name: webclient-ca Authority ID: 8a479f3a-0454-4a4d-8ade-fd3b5a54ab2e Subject DN: CN=WEBCLIENT,O=IDM.EXAMPLE.COM Issuer DN: CN=Certificate Authority,O=IDM.EXAMPLE.COMRun the ipa-certupdate command to create a certmonger tracking request for the webserver-ca and webclient-ca sub-CAs certificates:
[root@ipaserver ~]# ipa-certupdateImportantIf you forget to run the ipa-certupdate command after creating a sub-CA and the sub-CA certificate expires, end-entity certificates issued by that sub-CA are considered invalid even though the end-entity certificate has not expired.
Verification
Verify that the signing certificate of the new sub-CA has been added to the IdM database:
[root@ipaserver ~]# certutil -d /etc/pki/pki-tomcat/alias/ -L Certificate Nickname Trust Attributes SSL,S/MIME,JAR/XPI caSigningCert cert-pki-ca CTu,Cu,Cu Server-Cert cert-pki-ca u,u,u auditSigningCert cert-pki-ca u,u,Pu caSigningCert cert-pki-ca ba83f324-5e50-4114-b109-acca05d6f1dc u,u,u ocspSigningCert cert-pki-ca u,u,u subsystemCert cert-pki-ca u,u,uNoteThe new sub-CA certificate is automatically transferred to all the replicas that have a certificate system instance installed.
81.1.4. Disabling a sub-CA from the IdM CLI
Follow this procedure to disable a sub-CA from the IdM CLI. If there are still non-expired certificates that were issued by a sub-CA, you should not delete it but you can disable it. If you delete the sub-CA, revocation checking for that sub-CA will no longer work.
Prerequisites
- You are logged in as the administrator.
Procedure
Run the
ipa ca-findcommand to determine the name of the sub-CA you are deleting:[root@ipaserver ~]# ipa ca-find ------------- 3 CAs matched ------------- Name: ipa Description: IPA CA Authority ID: 5195deaf-3b61-4aab-b608-317aff38497c Subject DN: CN=Certificate Authority,O=IPA.TEST Issuer DN: CN=Certificate Authority,O=IPA.TEST Name: webclient-ca Authority ID: 605a472c-9c6e-425e-b959-f1955209b092 Subject DN: CN=WEBCLIENT,O=IDM.EXAMPLE.COM Issuer DN: CN=Certificate Authority,O=IPA.TEST Name: webserver-ca Authority ID: 02d537f9-c178-4433-98ea-53aa92126fc3 Subject DN: CN=WEBSERVER,O=IDM.EXAMPLE.COM Issuer DN: CN=Certificate Authority,O=IPA.TEST ---------------------------- Number of entries returned 3 ----------------------------Run the
ipa ca-disablecommand to disable your sub-CA, in this example, thewebserver-ca:ipa ca-disable webserver-ca -------------------------- Disabled CA "webserver-ca" --------------------------
81.1.5. Deleting a sub-CA from the IdM CLI
Follow this procedure to delete lightweight sub-CAs from the IdM CLI.
-
If you delete a sub-CA, revocation checking for that sub-CA will no longer work. Only delete a sub-CA when there are no more certificates that were issued by that sub-CA whose
notAfterexpiration time is in the future. - You should only disable sub-CAs while there are still non-expired certificates that were issued by that sub-CA. If all certificates that were issued by a sub-CA have expired, you can delete that sub-CA.
- You cannot disable or delete the IdM CA.
Prerequisites
- You are logged in as the administrator.
Procedure
To display a list of sub-CAs and CAs, run the
ipa ca-findcommand:# ipa ca-find ------------- 3 CAs matched ------------- Name: ipa Description: IPA CA Authority ID: 5195deaf-3b61-4aab-b608-317aff38497c Subject DN: CN=Certificate Authority,O=IPA.TEST Issuer DN: CN=Certificate Authority,O=IPA.TEST Name: webclient-ca Authority ID: 605a472c-9c6e-425e-b959-f1955209b092 Subject DN: CN=WEBCLIENT,O=IDM.EXAMPLE.COM Issuer DN: CN=Certificate Authority,O=IPA.TEST Name: webserver-ca Authority ID: 02d537f9-c178-4433-98ea-53aa92126fc3 Subject DN: CN=WEBSERVER,O=IDM.EXAMPLE.COM Issuer DN: CN=Certificate Authority,O=IPA.TEST ---------------------------- Number of entries returned 3 ----------------------------Run the
ipa ca-disablecommand to disable your sub-CA, in this example, thewebserver-ca:# ipa ca-disable webserver-ca -------------------------- Disabled CA "webserver-ca" --------------------------Delete the sub-CA, in this example, the
webserver-ca:# ipa ca-del webserver-ca ------------------------- Deleted CA "webserver-ca" -------------------------
Verification
Run
ipa ca-findto display the list of CAs and sub-CAs. Thewebserver-cais no longer on the list.# ipa ca-find ------------- 2 CAs matched ------------- Name: ipa Description: IPA CA Authority ID: 5195deaf-3b61-4aab-b608-317aff38497c Subject DN: CN=Certificate Authority,O=IPA.TEST Issuer DN: CN=Certificate Authority,O=IPA.TEST Name: webclient-ca Authority ID: 605a472c-9c6e-425e-b959-f1955209b092 Subject DN: CN=WEBCLIENT,O=IDM.EXAMPLE.COM Issuer DN: CN=Certificate Authority,O=IPA.TEST ---------------------------- Number of entries returned 2 ----------------------------
81.2. Downloading the sub-CA certificate from IdM WebUI
Prerequisites
- You are logged in as the administrator.
Procedure
In the Authentication menu, click Certificates > Certificates.
Figure 81.2. sub-CA certificate in the list of certificates

- Click the serial number of the sub-CA certificate to open the certificate information page.
- In the certificate information page, click Actions > Download.
In the CLI, move the sub-CA certificate to the
/etc/pki/tls/private/directory:# mv path/to/the/downloaded/certificate /etc/pki/tls/private/sub-ca.crt
81.3. Creating CA ACLs for web server and client authentication
Certificate authority access control list (CA ACL) rules define which profiles can be used to issue certificates to which users, services, or hosts. By associating profiles, principals, and groups, CA ACLs permit principals or groups to request certificates using particular profiles.
For example, using CA ACLs, the administrator can restrict the use of a profile intended for employees working from an office located in London only to users that are members of the London office-related group.
81.3.1. Viewing CA ACLs in IdM CLI
Follow this procedure to view the list of certificate authority access control lists (CA ACLs) available in your IdM deployment and the details of a specific CA ACL.
Procedure
To view all the CA ACLs in your IdM environment, enter the
ipa caacl-findcommand:$ ipa caacl-find ----------------- 1 CA ACL matched ----------------- ACL name: hosts_services_caIPAserviceCert Enabled: TRUETo view the details of a CA ACL, enter the
ipa caacl-showcommand, and specify the CA ACL name. For example, to view the details of the hosts_services_caIPAserviceCert CA ACL, enter:$ ipa caacl-show hosts_services_caIPAserviceCert ACL name: hosts_services_caIPAserviceCert Enabled: TRUE Host category: all Service category: all CAs: ipa Profiles: caIPAserviceCert Users: admin
81.3.2. Creating a CA ACL for web servers authenticating to web clients using certificates issued by webserver-ca
Follow this procedure to create a CA ACL that requires the system administrator to use the webserver-ca sub-CA and the caIPAserviceCert profile when requesting a certificate for the HTTP/my_company.idm.example.com@IDM.EXAMPLE.COM service. If the user requests a certificate from a different sub-CA or of a different profile, the request fails. The only exception is when there is another matching CA ACL that is enabled. To view the available CA ACLs, see Viewing CA ACLs in IdM CLI.
Prerequisites
- The HTTP/my_company.idm.example.com@IDM.EXAMPLE.COM service is part of IdM.
- You are logged in as the administrator.
Procedure
Create a CA ACL using the
ipa caaclcommand, and specify its name:$ ipa caacl-add TLS_web_server_authentication -------------------------------------------- Added CA ACL "TLS_web_server_authentication" -------------------------------------------- ACL name: TLS_web_server_authentication Enabled: TRUEModify the CA ACL using the
ipa caacl-modcommand to specify the description of the CA ACL:$ ipa caacl-mod TLS_web_server_authentication --desc="CAACL for web servers authenticating to web clients using certificates issued by webserver-ca" ----------------------------------------------- Modified CA ACL "TLS_web_server_authentication" ----------------------------------------------- ACL name: TLS_web_server_authentication Description: CAACL for web servers authenticating to web clients using certificates issued by webserver-ca Enabled: TRUEAdd the webserver-ca sub-CA to the CA ACL:
$ ipa caacl-add-ca TLS_web_server_authentication --ca=webserver-ca ACL name: TLS_web_server_authentication Description: CAACL for web servers authenticating to web clients using certificates issued by webserver-ca Enabled: TRUE CAs: webserver-ca ------------------------- Number of members added 1 -------------------------Use the
ipa caacl-add-serviceto specify the service whose principal will be able to request a certificate:$ ipa caacl-add-service TLS_web_server_authentication --service=HTTP/my_company.idm.example.com@IDM.EXAMPLE.COM ACL name: TLS_web_server_authentication Description: CAACL for web servers authenticating to web clients using certificates issued by webserver-ca Enabled: TRUE CAs: webserver-ca Services: HTTP/my_company.idm.example.com@IDM.EXAMPLE.COM ------------------------- Number of members added 1 -------------------------Use the
ipa caacl-add-profilecommand to specify the certificate profile for the requested certificate:$ ipa caacl-add-profile TLS_web_server_authentication --certprofiles=caIPAserviceCert ACL name: TLS_web_server_authentication Description: CAACL for web servers authenticating to web clients using certificates issued by webserver-ca Enabled: TRUE CAs: webserver-ca Profiles: caIPAserviceCert Services: HTTP/my_company.idm.example.com@IDM.EXAMPLE.COM ------------------------- Number of members added 1 -------------------------You can use the newly-created CA ACL straight away. It is enabled after its creation by default.
The point of CA ACLs is to specify which CA and profile combinations are allowed for requests coming from particular principals or groups. CA ACLs do not affect certificate validation or trust. They do not affect how the issued certificates will be used.
81.3.3. Creating a CA ACL for user web browsers authenticating to web servers using certificates issued by webclient-ca
Follow this procedure to create a CA ACL that requires the system administrator to use the webclient-ca sub-CA and the IECUserRoles profile when requesting a certificate. If the user requests a certificate from a different sub-CA or of a different profile, the request fails. The only exception is when there is another matching CA ACL that is enabled. To view the available CA ACLs, see Viewing CA ACLs in IdM CLI.
Prerequisites
- You are logged in as the administrator.
Procedure
Create a CA ACL using the
ipa caaclcommand and specify its name:$ ipa caacl-add TLS_web_client_authentication -------------------------------------------- Added CA ACL "TLS_web_client_authentication" -------------------------------------------- ACL name: TLS_web_client_authentication Enabled: TRUEModify the CA ACL using the
ipa caacl-modcommand to specify the description of the CA ACL:$ ipa caacl-mod TLS_web_client_authentication --desc="CAACL for user web browsers authenticating to web servers using certificates issued by webclient-ca" ----------------------------------------------- Modified CA ACL "TLS_web_client_authentication" ----------------------------------------------- ACL name: TLS_web_client_authentication Description: CAACL for user web browsers authenticating to web servers using certificates issued by webclient-ca Enabled: TRUEAdd the webclient-ca sub-CA to the CA ACL:
$ ipa caacl-add-ca TLS_web_client_authentication --ca=webclient-ca ACL name: TLS_web_client_authentication Description: CAACL for user web browsers authenticating to web servers using certificates issued by webclient-ca Enabled: TRUE CAs: webclient-ca ------------------------- Number of members added 1 -------------------------Use the
ipa caacl-add-profilecommand to specify the certificate profile for the requested certificate:$ ipa caacl-add-profile TLS_web_client_authentication --certprofiles=IECUserRoles ACL name: TLS_web_client_authentication Description: CAACL for user web browsers authenticating to web servers using certificates issued by webclient-ca Enabled: TRUE CAs: webclient-ca Profiles: IECUserRoles ------------------------- Number of members added 1 -------------------------Modify the CA ACL using the
ipa caacl-modcommand to specify that the CA ACL applies to all IdM users:$ ipa caacl-mod TLS_web_client_authentication --usercat=all ----------------------------------------------- Modified CA ACL "TLS_web_client_authentication" ----------------------------------------------- ACL name: TLS_web_client_authentication Description: CAACL for user web browsers authenticating to web servers using certificates issued by webclient-ca Enabled: TRUE User category: all CAs: webclient-ca Profiles: IECUserRolesYou can use the newly-created CA ACL straight away. It is enabled after its creation by default.
The point of CA ACLs is to specify which CA and profile combinations are allowed for requests coming from particular principals or groups. CA ACLs do not affect certificate validation or trust. They do not affect how the issued certificates will be used.
81.4. Obtaining an IdM certificate for a service using certmonger
To ensure that communication between browsers and the web service running on your IdM client is secure and encrypted, use a TLS certificate. If you want to restrict web browsers to trust certificates issued by the webserver-ca sub-CA but no other IdM sub-CA, obtain the TLS certificate for your web service from the webserver-ca sub-CA.
Follow this procedure to use certmonger to obtain an IdM certificate for a service (HTTP/my_company.idm.example.com@IDM.EXAMPLE.COM) running on an IdM client.
Using certmonger to request the certificate automatically means that certmonger manages and renews the certificate when it is due for a renewal.
For a visual representation of what happens when certmonger requests a service certificate, see Communication flow for certmonger requesting a service certificate.
Prerequisites
- The web server is enrolled as an IdM client.
- You have root access to the IdM client on which you are running the procedure.
- The service for which you are requesting a certificate does not have to pre-exist in IdM.
Procedure
On the
my_company.idm.example.comIdM client on which theHTTPservice is running, request a certificate for the service corresponding to theHTTP/my_company.idm.example.com@IDM.EXAMPLE.COMprincipal, and specify that-
The certificate is to be stored in the local
/etc/pki/tls/certs/httpd.pemfile -
The private key is to be stored in the local
/etc/pki/tls/private/httpd.keyfile -
The
webserver-casub-CA is to be the issuing certificate authority That an extensionRequest for a
SubjectAltNamebe added to the signing request with the DNS name ofmy_company.idm.example.com:# ipa-getcert request -K HTTP/my_company.idm.example.com -k /etc/pki/tls/private/httpd.key -f /etc/pki/tls/certs/httpd.pem -g 2048 -D my_company.idm.example.com -X webserver-ca -C "systemctl restart httpd" New signing request "20190604065735" added.In the command above:
-
The
ipa-getcert requestcommand specifies that the certificate is to be obtained from the IdM CA. Theipa-getcert requestcommand is a shortcut forgetcert request -c IPA. -
The
-goption specifies the size of key to be generated if one is not already in place. -
The
-Doption specifies theSubjectAltNameDNS value to be added to the request. -
The
-Xoption specifies that the issuer of the certificate must bewebserver-ca, notipa. -
The
-Coption instructscertmongerto restart thehttpdservice after obtaining the certificate.
-
To specify that the certificate be issued with a particular profile, use the
-Toption.
NoteRHEL 8 uses a different SSL module in Apache than the one used in RHEL 7. The SSL module relies on OpenSSL rather than NSS. For this reason, in RHEL 8 you cannot use an NSS database to store the
HTTPScertificate and the private key.-
The
-
The certificate is to be stored in the local
Optional: To check the status of your request:
# ipa-getcert list -f /etc/pki/tls/certs/httpd.pem Number of certificates and requests being tracked: 3. Request ID '20190604065735': status: MONITORING stuck: no key pair storage: type=FILE,location='/etc/pki/tls/private/httpd.key' certificate: type=FILE,location='/etc/pki/tls/certs/httpd.crt' CA: IPA issuer: CN=WEBSERVER,O=IDM.EXAMPLE.COM [...]The output shows that the request is in the
MONITORINGstatus, which means that a certificate has been obtained. The locations of the key pair and the certificate are those requested.
81.5. Communication flow for certmonger requesting a service certificate
These diagrams show the stages of what happens when certmonger requests a service certificate from Identity Management (IdM) certificate authority (CA) server. The sequence consists of these diagrams:
In the diagrams, the webserver-ca sub-CA is represented by the generic IdM CA server.
Unencrypted communication shows the initial situation: without an HTTPS certificate, the communication between the web server and the browser is unencrypted.
Figure 81.3. Unencrypted communication
Certmonger requesting a service certificate shows the system administrator using certmonger to manually request an HTTPS certificate for the Apache web server. Note that when requesting a web server certificate, certmonger does not communicate directly with the CA. It proxies through IdM.
Figure 81.4. Certmonger requesting a service certificate
IdM CA issuing the service certificate shows an IdM CA issuing an HTTPS certificate for the web server.
Figure 81.5. IdM CA issuing the service certificate
Certmonger applying the service certificate shows certmonger placing the HTTPS certificate in appropriate locations on the IdM client and, if instructed to do so, restarting the httpd service. The Apache server subsequently uses the HTTPS certificate to encrypt the traffic between itself and the browser.
Figure 81.6. Certmonger applying the service certificate
Certmonger requesting a new certificate when the old one is nearing expiration shows certmonger automatically requesting a renewal of the service certificate from the IdM CA before the expiration of the certificate. The IdM CA issues a new certificate.
Figure 81.7. Certmonger requesting a new certificate when the old one is nearing expiration
81.6. Setting up a single-instance Apache HTTP Server
You can set up a single-instance Apache HTTP Server to serve static HTML content.
Follow the procedure if the web server should provide the same content for all domains associated with the server. If you want to provide different content for different domains, set up name-based virtual hosts. For details, see Configuring Apache name-based virtual hosts.
Procedure
Install the
httpdpackage:# yum install httpdIf you use
firewalld, open the TCP port80in the local firewall:# firewall-cmd --permanent --add-port=80/tcp # firewall-cmd --reloadEnable and start the
httpdservice:# systemctl enable --now httpdOptional: Add HTML files to the
/var/www/html/directory.NoteWhen adding content to
/var/www/html/, files and directories must be readable by the user under whichhttpdruns by default. The content owner can be either therootuser androotuser group, or another user or group of the administrator’s choice. If the content owner is therootuser androotuser group, the files must be readable by other users. The SELinux context for all the files and directories must behttpd_sys_content_t, which is applied by default to all content within the/var/wwwdirectory.
Verification
Connect with a web browser to
http://my_company.idm.example.com/orhttp://server_IP/.If the
/var/www/html/directory is empty or does not contain anindex.htmlorindex.htmfile, Apache displays theRed Hat Enterprise Linux Test Page. If/var/www/html/contains HTML files with a different name, you can load them by entering the URL to that file, such ashttp://server_IP/example.htmlorhttp://my_company.idm.example.com/example.html.
81.7. Adding TLS encryption to an Apache HTTP Server
You can enable TLS encryption on the my_company.idm.example.com Apache HTTP Server for the idm.example.com domain.
Prerequisites
-
The
my_company.idm.example.comApache HTTP Server is installed and running. -
You have obtained the TLS certificate from the webserver-ca sub-CA, and stored it in the
/etc/pki/tls/certs/httpd.pemfile as described in Obtaining an IdM certificate for a service using certmonger. If you use a different path, adapt the corresponding steps of the procedure. -
The corresponding private key is stored in the
/etc/pki/tls/private/httpd.keyfile. If you use a different path, adapt the corresponding steps of the procedure. -
The webserver-ca CA certificate is stored in the
/etc/pki/tls/private/sub-ca.crtfile. If you use a different path, adapt the corresponding steps of the procedure. - Clients and the my_company.idm.example.com web server resolve the host name of the server to the IP address of the web server.
Procedure
Install the
mod_sslpackage:# yum install mod_sslEdit the
/etc/httpd/conf.d/ssl.conffile and add the following settings to the<VirtualHost _default_:443>directive:Set the server name:
ServerName my_company.idm.example.com
ImportantThe server name must match the entry set in the
Common Namefield of the certificate.Optional: If the certificate contains additional host names in the
Subject Alt Names(SAN) field, you can configuremod_sslto provide TLS encryption also for these host names. To configure this, add theServerAliasesparameter with corresponding names:ServerAlias www.my_company.idm.example.com server.my_company.idm.example.comSet the paths to the private key, the server certificate, and the CA certificate:
SSLCertificateKeyFile "/etc/pki/tls/private/httpd.key" SSLCertificateFile "/etc/pki/tls/certs/httpd.pem" SSLCACertificateFile "/etc/pki/tls/certs/ca.crt"
For security reasons, configure that only the
rootuser can access the private key file:# chown root:root /etc/pki/tls/private/httpd.key # chmod 600 //etc/pki/tls/private/httpd.keyWarningIf the private key was accessed by unauthorized users, revoke the certificate, create a new private key, and request a new certificate. Otherwise, the TLS connection is no longer secure.
If you use
firewalld, open port443in the local firewall:# firewall-cmd --permanent --add-port=443/tcp # firewall-cmd --reloadRestart the
httpdservice:# systemctl restart httpdNoteIf you protected the private key file with a password, you must enter this password each time when the
httpdservice starts.-
Use a browser and connect to
https://my_company.idm.example.com.
-
Use a browser and connect to
81.8. Setting the supported TLS protocol versions on an Apache HTTP Server
By default, the Apache HTTP Server on RHEL uses the system-wide crypto policy that defines safe default values, which are also compatible with recent browsers. For example, the DEFAULT policy defines that only the TLSv1.2 and TLSv1.3 protocol versions are enabled in apache.
You can manually configure which TLS protocol versions your my_company.idm.example.com Apache HTTP Server supports. Follow the procedure if your environment requires to enable only specific TLS protocol versions, for example:
-
If your environment requires that clients can also use the weak
TLS1(TLSv1.0) orTLS1.1protocol. -
If you want to configure that Apache only supports the
TLSv1.2orTLSv1.3protocol.
Prerequisites
- TLS encryption is enabled on the my_company.idm.example.com server as described in Adding TLS encryption to an Apache HTTP server.
Procedure
Edit the
/etc/httpd/conf/httpd.conffile, and add the following setting to the<VirtualHost>directive for which you want to set the TLS protocol version. For example, to enable only theTLSv1.3protocol:SSLProtocol -All TLSv1.3Restart the
httpdservice:# systemctl restart httpd
Verification
Use the following command to verify that the server supports
TLSv1.3:# openssl s_client -connect example.com:443 -tls1_3Use the following command to verify that the server does not support
TLSv1.2:# openssl s_client -connect example.com:443 -tls1_2If the server does not support the protocol, the command returns an error:
140111600609088:error:1409442E:SSL routines:ssl3_read_bytes:tlsv1 alert protocol version:ssl/record/rec_layer_s3.c:1543:SSL alert number 70- Optional: Repeat the command for other TLS protocol versions.
81.9. Setting the supported ciphers on an Apache HTTP Server
By default, the Apache HTTP Server uses the system-wide crypto policy that defines safe default values, which are also compatible with recent browsers. For the list of ciphers the system-wide crypto allows, see the /etc/crypto-policies/back-ends/openssl.config file.
You can manually configure which ciphers the my_company.idm.example.com Apache HTTP server supports. Follow the procedure if your environment requires specific ciphers.
Prerequisites
- TLS encryption is enabled on the my_company.idm.example.com server as described in Adding TLS encryption to an Apache HTTP server.
Procedure
Edit the
/etc/httpd/conf/httpd.conffile, and add theSSLCipherSuiteparameter to the<VirtualHost>directive for which you want to set the TLS ciphers:SSLCipherSuite "EECDH+AESGCM:EDH+AESGCM:AES256+EECDH:AES256+EDH:!SHA1:!SHA256"This example enables only the
EECDH+AESGCM,EDH+AESGCM,AES256+EECDH, andAES256+EDHciphers and disables all ciphers which use theSHA1andSHA256message authentication code (MAC).Restart the
httpdservice:# systemctl restart httpd
Verification
To display the list of ciphers the Apache HTTP Server supports:
Install the
nmappackage:# yum install nmapUse the
nmaputility to display the supported ciphers:# nmap --script ssl-enum-ciphers -p 443 example.com ... PORT STATE SERVICE 443/tcp open https | ssl-enum-ciphers: | TLSv1.2: | ciphers: | TLS_ECDHE_RSA_WITH_AES_256_GCM_SHA384 (ecdh_x25519) - A | TLS_DHE_RSA_WITH_AES_256_GCM_SHA384 (dh 2048) - A | TLS_ECDHE_RSA_WITH_CHACHA20_POLY1305_SHA256 (ecdh_x25519) - A ...
81.10. Configuring TLS client certificate authentication
Client certificate authentication enables administrators to allow only users who authenticate using a certificate to access resources on the my_company.idm.example.com web server. You can configure client certificate authentication for the /var/www/html/Example/ directory.
If the my_company.idm.example.com Apache server uses the TLS 1.3 protocol, certain clients require additional configuration. For example, in Firefox, set the security.tls.enable_post_handshake_auth parameter in the about:config menu to true. For further details, see Transport Layer Security version 1.3 in Red Hat Enterprise Linux 8.
Prerequisites
- TLS encryption is enabled on the my_company.idm.example.com server as described in Adding TLS encryption to an Apache HTTP server.
Procedure
Edit the
/etc/httpd/conf/httpd.conffile and add the following settings to the<VirtualHost>directive for which you want to configure client authentication:<Directory "/var/www/html/Example/"> SSLVerifyClient require </Directory>The
SSLVerifyClient requiresetting defines that the server must successfully validate the client certificate before the client can access the content in the/var/www/html/Example/directory.Restart the
httpdservice:# systemctl restart httpd
Verification
Use the
curlutility to access thehttps://my_company.idm.example.com/Example/URL without client authentication:$ curl https://my_company.idm.example.com/Example/ curl: (56) OpenSSL SSL_read: error:1409445C:SSL routines:ssl3_read_bytes:tlsv13 alert certificate required, errno 0The error indicates that the my_company.idm.example.com web server requires a client certificate authentication.
Pass the client private key and certificate, as well as the CA certificate to
curlto access the same URL with client authentication:$ curl --cacert ca.crt --key client.key --cert client.crt https://my_company.idm.example.com/Example/If the request succeeds,
curldisplays theindex.htmlfile stored in the/var/www/html/Example/directory.
81.11. Requesting a new user certificate and exporting it to the client
As an Identity Management (IdM) administrator, you can configure a web server running on an IdM client to request users that use web browsers to access the server to authenticate with certificates issued by a specific IdM sub-CA. Follow this procedure to request a user certificate from a specific IdM sub-CA and to export the certificate and the corresponding private key on to the host from which the user wants to access the web server using a web browser. Afterwards, import the certificate and the private key into the browser.
Procedure
Optional: Create a new directory, for example
~/certdb/, and make it a temporary certificate database. When asked, create an NSS Certificate DB password to encrypt the keys to the certificate to be generated in a subsequent step:# mkdir ~/certdb/ # certutil -N -d ~/certdb/ Enter a password which will be used to encrypt your keys. The password should be at least 8 characters long, and should contain at least one non-alphabetic character. Enter new password: Re-enter password:Create the certificate signing request (CSR) and redirect the output to a file. For example, to create a CSR with the name
certificate_request.csrfor a4096bit certificate for theidm_useruser in theIDM.EXAMPLE.COMrealm, setting the nickname of the certificate private keys toidm_userfor easy findability, and setting the subject toCN=idm_user,O=IDM.EXAMPLE.COM:# certutil -R -d ~/certdb/ -a -g 4096 -n idm_user -s "CN=idm_user,O=IDM.EXAMPLE.COM" > certificate_request.csrWhen prompted, enter the same password that you entered when using
certutilto create the temporary database. Then continue typing randomly until told to stop:Enter Password or Pin for "NSS Certificate DB": A random seed must be generated that will be used in the creation of your key. One of the easiest ways to create a random seed is to use the timing of keystrokes on a keyboard. To begin, type keys on the keyboard until this progress meter is full. DO NOT USE THE AUTOREPEAT FUNCTION ON YOUR KEYBOARD! Continue typing until the progress meter is full:Submit the certificate request file to the server. Specify the Kerberos principal to associate with the newly-issued certificate, the output file to store the certificate, and optionally the certificate profile. Specify the IdM sub-CA that you want to issue the certificate. For example, to obtain a certificate of the
IECUserRolesprofile, a profile with added user roles extension, for theidm_user@IDM.EXAMPLE.COMprincipal fromwebclient-ca, and save the certificate in the~/idm_user.pemfile:# ipa cert-request certificate_request.csr --principal=idm_user@IDM.EXAMPLE.COM --profile-id=IECUserRoles --ca=webclient-ca --certificate-out=~/idm_user.pemAdd the certificate to the NSS database. Use the
-noption to set the same nickname that you used when creating the CSR previously so that the certificate matches the private key in the NSS database. The-toption sets the trust level. For details, see the certutil(1) man page. The-ioption specifies the input certificate file. For example, to add to the NSS database a certificate with theidm_usernickname that is stored in the~/idm_user.pemfile in the~/certdb/database:# certutil -A -d ~/certdb/ -n idm_user -t "P,," -i ~/idm_user.pemVerify that the key in the NSS database does not show
(orphan)as its nickname. For example, to verify that the certificate stored in the~/certdb/database is not orphaned:# certutil -K -d ~/certdb/ < 0> rsa 5ad14d41463b87a095b1896cf0068ccc467df395 NSS Certificate DB:idm_userUse the
pk12utilcommand to export the certificate from the NSS database to the PKCS12 format. For example, to export the certificate with theidm_usernickname from the/root/certdbNSS database into the~/idm_user.p12file:# pk12util -d ~/certdb -o ~/idm_user.p12 -n idm_user Enter Password or Pin for "NSS Certificate DB": Enter password for PKCS12 file: Re-enter password: pk12util: PKCS12 EXPORT SUCCESSFULTransfer the certificate to the host on which you want the certificate authentication for
idm_userto be enabled:# scp ~/idm_user.p12 idm_user@client.idm.example.com:/home/idm_user/On the host to which the certificate has been transferred, make the directory in which the .pkcs12 file is stored inaccessible to the 'other' group for security reasons:
# chmod o-rwx /home/idm_user/For security reasons, remove the temporary NSS database and the .pkcs12 file from the server:
# rm ~/certdb/ # rm ~/idm_user.p12
81.12. Configuring a browser to enable certificate authentication
To be able to authenticate with a certificate when using the WebUI to log into Identity Management (IdM), you need to import the user and the relevant certificate authority (CA) certificates into the Mozilla Firefox or Google Chrome browser. The host itself on which the browser is running does not have to be part of the IdM domain.
IdM supports the following browsers for connecting to the WebUI:
- Mozilla Firefox 38 and later
- Google Chrome 46 and later
The following procedure shows how to configure the Mozilla Firefox 57.0.1 browser.
Prerequisites
- You have the user certificate that you want to import to the browser at your disposal in the PKCS#12 format.
- You have downloaded the sub-CA certificate and have it at your disposal in the PEM format.
Procedure
Open Firefox, then navigate to
Preferences→Privacy & Security.Figure 81.8. Privacy and Security section in Preferences
Click .
Figure 81.9. View Certificates in Privacy and Security
-
In the
Your Certificatestab, click . Locate and open the certificate of the user in the PKCS12 format, then click and . To make sure that your IdM sub-CA is recognized by Firefox as a trusted authority, import the IdM sub-CA certificate that you saved in Downloading the sub-CA certificate from IdM WebUI as a trusted certificate authority certificate:
Open Firefox, navigate to Preferences and click .
Figure 81.10. Privacy and Security section in Preferences
Click .
Figure 81.11. View Certificates in Privacy and Security
-
In the
Authoritiestab, click . Locate and open the sub-CA certificate. Trust the certificate to identify websites, then click and .
Chapter 83. Vaults in IdM
Learn more about vaults in Identity Management (IdM).
83.1. Vaults and their benefits
You can use an Identity Management (IdM) vault to keep all your sensitive data stored securely but conveniently in one place.
A vault is a secure location in IdM for storing, retrieving, sharing, and recovering a secret. A secret is security-sensitive data, usually authentication credentials, that only a limited group of people or entities can access. For example, secrets include:
- Passwords
- PINs
- Private SSH keys
A vault is comparable to a password manager. Just like a password manager, a vault typically requires a user to generate and remember one primary password to unlock and access any information stored in the vault. However, a user can also decide to have a standard vault. A standard vault does not require the user to enter any password to access the secrets stored in the vault.
The purpose of vaults in IdM is to store authentication credentials that allow you to authenticate to external, non-IdM-related services.
IdM vaults are characterized by the following:
- Vaults are only accessible to the vault owner and those IdM users that the vault owner selects to be the vault members. In addition, the IdM administrator has access to all vaults.
- If a user does not have sufficient privileges to create a vault, an IdM administrator can create the vault and set the user as its owner.
- Users and services can access the secrets stored in a vault from any machine enrolled in the IdM domain.
- One vault can only contain one secret, for example, one file. However, the file itself can contain multiple secrets such as passwords, keytabs or certificates.
Vault is only available from the IdM command line (CLI), not from the IdM Web UI.
83.2. Vault owners, members, and administrators
Identity Management (IdM) distinguishes the following vault user types:
- Vault owner
A vault owner is a user or service with basic management privileges on the vault. For example, a vault owner can modify the properties of the vault or add new vault members.
Each vault must have at least one owner. A vault can also have multiple owners.
- Vault member
- A vault member is a user or service that can access a vault created by another user or service.
- Vault administrator
Vault administrators have unrestricted access to all vaults and are allowed to perform all vault operations. In the context of IdM role-based access control (RBAC), a vault administrator is any IdM user with the
Vault Administratorsprivilege.NoteSymmetric and asymmetric vaults are protected with a password or key. Special access control rules apply for an administrator to:
- Access secrets in symmetric and asymmetric vaults.
- Change or reset the vault password or key.
- Vault User
The vault user represents the user in whose container the vault is located. The
Vault userinformation is displayed in the output of specific commands, such asipa vault-show:$ ipa vault-show my_vault Vault name: my_vault Type: standard Owner users: user Vault user: userFor details on vault containers and user vaults, see Vault containers.
83.3. Standard, symmetric, and asymmetric vaults
Based on the level of security and access control, IdM classifies vaults into the following types:
- Standard vaults
- Vault owners and vault members can archive and retrieve the secret inside a vault without having to use a password or key.
- Symmetric vaults
- Secrets in the vault are protected with a symmetric key. Vault owners and members can archive and retrieve the secrets, but they must provide the vault password.
- Asymmetric vaults
- Secrets in the vault are protected with asymmetric keys. Users archive the secret by using a public key and retrieve it by using a private key. Vault owners can both archive and retrieve secrets. Vault members can only archive secrets.
83.5. Vault containers
A vault container is a collection of vaults. The table below lists the default vault containers that Identity Management (IdM) provides.
| Type | Description | Purpose |
|---|---|---|
| User container | A private container for a user | Stores user vaults for a particular user |
| Service container | A private container for a service | Stores service vaults for a particular service |
| Shared container | A container for multiple users and services | Stores vaults that can be shared by multiple users or services |
IdM creates user and service containers for each user or service automatically when the first private vault for the user or service is created. After the user or service is deleted, IdM removes the container and its contents.
83.6. Basic IdM vault commands
You can use the basic commands outlined below to manage Identity Management (IdM) vaults. The table below contains a list of ipa vault-* commands with the explanation of their purpose.
Before running any ipa vault-* command, install the Key Recovery Authority (KRA) certificate system component on one or more of the servers in your IdM domain. For details, see Installing the Key Recovery Authority in IdM.
| Command | Purpose |
|---|---|
|
| Displays conceptual information about IdM vaults and sample vault commands. |
|
|
Adding the |
|
| When accessing a user vault as a vault member, you must specify the vault owner. If you do not specify the vault owner, IdM informs you that it did not find the vault: |
|
| When accessing a shared vault, you must specify that the vault you want to access is a shared vault. Otherwise, IdM informs you it did not find the vault: |
83.7. Installing the Key Recovery Authority in IdM
Follow this procedure to enable vaults in Identity Management (IdM) by installing the Key Recovery Authority (KRA) Certificate System (CS) component on a specific IdM server.
Prerequisites
-
You are logged in as
rooton the IdM server. - An IdM certificate authority is installed on the IdM server.
-
You have the
Directory Managercredentials.
Procedure
Install the KRA:
# ipa-kra-install
To make the vault service highly available and resilient, install the KRA on two IdM servers or more. Maintaining multiple KRA servers prevents data loss.
You can install the first KRA of an IdM cluster on a hidden replica. However, installing additional KRAs requires temporarily activating the hidden replica before you install the KRA clone on a non-hidden replica. Then you can hide the originally hidden replica again.
Chapter 84. Using IdM user vaults: storing and retrieving secrets
This chapter describes how to use user vaults in Identity Management. Specifically, it describes how a user can store a secret in an IdM vault, and how the user can retrieve it. The user can do the storing and the retrieving from two different IdM clients.
Prerequisites
- The Key Recovery Authority (KRA) Certificate System component has been installed on one or more of the servers in your IdM domain. For details, see Installing the Key Recovery Authority in IdM.
84.1. Storing a secret in a user vault
Follow this procedure to create a vault container with one or more private vaults to securely store files with sensitive information. In the example used in the procedure below, the idm_user user creates a vault of the standard type. The standard vault type ensures that idm_user will not be required to authenticate when accessing the file. idm_user will be able to retrieve the file from any IdM client to which the user is logged in.
In the procedure:
- idm_user is the user who wants to create the vault.
- my_vault is the vault used to store the user’s certificate.
-
The vault type is
standard, so that accessing the archived certificate does not require the user to provide a vault password. - secret.txt is the file containing the certificate that the user wants to store in the vault.
Prerequisites
- You know the password of idm_user.
- You are logged in to a host that is an IdM client.
Procedure
Obtain the Kerberos ticket granting ticket (TGT) for
idm_user:$ kinit idm_userUse the
ipa vault-addcommand with the--type standardoption to create a standard vault:$ ipa vault-add my_vault --type standard ---------------------- Added vault "my_vault" ---------------------- Vault name: my_vault Type: standard Owner users: idm_user Vault user: idm_userImportantMake sure the first user vault for a user is created by the same user. Creating the first vault for a user also creates the user’s vault container. The agent of the creation becomes the owner of the vault container.
For example, if another user, such as
admin, creates the first user vault foruser1, the owner of the user’s vault container will also beadmin, anduser1will be unable to access the user vault or create new user vaults.Use the
ipa vault-archivecommand with the--inoption to archive thesecret.txtfile into the vault:$ ipa vault-archive my_vault --in secret.txt ----------------------------------- Archived data into vault "my_vault" -----------------------------------
84.2. Retrieving a secret from a user vault
As an Identity Management (IdM), you can retrieve a secret from your user private vault onto any IdM client to which you are logged in.
Follow this procedure to retrieve, as an IdM user named idm_user, a secret from the user private vault named my_vault onto idm_client.idm.example.com.
Prerequisites
- idm_user is the owner of my_vault.
- idm_user has archived a secret in the vault.
- my_vault is a standard vault, which means that idm_user does not have to enter any password to access the contents of the vault.
Procedure
SSH to idm_client as idm_user:
$ ssh idm_user@idm_client.idm.example.comLog in as
idm_user:$ kinit userUse the
ipa vault-retrievecommand with the--outoption to retrieve the contents of the vault and save them into thesecret_exported.txtfile.$ ipa vault-retrieve my_vault --out secret_exported.txt -------------------------------------- Retrieved data from vault "my_vault" --------------------------------------
Chapter 85. Using Ansible to manage IdM user vaults: storing and retrieving secrets
This chapter describes how to manage user vaults in Identity Management using the Ansible vault module. Specifically, it describes how a user can use Ansible playbooks to perform the following three consecutive actions:
The user can do the storing and the retrieving from two different IdM clients.
Prerequisites
- The Key Recovery Authority (KRA) Certificate System component has been installed on one or more of the servers in your IdM domain. For details, see Installing the Key Recovery Authority in IdM.
85.1. Ensuring the presence of a standard user vault in IdM using Ansible
Follow this procedure to use an Ansible playbook to create a vault container with one or more private vaults to securely store sensitive information. In the example used in the procedure below, the idm_user user creates a vault of the standard type named my_vault. The standard vault type ensures that idm_user will not be required to authenticate when accessing the file. idm_user will be able to retrieve the file from any IdM client to which the user is logged in.
Prerequisites
You have configured your Ansible control node to meet the following requirements:
- You are using Ansible version 2.13 or later.
-
You have installed the
ansible-freeipapackage. - The example assumes that in the ~/MyPlaybooks/ directory, you have created an Ansible inventory file with the fully-qualified domain name (FQDN) of the IdM server.
-
The target node, that is the node on which the
ansible-freeipamodule is executed, is part of the IdM domain as an IdM client, server or replica. - You know the password of idm_user.
Procedure
Navigate to the MyPlaybooks directory:
$ cd ~/MyPlaybooks/Make a copy of the /usr/share/doc/ansible-freeipa/playbooks/vault/ensure-standard-vault-is-present.yml Ansible playbook file. For example:
$ cp /usr/share/doc/ansible-freeipa/playbooks/vault/ensure-standard-vault-is-present.yml ensure-standard-vault-is-present-copy.yml- Open the ensure-standard-vault-is-present-copy.yml file for editing.
Adapt the file by setting the following variables in the
ipavaulttask section:-
Set the
ipaadmin_principalvariable to idm_user. -
Set the
ipaadmin_passwordvariable to the password of idm_user. -
Set the
uservariable to idm_user. -
Set the
namevariable to my_vault. Set the
vault_typevariable to standard.This the modified Ansible playbook file for the current example:
--- - name: Tests hosts: ipaserver gather_facts: false tasks: - ipavault: ipaadmin_principal: idm_user ipaadmin_password: idm_user_password user: idm_user name: my_vault vault_type: standard-
Set the
- Save the file.
Run the playbook:
$ ansible-playbook -v -i inventory.file ensure-standard-vault-is-present-copy.yml
85.2. Archiving a secret in a standard user vault in IdM using Ansible
Follow this procedure to use an Ansible playbook to store sensitive information in a personal vault. In the example used, the idm_user user archives a file with sensitive information named password.txt in a vault named my_vault.
Prerequisites
You have configured your Ansible control node to meet the following requirements:
- You are using Ansible version 2.13 or later.
-
You have installed the
ansible-freeipapackage. - The example assumes that in the ~/MyPlaybooks/ directory, you have created an Ansible inventory file with the fully-qualified domain name (FQDN) of the IdM server.
-
The target node, that is the node on which the
ansible-freeipamodule is executed, is part of the IdM domain as an IdM client, server or replica. - You know the password of idm_user.
- idm_user is the owner, or at least a member user of my_vault.
- You have access to password.txt, the secret that you want to archive in my_vault.
Procedure
Navigate to the MyPlaybooks directory:
$ cd ~/MyPlaybooks/Make a copy of the /usr/share/doc/ansible-freeipa/playbooks/vault/data-archive-in-symmetric-vault.yml Ansible playbook file. For example:
$ cp /usr/share/doc/ansible-freeipa/playbooks/vault/data-archive-in-symmetric-vault.yml data-archive-in-symmetric-vault-copy.yml- Open the data-archive-in-standard-vault-copy.yml file for editing.
Adapt the file by setting the following variables in the
ipavaulttask section:-
Set the
ipaadmin_principalvariable to idm_user. -
Set the
ipaadmin_passwordvariable to the password of idm_user. -
Set the
uservariable to idm_user. -
Set the
namevariable to my_vault. -
Set the
invariable to the full path to the file with sensitive information. Set the
actionvariable to member.This the modified Ansible playbook file for the current example:
--- - name: Tests hosts: ipaserver gather_facts: false vars_files: - /home/user_name/MyPlaybooks/secret.yml tasks: - ipavault: ipaadmin_principal: idm_user ipaadmin_password: idm_user_password user: idm_user name: my_vault in: /usr/share/doc/ansible-freeipa/playbooks/vault/password.txt action: member-
Set the
- Save the file.
Run the playbook:
$ ansible-playbook -v -i inventory.file data-archive-in-standard-vault-copy.yml
85.3. Retrieving a secret from a standard user vault in IdM using Ansible
Follow this procedure to use an Ansible playbook to retrieve a secret from the user personal vault. In the example used in the procedure below, the idm_user user retrieves a file with sensitive data from a vault of the standard type named my_vault onto an IdM client named host01. idm_user does not have to authenticate when accessing the file. idm_user can use Ansible to retrieve the file from any IdM client on which Ansible is installed.
Prerequisites
You have configured your Ansible control node to meet the following requirements:
- You are using Ansible version 2.13 or later.
-
You have installed the
ansible-freeipapackage. - The example assumes that in the ~/MyPlaybooks/ directory, you have created an Ansible inventory file with the fully-qualified domain name (FQDN) of the IdM server.
-
The target node, that is the node on which the
ansible-freeipamodule is executed, is part of the IdM domain as an IdM client, server or replica. - You know the password of idm_user.
- idm_user is the owner of my_vault.
- idm_user has stored a secret in my_vault.
- Ansible can write into the directory on the IdM host into which you want to retrieve the secret.
- idm_user can read from the directory on the IdM host into which you want to retrieve the secret.
Procedure
Navigate to the MyPlaybooks directory:
$ cd ~/MyPlaybooks/Make a copy of the /usr/share/doc/ansible-freeipa/playbooks/vault/data-archive-in-symmetric-vault.yml Ansible playbook file. For example:
$ cp /usr/share/doc/ansible-freeipa/playbooks/vault/retrive-data-symmetric-vault.yml retrieve-data-symmetric-vault-copy.ymlOpen your inventory file and mention, in a clearly defined section, the IdM client onto which you want to retrieve the secret. For example, to instruct Ansible to retrieve the secret onto host01.idm.example.com, enter:
[ipahost] host01.idm.example.com- Open the retrieve-data-standard-vault.yml-copy.yml file for editing.
-
Adapt the file by setting the
hostsvariable to ipahost. Adapt the file by setting the following variables in the
ipavaulttask section:-
Set the
ipaadmin_principalvariable to idm_user. -
Set the
ipaadmin_passwordvariable to the password of idm_user. -
Set the
uservariable to idm_user. -
Set the
namevariable to my_vault. -
Set the
outvariable to the full path of the file into which you want to export the secret. Set the
statevariable to retrieved.This the modified Ansible playbook file for the current example:
--- - name: Tests hosts: ipahost gather_facts: false vars_files: - /home/user_name/MyPlaybooks/secret.yml tasks: - ipavault: ipaadmin_principal: idm_user ipaadmin_password: idm_user_password user: idm_user name: my_vault out: /tmp/password_exported.txt state: retrieved-
Set the
- Save the file.
Run the playbook:
$ ansible-playbook -v -i inventory.file retrieve-data-standard-vault.yml-copy.yml
Verification
SSHto host01 as user01:$ ssh user01@host01.idm.example.comView the file specified by the
outvariable in the Ansible playbook file:$ vim /tmp/password_exported.txt
You can now see the exported secret.
Additional resources
-
For more information about using Ansible to manage IdM vaults and user secrets and about playbook variables, see the README-vault.md Markdown file available in the
/usr/share/doc/ansible-freeipa/directory and the sample playbooks available in the/usr/share/doc/ansible-freeipa/playbooks/vault/directory.
Chapter 86. Managing IdM service secrets: storing and retrieving secrets
This section describes how an administrator can use a service vault in Identity Management (IdM) to securely store a service secret in a centralized location. The vault used in the example is asymmetric, which means that to use it, the administrator needs to perform the following steps:
-
Generate a private key using, for example, the
opensslutility. - Generate a public key based on the private key.
The service secret is encrypted with the public key when an administrator archives it into the vault. Afterwards, a service instance hosted on a specific machine in the domain retrieves the secret using the private key. Only the service and the administrator are allowed to access the secret.
If the secret is compromised, the administrator can replace it in the service vault and then redistribute it to those individual service instances that have not been compromised.
Prerequisites
- The Key Recovery Authority (KRA) Certificate System component has been installed on one or more of the servers in your IdM domain. For details, see Installing the Key Recovery Authority in IdM.
In the procedures below:
- The IdM admin user is the administrator who manages the service password.
- private-key-to-an-externally-signed-certificate.pem is the file containing the service secret, in this case a private key to an externally signed certificate. Do not confuse this private key with the private key used to retrieve the secret from the vault.
- secret_vault is the vault created for the service.
- HTTP/webserver.idm.example.com is the service whose secret is being archived.
- service-public.pem is the service public key used to encrypt the password stored in password_vault.
- service-private.pem is the service private key used to decrypt the password stored in secret_vault.
86.1. Storing an IdM service secret in an asymmetric vault
Follow this procedure to create an asymmetric vault and use it to archive a service secret.
Prerequisites
- You know the IdM administrator password.
Procedure
Log in as the administrator:
$ kinit adminObtain the public key of the service instance. For example, using the
opensslutility:Generate the
service-private.pemprivate key.$ openssl genrsa -out service-private.pem 2048 Generating RSA private key, 2048 bit long modulus .+++ ...........................................+++ e is 65537 (0x10001)Generate the
service-public.pempublic key based on the private key.$ openssl rsa -in service-private.pem -out service-public.pem -pubout writing RSA key
Create an asymmetric vault as the service instance vault, and provide the public key:
$ ipa vault-add secret_vault --service HTTP/webserver.idm.example.com --type asymmetric --public-key-file service-public.pem ---------------------------- Added vault "secret_vault" ---------------------------- Vault name: secret_vault Type: asymmetric Public key: LS0tLS1C...S0tLS0tCg== Owner users: admin Vault service: HTTP/webserver.idm.example.com@IDM.EXAMPLE.COMThe password archived into the vault will be protected with the key.
Archive the service secret into the service vault:
$ ipa vault-archive secret_vault --service HTTP/webserver.idm.example.com --in private-key-to-an-externally-signed-certificate.pem ----------------------------------- Archived data into vault "secret_vault" -----------------------------------This encrypts the secret with the service instance public key.
Repeat these steps for every service instance that requires the secret. Create a new asymmetric vault for each service instance.
86.2. Retrieving a service secret for an IdM service instance
Follow this procedure to use a service instance to retrieve the service vault secret using a locally-stored service private key.
Prerequisites
- You have access to the keytab of the service principal owning the service vault, for example HTTP/webserver.idm.example.com.
- You have created an asymmetric vault and archived a secret in the vault.
- You have access to the private key used to retrieve the service vault secret.
Procedure
Log in as the administrator:
$ kinit adminObtain a Kerberos ticket for the service:
# kinit HTTP/webserver.idm.example.com -k -t /etc/httpd/conf/ipa.keytabRetrieve the service vault password:
$ ipa vault-retrieve secret_vault --service HTTP/webserver.idm.example.com --private-key-file service-private.pem --out secret.txt ------------------------------------ Retrieved data from vault "secret_vault" ------------------------------------
86.3. Changing an IdM service vault secret when compromised
Follow this procedure to isolate a compromised service instance by changing the service vault secret.
Prerequisites
- You know the IdM administrator password.
- You have created an asymmetric vault to store the service secret.
- You have generated the new secret and have access to it, for example in the new-private-key-to-an-externally-signed-certificate.pem file.
Procedure
Archive the new secret into the service instance vault:
$ ipa vault-archive secret_vault --service HTTP/webserver.idm.example.com --in new-private-key-to-an-externally-signed-certificate.pem ----------------------------------- Archived data into vault "secret_vault" -----------------------------------This overwrites the current secret stored in the vault.
- Retrieve the new secret on non-compromised service instances only. For details, see Retrieving a service secret for an IdM service instance.
Chapter 87. Using Ansible to manage IdM service vaults: storing and retrieving secrets
This section describes how an administrator can use the ansible-freeipa vault module to securely store a service secret in a centralized location. The vault used in the example is asymmetric, which means that to use it, the administrator needs to perform the following steps:
-
Generate a private key using, for example, the
opensslutility. - Generate a public key based on the private key.
The service secret is encrypted with the public key when an administrator archives it into the vault. Afterwards, a service instance hosted on a specific machine in the domain retrieves the secret using the private key. Only the service and the administrator are allowed to access the secret.
If the secret is compromised, the administrator can replace it in the service vault and then redistribute it to those individual service instances that have not been compromised.
Prerequisites
- All the IdM servers in the ipaserver host category defined in the playbooks below have the Key Recovery Authority (KRA) Certificate System component installed on them. For details, see Installing the Key Recovery Authority in IdM.
In the procedures:
- The IdM admin user is the administrator who manages the service password.
- private-key-to-an-externally-signed-certificate.pem is the file containing the service secret, in this case a private key to an externally signed certificate. Do not confuse this private key with the private key used to retrieve the secret from the vault.
- secret_vault is the vault created to store the service secret.
- HTTP/webserver1.idm.example.com is the service that is the owner of the vault.
- HTTP/webserver2.idm.example.com and HTTP/webserver3.idm.example.com are the vault member services.
- service-public.pem is the service public key used to encrypt the password stored in password_vault.
- service-private.pem is the service private key used to decrypt the password stored in secret_vault.
87.1. Ensuring the presence of an asymmetric service vault in IdM using Ansible
Follow this procedure to use an Ansible playbook to create a service vault container with one or more private vaults to securely store sensitive information. In the example used in the procedure below, the administrator creates an asymmetric vault named secret_vault. This ensures that the vault members have to authenticate using a private key to retrieve the secret in the vault. The vault members will be able to retrieve the file from any IdM client.
Prerequisites
You have configured your Ansible control node to meet the following requirements:
- You are using Ansible version 2.13 or later.
-
You have installed the
ansible-freeipapackage. - The example assumes that in the ~/MyPlaybooks/ directory, you have created an Ansible inventory file with the fully-qualified domain name (FQDN) of the IdM server.
-
The example assumes that the secret.yml Ansible vault stores your
ipaadmin_password.
-
The target node, that is the node on which the
ansible-freeipamodule is executed, is part of the IdM domain as an IdM client, server or replica.
Procedure
Navigate to the MyPlaybooks directory:
$ cd ~/MyPlaybooks/Make a copy of the /usr/share/doc/ansible-freeipa/playbooks/vault/ensure-asymmetric-vault-is-present.yml Ansible playbook file. For example:
$ cp /usr/share/doc/ansible-freeipa/playbooks/vault/ensure-asymmetric-vault-is-present.yml ensure-asymmetric-vault-is-present-copy.ymlObtain the public key of the service instance. For example, using the
opensslutility:Generate the
service-private.pemprivate key.$ openssl genrsa -out service-private.pem 2048 Generating RSA private key, 2048 bit long modulus .+++ ...........................................+++ e is 65537 (0x10001)Generate the
service-public.pempublic key based on the private key.$ openssl rsa -in service-private.pem -out service-public.pem -pubout writing RSA key
- Open the ensure-asymmetric-vault-is-present-copy.yml file for editing.
- Add a task that copies the service-public.pem public key from the Ansible controller to the server.idm.example.com server.
Modify the rest of the file by setting the following variables in the
ipavaulttask section:-
Set the
ipaadmin_passwordvariable to the IdM administrator password. -
Define the name of the vault using the
namevariable, for example secret_vault. -
Set the
vault_typevariable to asymmetric. -
Set the
servicevariable to the principal of the service that owns the vault, for example HTTP/webserver1.idm.example.com. Set the
public_key_fileto the location of your public key.This is the modified Ansible playbook file for the current example:
--- - name: Tests hosts: ipaserver gather_facts: false vars_files: - /home/user_name/MyPlaybooks/secret.yml tasks: - name: Copy public key to ipaserver. copy: src: /path/to/service-public.pem dest: /usr/share/doc/ansible-freeipa/playbooks/vault/service-public.pem mode: 0600 - name: Add data to vault, from a LOCAL file. ipavault: ipaadmin_password: "{{ ipaadmin_password }}" name: secret_vault vault_type: asymmetric service: HTTP/webserver1.idm.example.com public_key_file: /usr/share/doc/ansible-freeipa/playbooks/vault/service-public.pem-
Set the
- Save the file.
Run the playbook:
$ ansible-playbook --vault-password-file=password_file -v -i inventory.file ensure-asymmetric-service-vault-is-present-copy.yml
87.2. Adding member services to an asymmetric vault using Ansible
Follow this procedure to use an Ansible playbook to add member services to a service vault so that they can all retrieve the secret stored in the vault. In the example used in the procedure below, the IdM administrator adds the HTTP/webserver2.idm.example.com and HTTP/webserver3.idm.example.com service principals to the secret_vault vault that is owned by HTTP/webserver1.idm.example.com.
Prerequisites
You have configured your Ansible control node to meet the following requirements:
- You are using Ansible version 2.13 or later.
-
You have installed the
ansible-freeipapackage. - The example assumes that in the ~/MyPlaybooks/ directory, you have created an Ansible inventory file with the fully-qualified domain name (FQDN) of the IdM server.
-
The example assumes that the secret.yml Ansible vault stores your
ipaadmin_password.
-
The target node, that is the node on which the
ansible-freeipamodule is executed, is part of the IdM domain as an IdM client, server or replica. - You have created an asymmetric vault to store the service secret.
Procedure
Navigate to the MyPlaybooks directory:
$ cd ~/MyPlaybooks/Make a copy of the /usr/share/doc/ansible-freeipa/playbooks/vault/data-archive-in-asymmetric-vault.yml Ansible playbook file. For example:
$ cp /usr/share/doc/ansible-freeipa/playbooks/vault/data-archive-in-asymmetric-vault.yml data-archive-in-asymmetric-vault-copy.yml- Open the data-archive-in-asymmetric-vault-copy.yml file for editing.
Modify the file by setting the following variables in the
ipavaulttask section:-
Set the
ipaadmin_passwordvariable to the IdM administrator password. -
Set the
namevariable to the name of the vault, for example secret_vault. -
Set the
servicevariable to the service owner of the vault, for example HTTP/webserver1.idm.example.com. -
Define the services that you want to have access to the vault secret using the
servicesvariable. Set the
actionvariable tomember.This the modified Ansible playbook file for the current example:
--- - name: Tests hosts: ipaserver gather_facts: false vars_files: - /home/user_name/MyPlaybooks/secret.yml tasks: - ipavault: ipaadmin_password: "{{ ipaadmin_password }}" name: secret_vault service: HTTP/webserver1.idm.example.com services: - HTTP/webserver2.idm.example.com - HTTP/webserver3.idm.example.com action: member-
Set the
- Save the file.
Run the playbook:
$ ansible-playbook --vault-password-file=password_file -v -i inventory.file add-services-to-an-asymmetric-vault.yml
87.3. Storing an IdM service secret in an asymmetric vault using Ansible
Follow this procedure to use an Ansible playbook to store a secret in a service vault so that it can be later retrieved by the service. In the example used in the procedure below, the administrator stores a PEM file with the secret in an asymmetric vault named secret_vault. This ensures that the service will have to authenticate using a private key to retrieve the secret from the vault. The service will be able to retrieve the file from any IdM client.
Prerequisites
You have configured your Ansible control node to meet the following requirements:
- You are using Ansible version 2.13 or later.
-
You have installed the
ansible-freeipapackage. - The example assumes that in the ~/MyPlaybooks/ directory, you have created an Ansible inventory file with the fully-qualified domain name (FQDN) of the IdM server.
-
The example assumes that the secret.yml Ansible vault stores your
ipaadmin_password.
-
The target node, that is the node on which the
ansible-freeipamodule is executed, is part of the IdM domain as an IdM client, server or replica. - You have created an asymmetric vault to store the service secret.
- The secret is stored locally on the Ansible controller, for example in the /usr/share/doc/ansible-freeipa/playbooks/vault/private-key-to-an-externally-signed-certificate.pem file.
Procedure
Navigate to the MyPlaybooks directory:
$ cd ~/MyPlaybooks/Make a copy of the /usr/share/doc/ansible-freeipa/playbooks/vault/data-archive-in-asymmetric-vault.yml Ansible playbook file. For example:
$ cp /usr/share/doc/ansible-freeipa/playbooks/vault/data-archive-in-asymmetric-vault.yml data-archive-in-asymmetric-vault-copy.yml- Open the data-archive-in-asymmetric-vault-copy.yml file for editing.
Modify the file by setting the following variables in the
ipavaulttask section:-
Set the
ipaadmin_passwordvariable to the IdM administrator password. -
Set the
namevariable to the name of the vault, for example secret_vault. -
Set the
servicevariable to the service owner of the vault, for example HTTP/webserver1.idm.example.com. -
Set the
invariable to "{{ lookup('file', 'private-key-to-an-externally-signed-certificate.pem') | b64encode }}". This ensures that Ansible retrieves the file with the private key from the working directory on the Ansible controller rather than from the IdM server. Set the
actionvariable tomember.This the modified Ansible playbook file for the current example:
--- - name: Tests hosts: ipaserver gather_facts: false vars_files: - /home/user_name/MyPlaybooks/secret.yml tasks: - ipavault: ipaadmin_password: "{{ ipaadmin_password }}" name: secret_vault service: HTTP/webserver1.idm.example.com in: "{{ lookup('file', 'private-key-to-an-externally-signed-certificate.pem') | b64encode }}" action: member-
Set the
- Save the file.
Run the playbook:
$ ansible-playbook --vault-password-file=password_file -v -i inventory.file data-archive-in-asymmetric-vault-copy.yml
87.4. Retrieving a service secret for an IdM service using Ansible
Follow this procedure to use an Ansible playbook to retrieve a secret from a service vault on behalf of the service. In the example used in the procedure below, running the playbook retrieves a PEM file with the secret from an asymmetric vault named secret_vault, and stores it in the specified location on all the hosts listed in the Ansible inventory file as ipaservers.
The services authenticate to IdM using keytabs, and they authenticate to the vault using a private key. You can retrieve the file on behalf of the service from any IdM client on which ansible-freeipa is installed.
Prerequisites
You have configured your Ansible control node to meet the following requirements:
- You are using Ansible version 2.13 or later.
-
You have installed the
ansible-freeipapackage. - The example assumes that in the ~/MyPlaybooks/ directory, you have created an Ansible inventory file with the fully-qualified domain name (FQDN) of the IdM server.
-
The example assumes that the secret.yml Ansible vault stores your
ipaadmin_password.
-
The target node, that is the node on which the
ansible-freeipamodule is executed, is part of the IdM domain as an IdM client, server or replica. - You have created an asymmetric vault to store the service secret.
- You have archived the secret in the vault.
-
You have stored the private key used to retrieve the service vault secret in the location specified by the
private_key_filevariable on the Ansible controller.
Procedure
Navigate to the MyPlaybooks directory:
$ cd ~/MyPlaybooks/Make a copy of the /usr/share/doc/ansible-freeipa/playbooks/vault/retrieve-data-asymmetric-vault.yml Ansible playbook file. For example:
$ cp /usr/share/doc/ansible-freeipa/playbooks/vault/retrieve-data-asymmetric-vault.yml retrieve-data-asymmetric-vault-copy.ymlOpen your inventory file and define the following hosts:
-
Define your IdM server in the
[ipaserver]section. -
Define the hosts onto which you want to retrieve the secret in the
[webservers]section. For example, to instruct Ansible to retrieve the secret to webserver1.idm.example.com, webserver2.idm.example.com, and webserver3.idm.example.com, enter:
[ipaserver] server.idm.example.com [webservers] webserver1.idm.example.com webserver2.idm.example.com webserver3.idm.example.com-
Define your IdM server in the
- Open the retrieve-data-asymmetric-vault-copy.yml file for editing.
Modify the file by setting the following variables in the
ipavaulttask section:-
Set the
ipaadmin_passwordvariable to your IdM administrator password. -
Set the
namevariable to the name of the vault, for example secret_vault. -
Set the
servicevariable to the service owner of the vault, for example HTTP/webserver1.idm.example.com. -
Set the
private_key_filevariable to the location of the private key used to retrieve the service vault secret. -
Set the
outvariable to the location on the IdM server where you want to retrieve the private-key-to-an-externally-signed-certificate.pem secret, for example the current working directory. Set the
actionvariable tomember.This the modified Ansible playbook file for the current example:
--- - name: Retrieve data from vault hosts: ipaserver become: no gather_facts: false vars_files: - /home/user_name/MyPlaybooks/secret.yml tasks: - name: Retrieve data from the service vault ipavault: ipaadmin_password: "{{ ipaadmin_password }}" name: secret_vault service: HTTP/webserver1.idm.example.com vault_type: asymmetric private_key: "{{ lookup('file', 'service-private.pem') | b64encode }}" out: private-key-to-an-externally-signed-certificate.pem state: retrieved-
Set the
Add a section to the playbook that retrieves the data file from the IdM server to the Ansible controller:
--- - name: Retrieve data from vault hosts: ipaserver become: no gather_facts: false tasks: [...] - name: Retrieve data file fetch: src: private-key-to-an-externally-signed-certificate.pem dest: ./ flat: true mode: 0600Add a section to the playbook that transfers the retrieved private-key-to-an-externally-signed-certificate.pem file from the Ansible controller on to the webservers listed in the
webserverssection of the inventory file:--- - name: Send data file to webservers become: no gather_facts: no hosts: webservers tasks: - name: Send data to webservers copy: src: private-key-to-an-externally-signed-certificate.pem dest: /etc/pki/tls/private/httpd.key mode: 0444- Save the file.
Run the playbook:
$ ansible-playbook --vault-password-file=password_file -v -i inventory.file retrieve-data-asymmetric-vault-copy.yml
87.5. Changing an IdM service vault secret when compromised using Ansible
Follow this procedure to reuse an Ansible playbook to change the secret stored in a service vault when a service instance has been compromised. The scenario in the following example assumes that on webserver3.idm.example.com, the retrieved secret has been compromised, but not the key to the asymmetric vault storing the secret. In the example, the administrator reuses the Ansible playbooks used when storing a secret in an asymmetric vault and retrieving a secret from the asymmetric vault onto IdM hosts. At the start of the procedure, the IdM administrator stores a new PEM file with a new secret in the asymmetric vault, adapts the inventory file so as not to retrieve the new secret on to the compromised web server, webserver3.idm.example.com, and then re-runs the two procedures.
Prerequisites
You have configured your Ansible control node to meet the following requirements:
- You are using Ansible version 2.13 or later.
-
You have installed the
ansible-freeipapackage. - The example assumes that in the ~/MyPlaybooks/ directory, you have created an Ansible inventory file with the fully-qualified domain name (FQDN) of the IdM server.
-
The example assumes that the secret.yml Ansible vault stores your
ipaadmin_password.
-
The target node, that is the node on which the
ansible-freeipamodule is executed, is part of the IdM domain as an IdM client, server or replica. - You know the IdM administrator password.
- You have created an asymmetric vault to store the service secret.
-
You have generated a new
httpdkey for the web services running on IdM hosts to replace the compromised old key. -
The new
httpdkey is stored locally on the Ansible controller, for example in the /usr/share/doc/ansible-freeipa/playbooks/vault/private-key-to-an-externally-signed-certificate.pem file.
Procedure
Navigate to the
/usr/share/doc/ansible-freeipa/playbooks/vaultdirectory:$ cd /usr/share/doc/ansible-freeipa/playbooks/vaultOpen your inventory file and make sure that the following hosts are defined correctly:
-
The IdM server in the
[ipaserver]section. The hosts onto which you want to retrieve the secret in the
[webservers]section. For example, to instruct Ansible to retrieve the secret to webserver1.idm.example.com and webserver2.idm.example.com, enter:[ipaserver] server.idm.example.com [webservers] webserver1.idm.example.com webserver2.idm.example.com
ImportantMake sure that the list does not contain the compromised webserver, in the current example webserver3.idm.example.com.
-
The IdM server in the
Make a copy of the data-archive-in-asymmetric-vault.yml Ansible playbook file, for example:
$ cp data-archive-in-asymmetric-vault.yml data-archive-in-asymmetric-vault-copy.yml- Open the data-archive-in-asymmetric-vault-copy.yml file for editing.
Modify the file by setting the following variables in the
ipavaulttask section:-
Set the
ipaadmin_passwordvariable to the IdM administrator password. -
Set the
namevariable to the name of the vault, for example secret_vault. -
Set the
servicevariable to the service owner of the vault, for example HTTP/webserver.idm.example.com. -
Set the
invariable to "{{ lookup('file', 'new-private-key-to-an-externally-signed-certificate.pem') | b64encode }}". This ensures that Ansible retrieves the file with the private key from the working directory on the Ansible controller rather than from the IdM server. Set the
actionvariable tomember.This the modified Ansible playbook file for the current example:
--- - name: Tests hosts: ipaserver gather_facts: false vars_files: - /home/user_name/MyPlaybooks/secret.yml tasks: - ipavault: ipaadmin_password: "{{ ipaadmin_password }}" name: secret_vault service: HTTP/webserver.idm.example.com in: "{{ lookup('file', 'new-private-key-to-an-externally-signed-certificate.pem') | b64encode }}" action: member-
Set the
- Save the file.
Run the playbook:
$ ansible-playbook --vault-password-file=password_file -v -i inventory.file data-archive-in-asymmetric-vault-copy.yml- Open the retrieve-data-asymmetric-vault-copy.yml file for editing.
Modify the file by setting the following variables in the
ipavaulttask section:-
Set the
ipaadmin_passwordvariable to your IdM administrator password. -
Set the
namevariable to the name of the vault, for example secret_vault. -
Set the
servicevariable to the service owner of the vault, for example HTTP/webserver1.idm.example.com. -
Set the
private_key_filevariable to the location of the private key used to retrieve the service vault secret. -
Set the
outvariable to the location on the IdM server where you want to retrieve the new-private-key-to-an-externally-signed-certificate.pem secret, for example the current working directory. Set the
actionvariable tomember.This the modified Ansible playbook file for the current example:
--- - name: Retrieve data from vault hosts: ipaserver become: no gather_facts: false vars_files: - /home/user_name/MyPlaybooks/secret.yml tasks: - name: Retrieve data from the service vault ipavault: ipaadmin_password: "{{ ipaadmin_password }}" name: secret_vault service: HTTP/webserver1.idm.example.com vault_type: asymmetric private_key: "{{ lookup('file', 'service-private.pem') | b64encode }}" out: new-private-key-to-an-externally-signed-certificate.pem state: retrieved-
Set the
Add a section to the playbook that retrieves the data file from the IdM server to the Ansible controller:
--- - name: Retrieve data from vault hosts: ipaserver become: true gather_facts: false tasks: [...] - name: Retrieve data file fetch: src: new-private-key-to-an-externally-signed-certificate.pem dest: ./ flat: true mode: 0600Add a section to the playbook that transfers the retrieved new-private-key-to-an-externally-signed-certificate.pem file from the Ansible controller on to the webservers listed in the
webserverssection of the inventory file:--- - name: Send data file to webservers become: true gather_facts: no hosts: webservers tasks: - name: Send data to webservers copy: src: new-private-key-to-an-externally-signed-certificate.pem dest: /etc/pki/tls/private/httpd.key mode: 0444- Save the file.
Run the playbook:
$ ansible-playbook --vault-password-file=password_file -v -i inventory.file retrieve-data-asymmetric-vault-copy.yml
Chapter 88. Ensuring the presence and absence of services in IdM using Ansible
With the Ansible service module, Identity Management (IdM) administrator can ensure that specific services that are not native to IdM are present or absent in IdM. For example, you can use the service module to:
Check that a manually installed service is present on an IdM client and automatically install that service if it is absent. For details, see:
- Ensuring the presence of an HTTP service in IdM on an IdM client.
- Ensuring the presence of multiple services in IdM on an IdM client using a single Ansible task.
- Ensuring the presence of an HTTP service in IdM on a non-IdM client.
- Ensuring the presence of an HTTP service on an IdM client without DNS.
Check that a service enrolled in IdM has a certificate attached and automatically install that certificate if it is absent. For details, see:
Allow IdM users and hosts to retrieve and create the service keytab. For details, see:
Allow IdM users and hosts to add a Kerberos alias to a service. For details, see:
Check that a service is not present on an IdM client and automatically remove that service if it is present. For details, see:
88.1. Ensuring the presence of an HTTP service in IdM using an Ansible playbook
Follow this procedure to ensure the presence of an HTTP server in IdM using an Ansible playbook.
Prerequisites
- The system to host the HTTP service is an IdM client.
- You have the IdM administrator password.
Procedure
Create an inventory file, for example
inventory.file:$ touch inventory.fileOpen the
inventory.fileand define the IdM server that you want to configure in the[ipaserver]section. For example, to instruct Ansible to configure server.idm.example.com, enter:[ipaserver] server.idm.example.comMake a copy of the
/usr/share/doc/ansible-freeipa/playbooks/service/service-is-present.ymlAnsible playbook file. For example:$ cp /usr/share/doc/ansible-freeipa/playbooks/service/service-is-present.yml /usr/share/doc/ansible-freeipa/playbooks/service/service-is-present-copy.ymlOpen the
/usr/share/doc/ansible-freeipa/playbooks/service/service-is-present-copy.ymlAnsible playbook file for editing:--- - name: Playbook to manage IPA service. hosts: ipaserver gather_facts: false vars_files: - /home/user_name/MyPlaybooks/secret.yml tasks: # Ensure service is present - ipaservice: ipaadmin_password: "{{ ipaadmin_password }}" name: HTTP/client.idm.example.comAdapt the file:
-
Change the IdM administrator password defined by the
ipaadmin_passwordvariable. -
Change the name of your IdM client on which the HTTP service is running, as defined by the
namevariable of theipaservicetask.
-
Change the IdM administrator password defined by the
- Save and exit the file.
Run the Ansible playbook. Specify the playbook file, the file storing the password protecting the secret.yml file, and the inventory file:
$ ansible-playbook --vault-password-file=password_file -v -i path_to_inventory_directory/inventory.file /usr/share/doc/ansible-freeipa/playbooks/service/service-is-present-copy.yml
Verification
- Log into the IdM Web UI as IdM administrator.
-
Navigate to
Identity→Services.
If HTTP/client.idm.example.com@IDM.EXAMPLE.COM is listed in the Services list, the Ansible playbook has been successfully added to IdM.
88.2. Ensuring the presence of multiple services in IdM on an IdM client using a single Ansible task
You can use the ansible-freeipa ipaservice module to add, modify, and delete multiple Identity Management (IdM) services with a single Ansible task. For that, use the services option of the ipaservice module.
Using the services option, you can also specify multiple service variables that only apply to a particular service. Define this service by the name variable, which is the only mandatory variable for the services option.
Complete this procedure to ensure the presence of the HTTP/client01.idm.example.com@IDM.EXAMPLE.COM and the ftp/client02.idm.example.com@IDM.EXAMPLE.COM services in IdM with a single task.
Prerequisites
On the control node:
- You are using Ansible version 2.13 or later.
-
You have installed the
ansible-freeipapackage. - You have created an Ansible inventory file with the fully-qualified domain name (FQDN) of the IdM server in the ~/MyPlaybooks/ directory.
- You are using RHEL 8.9 and later.
-
You have stored your
ipaadmin_passwordin the secret.yml Ansible vault.
Procedure
Create your Ansible playbook file add-http-and-ftp-services.yml with the following content:
--- - name: Playbook to add multiple services in a single task hosts: ipaserver vars_files: - /home/user_name/MyPlaybooks/secret.yml tasks: - name: Add HTTP and ftp services ipaservice: ipaadmin_password: "{{ ipaadmin_password }}" services: - name: HTTP/client01.idm.example.com@IDM.EXAMPLE.COM - name: ftp/client02.idm.example.com@IDM.EXAMPLE.COMRun the playbook:
$ ansible-playbook --vault-password-file=password_file -v -i inventory add-http-and-ftp-services.yml
88.3. Ensuring the presence of an HTTP service in IdM on a non-IdM client using an Ansible playbook
Follow this procedure to ensure the presence of an HTTP server in IdM on a host that is not an IdM client using an Ansible playbook. By adding the HTTP server to IdM you are also adding the host to IdM.
Prerequisites
- You have installed an HTTP service on your host.
- The host on which you have set up HTTP is not an IdM client. Otherwise, follow the steps in Ensuring the presence of an HTTP service in IdM using an Ansible playbook.
- You have the IdM administrator password.
- The DNS A record - or the AAAA record if IPv6 is used - for the host is available.
Procedure
Create an inventory file, for example
inventory.file:$ touch inventory.fileOpen the
inventory.fileand define the IdM server that you want to configure in the[ipaserver]section. For example, to instruct Ansible to configure server.idm.example.com, enter:[ipaserver] server.idm.example.comMake a copy of the
/usr/share/doc/ansible-freeipa/playbooks/service/service-is-present-without-host-check.ymlAnsible playbook file. For example:$ cp /usr/share/doc/ansible-freeipa/playbooks/service/service-is-present-without-host-check.yml /usr/share/doc/ansible-freeipa/playbooks/service/service-is-present-without-host-check-copy.ymlOpen the copied file,
/usr/share/doc/ansible-freeipa/playbooks/service/service-is-present-without-host-check-copy.yml, for editing. Locate theipaadmin_passwordandnamevariables in theipaservicetask:--- - name: Playbook to manage IPA service. hosts: ipaserver gather_facts: false vars_files: - /home/user_name/MyPlaybooks/secret.yml tasks: # Ensure service is present - ipaservice: ipaadmin_password: "{{ ipaadmin_password }}" name: HTTP/www2.example.com skip_host_check: trueAdapt the file:
-
Set the
ipaadmin_passwordvariable to your IdM administrator password. -
Set the
namevariable to the name of the host on which the HTTP service is running.
-
Set the
- Save and exit the file.
Run the Ansible playbook. Specify the playbook file, the file storing the password protecting the secret.yml file, and the inventory file:
$ ansible-playbook --vault-password-file=password_file -v -i path_to_inventory_directory/inventory.file /usr/share/doc/ansible-freeipa/playbooks/service/service-is-present-without-host-check-copy.yml
Verification
- Log into the IdM Web UI as IdM administrator.
-
Navigate to
Identity→Services.
You can now see HTTP/client.idm.example.com@IDM.EXAMPLE.COM listed in the Services list.
88.4. Ensuring the presence of an HTTP service on an IdM client without DNS using an Ansible playbook
Follow this procedure to ensure the presence of an HTTP server running on an IdM client that has no DNS entry using an Ansible playbook. The scenario implied is that the IdM host has no DNS A entry available - or no DNS AAAA entry if IPv6 is used instead of IPv4.
Prerequisites
- The system to host the HTTP service is enrolled in IdM.
- The DNS A or DNS AAAA record for the host may not exist. Otherwise, if the DNS record for the host does exist, follow the procedure in Ensuring the presence of an HTTP service in IdM using an Ansible playbook.
- You have the IdM administrator password.
Procedure
Create an inventory file, for example
inventory.file:$ touch inventory.fileOpen the
inventory.fileand define the IdM server that you want to configure in the[ipaserver]section. For example, to instruct Ansible to configure server.idm.example.com, enter:[ipaserver] server.idm.example.comMake a copy of the
/usr/share/doc/ansible-freeipa/playbooks/service/service-is-present-with-host-force.ymlAnsible playbook file. For example:$ cp /usr/share/doc/ansible-freeipa/playbooks/service/service-is-present-with-host-force.yml /usr/share/doc/ansible-freeipa/playbooks/service/service-is-present-with-host-force-copy.ymlOpen the copied file,
/usr/share/doc/ansible-freeipa/playbooks/service/service-is-present-with-host-force-copy.yml, for editing. Locate theipaadmin_passwordandnamevariables in theipaservicetask:--- - name: Playbook to manage IPA service. hosts: ipaserver gather_facts: false vars_files: - /home/user_name/MyPlaybooks/secret.yml tasks: # Ensure service is present - ipaservice: ipaadmin_password: "{{ ipaadmin_password }}" name: HTTP/ihavenodns.info force: trueAdapt the file:
-
Set the
ipaadmin_passwordvariable to your IdM administrator password. -
Set the
namevariable to the name of the host on which the HTTP service is running.
-
Set the
- Save and exit the file.
Run the Ansible playbook. Specify the playbook file, the file storing the password protecting the secret.yml file, and the inventory file:
$ ansible-playbook --vault-password-file=password_file -v -i path_to_inventory_directory/inventory.file /usr/share/doc/ansible-freeipa/playbooks/service/service-is-present-with-host-force-copy.yml
Verification
- Log into the IdM Web UI as IdM administrator.
-
Navigate to
Identity→Services.
You can now see HTTP/client.idm.example.com@IDM.EXAMPLE.COM listed in the Services list.
88.5. Ensuring the presence of an externally signed certificate in an IdM service entry using an Ansible playbook
Follow this procedure to use the ansible-freeipa service module to ensure that a certificate issued by an external certificate authority (CA) is attached to the IdM entry of the HTTP service. Having the certificate of an HTTP service signed by an external CA rather than the IdM CA is particularly useful if your IdM CA uses a self-signed certificate.
Prerequisites
- You have installed an HTTP service on your host.
- You have enrolled the HTTP service to IdM.
- You have the IdM administrator password.
- You have an externally signed certificate whose Subject corresponds to the principal of the HTTP service.
Procedure
Create an inventory file, for example
inventory.file:$ touch inventory.fileOpen the
inventory.fileand define the IdM server that you want to configure in the[ipaserver]section. For example, to instruct Ansible to configure server.idm.example.com, enter:[ipaserver] server.idm.example.comMake a copy of the
/usr/share/doc/ansible-freeipa/playbooks/service/service-member-certificate-present.ymlfile, for example:$ cp /usr/share/doc/ansible-freeipa/playbooks/service/service-member-certificate-present.yml /usr/share/doc/ansible-freeipa/playbooks/service/service-member-certificate-present-copy.ymlOptional: If the certificate is in the Privacy Enhanced Mail (PEM) format, convert the certificate to the Distinguished Encoding Rules (DER) format for easier handling through the command line (CLI):
$ openssl x509 -outform der -in cert1.pem -out cert1.derDecode the
DERfile to standard output using thebase64command. Use the-w0option to disable wrapping:$ base64 cert1.der -w0 MIIC/zCCAeegAwIBAgIUV74O+4kXeg21o4vxfRRtyJm...- Copy the certificate from the standard output to the clipboard.
Open the
/usr/share/doc/ansible-freeipa/playbooks/service/service-member-certificate-present-copy.ymlfile for editing and view its contents:--- - name: Service certificate present. hosts: ipaserver gather_facts: false vars_files: - /home/user_name/MyPlaybooks/secret.yml tasks: # Ensure service certificate is present - ipaservice: ipaadmin_password: "{{ ipaadmin_password }}" name: HTTP/client.idm.example.com certificate: | - MIICBjCCAW8CFHnm32VcXaUDGfEGdDL/... [...] action: member state: presentAdapt the file:
-
Replace the certificate, defined using the
certificatevariable, with the certificate you copied from the CLI. Note that if you use thecertificate:variable with the "|" pipe character as indicated, you can enter the certificate THIS WAY rather than having it to enter it in a single line. This makes reading the certificate easier. -
Change the IdM administrator password, defined by the
ipaadmin_passwordvariable. -
Change the name of your IdM client on which the HTTP service is running, defined by the
namevariable. - Change any other relevant variables.
-
Replace the certificate, defined using the
- Save and exit the file.
Run the Ansible playbook. Specify the playbook file, the file storing the password protecting the secret.yml file, and the inventory file:
$ ansible-playbook --vault-password-file=password_file -v -i path_to_inventory_directory/inventory.file /usr/share/doc/ansible-freeipa/playbooks/service/service-member-certificate-present-copy.yml
Verification
- Log into the IdM Web UI as IdM administrator.
-
Navigate to
Identity→Services. - Click the name of the service with the newly added certificate, for example HTTP/client.idm.example.com.
In the Service Certificate section on the right, you can now see the newly added certificate.
88.6. Using an Ansible playbook to allow IdM users, groups, hosts, or host groups to create a keytab of a service
A keytab is a file containing pairs of Kerberos principals and encrypted keys. Keytab files are commonly used to allow scripts to automatically authenticate using Kerberos, without requiring human interaction or access to password stored in a plain-text file. The script is then able to use the acquired credentials to access files stored on a remote system.
As an Identity Management (IdM) administrator, you can allow other users to retrieve or even create a keytab for a service running in IdM. By allowing specific users and user groups to create keytabs, you can delegate the administration of the service to them without sharing the IdM administrator password. This delegation provides a more fine-grained system administration.
Follow this procedure to allow specific IdM users, user groups, hosts, and host groups to create a keytab for the HTTP service running on an IdM client. Specifically, it describes how you can allow the user01 IdM user to create a keytab for the HTTP service running on an IdM client named client.idm.example.com.
Prerequisites
On the control node:
- You are using Ansible version 2.13 or later.
-
You have installed the
ansible-freeipapackage. - The example assumes that in the ~/MyPlaybooks/ directory, you have created an Ansible inventory file with the fully-qualified domain name (FQDN) of the IdM server.
-
The example assumes that the secret.yml Ansible vault stores your
ipaadmin_password.
-
The target node, that is the node on which the
ansible-freeipamodule is executed, is part of the IdM domain as an IdM client, server or replica. - You have enrolled the HTTP service to IdM.
- The system to host the HTTP service is an IdM client.
- The IdM users and user groups that you want to allow to create the keytab exist in IdM.
- The IdM hosts and host groups that you want to allow to create the keytab exist in IdM.
Procedure
Create an inventory file, for example
inventory.file:$ touch inventory.fileOpen the
inventory.fileand define the IdM server that you want to configure in the[ipaserver]section. For example, to instruct Ansible to configure server.idm.example.com, enter:[ipaserver] server.idm.example.comMake a copy of the
/usr/share/doc/ansible-freeipa/playbooks/service/service-member-allow_create_keytab-present.ymlAnsible playbook file. For example:$ cp /usr/share/doc/ansible-freeipa/playbooks/service/service-member-allow_create_keytab-present.yml /usr/share/doc/ansible-freeipa/playbooks/service/service-member-allow_create_keytab-present-copy.yml-
Open the
/usr/share/doc/ansible-freeipa/playbooks/service/service-member-allow_create_keytab-present-copy.ymlAnsible playbook file for editing. Adapt the file by changing the following:
-
The IdM administrator password specified by the
ipaadmin_passwordvariable. - The name of your IdM client on which the HTTP service is running. In the current example, it is HTTP/client.idm.example.com
-
The names of IdM users that are listed in the
allow_create_keytab_user:section. In the current example, it is user01. -
The names of IdM user groups that are listed in the
allow_create_keytab_group:section. -
The names of IdM hosts that are listed in the
allow_create_keytab_host:section. -
The names of IdM host groups that are listed in the
allow_create_keytab_hostgroup:section. The name of the task specified by the
namevariable in thetaskssection.After being adapted for the current example, the copied file looks like this:
--- - name: Service member allow_create_keytab present hosts: ipaserver vars_files: - /home/user_name/MyPlaybooks/secret.yml tasks: - name: Service HTTP/client.idm.example.com members allow_create_keytab present for user01 ipaservice: ipaadmin_password: "{{ ipaadmin_password }}" name: HTTP/client.idm.example.com allow_create_keytab_user: - user01 action: member-
The IdM administrator password specified by the
- Save the file.
Run the Ansible playbook. Specify the playbook file, the file storing the password protecting the secret.yml file, and the inventory file:
$ ansible-playbook --vault-password-file=password_file -v -i path_to_inventory_directory/inventory.file /usr/share/doc/ansible-freeipa/playbooks/service/service-member-allow_create_keytab-present-copy.yml
Verification
SSH to an IdM server as an IdM user that has the privilege to create a keytab for the particular HTTP service:
$ ssh user01@server.idm.example.com Password:Use the
ipa-getkeytabcommand to generate the new keytab for the HTTP service:$ ipa-getkeytab -s server.idm.example.com -p HTTP/client.idm.example.com -k /etc/httpd/conf/krb5.keytabThe
-soption specifies a Key Distribution Center (KDC) server to generate the keytab.The
-poption specifies the principal whose keytab you want to create.The
-koption specifies the keytab file to append the new key to. The file will be created if it does not exist.
If the command does not result in an error, you have successfully created a keytab of HTTP/client.idm.example.com as user01.
88.7. Using an Ansible playbook to allow IdM users, groups, hosts, or host groups to retrieve a keytab of a service
A keytab is a file containing pairs of Kerberos principals and encrypted keys. Keytab files are commonly used to allow scripts to automatically authenticate using Kerberos, without requiring human interaction or access to a password stored in a plain-text file. The script is then able to use the acquired credentials to access files stored on a remote system.
As IdM administrator, you can allow other users to retrieve or even create a keytab for a service running in IdM.
Follow this procedure to allow specific IdM users, user groups, hosts, and host groups to retrieve a keytab for the HTTP service running on an IdM client. Specifically, it describes how to allow the user01 IdM user to retrieve the keytab of the HTTP service running on client.idm.example.com.
Prerequisites
On the control node:
- You are using Ansible version 2.13 or later.
-
You have installed the
ansible-freeipapackage. - The example assumes that in the ~/MyPlaybooks/ directory, you have created an Ansible inventory file with the fully-qualified domain name (FQDN) of the IdM server.
-
The example assumes that the secret.yml Ansible vault stores your
ipaadmin_password.
-
The target node, that is the node on which the
ansible-freeipamodule is executed, is part of the IdM domain as an IdM client, server or replica. - You have enrolled the HTTP service to IdM.
- The IdM users and user groups that you want to allow to retrieve the keytab exist in IdM.
- The IdM hosts and host groups that you want to allow to retrieve the keytab exist in IdM.
Procedure
Create an inventory file, for example
inventory.file:$ touch inventory.fileOpen the
inventory.fileand define the IdM server that you want to configure in the[ipaserver]section. For example, to instruct Ansible to configure server.idm.example.com, enter:[ipaserver] server.idm.example.comMake a copy of the
/usr/share/doc/ansible-freeipa/playbooks/service/service-member-allow_retrieve_keytab-present.ymlAnsible playbook file. For example:$ cp /usr/share/doc/ansible-freeipa/playbooks/service/service-member-allow_retrieve_keytab-present.yml /usr/share/doc/ansible-freeipa/playbooks/service/service-member-allow_retrieve_keytab-present-copy.yml-
Open the copied file,
/usr/share/doc/ansible-freeipa/playbooks/service/service-member-allow_retrieve_keytab-present-copy.yml, for editing: Adapt the file:
-
Set the
ipaadmin_passwordvariable to your IdM administrator password. -
Set the
namevariable of theipaservicetask to the principal of the HTTP service. In the current example, it is HTTP/client.idm.example.com -
Specify the names of IdM users in the
allow_retrieve_keytab_group:section. In the current example, it is user01. -
Specify the names of IdM user groups in the
allow_retrieve_keytab_group:section. -
Specify the names of IdM hosts in the
allow_retrieve_keytab_group:section. -
Specify the names of IdM host groups in the
allow_retrieve_keytab_group:section. Specify the name of the task using the
namevariable in thetaskssection.After being adapted for the current example, the copied file looks like this:
--- - name: Service member allow_retrieve_keytab present hosts: ipaserver vars_files: - /home/user_name/MyPlaybooks/secret.yml tasks: - name: Service HTTP/client.idm.example.com members allow_retrieve_keytab present for user01 ipaservice: ipaadmin_password: "{{ ipaadmin_password }}" name: HTTP/client.idm.example.com allow_retrieve_keytab_user: - user01 action: member-
Set the
- Save the file.
Run the Ansible playbook. Specify the playbook file, the file storing the password protecting the secret.yml file, and the inventory file:
$ ansible-playbook --vault-password-file=password_file -v -i path_to_inventory_directory/inventory.file /usr/share/doc/ansible-freeipa/playbooks/service/service-member-allow_retrieve_keytab-present-copy.yml
Verification
SSH to an IdM server as an IdM user with the privilege to retrieve a keytab for the HTTP service:
$ ssh user01@server.idm.example.com Password:Use the
ipa-getkeytabcommand with the-roption to retrieve the keytab:$ ipa-getkeytab -r -s server.idm.example.com -p HTTP/client.idm.example.com -k /etc/httpd/conf/krb5.keytabThe
-soption specifies a Key Distribution Center (KDC) server from which you want to retrieve the keytab.The
-poption specifies the principal whose keytab you want to retrieve.The
-koption specifies the keytab file to which you want to append the retrieved key. The file will be created if it does not exist.
If the command does not result in an error, you have successfully retrieved a keytab of HTTP/client.idm.example.com as user01.
88.8. Ensuring the presence of a Kerberos principal alias of a service using an Ansible playbook
In some scenarios, it is beneficial for IdM administrator to enable IdM users, hosts, or services to authenticate against Kerberos applications using a Kerberos principal alias. These scenarios include:
- The user name changed, but the user should be able to log into the system using both the previous and new user names.
- The user needs to log in using the email address even if the IdM Kerberos realm differs from the email domain.
Follow this procedure to create the principal alias of HTTP/mycompany.idm.example.com for the HTTP service running on client.idm.example.com.
Prerequisites
On the control node:
- You are using Ansible version 2.13 or later.
-
You have installed the
ansible-freeipapackage. - The example assumes that in the ~/MyPlaybooks/ directory, you have created an Ansible inventory file with the fully-qualified domain name (FQDN) of the IdM server.
-
The example assumes that the secret.yml Ansible vault stores your
ipaadmin_password.
-
The target node, that is the node on which the
ansible-freeipamodule is executed, is part of the IdM domain as an IdM client, server or replica. - You have set up an HTTP service
- You have enrolled the HTTP service to IdM.
- The host on which you have set up HTTP is an IdM client.
Procedure
Create an inventory file, for example
inventory.file:$ touch inventory.fileOpen the
inventory.fileand define the IdM server that you want to configure in the[ipaserver]section. For example, to instruct Ansible to configure server.idm.example.com, enter:[ipaserver] server.idm.example.comMake a copy of the
/usr/share/doc/ansible-freeipa/playbooks/service/service-member-principal-present.ymlAnsible playbook file. For example:$ cp /usr/share/doc/ansible-freeipa/playbooks/service/service-member-principal-present.yml /usr/share/doc/ansible-freeipa/playbooks/service/service-member-principal-present-copy.yml-
Open the
/usr/share/doc/ansible-freeipa/playbooks/service/service-member-principal-present-copy.ymlAnsible playbook file for editing. Adapt the file by changing the following:
-
The IdM administrator password specified by the
ipaadmin_passwordvariable. -
The name of the service specified by the
namevariable. This is the canonical principal name of the service. In the current example, it is HTTP/client.idm.example.com. -
The Kerberos principal alias specified by the
principalvariable. This is the alias you want to add to the service defined by thenamevariable. In the current example, it is host/mycompany.idm.example.com. The name of the task specified by the
namevariable in thetaskssection.After being adapted for the current example, the copied file looks like this:
--- - name: Service member principal present hosts: ipaserver vars_files: - /home/user_name/MyPlaybooks/secret.yml tasks: - name: Service HTTP/client.idm.example.com member principals host/mycompany.idm.exmaple.com present ipaservice: ipaadmin_password: "{{ ipaadmin_password }}" name: HTTP/client.idm.example.com principal: - host/mycompany.idm.example.com action: member-
The IdM administrator password specified by the
- Save the file.
Run the Ansible playbook. Specify the playbook file, the file storing the password protecting the secret.yml file, and the inventory file:
$ ansible-playbook --vault-password-file=password_file -v -i path_to_inventory_directory/inventory.file /usr/share/doc/ansible-freeipa/playbooks/service/service-member-principal-present-copy.yml
If running the playbook results in 0 unreachable and 0 failed tasks, you have successfully created the host/mycompany.idm.example.com Kerberos principal for the HTTP/client.idm.example.com service.
88.9. Ensuring the absence of an HTTP service in IdM using an Ansible playbook
Follow this procedure to unenroll a service from IdM. More specifically, it describes how to use an Ansible playbook to ensure the absence of an HTTP server named HTTP/client.idm.example.com in IdM.
Prerequisites
- You have the IdM administrator password.
Procedure
Create an inventory file, for example
inventory.file:$ touch inventory.fileOpen the
inventory.fileand define the IdM server that you want to configure in the[ipaserver]section. For example, to instruct Ansible to configure server.idm.example.com, enter:[ipaserver] server.idm.example.comMake a copy of the
/usr/share/doc/ansible-freeipa/playbooks/service/service-is-absent.ymlAnsible playbook file. For example:$ cp /usr/share/doc/ansible-freeipa/playbooks/service/service-is-absent.yml /usr/share/doc/ansible-freeipa/playbooks/service/service-is-absent-copy.yml-
Open the
/usr/share/doc/ansible-freeipa/playbooks/service/service-is-absent-copy.ymlAnsible playbook file for editing. Adapt the file by changing the following:
-
The IdM administrator password defined by the
ipaadmin_passwordvariable. The Kerberos principal of the HTTP service, as defined by the
namevariable of theipaservicetask.After being adapted for the current example, the copied file looks like this:
--- - name: Playbook to manage IPA service. hosts: ipaserver gather_facts: false vars_files: - /home/user_name/MyPlaybooks/secret.yml tasks: # Ensure service is absent - ipaservice: ipaadmin_password: "{{ ipaadmin_password }}" name: HTTP/client.idm.example.com state: absent-
The IdM administrator password defined by the
- Save and exit the file.
Run the Ansible playbook. Specify the playbook file, the file storing the password protecting the secret.yml file, and the inventory file:
$ ansible-playbook --vault-password-file=password_file -v -i path_to_inventory_directory/inventory.file /usr/share/doc/ansible-freeipa/playbooks/service/service-is-absent-copy.yml
Verification
- Log into the IdM Web UI as IdM administrator.
-
Navigate to
Identity→Services.
If you cannot see the HTTP/client.idm.example.com@IDM.EXAMPLE.COM service in the Services list, you have successfully ensured its absence in IdM.
Chapter 89. Enabling AD users to administer IdM
89.1. ID overrides for AD users
In Red Hat Enterprise Linux (RHEL) 7, external group membership allows Active Directory (AD) users and groups to access Identity Management (IdM) resources in a POSIX environment with the help of the System Security Services Daemon (SSSD).
The IdM LDAP server has its own mechanisms to grant access control. RHEL 8 introduces an update that allows adding an ID user override for an AD user as a member of an IdM group. An ID override is a record describing what a specific Active Directory user or group properties should look like within a specific ID view, in this case the Default Trust View. As a consequence of the update, the IdM LDAP server is able to apply access control rules for the IdM group to the AD user.
AD users are now able to use the self service features of IdM UI, for example to upload their SSH keys, or change their personal data. An AD administrator is able to fully administer IdM without having two different accounts and passwords.
Currently, selected features in IdM may still be unavailable to AD users. For example, setting passwords for IdM users as an AD user from the IdM admins group might fail.
Do not use ID overrides of AD users for sudo rules in IdM. ID overrides of AD users represent only POSIX attributes of AD users, not AD users themselves.
89.2. Using ID overrides to enable AD users to administer IdM
Follow this procedure to create and use an ID override for an AD user to give that user rights identical to those of an IdM user. During this procedure, work on an IdM server that is configured as a trust controller or a trust agent.
Prerequisites
The
idm:DL1stream is enabled on your Identity Management (IdM) server and you have switched to the RPMs delivered through this stream:# yum module enable idm:DL1 # yum distro-syncThe
idm:DL1/adtrustprofile is installed on your IdM server.# yum module install idm:DL1/adtrustThe profile contains all the packages necessary for installing an IdM server that will have a trust agreement with Active Directory (AD).
- A working IdM environment is set up. For details, see Installing Identity Management.
- A working trust between your IdM environment and AD is set up.
Procedure
As an IdM administrator, create an ID override for an AD user in the Default Trust View. For example, to create an ID override for the user
ad_user@ad.example.com:# kinit admin # ipa idoverrideuser-add 'default trust view' ad_user@ad.example.comAdd the ID override from the Default Trust View as a member of an IdM group. This must be a non-POSIX group, as it interacts with Active Directory.
If the group in question is a member of an IdM role, the AD user represented by the ID override gains all permissions granted by the role when using the IdM API, including both the command-line interface and the IdM web UI.
For example, to add the ID override for the
ad_user@ad.example.comuser to the IdMadminsgroup:# ipa group-add-member admins --idoverrideusers=ad_user@ad.example.comAlternatively, you can add the ID override to a role, such as the User Administrator role:
# ipa role-add-member 'User Administrator' --idoverrideusers=ad_user@ad.example.com
89.3. Using Ansible to enable AD users to administer IdM
You can use the ansible-freeipa idoverrideuser and group modules to create a user ID override for an Active Directory (AD) user from a trusted AD domain and give that user rights identical to those of an IdM user. The procedure uses the example of the Default Trust View ID view to which the ad_user@ad.example.com ID override of a user stored in AD is added in the first playbook task. In the next playbook task, the ad_user@ad.example.com ID override is added to the IdM admins group as a member. As a result, an AD administrator can administer IdM without having two different accounts and passwords.
Prerequisites
-
You know the IdM
adminpassword. - You have installed a trust with AD.
- The group to which you are adding the user ID override already exists in IdM.
-
You are using the 4.8.7 version of IdM or later. To view the version of IdM you have installed on your server, enter
ipa --version. You have configured your Ansible control node to meet the following requirements:
- You are using Ansible version 2.13 or later.
- You are using RHEL 8.10 or later.
-
You have installed the
ansible-freeipapackage. - The example assumes that in the ~/MyPlaybooks/ directory, you have created an Ansible inventory file with the fully-qualified domain name (FQDN) of the IdM server.
-
The example assumes that the secret.yml Ansible vault stores your
ipaadmin_password.
- The AD forest is in trust with IdM. In the example, the name of the AD domain is ad.example.com and the fully-qualified domain name (FQDN) of the AD administrator is ad_user@ad.example.com.
-
The
ipaserverhost in the inventory file is configured as a trust controller or a trust agent. -
The target node, that is the node on which the
ansible-freeipamodule is executed, is part of the IdM domain as an IdM client, server or replica.
Procedure
Navigate to your ~/MyPlaybooks/ directory:
$ cd ~/MyPlaybooks/Create an enable-ad-admin-to-administer-idm.yml playbook with a task to add the ad_user@ad.example.com user override to the Default Trust View:
--- - name: Enable AD administrator to act as a FreeIPA admin hosts: ipaserver become: false gather_facts: false tasks: - name: Ensure idoverride for ad_user@ad.example.com in 'Default Trust View' ipaidoverrideuser: ipaadmin_password: "{{ ipaadmin_password }}" idview: "Default Trust View" anchor: ad_user@ad.example.comIn the example:
- ad_user@ad.example.com is the user ID override of an AD user that is stored in the AD domain with which a trust has been established.
Use another playbook task in the same playbook to add the AD administrator user ID override to the
adminsgroup:- name: Add the AD administrator to `admins` group ipagroup: ipaadmin_password: "{{ ipaadmin_password }}" name: admins idoverrideuser: - ad_user@ad.example.comIn the example:
-
adminsis the name of the IdM POSIX group to which you are adding the ad_user@ad.example.com ID override. Members of this group have full administrator privileges.
-
- Save the file.
Run the Ansible playbook. Specify the playbook file, the file storing the password protecting the secret.yml file, and the inventory file:
$ ansible-playbook --vault-password-file=password_file -v -i inventory enable-ad-admin-to-administer-idm.yml
89.4. Verifying that an AD user can perform correct commands in the IdM CLI
This procedure checks that an Active Directory (AD) user can log into Identity Management (IdM) command-line interface (CLI) and run commands appropriate for his role.
Destroy the current Kerberos ticket of the IdM administrator:
# kdestroy -ANoteThe destruction of the Kerberos ticket is required because the GSSAPI implementation in MIT Kerberos chooses credentials from the realm of the target service by preference, which in this case is the IdM realm. This means that if a credentials cache collection, namely the
KCM:,KEYRING:, orDIR:type of credentials cache is in use, a previously obtainedadminor any other IdM principal’s credentials will be used to access the IdM API instead of the AD user’s credentials.Obtain the Kerberos credentials of the AD user for whom an ID override has been created:
# kinit ad_user@AD.EXAMPLE.COM Password for ad_user@AD.EXAMPLE.COM:Test that the ID override of the AD user enjoys the same privileges stemming from membership in the IdM group as any IdM user in that group. If the ID override of the AD user has been added to the
adminsgroup, the AD user can, for example, create groups in IdM:# ipa group-add some-new-group ---------------------------- Added group "some-new-group" ---------------------------- Group name: some-new-group GID: 1997000011
Chapter 90. Configuring the domain resolution order to resolve short AD user names
By default, you must specify fully qualified names in the format user_name@domain.com or domain.com\user_name to resolve and authenticate users and groups from an Active Directory (AD) environment. Learn how to configure IdM servers and clients to resolve short AD usernames and group names.
90.1. How domain resolution order works
In Identity Management (IdM) environments with an Active Directory (AD) trust, Red Hat recommends that you resolve and authenticate users and groups by specifying their fully qualified names. For example:
-
<idm_username>@idm.example.comfor IdM users from theidm.example.comdomain -
<ad_username>@ad.example.comfor AD users from thead.example.comdomain
By default, if you perform user or group lookups using the short name format, such as ad_username, IdM only searches the IdM domain and fails to find the AD users or groups. To resolve AD users or groups using short names, change the order in which IdM searches multiple domains by setting the domain resolution order option.
You can set the domain resolution order centrally in the IdM database or in the SSSD configuration of individual clients. IdM evaluates domain resolution order in the following order of priority:
-
The local
/etc/sssd/sssd.confconfiguration. - The ID view configuration.
- The global IdM configuration.
Notes
-
You must use fully qualified usernames if the SSSD configuration on the host includes the
default_domain_suffixoption and you want to make a request to a domain not specified with this option. -
If you use the
domain resolution orderoption and query thecompattree, you might receive multiple user IDs (UIDs). If this might affect you, see Pagure bug report Inconsistent compat user objects for AD users when domain resolution order is set.
Do not use the full_name_format SSSD option on IdM clients or IdM servers. Using a non-default value for this option changes how usernames are displayed and might disrupt lookups in an IdM environment.
90.2. Setting the global domain resolution order on an IdM server
This procedure sets the domain resolution order for all the clients in the IdM domain. This example sets the domain resolution order to search for users and groups in the following order:
-
Active Directory (AD) root domain
ad.example.com -
AD child domain
subdomain1.ad.example.com -
IdM domain
idm.example.com
Prerequisites
- You have configured a trust with an AD environment.
Procedure
Use the
ipa config-mod --domain-resolution-ordercommand to list the domains to be searched in your preferred order. Separate the domains with a colon (:).[user@server ~]$ ipa config-mod --domain-resolution-order='ad.example.com:subdomain1.ad.example.com:idm.example.com' Maximum username length: 32 Home directory base: /home ... Domain Resolution Order: ad.example.com:subdomain1.ad.example.com:idm.example.com ...
Verification
Verify you can retrieve user information for a user from the
ad.example.comdomain using only a short name.[root@client ~]# id <ad_username> uid=1916901102(ad_username) gid=1916900513(domain users) groups=1916900513(domain users)
90.3. Setting the domain resolution order for an ID view on an IdM server
This procedure sets the domain resolution order for an ID view that you can apply to a specific set of IdM servers and clients. This example creates an ID view named ADsubdomain1_first for IdM host client1.idm.example.com, and sets the domain resolution order to search for users and groups in the following order:
-
Active Directory (AD) child domain
subdomain1.ad.example.com -
AD root domain
ad.example.com -
IdM domain
idm.example.com
The domain resolution order set in an ID view overrides the global domain resolution order, but it does not override any domain resolution order set locally in the SSSD configuration.
Prerequisites
- You have configured a trust with an AD environment.
Procedure
Create an ID view with the
--domain-resolution-orderoption set.[user@server ~]$ ipa idview-add ADsubdomain1_first --desc "ID view for resolving AD subdomain1 first on client1.idm.example.com" --domain-resolution-order subdomain1.ad.example.com:ad.example.com:idm.example.com --------------------------------- Added ID View "ADsubdomain1_first" --------------------------------- ID View Name: ADsubdomain1_first Description: ID view for resolving AD subdomain1 first on client1.idm.example.com Domain Resolution Order: subdomain1.ad.example.com:ad.example.com:idm.example.comApply the ID view to IdM hosts.
[user@server ~]$ ipa idview-apply ADsubdomain1_first --hosts client1.idm.example.com ----------------------------------- Applied ID View "ADsubdomain1_first" ----------------------------------- hosts: client1.idm.example.com --------------------------------------------- Number of hosts the ID View was applied to: 1 ---------------------------------------------
Verification
Display the details of the ID view.
[user@server ~]$ ipa idview-show ADsubdomain1_first --show-hosts ID View Name: ADsubdomain1_first Description: ID view for resolving AD subdomain1 first on client1.idm.example.com Hosts the view applies to: client1.idm.example.com Domain resolution order: subdomain1.ad.example.com:ad.example.com:idm.example.comVerify you can retrieve user information for a user from the
subdomain1.ad.example.comdomain using only a short name.[root@client1 ~]# id <user_from_subdomain1> uid=1916901106(user_from_subdomain1) gid=1916900513(domain users) groups=1916900513(domain users)
90.4. Using Ansible to create an ID view with a domain resolution order
You can use the ansible-freeipa idview module to add, modify, and delete ID views in your Identity Management (IdM) deployment. For example, you can create an ID view with a domain resolution order to enable short name notation.
Short name notation substitutes a full user name from Active Directory (AD), such as aduser05@ad.example.com, with a short login, in this case aduser05. That means that when using SSH to log in to an IdM client, aduser05 can enter ssh aduser05@client.idm.example.com instead of ssh aduser05@ad.example.com@client.idm.example.com. The same applies to other commands, such as id.
Complete this procedure to use Ansible to:
- Define a string of colon-separated domains used for short name qualification. In the example, the string is ad.example.com:idm.example.com.
- Create an ID view that instructs SSSD to first search a user name in the first domain identified in the string. In the example, this is ad.example.com.
- Apply the ID view to a specific host. In the example, this is testhost.idm.example.com.
You can apply only one ID view to an IdM client. Applying a new ID view automatically removes the previous ID view, if applicable.
Prerequisites
On the control node:
- You are using Ansible version 2.13 or later.
-
You have installed the
ansible-freeipapackage. - You have created an Ansible inventory file with the fully-qualified domain name (FQDN) of the IdM server in the ~/MyPlaybooks/ directory.
- You are using RHEL 8.10 and later.
-
You have stored your
ipaadmin_passwordin the secret.yml Ansible vault.
- testhost.idm.example.com is an IdM client.
-
The target node, that is the node on which the
ansible-freeipamodule is executed, is part of the IdM domain as an IdM client, server or replica.
Procedure
Navigate to your ~/MyPlaybooks/ directory and create an Ansible playbook file add-id-view-with-domain-resolution-order.yml with the following content:
--- - name: Playbook to add idview and apply it to an IdM client hosts: ipaserver vars_files: - /home/<user_name>/MyPlaybooks/secret.yml become: false gather_facts: false tasks: - name: Add idview and apply it to testhost.idm.example.com ipaidview: ipaadmin_password: "{{ ipaadmin_password }}" name: test_idview host: testhost.idm.example.com domain_resolution_order: "ad.example.com:ipa.example.com"Run the playbook. Specify the playbook file, the file storing the password protecting the secret.yml file, and the inventory file:
$ ansible-playbook --vault-password-file=password_file -v -i inventory add-id-view-with-domain-resolution-order.yml
Verification
- SSH to testhost.idm.example.com.
Verify you can retrieve user information for a user from the ad.example.com domain using only a short name.
[root@testhost ~]# id aduser05 uid=1916901102(aduser05) gid=1916900513(domain users) groups=1916900513(domain users)
90.5. Setting the domain resolution order in SSSD on an IdM client
This procedure sets the domain resolution order in the SSSD configuration on an IdM client. This example configures IdM host client2.idm.example.com to search for users and groups in the following order:
-
Active Directory (AD) child domain
subdomain1.ad.example.com -
AD root domain
ad.example.com -
IdM domain
idm.example.com
The domain resolution order in the local SSSD configuration overrides any global and ID view domain resolution order.
Prerequisites
- You have configured a trust with an AD environment.
Procedure
-
Open the
/etc/sssd/sssd.conffile in a text editor. Set the
domain_resolution_orderoption in the[sssd]section of the file.domain_resolution_order = subdomain1.ad.example.com, ad.example.com, idm.example.com- Save and close the file.
Restart the SSSD service to load the new configuration settings.
[root@client2 ~]# systemctl restart sssd
Verification
Verify you can retrieve user information for a user from the
subdomain1.ad.example.comdomain using only a short name.[root@client2 ~]# id <user_from_subdomain1> uid=1916901106(user_from_subdomain1) gid=1916900513(domain users) groups=1916900513(domain users)
Chapter 91. Enabling authentication using AD User Principal Names in IdM
91.1. User principal names in an AD forest trusted by IdM
As an Identity Management (IdM) administrator, you can allow AD users to use alternative User Principal Names (UPNs) to access resources in the IdM domain. A UPN is an alternative user login that AD users authenticate with in the format of user_name@KERBEROS-REALM. As an AD administrator, you can set alternative values for both user_name and KERBEROS-REALM, since you can configure both additional Kerberos aliases and UPN suffixes in an AD forest.
For example, if a company uses the Kerberos realm AD.EXAMPLE.COM, the default UPN for a user is user@ad.example.com. To allow your users to log in using their email addresses, for example user@example.com, you can configure EXAMPLE.COM as an alternative UPN in AD. Alternative UPNs (also known as enterprise UPNs) are especially convenient if your company has recently experienced a merge and you want to provide your users with a unified logon namespace.
UPN suffixes are only visible for IdM when defined in the AD forest root. As an AD administrator, you can define UPNs with the Active Directory Domain and Trust utility or the PowerShell command line tool.
To configure UPN suffixes for users, Red Hat recommends to use tools that perform error validation, such as the Active Directory Domain and Trust utility.
Red Hat recommends against configuring UPNs through low-level modifications, such as using ldapmodify commands to set the userPrincipalName attribute for users, because Active Directory does not validate those operations.
After you define a new UPN on the AD side, run the ipa trust-fetch-domains command on an IdM server to retrieve the updated UPNs. See Ensuring that AD UPNs are up-to-date in IdM.
IdM stores the UPN suffixes for a domain in the multi-value attribute ipaNTAdditionalSuffixes of the subtree cn=trusted_domain_name,cn=ad,cn=trusts,dc=idm,dc=example,dc=com.
91.2. Ensuring that AD UPNs are up-to-date in IdM
After you add or remove a User Principal Name (UPN) suffix in a trusted Active Directory (AD) forest, refresh the information for the trusted forest on an IdM server.
Prerequisites
- IdM administrator credentials.
Procedure
Enter the
ipa trust-fetch-domainscommand. Note that a seemingly empty output is expected:[root@ipaserver ~]# ipa trust-fetch-domains Realm-Name: ad.example.com ------------------------------- No new trust domains were found ------------------------------- ---------------------------- Number of entries returned 0 ----------------------------
Verification
Enter the
ipa trust-showcommand to verify that the server has fetched the new UPN. Specify the name of the AD realm when prompted:[root@ipaserver ~]# ipa trust-show Realm-Name: ad.example.com Realm-Name: ad.example.com Domain NetBIOS name: AD Domain Security Identifier: S-1-5-21-796215754-1239681026-23416912 Trust direction: One-way trust Trust type: Active Directory domain UPN suffixes: example.comThe output shows that the
example.comUPN suffix is now part of thead.example.comrealm entry.
91.3. Gathering troubleshooting data for AD UPN authentication issues
Follow this procedure to gather troubleshooting data about the User Principal Name (UPN) configuration from your Active Directory (AD) environment and your IdM environment. If your AD users are unable to log in using alternate UPNs, you can use this information to narrow your troubleshooting efforts.
Prerequisites
- You must be logged in to an IdM Trust Controller or Trust Agent to retrieve information from an AD domain controller.
-
You need
rootpermissions to modify the following configuration files, and to restart IdM services.
Procedure
-
Open the
/usr/share/ipa/smb.conf.emptyconfiguration file in a text editor. Add the following contents to the file.
[global] log level = 10-
Save and close the
/usr/share/ipa/smb.conf.emptyfile. -
Open the
/etc/ipa/server.confconfiguration file in a text editor. If you do not have that file, create one. Add the following contents to the file.
[global] debug = True-
Save and close the
/etc/ipa/server.conffile. Restart the Apache webserver service to apply the configuration changes:
[root@server ~]# systemctl restart httpdRetrieve trust information from your AD domain:
[root@server ~]# ipa trust-fetch-domains <ad.example.com>Review the debugging output and troubleshooting information in the following log files:
-
/var/log/httpd/error_log -
/var/log/samba/log.*
-
Chapter 92. Using canonicalized DNS host names in IdM
DNS canonicalization is disabled by default on Identity Management (IdM) clients to avoid potential security risks. For example, if an attacker controls the DNS server and a host in the domain, the attacker can cause the short host name, such as demo, to resolve to a compromised host, such as malicious.example.com. In this case, the user connects to a different server than expected.
This procedure describes how to use canonicalized host names on IdM clients.
92.1. Adding an alias to a host principal
By default, Identity Management (IdM) clients enrolled by using the ipa-client-install command do not allow to use short host names in service principals. For example, users can use only host/demo.example.com@EXAMPLE.COM instead of host/demo@EXAMPLE.COM when accessing a service.
Follow this procedure to add an alias to a Kerberos principal. Note that you can alternatively enable canonicalization of host names in the /etc/krb5.conf file. For details, see Enabling canonicalization of host names in service principals on clients.
Prerequisites
- The IdM client is installed.
- The host name is unique in the network.
Procedure
Authenticate to IdM as the
adminuser:$ kinit adminAdd the alias to the host principal. For example, to add the
demoalias to thedemo.examle.comhost principal:$ ipa host-add-principal demo.example.com --principal=demo
92.2. Enabling canonicalization of host names in service principals on clients
Follow this procedure to enable canonicalization of host names in service principals on clients.
- NOTE
If you use host principal aliases, as described in Adding an alias to a host principal, you do not need to enable canonicalization.
Prerequisites
- The Identity Management (IdM) client is installed.
-
You are logged in to the IdM client as the
rootuser. - The host name is unique in the network.
Procedure
Set the
dns_canonicalize_hostnameparameter in the[libdefaults]section in the/etc/krb5.conffile tofalse:[libdefaults] ... dns_canonicalize_hostname = true
92.3. Options for using host names with DNS host name canonicalization enabled
If you set dns_canonicalize_hostname = true in the /etc/krb5.conf file as explained in Enabling canonicalization of host names in service principals on clients, you have the following options when you use a host name in a service principal:
-
In Identity Management (IdM) environments, you can use the full host name in a service principal, such as
host/demo.example.com@EXAMPLE.COM. - In environments without IdM, but if the RHEL host as a member of an Active Directory (AD) domain, no further considerations are required, because AD domain controllers (DC) automatically create service principals for NetBIOS names of the machines enrolled into AD.
Chapter 93. Managing global DNS configuration in IdM using Ansible playbooks
Using the Red Hat Ansible Engine dnsconfig module, you can configure global configuration for Identity Management (IdM) DNS. Settings defined in global DNS configuration are applied to all IdM DNS servers. However, the global configuration has lower priority than the configuration for a specific IdM DNS zone.
The dnsconfig module supports the following variables:
- The global forwarders, specifically their IP addresses and the port used for communication.
- The global forwarding policy: only, first, or none. For more details on these types of DNS forward policies, see DNS forward policies in IdM.
- The synchronization of forward lookup and reverse lookup zones.
Prerequisites
DNS service is installed on the IdM server. For more information about how to install an IdM server with integrated DNS, see one of the following links:
This chapter includes the following sections:
- How IdM ensures that global forwarders from /etc/resolv.conf are not removed by NetworkManager
- Ensuring the presence of a DNS global forwarder in IdM using Ansible
- Ensuring the absence of a DNS global forwarder in IdM using Ansible
-
The
action: memberoption in ipadnsconfig ansible-freeipa modules - An introduction to DNS forward policies in IdM
- Using an Ansible playbook to ensure that the forward first policy is set in IdM DNS global configuration
- Using an Ansible playbook to ensure that global forwarders are disabled in IdM DNS
- Using an Ansible playbook to ensure that synchronization of forward and reverse lookup zones is disabled in IdM DNS
93.1. How IdM ensures that global forwarders from /etc/resolv.conf are not removed by NetworkManager
Installing Identity Management (IdM) with integrated DNS configures the /etc/resolv.conf file to point to the 127.0.0.1 localhost address:
# Generated by NetworkManager
search idm.example.com
nameserver 127.0.0.1
In certain environments, such as networks that use Dynamic Host Configuration Protocol (DHCP), the NetworkManager service may revert changes to the /etc/resolv.conf file. To make the DNS configuration persistent, the IdM DNS installation process also configures the NetworkManager service in the following way:
The DNS installation script creates an
/etc/NetworkManager/conf.d/zzz-ipa.confNetworkManagerconfiguration file to control the search order and DNS server list:# auto-generated by IPA installer [main] dns=default [global-dns] searches=$DOMAIN [global-dns-domain-*] servers=127.0.0.1-
The
NetworkManagerservice is reloaded, which always creates the/etc/resolv.conffile with the settings from the last file in the/etc/NetworkManager/conf.d/directory. This is in this case thezzz-ipa.conffile.
Do not modify the /etc/resolv.conf file manually.
93.2. Ensuring the presence of a DNS global forwarder in IdM using Ansible
Follow this procedure to use an Ansible playbook to ensure the presence of a DNS global forwarder in IdM. In the example procedure below, the IdM administrator ensures the presence of a DNS global forwarder to a DNS server with an Internet Protocol (IP) v4 address of 7.7.9.9 and IP v6 address of 2001:db8::1:0 on port 53.
Prerequisites
You have configured your Ansible control node to meet the following requirements:
- You are using Ansible version 2.13 or later.
-
You have installed the
ansible-freeipapackage. - The example assumes that in the ~/MyPlaybooks/ directory, you have created an Ansible inventory file with the fully-qualified domain name (FQDN) of the IdM server.
-
The example assumes that the secret.yml Ansible vault stores your
ipaadmin_password.
-
The target node, that is the node on which the
ansible-freeipamodule is executed, is part of the IdM domain as an IdM client, server or replica. - You know the IdM administrator password.
Procedure
Navigate to the
/usr/share/doc/ansible-freeipa/playbooks/dnsconfigdirectory:$ cd /usr/share/doc/ansible-freeipa/playbooks/dnsconfigOpen your inventory file and make sure that the IdM server that you want to configure is listed in the
[ipaserver]section. For example, to instruct Ansible to configureserver.idm.example.com, enter:[ipaserver] server.idm.example.comMake a copy of the
forwarders-absent.ymlAnsible playbook file. For example:$ cp forwarders-absent.yml ensure-presence-of-a-global-forwarder.yml-
Open the
ensure-presence-of-a-global-forwarder.ymlfile for editing. Adapt the file by setting the following variables:
-
Change the
namevariable for the playbook toPlaybook to ensure the presence of a global forwarder in IdM DNS. -
In the
taskssection, change thenameof the task toEnsure the presence of a DNS global forwarder to 7.7.9.9 and 2001:db8::1:0 on port 53. In the
forwarderssection of theipadnsconfigportion:-
Change the first
ip_addressvalue to the IPv4 address of the global forwarder:7.7.9.9. -
Change the second
ip_addressvalue to the IPv6 address of the global forwarder:2001:db8::1:0. -
Verify the
portvalue is set to53.
-
Change the first
Change the
statetopresent.This the modified Ansible playbook file for the current example:
--- - name: Playbook to ensure the presence of a global forwarder in IdM DNS hosts: ipaserver vars_files: - /home/user_name/MyPlaybooks/secret.yml tasks: - name: Ensure the presence of a DNS global forwarder to 7.7.9.9 and 2001:db8::1:0 on port 53 ipadnsconfig: forwarders: - ip_address: 7.7.9.9 - ip_address: 2001:db8::1:0 port: 53 state: present-
Change the
- Save the file.
Run the playbook:
$ ansible-playbook --vault-password-file=password_file -v -i inventory.file ensure-presence-of-a-global-forwarder.yml
93.3. Ensuring the absence of a DNS global forwarder in IdM using Ansible
Follow this procedure to use an Ansible playbook to ensure the absence of a DNS global forwarder in IdM. In the example procedure below, the IdM administrator ensures the absence of a DNS global forwarder with an Internet Protocol (IP) v4 address of 8.8.6.6 and IP v6 address of 2001:4860:4860::8800 on port 53.
Prerequisites
You have configured your Ansible control node to meet the following requirements:
- You are using Ansible version 2.13 or later.
-
You have installed the
ansible-freeipapackage. - The example assumes that in the ~/MyPlaybooks/ directory, you have created an Ansible inventory file with the fully-qualified domain name (FQDN) of the IdM server.
-
The example assumes that the secret.yml Ansible vault stores your
ipaadmin_password.
-
The target node, that is the node on which the
ansible-freeipamodule is executed, is part of the IdM domain as an IdM client, server or replica. - You know the IdM administrator password.
Procedure
Navigate to the
/usr/share/doc/ansible-freeipa/playbooks/dnsconfigdirectory:$ cd /usr/share/doc/ansible-freeipa/playbooks/dnsconfigOpen your inventory file and make sure that the IdM server that you want to configure is listed in the
[ipaserver]section. For example, to instruct Ansible to configureserver.idm.example.com, enter:[ipaserver] server.idm.example.comMake a copy of the
forwarders-absent.ymlAnsible playbook file. For example:$ cp forwarders-absent.yml ensure-absence-of-a-global-forwarder.yml-
Open the
ensure-absence-of-a-global-forwarder.ymlfile for editing. Adapt the file by setting the following variables:
-
Change the
namevariable for the playbook toPlaybook to ensure the absence of a global forwarder in IdM DNS. -
In the
taskssection, change thenameof the task toEnsure the absence of a DNS global forwarder to 8.8.6.6 and 2001:4860:4860::8800 on port 53. In the
forwarderssection of theipadnsconfigportion:-
Change the first
ip_addressvalue to the IPv4 address of the global forwarder:8.8.6.6. -
Change the second
ip_addressvalue to the IPv6 address of the global forwarder:2001:4860:4860::8800. -
Verify the
portvalue is set to53.
-
Change the first
-
Set the
actionvariable tomember. -
Verify the
stateis set toabsent.
This the modified Ansible playbook file for the current example:
--- - name: Playbook to ensure the absence of a global forwarder in IdM DNS hosts: ipaserver vars_files: - /home/user_name/MyPlaybooks/secret.yml tasks: - name: Ensure the absence of a DNS global forwarder to 8.8.6.6 and 2001:4860:4860::8800 on port 53 ipadnsconfig: forwarders: - ip_address: 8.8.6.6 - ip_address: 2001:4860:4860::8800 port: 53 action: member state: absentImportantIf you only use the
state: absentoption in your playbook without also usingaction: member, the playbook fails.-
Change the
- Save the file.
Run the playbook:
$ ansible-playbook --vault-password-file=password_file -v -i inventory.file ensure-absence-of-a-global-forwarder.yml
93.4. The action: member option in ipadnsconfig ansible-freeipa modules
Excluding global forwarders in Identity Management (IdM) by using the ansible-freeipa ipadnsconfig module requires using the action: member option in addition to the state: absent option. If you only use state: absent in your playbook without also using action: member, the playbook fails. Consequently, to remove all global forwarders, you must specify all of them individually in the playbook. In contrast, the state: present option does not require action: member.
The following table provides configuration examples for both adding and removing DNS global forwarders that demonstrate the correct use of the action: member option. The table shows, in each line:
- The global forwarders configured before executing a playbook
- An excerpt from the playbook
- The global forwarders configured after executing the playbook
| Forwarders before | Playbook excerpt | Forwarders after |
|---|---|---|
| 8.8.6.6 |
| 8.8.6.7 |
| 8.8.6.6 |
| 8.8.6.6, 8.8.6.7 |
| 8.8.6.6, 8.8.6.7 |
| Trying to execute the playbook results in an error. The original configuration - 8.8.6.6, 8.8.6.7 - is left unchanged. |
| 8.8.6.6, 8.8.6.7 |
| 8.8.6.6 |
93.5. DNS forward policies in IdM
IdM supports the first and only standard BIND forward policies, as well as the none IdM-specific forward policy.
- Forward first (default)
-
The IdM BIND service forwards DNS queries to the configured forwarder. If a query fails because of a server error or timeout, BIND falls back to the recursive resolution using servers on the Internet. The
forward firstpolicy is the default policy, and it is suitable for optimizing DNS traffic. - Forward only
-
The IdM BIND service forwards DNS queries to the configured forwarder. If a query fails because of a server error or timeout, BIND returns an error to the client. The
forward onlypolicy is recommended for environments with split DNS configuration. - None (forwarding disabled)
-
DNS queries are not forwarded with the
noneforwarding policy. Disabling forwarding is only useful as a zone-specific override for global forwarding configuration. This option is the IdM equivalent of specifying an empty list of forwarders in BIND configuration.
You cannot use forwarding to combine data in IdM with data from other DNS servers. You can only forward queries for specific subzones of the primary zone in IdM DNS.
By default, the BIND service does not forward queries to another server if the queried DNS name belongs to a zone for which the IdM server is authoritative. In such a situation, if the queried DNS name cannot be found in the IdM database, the NXDOMAIN answer is returned. Forwarding is not used.
Example 93.1. Example Scenario
The IdM server is authoritative for the test.example. DNS zone. BIND is configured to forward queries to the DNS server with the 192.0.2.254 IP address.
When a client sends a query for the nonexistent.test.example. DNS name, BIND detects that the IdM server is authoritative for the test.example. zone and does not forward the query to the 192.0.2.254. server. As a result, the DNS client receives the NXDomain error message, informing the user that the queried domain does not exist.
93.6. Using an Ansible playbook to ensure that the forward first policy is set in IdM DNS global configuration
Follow this procedure to use an Ansible playbook to ensure that global forwarding policy in IdM DNS is set to forward first.
If you use the forward first DNS forwarding policy, DNS queries are forwarded to the configured forwarder. If a query fails because of a server error or timeout, BIND falls back to the recursive resolution using servers on the Internet. The forward first policy is the default policy. It is suitable for traffic optimization.
Prerequisites
You have configured your Ansible control node to meet the following requirements:
- You are using Ansible version 2.13 or later.
-
You have installed the
ansible-freeipapackage. - The example assumes that in the ~/MyPlaybooks/ directory, you have created an Ansible inventory file with the fully-qualified domain name (FQDN) of the IdM server.
-
The example assumes that the secret.yml Ansible vault stores your
ipaadmin_password.
-
The target node, that is the node on which the
ansible-freeipamodule is executed, is part of the IdM domain as an IdM client, server or replica. - You know the IdM administrator password.
- Your IdM environment contains an integrated DNS server.
Procedure
Navigate to the
/usr/share/doc/ansible-freeipa/playbooks/dnsconfigdirectory:$ cd /usr/share/doc/ansible-freeipa/playbooks/dnsconfigOpen your inventory file and ensure that the IdM server that you want to configure is listed in the
[ipaserver]section. For example, to instruct Ansible to configure server.idm.example.com, enter:[ipaserver] server.idm.example.comMake a copy of the set-configuration.yml Ansible playbook file. For example:
$ cp set-configuration.yml set-forward-policy-to-first.yml- Open the set-forward-policy-to-first.yml file for editing.
Adapt the file by setting the following variables in the
ipadnsconfigtask section:-
Set the
ipaadmin_passwordvariable to your IdM administrator password. Set the
forward_policyvariable to first.Delete all the other lines of the original playbook that are irrelevant. This is the modified Ansible playbook file for the current example:
--- - name: Playbook to set global forwarding policy to first hosts: ipaserver become: true tasks: - name: Set global forwarding policy to first. ipadnsconfig: ipaadmin_password: "{{ ipaadmin_password }}" forward_policy: first-
Set the
- Save the file.
Run the playbook:
$ ansible-playbook --vault-password-file=password_file -v -i inventory.file set-forward-policy-to-first.yml
93.7. Using an Ansible playbook to ensure that global forwarders are disabled in IdM DNS
Follow this procedure to use an Ansible playbook to ensure that global forwarders are disabled in IdM DNS. The disabling is done by setting the forward_policy variable to none.
Disabling global forwarders causes DNS queries not to be forwarded. Disabling forwarding is only useful as a zone-specific override for global forwarding configuration. This option is the IdM equivalent of specifying an empty list of forwarders in BIND configuration.
Prerequisites
You have configured your Ansible control node to meet the following requirements:
- You are using Ansible version 2.13 or later.
-
You have installed the
ansible-freeipapackage. - The example assumes that in the ~/MyPlaybooks/ directory, you have created an Ansible inventory file with the fully-qualified domain name (FQDN) of the IdM server.
-
The example assumes that the secret.yml Ansible vault stores your
ipaadmin_password.
-
The target node, that is the node on which the
ansible-freeipamodule is executed, is part of the IdM domain as an IdM client, server or replica. - You know the IdM administrator password.
- Your IdM environment contains an integrated DNS server.
Procedure
Navigate to the
/usr/share/doc/ansible-freeipa/playbooks/dnsconfigdirectory:$ cd /usr/share/doc/ansible-freeipa/playbooks/dnsconfigOpen your inventory file and ensure that the IdM server that you want to configure is listed in the
[ipaserver]section. For example, to instruct Ansible to configure server.idm.example.com, enter:[ipaserver] server.idm.example.comMake a copy of the disable-global-forwarders.yml Ansible playbook file. For example:
$ cp disable-global-forwarders.yml disable-global-forwarders-copy.yml- Open the disable-global-forwarders-copy.yml file for editing.
Adapt the file by setting the following variables in the
ipadnsconfigtask section:-
Set the
ipaadmin_passwordvariable to your IdM administrator password. Set the
forward_policyvariable to none.This is the modified Ansible playbook file for the current example:
--- - name: Playbook to disable global DNS forwarders hosts: ipaserver become: true tasks: - name: Disable global forwarders. ipadnsconfig: ipaadmin_password: "{{ ipaadmin_password }}" forward_policy: none-
Set the
- Save the file.
Run the playbook:
$ ansible-playbook --vault-password-file=password_file -v -i inventory.file disable-global-forwarders-copy.yml
93.8. Using an Ansible playbook to ensure that synchronization of forward and reverse lookup zones is disabled in IdM DNS
Follow this procedure to use an Ansible playbook to ensure that forward and reverse lookup zones are not synchronized in IdM DNS.
Prerequisites
You have configured your Ansible control node to meet the following requirements:
- You are using Ansible version 2.13 or later.
-
You have installed the
ansible-freeipapackage. - The example assumes that in the ~/MyPlaybooks/ directory, you have created an Ansible inventory file with the fully-qualified domain name (FQDN) of the IdM server.
-
The example assumes that the secret.yml Ansible vault stores your
ipaadmin_password.
-
The target node, that is the node on which the
ansible-freeipamodule is executed, is part of the IdM domain as an IdM client, server or replica. - You know the IdM administrator password.
- Your IdM environment contains an integrated DNS server.
Procedure
Navigate to the
/usr/share/doc/ansible-freeipa/playbooks/dnsconfigdirectory:$ cd /usr/share/doc/ansible-freeipa/playbooks/dnsconfigOpen your inventory file and ensure that the IdM server that you want to configure is listed in the
[ipaserver]section. For example, to instruct Ansible to configure server.idm.example.com, enter:[ipaserver] server.idm.example.comMake a copy of the disallow-reverse-sync.yml Ansible playbook file. For example:
$ cp disallow-reverse-sync.yml disallow-reverse-sync-copy.yml- Open the disallow-reverse-sync-copy.yml file for editing.
Adapt the file by setting the following variables in the
ipadnsconfigtask section:-
Set the
ipaadmin_passwordvariable to your IdM administrator password. Set the
allow_sync_ptrvariable to no.This is the modified Ansible playbook file for the current example:
--- - name: Playbook to disallow reverse record synchronization hosts: ipaserver become: true tasks: - name: Disallow reverse record synchronization. ipadnsconfig: ipaadmin_password: "{{ ipaadmin_password }}" allow_sync_ptr: no-
Set the
- Save the file.
Run the playbook:
$ ansible-playbook --vault-password-file=password_file -v -i inventory.file disallow-reverse-sync-copy.yml
Chapter 94. Managing DNS zones in IdM
Learn how you can manage Identity Management (IdM) DNS zones as an IdM administrator.
Prerequisites
DNS service is installed on the IdM server. For more information about how to install an IdM server with integrated DNS, see one of the following links:
94.1. Supported DNS zone types
This section describes the two types of DNS zones that Identity Management (IdM) supports, primary and forward zones, and includes an example scenario for DNS forwarding.
This section uses the BIND terminology for zone types, which is different from the terminology used for Microsoft Windows DNS. Primary zones in BIND serve the same purpose as forward lookup zones and reverse lookup zones in Microsoft Windows DNS. Forward zones in BIND serve the same purpose as conditional forwarders in Microsoft Windows DNS.
- Primary DNS zones
Primary DNS zones contain authoritative DNS data and can accept dynamic DNS updates. This behavior is equivalent to the
type mastersetting in standard BIND configuration. You can manage primary zones by using theipa dnszone-*commands.In compliance with standard DNS rules, every primary zone must contain
start of authority(SOA) andnameserver(NS) records. IdM generates these records automatically when the DNS zone is created, but you must copy the NS records manually to the parent zone to create proper delegation.In accordance with standard BIND behavior, queries for names for which the server is not authoritative are forwarded to other DNS servers. These DNS servers, also known as forwarders, may or may not be authoritative for the query.
Example 94.1. Example scenario for DNS forwarding
The IdM server contains the
test.example.primary zone. This zone contains an NS delegation record for thesub.test.example.name. In addition, thetest.example.zone is configured with the192.0.2.254forwarder IP address for thesub.text.examplesubzone.A client querying the name
nonexistent.test.example.receives theNXDomainanswer, and no forwarding occurs because the IdM server is authoritative for this name.On the other hand, querying for the
host1.sub.test.example.name is forwarded to the configured forwarder192.0.2.254because the IdM server is not authoritative for this name.- Forward DNS zones
From the perspective of IdM, forward DNS zones do not contain any authoritative data. In fact, a forward "zone" usually only contains two pieces of information:
- A domain name
- The IP address of a DNS server associated with the domain
All queries for names belonging to the domain defined are forwarded to the specified IP address. This behavior is equivalent to the type forward setting in standard BIND configuration. You can manage forward zones by using the ipa dnsforwardzone-* commands.
Forward DNS zones are especially useful in the context of IdM-Active Directory (AD) trusts. If the IdM DNS server is authoritative for the idm.example.com zone and the AD DNS server is authoritative for the ad.example.com zone, then ad.example.com is a DNS forward zone for the idm.example.com primary zone. That means that when a query comes from an IdM client for the IP address of somehost.ad.example.com, the IdM DNS server forwards the query to an AD domain controller specified in the ad.example.com IdM DNS forward zone.
94.2. Adding a primary DNS zone in IdM Web UI
Follow this procedure to add a primary DNS zone by using the Identity Management (IdM) Web UI.
Prerequisites
- You are logged in as IdM administrator.
Procedure
In the IdM Web UI, click
Network Services→DNS→DNS Zones.Figure 94.1. Managing IdM DNS primary zones
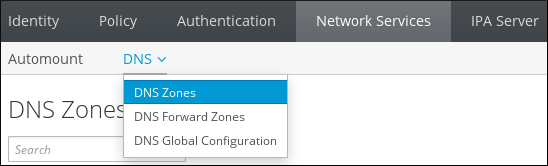
- Click at the top of the list of all zones.
Provide the zone name.
Figure 94.2. Entering an new IdM primary zone

- Click .
94.3. Adding a primary DNS zone in IdM CLI
Follow this procedure to add a primary DNS zone using the Identity Management (IdM) command-line interface (CLI).
Prerequisites
- You are logged in as IdM administrator.
Procedure
The
ipa dnszone-addcommand adds a new zone to the DNS domain. Adding a new zone requires you to specify the name of the new subdomain. You can pass the subdomain name directly with the command:$ ipa dnszone-add newzone.idm.example.comIf you do not pass the name to
ipa dnszone-add, the script prompts for it automatically.
94.4. Removing a primary DNS zone in IdM Web UI
Follow this procedure to remove a primary DNS zone from Identity Management (IdM) using the IdM Web UI.
Prerequisites
- You are logged in as IdM administrator.
Procedure
-
In the IdM Web UI, click
Network Services→DNS→DNS Zones. Select the check box by the zone name and click .
Figure 94.3. Removing a primary DNS Zone
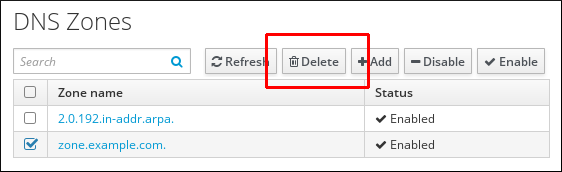
- In the Remove DNS zones dialog window, confirm that you want to delete the selected zone.
94.5. Removing a primary DNS zone in IdM CLI
Follow this procedure to remove a primary DNS zone from Identity Management (IdM) using the IdM command-line interface (CLI).
Prerequisites
- You are logged in as IdM administrator.
Procedure
To remove a primary DNS zone, enter the
ipa dnszone-delcommand, followed by the name of the zone you want to remove. For example:$ ipa dnszone-del idm.example.com
94.6. DNS configuration priorities
You can configure many DNS configuration options on the following levels. Each level has a different priority.
- Zone-specific configuration
-
The level of configuration specific for a particular zone defined in IdM has the highest priority. You can manage zone-specific configuration by using the
ipa dnszone-*andipa dnsforwardzone-*commands. - Per-server configuration
-
You are asked to define per-server forwarders during the installation of an IdM server. You can manage per-server forwarders by using the
ipa dnsserver-*commands. If you do not want to set a per-server forwarder when installing a replica, you can use the--no-forwarderoption. - Global DNS configuration
-
If no zone-specific configuration is defined, IdM uses global DNS configuration stored in LDAP. You can manage global DNS configuration using the
ipa dnsconfig-*commands. Settings defined in global DNS configuration are applied to all IdM DNS servers. - Configuration in
/etc/named.conf Configuration defined in the
/etc/named.conffile on each IdM DNS server has the lowest priority. It is specific for each server and must be edited manually.The
/etc/named.conffile is usually only used to specify DNS forwarding to a local DNS cache. Other options are managed using the commands for zone-specific and global DNS configuration mentioned above.
You can configure DNS options on multiple levels at the same time. In such cases, configuration with the highest priority takes precedence over configuration defined at lower levels.
94.7. Configuration attributes of primary IdM DNS zones
Identity Management (IdM) creates a new zone with certain default configuration, such as the refresh periods, transfer settings, or cache settings. In IdM DNS zone attributes, you can find the attributes of the default zone configuration that you can modify using one of the following options:
-
The
dnszone-modcommand on the command line (CLI). For more information, see Editing the configuration of a primary DNS zone in IdM CLI. - The IdM Web UI. For more information, see Editing the configuration of a primary DNS zone in IdM Web UI.
-
An Ansible playbook that uses the
ipadnszonemodule. For more information, see Using Ansible playbooks to manage IdM DNS zones.
Along with setting the actual information for the zone, the settings define how the DNS server handles the start of authority (SOA) record entries and how it updates its records from the DNS name server.
| Attribute | Command-Line Option | Description |
|---|---|---|
| Authoritative name server |
| Sets the domain name of the primary DNS name server, also known as SOA MNAME.
By default, each IdM server advertises itself in the SOA MNAME field. Consequently, the value stored in LDAP using |
| Administrator e-mail address |
| Sets the email address to use for the zone administrator. This defaults to the root account on the host. |
| SOA serial |
| Sets a serial number in the SOA record. Note that IdM sets the version number automatically and users are not expected to modify it. |
| SOA refresh |
| Sets the interval, in seconds, for a secondary DNS server to wait before requesting updates from the primary DNS server. |
| SOA retry |
| Sets the time, in seconds, to wait before retrying a failed refresh operation. |
| SOA expire |
| Sets the time, in seconds, that a secondary DNS server will try to perform a refresh update before ending the operation attempt. |
| SOA minimum |
| Sets the time to live (TTL) value in seconds for negative caching according to RFC 2308. |
| SOA time to live |
|
Sets TTL in seconds for records at zone apex. In zone |
| Default time to live |
|
Sets the default time to live (TTL) value in seconds for negative caching for all values in a zone that never had an individual TTL value set before. Requires a restart of the |
| BIND update policy |
| Sets the permissions allowed to clients in the DNS zone. |
| Dynamic update |
| Enables dynamic updates to DNS records for clients. Note that if this is set to false, IdM client machines will not be able to add or update their IP address. |
| Allow transfer |
| Gives a list of IP addresses or network names which are allowed to transfer the given zone, separated by semicolons (;).
Zone transfers are disabled by default. The default |
| Allow query |
| Gives a list of IP addresses or network names which are allowed to issue DNS queries, separated by semicolons (;). |
| Allow PTR sync |
| Sets whether A or AAAA records (forward records) for the zone will be automatically synchronized with the PTR (reverse) records. |
| Zone forwarders |
| Specifies a forwarder specifically configured for the DNS zone. This is separate from any global forwarders used in the IdM domain. To specify multiple forwarders, use the option multiple times. |
| Forward policy |
| Specifies the forward policy. For information about the supported policies, see DNS forward policies in IdM. |
94.8. Editing the configuration of a primary DNS zone in IdM Web UI
Follow this procedure to edit the configuration attributes of a primary Identity Management (IdM) DNS using the IdM Web UI.
Prerequisites
- You are logged in as IdM administrator.
Procedure
In the IdM Web UI, click
Network Services→DNS→DNS Zones.Figure 94.4. DNS primary zones management
In the
DNS Zonessection, click on the zone name in the list of all zones to open the DNS zone page.Figure 94.5. Editing a primary zone

Click
Settings.Figure 94.6. The Settings tab in the primary zone edit page

Change the zone configuration as required.
For information about the available settings, see IdM DNS zone attributes.
Click to confirm the new configuration.
NoteIf you are changing the default time to live (TTL) of a zone, restart the
namedservice on all IdM DNS servers to make the changes take effect. All other settings are automatically activated immediately.
94.9. Editing the configuration of a primary DNS zone in IdM CLI
Follow this procedure to edit the configuration of a primary DNS zone using the Identity Management (IdM) command-line interface (CLI).
Prerequisites
- You are logged in as IdM administrator.
Procedure
To modify an existing primary DNS zone, use the
ipa dnszone-modcommand. For example, to set the time to wait before retrying a failed refresh operation to 1800 seconds:$ ipa dnszone-mod --retry 1800For more information about the available settings and their corresponding CLI options, see IdM DNS zone attributes.
If a specific setting does not have a value in the DNS zone entry you are modifying, the
ipa dnszone-modcommand adds the value. If the setting does not have a value, the command overwrites the current value with the specified value.NoteIf you are changing the default time to live (TTL) of a zone, restart the
namedservice on all IdM DNS servers to make the changes take effect. All other settings are automatically activated immediately.
94.10. Zone transfers in IdM
In an Identity Management (IdM) deployment that has integrated DNS, you can use zone transfers to copy all resource records from one name server to another. Name servers maintain authoritative data for their zones. If you make changes to the zone on a DNS server that is authoritative for zone A DNS zone, you must distribute the changes among the other name servers in the IdM DNS domain that are outside zone A.
The IdM-integrated DNS can be written to by different servers simultaneously. The Start of Authority (SOA) serial numbers in IdM zones are not synchronized among the individual IdM DNS servers. For this reason, configure your DNS servers outside the to-be-transferred zone to only use one specific DNS server inside the to-be-transferred zone. This prevents zone transfer failures caused by non-synchronized SOA serial numbers.
IdM supports zone transfers according to the RFC 5936 (AXFR) and RFC 1995 (IXFR) standards.
94.11. Enabling zone transfers in IdM Web UI
Follow this procedure to enable zone transfers in Identity Management (IdM) using the IdM Web UI.
Prerequisites
- You are logged in as IdM administrator.
Procedure
-
In the IdM Web UI, click
Network Services→DNS→DNS Zones. -
Click
Settings. Under
Allow transfer, specify the name servers to which you want to transfer the zone records.Figure 94.7. Enabling zone transfers
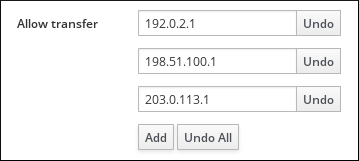
- Click at the top of the DNS zone page to confirm the new configuration.
94.12. Enabling zone transfers in IdM CLI
Follow this procedure to enable zone transfers in Identity Management (IdM) using the IdM command-line interface (CLI).
Prerequisites
- You are logged in as IdM administrator.
- You have root access to the secondary DNS servers.
Procedure
To enable zone transfers in the
BINDservice, enter theipa dnszone-modcommand, and specify the list of name servers that are outside the to-be-transferred zone to which the zone records will be transferred using the--allow-transferoption. For example:$ ipa dnszone-mod --allow-transfer=192.0.2.1;198.51.100.1;203.0.113.1 idm.example.com
Verification
SSH to one of the DNS servers to which zone transfer has been enabled:
$ ssh 192.0.2.1Transfer the IdM DNS zone using a tool such as the
digutility:# dig @ipa-server zone_name AXFR
If the command returns no error, you have successfully enabled zone transfer for zone_name.
Chapter 95. Using Ansible playbooks to manage IdM DNS zones
As Identity Management (IdM) administrator, you can manage how IdM DNS zones work using the dnszone module available in the ansible-freeipa package.
- What DNS zone types are supported in IdM
- What DNS attributes you can configure in IdM
- How to use an Ansible playbook to create a primary zone in IdM DNS
- How to use an Ansible playbook to ensure the presence of a primary IdM DNS zone with multiple variables
- How to use an Ansible playbook to ensure the presence of a zone for reverse DNS lookup when an IP address is given
Prerequisites
- DNS service is installed on the IdM server. For more information about how to use Ansible to install an IdM server with integrated DNS, see Installing an Identity Management server using an Ansible playbook.
95.1. Supported DNS zone types
This section describes the two types of DNS zones that Identity Management (IdM) supports, primary and forward zones, and includes an example scenario for DNS forwarding.
This section uses the BIND terminology for zone types, which is different from the terminology used for Microsoft Windows DNS. Primary zones in BIND serve the same purpose as forward lookup zones and reverse lookup zones in Microsoft Windows DNS. Forward zones in BIND serve the same purpose as conditional forwarders in Microsoft Windows DNS.
- Primary DNS zones
Primary DNS zones contain authoritative DNS data and can accept dynamic DNS updates. This behavior is equivalent to the
type mastersetting in standard BIND configuration. You can manage primary zones by using theipa dnszone-*commands.In compliance with standard DNS rules, every primary zone must contain
start of authority(SOA) andnameserver(NS) records. IdM generates these records automatically when the DNS zone is created, but you must copy the NS records manually to the parent zone to create proper delegation.In accordance with standard BIND behavior, queries for names for which the server is not authoritative are forwarded to other DNS servers. These DNS servers, also known as forwarders, may or may not be authoritative for the query.
Example 95.1. Example scenario for DNS forwarding
The IdM server contains the
test.example.primary zone. This zone contains an NS delegation record for thesub.test.example.name. In addition, thetest.example.zone is configured with the192.0.2.254forwarder IP address for thesub.text.examplesubzone.A client querying the name
nonexistent.test.example.receives theNXDomainanswer, and no forwarding occurs because the IdM server is authoritative for this name.On the other hand, querying for the
host1.sub.test.example.name is forwarded to the configured forwarder192.0.2.254because the IdM server is not authoritative for this name.- Forward DNS zones
From the perspective of IdM, forward DNS zones do not contain any authoritative data. In fact, a forward "zone" usually only contains two pieces of information:
- A domain name
- The IP address of a DNS server associated with the domain
All queries for names belonging to the domain defined are forwarded to the specified IP address. This behavior is equivalent to the type forward setting in standard BIND configuration. You can manage forward zones by using the ipa dnsforwardzone-* commands.
Forward DNS zones are especially useful in the context of IdM-Active Directory (AD) trusts. If the IdM DNS server is authoritative for the idm.example.com zone and the AD DNS server is authoritative for the ad.example.com zone, then ad.example.com is a DNS forward zone for the idm.example.com primary zone. That means that when a query comes from an IdM client for the IP address of somehost.ad.example.com, the IdM DNS server forwards the query to an AD domain controller specified in the ad.example.com IdM DNS forward zone.
95.2. Configuration attributes of primary IdM DNS zones
Identity Management (IdM) creates a new zone with certain default configuration, such as the refresh periods, transfer settings, or cache settings. In IdM DNS zone attributes, you can find the attributes of the default zone configuration that you can modify using one of the following options:
-
The
dnszone-modcommand on the command line (CLI). For more information, see Editing the configuration of a primary DNS zone in IdM CLI. - The IdM Web UI. For more information, see Editing the configuration of a primary DNS zone in IdM Web UI.
-
An Ansible playbook that uses the
ipadnszonemodule. For more information, see Using Ansible playbooks to manage IdM DNS zones.
Along with setting the actual information for the zone, the settings define how the DNS server handles the start of authority (SOA) record entries and how it updates its records from the DNS name server.
| Attribute | ansible-freeipa variable | Description |
|---|---|---|
| Authoritative name server |
| Sets the domain name of the primary DNS name server, also known as SOA MNAME.
By default, each IdM server advertises itself in the SOA MNAME field. Consequently, the value stored in LDAP using |
| Administrator e-mail address |
| Sets the email address to use for the zone administrator. This defaults to the root account on the host. |
| SOA serial |
| Sets a serial number in the SOA record. Note that IdM sets the version number automatically and users are not expected to modify it. |
| SOA refresh |
| Sets the interval, in seconds, for a secondary DNS server to wait before requesting updates from the primary DNS server. |
| SOA retry |
| Sets the time, in seconds, to wait before retrying a failed refresh operation. |
| SOA expire |
| Sets the time, in seconds, that a secondary DNS server will try to perform a refresh update before ending the operation attempt. |
| SOA minimum |
| Sets the time to live (TTL) value in seconds for negative caching according to RFC 2308. |
| SOA time to live |
|
Sets TTL in seconds for records at zone apex. In zone |
| Default time to live |
|
Sets the default time to live (TTL) value in seconds for negative caching for all values in a zone that never had an individual TTL value set before. Requires a restart of the |
| BIND update policy |
| Sets the permissions allowed to clients in the DNS zone. |
| Dynamic update |
| Enables dynamic updates to DNS records for clients. Note that if this is set to false, IdM client machines will not be able to add or update their IP address. |
| Allow transfer |
| Gives a list of IP addresses or network names which are allowed to transfer the given zone, separated by semicolons (;).
Zone transfers are disabled by default. The default |
| Allow query |
| Gives a list of IP addresses or network names which are allowed to issue DNS queries, separated by semicolons (;). |
| Allow PTR sync |
| Sets whether A or AAAA records (forward records) for the zone will be automatically synchronized with the PTR (reverse) records. |
| Zone forwarders |
| Specifies a forwarder specifically configured for the DNS zone. This is separate from any global forwarders used in the IdM domain. To specify multiple forwarders, use the option multiple times. |
| Forward policy |
| Specifies the forward policy. For information about the supported policies, see DNS forward policies in IdM. |
95.3. Using Ansible to create a primary zone in IdM DNS
Follow this procedure to use an Ansible playbook to ensure that a primary DNS zone exists. In the example used in the procedure below, you ensure the presence of the zone.idm.example.com DNS zone.
Prerequisites
You have configured your Ansible control node to meet the following requirements:
- You are using Ansible version 2.13 or later.
-
You have installed the
ansible-freeipapackage. - The example assumes that in the ~/MyPlaybooks/ directory, you have created an Ansible inventory file with the fully-qualified domain name (FQDN) of the IdM server.
-
The example assumes that the secret.yml Ansible vault stores your
ipaadmin_password.
-
The target node, that is the node on which the
ansible-freeipamodule is executed, is part of the IdM domain as an IdM client, server or replica. - You know the IdM administrator password.
Procedure
Navigate to the
/usr/share/doc/ansible-freeipa/playbooks/dnszonedirectory:$ cd /usr/share/doc/ansible-freeipa/playbooks/dnszoneOpen your inventory file and ensure that the IdM server that you want to configure is listed in the
[ipaserver]section. For example, to instruct Ansible to configure server.idm.example.com, enter:[ipaserver] server.idm.example.comMake a copy of the dnszone-present.yml Ansible playbook file. For example:
$ cp dnszone-present.yml dnszone-present-copy.yml- Open the dnszone-present-copy.yml file for editing.
Adapt the file by setting the following variables in the
ipadnszonetask section:-
Set the
ipaadmin_passwordvariable to your IdM administrator password. Set the
zone_namevariable to zone.idm.example.com.This is the modified Ansible playbook file for the current example:
--- - name: Ensure dnszone present hosts: ipaserver become: true tasks: - name: Ensure zone is present. ipadnszone: ipaadmin_password: "{{ ipaadmin_password }}" zone_name: zone.idm.example.com state: present-
Set the
- Save the file.
Run the playbook:
$ ansible-playbook --vault-password-file=password_file -v -i inventory.file dnszone-present-copy.yml
95.4. Using an Ansible playbook to ensure the presence of a primary DNS zone in IdM with multiple variables
Follow this procedure to use an Ansible playbook to ensure that a primary DNS zone exists. In the example used in the procedure below, an IdM administrator ensures the presence of the zone.idm.example.com DNS zone. The Ansible playbook configures multiple parameters of the zone.
Prerequisites
You have configured your Ansible control node to meet the following requirements:
- You are using Ansible version 2.13 or later.
-
You have installed the
ansible-freeipapackage. - The example assumes that in the ~/MyPlaybooks/ directory, you have created an Ansible inventory file with the fully-qualified domain name (FQDN) of the IdM server.
-
The example assumes that the secret.yml Ansible vault stores your
ipaadmin_password.
-
The target node, that is the node on which the
ansible-freeipamodule is executed, is part of the IdM domain as an IdM client, server or replica. - You know the IdM administrator password.
Procedure
Navigate to the
/usr/share/doc/ansible-freeipa/playbooks/dnszonedirectory:$ cd /usr/share/doc/ansible-freeipa/playbooks/dnszoneOpen your inventory file and ensure that the IdM server that you want to configure is listed in the
[ipaserver]section. For example, to instruct Ansible to configure server.idm.example.com, enter:[ipaserver] server.idm.example.comMake a copy of the dnszone-all-params.yml Ansible playbook file. For example:
$ cp dnszone-all-params.yml dnszone-all-params-copy.yml- Open the dnszone-all-params-copy.yml file for editing.
Adapt the file by setting the following variables in the
ipadnszonetask section:-
Set the
ipaadmin_passwordvariable to your IdM administrator password. -
Set the
zone_namevariable to zone.idm.example.com. -
Set the
allow_sync_ptrvariable to true if you want to allow the synchronization of forward and reverse records, that is the synchronization of A and AAAA records with PTR records. -
Set the
dynamic_updatevariable to true to enable IdM client machines to add or update their IP addresses. Set the
dnssecvariable to true to allow inline DNSSEC signing of records in the zone.WarningDNSSEC is only available as Technology Preview in IdM.
-
Set the
allow_transfervariable to the IP addresses of secondary name servers in the zone. -
Set the
allow_queryvariable to the IP addresses or networks that are allowed to issue queries. -
Set the
forwardersvariable to the IP addresses of global forwarders. -
Set the
serialvariable to the SOA record serial number. -
Define the
refresh,retry,expire,minimum,ttl, anddefault_ttlvalues for DNS records in the zone. -
Define the NSEC3PARAM record for the zone using the
nsec3param_recvariable. -
Set the
skip_overlap_checkvariable to true to force DNS creation even if it overlaps with an existing zone. Set the
skip_nameserver_checkto true to force DNS zone creation even if the nameserver is not resolvable.This is the modified Ansible playbook file for the current example:
--- - name: Ensure dnszone present hosts: ipaserver become: true tasks: - name: Ensure zone is present. ipadnszone: ipaadmin_password: "{{ ipaadmin_password }}" zone_name: zone.idm.example.com allow_sync_ptr: true dynamic_update: true dnssec: true allow_transfer: - 1.1.1.1 - 2.2.2.2 allow_query: - 1.1.1.1 - 2.2.2.2 forwarders: - ip_address: 8.8.8.8 - ip_address: 8.8.4.4 port: 52 serial: 1234 refresh: 3600 retry: 900 expire: 1209600 minimum: 3600 ttl: 60 default_ttl: 90 name_server: server.idm.example.com. admin_email: admin.admin@idm.example.com nsec3param_rec: "1 7 100 0123456789abcdef" skip_overlap_check: true skip_nameserver_check: true state: present-
Set the
- Save the file.
Run the playbook:
$ ansible-playbook --vault-password-file=password_file -v -i inventory.file dnszone-all-params-copy.yml
95.5. Using an Ansible playbook to ensure the presence of a zone for reverse DNS lookup when an IP address is given
Follow this procedure to use an Ansible playbook to ensure that a reverse DNS zone exists. In the example used in the procedure below, an IdM administrator ensures the presence of a reverse DNS lookup zone using the IP address and prefix length of an IdM host.
Providing the prefix length of the IP address of your DNS server using the name_from_ip variable allows you to control the zone name. If you do not state the prefix length, the system queries DNS servers for zones and, based on the name_from_ip value of 192.168.1.2, the query can return any of the following DNS zones:
- 1.168.192.in-addr.arpa.
- 168.192.in-addr.arpa.
- 192.in-addr.arpa.
Because the zone returned by the query might not be what you expect, name_from_ip can only be used with the state option set to present to prevent accidental removals of zones.
Prerequisites
You have configured your Ansible control node to meet the following requirements:
- You are using Ansible version 2.13 or later.
-
You have installed the
ansible-freeipapackage. - The example assumes that in the ~/MyPlaybooks/ directory, you have created an Ansible inventory file with the fully-qualified domain name (FQDN) of the IdM server.
-
The example assumes that the secret.yml Ansible vault stores your
ipaadmin_password.
-
The target node, that is the node on which the
ansible-freeipamodule is executed, is part of the IdM domain as an IdM client, server or replica. - You know the IdM administrator password.
Procedure
Navigate to the
/usr/share/doc/ansible-freeipa/playbooks/dnszonedirectory:$ cd /usr/share/doc/ansible-freeipa/playbooks/dnszoneOpen your inventory file and ensure that the IdM server that you want to configure is listed in the
[ipaserver]section. For example, to instruct Ansible to configure server.idm.example.com, enter:[ipaserver] server.idm.example.comMake a copy of the dnszone-reverse-from-ip.yml Ansible playbook file. For example:
$ cp dnszone-reverse-from-ip.yml dnszone-reverse-from-ip-copy.yml- Open the dnszone-reverse-from-ip-copy.yml file for editing.
Adapt the file by setting the following variables in the
ipadnszonetask section:-
Set the
ipaadmin_passwordvariable to your IdM administrator password. Set the
name_from_ipvariable to the IP of your IdM nameserver, and provide its prefix length.This is the modified Ansible playbook file for the current example:
--- - name: Ensure dnszone present hosts: ipaserver become: true tasks: - name: Ensure zone for reverse DNS lookup is present. ipadnszone: ipaadmin_password: "{{ ipaadmin_password }}" name_from_ip: 192.168.1.2/24 state: present register: result - name: Display inferred zone name. debug: msg: "Zone name: {{ result.dnszone.name }}"
The playbook creates a zone for reverse DNS lookup from the 192.168.1.2 IP address and its prefix length of 24. Next, the playbook displays the resulting zone name.
-
Set the
- Save the file.
Run the playbook:
$ ansible-playbook --vault-password-file=password_file -v -i inventory.file dnszone-reverse-from-ip-copy.yml
Chapter 96. Managing DNS locations in IdM
Learn about managing Identity Management (IdM) DNS locations by using the IdM Web UI and IdM command-line interface (CLI).
96.1. DNS-based service discovery
DNS-based service discovery is a process in which a client uses the DNS protocol to locate servers in a network that offer a specific service, such as LDAP or Kerberos. One typical type of operation is to allow clients to locate authentication servers within the closest network infrastructure, because they provide a higher throughput and lower network latency, lowering overall costs.
The major advantages of service discovery are:
- No need for clients to be explicitly configured with names of nearby servers.
- DNS servers are used as central providers of policy. Clients using the same DNS server have access to the same policy about service providers and their preferred order.
In an Identity Management (IdM) domain, DNS service records (SRV records) exist for LDAP, Kerberos, and other services. For example, the following command queries the DNS server for hosts providing a TCP-based Kerberos service in an IdM DNS domain:
Example 96.1. DNS location independent results
$ dig -t SRV +short _kerberos._tcp.idm.example.com
0 100 88 idmserver-01.idm.example.com.
0 100 88 idmserver-02.idm.example.com.The output contains the following information:
-
0(priority): Priority of the target host. A lower value is preferred. -
100(weight). Specifies a relative weight for entries with the same priority. For further information, see RFC 2782, section 3. -
88(port number): Port number of the service. - Canonical name of the host providing the service.
In the example, the two host names returned have the same priority and weight. In this case, the client uses a random entry from the result list.
When the client is, instead, configured to query a DNS server that is configured in a DNS location, the output differs. For IdM servers that are assigned to a location, tailored values are returned. In the example below, the client is configured to query a DNS server in the location germany:
Example 96.2. DNS location-based results
$ dig -t SRV +short _kerberos._tcp.idm.example.com
_kerberos._tcp.germany._locations.idm.example.com.
0 100 88 idmserver-01.idm.example.com.
50 100 88 idmserver-02.idm.example.com.The IdM DNS server automatically returns a DNS alias (CNAME) pointing to a DNS location specific SRV record which prefers local servers. This CNAME record is shown in the first line of the output. In the example, the host idmserver-01.idm.example.com has the lowest priority value and is therefore preferred. The idmserver-02.idm.example.com has a higher priority and thus is used only as backup for cases when the preferred host is unavailable.
96.2. Deployment considerations for DNS locations
Identity Management (IdM) can generate location-specific service (SRV) records when using the integrated DNS. Because each IdM DNS server generates location-specific SRV records, you have to install at least one IdM DNS server in each DNS location.
The client’s affinity to a DNS location is only defined by the DNS records received by the client. For this reason, you can combine IdM DNS servers with non-IdM DNS consumer servers and recursors if the clients doing DNS service discovery resolve location-specific records from IdM DNS servers.
In the majority of deployments with mixed IdM and non-IdM DNS services, DNS recursors select the closest IdM DNS server automatically by using round-trip time metrics. Typically, this ensures that clients using non-IdM DNS servers are getting records for the nearest DNS location and thus use the optimal set of IdM servers.
96.3. DNS time to live (TTL)
Clients can cache DNS resource records for an amount of time that is set in the zone’s configuration. Because of this caching, a client might not be able to receive the changes until the time to live (TTL) value expires. The default TTL value in Identity Management (IdM) is 1 day.
If your client computers roam between sites, you should adapt the TTL value for your IdM DNS zone. Set the value to a lower value than the time clients need to roam between sites. This ensures that cached DNS entries on the client expire before they reconnect to another site and thus query the DNS server to refresh location-specific SRV records.
96.4. Creating DNS locations using the IdM Web UI
You can use DNS locations to increase the speed of communication between Identity Management (IdM) clients and servers. Follow this procedure to create a DNS location using the IdM Web UI.
Prerequisites
- Your IdM deployment has integrated DNS.
- You have a permission to create DNS locations in IdM. For example, you are logged in as IdM admin.
Procedure
-
Open the
IPA Servertab. -
Select
Topologysubtab. -
Click
IPA Locationsin the navigation bar. - Click at the top of the locations list.
- Fill in the location name.
- Click the button to save the location.
- Optional: Repeat the steps to add further locations.
96.5. Creating DNS locations using the IdM CLI
You can use DNS locations to increase the speed of communication between Identity Management (IdM) clients and servers. Follow this procedure to create DNS locations using the ipa location-add command in the IdM command-line interface (CLI).
Prerequisites
- Your IdM deployment has integrated DNS.
- You have a permission to create DNS locations in IdM. For example, you are logged in as IdM admin.
Procedure
For example, to create a new location
germany, enter:$ ipa location-add germany ---------------------------- Added IPA location "germany" ---------------------------- Location name: germany- Optional: Repeat the step to add further locations.
96.6. Assigning an IdM server to a DNS location using the IdM Web UI
You can use Identity Management (IdM) DNS locations to increase the speed of communication between IdM clients and servers. Follow this procedure to assign IdM servers to DNS locations using the IdM Web UI.
Prerequisites
- Your IdM deployment has integrated DNS.
- You are logged in as a user with a permission to assign a server to a DNS location, for example the IdM admin user.
-
You have
rootaccess to the host that you want to assign a DNS location to. - You have created the IdM DNS locations to which you want to assign servers.
Procedure
-
Open the
IPA Servertab. -
Select the
Topologysubtab. -
Click
IPA Serversin the navigation. - Click on the IdM server name.
Select a DNS location, and optionally set a service weight:
Figure 96.1. Assigning a server to a DNS location
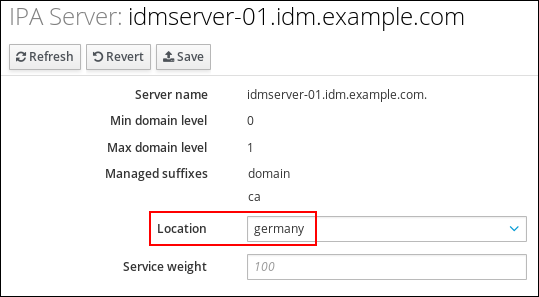
- Click .
On the command line (CLI) of the host you assigned in the previous steps the DNS location to, restart the
namedservice:[root@idmserver-01 ~]# systemctl restart named- Optional: Repeat the steps to assign DNS locations to further IdM servers.
96.7. Assigning an IdM server to a DNS location using the IdM CLI
You can use Identity Management (IdM) DNS locations to increase the speed of communication between IdM clients and servers. Follow this procedure to assign IdM servers to DNS locations using the IdM command-line interface (CLI).
Prerequisites
- Your IdM deployment has integrated DNS.
- You are logged in as a user with a permission to assign a server to a DNS location, for example the IdM admin user.
-
You have
rootaccess to the host that you want to assign a DNS location to. - You have created the IdM DNS locations to which you want to assign servers.
Procedure
Optional: List all configured DNS locations:
[root@server ~]# ipa location-find ----------------------- 2 IPA locations matched ----------------------- Location name: australia Location name: germany ----------------------------- Number of entries returned: 2 -----------------------------Assign the server to the DNS location. For example, to assign the location
germanyto the server idmserver-01.idm.example.com, run:# ipa server-mod idmserver-01.idm.example.com --location=germany [...] -------------------------------------------------- Modified IPA server "idmserver-01.idm.example.com" -------------------------------------------------- Servername: idmserver-01.idm.example.com Min domain level: 0 Max domain level: 1 Location: germany Enabled server roles: DNS server, NTP serverRestart the
namedservice on the host you assigned in the previous steps the DNS location to:# systemctl restart named- Optional: Repeat the steps to assign DNS locations to further IdM servers.
96.8. Configuring an IdM client to use IdM servers in the same location
Identity Management (IdM) servers are assigned to DNS locations as described in Assigning an IdM server to a DNS location using the IdM Web UI. Now you can configure the clients to use a DNS server that is in the same location as the IdM servers:
-
If a
DHCPserver assigns the DNS server IP addresses to the clients, configure theDHCPservice. For further details about assigning a DNS server in yourDHCPservice, see theDHCPservice documentation. -
If your clients do not receive the DNS server IP addresses from a
DHCPserver, manually set the IPs in the client’s network configuration. For further details about configuring the network on Red Hat Enterprise Linux, see the Configuring Network Connection Settings section in the Red Hat Enterprise Linux Networking Guide.
If you configure the client to use a DNS server that is assigned to a different location, the client contacts IdM servers in both locations.
Example 96.3. Different name server entries depending on the location of the client
The following example shows different name server entries in the /etc/resolv.conf file for clients in different locations:
Clients in Prague:
nameserver 10.10.0.1
nameserver 10.10.0.2Clients in Paris:
nameserver 10.50.0.1
nameserver 10.50.0.3Clients in Oslo:
nameserver 10.30.0.1Clients in Berlin:
nameserver 10.30.0.1If each of the DNS servers is assigned to a location in IdM, the clients use the IdM servers in their location.
Chapter 97. Using Ansible to manage DNS locations in IdM
As Identity Management (IdM) administrator, you can manage IdM DNS locations using the location module available in the ansible-freeipa package.
97.1. DNS-based service discovery
DNS-based service discovery is a process in which a client uses the DNS protocol to locate servers in a network that offer a specific service, such as LDAP or Kerberos. One typical type of operation is to allow clients to locate authentication servers within the closest network infrastructure, because they provide a higher throughput and lower network latency, lowering overall costs.
The major advantages of service discovery are:
- No need for clients to be explicitly configured with names of nearby servers.
- DNS servers are used as central providers of policy. Clients using the same DNS server have access to the same policy about service providers and their preferred order.
In an Identity Management (IdM) domain, DNS service records (SRV records) exist for LDAP, Kerberos, and other services. For example, the following command queries the DNS server for hosts providing a TCP-based Kerberos service in an IdM DNS domain:
Example 97.1. DNS location independent results
$ dig -t SRV +short _kerberos._tcp.idm.example.com
0 100 88 idmserver-01.idm.example.com.
0 100 88 idmserver-02.idm.example.com.The output contains the following information:
-
0(priority): Priority of the target host. A lower value is preferred. -
100(weight). Specifies a relative weight for entries with the same priority. For further information, see RFC 2782, section 3. -
88(port number): Port number of the service. - Canonical name of the host providing the service.
In the example, the two host names returned have the same priority and weight. In this case, the client uses a random entry from the result list.
When the client is, instead, configured to query a DNS server that is configured in a DNS location, the output differs. For IdM servers that are assigned to a location, tailored values are returned. In the example below, the client is configured to query a DNS server in the location germany:
Example 97.2. DNS location-based results
$ dig -t SRV +short _kerberos._tcp.idm.example.com
_kerberos._tcp.germany._locations.idm.example.com.
0 100 88 idmserver-01.idm.example.com.
50 100 88 idmserver-02.idm.example.com.The IdM DNS server automatically returns a DNS alias (CNAME) pointing to a DNS location specific SRV record which prefers local servers. This CNAME record is shown in the first line of the output. In the example, the host idmserver-01.idm.example.com has the lowest priority value and is therefore preferred. The idmserver-02.idm.example.com has a higher priority and thus is used only as backup for cases when the preferred host is unavailable.
97.2. Deployment considerations for DNS locations
Identity Management (IdM) can generate location-specific service (SRV) records when using the integrated DNS. Because each IdM DNS server generates location-specific SRV records, you have to install at least one IdM DNS server in each DNS location.
The client’s affinity to a DNS location is only defined by the DNS records received by the client. For this reason, you can combine IdM DNS servers with non-IdM DNS consumer servers and recursors if the clients doing DNS service discovery resolve location-specific records from IdM DNS servers.
In the majority of deployments with mixed IdM and non-IdM DNS services, DNS recursors select the closest IdM DNS server automatically by using round-trip time metrics. Typically, this ensures that clients using non-IdM DNS servers are getting records for the nearest DNS location and thus use the optimal set of IdM servers.
97.3. DNS time to live (TTL)
Clients can cache DNS resource records for an amount of time that is set in the zone’s configuration. Because of this caching, a client might not be able to receive the changes until the time to live (TTL) value expires. The default TTL value in Identity Management (IdM) is 1 day.
If your client computers roam between sites, you should adapt the TTL value for your IdM DNS zone. Set the value to a lower value than the time clients need to roam between sites. This ensures that cached DNS entries on the client expire before they reconnect to another site and thus query the DNS server to refresh location-specific SRV records.
97.4. Using Ansible to ensure an IdM location is present
As a system administrator of Identity Management (IdM), you can configure IdM DNS locations to allow clients to locate authentication servers within the closest network infrastructure.
The following procedure describes how to use an Ansible playbook to ensure a DNS location is present in IdM. The example describes how to ensure that the germany DNS location is present in IdM. As a result, you can assign particular IdM servers to this location so that local IdM clients can use them to reduce server response time.
Prerequisites
On the control node:
- You are using Ansible version 2.13 or later.
-
You have installed the
ansible-freeipapackage. - The example assumes that in the ~/MyPlaybooks/ directory, you have created an Ansible inventory file with the fully-qualified domain name (FQDN) of the IdM server.
-
The example assumes that the secret.yml Ansible vault stores your
ipaadmin_password.
-
The target node, that is the node on which the
ansible-freeipamodule is executed, is part of the IdM domain as an IdM client, server or replica. - You understand the deployment considerations for DNS locations.
Procedure
Navigate to the ~/MyPlaybooks/ directory:
$ cd ~/MyPlaybooks/Make a copy of the
location-present.ymlfile located in the/usr/share/doc/ansible-freeipa/playbooks/location/directory:$ cp /usr/share/doc/ansible-freeipa/playbooks/location/location-present.yml location-present-copy.yml-
Open the
location-present-copy.ymlAnsible playbook file for editing. Adapt the file by setting the following variables in the
ipalocationtask section:-
Adapt the
nameof the task to correspond to your use case. -
Set the
ipaadmin_passwordvariable to the password of the IdM administrator. -
Set the
namevariable to the name of the location.
This is the modified Ansible playbook file for the current example:
--- - name: location present example hosts: ipaserver vars_files: - /home/user_name/MyPlaybooks/secret.yml tasks: - name: Ensure that the "germany" location is present ipalocation: ipaadmin_password: "{{ ipaadmin_password }}" name: germany-
Adapt the
- Save the file.
Run the Ansible playbook. Specify the playbook file, the file storing the password protecting the secret.yml file, and the inventory file:
$ ansible-playbook --vault-password-file=password_file -v -i inventory location-present-copy.yml
97.5. Using Ansible to ensure an IdM location is absent
As a system administrator of Identity Management (IdM), you can configure IdM DNS locations to allow clients to locate authentication servers within the closest network infrastructure.
The following procedure describes how to use an Ansible playbook to ensure that a DNS location is absent in IdM. The example describes how to ensure that the germany DNS location is absent in IdM. As a result, you cannot assign particular IdM servers to this location and local IdM clients cannot use them.
Prerequisites
- You know the IdM administrator password.
- No IdM server is assigned to the germany DNS location.
You have configured your Ansible control node to meet the following requirements:
- You are using Ansible version 2.13 or later.
-
You have installed the
ansible-freeipapackage. - The example assumes that in the ~/MyPlaybooks/ directory, you have created an Ansible inventory file with the fully-qualified domain name (FQDN) of the IdM server.
-
The example assumes that the secret.yml Ansible vault stores your
ipaadmin_password.
-
The target node, that is the node on which the
ansible-freeipamodule is executed, is part of the IdM domain as an IdM client, server or replica. - The example assumes that you have created and configured the ~/MyPlaybooks/ directory as a central location to store copies of sample playbooks.
Procedure
Navigate to the ~/MyPlaybooks/ directory:
$ cd ~/MyPlaybooks/Make a copy of the
location-absent.ymlfile located in the/usr/share/doc/ansible-freeipa/playbooks/location/directory:$ cp /usr/share/doc/ansible-freeipa/playbooks/location/location-absent.yml location-absent-copy.yml-
Open the
location-absent-copy.ymlAnsible playbook file for editing. Adapt the file by setting the following variables in the
ipalocationtask section:-
Adapt the
nameof the task to correspond to your use case. -
Set the
ipaadmin_passwordvariable to the password of the IdM administrator. -
Set the
namevariable to the name of the DNS location. -
Make sure that the
statevariable is set toabsent.
This is the modified Ansible playbook file for the current example:
--- - name: location absent example hosts: ipaserver vars_files: - /home/user_name/MyPlaybooks/secret.yml tasks: - name: Ensure that the "germany" location is absent ipalocation: ipaadmin_password: "{{ ipaadmin_password }}" name: germany state: absent-
Adapt the
- Save the file.
Run the Ansible playbook. Specify the playbook file, the file storing the password protecting the secret.yml file, and the inventory file:
$ ansible-playbook --vault-password-file=password_file -v -i inventory location-absent-copy.yml
Chapter 98. Managing DNS forwarding in IdM
Follow these procedures to configure DNS global forwarders and DNS forward zones in the Identity Management (IdM) Web UI, the IdM CLI, and using Ansible:
- The two roles of an IdM DNS server
- DNS forward policies in IdM
- Adding a global forwarder in the IdM Web UI
- Adding a global forwarder in the CLI
- Adding a DNS Forward Zone in the IdM Web UI
- Adding a DNS Forward Zone in the CLI
- Establishing a DNS Global Forwarder in IdM using Ansible
- Ensuring the presence of a DNS global forwarder in IdM using Ansible
- Ensuring the absence of a DNS global forwarder in IdM using Ansible
- Ensuring DNS Global Forwarders are disabled in IdM using Ansible
- Ensuring the presence of a DNS Forward Zone in IdM using Ansible
- Ensuring a DNS Forward Zone has multiple forwarders in IdM using Ansible
- Ensuring a DNS Forward Zone is disabled in IdM using Ansible
- Ensuring the absence of a DNS Forward Zone in IdM using Ansible
98.1. The two roles of an IdM DNS server
DNS forwarding affects how a DNS service answers DNS queries. By default, the Berkeley Internet Name Domain (BIND) service integrated with IdM acts as both an authoritative and a recursive DNS server:
- Authoritative DNS server
- When a DNS client queries a name belonging to a DNS zone for which the IdM server is authoritative, BIND replies with data contained in the configured zone. Authoritative data always takes precedence over any other data.
- Recursive DNS server
- When a DNS client queries a name for which the IdM server is not authoritative, BIND attempts to resolve the query using other DNS servers. If forwarders are not defined, BIND asks the root servers on the Internet and uses a recursive resolution algorithm to answer the DNS query.
In some cases, it is not desirable to let BIND contact other DNS servers directly and perform the recursion based on data available on the Internet. You can configure BIND to use another DNS server, a forwarder, to resolve the query.
When you configure BIND to use a forwarder, queries and answers are forwarded back and forth between the IdM server and the forwarder, and the IdM server acts as the DNS cache for non-authoritative data.
98.2. DNS forward policies in IdM
IdM supports the first and only standard BIND forward policies, as well as the none IdM-specific forward policy.
- Forward first (default)
-
The IdM BIND service forwards DNS queries to the configured forwarder. If a query fails because of a server error or timeout, BIND falls back to the recursive resolution using servers on the Internet. The
forward firstpolicy is the default policy, and it is suitable for optimizing DNS traffic. - Forward only
-
The IdM BIND service forwards DNS queries to the configured forwarder. If a query fails because of a server error or timeout, BIND returns an error to the client. The
forward onlypolicy is recommended for environments with split DNS configuration. - None (forwarding disabled)
-
DNS queries are not forwarded with the
noneforwarding policy. Disabling forwarding is only useful as a zone-specific override for global forwarding configuration. This option is the IdM equivalent of specifying an empty list of forwarders in BIND configuration.
You cannot use forwarding to combine data in IdM with data from other DNS servers. You can only forward queries for specific subzones of the primary zone in IdM DNS.
By default, the BIND service does not forward queries to another server if the queried DNS name belongs to a zone for which the IdM server is authoritative. In such a situation, if the queried DNS name cannot be found in the IdM database, the NXDOMAIN answer is returned. Forwarding is not used.
Example 98.1. Example Scenario
The IdM server is authoritative for the test.example. DNS zone. BIND is configured to forward queries to the DNS server with the 192.0.2.254 IP address.
When a client sends a query for the nonexistent.test.example. DNS name, BIND detects that the IdM server is authoritative for the test.example. zone and does not forward the query to the 192.0.2.254. server. As a result, the DNS client receives the NXDomain error message, informing the user that the queried domain does not exist.
98.3. Adding a global forwarder in the IdM Web UI
Follow this procedure to add a global DNS forwarder in the Identity Management (IdM) Web UI.
Prerequisites
- You are logged in to the IdM WebUI as IdM administrator.
- You know the Internet Protocol (IP) address of the DNS server to forward queries to.
Procedure
In the IdM Web UI, select
Network Services→DNS Global Configuration→DNS.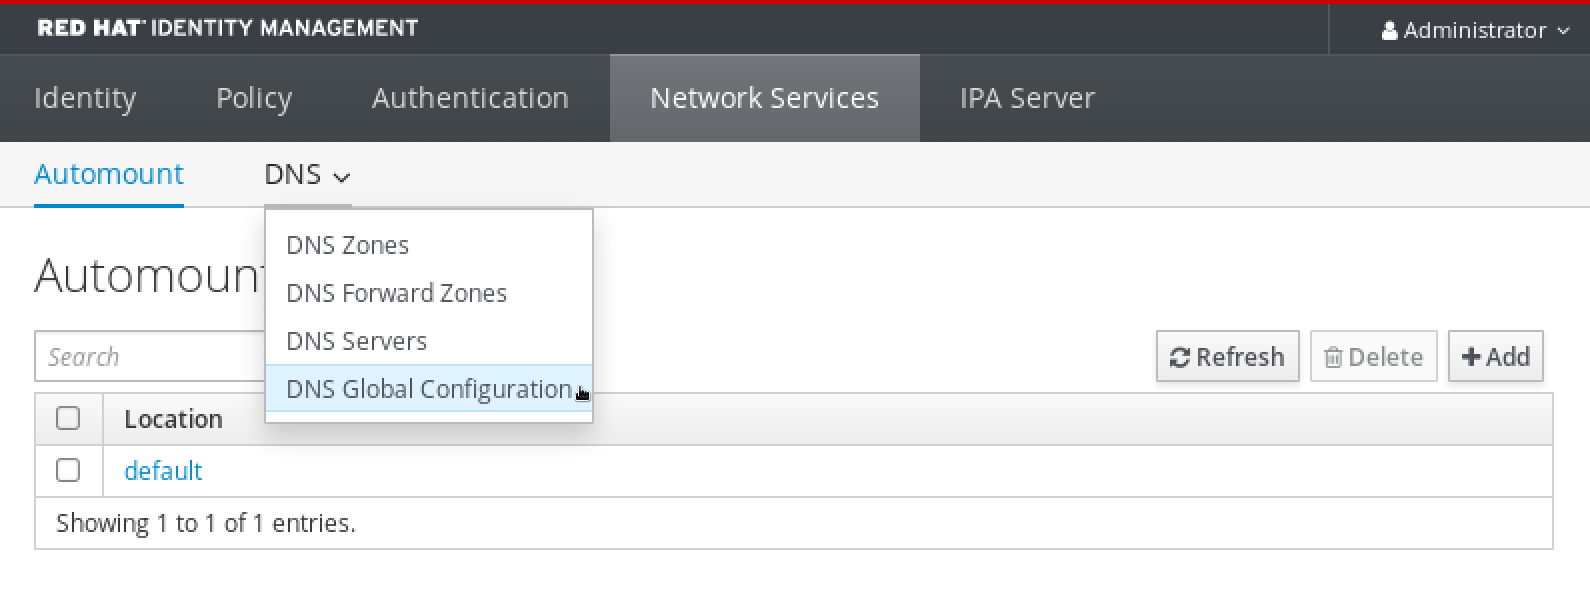
In the
DNS Global Configurationsection, clickAdd.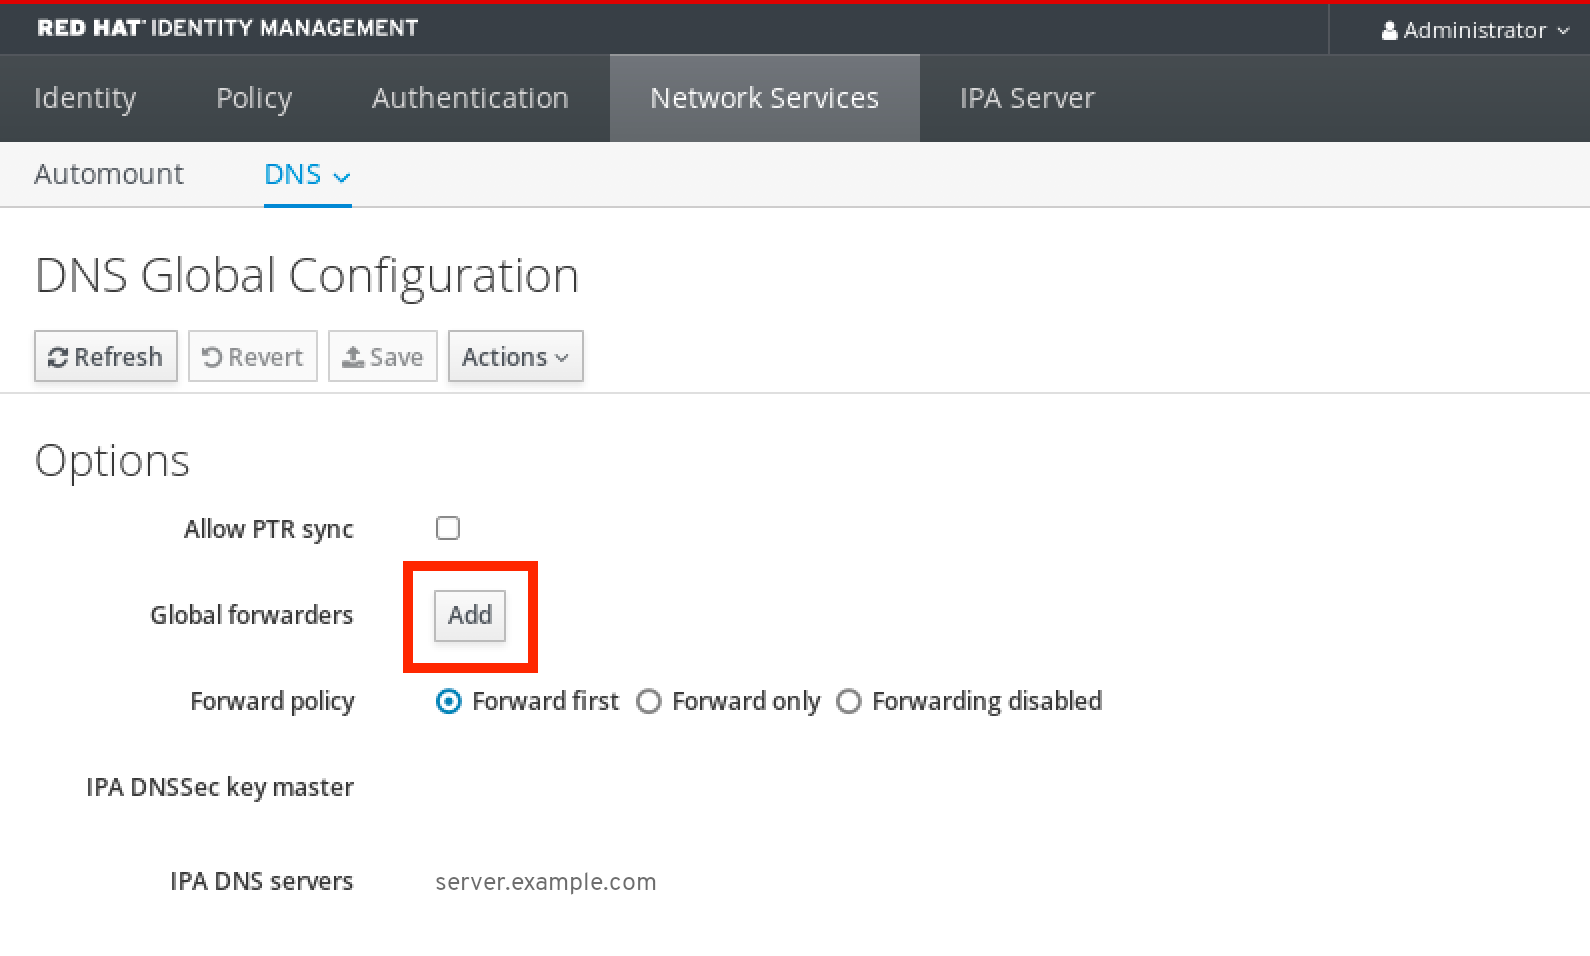
Specify the IP address of the DNS server that will receive forwarded DNS queries.
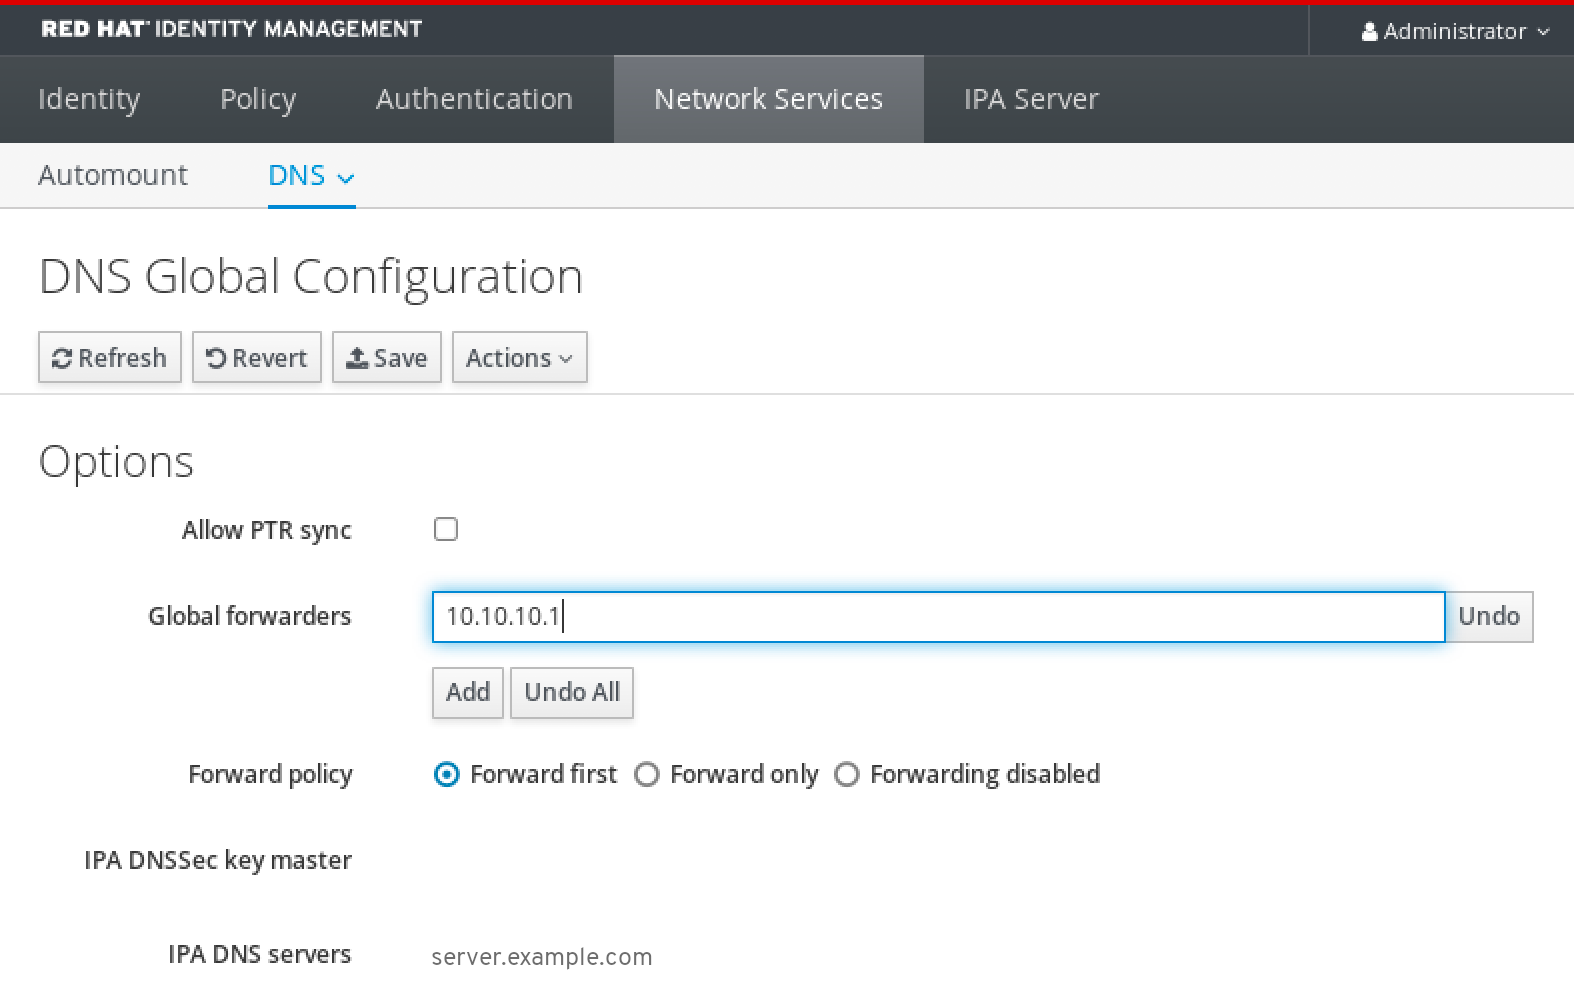
Select the
Forward policy.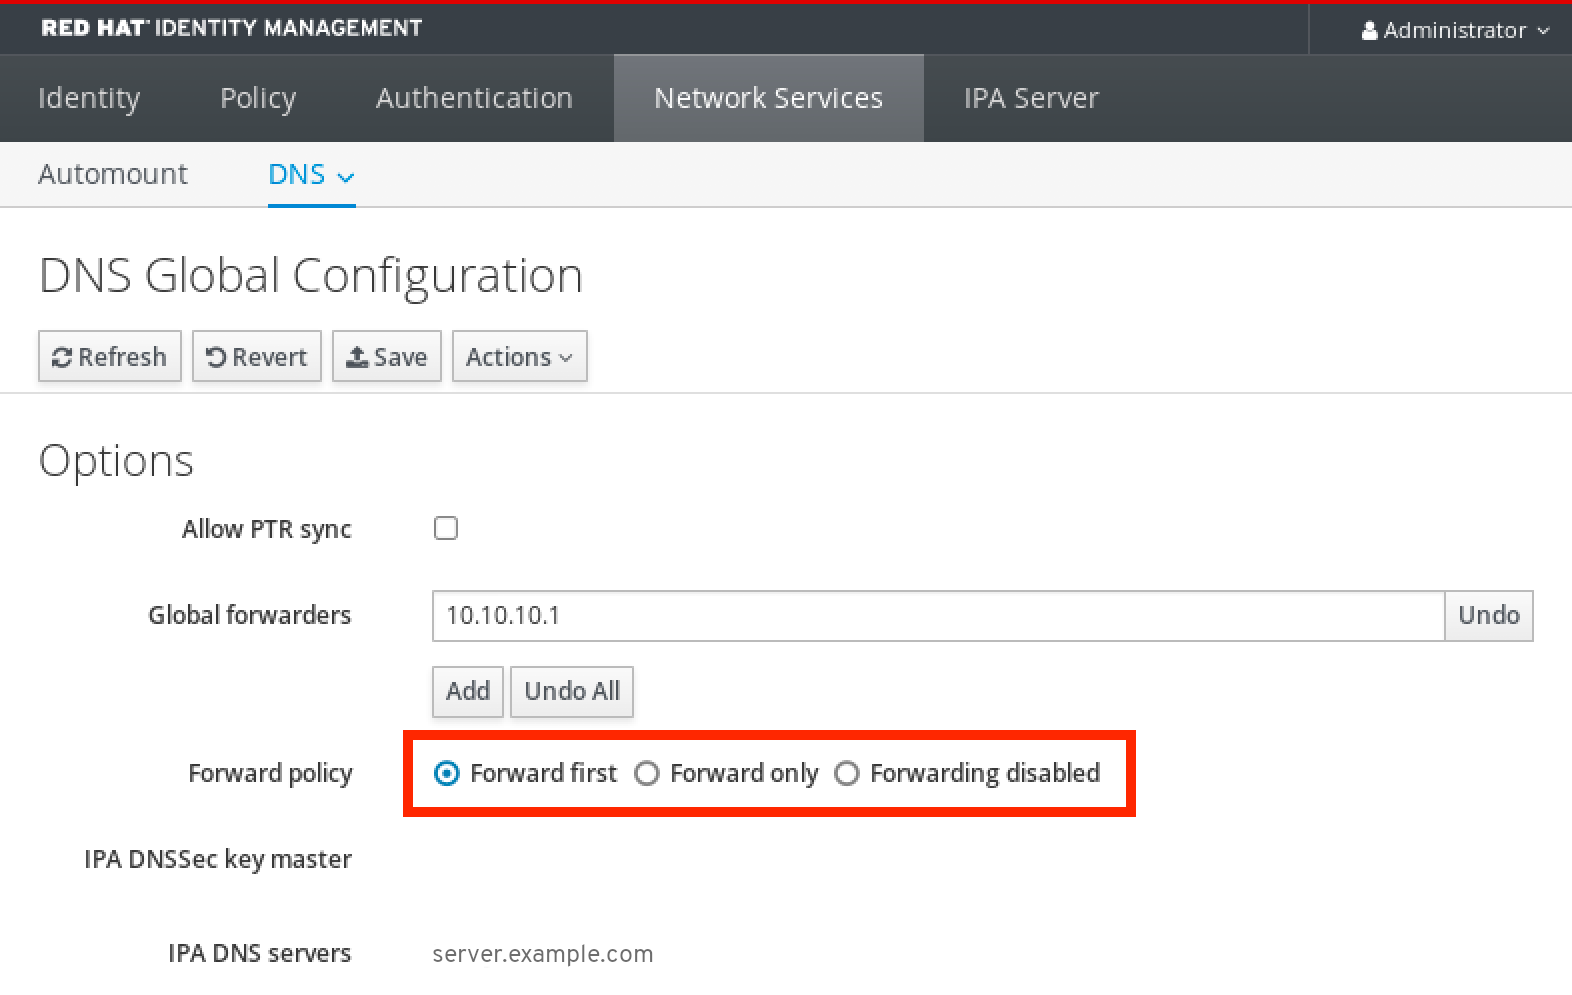
-
Click
Saveat the top of the window.
Verification
Select
Network Services→DNS Global Configuration→DNS.
Verify that the global forwarder, with the forward policy you specified, is present and enabled in the IdM Web UI.
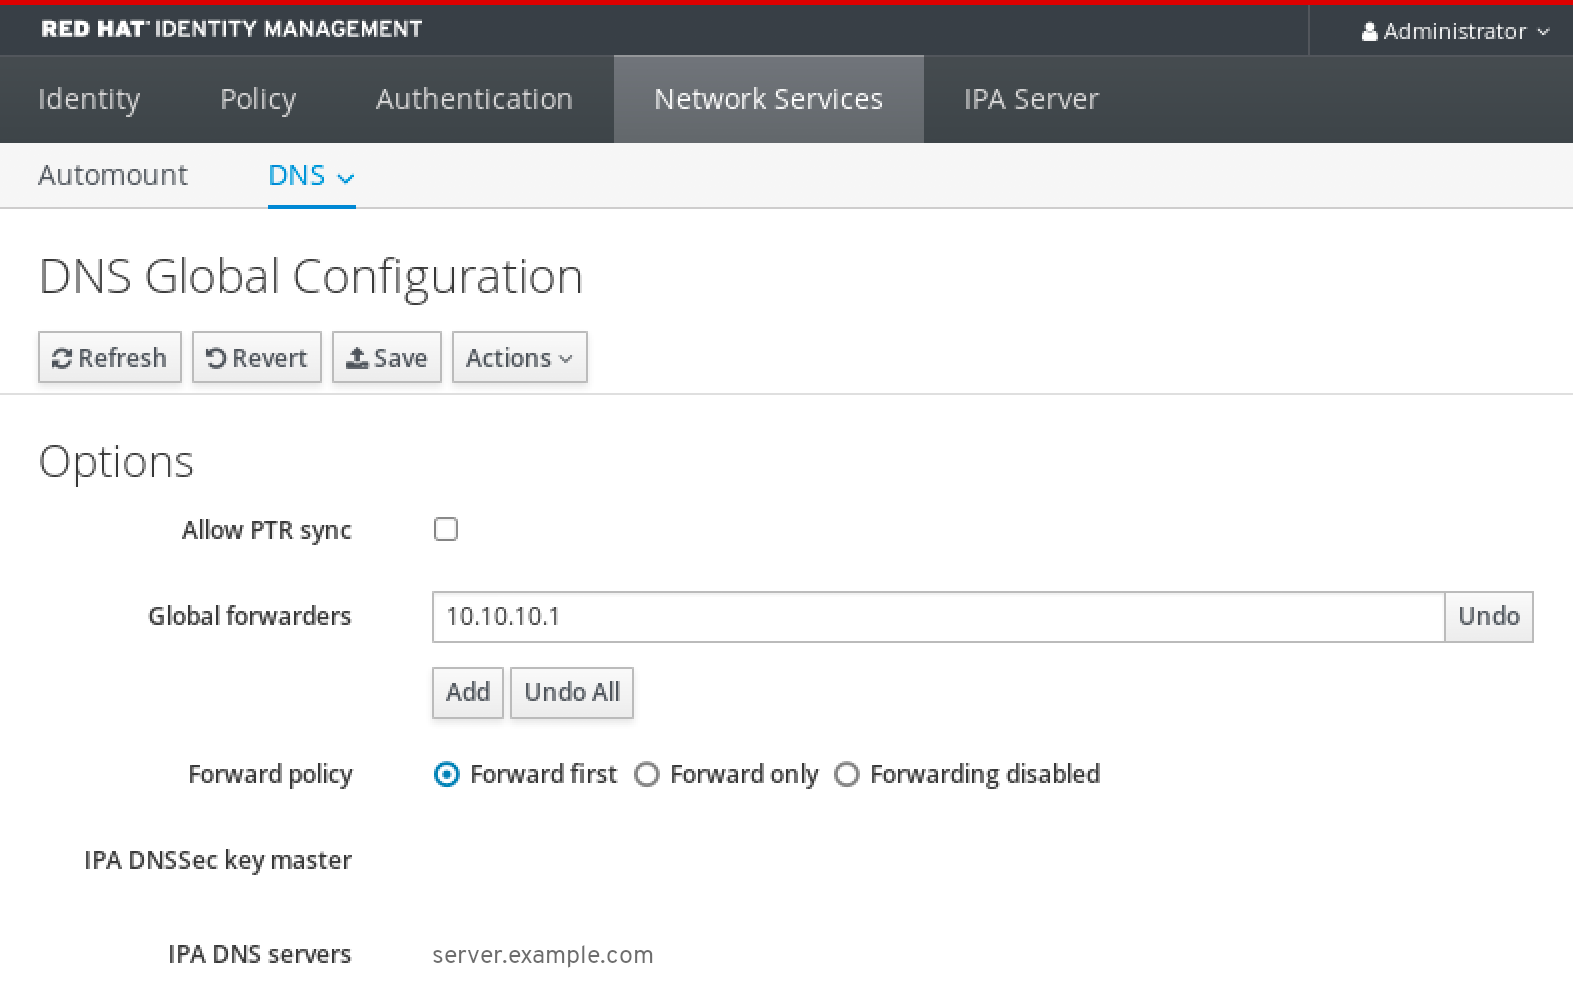
98.4. Adding a global forwarder in the CLI
Follow this procedure to add a global DNS forwarder by using the command line (CLI).
Prerequisites
- You are logged in as IdM administrator.
- You know the Internet Protocol (IP) address of the DNS server to forward queries to.
Procedure
Use the
ipa dnsconfig-modcommand to add a new global forwarder. Specify the IP address of the DNS forwarder with the--forwarderoption.[user@server ~]$ ipa dnsconfig-mod --forwarder=10.10.0.1 Server will check DNS forwarder(s). This may take some time, please wait ... Global forwarders: 10.10.0.1 IPA DNS servers: server.example.com
Verification
Use the
dnsconfig-showcommand to display global forwarders.[user@server ~]$ ipa dnsconfig-show Global forwarders: 10.10.0.1 IPA DNS servers: server.example.com
98.5. Adding a DNS Forward Zone in the IdM Web UI
Follow this procedure to add a DNS forward zone in the Identity Management (IdM) Web UI.
Do not use forward zones unless absolutely required. Forward zones are not a standard solution, and using them can lead to unexpected and problematic behavior. If you must use forward zones, limit their use to overriding a global forwarding configuration.
When creating a new DNS zone, Red Hat recommends to always use standard DNS delegation using nameserver (NS) records and to avoid forward zones. In most cases, using a global forwarder is sufficient, and forward zones are not necessary.
Prerequisites
- You are logged in to the IdM WebUI as IdM administrator.
- You know the Internet Protocol (IP) address of the DNS server to forward queries to.
Procedure
In the IdM Web UI, select
Network Services→DNS Forward Zones→DNS.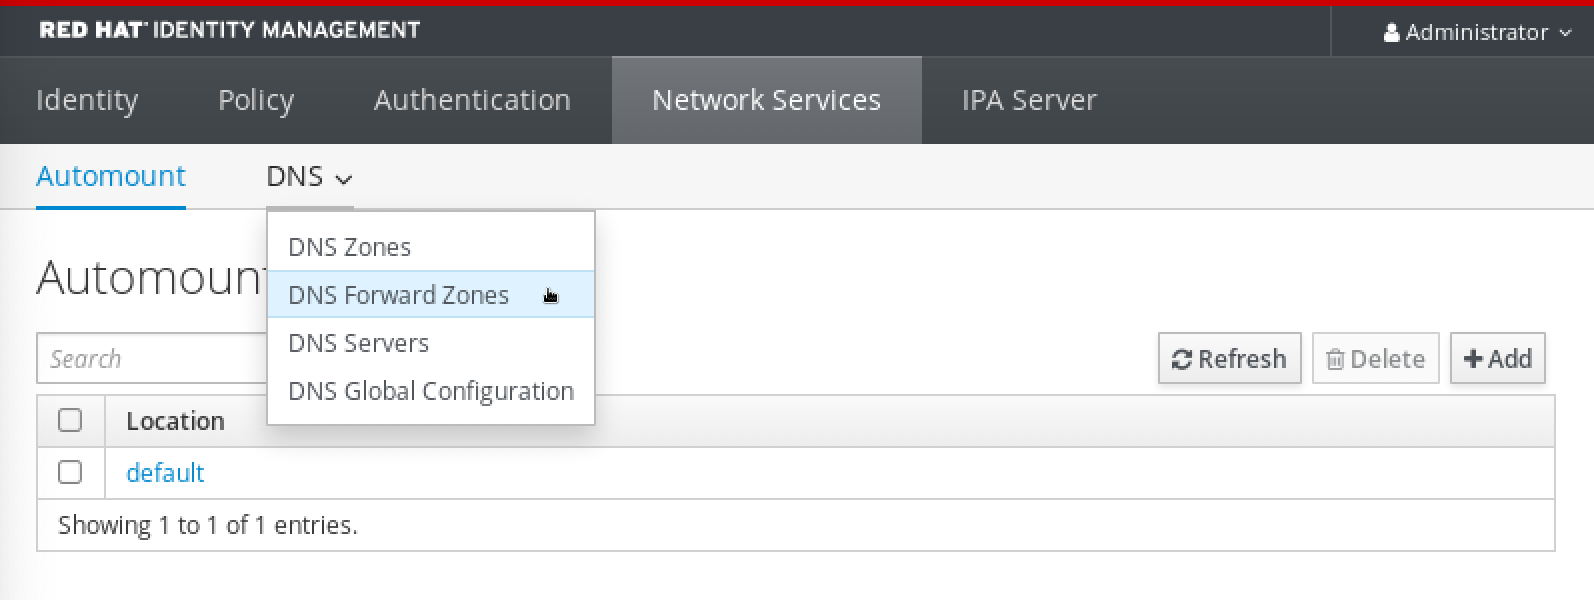
In the
DNS Forward Zonessection, clickAdd.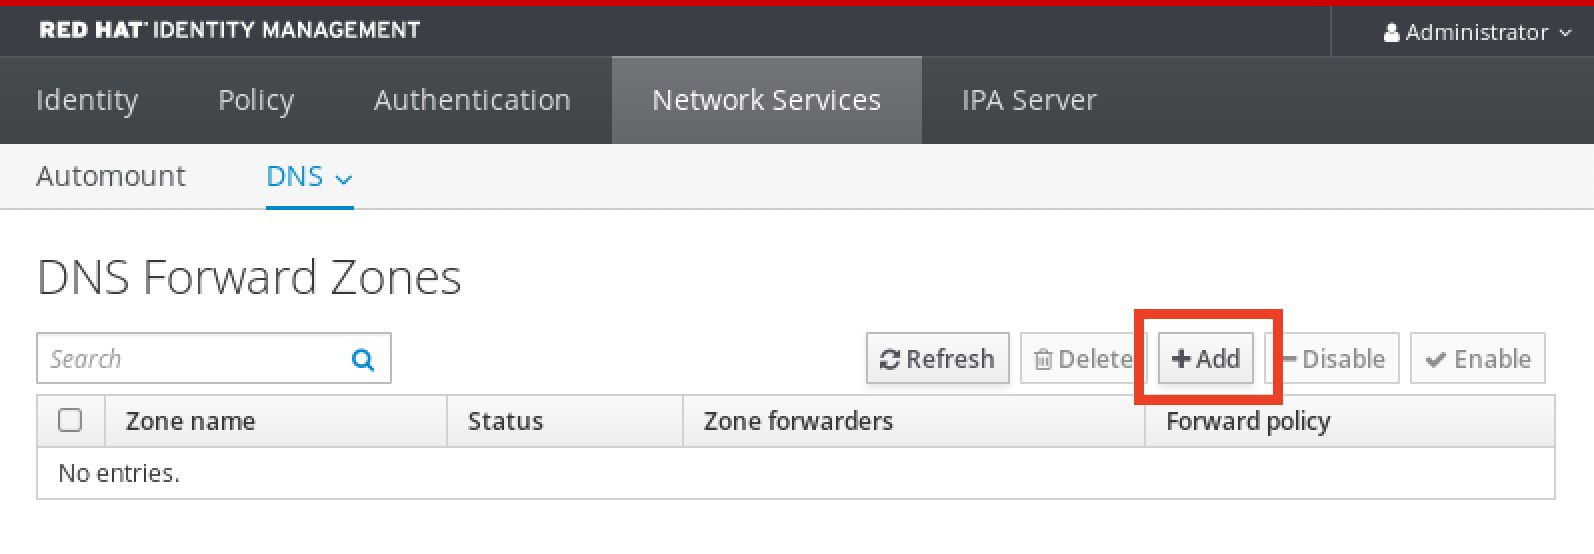
In the
Add DNS forward zonewindow, specify the forward zone name.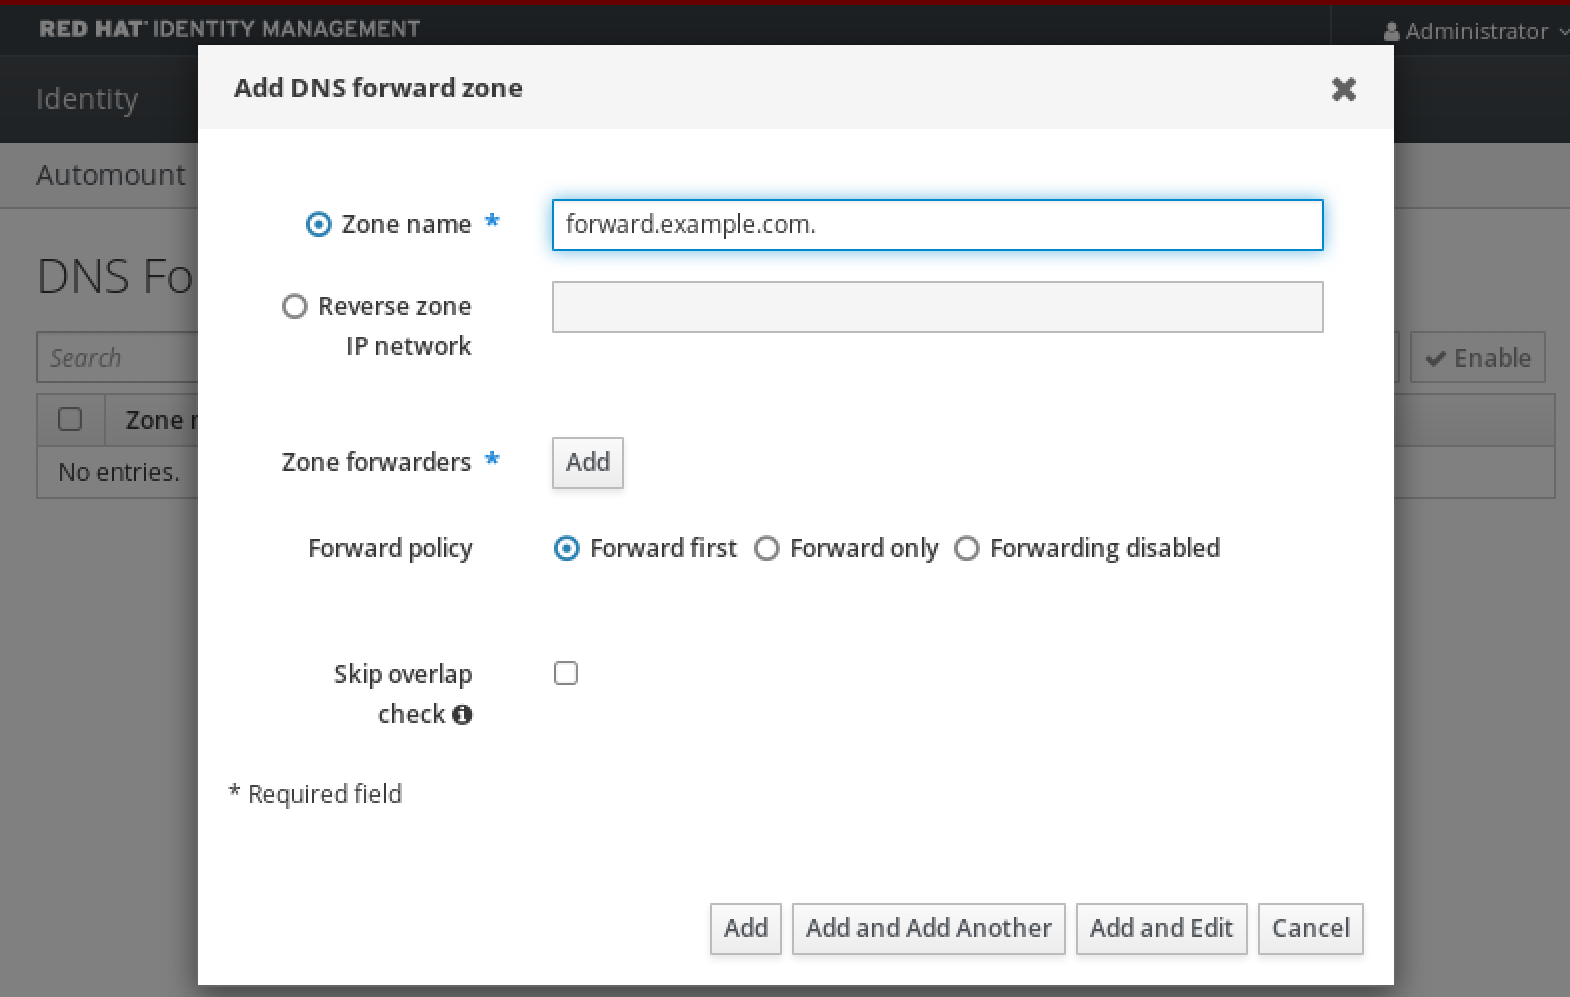
Click the
Addbutton and specify the IP address of a DNS server to receive the forwarding request. You can specify multiple forwarders per forward zone.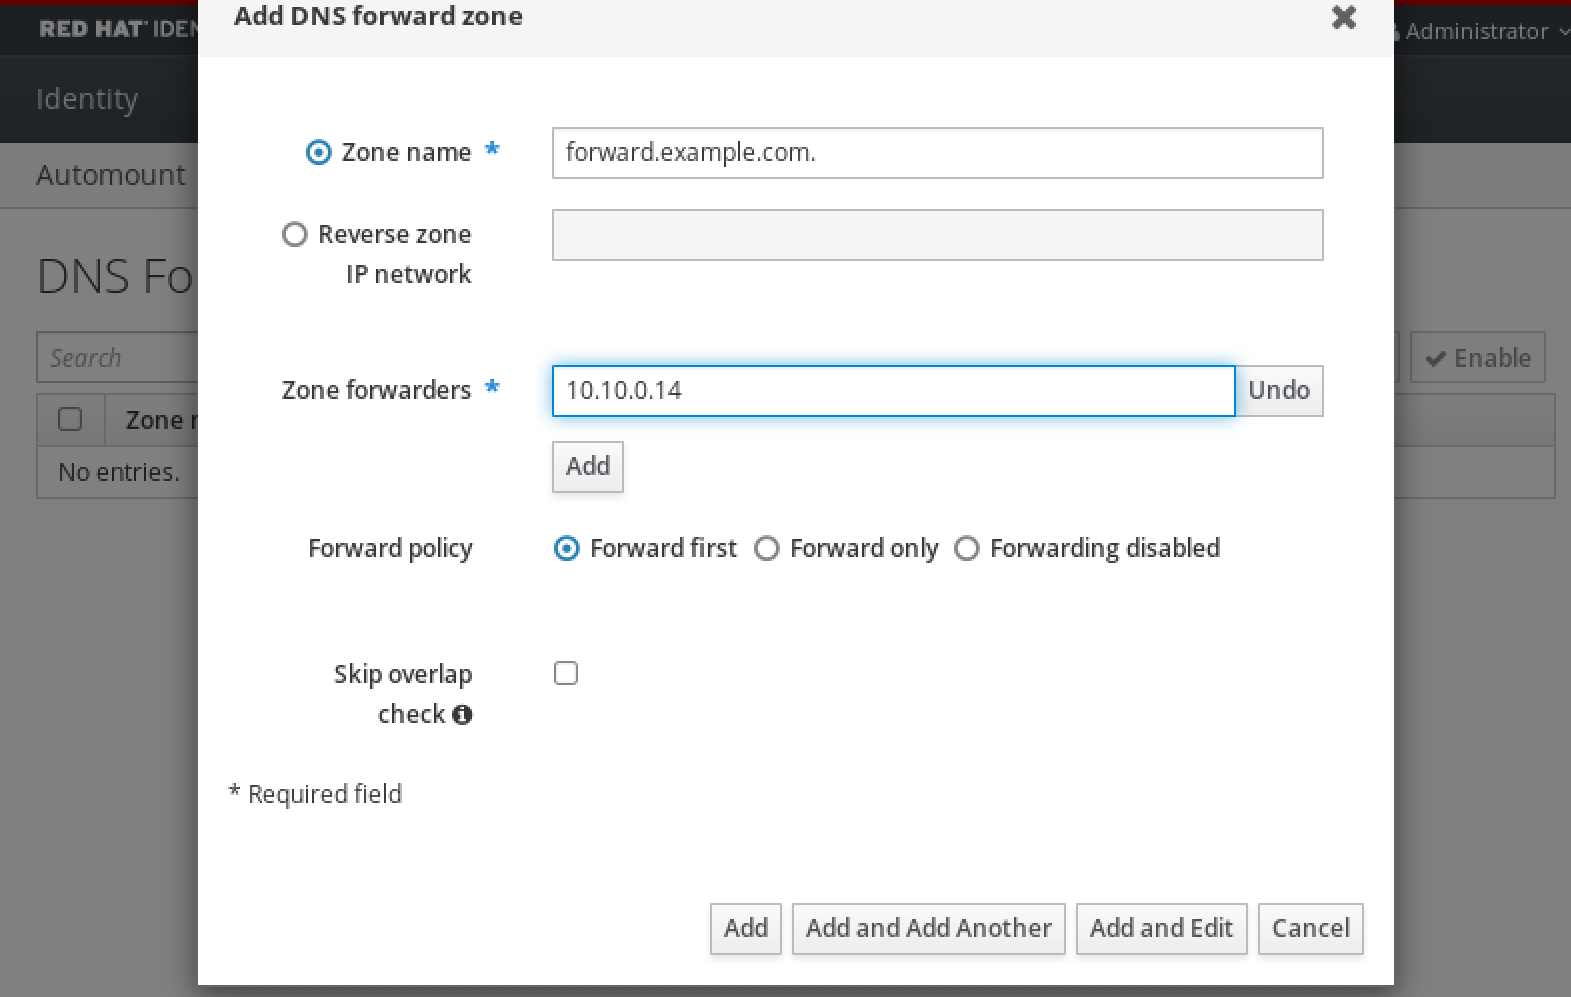
Select the
Forward policy.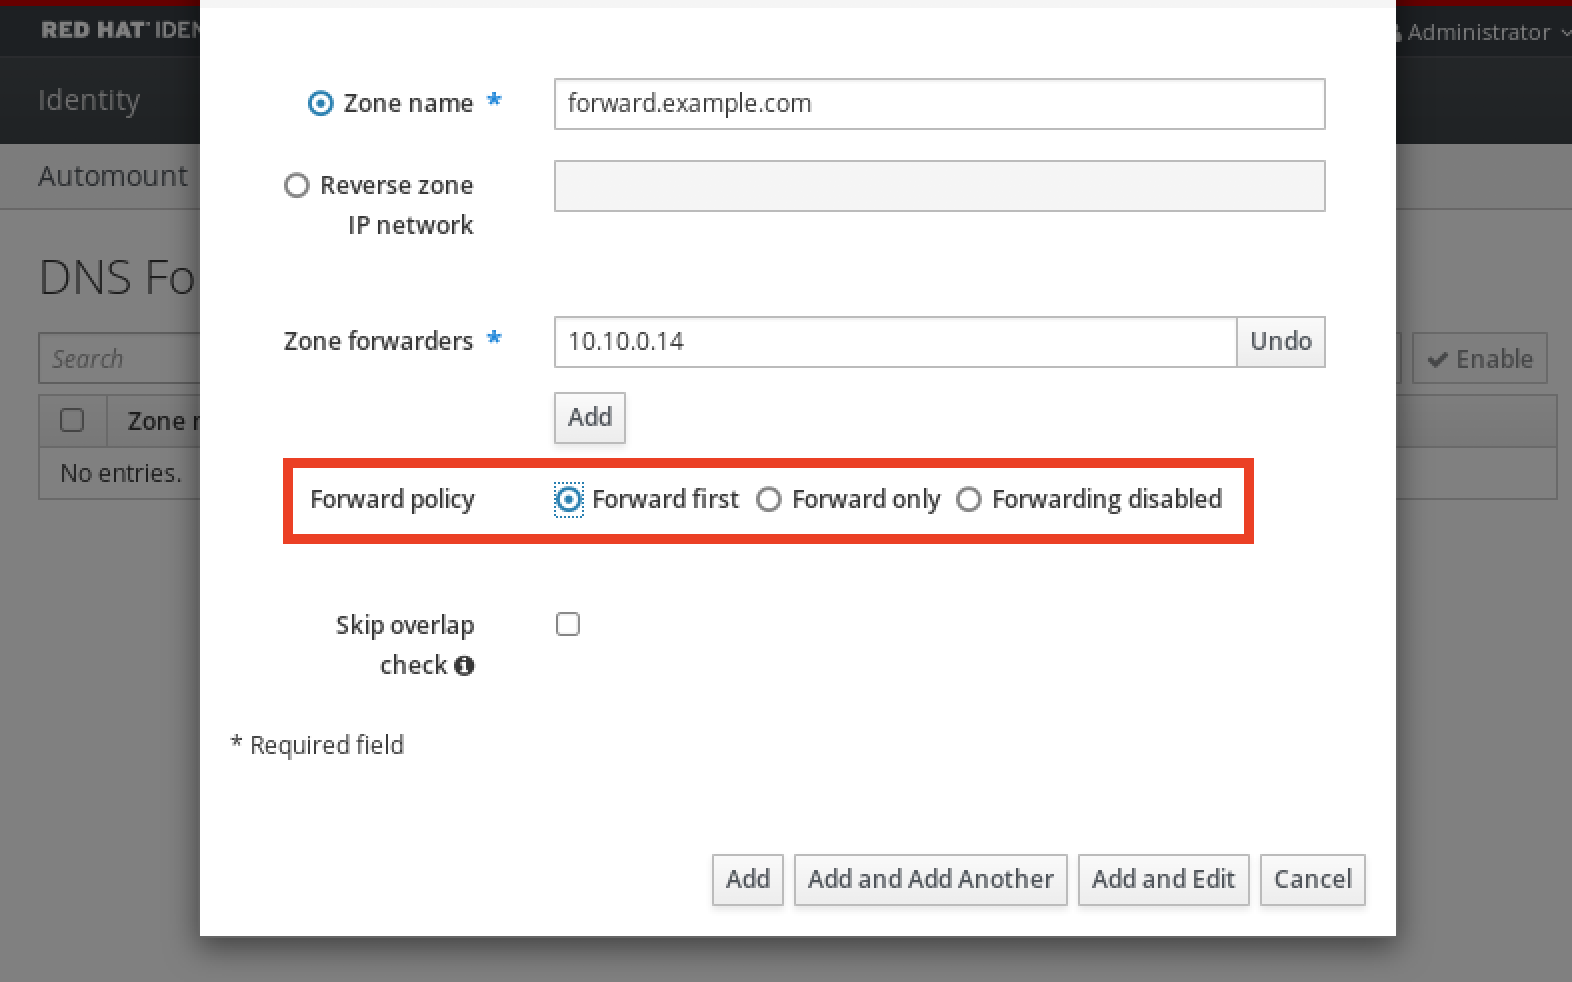
-
Click
Addat the bottom of the window to add the new forward zone.
Verification
In the IdM Web UI, select
Network Services→DNS Forward Zones→DNS.
Verify that the forward zone you created, with the forwarders and forward policy you specified, is present and enabled in the IdM Web UI.
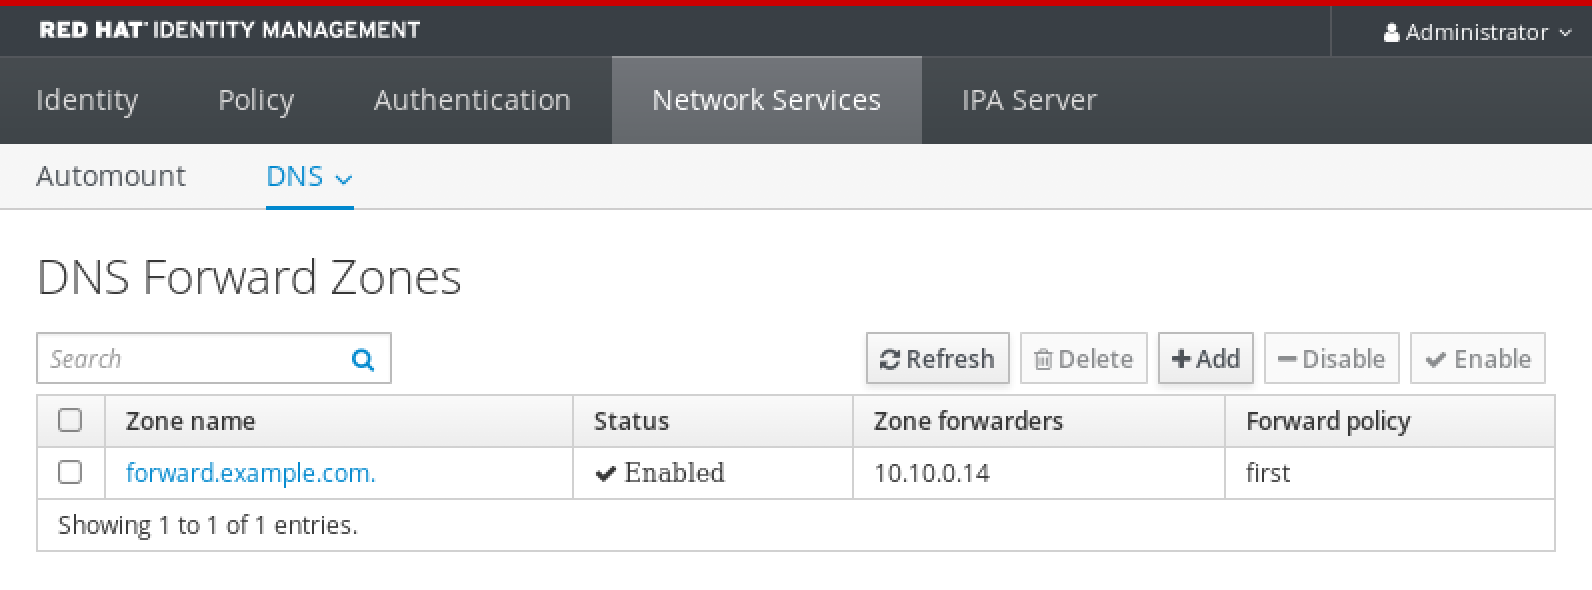
98.6. Adding a DNS Forward Zone in the CLI
Follow this procedure to add a DNS forward zone by using the command line (CLI).
Do not use forward zones unless absolutely required. Forward zones are not a standard solution, and using them can lead to unexpected and problematic behavior. If you must use forward zones, limit their use to overriding a global forwarding configuration.
When creating a new DNS zone, Red Hat recommends to always use standard DNS delegation using nameserver (NS) records and to avoid forward zones. In most cases, using a global forwarder is sufficient, and forward zones are not necessary.
Prerequisites
- You are logged in as IdM administrator.
- You know the Internet Protocol (IP) address of the DNS server to forward queries to.
Procedure
Use the
dnsforwardzone-addcommand to add a new forward zone. Specify at least one forwarder with the--forwarderoption if the forward policy is notnone, and specify the forward policy with the--forward-policyoption.[user@server ~]$ ipa dnsforwardzone-add forward.example.com. --forwarder=10.10.0.14 --forwarder=10.10.1.15 --forward-policy=first Zone name: forward.example.com. Zone forwarders: 10.10.0.14, 10.10.1.15 Forward policy: first
Verification
Use the
dnsforwardzone-showcommand to display the DNS forward zone you just created.[user@server ~]$ ipa dnsforwardzone-show forward.example.com. Zone name: forward.example.com. Zone forwarders: 10.10.0.14, 10.10.1.15 Forward policy: first
98.7. Establishing a DNS Global Forwarder in IdM using Ansible
Follow this procedure to use an Ansible playbook to establish a DNS Global Forwarder in IdM.
In the example procedure below, the IdM administrator creates a DNS global forwarder to a DNS server with an Internet Protocol (IP) v4 address of 8.8.6.6 and IPv6 address of 2001:4860:4860::8800 on port 53.
Prerequisites
You have configured your Ansible control node to meet the following requirements:
- You are using Ansible version 2.13 or later.
-
You have installed the
ansible-freeipapackage. - The example assumes that in the ~/MyPlaybooks/ directory, you have created an Ansible inventory file with the fully-qualified domain name (FQDN) of the IdM server.
-
The example assumes that the secret.yml Ansible vault stores your
ipaadmin_password.
-
The target node, that is the node on which the
ansible-freeipamodule is executed, is part of the IdM domain as an IdM client, server or replica. - You know the IdM administrator password.
Procedure
Navigate to the
/usr/share/doc/ansible-freeipa/playbooks/dnsconfigdirectory:$ cd /usr/share/doc/ansible-freeipa/playbooks/dnsconfigOpen your inventory file and make sure that the IdM server that you want to configure is listed in the
[ipaserver]section. For example, to instruct Ansible to configureserver.idm.example.com, enter:[ipaserver] server.idm.example.comMake a copy of the
set-configuration.ymlAnsible playbook file. For example:$ cp set-configuration.yml establish-global-forwarder.yml-
Open the
establish-global-forwarder.ymlfile for editing. Adapt the file by setting the following variables:
-
Change the
namevariable for the playbook toPlaybook to establish a global forwarder in IdM DNS. -
In the
taskssection, change thenameof the task toCreate a DNS global forwarder to 8.8.6.6 and 2001:4860:4860::8800. In the
forwarderssection of theipadnsconfigportion:-
Change the first
ip_addressvalue to the IPv4 address of the global forwarder:8.8.6.6. -
Change the second
ip_addressvalue to the IPv6 address of the global forwarder:2001:4860:4860::8800. -
Verify the
portvalue is set to53.
-
Change the first
Change the
forward_policytofirst.This the modified Ansible playbook file for the current example:
--- - name: Playbook to establish a global forwarder in IdM DNS hosts: ipaserver vars_files: - /home/user_name/MyPlaybooks/secret.yml tasks: - name: Create a DNS global forwarder to 8.8.6.6 and 2001:4860:4860::8800 ipadnsconfig: forwarders: - ip_address: 8.8.6.6 - ip_address: 2001:4860:4860::8800 port: 53 forward_policy: first allow_sync_ptr: true-
Change the
- Save the file.
Run the playbook:
$ ansible-playbook --vault-password-file=password_file -v -i inventory.file establish-global-forwarder.yml
98.8. Ensuring the presence of a DNS global forwarder in IdM using Ansible
Follow this procedure to use an Ansible playbook to ensure the presence of a DNS global forwarder in IdM. In the example procedure below, the IdM administrator ensures the presence of a DNS global forwarder to a DNS server with an Internet Protocol (IP) v4 address of 7.7.9.9 and IP v6 address of 2001:db8::1:0 on port 53.
Prerequisites
You have configured your Ansible control node to meet the following requirements:
- You are using Ansible version 2.13 or later.
-
You have installed the
ansible-freeipapackage. - The example assumes that in the ~/MyPlaybooks/ directory, you have created an Ansible inventory file with the fully-qualified domain name (FQDN) of the IdM server.
-
The example assumes that the secret.yml Ansible vault stores your
ipaadmin_password.
-
The target node, that is the node on which the
ansible-freeipamodule is executed, is part of the IdM domain as an IdM client, server or replica. - You know the IdM administrator password.
Procedure
Navigate to the
/usr/share/doc/ansible-freeipa/playbooks/dnsconfigdirectory:$ cd /usr/share/doc/ansible-freeipa/playbooks/dnsconfigOpen your inventory file and make sure that the IdM server that you want to configure is listed in the
[ipaserver]section. For example, to instruct Ansible to configureserver.idm.example.com, enter:[ipaserver] server.idm.example.comMake a copy of the
forwarders-absent.ymlAnsible playbook file. For example:$ cp forwarders-absent.yml ensure-presence-of-a-global-forwarder.yml-
Open the
ensure-presence-of-a-global-forwarder.ymlfile for editing. Adapt the file by setting the following variables:
-
Change the
namevariable for the playbook toPlaybook to ensure the presence of a global forwarder in IdM DNS. -
In the
taskssection, change thenameof the task toEnsure the presence of a DNS global forwarder to 7.7.9.9 and 2001:db8::1:0 on port 53. In the
forwarderssection of theipadnsconfigportion:-
Change the first
ip_addressvalue to the IPv4 address of the global forwarder:7.7.9.9. -
Change the second
ip_addressvalue to the IPv6 address of the global forwarder:2001:db8::1:0. -
Verify the
portvalue is set to53.
-
Change the first
Change the
statetopresent.This the modified Ansible playbook file for the current example:
--- - name: Playbook to ensure the presence of a global forwarder in IdM DNS hosts: ipaserver vars_files: - /home/user_name/MyPlaybooks/secret.yml tasks: - name: Ensure the presence of a DNS global forwarder to 7.7.9.9 and 2001:db8::1:0 on port 53 ipadnsconfig: forwarders: - ip_address: 7.7.9.9 - ip_address: 2001:db8::1:0 port: 53 state: present-
Change the
- Save the file.
Run the playbook:
$ ansible-playbook --vault-password-file=password_file -v -i inventory.file ensure-presence-of-a-global-forwarder.yml
98.9. Ensuring the absence of a DNS global forwarder in IdM using Ansible
Follow this procedure to use an Ansible playbook to ensure the absence of a DNS global forwarder in IdM. In the example procedure below, the IdM administrator ensures the absence of a DNS global forwarder with an Internet Protocol (IP) v4 address of 8.8.6.6 and IP v6 address of 2001:4860:4860::8800 on port 53.
Prerequisites
You have configured your Ansible control node to meet the following requirements:
- You are using Ansible version 2.13 or later.
-
You have installed the
ansible-freeipapackage. - The example assumes that in the ~/MyPlaybooks/ directory, you have created an Ansible inventory file with the fully-qualified domain name (FQDN) of the IdM server.
-
The example assumes that the secret.yml Ansible vault stores your
ipaadmin_password.
-
The target node, that is the node on which the
ansible-freeipamodule is executed, is part of the IdM domain as an IdM client, server or replica. - You know the IdM administrator password.
Procedure
Navigate to the
/usr/share/doc/ansible-freeipa/playbooks/dnsconfigdirectory:$ cd /usr/share/doc/ansible-freeipa/playbooks/dnsconfigOpen your inventory file and make sure that the IdM server that you want to configure is listed in the
[ipaserver]section. For example, to instruct Ansible to configureserver.idm.example.com, enter:[ipaserver] server.idm.example.comMake a copy of the
forwarders-absent.ymlAnsible playbook file. For example:$ cp forwarders-absent.yml ensure-absence-of-a-global-forwarder.yml-
Open the
ensure-absence-of-a-global-forwarder.ymlfile for editing. Adapt the file by setting the following variables:
-
Change the
namevariable for the playbook toPlaybook to ensure the absence of a global forwarder in IdM DNS. -
In the
taskssection, change thenameof the task toEnsure the absence of a DNS global forwarder to 8.8.6.6 and 2001:4860:4860::8800 on port 53. In the
forwarderssection of theipadnsconfigportion:-
Change the first
ip_addressvalue to the IPv4 address of the global forwarder:8.8.6.6. -
Change the second
ip_addressvalue to the IPv6 address of the global forwarder:2001:4860:4860::8800. -
Verify the
portvalue is set to53.
-
Change the first
-
Set the
actionvariable tomember. -
Verify the
stateis set toabsent.
This the modified Ansible playbook file for the current example:
--- - name: Playbook to ensure the absence of a global forwarder in IdM DNS hosts: ipaserver vars_files: - /home/user_name/MyPlaybooks/secret.yml tasks: - name: Ensure the absence of a DNS global forwarder to 8.8.6.6 and 2001:4860:4860::8800 on port 53 ipadnsconfig: forwarders: - ip_address: 8.8.6.6 - ip_address: 2001:4860:4860::8800 port: 53 action: member state: absentImportantIf you only use the
state: absentoption in your playbook without also usingaction: member, the playbook fails.-
Change the
- Save the file.
Run the playbook:
$ ansible-playbook --vault-password-file=password_file -v -i inventory.file ensure-absence-of-a-global-forwarder.yml
98.10. Ensuring DNS Global Forwarders are disabled in IdM using Ansible
Follow this procedure to use an Ansible playbook to ensure DNS Global Forwarders are disabled in IdM. In the example procedure below, the IdM administrator ensures that the forwarding policy for the global forwarder is set to none, which effectively disables the global forwarder.
Prerequisites
You have configured your Ansible control node to meet the following requirements:
- You are using Ansible version 2.13 or later.
-
You have installed the
ansible-freeipapackage. - The example assumes that in the ~/MyPlaybooks/ directory, you have created an Ansible inventory file with the fully-qualified domain name (FQDN) of the IdM server.
-
The example assumes that the secret.yml Ansible vault stores your
ipaadmin_password.
-
The target node, that is the node on which the
ansible-freeipamodule is executed, is part of the IdM domain as an IdM client, server or replica. - You know the IdM administrator password.
Procedure
Navigate to the
/usr/share/doc/ansible-freeipa/playbooks/dnsconfigdirectory:$ cd /usr/share/doc/ansible-freeipa/playbooks/dnsconfigOpen your inventory file and make sure that the IdM server that you want to configure is listed in the
[ipaserver]section. For example, to instruct Ansible to configureserver.idm.example.com, enter:[ipaserver] server.idm.example.comVerify the contents of the
disable-global-forwarders.ymlAnsible playbook file which is already configured to disable all DNS global forwarders. For example:$ cat disable-global-forwarders.yml --- - name: Playbook to disable global DNS forwarders hosts: ipaserver vars_files: - /home/user_name/MyPlaybooks/secret.yml tasks: - name: Disable global forwarders. ipadnsconfig: forward_policy: noneRun the playbook:
$ ansible-playbook --vault-password-file=password_file -v -i inventory.file disable-global-forwarders.yml
98.11. Ensuring the presence of a DNS Forward Zone in IdM using Ansible
Follow this procedure to use an Ansible playbook to ensure the presence of a DNS Forward Zone in IdM. In the example procedure below, the IdM administrator ensures the presence of a DNS forward zone for example.com to a DNS server with an Internet Protocol (IP) address of 8.8.8.8.
Prerequisites
You have configured your Ansible control node to meet the following requirements:
- You are using Ansible version 2.13 or later.
-
You have installed the
ansible-freeipapackage. - The example assumes that in the ~/MyPlaybooks/ directory, you have created an Ansible inventory file with the fully-qualified domain name (FQDN) of the IdM server.
-
The example assumes that the secret.yml Ansible vault stores your
ipaadmin_password.
-
The target node, that is the node on which the
ansible-freeipamodule is executed, is part of the IdM domain as an IdM client, server or replica. - You know the IdM administrator password.
Procedure
Navigate to the
/usr/share/doc/ansible-freeipa/playbooks/dnsconfigdirectory:$ cd /usr/share/doc/ansible-freeipa/playbooks/dnsconfigOpen your inventory file and make sure that the IdM server that you want to configure is listed in the
[ipaserver]section. For example, to instruct Ansible to configureserver.idm.example.com, enter:[ipaserver] server.idm.example.comMake a copy of the
forwarders-absent.ymlAnsible playbook file. For example:$ cp forwarders-absent.yml ensure-presence-forwardzone.yml-
Open the
ensure-presence-forwardzone.ymlfile for editing. Adapt the file by setting the following variables:
-
Change the
namevariable for the playbook toPlaybook to ensure the presence of a dnsforwardzone in IdM DNS. -
In the
taskssection, change thenameof the task toEnsure presence of a dnsforwardzone for example.com to 8.8.8.8. -
In the
taskssection, change theipadnsconfigheading toipadnsforwardzone. In the
ipadnsforwardzonesection:-
Add the
ipaadmin_passwordvariable and set it to your IdM administrator password. -
Add the
namevariable and set it toexample.com. In the
forwarderssection:-
Remove the
ip_addressandportlines. Add the IP address of the DNS server to receive forwarded requests by specifying it after a dash:
- 8.8.8.8
-
Remove the
-
Add the
forwardpolicyvariable and set it tofirst. -
Add the
skip_overlap_checkvariable and set it totrue. -
Change the
statevariable topresent.
This the modified Ansible playbook file for the current example:
-
Add the
--- - name: Playbook to ensure the presence of a dnsforwardzone in IdM DNS hosts: ipaserver vars_files: - /home/user_name/MyPlaybooks/secret.yml tasks: - name: Ensure the presence of a dnsforwardzone for example.com to 8.8.8.8 ipadnsforwardzone: ipaadmin_password: "{{ ipaadmin_password }}" name: example.com forwarders: - 8.8.8.8 forwardpolicy: first skip_overlap_check: true state: present-
Change the
- Save the file.
Run the playbook:
$ ansible-playbook --vault-password-file=password_file -v -i inventory.file ensure-presence-forwardzone.yml
98.12. Ensuring a DNS Forward Zone has multiple forwarders in IdM using Ansible
Follow this procedure to use an Ansible playbook to ensure a DNS Forward Zone in IdM has multiple forwarders. In the example procedure below, the IdM administrator ensures the DNS forward zone for example.com is forwarding to 8.8.8.8 and 4.4.4.4.
Prerequisites
You have configured your Ansible control node to meet the following requirements:
- You are using Ansible version 2.13 or later.
-
You have installed the
ansible-freeipapackage. - The example assumes that in the ~/MyPlaybooks/ directory, you have created an Ansible inventory file with the fully-qualified domain name (FQDN) of the IdM server.
-
The example assumes that the secret.yml Ansible vault stores your
ipaadmin_password.
-
The target node, that is the node on which the
ansible-freeipamodule is executed, is part of the IdM domain as an IdM client, server or replica. - You know the IdM administrator password.
Procedure
Navigate to the
/usr/share/doc/ansible-freeipa/playbooks/dnsconfigdirectory:$ cd /usr/share/doc/ansible-freeipa/playbooks/dnsconfigOpen your inventory file and make sure that the IdM server that you want to configure is listed in the
[ipaserver]section. For example, to instruct Ansible to configureserver.idm.example.com, enter:[ipaserver] server.idm.example.comMake a copy of the
forwarders-absent.ymlAnsible playbook file. For example:$ cp forwarders-absent.yml ensure-presence-multiple-forwarders.yml-
Open the
ensure-presence-multiple-forwarders.ymlfile for editing. Adapt the file by setting the following variables:
-
Change the
namevariable for the playbook toPlaybook to ensure the presence of multiple forwarders in a dnsforwardzone in IdM DNS. -
In the
taskssection, change thenameof the task toEnsure presence of 8.8.8.8 and 4.4.4.4 forwarders in dnsforwardzone for example.com. -
In the
taskssection, change theipadnsconfigheading toipadnsforwardzone. In the
ipadnsforwardzonesection:-
Add the
ipaadmin_passwordvariable and set it to your IdM administrator password. -
Add the
namevariable and set it toexample.com. In the
forwarderssection:-
Remove the
ip_addressandportlines. Add the IP address of the DNS servers you want to ensure are present, preceded by a dash:
- 8.8.8.8 - 4.4.4.4
-
Remove the
- Change the state variable to present.
This the modified Ansible playbook file for the current example:
-
Add the
--- - name: name: Playbook to ensure the presence of multiple forwarders in a dnsforwardzone in IdM DNS hosts: ipaserver vars_files: - /home/user_name/MyPlaybooks/secret.yml tasks: - name: Ensure presence of 8.8.8.8 and 4.4.4.4 forwarders in dnsforwardzone for example.com ipadnsforwardzone: ipaadmin_password: "{{ ipaadmin_password }}" name: example.com forwarders: - 8.8.8.8 - 4.4.4.4 state: present-
Change the
- Save the file.
Run the playbook:
$ ansible-playbook --vault-password-file=password_file -v -i inventory.file ensure-presence-multiple-forwarders.yml
98.13. Ensuring a DNS Forward Zone is disabled in IdM using Ansible
Follow this procedure to use an Ansible playbook to ensure a DNS Forward Zone is disabled in IdM. In the example procedure below, the IdM administrator ensures the DNS forward zone for example.com is disabled.
Prerequisites
You have configured your Ansible control node to meet the following requirements:
- You are using Ansible version 2.13 or later.
-
You have installed the
ansible-freeipapackage. - The example assumes that in the ~/MyPlaybooks/ directory, you have created an Ansible inventory file with the fully-qualified domain name (FQDN) of the IdM server.
-
The example assumes that the secret.yml Ansible vault stores your
ipaadmin_password.
-
The target node, that is the node on which the
ansible-freeipamodule is executed, is part of the IdM domain as an IdM client, server or replica. - You know the IdM administrator password.
Procedure
Navigate to the
/usr/share/doc/ansible-freeipa/playbooks/dnsconfigdirectory:$ cd /usr/share/doc/ansible-freeipa/playbooks/dnsconfigOpen your inventory file and make sure that the IdM server that you want to configure is listed in the
[ipaserver]section. For example, to instruct Ansible to configureserver.idm.example.com, enter:[ipaserver] server.idm.example.comMake a copy of the
forwarders-absent.ymlAnsible playbook file. For example:$ cp forwarders-absent.yml ensure-disabled-forwardzone.yml-
Open the
ensure-disabled-forwardzone.ymlfile for editing. Adapt the file by setting the following variables:
-
Change the
namevariable for the playbook toPlaybook to ensure a dnsforwardzone is disabled in IdM DNS. -
In the
taskssection, change thenameof the task toEnsure a dnsforwardzone for example.com is disabled. -
In the
taskssection, change theipadnsconfigheading toipadnsforwardzone. In the
ipadnsforwardzonesection:-
Add the
ipaadmin_passwordvariable and set it to your IdM administrator password. -
Add the
namevariable and set it toexample.com. -
Remove the entire
forwarderssection. -
Change the
statevariable todisabled.
This the modified Ansible playbook file for the current example:
-
Add the
--- - name: Playbook to ensure a dnsforwardzone is disabled in IdM DNS hosts: ipaserver vars_files: - /home/user_name/MyPlaybooks/secret.yml tasks: - name: Ensure a dnsforwardzone for example.com is disabled ipadnsforwardzone: ipaadmin_password: "{{ ipaadmin_password }}" name: example.com state: disabled-
Change the
- Save the file.
Run the playbook:
$ ansible-playbook --vault-password-file=password_file -v -i inventory.file ensure-disabled-forwardzone.yml
98.14. Ensuring the absence of a DNS Forward Zone in IdM using Ansible
Follow this procedure to use an Ansible playbook to ensure the absence of a DNS Forward Zone in IdM. In the example procedure below, the IdM administrator ensures the absence of a DNS forward zone for example.com.
Prerequisites
You have configured your Ansible control node to meet the following requirements:
- You are using Ansible version 2.13 or later.
-
You have installed the
ansible-freeipapackage. - The example assumes that in the ~/MyPlaybooks/ directory, you have created an Ansible inventory file with the fully-qualified domain name (FQDN) of the IdM server.
-
The example assumes that the secret.yml Ansible vault stores your
ipaadmin_password.
-
The target node, that is the node on which the
ansible-freeipamodule is executed, is part of the IdM domain as an IdM client, server or replica. - You know the IdM administrator password.
Procedure
Navigate to the
/usr/share/doc/ansible-freeipa/playbooks/dnsconfigdirectory:$ cd /usr/share/doc/ansible-freeipa/playbooks/dnsconfigOpen your inventory file and make sure that the IdM server that you want to configure is listed in the
[ipaserver]section. For example, to instruct Ansible to configureserver.idm.example.com, enter:[ipaserver] server.idm.example.comMake a copy of the
forwarders-absent.ymlAnsible playbook file. For example:$ cp forwarders-absent.yml ensure-absence-forwardzone.yml-
Open the
ensure-absence-forwardzone.ymlfile for editing. Adapt the file by setting the following variables:
-
Change the
namevariable for the playbook toPlaybook to ensure the absence of a dnsforwardzone in IdM DNS. -
In the
taskssection, change thenameof the task toEnsure the absence of a dnsforwardzone for example.com. -
In the
taskssection, change theipadnsconfigheading toipadnsforwardzone. In the
ipadnsforwardzonesection:-
Add the
ipaadmin_passwordvariable and set it to your IdM administrator password. -
Add the
namevariable and set it toexample.com. -
Remove the entire
forwarderssection. -
Leave the
statevariable asabsent.
This the modified Ansible playbook file for the current example:
-
Add the
--- - name: Playbook to ensure the absence of a dnsforwardzone in IdM DNS hosts: ipaserver vars_files: - /home/user_name/MyPlaybooks/secret.yml tasks: - name: Ensure the absence of a dnsforwardzone for example.com ipadnsforwardzone: ipaadmin_password: "{{ ipaadmin_password }}" name: example.com state: absent-
Change the
- Save the file.
Run the playbook:
$ ansible-playbook --vault-password-file=password_file -v -i inventory.file ensure-absence-forwardzone.yml
Chapter 99. Managing DNS records in IdM
This chapter describes how to manage DNS records in Identity Management (IdM). As an IdM administrator, you can add, modify and delete DNS records in IdM.
Prerequisites
Your IdM deployment contains an integrated DNS server. For information how to install IdM with integrated DNS, see one of the following links:
99.1. DNS records in IdM
Identity Management (IdM) supports many different DNS record types. The following four are used most frequently:
- A
This is a basic map for a host name and an IPv4 address. The record name of an A record is a host name, such as
www. TheIP Addressvalue of an A record is an IPv4 address, such as192.0.2.1.For more information about A records, see RFC 1035.
- AAAA
This is a basic map for a host name and an IPv6 address. The record name of an AAAA record is a host name, such as
www. TheIP Addressvalue is an IPv6 address, such as2001:DB8::1111.For more information about AAAA records, see RFC 3596.
- SRV
Service (SRV) resource records map service names to the DNS name of the server that is providing that particular service. For example, this record type can map a service like an LDAP directory to the server which manages it.
The record name of an SRV record has the format
_service._protocol, such as_ldap._tcp. The configuration options for SRV records include priority, weight, port number, and host name for the target service.For more information about SRV records, see RFC 2782.
- PTR
A pointer record (PTR) adds a reverse DNS record, which maps an IP address to a domain name.
NoteAll reverse DNS lookups for IPv4 addresses use reverse entries that are defined in the
in-addr.arpa.domain. The reverse address, in human-readable form, is the exact reverse of the regular IP address, with thein-addr.arpa.domain appended to it. For example, for the network address192.0.2.0/24, the reverse zone is2.0.192.in-addr.arpa.The record name of a PTR must be in the standard format specified in RFC 1035, extended in RFC 2317, and RFC 3596. The host name value must be a canonical host name of the host for which you want to create the record.
NoteReverse zones can also be configured for IPv6 addresses, with zones in the
.ip6.arpa.domain. For more information about IPv6 reverse zones, see RFC 3596.
When adding DNS resource records, note that many of the records require different data. For example, a CNAME record requires a host name, while an A record requires an IP address. In the IdM Web UI, the fields in the form for adding a new record are updated automatically to reflect what data is required for the currently selected type of record.
99.2. Adding DNS resource records in the IdM Web UI
Follow this procedure to add DNS resource records in the Identity Management (IdM) Web UI.
Prerequisites
- The DNS zone to which you want to add a DNS record exists and is managed by IdM. For more information about creating a DNS zone in IdM DNS, see Managing DNS zones in IdM.
- You are logged in as IdM administrator.
Procedure
-
In the IdM Web UI, click
Network Services→DNS→DNS Zones. - Click the DNS zone to which you want to add a DNS record.
In the
DNS Resource Recordssection, click to add a new record.Figure 99.1. Adding a New DNS Resource Record
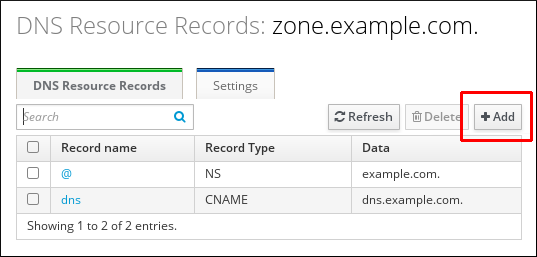
Select the type of record to create and fill out the other fields as required.
Figure 99.2. Defining a New DNS Resource Record
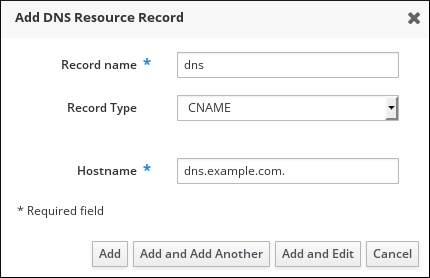
- Click to confirm the new record.
99.3. Adding DNS resource records from the IdM CLI
Follow this procedure to add a DNS resource record of any type from the command line (CLI).
Prerequisites
- The DNS zone to which you want to add a DNS records exists. For more information about creating a DNS zone in IdM DNS, see Managing DNS zones in IdM.
- You are logged in as IdM administrator.
Procedure
To add a DNS resource record, use the
ipa dnsrecord-addcommand. The command follows this syntax:$ ipa dnsrecord-add zone_name record_name --record_type_option=dataIn the command above:
- The zone_name is the name of the DNS zone to which the record is being added.
- The record_name is an identifier for the new DNS resource record.
For example, to add an A type DNS record of host1 to the idm.example.com zone, enter:
$ ipa dnsrecord-add idm.example.com host1 --a-rec=192.168.122.123
99.4. Common ipa dnsrecord-* options
You can use the following options when adding, modifying and deleting the most common DNS resource record types in Identity Management (IdM):
- A (IPv4)
- AAAA (IPv6)
- SRV
- PTR
In Bash, you can define multiple entries by listing the values in a comma-separated list inside curly braces, such as --option={val1,val2,val3}.
| Option | Description |
|---|---|
|
| Sets the time to live for the record. |
|
| Parses the raw DNS records and returns them in a structured format. |
| Option | Description | Examples |
|---|---|---|
|
| Passes a single A record or a list of A records. |
|
| Can create a wildcard A record with a given IP address. |
| |
|
|
Gives the IP address for the record. When creating a record, the option to specify the |
|
[a]
The example creates a wildcard A record with the IP address of 192.0.2.123.
| ||
| Option | Description | Example |
|---|---|---|
|
| Passes a single AAAA (IPv6) record or a list of AAAA records. |
|
|
|
Gives the IPv6 address for the record. When creating a record, the option to specify the |
|
| Option | Description | Example |
|---|---|---|
|
|
Passes a single PTR record or a list of PTR records. When adding the reverse DNS record, the zone name used with the |
|
|
| ||
|
| Gives the host name for the record. |
| Option | Description | Example |
|---|---|---|
|
|
Passes a single SRV record or a list of SRV records. In the examples on the right, _ldap._tcp defines the service type and the connection protocol for the SRV record. The |
|
|
| ||
|
| Sets the priority of the record. There can be multiple SRV records for a service type. The priority (0 - 65535) sets the rank of the record; the lower the number, the higher the priority. A service has to use the record with the highest priority first. |
|
|
| Sets the weight of the record. This helps determine the order of SRV records with the same priority. The set weights should add up to 100, representing the probability (in percentages) that a particular record is used. |
|
|
| Gives the port for the service on the target host. |
|
|
| Gives the domain name of the target host. This can be a single period (.) if the service is not available in the domain. |
99.5. Deleting DNS records in the IdM Web UI
Follow this procedure to delete DNS records in Identity Management (IdM) using the IdM Web UI.
Prerequisites
- You are logged in as IdM administrator.
Procedure
-
In the IdM Web UI, click
Network Services→DNS→DNS Zones. - Click the zone from which you want to delete a DNS record, for example example.com..
In the
DNS Resource Recordssection, click the name of the resource record.Figure 99.3. Selecting a DNS Resource Record

- Select the check box by the name of the record type to delete.
Click
Delete.Figure 99.4. Deleting a DNS Resource Record
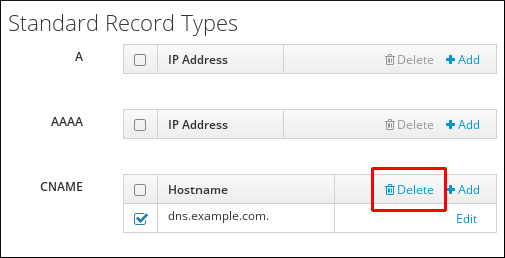
The selected record type is now deleted. The other configuration of the resource record is left intact.
99.6. Deleting an entire DNS record in the IdM Web UI
Follow this procedure to delete all the records for a particular resource in a zone using the Identity Management (IdM) Web UI.
Prerequisites
- You are logged in as IdM administrator.
Procedure
-
In the IdM Web UI, click
Network Services→DNS→DNS Zones. - Click the zone from which you want to delete a DNS record, for example zone.example.com..
-
In the
DNS Resource Recordssection, select the check box of the resource record to delete. Click .
Figure 99.5. Deleting an Entire Resource Record

The entire resource record is now deleted.
99.7. Deleting DNS records in the IdM CLI
Follow this procedure to remove DNS records from a zone managed by the Identity Management (IdM) DNS.
Prerequisites
- You are logged in as IdM administrator.
Procedure
To remove records from a zone, use the
ipa dnsrecord-delcommand and add the--recordType-recoption together with the record value. For example, to remove an A type record:$ ipa dnsrecord-del example.com www --a-rec 192.0.2.1If you run
ipa dnsrecord-delwithout any options, the command prompts for information about the record to delete. Note that passing the--del-alloption with the command removes all associated records for the zone.
Chapter 100. Updating DNS records systematically when using external DNS
When using external DNS, Identity Management (IdM) does not update the DNS records automatically after a change in the topology. You can update the DNS records managed by an external DNS service systematically, which reduces the need for manual DNS updates.
Updating DNS records removes old or invalid DNS records and adds new records. You must update DNS records after a change in your topology, for example:
- After installing or uninstalling a replica
- After installing a CA, DNS, KRA, or Active Directory trust on an IdM server
100.1. Updating external DNS records with GUI
If you have made any changes to your topology, you must update the external DNS records by using the external DNS GUI.
Procedure
Display the records that you must update:
$ ipa dns-update-system-records --dry-run IPA DNS records: _kerberos-master._tcp.example.com. 86400 IN SRV 0 100 88 ipa.example.com. _kerberos-master._udp.example.com. 86400 IN SRV 0 100 88 ipa.example.com. [... output truncated ...]- Use the external DNS GUI to update the records.
100.2. Updating external DNS records using nsupdate
You can update external DNS records using the nsupdate utility. You can also add the command to a script to automate the process. To update with the nsupdate utility, you need to generate a file with the DNS records, and then proceed with either sending an nsupdate request secured using TSIG, or sending an nsupdate request secured using the GSS-TSIG.
Procedure
To generate a file with the DNS records for
nsupdate, use the `ipa dns-update-system-records --dry-runcommand with the--outoption. The--outoption specifies the path of the file to generate:$ ipa dns-update-system-records --dry-run --out dns_records_file.nsupdate IPA DNS records: _kerberos-master._tcp.example.com. 86400 IN SRV 0 100 88 ipa.example.com. _kerberos-master._udp.example.com. 86400 IN SRV 0 100 88 ipa.example.com. [... output truncated ...]The generated file contains the required DNS records in the format accepted by the
nsupdateutility.The generated records rely on:
- Automatic detection of the zone in which the records are to be updated.
Automatic detection of the zone’s authoritative server.
If you are using an atypical DNS setup or if zone delegations are missing,
nsupdatemight not be able to find the right zone and server. In this case, add the following options to the beginning of the generated file:-
server: specify the server name or port of the authoritative DNS server to whichnsupdatesends the records. zone: specify the name of the zone wherensupdateplaces the records.Example 100.1. Generated record
$ cat dns_records_file.nsupdate zone example.com. server 192.0.2.1 ; IPA DNS records update delete _kerberos-master._tcp.example.com. SRV update add _kerberos-master._tcp.example.com. 86400 IN SRV 0 100 88 ipa.example.com. [... output truncated ...]
100.3. Sending an nsupdate request secured using TSIG
When sending a request using nsupdate, make sure you properly secure it. Transaction signature (TSIG) enables you to use nsupdate with a shared key.
Prerequisites
- Your DNS server must be configured for TSIG.
- Both the DNS server and its client must have the shared key.
Procedure
Run the
nsupdatecommand and provide the shared secret using one of these options:-kto provide the TSIG authentication key:$ nsupdate -k tsig_key.file dns_records_file.nsupdate-yto generate a signature from the name of the key and from the Base64-encoded shared secret:$ nsupdate -y algorithm:keyname:secret dns_records_file.nsupdate
100.4. Sending an nsupdate request secured using GSS-TSIG
When sending a request using nsupdate, make sure you properly secure it. GSS-TSIG uses the GSS-API interface to obtain the secret TSIG key. GSS-TSIG is an extension to the TSIG protocol.
Prerequisites
- Your DNS server must be configured for GSS-TSIG.
This procedure assumes that Kerberos V5 protocol is used as the technology for GSS-API.
Procedure
Authenticate with a principal allowed to update the records:
$ kinit principal_allowed_to_update_records@REALMRun
nsupdatewith the-goption to enable the GSS-TSIG mode:$ nsupdate -g dns_records_file.nsupdate
Chapter 101. Using Ansible to manage DNS records in IdM
This chapter describes how to manage DNS records in Identity Management (IdM) using an Ansible playbook. As an IdM administrator, you can add, modify, and delete DNS records in IdM. The chapter contains the following sections:
- Ensuring the presence of A and AAAA DNS records in IdM using Ansible
- Ensuring the presence of A and PTR DNS records in IdM using Ansible
- Ensuring the presence of multiple DNS records in IdM using Ansible
- Ensuring the presence of multiple CNAME records in IdM using Ansible
- Ensuring the presence of an SRV record in IdM using Ansible
101.1. DNS records in IdM
Identity Management (IdM) supports many different DNS record types. The following four are used most frequently:
- A
This is a basic map for a host name and an IPv4 address. The record name of an A record is a host name, such as
www. TheIP Addressvalue of an A record is an IPv4 address, such as192.0.2.1.For more information about A records, see RFC 1035.
- AAAA
This is a basic map for a host name and an IPv6 address. The record name of an AAAA record is a host name, such as
www. TheIP Addressvalue is an IPv6 address, such as2001:DB8::1111.For more information about AAAA records, see RFC 3596.
- SRV
Service (SRV) resource records map service names to the DNS name of the server that is providing that particular service. For example, this record type can map a service like an LDAP directory to the server which manages it.
The record name of an SRV record has the format
_service._protocol, such as_ldap._tcp. The configuration options for SRV records include priority, weight, port number, and host name for the target service.For more information about SRV records, see RFC 2782.
- PTR
A pointer record (PTR) adds a reverse DNS record, which maps an IP address to a domain name.
NoteAll reverse DNS lookups for IPv4 addresses use reverse entries that are defined in the
in-addr.arpa.domain. The reverse address, in human-readable form, is the exact reverse of the regular IP address, with thein-addr.arpa.domain appended to it. For example, for the network address192.0.2.0/24, the reverse zone is2.0.192.in-addr.arpa.The record name of a PTR must be in the standard format specified in RFC 1035, extended in RFC 2317, and RFC 3596. The host name value must be a canonical host name of the host for which you want to create the record.
NoteReverse zones can also be configured for IPv6 addresses, with zones in the
.ip6.arpa.domain. For more information about IPv6 reverse zones, see RFC 3596.
When adding DNS resource records, note that many of the records require different data. For example, a CNAME record requires a host name, while an A record requires an IP address. In the IdM Web UI, the fields in the form for adding a new record are updated automatically to reflect what data is required for the currently selected type of record.
101.2. Common ipa dnsrecord-* options
You can use the following options when adding, modifying and deleting the most common DNS resource record types in Identity Management (IdM):
- A (IPv4)
- AAAA (IPv6)
- SRV
- PTR
In Bash, you can define multiple entries by listing the values in a comma-separated list inside curly braces, such as --option={val1,val2,val3}.
| Option | Description |
|---|---|
|
| Sets the time to live for the record. |
|
| Parses the raw DNS records and returns them in a structured format. |
| Option | Description | Examples |
|---|---|---|
|
| Passes a single A record or a list of A records. |
|
| Can create a wildcard A record with a given IP address. |
| |
|
|
Gives the IP address for the record. When creating a record, the option to specify the |
|
[a]
The example creates a wildcard A record with the IP address of 192.0.2.123.
| ||
| Option | Description | Example |
|---|---|---|
|
| Passes a single AAAA (IPv6) record or a list of AAAA records. |
|
|
|
Gives the IPv6 address for the record. When creating a record, the option to specify the |
|
| Option | Description | Example |
|---|---|---|
|
|
Passes a single PTR record or a list of PTR records. When adding the reverse DNS record, the zone name used with the |
|
|
| ||
|
| Gives the host name for the record. |
| Option | Description | Example |
|---|---|---|
|
|
Passes a single SRV record or a list of SRV records. In the examples on the right, _ldap._tcp defines the service type and the connection protocol for the SRV record. The |
|
|
| ||
|
| Sets the priority of the record. There can be multiple SRV records for a service type. The priority (0 - 65535) sets the rank of the record; the lower the number, the higher the priority. A service has to use the record with the highest priority first. |
|
|
| Sets the weight of the record. This helps determine the order of SRV records with the same priority. The set weights should add up to 100, representing the probability (in percentages) that a particular record is used. |
|
|
| Gives the port for the service on the target host. |
|
|
| Gives the domain name of the target host. This can be a single period (.) if the service is not available in the domain. |
101.3. Ensuring the presence of A and AAAA DNS records in IdM using Ansible
Follow this procedure to use an Ansible playbook to ensure that A and AAAA records for a particular IdM host are present. In the example used in the procedure below, an IdM administrator ensures the presence of A and AAAA records for host1 in the idm.example.com DNS zone.
Prerequisites
You have configured your Ansible control node to meet the following requirements:
- You are using Ansible version 2.13 or later.
-
You have installed the
ansible-freeipapackage. - The example assumes that in the ~/MyPlaybooks/ directory, you have created an Ansible inventory file with the fully-qualified domain name (FQDN) of the IdM server.
-
The example assumes that the secret.yml Ansible vault stores your
ipaadmin_password.
-
The target node, that is the node on which the
ansible-freeipamodule is executed, is part of the IdM domain as an IdM client, server or replica. - You know the IdM administrator password.
- The idm.example.com zone exists and is managed by IdM DNS. For more information about adding a primary DNS zone in IdM DNS, see Using Ansible playbooks to manage IdM DNS zones.
Procedure
Navigate to the
/usr/share/doc/ansible-freeipa/playbooks/dnsrecorddirectory:$ cd /usr/share/doc/ansible-freeipa/playbooks/dnsrecordOpen your inventory file and ensure that the IdM server that you want to configure is listed in the
[ipaserver]section. For example, to instruct Ansible to configure server.idm.example.com, enter:[ipaserver] server.idm.example.comMake a copy of the ensure-A-and-AAAA-records-are-present.yml Ansible playbook file. For example:
$ cp ensure-A-and-AAAA-records-are-present.yml ensure-A-and-AAAA-records-are-present-copy.yml- Open the ensure-A-and-AAAA-records-are-present-copy.yml file for editing.
Adapt the file by setting the following variables in the
ipadnsrecordtask section:-
Set the
ipaadmin_passwordvariable to your IdM administrator password. -
Set the
zone_namevariable to idm.example.com. -
In the
recordsvariable, set thenamevariable to host1, and thea_ip_addressvariable to 192.168.122.123. In the
recordsvariable, set thenamevariable to host1, and theaaaa_ip_addressvariable to ::1.This is the modified Ansible playbook file for the current example:
--- - name: Ensure A and AAAA records are present hosts: ipaserver become: true gather_facts: false tasks: # Ensure A and AAAA records are present - name: Ensure that 'host1' has A and AAAA records. ipadnsrecord: ipaadmin_password: "{{ ipaadmin_password }}" zone_name: idm.example.com records: - name: host1 a_ip_address: 192.168.122.123 - name: host1 aaaa_ip_address: ::1-
Set the
- Save the file.
Run the playbook:
$ ansible-playbook --vault-password-file=password_file -v -i inventory.file ensure-A-and-AAAA-records-are-present-copy.yml
101.4. Ensuring the presence of A and PTR DNS records in IdM using Ansible
Follow this procedure to use an Ansible playbook to ensure that an A record for a particular IdM host is present, with a corresponding PTR record. In the example used in the procedure below, an IdM administrator ensures the presence of A and PTR records for host1 with an IP address of 192.168.122.45 in the idm.example.com zone.
Prerequisites
You have configured your Ansible control node to meet the following requirements:
- You are using Ansible version 2.13 or later.
-
You have installed the
ansible-freeipapackage. - The example assumes that in the ~/MyPlaybooks/ directory, you have created an Ansible inventory file with the fully-qualified domain name (FQDN) of the IdM server.
-
The example assumes that the secret.yml Ansible vault stores your
ipaadmin_password.
-
The target node, that is the node on which the
ansible-freeipamodule is executed, is part of the IdM domain as an IdM client, server or replica. - You know the IdM administrator password.
- The idm.example.com DNS zone exists and is managed by IdM DNS. For more information about adding a primary DNS zone in IdM DNS, see Using Ansible playbooks to manage IdM DNS zones.
Procedure
Navigate to the
/usr/share/doc/ansible-freeipa/playbooks/dnsrecorddirectory:$ cd /usr/share/doc/ansible-freeipa/playbooks/dnsrecordOpen your inventory file and ensure that the IdM server that you want to configure is listed in the
[ipaserver]section. For example, to instruct Ansible to configure server.idm.example.com, enter:[ipaserver] server.idm.example.comMake a copy of the ensure-dnsrecord-with-reverse-is-present.yml Ansible playbook file. For example:
$ cp ensure-dnsrecord-with-reverse-is-present.yml ensure-dnsrecord-with-reverse-is-present-copy.yml- Open the ensure-dnsrecord-with-reverse-is-present-copy.yml file for editing.
Adapt the file by setting the following variables in the
ipadnsrecordtask section:-
Set the
ipaadmin_passwordvariable to your IdM administrator password. -
Set the
namevariable to host1. -
Set the
zone_namevariable to idm.example.com. -
Set the
ip_addressvariable to 192.168.122.45. Set the
create_reversevariable to true.This is the modified Ansible playbook file for the current example:
--- - name: Ensure DNS Record is present. hosts: ipaserver become: true gather_facts: false tasks: # Ensure that dns record is present - ipadnsrecord: ipaadmin_password: "{{ ipaadmin_password }}" name: host1 zone_name: idm.example.com ip_address: 192.168.122.45 create_reverse: true state: present-
Set the
- Save the file.
Run the playbook:
$ ansible-playbook --vault-password-file=password_file -v -i inventory.file ensure-dnsrecord-with-reverse-is-present-copy.yml
101.5. Ensuring the presence of multiple DNS records in IdM using Ansible
Follow this procedure to use an Ansible playbook to ensure that multiple values are associated with a particular IdM DNS record. In the example used in the procedure below, an IdM administrator ensures the presence of multiple A records for host1 in the idm.example.com DNS zone.
Prerequisites
You have configured your Ansible control node to meet the following requirements:
- You are using Ansible version 2.13 or later.
-
You have installed the
ansible-freeipapackage. - The example assumes that in the ~/MyPlaybooks/ directory, you have created an Ansible inventory file with the fully-qualified domain name (FQDN) of the IdM server.
-
The example assumes that the secret.yml Ansible vault stores your
ipaadmin_password.
-
The target node, that is the node on which the
ansible-freeipamodule is executed, is part of the IdM domain as an IdM client, server or replica. - You know the IdM administrator password.
- The idm.example.com zone exists and is managed by IdM DNS. For more information about adding a primary DNS zone in IdM DNS, see Using Ansible playbooks to manage IdM DNS zones.
Procedure
Navigate to the
/usr/share/doc/ansible-freeipa/playbooks/dnsrecorddirectory:$ cd /usr/share/doc/ansible-freeipa/playbooks/dnsrecordOpen your inventory file and ensure that the IdM server that you want to configure is listed in the
[ipaserver]section. For example, to instruct Ansible to configure server.idm.example.com, enter:[ipaserver] server.idm.example.comMake a copy of the ensure-presence-multiple-records.yml Ansible playbook file. For example:
$ cp ensure-presence-multiple-records.yml ensure-presence-multiple-records-copy.yml- Open the ensure-presence-multiple-records-copy.yml file for editing.
Adapt the file by setting the following variables in the
ipadnsrecordtask section:-
Set the
ipaadmin_passwordvariable to your IdM administrator password. -
In the
recordssection, set thenamevariable to host1. -
In the
recordssection, set thezone_namevariable to idm.example.com. -
In the
recordssection, set thea_recvariable to 192.168.122.112 and to 192.168.122.122. Define a second record in the
recordssection:-
Set the
namevariable to host1. -
Set the
zone_namevariable to idm.example.com. -
Set the
aaaa_recvariable to ::1.
This is the modified Ansible playbook file for the current example:
-
Set the
--- - name: Test multiple DNS Records are present. hosts: ipaserver become: true gather_facts: false tasks: # Ensure that multiple dns records are present - ipadnsrecord: ipaadmin_password: "{{ ipaadmin_password }}" records: - name: host1 zone_name: idm.example.com a_rec: 192.168.122.112 a_rec: 192.168.122.122 - name: host1 zone_name: idm.example.com aaaa_rec: ::1-
Set the
- Save the file.
Run the playbook:
$ ansible-playbook --vault-password-file=password_file -v -i inventory.file ensure-presence-multiple-records-copy.yml
101.6. Ensuring the presence of multiple CNAME records in IdM using Ansible
A Canonical Name record (CNAME record) is a type of resource record in the Domain Name System (DNS) that maps one domain name, an alias, to another name, the canonical name.
You may find CNAME records useful when running multiple services from a single IP address: for example, an FTP service and a web service, each running on a different port.
Follow this procedure to use an Ansible playbook to ensure that multiple CNAME records are present in IdM DNS. In the example used in the procedure below, host03 is both an HTTP server and an FTP server. The IdM administrator ensures the presence of the www and ftp CNAME records for the host03 A record in the idm.example.com zone.
Prerequisites
You have configured your Ansible control node to meet the following requirements:
- You are using Ansible version 2.13 or later.
-
You have installed the
ansible-freeipapackage. - The example assumes that in the ~/MyPlaybooks/ directory, you have created an Ansible inventory file with the fully-qualified domain name (FQDN) of the IdM server.
-
The example assumes that the secret.yml Ansible vault stores your
ipaadmin_password.
-
The target node, that is the node on which the
ansible-freeipamodule is executed, is part of the IdM domain as an IdM client, server or replica. - You know the IdM administrator password.
- The idm.example.com zone exists and is managed by IdM DNS. For more information about adding a primary DNS zone in IdM DNS, see Using Ansible playbooks to manage IdM DNS zones.
- The host03 A record exists in the idm.example.com zone.
Procedure
Navigate to the
/usr/share/doc/ansible-freeipa/playbooks/dnsrecorddirectory:$ cd /usr/share/doc/ansible-freeipa/playbooks/dnsrecordOpen your inventory file and ensure that the IdM server that you want to configure is listed in the
[ipaserver]section. For example, to instruct Ansible to configure server.idm.example.com, enter:[ipaserver] server.idm.example.comMake a copy of the ensure-CNAME-record-is-present.yml Ansible playbook file. For example:
$ cp ensure-CNAME-record-is-present.yml ensure-CNAME-record-is-present-copy.yml- Open the ensure-CNAME-record-is-present-copy.yml file for editing.
Adapt the file by setting the following variables in the
ipadnsrecordtask section:-
Optional: Adapt the description provided by the
nameof the play. -
Set the
ipaadmin_passwordvariable to your IdM administrator password. -
Set the
zone_namevariable to idm.example.com. In the
recordsvariable section, set the following variables and values:-
Set the
namevariable to www. -
Set the
cname_hostnamevariable to host03. -
Set the
namevariable to ftp. -
Set the
cname_hostnamevariable to host03.
This is the modified Ansible playbook file for the current example:
-
Set the
--- - name: Ensure that 'www.idm.example.com' and 'ftp.idm.example.com' CNAME records point to 'host03.idm.example.com'. hosts: ipaserver become: true gather_facts: false tasks: - ipadnsrecord: ipaadmin_password: "{{ ipaadmin_password }}" zone_name: idm.example.com records: - name: www cname_hostname: host03 - name: ftp cname_hostname: host03-
Optional: Adapt the description provided by the
- Save the file.
Run the playbook:
$ ansible-playbook --vault-password-file=password_file -v -i inventory.file ensure-CNAME-record-is-present.yml
101.7. Ensuring the presence of an SRV record in IdM using Ansible
A DNS service (SRV) record defines the hostname, port number, transport protocol, priority and weight of a service available in a domain. In Identity Management (IdM), you can use SRV records to locate IdM servers and replicas.
Follow this procedure to use an Ansible playbook to ensure that an SRV record is present in IdM DNS. In the example used in the procedure below, an IdM administrator ensures the presence of the _kerberos._udp.idm.example.com SRV record with the value of 10 50 88 idm.example.com. This sets the following values:
- It sets the priority of the service to 10.
- It sets the weight of the service to 50.
- It sets the port to be used by the service to 88.
Prerequisites
You have configured your Ansible control node to meet the following requirements:
- You are using Ansible version 2.13 or later.
-
You have installed the
ansible-freeipapackage. - The example assumes that in the ~/MyPlaybooks/ directory, you have created an Ansible inventory file with the fully-qualified domain name (FQDN) of the IdM server.
-
The example assumes that the secret.yml Ansible vault stores your
ipaadmin_password.
-
The target node, that is the node on which the
ansible-freeipamodule is executed, is part of the IdM domain as an IdM client, server or replica. - You know the IdM administrator password.
- The idm.example.com zone exists and is managed by IdM DNS. For more information about adding a primary DNS zone in IdM DNS, see Using Ansible playbooks to manage IdM DNS zones.
Procedure
Navigate to the
/usr/share/doc/ansible-freeipa/playbooks/dnsrecorddirectory:$ cd /usr/share/doc/ansible-freeipa/playbooks/dnsrecordOpen your inventory file and ensure that the IdM server that you want to configure is listed in the
[ipaserver]section. For example, to instruct Ansible to configure server.idm.example.com, enter:[ipaserver] server.idm.example.comMake a copy of the ensure-SRV-record-is-present.yml Ansible playbook file. For example:
$ cp ensure-SRV-record-is-present.yml ensure-SRV-record-is-present-copy.yml- Open the ensure-SRV-record-is-present-copy.yml file for editing.
Adapt the file by setting the following variables in the
ipadnsrecordtask section:-
Set the
ipaadmin_passwordvariable to your IdM administrator password. -
Set the
namevariable to _kerberos._udp.idm.example.com. -
Set the
srv_recvariable to '10 50 88 idm.example.com'. Set the
zone_namevariable to idm.example.com.This the modified Ansible playbook file for the current example:
--- - name: Test multiple DNS Records are present. hosts: ipaserver become: true gather_facts: false tasks: # Ensure a SRV record is present - ipadnsrecord: ipaadmin_password: "{{ ipaadmin_password }}" name: _kerberos._udp.idm.example.com srv_rec: ’10 50 88 idm.example.com’ zone_name: idm.example.com state: present-
Set the
- Save the file.
Run the playbook:
$ ansible-playbook --vault-password-file=password_file -v -i inventory.file ensure-SRV-record-is-present.yml
Chapter 102. Managing IdM servers by using Ansible
You can use Red Hat Ansible Engine to manage the servers in your Identity Management (IdM) topology. You can use the server module in the ansible-freeipa package to check the presence or absence of a server in the IdM topology. You can also hide any replica or make a replica visible.
The section contains the following topics:
- Checking that an IdM server is present by using Ansible
- Ensuring that an IdM server is absent from an IdM topology by using Ansible
- Ensuring the absence of an IdM server despite hosting a last IdM server role
- Ensuring that an IdM server is absent but not necessarily disconnected from other IdM servers
- Ensuring that an existing IdM server is hidden using an Ansible playbook
- Ensuring that an existing IdM server is visible using an Ansible playbook
- Ensuring that an existing IdM server has an IdM DNS location assigned
- Ensuring that an existing IdM server has no IdM DNS location assigned
102.1. Checking that an IdM server is present by using Ansible
You can use the ipaserver ansible-freeipa module in an Ansible playbook to verify that an Identity Management (IdM) server exists.
The ipaserver Ansible module does not install the IdM server.
Prerequisites
On the control node:
- You are using Ansible version 2.13 or later.
-
You have installed the
ansible-freeipapackage. - The example assumes that in the ~/MyPlaybooks/ directory, you have created an Ansible inventory file with the fully-qualified domain name (FQDN) of the IdM server.
-
The example assumes that the secret.yml Ansible vault stores your
ipaadmin_password.
The target node, that is the node on which the
ansible-freeipamodule is executed, is part of the IdM domain as an IdM client, server or replica.-
The
SSHconnection from the control node to the IdM server defined in the inventory file is working correctly.
-
The
Procedure
Navigate to your ~/MyPlaybooks/ directory:
$ cd ~/MyPlaybooks/Copy the
server-present.ymlAnsible playbook file located in the/usr/share/doc/ansible-freeipa/playbooks/server/directory:$ cp /usr/share/doc/ansible-freeipa/playbooks/server/server-present.yml server-present-copy.yml-
Open the
server-present-copy.ymlfile for editing. Adapt the file by setting the following variables in the
ipaservertask section and save the file:-
Set the
ipaadmin_passwordvariable to the password of the IdMadmin. -
Set the
namevariable to theFQDNof the server. TheFQDNof the example server is server123.idm.example.com.
--- - name: Server present example hosts: ipaserver vars_files: - /home/user_name/MyPlaybooks/secret.yml tasks: - name: Ensure server server123.idm.example.com is present ipaserver: ipaadmin_password: "{{ ipaadmin_password }}" name: server123.idm.example.com-
Set the
Run the Ansible playbook and specify the playbook file and the inventory file:
$ ansible-playbook --vault-password-file=password_file -v -i inventory server-present-copy.yml
102.2. Ensuring that an IdM server is absent from an IdM topology by using Ansible
Use an Ansible playbook to ensure an Identity Management (IdM) server does not exist in an IdM topology, even as a host.
In contrast to the ansible-freeipa ipaserver role, the ipaserver module used in this playbook does not uninstall IdM services from the server.
Prerequisites
On the control node:
- You are using Ansible version 2.13 or later.
-
You have installed the
ansible-freeipapackage. - The example assumes that in the ~/MyPlaybooks/ directory, you have created an Ansible inventory file with the fully-qualified domain name (FQDN) of the IdM server.
-
The example assumes that the secret.yml Ansible vault stores your
ipaadmin_password.
The target node, that is the node on which the
ansible-freeipamodule is executed, is part of the IdM domain as an IdM client, server or replica.-
The
SSHconnection from the control node to the IdM server defined in the inventory file is working correctly.
-
The
Procedure
Navigate to your ~/MyPlaybooks/ directory:
$ cd ~/MyPlaybooks/Copy the
server-absent.ymlAnsible playbook file located in the/usr/share/doc/ansible-freeipa/playbooks/server/directory:$ cp /usr/share/doc/ansible-freeipa/playbooks/server/server-absent.yml server-absent-copy.yml-
Open the
server-absent-copy.ymlfile for editing. Adapt the file by setting the following variables in the
ipaservertask section and save the file:-
Set the
ipaadmin_passwordvariable to the password of the IdMadmin. -
Set the
namevariable to theFQDNof the server. TheFQDNof the example server is server123.idm.example.com. -
Ensure that the
statevariable is set toabsent.
--- - name: Server absent example hosts: ipaserver vars_files: - /home/user_name/MyPlaybooks/secret.yml tasks: - name: Ensure server server123.idm.example.com is absent ipaserver: ipaadmin_password: "{{ ipaadmin_password }}" name: server123.idm.example.com state: absent-
Set the
Run the Ansible playbook and specify the playbook file and the inventory file:
$ ansible-playbook --vault-password-file=password_file -v -i inventory server-absent-copy.yml- Make sure all name server (NS) DNS records pointing to server123.idm.example.com are deleted from your DNS zones. This applies regardless of whether you use integrated DNS managed by IdM or external DNS.
102.3. Ensuring the absence of an IdM server despite hosting a last IdM server role
You can use Ansible to ensure that an Identity Management (IdM) server is absent even if the last IdM service instance is running on the server. A certificate authority (CA), key recovery authority (KRA), or DNS server are all examples of IdM services.
If you remove the last server that serves as a CA, KRA, or DNS server, you disrupt IdM functionality seriously. You can manually check which services are running on which IdM servers with the ipa service-find command. The principal name of a CA server is dogtag/server_name/REALM_NAME.
In contrast to the ansible-freeipa ipaserver role, the ipaserver module used in this playbook does not uninstall IdM services from the server.
Prerequisites
On the control node:
- You are using Ansible version 2.13 or later.
-
You have installed the
ansible-freeipapackage. - The example assumes that in the ~/MyPlaybooks/ directory, you have created an Ansible inventory file with the fully-qualified domain name (FQDN) of the IdM server.
-
The example assumes that the secret.yml Ansible vault stores your
ipaadmin_password.
The target node, that is the node on which the
ansible-freeipamodule is executed, is part of the IdM domain as an IdM client, server or replica.-
The
SSHconnection from the control node to the IdM server defined in the inventory file is working correctly.
-
The
Procedure
Navigate to your ~/MyPlaybooks/ directory:
$ cd ~/MyPlaybooks/Copy the
server-absent-ignore-last-of-role.ymlAnsible playbook file located in the/usr/share/doc/ansible-freeipa/playbooks/server/directory:$ cp /usr/share/doc/ansible-freeipa/playbooks/server/server-absent-ignore-last-of-role.yml server-absent-ignore-last-of-role-copy.yml-
Open the
server-absent-ignore-last-of-role-copy.ymlfile for editing. Adapt the file by setting the following variables in the
ipaservertask section and save the file:-
Set the
ipaadmin_passwordvariable to the password of the IdMadmin. -
Set the
namevariable to theFQDNof the server. TheFQDNof the example server is server123.idm.example.com. -
Ensure that the
ignore_last_of_rolevariable is set totrue. -
Set the
statevariable toabsent.
--- - name: Server absent with last of role skip example hosts: ipaserver vars_files: - /home/user_name/MyPlaybooks/secret.yml tasks: - name: Ensure server “server123.idm.example.com" is absent with last of role skip ipaserver: ipaadmin_password: "{{ ipaadmin_password }}" name: server123.idm.example.com ignore_last_of_role: true state: absent-
Set the
Run the Ansible playbook and specify the playbook file and the inventory file:
$ ansible-playbook --vault-password-file=password_file -v -i inventory server-absent-ignore-last-of-role-copy.yml- Make sure all name server (NS) DNS records that point to server123.idm.example.com are deleted from your DNS zones. This applies regardless of whether you use integrated DNS managed by IdM or external DNS.
102.4. Ensuring that an IdM server is absent but not necessarily disconnected from other IdM servers
If you are removing an Identity Management (IdM) server from the topology, you can keep its replication agreements intact with an Ansible playbook. The playbook also ensures that the IdM server does not exist in IdM, even as a host.
Ignoring a server’s replication agreements when removing it is only recommended when the other servers are dysfunctional servers that you are planning to remove anyway. Removing a server that serves as a central point in the topology can split your topology into two disconnected clusters.
You can remove a dysfunctional server from the topology with the ipa server-del command.
If you remove the last server that serves as a certificate authority (CA), key recovery authority (KRA), or DNS server, you seriously disrupt the Identity Management (IdM) functionality. To prevent this problem, the playbook makes sure these services are running on another server in the domain before it uninstalls a server that serves as a CA, KRA, or DNS server.
In contrast to the ansible-freeipa ipaserver role, the ipaserver module used in this playbook does not uninstall IdM services from the server.
Prerequisites
On the control node:
- You are using Ansible version 2.13 or later.
-
You have installed the
ansible-freeipapackage. - The example assumes that in the ~/MyPlaybooks/ directory, you have created an Ansible inventory file with the fully-qualified domain name (FQDN) of the IdM server.
-
The example assumes that the secret.yml Ansible vault stores your
ipaadmin_password.
The target node, that is the node on which the
ansible-freeipamodule is executed, is part of the IdM domain as an IdM client, server or replica.-
The
SSHconnection from the control node to the IdM server defined in the inventory file is working correctly.
-
The
Procedure
Navigate to your ~/MyPlaybooks/ directory:
$ cd ~/MyPlaybooks/Copy the
server-absent-ignore_topology_disconnect.ymlAnsible playbook file located in the/usr/share/doc/ansible-freeipa/playbooks/server/directory:$ cp /usr/share/doc/ansible-freeipa/playbooks/server/server-absent-ignore_topology_disconnect.yml server-absent-ignore_topology_disconnect-copy.yml-
Open the
server-absent-ignore_topology_disconnect-copy.ymlfile for editing. Adapt the file by setting the following variables in the
ipaservertask section and save the file:-
Set the
ipaadmin_passwordvariable to the password of the IdMadmin. -
Set the
namevariable to theFQDNof the server. TheFQDNof the example server is server123.idm.example.com. -
Ensure that the
ignore_topology_disconnectvariable is set totrue. -
Ensure that the
statevariable is set toabsent.
--- - name: Server absent with ignoring topology disconnects example hosts: ipaserver vars_files: - /home/user_name/MyPlaybooks/secret.yml tasks: - name: Ensure server “server123.idm.example.com" with ignoring topology disconnects ipaserver: ipaadmin_password: "{{ ipaadmin_password }}" name: server123.idm.example.com ignore_topology_disconnect: true state: absent-
Set the
Run the Ansible playbook and specify the playbook file and the inventory file:
$ ansible-playbook --vault-password-file=password_file -v -i inventory server-absent-ignore_topology_disconnect-copy.yml- Optional: Make sure all name server (NS) DNS records pointing to server123.idm.example.com are deleted from your DNS zones. This applies regardless of whether you use integrated DNS managed by IdM or external DNS.
102.6. Ensuring that an existing IdM server is visible by using an Ansible playbook
Use the ipaserver ansible-freeipa module in an Ansible playbook to ensure that an existing Identity Management (IdM) server is visible. Note that this playbook does not install the IdM server.
Prerequisites
On the control node:
- You are using Ansible version 2.13 or later.
-
You have installed the
ansible-freeipapackage. - The example assumes that in the ~/MyPlaybooks/ directory, you have created an Ansible inventory file with the fully-qualified domain name (FQDN) of the IdM server.
-
The example assumes that the secret.yml Ansible vault stores your
ipaadmin_password.
The target node, that is the node on which the
ansible-freeipamodule is executed, is part of the IdM domain as an IdM client, server or replica.-
The
SSHconnection from the control node to the IdM server defined in the inventory file is working correctly.
-
The
Procedure
Navigate to your ~/MyPlaybooks/ directory:
$ cd ~/MyPlaybooks/Copy the
server-not-hidden.ymlAnsible playbook file located in the/usr/share/doc/ansible-freeipa/playbooks/server/directory:$ cp /usr/share/doc/ansible-freeipa/playbooks/server/server-not-hidden.yml server-not-hidden-copy.yml-
Open the
server-not-hidden-copy.ymlfile for editing. Adapt the file by setting the following variables in the
ipaservertask section and save the file:-
Set the
ipaadmin_passwordvariable to the password of the IdMadmin. -
Set the
namevariable to theFQDNof the server. TheFQDNof the example server is server123.idm.example.com. -
Ensure that the
hiddenvariable is set tono.
--- - name: Server not hidden example hosts: ipaserver vars_files: - /home/user_name/MyPlaybooks/secret.yml tasks: - name: Ensure server server123.idm.example.com is not hidden ipaserver: ipaadmin_password: "{{ ipaadmin_password }}" name: server123.idm.example.com hidden: no-
Set the
Run the Ansible playbook and specify the playbook file and the inventory file:
$ ansible-playbook --vault-password-file=password_file -v -i inventory server-not-hidden-copy.yml
102.7. Ensuring that an existing IdM server has an IdM DNS location assigned
Use the ipaserver ansible-freeipa module in an Ansible playbook to ensure that an existing Identity Management (IdM) server is assigned a specific IdM DNS location.
Note that the ipaserver Ansible module does not install the IdM server.
Prerequisites
-
You know the IdM
adminpassword. - The IdM DNS location exists. The example location is germany.
-
You have
rootaccess to the server. The example server is server123.idm.example.com. You have configured your Ansible control node to meet the following requirements:
- You are using Ansible version 2.13 or later.
-
You have installed the
ansible-freeipapackage. - The example assumes that in the ~/MyPlaybooks/ directory, you have created an Ansible inventory file with the fully-qualified domain name (FQDN) of the IdM server.
-
The example assumes that the secret.yml Ansible vault stores your
ipaadmin_password.
The target node, that is the node on which the
ansible-freeipamodule is executed, is part of the IdM domain as an IdM client, server or replica.-
The
SSHconnection from the control node to the IdM server defined in the inventory file is working correctly.
-
The
Procedure
Navigate to your ~/MyPlaybooks/ directory:
$ cd ~/MyPlaybooks/Copy the
server-location.ymlAnsible playbook file located in the/usr/share/doc/ansible-freeipa/playbooks/server/directory:$ cp /usr/share/doc/ansible-freeipa/playbooks/server/server-location.yml server-location-copy.yml-
Open the
server-location-copy.ymlfile for editing. Adapt the file by setting the following variables in the
ipaservertask section and save the file:-
Set the
ipaadmin_passwordvariable to the password of the IdMadmin. -
Set the
namevariable to server123.idm.example.com. -
Set the
locationvariable to germany.
This is the modified Ansible playbook file for the current example:
--- - name: Server enabled example hosts: ipaserver vars_files: - /home/user_name/MyPlaybooks/secret.yml tasks: - name: Ensure server server123.idm.example.com with location “germany" is present ipaserver: ipaadmin_password: "{{ ipaadmin_password }}" name: server123.idm.example.com location: germany-
Set the
Run the Ansible playbook and specify the playbook file and the inventory file:
$ ansible-playbook --vault-password-file=password_file -v -i inventory server-location-copy.ymlConnect to server123.idm.example.com as
rootusingSSH:ssh root@server123.idm.example.comRestart the
namedservice on the server for the updates to take effect immediately:[root@server123.idm.example.com ~]# systemctl restart named
102.8. Ensuring that an existing IdM server has no IdM DNS location assigned
Use the ipaserver ansible-freeipa module in an Ansible playbook to ensure that an existing Identity Management (IdM) server has no IdM DNS location assigned to it. Do not assign a DNS location to servers that change geographical location frequently. Note that the playbook does not install the IdM server.
Prerequisites
-
You know the IdM
adminpassword. -
You have
rootaccess to the server. The example server is server123.idm.example.com. You have configured your Ansible control node to meet the following requirements:
- You are using Ansible version 2.13 or later.
-
You have installed the
ansible-freeipapackage. - The example assumes that in the ~/MyPlaybooks/ directory, you have created an Ansible inventory file with the fully-qualified domain name (FQDN) of the IdM server.
-
The example assumes that the secret.yml Ansible vault stores your
ipaadmin_password.
The target node, that is the node on which the
ansible-freeipamodule is executed, is part of the IdM domain as an IdM client, server or replica.-
The
SSHconnection from the control node to the IdM server defined in the inventory file is working correctly.
-
The
Procedure
Navigate to your ~/MyPlaybooks/ directory:
$ cd ~/MyPlaybooks/Copy the
server-no-location.ymlAnsible playbook file located in the/usr/share/doc/ansible-freeipa/playbooks/server/directory:$ cp /usr/share/doc/ansible-freeipa/playbooks/server/server-no-location.yml server-no-location-copy.yml-
Open the
server-no-location-copy.ymlfile for editing. Adapt the file by setting the following variables in the
ipaservertask section and save the file:-
Set the
ipaadmin_passwordvariable to the password of the IdMadmin. -
Set the
namevariable to server123.idm.example.com. -
Ensure that the
locationvariable is set to "”.
--- - name: Server no location example hosts: ipaserver vars_files: - /home/user_name/MyPlaybooks/secret.yml tasks: - name: Ensure server server123.idm.example.com is present with no location ipaserver: ipaadmin_password: "{{ ipaadmin_password }}" name: server123.idm.example.com location: “"-
Set the
Run the Ansible playbook and specify the playbook file and the inventory file:
$ ansible-playbook --vault-password-file=password_file -v -i inventory server-no-location-copy.ymlConnect to server123.idm.example.com as
rootusingSSH:ssh root@server123.idm.example.comRestart the
namedservice on the server for the updates to take effect immediately:[root@server123.idm.example.com ~]# systemctl restart named
Chapter 103. Collecting IdM Healthcheck information
Healthcheck has been designed as a manual command line tool which should help you to identify possible problems in Identity Management (IdM).
You can create a collection of logs based on the Healthcheck output with 30-day rotation.
Prerequisites
- The Healthcheck tool is only available on RHEL 8.1 or newer
103.1. Healthcheck in IdM
The Healthcheck command line tool in Identity Management (IdM) helps find issues that can impact the performance of your IdM environment. Using Healthcheck, you can identify an issue in advance so that you can correct it before it becomes critical.
You can use Healthcheck without obtaining a Kerberos ticket.
Modules are independent
Healthcheck consists of independent modules which check for:
- Replication issues
- Certificate validity
- Certificate authority infrastructure issues
- IdM and Active Directory trust issues
- Correct file permissions and ownership settings
Output formats and destination
You can set the following types of output for Healthcheck to generate by using the output-type option:
-
json: Machine-readable output in JSON format (default) -
human: Human-readable output
You can specify a file to store the output by using the --output-file option.
Results
Each Healthcheck module returns one of the following results:
- SUCCESS
- The system is configured as expected.
- WARNING
- It is advisable to monitor or evaluate the configuration.
- ERROR
- The system is not configured as expected.
- CRITICAL
- The configuration is not as expected, with a significant potential to impact the functioning of your IdM deployment.
103.2. Log rotation
Log rotation creates a new log file every day and the files are organized by date. The date is included in the filename.
Using log rotation, you can configure the maximum number of log files to be stored. If this number is exceeded, the newest file replaces the oldest one. For example, if the maximum rotation number is thirty, the thirty-first log file replaces the first, that is the oldest one.
Log rotation reduces voluminous log files and organizes them. This helps you analyze the logs.
103.3. Configuring log rotation using the IdM Healthcheck tool
Follow this procedure to configure log rotation with the following utilities:
-
The
systemdtimer -
The
crondservice
The systemd timer runs the Healthcheck tool periodically and generates the logs. By default, this is set to occur at 4 a.m. every day.
The crond service is used for log rotation.
The default log name is healthcheck.log and the rotated logs use the healthcheck.log-YYYYMMDD format.
Prerequisites
-
You have
rootprivileges.
Procedure
Enable a
systemdtimer:# systemctl enable ipa-healthcheck.timer Created symlink /etc/systemd/system/multi-user.target.wants/ipa-healthcheck.timer -> /usr/lib/systemd/system/ipa-healthcheck.timer.Start the
systemdtimer:# systemctl start ipa-healthcheck.timerOpen the
/etc/logrotate.d/ipahealthcheckfile to configure the number of logs you want to be saved:[...] rotate 30 }By default, logs are stored for 30 days before they are overwritten by newer logs.
In the same file, configure the path to the file storing the logs.
/var/log/ipa/healthcheck/healthcheck.log { [...]By default, logs are saved in the
/var/log/ipa/healthcheck/directory.- In the same file, configure at what time you want logs to be generated. By default, a log is created daily at 4 a.m.
- Save the file.
Ensure that the
crondservice is enabled and running:# systemctl enable crond # systemctl start crondTo start generating logs, start the IdM healthcheck service:
# systemctl start ipa-healthcheck
Verification
-
Navigate to the
/var/log/ipa/healthcheck/directory. - Display the contents of the log file to check if it was created correctly.
103.4. Changing IdM Healthcheck configuration
You can change Healthcheck settings by adding the desired command line options to the /etc/ipahealthcheck/ipahealthcheck.conf file. This can be useful when, for example, you configured a log rotation and want to ensure the logs are in a format suitable for automatic analysis, but do not want to set up a new timer.
This Healthcheck feature is only available on RHEL 8.7 and newer.
After the modification, all logs that Healthcheck creates follow the new settings. These settings also apply to any manual execution of Healthcheck.
When running Healthcheck manually, settings in the configuration file take precedence over options specified in the command line. For example, if output_type is set to human in the configuration file, specifying json on the command line has no effect. Any command line options you use that are not specified in the configuration file are applied normally.
103.5. Configuring Healthcheck to change the output logs format
Follow this procedure to configure Healthcheck with a timer already configured. In this example, you re-configure Healthcheck to start producing logs in a human-readable format and to also include successful results instead of only errors.
Prerequisites
- Your system is running RHEL 8.7 or later.
-
You have
rootprivileges. - You have previously configured log rotation on a timer.
Procedure
-
Open the
/etc/ipahealthcheck/ipahealthcheck.conffile in a text editor. -
Add options
output_type=humanandall=Trueto the[default]section. - Save and close the file.
Verification
Run Healthcheck manually:
# ipa-healthcheck-
Go to
/var/log/ipa/healthcheck/and check that the logs are in the correct format.
Chapter 104. Checking services using IdM Healthcheck
You can monitor services used by the Identity Management (IdM) server using the Healthcheck tool.
Prerequisites
- The Healthcheck tool is only available on RHEL 8.1 and newer
104.1. The IdM services Healthcheck test
The Healthcheck tool includes a test to check if the Identity Management (IdM) services are running correctly. Start with this Healthcheck test as IdM services that are not running correctly can cause failures in other Healthcheck tests.
The services test is context-specific based on what features are configured. For example, named is only checked if the integrated IdM DNS service is configured on the IdM server. Others, for example smb or winbind, are only checked if an IdM-AD trust is enabled.
The list of IdM services that the test evaluates can look as follows:
- certmonger
- dirsrv
- gssproxy
- httpd
- ipa_custodia
- ipa_dnskeysyncd
- ipa_otpd
- kadmin
- krb5kdc
- named
- pki_tomcatd
- sssd
You can view this list by running the ipa-healthcheck --list-sources command and identifying the ipahealthcheck.meta.services section in the output.
104.2. Screening IdM services using Healthcheck
Follow this procedure to run a standalone manual test of services running on the Identity Management (IdM) server by using the Healthcheck tool.
Procedure
Enter:
# ipa-healthcheck --source=ipahealthcheck.meta.services-
The
--source=ipahealthcheck.meta.servicesoption ensures that IdM Healthcheck only performs the services test. -
The
--failures-onlyoption is enabled by default and it ensures that IdM Healthcheck only reports warnings, errors and critical issues.
A successful test displays empty brackets:
[ ]If one of the services fails, the result can looks similarly to this example:
{ "source": "ipahealthcheck.meta.services", "check": "httpd", "result": "ERROR", "kw": { "status": false, "msg": "httpd: not running" } }NoteRun this test on all IdM servers when trying to discover issues.
-
The
Chapter 105. Verifying your IdM and AD trust configuration using IdM Healthcheck
Learn more about identifying issues with a trust between Identity Management (IdM) and Active Directory (AD) by using the Healthcheck tool.
Prerequisites
- The Healthcheck tool is only available on RHEL 8.1 or newer
105.1. IdM and AD trust Healthcheck tests
The Healthcheck tool includes several tests for testing the status of the trust between Identity Management (IdM) and Active Directory (AD).
To see all trust tests, run ipa-healthcheck with the --list-sources option:
# ipa-healthcheck --list-sources
You can find all trust-related tests under the ipahealthcheck.ipa.trust source:
- IPATrustAgentCheck
-
This test checks the SSSD configuration if the current host is configured as a trust agent. For each domain in
/etc/sssd/sssd.confwhereid_provider=ipaensure thatipa_server_modeisTrue. - IPATrustDomainsCheck
-
This test checks if the trust domains match SSSD domains by comparing the list of domains in
sssctl domain-listwith the list of domains fromipa trust-findexcluding the IdM domain. - IPATrustCatalogCheck
This test resolves an AD user,
Administrator@REALM. This populates the AD Global catalog and AD Domain Controller values insssctl domain-statusoutput.For each trust domain look up the user with the ID of the SID + 500, that is the administrator ID, and then check the output of
sssctl domain-status <domain> --active-serverto ensure that the domain is active.- IPAsidgenpluginCheck
-
This test verifies that the
sidgenplugin is enabled in the IdM 389-ds instance. The test also verifies that theIPA SIDGENandipa-sidgen-taskplugins incn=plugins,cn=configinclude thensslapd-pluginEnabledoption. - IPATrustAgentMemberCheck
-
This test verifies that the current host is a member of
cn=adtrust agents,cn=sysaccounts,cn=etc,SUFFIX. - IPATrustControllerPrincipalCheck
-
This test verifies that the current host is a member of
cn=adtrust agents,cn=sysaccounts,cn=etc,SUFFIX. - IPATrustControllerServiceCheck
- This test verifies that the current host starts the ADTRUST service in ipactl.
- IPATrustControllerConfCheck
-
This test verifies that
ldapiis enabled for the passdb backend in the output ofnet conflist. - IPATrustControllerGroupSIDCheck
-
This test verifies that the
adminsgroup’s SID ends with 512, which is the Domain Admins' RID. - IPATrustPackageCheck
-
This test verifies that the
trust-adpackage is installed if the trust controller and AD trust are not enabled.
105.2. Screening the trust with the Healthcheck tool
Follow this procedure to run a standalone manual test of an Identity Management (IdM) and Active Directory (AD) trust health check using the Healthcheck tool.
Procedure
Enter:
# ipa-healthcheck --source=ipahealthcheck.ipa.trust --failures-only-
The
--source=ipahealthcheck.ipa.trustoption ensures that IdM Healthcheck only performs the trust tests.
-
The
Successful test displays empty brackets:
# ipa-healthcheck --source=ipahealthcheck.ipa.trust
[]Run these tests on all IdM servers when trying to find an issue.
Chapter 106. Verifying certificates using IdM Healthcheck
Learn more about understanding and using the Healthcheck tool in Identity management (IdM) to identify issues with IdM certificates maintained by the certmonger utility.
Prerequisites
- The Healthcheck tool is only available in RHEL 8.1 and newer.
106.1. IdM certificates Healthcheck tests
The Healthcheck tool includes several tests for verifying the status of certificates maintained by certmonger in Identity Management (IdM). For details about certmonger, see Obtaining an IdM certificate for a service using certmonger.
This suite of tests checks certificate expiration, validation, trust, and other configuration. Healthcheck can report multiple errors for the same underlying issue.
You can find these certificate tests under the ipahealthcheck.ipa.certs source in the output of the ipa-healthcheck --list-sources command.
- IPACertmongerExpirationCheck
This test checks expirations in
certmonger.If an error is reported, the certificate has expired.
If a warning appears, the certificate expires soon. By default, a warning appears if the test is run 28 days or fewer before certificate expiration.
You can configure the number of days in the
/etc/ipahealthcheck/ipahealthcheck.conffile. After opening the file, change thecert_expiration_daysoption located in thedefaultsection.NoteCertmongerloads and maintains its own view of the certificate expiration. This check does not validate the on-disk certificate.- IPACertfileExpirationCheck
This test checks if the certificate file or NSS database have correct access rights configured. This test also checks expiration. Therefore, carefully read the
msgattribute in the error or warning output. The message specifies the problem.NoteThis test checks the on-disk certificate. If a certificate is missing or unreadable, Healthcheck returns an error.
- IPACertNSSTrust
- This test analyzes the trust for certificates stored in the NSS databases. For the expected tracked certificates in the NSS databases, Healthcheck compares the trust to an expected value and raises an error on a non-match.
- IPANSSChainValidation
-
This test validates the certificate chain of the NSS certificates. The test executes the
certutil -V -u V -e -d [dbdir] -n [nickname]command. - IPAOpenSSLChainValidation
This test validates the certificate chain of the OpenSSL certificates. Specifically, Healthcheck executes the following OpenSSL command:
openssl verify -verbose -show_chain -CAfile /etc/ipa/ca.crt [cert file]- IPARAAgent
-
This test compares the certificate on disk with the equivalent record in LDAP in
uid=ipara,ou=People,o=ipaca. - IPACertRevocation
-
This test verifies that certificates that are maintained by
certmongerhave not been revoked. - IPACertmongerCA
This test verifies the
certmongerCertificate Authority (CA) configuration. IdM cannot issue certificates without a CA.Certmongermaintains a set of CA helpers. A CA namedIPAissues certificates for hosts or services through IdM, authenticating as a host or user principal.There are also
dogtag-ipa-ca-renew-agentanddogtag-ipa-ca-renew-agent-reusethat renew the CA subsystem certificates.
106.2. Screening certificates using the Healthcheck tool
Follow this procedure to run a standalone manual test of an Identity Management (IdM) certificate health check using the Healthcheck tool.
Prerequisites
-
You have
rootprivileges.
Procedure
Enter:
# ipa-healthcheck --source=ipahealthcheck.ipa.certs --failures-onlyThe
--source=ipahealthcheck.ipa.certsoption ensures that IdM Healthcheck only performs thecertmongercertificate tests.Successful test displays empty brackets:
[]Failed test shows you the following output:
{ "source": "ipahealthcheck.ipa.certs", "check": "IPACertfileExpirationCheck", "result": "ERROR", "kw": { "key": 1234, "dbdir": "/path/to/nssdb", "error": [error], "msg": "Unable to open NSS database '/path/to/nssdb': [error]" } }
This
IPACertfileExpirationChecktest failed on opening the NSS database.
Run this suite of Healthcheck tests on all IdM servers when trying to check for issues.
Chapter 107. Verifying system certificates using IdM Healthcheck
Learn more about identifying issues with system certificates in Identity Management (IdM) by using the Healthcheck tool.
Prerequisites
- The Healthcheck tool is only available on RHEL 8.1 or newer.
107.1. System certificates Healthcheck tests
The Healthcheck tool includes several tests for verifying system, or Dogtag, certificates.
You can find all certificate-related tests under the ipahealthcheck.dogtag.ca source in the output of the ipa-healthcheck --list-sources command.
- DogtagCertsConfigCheck
This test compares the CA (Certificate Authority) certificates in its NSS database to the same values stored in
CS.cfg. If they do not match, the CA fails to start.Specifically, it checks:
-
auditSigningCert cert-pki-caagainstca.audit_signing.cert -
ocspSigningCert cert-pki-caagainstca.ocsp_signing.cert -
caSigningCert cert-pki-caagainstca.signing.cert -
subsystemCert cert-pki-caagainstca.subsystem.cert -
Server-Cert cert-pki-caagainstca.sslserver.cert
If Key Recovery Authority (KRA) is installed, it also checks:
-
transportCert cert-pki-kraagainstca.connector.KRA.transportCert
-
- DogtagCertsConnectivityCheck
This test verifies connectivity. This test is equivalent to the
ipa cert-show 1command which checks the following:- The PKI proxy configuration in Apache
- IdM being able to find a CA
- The RA agent client certificate
- The correctness of CA replies to requests
The test verifies that the
ipa cert-showcommand can be executed and that an expected response is returned from the IdM CA - either the certificate itself or anot foundresponse.
107.2. Screening system certificates using Healthcheck
Follow this procedure to run a standalone manual test of Identity Management (IdM) certificates using the Healthcheck tool.
Procedure
Enter:
# ipa-healthcheck --source=ipahealthcheck.dogtag.ca-
The
--source=ipahealthcheck.dogtag.caoption ensures that Healthcheck only performs the certificate tests.
-
The
An example of a successful test:
{
"source: ipahealthcheck.dogtag.ca",
"check: DogtagCertsConfigCheck",
"result: SUCCESS",
"uuid: 9b366200-9ec8-4bd9-bb5e-9a280c803a9c",
"when: 20191008135826Z",
"duration: 0.252280",
"kw:" {
"key": "Server-Cert cert-pki-ca",
"configfile": "/var/lib/pki/pki-tomcat/conf/ca/CS.cfg"
}
}An example of a failed test:
{
"source: ipahealthcheck.dogtag.ca",
"check: DogtagCertsConfigCheck",
"result: CRITICAL",
"uuid: 59d66200-1447-4b3b-be01-89810c803a98",
"when: 20191008135912Z",
"duration: 0.002022",
"kw:" {
"exception": "NSDB /etc/pki/pki-tomcat/alias not initialized",
}
}Run the certificate tests on all IdM servers when trying to find an issue.
Chapter 108. Checking disk space using IdM Healthcheck
You can monitor the Identity Management server’s free disk space using the Healthcheck tool.
Prerequisites
- The Healthcheck tool is only available on RHEL 8.1 and newer.
108.1. Disk space healthcheck test
The Healthcheck tool includes the FileSystemSpaceCheck test for checking available disk space. The test checks the following:
- The minimum raw free bytes needed.
- The percentage — the minimum free disk space is hardcoded to 20%.
The test checks the following paths:
| Paths checked by the test | Minimal disk space in MB |
|---|---|
|
| 1024 |
|
| 512 |
|
| 1024 |
|
| 512 |
|
| 512 |
|
| 512 |
Insufficient free disk space can cause issues with the following:
- Logging
- Execution
- Backups
You can find the FileSystemSpaceCheck test by running the ipa-healthcheck --list-sources command and identifying the ipahealthcheck.system.filesystemspace section in the output.
108.2. Screening disk space using the Healthcheck tool
Follow this procedure to run a standalone manual test of available disk space on an Identity Management (IdM) server using the Healthcheck tool.
Procedure
Enter:
# ipa-healthcheck --source=ipahealthcheck.system.filesystemspace-
The
--source=ipahealthcheck.meta.servicesoption ensures that IdM Healthcheck only performs the disk space test.
-
The
A successful test displays empty brackets:
[]As an example, a failed test can display:
{
"source": "ipahealthcheck.system.filesystemspace",
"check": "FileSystemSpaceCheck",
"result": "ERROR",
"kw": {
"msg": "/var/lib/dirsrv: free space under threshold: 0 MiB < 1024 MiB",
"store": "/var/lib/dirsrv",
"free_space": 0,
"threshold": 1024
}
}
This failed test informs you that no space is available in the /var/lib/dirsrv directory.
Run this test on all IdM servers when trying to discover issues.
Chapter 109. Verifying permissions of IdM configuration files using Healthcheck
Learn more about how to test Identity Management (IdM) configuration files using the Healthcheck tool.
Prerequisites
- The Healthcheck tool is only available on RHEL 8.1 or newer systems.
109.1. File permissions Healthcheck tests
The Healthcheck tool tests the ownership and permissions of files installed or configured by Identity Management (IdM).
If you change the ownership or permissions of these files, the tests return a warning in the result section. While this does not necessarily mean that the configuration does not work, it means that the file differs from the default configuration.
You can find the file permissions tests under the ipahealthcheck.ipa.files source of the output of the ipa-healthcheck --list-sources command.
- IPAFileNSSDBCheck
-
This test checks the 389-ds NSS database and the Certificate Authority (CA) database, if relevant. The 389-ds database is located in
/etc/dirsrv/slapd-<dashed-REALM>and the CA database is located in/etc/pki/pki-tomcat/alias/. - IPAFileCheck
This test checks the following files:
-
/var/lib/ipa/ra-agent.{key|pem} -
/var/lib/ipa/certs/httpd.pem -
/var/lib/ipa/private/httpd.key -
/etc/httpd/alias/ipasession.key -
/etc/dirsrv/ds.keytab -
/etc/ipa/ca.crt -
/etc/ipa/custodia/server.keys -
/etc/resolv.conf /etc/hostsIf PKINIT is enabled, it also tests:
-
/var/lib/ipa/certs/kdc.pem /var/lib/ipa/private/kdc.keyIf DNS is configured, it also tests:
-
/etc/named.keytab -
/etc/ipa/dnssec/ipa-dnskeysyncd.keytab
-
- TomcatFileCheck
This test checks certain
tomcat-specific files:-
/etc/pki/pki-tomcat/password.conf -
/var/lib/pki/pki-tomcat/conf/ca/CS.cfg -
/etc/pki/pki-tomcat/server.xml
-
109.2. Screening configuration files using Healthcheck
Follow this procedure to run a standalone manual test of an Identity Management (IdM) server’s configuration files using the Healthcheck tool.
The Healthcheck tool includes many tests. Results can be narrowed down by:
-
Including only ownership and permissions tests:
--source=ipahealthcheck.ipa.files
Procedure
To run Healthcheck tests on IdM configuration file ownership and permissions, while displaying only warnings, errors and critical issues, enter:
# ipa-healthcheck --source=ipahealthcheck.ipa.files
A successful test displays empty brackets:
# ipa-healthcheck --source=ipahealthcheck.ipa.files
[]
Failed tests display results similar to the following WARNING:
{
"source": "ipahealthcheck.ipa.files",
"check": "IPAFileNSSDBCheck",
"result": "WARNING",
"kw": {
"key": "_etc_dirsrv_slapd-EXAMPLE-TEST_pkcs11.txt_mode",
"path": "/etc/dirsrv/slapd-EXAMPLE-TEST/pkcs11.txt",
"type": "mode",
"expected": "0640",
"got": "0666",
"msg": "Permissions of /etc/dirsrv/slapd-EXAMPLE-TEST/pkcs11.txt are 0666 and should be 0640"
}
}Run these tests on all IdM servers when trying to find issues.
Chapter 110. Checking IdM replication using Healthcheck
You can test Identity Management (IdM) replication using the Healthcheck tool.
Prerequisites
- You are using RHEL version 8.1 or newer.
110.1. The IdM replication and topology Healthcheck tests
The Healthcheck tool includes tests of the Identity Management (IdM) topology configuration. The tests search for replication conflict issues.
You can find the IPATopologyDomainCheck and ReplicationConflictCheck tests under the ipahealthcheck.ipa.topology and ipahealthcheck.ds.replication sources of the output of the ipa-healthcheck --list-sources command.
- IPATopologyDomainCheck
Tests the following configuration:
- No IdM server is disconnected from the topology.
- The IdM servers do not have more than the recommended number of replication agreements.
If the test succeeds, the test returns the configured domains. Otherwise, specific connection errors are reported.
NoteThe test runs the
ipa topologysuffix-verifycommand for thedomainsuffix. It also runs the command for thecasuffix if the IdM Certificate Authority server role is configured on this server.- ReplicationConflictCheck
-
Searches for entries in LDAP matching
(&(!(objectclass=nstombstone))(nsds5ReplConflict=*)).
110.2. Screening replication using Healthcheck
Follow this procedure to run a standalone manual test of your Identity Management (IdM) replication and topology configuration using the Healthcheck tool.
Prerequisites
-
You have
rootprivileges.
Procedure
Enter:
# ipa-healthcheck --source=ipahealthcheck.ds.replication --source=ipahealthcheck.ipa.topology-
The
--source=ipahealthcheck.ds.replicationand--source=ipahealthcheck.ipa.topologyoptions ensure that IdM Healthcheck only performs the replication conflict and topology tests.
Four different results are possible:
SUCCESS — the test passed successfully.
{ "source": "ipahealthcheck.ipa.topology", "check": "IPATopologyDomainCheck", "result": "SUCCESS", "kw": { "suffix": "domain" } }- WARNING — the test passed but there might be a problem.
ERROR — the test failed.
{ "source": "ipahealthcheck.ipa.topology", "check": "IPATopologyDomainCheck", "result": "ERROR", "uuid": d6ce3332-92da-423d-9818-e79f49ed321f "when": 20191007115449Z "duration": 0.005943 "kw": { "msg": "topologysuffix-verify domain failed, server2 is not connected (server2_139664377356472 in MainThread)" } }- CRITICAL — the test failed and it affects the IdM server functionality.
-
The
Run these tests on all IdM servers when trying to check for issues.
110.3. Additional resources
Chapter 111. Checking DNS records using IdM Healthcheck
You can identify issues with DNS records in Identity Management (IdM) using the Healthcheck tool.
Prerequisites
- The DNS records Healthcheck tool is only available on RHEL 8.2 or newer.
111.1. DNS records healthcheck test
The Healthcheck tool includes the IPADNSSystemRecordsCheck test for checking that the expected DNS records required for autodiscovery are resolvable. Specifically, the test checks the DNS records obtained by the ipa dns-update-system-records --dry-run command using the first resolver specified in the /etc/resolv.conf file on the IdM server to which you are logged in.
You can find the IPADNSSystemRecordsCheck test under the ipahealthcheck.ipa.idns source of the output of the ipa-healthcheck --list-sources command.
111.2. Screening IdM DNS records using the Healthcheck tool
Follow this procedure to run a standalone manual test of DNS records on an Identity Management (IdM) server using the Healthcheck tool.
The Healthcheck tool includes many tests. Results can be narrowed down by including only the DNS records tests by adding the --source ipahealthcheck.ipa.idns option.
Prerequisites
-
You have
rootprivileges.
Procedure
Enter:
# ipa-healthcheck --source ipahealthcheck.ipa.idnsThe
--source ipahealthcheck.ipa.idnsoption ensures that IdM Healthcheck only performs the DNS records test.If the record is resolvable, the test returns
SUCCESSas a result:{ "source": "ipahealthcheck.ipa.idns", "check": "IPADNSSystemRecordsCheck", "result": "SUCCESS", "uuid": "eb7a3b68-f6b2-4631-af01-798cac0eb018", "when": "20200415143339Z", "duration": "0.210471", "kw": { "key": "_ldap._tcp.idm.example.com.:server1.idm.example.com." } }The test returns a
WARNINGwhen, for example, the number of records does not match the expected number:
{ "source": "ipahealthcheck.ipa.idns", "check": "IPADNSSystemRecordsCheck", "result": "WARNING", "uuid": "972b7782-1616-48e0-bd5c-49a80c257895", "when": "20200409100614Z", "duration": "0.203049", "kw": { "msg": "Got {count} ipa-ca A records, expected {expected}", "count": 2, "expected": 1 } }
Chapter 113. Identity Management security settings
Learn more about security-related features of Identity Management.
113.1. How Identity Management applies default security settings
By default, Identity Management (IdM) on RHEL 8 uses the system-wide crypto policy. The benefit of this policy is that you do not need to harden individual IdM components manually.
Red Hat recommends that you use the system-wide crypto policy. Changing individual security settings can break components of IdM. For example, Java in RHEL 8 does not fully support the TLS 1.3 protocol. Therefore, using this protocol can cause failures in IdM.
113.2. Anonymous LDAP binds in Identity Management
By default, anonymous binds to the Identity Management (IdM) LDAP server are enabled. Anonymous binds can expose certain configuration settings or directory values. However, some utilities, such as realmd, or older RHEL clients require anonymous binds enabled to discover domain settings when enrolling a client.
113.3. Disabling anonymous binds
You can disable anonymous binds on the Identity Management (IdM) 389 Directory Server instance by using LDAP tools to reset the nsslapd-allow-anonymous-access attribute.
These are the valid values for the nsslapd-allow-anonymous-access attribute:
-
on: allows all anonymous binds (default) -
rootdse: allows anonymous binds only for root DSE information -
off: disallows any anonymous binds
Red Hat does not recommend completely disallowing anonymous binds by setting the attribute to off, because this also blocks external clients from checking the server configuration. LDAP and web clients are not necessarily domain clients, so they connect anonymously to read the root DSE file to get connection information.
By changing the value of the nsslapd-allow-anonymous-access attribute to rootdse, you allow access to the root DSE and server configuration without any access to the directory data.
Certain clients rely on anonymous binds to discover IdM settings. Additionally, the compat tree can break for legacy clients that are not using authentication. Perform this procedure only if your clients do not require anonymous binds.
Prerequisites
- You can authenticate as the Directory Manager to write to the LDAP server.
-
You can authenticate as the
rootuser to restart IdM services.
Procedure
Change the
nsslapd-allow-anonymous-accessattribute torootdse.$ ldapmodify -x -D "cn=Directory Manager" -W -h server.example.com -p 389 Enter LDAP Password: dn: cn=config changetype: modify replace: nsslapd-allow-anonymous-access nsslapd-allow-anonymous-access: rootdse modifying entry "cn=config"Restart the 389 Directory Server instance to load the new setting.
# systemctl restart dirsrv.target
Verification
Display the value of the
nsslapd-allow-anonymous-accessattribute.$ ldapsearch -x -D "cn=Directory Manager" -b cn=config -W -h server.example.com -p 389 nsslapd-allow-anonymous-access | grep nsslapd-allow-anonymous-access Enter LDAP Password: # requesting: nsslapd-allow-anonymous-access nsslapd-allow-anonymous-access: rootdse
Chapter 114. Setting up Samba on an IdM domain member
You can set up Samba on a host that is joined to a Red Hat Identity Management (IdM) domain. Users from IdM and also, if available, from trusted Active Directory (AD) domains, can access shares and printer services provided by Samba.
Using Samba on an IdM domain member is an unsupported Technology Preview feature and contains certain limitations. For example, IdM trust controllers do not support the Active Directory Global Catalog service, and they do not support resolving IdM groups using the Distributed Computing Environment / Remote Procedure Calls (DCE/RPC) protocols. As a consequence, AD users can only access Samba shares and printers hosted on IdM clients when logged in to other IdM clients; AD users logged into a Windows machine cannot access Samba shares hosted on an IdM domain member.
Customers deploying Samba on IdM domain members are encouraged to provide feedback to Red Hat.
If users from AD domains need to access shares and printer services provided by Samba, ensure the AES encryption type is enabled is AD. For more information, see Enabling the AES encryption type in Active Directory using a GPO.
Prerequisites
- The host is joined as a client to the IdM domain.
- Both the IdM servers and the client must run on RHEL 8.1 or later.
114.1. Preparing the IdM domain for installing Samba on domain members
Before you can set up Samba on an IdM client, you must prepare the IdM domain using the ipa-adtrust-install utility on an IdM server.
Any system where you run the ipa-adtrust-install command automatically becomes an AD trust controller. However, you must run ipa-adtrust-install only once on an IdM server.
Prerequisites
- IdM server is installed.
- You have root privileges to install packages and restart IdM services.
Procedure
Install the required packages:
[root@ipaserver ~]# yum install ipa-server-trust-ad samba-clientAuthenticate as the IdM administrative user:
[root@ipaserver ~]# kinit adminRun the
ipa-adtrust-installutility:[root@ipaserver ~]# ipa-adtrust-installThe DNS service records are created automatically if IdM was installed with an integrated DNS server.
If you installed IdM without an integrated DNS server,
ipa-adtrust-installprints a list of service records that you must manually add to DNS before you can continue.The script prompts you that the
/etc/samba/smb.confalready exists and will be rewritten:WARNING: The smb.conf already exists. Running ipa-adtrust-install will break your existing Samba configuration. Do you wish to continue? [no]: yesThe script prompts you to configure the
slapi-nisplug-in, a compatibility plug-in that allows older Linux clients to work with trusted users:Do you want to enable support for trusted domains in Schema Compatibility plugin? This will allow clients older than SSSD 1.9 and non-Linux clients to work with trusted users. Enable trusted domains support in slapi-nis? [no]: yesWhen prompted, enter the NetBIOS name for the IdM domain or press Enter to accept the name suggested:
Trust is configured but no NetBIOS domain name found, setting it now. Enter the NetBIOS name for the IPA domain. Only up to 15 uppercase ASCII letters, digits and dashes are allowed. Example: EXAMPLE. NetBIOS domain name [IDM]:You are prompted to run the SID generation task to create a SID for any existing users:
Do you want to run the ipa-sidgen task? [no]: yesThis is a resource-intensive task, so if you have a high number of users, you can run this at another time.
Optional: By default, the Dynamic RPC port range is defined as
49152-65535for Windows Server 2008 and later. If you need to define a different Dynamic RPC port range for your environment, configure Samba to use different ports and open those ports in your firewall settings. The following example sets the port range to55000-65000.[root@ipaserver ~]# net conf setparm global 'rpc server dynamic port range' 55000-65000 [root@ipaserver ~]# firewall-cmd --add-port=55000-65000/tcp [root@ipaserver ~]# firewall-cmd --runtime-to-permanentRestart the
ipaservice:[root@ipaserver ~]# ipactl restartUse the
smbclientutility to verify that Samba responds to Kerberos authentication from the IdM side:[root@ipaserver ~]# smbclient -L ipaserver.idm.example.com -U user_name --use-kerberos=required lp_load_ex: changing to config backend registry Sharename Type Comment --------- ---- ------- IPC$ IPC IPC Service (Samba 4.15.2) ...
114.2. Installing and configuring a Samba server on an IdM client
You can install and configure Samba on a client enrolled in an IdM domain.
Prerequisites
- Both the IdM servers and the client must run on RHEL 8.1 or later.
- The IdM domain is prepared as described in Preparing the IdM domain for installing Samba on domain members.
- If IdM has a trust configured with AD, enable the AES encryption type for Kerberos. For example, use a group policy object (GPO) to enable the AES encryption type. For details, see Enabling AES encryption in Active Directory using a GPO.
Procedure
Install the
ipa-client-sambapackage:[root@idm_client]# yum install ipa-client-sambaUse the
ipa-client-sambautility to prepare the client and create an initial Samba configuration:[root@idm_client]# ipa-client-samba Searching for IPA server... IPA server: DNS discovery Chosen IPA master: idm_server.idm.example.com SMB principal to be created: cifs/idm_client.idm.example.com@IDM.EXAMPLE.COM NetBIOS name to be used: IDM_CLIENT Discovered domains to use: Domain name: idm.example.com NetBIOS name: IDM SID: S-1-5-21-525930803-952335037-206501584 ID range: 212000000 - 212199999 Domain name: ad.example.com NetBIOS name: AD SID: None ID range: 1918400000 - 1918599999 Continue to configure the system with these values? [no]: yes Samba domain member is configured. Please check configuration at /etc/samba/smb.conf and start smb and winbind servicesBy default,
ipa-client-sambaautomatically adds the[homes]section to the/etc/samba/smb.conffile that dynamically shares a user’s home directory when the user connects. If users do not have home directories on this server, or if you do not want to share them, remove the following lines from/etc/samba/smb.conf:[homes] read only = noShare directories and printers. For details, see the following sections:
Open the ports required for a Samba client in the local firewall:
[root@idm_client]# firewall-cmd --permanent --add-service=samba-client [root@idm_client]# firewall-cmd --reloadEnable and start the
smbandwinbindservices:[root@idm_client]# systemctl enable --now smb winbindNoteDo not start the
nmbdservice. When using Samba with Active Directory, NetBIOS is not required for interoperability because DNS handles name resolution in AD environments.
Verification
Run the following verification step on a different IdM domain member that has the samba-client package installed:
List the shares on the Samba server using Kerberos authentication:
$ smbclient -L idm_client.idm.example.com -U user_name --use-kerberos=required lp_load_ex: changing to config backend registry Sharename Type Comment --------- ---- ------- example Disk IPC$ IPC IPC Service (Samba 4.15.2) ...
114.3. Manually adding an ID mapping configuration if IdM trusts a new domain
Samba requires an ID mapping configuration for each domain from which users access resources. On an existing Samba server running on an IdM client, you must manually add an ID mapping configuration after the administrator added a new trust to an Active Directory (AD) domain.
Prerequisites
- You configured Samba on an IdM client. Afterward, a new trust was added to IdM.
- The DES and RC4 encryption types for Kerberos must be disabled in the trusted AD domain. For security reasons, RHEL 8 does not support these weak encryption types.
Procedure
Authenticate using the host’s keytab:
[root@idm_client]# kinit -kUse the
ipa idrange-findcommand to display both the base ID and the ID range size of the new domain. For example, the following command displays the values for thead.example.comdomain:[root@idm_client]# ipa idrange-find --name="AD.EXAMPLE.COM_id_range" --raw --------------- 1 range matched --------------- cn: AD.EXAMPLE.COM_id_range ipabaseid: 1918400000 ipaidrangesize: 200000 ipabaserid: 0 ipanttrusteddomainsid: S-1-5-21-968346183-862388825-1738313271 iparangetype: ipa-ad-trust ---------------------------- Number of entries returned 1 ----------------------------You need the values from the
ipabaseidandipaidrangesizeattributes in the next steps.To calculate the highest usable ID, use the following formula:
maximum_range = ipabaseid + ipaidrangesize - 1With the values from the previous step, the highest usable ID for the
ad.example.comdomain is1918599999(1918400000 + 200000 - 1).Edit the
/etc/samba/smb.conffile, and add the ID mapping configuration for the domain to the[global]section:idmap config AD : range = 1918400000 - 1918599999 idmap config AD : backend = sssSpecify the value from
ipabaseidattribute as the lowest and the computed value from the previous step as the highest value of the range.Restart the
smbandwinbindservices:[root@idm_client]# systemctl restart smb winbind
Verification
List the shares on the Samba server using Kerberos authentication:
$ smbclient -L idm_client.idm.example.com -U user_name --use-kerberos=required lp_load_ex: changing to config backend registry Sharename Type Comment --------- ---- ------- example Disk IPC$ IPC IPC Service (Samba 4.15.2) ...
Chapter 115. Using external identity providers to authenticate to IdM
You can associate users with external identity providers (IdP) that support the OAuth 2.0 device authorization flow. When these users authenticate with the System Security Services Daemon (SSSD) version available in RHEL 8.7 or later, they receive RHEL Identity Management (IdM) single sign-on capabilities with Kerberos tickets after performing authentication and authorization at the external IdP.
Notable features include:
-
Adding, modifying, and deleting references to external IdPs with
ipa idp-*commands. -
Enabling IdP authentication for users with the
ipa user-mod --user-auth-type=idpcommand.
What is supported:
-
Logging in remotely via Secure Shell (SSH) with the
keyboard-interactiveauthentication method enabled, which allows calling Pluggable Authentication Module (PAM) libraries. -
Logging in locally with the console via the
logindservice. -
Retrieving a Kerberos TGT with the
kinitutility.
What is currently not supported:
- Logging in to the IdM WebUI directly. To log in to the IdM WebUI, you must first acquire a Kerberos ticket.
- Logging in to Cockpit WebUI directly. To log in to the Cockpit WebUI, you must first acquire a Kerberos ticket.
115.1. The benefits of connecting IdM to an external IdP
As an administrator, you might want to allow users stored in an external identity source, such as a cloud services provider, to access RHEL systems joined to your Identity Management (IdM) environment. To achieve this, you can delegate the authentication and authorization process of issuing Kerberos tickets for these users to that external entity.
You can use this feature to expand IdM’s capabilities and allow users stored in external identity providers (IdPs) to access Linux systems managed by IdM.
115.2. How IdM incorporates logins via external IdPs
SSSD 2.7.0 contains the sssd-idp package, which implements the idp Kerberos pre-authentication method. This authentication method follows the OAuth 2.0 Device Authorization Grant flow to delegate authorization decisions to external IdPs:
-
An IdM client user initiates OAuth 2.0 Device Authorization Grant flow, for example, by attempting to retrieve a Kerberos Ticket Granting Ticket (TGT) with the
kinitutility at the command line. - A special code and website link are sent from the Authorization Server to the IdM Key Distribution Center (KDC) backend.
- The IdM client displays the link and the code to the user. In this example, the IdM client outputs the link and code on the command line.
The user opens the website link in a browser, which can be on another host, a mobile phone, and so on:
- The user enters the special code.
- If necessary, the user logs in to the OAuth 2.0-based IdP.
- The user is prompted to authorize the client to access information.
- The user confirms access at the original device prompt. In this example, the user hits the Enter key at the command line.
- The IdM KDC backend polls the OAuth 2.0 Authorization Server for access to user information.
115.3. Creating a reference to an external identity provider
To connect external identity providers (IdPs) to your Identity Management (IdM) environment, create IdP references in IdM. Complete this procedure to create a reference called my-keycloak-idp to an IdP based on the Keycloak template. For more reference templates, see Example references to different external IdPs in IdM.
Prerequisites
- You have registered IdM as an OAuth application to your external IdP, and obtained a client ID.
- You can authenticate as the IdM admin account.
- Your IdM servers are using RHEL 8.7 or later.
- Your IdM servers are using SSSD 2.7.0 or later.
Procedure
Authenticate as the IdM admin on an IdM server.
[root@server ~]# kinit adminCreate a reference called
my-keycloak-idpto an IdP based on the Keycloak template, where the--base-urloption specifies the URL to the Keycloak server in the formatserver-name.$DOMAIN:$PORT/prefix.[root@server ~]# ipa idp-add my-keycloak-idp \ --provider keycloak --organization main \ --base-url keycloak.idm.example.com:8443/auth \ --client-id id13778 ------------------------------------------------ Added Identity Provider reference "my-keycloak-idp" ------------------------------------------------ Identity Provider reference name: my-keycloak-idp Authorization URI: https://keycloak.idm.example.com:8443/auth/realms/main/protocol/openid-connect/auth Device authorization URI: https://keycloak.idm.example.com:8443/auth/realms/main/protocol/openid-connect/auth/device Token URI: https://keycloak.idm.example.com:8443/auth/realms/main/protocol/openid-connect/token User info URI: https://keycloak.idm.example.com:8443/auth/realms/main/protocol/openid-connect/userinfo Client identifier: ipa_oidc_client Scope: openid email External IdP user identifier attribute: email
Verification
Verify that the output of the
ipa idp-showcommand shows the IdP reference you have created.[root@server ~]# ipa idp-show my-keycloak-idp
115.4. Example references to different external IdPs in IdM
The following table lists examples of the ipa idp-add command for creating references to different IdPs in IdM.
| Identity Provider | Important options | Command example |
|---|---|---|
|
Microsoft Identity Platform, |
|
|
| |
|
|
| GitHub |
|
|
|
Keycloak, |
|
Note
The Quarkus version of Keycloak 17 and later have removed the |
| Okta |
|
|
115.5. Options for the ipa idp-* commands to manage external identity providers in IdM
The following examples show how to configure references to external IdPs based on the different IdP templates. Use the following options to specify your settings:
--provider- The predefined template for one of the known identity providers.
--client-id- The OAuth 2.0 client identifier issued by the IdP during application registration. As the application registration procedure is specific to each IdP, refer to their documentation for details. If the external IdP is Red Hat Single Sign-On (SSO), see Creating an OpenID Connect Client.
--base-url- Base URL for IdP templates, required by Keycloak and Okta.
--organization- Domain or Organization ID from the IdP, required by Microsoft Azure.
--secretOptional: Use this option if you have configured your external IdP to require a secret from confidential OAuth 2.0 clients. If you use this option when creating an IdP reference, you are prompted for the secret interactively. Protect the client secret as a password.
NoteSSSD in RHEL 8.7 only supports non-confidential OAuth 2.0 clients that do not use a client secret. If you want to use external IdPs that require a client secret from confidential clients, you must use SSSD in RHEL 8.8 and later.
115.6. Managing references to external IdPs
After you have created a reference to an external identity provider (IdP), you can find, show, modify, and delete that reference. This example shows you how to manage a reference to an external IdP named keycloak-server1.
Prerequisites
- You can authenticate as the IdM admin account.
- Your IdM servers are using RHEL 8.7 or later.
- Your IdM servers are using SSSD 2.7.0 or later.
- You have created a reference to an external IdP in IdM. See Creating a reference to an external identity provider.
Procedure
Authenticate as the IdM admin on an IdM server.
[root@server ~]# kinit adminManage the IdP reference.
To find an IdP reference whose entry includes the string
keycloak:[root@server ~]# ipa idp-find keycloakTo display an IdP reference named
my-keycloak-idp:[root@server ~]# ipa idp-show my-keycloak-idpTo modify an IdP reference, use the
ipa idp-modcommand. For example, to change the secret for an IdP reference namedmy-keycloak-idp, specify the--secretoption to be prompted for the secret:[root@server ~]# ipa idp-mod my-keycloak-idp --secretTo delete an IdP reference named
my-keycloak-idp:[root@server ~]# ipa idp-del my-keycloak-idp
115.7. Enabling an IdM user to authenticate via an external IdP
To enable an IdM user to authenticate via an external identity provider (IdP), associate the external IdP reference you have previously created with the user account. This example associates the external IdP reference keycloak-server1 with the user idm-user-with-external-idp.
Prerequisites
- Your IdM client and IdM servers are using RHEL 8.7 or later.
- Your IdM client and IdM servers are using SSSD 2.7.0 or later.
- You have created a reference to an external IdP in IdM. See Creating a reference to an external identity provider.
Procedure
Modify the IdM user entry to associate an IdP reference with the user account:
[root@server ~]# ipa user-mod idm-user-with-external-idp \ --idp my-keycloak-idp \ --idp-user-id idm-user-with-external-idp@idm.example.com \ --user-auth-type=idp --------------------------------- Modified user "idm-user-with-external-idp" --------------------------------- User login: idm-user-with-external-idp First name: Test Last name: User1 Home directory: /home/idm-user-with-external-idp Login shell: /bin/sh Principal name: idm-user-with-external-idp@idm.example.com Principal alias: idm-user-with-external-idp@idm.example.com Email address: idm-user-with-external-idp@idm.example.com UID: 35000003 GID: 35000003 User authentication types: idp External IdP configuration: keycloak External IdP user identifier: idm-user-with-external-idp@idm.example.com Account disabled: False Password: False Member of groups: ipausers Kerberos keys available: False
Verification
Verify that the output of the
ipa user-showcommand for that user displays references to the IdP:[root@server ~]# ipa user-show idm-user-with-external-idp User login: idm-user-with-external-idp First name: Test Last name: User1 Home directory: /home/idm-user-with-external-idp Login shell: /bin/sh Principal name: idm-user-with-external-idp@idm.example.com Principal alias: idm-user-with-external-idp@idm.example.com Email address: idm-user-with-external-idp@idm.example.com ID: 35000003 GID: 35000003 User authentication types: idp External IdP configuration: keycloak External IdP user identifier: idm-user-with-external-idp@idm.example.com Account disabled: False Password: False Member of groups: ipausers Kerberos keys available: False
115.8. Retrieving an IdM ticket-granting ticket as an external IdP user
If you have delegated authentication for an Identity Management (IdM) user to an external identity provider (IdP), the IdM user can request a Kerberos ticket-granting ticket (TGT) by authenticating to the external IdP.
Complete this procedure to:
- Retrieve and store an anonymous Kerberos ticket locally.
-
Request the TGT for the idm-user-with-external-idp user by using
kinitwith the-Toption to enable Flexible Authentication via Secure Tunneling (FAST) channel to provide a secure connection between the Kerberos client and Kerberos Distribution Center (KDC).
Prerequisites
- Your IdM client and IdM servers use RHEL 8.7 or later.
- Your IdM client and IdM servers use SSSD 2.7.0 or later.
- You have created a reference to an external IdP in IdM. See Creating a reference to an external identity provider.
- You have associated an external IdP reference with the user account. See Enabling an IdM user to authenticate via an external IdP.
- The user that you are initially logged in as has write permissions on a directory in the local filesystem.
Procedure
Use Anonymous PKINIT to obtain a Kerberos ticket and store it in a file named
./fast.ccache.$ kinit -n -c ./fast.ccacheOptional: View the retrieved ticket:
$ klist -c fast.ccache Ticket cache: FILE:fast.ccache Default principal: WELLKNOWN/ANONYMOUS@WELLKNOWN:ANONYMOUS Valid starting Expires Service principal 03/03/2024 13:36:37 03/04/2024 13:14:28 krbtgt/IDM.EXAMPLE.COM@IDM.EXAMPLE.COMBegin authenticating as the IdM user, using the
-Toption to enable the FAST communication channel.[root@client ~]# kinit -T ./fast.ccache idm-user-with-external-idp Authenticate at https://oauth2.idp.com:8443/auth/realms/master/device?user_code=YHMQ-XKTL and press ENTER.:- In a browser, authenticate as the user at the website provided in the command output.
- At the command line, press the Enter key to finish the authentication process.
Verification
Display your Kerberos ticket information and confirm that the line
config: pa_typeshows152for pre-authentication with an external IdP.[root@client ~]# klist -C Ticket cache: KCM:0:58420 Default principal: idm-user-with-external-idp@IDM.EXAMPLE.COM Valid starting Expires Service principal 05/09/22 07:48:23 05/10/22 07:03:07 krbtgt/IDM.EXAMPLE.COM@IDM.EXAMPLE.COM config: fast_avail(krbtgt/IDM.EXAMPLE.COM@IDM.EXAMPLE.COM) = yes 08/17/2022 20:22:45 08/18/2022 20:22:43 krbtgt/IDM.EXAMPLE.COM@IDM.EXAMPLE.COM config: pa_type(krbtgt/IDM.EXAMPLE.COM@IDM.EXAMPLE.COM) = 152The
pa_type = 152indicates external IdP authentication.
115.9. Logging in to an IdM client via SSH as an external IdP user
To log in to an IdM client via SSH as an external identity provider (IdP) user, begin the login process on the command linel. When prompted, perform the authentication process at the website associated with the IdP, and finish the process at the Identity Management (IdM) client.
Prerequisites
- Your IdM client and IdM servers are using RHEL 8.7 or later.
- Your IdM client and IdM servers are using SSSD 2.7.0 or later.
- You have created a reference to an external IdP in IdM. See Creating a reference to an external identity provider.
- You have associated an external IdP reference with the user account. See Enabling an IdM user to authenticate via an external IdP.
Procedure
Attempt to log in to the IdM client via SSH.
[user@client ~]$ ssh idm-user-with-external-idp@client.idm.example.com (idm-user-with-external-idp@client.idm.example.com) Authenticate at https://oauth2.idp.com:8443/auth/realms/main/device?user_code=XYFL-ROYR and press ENTER.- In a browser, authenticate as the user at the website provided in the command output.
- At the command line, press the Enter key to finish the authentication process.
Verification
Display your Kerberos ticket information and confirm that the line
config: pa_typeshows152for pre-authentication with an external IdP.[idm-user-with-external-idp@client ~]$ klist -C Ticket cache: KCM:0:58420 Default principal: idm-user-with-external-idp@IDM.EXAMPLE.COM Valid starting Expires Service principal 05/09/22 07:48:23 05/10/22 07:03:07 krbtgt/IDM.EXAMPLE.COM@IDM.EXAMPLE.COM config: fast_avail(krbtgt/IDM.EXAMPLE.COM@IDM.EXAMPLE.COM) = yes 08/17/2022 20:22:45 08/18/2022 20:22:43 krbtgt/IDM.EXAMPLE.COM@IDM.EXAMPLE.COM config: pa_type(krbtgt/IDM.EXAMPLE.COM@IDM.EXAMPLE.COM) = 152
115.10. The --provider option in the ipa idp-* commands
The following identity providers (IdPs) support OAuth 2.0 device authorization grant flow:
- Microsoft Identity Platform, including Azure AD
- GitHub
- Keycloak, including Red Hat Single Sign-On (SSO)
- Okta
When using the ipa idp-add command to create a reference to one of these external IdPs, you can specify the IdP type with the --provider option, which expands into additional options as described below:
--provider=microsoftMicrosoft Azure IdPs allow parametrization based on the Azure tenant ID, which you can specify with the
--organizationoption to theipa idp-addcommand. If you need support for the live.com IdP, specify the option--organization common.Choosing
--provider=microsoftexpands to use the following options. The value of the--organizationoption replaces the string${ipaidporg}in the table.Expand Option Value --auth-uri=URIhttps://login.microsoftonline.com/${ipaidporg}/oauth2/v2.0/authorize--dev-auth-uri=URIhttps://login.microsoftonline.com/${ipaidporg}/oauth2/v2.0/devicecode--token-uri=URIhttps://login.microsoftonline.com/${ipaidporg}/oauth2/v2.0/token--userinfo-uri=URIhttps://graph.microsoft.com/oidc/userinfo--keys-uri=URIhttps://login.microsoftonline.com/common/discovery/v2.0/keys--scope=STRopenid email--idp-user-id=STRemail--provider=googleChoosing
--provider=googleexpands to use the following options:Expand Option Value --auth-uri=URIhttps://accounts.google.com/o/oauth2/auth--dev-auth-uri=URIhttps://oauth2.googleapis.com/device/code--token-uri=URIhttps://oauth2.googleapis.com/token--userinfo-uri=URIhttps://openidconnect.googleapis.com/v1/userinfo--keys-uri=URIhttps://www.googleapis.com/oauth2/v3/certs--scope=STRopenid email--idp-user-id=STRemail--provider=githubChoosing
--provider=githubexpands to use the following options:Expand Option Value --auth-uri=URIhttps://github.com/login/oauth/authorize--dev-auth-uri=URIhttps://github.com/login/device/code--token-uri=URIhttps://github.com/login/oauth/access_token--userinfo-uri=URIhttps://openidconnect.googleapis.com/v1/userinfo--keys-uri=URIhttps://api.github.com/user--scope=STRuser--idp-user-id=STRlogin--provider=keycloakWith Keycloak, you can define multiple realms or organizations. Since it is often a part of a custom deployment, both base URL and realm ID are required, and you can specify them with the
--base-urland--organizationoptions to theipa idp-addcommand:[root@client ~]# ipa idp-add MySSO --provider keycloak \ --org main --base-url keycloak.domain.com:8443/auth \ --client-id <your-client-id>Choosing
--provider=keycloakexpands to use the following options. The value you specify in the--base-urloption replaces the string${ipaidpbaseurl}in the table, and the value you specify for the--organization `option replaces the string `${ipaidporg}.Expand Option Value --auth-uri=URIhttps://${ipaidpbaseurl}/realms/${ipaidporg}/protocol/openid-connect/auth--dev-auth-uri=URIhttps://${ipaidpbaseurl}/realms/${ipaidporg}/protocol/openid-connect/auth/device--token-uri=URIhttps://${ipaidpbaseurl}/realms/${ipaidporg}/protocol/openid-connect/token--userinfo-uri=URIhttps://${ipaidpbaseurl}/realms/${ipaidporg}/protocol/openid-connect/userinfo--scope=STRopenid email--idp-user-id=STRemail--provider=oktaAfter registering a new organization in Okta, a new base URL is associated with it. You can specify this base URL with the
--base-urloption to theipa idp-addcommand:[root@client ~]# ipa idp-add MyOkta --provider okta --base-url dev-12345.okta.com --client-id <your-client-id>Choosing
--provider=oktaexpands to use the following options. The value you specify for the--base-urloption replaces the string${ipaidpbaseurl}in the table.Expand Option Value --auth-uri=URIhttps://${ipaidpbaseurl}/oauth2/v1/authorize--dev-auth-uri=URIhttps://${ipaidpbaseurl}/oauth2/v1/device/authorize--token-uri=URIhttps://${ipaidpbaseurl}/oauth2/v1/token--userinfo-uri=URIhttps://${ipaidpbaseurl}/oauth2/v1/userinfo--scope=STRopenid email--idp-user-id=STRemail
Chapter 116. Using Ansible to delegate authentication for IdM users to external identity providers
You can use the idp ansible-freeipa module to associate users with external identity providers (IdP) that support the OAuth 2 device authorization flow. If an IdP reference and an associated IdP user ID exist, you can use them to enable IdP authentication for an IdM user with the user ansible-freeipa module.
Afterward, if these users authenticate with the SSSD version 2.7.0 or later, available in RHEL 8.7 or later, they receive RHEL Identity Management (IdM) single sign-on capabilities with Kerberos tickets after performing authentication and authorization at the external IdP.
116.1. The benefits of connecting IdM to an external IdP
As an administrator, you might want to allow users stored in an external identity source, such as a cloud services provider, to access RHEL systems joined to your Identity Management (IdM) environment. To achieve this, you can delegate the authentication and authorization process of issuing Kerberos tickets for these users to that external entity.
You can use this feature to expand IdM’s capabilities and allow users stored in external identity providers (IdPs) to access Linux systems managed by IdM.
116.2. How IdM incorporates logins via external IdPs
SSSD 2.7.0 contains the sssd-idp package, which implements the idp Kerberos pre-authentication method. This authentication method follows the OAuth 2.0 Device Authorization Grant flow to delegate authorization decisions to external IdPs:
-
An IdM client user initiates OAuth 2.0 Device Authorization Grant flow, for example, by attempting to retrieve a Kerberos Ticket Granting Ticket (TGT) with the
kinitutility at the command line. - A special code and website link are sent from the Authorization Server to the IdM Key Distribution Center (KDC) backend.
- The IdM client displays the link and the code to the user. In this example, the IdM client outputs the link and code on the command line.
The user opens the website link in a browser, which can be on another host, a mobile phone, and so on:
- The user enters the special code.
- If necessary, the user logs in to the OAuth 2.0-based IdP.
- The user is prompted to authorize the client to access information.
- The user confirms access at the original device prompt. In this example, the user hits the Enter key at the command line.
- The IdM KDC backend polls the OAuth 2.0 Authorization Server for access to user information.
116.3. Using Ansible to create a reference to an external identity provider
To connect external identity providers (IdPs) to your Identity Management (IdM) environment, create IdP references in IdM. Complete this procedure to use the idp ansible-freeipa module to configure a reference to the github external IdP.
Prerequisites
You have registered IdM as an OAuth application to your external IdP, and generated a client ID and client secret on the device that an IdM user will be using to authenticate to IdM. The example assumes that:
- my_github_account_name is the github user whose account the IdM user will be using to authenticate to IdM.
-
The
client IDis 2efe1acffe9e8ab869f4. -
The
client secretis 656a5228abc5f9545c85fa626aecbf69312d398c.
- Your IdM servers are using RHEL 8.7 or later.
- Your IdM servers are using SSSD 2.7.0 or later.
You have configured your Ansible control node to meet the following requirements:
- You are using Ansible version 2.13 or later.
-
You have installed the
ansible-freeipapackage on the Ansible controller. - You are using RHEL 8.10 or later.
- The example assumes that in the ~/MyPlaybooks/ directory, you have created an Ansible inventory file with the fully-qualified domain name (FQDN) of the IdM server.
-
The example assumes that the secret.yml Ansible vault stores your
ipaadmin_password.
Procedure
On your Ansible control node, create an configure-external-idp-reference.yml playbook:
--- - name: Configure external IdP hosts: ipaserver become: false gather_facts: false tasks: - name: Ensure a reference to github external provider is available ipaidp: ipaadmin_password: "{{ ipaadmin_password }}" name: github_idp provider: github client_ID: 2efe1acffe9e8ab869f4 secret: 656a5228abc5f9545c85fa626aecbf69312d398c idp_user_id: my_github_account_name- Save the file.
Run the Ansible playbook. Specify the playbook file, the file storing the password protecting the secret.yml file, and the inventory file:
$ ansible-playbook --vault-password-file=password_file -v -i inventory configure-external-idp-reference.yml
Verification
On an IdM client, verify that the output of the
ipa idp-showcommand shows the IdP reference you have created.[idmuser@idmclient ~]$ ipa idp-show github_idp
116.4. Using Ansible to enable an IdM user to authenticate via an external IdP
You can use the user ansible-freeipa module to enable an Identity Management (IdM) user to authenticate via an external identity provider (IdP). To do that, associate the external IdP reference you have previously created with the IdM user account. Complete this procedure to use Ansible to associate an external IdP reference named github_idp with the IdM user named idm-user-with-external-idp. As a result of the procedure, the user is able to use the my_github_account_name github identity to authenticate as idm-user-with-external-idp to IdM.
Prerequisites
- Your IdM client and IdM servers are using RHEL 8.7 or later.
- Your IdM client and IdM servers are using SSSD 2.7.0 or later.
- You have created a reference to an external IdP in IdM. See Using Ansible to create a reference to an external identity provider.
You have configured your Ansible control node to meet the following requirements:
- You are using Ansible version 2.13 or later.
-
You have installed the
ansible-freeipapackage on the Ansible controller. - You are using RHEL 8.10 or later.
- The example assumes that in the ~/MyPlaybooks/ directory, you have created an Ansible inventory file with the fully-qualified domain name (FQDN) of the IdM server.
-
The example assumes that the secret.yml Ansible vault stores your
ipaadmin_password.
Procedure
On your Ansible control node, create an enable-user-to-authenticate-via-external-idp.yml playbook:
--- - name: Ensure an IdM user uses an external IdP to authenticate to IdM hosts: ipaserver become: false gather_facts: false tasks: - name: Retrieve Github user ID ansible.builtin.uri: url: “https://api.github.com/users/my_github_account_name" method: GET headers: Accept: “application/vnd.github.v3+json" register: user_data - name: Ensure IdM user exists with an external IdP authentication ipauser: ipaadmin_password: "{{ ipaadmin_password }}" name: idm-user-with-external-idp first: Example last: User userauthtype: idp idp: github_idp idp_user_id: my_github_account_name- Save the file.
Run the Ansible playbook. Specify the playbook file, the file storing the password protecting the secret.yml file, and the inventory file:
$ ansible-playbook --vault-password-file=password_file -v -i inventory enable-user-to-authenticate-via-external-idp.yml
Verification
Log in to an IdM client and verify that the output of the
ipa user-showcommand for the idm-user-with-external-idp user displays references to the IdP:$ ipa user-show idm-user-with-external-idp User login: idm-user-with-external-idp First name: Example Last name: User Home directory: /home/idm-user-with-external-idp Login shell: /bin/sh Principal name: idm-user-with-external-idp@idm.example.com Principal alias: idm-user-with-external-idp@idm.example.com Email address: idm-user-with-external-idp@idm.example.com ID: 35000003 GID: 35000003 User authentication types: idp External IdP configuration: github External IdP user identifier: idm-user-with-external-idp@idm.example.com Account disabled: False Password: False Member of groups: ipausers Kerberos keys available: False
116.5. Retrieving an IdM ticket-granting ticket as an external IdP user
If you have delegated authentication for an Identity Management (IdM) user to an external identity provider (IdP), the IdM user can request a Kerberos ticket-granting ticket (TGT) by authenticating to the external IdP.
Complete this procedure to:
- Retrieve and store an anonymous Kerberos ticket locally.
-
Request the TGT for the idm-user-with-external-idp user by using
kinitwith the-Toption to enable Flexible Authentication via Secure Tunneling (FAST) channel to provide a secure connection between the Kerberos client and Kerberos Distribution Center (KDC).
Prerequisites
- Your IdM client and IdM servers use RHEL 8.7 or later.
- Your IdM client and IdM servers use SSSD 2.7.0 or later.
- You have created a reference to an external IdP in IdM. See Using Ansible to create a reference to an external identity provider.
- You have associated an external IdP reference with the user account. See Using Ansible to enable an IdM user to authenticate via an external IdP.
- The user that you are initially logged in as has write permissions on a directory in the local filesystem.
Procedure
Use Anonymous PKINIT to obtain a Kerberos ticket and store it in a file named
./fast.ccache.$ kinit -n -c ./fast.ccacheOptional: View the retrieved ticket:
$ klist -c fast.ccache Ticket cache: FILE:fast.ccache Default principal: WELLKNOWN/ANONYMOUS@WELLKNOWN:ANONYMOUS Valid starting Expires Service principal 03/03/2024 13:36:37 03/04/2024 13:14:28 krbtgt/IDM.EXAMPLE.COM@IDM.EXAMPLE.COMBegin authenticating as the IdM user, using the
-Toption to enable the FAST communication channel.[root@client ~]# kinit -T ./fast.ccache idm-user-with-external-idp Authenticate at https://oauth2.idp.com:8443/auth/realms/master/device?user_code=YHMQ-XKTL and press ENTER.:- In a browser, authenticate as the user at the website provided in the command output.
- At the command line, press the Enter key to finish the authentication process.
Verification
Display your Kerberos ticket information and confirm that the line
config: pa_typeshows152for pre-authentication with an external IdP.[root@client ~]# klist -C Ticket cache: KCM:0:58420 Default principal: idm-user-with-external-idp@IDM.EXAMPLE.COM Valid starting Expires Service principal 05/09/22 07:48:23 05/10/22 07:03:07 krbtgt/IDM.EXAMPLE.COM@IDM.EXAMPLE.COM config: fast_avail(krbtgt/IDM.EXAMPLE.COM@IDM.EXAMPLE.COM) = yes 08/17/2022 20:22:45 08/18/2022 20:22:43 krbtgt/IDM.EXAMPLE.COM@IDM.EXAMPLE.COM config: pa_type(krbtgt/IDM.EXAMPLE.COM@IDM.EXAMPLE.COM) = 152The
pa_type = 152indicates external IdP authentication.
116.6. Logging in to an IdM client via SSH as an external IdP user
To log in to an IdM client via SSH as an external identity provider (IdP) user, begin the login process on the command linel. When prompted, perform the authentication process at the website associated with the IdP, and finish the process at the Identity Management (IdM) client.
Prerequisites
- Your IdM client and IdM servers are using RHEL 8.7 or later.
- Your IdM client and IdM servers are using SSSD 2.7.0 or later.
- You have created a reference to an external IdP in IdM. See Using Ansible to create a reference to an external identity provider.
- You have associated an external IdP reference with the user account. See Using Ansible to enable an IdM user to authenticate via an external IdP.
Procedure
Attempt to log in to the IdM client via SSH.
[user@client ~]$ ssh idm-user-with-external-idp@client.idm.example.com (idm-user-with-external-idp@client.idm.example.com) Authenticate at https://oauth2.idp.com:8443/auth/realms/main/device?user_code=XYFL-ROYR and press ENTER.- In a browser, authenticate as the user at the website provided in the command output.
- At the command line, press the Enter key to finish the authentication process.
Verification
Display your Kerberos ticket information and confirm that the line
config: pa_typeshows152for pre-authentication with an external IdP.[idm-user-with-external-idp@client ~]$ klist -C Ticket cache: KCM:0:58420 Default principal: idm-user-with-external-idp@IDM.EXAMPLE.COM Valid starting Expires Service principal 05/09/22 07:48:23 05/10/22 07:03:07 krbtgt/IDM.EXAMPLE.COM@IDM.EXAMPLE.COM config: fast_avail(krbtgt/IDM.EXAMPLE.COM@IDM.EXAMPLE.COM) = yes 08/17/2022 20:22:45 08/18/2022 20:22:43 krbtgt/IDM.EXAMPLE.COM@IDM.EXAMPLE.COM config: pa_type(krbtgt/IDM.EXAMPLE.COM@IDM.EXAMPLE.COM) = 152
116.7. The provider option in the ipaidp Ansible module
The following identity providers (IdPs) support OAuth 2.0 device authorization grant flow:
- Microsoft Identity Platform, including Azure AD
- GitHub
- Keycloak, including Red Hat Single Sign-On (SSO)
- Okta
When using the idp ansible-freeipa module to create a reference to one of these external IdPs, you can specify the IdP type with the provider option in your ipaidp ansible-freeipa playbook task, which expands into additional options as described below:
provider: microsoftMicrosoft Azure IdPs allow parametrization based on the Azure tenant ID, which you can specify with the
organizationoption. If you need support for the live.com IdP, specify the optionorganization common.Choosing
provider: microsoftexpands to use the following options. The value of theorganizationoption replaces the string${ipaidporg}in the table.Expand Option Value auth_uri: URIhttps://login.microsoftonline.com/${ipaidporg}/oauth2/v2.0/authorizedev_auth_uri: URIhttps://login.microsoftonline.com/${ipaidporg}/oauth2/v2.0/devicecodetoken_uri: URIhttps://login.microsoftonline.com/${ipaidporg}/oauth2/v2.0/tokenuserinfo_uri: URIhttps://graph.microsoft.com/oidc/userinfokeys_uri: URIhttps://login.microsoftonline.com/common/discovery/v2.0/keysscope: STRopenid emailidp_user_id: STRemailprovider: googleChoosing
provider: googleexpands to use the following options:Expand Option Value auth_uri: URIhttps://accounts.google.com/o/oauth2/authdev_auth_uri: URIhttps://oauth2.googleapis.com/device/codetoken_uri: URIhttps://oauth2.googleapis.com/tokenuserinfo_uri: URIhttps://openidconnect.googleapis.com/v1/userinfokeys_uri: URIhttps://www.googleapis.com/oauth2/v3/certsscope: STRopenid emailidp_user_id: STRemailprovider: githubChoosing
provider: githubexpands to use the following options:Expand Option Value auth_uri: URIhttps://github.com/login/oauth/authorizedev_auth_uri: URIhttps://github.com/login/device/codetoken_uri: URIhttps://github.com/login/oauth/access_tokenuserinfo_uri: URIhttps://openidconnect.googleapis.com/v1/userinfokeys_uri: URIhttps://api.github.com/userscope: STRuseridp_user_id: STRloginprovider: keycloakWith Keycloak, you can define multiple realms or organizations. Since it is often a part of a custom deployment, both base URL and realm ID are required, and you can specify them with the
base_urlandorganizationoptions in youripaidpplaybook task:--- - name: Playbook to manage IPA idp hosts: ipaserver become: false tasks: - name: Ensure keycloak idp my-keycloak-idp is present using provider ipaidp: ipaadmin_password: "{{ ipaadmin_password }}" name: my-keycloak-idp provider: keycloak organization: main base_url: keycloak.domain.com:8443/auth client_id: my-keycloak-client-idChoosing
provider: keycloakexpands to use the following options. The value you specify in thebase_urloption replaces the string${ipaidpbaseurl}in the table, and the value you specify for theorganization `option replaces the string `${ipaidporg}.Expand Option Value auth_uri: URIhttps://${ipaidpbaseurl}/realms/${ipaidporg}/protocol/openid-connect/authdev_auth_uri: URIhttps://${ipaidpbaseurl}/realms/${ipaidporg}/protocol/openid-connect/auth/devicetoken_uri: URIhttps://${ipaidpbaseurl}/realms/${ipaidporg}/protocol/openid-connect/tokenuserinfo_uri: URIhttps://${ipaidpbaseurl}/realms/${ipaidporg}/protocol/openid-connect/userinfoscope: STRopenid emailidp_user_id: STRemailprovider: oktaAfter registering a new organization in Okta, a new base URL is associated with it. You can specify this base URL with the
base_urloption in theipaidpplaybook task:--- - name: Playbook to manage IPA idp hosts: ipaserver become: false tasks: - name: Ensure okta idp my-okta-idp is present using provider ipaidp: ipaadmin_password: "{{ ipaadmin_password }}" name: my-okta-idp provider: okta base_url: dev-12345.okta.com client_id: my-okta-client-idChoosing
provider: oktaexpands to use the following options. The value you specify for thebase_urloption replaces the string${ipaidpbaseurl}in the table.Expand Option Value auth_uri: URIhttps://${ipaidpbaseurl}/oauth2/v1/authorizedev_auth_uri: URIhttps://${ipaidpbaseurl}/oauth2/v1/device/authorizetoken_uri: URIhttps://${ipaidpbaseurl}/oauth2/v1/tokenuserinfo_uri: URIhttps://${ipaidpbaseurl}/oauth2/v1/userinfoscope: STRopenid emailidp_user_id: STRemail
Chapter 117. IdM integration with Red Hat products
Find documentation for other Red Hat products that integrate with IdM. You can configure these products to allow your IdM users to access their services.
Chapter 118. Using Ansible to integrate IdM with NIS domains and netgroups
118.1. NIS and its benefits
In UNIX environments, the network information service (NIS) is a common way to centrally manage identities and authentication. NIS, which was originally named Yellow Pages (YP), centrally manages authentication and identity information such as:
- Users and passwords
- Host names and IP addresses
- POSIX groups
For modern network infrastructures, NIS is considered too insecure because, for example, it neither provides host authentication, nor is data sent encrypted over the network. To work around the problems, NIS is often integrated with other protocols to enhance security.
If you use Identity Management (IdM), you can use the NIS server plug-in to connect clients that cannot be fully migrated to IdM. IdM integrates netgroups and other NIS data into the IdM domain. Additionally, you can easily migrate user and host identities from a NIS domain to IdM.
Netgroups can be used everywhere that NIS groups are expected.
118.2. NIS in IdM
NIS objects in IdM
NIS objects are integrated and stored in the Directory Server back end in compliance with RFC 2307. IdM creates NIS objects in the LDAP directory and clients retrieve them through, for example, System Security Services Daemon (SSSD) or nss_ldap using an encrypted LDAP connection.
IdM manages netgroups, accounts, groups, hosts, and other data. IdM uses a NIS listener to map passwords, groups, and netgroups to IdM entries.
NIS Plug-ins in IdM
For NIS support, IdM uses the following plug-ins provided in the slapi-nis package:
- NIS Server Plug-in
- The NIS Server plug-in enables the IdM-integrated LDAP server to act as a NIS server for clients. In this role, Directory Server dynamically generates and updates NIS maps according to the configuration. Using the plug-in, IdM serves clients using the NIS protocol as an NIS server.
- Schema Compatibility Plug-in
The Schema Compatibility plug-in enables the Directory Server back end to provide an alternate view of entries stored in part of the directory information tree (DIT). This includes adding, dropping, or renaming attribute values, and optionally retrieving values for attributes from multiple entries in the tree.
For further details, see the
/usr/share/doc/slapi-nis-version/sch-getting-started.txtfile.
118.3. NIS netgroups in IdM
NIS entities can be stored in netgroups. Compared to UNIX groups, netgroups provide support for:
- Nested groups (groups as members of other groups).
- Grouping hosts.
A netgroup defines a set of the following information: host, user, and domain. This set is called a triple. These three fields can contain:
- A value.
-
A dash (
-), which specifies "no valid value" - No value. An empty field specifies a wildcard.
(host.example.com,,nisdomain.example.com)
(-,user,nisdomain.example.com)When a client requests a NIS netgroup, IdM translates the LDAP entry :
- To a traditional NIS map and sends it to the client over the NIS protocol by using the NIS plug-in.
- To an LDAP format that is compliant with RFC 2307 or RFC 2307bis.
118.4. Using Ansible to ensure that a netgroup is present
You can use an Ansible playbook to ensure that an IdM netgroup is present. The example describes how to ensure that the TestNetgroup1 group is present.
Prerequisites
You have configured your Ansible control node to meet the following requirements:
- You are using Ansible version 2.13 or later.
-
You have installed the
ansible-freeipapackage on the Ansible controller. - You have created an Ansible inventory file with the fully-qualified domain name (FQDN) of the IdM server in the ~/MyPlaybooks/ directory.
-
You have stored your
ipaadmin_passwordin the secret.yml Ansible vault.
Procedure
Create your Ansible playbook file netgroup-present.yml with the following content:
--- - name: Playbook to manage IPA netgroup. hosts: ipaserver become: no vars_files: - /home/user_name/MyPlaybooks/secret.yml tasks: - name: Ensure netgroup members are present ipanetgroup: ipaadmin_password: "{{ ipaadmin_password }}" name: TestNetgroup1Run the playbook:
$ ansible-playbook --vault-password-file=password_file -v -i path_to_inventory_directory/inventory.file path_to_playbooks_directory_/netgroup-present.yml
118.5. Using Ansible to ensure that members are present in a netgroup
You can use an Ansible playbook to ensure that IdM users, groups, and netgroups are members of a netgroup. The example describes how to ensure that the TestNetgroup1 group has the following members:
- The user1 and user2 IdM users
- The group1 IdM group
- The admins netgroup
- An idmclient1 host that is an IdM client
Prerequisites
You have configured your Ansible control node to meet the following requirements:
- You are using Ansible version 2.13 or later.
-
You have installed the
ansible-freeipapackage on the Ansible controller. - You have created an Ansible inventory file with the fully-qualified domain name (FQDN) of the IdM server in the ~/MyPlaybooks/ directory.
-
You have stored your
ipaadmin_passwordin the secret.yml Ansible vault.
- The TestNetgroup1 IdM netgroup exists.
- The user1 and user2 IdM users exist.
- The group1 IdM group exists.
- The admins IdM netgroup exists.
Procedure
Create your Ansible playbook file IdM-members-present-in-a-netgroup.yml with the following content:
--- - name: Playbook to manage IPA netgroup. hosts: ipaserver become: no vars_files: - /home/user_name/MyPlaybooks/secret.yml tasks: - name: Ensure netgroup members are present ipanetgroup: ipaadmin_password: "{{ ipaadmin_password }}" name: TestNetgroup1 user: user1,user2 group: group1 host: idmclient1 netgroup: admins action: memberRun the playbook:
$ ansible-playbook --vault-password-file=password_file -v -i path_to_inventory_directory/inventory.file path_to_playbooks_directory_/IdM-members-present-in-a-netgroup.yml
118.6. Using Ansible to ensure that a member is absent from a netgroup
You can use an Ansible playbook to ensure that IdM users are members of a netgroup. The example describes how to ensure that the TestNetgroup1 group does not have the user1 IdM user among its members. netgroup
Prerequisites
You have configured your Ansible control node to meet the following requirements:
- You are using Ansible version 2.13 or later.
-
You have installed the
ansible-freeipapackage on the Ansible controller. - You have created an Ansible inventory file with the fully-qualified domain name (FQDN) of the IdM server in the ~/MyPlaybooks/ directory.
-
You have stored your
ipaadmin_passwordin the secret.yml Ansible vault.
- The TestNetgroup1 netgroup exists.
Procedure
Create your Ansible playbook file IdM-member-absent-from-a-netgroup.yml with the following content:
--- - name: Playbook to manage IPA netgroup. hosts: ipaserver become: no vars_files: - /home/user_name/MyPlaybooks/secret.yml tasks: - name: Ensure netgroup user, "user1", is absent ipanetgroup: ipaadmin_password: "{{ ipaadmin_password }}" name: TestNetgroup1 user: "user1" action: member state: absentRun the playbook:
$ ansible-playbook --vault-password-file=password_file -v -i path_to_inventory_directory/inventory.file path_to_playbooks_directory_/IdM-member-absent-from-a-netgroup.yml
118.7. Using Ansible to ensure that a netgroup is absent
You can use an Ansible playbook to ensure that a netgroup does not exist in Identity Management (IdM). The example describes how to ensure that the TestNetgroup1 group does not exist in your IdM domain.
Prerequisites
You have configured your Ansible control node to meet the following requirements:
- You are using Ansible version 2.13 or later.
-
You have installed the
ansible-freeipapackage on the Ansible controller. - You have created an Ansible inventory file with the fully-qualified domain name (FQDN) of the IdM server in the ~/MyPlaybooks/ directory.
-
You have stored your
ipaadmin_passwordin the secret.yml Ansible vault.
Procedure
Create your Ansible playbook file netgroup-absent.yml with the following content:
--- - name: Playbook to manage IPA netgroup. hosts: ipaserver become: no vars_files: - /home/user_name/MyPlaybooks/secret.yml tasks: - name: Ensure netgroup my_netgroup1 is absent ipanetgroup: ipaadmin_password: "{{ ipaadmin_password }}" name: my_netgroup1 state: absentRun the playbook:
$ ansible-playbook --vault-password-file=password_file -v -i path_to_inventory_directory/inventory.file path_to_playbooks_directory_/netgroup-absent.yml
Chapter 119. Migrating from NIS to Identity Management
A Network Information Service (NIS) server can contain information about users, groups, hosts, netgroups and automount maps. As a system administrator you can migrate these entry types, authentication, and authorization from NIS server to an Identity Management (IdM) server so that all user management operations are performed on the IdM server. Migrating from NIS to IdM will also allow you access to more secure protocols such as Kerberos.
119.1. Enabling NIS in IdM
To allow communication between NIS and Identity Management (IdM) server, you must enable NIS compatibility options on IdM server.
Prerequisites
- You have root access on IdM server.
Procedure
Enable the NIS listener and compatibility plug-ins on IdM server:
[root@ipaserver ~]# ipa-nis-manage enable [root@ipaserver ~]# ipa-compat-manage enableOptional: For a more strict firewall configuration, set a fixed port.
For example, to set the port to unused port
514:[root@ipaserver ~]# ldapmodify -x -D 'cn=directory manager' -W dn: cn=NIS Server,cn=plugins,cn=config changetype: modify add: nsslapd-pluginarg0 nsslapd-pluginarg0: 514WarningTo avoid conflict with other services do not use any port number above 1024.
Enable and start the port mapper service:
[root@ipaserver ~]# systemctl enable rpcbind.service [root@ipaserver ~]# systemctl start rpcbind.serviceRestart Directory Server:
[root@ipaserver ~]# systemctl restart dirsrv.target
119.2. Migrating user entries from NIS to IdM
The NIS passwd map contains information about users, such as names, UIDs, primary group, GECOS, shell, and home directory. Use this data to migrate NIS user accounts to Identity Management (IdM):
Prerequisites
- You have root access on NIS server.
- NIS is enabled in IdM.
- The NIS server is enrolled into IdM.
- You have ID ranges that can store UIDs of importing users.
Procedure
Install the
yp-toolspackage:[root@nis-server ~]# yum install yp-tools -yOn the NIS server create the
/root/nis-users.shscript with the following content:#!/bin/sh # $1 is the NIS domain, $2 is the primary NIS server ypcat -d $1 -h $2 passwd > /dev/shm/nis-map.passwd 2>&1 IFS=$'\n' for line in $(cat /dev/shm/nis-map.passwd) ; do IFS=' ' username=$(echo $line | cut -f1 -d:) # Not collecting encrypted password because we need cleartext password # to create kerberos key uid=$(echo $line | cut -f3 -d:) gid=$(echo $line | cut -f4 -d:) gecos=$(echo $line | cut -f5 -d:) homedir=$(echo $line | cut -f6 -d:) shell=$(echo $line | cut -f7 -d:) # Now create this entry echo passw0rd1 | ipa user-add $username --first=NIS --last=USER \ --password --gidnumber=$gid --uid=$uid --gecos="$gecos" --homedir=$homedir \ --shell=$shell ipa user-show $username doneAuthenticate as the IdM
adminuser:[root@nis-server ~]# kinit adminRun the script. For example:
[root@nis-server ~]# sh /root/nis-users.sh nisdomain nis-server.example.comImportantThis script uses hard-coded values for first name, last name, and sets the password to
passw0rd1. The user must change the temporary password at the next login.
119.3. Migrating user group from NIS to IdM
The NIS group map contains information about groups, such as group names, GIDs, or group members. Use this data to migrate NIS groups to Identity Management (IdM):
Prerequisites
- You have root access on NIS server.
- NIS is enabled in IdM.
- The NIS server is enrolled into IdM.
Procedure
Install the
yp-toolspackage:[root@nis-server ~]# yum install yp-tools -yCreate the
/root/nis-groups.shscript with the following content on the NIS server:#!/bin/sh # $1 is the NIS domain, $2 is the primary NIS server ypcat -d $1 -h $2 group > /dev/shm/nis-map.group 2>&1 IFS=$'\n' for line in $(cat /dev/shm/nis-map.group); do IFS=' ' groupname=$(echo $line | cut -f1 -d:) # Not collecting encrypted password because we need cleartext password # to create kerberos key gid=$(echo $line | cut -f3 -d:) members=$(echo $line | cut -f4 -d:) # Now create this entry ipa group-add $groupname --desc=NIS_GROUP_$groupname --gid=$gid if [ -n "$members" ]; then useropts=$(eval echo --users={$members}) ipa group-add-member $groupname $useropts fi ipa group-show $groupname doneNoteMake sure your usernames do not contain any special characters to ensure successful migration of the user group.
Authenticate as the IdM
adminuser:[root@nis-server ~]# kinit adminRun the script. For example:
[root@nis-server ~]# sh /root/nis-groups.sh nisdomain nis-server.example.com
119.4. Migrating host entries from NIS to IdM
The NIS hosts map contains information about hosts, such as host names and IP addresses. Use this data to migrate NIS host entries to Identity Management (IdM):
When you create a host group in IdM, a corresponding shadow NIS group is automatically created. Do not use the ipa netgroup-* commands on these shadow NIS groups. Use the ipa netgroup-* commands only to manage native netgroups created via the netgroup-add command.
Prerequisites
- You have root access on NIS server.
- NIS is enabled in IdM.
- The NIS server is enrolled into IdM.
Procedure
Install the
yp-toolspackage:[root@nis-server ~]# yum install yp-tools -yCreate the
/root/nis-hosts.shscript with the following content on the NIS server:#!/bin/sh # $1 is the NIS domain, $2 is the primary NIS server ypcat -d $1 -h $2 hosts | egrep -v "localhost|127.0.0.1" > /dev/shm/nis-map.hosts 2>&1 IFS=$'\n' for line in $(cat /dev/shm/nis-map.hosts); do IFS=' ' ipaddress=$(echo $line | awk '{print $1}') hostname=$(echo $line | awk '{print $2}') primary=$(ipa env xmlrpc_uri | tr -d '[:space:]' | cut -f3 -d: | cut -f3 -d/) domain=$(ipa env domain | tr -d '[:space:]' | cut -f2 -d:) if [ $(echo $hostname | grep "\." |wc -l) -eq 0 ] ; then hostname=$(echo $hostname.$domain) fi zone=$(echo $hostname | cut -f2- -d.) if [ $(ipa dnszone-show $zone 2>/dev/null | wc -l) -eq 0 ] ; then ipa dnszone-add --name-server=$primary --admin-email=root.$primary fi ptrzone=$(echo $ipaddress | awk -F. '{print $3 "." $2 "." $1 ".in-addr.arpa."}') if [ $(ipa dnszone-show $ptrzone 2>/dev/null | wc -l) -eq 0 ] ; then ipa dnszone-add $ptrzone --name-server=$primary --admin-email=root.$primary fi # Now create this entry ipa host-add $hostname --ip-address=$ipaddress ipa host-show $hostname doneAuthenticate as the IdM
adminuser:[root@nis-server ~]# kinit adminRun the script. For example:
[root@nis-server ~]# sh /root/nis-hosts.sh nisdomain nis-server.example.comNoteThis script does not migrate special host configurations, such as aliases.
119.5. Migrating netgroup entries from NIS to IdM
The NIS netgroup map contains information about netgroups. Use this data to migrate NIS netgroups to Identity Management (IdM):
Prerequisites
- You have root access on NIS server.
- NIS is enabled in IdM.
- The NIS server is enrolled into IdM.
Procedure
Install the
yp-toolspackage:[root@nis-server ~]# yum install yp-tools -yCreate the
/root/nis-netgroups.shscript with the following content on the NIS server:#!/bin/sh # $1 is the NIS domain, $2 is the primary NIS server ypcat -k -d $1 -h $2 netgroup > /dev/shm/nis-map.netgroup 2>&1 IFS=$'\n' for line in $(cat /dev/shm/nis-map.netgroup); do IFS=' ' netgroupname=$(echo $line | awk '{print $1}') triples=$(echo $line | sed "s/^$netgroupname //") echo "ipa netgroup-add $netgroupname --desc=NIS_NG_$netgroupname" if [ $(echo $line | grep "(," | wc -l) -gt 0 ]; then echo "ipa netgroup-mod $netgroupname --hostcat=all" fi if [ $(echo $line | grep ",," | wc -l) -gt 0 ]; then echo "ipa netgroup-mod $netgroupname --usercat=all" fi for triple in $triples; do triple=$(echo $triple | sed -e 's/-//g' -e 's/(//' -e 's/)//') if [ $(echo $triple | grep ",.*," | wc -l) -gt 0 ]; then hostname=$(echo $triple | cut -f1 -d,) username=$(echo $triple | cut -f2 -d,) domain=$(echo $triple | cut -f3 -d,) hosts=""; users=""; doms=""; [ -n "$hostname" ] && hosts="--hosts=$hostname" [ -n "$username" ] && users="--users=$username" [ -n "$domain" ] && doms="--nisdomain=$domain" echo "ipa netgroup-add-member $netgroup $hosts $users $doms" else netgroup=$triple echo "ipa netgroup-add $netgroup --desc=<NIS_NG>_$netgroup" fi done doneAuthenticate as the IdM
adminuser:[root@nis-server ~]# kinit adminRun the script. For example:
[root@nis-server ~]# sh /root/nis-netgroups.sh nisdomain nis-server.example.com
119.6. Migrating automount maps from NIS to IdM
Automount maps are a series of nested and interrelated entries that define the location (the parent entry), the associated keys, and maps. To migrate NIS automount maps to Identity Management (IdM):
Prerequisites
- You have root access on NIS server.
- NIS is enabled in IdM.
- The NIS server is enrolled into IdM.
Procedure
Install the
yp-toolspackage:[root@nis-server ~]# yum install yp-tools -yCreate the
/root/nis-automounts.shscript with the following content on the NIS server:#!/bin/sh # $1 is for the automount entry in ipa ipa automountlocation-add $1 # $2 is the NIS domain, $3 is the primary NIS server, $4 is the map name ypcat -k -d $2 -h $3 $4 > /dev/shm/nis-map.$4 2>&1 ipa automountmap-add $1 $4 basedn=$(ipa env basedn | tr -d '[:space:]' | cut -f2 -d:) cat > /tmp/amap.ldif <<EOF dn: nis-domain=$2+nis-map=$4,cn=NIS Server,cn=plugins,cn=config objectClass: extensibleObject nis-domain: $2 nis-map: $4 nis-base: automountmapname=$4,cn=$1,cn=automount,$basedn nis-filter: (objectclass=\*) nis-key-format: %{automountKey} nis-value-format: %{automountInformation} EOF # $5 is the LDAP server ldapadd -x -h $5 -D "cn=Directory Manager" -W -f /tmp/amap.ldif IFS=$'\n' for line in $(cat /dev/shm/nis-map.$4); do IFS=" " key=$(echo "$line" | awk '{print $1}') info=$(echo "$line" | sed -e "s^$key[ \t]*") ipa automountkey-add nis $4 --key="$key" --info="$info" doneNoteThe script exports the NIS automount information, generates an LDAP Data Interchange Format (LDIF) for the automount location and associated map, and imports the LDIF file into the IdM Directory Server.
Authenticate as the IdM
adminuser:[root@nis-server ~]# kinit adminRun the script. For example:
[root@nis-server ~]# sh /root/nis-automounts.sh location nisdomain nis-server.example.com map_name
Chapter 120. Using automount in IdM
Automount is a way to manage, organize, and access directories across multiple systems. Automount automatically mounts a directory whenever access to it is requested. This works well within an Identity Management (IdM) domain as it allows you to share directories on clients within the domain easily.
The example uses the following scenario:
- nfs-server.idm.example.com is the fully-qualified domain name (FQDN) of a Network File System (NFS) server.
For the sake of simplicity, nfs-server.idm.example.com is an IdM client that provides the maps for the raleigh automount location.
NoteAn automount location is a unique set of NFS maps. Ideally, these maps are all located in the same geographical region so that, for example, the clients can benefit from fast connections, but this is not mandatory.
- The NFS server exports the /exports/project directory as read-write.
- Any IdM user belonging to the developers group can access the contents of the exported directory as /devel/project/ on any IdM client that uses the raleigh automount location.
- idm-client.idm.example.com is an IdM client that uses the raleigh automount location.
If you want to use a Samba server instead of an NFS server to provide the shares for IdM clients, see the Red Hat Knowledgebase solution How do I configure kerberized CIFS mounts with Autofs in an IPA environment?.
120.1. Autofs and automount in IdM
The autofs service automates the mounting of directories, as needed, by directing the automount daemon to mount directories when they are accessed. In addition, after a period of inactivity, autofs directs automount to unmount auto-mounted directories. Unlike static mounting, on-demand mounting saves system resources.
- Automount maps
On a system that utilizes
autofs, theautomountconfiguration is stored in several different files. The primaryautomountconfiguration file is/etc/auto.master, which contains the master mapping ofautomountmount points, and their associated resources, on a system. This mapping is known as automount maps.The
/etc/auto.masterconfiguration file contains the master map. It can contain references to other maps. These maps can either be direct or indirect. Direct maps use absolute path names for their mount points, while indirect maps use relative path names.- Automount configuration in IdM
While
automounttypically retrieves its map data from the local/etc/auto.masterand associated files, it can also retrieve map data from other sources. One common source is an LDAP server. In the context of Identity Management (IdM), this is a 389 Directory Server.If a system that uses
autofsis a client in an IdM domain, theautomountconfiguration is not stored in local configuration files. Instead, theautofsconfiguration, such as maps, locations, and keys, is stored as LDAP entries in the IdM directory. For example, for theidm.example.comIdM domain, the default master map is stored as follows:dn: automountmapname=auto.master,cn=default,cn=automount,dc=idm,dc=example,dc=com objectClass: automountMap objectClass: top automountMapName: auto.master
120.2. Setting up an NFS server with Kerberos in a Red Hat Enterprise Linux Identity Management domain
If you use Red Hat Enterprise Linux Identity Management (IdM), you can join your NFS server to the IdM domain. This enables you to centrally manage users and groups and to use Kerberos for authentication, integrity protection, and traffic encryption.
Prerequisites
- The NFS server is enrolled in a Red Hat Enterprise Linux Identity Management (IdM) domain.
- The NFS server is running and configured.
Procedure
Obtain a kerberos ticket as an IdM administrator:
# kinit adminCreate a
nfs/<FQDN>service principal:# ipa service-add nfs/nfs_server.idm.example.comRetrieve the
nfsservice principal from IdM, and store it in the/etc/krb5.keytabfile:# ipa-getkeytab -s idm_server.idm.example.com -p nfs/nfs_server.idm.example.com -k /etc/krb5.keytabOptional: Display the principals in the
/etc/krb5.keytabfile:# klist -k /etc/krb5.keytab Keytab name: FILE:/etc/krb5.keytab KVNO Principal ---- -------------------------------------------------------------------------- 1 nfs/nfs_server.idm.example.com@IDM.EXAMPLE.COM 1 nfs/nfs_server.idm.example.com@IDM.EXAMPLE.COM 1 nfs/nfs_server.idm.example.com@IDM.EXAMPLE.COM 1 nfs/nfs_server.idm.example.com@IDM.EXAMPLE.COM 7 host/nfs_server.idm.example.com@IDM.EXAMPLE.COM 7 host/nfs_server.idm.example.com@IDM.EXAMPLE.COM 7 host/nfs_server.idm.example.com@IDM.EXAMPLE.COM 7 host/nfs_server.idm.example.com@IDM.EXAMPLE.COMBy default, the IdM client adds the host principal to the
/etc/krb5.keytabfile when you join the host to the IdM domain. If the host principal is missing, use theipa-getkeytab -s idm_server.idm.example.com -p host/nfs_server.idm.example.com -k /etc/krb5.keytabcommand to add it.Use the
ipa-client-automountutility to configure mapping of IdM IDs:# ipa-client-automount Searching for IPA server... IPA server: DNS discovery Location: default Continue to configure the system with these values? [no]: yes Configured /etc/idmapd.conf Restarting sssd, waiting for it to become available. Started autofsUpdate your
/etc/exportsfile, and add the Kerberos security method to the client options. For example:/nfs/projects/ 192.0.2.0/24(rw,sec=krb5i)If you want that your clients can select from multiple security methods, specify them separated by colons:
/nfs/projects/ 192.0.2.0/24(rw,sec=krb5:krb5i:krb5p)Reload the exported file systems:
# exportfs -r
120.3. Configuring automount locations and maps in IdM using the IdM CLI
A location is a set of maps, which are all stored in auto.master. A location can store multiple maps. The location entry only works as a container for map entries; it is not an automount configuration in and of itself.
As a system administrator in Identity Management (IdM), you can configure automount locations and maps in IdM so that IdM users in the specified locations can access shares exported by an NFS server by navigating to specific mount points on their hosts. Both the exported NFS server directory and the mount points are specified in the maps. The example describes how to configure the raleigh location and a map that mounts the nfs-server.idm.example.com:/exports/project share on the /devel/ mount point on the IdM client as a read-write directory.
Prerequisites
- You are logged in as an IdM administrator on any IdM-enrolled host.
Procedure
Create the raleigh automount location:
$ ipa automountlocation-add raleigh ---------------------------------- Added automount location "raleigh" ---------------------------------- Location: raleighCreate an auto.devel automount map in the raleigh location:
$ ipa automountmap-add raleigh auto.devel -------------------------------- Added automount map "auto.devel" -------------------------------- Map: auto.develAdd the keys and mount information for the exports/ share:
Add the key and mount information for the auto.devel map:
$ ipa automountkey-add raleigh auto.devel --key='*' --info='-sec=krb5p,vers=4 nfs-server.idm.example.com:/exports/&' ----------------------- Added automount key "*" ----------------------- Key: * Mount information: -sec=krb5p,vers=4 nfs-server.idm.example.com:/exports/&Add the key and mount information for the auto.master map:
$ ipa automountkey-add raleigh auto.master --key=/devel --info=auto.devel ---------------------------- Added automount key "/devel" ---------------------------- Key: /devel Mount information: auto.devel
120.4. Configuring automount on an IdM client
As an Identity Management (IdM) system administrator, you can configure automount services on an IdM client so that NFS shares configured for a location to which the client has been added are accessible to an IdM user automatically when the user logs in to the client. The example describes how to configure an IdM client to use automount services that are available in the raleigh location.
Prerequisites
-
You have
rootaccess to the IdM client. - You are logged in as IdM administrator.
- The automount location exists. The example location is raleigh.
Procedure
On the IdM client, enter the
ipa-client-automountcommand and specify the location. Use the-Uoption to run the script unattended:# ipa-client-automount --location raleigh -UStop the autofs service, clear the SSSD cache, and start the autofs service to load the new configuration settings:
# systemctl stop autofs ; sss_cache -E ; systemctl start autofs
Chapter 122. IdM log files and directories
Use the following sections to monitor, analyze, and troubleshoot the individual components of Identity Management (IdM):
Additionally, you can monitor, analyze, and troubleshoot the IdM server and client and enable audit logging on an IdM server.
122.1. IdM server and client log files and directories
The following table presents directories and files that the Identity Management (IdM) server and client use to log information. You can use the files and directories for troubleshooting installation errors.
| Directory or File | Description |
|---|---|
|
| The installation log for the IdM server. |
|
| The installation log for the IdM replica. |
|
| The installation log for the IdM client. |
|
| Log files for SSSD. You can enable detailed logging for SSSD in the sssd.conf file or with the sssctl command. |
|
|
The log file for errors returned by remote procedure calls (RPCs) and responses by the |
|
| The log rotation policies for DNS, SSSD, Apache, Tomcat, and Kerberos. |
|
|
This link points to the default Certificate Authority logging configuration at |
122.2. Directory Server log files
The following table presents directories and files that the Identity Management (IdM) Directory Server (DS) instance uses to log information. You can use the files and directories for troubleshooting DS-related problems.
| Directory or file | Description |
|---|---|
|
| Log files associated with the DS instance used by the IdM server. Most operational data recorded here are related to server-replica interactions. |
|
| Contains audit trails of all DS operations when auditing is enabled in the DS configuration. Note
You can also audit the Apache error logs, where the IdM API logs access. However, because changes can be made directly over LDAP too, Red Hat recommends enabling the more comprehensive |
|
| Contains detailed information about attempted access for the domain DS instance. |
|
| Contains detailed information about failed operations for the domain DS instance. |
122.3. Enabling audit logging on an IdM server
Follow this procedure to enable logging on an Identity Management (IdM) server for audit purposes. Using detailed logs, you can monitor data, troubleshoot issues, and examine suspicious activity on the network.
The LDAP service may become slower if there are many LDAP changes logged, especially if the values are large.
Prerequisites
- The Directory Manager password
Procedure
Bind to the LDAP server:
$ ldapmodify -D "cn=Directory Manager" -W << EOFSpecify all the modifications you want to make, for example:
dn: cn=config changetype: modify replace: nsslapd-auditlog-logging-enabled nsslapd-auditlog-logging-enabled: on - replace:nsslapd-auditlog nsslapd-auditlog: /var/log/dirsrv/slapd-REALM_NAME/audit - replace:nsslapd-auditlog-mode nsslapd-auditlog-mode: 600 - replace:nsslapd-auditlog-maxlogsize nsslapd-auditlog-maxlogsize: 100 - replace:nsslapd-auditlog-logrotationtime nsslapd-auditlog-logrotationtime: 1 - replace:nsslapd-auditlog-logrotationtimeunit nsslapd-auditlog-logrotationtimeunit: day-
Indicate the end of the
ldapmodifycommand by entering EOF on a new line. - Press [Enter] twice.
- Repeat the previous steps on all the other IdM servers on which you want to enable audit logging.
Verification
Open the
/var/log/dirsrv/slapd-REALM_NAME/auditfile:389-Directory/1.4.3.231 B2021.322.1803 server.idm.example.com:636 (/etc/dirsrv/slapd-IDM-EXAMPLE-COM) time: 20220607102705 dn: cn=config result: 0 changetype: modify replace: nsslapd-auditlog-logging-enabled nsslapd-auditlog-logging-enabled: on [...]The fact that the file is not empty anymore confirms that auditing is enabled.
The system logs the bound LDAP distinguished name (DN) of the entry that makes a change. For this reason, you might have to post-process the log. For example, in the IdM Directory Server, it is an ID override DN that represents the identity of an AD user that modified a record:
$ modifiersName: ipaanchoruuid=:sid:s-1-5-21-19610888-1443184010-1631745340-279100,cn=default trust view,cn=views,cn=accounts,dc=idma,dc=idm,dc=example,dc=com
Use the pysss_nss_idmap.getnamebysid Python command to look up an AD user if you have the user SID:
>>> import pysss_nss_idmap
>>> pysss_nss_idmap.getnamebysid('S-1-5-21-1273159419-3736181166-4190138427-500'))
{'S-1-5-21-1273159419-3736181166-4190138427-500': {'name': 'administrator@ad.vm', 'type': 3}}122.4. Modifying error logging on an IdM server
Follow this procedure to obtain debugging information about specific types of errors. The example focuses on obtaining detailed error logs about replication by setting the error log level to 8192. To record a different type of information, select a different number from the table in Error Log Logging Levels in the Red Hat Directory Server documentation.
The LDAP service may become slower if there are many types of LDAP errors logged, especially if the values are large.
Prerequisites
- The Directory Manager password.
Procedure
Bind to the LDAP server:
$ ldapmodify -x -D "cn=directory manager" -w <password>Specify the modifications you want to make. For example to collect only logs related to replication:
dn: cn=config changetype: modify add: nsslapd-errorlog-level nsslapd-errorlog-level: 8192-
Press [Enter] twice, to indicate the end of the
ldapmodifyinstruction. This displays themodifying entry "cn=config"message. -
Press [Ctrl+C] to exit the
ldapmodifycommand. - Repeat the previous steps on all the other IdM servers on which you want to collect detailed logs about replication errors.
After you finish troubleshooting, set nsslapd-errorlog-level back to 0 to prevent performance problems.
122.5. The IdM Apache server log files
The following table presents directories and files that the Identity Management (IdM) Apache Server uses to log information.
| Directory or File | Description |
|---|---|
|
| Log files for the Apache web server. |
|
| Standard access and error logs for Apache servers. Messages specific to IdM are recorded along with the Apache messages because the IdM web UI and the RPC command-line interface use Apache. The access logs log mostly only the user principal and the URI used, which is often an RPC endpoint. The error logs contain the IdM server logs. |
|
|
122.6. Certificate System log files in IdM
The following table presents directories and files that the Identity Management (IdM) Certificate System uses to log information.
| Directory or File | Description |
|---|---|
|
| The installation log for the IdM certificate authority (CA). |
|
| The installation log for the IdM Key Recovery Authority (KRA). |
|
| The top level directory for PKI operation logs. Contains CA and KRA logs. |
|
| Directory with logs related to certificate operations. In IdM, these logs are used for service principals, hosts, and other entities which use certificates. |
|
| Directory with logs related to KRA. |
|
| Includes certificate error messages among other system messages. |
122.7. Kerberos log files in IdM
The following table presents directories and files that Kerberos uses to log information in Identity Management (IdM).
| Directory or File | Description |
|---|---|
|
| The primary log file for the Kerberos KDC server. |
|
| The primary log file for the Kerberos administration server. |
|
Locations for these files are configured in the | |
122.8. DNS log files in IdM
The following table presents directories and files that DNS uses to log information in Identity Management (IdM).
| Directory or File | Description |
|---|---|
|
|
Includes DNS error messages and other system messages. DNS logging in this file is not enabled by default. To enable it, enter the |
122.9. Custodia log files in IdM
The following table presents directories and files that Custodia uses to log information in Identity Management (IdM).
| Directory or File | Description |
|---|---|
|
| Log file directory for the Custodia service. |
Chapter 123. Configuring Single Sign-On for the RHEL 8 web console in the IdM domain
Using Single Sign-on (SSO) authentication provided by Identity Management (IdM) in the RHEL 8 web console has the following advantages:
- Users with a Kerberos ticket in the IdM domain do not need to provide login credentials to access the web console.
- Users with a certificate issued by the IdM certificate authority (CA) do not need to provide login credentials to access the web console. The web console server automatically switches to a certificate issued by the IdM certificate authority and accepted by browsers. Certificate configuration is not necessary.
Configuring SSO for logging into the RHEL web console requires to:
- Add machines to the IdM domain using the RHEL 8 web console.
- If you want to use Kerberos for authentication, you must obtain a Kerberos ticket on your machine.
- Allow administrators on the IdM server to run any command on any host.
Prerequisites
The RHEL web console service is installed on a RHEL 8 system.
For details, see Installing the web console.
The IdM client is installed on the system where the RHEL web console service is running.
For details, see IdM client installation.
123.1. Logging in to the web console using Kerberos authentication
As an Identity Management (IdM) user, you can use Single Sign-On (SSO) authentication to automatically access the RHEL web console in your browser.
With SSO, you usually do not have any administrative privileges in the web console. This only works if you configure passwordless sudo. The web console does not interactively ask for a sudo password.
Prerequisites
The IdM domain is resolvable by DNS. For instance, the SRV records of the Kerberos server are resolvable:
$ host -t SRV _kerberos._udp.idm.example.com _kerberos._udp.idm.example.com has SRV record 0 100 88 dc.idm.example.comIf the system where you are running your browser is a RHEL 8 system and has been joined to the IdM domain, you are using the same DNS as the web console server and no DNS configuration is necessary.
- You have configured the web console server for SSO authentication.
- The host on which the web console service is running is an IdM client.
- You have configured the web console client for SSO authentication.
Procedure
Obtain your Kerberos ticket-granting ticket:
$ kinit idmuser@IDM.EXAMPLE.COM Password for idmuser@IDM.EXAMPLE.COM:Enter the fully qualified name of the host on which the web console service is running into your browser:
https://<dns_name>:9090
Next steps
- After you successfully connect to the RHEL web console, you can join a RHEL 8 system to the IdM domain in the web console.
123.2. Joining a RHEL 8 system to an IdM domain using the web console
You can use the web console to join a Red Hat Enterprise Linux 8 system to the Identity Management (IdM) domain.
Prerequisites
- The IdM domain is running and reachable from the client you want to join.
- You have the IdM domain administrator credentials.
- You have installed the RHEL 8 web console.
- You have enabled the cockpit service.
Your user account is allowed to log in to the web console.
For instructions, see Installing and enabling the web console.
Procedure
Log in to the RHEL 8 web console.
For details, see Logging in to the web console.
- In the Configuration field of the Overview tab click Join Domain.
- In the Join a Domain dialog box, enter the host name of the IdM server in the Domain Address field.
- In the Domain administrator name field, enter the user name of the IdM administration account.
- In the Domain administrator password, add a password.
- Click .
Verification
- If the RHEL 8 web console did not display an error, the system has been joined to the IdM domain and you can see the domain name in the System screen.
To verify that the user is a member of the domain, click the Terminal page and type the
idcommand:$ id euid=548800004(example_user) gid=548800004(example_user) groups=548800004(example_user) context=unconfined_u:unconfined_r:unconfined_t:s0-s0:c0.c1023
Chapter 124. Using constrained delegation in IdM
Learn more about how you can use the constrained delegation feature in Identity Management (IdM):
- Constrained delegation in Identity Management describes how constrained delegation works.
-
Configuring a web console to allow a user authenticated with a smart card to SSH to a remote host without being asked to authenticate again describes a use case for constrained delegation in the context of using the Red Hat Enterprise Linux web console to
SSHto a remote host without requiring authentication. -
Using Ansible to configure a web console to allow a user authenticated with a smart card to SSH to a remote host without being asked to authenticate again describes a use case for constrained delegation in the context of using Ansible to configure the use of the Red Hat Enterprise Linux web console to
SSHto a remote host without requiring authentication. -
Configuring a web console client to allow a user authenticated with a smart card to run sudo without being asked to authenticate describes a use case for constrained delegation in the context of using the Red Hat Enterprise Linux web console to run
sudowithout requiring authentication. -
Using Ansible to configure a web console to allow a user authenticated with a smart card to run sudo without being asked to authenticate again describes a use case for constrained delegation in the context of using Ansible to configure the use of the Red Hat Enterprise Linux web console to run
sudowithout requiring authentication.
124.1. Constrained delegation in Identity Management
The Service for User to Proxy (S4U2proxy) extension provides a service that obtains a service ticket to another service on behalf of a user. This feature is known as constrained delegation. The second service is typically a proxy performing some work on behalf of the first service, under the authorization context of the user. Using constrained delegation eliminates the need for the user to delegate their full ticket-granting ticket (TGT).
Identity Management (IdM) traditionally uses the Kerberos S4U2proxy feature to allow the web server framework to obtain an LDAP service ticket on the user’s behalf. The IdM-AD trust system also uses constrained delegation to obtain a cifs principal.
You can use the S4U2proxy feature to configure a web console client to allow an IdM user that has authenticated with a smart card to achieve the following:
- Run commands with superuser privileges on the RHEL host on which the web console service is running without being asked to authenticate again.
-
Access a remote host using
SSHand access services on the host without being asked to authenticate again.
124.2. Configuring smart-card authentication for SSH logins in the web console
After logging in to a user account on the RHEL web console, you can connect to remote machines by using the SSH protocol. You can use the constrained delegation feature to use SSH without being asked to authenticate again.
In the example procedure, the web console session runs on the myhost.idm.example.com host, and you configure the console to access the remote.idm.example.com host by using SSH on behalf of the authenticated user.
Prerequisites
-
You have obtained an IdM
adminticket-granting ticket (TGT) onmyhost.idm.example.com. -
You have
rootaccess toremote.idm.example.com. - The host that runs the web console is a member of an IdM domain
Procedure
In the Terminal page, verify that the web console has created a Service for User to Proxy (S4U2proxy) Kerberos ticket in the user session:
$ klist … Valid starting Expires Service principal 05/20/25 09:19:06 05/21/25 09:19:06 HTTP/myhost.idm.example.com@IDM.EXAMPLE.COM …Create a list of the target hosts that the delegation rule can access:
Create a service delegation target:
$ ipa servicedelegationtarget-add cockpit-targetAdd the target host to the delegation target:
$ ipa servicedelegationtarget-add-member cockpit-target \ --principals=host/remote.idm.example.com@IDM.EXAMPLE.COM
Allow
cockpitsessions to access the target host list by creating a service delegation rule and adding the HTTP service Kerberos principal to it:Create a service delegation rule:
$ ipa servicedelegationrule-add cockpit-delegationAdd the web console client to the delegation rule:
$ ipa servicedelegationrule-add-member cockpit-delegation \ --principals=HTTP/myhost.idm.example.com@IDM.EXAMPLE.COMAdd the delegation target to the delegation rule:
$ ipa servicedelegationrule-add-target cockpit-delegation \ --servicedelegationtargets=cockpit-target
Enable Kerberos authentication on the
remote.idm.example.comhost:-
Connect through SSH to
remote.idm.example.comasroot. -
Add the
GSSAPIAuthentication yessetting to the/etc/ssh/sshd_configfile.
-
Connect through SSH to
Restart the
sshdservice onremote.idm.example.comso that the changes take effect immediately:$ systemctl try-restart sshd.service
124.3. Using Ansible to configure smart-card authentication for SSH logins in the web console
After logging in to a user account on the RHEL web console, you can connect to remote machines by using the SSH protocol. You can use the servicedelegationrule and servicedelegationtarget Ansible modules to configure the web console for the constrained delegation feature, which enables SSH connections without being asked to authenticate again.
In the example procedure, the web console session runs on the myhost.idm.example.com host and you configure it to access the remote.idm.example.com host by using SSH on behalf of the authenticated user.
Prerequisites
-
You have obtained an IdM
adminticket-granting ticket (TGT) onmyhost.idm.example.com. -
You have
rootaccess toremote.idm.example.com. - The host that runs the web console is a member of an IdM domain
You have configured your Ansible control node to meet the following requirements:
-
You have installed the
ansible-freeipapackage. - You are using Ansible version 2.13 or later.
-
The example assumes you have created an Ansible inventory file with the fully-qualified domain name (FQDN) of the IdM server in the
~/MyPlaybooks/directory. -
The example assumes that the
secret.ymlAnsible vault stores the admin password in theipaadmin_passwordvariable.
-
You have installed the
-
The target node, that is the node on which the
ansible-freeipamodule runs, is part of the IdM domain as an IdM client, server, or replica.
Procedure
In the Terminal page, verify that the web console has created a Service for User to Proxy (S4U2proxy) Kerberos ticket in the user session:
$ klist … Valid starting Expires Service principal 05/20/25 09:19:06 05/21/25 09:19:06 HTTP/myhost.idm.example.com@IDM.EXAMPLE.COM …Navigate to your
~/MyPlaybooks/directory:$ cd ~/MyPlaybooks/Create a
web-console-smart-card-ssh.ymlplaybook with the following content:Create a task that ensures the presence of a delegation target:
--- - name: Playbook to create a constrained delegation target hosts: ipaserver vars_files: - /home/user_name/MyPlaybooks/secret.yml tasks: - name: Ensure servicedelegationtarget web-console-delegation-target is present ipaservicedelegationtarget: ipaadmin_password: "{{ ipaadmin_password }}" name: web-console-delegation-targetAdd a task that adds the target host to the delegation target:
- name: Ensure servicedelegationtarget web-console-delegation-target member principal host/remote.idm.example.com@IDM.EXAMPLE.COM is present ipaservicedelegationtarget: ipaadmin_password: "{{ ipaadmin_password }}" name: web-console-delegation-target principal: host/remote.idm.example.com@IDM.EXAMPLE.COM action: memberAdd a task that ensures the presence of a delegation rule:
- name: Ensure servicedelegationrule delegation-rule is present ipaservicedelegationrule: ipaadmin_password: "{{ ipaadmin_password }}" name: web-console-delegation-ruleAdd a task that ensures that the Kerberos principal of the web console client service is a member of the constrained delegation rule:
- name: Ensure the Kerberos principal of the web console client service is added to the servicedelegationrule web-console-delegation-rule ipaservicedelegationrule: ipaadmin_password: "{{ ipaadmin_password }}" name: web-console-delegation-rule principal: HTTP/myhost.idm.example.com action: memberAdd a task that ensures that the constrained delegation rule is associated with the web-console-delegation-target delegation target:
- name: Ensure a constrained delegation rule is associated with a specific delegation target ipaservicedelegationrule: ipaadmin_password: "{{ ipaadmin_password }}" name: web-console-delegation-rule target: web-console-delegation-target action: member
- Save the file.
Run the Ansible playbook. Specify the playbook file, the file storing the password protecting the
secret.ymlfile, and the inventory file:$ ansible-playbook --vault-password-file=password_file -v -i inventory web-console-smart-card-ssh.ymlEnable Kerberos authentication on
remote.idm.example.com:-
Connect through SSH to
remote.idm.example.comasroot. -
Add the
GSSAPIAuthentication yessetting to the/etc/ssh/sshd_configfile.
-
Connect through SSH to
Restart the
sshdservice onremote.idm.example.comso that the changes take effect immediately:$ systemctl try-restart sshd.service
124.4. Configuring a web console to allow a user authenticated with a smart card to run sudo without being asked to authenticate again
After you have logged in to a user account on the RHEL web console, as an Identity Management (IdM) system administrator you might need to run commands with superuser privileges. You can use the constrained delegation feature to run sudo on the system without being asked to authenticate again.
Follow this procedure to configure a web console to use constrained delegation. In the example below, the web console session runs on the myhost.idm.example.com host.
Prerequisites
-
You have obtained an IdM
adminticket-granting ticket (TGT). - The web console service is present in IdM.
- The myhost.idm.example.com host is present in IdM.
-
You enabled
adminsudoaccess to domain administrators on the IdM server. For details, see Enabling sudo access for IdM administrators on IdM hosts. The web console has created an
S4U2ProxyKerberos ticket in the user session. To verify that this is the case, log in to the web console as an IdM user, open theTerminalpage, and enter:$ klist Ticket cache: FILE:/run/user/1894000001/cockpit-session-3692.ccache Default principal: user@IDM.EXAMPLE.COM Valid starting Expires Service principal 07/30/21 09:19:06 07/31/21 09:19:06 HTTP/myhost.idm.example.com@IDM.EXAMPLE.COM 07/30/21 09:19:06 07/31/21 09:19:06 krbtgt/IDM.EXAMPLE.COM@IDM.EXAMPLE.COM for client HTTP/myhost.idm.example.com@IDM.EXAMPLE.COM
Procedure
Create a list of the target hosts that can be accessed by the delegation rule:
Create a service delegation target:
$ ipa servicedelegationtarget-add cockpit-targetAdd the target host to the delegation target:
$ ipa servicedelegationtarget-add-member cockpit-target \ --principals=host/myhost.idm.example.com@IDM.EXAMPLE.COM
Allow
cockpitsessions to access the target host list by creating a service delegation rule and adding theHTTPservice Kerberos principal to it:Create a service delegation rule:
$ ipa servicedelegationrule-add cockpit-delegationAdd the web console service to the delegation rule:
$ ipa servicedelegationrule-add-member cockpit-delegation \ --principals=HTTP/myhost.idm.example.com@IDM.EXAMPLE.COMAdd the delegation target to the delegation rule:
$ ipa servicedelegationrule-add-target cockpit-delegation \ --servicedelegationtargets=cockpit-target
Enable
pam_sss_gss, the PAM module for authenticating users over the Generic Security Service Application Program Interface (GSSAPI) in cooperation with the System Security Services Daemon (SSSD):-
Open the
/etc/sssd/sssd.conffile for editing. Specify that
pam_sss_gsscan provide authentication for thesudoandsudo -icommands in IdM your domain:[domain/idm.example.com] pam_gssapi_services = sudo, sudo-i- Save and exit the file.
-
Open the
/etc/pam.d/sudofile for editing. Insert the following line to the top of the
#%PAM-1.0list to allow, but not require, GSSAPI authentication forsudocommands:auth sufficient pam_sss_gss.so- Save and exit the file.
-
Open the
Restart the
SSSDservice so that the above changes take effect immediately:$ systemctl restart sssd
After you have logged in to a user account on the RHEL web console, as an Identity Management (IdM) system administrator you might need to run commands with superuser privileges. You can use the constrained delegation feature to run sudo on the system without being asked to authenticate again.
Follow this procedure to use the ipaservicedelegationrule and ipaservicedelegationtarget ansible-freeipa modules to configure a web console to use constrained delegation. In the example below, the web console session runs on the myhost.idm.example.com host.
Prerequisites
-
You have obtained an IdM
adminticket-granting ticket (TGT) by authenticating to the web console session with a smart card.. - The web console service has been enrolled into IdM.
- The myhost.idm.example.com host is present in IdM.
-
You enabled
adminsudoaccess to domain administrators on the IdM server. For details, see Enabling sudo access for IdM administrators on IdM hosts. The web console has created an
S4U2ProxyKerberos ticket in the user session. To verify that this is the case, log in to the web console as an IdM user, open theTerminalpage, and enter:$ klist Ticket cache: FILE:/run/user/1894000001/cockpit-session-3692.ccache Default principal: user@IDM.EXAMPLE.COM Valid starting Expires Service principal 07/30/21 09:19:06 07/31/21 09:19:06 HTTP/myhost.idm.example.com@IDM.EXAMPLE.COM 07/30/21 09:19:06 07/31/21 09:19:06 krbtgt/IDM.EXAMPLE.COM@IDM.EXAMPLE.COM for client HTTP/myhost.idm.example.com@IDM.EXAMPLE.COMYou have configured your Ansible control node to meet the following requirements:
- You are using Ansible version 2.13 or later.
-
You have installed the
ansible-freeipapackage. - The example assumes that in the ~/MyPlaybooks/ directory, you have created an Ansible inventory file with the fully-qualified domain name (FQDN) of the IdM server where you are configuring the constrained delegation.
-
The example assumes that the secret.yml Ansible vault stores your
ipaadmin_password.
-
The target node, that is the node on which the
ansible-freeipamodule is executed, is part of the IdM domain as an IdM client, server or replica.
Procedure
On your Ansible control node, navigate to your ~/MyPlaybooks/ directory:
$ cd ~/MyPlaybooks/Create a
web-console-smart-card-sudo.ymlplaybook with the following content:Create a task that ensures the presence of a delegation target:
--- - name: Playbook to create a constrained delegation target hosts: ipaserver vars_files: - /home/user_name/MyPlaybooks/secret.yml tasks: - name: Ensure servicedelegationtarget named sudo-web-console-delegation-target is present ipaservicedelegationtarget: ipaadmin_password: "{{ ipaadmin_password }}" name: sudo-web-console-delegation-targetAdd a task that adds the target host to the delegation target:
- name: Ensure that a member principal named host/myhost.idm.example.com@IDM.EXAMPLE.COM is present in a service delegation target named sudo-web-console-delegation-target ipaservicedelegationtarget: ipaadmin_password: "{{ ipaadmin_password }}" name: sudo-web-console-delegation-target principal: host/myhost.idm.example.com@IDM.EXAMPLE.COM action: memberAdd a task that ensures the presence of a delegation rule:
- name: Ensure servicedelegationrule named sudo-web-console-delegation-rule is present ipaservicedelegationrule: ipaadmin_password: "{{ ipaadmin_password }}" name: sudo-web-console-delegation-ruleAdd a task that ensures that the Kerberos principal of the web console service is a member of the constrained delegation rule:
- name: Ensure the Kerberos principal of the web console service is added to the service delegation rule named sudo-web-console-delegation-rule ipaservicedelegationrule: ipaadmin_password: "{{ ipaadmin_password }}" name: sudo-web-console-delegation-rule principal: HTTP/myhost.idm.example.com action: memberAdd a task that ensures that the constrained delegation rule is associated with the sudo-web-console-delegation-target delegation target:
- name: Ensure a constrained delegation rule is associated with a specific delegation target ipaservicedelegationrule: ipaadmin_password: "{{ ipaadmin_password }}" name: sudo-web-console-delegation-rule target: sudo-web-console-delegation-target action: member
- Save the file.
Run the Ansible playbook. Specify the playbook file, the file storing the password protecting the secret.yml file, and the inventory file:
$ ansible-playbook --vault-password-file=password_file -v -i inventory web-console-smart-card-sudo.ymlEnable
pam_sss_gss, the PAM module for authenticating users over the Generic Security Service Application Program Interface (GSSAPI) in cooperation with the System Security Services Daemon (SSSD):-
Open the
/etc/sssd/sssd.conffile for editing. Specify that
pam_sss_gsscan provide authentication for thesudoandsudo -icommands in IdM your domain:[domain/idm.example.com] pam_gssapi_services = sudo, sudo-i- Save and exit the file.
-
Open the
/etc/pam.d/sudofile for editing. Insert the following line to the top of the
#%PAM-1.0list to allow, but not require, GSSAPI authentication forsudocommands:auth sufficient pam_sss_gss.so- Save and exit the file.
-
Open the
Restart the
SSSDservice so that the above changes take effect immediately:$ systemctl restart sssd