Deduplicating and compressing storage
Using VDO to optimize storage capacity in RHEL 8
Abstract
Providing feedback on Red Hat documentation
We are committed to providing high-quality documentation and value your feedback. To help us improve, you can submit suggestions or report errors through the Red Hat Jira tracking system.
Procedure
Log in to the Jira website.
If you do not have an account, select the option to create one.
- Click Create in the top navigation bar.
- Enter a descriptive title in the Summary field.
- Enter your suggestion for improvement in the Description field. Include links to the relevant parts of the documentation.
- Click Create at the bottom of the dialogue.
Chapter 1. Deploying VDO
As a system administrator, you can use VDO to create deduplicated and compressed storage pools.
1.1. Introduction to VDO
Virtual Data Optimizer (VDO) provides inline data reduction for Linux in the form of deduplication, compression, and thin provisioning. When you set up a VDO volume, you specify a block device on which to construct your VDO volume and the amount of logical storage you plan to present.
- When hosting active VMs or containers, Red Hat recommends provisioning storage at a 10:1 logical to physical ratio: that is, if you are utilizing 1 TB of physical storage, you would present it as 10 TB of logical storage.
- For object storage, such as the type provided by Ceph, Red Hat recommends using a 3:1 logical to physical ratio: that is, 1 TB of physical storage would present as 3 TB logical storage.
In either case, you can simply put a file system on top of the logical device presented by VDO and then use it directly or as part of a distributed cloud storage architecture.
Because VDO is thinly provisioned, the file system and applications only see the logical space in use and are not aware of the actual physical space available. Use scripting to monitor the actual available space and generate an alert if use exceeds a threshold: for example, when the VDO volume is 80% full.
1.2. VDO deployment scenarios
You can deploy VDO in a variety of ways to provide deduplicated storage for:
- both block and file access
- both local and remote storage
Because VDO exposes its deduplicated storage as a standard Linux block device, you can use it with standard file systems, iSCSI and FC target drivers, or as unified storage.
Deployment of VDO volumes on top of Ceph RADOS Block Device (RBD) is currently supported. However, the deployment of Red Hat Ceph Storage cluster components on top of VDO volumes is currently not supported.
KVM
You can deploy VDO on a KVM server configured with Direct Attached Storage.

File systems
You can create file systems on top of VDO and expose them to NFS or CIFS users with the NFS server or Samba.

Placement of VDO on iSCSI
You can export the entirety of the VDO storage target as an iSCSI target to remote iSCSI initiators.
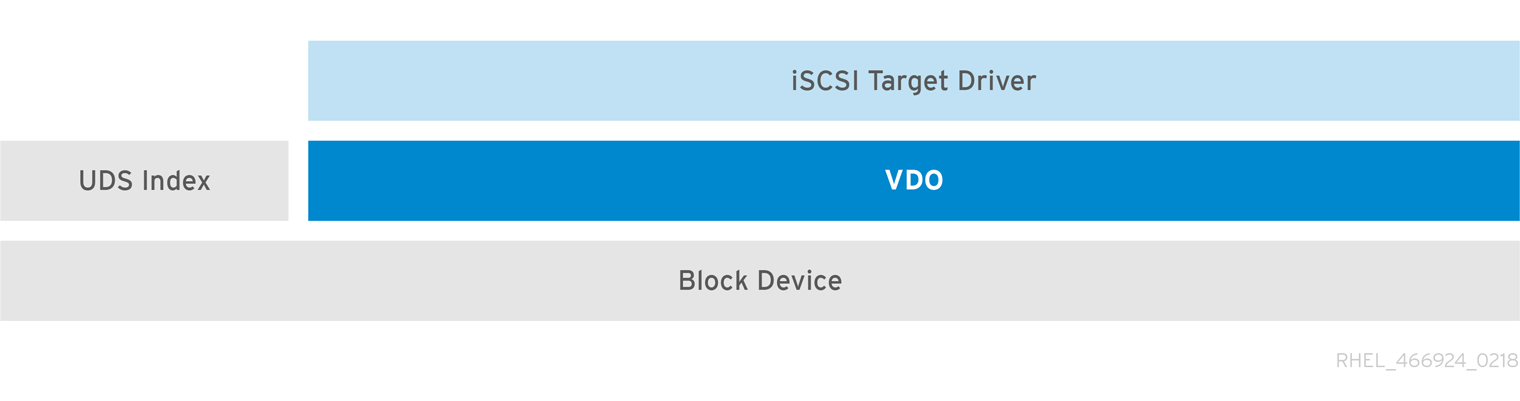
When creating a VDO volume on iSCSI, you can place the VDO volume above or below the iSCSI layer. Although there are many considerations to be made, some guidelines are provided here to help you select the method that best suits your environment.
When placing the VDO volume on the iSCSI server (target) below the iSCSI layer:
- The VDO volume is transparent to the initiator, similar to other iSCSI LUNs. Hiding the thin provisioning and space savings from the client makes the appearance of the LUN easier to monitor and maintain.
- There is decreased network traffic because there are no VDO metadata reads or writes, and read verification for the dedupe advice does not occur across the network.
- The memory and CPU resources being used on the iSCSI target can result in better performance. For example, the ability to host an increased number of hypervisors because the volume reduction is happening on the iSCSI target.
- If the client implements encryption on the initiator and there is a VDO volume below the target, you will not realize any space savings.
When placing the VDO volume on the iSCSI client (initiator) above the iSCSI layer:
- There is a potential for lower network traffic across the network in ASYNC mode if achieving high rates of space savings.
- You can directly view and control the space savings and monitor usage.
-
If you want to encrypt the data, for example, using
dm-crypt, you can implement VDO on top of the crypt and take advantage of space efficiency.
LVM
On more feature-rich systems, you can use LVM to provide multiple logical unit numbers (LUNs) that are all backed by the same deduplicated storage pool.
In the following diagram, the VDO target is registered as a physical volume so that it can be managed by LVM. Multiple logical volumes (LV1 to LV4) are created out of the deduplicated storage pool. In this way, VDO can support multiprotocol unified block or file access to the underlying deduplicated storage pool.
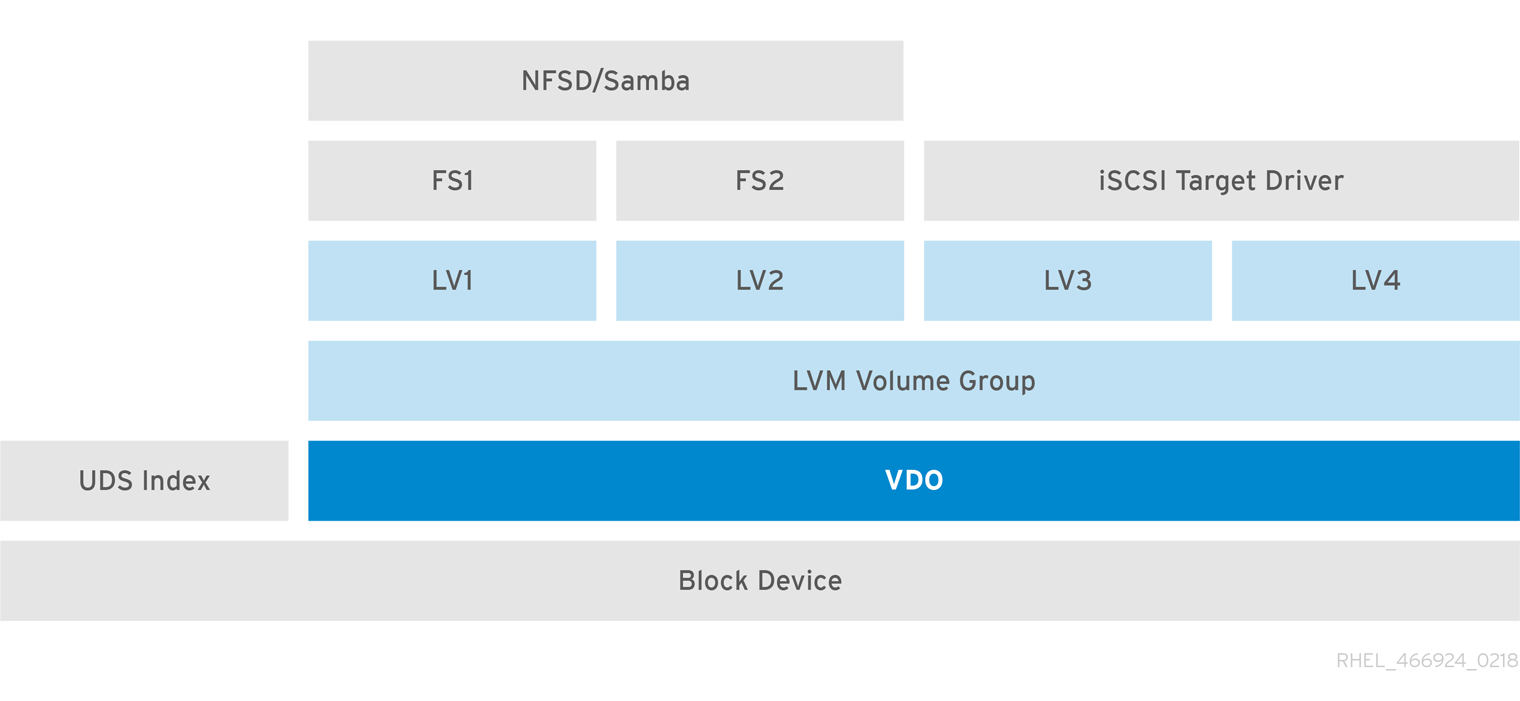
Deduplicated unified storage design enables for multiple file systems to collectively use the same deduplication domain through the LVM tools. Also, file systems can take advantage of LVM snapshot, copy-on-write, and shrink or grow features, all on top of VDO.
Encryption
Device Mapper (DM) mechanisms such as DM Crypt are compatible with VDO. Encrypting VDO volumes helps ensure data security, and any file systems above VDO are still deduplicated.
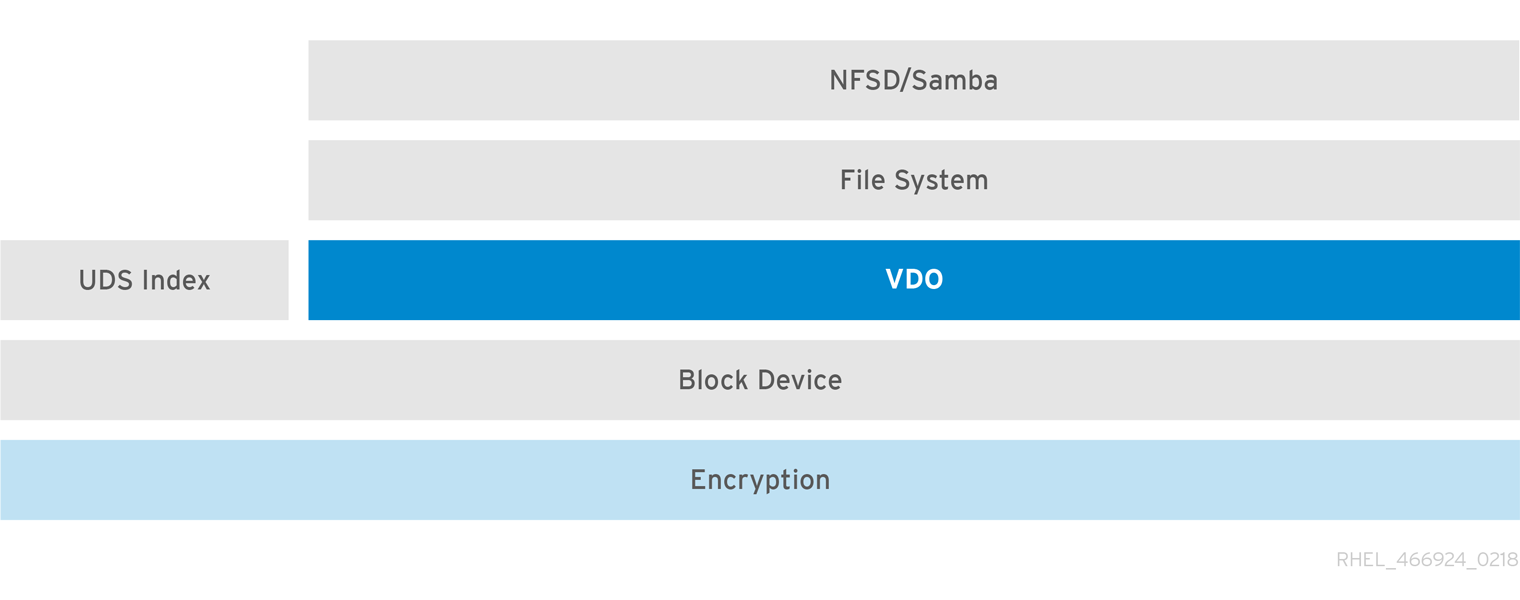
Applying the encryption layer above VDO results in little if any data deduplication. Encryption makes duplicate blocks different before VDO can deduplicate them.
Always place the encryption layer below VDO.
1.3. Components of a VDO volume
VDO uses a block device as a backing store, which can include an aggregation of physical storage consisting of one or more disks, partitions, or even flat files. When a storage management tool creates a VDO volume, VDO reserves volume space for the UDS index and VDO volume. The UDS index and the VDO volume interact together to provide deduplicated block storage.
Figure 1.1. VDO disk organization

The VDO solution consists of the following components:
kvdoA kernel module that loads into the Linux Device Mapper layer provides a deduplicated, compressed, and thinly provisioned block storage volume.
The
kvdomodule exposes a block device. You can access this block device directly for block storage or present it through a Linux file system, such as XFS or ext4.When
kvdoreceives a request to read a logical block of data from a VDO volume, it maps the requested logical block to the underlying physical block and then reads and returns the requested data.When
kvdoreceives a request to write a block of data to a VDO volume, it first checks whether the request is a DISCARD or TRIM request or whether the data is uniformly zero. If either of these conditions is true,kvdoupdates its block map and acknowledges the request. Otherwise, VDO processes and optimizes the data.udsA kernel module that communicates with the Universal Deduplication Service (UDS) index on the volume and analyzes data for duplicates. For each new piece of data, UDS quickly determines if that piece is identical to any previously stored piece of data. If the index finds a match, the storage system can then internally reference the existing item to avoid storing the same information more than once.
The UDS index runs inside the kernel as the
udskernel module.- Command line tools
- For configuring and managing optimized storage.
1.4. The physical and logical size of a VDO volume
VDO utilizes physical, available physical, and logical size in the following ways:
- Physical size
This is the same size as the underlying block device. VDO uses this storage for:
- User data, which might be deduplicated and compressed
- VDO metadata, such as the UDS index
- Available physical size
This is the portion of the physical size that VDO is able to use for user data
It is equivalent to the physical size minus the size of the metadata, minus the remainder after dividing the volume into slabs by the given slab size.
- Logical Size
This is the provisioned size that the VDO volume presents to applications. It is usually larger than the available physical size. If the
--vdoLogicalSizeoption is not specified, then the provisioning of the logical volume is now provisioned to a1:1ratio. For example, if a VDO volume is put on top of a 20 GB block device, then 2.5 GB is reserved for the UDS index (if the default index size is used). The remaining 17.5 GB is provided for the VDO metadata and user data. As a result, the available storage to consume is not more than 17.5 GB, and can be less due to metadata that makes up the actual VDO volume.VDO currently supports any logical size up to 254 times the size of the physical volume with an absolute maximum logical size of 4PB.
Figure 1.2. VDO disk organization
In this figure, the VDO deduplicated storage target sits completely on top of the block device, meaning the physical size of the VDO volume is the same size as the underlying block device.
1.5. Slab size in VDO
The physical storage of the VDO volume is divided into a number of slabs. Each slab is a contiguous region of the physical space. All of the slabs for a given volume have the same size, which can be any power of 2 multiple of 128 MB up to 32 GB.
The default slab size is 2 GB to facilitate evaluating VDO on smaller test systems. A single VDO volume can have up to 8192 slabs. Therefore, in the default configuration with 2 GB slabs, the maximum allowed physical storage is 16 TB. When using 32 GB slabs, the maximum allowed physical storage is 256 TB. VDO always reserves at least one entire slab for metadata, and therefore, the reserved slab cannot be used for storing user data.
Slab size has no effect on the performance of the VDO volume.
| Physical volume size | Recommended slab size |
|---|---|
| 10-99 GB | 1 GB |
| 100 GB - 1 TB | 2 GB |
| 2-256 TB | 32 GB |
The minimal disk usage for a VDO volume using default settings of 2 GB slab size and 0.25 dense index, requires approx 4.7 GB. This provides slightly less than 2 GB of physical data to write at 0% deduplication or compression.
Here, the minimal disk usage is the sum of the default slab size and dense index.
You can control the slab size by providing the --vdosettings 'vdo_slab_size_mb=size-in-megabytes' option to the lvcreate command.
1.6. VDO requirements
VDO has certain requirements on its placement and your system resources.
1.6.1. VDO memory requirements
Each VDO volume has two distinct memory requirements:
- The VDO module
VDO requires a fixed 38 MB of RAM and several variable amounts:
- 1.15 MB of RAM for each 1 MB of configured block map cache size. The block map cache requires a minimum of 150 MB of RAM.
- 1.6 MB of RAM for each 1 TB of logical space.
- 268 MB of RAM for each 1 TB of physical storage managed by the volume.
- The UDS index
The Universal Deduplication Service (UDS) requires a minimum of 250 MB of RAM, which is also the default amount that deduplication uses. You can configure the value when formatting a VDO volume, because the value also affects the amount of storage that the index needs.
The memory required for the UDS index is determined by the index type and the required size of the deduplication window. The deduplication window is the amount of previously written data that VDO can check for matching blocks.
Expand Index type Deduplication window Dense
1 TB per 1 GB of RAM
Sparse
10 TB per 1 GB of RAM
NoteThe minimal disk usage for a VDO volume using default settings of 2 GB slab size and 0.25 dense index, requires approx 4.7 GB. This provides slightly less than 2 GB of physical data to write at 0% deduplication or compression.
Here, the minimal disk usage is the sum of the default slab size and dense index.
1.6.2. VDO storage space requirements
You can configure a VDO volume to use up to 256 TB of physical storage. Only a certain part of the physical storage is usable to store data.
VDO requires storage for two types of VDO metadata and for the UDS index. Use the following calculations to determine the usable size of a VDO-managed volume:
- The first type of VDO metadata uses approximately 1 MB for each 4 GB of physical storage plus an additional 1 MB per slab.
- The second type of VDO metadata consumes approximately 1.25 MB for each 1 GB of logical storage, rounded up to the nearest slab.
- The amount of storage required for the UDS index depends on the type of index and the amount of RAM allocated to the index. For each 1 GB of RAM, a dense UDS index uses 17 GB of storage, and a sparse UDS index will use 170 GB of storage.
1.6.3. Placement of VDO in the storage stack
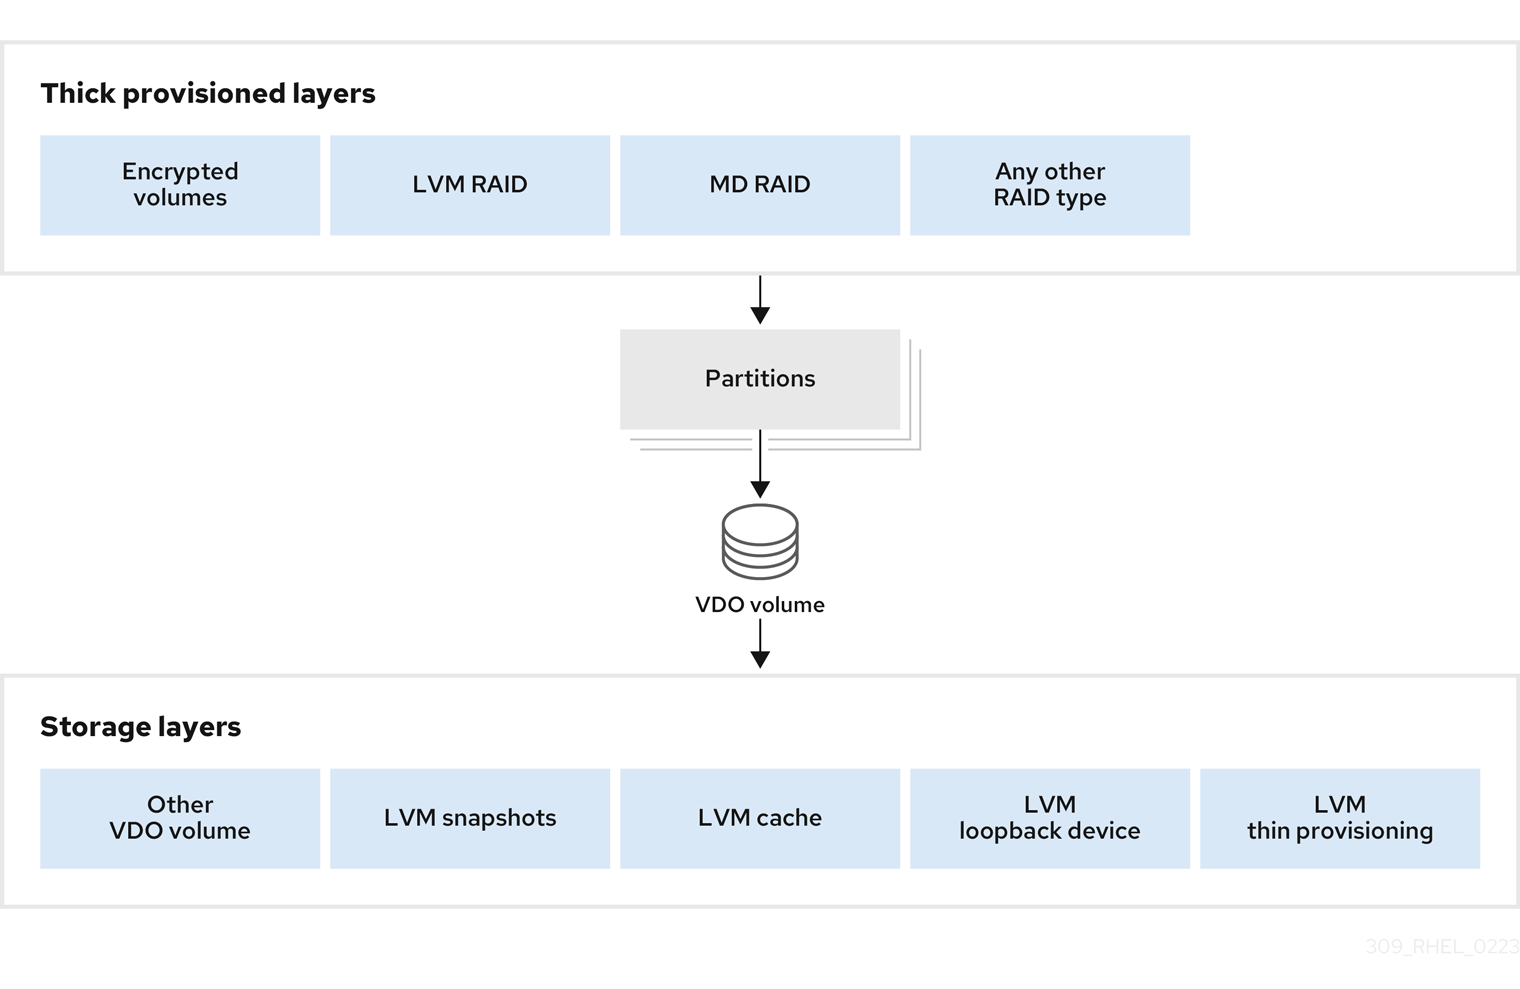
Place storage layers either above, or under the Virtual Data Optimizer (VDO), to fit the placement requirements.
A VDO volume is a thin-provisioned block device. You can prevent running out of physical space by placing the volume above a storage layer that you can expand at a later time. Examples of such expandable storage are Logical Volume Manager (LVM) volumes, or Multiple Device Redundant Array Inexpensive or Independent Disks (MD RAID) arrays.
You can place thick provisioned layers above VDO. There are two aspects of thick provisioned layers that you must consider:
- Writing new data to unused logical space on a thick device. When using VDO, or other thin-provisioned storage, the device can report that it is out of space during this kind of write.
- Overwriting used logical space on a thick device with new data. When using VDO, overwriting data can also result in a report of the device being out of space.
These limitations affect all layers above the VDO layer. If you do not monitor the VDO device, you can unexpectedly run out of physical space on the thick-provisioned volumes above VDO.
See the following examples of supported and unsupported VDO volume configurations.
Figure 1.3. Supported VDO volume configurations
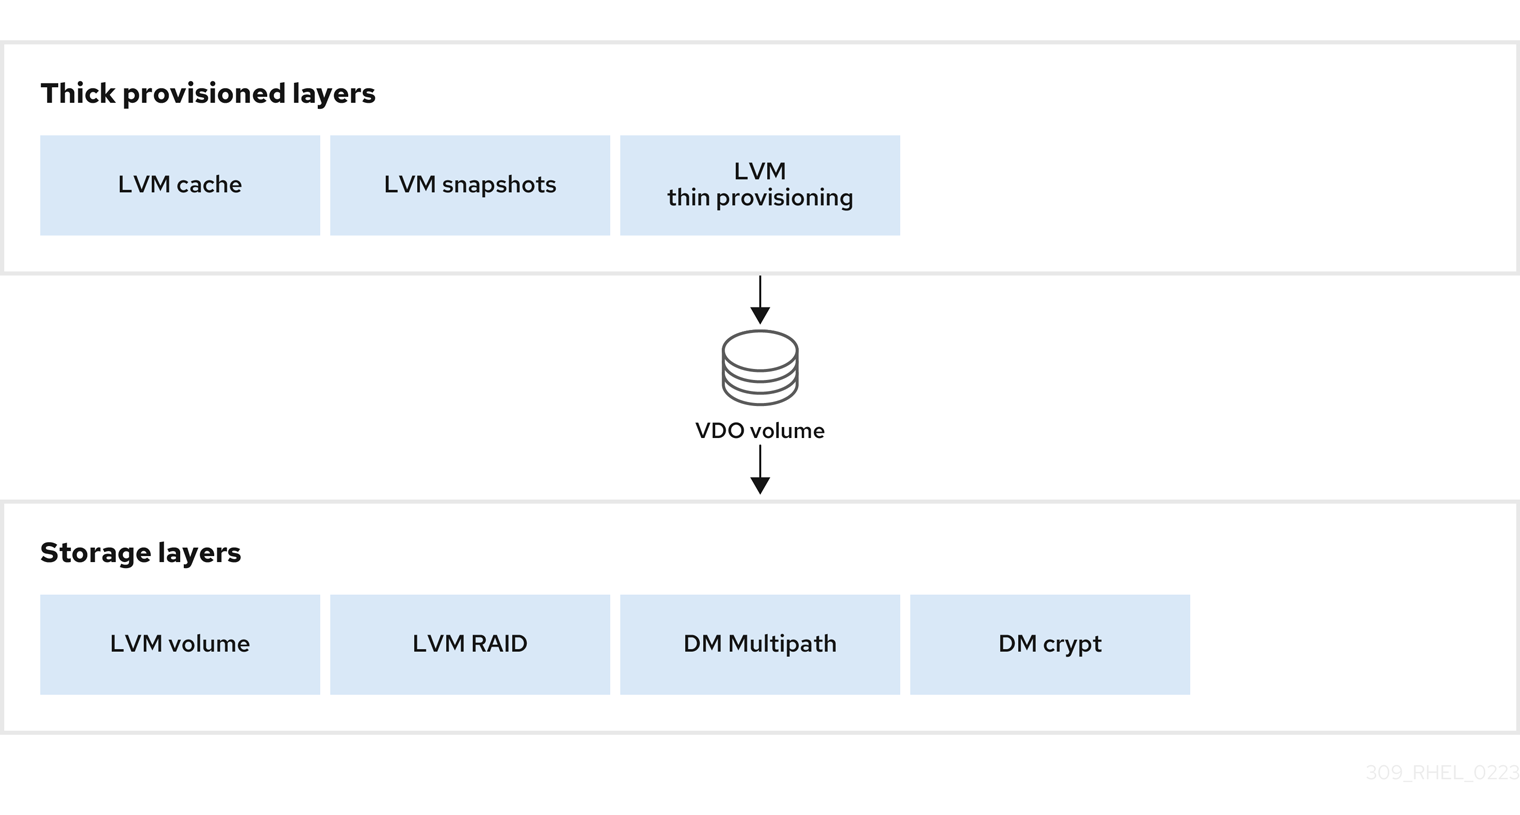
Figure 1.4. Unsupported VDO volume configurations
1.6.4. Examples of VDO requirements by physical size
The following tables provide approximate system requirements of VDO based on the physical size of the underlying volume. Each table lists requirements appropriate to the intended deployment, such as primary storage or backup storage.
The exact numbers depend on your configuration of the VDO volume.
- Primary storage deployment
In the primary storage case, the UDS index is between 0.01% to 25% the size of the physical size.
Expand Table 1.2. Examples of storage and memory configurations for primary storage Physical size RAM usage: UDS RAM usage: VDO Disk usage Index type 1 TB
250 MB
472 MB
2.5 GB
Dense
10 TB
1 GB
3 GB
10 GB
Dense
250 MB
22 GB
Sparse
50 TB
1 GB
14 GB
85 GB
Sparse
100 TB
3 GB
27 GB
255 GB
Sparse
256 TB
5 GB
69 GB
425 GB
Sparse
- Backup storage deployment
In the backup storage case, the deduplication window must be larger than the backup set. If you expect the backup set or the physical size to grow in the future, factor this into the index size.
Expand Table 1.3. Examples of storage and memory configurations for backup storage Deduplication window RAM usage: UDS Disk usage Index type 1 TB
250 MB
2.5 GB
Dense
10 TB
2 GB
21 GB
Dense
50 TB
2 GB
170 GB
Sparse
100 TB
4 GB
340 GB
Sparse
256 TB
8 GB
700 GB
Sparse
1.7. Installing VDO
You can install the VDO software necessary to create, mount, and manage VDO volumes.
Procedure
Install the VDO software:
# yum install lvm2 kmod-kvdo vdo
1.8. Creating a VDO volume
This procedure creates a VDO volume on a block device.
Prerequisites
- Install the VDO software. See Section 1.7, “Installing VDO”.
- Use expandable storage as the backing block device. For more information, see Section 1.6.3, “Placement of VDO in the storage stack”.
Procedure
In all the following steps, replace vdo-name with the identifier you want to use for your VDO volume; for example, vdo1. You must use a different name and device for each instance of VDO on the system.
Find a persistent name for the block device where you want to create the VDO volume. For more information about persistent names, see Chapter 6, Overview of persistent naming attributes.
If you use a non-persistent device name, then VDO might fail to start properly in the future if the device name changes.
Create the VDO volume:
# vdo create \ --name=vdo-name \ --device=block-device \ --vdoLogicalSize=logical-size-
Replace block-device with the persistent name of the block device where you want to create the VDO volume. For example,
/dev/disk/by-id/scsi-3600508b1001c264ad2af21e903ad031f. Replace logical-size with the amount of logical storage that the VDO volume should present:
-
For active VMs or container storage, use logical size that is ten times the physical size of your block device. For example, if your block device is 1TB in size, use
10There. -
For object storage, use logical size that is three times the physical size of your block device. For example, if your block device is 1TB in size, use
3There.
-
For active VMs or container storage, use logical size that is ten times the physical size of your block device. For example, if your block device is 1TB in size, use
If the physical block device is larger than 16TiB, add the
--vdoSlabSize=32Goption to increase the slab size on the volume to 32GiB.Using the default slab size of 2GiB on block devices larger than 16TiB results in the
vdo createcommand failing with the following error:vdo: ERROR - vdoformat: formatVDO failed on '/dev/device': VDO Status: Exceeds maximum number of slabs supported
Example 1.1. Creating VDO for container storage
For example, to create a VDO volume for container storage on a 1TB block device, you might use:
# vdo create \ --name=vdo1 \ --device=/dev/disk/by-id/scsi-3600508b1001c264ad2af21e903ad031f \ --vdoLogicalSize=10TImportantIf a failure occurs when creating the VDO volume, remove the volume to clean up. See Section 2.10.2, “Removing an unsuccessfully created VDO volume” for details.
-
Replace block-device with the persistent name of the block device where you want to create the VDO volume. For example,
Create a file system on top of the VDO volume:
For the XFS file system:
# mkfs.xfs -K /dev/mapper/vdo-nameFor the ext4 file system:
# mkfs.ext4 -E nodiscard /dev/mapper/vdo-nameNoteThe purpose of the
-Kand-E nodiscardoptions on a freshly created VDO volume is to not spend time sending requests, as it has no effect on an un-allocated block. A fresh VDO volume starts out 100% un-allocated.
Use the following command to wait for the system to register the new device node:
# udevadm settle
Next steps
- Mount the file system. See Section 1.9, “Mounting a VDO volume” for details.
-
Enable the
discardfeature for the file system on your VDO device. See Section 1.10, “Enabling periodic block discard” for details.
1.9. Mounting a VDO volume
This procedure mounts a file system on a VDO volume, either manually or persistently.
Prerequisites
- A VDO volume has been created on your system. For instructions, see Section 1.8, “Creating a VDO volume”.
Procedure
To mount the file system on the VDO volume manually, use:
# mount /dev/mapper/vdo-name mount-pointTo configure the file system to mount automatically at boot, add a line to the
/etc/fstabfile:For the XFS file system:
/dev/mapper/vdo-name mount-point xfs defaults 0 0For the ext4 file system:
/dev/mapper/vdo-name mount-point ext4 defaults 0 0
If the VDO volume is located on a block device that requires network, such as iSCSI, add the
_netdevmount option.
1.10. Enabling periodic block discard
You can enable a systemd timer to regularly discard unused blocks on all supported file systems.
Procedure
Enable and start the
systemdtimer:# systemctl enable --now fstrim.timer Created symlink /etc/systemd/system/timers.target.wants/fstrim.timer → /usr/lib/systemd/system/fstrim.timer.
Verification
Verify the status of the timer:
# systemctl status fstrim.timer
fstrim.timer - Discard unused blocks once a week
   Loaded: loaded (/usr/lib/systemd/system/fstrim.timer; enabled; vendor preset: disabled)
   Active: active (waiting) since Wed 2023-05-17 13:24:41 CEST; 3min 15s ago
  Trigger: Mon 2023-05-22 01:20:46 CEST; 4 days left
     Docs: man:fstrim

May 17 13:24:41 localhost.localdomain systemd[1]: Started Discard unused blocks once a week.
1.11. Monitoring VDO
This procedure describes how to obtain usage and efficiency information from a VDO volume.
Prerequisites
- Install the VDO software. See Section 1.7, “Installing VDO”.
Procedure
Use the
vdostatsutility to get information about a VDO volume:# vdostats --human-readable Device 1K-blocks Used Available Use% Space saving% /dev/mapper/node1osd1 926.5G 21.0G 905.5G 2% 73% /dev/mapper/node1osd2 926.5G 28.2G 898.3G 3% 64%
Chapter 2. Maintaining VDO
After deploying a VDO volume, you can perform certain tasks to maintain or optimize it. Some of the following tasks are required for the correct functioning of VDO volumes.
Prerequisites
- VDO is installed and deployed. See Chapter 1, Deploying VDO.
2.1. Managing free space on VDO volumes
VDO is a thinly provisioned block storage target. Because of that, you must actively monitor and manage space usage on VDO volumes.
2.1.1. The physical and logical size of a VDO volume
VDO utilizes physical, available physical, and logical size in the following ways:
- Physical size
This is the same size as the underlying block device. VDO uses this storage for:
- User data, which might be deduplicated and compressed
- VDO metadata, such as the UDS index
- Available physical size
This is the portion of the physical size that VDO is able to use for user data
It is equivalent to the physical size minus the size of the metadata, minus the remainder after dividing the volume into slabs by the given slab size.
- Logical Size
This is the provisioned size that the VDO volume presents to applications. It is usually larger than the available physical size. If the
--vdoLogicalSizeoption is not specified, then the provisioning of the logical volume is now provisioned to a1:1ratio. For example, if a VDO volume is put on top of a 20 GB block device, then 2.5 GB is reserved for the UDS index (if the default index size is used). The remaining 17.5 GB is provided for the VDO metadata and user data. As a result, the available storage to consume is not more than 17.5 GB, and can be less due to metadata that makes up the actual VDO volume.VDO currently supports any logical size up to 254 times the size of the physical volume with an absolute maximum logical size of 4PB.
Figure 2.1. VDO disk organization
In this figure, the VDO deduplicated storage target sits completely on top of the block device, meaning the physical size of the VDO volume is the same size as the underlying block device.
2.1.2. Thin provisioning in VDO
VDO is a thinly provisioned block storage target. The amount of physical space that a VDO volume uses might differ from the size of the volume that is presented to users of the storage. You can make use of this disparity to save on storage costs.
Out-of-space conditions
Take care to avoid unexpectedly running out of storage space, if the data written does not achieve the expected rate of optimization.
Whenever the number of logical blocks (virtual storage) exceeds the number of physical blocks (actual storage), it becomes possible for file systems and applications to unexpectedly run out of space. For that reason, storage systems using VDO must provide you with a way of monitoring the size of the free pool on the VDO volume.
You can determine the size of this free pool by using the vdostats utility. The default output of this utility lists information for all running VDO volumes in a format similar to the Linux df utility. For example:
Device                1K-blocks   Used        Available   Use%
/dev/mapper/vdo-name  211812352   105906176   105906176   50%
When the physical storage capacity of a VDO volume is almost full, VDO reports a warning in the system log, similar to the following:
Oct  2 17:13:39 system lvm[13863]: Monitoring VDO pool vdo-name.
Oct  2 17:27:39 system lvm[13863]: WARNING: VDO pool vdo-name is now 80.69% full.
Oct  2 17:28:19 system lvm[13863]: WARNING: VDO pool vdo-name is now 85.25% full.
Oct  2 17:29:39 system lvm[13863]: WARNING: VDO pool vdo-name is now 90.64% full.
Oct  2 17:30:29 system lvm[13863]: WARNING: VDO pool vdo-name is now 96.07% full.
These warning messages appear only when the lvm2-monitor service is running. It is enabled by default.
How to prevent out-of-space conditions
If the size of free pool drops below a certain level, you can take action by:
- Deleting data. This reclaims space whenever the deleted data is not duplicated. Deleting data frees the space only after discards are issued.
- Adding physical storage
Monitor physical space on your VDO volumes to prevent out-of-space situations. Running out of physical blocks might result in losing recently written, unacknowledged data on the VDO volume.
Thin provisioning and the TRIM and DISCARD commands
To benefit from the storage savings of thin provisioning, the physical storage layer needs to know when data is deleted. File systems that work with thinly provisioned storage send TRIM or DISCARD commands to inform the storage system when a logical block is no longer required.
Several methods of sending the TRIM or DISCARD commands are available:
-
With the
discardmount option, the file systems can send these commands whenever a block is deleted. -
You can send the commands in a controlled manner by using utilities such as
fstrim. These utilities tell the file system to detect which logical blocks are unused and send the information to the storage system in the form of aTRIMorDISCARDcommand.
The need to use TRIM or DISCARD on unused blocks is not unique to VDO. Any thinly provisioned storage system has the same challenge.
2.1.3. Monitoring VDO
This procedure describes how to obtain usage and efficiency information from a VDO volume.
Prerequisites
- Install the VDO software. See Section 1.7, “Installing VDO”.
Procedure
Use the
vdostatsutility to get information about a VDO volume:# vdostats --human-readable Device 1K-blocks Used Available Use% Space saving% /dev/mapper/node1osd1 926.5G 21.0G 905.5G 2% 73% /dev/mapper/node1osd2 926.5G 28.2G 898.3G 3% 64%
2.1.4. Reclaiming space for VDO on file systems
This procedure reclaims storage space on a VDO volume that hosts a file system.
VDO cannot reclaim space unless file systems communicate that blocks are free using the DISCARD, TRIM, or UNMAP commands.
Procedure
- If the file system on your VDO volume supports discard operations, enable them. See Chapter 5, Discarding unused blocks.
-
For file systems that do not use
DISCARD,TRIM, orUNMAP, you can manually reclaim free space. Store a file consisting of binary zeros to fill the free space and then delete that file.
2.1.5. Reclaiming space for VDO without a file system
This procedure reclaims storage space on a VDO volume that is used as a block storage target without a file system.
Procedure
Use the
blkdiscardutility.For example, a single VDO volume can be carved up into multiple subvolumes by deploying LVM on top of it. Before deprovisioning a logical volume, use the
blkdiscardutility to free the space previously used by that logical volume.LVM supports the
REQ_DISCARDcommand and forwards the requests to VDO at the appropriate logical block addresses in order to free the space. If you use other volume managers, they also need to supportREQ_DISCARD, or equivalently,UNMAPfor SCSI devices orTRIMfor ATA devices.
2.1.6. Reclaiming space for VDO on Fibre Channel or Ethernet network
This procedure reclaims storage space on VDO volumes (or portions of volumes) that are provisioned to hosts on a Fibre Channel storage fabric or an Ethernet network using SCSI target frameworks such as LIO or SCST.
Procedure
SCSI initiators can use the
UNMAPcommand to free space on thinly provisioned storage targets, but the SCSI target framework needs to be configured to advertise support for this command. This is typically done by enabling thin provisioning on these volumes.Verify support for
UNMAPon Linux-based SCSI initiators by running the following command:# sg_vpd --page=0xb0 /dev/deviceIn the output, verify that the Maximum unmap LBA count value is greater than zero.
2.2. Starting or stopping VDO volumes
You can start or stop a given VDO volume, or all VDO volumes, and their associated UDS indexes.
2.2.1. Started and activated VDO volumes
During the system boot, the vdo systemd unit automatically starts all VDO devices that are configured as activated.
The vdo systemd unit is installed and enabled by default when the vdo package is installed. This unit automatically runs the vdo start --all command at system startup to bring up all activated VDO volumes.
You can also create a VDO volume that does not start automatically by adding the --activate=disabled option to the vdo create command.
The starting order
Some systems might place LVM volumes both above VDO volumes and below them. On these systems, it is necessary to start services in the right order:
- The lower layer of LVM must start first. In most systems, starting this layer is configured automatically when the LVM package is installed.
-
The
vdosystemdunit must start then. - Finally, additional scripts must run in order to start LVM volumes or other services on top of the running VDO volumes.
How long it takes to stop a volume
Stopping a VDO volume takes time based on the speed of your storage device and the amount of data that the volume needs to write:
- The volume always writes around 1GiB for every 1GiB of the UDS index.
- The volume additionally writes the amount of data equal to the block map cache size plus up to 8MiB per slab.
- The volume must finish processing all outstanding IO requests.
2.2.2. Starting a VDO volume
This procedure starts a given VDO volume or all VDO volumes on your system.
Procedure
To start a given VDO volume, use:
# vdo start --name=my-vdoTo start all VDO volumes, use:
# vdo start --all
2.2.3. Stopping a VDO volume
This procedure stops a given VDO volume or all VDO volumes on your system.
Procedure
Stop the volume.
To stop a given VDO volume, use:
# vdo stop --name=my-vdoTo stop all VDO volumes, use:
# vdo stop --all
- Wait for the volume to finish writing data to the disk.
2.3. Automatically starting VDO volumes at system boot
You can configure VDO volumes so that they start automatically at system boot. You can also disable the automatic start.
2.3.1. Started and activated VDO volumes
During the system boot, the vdo systemd unit automatically starts all VDO devices that are configured as activated.
The vdo systemd unit is installed and enabled by default when the vdo package is installed. This unit automatically runs the vdo start --all command at system startup to bring up all activated VDO volumes.
You can also create a VDO volume that does not start automatically by adding the --activate=disabled option to the vdo create command.
The starting order
Some systems might place LVM volumes both above VDO volumes and below them. On these systems, it is necessary to start services in the right order:
- The lower layer of LVM must start first. In most systems, starting this layer is configured automatically when the LVM package is installed.
-
The
vdosystemdunit must start then. - Finally, additional scripts must run in order to start LVM volumes or other services on top of the running VDO volumes.
How long it takes to stop a volume
Stopping a VDO volume takes time based on the speed of your storage device and the amount of data that the volume needs to write:
- The volume always writes around 1GiB for every 1GiB of the UDS index.
- The volume additionally writes the amount of data equal to the block map cache size plus up to 8MiB per slab.
- The volume must finish processing all outstanding IO requests.
2.3.2. Activating a VDO volume
This procedure activates a VDO volume to enable it to start automatically.
Procedure
To activate a specific volume:
# vdo activate --name=my-vdoTo activate all volumes:
# vdo activate --all
2.3.3. Deactivating a VDO volume
This procedure deactivates a VDO volume to prevent it from starting automatically.
Procedure
To deactivate a specific volume:
# vdo deactivate --name=my-vdoTo deactivate all volumes:
# vdo deactivate --all
2.4. Selecting a VDO write mode
You can configure write mode for a VDO volume, based on what the underlying block device requires. By default, VDO selects write mode automatically.
2.4.1. VDO write modes
VDO supports the following write modes:
syncWhen VDO is in
syncmode, the layers above it assume that a write command writes data to persistent storage. As a result, it is not necessary for the file system or application, for example, to issue FLUSH or force unit access (FUA) requests to cause the data to become persistent at critical points.VDO must be set to
syncmode only when the underlying storage guarantees that data is written to persistent storage when the write command completes. That is, the storage must either have no volatile write cache, or have a write through cache.asyncWhen VDO is in
asyncmode, VDO does not guarantee that the data is written to persistent storage when a write command is acknowledged. The file system or application must issue FLUSH or FUA requests to ensure data persistence at critical points in each transaction.VDO must be set to
asyncmode if the underlying storage does not guarantee that data is written to persistent storage when the write command completes; that is, when the storage has a volatile write back cache.async-unsafeThis mode has the same properties as
asyncbut it is not compliant with Atomicity, Consistency, Isolation, Durability (ACID). Compared toasync,async-unsafehas a better performance.WarningWhen an application or a file system that assumes ACID compliance operates on top of the VDO volume,
async-unsafemode might cause unexpected data loss.auto-
The
automode automatically selectssyncorasyncbased on the characteristics of each device. This is the default option.
2.4.2. The internal processing of VDO write modes
The write modes for VDO are sync and async. The following information describes the operations of these modes.
If the kvdo module is operating in synchronous (synch) mode:
- It temporarily writes the data in the request to the allocated block and then acknowledges the request.
- Once the acknowledgment is complete, an attempt is made to deduplicate the block by computing a MurmurHash-3 signature of the block data, which is sent to the VDO index.
-
If the VDO index contains an entry for a block with the same signature,
kvdoreads the indicated block and does a byte-by-byte comparison of the two blocks to verify that they are identical. -
If they are indeed identical, then
kvdoupdates its block map so that the logical block points to the corresponding physical block and releases the allocated physical block. -
If the VDO index did not contain an entry for the signature of the block being written, or the indicated block does not actually contain the same data,
kvdoupdates its block map to make the temporary physical block permanent.
If kvdo is operating in asynchronous (async) mode:
- Instead of writing the data, it will immediately acknowledge the request.
- It will then attempt to deduplicate the block in same manner as described above.
-
If the block turns out to be a duplicate,
kvdoupdates its block map and releases the allocated block. Otherwise, it writes the data in the request to the allocated block and updates the block map to make the physical block permanent.
2.4.3. Checking the write mode on a VDO volume
This procedure lists the active write mode on a selected VDO volume.
Procedure
Use the following command to see the write mode used by a VDO volume:
# vdo status --name=my-vdoThe output lists:
-
The configured write policy, which is the option selected from
sync,async, orauto -
The write policy, which is the particular write mode that VDO applied, that is either
syncorasync
-
The configured write policy, which is the option selected from
2.4.4. Checking for a volatile cache
This procedure determines if a block device has a volatile cache or not. You can use the information to choose between the sync and async VDO write modes.
Procedure
Use either of the following methods to determine if a device has a writeback cache:
Read the
/sys/block/block-device/device/scsi_disk/identifier/cache_typesysfsfile. For example:$ cat '/sys/block/sda/device/scsi_disk/7:0:0:0/cache_type' write back$ cat '/sys/block/sdb/device/scsi_disk/1:2:0:0/cache_type' NoneAlternatively, you can find whether the above mentioned devices have a write cache or not in the kernel boot log:
sd 7:0:0:0: [sda] Write cache: enabled, read cache: enabled, does not support DPO or FUA
sd 1:2:0:0: [sdb] Write cache: disabled, read cache: disabled, supports DPO and FUA
In the previous examples:
-
Device
sdaindicates that it has a writeback cache. Useasyncmode for it. -
Device
sdbindicates that it does not have a writeback cache. Usesyncmode for it.
You should configure VDO to use the
syncwrite mode if thecache_typevalue isNoneorwrite through.-
Device
2.4.5. Setting a VDO write mode
This procedure sets a write mode for a VDO volume, either for an existing one or when creating a new volume.
Using an incorrect write mode might result in data loss after a power failure, a system crash, or any unexpected loss of contact with the disk.
Prerequisites
- Determine which write mode is correct for your device. See Section 2.4.4, “Checking for a volatile cache”.
Procedure
You can set a write mode either on an existing VDO volume or when creating a new volume:
To modify an existing VDO volume, use:
# vdo changeWritePolicy --writePolicy=sync|async|async-unsafe|auto \ --name=vdo-name-
To specify a write mode when creating a VDO volume, add the
--writePolicy=sync|async|async-unsafe|autooption to thevdo createcommand.
2.5. Recovering a VDO volume after an unclean shutdown
You can recover a VDO volume after an unclean shutdown to enable it to continue operating. The task is mostly automated. Additionally, you can clean up after a VDO volume was unsuccessfully created because of a failure in the process.
2.5.1. VDO write modes
VDO supports the following write modes:
syncWhen VDO is in
syncmode, the layers above it assume that a write command writes data to persistent storage. As a result, it is not necessary for the file system or application, for example, to issue FLUSH or force unit access (FUA) requests to cause the data to become persistent at critical points.VDO must be set to
syncmode only when the underlying storage guarantees that data is written to persistent storage when the write command completes. That is, the storage must either have no volatile write cache, or have a write through cache.asyncWhen VDO is in
asyncmode, VDO does not guarantee that the data is written to persistent storage when a write command is acknowledged. The file system or application must issue FLUSH or FUA requests to ensure data persistence at critical points in each transaction.VDO must be set to
asyncmode if the underlying storage does not guarantee that data is written to persistent storage when the write command completes; that is, when the storage has a volatile write back cache.async-unsafeThis mode has the same properties as
asyncbut it is not compliant with Atomicity, Consistency, Isolation, Durability (ACID). Compared toasync,async-unsafehas a better performance.WarningWhen an application or a file system that assumes ACID compliance operates on top of the VDO volume,
async-unsafemode might cause unexpected data loss.auto-
The
automode automatically selectssyncorasyncbased on the characteristics of each device. This is the default option.
2.5.2. VDO volume recovery
When a VDO volume restarts after an unclean shutdown, VDO performs the following actions:
- Verifies the consistency of the metadata on the volume.
- Rebuilds a portion of the metadata to repair it if necessary.
Rebuilds are automatic and do not require user intervention.
VDO might rebuild different writes depending on the active write mode:
sync-
If VDO was running on synchronous storage and write policy was set to
sync, all data written to the volume are fully recovered. async-
If the write policy was
async, some writes might not be recovered if they were not made durable. This is done by sending VDO aFLUSHcommand or a write I/O tagged with the FUA (force unit access) flag. You can accomplish this from user mode by invoking a data integrity operation likefsync,fdatasync,sync, orumount.
In either mode, some writes that were either unacknowledged or not followed by a flush might also be rebuilt.
Automatic and manual recovery
When a VDO volume enters recovering operating mode, VDO automatically rebuilds the unclean VDO volume after the it comes back online. This is called online recovery.
If VDO cannot recover a VDO volume successfully, it places the volume in read-only operating mode that persists across volume restarts. You need to fix the problem manually by forcing a rebuild.
2.5.3. VDO operating modes
This section describes the modes that indicate whether a VDO volume is operating normally or is recovering from an error.
You can display the current operating mode of a VDO volume using the vdostats --verbose device command. See the Operating mode attribute in the output.
normal-
This is the default operating mode. VDO volumes are always in
normalmode, unless either of the following states forces a different mode. A newly created VDO volume starts innormalmode. recoveringWhen a VDO volume does not save all of its metadata before shutting down, it automatically enters
recoveringmode the next time that it starts up. The typical reasons for entering this mode are sudden power loss or a problem from the underlying storage device.In
recoveringmode, VDO is fixing the references counts for each physical block of data on the device. Recovery usually does not take very long. The time depends on how large the VDO volume is, how fast the underlying storage device is, and how many other requests VDO is handling simultaneously. The VDO volume functions normally with the following exceptions:- Initially, the amount of space available for write requests on the volume might be limited. As more of the metadata is recovered, more free space becomes available.
- Data written while the VDO volume is recovering might fail to deduplicate against data written before the crash if that data is in a portion of the volume that has not yet been recovered. VDO can compress data while recovering the volume. You can still read or overwrite compressed blocks.
- During an online recovery, certain statistics are unavailable: for example, blocks in use and blocks free. These statistics become available when the rebuild is complete.
- Response times for reads and writes might be slower than usual due to the ongoing recovery work
You can safely shut down the VDO volume in
recoveringmode. If the recovery does not finish before shutting down, the device entersrecoveringmode again the next time that it starts up.The VDO volume automatically exits
recoveringmode and moves tonormalmode when it has fixed all the reference counts. No administrator action is necessary. For details, see Section 2.5.4, “Recovering a VDO volume online”.read-onlyWhen a VDO volume encounters a fatal internal error, it enters
read-onlymode. Events that might causeread-onlymode include metadata corruption or the backing storage device becoming read-only. This mode is an error state.In
read-onlymode, data reads work normally but data writes always fail. The VDO volume stays inread-onlymode until an administrator fixes the problem.You can safely shut down a VDO volume in
read-onlymode. The mode usually persists after the VDO volume is restarted. In rare cases, the VDO volume is not able to record theread-onlystate to the backing storage device. In these cases, VDO attempts to do a recovery instead.Once a volume is in read-only mode, there is no guarantee that data on the volume has not been lost or corrupted. In such cases, Red Hat recommends copying the data out of the read-only volume and possibly restoring the volume from backup.
If the risk of data corruption is acceptable, it is possible to force an offline rebuild of the VDO volume metadata so the volume can be brought back online and made available. The integrity of the rebuilt data cannot be guaranteed. For details, see Section 2.5.5, “Forcing an offline rebuild of a VDO volume metadata”.
2.5.4. Recovering a VDO volume online
This procedure performs an online recovery on a VDO volume to recover metadata after an unclean shutdown.
Procedure
If the VDO volume is not already started, start it:
# vdo start --name=my-vdoNo additional steps are necessary. The recovery runs in the background.
- If you rely on volume statistics like blocks in use and blocks free, wait until they are available.
2.5.5. Forcing an offline rebuild of a VDO volume metadata
This procedure performs a forced offline rebuild of a VDO volume metadata to recover after an unclean shutdown.
This procedure might cause data loss on the volume.
Prerequisites
- The VDO volume is started.
Procedure
Check if the volume is in read-only mode. See the operating mode attribute in the command output:
# vdo status --name=my-vdoIf the volume is not in read-only mode, it is not necessary to force an offline rebuild. Perform an online recovery as described in Section 2.5.4, “Recovering a VDO volume online”.
Stop the volume if it is running:
# vdo stop --name=my-vdoRestart the volume with the
--forceRebuildoption:# vdo start --name=my-vdo --forceRebuild
2.5.6. Removing an unsuccessfully created VDO volume
This procedure cleans up a VDO volume in an intermediate state. A volume is left in an intermediate state if a failure occurs when creating the volume. This might happen when, for example:
- The system crashes
- Power fails
-
The administrator interrupts a running
vdo createcommand
Procedure
To clean up, remove the unsuccessfully created volume with the
--forceoption:# vdo remove --force --name=my-vdoThe
--forceoption is required because the administrator might have caused a conflict by changing the system configuration since the volume was unsuccessfully created.Without the
--forceoption, thevdo removecommand fails with the following message:[...] A previous operation failed. Recovery from the failure either failed or was interrupted. Add '--force' to 'remove' to perform the following cleanup. Steps to clean up VDO my-vdo: umount -f /dev/mapper/my-vdo udevadm settle dmsetup remove my-vdo vdo: ERROR - VDO volume my-vdo previous operation (create) is incomplete
2.6. Optimizing the UDS index
You can configure certain settings of the UDS index to optimize it on your system.
You cannot change the properties of the UDS index after creating the VDO volume.
2.6.1. Components of a VDO volume
VDO uses a block device as a backing store, which can include an aggregation of physical storage consisting of one or more disks, partitions, or even flat files. When a storage management tool creates a VDO volume, VDO reserves volume space for the UDS index and VDO volume. The UDS index and the VDO volume interact together to provide deduplicated block storage.
Figure 2.2. VDO disk organization
The VDO solution consists of the following components:
kvdoA kernel module that loads into the Linux Device Mapper layer provides a deduplicated, compressed, and thinly provisioned block storage volume.
The
kvdomodule exposes a block device. You can access this block device directly for block storage or present it through a Linux file system, such as XFS or ext4.When
kvdoreceives a request to read a logical block of data from a VDO volume, it maps the requested logical block to the underlying physical block and then reads and returns the requested data.When
kvdoreceives a request to write a block of data to a VDO volume, it first checks whether the request is a DISCARD or TRIM request or whether the data is uniformly zero. If either of these conditions is true,kvdoupdates its block map and acknowledges the request. Otherwise, VDO processes and optimizes the data.udsA kernel module that communicates with the Universal Deduplication Service (UDS) index on the volume and analyzes data for duplicates. For each new piece of data, UDS quickly determines if that piece is identical to any previously stored piece of data. If the index finds a match, the storage system can then internally reference the existing item to avoid storing the same information more than once.
The UDS index runs inside the kernel as the
udskernel module.- Command line tools
- For configuring and managing optimized storage.
2.6.2. The UDS index
VDO uses a high-performance deduplication index called UDS to detect duplicate blocks of data as they are being stored.
The UDS index provides the foundation of the VDO product. For each new piece of data, it quickly determines if that piece is identical to any previously stored piece of data. If the index finds match, the storage system can then internally reference the existing item to avoid storing the same information more than once.
The UDS index runs inside the kernel as the uds kernel module.
The deduplication window is the number of previously written blocks that the index remembers. The size of the deduplication window is configurable. For a given window size, the index requires a specific amount of RAM and a specific amount of disk space. The size of the window is usually determined by specifying the size of the index memory using the --indexMem=size option. VDO then determines the amount of disk space to use automatically.
The UDS index consists of two parts:
- A compact representation is used in memory that contains at most one entry per unique block.
- An on-disk component that records the associated block names presented to the index as they occur, in order.
UDS uses an average of 4 bytes per entry in memory, including cache.
The on-disk component maintains a bounded history of data passed to UDS. UDS provides deduplication advice for data that falls within this deduplication window, containing the names of the most recently seen blocks. The deduplication window allows UDS to index data as efficiently as possible while limiting the amount of memory required to index large data repositories. Despite the bounded nature of the deduplication window, most datasets which have high levels of deduplication also exhibit a high degree of temporal locality - in other words, most deduplication occurs among sets of blocks that were written at about the same time. Furthermore, in general, data being written is more likely to duplicate data that was recently written than data that was written a long time ago. Therefore, for a given workload over a given time interval, deduplication rates will often be the same whether UDS indexes only the most recent data or all the data.
Because duplicate data tends to exhibit temporal locality, it is rarely necessary to index every block in the storage system. Were this not so, the cost of index memory would outstrip the savings of reduced storage costs from deduplication. Index size requirements are more closely related to the rate of data ingestion. For example, consider a storage system with 100 TB of total capacity but with an ingestion rate of 1 TB per week. With a deduplication window of 4 TB, UDS can detect most redundancy among the data written within the last month.
2.6.3. Recommended UDS index configuration
This section describes the recommended options to use with the UDS index, based on your intended use case.
In general, Red Hat recommends using a sparse UDS index for all production use cases. This is an extremely efficient indexing data structure, requiring approximately one-tenth of a byte of RAM per block in its deduplication window. On disk, it requires approximately 72 bytes of disk space per block. The minimum configuration of this index uses 256 MB of RAM and approximately 25 GB of space on disk.
To use this configuration, specify the --sparseIndex=enabled --indexMem=0.25 options to the vdo create command. This configuration results in a deduplication window of 2.5 TB (meaning it will remember a history of 2.5 TB). For most use cases, a deduplication window of 2.5 TB is appropriate for deduplicating storage pools that are up to 10 TB in size.
The default configuration of the index, however, is to use a dense index. This index is considerably less efficient (by a factor of 10) in RAM, but it has much lower (also by a factor of 10) minimum required disk space, making it more convenient for evaluation in constrained environments.
In general, a deduplication window that is one quarter of the physical size of a VDO volume is a recommended configuration. However, this is not an actual requirement. Even small deduplication windows (compared to the amount of physical storage) can find significant amounts of duplicate data in many use cases. Larger windows may also be used, but it in most cases, there will be little additional benefit to doing so.
2.7. Enabling or disabling deduplication in VDO
In some instances, you might want to temporarily disable deduplication of data being written to a VDO volume while still retaining the ability to read to and write from the volume. Disabling deduplication prevents subsequent writes from being deduplicated, but the data that was already deduplicated remains so.
2.7.1. Deduplication in VDO
Deduplication is a technique for reducing the consumption of storage resources by eliminating multiple copies of duplicate blocks.
Instead of writing the same data more than once, VDO detects each duplicate block and records it as a reference to the original block. VDO maintains a mapping from logical block addresses, which are used by the storage layer above VDO, to physical block addresses, which are used by the storage layer under VDO.
After deduplication, multiple logical block addresses can be mapped to the same physical block address. These are called shared blocks. Block sharing is invisible to users of the storage, who read and write blocks as they would if VDO were not present.
When a shared block is overwritten, VDO allocates a new physical block for storing the new block data to ensure that other logical block addresses that are mapped to the shared physical block are not modified.
2.7.2. Enabling deduplication on a VDO volume
This procedure restarts the associated UDS index and informs the VDO volume that deduplication is active again.
Deduplication is enabled by default.
Procedure
To restart deduplication on a VDO volume, use the following command:
# vdo enableDeduplication --name=my-vdo
2.7.3. Disabling deduplication on a VDO volume
This procedure stops the associated UDS index and informs the VDO volume that deduplication is no longer active.
Procedure
To stop deduplication on a VDO volume, use the following command:
# vdo disableDeduplication --name=my-vdo-
You can also disable deduplication when creating a new VDO volume by adding the
--deduplication=disabledoption to thevdo createcommand.
2.8. Enabling or disabling compression in VDO
VDO provides data compression. Disabling it can maximize performance and speed up processing of data that is unlikely to compress. Re-enabling it can increase space savings.
2.8.1. Compression in VDO
In addition to block-level deduplication, VDO also provides inline block-level compression using the HIOPS Compression™ technology.
VDO volume compression is on by default.
While deduplication is the optimal solution for virtual machine environments and backup applications, compression works very well with structured and unstructured file formats that do not typically exhibit block-level redundancy, such as log files and databases.
Compression operates on blocks that have not been identified as duplicates. When VDO sees unique data for the first time, it compresses the data. Subsequent copies of data that have already been stored are deduplicated without requiring an additional compression step.
The compression feature is based on a parallelized packaging algorithm that enables it to handle many compression operations at once. After first storing the block and responding to the requestor, a best-fit packing algorithm finds multiple blocks that, when compressed, can fit into a single physical block. After it is determined that a particular physical block is unlikely to hold additional compressed blocks, it is written to storage and the uncompressed blocks are freed and reused.
By performing the compression and packaging operations after having already responded to the requestor, using compression imposes a minimal latency penalty.
2.8.2. Enabling compression on a VDO volume
This procedure enables compression on a VDO volume to increase space savings.
Compression is enabled by default.
Procedure
To start it again, use the following command:
# vdo enableCompression --name=my-vdo
2.8.3. Disabling compression on a VDO volume
This procedure stops compression on a VDO volume to maximize performance or to speed processing of data that is unlikely to compress.
Procedure
To stop compression on an existing VDO volume, use the following command:
# vdo disableCompression --name=my-vdo-
Alternatively, you can disable compression by adding the
--compression=disabledoption to thevdo createcommand when creating a new volume.
2.9. Increasing the size of a VDO volume
You can increase the physical size of a VDO volume to utilize more underlying storage capacity, or the logical size to provide more capacity on the volume.
2.9.1. The physical and logical size of a VDO volume
VDO utilizes physical, available physical, and logical size in the following ways:
- Physical size
This is the same size as the underlying block device. VDO uses this storage for:
- User data, which might be deduplicated and compressed
- VDO metadata, such as the UDS index
- Available physical size
This is the portion of the physical size that VDO is able to use for user data
It is equivalent to the physical size minus the size of the metadata, minus the remainder after dividing the volume into slabs by the given slab size.
- Logical Size
This is the provisioned size that the VDO volume presents to applications. It is usually larger than the available physical size. If the
--vdoLogicalSizeoption is not specified, then the provisioning of the logical volume is now provisioned to a1:1ratio. For example, if a VDO volume is put on top of a 20 GB block device, then 2.5 GB is reserved for the UDS index (if the default index size is used). The remaining 17.5 GB is provided for the VDO metadata and user data. As a result, the available storage to consume is not more than 17.5 GB, and can be less due to metadata that makes up the actual VDO volume.VDO currently supports any logical size up to 254 times the size of the physical volume with an absolute maximum logical size of 4PB.
Figure 2.3. VDO disk organization
In this figure, the VDO deduplicated storage target sits completely on top of the block device, meaning the physical size of the VDO volume is the same size as the underlying block device.
2.9.2. Thin provisioning in VDO
VDO is a thinly provisioned block storage target. The amount of physical space that a VDO volume uses might differ from the size of the volume that is presented to users of the storage. You can make use of this disparity to save on storage costs.
Out-of-space conditions
Take care to avoid unexpectedly running out of storage space, if the data written does not achieve the expected rate of optimization.
Whenever the number of logical blocks (virtual storage) exceeds the number of physical blocks (actual storage), it becomes possible for file systems and applications to unexpectedly run out of space. For that reason, storage systems using VDO must provide you with a way of monitoring the size of the free pool on the VDO volume.
You can determine the size of this free pool by using the vdostats utility. The default output of this utility lists information for all running VDO volumes in a format similar to the Linux df utility. For example:
Device                1K-blocks   Used        Available   Use%
/dev/mapper/vdo-name  211812352   105906176   105906176   50%
When the physical storage capacity of a VDO volume is almost full, VDO reports a warning in the system log, similar to the following:
Oct  2 17:13:39 system lvm[13863]: Monitoring VDO pool vdo-name.
Oct  2 17:27:39 system lvm[13863]: WARNING: VDO pool vdo-name is now 80.69% full.
Oct  2 17:28:19 system lvm[13863]: WARNING: VDO pool vdo-name is now 85.25% full.
Oct  2 17:29:39 system lvm[13863]: WARNING: VDO pool vdo-name is now 90.64% full.
Oct  2 17:30:29 system lvm[13863]: WARNING: VDO pool vdo-name is now 96.07% full.
These warning messages appear only when the lvm2-monitor service is running. It is enabled by default.
How to prevent out-of-space conditions
If the size of free pool drops below a certain level, you can take action by:
- Deleting data. This reclaims space whenever the deleted data is not duplicated. Deleting data frees the space only after discards are issued.
- Adding physical storage
Monitor physical space on your VDO volumes to prevent out-of-space situations. Running out of physical blocks might result in losing recently written, unacknowledged data on the VDO volume.
Thin provisioning and the TRIM and DISCARD commands
To benefit from the storage savings of thin provisioning, the physical storage layer needs to know when data is deleted. File systems that work with thinly provisioned storage send TRIM or DISCARD commands to inform the storage system when a logical block is no longer required.
Several methods of sending the TRIM or DISCARD commands are available:
-
With the
discardmount option, the file systems can send these commands whenever a block is deleted. -
You can send the commands in a controlled manner by using utilities such as
fstrim. These utilities tell the file system to detect which logical blocks are unused and send the information to the storage system in the form of aTRIMorDISCARDcommand.
The need to use TRIM or DISCARD on unused blocks is not unique to VDO. Any thinly provisioned storage system has the same challenge.
2.9.3. Increasing the logical size of a VDO volume
This procedure increases the logical size of a given VDO volume. It enables you to initially create VDO volumes that have a logical size small enough to be safe from running out of space. After some period of time, you can evaluate the actual rate of data reduction, and if sufficient, you can grow the logical size of the VDO volume to take advantage of the space savings.
It is not possible to decrease the logical size of a VDO volume.
Procedure
To grow the logical size, use:
# vdo growLogical --name=my-vdo \
                  --vdoLogicalSize=new-logical-size
When the logical size increases, VDO informs any devices or file systems on top of the volume of the new size.
2.9.4. Increasing the physical size of a VDO volume
This procedure increases the amount of physical storage available to a VDO volume.
It is not possible to shrink a VDO volume in this way.
Prerequisites
The underlying block device has a larger capacity than the current physical size of the VDO volume.
If it does not, you can attempt to increase the size of the device. The exact procedure depends on the type of the device. For example, to resize an MBR or GPT partition, see the Resizing a partition section in the Managing storage devices guide.
Procedure
Add the new physical storage space to the VDO volume:
# vdo growPhysical --name=my-vdo
2.10. Removing VDO volumes
You can remove an existing VDO volume on your system.
2.10.1. Removing a working VDO volume
This procedure removes a VDO volume and its associated UDS index.
Procedure
- Unmount the file systems and stop the applications that are using the storage on the VDO volume.
To remove the VDO volume from your system, use:
# vdo remove --name=my-vdo
2.10.2. Removing an unsuccessfully created VDO volume
This procedure cleans up a VDO volume in an intermediate state. A volume is left in an intermediate state if a failure occurs when creating the volume. This might happen when, for example:
- The system crashes
- Power fails
-
The administrator interrupts a running
vdo createcommand
Procedure
To clean up, remove the unsuccessfully created volume with the
--forceoption:# vdo remove --force --name=my-vdoThe
--forceoption is required because the administrator might have caused a conflict by changing the system configuration since the volume was unsuccessfully created.Without the
--forceoption, thevdo removecommand fails with the following message:[...] A previous operation failed. Recovery from the failure either failed or was interrupted. Add '--force' to 'remove' to perform the following cleanup. Steps to clean up VDO my-vdo: umount -f /dev/mapper/my-vdo udevadm settle dmsetup remove my-vdo vdo: ERROR - VDO volume my-vdo previous operation (create) is incomplete
Chapter 3. Testing VDO space savings
You can perform a series of tests to determine how much storage space you can save by using VDO.
Prerequisites
- One or more physical block devices are available.
- The target block device is larger than 512 GiB.
- VDO is installed.
3.1. The purpose and outcomes of testing VDO
VDO tests provided by Red Hat help produce an assessment of the integration of VDO into existing storage devices. They are intended to augment, not replace, your internal evaluation efforts.
The test results help Red Hat engineers to assist you in understanding VDO behavior in specific storage environments. Original equipment manufacturers (OEMs) can learn how to design their deduplication and compression capable devices, and how their customers can tune their applications for those devices.
Goals
- Identify configuration settings that elicit optimal responses from the test device.
- Explain basic tuning parameters to help avoid product misconfigurations.
- Create a reference of performance results to compare with real use cases.
- Identify how different workloads affect performance and data efficiency.
- Shorten the time to market with VDO implementations.
The test plan and test conditions
The VDO tests provide conditions under which VDO can be most realistically evaluated. Altering test procedures or parameters might invalidate results. Red Hat sales engineers can guide you when modifying test plans.
For an effective test plan, you must study the VDO architecture and explore these items:
- The performance in high-load environments
- The configurable properties of VDO for performance tuning end-user applications
- The impact of VDO being a native 4 KiB block device
- The response to access patterns and distributions of deduplication and compression
- The value of cost versus capacity versus performance for a given application
3.2. Thin provisioning in VDO
VDO is a thinly provisioned block storage target. The amount of physical space that a VDO volume uses might differ from the size of the volume that is presented to users of the storage. You can make use of this disparity to save on storage costs.
Out-of-space conditions
Take care to avoid unexpectedly running out of storage space, if the data written does not achieve the expected rate of optimization.
Whenever the number of logical blocks (virtual storage) exceeds the number of physical blocks (actual storage), it becomes possible for file systems and applications to unexpectedly run out of space. For that reason, storage systems using VDO must provide you with a way of monitoring the size of the free pool on the VDO volume.
You can determine the size of this free pool by using the vdostats utility. The default output of this utility lists information for all running VDO volumes in a format similar to the Linux df utility. For example:
Device                1K-blocks   Used        Available   Use%
/dev/mapper/vdo-name  211812352   105906176   105906176   50%
When the physical storage capacity of a VDO volume is almost full, VDO reports a warning in the system log, similar to the following:
Oct  2 17:13:39 system lvm[13863]: Monitoring VDO pool vdo-name.
Oct  2 17:27:39 system lvm[13863]: WARNING: VDO pool vdo-name is now 80.69% full.
Oct  2 17:28:19 system lvm[13863]: WARNING: VDO pool vdo-name is now 85.25% full.
Oct  2 17:29:39 system lvm[13863]: WARNING: VDO pool vdo-name is now 90.64% full.
Oct  2 17:30:29 system lvm[13863]: WARNING: VDO pool vdo-name is now 96.07% full.
These warning messages appear only when the lvm2-monitor service is running. It is enabled by default.
How to prevent out-of-space conditions
If the size of free pool drops below a certain level, you can take action by:
- Deleting data. This reclaims space whenever the deleted data is not duplicated. Deleting data frees the space only after discards are issued.
- Adding physical storage
Monitor physical space on your VDO volumes to prevent out-of-space situations. Running out of physical blocks might result in losing recently written, unacknowledged data on the VDO volume.
Thin provisioning and the TRIM and DISCARD commands
To benefit from the storage savings of thin provisioning, the physical storage layer needs to know when data is deleted. File systems that work with thinly provisioned storage send TRIM or DISCARD commands to inform the storage system when a logical block is no longer required.
Several methods of sending the TRIM or DISCARD commands are available:
-
With the
discardmount option, the file systems can send these commands whenever a block is deleted. -
You can send the commands in a controlled manner by using utilities such as
fstrim. These utilities tell the file system to detect which logical blocks are unused and send the information to the storage system in the form of aTRIMorDISCARDcommand.
The need to use TRIM or DISCARD on unused blocks is not unique to VDO. Any thinly provisioned storage system has the same challenge.
3.3. Information to record before each VDO test
You must record the following information at the start of each test to ensure that the test environment is fully understood. You can capture much of the required information by using the sosreport utility.
Required information
- The used Linux build, including the kernel build number
-
The complete list of installed packages, as obtained from the
rpm -qacommand Complete system specifications
-
CPU type and quantity; available in the
/proc/cpuinfofile -
Installed memory and the amount available after the rase OS is running; available in the
/proc/meminfofile - Types of used drive controllers
- Types and quantity of used disks
-
CPU type and quantity; available in the
-
A complete list of running processes; available from the
ps auxcommand or a similar listing -
Name of the physical volume and the volume group created for use with VDO; available from the
pvsandvgscommands - File system used when formatting the VDO volume, if any
- Permissions on the mounted directory
-
Content of the
/etc/vdoconf.yamlfile - Location of the VDO files
3.4. Creating a VDO test volume
This procedure creates a VDO volume with a logical size of 1 TiB on a 512 GiB physical volume for testing purposes.
Procedure
Create a VDO volume:
# vdo create --name=vdo-test \ --device=/dev/sdb \ --vdoLogicalSize=1T \ --writePolicy=policy \ --verbose-
Replace
/dev/sdbwith the path to a block device. -
To test the VDO
asyncmode on top of asynchronous storage, create an asynchronous volume using the--writePolicy=asyncoption. -
To test the VDO
syncmode on top of synchronous storage, create a synchronous volume using the--writePolicy=syncoption.
-
Replace
Format the new volume with an XFS or ext4 file system.
For XFS:
# mkfs.xfs -K /dev/mapper/vdo-testFor ext4:
# mkfs.ext4 -E nodiscard /dev/mapper/vdo-test
Mount the formatted volume:
# mkdir /mnt/vdo-test

# mount /dev/mapper/vdo-test /mnt/vdo-test && \
  chmod a+rwx /mnt/vdo-test
3.5. Testing the VDO test volume
This procedure tests whether reading and writing to the VDO test volume works.
Prerequisites
- A newly created VDO test volume is mounted. For details, see Section 3.4, “Creating a VDO test volume”.
Procedure
Write 32 GiB of random data to the VDO volume:
$ dd if=/dev/urandom of=/mnt/vdo-test/testfile bs=4096 count=8388608Read the data from the VDO volume and write it to another volume:
$ dd if=/mnt/vdo-test/testfile of=another-location/testfile bs=4096- Replace another-location with any directory where you have write access that is not on the VDO test volume. For example, you can use your home directory.
Compare the two files:
$ diff --report-identical-files /mnt/vdo-test/testfile another-location/testfileThe command should report that the files are the same.
Copy the file back to a new location on the VDO volume:
$ dd if=another-location/testfile of=/mnt/vdo-test/testfile2 bs=4096Compare the third file to the second file:
$ diff --report-identical-files /mnt/vdo-test/testfile2 another-location/testfileThe command should report that the files are the same.
Cleanup steps
- Remove the VDO test volume as described in Section 3.6, “Cleaning up the VDO test volume”.
3.6. Cleaning up the VDO test volume
This procedure removes the VDO volume used for testing VDO efficiency from the system.
Prerequisites
- A VDO test volume is mounted.
Procedure
Unmount the file system created on the VDO volume:
# umount /mnt/vdo-testRemove the VDO test volume from the system:
# vdo remove --name=vdo-test
Verification
Verify that the volume has been removed:
# vdo list --all | grep vdo-testThe command should not list the VDO test partition.
3.7. Measuring VDO deduplication
This procedure tests the efficiency of VDO data deduplication on a VDO test volume.
Prerequisites
- A newly created VDO test volume is mounted. For details, see Section 3.4, “Creating a VDO test volume”.
Procedure
Prepare a table where you can record the test results:
Expand Statistic Bare file system After seed After 10 copies File system used size
VDO data used
VDO logical used
Create 10 directories on the VDO volume to hold 10 copies of the test data set:
$ mkdir /mnt/vdo-test/vdo{01..10}Examine the disk usage reported by the file system:
$ df --human-readable /mnt/vdo-testExample 3.1. Disk usage
Filesystem            Size  Used Avail Use% Mounted on
/dev/mapper/vdo-test  1.5T  198M  1.4T   1% /mnt/vdo-test
Record the following values:
# vdostats --verbose | grep "blocks used"Example 3.2. Used blocks
data blocks used : 1090 overhead blocks used : 538846 logical blocks used : 6059434-
The
data blocks usedvalue is the number of blocks used by user data after optimization on the physical device running under VDO. -
The
logical blocks usedvalue is the number of blocks used before optimization. It will be used as the starting point for measurements.
-
The
Create a data source file on the VDO volume:
$ dd if=/dev/urandom of=/mnt/vdo-test/sourcefile bs=4096 count=1048576

4294967296 bytes (4.3 GB) copied, 540.538 s, 7.9 MB/s
Re-examine the amount of used physical disk space:
$ df --human-readable /mnt/vdo-testExample 3.3. Disk usage with the data source file
Filesystem            Size  Used Avail Use% Mounted on
/dev/mapper/vdo-test  1.5T  4.2G  1.4T   1% /mnt/vdo-test
# vdostats --verbose | grep "blocks used"Example 3.4. Used blocks with the data source file
data blocks used                : 1050093  # Increased by 4GiB
overhead blocks used            : 538846   # Did not significantly change
logical blocks used             : 7108036  # Increased by 4GiB
This command should show an increase in the number of blocks used, corresponding to the size of the written file.
Copy the file to each of the 10 subdirectories:
$ for i in {01..10}; do
  cp /mnt/vdo-test/sourcefile /mnt/vdo-test/vdo$i
  done
Re-examine the amount of used physical disk space:
$ df -h /mnt/vdo-testExample 3.5. Disk usage after copying the file
Filesystem            Size  Used Avail Use% Mounted on
/dev/mapper/vdo-test  1.5T   45G  1.3T   4% /mnt/vdo-test
# vdostats --verbose | grep "blocks used"Example 3.6. Used blocks after copying the file
data blocks used                : 1050836   # Increased by 3 MiB
overhead blocks used            : 538846
logical blocks used             : 17594127  # Increased by 41 GiB
The
data blocks usedvalue should be similar to the result of the earlier listing, with only a slight increase due to file system journaling and metadata.- Subtract this new value of the space used by the file system from the value found before writing the test data. This is the amount of space consumed by this test from the perspective of the file system.
Observe the space savings in your recorded statistics:
Example 3.7. Recorded values
Expand Statistic Bare file system After seed After 10 copies File system used size
198 MiB
4.2 GiB
45 GiB
VDO data used
4 MiB
4.1 GiB
4.1 GiB
VDO logical used
23.6 GiB (file system overhead for 1.6 TiB formatted drive)
27.8 GiB
68.7 GiB
NoteIn the table, values have been converted to MiB or GiB. Blocks in the
vdostatsoutput are 4,096 B in size.
Cleanup steps
- Remove the VDO test volume as described in Section 3.6, “Cleaning up the VDO test volume”.
3.8. Measuring VDO compression
This procedure tests the efficiency of VDO data compression on a VDO test volume.
Prerequisites
- A newly created VDO test volume is mounted. For details, see Section 3.4, “Creating a VDO test volume”.
Procedure
Disable deduplication and enable compression on the VDO test volume:
# vdo disableDeduplication --name=vdo-test
# vdo enableCompression --name=vdo-test
Synchronize the VDO volume to complete any unfinished compression:
# sync && dmsetup message vdo-test 0 sync-dedupeInspect VDO statistics before the transfer:
# vdostats --verbose | grep "blocks used"Make note of the
data blocks usedandlogical blocks usedvalues.-
VDO optimizes file system overhead as well as actual user data. Calculate the number of 4 KiB blocks saved by compression for the empty file system as
logical blocks usedminusdata blocks used. Copy the content of the
/libdirectory to the VDO volume:# cp --verbose --recursive /lib /mnt/vdo-test ... sent 152508960 bytes received 60448 bytes 61027763.20 bytes/sec total size is 152293104 speedup is 1.00Record the total size of the copied data.
Synchronize Linux caches and the VDO volume:
# sync && dmsetup message vdo-test 0 sync-dedupeInspect VDO statistics again:
# vdostats --verbose | grep "blocks used"Observe the
logical blocks usedanddata blocks usedvalues.Calculate the amount of bytes saved by compression using the following formula:
saved_bytes = (logical_blocks_used - data_blocks_used) * 4096
Cleanup steps
- Remove the VDO test volume as described in Section 3.6, “Cleaning up the VDO test volume”.
3.9. Measuring total VDO space savings
This procedure tests the combined efficiency of VDO data deduplication and compression on a VDO test volume.
Procedure
- Create and mount a VDO volume as described in Section 3.4, “Creating a VDO test volume”.
-
Perform the tests described in Measuring VDO deduplication and Measuring VDO compression on the same volume without removing it. Observe changes to space savings in the
vdostatsoutput. - Experiment with your own datasets.
3.10. Testing the effect of TRIM and DISCARD on VDO
This procedure tests whether the TRIM and DISCARD commands properly free up blocks from deleted files on a VDO test volume. It demonstrates that discards inform VDO that the space is no longer used.
Prerequisites
- A newly created VDO test volume is mounted. For details, see Section 3.4, “Creating a VDO test volume”.
Procedure
Prepare a table where you can record the test results:
Expand Step File space used (MB) Data blocks used Logical blocks used Initial
Add 1 GiB file
Run
fstrimDelete 1 GiB file
Run
fstrimTrim the file system to remove unneeded blocks:
# fstrim /mnt/vdo-testThe command might take a long time.
Record the initial space usage in the file system:
$ df -m /mnt/vdo-testSee how many physical and logical data blocks the VDO volume uses:
# vdostats --verbose | grep "blocks used"Create a 1 GiB file with non-duplicate data on the VDO volume:
$ dd if=/dev/urandom of=/mnt/vdo-test/file bs=1M count=1KRecord the space usage again:
$ df -m /mnt/vdo-test

# vdostats --verbose | grep "blocks used"
The file system should use an additional 1 GiB. The
data blocks usedandlogical blocks usedvalues should increase similarly.Trim the file system again:
# fstrim /mnt/vdo-testInspect the space usage again to confirm that the trim had no impact on the physical volume usage:
$ df -m /mnt/vdo-test

# vdostats --verbose | grep "blocks used"
Delete the 1 GiB file:
$ rm /mnt/vdo-test/fileCheck and record the space usage again:
$ df -m /mnt/vdo-test

# vdostats --verbose | grep "blocks used"
The file system is aware that a file has been deleted, but there is no change to the number of physical or logical blocks because the file deletion has not been communicated to the underlying storage.
Trim the file system again:
# fstrim /mnt/vdo-testCheck and record the space usage again:
$ df -m /mnt/vdo-test

# vdostats --verbose | grep "blocks used"
The
fstrimutility looks for free blocks in the file system and sends aTRIMcommand to the VDO volume for unused addresses, which releases the associated logical blocks. VDO processes theTRIMcommand to release the underlying physical blocks.
Chapter 4. Testing VDO performance
You can perform a series of tests to measure VDO performance, obtain a performance profile of your system with VDO, and determine which applications perform well with VDO.
Prerequisites
- One or more Linux physical block devices are available.
-
The target block device (for example,
/dev/sdb) is larger than 512 GiB. -
Flexible I/O Tester (
fio) is installed. - VDO is installed.
4.1. Preparing an environment for VDO performance testing
Before testing VDO performance, you must consider the host system configuration, VDO configuration, and the workloads that will be used during testing. These choices affect the benchmarking of space efficiency, bandwidth, and latency.
To prevent one test from affecting the results of another, you must create a new VDO volume for each iteration of each test.
4.1.1. Considerations before testing VDO performance
The following conditions and configurations affect the VDO test results:
System configuration
-
Number and type of CPU cores available. You can list this information using the
tasksetutility. - Available memory and total installed memory
- Configuration of storage devices
- Active disk scheduler
- Linux kernel version
- Packages installed
VDO configuration
- Partitioning scheme
- File systems used on VDO volumes
- Size of the physical storage assigned to a VDO volume
- Size of the logical VDO volume created
- Sparse or dense UDS indexing
- UDS Index in memory size
- VDO thread configuration
Workloads
- Types of tools used to generate test data
- Number of concurrent clients
- The quantity of duplicate 4 KiB blocks in the written data
- Read and write patterns
- The working set size
4.1.2. Special considerations for testing VDO read performance
You must consider these additional factors before testing VDO read performance:
- If a 4 KiB block has never been written, VDO does not read from the storage and immediately responds with a zero block.
- If a 4 KiB block has been written but contains all zeros, VDO does not read from the storage and immediately responds with a zero block.
This behavior results in very fast read performance when there is no data to read. This is why read tests must prefill the volume with actual data.
4.1.3. Preparing the system for testing VDO performance
This procedure configures system settings to achieve optimal VDO performance during testing.
Testing beyond the bounds listed in any particular test might result in the loss of testing time due to abnormal results.
For example, the VDO tests describe a test that conducts random reads over a 100 GiB address range. To test a working set of 500 GiB, you must increase the amount of RAM allocated for the VDO block map cache accordingly.
Procedure
- Ensure that your CPU is running at its highest performance setting.
-
If possible, disable CPU frequency scaling using the BIOS configuration or the Linux
cpupowerutility. - If possible, enable dynamic processor frequency adjustment (Turbo Boost or Turbo Core) for the CPU. This feature introduces some variability in the test results, but improves overall performance.
File systems might have unique impacts on performance. They often skew performance measurements, making it harder to isolate the impact of VDO on the results.
If reasonable, measure performance on the raw block device. If this is not possible, format the device using the file system that VDO will use in the target implementation.
4.2. Creating a VDO volume for performance testing
This procedure creates a VDO volume with a logical size of 1 TiB on a 512 GiB physical volume for testing VDO performance.
Procedure
Create a VDO volume:
# vdo create --name=vdo-test \ --device=/dev/sdb \ --vdoLogicalSize=1T \ --writePolicy=policy \ --verbose-
Replace
/dev/sdbwith the path to a block device. -
To test the VDO
asyncmode on top of asynchronous storage, create an asynchronous volume using the--writePolicy=asyncoption. -
To test the VDO
syncmode on top of synchronous storage, create a synchronous volume using the--writePolicy=syncoption.
-
Replace
4.3. Cleaning up the VDO performance testing volume
This procedure removes the VDO volume used for testing VDO performance from the system.
Prerequisites
- A VDO test volume exists on the system.
Procedure
Remove the VDO test volume from the system:
# vdo remove --name=vdo-test
Verification
Verify that the volume has been removed:
# vdo list --all | grep vdo-testThe command should not list the VDO test partition.
4.4. Testing the effects of I/O depth on VDO performance
These tests determine the I/O depth that produces the optimal throughput and the lowest latency for your VDO configuration. I/O depth represents the number of I/O requests that the fio tool submits at a time.
Because VDO uses a 4 KiB sector size, the tests perform four-corner testing at 4 KiB I/O operations, and I/O depth of 1, 8, 16, 32, 64, 128, 256, 512, and 1024.
4.4.1. Testing the effect of I/O depth on sequential 100% reads in VDO
This test determines how sequential 100% read operations perform on a VDO volume at different I/O depth values.
Procedure
Create a new VDO volume.
For details, see Section 4.2, “Creating a VDO volume for performance testing”.
Prefill any areas that the test might access by performing a write
fiojob on the test volume:# fio --rw=write \ --bs=8M \ --name=vdo \ --filename=/dev/mapper/vdo-test \ --ioengine=libaio \ --thread \ --direct=1 \ --scramble_buffers=1Record the reported throughput and latency for sequential 100% reads:
# for depth in 1 2 4 8 16 32 64 128 256 512 1024 2048; do
  fio --rw=read \
      --bs=4096 \
      --name=vdo \
      --filename=/dev/mapper/vdo-test \
      --ioengine=libaio \
      --numjobs=1 \
      --thread \
      --norandommap \
      --runtime=300 \
      --direct=1 \
      --iodepth=$depth \
      --scramble_buffers=1 \
      --offset=0 \
      --size=100g
  done
Remove the VDO test volume.
For details, see Section 4.3, “Cleaning up the VDO performance testing volume”.
4.4.2. Testing the effect of I/O depth on sequential 100% writes in VDO
This test determines how sequential 100% write operations perform on a VDO volume at different I/O depth values.
Procedure
Create a new VDO test volume.
For details, see Section 4.2, “Creating a VDO volume for performance testing”.
Prefill any areas that the test might access by performing a write
fiojob:# fio --rw=write \ --bs=8M \ --name=vdo \ --filename=/dev/mapper/vdo-test \ --ioengine=libaio \ --thread \ --direct=1 \ --scramble_buffers=1Record the reported throughput and latency for sequential 100% writes:
# for depth in 1 2 4 8 16 32 64 128 256 512 1024 2048; do
  fio --rw=write \
      --bs=4096 \
      --name=vdo \
      --filename=/dev/mapper/vdo-test \
      --ioengine=libaio \
      --numjobs=1 \
      --thread \
      --norandommap \
      --runtime=300 \
      --direct=1 \
      --iodepth=$depth \
      --scramble_buffers=1 \
      --offset=0 \
      --size=100g
  done
Remove the VDO test volume.
For details, see Section 4.3, “Cleaning up the VDO performance testing volume”.
4.4.3. Testing the effect of I/O depth on random 100% reads in VDO
This test determines how random 100% read operations perform on a VDO volume at different I/O depth values.
Procedure
Create a new VDO test volume.
For details, see Section 4.2, “Creating a VDO volume for performance testing”.
Prefill any areas that the test might access by performing a write
fiojob:# fio --rw=write \ --bs=8M \ --name=vdo \ --filename=/dev/mapper/vdo-test \ --ioengine=libaio \ --thread \ --direct=1 \ --scramble_buffers=1Record the reported throughput and latency for random 100% reads:
# for depth in 1 2 4 8 16 32 64 128 256 512 1024 2048; do
  fio --rw=randread \
      --bs=4096 \
      --name=vdo \
      --filename=/dev/mapper/vdo-test \
      --ioengine=libaio \
      --numjobs=1 \
      --thread \
      --norandommap \
      --runtime=300 \
      --direct=1 \
      --iodepth=$depth \
      --scramble_buffers=1 \
      --offset=0 \
      --size=100g
  done
Remove the VDO test volume.
For details, see Section 4.3, “Cleaning up the VDO performance testing volume”.
4.4.4. Testing the effect of I/O depth on random 100% writes in VDO
This test determines how random 100% write operations perform on a VDO volume at different I/O depth values.
You must recreate the VDO volume between each I/O depth test run.
Procedure
Perform the following series of steps separately for the I/O depth values of 1, 2, 4, 8, 16, 32, 64, 128, 256, 512, 1024, and 2048:
Create a new VDO test volume.
For details, see Section 4.2, “Creating a VDO volume for performance testing”.
Prefill any areas that the test might access by performing a write
fiojob:# fio --rw=write \ --bs=8M \ --name=vdo \ --filename=/dev/mapper/vdo-test \ --ioengine=libaio \ --thread \ --direct=1 \ --scramble_buffers=1Record the reported throughput and latency for random 100% writes:
# fio --rw=randwrite \
      --bs=4096 \
      --name=vdo \
      --filename=/dev/mapper/vdo-test \
      --ioengine=libaio \
      --numjobs=1 \
      --thread \
      --norandommap \
      --runtime=300 \
      --direct=1 \
      --iodepth=depth-value
      --scramble_buffers=1 \
      --offset=0 \
      --size=100g
  done
Remove the VDO test volume.
For details, see Section 4.3, “Cleaning up the VDO performance testing volume”.
4.4.5. Analysis of VDO performance at different I/O depths
The following example analyses VDO throughput and latency recorded at different I/O depth values.
Watch the behavior across the range and the points of inflection where increased I/O depth provides diminishing throughput gains. Sequential access and random access probably peak at different values, but the peaks might be different for all types of storage configurations.
Example 4.1. I/O depth analysis
Figure 4.1. VDO throughput analysis

Notice the "knee" in each performance curve:
- Marker 1 identifies the peak sequential throughput at point X. This particular configuration does not benefit from sequential 4 KiB I/O depth larger than X.
- Marker 2 identifies peak random 4 KiB throughput at point Z. This particular configuration does not benefit from random 4 KiB I/O depth larger than Z.
Beyond the I/O depth at points X and Z, there are diminishing bandwidth gains, and average request latency increases 1:1 for each additional I/O request.
The following image shows an example of the random write latency after the "knee" of the curve in the previous graph. You should test at these points for maximum throughput that incurs the least response time penalty.
Figure 4.2. VDO latency analysis

Optimal I/O depth
Point Z marks the optimal I/O depth. The test plan collects additional data with I/O depth equal to Z.
4.5. Testing the effects of I/O request size on VDO performance
Using these tests, you can identify the block size that produces the best performance of VDO at the optimal I/O depth.
The tests perform four-corner testing at a fixed I/O depth, with varied block sizes over the range of 8 KiB to 1 MiB.
Prerequisites
You have determined the optimal I/O depth value. For details, see Section 4.4, “Testing the effects of I/O depth on VDO performance”.
In the following tests, replace optimal-depth with the optimal I/O depth value.
4.5.1. Testing the effect of I/O request size on sequential writes in VDO
This test determines how sequential write operations perform on a VDO volume at different I/O request sizes.
Procedure
Create a new VDO volume.
For details, see Section 4.2, “Creating a VDO volume for performance testing”.
Prefill any areas that the test might access by performing a write
fiojob on the test volume:# fio --rw=write \ --bs=8M \ --name=vdo \ --filename=/dev/mapper/vdo-test \ --ioengine=libaio \ --thread \ --direct=1 \ --scramble_buffers=1Record the reported throughput and latency for the sequential write test:
# for iosize in 4 8 16 32 64 128 256 512 1024; do
  fio --rw=write \
      --bs=${iosize}k \
      --name=vdo \
      --filename=/dev/mapper/vdo-test \
      --ioengine=libaio \
      --numjobs=1 \
      --thread \
      --norandommap \
      --runtime=300 \
      --direct=1 \
      --iodepth=optimal-depth \
      --scramble_buffers=1 \
      --offset=0 \
      --size=100g
  done
Remove the VDO test volume.
For details, see Section 4.3, “Cleaning up the VDO performance testing volume”.
4.5.2. Testing the effect of I/O request size on random writes in VDO
This test determines how random write operations perform on a VDO volume at different I/O request sizes.
You must recreate the VDO volume between each I/O request size test run.
Procedure
Perform the following series steps separately for the I/O request sizes of 4k, 8k, 16k, 32k, 64k, 128k, 256k, 512k, and 1024k:
Create a new VDO volume.
For details, see Section 4.2, “Creating a VDO volume for performance testing”.
Prefill any areas that the test might access by performing a write
fiojob on the test volume:# fio --rw=write \ --bs=8M \ --name=vdo \ --filename=/dev/mapper/vdo-test \ --ioengine=libaio \ --thread \ --direct=1 \ --scramble_buffers=1Record the reported throughput and latency for the random write test:
# fio --rw=randwrite \
      --bs=request-size \
      --name=vdo \
      --filename=/dev/mapper/vdo-test \
      --ioengine=libaio \
      --numjobs=1 \
      --thread \
      --norandommap \
      --runtime=300 \
      --direct=1 \
      --iodepth=optimal-depth \
      --scramble_buffers=1 \
      --offset=0 \
      --size=100g
  done
Remove the VDO test volume.
For details, see Section 4.3, “Cleaning up the VDO performance testing volume”.
4.5.3. Testing the effect of I/O request size on sequential read in VDO
This test determines how sequential read operations perform on a VDO volume at different I/O request sizes.
Procedure
Create a new VDO volume.
For details, see Section 4.2, “Creating a VDO volume for performance testing”.
Prefill any areas that the test might access by performing a write
fiojob on the test volume:# fio --rw=write \ --bs=8M \ --name=vdo \ --filename=/dev/mapper/vdo-test \ --ioengine=libaio \ --thread \ --direct=1 \ --scramble_buffers=1Record the reported throughput and latency for the sequential read test:
# for iosize in 4 8 16 32 64 128 256 512 1024; do
  fio --rw=read \
      --bs=${iosize}k \
      --name=vdo \
      --filename=/dev/mapper/vdo-test \
      --ioengine=libaio \
      --numjobs=1 \
      --thread \
      --norandommap \
      --runtime=300 \
      --direct=1 \
      --iodepth=optimal-depth \
      --scramble_buffers=1 \
      --offset=0 \
      --size=100g
  done
Remove the VDO test volume.
For details, see Section 4.3, “Cleaning up the VDO performance testing volume”.
4.5.4. Testing the effect of I/O request size on random read in VDO
This test determines how random read operations perform on a VDO volume at different I/O request sizes.
Procedure
Create a new VDO volume.
For details, see Section 4.2, “Creating a VDO volume for performance testing”.
Prefill any areas that the test might access by performing a write
fiojob on the test volume:# fio --rw=write \ --bs=8M \ --name=vdo \ --filename=/dev/mapper/vdo-test \ --ioengine=libaio \ --thread \ --direct=1 \ --scramble_buffers=1Record the reported throughput and latency for the random read test:
# for iosize in 4 8 16 32 64 128 256 512 1024; do
  fio --rw=read \
      --bs=${iosize}k \
      --name=vdo \
      --filename=/dev/mapper/vdo-test \
      --ioengine=libaio \
      --numjobs=1 \
      --thread \
      --norandommap \
      --runtime=300 \
      --direct=1 \
      --iodepth=optimal-depth \
      --scramble_buffers=1 \
      --offset=0 \
      --size=100g
  done
Remove the VDO test volume.
For details, see Section 4.3, “Cleaning up the VDO performance testing volume”.
4.5.5. Analysis of VDO performance at different I/O request sizes
The following example analyses VDO throughput and latency recorded at different I/O request sizes.
Example 4.2. I/O request size analysis
Figure 4.3. Request size versus throughput analysis and key inflection points

Analyzing the example results:
Sequential writes reach a peak throughput at request size Y.
This curve demonstrates how applications that are configurable or naturally dominated by certain request sizes might perceive performance. Larger request sizes often provide more throughput because 4 KiB I/O operations might benefit from merging.
Sequential reads reach a similar peak throughput at point Z.
After these peaks, the overall latency before the I/O operation completes increases with no additional throughput. You should tune the device to not accept I/O operations larger than this size.
Random reads achieve peak throughput at point X.
Certain devices might achieve near-sequential throughput rates at large request size random accesses, but others suffer more penalty when varying from purely sequential access.
Random writes achieve peak throughput at point Y.
Random writes involve the most interaction of a deduplication device, and VDO achieves high performance especially when request sizes or I/O depths are large.
4.6. Testing the effects of mixed I/O loads on VDO performance
This test determines how your VDO configuration behaves with mixed read and write I/O loads, and analyzes the effects of mixed reads and writes at the optimal random queue depth and request sizes from 4 KB to 1 MB.
This procedure performs four-corner testing at fixed I/O depth, varied block size over the 8 KB to 256 KB range, and set read percentage at 10% increments, beginning with 0%.
Prerequisites
You have determined the optimal I/O depth value. For details, see Section 4.4, “Testing the effects of I/O depth on VDO performance”.
In the following procedure, replace optimal-depth with the optimal I/O depth value.
Procedure
Create a new VDO volume.
For details, see Section 4.2, “Creating a VDO volume for performance testing”.
Prefill any areas that the test might access by performing a write
fiojob on the test volume:# fio --rw=write \ --bs=8M \ --name=vdo \ --filename=/dev/mapper/vdo-test \ --ioengine=libaio \ --thread \ --direct=1 \ --scramble_buffers=1Record the reported throughput and latency for the read and write input stimulus:
# for readmix in 0 10 20 30 40 50 60 70 80 90 100; do
    for iosize in 4 8 16 32 64 128 256 512 1024; do
      fio --rw=rw \
          --rwmixread=$readmix \
          --bs=${iosize}k \
          --name=vdo \
          --filename=/dev/mapper/vdo-test \
          --ioengine=libaio \
          --numjobs=1 \
          --thread \
          --norandommap \
          --runtime=300 \
          --direct=0 \
          --iodepth=optimal-depth \
          --scramble_buffers=1 \
          --offset=0 \
          --size=100g
    done
  done
Remove the VDO test volume.
For details, see Section 4.3, “Cleaning up the VDO performance testing volume”.
Graph the test results.
Example 4.3. Mixed I/O loads analysis
The following image shows an example of how VDO might respond to mixed I/O loads:
Figure 4.4. Performance is consistent across varying read and write mixes

Aggregate performance and aggregate latency are relatively consistent across the range of mixing reads and writes, trending from the lower maximum write throughput to the higher maximum read throughput.
This behavior might vary with different storage, but the important observation is that the performance is consistent under varying loads or that you can understand performance expectation for applications that demonstrate specific read and write mixes.
NoteIf your system does not show a similar response consistency, it might be a sign of a sub-optimal configuration. Contact your Red Hat Sales Engineer if this occurs.
4.7. Testing the effects of application environments on VDO performance
These tests determine how your VDO configuration behaves when deployed in a mixed, real application environment. If you know more details about the expected environment, test them as well.
Prerequisites
- Consider limiting the permissible queue depth on your configuration.
- If possible, tune the application to issue requests with the block sizes that are the most beneficial to VDO performance.
Procedure
Create a new VDO volume.
For details, see Section 4.2, “Creating a VDO volume for performance testing”.
Prefill any areas that the test might access by performing a write
fiojob on the test volume:# fio --rw=write \ --bs=8M \ --name=vdo \ --filename=/dev/mapper/vdo-test \ --ioengine=libaio \ --thread \ --direct=1 \ --scramble_buffers=1Record the reported throughput and latency for the read and write input stimulus:
# for readmix in 20 50 80; do
    for iosize in 4 8 16 32 64 128 256 512 1024; do
      fio --rw=rw \
          --rwmixread=$readmix \
          --bsrange=4k-256k \
          --name=vdo \
          --filename=/dev/mapper/vdo-name \
          --ioengine=libaio \
          --numjobs=1 \
          --thread \
          --norandommap \
          --runtime=300 \
          --direct=0 \
          --iodepth=$iosize \
          --scramble_buffers=1 \
          --offset=0 \
          --size=100g
    done
  done
Remove the VDO test volume.
For details, see Section 4.3, “Cleaning up the VDO performance testing volume”.
Graph the test results.
Example 4.4. Application environment analysis
The following image shows an example of how VDO might respond to mixed I/O loads:
Figure 4.5. Mixed environment performance
4.8. Options used for testing VDO performance with fio
The VDO tests use the fio utility to synthetically generate data with repeatable characteristics. The following fio options are necessary to simulate real world workloads in the tests:
| Argument | Description | Value used in the tests |
|---|---|---|
|
|
The quantity of data that
See also the | 100 GiB |
|
|
The block size of each read-and-write request produced by Red Hat recommends a 4 KiB block size to match 4 KiB default of VDO. | 4k |
|
|
The number of jobs that
Each job sends the amount of data specified by the To achieve peak performance on flash disks (SSD), Red Hat recommends at least two jobs. One job is typically enough to saturate rotational disk (HDD) throughput. | 1 for HDD, 2 for SSD |
|
|
Instructs | none |
|
|
The I/O engine that
Red Hat testing uses the asynchronous unbuffered engine called |
|
|
| The option enables requests submitted to the device to bypass the kernel page cache.
You must use the |
1 ( |
|
| The number of I/O buffers in flight at any time. A high value usually increases performance, particularly for random reads or writes. High values ensure that the controller always has requests to batch. However, setting the value too high, (typically greater than 1K, might cause undesirable latency. Red Hat recommends a value between 128 and 512. The final value is a trade-off and depends on how your application tolerates latency. | 128 at minimum |
|
| The number of I/O requests to create when the I/O depth buffer pool begins to empty. This option limits task switching from I/O operations to buffer creation during the test. | 16 |
|
| The number of I/O operations to complete before submitting a batch. This option limits task switching from I/O operations to buffer creation during the test. | 16 |
|
| Disables time-of-day calls to calculate latency. This setting lowers throughput if enabled. Enable the option unless you require latency measurement. | 1 |
Chapter 5. Discarding unused blocks
You can perform or schedule discard operations on block devices that support them. The block discard operation communicates to the underlying storage which file system blocks are no longer in use by the mounted file system. Block discard operations allow SSDs to optimize garbage collection routines, and they can inform thinly-provisioned storage to repurpose unused physical blocks.
Requirements
The block device underlying the file system must support physical discard operations.
Physical discard operations are supported if the value in the
/sys/block/<device>/queue/discard_max_bytesfile is not zero.
5.1. Types of block discard operations
You can run discard operations using different methods:
- Batch discard
- Is triggered explicitly by the user and discards all unused blocks in the selected file systems.
- Online discard
-
Is specified at mount time and triggers in real time without user intervention. Online discard operations discard only blocks that are transitioning from the
usedto thefreestate. - Periodic discard
-
Are batch operations that are run regularly by a
systemdservice.
All types are supported by the XFS and ext4 file systems.
Recommendations
Red Hat recommends that you use batch or periodic discard.
Use online discard only if:
- the system’s workload is such that batch discard is not feasible, or
- online discard operations are necessary to maintain performance.
5.2. Performing batch block discard
You can perform a batch block discard operation to discard unused blocks on a mounted file system.
Prerequisites
- The file system is mounted.
- The block device underlying the file system supports physical discard operations.
Procedure
Use the
fstrimutility:To perform discard only on a selected file system, use:
# fstrim mount-pointTo perform discard on all mounted file systems, use:
# fstrim --all
If you execute the fstrim command on:
- a device that does not support discard operations, or
- a logical device (LVM or MD) composed of multiple devices, where any one of the device does not support discard operations,
the following message displays:
# fstrim /mnt/non_discard

fstrim: /mnt/non_discard: the discard operation is not supported5.3. Enabling online block discard
You can perform online block discard operations to automatically discard unused blocks on all supported file systems.
Procedure
Enable online discard at mount time:
When mounting a file system manually, add the
-o discardmount option:# mount -o discard device mount-point-
When mounting a file system persistently, add the
discardoption to the mount entry in the/etc/fstabfile.
5.4. Enabling online block discard by using the storage RHEL system role
You can mount an XFS file system with the online block discard option to automatically discard unused blocks.
Prerequisites
- You have prepared the control node and the managed nodes.
-
The account you use to connect to the managed nodes has
sudopermissions for these nodes.
Procedure
Create a playbook file, for example,
~/playbook.yml, with the following content:--- - name: Manage local storage hosts: managed-node-01.example.com tasks: - name: Enable online block discard ansible.builtin.include_role: name: redhat.rhel_system_roles.storage vars: storage_volumes: - name: barefs type: disk disks: - sdb fs_type: xfs mount_point: /mnt/data mount_options: discardFor details about all variables used in the playbook, see the
/usr/share/ansible/roles/rhel-system-roles.storage/README.mdfile on the control node.Validate the playbook syntax:
$ ansible-playbook --syntax-check ~/playbook.ymlNote that this command only validates the syntax and does not protect against a wrong but valid configuration.
Run the playbook:
$ ansible-playbook ~/playbook.yml
Verification
Verify that online block discard option is enabled:
# ansible managed-node-01.example.com -m command -a 'findmnt /mnt/data'
5.5. Enabling periodic block discard
You can enable a systemd timer to regularly discard unused blocks on all supported file systems.
Procedure
Enable and start the
systemdtimer:# systemctl enable --now fstrim.timer Created symlink /etc/systemd/system/timers.target.wants/fstrim.timer → /usr/lib/systemd/system/fstrim.timer.
Verification
Verify the status of the timer:
# systemctl status fstrim.timer
fstrim.timer - Discard unused blocks once a week
   Loaded: loaded (/usr/lib/systemd/system/fstrim.timer; enabled; vendor preset: disabled)
   Active: active (waiting) since Wed 2023-05-17 13:24:41 CEST; 3min 15s ago
  Trigger: Mon 2023-05-22 01:20:46 CEST; 4 days left
     Docs: man:fstrim

May 17 13:24:41 localhost.localdomain systemd[1]: Started Discard unused blocks once a week.
Chapter 6. Overview of persistent naming attributes
As a system administrator, you need to refer to storage volumes using persistent naming attributes to build storage setups that are reliable over multiple system boots.
6.1. Disadvantages of non-persistent naming attributes
Red Hat Enterprise Linux provides a number of ways to identify storage devices. It is important to use the correct option to identify each device when used in order to avoid inadvertently accessing the wrong device, particularly when installing to or reformatting drives.
Traditionally, non-persistent names in the form of /dev/sd(major number)(minor number) are used on Linux to refer to storage devices. The major and minor number range and associated sd names are allocated for each device when it is detected. This means that the association between the major and minor number range and associated sd names can change if the order of device detection changes.
Such a change in the ordering might occur in the following situations:
- The parallelization of the system boot process detects storage devices in a different order with each system boot.
-
A disk fails to power up or respond to the SCSI controller. This results in it not being detected by the normal device probe. The disk is not accessible to the system and subsequent devices will have their major and minor number range, including the associated
sdnames shifted down. For example, if a disk normally referred to assdbis not detected, a disk that is normally referred to assdcwould instead appear assdb. -
A SCSI controller (host bus adapter, or HBA) fails to initialize, causing all disks connected to that HBA to not be detected. Any disks connected to subsequently probed HBAs are assigned different major and minor number ranges, and different associated
sdnames. - The order of driver initialization changes if different types of HBAs are present in the system. This causes the disks connected to those HBAs to be detected in a different order. This might also occur if HBAs are moved to different PCI slots on the system.
-
Disks connected to the system with Fibre Channel, iSCSI, or FCoE adapters might be inaccessible at the time the storage devices are probed, due to a storage array or intervening switch being powered off, for example. This might occur when a system reboots after a power failure, if the storage array takes longer to come online than the system take to boot. Although some Fibre Channel drivers support a mechanism to specify a persistent SCSI target ID to WWPN mapping, this does not cause the major and minor number ranges, and the associated
sdnames to be reserved; it only provides consistent SCSI target ID numbers.
These reasons make it undesirable to use the major and minor number range or the associated sd names when referring to devices, such as in the /etc/fstab file. There is the possibility that the wrong device will be mounted and data corruption might result.
Occasionally, however, it is still necessary to refer to the sd names even when another mechanism is used, such as when errors are reported by a device. This is because the Linux kernel uses sd names (and also SCSI host/channel/target/LUN tuples) in kernel messages regarding the device.
6.2. File system and device identifiers
File system identifiers are tied to the file system itself, while device identifiers are linked to the physical block device. Understanding the difference is important for proper storage management.
File system identifiers
File system identifiers are tied to a particular file system created on a block device. The identifier is also stored as part of the file system. If you copy the file system to a different device, it still carries the same file system identifier. However, if you rewrite the device, such as by formatting it with the mkfs utility, the device loses the attribute.
File system identifiers include:
- Unique identifier (UUID)
- Label
Device identifiers
Device identifiers are tied to a block device: for example, a disk or a partition. If you rewrite the device, such as by formatting it with the mkfs utility, the device keeps the attribute, because it is not stored in the file system.
Device identifiers include:
- World Wide Identifier (WWID)
- Partition UUID
- Serial number
Recommendations
- Some file systems, such as logical volumes, span multiple devices. Red Hat recommends accessing these file systems using file system identifiers rather than device identifiers.
6.3. Device names managed by the udev mechanism in /dev/disk/
The udev mechanism is used for all types of devices in Linux, and is not limited only for storage devices. It provides different kinds of persistent naming attributes in the /dev/disk/ directory. In the case of storage devices, Red Hat Enterprise Linux contains udev rules that create symbolic links in the /dev/disk/ directory. This enables you to refer to storage devices by:
- Their content
- A unique identifier
- Their serial number.
Although udev naming attributes are persistent, in that they do not change on their own across system reboots, some are also configurable.
6.3.1. File system identifiers
The UUID attribute in /dev/disk/by-uuid/
Entries in this directory provide a symbolic name that refers to the storage device by a unique identifier (UUID) in the content (that is, the data) stored on the device. For example:
/dev/disk/by-uuid/3e6be9de-8139-11d1-9106-a43f08d823a6
You can use the UUID to refer to the device in the /etc/fstab file using the following syntax:
UUID=3e6be9de-8139-11d1-9106-a43f08d823a6You can configure the UUID attribute when creating a file system, and you can also change it later on.
The Label attribute in /dev/disk/by-label/
Entries in this directory provide a symbolic name that refers to the storage device by a label in the content (that is, the data) stored on the device.
For example:
/dev/disk/by-label/Boot
You can use the label to refer to the device in the /etc/fstab file using the following syntax:
LABEL=BootYou can configure the Label attribute when creating a file system, and you can also change it later on.
6.3.2. Device identifiers
The WWID attribute in /dev/disk/by-id/
The World Wide Identifier (WWID) is a persistent, system-independent identifier that the SCSI Standard requires from all SCSI devices. The WWID identifier is guaranteed to be unique for every storage device, and independent of the path that is used to access the device. The identifier is a property of the device but is not stored in the content (that is, the data) on the devices.
This identifier can be obtained by issuing a SCSI Inquiry to retrieve the Device Identification Vital Product Data (page 0x83) or Unit Serial Number (page 0x80).
Red Hat Enterprise Linux automatically maintains the proper mapping from the WWID-based device name to a current /dev/sd name on that system. Applications can use the /dev/disk/by-id/ name to reference the data on the disk, even if the path to the device changes, and even when accessing the device from different systems.
Example 6.1. WWID mappings
| WWID symlink | Non-persistent device | Note |
|---|---|---|
|
|
|
A device with a page |
|
|
|
A device with a page |
|
|
| A disk partition |
In addition to these persistent names provided by the system, you can also use udev rules to implement persistent names of your own, mapped to the WWID of the storage.
The Partition UUID attribute in /dev/disk/by-partuuid
The Partition UUID (PARTUUID) attribute identifies partitions as defined by GPT partition table.
Example 6.2. Partition UUID mappings
| PARTUUID symlink | Non-persistent device |
|---|---|
|
|
|
|
|
|
|
|
|
The Path attribute in /dev/disk/by-path/
This attribute provides a symbolic name that refers to the storage device by the hardware path used to access the device.
The Path attribute fails if any part of the hardware path (for example, the PCI ID, target port, or LUN number) changes. The Path attribute is therefore unreliable. However, the Path attribute may be useful in one of the following scenarios:
- You need to identify a disk that you are planning to replace later.
- You plan to install a storage service on a disk in a specific location.
6.4. The World Wide Identifier with DM Multipath
You can configure Device Mapper (DM) Multipath to map between the World Wide Identifier (WWID) and non-persistent device names.
If there are multiple paths from a system to a device, DM Multipath uses the WWID to detect this. DM Multipath then presents a single "pseudo-device" in the /dev/mapper/wwid directory, such as /dev/mapper/3600508b400105df70000e00000ac0000.
The command multipath -l shows the mapping to the non-persistent identifiers:
-
Host:Channel:Target:LUN -
/dev/sdname -
major:minornumber
Example 6.3. WWID mappings in a multipath configuration
An example output of the multipath -l command:
3600508b400105df70000e00000ac0000 dm-2 vendor,product
[size=20G][features=1 queue_if_no_path][hwhandler=0][rw]
\_ round-robin 0 [prio=0][active]
 \_ 5:0:1:1 sdc 8:32  [active][undef]
 \_ 6:0:1:1 sdg 8:96  [active][undef]
\_ round-robin 0 [prio=0][enabled]
 \_ 5:0:0:1 sdb 8:16  [active][undef]
 \_ 6:0:0:1 sdf 8:80  [active][undef]
DM Multipath automatically maintains the proper mapping of each WWID-based device name to its corresponding /dev/sd name on the system. These names are persistent across path changes, and they are consistent when accessing the device from different systems.
When the user_friendly_names feature of DM Multipath is used, the WWID is mapped to a name of the form /dev/mapper/mpathN. By default, this mapping is maintained in the file /etc/multipath/bindings. These mpathN names are persistent as long as that file is maintained.
If you use user_friendly_names, then additional steps are required to obtain consistent names in a cluster.
6.5. Limitations of the udev device naming convention
The following are some limitations of the udev naming convention:
-
It is possible that the device might not be accessible at the time the query is performed because the
udevmechanism might rely on the ability to query the storage device when theudevrules are processed for audevevent. This is more likely to occur with Fibre Channel, iSCSI or FCoE storage devices when the device is not located in the server chassis. -
The kernel might send
udevevents at any time, causing the rules to be processed and possibly causing the/dev/disk/by-*/links to be removed if the device is not accessible. -
There might be a delay between when the
udevevent is generated and when it is processed, such as when a large number of devices are detected and the user-spaceudevdservice takes some amount of time to process the rules for each one. This might cause a delay between when the kernel detects the device and when the/dev/disk/by-*/names are available. -
External programs such as
blkidinvoked by the rules might open the device for a brief period of time, making the device inaccessible for other uses. -
The device names managed by the
udevmechanism in /dev/disk/ may change between major releases, requiring you to update the links.
6.6. Listing persistent naming attributes
You can find out the persistent naming attributes of non-persistent storage devices.
Procedure
To list the UUID and Label attributes, use the
lsblkutility:$ lsblk --fs storage-deviceFor example:
Example 6.4. Viewing the UUID and Label of a file system
$ lsblk --fs /dev/sda1

NAME FSTYPE LABEL UUID                                 MOUNTPOINT
sda1 xfs    Boot  afa5d5e3-9050-48c3-acc1-bb30095f3dc4 /boot
To list the PARTUUID attribute, use the
lsblkutility with the--output +PARTUUIDoption:$ lsblk --output +PARTUUIDFor example:
Example 6.5. Viewing the PARTUUID attribute of a partition
$ lsblk --output +PARTUUID /dev/sda1

NAME MAJ:MIN RM  SIZE RO TYPE MOUNTPOINT PARTUUID
sda1   8:1    0  512M  0 part /boot      4cd1448a-01
To list the WWID attribute, examine the targets of symbolic links in the
/dev/disk/by-id/directory. For example:Example 6.6. Viewing the WWID of all storage devices on the system
$ file /dev/disk/by-id/*

/dev/disk/by-id/ata-QEMU_HARDDISK_QM00001
symbolic link to ../../sda
/dev/disk/by-id/ata-QEMU_HARDDISK_QM00001-part1
symbolic link to ../../sda1
/dev/disk/by-id/ata-QEMU_HARDDISK_QM00001-part2
symbolic link to ../../sda2
/dev/disk/by-id/dm-name-rhel_rhel8-root
symbolic link to ../../dm-0
/dev/disk/by-id/dm-name-rhel_rhel8-swap
symbolic link to ../../dm-1
/dev/disk/by-id/dm-uuid-LVM-QIWtEHtXGobe5bewlIUDivKOz5ofkgFhP0RMFsNyySVihqEl2cWWbR7MjXJolD6g
symbolic link to ../../dm-1
/dev/disk/by-id/dm-uuid-LVM-QIWtEHtXGobe5bewlIUDivKOz5ofkgFhXqH2M45hD2H9nAf2qfWSrlRLhzfMyOKd
symbolic link to ../../dm-0
/dev/disk/by-id/lvm-pv-uuid-atlr2Y-vuMo-ueoH-CpMG-4JuH-AhEF-wu4QQm
symbolic link to ../../sda2
6.7. Modifying persistent naming attributes
You can change the UUID or Label persistent naming attribute of a file system.
Changing udev attributes happens in the background and might take a long time. The udevadm settle command waits until the change is fully registered, which ensures that your next command will be able to use the new attribute correctly.
In the following commands:
-
Replace new-uuid with the UUID you want to set; for example,
1cdfbc07-1c90-4984-b5ec-f61943f5ea50. You can generate a UUID using theuuidgencommand. -
Replace new-label with a label; for example,
backup_data.
Prerequisites
- If you are modifying the attributes of an XFS file system, unmount it first.
Procedure
To change the UUID or Label attributes of an XFS file system, use the
xfs_adminutility:# xfs_admin -U new-uuid -L new-label storage-device # udevadm settleTo change the UUID or Label attributes of an ext4, ext3, or ext2 file system, use the
tune2fsutility:# tune2fs -U new-uuid -L new-label storage-device # udevadm settleTo change the UUID or Label attributes of a swap volume, use the
swaplabelutility:# swaplabel --uuid new-uuid --label new-label swap-device # udevadm settle