Using SELinux
Prevent users and processes from performing unauthorized interactions with files and devices by using Security-Enhanced Linux (SELinux)
Abstract
Providing feedback on Red Hat documentation
We are committed to providing high-quality documentation and value your feedback. To help us improve, you can submit suggestions or report errors through the Red Hat Jira tracking system.
Procedure
Log in to the Jira website.
If you do not have an account, select the option to create one.
- Click Create in the top navigation bar.
- Enter a descriptive title in the Summary field.
- Enter your suggestion for improvement in the Description field. Include links to the relevant parts of the documentation.
- Click Create at the bottom of the dialogue.
Chapter 1. Getting started with SELinux
Security Enhanced Linux (SELinux) provides an additional layer of system security. SELinux fundamentally answers the question: May <subject> do <action> to <object>?, for example: May a web server access files in users' home directories?
1.1. Introduction to SELinux
The standard access policy based on the user, group, and other permissions, known as Discretionary Access Control (DAC), does not enable system administrators to create comprehensive and fine-grained security policies, such as restricting specific applications to only viewing log files, while allowing other applications to append new data to the log files.
Security Enhanced Linux (SELinux) implements Mandatory Access Control (MAC). Every process and system resource has a special security label called an SELinux context. A SELinux context, sometimes referred to as an SELinux label, is an identifier which abstracts away the system-level details and focuses on the security properties of the entity. Not only does this provide a consistent way of referencing objects in the SELinux policy, but it also removes any ambiguity that can be found in other identification methods. For example, a file can have multiple valid path names on a system that makes use of bind mounts.
The SELinux policy uses these contexts in a series of rules which define how processes can interact with each other and the various system resources. By default, the policy does not allow any interaction unless a rule explicitly grants access.
Remember that SELinux policy rules are checked after DAC rules. SELinux policy rules are not used if DAC rules deny access first, which means that no SELinux denial is logged if the traditional DAC rules prevent the access.
SELinux contexts have several fields: user, role, type, and security level. The SELinux type information is perhaps the most important when it comes to the SELinux policy, as the most common policy rule which defines the allowed interactions between processes and system resources uses SELinux types and not the full SELinux context. SELinux types end with _t. For example, the type name for the web server is httpd_t. The type context for files and directories normally found in /var/www/html/ is httpd_sys_content_t. The type contexts for files and directories normally found in /tmp and /var/tmp/ is tmp_t. The type context for web server ports is http_port_t.
There is a policy rule that permits Apache (the web server process running as httpd_t) to access files and directories with a context normally found in /var/www/html/ and other web server directories (httpd_sys_content_t). There is no allow rule in the policy for files normally found in /tmp and /var/tmp/, so access is not permitted. With SELinux, even if Apache is compromised, and a malicious script gains access, it is still not able to access the /tmp directory.
Figure 1.1. An example how can SELinux help to run Apache and MariaDB in a secure way.
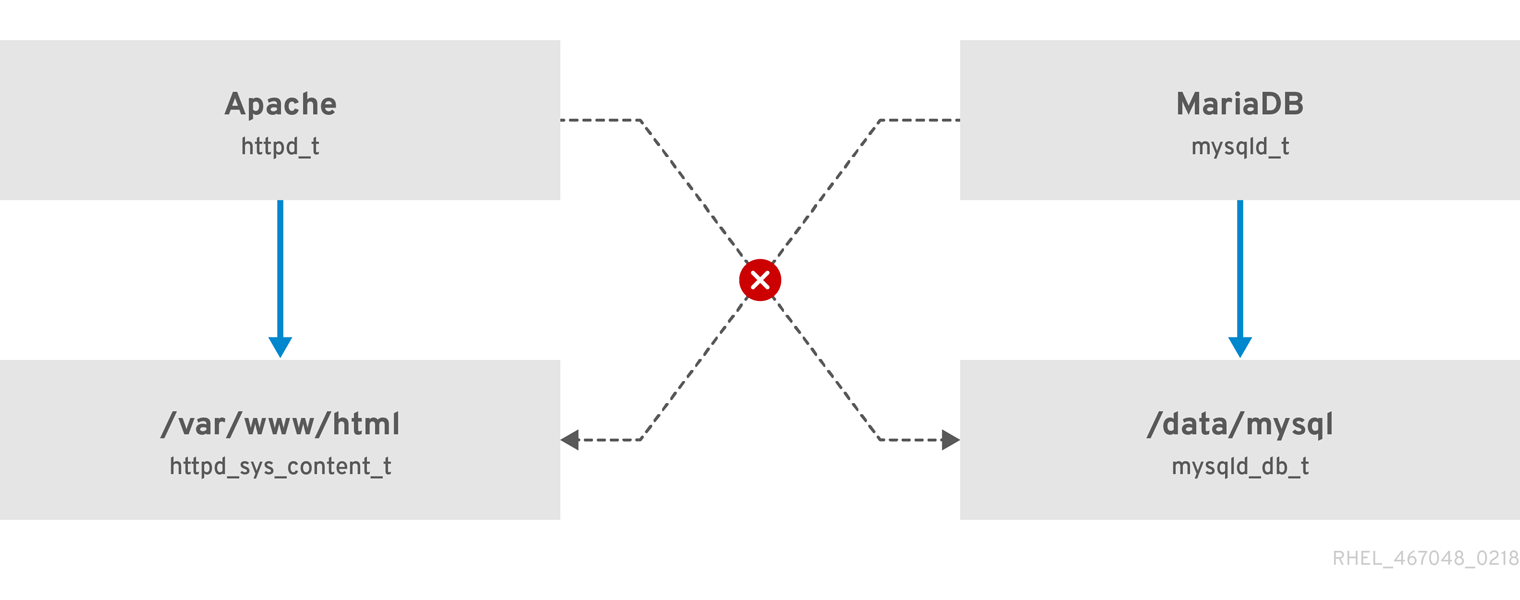
As the previous scheme shows, SELinux allows the Apache process running as httpd_t to access the /var/www/html/ directory and it denies the same process to access the /data/mysql/ directory because there is no allow rule for the httpd_t and mysqld_db_t type contexts. On the other hand, the MariaDB process running as mysqld_t is able to access the /data/mysql/ directory and SELinux also correctly denies the process with the mysqld_t type to access the /var/www/html/ directory labeled as httpd_sys_content_t.
1.2. Benefits of running SELinux
SELinux provides the following benefits:
- All processes and files are labeled. SELinux policy rules define how processes interact with files, as well as how processes interact with each other. Access is only allowed if an SELinux policy rule exists that specifically allows it.
- SELinux provides fine-grained access control. Stepping beyond traditional UNIX permissions that are controlled at user discretion and based on Linux user and group IDs, SELinux access decisions are based on all available information, such as an SELinux user, role, type, and, optionally, a security level.
- SELinux policy is administratively-defined and enforced system-wide.
- SELinux can mitigate privilege escalation attacks. Processes run in domains, and are therefore separated from each other. SELinux policy rules define how processes access files and other processes. If a process is compromised, the attacker only has access to the normal functions of that process, and to files the process has been configured to have access to. For example, if the Apache HTTP Server is compromised, an attacker cannot use that process to read files in user home directories, unless a specific SELinux policy rule was added or configured to allow such access.
- SELinux can enforce data confidentiality and integrity, and can protect processes from untrusted inputs.
SELinux is designed to enhance existing security solutions, not replace antivirus software, secure passwords, firewalls, or other security systems. Even when running SELinux, it is important to continue to follow good security practices, such as keeping software up-to-date, using hard-to-guess passwords, and firewalls.
1.3. SELinux examples
The following examples demonstrate how SELinux increases security:
- The default action is deny. If an SELinux policy rule does not exist to allow access, such as for a process opening a file, access is denied.
-
SELinux can confine Linux users. A number of confined SELinux users exist in the SELinux policy. Linux users can be mapped to confined SELinux users to take advantage of the security rules and mechanisms applied to them. For example, mapping a Linux user to the SELinux
user_uuser, results in a Linux user that is not able to run unless configured otherwise set user ID (setuid) applications, such assudoandsu. - Increased process and data separation. The concept of SELinux domains allows defining which processes can access certain files and directories. For example, when running SELinux, unless otherwise configured, an attacker cannot compromise a Samba server, and then use that Samba server as an attack vector to read and write to files used by other processes, such as MariaDB databases.
-
SELinux helps mitigate the damage made by configuration mistakes. Domain Name System (DNS) servers often replicate information between each other in a zone transfer. Attackers can use zone transfers to update DNS servers with false information. When running the Berkeley Internet Name Domain (BIND) as a DNS server in RHEL, even if an administrator forgets to limit which servers can perform a zone transfer, the default SELinux policy prevent updates for zone files [1] that use zone transfers, by the BIND
nameddaemon itself, and by other processes. -
Without SELinux, an attacker can misuse a vulnerability to path traversal on an Apache web server and access files and directories stored on the file system by using special elements such as
../. If an attacker attempts an attack on a server running with SELinux in enforcing mode, SELinux denies access to files that thehttpdprocess must not access. SELinux cannot block this type of attack completely but it effectively mitigates it. -
SELinux in enforcing mode successfully prevents exploitation of kernel NULL pointer dereference operators on non-SMAP platforms (CVE-2019-9213). Attackers use a vulnerability in the
mmapfunction, which does not check mapping of a null page, for placing arbitrary code on this page. -
The
deny_ptraceSELinux boolean and SELinux in enforcing mode protect systems from the PTRACE_TRACEME vulnerability (CVE-2019-13272). Such configuration prevents scenarios when an attacker can getrootprivileges. -
The
nfs_export_all_rwandnfs_export_all_roSELinux booleans provide an easy-to-use tool to prevent misconfigurations of Network File System (NFS) such as accidental sharing/homedirectories.
1.4. SELinux architecture and packages
SELinux is a Linux Security Module (LSM) that is built into the Linux kernel. The SELinux subsystem in the kernel is driven by a security policy which is controlled by the administrator and loaded at boot. All security-relevant, kernel-level access operations on the system are intercepted by SELinux and examined in the context of the loaded security policy. If the loaded policy allows the operation, it continues. Otherwise, the operation is blocked and the process receives an error.
SELinux decisions, such as allowing or disallowing access, are cached. This cache is known as the Access Vector Cache (AVC). When using these cached decisions, SELinux policy rules need to be checked less, which increases performance. Remember that SELinux policy rules have no effect if DAC rules deny access first. Raw audit messages are logged to the /var/log/audit/audit.log and they start with the type=AVC string.
In RHEL 8, system services are controlled by the systemd daemon; systemd starts and stops all services, and users and processes communicate with systemd using the systemctl utility. The systemd daemon can consult the SELinux policy and check the label of the calling process and the label of the unit file that the caller tries to manage, and then ask SELinux whether or not the caller is allowed the access. This approach strengthens access control to critical system capabilities, which include starting and stopping system services.
The systemd daemon also works as an SELinux Access Manager. It retrieves the label of the process running systemctl or the process that sent a D-Bus message to systemd. The daemon then looks up the label of the unit file that the process wanted to configure. Finally, systemd can retrieve information from the kernel if the SELinux policy allows the specific access between the process label and the unit file label. This means a compromised application that needs to interact with systemd for a specific service can now be confined by SELinux. Policy writers can also use these fine-grained controls to confine administrators.
If a process is sending a D-Bus message to another process and if the SELinux policy does not allow the D-Bus communication of these two processes, then the system prints a USER_AVC denial message, and the D-Bus communication times out. Note that the D-Bus communication between two processes works bidirectionally.
To avoid incorrect SELinux labeling and subsequent problems, ensure that you start services using a systemctl start command.
RHEL 8 provides the following packages for working with SELinux:
-
policies:
selinux-policy-targeted,selinux-policy-mls -
tools:
policycoreutils,policycoreutils-gui,libselinux-utils,policycoreutils-python-utils,setools-console,checkpolicy
1.5. SELinux states and modes
SELinux can run in one of three modes: enforcing, permissive, or disabled.
- Enforcing mode is the default, and recommended, mode of operation; in enforcing mode SELinux operates normally, enforcing the loaded security policy on the entire system.
- In permissive mode, the system acts as if SELinux is enforcing the loaded security policy, including labeling objects and emitting access denial entries in the logs, but it does not actually deny any operations. While not recommended for production systems, permissive mode can be helpful for SELinux policy development and debugging.
- Disabled mode is strongly discouraged; not only does the system avoid enforcing the SELinux policy, it also avoids labeling any persistent objects such as files, making it difficult to enable SELinux in the future.
Use the setenforce utility to change between enforcing and permissive mode. Changes made with setenforce do not persist across reboots. To change to enforcing mode, enter the setenforce 1 command as the Linux root user. To change to permissive mode, enter the setenforce 0 command. Use the getenforce utility to view the current SELinux mode:
# getenforce
Enforcing
# setenforce 0
# getenforce
Permissive# setenforce 1
# getenforce
EnforcingIn Red Hat Enterprise Linux, you can set individual domains to permissive mode while the system runs in enforcing mode. For example, to make the httpd_t domain permissive:
# semanage permissive -a httpd_tNote that permissive domains are a powerful tool that can compromise security of your system. Red Hat recommends to use permissive domains with caution, for example, when debugging a specific scenario.
Chapter 2. Changing SELinux states and modes
When enabled, SELinux can run in one of two modes: enforcing or permissive. The following sections show how to permanently change into these modes.
2.1. Permanent changes in SELinux states and modes
As discussed in SELinux states and modes, SELinux can be enabled or disabled. When enabled, SELinux has two modes: enforcing and permissive.
Use the getenforce or sestatus commands to check in which mode SELinux is running. The getenforce command returns Enforcing, Permissive, or Disabled.
The sestatus command returns the SELinux status and the SELinux policy being used:
$ sestatus
SELinux status:                 enabled
SELinuxfs mount:                /sys/fs/selinux
SELinux root directory:         /etc/selinux
Loaded policy name:             targeted
Current mode:                   enforcing
Mode from config file:          enforcing
Policy MLS status:              enabled
Policy deny_unknown status:     allowed
Memory protection checking:     actual (secure)
Max kernel policy version: 31When systems run SELinux in permissive mode, users and processes might label various file-system objects incorrectly. File-system objects created while SELinux is disabled are not labeled at all. This behavior causes problems when changing to enforcing mode because SELinux relies on correct labels of file-system objects.
To prevent incorrectly labeled and unlabeled files from causing problems, SELinux automatically relabels file systems when changing from the disabled state to permissive or enforcing mode. Use the fixfiles -F onboot command as root to create the /.autorelabel file containing the -F option to ensure that files are relabeled upon next reboot.
Before rebooting the system for relabeling, make sure the system will boot in permissive mode, for example by using the enforcing=0 kernel option. This prevents the system from failing to boot in case the system contains unlabeled files required by systemd before launching the selinux-autorelabel service. For more information, see RHBZ#2021835.
2.2. Changing SELinux to permissive mode
When SELinux is running in permissive mode, SELinux policy is not enforced. The system remains operational and SELinux does not deny any operations but only logs AVC messages, which can be then used for troubleshooting, debugging, and SELinux policy improvements. Each AVC is logged only once in this case.
Prerequisites
-
The
selinux-policy-targeted,libselinux-utils, andpolicycoreutilspackages are installed on your system. -
The
selinux=0orenforcing=0kernel parameters are not used.
Procedure
Open the
/etc/selinux/configfile in a text editor of your choice, for example:# vi /etc/selinux/configConfigure the
SELINUX=permissiveoption:# This file controls the state of SELinux on the system. # SELINUX= can take one of these three values: # enforcing - SELinux security policy is enforced. # permissive - SELinux prints warnings instead of enforcing. # disabled - No SELinux policy is loaded. SELINUX=permissive # SELINUXTYPE= can take one of these two values: # targeted - Targeted processes are protected, # mls - Multi Level Security protection. SELINUXTYPE=targetedRestart the system:
# reboot
Verification
After the system restarts, confirm that the
getenforcecommand returnsPermissive:$ getenforce Permissive
2.3. Changing SELinux to enforcing mode
When SELinux is running in enforcing mode, it enforces the SELinux policy and denies access based on SELinux policy rules. In RHEL, enforcing mode is enabled by default when the system was initially installed with SELinux.
Prerequisites
-
The
selinux-policy-targeted,libselinux-utils, andpolicycoreutilspackages are installed on your system. -
The
selinux=0orenforcing=0kernel parameters are not used.
Procedure
Open the
/etc/selinux/configfile in a text editor of your choice, for example:# vi /etc/selinux/configConfigure the
SELINUX=enforcingoption:# This file controls the state of SELinux on the system. # SELINUX= can take one of these three values: # enforcing - SELinux security policy is enforced. # permissive - SELinux prints warnings instead of enforcing. # disabled - No SELinux policy is loaded. SELINUX=enforcing # SELINUXTYPE= can take one of these two values: # targeted - Targeted processes are protected, # mls - Multi Level Security protection. SELINUXTYPE=targetedSave the change, and restart the system:
# rebootOn the next boot, SELinux relabels all the files and directories within the system and adds SELinux context for files and directories that were created when SELinux was disabled.
Verification
After the system restarts, confirm that the
getenforcecommand returnsEnforcing:$ getenforce Enforcing
Troubleshooting
After changing to enforcing mode, SELinux may deny some actions because of incorrect or missing SELinux policy rules.
To view what actions SELinux denies, enter the following command as root:
# ausearch -m AVC,USER_AVC,SELINUX_ERR,USER_SELINUX_ERR -ts todayAlternatively, with the
setroubleshoot-serverpackage installed, enter:# grep "SELinux is preventing" /var/log/messagesIf SELinux is active and the Audit daemon (
auditd) is not running on your system, then search for certain SELinux messages in the output of thedmesgcommand:# dmesg | grep -i -e type=1300 -e type=1400
See Troubleshooting problems related to SELinux for more information.
2.4. Enabling SELinux on systems that previously had it disabled
To avoid problems, such as systems unable to boot or process failures, when enabling SELinux on systems that previously had it disabled, resolve Access Vector Cache (AVC) messages in permissive mode first.
When systems run SELinux in permissive mode, users and processes might label various file-system objects incorrectly. File-system objects created while SELinux is disabled are not labeled at all. This behavior causes problems when changing to enforcing mode because SELinux relies on correct labels of file-system objects.
To prevent incorrectly labeled and unlabeled files from causing problems, SELinux automatically relabels file systems when changing from the disabled state to permissive or enforcing mode.
Before rebooting the system for relabeling, make sure the system will boot in permissive mode, for example by using the enforcing=0 kernel option. This prevents the system from failing to boot in case the system contains unlabeled files required by systemd before launching the selinux-autorelabel service. For more information, see RHBZ#2021835.
Procedure
- Enable SELinux in permissive mode. For more information, see Changing to permissive mode.
Restart your system:
# reboot- Check for SELinux denial messages. For more information, see Identifying SELinux denials.
Ensure that files are relabeled upon the next reboot:
# fixfiles -F onbootThis creates the
/.autorelabelfile containing the-Foption.WarningAlways switch to permissive mode before entering the
fixfiles -F onbootcommand.By default,
autorelabeluses as many threads in parallel as the system has available CPU cores. To use only a single thread during automatic relabeling, use thefixfiles -T 1 onbootcommand.- If there are no denials, switch to enforcing mode. For more information, see Changing SELinux modes at boot time.
Verification
After the system restarts, confirm that the
getenforcecommand returnsEnforcing:$ getenforce Enforcing
Next steps
To run custom applications with SELinux in enforcing mode, choose one of the following scenarios:
-
Run your application in the
unconfined_service_tdomain. - Write a new policy for your application. See the Writing a custom SELinux policy section for more information.
2.5. Disabling SELinux
When you disable SELinux, your system does not load your SELinux policy. As a result, the system does not enforce the SELinux policy and does not log Access Vector Cache (AVC) messages. Therefore, all benefits of running SELinux are lost.
Do not disable SELinux except in specific scenarios, such as performance-sensitive systems where the weakened security does not impose significant risks.
If your scenario requires to perform debugging in a production environment, temporarily use permissive mode instead of permanently disabling SELinux. See Changing to permissive mode for more information about permissive mode.
Prerequisites
The
grubbypackage is installed:$ rpm -q grubby grubby-<version>
Procedure
Configure your boot loader to add
selinux=0to the kernel command line:$ sudo grubby --update-kernel ALL --args selinux=0Restart your system:
$ reboot
Verification
After the reboot, confirm that the
getenforcecommand returnsDisabled:$ getenforce Disabled
Alternative method
In RHEL 8, you can still use the deprecated method for disabling SELinux by using the SELINUX=disabled option in the /etc/selinux/config file. This results the kernel booting with SELinux enabled and switching to disabled mode later in the boot process. Consequently, memory leaks and race conditions might occur that cause kernel panics. To use this method:
Open the
/etc/selinux/configfile in a text editor of your choice, for example:# vi /etc/selinux/configConfigure the
SELINUX=disabledoption:# This file controls the state of SELinux on the system. # SELINUX= can take one of these three values: # enforcing - SELinux security policy is enforced. # permissive - SELinux prints warnings instead of enforcing. # disabled - No SELinux policy is loaded. SELINUX=disabled # SELINUXTYPE= can take one of these two values: # targeted - Targeted processes are protected, # mls - Multi Level Security protection. SELINUXTYPE=targetedSave the change, and restart your system:
# reboot
2.6. Changing SELinux modes at boot time
On boot, you can set the following kernel parameters to change the way SELinux runs:
enforcing=0Setting this parameter causes the system to start in permissive mode, which is useful when troubleshooting issues. Using permissive mode might be the only option to detect a problem if your file system is too corrupted. Moreover, in permissive mode, the system continues to create the labels correctly. The AVC messages that are created in this mode can be different than in enforcing mode.
In permissive mode, only the first denial from a series of the same denials is reported. However, in enforcing mode, you might get a denial related to reading a directory, and an application stops. In permissive mode, you get the same AVC message, but the application continues reading files in the directory and you get an AVC for each denial in addition.
selinux=0This parameter causes the kernel to not load any part of the SELinux infrastructure. The init scripts notice that the system booted with the
selinux=0parameter and touch the/.autorelabelfile. This causes the system to automatically relabel the next time you boot with SELinux enabled.ImportantDo not use the
selinux=0parameter in a production environment. To debug your system, temporarily use permissive mode instead of disabling SELinux.autorelabel=1This parameter forces the system to relabel similarly to the following commands:
# touch /.autorelabel
# reboot
If a file system contains a large amount of mislabeled objects, start the system in permissive mode to make the autorelabel process successful.
Chapter 3. Managing confined and unconfined users
Each Linux user is mapped to an SELinux user according to the rules in the SELinux policy. Administrators can modify these rules by using the semanage login utility or by assigning Linux users directly to specific SELinux users. Therefore, a Linux user has the restrictions of the SELinux user to which it is assigned. When a Linux user that is assigned to an SELinux user launches a process, this process inherits the SELinux user’s restrictions, unless other rules specify a different role or type.
3.1. Confined and unconfined users in SELinux
By default, all Linux users in Red Hat Enterprise Linux, including users with administrative privileges, are mapped to the unconfined SELinux user unconfined_u. You can improve the security of the system by assigning users to SELinux confined users.
The security context for a Linux user consists of the SELinux user, the SELinux role, and the SELinux type. For example:
user_u:user_r:user_tWhere:
user_u- Is the SELinux user.
user_r- Is the SELinux role.
user_t- Is the SELinux type.
After a Linux user logs in, its SELinux user cannot change. However, its type and role can change, for example, during transitions.
To see the SELinux user mapping on your system, use the semanage login -l command as root:
# semanage login -l
Login Name           SELinux User         MLS/MCS Range        Service

__default__          unconfined_u         s0-s0:c0.c1023       *
root                 unconfined_u         s0-s0:c0.c1023       *
In Red Hat Enterprise Linux, Linux users are mapped to the SELinux __default__ login by default, which is mapped to the SELinux unconfined_u user. The following line defines the default mapping:
default unconfined_u s0-s0:c0.c1023 *Confined users are restricted by SELinux rules explicitly defined in the current SELinux policy. Unconfined users are subject to only minimal restrictions by SELinux.
Confined and unconfined Linux users are subject to executable and writable memory checks, and are also restricted by MCS or MLS.
To list the available SELinux users, enter the following command:
$ seinfo -u
Users: 8
   guest_u
   root
   staff_u
   sysadm_u
   system_u
   unconfined_u
   user_u
   xguest_u
Note that the seinfo command is provided by the setools-console package, which is not installed by default.
If an unconfined Linux user executes an application that SELinux policy defines as one that can transition from the unconfined_t domain to its own confined domain, the unconfined Linux user is still subject to the restrictions of that confined domain. The security benefit of this is that, even though a Linux user is running unconfined, the application remains confined. Therefore, the exploitation of a flaw in the application can be limited by the policy.
Similarly, we can apply these checks to confined users. Each confined user is restricted by a confined user domain. The SELinux policy can also define a transition from a confined user domain to its own target confined domain. In such a case, confined users are subject to the restrictions of that target confined domain. The main point is that special privileges are associated with the confined users according to their role.
3.2. Roles and access rights of SELinux users
The SELinux policy maps each Linux user to an SELinux user. This allows Linux users to inherit the restrictions of SELinux users.
You can customize the permissions for confined users in your SELinux policy according to specific needs by adjusting booleans in the policy. You can determine the current state of these booleans by using the semanage boolean -l command. To list all SELinux users, their SELinux roles, and levels and ranges for MLS and MCS, use the semanage user -l command as root.
| User | Default role | Additional roles |
|---|---|---|
|
|
|
|
|
|
| |
|
|
| |
|
|
| |
|
|
|
|
|
| ||
|
| ||
|
|
| |
|
|
|
|
|
| ||
|
| ||
|
|
|
Note that system_u is a special user identity for system processes and objects, and system_r is the associated role. Administrators must never associate this system_u user and the system_r role to a Linux user. Also, unconfined_u and root are unconfined users. For these reasons, the roles associated to these SELinux users are not included in the following table Types and access rights of SELinux roles.
Each SELinux role corresponds to an SELinux type and provides specific access rights.
| Role | Type | Log in using X Window System | su and sudo | Execute in home directory and /tmp (default) | Networking |
|---|---|---|---|---|---|
|
|
| yes | yes | yes | yes |
|
|
| no | no | yes | no |
|
|
| yes | no | yes | web browsers only (Mozilla Firefox, GNOME Web) |
|
|
| yes | no | yes | yes |
|
|
| yes |
only | yes | yes |
|
|
| yes | yes | yes | |
|
|
| yes | yes | yes | |
|
|
| yes | yes | yes | |
|
|
| yes | yes | yes | |
|
|
| yes | yes | yes | |
|
|
|
only when the | yes | yes | yes |
For more detailed descriptions of the non-administrator roles, see Confined non-administrator roles in SELinux.
For more detailed descriptions of the administrator roles, see Confined administrator roles in SELinux.
To list all available roles, enter the seinfo -r command:
$ seinfo -r
Roles: 14
   auditadm_r
   dbadm_r
   guest_r
   logadm_r
   nx_server_r
   object_r
   secadm_r
   staff_r
   sysadm_r
   system_r
   unconfined_r
   user_r
   webadm_r
   xguest_r
Note that the seinfo command is provided by the setools-console package, which is not installed by default.
3.3. Confined non-administrator roles in SELinux
In SELinux, confined non-administrator roles grant specific sets of privileges and permissions for performing specific tasks to the Linux users assigned to them. By assigning separate confined non-administrator roles, you can assign specific privileges to individual users. This is useful in scenarios with multiple users who each have a different level of authorizations.
You can also customize the permissions of SELinux roles by changing the related SELinux booleans on your system. To see the SELinux booleans and their current state, use the semanage boolean -l command as root. You can get more detailed descriptions if you install the selinux-policy-devel package.
# semanage boolean -l
SELinux boolean                State  Default Description
…
xguest_connect_network         (on   ,   on)  Allow xguest users to configure Network Manager and connect to apache ports
xguest_exec_content            (on   ,   on)  Allow xguest to exec content
…
Linux users in the user_t, guest_t, and xguest_t domains can only run set user ID (setuid) applications if SELinux policy permits it (for example, passwd). These users cannot run the setuid applications su and sudo, and therefore cannot use these applications to become root.
By default, Linux users in the staff_t, user_t, guest_t, and xguest_t domains can execute applications in their home directories and /tmp. Applications inherit the permissions of the user that executed them.
To prevent guest_t, and xguest_t users from executing applications in directories in which they have write access, set the guest_exec_content and xguest_exec_content booleans to off.
SELinux has the following confined non-administrator roles, each with specific privileges and limitations:
guest_rHas very limited permissions. Users assigned to this role cannot access the network, but can execute files in the
/tmpand/homedirectories.Related boolean:
SELinux boolean State Default Description guest_exec_content (on , on) Allow guest to exec contentxguest_rHas limited permissions. Users assigned to this role can log into X Window, access web pages by using network browsers, and access media. They can also execute files in the
/tmpand/homedirectories.Related booleans:
SELinux boolean State Default Description xguest_connect_network (on , on) Allow xguest users to configure Network Manager and connect to apache ports xguest_exec_content (on , on) Allow xguest to exec content xguest_mount_media (on , on) Allow xguest users to mount removable media xguest_use_bluetooth (on , on) Allow xguest to use blue tooth devicesuser_rHas non-privileged access with full user permissions. Users assigned to this role can perform most actions that do not require administrative privileges.
Related booleans:
SELinux boolean State Default Description unprivuser_use_svirt (off , off) Allow unprivileged user to create and transition to svirt domains.staff_rHas permissions similar to
user_rand additional privileges. In particular, users assigned to this role are allowed to runsudoto execute administrative commands that are normally reserved for therootuser. This changes roles and the effective user ID (EUID) but does not change the SELinux user.Related booleans:
SELinux boolean                State  Default Description
staff_exec_content             (on   ,   on)  Allow staff to exec content
staff_use_svirt                (on   ,   on)  allow staff user to create and transition to svirt domains.
3.4. Confined administrator roles in SELinux
In SELinux, confined administrator roles grant specific sets of privileges and permissions for performing specific tasks to the Linux users assigned to them. By assigning separate confined administrator roles, you can divide the privileges over various domains of system administration to individual users. This is useful in scenarios with multiple administrators, each with a separate domain.
You can assign these roles to SELinux users by using the semanage user command.
SELinux has the following confined administrator roles:
auditadm_rThe audit administrator role allows managing processes related to the Audit subsystem.
Related boolean:
SELinux boolean State Default Description auditadm_exec_content (on , on) Allow auditadm to exec contentdbadm_rThe database administrator role allows managing MariaDB and PostgreSQL databases.
Related booleans:
SELinux boolean State Default Description dbadm_exec_content (on , on) Allow dbadm to exec content dbadm_manage_user_files (off , off) Determine whether dbadm can manage generic user files. dbadm_read_user_files (off , off) Determine whether dbadm can read generic user files.logadm_rThe log administrator role allows managing logs, specifically, SELinux types related to the Rsyslog logging service and the Audit subsystem.
Related boolean:
SELinux boolean State Default Description logadm_exec_content (on , on) Allow logadm to exec contentwebadm_rThe web administrator allows managing the Apache HTTP Server.
Related booleans:
SELinux boolean State Default Description webadm_manage_user_files (off , off) Determine whether webadm can manage generic user files. webadm_read_user_files (off , off) Determine whether webadm can read generic user files.secadm_rThe security administrator role allows managing the SELinux database.
Related booleans:
SELinux boolean State Default Description secadm_exec_content (on , on) Allow secadm to exec contentsysadm_rThe system administrator role allows doing everything of the previously listed roles and has additional privileges. In non-default configurations, security administration can be separated from system administration by disabling the
sysadm_secadmmodule in the SELinux policy. For detailed instructions, see Separating system administration from security administration in MLS.The
sysadm_uuser cannot log in directly using SSH. To enable SSH logins forsysadm_u, set thessh_sysadm_loginboolean toon:# setsebool -P ssh_sysadm_login onRelated booleans:
SELinux boolean                State  Default Description
ssh_sysadm_login               (on   ,   on)  Allow ssh logins as sysadm_r:sysadm_t
sysadm_exec_content            (on   ,   on)  Allow sysadm to exec content
xdm_sysadm_login               (on   ,   on)  Allow the graphical login program to login directly as sysadm_r:sysadm_t
3.5. Adding a new user automatically mapped to the SELinux unconfined_u user
The following procedure demonstrates how to add a new Linux user to the system. The user is automatically mapped to the SELinux unconfined_u user.
Prerequisites
-
The
rootuser is running unconfined, as it does by default in Red Hat Enterprise Linux.
Procedure
Enter the following command to create a new Linux user named
<example_user>:# useradd <example_user>To assign a password to the Linux
<example_user>user:# passwd <example_user> Changing password for user <example_user>. New password: Retype new password: passwd: all authentication tokens updated successfully.- Log out of your current session.
-
Log in as the Linux
<example_user>user. When you log in, thepam_selinuxPAM module automatically maps the Linux user to an SELinux user (in this case,unconfined_u), and sets up the resulting SELinux context. The Linux user’s shell is then launched with this context.
Verification
When logged in as the
<example_user>user, check the context of a Linux user:$ id -Z unconfined_u:unconfined_r:unconfined_t:s0-s0:c0.c1023
3.6. Adding a new user as an SELinux-confined user
Use the following steps to add a new SELinux-confined user to the system. This example procedure maps the user to the SELinux staff_u user right with the command for creating the user account.
Prerequisites
-
The
rootuser is running unconfined, as it does by default in Red Hat Enterprise Linux.
Procedure
Enter the following command to create a new Linux user named
<example_user>and map it to the SELinuxstaff_uuser:# useradd -Z staff_u <example_user>To assign a password to the Linux
<example_user>user:# passwd <example_user> Changing password for user <example_user>. New password: Retype new password: passwd: all authentication tokens updated successfully.- Log out of your current session.
-
Log in as the Linux
<example_user>user. The user’s shell launches with thestaff_ucontext.
Verification
When logged in as the
<example_user>user, check the context of a Linux user:$ id -Z uid=1000(<example_user>) gid=1000(<example_user>) groups=1000(<example_user>) context=staff_u:staff_r:staff_t:s0-s0:c0.c1023
3.7. Confining regular users in SELinux
You can confine all regular users on your system by mapping them to the user_u SELinux user.
By default, all Linux users in Red Hat Enterprise Linux, including users with administrative privileges, are mapped to the unconfined SELinux user unconfined_u. You can improve the security of the system by assigning users to SELinux confined users. This is useful to conform with the V-71971 Security Technical Implementation Guide.
Procedure
Display the list of SELinux login records. The list displays the mappings of Linux users to SELinux users:
# semanage login -l

Login Name    SELinux User  MLS/MCS Range   Service

__default__   unconfined_u  s0-s0:c0.c1023       *
root          unconfined_u  s0-s0:c0.c1023       *
Map the
__default__user, which represents all users without an explicit mapping, to theuser_uSELinux user:# semanage login -m -s user_u -r s0 __default__
Verification
Check that the
__default__user is mapped to theuser_uSELinux user:# semanage login -l Login Name SELinux User MLS/MCS Range Service __default__ user_u s0 * root unconfined_u s0-s0:c0.c1023 *Verify that the processes of a new user run in the
user_u:user_r:user_t:s0SELinux context.Create a new user:
# adduser <example_user>Define a password for
<example_user>:# passwd <example_user>-
Log out as
rootand log in as the new user. Show the security context for the user’s ID:
[<example_user>@localhost ~]$ id -Z
user_u:user_r:user_t:s0
Show the security context of the user’s current processes:
[<example_user>@localhost ~]$ ps axZ
LABEL                           PID TTY      STAT   TIME COMMAND
-                                 1 ?        Ss     0:05 /usr/lib/systemd/systemd --switched-root --system --deserialize 18
-                              3729 ?        S      0:00 (sd-pam)
user_u:user_r:user_t:s0        3907 ?        Ss     0:00 /usr/lib/systemd/systemd --user
-                              3911 ?        S      0:00 (sd-pam)
user_u:user_r:user_t:s0        3918 ?        S      0:00 sshd: <example_user>@pts/0
user_u:user_r:user_t:s0        3922 pts/0    Ss     0:00 -bash
user_u:user_r:user_dbusd_t:s0  3969 ?        Ssl    0:00 /usr/bin/dbus-daemon --session --address=systemd: --nofork --nopidfile --systemd-activation --syslog-only
user_u:user_r:user_t:s0        3971 pts/0    R+     0:00 ps axZ
3.8. Confining an administrator by mapping to sysadm_u
You can confine a user with administrative privileges by mapping the user directly to the sysadm_u SELinux user. When the user logs in, the session runs in the sysadm_u:sysadm_r:sysadm_t SELinux context.
By default, all Linux users in Red Hat Enterprise Linux, including users with administrative privileges, are mapped to the unconfined SELinux user unconfined_u. You can improve the security of the system by assigning users to SELinux confined users. This is useful to conform with the V-71971 Security Technical Implementation Guide.
Prerequisites
-
The
rootuser runs unconfined. This is the Red Hat Enterprise Linux default.
Procedure
Optional: To allow
sysadm_uusers to connect to the system by using SSH:# setsebool -P ssh_sysadm_login onMap a new or existing user to the
sysadm_uSELinux user:To map a new user, add a new user to the
wheeluser group and map the user to thesysadm_uSELinux user:# adduser -G wheel -Z sysadm_u <example_user>To map an existing user, add the user to the
wheeluser group and map the user to thesysadm_uSELinux user:# usermod -G wheel -Z sysadm_u <example_user>
Restore the context of the user’s home directory:
# restorecon -R -F -v /home/<example_user>
Verification
Check that
<example_user>is mapped to thesysadm_uSELinux user:# semanage login -l | grep <example_user> <example_user> sysadm_u s0-s0:c0.c1023 *Log in as
<example_user>, for example, by using SSH, and show the user’s security context:[<example_user>@localhost ~]$ id -Z sysadm_u:sysadm_r:sysadm_t:s0-s0:c0.c1023Switch to the
rootuser:$ sudo -i [sudo] password for <example_user>:Verify that the security context remains unchanged:
# id -Z
sysadm_u:sysadm_r:sysadm_t:s0-s0:c0.c1023
Try an administrative task, for example, restarting the
sshdservice:# systemctl restart sshdIf there is no output, the command finished successfully.
If the command does not finish successfully, it prints the following message:
Failed to restart sshd.service: Access denied
See system logs and 'systemctl status sshd.service' for details.
3.9. Confining an administrator by using sudo and the sysadm_r role
You can map a specific user with administrative privileges to the staff_u SELinux user, and configure sudo so that the user can gain the sysadm_r SELinux administrator role. This role allows the user to perform administrative tasks without SELinux denials. When the user logs in, the session runs in the staff_u:staff_r:staff_t SELinux context, but when the user enters a command by using sudo, the session changes to the staff_u:sysadm_r:sysadm_t context.
By default, all Linux users in Red Hat Enterprise Linux, including users with administrative privileges, are mapped to the unconfined SELinux user unconfined_u. You can improve the security of the system by assigning users to SELinux confined users. This is useful to conform with the V-71971 Security Technical Implementation Guide.
Prerequisites
-
The
rootuser runs unconfined. This is the Red Hat Enterprise Linux default.
Procedure
Map a new or existing user to the
staff_uSELinux user:To map a new user, add a new user to the
wheeluser group and map the user to thestaff_uSELinux user:# adduser -G wheel -Z staff_u <example_user>To map an existing user, add the user to the
wheeluser group and map the user to thestaff_uSELinux user:# usermod -G wheel -Z staff_u <example_user>
Restore the context of the user’s home directory:
# restorecon -R -F -v /home/<example_user>To allow
<example_user>to gain the SELinux administrator role, create a new file in the/etc/sudoers.d/directory, for example:# visudo -f /etc/sudoers.d/<example_user>Add the following line to the new file:
<example_user> ALL=(ALL) TYPE=sysadm_t ROLE=sysadm_r ALL
Verification
Check that
<example_user>is mapped to thestaff_uSELinux user:# semanage login -l | grep <example_user> <example_user> staff_u s0-s0:c0.c1023 *Log in as
<example_user>, for example, using SSH, and switch to therootuser:[<example_user>@localhost ~]$ sudo -i [sudo] password for <example_user>:Show the
rootsecurity context:# id -Z staff_u:sysadm_r:sysadm_t:s0-s0:c0.c1023Try an administrative task, for example, restarting the
sshdservice:# systemctl restart sshdIf there is no output, the command finished successfully.
If the command does not finish successfully, it prints the following message:
Failed to restart sshd.service: Access denied
See system logs and 'systemctl status sshd.service' for details.
Chapter 4. Configuring SELinux for applications and services with non-standard configurations
When SELinux is in enforcing mode, the default policy is the targeted policy. The following sections provide information about setting up and configuring the SELinux policy for various services after you change configuration defaults, such as ports, database locations, or file-system permissions for processes.
You learn to change SELinux types for non-standard ports, to identify and fix incorrect labels for changes of default directories, and to adjust the policy using SELinux booleans.
4.1. Customizing the SELinux policy for the Apache HTTP server in a non-standard configuration
You can configure the Apache HTTP server to listen on a different port and to provide content in a non-default directory. To prevent consequent SELinux denials, follow the steps in this procedure to adjust your system’s SELinux policy.
Prerequisites
-
The
httpdpackage is installed and the Apache HTTP server is configured to listen on TCP port 3131 and to use the/var/test_www/directory instead of the default/var/www/directory. -
The
policycoreutils-python-utilsandsetroubleshoot-serverpackages are installed on your system.
Procedure
Start the
httpdservice and check the status:# systemctl start httpd # systemctl status httpd … httpd[14523]: (13)Permission denied: AH00072: make_sock: could not bind to address [::]:3131 … systemd[1]: Failed to start The Apache HTTP Server. …The SELinux policy assumes that
httpdruns on port 80:# semanage port -l | grep http http_cache_port_t tcp 8080, 8118, 8123, 10001-10010 http_cache_port_t udp 3130 http_port_t tcp 80, 81, 443, 488, 8008, 8009, 8443, 9000 pegasus_http_port_t tcp 5988 pegasus_https_port_t tcp 5989Change the SELinux type of port 3131 to match port 80:
# semanage port -a -t http_port_t -p tcp 3131Start
httpdagain:# systemctl start httpdHowever, the content remains inaccessible:
# wget localhost:3131/index.html
…
HTTP request sent, awaiting response... 403 Forbidden
…
Find the reason with the
sealerttool:# sealert -l "*" ... SELinux is preventing httpd from getattr access on the file /var/test_www/html/index.html. …Compare SELinux types for the standard and the new path using the
matchpathcontool:# matchpathcon /var/www/html /var/test_www/html /var/www/html system_u:object_r:httpd_sys_content_t:s0 /var/test_www/html system_u:object_r:var_t:s0Change the SELinux type of the new
/var/test_www/html/content directory to the type of the default/var/www/htmldirectory:# semanage fcontext -a -e /var/www /var/test_wwwRelabel the
/vardirectory recursively:# restorecon -Rv /var/ ... Relabeled /var/test_www/html from unconfined_u:object_r:var_t:s0 to unconfined_u:object_r:httpd_sys_content_t:s0 Relabeled /var/test_www/html/index.html from unconfined_u:object_r:var_t:s0 to unconfined_u:object_r:httpd_sys_content_t:s0
Verification
Check that the
httpdservice is running:# systemctl status httpd … Active: active (running) … systemd[1]: Started The Apache HTTP Server. httpd[14888]: Server configured, listening on: port 3131 …Verify that the content provided by the Apache HTTP server is accessible:
# wget localhost:3131/index.html
…
HTTP request sent, awaiting response... 200 OK
Length: 0 [text/html]
Saving to: ‘index.html’
…
4.2. Adjusting the policy for sharing NFS and CIFS volumes by using SELinux booleans
You can change parts of SELinux policy at runtime using booleans, even without any knowledge of SELinux policy writing. This enables changes, such as allowing services access to NFS volumes, without reloading or recompiling SELinux policy. The following procedure demonstrates listing SELinux booleans and configuring them to achieve the required changes in the policy.
NFS mounts on the client side are labeled with a default context defined by a policy for NFS volumes. In RHEL, this default context uses the nfs_t type. Also, Samba shares mounted on the client side are labeled with a default context defined by the policy. This default context uses the cifs_t type. You can enable or disable booleans to control which services are allowed to access the nfs_t and cifs_t types.
To allow the Apache HTTP server service (httpd) to access and share NFS and CIFS volumes, perform the following steps:
Prerequisites
-
Optionally, install the
selinux-policy-develpackage to obtain clearer and more detailed descriptions of SELinux booleans in the output of thesemanage boolean -lcommand.
Procedure
Identify SELinux booleans relevant for NFS, CIFS, and Apache:
# semanage boolean -l | grep 'nfs\|cifs' | grep httpd
httpd_use_cifs                 (off  ,  off)  Allow httpd to access cifs file systems
httpd_use_nfs                  (off  ,  off)  Allow httpd to access nfs file systems
List the current state of the booleans:
$ getsebool -a | grep 'nfs\|cifs' | grep httpd
httpd_use_cifs --> off
httpd_use_nfs --> off
Enable the identified booleans:
# setsebool httpd_use_nfs on # setsebool httpd_use_cifs onNoteUse
setseboolwith the-Poption to make the changes persistent across restarts. Asetsebool -Pcommand requires a rebuild of the entire policy, and it might take some time depending on your configuration.
Verification
Check that the booleans are
on:$ getsebool -a | grep 'nfs\|cifs' | grep httpd httpd_use_cifs --> on httpd_use_nfs --> on
4.3. Finding the correct SELinux type for managing access to non-standard directories
If you need to set access-control rules that the default SELinux policy does not cover, start by searching for a boolean that matches your use case. If you cannot find a suitable boolean, you can use a matching SELinux type or even create a local policy module.
Prerequisites
-
The
selinux-policy-docandsetools-consolepackages are installed on your system.
Procedure
List all SELinux-related topics and limit the results to a component you want to configure. For example:
# man -k selinux | grep samba
samba_net_selinux (8) - Security Enhanced Linux Policy for the samba_net processes
samba_selinux (8)    - Security Enhanced Linux Policy for the smbd processes
…
In the man page that corresponds to your scenario, find the related SELinux booleans, port types, and file types.
Note that the
man -k selinuxorapropos selinuxcommands are available only after you install theselinux-policy-docpackage.Optional: You can display the default mapping of processes on default locations by using the
semanage fcontext -lcommand, for example:# semanage fcontext -l | grep samba … /var/cache/samba(/.*)? all files system_u:object_r:samba_var_t:s0 … /var/spool/samba(/.*)? all files system_u:object_r:samba_spool_t:s0 …Use the
sesearchcommand to display rules in the default SELinux policy. You can find the type and boolean to use by listing the corresponding rule, for example:$ sesearch -A | grep samba | grep httpd … allow httpd_t cifs_t:dir { getattr open search }; [ use_samba_home_dirs && httpd_enable_homedirs ]:True …An SELinux boolean might be the most straightforward solution for your configuration problem. You can display all available booleans and their values by using the
getsebool -acommand, for example:$ getsebool -a | grep homedirs git_cgi_enable_homedirs --> off git_system_enable_homedirs --> off httpd_enable_homedirs --> off mock_enable_homedirs --> off mpd_enable_homedirs --> off openvpn_enable_homedirs --> on ssh_chroot_rw_homedirs --> offYou can verify that the selected boolean does exactly what you want by using the
sesearchcommand, for example:$ sesearch -A | grep httpd_enable_homedirs … allow httpd_suexec_t autofs_t:dir { getattr open search }; [ use_nfs_home_dirs && httpd_enable_homedirs ]:True allow httpd_suexec_t autofs_t:dir { getattr open search }; [ use_samba_home_dirs && httpd_enable_homedirs ]:True …If no boolean matches your scenario, find an SELinux type that suits your case. You can find a type for your files by querying a corresponding rule from the default policy by using
sesearch, for example:$ sesearch -A -s httpd_t -c file -p read … allow httpd_t httpd_t:file { append getattr ioctl lock open read write }; allow httpd_t httpd_tmp_t:file { append create getattr ioctl link lock map open read rename setattr unlink write }; …- If none of the previous solutions cover your scenario, you can add a custom rule to the SELinux policy. See the Creating a local SELinux policy module section for more information.
Chapter 6. Using Multi-Level Security (MLS)
The Multi-Level Security (MLS) policy uses levels of clearance as originally designed by the US defense community. MLS meets a very narrow set of security requirements based on information management in rigidly controlled environments such as the military.
Using MLS is complex and does not map well to general use-case scenarios.
6.1. Multi-Level Security (MLS)
The Multi-Level Security (MLS) technology classifies data in a hierarchical classification using information security levels, for example:
- [lowest] Unclassified
- [low] Confidential
- [high] Secret
- [highest] Top secret
By default, the MLS SELinux policy uses 16 sensitivity levels:
-
s0is the least sensitive. -
s15is the most sensitive.
MLS uses specific terminology to address sensitivity levels:
- Users and processes are called subjects, whose sensitivity level is called clearance.
- Files, devices, and other passive components of the system are called objects, whose sensitivity level is called classification.
To implement MLS, SELinux uses the Bell-La Padula Model (BLP) model. This model specifies how information can flow within the system based on labels attached to each subject and object.
The basic principle of BLP is “No read up, no write down." This means that users can only read files at their own sensitivity level and lower, and data can flow only from lower levels to higher levels, and never the reverse.
The MLS SELinux policy, which is the implementation of MLS on RHEL, applies a modified principle called Bell-La Padula with write equality. This means that users can read files at their own sensitivity level and lower, but can write only at exactly their own level. This prevents, for example, low-clearance users from writing content into top-secret files.
For example, by default, a user with clearance level s2:
-
Can read files with sensitivity levels
s0,s1, ands2. -
Cannot read files with sensitivity level
s3and higher. -
Can modify files with sensitivity level of exactly
s2. -
Cannot modify files with sensitivity level other than
s2.
Security administrators can adjust this behavior by modifying the system’s SELinux policy. For example, they can allow users to modify files at lower levels, which increases the file’s sensitivity level to the user’s clearance level.
In practice, users are typically assigned to a range of clearance levels, for example s1-s2. A user can read files with sensitivity levels lower than the user’s maximum level, and write to any files within that range.
For example, by default, a user with a clearance range s1-s2:
-
Can read files with sensitivity levels
s0ands1. -
Cannot read files with sensitivity level
s2and higher. -
Can modify files with sensitivity level
s1. -
Cannot modify files with sensitivity level other than
s1. -
Can change own clearance level to
s2.
The security context for a non-privileged user in an MLS environment is, for example:
user_u:user_r:user_t:s1Where:
user_u- Is the SELinux user.
user_r- Is the SELinux role.
user_t- Is the SELinux type.
s1- Is the range of MLS sensitivity levels.
The system always combines MLS access rules with conventional file access permissions. For example, if a user with a security level of "Secret" uses Discretionary Access Control (DAC) to block access to a file by other users, even “Top Secret" users cannot access that file. A high security clearance does not automatically permit a user to browse the entire file system.
Users with top-level clearances do not automatically acquire administrative rights on multi-level systems. While they might have access to all sensitive information about the system, this is different from having administrative rights.
In addition, administrative rights do not provide access to sensitive information. For example, even when someone logs in as root, they still cannot read top-secret information.
You can further adjust access within an MLS system by using categories. With Multi-Category Security (MCS), you can define categories such as projects or departments, and users will only be allowed to access files in the categories to which they are assigned. For additional information, see Using Multi-Category Security (MCS) for data confidentiality .
6.2. SELinux roles in MLS
The SELinux policy maps each Linux user to an SELinux user. This allows Linux users to inherit the restrictions of SELinux users.
The MLS policy does not contain the unconfined module, including unconfined users, types, and roles. As a result, users that would be unconfined, including root, cannot access every object and perform every action they could in the targeted policy.
You can customize the permissions for confined users in your SELinux policy according to specific needs by adjusting the booleans in policy. You can determine the current state of these booleans by using the semanage boolean -l command. To list all SELinux users, their SELinux roles, and MLS/MCS levels and ranges, use the semanage user -l command as root.
| User | Default role | Additional roles |
|---|---|---|
|
|
| |
|
|
| |
|
|
| |
|
|
|
|
|
| ||
|
| ||
|
| ||
|
|
| |
|
|
|
|
|
| ||
|
| ||
|
| ||
|
|
|
Note that system_u is a special user identity for system processes and objects, and system_r is the associated role. Administrators must never associate this system_u user and the system_r role to a Linux user. Also, unconfined_u and root are unconfined users. For these reasons, the roles associated to these SELinux users are not included in the following table Types and access of SELinux roles.
Each SELinux role corresponds to an SELinux type and provides specific access rights.
| Role | Type | Login using X Window System | su and sudo | Execute in home directory and /tmp (default) | Networking |
|---|---|---|---|---|---|
|
|
| no | no | yes | no |
|
|
| yes | no | yes | web browsers only (Firefox, GNOME Web) |
|
|
| yes | no | yes | yes |
|
|
| yes |
only | yes | yes |
|
|
| yes | yes | yes | |
|
|
| yes | yes | yes | |
|
|
|
only when the | yes | yes | yes |
-
By default, the
sysadm_rrole has the rights of thesecadm_rrole, which means a user with thesysadm_rrole can manage the security policy. If this does not correspond to your use case, you can separate the two roles by disabling thesysadm_secadmmodule in the policy. For additional information, see Separating system administration from security administration in MLS. -
Non-login roles
dbadm_r,logadm_r, andwebadm_rcan be used for a subset of administrative tasks. By default, these roles are not associated with any SELinux user.
6.3. Switching the SELinux policy to MLS
Use the following steps to switch the SELinux policy from targeted to Multi-Level Security (MLS).
Do not use the MLS policy on a system that is running the X Window System. Furthermore, when you relabel the file system with MLS labels, the system may prevent confined domains from access, which prevents your system from starting correctly. Therefore ensure that you switch SELinux to permissive mode before you relabel the files. On most systems, you see a lot of SELinux denials after switching to MLS, and many of them are not trivial to fix.
Procedure
Install the
selinux-policy-mlspackage:# yum install selinux-policy-mlsOpen the
/etc/selinux/configfile in a text editor of your choice, for example:# vi /etc/selinux/configChange SELinux mode from enforcing to permissive and switch from the targeted policy to MLS:
SELINUX=permissive
SELINUXTYPE=mls
Save the changes, and quit the editor.
Before you enable the MLS policy, you must relabel each file on the file system with an MLS label:
# fixfiles -F onboot
System will relabel on next boot
Restart the system:
# rebootCheck for SELinux denials:
# ausearch -m AVC,USER_AVC,SELINUX_ERR,USER_SELINUX_ERR -ts recent -iBecause the previous command does not cover all scenarios, see Troubleshooting problems related to SELinux for guidance on identifying, analyzing, and fixing SELinux denials.
After you ensure that there are no problems related to SELinux on your system, switch SELinux back to enforcing mode by changing the corresponding option in
/etc/selinux/config:SELINUX=enforcingRestart the system:
# reboot
If your system does not start or you are not able to log in after you switch to MLS, add the enforcing=0 parameter to your kernel command line. See Changing SELinux modes at boot time for more information.
Also note that in MLS, SSH logins as the root user mapped to the sysadm_r SELinux role differ from logging in as root in staff_r. Before you start your system in MLS for the first time, consider allowing SSH logins as sysadm_r by setting the ssh_sysadm_login SELinux boolean to 1. To enable ssh_sysadm_login later, already in MLS, you must log in as root in staff_r, switch to root in sysadm_r using the newrole -r sysadm_r command, and then set the boolean to 1.
Verification
Verify that SELinux runs in enforcing mode:
# getenforce
Enforcing
Check that the status of SELinux returns the
mlsvalue:# sestatus | grep mls Loaded policy name: mls
6.4. Establishing user clearance in MLS
After you switch SELinux policy to MLS, you must assign security clearance levels to users by mapping them to confined SELinux users. By default, a user with a given security clearance:
- Cannot read objects that have a higher sensitivity level.
- Cannot write to objects at a different sensitivity level.
Prerequisites
-
The SELinux policy is set to
mls. -
The SELinux mode is set to
enforcing. -
The
policycoreutils-python-utilspackage is installed. A user assigned to an SELinux confined user:
-
For a non-privileged user, assigned to
user_u(example_user in the following procedure). -
For a privileged user, assigned to
staff_u(staff in the following procedure) .
-
For a non-privileged user, assigned to
Make sure that the users have been created when the MLS policy was active. Users created in other SELinux policies cannot be used in MLS.
Procedure
Optional: To prevent adding errors to your SELinux policy, switch to the
permissiveSELinux mode, which facilitates troubleshooting:# setenforce 0Note that in permissive mode, SELinux does not enforce the active policy but only logs Access Vector Cache (AVC) messages, which can be then used for troubleshooting and debugging.
Define a clearance range for the
staff_uSELinux user. For example, this command sets the clearance range froms1tos15withs1being the default clearance level:# semanage user -m -L s1 -r s1-s15 staff_uGenerate SELinux file context configuration entries for user home directories:
# genhomedirconRestore file security contexts to default:
# restorecon -R -F -v /home/
Relabeled /home/staff from staff_u:object_r:user_home_dir_t:s0 to staff_u:object_r:user_home_dir_t:s1
Relabeled /home/staff/.bash_logout from staff_u:object_r:user_home_t:s0 to staff_u:object_r:user_home_t:s1
Relabeled /home/staff/.bash_profile from staff_u:object_r:user_home_t:s0 to staff_u:object_r:user_home_t:s1
Relabeled /home/staff/.bashrc from staff_u:object_r:user_home_t:s0 to staff_u:object_r:user_home_t:s1
Assign a clearance level to the user:
# semanage login -m -r s1 example_userWhere
s1is the clearance level assigned to the user.Relabel the user’s home directory to the user’s clearance level:
# chcon -R -l s1 /home/example_userOptional: If you previously switched to the
permissiveSELinux mode, and after you verify that everything works as expected, switch back to theenforcingSELinux mode:# setenforce 1
Verification
Verify that the user is mapped to the correct SELinux user and has the correct clearance level assigned:
# semanage login -l Login Name SELinux User MLS/MCS Range Service __default__ user_u s0-s0 * example_user user_u s1 * …- Log in as the user within MLS.
Verify that the user’s security level works correctly:
WarningThe files you use for verification should not contain any sensitive information in case the configuration is incorrect and the user actually can access the files without authorization.
- Verify that the user cannot read a file with a higher-level sensitivity.
- Verify that the user can write to a file with the same sensitivity.
- Verify that the user can read a file with a lower-level sensitivity.
6.5. Changing a user’s clearance level within the defined security range in MLS
As a user in Multi-Level Security (MLS), you can change your current clearance level within the range the administrator assigned to you. You can never exceed the upper limit of your range or reduce your level below the lower limit of your range. This allows you, for example, to modify lower-sensitivity files without increasing their sensitivity level to your highest clearance level.
For example, as a user assigned to range s1-s3:
-
You can switch to levels
s1,s2, ands3. -
You can switch to ranges
s1-s2, ands2-s3. -
You cannot switch to ranges
s0-s3ors1-s4.
Switching to a different level opens a new shell with the different clearance. This means you cannot return to your original clearance level in the same way as decreasing it. However, you can always return to the previous shell by entering exit.
Prerequisites
-
The SELinux policy is set to
mls. -
SELinux mode is set to
enforcing. - You can log in as a user assigned to a range of MLS clearance levels.
Procedure
Log in as the user from a secure terminal.
Secure terminals are defined in the
/etc/selinux/mls/contexts/securetty_typesfile. By default, the console is a secure terminal, but SSH is not.Check the current user’s security context:
$ id -Z
user_u:user_r:user_t:s0-s2
In this example, the user is assigned to the
user_uSELinux user,user_rrole,user_ttype, and the MLS security ranges0-s2.Check the current user’s security context:
$ id -Z
user_u:user_r:user_t:s1-s2
Switch to a different security clearance range within the user’s clearance range:
$ newrole -l s1You can switch to any range whose maximum is lower or equal to your assigned range. Entering a single-level range changes the lower limit of the assigned range. For example, entering
newrole -l s1as a user with as0-s2range is equivalent to enteringnewrole -l s1-s2.
Verification
Display the current user’s security context:
$ id -Z
user_u:user_r:user_t:s1-s2
Return to the previous shell with the original range by terminating the current shell:
$ exit
6.6. Increasing file sensitivity levels in MLS
By default, Multi-Level Security (MLS) users cannot increase file sensitivity levels. However, the security administrator (secadm_r) can change this default behavior to allow users to increase the sensitivity of files by adding the local module mlsfilewrite to the system’s SELinux policy. Then, users assigned to the SELinux type defined in the policy module can increase file classification levels by modifying the file. Any time a user modifies a file, the file’s sensitivity level increases to the lower value of the user’s current security range.
The security administrator, when logged in as a user assigned to the secadm_r role, can change the security levels of files by using the chcon -l s0 /path/to/file command. For more information, see Changing file sensitivity in MLS.
Prerequisites
-
The SELinux policy is set to
mls. -
SELinux mode is set to
enforcing. -
The
policycoreutils-python-utilspackage is installed. -
The
mlsfilewritelocal module is installed in the SELinux MLS policy. You are logged in as a user in MLS which is:
-
Assigned to a defined security range. This example shows a user with a security range
s0-s2. -
Assigned to the same SELinux type defined in the
mlsfilewritemodule. This example requires the(typeattributeset mlsfilewrite (user_t))module.
-
Assigned to a defined security range. This example shows a user with a security range
Procedure
Optional: Display the security context of the current user:
$ id -Z
user_u:user_r:user_t:s0-s2
Change the lower level of the user’s MLS clearance range to the level which you want to assign to the file:
$ newrole -l s1-s2Optional: Display the security context of the current user:
$ id -Z
user_u:user_r:user_t:s1-s2
Optional: Display the security context of the file:
$ ls -Z /path/to/file
user_u:object_r:user_home_t:s0 /path/to/file
Change the file’s sensitivity level to the lower level of the user’s clearance range by modifying the file:
$ touch /path/to/fileImportantThe classification level reverts to the default value if the
restoreconcommand is used on the system.Optional: Exit the shell to return to the user’s previous security range:
$ exit
Verification
Display the security context of the file:
$ ls -Z /path/to/file
user_u:object_r:user_home_t:s1 /path/to/file
6.7. Changing file sensitivity in MLS
In the MLS SELinux policy, users can only modify files at their own sensitivity level. This is intended to prevent any highly sensitive information to be exposed to users at lower clearance levels, and also prevent low-clearance users creating high-sensitivity documents. Administrators, however, can manually increase a file’s classification, for example for the file to be processed at the higher level.
Prerequisites
-
SELinux policy is set to
mls. - SELinux mode is set to enforcing.
You have security administration rights, which means that you are assigned to either:
-
The
secadm_rrole. -
If the
sysadm_secadmmodule is enabled, to thesysadm_rrole. Thesysadm_secadmmodule is enabled by default.
-
The
-
The
policycoreutils-python-utilspackage is installed. A user assigned to any clearance level. For additional information, see Establishing user clearance levels in MLS .
In this example,
User1has clearance levels1.A file with a classification level assigned and to which you have access.
In this example,
/path/to/filehas classification levels1.
Procedure
Check the file’s classification level:
# ls -lZ /path/to/file
-rw-r-----. 1 User1 User1 user_u:object_r:user_home_t:s1 0 12. Feb 10:43 /path/to/file
Change the file’s default classification level:
# semanage fcontext -a -r s2 /path/to/fileForce the relabeling of the file’s SELinux context:
# restorecon -F -v /path/to/file
Relabeled /path/to/file from user_u:object_r:user_home_t:s1 to user_u:object_r:user_home_t:s2
Verification
Check the file’s classification level:
# ls -lZ /path/to/file
-rw-r-----. 1 User1 User1 user_u:object_r:user_home_t:s2 0 12. Feb 10:53 /path/to/file
Optional: Verify that the lower-clearance user cannot read the file:
$ cat /path/to/file
cat: file: Permission denied
6.8. Separating system administration from security administration in MLS
By default, the sysadm_r role has the rights of the secadm_r role, which means a user with the sysadm_r role can manage the security policy. If you need more control over security authorizations, you can separate system administration from security administration by assigning a Linux user to the secadm_r role and disabling the sysadm_secadm module in the SELinux policy.
Prerequisites
-
The SELinux policy is set to
mls. -
The SELinux mode is set to
enforcing. -
The
policycoreutils-python-utilspackage is installed. A Linux user which will be assigned to the
secadm_rrole:-
The user is assigned to the
staff_uSELinux user - A password for this user has been defined.
WarningMake sure you can log in as the user which will be assigned to the
secadmrole. If not, you can prevent any future modifications of the system’s SELinux policy.-
The user is assigned to the
Procedure
Create a new
sudoersfile in the/etc/sudoers.ddirectory for the user:# visudo -f /etc/sudoers.d/<sec_adm_user>To keep the
sudoersfiles organized, replace<sec_adm_user>with the Linux user which will be assigned to thesecadmrole.Add the following content into the
/etc/sudoers.d/<sec_adm_user>file:<sec_adm_user> ALL=(ALL) TYPE=secadm_t ROLE=secadm_r ALLThis line authorizes
<secadmuser>on all hosts to perform all commands, and maps the user to thesecadmSELinux type and role by default.Log in as the <sec_adm_user> user.
To make sure that the SELinux context (which consists of SELinux user, role, and type) is changed, log in using
ssh, the console, orxdm. Other ways, such assuandsudo, cannot change the entire SELinux context.Verify the user’s security context:
$ id
uid=1000(<sec_adm_user>) gid=1000(<sec_adm_user>) groups=1000(<sec_adm_user>) context=staff_u:staff_r:staff_t:s0-s15:c0.c1023
Run the interactive shell for the root user:
$ sudo -i
[sudo] password for <sec_adm_user>:
Verify the current user’s security context:
# id
uid=0(root) gid=0(root) groups=0(root) context=staff_u:secadm_r:secadm_t:s0-s15:c0.c1023
Disable the
sysadm_secadmmodule from the policy:# semodule -d sysadm_secadmImportantUse the
semodule -dcommand instead of removing the system policy module by using thesemodule -rcommand. Thesemodule -rcommand deletes the module from your system’s storage, which means it cannot be loaded again without reinstalling theselinux-policy-mlspackage.
Verification
As the user assigned to the
secadmrole, and in the interactive shell for the root user, verify that you can access the security policy data:# seinfo -xt secadm_t Types: 1 type secadm_t, can_relabelto_shadow_passwords, (…) userdomain;Log out from the root shell:
# logoutLog out from the
<sec_adm_user>user:$ logout Connection to localhost closed.Display the current security context:
# id
uid=0(root) gid=0(root) groups=0(root) context=root:sysadm_r:sysadm_t:s0-s15:c0.c1023
Attempt to enable the
sysadm_secadmmodule. The command should fail:# semodule -e sysadm_secadm SELinux: Could not load policy file /etc/selinux/mls/policy/policy.31: Permission denied /sbin/load_policy: Can't load policy: Permission denied libsemanage.semanage_reload_policy: load_policy returned error code 2. (No such file or directory). SELinux: Could not load policy file /etc/selinux/mls/policy/policy.31: Permission denied /sbin/load_policy: Can't load policy: Permission denied libsemanage.semanage_reload_policy: load_policy returned error code 2. (No such file or directory). semodule: Failed!Attempt to display the details about the
sysadm_tSELinux type. The command should fail:# seinfo -xt sysadm_t [Errno 13] Permission denied: '/sys/fs/selinux/policy'
6.9. Defining a secure terminal in MLS
The SELinux policy checks the type of the terminal from which a user is connected, and allows running of certain SELinux applications, for example newrole, only from secure terminals. Attempting this from a non-secure terminal produces an error: Error: you are not allowed to change levels on a non secure terminal;.
The /etc/selinux/mls/contexts/securetty_types file defines secure terminals for the Multi-Level Security (MLS) policy.
Default contents of the file:
console_device_t
sysadm_tty_device_t
user_tty_device_t
staff_tty_device_t
auditadm_tty_device_t
secureadm_tty_device_tAdding terminal types to the list of secure terminals can expose your system to security risks.
Prerequisites
-
SELinux policy is set to
mls. - You are connected from an already secure terminal, or SELinux is in permissive mode.
You have security administration rights, which means that you are assigned to either:
-
The
secadm_rrole. -
If the
sysadm_secadmmodule is enabled, to thesysadm_rrole. Thesysadm_secadmmodule is enabled by default.
-
The
-
The
policycoreutils-python-utilspackage is installed.
Procedure
Determine the current terminal type:
# ls -Z `tty`
root:object_r:user_devpts_t:s0 /dev/pts/0
In this example output,
user_devpts_tis the current terminal type.-
Add the relevant SELinux type on a new line in the
/etc/selinux/mls/contexts/securetty_typesfile. Optional: Switch SELinux to enforcing mode:
# setenforce 1
Verification
-
Log in from the previously insecure terminal you have added to the
/etc/selinux/mls/contexts/securetty_typesfile.
6.10. Allowing MLS users to edit files on lower levels
By default, MLS users cannot write to files which have a sensitivity level below the lower value of the clearance range. If your scenario requires allowing users to edit files on lower levels, you can do so by creating a local SELinux module. However, writing to a file will increase its sensitivity level to the lower value of the user’s current range.
Prerequisites
-
The SELinux policy is set to
mls. -
The SELinux mode is set to
enforcing. -
The
policycoreutils-python-utilspackage is installed. -
The
setools-consoleandauditpackages for verification.
Procedure
Optional: Switch to permissive mode for easier troubleshooting.
# setenforce 0Open a new
.cilfile with a text editor, for example~/local_mlsfilewrite.cil, and insert the following custom rule:(typeattributeset mlsfilewrite (_staff_t_))You can replace
staff_twith a different SELinux type. By specifying SELinux type here, you can control which SELinux roles can edit lower-level files.To keep your local modules better organized, use the
local_prefix in the names of local SELinux policy modules.Install the policy module:
# semodule -i ~/local_mlsfilewrite.cilNoteTo remove the local policy module, use
semodule -r ~/local_mlsfilewrite. Note that you must refer to the module name without the.cilsuffix.Optional: If you previously switched back to permissive mode, return to enforcing mode:
# setenforce 1
Verification
Find the local module in the list of installed SELinux modules:
# semodule -lfull | grep "local_mls"
400 local_mlsfilewrite  cil
Because local modules have priority
400, you can list them also by using thesemodule -lfull | grep -v ^100command.-
Log in as a user assigned to the type defined in the custom rule, for example,
staff_t. Attempt to write to a file with a lower sensitivity level. This increases the file’s classification level to the user’s clearance level.
ImportantThe files you use for verification should not contain any sensitive information in case the configuration is incorrect and the user actually can access the files without authorization.
Chapter 7. Using Multi-Category Security (MCS) for data confidentiality
You can use MCS to enhance the data confidentiality of your system by categorizing data, and then granting certain processes and users access to specific categories
7.1. Multi-Category Security (MCS)
Multi-Category Security (MCS) is an access control mechanism that uses categories assigned to processes and files. Files can then be accessed only by processes that are assigned to the same categories. The purpose of MCS is to maintain data confidentiality on your system.
MCS categories are defined by the values c0 to c1023, but you can also define a text label for each category or combination of categories, such as “Personnel", “ProjectX”, or “ProjectX.Personnel”. The MCS Translation service (mcstrans) then replaces the category values with the appropriate labels in system inputs and outputs, so that users can use these labels instead of the category values.
When users are assigned to categories, they can label any of their files with any of the categories to which they have been assigned.
MCS works on a simple principle: to access a file, a user must be assigned to all of the categories that have been assigned to the file. The MCS check is applied after normal Linux Discretionary Access Control (DAC) and SELinux Type Enforcement (TE) rules, so it can only further restrict existing security configuration.
MCS within Multi-Level Security
You can use MCS on its own as a non-hierarchical system, or you can use it in combination with Multi-Level Security (MLS) as a non-hierarchical layer within a hierarchical system.
An example of MCS within MLS could be a secretive research organization, where files are classified like this:
| Security level | Category | |||
| Not specified | Project X | Project Y | Project Z | |
| Unclassified |
|
|
|
|
| Confidential |
|
|
|
|
| Secret |
|
|
|
|
| Top secret |
|
|
|
|
A user with a range s0:c0.1023 would be able to access all files assigned to all categories on level s0, unless the access is prohibited by other security mechanisms, such as DAC or type enforcement policy rules.
The resulting security context of a file or process is a combination of:
- SELinux user
- SELinux role
- SELinux type
- MLS sensitivity level
- MCS category
For example, a non-privileged user with access to sensitivity level 1 and category 2 in an MLS/MCS environment could have the following SELinux context:
user_u:user_r:user_t:s1:c27.2. Configuring Multi-Category Security for data confidentiality
By default, Multi-Category Security (MCS) is active in the targeted and mls SELinux policies but is not configured for users. In the targeted policy, MCS is configured only for:
- OpenShift
- virt
- sandbox
- network labeling
-
containers (
container-selinux)
You can configure MCS to categorize users by creating a local SELinux module with a rule that constrains the user_t SELinux type by MCS rules in addition to type enforcement.
Changing the categories of certain files may render some services non-operational. If you are not an expert, contact your Red Hat sales representative and request consulting services.
Prerequisites
-
SELinux mode is set to
enforcing. -
The SELinux policy is set to
targetedormls. -
The
policycoreutils-python-utilsandsetools-consolepackages are installed.
Procedure
Create a new file named, for example,
local_mcs_user.cil:# vim local_mcs_user.cilInsert the following rule:
(typeattributeset mcs_constrained_type (user_t))Install the policy module:
# semodule -i local_mcs_user.cil
Verification
For each user domain, display additional details for all the components:
# seinfo -xt user_t

Types: 1
type user_t, application_domain_type, nsswitch_domain, corenet_unlabeled_type, domain, kernel_system_state_reader, mcs_constrained_type, netlabel_peer_type, privfd, process_user_target, scsi_generic_read, scsi_generic_write, syslog_client_type, pcmcia_typeattr_1, user_usertype, login_userdomain, userdomain, unpriv_userdomain, userdom_home_reader_type, userdom_filetrans_type, xdmhomewriter, x_userdomain, x_domain, dridomain, xdrawable_type, xcolormap_type;
7.3. Defining category labels in MCS
You can manage and maintain labels for MCS categories, or combinations of MCS categories with MLS levels, on your system by editing the setrans.conf file. In this file, SELinux maintains a mapping between internal sensitivity and category levels and their human-readable labels.
Category labels only make it easier for users to use the categories. MCS works the same whether you define labels or not.
Prerequisites
-
The SELinux mode is set to
enforcing. -
The SELinux policy is set to
targetedormls. -
The
policycoreutils-python-utilsandmcstranspackages are installed.
Procedure
Modify existing categories or create new categories by editing the
/etc/selinux/<selinuxpolicy>/setrans.conffile in a text editor. Replace <selinuxpolicy> withtargetedormlsdepending on the SELinux policy you use. For example:# vi /etc/selinux/targeted/setrans.confIn the
setrans.conffile for your policy, define the combinations of categories required by your scenario using the syntaxs_<security level>_:c_<category number>_=<category.name>, for example:s0:c0=Marketing s0:c1=Finance s0:c2=Payroll s0:c3=Personnel-
You can use category numbers from
c0toc1023. -
In the
targetedpolicy, use thes0security level. -
In the
mlspolicy, you can label each combination of sensitivity levels and categories.
-
You can use category numbers from
-
Optional: In the
setrans.conffile, you can also label the MLS sensitivity levels. - Save and exit the file.
To make the changes effective, restart the MCS translation service:
# systemctl restart mcstrans
Verification
Display the current categories:
# chcat -LThe example above produces the following output:
s0:c0                          Marketing
s0:c1                          Finance
s0:c2                          Payroll
s0:c3                          Personnel
s0
s0-s0:c0.c1023                 SystemLow-SystemHigh
s0:c0.c1023                    SystemHigh
7.4. Assigning categories to users in MCS
You can define user authorizations by assigning categories to Linux users. A user with assigned categories can access and modify files that have a subset of the user’s categories. Users can also assign files they own to categories they have been assigned to.
A Linux user cannot be assigned to a category that is outside of the security range defined for the relevant SELinux user.
Category access is assigned during login. Consequently, users do not have access to newly assigned categories until they log in again. Similarly, if you revoke a user’s access to a category, this is effective only after the user logs in again.
Prerequisites
-
The SELinux mode is set to
enforcing. -
The SELinux policy is set to
targetedormls. -
The
policycoreutils-python-utilspackage is installed. Linux users are assigned to SELinux confined users:
-
Non-privileged users are assigned to
user_u. -
Privileged users are assigned to
staff_u.
-
Non-privileged users are assigned to
Procedure
Define the security range for the SELinux user.
# semanage user -m -rs0:c0,c1-s0:c0.c9 <user_u>Use category numbers
c0toc1023or category labels as defined in thesetrans.conffile. For additional information, see Defining category labels in MCS .Assign MCS categories to a Linux user. You can specify only a range within the range defined to the relevant SELinux user:
# semanage login -m -rs0:c1 <Linux.user1>NoteYou can add or remove categories from Linux users by using the
chcatcommand. The following example adds<category1>and removes<category2>from<Linux.user1>and<Linux.user2>:# chcat -l -- +<category1>,-<category2> <Linux.user1>,<Linux.user2>You must specify
--on the command line before using the-<category>syntax. Otherwise, thechcatcommand misinterprets the category removal as a command option.
Verification
List the categories assigned to Linux users:
# chcat -L -l <Linux.user1>,<Linux.user2>
<Linux.user1>: <category1>,<category2>
<Linux.user2>: <category1>,<category2>
7.5. Assigning categories to files in MCS
You need administrative privileges to assign categories to users. Users can then assign categories to files. To modify the categories of a file, users must have access rights to that file. Users can only assign a file to a category that is assigned to them.
The system combines category access rules with conventional file access permissions. For example, if a user with a category of bigfoot uses Discretionary Access Control (DAC) to block access to a file by other users, other bigfoot users cannot access that file. A user assigned to all available categories still may not be able to access the entire file system.
Prerequisites
-
The SELinux mode is set to
enforcing. -
The SELinux policy is set to
targetedormls. -
The
policycoreutils-python-utilspackage is installed. Access and permissions to a Linux user that is:
- Assigned to an SELinux user.
- Assigned to the category to which you want to assign the file. For additional information, see Assigning categories to users in MCS .
- Access and permissions to the file you want to add to the category.
- For verification purposes: Access and permissions to a Linux user not assigned to this category
Procedure
Add categories to a file:
$ chcat -- +<category1>,+<category2> <path/to/file1>Use category numbers
c0toc1023or category labels as defined in thesetrans.conffile. For additional information, see Defining category labels in MCS .You can remove categories from a file by using the same syntax:
$ chcat -- -<category1>,-<category2> <path/to/file1>NoteWhen removing a category, you must specify
--on the command line before using the-<category>syntax. Otherwise, thechcatcommand misinterprets the category removal as a command option.
Verification
Display the security context of the file to verify that it has the correct categories:
$ ls -lZ <path/to/file>
-rw-r--r--  <LinuxUser1> <Group1> root:object_r:user_home_t:_<sensitivity>_:_<category>_ <path/to/file>
The specific security context of the file may differ.
Optional: Attempt to access the file when logged in as a Linux user not assigned to the same category as the file:
$ cat <path/to/file>
cat: <path/to/file>: Permission Denied
Chapter 8. Writing a custom SELinux policy
To run your applications confined by SELinux, you must write and use a custom policy.
8.2. Creating and enforcing an SELinux policy for a custom application
You can confine applications by SELinux to increase the security of host systems and users' data. Because each application has specific requirements, modify this example procedure for creating an SELinux policy that confines a simple daemon according to your use case.
Prerequisites
-
The
selinux-policy-develpackage and its dependencies are installed on your system.
Procedure
For this example procedure, prepare a simple daemon that opens the
/var/log/messagesfile for writing:Create a new file, and open it in a text editor of your choice:
$ vi mydaemon.cInsert the following code:
#include <unistd.h>
#include <stdio.h>

FILE *f;

int main(void)
{
while(1) {
f = fopen("/var/log/messages","w");
        sleep(5);
        fclose(f);
    }
}
Compile the file:
$ gcc -o mydaemon mydaemon.cCreate a
systemdunit file for your daemon:$ vi mydaemon.service [Unit] Description=Simple testing daemon [Service] Type=simple ExecStart=/usr/local/bin/mydaemon [Install] WantedBy=multi-user.targetInstall and start the daemon:
# cp mydaemon /usr/local/bin/
# cp mydaemon.service /usr/lib/systemd/system
# systemctl start mydaemon
# systemctl status mydaemon
● mydaemon.service - Simple testing daemon
   Loaded: loaded (/usr/lib/systemd/system/mydaemon.service; disabled; vendor preset: disabled)
   Active: active (running) since Sat 2020-05-23 16:56:01 CEST; 19s ago
 Main PID: 4117 (mydaemon)
    Tasks: 1
   Memory: 148.0K
   CGroup: /system.slice/mydaemon.service
           └─4117 /usr/local/bin/mydaemon

May 23 16:56:01 localhost.localdomain systemd[1]: Started Simple testing daemon.
Check that the new daemon is not confined by SELinux:
$ ps -efZ | grep mydaemon
system_u:system_r:unconfined_service_t:s0 root 4117    1  0 16:56 ?        00:00:00 /usr/local/bin/mydaemon
Generate a custom policy for the daemon:
$ sepolicy generate --init /usr/local/bin/mydaemon
Created the following files:
/home/example.user/mysepol/mydaemon.te # Type Enforcement file
/home/example.user/mysepol/mydaemon.if # Interface file
/home/example.user/mysepol/mydaemon.fc # File Contexts file
/home/example.user/mysepol/mydaemon_selinux.spec # Spec file
/home/example.user/mysepol/mydaemon.sh # Setup Script
Rebuild the system policy with the new policy module using the setup script created by the previous command:
# ./mydaemon.sh
Building and Loading Policy
+ make -f /usr/share/selinux/devel/Makefile mydaemon.pp
Compiling targeted mydaemon module
Creating targeted mydaemon.pp policy package
rm tmp/mydaemon.mod.fc tmp/mydaemon.mod
+ /usr/sbin/semodule -i mydaemon.pp
...
Note that the setup script relabels the corresponding part of the file system using the
restoreconcommand:restorecon -v /usr/local/bin/mydaemon /usr/lib/systemd/systemRestart the daemon, and check that it now runs confined by SELinux:
# systemctl restart mydaemon
$ ps -efZ | grep mydaemon
system_u:system_r:mydaemon_t:s0 root        8150       1  0 17:18 ?        00:00:00 /usr/local/bin/mydaemon
Because the daemon is now confined by SELinux, SELinux also prevents it from accessing
/var/log/messages. Display the corresponding denial message:# ausearch -m AVC -ts recent ... type=AVC msg=audit(1590247112.719:5935): avc: denied { open } for pid=8150 comm="mydaemon" path="/var/log/messages" dev="dm-0" ino=2430831 scontext=system_u:system_r:mydaemon_t:s0 tcontext=unconfined_u:object_r:var_log_t:s0 tclass=file permissive=1 ...You can get additional information also using the
sealerttool:$ sealert -l "*" SELinux is preventing mydaemon from open access on the file /var/log/messages. ***** Plugin catchall (100. confidence) suggests ************************** If you believe that mydaemon should be allowed open access on the messages file by default. Then you should report this as a bug. You can generate a local policy module to allow this access. Do allow this access for now by executing: # ausearch -c 'mydaemon' --raw | audit2allow -M my-mydaemon # semodule -X 300 -i my-mydaemon.pp Additional Information: Source Context system_u:system_r:mydaemon_t:s0 Target Context unconfined_u:object_r:var_log_t:s0 Target Objects /var/log/messages [ file ] Source mydaemon …Use the
audit2allowtool to suggest changes:$ ausearch -m AVC -ts recent | audit2allow -R require { type mydaemon_t; } #============= mydaemon_t ============== logging_write_generic_logs(mydaemon_t)Because rules suggested by
audit2allowcan be incorrect for certain cases, use only a part of its output to find the corresponding policy interface. Inspect thelogging_write_generic_logs(mydaemon_t)macro with themacro-expandertool, to see all allow rules the macro provides:$ macro-expander "logging_write_generic_logs(mydaemon_t)" allow mydaemon_t var_t:dir { getattr search open }; allow mydaemon_t var_log_t:dir { getattr search open read lock ioctl }; allow mydaemon_t var_log_t:dir { getattr search open }; allow mydaemon_t var_log_t:file { open { getattr write append lock ioctl } }; allow mydaemon_t var_log_t:dir { getattr search open }; allow mydaemon_t var_log_t:lnk_file { getattr read };In this case, you can use the suggested interface, because it only provides read and write access to log files and their parent directories. Add the corresponding rule to your type enforcement file:
$ echo "logging_write_generic_logs(mydaemon_t)" >> mydaemon.teAlternatively, you can add this rule instead of using the interface:
$ echo "allow mydaemon_t var_log_t:file { open write getattr };" >> mydaemon.teReinstall the policy:
# ./mydaemon.sh
Building and Loading Policy
+ make -f /usr/share/selinux/devel/Makefile mydaemon.pp
Compiling targeted mydaemon module
Creating targeted mydaemon.pp policy package
rm tmp/mydaemon.mod.fc tmp/mydaemon.mod
+ /usr/sbin/semodule -i mydaemon.pp
...
Verification
Check that your application runs confined by SELinux, for example:
$ ps -efZ | grep mydaemon
system_u:system_r:mydaemon_t:s0 root        8150       1  0 17:18 ?        00:00:00 /usr/local/bin/mydaemon
Verify that your custom application does not cause any SELinux denials:
# ausearch -m AVC -ts recent
<no matches>
Chapter 9. Creating SELinux policies for containers
RHEL 8 provides a tool for generating SELinux policies for containers using the udica package. With udica, you can create a tailored security policy for better control of how a container accesses host system resources, such as storage, devices, and network. This enables you to harden your container deployments against security violations and it also simplifies achieving and maintaining regulatory compliance.
9.1. Introduction to the udica SELinux policy generator
To simplify creating new SELinux policies for custom containers, RHEL 8 provides the udica utility. You can use this tool to create a policy based on an inspection of the container JavaScript Object Notation (JSON) file, which contains Linux-capabilities, mount-points, and ports definitions. The tool consequently combines rules generated using the results of the inspection with rules inherited from a specified SELinux Common Intermediate Language (CIL) block.
The process of generating SELinux policy for a container using udica has three main parts:
- Parsing the container spec file in the JSON format
- Finding suitable allow rules based on the results of the first part
- Generating final SELinux policy
During the parsing phase, udica looks for Linux capabilities, network ports, and mount points.
Based on the results, udica detects which Linux capabilities are required by the container and creates an SELinux rule allowing all these capabilities. If the container binds to a specific port, udica uses SELinux user-space libraries to get the correct SELinux label of a port that is used by the inspected container.
Afterward, udica detects which directories are mounted to the container file-system name space from the host.
The CIL’s block inheritance feature allows udica to create templates of SELinux allow rules focusing on a specific action, for example:
- allow accessing home directories
- allow accessing log files
- allow accessing communication with Xserver.
These templates are called blocks and the final SELinux policy is created by merging the blocks.
9.2. Creating and using an SELinux policy for a custom container
With the udica utility, you can generate an SELinux security policy for a custom container.
Prerequisites
-
The
podmantool for managing containers is installed. If it is not, use theyum install podmancommand. - A custom Linux container - ubi8 in this example.
Procedure
Install the
udicapackage:# yum install -y udicaAlternatively, install the
container-toolsmodule, which provides a set of container software packages, includingudica:# yum module install -y container-toolsStart the ubi8 container that mounts the
/homedirectory with read-only permissions and the/var/spooldirectory with permissions to read and write. The container exposes the port 21.# podman run --env container=podman -v /home:/home:ro -v /var/spool:/var/spool:rw -p 21:21 -it ubi8 bashNote that now the container runs with the
container_tSELinux type. This type is a generic domain for all containers in the SELinux policy and it might be either too strict or too loose for your scenario.Open a new terminal, and enter the
podman pscommand to obtain the ID of the container:# podman ps CONTAINER ID IMAGE COMMAND CREATED STATUS PORTS NAMES 37a3635afb8f registry.access.redhat.com/ubi8:latest bash 15 minutes ago Up 15 minutes ago heuristic_lewinCreate a container JSON file, and use
udicafor creating a policy module based on the information in the JSON file:# podman inspect 37a3635afb8f > container.json # udica -j container.json my_container Policy my_container with container id 37a3635afb8f created! […]Alternatively:
# podman inspect 37a3635afb8f | udica my_container
Policy my_container with container id 37a3635afb8f created!

Please load these modules using:
# semodule -i my_container.cil /usr/share/udica/templates/{base_container.cil,net_container.cil,home_container.cil}

Restart the container with: "--security-opt label=type:my_container.process" parameter
As suggested by the output of
udicain the previous step, load the policy module:# semodule -i my_container.cil /usr/share/udica/templates/{base_container.cil,net_container.cil,home_container.cil}Stop the container and start it again with the
--security-opt label=type:my_container.processoption:# podman stop 37a3635afb8f # podman run --security-opt label=type:my_container.process -v /home:/home:ro -v /var/spool:/var/spool:rw -p 21:21 -it ubi8 bash
Verification
Check that the container runs with the
my_container.processtype:# ps -efZ | grep my_container.process unconfined_u:system_r:container_runtime_t:s0-s0:c0.c1023 root 2275 434 1 13:49 pts/1 00:00:00 podman run --security-opt label=type:my_container.process -v /home:/home:ro -v /var/spool:/var/spool:rw -p 21:21 -it ubi8 bash system_u:system_r:my_container.process:s0:c270,c963 root 2317 2305 0 13:49 pts/0 00:00:00 bashVerify that SELinux now allows access the
/homeand/var/spoolmount points:[root@37a3635afb8f /]# cd /home [root@37a3635afb8f home]# ls username [root@37a3635afb8f ~]# cd /var/spool/ [root@37a3635afb8f spool]# touch test [root@37a3635afb8f spool]#Check that SELinux allows binding only to the port 21:
[root@37a3635afb8f /]# yum install nmap-ncat
[root@37a3635afb8f /]# nc -lvp 21
…
Ncat: Listening on :::21
Ncat: Listening on 0.0.0.0:21
^C
[root@37a3635afb8f /]# nc -lvp 80
…
Ncat: bind to :::80: Permission denied. QUITTING.
Chapter 10. Deploying the same SELinux configuration on multiple systems
You can deploy your verified SELinux configuration on multiple systems by using one of the following methods:
- Using RHEL system roles and Ansible
- Using the RHEL web console
-
Using
semanageexport and import commands in your scripts
10.1. Restoring the SELinux context on directories by using the selinux RHEL system role
To remotely reset the SELinux context on directories, you can use the selinux RHEL system role. With an incorrect SELinux context, applications can fail to access the files.
Prerequisites
- You have prepared the control node and the managed nodes.
-
The account you use to connect to the managed nodes has
sudopermissions for these nodes.
Procedure
Create a playbook file, for example,
~/playbook.yml, with the following content:--- - name: Managing SELinux hosts: managed-node-01.example.com tasks: - name: Restore SELinux context ansible.builtin.include_role: name: redhat.rhel_system_roles.selinux vars: selinux_restore_dirs: - /var/www/ - /etc/The settings specified in the example playbook include the following:
selinux_restore_dirs: <list>- Defines the list of directories on which the role should reset the SELinux context.
For details about all variables used in the playbook, see the
/usr/share/ansible/roles/rhel-system-roles.selinux/README.mdfile on the control node.Validate the playbook syntax:
$ ansible-playbook --syntax-check ~/playbook.ymlNote that this command only validates the syntax and does not protect against a wrong but valid configuration.
Run the playbook:
$ ansible-playbook ~/playbook.yml
Verification
Display the SELinux context for files or directories for which you have reset the context. For example, to display the context on the
/var/www/directory, enter:# ansible rhel9.example.com -m command -a 'ls -ldZ /var/www/' drwxr-xr-x. 4 root root system_u:object_r:httpd_sys_content_t:s0 33 Feb 28 13:20 /var/www/
10.2. Managing SELinux network port labels by using the selinux RHEL system role
If you want to run a service on a non-standard port, you must set the corresponding SELinux type label on this port to prevent SELinux denying permission to the service. By using the selinux RHEL system role, you can automate this task and remotely assign a type label on ports.
Prerequisites
- You have prepared the control node and the managed nodes.
-
The account you use to connect to the managed nodes has
sudopermissions for these nodes.
Procedure
Create a playbook file, for example,
~/playbook.yml, with the following content:--- - name: Managing SELinux hosts: managed-node-01.example.com tasks: - name: Set http_port_t label on network port ansible.builtin.include_role: name: redhat.rhel_system_roles.selinux vars: selinux_ports: - ports: <port_number> proto: tcp setype: http_port_t state: presentThe settings specified in the example playbook include the following:
ports: <port_number>- Defines the port numbers to which you want to assign the SELinux label. Separate multiple values by comma.
setype: <type_label>- Defines the SELinux type label.
For details about all variables used in the playbook, see the
/usr/share/ansible/roles/rhel-system-roles.selinux/README.mdfile on the control node.Validate the playbook syntax:
$ ansible-playbook --syntax-check ~/playbook.ymlNote that this command only validates the syntax and does not protect against a wrong but valid configuration.
Run the playbook:
$ ansible-playbook ~/playbook.yml
Verification
Display the port numbers that have the
http_port_tlabel assigned:# ansible managed-node-01.example.com -m shell -a 'semanage port --list | grep http_port_t' http_port_t tcp 80, 81, 443, <port_number>, 488, 8008, 8009, 8443, 9000
10.3. Deploying an SELinux module by using the selinux RHEL system role
If the default SELinux policies do not meet your requirements, you can create custom modules to allow your application to access the required resources. By using the selinux RHEL system role, you can automate this process and remotely deploy SELinux modules.
Prerequisites
- You have prepared the control node and the managed nodes.
-
The account you use to connect to the managed nodes has
sudopermissions for these nodes. - The SELinux module you want to deploy is stored in the same directory as the playbook.
The SELinux module is available in the Common Intermediate Language (CIL) or policy package (PP) format.
If you are using a PP module, ensure that
policydbversion on the managed nodes is the same or later than the version used to build the PP module.
Procedure
Create a playbook file, for example,
~/playbook.yml, with the following content:--- - name: Managing SELinux hosts: managed-node-01.example.com tasks: - name: Deploying a SELinux module ansible.builtin.include_role: name: redhat.rhel_system_roles.selinux vars: selinux_modules: - path: <module_file> priority: <value> state: enabledThe settings specified in the example playbook include the following:
path: <module_file>- Sets the path to the module file on the control node.
priority: <value>-
Sets the SELinux module priority.
400is the default. state: <value>Defines the state of the module:
-
enabled: Install or enable the module. -
disabled: Disable a module. -
absent: Remove a module.
-
For details about all variables used in the playbook, see the
/usr/share/ansible/roles/rhel-system-roles.selinux/README.mdfile on the control node.Validate the playbook syntax:
$ ansible-playbook --syntax-check ~/playbook.ymlNote that this command only validates the syntax and does not protect against a wrong but valid configuration.
Run the playbook:
$ ansible-playbook ~/playbook.yml
Verification
Remotely display the list of SELinux modules and filter for the one you used in the playbook:
# ansible managed-node-01.example.com -m shell -a 'semodule -l | grep <module>'If the module is listed, it is installed and enabled.
10.4. Creating an SELinux configuration Ansible playbook in the web console
In the web console, you can generate a shell script or an Ansible playbook of your SELinux configuration. In case of the Ansible playbook, you can conveniently apply the configuration on multiple systems.
Prerequisites
- You have installed the RHEL 8 web console.
- You have enabled the cockpit service.
Your user account is allowed to log in to the web console.
For instructions, see Installing and enabling the web console.
Procedure
Log in to the RHEL 8 web console.
For details, see Logging in to the web console.
- Click SELinux.
Click .
A window with the generated script opens. You can navigate between a shell script and an Ansible playbook generation options tab.
- Click the button to select the script or playbook and apply it.
As a result, you have an automation script that you can apply to more machines.
10.5. Transferring SELinux settings to another system with semanage
Use the following steps for transferring your custom and verified SELinux settings between RHEL 8-based systems.
Prerequisites
-
The
policycoreutils-python-utilspackage is installed on your system.
Procedure
Export your verified SELinux settings:
# semanage export -f ./my-selinux-settings.modCopy the file with the settings to the new system:
# scp ./my-selinux-settings.mod new-system-hostname:Log in on the new system:
$ ssh root@new-system-hostnameImport the settings on the new system:
new-system-hostname# semanage import -f ./my-selinux-settings.mod
Chapter 11. Configuring polyinstantiated directories
By default, all programs, services, and users use the /tmp, /var/tmp, and home directories for temporary storage. This makes these directories vulnerable to race condition attacks and information leaks based on file names. You can make /tmp/, /var/tmp/, and the home directory instantiated so that they are no longer shared between all users, and each user’s /tmp-inst and /var/tmp/tmp-inst is separately mounted to the /tmp and /var/tmp directory.
Procedure
Enable polyinstantiation in SELinux:
# setsebool -P allow_polyinstantiation 1You can verify that polyinstantiation is enabled in SELinux by entering the
getsebool allow_polyinstantiationcommand.Create the directory structure for data persistence over reboot with the necessary permissions:
# mkdir /tmp-inst /var/tmp/tmp-inst --mode 000Restore the entire security context including the SELinux user part:
# restorecon -Fv /tmp-inst /var/tmp/tmp-inst
Relabeled /tmp-inst from unconfined_u:object_r:default_t:s0 to system_u:object_r:tmp_t:s0
Relabeled /var/tmp/tmp-inst from unconfined_u:object_r:tmp_t:s0 to system_u:object_r:tmp_t:s0
If your system uses the
fapolicydapplication control framework, allowfapolicydto monitor file access events on the underlying file system when they are bind mounted by enabling theallow_filesystem_markoption in the/etc/fapolicyd/fapolicyd.confconfiguration file.allow_filesystem_mark = 1Enable instantiation of the
/tmp,/var/tmp/, and users' home directories:ImportantUse
/etc/security/namespace.confinstead of a separate file in the/etc/security/namespace.d/directory because thepam_namespace_helperprogram does not read additional files in/etc/security/namespace.d.On a system with multi-level security (MLS), uncomment the last three lines in the
/etc/security/namespace.conffile:/tmp /tmp-inst/ level root,adm /var/tmp /var/tmp/tmp-inst/ level root,adm $HOME $HOME/$USER.inst/ levelOn a system without multi-level security (MLS), add the following lines in the
/etc/security/namespace.conffile:/tmp /tmp-inst/ user root,adm /var/tmp /var/tmp/tmp-inst/ user root,adm $HOME $HOME/$USER.inst/ user
Verify that the
pam_namespace.somodule is configured for the session:$ grep namespace /etc/pam.d/login session required pam_namespace.soOptional: Enable cloud users to access the system with SSH keys:
-
Install the
openssh-keycatpackage. Create a file in the
/etc/ssh/sshd_config.d/directory with the following content:AuthorizedKeysCommand /usr/libexec/openssh/ssh-keycat AuthorizedKeysCommandRunAs rootVerify that public key authentication is enabled by checking that the
PubkeyAuthenticationvariable insshd_configis set toyes. By default,PubkeyAuthenticationis set to yes, even though the line insshd_configis commented out.$ grep -r PubkeyAuthentication /etc/ssh/ /etc/ssh/sshd_config:#PubkeyAuthentication yes
-
Install the
Add the
session required pam_namespace.so unmnt_remntentry into the module for each service for which polyinstantiation should apply, after thesession include system-authline. For example, in/etc/pam.d/su,/etc/pam.d/sudo,/etc/pam.d/ssh, and/etc/pam.d/sshd:[...] session include system-auth session required pam_namespace.so unmnt_remnt [...]
Verification
- Log in as a non-root user. Users that were logged in before polyinstantiation was configured must log out and log in before the changes take effect for them.
Check that the
/tmp/directory is mounted under/tmp-inst/:$ findmnt --mountpoint /tmp/ TARGET SOURCE FSTYPE OPTIONS /tmp /dev/vda1[/tmp-inst/<user>] xfs rw,relatime,seclabel,attr2,inode64,logbufs=8,logbsize=32k,noquotaThe
SOURCEoutput differs based on your environment. * On virtual systems, it shows/dev/vda_<number>_. * On bare-metal systems it shows/dev/sda_<number>_or/dev/nvme*