Configuring and using a CUPS printing server
Configure your system to operate as a CUPS server and manage printers, print queues and your printing environment
Abstract
- AirPrint™ and IPP Everywhere™ printers
- Network and local USB printers with printer applications
- Network and local USB printers with legacy PostScript Printer Description (PPD)-based drivers
Providing feedback on Red Hat documentation
We are committed to providing high-quality documentation and value your feedback. To help us improve, you can submit suggestions or report errors through the Red Hat Jira tracking system.
Procedure
Log in to the Jira website.
If you do not have an account, select the option to create one.
- Click Create in the top navigation bar.
- Enter a descriptive title in the Summary field.
- Enter your suggestion for improvement in the Description field. Include links to the relevant parts of the documentation.
- Click Create at the bottom of the dialogue.
Chapter 1. Installing and configuring CUPS
You can use CUPS to print from a local host. You can also use this host to share printers in the network and act as a print server.
Procedure
Install the
cupspackage:# dnf install cupsIf you configure CUPS as a print server, edit the
/etc/cups/cupsd.conffile, and make the following changes:If you want to remotely configure CUPS or use this host as a print server, configure on which IP addresses and ports the service listens:
Listen 192.0.2.1:631
Listen [2001:db8:1::1]:631
By default, CUPS listens only on
localhostinterfaces (127.0.0.1and::1). Specify IPv6 addresses in square brackets.ImportantDo not configure CUPS to listen on interfaces that allow access from untrustworthy networks, such as the internet.
Configure which IP ranges can access the service by allowing the respective IP ranges in the
<Location />directive:<Location /> Allow from 192.0.2.0/24 Allow from [2001:db8:1::1]/32 Order allow,deny </Location>In the
<Location /admin>directive, configure which IP addresses and ranges can access the CUPS administration services:<Location /admin> Allow from 192.0.2.15/32 Allow from [2001:db8:1::22]/128 Order allow,deny </Location>With these settings, only the hosts with the IP addresses
192.0.2.15and2001:db8:1::22can access the administration services.Optional: Configure IP addresses and ranges that are allowed to access the configuration and log files in the web interface:
<Location /admin/conf>
  Allow from 192.0.2.15/32
  Allow from [2001:db8:1::22]/128
  ...
</Location>

<Location /admin/log>
  Allow from 192.0.2.15/32
  Allow from [2001:db8:1::22]/128
  ...
</Location>
If you run the
firewalldservice and want to configure remote access to CUPS, open the CUPS port infirewalld:# firewall-cmd --permanent --add-port=631/tcp # firewall-cmd --reloadIf you run CUPS on a host with multiple interfaces, consider limiting the access to the required networks.
Enable and start the
cupsservice:# systemctl enable --now cups
Verification
Use a browser, and access
http://<hostname>:631. If you can connect to the web interface, CUPS works.Note that certain features, such as the
Administrationtab, require authentication and an HTTPS connection. By default, CUPS uses a self-signed certificate for HTTPS access and, consequently, the connection is not secure when you authenticate.
Chapter 2. Configuring TLS encryption on a CUPS server
CUPS supports TLS-encrypted connections and, by default, the service enforces encrypted connections for all requests that require authentication. TLS-encrypted connections ensure safe communication with the CUPS server.
If no certificates are configured, CUPS creates a private key and a self-signed certificate. This is only sufficient if you access CUPS from the local host itself. For a secure connection over the network, use a server certificate that is signed by a certificate authority (CA).
Without encryption or with a self-signed certificates, a man-in-the-middle (MITM) attack can disclose, for example:
- Credentials of administrators when configuring CUPS using the web interface
- Confidential data when sending print jobs over the network
Prerequisites
- CUPS is configured.
- You created a private key, and a CA issued a server certificate for it.
- If an intermediate certificate is required to validate the server certificate, attach the intermediate certificate to the server certificate.
- The private key is not protected by a password because CUPS provides no option to enter the password when the service reads the key.
The Canonical Name (
CN) or Subject Alternative Name (SAN) field in the certificate matches one of the following:- The fully-qualified domain name (FQDN) of the CUPS server
- An alias that the DNS resolves to the server’s IP address
- The private key and server certificate files use the Privacy Enhanced Mail (PEM) format.
- Clients trust the CA certificate.
- If the server runs RHEL 9.2 or later and the FIPS mode is enabled, clients must either support the Extended Master Secret (EMS) extension or use TLS 1.3. TLS 1.2 connections without EMS fail. For more information, see the Red Hat Knowledgebase solution TLS extension "Extended Master Secret" enforced.
Procedure
Edit the
/etc/cups/cups-files.conffile, and add the following setting to disable the automatic creation of self-signed certificates:CreateSelfSignedCerts noRemove the self-signed certificate and private key:
# rm /etc/cups/ssl/<hostname>.crt /etc/cups/ssl/<hostname>.keyOptional: Display the FQDN of the server:
# hostname -fserver.example.comStore the private key and server certificate in the
/etc/cups/ssl/directory, for example:# mv /root/server.key /etc/cups/ssl/server.example.com.key # mv /root/server.crt /etc/cups/ssl/server.example.com.crtImportantCUPS requires that you name the private key
<fqdn>.keyand the server certificate file<fqdn>.crt. If you use an alias, you must name the files<alias>.keyand<alias>.crt.Set secure permissions on the private key that enable only the
rootuser to read this file:# chown root:root /etc/cups/ssl/server.example.com.key # chmod 600 /etc/cups/ssl/server.example.com.keyBecause certificates are part of the communication between a client and the server before they establish a secure connection, any client can retrieve the certificates without authentication. Therefore, you do not need to set strict permissions on the server certificate file.
Restore the SELinux context:
# restorecon -Rv /etc/cups/ssl/Optional: Display the
CNand SAN fields of the certificate:# openssl x509 -text -in /etc/cups/ssl/server.example.com.crtCertificate: Data: ... Subject: CN = server.example.com ... X509v3 extensions: ... X509v3 Subject Alternative Name: DNS:server.example.com ...If the
CNor SAN fields in the server certificate contains an alias that is different from the server’s FQDN, add theServerAliasparameter to the/etc/cups/cupsd.conffile:ServerAlias alternative_name.example.comIn this case, use the alternative name instead of the FQDN in the rest of the procedure.
By default, CUPS enforces encrypted connections only if a task requires authentication, for example when performing administrative tasks on the
/adminpage in the web interface.To enforce encryption for the entire CUPS server, add
Encryption Requiredto all<Location>directives in the/etc/cups/cupsd.conffile, for example:<Location /> ... Encryption Required </Location>Restart CUPS:
# systemctl restart cups
Verification
-
Use a browser, and access
https://<hostname>:631/admin/. This requires that your browser trusts the CA certificate. If the connection succeeds, you configured TLS encryption in CUPS correctly. -
If you configured that encryption is required for the entire server, access
http://<hostname>:631/. CUPS returns anUpgrade Requirederror in this case.
Troubleshooting
Display the
systemdjournal entries of thecupsservice:# journalctl -u cupsIf the journal contains an
Unable to encrypt connection: Error while reading fileerror after you failed to connect to the web interface by using the HTTPS protocol, verify the name of the private key and server certificate file.
Chapter 3. Granting administration permissions to manage a CUPS server in the web interface
To avoid CUPS administrators gaining unexpected permissions in other services, use a dedicated group for CUPS administrators.
By default, members of the sys, root, and wheel groups can perform administration tasks in the web interface. However, certain other services use these groups as well. For example, members of the wheel groups can, by default, run commands with root permissions by using sudo. By using a separate group for CUPS administrators, you can ensure that these users have only access to the CUPS interface.
Prerequisites
- CUPS is configured.
- The IP address of the client you want to use has permissions to access the administration area in the web interface.
Procedure
Create a group for CUPS administrators:
# groupadd cups-adminsAdd the users who should manage the service in the web interface to the
cups-adminsgroup:# usermod -a -G cups-admins <username>Update the value of the
SystemGroupparameter in the/etc/cups/cups-files.conffile, and append thecups-admingroup:SystemGroup sys root wheel cups-adminsIf only the
cups-admingroup should have administrative access, remove the other group names from the parameter.Restart CUPS:
# systemctl restart cups
Verification
Use a browser, and access
https://<hostname_or_ip_address>:631/admin/.NoteYou can access the administration area in the web UI only if you use the HTTPS protocol.
-
Start performing an administrative task. For example, click
Add printer. The web interface prompts for a username and password. To proceed, authenticate by using credentials of a user who is a member of the
cups-adminsgroup.If authentication succeeds, this user can perform administrative tasks.
Chapter 4. Packages with printer drivers
Red Hat Enterprise Linux (RHEL) provides different packages with printer drivers for CUPS. After installing the required package, you can display the list of drivers in the CUPS web interface or by using the lpinfo -m command.
| Package name | Drivers for printers |
|---|---|
|
| Zebra, Dymo |
|
| Kodak |
|
| Brother, Canon, Epson, Gestetner, HP, Infotec, Kyocera, Lanier, Lexmark, NRG, Ricoh, Samsung, Savin, Sharp, Toshiba, Xerox, and others |
|
| Brother, Canon, Epson, Fujitsu, HP, Infotec, Kyocera, Lanier, NRG, Oki, Minolta, Ricoh, Samsung, Savin, Xerox, and others |
|
| HP |
|
| HP |
|
| Samsung, Xerox, and others |
Note that some packages can contain drivers for the same printer vendor or model but with different functionality.
Chapter 5. Determining whether a printer supports driverless printing
CUPS supports driverless printing, which means that you can print without providing any hardware-specific software for the printer model.
For driverless printing, the printer must inform the client about its capabilities and use one of the following standards:
- AirPrint™
- IPP Everywhere™
- Mopria®
- Wi-Fi Direct Print Services
You can use the ipptool utility to find out whether a printer supports driverless printing.
Prerequisites
- The printer or remote print server supports the Internet Printing Protocol (IPP).
- The host can connect to the IPP port of the printer or remote print server. The default IPP port is 631.
Procedure
Query the
ipp-versions-supportedanddocument-format-supportedattributes, and ensure that theget-printer-attributestest passes:For a remote printer, enter:
# ipptool -tv ipp://<ip_address_or_hostname>:631/ipp/print get-printer-attributes.test | grep -E "ipp-versions-supported|document-format-supported|get-printer-attributes"Get printer attributes using get-printer-attributes [PASS] ipp-versions-supported (1setOf keyword) = ... document-format-supported (1setOf mimeMediaType) = ...For a queue on a remote print server, enter:
# ipptool -tv ipp://<ip_address_or_hostname>:631/printers/<queue_name> get-printer-attributes.test | grep -E "ipp-versions-supported|document-format-supported|get-printer-attributes"Get printer attributes using get-printer-attributes [PASS] ipp-versions-supported (1setOf keyword) = ... document-format-supported (1setOf mimeMediaType) = ...
To ensure that driverless printing works, verify in the output:
-
The
get-printer-attributestest returnsPASS. - The IPP version that the printer supports is 2.0 or higher.
The list of formats contains one of the following:
-
application/pdf -
image/urf -
image/pwg-raster
-
-
For color printers, the output contains one of the mentioned formats and, additionally,
image/jpeg.
Chapter 6. Adding a printer to CUPS by using the web interface
Before users can print through CUPS, you must add printers. You can use both network printers and printers that are directly attached to the CUPS host, for example over USB.
You can add printers by using the CUPS driverless feature or by using a PostScript Printer Description (PPD) file.
CUPS prefers driverless printing, and using drivers is deprecated.
Red Hat Enterprise Linux (RHEL) does not provide the name service switch multicast DNS plug-in (nss-mdns), which resolves requests by querying an mDNS responder. Consequently, automatic discovery and installation for local driverless printers by using mDNS is not available in RHEL. To work around this problem, install single printers manually or use cups-browsed to automatically install a high amount of print queues that are available on a remote print server.
Prerequisites
- CUPS is configured.
- You have permissions in CUPS to manage printers.
- If you use CUPS as a print server, you configured TLS encryption to securely transmit data over the network.
- The printer supports driverless printing, if you want to use this feature.
Procedure
Use a browser, and access
https://<hostname>:631/admin/.You must connect to the web interface by using the HTTPS protocol. Otherwise, CUPS prevents you from authenticating in a later step for security reasons.
- Click .
- If you are not already authenticated, CUPS prompts for credentials of an administrative user. Enter the username and password of an authorized user.
- If you decide to not use driverless printing and the printer you want to add is detected automatically, select it, and click .
If the printer was not detected:
Select the protocol that the printer supports.
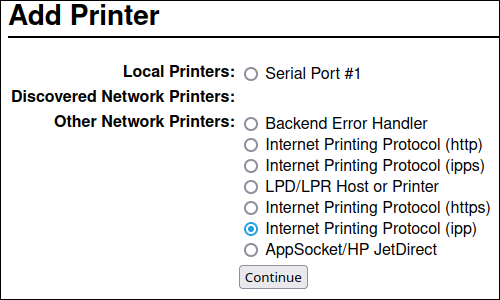
If your printer supports driverless printing and you want to use this feature, select the
ipporippsprotocol.- Click .
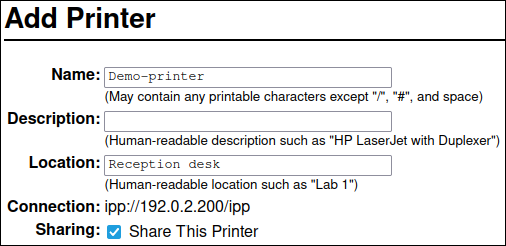
Enter the URL to the printer or to the queue on a remote print server.

- Click .
Enter a name and, optionally, a description and location. If you use CUPS as a print server, and other clients should be able to print through CUPS on this printer, select also Share this printer.
- Select the printer manufacturer in the Make list. If the printer manufacturer is not on the list, select Generic or upload a PPD file for the printer.
- Click .
Select the printer model:
- If the printer supports driverless printing, select IPP Everywhere. Note that, if you previously installed printer-specific drivers locally, it is possible that the list also contains entries such as <printer_name> - IPP Everywhere.
- If the printer does not support driverless printing, select the model or upload the PPD file for the printer.
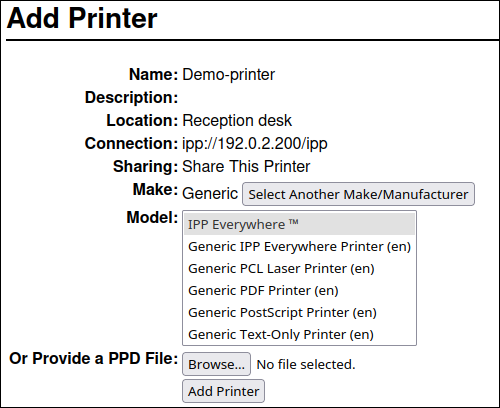
- Click
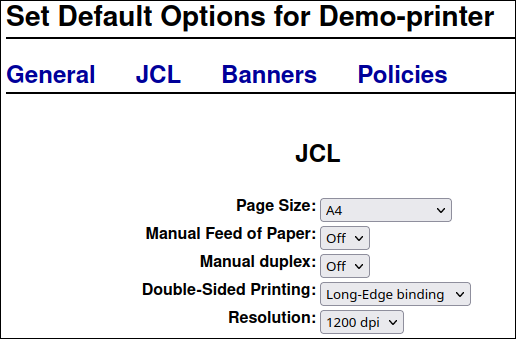
The settings and tabs on the Set printer options page depend on the driver and the features the printer supports. Use this page to set default options, such as for the paper size.
- Click .
Verification
- Open the Printers tab in the web interface.
- Click on the printer’s name.
- In the Maintenance list, select Print test page.
Troubleshooting
-
If you use driverless printing, and printing does not work, use the
lpadminutility to add the printer on the command line. For details, see Adding a printer to CUPS by using the lpadmin utility.
Chapter 7. Adding a printer to CUPS by using the lpadmin utility
Before users can print through CUPS, you must add printers. You can use both network printers and printers that are directly attached to the CUPS host, for example over USB.
You can add printers by using the CUPS driverless feature or by using a PostScript Printer Description (PPD) file.
CUPS prefers driverless printing, and using drivers is deprecated.
Red Hat Enterprise Linux (RHEL) does not provide the name service switch multicast DNS plug-in (nss-mdns), which resolves requests by querying an mDNS responder. Consequently, automatic discovery and installation for local driverless printers by using mDNS is not available in RHEL. To work around this problem, install single printers manually or use cups-browsed to automatically install a high amount of print queues that are available on a remote print server.
Prerequisites
- CUPS is configured.
- The printer supports driverless printing, if you want to use this feature.
- The printer accepts data on port 631 (IPP), 9100 (socket), or 515 (LPD). The port depends on the method you use to connect to the printer.
Procedure
Add the printer to CUPS:
To add a printer with driverless support, enter:
# lpadmin -p Demo-printer -E -v ipp://192.0.2.200/ipp/print -m everywhereIf the
-m everywhereoption does not work for your printer, try-m driverless:<uri>, for example:-m driverless:ipp://192.0.2.200/ipp/print.To add a queue from a remote print server with driverless support, enter:
# lpadmin -p Demo-printer -E -v ipp://192.0.2.201/printers/example-queue -m everywhereIf the
-m everywhereoption does not work for your printer, try-m driverless:<uri>, for example:-m driverless:ipp://192.0.2.200/printers/example-queue.To add a printer with a driver in file, enter:
# lpadmin -p Demo-printer -E -v socket://192.0.2.200/ -P /root/example.ppdTo add a queue from a remote print server with a driver in a file, enter:
# lpadmin -p Demo-printer -E -v ipp://192.0.2.201/printers/example-queue -P /root/example.ppdTo add a printer with a driver in the local driver database:
List the drivers in the database:
# lpinfo -mdrv:///sample.drv/generpcl.ppd Generic PCL Laser PrinterAdd the printer with the URI to the driver in the database:
# lpadmin -p Demo-printer -E -v socket://192.0.2.200/ -m drv:///sample.drv/generpcl.ppd
These commands uses the following options:
-
-p <printer_name>: Sets the name of the printer in CUPS. -
-E: Enables the printer and CUPS accepts jobs for it. Note that you must specify this option after-p. See the option’s description in the man page for further details. -
-v <uri>: Sets the URI to the printer or remote print server queue. -
-m <driver_uri>: Sets the PPD file based on the provided driver URI obtained from the local driver database. -
-P <PPD_file>: Sets the path to the PPD file.
Verification
Display the available printers:
# lpstat -pprinter Demo-printer is idle. enabled since Fri 23 Jun 2023 09:36:40 AM CESTPrint a test page:
# lp -d Demo-printer /usr/share/cups/data/default-testpage.pdf
Chapter 8. Performing maintenance and administration tasks on CUPS printers by using the web interface
The CUPS web interface provides a graphical option to perform administration tasks on printers.
Printer administrators sometimes need to perform different tasks on a print server. For example:
- Maintenance tasks, such as temporary pausing a printer while a technician repairs a printer
- Administrative tasks, such as changing a printer’s default settings
You can perform these tasks by using the CUPS web interface.
Prerequisites
- CUPS is configured.
- You have permissions in CUPS to manage printers.
- If you use CUPS as a print server, you configured TLS encryption to not send credentials in plain text over the network.
- The printer already exists in CUPS.
Procedure
Use a browser, and access
https://<hostname>:631/printers/.You must connect to the web interface by using the HTTPS protocol. Otherwise, CUPS prevents you from authenticating in a later step for security reasons.
- Click on the name of the printer that you want to configure.
- Depending on whether you want to perform a maintenance or administration task, select the required action from the list.
- If you are not already authenticated, CUPS prompts for credentials of an administrative user. Enter the username and password of an authorized user.
- Perform the task.
Chapter 9. Using Samba to print to a Windows print server with Kerberos authentication
With the samba-krb5-printing wrapper, Active Directory (AD) users who are logged in to Red Hat Enterprise Linux (RHEL) can authenticate to Active Directory (AD) by using Kerberos and then print to a local CUPS print server that forwards the print job to a Windows print server.
The benefit of this configuration is that the administrator of CUPS on RHEL does not need to store a fixed user name and password in the configuration. CUPS authenticates to AD with the Kerberos ticket of the user that sends the print job.
Red Hat supports only submitting print jobs to CUPS from your local system, and not to re-share a printer on a Samba print server.
Prerequisites
- The printer that you want to add to the local CUPS instance is shared on an AD print server.
- You joined the RHEL host as a member of the AD.
-
CUPS is installed on RHEL, and the
cupsservice is running. -
The PostScript Printer Description (PPD) file for the printer is stored in the
/usr/share/cups/model/directory.
Procedure
Install the
samba-krb5-printing,samba-client, andkrb5-workstationpackages:# dnf install samba-krb5-printing samba-client krb5-workstationOptional: Authenticate as a domain administrator and display the list of printers that are shared on the Windows print server:
# smbclient -L win_print_srv.ad.example.com -U administrator@AD_KERBEROS_REALM --use-kerberos=requiredSharename Type Comment --------- ---- ------- Example Printer ExampleOptional: Display the list of CUPS models to identify the PPD name of your printer:
lpinfo -msamsung.ppd Samsung M267x 287x Series PXLYou require the name of the PPD file when you add the printer in the next step.
Add the printer to CUPS:
# lpadmin -p "example_printer" -v smb://win_print_srv.ad.example.com/Example -m samsung.ppd -o auth-info-required=negotiate -EThe command uses the following options:
-
-p printer_namesets the name of the printer in CUPS. -
-v URI_to_Windows_printersets the URI to the Windows printer. Use the following format:smb://host_name/printer_share_name. -
-m PPD_filesets the PPD file the printer uses. -
-o auth-info-required=negotiateconfigures CUPS to use Kerberos authentication when it forwards print jobs to the remote server. -
-Eenables the printer and CUPS accepts jobs for the printer.
-
Verification
- Log into the RHEL host as an AD domain user.
Authenticate as an AD domain user:
# kinit domain_user_name@AD_KERBEROS_REALMPrint a file to the printer you added to the local CUPS print server:
# lp -d example_printer file
Chapter 10. Using cups-browsed to locally integrate printers from a remote print server
The cups-browsed service uses DNS service discovery (DNS-SD) and CUPS browsing to make all or a filtered subset of shared remote printers automatically available in a local CUPS service. Use this feature on workstations to make only printers from a trusted print server available.
It is also possible to configure cups-browsed to filter the browsed printers by certain criteria to reduce the number of listed printers if a print server shares a large number of printers.
If the print dialog in an application uses other mechanisms than, for example DNS-SD, to list remote printers, cups-browsed has no influence. The cups-browsed service also does not prevent users from manually accessing non-listed printers.
Prerequisites
- The CUPS service is configured on the local host.
A remote CUPS print server exists, and the following conditions apply to this server:
- The server listens on an interface that is accessible from the client.
-
The
Allow fromparameter in the server’s<Location />directive in the/etc/cups/cups.conffile allows access from the client’s IP address. - The server shares printers.
- Firewall rules allow access from the client to the CUPS port on the server.
Procedure
Edit the
/etc/cups/cups-browsed.conffile, and make the following changes:Add
BrowsePollparameters for each remote CUPS server you want to poll:BrowsePoll remote_cups_server.example.com BrowsePoll 192.0.2.100:1631Append
:<port>to the hostname or IP address if the remote CUPS server listens on a port different from 631.Optional: Configure a filter to limit which printers are shown in the local CUPS service. For example, to filter for queues whose name contain
sales_, add:BrowseFilter name sales_You can filter by different field names, negate the filter, and match the exact values. For further details, see the parameter description and examples in the
cups-browsed.conf(5)man page on your system.Optional: Change the polling interval and timeout to limit the number of browsing cycles:
BrowseInterval 1200
BrowseTimeout 6000
Increase both
BrowseIntervalandBrowseTimeoutin the same ratio to avoid situations in which printers disappear from the browsing list. This means, multiply the value ofBrowseIntervalby 5 or a higher integer, and use this result value forBrowseTimeout.By default,
cups-browsedpolls remote servers every 60 seconds and the timeout is 300 seconds. However, on print servers with many queues, these default values can cost many resources.
Enable and start the
cups-browsedservice:# systemctl enable --now cups-browsed
Verification
List the available printers:
# lpstat -vdevice for Demo-printer: implicitclass://Demo-printer/If the output for a printer contains
implicitclass, thecups-browsedservice manages the printer in CUPS.
Chapter 11. Accessing the CUPS logs in the systemd journal
By default, CUPS stores log messages in the systemd journal. This includes, error messages, access log entries, and page log entries.
Prerequisites
Procedure
Display the log entries:
To display all log entries, enter:
# journalctl -u cupsTo display the log entries for a specific print job, enter:
# journalctl -u cups JID=<print_job_id>To display log entries within a specific time frame, enter:
# journalectl -u cups --since=<YYYY-MM-DD> --until=<YYYY-MM-DD>Replace
YYYYwith the year,MMwith the month, andDDwith the day.
Chapter 12. Configuring CUPS to store logs in files instead of the systemd journal
By default, CUPS stores log messages in the systemd journal. Alternatively, you can configure CUPS to store log messages in files.
Prerequisites
Procedure
Edit the
/etc/cups/cups-files.conffile, and set theAccessLog,ErrorLog, andPageLogparameters to the paths where you want to store these log files:AccessLog /var/log/cups/access_log ErrorLog /var/log/cups/error_log PageLog /var/log/cups/page_logIf you configure CUPS to store the logs in a directory other than
/var/log/cups/, set thecupsd_log_tSELinux context on this directory, for example:# semanage fcontext -a -t cupsd_log_t "/var/log/printing(/.*)?" # restorecon -Rv /var/log/printing/Restart the
cupsservice:# systemctl restart cups
Verification
Display the log files:
# cat /var/log/cups/access_log
# cat /var/log/cups/error_log
# cat /var/log/cups/page_log
If you configured CUPS to store the logs in a directory other than
/var/log/cups/, verify that the SELinux context on the log directory iscupsd_log_t:# ls -ldZ /var/log/printing/drwxr-xr-x. 2 lp sys unconfined_u:object_r:cupsd_log_t:s0 6 Jun 20 15:55 /var/log/printing/
Chapter 13. Setting up a high-availability CUPS print server environment
If your clients require access to printers without interruption, you can set up CUPS on multiple hosts and use the print queue browsing feature to provide high availability. Print clients then automatically configure print queues shared by the different print servers.
If a client sends a print job to its local print queue, CUPS on the client routes the job to one of the print servers which processes the job and sends it to the printer.
Procedure
Set up CUPS on two or more servers:
- Install and configure CUPS.
- Enable TLS encryption.
Add print queues to all CUPS instances by using the lpadmin utility or the web interface. If you use the web interface, ensure that you select the Share this printer option while you add the printer. The
lpadminutility enables this setting by default.ImportantFor the high-availability scenario, each queue on one print server requires a queue with exactly the same queue name on the other servers. You can display the queue names on each server by using the
lpstat -ecommand.Optional: You can configure the queues on each server to refer to different printers.
On print clients:
Edit the
/etc/cups/cups-browsed.conffile, and addBrowsePolldirectives for each CUPS print server:BrowsePoll print_server_1.example.com:631 BrowsePoll print_server_2.example.com:631Enable and start both the
cupsandcups-browsedservice:# systemctl enable --now cups cups-browsed
Verification
Display the available printers on a client:
# lpstat -tdevice for Demo-printer: implicitclass://Demo-printer/ Demo-printer accepting requests since Fri 22 Nov 2024 11:54:59 AM CET printer Demo-printer is idle. enabled since Fri 22 Nov 2024 11:54:59 AM CET ...The example output shows that the Demo-printer queue uses the
implicitclassback end. As a result,cups-browsedroutes print jobs for this queue to the hosts specified in theBrowsePolldirectives on this client.
Chapter 14. Accessing the CUPS documentation
CUPS provides browser-based access to the service’s documentation that is installed on the CUPS server.
The CUPS documentation includes:
- Administration documentation, such as for command-line printer administration and accounting
- Man pages
- Programming documentation, such as the administration API
- References
- Specifications
Prerequisites
- CUPS is installed and running.
- The IP address of the client you want to use has permissions to access the web interface.
Procedure
-
Use a browser, and access
http://<hostname_or_ip_address>:631/help/. -
Expand the entries in
Online Help Documents, and select the documentation you want to read.