Configuring device mapper multipath
Configuring and managing the Device Mapper Multipath feature
Abstract
Providing feedback on Red Hat documentation
We are committed to providing high-quality documentation and value your feedback. To help us improve, you can submit suggestions or report errors through the Red Hat Jira tracking system.
Procedure
Log in to the Jira website.
If you do not have an account, select the option to create one.
- Click Create in the top navigation bar.
- Enter a descriptive title in the Summary field.
- Enter your suggestion for improvement in the Description field. Include links to the relevant parts of the documentation.
- Click Create at the bottom of the dialogue.
Chapter 1. Overview of device mapper multipathing
DM Multipath provides:
- Redundancy
- DM Multipath can provide failover in an active/passive configuration. In an active/passive configuration, only a subset of the paths is used at any time for I/O. If any element of an I/O path such as the cable, switch, or controller fails, DM Multipath switches to an alternate path.
The number of paths is dependent on the setup. Usually, DM Multipath setups have 2, 4, or 8 paths to the storage, but this is a common setup and other numbers are possible for the paths.
- Improved Performance
- DM Multipath can be configured in an active/active mode, where I/O is spread over the paths in a round-robin fashion. In some configurations, DM Multipath can detect loading on the I/O paths and dynamically rebalance the load.
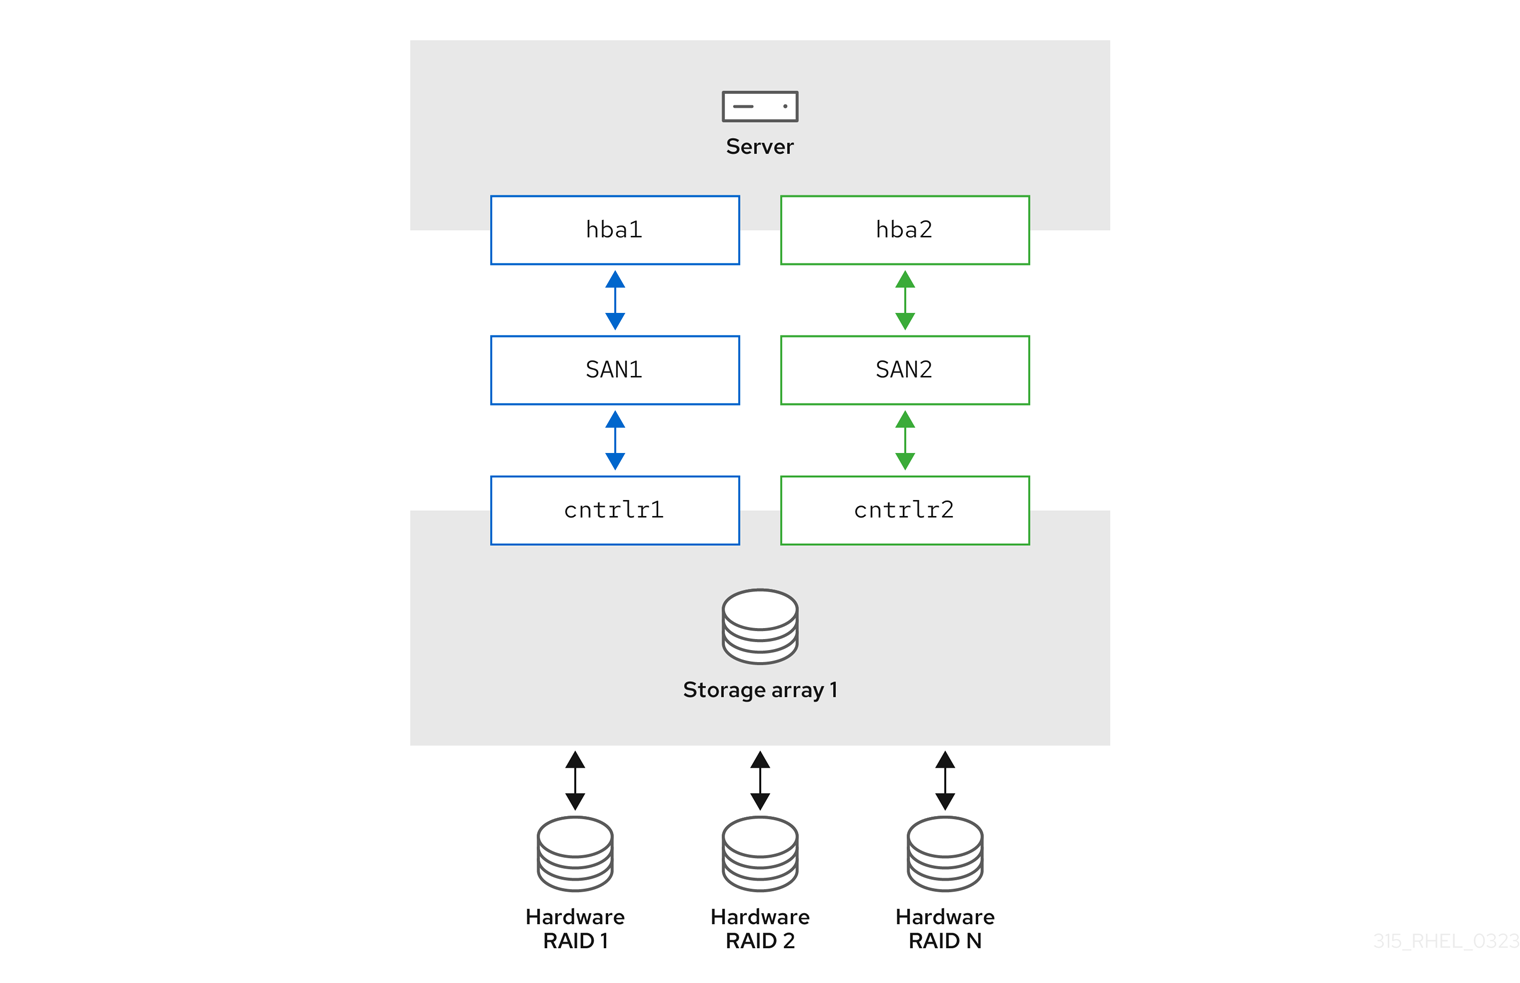
1.1. Active/Passive multipath configuration with one RAID device
In this configuration, there are two Host Bus Adapters (HBAs) on the server, two SAN switches, and two RAID controllers. Following are the possible failure in this configuration:
- HBA failure
- Fibre Channel cable failure
- SAN switch failure
- Array controller port failure
With DM Multipath configured, a failure at any of these points causes DM Multipath to switch to the alternate I/O path. The following image describes the configuration with two I/O paths from the server to a RAID device. Here, there is one I/O path that goes through hba1, SAN1, and cntrlr1 and a second I/O path that goes through hba2, SAN2, and cntrlr2.
Figure 1.1. Active/Passive multipath configuration with one RAID device
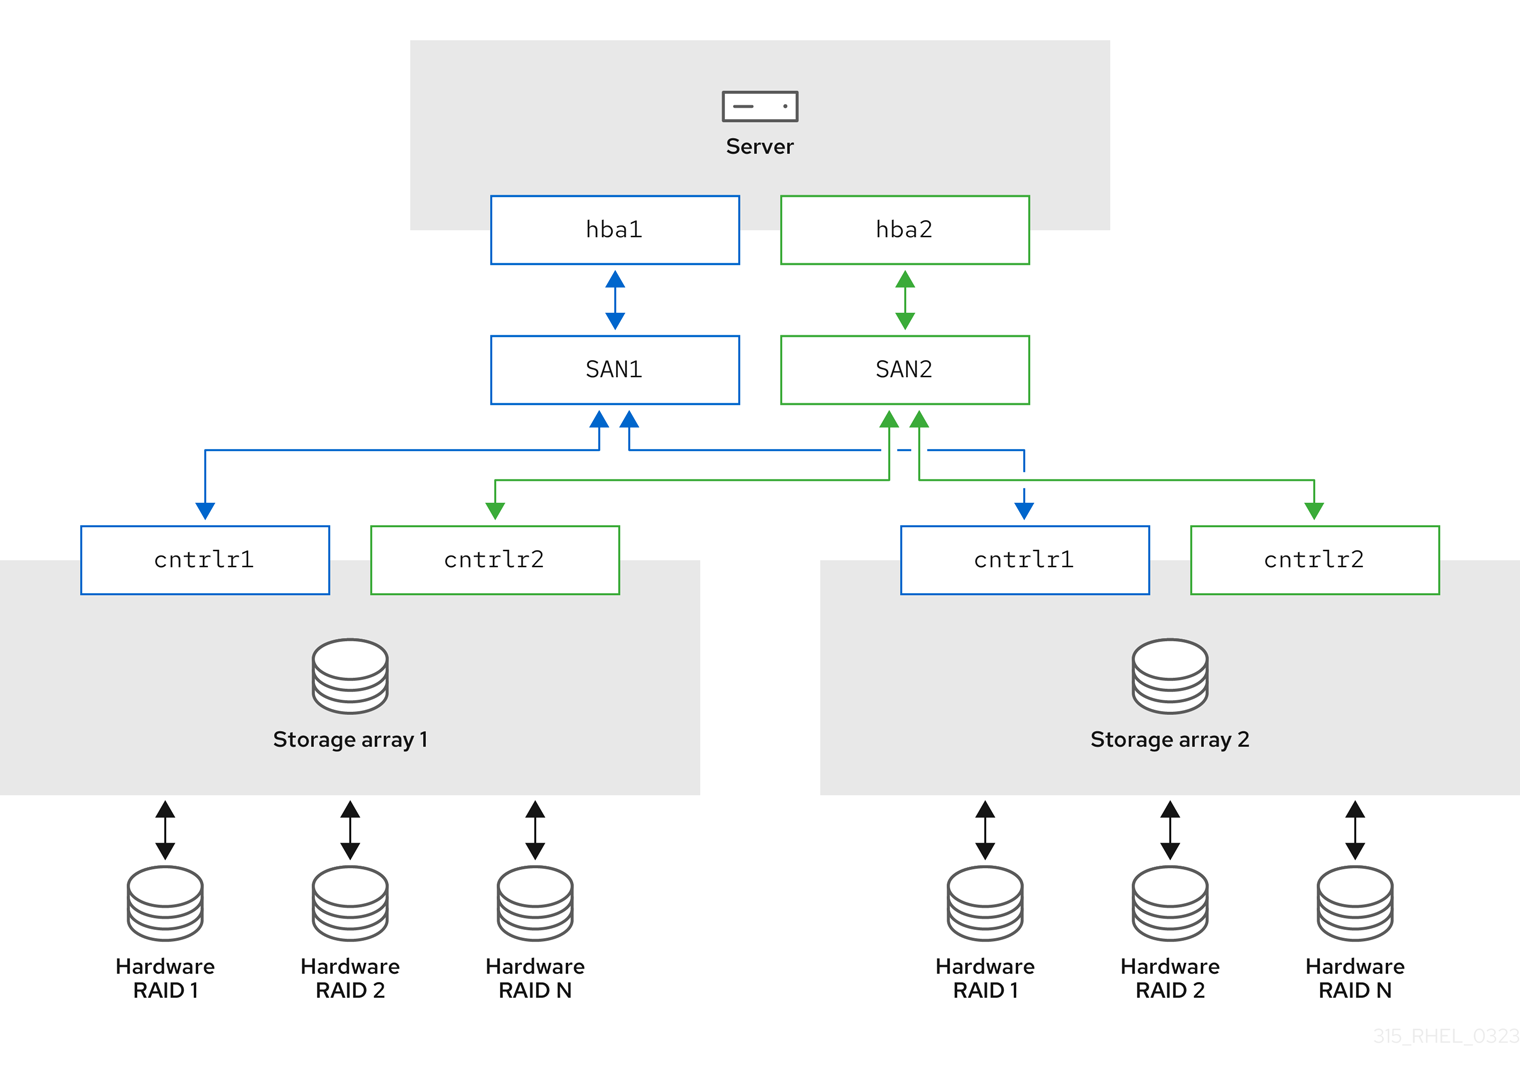
1.2. Active/Passive multipath configuration with two RAID devices
In this configuration, there are two HBAs on the server, two SAN switches, and two RAID devices with two RAID controllers each. With DM Multipath configured, a failure at any of the points of the I/O path to either of the RAID devices causes DM Multipath to switch to the alternate I/O path for that device. The following image describes the configuration with two I/O paths to each RAID device. Here, there are two I/O paths to each RAID device.
Figure 1.2. Active/Passive multipath configuration with two RAID device
1.3. Active/Active multipath configuration with one RAID device
In this configuration, there are two HBAs on the server, two SAN switches, and two RAID controllers. The following image describes the configuration with two I/O paths from the server to a storage device. Here, I/O can be spread among these two paths.
Figure 1.3. Active/Active multipath configuration with one RAID device
1.4. DM Multipath components
The following table describes the DM Multipath components.
| Component | Description |
|
| Reroutes I/O and supports failover for paths and path groups. |
|
| Configures and enables device mapper multipathing. |
|
|
Lists and configures the multipath devices. It is also executed by |
|
|
Automatically creates and removes multipath devices and monitors paths; as paths fail and come back, it may update the multipath device. Allows interactive changes to multipath devices. Reload the service if there are any changes to the |
|
|
Creates device mapper devices for the partitions on a device. This command is automatically executed by |
|
|
Sets up |
1.5. Displaying multipath topology
To effectively monitor paths, troubleshoot multipath issues, or check whether the multipath configurations are set correctly, you can display the multipath topology.
Procedure
Display the multipath device topology:
# multipath -ll
mpatha (3600d0230000000000e13954ed5f89300) dm-4 WINSYS,SF2372
size=233G features='1 queue_if_no_path' hwhandler='0' wp=rw
`-+- policy='service-time 0' prio=1 status=active
  `- 6:0:0:0 sdf 8:80 active ready running
The output can be split into three parts. Each part displays information for the following group:
Multipath device information:
-
mpatha (3600d0230000000000e13954ed5f89300): alias (wwid if it’s different from the alias) -
dm-4: dm device name -
WINSYS,SF2372: vendor, product -
size=233G: size -
features='1 queue_if_no_path': features -
hwhandler='0': hardware handler -
wp=rw: write permissions
-
Path group information:
-
policy='service-time 0': scheduling policy -
prio=1: path group priority -
status=active: path group status
-
Path information:
-
6:0:0:0: host:channel:id:lun -
sdf: devnode -
8:80: major:minor numbers -
active: dm status -
ready: path status running: online statusFor more information about the dm, path and online status, see Path status.
-
Other multipath commands, which are used to list, create, or reload multipath devices, also display the device topology. However, some information might be unknown and shown as undef in the output. This is normal behavior. Use the multipath -ll command to view the correct state.
In certain cases, such as creating a multipath device, the multipath topology displays a parameter, which represents if any action was taken. For example, the following command output shows the create: parameter to represent that a multipath device was created:
create: mpatha (3600d0230000000000e13954ed5f89300) undef WINSYS,SF2372
size=233G features='1 queue_if_no_path' hwhandler='0' wp=undef
`-+- policy='service-time 0' prio=1 status=undef
  `- 6:0:0:0 sdf 8:80 undef ready running
1.6. Path status
The path status is updated periodically by the multipathd daemon based on the polling interval defined in the /etc/multipath.conf file. In terms of the kernel, the dm status is similar to the path status. The dm state will retain its current status until the path checker has completed.
- Path status
- ready, ghost
- The path is up and ready for I/O.
- faulty, shaky
- The path is down.
- i/o pending
- The checker is actively checking this path, and the state will be updated shortly.
- i/o timeout
-
The checker did not return
success/failurebefore the timeout period. This is treated the same asfaulty. - removed
-
The path has been removed from the system, and will shortly be removed from the multipath device. This is treated the same as
faulty. - wild
-
multipathdwas unable to run the path checker, because of an internal error or configuration issue. This is treated the same asfaulty, except multipath will skip many actions on the path. - unchecked
-
The path checker has not run on this path, either because it has just been discovered, it does not have an assigned path checker, or the path checker encountered an error. This is treated the same as
wild. - delayed
-
The path checker returns that the path is up, but multipath is delaying the reinstatement of the path because the path has recently failed multiple times and multipath has been configured to delay paths in this case. This is treated the same as
faulty.
- Dm status
- Active
-
Maps to the
readyandghostpath status. - Failed
-
Maps to all other path status, except
i/o pendingthat does not have an equivalentdmstate.
- Online status
- Running
- The device is enabled.
- Offline
- The device has been disabled.
Chapter 2. Multipath devices
DM Multipath provides a way of organizing the I/O paths logically, by creating a single multipath device on top of the underlying devices. Without DM Multipath, system treats each path from a server node to a storage controller as a separate device, even when the I/O path connects the same server node to the same storage controller.
2.1. Multipath device identifiers
When new devices are under the control of DM Multipath, these devices are created in the /dev/mapper/ and /dev/ directory.
Any devices of the form /dev/dm-X are for internal use only and should never be used by the administrator directly.
The following describes multipath device names:
-
When the
user_friendly_namesconfiguration option is set tono, the name of the multipath device is set to World Wide Identifier (WWID). By default, the name of a multipath device is set to its WWID. The device name would be/dev/mapper/WWID. It is also created in the/dev/directory, named as/dev/dm-X. -
Alternatively, you can set the
user_friendly_namesoption toyesin the/etc/multipath.conffile. This sets thealiasin themultipathsection to a node-unique name of the formmpathN. The device name would be/dev/mapper/mpathNand/dev/dm-X. But the device name is not guaranteed to be the same on all nodes using the multipath device. Similarly, if you set thealiasoption in the/etc/multipath.conffile, the name is not automatically consistent across all nodes in the cluster.
This should not cause any difficulties if you use LVM to create logical devices from the multipath device. To keep your multipath device names consistent in every node, Red Hat recommends disabling the user_friendly_names option.
For example, a node with two HBAs attached to a storage controller with two ports by means of a single unzoned FC switch sees four devices: /dev/sda, /dev/sdb, /dev/sdc, and /dev/sdd. DM Multipath creates a single device with a unique WWID that reroutes I/O to those four underlying devices according to the multipath configuration.
In addition to the user_friendly_names and alias options, a multipath device also has other attributes. You can modify these attributes for a specific multipath device by creating an entry for that device in the multipaths section of the /etc/multipath.conf file.
2.2. Multipath devices in logical volumes
After creating multipath devices, you can use the multipath device names as you would use a physical device name when creating an Logical volume manager (LVM) physical volume. For example, if /dev/mapper/mpatha is the name of a multipath device, the pvcreate /dev/mapper/mpatha command marks /dev/mapper/mpatha as a physical volume.
You can use the resulting LVM physical device when you create an LVM volume group just as you would use any other LVM physical device.
To filter all the sd devices in the /etc/lvm/lvm.conf file, add the filter = [ "r/block/", "r/disk/", "r/sd./", "a/./" ] filter in the devices section of the file.
If you attempt to create an LVM physical volume on a whole device on which you have configured partitions, the pvcreate command fails. The Anaconda and Kickstart installation programs create empty partition tables if you do not specify otherwise for every block device. If you want to use the whole device instead of creating a partition, remove the existing partitions from the device. You can remove existing partitions with the kpartx -d device command and the fdisk utility. If your system has block devices that are greater than 2Tb, use the parted utility to remove partitions.
When you create an LVM logical volume that uses active/passive multipath arrays as the underlying physical devices, you can optionally include filters in the /etc/lvm/lvm.conf file to exclude the disks that underline the multipath devices. This is because if the array automatically changes the active path to the passive path when it receives I/O, multipath will failover and failback whenever LVM scans the passive path, if these devices are not filtered.
The kernel changes the active/passive state by automatically detecting the correct hardware handler to use. For active/passive paths that require intervention to change their state, multipath automatically uses this hardware handler to do so as necessary. If the kernel does not automatically detect the correct hardware handler to use, you can configure which hardware handler to use in the multipath.conf file with the "hardware_handler" option. For active/passive arrays that require a command to make the passive path active, LVM prints a warning message when this occurs.
Depending on your configuration, LVM may print any of the following messages:
LUN not ready:
end_request: I/O error, dev sdc, sector 0
sd 0:0:0:3: Device not ready: <6>: Current: sense key: Not Ready
    Add. Sense: Logical unit not ready, manual intervention required
Read failed:
/dev/sde: read failed after 0 of 4096 at 0: Input/output error
The following are the reasons for the mentioned errors:
- Multipath is not set up on storage devices that are providing active/passive paths to a machine.
- Paths are accessed directly, instead of through the multipath device.
Chapter 3. Configuring DM Multipath
You can set up DM Multipath with the mpathconf utility. This utility creates or edits the /etc/multipath.conf multipath configuration file based on the following scenarios:
-
If the
/etc/multipath.conffile already exists, thempathconfutility will edit it. -
If the
/etc/multipath.conffile does not exist, thempathconfutility will create the/etc/multipath.conffile from scratch.
3.1. Checking for the device-mapper-multipath package
Before setting up DM Multipath on your system, ensure that your system is up-to-date and includes the device-mapper-multipath package.
Procedure
Check if your system includes the
device-mapper-multipathpackage:# rpm -q device-mapper-multipath device-mapper-multipath-current-package-versionIf your system does not include the package, it prints the following:
package device-mapper-multipath is not installedIf your system does not include the package, install it by running the following command:
# dnf install device-mapper-multipath
3.2. Setting up basic failover configuration with DM Multipath
You can set up DM Multipath for a basic failover configuration and edit the /etc/multipath.conf file before starting the multipathd daemon.
Prerequisites
- Administrative access.
Procedure
Enable and initialize the multipath configuration file:
# mpathconf --enableOptional: Edit the
/etc/multipath.conffile.Most default settings are already configured, including
path_grouping_policywhich is set tofailover.Optional: The default naming format of multipath devices is set to
/dev/mapper/mpathnformat. If you prefer a different naming format:Configure DM Multipath to use the multipath device WWID as its name, instead of the mpath_n_ user-friendly naming scheme:
# mpathconf --enable --user_friendly_names nReload the configuration of the DM Multipath daemon:
# systemctl reload multipathd.service
Start the DM Multipath daemon:
# systemctl start multipathd.service
Verification
Confirm that the DM Multipath daemon is running without issues:
# systemctl status multipathd.serviceVerify the naming format of multipath devices:
# ls /dev/mapper/
3.3. Ignoring local disks when generating multipath devices
Some machines have local SCSI cards for their internal disks and DM Multipath is not recommended for these devices. If you set the find_multipaths configuration parameter to on, you do not have to disable multipathing on these devices.
If you do not set the find_multipaths configuration parameter to on, you can use the following procedure to modify the DM Multipath configuration file to ignore the local disks when configuring multipath.
Procedure
Identify the internal disk using any known parameters such as the device’s model, path or vendor, and determine its WWID by using any one of the following options:
Display existing multipath devices:
# multipath -v2 -l

mpatha (WDC_WD800JD-75MSA3_WD-WMAM9FU71040) dm-2 ATA,WDC WD800JD-75MS
size=33 GB features="0" hwhandler="0" wp=rw
`-+- policy='round-robin 0' prio=0 status=active
  |- 0:0:0:0 sda 8:0 active undef running
Display additional multipath devices that DM Multipath could create:
# multipath -v2 -d

: mpatha (WDC_WD800JD-75MSA3_WD-WMAM9FU71040) dm-2 ATA,WDC WD800JD-75MS
size=33 GB features="0" hwhandler="0" wp=undef
`-+- policy='round-robin 0' prio=1 status=undef
  |- 0:0:0:0 sda 8:0  undef ready running
Display device information:
# multipathd show paths raw format "%d %w" | grep sda
sda WDC_WD800JD-75MSA3_WD-WMAM9FU71040
In this example,
/dev/sdais the internal disk and its WWID isWDC_WD800JD-75MSA3_WD-WMAM9FU71040.
Edit the
blacklistsection of the/etc/multipath.conffile to ignore this device, using its WWID attribute:blacklist { wwid WDC_WD800JD-75MSA3_WD-WMAM9FU71040 }WarningAlthough you could identify the device using its
devnodeparameter, such assda, it would not be a safe procedure, because/dev/sdais not guaranteed to refer to the same device on reboot.Check for any configuration errors in the
/etc/multipath.conffile:# multipath -t > /dev/nullTo see the full report, do not discard the command output:
# multipath -t-
Remake the initramfs if the disk is included in
initramfs. For more information, see Configuring multipathing in initramfs. Reload the
/etc/multipath.conffile by reconfiguring themultipathddaemon:# systemctl reload multipathd
Multipath devices on top of local disks cannot be removed when in use. To ignore such device, stop all users of the device. For example, by unmounting any filesystem on top of it and deactivating any logical volumes using it. If this is not possible, you can reboot the system to remove the multipath device.
Verification
Verify that the internal disk is ignored and it is not displayed in the multipath output:
List the multipathed devices:
# multipath -v2 -lList the additional devices that DM Multipath could create:
# multipath -v2 -d
3.4. Configuring additional storage with DM Multipath
By default, DM Multipath includes built-in configurations for the most common storage arrays, which support DM Multipath. If your storage array does not already have a configuration, you can add one by editing the /etc/multipath.conf file.
Add additional storage devices during the initial configuration to align the setup with your anticipated needs. DM Multipath enables adding devices later for scalability or upgrades, but this approach may require adjusting configurations to ensuring compatibility.
Procedure
View the default configuration value and supported devices:
# multipathd show configEdit the
/etc/multipath.conffile to set up your multipath configuration.Example 3.1. DM Multipath Configuration for HP OPEN-V Storage Device
# Set default configurations for all devices managed by DM Multipath defaults { # Enable user-friendly names for devices user_friendly_names yes } devices { # Define configuration for HP OPEN-V storage device { vendor "HP" pproduct "OPEN-V" no_path_retry 18 } }- Save your changes and close the editor.
Update the multipath device list by scanning for new devices:
# multipath -r
Verification
Confirm that the multipath devices are recognized correctly:
# multipath -ll
3.5. Configuring multipathing in initramfs
Setting up multipathing in the initramfs file system is essential for seamless storage functionality, particularly in scenarios requiring redundancy and load balancing. This setup guarantees that multipath devices are available early in the boot process, which is crucial for maintaining the integrity of the storage setup and preventing potential issues.
Prerequisites
- Configured DM multipath on your system.
Procedure
Rebuild the
initramfsfile system with the multipath configuration files:# dracut --force --add multipathNoteWhen using multipath in the
initramfsand modifying its configuration files, remember to rebuild theinitramfsfor the changes to take effect. If your root device employs multipath, thedracutcommand will automatically include the multipath module in theinitramfs.Optional: If multipath in the
initramfsis no longer necessary:Remove the multipath configuration file:
# rm /etc/dracut.conf.d/multipath.confRebuild the
initramfswith the added multipath configuration:# dracut --force --omit multipath
Verification
Check if multipath-related files and configurations are present:
# lsinitrd /path/to/initramfs.img -m | grep multipath
While verefication steps provided can give you an indication of success, a final test boot-up is recommended to ensure that the configuration works as expected.
After the reboot, confirm that the multipath devices are recognized correctly:
# multipath -ll
Chapter 4. Enabling multipathing on NVMe devices
You can multipath Non-volatile Memory Express™ (NVMe™) devices that are connected to your system over a fabric transport, such as Fibre Channel (FC). You can select between multiple multipathing solutions.
4.1. Native NVMe multipathing and DM Multipath
Non-volatile Memory Express™ (NVMe™) devices support a native multipathing functionality. When configuring multipathing on NVMe, you can select between the standard DM Multipath framework and the native NVMe multipathing.
Both DM Multipath and native NVMe multipathing support the Asymmetric Namespace Access (ANA) multipathing scheme of NVMe devices. ANA identifies optimized paths between the controller and the host, and improves performance.
When native NVMe multipathing is enabled, it applies globally to all NVMe devices. It can provide higher performance, but does not contain all of the functionality that DM Multipath provides. For example, native NVMe multipathing supports only the numa and round-robin path selection methods.
By default, NVMe multipathing is enabled in Red Hat Enterprise Linux 9 and is the recommended multipathing solution.
4.2. Enabling DM Multipath on NVMe devices
The default kernel setting for the nvme_core.multipath option is set to Y, which means that the native Non-volatile Memory Express™ (NVMe™) multipathing is enabled. You can enable DM Multipath on connected NVMe devices by disabling native NVMe multipathing.
Prerequisites
- The NVMe devices are connected to your system. For more information, see Overview of NVMe over fabric devices.
Procedure
Check if the native NVMe multipathing is enabled:
# cat /sys/module/nvme_core/parameters/multipathThe command displays one of the following:
N- Native NVMe multipathing is disabled.
Y- Native NVMe multipathing is enabled.
If the native NVMe multipathing is enabled, disable it by using one of the following methods:
Using a kernel option:
Add the
nvme_core.multipath=Noption to the command line:# grubby --update-kernel=ALL --args="nvme_core.multipath=N"On the 64-bit IBM Z architecture, update the boot menu:
# zipl- Reboot the system.
Using a kernel module configuration file:
Create the
/etc/modprobe.d/nvme_core.confconfiguration file with the following content:options nvme_core multipath=NBack up the
initramfsfile:# cp /boot/initramfs-$(uname -r).img /boot/initramfs-$(uname -r).bak.$(date +%m%d-%H%M%S).imgRebuild the
initramfs:# cp /boot/initramfs-$(uname -r).img /boot/initramfs-$(uname -r).bak.$(date +%m-%d-%H%M%S).img # dracut --force --verbose- Reboot the system.
Enable DM Multipath:
# systemctl enable --now multipathd.serviceDistribute I/O on all available paths. Add the following content in the
/etc/multipath.conffile:devices { device { vendor "NVME" product ".*" path_grouping_policy group_by_prio } }NoteThe
/sys/class/nvme-subsystem/nvme-subsys0/iopolicyconfiguration file has no effect on the I/O distribution when DM Multipath manages the NVMe devices.Reload the
multipathdservice to apply the configuration changes:# multipath -r
Verification
Verify if the native NVMe multipathing is disabled:
# cat /sys/module/nvme_core/parameters/multipath
N
Verify if DM multipath recognizes the nvme devices:
# multipath -l

eui.00007a8962ab241100a0980000d851c8 dm-6 NVME,NetApp E-Series
size=20G features='0' hwhandler='0' wp=rw
`-+- policy='service-time 0' prio=0 status=active
  |- 0:10:2:2 nvme0n2 259:3 active undef running
`-+- policy='service-time 0' prio=0 status=enabled
  |- 4:11:2:2 nvme4n2 259:28 active undef running
`-+- policy='service-time 0' prio=0 status=enabled
  |- 5:32778:2:2 nvme5n2 259:38 active undef running
`-+- policy='service-time 0' prio=0 status=enabled
  |- 6:32779:2:2 nvme6n2 259:44 active undef running
4.3. Enabling native NVMe multipathing
If native NVMe multipathing is disabled, you can enable it using the following solution.
Prerequisites
- The NVMe devices are connected to your system. For more information, see Overview of NVMe over fabric devices.
Procedure
Check if native NVMe multipathing is enabled in the kernel:
# cat /sys/module/nvme_core/parameters/multipathThe command displays one of the following:
N- Native NVMe multipathing is disabled.
Y- Native NVMe multipathing is enabled.
If native NVMe multipathing is disabled, enable it by using one of the following methods:
Using a kernel option:
Remove the
nvme_core.multipath=Noption from the kernel command line:# grubby --update-kernel=ALL --remove-args="nvme_core.multipath=N"On the 64-bit IBM Z architecture, update the boot menu:
# zipl- Reboot the system.
Using a kernel module configuration file:
Remove the
/etc/modprobe.d/nvme_core.confconfiguration file:# rm /etc/modprobe.d/nvme_core.confBack up the
initramfsfile:# cp /boot/initramfs-$(uname -r).img /boot/initramfs-$(uname -r).bak.$(date +%m-%d-%H%M%S).imgRebuild the
initramfs:# dracut --force --verbose- Reboot the system.
Optional: On the running system, change the I/O policy on NVMe devices to distribute the I/O on all available paths:
# echo "round-robin" > /sys/class/nvme-subsystem/nvme-subsys0/iopolicyOptional: Set the I/O policy persistently using
udevrules. Create the/etc/udev/rules.d/71-nvme-io-policy.rulesfile with the following content:ACTION=="add|change", SUBSYSTEM=="nvme-subsystem", ATTR{iopolicy}="round-robin"
Verification
Verify if your system recognizes the NVMe devices. The following example assumes you have a connected NVMe over fabrics storage subsystem with two NVMe namespaces:
# nvme list

Node             SN                   Model                                    Namespace Usage                      Format           FW Rev
---------------- -------------------- ---------------------------------------- --------- -------------------------- ---------------- --------
/dev/nvme0n1     a34c4f3a0d6f5cec     Linux                                    1         250.06  GB / 250.06  GB    512   B +  0 B   4.18.0-2
/dev/nvme0n2     a34c4f3a0d6f5cec     Linux                                    2         250.06  GB / 250.06  GB    512   B +  0 B   4.18.0-2
List all connected NVMe subsystems:
# nvme list-subsys

nvme-subsys0 - NQN=testnqn
\
 +- nvme0 fc traddr=nn-0x20000090fadd597a:pn-0x10000090fadd597a host_traddr=nn-0x20000090fac7e1dd:pn-0x10000090fac7e1dd live
 +- nvme1 fc traddr=nn-0x20000090fadd5979:pn-0x10000090fadd5979 host_traddr=nn-0x20000090fac7e1dd:pn-0x10000090fac7e1dd live
 +- nvme2 fc traddr=nn-0x20000090fadd5979:pn-0x10000090fadd5979 host_traddr=nn-0x20000090fac7e1de:pn-0x10000090fac7e1de live
 +- nvme3 fc traddr=nn-0x20000090fadd597a:pn-0x10000090fadd597a host_traddr=nn-0x20000090fac7e1de:pn-0x10000090fac7e1de live
Check the active transport type. For example,
nvme0 fcindicates that the device is connected over the Fibre Channel transport, andnvme tcpindicates that the device is connected over TCP.If you edited the kernel options, verify if native NVMe multipathing is enabled on the kernel command line:
# cat /proc/cmdline

BOOT_IMAGE=[...] nvme_core.multipath=Y
If you changed the I/O policy, verify if
round-robinis the active I/O policy on NVMe devices:# cat /sys/class/nvme-subsystem/nvme-subsys0/iopolicy round-robin
Chapter 5. Modifying the DM Multipath configuration file
By default, DM Multipath provides configuration values for the most common uses of multipathing. In addition, DM Multipath includes support for the most common storage arrays that themselves support DM Multipath.
You can override the default configuration values for DM Multipath by editing the /etc/multipath.conf configuration file. If necessary, you can also add an unsupported by default storage array to the configuration file. In the multipath configuration file, you need to specify only the sections that you need for your configuration, or that you need to change from the default values. If there are sections of the file that are not relevant to your environment or for which you do not need to override the default values, you can leave them commented out, as they are in the initial file.
In the configuration file, you can also use the regular expression.
If you run multipath from the initramfs file system and you make any changes to the multipath configuration files, you must rebuild the initramfs file system for the changes to take effect
5.1. Configuration file overview
The multipath configuration file is divided into the following sections:
- blacklist
- Listing of specific devices that will not be considered for multipath.
- blacklist_exceptions
-
Listing of multipath devices that would otherwise be ignored according to the parameters of the
blacklistsection. - defaults
- General default settings for DM Multipath.
- multipaths
-
Settings for the characteristics of individual multipath devices. These values overwrite what is specified in the
overrides,devices, anddefaultssections of the configuration file. - devices
-
Settings for the individual storage controllers. These values overwrite what is specified in the
defaultssection of the configuration file. If you are using a storage array that is not supported by default, you may need to create adevicessubsection for your array. - overrides
-
Settings that are applied to all devices. These values overwrite what is specified in the
devicesanddefaultssections of the configuration file.
When the system determines the attributes of a multipath device, it checks the settings of the separate sections from the multipath.conf file in the following order:
-
multipathssection -
overridessection -
devicessection -
defaultssection
The following are the ways to view the default configurations:
If you install your machine on a multipath device, the default multipath configuration applies automatically. The default configuration includes the following:
-
For a complete list of the default configuration values, execute either
multipath -tormultipathd show configcommand. -
For a list of configuration options with descriptions, see the
multipath.confman page on your system.
-
For a complete list of the default configuration values, execute either
-
If you did not set up multipathing during installation, execute the
mpathconf --enablecommand to get the default configuration.
5.2. Configuration file defaults
The /etc/multipath.conf configuration file contains a defaults section. This section includes the default configuration of Device Mapper (DM) Multipath. The default values might differ based on your initial device settings.
The following table describes the optional attributes, set in the defaults section of the multipath.conf configuration file. If you do not set them, default values from the overrides, or devices sections apply.
| Attribute | Description |
|---|---|
|
|
Specifies the interval between two path checks in seconds. For properly functioning paths, the interval between checks gradually increases to |
|
The default value is | |
|
| Specifies the maximum length of the interval between two path checks in seconds. |
|
The default value is | |
|
| Defines the mode for setting up multipath devices. Available values include: |
|
| |
|
| |
|
| |
|
| |
|
| |
|
The default value is | |
|
|
This represents the timeout in seconds, to wait for additional paths after detecting the first one, if |
| Positive value: If set with a positive value, the timeout applies for all non-blacklisted devices. | |
|
Negative value: If set with a negative value, the timeout applies only to known devices that have an entry in the multipath hardware table, either in the built-in table, or in a | |
|
| |
|
The default value for known hardware is | |
|
|
Set the timeout of |
|
For systems with a large number of devices, | |
|
The default value is | |
|
|
Enable reassigning of device-mapper maps. With this option, the |
|
|
The default verbosity value is |
|
| Specifies the default algorithm to use in determining what path to use for the next I/O operation. Possible values include: |
|
| |
|
| |
|
| |
|
The default value is | |
|
| Specifies the default path grouping policy to apply to unspecified multipaths. Possible values include: |
|
| |
|
| |
|
| |
|
| |
|
| |
|
The default value is | |
|
|
Set this option to activate merging |
|
The value of this option is a space separated list of records like | |
| If you configure this option and it matches the device node name of a device, it overrides any other configured methods for determining the WWID for this device. | |
|
You can enable | |
|
The default is | |
|
|
Specifies the default function to call to obtain a path priority value. For example, the ALUA bits in SPC-3 provide an exploitable |
|
| |
|
| |
|
| |
|
| |
|
| |
|
| |
|
| |
|
| |
|
| |
|
| |
|
| |
|
| |
|
| |
|
| |
|
The default value depends on the | |
|
|
Arguments to pass to the |
|
| |
|
| |
|
| |
|
| |
|
| |
|
| |
|
| |
|
| |
|
| |
|
| |
|
| |
|
| |
|
| |
|
| |
|
| |
|
The default value is | |
|
| The default extra features of multipath devices, using the format: "number_of_features_plus_arguments feature1 …". |
|
Possible values for | |
|
| |
|
| |
|
| |
|
| |
| By default, the value is unset. | |
|
| Specifies the default method to determine the state of the paths. Possible values include: |
|
| |
|
| |
|
| |
|
| |
|
| |
|
| |
|
| |
|
| |
|
The default value is | |
|
|
This attribute represents the |
|
The default value is | |
|
| Manages path group failback. Possible values include: |
|
| |
|
| |
|
| |
| A numeric value greater than zero, specifies deferred failback, and is expressed in seconds. | |
|
The default value is | |
|
|
Specifies the number of I/O requests to route to a path before switching to the next path in the current path group. This setting is only for systems running kernels older than 2.6.31. Newer systems should use |
|
|
Specifies the number of I/O requests to route to a path, before switching to the next path in the current path group. Uses a request-based device-mapper-multipath. This setting can be used on systems running current kernels. On systems running kernels older than 2.6.31, use |
|
| A numeric value for this attribute specifies the number of times that the path checker must fail for all paths in a multipath device, before disabling queuing. |
|
A value of | |
|
A value of | |
|
The default value is | |
|
| Possible values include: |
|
| |
|
| |
|
The default value is | |
|
|
If set to |
|
|
If set to |
|
|
Sets the maximum number of open file descriptors that can be opened by multipath and the |
|
|
The timeout to use for prioritizers and path checkers that issue SCSI commands with an explicit timeout, in seconds. The |
|
|
The number of seconds the SCSI layer waits after a problem is detected on an FC remote port, before failing I/O to devices on that remote port. This value must be smaller than the value of |
|
| The number of seconds the SCSI layer waits after a problem is detected on an FC remote port, before removing it from the system. Setting this to infinity will set this to 2147483647 seconds, or 68 years. The OS determines the default value. |
|
|
Specifies the maximum number of seconds the SCSI layer spends performing error handling, when SCSI devices fail. After this timeout, the scsi layer performs a full HBA reset. Setting this is necessary in cases where the |
|
The default value is | |
|
|
If this is set to |
|
If | |
|
The default value is | |
|
|
Specifies the |
|
The default value is device dependent: | |
|
|
If set to |
|
The default value is | |
|
|
If set to |
|
The default value is | |
|
|
Use the |
|
The default value of | |
|
|
This attribute controls the number of seconds the |
|
The default value is | |
|
|
If set to |
|
|
If you set all three of these attributes to integers greater than zero, they enable the |
|
See the Shaky paths detection section of the | |
|
The default value is | |
|
|
If |
|
If a path fails twice within the value set in the | |
|
See the Shaky paths detection section of the | |
|
The default value is | |
|
| Possible values include: |
|
| |
|
| |
|
| |
|
The | |
|
See the Shaky paths detection section of the | |
|
The default value is | |
|
|
If set to |
|
|
If set to |
|
|
Using this option, you can set the |
|
|
This attribute sets the number of seconds that multipath waits after creating a device with only ghost paths, before marking it ready for use in |
|
Setting this to | |
|
The default value is | |
|
| This attribute enables or disables foreign libraries. |
| The value is a regular expression. Foreign libraries are loaded if their name matches the expression. | |
|
By default, no foreign libraries are enabled. Use | |
|
|
If set to |
|
This option only works for SCSI devices with configuration to use the default | |
|
The default value is | |
|
|
This option sets the number of times multipath retries removing a device that is in use. Between each attempt, multipath becomes inactive for 1 second. The default value is |
|
|
If set to |
|
The default value is | |
|
|
The |
|
This parameter can also be set to | |
|
|
If this option is set to |
|
|
Controls when the |
|
| |
|
| |
|
|
5.3. Modifying multipath configuration file defaults
The default values that are set in the defaults section on the multipath.conf file, are used by DM Multipath unless they are overwritten by the attributes specified in the devices, multipath, or overrides sections of the multipath.conf file.
Procedure
View the
/etc/multipath.confconfiguration file, which includes a template of configuration defaults:#defaults { # polling_interval 10 # path_selector "round-robin 0" # path_grouping_policy multibus # uid_attribute ID_SERIAL # prio alua # path_checker readsector0 # rr_min_io 100 # max_fds 8192 # rr_weight priorities # failback immediate # no_path_retry fail # user_friendly_names yes #}Overwrite the default value for any of the configuration parameters. You can copy the relevant line from this template into the
defaultssection and uncomment it.For example, to overwrite the
path_grouping_policyparameter tomultibusinstead of the default value offailover, copy the appropriate line from the template to the initial defaults section of the configuration file, and uncomment it, as follows:defaults { user_friendly_names yes path_grouping_policy multibus }Validate the
/etc/multipath.conffile after modifying the multipath configuration file by running one of the following commands:To display any configuration errors, run:
# multipath -t > /dev/nullTo display the new configuration with the changes added, run:
# multipath -t
Reload the
/etc/multipath.conffile and reconfigure themultipathddaemon for changes to take effect:# service multipathd reload
5.4. Configuration file multipaths section
Set attributes of individual multipath devices by using the multipaths section of the /etc/multipath.conf configuration file. Device Mapper (DM) Multipath uses these attributes to override all other configuration settings, including those from the overrides section.
The multipaths section recognizes only the multipath subsection as an attribute. The following table shows the attributes that you can set in the multipath subsection, for each specific multipath device. These attributes apply only to one specified multipath. If several multipath subsections match a specific device World Wide Identifier (WWID), the contents of those subsections merge. The settings from latest entries have priority over any previous versions.
| Attribute | Description |
|---|---|
|
|
Specifies the WWID of the multipath device, to which the multipath attributes apply. This parameter is mandatory for this section of the |
|
|
Specifies the symbolic name for the multipath device, to which the multipath attributes apply. If you are using |
The following example shows multipath attributes specified in the configuration file for two specific multipath devices. The first device has a WWID of 3600508b4000156d70001200000b0000 and a symbolic name of yellow.
The second multipath device in the example has a WWID of 1DEC_321816758474 and a symbolic name of red.
Example 5.1. Multipath attributes specification
multipaths {
       multipath {
              wwid                  3600508b4000156d70001200000b0000
              alias                 yellow
              path_grouping_policy  multibus
              path_selector         "round-robin 0"
              failback              manual
              no_path_retry         5
       }
       multipath {
              wwid                  1DEC_321816758474
              alias                 red
        }
}5.5. Configuration file devices section
Use the devices section of the multipath.conf configuration file to define settings for individual storage controller types. Values set in this section overwrite specified values in the defaults section.
The system identifies the storage controller types by the vendor, product, and revision keywords. These keywords are regular expressions and must match the sysfs information about the specific device.
The devices section recognizes only the device subsection as an attribute. If there are multiple keyword matches for a device, the attributes of all matching entries apply to it. If an attribute is specified in several matching device subsections, later versions of entries have priority over any previous entries.
Configuration attributes in the latest version of the device subsections override attributes in any previous devices subsections and from the defaults section.
The following table shows the attributes that you can set in the device subsection.
| Attribute | Description |
|---|---|
|
| Specifies the regular expression to match the device vendor name. This is a mandatory attribute. |
|
| Specifies the regular expression to match the device product name. This is a mandatory attribute. |
|
| Specifies the regular expression to match the device product revision. If the revision attribute is missing, all device revisions match. |
|
|
Multipath uses this attribute to create a device |
|
| Shows the vendor specific Vital Product Data (VPD) page information, using the VPD page abbreviation. |
|
The | |
|
| Specifies the hardware handler to use for a particular device type. All possible values are hardware dependent and include: |
|
| |
|
| |
|
| |
|
| |
|
| |
|
The default value is |
Linux kernels, versions 4.3 and newer, automatically attach a device handler to known devices. This includes all devices supporting SCSI-3 ALUA). The kernel does not enable changing the handler later on. Setting the hardware_handler attribute for such devices on these kernels takes no effect.
5.6. Configuration file overrides section
The overrides section recognizes the optional protocol subsection, and can contain multiple protocol subsections. The system matches path devices against the protocol subsection, using the mandatory type attribute. Attributes in a matching protocol subsection have priority over attributes in the rest of the overrides section. If there are multiple matching protocol subsections, later entries have higher priority.
The protocol subsection recognizes the following mandatory attribute:
| Attribute | Description |
|---|---|
|
| Specifies the protocol string of the path device. Possible values include: |
|
| |
| This attribute is not a regular expression. The path device protocol string must match exactly. |
The attributes in the following list are optional for the protocol subsection. If you do not set them, default values from the overrides, devices or defaults sections apply.
-
fast_io_fail_tmo -
dev_loss_tmo -
eh_deadline
5.7. DM Multipath overrides of the device timeout
The recovery_tmo sysfs option controls the timeout for a particular iSCSI device. The following options globally override the recovery_tmo values:
-
The
replacement_timeoutconfiguration option globally overrides therecovery_tmovalue for all iSCSI devices. For all iSCSI devices that are managed by DM Multipath, the
fast_io_fail_tmooption in DM Multipath globally overrides therecovery_tmovalue.The
fast_io_fail_tmooption in DM Multipath also overrides thefast_io_fail_tmooption in Fibre Channel devices.
The DM Multipath fast_io_fail_tmo option takes precedence over replacement_timeout. Every time the multipathd service is reloaded, it resets recovery_tmo to the value of the fast_io_fail_tmo configuration option. Use the DM multipath fast_io_fail_tmo configuration option to override recovery_tmo in devices managed by DM Multipath.
5.8. Modifying multipath settings for specific devices
In the multipaths section of the multipath.conf configuration file, you can add configurations that are specific to an individual multipath device, referenced by the mandatory WWID parameter.
These defaults are used by DM Multipath and override attributes set in the overrides, defaults, and devices sections of the multipath.conf file. There can be any number of multipath subsections in the multipaths section.
Procedure
Modify the
multipathssection for specific multipath device. The following example shows multipath attributes specified in the configuration file for two specific multipath devices:-
The first device has a WWID of
3600508b4000156d70001200000b0000and a symbolic name ofyellow. -
The second multipath device in the example has a WWID of
1DEC_321816758474and a symbolic name ofred.
In this example, the
rr_weightattribute is set topriorities.multipaths { multipath { wwid 3600508b4000156d70001200000b0000 alias yellow path_grouping_policy multibus path_selector "round-robin 0" failback manual rr_weight priorities no_path_retry 5 } multipath { wwid 1DEC_321816758474 alias red rr_weight priorities } }-
The first device has a WWID of
Validate the
/etc/multipath.conffile after modifying the multipath configuration file by running one of the following commands:To display any configuration errors, run:
# multipath -t > /dev/nullTo display the new configuration with the changes added, run:
# multipath -t
Reload the
/etc/multipath.conffile and reconfigure themultipathddaemon for changes to take effect:# service multipathd reload
5.9. Modifying the multipath configuration for specific devices with protocol
You can configure multipath device paths, based on their transport protocol. By using the protocol subsection of the overrides section in the /etc/multipath.conf file, you can override the multipath configuration settings on certain paths. This enables access to multipath devices over multiple transport protocols, like Fiber Channel (FC) or Internet Small Computer Systems Interface (iSCSI).
Options set in the protocol subsection override values in the overrides, devices and defaults sections. These options apply only to devices using a transport protocol which matches the type parameter of the subsection.
Prerequisites
- You have configured Device Mapper (DM) multipath in your system.
- You have multipath devices where not all paths use the same transport protocol.
Procedure
View the specific path protocol by running the following:
# multipathd show paths format "%d %P"
dev protocol
sda scsi:ata
sdb scsi:fcp
sdc scsi:fcp
Edit the
overridessection of the/etc/multipath.conffile, by addingprotocolsubsections for each multipath type.The
overridessection can include multipleprotocolsubsections.ImportantThe
protocolsubsection must include atypeparameter. The configuration of all paths with a matchingtypeparameter is then updated with the rest of the parameters listed in theprotocolsubsection.Settings for path devices, which use the
scsi:fcpprotocol:overrides { dev_loss_tmo 60 fast_io_fail_tmo 8 protocol { type "scsi:fcp" dev_loss_tmo 70 fast_io_fail_tmo 10 eh_deadline 360 } }Settings for path devices, which use the
scsi:iscsiprotocol:overrides { dev_loss_tmo 60 fast_io_fail_tmo 8 protocol { type "scsi:iscsi" dev_loss_tmo 60 fast_io_fail_tmo 120 } }Settings for path devices, which use all other protocols:
overrides {
        dev_loss_tmo 60
        fast_io_fail_tmo 8
        protocol {
                type "<type of protocol>"
                dev_loss_tmo 60
                fast_io_fail_tmo 8
        }
}
5.10. Modifying multipath settings for storage controllers
The devices section of the multipath.conf configuration file sets attributes for individual storage devices. These attributes are used by DM Multipath unless they are overwritten by the attributes specified in the multipaths or overrides sections of the multipath.conf file for paths that contain the device. These attributes override the attributes set in the defaults section of the multipath.conf file.
Procedure
View the information about the default configuration value, including supported devices:
# multipathd show config
# multipath -t
Many devices that support multipathing are included by default in a multipath configuration.
-
Optional: If you need to modify the default configuration values, you can overwrite the default values by including an entry in the configuration file for the device that overwrites those values. You can copy the device configuration defaults for the device that the
multipathd show configcommand displays and override the values that you want to change. Add a device that is not configured automatically by default to the
devicessection of the configuration file by setting thevendorandproductparameters. Find these values by opening the/sys/block/device_name/device/vendorand/sys/block/device_name/device/modelfiles where device_name is the device to be multipathed, as mentioned in the following example:# cat /sys/block/sda/device/vendor WINSYS # cat /sys/block/sda/device/model SF2372Optional: Specify the additional parameters depending on your specific device:
active/activedevice-
Usually there is no need to set additional parameters in this case. If required, you might set
path_grouping_policytomultibus. Other parameters you may need to set areno_path_retryandrr_min_io. active/passivedevice-
If it automatically switches paths with I/O to the passive path, you need to change the checker function to one that does not send I/O to the path to test if it is working, otherwise, your device will keep failing over. This means that you have set the
path_checkertotur, which works for all SCSI devices that support the Test Unit Ready command, which most do.
If the device needs a special command to switch paths, then configuring this device for multipath requires a hardware handler kernel module. The current available hardware handler is
emc. If this is not sufficient for your device, you might not be able to configure the device for multipath.The following example shows a
deviceentry in the multipath configuration file:# } # device { # vendor "COMPAQ " # product "MSA1000 " # path_grouping_policy multibus # path_checker tur # rr_weight priorities # } #}Validate the
/etc/multipath.conffile after modifying the multipath configuration file by running one of the following commands:To display any configuration errors, run:
# multipath -t > /dev/nullTo display the new configuration with the changes added, run:
# multipath -t
Reload the
/etc/multipath.conffile and reconfigure themultipathddaemon for changes to take effect:# service multipathd reload
5.11. Setting multipath values for all devices
Using the overrides section of the multipath.conf configuration file, you can set a configuration value for all of your devices. This section supports all attributes that are supported by both the devices and defaults section of the multipath.conf configuration file, which is all of the devices section attributes except vendor, product, and revision.
DM Multipath uses these attributes for all devices unless they are overwritten by the attributes specified in the multipaths section of the multipath.conf file for paths that contain the device. These attributes override the attributes set in the devices and defaults sections of the multipath.conf file.
Procedure
Override device specific settings. For example, you might want all devices to set
no_path_retrytofail. Use the following command to turn off queueing, when all paths have failed. This overrides any device specific settings.overrides { no_path_retry fail }Validate the
/etc/multipath.conffile after modifying the multipath configuration file by running one of the following commands:To display any configuration errors, run:
# multipath -t > /dev/nullTo display the new configuration with the changes added, run:
# multipath -t
Reload the
/etc/multipath.conffile and reconfigure themultipathddaemon for changes to take effect:# service multipathd reload
Chapter 6. Preventing devices from multipathing
You can configure DM Multipath to ignore selected devices when it configures multipath devices. DM Multipath does not group these ignored devices into a multipath device.
6.1. Conditions when DM Multipath creates a multipath device for a path
DM Multipath has a set of default rules to determine whether to create a multipath device for a path or whether to ignore the path. You can configure the behavior.
If the find_multipaths configuration parameter is set to off, multipath always tries to create a multipath device for every path that is not explicitly disabled. If the find_multipaths configuration parameter is set to on, then multipath creates a device, only if one of following conditions is met:
- There are at least two paths with the same World-Wide Identification (WWID) that are not disabled.
-
You manually force the creation of the device by specifying a device with the
multipathcommand. - A path has the same WWID as a multipath device that was previously created even if that multipath device does not currently exist. Whenever a multipath device is created, multipath remembers the WWID of the device so that it automatically creates the device again as soon as it sees a path with that WWID. This allows you to have multipath automatically choose the correct paths to make into multipath devices, without having to disable multipathing on other devices.
If you have previously created a multipath device without using the find_multipaths parameter and then you later set the parameter to on, you might need to remove the WWIDs of any device you do not want created as a multipath device from the /etc/multipath/wwids file. The following example shows a sample /etc/multipath/wwids file. The WWIDs are enclosed by slashes (/):
# Multipath wwids, Version : 1.0
# NOTE: This file is automatically maintained by multipath and multipathd.
# You should not need to edit this file in normal circumstances.
#
# Valid WWIDs:
/3600d0230000000000e13955cc3757802/
/3600d0230000000000e13955cc3757801/
/3600d0230000000000e13955cc3757800/
/3600d02300069c9ce09d41c31f29d4c00/
/SWINSYS  SF2372         0E13955CC3757802/
/3600d0230000000000e13955cc3757803/
In addition to on and off, you can also set find_multipaths to the following values:
strict-
Multipath never accepts paths that have not previously been multipathed and are therefore not in the
/etc/multipath/wwidsfile. smart-
Multipath always accepts non-disabled devices in
udevas soon as they appear. Ifmultipathddoes not create the device within a timeout set with thefind_multipaths_timeoutparameter, it will release its claim on the device.
The built-in default value of find_multipaths is off. The default multipath.conf file created by mpathconf, however, will set the value of find_multipaths to on.
When the find_multipaths parameter is set to on, disable multipathing only on the devices with multiple paths that you do not want to be multipathed. Because of this, it will generally not be necessary to disable multipathing on devices.
If you add a previously created multipath device to blacklist, removing the WWID of that device from the /etc/multipath/wwids file by using the -w option can help avoid issues with other programs. For example, to remove the device /dev/sdb with WWID 3600d0230000000000e13954ed5f89300 from the /etc/multipath/wwids file, you can use either of the following methods.
Removing a multipath device by using the device name.
# multipath -w /dev/sdb
wwid '3600d0230000000000e13954ed5f89300' removed
Removing a multipath device by using the WWID of the device.
# multipath -w 3600d0230000000000e13954ed5f89300
wwid '3600d0230000000000e13954ed5f89300' removed
You can also use the -W option to update the /etc/multipath/wwids file. This would reset the /etc/multipath/wwids file to only include the WWIDs of the current multipath devices. To reset the file, run the following:
# multipath -W
successfully reset wwids6.2. Criteria for disabling multipathing on certain devices
You can disable multipathing on devices by any of the following criteria:
- WWID
- device name
- device type
- property
- protocol
By default, a variety of device types are disabled, even after you comment out the initial blacklist section of the configuration file.
For every device, DM Multipath evaluates these criteria in the following order:
-
property -
devnode -
device -
protocol -
wwid
If a device turns out to be disabled by any of the mentioned criteria, DM Multipath excludes it from handling by multipathd, and does not evaluate the later criteria. For each criteria, the exception list takes precedence over the list of disabled devices, if a device matches both.
6.3. Disabling multipathing by WWID
You can disable multipathing on individual devices by their World-Wide Identification (WWID).
Procedure
Find WWID of a device:
# multipathd show paths raw format "%d %w" | grep sdb
sdb 3600508b4001080520001e00011700000
Disable devices in the
/etc/multipath.confconfiguration file using thewwidentry.The following example shows the lines in the DM Multipath configuration file that disable a device with a WWID of
3600508b4001080520001e00011700000:blacklist { wwid 3600508b4001080520001e00011700000 }Validate the
/etc/multipath.conffile after modifying the multipath configuration file by running one of the following commands:To display any configuration errors, run:
# multipath -t > /dev/nullTo display the new configuration with the changes added, run:
# multipath -t
Reload the
/etc/multipath.conffile and reconfigure themultipathddaemon for changes to take effect:# service multipathd reload
6.4. Disabling multipathing by device name
You can disable multipathing on device types by device name, so that DM Multipath will not group them into a multipath device.
Procedure
Display device information:
# udevadm info --query=all -n /dev/mapper/sd*Disable devices in the
/etc/multipath.confconfiguration file using thedevnodeentry.The following example shows the lines in the DM Multipath configuration file that disable all SCSI devices, because it disables all
sd*devices as well:blacklist { devnode "^sd[a-z]" }You can use a
devnodeentry to disable individual devices rather than all devices of a specific type. However, this is not recommended because unless it is statically mapped byudevrules, there is no guarantee that a specific device will have the same name on reboot. For example, a device name could change from/dev/sdato/dev/sdbon reboot.By default, DM Multipath disables all devices that are not SCSI, NVMe, or DASD, using the following
devnodeentry:blacklist { devnode "!^(sd[a-z]|dasd[a-z]|nvme[0-9])" }The devices that this entry disables do not generally support DM Multipath.
Validate the
/etc/multipath.conffile after modifying the multipath configuration file by running one of the following commands:To display any configuration errors, run:
# multipath -t > /dev/nullTo display the new configuration with the changes added, run:
# multipath -t
Reload the
/etc/multipath.conffile and reconfigure themultipathddaemon for changes to take effect:# service multipathd reload
6.5. Disabling multipathing by device type
You can disable multipathing on devices by using the device section.
Procedure
Display device type:
# multipathd show paths raw format "%d %s" | grep sdb
sdb HP,HSV210
Disable devices in the
/etc/multipath.confconfiguration file using thedevicesection.The following example disables multipathing on all IBM DS4200 and HP devices:
blacklist {
       device {
               vendor  "IBM"
               product "3S42"       #DS4200 Product 10
       }
       device {
               vendor  "HP"
               product ".*"
       }
}
Validate the
/etc/multipath.conffile after modifying the multipath configuration file by running one of the following commands:To display any configuration errors, run:
# multipath -t > /dev/nullTo display the new configuration with the changes added, run:
# multipath -t
Reload the
/etc/multipath.conffile and reconfigure themultipathddaemon for changes to take effect:# service multipathd reload
6.6. Disabling multipathing by udev property
You can disable multipathing on devices by their udev property parameter.
Procedure
Display the
udevvariables for a device:# udevadm info --query=all -n /dev/sdbDisable devices in the
/etc/multipath.confconfiguration file using thepropertyparameter. This parameter is a regular expression string that matches against theudevenvironment variable name for the devices.The following example disables multipathing on all devices with the
udevpropertyID_ATA:blacklist { property "ID_ATA" }Validate the
/etc/multipath.conffile after modifying the multipath configuration file by running one of the following commands:To display any configuration errors, run:
# multipath -t > /dev/nullTo display the new configuration with the changes added, run:
# multipath -t
Reload the
/etc/multipath.conffile and reconfigure themultipathddaemon for changes to take effect:# service multipathd reload
6.7. Disabling multipathing by device protocol
You can disable multipathing on devices by using the device protocol.
Procedure
Optional: View the protocol that a path is using:
# multipathd show paths raw format "%d %P" | grep sdb
sdb scsi:fcp
Disable devices in the
/etc/multipath.confconfiguration file using theprotocolparameter.The
protocolparameter takes a regular expression and blacklists all devices with matching protocol strings. For example, to disable multipathing on all nvme devices, use the following:blacklist { protocol "nvme" }DM Multipath recognizes the
protocolstrings such asscsi:fcp,scsi:spi,scsi:ssa,scsi:sbp,scsi:srp,scsi:iscsi,scsi:sas,scsi:adt,scsi:ata,scsi:unspec,ccw,cciss,nvme:pcie,nvme:rdma,nvme:fc,nvme:tcp,nvme:loop,nvme:apple-nvme,nvme:unspec, andundef.Validate the
/etc/multipath.conffile after modifying the multipath configuration file by running one of the following commands:To display any configuration errors, run:
# multipath -t > /dev/nullTo display the new configuration with the changes added, run:
# multipath -t
Reload the
/etc/multipath.conffile and reconfigure themultipathddaemon for changes to take effect:# service multipathd reload
6.8. Adding exceptions for devices with disabled multipathing
You can enable multipathing by adding exceptions on devices where multipathing is currently disabled.
Prerequisites
- Multipathing is disabled on certain devices.
Procedure
Enable multipathing on the devices using the
blacklist_exceptionssection of the/etc/multipath.confconfiguration file.When specifying devices in the
blacklist_exceptionssection of the configuration file, you must specify the exceptions using the same criteria as they were specified in theblacklistsection. For example, a WWID exception does not apply to devices disabled by adevnodeentry, even if the disabled device is associated with that WWID. Similarly,devnodeexceptions apply only todevnodeentries, anddeviceexceptions apply only to device entries.Example 6.1. An exception by WWID
If you have a large number of devices and want to multipath only one of them with the WWID of
3600d0230000000000e13955cc3757803, instead of individually disabling each of the devices except the one you want, you could disable all of them, and then enable only the one you want by adding the following lines to the/etc/multipath.conffile:blacklist { wwid ".*" } blacklist_exceptions { wwid "3600d0230000000000e13955cc3757803" }Alternatively, you could use an exclamation mark (
!) to invert theblacklistentry, which disables all devices except the specified WWID:blacklist { wwid "!3600d0230000000000e13955cc3757803" }Example 6.2. An exception by udev property
The
propertyparameter works differently than the otherblacklist_exceptionparameters. The value of thepropertyparameter must match the name of a variable in theudevdatabase. Otherwise, the device is disabled. Using this parameter, you can disable multipathing on certain SCSI devices, such as USB sticks and local hard drives.To enable multipathing only on SCSI devices that could reasonably be multipathed, set this parameter to
(SCSI_IDENT_|ID_WWN)as in the following example:blacklist_exceptions { property "(SCSI_IDENT_|ID_WWN)" }Validate the
/etc/multipath.conffile after modifying the multipath configuration file by running one of the following commands:To display any configuration errors, run:
# multipath -t > /dev/nullTo display the new configuration with the changes added, run:
# multipath -t
Reload the
/etc/multipath.conffile and reconfigure themultipathddaemon for changes to take effect:# service multipathd reload
Chapter 7. Managing multipathed volumes
You can manage multipath volumes by using the multipath, dmsetup, and multipathd commands, which are provided by DM Multipath.
7.1. Resizing an online multipath device
You can resize an online multipath device and a file system using the multipad and resize2fs commands .
Procedure
- Resize your physical device.
Find the paths to the logical unit number (LUN):
# multipath -lResize your paths. For SCSI devices, writing a 1 to the
rescanfile for the device causes the SCSI driver to rescan, as in the following command:# echo 1 > /sys/block/path_device/device/rescanEnsure that you run this command for each of the path devices. For example, if your path devices are
sda,sdb,sde, andsdf, run the following commands:# echo 1 > /sys/block/sda/device/rescan # echo 1 > /sys/block/sdb/device/rescan # echo 1 > /sys/block/sde/device/rescan # echo 1 > /sys/block/sdf/device/rescanResize your multipath device:
# multipathd resize map multipath_deviceResize the file system, assuming no LVM or DOS partitions are used:
# resize2fs /dev/mapper/mpatha
7.2. Moving a root file system from a single path device to a multipath device
If you have installed your system on a single-path device and later added another path to the root file system, move your root file system to a multipathed device.
Prerequisites
-
You have installed the
device-mapper-multipathpackage.
Procedure
Create the
/etc/multipath.confconfiguration file:# mpathconf --enableEnable the
multipathdservice:# systemctl enable multipathd.service-
If the
find_multipathsconfiguration parameter is not set toon, edit theblacklistandblacklist_exceptionssections of the/etc/multipath.conffile, as described in Preventing devices from multipathing. Add the WWID of the device to the
/etc/multipath/wwidsfile:# multipath -a /dev/sdb wwid '3600d02300069c9ce09d41c4ac9c53200' addedReplace /dev/sdb with the root device name.
Confirm that your configuration file is set up correctly:
# multipath -d 3600d02300069c9ce09d41c4ac9c53200
: mpatha (3600d02300069c9ce09d41c4ac9c53200) undef 3PARdata,VV
size=446M features='1 queue_if_no_path' hwhandler='1 alua' wp=undef
`-+- policy='service-time 0' prio=50 status=undef
  `- 5:0:0:0 sdb 8:16 undef ready running
Replace 3600d02300069c9ce09d41c4ac9c53200 with the WWID of your swap device.
Rebuild the
initramfsfile system withmultipath:# dracut --force --add multipath- Shut the machine down.
- Boot the machine.
- Make the other paths visible to the machine.
Verification
Check whether the multipath device is created by running the following command:
# multipath -l | grep 3600d02300069c9ce09d41c4ac9c53200
mpatha (3600d02300069c9ce09d41c4ac9c53200) dm-0 3PARdata,VV
7.3. Moving a swap file system from a single path device to a multipath device
By default, swap devices are set up as logical volumes. This does not require any special procedure for configuring them as multipath devices if you set up multipathing on the physical volumes that constitute the logical volume group. If your swap device is not an LVM volume, however, and it is mounted by device name, you might need to edit the /etc/fstab file to switch to the appropriate multipath device name.
Procedure
Create the
/etc/multipath.confconfiguration file:# mpathconf --enableEnable the
multipathdservice:# systemctl enable multipathd.service-
If the
find_multipathsconfiguration parameter is not set toon, edit theblacklistandblacklist_exceptionssections of the/etc/multipath.conffile, as described in Preventing devices from multipathing. Add the WWID of the device to the
/etc/multipath/wwidsfile:# multipath -a /dev/sdb wwid '3600d02300069c9ce09d41c4ac9c53200' addedReplace /dev/sdb with the swap device name.
Confirm that your configuration file is set up correctly:
# multipath -d 3600d02300069c9ce09d41c4ac9c53200
: mpatha (3600d02300069c9ce09d41c4ac9c53200) undef 3PARdata,VV
size=446M features='1 queue_if_no_path' hwhandler='1 alua' wp=undef
`-+- policy='service-time 0' prio=50 status=undef
  `- 5:0:0:0 sdb 8:16 undef ready running
Replace 3600d02300069c9ce09d41c4ac9c53200 with the WWID of your swap device.
Set up an alias for the swap device in the
/etc/multipath.conffile:multipaths { multipath { wwid WWID_of_swap_device alias swapdev } }Edit the
/etc/fstabfile and replace the old device path to the root device with the multipath device.For example, if you had the following entry in the
/etc/fstabfile:/dev/sdb2 swap swap defaults 0 0Change the entry to the following:
/dev/mapper/swapdev swap swap defaults 0 0Rebuild the initramfs file system with multipath:
# dracut --force --add multipath- Shut the machine down.
- Boot the machine.
- Make the other paths visible to the machine.
Verification
Verify if the swap device is on the multipath device:
# swapon -s

Filename                Type          Size Used    Priority
/dev/dm-3               partition     4169724 0    -2
The file name should match the multipath swap device.
# readlink -f /dev/mapper/swapdev
/dev/dm-3
7.4. Determining device mapper entries for multipath devices
You can use the multipathd command to discover which device mapper entries match the multipathed devices.
Procedure
Display all device mapper devices:
# multipathd show maps format "%n %d"

name   sysfs
mpathd dm-4
mpathb dm-3
mpatha dm-2
mpathh dm-9
7.5. Administering the multipathd daemon
The multipathd commands can be used to administer the multipathd daemon.
Procedure
View the default format for the output of the
multipathd show mapscommand:# multipathd show maps name sysfs uuid mpathc dm-0 360a98000324669436c2b45666c567942Some
multipathdcommands include aformatoption followed by a wildcard. Display a list of available wildcards with the following command:# multipathd show wildcards multipath format wildcards: %n name %w uuid %d sysfs ...Display the multipath devices that
multipathdis monitoring. Use wildcards to specify the shown fields:# multipathd show maps format "%n %w %d %s" name uuid sysfs vend/prod/rev mpathc 360a98000324669436c2b45666c567942 dm-0 NETAPP,LUNDisplay the paths that
multipathdis monitoring. Use wildcards to specify the shown fields:# multipathd show paths format "%n %w %d %s" target WWNN uuid dev vend/prod/rev 0x50001fe1500d2250 3600508b4001080520001e00011700000 sdb HP,HSV210Display data in a raw format:
# multipathd show maps raw format "%n %w %d %s"
mpathc 360a98000324669436c2b45666c567942 dm-0 NETAPP,LUN
In raw format, no headers are printed and the fields are not padded to align the columns with the headers. This output can be more easily used for scripting.
Chapter 8. Removing storage devices
You can safely remove a storage device from a running system, which helps prevent system memory overload and data loss. Do not remove a storage device on a system where:
- Free memory is less than 5% of the total memory in more than 10 samples per 100.
-
Swapping is active (non-zero
siandsocolumns in thevmstatcommand output).
Prerequisites
Before you remove a storage device, ensure that you have enough free system memory due to the increased system memory load during an I/O flush. Use the following commands to view the current memory load and free memory of the system:
# vmstat 1 100
# free
8.1. Safe removal of storage devices
Safely removing a storage device from a running system requires a top-to-bottom approach. Start from the top layer, which typically is an application or a file system, and work towards the bottom layer, which is the physical device.
You can use storage devices in multiple ways, and they can have different virtual configurations on top of physical devices. For example, you can group multiple instances of a device into a multipath device, make it part of a RAID, or you can make it part of an LVM group. Additionally, devices can be accessed via a file system, or they can be accessed directly such as a “raw" device.
While using the top-to-bottom approach, you must ensure that:
- the device that you want to remove is not in use
- all pending I/O to the device is flushed
- the operating system is not referencing the storage device
8.2. Removing block devices and associated metadata
To safely remove a block device from a running system, to help prevent system memory overload and data loss you need to first remove metadata from them. Address each layer in the stack, starting with the file system, and proceed to the disk. These actions prevent putting your system into an inconsistent state.
Use specific commands that may vary depending on what type of devices you are removing:
-
lvremove,vgremoveandpvremoveare specific to LVM. -
For software RAID, run
mdadmto remove the array. For more information, see Managing RAID. - For block devices encrypted using LUKS, there are specific additional steps. The following procedure will not work for the block devices encrypted using LUKS. For more information, see Encrypting block devices using LUKS.
Rescanning the SCSI bus or performing any other action that changes the state of the operating system, without following the procedure documented here can cause delays due to I/O timeouts, devices to be removed unexpectedly, or data loss.
Prerequisites
- You have an existing block device stack containing the file system, the logical volume, and the volume group.
- You ensured that no other applications or services are using the device that you want to remove.
- You backed up the data from the device that you want to remove.
Optional: If you want to remove a multipath device, and you are unable to access its path devices, disable queueing of the multipath device by running the following command:
# multipathd disablequeueing map multipath-deviceThis enables the I/O of the device to fail, allowing the applications that are using the device to shut down.
Removing devices with their metadata one layer at a time ensures no stale signatures remain on the disk.
Procedure
Unmount the file system:
# umount /mnt/mount-pointRemove the file system:
# wipefs -a /dev/vg0/myvolIf you have added an entry into the
/etc/fstabfile to make a persistent association between the file system and a mount point, edit/etc/fstabat this point to remove that entry.Continue with the following steps, depending on the type of the device you want to remove:
Remove the logical volume (LV) that contained the file system:
# lvremove vg0/myvolIf there are no other logical volumes remaining in the volume group (VG), you can safely remove the VG that contained the device:
# vgremove vg0Remove the physical volume (PV) metadata from the PV device(s):
# pvremove /dev/sdc1# wipefs -a /dev/sdc1Remove the partitions that contained the PVs:
# parted /dev/sdc rm 1Remove the partition table if you want to fully wipe the device:
# wipefs -a /dev/sdcExecute the following steps only if you want to physically remove the device:
If you are removing a multipath device, execute the following commands:
View all the paths to the device:
# multipath -lThe output of this command is required in a later step.
Flush the I/O and remove the multipath device:
# multipath -f multipath-device
If the device is not configured as a multipath device, or if the device is configured as a multipath device and you have previously passed I/O to the individual paths, flush any outstanding I/O to all device paths that are used:
# blockdev --flushbufs deviceThis is important for devices accessed directly where the
umountorvgreducecommands do not flush the I/O.If you are removing a SCSI device, execute the following commands:
-
Remove any reference to the path-based name of the device, such as
/dev/sd,/dev/disk/by-path, or themajor:minornumber, in applications, scripts, or utilities on the system. This ensures that different devices added in the future are not mistaken for the current device. Remove each path to the device from the SCSI subsystem:
# echo 1 > /sys/block/device-name/device/deleteHere the
device-nameis retrieved from the output of themultipath -lcommand, if the device was previously used as a multipath device.
-
Remove any reference to the path-based name of the device, such as
- Remove the physical device from a running system. Note that the I/O to other devices does not stop when you remove this device.
Verification
Verify that the devices you intended to remove are not displaying on the output of
lsblkcommand. The following is an example output:# lsblk NAME MAJ:MIN RM SIZE RO TYPE MOUNTPOINT sda 8:0 0 5G 0 disk sr0 11:0 1 1024M 0 rom vda 252:0 0 10G 0 disk |-vda1 252:1 0 1M 0 part |-vda2 252:2 0 100M 0 part /boot/efi `-vda3 252:3 0 9.9G 0 part /
Chapter 9. Troubleshooting DM Multipath
If you have trouble implementing a multipath configuration, there are a variety of issues you can check for. The following issues may result in a slow or non-functioning multipath configuration:
- The multipath daemon is not running
-
If you find you have trouble implementing a multipath configuration, ensure that the
multipathddaemon is running, as described in Configuring DM Multipath. Themultipathddaemon must be running to use multipathed devices. - Issues with
queue_if_no_pathfeature -
If a multipath device is configured with the
features "1 queue_if_no_path"option, then any process that issues I/O hangs until one or more paths are restored.
9.1. Troubleshooting issues with queue_if_no_path feature
If a multipath device is configured with the features "1 queue_if_no_path" option, then any process that issues I/O hangs until one or more paths are restored. To avoid this, set the no_path_retry N parameter in the /etc/multipath.conf file, where N is the number of times the system should retry a path.
To use the features "1 queue_if_no_path" option without the described problem, you can disable the queueing policy at runtime for a particular LUN, for which all paths are unavailable.
Procedure
Disable queueing:
For a specific device:
# multipathd disablequeueing map deviceFor all devices:
# multipathd disablequeueing mapsAfter you disable queueing, it will remain disabled until you restart or reload
multipathd.
Reset queueing to a previous value:
For a specific device:
# multipathd restorequeueing map deviceFor all devices:
# multipathd restorequeueing maps
9.2. Troubleshooting with the multipathd interactive console
The multipathd -k command is an interactive interface to the multipathd daemon. Entering this command brings up an interactive multipath console. After executing this command, you can enter help to get a list of available commands and Ctrl+D to quit.
Use the multipathd interactive console to troubleshoot problems you might have with your system.
Procedure
Display the multipath configuration, including the default values, before exiting the console:
# multipathd -k
multipathd> show config
multipathd> Ctrl+D
Ensure that multipath picked up all changes to the
multipath.conffile:# multipathd -k multipathd> reconfigure multipathd> Ctrl+DEnsure that the path checker is working properly:
# multipathd -k
multipathd> show paths
multipathd> Ctrl+D
You can also run a single
multipathdinteractive command directly from the command line, without starting the interactive console. For example, to check that multipath picks up all changes to themultipath.conffile, run the following command:# multipathd reconfigure
Chapter 10. Configuring maximum time for storage error recovery with eh_deadline
You can configure the maximum allowed time to recover failed SCSI devices. This configuration guarantees an I/O response time even when storage hardware becomes unresponsive due to a failure.
10.1. The eh_deadline parameter
The SCSI error handling (EH) mechanism attempts to perform error recovery on failed SCSI devices. The SCSI host object eh_deadline parameter enables you to configure the maximum amount of time for the recovery. After the configured time expires, SCSI EH stops and resets the entire host bus adapter (HBA).
Using eh_deadline can reduce the time:
- to shut off a failed path,
- to switch a path, or
- to disable a RAID slice.
When eh_deadline expires, SCSI EH resets the HBA, which affects all target paths on that HBA, not only the failing one. If some of the redundant paths are not available for other reasons, I/O errors might occur. Enable eh_deadline only if you have multipath configured on all targets. Also, if your multipath devices are not fully redundant, you should verify that no_path_retry is set large enough to allow paths to recover.
The value of the eh_deadline parameter is specified in seconds. The default setting is off, which disables the time limit and allows all of the error recovery to take place.
Scenarios when eh_deadline is useful
In most scenarios, you do not need to enable eh_deadline. Using eh_deadline can be useful in certain specific scenarios. For example if a link loss occurs between a Fibre Channel (FC) switch and a target port, and the HBA does not receive Registered State Change Notifications (RSCNs). In such a case, I/O requests and error recovery commands all time out rather than encounter an error. Setting eh_deadline in this environment puts an upper limit on the recovery time. That enables the failed I/O to be retried on another available path by DM Multipath.
Under the following conditions, the eh_deadline parameter provides no additional benefit, because the I/O and error recovery commands fail immediately, which enables DM Multipath to retry:
- If RSCNs are enabled
- If the HBA does not register the link becoming unavailable
10.2. Setting the eh_deadline parameter
You can configure the value of the eh_deadline parameter to limit the maximum SCSI recovery time.
Procedure
You can configure
eh_deadlineusing either of the following methods:defaultssection of themultpath.conffileFrom the defaults section of the
multpath.conffile, set theeh_deadlineparameter to the required number of seconds:# eh_deadline 300NoteFrom RHEL 8.4, setting the
eh_deadlineparameter using the defaults section of themultpath.conffile is the preferred method.To turn off the
eh_deadlineparameter with this method, seteh_deadlinetooff.sysfsWrite the number of seconds into the
/sys/class/scsi_host/host<host-number>/eh_deadlinefiles. For example, to set theeh_deadlineparameter throughsysfson SCSI host 6:# echo 300 > /sys/class/scsi_host/host6/eh_deadlineTo turn off the
eh_deadlineparameter with this method, use echooff.Kernel parameter
Set a default value for all SCSI HBAs using the
scsi_mod.eh_deadlinekernel parameter.# echo 300 > /sys/module/scsi_mod/parameters/eh_deadlineTo turn off the
eh_deadlineparameter with this method, use echo-1.