Customizing the GNOME desktop environment
Customizing the GNOME desktop environment on Red Hat Enterprise Linux 9
Abstract
Preface
To function properly, GNOME requires your system to support 3D acceleration. This includes bare metal systems, as well as hypervisor solutions such as VMWare.
If GNOME does not start or performs poorly on your VMWare virtual machine (VM), see Why does the GUI fail to start on my VMware virtual machine? (Red Hat Knowledgebase)
Providing feedback on Red Hat documentation
We are committed to providing high-quality documentation and value your feedback. To help us improve, you can submit suggestions or report errors through the Red Hat Jira tracking system.
Procedure
Log in to the Jira website.
If you do not have an account, select the option to create one.
- Click Create in the top navigation bar.
- Enter a descriptive title in the Summary field.
- Enter your suggestion for improvement in the Description field. Include links to the relevant parts of the documentation.
- Click Create at the bottom of the dialogue.
Chapter 1. Enabling desktop icons
You can enable the desktop icons functionality and move files to the desktop.
1.1. Desktop icons in RHEL 9
Desktop icons are provided by the Desktop icons GNOME Shell extension, which is available from the gnome-shell-extension-desktop-icons package.
Desktop icons in GNOME Classic
The GNOME Classic environment includes the gnome-shell-extension-desktop-icons package by default. Desktop icons are always on, and you cannot turn them off.
Desktop icons in GNOME Standard
In GNOME Standard, desktop icons are disabled by default.
To enable desktop icons in the GNOME Standard environment, you must install the gnome-shell-extension-desktop-icons package.
1.2. Enabling desktop icons in GNOME Standard
This procedure enables the desktop icons functionality in the GNOME Standard environment.
Prerequisites
The Extensions application is installed on the system:
# dnf install gnome-shell-extension-desktop-icons
Procedure
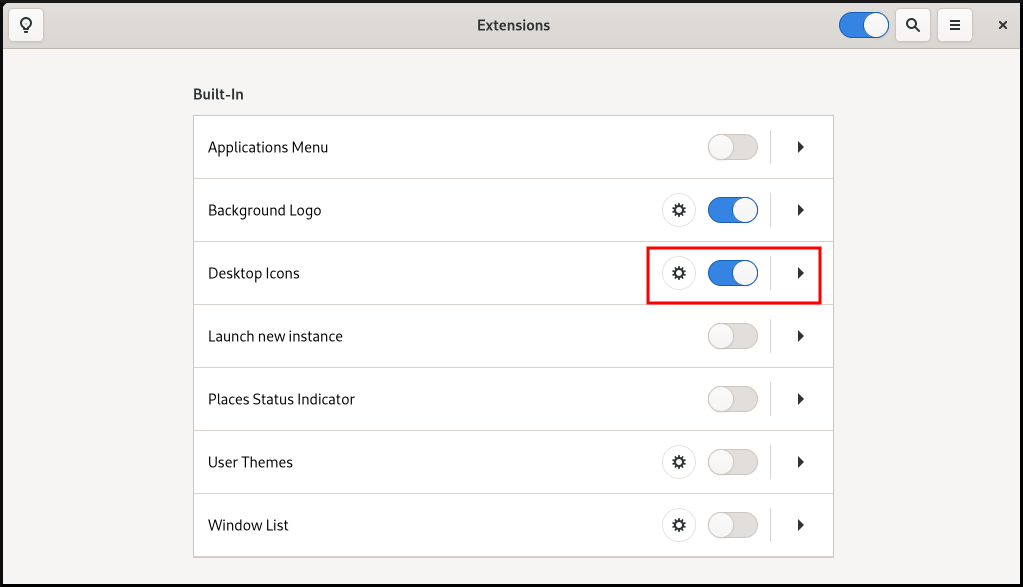
- Open the Extensions application.
Enable the Desktop Icons extension.
1.3. Creating a desktop icon for a file
This procedure creates a desktop icon for an existing file.
Prerequisites
- The Desktop icons extension is enabled.
Procedure
Move the selected file into the
~/Desktop/directory.
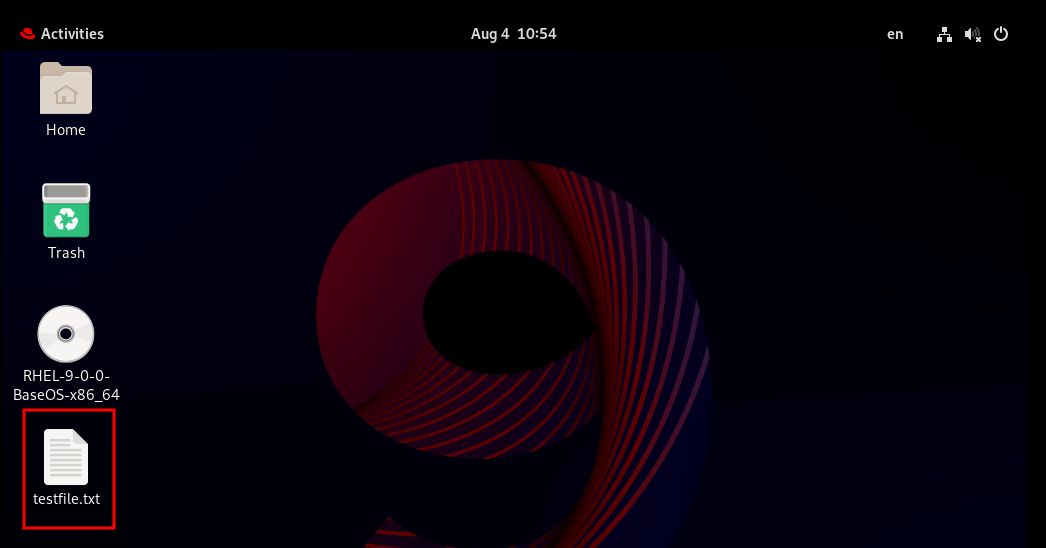
Verification
Check that the icon for the file appears on the desktop.
Chapter 2. Setting up startup applications in GNOME
In the GNOME desktop environment, you can add applications to start automatically upon logging in, meaning that the application launches automatically every time you log into your GNOME desktop session.
2.1. Launching an application automatically on login
You can set applications to launch automatically on login using the Tweaks tool. Tweaks is a tool to customize the GNOME Shell environment for a particular user.
Prerequisites
-
You have installed
gnome-tweakson your system. For more details, see Installing software in GNOME - You have installed the application that you want to launch at login.
Procedure
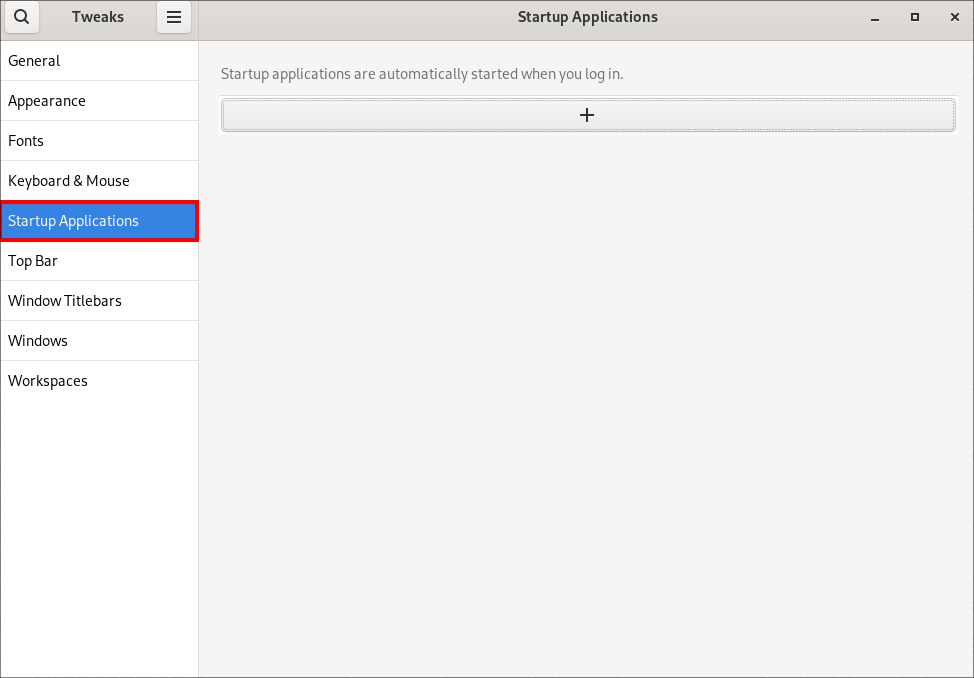
- Open Tweaks. For more details see Launching applications in GNOME.
Select Startup Applications in the left side bar.
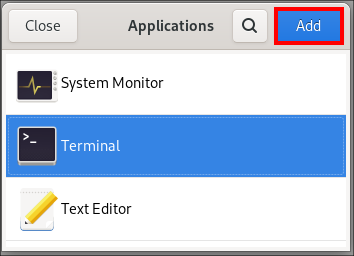
Click the plus sign button ().
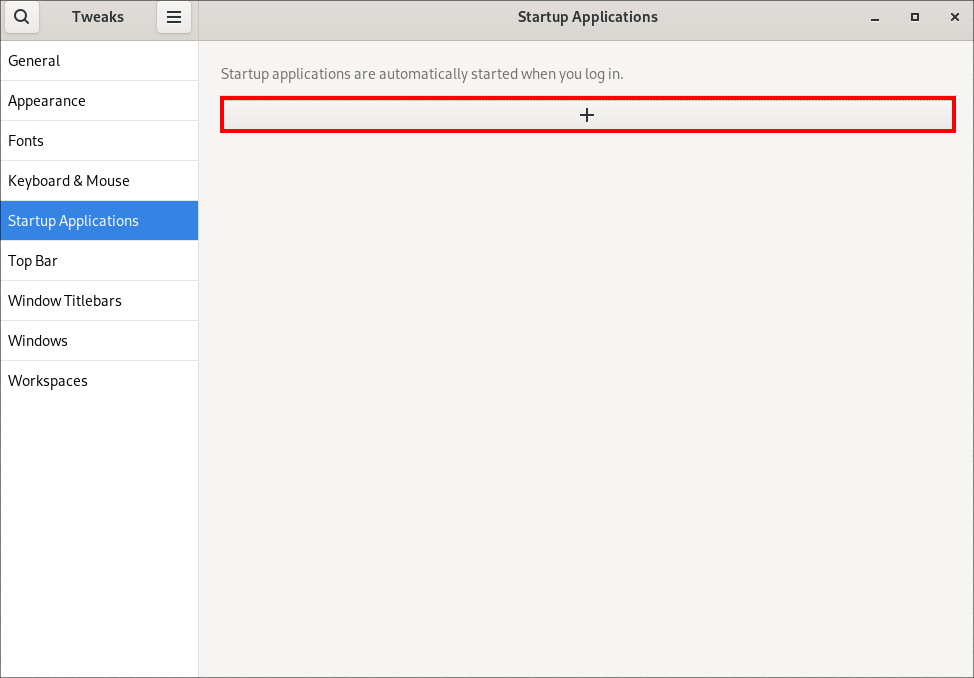
Select an application from the list of available applications and click .
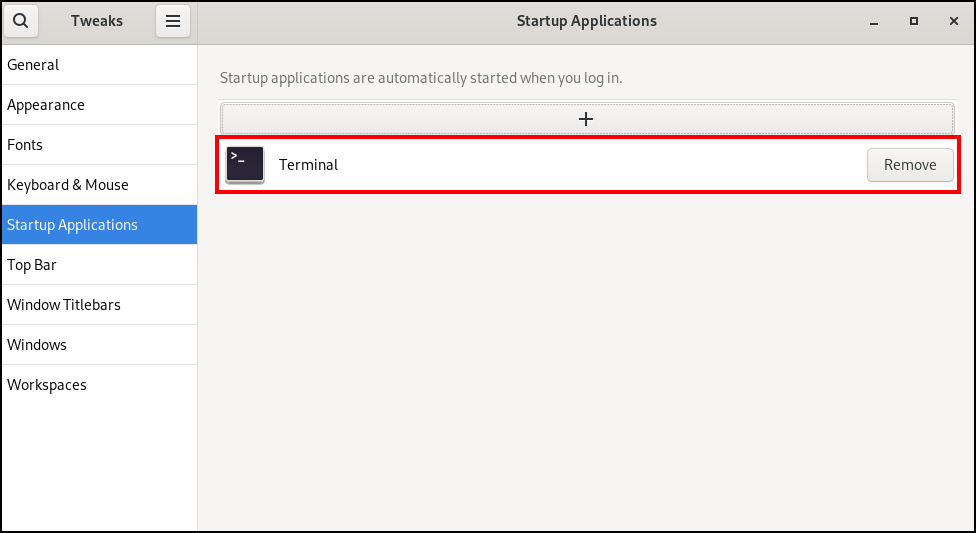
Verification
- Open Tweaks.
- Select Startup Applications in the left side bar.
List of applications launched at start will be present in the center section.
2.2. Enabling startup applications for another user in GNOME
You can set up a startup application to run for specific users on a system. This will automatically start the specified application for the target user when they log in.
Prerequisites
- Administrative access.
Procedure
-
Locate the
.desktopfile in the/usr/share/applications/directory that corresponds to the application you want to start automatically. As the
rootuser, copy the.desktopfile to the/home/<targetuser>/.config/autostart/directory:# cp /usr/share/applications/<yourapp>.desktop /home/<targetuser>/.config/autostart/Replace
<yourapp>with the name of your application. Replace<targetuser>with the username.Ensure that the
.desktopfile is owned by the target user and has the correct permissions:# chown <targetuser>:<targetuser> /home/<targetuser>/.config/autostart/<yourapp>.desktop # chmod 644 /home/<targetuser>/.config/autostart/<yourapp>.desktopReplace
<targetuser>with the username. Replace<yourapp>.desktopwith the.desktopfile you copied.
Verification
-
The target user should log out of their GNOME session and log back in. The application specified in the
.desktopfile should start automatically.
2.3. Enabling system-wide startup applications for all users in GNOME
You can set up a startup application to run for all users on a system by placing the .desktop file in a system-wide directory that is accessible to all users. This will automatically start the specified application for every user who logs in.
Prerequisites
- Administrative access.
Procedure
-
Locate the
.desktopfile in the/usr/share/applications/directory that corresponds to the application you want to start automatically. As the
rootuser, copy the.desktopfile to the/etc/xdg/autostart/directory:# cp /usr/share/applications/<yourapp>.desktop /etc/xdg/autostart/Replace
<yourapp>with the name of your application.Ensure that the
.desktopfile has the correct permissions to be read by all users:# chmod 644 /etc/xdg/autostart/<yourapp>.desktopReplace
<yourapp>.desktopwith the.desktopfile you copied.
Verification
-
Users on the system should log out of their sessions and log back in. The application specified in the system-wide
.desktopfile should start automatically.
Chapter 3. Enabling automatic login
You can enable automatic login in order to streamline your computing experience, avoiding the need to repeatedly enter your password during every session startup. This can be convenient for single-user environments where security risks are minimal, such as on a personal home computer that is not shared with others.
Enabling automatic login poses security risks. It allows direct access to the user account without requiring a password. This might lead to unauthorized use of the system or sensitive data. This risk is significant when the computer is shared, in public spaces, or physically accessible.
Consider whether the login convenience outweighs the potential compromise of security and privacy.
Procedure
- Open Settings.
- Click Users.
- Select the button and enter your password.
- Toggle the switch to enable automatic login.
Once you have enabled automatic login, your computer will automatically log in to the specified user account the next time you start it up.
Chapter 4. Enabling automatic suspension
Enabling automatic suspension provides benefits in terms of energy conservation by ensuring that your system goes into a lower power state after a period of inactivity. This feature helps reduce power consumption when your computer is not in use, potentially prolonging the battery life of your device.
Procedure
- Open Settings.
- Click Power.
- Choose Automatic Suspend.
- Toggle the switch to enable automatic logout.
Set the desired time interval for automatic logout after inactivity.
This interval defines how long your system remains idle before automatically logging you out.
Chapter 5. Enabling automatic screen lock
Enabling automatic screen lock is a security measure that helps protect your computer when it is left unattended. This feature ensures that your screen is locked after a specified period of inactivity, requiring a password or authentication to regain access.
Procedure
- Open Settings.
- Click Privacy.
- Choose Screen Lock.
- Toggle the switch to enable automatic screen lock.
Set the desired time interval for automatic screen lock delay.
This interval defines how long your screen stays active after itthe screen is automatically locked.
Chapter 6. Changing how your system behaves when you close the laptop lid
When you close the lid of your laptop, it suspends by default to save battery. You can customize this behavior according to your preferences.
- WARNING
- Some laptops can overheat if they are left running with the lid closed, especially in confined spaces. Consider whether changing this setting is safe for your laptop, especially if you intend to keep the laptop running with the lid closed for extended periods of time.
Prerequisites
- Administrative access.
Procedure
-
Open the
/etc/systemd/logind.confconfiguration file. -
Look for the line that says
HandleLidSwitch=suspend. -
If the line starts with the
#symbol, remove it to enable the setting. Replace
suspendwith one of the following options:-
poweroffto shut down the computer. -
lockto lock the screen. -
ignoreto do nothing.
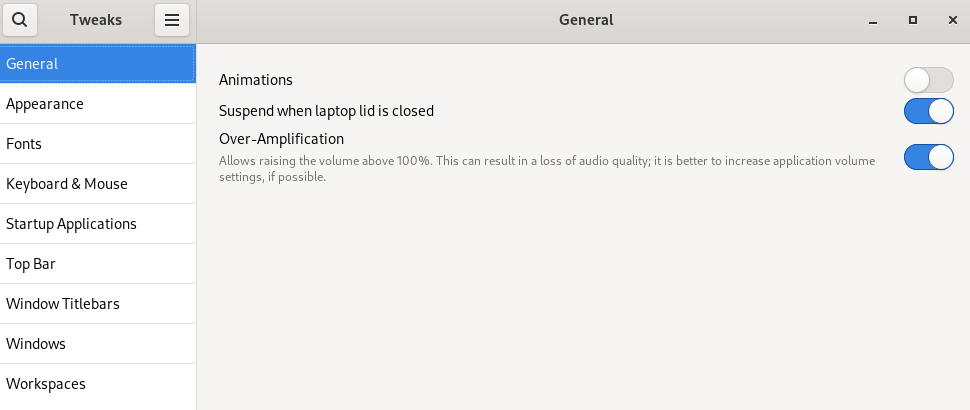
For example, to lock the screen upon closing the lid, use this setting:
HandleLidSwitch=lock-
- Save your changes and close the editor.
Chapter 7. Configuring screen rotation
7.1. Configuring screen rotation for a single user
This procedure sets screen rotation for the current user.
Procedure
Go to the system menu, which is accessible from the top-right screen corner, and click the Settings icon.

- In the → section, choose Displays.
- Configure the rotation using the Orientation field.
- Confirm your choice by clicking .
- If you are satisfied with the new setup preview, click on .
The setting persists to your next login.
7.2. Configuring screen rotation for all users
This procedure sets a default screen rotation for all users on a system and is suitable for mass deployment of homogenized display configuration.
Procedure
- Prepare the preferable setup for a single user as in Configuring the screen rotation for a single user.
Copy the transform section of the
~/.config/monitors.xmlconfiguration file, which configures the screen rotation. An example portrait orientation:<?xml version="1.0" encoding="UTF-8"?> <transform> <rotation>left</rotation> <flipped>no</flipped> </transform>-
Paste the content in the
/etc/xdg/monitors.xmlfile that stores system-wide configuration. - Save the changes.
The new setup takes effect for all the users the next time they log in in the system.
7.3. Configuring screen rotation for multiple monitors
In a multi-monitor setup, you can configure individual monitors with different screen rotation so that you can adjust monitor layout to your display needs.
Procedure
- In the Settings application, go to Displays.
Identify the monitor that you want to rotate from the visual representation of your connected monitors.

- Select the monitor whose orientation you want to configure.
Select orientation:
- Landscape: Default orientation.
- Portrait Right: Rotates the screen by 90 degrees to the right.
- Portrait Left: Rotates the screen by 90 degrees to the left.
- Landscape (flipped): Rotates the screen by 180 degrees upside down.
- Click Apply to display preview.
- If you are satisfied with the preview, click Keep Changes. Alternatively, go back to the original orientation by clicking Revert Changes.
Chapter 8. Customizing desktop appearance and branding
As a system administrator, you can configure the default appearance and branding of the GNOME interface for all users on the system.
8.1. Customizing desktop backgrounds
As a system administrator, you can configure the default desktop background, add extra backgrounds, or add multiple backgrounds available to all users of the system.
If the users are not permitted to change background from the defaults, you must lock the settings using the locks directory. Otherwise, each user can customize the background according to their preferences.
8.1.1. Customizing the default desktop background
You can configure the default desktop background and its appearance by setting the relevant GSettings keys in the org.gnome.desktop.background schema.
Procedure
Create a local database for machine-wide settings in
/etc/dconf/db/local.d/00-background:[org/gnome/desktop/background] picture-uri='file:///usr/local/share/backgrounds/wallpaper.jpg' picture-options='scaled' primary-color='000000' secondary-color='FFFFFF'-
picture-uri: Path to the desktop background image file. -
picture-options: How the background image is rendered. Valid values:none,wallpaper,centered,scaled,stretched,zoom,spanned. -
primary-color: Left or top color when drawing gradients, or the solid color. -
secondary-color: Right or bottom color when drawing gradients.
-
Optional: If you want to prevent a user from changing the default background, override the user’s setting in the
/etc/dconf/db/local.d/locks/backgroundfile:# List the keys used to configure the desktop background /org/gnome/desktop/background/picture-uri /org/gnome/desktop/background/picture-options /org/gnome/desktop/background/primary-color /org/gnome/desktop/background/secondary-colorUpdate the system databases:
# dconf update- Users must log out and back in again before the system-wide settings take effect.
8.1.2. Adding extra backgrounds
You can make extra backgrounds available to users on your system.
Procedure
-
Create the
/usr/share/gnome-background-properties/extra-backgrounds.xmlfile. In the new file, specify the extra background files and their appearance in the following format:
<?xml version="1.0" encoding="UTF-8"?> <!DOCTYPE wallpapers SYSTEM "gnome-wp-list.dtd"> <wallpapers> <wallpaper deleted="false"> <name>Background name</name> <filename>full-path-to-the-image</filename> <options>display-option</options> <shade_type>background-shade</shade_type> <pcolor>primary-color</pcolor> <scolor>secondary-color</scolor> </wallpaper> </wallpapers>- The new backgrounds are now available to all users in the Background section of the Settings application.
8.1.3. Frequently used background schema keys
The following configuration controls the behavior of desktop backgrounds in the GSettings system.
| Key name | XML name | Possible values | Description |
|---|---|---|---|
|
|
|
|
Determines how the image set by |
|
|
|
| Determines the shade of the background color. |
|
|
|
default: | Left or Top color when drawing gradients, or the solid color. |
|
|
|
default: | Right or Bottom color when drawing gradients, not used for solid color. |
Example 8.1. An extra backgrounds file with one <wallpaper> element
<?xml version="1.0" encoding="UTF-8"?>
<!DOCTYPE wallpapers SYSTEM "gnome-wp-list.dtd">
<wallpapers>
  <wallpaper deleted="false">
    <name>Company Background</name>
    <name xml:lang="de">Firmenhintergrund</name>
    <filename>/usr/local/share/backgrounds/company-wallpaper.jpg</filename>
    <options>zoom</options>
    <shade_type>solid</shade_type>
    <pcolor>#ffffff</pcolor>
    <scolor>#000000</scolor>
  </wallpaper>
</wallpapers>
Example 8.2. An extra backgrounds file with two <wallpaper> elements
In one configuration file, you can specify multiple <wallpaper> elements to add more backgrounds as shown in the following example with two <wallpaper> elements, adding two different backgrounds.
<?xml version="1.0" encoding="UTF-8"?>
<!DOCTYPE wallpapers SYSTEM "gnome-wp-list.dtd">
<wallpapers>
  <wallpaper deleted="false">
    <name>Company Background</name>
    <name xml:lang="de">Firmenhintergrund</name>
    <filename>/usr/local/share/backgrounds/company-wallpaper.jpg</filename>
    <options>zoom</options>
    <shade_type>solid</shade_type>
    <pcolor>#ffffff</pcolor>
    <scolor>#000000</scolor>
  </wallpaper>
  <wallpaper deleted="false">
    <name>Company Background 2</name>
    <name xml:lang="de">Firmenhintergrund 2</name>
    <filename>/usr/local/share/backgrounds/company-wallpaper-2.jpg</filename>
    <options>zoom</options>
    <shade_type>solid</shade_type>
    <pcolor>#ff0000</pcolor>
    <scolor>#00ffff</scolor>
  </wallpaper>
</wallpapers>
8.1.4. Setting the screen shield
Screen shield is the screen that slides down when you lock the system. You can set a default screen shield picture for all users on the system.
Procedure
Create the
/etc/dconf/db/gdm.d/01-screensaverfile:[org/gnome/desktop/screensaver] picture-uri='file:///opt/corp/background.jpg'Replace
/opt/corp/background.jpgwith the absolute path to the image file that you want to use as the default screen shield. Supported formats are PNG, JPG, JPEG, and TGA. Note that the screen shield scales your image if necessary to fit the screen.Update the system databases:
# dconf update- Users must log out and back in again before the system-wide settings take effect.
Troubleshooting
If the screen shield does not update:
Verify that you have updated the system databases:
# dconf updateTry restarting GDM:
# systemctl restart gdm.serviceWarningRestarting the
gdmservice terminates all currently running GNOME sessions of all desktop users who are logged in. This might result in users losing unsaved data.
8.2. Customizing the branding of the login screen
You can change the logo that appears on the GNOME login screen (GDM) using a dconf profile.
Prerequisites
- Prepare an image file in any of the supported formats: ANI, BPM, GIF, GTIFF, ICNS, ICO, JPEG, JPEG 2000, PCX, PNM, PBM, PGM, PPM, RAS, SVG, TGA, TIFF, WBMP, XBM, or XPM.
- The image must be around 48 pixels in height. If it is significantly larger, it will exceed the logo area.
-
Store the image file in a location that the
gdmuser can access. For example, select a universally readable system directory such as/opt/or/usr/local/.
Procedure
Create the
/etc/dconf/db/gdm.d/01-override-logoconfiguration file with the following content:[org/gnome/login-screen] logo='/path/to/logo.png'Replace
/path/to/logo.pngwith the full path to the image file that you want to use as the login screen logo.Update the system databases:
# dconf update
Verification
- Log out or otherwise switch to the login screen.
- Check if it displays the logo that you selected.
If the logo does not update, restart GDM:
# systemctl restart gdmWarningRestarting the
gdmservice terminates all currently running GNOME sessions of all desktop users who are logged in. This might result in users losing unsaved data.
Chapter 9. Restricting the desktop session
You can restrict and control various functionalities on the GNOME desktop environment. You can enforce specific configurations and restrictions to maintain system integrity and prevent unauthorized access.
9.1. Disabling user logout and user switching
Disabling user logout and user switching can improve security, prevent user errors, and enforce a specific workflow. This can mitigate unauthorized access to sensitive data and disruptions to the workflow caused by users accidentally logging out or switching to another user.
Prerequisites
- Administrative access.
Procedure
Create a plain text
/etc/dconf/db/local.d/00-logoutkeyfile in the/etc/dconf/db/local.d/directory with the following content:[org/gnome/desktop/lockdown] # Disable user logut disable-log-out=true # Disable user switching disable-user-switching=trueCreate a new file under the
/etc/dconf/db/local.d/locks/directory and list the keys or subpaths you want to lock down:# Lock user logout /org/gnome/desktop/lockdown/disable-log-out # Lock user switching /org/gnome/desktop/lockdown/disable-user-switchingApply the changes to the system databases:
# dconf update
9.2. Disabling printing
Disabling printing can prevent unauthorized access to sensitive documents and potential breaches and safeguard confidential information.
Prerequisites
- Administrative access.
Procedure
Create a plain text
/etc/dconf/db/local.d/00-printingkeyfile in the/etc/dconf/db/local.d/directory with the following content:[org/gnome/desktop/lockdown] # Disable printing disable-printing=trueCreate a new file under the
/etc/dconf/db/local.d/locks/directory and list the keys or subpaths you want to lock down:# Lock printing /org/gnome/desktop/lockdown/disable-printingApply the changes to the system databases:
# dconf update
9.3. Disabling filesaving
Disabling file saving can help to protect sensitive data from unauthorized access and protect against potential data leaks.
Prerequisites
- Administrative access.
Procedure
Create a plain text
/etc/dconf/db/local.d/00-filesavingkeyfile in the/etc/dconf/db/local.d/directory with the following content:[org/gnome/desktop/lockdown] # Disable saving files on disk disable-save-to-disk=trueCreate a new file under the
/etc/dconf/db/local.d/locks/directory and list the keys or subpaths you want to lock down:# Lock file saving /org/gnome/desktop/lockdown/disable-save-to-diskApply the changes to the system databases:
# dconf update
9.4. Disabling the command prompt
Disabling the command prompt can simplify user interactions with the system, prevent inexperienced users from executing potentially harmful commands that might cause system instability or data loss, and reduce the risk of unauthorized changes to system settings or configurations.
Prerequisites
- Administrative access.
Procedure
Create a plain text
/etc/dconf/db/local.d/00-lockdownkeyfile in the/etc/dconf/db/local.d/directory with the following content:[org/gnome/desktop/lockdown] # Disable command prompt disable-command-line=trueCreate a new file under the
/etc/dconf/db/local.d/locks/directory and list the keys or subpaths you want to lock down:# Lock command prompt /org/gnome/desktop/lockdown/disable-command-lineApply the changes to the system databases:
# dconf update- For this settings to take effect, users needs to log out and log back in.
9.5. Disabling repartitioning
You can override the default system settings that control disk management.
Avoid modifying the /usr/share/polkit-1/actions/org.freedesktop.udisks2.policy file directly. Any changes you make will be replaced during the next package update.
Prerequisites
- Administrative access.
Procedure
Copy the
/usr/share/polkit-1/actions/org.freedesktop.udisks2.policyfile under the/etc/share/polkit-1/actions/directory:# cp /usr/share/polkit-1/actions/org.freedesktop.udisks2.policy /etc/share/polkit-1/actions/org.freedesktop.udisks2.policyIn the
/etc/polkit-1/actions/org.freedesktop.udisks2.policyfile, delete any actions that you do not need and add the following lines:<action id="org.freedesktop.udisks2.modify-device"> <message>Authentication is required to modify the disks settings</message> <defaults> <allow_any>no</allow_any> <allow_inactive>no</allow_inactive> <allow_active>yes</allow_active> </defaults> </action>If you want to restrict access only to the root user, replace
<allow_any>no</allow_any>with<allow_any>auth_admin</allow_any>.
Chapter 10. Restricting the session to a single application
You can start the GNOME session in single-application mode, also known as kiosk mode. In this session, GNOME displays only a full-screen window of the application that you have selected.
10.1. Single-application mode
Single-application mode is a modified GNOME session that reconfigures the Mutter window manager into an interactive kiosk. This session locks down certain behavior to make the standard desktop more restrictive. The user can interact only with a single application selected by the administrator.
You can set up single-application mode for several use cases, such as:
- In the communication, entertainment, or education fields
- As a self-serve machine
- As an event manager
- As a registration point
The GNOME Kiosk utility provides the single-application mode configuration and sessions.
The following single-application sessions are available:
- Search Appliance Session
-
This session always starts the Mozilla Firefox web browser at the
www.google.comwebsite. - Kiosk Script Session
- This session starts an arbitrary application that you specify in a shell script.
10.2. Enabling search appliance mode
This procedure installs and enables the Search Appliance Session, which restricts the GNOME session to the Google search engine in a web browser.
Procedure
Install the GNOME Kiosk packages:
# dnf install gnome-kiosk gnome-kiosk-search-appliance- At the GNOME login screen, select Search Appliance Session from the gear button menu and log in as the single-application user.
- The Mozilla Firefox browser opens as a full-screen window in its kiosk mode. It shows the Google search page.
10.3. Enabling single-application mode
This procedure installs and enables the Kiosk Script Session, which restricts the GNOME session to a selected single application.
Procedure
Install the GNOME Kiosk packages:
# dnf install gnome-kiosk gnome-kiosk-script-session- At the GNOME login screen, select Kiosk Script Session from the gear button menu and log in as the single-application user.
The gedit text editor opens as a full-screen window. It shows the shell script that configures which application runs in your single-application session.
Edit the shell script and enter the application that you want to start in the single-application session.
For example, to start the Mozilla Firefox browser, enter the following content:
#!/usr/bin/sh firefox --kiosk https://example.org- Save the script file.
Close the gedit window.
The session terminates and restarts with your selected application.
- The next time you log into the single-application session, your selected application runs.
Chapter 11. Configuring sound in GNOME
You can configure sound volume and other sound options in GNOME.
11.1. Sound configuration tools in GNOME
In RHEL 9, the PipeWire sound server handles sound output and input. PipeWire lets programs output the audio using the pipewire daemon.
To configure sound, you can use one of the following graphical applications in GNOME:
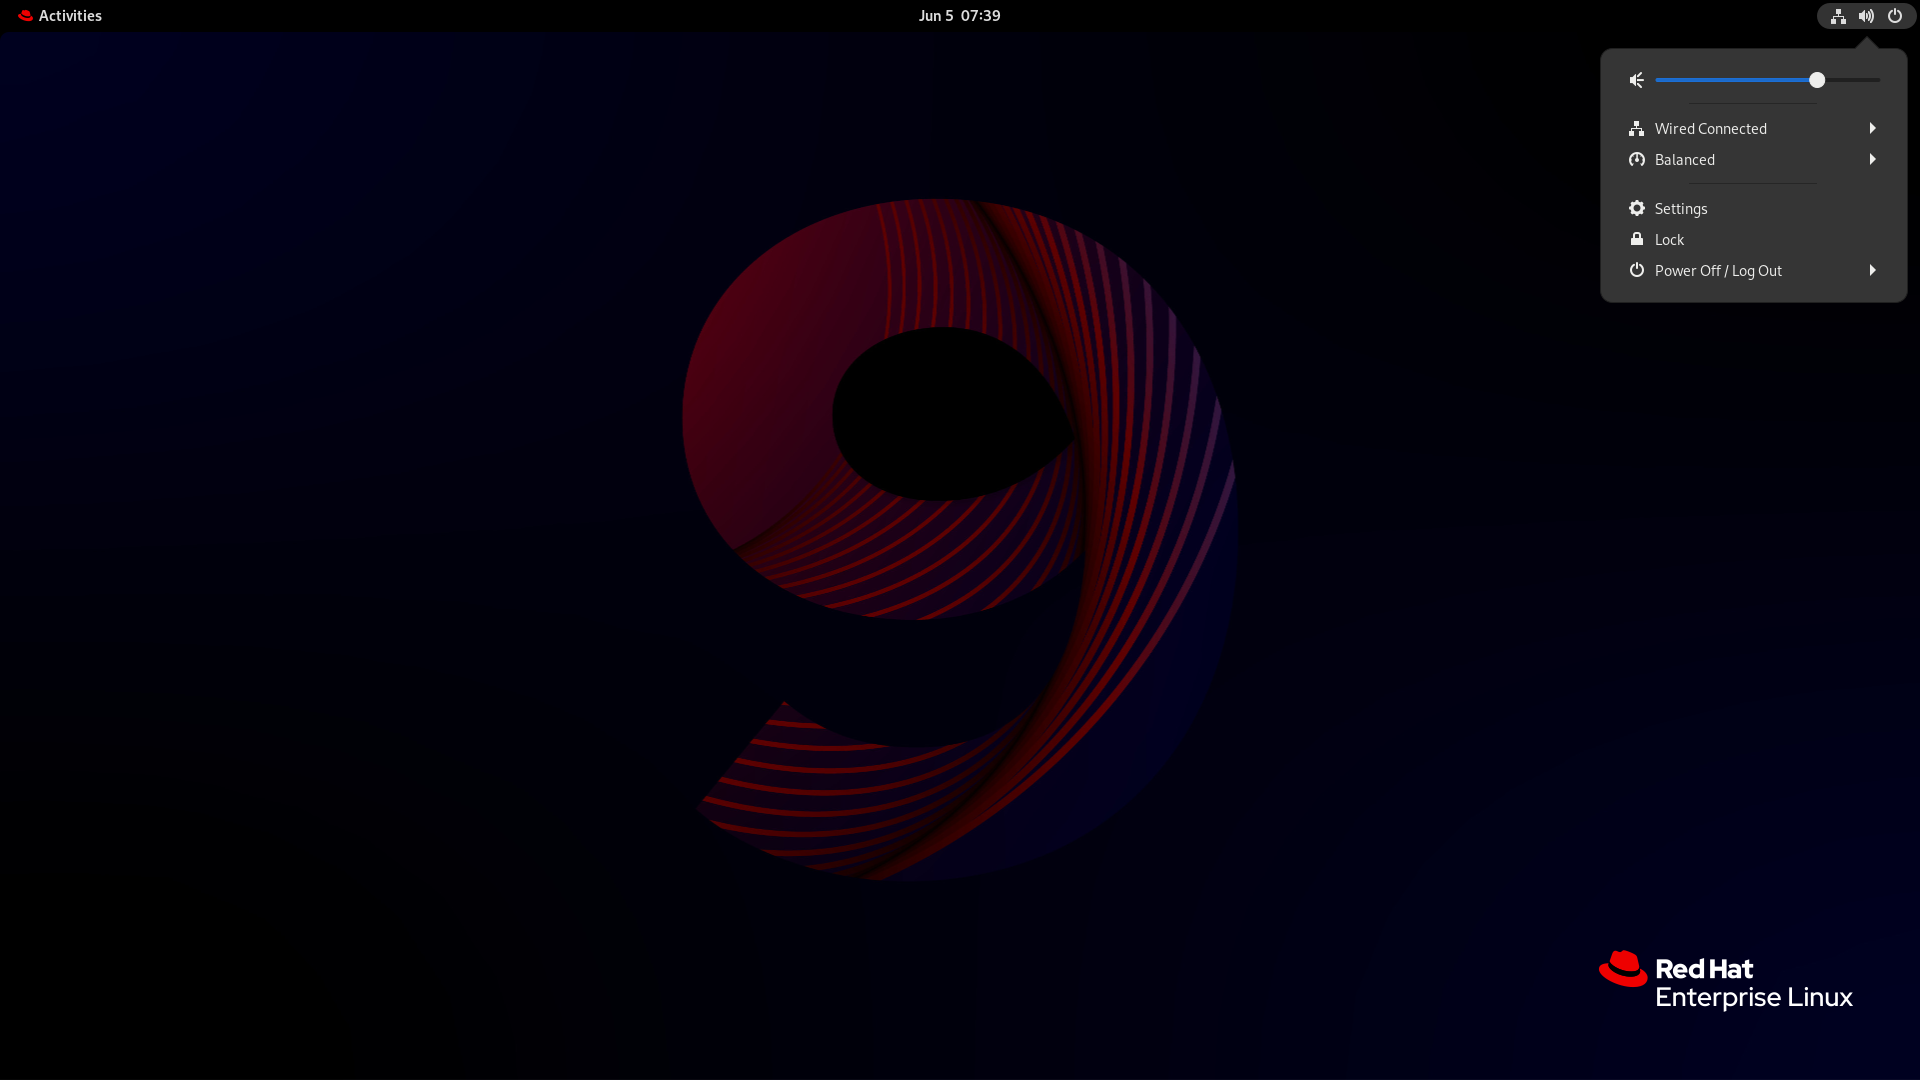
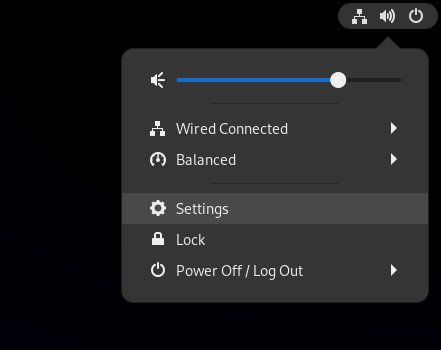
System menu
The system menu is located in the top-right screen corner. It enables you only to set the intensity of the sound output or sound input through the sound bar. The sound bar for input sound is available only if you are running an application that is using an internal microphone (built-in audio), such as some teleconference tools.
Settings
Settings provides other general options to configure sound.
Tweaks
The Tweaks application enables you to configure only volume over-amplification.
11.2. Accessing sound configuration in Settings
This procedure opens the sound configuration screen in the Settings.
Launch Settings.
You can use one of the approaches described in Launching applications in GNOME. Alternatively, you can also launch it from the system menu by clicking on its icon.
- In Settings, choose Sound from the left vertical bar.
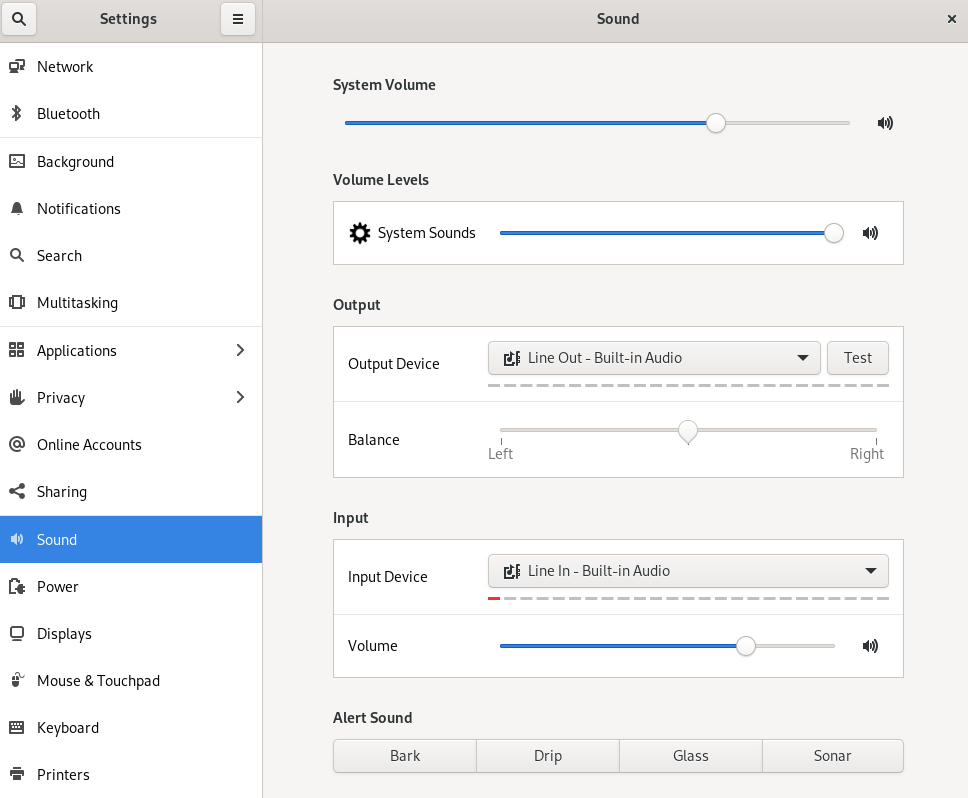
11.3. Sound options in Settings
Through the Sound menu in Settings, you can configure the following sound options:
- Volume Levels
- The Volume levels section shows all currently running applications that can process sound, and allows you to amplify or lower the sound of a particular application.
- Output and Input
- The Output and Input sections show all built-in audio devices and external audio devices that are currently connected.
- Alert sound
- The Alert sound section shows different themes of system audio alerts.
The Output section on the sound configuration screen
Chapter 12. Enabling accessibility for visually impaired users
As a system administrator, you can configure the desktop environment to support users with a visual impairment.
To enable accessibility, perform the following procedures.
12.1. Components that provide accessibility features
On the RHEL 9 desktop, the Orca screen reader ensures accessibility for users with a visual impairment. Orca is included in the default RHEL installation.
Orca reads information from the screen and communicates it to you using the following components:
- Speech Dispatcher
- Orca uses Speech Dispatcher to communicate with the speech synthesizer. Speech Dispatcher supports various speech synthesis backends, ensures that messages from other applications do not to interrupt the messages from Orca, and provides other functionality.
- Speech synthesizer
- Provides a speech output. The default speech synthesizer is eSpeak-NG.
- Braille display
- Provides a tactile output. The BRLTTY service enables this functionality.
12.2. Enabling the Accessibility menu
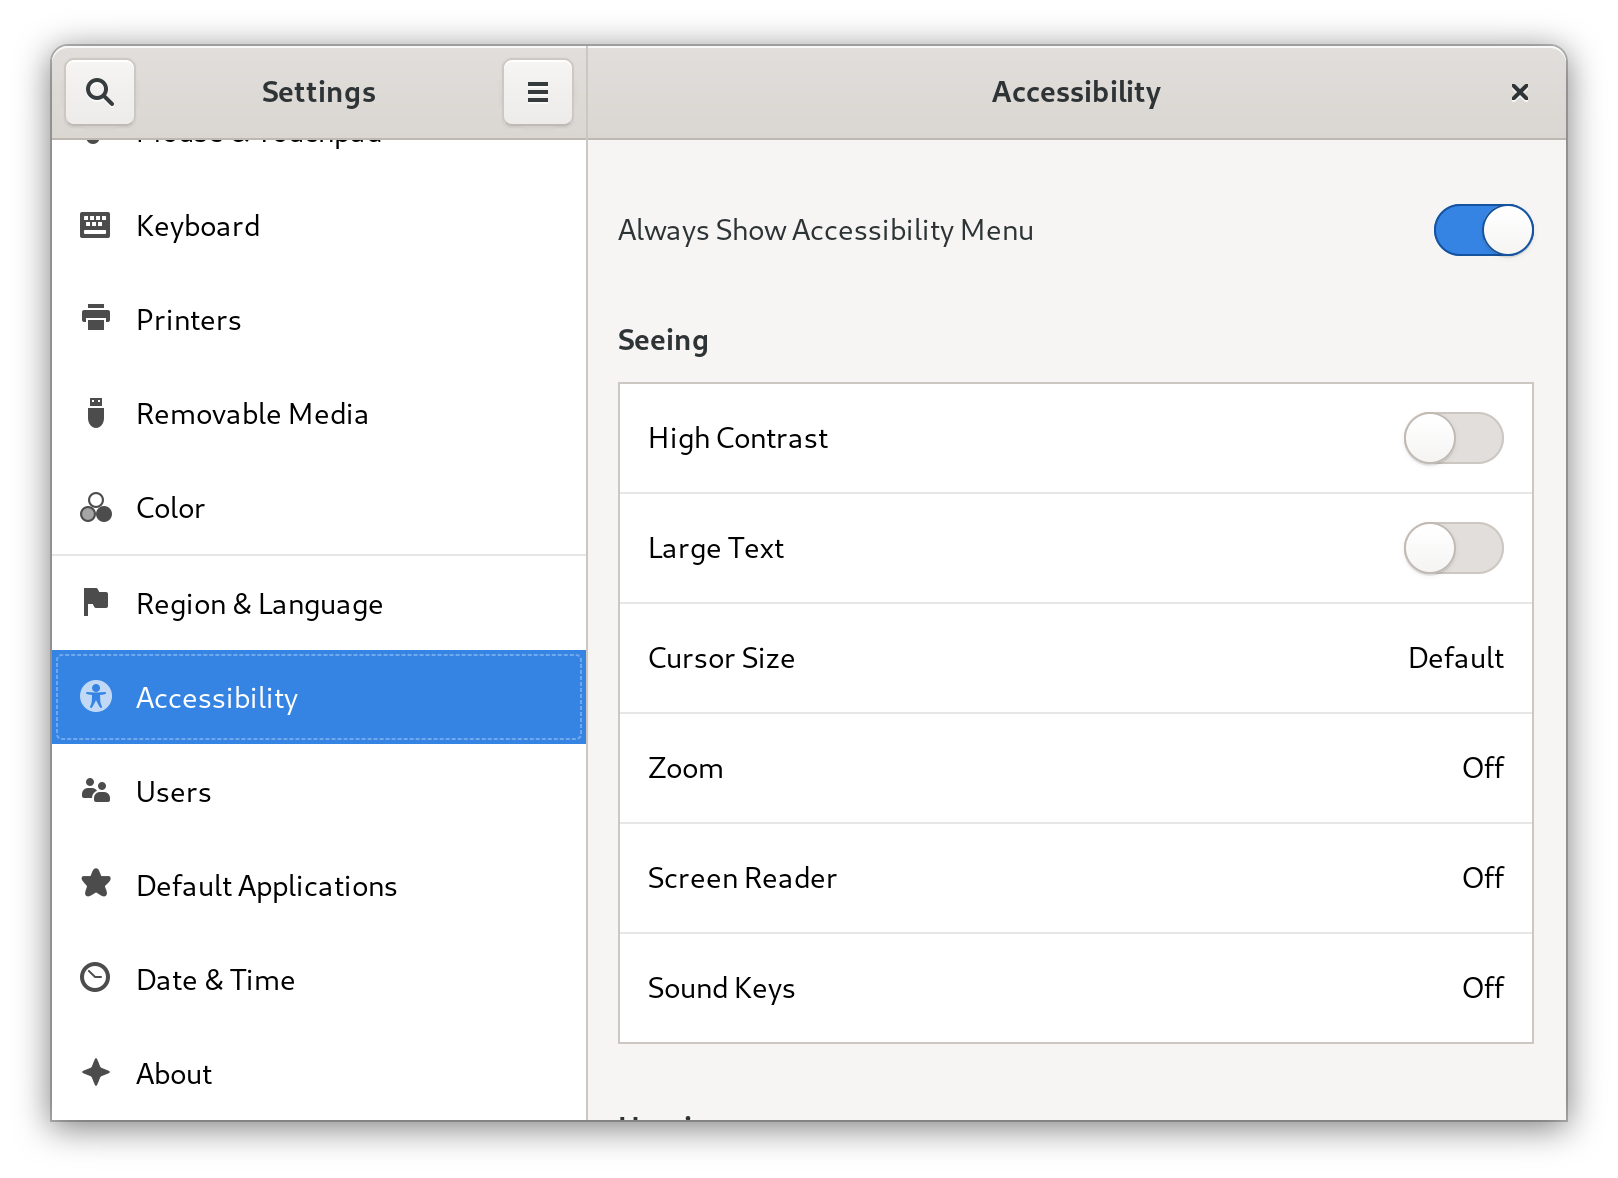
You can enable the Accessibility menu icon in the top panel, which provides a menu with several accessibility options.
Procedure
- Open the Settings application.
- Select Accessibility.
Enable the Always Show Accessibility Menu item.
Enabling the Accessibility menu in Settings
Verification
Check that the Accessibility menu icon is displayed on the top bar even when all options from this menu are switched off.

12.3. Enabling the screen reader
You can enable the Orca screen reader in your desktop environment. The screen reader then reads the text displayed on the screen to improve accessibility.
Procedure
Enable the screen reader using either of the following ways:
- Press the Super+Alt+S keyboard shortcut.
- If the top panel shows the Universal Access menu, select Screen Reader in the menu.
Verification
- Open an application with text content.
- Check that the screen reader reads the text in the application.
12.4. Enabling a Braille display device
The Braille display is a device that uses the brltty service to provide tactile output for visually impaired users.
In order for the Braille display to work correctly, perform the following procedures.
12.4.1. Supported types of Braille display device
The following types of Braille display devices are supported on RHEL 9.
| Braille device type | Syntax of the type | Note |
|---|---|---|
| Serial device |
|
Relative paths are at |
| USB device |
|
The brackets ( |
| Bluetooth device |
|
12.4.2. Enabling the brltty service
To enable the Braille display, enable the brltty service to start automatically on boot. By default, brltty is disabled.
Prerequisites
Ensure that the
brlttypackage is installed:# dnf install brlttyOptionally, you can install speech synthesis support for
brltty:# dnf install brltty-espeak-ng
Procedure
Enable the
brlttyservice to start on boot:# systemctl enable --now brltty
Verification
- Reboot the system.
Check that the
brlttyservice is running:# systemctl status brltty ● brltty.service - Braille display driver for Linux/Unix Loaded: loaded (/usr/lib/systemd/system/brltty.service; enabled; vendor pres> Active: active (running) since Tue 2019-09-10 14:13:02 CEST; 39s ago Process: 905 ExecStart=/usr/bin/brltty (code=exited, status=0/SUCCESS) Main PID: 914 (brltty) Tasks: 3 (limit: 11360) Memory: 4.6M CGroup: /system.slice/brltty.service └─914 /usr/bin/brltty
12.4.3. Authorizing users of a Braille display device
To use a Braille display device, you must set the users who are authorized to use the Braille display device.
Procedure
In the
/etc/brltty.conffile, ensure thatkeyfileis set to/etc/brlapi.key:api-parameters Auth=keyfile:/etc/brlapi.keyThis is the default value. Your organization might have overridden it.
Authorize the selected users by adding them to the
brlapigroup:# usermod --append -G brlapi user-name
12.4.4. Setting the driver for a Braille display device
The brltty service automatically chooses a driver for your Braille display device. If the automatic detection fails or takes too long, you can set the driver manually.
Prerequisites
- The automatic driver detection has failed or takes too long.
Procedure
-
Open the
/etc/brltty.confconfiguration file. -
Find the
braille-driverdirective, which specifies the driver for your Braille display device. Specify the identification code of the required driver in the
braille-driverdirective.Choose the identification code of required driver from the list provided in
/etc/brltty.conf. For example, to use the XWindow driver:# XWindow braille-driver xwTo set multiple drivers, list them separated by commas. Automatic detection then chooses from the listed drivers.
12.4.5. Connecting a Braille display device
The brltty service automatically connects to your Braille display device. If the automatic detection fails, you can set the connection method manually.
Prerequisites
- The Braille display device is physically connected to your system.
- The automatic connection has failed.
Procedure
If the device is connected by a serial-to-USB adapter, find the actual device name in the kernel messages on the device plug:
# journalctl --dmesg | fgrep ttyUSB-
Open the
/etc/brltty.confconfiguration file. -
Find the
braille-devicedirective. In the
braille-devicedirective, specify the connection.You can also set multiple devices, separated by commas, and each of them will be probed in turn.
For example:
Example 12.1. Settings for the first serial device
braille-device serial:ttyS0Example 12.2. Settings for the first USB device matching Braille driver
braille-device usb:Example 12.3. Settings for a specific USB device by serial number
braille-device usb:nnnnnExample 12.4. Settings for a serial-to-USB adapter
Use the device name that you found earlier in the kernel messages:
braille-device serial:ttyUSB0NoteSetting
braille-devicetousb:does not work for a serial-to-USB adapter.Example 12.5. Settings for a specific Bluetooth device by address
braille-device bluetooth:xx:xx:xx:xx:xx:xx
12.4.6. Setting the text table
The brltty service automatically selects a text table based on your system language. If your system language does not match the language of a document that you want to read, you can set the text table manually.
Procedure
-
Edit the
/etc/brltty.conffile. Identify the code of your selected text table.
You can find all available text tables in the
/etc/brltty/Text/directory. The code is the file name of the text table without its file suffix.Specify the code of the selected text table in the
text-tabledirective.For example, to use the text table for American English:
text-table en_US # English (United States)
12.4.7. Setting the contraction table
You can select which table is used to encode the abbreviations with a Braille display device. Relative paths to particular contraction tables are stored within the /etc/brltty/Contraction/ directory.
If no table is specified, the brltty service does not use a contraction table.
Procedure
Choose a contraction table from the list in the
/etc/brltty.conffile.For example, to use the contraction table for American English, grade 2:
contraction-table en-us-g2 # English (US, grade 2)
Chapter 13. Using special characters in GNOME
In GNOME, you can use the Compose Key to type special characters from different languages and symbol sets, including those not available on your keyboard. You can enter and view special characters from different languages and symbol sets, making it easy to work with diverse character sets in GNOME.
To input these special characters, you can define one of the existing keys on your keyboard as a Compose Key. Once enabled, the Compose Key allows you to type special characters and symbols by pressing multiple keys in a specific sequence.
13.1. Enabling the Compose Key for an individual user
You can enable the Compose Key from the Settings menu while logged in as the user.
Procedure
- Click on the Activities button in the upper-left corner of the screen.
- Type Settings and click on the Settings icon to open the Settings application.
- In the Settings window, click on Keyboard in the left sidebar.
- Scroll down and select the Compose Key option.
- Toggle the slider to enable the Compose Key.
- Select the key you want to use as the Compose Key.
- Once you have selected the Compose Key, close the Settings window.
Now the Compose Key is enabled, and you can use it to input special characters and symbols by pressing the Compose Key, followed by the corresponding sequence of keys.
To see available multi-key sequences for composing special characters, use:
$ grep "<Multi_key>" /usr/share/X11/locale/en_US.UTF-8/ComposeVerification
-
Press the Compose Key, then type the sequence of keys for the special character you want to input. For example, to type
©, press the Compose Key, then press o and c.
13.2. Enabling the Compose Key for another user
You can enable the Compose Key for another user with the gsettings utility.
Prerequisites
- Administrative access.
Procedure
Allow all clients to connect to the X server:
# xhost +Run the following command to set the Compose Key:
# su - <username> -c "gsettings set org.gnome.desktop.input-sources xkb-options \"['compose:<compose_key>']\""Replace
<username>with the username of the user for whom you want to enable the Compose Key. Replace<compose_key>with the key you want to use as the Compose Key. You can use theraltoption to designate the right Alt key as the Compose Key.To see other Compose Key options that you can use to set up a Compose Key on your keyboard, use:
$ grep compose /usr/share/X11/xkb/rules/evdev.lstResets the access control:
# xhost -
Verification
To check the Compose Key settings for another user, use:
# su - <username> -c "gsettings get org.gnome.desktop.input-sources xkb-options"Replace
<username>with the username of the user for whom you want to check the Compose Key setting.
13.3. Enabling the Compose Key for all users
You can enable the Compose Key for all users by creating a dconf configuration file.
Prerequisites
- Administrative access.
Procedure
Create the
/etc/dconf/db/local.d/00-compose-keyconfiguration file with the following content:[org/gnome/desktop/input-sources] xkb-options=['compose:<compose_key>']Replace
<compose_key>with the key you want to use as the Compose Key. You can use theraltoption to designate the right Alt key as the Compose Key.To see other Compose Key options that you can use to set up a Compose Key on your keyboard, use:
$ grep compose /usr/share/X11/xkb/rules/evdev.lstUpdate the
dconfdatabase with the new configuration:# dconf update- Restart your system or log out and log back in to your GNOME session for the changes to take effect.
Now the Compose Key is enabled for all users on the system and they can use it to input special characters and symbols by pressing the Compose Key, followed by the corresponding sequence of keys.
Verification
-
Press the Compose Key, then type the sequence of keys for the special character you want to input. For example, to type
©, press the Compose Key, then press o and c.
13.4. Compose Key sequences for special characters
The table showcases Compose Key sequences used to input special characters with diacritics or accents in GNOME. Each row displays a Compose Key sequence alongside its corresponding result
| Compose Key Sequence | Result |
|---|---|
| Compose+'+letter | Letter with acute accent (é, á, ñ) |
| Compose+`+letter | Letter with grave accent (è, ù, ò) |
| Compose+"+letter | Letter with umlaut or diaeresis (ë, ö, ü) |
| Compose+-+letter | Letter with macron (ā, ē, ō) |
| Compose+/+letter | Letter with stroke or diacritic (ø, ł, ǿ) |
| Compose+=+letter | Letter with double acute accent (ő, ű, ȁ) |
| Compose+.+letter | Letter with dot above (ȧ, ċ, ḋ) |
| Compose+,+letter | Letter with cedilla (ç, ş, ņ) |
| Compose+^+letter | Letter with circumflex accent (â, ê, î) |
| Compose+~+letter | Letter with tilde accent (ã, ñ, õ) |
Chapter 14. Managing GNOME Shell extensions by using the command line
The gnome-extensions utility is a command-line tool that allows you to manage GNOME Shell extensions from the terminal. It provides various commands to list, install, enable, disable, remove, and get information about extensions.
Each GNOME Shell extension has a UUID (Universally Unique Identifier) as listed by the gnome-extensions list command.
Procedure
To list the installed GNOME Shell extensions, use:
$ gnome-extensions listTo install a GNOME Shell extension, use the following command, which uses the file name of an extension archive (from a
.zipfile downloaded from GNOME extensions):$ gnome-extensions install <zip_file>To enable a GNOME Shell extension, use:
$ gnome-extensions enable <UUID>To show information about a GNOME Shell extension, use:
$ gnome-extensions info <UUID>To disable a GNOME Shell extension, use:
$ gnome-extensions disable <UUID>To remove a GNOME Shell extension, use:
$ gnome-extensions uninstall <UUID>
Replace the <UUIDs> with the unique identifier assigned to the GNOME Shell extension you want to install.
Chapter 15. Enabling and enforcing GNOME Shell extensions
GNOME Shell Extensions are add-ons that enhance the functionality and appearance of the GNOME desktop environment. Users can enable extensions for their own desktop session or for all users on the sytem.
15.1. Enabling system-wide GNOME Shell extensions
You can automatically enable GNOME extensions for all users, eliminating the need for individual installations. Existing users with personalized extensions are not affected.
Prerequisites
- Administrative access
Procedure
- Download the extension archive from the GNOME Extensions website.
Extract the archive into the
/usr/share/gnome-shell/extensions/directory:# unzip -q <extension-file.zip> -d /usr/share/gnome-shell/extensions/Replace
<extension-file.zip>with the name of the extension zip file.Adjust the permissions to ensure that the extension files are readable and executable by everyone:
# chmod -R 755 /usr/share/gnome-shell/extensions/<extension-directory>/Replace
<extension-directory>with the name of the extension directory.Create a new
/etc/dconf/db/local.d/00-extensionsfile with the following content:[org/gnome/shell] enabled-extensions=['myextension1@myname.example.com', 'myextension2@myname.example.com']Replace the UUIDs (
myextension1@myname.example.com,myextension2@myname.example.com) with the ones you want to enable. You can find the UUID of an extension on its GNOME Shell Extensions website page.Apply the changes to the system databases:
# dconf update
After completing these steps, the specified extensions are enabled by default for all new users on your system.
15.2. Restricting GNOME Shell extensions
By locking down specific GNOME Shell extensions, you can ensuring that a predefined set of extensions is consistently available to all users. You can configure a set of mandatory extensions and prevent users from modifying them. The specified extensions are mandatory for all users, and the Looking Glass tool is disabled to ensure compliance with the predefined configuration.
Prerequisites
- Administrative access
Procedure
Create a new
/etc/dconf/db/local.d/00-extensionsfile with the following content:[org/gnome/shell] enabled-extensions=['myextension1@myname.example.com', 'myextension2@myname.example.com'] development-tools=falseReplace the UUIDs (
myextension1@myname.example.com,myextension2@myname.example.com)with the ones you want to enable. You can find the UUID of an extension on its GNOME Shell Extensions website page.To prevent users from changing these settings, create a new
/etc/dconf/db/local.d/locks/extensionsfile with the following content:/org/gnome/shell/enabled-extensions /org/gnome/shell/development-toolsApply the changes to the system databases:
# dconf update
Extensions that are not listed in the org.gnome.shell.enabled-extensions file are not loaded by the GNOME Shell, preventing the user from using them.